april 2022 - b2b gateway - informatica documentation
TRANSCRIPT

Informatica® Cloud B2B GatewayApril 2022
B2B Gateway

Informatica Cloud B2B Gateway B2B GatewayApril 2022April 2022
© Copyright Informatica LLC 2016, 2022
This software and documentation contain proprietary information of Informatica LLC and are provided under a license agreement containing restrictions on use and disclosure and are also protected by copyright law. Reverse engineering of the software is prohibited. No part of this document may be reproduced or transmitted in any form, by any means (electronic, photocopying, recording or otherwise) without prior consent of Informatica LLC. This Software may be protected by U.S. and/or international Patents and other Patents Pending.
Use, duplication, or disclosure of the Software by the U.S. Government is subject to the restrictions set forth in the applicable software license agreement and as provided in DFARS 227.7202-1(a) and 227.7702-3(a) (1995), DFARS 252.227-7013©(1)(ii) (OCT 1988), FAR 12.212(a) (1995), FAR 52.227-19, or FAR 52.227-14 (ALT III), as applicable.
The information in this product or documentation is subject to change without notice. If you find any problems in this product or documentation, please report them to us in writing.
Informatica, Informatica Platform, Informatica Data Services, PowerCenter, PowerCenterRT, PowerCenter Connect, PowerCenter Data Analyzer, PowerExchange, PowerMart, Metadata Manager, Informatica Data Quality, Informatica Data Explorer, Informatica B2B Data Transformation, Informatica B2B Data Exchange Informatica On Demand, Informatica Identity Resolution, Informatica Application Information Lifecycle Management, Informatica Complex Event Processing, Ultra Messaging, Informatica Master Data Management, and Live Data Map are trademarks or registered trademarks of Informatica LLC in the United States and in jurisdictions throughout the world. All other company and product names may be trade names or trademarks of their respective owners.
Portions of this software and/or documentation are subject to copyright held by third parties, including without limitation: Copyright DataDirect Technologies. All rights reserved. Copyright © Sun Microsystems. All rights reserved. Copyright © RSA Security Inc. All Rights Reserved. Copyright © Ordinal Technology Corp. All rights reserved. Copyright © Aandacht c.v. All rights reserved. Copyright Genivia, Inc. All rights reserved. Copyright Isomorphic Software. All rights reserved. Copyright © Meta Integration Technology, Inc. All rights reserved. Copyright © Intalio. All rights reserved. Copyright © Oracle. All rights reserved. Copyright © Adobe Systems Incorporated. All rights reserved. Copyright © DataArt, Inc. All rights reserved. Copyright © ComponentSource. All rights reserved. Copyright © Microsoft Corporation. All rights reserved. Copyright © Rogue Wave Software, Inc. All rights reserved. Copyright © Teradata Corporation. All rights reserved. Copyright © Yahoo! Inc. All rights reserved. Copyright © Glyph & Cog, LLC. All rights reserved. Copyright © Thinkmap, Inc. All rights reserved. Copyright © Clearpace Software Limited. All rights reserved. Copyright © Information Builders, Inc. All rights reserved. Copyright © OSS Nokalva, Inc. All rights reserved. Copyright Edifecs, Inc. All rights reserved. Copyright Cleo Communications, Inc. All rights reserved. Copyright © International Organization for Standardization 1986. All rights reserved. Copyright © ej-technologies GmbH. All rights reserved. Copyright © Jaspersoft Corporation. All rights reserved. Copyright © International Business Machines Corporation. All rights reserved. Copyright © yWorks GmbH. All rights reserved. Copyright © Lucent Technologies. All rights reserved. Copyright © University of Toronto. All rights reserved. Copyright © Daniel Veillard. All rights reserved. Copyright © Unicode, Inc. Copyright IBM Corp. All rights reserved. Copyright © MicroQuill Software Publishing, Inc. All rights reserved. Copyright © PassMark Software Pty Ltd. All rights reserved. Copyright © LogiXML, Inc. All rights reserved. Copyright © 2003-2010 Lorenzi Davide, All rights reserved. Copyright © Red Hat, Inc. All rights reserved. Copyright © The Board of Trustees of the Leland Stanford Junior University. All rights reserved. Copyright © EMC Corporation. All rights reserved. Copyright © Flexera Software. All rights reserved. Copyright © Jinfonet Software. All rights reserved. Copyright © Apple Inc. All rights reserved. Copyright © Telerik Inc. All rights reserved. Copyright © BEA Systems. All rights reserved. Copyright © PDFlib GmbH. All rights reserved. Copyright © Orientation in Objects GmbH. All rights reserved. Copyright © Tanuki Software, Ltd. All rights reserved. Copyright © Ricebridge. All rights reserved. Copyright © Sencha, Inc. All rights reserved. Copyright © Scalable Systems, Inc. All rights reserved. Copyright © jQWidgets. All rights reserved. Copyright © Tableau Software, Inc. All rights reserved. Copyright© MaxMind, Inc. All Rights Reserved. Copyright © TMate Software s.r.o. All rights reserved. Copyright © MapR Technologies Inc. All rights reserved. Copyright © Amazon Corporate LLC. All rights reserved. Copyright © Highsoft. All rights reserved. Copyright © Python Software Foundation. All rights reserved. Copyright © BeOpen.com. All rights reserved. Copyright © CNRI. All rights reserved.
This product includes software developed by the Apache Software Foundation (http://www.apache.org/), and/or other software which is licensed under various versions of the Apache License (the "License"). You may obtain a copy of these Licenses at http://www.apache.org/licenses/. Unless required by applicable law or agreed to in writing, software distributed under these Licenses is distributed on an "AS IS" BASIS, WITHOUT WARRANTIES OR CONDITIONS OF ANY KIND, either express or implied. See the Licenses for the specific language governing permissions and limitations under the Licenses.
This product includes software which was developed by Mozilla (http://www.mozilla.org/), software copyright The JBoss Group, LLC, all rights reserved; software copyright © 1999-2006 by Bruno Lowagie and Paulo Soares and other software which is licensed under various versions of the GNU Lesser General Public License Agreement, which may be found at http:// www.gnu.org/licenses/lgpl.html. The materials are provided free of charge by Informatica, "as-is", without warranty of any kind, either express or implied, including but not limited to the implied warranties of merchantability and fitness for a particular purpose.
The product includes ACE(TM) and TAO(TM) software copyrighted by Douglas C. Schmidt and his research group at Washington University, University of California, Irvine, and Vanderbilt University, Copyright (©) 1993-2006, all rights reserved.
This product includes software developed by the OpenSSL Project for use in the OpenSSL Toolkit (copyright The OpenSSL Project. All Rights Reserved) and redistribution of this software is subject to terms available at http://www.openssl.org and http://www.openssl.org/source/license.html.
This product includes Curl software which is Copyright 1996-2013, Daniel Stenberg, <[email protected]>. All Rights Reserved. Permissions and limitations regarding this software are subject to terms available at http://curl.haxx.se/docs/copyright.html. Permission to use, copy, modify, and distribute this software for any purpose with or without fee is hereby granted, provided that the above copyright notice and this permission notice appear in all copies.
The product includes software copyright 2001-2005 (©) MetaStuff, Ltd. All Rights Reserved. Permissions and limitations regarding this software are subject to terms available at http://www.dom4j.org/ license.html.
The product includes software copyright © 2004-2007, The Dojo Foundation. All Rights Reserved. Permissions and limitations regarding this software are subject to terms available at http://dojotoolkit.org/license.
This product includes ICU software which is copyright International Business Machines Corporation and others. All rights reserved. Permissions and limitations regarding this software are subject to terms available at http://source.icu-project.org/repos/icu/icu/trunk/license.html.
This product includes software copyright © 1996-2006 Per Bothner. All rights reserved. Your right to use such materials is set forth in the license which may be found at http:// www.gnu.org/software/ kawa/Software-License.html.
This product includes OSSP UUID software which is Copyright © 2002 Ralf S. Engelschall, Copyright © 2002 The OSSP Project Copyright © 2002 Cable & Wireless Deutschland. Permissions and limitations regarding this software are subject to terms available at http://www.opensource.org/licenses/mit-license.php.
This product includes software developed by Boost (http://www.boost.org/) or under the Boost software license. Permissions and limitations regarding this software are subject to terms available at http:/ /www.boost.org/LICENSE_1_0.txt.
This product includes software copyright © 1997-2007 University of Cambridge. Permissions and limitations regarding this software are subject to terms available at http:// www.pcre.org/license.txt.
This product includes software copyright © 2007 The Eclipse Foundation. All Rights Reserved. Permissions and limitations regarding this software are subject to terms available at http:// www.eclipse.org/org/documents/epl-v10.php and at http://www.eclipse.org/org/documents/edl-v10.php.

This product includes software licensed under the terms at http://www.tcl.tk/software/tcltk/license.html, http://www.bosrup.com/web/overlib/?License, http://www.stlport.org/doc/ license.html, http://asm.ow2.org/license.html, http://www.cryptix.org/LICENSE.TXT, http://hsqldb.org/web/hsqlLicense.html, http://httpunit.sourceforge.net/doc/ license.html, http://jung.sourceforge.net/license.txt , http://www.gzip.org/zlib/zlib_license.html, http://www.openldap.org/software/release/license.html, http://www.libssh2.org, http://slf4j.org/license.html, http://www.sente.ch/software/OpenSourceLicense.html, http://fusesource.com/downloads/license-agreements/fuse-message-broker-v-5-3- license-agreement; http://antlr.org/license.html; http://aopalliance.sourceforge.net/; http://www.bouncycastle.org/licence.html; http://www.jgraph.com/jgraphdownload.html; http://www.jcraft.com/jsch/LICENSE.txt; http://jotm.objectweb.org/bsd_license.html; . http://www.w3.org/Consortium/Legal/2002/copyright-software-20021231; http://www.slf4j.org/license.html; http://nanoxml.sourceforge.net/orig/copyright.html; http://www.json.org/license.html; http://forge.ow2.org/projects/javaservice/, http://www.postgresql.org/about/licence.html, http://www.sqlite.org/copyright.html, http://www.tcl.tk/software/tcltk/license.html, http://www.jaxen.org/faq.html, http://www.jdom.org/docs/faq.html, http://www.slf4j.org/license.html; http://www.iodbc.org/dataspace/iodbc/wiki/iODBC/License; http://www.keplerproject.org/md5/license.html; http://www.toedter.com/en/jcalendar/license.html; http://www.edankert.com/bounce/index.html; http://www.net-snmp.org/about/license.html; http://www.openmdx.org/#FAQ; http://www.php.net/license/3_01.txt; http://srp.stanford.edu/license.txt; http://www.schneier.com/blowfish.html; http://www.jmock.org/license.html; http://xsom.java.net; http://benalman.com/about/license/; https://github.com/CreateJS/EaselJS/blob/master/src/easeljs/display/Bitmap.js; http://www.h2database.com/html/license.html#summary; http://jsoncpp.sourceforge.net/LICENSE; http://jdbc.postgresql.org/license.html; http://protobuf.googlecode.com/svn/trunk/src/google/protobuf/descriptor.proto; https://github.com/rantav/hector/blob/master/LICENSE; http://web.mit.edu/Kerberos/krb5-current/doc/mitK5license.html; http://jibx.sourceforge.net/jibx-license.html; https://github.com/lyokato/libgeohash/blob/master/LICENSE; https://github.com/hjiang/jsonxx/blob/master/LICENSE; https://code.google.com/p/lz4/; https://github.com/jedisct1/libsodium/blob/master/LICENSE; http://one-jar.sourceforge.net/index.php?page=documents&file=license; https://github.com/EsotericSoftware/kryo/blob/master/license.txt; http://www.scala-lang.org/license.html; https://github.com/tinkerpop/blueprints/blob/master/LICENSE.txt; http://gee.cs.oswego.edu/dl/classes/EDU/oswego/cs/dl/util/concurrent/intro.html; https://aws.amazon.com/asl/; https://github.com/twbs/bootstrap/blob/master/LICENSE; https://sourceforge.net/p/xmlunit/code/HEAD/tree/trunk/LICENSE.txt; https://github.com/documentcloud/underscore-contrib/blob/master/LICENSE, and https://github.com/apache/hbase/blob/master/LICENSE.txt.
This product includes software licensed under the Academic Free License (http://www.opensource.org/licenses/afl-3.0.php), the Common Development and Distribution License (http://www.opensource.org/licenses/cddl1.php) the Common Public License (http://www.opensource.org/licenses/cpl1.0.php), the Sun Binary Code License Agreement Supplemental License Terms, the BSD License (http:// www.opensource.org/licenses/bsd-license.php), the new BSD License (http://opensource.org/licenses/BSD-3-Clause), the MIT License (http://www.opensource.org/licenses/mit-license.php), the Artistic License (http://www.opensource.org/licenses/artistic-license-1.0) and the Initial Developer’s Public License Version 1.0 (http://www.firebirdsql.org/en/initial-developer-s-public-license-version-1-0/).
This product includes software copyright © 2003-2006 Joe WaInes, 2006-2007 XStream Committers. All rights reserved. Permissions and limitations regarding this software are subject to terms available at http://xstream.codehaus.org/license.html. This product includes software developed by the Indiana University Extreme! Lab. For further information please visit http://www.extreme.indiana.edu/.
This product includes software Copyright (c) 2013 Frank Balluffi and Markus Moeller. All rights reserved. Permissions and limitations regarding this software are subject to terms of the MIT license.
See patents at https://www.informatica.com/legal/patents.html.
DISCLAIMER: Informatica LLC provides this documentation "as is" without warranty of any kind, either express or implied, including, but not limited to, the implied warranties of noninfringement, merchantability, or use for a particular purpose. Informatica LLC does not warrant that this software or documentation is error free. The information provided in this software or documentation may include technical inaccuracies or typographical errors. The information in this software and documentation is subject to change at any time without notice.
NOTICES
This Informatica product (the "Software") includes certain drivers (the "DataDirect Drivers") from DataDirect Technologies, an operating company of Progress Software Corporation ("DataDirect") which are subject to the following terms and conditions:
1. THE DATADIRECT DRIVERS ARE PROVIDED "AS IS" WITHOUT WARRANTY OF ANY KIND, EITHER EXPRESSED OR IMPLIED, INCLUDING BUT NOT LIMITED TO, THE IMPLIED WARRANTIES OF MERCHANTABILITY, FITNESS FOR A PARTICULAR PURPOSE AND NON-INFRINGEMENT.
2. IN NO EVENT WILL DATADIRECT OR ITS THIRD PARTY SUPPLIERS BE LIABLE TO THE END-USER CUSTOMER FOR ANY DIRECT, INDIRECT, INCIDENTAL, SPECIAL, CONSEQUENTIAL OR OTHER DAMAGES ARISING OUT OF THE USE OF THE ODBC DRIVERS, WHETHER OR NOT INFORMED OF THE POSSIBILITIES OF DAMAGES IN ADVANCE. THESE LIMITATIONS APPLY TO ALL CAUSES OF ACTION, INCLUDING, WITHOUT LIMITATION, BREACH OF CONTRACT, BREACH OF WARRANTY, NEGLIGENCE, STRICT LIABILITY, MISREPRESENTATION AND OTHER TORTS.
Publication Date: 2022-04-18

Table of Contents
Preface . . . . . . . . . . . . . . . . . . . . . . . . . . . . . . . . . . . . . . . . . . . . . . . . . . . . . . . . . . . . . . . . . . . . . . 8Informatica Resources. . . . . . . . . . . . . . . . . . . . . . . . . . . . . . . . . . . . . . . . . . . . . . . . . . . 8
Informatica Network. . . . . . . . . . . . . . . . . . . . . . . . . . . . . . . . . . . . . . . . . . . . . . . . . 8
Informatica Knowledge Base. . . . . . . . . . . . . . . . . . . . . . . . . . . . . . . . . . . . . . . . . . . . 8
Informatica Documentation. . . . . . . . . . . . . . . . . . . . . . . . . . . . . . . . . . . . . . . . . . . . . 8
Informatica Product Availability Matrices. . . . . . . . . . . . . . . . . . . . . . . . . . . . . . . . . . . . 9
Informatica Velocity. . . . . . . . . . . . . . . . . . . . . . . . . . . . . . . . . . . . . . . . . . . . . . . . . . 9
Informatica Marketplace. . . . . . . . . . . . . . . . . . . . . . . . . . . . . . . . . . . . . . . . . . . . . . . 9
Informatica Global Customer Support. . . . . . . . . . . . . . . . . . . . . . . . . . . . . . . . . . . . . . 9
Chapter 1: Introducing B2B Gateway. . . . . . . . . . . . . . . . . . . . . . . . . . . . . . . . . . . . . . . . . 10B2B Gateway overview. . . . . . . . . . . . . . . . . . . . . . . . . . . . . . . . . . . . . . . . . . . . . . . . . . 10
Partners. . . . . . . . . . . . . . . . . . . . . . . . . . . . . . . . . . . . . . . . . . . . . . . . . . . . . . . . . . . 11
Inbound and outbound flows. . . . . . . . . . . . . . . . . . . . . . . . . . . . . . . . . . . . . . . . . . . . . . 12
Data Integration mappings. . . . . . . . . . . . . . . . . . . . . . . . . . . . . . . . . . . . . . . . . . . . . . . . 12
Schedules. . . . . . . . . . . . . . . . . . . . . . . . . . . . . . . . . . . . . . . . . . . . . . . . . . . . . . . . . . 12
File listeners. . . . . . . . . . . . . . . . . . . . . . . . . . . . . . . . . . . . . . . . . . . . . . . . . . . . . . . . . 13
EDI and EDIFACT messages . . . . . . . . . . . . . . . . . . . . . . . . . . . . . . . . . . . . . . . . . . . . . . 13
Custom files with custom mappings. . . . . . . . . . . . . . . . . . . . . . . . . . . . . . . . . . . . . . . . . 13
Inbound custom files with Intelligent Structure Discovery . . . . . . . . . . . . . . . . . . . . . . . . . . . . 14
Connections . . . . . . . . . . . . . . . . . . . . . . . . . . . . . . . . . . . . . . . . . . . . . . . . . . . . . . . . 14
B2B Gateway processes. . . . . . . . . . . . . . . . . . . . . . . . . . . . . . . . . . . . . . . . . . . . . . . . . 14
Processes for EDI X12 and EDIFACT messages. . . . . . . . . . . . . . . . . . . . . . . . . . . . . . . 14
Processes for custom files with custom mappings. . . . . . . . . . . . . . . . . . . . . . . . . . . . . 21
Process for inbound custom files with Intelligent Structure Discovery . . . . . . . . . . . . . . . . . 22
Home page. . . . . . . . . . . . . . . . . . . . . . . . . . . . . . . . . . . . . . . . . . . . . . . . . . . . . . . . . . 23
Explore page. . . . . . . . . . . . . . . . . . . . . . . . . . . . . . . . . . . . . . . . . . . . . . . . . . . . . . . . . 24
Chapter 2: B2B Gateway administration. . . . . . . . . . . . . . . . . . . . . . . . . . . . . . . . . . . . . . 28Organization management. . . . . . . . . . . . . . . . . . . . . . . . . . . . . . . . . . . . . . . . . . . . . . . . 28
Before You Begin. . . . . . . . . . . . . . . . . . . . . . . . . . . . . . . . . . . . . . . . . . . . . . . . . . . 29
Setting up the organization in B2B Gateway. . . . . . . . . . . . . . . . . . . . . . . . . . . . . . . . . . 30
Editing Organization Settings in B2B Gateway. . . . . . . . . . . . . . . . . . . . . . . . . . . . . . . . 31
User roles. . . . . . . . . . . . . . . . . . . . . . . . . . . . . . . . . . . . . . . . . . . . . . . . . . . . . . . . . . 31
File servers and file transfer protocols. . . . . . . . . . . . . . . . . . . . . . . . . . . . . . . . . . . . . . . . 32
File server users. . . . . . . . . . . . . . . . . . . . . . . . . . . . . . . . . . . . . . . . . . . . . . . . . . . 33
Custom transformation services. . . . . . . . . . . . . . . . . . . . . . . . . . . . . . . . . . . . . . . . . . . . 33
EDI message customization process. . . . . . . . . . . . . . . . . . . . . . . . . . . . . . . . . . . . . . 33
Transformation service management . . . . . . . . . . . . . . . . . . . . . . . . . . . . . . . . . . . . . 34
Message Schema Upload. . . . . . . . . . . . . . . . . . . . . . . . . . . . . . . . . . . . . . . . . . . . . . . . 36
4 Table of Contents

Uploading Message Schemas to Informatica Intelligent Cloud Services. . . . . . . . . . . . . . . . 36
B2B Partners Portal setup and customization. . . . . . . . . . . . . . . . . . . . . . . . . . . . . . . . . . . . 37
Step 1. Set up partner users and roles in Administrator. . . . . . . . . . . . . . . . . . . . . . . . . . 37
Step 2. Set up B2B Partners Portal partners. . . . . . . . . . . . . . . . . . . . . . . . . . . . . . . . . . 38
Step 3. Customize B2B Partners Portal. . . . . . . . . . . . . . . . . . . . . . . . . . . . . . . . . . . . . 38
Chapter 3: Project and asset management. . . . . . . . . . . . . . . . . . . . . . . . . . . . . . . . . . . 39Copying projects, folders, and assets. . . . . . . . . . . . . . . . . . . . . . . . . . . . . . . . . . . . . . . . . 39
Moving folders and assets. . . . . . . . . . . . . . . . . . . . . . . . . . . . . . . . . . . . . . . . . . . . . . . . 40
Renaming projects, folders, and assets. . . . . . . . . . . . . . . . . . . . . . . . . . . . . . . . . . . . . . . . 41
Deleting projects, folders, and assets. . . . . . . . . . . . . . . . . . . . . . . . . . . . . . . . . . . . . . . . . 41
Tags. . . . . . . . . . . . . . . . . . . . . . . . . . . . . . . . . . . . . . . . . . . . . . . . . . . . . . . . . . . . . . 42
Creating tags. . . . . . . . . . . . . . . . . . . . . . . . . . . . . . . . . . . . . . . . . . . . . . . . . . . . . 43
Assigning tags. . . . . . . . . . . . . . . . . . . . . . . . . . . . . . . . . . . . . . . . . . . . . . . . . . . . 44
Editing and deleting tags. . . . . . . . . . . . . . . . . . . . . . . . . . . . . . . . . . . . . . . . . . . . . . 45
Asset dependencies. . . . . . . . . . . . . . . . . . . . . . . . . . . . . . . . . . . . . . . . . . . . . . . . . . . . 45
Permissions. . . . . . . . . . . . . . . . . . . . . . . . . . . . . . . . . . . . . . . . . . . . . . . . . . . . . . . . . 46
Rules and Guidelines for Permissions. . . . . . . . . . . . . . . . . . . . . . . . . . . . . . . . . . . . . . 47
Configuring permissions. . . . . . . . . . . . . . . . . . . . . . . . . . . . . . . . . . . . . . . . . . . . . . 47
Asset migration. . . . . . . . . . . . . . . . . . . . . . . . . . . . . . . . . . . . . . . . . . . . . . . . . . . . . . . 49
Dependent objects. . . . . . . . . . . . . . . . . . . . . . . . . . . . . . . . . . . . . . . . . . . . . . . . . . 49
Asset export. . . . . . . . . . . . . . . . . . . . . . . . . . . . . . . . . . . . . . . . . . . . . . . . . . . . . . 50
Asset import. . . . . . . . . . . . . . . . . . . . . . . . . . . . . . . . . . . . . . . . . . . . . . . . . . . . . . 52
Post-import tasks. . . . . . . . . . . . . . . . . . . . . . . . . . . . . . . . . . . . . . . . . . . . . . . . . . 54
Monitoring imports and exports. . . . . . . . . . . . . . . . . . . . . . . . . . . . . . . . . . . . . . . . . 54
Chapter 4: EDI X12 and EDIFACT Messages. . . . . . . . . . . . . . . . . . . . . . . . . . . . . . . . . 55Control numbers in outbound messages. . . . . . . . . . . . . . . . . . . . . . . . . . . . . . . . . . . . . . . 56
Partner interchange IDs. . . . . . . . . . . . . . . . . . . . . . . . . . . . . . . . . . . . . . . . . . . . . . . . . . 56
Interface files for EDI X12 and EDIFACT messages. . . . . . . . . . . . . . . . . . . . . . . . . . . . . . . . 57
Structure of the interface file for EDI messages. . . . . . . . . . . . . . . . . . . . . . . . . . . . . . . 57
Schemas of the interface file for EDI messages. . . . . . . . . . . . . . . . . . . . . . . . . . . . . . . 61
Example of an outbound interface file for EDI X12 messages. . . . . . . . . . . . . . . . . . . . . . . 61
Example of an inbound interface file for EDI X12 messages. . . . . . . . . . . . . . . . . . . . . . . . 62
Example of an outbound interface file for EDIFACT messages. . . . . . . . . . . . . . . . . . . . . . 64
Example of an inbound interface file for EDIFACT messages. . . . . . . . . . . . . . . . . . . . . . . 68
Data Integration mappings for EDI X12 and EDIFACT messages . . . . . . . . . . . . . . . . . . . . . . . 71
EDI processing mappings. . . . . . . . . . . . . . . . . . . . . . . . . . . . . . . . . . . . . . . . . . . . . 71
Custom mappings for EDI message exchange. . . . . . . . . . . . . . . . . . . . . . . . . . . . . . . . 72
Rules and guidelines for custom EDI mappings. . . . . . . . . . . . . . . . . . . . . . . . . . . . . . . . 72
Context parameters in custom mappings. . . . . . . . . . . . . . . . . . . . . . . . . . . . . . . . . . . 74
Target fields in custom mappings. . . . . . . . . . . . . . . . . . . . . . . . . . . . . . . . . . . . . . . . 74
Creating a process-to-backend mapping for inbound EDI message flows. . . . . . . . . . . . . . . 75
Table of Contents 5

Creating a process-from-backend mapping for outbound EDI message flows. . . . . . . . . . . . 77
Creating a message discovery mapping for outbound EDI message flows. . . . . . . . . . . . . . 80
Chapter 5: Custom files with custom mappings . . . . . . . . . . . . . . . . . . . . . . . . . . . . . 82Interface files for custom files. . . . . . . . . . . . . . . . . . . . . . . . . . . . . . . . . . . . . . . . . . . . . 83
Data Integration mappings for custom files with custom mappings. . . . . . . . . . . . . . . . . . . . . . 83
Rules and guidelines for custom file mappings. . . . . . . . . . . . . . . . . . . . . . . . . . . . . . . . 83
Context parameters in custom mappings. . . . . . . . . . . . . . . . . . . . . . . . . . . . . . . . . . . 84
Mapping sources and targets in custom file mappings. . . . . . . . . . . . . . . . . . . . . . . . . . . 84
Chapter 6: Inbound Custom Files with Intelligent Structure Discovery. . . . . . . . 87Interface files for custom files with Intelligent Structure Discovery. . . . . . . . . . . . . . . . . . . . . . 87
Intelligent Structure Discovery message structures. . . . . . . . . . . . . . . . . . . . . . . . . . . . . . . . 87
Creating a structure. . . . . . . . . . . . . . . . . . . . . . . . . . . . . . . . . . . . . . . . . . . . . . . . . 88
Data Integration mappings for custom files with Intelligent Structure Discovery. . . . . . . . . . . . . . 88
Creating a custom mapping for inbound custom files with Intelligent Structure Discovery. . . . 88
Chapter 7: File transfer tasks. . . . . . . . . . . . . . . . . . . . . . . . . . . . . . . . . . . . . . . . . . . . . . . . 91Encrypt. . . . . . . . . . . . . . . . . . . . . . . . . . . . . . . . . . . . . . . . . . . . . . . . . . . . . . . . . . . . 91
Decrypt. . . . . . . . . . . . . . . . . . . . . . . . . . . . . . . . . . . . . . . . . . . . . . . . . . . . . . . . . . . . 91
Compress. . . . . . . . . . . . . . . . . . . . . . . . . . . . . . . . . . . . . . . . . . . . . . . . . . . . . . . . . . 92
Decompress. . . . . . . . . . . . . . . . . . . . . . . . . . . . . . . . . . . . . . . . . . . . . . . . . . . . . . . . . 92
Chapter 8: Partners. . . . . . . . . . . . . . . . . . . . . . . . . . . . . . . . . . . . . . . . . . . . . . . . . . . . . . . . . 93Create partners for EDI and EDIFACT messages. . . . . . . . . . . . . . . . . . . . . . . . . . . . . . . . . . 93
Before you begin. . . . . . . . . . . . . . . . . . . . . . . . . . . . . . . . . . . . . . . . . . . . . . . . . . . 93
Creating a partner for EDI and EDIFACT messages. . . . . . . . . . . . . . . . . . . . . . . . . . . . . 94
Partner properties for EDI X12 and EDIFACT messages. . . . . . . . . . . . . . . . . . . . . . . . . . 96
Create partners for custom files with custom mappings. . . . . . . . . . . . . . . . . . . . . . . . . . . . 104
Before you begin. . . . . . . . . . . . . . . . . . . . . . . . . . . . . . . . . . . . . . . . . . . . . . . . . . 104
Creating a partner for custom files with custom mappings. . . . . . . . . . . . . . . . . . . . . . . 104
Partner properties for custom files with custom mappings. . . . . . . . . . . . . . . . . . . . . . . 106
Create partners for custom files with Intelligent Structure Discovery. . . . . . . . . . . . . . . . . . . . 111
Before you begin. . . . . . . . . . . . . . . . . . . . . . . . . . . . . . . . . . . . . . . . . . . . . . . . . . 111
Creating a partner for custom files with Intelligent Structure Discovery. . . . . . . . . . . . . . . 112
Partner properties for custom files with Intelligent Structure Discovery. . . . . . . . . . . . . . . 113
Editing a partner. . . . . . . . . . . . . . . . . . . . . . . . . . . . . . . . . . . . . . . . . . . . . . . . . . . . . 119
Running a partner flow manually. . . . . . . . . . . . . . . . . . . . . . . . . . . . . . . . . . . . . . . . . . . 119
Chapter 9: Tracking and Monitoring Events. . . . . . . . . . . . . . . . . . . . . . . . . . . . . . . . . 120File events. . . . . . . . . . . . . . . . . . . . . . . . . . . . . . . . . . . . . . . . . . . . . . . . . . . . . . . . . 120
Event history. . . . . . . . . . . . . . . . . . . . . . . . . . . . . . . . . . . . . . . . . . . . . . . . . . . . . 121
Event session logs. . . . . . . . . . . . . . . . . . . . . . . . . . . . . . . . . . . . . . . . . . . . . . . . . 122
6 Table of Contents

Message details. . . . . . . . . . . . . . . . . . . . . . . . . . . . . . . . . . . . . . . . . . . . . . . . . . . . . 122
Custom file details. . . . . . . . . . . . . . . . . . . . . . . . . . . . . . . . . . . . . . . . . . . . . . . . . . . . 122
Event filters. . . . . . . . . . . . . . . . . . . . . . . . . . . . . . . . . . . . . . . . . . . . . . . . . . . . . . . . 122
Event properties. . . . . . . . . . . . . . . . . . . . . . . . . . . . . . . . . . . . . . . . . . . . . . . . . . . . . . 123
File event properties. . . . . . . . . . . . . . . . . . . . . . . . . . . . . . . . . . . . . . . . . . . . . . . . 123
EDI message details properties. . . . . . . . . . . . . . . . . . . . . . . . . . . . . . . . . . . . . . . . . 125
Custom file details properties. . . . . . . . . . . . . . . . . . . . . . . . . . . . . . . . . . . . . . . . . . 127
Viewing and managing events. . . . . . . . . . . . . . . . . . . . . . . . . . . . . . . . . . . . . . . . . . . . . 128
Event monitors. . . . . . . . . . . . . . . . . . . . . . . . . . . . . . . . . . . . . . . . . . . . . . . . . . . . . . 128
Monitoring rules. . . . . . . . . . . . . . . . . . . . . . . . . . . . . . . . . . . . . . . . . . . . . . . . . . 129
Managing Monitoring Rules. . . . . . . . . . . . . . . . . . . . . . . . . . . . . . . . . . . . . . . . . . . 129
Monitoring rule properties. . . . . . . . . . . . . . . . . . . . . . . . . . . . . . . . . . . . . . . . . . . . 130
Chapter 10: B2B Gateway REST APIs. . . . . . . . . . . . . . . . . . . . . . . . . . . . . . . . . . . . . . . 132Authorization Header. . . . . . . . . . . . . . . . . . . . . . . . . . . . . . . . . . . . . . . . . . . . . . . . . . 132
Run Partner REST API. . . . . . . . . . . . . . . . . . . . . . . . . . . . . . . . . . . . . . . . . . . . . . . . . . 132
Run Partner REST API request. . . . . . . . . . . . . . . . . . . . . . . . . . . . . . . . . . . . . . . . . . 133
Run Partner REST API action response. . . . . . . . . . . . . . . . . . . . . . . . . . . . . . . . . . . . 134
Event Status API. . . . . . . . . . . . . . . . . . . . . . . . . . . . . . . . . . . . . . . . . . . . . . . . . . . . . 134
Event status REST API request. . . . . . . . . . . . . . . . . . . . . . . . . . . . . . . . . . . . . . . . . 135
Event Status API action response. . . . . . . . . . . . . . . . . . . . . . . . . . . . . . . . . . . . . . . 135
Chapter 11: Glossary. . . . . . . . . . . . . . . . . . . . . . . . . . . . . . . . . . . . . . . . . . . . . . . . . . . . . . . 139
Index. . . . . . . . . . . . . . . . . . . . . . . . . . . . . . . . . . . . . . . . . . . . . . . . . . . . . . . . . . . 140
Table of Contents 7

PrefaceUse B2B Gateway to learn how to exchange Electronic Data Interchange (EDI) messages with business trading partners using Informatica Intelligent Cloud Services B2B Gateway. Learn how to set up and configure partners, create mappings to move files, and track and monitor file events. You can also learn how to enable access to B2B Partners Portal for your trading partners.
Informatica ResourcesInformatica provides you with a range of product resources through the Informatica Network and other online portals. Use the resources to get the most from your Informatica products and solutions and to learn from other Informatica users and subject matter experts.
Informatica NetworkThe Informatica Network is the gateway to many resources, including the Informatica Knowledge Base and Informatica Global Customer Support. To enter the Informatica Network, visit https://network.informatica.com.
As an Informatica Network member, you have the following options:
• Search the Knowledge Base for product resources.
• View product availability information.
• Create and review your support cases.
• Find your local Informatica User Group Network and collaborate with your peers.
Informatica Knowledge BaseUse the Informatica Knowledge Base to find product resources such as how-to articles, best practices, video tutorials, and answers to frequently asked questions.
To search the Knowledge Base, visit https://search.informatica.com. If you have questions, comments, or ideas about the Knowledge Base, contact the Informatica Knowledge Base team at [email protected].
Informatica DocumentationUse the Informatica Documentation Portal to explore an extensive library of documentation for current and recent product releases. To explore the Documentation Portal, visit https://docs.informatica.com.
8

If you have questions, comments, or ideas about the product documentation, contact the Informatica Documentation team at [email protected].
Informatica Product Availability MatricesProduct Availability Matrices (PAMs) indicate the versions of the operating systems, databases, and types of data sources and targets that a product release supports. You can browse the Informatica PAMs at https://network.informatica.com/community/informatica-network/product-availability-matrices.
Informatica VelocityInformatica Velocity is a collection of tips and best practices developed by Informatica Professional Services and based on real-world experiences from hundreds of data management projects. Informatica Velocity represents the collective knowledge of Informatica consultants who work with organizations around the world to plan, develop, deploy, and maintain successful data management solutions.
You can find Informatica Velocity resources at http://velocity.informatica.com. If you have questions, comments, or ideas about Informatica Velocity, contact Informatica Professional Services at [email protected].
Informatica MarketplaceThe Informatica Marketplace is a forum where you can find solutions that extend and enhance your Informatica implementations. Leverage any of the hundreds of solutions from Informatica developers and partners on the Marketplace to improve your productivity and speed up time to implementation on your projects. You can find the Informatica Marketplace at https://marketplace.informatica.com.
Informatica Global Customer SupportYou can contact a Global Support Center by telephone or through the Informatica Network.
To find your local Informatica Global Customer Support telephone number, visit the Informatica website at the following link: https://www.informatica.com/services-and-training/customer-success-services/contact-us.html.
To find online support resources on the Informatica Network, visit https://network.informatica.com and select the eSupport option.
Preface 9

C h a p t e r 1
Introducing B2B GatewayB2B Gateway simplifies the order-to-cash and procure-to-pay cycles and reduces the cycle time with end-to-end processing and handling of the exchange of Electronic Data Interchange (EDI) messages with your partners, including the X12 and EDIFACT EDI standards. If any of your partners do not use EDI, you can use B2B Gateway to exchange any other type of file, for example, CSV, XML, or Excel files.
Informatica Cloud B2B Gateway is one of several services available in Informatica Intelligent Cloud Services. When you log into Informatica Intelligent Cloud Services, the My Services page displays the B2B Gateway service and services that apply to partner management. The My Services page might also include other services that you subscribe to and trial versions of other services.
The following services apply to B2B Gateway:
• Data Integration. Manage data integration projects and create assets such as mappings to move your files to and from your backend system.
• Administrator. Perform administrative tasks such as creating users and managing privileges, downloading Secure Agents and configuring runtime environments, configuring connections, managing licenses, and creating schedules.
• Monitor. Check the status of imports and exports that are in progress and imports and exports that have completed.
• B2B Partners Portal. Extend tracking and monitoring capabilities to your trading partner companies. Trading partners use B2B Partners Portal to track and monitor file events for the messages that they exchange with your organization.
B2B Gateway overviewUse B2B Gateway to streamline and automate order-to-cash and procure-to-pay processes with your trading partners.
B2B Gateway uses Data Integration mappings to process and exchange messages and files between the organization and its partners. To simplify EDI message handling, B2B Gateway includes pre-packaged, EDI processing mappings that validate and handle the EDI messages and convert EDI messages from partners to XML interface files, which you can then process and move from the gateway to the backend systems.
When partner EDI messages arrive, B2B Gateway receives and validates the messages and sends functional and technical acknowledgments to the partners. To process the messages to the backend systems, you can create Data Integration mappings.
To send EDI messages to partners, you create Data Integration mappings that extract the information from the backend systems, write the information to the interface files, and move the files from the backend system to the gateway. The gateway enriches the data in the interface files with metadata from the gateway, creates
10

a valid EDI message file for each interface file, and sends the message files to the partners. You can ask to receive acknowledgments from the partner. For EDI X12 messages, the gateway tracks all the acknowledgments that the partner sends.
B2B Gateway can also process non-EDI files. For custom, non-EDI files, you create the mappings that process the files for all the stages of the order-to-cash and procure-to-pay processes. For the exchange of custom files with your partners you can use any type of file as the interface file.
For inbound Excel, TXT, and CSV files, instead of creating custom mappings to process the incoming files, you can use Informatica Intelligent Structure Discovery to automatically discover the file structure and create CSV interface files. You can then create custom mappings that process the data to your backend system.
B2B Gateway generates events as it processes messages and files, to help you track and monitor the data that you exchange with partners. The event list provides full visibility into the data exchange and alerts you to errors that might occur.
Order-to-cash example
You are a supplier that receives purchase orders from a retail chain. Message exchanges between you and the retail chain can include sending and receiving messages, for example, receiving purchase orders and payment or order remittance advices and sending functional acknowledgments and invoices.
Procure-to-pay example
You place orders with an Internet supplier. Message exchanges between you and the supplier can include sending and receiving messages, for example, sending purchase orders and payment or order remittance advices and receiving purchase order acknowledgments and invoices.
Data exchange setup
To set up the data exchanges with the retail chain and the Internet supplier, you perform the following tasks:
1. In B2B Gateway, create a new customer for the retail chain.
2. Define the type of messages that you exchange with the customer and the communication protocols through which you exchange data with the customer, select whether to send functional acknowledgments, assign mappings to the inbound and outbound flows as applicable, and define messaging schedules.
3. If you want B2B Gateway to process inbound messages from the gateway to the backend system, create a Data Integration mapping where B2B Gateway is the source and the backend system is the target. In B2B Gateway, in partner management, select the mapping as the process-to-backend mapping.
4. For outbound messages, create a Data Integration mapping where the backend system is the source and B2B Gateway is the target. You create a mapping that handles all message types and versions that you send to the customer. In B2B Gateway, in partner management, select the mapping as the process-from-backend mapping.
5. Save the new customer.
6. Create a new supplier for the Internet supplier.
PartnersThe organization partners are customers that place orders with the organization and suppliers with which the organization places orders.
A partner can be either a customer or a supplier.
Partners 11

When you define a partner in B2B Gateway, you define the details of your exchanges with the partner as agreed upon between you and the partner. Exchange details include the type of messages that you exchange with the partner, the communication protocols through which you exchange data with the partner, whether or not you send functional and technical acknowledgments to the partner, the mappings that you use for inbound and outbound flows, as applicable, and the messaging schedules.
Inbound and outbound flowsFor each partner, you can define an inbound flow, an outbound flow, or both.
When you define an inbound flow, B2B Gateway uses the flow details to handle incoming messages and files and to send acknowledgements in response. When you define an outbound flow, B2B Gateway uses the flow details to handle outgoing messages and files.
When you define an inbound or an outbound flow, you configure a connection, select the mappings, and select a schedule for the flow.
If you select the file servers connection type for a flow, you can also select a file transfer task to decrypt or decompress inbound files or to encrypt or compress outbound files that you exchange with your partner.
Data Integration mappingsB2B Gateway uses Data Integration mappings to process EDI messages and custom files that you exchange with your partners.
If system resources are limited, you can select to minimize the number of process-to-backend mappings for your organization. For all the XML interface files created during a single inbound processing flow for an EDI X12, EDIFACT, or custom file, B2B Gateway can group the process-to-backend mappings into a single mapping.
If no files are found in a source directory for an inbound message flow, processing is not triggered and the mapping doesn't run.
SchedulesDefine schedules to run partner inbound flow, outbound flow, or both.
Create schedules in Administrator. For information about defining schedules, see Schedules in the Administrator service help.
To create, define, and update schedules for partner flows, users must have the appropriate privileges for Schedule and Schedule job. For more information about user privileges, see the Administrator help.
12 Chapter 1: Introducing B2B Gateway

File listenersCreate file listeners to trigger inbound and outbound flows when files arrive in a specific folder. A file listener listens to files in a specific location and can notify subscribing applications when files arrive at the location or when files in the location are updated or deleted.
You choose the file listener to trigger the partner flow in the Schedule pane of the Inbound and Outbound partner properties windows.
The file listener creates a job when the file listener starts. It lists the job instance on the File Transfer Logs page in Monitor. The file listener job details appear in the file listener job properties. For more information about monitoring file listener jobs, see the Monitor help.
A file listener that is not used by an asset is not active and does not listen to the defined folder.
Create file listeners in Data Integration. For more information about creating file listeners, see Components in the Data Integration help.
To create and use file listeners, users need the appropriate privileges for File Listener. For more information about user privileges, see the Administrator help.
EDI and EDIFACT messagesB2B Gateway uses Data Integration mappings to validate and handle EDI and EDIFACT message exchanges between the organization and its partners.
When you exchange EDI and EDIFACT messages with your partners, B2B Gateway creates EDI processing mappings in Data Integration to exchange and process messages between partners and B2B Gateway. You create custom mappings for data transfer between B2B Gateway and the backend system.
Custom files with custom mappingsFor partners that do not use EDI, you can use B2B Gateway to validate and handle exchanges of any type of file between the organization and the partners.
To exchange custom files with partners you create custom Data Integration mappings.
To simplify the handling for incoming Excel, TXT, and CSV files, you can use Informatica Intelligent Structure Discovery to automatically discover file structures and create an interface file. Intelligent Structure Discovery uses artificial intelligence to automate structure discovery for files that do not follow industry standards.
File listeners 13

Inbound custom files with Intelligent Structure Discovery
For inbound Excel, TXT, and CSV files you can use Informatica Intelligent Structure Discovery to automatically discover the file structure.
Intelligent Structure Discovery creates CSV interface files on the B2B Gateway document store. You can then define a custom mapping to process the data from the document store to the backend system.
Using Intelligent Structure Discovery for an inbound partner flow eliminates the need to create an inbound custom mapping for the flow.
ConnectionsWhen you define a partner you also define a connection for each of the partner flows, an inbound connection for the inbound flow and an outbound connection for the outbound flow.
In the inbound connection, you define the source from where B2B Gateway picks up files. In the outbound connection, you define the target where B2B Gateway places the files for the partner.
Configure connections in Administrator. For more information about configuring connections, see Connections in the Administrator help.
B2B Gateway processesB2B Gateway processes messages and files that you exchange with your trading partners.
When you receive partner messages and files, B2B Gateway runs an inbound process flow. When you send messages and files to partners, B2B Gateway runs an outbound process flow.
Processes for EDI X12 and EDIFACT messagesWhen you exchange EDI and EDIFACT messages with your partners, B2B Gateway runs the pre-packaged EDI processing mappings and any custom mappings that you assigned to the partner.
The pre-packaged EDI processing mappings that B2B Gateway provides support EDI message types for inbound and outbound flows, based on the type of process with the partner, EDI X12 or EDIFACT message exchange.
14 Chapter 1: Introducing B2B Gateway

EDI X12 messages
The pre-packaged EDI processing mappings support the following message types for EDI X12 messages:
Message description Message type Order-to-cash process (customer)
Procure-to-pay process (supplier)
Air Freight Details and Invoice
110 Outbound flow Inbound flow
Return Merchandise Authorization and Notification
180 Inbound flow Outbound flow
Secondary Mortgage Market Investor Report
203 Inbound and outbound flows
Inbound and outbound flows
Motor Carrier Load Tender
204 Inbound and outbound flows
Inbound and outbound flows
Motor Carrier Freight Details and Invoice
210 Outbound flow Inbound flow
Motor Carrier Bill of Landing
211 Inbound and outbound flows
Inbound and outbound flows
Transportation Carrier Shipment Status Message
214 Inbound and outbound flows
Inbound and outbound flows
Motor Carrier Pickup Manifest
215 Inbound and outbound flow
Inbound and outbound flow
Logistics Service Response
220 Outbound flow Inbound flow
Response to a Cartage Work Assignment
225 Outbound flow Inbound flow
Motor Carrier Package Status
240 Inbound flow Outbound flow
Account Assignment/Inquiry and Service/Status
248 Inbound and Outbound flows
Inbound and Outbound flows
Residential Mortgage Insurance Explanation of Benefits
259 Inbound and Outbound flows
Inbound and Outbound flows
Application for Mortgage Insurance Benefits
260 Inbound and Outbound flows
Inbound and Outbound flows
Mortgage or Property Record Change Notification
266 Inbound flow Outbound flow
B2B Gateway processes 15

Message description Message type Order-to-cash process (customer)
Procure-to-pay process (supplier)
Medicare Benefits Inquiry
270 Inbound flow Outbound flow
Medicare Benefits Response
271 Outbound flow Inbound flow
Salvage transaction 272 Outbound flow Inbound flow
Shipping Instructions 304 Inbound and Outbound flows
Inbound and Outbound flows
Customs Manifest 309 Outbound flow Inbound flow
Freight Receipt and Invoice
310 Inbound and outbound flows
Inbound and outbound flows
Status Details (Ocean) 315 Inbound and outbound flows
Inbound and outbound flows
Customs Status Information
350 Inbound and outbound flows
Inbound and outbound flows
Customs Events Advisory Details
353 Inbound flow Outbound flow
U.S. Customs Acceptance/Rejection
355 Inbound and outbound flows
Inbound and outbound flows
U.S. Customs In-Bond Information
357 Inbound and outbound flows
Inbound and outbound flows
Customs Consist Information
358 Inbound and outbound flows
Inbound and outbound flows
Rail Carrier Shipment Information
404 Outbound flow Inbound flow
Rail Carrier Freight Details and Invoice
410 Outbound flow Inbound flow
Invoice 810 Outbound flow Inbound flow
Consolidated Service Invoice/Statement
811 Outbound flow Inbound flow
Credit/Debit Adjustment
812 Inbound and outbound flows
Inbound and outbound flows
General Request, Response or Confirmation
814 Inbound and Outbound flows
Inbound and Outbound flows
Cryptographic Service Message
815 Inbound and outbound flows
Inbound and outbound flows
16 Chapter 1: Introducing B2B Gateway

Message description Message type Order-to-cash process (customer)
Procure-to-pay process (supplier)
Organizational Relationships
816 Inbound and outbound flows
Inbound and outbound flows
Remittance Advice 820 Inbound flow Outbound flow
Lockbox 823 Outbound flow Inbound flow
Application Advice 824 Inbound and outbound flows
Inbound and outbound flows
Planning Schedule with Release Capability
830 Inbound flow Outbound flow
Price/Sales Catalog 832 Outbound flow Inbound flow
Procurement Notices 836 Inbound flow Outbound flow
Trading Partner Profile
838 Inbound and outbound flows
Inbound and outbound flows
Product Transfer Account Adjustment
844 Inbound flow Outbound flow
Price Authorization Acknowledgment/Status
845 Outbound flow Inbound flow
Inventory Inquiry/Advice
846 Inbound and outbound flows
Inbound and outbound flows
Response to Product Transfer Account Adjustment
849 Outbound flow Inbound flow
Purchase Order 850 Inbound flow Outbound flow
Product Activity Data 852 Inbound flow Outbound flow
Purchase Order Acknowledgment
855 Outbound flow Inbound flow
Advance Ship Notice 856 Outbound flow Inbound flow
Purchase Order Change Request
860 Inbound flow Outbound flow
Receiving Advice/Acceptance Certificate
861 Inbound flow Outbound flow
Shipping Schedule 862 Inbound flow Outbound flow
B2B Gateway processes 17

Message description Message type Order-to-cash process (customer)
Procure-to-pay process (supplier)
Text Message 864 Inbound and Outbound flows
Inbound and Outbound flows
Purchase Order Change Acknowledgment/Request
865 Outbound flow Inbound flow
Product Transfer and Resale Report
867 Inbound flow Outbound flow
Order Status Report 870 Inbound and Outbound flows
Inbound and Outbound flows
Grocery Products Purchase Order
875 Inbound flow Outbound flow
Grocery Products Invoice
880 Inbound and Outbound flows
Inbound and Outbound flows
Item Maintenance 888 Outbound flow Inbound flow
Warehouse Shipping Order
940 Outbound flow Inbound flow
Warehouse Stock Transfer Shipment Advice
943 Outbound flow Inbound flow
Warehouse Stock Transfer Receipt Advice
944 Outbound flow Inbound flow
Warehouse Shipping Advice
945 Inbound and outbound flows
Inbound and outbound flows
Warehouse Inventory Adjustment Advice
947 Inbound and outbound flows
Inbound and outbound flows
Response to a Load Tender
990 Inbound flow Outbound flow
EDI Functional Acknowledgment
997 Inbound and outbound flows
Inbound and outbound flows
EDI Technical Acknowledgment
TA1 Inbound and outbound flows
Inbound and outbound flows
18 Chapter 1: Introducing B2B Gateway

EDIFACT messages
The pre-packaged EDI processing mappings support the following message types for EDIFACT messages:
Message Description Message Type Order-to-Cash Process
Procure-to-Pay Process
Invoice INVOIC Outbound flow Inbound flow
Remittance Advice REMADV Inbound flow Outbound flow
Planning Schedule with Release Capability
DELFOR Inbound flow Outbound flow
Purchase Order ORDERS Inbound flow Outbound flow
Purchase Order Acknowledgment
ORDRSP Outbound flow Inbound flow
Advance Ship Notice DESADV Outbound flow Inbound flow
Purchase Order Change Request
ORDCHG Inbound flow Outbound flow
Purchase Order Change Acknowledgment/Request
ORDRSP Outbound flow Inbound flow
EDIFACT Acknowledgment
CONTRL Inbound and outbound flows
Inbound and outbound flows
Instruction to Dispatch
INSDES Inbound flow Outbound flow
Order Status Report OSTRPT Outbound flow Inbound flow
Receiving Advice RECADV Inbound flow Outbound flow
Balance of payment information from customer
BOPINF Outbound flow Inbound flow
Price/sales catalogue message
PRICAT Inbound flow Outbound flow
Customs response Message
CUSRES Inbound flow Outbound flow
Customs Conveyance Report Message
CUSREP Outbound flow Inbound flow
International Multimodal Status Report Message
IFTSTA Inbound and outbound flows
Inbound and outbound flows
B2B Gateway processes 19

Message Description Message Type Order-to-Cash Process
Procure-to-Pay Process
Inventory Report Message
INVRPT Inbound and outbound flows
Inbound and outbound flows
Sales Data Report Message
SLSRPT Inbound and outbound flows
Inbound and outbound flows
Inbound process for EDI messagesTo receive messages that a partner sends to the organization, B2B Gateway runs an inbound flow according to the defined schedule.
The inbound flow for EDI messages includes the following stages:
1. When an inbound process runs, B2B Gateway runs the B2B Gateway pre-packaged, EDI processing mapping. The source and target of the mapping are based on the source and target details from the partners definition metadata. The source of the mapping is the location from where to read the incoming messages, and the target of the mapping is an interface file on B2B Gateway.
2. The mapping converts the EDI messages to XML interface files, one file for each functional group, and places the files on B2B Gateway.
3. B2B Gateway validates the incoming messages. If any of the validations fail, B2B Gateway rejects the message and creates an error event.
4. If during partner configuration you selected to send technical or functional acknowledgments to the partner, B2B Gateway sends an EDI functional and technical acknowledgment to the partner.
5. If during partner configuration you assigned a process-to-backend custom mapping for the inbound flow, B2B Gateway runs the mapping. If you assigned values to mapping parameters during partner configuration, B2B Gateway uses the values in the mapping flow. If you did not assign a mapping, the inbound process ends with the placement of the interface files on B2B Gateway. You can use your own method to processes the interface files to your backend systems.
The following image shows the processing flow for an inbound EDI file:
20 Chapter 1: Introducing B2B Gateway

Outbound process for EDI messagesTo send messages to partners, B2B Gateway runs an outbound process flow according to the defined schedule.
The outbound flow for EDI messages includes the following stages:
1. When an outbound process starts, B2B Gateway first runs the custom process from the backend mapping that you defined in the partner definition. The output of the mapping should be interface files that include the messages to send to your partners. The mapping places the files on B2B Gateway.
2. B2B Gateway uses the pre-packaged, EDI processing mapping to read the interface files, and then enriches the data in the interface file with the partner metadata and creates valid EDI messages. If you assigned values to mapping parameters during partner configuration, B2B Gateway uses the values in the mapping flow. The mapping source and target details are based on the partner definition metadata. The source of the mapping is the interface files, and the target of the mapping is the location where to send the messages.
The following image shows the processing flow for an outbound EDI file:
Processes for custom files with custom mappingsWhen you exchange custom, non-EDI files with your partners, you create custom mappings that process the files, and then assign the mappings to the partner.
B2B Gateway runs the mappings that you assign to the partner according to the defined schedule.
Inbound process for custom filesTo receive and process custom, non-EDI files that a partner sends to the organization, B2B Gateway runs the inbound flow that is defined for the partner according to the defined schedule.
You can use one of the following methods to process inbound custom files:
• Two-step processing, using two custom mappings. An inbound mapping reads the file that the partner sends, processes it, and writes the file to an interface file on the B2B Gateway document store. A process-to-backend mapping then writes the data to the backend system. When you use two-step processing, you can use a single process-to-backend mapping to process all inbound custom files to your backend system from a single interface file.
• Single-step processing. A single custom mapping reads the file that the partner sends, processes it, and writes the file directly to the backend system. When you use single-step processing, you must write the logic of writing the data to the backend system for every inbound custom file from each partner.
• Intelligent Structure Discovery processing. Use Intelligent Structure Discovery to discover the file structure of a custom input file, and auto-generate a parsing process that creates an interface CSV file with the discovered content. The Intelligent Structure Discovery parsing process replaces a custom inbound mapping. You can also create a custom process-to-backend mapping to process the auto-generated interface file to the backend system.
B2B Gateway processes 21

The inbound flow for custom files includes the following stages:
1. When an inbound process runs, B2B Gateway runs the inbound mapping that you assigned the partner. The source and target of the mapping are based on the source and target details from the partners definition metadata. The source of the mapping is the location from where to read the incoming files. The target of the mapping can be either an interface file on B2B Gateway or the backend system.
2. If the target of the inbound mapping is an interface file on B2B Gateway, and if during partner configuration you assigned a process-to-backend mapping for the inbound flow, B2B Gateway runs the defined mapping. If you assigned values to mapping parameters during partner configuration, B2B Gateway uses the values in the mapping flow. The mapping writes the data to the backend system.If you did not assign a process-to-backend mapping, the inbound process ends with the placement of the interface file on B2B Gateway. You can use your own method to write the data to the backend system.
3. If the target of the inbound mapping is the backend system, B2B Gateway writes the data to the backend system.
Outbound process for custom filesTo send custom, non-EDI files to a partner, B2B Gateway runs the outbound flow according to the defined schedule.
The outbound flow for custom files includes the following stages:
1. When an outbound process starts, B2B Gateway first runs the custom process from the process-from-backend mapping that you defined in the partner definition and reads the data from the backend system. If you assigned values to mapping parameters during partner configuration, B2B Gateway uses the values in the mapping flow.
2. The mapping writes the data to an interface file on B2B Gateway.
3. If during partner configuration you assign an outbound mapping for the flow, B2B Gateway runs the mapping and sends the files to your partner. If you assigned values to mapping parameters during partner configuration, B2B Gateway uses the values in the mapping flow. If you did not assign an outbound mapping, the outbound process ends with the placement of the interface files on B2B Gateway. You can use your own method to send the files to your partner.
Process for inbound custom files with Intelligent Structure Discovery
For inbound Excel, TXT, and CSV files you can use Intelligent Structure Discovery to automatically discover the structure of the files and generate the interface files. You can create a custom process-to-backend mappings to process the interface files to the backend system.
B2B Gateway runs the structure and the custom mapping that you assign to the partner according to the defined schedule.
22 Chapter 1: Introducing B2B Gateway

Home pageThe B2B Gateway Home page gives you an overview of your organization's partners, events, and files.
After your organization is set up in B2B Gateway and you have at least one partner in your organization, when you open B2B Gateway, the Home page appears. The following image shows an example of the Home page:
The Home page displays the following information:
• Events Status. The number of events that are in each status. The default range is the last 24 hours.To view the events with a specific status, click the number of events.
• Total no. of Partners. The number of customers and suppliers in the organization.
• Number of Events Per Partner. The number of partner events for the 10 partners with the most events. The default range is the last 24 hours.To view the events for a specific partner, click the bar on the graph.
• Message Types Usage. The 10 most used X12 and EDIFACT message types in the organization.
• File Type Usage. The total number of each file type exchanged with partners.
• Number of Events. The number of events per day. The default range is the last 30 days.To view the events for a specific day, click the point on the graph.
The Events Status and Number of Events Per Partner graphs show information for the last 24 hours by default. You can apply filters to see event information for a specified date range. To apply a filter, click the filter icon at the top of the Home page. To specify a date range, click Add Field and select Date Range. You can apply the following filters:
• Last 24 hours
• Last 7 days
• Custom Range. You can set a maximum range of seven days.
You can refresh the Home page in the following ways:
• Navigate back to the Home page from any other page.
Home page 23

• Click the Refresh icon in the upper left of the dashboard.
You can access the following pages from the upper right Home page:
• Settings. View and update organization settings.
• Transformation Services. Create and manage transformation services.
• Message Schemas. Create and manage message schemas.
You can access the following pages from the navigation bar:
• New. Create a new B2B Gateway asset.
• Home. Return to the Home page.
• Explore. Manage Informatica Intelligent Cloud Services assets within your organization.
• Events. View the status of B2B Gateway events.
• My Import/Export Logs. View the status of your imports and exports.
Explore pageUse the Explore page to work with your Informatica Intelligent Cloud Services projects and assets.
Finding projects and assets on the Explore page
Use any of the following methods to find your projects and assets on the Explore page:
• Explore by projects and folders. Vew all projects or select a particular project.
• Explore by asset types. View all assets or view assets of a particular type.
• Explore by tags. View assets associated with a particular tag.
• Search for projects or assets. To search all projects, folders, and assets in the organization, view the Explore page by All Projects, and then enter a name or description in the Find box. Or, to narrow your search, filter the Explore page by All Assets, select a specific asset type, project, or folder, and then enter a name or description in the Find box.
• Sort the search results. Sort the Explore page by name, last update date, description, or type. When you sort by type, the Explore page groups assets by asset type. It does not list the asset types in alphabetical order.
You can see projects, folders, and assets for all of the services that you use. If you select an asset to open it or perform an action and the asset is created in a different service than the one you have open, the service opens in a new browser tab.
The following characters cannot be used on the Explore page:
# ? ' | { } " ^ & [ ] / \Do not use these characters in project, folder, asset, or tag names.
24 Chapter 1: Introducing B2B Gateway

Working with projects and assets on the Explore page
Perform actions on projects, folders, and assets on the Explore page. To see what actions you can perform on an object, in the row that contains the object, click the Actions icon, as shown in the following image:
The Actions menu lists the actions you can perform based on your user role privileges and the permissions specified for the selected object. For example, your user role might have privileges to run partner flows but not to delete partners. You might not have permission to run a particular partner flow because of the permissions set by the creator of the partner.
Explore page 25

You can also perform an action on multiple objects at one time. Select the check box to the left of each object, or select the Select All check box to select all of the objects that are displayed on the current page. The following image shows the Select All check box in use:
After you select the objects, click Actions in the row of any of the selected objects. The Actions menu will list the actions available for the selected assets based on your user role and privileges.
26 Chapter 1: Introducing B2B Gateway

Alternatively, you can use the Selection menu to choose the action, as shown in the following image:
Customizing the Explore page
You can display, hide, or rearrange object properties on the Explore page. To display or hide properties, right-click the column heading area and check or uncheck the properties. The following image shows the properties menu on the Explore page column heading area:
To rearrange columns, click a column heading and drag it to a different location.
Explore page 27

C h a p t e r 2
B2B Gateway administrationAfter you set up the organization in Informatica Intelligent Cloud Services, you can manage your organization, including settings and users, file servers, transformation services, message schemas, and access to B2B Partners Portal.
You can perform following tasks:
• Set up your organization in B2B Gateway and edit organization settings.
• If user roles are defined for the organization in Informatica Intelligent Cloud Services, verify that users have permissions to perform the required actions in Informatica Intelligent Cloud Services.
• Configure file servers and file server users to enable file exchange with your partners using advanced file servers and file transfer protocols.
• Manage transformation services for EDI message customization.
• Upload message schemas to Informatica Intelligent Cloud Services.
• Enable access to B2B Partners Portal for trading partners and customize the portal appearance.
Organization managementBefore the organization can use B2B Gateway, you must set up an organization in Informatica Intelligent Cloud Services and then set up the organization in B2B Gateway.
For information about setting up your organization in Informatica Intelligent Cloud Services, see the Administrator help.
When you set up the organization in B2B Gateway, B2B Gateway creates connections in Informatica Intelligent Cloud Services, uploads the XML schema files to use in custom mappings to Data Integration, and creates the B2B Gateway document store for the organization. The setup process might take a few minutes to complete.
Warning: When you set up the organization in B2B Gateway, B2B Gateway creates the connections B2B EDI Gateway, B2B EDI Gateway Endpoint, and B2B Gateway Document Store in the organization in Informatica Intelligent Cloud Services. Do not rename or edit these connections. Editing a connection or changing a connection name might result in errors at run time.
28

Before You BeginBefore you set up the organization in B2B Gateway, open Administrator and verify that the following conditions exist.
Configuration
On the Runtime Environments page in Administrator, verify that the Secure Agent is running. The Secure Agent must be running to run partner flows.
Administration
On the Licenses page in Administrator, verify that the following licences are valid:
License Category
Mappings Application
DT XML Processing Feature
REST API Verify that Maximum Concurrent Sessions is set to a high value, for example, 100 sessions.
B2B EDI Gateway Connector
B2B EDI Gateway Endpoint Connector
B2BProcessor Package
EDI Gateway Bundle
DataTransformation Package
B2BEDIGateway Package
UDTforHierarchy Package
B2B Partners Portal Service
Proxy Settings
If your organization uses an outgoing proxy server to connect to the internet, set the following JVM options on the Secure Agent:
Name Value
JVMOption1 -Dhttp.proxyHost=<proxy host>
JVMOption2 -Dhttp.proxyPort=<proxy port>
JVMOption3 -Dhttp.useProxy=true
JVMOption4 -Dhttp.proxyUser=<proxy user name>
JVMOption5 -Dhttp.proxyPassword=<proxy password>
Organization management 29

After the Secure Agent restarts, check the agent core log file to verify that the correct proxy server is used. The agent core log file is the following file:
<Secure Agent installation directory>\apps\agentcore\agentcore.logTo find the proxy information, search for "proxy" in the log file.
Setting up the organization in B2B GatewaySet up the organization in B2B Gateway.
1. Access B2B Gateway from the My Services page.
The Organization Setup dialog box appears.
2. Define the following settings and then click Save:
Property Description
Organization Name
Name of the organization in Informatica Intelligent Cloud Services. Appears in view only mode.
Organization ID ID of the organization in Informatica Intelligent Cloud Services. Appears in view only mode.
X12 Interchange Qualifier
Required if you exchange X12 messages with your partners.Interchange qualifier of the organization to use in outbound X12 messages. If you want B2B Gateway to use a different qualifier in outbound messages for specific partners, you can provide the qualifier to use for the partner when you create or edit the partner.
X12 Interchange ID
Required if you exchange X12 messages with your partners.Interchange identifier of the organization to use in outbound X12 messages. If you want B2B Gateway to use a different identifier in outbound messages for specific partners, you can provide the identifiers to use for the partner when you create or edit the partner.
EDIFACT Interchange Qualifier
Required if you exchange EDIFACT messages with your partners.Interchange qualifier of the organization to use in outbound EDIFACT messages. If you want B2B Gateway to use a different qualifier in outbound messages for specific partners, you can provide the qualifier to use for the partner when you create or edit the partner.
EDIFACT Interchange ID
Required if you exchange EDIFACT messages with your partners.Interchange identifier of the organization to use in outbound EDIFACT messages. If you want B2B Gateway to use a different identifier in outbound messages for specific partners, you can provide the identifiers to use for the partner when you create or edit the partner.
Rotate Key Click Rotate Key to rotate the encryption key used for data encryption.
30 Chapter 2: B2B Gateway administration

The following additional properties are required for runtime processing of messages and files:
Property Description
Enable Runtime Processing
Select to run inbound and outbound partner flows.Note: If runtime processing is not enabled, you cannot run partner flows.
Informatica Cloud User
Name of the Informatica Intelligent Cloud Services user to use at run time. The user must have all the permissions that are required for B2B Gateway administrators, B2B Gateway users, and Data Integration users. For more information about the required permissions, see “User roles” on page 31.
Informatica Cloud Password
Password for the Informatica Intelligent Cloud Services user to use at run time.
Runtime Environment
Informatica Intelligent Cloud Services Secure Agent runtime environment to use at run time.
Document Store File directory inside the organization where B2B Gateway stores all the documents that the organization exchanges with partners, for tracking purposes.The directory must be accessible to the runtime environment.Do not create the document store directory in the Secure Agent installation home directory or any subdirectory.You must enter an absolute path to the directory.
Minimize number of processing tasks
B2B Gateway can group process-to-backend mappings for an inbound flow, and create a single mapping to handle all the XML interface files created during EDI X12, EDIFACT, or custom file processing. Recommended only when system resources are limited.
Warning: When you set up the organization in B2B Gateway, B2B Gateway creates the connections B2B EDI Gateway, B2B EDI Gateway Endpoint, and B2B Gateway Document Store in the Informatica Intelligent Cloud Services organization. Do not rename or edit these connections. Editing a connection or changing a connection name might result in errors at run time.
Editing Organization Settings in B2B GatewayEdit the organization settings in B2B Gateway.
1. Log in to B2B Gateway with your Informatica Intelligent Cloud Services credentials.
2. Click Settings in the upper right corner of the screen.
The Organization Setup dialog box shows.
3. Edit the required settings and then click Save.
User rolesA role is a collection of privileges that you can assign to users and user groups.
A role defines the privileges for different types of assets and service features. For example, users with the Designer role can create, read, update, delete, and set permissions on B2B Gateway assets. However, they do not have access to certain Administrator features such as licenses.
User roles 31

To configure user roles, you need the Administrator role.
You can assign the following types of roles:System-defined
System-defined roles are pre-defined roles that define access privileges for the services that your organization uses. You cannot edit or delete system-defined roles.
Custom role
Custom roles are roles that you create to set privileges individually. To create custom roles, you need the appropriate license. You can edit and delete custom roles.
Some system-defined roles have access privileges across multiple services. For example, users with the Designer role can create a mapping in Data Integration, add the mapping to a B2B Gateway partner as a process-from-backend mapping, and run the partner flow.
The following cross-service roles apply to B2B Gateway:
• Administrator
• Designer
• Monitor
For more information about user roles, see the Administrator help.
File servers and file transfer protocolsYou can exchange files with your partners using advanced file servers and file transfer protocols.
Configure file transfer servers and file transfer users to allow remote partners to send files from AS2, HTTPS, and SFTP servers to your Informatica Intelligent Cloud Services organization, and to receive files that you send to HTTPS and SFTP servers.
Configure the file server properties on the File Servers page in Administrator. Configuration includes properties such as file server details, encryption methods, and allowed file types. For more information about configuring file servers, see File transfer in the Administrator help.
To exchange files with a partner using advanced file servers, you select the file servers connection when you configure the partner flow. For more information, see Chapter 8, “Partners” on page 93.
You can enable your trading partners to send and receive files over HTTPS through B2B Partners Portal. For more information, see the B2B Partners Portal help.
You can monitor file transfer jobs on the File Transfer Logs page in Monitor. For information, see the Monitor help.
Alternatively, you can use the following advanced FTP connectors to exchange files with your partners:
• Advanced FTP V2 Connector
• Advanced FTPS V2 Connector
• Advanced SFTP V2 Connector
For more information about the advanced FTP connectors, see the respective connector guides.
32 Chapter 2: B2B Gateway administration

File server usersCreate a user account for each partner that sends files from an AS2, HTTPS, or SFTP server to your organization or receives files that you send to an HTTPS or SFTP server for the partner. The user account enables the partner to upload files to your file servers and to download files that you upload to your file servers for the partner.
You don't need to configure file server users when you use the advanced FTP connectors.
For each partner, configure the following types of properties:
• General properties such as user name, email address, and password.
• Server-specific properties such as the remote server ID, certificate information, and the upload or download folder.
Note: File server user accounts are different from Informatica Intelligent Cloud Services user accounts. File server user accounts enable partner users to send files to your organization's file servers. Informatica Intelligent Cloud Services user accounts enable your users to access your Informatica Intelligent Cloud Services organization.
For more information about configuring file server users, see File transfer in the Administrator help.
Custom transformation servicesYour organization or your partners might choose to customize EDI messages by adding or removing elements.
For example, consider an online furniture vendor that uses EDI 850 Purchase Order messages. The EDI 850 message structure defines hundreds of data elements. The clothing business uses standard elements such as model, color, and size, and a custom element for the wood type. It does not need batch number or expiration date. To process customized EDI messages from this vendor, you can remove the unneeded elements and add the fabric type element to a custom transformation service.
You can create a customized service to process the customized messages using the Informatica Library Customization Tool. B2B Gateway manages the customized services in the B2B Gateway repository and implements these services for specific partners and messages.
EDI message customization processB2B Gateway mappings include transformation services that convert inbound EDI messages into interface files, or interface files into outbound EDI messages. A transformation service is configured to convert a specific message type in its standard format. To process a customized message, you create a custom transformation service.
You can download an out-of-the-box transformation service and use it as a template. You use the Library Customization Tool to configure the transformation service components according to the customized message structure. After you complete your changes, you create a custom transformation service in B2B Gateway and upload the edited service.
When you define a partner in B2B Gateway, you can associate a custom transformation service with a specific EDI message that is sent from or to the partner. B2B Gateway runs the service when a flow runs for the partner for the message associated with the service.
Custom transformation services 33

Transformation service managementThe Transformation Service Management page displays transformation services in two views: Custom and Out-of-the-Box. By default, the Custom view is displayed. Use the Custom view to create, edit, search, download, or delete custom transformation services. Use the Out-of-the-Box page to find and download out-of-the-box transformation services.
To access the Transformation Service Management page, from the upper-right hand corner of the home page, click the Transformation Service Management.
The following image shows the Transformation Service Management page with the default Custom view:
You create a custom transformation service in the Custom view. When you create the custom transformation service, you upload a service that you created externally.
The Transformation Service Management page displays the following properties:
Service Name
Name of the transformation service.
Description
Description of the transformation service.
Note: You must have administrative privileges in order to work with transformation services.
Service customization processTo create a custom transformation service, perform the following steps:
1. In B2B Gateway, search for and download an out-of-the-box transformation service for the standard form of the EDI message.
2. Edit the service with Data Transformation, using the Library Customization Tool. For details, see the Data Transformation User Guide.
3. Export or deploy the edited transformation as a service.
4. In B2B Gateway, create a transformation service and upload the edited service.
Note: The name of the custom transformation service must be unique. You must change the name of the out-of-the-box service when you create the new service in B2B Gateway. The name is case sensitive.
34 Chapter 2: B2B Gateway administration

Searching for a transformation serviceCustom transformation services and out-of-the-box transformation services are displayed in different views, to ensure that service management is efficient. To search for transformation services in B2B Gateway, switch to the appropriate view.
1. To search for an out-of-the-box transformation service, click the Transformation Service Management menu in the upper left and select Out-of-the-Box.
2. Alternatively, to search for a custom transformation service, if needed, click the Transformation Service Management menu in the upper left and select Custom.
Note: The Custom view is the default view.
3. To search for a transformation service, in the Search field type the any part of the service name or description.
The matching services are displayed.
Downloading a transformation serviceYou can download the transformation services displayed in the Transformation Service Management page to your local machine.
u To download a transformation service, select the row containing the service and then click the Download icon.
After you download an out-of-the-box transformation service, you can use the service as a template from which to create a custom transformation service.
Creating a Custom Transformation Service in B2B GatewayWhen you create a custom transformation service object in the Custom view of Transformation Service Management page, you upload a service that you edited externally.
1. To create a custom transformation service, click New Service.
2. Browse to find the directory that contains the transformation service that you created or edited externally.
If you are using a Chrome browser, select the folder. If you are using an Internet Explorer browser, select all the files in the folder.
Note: You cannot add a description or any other information before you select a transformation service.
3. Rename the service. The custom transformation service must be unique, and cannot have the same name as an out-of-the-box service name. The name is case sensitive.
4. Optionally, add a description to the service. The description must not contain angled brackets (< or >).
5. You can select to upload the schema that is part of the transformation service.
By default, this option is enabled.
The schema is uploaded to Informatica Intelligent Cloud Services as a hierarchical schema. You can use the hierarchical schema with the Hierarchy Parser or Hierarchy Builder transformations in Data Integration mappings.
6. Select the root element for the schema.
You can select one of the roots used by the out-of-the-box mappings or select a custom root.
7. Click Save.
Custom transformation services 35

Editing a transformation serviceYou can edit a custom transformation service in B2B Gateway.
1. To edit a custom transformation service, select the row containing the service and then click the Edit icon.
2. To change the service, browse to find the directory containing the custom transformation service that you want to use.
If you are using a Chrome browser, select the folder. If you are using an Internet Explorer browser, select all the files in the folder.
Note: You cannot add a description or any other information before you select a transformation service.
3. You can select to upload the schema that is part of the transformation service.
By default, this option is enabled.
4. Select the root element for the schema.
5. Click Save.
Deleting a transformation serviceYou can delete a transformation service that is not assigned to a partner. After you assign a transformation service to a partner, you cannot delete it.
u To delete a transformation service, select the row containing the service and then click the Delete icon.
If the transformation schema is used by a mapping in Data Integration, you will get a warning message. You can select whether or not to delete the transformation service.
Message Schema UploadProcess-to-backend and process-from-backend mappings that process EDI X12 and EDIFACT messages use Hierarchy Parser and Hierarchy Builder transformations, respectively.
Before you develop mappings that use the Hierarchy Parser or Hierarchy Builder transformations, you must upload the respective message schemas to Informatica Intelligent Cloud Services.
After you upload the schemas to Informatica Intelligent Cloud Services, they are available for selection during mapping development.
Uploading Message Schemas to Informatica Intelligent Cloud Services
If user groups are defined for the organization in Informatica Intelligent Cloud Services, to perform this task you must have permissions to read, create, and update hierarchical schemas.
1. Click the Message Schema link in the upper right corner of the screen.
The Message Schema Upload page appears.
2. Select the file type, EDI X12 or EDIFACT, and then select one or more message types and one or more message versions.
36 Chapter 2: B2B Gateway administration

Note: You can upload message schemas for one file type at a time. To upload both EDI X12 and EDIFACT schemas you must first complete the upload for one file type and then repeat the upload procedure for the second file type.
3. For EDI X12 messages, select whether to use element reference numbers or use element names in XML interface files.
4. Click Apply.
The messages you selected appear in the Message Schema Upload page.
5. Click Upload Message Schemas.
B2B Gateway uploads the selected schemas to Informatica Intelligent Cloud Services. The schemas are available for selection in Data Integration when you develop mappings that use the Hierarchy Parser or Hierarchy Builder transformations.
Note: B2B Gateway does not save a list of uploaded schemas. You can view the list of uploaded schemas in the Explore page of Data Integration.
B2B Partners Portal setup and customizationTo enable trading partners to use B2B Partners Portal and to customize the portal, perform tasks in Administrator and in B2B Partners Portal.
In Administrator, set up partner users and roles. In B2B Partners Portal, set up partners for portal access.
You can customize B2B Partners Portal so that your organization name and logo appear on the portal. You customize the portal appearance in B2B Partners Portal.
Step 1. Set up partner users and roles in AdministratorTo perform the required tasks in Administrator, log in with a user that has a user role with the following privileges:
Service Privileges
Administrator Read privilege for the Privilege, Role, and User assets
B2B Partners Portal Portal Setup feature privilege
Perform the following tasks:
1. Create a custom role for partner users. Assign the role only the Partners Portal feature privilege in the B2B Partners Portal service.
2. Create an Informatica Intelligent Cloud Services user for each user in the partner company, and assign each user the partner users custom role.
For more information, see the Administrator help.
B2B Partners Portal setup and customization 37

Step 2. Set up B2B Partners Portal partnersSet up partners and partner users that can access and use B2B Partners Portal.
To set up portal partners, log in to the portal with a user that has the Admin user role. Perform the following tasks for each partner:
1. Add the partner to the portal
2. Assign portal users to the partner.
For more information, see the B2B Partners Portal help.
Step 3. Customize B2B Partners PortalCustomize B2B Partners Portal so that your organization name, logo, or both appear on the portal.
To customize the portal, log in to the portal with a user that has the Admin user role. You can perform the following tasks:
• Customize the portal name.
• Customize the portal logo.
For more information, see the B2B Partners Portal help.
38 Chapter 2: B2B Gateway administration

C h a p t e r 3
Project and asset managementManage projects, and the assets and folders within them, on the Explore page. The Explore page is a Informatica Intelligent Cloud Services feature that is available for most services. If you use multiple services, you might see projects, folders, and assets for all of your services on the Explore page.
You can manage your Informatica Intelligent Cloud Services projects and assets in the following ways:
• Copy projects, folders, or assets to create new versions of them.
• Move folders or assets to other locations on the Explore page.
• Rename projects, folders, or assets.
• Delete projects, folders, or assets.
• Apply tags so you can filter for related assets on the Explore and Events pages.
• Configure permissions for projects, folders, or assets.
• Use source control to manage versions of projects, folders, and assets.
• Migrate assets between organizations.
Copying projects, folders, and assetsYou can copy projects, folders, and assets on the Explore page. You might want to copy an object to use as a template, or you might want to create a backup copy.
When you copy objects, Informatica Intelligent Cloud Services retains child elements in the following instances:
• When you copy a project, the new project contains all of the folders and assets that were in the original project. Similarly, when you copy a folder, the new folder contains all of the assets that were in the original folder.
• When you copy assets or a folder containing assets to another location, the assets retain their references to dependent objects.For example, a folder in the Customers project contains the m_cust and the mt_ca_cust assets. The mt_ca_cust asset requires the m_cust asset. If you copy the mt_ca_cust asset to a folder in the Customers_ca_upsell project, the mt_ca_cust asset in the Customers_ca_upsell project still references the m_cust asset in the Customers project.
When you copy an asset within the folder where the asset exists, you have the option to keep both assets or cancel the operation. When you copy an asset into a different folder that contains an asset with the same name, you have the option to keep both assets, overwrite the asset in the folder, or cancel the operation. If you choose to keep both assets, Informatica Intelligent Cloud Services appends the new asset name with "Copy x" where x is the sequential copy number.
39

Note: To avoid naming conflicts with duplicate assets, rename assets with a "Copy x" suffix.
When you copy an asset with a schedule, the schedule is removed from the copied asset.
You cannot copy customers, suppliers, or monitoring rules. When you copy a project or folder that contains a customer, supplier, or monitoring rule, the assets are not copied with the project or folder.
For example, you have a project called "My Project." The project contains 10 customers, 15 mappings, and two monitoring rules. When you copy the project, only the mappings are copied to the new project.
1. On the Explore page, navigate to the object that you want to copy.
2. In the row that contains the object that you want to copy, click Actions and select Copy To.
3. Browse to the new location and click Select.
Moving folders and assetsYou can move folders and assets on the Explore page.
1. On the Explore page, navigate to the folder or asset that you want to move.
2. If your organization has enabled source control, check out the folder or assets that you want to move.
If you want to move a folder, be sure to check out the folder and each of the assets within the folder.
3. In the row that contains the folder or asset, click Actions and select Move To, and then browse to the new location.
4. If the folder or assets are checked out, check them in so that the Git repository reflects the new structure.
40 Chapter 3: Project and asset management

Renaming projects, folders, and assetsYou can rename projects, folders, and assets without losing any references to objects that they use.
For example, if an asset named mt_ResolveClientList uses an asset named m_RegionToMainList, you can rename the mt_ResolveClientList asset to mt_ClientList and it will still reference the m_RegToMainList asset.
The following characters cannot be used on the Explore page:
# ? ' | { } " ^ & [ ] / \Do not use these characters in project, folder, asset, or tag names.
1. On the Explore page, navigate to the object that you want to rename.
2. If your organization has enabled source control, check out the object that you want to rename.
3. To rename an asset, in the row that contains the asset, click Actions and select Rename.
4. To rename a customer, supplier, or monitoring rule, click Actions and select Edit.
5. To rename a project or folder, in the row that contains the project or folder, click Actions and select Properties.
6. Enter the new name and click Save.
You cannot use special characters in a name or use the same name as another object that is in the same folder.
7. If the object was checked out, check in the object so that the change is reflected in the Git repository.
Deleting projects, folders, and assetsYou can delete a project, folder, or asset if you no longer need it. However, before you delete it, verify that no users in the organization plan to use it. You cannot retrieve projects, folders, or assets after you delete them.
You cannot delete an asset in the following situations:
• The asset is a task that is currently running.
• The asset is used by another asset. You must first delete the dependencies of the asset before you can delete the asset.For example, if a monitoring rule is used by a partner, you cannot delete the monitoring rule. You must either delete the monitoring rule or update the partner to use a different monitoring rule.
For information about viewing asset dependencies, see “Asset dependencies” on page 45.
Delete a project, folder, or asset from the Explore page, as shown in the following image:
Renaming projects, folders, and assets 41

Note: When you delete a partner with an event history, the events remain stored in the B2B Gateway database. You can select to show the partner and the events related to the partner on the event list. Deleted partners show in the event list in view-only mode.
1. To delete a project, folder, or asset, on the Explore page, navigate to the object that you want to delete.
2. If your organization has enabled source control, check out the object that you want to delete.
3. In the row that contains the project, folder, or asset, click Actions and select Delete.
4. If the object was checked out, check in the object so that the change is reflected in the Git repository.
TagsA tag is an asset property that you can use to group assets. Create tags to filter for assets that share a common attribute on the Explore and Events pages.
For example, your regional offices manage the assets that only apply to their region. Each of your organization's assets includes a tag that identifies the asset by region. You want to view all of the assets that the Southwest regional office manages. On the Explore page, you explore by tag and then click the SW Region tag, as shown in the following image:
42 Chapter 3: Project and asset management

You might also want to view all the events that are associated with partners that the Southwest regional office manages. On the Events page, you filter by partner tag, as shown in the following image:
You can assign tags to all asset types. An asset can have up to 64 tags.
You can find all of the assets that have a particular tag using one of the following methods:
• Click the name of the tag in the Tags column, in any row.
• Explore by tag, and then in the list of tags that shows on the page, click the name of the tag.
• Search by tab on the Events page, and then in the list of tags that shows on the page, click the name of the tag.
The following image shows an Explore page that lists all the tags created for the organization:
Click the name of a tag to see a list of all the assets associated with the tag.
Creating tagsYou can create multiple tags to assign to assets.
You can create tags that you want to use for an asset when you configure the asset properties, or you can create multiple tags to be available for future use. To create multiple tags for future use, you use an asset's Properties dialog box.
Follow this procedure if you want to create multiple tags without assigning them to an asset.
1. On the Explore page, browse by asset type.
2. In a row that contains an asset, click Actions and select Properties.
If the asset is source controlled, check out the asset first.
3. In the Tags field, enter the name of a tag that you want to create, and then press Enter.
A tag can have a maximum of 255 characters.The following characters cannot be used on the Explore page:
# ? ' | { } " ^ & [ ] / \Do not use these characters in project, folder, asset, or tag names.
Tags 43

4. Continue to enter the desired tags. Press Enter after each tag name to add it to the tag list.
5. After you have entered the tags, delete the tags from the Tags field so that the asset does not become associated with the tags. The tags will still appear in the list of available tags.
6. Click Save.
Assigning tagsYou can assign a tag to one asset at a time or assign a tag to multiple assets at the same time. You can assign multiple tags to one asset.
When you assign tags to an asset, you can choose an existing tag or create a new one.
1. On the Explore page, navigate to the asset or assets.
If the assets are source controlled, check out the assets.
2. Perform one of the following tasks depending on whether you want to assign tags to one asset or assign tags to multiple assets at the same time.
• To assign tags to one asset, in the row that contains the asset, click Actions and select Properties.
44 Chapter 3: Project and asset management

• To assign tags to multiple assets at the same time, in the row for each asset, select the check box. After you have selected all of the assets, from the Selection menu, select Tags.
3. Select an existing tag or enter the name of a new tag.
Continue adding tags or creating new tags until you have assigned all of the desired tags.
4. Click Save.
Editing and deleting tagsYou can edit or delete a tag on the Explore page.
Edit a tag name or description in the tag properties. When you edit a tag, the properties for associated assets update as well. For example, if your m_sales asset has the NorthWest tag and you change the name of the tag to NW, the name of the tag changes to NW in the m_sales asset properties.
If you delete a tag, the tag no longer appears in the asset properties.
1. On the Explore page, browse by tags.
2. In the row that contains the tag, perform one of the following tasks:
• To edit a tag, click Actions and select Edit. After you make your changes, click Save.
• To delete a tag, click Actions and select Delete.
Asset dependenciesYou can view object dependencies for an asset. You might want to view object dependencies before performing certain operations on an asset.
For example, you cannot delete an asset if another object depends on the asset. You must first delete the dependent objects and then delete the asset. You can find the dependent objects by viewing the asset dependencies.
You can view object dependencies for an asset on the Explore page. To view object dependencies for an asset, in the row that contains the asset, click Actions and select Show Dependencies. The Dependencies page opens showing the Uses tab by default.
The Uses tab lists the objects that the selected asset uses. For example, a customer might use a mapping, a monitoring rule, and a connection.
Asset dependencies 45

The Used By tab lists the objects that use the selected asset. For example, a connection might be used by one or more partners.
To drill down to the lowest level dependency, you can continue to show dependencies for each asset that appears on the Dependencies page. At the top of the Dependencies page, a breadcrumb shows the chain of dependencies.
The following image shows that the asset mt_FilterArchCustRecords is dependent on m_FilterCustRecords, which is dependent on FF_USW1PF:
If you have the appropriate permissions, you can perform actions on the Dependencies page such as viewing or deleting assets. To view or delete an asset, in the row that contains the asset, click Actions and select the action.
If you work with source controlled assets, you can view source control information such as the last pull time and the last check-in. To view source control information, you can add the following source control columns to the table:
• Last Pull Time
• Checked Out By
• Last Check in
• Git Hash
PermissionsPermissions determine the access rights that a user has for a Secure Agent, Secure Agent group, connection, schedule, or asset. Permissions add additional or custom security for an object. Permissions define which users and groups can read, update, delete, execute, and change permissions on the object.
To configure permissions on an object, you need the following licenses and privileges:
• To configure permissions at the project level for all assets in a project, your organization must have the Set/Unset Security Permissions at Project Level license.
• To configure permissions at the folder level for all assets in a folder, your organization must have the Set/Unset Security Permissions at Folder Level license.
• To configure permissions on individual assets, your organization must have the Fine Grained Security license.
• The role assigned to your user account or to a group in which you are a member must have the Set Permission privilege for the object type. For example, to configure permissions on a Secure Agent, you must be assigned a role that has the Set Permission privilege for Secure Agents.
To configure permissions on an object, navigate to the object and set the appropriate permissions. For example, you want only users in the Development Team user group to have access to assets in the Development Data folder. Navigate to the folder, edit the permissions, and grant the Development Team user group permissions on the folder.
Permissions apply to the objects for which you configure them but not to copies of the object. Therefore, when you copy or export an asset, the permissions are not copied or exported with the asset. For example,
46 Chapter 3: Project and asset management

you export a mapping task in which only user rjones has execute permission. When you import the mapping task, the imported mapping has no permissions assigned to it. Therefore, any user with privileges to run mapping tasks can run the imported task.
You can configure the following permissions on an object:
Permission Description
Read Open and view the object.If the object is source controlled, this permission allows the user or group to pull or check out the object from the source control repository.If you select a task, this permission also allows the user or group to use a connection or schedule in the task.
Update Edit the object.If the object is source controlled, this permission allows the user or group to check in, check out, pull, unlink, or roll back the object.Requires read permission, which is automatically granted.
Delete Delete the object.
Execute Run the object. Applies to mappings, tasks, and taskflows. Monitor, stop, and restart instances of the mapping, task, or taskflow.
Change permissions
Change the permissions that are assigned to the object.
Note: These permissions control permissions within Informatica Intelligent Cloud Services. They do not control operating system permissions, such as the ability to start, stop, or configure the Secure Agent on Windows or Linux.
Rules and Guidelines for PermissionsUse the following rules and guidelines for permissions:
• When you configure permissions for an object, verify that the user or group to which you grant permissions is assigned a role with the appropriate privileges for the object type. For example, if you grant a user with the Service Consumer role Update privilege on a particular folder, the user cannot update the folder because the Service Consumer role does not have update privileges for folders.
• To edit an asset, the user must have read permission for all assets used within the asset. For example, when you assign a user Read and Update permissions for a partner, verify that the user also has Read permission for the mappings and schedules associated with the partner.
Configuring permissionsYou can configure permissions on an object if you are assigned a role with the Set Permission privilege for the object type. For example, to configure permissions on a folder, you must be assigned a role that has the Set Permission privilege for folders.
1. Navigate to the object for which you want to configure permissions.
Permissions 47

For example:
• To configure permissions on a Secure Agent or Secure Agent group, in Administrator, select Runtime Environments.
• To configure permissions on a connection, in Administrator, select Connections.
• To configure permissions on a mapping, in Data Integration, open the project and folder that contain the mapping.
• To configure permissions on a supplier, open the project and folder that contain the supplier.
2. In the row that contains the object, either click Actions and select Permissions, or click the Change Permission icon.
The Permissions dialog box lists the users and groups that have permissions on the object.
If the Permissions dialog box lists no users or groups, then no permissions are configured for the object. Any user with appropriate privileges for the object type can access the object.
The following image shows the Permissions dialog box for a mapping:
3. To configure user permissions on the object:
a. Select Users.
b. If the user does not appear in the Users list, click Add, and select a user.
c. Enable or disable the appropriate permissions on the user.
Note: When you grant any user permissions on the object, Informatica Intelligent Cloud Services also adds you as a user with permissions on the object. This prevents you from losing access to the object when you configure permissions.
4. To configure user group permissions on the object:
a. Select Groups.
b. If the group does not appear in the Groups list, click Add, and select a group.
c. Enable or disable the appropriate permissions on the group.
Note: When you grant any group permissions on the object, Informatica Intelligent Cloud Services also adds you as a user with permissions on the object. This prevents you from losing access to the object when you configure permissions.
48 Chapter 3: Project and asset management
5. To remove all permissions restrictions for the object, remove all users and groups from the Permissions dialog box.
When you remove all users and groups, any user with appropriate privileges for the object type can access the object.
6. Click Save.
Asset migrationYou can migrate Informatica Intelligent Cloud Services assets from one organization to another organization. To migrate assets, you export the assets from the source organization and then import the assets into the target organization.
You can import and export the following types of assets:
• Customers
• Suppliers
• Monitoring Rules
You can export single assets, groups of assets, or export all of the assets in a project. If you export a project or folder, the file structure remains intact so that when you perform the import in the target organization, you can duplicate the original structure.
Before you migrate an asset from one organization to another, ensure that you meet the following requirements:
• The source and target organizations must have the required license to import and export assets.
• The target organization must have the required licenses for the assets that you want to import.
• You must have a user account in the source and target organizations with a role that has import and export privileges, such as the Admin or Designer role.
• You have completed the cloud organization setup for both the source and target organizations.
To export or import assets in a sub-organization, log in to the sub-organization. If you have administrator privileges in the parent organization, you can also switch to the sub-organization and export or import assets.
Dependent objectsDependent objects are assets that are required by other assets.
For example, a mapping or an Intelligent Structure Discovery model that is used by a partner inbound or outbound flow are dependent objects.
When you set up an export, you have the option to include or exclude dependent objects in the export file. The dependent objects must exist either in the export file or in the target organization, else the import fails.
You might want to include dependent objects if they do not exist in the target organization. Or, you might want to include dependent objects if you want to replace the dependent objects in the target organization with updated versions from the source organization. If you choose to include dependent objects, the export file includes dependent objects for all of the assets that you include in the export. When you configure the import, you can choose which dependent assets to import.
You might want to exclude an asset's dependent objects if the objects exist in the target organization and you do not want to replace them.
Asset migration 49

Note: Schedules are not dependent objects and are not included when you export assets that use them.
Asset exportWhen you export assets, Informatica Intelligent Cloud Services creates an export ZIP file that contains the assets that you selected for export.
You can select individual assets to export, or you can select an entire project or folder. When you export a project or folder, the export file includes all of the assets in the project or folder.
To export an asset, you need the following privileges and permissions:
• Your user role must have privileges to export assets.
• You must have read permission on the asset.
Note: Informatica recommends that you include no more than 1000 objects in an export file.
Export filesThe export file includes a spreadsheet that lists the objects within the file.
The following image is an example of an export spreadsheet:
Export file structure
The export file retains the file structure of the source organization's Explore page for projects, folders, and assets.
50 Chapter 3: Project and asset management

The following image show the structure of an export file:
Object names
The following table lists the asset types and the associated extensions appended to B2B Gateway asset names:
Asset Type Extension
Customer B2BGW_CUSTOMER
Supplier B2BGW_SUPPLIER
Monitoring Rule B2BGW_MONITOR
Exporting assetsYou can select a single asset, multiple assets, or a project to export.
To include multiple assets, you can either select each asset within a folder or select a project or folder to export all of its assets. If you export a project, during import you can import the entire project or import only the assets that you select.
1. Log in to the source organization.
2. On the Explore page, navigate to the assets that you want to export.
3. Select the assets that you want to export.
To export a single asset or project, select the asset or project, and then click Actions and select Export.
To export multiple assets, select the check box to the left of each asset that you want to export. Or, select the check box for each project or folder that contains the assets that you want to export. From the selection menu, select Export.
Asset migration 51

The following image shows the selection menu with multiple assets selected:
4. On the Export Assets page, change the job name or leave the default.
5. Select whether to include dependent objects for the assets.
6. Click Export.
7. To see the progress of the job, select My Import/Export Logs from the navigation bar and then select Export from the menu at the top of the page. Click the name of the log to open the log details page.
8. To download the export file when the job completes, on the log details page, click the export file name.
Tip: You can quickly open the log details page for a completed export job in Notifications. When the export process is complete, a message appears in Notifications. Click the link in the message to open the log details page.
Asset importYou can import all of the assets in an export file or select the assets that you want to import.
When you import assets, you specify the following information:
• The assets in the export file that you want to import and the projects in which to import them.
• Whether to overwrite assets in the target project with assets in the export file when there is a name conflict.
To import an asset, you need the following privileges and permissions:
• Your user role must have privileges to import assets.
• If you import an asset into the target project as a new asset, you must have create, update, and read permissions on the asset.
• If you overwrite an asset in the target project, you must have update and read permissions on the asset.
Additionally, to overwrite a source-controlled asset in the target project, you must have the asset checked out.
The Import Assets page lists the assets that are in the export file. You can select which assets you want to import, and then specify which project to import the assets to. You can accept the default project, which is the same project name as the source project, or you can select a different project. If the project does not exist in the target organization, Informatica Intelligent Cloud Services creates it.
52 Chapter 3: Project and asset management

The target organization must have all of the required licenses for the assets being imported.
You can specify how Informatica Intelligent Cloud Services handles asset name conflicts when the export file contains assets with the same name as assets in the target project. You can choose whether to overwrite the assets in the target project. If you choose not to overwrite the assets, Informatica Intelligent Cloud Services uses the existing assets in the target project.
To see how the import handles any asset name conflicts before you start the import job, you can test the import on the Import Assets page before you import the assets. The import action displays in the Status column for each asset. You can filter the list of assets by asset name, asset type, or status.
The following image shows a list of assets and the import action to be performed when overwriting existing assets is enabled:
When you import partners into the target organization, the partner name and number must be unique. You cannot import a partner into an organization where a partner with the same partner name or partner number exists.
When you migrate partners with custom transformation services, the partner is imported with the custom transformation service link, but the transformation service is not migrated with the partner. If a custom transformation service of the same name exists in the target organization, the partner will use the custom transformation service in the target organization.
Importing assetsImport assets from an Informatica Intelligent Cloud Services export file.
1. Log in to the target organization.
2. On the Explore page, navigate to All Projects and click Import.
3. On the Import Assets page, navigate to the export file and click Open, or drag the zip file from the Downloads folder in Windows.
The Import Assets page lists the assets in the file.
4. Optionally, change the import job name.
5. Choose whether to overwrite existing assets with the assets in the import.
• If you choose to overwrite existing assets, when an asset has the same name as an asset in the target project, the asset replaces the existing asset in the target project.
• If you do not choose this option, if an asset with the same name exists in the target project, the asset is not imported.
Asset migration 53

6. Select the assets that you want to import.
If the export file contains a project and you want to import the entire project, select all of the assets. Informatica Intelligent Cloud Services creates the project in the source organization.
7. Select the target project or accept the default.
8. Click Test to see the potential results of the import.
In the Select Assets area, the status for each asset shows the action that the service performs when you import the files.
9. If necessary, revise your selections to resolve any issues in the test results.
10. Click Import.
You can see the progress of the import on the Import tab of the My Import/Export Logs page. When the import process is complete, a message appears in Notifications. Click the link in the message to open the log details page and see the results of the import.
Post-import tasksTo complete the migration process you need to perform certain tasks based on the types of assets that you imported.
Perform the following tasks after you import assets:
• Configure connection passwords and security tokens. Informatica Intelligent Cloud Services does not include connection passwords and security tokens in imports for security reasons.
• Recreate and define partner schedules. Informatica Intelligent Cloud Services does not import schedule information and partners are imported with a manual trigger.
• Download any custom transformation services from the source organization and add them into the target organization. Informatica Intelligent Cloud Services does not migrate custom transformation services.
Monitoring imports and exportsYou can monitor the imports that are running or have run in your organization. Each time that you import or export objects, Informatica Intelligent Cloud Services creates a log entry for the import or export.
You can view the import and export logs on the following pages:My Import/Export Logs page
Lists all imports and exports started by the currently logged in user. If you view your exports, you can download the export files from this page.
To open the My Import/Export logs page, in B2B Gateway, click My Import/Export Logs.
Import/Export Logs page
Lists all imports and exports that are running or have run in the organization. If you view exports, you can download the export files from this page.
To open the Import/Export Logs page, open Monitor, click Import/Export Logs.
Details page
Displays detailed information about a specific import or export instance. You can also download the import or export instance log file. The log contains instance and object-level details. Logs are available for download for seven days. If you view details for an export instance, you can download the export file from this page. To open the details page, click an import or export instance on the My Import/Export Logs or Import/Export Logs page.
For more information about monitoring imports and exports, see the Monitor service help.
54 Chapter 3: Project and asset management

C h a p t e r 4
EDI X12 and EDIFACT MessagesB2B Gateway uses Data Integration mappings to process EDI and EDIFACT messages that you exchange with your partners.
Inbound EDI X12 and EDIFACT messages
B2B Gateway runs pre-packaged, EDI processing mappings to handle the connectivity between the partner and the B2B Gateway document store. You can define custom backend processing mappings to process the interface file that the EDI processing mapping places on the document store to the backend system.
You can define a single process-to-backend mapping to process all interface files, a mapping for each type of file that you want to process, or both mapping types. When an inbound process runs, B2B Gateway first runs the process-to-backend mappings that are defined for specific message types, and then it runs the process-to-backend mapping that is defined for the inbound flow of the partner.
Outbound EDI X12 and EDIFACT messages
For an outbound flow, you must define custom backend processing mappings to extract and process the data to send to the partner from the backend system to an interface file on the B2B Gateway document store. You can define a single process-from-backend mapping to process all the messages to the interface file, a mapping for each type of file that you want to process, or both mapping types. When an outbound process runs, B2B Gateway first runs the process-from-backend mappings that are defined for specific message types, and then it runs the process-from-backend mapping that is defined for the outbound flow of the partner.
B2B Gateway then runs the pre-packaged, EDI processing mappings to generate valid EDI messages and to handle the connectivity between the document store and the partner.
Note: For both inbound and outbound flows, define each message type in one mapping only. If you define the same message type in both a message-specific backend processing mapping and in the flow's backend processing mapping, B2B Gateway might run messages of that message type twice. For example, if you define a process-from-backend mapping for the 810 Invoice message type for a customer, and 810 Invoice is also defined in the process-from-backend mapping that is defined for the outbound flow of the customer, B2B Gateway might run 810 Invoice messages twice.
When you create a partner, you define the partner interchange qualifier and identifiers, B2B Gateway uses the interchange qualifier and identifiers in inbound flows to verify the interchange qualifier and identifier in inbound partner messages. If the qualifier and identifier in inbound partner messages are not identical to those that you define for the partner, B2B Gateway rejects the messages.
You can use context parameters in custom mappings to add information from the gateway to inbound and outbound messages and to filter the data in inbound and outbound messages. For example, add the partner name to inbound messages, or filter outbound messages based on partner number.
55

Control numbers in outbound messagesB2B Gateway adds an interchange control number and a group control number to outbound EDI X12 and EDIFACT messages, including outgoing acknowledgments. The control numbers uniquely identify the message or acknowledgement.
You can use the following types of control numbers:
• Event IDs. B2B Gateway adds the file event ID as both the interchange control number and group control number to outbound messages and acknowledgments.
• Sequence numbers. You define the initial interchange control and group control numbers that start the sequences. B2B Gateway adds the initial interchange control and group control numbers to the first outbound message or acknowledgement, and increments the numbers sequentially for subsequent messages.
You select the type of control numbers to use when you define the outbound flow for a partner.
You can reset a control number sequence at any time by editing the initial control number. After you reset an initial control number, the sequence restarts with the new initial number. The allowed number of digits in a control number is nine digits for EDI X12 messages and 14 digits for EDIFACT messages.
Tip: Reset the interchange control number when the number of digits in the next expected number is about to reach the maximum allowed number of digits in control numbers.
When the sequence restarts, B2B Gateway doesn't retain the correlation between messages and message acknowledgments for messages that were sent before the sequence restart.
Partner interchange IDsB2B Gateway adds a partner interchange ID to all EDI X12 and EDIFACT messages, including outgoing acknowledgments.
In inbound messages, B2B Gateway adds the ID as the interchange sender ID. In outbound messages, B2B Gateway adds the ID as the interchange receiver ID. In acknowledgments, B2B Gateway returns the interchange sender ID that it received in the message that it acknowledges.
When you create a partner, you need to define at least one type of partner interchange ID. You can define an interchange production ID, an interchange test ID, or both.
To identify segments within the partner organization, you can define multiple partner interchange production IDs and multiple interchange test IDs. For example, define an ID for each department in the partner organization that you exchange EDI X12 and EDIFACT messages with. You can define up to 50 interchange production IDs and 50 interchange test IDs for a partner.
If you define multiple interchange IDs of the same type for a partner, you must pass the interchange ID to use in outbound flows as a parameter in the process-from-backend mapping that you assign to the partner, so that B2B Gateway can determine which partner interchange ID to use in outbound flows. You add the ID to the source that contains the message details and map it to the appropriate field in the mapping target. For more information, see “Creating a process-from-backend mapping for outbound EDI message flows” on page 77.
56 Chapter 4: EDI X12 and EDIFACT Messages

If B2B Gateway can't determine which partner interchange ID to use in outbound flows, it can't run outbound flows and the flows fail. B2B Gateway can't determine which partner interchange ID to use if you don't define an interchange ID in the mapping when the partner interchange IDs have one of the following configurations:
• Multiple IDs are defined for both the interchange production ID and the interchange test ID.
• Multiple IDs are defined for one type of interchange ID and the other type of the interchange ID isn't defined. For example, if you define multiple IDs for the interchange production ID and don't define the interchange test ID.
B2B Gateway passes the sender interchange ID and qualifier to the target of the mapping which runs the inbound flow that receives the message. If you use a process-to-backend mapping in the inbound flow, you can map the sender interchange ID and qualifier from the mapping source to the backend target.
Interface files for EDI X12 and EDIFACT messagesWhen you exchange EDI X12 and EDIFACT messages with your partners, B2B Gateway uses XML interface files between the custom mappings and the pre-packaged EDI processing mappings. The XML interface files use the structure and naming conventions from the EDI X12 and EDIFACT standards.
When you receive EDI and EDIFACT messages from partners, the pre-packaged, EDI processing mappings validate the inbound messages and convert them to XML interface files, one file for each message type.
To send messages to partners, you create interface files and place them on B2B Gateway. You create an interface file for each type of message that you send to partners. The gateway creates a valid EDI message file for each interface file and sends the message files to the partners.
The structure and elements of an interface file reflect the structure and elements of the relevant EDI X12 or EDIFACT standard for the specific message type. For example:
• For an EDI X12 outbound message for message type 810, the interface file reflects the structure for message type 810.
• For an EDIFACT inbound message for message type ORDERS, the interface file reflects the structure for message type ORDERS.
The pre-packaged schemas for B2B Gateway can be loaded into Data Integration during organization provisioning, or any time after provisioning. The pre-packaged schemas are used in the Hierarchy Parser and the Hierarchy Builder transformations to define the expected structure of an inbound or outbound interface file. Each message type and version has its own schema. Before you create an interface file, study the schema for the message type so that you structure the hierarchy correctly.
Structure of the interface file for EDI messagesThe interface file for a specific EDI message uses the structure and naming conventions from the EDI X12 or EDIFACT standard for that message.
The EDI interface file contains the following root element:
• EDI X12: <interchanges> element.
• EDIFACT: <interchange> element.
Within the root element is a message type element, for example <x12:TS_810> in EDI X12 or <TS_INVOIC> in EDIFACT, and loop elements, segment elements, and data elements. For each element in the standard, there is a matching element in the interface file. The loop, segment, and data elements use the naming conventions in the EDI X12 or EDIFACT standard.
Interface files for EDI X12 and EDIFACT messages 57

Structure of segmentIn the interface file, the segment element uses the segment ID as the name of the corresponding XML element. Data elements within the segment use the reference element ID with the prefix R as the name of the corresponding XML element.
The following XML shows the syntax of a segment element that contains data elements:
<segment ID> <data element reference ID>...</data element reference ID> <data element reference ID>...</data element reference ID> <data element reference ID>...</data element reference ID> ...</segment ID>
Example of an EDI X12 segment
As an example, in the 810 message, the segment ID for the Transaction Set Header segment is ST. The segment contains three data elements. The following table describes the data elements according to the EDI X12 standard:
Name of data element Reference element ID
Transaction Set Identifier Code 01
Transaction Set Control Number 02
Implementation Convention Reference 03
The following XML represents the Transaction Set Header segment in the interface file:
<ST> <R01>810</R01> <R02>1131</R02> <R03>005030</R03></ST>
Example of an EDIFACT segment
As an example, in the INVOIC message, the segment ID for the UNH Message Header segment is UNH. The segment contains seven data elements. The following table describes the data elements according to the EDIFACT standard:
Name of data element Reference element ID
Message reference number 010
MESSAGE IDENTIFIER 020
Common access reference 030
STATUS OF THE TRANSFER 040
MESSAGE SUBJECT IDENTIFICATION 050
MESSAGE IMPLEMENTATION GUIDELINE IDENTIFICATION 060
SCENARIO IDENTIFICATION 070
58 Chapter 4: EDI X12 and EDIFACT Messages

The following XML represents the UNH Message Header segment in the interface file:
<UNH> <R01>1</R01> <R02> <R01>DELFOR</R01> <R02>D</R02> <R03>97A</R03> <R04>UN</R04> <R05>A09041</R05> </R02><UNH>
Structure of loopThe loop element uses the loop ID from the EDI standard as the name of the corresponding loop XML element with the prefix LOOP_.
The following XML shows the syntax of a loop element that contains segments with data elements:
<LOOP_loop ID> <segment ID> <data element reference ID>...</data element reference ID> <data element reference ID>...</data element reference ID> <data element reference ID>...</data element reference ID> ... </segment ID> <segment ID> <data element reference ID>...</data element reference ID> <data element reference ID>...</data element reference ID> <data element reference ID>...</data element reference ID> ... </segment ID> ...</LOOP_loop ID>
Example of an EDI X12 loop
As an example, in the outbound EDI X12 810 message, the Baseline Item Data loop (IT1) contains two segments, IT1 and TX1, and another loop, the Product/Item Description loop (PID).
The following XML represents an IT1 loop in the interface file:
<LOOP_IT1> <IT1> <R01>11</R01> <R02>1.000</R02> <R03>EA</R03> <R04>0.16</R04> <R06>VP</R06> <R07>HEA006-PHO2S-NL</R07> </IT1> <TXI> <R01>TX</R01> <R02>0.00</R02> <R06>2</R06> </TXI> <LOOP_PID> <PID> <R01>F</R01> <R05>12" X 15" ABCDEFGHIJ</R05> </PID> </LOOP_PID></LOOP_IT1>
Example of an EDIFACT loop
As an example, in the outbound EDIFACT INVOIC message, loop 26 contains three segments, LIN, IMD_1, and QTY_2, and two other loops, loop 27 and loop 29.
Interface files for EDI X12 and EDIFACT messages 59
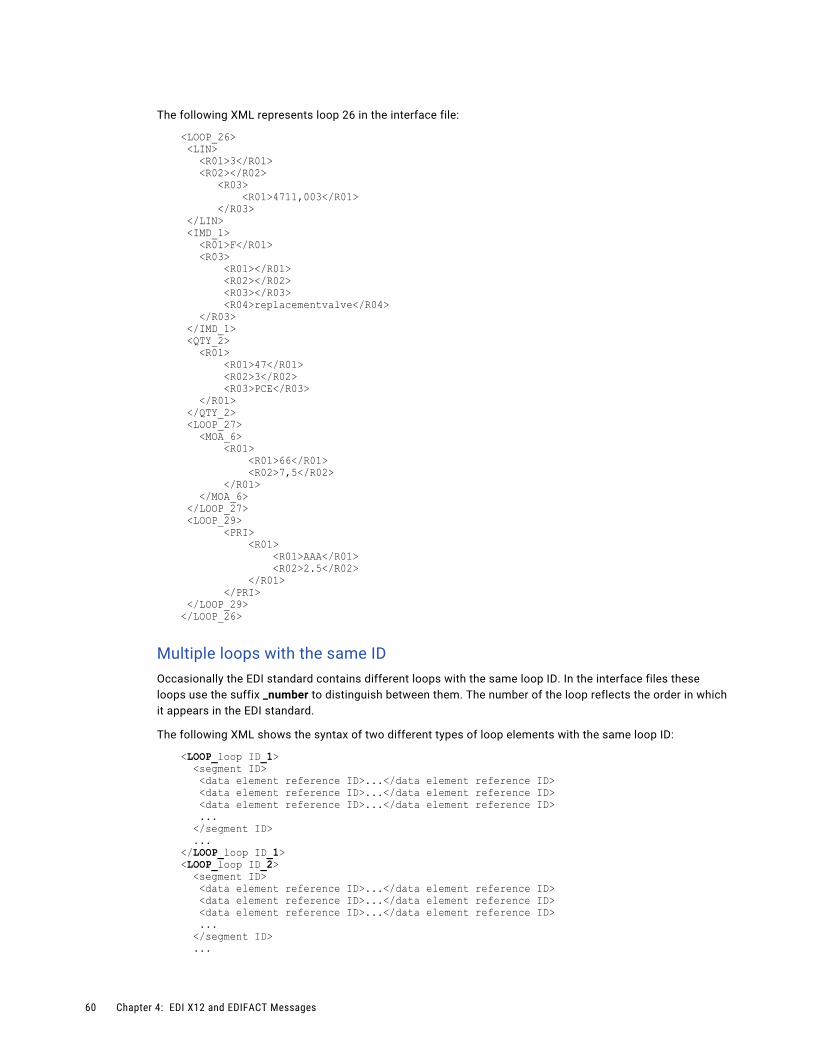
The following XML represents loop 26 in the interface file:
<LOOP_26> <LIN> <R01>3</R01> <R02></R02> <R03> <R01>4711,003</R01> </R03> </LIN> <IMD_1> <R01>F</R01> <R03> <R01></R01> <R02></R02> <R03></R03> <R04>replacementvalve</R04> </R03> </IMD_1> <QTY_2> <R01> <R01>47</R01> <R02>3</R02> <R03>PCE</R03> </R01> </QTY_2> <LOOP_27> <MOA_6> <R01> <R01>66</R01> <R02>7,5</R02> </R01> </MOA_6> </LOOP_27> <LOOP_29> <PRI> <R01> <R01>AAA</R01> <R02>2.5</R02> </R01> </PRI> </LOOP_29></LOOP_26>
Multiple loops with the same IDOccasionally the EDI standard contains different loops with the same loop ID. In the interface files these loops use the suffix _number to distinguish between them. The number of the loop reflects the order in which it appears in the EDI standard.
The following XML shows the syntax of two different types of loop elements with the same loop ID:
<LOOP_loop ID_1> <segment ID> <data element reference ID>...</data element reference ID> <data element reference ID>...</data element reference ID> <data element reference ID>...</data element reference ID> ... </segment ID> ...</LOOP_loop ID_1><LOOP_loop ID_2> <segment ID> <data element reference ID>...</data element reference ID> <data element reference ID>...</data element reference ID> <data element reference ID>...</data element reference ID> ... </segment ID> ...
60 Chapter 4: EDI X12 and EDIFACT Messages

</LOOP_loop ID_2>...
Schemas of the interface file for EDI messagesB2B Gateway contains pre-packaged schemas that define the expected structure of an inbound or outbound interface file for EDI messages. Each message type and version has its own schema.
The schemas are located in the directory <secure_agent_installation>\main\rdtmDir\DT\ServiceDB, inside a project folder with the following naming convention:
<EDI_standard>_<EDI_version>_<message_type>_<Script object>For EDI X12 messages, the Script object can be either a Parser or a Restricted Serializer (Restricted_Serializer). For EDIFACT messages, the Script object can be a Serializer (Serializer).
If you trace through the schema of an inbound message, you can determine the relationship between the elements of the schema and the interface file. For an outbound message, use the schema to determine the expected structure of an interface file. Before you create an outbound interface file, study the relevant schema for the message type so that you structure the hierarchy correctly.
Example of an outbound interface file for EDI X12 messagesThe outbound interface file for EDI X12 messages contains a root element, message type element, loop elements, segment elements, and data elements.
The following XML represents an interface file for an outbound message of type 810:
<x12:interchange xmlns:x12="http://www.informatica.com/B2B/X12/4010"> <x12:TS_810> <ST> <R01>810</R01> <R02>0007</R02> </ST> <BIG> <R01>20131025</R01> <R02>INV159154</R02> <R03>20131016</R03> <R04>7100124746</R04> <R07>FB</R07> </BIG> <LOOP_IT1> <IT1> <R01>11</R01> <R02>1.000</R02> <R03>EA</R03> <R04>0.16</R04> <R06>VP</R06> <R07>HEA006-PHO2S-NL</R07> </IT1> <TXI> <R01>TX</R01> <R02>0.00</R02> <R06>2</R06> </TXI> <LOOP_PID> <PID> <R01>F</R01> <R05>12" X 15" ABCDEFGHIJ</R05> </PID> </LOOP_PID> </LOOP_IT1> <LOOP_IT1> <IT1> <R01>15</R01> <R02>2500.05</R02>
Interface files for EDI X12 and EDIFACT messages 61

<R03>EA</R03> <R04>0.25</R04> <R06>VP</R06> <R07>ABCDEFGHIJ</R07> </IT1> <TXI> <R01>TX</R01> <R02>0.00</R02> <R06>2</R06> </TXI> <LOOP_PID> <PID> <R01>F</R01> <R05>ABCDEFGHIJ</R05> </PID> </LOOP_PID> </LOOP_IT1> <TDS> <R01>844969</R01> </TDS> <TXI> <R01>TX</R01> <R02>624.11</R02> <R06>2</R06> </TXI> <LOOP_SAC_2> <SAC> <R01>C</R01> <R02>D240</R02> <R05>89103</R05> <R12>06</R12> <R15>Freight</R15> </SAC> </LOOP_SAC_2> <CTT> <R01>7</R01> </CTT> <SE> <R01>19</R01> <R02>0007</R02> </SE> </x12:TS_810></x12:interchange>
The root element for an outbound interface file is specified as <x12:interchange> to identify the message as an EDI X12 message. The message type element <x12:TS_810> identifies the message as message type 810.
If you trace through the interface file, you can determine the relationship between the elements of the file. The hierarchy contains different IT1 loop elements that contain PID loop elements, and a SAC loop element.
The interface file also contains segment elements with data elements.
Example of an inbound interface file for EDI X12 messagesThe inbound interface file for EDI X12 messages contains a root element, message type element, delimiters, loop elements, segment elements, and data elements.
The following XML represents an interface file for an inbound message of type 850:
<x12:interchanges xmlns:x12="http://www.informatica.com/B2B/X12/4010"> <interchange> <delimiters> <field_separator>*</field_separator> <segment_separator>~</segment_separator> <composite_separator>^</composite_separator> <segment_separator_suffix> </segment_separator_suffix> </delimiters>
62 Chapter 4: EDI X12 and EDIFACT Messages

<ISA> <R01>03</R01> <R02>Brett </R02> <R03>01</R03> <R04>JoZaza </R04> <R05>ZZ</R05> <R06>6666 </R06> <R07>14</R07> <R08>148055531ECPI </R08> <R09>071031</R09> <R10>0619</R10> <R11>U</R11> <R12>00503</R12> <R13>111111176</R13> <R14>0</R14> <R15>P</R15> <R16>^</R16> </ISA> <GS> <R01>PO</R01> <R02>4405197800</R02> <R03>999999999</R03> <R04>20101127</R04> <R05>1719</R05> <R06>1421</R06> <R07>X</R07> <R08>004010</R08> </GS> <x12:TS_850> <ST> <R01>850</R01> <R02>000000010</R02> </ST> <BEG> <R01>00</R01> <R02>SA</R02> <R03>08292233294</R03> <R05>20101127</R05> <R06>610385385</R06> </BEG> <LOOP_PO1> <PO1> <R01>1</R01> <R02>120</R02> <R03>EA</R03> <R04>9.25</R04> <R05>TE</R05> <R06>CB</R06> <R07>065322-117</R07> <R08>PR</R08> <R09>RO</R09> <R10>VN</R10> <R11>AB3542</R11> </PO1> <LOOP_PID> <PID> <R01>F</R01> <R05>SMALL WIDGET</R05> </PID> </LOOP_PID> <PO4> <R01>4</R01> <R02>4</R02> <R03>EA</R03> <R04>PLT94</R04> <R06>3</R06> <R07>LR</R07> <R08>15</R08> <R09>CT</R09> </PO4> </LOOP_PO1>
Interface files for EDI X12 and EDIFACT messages 63

<LOOP_PO1> <PO1> <R01>2</R01> <R02>220</R02> <R03>EA</R03> <R04>13.79</R04> <R05>TE</R05> <R06>CB</R06> <R07>066850-116</R07> <R08>PR</R08> <R09>RO</R09> <R10>VN</R10> <R11>RD5322</R11> </PO1> </LOOP_PO1> <LOOP_CTT> <CTT> <R01>6</R01> </CTT> <AMT> <R01>1</R01> <R02>13045.94</R02> </AMT> </LOOP_CTT> <SE> <R01>14</R01> <R02>000000010</R02> </SE> </x12:TS_850> <GE> <R01>1</R01> <R02>1421</R02> </GE> <IEA> <R01>1</R01> <R02>000003438</R02> </IEA> </interchange></x12:interchanges>
If you trace through the hierarchy of the interface file, you can see that there are multiple interchanges. The hierarchy reflects the structure of the relevant message type, the schema, and the type of information that the customer sent.
You can pass the data from this interface file to a backend system for further processing.
Example of an outbound interface file for EDIFACT messagesThe outbound interface file for EDIFACT messages contains a root element, message type element, loop elements, segment elements, and data elements.
The root element for an outbound interface file is specified as <interchange> to identify the message as an EDIFACT message. In this example, the message type element <TS_INVOIC> identifies the message as message type INVOIC.
<interchange> <TS_INVOIC> <UNH> <R01>1</R01> <R02> <R01>INVOIC</R01> <R02>D</R02> <R03>99A</R03> <R04>UN</R04> <R05>MMDR01</R05> </R02> <R03>2002</R03> <R04>
64 Chapter 4: EDI X12 and EDIFACT Messages

<R01>1</R01> </R04> </UNH> <BGM> <R01> <R01>380</R01> </R01> <R02> <R01>9908001</R01> </R02> <R03>9</R03> </BGM> <DTM> <R01> <R01>3</R01> <R02>19990802</R02> <R03>102</R03> </R01> </DTM> <LOOP_1> <RFF> <R01> <R01>ON</R01> <R02>O0010001</R02> </R01> </RFF> <DTM_1> <R01> <R01>4</R01> <R02>19999715</R02> <R03>102</R03> </R01> </DTM_1> </LOOP_1> <LOOP_2> <NAD> <R01>SE</R01> <R03> <R01>Fahrradhandelpedal</R01> </R03> <R05> <R01>Wagingerstr.5</R01> </R05> <R06></R06> <R07></R07> <R08>München</R08> </NAD> </LOOP_2> <LOOP_2> <NAD> <R01>BY</R01> <R03> <R01>HuberGmbH</R01> </R03> <R05> <R01>Obstgasse2</R01> </R05> <R06>München</R06> <R07></R07> <R08>81549</R08> </NAD> </LOOP_2> <LOOP_26> <LIN> <R01>1</R01> <R02></R02> <R03> <R01>4711,001</R01> </R03> </LIN> <IMD_1>
Interface files for EDI X12 and EDIFACT messages 65

<R01>F</R01> <R03> <R01></R01> <R02></R02> <R03></R03> <R04>bike,ladies</R04> </R03> </IMD_1> <QTY_2> <R01> <R01>47</R01> <R02>1</R02> <R03>PCE</R03> </R01> </QTY_2> <LOOP_27> <MOA_6> <R01> <R01>66</R01> <R02>750</R02> </R01> </MOA_6> </LOOP_27> <LOOP_29> <PRI> <R01> <R01>AAA</R01> <R02>750</R02> </R01> </PRI> </LOOP_29> </LOOP_26> <LOOP_26> <LIN> <R01>2</R01> <R02></R02> <R03> <R01>4711,002</R01> </R03> </LIN> <IMD_1> <R01>F</R01> <R03> <R01></R01> <R02></R02> <R03></R03> <R04>airpump,stand</R04> </R03> </IMD_1> <QTY_2> <R01> <R01>47</R01> <R02>1</R02> <R03>PCE</R03> </R01> </QTY_2> <LOOP_27> <MOA_6> <R01> <R01>66</R01> <R02>19.9</R02> </R01> </MOA_6> </LOOP_27> <LOOP_29> <PRI> <R01> <R01>AAA</R01> <R02>19.9</R02> </R01> </PRI>
66 Chapter 4: EDI X12 and EDIFACT Messages

</LOOP_29> </LOOP_26> <LOOP_26> <LIN> <R01>3</R01> <R02></R02> <R03> <R01>4711,003</R01> </R03> </LIN> <IMD_1> <R01>F</R01> <R03> <R01></R01> <R02></R02> <R03></R03> <R04>replacementvalve</R04> </R03> </IMD_1> <QTY_2> <R01> <R01>47</R01> <R02>3</R02> <R03>PCE</R03> </R01> </QTY_2> <LOOP_27> <MOA_6> <R01> <R01>66</R01> <R02>7,5</R02> </R01> </MOA_6> </LOOP_27> <LOOP_29> <PRI> <R01> <R01>AAA</R01> <R02>2.5</R02> </R01> </PRI> </LOOP_29> </LOOP_26> <UNS> <R01>S</R01> </UNS> <CNT> <R01> <R01>1</R01> <R02>180</R02> </R01> </CNT> <LOOP_50> <MOA_12> <R01> <R01>79</R01> <R02>777.4</R02> </R01> </MOA_12> </LOOP_50> <LOOP_50> <MOA_12> <R01> <R01>124</R01> <R02>124.38</R02> </R01> </MOA_12> </LOOP_50> <LOOP_50> <MOA_12> <R01>
Interface files for EDI X12 and EDIFACT messages 67

<R01>128</R01> <R02>901.78</R02> </R01> </MOA_12> </LOOP_50> <LOOP_52> <TAX_4> <R01>7</R01> <R02> <R01>VAT</R01> </R02> <R04></R04> <R05> <R01></R01> <R02></R02> <R03></R03> <R04>16</R04> </R05> <R06>S</R06> </TAX_4> </LOOP_52> <UNT> <R01>28</R01> <R02>INVOIC0001</R02> </UNT> </TS_INVOIC></interchange>
Example of an inbound interface file for EDIFACT messagesThe inbound interface file for EDIFACT messages contains a root element, message type element, delimiters, loop elements, segment elements, and data elements.
The root element for an inbound interface file is specified as <interchange> to identify the message as an EDIFACT message. In this example, the message type element <TS_ORDERS> identifies the message as message type ORDERS.
<interchange> <delimiters> <field_separator>+</field_separator> <segment_separator>'</segment_separator> <composite_separator>:</composite_separator> <escape_character>?</escape_character> </delimiters> <UNA> <R01>:</R01> <R02>+</R02> <R03>.</R03> <R04>?</R04> <R05> </R05> <R06>'</R06> </UNA> <UNB> <R01> <R01>UNOC</R01> <R02>3</R02> </R01> <R02> <R01>380948745PLA001</R01> <R02>ZZZ</R02> </R02> <R03> <R01>0607047800019</R01> <R02>14</R02> </R03> <R04> <R01>160525</R01> <R02>1606</R02>
68 Chapter 4: EDI X12 and EDIFACT Messages

</R04> <R05>50105153010903</R05> <R07>ORDERS</R07> </UNB> <TS_ORDERS> <UNH> <R01>1</R01> <R02> <R01>ORDERS</R01> <R02>D</R02> <R03>97A</R03> <R04>UN</R04> </R02> </UNH> <BGM> <R01> <R01>105</R01> </R01> <R02> <R01>?+4201138193</R01> </R02> <R03>9</R03> </BGM> <DTM> <R01> <R01>4</R01> <R02>20160425</R02> <R03>102</R03> </R01> </DTM> <DTM> <R01> <R01>2</R01> <R02>20160509</R02> <R03>102</R03> </R01> </DTM> <DTM> <R01> <R01>137</R01> <R02>20160525</R02> <R03>102</R03> </R01> </DTM> <LOOP_2> <NAD> <R01>SU</R01> <R02> <R01>1110003840</R01> <R02></R02> <R03>92</R03> </R02> </NAD> </LOOP_2> <LOOP_2> <NAD> <R01>BY</R01> <R02> <R01>887243</R01> <R02></R02> <R03>91</R03> </R02> </NAD> </LOOP_2> <LOOP_2> <NAD> <R01>ST</R01> <R02> <R01>893186</R01> <R02></R02> <R03>91</R03>
Interface files for EDI X12 and EDIFACT messages 69

</R02> </NAD> </LOOP_2> <LOOP_7> <CUX> <R01> <R01>2</R01> <R02>PLN</R02> <R03>9</R03> </R01> </CUX> </LOOP_7> <LOOP_28> <LIN> <R01>1001</R01> <R02></R02> <R03> <R01></R01> <R02>VP</R02> </R03> </LIN> <PIA> <R01>5</R01> <R02> <R01>?+04705201</R01> <R02>BP</R02> </R02> </PIA> <PIA> <R01>5</R01> <R02> <R01>1 Handsets</R01> <R02>EN</R02> </R02> </PIA> </LOOP_28> <UNS> <R01>S</R01> </UNS> <UNT> <R01>13</R01> <R02>72</R02> </UNT> </TS_ORDERS> <UNZ> <R01>1</R01> <R02>50105153010903</R02> </UNZ></interchange>
If you trace through the hierarchy of the interface file, you can see that there are multiple interchanges. The hierarchy reflects the structure of the relevant message type, the schema, and the type of information that the customer sent.
You can pass the data from this interface file to a backend system for further processing.
70 Chapter 4: EDI X12 and EDIFACT Messages

Data Integration mappings for EDI X12 and EDIFACT messages
B2B Gateway uses pre-packaged, EDI processing mappings to handle inbound and outbound EDI X12 and EDIFACT messages based on the flows that you assign to the partner. The EDI processing mappings handle the connectivity between the partner and the B2B Gateway document store.
You can define the following flows:
Inbound flow
You can use custom mappings to process the interface file that the B2B Gateway EDI processing mapping generates and places on the B2B Gateway document store to the backend system. You can define a single process-to-backend mapping to process all interface files, a mapping for each type of file that you want to process, or both mapping types. When an inbound process runs, B2B Gateway first runs the process-to-backend mappings that are defined for specific message types, and then it runs the process-to-backend mapping that is defined for the inbound flow of the partner.
Outbound flow
You can define custom backend processing mappings to extract and process the data to send to the partner from the backend system to an interface file on the B2B Gateway document store. You can define a single process-from-backend mapping to process all the messages to the interface file, a mapping for each type of file that you want to process, or both mapping types.
When an outbound process runs, B2B Gateway first runs the process-from-backend mappings that are defined for specific message types, and then it runs the process-from-backend mapping that is defined for the outbound flow of the partner. The B2B Gateway EDI processing mapping reads the messages from the B2B Gateway document store.
Note: For both inbound and outbound flows, define each message type in one mapping only. If you define the same message type in both a message-specific backend processing mapping and in the flow's backend processing mapping, B2B Gateway might run messages of that message type twice. For example, if you define a process-from-backend mapping for the 810 Invoice message type for a customer, and 810 Invoice is also defined in the process-from-backend mapping that is defined for the outbound flow of the customer, B2B Gateway might run 810 Invoice messages twice.
EDI processing mappingsB2B Gateway uses pre-packaged, EDI processing mappings for both inbound and outbound EDI message flows.
EDI processing mappings for inbound EDI messages
The source of the mapping is the incoming messages, and the target is an interface file on the B2B Gateway document store. The mapping validates the EDI message, sends technical and functional acknowledgment to the partner, converts the EDI messages to an XML interface file, and places the file in the document store.
EDI processing mappings for outbound EDI messages
The source of the mapping is the interface file that you place on the B2B Gateway document store, and the target is the target location for the partner to which to send the messages. The mapping enriches the data in the interface file with partner metadata, creates a valid EDI message file, and sends the file to the partner.
Data Integration mappings for EDI X12 and EDIFACT messages 71

Custom mappings for EDI message exchangeTo send EDI messages to partners, you must create custom mappings for outbound flows. To receive EDI messages from partners, you can optionally create custom mappings for inbound flows.
Custom mappings for inbound EDI messages
You can use custom mappings in inbound EDI message flows to process the interface file from the B2B Gateway document store to the backend system. The source of the mappings is the interface file and the target is the backend system. The mappings use a Hierarchy Parser transformation to convert the XML interface file to relational database format and places the data in the backend system.
If you use custom mappings to process the interface file to the backend system, B2B Gateway provides end-to-end tracking of inbound messages, from the partner to the backend system. If you use a different method to process the interface file to the backend system, B2B Gateway tracks the messages from the partner to B2B Gateway and does not track the messages to the backend system.
Custom mappings for outbound EDI messages
Use custom mappings in outbound EDI message flows to process outgoing messages from the backend system to an interface file on the B2B Gateway document store. The source of the mappings is the backend system and the target is the B2B Gateway connection to the location of the interface file. The mappings use a Hierarchy Builder transformation to convert the data to XML format and places the data on the document store.
Rules and guidelines for custom EDI mappingsWhen you develop custom Data Integration mappings to use in B2B Gateway for EDI message exchange, consider these rules and guidelines.
General rules and guidelinesThe following rules and guidelines apply to both inbound and outbound flows:
• You can create the mappings after your organization is set up in Data Integration and B2B Gateway connections are available for selection when you create the mapping.
Warning: When you set up the organization in B2B Gateway, B2B Gateway creates the connections B2B EDI Gateway, B2B EDI Gateway Endpoint, and B2B Gateway Document Store in the Informatica Intelligent Cloud Services organization. Do not rename or edit these connections. Editing a connection or changing a connection name might result in errors at run time.
• Define each message type in one mapping only. If you define the same message type in both a message-specific backend processing mapping and in the flow's backend processing mapping, B2B Gateway might run messages of that message type twice. For example, if you define a process-from-backend mapping for the 810 Invoice message type for a customer, and 810 Invoice is also defined in the process-from-backend mapping that is defined for the outbound flow of the customer, B2B Gateway might run 810 Invoice messages twice.
72 Chapter 4: EDI X12 and EDIFACT Messages

Rules and guidelines for inbound flowsThe following rules and guidelines apply to custom mappings that you use in inbound flows:
• To use the inbound mapping option, you create process-to-backend mappings. You can define a single process-to-backend mapping to process all interface files, a mapping for each type of file that you want to process, or both mapping types. When an inbound process runs, B2B Gateway first runs the process-to-backend mappings that are defined for specific message types, and then it runs the process-to-backend mapping that is defined for the inbound flow of the partner. Message types include all the types of messages that you receive from partners. Targets include all the backend applications to which you transfer incoming messages. To handle the B2B Gateway interface file and to convert it from XML format to relational database format you add Hierarchy Parser transformations to the mappings.
• You can add multiple sources to a process-to-backend mapping. The mapping must include only one source that connects to the B2B EDI Gateway connection. You must parameterize the B2B EDI Gateway connection. You can connect other sources to any Informatica connection that isn't a B2B Gateway connection. Do not parameterize the additional connections.
Note: Connecting additional sources to a B2B Gateway connection or parameterizing them might result in errors at run time.
• Do not parameterize the target connection.
Note: Parameterizing the target connection might result in errors at run time.
• If you add parameters to the process-to-backend mapping, you can configure the mapping parameters when you create the partner flow, after you select the mapping.
• You can map the sender interchange ID and qualifier of incoming messages from the mapping source to the target. You can map the following fields:
- SENDER_INTERCHANGE_ID
- SENDER_INTERCHANGE_QUALIFIER
Rules and guidelines for outbound flowsThe following rules and guidelines apply to custom mappings that you use in outbound flows:
• To convert relational data to the B2B Gateway XML interface file in the outbound flow, define custom backend processing mappings to extract and process the data to send to the partner from the backend system to an interface file on the B2B Gateway document store. You can define a single process-from-backend mapping to process all the messages to the interface file, a mapping for each type of file that you want to process, or both mapping types. When an outbound process runs, B2B Gateway first runs the process-from-backend mappings that are defined for specific message types, and then it runs the process-from-backend mapping that is defined for the outbound flow of the partner. You add Hierarchy Builder transformations to the mappings.
• Do not parameterize the source connection.
Note: Parameterizing the source connection might result in errors at run time.
• The targets of the mapping must be the B2B EDI Gateway connection. You must parameterize the target connections.
• If you assign process-from-backend mappings to specific message types you must also create a message discovery mapping and assign it to the outbound flow of the partner.
• If you define multiple interchange IDs of the same type for a partner, you must pass the interchange ID to use in outbound flows as a parameter in the process-from-backend mapping that you assign to the partner, so that B2B Gateway can determine which partner interchange ID to use in outbound flows. You
Data Integration mappings for EDI X12 and EDIFACT messages 73

add the ID to the source that contains the message details and map it to the appropriate field in the mapping target. For more information, see “Partner interchange IDs” on page 56
• If you add parameters to the process-from-backend mapping, you can configure the parameter values when you create the partner flow, after you select the mapping. You can also pass the parameter values with the Run Partner REST API. When you run the partner with the API, the values that you define in the API override those that you define in the partner flow. For more information, see “Run Partner REST API” on page 132.
Context parameters in custom mappingsYou can use input and in-out parameters as context parameters in custom mappings to add information from the gateway to inbound and outbound messages and to filter the data in inbound and outbound messages. For example, add the partner name to inbound messages, or filter outbound messages based on partner number.
Consider the following guidelines when you add the parameters:
• Add a transformation to the mapping. You can add any transformation that accepts Data Integration parameters as input. For example, an Expression transformation or a Filter transformation.
• In outbound flows, add the transformation before the target. In inbound flows, add the transformation after the source.
• Configure ports that add the data. The following table describes the port values that you can configure. Port values are not case sensitive.
Port Value Data to Add to the Port
PARTNER_NUMBER Partner number
PARTNER_NAME Partner name
PARTNER_PROD_INTERCHANGE_ID Partner production interchange ID
PARTNER_TEST_INTERCHANGE_ID Partner test interchange ID
EVENT_ID Event ID
Target fields in custom mappingsWhen the target connection in a mapping is GW_TARGET, you can map incoming fields to target fields.
The following table describes the target fields that you can map incoming fields to. Target field names are not case-sensitive.
Target Field Description
XML_FILE_PATH Path of the XML file
DATA Data of the XML file
FILE_NAME Name of the XML file
74 Chapter 4: EDI X12 and EDIFACT Messages

Target Field Description
PARTNER_PROD_INTERCHANGE_ID Partner production interchange ID
PARTNER_TEST_INTERCHANGE_ID Partner test interchange ID
PARTNER_INTERCHANGE_QUALIFIER Partner interchange qualifier
You map incoming fields to target fields on the Field Mapping tab of the Target transformation.
Creating a process-to-backend mapping for inbound EDI message flows
Create a process-to-backend mapping that processes incoming EDI messages in Data Integration.
A mapping can process a single message type or multiple message types. When you create a partner, you can select a mapping that contains a single message type when you add the message type for the partner. You can select a mapping that includes multiple message types when you define the inbound flow for the partner.
When you create a mapping you define the B2B Gateway document store as the source, add a filter for each message type in the mapping, add and configure a Hierarchy Parser transformation for each message type, and, for each message type, add the relevant backend systems as targets.
To define B2B Gateway as a source, you select the B2B EDI Gateway connection. You must parameterize the connection.
Optionally, you can add sources that connect to locations other than the document store. You can use any Informatica connection that isn't a B2B Gateway connection. Do not parameterize the connections.
Note: Parameterizing connections other than B2B Gateway connections might result in errors at run time.
After you add all the required elements to the mapping save and validate the mapping.
Step 1. Create the mappingCreate the mapping for inbound flows.
1. Click New > Mappings, and then click Create.
2. In the mapping Properties panel, enter the mapping name and description, and change the location to save the mapping.
You can use alphanumeric characters and underscores (_) in the mapping name.
Step 2. Configure the sourcesConfigure the Source transformation to specify the B2B Gateway connection as the source object.
Optionally, add more sources to the mapping.
1. Click the Source transformation on the mapping canvas.
2. In the Properties panel, on the General tab, you can enter a name and description.
Data Integration mappings for EDI X12 and EDIFACT messages 75

3. Click the Source tab and then select the following options:
Option Selection
Connection B2B EDI Gateway
Source Type Single Object
Object GW_EDI_SOURCE
4. Click New Parameter to the right of the Connection field.
The New Input Parameter dialog box shows.
5. Enter a parameter name and then click OK.
The New Input Parameter dialog box closes. In the Properties panel, the parameter name you entered shows in the Connection field.
Note: You must parameterize the B2B EDI Gateway connection.
6. Optionally, add more Source transformations to the mapping and configure them. You can use any Informatica connection that isn't a B2B Gateway connection. Do not parameterize the connections.
Note: Connecting additional sources to a B2B Gateway connection or parameterizing them might result in errors at run time.
Step 3. Create Filter transformationsCreate Filter transformations to filter source data based on the message type. Create a transformation for each type of inbound message that you want to map.
1. Add a Filter transformation to the mapping canvas and connect the source to the Filler transformation.
2. Click the Filter tab. In the Field Name column select MESSAGE_TYPE and then, in the Value column, enter the value of the message type for which you create the filter.
Step 4. Create Hierarchy Parser transformationsCreate Hierarchy Parser transformations to transform source hierarchical data to relational database data. Create a transformation for each type of inbound message that you want to map.
1. Add a Hierarchy Parser transformation to the mapping canvas and connect the Filler transformation of the relevant message type to the Hierarchy Parser transformation.
2. In the Properties panel select the Input Settings tab, select the File input type, and then click Select.
The Select Schema dialog box shows.
3. Select the schema of the message type to add to the inbound flow. For example, if you create a mapping for an EDI X12 810 message, select the TS_810 level. Click OK.
4. Click the Input Field Selection tab and map the field FILE_PATH from the Incoming Fields column to the Hierarchical Schema Input Fields column.
5. Click the Field Mapping tab. In the Schema Structure table expand the interchanges element, expand the interchange element, and then map fields to the Relational Fields area.
Tip: For details, see the "Hierarchy Parser Transformation" section of the Data Integration Transformation Guide.
76 Chapter 4: EDI X12 and EDIFACT Messages

Step 5. Configure the targetsCreate target transformations to specify your backend systems as the target objects. For each message type, create the relevant backend systems as targets.
Note: Do not parameterize the targets. Parameterizing the targets might result in errors at run time.
1. Add a target to the mapping canvas and connect the Hierarchy Parser transformation of the relevant message type to the target.
If you selected multiple fields in the field mapping of the Hierarchy Parser transformation, the Select Output Group dialog box shows.
2. Select the group or groups to add to the target and then click OK.
3. In the Properties panel, on the General tab, you can enter a name and description.
4. Click the Target tab and configure target details.
5. Optionally, click the Field Mapping tab and map incoming fields to target fields.
Creating a process-from-backend mapping for outbound EDI message flows
Create a process-from-backend mapping that processes outgoing EDI messages in Data Integration.
A mapping can process a single message type or multiple message types. When you create a partner, you can select a mapping that contains a single message type when you add the message type for the partner. You can select a mapping that includes multiple message types when you define the outbound flow for the partner. To use mappings that contain a single message type you must also create a message discovery mapping and assign it to the outbound flow of the partner. For more information, see “Creating a message discovery mapping for outbound EDI message flows” on page 80.
When you create the mapping in Data Integration you select your backend system as the source. You add two source transformations to the mapping, a transformation for the master source and a transformation for the source that contains the message details. For example, add a source that contain the order as the master source and a details source that contains the order details.
If you define multiple interchange IDs of the same type for the partner that uses the mapping, define the interchange IDs to use in outbound flows in the source that contains the message details and map it to the interchange ID fields in the target transformations. You can map one interchange production ID and one interchange test ID. You must map at lease one interchange ID in the mapping.
If information on multiple message types appears in the same table, you add a filter for each message type. You then add and configure a Hierarchy Builder transformation for each message type, and, for each message type, add the B2B Gateway interface file as the target.
After you add all the required elements to the mapping save and validate the mapping.
Step 1. Create the mappingCreate the mapping for outbound flows in Data Integration.
1. Click New > Mappings, and then click Create.
2. In the mapping Properties panel, enter the mapping name and description, and change the location to save the mapping.
You can use alphanumeric characters and underscores (_) in the mapping name.
Data Integration mappings for EDI X12 and EDIFACT messages 77

Step 2. Configure the sourceCreate Source transformations to specify your backend system as the source object. Create one source transformation for the master source and one source transformation for the source that contains the message details.
Note: Do not parameterize the sources. Parameterizing the sources might result in errors at run time .
1. Add a source for the master to the mapping canvas.
2. In the Properties panel, on the General tab, you can enter a name and description.
3. Click the Source tab and configure source details.
4. Repeat steps 1 through 3 to add a source transformation for the message details.
Step 3. Create Filter transformationsIf information on multiple message types appears in the same table, create Filter transformations to filter target data based on the message type. Create a transformation for each type of outbound message in the table.
1. Add a Filter transformation to the mapping canvas and connect the source to the Filler transformation.
2. Click the Filter tab. In the Field Name column select MESSAGE_TYPE and then, in the Value column, enter the value of the message type for which you create the filter.
3. Repeat steps 1 through 2 for each message type in the table.
Step 4. Create Hierarchy Builder transformationsCreate Hierarchy Builder transformations to transform source relational database data to XML data. Create a transformation for each type of outbound message that you want to map.
1. Add a Hierarchy Builder transformation to the mapping canvas and connect the last transformation that you created for the relevant message type to the Hierarchy Builder transformation, that is, the Source, Filler, or Expression transformation that you created for the message type for which you are adding the Hierarchy Builder transformation.
2. In the Properties panel select the Output Settings tab and then click Select.
The Select Schema dialog box shows.
3. Select the schema of the message type to add to the outbound flow and then click OK.
4. Click the Field Mapping tab and, in the Relational Fields area, define the relationships between the tables. Assign the following keys to the source tables:
• For each table, define the primary key.
• For the table that contains the source details, define a foreign key that points to the master source table.
5. If your schema contains a single master table and a single source details table, the Hierarchy Builder transformation creates a file for each master table row. In this case, perform the following tasks to create all table rows into one hierarchy and add the hierarchy to the transformation:
a. Add a new source table to the transformation, and assign it a primary key.
b. In the master source table, for every table row, assign a foreign key that points to the primary key of the new source table.
78 Chapter 4: EDI X12 and EDIFACT Messages

c. Map the new source table from the Relational Fields area to the following element in the Hierarchy Fields area:
• EDI X12 messages: interchanges element.
• EDIFACT messages: interchange element.
6. Configure field mappings for the master table:
a. Map the master table from the Relational Fields area to the following element in the Hierarchy Fields area:
• EDI X12 master table: Interchange element.
• EDIFACT master table: Loop_UNG element.
Tip: See PO in the sample field mappings below.
b. Map the EDI data fields of the table from the Relational Fields area to the required EDI segments in the Hierarchy Fields area.
7. Configure field mappings for the details table:
a. Map the table from the Relational Fields area to the relevant loop in the Hierarchy Fields table.
b. Map the EDI data fields of the table from the Relational Fields area to the required EDI segments in the Hierarchy Fields area.
Tip: For details, see the "Hierarchy Builder Transformation" section of the Data Integration Transformation Guide.
The following image shows sample field mappings for EDI X12 messages:
8. Repeat steps 1 through 7 for each message type.
Step 5. Configure the targetCreate target transformations to specify the B2B Gateway interface file as the target object. Create a target transformation for each type of message that you want to map.
1. Add a target to the mapping canvas and connect the relevant Hierarchy Builder transformation to the target.
2. In the Properties panel, on the General tab, you can enter a name and description.
Data Integration mappings for EDI X12 and EDIFACT messages 79

3. Click the Target tab and then select the following options:
Option Selection
Connection B2B EDI Gateway
Target Type Single Object
Object GW_TARGET
Operation Insert
4. Click New Parameter to the right of the Connection field.
The New Input Parameter dialog box shows.
5. Enter a parameter name and then click OK.
The New Input Parameter dialog box closes. In the Properties panel, the parameter name you entered shows in the Connection field.
Note: You must parameterize the B2B EDI Gateway connection.
6. Click the Field Mapping tab. In the Field mapping options field, verify that the Manual option is selected, and then map the Output field in the Incoming Fields table to the DATA field in the Target Fields table.
7. If you define multiple interchange IDs of the same type for the partner that uses the mapping, map the incoming fields that contain the IDs to use for the partner to one or both of the following target fields, as applicable:
• PARTNER_PROD_INTERCHANGE_ID
• PARTNER_TEST_INTERCHANGE_ID
8. Optionally, map additional target fields. For more information, see “Target fields in custom mappings” on page 74.
9. Repeat steps 1 through 8 for each message type.
Creating a message discovery mapping for outbound EDI message flows
Create a message discovery mapping that discovers messages that are ready to be sent to customers, based on the message type. Assign the message discovery mapping to partners to which you assign one or more process-from-backend mappings that contain a single message type.
When you create the mapping you select the B2B Gateway connection as the source, and the B2B Gateway XML interface file as the target, and map all the message types that you want the mapping to discover as the target fields.
After you add all the required elements to the mapping save and validate the mapping.
Step 1. Create the mappingCreate the mapping for outbound flows in Data Integration.
1. Click New > Mappings, and then click Create.
2. In the mapping Properties panel, enter the mapping name and description, and change the location to save the mapping.
You can use alphanumeric characters and underscores (_) in the mapping name.
80 Chapter 4: EDI X12 and EDIFACT Messages

Step 2. Configure the sourceCreate Source transformations to specify your backend system as the source object. Create one source transformation for the master source and one source transformation for the source that contains the message details.
Note: Do not parameterize the sources. Parameterizing the sources might result in errors at run time .
1. Add a source for the master to the mapping canvas.
2. In the Properties panel, on the General tab, you can enter a name and description.
3. Click the Source tab and configure source details.
4. Repeat steps 1 through 3 to add a source transformation for the message details.
Step 3. Configure the targetCreate a target transformation to specify the B2B Gateway interface file as the target object.
1. Add a target to the mapping canvas and connect the source to the target.
2. In the Properties panel, on the General tab, you can enter a name and description.
3. Click the Target tab and then select the following options:
Option Selection
Connection B2B EDI Gateway
Target Type Single Object
Object MSG_DISCOVERY
Operation Insert
4. Click New Parameter to the right of the Connection field.
The New Input Parameter dialog box shows.
5. Enter a parameter name and then click OK.
The New Input Parameter dialog box closes. In the Properties panel, the parameter name you entered shows in the Connection field.
Note: You must parameterize the B2B EDI Gateway connection.
6. Click the Field Mapping tab. In the Field mapping options field, verify that the Manual option is selected, and then map an Output field in the Incoming Fields table to the MSG_TYPE field in the Target Fields table. Map all the Output fields to the Target Fields table, each MSG_TYPE field in a separate row.
Data Integration mappings for EDI X12 and EDIFACT messages 81

C h a p t e r 5
Custom files with custom mappings
B2B Gateway uses custom Data Integration mappings, which you create, to validate and handle custom file exchanges between the organization and its partners.
Custom mappings for inbound custom files
Use an inbound mapping to receive files from partners. If you use the two-step processing method, the inbound mapping writes the files to an interface file on the B2B Gateway document store. If you use the single-step method, the inbound mapping writes the data to the backend system. The source of the inbound mapping is the incoming files, and the target is either an interface file on the B2B Gateway document store or the backend system, based on the method that you use.
If the target of the mapping is B2B Gateway, you can use a process-to-backend mapping to read the files from the gateway and write the data to the backend system. The source of the process-to-backend mapping is the interface file on B2B Gateway, and the target is the backend system.
For inbound Excel, TXT, and CSV files, instead of creating custom mappings to process the incoming files, you can use Informatica Intelligent Structure Discovery to automatically discover the file structure and create CSV interface files. You can then create custom mappings that process the data to your backend system.
For more information about the processing methods, see “Inbound process for custom files” on page 21.
Custom mappings for outbound custom files
Use a process-from-backend mapping to read outgoing data from the backend system and write the data to an interface file on the B2B Gateway document store.
You can use an additional, outbound mapping to read the data from the gateway and send it to the partner. The source of the outbound mapping is the interface file on B2B Gateway, and the target is the target location for the partner that you send the data to.
82

Interface files for custom filesWhen you exchange custom files with your partners, you can use any type of file as the interface file for custom mappings.
Data Integration mappings for custom files with custom mappings
B2B Gateway uses custom mappings to handle inbound and outbound custom files based on the flows that you assign to the partner.
When you define an inbound flow you must use a custom mapping to receive partner files. The inbound mapping can write the data either to an interface file on the B2B Gateway document store or to the backend system. If the inbound mapping writes the data to the document store, you can use an additional custom mapping to write the data to the backend system.
For inbound Excel, TXT, and CSV files, instead of creating custom mappings to process the incoming files, you can use Informatica Intelligent Structure Discovery to automatically discover the file structure and create CSV interface files. You can then create custom mappings that process the data to your backend system.
When you define an outbound flow you must use a custom mapping to read the data to send to the partner from the backend system. The mapping writes the data to an interface file on the B2B Gateway document store. You can use an additional, outbound custom mapping to send the data to the partner.
Rules and guidelines for custom file mappingsWhen you develop custom Data Integration mappings to use in B2B Gateway for custom, non-EDI file exchange, consider these rules and guidelines.
• The mappings can process any type of file. B2B Gateway does not verify the file type when it runs the mapping.
• You can create the mappings after your organization is set up in Data Integration and B2B Gateway connections are available for selection when you create the mapping.
Warning: When you set up the organization in B2B Gateway, B2B Gateway creates the connections B2B EDI Gateway, B2B EDI Gateway Endpoint, and B2B Gateway Document Store in the Informatica Intelligent Cloud Services organization. Do not rename or edit these connections. Editing a connection or changing a connection name might result in errors at run time.
• You must parameterize connections to a B2B Gateway connection. Do not parameterize any other connections.
Note: Parameterizing connections other than B2B Gateway connections might result in errors at run time.
• When the target of a mapping is GW_ROUTER, the value that you assign to the STATUS_MESSAGE port appears in Error events. For all other event statuses, the gateway does not show the status message in the event. Therefore, assign a value to STATUS_MESSAGE only in case IS_EROOR is true.
Interface files for custom files 83

Context parameters in custom mappingsYou can use input and in-out parameters as context parameters in custom mappings to add information from the gateway to inbound and outbound messages and to filter the data in inbound and outbound messages. For example, add the partner name to inbound messages, or filter outbound messages based on partner number.
Consider the following guidelines when you add the parameters:
• Add a transformation to the mapping. You can add any transformation that accepts Data Integration parameters as input. For example, an Expression transformation or a Filter transformation.
• In outbound flows, add the transformation before the target. In inbound flows, add the transformation after the source.
• Configure ports that add the data. The following table describes the port values that you can configure. Port values are not case sensitive.
Port Value Data to Add to the Port
PARTNER_NUMBER Partner number
PARTNER_NAME Partner name
PARTNER_PROD_INTERCHANGE_ID Partner production interchange ID
PARTNER_TEST_INTERCHANGE_ID Partner test interchange ID
EVENT_ID Event ID
Mapping sources and targets in custom file mappingsThe sources and targets in custom mappings depend on the direction of the flow, inbound or outbound. For inbound flows, the target of the mapping depends on the processing method, two-step processing or single-step processing.
Sources and targets in inbound flowsMapping sources and targets in inbound flows depend on the processing method, two-step processing or single-step processing.
Two-step processing
In two-step processing you use both an inbound mapping and a process-to-backend mapping.
The following table describes the sources and targets of the inbound mapping in two-step processing:
Mapping component Requirements
Source Connection B2B EDI Gateway Endpoint
Source Object get
84 Chapter 5: Custom files with custom mappings

Mapping component Requirements
Target Connection B2B EDI Gateway
Target Object CUSTOM_TARGET
The following table describes the sources and targets of the process-to-backend mapping in two-step processing:
Mapping component
Requirements
Source Connection You can add multiple source connections to the mapping. You can use the following connections in the mapping:- B2B EDI Gateway. You must parameterize the connection.- Optional connections to other connectors. You can use any Informatica connection
that isn't a B2B Gateway connection. Do not parameterize the connections.Note: Connecting additional sources to a B2B Gateway connection or parameterizing them might result in errors at run time.
Source Object CUSTOM_SOURCE
Target Connection Any
Target Object Any
Single-step processing
In single-step processing you use an inbound mapping. The following table describes the sources and targets of the inbound mapping in single-step processing:
Mapping component Requirements
Source Connection B2B EDI Gateway Endpoint
Source Object get
Target Connection Any
Target Object Any
Data Integration mappings for custom files with custom mappings 85

Sources and targets in outbound flowsMapping sources and targets in outbound flows depend on the stage of the process that the mapping performs, process the data from the backend to B2B Gateway or process the data from B2B Gateway to the partner.
The following table describes the sources and targets of the process-from-backend mapping:
Mapping component Requirements
Source Connection Any
Source Object Any
Target Connection B2B EDI Gateway
Target Object CUSTOM_TARGET
The following table describes the sources and targets of the outbound mapping:
Mapping component Requirements
Source Connection B2B EDI Gateway
Source Object CUSTOM_SOURCE
Target Connection B2B EDI Gateway Endpoint, B2B EDI Gateway
Target Object put, CUSTOM_TARGET
86 Chapter 5: Custom files with custom mappings

C h a p t e r 6
Inbound Custom Files with Intelligent Structure Discovery
You can use Intelligent Structure Discovery to receive incoming Excel, TXT, and CSV files from customers. Intelligent Structure Discovery writes the files to an interface file on the B2B Gateway document store.
In addition, use custom Data Integration mappings, which you create, to handle the following stages of the file exchanges between the organization and its partners:
Custom mappings for inbound custom files with Intelligent Structure Discovery
You can use a process-to-backend mapping to read the files from the document store and write the data to the backend system. The source of the process-to-backend mapping is the interface file on B2B Gateway, and the target is the backend system.
Custom mappings for outbound custom files
Use a process-from-backend mapping to read outgoing data from the backend system and write the data to an interface file on the B2B Gateway document store.
You can use an additional, outbound mapping to read the data from the gateway and send it to the partner. The source of the outbound mapping is the interface file on B2B Gateway, and the target is the target location for the partner that you send the data to.
Interface files for custom files with Intelligent Structure Discovery
For inbound CSV, TXT, and Excel files that use Intelligent Structure Discovery, Intelligent Structure Discovery creates CSV interface files between the custom mappings and the file structures.
Intelligent Structure Discovery message structuresEDI and EDIFACT files contain information that is structured according to the EDI or EDIFACT standard. Non-EDI files, such as Excel files, contain information that is structured according to the needs of the user. For
87

example, an Excel file might contain tables with inventory information. The structure of the information gives meaning to the inventory data that is presented in the columns and rows.
Intelligent Structure Discovery uses artificial intelligence and machine learning algorithms to automate structure discovery for such files by evaluating the type of data that is presented. When Intelligent Structure Discovery runs, it creates and displays a message structure that contains the elements that were identified in the discovery process.
For more information about managing intelligent structures, see Intelligent structures in the Data Integration service help.
Creating a structureCreate a message structure for B2B Gateway in Data Integration.
1. In Data Integration, click New > Components > Intelligent Structure Model.
The New Structure wizard appears.
2. In the General page, enter a name and description. You must provide a name for the message structure.
3. To create a message structure, browse for a file and click Discover Structure.
4. To refine the message structure, you can select an element and combine, exclude, flatten, or collapse the element.
5. To save the message structure, click Save.
Data Integration mappings for custom files with Intelligent Structure Discovery
When you use Intelligent Structure Discovery to receive incoming Excel, TXT, and CSV files from customers, Intelligent Structure Discovery writes the files to interface files on the B2B Gateway document store. You can use a process-to-backend Data Integration custom mapping to read the interface files from the document store and write the data to the backend system.
When you define an outbound flow you must use a custom mapping to read the data to send to the partner from the backend system. The mapping writes the data to an interface file on the B2B Gateway document store. You can use an additional, outbound custom mapping to send the data to the partner. For more information, see “Rules and guidelines for custom file mappings” on page 83.
Creating a custom mapping for inbound custom files with Intelligent Structure Discovery
Create a mapping that processes all incoming files for a message structure from the B2B Gateway document store to the backend system.
You can create as many mappings as required, one mapping for each message structure for which you want to process the interface files to the backend system.
When you create the mapping you select the B2B Gateway document store as the source, select the fields that you want to use in the mapping, and define the sample interface files of the structure as source parameters. You configure the organization backend system as the mapping target and map fields. You can add other elements to the mapping, based on your business logic, for example, filters and joiners.
88 Chapter 6: Inbound Custom Files with Intelligent Structure Discovery

To define the B2B Gateway document store as a source, you select a flat file connection that accesses the interface files. You must parameterize the connection. You can add as many connections to interface files as required.
Optionally, you can add more sources to the mapping. You can use any Informatica connection that isn't a B2B Gateway connection. Do not parameterize the connections.
Note: Parameterizing connections other than B2B Gateway connections might result in errors at run time.
After you add all the required elements to the mapping save and validate the mapping.
Step 1. Create the mappingCreate the mapping for inbound flows.
1. Click New > Mappings, and then click Create.
2. In the mapping Properties panel, enter the mapping name and description, and change the location to save the mapping.
You can use alphanumeric characters and underscores (_) in the mapping name.
Step 2. Configure the sourcesCreate source transformations to specify the sample interface files on the B2B Gateway connection as the source objects.
Optionally, add other sources to the mapping.
1. Add a source to the mapping canvas.
2. Click the Source tab and then select the following options:
Option Selection
Connection Flat file connection that accesses the interface files.
Source Type Single Object
Object A sample interface file.
Note: You must parameterize the flat file connection that accesses the interface files.
3. Repeat steps 1 and 2 for all the sample interface files.
4. Optionally, add more Source transformations to the mapping and configure them. You can use any Informatica connection that isn't a B2B Gateway connection. Do not parameterize the connections.
Note: Connecting additional sources to a B2B Gateway connection or parameterizing them might result in errors at run time.
Step 3. Select incoming fieldsFor each sample interface file, select the incoming fields to use in the mapping.
1. Add an object to the mapping canvas and connect one of the source transformations you created to the object you add. You can add any type of object, based on the business logic that you want to add to the mapping. For example, a filter or a joiner. The object can also be the target of the mapping.
Data Integration mappings for custom files with Intelligent Structure Discovery 89

2. Select the object you added. Select the Incoming Fields tab and, in the Field Rules table, select the following options:
Option Selection
Operator Include
Field Selection Criteria Named Fields
Click anywhere outside of the Field Selection Criteria selection box.
3. In the Field Rules table, under Details, click Configure.
The Include Named Fields dialog box appears, listing all the fields in the sample interface file.
4. Select the incoming fields to use in the mapping and then click OK.
The Include Named Fields dialog box closes.
5. If required, add more elements to the mappings to build the business logic of the mapping.
Note: If you selected incoming fields in a target transformation, do not add elements after the target. The target must be the last element in the mapping.
6. Repeat steps 1 through 5 for all the sample interface files that you defined as sources in the mapping.
Step 4. Configure the targetsCreate target transformations to specify your backend systems as the target objects for the interface files. Each sample interface file that you defined as a source in the mapping must be mapped to a target.
Note: If you added target transformations when you selected incoming fields, you do not need to add more target transformations.
1. Add a target to the mapping canvas and connect the last element on the mapping to the target, or, if you already added a target to the mapping, select the existing target.
2. Click the Target tab and configure target details.
3. Click the Field Mapping tab and map incoming fields to target fields.
Step 5. Parameterize the sourcesParameterize the sources. Name each source parameter by the name of the sample interface file that is the source object.
1. Click the Source tab, select a source element, and then select the following options:
Option Selection
Connection B2B Gateway Document Store
Source Type Parameter
2. Click New Parameter.
The New Input Parameter dialog box appears.
3. In the Name field, enter the name of an output group in the structure. Click OK.
4. Repeat steps 1 through 3 for all the sources in the mapping.
90 Chapter 6: Inbound Custom Files with Intelligent Structure Discovery

C h a p t e r 7
File transfer tasksFile transfer tasks run actions on files that B2B Gateway receives from file servers or sends to file servers.
You can use file transfer tasks with partner flows that use a file servers connection type. Use the tasks to decrypt or decompress inbound files and to encrypt or compress outbound files. You select a task for a flow when you configure the partner.
EncryptAn encrypt file transfer task uses PGP to encrypt outbound files when transferring them from the source location to the home directory of the file server user.
You can use encrypt tasks in outbound partner flows.
An encrypt task contains the following variables:
Variable Description
PUBLIC_KEY_ID ID of the key to use to encrypt the file.
SECRET_KEY_ID Required when the value of SIGN is true. The ID of the secret key to use to sign the file.
SECRET_KEY_PASSPHRASE Required when the value of SIGN is true. The passphrase to access the secret key.
SIGN Determines whether the files must be signed by PGP. Valid values are true or false. Default is false. Values are not case sensitive.
DecryptA decrypt file transfer task uses PGP to decrypt uploaded files when transferring them from the directory of the user on the file server to the B2B Gateway document store.
You can use decrypt tasks in inbound partner flows.
91

A decrypt task contains the following variables:
Variable Description
PATTERN_CASE_SENSITIVE Determines whether the file pattern is case sensitive. Valid values are true or false. Default is false. Values are not case sensitive.
PATTERN_TO_COLLECT File name pattern of the files to collect and decrypt. Use a regular expression to match the file name pattern.
PGP_PASSPHRASE PGP passphrase.
CompressA compress file transfer task compresses outbound files when transferring them from the source location to the home directory of the file server user.
You can use compress tasks in outbound partner flows.
A compress task contains the following variable:
Variable Description
COMPRESSION_TYPE Type of compression. Valid values are Zip, Tar, or Gzip. Default is Zip. Values are not case sensitive.
DecompressA decompress file transfer task decompresses uploaded files when transferring them from the directory of the user on the file server to the B2B Gateway document store.
You can use decompress tasks in inbound partner flows.
A decompress task contains the following variables:
Variable Description
DECOMPRESSION_TYPE Type of decompression. Valid values are UnZip, UnTar, or GunZip. Default is UnZip. Values are not case sensitive.
PATTERN_CASE_SENSITIVE Determines whether the file pattern is case sensitive. Valid values are true or false. Default is false. Values are not case sensitive.
PATTERN_TO_COLLECT File name pattern of the files to collect and decompress. Use a regular expression to match the file name pattern.
92 Chapter 7: File transfer tasks

C h a p t e r 8
PartnersCreate partners for exchanging messages. A partner can be either a customer or a supplier. You create a customer in the New Customer wizard. You create a supplier in the New Supplier wizard.
You can create partners for the following types of messages:
• X12 and EDIFACT messages
• Custom messages
• Custom messages with Intelligent Structure Discovery
When you create a partner, you can define an inbound flow, an outbound flow, or both. The properties that you configure for the partner depend on the type of messages that you exchange with the partner and on the type of connections you use for the exchange.
Create partners for EDI and EDIFACT messagesCreate partners for exchanging EDI and EDIFACT messages.
When you create a partner for EDI and EDIFACT messages, you configure general partner properties, select the types of messages to exchange with the partner, and define an inbound flow, an outbound flow, or both.
Before you create a partner, verify that you have completed the required prerequisites.
Before you beginBefore you create a partner for EDI and EDIFACT messages, complete the following prerequisites:
• For an inbound flow, if you plan to use process-to-backend custom mappings for the partner, you must create the mappings.
• For an outbound flow, you must create one or more process-from-backend custom mappings.
• If you plan to use an Advanced FTP V2, Advanced FTPS V2, Advanced SFTP V2, or AS2 Client connection, configure the connection in Administrator. For information about configuring the connection, see the respective connector guide.
• If you plan to use the File Servers connection, create a user account for each partner that sends files from an AS2, HTTPS, or SFTP server to your organization or receives files that you send to an HTTPS or SFTP server for the partner. For more information, see “File server users” on page 33.
• If you plan to run a flow based on a schedule, verify that the schedule has been created or create the schedule in Administrator.
93

• Verify that you have the appropriate asset privileges to create the partner and define the flows. For more information about privileges, see “User roles” on page 31.
Creating a partner for EDI and EDIFACT messagesCreate a customer in the New Customer wizard, or create a supplier in the New Supplier wizard.
1. Click New and select Partners > Customer or Partners > Supplier, as applicable.
The New Customer or New Supplier wizard appears.
2. In the General page enter the partner name and number, select EDI X12 or EDIFACT from the File Type list, and then enter the message interchange details. Click Next.
The Messages page appears.
3. Perform the following steps:
a. Click Add Message to select a message type to exchange with the partner.
b. If required, edit the version, mode, or status of the message type.
c. For each message type, you can assign a custom process to process EDI messages of that type. To assign a custom process to a message type, perform the following tasks:
1. Customize a Library Data Transformation project in Informatica Developer.
2. Export or deploy the transformation as a service. For more information, see the Data Transformation User Guide.
3. Upload the custom transformation service to B2B Gateway. For more information, see “Creating a Custom Transformation Service in B2B Gateway” on page 35.
4. In the Custom Process field, select a transformation service from the list.
d. For each message type, you can attach a process-from-backend mapping. To attach a process-from-backend mapping to the message type, click the Actions button to the right of the line of the message type, click Add Process-from-Backend Mapping, select a mapping that is appropriate to the message type that you are adding, and then click Select.
Note: For both inbound and outbound flows, define each message type in one mapping only. If you define the same message type in both a message-specific backend processing mapping and in the flow's backend processing mapping, B2B Gateway might run messages of that message type twice. For example, if you define a process-from-backend mapping for the 810 Invoice message type for a customer, and 810 Invoice is also defined in the process-from-backend mapping that is defined for the outbound flow of the customer, B2B Gateway might run 810 Invoice messages twice.
e. Add as many message types as applicable for the partner.
f. Click Next.
The Inbound page appears.
4. To define an inbound flow, perform the following steps:
a. Select the connection type for the flow and configure connection details.
b. If you selected the Advanced FTP V2, Advanced FTPS V2, or Advanced SFTP V2 connection type, select the connection where B2B Gateway creates files for the partner and the action that B2B Gateway performs on the files after pickup.
94 Chapter 8: Partners

c. If you selected the File Servers connection type, you can select a file transfer task in the Pre-Process area and define the task variables. You can select one of the following file transfer tasks:
Name Description
Decrypt Decrypts files that the partner uploads to the file server before the files are sent to B2B Gateway. For more information, see “Decrypt” on page 91.
Decompress Decompresses files that the partner uploads to the file server before the files are sent to B2B Gateway. For more information, see “Decompress” on page 92.
d. If you selected the Local Folder/MFT, FTP Client, or SFTP Client connection type, select whether or not B2B Gateway deletes files after pickup.
e. Select a process-to-backend mapping if applicable and the location where B2B Gateway saves the mapping. This mapping is used for messages where a process-to-backend mapping is not associated with the message type.
f. If the mapping contains parameters, optionally enter parameter values in the Mapping Parameters list.
g. For EDI X12 messages, select whether to use element names or element reference numbers in the B2B Gateway XML interface files.
h. Define a schedule for the flow.
i. Click Next.
The Outbound page appears.
Tip: If the outbound flow uses the same connection as the inbound flow, and the connection type is File Servers, Local Folder/MFT, FTP Client, or SFTP Client, click Copy Details from Inbound to populate the Outbound page with details that you entered in the Inbound page and then edit the outbound details, as required.
5. To define an outbound flow, perform the following steps:
a. Select the connection type for the flow and configure connection details.
b. If you selected the Advanced FTP V2, Advanced FTPS V2, Advanced SFTP V2, or AS2 Client connection type, select the connection where B2B Gateway creates files for the partner.
c. If you selected the File Servers connection type, you can select a file transfer task in the Post-Process area and define the task variables. You can select one of the following file transfer tasks:
Name Description
Encrypt Encrypts files that you send to the partner before they are upload to the file server. For more information, see “Encrypt” on page 91.
Compress Compresses files that you send to the partner before they are upload to the file server. For more information, see “Compress” on page 92.
Create partners for EDI and EDIFACT messages 95

d. Select one or both of the following mappings, and the locations where B2B Gateway saves the mappings:
• If you assigned process-from-backend mapping to specific messages on the Messages page, select a message discovery mapping.
• Select a process-from-backend mapping to use for messages where a process-from-backend mapping is not associated with the message type.
e. If the mappings contain parameters, optionally enter parameter values on the Mapping Parameters lists.
f. Optionally configure message details.
g. Optionally define a schedule for the flow.
h. Click Save.
The partner shows on the Explore page.
Partner properties for EDI X12 and EDIFACT messagesUse the partner wizard to create or edit a partner. A partner can be either a customer or a supplier.
The partner wizard contains the following pages for EDI X12 and EDIFACT messages:
General page
Define partner details and message interchange details.
Messages page
Select the types of messages that you exchange with the partner and define general message details. For each message type that you select you can assign a custom process to process EDI messages of that type, and select process-to-backend and process-from-backend mappings for the message type, as applicable.
Inbound page
Define the connection to use for the inbound flow, select a file transfer task if applicable, select a custom process-to-backend mapping if applicable, and define the schedule by which the flow runs.
Outbound page
Define the connection to use for the outbound flow, select a file transfer task if applicable, select a message discovery mapping, a process-from-backend mapping, or both, configure message details, and define a schedule to run the flow.
Partner general properties for EDI and EDIFACT messagesUse the General page of the partner wizard to define partner details and message interchange details.
The General page includes the following properties for EDI and EDIFACT messages:
Customer or Supplier Details
Customer or Supplier Name
Name of the partner. The name can contain up to 30 characters and must be unique in the organization and can be used either for a customer or for a supplier, not for both. The name can contain alphanumeric characters, symbols, and special characters, and must not contain angled brackets (< or >).
96 Chapter 8: Partners

Customer or Supplier Number
Number of the partner. The number can contain up to 15 characters and must be unique in the organization. The number can contain alphanumeric characters, symbols, and special characters, and must not contain angled brackets (< or >).
Tip: Use a number that identifies the partner in your organization.
File Type
Type of files to exchange with the partner. Select EDI X12 or EDIFACT.
Message Interchange Details
Customer or Supplier Interchange Qualifier
Partner interchange qualifier. Optional.
Customer or Supplier Interchange Production ID
Interchange identifier to use for messages of message types that are in production mode, as defined in the Messages tab. The identifier can contain up to 15 ASCII characters for X12 message and up to 30 characters for EDIFACT message.
To define multiple interchange production IDs for the partner, click Manage Multiple IDs, add the IDs, and click OK. You can define up to 50 interchange production IDs.
Customer or Supplier Interchange Test ID
Interchange identifier to use for messages of message types that are in test mode, as defined in the Messages tab. The identifier can contain up to 15 ASCII characters for X12 message and up to 30 characters for EDIFACT message.
To define multiple interchange test IDs for the partner, click Manage Multiple IDs, add the IDs, and click OK. You can define up to 50 interchange test IDs.
When you define interchange IDs for the partner, consider the following requirements:
• You must enter at least one partner Interchange ID. For more information, see “Partner interchange IDs” on page 56.
• If you define multiple interchange IDs of the same type for the partner, you must pass the interchange ID to use in outbound flows as a parameter in the process-from-backend mapping that you assign to the partner. For more information, see “Creating a process-from-backend mapping for outbound EDI message flows” on page 77.
Customer or Supplier Group ID
Partner group identifier to use in outbound messages as the Application Receiver's Code, GS-03. Applies to X12 messages.
You can use the group identifier to differentiate between groups in your organization, so that the receiver of the messages can redirect the EDI data to the appropriate recipients. For example, assign each department in the organization a unique group identifier.
Organization Interchange Qualifier
Organization interchange qualifier to use in outbound message to your partners. By default, the qualifier that is defined in the organization setup. If you want B2B Gateway to use a different qualifier in outbound messages for this partner, enter the qualifier here.
Organization Interchange ID
Organization interchange identifier to use in outbound message to your partners. By default, the identifier that is defined in the organization setup. If you want B2B Gateway to use a different identifier in outbound messages for this partner, enter the identifier here.
Create partners for EDI and EDIFACT messages 97

Partner messages properties for EDI and EDIFACT messagesUse the Messages page of the partner wizard to select the types of messages that you exchange with partners that you exchange EDI X12 and EDIFACT messages with and to define general message details.
Note: B2B Gateway rejects incoming messages of a type that is not selected or is disabled for the partner.
The Messages page can include the following properties for EDI and EDIFACT messages:
Messages
To select the types of messages that you exchange with the partner, click Add Message and then select the message type to add, or select Add all to add all supported message types. The list of message types includes the supported EDI X12 or EDIFACT message types, based on the file type you select for the partner on the General page.
For each message type, select the version number that you use and select whether to use this type of message in test mode or in production mode. After you select a message type you can disable and enable the use of the message type in exchanges with the partner, as required.
For each message type, you can assign a custom process to process EDI messages of that type. To assign a custom process to a message type, perform the following tasks:
1. Customize a Library Data Transformation project in Informatica Developer.
2. Export or deploy the transformation as a service. For more information, see the Data Transformation User Guide.
3. Upload the custom transformation service to B2B Gateway. For more information, see “Creating a Custom Transformation Service in B2B Gateway” on page 35.
4. In the Custom Process field, select a transformation service from the list.
For each message type, you can attach a process-from-backend mapping. To attach a process-from-backend mapping to the message type, click the Actions button to the right of the line of the message type, click Add Process-from-Backend Mapping, select a mapping that is appropriate to the message type that you are adding, and then click Select.
Security Information Qualifier
Applicable to the EDI X12 file type. Select the code to identify the type of information in Security Information. If you select the option 01 Password, enter the information in the Security Information field. Security information can contain up to 10 ASCII characters.
Authorization Information Qualifier
Applicable to the EDI X12 file type. Select the code to identify the type of information in Authorization Information. If you select an option other than 00 No Authorization Information Present, enter the information in the Authorization Information field. Authorization information can contain up to 10 ASCII characters.
Partner inbound properties for EDI and EDIFACT messagesUse the Inbound page of the partner wizard to define the inbound flow for the partner.
The Inbound page can include the following properties for EDI and EDIFACT messages:
Connection
The Connection area includes the following properties:
98 Chapter 8: Partners

Connection Type
Select the type of the connection from where B2B Gateway picks up files. You can select the following connection types:
• Advanced FTP V2
• Advanced FTPS V2
• Advanced SFTP V2
• File Servers (AS2, HTTPS, SFTP)
• Local Folder/MFT
• FTP Client
• SFTP Client
Connection
Connection where B2B Gateway creates files for the partner. Applies to the Advanced FTP V2, Advanced FTPS V2, and Advanced SFTP V2 connection types.
You configure connections in Administrator. For information about configuring the connections, see the respective connector guides.
File Server User
The file server user name for the partner from whom you receive files. Applies to the file servers connection type.
You create file server users in Administrator. For information about creating file server users, see the Administrator help.
Host
Host where the files that B2B Gateway picks up are located. Applies to the Local Folder/MFT, FTP Client, and SFTP Client connection types.
Port
Port where the files that B2B Gateway picks up are located. Applies to the Local Folder/MFT, FTP Client, and SFTP Client connection types.
Source Directory
Path to the directory on the connection from where B2B Gateway picks up files. Applies to the Local Folder/MFT, FTP Client, and SFTP Client connection types.
File Pattern
Pattern that defines the names of the files that B2B Gateway picks up. The pattern must be a Java regular expression.
For example:
To pick up all files enter .*
To pick up only files that start with ab enter ab\S.*
Tip: After you configure the connection click Test Connection to test and validate the connection.
File Pattern
Select the file pattern type to pick up.
Create partners for EDI and EDIFACT messages 99

After File Pickup
Action that B2B Gateway performs on the files after pickup. Applies to the Advanced FTP V2, Advanced FTPS V2, and Advanced SFTP V2 connection types.
Choose one of the following options:
• Keep Files. Keep the files in the source location.
• Delete Files. Delete the files from the source location.
• Archive Files. Moves the files from the source location. Enter the target location in Archive Directory.
• Rename Files. Rename the files in the source location. Enter a suffix to add to the original file name in New File Name Suffix.
Delete files on source after pickup
Determines whether or not B2B Gateway deletes files after pickup. Selected by default. Applies to the Local Folder/MFT, FTP Client, and FTPS Client connection types.
Pre-Process
Optionally, select a file transfer task to run actions on files that you receive from the partner. Applies to the file servers connection type.
You can select one of the following file transfer tasks:
Name Description
Decrypt Decrypts files that the partner uploads to the file server before the files are sent to B2B Gateway. For more information, see “Decrypt” on page 91.
Decompress Decompresses files that the partner uploads to the file server before the files are sent to B2B Gateway. For more information, see “Decompress” on page 92.
Processing
The Processing area includes the following properties:
• Process-to-Backend Mapping. Optionally, select a mapping to process files from B2B Gateway to the organization backend system. This mapping is used for messages where a process-to-backend mapping is not associated with the message type.
• Mapping Location. Location where B2B Gateway saves the mapping.
• Mapping Parameters. Lists the mapping parameters. You can enter parameter values in the Value fields.
• XML Interface Files. Determines whether to use element names or element reference numbers in the B2B Gateway XML interface files. Applies to EDI X12 messages.
Send Functional Acknowledgment (997)/Send Acknowledgment
Select whether or not to send acknowledgments to the partner. If you select to send acknowledgments, B2B Gateway generates and sends acknowledgments to the partner upon receiving and processing messages. Selected by default.
Schedule
Schedule by which to run the flow. Select one of the following options:
• Manually or by an external trigger. No schedule. You can run the flow from the Explore page or from a REST API. You can also run the flow from the Partner wizard.
100 Chapter 8: Partners

• By schedule. Runs the flow according to the defined schedule. Select a schedule from the list.
Note: To run a flow by a schedule, users need Read and Run permissions for schedules. If permissions are not configured, users cannot see existing schedules. For more information about permissions, see “User roles” on page 31.
• By file listener. Runs the flow according to the defined file listener rules. Select a file listener from the list. You create file listeners in Data Integration. For information about creating file listeners, see Components in the Data Integration help.
Partner outbound properties for EDI and EDIFACT messagesUse the Outbound page of the partner wizard to define the outbound flow for the partner.
The Outbound page can include the following properties for EDI and EDIFACT messages:
Copy Details from Inbound
Populates the fields in the Outbound page with the details that you entered in the Inbound page. You then edit the fields in the Outbound page as required. Applies to the File Servers, Local Folder/MFT, FTP Client, and SFTP Client connection types.
Connection
The Connection area includes the following properties:
Connection Type
Select the type of the connection where B2B Gateway creates the files for the partner. You can select the following connection types:
• Advanced FTP V2
• Advanced FTPS V2
• Advanced SFTP V2
• AS2 Client
• File Servers (HTTPS, SFTP)
• Local Folder/MFT
• FTP Client
• SFTP Client
Connection
Connection where B2B Gateway creates files for the partner. Applies to the Advanced FTP V2, Advanced FTPS V2, Advanced SFTP V2, and AS2 Client connection types.
You configure connections in Administrator. For information about configuring the connections, see the respective connector guides.
File Server User
The file server user name for the partner from whom you receive files. Applies to the File Servers connection type.
You create file server users in Administrator. For information about creating file server users, see the Administrator help.
Host
Host where B2B Gateway creates the files. Applies to the Local Folder/MFT, FTP Client, and SFTP Client connection types.
Create partners for EDI and EDIFACT messages 101

Port
Port where B2B Gateway creates the files. Applies to the Local Folder/MFT, FTP Client, and SFTP Client connection types.
Target Directory
Path to the directory on the connection where B2B Gateway creates the files.
Pattern Type
Select the file name pattern type to create.
Pattern Type
Select the file name pattern type to create.
File Pattern
Pattern that defines the names of the files that B2B Gateway creates. You can use variables with the following file patterns:
• ($eventId)• ($partnerName)• ($timestamp)• ($fileName)
For example:
($eventId).edi
The patterns are not case sensitive.
Post-Process
Applies to the file servers connection type. Optionally, select a file transfer task to run actions on files that you send to the partner. You can select one of the following file transfer tasks:
Name Description
Encrypt Encrypts files that you send to the partner before they are upload to the file server. For more information, see “Encrypt” on page 91.
Compress Compresses files that you send to the partner before they are upload to the file server. For more information, see “Compress” on page 92.
Processing
The Processing area includes the following properties:
• Message Discovery Mapping. Use if you assigned a process-from-backend mapping to specific messages on the Messages page.
• Process-from-Backend Mapping. Use for messages where a process-from-backend mapping is not associated with the message type.
• Mapping Location. Location where B2B Gateway saves the mapping.
• Mapping Parameters. Lists the parameters of the process-from-backend mapping. You can enter parameter values in the Value fields.
Tip: If required, you can temporarily override the values that you define here by defining different values in the Run Partner REST API and running the flow with the API. For more information, see “Run Partner REST API” on page 132.
102 Chapter 8: Partners

Message Details
The Message Details area includes the following properties:
• Data Element Separator. Symbol used in the file as a data element separator.
• Repetition Separator. Symbol used in the file as a repetition separator.
• Component Element Separator. Symbol used in the file as a component element separator.
• Segment Terminator. Symbol used in the file as a segment terminator. Select Add new line to start a new line at the end of the segment.
• Decimal mark. Symbol used in the file as a decimal mark. Applies to the EDIFACT file type.
• Release Character. Symbol used in the file as a release character. Applies to the EDIFACT file type.
• Control Number. Determines the type of numbers to use as control numbers in outbound messages, including outgoing acknowledgments. You can choose one of the following options:
- Use event ID. B2B Gateway adds file event IDs as control numbers to outbound messages and acknowledgments. Selected by default.
- Use sequence numbers. B2B Gateway uses number sequences to determine the control numbers. The initial interchange control and group control numbers start the sequences. B2B Gateway adds the initial interchange control and group control numbers to the first outbound message or acknowledgement, and increments the numbers sequentially for subsequent messages.To reset the sequence of a control number, click Edit Initial Number next to the number to reset, enter the new initial number, and click OK. Control numbers can include only numeric characters. The allowed number of digits in control numbers is nine digits for EDI X12 messages and 14 digits for EDIFACT messages.
For more information about control numbers, see “Control numbers in outbound messages” on page 56.
• Request technical acknowledgment (TA1). Determines whether or not you receive a technical acknowledgment for the file you send. Selected by default. Applies to the EDI X12 file type.
• Request functional acknowledgment (997). Determines whether or not you receive a functional acknowledgment for a functional group in the file you send. Selected by default. Applies to the EDI X12 file type.
• Add UNG group header. Determines whether or not message type events show the functional groups that are sent in the file. By default, not selected. Applies to the EDIFACT file type.
• Request acknowledgment. Determines whether or not you receive an acknowledgment when you send the file. Selected by default. Applies to the EDIFACT file type.
Note: Separators and terminators must be unique. You cannot assign the same symbol to more than one separator or terminator.
Schedule
Schedule by which to run the flow. Select one of the following options:
• Manually or by an external trigger. No schedule. You can run the flow from the Explore page or from a REST API. You can also run the flow from the Partner wizard.
• By schedule. Runs the flow according to the defined schedule. Select a schedule from the list.
Note: To run a flow by a schedule, users need Read and Run permissions for schedules. If permissions are not configured, users cannot see existing schedules. For more information about permissions, see “User roles” on page 31.
• By file listener. Runs the flow according to the defined file listener rules. Select a file listener from the list. You create file listeners in Data Integration. For information about creating file listeners, see Components in the Data Integration help.
Create partners for EDI and EDIFACT messages 103

Create partners for custom files with custom mappings
Create partners for exchanging custom files with custom mappings.
When you create a partner for custom files with custom mappings, you configure general partner properties and define an inbound flow, an outbound flow, or both.
Before you create a partner, verify that you have completed the required prerequisites.
Before you beginBefore you create a partner for custom files with custom mappings, complete the following prerequisites:
• For an inbound flow, you must create the inbound mapping. If you plan to use a process-to-backend mapping for the flow, you must also create the process-to-backend mapping.
• For an outbound flow, you must create a process-from-backend mapping. If you plan to use an outbound mapping for the flow, you must also create the outbound mapping.
• If you plan to use an Advanced FTP V2, Advanced FTPS V2, Advanced SFTP V2, or AS2 Client connection, configure the connection in Administrator. For information about configuring the connection, see the respective connector guide.
• If you plan to use the File Servers connection, create a user account for each partner that sends files from an AS2, HTTPS, or SFTP server to your organization or receives files that you send to an HTTPS or SFTP server for the partner. For more information, see “File server users” on page 33.
• If you plan to run a flow based on a schedule, verify that the schedule has been created or create the schedule in Administrator.
• Verify that you have the appropriate asset privileges to create the partner and define the flows. For more information about privileges, see “User roles” on page 31.
Creating a partner for custom files with custom mappingsCreate a customer in the New Customer wizard, or create a supplier in the New Supplier wizard.
1. Click New and select Partners > Customer or Partners > Supplier, as applicable.
The New Customer or New Supplier wizard appears.
2. In the General page enter the partner name and number and then, from the File Type list, select Custom. Clear the option Use intelligent structure discovery and then click Next.
The Inbound page appears.
3. To define an inbound flow, perform the following steps:
a. Select the connection type for the flow and configure connection details.
b. If you selected the Advanced FTP V2, Advanced FTPS V2, or Advanced SFTP V2 connection type, select the connection where B2B Gateway creates files for the partner and the action that B2B Gateway performs on the files after pickup.
104 Chapter 8: Partners

c. If you selected the File Servers connection type, you can select a file transfer task in the Pre-Process area and define the task variables. You can select one of the following file transfer tasks:
Name Description
Decrypt Decrypts files that the partner uploads to the file server before the files are sent to B2B Gateway. For more information, see “Decrypt” on page 91.
Decompress Decompresses files that the partner uploads to the file server before the files are sent to B2B Gateway. For more information, see “Decompress” on page 92.
d. Select an inbound mapping and the location where B2B Gateway saves the mapping.
e. If applicable, select a process-to-backend mapping and the location where B2B Gateway saves the mapping.
f. If the mappings contain parameters, optionally enter parameter values on the Mapping Parameters lists.
g. Click Next.
The Outbound page appears.
Tip: If the outbound flow uses the same connection as the inbound flow, and the connection type is File Servers, Local Folder/MFT, FTP Client, or SFTP Client, click Copy Details from Inbound to populate the Outbound page with details that you entered in the Inbound page and then edit the outbound details, as required.
4. To define an outbound flow, perform the following steps:
a. Select the connection type for the flow and configure connection details.
b. If you selected the Advanced FTP V2, Advanced FTPS V2, Advanced SFTP V2, or AS2 Client connection type, select the connection where B2B Gateway creates files for the partner.
c. If you selected the File Servers connection type, you can select a file transfer task in the Post-Process area and define the task variables. You can select one of the following file transfer tasks:
Name Description
Encrypt Encrypts files that you send to the partner before they are upload to the file server. For more information, see “Encrypt” on page 91.
Compress Compresses files that you send to the partner before they are upload to the file server. For more information, see “Compress” on page 92.
d. Select a process-from-backend mapping and the location where B2B Gateway saves the mapping.
e. If applicable, select an outbound mapping and the location where B2B Gateway saves the mapping.
f. If the mappings contain parameters, optionally enter parameter values on the Mapping Parameters lists.
g. Define a schedule for the flow.
h. Click Save.
The partner you created shows on the Explore page.
Create partners for custom files with custom mappings 105

Partner properties for custom files with custom mappingsUse the partner wizard to create or edit a partner. A partner can be either a customer or a supplier.
The partner wizard contains the following pages for custom files with custom mappings:
General page
Define partner details and message interchange details.
Inbound page
Define the connection to use for the inbound flow, select a file transfer task if applicable, select an inbound mapping, select a process-to-backend mapping if applicable, and define the schedule by which the flow runs.
Outbound page
Define the connection to use for the outbound flow, select a file transfer task if applicable, select a process-from-backend mapping, select an outbound mapping if applicable, and define the schedule by which the flow runs.
Partner general properties for custom files with custom mappingsUse the General page of the partner wizard to define basic partner properties.
The General page includes the following properties for custom files with custom mappings:
Customer or Supplier Name
Name of the partner. The name can contain up to 30 characters and must be unique in the organization and can be used either for a customer or for a supplier, not for both. The name can contain alphanumeric characters, symbols, and special characters, and must not contain angled brackets (< or >).
Customer or Supplier Number
Number of the partner. The number can contain up to 15 characters and must be unique in the organization. The number can contain alphanumeric characters, symbols, and special characters, and must not contain angled brackets (< or >).
Tip: Use a number that identifies the partner in your organization.
File Type
Type of files to exchange with the partner. Select Custom.
Use intelligent structure discovery
Clear this option.
Partner inbound properties for custom files with custom mappingsUse the Inbound page of the partner wizard to define the inbound flow for the partner.
The Inbound page can include the following properties for custom files with custom mappings:
Connection
The Connection area includes the following properties:
106 Chapter 8: Partners

Connection Type
Select the type of the connection from where B2B Gateway picks up files. You can select the following connection types:
• Advanced FTP V2
• Advanced FTPS V2
• Advanced SFTP V2
• File Servers (AS2, HTTPS, SFTP)
• Local Folder/MFT
• FTP Client
• SFTP Client
Connection
Connection where B2B Gateway creates files for the partner. Applies to the Advanced FTP V2, Advanced FTPS V2, and Advanced SFTP V2 connection types.
You configure connections in Administrator. For information about configuring the connections, see the respective connector guides.
File Server User
The file server user name for the partner from whom you receive files. Applies to the file servers connection type.
You create file server users in Administrator. For information about creating file server users, see the Administrator help.
Host
Host where the files that B2B Gateway picks up are located. Applies to the Local Folder/MFT, FTP Client, and SFTP Client connection types.
Port
Port where the files that B2B Gateway picks up are located. Applies to the Local Folder/MFT, FTP Client, and SFTP Client connection types.
Source Directory
Path to the directory on the connection from where B2B Gateway picks up files. Applies to the Local Folder/MFT, FTP Client, and SFTP Client connection types.
File Pattern
Pattern that defines the names of the files that B2B Gateway picks up. The pattern must be a Java regular expression.
For example:
To pick up all files enter .*
To pick up only files that start with ab enter ab\S.*
Tip: After you configure the connection click Test Connection to test and validate the connection.
File Pattern
Select the file pattern type to pick up.
Create partners for custom files with custom mappings 107

After File Pickup
Action that B2B Gateway performs on the files after pickup. Applies to the Advanced FTP V2, Advanced FTPS V2, and Advanced SFTP V2 connection types.
Choose one of the following options:
• Keep Files. Keep the files in the source location.
• Delete Files. Delete the files from the source location.
• Archive Files. Moves the files from the source location. Enter the target location in Archive Directory.
• Rename Files. Rename the files in the source location. Enter a suffix to add to the original file name in New File Name Suffix.
Delete files on source after pickup
Determines whether or not B2B Gateway deletes files after pickup. Selected by default. Applies to the Local Folder/MFT, FTP Client, and FTPS Client connection types.
Pre-Process
Optionally, select a file transfer task to run actions on files that you receive from the partner. Applies to the file servers connection type.
You can select one of the following file transfer tasks:
Name Description
Decrypt Decrypts files that the partner uploads to the file server before the files are sent to B2B Gateway. For more information, see “Decrypt” on page 91.
Decompress Decompresses files that the partner uploads to the file server before the files are sent to B2B Gateway. For more information, see “Decompress” on page 92.
Processing
The Processing area includes the following properties:
• Inbound Mapping. Select an inbound mapping to receive files from the customer.
• Process-to-Backend Mapping. If the target of the mapping is an interface file on the B2B Gateway document store, optionally, select a mapping to process files from B2B Gateway to the organization backend system. This mapping is used for messages where a process-to-backend mapping is not associated with the message type.
• Mapping Location. Location where B2B Gateway saves the mapping.
• Mapping Parameters. Lists the parameters of the process-to-backend mapping. You can enter parameter values in the Value fields.
Schedule
Schedule by which to run the flow. Select one of the following options:
• Manually or by an external trigger. No schedule. You can run the flow from the Explore page or from a REST API. You can also run the flow from the Partner wizard.
• By schedule. Runs the flow according to the defined schedule. Select a schedule from the list.
Note: To run a flow by a schedule, users need Read and Run permissions for schedules. If permissions are not configured, users cannot see existing schedules. For more information about permissions, see “User roles” on page 31.
108 Chapter 8: Partners

• By file listener. Runs the flow according to the defined file listener rules. Select a file listener from the list. You create file listeners in Data Integration. For information about creating file listeners, see Components in the Data Integration help.
Partner outbound properties for custom files with custom mappingsUse the Outbound page of the partner wizard to define the outbound flow for the partner.
The Outbound page can include the following properties for custom files with custom mappings:
Copy Details from Inbound
Populates the fields in the Outbound page with the details that you entered in the Inbound page. You then edit the fields in the Outbound page as required. Applies to the File Servers, Local Folder/MFT, FTP Client, and SFTP Client connection types.
Connection
The Connection area includes the following properties:
Connection Type
Select the type of the connection where B2B Gateway creates the files for the partner. You can select the following connection types:
• Advanced FTP V2
• Advanced FTPS V2
• Advanced SFTP V2
• AS2 Client
• File Servers (HTTPS, SFTP)
• Local Folder/MFT
• FTP Client
• SFTP Client
Connection
Connection where B2B Gateway creates files for the partner. Applies to the Advanced FTP V2, Advanced FTPS V2, Advanced SFTP V2, and AS2 Client connection types.
You configure connections in Administrator. For information about configuring the connections, see the respective connector guides.
File Server User
The file server user name for the partner from whom you receive files. Applies to the File Servers connection type.
You create file server users in Administrator. For information about creating file server users, see the Administrator help.
Host
Host where B2B Gateway creates the files. Applies to the Local Folder/MFT, FTP Client, and SFTP Client connection types.
Port
Port where B2B Gateway creates the files. Applies to the Local Folder/MFT, FTP Client, and SFTP Client connection types.
Create partners for custom files with custom mappings 109

Target Directory
Path to the directory on the connection where B2B Gateway creates the files.
Pattern Type
Select the file name pattern type to create.
Pattern Type
Select the file name pattern type to create.
File Pattern
Pattern that defines the names of the files that B2B Gateway creates. You can use variables with the following file patterns:
• ($eventId)• ($partnerName)• ($timestamp)• ($fileName)
For example:
($eventId).edi
The patterns are not case sensitive.
Post-Process
Applies to the file servers connection type. Optionally, select a file transfer task to run actions on files that you send to the partner. You can select one of the following file transfer tasks:
Name Description
Encrypt Encrypts files that you send to the partner before they are upload to the file server. For more information, see “Encrypt” on page 91.
Compress Compresses files that you send to the partner before they are upload to the file server. For more information, see “Compress” on page 92.
Processing
The Processing area includes the following properties:
• Process-from-Backend Mapping. Reads outgoing data from the backend system and writes it to the B2B Gateway document store.
• Outbound Mapping. Optional outbound mapping that reads the files from the gateway and sends them to the partner.
• Mapping Location. Location where B2B Gateway saves the mapping.
• Mapping Parameters. Lists the parameters of the process-from-backend mapping. You can enter parameter values in the Value fields.
Tip: If required, you can temporarily override the values that you define here by defining different values in the Run Partner REST API and running the flow with the API. For more information, see “Run Partner REST API” on page 132.
110 Chapter 8: Partners

Schedule
Schedule by which to run the flow. Select one of the following options:
• Manually or by an external trigger. No schedule. You can run the flow from the Explore page or from a REST API. You can also run the flow from the Partner wizard.
• By schedule. Runs the flow according to the defined schedule. Select a schedule from the list.
Note: To run a flow by a schedule, users need Read and Run permissions for schedules. If permissions are not configured, users cannot see existing schedules. For more information about permissions, see “User roles” on page 31.
• By file listener. Runs the flow according to the defined file listener rules. Select a file listener from the list. You create file listeners in Data Integration. For information about creating file listeners, see Components in the Data Integration help.
Create partners for custom files with Intelligent Structure Discovery
Create partners for exchanging custom files Intelligent Structure Discovery.
When you create a partner for custom files Intelligent Structure Discovery, you configure general partner properties, select a message structure for a sample custom input file, and define an inbound flow, an outbound flow, or both.
Before you create a partner, verify that you have completed the required prerequisites.
Before you beginBefore you create a partner for custom files with Intelligent Structure Discovery, complete the following prerequisites:
• For an inbound flow, you must create the structures of the files that you plan to exchange with the partner. For information about creating structures, see “Creating a structure” on page 88.If you plan to use a process-to-backend mapping for the flow, you must also create the process-to-backend mapping.
• For an outbound flow, you must create a process-from-backend mapping. If you plan to use an outbound mapping for the flow, you must also create the outbound mapping.
• If you plan to use an Advanced FTP V2, Advanced FTPS V2, Advanced SFTP V2, or AS2 Client connection, configure the connection in Administrator. For information about configuring the connection, see the respective connector guide.
• If you plan to use the File Servers connection, create a user account for each partner that sends files from an AS2, HTTPS, or SFTP server to your organization or receives files that you send to an HTTPS or SFTP server for the partner. For more information, see “File server users” on page 33.
• If you plan to run a flow based on a schedule, verify that the schedule has been created or create the schedule in Administrator.
• Verify that you have the appropriate asset privileges to create the partner and define the flows. For more information about privileges, see “User roles” on page 31.
Create partners for custom files with Intelligent Structure Discovery 111

Creating a partner for custom files with Intelligent Structure Discovery
Create a customer in the New Customer wizard, or create a supplier in the New Supplier wizard.
1. Click New and select Partners > Customer or Partners > Supplier, as applicable.
The New Customer or New Supplier wizard appears.
2. In the General page enter the partner name and number and then, from the File Type list, select Custom. Verify that Use intelligent structure discovery is selected and then click Next.
The Messages page appears.
3. Click Select Structure and choose a message structure. Click Select, and then click Next.
The Inbound page appears.
4. To define an inbound flow, perform the following steps:
a. Select the connection type for the flow and configure connection details.
b. If you selected the Advanced FTP V2, Advanced FTPS V2, or Advanced SFTP V2 connection type, select the connection where B2B Gateway creates files for the partner and the action that B2B Gateway performs on the files after pickup.
c. If you selected the File Servers connection type, you can select a file transfer task in the Pre-Process area and define the task variables. You can select one of the following file transfer tasks:
Name Description
Decrypt Decrypts files that the partner uploads to the file server before the files are sent to B2B Gateway. For more information, see “Decrypt” on page 91.
Decompress Decompresses files that the partner uploads to the file server before the files are sent to B2B Gateway. For more information, see “Decompress” on page 92.
d. If applicable, select a process-to-backend mapping and the location where B2B Gateway saves the mapping.
e. If the mapping contains parameters, optionally enter parameter values in the Mapping Parameters list.
f. Define a schedule for the flow.
g. Click Next.
The Outbound page appears.
Tip: If the outbound flow uses the same connection as the inbound flow, and the connection type is File Servers, Local Folder/MFT, FTP Client, or SFTP Client, click Copy Details from Inbound to populate the Outbound page with details that you entered in the Inbound page and then edit the outbound details, as required.
5. To define an outbound flow, perform the following steps:
a. Select the connection type for the flow and configure connection details.
b. If you selected the Advanced FTP V2, Advanced FTPS V2, Advanced SFTP V2, or AS2 Client connection type, select the connection where B2B Gateway creates files for the partner.
112 Chapter 8: Partners

c. If you selected the File Servers connection type, you can select a file transfer task in the Post-Process area and define the task variables. You can select one of the following file transfer tasks:
Name Description
Encrypt Encrypts files that you send to the partner before they are upload to the file server. For more information, see “Encrypt” on page 91.
Compress Compresses files that you send to the partner before they are upload to the file server. For more information, see “Compress” on page 92.
d. Select a process-from-backend mapping and the location where B2B Gateway saves the mapping.
e. If applicable, select an outbound mapping and the location where B2B Gateway saves the mapping.
f. If the mappings contain parameters, optionally enter parameter values on the Mapping Parameters lists.
g. Define a schedule for the flow.
h. Click Save.
The partner you created shows on the Explore page.
Partner properties for custom files with Intelligent Structure Discovery
Use the partner wizard to create or edit a partner. A partner can be either a customer or a supplier.
The partner wizard contains the following pages for custom files with Intelligent Structure Discovery:
General page
Define partner details and message interchange details.
Messages page
Add intelligent structures to process partner messages.
Inbound page
Define the connection to use for the inbound flow, select a file transfer task if applicable, select a process-to-backend mapping if applicable, and define the schedule by which the flow runs.
Outbound page
Define the connection to use for the outbound flow, select a file transfer task if applicable, select a process-from-backend mapping, select an outbound mapping if applicable, and define the schedule by which the flow runs.
Partner general properties for custom files with Intelligent Structure DiscoveryUse the General page of the partner wizard to define basic partner properties.
The General page includes the following properties for custom files with Intelligent Structure Discovery:
Customer or Supplier Name
Name of the partner. The name can contain up to 30 characters and must be unique in the organization and can be used either for a customer or for a supplier, not for both. The name can contain alphanumeric characters, symbols, and special characters, and must not contain angled brackets (< or >).
Create partners for custom files with Intelligent Structure Discovery 113

Customer or Supplier Number
Number of the partner. The number can contain up to 15 characters and must be unique in the organization. The number can contain alphanumeric characters, symbols, and special characters, and must not contain angled brackets (< or >).
Tip: Use a number that identifies the partner in your organization.
File Type
Type of files to exchange with the partner. Select Custom.
Use intelligent structure discovery
Must be enabled.
Partner messages properties for custom files with Intelligent Structure DiscoveryUse the Messages page of the partner wizard to select a message structure for a sample custom input file.
The Messages page shows the list of selected message structures, and includes the following properties:Names
Name of the message structure. The name can contain alphanumeric characters, symbols, and special characters, and must not contain angled brackets (< or >).
Description
Description of the message structure. The description can contain alphanumeric characters, symbols, and special characters, and must not contain angled brackets (< or >).
Select Structure
Click Select Structure, select a structure in the Select Structure page, and then click Select.
Partner inbound properties for custom files with Intelligent Structure DiscoveryUse the Inbound page of the partner wizard to define the inbound flow for the partner.
The Inbound page can include the following properties for custom files with Intelligent Structure Discovery:
Connection
The Connection area includes the following properties:
Connection Type
Select the type of the connection from where B2B Gateway picks up files. You can select the following connection types:
• Advanced FTP V2
• Advanced FTPS V2
• Advanced SFTP V2
• File Servers (AS2, HTTPS, SFTP)
• Local Folder/MFT
• FTP Client
• SFTP Client
114 Chapter 8: Partners

Connection
Connection where B2B Gateway creates files for the partner. Applies to the Advanced FTP V2, Advanced FTPS V2, and Advanced SFTP V2 connection types.
You configure connections in Administrator. For information about configuring the connections, see the respective connector guides.
File Server User
The file server user name for the partner from whom you receive files. Applies to the file servers connection type.
You create file server users in Administrator. For information about creating file server users, see the Administrator help.
Host
Host where the files that B2B Gateway picks up are located. Applies to the Local Folder/MFT, FTP Client, and SFTP Client connection types.
Port
Port where the files that B2B Gateway picks up are located. Applies to the Local Folder/MFT, FTP Client, and SFTP Client connection types.
Source Directory
Path to the directory on the connection from where B2B Gateway picks up files. Applies to the Local Folder/MFT, FTP Client, and SFTP Client connection types.
File Pattern
Pattern that defines the names of the files that B2B Gateway picks up. The pattern must be a Java regular expression.
For example:
To pick up all files enter .*
To pick up only files that start with ab enter ab\S.*
Tip: After you configure the connection click Test Connection to test and validate the connection.
File Pattern
Select the file pattern type to pick up.
After File Pickup
Action that B2B Gateway performs on the files after pickup. Applies to the Advanced FTP V2, Advanced FTPS V2, and Advanced SFTP V2 connection types.
Choose one of the following options:
• Keep Files. Keep the files in the source location.
• Delete Files. Delete the files from the source location.
• Archive Files. Moves the files from the source location. Enter the target location in Archive Directory.
• Rename Files. Rename the files in the source location. Enter a suffix to add to the original file name in New File Name Suffix.
Create partners for custom files with Intelligent Structure Discovery 115

Delete files on source after pickup
Determines whether or not B2B Gateway deletes files after pickup. Selected by default. Applies to the Local Folder/MFT, FTP Client, and FTPS Client connection types.
Pre-Process
Optionally, select a file transfer task to run actions on files that you receive from the partner. Applies to the file servers connection type.
You can select one of the following file transfer tasks:
Name Description
Decrypt Decrypts files that the partner uploads to the file server before the files are sent to B2B Gateway. For more information, see “Decrypt” on page 91.
Decompress Decompresses files that the partner uploads to the file server before the files are sent to B2B Gateway. For more information, see “Decompress” on page 92.
Processing
The Processing area includes the following properties:
• Process-to-Backend Mapping. Optionally, select a mapping to process files from B2B Gateway to the organization backend system. This mapping is used for messages where a process-to-backend mapping is not associated with the message type.
• Mapping Location. Location where B2B Gateway saves the mapping.
• Mapping Parameters. Lists the mapping parameters. You can enter parameter values in the Value fields.
• XML Interface Files. Determines whether to use element names or element reference numbers in the B2B Gateway XML interface files. Applies to EDI X12 messages.
Schedule
Schedule by which to run the flow. Select one of the following options:
• Manually or by an external trigger. No schedule. You can run the flow from the Explore page or from a REST API. You can also run the flow from the Partner wizard.
• By schedule. Runs the flow according to the defined schedule. Select a schedule from the list.
Note: To run a flow by a schedule, users need Read and Run permissions for schedules. If permissions are not configured, users cannot see existing schedules. For more information about permissions, see “User roles” on page 31.
• By file listener. Runs the flow according to the defined file listener rules. Select a file listener from the list. You create file listeners in Data Integration. For information about creating file listeners, see Components in the Data Integration help.
Partner outbound properties for custom files with Intelligent Structure DiscoveryUse the Outbound page of the partner wizard to define the outbound flow for the partner.
The Outbound page can include the following properties for custom files with Intelligent Structure Discovery:
116 Chapter 8: Partners

Copy Details from Inbound
Populates the fields in the Outbound page with the details that you entered in the Inbound page. You then edit the fields in the Outbound page as required. Applies to the File Servers, Local Folder/MFT, FTP Client, and SFTP Client connection types.
Connection
The Connection area includes the following properties:
Connection Type
Select the type of the connection where B2B Gateway creates the files for the partner. You can select the following connection types:
• Advanced FTP V2
• Advanced FTPS V2
• Advanced SFTP V2
• AS2 Client
• File Servers (HTTPS, SFTP)
• Local Folder/MFT
• FTP Client
• SFTP Client
Connection
Connection where B2B Gateway creates files for the partner. Applies to the Advanced FTP V2, Advanced FTPS V2, Advanced SFTP V2, and AS2 Client connection types.
You configure connections in Administrator. For information about configuring the connections, see the respective connector guides.
File Server User
The file server user name for the partner from whom you receive files. Applies to the File Servers connection type.
You create file server users in Administrator. For information about creating file server users, see the Administrator help.
Host
Host where B2B Gateway creates the files. Applies to the Local Folder/MFT, FTP Client, and SFTP Client connection types.
Port
Port where B2B Gateway creates the files. Applies to the Local Folder/MFT, FTP Client, and SFTP Client connection types.
Target Directory
Path to the directory on the connection where B2B Gateway creates the files.
Pattern Type
Select the file name pattern type to create.
Pattern Type
Select the file name pattern type to create.
Create partners for custom files with Intelligent Structure Discovery 117

File Pattern
Pattern that defines the names of the files that B2B Gateway creates. You can use variables with the following file patterns:
• ($eventId)• ($partnerName)• ($timestamp)• ($fileName)
For example:
($eventId).edi
The patterns are not case sensitive.
Post-Process
Applies to the file servers connection type. Optionally, select a file transfer task to run actions on files that you send to the partner. You can select one of the following file transfer tasks:
Name Description
Encrypt Encrypts files that you send to the partner before they are upload to the file server. For more information, see “Encrypt” on page 91.
Compress Compresses files that you send to the partner before they are upload to the file server. For more information, see “Compress” on page 92.
Processing
The Processing area includes the following properties:
• Process-from-Backend Mapping. Reads outgoing data from the backend system and writes it to the B2B Gateway document store.
• Outbound Mapping. Optional outbound mapping that reads the files from the gateway and sends them to the partner.
• Mapping Location. Location where B2B Gateway saves the mapping.
• Mapping Parameters. Lists the parameters of the process-from-backend mapping. You can enter parameter values in the Value fields.
Tip: If required, you can temporarily override the values that you define here by defining different values in the Run Partner REST API and running the flow with the API. For more information, see “Run Partner REST API” on page 132.
Schedule
Schedule by which to run the flow. Select one of the following options:
• Manually or by an external trigger. No schedule. You can run the flow from the Explore page or from a REST API. You can also run the flow from the Partner wizard.
• By schedule. Runs the flow according to the defined schedule. Select a schedule from the list.
Note: To run a flow by a schedule, users need Read and Run permissions for schedules. If permissions are not configured, users cannot see existing schedules. For more information about permissions, see “User roles” on page 31.
118 Chapter 8: Partners

• By file listener. Runs the flow according to the defined file listener rules. Select a file listener from the list. You create file listeners in Data Integration. For information about creating file listeners, see Components in the Data Integration help.
Editing a partnerEdit a partner on the Explore page.
1. Click Explore and navigate to the partner you want to edit.
2. Click the name of the partner that you want to edit, or click the line of the partner that you want to edit and then click the Edit button. The Edit Customer or Edit Supplier wizard appears, based on the type of partner you are editing.
3. Edit partner settings, as required, and then click Save.
Running a partner flow manuallyRun an inbound or an outbound partner flow from the Explore page.
1. Click Explore, and then click the line of the partner for which to run the flow. Do not click the partner name. Clicking the partner name opens the Edit Customer the or Edit Supplier wizard.
2. Click the Actions button to the right of the line that you selected and then select Run Inbound Flow or Run Outbound Flow, based on the flow to run.
Editing a partner 119

C h a p t e r 9
Tracking and Monitoring EventsB2B Gateway generates events as it processes messages and files to help you track and monitor the data that you exchange with partners and of acknowledgments that the gateway sends to and receives from partners. The event list provides full visibility into the data exchange and alerts you to errors that might occur.
Task events
Each time B2B Gateway triggers a mapping to run a partner flow, B2B Gateway generates a task event. The event is saved in Informatica Intelligent Cloud Services.
File events
B2B Gateway generates file events for files that it receives and sends. When you exchange EDI messages with partners, you can track EDI groups, and the following message details:
• Functional groups in the file.
Note: For EDIFACT messages, the existence of group level information is optional.
• Messages and transactions that are received and sent in the file.
When B2B Gateway processes custom files with Intelligent Structure Discovery, you can track events for output groups for discovered files.
You can view all events on the Events page. The Events page provides detailed information for every file and message that the system processes.
You can select a specific file event to view more details. When you drill down in an EDI file event, you see details for the messages in the file.
You can use the filter to search for specific events. You can search for events related to a specific partner, or based on event ID, type, or status, time frame, or message type or number.
You can create monitoring rules that monitor events, and notify users on events that are in a defined status, for example, create a monitoring rule that notifies users when events are in an Error status.
File eventsThe Events page provides detailed event processing information for every file that B2B Gateway processes, whether inbound or outbound.
A file event shows the status of a specific file that B2B Gateway processes. For each file event in the Events page, you can view the file that B2B Gateway sends or receives by clicking the file name. If B2B Gateway sends or receives an acknowledgment for the file exchange you can view the acknowledgment file by clicking the link in the Acknowledgment column.
120

In outbound file events, you can view the source file by clicking the source file link on the event. The source file is the file that the custom outbound mapping generates.
Event historyYou can view the event status history for each file that B2B Gateway processes.
The event history shows the processing stages that the file passed through, when each stage started, and the cumulative processing status.
The following table describes the processing stages that can show in the Event History for inbound files:
Stage Description
Transferring incoming files
The gateway receives files from a source defined by the inbound connection.
Processing incoming files
For a custom file that Intelligent Structure Discovery processes, the message structure parses the file and produces output group (interface) files, then writes each interface file to the B2B Gateway document store. For other custom files, the custom inbound mapping writes the incoming files to an interface file on the B2B Gateway document store or writes the data to the backend system.
Processing files to backend
Processing the process-to-backend mapping.
Reprocessed from event
Indicates that the event was generated as a result of reprocessing of another event. The Event ID is presented in the status.
Reprocessed Indicates that the event was reprocessed and a new event was generated.
Change event status to discarded
Indicates that the event status was manually changed to Discarded. If the user entered a reason for the change, the reason is displayed.
The following table describes the processing stages that can show in the Event History for outbound files:
Stage Description
Processing files from backend Processing the process-from-backend mapping.
Processing outbound mapping The outbound mapping reads the files from the gateway and sends them to the partner.
Transferring incoming files The gateway sends files to a target defined by the outbound connection.
Waiting for Acknowledgment (EDI X12 messages, outbound flow)
Waiting for partner to send a technical acknowledgment, a functional acknowledgment, or both.
Reprocessed from event Indicates that the event was generated as a result of reprocessing of another event. The Event ID is presented in the status.
Reprocessed Indicates that the event was reprocessed and another event was generated.
Change event status to discarded Indicates that the event status was manually changed to Discarded. If the user entered a reason for the change, the reason is displayed.
File events 121

Event session logsEach time an EDI processing mapping or custom mapping runs, B2B Gateway generates a task event. You can access the session log from the event.
If an error occurs during file processing, you can use the related session log to view further information about the error.
For custom files that Intelligent Structure Discovery processes, there are only session logs for the process-to-backend mapping.
Message detailsWhen you drill down an EDI file event, the event expands to show message details, including details about the EDI groups in the file, if applicable, and about the transactions in the file.
For each EDI group, the validation status is presented. If an acknowledgment was sent in Inbound events or received for outbound events, it is presented for each group.
For inbound messages, message details also present the status of the custom backend mapping.
When B2B Gateway processes an inbound EDI file, the EDI process mapping converts each transaction in the file into a separate XML interface file. You can view the interface file by clicking the File icon in the Message File column of the message list.
Custom file detailsWhen B2B Gateway processes a custom file with Intelligent Structure Discovery, the parsing process converts each output group in the message structure into a separate CSV interface file.
When you drill down an inbound file event for custom files processed by Intelligent Structure Discovery, the event expands to show details of the interface files.
You can view an interface file by clicking the name of the file in the File Name column of the events list.
Event filtersOn the Events page, you can use filters to monitor and track specific partners, messages, and files.
Click the filter icon to expand the filter pane and filter the event list to show events for the selected filter or filters. The event list updates to show the relevant events.
You can select Display deleted partners to view events for deleted partners with an event history in view-only mode.
By default, the event list shows all events from the last 24 hours. After you filter the view of the list, to restore the default view, click Restore Defaults.
122 Chapter 9: Tracking and Monitoring Events

Event propertiesThe Events page shows file events. File event properties include details about the file that B2B Gateway processed.
When you drill down an EDI file event, the Events page shows message details for the file, including details about the EDI groups and the messages that B2B Gateway processed for the file, and the message processing status.
When you drill down a custom file event for files processed by Intelligent Structure Discovery, the event expands to show details for output groups discovered in the message structure. For each output group that is processed, the name of the interface file and the event ID show.
File event propertiesFile event properties include the file that B2B Gateway processed, when the file was processed, which partner sent or received the file, the processing status, and other details.
The following image shows the file events on the Events page:
The display for file events includes the following properties:
File Type
The icon on the left side of the Events page indicates the file type:
• inbound file.
• inbound acknowledgment file.
• outbound file.
File Name
The name of the file that the gateway received from the partner or sent to the partner. Click the file name to open the file.
Event properties 123

Partner Name
The name of the partner that sent or received the message or the file. Click the partner name to open the edit partner wizard.
Event ID
Unique identifier for the event.
Time
The time the event started.
Status
Status of the event. An event can be in one of the following statuses:
• Complete . The file processing completed successfully.
• Discarded . The event status was manually changed to Discarded. Discarded events are read-only and cannot be handled any further.
• Downloading . The file is downloading.
• Error . An error occurred during file processing.
• Processing . A mapping is processing the file.
• Reprocessed . The event was reprocessed and another event was generated to reflect the new process.
• System Error . A system error occurred unrelated to file processing.
• Waiting for Acknowledgment . An intermediate status of an outbound event that is waiting for an acknowledgment. The final status of the outbound event corresponds to the status of the received acknowledgment. If the acknowledgment is accepted, the status of the corresponding outbound event changes to Complete. If the acknowledgment is rejected, the status of the corresponding outbound event changes to Error.
• Warning . The event generated a warning. For example, when an acknowledgment does not contain a group control number of the source message.
Rest on an event status icon to show additional information. For example, for an event in an Error status, the error that occurred during file processing .
Acknowledgment
Applicable for EDI X12 messages. Indicates whether an acknowledgment was received. Rest on the acknowledgment link to view the acknowledgment event number. Click the acknowledgment link to open the acknowledgment file.
For both incoming and outgoing file events, to view the file processing steps, click History. To view the session log for the associated mapping, click Session Log. For outgoing file events, to view the source file that the custom mapping generated, click Source File.
124 Chapter 9: Tracking and Monitoring Events

EDI message details propertiesWhen you drill down an EDI file event, you see further details for the EDI groups and messages that the gateway processed for the EDI file. The message details identify the EDI groups, transactions, message types, and acknowledgements that B2B Gateway processed, as relevant for the message.
To drill down a file event, click the triangle to the left of the file event row. The message event panel appears.
The following image shows sample details for an incoming EDI file:
The message details panel displays the EDI groups in the file, the message processing status, and the transactions in the file. Incoming EDI files can include multiple EDI groups. Outgoing EDI files contain one EDI group.
When the view includes multiple EDI groups for a file, click the row of an EDI group to show the transactions that are associated with the group.
EDI group detailsThe EDI Groups panel displays details for each functional group in the EDI file.
For each functional group in the file, the EDI Groups panel includes the following properties:
Message Type
Message type for the functional group.
Group Control Number
Control number for the functional group.
Event ID
Unique identifier for the event associated with processing the EDI group.
Status
Status of the group validation for the EDI group. This appears for inbound messages. Group validation can be in one of the following statuses:
• Complete . B2B Gateway completed the message validation for the functional group successfully.
• Error . Group validation failed. Click the File icon to open a report with details about the error.
• Waiting for Acknowledgment . Waiting for an acknowledgment from the partner.
Rest on an EDI group status icon to show additional information. For example, for an event in an Error status, the reason that the message was rejected.
Event properties 125

Acknowledgment
Indicates whether B2B Gateway sent or received a functional acknowledgment for the EDI group. Click the acknowledgment number to open the acknowledgment file.
Message processing statusThe EDI Groups panel displays message processing status for the custom mapping that is assigned to the flow.
The Message Processing icon indicates the message processing status for the mapping. Message processing can be in one of the following statuses:
• Complete . B2B Gateway processed the custom mapping successfully or no custom mapping is assigned to the flow.
• Error . Processing of the custom mapping failed.
To view the session log associated with the processing of the custom mapping, click Session Log. If no custom mapping is assigned to the flow, session log details are not available.
Transaction detailsThe message details panel displays details for each transaction in the EDI file. If you click the row of the EDI group, only the transactions that B2B Gateway processed for the specific EDI group are listed.
For each transaction, the message details panel can include the following properties:
Message Type
Indicates the message type of the transaction.
Number
Transaction number, for example, invoice number. Rest on the information icon to the left of the transaction number to view the number of rows in the transaction.
Group Control Number
The group control number for the functional group of the transaction.
Message Control Number
The message control number for the transaction.
Event ID
Unique identifier for the event associated with processing the transaction.
Message File
Applicable for inbound flows. The XML file that B2B Gateway generates for the inbound message. Click the File icon to view the file.
Acknowledgment
Applicable for outbound flows. Rest on the acknowledgment link to view the acknowledgment event number. Click the acknowledgment link to open the acknowledgment file.
126 Chapter 9: Tracking and Monitoring Events

Custom file details propertiesWhen Intelligent Structure Discovery processes a file, it discovers output groups. Output groups contain units of identified data, such as a street address, city, and zip code. An interface file is created for each discovered output group. When you drill down a custom file event for files that Intelligent Structure Discovery has processed, you see further details for the interface files that were produced.
To drill down a file event, click the triangle to the left of the file event row. The Discovered File panel appears.
The following image shows sample details for an incoming custom file that Intelligent Structure Discovery processed:
The details panel displays the interface file that was produced, and the processing status.
Incoming custom files can produce multiple interface files, depending on the custom file structure.
Discovered FilesFor each interface file, the Discovered Files panel includes the following properties:
File Name
Name of the interface file. Click the name of the file to view the file.
Event ID
Identification number for the event.
Processing StatusThe Discovered Files panel displays the processing status for the inbound process that includes Intelligent Structure Discovery to parse the custom file.
The Processing icon indicates the inbound processing status. The processing state can be in one of the following statuses:
• Complete . B2B Gateway processed the file successfully.
• Error . File processing failed.
• Warning . The Intelligent Structure Discovery process was unable to identify some of the data, and no process-to-backend mapping has been defined.
Event properties 127

Unidentified DataIf Intelligent Structure Discovery was not able to identify all the data, the Discovered File panel displays the link Unidentified Data.
The data that was not processed is saved to a file with the naming convention <original filename>_unidentified.txt.
To access the data, click the link Unidentified Data.
Viewing and managing eventsYou can view file events and message details in the Events page. You can also use a filter to find specific events. You can also reprocess or discard a file event.
1. Click Events.
A list of file and system events appear.
2. To filter events, click the Filter icon. In the Filter pane, select to view events related to a specific partner, to an event ID, type, or status, to a selected time frame, or to message type or number.
When you select the event ID, event and file processing details are displayed for that event.
3. To view the file for a file event, click the name of the file.
4. To view partner details for a file event, click the name of the partner.
5. To view EDI message type events related to a file event, drill down the file event. Click the arrow to the left of the row of a specific file event.
6. To view the source file for an outbound flow, select to highlight the file event row, select the Action menu and then select Source File.
7. To troubleshoot an error, view the session log for an event. Select to highlight the file event row, select the Action menu and then select File Session Log or Custom Process Session Log.
8. To discard a file event and stop handling the file, select to highlight the file event row, select the Action menu and then select Discard Event. You can enter a reason for the discard.
9. To reprocess a file event, select to highlight the file event row, select the Action menu and then select Reprocess.
The event is assigned the Reprocessed status and another event is created for the new process flow.
Note: Only file events can be reprocessed. You cannot reprocess custom partner events that use Intelligent Structure Discovery, or system error events.
Event monitorsYou can create event monitors that track events based on their status, and send notifications when an event is in a defined status.
You create monitoring rules that define which partners to monitor, what are the event statuses that trigger an action, and users to which to send email notifications. For example, you can create a rule that notifies the administrator when events that are generated for a specific partner are in an Error status.
128 Chapter 9: Tracking and Monitoring Events

Monitoring rulesA monitoring rule defines which partners to monitor, the event statuses that trigger an action, and the users to which to send email notifications when an event is in a defined status.
When you create a monitoring rule, you define the following elements:
• Partners to which the rule applies. You can apply the rule to a single partner, to a number of selected partners, or to all partners.
• Event status or statuses to which the rule applies. B2B Gateway applies the rule only to events that are in a final state.
• Rule action. You can define one or more users to which B2B Gateway sends email notifications when the rule conditions are true.
Managing Monitoring RulesCreate, edit, view, disable, enable, and delete monitoring rules.
Creating a monitoring ruleUse the Navigator to create monitoring rules.
1. In the Navigator, click New > Minitoring > Monitoring Rule. Then click Create.
The New Monitoring Rule page appears.
2. Enter the rule name. Optionally, enter a description for the rule.
3. Select the location to save the rule.
4. Choose the rule mode, enabled or disabled. A disabled rule does not perform the defined actions.
5. Select a partner or partners to which to apply the rule, or select Apply to all to apply the rule to all partners, including current partners and partners that are added to B2B Gateway after you create the rule.
a. Click Select Partners.
The Partners page appears.
b. Check the box to the left of the partners to apply the Monitoring Rule, and then click Select.
c. To remove a partner, check the box to the left of the partner and click the trash icon.
6. Select the event statuses to monitor. You must select at least one status.
7. Define users to which to send email notifications. You can define up to 30 email users.
Perform the following steps for each user:
1. Click Add in the Actions area.
2. Select the name of an Informatica Cloud user or select A non-Informatica Cloud user from the User Name list and then enter the email address in the Email field.
B2B Gateway sends email notifications to the recipients that you define here when events of any of the affected partners are in any of the affected statuses.
8. Click Save.
Event monitors 129

Editing a Monitoring RuleUse the Explore page to edit monitoring rules.
1. In the Navigator, click Explore. Click the All Assets list and then select Monitors > Monitoring Rules.
The Explore page shows all existing monitoring rules.
2. Click the name of the monitoring rule to edit.
The monitoring rule page shows.
3. Edit the monitoring rule and then click Save.
Disabling and enabling a monitoring ruleUse the Explore page to disable and enable a monitoring rule.
1. In the Navigator, click Explore. Click the All Assets list and then select Monitors > Monitoring Rules.
The Explore page shows all existing monitoring rules.
2. In the row that contains the rule, click Actions and select one of the following actions:
• To disable a rule select Disabled. A disabled rule does not perform the defined actions.
• To enable a disabled rule select Enabled.
Monitoring rule propertiesMonitoring rule properties include general information about the monitoring rule, the asset or assets that the rule applies to, the event statuses that the rule monitors, and the rule action or actions.
The following image shows a sample monitoring rule page:
The monitoring rule page includes the following properties:
130 Chapter 9: Tracking and Monitoring Events

Rule Name
Name of the monitoring rule. The name can contain up to 80 characters and can contain special characters. The name must not contain angled brackets (< or >).
Description
Description of the monitoring rule. The description can contain up to 255 characters.
Mode
Monitoring rule mode, enabled or disabled. A disabled rule does not perform the defined actions.
Content
The conditions of the monitoring rule.
Affected Partners
The partners that the rule applies to.
Affected Statuses
The statuses of the affected assets that the rule applies to. Select one or more of the following statuses:
• Complete
• Discarded
• Error
• Reprocessed
• System Error
• Warning
Actions
The users to send email notifications to. Click Add to add a user and then enter the user name and email address.
Event monitors 131

C h a p t e r 1 0
B2B Gateway REST APIsUse the B2B Gateway REST APIs to run inbound and outbound partner flows and to query the status of events.
You can use the following APIs:
• Run Partner REST API. Runs inbound and outbound partner flows.
• Event Status REST API. Returns the status of events.
Authorization HeaderEach B2B Gateway REST API call must contain an authorization header.
The type of the authorization header must be Basic, and the header must include an Informatica Intelligent Cloud Services user and an Informatica Intelligent Cloud Services password.
For example:
{Username: [email protected]: MyPassword}
Run Partner REST APIUse the B2B Gateway Run Partner API to run inbound and outbound partner flows.
You can use the Run Partner API only for flows with the scheduling option Manually or by an external trigger.
When you run an outbound flow with the Run Partner REST API, if the process-from-backend mapping contains parameters, you can pass the parameter values in the API request. When you run the partner with the API, the values that you define in the API override those that you define in the partner flow.
For example, one of the mapping parameters is the shipment number, and you define the value in the outbound partner flow. If you need to send a one-time message with a different shipment number, run the flow with the API and assign the shipment number parameter a different value.
If you later reprocess the file event, B2B Gateway doesn't run the flow with the API. Therefore, it passes the parameter values that you define in the partner flow, not those that you define in the API.
132

The Run Partner API returns the response code of the action that you perform. If the partner flow triggers successfully, the API returns the event ID of the task event that B2B Gateway generates. You can run the B2B Gateway Event Status API to query the status of the event based on the event ID.
Run Partner REST API requestUse a POST request with an application/json content type to run a partner flow.
To run a flow, use the following REST URL:
https://b2bgateway.<pod>.<baseUrl>/b2b-gw/api/v1/partner/runWhere:
• <pod> is the name of the Informatica Intelligent Cloud Services point of delivery (PoD) where you access B2B Gateway. For example: pod1.
• <baseUrl> is the Informatica Intelligent Cloud Services URL. For example: dm-us.informaticacloud.com/.
For example:
https://b2bgateway.pod1.dm-us.informaticacloud.com/b2b-gw/api/v1/partner/runTip: You can copy the values of <pod> and <baseUrl> from the B2B Gateway URL after you access it from the My Services page of Informatica Intelligent Cloud Services.
Request Syntax
To run a flow, use the following request syntax:
{"partnerName":"<partner name>","direction":"<direction of flow>"}
Where:
• partner name is the name of the partner for which you want to run the flow. The name must not contain angled brackets (<>), backslashes (\), or double quotes ("). If the defined partner name contains backslashes, add another backslash before each existing backslash (\\). If the defined partner name contains double quotes, add a backslash before each double quote (\").
• direction of flow is the flow to run for the customer: INBOUND for an inbound flow and OUTBOUND for an outbound flow. The direction is not case sensitive.
For example:
To run the inbound flow for the customer My_Customer, use the following request syntax:
{"partnerName":"My_Customer","direction":"INBOUND"}
To run the outbound flow for the customer My_Customer, use the following request syntax:
{"partnerName":"My_Customer","direction":"OUTBOUND"}
Run Partner REST API 133

Pass parameter values in outbound flowsYou can pass the values of process-from-backend mapping parameters in the Run Partner REST API request.
To pass parameter values in the request, add a "mappingParameters" section to the request body. The section can include one or both of the following categories:
• "inputParameters". Contains one or more key-value pairs of input parameters.
• "inOutParameters". Contains one or more key-value pairs of in-out parameters.
Use the following syntax for the key-value pairs:
"<mapping parameter name>": "<parameter value>"For example:
To run the outbound flow for the customer My_Customer and pass the values of the invoice number and the shipment number in the request, use the following syntax:
{"partnerName":"My_Customer","direction":"OUTBOUND","mappingParameters": { "inputParameters": { "Invoice_Number": "7800" }, "inOutParameters": { "Shipment_Number": "A3065" } }}
Run Partner REST API action responseWhen you use the B2B Gateway Run Partner REST API to run a partner flow, B2B Gateway returns the action response in the REST API response.
Running a flow from the REST API returns the HTTP response code that is relevant to the result of the action
• When the request succeeds, B2B Gateway returns 200, the code for a successful request.
• When the request fails, the API returns the HTTP response code that is relevant to the cause of the error. For example, it the value of direction is wrong, the API returns 400, the code for a bad request.
Event Status APIWhen you use a B2B Gateway Run Partner API to trigger a mapping to run a partner flow and the action succeeds, B2B Gateway returns the event ID of the task event that it generates in the REST API response.
You can use the B2B Gateway Event Status REST API to query the status of the event, based on the event ID.
When you query a task event and the event reaches its final status, the API returns the event IDs of all the file events that the mapping generated. You can then run the API to query the status of each file event.
A task event reaches its final status when the mapping finishes running. A file event reaches its final status when the file processing is complete. Processing is complete when all task and file events are in a final status.
134 Chapter 10: B2B Gateway REST APIs

Event status REST API requestUse a GET request with an application/json content type to query the status of a partner event.
To query the status of a partner event, use the following REST URL:
https://b2bgateway.<pod>.<baseUrl>/b2b-gw/api/v3/event/status/eventIdWhere:
• <pod> is the name of the Informatica Intelligent Cloud Services point of delivery (PoD) where you access B2B Gateway. For example: pod1.
• <baseUrl> is the Informatica Intelligent Cloud Services URL. For example: dm-us.informaticacloud.com/.
For example:
https://b2bgateway.pod1.dm-us.informaticacloud.com/b2b-gw/api/v3/event/status/7638Tip: You can copy the values of <pod> and <baseUrl> from the B2B Gateway URL after you access it from the My Services page of Informatica Intelligent Cloud Services.
Event Status API action responseWhen you use the B2B Gateway Event Status API to query the status of task and file events, the API returns the event response in a JSON format.
When the request fails, the API returns the HTTP response code that is relevant to the cause of the error. For example, if the event you query is of an unsupported type, such as a group event, the API returns 400, the code for a bad request. When file processing fails, the event is in Error status.
Success response for task eventsWhen you query the status of task events and the request succeeds, the response includes the following information about the event:
Property Description
eventType Type of event: Task Level Event.
eventStatus Status of the event.
eventId ID of the event.
eventCreationTimestamp Time when the event occurred. System time in milliseconds as returned by Java API java.lang.System.currentTimeMillis.
partnerName Name of the partner.
partnerNumber Number of the partner.
partnerFileType Type of files that are exchanged with the partner.
direction Direction of the partner flow, INBOUND or OUTBOUND.
isErrorStatus Indicates whether or not the event is in error status.
Event Status API 135

Property Description
isFinalStatus Indicates whether or not the event reached its final status.
files List of files that were exchanged with the partner, including details of each file event.
Success response for file eventsWhen you query the status of a task event or a file event and the request succeeds, the response includes the following information for each file event:
Property Description
eventType Type of event: File Level Event.
eventStatus Status of the event.
eventId ID of the event.
eventCreationTimestamp Time when the event occurred. System time in milliseconds as returned by Java API java.lang.System.currentTimeMillis.
parentEventId ID of the parent task event.
messageType Type of message that is exchanged with the partner.
ackCode Correlated acknowledgment status.
ackCodeDescription Description of correlated acknowledgment status.
fileName Name of the file.
interchangeControlNumber Interchange control number.
groupList If the file event includes groups, list of group events, including details of each group event and the group's transaction events.
transactionList If the file event includes transactions that aren't nested under groups, list of transaction events, including details of each transaction event.
sectionList If the file event includes sections, list of section events, including details of each section event. Applies to inbound custom files with Intelligent Structure Discovery.
hasUnidentifiedData Indicates whether or not the file includes unidentified data. Applies to inbound custom files with Intelligent Structure Discovery.
isErrorStatus Indicates whether or not the event is in error status.
isFinalStatus Indicates whether or not the event reached its final status.
136 Chapter 10: B2B Gateway REST APIs

Group event detailsIf a file event includes groups of transactions, the file event success response includes group events.
A group event includes the following information:
Property Description
eventType Type of event: Group Level Event.
eventStatus Status of the event: Complete or in progress.
eventId ID of the event.
eventCreationTimestamp Time when the event occurred. System time in milliseconds as returned by Java API java.lang.System.currentTimeMillis.
parentEventId ID of the parent file event.
messageType Type of message that is exchanged with the partner.
ackCode Correlated acknowledgment status.
ackCodeDescription Description of correlated acknowledgment status.
groupControlNumber Group control number.
transactionList List of transaction events, including details of each transaction event.
isErrorStatus Indicates whether or not the event is in error status.
isFinalStatus Indicates whether or not the event reached its final status.
Transaction event detailsIf a file event includes transactions, the file event success response includes transaction events. Transaction events can be nested directly under the file event or under group events.
A transaction event includes the following information:
Property Description
eventType Type of event: Transaction Level Event.
eventStatus Status of the event: Complete or in progress.
eventId ID of the event.
eventCreationTimestamp Time when the event occurred. System time in milliseconds as returned by Java API java.lang.System.currentTimeMillis.
parentEventId ID of the parent event, either a file event or a group event.
messageType Type of message that is exchanged with the partner.
ackCode Correlated acknowledgment status.
Event Status API 137

Property Description
ackCodeDescription Description of correlated acknowledgment status.
number Transaction number.
messageControlNumber Message control number.
groupNumber ID of the parent group. Applies to transactions that are nested under groups.
isErrorStatus Indicates whether or not the event is in error status.
isFinalStatus Indicates whether or not the event reached its final status.
Section event detailsIf a file event includes sections, the file event success response includes section events.
A section event includes the following information:
Property Description
eventType Type of event: Section Level Event.
eventStatus Status of the event: Complete or in progress.
eventId ID of the event.
eventCreationTimestamp Time when the event occurred. System time in milliseconds as returned by Java API java.lang.System.currentTimeMillis.
parentEventId ID of the parent file event.
messageType Type of message that is exchanged with the partner.
sectionName Name of the section.
fileName Name of the file. Applies when messageType is File.
isErrorStatus Indicates whether or not the event is in error status.
isFinalStatus Indicates whether or not the event reached its final status.
138 Chapter 10: B2B Gateway REST APIs

C h a p t e r 1 1
Glossaryevent
An occurrence of a partner flow or a file transfer at each stage of processing. The B2B Gateway server generates the event and updates the event status while it processes the partner flow or file transfer.
inbound flow
A B2B Gateway inbound flow receives and processes messages that a partner sends to the organization.
interface file
When you receive EDI messages from partners, pre-packaged processing mappings validate the inbound EDI messages and convert them to XML interface files, one file for each message type.
mapping
A mapping that processes a data set. The mapping includes the data sources and targets, metadata folders, and connections to process the data.
outbound flow
A B2B Gateway outbound flow creates and sends messages from the organization to the partner.
partner
An external or internal entity that sends documents for processing or receives documents after processing in B2B Gateway. A partner can be an organization such as a vendor or customer or an internal system such as an accounting system or an ERP system.
repository
A relational database table set that contains the metadata required to process files in B2B Gateway. It also contains the events that B2B Gateway generates while it processes files.
139

I n d e x
AAPI
authorization header 132Event Status 135Run Partner 133, 134
assets assigning tags 44copying 39creating tags 43deleting 41exporting 50, 51importing 52, 53migrating between organizations 49moving 40renaming 41tags 42
Ccompress
file transfer task 92connection
description 14inbound 14outbound 14
connections importing 52
context parameters custom EDI mapping 74, 84
copying assets 39folders 39projects 39
create monitoring rule 129
creating customer 94, 104, 112partner 94, 104, 112supplier 94, 104, 112tags 43
custom EDI mapping context parameters 74, 84general guidelines 72guidelines for inbound flows 73guidelines for outbound flows 73mapping guidelines 72
custom file details 127
custom file details events 122properties 127
custom file mapping mapping guidelines 83
custom file process description 21inbound 21outbound 22
custom files create partner 104, 112custom mappings 83description 13, 82Intelligent Structure Discovery 127interface file 83mappings 83process 21
custom files with custom mappings create partner 104inbound properties 106outbound properties 109partner general properties 106partner properties 106
custom files with Intelligent Structure Discovery create partner 112custom mappings 88description 87inbound properties 114mappings 88outbound properties 116partner general properties 113partner properties 113
custom mapping inbound custom files with Intelligent Structure Discovery 88inbound EDI flow 75outbound EDI flow 77, 80
custom mappings description 82EDI messages 72
customer creating 94, 104, 112custom files 106, 113editing 119flow 119general properties 96inbound properties 98, 106, 114messages properties 98, 114outbound properties 101, 109, 116properties 96, 106, 113
customer properties general 96, 106, 113inbound 98, 106, 114messages 98, 114outbound 101, 109, 116
DData Integration
mappings 72, 74, 83, 84
140

Data Integration mapping inbound custom files with Intelligent Structure Discovery 88inbound EDI flow 75outbound EDI flow 77, 80
Data Integration mappings custom files 83custom files with Intelligent Structure Discovery 88description 12EDI messages 71, 72
decompress file transfer task 92
decrypt file transfer task 91
deleting assets 41folders 41projects 41tags 45
dependencies viewing dependencies 45
dependent objects in export files 49
disable monitoring rule 130
discovered files Intelligent Structure Discovery 127
EEDI and EDIFACT messages
create partner 94inbound properties 98messages properties 98outbound properties 101partner general properties 96partner properties 96
EDI file details 125, 126
EDI group details 125
EDI interface file data element 57example 61, 62, 64, 68loop 57segment 57structure 57
EDI message custom 33customization process 33interface file 57, 61interface files 57schema upload 36
EDI message details properties 125
EDI messages custom mappings 72description 13, 55EDI processing mappings 71mappings 71, 72process 14
EDI process description 14inbound 20outbound 21
EDI processing mappings 71
EDI schemas description 61location 61
EDI X12 message interface file 61, 62
EDIFACT message interface file 64, 68interface files 57
EDIFACT messages description 13, 55
edit monitoring rule 130
editing customer 119partner 119supplier 119tags 45
enable monitoring rule 130
encrypt file transfer task 91
event custom file details 127EDI message details 125file 123monitoring 128, 129tracking 128, 129
event monitoring overview 120
event status API file events 136group events 137process status 134response 135response for file events 136response for task events 135section events 138task events 135transaction events 137
Event Status API REST API 135
Event Status REST API request 135
events custom file details 122files 120filter 122history 121message details 122overview 120properties 123session logs 122source files 120viewing 128
Explore page tags 42
export file 50exporting
assets 50, 51dependent objects 49overview 49projects 51
Ffile
events 120
Index 141

file event history 121properties 123success response 136
file transfer task 91
file transfer task compress 92decompress 92decrypt 91encrypt 91
file transfer tasks description 91
filter events 122
flow run 119, 132
folders copying 39deleting 41importing 53moving 40
Gglossary
of terms 139group event
details 137
Iimporting
assets 52connections 52dependent objects 49name conflicts 52overview 49post-migration tasks 54projects 52
importing assets 53inbound
custom file process 21EDI process 20
inbound custom files with Intelligent Structure Discovery custom mapping 88
inbound EDI custom mapping 75
Intelligent Structure Discovery custom files 127description 14discovered files 127interface file 87message structure 88messages 114process 22processing status 127unidentified data 128
Intelligent Structure Discovery processing status 127
interface file custom files 83data element 58EDI messages 57EDIFACT messages 57Intelligent Structure Discovery 87
interface file (continued)loop 59, 60segment 58structure 58–60
Mmapping
message discovery mapping 80
process-from-backend mapping 77
process-to-backend mapping 75
mappings general guidelines 72guidelines 72, 83guidelines for inbound flows 73guidelines for outbound flows 73
message structure 88
message details events 122
message discovery mapping 80
message processing status 126
message schema upload 36
message structure creating 88
migrating assets 51
migration assets 53of assets between organizations 49
monitor events 128, 129
monitoring overview 120rules 129
monitoring rule creating 129disabling 130editing 130enabling 130managing 129properties 130
moving assets and folders 40
Oobject migration 49organization
management 28setup 30, 31
organization management before you begin 29description 28setup 30, 31
organization setup before you begin 29
outbound custom file process 22EDI process 21
142 Index

outbound EDI custom mapping 77, 80
overview description 10
Ppartner
creating 94, 104, 112editing 119flow 119flows 12general properties 96, 106, 113inbound properties 98, 106, 114messages properties 98, 114outbound properties 101, 109, 116properties 96, 106, 113
partner flow connections 14description 12
partner for custom files creating 104
partner for EDI and EDIFACT messages creating 94
partner properties general 96, 106, 113inbound 98, 106, 114messages 98, 114
partner properties custom files 106, 113
partners description 11
permissions best practices 47configuring for objects 47description 31for copied assets 46for imported assets 46overview 46permission descriptions 46rules and guidelines 47
process-from-backend mapping 77
process-to-backend mapping 75
processes description 14
project folders 24projects
copying 39deleting 41exporting 51importing 52, 53
properties customer 96, 106, 113events 123partner 96, 106, 113supplier 96, 106, 113
Rrenaming
assets 41folders 41projects 41
REST API authorization header 132Event Status 135Run Partner 133, 134
REST APIs description 132
rule monitoring 129
run customer manual 119
run flow external trigger 132manual 119
run partner external trigger 132manual 119
run partner API process status 134
Run Partner API description 132REST API 133, 134
run partner process status 134
Run Partner REST API request 133response 134
run partner status event status API 134, 135
run supplier manual 119
Sscheduling
copying tasks and taskflows 39section event
details 138status
Intelligent Structure Discovery processing 127message processing 126
supplier creating 94, 104, 112custom files 106, 113editing 119flow 119general properties 96inbound properties 98, 106, 114messages properties 98, 114outbound properties 101, 109, 116properties 96, 106, 113
supplier properties general 96, 106, 113inbound 98, 106, 114messages 98, 114outbound 101, 109, 116
Ttags
assigning 44creating 43deleting 45editing 45properties 45
task file transfer 91
Index 143

task event success response 135
tasks deleting 41
track events 128, 129
transaction details 126
transaction event details 137
transformation service create 35delete 36download 35edit 36management 34search 35
Uunidentified data
Intelligent Structure Discovery 128upload
message schema 36user groups 31
Vview
events 128
144 Index