hp openview performance insight installation and ... - support
TRANSCRIPT
HP OpenView Performance Insight
For the HP-UX, Linux, Solaris, and Windows operating systems
Software Version: 5.30
Installation and Upgrade Guide for Sybase Databases
Manufacturing Part Number: J5223-90051
Document Release Date: October 2007
Software Release Date: October 2007
Legal Notices
Warranty
The only warranties for HP products and services are set forth in the express warranty statements accompanying such products and services. Nothing herein should be construed as constituting an additional warranty. HP shall not be liable for technical or editorial errors or omissions contained herein.
The information contained herein is subject to change without notice.
Restricted Rights Legend
Confidential computer software. Valid license from HP required for possession, use or copying. Consistent with FAR 12.211 and 12.212, Commercial Computer Software, Computer Software Documentation, and Technical Data for Commercial Items are licensed to the U.S. Government under vendor's standard commercial license.
Copyright Notices
© Copyright 2007 Hewlett-Packard Development Company, L.P.
Trademark Notices
Windows® and Windows Server™ 2003 are U.S. registered trademarks of Microsoft® Corp.
UNIX® is a registered trademark of The Open Group.
Java™ is a US trademark of Sun Microsystems, Inc.
2
Documentation Updates
This guide’s title page contains the following identifying information:
• Software Version number, which indicates the software version.
• Document Release Date, which changes each time the document is updated.
• Software Release Date, which indicates the release date of this version of the software.
To check for recent updates, or to verify that you are using the most recent edition of a document, go to:
http://ovweb.external.hp.com/lpe/doc_serv/
You will also receive updated or new editions if you subscribe to the appropriate product support service. Contact your HP sales representative for details.
3
Support
You can visit the HP software support web site at:
http://support.openview.hp.com/support.jsp
HP Software online support provides an efficient way to access interactive technical support tools. As a valued support customer, you can benefit by using the support site to:
• Search for knowledge documents of interest
• Submit and track support cases and enhancement requests
• Download software patches
• Manage support contracts
• Look up HP support contacts
• Review information about available services
• Enter into discussions with other software customers
• Research and register for software training
Most of the support areas require that you register as an HP Passport user and sign in. Many also require a support contract.
To find more information about access levels and HP Passport, go to:
http://support.openview.hp.com/new_access_levels.jsp
4
Contents
1 Introduction to OVPI Installation . . . . . . . . . . . . . . . . . . . . . . . . . . . . . . . . . . . . . . . . . . . . 9
Operating Environments . . . . . . . . . . . . . . . . . . . . . . . . . . . . . . . . . . . . . . . . . . . . . . . . . . . . 9Standalone OVPI Environment . . . . . . . . . . . . . . . . . . . . . . . . . . . . . . . . . . . . . . . . . . . . 9Distributed OVPI Environment . . . . . . . . . . . . . . . . . . . . . . . . . . . . . . . . . . . . . . . . . . . 11
Distributing Functionality . . . . . . . . . . . . . . . . . . . . . . . . . . . . . . . . . . . . . . . . . . . . 11Distributing Servers . . . . . . . . . . . . . . . . . . . . . . . . . . . . . . . . . . . . . . . . . . . . . . . . . 11
Choosing Between Standalone or Distributed Environments . . . . . . . . . . . . . . . . . . . 15Questions to Ask . . . . . . . . . . . . . . . . . . . . . . . . . . . . . . . . . . . . . . . . . . . . . . . . . . . . 15
OVPI Components . . . . . . . . . . . . . . . . . . . . . . . . . . . . . . . . . . . . . . . . . . . . . . . . . . . . . . . . 17OVPI Database . . . . . . . . . . . . . . . . . . . . . . . . . . . . . . . . . . . . . . . . . . . . . . . . . . . . . . . . 17OVPI Performance Manager . . . . . . . . . . . . . . . . . . . . . . . . . . . . . . . . . . . . . . . . . . . . . 17OVPI Web Access Server . . . . . . . . . . . . . . . . . . . . . . . . . . . . . . . . . . . . . . . . . . . . . . . . 18OVPI Clients . . . . . . . . . . . . . . . . . . . . . . . . . . . . . . . . . . . . . . . . . . . . . . . . . . . . . . . . . . 18
OVPI Client-Only Installation . . . . . . . . . . . . . . . . . . . . . . . . . . . . . . . . . . . . . . . . . 19Remote Pollers . . . . . . . . . . . . . . . . . . . . . . . . . . . . . . . . . . . . . . . . . . . . . . . . . . . . . . . . 20
OVPI Coexistence. . . . . . . . . . . . . . . . . . . . . . . . . . . . . . . . . . . . . . . . . . . . . . . . . . . . . . . . . 21OVPI Installation Overview . . . . . . . . . . . . . . . . . . . . . . . . . . . . . . . . . . . . . . . . . . . . . . . . 22Typical Installation by System Role . . . . . . . . . . . . . . . . . . . . . . . . . . . . . . . . . . . . . . . . . . 23
Standalone Environment System Roles . . . . . . . . . . . . . . . . . . . . . . . . . . . . . . . . . . . . 23Distributed Environment System Roles . . . . . . . . . . . . . . . . . . . . . . . . . . . . . . . . . . . . 23
Supported OVPI Configurations . . . . . . . . . . . . . . . . . . . . . . . . . . . . . . . . . . . . . . . . . . . . . 25Installation Media . . . . . . . . . . . . . . . . . . . . . . . . . . . . . . . . . . . . . . . . . . . . . . . . . . . . . . . . 25
2 Installation Prerequisites . . . . . . . . . . . . . . . . . . . . . . . . . . . . . . . . . . . . . . . . . . . . . . . . . . 27
Convert Evaluation to Licensed Installation . . . . . . . . . . . . . . . . . . . . . . . . . . . . . . . . . . . 27Pre-Installation Tasks . . . . . . . . . . . . . . . . . . . . . . . . . . . . . . . . . . . . . . . . . . . . . . . . . . . . . 28
Plan for internationalization and localization . . . . . . . . . . . . . . . . . . . . . . . . . . . . . . . 36Install db3 Module (Red Hat Linux Systems Only) . . . . . . . . . . . . . . . . . . . . . . . . . . . 36
5
Installation Prerequisites Checklist . . . . . . . . . . . . . . . . . . . . . . . . . . . . . . . . . . . . . . . . . . 37Memory and Storage Requirements . . . . . . . . . . . . . . . . . . . . . . . . . . . . . . . . . . . . . . . . . . 39
Installation Parameter Values . . . . . . . . . . . . . . . . . . . . . . . . . . . . . . . . . . . . . . . . . . . . 40
3 Installing Sybase Adaptive Server Enterprise 15. . . . . . . . . . . . . . . . . . . . . . . . . . . . . 43
Sybase Installation Prerequisites . . . . . . . . . . . . . . . . . . . . . . . . . . . . . . . . . . . . . . . . . . . . 43Prerequisite for UNIX Systems Only . . . . . . . . . . . . . . . . . . . . . . . . . . . . . . . . . . . . . . . . . 48
Using the SAM Utility to Reconfigure the Kernel on HP-UX . . . . . . . . . . . . . . . . . . . 48Using the Command Line to Reconfigure the Kernel on HP-UX. . . . . . . . . . . . . . . . . 50Reconfiguring the Kernel on Solaris . . . . . . . . . . . . . . . . . . . . . . . . . . . . . . . . . . . . . . . 52Reconfiguring the Kernel on Red Hat Linux. . . . . . . . . . . . . . . . . . . . . . . . . . . . . . . . . 53Using a Raw Partition or a UNIX File System for Sybase Installation. . . . . . . . . . . . 53
Comparing a Raw Partition to a UNIX File System . . . . . . . . . . . . . . . . . . . . . . . . 55Setting Up a Raw Partition . . . . . . . . . . . . . . . . . . . . . . . . . . . . . . . . . . . . . . . . . . . . . . 55
Setting Up a Raw Partition on Solaris . . . . . . . . . . . . . . . . . . . . . . . . . . . . . . . . . . . 56Setting Up a Raw Partition on HP-UX. . . . . . . . . . . . . . . . . . . . . . . . . . . . . . . . . . . 58
Sybase Installation Parameter Values . . . . . . . . . . . . . . . . . . . . . . . . . . . . . . . . . . . . . . . . 69Installing Sybase 15.0.2 on UNIX Systems . . . . . . . . . . . . . . . . . . . . . . . . . . . . . . . . . . . . 72Installing Sybase 15.0.2 on Windows Systems. . . . . . . . . . . . . . . . . . . . . . . . . . . . . . . . . . 78Post-Installation. . . . . . . . . . . . . . . . . . . . . . . . . . . . . . . . . . . . . . . . . . . . . . . . . . . . . . . . . . 81Starting and Stopping Sybase. . . . . . . . . . . . . . . . . . . . . . . . . . . . . . . . . . . . . . . . . . . . . . . 82
Starting Sybase. . . . . . . . . . . . . . . . . . . . . . . . . . . . . . . . . . . . . . . . . . . . . . . . . . . . . . . . 82Stopping Sybase . . . . . . . . . . . . . . . . . . . . . . . . . . . . . . . . . . . . . . . . . . . . . . . . . . . . . . . 82
Troubleshooting a Sybase Installation Failure . . . . . . . . . . . . . . . . . . . . . . . . . . . . . . . . . 83
4 Installing OVPI on a Standalone Server . . . . . . . . . . . . . . . . . . . . . . . . . . . . . . . . . . . . 85
Start the OVPI Installation Program . . . . . . . . . . . . . . . . . . . . . . . . . . . . . . . . . . . . . . . . . 85Next Steps . . . . . . . . . . . . . . . . . . . . . . . . . . . . . . . . . . . . . . . . . . . . . . . . . . . . . . . . . . . . . . 89
5 Installing OVPI in a Distributed Environment . . . . . . . . . . . . . . . . . . . . . . . . . . . . . . . 111
Starting the Installation Program . . . . . . . . . . . . . . . . . . . . . . . . . . . . . . . . . . . . . . . . . . 111Next Steps . . . . . . . . . . . . . . . . . . . . . . . . . . . . . . . . . . . . . . . . . . . . . . . . . . . . . . . . . . . . . 114Installing OVPI on a Central Server . . . . . . . . . . . . . . . . . . . . . . . . . . . . . . . . . . . . . . . . 115Installing OVPI on a Satellite Server . . . . . . . . . . . . . . . . . . . . . . . . . . . . . . . . . . . . . . . . 115Installing the Web Access Server . . . . . . . . . . . . . . . . . . . . . . . . . . . . . . . . . . . . . . . . . . . 138Installing Only the OVPI Clients . . . . . . . . . . . . . . . . . . . . . . . . . . . . . . . . . . . . . . . . . . . 144
6
Installing the Remote Poller Component . . . . . . . . . . . . . . . . . . . . . . . . . . . . . . . . . . . . . 147Installing OVPI Clients Only . . . . . . . . . . . . . . . . . . . . . . . . . . . . . . . . . . . . . . . . . . . . . . 151
6 Post-Installation. . . . . . . . . . . . . . . . . . . . . . . . . . . . . . . . . . . . . . . . . . . . . . . . . . . . . . . . . 153
Apply a Service Pack . . . . . . . . . . . . . . . . . . . . . . . . . . . . . . . . . . . . . . . . . . . . . . . . . . . . . 153Use a Common Character Set Across Distributed Systems . . . . . . . . . . . . . . . . . . . . . . 153Root Permission for Certificate Management Application . . . . . . . . . . . . . . . . . . . . . . . 154Perform Configuration Tasks . . . . . . . . . . . . . . . . . . . . . . . . . . . . . . . . . . . . . . . . . . . . . . 154Back Up Your System . . . . . . . . . . . . . . . . . . . . . . . . . . . . . . . . . . . . . . . . . . . . . . . . . . . . 156Confirming that OVPI is Running and Collecting Data . . . . . . . . . . . . . . . . . . . . . . . . . 156Starting and Stopping OVPI . . . . . . . . . . . . . . . . . . . . . . . . . . . . . . . . . . . . . . . . . . . . . . . 157Troubleshooting OVPI Installation Problems . . . . . . . . . . . . . . . . . . . . . . . . . . . . . . . . . 158
OVPI Log Files . . . . . . . . . . . . . . . . . . . . . . . . . . . . . . . . . . . . . . . . . . . . . . . . . . . . . . . 158Windows Only: NNM Integration . . . . . . . . . . . . . . . . . . . . . . . . . . . . . . . . . . . . . . . . 158
7 Uninstalling OVPI. . . . . . . . . . . . . . . . . . . . . . . . . . . . . . . . . . . . . . . . . . . . . . . . . . . . . . . 159
OVPI Uninstall Prerequisite Tasks . . . . . . . . . . . . . . . . . . . . . . . . . . . . . . . . . . . . . . . . . 159OVPI Uninstall Procedure . . . . . . . . . . . . . . . . . . . . . . . . . . . . . . . . . . . . . . . . . . . . . . . . 160Uninstalling OVPI Manually (Windows Systems) . . . . . . . . . . . . . . . . . . . . . . . . . . . . . . 162OVPI Post-Uninstallation Tasks . . . . . . . . . . . . . . . . . . . . . . . . . . . . . . . . . . . . . . . . . . . . 164
Delete the OVPI Installation Directory . . . . . . . . . . . . . . . . . . . . . . . . . . . . . . . . . . . . 164Remove Excess Directories. . . . . . . . . . . . . . . . . . . . . . . . . . . . . . . . . . . . . . . . . . . . . . 165 Delete the .ovpi Directory . . . . . . . . . . . . . . . . . . . . . . . . . . . . . . . . . . . . . . . . . . . . . . 165Uninstall the RDBMS. . . . . . . . . . . . . . . . . . . . . . . . . . . . . . . . . . . . . . . . . . . . . . . . . . 166
8 Uninstalling the Sybase RDBMS . . . . . . . . . . . . . . . . . . . . . . . . . . . . . . . . . . . . . . . . . . 167
Uninstalling Adaptive Server 15.0.2 on Windows . . . . . . . . . . . . . . . . . . . . . . . . . . . . . . 167Uninstalling Adaptive Server 15.0.2 on UNIX. . . . . . . . . . . . . . . . . . . . . . . . . . . . . . . . . 169
9 Upgrading to Sybase 15.0.2 . . . . . . . . . . . . . . . . . . . . . . . . . . . . . . . . . . . . . . . . . . . . 171
Upgrading Sybase on HP-UX, Linux, and Solaris Systems . . . . . . . . . . . . . . . . . . . . . . 171Upgrading Sybase on Windows Systems . . . . . . . . . . . . . . . . . . . . . . . . . . . . . . . . . . . . . 181
Upgrading From Sybase 11.9 to 15.0.2 . . . . . . . . . . . . . . . . . . . . . . . . . . . . . . . . . . . . 181Upgrading From Sybase 15.0.1 to 15.0.2. . . . . . . . . . . . . . . . . . . . . . . . . . . . . . . . . . . 187
10 Upgrading to OVPI 5.30 . . . . . . . . . . . . . . . . . . . . . . . . . . . . . . . . . . . . . . . . . . . . . . . . 189
7
Pre-Upgrade Tasks. . . . . . . . . . . . . . . . . . . . . . . . . . . . . . . . . . . . . . . . . . . . . . . . . . . . . . . 190Using the Wizard to Upgrade . . . . . . . . . . . . . . . . . . . . . . . . . . . . . . . . . . . . . . . . . . . . . . 191Upgrading Report Packs . . . . . . . . . . . . . . . . . . . . . . . . . . . . . . . . . . . . . . . . . . . . . . . . . . 197Upgrading the Remote Poller . . . . . . . . . . . . . . . . . . . . . . . . . . . . . . . . . . . . . . . . . . . . . . 198Post Upgrade Task . . . . . . . . . . . . . . . . . . . . . . . . . . . . . . . . . . . . . . . . . . . . . . . . . . . . . . . 198
11 The Sybase Interfaces File . . . . . . . . . . . . . . . . . . . . . . . . . . . . . . . . . . . . . . . . . . . . . . . 199
Create the Sybase Interfaces File on UNIX Systems . . . . . . . . . . . . . . . . . . . . . . . . . . . 200Create the Sybase Interfaces File on Windows Systems . . . . . . . . . . . . . . . . . . . . . . . . . 203
Index . . . . . . . . . . . . . . . . . . . . . . . . . . . . . . . . . . . . . . . . . . . . . . . . . . . . . . . . . . . . . . . . . . . . . 209
8

1 Introduction to OVPI Installation
This guide describes how to install HP OpenView Performance Insight (OVPI) 5.30 in an operating environment that best serves your users.
OVPI 5.30 supports only Sybase Adaptive Server Enterprise version 15. If you are using an older version, you must upgrade. You can find the upgrade instructions in Chapter 9, Upgrading to Sybase 15.0.2.
Operating Environments
You can install OVPI as either a standalone operating environment or as a distributed operating environment. This section contains information about both implementations and about how to choose between them.
OVPI uses a modular client-server architecture that enables you to start with a single standalone system and add to it as needed. You can install multiple remote clients and place them under the control of a single database server, or you can install multiple database servers around the network as necessary to create a distributed OVPI environment.
Standalone OVPI Environment
To monitor network performance in a single building or for a single group of users, or if your network contains fewer than approximately 20,000 managed objects, implement a standalone OVPI environment.
In a standalone environment, all OVPI components are installed on one system. The system is capable of polling the managed objects, gathering and processing performance data, hosting the OVPI web site, producing performance reports, and running the OVPI clients.
9
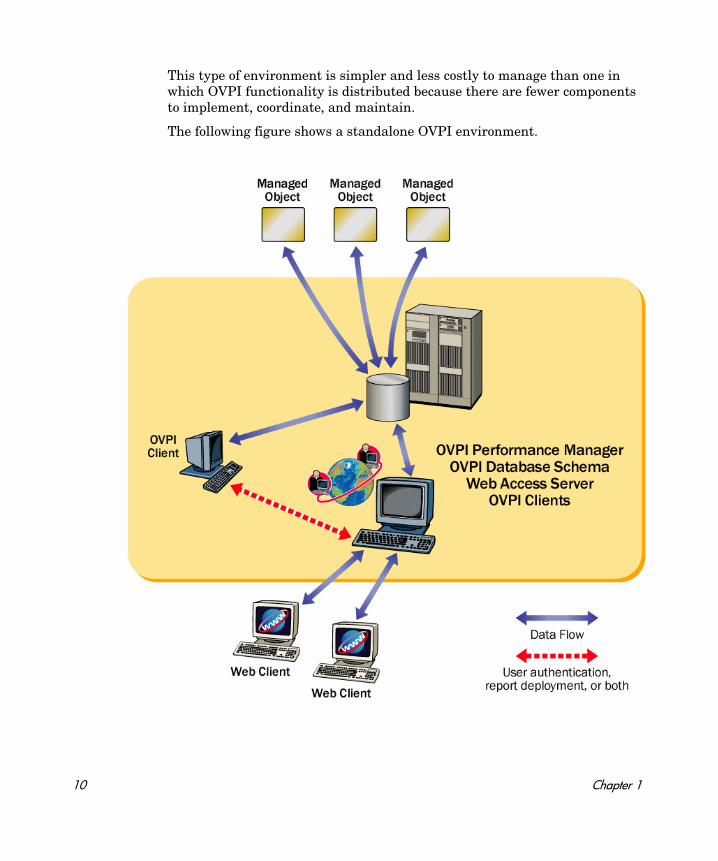
This type of environment is simpler and less costly to manage than one in which OVPI functionality is distributed because there are fewer components to implement, coordinate, and maintain.
The following figure shows a standalone OVPI environment.
10 Chapter 1
Distributed OVPI Environment
In a large enterprise, a single system may not provide the processing power or space for OVPI to optimally monitor the network, which can make it necessary to distribute the load.
When OVPI components are installed across systems to create a network-wide configuration, it is called a distributed OVPI environment. Although the OVPI components are installed on physically discrete systems, they operate as a single system.
Because networks that require monitoring are often large and geographically dispersed, OVPI is designed to be distributed. Its various components can be positioned functionally throughout the environment to reduce network load and optimize system performance.
In a distributed OVPI environment, you must install the same version of OVPI, including service packs (patch levels), on all systems in the environment.
Distributing Functionality
The OVPI functions that can be located discretely are:
• Data collection
• Data management (processing and summarization)
• Data reporting
All three functions are integrated and their physical location does not affect their integration.
For the most cost-effective use of resources, you can use different platforms to run the different functions. For example, you can use PCs running the Windows operating system as remote polling systems to collect data, and UNIX machines as database servers to store and process data.
Distributing Servers
In a distributed OVPI environment, the main processing and reporting platform in the environment is the central database server, which is accessible by users throughout the network. Usually, there is only one central database server, and it requires a large amount of disk space, memory, and processing power.
Introduction to OVPI Installation 11

Conversely, there can be any number of satellite database servers in the distributed environment, each one responsible for data collection and initial data processing. The data from each satellite database server is uploaded to the central database server, where it is combined with other data.
Data collection places a significant load on the network and is one of the few time-sensitive processes in OVPI. In a distributed environment, remote polling systems are usually located close to the target devices they poll to localize polling traffic and minimize delays. Each polling system polls multiple devices and communicates with its parent satellite database server, which is most likely regionally based.
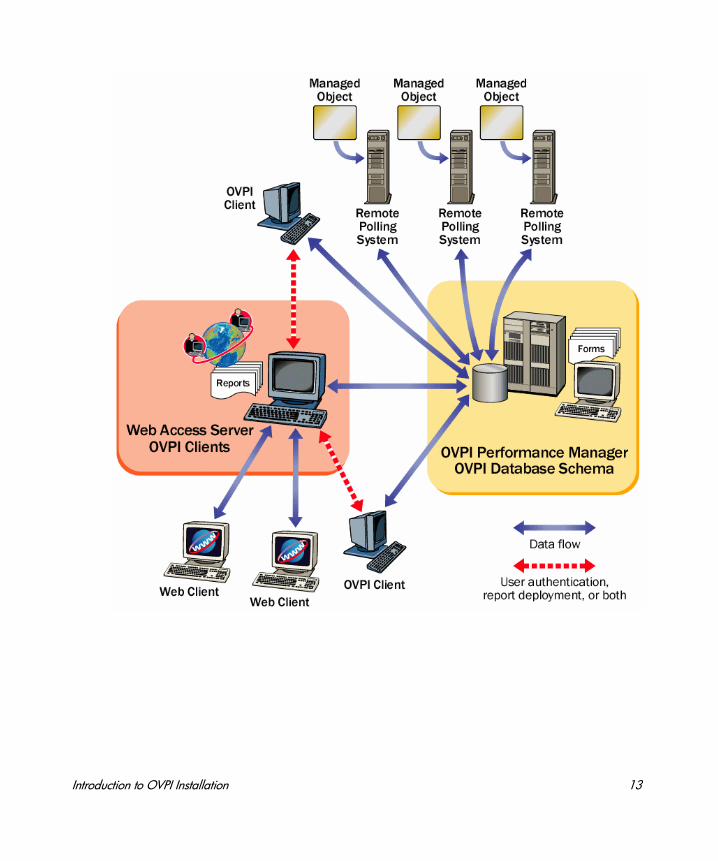
Usually, there is only one Web Access Server in the distributed environment, and it is installed on a system dedicated to servicing incoming report requests from accessible web-based client workstations and OVPI client workstations.
The following figure shows an example of a simple distributed OVPI environment, where the central database server is performing all functions except web hosting and remote polling.
12 Chapter 1
Introduction to OVPI Installation 13
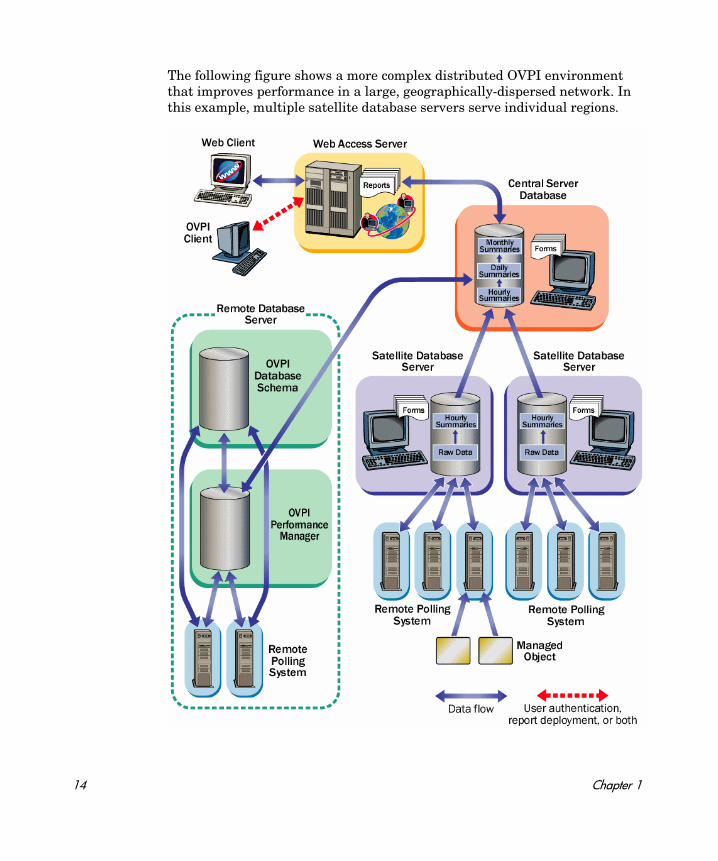
The following figure shows a more complex distributed OVPI environment that improves performance in a large, geographically-dispersed network. In this example, multiple satellite database servers serve individual regions.
14 Chapter 1
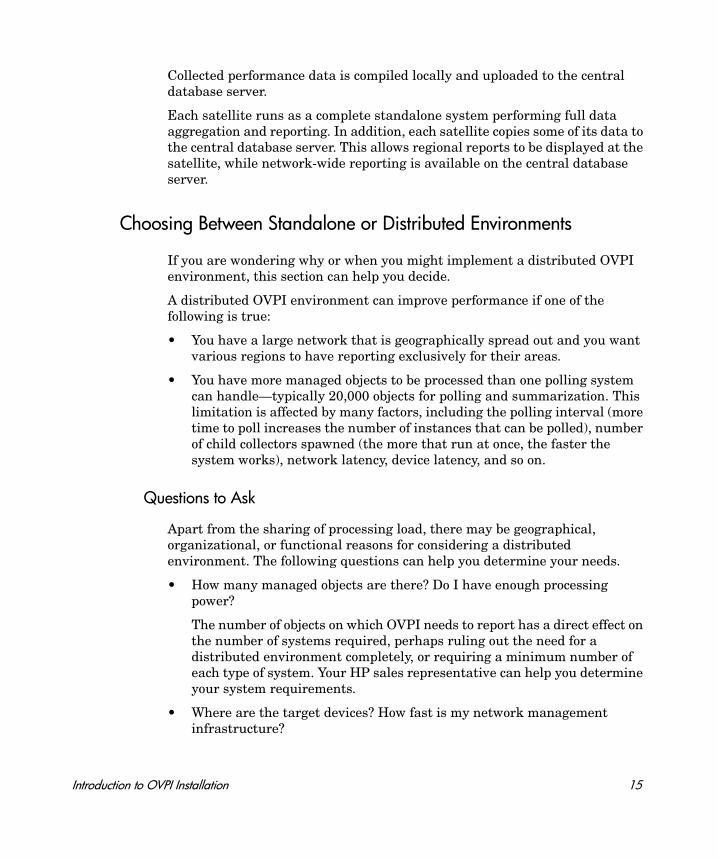
Collected performance data is compiled locally and uploaded to the central database server.
Each satellite runs as a complete standalone system performing full data aggregation and reporting. In addition, each satellite copies some of its data to the central database server. This allows regional reports to be displayed at the satellite, while network-wide reporting is available on the central database server.
Choosing Between Standalone or Distributed Environments
If you are wondering why or when you might implement a distributed OVPI environment, this section can help you decide.
A distributed OVPI environment can improve performance if one of the following is true:
• You have a large network that is geographically spread out and you want various regions to have reporting exclusively for their areas.
• You have more managed objects to be processed than one polling system can handle—typically 20,000 objects for polling and summarization. This limitation is affected by many factors, including the polling interval (more time to poll increases the number of instances that can be polled), number of child collectors spawned (the more that run at once, the faster the system works), network latency, device latency, and so on.
Questions to Ask
Apart from the sharing of processing load, there may be geographical, organizational, or functional reasons for considering a distributed environment. The following questions can help you determine your needs.
• How many managed objects are there? Do I have enough processing power?
The number of objects on which OVPI needs to report has a direct effect on the number of systems required, perhaps ruling out the need for a distributed environment completely, or requiring a minimum number of each type of system. Your HP sales representative can help you determine your system requirements.
• Where are the target devices? How fast is my network management infrastructure?
Introduction to OVPI Installation 15
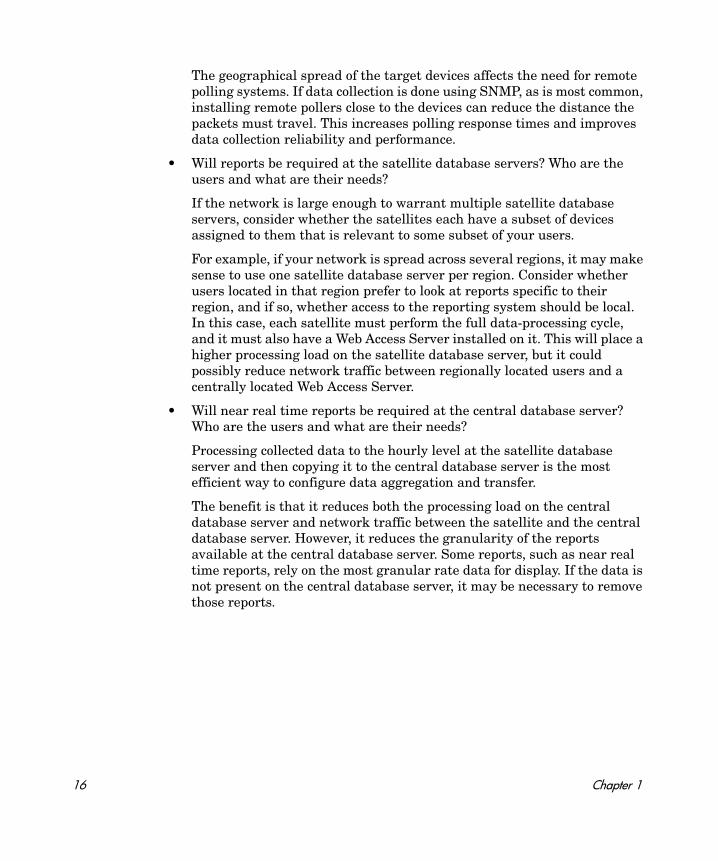
The geographical spread of the target devices affects the need for remote polling systems. If data collection is done using SNMP, as is most common, installing remote pollers close to the devices can reduce the distance the packets must travel. This increases polling response times and improves data collection reliability and performance.
• Will reports be required at the satellite database servers? Who are the users and what are their needs?
If the network is large enough to warrant multiple satellite database servers, consider whether the satellites each have a subset of devices assigned to them that is relevant to some subset of your users.
For example, if your network is spread across several regions, it may make sense to use one satellite database server per region. Consider whether users located in that region prefer to look at reports specific to their region, and if so, whether access to the reporting system should be local. In this case, each satellite must perform the full data-processing cycle, and it must also have a Web Access Server installed on it. This will place a higher processing load on the satellite database server, but it could possibly reduce network traffic between regionally located users and a centrally located Web Access Server.
• Will near real time reports be required at the central database server? Who are the users and what are their needs?
Processing collected data to the hourly level at the satellite database server and then copying it to the central database server is the most efficient way to configure data aggregation and transfer.
The benefit is that it reduces both the processing load on the central database server and network traffic between the satellite and the central database server. However, it reduces the granularity of the reports available at the central database server. Some reports, such as near real time reports, rely on the most granular rate data for display. If the data is not present on the central database server, it may be necessary to remove those reports.
16 Chapter 1

OVPI Components
OVPI components comprise the following.
OVPI Database
The OVPI database consists of the RDBMS and the OVPI database schema. To begin installing OVPI, you first create a database server for your OVPI operating environment. Creating a database server consists of the following:
• Installing an OVPI-supported RDBMS on your system, or upgrading an existing supported RDBMS to the version required by OVPI.
OVPI version 5.30 supports the RDBMS.
Installing the RDBMS creates an OVPI database instance—a named repository for the performance data that is collected, processed, and reported on by OVPI. The database instance is initially empty.
• Installing the OVPI database schema, which creates the tables that will contain performance data, as well as the indexes that determine data relationships. When you install the database schema, OVPI creates the tables and populates some of them immediately with data (for example, time period tables and informational tables about the database). OVPI also adds device files and tunes the OVPI database instance.
OVPI Performance Manager
OVPI Performance Manager, which is a different product from HP OpenView Performance Manager, provides tools for storing, processing, and reporting performance data that is collected. It aggregates, summarizes, and ages out data from the OVPI database. OVPI Performance Manager includes a full-function Management Console, which provides OVPI users with the tools to manage the OVPI environment. Also included is the OVPI Management Server, which is a web application that provides web services for OVPI clients.
You can install OVPI Performance Manager on multiple systems in your environment, but in each case the system onto which you install OVPI must be a database server or connect to an existing remote database server.
Introduction to OVPI Installation 17
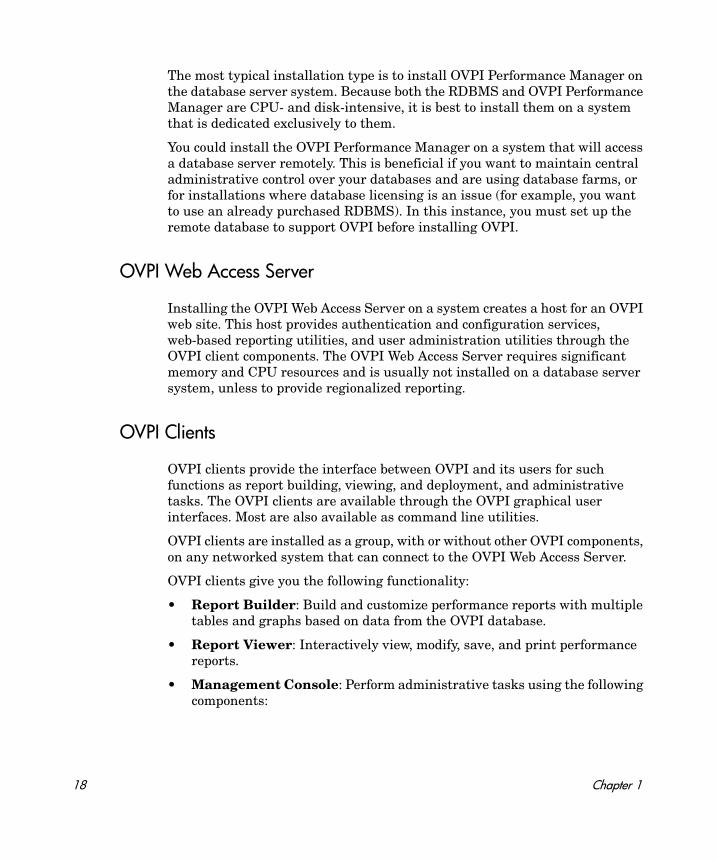
The most typical installation type is to install OVPI Performance Manager on the database server system. Because both the RDBMS and OVPI Performance Manager are CPU- and disk-intensive, it is best to install them on a system that is dedicated exclusively to them.
You could install the OVPI Performance Manager on a system that will access a database server remotely. This is beneficial if you want to maintain central administrative control over your databases and are using database farms, or for installations where database licensing is an issue (for example, you want to use an already purchased RDBMS). In this instance, you must set up the remote database to support OVPI before installing OVPI.
OVPI Web Access Server
Installing the OVPI Web Access Server on a system creates a host for an OVPI web site. This host provides authentication and configuration services, web-based reporting utilities, and user administration utilities through the OVPI client components. The OVPI Web Access Server requires significant memory and CPU resources and is usually not installed on a database server system, unless to provide regionalized reporting.
OVPI Clients
OVPI clients provide the interface between OVPI and its users for such functions as report building, viewing, and deployment, and administrative tasks. The OVPI clients are available through the OVPI graphical user interfaces. Most are also available as command line utilities.
OVPI clients are installed as a group, with or without other OVPI components, on any networked system that can connect to the OVPI Web Access Server.
OVPI clients give you the following functionality:
• Report Builder: Build and customize performance reports with multiple tables and graphs based on data from the OVPI database.
• Report Viewer: Interactively view, modify, save, and print performance reports.
• Management Console: Perform administrative tasks using the following components:
18 Chapter 1
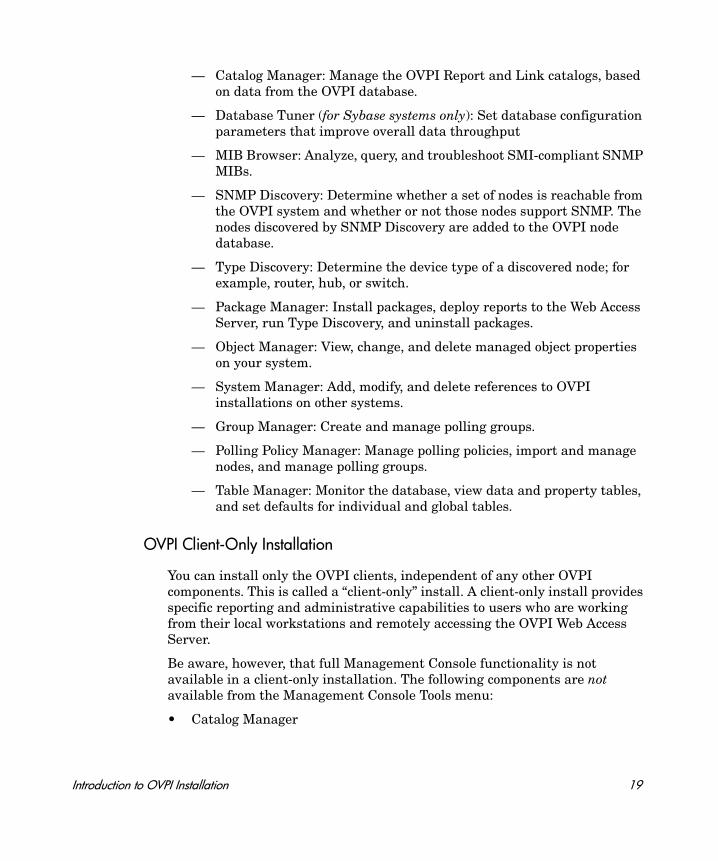
— Catalog Manager: Manage the OVPI Report and Link catalogs, based on data from the OVPI database.
— Database Tuner (for Sybase systems only): Set database configuration parameters that improve overall data throughput
— MIB Browser: Analyze, query, and troubleshoot SMI-compliant SNMP MIBs.
— SNMP Discovery: Determine whether a set of nodes is reachable from the OVPI system and whether or not those nodes support SNMP. The nodes discovered by SNMP Discovery are added to the OVPI node database.
— Type Discovery: Determine the device type of a discovered node; for example, router, hub, or switch.
— Package Manager: Install packages, deploy reports to the Web Access Server, run Type Discovery, and uninstall packages.
— Object Manager: View, change, and delete managed object properties on your system.
— System Manager: Add, modify, and delete references to OVPI installations on other systems.
— Group Manager: Create and manage polling groups.
— Polling Policy Manager: Manage polling policies, import and manage nodes, and manage polling groups.
— Table Manager: Monitor the database, view data and property tables, and set defaults for individual and global tables.
OVPI Client-Only Installation
You can install only the OVPI clients, independent of any other OVPI components. This is called a “client-only” install. A client-only install provides specific reporting and administrative capabilities to users who are working from their local workstations and remotely accessing the OVPI Web Access Server.
Be aware, however, that full Management Console functionality is not available in a client-only installation. The following components are not available from the Management Console Tools menu:
• Catalog Manager
Introduction to OVPI Installation 19
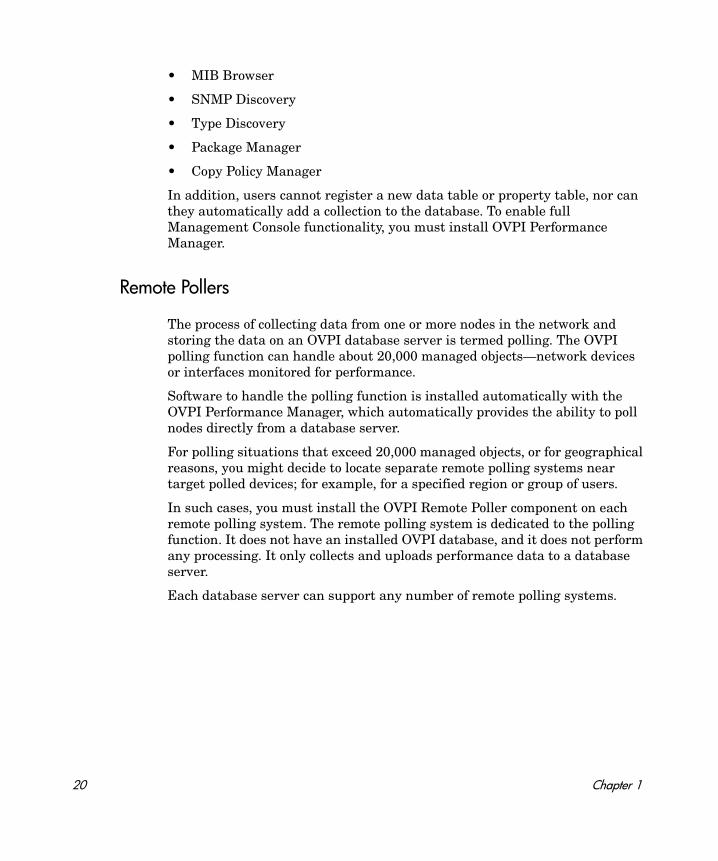
• MIB Browser
• SNMP Discovery
• Type Discovery
• Package Manager
• Copy Policy Manager
In addition, users cannot register a new data table or property table, nor can they automatically add a collection to the database. To enable full Management Console functionality, you must install OVPI Performance Manager.
Remote Pollers
The process of collecting data from one or more nodes in the network and storing the data on an OVPI database server is termed polling. The OVPI polling function can handle about 20,000 managed objects—network devices or interfaces monitored for performance.
Software to handle the polling function is installed automatically with the OVPI Performance Manager, which automatically provides the ability to poll nodes directly from a database server.
For polling situations that exceed 20,000 managed objects, or for geographical reasons, you might decide to locate separate remote polling systems near target polled devices; for example, for a specified region or group of users.
In such cases, you must install the OVPI Remote Poller component on each remote polling system. The remote polling system is dedicated to the polling function. It does not have an installed OVPI database, and it does not perform any processing. It only collects and uploads performance data to a database server.
Each database server can support any number of remote polling systems.
20 Chapter 1

OVPI Coexistence
The following OpenView products can coexist with OVPI 5.30:
• NNM 7.5x
• HP Performance Agent 4.70
• HP Operations agent 7x, 8x
Introduction to OVPI Installation 21
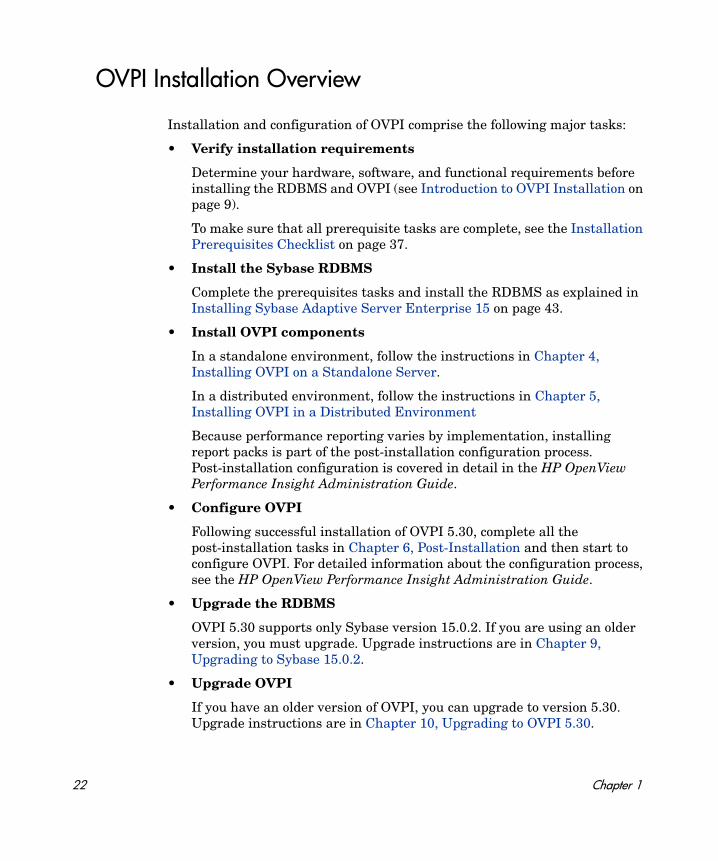
OVPI Installation Overview
Installation and configuration of OVPI comprise the following major tasks:
• Verify installation requirements
Determine your hardware, software, and functional requirements before installing the RDBMS and OVPI (see Introduction to OVPI Installation on page 9).
To make sure that all prerequisite tasks are complete, see the Installation Prerequisites Checklist on page 37.
• Install the Sybase RDBMS
Complete the prerequisites tasks and install the RDBMS as explained in Installing Sybase Adaptive Server Enterprise 15 on page 43.
• Install OVPI components
In a standalone environment, follow the instructions in Chapter 4, Installing OVPI on a Standalone Server.
In a distributed environment, follow the instructions in Chapter 5, Installing OVPI in a Distributed Environment
Because performance reporting varies by implementation, installing report packs is part of the post-installation configuration process. Post-installation configuration is covered in detail in the HP OpenView Performance Insight Administration Guide.
• Configure OVPI
Following successful installation of OVPI 5.30, complete all the post-installation tasks in Chapter 6, Post-Installation and then start to configure OVPI. For detailed information about the configuration process, see the HP OpenView Performance Insight Administration Guide.
• Upgrade the RDBMS
OVPI 5.30 supports only Sybase version 15.0.2. If you are using an older version, you must upgrade. Upgrade instructions are in Chapter 9, Upgrading to Sybase 15.0.2.
• Upgrade OVPI
If you have an older version of OVPI, you can upgrade to version 5.30. Upgrade instructions are in Chapter 10, Upgrading to OVPI 5.30.
22 Chapter 1
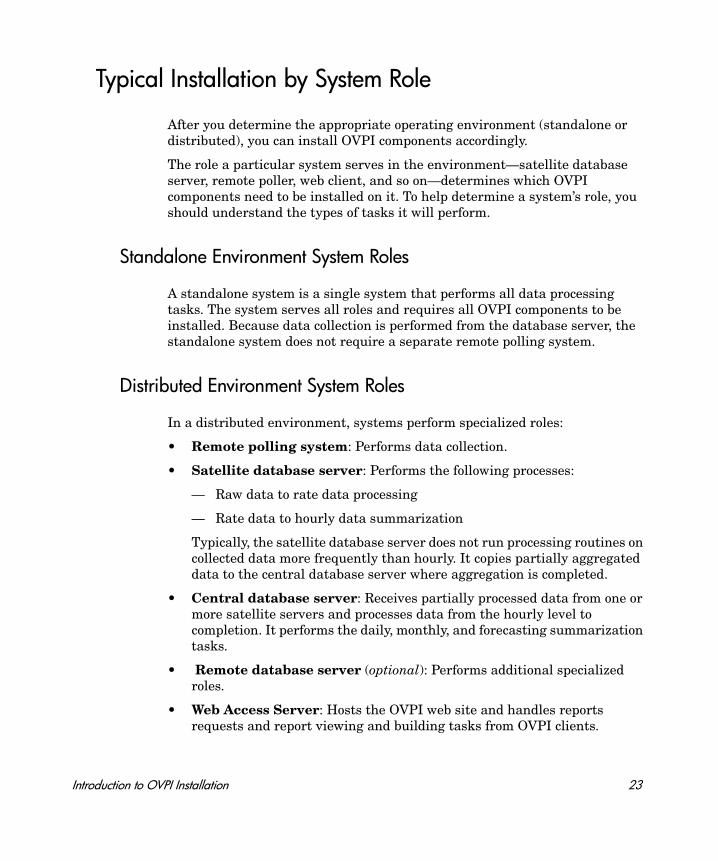
Typical Installation by System Role
After you determine the appropriate operating environment (standalone or distributed), you can install OVPI components accordingly.
The role a particular system serves in the environment—satellite database server, remote poller, web client, and so on—determines which OVPI components need to be installed on it. To help determine a system’s role, you should understand the types of tasks it will perform.
Standalone Environment System Roles
A standalone system is a single system that performs all data processing tasks. The system serves all roles and requires all OVPI components to be installed. Because data collection is performed from the database server, the standalone system does not require a separate remote polling system.
Distributed Environment System Roles
In a distributed environment, systems perform specialized roles:
• Remote polling system: Performs data collection.
• Satellite database server: Performs the following processes:
— Raw data to rate data processing
— Rate data to hourly data summarization
Typically, the satellite database server does not run processing routines on collected data more frequently than hourly. It copies partially aggregated data to the central database server where aggregation is completed.
• Central database server: Receives partially processed data from one or more satellite servers and processes data from the hourly level to completion. It performs the daily, monthly, and forecasting summarization tasks.
• Remote database server (optional): Performs additional specialized roles.
• Web Access Server: Hosts the OVPI web site and handles reports requests and report viewing and building tasks from OVPI clients.
Introduction to OVPI Installation 23
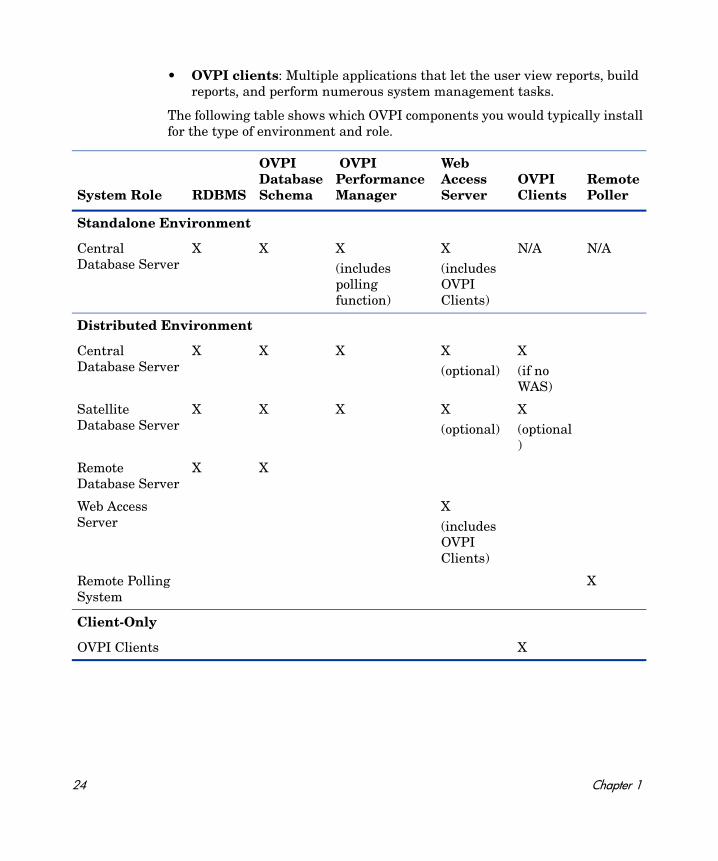
• OVPI clients: Multiple applications that let the user view reports, build reports, and perform numerous system management tasks.
The following table shows which OVPI components you would typically install for the type of environment and role.
System Role RDBMS
OVPI Database Schema
OVPIPerformance Manager
Web Access Server
OVPI Clients
Remote Poller
Standalone Environment
Central Database Server
X X X(includes polling function)
X(includes OVPI Clients)
N/A N/A
Distributed Environment
Central Database Server
X X X X(optional)
X(if no WAS)
Satellite Database Server
X X X X(optional)
X(optional)
Remote Database Server
X X
Web Access Server
X(includes OVPI Clients)
Remote Polling System
X
Client-Only
OVPI Clients X
24 Chapter 1
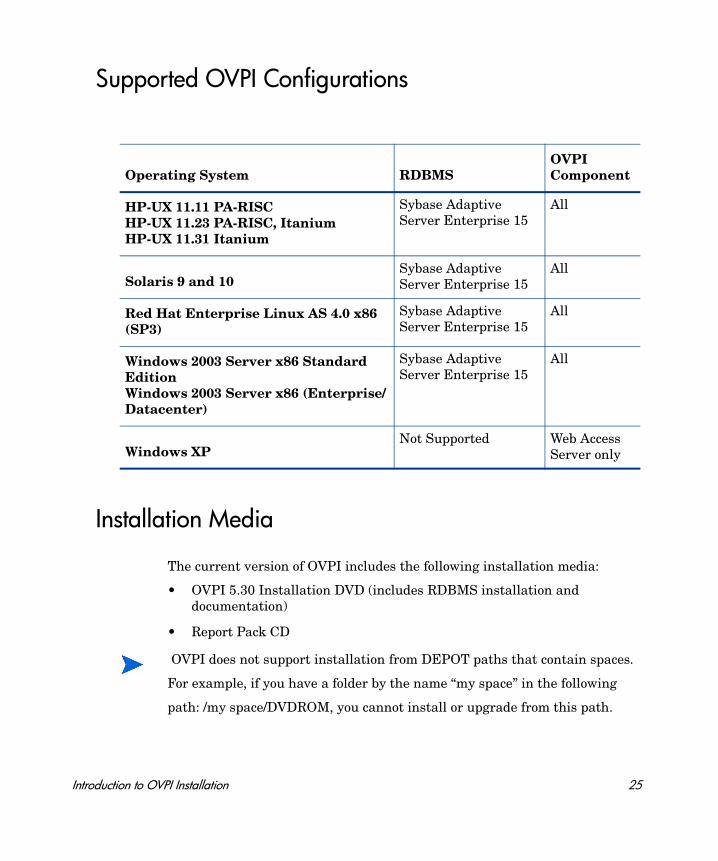
Supported OVPI Configurations
Installation Media
The current version of OVPI includes the following installation media:
• OVPI 5.30 Installation DVD (includes RDBMS installation and documentation)
• Report Pack CD
Operating System RDBMSOVPI Component
HP-UX 11.11 PA-RISCHP-UX 11.23 PA-RISC, ItaniumHP-UX 11.31 Itanium
Sybase Adaptive Server Enterprise 15
All
Solaris 9 and 10 Sybase Adaptive Server Enterprise 15
All
Red Hat Enterprise Linux AS 4.0 x86 (SP3)
Sybase Adaptive Server Enterprise 15
All
Windows 2003 Server x86 Standard EditionWindows 2003 Server x86 (Enterprise/Datacenter)
Sybase Adaptive Server Enterprise 15
All
Windows XP Not Supported Web Access
Server only
OVPI does not support installation from DEPOT paths that contain spaces.
For example, if you have a folder by the name “my space” in the following
path: /my space/DVDROM, you cannot install or upgrade from this path.
Introduction to OVPI Installation 25

26 Chapter 1
2 Installation Prerequisites
HP strongly recommends that you read the HP OpenView Performance Insight Release Notes before you install. Release notes provide an overview of new features, bug fixes, last-minute changes made to OVPI, and a list of available Report Packs for the release.
Convert Evaluation to Licensed Installation
If you have downloaded and installed the evaluation version of PI 5.20 and you want to convert that installation to a licensed installation, follow these steps:
1 Close all PI GUIs and Website browsers.
2 Insert the PI 5.20 Production DVD in the CD-ROM drive.
3 Browse to the “setup” command file for the Production software.
4 From the command line, type (in lower case): setup -noeval
5 Close the PI Installation GUI if it appears.
6 Restart the PI HTTP server.
Note: This procedure is not a reinstallation. The evaluation version is identical to the production version except that the evaluation version displayed "Unlicensed Software" watermarks on reports and with the Help About version information. The installer will simply change your installation to remove the watermark.
27
Pre-Installation Tasks
The following tasks need to be completed in the sequence given before you can install the RDBMS or OVPI components.
Task 1: Update your operating system software
Install all required patches to your operating system software. Contact your HP sales representative for the most recent list of patches required.
1 Verify patches for release levels.
Make sure that your operating system is at the correct release level. You must install operating system patches before installing the RDBMS.
Windows Systems
a From the Windows Explorer Help menu, select About Windows.
b Find the service pack number on the Version line. In the following example, xxxx is the build number and n is the service pack number:
Version 5.0 (Build xxxx: Service Pack n)
Windows 2003 requires Service Pack 1.
HP-UX Systems
Type the following command:
/usr/sbin/swlist -l product | fgrep PH
Solaris Systems
Type the following command:
showrev -p
Required patches for Solaris are the following:
Red Hat Linux Systems
Type the following command:
rpm -q -a
Solaris 10 Solaris 10 Recommended Patch Cluster, Sep/07/06
Solaris 9 Solaris 9 Recommended Patch Cluster, Oct/14/05
28 Chapter 2
If your system is not at the current patch level for the release, download and install the required patches before continuing.
2 Install HP-UX-specific patches.
HP-UX11.11:
HP-UX11.23 (PA and IA):
HP-UX11.31 (IA):
You can download the patch from http://www1.itrc.hp.com/
3 Install Red Hat Linux-specific patches.
Linux (RHEL4): Update 3
Task 2: Verify that patches are running for Java
OVPI includes Java 1.4.2.13, which will automatically load onto your system during OVPI installation. However, Java may not run properly unless you applied the patches required for your operating system.
You must install all operating system patches before you install the Sybase database or OVPI. For your convenience, the patches that were required and tested at the time this guide was printed are included. Contact your HP sales representative for the most recent list of patches required.
Viewing Installed Patches
GOLDAPPS11i B.11.11.0612.459 Applications Patches for HP-UX 11i v1, December 2006
GOLDBASE11i B.11.11.0612.459 Base Patches for HP-UX 11i v1, December 2006
QPKAPPS B.11.23.0706.064 Quality Pack Depot for 11i v2, June 2007
QPKBASE B.11.23.0706.064 Quality Pack Depot for 11i v2, June 2007
QPKBASE B.11.31.0709.312a Quality Pack Depot for 11i v3, September 2007
QPKBASE B.11.31.0709.312a Quality Pack Depot for 11i v3, September 2007
Installation Prerequisites 29
To determine which patches are installed on your system, use the following commands:
HP-UX Systems:
/usr/sbin/swlist -l product | fgrep PH
Solaris Systems:
showrev -p
Windows Systems:
a From the Windows Explorer Help menu, select About Windows.
b Find the Service Pack number on the Version line. In the following example, xxxx is the build number and n is the service pack number: Version 5.0 (Build xxxx: Service Pack n).
Required Java Patches
To locate the latest Java patches for your operating system, go to the following URLs:
HP-UX Systems: http://www.hp.com/products1/unix/java/patches/index.html
Solaris Systems: http://java.sun.com/j2se/1.4/download.html and find the Solaris OS Patches section
Windows Systems: http://windowsupdate.microsoft.com
URLs are subject to change without notice.
Task 3: (For HP-UX only) Install HP-UX Measurement Interface for 11i product
The new OVPI monitoring feature requires the HP-UX Measurement Interface for 11i product to be installed so that OVPI system status can be monitored properly. The HP-UX Measurement Interface for 11i package is available on media distributed with HP-UX Mission Critical Operating Environment (MC-OE) and the HP-UX Enterprise Operating Environment bundles. It can also be obtained from the HP-UX Application Release distribution media.
If /opt/perf/lib/libnums.sl exists, the required files are installed on your system.
30 Chapter 2

HP-UX systems that have GlancePlus or OpenView Performance Agent installed will already have the required files needed by the OVPI monitoring feature, so no additional prerequisite product installation is required on these systems.
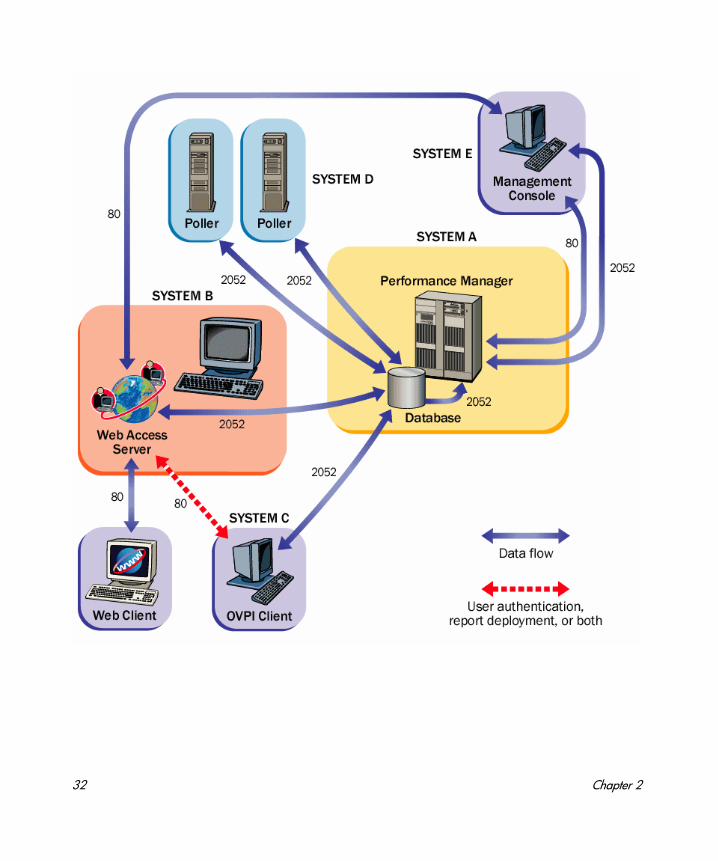
Task 4: Identify ports for network connectivity
Ports establish connectivity between OVPI systems. OVPI uses the following default port numbers.
The following example shows an OVPI configuration using the default port numbers.
OVPI Component Default Port Number
Sybase RDBMS 5000 (Windows systems) 2052 (UNIX Systems)
Web Access Server(Includes the management server, which also uses port 80 by default. If any other web server is running on port 80, use a different port for OVPI; for example, port 8080.)
80 (SSL not enabled) 443 (SSL enabled)
Management Console 80
If you are using firewall software, you must open the OVPI ports in the firewall. For instructions, see your firewall documentation.
Installation Prerequisites 31
32 Chapter 2
Polling and SNMP Connectivity
Any system that gathers data from the network requires connectivity through intermediate firewalls to reach the network devices. It is recommended that the remote poller system and polled devices be outside the firewall, and that the remote poller connects through the firewall to the database server. This reduces the number of connections through the firewall.
In situations where a satellite database server is controlling polling systems, you may need to create specialized polling policies to help divide the devices to be polled between polling systems. For information about creating polling policies, see the HP OpenView Performance Insight Administration Guide.
Client Connectivity
To view reports using a web browser, you must have HTTP connectivity between your systems and the Web Access Server.
To use the Report Viewer or Report Builder applications, you must have connectivity between the client system and the Web Access Server system and the database server on the appropriate ports. When installing clients, specify the same Web Access Server and port number that was specified on the Web Access Server reference page. For more information about installing the Web Access Server, see Installing the Web Access Server on page 138.
Task 5: Plan for web access
1 Verify that you are using the supported web browsers.
Web users must be able to connect to one of the following web browsers:
— Microsoft Internet Explorer 5.5 or later
— Mozilla Firefox 1.5 or later
2 Verify that Java scripting is enabled.
Your web browser must have Java scripting enabled. Otherwise, you will not be able to view the Navigation frame for the Web Access Server application.
To enable Java scripting, do one of the following, depending on the web browser:
Internet Explorer
a From the browser’s Tools menu, select Internet Options. The Internet Options dialog box opens.
Installation Prerequisites 33
b Select the Security tab. Click Internet for the Web content zone, and then click Custom Level. The Security Settings dialog box opens.
c Scroll down the list of settings and locate the Scripting settings. Select Enable under Active scripting.
d Click OK in the Security Settings dialog box.
e Click OK in the Internet Options dialog box.
Mozilla Firefox
a From the browser’s Tools menu, select Options.
The Options dialog box opens.
b Select the Content tab and then select Enable JavaScript check box.
c Click OK in the Options dialog box.
Task 6: Install the SNMP security pack for SNMPv3 nodes
If you plan to collect data from SNMPv3 nodes, you must install the SNMP Security Pack product, available from SNMP Research International, Inc. Go to the SNMP web site for information:
http://www.snmp.com
Install the following version, depending on your operating system:
• Windows Systems: Version 16.1.0.35
• UNIX Systems: Version 16.1.0.19
You must configure your SNMPv3 nodes following installation. For configuration details, see the HP OpenView Performance Insight Administration Guide.
Task 7: Integrate with Network Node Manager
1 Verify that you are running HP OpenView Network Node Manager (NNM) version 7.5 or later.
If your system is already running NNM version 7.5, you can install OVPI on the system. OVPI and NNM will share components that enable the OVPI MIB Browser and Collection Wizard tools to function. These tools will not function with earlier versions of NNM.
34 Chapter 2
HP recommends upgrading NNM to version 7.5 or later before installing OVPI.
2 Stop NNM processes before installing OVPI.
To avoid errors from occurring during installation, stop NNM processes before installing OVPI. Follow these steps.
Windows Systems
a From the Start button on the Windows task bar, click Programs→HP OpenView→Network Node Manager Admin, and select NNM Services - Stop.
b Verify that the NNM processes are stopped. From the Start button on the Windows task bar, click Programs→HP OpenView→Network Node Manager Admin, and select NNM Services - Status.
c Close the Services window. Otherwise, the OVPI Services will fail to install.
UNIX Systems
a At the command prompt, type:
ovstop -c
b Verify that the NNM processes have stopped. At the command prompt, type:
ovstatus -c
Task 8: Stop Compaq Insight Manager services (HP Compaq systems only)
If you intend to install OVPI on a Compaq system, you must stop the Compaq Insight Manager services.
Task 9: (Windows systems only) Disable HP-proprietary memory management devices
If your environment includes Windows systems that are running HP-proprietary memory management services, you must disable those services by using the Services Manager to set those services to “disabled.” The services to disable include:
• HpComponent
You cannot install OVPI with any NNM version prior to NNM 6.4.
Installation Prerequisites 35
• HPEventLog
• HPFpcSvc
• HpLerSvc
• HPSdnSvc
Task 10: UNIX systems only) Verify that you are using supported desktops
OVPI supports the Common Desktop Environment (CDE). OVPI does not support OpenWindows.
Plan for internationalization and localization
OVPI supports internationalization. You can install OVPI on any language version of the supported operating systems. Database support is internationalized for Sybase.
OVPI version 5.30 is provided in English, Simplified Chinese, and Japanese only.
Install db3 Module (Red Hat Linux Systems Only)
If you intend to install OVPI client applications on a Red Hat Linux system, you must install the Linux system with the db3 module (rpm). The module is located on the Red Hat installation CD, but is not automatically installed. You must install it to use OVPI.
36 Chapter 2
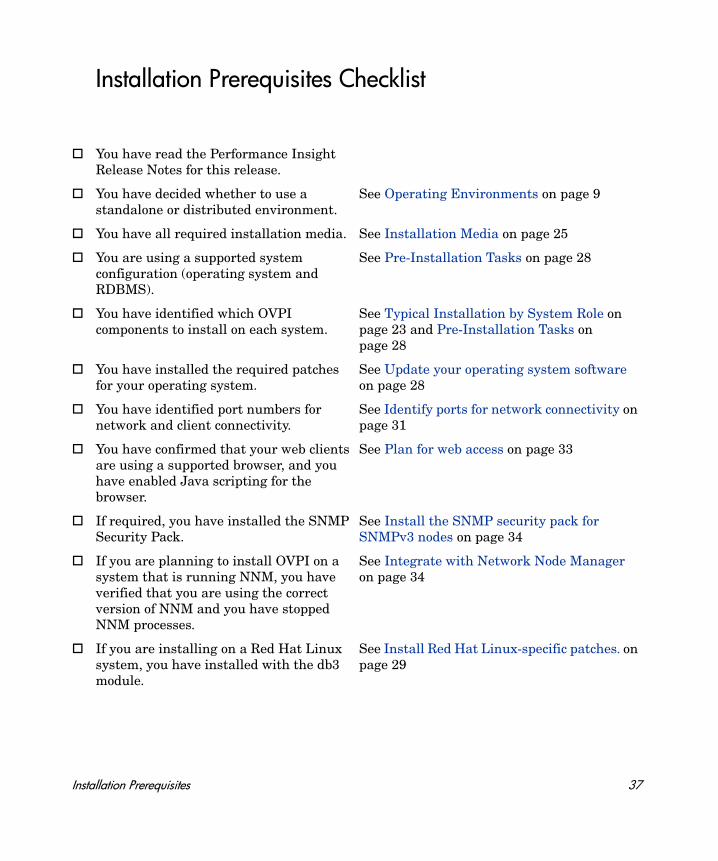
Installation Prerequisites Checklist
You have read the Performance Insight Release Notes for this release.
You have decided whether to use a standalone or distributed environment.
See Operating Environments on page 9
You have all required installation media. See Installation Media on page 25
You are using a supported system configuration (operating system and RDBMS).
See Pre-Installation Tasks on page 28
You have identified which OVPI components to install on each system.
See Typical Installation by System Role on page 23 and Pre-Installation Tasks on page 28
You have installed the required patches for your operating system.
See Update your operating system software on page 28
You have identified port numbers for network and client connectivity.
See Identify ports for network connectivity on page 31
You have confirmed that your web clients are using a supported browser, and you have enabled Java scripting for the browser.
See Plan for web access on page 33
If required, you have installed the SNMP Security Pack.
See Install the SNMP security pack for SNMPv3 nodes on page 34
If you are planning to install OVPI on a system that is running NNM, you have verified that you are using the correct version of NNM and you have stopped NNM processes.
See Integrate with Network Node Manager on page 34
If you are installing on a Red Hat Linux system, you have installed with the db3 module.
See Install Red Hat Linux-specific patches. on page 29
Installation Prerequisites 37
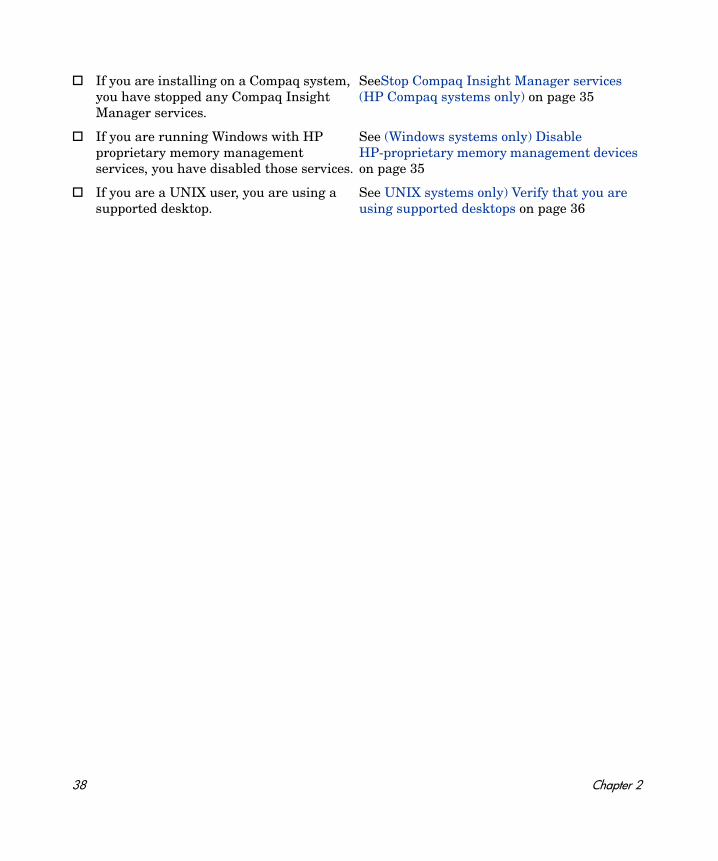
If you are installing on a Compaq system, you have stopped any Compaq Insight Manager services.
SeeStop Compaq Insight Manager services (HP Compaq systems only) on page 35
If you are running Windows with HP proprietary memory management services, you have disabled those services.
See (Windows systems only) Disable HP-proprietary memory management devices on page 35
If you are a UNIX user, you are using a supported desktop.
See UNIX systems only) Verify that you are using supported desktops on page 36
38 Chapter 2
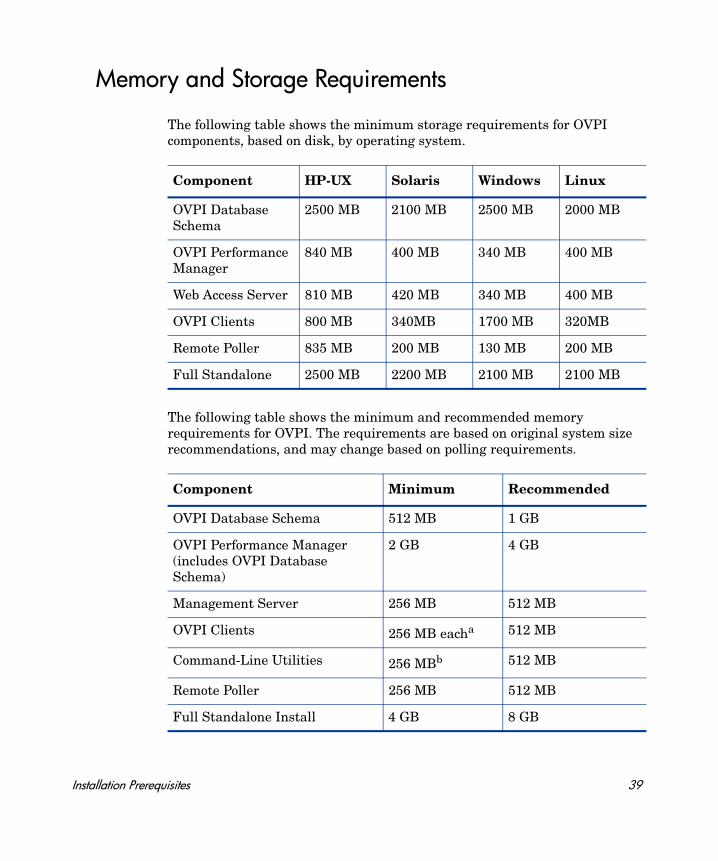
Memory and Storage Requirements
The following table shows the minimum storage requirements for OVPI components, based on disk, by operating system.
The following table shows the minimum and recommended memory requirements for OVPI. The requirements are based on original system size recommendations, and may change based on polling requirements.
Component HP-UX Solaris Windows Linux
OVPI Database Schema
2500 MB 2100 MB 2500 MB 2000 MB
OVPI Performance Manager
840 MB 400 MB 340 MB 400 MB
Web Access Server 810 MB 420 MB 340 MB 400 MB
OVPI Clients 800 MB 340MB 1700 MB 320MB
Remote Poller 835 MB 200 MB 130 MB 200 MB
Full Standalone 2500 MB 2200 MB 2100 MB 2100 MB
Component Minimum Recommended
OVPI Database Schema 512 MB 1 GB
OVPI Performance Manager (includes OVPI Database Schema)
2 GB 4 GB
Management Server 256 MB 512 MB
OVPI Clients 256 MB eacha 512 MB
Command-Line Utilities 256 MBb 512 MB
Remote Poller 256 MB 512 MB
Full Standalone Install 4 GB 8 GB
Installation Prerequisites 39
The OVPI Database Schema is set to between 50 to 60 percent of total memory. The Management Server, OVPI clients, Command-Line Utilities, and Remote Poller are installed at minimum (1 to 2 GB of memory). The remaining processing space is used by the OVPI Performance Manager. Make sure that this space is large enough to handle polling and data loading.
To change the amount of memory for Report Builder, Report Viewer, or Web Access Server after installation, change the Java settings using the Web Access Server. See the HP OpenView Performance Insight Administration Guide for details.
Installation Parameter Values
OVPI provides default values for many installation parameters. If you want to change any of the defaults, you can avoid delays during installation by identifying the changes ahead of time.
If you change the default path settings for Windows systems, make sure you do not add spaces in the directory path.
a. If you plan to have more than one component running at the same time, the memory requirements are additive. For example, if you run the Management Console, Report Builder, and the Web Access Server simultaneously on one system, 768 MB is the minimum memory requirement. In a standalone installation, the Web Access Server and Management Server use the same Java Virtual Memory (JVM). The minimum, therefore, is still 256 MB.
b. Command line utilities use far less memory.
40 Chapter 2
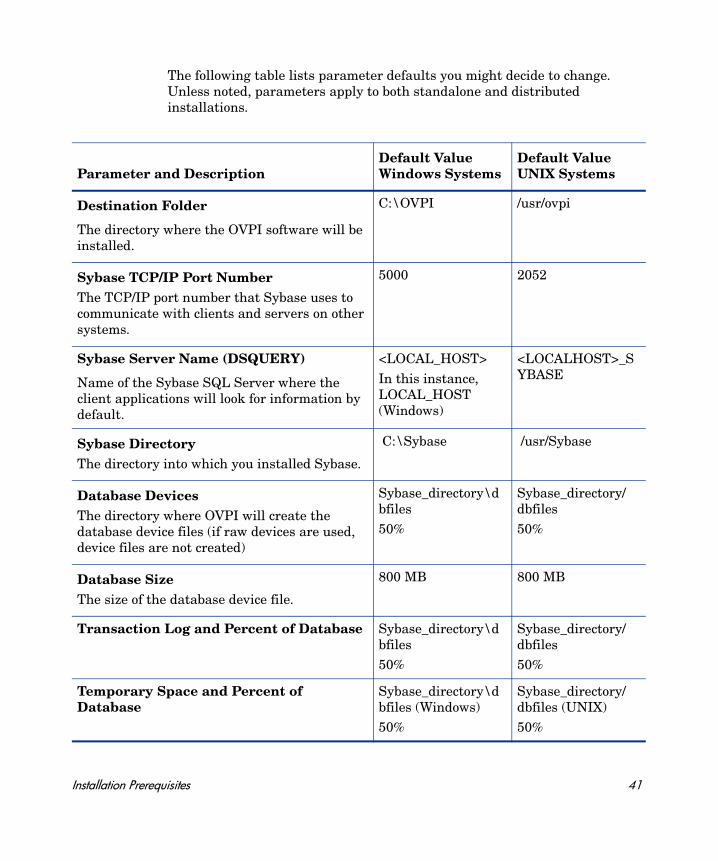
The following table lists parameter defaults you might decide to change. Unless noted, parameters apply to both standalone and distributed installations.
Parameter and DescriptionDefault ValueWindows Systems
Default ValueUNIX Systems
Destination Folder
The directory where the OVPI software will be installed.
C:\OVPI /usr/ovpi
Sybase TCP/IP Port NumberThe TCP/IP port number that Sybase uses to communicate with clients and servers on other systems.
5000 2052
Sybase Server Name (DSQUERY)
Name of the Sybase SQL Server where the client applications will look for information by default.
<LOCAL_HOST> In this instance, LOCAL_HOST (Windows)
<LOCALHOST>_SYBASE
Sybase DirectoryThe directory into which you installed Sybase.
C:\Sybase /usr/Sybase
Database Devices The directory where OVPI will create the database device files (if raw devices are used, device files are not created)
Sybase_directory\dbfiles50%
Sybase_directory/dbfiles50%
Database Size The size of the database device file.
800 MB 800 MB
Transaction Log and Percent of Database Sybase_directory\dbfiles50%
Sybase_directory/dbfiles50%
Temporary Space and Percent of Database
Sybase_directory\dbfiles (Windows)50%
Sybase_directory/dbfiles (UNIX)50%
Installation Prerequisites 41
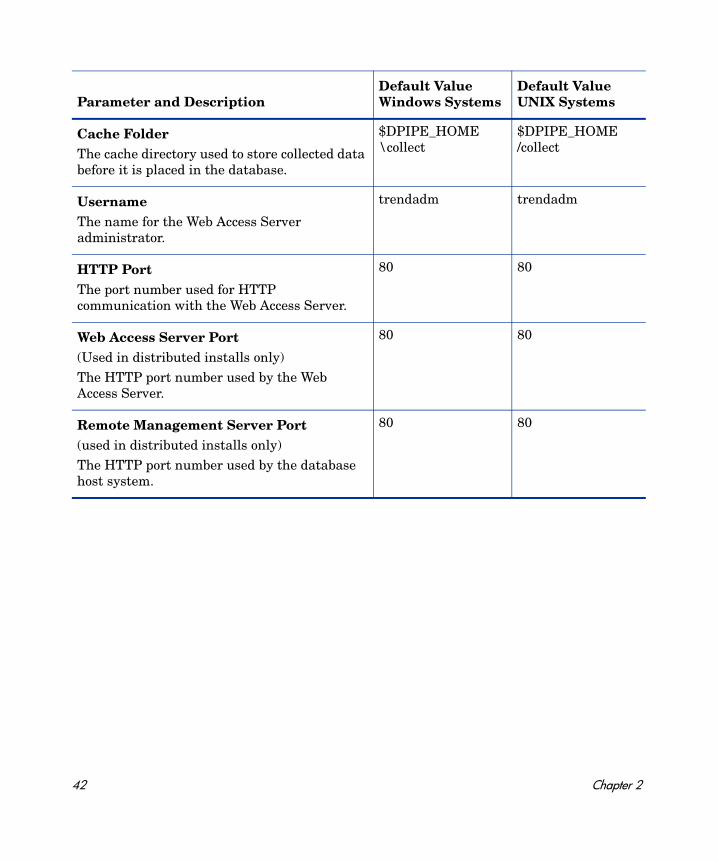
Cache Folder The cache directory used to store collected data before it is placed in the database.
$DPIPE_HOME \collect
$DPIPE_HOME /collect
Username The name for the Web Access Server administrator.
trendadm trendadm
HTTP Port The port number used for HTTP communication with the Web Access Server.
80 80
Web Access Server Port (Used in distributed installs only)The HTTP port number used by the Web Access Server.
80 80
Remote Management Server Port (used in distributed installs only)The HTTP port number used by the database host system.
80 80
Parameter and DescriptionDefault ValueWindows Systems
Default ValueUNIX Systems
42 Chapter 2
3 Installing Sybase Adaptive Server Enterprise 15
You must install the Sybase RDBMS, and it must be running, before you can install OVPI.
Sybase Installation Prerequisites
• Review the Sybase documentation.
Before installing Sybase, review the Sybase installation guides, the release notes, and the readme files. Sybase documents are available online at http://www.sybase.com/support/manuals/
• Consult with a database administrator.
If possible, consult with an Sybase database administrator before installing Sybase. A database administrator can help you design and set up the Sybase database for optimal use by OVPI.
• Follow general performance guidelines.
Whenever possible adhere to the following guidelines when installing Sybase for use with OVPI. The intent of these recommendations is to reduce disk contention. In general, the more disk heads moving at the same time, the faster your database can operate.
— Install Sybase and OVPI on separate physical devices.
— If possible, put the data datafile on separate devices from the index datafiles.
— If possible, put the tempdb on a separate device.
— If possible, put the dpipe_log on a separate device.
• Make sure that you have the following patches for HP-UX 11.11 for both 32-bit and 64-bit versions:
43
— PHKL_27688
— PHCO_31878
Installed bundle patches for HP-UX:
— Patch Level Description
— Bundle B.11.11 Patch bundle
— Bundle11i B.11.11.0306.1 Required patch bundle
— FEATURE11-11 B.11.11.0209.5 Feature enablement patches
— GOLDAPPS11i B.11.11.0412.5 Gold applications patches
— GOLDBASE11i B.11.11.0412.5 Gold base patches
— HWEnable11i B.11.11.0412.5 Hardware enablement patches
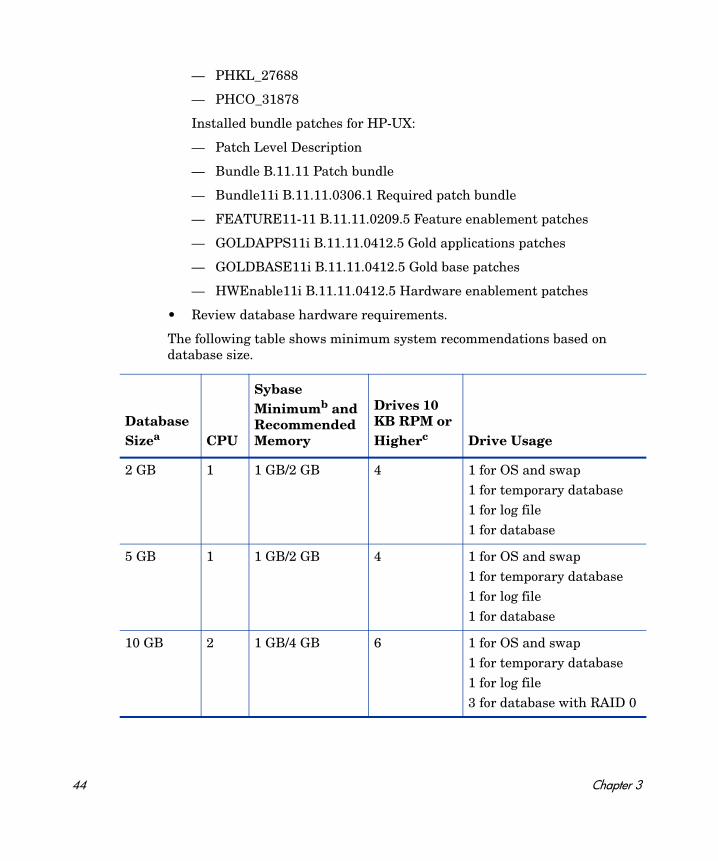
• Review database hardware requirements.
The following table shows minimum system recommendations based on database size.
Database Sizea CPU
Sybase Minimumb and Recommended Memory
Drives 10 KB RPM or Higherc Drive Usage
2 GB 1 1 GB/2 GB 4 1 for OS and swap1 for temporary database1 for log file1 for database
5 GB 1 1 GB/2 GB 4 1 for OS and swap1 for temporary database1 for log file1 for database
10 GB 2 1 GB/4 GB 6 1 for OS and swap1 for temporary database1 for log file3 for database with RAID 0
44 Chapter 3
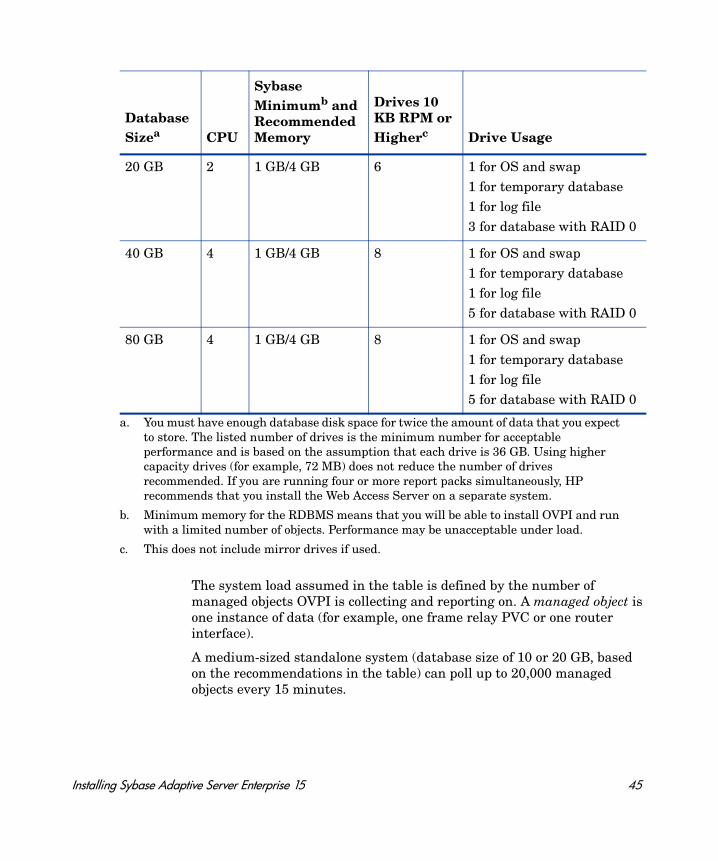
The system load assumed in the table is defined by the number of managed objects OVPI is collecting and reporting on. A managed object is one instance of data (for example, one frame relay PVC or one router interface).
A medium-sized standalone system (database size of 10 or 20 GB, based on the recommendations in the table) can poll up to 20,000 managed objects every 15 minutes.
20 GB 2 1 GB/4 GB 6 1 for OS and swap1 for temporary database1 for log file3 for database with RAID 0
40 GB 4 1 GB/4 GB 8 1 for OS and swap1 for temporary database1 for log file5 for database with RAID 0
80 GB 4 1 GB/4 GB 8 1 for OS and swap1 for temporary database1 for log file5 for database with RAID 0
a. You must have enough database disk space for twice the amount of data that you expect to store. The listed number of drives is the minimum number for acceptable performance and is based on the assumption that each drive is 36 GB. Using higher capacity drives (for example, 72 MB) does not reduce the number of drives recommended. If you are running four or more report packs simultaneously, HP recommends that you install the Web Access Server on a separate system.
b. Minimum memory for the RDBMS means that you will be able to install OVPI and run with a limited number of objects. Performance may be unacceptable under load.
c. This does not include mirror drives if used.
Database Sizea CPU
Sybase Minimumb and Recommended Memory
Drives 10 KB RPM or Higherc Drive Usage
Installing Sybase Adaptive Server Enterprise 15 45

A distributed configuration typically comprises a separate reporting server (Web Access Server), satellite servers, and a central server. The satellite server performs hourly roll-ups and transfers the hourly data to the central server. A large-sized satellite server can poll up to 30,000 interfaces at 15-minute intervals. A central server that is not polling can support four satellite servers without specific tuning.
• Determine storage and memory requirements for Sybase.
The following are the minimum storage requirements.
For instructions to increase the size of the Sybase database after OVPI is installed, see the Performance Insight Administration Guide.
When determining the amount of memory Sybase requires to run, use a scaled algorithm that is based on the system total memory.
The following table shows a scaled algorithm for running Sybase that is based on the system total memory.
• Determine Device Size and Addressable Memory Limits
For large systems, a second disk controller is recommended.
Component HP-UX Solaris WindowsRed Hat Linux
Executables 367 MB 358 MB 99 MB 850 MB
Master Database 50 MB 50 MB 30 MB 50 MB
Stored Procedures Database
60 MB 60 MB 60 MB 120 MB
Installation Total 477 MB 468 MB 189 MB 1020 MB
System Physical Memory Percentage Required by Sybase
1 GB or less 50% physical memory
1 GB or greater 60% physical memory
46 Chapter 3
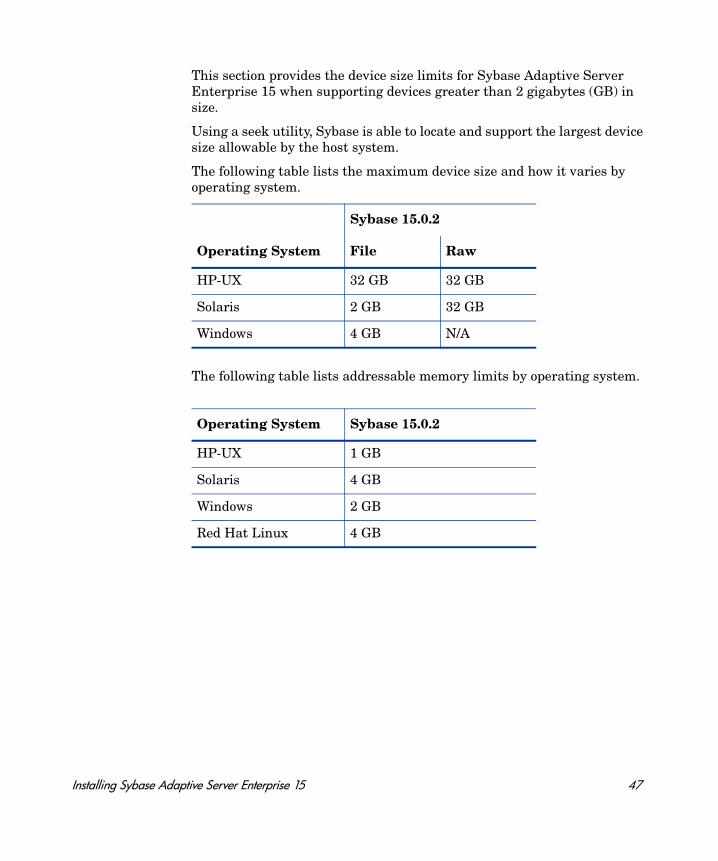
This section provides the device size limits for Sybase Adaptive Server Enterprise 15 when supporting devices greater than 2 gigabytes (GB) in size.
Using a seek utility, Sybase is able to locate and support the largest device size allowable by the host system.
The following table lists the maximum device size and how it varies by operating system.
The following table lists addressable memory limits by operating system.
Sybase 15.0.2
Operating System File Raw
HP-UX 32 GB 32 GB
Solaris 2 GB 32 GB
Windows 4 GB N/A
Operating System Sybase 15.0.2
HP-UX 1 GB
Solaris 4 GB
Windows 2 GB
Red Hat Linux 4 GB
Installing Sybase Adaptive Server Enterprise 15 47
Prerequisite for UNIX Systems Only
If you plan to install Sybase on a UNIX system, you must do the following before beginning the installation:
• Reconfigure the kernel and then reboot the system. You can use the SAM utility or the command line.
• Determine whether you want to install the OVPI database on a UNIX file system or on a raw partition. If you opt for raw partition, you must set up the raw partitions before you install the Sybase database. For more information, see Using a Raw Partition or a UNIX File System for Sybase Installation on page 53.
It is recommended that you check the version of Sybase installed on your system before installing OVPI. You should have Sybase 15.0.2 installed on your system to install Performance Insight 5.30. For details, see Chapter 4, Installing OVPI on a Standalone Server.
Using the SAM Utility to Reconfigure the Kernel on HP-UX
Follow these steps:
1 Log on and start the SAM utility.
a Log on as root.
b Invoke the SAM utility (typically, from the /usr/sbin directory). The System Administration Manager window opens.
c Double-click the Kernel Configuration icon. The SAM Areas: Kernel Configuration area appears in the System Administration Manager window.
d Double-click the Configurable Parameters icon. The Kernel Configuration window opens.
2 Configure the maximum number of threads per process.
a Select max_thread_proc from the list of configurable parameters. The max_thread_proc entry is highlighted.
b From the Action menu, select Modify Configurable Parameter. The Modify Configurable Parameter window opens.
48 Chapter 3
c Select Specify New Formula/Value and type the following value in the Formula/Value box:
1024
If you are unable to set max_thread_proc to 1024, you may need to adjust other dependent kernel parameters; for example maxusers.
d Click OK to close the Modify Configurable Parameter window. The Kernel Configuration window opens.
3 Configure the maximum number of concurrent users.
a Select maxusers from the list of configurable parameters. The maxusers entry is highlighted.
b From the Action menu, select Modify Configurable Parameter. The Modify Configurable Parameter window opens.
c Select Specify New Formula/Value and type the following value in the Formula/Value box:
124
d Click OK to close the Modify Configurable Parameter window. The Kernel Configuration window opens.
4 Configure the maximum amount of RAM for Sybase.
a Select shmmax from the list of configurable parameters. The shmmax entry is highlighted.
b From the Action menu, select Modify Configurable Parameter. The Modify Configurable Parameter window opens.
c Select Specify New Formula/Value, and then enter the following value in the Formula/Value box:
1073741824
d This defines the maximum amount of your system’s RAM that can be dedicated to Sybase. The value you entered (1073741824) is the total number of bytes in 1 GB. You can adjust this to a maximum of 2147483648 (2 GB) depending on your HP-UX patch installation.
e Click OK to close the Modify Configurable Parameter window. The Kernel Configuration window opens.
Installing Sybase Adaptive Server Enterprise 15 49
5 Enable asynchronous disk I/O.
a From the SAM Kernel Configuration menu, select Drivers.
b Select asyncdsk from the list of drivers. The asyncdsk driver is highlighted.
c From the Action menu, choose Add Driver to Kernel. The pending state for asyncdsk should be set to In.
6 Build the kernel, reboot, and install.
a From the Action menu, choose Process New Kernel and then reboot the system.
b Click Yes to rebuild the kernel and to reboot the system.
c Because the user ID of the user booting Adaptive Server and Backup Server must be the owner of the /dev/async device file, type the following commands as root at the UNIX command prompt:
/etc/mknod /dev/async c 101 4 chmod 0660 /dev/async
d Continue with the installation process by installing Sybase. For more information, see Installing Sybase 15.0.2 on UNIX Systems on page 72.
Using the Command Line to Reconfigure the Kernel on HP-UX
Follow these steps:
1 Log on to the system and extract the system file.
a Log on as root.
b To extract the system file from the running kernel, type the following command:
cd /stand/build /usr/lbin/sysadm/system_prep -v -ssystem
HP strongly recommends that you enable asynchronous disk I/O, whether or not you intend to use it. If you install the OVPI database on a raw partition, the database engine can use asynchronous I/O. The steps that follow describe how to do this.
50 Chapter 3
2 Configure parameters.
Edit the “Tunable Parameters” section of the system file by adding or modifying the parameters shmmax, maxusers, and max_thread_proc. For example, you might use the following settings:
shmmax 1073741824
This defines the maximum amount of your system’s RAM that can be dedicated to Sybase. The value you entered (1073741824) is the total number of bytes in 1 GB. You can adjust this to a maximum of 2147483648 (2 GB) depending on your HP-UX patch installation. (For more information, contact Support.
maxusers 124 max_thread_proc 1024
If you are unable to set max_thread_proc to 1024, you may need to adjust other dependent kernel parameters; for example, maxusers.
3 Enable asynchronous I/O.
a Find the “Drivers/Subsystems” section of the file.
b Add the following line:
asyncdsk
4 Build the kernel.
a Build a system kernel in the current directory using the following command:
/usr/sbin/mk_kernel -ssystem
b Enter the following command sequence to complete the process:
mv /stand/system /stand/system.prev mv /stand/vmunix /stand/vmunix.prev mv /stand/build/system /stand/system mv /stand/build/vmunix_test /stand/vmunix
5 Reboot and install.
HP strongly recommends that you enable asynchronous disk I/O, whether or not you intend to use it. If you install the OVPI database on a raw partition, the database engine can use asynchronous I/O. Use the following steps to enable asynchronous I/O.
Installing Sybase Adaptive Server Enterprise 15 51
a Reboot your system.
b Because the user ID of the user booting Adaptive Server and Backup Server must be the owner of the /dev/async device file, type the following commands as root at the UNIX command prompt:
/etc/mknod /dev/async c 101 4 chmod 0660 /dev/async
c Continue with the installation process by installing Sybase. For more information, see Installing Sybase 15.0.2 on UNIX Systems on page 72.
Reconfiguring the Kernel on Solaris
Follow these steps:
1 Edit the Sybase system file.
a Open the /etc/system file using a text editor
b Modify the following command to reflect the total number of bytes (nnnnnnnnnn) that will be allocated to Sybase:
set shmsys:shminfo_shmmax=nnnnnnnnnn
For information about how much memory you need to allocate for Sybase, see page 46. The total number of bytes must meet or exceed the requirements listed.
For Solaris 8 and 9, you can specify up to 4294967295 (4 GB) whether or not you physically have this amount of memory available.
One gigabyte equals 1024³. The total number of bytes is, therefore, calculated as follows: number of gigabytes x 1024³. For example, the calculation for 4 GB would be 4 x 1024³ =4294967295.
c Modify the maxusers parameter. By default, this parameter is set to the number of megabytes of physical memory or 1024, whichever is lower. You cannot set it higher than 2048.
2 Reboot your system.
a Reboot your system.
b Because the user ID of the user booting Adaptive Server and Backup Server must be the owner of the /dev/async device file, type the following commands as root at the UNIX command prompt:
52 Chapter 3
/etc/mknod /dev/async c 101 4 chmod 0660 /dev/async
c Continue with the installation process by installing Sybase. For more information, see Installing Sybase 15.0.2 on UNIX Systems on page 72.
Reconfiguring the Kernel on Red Hat Linux
Follow these steps:
1 Edit the Sybase system file.
a Open the /etc/rc.d/rc.local file using a text editor.
b Modify the following command to reflect the total number of bytes (nnnnnnnnnn) that will be allocated to Sybase.
set kernel.shmmax=nnnnnnnnnn
The default value for operating system shared memory is usually 32 MB. For Red Hat Linux systems, HP recommends 1 GB (1000000000 bytes) as the minimum requirement. For information about how much memory you need to allocate for Sybase, see page 46.
2 Reboot your system.
a Reboot your system.
b Because the user ID of the user booting Adaptive Server and Backup Server must be the owner of the /dev/async device file, type the following commands as root at the UNIX command prompt:
/etc/mknod /dev/async c 101 4chmod 0660 /dev/async
c Continue with the installation process by installing Sybase. For more information, see Installing Sybase 15.0.2 on UNIX Systems on page 72.
Using a Raw Partition or a UNIX File System for Sybase Installation
This section describes the differences between installing the OVPI Sybase database on a raw partition (S0 and Veritas raw partitions are supported) or on a UNIX file system.
Installing Sybase Adaptive Server Enterprise 15 53
When you install OVPI, the database is installed on a UNIX file system by default.
• Raw Partition
If you use a raw partition, the effect is to partition or isolate your database from any other information that may be stored on that server. Such partitioning has important performance implications. The advantages are the following:
— All of the stored data resides in a single location. This can increase database efficiency and processing speed.
— In the event of a system crash, a partitioned database can be somewhat easier to recover.
— It is also much more difficult for an outside influence to interfere with the database.
The disadvantages are:
— Some OVPI users find that the performance advantages of installing Sybase on a raw partition are not significant for their systems. The installation process is more involved and may be unnecessary.
— Installing Sybase on a raw partition requires more of your server’s available disk space.
— You cannot use standard UNIX backup utilities to back up a raw partition. You must use Sybase’s backup and archive utilities to make a copy of the database.
• UNIX File System
If you use the UNIX file system, your database may be surrounded by and interspersed with other applications. The advantages are:
— Installing Sybase on the UNIX file system is a simpler process that you accomplish as part of the OVPI installation.
— Sybase can still operate at 80%+ of peak efficiency. Some database administration tasks are also easier to perform.
— Since Sybase installation automatically reserves disk space for its own use, there is often no need to create a physical partition.
The disadvantages are:
54 Chapter 3

— Sybase components on your hard disk are dispersed. This means that Sybase will sometimes need to search several different locations on the disk to find the information it needs. This can slow down Sybase processing somewhat.
— Since Sybase is not physically isolated from other applications, it is marginally more susceptible to outside influences.
In the final analysis, HP cannot make a blanket recommendation about how you should install Sybase. This issue needs to be decided on a case-by-case basis, preferably in consultation with an HP systems engineer.
Comparing a Raw Partition to a UNIX File System
A raw partition on a UNIX system is a part of the disk where no file system has been created. Even though the Sybase Adaptive Server can use UNIX files for database devices, Sybase recommends using raw partitions instead.
Most UNIX systems use a buffer cache for disk I/O. Writes to disk are stored in the buffer and may not be written to disk immediately. If the Sybase Adaptive Server completes a transaction and sends the result to a UNIX file, the transaction is considered complete, even though the UNIX buffer cache may not have been written to disk. If the system crashes before this buffer cache is written, you lose data. In this situation, the Sybase Adaptive Server has no way of knowing that the write to disk eventually failed, and the transaction is not rolled back. In addition, some UNIX operating systems do partial writes. In that case, if the system crashes, the Sybase device is corrupted.
Using raw partitions for Sybase devices allows the Sybase Adaptive Server to process its own I/O requests without having to go through the UNIX buffering scheme. Using this method, Sybase Adaptive Server knows exactly what portions of a transaction completed or failed in the event of a system crash.
Setting Up a Raw Partition
You must set up the raw partitions needed before you install the OVPI database, the transaction log, and tempdb (if you decide to install tempdb on a raw partition).
Sybase executables, libraries, installation, and configuration files reside on a file system. The OVPI executables, reports, demo database, and documentation also reside on a file system.
Installing Sybase Adaptive Server Enterprise 15 55
You can set up as many raw partitions as necessary to accommodate the size of your OVPI database, transaction log, and tempdb.
Suggested guidelines for setting up the database are as follows:
• Place tempdb on a raw partition or on a file system. HP recommends that you place tempdb on a file system. The size of tempdb should be 50% of the size of the OVPI database.
• Place the OVPI database on either a raw partition or file system.
• Place the transaction log the same way you place the OVPI database; that is, place it on either a raw partition or on a file system. If you place the transaction log on a raw partition, place it on a different disk spindle from the OVPI database. The size of the transaction log should be 50% of the size of the OVPI database.
Setting Up a Raw Partition on Solaris
Partitions c0t3d0s3 and c0t3d0s4 could represent the following:
• c0t3d0s3: OVPI Database (10 GB)
• c0t3d0s4: tempdb (5 GB)
You can repeat the following procedure, as needed, substituting partition name and size for the raw partitions that you could be using to comprise either the OVPI database, the transaction log, or tempdb (if you are placing tempdb on a raw partition).
Using the Command Line Interface
1 Execute the format command.
a At the command prompt, type the following:
format
Do not install any Sybase database components on a raw partition that contains the partition map. Typically, this is found on the first sector of the first cylinder.
If using raw partitions on Sybase, install the following raw partition one off patch from Sybase, which is in the product DVD: $DVDROM/Data/sybase/sybase_one_off_patch. In this instance, $DVDROM is the DVD mount point.
56 Chapter 3
b Select the number of the disk on which the raw partition will be created. A list of command options appears.
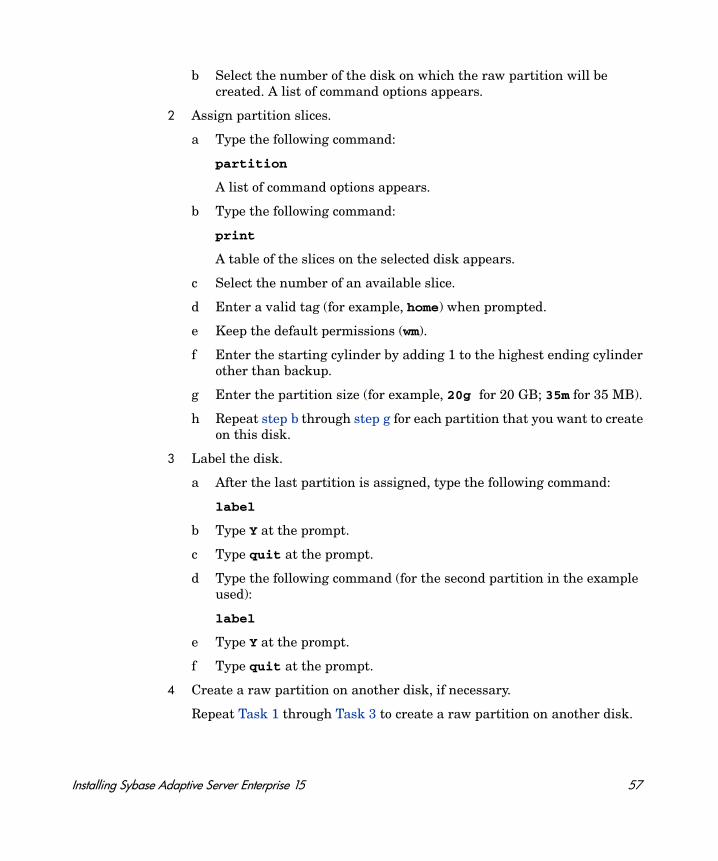
2 Assign partition slices.
a Type the following command:
partition
A list of command options appears.
b Type the following command:
A table of the slices on the selected disk appears.
c Select the number of an available slice.
d Enter a valid tag (for example, home) when prompted.
e Keep the default permissions (wm).
f Enter the starting cylinder by adding 1 to the highest ending cylinder other than backup.
g Enter the partition size (for example, 20g for 20 GB; 35m for 35 MB).
h Repeat step b through step g for each partition that you want to create on this disk.
3 Label the disk.
a After the last partition is assigned, type the following command:
label
b Type Y at the prompt.
c Type quit at the prompt.
d Type the following command (for the second partition in the example used):
label
e Type Y at the prompt.
f Type quit at the prompt.
4 Create a raw partition on another disk, if necessary.
Repeat Task 1 through Task 3 to create a raw partition on another disk.
Installing Sybase Adaptive Server Enterprise 15 57
5 Change the character block.
For each disk, you must also change the character block. To change the group
ID (using the example partitions), type the following
chgrp sybase /dev/dsk/c0t3d0s3 chgrp sybase /dev/rdsk/c0t3d0s3 chgrp -h sybase /dev/dsk/c0t3d0s3 chgrp -h sybase /dev/rdsk/c0t3d0s3 chgrp sybase /dev/dsk/c0t3d0s4 chgrp sybase /dev/rdsk/c0t3d0s4 chgrp -h sybase /dev/dsk/c0t3d0s4 chgrp -h sybase /dev/rdsk/c0t3d0s4
Setting Up a Raw Partition on HP-UX
Partitions lv01and lv02 could represent the following:
• lv01: OVPI Database (10 GB)
• lv02: tempdb (5 GB)
You can repeat the following procedure, as needed, substituting partition name and size for the raw partitions which you could be using to comprise either the OVPI database, the transaction log, or tempdb (if you are placing tempdb on a raw partition).
You can set up raw partitions using either the SAM utility or the command line.
Using the SAM Utility
1 Log on and start the SAM utility.
a Log on as root.
b Invoke the SAM utility (typically from the /usr/sbin directory). The System Administration Manager window opens.
c Double-click the Disks and File Systems icon. The Disk and File Systems dialog box opens.
2 Decide whether to create a volume group.
If you do not need to create a volume group:
58 Chapter 3
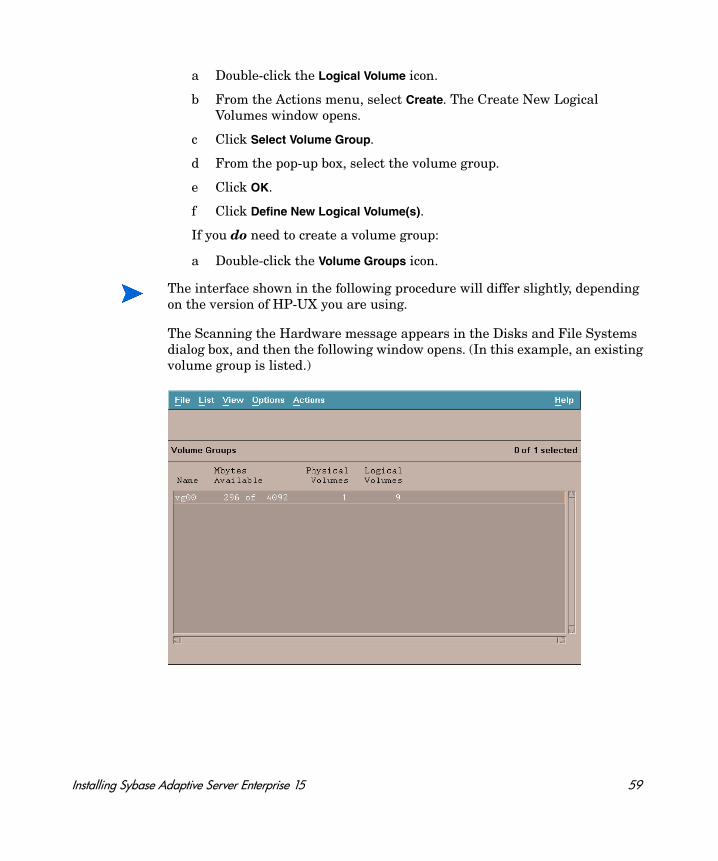
a Double-click the Logical Volume icon.
b From the Actions menu, select Create. The Create New Logical Volumes window opens.
c Click Select Volume Group.
d From the pop-up box, select the volume group.
e Click OK.
f Click Define New Logical Volume(s).
If you do need to create a volume group:
a Double-click the Volume Groups icon.
The Scanning the Hardware message appears in the Disks and File Systems dialog box, and then the following window opens. (In this example, an existing volume group is listed.)
The interface shown in the following procedure will differ slightly, depending on the version of HP-UX you are using.
Installing Sybase Adaptive Server Enterprise 15 59
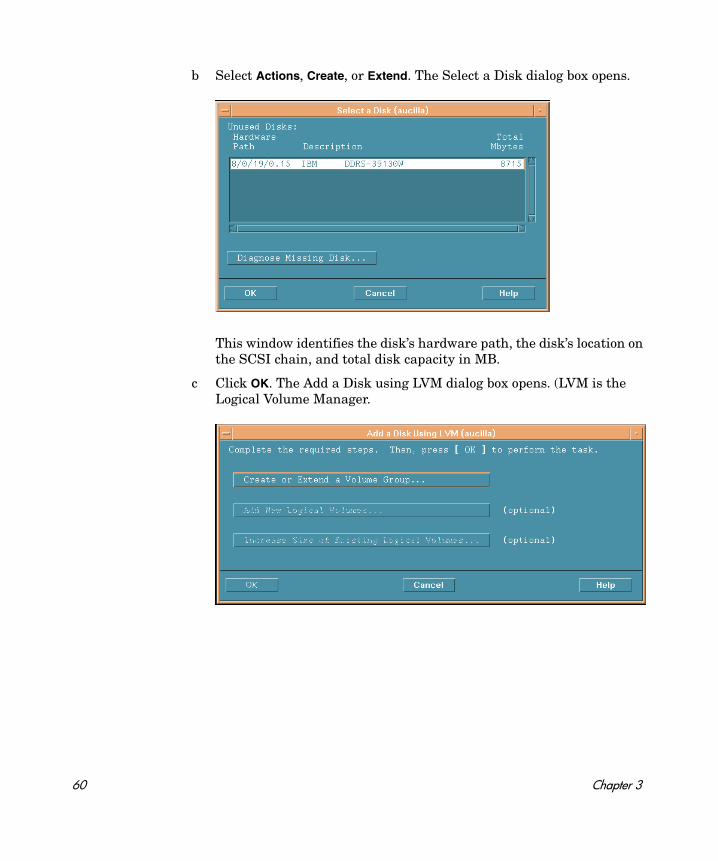
b Select Actions, Create, or Extend. The Select a Disk dialog box opens.
This window identifies the disk’s hardware path, the disk’s location on the SCSI chain, and total disk capacity in MB.
c Click OK. The Add a Disk using LVM dialog box opens. (LVM is the Logical Volume Manager.
60 Chapter 3
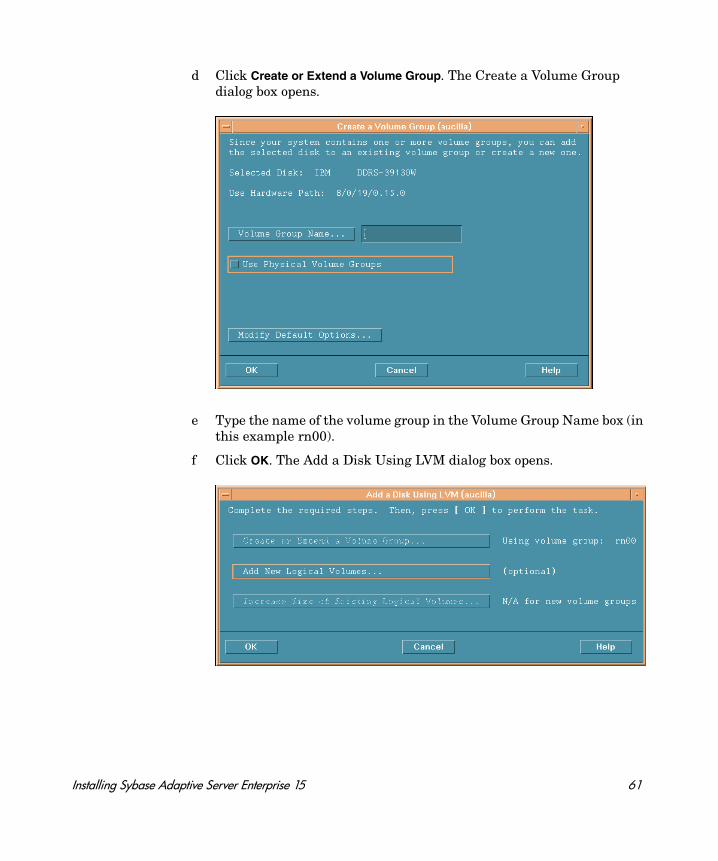
d Click Create or Extend a Volume Group. The Create a Volume Group dialog box opens.
e Type the name of the volume group in the Volume Group Name box (in this example rn00).
f Click OK. The Add a Disk Using LVM dialog box opens.
Installing Sybase Adaptive Server Enterprise 15 61

g Select the Add New Logical Volumes button. The Create New Logical Volumes dialog box opens.
3 Create a new logical volume.
a In the LV Name box, type the name of the logical volume; lv01 in this example.
b In the LV Size (Mbytes) box, type the size of the logical volume; 10240 in this example.
Do not click the OK button during this procedure. This will start the physical volume creation task, which is an unrelated procedure.
The physical extent size for the volume group must be a multiple of 4. If you enter a value in the LV Size (Mbytes) box that is not a multiple of 4, a message appears to notify you that the system will round the value up to the nearest multiple of 4. Click OK to dismiss the message and continue.
62 Chapter 3
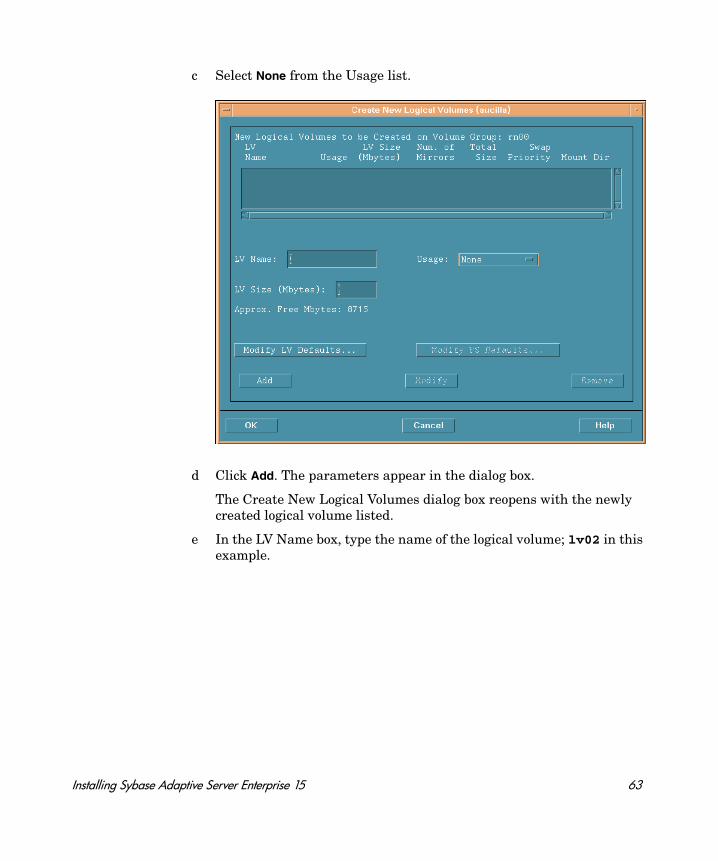
c Select None from the Usage list.
d Click Add. The parameters appear in the dialog box.
The Create New Logical Volumes dialog box reopens with the newly created logical volume listed.
e In the LV Name box, type the name of the logical volume; lv02 in this example.
Installing Sybase Adaptive Server Enterprise 15 63
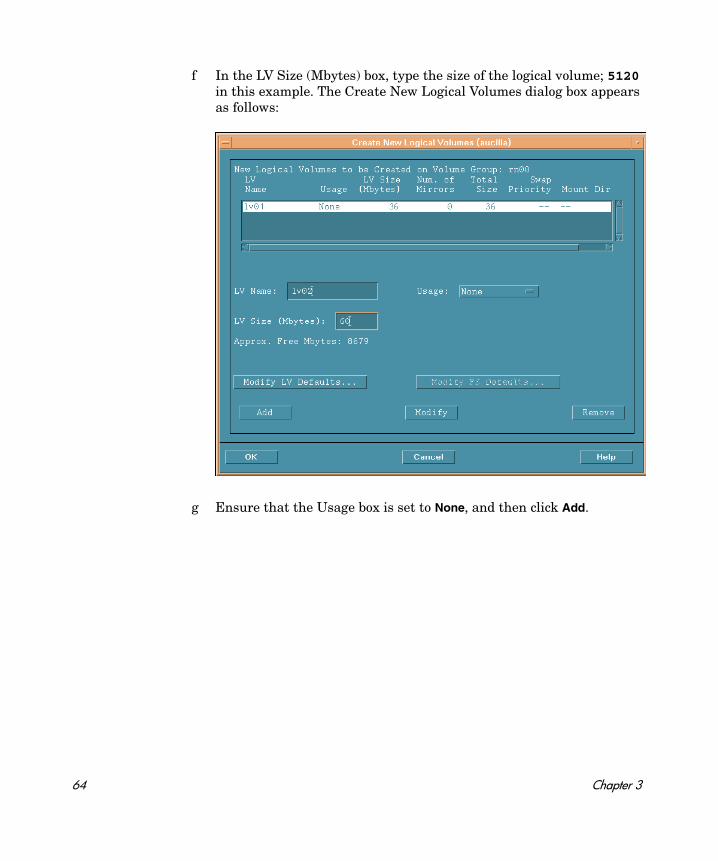
f In the LV Size (Mbytes) box, type the size of the logical volume; 5120 in this example. The Create New Logical Volumes dialog box appears as follows:
g Ensure that the Usage box is set to None, and then click Add.
64 Chapter 3
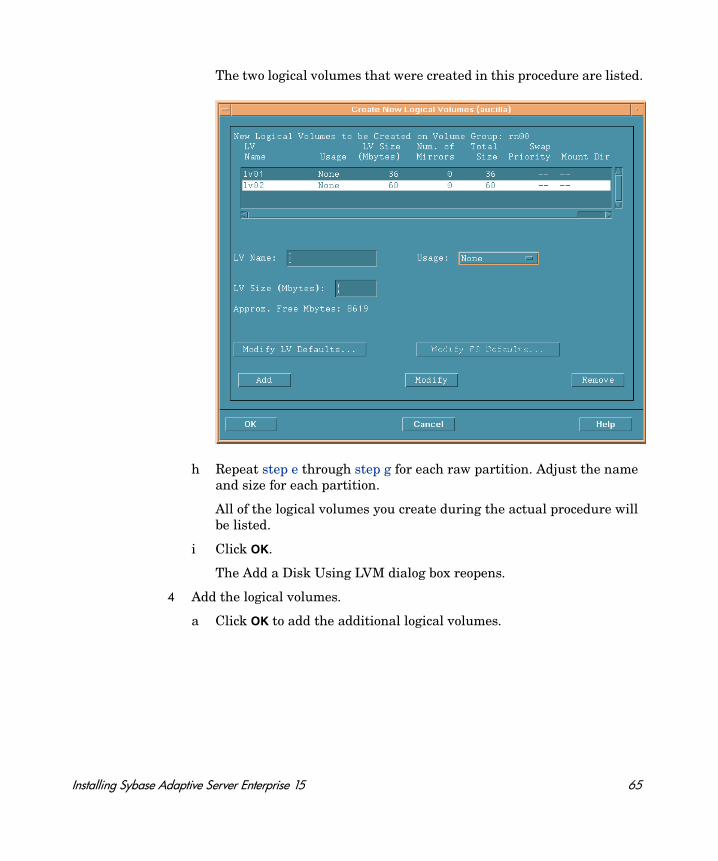
The two logical volumes that were created in this procedure are listed.
h Repeat step e through step g for each raw partition. Adjust the name and size for each partition.
All of the logical volumes you create during the actual procedure will be listed.
i Click OK.
The Add a Disk Using LVM dialog box reopens.
4 Add the logical volumes.
a Click OK to add the additional logical volumes.
Installing Sybase Adaptive Server Enterprise 15 65
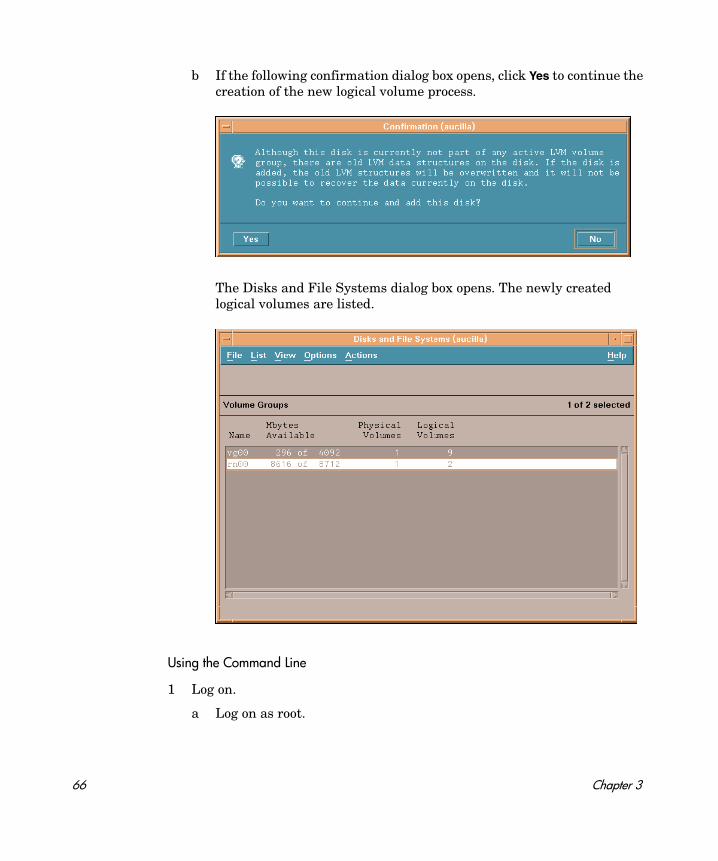
b If the following confirmation dialog box opens, click Yes to continue the creation of the new logical volume process.
The Disks and File Systems dialog box opens. The newly created logical volumes are listed.
Using the Command Line
1 Log on.
a Log on as root.
66 Chapter 3
b Before creating a logical volume, run the ioscan command to determine the disks attached to the system and their device file names:
ioscan -f -n
2 Initialize each disk.
a Initialize each disk as an LVM disk by using the pvcreate command. For example, enter:
pvcreate /dev/rdsk/c0t15d0
b Create a directory for the volume group; for example:
mkdir /dev/rn00
c Create a device file named group in the above directory using the mknod command. The basic syntax is:
mknod /dev/rn00/group c 64 0x010000
The “c” following the device file name specifies that group is a character device file. The 64 is the major number for the group device file. It will always be 64. The 0x010000 (0x020000, and so on) is the major number for the group file in hexadecimal. Each particular 01 (02 and so on) must be a unique number across all volume groups.
Use the pvdisplay command to get information about your drive; for example:
pvdisplay /dev/dsk/c0t15d0
3 Create a volume group.
Create the volume group specifying each physical volume to be included using the vgcreate command; for example:
vgcreate /dev/rn00 /dev/dsk/c0t15d0
The following messages appear as a result of this command:
Increased the number of physical extents per physical volume to 2178
Using the pvcreate command results in the loss of all data currently on the physical volume, and you use the character device file for the disk. Once a disk is initialized, it is called a physical volume.
Installing Sybase Adaptive Server Enterprise 15 67
Volume group “dev/rn00” has been successfully created
4 Create a logical volume.
After you create the volume group, create a logical volume using the lvcreate command; for example:
lvcreate /dev/rn00
When LVM creates the logical volume, it creates the block and character device files and places them in the /dev/rn00/lvol1 directory.
The following message appears as a result of this command:
/dev/rn00/lvol1 has been successfully created with character device “/dev/rn00/rlvol1”.
5 Repeat Task 2 through Task 4 for each raw partition to be created.
6 Allocate disk capacity.
The following commands illustrate how to allocate (extend) disk capacity for the specific lvol.
For the OVPI database:
lvextend -L 36 /dev/rn00/lvol1
For the Temporary Database:
lvextend -L 60 /dev/rn00/lvol2
Repeat the entire procedure as needed, substituting partition name and size for the raw partitions that you could be using to comprise either the OVPI database, the transaction log, or tempdb (if you are placing tempdb on a raw partition).
68 Chapter 3

Sybase Installation Parameter Values
Required
You must adjust the operating system shared memory parameter as follows:
• HPUX
Set shared memory to 2147483648(2GB). Use the System Administration Manager (SAM).
To optimize asynchronous I/O and to prevent the paging of shared memory, you must grant MLOCK permissions before you install Adaptive Server.
To grant MLOCK permissions to a group, enter:
/etc/privgrp add mlock <group name>
or:
/etc/setprivgrp <group name> MLOCK
• Solaris
To adjust the shared memory value of the operating system, add the following line to the operating system configuration file /etc/system:
set shmsys:shminfo_shmmax = 2147483648
• Linux
Use the sysctl(8) method to check and adjust the operating system shared memory parameter.
To check the current shared memory size, enter:
# /sbin/sysctl kernel.shmmax
To adjust the shared memory size:
# /sbin/sysctl -w kernel.shmmax=2147483648
To guarantee that this value is applied every time the system is started, add the above line to your /etc/rc.d/rc.local file. On SuSE systems, the file is /etc/init.d/boot.local.
On Linux RHEL Update 3.0 and greater, Adaptive Server version 15.0 running on multiple engines requires the security feature Exec-Shield to be disabled.
Installing Sybase Adaptive Server Enterprise 15 69

To disable Exec-Shield:
— Add the following lines in /etc/sysctl.conf:
kernel.exec-shield=0 kernel.exec-shield-randomize=0
— As SU, enter the following for the action to take effect:
/sbin/sysctl -P
For additional information, see the Red Hat web site:
http://www.redhat.com/f/pdf/rhel/WHP0006US_Execshield.pdf
Optional
The parameters listed in the following table are the defaults you can change if you choose to. Unless noted, parameters apply to both standalone and distributed installs.
Parameter and DescriptionDefault ValueWindows Systems
Default ValueUNIX Systems
Sybase DirectoryThe directory into which you install Sybase
C:\Sybase /usr/Sybase
Sybase Host NameSystem on which Sybase is installed
Sybase Server Name (DSQUERY)The Sybase server name
<HOST_NAME_SYBASE>
This is the name of your Sybase server.
<HOST_NAME_SYBASE>
This is the name of your Sybase server.
Sybase TCP/IP Port Number
The TCP/IP port number that Sybase uses to communicate with clients and servers on other systems
5000 2052
70 Chapter 3
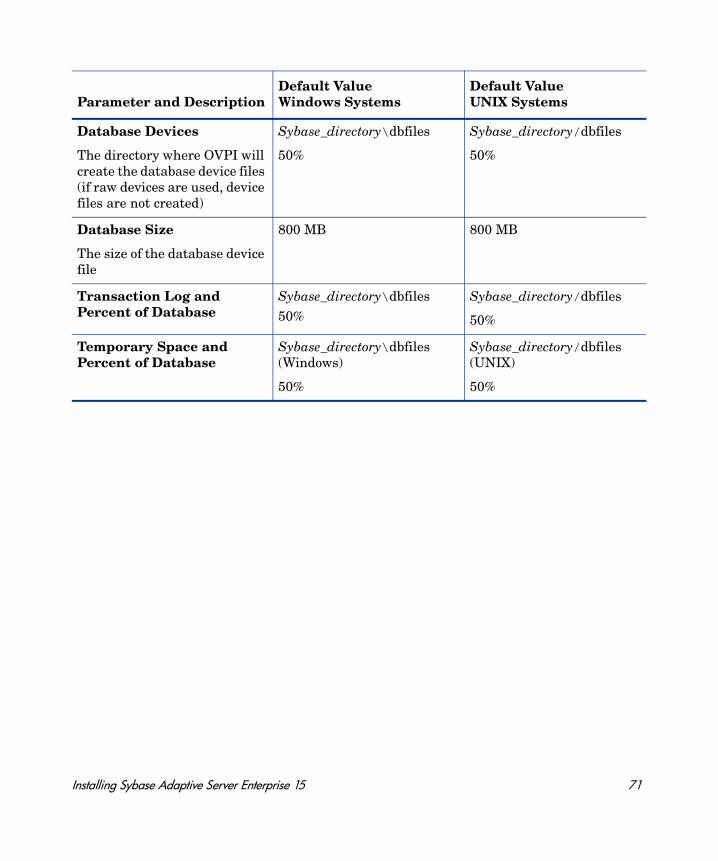
Database Devices
The directory where OVPI will create the database device files (if raw devices are used, device files are not created)
Sybase_directory\dbfiles
50%
Sybase_directory/dbfiles
50%
Database Size
The size of the database device file
800 MB 800 MB
Transaction Log and Percent of Database
Sybase_directory\dbfiles50%
Sybase_directory/dbfiles
50%
Temporary Space and Percent of Database
Sybase_directory\dbfiles (Windows)
50%
Sybase_directory/dbfiles (UNIX)
50%
Parameter and DescriptionDefault ValueWindows Systems
Default ValueUNIX Systems
Installing Sybase Adaptive Server Enterprise 15 71
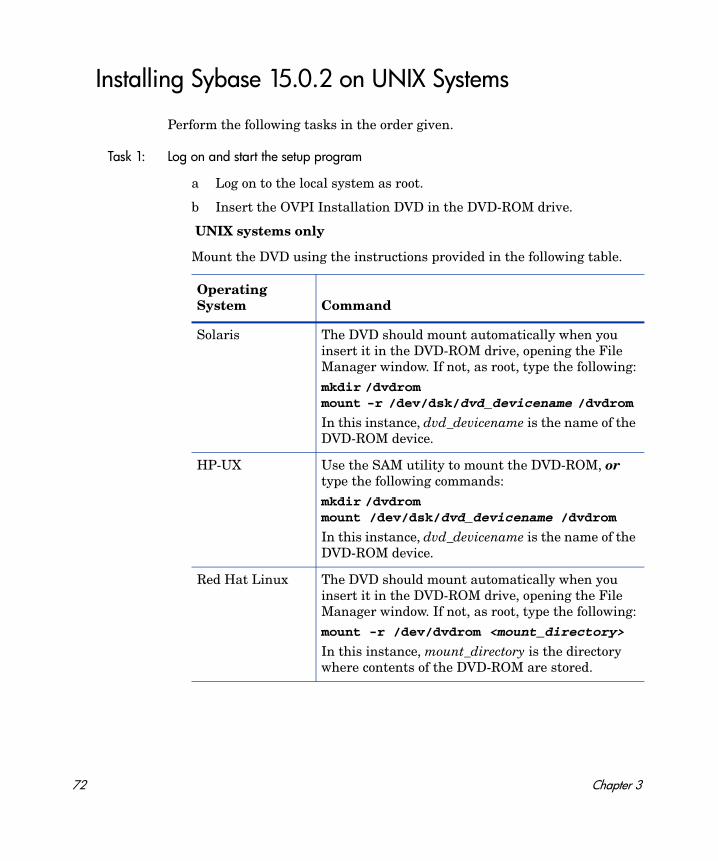
Installing Sybase 15.0.2 on UNIX Systems
Perform the following tasks in the order given.
Task 1: Log on and start the setup program
a Log on to the local system as root.
b Insert the OVPI Installation DVD in the DVD-ROM drive.
UNIX systems only
Mount the DVD using the instructions provided in the following table.
Operating System Command
Solaris The DVD should mount automatically when you insert it in the DVD-ROM drive, opening the File Manager window. If not, as root, type the following:mkdir /dvdrom mount -r /dev/dsk/dvd_devicename /dvdrom
In this instance, dvd_devicename is the name of the DVD-ROM device.
HP-UX Use the SAM utility to mount the DVD-ROM, or type the following commands:mkdir /dvdrom mount /dev/dsk/dvd_devicename /dvdrom
In this instance, dvd_devicename is the name of the DVD-ROM device.
Red Hat Linux The DVD should mount automatically when you insert it in the DVD-ROM drive, opening the File Manager window. If not, as root, type the following:mount -r /dev/dvdrom <mount_directory>
In this instance, mount_directory is the directory where contents of the DVD-ROM are stored.
72 Chapter 3
Solaris Systems only
• To display the dvd_label, type the command:
ls -l /dvdrom
• To change the directory, type the command:
cd /dvdrom/dvd_label
In this instance, dvd_label identifies the DVD name.
c Start the Installation Program by locating the setup program and typing the command:
./setup
The Setup window opens.
Installing Sybase Adaptive Server Enterprise 15 73
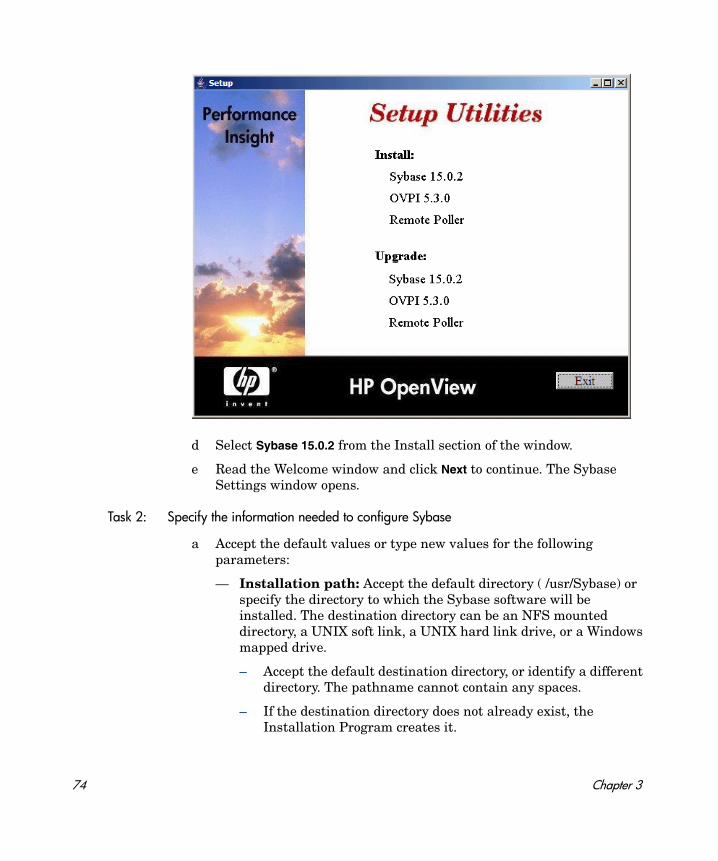
d Select Sybase 15.0.2 from the Install section of the window.
e Read the Welcome window and click Next to continue. The Sybase Settings window opens.
Task 2: Specify the information needed to configure Sybase
a Accept the default values or type new values for the following parameters:
— Installation path: Accept the default directory ( /usr/Sybase) or specify the directory to which the Sybase software will be installed. The destination directory can be an NFS mounted directory, a UNIX soft link, a UNIX hard link drive, or a Windows mapped drive.
– Accept the default destination directory, or identify a different directory. The pathname cannot contain any spaces.
– If the destination directory does not already exist, the Installation Program creates it.
74 Chapter 3
– If the destination directory does exist and contains data, a message warns you that the directory is not empty.
– If the destination directory is located on a file system that the Installation Program cannot access, a message warns you. You cannot continue the installation until you supply a valid destination.
— Server Name (DSQUERY): Type the name of the Sybase SQL server.
The Sybase SQL server is where the client applications will look for information by default. The default server name is the host name of the system, namely hostname_sybase.
— TCP/IP Port Number: Type the port number for the Sybase server.
The default port number is 2052. Sybase uses assigned TCP ports to communicate with Sybase clients and servers on other systems. It knows how to find them by the combined IP address of the remote system and the TCP Port of the application it needs on that system. This information is stored in the interfaces file in the Sybase directory. Sybase uses only one TCP port. It can be any port numbered higher than 1024 that is not already used by another application. The installation wizard will use the port number you enter here for Sybase.
If you change the TCP Port, check the /etc/services file to make sure that no other application is using your port number or the one after it.
b If necessary, click Advanced to display the Advanced OVPI Configuration window. Use the window to do the following:
— Modify the general parameters (General tab)
The General tab contains a parameter for changing the location of the Sybase error.log file.
Make sure that you enter the Sybase SQL server’s name in uppercase and that it is a valid server name identifier. Server names cannot be more than 31 characters. The first character must be alphabetic. Characters following the first character can include letters, numbers, or an underscore. You cannot use embedded spaces or hyphens.
Installing Sybase Adaptive Server Enterprise 15 75
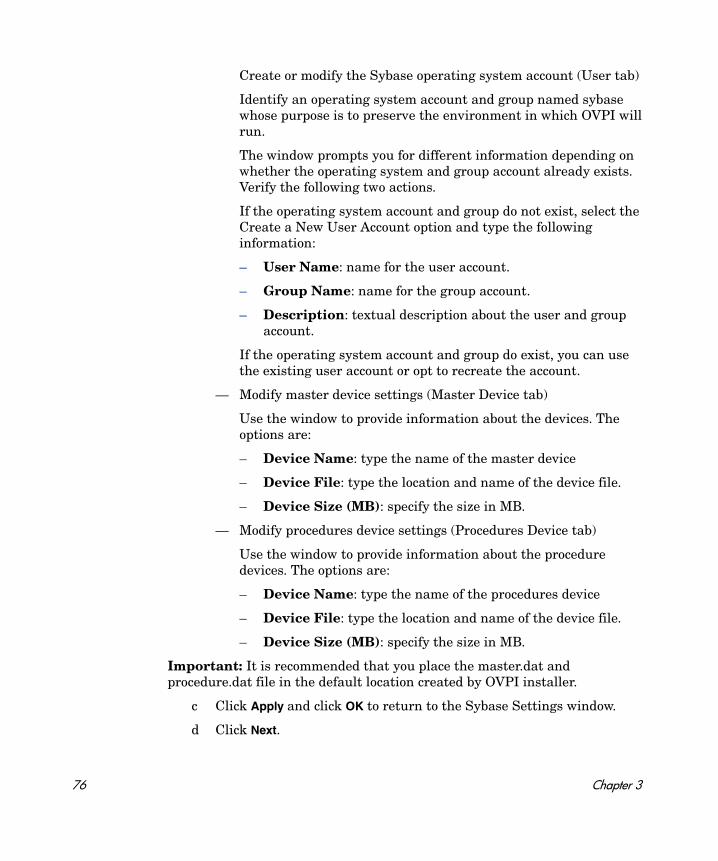
Create or modify the Sybase operating system account (User tab)
Identify an operating system account and group named sybase whose purpose is to preserve the environment in which OVPI will run.
The window prompts you for different information depending on whether the operating system and group account already exists. Verify the following two actions.
If the operating system account and group do not exist, select the Create a New User Account option and type the following information:
– User Name: name for the user account.
– Group Name: name for the group account.
– Description: textual description about the user and group account.
If the operating system account and group do exist, you can use the existing user account or opt to recreate the account.
— Modify master device settings (Master Device tab)
Use the window to provide information about the devices. The options are:
– Device Name: type the name of the master device
– Device File: type the location and name of the device file.
– Device Size (MB): specify the size in MB.
— Modify procedures device settings (Procedures Device tab)
Use the window to provide information about the procedure devices. The options are:
– Device Name: type the name of the procedures device
– Device File: type the location and name of the device file.
– Device Size (MB): specify the size in MB.
Important: It is recommended that you place the master.dat and procedure.dat file in the default location created by OVPI installer.
c Click Apply and click OK to return to the Sybase Settings window.
d Click Next.
76 Chapter 3
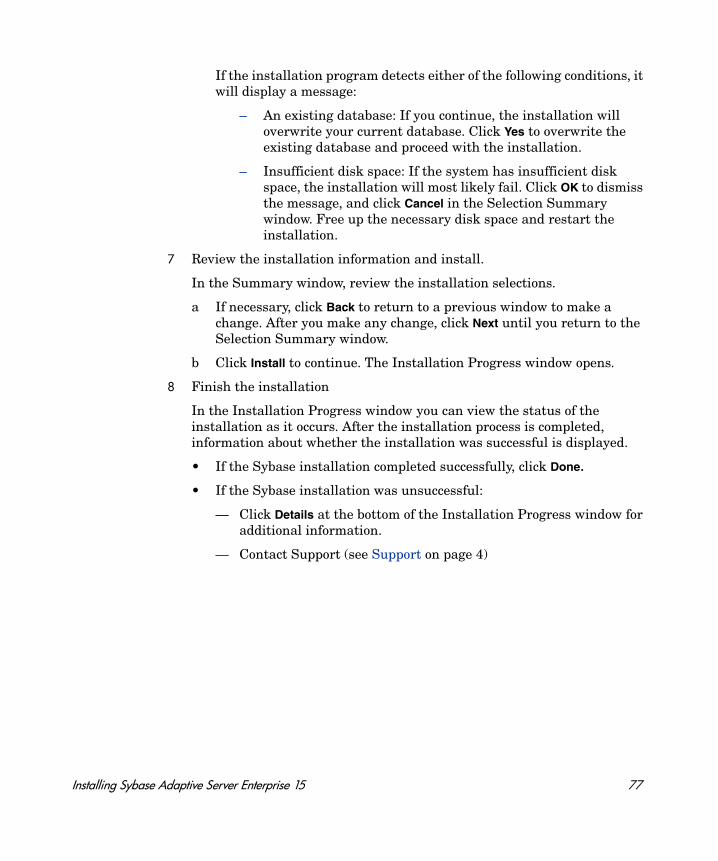
If the installation program detects either of the following conditions, it will display a message:
– An existing database: If you continue, the installation will overwrite your current database. Click Yes to overwrite the existing database and proceed with the installation.
– Insufficient disk space: If the system has insufficient disk space, the installation will most likely fail. Click OK to dismiss the message, and click Cancel in the Selection Summary window. Free up the necessary disk space and restart the installation.
7 Review the installation information and install.
In the Summary window, review the installation selections.
a If necessary, click Back to return to a previous window to make a change. After you make any change, click Next until you return to the Selection Summary window.
b Click Install to continue. The Installation Progress window opens.
8 Finish the installation
In the Installation Progress window you can view the status of the installation as it occurs. After the installation process is completed, information about whether the installation was successful is displayed.
• If the Sybase installation completed successfully, click Done.
• If the Sybase installation was unsuccessful:
— Click Details at the bottom of the Installation Progress window for additional information.
— Contact Support (see Support on page 4)
Installing Sybase Adaptive Server Enterprise 15 77
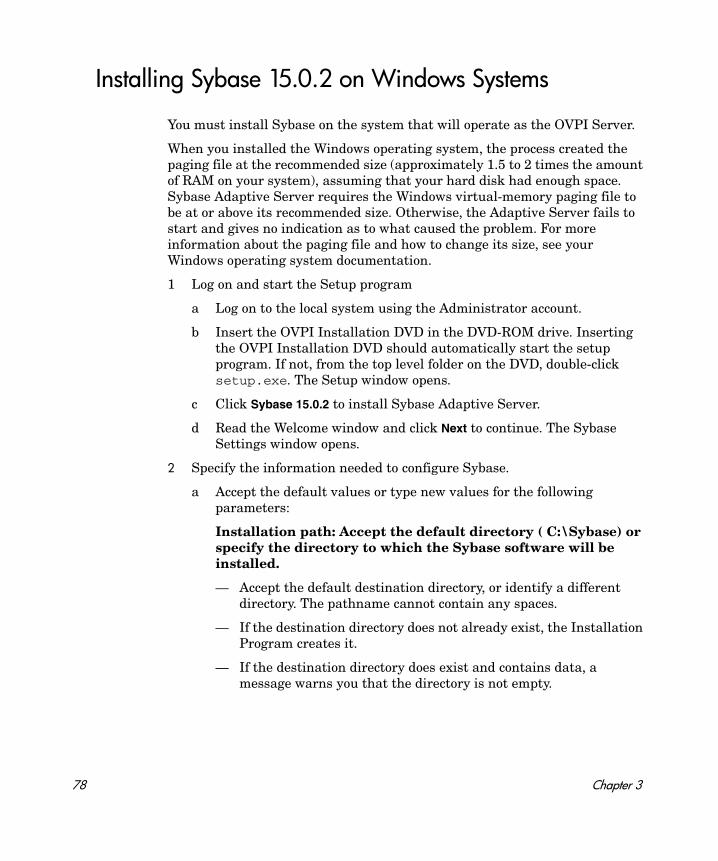
Installing Sybase 15.0.2 on Windows Systems
You must install Sybase on the system that will operate as the OVPI Server.
When you installed the Windows operating system, the process created the paging file at the recommended size (approximately 1.5 to 2 times the amount of RAM on your system), assuming that your hard disk had enough space. Sybase Adaptive Server requires the Windows virtual-memory paging file to be at or above its recommended size. Otherwise, the Adaptive Server fails to start and gives no indication as to what caused the problem. For more information about the paging file and how to change its size, see your Windows operating system documentation.
1 Log on and start the Setup program
a Log on to the local system using the Administrator account.
b Insert the OVPI Installation DVD in the DVD-ROM drive. Inserting the OVPI Installation DVD should automatically start the setup program. If not, from the top level folder on the DVD, double-click setup.exe. The Setup window opens.
c Click Sybase 15.0.2 to install Sybase Adaptive Server.
d Read the Welcome window and click Next to continue. The Sybase Settings window opens.
2 Specify the information needed to configure Sybase.
a Accept the default values or type new values for the following parameters:
Installation path: Accept the default directory ( C:\Sybase) or specify the directory to which the Sybase software will be installed.
— Accept the default destination directory, or identify a different directory. The pathname cannot contain any spaces.
— If the destination directory does not already exist, the Installation Program creates it.
— If the destination directory does exist and contains data, a message warns you that the directory is not empty.
78 Chapter 3
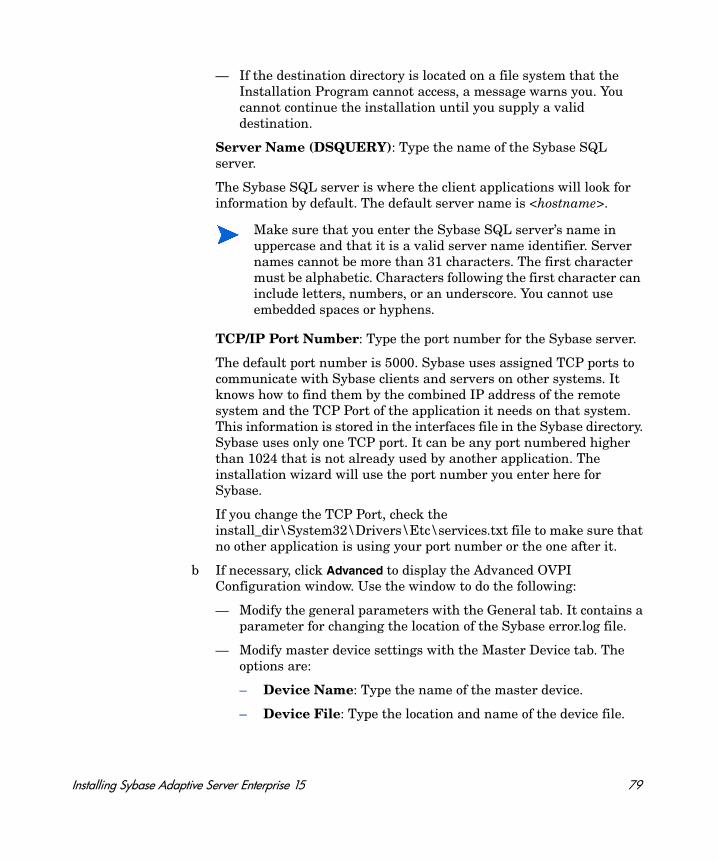
— If the destination directory is located on a file system that the Installation Program cannot access, a message warns you. You cannot continue the installation until you supply a valid destination.
Server Name (DSQUERY): Type the name of the Sybase SQL server.
The Sybase SQL server is where the client applications will look for information by default. The default server name is <hostname>.
TCP/IP Port Number: Type the port number for the Sybase server.
The default port number is 5000. Sybase uses assigned TCP ports to communicate with Sybase clients and servers on other systems. It knows how to find them by the combined IP address of the remote system and the TCP Port of the application it needs on that system. This information is stored in the interfaces file in the Sybase directory. Sybase uses only one TCP port. It can be any port numbered higher than 1024 that is not already used by another application. The installation wizard will use the port number you enter here for Sybase.
If you change the TCP Port, check the install_dir\System32\Drivers\Etc\services.txt file to make sure that no other application is using your port number or the one after it.
b If necessary, click Advanced to display the Advanced OVPI Configuration window. Use the window to do the following:
— Modify the general parameters with the General tab. It contains a parameter for changing the location of the Sybase error.log file.
— Modify master device settings with the Master Device tab. The options are:
– Device Name: Type the name of the master device.
– Device File: Type the location and name of the device file.
Make sure that you enter the Sybase SQL server’s name in uppercase and that it is a valid server name identifier. Server names cannot be more than 31 characters. The first character must be alphabetic. Characters following the first character can include letters, numbers, or an underscore. You cannot use embedded spaces or hyphens.
Installing Sybase Adaptive Server Enterprise 15 79
– Device Size (MB): Specify the size in MB.
— Modify procedures device settings with the Procedures Device tab. The options are:
– Device Name: Type the name of the procedures device.
– Device File: Type the location and name of the device file.
– Device Size (MB): Specify the size in MB.
c Click Apply and click OK to return to the Sybase Settings window.
d Click Next.
If the installation program detects either of the following conditions, it will display a message:
— An existing database: If you continue, the installation will overwrite your current database. Click Yes to overwrite the existing database and proceed with the installation.
— Insufficient disk space: If the system has insufficient disk space, the installation will most likely fail. Click OK to dismiss the message, and click Cancel in the Selection Summary window. Free up the necessary disk space and restart the installation.
3 In the Summary window, review the installation selections and install.
a If necessary, click Back to return to a previous window to make a change. After you make any change, click Next until you return to the Selection Summary window.
b Click Install to continue. The Installation Progress window opens.
4 Finish the installation
In the Installation Progress window you can view the status of the installation as it occurs. After the installation process is completed, information about whether the installation was successful is displayed.
• If the Sybase installation completed successfully, click Done.
• If the Sybase installation was unsuccessful:
— Click Details at the bottom of the Installation Progress window for additional information.
— Contact Support (see Support on page 4).
80 Chapter 3
Post-Installation
When you have successfully installed Sybase, do the following:
1 Verify that Sybase is running on your system by typing the following at the command line:
ps -ef | grep -i sybase
2 Make Sybase the owner of the /dev/async directory by typing the following command as root user:
chown sybase /dev/async
3 Set a Sybase sa password (optional) by logging in to isql as the “sa” user with a null password. Specify a new password, represented by <sa_password>:
isql -Usa -P1> sp_password NULL, <sa_password>2> go
Installing Sybase Adaptive Server Enterprise 15 81
Starting and Stopping Sybase
Starting Sybase
After you install Sybase successfully, it should automatically be running on your system. If it is not, you must manually start it before you can install OVPI.
If Sybase is not running, enter one of the following commands:
• Solaris
/etc/init.d/Sybase start
• HP-UX
/sbin/init.d/Sybase start
• Red Hat Linux
/etc/init.d/Sybase start
• Windows
a From the Control Panel window, double-click the Administrative Tools icon. The Administrative Tools window opens.
b Double-click the Services icon. The Services window opens.
c Select Sybase SQLServer_server, where server is the name of your Sybase SQL Server.
d If the service is not started, right-click the service name, and then select Start from the shortcut menu.
Close the Services window.
Stopping Sybase
If you ever need to shut down Sybase, type the following commands:
isql -Usa -P <sa_password> -S<DSQUERY> 1>shutdown 2>go
<sa_password> is needed only if you set a Sybase sa password.
82 Chapter 3
Troubleshooting a Sybase Installation Failure
Use the error.log file in the Sybase installation directory to determine the cause of an installation failure. Sybase writes messages to this file each time the system is booted and each time a Sybase error occurs. The name of the error log file is as follows:
• UNIX
$SYBASE/$SYBASE_ASE/install/servername_SYBASE.log
or
$SYBASE/$SYBASE_ASE/install/error.log
• Windows
%SYBASE%/%SYBASE_ASE%/install/servername_SYBASE.log
or
%SYBASE%/%SYBASE_ASE%/install/error.log
After you identify the cause, consult the Sybase documentation.
Installing Sybase Adaptive Server Enterprise 15 83

84 Chapter 3
4 Installing OVPI on a Standalone Server
Start the OVPI Installation Program
The OVPI installation program contains options for installing the OVPI components and remote pollers. To upgrade the database, see Chapter 9, Upgrading to Sybase 15.0.2. To upgrade OVPI and the remote pollers, see Chapter 10, Upgrading to OVPI 5.30.
Follow these steps:
1 Log on to the local system.
Windows Systems
Log on using the Administrator account.
UNIX Systems
Log on as root.
2 Insert the OVPI Installation DVD in the DVD-ROM drive.
UNIX Systems
85
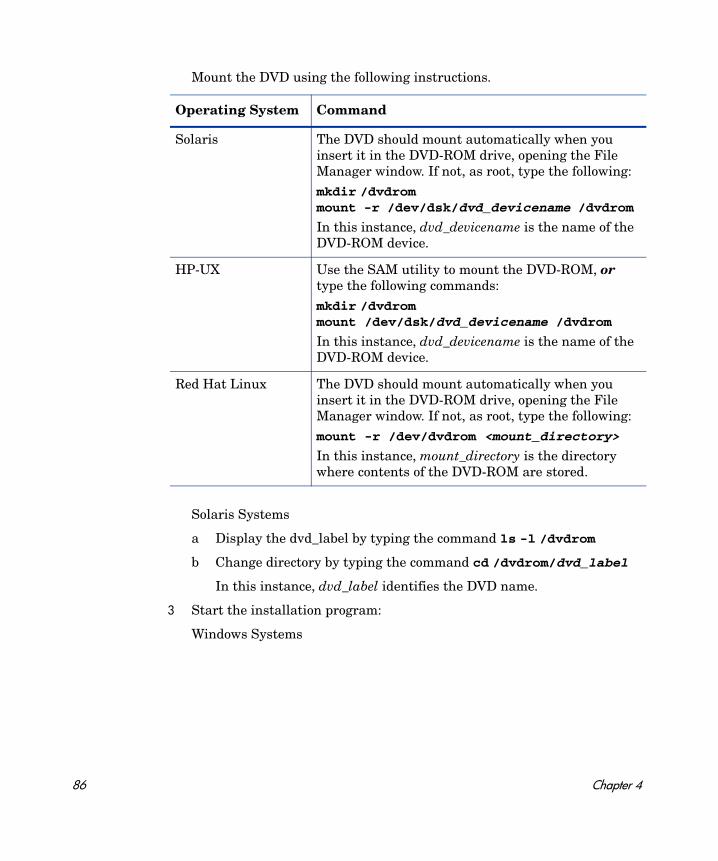
Mount the DVD using the following instructions.
Solaris Systems
a Display the dvd_label by typing the command ls -l /dvdrom
b Change directory by typing the command cd /dvdrom/dvd_label
In this instance, dvd_label identifies the DVD name.
3 Start the installation program:
Windows Systems
Operating System Command
Solaris The DVD should mount automatically when you insert it in the DVD-ROM drive, opening the File Manager window. If not, as root, type the following:mkdir /dvdrom mount -r /dev/dsk/dvd_devicename /dvdrom
In this instance, dvd_devicename is the name of the DVD-ROM device.
HP-UX Use the SAM utility to mount the DVD-ROM, or type the following commands:mkdir /dvdrom mount /dev/dsk/dvd_devicename /dvdrom
In this instance, dvd_devicename is the name of the DVD-ROM device.
Red Hat Linux The DVD should mount automatically when you insert it in the DVD-ROM drive, opening the File Manager window. If not, as root, type the following:mount -r /dev/dvdrom <mount_directory>
In this instance, mount_directory is the directory where contents of the DVD-ROM are stored.
86 Chapter 4
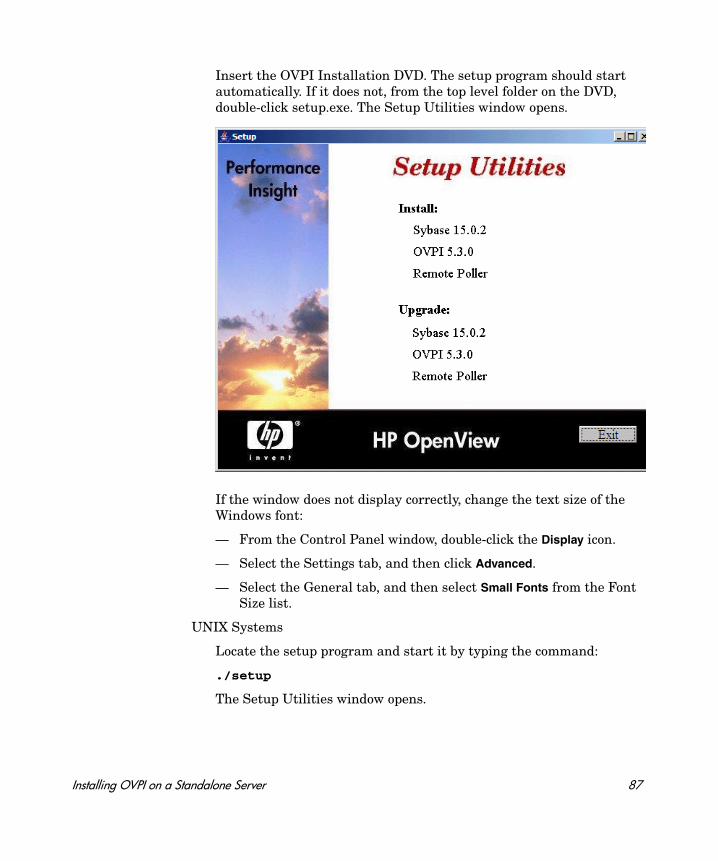
Insert the OVPI Installation DVD. The setup program should start automatically. If it does not, from the top level folder on the DVD, double-click setup.exe. The Setup Utilities window opens.
If the window does not display correctly, change the text size of the Windows font:
— From the Control Panel window, double-click the Display icon.
— Select the Settings tab, and then click Advanced.
— Select the General tab, and then select Small Fonts from the Font Size list.
UNIX Systems
Locate the setup program and start it by typing the command:
./setup
The Setup Utilities window opens.
Installing OVPI on a Standalone Server 87

To continue installing OVPI in a standalone environment, proceed to Next Steps on page 89.
To install OVPI in a distributed environment, go to Chapter 5, Installing OVPI in a Distributed Environment.
88 Chapter 4
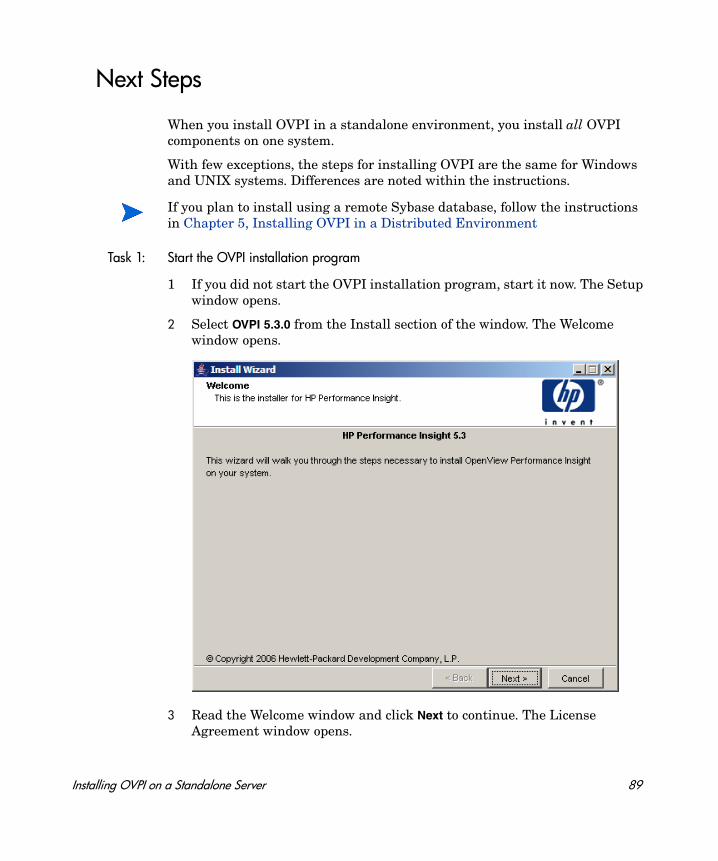
Next Steps
When you install OVPI in a standalone environment, you install all OVPI components on one system.
With few exceptions, the steps for installing OVPI are the same for Windows and UNIX systems. Differences are noted within the instructions.
Task 1: Start the OVPI installation program
1 If you did not start the OVPI installation program, start it now. The Setup window opens.
2 Select OVPI 5.3.0 from the Install section of the window. The Welcome window opens.
3 Read the Welcome window and click Next to continue. The License Agreement window opens.
If you plan to install using a remote Sybase database, follow the instructions in Chapter 5, Installing OVPI in a Distributed Environment
Installing OVPI on a Standalone Server 89
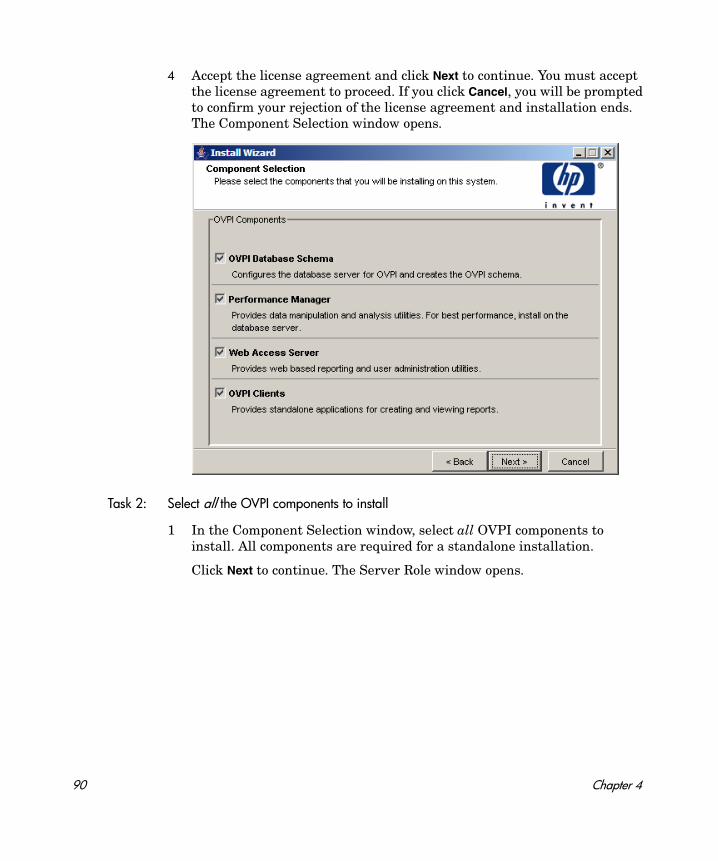
4 Accept the license agreement and click Next to continue. You must accept the license agreement to proceed. If you click Cancel, you will be prompted to confirm your rejection of the license agreement and installation ends. The Component Selection window opens.
Task 2: Select all the OVPI components to install
1 In the Component Selection window, select all OVPI components to install. All components are required for a standalone installation.
Click Next to continue. The Server Role window opens.
90 Chapter 4
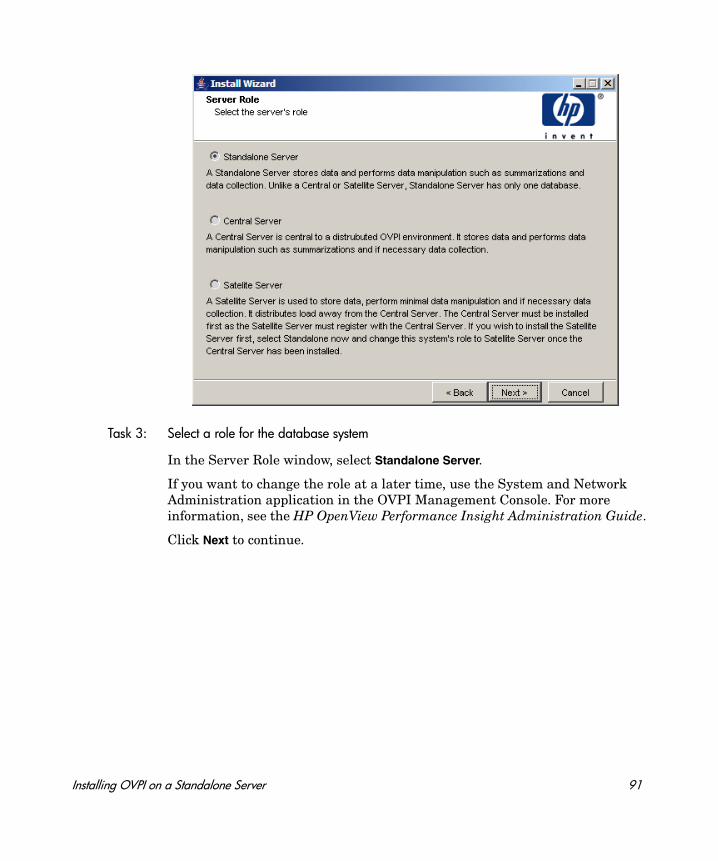
Task 3: Select a role for the database system
In the Server Role window, select Standalone Server.
If you want to change the role at a later time, use the System and Network Administration application in the OVPI Management Console. For more information, see the HP OpenView Performance Insight Administration Guide.
Click Next to continue.
Installing OVPI on a Standalone Server 91
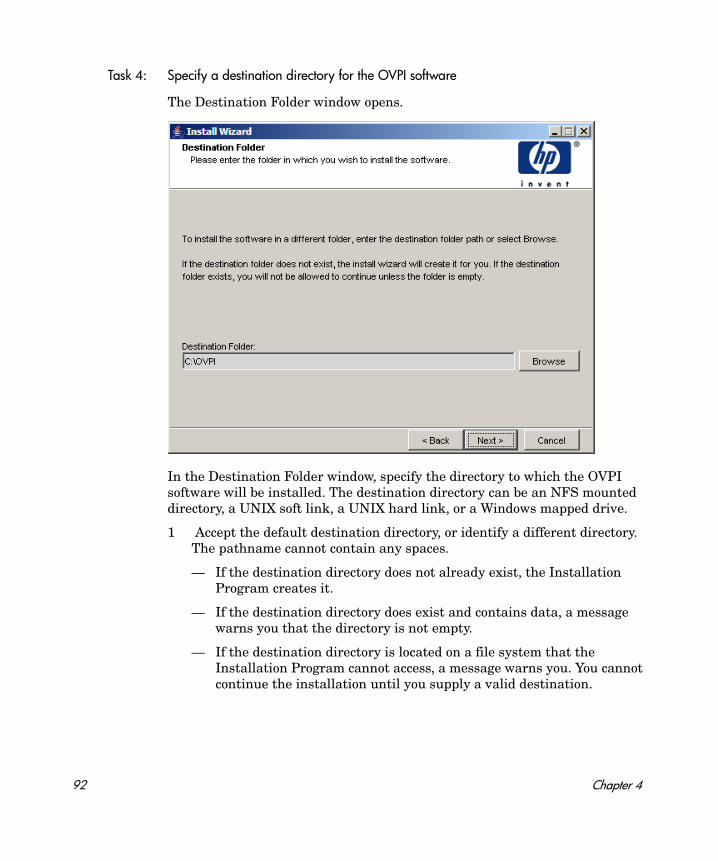
Task 4: Specify a destination directory for the OVPI software
The Destination Folder window opens.
In the Destination Folder window, specify the directory to which the OVPI software will be installed. The destination directory can be an NFS mounted directory, a UNIX soft link, a UNIX hard link, or a Windows mapped drive.
1 Accept the default destination directory, or identify a different directory. The pathname cannot contain any spaces.
— If the destination directory does not already exist, the Installation Program creates it.
— If the destination directory does exist and contains data, a message warns you that the directory is not empty.
— If the destination directory is located on a file system that the Installation Program cannot access, a message warns you. You cannot continue the installation until you supply a valid destination.
92 Chapter 4
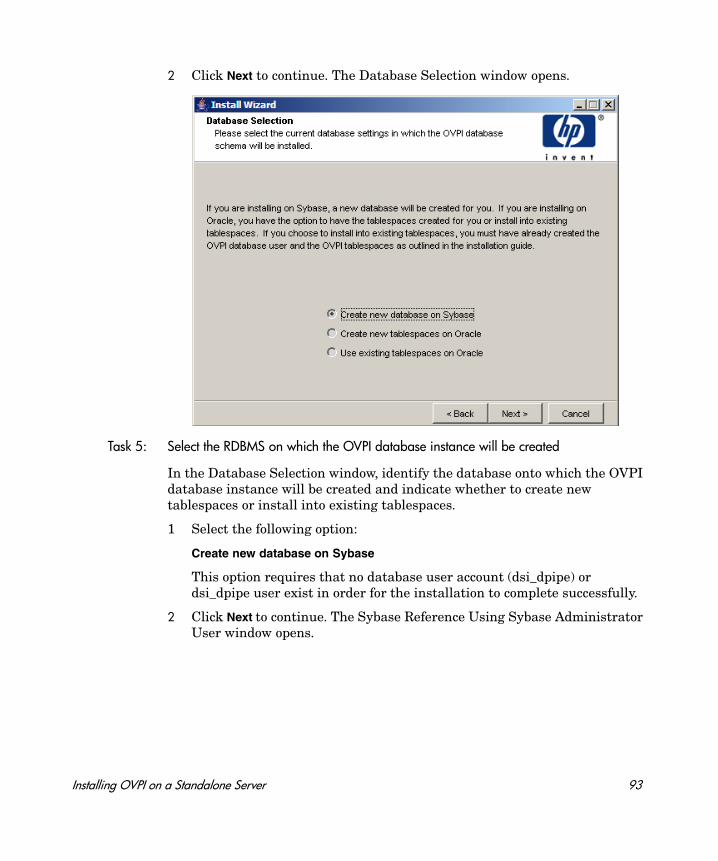
2 Click Next to continue. The Database Selection window opens.
Task 5: Select the RDBMS on which the OVPI database instance will be created
In the Database Selection window, identify the database onto which the OVPI database instance will be created and indicate whether to create new tablespaces or install into existing tablespaces.
1 Select the following option:
Create new database on Sybase
This option requires that no database user account (dsi_dpipe) or dsi_dpipe user exist in order for the installation to complete successfully.
2 Click Next to continue. The Sybase Reference Using Sybase Administrator User window opens.
Installing OVPI on a Standalone Server 93
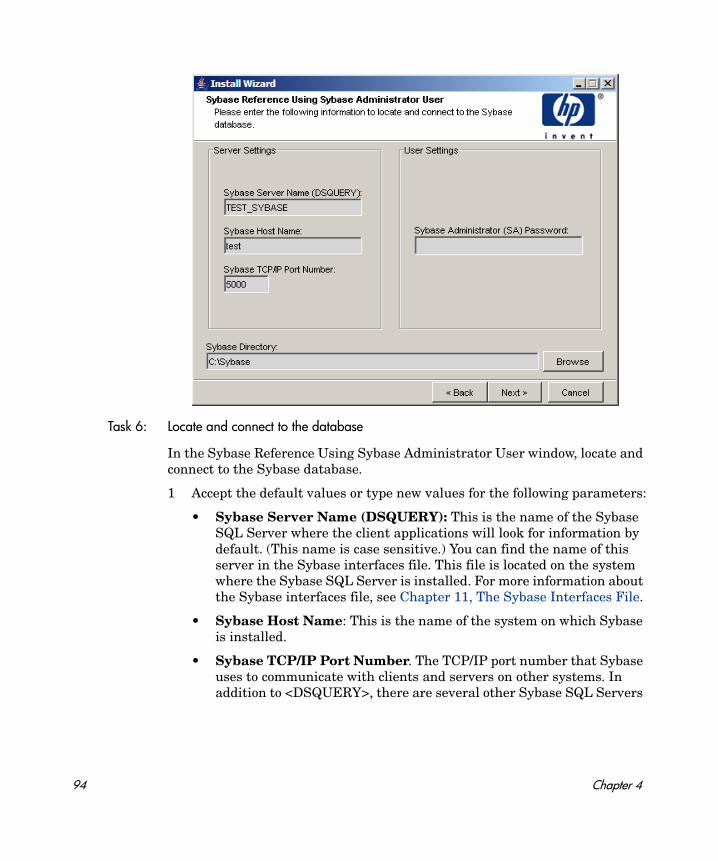
Task 6: Locate and connect to the database
In the Sybase Reference Using Sybase Administrator User window, locate and connect to the Sybase database.
1 Accept the default values or type new values for the following parameters:
• Sybase Server Name (DSQUERY): This is the name of the Sybase SQL Server where the client applications will look for information by default. (This name is case sensitive.) You can find the name of this server in the Sybase interfaces file. This file is located on the system where the Sybase SQL Server is installed. For more information about the Sybase interfaces file, see Chapter 11, The Sybase Interfaces File.
• Sybase Host Name: This is the name of the system on which Sybase is installed.
• Sybase TCP/IP Port Number. The TCP/IP port number that Sybase uses to communicate with clients and servers on other systems. In addition to <DSQUERY>, there are several other Sybase SQL Servers
94 Chapter 4

that will be assigned port numbers during the installation. These servers are the following:
You must manually start each of these servers in order for them to work.
— Sybase Administrator (SA) Password: If you changed the Sybase Administrator password during the Sybase installation from a NULL value to an actual password, type that password in the Sybase Administrator (SA) Password box.
If you did not change the Sybase Administrator during the Sybase installation, you can leave this box blank.
• Sybase Directory: The directory into which you installed Sybase. Click Browse to select a different directory. After you select a directory, click Open to return to the Sybase SA Reference window.
Sybase Server Windows UNIX
<DSQUERY>_BS 5001 2053
<DSQUERY>_MS 5002 2054
<DSQUERY>_HS 5003 2055
<DSQUERY>_XP 5004 2056
Installing OVPI on a Standalone Server 95
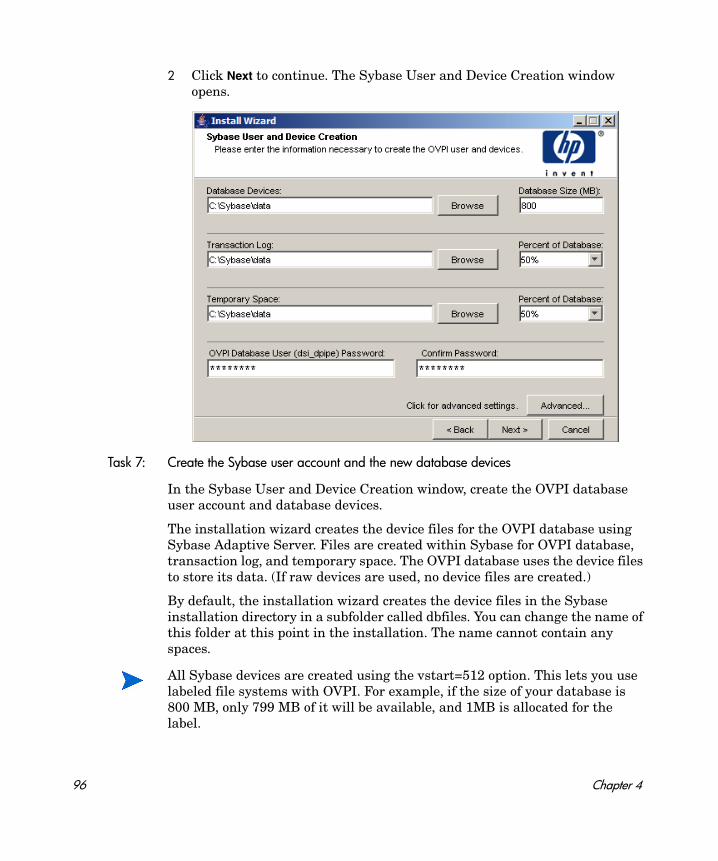
2 Click Next to continue. The Sybase User and Device Creation window opens.
Task 7: Create the Sybase user account and the new database devices
In the Sybase User and Device Creation window, create the OVPI database user account and database devices.
The installation wizard creates the device files for the OVPI database using Sybase Adaptive Server. Files are created within Sybase for OVPI database, transaction log, and temporary space. The OVPI database uses the device files to store its data. (If raw devices are used, no device files are created.)
By default, the installation wizard creates the device files in the Sybase installation directory in a subfolder called dbfiles. You can change the name of this folder at this point in the installation. The name cannot contain any spaces.
All Sybase devices are created using the vstart=512 option. This lets you use labeled file systems with OVPI. For example, if the size of your database is 800 MB, only 799 MB of it will be available, and 1MB is allocated for the label.
96 Chapter 4
1 Accept the default values or type new values for the following parameters:
• Database Devices and Database Size (MB): Type the file location of the database device and its size.
• Transaction Log and Percent of Database: Type the file location of the transaction log and the amount of space allocated to it in the database.
• Temporary Space and Percent of Database: Type the file location of the temporary space and the amount of space allocated to it in the database.
• HP recommends that the temporary space (dpipe_temp) and the transaction log (dpipe_log) be approximately 50% the size of the database device (dpipe_db). For example, if the database (dpipe_db) is 800 MB, then the temporary space (dpipe_temp) and temporary log (dpipe_log) should be 400 MB each.
• OVPI Database User (dsi_dpipe) Password: Type a password for the OVPI database user account (dsi_dpipe).
• The password must start with an alphabetic character and be between one and 30 characters in length. The minimum length is six. Valid characters are all alphanumeric characters, the pound (#), and the underscore (_). The password is case sensitive.
• Confirm Password: Retype the password.
2 (Optional) If necessary, click Advanced to display the Advanced OVPI Configuration window. Use the window to:
• Add files to or remove them from the OVPI database devices (dpipe_db, dpipe_temp, and dpipe_log). On UNIX systems only, you can use raw partitions for these devices (Database, Transaction Log, and Temporary Space tabs). S0 and Veritas raw partitions are supported.
• Modify the Sybase configuration parameters (Parameters tab).
Installing OVPI on a Standalone Server 97

3 Click Next to continue. The Performance Manager Settings window opens.
Go to Task 9 on page 101.
Task 8: (Optional) Modify the default database devices
1 Select the tab associated with the device (Database, Transaction Log, or Temporary Space) you want to modify.
2 To add a file to a database device, do one of the following:
Windows:
Click Add.
UNIX:
Click Add, and then click the Datafile arrow, and select a file from the list.
A precalculated size for the device appears next to the device’s name in the Size (MB) column. If you are using raw partitions, it is recommended that you do not change this value.
98 Chapter 4
3 File-system database files only: To edit the file, double-click the file, path, or size cell.
4 To remove a file:
a Click on the file, and press the TAB key.
b Press the up or down arrow key to enable selection, and then use the up or down arrow key to select the file you want to remove.
c Click Remove.
d UNIX only: To use a raw partition for a database device, do the following:
— Select the tab associated with the device that you want to use a raw partition.
— Select the Use raw partitions for this database check box.
The installation application will find disk partitions that are not mounted, used, swapped or listed in the /etc/vfstab file. This will prevent any file systems that may have been unmounted, but are still available as file systems if the administrator were to mount them, from being used by the installation wizard.
e Click Apply when you finish making all of your changes.
f Click OK to return to the Sybase User and Device Creation window, and then click Next to continue the installation.
When you return to the Sybase User and Device Creation window, you may notice the following conditions:
— UNIX only: If you chose a raw partition for a particular database device, the database device will appear dimmed on the window.
— If you added a file to or removed a file from one of the devices, the percentages and database size listed on the window will be recalculated.
— If a database device has several files that are located in different directories, the fields for the database device will appear dimmed on the window.
You must create at least one file for each device.
Installing OVPI on a Standalone Server 99
Changing Sybase Configuration Parameters
To change your Sybase configuration parameters:
a Select the Parameters tab. The Parameters tab contains the following options:
— Recovery Interval (Minutes). Sets the maximum number of minutes that the SQL Server should use to recover each database in case of system failure.
— Maximum Memory (MB). Sets the size of memory that the SQL Server allocates from the operating system.
— User Connections. Sets the maximum number of user connections that can be connected to a SQL Server at the same time. The global variable @@max_connections stores the maximum values for your system. It varies according to operating system.
— Number of Locks. Sets the number of available locks.
— Maximum Online Engines. Controls the number of engines in a symmetric multiprocessor environment.
— If your system uses a single CPU, the recommended value is 1. If you increase the value, there is a possibility that Sybase will slow down due to internal contention. However, if your system uses multiple CPUs, the value may be increased in order to take advantage of the multiple CPU architecture.
— Maximum Network Packet Size (Bytes). Sets the maximum network packet size that a client program can request.
— Additional Network Memory (Bytes). Allocates additional memory for clients that request packet sizes larger than the default packet size for the server.
— Number of Devices. Limits the number of database devices that the SQL Server can use.
b Click Apply when you finish making all your changes.
5 Click OK to return to the Sybase User and Device Creation window.
HP recommends that only a Sybase database administrator change the values for these parameters.
100 Chapter 4
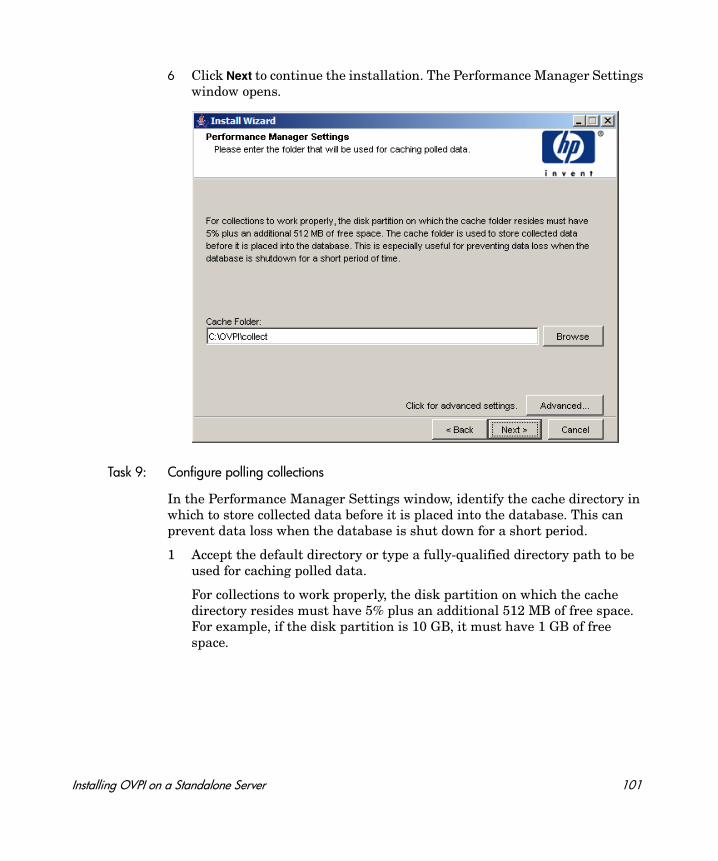
6 Click Next to continue the installation. The Performance Manager Settings window opens.
Task 9: Configure polling collections
In the Performance Manager Settings window, identify the cache directory in which to store collected data before it is placed into the database. This can prevent data loss when the database is shut down for a short period.
1 Accept the default directory or type a fully-qualified directory path to be used for caching polled data.
For collections to work properly, the disk partition on which the cache directory resides must have 5% plus an additional 512 MB of free space. For example, if the disk partition is 10 GB, it must have 1 GB of free space.
Installing OVPI on a Standalone Server 101
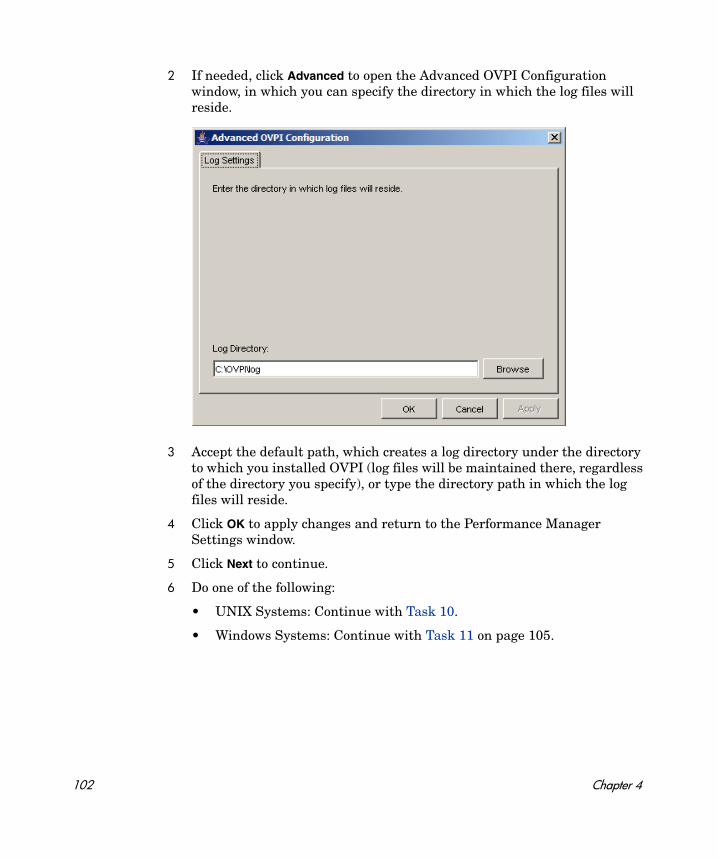
2 If needed, click Advanced to open the Advanced OVPI Configuration window, in which you can specify the directory in which the log files will reside.
3 Accept the default path, which creates a log directory under the directory to which you installed OVPI (log files will be maintained there, regardless of the directory you specify), or type the directory path in which the log files will reside.
4 Click OK to apply changes and return to the Performance Manager Settings window.
5 Click Next to continue.
6 Do one of the following:
• UNIX Systems: Continue with Task 10.
• Windows Systems: Continue with Task 11 on page 105.
102 Chapter 4

Task 10: UNIX only) Create or modify the operating system account
In the Operating System User for Performance Manager window, identify an operating system account and group named trendadm,the purpose of which is to preserve the environment in which OVPI will run.
Do not confuse the trendadm account used to log on to the operating system with the trendadm account created later, used to log on to the Web Access Server application.
The window prompts you for different information depending on whether the operating system and group account already exists.
• If the operating system account and group do not exist, the Create OS User window opens.
To create the operating system account and group:
a Create a password for the trendadm account by typing values for the following:
Installing OVPI on a Standalone Server 103
— Password: The password must be at least one character long. It can be of any length and may contain any character. HP recommends that you adhere to your company’s policy for password creation.
— Confirm Password: Retype the password.
b Click Next to continue.
• If the operating system account and group exist, the Existing OS User window opens.
To modify the operating system account user environment.
a Click one of the following:
— Modify user environment: This parameter updates the trendadm account’s .profile or .cshrc with the OVPI environment variables (COLLECT_HOME, DPIPE_HOME, DPIPE_TMP, and TREND_LOG).
— Do not modify user environment: This parameter will not update the account’s .profile or .cshrc with the OVPI environment variables. If you select this option, you must manually add the OVPI environment variables later.
b Click Next to continue.
104 Chapter 4

Task 11: Specify an administrator and port for the Web Access Server
In the Web Access Server Settings window, create an OVPI administrator account for the Web Access Server, as well as an HTTP port on which to listen.
1 Type values for the following parameters:
• Username: Accept the default username for the Web Access Server administrator, or type a new name. This account is used to log on to the Web Access Server.
There are no restrictions on the minimum and maximum length or on the characters that can be used in the username and password. HP recommends that you adhere to your company’s policy for username and password creation.
Do not confuse this account with the trendadm account used for logging on the operating system (UNIX installations only), which is used to preserve the environment in which OVPI will run.
Installing OVPI on a Standalone Server 105
• Password: Type a password for the Web Access Server administrator account.
You can change password rules after you install OVPI using the Web Access Server application. see the HP OpenView Performance Insight Administration Guide for details.
• Confirm Password: Retype the password.
• HTTP Port: Accept the default port (80) or type a new port number for the Web Access Server. Any open port can be used.
2 If necessary, click Advanced to open the Advanced Configuration window, in which you can select the following tabs:
Directories: To change the location of report directories, in which all deployed reports are stored. To change the location of the reports directories:
a Accept the default directory or identify a new directory.
b Click Apply.
c Click OK to return to the Web Access Server Settings window.
OVPI Users: To create and modify user accounts used to log on to OVPI clients. You can create regular user accounts or administrator accounts. Regular user accounts can access the OVPI clients. Administrator accounts can access the administration features (Administration link) of the Web Access Server. see the HP OpenView Performance Insight Administration Guide for details.
To add or modify a user account:
a Click Add User. A default username (new-user), password (new-user), and role (user) displays, along with created user accounts.
b Double-click the name or password, delete the value, and type a new value. Select either user or admin for Role.
c Click Apply.
To remove a user account:
a Select the user name and click Remove User.
b Click Apply. and then click OK to return to the Web Access Server Settings window.
106 Chapter 4
You can also create, modify, and delete user accounts after you install OVPI using the Web Access Server. See the HP OpenView Performance Insight Administration Guide for details.
SSL Setup: To enable SSL communications, which you can use to enable secure communication between the Web Access Server and a supported web browser, Report Viewer, Report Builder, and the Management Console. To enable SSL, you create a self-signed certificate. This self-signed certificate allows you to enable SSL, however, it is only valid for 90 days. You should send this certificate to a certificate authority in order to receive a signed digital certificate or generate another self-signed certificate before the 90 days expires. After you sign a digital certificate, you must import it using the Web Access Server application. You can also use the Web Access Server to change SSL settings after you install OVPI. See the HP OpenView Performance Insight Administration Guide for details.
To enable SSL communications and create a self-signed certificate, click to select the Enable SSL check box.
By selecting this option, you will not disable the standard HTTP listener. Thus, the secured SSL port and the unsecured HTTP port will both be enabled.
a SSL Port: Accept the default value or type a new value.
b Keystore Password: Type a password of six characters or more.
Record the password and keep it in a secure place. You will need it to generate a signed certificate.
After you generate your self-signed certificate, it will be stored in the certificate repository. This password lets the Web Access Server access the certificate repository.
The remaining fields request information that is necessary when you generate an SSL key that must be verified and signed by a certificate-signing authority. This information is used by the person who checks the certificate to ensure that the certificate is valid.
a Organization (Optional): Type the name of your organization, for example, “ABC Systems, Inc.”
b Org. Unit (Optional): Type the name of your department or division, for example, “Northeast Sales”.
Installing OVPI on a Standalone Server 107
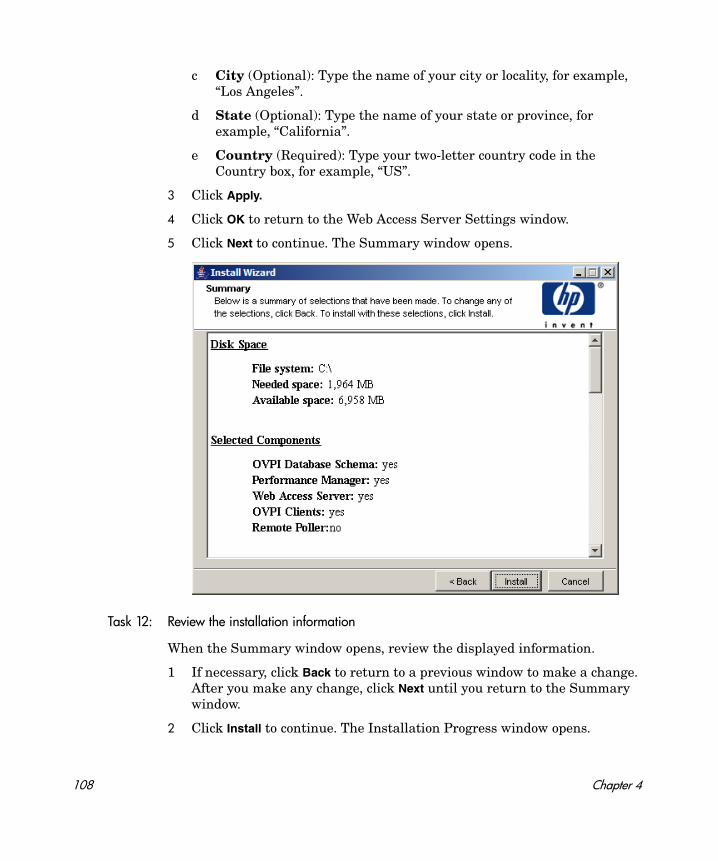
c City (Optional): Type the name of your city or locality, for example, “Los Angeles”.
d State (Optional): Type the name of your state or province, for example, “California”.
e Country (Required): Type your two-letter country code in the Country box, for example, “US”.
3 Click Apply.
4 Click OK to return to the Web Access Server Settings window.
5 Click Next to continue. The Summary window opens.
Task 12: Review the installation information
When the Summary window opens, review the displayed information.
1 If necessary, click Back to return to a previous window to make a change. After you make any change, click Next until you return to the Summary window.
2 Click Install to continue. The Installation Progress window opens.
108 Chapter 4
Task 13: Finish the installation
In the Installation Progress window you can view the status of the installation as it occurs. After the installation process is completed, information about whether the installation was successful is displayed.
If the OVPI installation completed successfully, click Done.
• UNIX Systems: the installation is complete.
• Windows Systems: reboot the system to complete installation.
If the OVPI installation was unsuccessful:
1 Click Details at the bottom of the Installation Progress window for additional information.
2 Contact Support (see Support on page 4).
Task 14: (Windows only) Restart your Windows system
You must restart before you can use OVPI.
To install report packs and datapipes, see the instructions in the HP OpenView Performance Insight Administration Guide.
Installing OVPI on a Standalone Server 109

110 Chapter 4
5 Installing OVPI in a Distributed Environment
Starting the Installation Program
The OVPI installation program contains options for installing the OVPI components and remote pollers. To upgrade the database (which you must do before upgrading OVPI), see Chapter 9, Upgrading to Sybase 15.0.2. To upgrade OVPI and the remote pollers, see Chapter 10, Upgrading to OVPI 5.30.
Follow these steps:
1 Log on to the local system.
Windows Systems
Log on using the Administrator account.
UNIX Systems
Log on as root.
2 Insert the OVPI Installation DVD in the DVD-ROM drive.
UNIX Systems
111
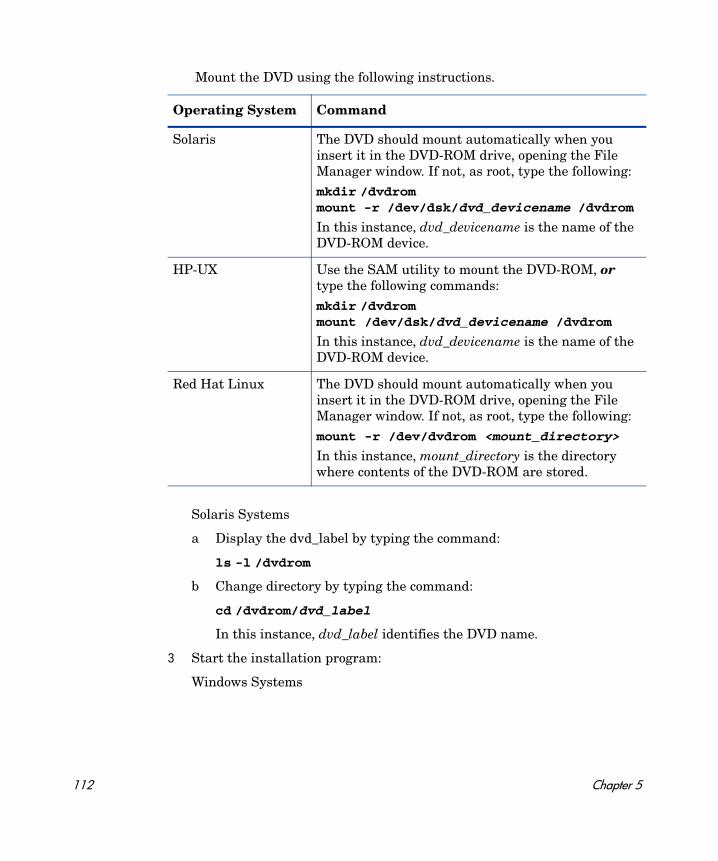
Mount the DVD using the following instructions.
Solaris Systems
a Display the dvd_label by typing the command:
ls -l /dvdrom
b Change directory by typing the command:
cd /dvdrom/dvd_label
In this instance, dvd_label identifies the DVD name.
3 Start the installation program:
Windows Systems
Operating System Command
Solaris The DVD should mount automatically when you insert it in the DVD-ROM drive, opening the File Manager window. If not, as root, type the following:mkdir /dvdrom mount -r /dev/dsk/dvd_devicename /dvdrom
In this instance, dvd_devicename is the name of the DVD-ROM device.
HP-UX Use the SAM utility to mount the DVD-ROM, or type the following commands:mkdir /dvdrom mount /dev/dsk/dvd_devicename /dvdrom
In this instance, dvd_devicename is the name of the DVD-ROM device.
Red Hat Linux The DVD should mount automatically when you insert it in the DVD-ROM drive, opening the File Manager window. If not, as root, type the following:mount -r /dev/dvdrom <mount_directory>
In this instance, mount_directory is the directory where contents of the DVD-ROM are stored.
112 Chapter 5
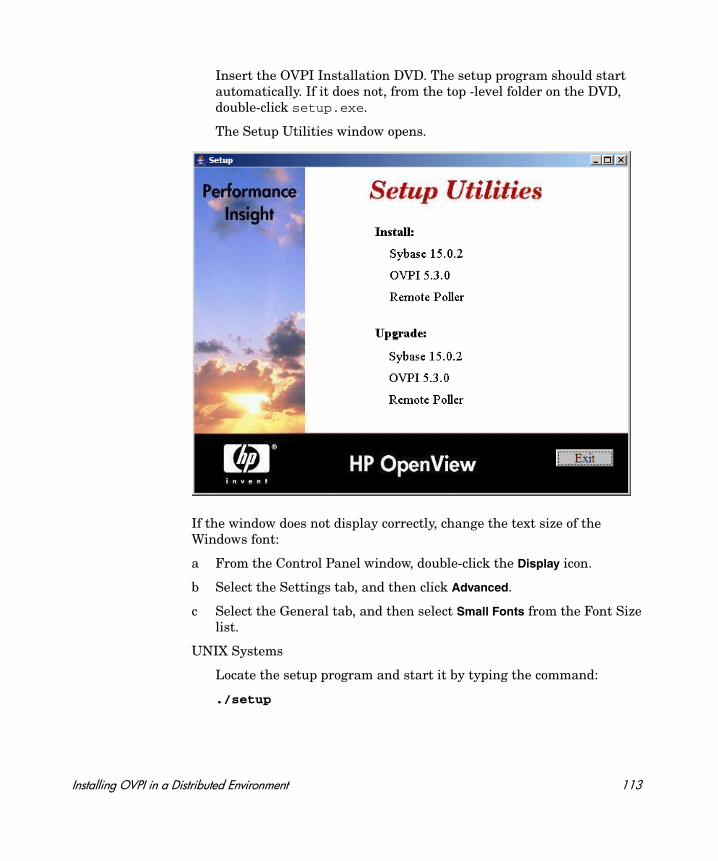
Insert the OVPI Installation DVD. The setup program should start automatically. If it does not, from the top -level folder on the DVD, double-click setup.exe.
The Setup Utilities window opens.
If the window does not display correctly, change the text size of the Windows font:
a From the Control Panel window, double-click the Display icon.
b Select the Settings tab, and then click Advanced.
c Select the General tab, and then select Small Fonts from the Font Size list.
UNIX Systems
Locate the setup program and start it by typing the command:
./setup
Installing OVPI in a Distributed Environment 113
Next Steps
There are numerous ways to install OVPI in a distributed environment. The instructions describe how to individually install the OVPI components in the representative complex distributed configuration discussed in Chapter 1, Introduction to OVPI Installation.
The order of installation in a distributed environment is:
• Install the OVPI Database Schema and OVPI Performance Manager on the central database server first.
Install the Web Access Server. If you have more than one Web Access Server, repeat the installation procedure for each.
Install report packs on the central database server. Do not install datapipes on the central database server unless the central server is polling. Then deploy reports to each Web Access Server. You can defer this task until the installation is complete.
• Install the OVPI Database Schema and OVPI Performance Manager on each satellite database server.
At this point, you can discover the network on the satellite database servers.
• Install report packs and datapipes on each satellite database server.
• Install the Remote Poller component on each remote polling system. If you have more than one remote polling system, you must repeat the installation procedure for each.
At this point, you can perform a type discovery of each satellite database server, configure report packs for operation in the distributed environment, and configure polling policies for remote polling systems. You can defer this task until the installation is complete.
• Install the OVPI client applications on individual workstations whose users will be accessing the Web Access Server.
114 Chapter 5
Installing OVPI on a Central Server
In a distributed environment, you must first install OVPI on the Central Server. You can then install the Satellite Servers and register them with the Central Server. To install OVPI on a Central Server, follow the instructions in Chapter 4, Installing OVPI on a Standalone Server. Instead of Standalone Server, select Central Server option inTask 3 on page 91.
Installing OVPI on a Satellite Server
This section describes the steps for installing the OVPI Database Schema and OVPI Performance Manager on the database server of a satellite server. Unless you are using a remote database, you must install both components on the same system.
Much of the procedure is the same as for installing the OVPI Database Schema and OVPI Performance Manager on a standalone system.
Task 1: Start the OVPI installation program
1 If you have not already started the OVPI installation program, start it now. The Setup Utilities window opens.
Installing OVPI in a Distributed Environment 115

2 Select OVPI 5.3.0 from the Install section of the window. The Welcome window opens.
3 Read the Welcome window and click Next to continue. The License Agreement window opens.
4 Accept the license agreement and click Next to continue. You must accept the license agreement to proceed. If you click Cancel, you will be prompted to confirm your rejection of the license agreement and installation ends.
116 Chapter 5
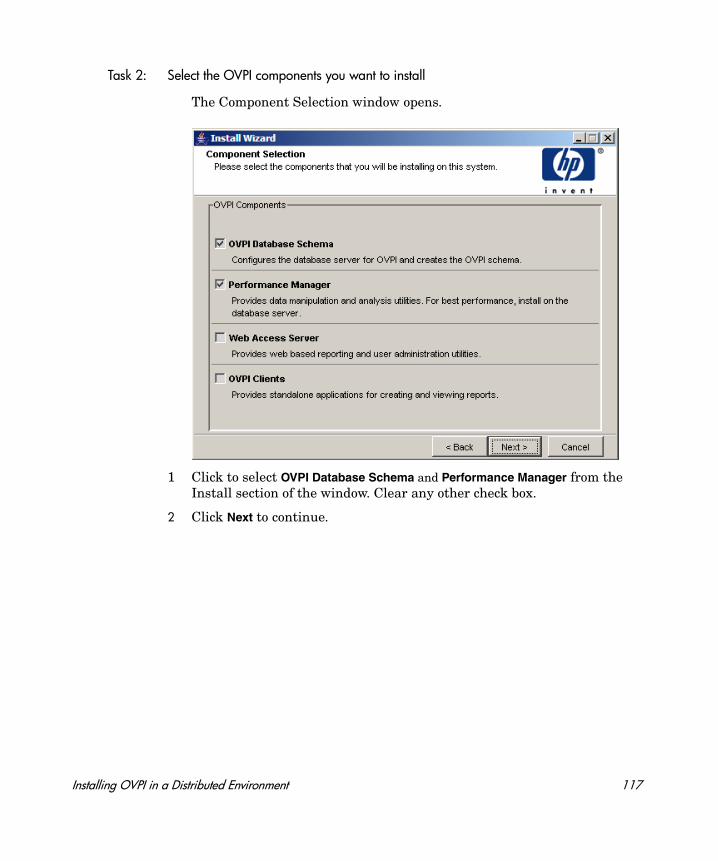
Task 2: Select the OVPI components you want to install
The Component Selection window opens.
1 Click to select OVPI Database Schema and Performance Manager from the Install section of the window. Clear any other check box.
2 Click Next to continue.
Installing OVPI in a Distributed Environment 117
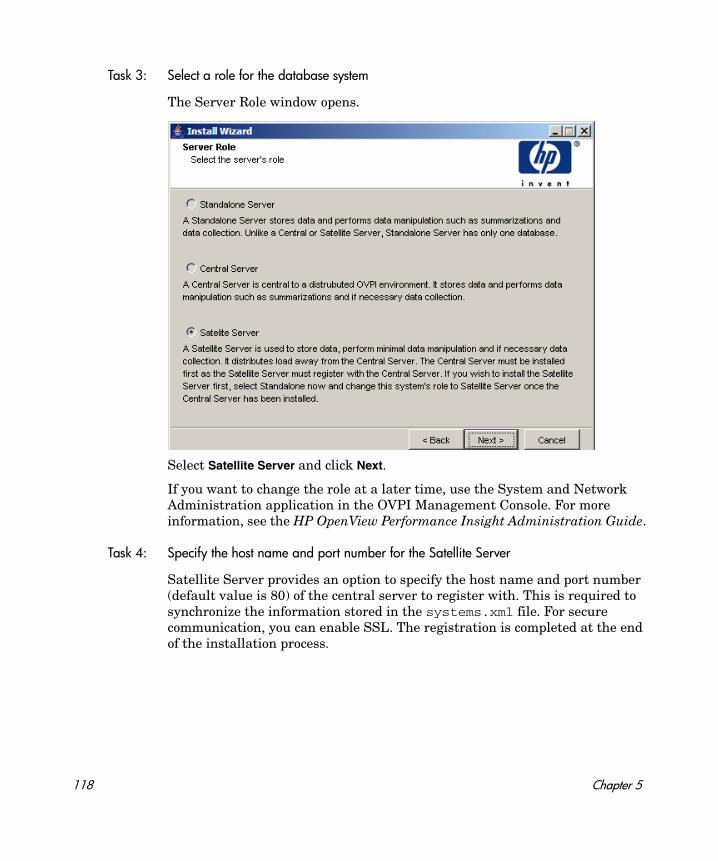
Task 3: Select a role for the database system
The Server Role window opens.
Select Satellite Server and click Next.
If you want to change the role at a later time, use the System and Network Administration application in the OVPI Management Console. For more information, see the HP OpenView Performance Insight Administration Guide.
Task 4: Specify the host name and port number for the Satellite Server
Satellite Server provides an option to specify the host name and port number (default value is 80) of the central server to register with. This is required to synchronize the information stored in the systems.xml file. For secure communication, you can enable SSL. The registration is completed at the end of the installation process.
118 Chapter 5

Click Next to continue. The Central Server Registration window opens.
Installing OVPI in a Distributed Environment 119
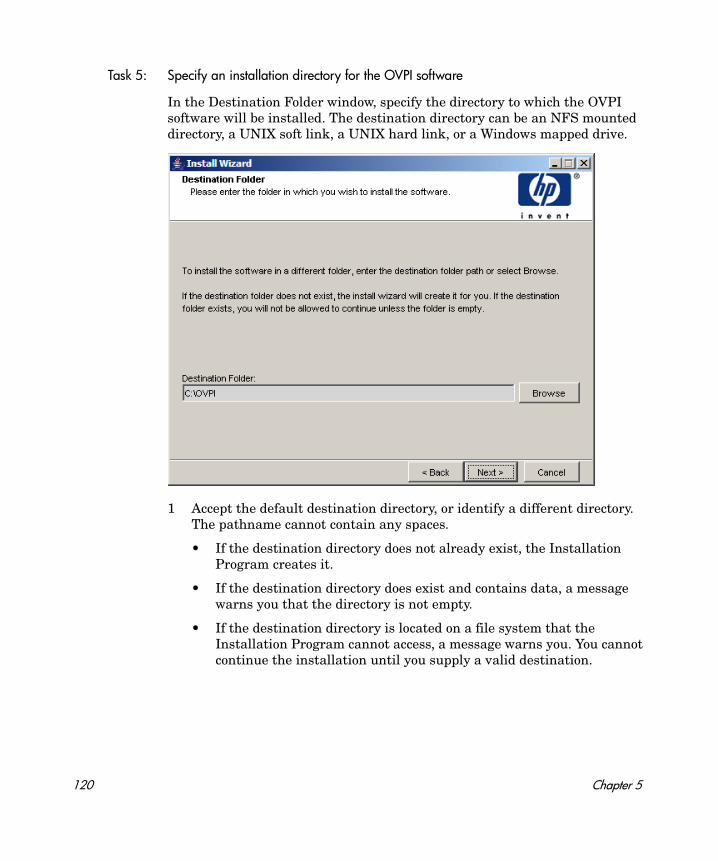
Task 5: Specify an installation directory for the OVPI software
In the Destination Folder window, specify the directory to which the OVPI software will be installed. The destination directory can be an NFS mounted directory, a UNIX soft link, a UNIX hard link, or a Windows mapped drive.
1 Accept the default destination directory, or identify a different directory. The pathname cannot contain any spaces.
• If the destination directory does not already exist, the Installation Program creates it.
• If the destination directory does exist and contains data, a message warns you that the directory is not empty.
• If the destination directory is located on a file system that the Installation Program cannot access, a message warns you. You cannot continue the installation until you supply a valid destination.
120 Chapter 5
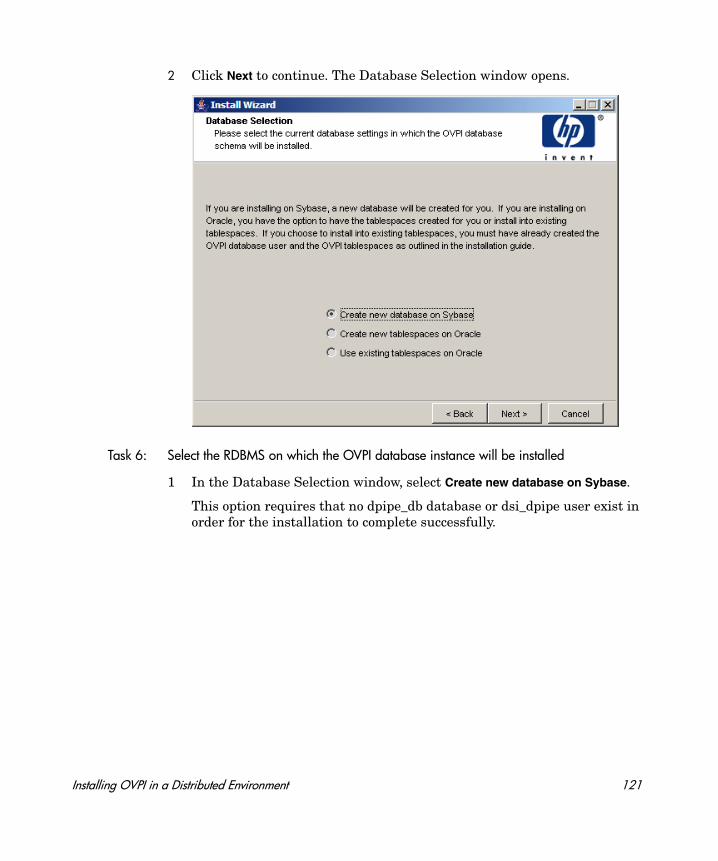
2 Click Next to continue. The Database Selection window opens.
Task 6: Select the RDBMS on which the OVPI database instance will be installed
1 In the Database Selection window, select Create new database on Sybase.
This option requires that no dpipe_db database or dsi_dpipe user exist in order for the installation to complete successfully.
Installing OVPI in a Distributed Environment 121
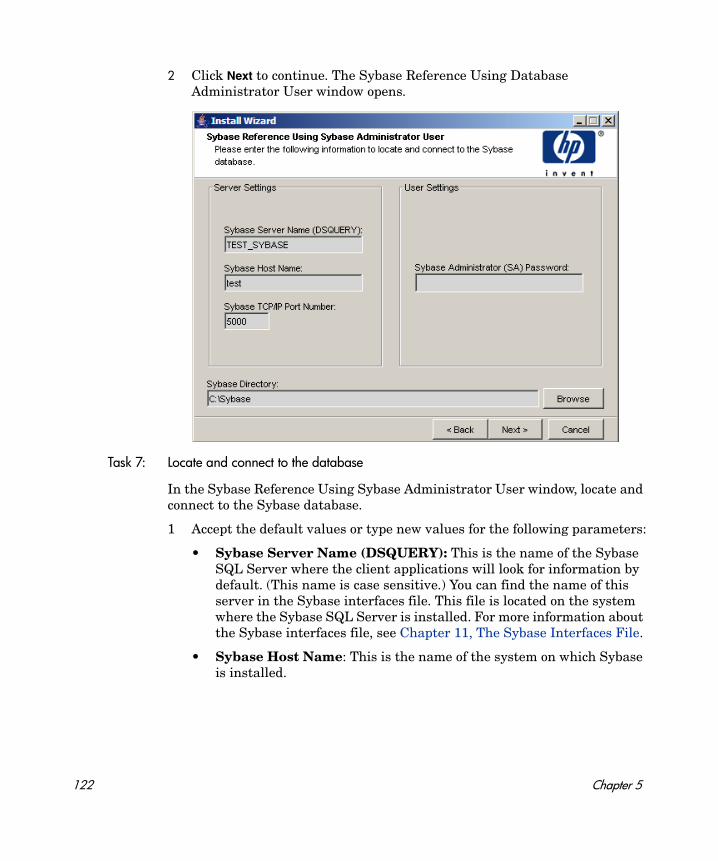
2 Click Next to continue. The Sybase Reference Using Database Administrator User window opens.
Task 7: Locate and connect to the database
In the Sybase Reference Using Sybase Administrator User window, locate and connect to the Sybase database.
1 Accept the default values or type new values for the following parameters:
• Sybase Server Name (DSQUERY): This is the name of the Sybase SQL Server where the client applications will look for information by default. (This name is case sensitive.) You can find the name of this server in the Sybase interfaces file. This file is located on the system where the Sybase SQL Server is installed. For more information about the Sybase interfaces file, see Chapter 11, The Sybase Interfaces File.
• Sybase Host Name: This is the name of the system on which Sybase is installed.
122 Chapter 5

• Sybase TCP/IP Port Number. The TCP/IP port number that Sybase uses to communicate with clients and servers on other systems. In addition to <DSQUERY>, the following Sybase SQL Servers will be assigned port numbers during the installation:
You must manually start each of these servers in order for them to work.
• Sybase Administrator (SA) Password: If you changed the Sybase Administrator password during the Sybase installation from a NULL value to an actual password, type that password in the Sybase Administrator (SA) Password box.
If you did not change the Sybase Administrator during the Sybase installation, you can leave this box blank.
• Sybase Directory: The directory into which you installed Sybase. Click Browse to select a different directory. After you select a directory, click Open to return to the Sybase SA Reference window.
Sybase Server Windows UNIX
<DSQUERY>_BS 5001 2053
<DSQUERY>_MS 5002 2054
<DSQUERY>_HS 5003 2055
<DSQUERY>_XP 5004 2056
Installing OVPI in a Distributed Environment 123
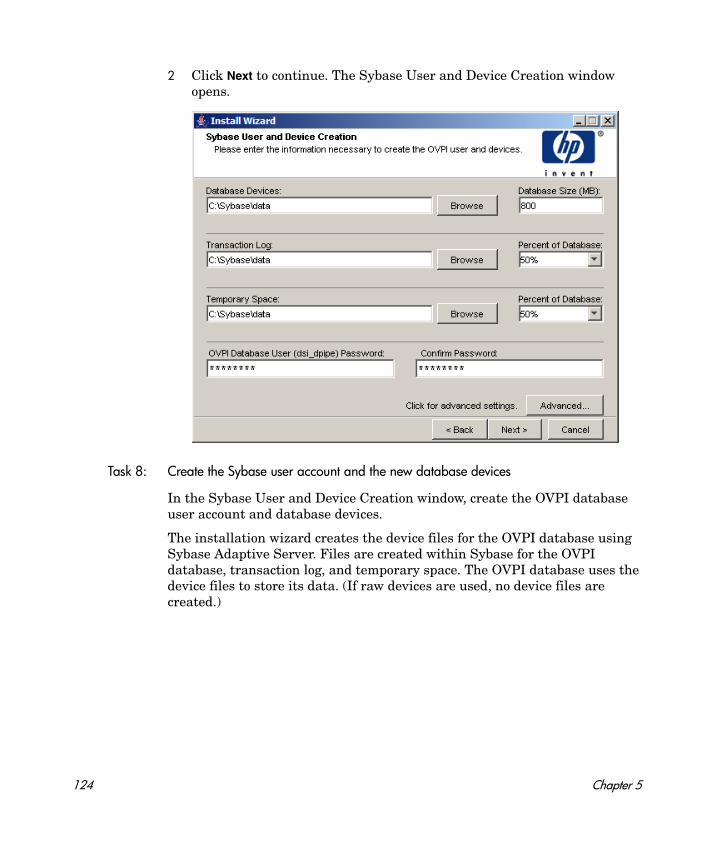
2 Click Next to continue. The Sybase User and Device Creation window opens.
Task 8: Create the Sybase user account and the new database devices
In the Sybase User and Device Creation window, create the OVPI database user account and database devices.
The installation wizard creates the device files for the OVPI database using Sybase Adaptive Server. Files are created within Sybase for the OVPI database, transaction log, and temporary space. The OVPI database uses the device files to store its data. (If raw devices are used, no device files are created.)
124 Chapter 5
By default, the installation wizard creates the device files in the Sybase installation directory in a subfolder called dbfiles. You can change the name of this folder at this point in the installation to be something different. The name cannot contain any spaces.
1 Accept the default values or type new values for the following parameters:
• Database Devices and Database Size (MB): Type the file location of the database device and its size.
• Transaction Log and Percent of Database: Type the file location of the transaction log and the amount of space allocated to it in the database.
• Temporary Space and Percent of Database: Type the file location of the temporary space and the amount of space allocated to it in the database.
HP recommends that the temporary space (dpipe_temp) and the transaction log (dpipe_log) be approximately 50% the size of the database device (dpipe_db). For example, if the database (dpipe_db) is 800 MB, then the temporary space (dpipe_temp) and temporary log (dpipe_log) should be 400 MB each.
• OVPI Database User (dsi_dpipe) Password: Type a password for the OVPI database user account (dsi_dpipe).
The password must start with an alphabetic character and must be between one and 30 characters in length. The minimum length is six. Valid characters are all alphanumeric characters, the pound (#), and the underscore (_). The password is case sensitive.
• Confirm Password: Retype the password.
2 (Optional) If necessary, click Advanced to display the Advanced OVPI Configuration window. Use the window to:
• Add files to or remove them from the OVPI database devices (dpipe_db, dpipe_temp, and dpipe_log).
All Sybase devices are created using the vstart=512 option. This lets you use labeled file systems with OVPI. For example, if the size of your database is 800 MB, only 799 MB of it will be available, and 1 MB is allocated for the label.
Installing OVPI in a Distributed Environment 125
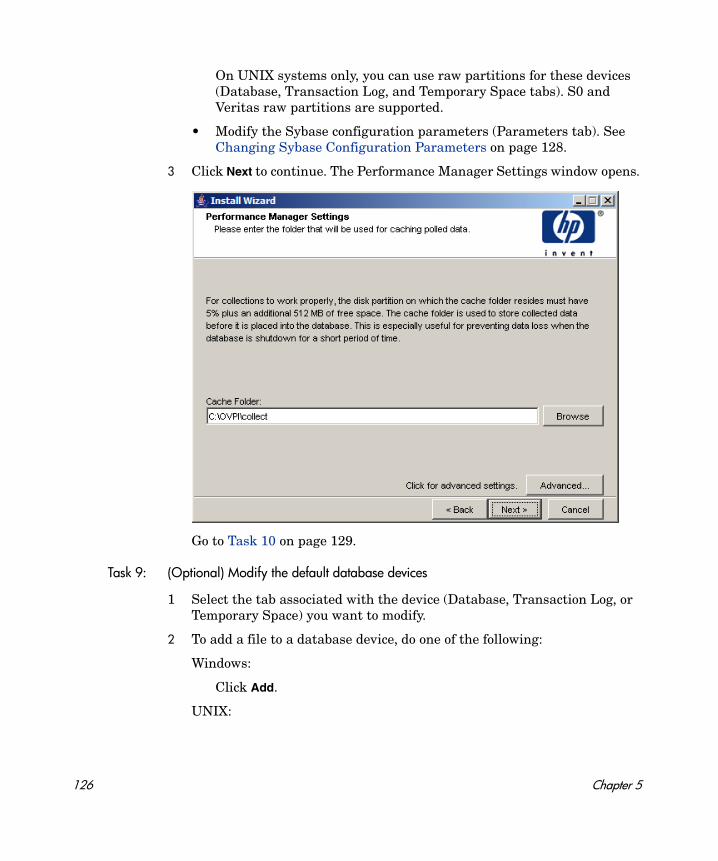
On UNIX systems only, you can use raw partitions for these devices (Database, Transaction Log, and Temporary Space tabs). S0 and Veritas raw partitions are supported.
• Modify the Sybase configuration parameters (Parameters tab). See Changing Sybase Configuration Parameters on page 128.
3 Click Next to continue. The Performance Manager Settings window opens.
Go to Task 10 on page 129.
Task 9: (Optional) Modify the default database devices
1 Select the tab associated with the device (Database, Transaction Log, or Temporary Space) you want to modify.
2 To add a file to a database device, do one of the following:
Windows:
Click Add.
UNIX:
126 Chapter 5
Click Add, and then click the Datafile arrow, and select a file from the list.
A precalculated size for the device appears next to the device’s name in the Size (MB) column. If you are using raw partitions, it is recommended that you do not change this value.
3 File-system database files only: To edit the file, double-click the file, path, or size cell.
4 To remove a file:
a Click on the file, and press the TAB key.
b Press the up or down arrow key to enable selection, and then use the up or down arrow key to select the file you want to remove.
c Click Remove.
d UNIX only: To use a raw partition for a database device, do the following:
— Select the tab associated with the device that you want to use a raw partition.
— Select the Use raw partitions for this database check box.
The installation application will find disk partitions that are not mounted, used, swapped or listed in the /etc/vfstab file. This will prevent any file systems that may have been unmounted, but are still available as file systems if the administrator were to mount them, from being used by the installation wizard.
e Click Apply when you finish making all of your changes.
f Click OK to return to the Sybase User and Device Creation window, and then click Next to continue the installation.
When you return to the Sybase User and Device Creation window, you may notice the following conditions:
– UNIX only: If you chose a raw partition for a particular database device, the database device will appear dimmed on the window.
– If you added a file to or removed a file from one of the devices, the percentages and database size listed on the window will be recalculated.
You must create at least one file for each device.
Installing OVPI in a Distributed Environment 127
– If a database device has several files that are located in different directories, the fields for the database device will appear dimmed on the window.
Changing Sybase Configuration Parameters
To change your Sybase configuration parameters:
a Select the Parameters tab. The Parameters tab contains the following options:
— Recovery Interval (Minutes). Sets the maximum number of minutes that the SQL Server should use to recover each database in case of system failure.
— Maximum Memory (MB). Sets the size of memory that the SQL Server allocates from the operating system.
— User Connections. Sets the maximum number of user connections that can be connected to a SQL Server at the same time. The global variable @@max_connections stores the maximum values for your system. It varies according to operating system.
— Number of Locks. Sets the number of available locks.
— Maximum Online Engines. Controls the number of engines in a symmetric multiprocessor environment.
— If your system uses a single CPU, the recommended value is 1. If you increase the value, there is a possibility that Sybase will slow down due to internal contention. However, if your system uses multiple CPUs, the value may be increased to take advantage of the multiple CPU architecture.
— Maximum Network Packet Size (Bytes). Sets the maximum network packet size that a client program can request.
— Additional Network Memory (Bytes). Allocates additional memory for clients that request packet sizes larger than the default packet size for the server.
— Number of Devices. Limits the number of database devices that the SQL Server can use.
b Click Apply when you finish making all of your changes.
HP recommends that only a Sybase database administrator change the values for these parameters.
128 Chapter 5
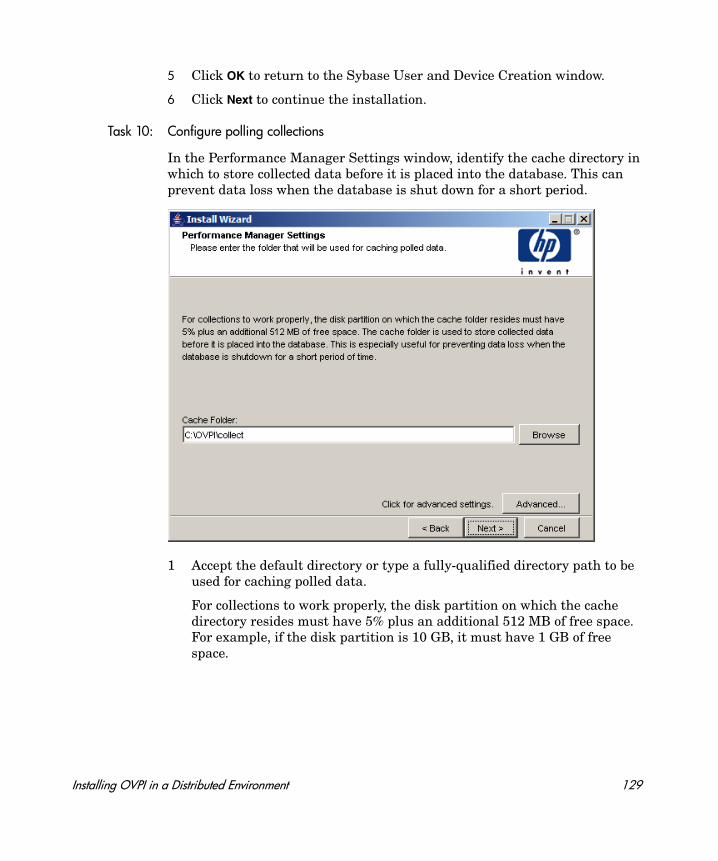
5 Click OK to return to the Sybase User and Device Creation window.
6 Click Next to continue the installation.
Task 10: Configure polling collections
In the Performance Manager Settings window, identify the cache directory in which to store collected data before it is placed into the database. This can prevent data loss when the database is shut down for a short period.
1 Accept the default directory or type a fully-qualified directory path to be used for caching polled data.
For collections to work properly, the disk partition on which the cache directory resides must have 5% plus an additional 512 MB of free space. For example, if the disk partition is 10 GB, it must have 1 GB of free space.
Installing OVPI in a Distributed Environment 129
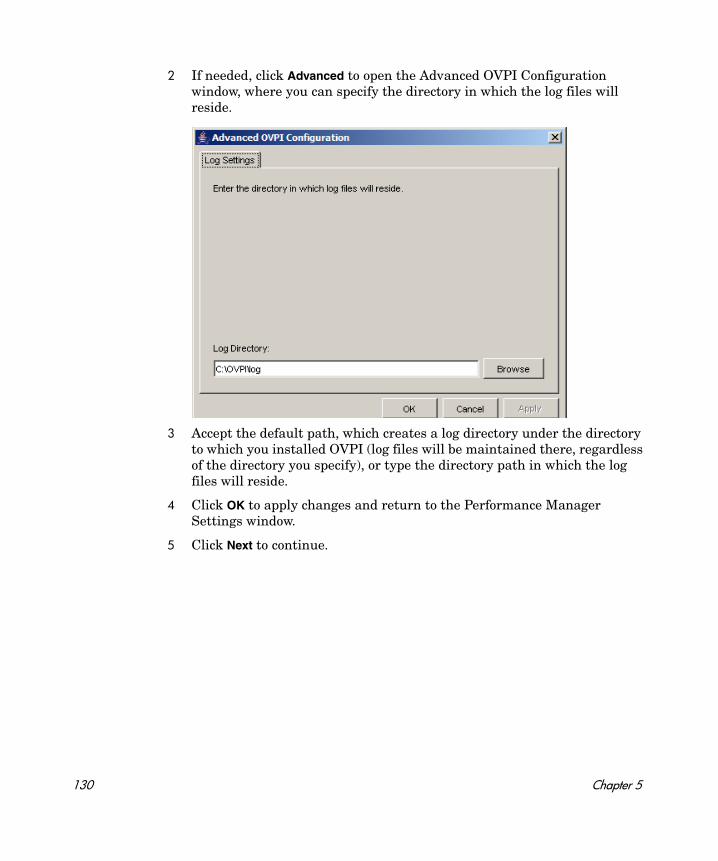
2 If needed, click Advanced to open the Advanced OVPI Configuration window, where you can specify the directory in which the log files will reside.
3 Accept the default path, which creates a log directory under the directory to which you installed OVPI (log files will be maintained there, regardless of the directory you specify), or type the directory path in which the log files will reside.
4 Click OK to apply changes and return to the Performance Manager Settings window.
5 Click Next to continue.
130 Chapter 5
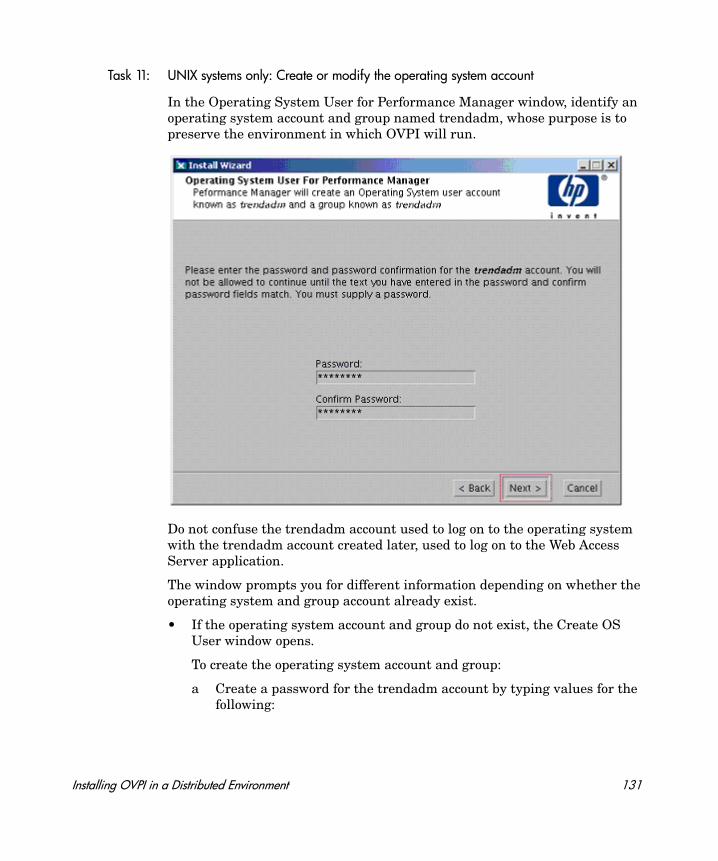
Task 11: UNIX systems only: Create or modify the operating system account
In the Operating System User for Performance Manager window, identify an operating system account and group named trendadm, whose purpose is to preserve the environment in which OVPI will run.
Do not confuse the trendadm account used to log on to the operating system with the trendadm account created later, used to log on to the Web Access Server application.
The window prompts you for different information depending on whether the operating system and group account already exist.
• If the operating system account and group do not exist, the Create OS User window opens.
To create the operating system account and group:
a Create a password for the trendadm account by typing values for the following:
Installing OVPI in a Distributed Environment 131

— Password: The password must be at least one character long. There is no maximum on length. You can use any characters. HP recommends that you adhere to your company’s policy for password creation.
— Confirm Password: Retype the password.
b Click Next to continue.
• If the operating system account and group exist, the Existing OS User window opens.
To modify the operating system account user environment:
a Click one of the following:
— Modify user environment: This parameter updates the trendadm account’s .profile or .cshrc with the OVPI environment variables (COLLECT_HOME, DPIPE_HOME, DPIPE_TMP, and TREND_LOG).
— Do not modify user environment: This parameter will not update the account’s .profile or .cshrc with the OVPI environment variables. If you select this option, you must manually add the OVPI environment variables later.
b Click Next to continue.
132 Chapter 5
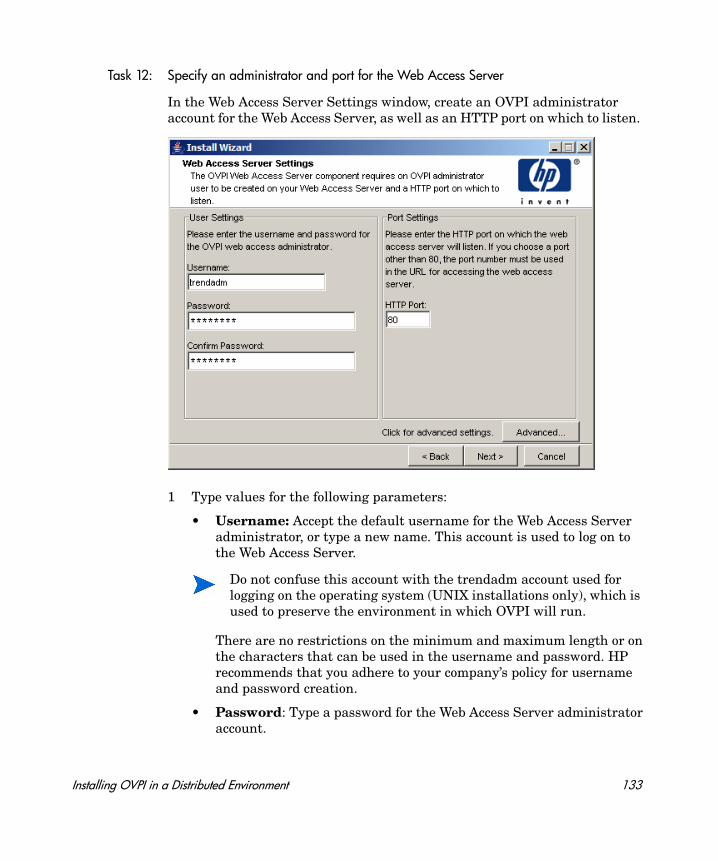
Task 12: Specify an administrator and port for the Web Access Server
In the Web Access Server Settings window, create an OVPI administrator account for the Web Access Server, as well as an HTTP port on which to listen.
1 Type values for the following parameters:
• Username: Accept the default username for the Web Access Server administrator, or type a new name. This account is used to log on to the Web Access Server.
There are no restrictions on the minimum and maximum length or on the characters that can be used in the username and password. HP recommends that you adhere to your company’s policy for username and password creation.
• Password: Type a password for the Web Access Server administrator account.
Do not confuse this account with the trendadm account used for logging on the operating system (UNIX installations only), which is used to preserve the environment in which OVPI will run.
Installing OVPI in a Distributed Environment 133
You can change password rules after you install OVPI using the Web Access Server application. See the HP OpenView Performance Insight Administration Guide for details.
• Confirm Password: Retype the password.
• HTTP Port: Accept the default port (80) or type a new port number for the Web Access Server. Any open port can be used.
2 If necessary, click Advanced to open the Advanced Configuration window, in which you can select the following tabs:
Directories: Change the location of report directories in which all deployed reports are stored.
a Accept the default directory or identify a new directory.
b Click Apply.
c Click OK to return to the Web Access Server Settings window.
OVPI Users: Create and modify user accounts used to log on to OVPI clients. You can create regular user accounts or administrator accounts. Regular user accounts can access the OVPI clients. Administrator accounts can access the administration features (Administration link) of the Web Access Server. See the HP OpenView Performance Insight Administration Guide for details.
To add or modify a user account:
a Click Add User. A default username (new-user), password (new-user), and role (user) displays, along with created user accounts.
b Double-click the name or password, delete the value, and type a new value. Select either user or admin for Role.
c Click Apply.
To remove a user account:
a Select the user name and click Remove User.
b Click Apply. and then click OK to return to the Web Access Server Settings window.
You can also create, modify, and delete user accounts after you install OVPI using the Web Access Server. See the HP OpenView Performance Insight Administration Guide for details.
134 Chapter 5
SSL Setup: Enable SSL communications to enable secure communication between the Web Access Server and a supported web browser, Report Viewer, Report Builder, and the Management Console. To enable SSL, you create a self-signed certificate. This self-signed certificate allows you to enable SSL, however, it is only valid for 90 days. You should send this certificate to a certificate authority in order to receive a signed digital certificate or generate another self-signed certificate before the 90 days expires. After you sign a digital certificate, you must import it using the Web Access Server application. You can also use the Web Access Server to change SSL settings after you install OVPI. See the HP OpenView Performance Insight Administration Guide for details.
To enable SSL communications and create a self-signed certificate:
a Click to select the Enable SSL check box.
By selecting this option, you will not disable the standard HTTP listener. Thus, the secured SSL port and the unsecured HTTP port will both be enabled.
— SSL Port: Accept the default value or type a new value.
— Keystore Password: Type a password of six characters or more. Record the password and keep it in a secure place. You will need it to generate a signed certificate.
After you generate your self-signed certificate, it will be stored in the certificate repository. This password lets the Web Access Server access the certificate repository.
b The remaining fields request information that is necessary when you generate an SSL key that must be verified and signed by a certificate-signing authority. This information is used by the person who checks the certificate to ensure that the certificate is valid.
— Organizations: Optional. Type the name of your organization, for example, “ABC Systems, Inc.”
— Org. Unit: Optional. Type the name of your department or division, for example, “Northeast Sales”.
— City: Optional. Type the name of your city or locality, for example, “Los Angeles”.
— State: Optional. Type the name of your state or province, for example, “California”.
Installing OVPI in a Distributed Environment 135
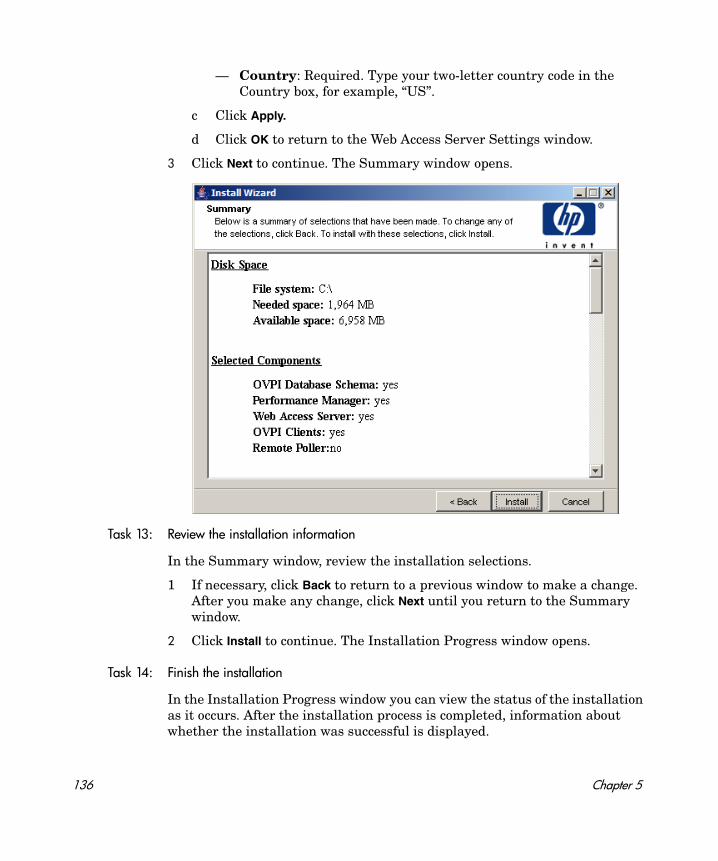
— Country: Required. Type your two-letter country code in the Country box, for example, “US”.
c Click Apply.
d Click OK to return to the Web Access Server Settings window.
3 Click Next to continue. The Summary window opens.
Task 13: Review the installation information
In the Summary window, review the installation selections.
1 If necessary, click Back to return to a previous window to make a change. After you make any change, click Next until you return to the Summary window.
2 Click Install to continue. The Installation Progress window opens.
Task 14: Finish the installation
In the Installation Progress window you can view the status of the installation as it occurs. After the installation process is completed, information about whether the installation was successful is displayed.
136 Chapter 5
• If the OVPI installation completed successfully, click Done.
UNIX Systems: The installation is complete.
Windows Systems: Reboot the system to complete installation.
• If the OVPI installation was unsuccessful:
a Click Details at the bottom of the Installation Progress window for additional information.
b Contact Support (see Support on page 4).
Task 15: Install other OVPI components as necessary
To install the Web Access Server, go to Installing the Web Access Server on page 138.
To install Remote Pollers, go to Installing the Remote Poller Component on page 147.
To install Client Applications, go to Installing Only the OVPI Clients on page 144.
Installing OVPI in a Distributed Environment 137
Installing the Web Access Server
The database should be installed and running before you install the Web Access Server.
During installation, you are asked to provide the remote management server host name and port number. This enables the Installation Program to download database information from the database system. If you did not install the database, the installation will continue. However, you must use the Management Console to configure the database system after the install.
Much of the procedure is the same as for installing the Web Access Server on a standalone system.
Task 1: Start the OVPI installation program
1 If you have not already started the OVPI installation program, start it now.
2 The Setup window opens. Select OVPI 5.3.0 from the Install section of the window.
3 The Welcome window opens. Read the Welcome window and click Next to continue.
4 The License Agreement window opens. Accept the license agreement and click Next to continue.
Task 2: Select the OVPI components to install
The Component Selection window opens. Use the window to select the components to install.
1 Click to select Web Access Server from the Install section of the window. Deselect any other components.
2 Click Next to continue.
You must accept the license agreement to proceed. If you click Cancel, you will be prompted to confirm your rejection of the license agreement and installation ends.
138 Chapter 5
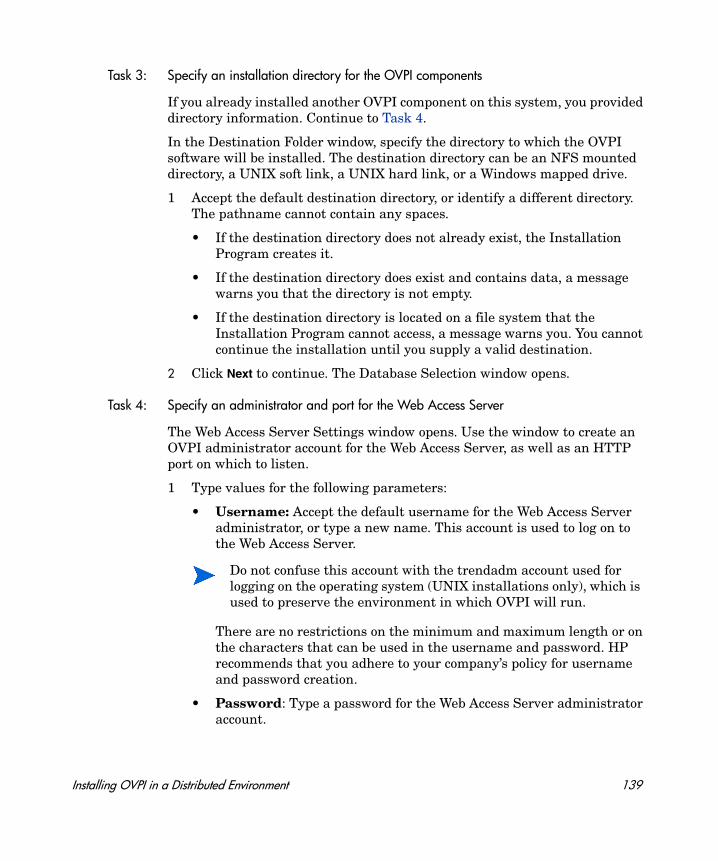
Task 3: Specify an installation directory for the OVPI components
If you already installed another OVPI component on this system, you provided directory information. Continue to Task 4.
In the Destination Folder window, specify the directory to which the OVPI software will be installed. The destination directory can be an NFS mounted directory, a UNIX soft link, a UNIX hard link, or a Windows mapped drive.
1 Accept the default destination directory, or identify a different directory. The pathname cannot contain any spaces.
• If the destination directory does not already exist, the Installation Program creates it.
• If the destination directory does exist and contains data, a message warns you that the directory is not empty.
• If the destination directory is located on a file system that the Installation Program cannot access, a message warns you. You cannot continue the installation until you supply a valid destination.
2 Click Next to continue. The Database Selection window opens.
Task 4: Specify an administrator and port for the Web Access Server
The Web Access Server Settings window opens. Use the window to create an OVPI administrator account for the Web Access Server, as well as an HTTP port on which to listen.
1 Type values for the following parameters:
• Username: Accept the default username for the Web Access Server administrator, or type a new name. This account is used to log on to the Web Access Server.
There are no restrictions on the minimum and maximum length or on the characters that can be used in the username and password. HP recommends that you adhere to your company’s policy for username and password creation.
• Password: Type a password for the Web Access Server administrator account.
Do not confuse this account with the trendadm account used for logging on the operating system (UNIX installations only), which is used to preserve the environment in which OVPI will run.
Installing OVPI in a Distributed Environment 139
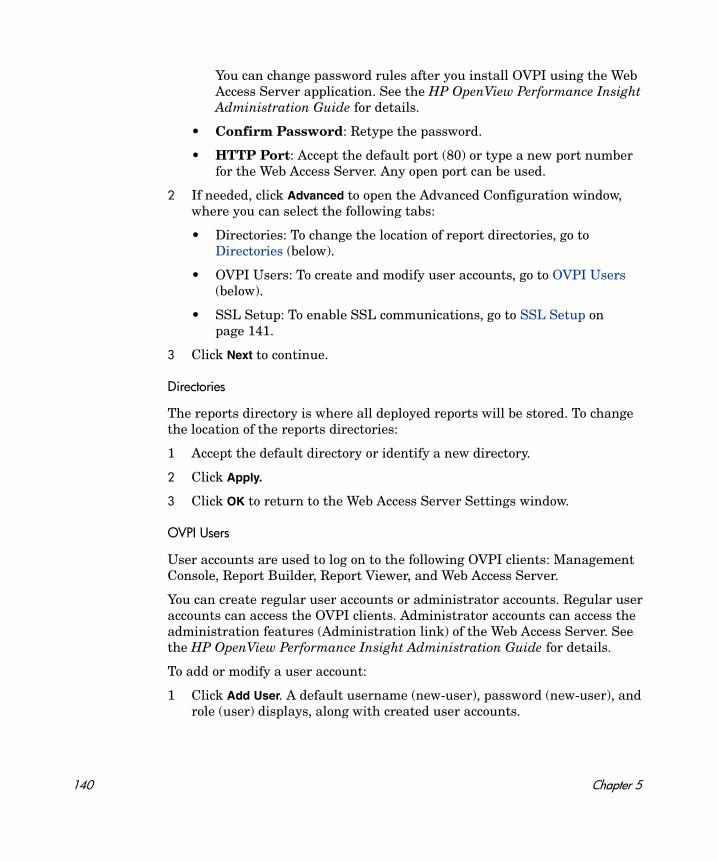
You can change password rules after you install OVPI using the Web Access Server application. See the HP OpenView Performance Insight Administration Guide for details.
• Confirm Password: Retype the password.
• HTTP Port: Accept the default port (80) or type a new port number for the Web Access Server. Any open port can be used.
2 If needed, click Advanced to open the Advanced Configuration window, where you can select the following tabs:
• Directories: To change the location of report directories, go to Directories (below).
• OVPI Users: To create and modify user accounts, go to OVPI Users (below).
• SSL Setup: To enable SSL communications, go to SSL Setup on page 141.
3 Click Next to continue.
Directories
The reports directory is where all deployed reports will be stored. To change the location of the reports directories:
1 Accept the default directory or identify a new directory.
2 Click Apply.
3 Click OK to return to the Web Access Server Settings window.
OVPI Users
User accounts are used to log on to the following OVPI clients: Management Console, Report Builder, Report Viewer, and Web Access Server.
You can create regular user accounts or administrator accounts. Regular user accounts can access the OVPI clients. Administrator accounts can access the administration features (Administration link) of the Web Access Server. See the HP OpenView Performance Insight Administration Guide for details.
To add or modify a user account:
1 Click Add User. A default username (new-user), password (new-user), and role (user) displays, along with created user accounts.
140 Chapter 5
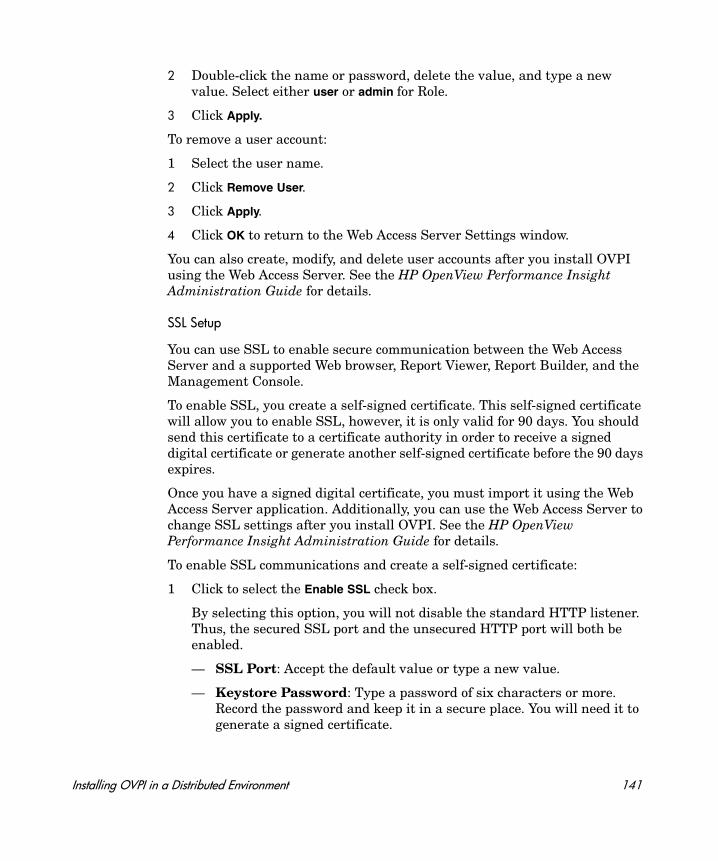
2 Double-click the name or password, delete the value, and type a new value. Select either user or admin for Role.
3 Click Apply.
To remove a user account:
1 Select the user name.
2 Click Remove User.
3 Click Apply.
4 Click OK to return to the Web Access Server Settings window.
You can also create, modify, and delete user accounts after you install OVPI using the Web Access Server. See the HP OpenView Performance Insight Administration Guide for details.
SSL Setup
You can use SSL to enable secure communication between the Web Access Server and a supported Web browser, Report Viewer, Report Builder, and the Management Console.
To enable SSL, you create a self-signed certificate. This self-signed certificate will allow you to enable SSL, however, it is only valid for 90 days. You should send this certificate to a certificate authority in order to receive a signed digital certificate or generate another self-signed certificate before the 90 days expires.
Once you have a signed digital certificate, you must import it using the Web Access Server application. Additionally, you can use the Web Access Server to change SSL settings after you install OVPI. See the HP OpenView Performance Insight Administration Guide for details.
To enable SSL communications and create a self-signed certificate:
1 Click to select the Enable SSL check box.
By selecting this option, you will not disable the standard HTTP listener. Thus, the secured SSL port and the unsecured HTTP port will both be enabled.
— SSL Port: Accept the default value or type a new value.
— Keystore Password: Type a password of six characters or more. Record the password and keep it in a secure place. You will need it to generate a signed certificate.
Installing OVPI in a Distributed Environment 141
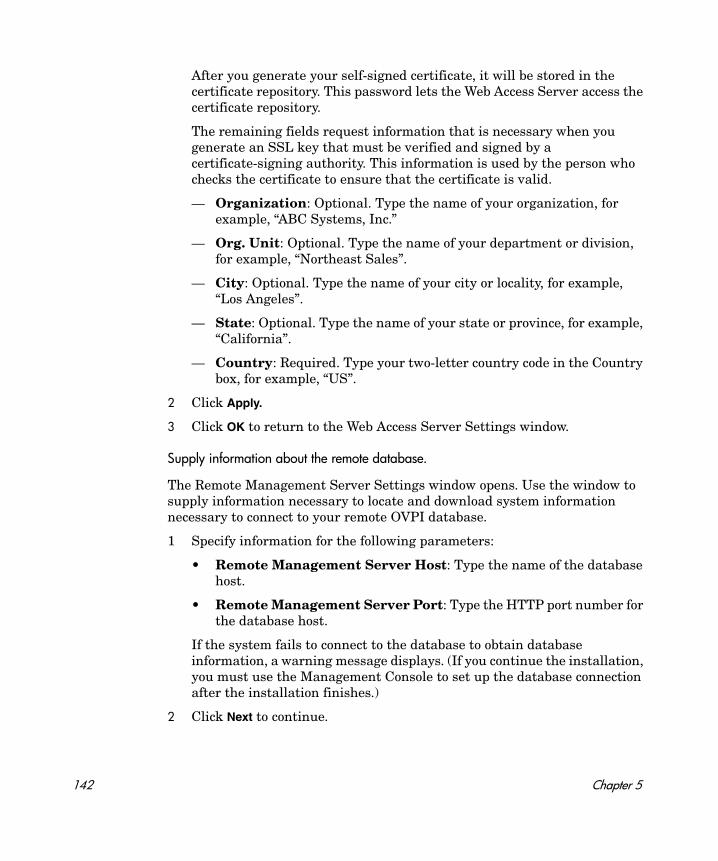
After you generate your self-signed certificate, it will be stored in the certificate repository. This password lets the Web Access Server access the certificate repository.
The remaining fields request information that is necessary when you generate an SSL key that must be verified and signed by a certificate-signing authority. This information is used by the person who checks the certificate to ensure that the certificate is valid.
— Organization: Optional. Type the name of your organization, for example, “ABC Systems, Inc.”
— Org. Unit: Optional. Type the name of your department or division, for example, “Northeast Sales”.
— City: Optional. Type the name of your city or locality, for example, “Los Angeles”.
— State: Optional. Type the name of your state or province, for example, “California”.
— Country: Required. Type your two-letter country code in the Country box, for example, “US”.
2 Click Apply.
3 Click OK to return to the Web Access Server Settings window.
Supply information about the remote database.
The Remote Management Server Settings window opens. Use the window to supply information necessary to locate and download system information necessary to connect to your remote OVPI database.
1 Specify information for the following parameters:
• Remote Management Server Host: Type the name of the database host.
• Remote Management Server Port: Type the HTTP port number for the database host.
If the system fails to connect to the database to obtain database information, a warning message displays. (If you continue the installation, you must use the Management Console to set up the database connection after the installation finishes.)
2 Click Next to continue.
142 Chapter 5

Task 5: Review the installation information
In the Summary window, review the installation selections.
1 If necessary, click Back to return to a previous window to make a change. After you make any change, click Next until you return to the Summary window.
2 Click Install to continue. The Installation Progress window opens.
Task 6: Finish the installation
In the Installation Progress window you can view the status of the installation as it occurs. After the installation process is completed, information about whether the installation was successful is displayed.
• If the OVPI installation completed successfully, click Done.
— UNIX Systems: the installation is complete.
— Windows Systems: reboot the system to complete installation.
• If the OVPI installation was unsuccessful:
a Click Details at the bottom of the Installation Progress window for additional information.
b Contact Support (see Support on page 4).
Task 7: Install other OVPI components as necessary
To install Client Applications, see Installing Only the OVPI Clients on page 144.
To install Remote Pollers, see Installing the Remote Poller Component on page 147.
Windows Systems Only: If the system where you installed the Web Access Server experiences hardware failure, reinstall the Web Access Server on a new system. If you deployed reports (a configuration task), run the deploytool command from the system on which the OVPI database is installed to redeploy reports to the Web Access Server. See the Performance Insight Reference Guide for more information about the deploytool command.
Installing OVPI in a Distributed Environment 143
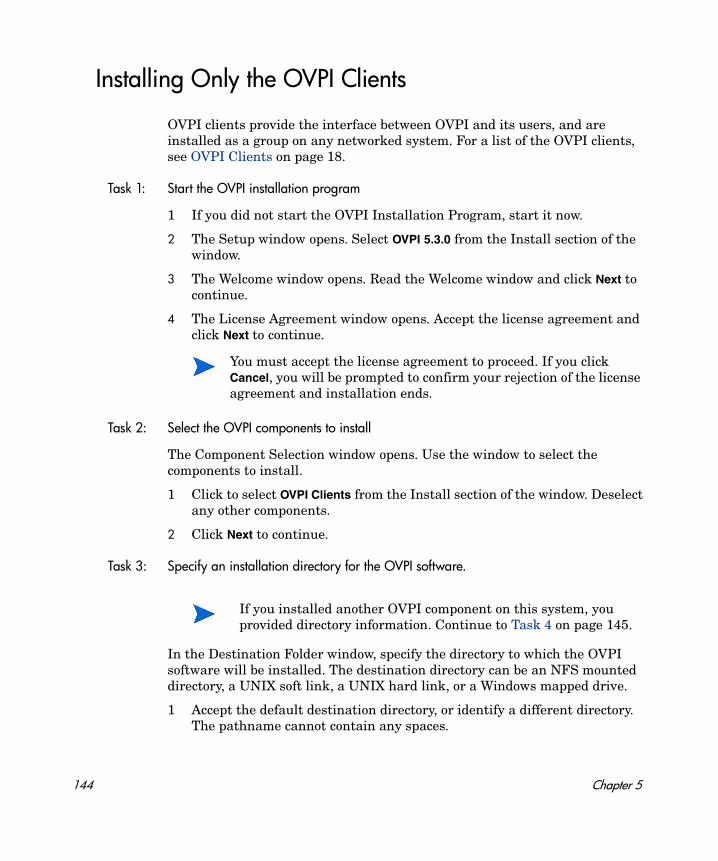
Installing Only the OVPI Clients
OVPI clients provide the interface between OVPI and its users, and are installed as a group on any networked system. For a list of the OVPI clients, see OVPI Clients on page 18.
Task 1: Start the OVPI installation program
1 If you did not start the OVPI Installation Program, start it now.
2 The Setup window opens. Select OVPI 5.3.0 from the Install section of the window.
3 The Welcome window opens. Read the Welcome window and click Next to continue.
4 The License Agreement window opens. Accept the license agreement and click Next to continue.
Task 2: Select the OVPI components to install
The Component Selection window opens. Use the window to select the components to install.
1 Click to select OVPI Clients from the Install section of the window. Deselect any other components.
2 Click Next to continue.
Task 3: Specify an installation directory for the OVPI software.
In the Destination Folder window, specify the directory to which the OVPI software will be installed. The destination directory can be an NFS mounted directory, a UNIX soft link, a UNIX hard link, or a Windows mapped drive.
1 Accept the default destination directory, or identify a different directory. The pathname cannot contain any spaces.
You must accept the license agreement to proceed. If you click Cancel, you will be prompted to confirm your rejection of the license agreement and installation ends.
If you installed another OVPI component on this system, you provided directory information. Continue to Task 4 on page 145.
144 Chapter 5

• If the destination directory does not already exist, the Installation Program creates it.
• If the destination directory does exist and contains data, a message warns you that the directory is not empty.
• If the destination directory is located on a file system that the Installation Program cannot access, a message warns you. You cannot continue the installation until you supply a valid destination.
2 Click Next to continue. The Database Selection window opens.
Task 4: Specify the information needed to access the Web Access Server
The Remote Web Access Server Settings window opens. Use the window to enter information about where the Web Access Server will be installed.
1 Accept the defaults or specify values for the following parameters:
• Web Access Server Host: Type the name of the Web Access Server.
• Web Access Server Port: Type the port number for the Web Access Server.
2 Click Next to continue.
Task 5: Review the installation information
In the Summary window, review the installation selections.
1 If necessary, click Back to return to a previous window to make a change. After you make any change, click Next until you return to the Summary window.
2 Click Install to continue. The Installation Progress window opens.
Task 6: Finish the installation
In the Installation Progress window you can view the status of the installation as it occurs. After the installation process is completed, information about whether the installation was successful is displayed.
• If the OVPI installation completed successfully, click Done.
— UNIX Systems: the installation is complete.
— Windows Systems: reboot the system to complete installation.
• If the OVPI installation was unsuccessful:
Installing OVPI in a Distributed Environment 145
a Click Details at the bottom of the Installation Progress window for additional information.
b Contact Support (see Support on page 4).
Task 7: Install other OVPI components as necessary
To install Remote Pollers, go to Installing the Remote Poller Component on page 147.
146 Chapter 5
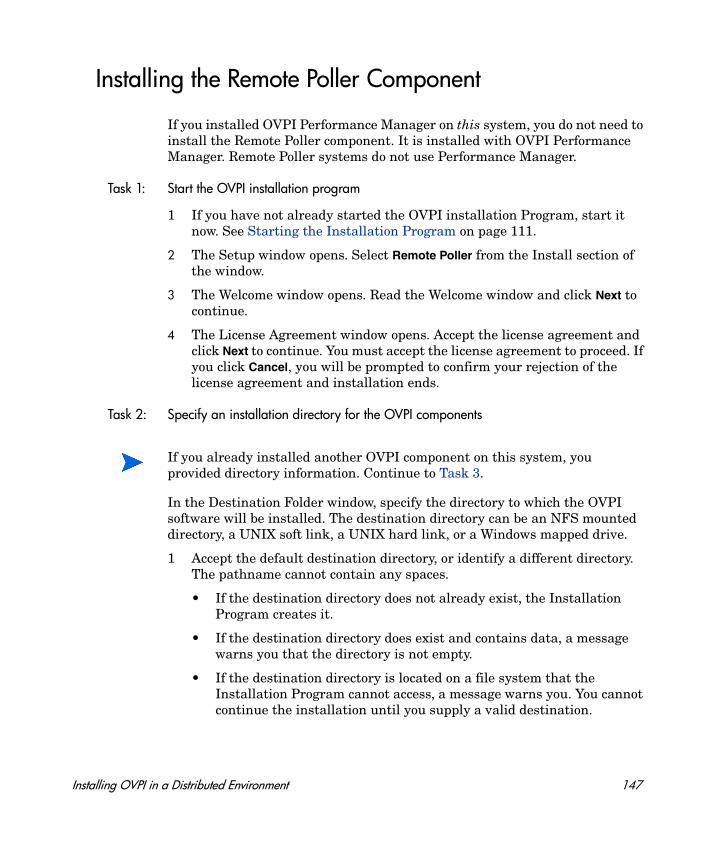
Installing the Remote Poller Component
If you installed OVPI Performance Manager on this system, you do not need to install the Remote Poller component. It is installed with OVPI Performance Manager. Remote Poller systems do not use Performance Manager.
Task 1: Start the OVPI installation program
1 If you have not already started the OVPI installation Program, start it now. See Starting the Installation Program on page 111.
2 The Setup window opens. Select Remote Poller from the Install section of the window.
3 The Welcome window opens. Read the Welcome window and click Next to continue.
4 The License Agreement window opens. Accept the license agreement and click Next to continue. You must accept the license agreement to proceed. If you click Cancel, you will be prompted to confirm your rejection of the license agreement and installation ends.
Task 2: Specify an installation directory for the OVPI components
In the Destination Folder window, specify the directory to which the OVPI software will be installed. The destination directory can be an NFS mounted directory, a UNIX soft link, a UNIX hard link, or a Windows mapped drive.
1 Accept the default destination directory, or identify a different directory. The pathname cannot contain any spaces.
• If the destination directory does not already exist, the Installation Program creates it.
• If the destination directory does exist and contains data, a message warns you that the directory is not empty.
• If the destination directory is located on a file system that the Installation Program cannot access, a message warns you. You cannot continue the installation until you supply a valid destination.
If you already installed another OVPI component on this system, you provided directory information. Continue to Task 3.
Installing OVPI in a Distributed Environment 147
2 Click Next to continue. The Database Selection window opens.
Task 3: Supply information about the database
The Remote Management Server Settings window opens. Use the window to supply information necessary to locate and download system information necessary to connect to your remote OVPI database.
1 Specify information for the following parameters:
• Remote Management Server Host: Type the name of the database host.
• Remote Management Server Port: Type the HTTP port number for the database host.
This information is used to allow the remote poller system to automatically connect with the OVPI server running Performance Manager. The first time they connect, an information block is downloaded from the OVPI server and saved.
Task 4: Configure polling collections
The Performance Manager Settings window opens. Use this window to identify the cache directory used to store collected data before it is placed into the database. This can prevent data loss when the database is shut down for a short period.
1 Accept the default directory or type a fully-qualified directory path to be used for caching polled data.
2 If needed, click Advanced to open the Advanced OVPI Configuration window, where you can specify the directory in which the log files will reside.
a Accept the default path, which creates a log directory under the directory into which you installed OVPI (certain log files will be maintained there, regardless of the directory you specify), or type the directory path in which the log files will reside.
For collections to work properly, the disk partition on which the cache directory resides must have 5% plus an additional 512 MB of free space. For example, if the disk partition is 10 GB, it must have 1 GB of free space.
148 Chapter 5
b Click OK to apply changes and return to the Performance Manager Settings window.
3 Click Next to continue.
Task 5: UNIX systems only: Create or modify the operating system account
The Operating System User for Performance Manager window opens. Use the window to identify an operating system account and group named trendadm, whose purpose is to preserve the environment in which OVPI will run.
The window prompts you for different information depending on whether the operating system and group account already exist.
• If the operating system account and group do not exist, the Create OS user window opens.
To create a password for the trendadm account by typing values for the following:
a Password: The password must at minimum be one character in length, has no limit on maximum length, and may contain any character. HP recommends that you adhere to your company’s policy for password creation.
b Confirm Password: Retype the password.
Click Next to continue.
• If the operating system account and group exist, the Existing OS User window opens.
Click one of the following:
— Modify user environment: This parameter updates the trendadm account’s .profile or .cshrc with the OVPI environment variables (COLLECT_HOME, DPIPE_HOME, DPIPE_TMP, and TREND_LOG).
— Do not modify user environment: This parameter will not update the account’s .profile or .cshrc with the OVPI environment variables. If you select this option, you must manually add the OVPI environment variables later.
Do not confuse the trendadm account used to log on to the operating system with the trendadm account created later, used to log on to the Web Access Server application.
Installing OVPI in a Distributed Environment 149
Click Next to continue.
Task 6: Review the installation information
In the Summary window, review the installation selections.
1 If necessary, click Back to return to a previous window to make a change. After you make any change, click Next until you return to the Summary window.
2 Click Install to continue. The Installation Progress window opens.
Task 7: Finish the installation
In the Installation Progress window you can view the status of the installation as it occurs. After the installation process is completed, information about whether the installation was successful is displayed.
• If the OVPI installation completed successfully, click Done.
— UNIX Systems: the installation is complete.
— Windows Systems: reboot the system to complete installation.
• If the OVPI installation was unsuccessful:
a Click Details at the bottom of the Installation Progress window for additional information.
b Contact Support (see Support on page 4).
The Remote Poller does not poll devices until you configure its polling policy. To configure the polling policy, use the Polling Policies application in the Management Console. For more information, see the HP OpenView Performance Insight Administration Guide.
150 Chapter 5
Installing OVPI Clients Only
You can install only the OVPI clients on any system in a standalone or distributed environment without installing any other OVPI components on that system. This type of install is termed a client-only install, and gives users the ability to access the Web Access Server for reporting and administration capabilities from local workstations.
In a client-only installation, you cannot use the following applications from the Management Console Tools menu: Catalog Manager, MIB Browser, SNMP Discovery, Type Discovery, and Package Manager. You cannot register a new data table, property table, or automatically add a collection to the database. For full functionality, OVPI Performance Manager must also be installed,
To install the clients only, follow the instructions provided at Installing Only the OVPI Clients on page 144.
Installing OVPI in a Distributed Environment 151

152 Chapter 5
6 Post-Installation
Apply a Service Pack
After you install OVPI, you should check for service packs for your OVPI system. If available, you should download and apply the most recent service pack. It includes any previous service packs.
You must have an HP Passport ID to access service packs. For information about how to obtain an HP Passport ID, see Support on page 4.
To locate the most recent service pack for this release
1 Go to the following url:
www.openview.hp.com/downloads/index.html
2 Click Software patches.
The HP Passport sign-in window opens.
3 Enter your HP Passport ID and log on.
4 Navigate to the Performance Insight software patches and download the service pack.
Use a Common Character Set Across Distributed Systems
In a distributed configuration, the central database server, satellite database servers, and polling systems can be different platforms. Because the default database character sets may differ between operating systems, make sure that all database instances and OVPI clients use a common character set.
153
Root Permission for Certificate Management Application
The Certificate Management application uses ovcert and ovconfchg programs present in the /opt/OV/bin directory. These programs are used for managing security certificates on the system. You need root privilege to run these programs. Usually the trendadm user launches the Certificate Management application, who has no root privileges. If you are using the trendadm user profile to launch this application, run the ovswitchuser.sh script using the following command:
/opt/OV/bin/ovswitchuser.sh -existinguser trendadm -existinggroup trendadm
For more information, refer to HP OpenView Performance Insight Administration Guide.
Perform Configuration Tasks
The immediate configuration tasks you must perform include the following:
1 Install the report packs on the central database server and deploy them to the Web Access Server.
A report pack is a collection of reports that analyze performance data. A datapipe contains directives for OVPI to use when collecting the data. Installing the datapipe configures OVPI to collect a specific type of performance data at a specific polling interval. Installing the report pack configures OVPI to summarize and aggregate the data collected by the datapipe. To install report packs and datapipes, use the OVPI Package Manager, an application supplied by the Management Console client application. There are many types of reports to choose from. Advanced users also have the option of creating their own reports. Before installing any report pack, see the user guide for the report pack. If your configuration has more than one Web Access Server, deploy the reports to each one. Do not install datapipes on the central database server unless the central server is polling.
154 Chapter 6
2 Discover the network on the satellite database servers for those nodes that you plan to poll. The discovery process involves running a utility that determines if there is a device at a specific IP address, if the device is SNMP-manageable, and if so, what kind of device it is (router, hub, or switch). This information is used to populate and update tables in the OVPI database instance.
3 Install report packs and datapipes on the satellite database servers, but do not deploy them. Make sure to install the same report packages on the satellite database servers that you installed on the central database server. Disable polling if a satellite database server is not going to be polling devices.
4 Run type discovery on the satellite database servers.
5 In a distributed configuration, configure report packs and polling policies for the distributed configuration. For example, you must modify the report package polling policies, located on the satellite database servers, so that the policies are collecting data from the system on which the remote poller component is located.
6 Other types of configuration tasks include the following:
• Configuring the trendtimer utility to schedule activities to run at specific times
• Creating data collections (types and sources of data)
• Configuring polling policies
• Configuring users and groups
• Creating views for presenting data
• Configuring the Web Access Server
• Configuring the OVPI database
• Scheduling and generating reports
All configuration tasks are explained in detail in the HP OpenView Performance Insight Administration Guide. You should read this guide immediately following OVPI installation.
Post-Installation 155
Back Up Your System
After you install OVPI, you should back up both the database and the OVPI installation. For instructions, see the HP OpenView Performance Insight Administration Guide.
Confirming that OVPI is Running and Collecting Data
To verify that OVPI is running and collecting data:
• Windows Systems
a From the Control Panel window, double-click Administrative Tools.
b The Administrative Tools window opens.
c Double-click the Services icon.
d Locate the following OVPI Services in the Services list:
– OVPI Timer
– OVPI_HTTP_Server
The Status should say Started.
e If the service is stopped, right-click the service name and click Start on the shortcut menu.
• UNIX Systems
Type the following at the command line:
ps -ef | grep trendtimer
The output will look similar to the following:
trendadm 1755 1 0 Apr 13 ? 0:10 /usr/OVPI/bin/trendtimer -s /usr/OVPI/lib/trendtimer.sched
If the process is not listed, OVPI is not running. The path of program depends on where OVPI is installed.
You can also verify the jboss process (OVPI HTTP Server service on Windows). Although jboss is not required for OVPI to collect data successfully, it is required for activities using the web server. For example, to view reports.
156 Chapter 6
Type either of the following commands:
• ps -ef | grep java
The output will look similar to the following:
root 22284 22271 0 06:28:04 ? 10:11 /opt/OV/nonOV/jdk/a/bin/java -Dprogram.name=run.sh -server -Xms32m -Xmx256m ............
• ps -ef | grep jboss
The output will look similar to the following:
root 11250 11191 0 Jul10 pts/1 00:06:30 /opt/OV/nonOV/jdk/a/bin/java -Dprogram.name=run.sh -server -Xms32m -Xmx256m -Dtrend.home=/usr/OVPI -Dfile.encoding=UTF-8 -Djava.awt.headless=true ..............
If the process is not listed, the web server is not running. The path of program depends on where OVPI is installed.
Starting and Stopping OVPI
The HP OpenView Performance Insight Administration Guide provides instructions for starting and stopping each OVPI component.
Post-Installation 157
Troubleshooting OVPI Installation Problems
OVPI Log Files
All OVPI log files are located at $DPIPE_HOME/log/
The log file used during installation is named install.log. If you have problems during installation, check this log.
For information about how to use OVPI log files, see the HP OpenView Performance Insight Troubleshooting Guide, which is available online at the Support web site (see Support on page 4).
Windows Only: NNM Integration
On Windows systems only, when installing OVPI on a system running NNM, you may see ERROR and WARNING messages during the OVPI installation. You can ignore them.
• During installation, you may see the error:
failed to copy the file, msvcr70.dll, into the OVPI “bin” directory
• After installation completes, the Details window Error tab displays this message:
msiexec failed with exit status: 1603
The Warning tab displays one or both of these warning messages:
Higher version of package might have been installed. Failed to install packageHPOvXpl-02.50.100-WinNT4.0-release.msi:{C9C24CC5-23CE-4B55-8BC0-6D5785924842}
Higher version of package might have been installed. Failed to install packageHPOvJxpl-02.50.100-WinNT4.0-release.msi:{48C97C18-5AFA-40FE-B51D-A4EECBE02808}
158 Chapter 6
7 Uninstalling OVPI
You must uninstall OVPI before you uninstall the RDBMS.
Uninstalling OVPI removes all OVPI-related tablespaces and the dsi_dpipe user from the database used by OVPI. The database itself remains.
OVPI Uninstall Prerequisite Tasks
Perform the following tasks before uninstalling OVPI.
• Stop the OVPI Timer
• Stop the OVPI HTTP Server
• Wait for OVPI processes to complete
• Verify that Sybase is still running
Note the directory locations for the following environment variables. These directories must be manually removed after the uninstall.
• DPIPE_HOME
• DPIPE_TMP
• TREND_LOG
• COLLECT_HOME
159
OVPI Uninstall Procedure
Use the OVPI Uninstall Wizard to uninstall OVPI. It removes all OVPI components from the local system, as well as files that were added to the system during OVPI installation. It does not remove files that were created by users or applications — log files and reports, for example.
With the exception of starting the Uninstall Wizard, the procedure for uninstalling OVPI is the same for Windows and UNIX systems.
Task 1: Start the OVPI Uninstall Wizard.
1 Log on to the local system.
Windows Systems:
a Log on using the Administrator account.
b From the Windows Desktop, click Start. Point to Programs, point to HP OpenView, point to Performance Insight, and click Uninstall.
UNIX Systems:
a Log on as root.
b Type the following command:
$DPIPE_HOME/bin/uninstall
In this instance, $DPIPE_HOME is the directory into which you installed OVPI.
2 The Welcome window opens. Click Next to continue.
3 If the OVPI database schema is installed on the system where you are uninstalling OVPI, go to Task 2.
4 If the OVPI database schema is not installed on the system where you are uninstalling OVPI go to Task 3.
Task 2: Supply the Sybase Administrator password (local Sybase database only)
The Sybase Administrator Password window opens. Do one of the following:
• If you set the Sybase Administrator password, type the password in the Sybase Administrator (SA) Password box and click Next to continue.
160 Chapter 7
• If you did not set the Sybase Administrator password, leave the Sybase Administrator (SA) Password box blank and click Next to continue.
Task 3: Review and uninstall
The Summary window opens. Use the window to review the components to be uninstalled.
1 If necessary, click Back to return to a previous window to make a change. After you make any change, click Next until you return to the Summary window.
2 Click Uninstall to continue.
Task 4: Finish the uninstall
The Uninstall Progress window opens. The window shows the status of the uninstall as it occurs. Following completion, the window reports whether installation was successful.
• If the OVPI uninstall completed successfully:
a Click Done.
— UNIX Systems: the uninstall is complete.
— Windows Systems: reboot the system to complete the uninstall.
b Continue to OVPI Post-Uninstallation Tasks on page 164.
• If the OVPI uninstall was unsuccessful:
a Click the Details button at the bottom of the Uninstall Progress window for additional information.
b Contact Support (see Support on page 4).
Uninstalling OVPI 161
Uninstalling OVPI Manually (Windows Systems)
If OVPI fails to uninstall on a Windows system, you can manually uninstall OVPI. The OVPI uninstall may fail if:
• OVPI processes are still running. This could cause a file to fail to be deleted and cause warnings on uninstall.
• Something catastrophic happens during uninstall, such as a power failure.
• The OVPI database is not running or the uninstall fails to connect to the database during the process.
Task 1: Stop OVPI services
1 From the Control Panel window, double-click Administrative Tools.
The Administrative Tools window opens.
2 Double-click the Services icon.
3 From the Services window, right-click OVPI Timer and select Stop from the menu.
4 From the Services window, right-click OVPI_HTTP_Server and select Stop from the menu.
Task 2: Remove the Web Access Server
1 Open a command prompt window.
2 Navigate to the following directory:
installation_directory\nonOV\PiJBoss\4.0.5\bin
In this instance, installation_directory is the directory into which you installed OVPI.
3 Run the following command:
JavaService.exe -uninstall OVPI_HTTP_Server
Task 3: Remove Windows Registry entries
Using the Registry Editor, remove the following Windows Registry entry:
From HKEY_LOCAL_MACHINE > SOFTWARE > Hewlett-Packard > HP OpenView, remove the following entry:
162 Chapter 7
Performance Insight
Task 4: Remove the OVPI Timer service
1 Open a command prompt window.
2 Navigate to the following directory:
OVPI_HOME\bin
In this instance, OVPI_HOME is the directory into which you installed OVPI.
3 Type the command:
trendtimer -r
Task 5: Remove specific environment variables
1 From the Control Panel window, double-click System. The System Properties dialog box opens.
2 Click the Advanced tab, and then click the Environment Variables button. The Environment Variables dialog box opens.
3 Delete the following variables:
— COLLECT_HOME
— DPIPE_HOME
— DPIPE_TMP
— TREND_LOG
4 Edit the PATH environment variable by removing anything that relates to OVPI.
5 Click OK when done.
Task 6: Restart your system.
Uninstalling OVPI 163
OVPI Post-Uninstallation Tasks
To prevent potential problems if you reinstall OVPI, HP recommends that you delete the following directories:
• The OVPI directory
• The .ovpi directory
Delete the OVPI Installation Directory
The OVPI directory is the directory into which you installed OVPI.
The OVPI Uninstall Wizard removes files from the OVPI directory that were installed by the OVPI Installation Program. It does not remove generated files (log files), files created by users, or reports deployed for any installed report packs that were placed in this directory.
To delete the OVPI directory, follow these steps.
• UNIX Systems:
a Open a new shell window on the system where OVPI was installed.
b Type the following command:
rm -rf $DPIPE_HOME/ovpi
In this instance, $DPIPE_HOME is the directory into which you installed OVPI. For example, if you installed OVPI in the /data directory, you would type:
rm -rf /data/ovpi
• Windows Systems: perform one of the following:
— Windows Explorer: locate and right-click the Performance Insight directory. Select Delete from the menu.
— Command Prompt window: type the following command:
rmdir /S $DPIPE_HOME
If there are reports or data in the OVPI directory that you want to save, move those files to another location before continuing.
164 Chapter 7

In this instance, $DPIPE_HOME is the directory into which you installed OVPI.
Remove Excess Directories
Manually remove the directories that contain the following environment variables:
• DPIPE_TMP
• TREND_LOG
• COLLECT_HOME
Delete the .ovpi Directory
The .ovpi directory stores a user’s custom settings. It is present only if the user has run Report Builder, Report Viewer, or Web Access Server.
The .ovpi directory is a hidden file. Therefore, you need to make it visible to remove it. On Windows, modify the directory view to show hidden files and directories by setting the Tools > Folder Options, View tab and selecting the “'Show hidden files and folders” radio box.
To delete the .ovpi directory, do the following:
• UNIX Systems:
The .ovpi directory is located in the UNIX home directory.
a Open a new shell window on the system where OVPI was installed.
b Type the following command from the home directory:
rm -rf .ovpi
• Windows Systems:
The .ovpi directory is located at %SystemDrive%\Documents and Settings\username. Navigate to that directory and do one of the following:
• Windows Explorer: Right-click the .ovpi directory and select Delete from the menu.
Users should remove their own .ovpi directory.
Uninstalling OVPI 165
• Command Prompt window: Type the following command:
rmdir /S .ovpi
Uninstall the RDBMS
Continue by uninstalling the RDBMS. See Chapter 8, Uninstalling the Sybase RDBMS.
166 Chapter 7
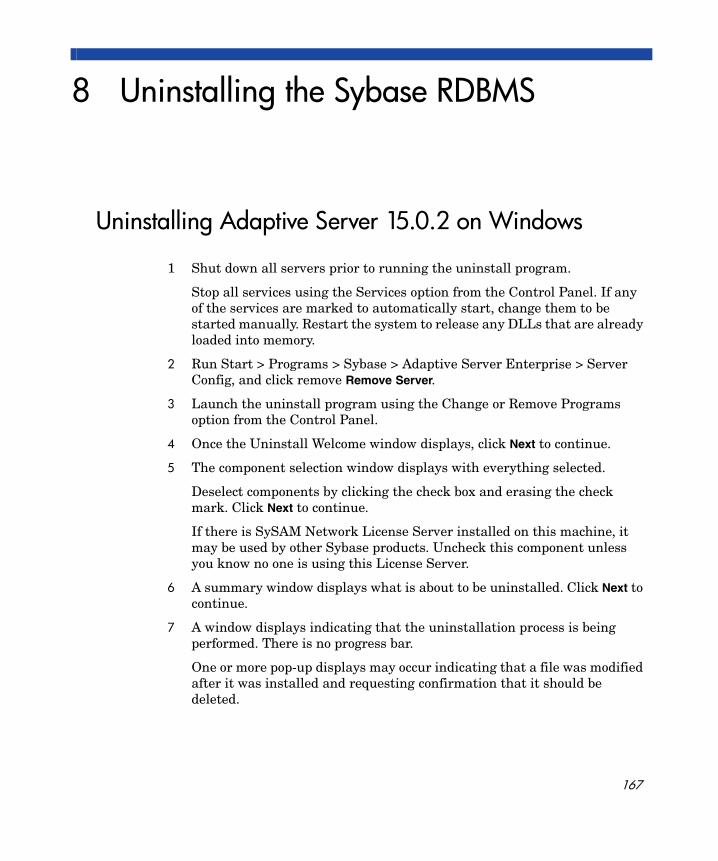
8 Uninstalling the Sybase RDBMS
Uninstalling Adaptive Server 15.0.2 on Windows
1 Shut down all servers prior to running the uninstall program.
Stop all services using the Services option from the Control Panel. If any of the services are marked to automatically start, change them to be started manually. Restart the system to release any DLLs that are already loaded into memory.
2 Run Start > Programs > Sybase > Adaptive Server Enterprise > Server Config, and click remove Remove Server.
3 Launch the uninstall program using the Change or Remove Programs option from the Control Panel.
4 Once the Uninstall Welcome window displays, click Next to continue.
5 The component selection window displays with everything selected.
Deselect components by clicking the check box and erasing the check mark. Click Next to continue.
If there is SySAM Network License Server installed on this machine, it may be used by other Sybase products. Uncheck this component unless you know no one is using this License Server.
6 A summary window displays what is about to be uninstalled. Click Next to continue.
7 A window displays indicating that the uninstallation process is being performed. There is no progress bar.
One or more pop-up displays may occur indicating that a file was modified after it was installed and requesting confirmation that it should be deleted.
167
8 If there are any user created files left over from the uninstall, the uninstaller will prompt you to remove them.
9 When the uninstall process has completed a final window displays. Click Finish to exit the uninstall program.
10 The uninstall program does not remove the DSLISTEN and DSQUERY environment variables. Remove them, using the system option from the Control Panel.
168 Chapter 8
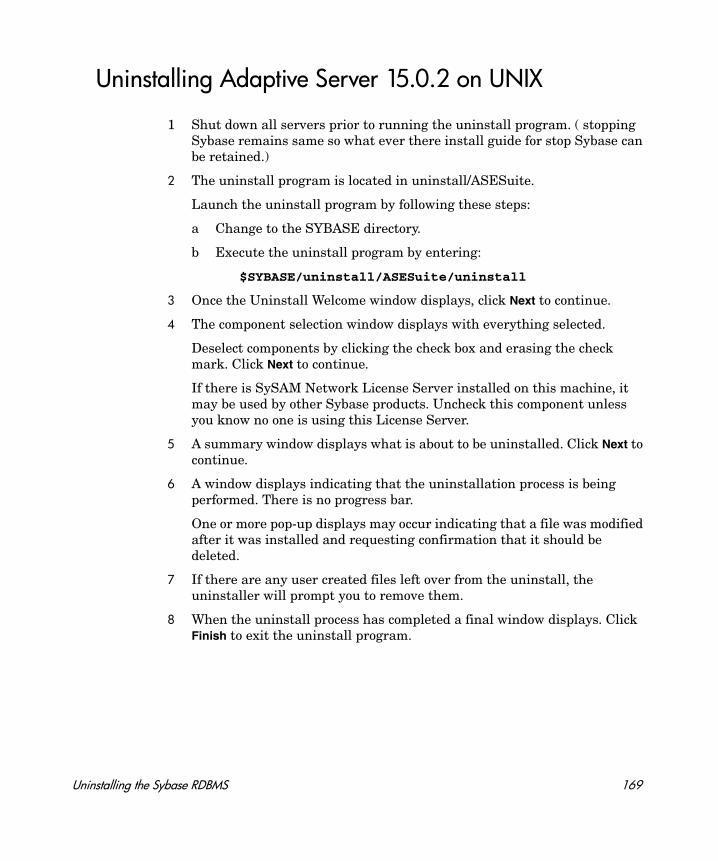
Uninstalling Adaptive Server 15.0.2 on UNIX
1 Shut down all servers prior to running the uninstall program. ( stopping Sybase remains same so what ever there install guide for stop Sybase can be retained.)
2 The uninstall program is located in uninstall/ASESuite.
Launch the uninstall program by following these steps:
a Change to the SYBASE directory.
b Execute the uninstall program by entering:
$SYBASE/uninstall/ASESuite/uninstall
3 Once the Uninstall Welcome window displays, click Next to continue.
4 The component selection window displays with everything selected.
Deselect components by clicking the check box and erasing the check mark. Click Next to continue.
If there is SySAM Network License Server installed on this machine, it may be used by other Sybase products. Uncheck this component unless you know no one is using this License Server.
5 A summary window displays what is about to be uninstalled. Click Next to continue.
6 A window displays indicating that the uninstallation process is being performed. There is no progress bar.
One or more pop-up displays may occur indicating that a file was modified after it was installed and requesting confirmation that it should be deleted.
7 If there are any user created files left over from the uninstall, the uninstaller will prompt you to remove them.
8 When the uninstall process has completed a final window displays. Click Finish to exit the uninstall program.
Uninstalling the Sybase RDBMS 169

170 Chapter 8
9 Upgrading to Sybase 15.0.2
To use the new features introduced in Sybase 15.0.2, you must upgrade to Sybase 15.0.2.
You can use the OVPI installer to upgrade HP-UX and Solaris systems. The Upgrade Wizard is not available for Windows systems. To upgrade a Windows system, see Upgrading Sybase on Windows Systems on page 181.
Upgrading Sybase on HP-UX, Linux, and Solaris Systems
First make sure you updated your system with the latest Java patches (see Verify that patches are running for Java on page 29).
171
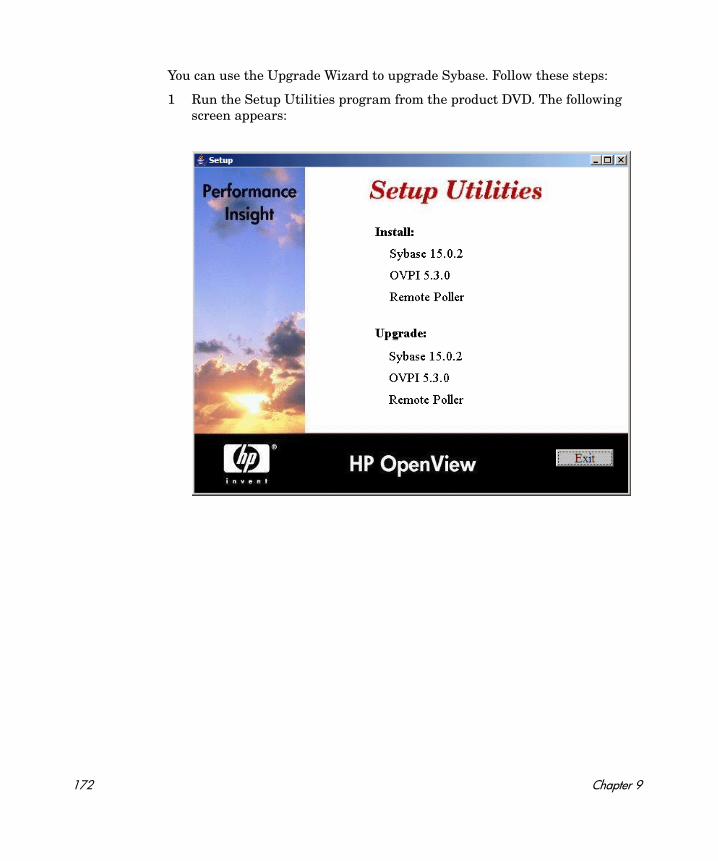
You can use the Upgrade Wizard to upgrade Sybase. Follow these steps:
1 Run the Setup Utilities program from the product DVD. The following screen appears:
172 Chapter 9
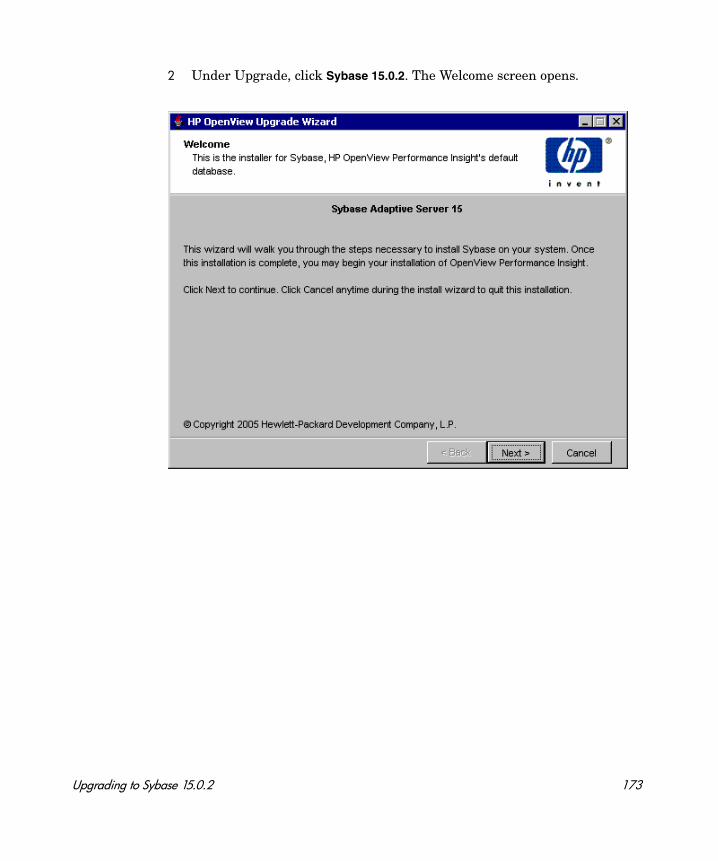
2 Under Upgrade, click Sybase 15.0.2. The Welcome screen opens.
Upgrading to Sybase 15.0.2 173
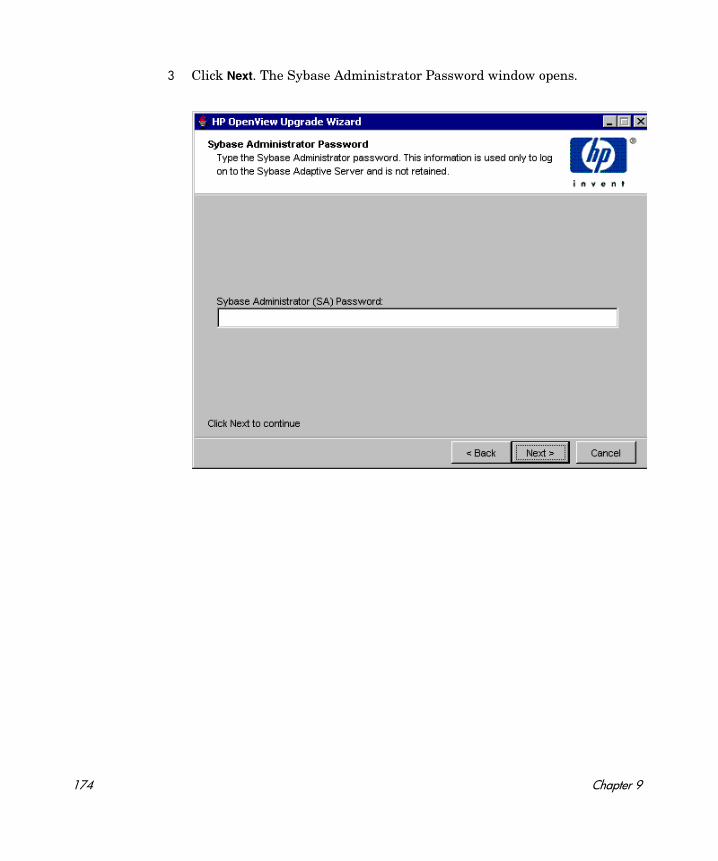
3 Click Next. The Sybase Administrator Password window opens.
174 Chapter 9
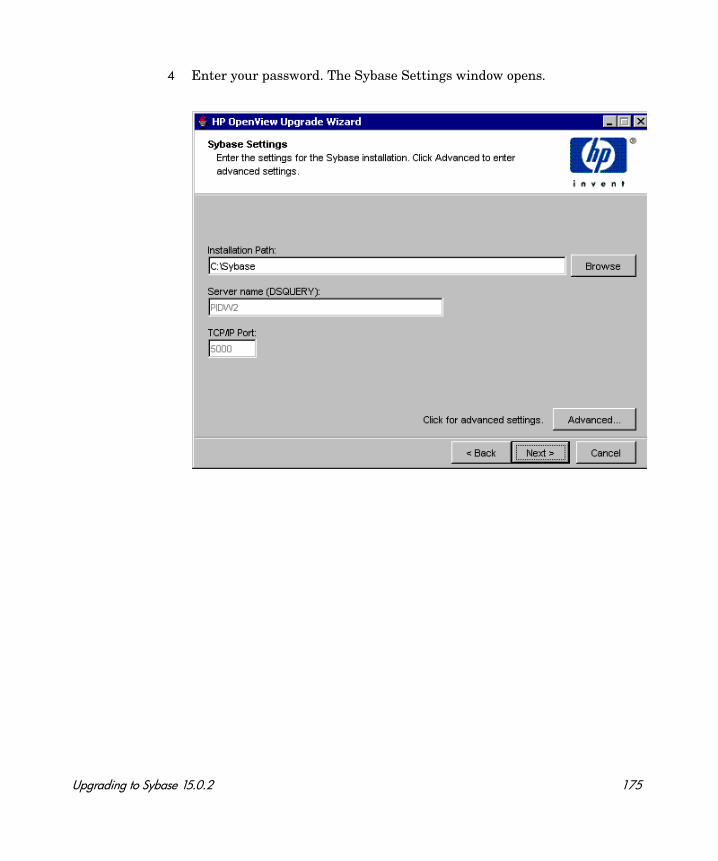
4 Enter your password. The Sybase Settings window opens.
Upgrading to Sybase 15.0.2 175
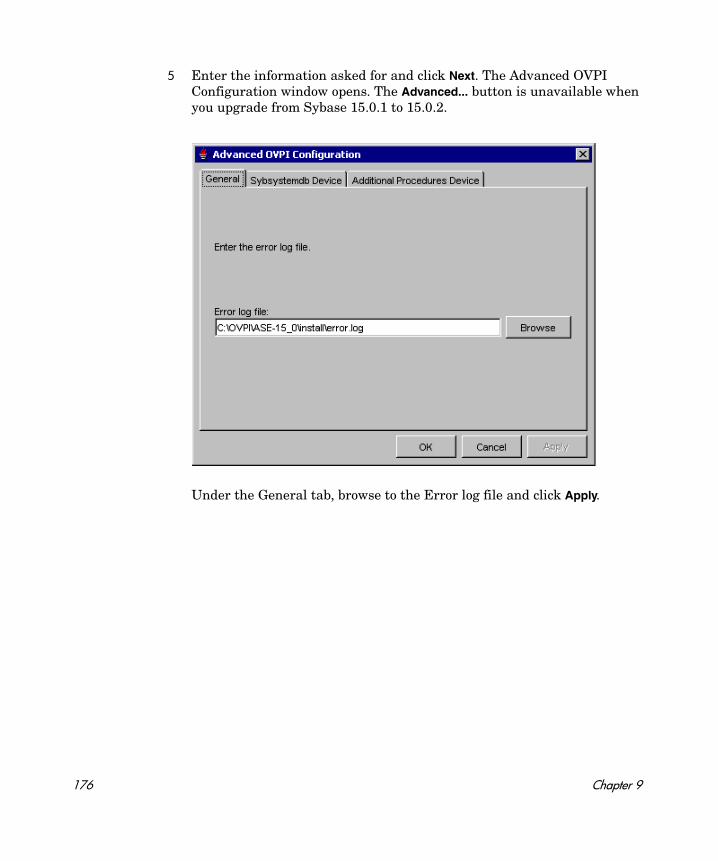
5 Enter the information asked for and click Next. The Advanced OVPI Configuration window opens. The Advanced... button is unavailable when you upgrade from Sybase 15.0.1 to 15.0.2.
Under the General tab, browse to the Error log file and click Apply.
176 Chapter 9

6 Under the Sysystemdb Device tab, enter the information asked for and click Apply.
Upgrading to Sybase 15.0.2 177
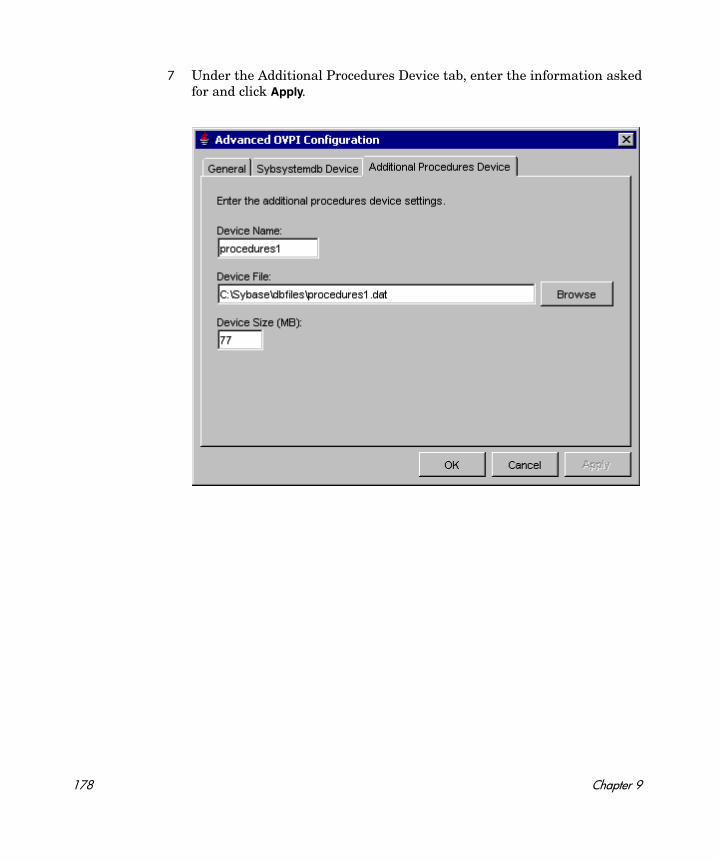
7 Under the Additional Procedures Device tab, enter the information asked for and click Apply.
178 Chapter 9
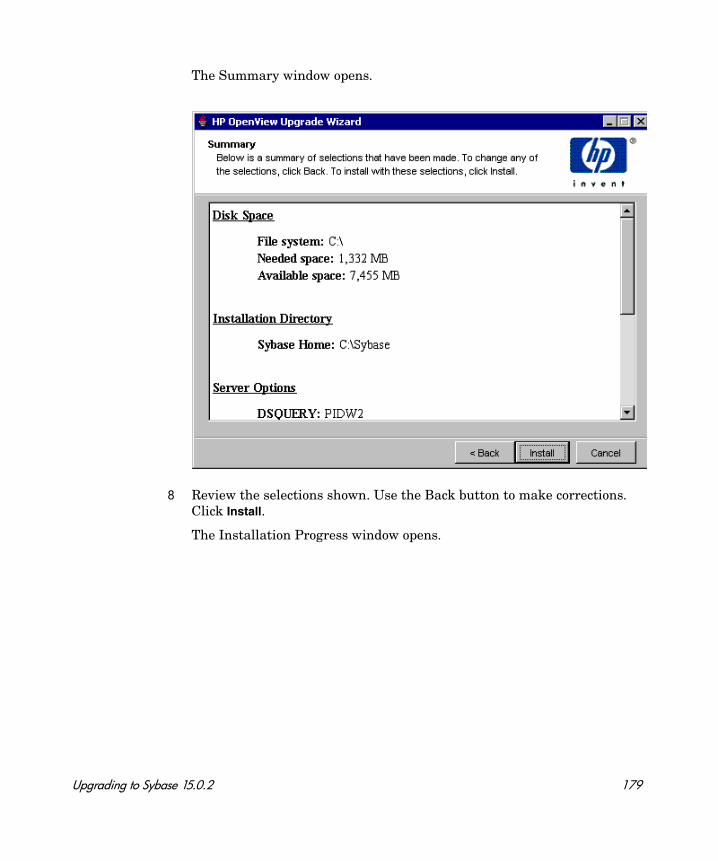
The Summary window opens.
8 Review the selections shown. Use the Back button to make corrections. Click Install.
The Installation Progress window opens.
Upgrading to Sybase 15.0.2 179
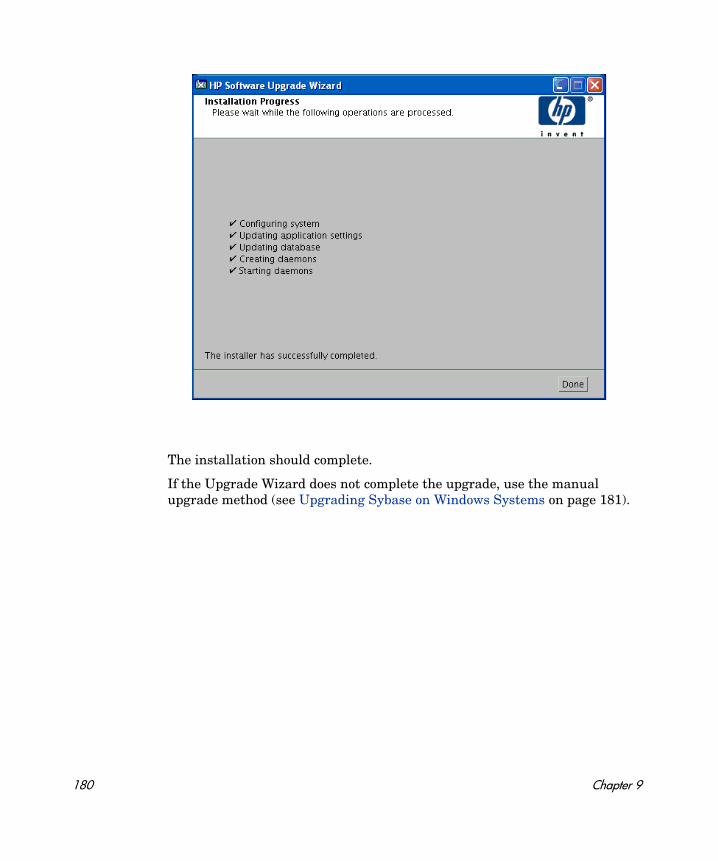
The installation should complete.
If the Upgrade Wizard does not complete the upgrade, use the manual upgrade method (see Upgrading Sybase on Windows Systems on page 181).
180 Chapter 9
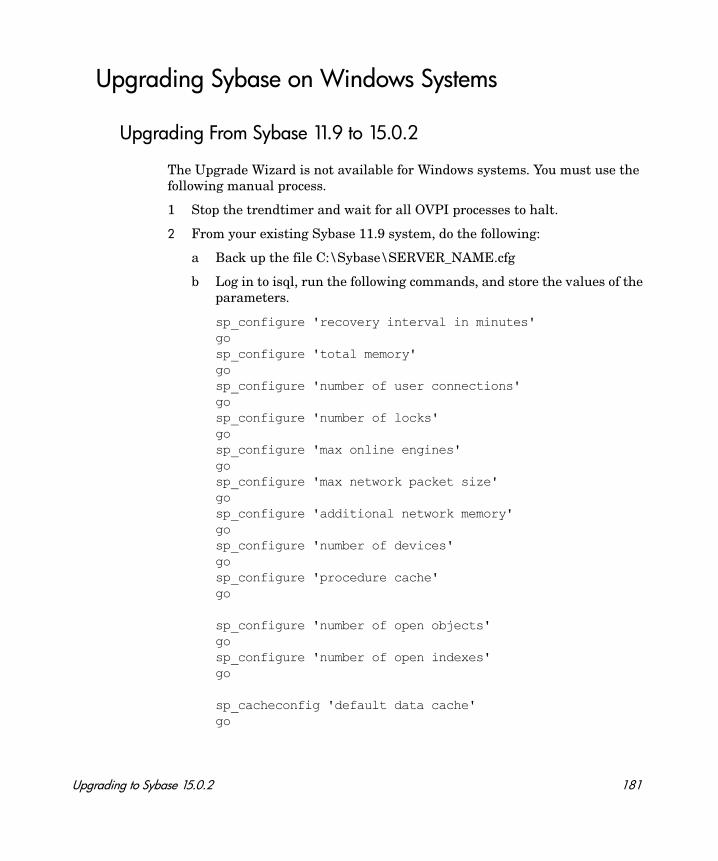
Upgrading Sybase on Windows Systems
Upgrading From Sybase 11.9 to 15.0.2
The Upgrade Wizard is not available for Windows systems. You must use the following manual process.
1 Stop the trendtimer and wait for all OVPI processes to halt.
2 From your existing Sybase 11.9 system, do the following:
a Back up the file C:\Sybase\SERVER_NAME.cfg
b Log in to isql, run the following commands, and store the values of the parameters.
sp_configure 'recovery interval in minutes'go sp_configure 'total memory'go sp_configure 'number of user connections'go sp_configure 'number of locks'go sp_configure 'max online engines'go sp_configure 'max network packet size'go sp_configure 'additional network memory'go sp_configure 'number of devices'go sp_configure 'procedure cache'go
sp_configure 'number of open objects'gosp_configure 'number of open indexes'go
sp_cacheconfig 'default data cache'go
Upgrading to Sybase 15.0.2 181
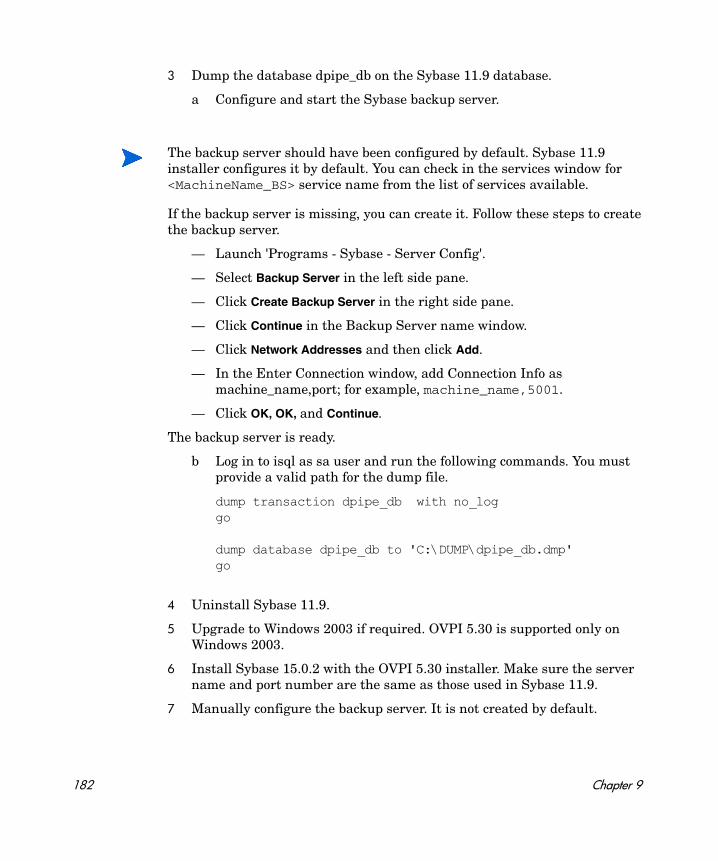
3 Dump the database dpipe_db on the Sybase 11.9 database.
a Configure and start the Sybase backup server.
If the backup server is missing, you can create it. Follow these steps to create the backup server.
— Launch 'Programs - Sybase - Server Config'.
— Select Backup Server in the left side pane.
— Click Create Backup Server in the right side pane.
— Click Continue in the Backup Server name window.
— Click Network Addresses and then click Add.
— In the Enter Connection window, add Connection Info as machine_name,port; for example, machine_name,5001.
— Click OK, OK, and Continue.
The backup server is ready.
b Log in to isql as sa user and run the following commands. You must provide a valid path for the dump file.
dump transaction dpipe_db with no_loggo
dump database dpipe_db to 'C:\DUMP\dpipe_db.dmp'go
4 Uninstall Sybase 11.9.
5 Upgrade to Windows 2003 if required. OVPI 5.30 is supported only on Windows 2003.
6 Install Sybase 15.0.2 with the OVPI 5.30 installer. Make sure the server name and port number are the same as those used in Sybase 11.9.
7 Manually configure the backup server. It is not created by default.
The backup server should have been configured by default. Sybase 11.9 installer configures it by default. You can check in the services window for <MachineName_BS> service name from the list of services available.
182 Chapter 9
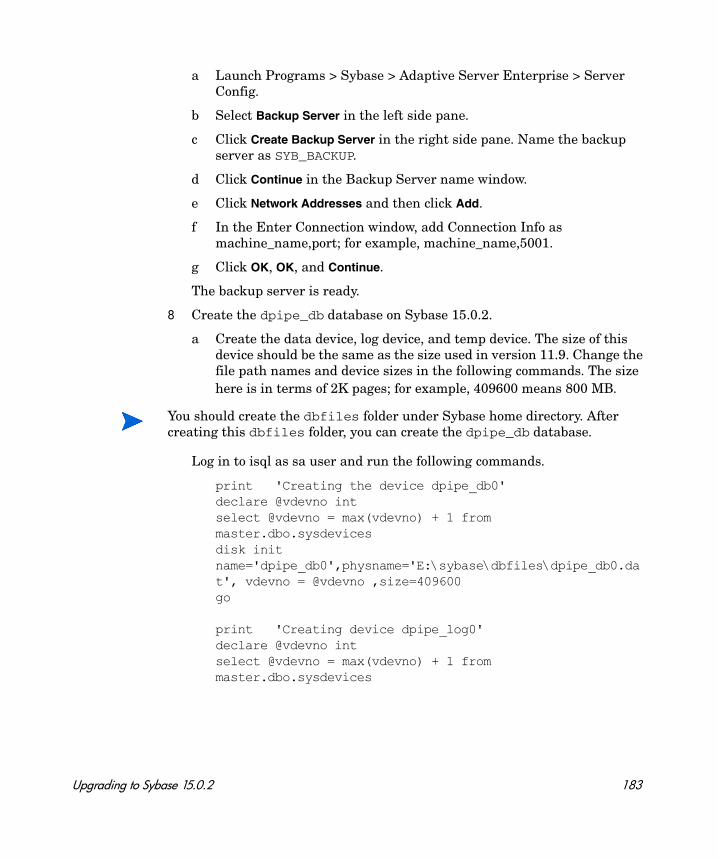
a Launch Programs > Sybase > Adaptive Server Enterprise > Server Config.
b Select Backup Server in the left side pane.
c Click Create Backup Server in the right side pane. Name the backup server as SYB_BACKUP.
d Click Continue in the Backup Server name window.
e Click Network Addresses and then click Add.
f In the Enter Connection window, add Connection Info as machine_name,port; for example, machine_name,5001.
g Click OK, OK, and Continue.
The backup server is ready.
8 Create the dpipe_db database on Sybase 15.0.2.
a Create the data device, log device, and temp device. The size of this device should be the same as the size used in version 11.9. Change the file path names and device sizes in the following commands. The size here is in terms of 2K pages; for example, 409600 means 800 MB.
Log in to isql as sa user and run the following commands.
print 'Creating the device dpipe_db0'declare @vdevno int select @vdevno = max(vdevno) + 1 from master.dbo.sysdevicesdisk init name='dpipe_db0',physname='E:\sybase\dbfiles\dpipe_db0.dat', vdevno = @vdevno ,size=409600go
print 'Creating device dpipe_log0'declare @vdevno int select @vdevno = max(vdevno) + 1 from master.dbo.sysdevices
You should create the dbfiles folder under Sybase home directory. After creating this dbfiles folder, you can create the dpipe_db database.
Upgrading to Sybase 15.0.2 183
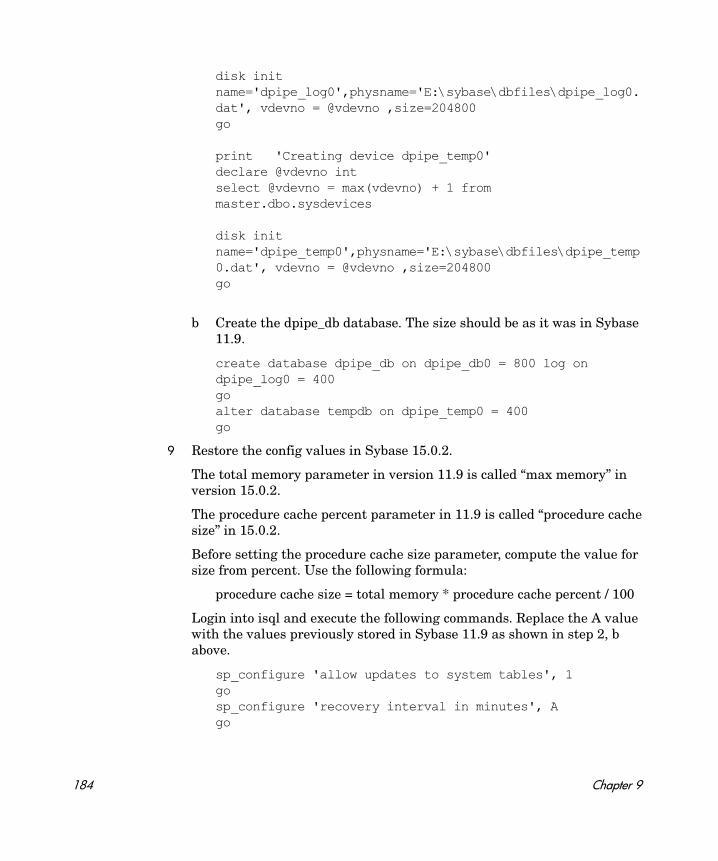
disk init name='dpipe_log0',physname='E:\sybase\dbfiles\dpipe_log0.dat', vdevno = @vdevno ,size=204800go
print 'Creating device dpipe_temp0'declare @vdevno int select @vdevno = max(vdevno) + 1 from master.dbo.sysdevices
disk init name='dpipe_temp0',physname='E:\sybase\dbfiles\dpipe_temp0.dat', vdevno = @vdevno ,size=204800go
b Create the dpipe_db database. The size should be as it was in Sybase 11.9.
create database dpipe_db on dpipe_db0 = 800 log on dpipe_log0 = 400goalter database tempdb on dpipe_temp0 = 400go
9 Restore the config values in Sybase 15.0.2.
The total memory parameter in version 11.9 is called “max memory” in version 15.0.2.
The procedure cache percent parameter in 11.9 is called “procedure cache size” in 15.0.2.
Before setting the procedure cache size parameter, compute the value for size from percent. Use the following formula:
procedure cache size = total memory * procedure cache percent / 100
Login into isql and execute the following commands. Replace the A value with the values previously stored in Sybase 11.9 as shown in step 2, b above.
sp_configure 'allow updates to system tables', 1 gosp_configure 'recovery interval in minutes', Ago
184 Chapter 9
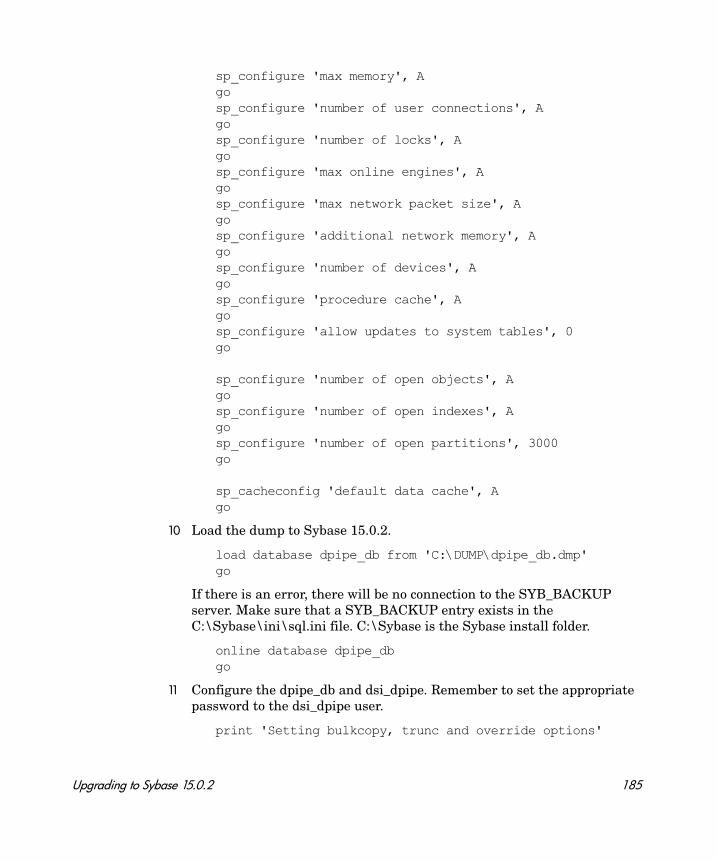
sp_configure 'max memory', Ago sp_configure 'number of user connections', Ago sp_configure 'number of locks', Ago sp_configure 'max online engines', Ago sp_configure 'max network packet size', Ago sp_configure 'additional network memory', Ago sp_configure 'number of devices', Ago sp_configure 'procedure cache', Ago sp_configure 'allow updates to system tables', 0 go
sp_configure 'number of open objects', Agosp_configure 'number of open indexes', Agosp_configure 'number of open partitions', 3000go
sp_cacheconfig 'default data cache', Ago
10 Load the dump to Sybase 15.0.2.
load database dpipe_db from 'C:\DUMP\dpipe_db.dmp'go
If there is an error, there will be no connection to the SYB_BACKUP server. Make sure that a SYB_BACKUP entry exists in the C:\Sybase\ini\sql.ini file. C:\Sybase is the Sybase install folder.
online database dpipe_dbgo
11 Configure the dpipe_db and dsi_dpipe. Remember to set the appropriate password to the dsi_dpipe user.
print 'Setting bulkcopy, trunc and override options'
Upgrading to Sybase 15.0.2 185

exec sp_dboption dpipe_db, bulkcopy, truegoexec sp_dboption dpipe_db, trunc, truegoreconfigure with overridego
print 'Adding a default user'exec sp_addlogin dsi_dpipe, PASSWORDgo
print 'Adding required system roles to user.'goexec sp_role 'grant', 'sa_role', dsi_dpipegoexec sp_role 'grant', 'sso_role', dsi_dpipego
print 'Making the user the default for dpipe_db'goexec sp_defaultdb dsi_dpipe, dpipe_dbgo
use dpipe_dbgo
print 'Making dsi_dpipe the owner of dpipe_db database'exec sp_changedbowner dsi_dpipe, truecheckpointgo
exit
186 Chapter 9
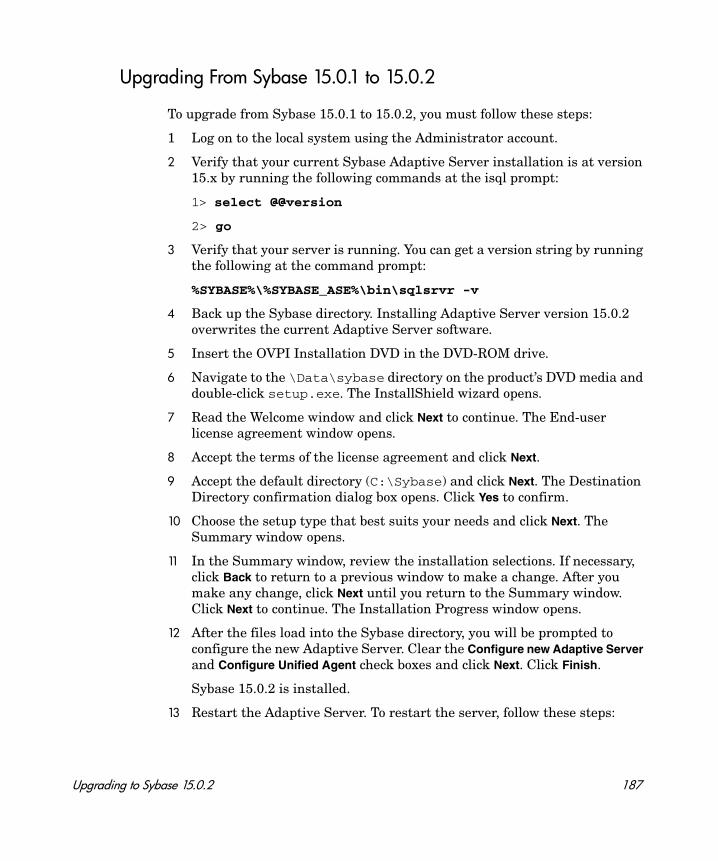
Upgrading From Sybase 15.0.1 to 15.0.2
To upgrade from Sybase 15.0.1 to 15.0.2, you must follow these steps:
1 Log on to the local system using the Administrator account.
2 Verify that your current Sybase Adaptive Server installation is at version 15.x by running the following commands at the isql prompt:
1> select @@version
2> go
3 Verify that your server is running. You can get a version string by running the following at the command prompt:
%SYBASE%\%SYBASE_ASE%\bin\sqlsrvr -v
4 Back up the Sybase directory. Installing Adaptive Server version 15.0.2 overwrites the current Adaptive Server software.
5 Insert the OVPI Installation DVD in the DVD-ROM drive.
6 Navigate to the \Data\sybase directory on the product’s DVD media and double-click setup.exe. The InstallShield wizard opens.
7 Read the Welcome window and click Next to continue. The End-user license agreement window opens.
8 Accept the terms of the license agreement and click Next.
9 Accept the default directory (C:\Sybase) and click Next. The Destination Directory confirmation dialog box opens. Click Yes to confirm.
10 Choose the setup type that best suits your needs and click Next. The Summary window opens.
11 In the Summary window, review the installation selections. If necessary, click Back to return to a previous window to make a change. After you make any change, click Next until you return to the Summary window. Click Next to continue. The Installation Progress window opens.
12 After the files load into the Sybase directory, you will be prompted to configure the new Adaptive Server. Clear the Configure new Adaptive Server and Configure Unified Agent check boxes and click Next. Click Finish.
Sybase 15.0.2 is installed.
13 Restart the Adaptive Server. To restart the server, follow these steps:
Upgrading to Sybase 15.0.2 187
a From the Control Panel window, double-click the Administrative Tools icon. The Administrative Tools window opens.
b Double-click the Services icon. The Services window opens.
c Select the Sybase SQLserver_hostname, where hostname is the name of your Sybase SQL Server.
d Right-click the service name and select Stop from the shortcut menu. After the service stops, right-click the service name, and select Start from the shortcut menu.
e Close the Services and the Control Panel windows.
14 Run the following commands at the isql prompt:
1> select @@version
2> go
The Sybase server should now be at version 15.0.2.
188 Chapter 9
10 Upgrading to OVPI 5.30
You can upgrade to OVPI 5.30 if you currently have any one of the following versions of OVPI:
• OVPI 5.1 Service Pack 9 or above
• OVPI 5.1.1 Service Pack 9 or above
• OVPI 5.1.2 Service Pack 4 or above
• OVPI 5.20
You can upgrade to OVPI 5.30 whether you have a standalone or a distributed environment. The installation process provided in this section applies to all environment. However, if you have a distributed environment, you must first upgrade your database schema. The instructions can be found in Chapter 9, Upgrading to Sybase 15.0.2. Once you have upgraded your database, you can install the distributed components in any order.
The remote poller is upgraded separately from OVPI but the procedure is the same.
189
Pre-Upgrade Tasks
You must complete the following tasks before you upgrade to OVPI 5.30.
Task 1: Verify that Java patches are running
OVPI 5.30 includes Java 1.4.2.13. Java will automatically load onto your system during the upgrade, replacing any previous Java versions that OVPI has installed.
You must install the appropriate Java patches required for your operating system (see Verify that patches are running for Java on page 29).
Task 2: Upgrade your Sybase database
You must upgrade to Sybase 15.0.2 database. For information about upgrading Sybase databases, see Chapter 9, Upgrading to Sybase 15.0.2.
Task 3: Stop the OVPI Timer
You must stop the OVPI Timer and wait for all OVPI processes to halt. For more information about stopping or starting the OVPI Timer, see the HP OpenView Performance Insight Administration Guide.
190 Chapter 10
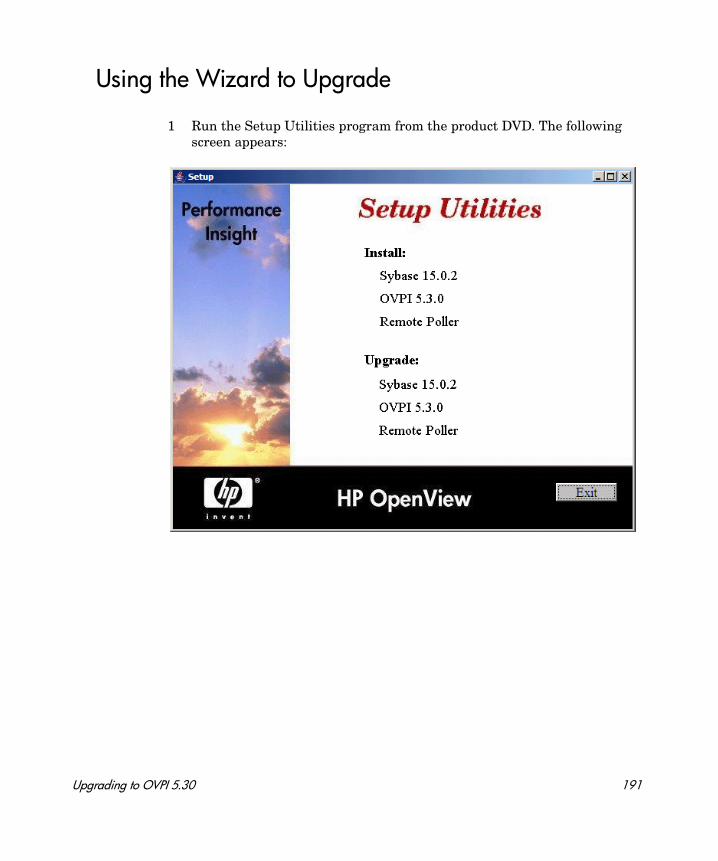
Using the Wizard to Upgrade
1 Run the Setup Utilities program from the product DVD. The following screen appears:
Upgrading to OVPI 5.30 191
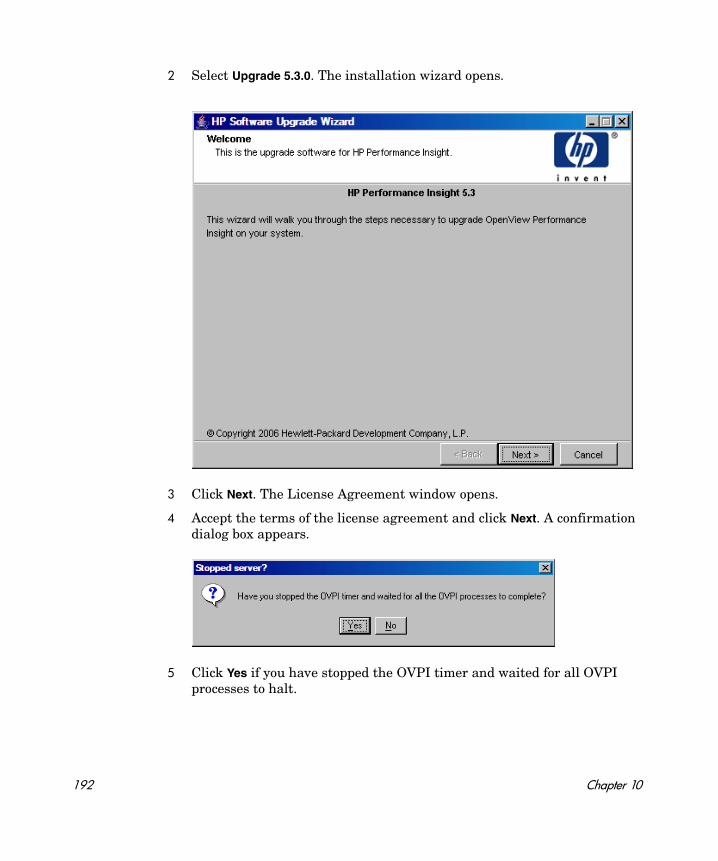
2 Select Upgrade 5.3.0. The installation wizard opens.
3 Click Next. The License Agreement window opens.
4 Accept the terms of the license agreement and click Next. A confirmation dialog box appears.
5 Click Yes if you have stopped the OVPI timer and waited for all OVPI processes to halt.
192 Chapter 10
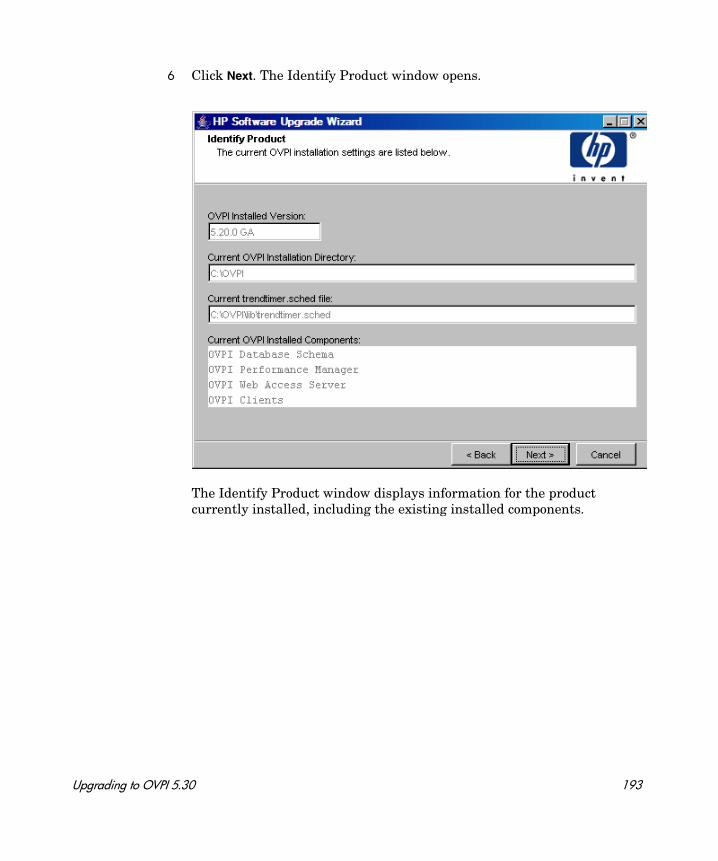
6 Click Next. The Identify Product window opens.
The Identify Product window displays information for the product currently installed, including the existing installed components.
Upgrading to OVPI 5.30 193

7 Click Next. The Server Role window opens.
8 Select the environment on which you want to install OVPI.
If you select Satellite Server, the Central Server Registration window opens. Enter the host name and port number. Check if SSL is enabled.
194 Chapter 10
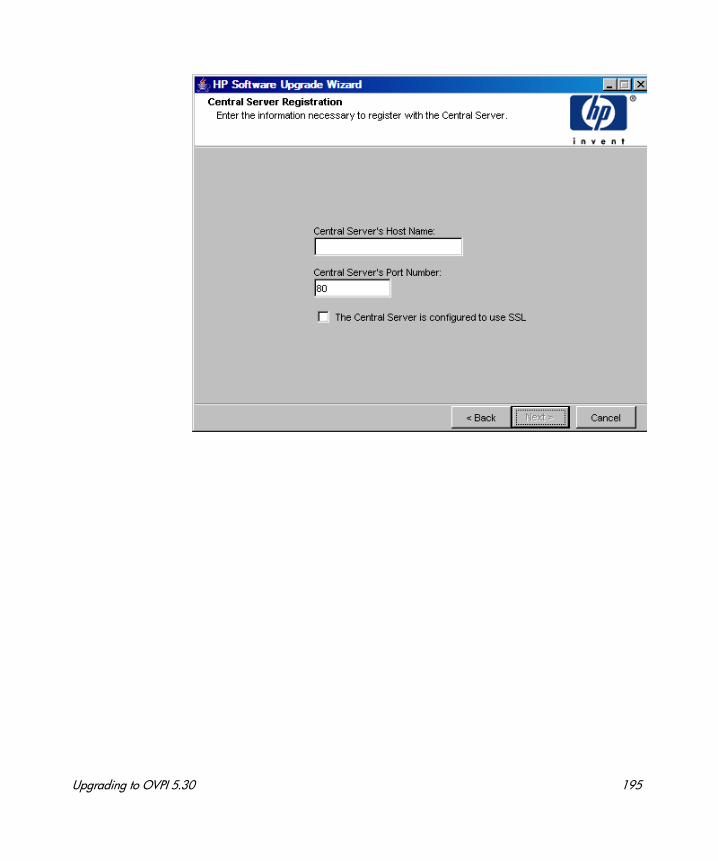
Upgrading to OVPI 5.30 195
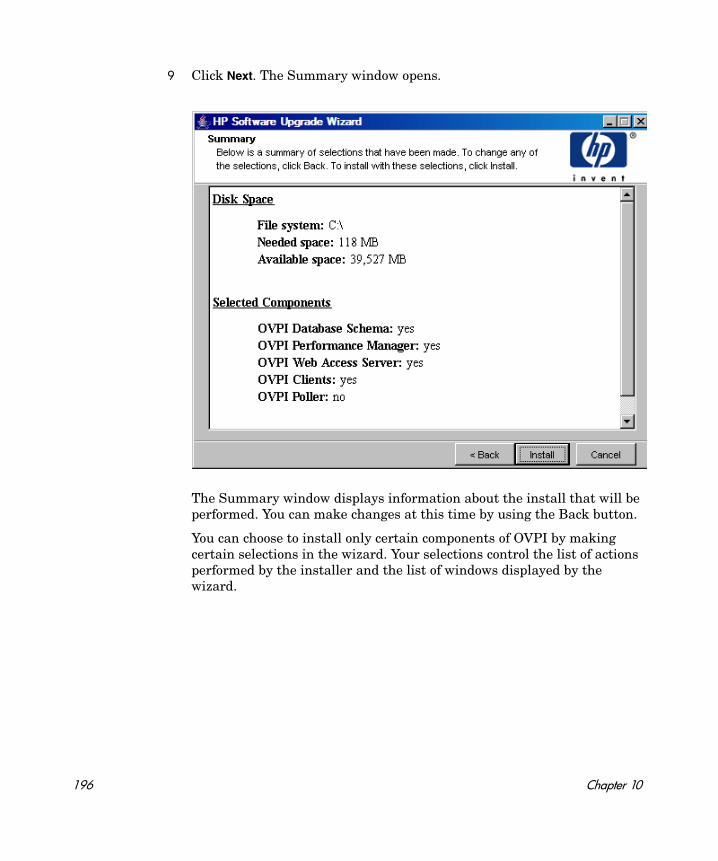
9 Click Next. The Summary window opens.
The Summary window displays information about the install that will be performed. You can make changes at this time by using the Back button.
You can choose to install only certain components of OVPI by making certain selections in the wizard. Your selections control the list of actions performed by the installer and the list of windows displayed by the wizard.
196 Chapter 10

10 Click Install. The Installation Progress window opens.
The installation is complete.
Upgrading Report Packs
After you upgrade OVPI, you must upgrade the report packs to OCT07RP version and start the OVPI Timer.
Upgrading to OVPI 5.30 197
Upgrading the Remote Poller
OVPI provides the ability to install or upgrade a remote poller separately from the OVPI installation.
The installation process for upgrading the remote poller is the same as the process for upgrading OVPI, except that the Database Role window does not appear.
Post Upgrade Task
After upgrading to OVPI 5.30, start the OVPI Timer program. For details on how to start the Timer, see the HP OpenView Performance Insight Administration Guide.
198 Chapter 10
11 The Sybase Interfaces File
The information in this chapter is supplied for reference purposes only. Any changes to the Sybase interfaces file should be made using the Management Console’s System Management application. See the Performance Insight Administration Guide for more information about using this application.
Sybase uses a file called an interfaces file to locate the SQL Servers on the network. This appendix describes how to create or modify this file using dsedit.
You can find the Sybase interfaces file in the following locations:
• UNIX
The interfaces file is located in the Sybase home directory specified by your SYBASE environment variable; for example, /usr/Sybase. See Create the Sybase Interfaces File on UNIX Systems on page 200 for details.
• Windows
The interfaces file is located in C:\Sybase\ini\sql.ini, where C: is the location of the Sybase directory. See Create the Sybase Interfaces File on Windows Systems on page 203 for details.
Make sure that when you type the SQL Server name that it matches the entry in the Sybase interfaces file exactly.
199
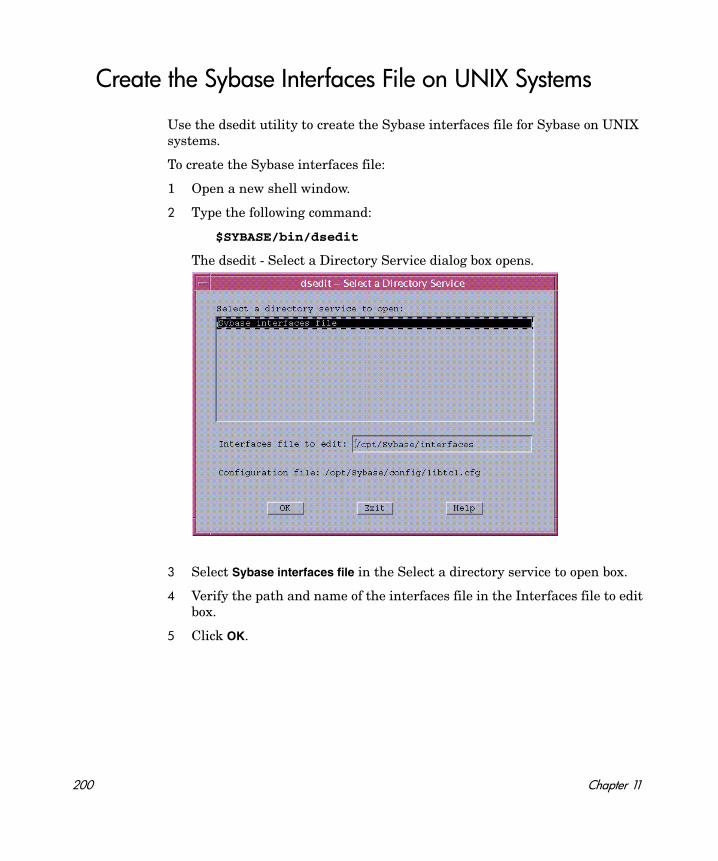
Create the Sybase Interfaces File on UNIX Systems
Use the dsedit utility to create the Sybase interfaces file for Sybase on UNIX systems.
To create the Sybase interfaces file:
1 Open a new shell window.
2 Type the following command:
$SYBASE/bin/dsedit
The dsedit - Select a Directory Service dialog box opens.
3 Select Sybase interfaces file in the Select a directory service to open box.
4 Verify the path and name of the interfaces file in the Interfaces file to edit box.
5 Click OK.
200 Chapter 11
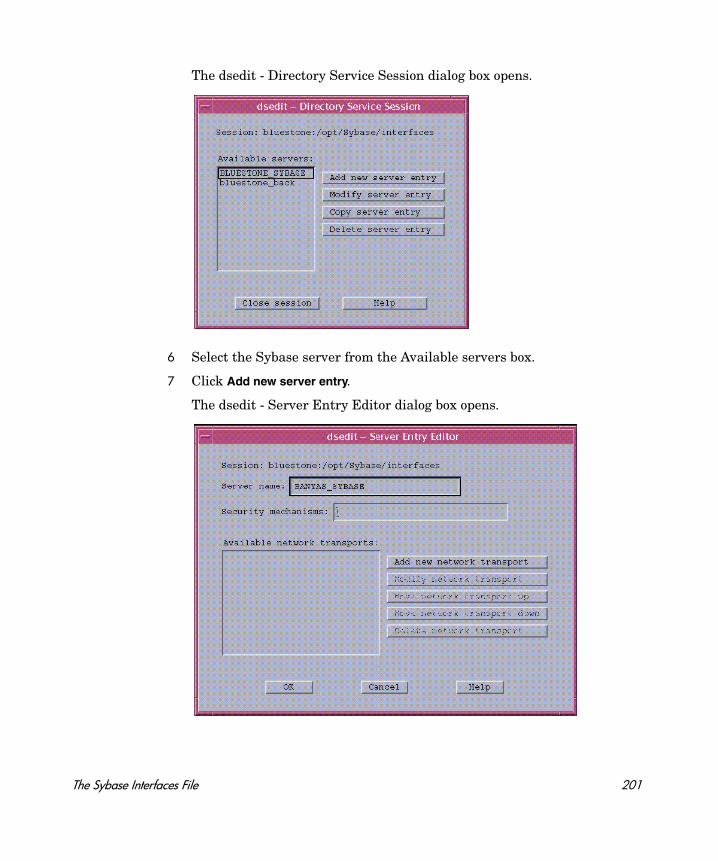
The dsedit - Directory Service Session dialog box opens.
6 Select the Sybase server from the Available servers box.
7 Click Add new server entry.
The dsedit - Server Entry Editor dialog box opens.
The Sybase Interfaces File 201
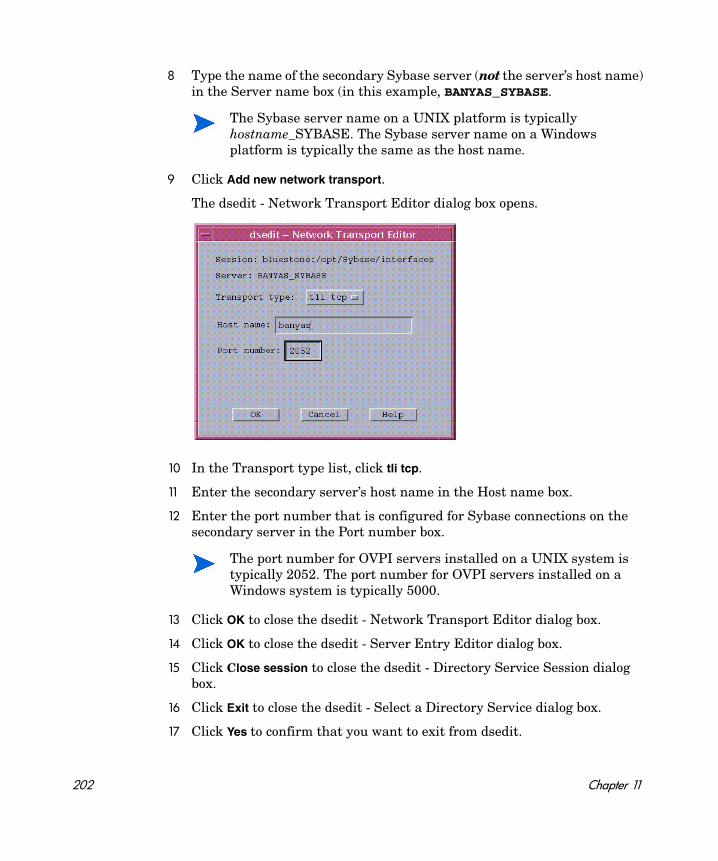
8 Type the name of the secondary Sybase server (not the server’s host name) in the Server name box (in this example, BANYAS_SYBASE.
9 Click Add new network transport.
The dsedit - Network Transport Editor dialog box opens.
10 In the Transport type list, click tli tcp.
11 Enter the secondary server’s host name in the Host name box.
12 Enter the port number that is configured for Sybase connections on the secondary server in the Port number box.
13 Click OK to close the dsedit - Network Transport Editor dialog box.
14 Click OK to close the dsedit - Server Entry Editor dialog box.
15 Click Close session to close the dsedit - Directory Service Session dialog box.
16 Click Exit to close the dsedit - Select a Directory Service dialog box.
17 Click Yes to confirm that you want to exit from dsedit.
The Sybase server name on a UNIX platform is typically hostname_SYBASE. The Sybase server name on a Windows platform is typically the same as the host name.
The port number for OVPI servers installed on a UNIX system is typically 2052. The port number for OVPI servers installed on a Windows system is typically 5000.
202 Chapter 11
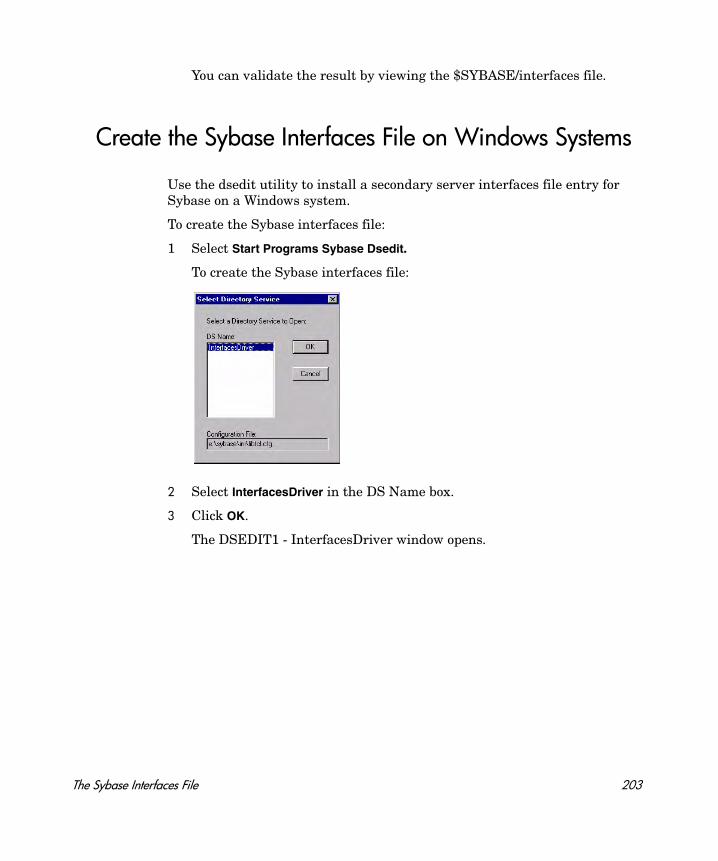
You can validate the result by viewing the $SYBASE/interfaces file.
Create the Sybase Interfaces File on Windows Systems
Use the dsedit utility to install a secondary server interfaces file entry for Sybase on a Windows system.
To create the Sybase interfaces file:
1 Select Start Programs Sybase Dsedit.
To create the Sybase interfaces file:
2 Select InterfacesDriver in the DS Name box.
3 Click OK.
The DSEDIT1 - InterfacesDriver window opens.
The Sybase Interfaces File 203
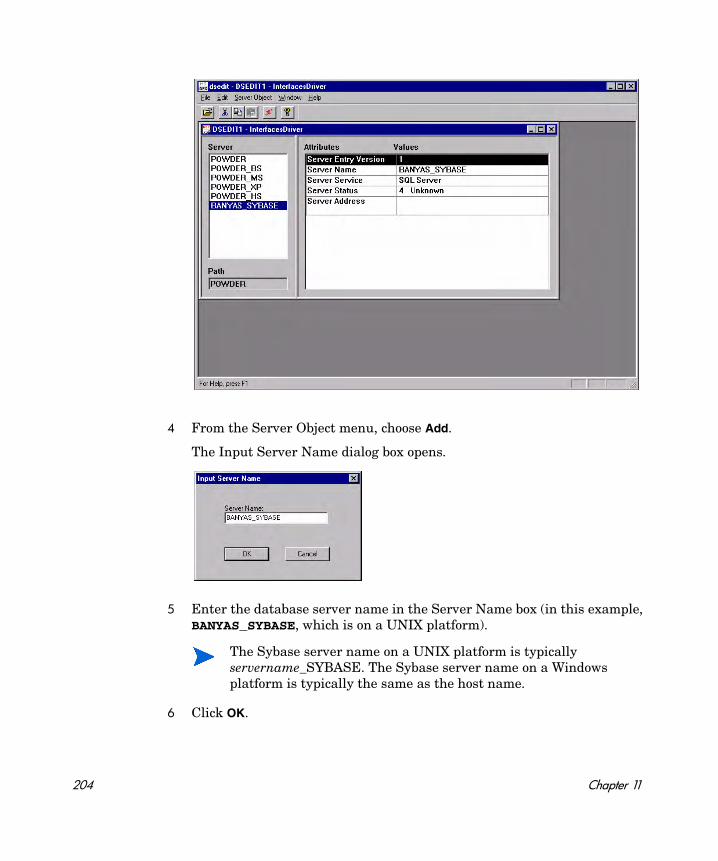
4 From the Server Object menu, choose Add.
The Input Server Name dialog box opens.
5 Enter the database server name in the Server Name box (in this example, BANYAS_SYBASE, which is on a UNIX platform).
6 Click OK.
The Sybase server name on a UNIX platform is typically servername_SYBASE. The Sybase server name on a Windows platform is typically the same as the host name.
204 Chapter 11
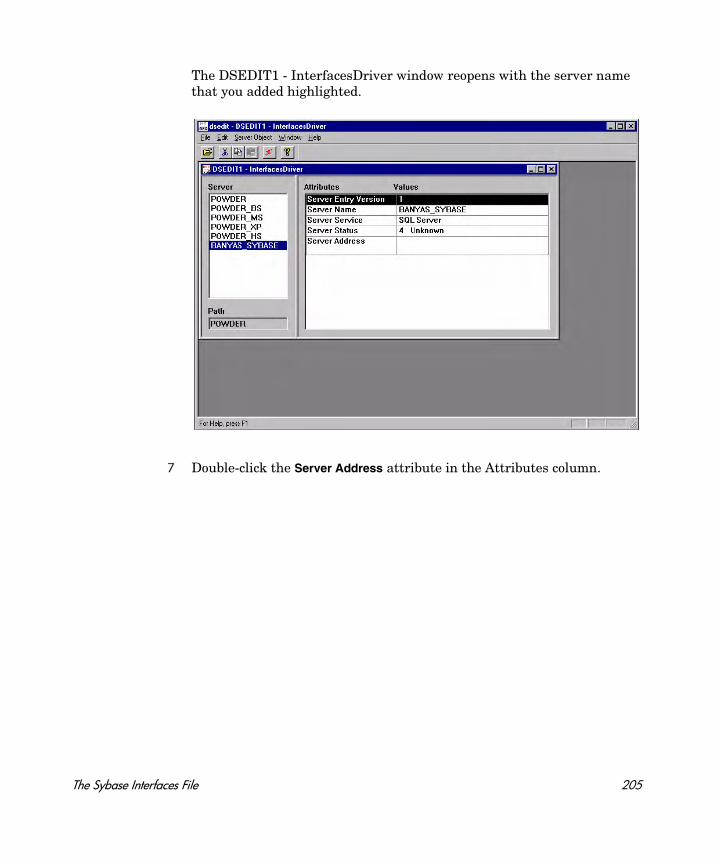
The DSEDIT1 - InterfacesDriver window reopens with the server name that you added highlighted.
7 Double-click the Server Address attribute in the Attributes column.
The Sybase Interfaces File 205
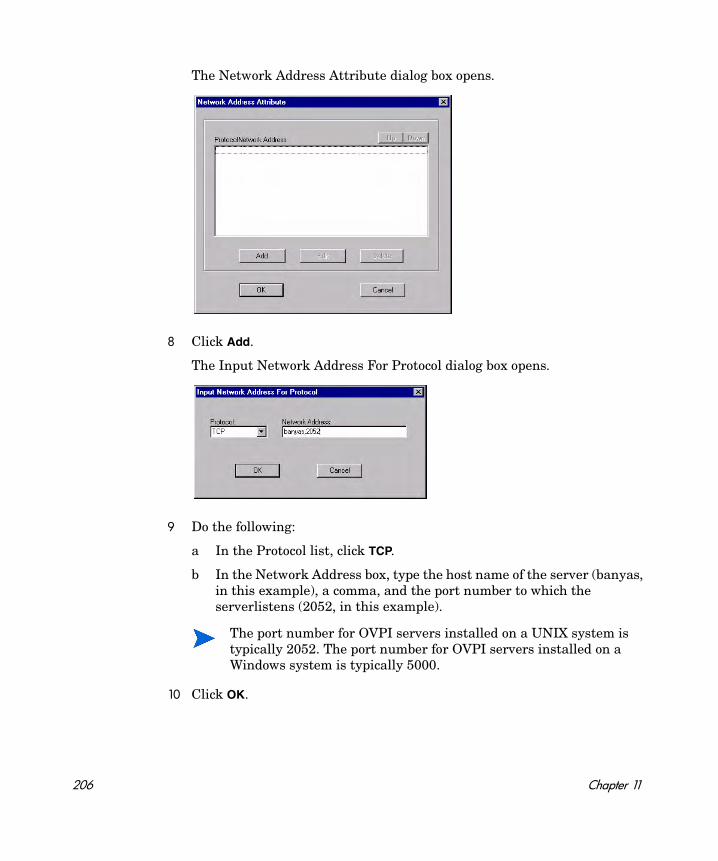
The Network Address Attribute dialog box opens.
8 Click Add.
The Input Network Address For Protocol dialog box opens.
9 Do the following:
a In the Protocol list, click TCP.
b In the Network Address box, type the host name of the server (banyas, in this example), a comma, and the port number to which the serverlistens (2052, in this example).
10 Click OK.
The port number for OVPI servers installed on a UNIX system is typically 2052. The port number for OVPI servers installed on a Windows system is typically 5000.
206 Chapter 11
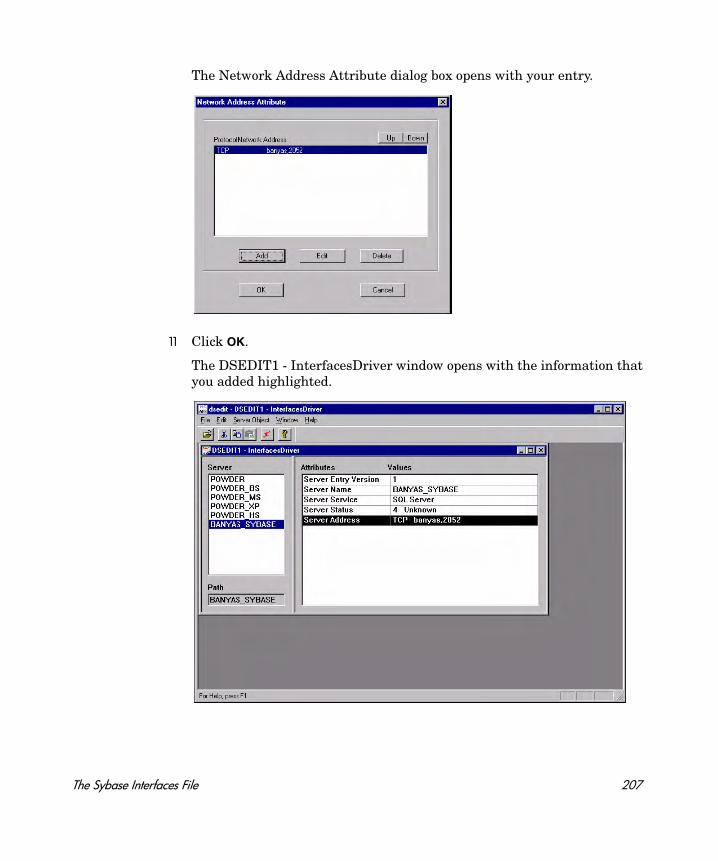
The Network Address Attribute dialog box opens with your entry.
11 Click OK.
The DSEDIT1 - InterfacesDriver window opens with the information that you added highlighted.
The Sybase Interfaces File 207
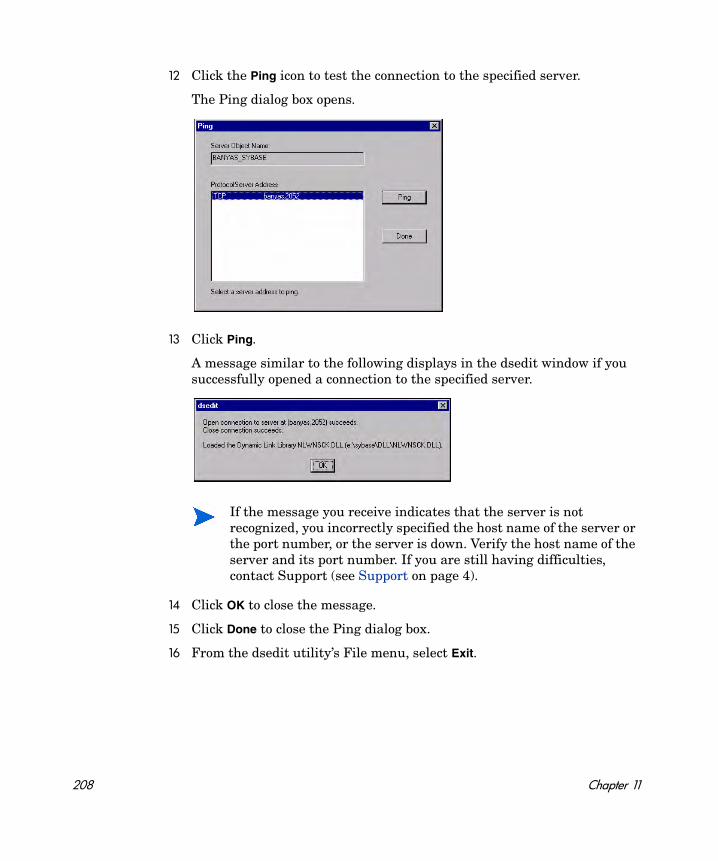
12 Click the Ping icon to test the connection to the specified server.
The Ping dialog box opens.
13 Click Ping.
A message similar to the following displays in the dsedit window if you successfully opened a connection to the specified server.
14 Click OK to close the message.
15 Click Done to close the Ping dialog box.
16 From the dsedit utility’s File menu, select Exit.
If the message you receive indicates that the server is not recognized, you incorrectly specified the host name of the server or the port number, or the server is down. Verify the host name of the server and its port number. If you are still having difficulties, contact Support (see Support on page 4).
208 Chapter 11

Index
Aaccounts
administrator, 106, 134, 140user, 140
addinguser accounts, 106, 134, 140
administrator accounts, 106, 134, 140
Bbrowser requirements
Web Access Server, 33
Ccache directory, 101, 129, 148
central database server, 11
checklist, 37
common character set, 153
Common Desktop Environment, 36
configuration tasks, 154
connect to Sybase database, 94, 122
Ddatabase instance, 17
database management software, 17
database segmentsmodifying, 98, 126
Database Selection window, 93, 121, 139, 145, 148
database server, 17central, 11remote, 18satellite, 12
database system role, 91, 118
default port numbers, 31example, 31
desktops (UNIX)supported for installation, 36
Destination Folder window, 92, 139, 144, 147
distributed environment, 11common character set, 153functionality, 11order of installation, 114servers, 11when to use, 15
Eenabling
SSL, 141
Ffirewalls
installation issues, 33OVPI ports, 31
209

HHP Passport ID, 153
Iinstallation issues
polling and SNMP connectivity, 33reporting client connectivity, 33
installation prerequisites, 37
Installation Progress window, 77, 80, 108, 109, 136, 143, 145, 150
internationalization, 36
JJava-related patches, 29
Llocalization, 36
MManagement Console, 18
default port number, 31
modifyingdatabase segments, 98, 126
Mounting the DVD (UNIX), 72, 86, 112
Nnetwork connectivity, 31
Network Node Manager, 34, 158
Ooperating environment
distributed, 11, 14standalone, 9
figure, 10
operating nvironmentdistributed, 12
operating systemsrelease level patches, 28updating, 28
OVPIstarting and stopping, 157uninstalling
prerequisite tasks, 159
OVPI administrator account, 105, 133, 139
OVPI Clients, 18Management Console, 18Report Builder, 18Report Viewer, 18
OVPI componentsdatabase management software, 17OVPI Clients, 18Performance Manager, 17remote poller, 20Web Access Server, 18
OVPI configurationsexample, 31
OVPI database, 17
OVPI database instance, 17
OVPI functions, 11
Ppatches
Java-related, 29release level, 28
Performance Manager, 17
Performance Manager Settings window, 98, 101, 126, 129, 148
polling, 20
polling and SNMP connectivity, 33
210
port numbersexample, 31
portsnetwork connectivity, 31
pre-installation tasksHP Compaq Users, 35identify ports, 31install SNMP Security Pack, 34integrate with Network Node Manager,
34plan for internationalization, 36plan for web access, 33Red Hat Linux Systems, 35update operating system software, 28
Rremote database server, 18
Remote Management Server Settings window, 142, 148
remote poller, 20
removing user accounts, 106, 134, 141
Report Builder, 18
reporting client connectivity, 33
reports directory, 140
Report Viewer, 18
roledatabase system, 91, 118
Ssatellite database server, 12
serversdatabase, 17distributed, 11
service packs, 153
SNMP Security Pack, 34
SSL, 107, 135, 141enabling, 141
standalone environment, 9figure, 10
starting OVPI, 157
stopping OVPI, 157
Summary window, 136, 143, 145, 150
Sybaseconnect to database, 94, 122default port number, 31
Sybase Reference Using Database Administrator window, 94, 122
Sybase User and Device Creation window, 96, 124
Sybase User and Device window, 124
system backup, 156
system requirementsdefault port numbers
example, 31supported desktops (UNIX), 36
Ttablespaces, 93, 96, 124
Uuninstalling OVPI
on UNIX, 160on Windows, 160prerequisite tasks, 159
Uninstall Wizardstarting, 160
UNIXsupported desktop, 36uninstalling OVPI, 160
UNIX systemsmounting the DVD, 72, 86, 112
211

updating operating system software, 28
user accounts, 140removing, 106, 134, 141
Wweb access, 33
Web Access Server, 18browser requirements, 33default port number, 31
Web Access Server Settings window, 105, 133, 139
Windowsuninstalling OVPI, 160
windowsDatabase Selection, 93, 121, 139, 145,
148Destiniation Folder, 92, 139, 144, 147Installation Progress, 77, 80, 108, 109,
136, 143, 145, 150Performance Manager Settings, 98, 101,
126, 129, 148Remote Management Server Settings,
142, 148Summary, 136, 143, 145, 150Sybase Reference Using Database
Administrator, 94, 122Sybase User and Device Creation, 96,
124Web Access Server Settings, 105, 133,
139
WizardUninstall, 160
212