hp smartstream for hp pagewide xl and hp designjet user
TRANSCRIPT

HP SmartStream for HP PageWide XL and HP DesignJet
User Guide

Edition 13
© Copyright 2014–2021 HP Development Company, L.P.
Legal notices
The information contained herein is subject to change without notice.
The only warranties for HP products and services are set forth in the express warranty statements accompanying such products and services. Nothing herein should be construed as constituting an additional warranty. HP shall not be liable for technical or editorial errors or omissions contained herein.
Trademarks
Microsoft® and Windows® are U.S. registered trademarks of Microsoft Corporation.
Adobe® and PostScript® are trademarks of Adobe Systems Incorporated.

Table of contents
1 Introduction ............................................................................................................................................................................................... 1
What is it for? ............................................................................................................................................................................. 1
Getting started .......................................................................................................................................................................... 2
What do I see on the screen? .................................................................................................................................................. 3
Recommended ways to set up the software ....................................................................................................................... 5
2 Printers ....................................................................................................................................................................................................... 7
Preflight desk ............................................................................................................................................................................ 7
Add a printer .............................................................................................................................................................................. 7
Change a printer’s IP address or hostname ......................................................................................................................... 9
Delete a printer ......................................................................................................................................................................... 9
The printers pane ................................................................................................................................................................... 10
3 Set preferences ...................................................................................................................................................................................... 14
General preferences .............................................................................................................................................................. 14
Accounting preferences ........................................................................................................................................................ 15
Printer-specific preferences ................................................................................................................................................. 15
Presets ..................................................................................................................................................................................... 18
Hot folders .............................................................................................................................................................................. 18
4 Job preparation ....................................................................................................................................................................................... 21
HP SmartStream Preflight Manager ................................................................................................................................... 22
Job overview ........................................................................................................................................................................... 25
Edit a job .................................................................................................................................................................................. 26
Job options .............................................................................................................................................................................. 28
Gloss enhancer ....................................................................................................................................................................... 30
Stamps ..................................................................................................................................................................................... 30
Printing on sheets .................................................................................................................................................................. 33
Nesting ..................................................................................................................................................................................... 35
Vertical trimmer ..................................................................................................................................................................... 38
Borderless printing ................................................................................................................................................................ 38
Move or copy a job or pages to another printer ................................................................................................................ 38
Delete a job ............................................................................................................................................................................. 38
Page options ........................................................................................................................................................................... 39
ENWW iii

Filter pages .............................................................................................................................................................................. 39
Sort pages ............................................................................................................................................................................... 40
Print settings ........................................................................................................................................................................... 40
5 Print preview ........................................................................................................................................................................................... 48
Image, page, and roll ............................................................................................................................................................. 49
Preview features .................................................................................................................................................................... 49
Preview tools .......................................................................................................................................................................... 50
Undock the preview ............................................................................................................................................................... 50
Mirror ........................................................................................................................................................................................ 50
Crystal Preview ....................................................................................................................................................................... 51
6 Printing ..................................................................................................................................................................................................... 55
Submit jobs for printing ........................................................................................................................................................ 55
Filtered and unchecked pages ............................................................................................................................................. 55
Job separators (HP PageWide XL only) .............................................................................................................................. 55
Printing queue ........................................................................................................................................................................ 56
Printing interruptions ............................................................................................................................................................ 57
Cancel jobs .............................................................................................................................................................................. 58
Exit the application while printing ....................................................................................................................................... 58
7 Color management ................................................................................................................................................................................ 59
8 History ...................................................................................................................................................................................................... 60
Search the history .................................................................................................................................................................. 60
Reprint a job ............................................................................................................................................................................ 60
Reconfigure a job ................................................................................................................................................................... 60
Remove jobs from the history ............................................................................................................................................. 61
9 Folding ...................................................................................................................................................................................................... 62
10 Scanning ................................................................................................................................................................................................ 65
Using a multifunction printer that includes a scanner ..................................................................................................... 65
Connecting an HP PageWide XL scanner ........................................................................................................................... 65
Using an HP PageWide XL scanner ..................................................................................................................................... 67
11 Accounting ............................................................................................................................................................................................. 70
12 Submission Driver ................................................................................................................................................................................ 73
13 Troubleshooting ................................................................................................................................................................................... 75
Error codes .............................................................................................................................................................................. 75
iv ENWW

Troubleshooting Tool ............................................................................................................................................................ 76
Appendix A Optional modules for advanced users .............................................................................................................................. 77
Document organizer module ............................................................................................................................................... 77
Pixel analysis module ............................................................................................................................................................ 85
Workflow management module .......................................................................................................................................... 87
Ink-density profile .................................................................................................................................................................. 87
Appendix B How to use non-HP printers with HP SmartStream ........................................................................................................ 88
Introduction ............................................................................................................................................................................. 88
Installing the printer .............................................................................................................................................................. 88
Preparing a job ....................................................................................................................................................................... 89
Other considerations ............................................................................................................................................................. 90
Appendix C Shortcut keys ......................................................................................................................................................................... 93
Overall selectors ..................................................................................................................................................................... 93
Icon-toolbar selectors ........................................................................................................................................................... 93
Globals ..................................................................................................................................................................................... 94
Preview selectors ................................................................................................................................................................... 95
Job selectors ........................................................................................................................................................................... 95
Index ............................................................................................................................................................................................................. 97
ENWW v

vi ENWW

1 Introduction
What is it for?HP SmartStream for HP PageWide XL printers and HP DesignJet Production printers is a professional software solution that helps to improve your productivity and operator efficiency, while expanding your color production. Now, your large-format production workflow will be twice as efficient for both monochrome and color without changing your current workflow.
SPEED – Do jobs in half the time
● Respond to the tightest deadlines with ultra-fast HP SmartStream Preflight Manager file analysis and processing.
● Reduce reprints—rely on native PDF management with Adobe PDF Print Engine 4.
● Stop changing settings one by one—create presets to bundle all desired settings, then reuse as needed.
● Simplify production of large jobs—visualize clusters of pages by size and content.
● Stay productive with an easy and intuitive user interface.
EFFICIENCY – Streamline your production workflow
● Easily distribute the HP SmartStream configuration into different workstations—presets, hot folders, printers.
● Make sure files are produced reliably with automatic detection of potential issues.
● Run HP PageWide XL and HP DesignJet production accessories—such as an online folder and high-capacity or integrated stacker—using generic accessory support.
● Operate your non-HP large-format LED printers through standard drivers.*
● Manage all connected HP PageWide XL and HP DesignJet production printers in your fleet.
GROWTH – Expand with color production
● Efficiently produce all your GIS maps and point-of-sale (POS) posters on HP PageWide XL printers.
● Preview color, just as it will print, and adjust settings with interactive HP Crystal Preview Technology.
● Get the most out of your paper with nesting designed to minimize paper waste.
● Get accurate data for invoicing—the job report summary even includes pixel coverage.
Bring key efficiencies to your business by adding a powerful solution to enhance your current production workflow. Now you can turn operator efficiency into operating profit with HP SmartStream software for HP PageWide XL printers and HP DesignJet Production printers.
* Support is provided for a limited number of brands and models. For more information, see http://www.hp.com/go/smartstreampagewidexl and http://www.hp.com/go/smartstreamdesignjet.
ENWW What is it for? 1

Getting started1. Install the software and software licenses. See the installation guide.
2. Create a job in the job preparation pane, which gives you many tools for manipulating and setting up each job before printing. To create your first job, select the printer that you want to use, and drag and drop one or more files onto the job preparation pane (or click to browse for files). At this point, the Preflight Manager checks each file and reports any errors in the file that could affect printing. You can preview pages in the preview pane. See Job preparation on page 21.
NOTE: The supported file formats are PDF, JPEG, TIFF, HP-GL/2, DWF, as well as SMJ and ZIP files containing files in any of the preceding formats.
3. Send your job to the printing queue (using the Print job button), where you can monitor its progress. See Printing on page 55.
NOTE: If you are printing to an HP DesignJet printer, do not close the application or shut down the computer until your job has printed. See Exit the application while printing on page 58.
4. Conveniently reprint past jobs from the application’s history tab. See History on page 60.
NOTE: Whenever a new version of the application becomes available, it will notify you, and it can update itself if you give permission.
2 Chapter 1 Introduction ENWW
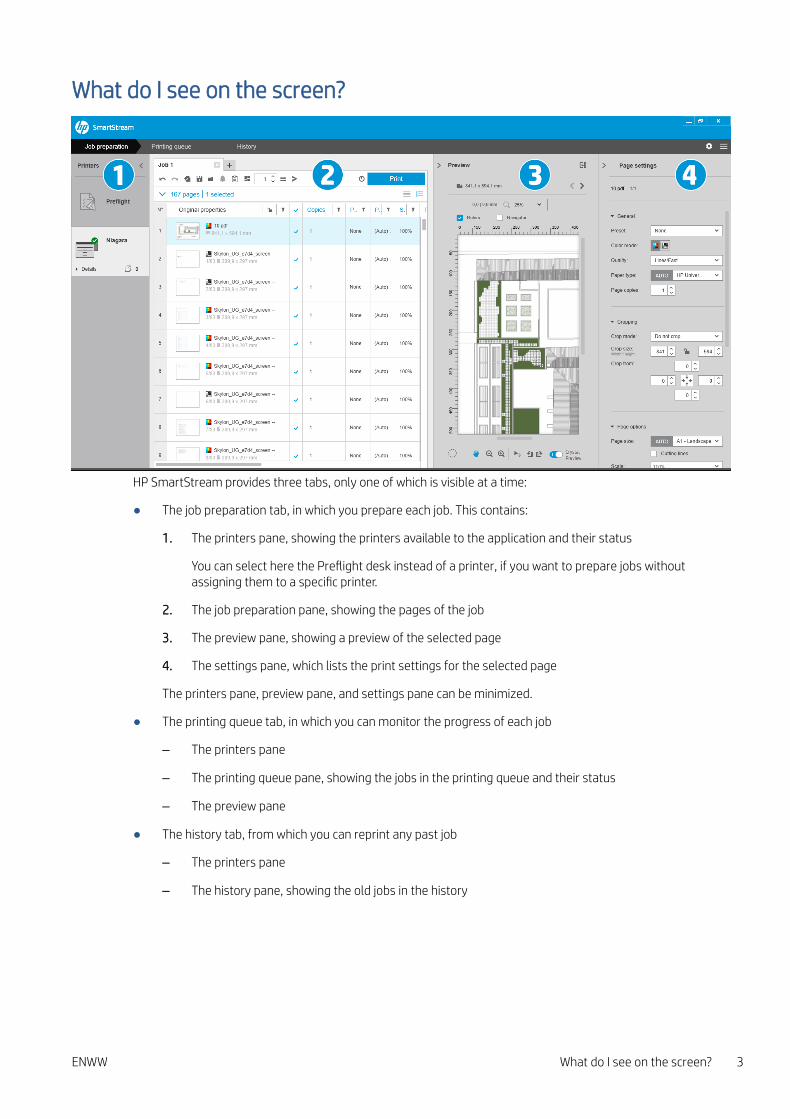
What do I see on the screen?
HP SmartStream provides three tabs, only one of which is visible at a time:
● The job preparation tab, in which you prepare each job. This contains:
1. The printers pane, showing the printers available to the application and their status
You can select here the Preflight desk instead of a printer, if you want to prepare jobs without assigning them to a specific printer.
2. The job preparation pane, showing the pages of the job
3. The preview pane, showing a preview of the selected page
4. The settings pane, which lists the print settings for the selected page
The printers pane, preview pane, and settings pane can be minimized.
● The printing queue tab, in which you can monitor the progress of each job
– The printers pane
– The printing queue pane, showing the jobs in the printing queue and their status
– The preview pane
● The history tab, from which you can reprint any past job
– The printers pane
– The history pane, showing the old jobs in the history
ENWW What do I see on the screen? 3

How can I adjust the HP SmartStream window?
The widths of each area can be changed according to your requirements.
● The printers pane (with Preflight desk) is minimized by default, but can be widened by clicking the active printer. See also The printers pane on page 10.
● The preview pane can be minimized by clicking or the PREVIEW title, or widened by dragging the left pane border to the left, or maximized by clicking in the top right corner of the pane.
● The settings pane is minimized by default, but can be widened by clicking and then minimized again by clicking .
● The job preparation pane includes a horizontal scroll bar if necessary, so that all columns can be accessed.
You can change the order of the columns by dragging the column headings.
You can show or hide columns by right-clicking anywhere in the column heading row, and then checking or unchecking column names in the menu.
You can freeze the first column by clicking in the column heading.
4 Chapter 1 Introduction ENWW

Notifications
A notification is displayed briefly on the screen when certain events occur, such as:
● A job moves from the job preparation pane to the printing queue.
● A job moves from the printing queue to the history (when it has been printed).
● A stacker or folder has been installed or uninstalled.
The notification normally fades in, remains for 5 seconds, and then fades out. You can stop it from fading by hovering over it, or see it again by hovering over the notification icon in the icon tray (if you have enabled it).
Recommended ways to set up the softwareHP SmartStream can be set up in a variety of ways, the most common of which are described below.
End-to-end printing workflow
The end-to-end workflow is a basic flow designed around the needs of a single operator managing the end-to-end flow of a job from job reception to preparation/preflight to printing and perhaps finishing.
For example, only one operator is in charge of printing, or possibly one operator per printer. In this case, this operator has full control over the printing workflows and the printing queue using HP SmartStream.
In other cases, with multiple operators, each of them may be responsible for a single job end to end; that is, from the reception of the job to its delivery.
A individual installation of HP SmartStream can perform all the required steps of an end-to-end printing workflow, allowing an operator to prepare jobs and print to one or more printers.
Files can be added to the application from local or removable drives, local network, or remote locations, as long as they are accessible by the operating system’s file explorer.
Distributed workflows
In an enterprise environment, the HP SmartStream solution allows users (such as architects or engineers) to send jobs to the CRD (Central Reprographics Department), so that the central print operator can print them. This is not intended to replace using any printer present in the users’ own department to print samples or a limited number of pages on their own. Rather, it is intended for jobs with many pages or high urgency, when professional print operators should take care of the printing and finishing.
In order to streamline the job submission and subsequent processing by the print operator, the installation of HP SmartStream in the CRD should have one or more hot folders configured that point to a folder that any user in the enterprise can access. See Hot folders on page 18.
Likewise, each user’s installation of the HP SmartStream Submission Driver should point to a hot folder that is connected to the CRD’s HP SmartStream software.
With this setup in place, a typical enterprise workflow with a CRD may run as follows:
1. Job submission from the user’s computer
ENWW Recommended ways to set up the software 5

Users can:
● Send a print-ready file from their specialized application (such as CAD software) by selecting the HP SmartStream Submission Driver from the application’s print menu. See Submission Driver on page 73.
● Select their desired color mode, paper type, page settings, number of copies, and finishing options. See Job preparation on page 21.
● Assign the project and/or department ID to the job for tracking and/or accounting purposes. See Accounting on page 70.
● Add any further instructions as a comment. See Accounting on page 70.
● Submit the file to the CRD with the job ticket information.
2. Job reception and printing in the CRD
The print operator can:
● Act on a notification that a new job has arrived in a hot folder, by opening it in the preparation pane. See Job preparation on page 21.
● Check the instructions in the job ticket by opening the detailed job summary. See Accounting on page 70.
● Make sure that a suitable roll is loaded in the printer, and that the finisher is ready.
● Change the page settings according to instructions, where they have not been applied automatically when the job was added from the hot folder.
● Ensure that any issues detected (such as content in the printer margins) are tolerable, by consulting the Resolution Center. See Resolution Center on page 24.
● Print the job and prepare the printout for delivery or pickup. See Printing on page 55.
NOTE: Configuring a hot folder for auto-print allows unattended processing and printing of incoming jobs. See Hot folders on page 18.
6 Chapter 1 Introduction ENWW

2 Printers
Preflight deskThere is a Preflight entry in the list of printers, with which you can use the Preflight Manager to check your files without printing them. It has only the settings that are appropriate without a printer, and has no printing queue or history.
The Preflight desk can be disabled from the printer preferences by right-clicking the icon and selecting Disable Preflight desk. Subsequently, the Preflight desk will no longer appear in the printers pane, but it cannot be deleted, and can be re-enabled from the printer preferences. See Printer-specific preferences on page 15.
Add a printerTo add a non-HP printer, see How to use non-HP printers with HP SmartStream on page 88.
1. Before you can add any printers, the software must be licensed. See the installation guide.
2. Ensure that the printer you want to add is turned on, awake, and accessible from your computer.
3. Click near the top right of the window.
ENWW Preflight desk 7

4. Click the Printers tab.
5. Click the Add Printer button.
6. You can give the printer a name (this is optional) and enter its IP address or hostname (this is required), then click Continue. If you assign a name, you can choose any name you like; it will be used only in the printers pane. If you do not know the printer’s IP address, the printer’s own documentation will tell you how to find it. It is normally available from the Connectivity menu in the printer’s front panel.
NOTE: You can change the IP address or hostname later in the printer preferences. See Printer-specific preferences on page 15.
NOTE: Only supported printers are detected (see the installation guide), and only licensed printers can be added to the application; any attempt to add an unlicensed printer will fail, unless you have a trial version of the software (see the installation guide).
7. The application downloads a set of color profiles for the new printer.
The name you have given the new printer should now appear in the printers pane.
You can add more printers, in which case their names all appear in the printers pane.
8 Chapter 2 Printers ENWW
Change a printer’s IP address or hostnameIf the IP address of a printer changes, it is removed from HP SmartStream. To add it again with the new IP address, see Add a printer on page 7.
When you add it with the new IP address, HP SmartStream detects that it is the same printer with a new IP address, and asks whether you would like to merge the two printers.
● Click Merge to merge the two printers: the new printer keeps the history of the old printer.
● Click Duplicate not to merge the printers: the new printer’s history starts off empty.
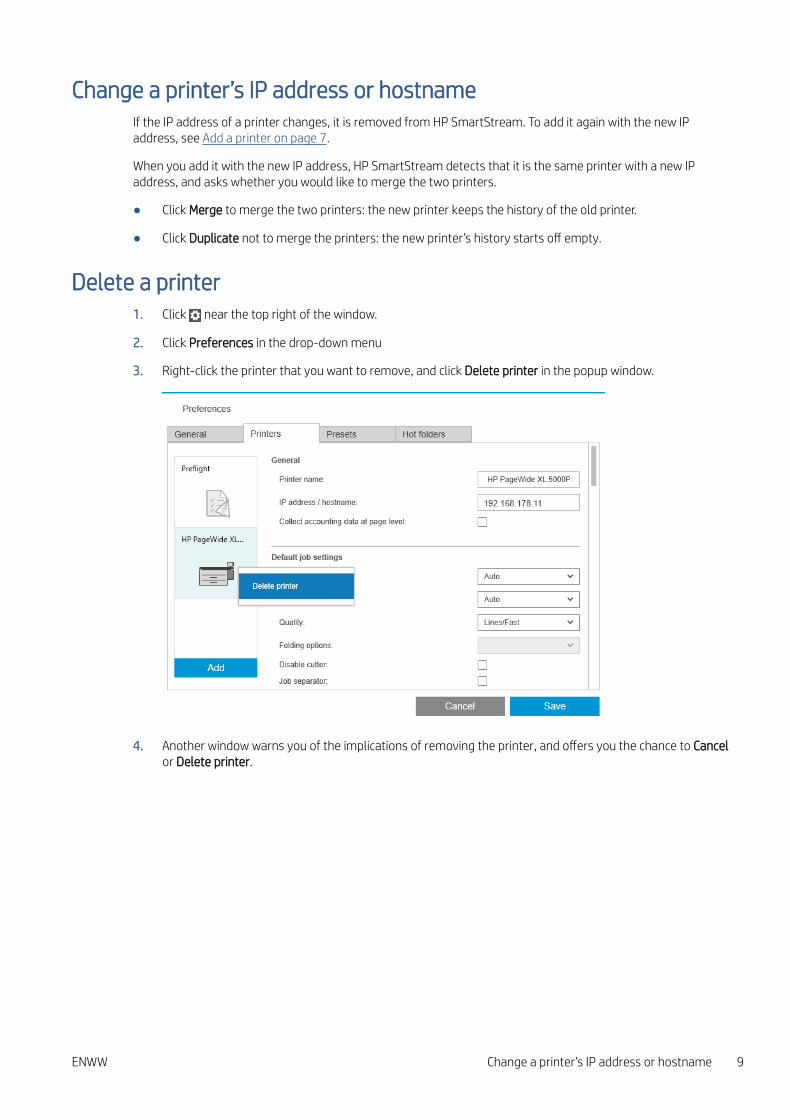
Delete a printer1. Click near the top right of the window.
2. Click Preferences in the drop-down menu
3. Right-click the printer that you want to remove, and click Delete printer in the popup window.
4. Another window warns you of the implications of removing the printer, and offers you the chance to Cancel or Delete printer.
ENWW Change a printer’s IP address or hostname 9

The printers paneThe printers pane is at the far left of the window. By default, it shows only the names of the printers that you have added.
Click a printer name to select the active printer; the rest of the window always shows the jobs for the active printer, in any of the three tabs.
The active printer is shown with a lighter background color than the others.
To widen the pane and see more information about each printer, click the active printer or double-click an inactive printer (which also activates it). You can now see up-to-date status information on the printer and its accessories.
NOTE: There may be a short delay while the application retrieves the status information from the printer.
10 Chapter 2 Printers ENWW
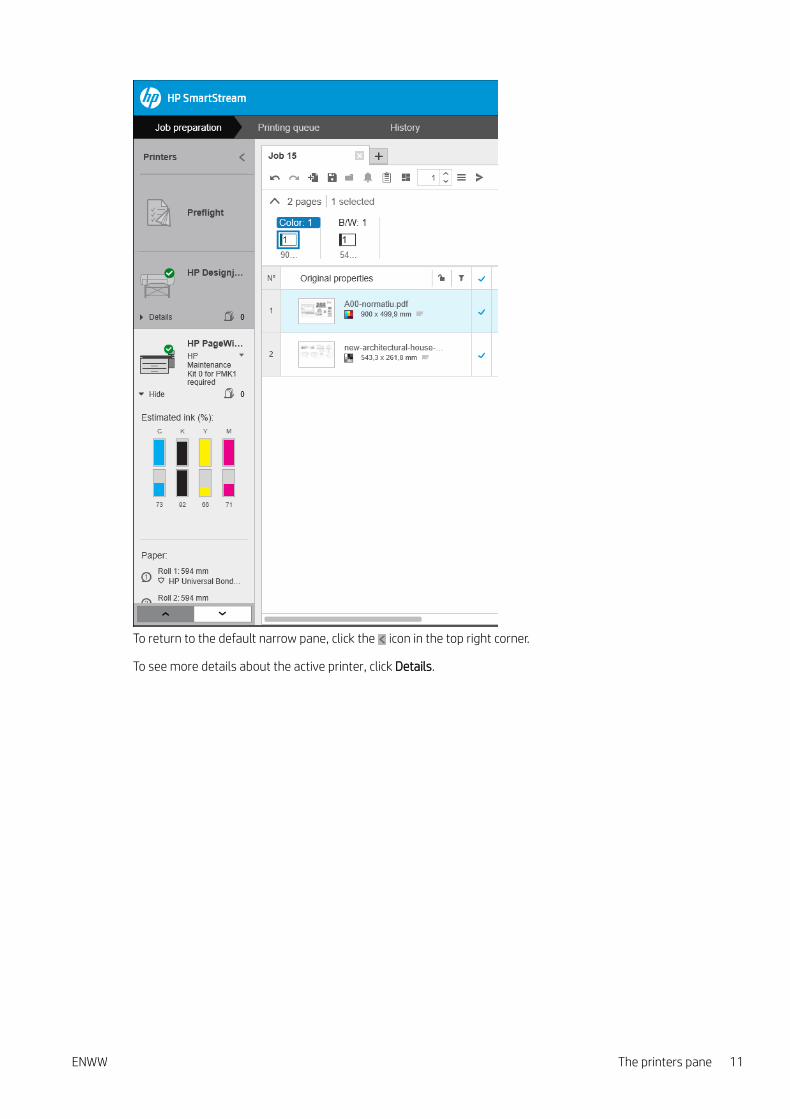
To return to the default narrow pane, click the icon in the top right corner.
To see more details about the active printer, click Details.
ENWW The printers pane 11

When fully expanded, the printers pane contains the following items:
1. The name of the printer
2. The overall status of the printer
3. A picture of the printer
4. An expander button to increase or decrease the number of details shown
5. The total number of pages in the queue for this printer.
6. The ink level in each ink cartridge
7. The dimensions and type of paper loaded on each roll, and a warning or error message if necessary
8. The status of the folder and stacker, if any
9. A link that opens the printer’s Embedded Web Server
The collapsed printers pane (before clicking Details) contains only items 1 to 4 above.
If the pane is too small to show all of the printers, you can move up and down the list by clicking the
and buttons at the bottom of the pane.
Accessory status
Folder status
If a printer has a folder installed, its status may be described in the following ways. However, the status values depend on the folder you are using: for more detail, check the documentation provided with the folder.
● Initializing: The folder is initializing and will be ready soon.
● Ready: The folder is ready or folding.
● Full: The folder is full, and you must remove the folded paper in order to continue printing.
● Jam: The folder is jammed, and you must clear the jam in order to continue printing.
● Open: A folder door is open, and you must close the door in order to continue printing.
● Detached: The folder is detached from the printer, and you must attach it in order to continue printing.
● Disabled: The folder is disabled, and you must enable it in order to continue printing.
12 Chapter 2 Printers ENWW

● Communication error: The printer cannot communicate with the folder; there are various possible reasons (door open, folder turned off, communication cable disconnected).
● Internal error: The folder is not working correctly; there are various possible reasons (door open, folder jammed or offline). An error code is displayed on the front panel; check the service documentation for an explanation of it.
Stacker status
If a printer has a stacker installed, its status may be described in the following ways. However, the status values depend on the stacker you are using: for more details, check the documentation provided with the stacker.
● Initializing: The stacker is initializing and start warming up soon.
● Warming up: The stacker is warming up and will be ready soon.
● Ready: The stacker is ready or stacking.
● : The printer is in manual mode: the stacker door is open.
● Full: The stacker is full, and you must remove the stacked paper in order to continue printing.
● Busy: The stacker is being cleaned, and you must wait for the cleaning procedure to finish.
● Upgrading firmware: The stacker firmware is being updated, and you must wait for the updating procedure to finish.
● Jam: The stacker is jammed, and you must clear the jam in order to continue printing.
● Open: The stacker door is open, and you must close it in order to continue printing.
● Detached: The stacker is detached from the printer, and you must attach it in order to continue printing.
● Disabled: The stacker is disabled, and printing will continue without using the stacker.
● Communication error: The printer cannot communicate with the stacker; the stacker may be turned off or disconnected from the printer.
● Internal error: The stacker is not working correctly for some unknown reason. An error code is displayed on the front panel; follow the instructions there.
ENWW The printers pane 13

3 Set preferences
The preferences dialog allows you to configure HP SmartStream.
General preferencesThe general preferences apply to all printers in the printers pane. To set them, click the icon near the top right of the window.
You can set:
● Language and units: The language of the text and the units of measurement displayed by the application
● Preview
– Default zoom in Preview pane: The default zoom option used in the print preview
– Show folding size: Whether to display the folding size in the preview
● History: How long jobs should be retained in the history
● Page size: Which standard page sizes should be displayed in lists of page sizes, and whether page sizes should be mapped to the nearest standard size
● Save options: Whether to embed the documents when saving jobs, increasing the job file size
● Resolution Center: Whether the Preflight Manager should omit warnings of specific kinds
14 Chapter 3 Set preferences ENWW

● Checks before printing: Whether the Preflight Manager should perform the normal checks before printing
● Batch rename save folder: The folder in which renamed pages are saved.
Accounting preferences
You can set:
● Job details: Choose which fields should be used in the job details, and manage account IDs.
– If you check the box Check whether Accounting fields are filled, HP SmartStream will require all fields of the job summary to be filled in before sending the job to print.
– The Export button creates a CSV file containing the account IDs known to HP SmartStream.
● Currency: Choose the currency to be used in job details and cost calculations. You can start to enter the name of the currency manually, in which case non-matching currencies are removed from the list.
Printer-specific preferencesThere are a number of preferences that you can set separately for each printer. Click the icon near the top right of the window, then select the Printers tab in the Preferences window. On the left side of the Printers tab, you can see a list of your printers: click the printer whose preferences you would like to set.
ENWW Accounting preferences 15

You may be able to set the following preferences, although the list of preferences can vary, depending on your printer and its accessories:
● Printer name: Your chosen name for this particular printer in this application.
● IP address / hostname: The printer’s IP address or hostname.
● Collect accounting data at page level: Whether to gather page accounting data from the printer (HP PageWide XL printers only). See Accounting on page 70.
● Paper type: Choose the default paper type.
● Color mode: Choose the default color mode.
● Quality: Choose the default print quality.
● Folding options: Choose the default folding style.
● Disable cutter: Whether to disable the automatic cutter.
● Job separator: Whether to print a job separator page after the last page of each job. See Job separators (HP PageWide XL only) on page 55.
● Job separator roll ID: A roll number, or Any.
● Non-HP accessory name: Assign a name of your choice to a non-HP accessory connected to the printer.
16 Chapter 3 Set preferences ENWW

● Preflight Manager analysis: By default, a thumbnail of each page in a job is generated, and displayed in the left column of the job preparation pane. You can choose a partial analysis to increase the speed of the Preflight Manager, by unchecking the Always generate thumbnails box here; in which case, a placeholder image is displayed in place of each thumbnail. However, by turning off thumbnails you also disable some features of HP SmartStream, such as identifying the color mode of your original documents, clipping detection, fast page preview, and automatic removal of white areas.
If thumbnail generation has been turned off, you can use the icon in the job header to generate thumbnails for all pages in the current job at any point:
● Remove white areas: If you choose Remove white areas or Smart crop, your pages are automatically cropped to remove white areas at the edges. You can also choose Custom crop. See Cropping on page 44.
● Rotation: Choose the page rotation to be applied by default (Original, Auto, Landscape, or Portrait).
● Alignment
– Page/image alignment: Choose how the image is aligned with respect to the page.
– Roll/page alignment: Choose how the page is aligned with respect to the roll.
● First page on top: You can request printing with the first page on top (the reverse of the default order) when using the stacker, when using the folder, and when using neither.
● Content in printer margin: The printer margins are normally 5 mm, but in some circumstances you may be able to choose a printer margin of 3 mm, depending on the printer, the printer firmware, and the paper type.
– You can choose whether the printer should try to detect content in the printer margins (never, moderate analysis, or extensive analysis).
NOTE: Moderate analysis may not detect all clipping; extensive analysis detects all clipping but may sometimes detect clipping when there is none (a false positive).
– If content is detected in the printer margin, the application can try to fix the problem automatically by adjusting the paper source margins.
– When adding margins, you can choose between the minimum distance needed to avoid clipping and the whole width of the printer margin.
ENWW Printer-specific preferences 17

● Paper and ink alerts: Whether to minimize paper and ink alerts.
● Roll switching options: If you choose Non-stop printing (see Job options on page 28), the application will try to carry on printing even if a roll runs out of paper while printing and there is no roll of the same roll width loaded. In this case, it will look for a roll of the same paper type with a wider roll. The narrowest suitable roll is selected. If there are multiple narrowest suitable rolls, the application can choose between them according to one of the following rules:
– Minimize roll switches
– Use roll with less paper
● Color options: You can select Relative colorimetric, the default setting, or Perceptual, which emulates the output of a PostScript driver. See Color management on page 59.
● Nesting: see Nesting on page 35.
PresetsA preset is a group of settings saved together under a single name. You can create, modify, or delete presets in the Presets tab.
On the left, you can select from a list of presets that you have created. They are displayed in the same order in the preset drop-down menu in the job preparation pane. You can delete a preset by right-clicking its name in this list.
On the right, you can see the settings of the selected preset. A setting is part of the preset only if the box to the left of the setting is checked.
You can use the Preset column in the job preparation pane to apply a preset to one or more pages, or to a whole job.
Hot foldersThis tab enables you to define hot folders for incoming and outgoing files. Once defined, the hot folder allows you to import files into (or export files from) the application in an easy way. See Using a multifunction printer that includes a scanner on page 65.
18 Chapter 3 Set preferences ENWW

You can set:
● Function: Whether this particular hot folder is for incoming or outgoing files
● Target: The folder in your computer or network that will contain the hot folder
● Name: The name of the hot folder
● Delete imported files: Whether the imported documents should be deleted after importing them
NOTE: If you delete the imported files, you are recommended to attach the files when saving the job, otherwise the application will not be able to find the files when you reopen the job. See Save options in General preferences on page 14.
● Assign preset: An optional preset that may be applied automatically when files are added to or dragged from this folder.
NOTE: You must create the preset in advance in order to select its name here.
ENWW Hot folders 19

● Printer to autoprint: A printer that will automatically print any files added to this hot folder. If you select None, the files in the hot folder will not be automatically printed. You can specify here the number of copies to be printed.
If the printer has any problem, automatic printing is suspended until the printer is ready again, and a warning is added to the hot folder icon in the job preparation pane.
Log files for autoprint operations can be found in the My Documents\HP SmartStream\Auto-print Logs folder. A log file contains information about the success or failure of the autoprint operation. Any document added to the hot folder that cannot be processed correctly by the application will be copied to a subfolder of the logs folder.
NOTE: Documents added to a hot folder with autoprint enabled will print as they are to the most suitable roll available in the assigned printer. If the printer has no roll wide enough for the document, the print of that document will be clipped.
20 Chapter 3 Set preferences ENWW

4 Job preparation
You can create and edit jobs in the job preparation pane.
HP SmartStream allows you to work in two different ways:
● You can select a specific printer and prepare a job for that printer.
● You can select the Preflight desk in order to prepare a job without specifying a specific printer. This allows you to check page size and alignment. The job can be assigned to a printer later, by clicking or by dragging the job to a printer in the printers pane.
The job preparation process
1. Select the printer that you want to use to print your job, or select the Preflight desk.
2. Create a new job by clicking at the top left of the job preparation pane, or by dragging files or folders directly onto an empty job preparation pane.
NOTE: Whenever you add a new printer, an empty job is created automatically.
3. To add files or folders to a job, you can click , or drag and drop the files or folders onto the job preparation pane.
See also Tracking files added to the job on page 77.
NOTE: You can drag and drop files directly from Microsoft Outlook to HP SmartStream.
ENWW 21

4. A Preflight Manager window is displayed while the application is checking each file for problems. This window disappears when the job is ready. See File error detection on page 22.
If problems are found that prevent files from being added, a report window appears with a summary of the problems. This window remains open until you click Later. More details can be seen in the Resolution Center. See Resolution Center on page 24.
If problems are found that do not prevent files from being added, the Preflight Manager does not produce a report, but the details can be seen in the Resolution Center.
5. After checking the files, the application automatically suggests the paper type (unless the preferences indicate to use one specific paper type), the page size, the rotation of the page on the roll, and the roll width. See Automatic attribute detection and setting assignment on page 25.
6. You can review and modify the settings using the job preparation pane and/or the settings pane. See Edit a job on page 26.
You can also sort and/or filter the content of the grid. See Sort pages on page 40 and Filter pages on page 39.
See Accounting on page 70 for information about clusters and the job details icon.
TIP: Changing the view from standard to compact turns off the display of thumbnails and thus
allows you to see more rows on the screen.
7. Use the print preview to see how a page will look when printed, how it will be positioned on the roll, and whether your image will be clipped with your present settings. See Print preview on page 48.
8. When you are ready to print, click the Print job button. See Printing on page 55.
If you decide to print the job on a printer different from the one you originally selected, you can drag the job tab to another printer tab.
HP SmartStream Preflight ManagerThe Preflight Manager analyzes each file to check for errors, issue warnings, and propose various page settings automatically.
NOTE: You can choose to perform only a limited Preflight Manager analysis. See Faster Preflight Manager analysis in the Printer-specific preferences on page 15.
File error detection
When files are added to a job, the Preflight Manager checks them for possible errors. If an error means that a page cannot be printed, it is not added to the job preparation pane and is not included in the job.
All supported file types are checked. The Adobe Libraries are used for fast and accurate checking of PDF files.
22 Chapter 4 Job preparation ENWW

Errors that prevent adding files
In these cases, the file is not added to the job.
● The file format is not supported by HP SmartStream.
● The file is corrupted.
● A certificate is needed to open the file.
● You do not have enough free memory or enough free hard disk space to process the file.
The author of a PDF file can specify an Open password that you must provide to open the file, and/or a Permissions password that you must provide to print the file. If you try to add a password-protected PDF file to a job, an Action Required window is displayed, in which you can enter the required password(s). If you cannot provide a required password, the file is not added to the job.
A PDF file with a Permissions password but no Open password is treated as being in error, and is not added to the job.
Errors that do not prevent adding files
In these cases, an explanation is added to the resolution center for your information, but the page is added to the job and can be printed, unless you decide to exclude it.
● The page and/or image will be clipped. You can ask the application to try to fix this problem automatically, or you can fix it manually after viewing the preview to see what will be clipped and where.
NOTE: You can choose not to be notified about clipping that occurs within the printer margins. See Printer-specific preferences on page 15.
● Some layers are not printable. You can check what will be printed in the preview.
● Some layers are not visible, but can be printed. You can check what will be printed in the preview.
● The following errors are found only in PDF files:
– Fonts are missing. The application can automatically substitute other fonts for the missing fonts. Alternatively, you may be able to recreate the PDF file with the correct fonts embedded in it.
– There are references to external items, which will not be printed. If you want to print these items, they must be embedded in the file.
– The file contains one or more embedded PostScript objects that will not be printed.
ENWW HP SmartStream Preflight Manager 23

When a page has an error, its thumbnail is outlined in yellow. When it is selected, its background color changes to blue.
Resolution Center
The toolbar contains a Resolution Center icon. If a job contains no issues (everything is fine), this icon is disabled.
If there are any issues with the job, you can click the button to see them. In addition, a warning icon is displayed over the page thumbnail. You can double-click the warning icon to open the Resolution Center at the page showing the issue.
The issues may consist of the following types:
● Information: These give you information but require no action.
● Warnings: These warn you of a possible problem that may require action. The action is explained.
● Actions: These explain a situation and offer you options for responding to it.
In the resolution center, you can choose to see all the issues on a page, or you can choose a specific type of issue and browse through the pages that have that issue.
Issues are shown per page, and you can navigate from page to page by using the buttons at the top right.
You can choose to ignore specific issues, or use the General preferences to ignore all issues of a specific kind, or not to perform checks before printing. See General preferences on page 14.
If I get a warning that the image will be clipped, what can I do about it?
You can click the Solve all button, in which case HP SmartStream will try to solve the problem automatically.
Alternatively, you can use the preview to see exactly what the problem is, and solve it manually. For more details, see Print preview on page 48.
24 Chapter 4 Job preparation ENWW

Automatic attribute detection and setting assignment
The following attributes are detected automatically for each page that is added to a job:
● The document name and the number of pages that it contains
● The original image size of the page
● Whether the page is in color or grayscale
The following settings are automatically assigned for each page:
● The page size
● The page rotation, if any
NOTE: In the paper source options, you can turn automatic rotation on or off by means of a check box. See Paper source options on page 46.
● The paper type, which is limited to the paper types currently loaded in the printer
NOTE: In the Preferences window, you can choose to use a specific default paper type when adding pages, instead of using the paper type proposed by the application. See Printer-specific preferences on page 15.
● The roll width, which depends on the page size
● The roll ID, which may depend on the roll width
NOTE: The roll ID is assigned automatically only if you have set it to Any in the paper source options. See Paper source options on page 46.
NOTE: Your printer may enable you to set a roll to protected status. In this case, the roll ID is not available for automatic assignment; you can print on that roll only by requesting it explicitly.
You can modify these proposed settings. If you have changed a setting and want to restore the automatic value, click the AUTO button.
Job overview
Visual job overview
The Preflight Manager generates a visual overview of each job, known as a cluster, which can be displayed near the top of the job preparation pane. It divides the pages of the job into categories, first dividing them into color or monochrome pages, and then dividing them by page size; showing a count of the pages in each category.
Page clusters are a new feature that helps you to simplify the production of large jobs by giving you a fast and clear understanding of the job composition from the beginning, knowing the number of pages that each job has for each size and page content. In addition, you can easily select all pages in one or more categories by clicking those categories. In this way you can apply and modify settings at a category level.
The total page count is always displayed; you can open or close the display of categories.
ENWW Job overview 25

If a filter is in operation, the pages hidden from the job preparation pane are also excluded from the cluster.
Job details
The icon in the toolbar displays information about the job that may be used for accounting purposes (see Accounting on page 70). The icon appears in the job preparation pane and in the history pane.
Edit a job
You can edit a job in various ways to print the pages that you want, in the order that you want, and with the print settings that you want.
● By selecting one or more pages and changing the print settings
You can change print settings in the job preparation pane or in the settings pane; the effect is the same. The difference is that the display of settings in the job preparation pane can be customized: you can change the order of the columns and remove columns that you don’t normally use. The settings pane displays all available settings in a fixed order: it cannot be customized.
To display a list of all the possible columns that you can show or hide, right-click any column header.
● By clicking the column header to change the settings of the whole job
● By sorting the pages into a different sequence (see Sort pages on page 40)
● By applying a filter to one or more columns in the job preparation pane, and thus hiding some pages (see Filter pages on page 39)
26 Chapter 4 Job preparation ENWW

● By selecting one or more pages and dragging manually them up or down to a different position: this changes the sequence in which the pages will be printed
● By renaming pages (see Rename pages on page 77)
This is not a complete list of the possibilities. For further options, see the subsequent sections in this chapter.
TIP: If you make a mistake or change your mind while editing a job, you can use and (or their Ctrl-Z and Ctrl-Shift-Z shortcuts) to undo or redo edits to a single job. Actions other than job editing cannot be undone.
Toolbar
The toolbar contains the following icons and buttons:
● to undo the last job editing action
● to redo the last action that was undone
● to add documents to a job or open a saved job
● to save a job
● to show the status of the hot folders
● to show the status of the resolution center
● to show the job details
● to toggle nesting on and off
● to change the number of copies of the job to be printed
● to select job options
● to send (in the context of a printer)
● to submit a job but put it on hold in the printing queue
● to print a job
Labels
The job preparation pane has a Label column that is hidden by default, but can be shown (right-click any column header to show or hide columns).
If you choose to show this column, it initially contains the tag attached to each page of a PDF file. However, you can edit these tags in the Label column, replacing them with any text you like. The new text that you provide is saved as part of the job, but it is not saved in the PDF file.
ENWW Edit a job 27

The existence of this column allows you to sort and filter pages according to tags that you can choose yourself.
Discipline
The job preparation pane has a Discipline column that is hidden by default, but can be shown (right-click any column header to show or hide columns).
If you choose to show this column, it initially contains a subset of categories. However, you can edit these categories in the Discipline column, replacing them with any you like.
The existence of this column allows you to sort and filter pages according to tags that you can choose yourself.
Job optionsYou can see the job options for any job by clicking in the toolbar of the preparation pane.
28 Chapter 4 Job preparation ENWW

● Collate: If you choose to print more than one copy of the job, you can choose to collate the copies; otherwise, the printer will print multiple copies of the first page, then multiple copies of the second page, and so on.
● First page on top: You can choose to print the job with the first page on top, which may be convenient if you are stacking the pages face-up as they emerge.
NOTE: You can choose in the Preferences window whether this option is on or off by default. See Printer-specific preferences on page 15.
● Disable cutter: If the paper is cuttable and the cutter is turned on at the printer’s front panel, you can turn it off here. If the paper is not cuttable or the cutter is turned off at the front panel, you cannot turn it on from HP SmartStream.
● Revert to original page order: Restore the original sequence of pages in the job, as they were when you created the job. This may be useful if you have sorted the pages or changed the order manually.
● Revert to custom page order: Restore the last manual sequence of pages in the job, as they were when you last manually reordered them.
● Non-stop mode: The application checks the selected roll ID, roll width, and paper type for each page against the currently loaded rolls in the printer. If a roll with the correct characteristics is not loaded, a window appears asking you how to proceed. However, just before printing the page, if a roll is detected of the correct paper type but wider than specified, printing will continue.
NOTE: This option allows you to print with minimal interruptions, while still respecting the paper type specified in the job and avoiding clipping. A job may be printed on wider paper if the specified width is not available.
● Extract job: You can extract a whole job and store it, in the same way that individual pages can be extracted. See Extract pages on page 39.
● Duplicate job: You can duplicate a whole job, including its job options and page settings.
ENWW Job options 29

NOTE: You can also duplicate a job by dragging it to the + tab at the top of the job preparation pane.
● Separator: You can choose to print a job separator page for this particular job. See Job separators (HP PageWide XL only) on page 55.
Gloss enhancerGloss enhancer is a layer of coating that you can apply to printouts to create a special effect, is switched on/off in job options (see Job options on page 28), and applies to the whole job.
NOTE: Gloss enhancer cannot be applied on all paper types.
NOTE: For printers that support this feature.
StampsIn the preparation pane, in the Stamp column, you can choose to assign a stamp to a page or create a new one. This prints a text and/or graphical stamp or watermark over the contents of the page; you can assign the same stamp to all pages of a job, or particular stamps to particular pages.
You can specify the position of the stamp and the formatting of a text stamp: its font, size, color, angle, opacity, and offset. You can add various dynamic fields to be displayed as part of the text.
TIFF, PNG, and JPEG files can be imported to provide a graphical stamp. You can also import one of these files contained in a ZIP file. If the ZIP file is password-protected, you will need to give the password in order to import the image successfully.
NOTE: A ZIP file within a ZIP file is not supported.
The stamp can consist of a maximum of five layers.
30 Chapter 4 Job preparation ENWW

Export stamp template : You can export your stamp design as a template. Templates are saved in My Documents\HP SmartStream\Stamps, with the .smst extension (HP SmartStream Stamp Template file).
Open stamp template : You can open a stamp design saved in a template file. All stamp fields are filled with data from the template, or they become empty if the corresponding fields in the template are empty.
Stamps in the preview
The stamp can be seen in the page preview. If you select the Move tool, each layer of the stamp is indicated with a red rectangle. To select a stamp layer, the image, or the page, just click what you want to select.
If you select a stamp layer, the following parts of it can be distinguished.
1. Stamp image
2. Stamp text
3. Stamp transformation controls
4. Stamp rotation tool
You can readjust a stamp in various ways after selecting the Move tool:
● You can resize it by dragging one of the corners of the red rectangle. The aspect ratio is preserved.
● You can rotate it by dragging the rotation tool: the gray circle above the center of the stamp. If you hold down the Shift key while dragging, the rotation is constrained to steps of 15°.
ENWW Stamps 31

● You can reposition it by dragging it into any of the positions in the predefined stamp grid.
If you double-click a stamp layer, the layer is opened in the stamps dialog box.
Remember that a stamp belongs to one page only. After editing it, you can copy it to all other pages of the job, if you want to do that.
QR codes
You can generate a QR code and add it to an image.
In the preparation pane, in the QR & Stamp column, you can choose to assign a QR code to a page or create a new one. You can assign the same code to all pages of a job, or particular codes to particular pages.
Introduce text, URL, vcard, and so on; then click the Generate button to generate and place the QR code on the page.
32 Chapter 4 Job preparation ENWW

You can specify the position and the formatting of a QR code: its font, size, color, angle, opacity, and offset. You can add various dynamic fields to be displayed as part of the text.
TIFF, PNG, and JPEG files can be imported to provide a graphical QR code. You can also import one of these files contained in a ZIP file. If the ZIP file is password-protected, you will need to give the password in order to import the image successfully.
NOTE: A ZIP file within a ZIP file is not supported.
The QR code can consist of a maximum of five layers.
Export stamp template : You can export your QR code as a template. Templates are saved in My Documents\HP SmartStream\Stamps, with the .smst extension (HP SmartStream Stamp Template file).
Open stamp template : You can open a QR code saved in a template file. All fields are filled with data from the template, or they become empty if the corresponding fields in the template are empty.
NOTE: For printers that support this feature.
Printing on sheetsYou can print on sheets of loose paper with fixed dimensions.
To change from roll view to sheet view, click the Sheet icon in the toolbar. The preparation grid then displays different fields such as sheet size and thickness.
Double-sided printing
Double-sided printing allows you to print on both sides of a sheet of paper.
To enable double-sided printing, click the Double-Sided icon in the toolbar.
Once enabled, documents on the page are marked as side A or side B.
Documents are paired as A and B sides. Properties or actions applied to side A are replicated on side B.
ENWW Printing on sheets 33

Double-sided printing order
Select the printing order A|B, A|B, A|B or AAA|BBB from Job options.
Automatic alignment
When aligning a document on side A, the application applies an automatic alignment to side B.
Side-to-side registration
Enabling this feature with the Registration icon allows you to preview double-sided documents, with a slider to change the transparency of side A in order to see side B.
34 Chapter 4 Job preparation ENWW

NestingNesting enables you to save paper and time. It enables you to print two or more pages side-by-side on the paper (if the paper is wide enough). In this way, you can print the whole document more quickly, and avoid wasting paper.
NOTE: When you nest a job, the paper type and print quality must be the same for all pages in the job.
NOTE: Nesting is not available if you have chosen the Preflight desk.
You can set the nesting parameters for each printer in the printer preferences (see Printer-specific preferences on page 15), and you can turn nesting on and off for each job using the icon in the toolbar.
In the preview (see Print preview on page 48), you can see how your pages will be nested, and you can move individual pages in the preview if you like. The order and positioning of pages that you set in the preview will be respected in the final print.
ENWW Nesting 35

If you have asked for multiple copies of a page, the copies of that page can be nested, which is known as N-up printing.
36 Chapter 4 Job preparation ENWW
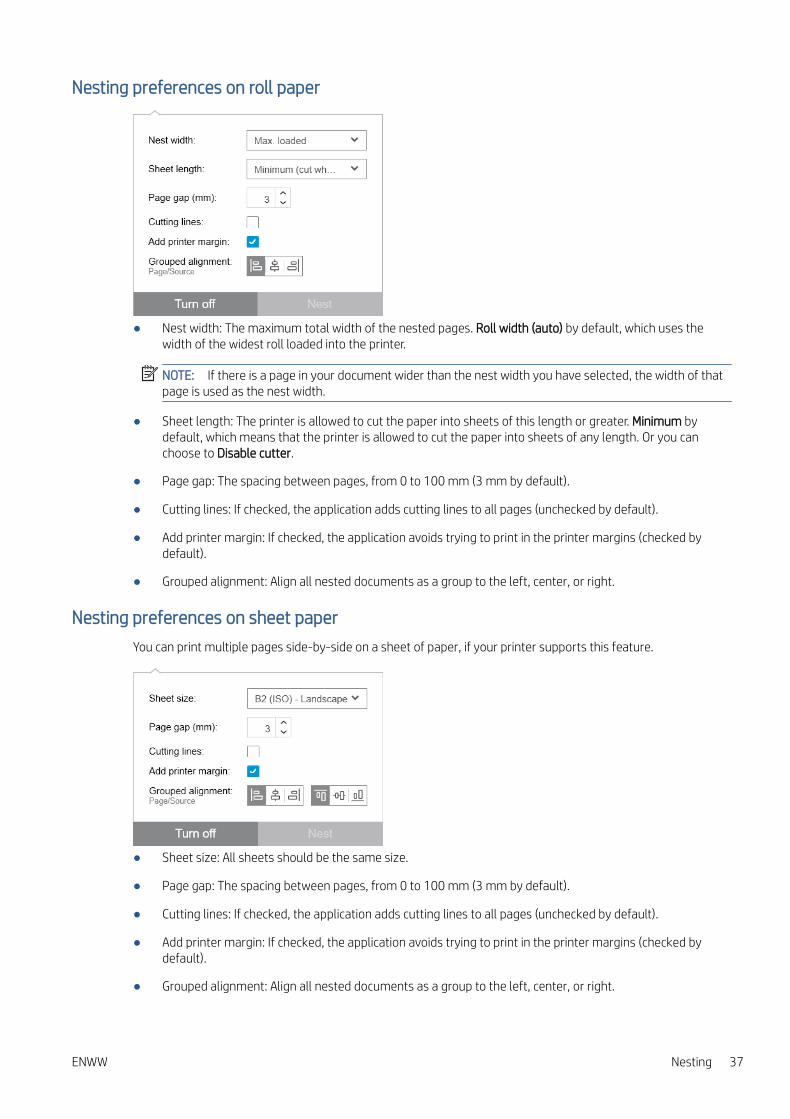
Nesting preferences on roll paper
● Nest width: The maximum total width of the nested pages. Roll width (auto) by default, which uses the width of the widest roll loaded into the printer.
NOTE: If there is a page in your document wider than the nest width you have selected, the width of that page is used as the nest width.
● Sheet length: The printer is allowed to cut the paper into sheets of this length or greater. Minimum by default, which means that the printer is allowed to cut the paper into sheets of any length. Or you can choose to Disable cutter.
● Page gap: The spacing between pages, from 0 to 100 mm (3 mm by default).
● Cutting lines: If checked, the application adds cutting lines to all pages (unchecked by default).
● Add printer margin: If checked, the application avoids trying to print in the printer margins (checked by default).
● Grouped alignment: Align all nested documents as a group to the left, center, or right.
Nesting preferences on sheet paper
You can print multiple pages side-by-side on a sheet of paper, if your printer supports this feature.
● Sheet size: All sheets should be the same size.
● Page gap: The spacing between pages, from 0 to 100 mm (3 mm by default).
● Cutting lines: If checked, the application adds cutting lines to all pages (unchecked by default).
● Add printer margin: If checked, the application avoids trying to print in the printer margins (checked by default).
● Grouped alignment: Align all nested documents as a group to the left, center, or right.
ENWW Nesting 37

Double-sided nesting
Double-sided nesting on sheets enables you to print multiple pages side-by-side on both sides of a sheet of paper, if your printer supports this feature.
To enable double-sided nesting, click the Double-Sided Nesting icon in the toolbar.
You can set the nesting parameters for each printer in the printer preferences, and you can turn nesting on sheets on and off for each job (see Nesting preferences on sheet paper on page 37).
Vertical trimmerThe vertical trimmer allows the printer to cut paper along the Y axis.
There are two cutters, one at the left of the printer that is fixed, and one at the right that moves along the X axis. There is a limit on how close both trimmers can be.
How to use it
To enable the vertical trimmer, in the toolbar click . When activated, the preview displays two vertical lines to indicate where the page will be trimmed.
NOTE: For printers that support this feature.
Borderless printingBorderless printing allows you to print on the whole paper surface, without margins.
How to use it
To enable borderless printing, in the toolbar click . When activated, the preview displays a page with no borders.
NOTE: For printers that support this feature.
Move or copy a job or pages to another printerTo move a job to another printer, click the job tab (containing the job name) and drag it to the other printer in the printers pane.
Alternatively, you can use the Send button.
You can select one or more pages and drag them to a printer, in which case a new job is created for that printer with those pages.
To copy instead of moving, hold down the Ctrl key during the operation.
Delete a jobTo remove a job, click to the right of the job name in the job tab.
Alternatively, you can select Delete job from the job option menu in the job header.
38 Chapter 4 Job preparation ENWW

Page optionsYou can right-click any selected pages to see a menu of options for those pages. The page options enable you to extract or delete the selected pages, or ignore an issue affecting that page.
If you right-clicked on a table cell containing a print setting, you can choose to copy that setting to other pages.
● Copy down copies the setting in the current cell to all pages below it in the table.
● Copy to all copies the setting in the current cell to all pages above and below it in the table.
If a filter is active, the setting is not copied to hidden pages.
Extract pages
You can extract pages from a job and store them elsewhere, to be printed later on another printer. This may be useful for small-format or monochrome pages.
First select the pages that you want to extract, then right-click the selection and click Extract. Then choose a folder in which the extracted pages will be stored.
NOTE: You can extract pages from PDF files only if extraction is not restricted.
How can I extract small-format pages?
Use a filter to remove large-format pages from the job preparation grid, and extract the whole job.
Alternatively, sort the pages by page size, select the smallest pages manually, and extract those pages.
How can I separate color and black-and-white pages?
Again, you can filter or sort the page.
Delete pages
To remove one or more pages permanently from a job, select the pages, then right-click the selection and select Delete.
NOTE: The pages are removed from the job only: they are not removed from the original document.
Filter pagesYou can hide a particular category of document or page by clicking one of the icons in the column headers, unchecking one or more of the boxes in the menu, and clicking the Apply button. All unchecked categories are then hidden and do not appear on the screen. Thus, you can hide items of a particular page size, paper type, print quality, and so on.
ENWW Page options 39

NOTE: Only categories that are actually present in the job are shown in the filter menu.
For example, if you want to see only the pages assigned to print on glossy paper, in order to apply a superior print quality, you can use the filter to do so quickly and easily.
Multiple filters can be applied simultaneously to different columns.
You can click the icon in a column header to see what filter is active for that column. If all boxes are unchecked, no filter is applied. When a specific filter has been applied, the filter icon changes to indicate that at a glance.
IMPORTANT: If you click the Print job button while one or more filters are active, only the visible pages (and not the hidden pages) are transferred to the printing queue. See Printing on page 55.
Sort pagesWhen you click a filter icon, you can also sort the items in the job preparation pane.
Sorting by document name is in alphabetical order. When there is a list of items in the popup window, they are sorted into the order in which they appear in the list. When there are checkboxes, the ticked boxes are sorted first and the unticked boxes afterwards (or the reverse, if you select reverse order).
After sorting, you can use the job options to restore either the original sequence in which the documents were added to the job (Restore original position), or the last sequence into which they were arranged manually (Restore manual position).
Print settingsThe settings shown in this pane depend on the characteristics of the selected printer and its active accessories.
40 Chapter 4 Job preparation ENWW

Print settings can be changed either in the job preparation pane or in the settings pane. The changes are applied to the currently selected item(s), which can be a single page or multiple pages.
NOTE: When a setting has been determined automatically by the application, such as the roll number, paper type, page size, or rotation, (Auto) is displayed before the setting in the job preparation pane.
ENWW Print settings 41

General settings
● Preset: Select a preset to be applied (see Presets on page 18).
● Color mode: With supported HP DesignJet T-series printers, you can select color, grayscale, or pure black and white (initially set automatically from the color mode detected in the image).
With supported HP DesignJet Z-series printers, you can select color, grayscale with gray and black inks only, or grayscale with the full set of inks (initially set automatically from the color mode detected in the image).
With HP PageWide XL printers, you can select color or grayscale.
● Print quality:
– For HP DesignJet printers, the available options are Fast, Normal, and Best. The default value is Normal.
There may also be a check box for EconoMode in the Settings pane, unchecked by default. The job preparation pane does not show whether EconoMode is on or off.
– For HP PageWide XL and HP PageWide XL Pro printers (except the Pro 10000), the available options are Lines/Fast, Uniform areas, and High detail.
HP PageWide XL and HP PageWide XL Pro printers (except the Pro 10000)
If the image content is…Recommended print mode You will obtain…
A
Monochrome or color lines and text
Any content if maximum productivity is needed
Lines/FastHIgh-quality lines with maximum productivity
B Large areas of uniform colors Uniform areasHigh-coverage graphics with more uniform and saturated colors
C
Text or lines on top of color backgrounds
Highly complex drawings with plenty of detail
High detailHigher-resolution images with smooth backgrounds, accurate lines, and sharp text
42 Chapter 4 Job preparation ENWW

When printing blueprints
■ You are recommended to choose Lines/Fast in all cases, except when printing on Natural Tracing Paper, when you should choose as indicated above.
■ Blueprints are printed in shades of blue (bluescale). For a more saturated result, you could change the original file to pure black-and-white (not grayscale), in which case the print will be in 100% blue and white.
– For the HP PageWide XL Pro 10000 printer, the available options are Fast, Normal, and Best.
HP PageWide XL Pro 10000 printer
If the image content is…Recommended print mode You will obtain…
A Simple graphics Fast Maximum productivity for printing graphics
B Large areas of uniform colors Normal Graphics with uniform and saturated colors
C
Smooth background with fine detail
Complex designs with vivid colors and transitions
Best
Best print quality and consistency throughout the job
Best performance delivering top-quality posters
● Paper type: Your options are those provided by the printer. For each printer, you can choose in the preferences dialog whether the paper type can be set automatically or not. If not, you can choose the default paper type to be used by the printer.
– If the paper type is set automatically (which is the default behavior), it works in the same way as the other automatic settings, and you can still choose to set the paper type manually for one or more pages.
– If the paper type is not set automatically, it remains set to the default type unless you change it manually.
NOTE: When printing blueprints, you should select one of the papers in the Blueprint Paper category.
● Page copies: You can select how many copies are printed of that page.
ENWW Print settings 43

How can I change and assign paper types?
In the print settings (general settings).
Cropping
● You can choose from the following cropping options:
– Do not crop: No cropping is done (the default option).
– Remove white areas: Crop white areas around the edges of the image.
– Smart crop: Crop white areas around the edges of the image, and solve any issue arising from content in printer margins.
– Custom crop: Crop the image to a specified width and height.
TIP: The ability to crop white border areas automatically can save you a lot of work compared with doing the same task manually for each page.
TIP: You can lock the width and height to preserve the aspect ratio of the cropped image, or release the lock to change width and height independently.
If the page size is set automatically and you crop to a different page size, that becomes the new page size. However, if you have set the page size manually, cropping does not change it.
After cropping, you can select Do not crop to restore the original image size.
Page options
● Scale: You can rescale the image to a different size—to a percentage of its original size, to fit a particular page size, or to fit the current roll.
– When you rescale the image, the page margins are also rescaled.
– When the page size is set automatically, it will change automatically if you rescale the image.
– However, when you set the page size manually and then rescale the image, the page size is not affected.
44 Chapter 4 Job preparation ENWW

● Page size: This is initially set automatically, based on the dimensions of your original document, but you can change it. The page-size list enables you to select portrait or landscape mode. You can also click AUTO at any time to return to the automatic page size.
NOTE: If your original document has dimensions within 1.5 mm (0.6 in) of a standard size, the page size is set to the standard size. You can disable the display of standard sizes in the preferences. See General preferences on page 14.
To print your document on the nearest standard page size, scroll down to Nearest standard size in the page-size list. Below it is a list of page-size families (ANSI, American, Architectural, and so on); click the family you want to use. See also Page size in General preferences on page 14.
You can create, modify, and delete custom page sizes by selecting Create from the page-size list. A custom page size is specific to a particular printer: it is not available for use with all printers.
The application notifies you if you try to create a custom size that already exists; whether it is a standard size or another custom size.
● Cutting lines: In the Settings pane, you can add dashed lines to show where the paper should be cut to achieve the correct page size. Cutting lines can be printed only if they fall within the printable area of the paper.
Cutting lines are turned off by default, but you can turn them on for particular pages, or change the preferences to turn them on by default.
● Alignment: You can align the image to the left, right, center, top, or bottom of the page.
ENWW Print settings 45

● Margins: In the Settings pane, you can change the margins between the printed image and the page boundaries.
● Rotation: You can rotate the page and image by multiples of 90°, or select automatic rotation (the default behavior), which seeks to minimize the use of paper.
NOTE: The Top, Bottom, Left, and Right fields when cropping or adjusting margins always take into account the current rotation of the page (if any) as seen in the preview.
Paper source options
With these options, you can specify how the page should be printed on the available paper sources.
● Paper source: You can select a roll or single sheets, or select Any to tell HP SmartStream to select the paper source automatically.
● Roll width: You can select the desired roll width, or select Any to tell HP SmartStream to select the roll automatically.
● Alignment: You can specify how pages should be aligned on the roll.
● Margins: You can change the margins between the roll edges and and the page.
● Destination: You can select the destination of the printed output if the printer offers a choice. For example, you may be able to choose between a basket and a stacker. If no choice is available, this option is not shown.
A Manual mode checkbox may be provided if the printer has a stacker that offers this option. If you check the box, before the page is printed you will be reminded to put the printer into manual mode (it cannot be done automatically).
● Folding style: If the printer has a folder installed, you can assign a folding style, display the folding style in the preview, or create a new folding style (if the folder allows you to do that). For more information on folding styles, see the printer or folder user’s guide. This option is not shown if no folder is available.
NOTE: With auto-rotation enabled, pages with the folder as destination are rotated depending on the selected folding style; see the list of rules below.
To help users to set rotation automatically for a job when there is a folding style selected, automatic rotation is applied if any of the following folding style families are selected: DIN, inverse DIN, fan fold only, mailer, or a custom folding style.
Autorotation applies the following rules:
● If page width is greater than or equal to page height (B ≥ A), rotate 270°.
● If page width is less than page height (B < A), rotate 180°.
● If page width is less than page height (B ≤ A), and page height is less than or equal to 305 mm, and page width is less than or equal to 229mm (A ≤ 305 mm && B ≤ 229 mm), rotate 270°.
● If page width is greater than page height (B > A), and page width is less than or equal to 305 mm, and page height is less than or equal to 229 mm (B ≤ 305 mm && A ≤ 229 mm), rotate 180°.
46 Chapter 4 Job preparation ENWW

ENWW Print settings 47

5 Print preview
The preview pane shows what your final print will look like, and adds a visual indication of margins and clipping (if any).
The preview pane can be enlarged by dragging the left pane border further to the left, or maximized by clicking the maximize button in the top right corner of the pane.
You can zoom in or out by using the Zoom drop-down menu (above the preview), or by pressing the Ctrl key and moving the mouse wheel. You can also zoom in on a particular section of the preview by clicking and dragging to form a rectangle enclosing that section.
48 Chapter 5 Print preview ENWW

If you have zoomed in so that the preview is too big to fit in the available space, you can view different parts of it by using the scroll bars, or by pressing the space bar and dragging the image with the mouse (panning). If you have a mouse wheel, you can use it to pan vertically or (with the Shift key) horizontally.
The interactive preview also allows you to adjust the paper and the page freely with the Move tool, or rotate left or right with the Rotate buttons.
Image, page, and rollHP SmartStream distinguishes between the image, the page, and the roll.
The documents you want to print consist of one or more pages, called original pages. For each original page, you can select it completely or crop it to select a particular part of it. The part of the original page selected for printing is called the image.
Images are laid out on destination pages, called simply pages in HP SmartStream. The destination page is the output you want to print. If cutting lines are requested, they will be drawn around this page. By default, the destination page size is the same as the image size, but you can define a different page size which may create margins between the image and the page. When there is a difference between the image size and the page size, you can set how the image is aligned within the page in the page options in the Settings pane: see Print settings on page 40.
Pages are printed on rolls of paper. The roll can be wider than the page, in which case you can set how the page is aligned within the roll in the paper source options in the Settings pane: see Print settings on page 40.
Preview featuresA preview shows the whole roll width (not just the page), and it shows the page boundaries and image boundaries if they are different. All previews are marked with boundaries in various ways:
● The background color of the page is white; any part of the roll outside the page is colored light gray.
● Printer margins are shown as dashed gray lines.
● If the image size differs from the page size, the boundaries of the image are shown as blue lines.
The printed image may be clipped for different reasons; these are indicated by warning icons in the job preparation pane, and visually marked in the preview:
● Part of the image falls outside the page: The image is cropped, and the cropped edge is shown with a solid yellow line. Also, the page options in the Settings pane include a negative margin.
● Part of the page falls outside the roll: That part of the page is highlighted in yellow. Also, the paper source options in the Settings pane include a negative margin.
● One image is overlapped by another.
If the clipping indicated in the preview is not acceptable, there are various ways to avoid it, such as:
● Choose a wider roll.
● Reduce the widths of the margins (if possible).
● Rotate the page and/or the image.
● Rescale the page and/or the image.
If the folder style does a cross and fan fold, the preview shows a green rectangle in the appropriate corner. If the folder style only does a fan fold, the rectangle is shown at the top or bottom, across the whole width of the roll.
ENWW Image, page, and roll 49

How can I use the color proofing preview to see the real colors that will be printed?
Click the button.
How can I remove white areas from the edges of the page?
You can do this easily and automatically by selecting Remove white areas, which is one of the cropping options in the print settings. See Print settings on page 40.
Preview toolsThe preview is interactive: it permits image manipulation using the tools provided in the preview pane:
● The Rotate buttons allow you to rotate the image.
● The Move tool allows you to select the image (click the image) or the page (click the edge of the page), and move it to a new position on the paper.
You can also use the Move tool to resize an image, by dragging a corner of the image. To maintain the image proportions (the aspect ratio), hold down the Shift key while resizing.
NOTE: The Move tool is disabled if the job has not been assigned to a printer.
Undock the previewYou can undock the preview into its own separate window by clicking the button at the top right of the preview pane. This gives you more space for the other panes in the SmartStream window.
To return the preview to the SmartStream window, click the button at the top right of the preview window.
MirrorMirroring allows you to reflect an image horizontally or vertically.
For horizontal mirroring, click the Horizontal Mirror icon , and for vertical mirroring click the Vertical Mirror icon .
50 Chapter 5 Print preview ENWW

Crystal PreviewIf HP SmartStream finds problems in a PDF file, in some cases it can continue and print the file, but the thumbnail and preview may not correctly represent the final print. In these cases, you can display an accurate soft-proofing
preview by clicking the button near the bottom left of the preview pane. The following scenarios
require the Crystal Preview, which uses the Adobe Libraries:
● Fonts are used but not found in the PDF file nor in the system.
● Some PDF layers are enabled or disabled differently, depending on whether they are viewed or printed.
● There are references to external documents or images.
● Embedded PostScript (EPS) is contained in the PDF file.
The Crystal Preview provides an accurate preview whatever the characteristics of the file, showing you exactly what will be printed, so that you can evaluate the printed colors, and judge for yourself the effect of any problems in the file. However, the Crystal Preview may take longer to generate than the default preview. It performs full color management (see Color management on page 59), and can understand and handle the following PDF features correctly:
● Output intent
● Transparency
ENWW Crystal Preview 51

● Overprinting
● Rendering spot colors with the HP Professional PANTONE Emulation Library
While the computer is busy generating a Crystal Preview, the toolbar buttons in the Preview pane are disabled.
The example below illustrates the use of soft proofing to judge the printed colors.
Crystal Preview for glossy paper Crystal Preview for plain paper
52 Chapter 5 Print preview ENWW

PDF file with unprintable layers
ENWW Crystal Preview 53
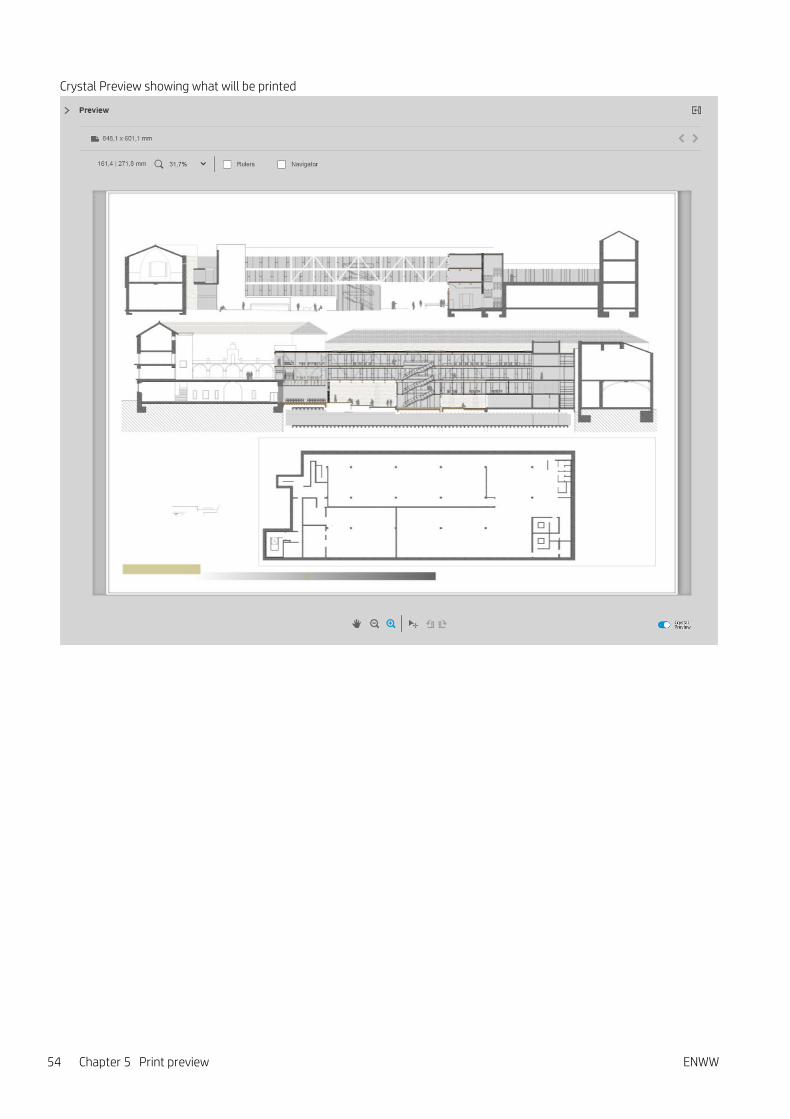
Crystal Preview showing what will be printed
54 Chapter 5 Print preview ENWW

6 Printing
Submit jobs for printingFrom the job preparation pane, you can submit the selected job(s) for printing by clicking the Print job button at the top right.
Jobs are checked for possible problems before being added to the printing queue. If any problems are found, you can choose between the following options:
● Modify settings: The job is not added to the printing queue but is kept in the job preparation pane so that you can try to solve the problems.
● Continue anyway: The job is added to the printing queue without modification. If the problem consists of clipping an image, the image will be clipped. Other problems, such as a paper type mismatch, may cause a pause and notification while printing.
Filtered and unchecked pagesIf you have hidden some pages by using a filter (see Filter pages on page 39), they disappear from the screen and are not printed. However, if you remove the filter, those pages reappear in the job preparation pane.
If you have excluded some pages by unchecking the box in the Print column, they remain visible on the screen. When you click Print job and the job is printed, the excluded pages are not printed, but they are added to the history together with the printed pages.
Job separators (HP PageWide XL only)A job separator is a page of information about a printing job. If you have chosen to print job separators, a separator is printed as soon as all pages of the job have been printed, regardless of the First page on top setting. You can choose to print job separators in the printer-specific preferences (for all jobs of a particular printer), or in the job options (for a particular job). A job separator is not counted as part of the job for accounting purposes.
ENWW Submit jobs for printing 55

It is sent to the same destination as the last printed page, with the same width as the last printed page, and the same height as the last printed page plus 5 cm. It is printed in grayscale (no color).
A job with collated copies has a separator for each collated copy.
A job separator is indicated in the printing queue and history as ‘(+1)’ after the stated number of pages of the job. It is not indicated in the job preparation pane.
Printing queueYou can monitor the printing process by clicking Printing queue near the top of the window.
In the printing queue tab, you can see the progress of each job and document in the active printer queue, including the destination of the print, which may be the stacker, the folder, or the basket.
At the top of the printing queue are the Cancel all and Hold all buttons, which can be clicked to cancel or put on hold all jobs in the queue. There is also a Release all button to release all jobs that have been held.
56 Chapter 6 Printing ENWW

In the Actions column, at job level only, there is a Cancel button to cancel the job. If the job has not started printing, there is also a Hold button to put the job on hold, and a Modify settings button that returns the job to the job preparation pane so that you can modify the print settings.
If you are printing to an HP PageWide XL printer:
● You can cancel only your own jobs from the application. You can cancel jobs created by other people from the printer’s front panel.
● You can change the order of the jobs in the queue.
The job at the top of the queue is printed first, and any jobs added to the queue are added at the bottom. You can change the order of the jobs in the queue by dragging a job into a different position, except for jobs that are currently printing or about to be printed. You cannot drag a job to a different printer.
Before printing, each page of a job is checked for mismatches between the job settings and the loaded roll (for instance, the wrong paper type is loaded). If there is a mismatch, you can resolve the problem by modifying the print settings, loading a different roll, or canceling the job.
Job status
● The current status of a job is displaying below the printing progress bar. A normal, successful job passes through the following states: Waiting to process in printer*, Waiting to process**, Processing in printer*, Processing**, Waiting to print, Printing, Printed.
● If the job encounters some problem, you may see: Paused, Failed.
● If you interrupt the job in some way, you may see: On hold in printer*, On hold for mismatch, Canceling, Canceled, Pausing, Printer paused*, Releasing.
● In the Finishing column, you may see: Servicing*, Stacking, Folding, Completed.
* HP PageWide printers only
** HP DesignJet printers only
Printing interruptionsThere are various situations in which printing may be interrupted, such as:
● A paper jam in the printer
● A problem with the cutter, stacker, or folder
● The printer runs out of paper
● The printer runs out of ink
● The connection to the printer has been lost
● A page cannot be rendered for one of various possible reasons
● The printer is paused, perhaps because a cover is open
In such situations, a popup window explains what has happened, and offers options depending on the situation. For example:
● Paper jam: If there is a paper jam, you will have to clear the jam and restart the printer. This means that the job that was printing when the jam occurred will be left uncompleted, and the whole job will appear in the history with the unprinted pages marked as failed.
● Out of paper: If the current roll runs out of paper, there are various possible consequences. These depend on the validation mode (see Printer-specific preferences on page 15) and the job settings (such as roll ID)
ENWW Printing interruptions 57

that you assigned. In some cases, if the printer finds another roll of the required paper type and roll width, it will continue printing automatically; in these cases, a page that was interrupted while printing is normally reprinted in full on the second roll. Such a page is marked with a warning in the history.
You may see the following options in an out-of-paper situation:
– Cancel: This cancels the job and moves it to the history.
– Modify settings: This cancels the job and moves it back to the job preparation pane.
– Assigned roll/Continue: This allows you to choose a roll of the same or greater width to continue printing the current job.
– Hold: This puts the current job on hold.
If the connection to the printer is lost or printing is impossible for some other reason, the current job is canceled and the jobs remaining in the queue are put on hold. You can chose to print the jobs when the printer problem has been fixed.
Cancel jobsThere are three ways of canceling print jobs:
● In the printing queue, click the Cancel button in the Actions column, next to the job name, to cancel that job.
● In the printing queue, click the Cancel all button at the top of the queue to cancel all jobs for a particular printer.
NOTE: With an HP PageWide XL printer, all jobs for that printer are shown, but Cancel all cancels only the HP SmartStream jobs.
● Use the printer’s front panel to cancel the job that is currently printing. Any other jobs for that printer in the HP SmartStream queue are also canceled.
Exit the application while printingIf you are printing to an HP DesignJet printer, and you try to close the HP SmartStream application while there are still jobs in the printing queues, you are warned and offered the opportunity to change your mind. If you go ahead and close the application, any jobs in the printing queues are canceled and moved to the history.
This does not occur if you are printing to an HP PageWide XL printer, because in that case the queue is stored in the printer.
58 Chapter 6 Printing ENWW

7 Color management
HP SmartStream provides many advanced color management features with a very simple user interface. ICC V4 and V2 color profiles are fully supported for all supported file types, plus black point compensation, PDF output intent, HP Professional PANTONE emulation, and Crystal Preview soft-proofing (see Crystal Preview on page 51).
HP Professional PANTONE Emulation (HP PPE) is a technology that replaces PANTONE color names with RGB or CMYK colors calculated specifically for your printer and paper at print time, in the same way that professional graphic artists and prepress professionals prepare PANTONE emulations by hand. The results are professional-quality emulations of PANTONE colors that look as similar to the originals as possible with a given combination of printer and paper.
Crystal Preview soft-proofing uses the Adobe Libraries to emulate on your screen what your print will look like on paper, using color profiles provided with your printer to take account of the characteristics of paper, ink, and printing mode.
Supported color spaces
● PDF: Any color space supported by PDF 1.7
● JPEG: Gray, RGB, CMYK, and ITU/Fax CIE L*a*b*
● TIFF: Monochrome, indexed, gray, RGB, CMYK, and CIE L*a*b*
● HPGL2: Adobe RGB, sRGB, and Device RGB
Color options
Color management is automatically applied by HP SmartStream to provide optimal color output. However, you can choose between two color management options in the Preferences window (see Printer-specific preferences on page 15):
● Relative colorimetric: This is the default option. It favors more saturated colors and modern CMYK standards. It uses relative colorimetric rendering intent and black point compensation, sRGB IEC 61966-2.1 as the default RGB color space, and ISO Coated v2 as the default CMYK color space.
● Perceptual: This option provides color consistency with a printer using a PostScript driver. It uses perceptual rendering intent, sRGB IEC 61966-2.1 as the default RGB color space, and SWOP as the default CMYK color space.
ENWW 59
8 History
The history preserves a record of printed jobs in case you want to reprint any of them later; perhaps with changed settings.
NOTE: You can also save jobs outside the history, using the icon in the toolbar. See Toolbar on page 27.
The history contains a tab for each printer, which has its own separate history.
The history includes various items of information about the original job, including its success or failure.
To manage the size of the history, you can set a time limit in the general preferences: jobs older than this are deleted from the history. See General preferences on page 14.
How can I reprint from the history in case of a mismatch?
Click the Reprint button, and correct the mismatch by changing the loaded paper or changing the print settings in the job preparation tab.
Search the historyThere is a search field that you can use to search for past jobs or documents by name.
Reprint a jobTo reprint a job, click the Reprint button in the job action column.
● If the job was printed on an HP PageWide XL printer, the reprint is done by the printer.
● In the case of other printers, the job is returned to the job preparation pane for error detection; if there are no errors, the job moves automatically to the printing queue and is sent to the active printer. If you want to change the printer, click and hold the Prepare to print button, which displays a menu of all the available printers; select the one you want.
NOTE: You can reprint only a whole job; you cannot select part of a job. You can select the number of copies.
NOTE: If the printer no longer has the same rolls available, there may be a mismatch between the job and the available rolls, in which case you are offered the opportunity to modify the job settings.
Reconfigure a jobTo change settings or revalidate an old job, click the Prepare to print button in the job action column. The job is moved to the job preparation pane.
Any settings that were originally set automatically are recalculated, which may change the settings, depending on the rolls loaded. Settings that were set manually remain unchanged. You may change any of the settings manually.
60 Chapter 8 History ENWW

Remove jobs from the historyYou can remove an individual job by clicking the Remove button in the job action column.
ENWW Remove jobs from the history 61

9 Folding
If your printer has a folder installed, you can select the folding style as one of the print options. See Paper source options on page 46. At the same time, you can choose to print jobs in reverse order whenever the folder is in use.
If the folder permits custom folding styles, you can create them by selecting Create from the folding style print option and then filling in the specifications of your custom folding style.
62 Chapter 9 Folding ENWW

You can specify in the dialog the dimensions of your custom folding style. You can also choose from the following options:
● Fan-fold only: The folding style is fan-fold, and has no cross-fold part.
● Compensation: The folding style performs compensation if necessary.
● Tabs: The folding style uses tabs (this option appears only if the folder has tabs).
NOTE: If you are using an HP PageWide printer, any custom folding style created with the printer’s control panel will automatically be synchronized to HP SmartStream.
You can specify in the application preferences whether you want to see the dimensions of the folded paper indicated in green in the preview. See General preferences on page 14.
NOTE: In some cases, the folded dimensions may not be shown because the application does not know them.
The green rectangle in the preview indicates which part of the page will be on top after folding. If the page contains some header or summary information describing its contents, you may want to ensure that this is in the green rectangle, so that it will be easily visible once the page has been folded. To move the contents of the page,
ENWW 63

you can use the rotation, alignment, and/or margins options (among the paper source options in the settings pane).
The following steps are recommended to check that the required content is in the green rectangle, and to adjust the page if necessary:
1. Set the default alignment between page and roll in the preferences so that the page is placed on the correct side of the roll (see Printer-specific preferences on page 15). You need to do this only once.
2. Select the first page of the job to see it in the preview.
3. Zoom in on the green rectangle. You may want to maximize the preview.
4. If required, use the E key on the keyboard to rotate the page 90° counterclockwise or the R key to rotate 90° clockwise.
5. Use the down-arrow navigation key to select and preview the next page.
64 Chapter 9 Folding ENWW

10 Scanning
TIP: If you have no scanner connected, you can still use the printer-specific preferences to set up a hot folder from which you can import files conveniently into a job. See Printer-specific preferences on page 15.
Using a multifunction printer that includes a scannerIf you have a multifunction device with a scanner in the printers pane, you can scan directly into HP SmartStream.
1. Use the Embedded Web Server of your multifunction device to set up a scan folder in which scanned pages will be stored for use by HP SmartStream.
Every printer compatible with HP SmartStream includes an Embedded Web Server that you can use to monitor printing activity and perform various other functions from any Web-connected device. You can access the Embedded Web Server by clicking the link in the printers pane.
2. In the HP SmartStream preferences for your multifunction device, set the scan folder to the same folder that you selected in step 1. See Printer-specific preferences on page 15.
3. Use the front panel of your multifunction device to send a scanned page as a file to HP SmartStream.
4. The application automatically detects the incoming file and displays a notification (see Notifications on page 5).
NOTE: New files in a hot folder are automatically detected only if they are newer than the previous file detected in that folder. If you copy old files into the folder, they will not be detected.
5. To import the files into a job, click the hot folder name. All files are imported that have not already been imported into a job. Clicking opens a window that allows you to select specific files to import.
NOTE: The number in the icon tells you how many files are waiting to be imported. If there are no new files, the icon is disabled.
Connecting an HP PageWide XL scannerIf you have a stand-alone scanner, you must ensure that it is connected to your network.
1. Physically connect it to the network: connect a network cable to the scanner.
2. On the scanner’s front panel, click to open the file manager.
ENWW Using a multifunction printer that includes a scanner 65

3. Click the Network button.
4. Click the Add Network Connection button. After clicking it, you should see the following screen.
Add Network Connection settings
Contact your network administrator if you need help with any of these settings.
● Network folder: Enter the full path name to the location on the network.
● User name: The login username for the network server.
● Password: The login password for the network server.
● Label: This is what your scanner will display in its browse dialogs.
● Inactivity timeout: You can set an individual timeout value (in minutes) for your network connections, for added security.
● Reconnect at logon: If this is left unchecked, your network connection definition will automatically be deleted when you shut down the scanner. Check the box to tell the scanner to store the connection and reactivate it whenever the scanner is restarted.
● HP SmartStream: Check this box to display an icon in the file browser, which helps you to link to the HP SmartStream hot folder.
NOTE: The scanner and HP SmartStream must point to the same folder.
Add the hot folder in HP SmartStream
1. In the HP SmartStream preferences for your scanner, set the scan folder to the same folder that you selected in the scanner’s front panel. See Printer-specific preferences on page 15.
2. When you scan a document, the application automatically detects the incoming file and displays a notification (see Notifications on page 5).
66 Chapter 10 Scanning ENWW

Using an HP PageWide XL scanner1. Click the Scan icon.
2. Select the scan destination.
● Scan to USB
● Scan to email (an email address will be requested)
● Scan to HP SmartStream
● Scan to network
3. Select a quickset for this session and click Continue. You can scan with the same quickset for the whole session.
NOTE: Clicking New scan at the end of the scanning process does not end the session.
NOTE: A quickset is associated with a single-page or multipage scan; remember to select the appropriate one.
To change a quickset temporarily during a scan session, click Edit below the quickset.
ENWW Using an HP PageWide XL scanner 67

4. Insert the original, facing upwards.
5. Pick up the original when the scanner releases it.
TIP: To release the page, you can select automatic release in the quickset settings, or keep the original on hold until you click Release page or insert a new original.
6. If the pre-scan option is activated in the quickset options, the scanner prescans the document, and you can select the area to scan. When the pre-scanned job appears, move or resize the selection area to define the area to scan. In the toolbar, you can zoom in and out of the document, and use the third button to adjust the selected area to fit the screen size.
7. One of the most useful quickset options is the one to scan a multipage or single-page document.
● Multipage: The result will be a single document containing all the scanned pages.
When scanning a multipage document, insert the next page when prompted.
68 Chapter 10 Scanning ENWW

● Single-page: The result will be a single-page PDF or TIFF document.
When scanning a single page, the document is automatically saved. If you insert another page, a new document is created.
NOTE: By clicking … you can change the scan settings for the following pages. Change the settings as you like and click Apply to next scan.
NOTE: You can zoom, and see scanner information about the selected page, with the toolbar buttons. In a multipage document, you can delete a page.
NOTE: When you are scanning to a USB flash drive, the space remaining on the drive is displayed.
8. Exit the scan by clicking Finish (for single-page documents), or save the document and exit by clicking Send/Save (for multipage documents).
9. Click New scan to scan again with the same settings. Click Job queue to see the status of the scanned jobs. With USB viewer (only when scanning to USB) you can go to the USB flash drive to confirm that the job is there and preview it.
ENWW Using an HP PageWide XL scanner 69

11 Accounting
The icon in the toolbar displays information about the job that may be used for accounting purposes. The icon appears in the job preparation pane and in the history pane; but some of the information is available only from the history pane, after the job has been printed.
You can decide in the general preferences (see General preferences on page 14) what information is displayed.
The General tab normally includes:
● Total number of pages; total area of paper printed (not including wasted paper outside the page area); and total length of paper printed
● Number of pages per paper-type category
● Number of pages per page size
● Number of pages per color mode
● Number of pages per page length
● Area of paper used per print-coverage category
NOTE: A job analysis module is available that can calculate the print coverage per page in advance, so that you can plan your jobs.
In the general preferences (see General preferences on page 14), you can move two sliders to adjust the three print-coverage categories shown in this tab.
70 Chapter 11 Accounting ENWW

The units of measurement used in the job details are those you have chosen for the application in general.
If you have selected the Preflight desk, you will see here only the page counts, with no paper types nor printed area.
You can click the Export button to export the job details to a file in the PDF or CSV format.
If you have chosen to gather page accounting data from the printer (see Printer-specific preferences on page 15), the history pane will contain an icon to access the accounting data.
The Accounting tab contains information that you can attach to the job for accounting purposes.
ENWW 71

You can select a previously-created template from the Use template list as an alternative to filling in the fields manually. To create a template, click Create at the bottom of the Use template list. Accounting templates are saved in My Documents\HP SmartStream\Accounting templates with the .smat extension (HP SmartStream Accounting Template file).
The Work log tab contains a summary of the settings that were applied to the printed pages, and a summary of any unsolvable issues.
If you want a higher level of accounting details, such as getting to know which users sent jobs to print, and generating and customizing reports with accounting information, consider using HP SmartTracker software. Your support representative can give you more information about HP SmartTracker.
72 Chapter 11 Accounting ENWW

12 Submission Driver
The HP SmartStream Submission Driver enables you to send content from any application (including CAD and graphics applications) and any file format (including DWF, DWG, Microsoft Office, and so on) to be prepared and printed with HP SmartStream. The Submission Driver appears among your system’s list of printers and creates a package containing the content to be printed plus the print instructions and accounting information. Once submitted, the package is sent to the hot folder monitored by HP SmartStream (see Hot folders on page 18).
The Submission Driver is an ideal companion for HP SmartStream in enterprise environments with Central Reprographic Departments (see Distributed workflows on page 5), or for anyone using applications that are unable to save HP SmartStream-supported file formats (see Color management on page 59).
HP Applications Center
In particular, the Submission Driver enables you to use HP SmartStream to prepare and print files from the HP Applications Center. To set this up:
1. Click .
2. Click the Hot folders tab.
3. Add a new incoming hot folder and enter its path and name.
4. Check the box Get files from Applications Center.
5. Enter the Applications Center URL, and your username and password.
ENWW 73

The hot-folder toolbar icon will notify you of any Applications Center files in the hot folder, as usual.
Restrict account IDs
By default, the Submission Driver accepts any account ID entered by the user, but it can be set up to offer a closed list of permissible account IDs.
1. Go to the driver’s Advanced tab and select Account IDs file.
2. Enter the name of a CSV file containing the list of permissible account IDs.
The CSV file can be automatically generated from HP SmartStream, using the account IDs known to the application. In the General tab of the application preferences, click the Export button and select a folder in which to create the file.
74 Chapter 12 Submission Driver ENWW

13 Troubleshooting
Error codesThere are some issues that may cause an application error window to be displayed, showing one or more error codes and descriptions. These are listed in the table below.
Error code Short description Full description
2001-0199 Non-recoverable generic database error
An internal database error has occurred. Restart the application.
If the problem persists, contact your reseller.
2002-0186 Disk error: can't create temporary storage in infrastructure
The application does not have sufficient system resources to create temporary data. You are recommended to restart the application. Before restarting the application, check that, for example, your hard disk has sufficient free space.
2002-1086 Disk error in analysis The application does not have sufficient system resources to perform the file analysis. It is recommended to restart the application. Before restarting the application you can check if for example your system has sufficient disk space.
2002-1087 Analysis: application or resources not found or no access permissions
The application stopped working. One of its resources is not responding. You are recommended to restart the application.
If the problem persists, the application may need to be reinstalled. Contact your reseller if necessary.
2002-2086 Disk error: can't create temporary storage in job processing
The application does not have sufficient system resources to process a job you want to print. You are recommended to restart the application. Before restarting the application, check that, for example, your hard disk has sufficient free space.
2002-2087 Application or resources not found or no access permissions
The application stopped working. One of its resources is not responding. You are recommended to restart the application.
If the problem persists, the application may need to be reinstalled. Contact your reseller if necessary.
2002-5086 Disk error: HP-GL/2 can't write to disk The application does not have sufficient system resources to process an HP-GL/2 file. You are recommended to restart the application. Before restarting the application, check that, for example, your hard disk has sufficient free space.
2002-5186 Disk error in Imaging Library The application does not have sufficient system resources to analyze a raster document. You are recommended to restart the application. Before restarting the application, check that, for example, your hard disk has sufficient free space.
2002-6186 Disk error in PDF Library The application does not have sufficient system resources to analyze a PDF document. You are recommended to restart the application. Before restarting the application, check that, for example, your hard disk has sufficient free space.
2202-5144 Disk error: can't create temporary storage in Imaging Library
The application does not have sufficient system resources. You are recommended to restart the application. Before restarting the application, check that, for example, your hard disk has sufficient free space.
ENWW Error codes 75

Error code Short description Full description
2202-8089 Unsupported printer or required license
Check that the printer you are trying to use is supported by the application (see the installation guide). In particular, check that it is a PostScript printer.
Check that the required licenses are installed (see the installation guide).
Printer protocol unsupported version. Upgrade SW application.
This application is not compatible with the printer. Contact your reseller for upgrade possibilities, or download the upgrade from the link.
Printer protocol unsupported version. Upgrade printer FW.
The firmware of one of the installed printers is not compatible. Check whether firmware updates are available for your printers, or download the update from the link.
Troubleshooting ToolThere is a Troubleshooting Tool provided in the HP SmartSteam program group, which offers the following options to help you to recover from a problem:
1. Delete temporary data: Delete only temporary files in C:\Users\User\AppData\Local\Temp\HP\HPSmartStream. The database (folder and files) is not deleted.
Also delete all files in C:\Users\User\AppData\Local\Roaming\HP\HPSmartStream.
2. Delete calculated data: Delete all items in option 1, plus jobs in preparation. This option can be used if you have a job in preparation that is causing an error, and you cannot delete it any other way.
3. Delete all jobs: Delete all items in options 1 and 2, plus all other jobs, including the job history, and all HP SmartStream application data in the Windows registry (persistent settings).
4. Reset HP Smart Stream Configuration Tool configuration: Deletes information in the registry related to the latest configuration file applied. This option can be used if you want to reapply the latest configuration file.
5. Delete all data, including printers: Delete all items in options 1 to 4, plus the database. Licenses are not deleted. This option can be used to reset the software if you are experiencing frequent errors; it may be more convenient than reinstalling the software.
Choose the option you wish to use and click Start; or click Close to use none of them.
76 Chapter 13 Troubleshooting ENWW

A Optional modules for advanced users
Three optional modules are available for HP SmartStream: the document organizer module, the pixel analysis module, and the workflow management module.
Each module requires a specific electronic license. If the license is not present, the features of the module will not appear in the application.
Document organizer moduleThe document organizer module allows you to track files that you have already added to a job, and to rename documents and pages in several different ways.
Tracking files added to the job
The application remembers which files you have added to your job. When you use the HP SmartStream file explorer to locate more files to add, any files in the folder that you have already added are marked with a blue dot.
Files that are added by dragging and dropping are also remembered.
However, the application no longer remembers the added files after the job has been printed.
Rename pages
Documents and pages can be renamed in three different ways: manual renaming, batch renaming, and OCR renaming.
ENWW Document organizer module 77

Renaming overwrites the original files. Therefore, if you want to retain the original files, copy them before renaming.
If you rename a single page of a multipage PDF file, the page is extracted from the original document.
DWF, HP-GL/2, and TIFF files are not supported for renaming.
Manual renaming
You can rename one or more documents or pages manually.
To rename a page manually:
● Right-click the current page name in the job preparation pane, and select Rename from the popup menu.
● Alternatively, ensure that the page is selected, and press F2.
Press Enter to confirm the new name.
To rename the next page, press Tab. To rename the previous page, press Shift Tab.
Manual renaming can also be done in the settings pane.
If you enter a name that is already in use, the application will suggest another name.
78 Appendix A Optional modules for advanced users ENWW

If you select multiple pages to rename at once, the name you enter will be used for all pages, with an added numerical suffix to distinguish between them. The suffix for the first page will be 1, 01, or 001, depending on the number of renamed pages.
Batch renaming
You can rename multiple documents or pages in a single batch.
First select the pages you want to rename in the job preparation pane. If none are selected, all pages will be renamed.
Near the left of the column headers in the job preparation pane, click and then Renaming Center.
The following dialog box appears, in which you can specify the new filenames that you want to use.
The new page names can be composed of a prefix, a main part, a suffix, and the filename extension (which you cannot edit).
You can fill each part of the new name by entering text (avoid using special characters), and/or by clicking one of the variables below: file name, file page number. and so on.
If used, the Current date variable is displayed in the standard format that you have selected in your operating system.
By default, the suffix consists of a numerical counter, starting from 1, 01, or 001, depending on the number of renamed pages. But this is not obligatory: you can remove the counter from the suffix. Alternatively, you can change the starting value and format of the counter by clicking the icon in the counter.
ENWW Document organizer module 79

When you have specified how you want to rename the pages, click Rename to start renaming.
While the renaming operation is in progress, you can cancel it at any time. If you cancel it, all pages are restored to the names they had at the beginning of the operation.
By default, the renamed files remain in their original folder, but you can specify a different batch-rename save folder in the preferences; see General preferences on page 14.
NOTE: Any pages whose extensions are not supported by the application will not be renamed.
NOTE: If you try to give a file a name that already exists in the same folder, the application will modify the new name automatically.
OCR renaming
OCR stands for Optical Character Recognition: the software technique of interpreting pixels as text. You can use this technique to obtain a filename to be used in renaming.
First select the pages you want to rename in the job preparation pane. If none are selected, all pages will be renamed.
Near the left of the column headers in the job preparation pane, click and then Renaming Center.
In the Renaming Center dialog box, click Define OCR areas.
80 Appendix A Optional modules for advanced users ENWW

In the preview pane, you can define up to three OCR areas containing text to be used in renaming. Each area is defined by drawing a rectangle around it on the preview image, enclosing the text.
Areas can be added, modified, or deleted.
When you have specified in the Renaming Center dialog box how you want to rename the pages, click Rename to start renaming.
Autoprofiles
During Optical Character Recognition you can select Autoprofile, in which case the application will try to detect a pattern in the text.
ENWW Document organizer module 81

The autoprofile has a tooltip that shows the autodetected pattern.
Creating OCR profiles
This tab enables you to save named OCR profiles, each one specifying rules for interpreting scanned text.
Create a new OCR profile
1. Click Create.
2. Enter a name for the new profile.
3. Enter the profile specification. You can enter characters directly and/or drag one of the patterns shown below.
4. Click Save to save the new profile.
Your OCR profiles are listed on the left; you can reorder the list, and delete profiles from it (right-click, then Delete).
OCR simulation
In the Renaming Center, you can click OCR simulation to check the OCR results before applying them. The OCR simulation window then appears, in which you can see the OCR results and manually correct any that need adjustment. You can choose different OCR profiles (see Creating OCR profiles on page 82) and see the results.
82 Appendix A Optional modules for advanced users ENWW

When you have finished with this window, you can click Apply to apply the results as displayed, or Cancel not to apply them. Both buttons close the window.
Zoom to legend box
In preview zoom drop-down menu, select Zoom to legend box. This displays the title box in the viewport and helps you to identify and focus on a document’s legend box.
Add metadata
First select in the job preparation pane the pages to which you want to add metadata. If none are selected, the metadata will be added to all pages.
Near the left of the column headers in the job preparation pane, click and then Metadata Center.
ENWW Document organizer module 83
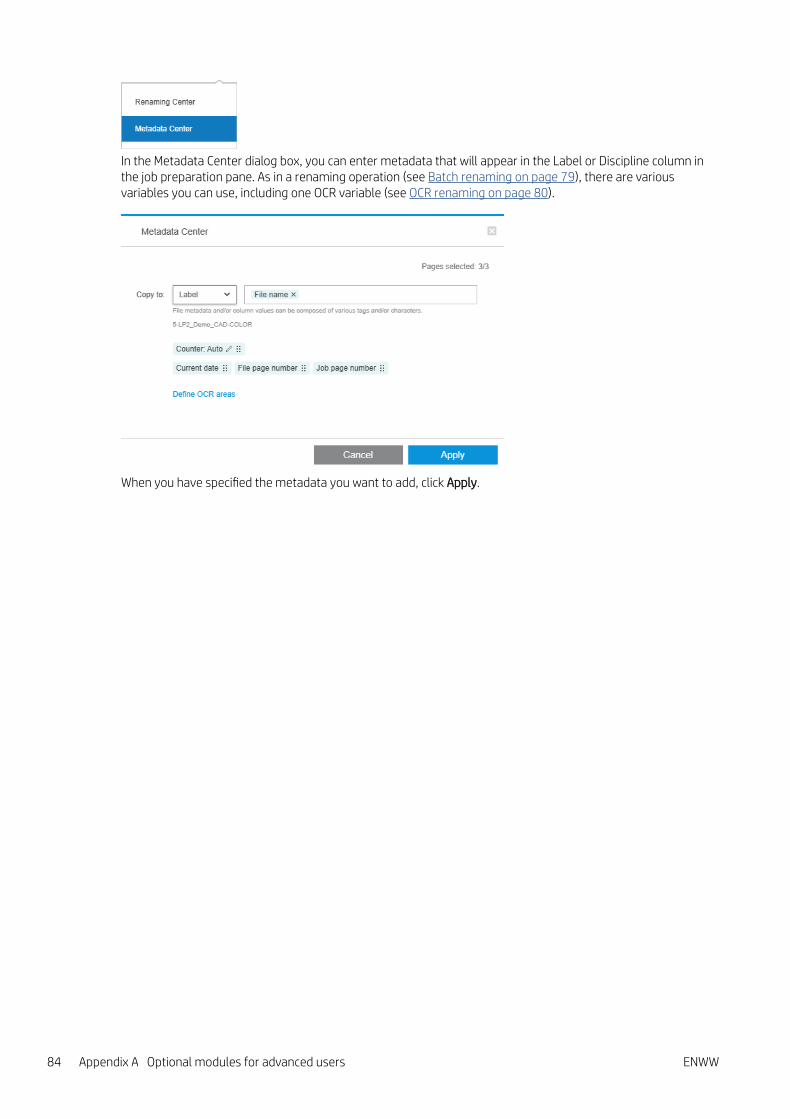
In the Metadata Center dialog box, you can enter metadata that will appear in the Label or Discipline column in the job preparation pane. As in a renaming operation (see Batch renaming on page 79), there are various variables you can use, including one OCR variable (see OCR renaming on page 80).
When you have specified the metadata you want to add, click Apply.
84 Appendix A Optional modules for advanced users ENWW

Pixel analysis moduleWith the pixel analysis module, the application can calculate the pixel coverage of pages and classify them into custom categories that you can set in the preferences. A report then appears in the job details, with an estimate of the total page cost.
Categories and thresholds
If the pixel analysis module license is active, you will find the pixel coverage section at the bottom of the application’s accounting preferences, in which you can specify pixel coverage thresholds and categories.
When you use the application for the first time, default categories are set up as shown above, with no prices.
You can edit these categories and set prices for each category, per square meter or per page. Costs can be calculated for the total amount of paper used (the roll width) or only for the paper that is actually printed on (the page width).
The fifth category is optional. To use it, just enter a name of your own choice where you see Custom category on the screen. You will then see a extra marker in the threshold slider, as shown below.
When you click Save, your changes are saved and applied to all past as well as future jobs.
Calculating pixel coverage
If the pixel analysis module license is active, the Coverage column appears in the job preparation pane. This column is visible by default, but it can be made to disappear or reappear like the other columns (see How can I adjust the HP SmartStream window? on page 4).
ENWW Pixel analysis module 85

To analyze pixel coverage, just click in the column header. Pixel coverage can be calculated for a single page, or for all pages in a job.
When pixel coverage has been calculated, the Coverage column displays two values: the total percentage coverage of the surface, and the color percentage coverage.
Coverage of pages or documents can be recalculated at any time.
Job details
The job details window includes a table summarizing the pixel coverage analysis, as shown below.
Click Export to export the job details report to a CSV or PDF file. The exported report includes a detailed list of all pages with page statistics.
86 Appendix A Optional modules for advanced users ENWW

Workflow management moduleThe workflow management module allows HP SmartStream to use Job Definition Format (JDF) files.
JDF is a technical standard in use with XML files. HP SmartStream JDF supports job settings such as job name, job copies, and collate; and document settings such as number of copies, color mode, and destination.
When a JDF file is added it will be analyzed as a separate job, regardless of the job in which it was inserted.
Once the JDF file has been analyzed, only the files referenced by the JDF will exist as documents in the application; the JDF file itself is not preserved as an item within the application (as with SMJ and ZIP files).
Ink-density profileThe ink-density profile allows you to select the percentage of ink to be used for printing a job, if your printer supports this feature.
ENWW Workflow management module 87

B How to use non-HP printers with HP SmartStream
IntroductionHP SmartStream can print to some non-HP large-format printers by using specific drivers, each of which may cover multiple non-HP printers. Here is the list of officially supported printers and their drivers:
Printer model Windows driver
OCE TDS600 OCE WPD1.22
OCE TDS700
OCE WPD2.13
OCE TDS750
OCE TDS800
OCE TDS860
OCE PLOTWAVE 750
OCE PLOTWAVE 900
OCE CW600
OCE CW650
OCE CW500
OCE CW700
KIP 5000 – 5000 MF
'KIP Wide format driver Installer v.8.159.0.0 WHQL' - GL2 v.0.3.4103.159 (GL2/RTL)
KIP 7000 – 7000 MF
KIP 7700 – 7700 MF
KIP 8000
KIP 9900
RICOH AFICIO MP W5100 RICOH Aficio MP W5100 PS (v.6.0.0.0)
XEROX DOCUWIDE 6055 XEROX WHQL Driver version 1.8.2
Installing the printerBefore you can add any printers, the software must be non-HP licensed. The license for non-HP printers will enable the non-HP mode in SmartStream, so the user will be able to print to multiple non-HP printers with only one license.
88 Appendix B How to use non-HP printers with HP SmartStream ENWW

Contact your HP sales representative to acquire an EON code with a non-HP full license (T9B46AAE: HP SmartStream Print Controller for Non-HP MV-HV devices E-LTU). You can test the new functionality by using the trial license for non-HP printers for 60 days. See how to get the EON code for the trial license here: http://www.hp.com/go/smartstreampagewidexl/software.
Once the non-HP license is added to the License Manager, follow the instructions below to add non-HP printers:
1. Click Preferences near the top right of the window.
2. Click the Printers tab.
3. Click the Add printer button.
4. Click Add non-HP large format printer (visible only when there are compatible printer drivers installed in the system).
5. Give the printer a name (optionally) and select a driver.
NOTE: Only drivers that are installed and compatible with HP Smartstream will appear; so you must install the driver in advance.
6. Click the Add button.
Preparing a jobNon-HP printers are driver-supported in HP SmartStream, which means that there are some differences in functionality compared with HP printers. In the job preparation or settings pane you will be able to edit only the following print settings for each page:
● General settings: Color mode
● Page options: Page size, scale, orientation, alignment on page, rotation on page
● Cropping
● Advanced options: Copies
Print settings can be changed in either the job preparation pane or the settings pane. Other settings must be defined at job level, with the icon.
ENWW Preparing a job 89

Here you can define the following job settings or actions:
● Copies
● Collate
● Revert to original page order
● Revert to custom page order
● Print job
● Extract
● Delete job
For non-HP printers, Advanced options at job level is enabled within the above list. Select this option to open the printer driver. Here you can change driver default values and save them, so that they apply to the whole job. In this way, you can define additional settings such as the output destination or print quality.
However, the following driver settings will not be saved: they are always overwritten by those defined at page level in the job preparation pane.
● General settings: Color mode
● Page options: Page size, scale, orientation, alignment on page, rotation on page
Therefore, you are not recommended to change these settings in the driver.
Other considerationsNon-HP printer integration in HP SmartStream has some limitations compared with HP printers in the following areas.
Printer status
Only the following statuses are reported:
● Ready
● Paused
● Error
90 Appendix B How to use non-HP printers with HP SmartStream ENWW

Printer queue
Jobs being processed are categorized based on the submittal process instead of the printing process:
● Submitting
● Submitted
● About to submit
● Preparing to submit
● Waiting to submit
History
Jobs sent to print are categorized as Submitted, Failed, or Canceled.
Job summary
No printer paper type field is included.
Resolution center
Alerts of the following kinds do not appear:
● Output destination
● Rolls
● Paper size mismatch
ENWW Other considerations 91

Preview
The following features are disabled:
● Crystal Preview
● Zoom to roll
● Zoom to printer
Presets
Only the following settings available when defining a preset will be applied to a non-HP printer:
● Color mode
● Print quality
● Page options (cutting lines, rotation, paper alignment)
● Cropping
Printer preferences
Only the following settings are available:
● Printer name
● Print quality
● Remove white areas
● Rotation
● Page/image alignment
● Roll/page alignment
● Content in printer margin
● Color options
● Nesting
Other limitations
● Print-preview orientation inconsistency: If the printer has a Save paper setting activated, the orientation of the HP SmartStream preview may not match the orientation of the print.
● Long plots: Some printers may not permit prints longer than 5 m, which will be canceled.
92 Appendix B How to use non-HP printers with HP SmartStream ENWW

C Shortcut keys
Overall selectors
Esc Cancel
F3 Maximize job preparation pane (close other panes) or restore previous state
F4 Printers panel open/close
F5 Navigator panel open/close
F6 Preview panel open/close
F7 Settings panel open/close
Tab Tabulate through content
Q Printing queue tab
Alt E Rotate left
Alt R Rotate right
Y History tab
O Options menu
F Freeze column on/off
J Job preparation tab
In job preparation tab, focus on job
K Preferences
Enter or Spacebar Press selected button, or select element in focus
Home Go to first page (or first of selection)
End Go to last page (or last of selection)
Page Up or up arrow Go to previous page
Page Down or down arrow
Go to next page
Left arrow Scroll left
Right arrow Scroll right
Icon-toolbar selectors
Ctrl D Duplicate job
Ctrl W Remove job
ENWW Overall selectors 93

Ctrl R Resolution center
Ctrl T Nest job on/off
Shift Ctrl T Nest drop-down options
Ctrl O Open/add documents
Shift Ctrl O Original position order
Ctrl P Print
Shift Ctrl P Job options
Ctrl S Save
Ctrl F Hot folder (open drop-down menu and focus)
Ctrl J Job details
Ctrl Z Undo
Shift Ctrl Z Redo
Shift Ctrl X Extract
Shift Ctrl C Focus job copies
Shift Ctrl M Restore manual/custom order
Ctrl Enter Send
Globals
F1 Help (open user’s guide)
F2 Rename active tab
Alt F4 Close application
Shift F10 Display shortcuts
Ctrl W Cancel active job in print queue or history
Shift Ctrl W Cancel all in print queue
Ctrl R Release active job in print queue or history
Shift Ctrl R Release all in print queue
Ctrl U Details, or collapse current printer
Ctrl I Drop-down information on printer status
Ctrl A Select all (with focus on pane)
Ctrl F Focus on search in history
Ctrl H Hold active job in print queue or history
Shift Ctrl H Hold all in print queue
Ctrl N New tab
Ctrl X Cut text
Ctrl C Copy text
Ctrl V Paste text
Shift Ctrl N New job with selection
94 Appendix C Shortcut keys ENWW

Windows up arrow Maximize
Windows down arrow Minimize
Preview selectors
Esc Cancel crop
Ctrl 0 Zoom all
Ctrl - Zoom out
Ctrl + Zoom in
E Rotate left
R Rotate right
H Select Hand tool (pan)
L Rulers on/off
Z Select Zoom-in tool
X Crystal Preview on/off
C Select Crop tool
V Select Move tool
Shift Scale proportionally with the Move tool
Ctrl Enable mouse wheel with the zoom tool selected
Alt Temporary inverse zoom (resumes previous state on release)
Spacebar Temporarily select hand tool (resumes previous state on release)
Ctrl Spacebar Temporarily select zoom (resumes previous state on release)
Enter or Spacebar or C Confirm crop
< or up arrow or Page Up Previous
> or down arrow or Page Down
Next
Arrow keys Scroll with the Hand tool
Go to an adjacent page with the Move tool
Move the image with the Crop tool
Job selectorsThese shortcuts can be used in job preparation, in the job queue, or in the history.
Ctrl 1 First job
Ctrl 2 to 8 Job 2 to 8
Ctrl 9 Last job
Ctrl Tab Next job
ENWW Preview selectors 95

Shift Ctrl Tab Previous job
Ctrl D Deselect all
96 Appendix C Shortcut keys ENWW
Index
Aaccounting 70accounting preferences 15add files 21application error 75automatic settings 25
Bborderless printing 38
Ccancel jobs 58categories, pixel coverage 85clipping 49clusters 25collate 28color management 59columns
hide 3resequence 3show 3
copies 28copy settings 39create a job 21Crystal Preview 51
Ddelete a job 38delete pages 39discipline 28distributed workflow 5document organizer module 77double-sided printing 33
Eedit a job 26error detection 22errors 24excluded pages 55exit while printing 58extract pages 39
Ffilter pages 39filtered pages 55folder 62
Ggeneral preferences 14getting started 2gloss enhancer 30
Hhistory 60hot folders 18, 65
Iimage 49ink-density profile 87interrupted printing 57
Jjob
edit 26job options 28job overview 25job preparation 21job separators 55
Llabels 27language 14
Mmain window 3metadata 83mirror 50move/copy job/pages 38
NN-up printing 36nesting 35non-HP printers 88
Ppage 49
page options 39pane widths 3PDF
password protection 23pixel analysis module 85preferences
accounting 15general 14printer-specific 15
preflight desk 7presets 18preview 48
moving stamps 31preview tools 50preview undocking 50print operator 5print settings 40printer
add 7change address 9delete 9non-HP 88
printer-specific preferences 15printers pane 10printing 55printing queue 55, 56
QQR codes 32queue 56
Rrename pages 77resolution center 24roll 49
Sscanning 65send to print 55separators, job 55settings 40sheets 33shortcut keys 93
ENWW Index 97

soft proofing 51software setup 5sort pages 40stamps 30
in preview 31submission driver 73
Tthresholds, pixel coverage 85thumbnails
disable 17toolbar 27track added files 77
Uunits of measurement 14user interface 3
Vvertical trimmer 38
Wwarnings 24workflow management module 87
98 Index ENWW