goals requirements - apple
TRANSCRIPT

Goals Make a persuasive case that clearly states a position andreinforces it for the audience with multiple relevant points.
Develop the argument and corresponding script to effectivelycommunicate the group’s position on a chosen topic.
Capture footage or photos as a group that can visuallystrengthen the argument.
Edit the elements together to create a television commercialor public service announcement.
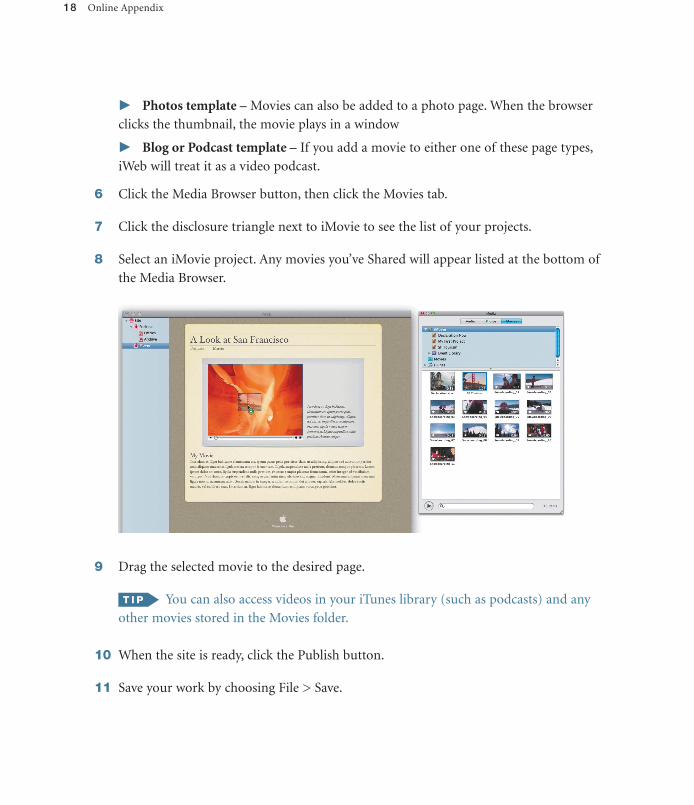
Publish the commercial to a DVD for playback.
Requirements Recommended hardware and software:
� Macintosh computers
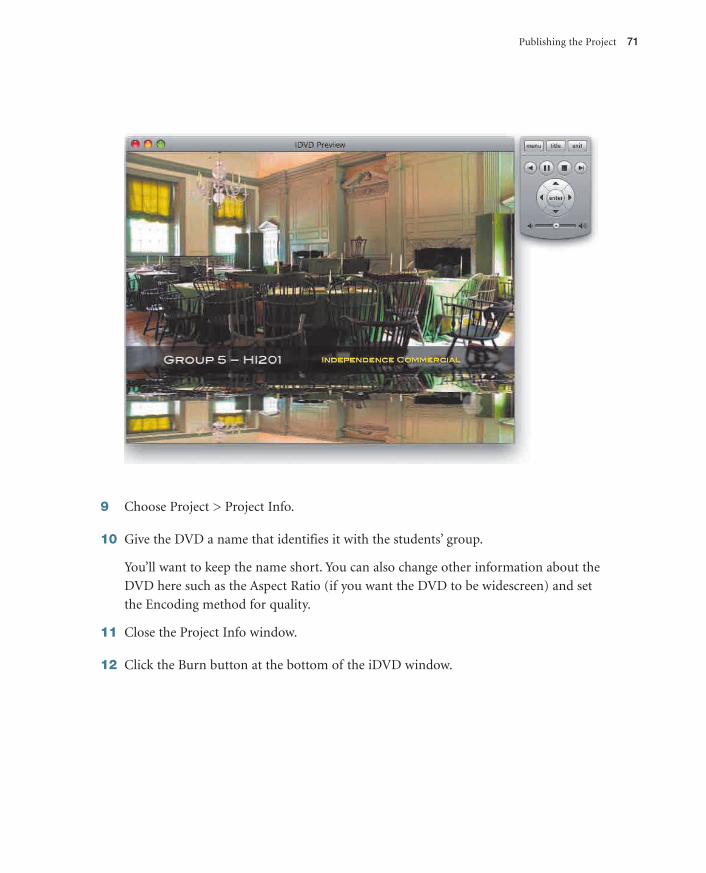
� Digital video or photo cameras
� Numbers (part of iWork ’08)
� Pages (part of iWork ’08)
� iMovie (part of iLife ’08)
� GarageBand (part of iLife ’08)
� iDVD (part of iLife ’08)
� DVD player or computer with DVD drive for playback
3
59143c03.qxd:50266c04 9/8/08 1:52 PM Page 42
43
Students need to learn how to make persuasive presentations in order
to present their ideas effectively. Whether the final product is an oral
presentation accompanied by slides, a full-fleged edited video that rein-
forces the student’s position with visuals, or anything in between, the
ability to clearly present an opinion and influence an audience is an
important life and career skill.
The use of digital tools has made it easier for many students to present
their ideas in a way that emphasizes visual and media literacy. By using
digital tools, students can organize their ideas, capture audio and video
that reinforces their point, edit their material to refine the message, and
publish their presentation to share it with ease.
Lesson 3
Make a Case:Persuasive Presentations
59143c03.qxd:50266c04 9/8/08 1:52 PM Page 43
Project SummaryAs part of a lesson in history, social studies, science, or public speaking, students produce
a television commercial or public service announcement to make a case to the viewing
audience. Teachers can present a wide range of topics including past presidential cam-
paigns, constitutional amendments, social issues, or scientific discoveries.
Students use Numbers to brainstorm, develop, and organize their argument. Next, the
students use the writing process and Pages to create a script that makes a concise but
effective case. The students then gather images using video or still photo cameras, and
edit them together using iMovie. To create a polished presentation, students add music
and sound effects using GarageBand. Lastly, the commercial can be published to disc
using iDVD for playback on televisions or computers.
Learning ObjectivesAfter completing this project, students will be able to:
Academic
� Develop and organize their thoughts to make a case.
� Use creative writing to express an opinion.
� Develop their visual literacy by gathering video or images that support the
written word.
� Edit and arrange their images and words into a compelling form.
� Work in a collaborative group setting, delegating and sharing responsibilities
to successfully complete the project.
Technical
� Use Numbers to capture and organize persuasive arguments.
� Use Pages to write a script for the television commercial.
� Shoot video footage or acquire digital photos.
� Edit their footage or images together using iMovie.
� Add music and sound effects with GarageBand.
� Publish a DVD with iDVD.
44 Make a Case: Persuasive Presentations
59143c03.qxd:50266c04 9/8/08 1:52 PM Page 44
Assessment Guidelines
Student’s RoleStudents design their approach to the lesson, including the following:
� Organize the different products of the lesson.
� Decide on the argument they want to present.
� Use the writing process to develop their script.
� Gather, organize, and edit footage or photos that support the written word.
� Select music and sound effects to use in their commercial that enhances the group’s
message.
� Publish the completed video to DVD.
With the teacher’s guidance, the students should create a rubric to assess the outcomes of
the project.
If you need help creating rubrics, Rubistar from www.4teachers.org is a free
online rubric creator that supports multimedia projects.
Teacher’s RoleDetermine the criteria for evaluating student’s work throughout the project and explain
how you will assess the parts of the project, including:
� The ability of the group to capture, edit, and organize their persuasive argument.
� The use of the writing process for the creation of the group’s script.
� The selection or acquisition of video footage or photos that support the group’s
position.
� The presentation of the commercial, focusing on clarity of message and overall
persuasive and visual impact.
Establish and explain the criteria that will be used for evaluating the student’s technical
skills, including their ability to:
� Create and sort an organized list of persuasive arguments.
� Develop a script and storyboard that present the students’ words and visuals in an
organized manner.
Assessment Guidelines 45
59143c03.qxd:50266c04 9/8/08 1:52 PM Page 45
� Capture high-quality visuals with attention being paid to visual composition and
audio quality.
� Edit their material into a cohesive project using iMovie.
� Publish their work to a DVD using iDVD.
Be sure to explain to students how you will evaluate their ability to reach the goals and
objectives of the project, as judged by the final product.
Getting Started
Teacher PlanningIn order for the lesson to succeed, you will need a working knowledge of the technology,
including:
� The basic functionality of Numbers, the spreadsheet application included with iWork
(see Lesson 10 of Apple Training Series: iWork ’08).
� The basic functionality of Pages, the word-processing application included with
iWork (see Lesson 12 of Apple Training Series: iWork ’08). A two-column video script
template is included on the DVD-ROM of the iWork ’08 book.
� The basic functionality of iMovie, the video editing application included with iLife
(see Lesson 5 of Apple Training Series: iLife ’08).
� The digital video or photo cameras available to students, so you can answer their
questions. For an introduction to the basics of shooting video and loading it into
your Mac, be sure to see Lesson 7 of Apple Training Series: iLife ’08.
� It’s a good idea to visit a video-sharing site, such as YouTube or SchoolTube, and
choose a few examples of commercials or public service announcements that are
similar in topic or focus to the student project.
� Develop guidelines for the length of the student commercials. Most television com-
mercials run :30 or :60 seconds. The use of an exact run time makes the assignment
more challenging and requires the students to choose and edit their words and visuals
carefully and be mindful of communicating a succinct message.
� Develop guidelines for the content of the student presentations. This lesson plan is
easy to modify for any age level or curricular area, so feel free to be creative. Many
46 Make a Case: Persuasive Presentations
59143c03.qxd:50266c04 9/8/08 1:52 PM Page 46
teachers find that putting the commercials into a historical perspective can be enjoy-
able for all involved. For example, a science class could use a public service announce-
ment to raise awareness of significant historical discoveries such as gravity or DNA
structure, while a history class could produce commercials debating amendments to
the Constitution or take opposing sides in a past presidential race.
� Ensure that the needed hardware and software are available to the students.
� Determine the amount of time to be spent on the project, and provide suggested
timeframes for project milestones. For example, how much time the students should
spend shooting their footage or editing their commercial.
Student PreparationIt’s a good idea to give the students some time to experiment with the hardware and soft-
ware before they start creating their commercial or public service announcement. Ideally,
let students:
� Explore Numbers and Pages.
� Practice editing video files. A useful practice exercise can be adapted from Lesson 5 of
Apple Training Series: iLife ’08.
� Students should explore the basics of creating a DVD with iDVD. A practice exercise
can be adapted from Lesson 16 of Apple Training Series: iLife ’08.
Introducing the ProjectThe first step in introducing the project is to show examples of effective commercials. The
focus here should be less on commercial products and more on political or public service
announcements. There are numerous examples online; here are a few to get you started:
� All Politics – Ad Archive – www.cnn.com/ALLPOLITICS/1996/candidates/ad.archive/
� The :30 Second Candidate – www.pbs.org/30secondcandidate/
� Political Communication Lab – pcl.stanford.edu/campaigns/
� Internet Archive – www.archive.org
� Creativity – www.creativity-online.com/
Next, present the students with a list of possible topics for their commercials. Consider
placing student groups on opposite sides of an issue so they can evaluate the effective-
ness of their commercial in comparison with that of the opposing side.
Introducing the Project 47
59143c03.qxd:50266c04 9/8/08 1:52 PM Page 47

48
SOMETIMES THE POWER OF LEARNINGreaches beyond the classroom and connects
directly to social issues that touch all of our
lives. In recent years, no scientific area has been
of greater concern to young people than the
environment. Learning about the threats of
global warming and the deterioration of
environments around the world makes young
people want to take action.
Digital arts provide a way for students to express their concerns and ideas for
the future, in some cases enabling them to take a leadership role for the first
time. Educationally, students are learning the importance of applying media
conventions to their arguments. Digital film is a powerful extension of their
voice, but what exactly is their argument? How do they persuade their audi-
ence to embrace their solutions?
In response to such questions, the Digital Arts
Alliance launched the Mobile Learning
Institute Earth Day Challenge. Starting at Jane
Goodall’s Global Youth Summit in the spring of
2008 and extending through the end of the year,
thousands of students across the United States
and around the world created short films about
environmental topics.
Cameo
Earth Day ChallengeJane Goodall Global Youth Summit
59143c03.qxd:50266c04 9/8/08 1:52 PM Page 48
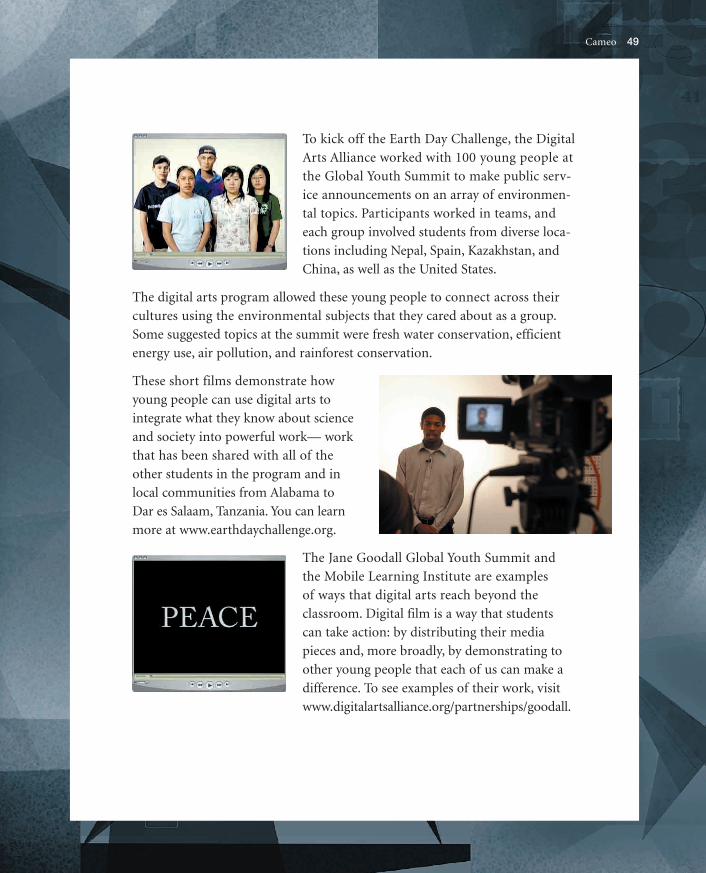
To kick off the Earth Day Challenge, the Digital
Arts Alliance worked with 100 young people at
the Global Youth Summit to make public serv-
ice announcements on an array of environmen-
tal topics. Participants worked in teams, and
each group involved students from diverse loca-
tions including Nepal, Spain, Kazakhstan, and
China, as well as the United States.
The digital arts program allowed these young people to connect across their
cultures using the environmental subjects that they cared about as a group.
Some suggested topics at the summit were fresh water conservation, efficient
energy use, air pollution, and rainforest conservation.
These short films demonstrate how
young people can use digital arts to
integrate what they know about science
and society into powerful work— work
that has been shared with all of the
other students in the program and in
local communities from Alabama to
Dar es Salaam, Tanzania. You can learn
more at www.earthdaychallenge.org.
The Jane Goodall Global Youth Summit and
the Mobile Learning Institute are examples
of ways that digital arts reach beyond the
classroom. Digital film is a way that students
can take action: by distributing their media
pieces and, more broadly, by demonstrating to
other young people that each of us can make a
difference. To see examples of their work, visit
www.digitalartsalliance.org/partnerships/goodall.
Cameo 49
59143c03.qxd:50266c04 9/8/08 1:52 PM Page 49

Creating the ProjectThere are several potential tasks to this project. You can adapt these to meet the educa-
tional goals and time constraints of your classroom, as well as the age and ability levels
of your individual students.
Research the Issue
Once you divide them into groups, give the students time to research the topic they will
be presenting. Students might want to divide their larger group into smaller topic groups
for their research. The goal is to gather facts and opinions that can be used to make a case.
Depending upon your school’s policy, consider giving students access to the Internet for
researching a topic. Be sure to emphasize that students must build and refine their own
script, not merely use an existing commercial or line of reasoning.
Develop & Organize ArgumentsAfter adequate research time, have the students rejoin their group and encourage them to
share their ideas on points to include in the argument. Be sure the group understands that
the goal of this initial brainstorming is to capture all ideas and encourage participation in
50 Make a Case: Persuasive Presentations
59143c03.qxd:50266c04 9/8/08 1:52 PM Page 50
the discussion by all members of the group. The students can use Numbers to compile
and organize a list of persuasive arguments.
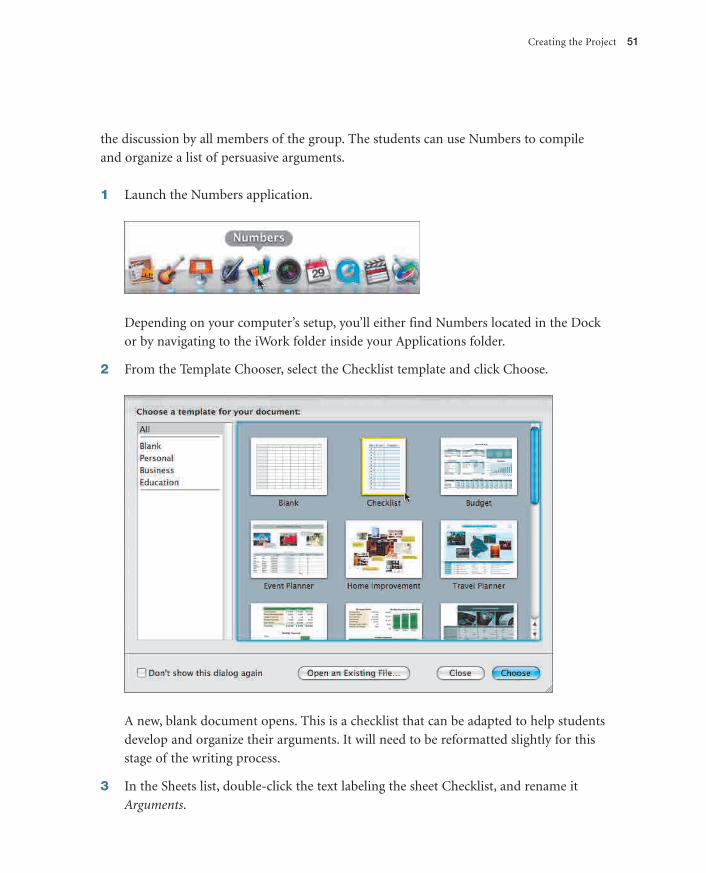
1 Launch the Numbers application.
Depending on your computer’s setup, you’ll either find Numbers located in the Dock
or by navigating to the iWork folder inside your Applications folder.
2 From the Template Chooser, select the Checklist template and click Choose.
A new, blank document opens. This is a checklist that can be adapted to help students
develop and organize their arguments. It will need to be reformatted slightly for this
stage of the writing process.
3 In the Sheets list, double-click the text labeling the sheet Checklist, and rename it
Arguments.
Creating the Project 51
59143c03.qxd:50266c04 9/8/08 1:52 PM Page 51
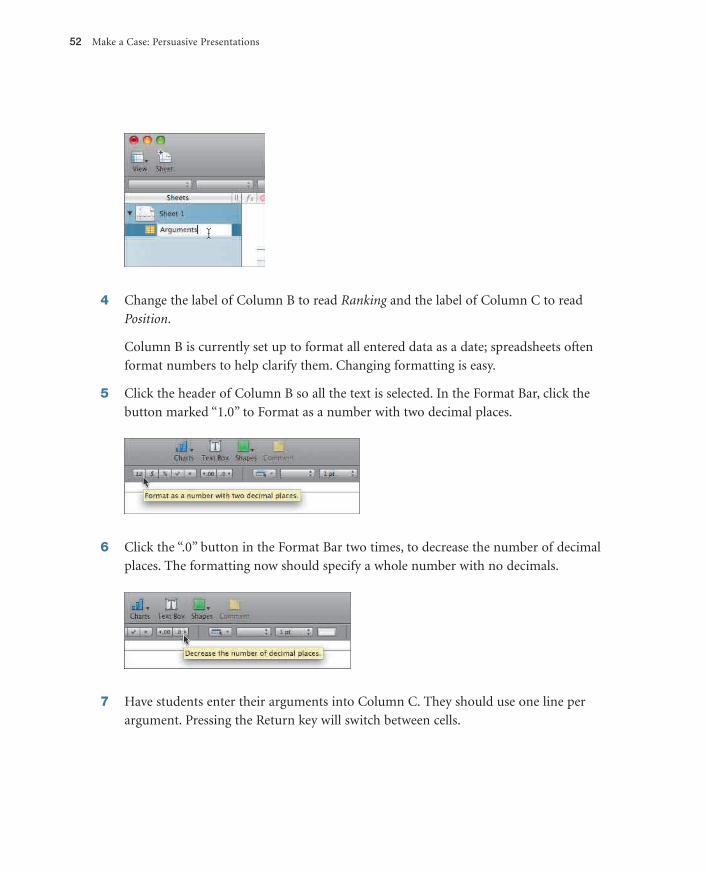
4 Change the label of Column B to read Ranking and the label of Column C to read
Position.
Column B is currently set up to format all entered data as a date; spreadsheets often
format numbers to help clarify them. Changing formatting is easy.
5 Click the header of Column B so all the text is selected. In the Format Bar, click the
button marked “1.0” to Format as a number with two decimal places.
6 Click the “.0” button in the Format Bar two times, to decrease the number of decimal
places. The formatting now should specify a whole number with no decimals.
7 Have students enter their arguments into Column C. They should use one line per
argument. Pressing the Return key will switch between cells.
52 Make a Case: Persuasive Presentations
59143c03.qxd:50266c04 9/8/08 1:52 PM Page 52
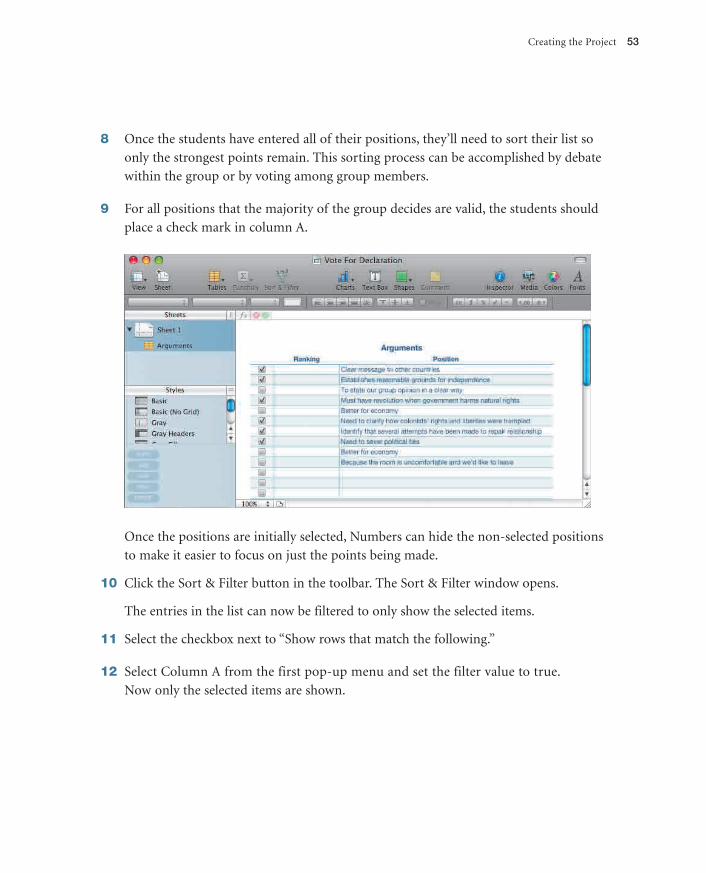
8 Once the students have entered all of their positions, they’ll need to sort their list so
only the strongest points remain. This sorting process can be accomplished by debate
within the group or by voting among group members.
9 For all positions that the majority of the group decides are valid, the students should
place a check mark in column A.
Once the positions are initially selected, Numbers can hide the non-selected positions
to make it easier to focus on just the points being made.
10 Click the Sort & Filter button in the toolbar. The Sort & Filter window opens.
The entries in the list can now be filtered to only show the selected items.
11 Select the checkbox next to “Show rows that match the following.”
12 Select Column A from the first pop-up menu and set the filter value to true.
Now only the selected items are shown.
Creating the Project 53
59143c03.qxd:50266c04 9/8/08 1:52 PM Page 53
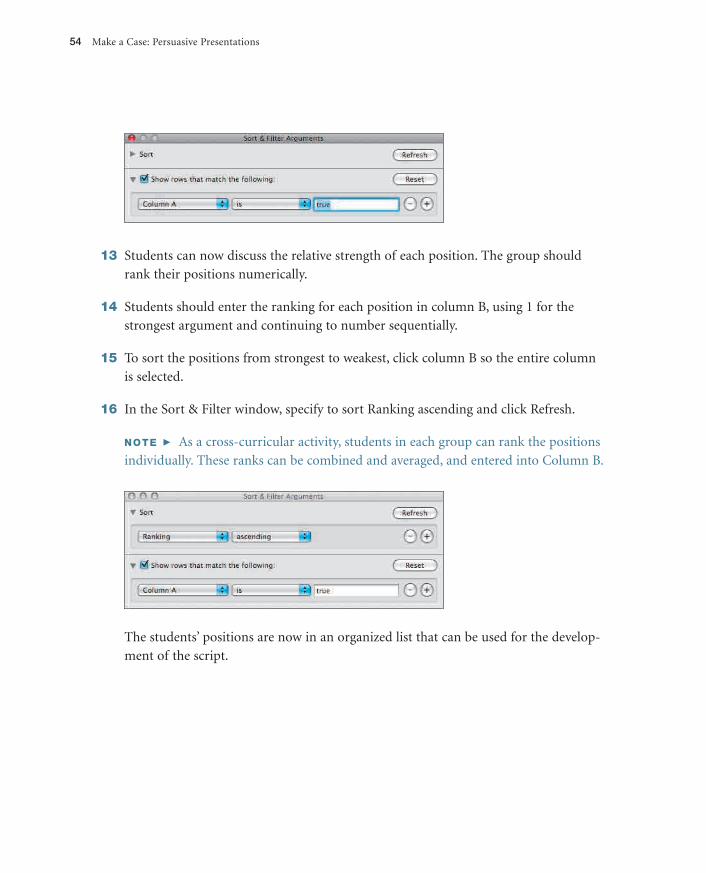
13 Students can now discuss the relative strength of each position. The group should
rank their positions numerically.
14 Students should enter the ranking for each position in column B, using 1 for the
strongest argument and continuing to number sequentially.
15 To sort the positions from strongest to weakest, click column B so the entire column
is selected.
16 In the Sort & Filter window, specify to sort Ranking ascending and click Refresh.
NOTE � As a cross-curricular activity, students in each group can rank the positions
individually. These ranks can be combined and averaged, and entered into Column B.
The students’ positions are now in an organized list that can be used for the develop-
ment of the script.
54 Make a Case: Persuasive Presentations
59143c03.qxd:50266c04 9/8/08 1:52 PM Page 54
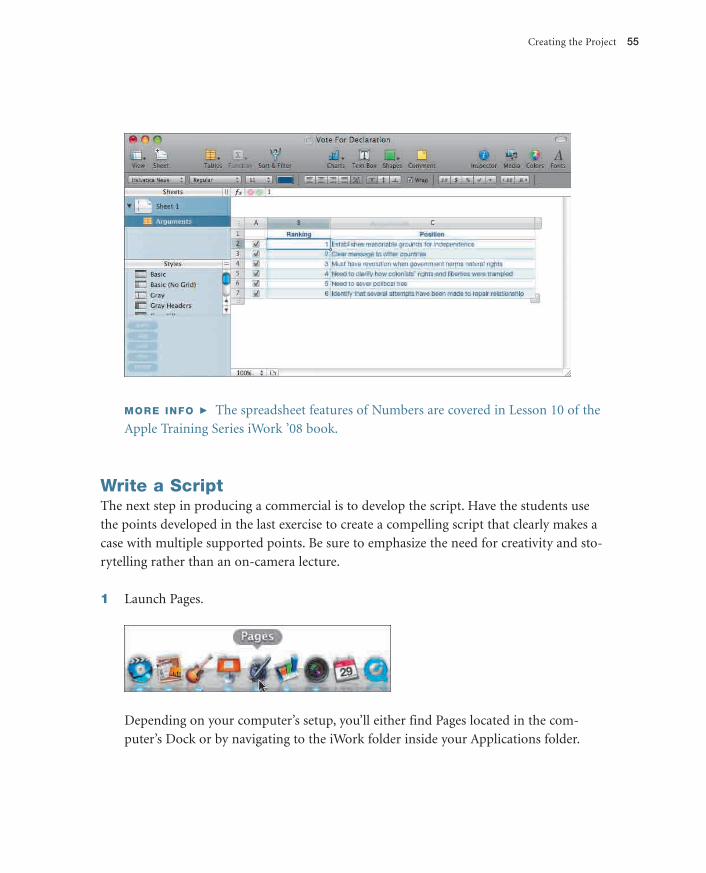
MORE INFO � The spreadsheet features of Numbers are covered in Lesson 10 of the
Apple Training Series iWork ’08 book.
Write a Script The next step in producing a commercial is to develop the script. Have the students use
the points developed in the last exercise to create a compelling script that clearly makes a
case with multiple supported points. Be sure to emphasize the need for creativity and sto-
rytelling rather than an on-camera lecture.
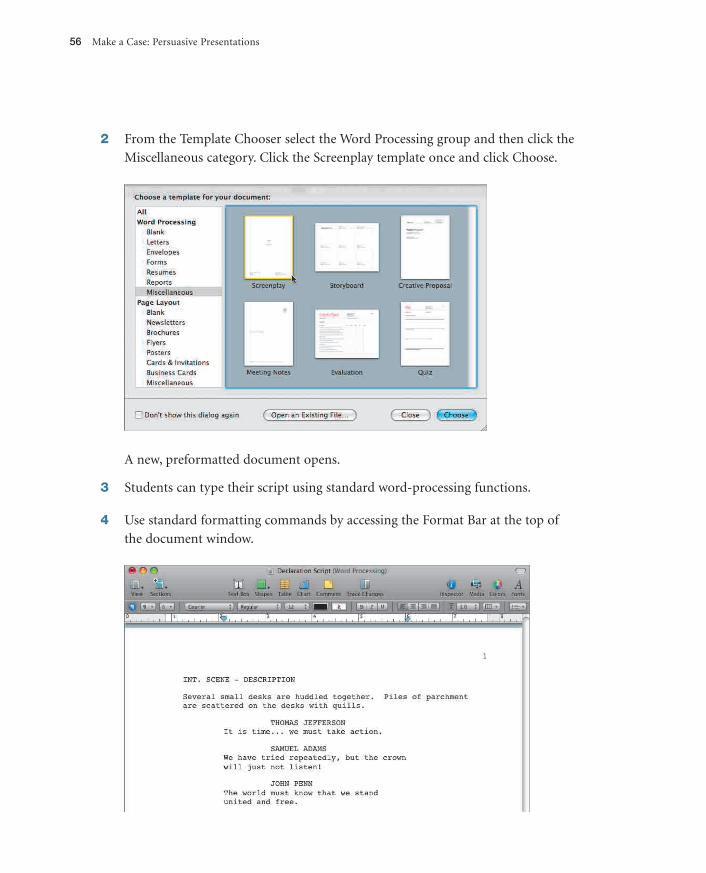
1 Launch Pages.
Depending on your computer’s setup, you’ll either find Pages located in the com-
puter’s Dock or by navigating to the iWork folder inside your Applications folder.
Creating the Project 55
59143c03.qxd:50266c04 9/8/08 1:52 PM Page 55
2 From the Template Chooser select the Word Processing group and then click the
Miscellaneous category. Click the Screenplay template once and click Choose.
A new, preformatted document opens.
3 Students can type their script using standard word-processing functions.
4 Use standard formatting commands by accessing the Format Bar at the top of
the document window.
56 Make a Case: Persuasive Presentations
59143c03.qxd:50266c04 9/8/08 1:52 PM Page 56
5 Have students choose Edit > Spelling > Check Spelling when they want to examine
their document for spelling and grammar errors.
6 Throughout the writing process, students should choose File > Save to capture their
writing.
Students should store their work in a folder on the computer for the assignment.
As students progress through the stages of the writing process, they should review
each point they are emphasizing. In the revising stage, they should critically exam-
ine each argument for clarity and focus.
7 To print a document, choose File > Print and select a printer on your classroom
network.
NOTE � Students should read their script aloud and act it out to test its effectiveness.
This is also a good way to check the likely run time for the script.
MORE INFO � The word-processing features of Pages are covered in Lesson 7 of
Apple Training Series: iWork ’08.
Create a StoryboardOnce the script is written, the group can refine their vision by converting the script into a
storyboard. Storyboards are a visual tool that combines the words of the script with repre-
sentative photos or drawings (they are similar to a comic book). The storyboard acts as a
rough draft for all the visual elements of a production. For example, the pictures in the
storyboard panel may represent each shot taken with a video camera that will make up
the scene. The images also could represent still photos that will help convey the group’s
message. Pages offers an easy-to-use template for making a storyboard.
1 Launch Pages or choose File > New.
2 From the Template Chooser, select the Word Processing group and then click the
Miscellaneous category. Click the Storyboard template once and click Choose.
Creating the Project 57
59143c03.qxd:50266c04 9/8/08 1:52 PM Page 57
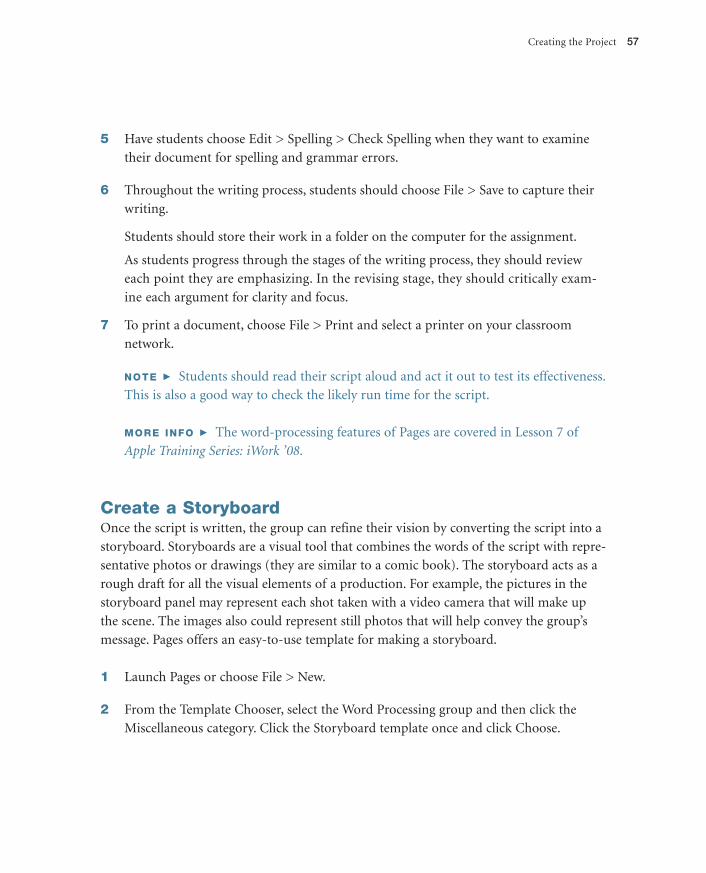
A new, blank document opens using a storyboard layout.
3 Students can copy and paste lines of their script below each block. The goal is to
break the script up so lines of text match with key visuals.
4 Once the text is filled in, choose Edit > Spelling > Check Spelling to check the docu-
ment for spelling and grammar errors.
5 To print the document, choose File > Print and select a printer on your classroom
network. Print 2 copies of the storyboard.
6 The students should then sketch in a visual for each scene of their commercial.
58 Make a Case: Persuasive Presentations
59143c03.qxd:50266c04 9/8/08 1:52 PM Page 58
iStockphoto/urbancow
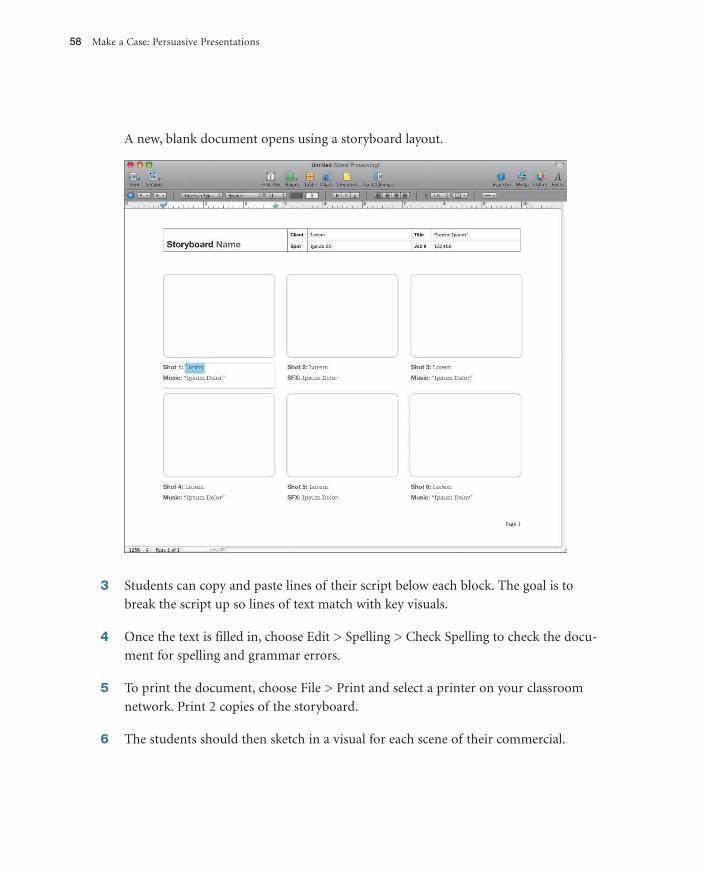
This is merely meant to help in planning video or still shots. Students can use stick
figures or rough drawings as needed. The most important thing about a storyboard is
that it will represent each image or video shot that will help tell a story or enhance the
point the group is trying to make. It doesn’t need to be a fine work of art; rather, it’s a
tool to communicate their planning. If the group can follow their storyboard, then
they’ve accomplished their task. However, for more vibrant detail and clarity, it is sug-
gested that students first draw in pencil, then return and outline in ink and fill in with
markers or colored pencils.
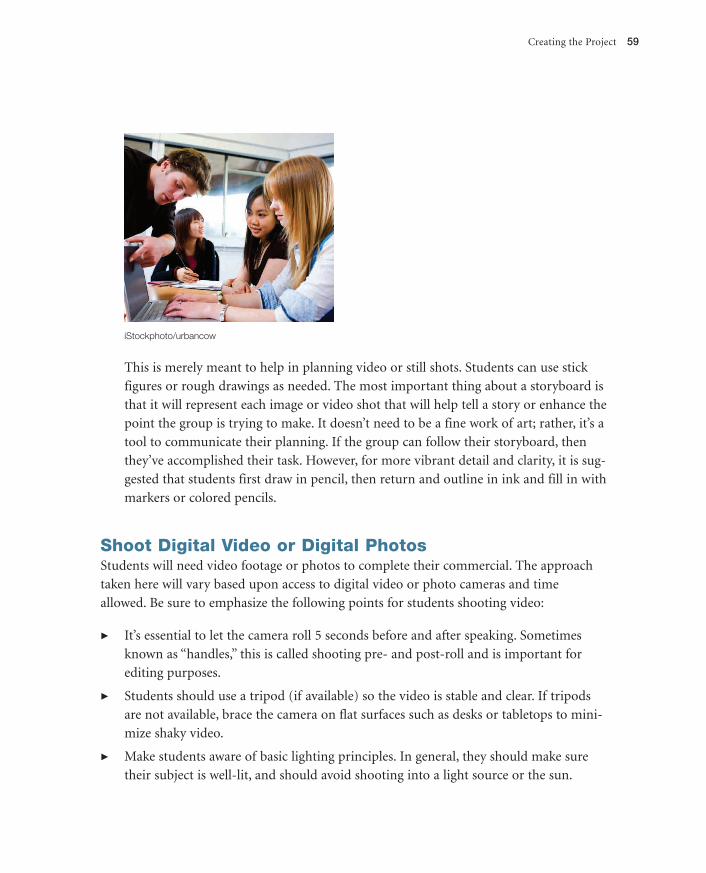
Shoot Digital Video or Digital PhotosStudents will need video footage or photos to complete their commercial. The approach
taken here will vary based upon access to digital video or photo cameras and time
allowed. Be sure to emphasize the following points for students shooting video:
� It’s essential to let the camera roll 5 seconds before and after speaking. Sometimes
known as “handles,” this is called shooting pre- and post-roll and is important for
editing purposes.
� Students should use a tripod (if available) so the video is stable and clear. If tripods
are not available, brace the camera on flat surfaces such as desks or tabletops to mini-
mize shaky video.
� Make students aware of basic lighting principles. In general, they should make sure
their subject is well-lit, and should avoid shooting into a light source or the sun.
Creating the Project 59
59143c03.qxd:50266c04 9/8/08 1:52 PM Page 59
iStockphoto/Ju-Lee
� If there is a headphone jack on the camera, be sure students listen to the audio they
are recording by plugging in a pair of headphones. This will give them a more accu-
rate idea of background noise and the clarity of their audio.
� Instruct students not to over-record. Starting and stopping the camera between shots
or takes is important and will save a lot of time during the editing stage. Each panel
of the storyboard represents a separate shot for the video.
� Be sure students exercise caution while taping and that they respect the rules and
property where they are staging their commercial.
Import Footage into iMovieTo edit their footage with iMovie, students will need to transfer the footage from the cam-
era to their computer. This process of copying video from the camera onto a computer or
hard drive is called “importing.”
Remember, it can take many gigabytes (GB) of disk space to store video. For example
Mini-DV cameras require 13 GB of storage for 1 hour of footage. Make sure the student’s
computers have enough storage space.
How you import footage will vary depending on whether your camera connects using a
USB cable or a FireWire cable.
NOTE � If the students need to use photos in their commercial, simply import them
into iPhoto. The pictures will be available in iMovie by clicking the Photos button
(shaped like a digital photo camera).
60 Make a Case: Persuasive Presentations
59143c03.qxd:50266c04 9/8/08 1:52 PM Page 60
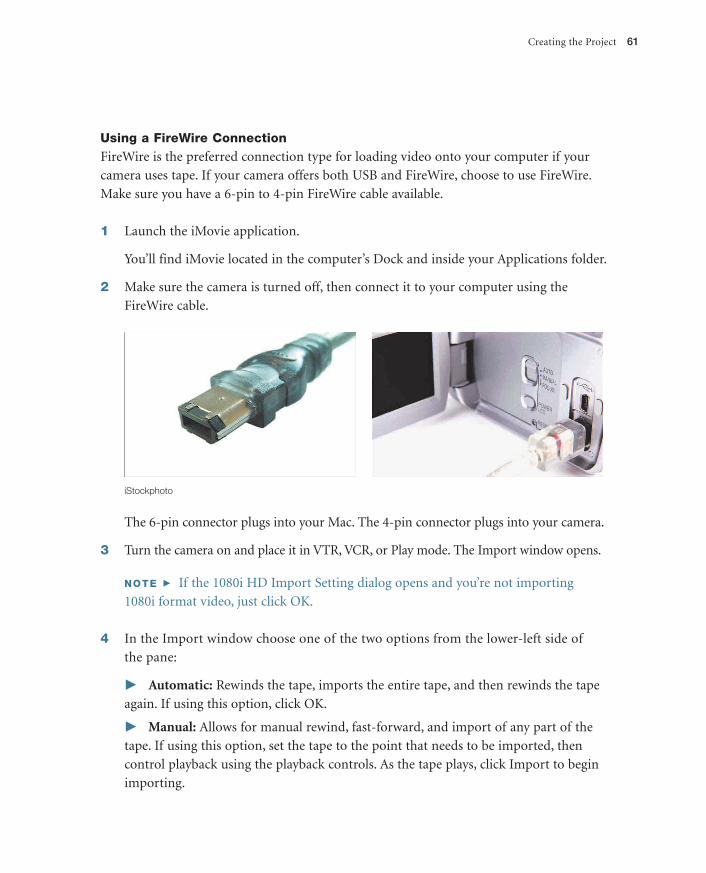
Using a FireWire ConnectionFireWire is the preferred connection type for loading video onto your computer if your
camera uses tape. If your camera offers both USB and FireWire, choose to use FireWire.
Make sure you have a 6-pin to 4-pin FireWire cable available.
1 Launch the iMovie application.
You’ll find iMovie located in the computer’s Dock and inside your Applications folder.
2 Make sure the camera is turned off, then connect it to your computer using the
FireWire cable.
iStockphoto
The 6-pin connector plugs into your Mac. The 4-pin connector plugs into your camera.
3 Turn the camera on and place it in VTR, VCR, or Play mode. The Import window opens.
NOTE � If the 1080i HD Import Setting dialog opens and you’re not importing
1080i format video, just click OK.
4 In the Import window choose one of the two options from the lower-left side of
the pane:
� Automatic: Rewinds the tape, imports the entire tape, and then rewinds the tape
again. If using this option, click OK.
� Manual: Allows for manual rewind, fast-forward, and import of any part of the
tape. If using this option, set the tape to the point that needs to be imported, then
control playback using the playback controls. As the tape plays, click Import to begin
importing.
Creating the Project 61
59143c03.qxd:50266c04 9/8/08 1:52 PM Page 61
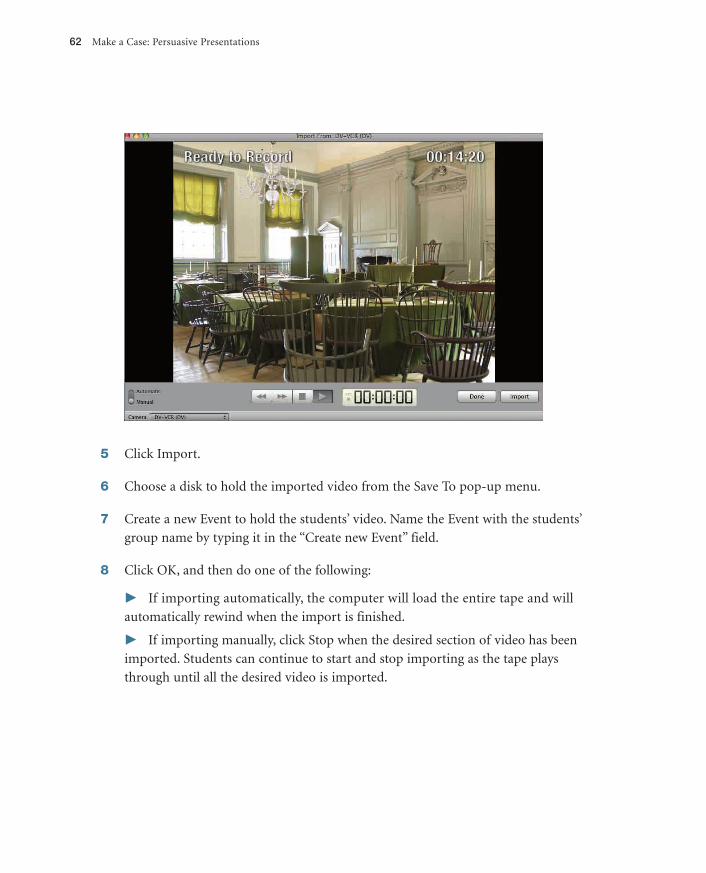
5 Click Import.
6 Choose a disk to hold the imported video from the Save To pop-up menu.
7 Create a new Event to hold the students’ video. Name the Event with the students’
group name by typing it in the “Create new Event” field.
8 Click OK, and then do one of the following:
� If importing automatically, the computer will load the entire tape and will
automatically rewind when the import is finished.
� If importing manually, click Stop when the desired section of video has been
imported. Students can continue to start and stop importing as the tape plays
through until all the desired video is imported.
62 Make a Case: Persuasive Presentations
59143c03.qxd:50266c04 9/8/08 1:52 PM Page 62

Using a USB ConnectionSome cameras, notably those that record to hard disk drives or DVDs (and not tapes), use
a USB connection. This is also true if you are using a digital still camera that also records
video. To import the video, you’ll need to connect the device using a USB cable. Many
cameras come with special USB cables for the end that connects to the camera.
1 Launch the iMovie application.
You’ll find iMovie located in the computer’s Dock and inside your Applications folder.
2 Make sure the camera is turned off, and then connect it to your computer using the
USB cable.
3 Turn the camera on and place it in VTR, VCR, or Play mode.
NOTE � Do not attempt to load miniDVDs from a video camera into your Mac. The
discs are not designed to work with the computer and can damage your DVD drive.
4 The Import window opens automatically.
All of the clips on the camera will be displayed. Use the playback controls under the
viewer to review the clips.
Creating the Project 63
59143c03.qxd:50266c04 9/8/08 1:52 PM Page 63
5 Choose one of the two options from the lower-left side of the pane:
� To import all clips, set the Automatic/Manual switch to Automatic, and then click
Import All.
� To import some of the clips, set the Automatic/Manual switch to Manual.
Deselect any clips you don’t want and then click Import Checked.
6 Choose a disk to hold the imported video from the Save To pop-up menu.
7 Create a new Event to hold the students’ video.
Name the Event with the students’ group name by typing it in the “Create new Event”
field.
8 Click OK.
NOTE � It can take from several minutes to more than an hour for iMovie to import
the video and generate thumbnail images of each clip. The wait is determined by the
quantity of clips, the number of open applications, and the speed of the computer
used. A circular progress indicator in the Import window shows you a time estimate.
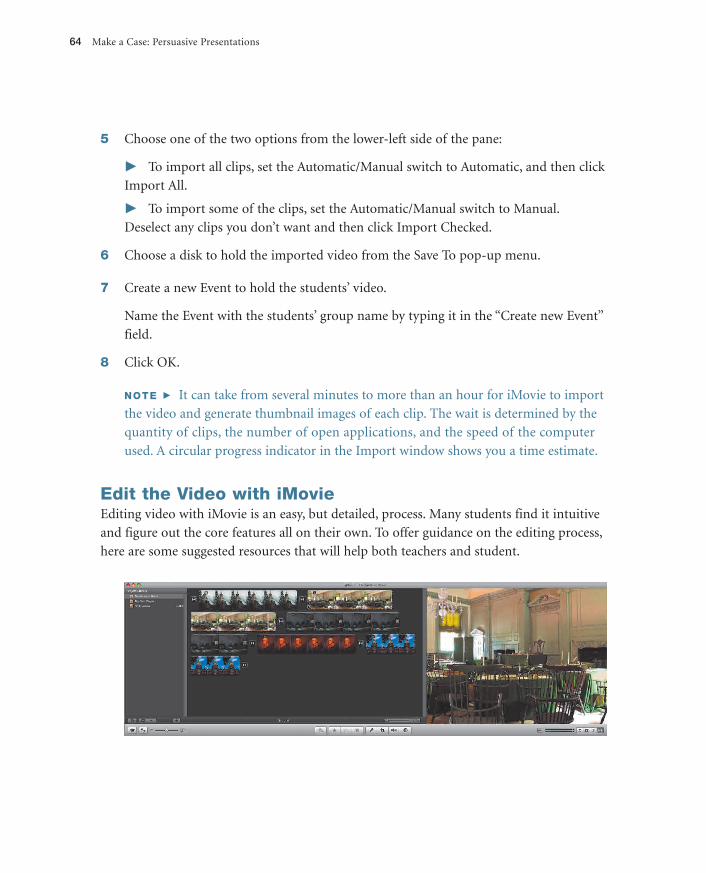
Edit the Video with iMovieEditing video with iMovie is an easy, but detailed, process. Many students find it intuitive
and figure out the core features all on their own. To offer guidance on the editing process,
here are some suggested resources that will help both teachers and student.
64 Make a Case: Persuasive Presentations
59143c03.qxd:50266c04 9/8/08 1:52 PM Page 64
� iLife Online Tutorials – There are several web-based tutorials that show the key fea-
tures of editing video. These can be accessed by choosing Help > Video Tutorials.
� Apple Training Series: iLife ’08 – The official Apple-certified guide offers six useful
lessons on iMovie ’08 covering both basic and advanced topics. Lesson 5, “Assembling
a Simple Movie,” is an excellent starting point for teachers and offers hands-on prac-
tice files that can be used in the classroom.
NOTE � Students will often want more time to create a well-edited finished product.
Unfortunately the time constraints in the classroom might prevent this. The most
essential element of the video creation process is to edit the footage and place it in a
logical sequence that helps tell the story or communicate the point. Even if all the stu-
dents do is this step, then they have a story with the essence of what they wanted to
communicate.
When students complete the editing and placement of footage, they can begin adding
elements that will make their project more professional looking. Titles and credits
should be added next so that students can introduce their topic and cite any sources
they used for their project.
Although some people feel that a musical soundtrack should be added at the very
end, a video project often looks more refined when it is edited with music in mind.
Finding appropriate music can truly help communicate the story and reinforce the
emotions and points that are made.
Add Music and Sound Effects with GarageBandOnce the video edit is complete, students can move the video project into GarageBand.
This will allow the students to add music and sound effects. GarageBand is very versatile,
so students can choose to use pre-recorded jingles and sound effects, create their own
music using musical loops (pre-recorded sections of musical instruments), or even record
their own music from scratch.
1 Before closing your iMovie project, choose Share > Media Browser.
2 Specify the Large size and click Publish.
Creating the Project 65
59143c03.qxd:50266c04 9/8/08 1:52 PM Page 65
Depending on the size of the project and speed of the computer, this may take a few
minutes.
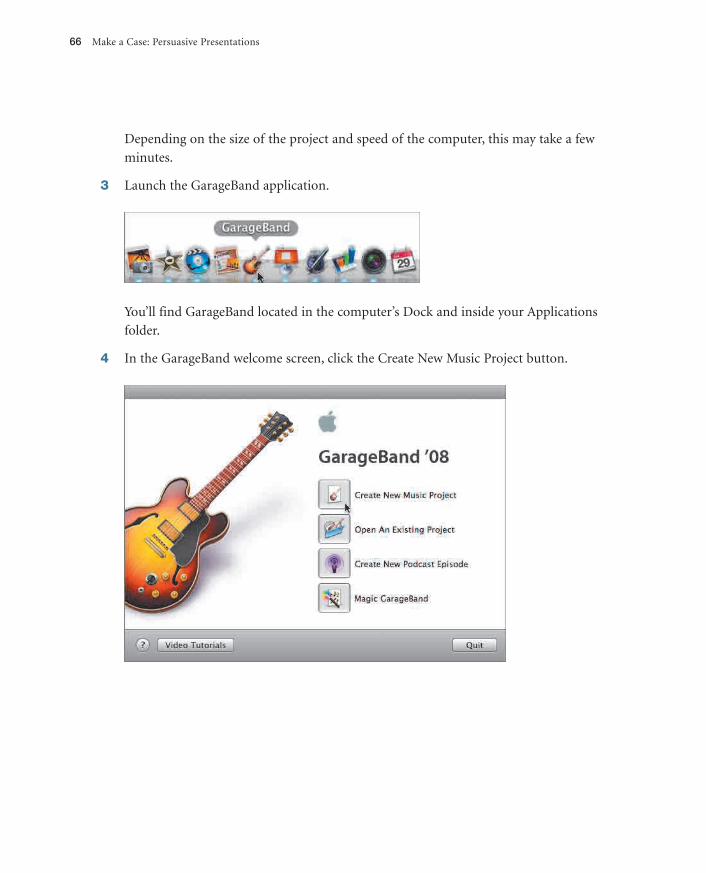
3 Launch the GarageBand application.
You’ll find GarageBand located in the computer’s Dock and inside your Applications
folder.
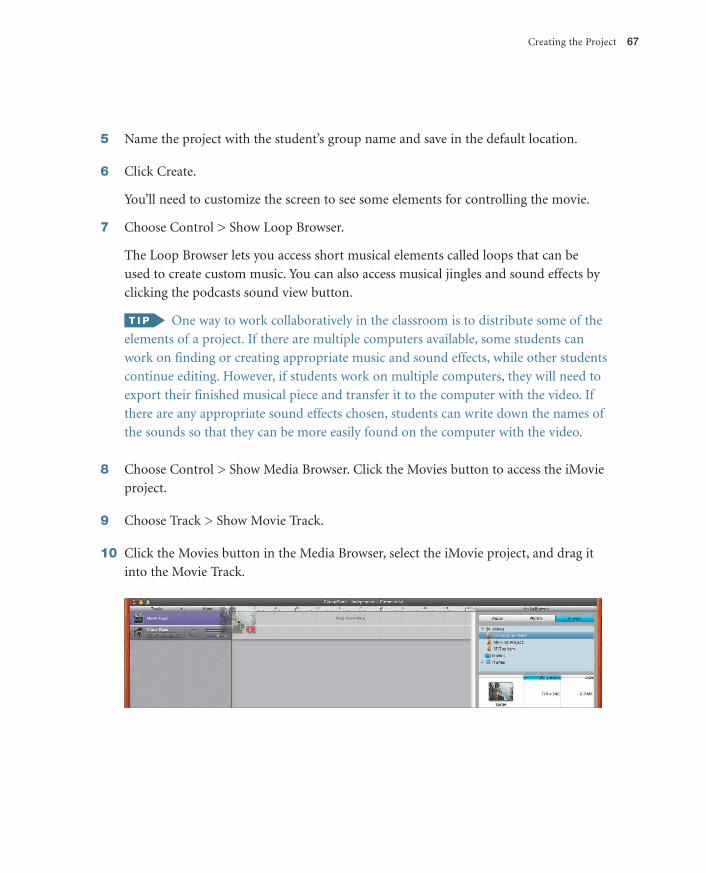
4 In the GarageBand welcome screen, click the Create New Music Project button.
66 Make a Case: Persuasive Presentations
59143c03.qxd:50266c04 9/8/08 1:52 PM Page 66
5 Name the project with the student’s group name and save in the default location.
6 Click Create.
You’ll need to customize the screen to see some elements for controlling the movie.
7 Choose Control > Show Loop Browser.
The Loop Browser lets you access short musical elements called loops that can be
used to create custom music. You can also access musical jingles and sound effects by
clicking the podcasts sound view button.
One way to work collaboratively in the classroom is to distribute some of the
elements of a project. If there are multiple computers available, some students can
work on finding or creating appropriate music and sound effects, while other students
continue editing. However, if students work on multiple computers, they will need to
export their finished musical piece and transfer it to the computer with the video. If
there are any appropriate sound effects chosen, students can write down the names of
the sounds so that they can be more easily found on the computer with the video.
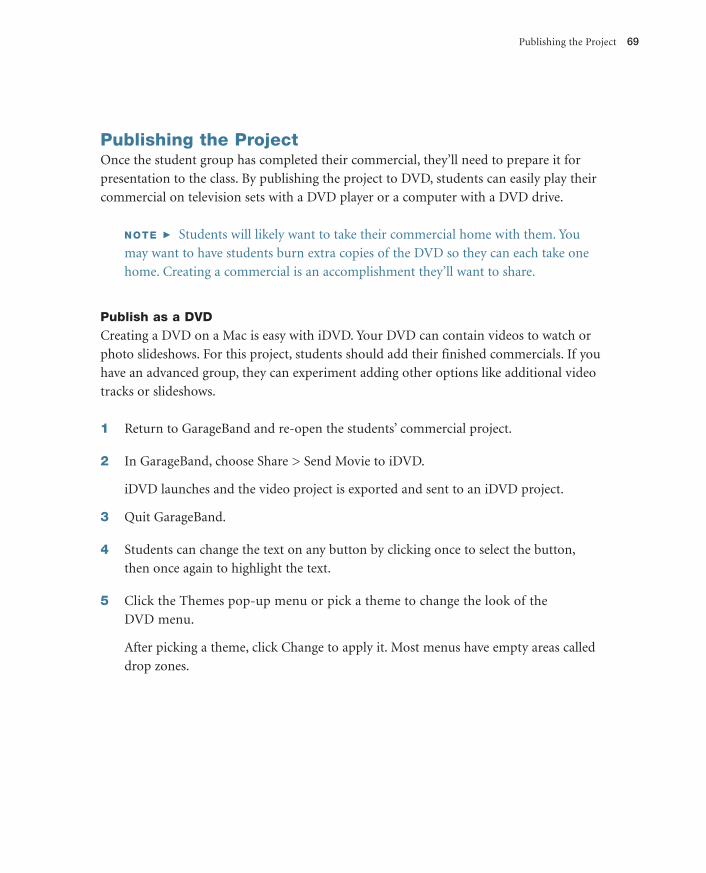
8 Choose Control > Show Media Browser. Click the Movies button to access the iMovie
project.
9 Choose Track > Show Movie Track.
10 Click the Movies button in the Media Browser, select the iMovie project, and drag it
into the Movie Track.
Creating the Project 67
59143c03.qxd:50266c04 9/8/08 1:52 PM Page 67

11 Students can now drag musical elements and sound effects into the tracks below. If an
entire musical piece was created on another computer, they can either add the audio
file into iTunes or drag it directly onto a GarageBand track after transferring to the
computer with the video.
MORE INFO � You can find more out about using GarageBand to create music by
reading Lessons 11 & 13 of Apple Training Series: iLife ’08. You can also choose Help >
Video Tutorials to see short tutorials on the essential features of GarageBand.
12 When finished scoring the music, choose File > Close.
13 Click the Save button to capture changes.
14 When asked about saving your project with an iLife preview, click Yes.
This option generates a preview file that we can use in other iLife and iWork applica-
tions. We’ll need it for use in iDVD.
68 Make a Case: Persuasive Presentations
59143c03.qxd:50266c04 9/8/08 1:52 PM Page 68
Publishing the ProjectOnce the student group has completed their commercial, they’ll need to prepare it for
presentation to the class. By publishing the project to DVD, students can easily play their
commercial on television sets with a DVD player or a computer with a DVD drive.
NOTE � Students will likely want to take their commercial home with them. You
may want to have students burn extra copies of the DVD so they can each take one
home. Creating a commercial is an accomplishment they’ll want to share.
Publish as a DVDCreating a DVD on a Mac is easy with iDVD. Your DVD can contain videos to watch or
photo slideshows. For this project, students should add their finished commercials. If you
have an advanced group, they can experiment adding other options like additional video
tracks or slideshows.
1 Return to GarageBand and re-open the students’ commercial project.
2 In GarageBand, choose Share > Send Movie to iDVD.
iDVD launches and the video project is exported and sent to an iDVD project.
3 Quit GarageBand.
4 Students can change the text on any button by clicking once to select the button,
then once again to highlight the text.
5 Click the Themes pop-up menu or pick a theme to change the look of the
DVD menu.
After picking a theme, click Change to apply it. Most menus have empty areas called
drop zones.
Publishing the Project 69
59143c03.qxd:50266c04 9/8/08 1:52 PM Page 69
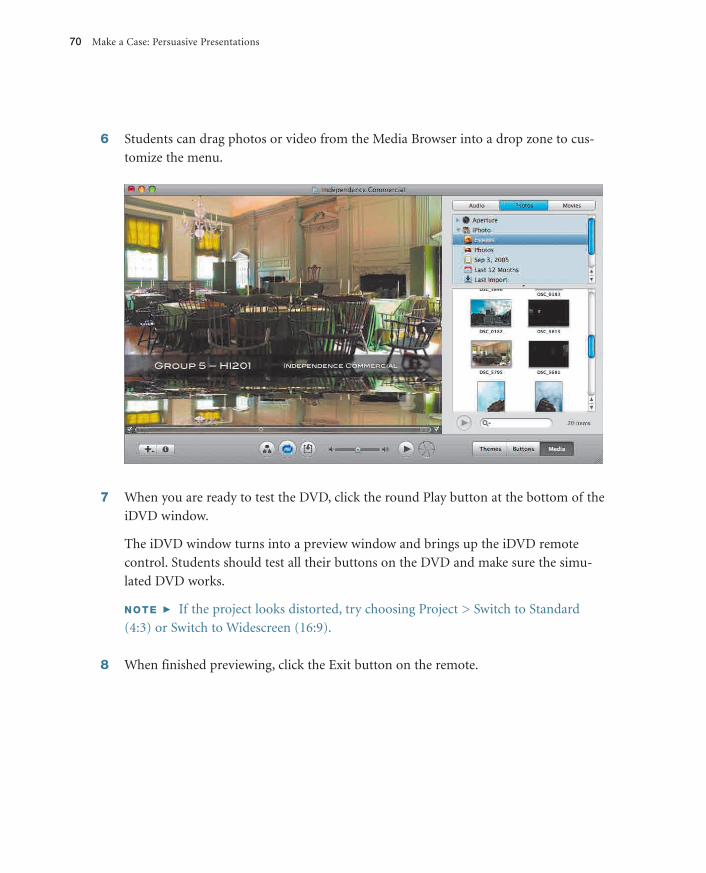
6 Students can drag photos or video from the Media Browser into a drop zone to cus-
tomize the menu.
7 When you are ready to test the DVD, click the round Play button at the bottom of the
iDVD window.
The iDVD window turns into a preview window and brings up the iDVD remote
control. Students should test all their buttons on the DVD and make sure the simu-
lated DVD works.
NOTE � If the project looks distorted, try choosing Project > Switch to Standard
(4:3) or Switch to Widescreen (16:9).
8 When finished previewing, click the Exit button on the remote.
70 Make a Case: Persuasive Presentations
59143c03.qxd:50266c04 9/8/08 1:52 PM Page 70
9 Choose Project > Project Info.
10 Give the DVD a name that identifies it with the students’ group.
You’ll want to keep the name short. You can also change other information about the
DVD here such as the Aspect Ratio (if you want the DVD to be widescreen) and set
the Encoding method for quality.
11 Close the Project Info window.
12 Click the Burn button at the bottom of the iDVD window.
Publishing the Project 71
59143c03.qxd:50266c04 9/8/08 1:52 PM Page 71
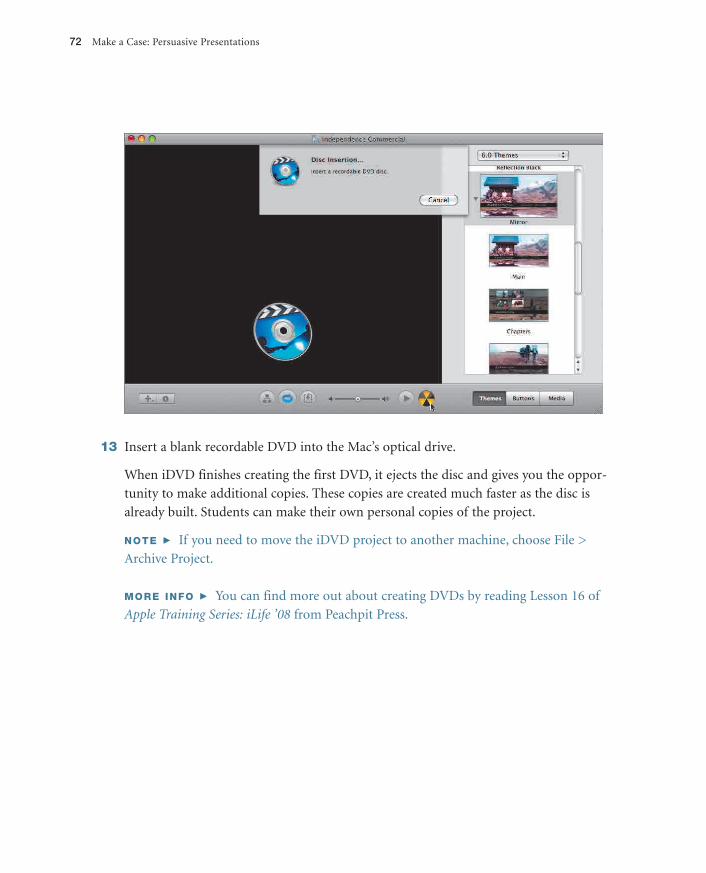
13 Insert a blank recordable DVD into the Mac’s optical drive.
When iDVD finishes creating the first DVD, it ejects the disc and gives you the oppor-
tunity to make additional copies. These copies are created much faster as the disc is
already built. Students can make their own personal copies of the project.
NOTE � If you need to move the iDVD project to another machine, choose File >
Archive Project.
MORE INFO � You can find more out about creating DVDs by reading Lesson 16 of
Apple Training Series: iLife ’08 from Peachpit Press.
72 Make a Case: Persuasive Presentations
59143c03.qxd:50266c04 9/8/08 1:52 PM Page 72

Assessing the ProjectThere are several ways to evaluate the student’s performance for the lesson. Be sure to
evaluate all aspects of the project, looking at the creativity and effectiveness of the com-
mercial, as well as the technical performance of the tasks.
� Students should submit their scripts and storyboards in printed form and include any
drafts and revisions for evaluation of the writing process. These can be assessed using
standard practices or district guidelines for writing samples.
� Assess the students’ performance of their commercial. Keep in mind the effectiveness
of their story or commercial. Be sure to incorporate opportunities for peer review.
� Invite discussion, journal entries, or other follow-up activities regarding the project to
assess the effectiveness of individual group members in creating the commercial.
� Have students complete self-assessment rubrics to justify their achievements in mak-
ing a case.
Assessing the Project 73
59143c03.qxd:50266c04 9/8/08 1:52 PM Page 73
1
Tip #6: Add a Web Page to a Presentation
Sometimes when you’re making a presentation, it’s useful to add a snapshot of
a web page. Rather than make this snapshot be just an image of the web page,
you can make it a link to the actual web page—a slide of live content that can
be updated automatically when you are connected to the Internet.
1 Select a slide in the slide organizer.
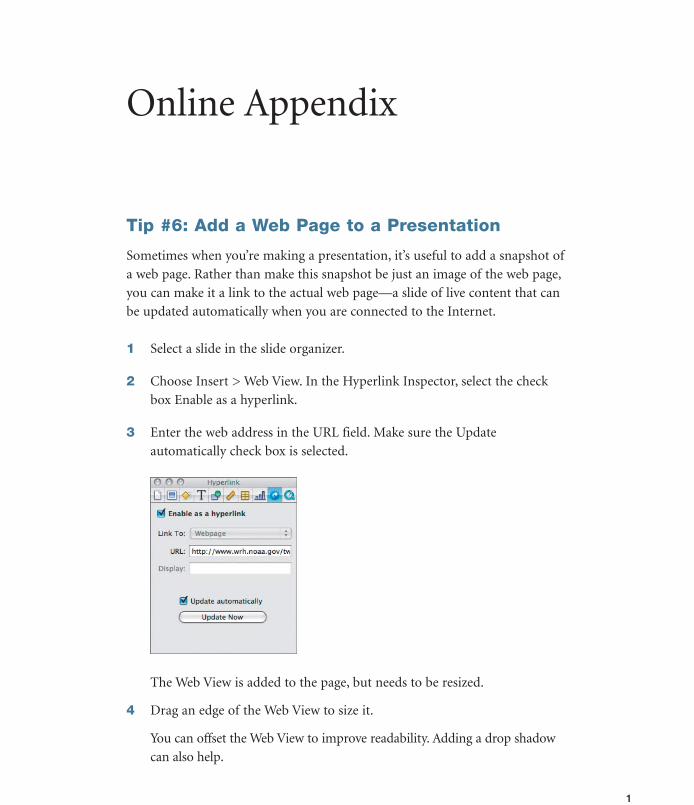
2 Choose Insert > Web View. In the Hyperlink Inspector, select the check
box Enable as a hyperlink.
3 Enter the web address in the URL field. Make sure the Update
automatically check box is selected.
The Web View is added to the page, but needs to be resized.
4 Drag an edge of the Web View to size it.
You can offset the Web View to improve readability. Adding a drop shadow
can also help.
Online Appendix
59143OnlineAppendix.qxd:50266c04 9/5/08 2:28 AM Page 1

5 Enable the drop shadow in the Graphics Inspector, and set the offset and blur values
to 10 px.
6 Choose File > Save to save your work.
Tip #7: Print a Presentation
There are times when it’s useful to hand out copies of your presentation with not just the
slides, but with your presenter notes included as well. These notes can be a great takeaway
and can help students review the information you presented more thoroughly. They can
also help other teachers who want to give the same presentation to their students.
1 Open a Keynote presentation.
2 Click the View button in the Toolbar and choose Navigator.
If notes aren’t visible, choose View > Show Presenter Notes to see notes for a
presentation. Click in the field below the Canvas to add presenter notes.
2 Online Appendix
59143OnlineAppendix.qxd:50266c04 9/5/08 2:28 AM Page 2
3 Select a slide and click in the area below it to add notes.
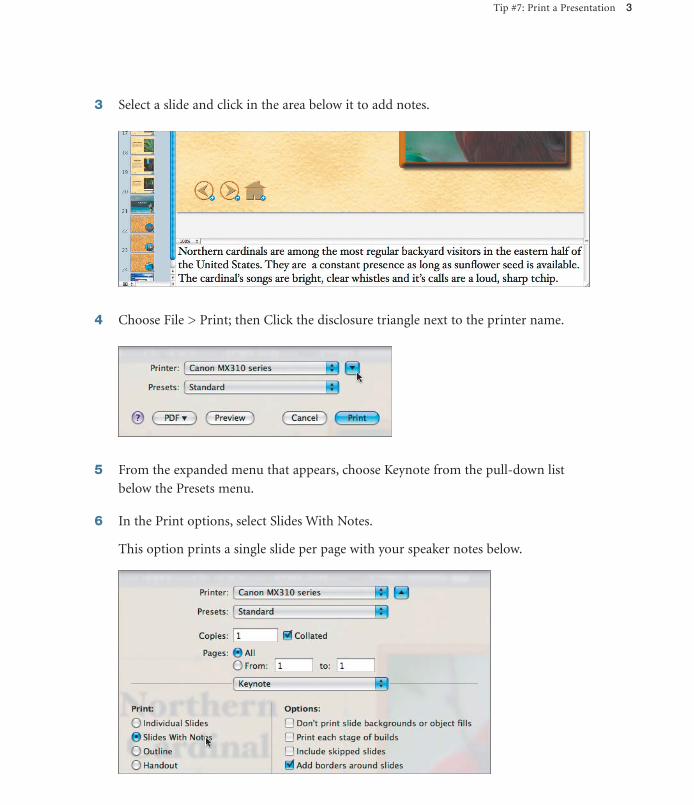
4 Choose File > Print; then Click the disclosure triangle next to the printer name.
5 From the expanded menu that appears, choose Keynote from the pull-down list
below the Presets menu.
6 In the Print options, select Slides With Notes.
This option prints a single slide per page with your speaker notes below.
Tip #7: Print a Presentation 3
59143OnlineAppendix.qxd:50266c04 9/5/08 2:28 AM Page 3
7 Select other printer options such as the number of copies and print quality.
8 Click Print.
You can also print multiple slides per page if you’d like to save paper.
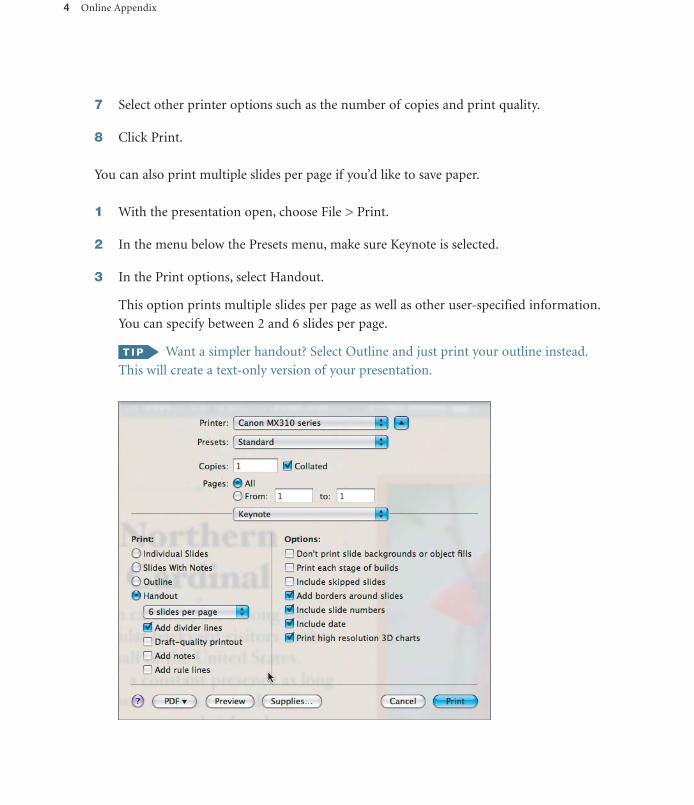
1 With the presentation open, choose File > Print.
2 In the menu below the Presets menu, make sure Keynote is selected.
3 In the Print options, select Handout.
This option prints multiple slides per page as well as other user-specified information.
You can specify between 2 and 6 slides per page.
Want a simpler handout? Select Outline and just print your outline instead.
This will create a text-only version of your presentation.
4 Online Appendix
59143OnlineAppendix.qxd:50266c04 9/5/08 2:28 AM Page 4

4 Use the pop-up menu under the Presets menu to access and adjust other printer
options such as the number of copies and print quality, and then click Print.
To save printing costs (and speed up printing), use the Draft-quality printout
option.
5 Save your work by choosing File > Save.
Tip #8: Fix Red Eye
Photos taken in low light often show red-eye (which is caused by the reflection of the flash).
iPhoto offers an easy-to-use tool to significantly reduce the appearance of red-eye.
1 Launch iPhoto.
2 Select a photo that needs adjustment in the photo Browser.
3 Click the Edit button.
4 Zoom in tightly on the area that needs fixing by using the size slider.
Tip #8: Fix Red Eye 5
59143OnlineAppendix.qxd:50266c04 9/5/08 2:28 AM Page 5

5 Click the Red-Eye button to select the Red-Eye tool and choose an option from the
pop-up menu:
� Automatic – Uses the default pointer size.
� Manual – Drag the size slider to pick a size that matches the size of the pupils.
6 Position the pointer over one of the affected pupils and click once.
Repeat for the second eye.
7 Click the Red-Eye button again to close the red-eye tool or select a different
editing tool.
8 When you’re finished editing the picture, click Done.
Tip #9: Adjust the Image Quality of a Movie
Student videography can often be improved by making adjustments in iMovie. While it’s
always ideal to shoot video properly and make it look great “in-camera,” students can use
the power of iMovie to improve their end results. iMovie offers adjustments for levels of
6 Online Appendix
59143OnlineAppendix.qxd:50266c04 9/5/08 2:28 AM Page 6
black and white, exposure, brightness, contrast, saturation, and white point settings on
any video clip that’s been added to a project.
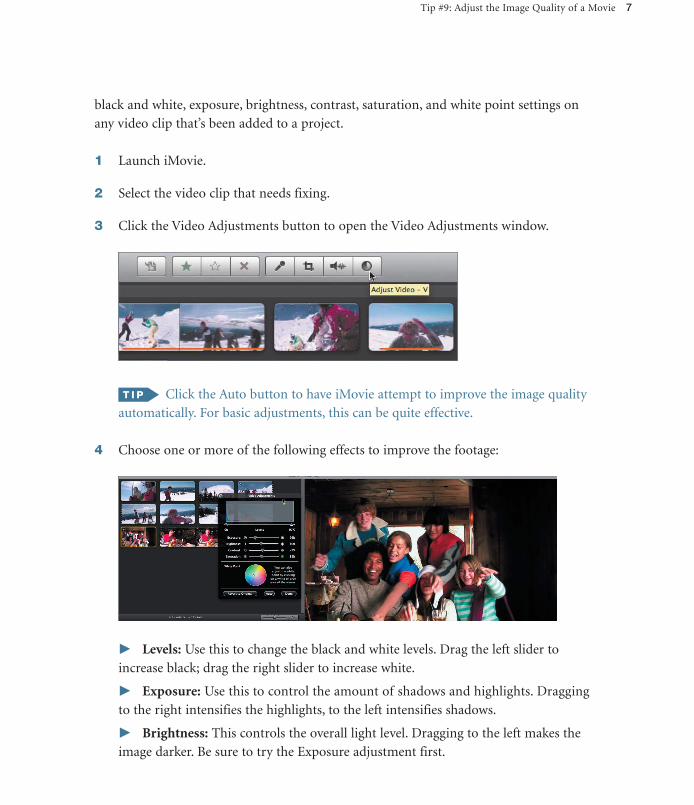
1 Launch iMovie.
2 Select the video clip that needs fixing.
3 Click the Video Adjustments button to open the Video Adjustments window.
Click the Auto button to have iMovie attempt to improve the image quality
automatically. For basic adjustments, this can be quite effective.
4 Choose one or more of the following effects to improve the footage:
� Levels: Use this to change the black and white levels. Drag the left slider to
increase black; drag the right slider to increase white.
� Exposure: Use this to control the amount of shadows and highlights. Dragging
to the right intensifies the highlights, to the left intensifies shadows.
� Brightness: This controls the overall light level. Dragging to the left makes the
image darker. Be sure to try the Exposure adjustment first.
Tip #9: Adjust the Image Quality of a Movie 7
59143OnlineAppendix.qxd:50266c04 9/5/08 2:28 AM Page 7
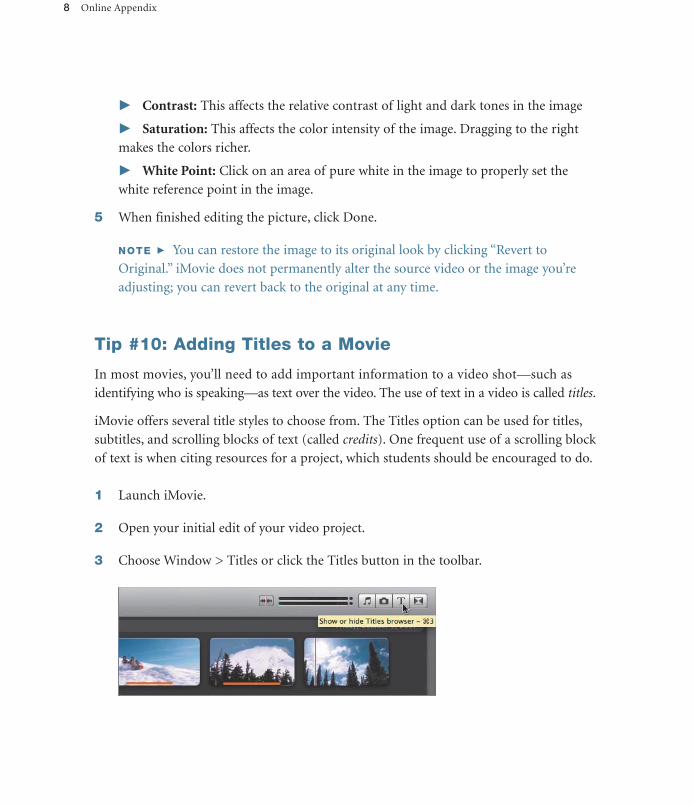
� Contrast: This affects the relative contrast of light and dark tones in the image
� Saturation: This affects the color intensity of the image. Dragging to the right
makes the colors richer.
� White Point: Click on an area of pure white in the image to properly set the
white reference point in the image.
5 When finished editing the picture, click Done.
NOTE � You can restore the image to its original look by clicking “Revert to
Original.” iMovie does not permanently alter the source video or the image you’re
adjusting; you can revert back to the original at any time.
Tip #10: Adding Titles to a Movie
In most movies, you’ll need to add important information to a video shot—such as
identifying who is speaking—as text over the video. The use of text in a video is called titles.
iMovie offers several title styles to choose from. The Titles option can be used for titles,
subtitles, and scrolling blocks of text (called credits). One frequent use of a scrolling block
of text is when citing resources for a project, which students should be encouraged to do.
1 Launch iMovie.
2 Open your initial edit of your video project.
3 Choose Window > Titles or click the Titles button in the toolbar.
8 Online Appendix
59143OnlineAppendix.qxd:50266c04 9/5/08 2:28 AM Page 8
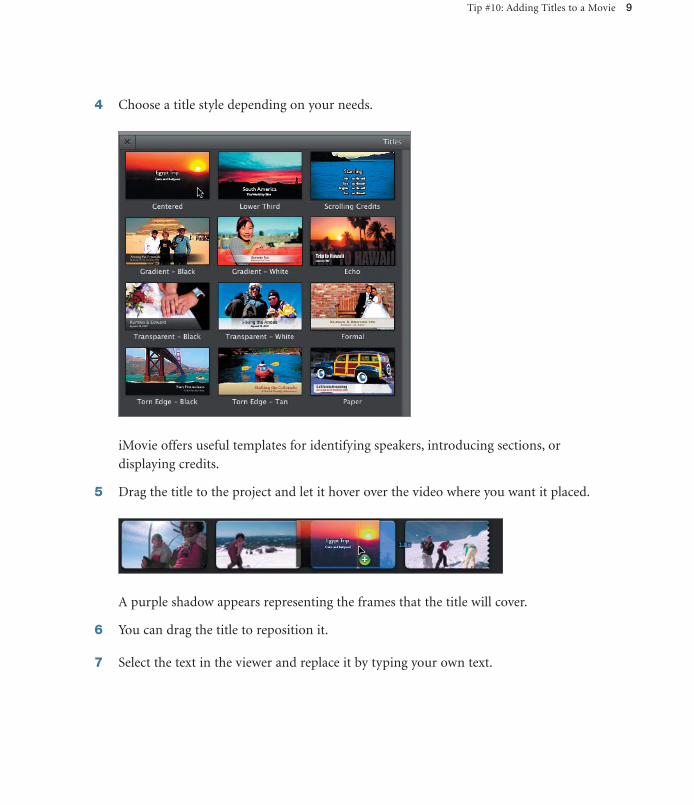
4 Choose a title style depending on your needs.
iMovie offers useful templates for identifying speakers, introducing sections, or
displaying credits.
5 Drag the title to the project and let it hover over the video where you want it placed.
A purple shadow appears representing the frames that the title will cover.
6 You can drag the title to reposition it.
7 Select the text in the viewer and replace it by typing your own text.
Tip #10: Adding Titles to a Movie 9
59143OnlineAppendix.qxd:50266c04 9/5/08 2:28 AM Page 9
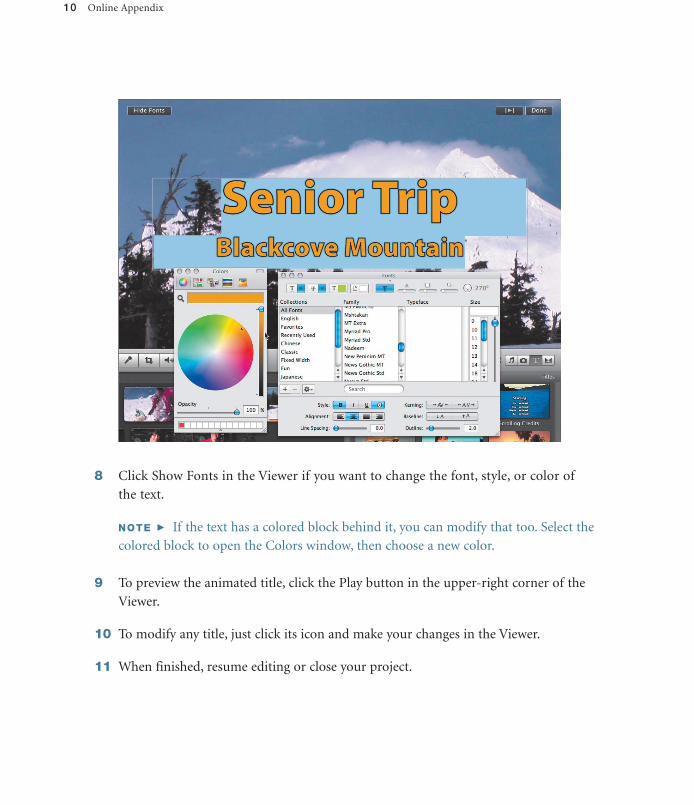
8 Click Show Fonts in the Viewer if you want to change the font, style, or color of
the text.
NOTE � If the text has a colored block behind it, you can modify that too. Select the
colored block to open the Colors window, then choose a new color.
9 To preview the animated title, click the Play button in the upper-right corner of the
Viewer.
10 To modify any title, just click its icon and make your changes in the Viewer.
11 When finished, resume editing or close your project.
10 Online Appendix
59143OnlineAppendix.qxd:50266c04 9/5/08 2:28 AM Page 10
Tip #11: Add a Movie to a Presentation
Text is often considered the most important part of a presentation, but in today’s media-
rich world it is the supporting media that can make a presentation stand out, and the use
of multimedia that helps develop both visual and media literacy.
Fortunately, adding a movie to a slideshow is as simple as drag and drop. Keynote supports
a wide variety of media formats, including movies. The heart of this support is QuickTime,
the versatile media player that comes installed on your Mac. In fact, if you can open a file
in QuickTime, you can use it in Keynote. This flexibility makes it easy for you to design
movie-enhanced presentations.
In Keynote, placing video on a slide is similar to adding a photo to a slide. You just
navigate to the file and drag the video onto a slide.
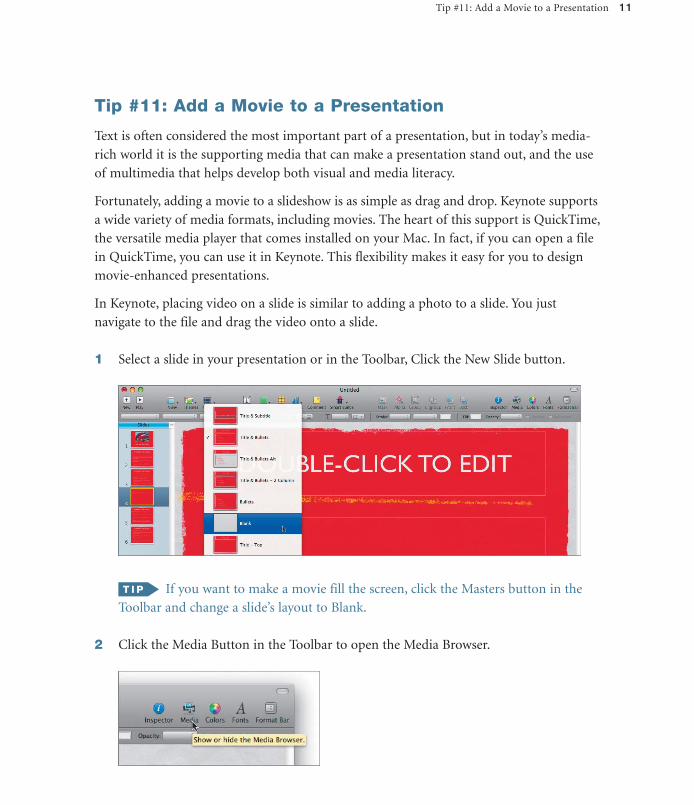
1 Select a slide in your presentation or in the Toolbar, Click the New Slide button.
If you want to make a movie fill the screen, click the Masters button in the
Toolbar and change a slide’s layout to Blank.
2 Click the Media Button in the Toolbar to open the Media Browser.
Tip #11: Add a Movie to a Presentation 11
59143OnlineAppendix.qxd:50266c04 9/5/08 2:28 AM Page 11
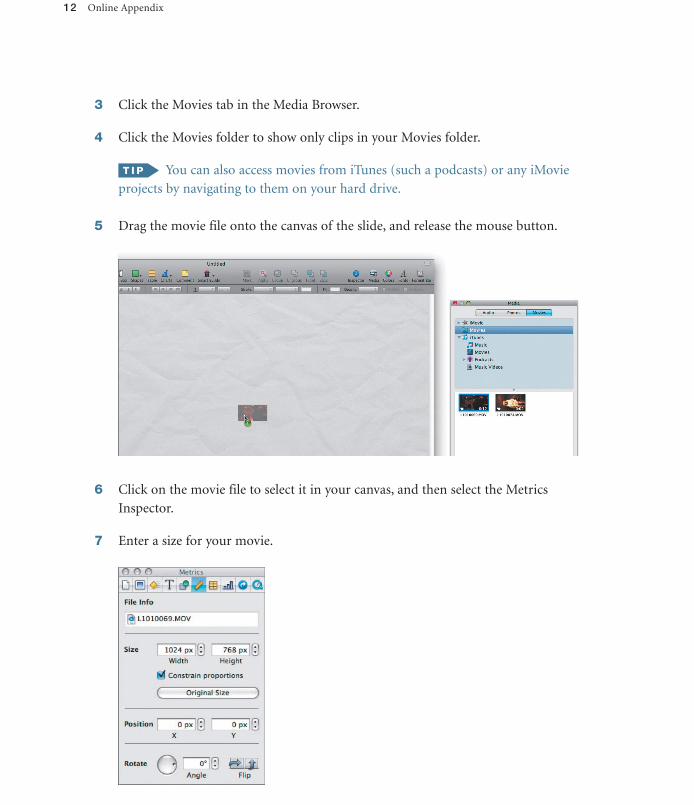
3 Click the Movies tab in the Media Browser.
4 Click the Movies folder to show only clips in your Movies folder.
You can also access movies from iTunes (such a podcasts) or any iMovie
projects by navigating to them on your hard drive.
5 Drag the movie file onto the canvas of the slide, and release the mouse button.
6 Click on the movie file to select it in your canvas, and then select the Metrics
Inspector.
7 Enter a size for your movie.
12 Online Appendix
59143OnlineAppendix.qxd:50266c04 9/5/08 2:28 AM Page 12
If you want it to fill the slide, change the Size dimensions to match the canvas size of
your slides (such as 1024 x 768). The movie scales to the size of the canvas.
The .m4v file format uses H.264 compression, which scales very cleanly. This
format requires QuickTime 7 or newer, but works very well. It nicely balances file size
and image quality for optimal playback. The file will look good for playback, but will
not require a lot of disk space.
8 To center a movie, enter a position of 0 px for both the X and Y coordinates in the
Position fields of the Metrics Inspector.
These coordinates place the upper-left corner of the movie at the upper-left corner of
the slide. Because this slide and movie are exactly the same size, the movie completely
fills the slide.
9 Click the Play button to test your movie.
10 When the movie finishes, press the Esc key to exit your presentation.
You can adjust what part of the movie plays as well as its volume by using the
QuickTime Inspector.
11 Press Command-S to save your document.
Tip #12: Convert a Presentation to DVD
As a backup, you might want to publish your Keynote presentation to a DVD. You can
also create DVDs to distribute your presentation to people who could not attend. In fact,
if you navigate to File > Record Slideshow, you can record the audio of the presentation as
well as the timing for each slide. All of this can be burned to a DVD as well, and saved in a
student portfolio.
1 With a Keynote presentation open, choose File > Send to iDVD.
2 Specify the size of the video you want to create:
� Standard: Exports slides for viewing on a standard video display. Use this
option if your original presentation has a 4:3 aspect ratio, using a resolution such
as 800 × 600 or 1024 × 768.
Tip #12: Convert a Presentation to DVD 13
59143OnlineAppendix.qxd:50266c04 9/5/08 2:28 AM Page 13
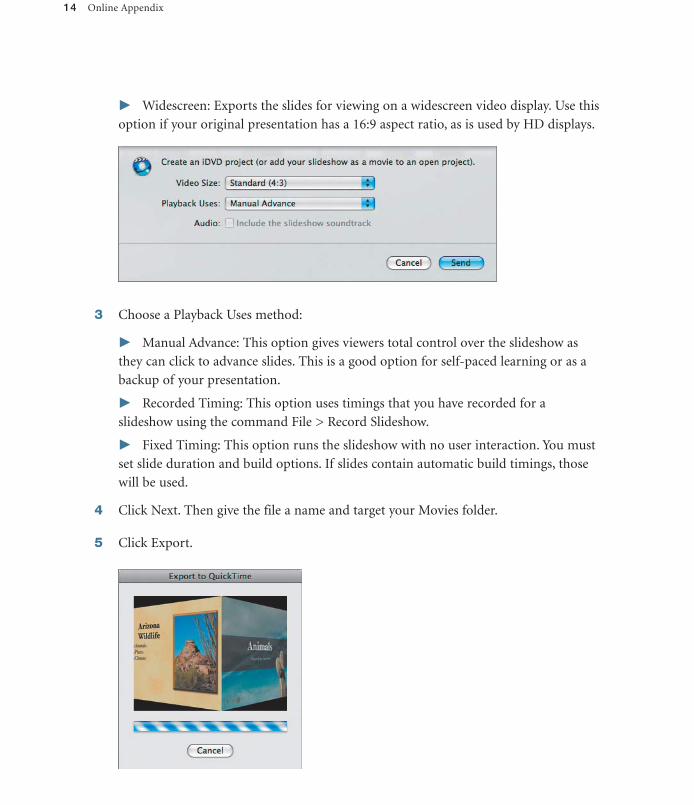
� Widescreen: Exports the slides for viewing on a widescreen video display. Use this
option if your original presentation has a 16:9 aspect ratio, as is used by HD displays.
3 Choose a Playback Uses method:
� Manual Advance: This option gives viewers total control over the slideshow as
they can click to advance slides. This is a good option for self-paced learning or as a
backup of your presentation.
� Recorded Timing: This option uses timings that you have recorded for a
slideshow using the command File > Record Slideshow.
� Fixed Timing: This option runs the slideshow with no user interaction. You must
set slide duration and build options. If slides contain automatic build timings, those
will be used.
4 Click Next. Then give the file a name and target your Movies folder.
5 Click Export.
14 Online Appendix
59143OnlineAppendix.qxd:50266c04 9/5/08 2:28 AM Page 14
A QuickTime movie file is written to disk. Depending on the number of slides, it can
take a few minutes to create the DVD video file.
Before the export finishes, iDVD will launch automatically.
6 When the export finishes, click the Play button to test the DVD project:
� You can click Play Movie to watch the entire movie.
� You can click Scene Selection to see an index of the presentation.
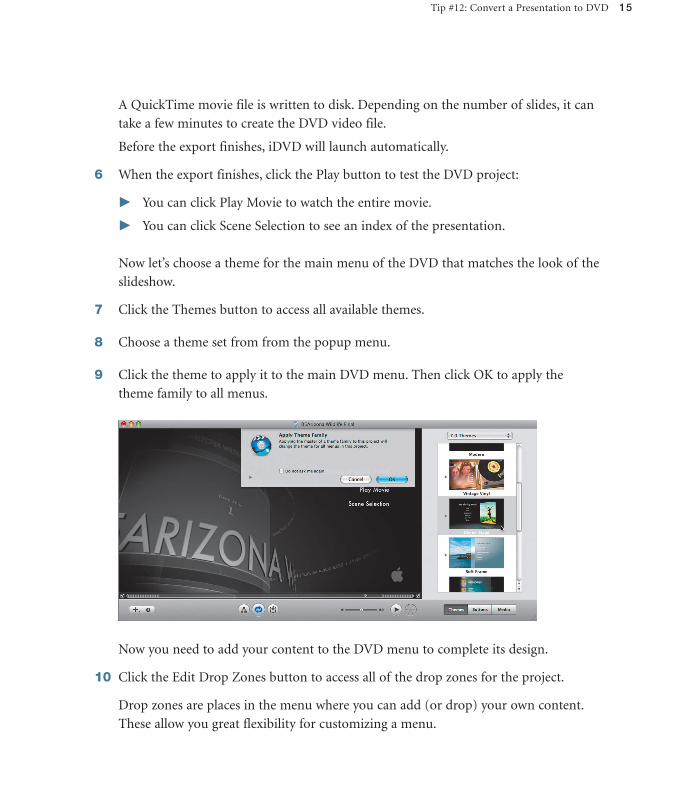
Now let’s choose a theme for the main menu of the DVD that matches the look of the
slideshow.
7 Click the Themes button to access all available themes.
8 Choose a theme set from from the popup menu.
9 Click the theme to apply it to the main DVD menu. Then click OK to apply the
theme family to all menus.
Now you need to add your content to the DVD menu to complete its design.
10 Click the Edit Drop Zones button to access all of the drop zones for the project.
Drop zones are places in the menu where you can add (or drop) your own content.
These allow you great flexibility for customizing a menu.
Tip #12: Convert a Presentation to DVD 15
59143OnlineAppendix.qxd:50266c04 9/5/08 2:28 AM Page 15
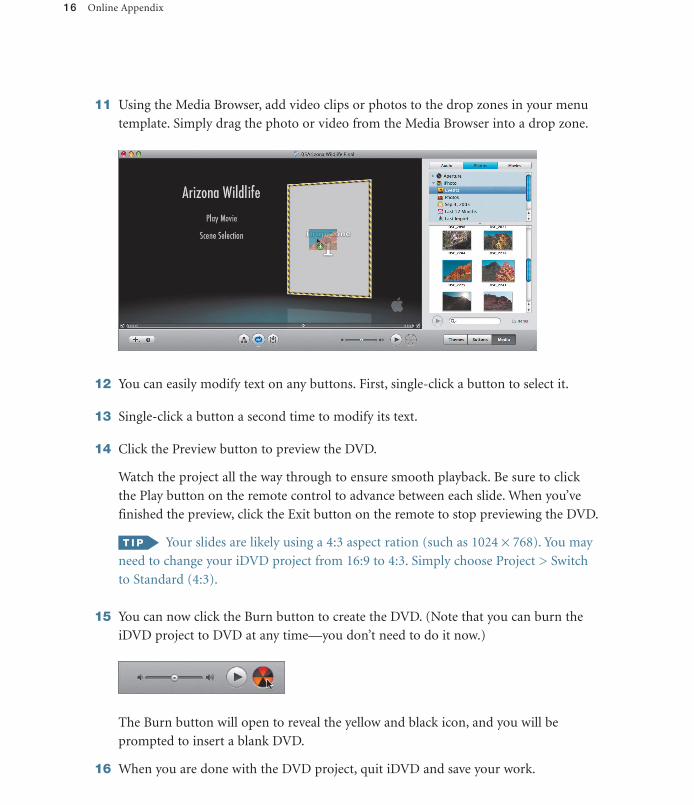
11 Using the Media Browser, add video clips or photos to the drop zones in your menu
template. Simply drag the photo or video from the Media Browser into a drop zone.
12 You can easily modify text on any buttons. First, single-click a button to select it.
13 Single-click a button a second time to modify its text.
14 Click the Preview button to preview the DVD.
Watch the project all the way through to ensure smooth playback. Be sure to click
the Play button on the remote control to advance between each slide. When you’ve
finished the preview, click the Exit button on the remote to stop previewing the DVD.
Your slides are likely using a 4:3 aspect ration (such as 1024 × 768). You may
need to change your iDVD project from 16:9 to 4:3. Simply choose Project > Switch
to Standard (4:3).
15 You can now click the Burn button to create the DVD. (Note that you can burn the
iDVD project to DVD at any time—you don’t need to do it now.)
The Burn button will open to reveal the yellow and black icon, and you will be
prompted to insert a blank DVD.
16 When you are done with the DVD project, quit iDVD and save your work.
16 Online Appendix
59143OnlineAppendix.qxd:50266c04 9/5/08 2:28 AM Page 16
Tip #13: Put a Movie on a Web Page
Sharing a video with iWeb is easy once you understand a few key facts about how video
works on the web. It is important to keep your videos short and their file sizes small
(ideally less than 10 MB). You should also avoid overlapping pictures or objects on top
of a movie, since web browsers want a movie to be the topmost layer.
If you are exporting the video for podcasting, the file will likely be larger than 10 MB.
This is okay because podcasting prefers higher quality video than most streaming video.
The larger size isn’t as much of an issue because podcasts are generally downloaded before
watching, plus there is an increased prevalence of higher speed Internet connections
among podcast users.
Getting your movies to a web page is easy, but requires that you choose the right method.
Sharing a video from iMovie is the easiest way to get a video to the web.
1 Launch iMovie and select a project in the Project Library.
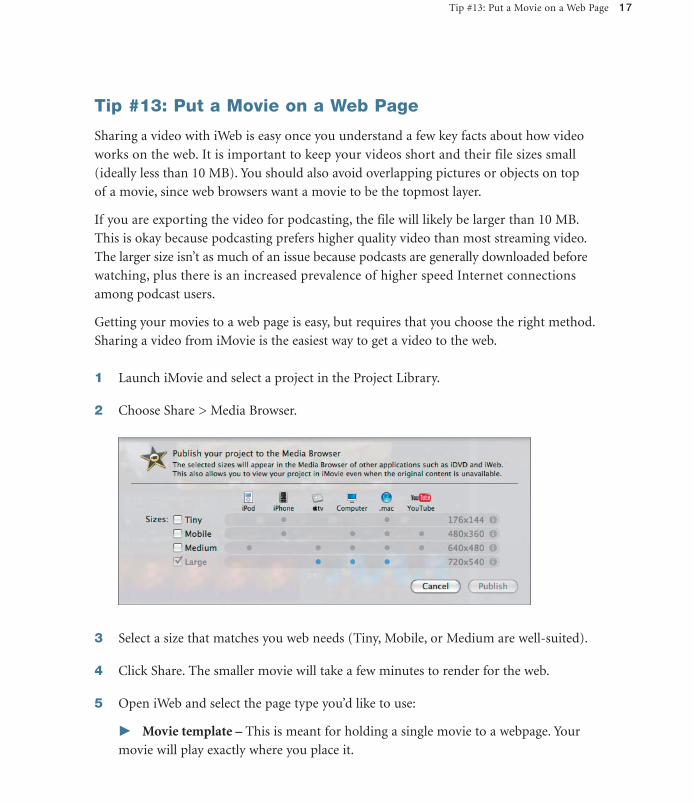
2 Choose Share > Media Browser.
3 Select a size that matches you web needs (Tiny, Mobile, or Medium are well-suited).
4 Click Share. The smaller movie will take a few minutes to render for the web.
5 Open iWeb and select the page type you’d like to use:
� Movie template – This is meant for holding a single movie to a webpage. Your
movie will play exactly where you place it.
Tip #13: Put a Movie on a Web Page 17
59143OnlineAppendix.qxd:50266c04 9/5/08 2:28 AM Page 17
� Photos template – Movies can also be added to a photo page. When the browser
clicks the thumbnail, the movie plays in a window
� Blog or Podcast template – If you add a movie to either one of these page types,
iWeb will treat it as a video podcast.
6 Click the Media Browser button, then click the Movies tab.
7 Click the disclosure triangle next to iMovie to see the list of your projects.
8 Select an iMovie project. Any movies you’ve Shared will appear listed at the bottom of
the Media Browser.
9 Drag the selected movie to the desired page.
You can also access videos in your iTunes library (such as podcasts) and any
other movies stored in the Movies folder.
10 When the site is ready, click the Publish button.
11 Save your work by choosing File > Save.
18 Online Appendix
59143OnlineAppendix.qxd:50266c04 9/5/08 2:28 AM Page 18
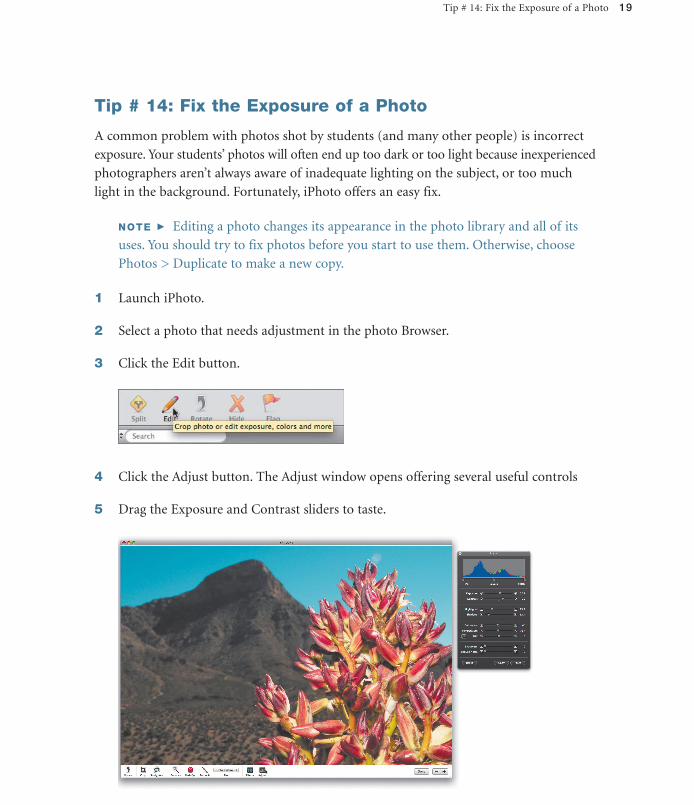
Tip # 14: Fix the Exposure of a Photo
A common problem with photos shot by students (and many other people) is incorrect
exposure. Your students’ photos will often end up too dark or too light because inexperienced
photographers aren’t always aware of inadequate lighting on the subject, or too much
light in the background. Fortunately, iPhoto offers an easy fix.
NOTE � Editing a photo changes its appearance in the photo library and all of its
uses. You should try to fix photos before you start to use them. Otherwise, choose
Photos > Duplicate to make a new copy.
1 Launch iPhoto.
2 Select a photo that needs adjustment in the photo Browser.
3 Click the Edit button.
4 Click the Adjust button. The Adjust window opens offering several useful controls
5 Drag the Exposure and Contrast sliders to taste.
Tip # 14: Fix the Exposure of a Photo 19
59143OnlineAppendix.qxd:50266c04 9/5/08 2:28 AM Page 19
6 If the sky is blown out or the shadows are too dark, use the Highlights and Shadows
sliders.
After make adjustments to a photo, you can press the Shift key to compare
the edited photo to its original state.
7 When you’ve finished editing the photo, click Done.
If you have several photos shot in similar conditions, click the Copy button in
the Adjust window. You can then select another photo and click the Paste button to
reuse the adjustment settings and apply them to the new photo.
NOTE � If you need to change a photo, you can always re-open the Adjust window.
You can reset an edited photo to its original state by opening the Edit window and
clicking the Reset button. iPhoto always retains the original photo you imported.
Tip #15: Straighten a Photo
Student photographers are not known for their stability. That is to say, they often end up
with photos that seem to lean. Fortunately iPhoto makes it easy to fix a crooked-looking
photo. Photos can be straightened by rotating them 10 degrees or less in either direction.
1 Launch iPhoto.
2 Select a photo that needs adjustment in the photo Browser.
3 Click the Edit button.
4 Click the Straighten button.
20 Online Appendix
59143OnlineAppendix.qxd:50266c04 9/5/08 2:28 AM Page 20

5 Drag the Straighten slider until the photo appears level. Use the yellow alignment
guides to assist you.
After make adjustments to a photo, you can press the Shift key to compare
the edited photo to its original state.
6 When finished editing the picture, click Done.
NOTE � If you need to rotate a photo 90 degrees at a time, use the Rotate button in
the toolbar.
MORE INFO � More tips on using iLIfe and iWork in the classroom are available at
this book’s companion web page: www.peachpit.com/ats.teachersguide
Tip #15: Straighten a Photo 21
59143OnlineAppendix.qxd:50266c04 9/5/08 2:28 AM Page 21
iLife and iWork Training and CertificationApple offers Associate-level training and certification for the iLife and iWork product
suites. Educators and students can earn certification to validate entry level skills (Apple
Certified Associate), complementing the professional level skills (Apple Certified Pro)
that are offered at our Apple Authorized Training Centers (AATCs).
The iLife ’08 and iWork ’08 courses are based on Apple Training Series: iLife ’08 by Michael
Cohen, Jeff Bollow, and Richard Harrington, and Apple Training Series; iWork ’08 by
Richard Harrington. The books include DVDs with all required media. Course descrip-
tions appear at http://training.apple.com/training/.
By passing an Apple certification exam, students can distinguish themselves to colleges or
prospective employers as skilled users of the chosen applications. Once you earn iLife ’08
or iWork ’08 Trainer status by passing the associated $150 online exams, you can offer cer-
tification to your students. If you feel that you need additional preparation before taking
the trainer exam, you may want to attend a course at one of our AATCs. To find a course
in your area, visit http://training.apple.com/schedule.
Both courses include an end-user exam, which earns either Apple Certified Associate,
iWork ’08 or Apple Certified Associate, iLife ’08 certification. Your school can purchase
exam codes for $45. Students who pass will receive a certificate and certification logos.
Once you pass the Trainer exam, information on how to purchase exam codes will appear
in the results email. If you do not pass the exam, retake instructions will appear in the
results email. For more information, email [email protected].
Resources for iLife and iWork� iLife Online Tutorials. Visit www.apple.com/ilife/tutorials/.
� iWork Online Tutorials. Visit www.apple.com/iwork/tutorials/.
� Apple Discussions. A rich online community is available at discussions.apple.com.
There are several groups for all of the iLife and iWork applications.
� Apple Support Pages. For technical support and articles, visit Apple’s support web-
site; www.apple.com/support/ilife/ and http://www.apple.com/support/iwork/.
� Apple – Education. The Apple website offers extensive case studies and educational
resources. To browse offerings organized by grade level, visit www.apple.com/education/.
� Apple Training Series books. The official guides to both iLife and iWork offer hands
on practice. Be sure to see the back of this book for discounted pricing offers.
iLife and iWork Training and Certification ix
59143c00.qxd:50266c04 9/8/08 4:00 PM Page ix
Instructions for iLife and iWork Training & Certification
Apple offers Associate-level training and certification for the iLife and iWork product suites. Now educators and students can earn certification to validate entry level skills (Apple Certified Associate) to complement the professional level skills (Apple Certified Pro) that are offered at our Apple Authorized Training Centers (AATC).
The iLife ’08 and iWork ’08 courses are based on the Apple Training Series books “iLife ‘08” by Michael Cohen, Jeff Bollow and Richard Harrington and “iWork ‘08” by Richard Harrington. The books include DVDs with all required media. Course descriptions appear at http://training.apple.com/training/.
By passing an Apple certification exam, students can distinguish themselves to colleges or prospective employers as skilled users of the chosen applications. Once you earn iLife ’08 and/or/iWork ’08 Trainer status by passing the associated $150USD online exams, you can offer certification to your students. If you feel that you need additional preparation before taking the trainer exam, you may want to attend a course at one of our AATCs. To find a course in your area, visit http://training.apple.com/schedule.
Both courses include an end user exam which earns either Apple Certified Associate, iWork '08 or Apple Certified Associate, iLife '08 certification. Your school can purchase exam codes for $45USD. Students who pass a certification exam will receive a certificate and certification logos.
Taking the Trainer ExamOnce you pass the Trainer exam, information on how to purchase exam codes will appear in the results email. If you do not pass the exam, retake instructions will appear in the results email, so do not discard this email. If you have any questions, please email [email protected].
1. Log on to http://ibt.prometric.com/apple using your Tech ID. If you do not have a Tech ID, you can sign up for one at https://certifications.apple.com.
2. Click Secure Sign-In (uses SSL encryption) and log in with your Prometric Prime ID and password. If you don’t already have a Prometric Prime ID, click First-Time Registration and follow the instructions to create a Prometric Prime ID and password.
3. Click I Agree to the Privacy Notice and click Continue to verify your information and access the Candidate Menu page.
4. In the Candidate Menu page, click Take Test.5. Enter the appropriate code in the Private Tests box and click Submit. The codes are case sensitive
and only valid for one use. The code for the iLife ’08 Trainer exam is ACTiLife08; the code for the iWork ’08 Trainer exam is ACTiWork08.
6. Click Continue to skip the voucher then enter your credit card to pay the $150 USD fee.7. Click Begin Test at the bottom of the page.8. When you finish all the questions, click End Test.
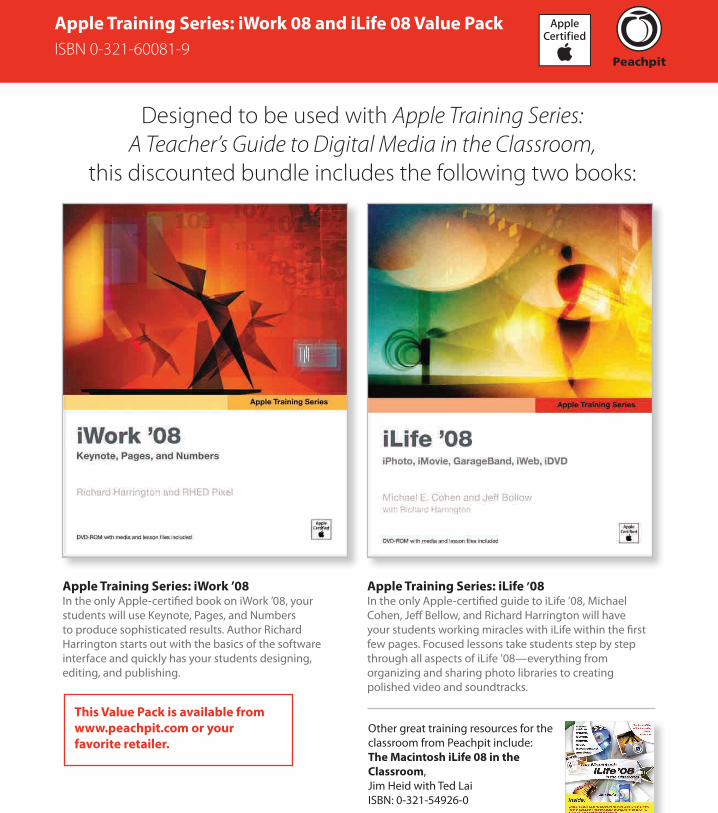
Apple Training Series: iWork ’08 In the only Apple-certified book on iWork ’08, your students will use Keynote, Pages, and Numbers to produce sophisticated results. Author Richard Harrington starts out with the basics of the software interface and quickly has your students designing, editing, and publishing.
Apple Training Series: iLife ’08In the only Apple-certified guide to iLife ’08, Michael Cohen, Jeff Bellow, and Richard Harrington will have your students working miracles with iLife within the first few pages. Focused lessons take students step by step through all aspects of iLife ’08—everything from organizing and sharing photo libraries to creating polished video and soundtracks.
Designed to be used with Apple Training Series: A Teacher’s Guide to Digital Media in the Classroom,
this discounted bundle includes the following two books:
This Value Pack is available from www.peachpit.com or your favorite retailer.
Other great training resources for the classroom from Peachpit include:The Macintosh iLife 08 in the Classroom, Jim Heid with Ted Lai ISBN: 0-321-54926-0
Apple Training Series: iWork 08 and iLife 08 Value Pack ISBN 0-321-60081-9
ATSBOB.indd 1 8/14/08 8:54:49 AM