english_er-nd300hk_manual & cook book.pdf - toshiba
TRANSCRIPT
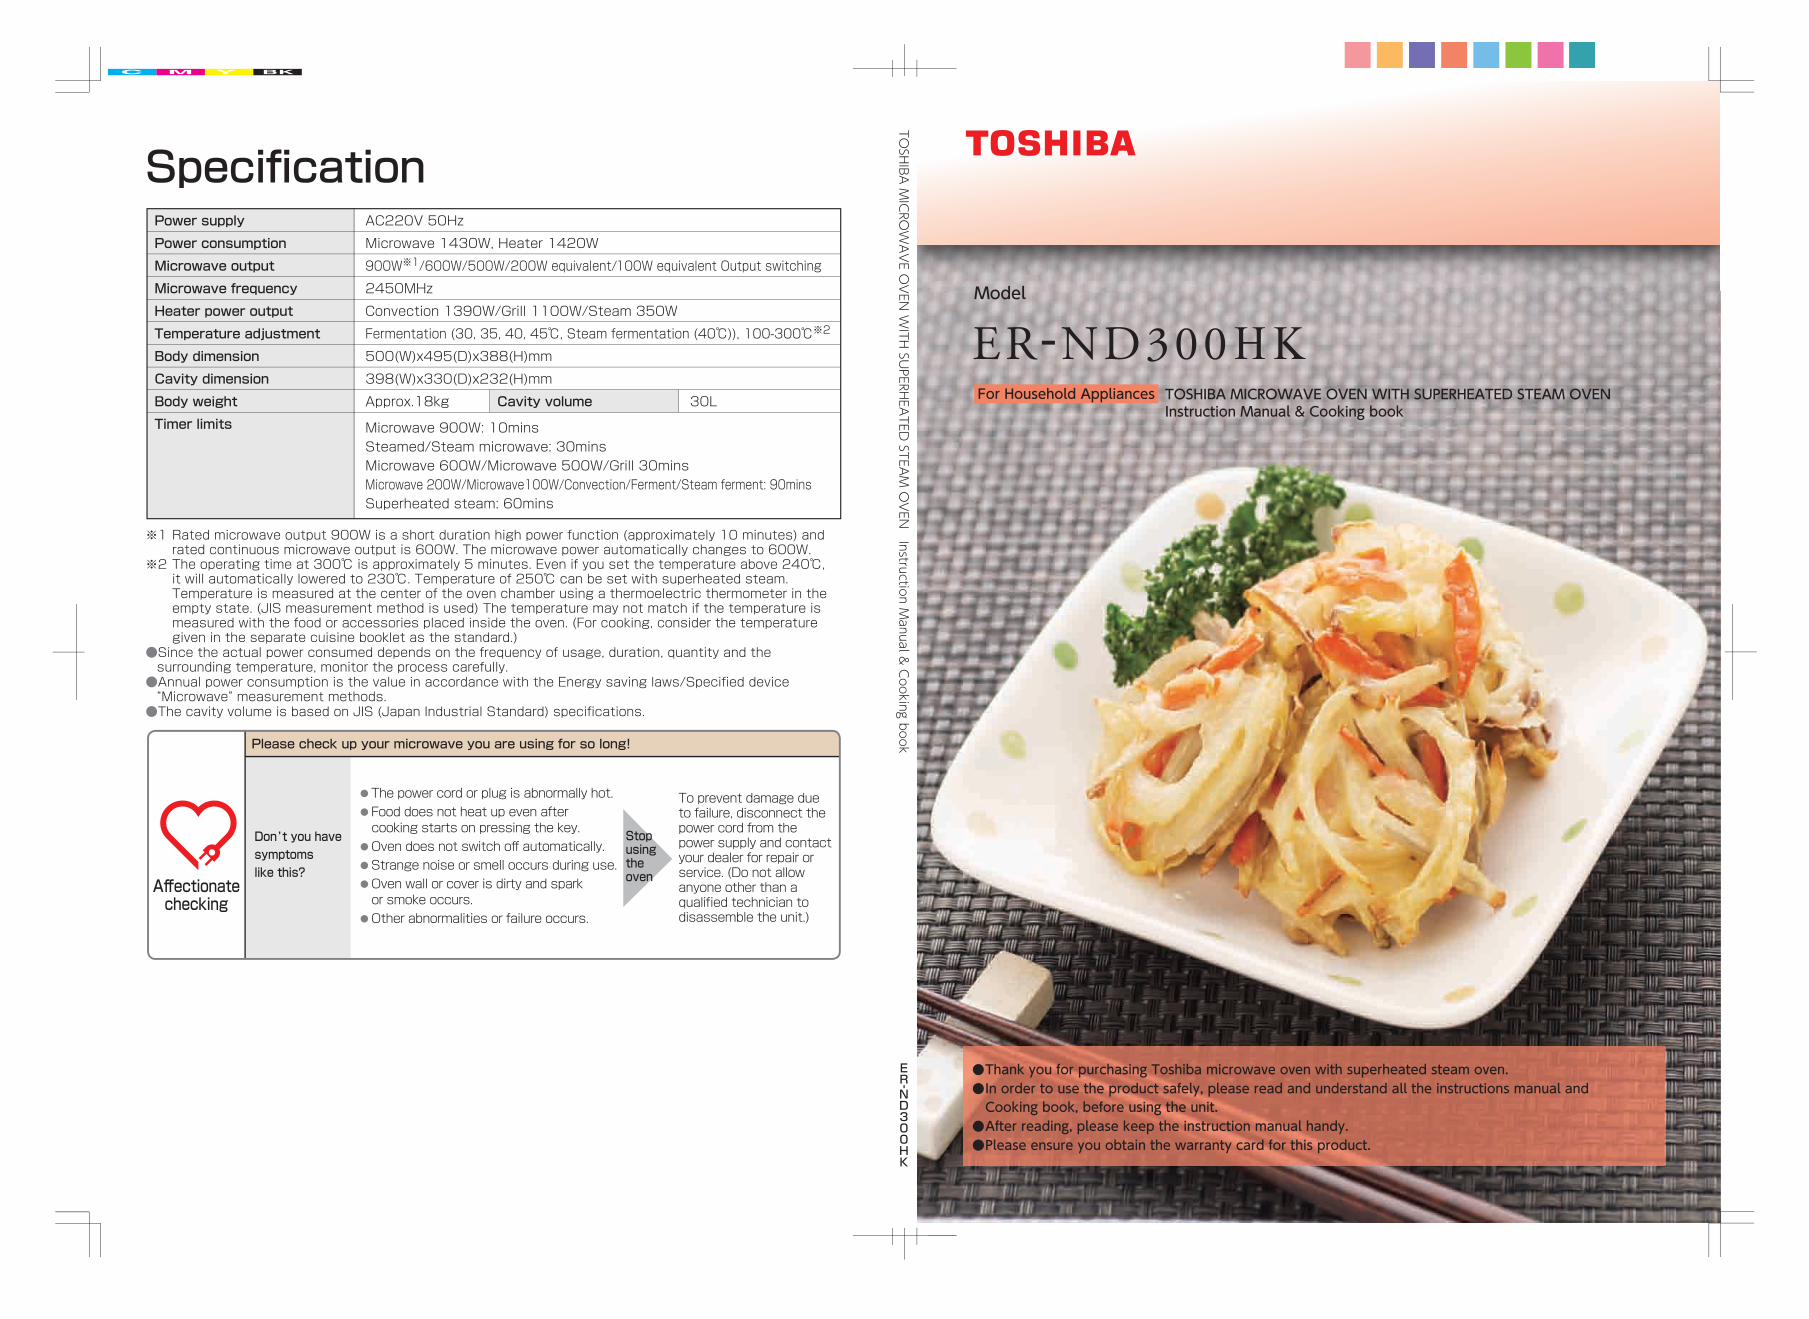
● Thank you for purchasing Toshiba microwave oven with superheated steam oven.● In order to use the product safely, please read and understand all the instructions manual and Cooking book, before using the unit.
● After reading, please keep the instruction manual handy.● Please ensure you obtain the warranty card for this product.
Model
For Household Appliances TOSHIBA MICROWAVE OVEN WITH SUPERHEATED STEAM OVENInstruction Manual & Cooking book
Affectionatechecking
Stopusingtheoven
Power supply
Power consumption
Microwave output
Microwave frequency
Heater power output
Temperature adjustment
Body dimension
Cavity dimension
Body weight
Timer limits
AC220V 50Hz
Microwave 1430W, Heater 1420W
900W※1/600W/500W/200W equivalent/100W equivalent Output switching
2450MHz
Convection 1390W/Grill 1100W/Steam 350W
Fermentation (30, 35, 40, 45℃, Steam fermentation (40℃)), 100-300℃※2
500(W)x495(D)x388(H)mm
398(W)x330(D)x232(H)mm
Approx.18kg Cavity volume 30L
Microwave 900W: 10minsSteamed/Steam microwave: 30minsMicrowave 600W/Microwave 500W/Grill 30minsMicrowave 200W/Microwave100W/Convection/Ferment/Steam ferment: 90minsSuperheated steam: 60mins
TOSHIBA M
ICROWAVE O
VEN WITH SU
PERHEATED STEAM
OVEN
Instruction Manual & Cooking book
※1 Rated microwave output 900W is a short duration high power function (approximately 10 minutes) and rated continuous microwave output is 600W. The microwave power automatically changes to 600W.
※2 The operating time at 300℃ is approximately 5 minutes. Even if you set the temperature above 240℃, it will automatically lowered to 230℃. Temperature of 250℃ can be set with superheated steam. Temperature is measured at the center of the oven chamber using a thermoelectric thermometer in the empty state. (JIS measurement method is used) The temperature may not match if the temperature is measured with the food or accessories placed inside the oven. (For cooking, consider the temperature given in the separate cuisine booklet as the standard.)
●Since the actual power consumed depends on the frequency of usage, duration, quantity and the surrounding temperature, monitor the process carefully.●Annual power consumption is the value in accordance with the Energy saving laws/Specified device “Microwave” measurement methods. ●The cavity volume is based on JIS (Japan Industrial Standard) specifications.
Please check up your microwave you are using for so long!
● The power cord or plug is abnormally hot.● Food does not heat up even aftercooking starts on pressing the key.
● Oven does not switch off automatically.● Strange noise or smell occurs during use.● Oven wall or cover is dirty and sparkor smoke occurs.
● Other abnormalities or failure occurs.
Don't you havesymptoms like this?
To prevent damage due to failure, disconnect thepower cord from the power supply and contact your dealer for repair or service. (Do not allow anyone other than a qualified technician to disassemble the unit.)
Specification
1STEP
2STEP
3STEP
4STEP
5STEP
Square tray
Gridiron
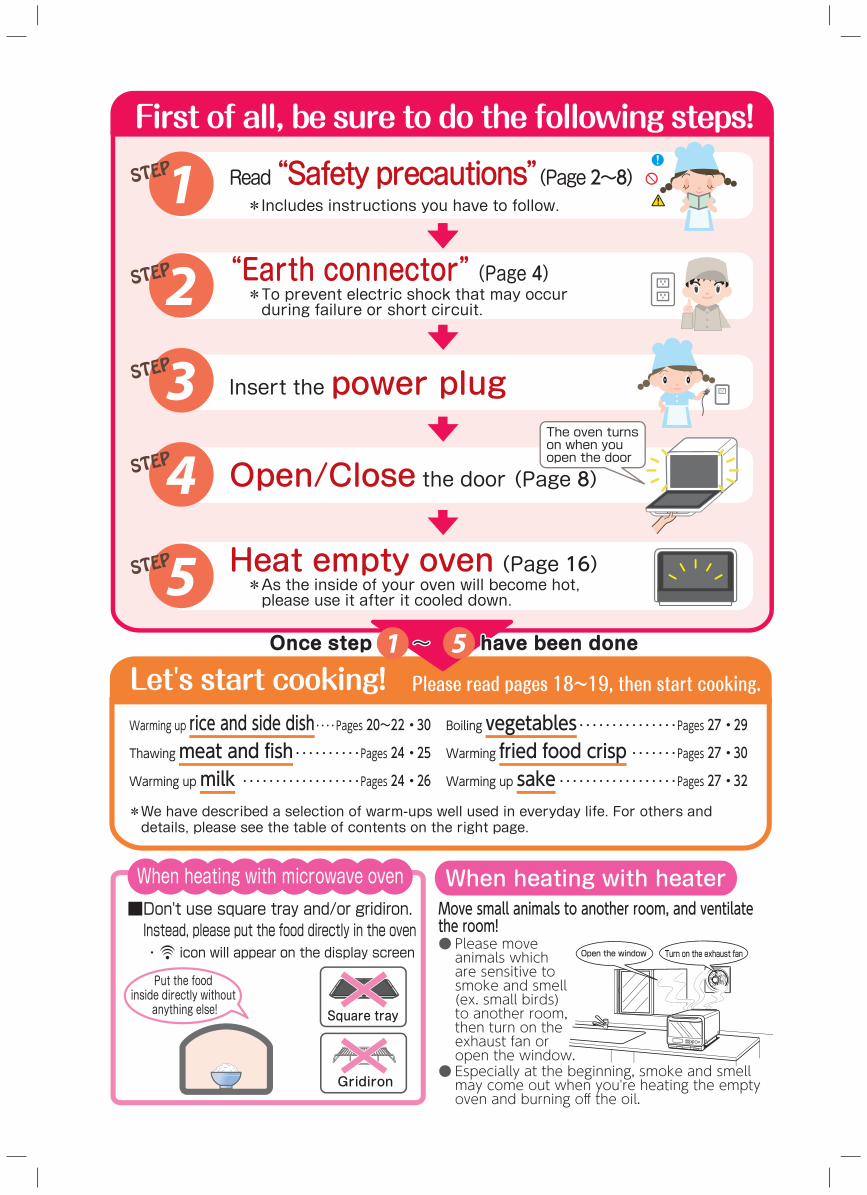
■Don't use square tray and/or gridiron.Instead, please put the food directly in the oven・ icon will appear on the display screen
When heating with microwave oven
Put the food inside directly without
anything else!
The oven turns on when you open the door
Once step have been doneOnce step have been done~~1 5
Read “Safety precautions”(Page 2~8)*Includes instructions you have to follow.
“Earth connector” (Page 4)* To prevent electric shock that may occur during failure or short circuit.
Open/Close the door (Page 8)
Insert the power plug
Heat empty oven (Page 16)* As the inside of your oven will become hot, please use it after it cooled down.
Warming up rice and side dish ・・・・Pages 20~22・30Thawing meat and fish ・・・・・・・・・・Pages 24・25Warming up milk ・・・・・・・・・・・・・・・・・・Pages 24・26
Boiling vegetables ・・・・・・・・・・・・・・・Pages 27・29Warming fried food crisp ・・・・・・・Pages 27・30Warming up sake ・・・・・・・・・・・・・・・・・・Pages 27・32
* We have described a selection of warm-ups well used in everyday life. For others and details, please see the table of contents on the right page.
Please read pages 18~19, then start cooking.
First of all, be sure to do the following steps!
Let's start cooking!
Move small animals to another room, and ventilate the room!● Please move animals which are sensitive to smoke and smell (ex. small birds) to another room, then turn on the exhaust fan or open the window.
● Especially at the beginning, smoke and smell may come out when you're heating the empty oven and burning off the oil.
Open the window Turn on the exhaust fan
When heating with heater
1
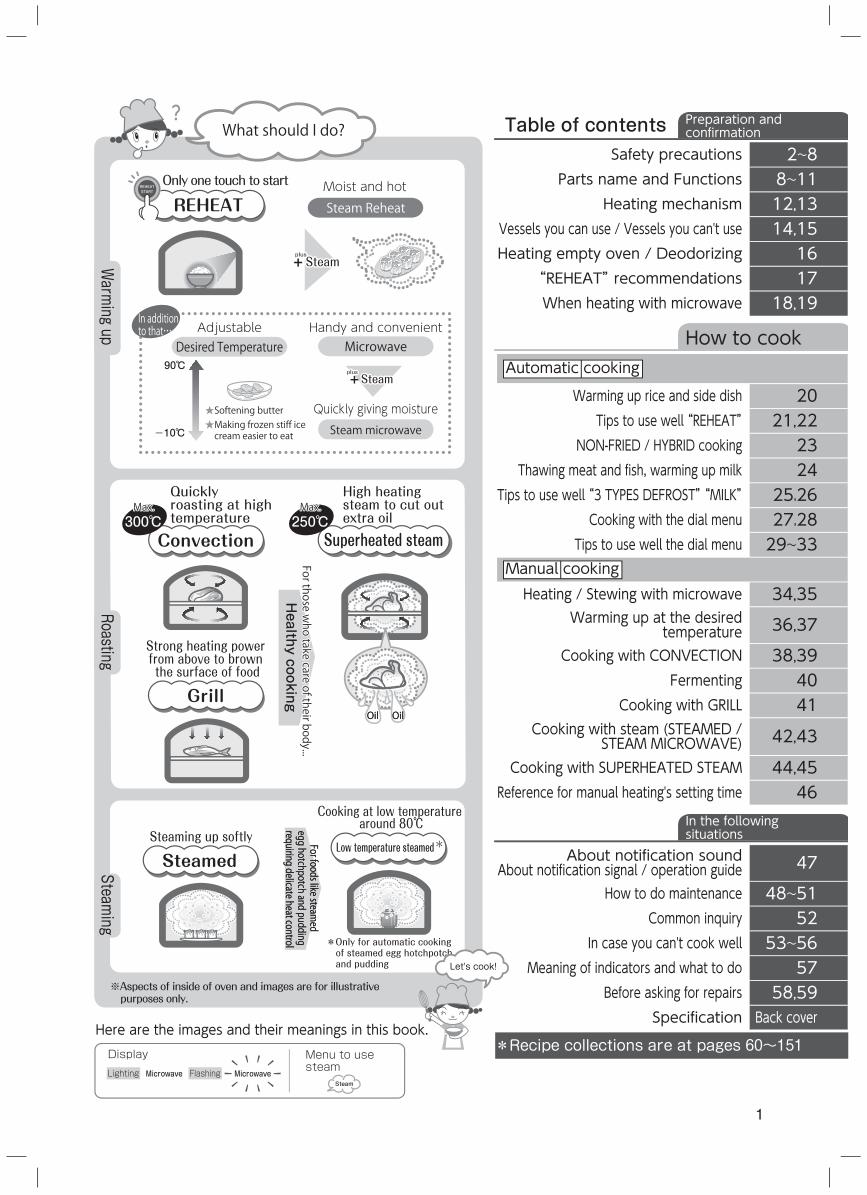
Steam Reheat
Moist and hot
Convection
REHEAT
Grill
SteamedLow temperature steamed*
Quickly roasting at high temperature
Steaming up softly
300℃
-10℃
90℃
★Making frozen stiff ice cream easier to eat
★Softening butter
Cooking at low temperature around 80℃
Only one touch to start
Desired TemperatureAdjustable
Steam microwave
Quickly giving moisture
In additionto that…
※Aspects of inside of oven and images are for illustrative purposes only.
MicrowaveHandy and convenient
Superheated steam
High heating steam to cut out extra oil250℃
++
What should I do?
*Only for automatic cooking of steamed egg hotchpotch and pudding
SteamSteamplusplus
SteamSteam+plusplus
Max.Max. Max.Max.
Strong heating power from above to brown the surface of food
For those who take care of their body...
For those who take care of their body...
Healthy cooking
OilOil OilOil
For foods like steamed
egg hotchpotch and pudding requiring delicate heat control
For foods like steamed
egg hotchpotch and pudding requiring delicate heat control
REHEATSTART
Here are the images and their meanings in this book.
Table of contents
*Recipe collections are at pages 60~151Menu to use steam
DisplayLighting Flashing
Steam
MicrowaveMicrowave
Warm
ing upRoasting
Steaming
Safety precautions 2~8Parts name and Functions 8~11
Heating mechanism 12,13Vessels you can use / Vessels you can't use 14,15Heating empty oven / Deodorizing 16
“REHEAT” recommendations 17When heating with microwave 18,19
Warming up rice and side dish 20Tips to use well “REHEAT” 21,22
NON-FRIED / HYBRID cooking 23Thawing meat and fish, warming up milk 24
Tips to use well “3 TYPES DEFROST” “MILK” 25,26Cooking with the dial menu 27,28
Tips to use well the dial menu 29~33
Heating / Stewing with microwave 34,35Warming up at the desired
temperature 36,37
Cooking with CONVECTION 38,39Fermenting 40
Cooking with GRILL 41Cooking with steam (STEAMED /
STEAM MICROWAVE) 42,43
Cooking with SUPERHEATED STEAM 44,45Reference for manual heating's setting time 46
About notification soundAbout notification signal / operation guide 47
How to do maintenance 48~51Common inquiry 52
In case you can't cook well 53~56Meaning of indicators and what to do 57
Before asking for repairs 58,59Specification Back cover
How to cook
In the following situations
Preparation and confirmation
Let's cook!
Automatic cooking
Manual cooking
2
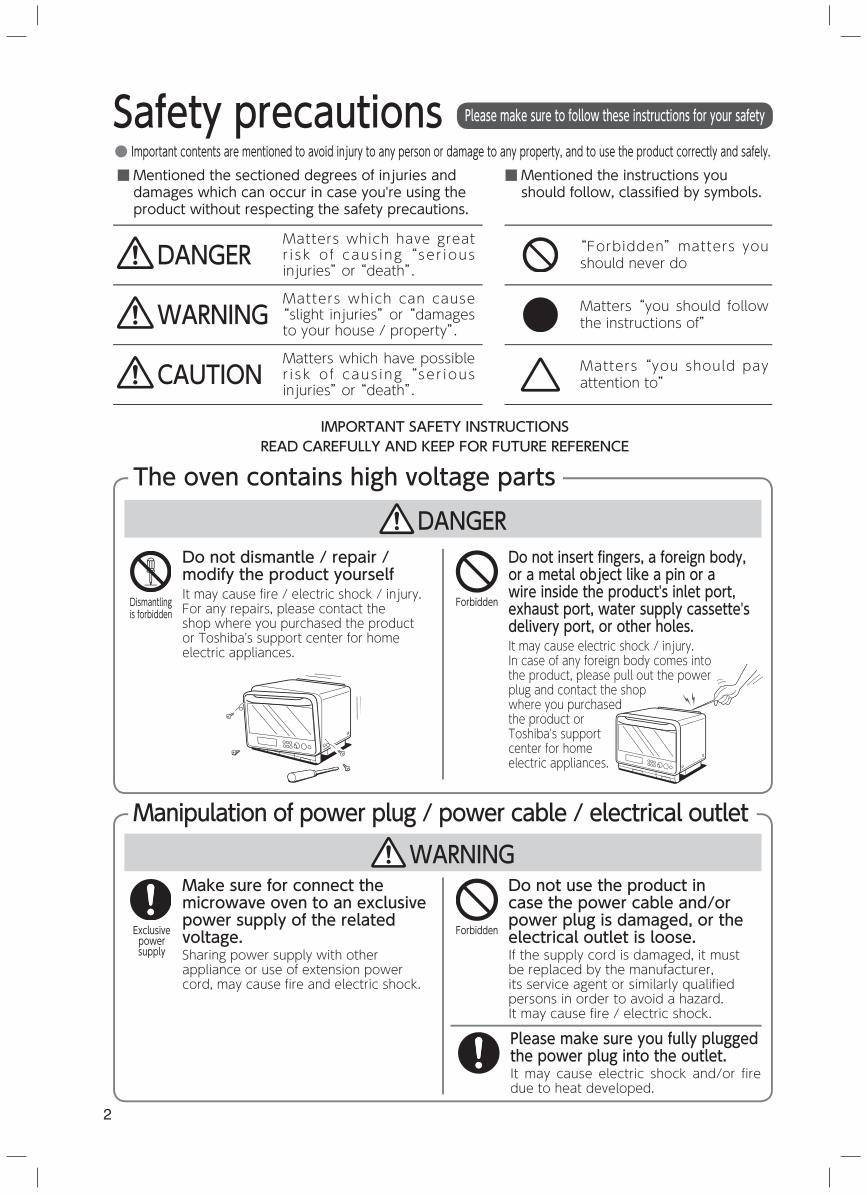
Safety precautions Please make sure to follow these instructions for your safety
DANGER
WARNINGDo not use the product in case the power cable and/or power plug is damaged, or the electrical outlet is loose.If the supply cord is damaged, it must be replaced by the manufacturer, its service agent or similarly qualified persons in order to avoid a hazard.It may cause fire / electric shock.
Do not dismantle / repair / modify the product yourselfIt may cause fire / electric shock / injury.For any repairs, please contact the shop where you purchased the product or Toshiba's support center for home electric appliances.
Dismantling is forbidden
Forbidden
Make sure for connect the microwave oven to an exclusive power supply of the related voltage.Sharing power supply with other appliance or use of extension power cord, may cause fire and electric shock.
Exclusive power supply
Forbidden
● Important contents are mentioned to avoid injury to any person or damage to any property, and to use the product correctly and safely.
Do not insert fingers, a foreign body, or a metal object like a pin or a wire inside the product's inlet port, exhaust port, water supply cassette's delivery port, or other holes. It may cause electric shock / injury.In case of any foreign body comes into the product, please pull out the power plug and contact the shop where you purchased the product or Toshiba's support center for home electric appliances.
Manipulation of power plug / power cable / electrical outlet
Please make sure you fully plugged the power plug into the outlet.It may cause electric shock and/or fire due to heat developed.
■ Mentioned the sectioned degrees of injuries and damages which can occur in case you're using the product without respecting the safety precautions.
DANGERMatters which have great r i sk of caus ing “ser ious injuries” or “death”.
WARNINGMatters which can cause “slight injuries” or “damages to your house / property”.
CAUTIONMatters which have possible r i sk of caus ing “ser ious injuries” or “death”.
■ Mentioned the instructions you should follow, classified by symbols.
“Forbidden” matters you should never do
Matters “you should follow the instructions of”
Matters “you should pay attention to”
The oven contains high voltage parts
IMPORTANT SAFETY INSTRUCTIONSREAD CAREFULLY AND KEEP FOR FUTURE REFERENCE
3
Preparation and confirm
ationSafety precautions
Forbidden
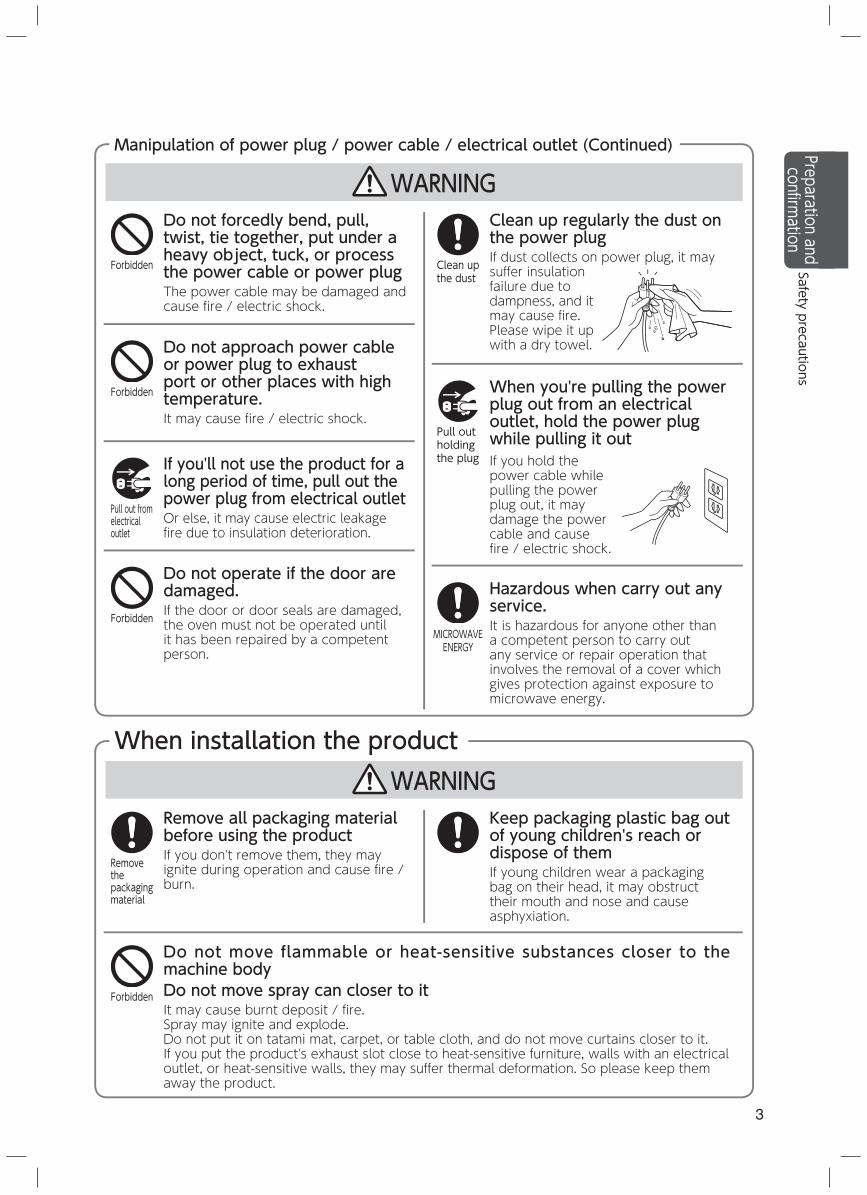
Do not forcedly bend, pull, twist, tie together, put under a heavy object, tuck, or process the power cable or power plugThe power cable may be damaged and cause fire / electric shock.
Forbidden
Do not approach power cable or power plug to exhaust port or other places with high temperature.It may cause fire / electric shock.
Forbidden
Do not operate if the door are damaged.If the door or door seals are damaged, the oven must not be operated until it has been repaired by a competent person.
Clean up regularly the dust on the power plugIf dust collects on power plug, it may suffer insulation failure due to dampness, and it may cause fire. Please wipe it up with a dry towel.
Clean up the dust
MICROWAVE ENERGY
Manipulation of power plug / power cable / electrical outlet (Continued)
If you'll not use the product for a long period of time, pull out the power plug from electrical outletOr else, it may cause electric leakage fire due to insulation deterioration.
Pull out from electrical outlet
Keep packaging plastic bag out of young children's reach or dispose of themIf young children wear a packaging bag on their head, it may obstruct their mouth and nose and cause asphyxiation.
When installation the product
Remove all packaging material before using the productIf you don't remove them, they may ignite during operation and cause fire / burn.
Remove the packaging material
Do not move flammable or heat-sensitive substances closer to the machine bodyDo not move spray can closer to itIt may cause burnt deposit / fire.Spray may ignite and explode.Do not put it on tatami mat, carpet, or table cloth, and do not move curtains closer to it.If you put the product's exhaust slot close to heat-sensitive furniture, walls with an electrical outlet, or heat-sensitive walls, they may suffer thermal deformation. So please keep them away the product.
Forbidden
When you're pulling the power plug out from an electrical outlet, hold the power plug while pulling it outIf you hold the power cable while pulling the power plug out, it may damage the power cable and cause fire / electric shock.
Pull out holding the plug
Hazardous when carry out any service.It is hazardous for anyone other than a competent person to carry out any service or repair operation that involves the removal of a cover which gives protection against exposure to microwave energy.
WARNING
WARNING
4
Safety precautions
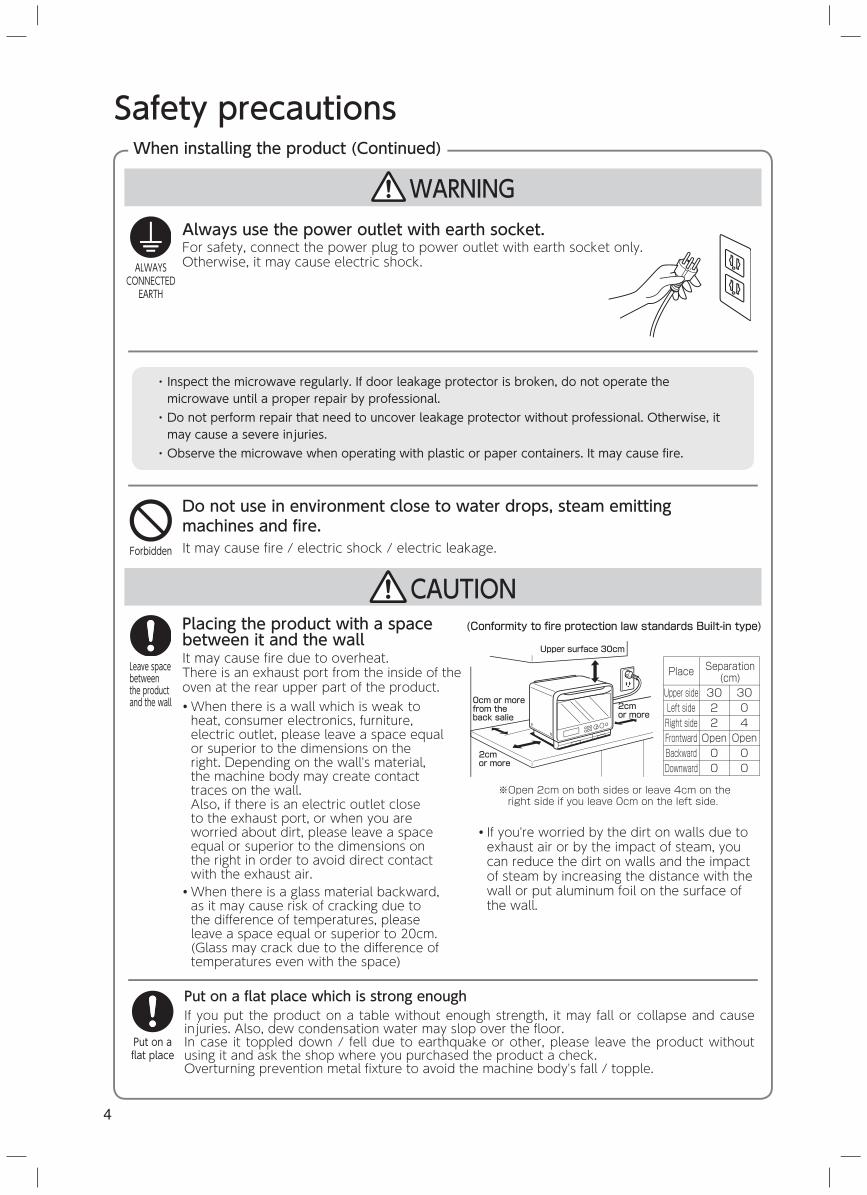
Always use the power outlet with earth socket.For safety, connect the power plug to power outlet with earth socket only.Otherwise, it may cause electric shock.ALWAYS
CONNECTED EARTH
When installing the product (Continued)
・ Inspect the microwave regularly. If door leakage protector is broken, do not operate the microwave until a proper repair by professional.
・ Do not perform repair that need to uncover leakage protector without professional. Otherwise, it may cause a severe injuries.
・ Observe the microwave when operating with plastic or paper containers. It may cause fire.
Upper surface 30cm
(Conformity to fire protection law standards Built-in type)
2cm or more
0cm or more from the back salie
2cm or more
Separation(cm)Place
Upper side 3022Open00
Left sideRight sideFrontwardBackwardDownward
※Open 2cm on both sides or leave 4cm on the right side if you leave 0cm on the left side.
3004Open00
Do not use in environment close to water drops, steam emitting machines and fire.It may cause fire / electric shock / electric leakage.Forbidden
WARNING
CAUTIONPlacing the product with a space between it and the wallIt may cause fire due to overheat.There is an exhaust port from the inside of the oven at the rear upper part of the product.
Leave space between the product and the wall ・ When there is a wall which is weak to
heat, consumer electronics, furniture, electric outlet, please leave a space equal or superior to the dimensions on the right. Depending on the wall's material, the machine body may create contact traces on the wall.Also, if there is an electric outlet close to the exhaust port, or when you are worried about dirt, please leave a space equal or superior to the dimensions on the right in order to avoid direct contact with the exhaust air.
・ When there is a glass material backward, as it may cause risk of cracking due to the difference of temperatures, please leave a space equal or superior to 20cm. (Glass may crack due to the difference of temperatures even with the space)
Put on a flat place which is strong enoughIf you put the product on a table without enough strength, it may fall or collapse and cause injuries. Also, dew condensation water may slop over the floor.In case it toppled down / fell due to earthquake or other, please leave the product without using it and ask the shop where you purchased the product a check.Overturning prevention metal fixture to avoid the machine body's fall / topple.
Put on a flat place
・ If you're worried by the dirt on walls due to exhaust air or by the impact of steam, you can reduce the dirt on walls and the impact of steam by increasing the distance with the wall or put aluminum foil on the surface of the wall.
5
Preparation and confirm
ationSafety precautions
While using
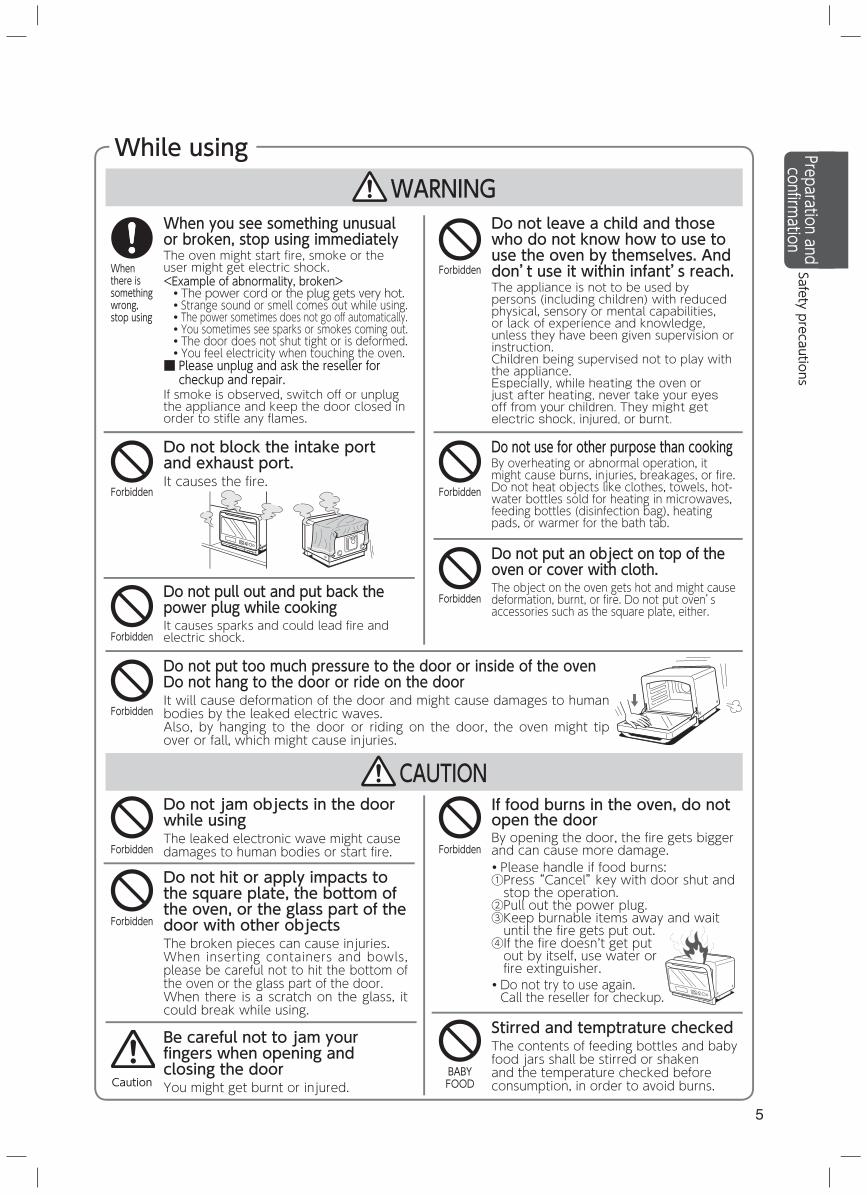
If food burns in the oven, do not open the doorBy opening the door, the fire gets bigger and can cause more damage.・ Please handle if food burns:① Press “Cancel” key with door shut and stop the operation.②Pull out the power plug.③ Keep burnable items away and wait until the fire gets put out.④ If the fire doesn’t get put out by itself, use water or fire extinguisher.
・ Do not try to use again. Call the reseller for checkup.
Do not pull out and put back the power plug while cookingIt causes sparks and could lead fire and electric shock.Forbidden
Do not leave a child and those who do not know how to use to use the oven by themselves. And don’t use it within infant’s reach.The appliance is not to be used by persons (including children) with reduced physical, sensory or mental capabilities, or lack of experience and knowledge, unless they have been given supervision or instruction.Children being supervised not to play with the appliance.Especially, while heating the oven or just after heating, never take your eyes off from your children. They might get electric shock, injured, or burnt.
Forbidden
Do not jam objects in the door while usingThe leaked electronic wave might cause damages to human bodies or start fire.Forbidden
Do not put an object on top of the oven or cover with cloth.The object on the oven gets hot and might cause deformation, burnt, or fire. Do not put oven’s accessories such as the square plate, either.
Forbidden
Forbidden
Do not hit or apply impacts to the square plate, the bottom of the oven, or the glass part of the door with other objectsThe broken pieces can cause injuries.When inserting containers and bowls, please be careful not to hit the bottom of the oven or the glass part of the door.When there is a scratch on the glass, it could break while using.
Forbidden
Stirred and temptrature checkedThe contents of feeding bottles and baby food jars shall be stirred or shaken and the temperature checked before consumption, in order to avoid burns.
BABYFOOD
When you see something unusual or broken, stop using immediatelyThe oven might start fire, smoke or the user might get electric shock.<Example of abnormality, broken>・ The power cord or the plug gets very hot.・ Strange sound or smell comes out while using.・ The power sometimes does not go off automatically.・ You sometimes see sparks or smokes coming out.・ The door does not shut tight or is deformed.・ You feel electricity when touching the oven.■ Please unplug and ask the reseller for
checkup and repair.If smoke is observed, switch off or unplug the appliance and keep the door closed in order to stifle any flames.
When there is something wrong, stop using
Do not put too much pressure to the door or inside of the ovenDo not hang to the door or ride on the doorIt will cause deformation of the door and might cause damages to human bodies by the leaked electric waves.Also, by hanging to the door or riding on the door, the oven might tip over or fall, which might cause injuries.
Forbidden
Do not block the intake port and exhaust port.It causes the fire.
Forbidden
Do not use for other purpose than cookingBy overheating or abnormal operation, it might cause burns, injuries, breakages, or fire. Do not heat objects like clothes, towels, hot-water bottles sold for heating in microwaves, feeding bottles (disinfection bag), heating pads, or warmer for the bath tab.
Forbidden
Be careful not to jam your fingers when opening and closing the doorYou might get burnt or injured.Caution
WARNING
CAUTION
6
Safety precautionsWhile microwave heating
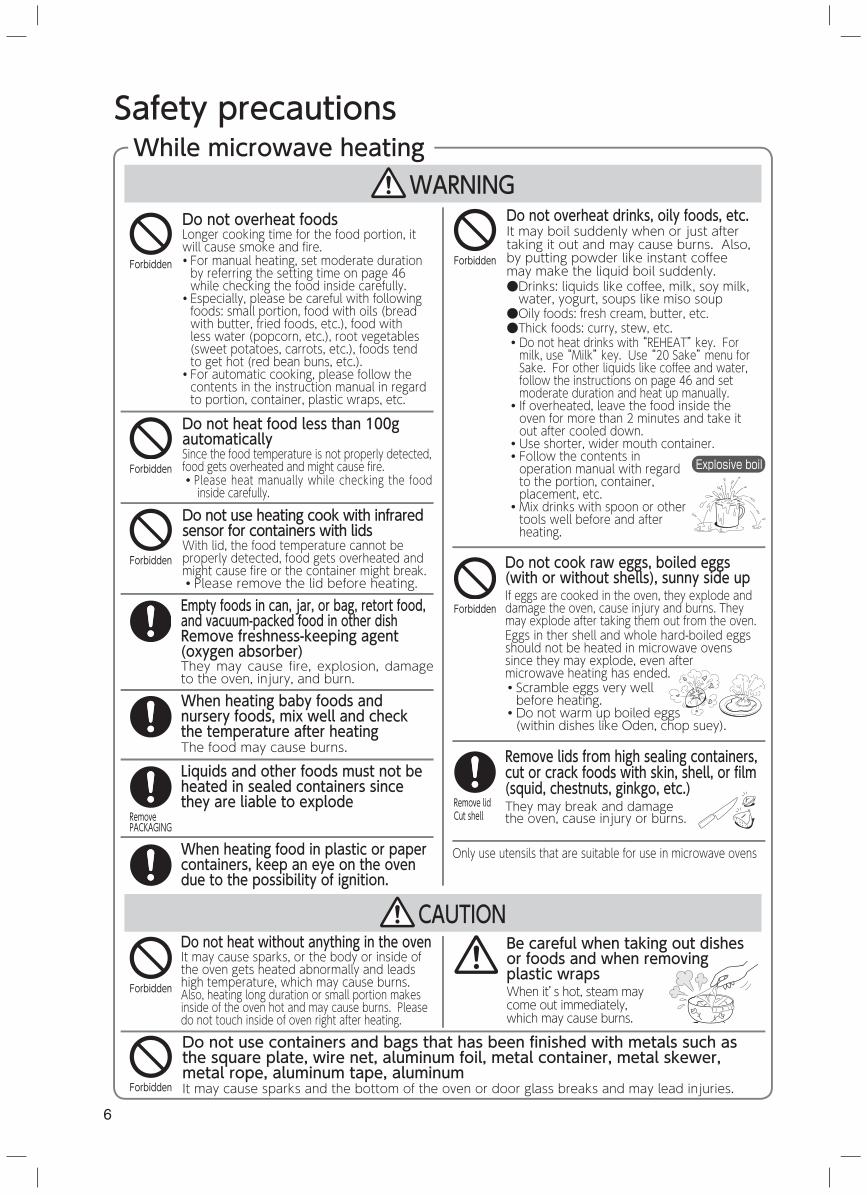
Empty foods in can, jar, or bag, retort food, and vacuum-packed food in other dishRemove freshness-keeping agent (oxygen absorber)They may cause fire, explosion, damage to the oven, injury, and burn.
Do not cook raw eggs, boiled eggs (with or without shells), sunny side upIf eggs are cooked in the oven, they explode and damage the oven, cause injury and burns. They may explode after taking them out from the oven.Eggs in ther shell and whole hard-boiled eggs should not be heated in microwave ovens since they may explode, even after microwave heating has ended.・ Scramble eggs very well before heating.・ Do not warm up boiled eggs (within dishes like Oden, chop suey).
Forbidden
Be careful when taking out dishes or foods and when removing plastic wrapsWhen it’s hot, steam may come out immediately, which may cause burns.
Do not use containers and bags that has been finished with metals such as the square plate, wire net, aluminum foil, metal container, metal skewer, metal rope, aluminum tape, aluminumIt may cause sparks and the bottom of the oven or door glass breaks and may lead injuries.Forbidden
Forbidden
Do not overheat drinks, oily foods, etc.It may boil suddenly when or just after taking it out and may cause burns. Also, by putting powder like instant coffee may make the liquid boil suddenly.● Drinks: liquids like coffee, milk, soy milk, water, yogurt, soups like miso soup●Oily foods: fresh cream, butter, etc.●Thick foods: curry, stew, etc.・ Do not heat drinks with “REHEAT” key. For milk, use “Milk” key. Use “20 Sake” menu for Sake. For other liquids like coffee and water, follow the instructions on page 46 and set moderate duration and heat up manually.・ If overheated, leave the food inside the oven for more than 2 minutes and take it out after cooled down.・ Use shorter, wider mouth container.・ Follow the contents in operation manual with regard to the portion, container, placement, etc.・ Mix drinks with spoon or other tools well before and after heating.
Do not heat food less than 100g automaticallySince the food temperature is not properly detected, food gets overheated and might cause fire.・Please heat manually while checking the food inside carefully.
Forbidden
Remove lids from high sealing containers, cut or crack foods with skin, shell, or film (squid, chestnuts, ginkgo, etc.)They may break and damage the oven, cause injury or burns.
Remove lidCut shell
Do not heat without anything in the ovenIt may cause sparks, or the body or inside of the oven gets heated abnormally and leads high temperature, which may cause burns.Also, heating long duration or small portion makes inside of the oven hot and may cause burns. Please do not touch inside of oven right after heating.
Forbidden
Do not overheat foodsLonger cooking time for the food portion, it will cause smoke and fire.・ For manual heating, set moderate duration by referring the setting time on page 46 while checking the food inside carefully.
・ Especially, please be careful with following foods: small portion, food with oils (bread with butter, fried foods, etc.), food with less water (popcorn, etc.), root vegetables (sweet potatoes, carrots, etc.), foods tend to get hot (red bean buns, etc.).
・ For automatic cooking, please follow the contents in the instruction manual in regard to portion, container, plastic wraps, etc.
Forbidden
Explosive boil
Do not use heating cook with infrared sensor for containers with lidsWith lid, the food temperature cannot be properly detected, food gets overheated and might cause fire or the container might break.・Please remove the lid before heating.
Forbidden
When heating baby foods and nursery foods, mix well and check the temperature after heatingThe food may cause burns.
WARNING
CAUTION
Remove PACKAGING
Liquids and other foods must not be heated in sealed containers since they are liable to explode
When heating food in plastic or paper containers, keep an eye on the oven due to the possibility of ignition.
Only use utensils that are suitable for use in microwave ovens
7
Preparation and confirm
ationSafety precautions
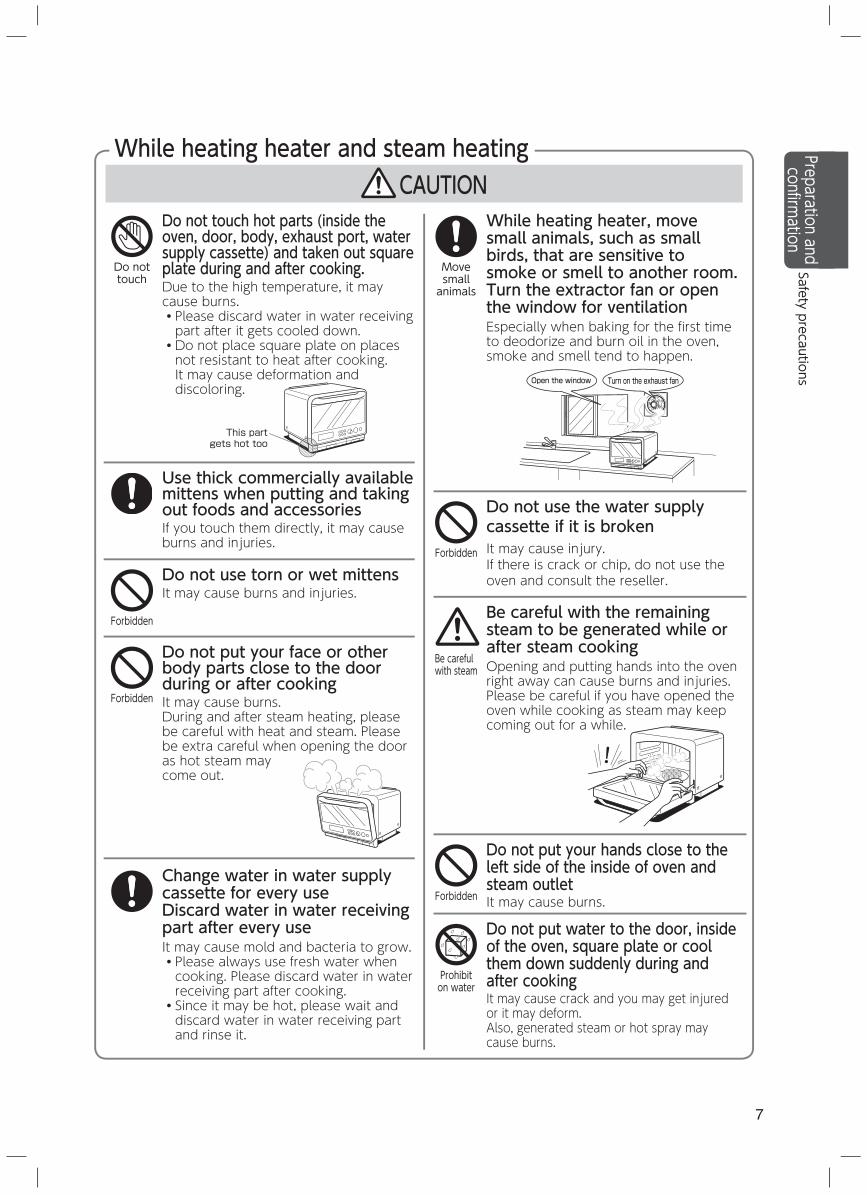
While heating heater, move small animals, such as small birds, that are sensitive to smoke or smell to another room.Turn the extractor fan or open the window for ventilationEspecially when baking for the first time to deodorize and burn oil in the oven, smoke and smell tend to happen.
Do not touch hot parts (inside the oven, door, body, exhaust port, water supply cassette) and taken out square plate during and after cooking.Due to the high temperature, it may cause burns.・ Please discard water in water receiving part after it gets cooled down.・ Do not place square plate on places not resistant to heat after cooking. It may cause deformation and discoloring.
Do not touch
Do not put water to the door, inside of the oven, square plate or cool them down suddenly during and after cookingIt may cause crack and you may get injured or it may deform.Also, generated steam or hot spray may cause burns.
Prohibit on water
Do not use the water supply cassette if it is brokenIt may cause injury.If there is crack or chip, do not use the oven and consult the reseller.
Forbidden
Be careful with the remaining steam to be generated while or after steam cookingOpening and putting hands into the oven right away can cause burns and injuries.Please be careful if you have opened the oven while cooking as steam may keep coming out for a while.
Be careful with steam
Move small
animals
Do not use torn or wet mittensIt may cause burns and injuries.
Forbidden
Do not put your hands close to the left side of the inside of oven and steam outletIt may cause burns.Forbidden
Change water in water supply cassette for every useDiscard water in water receiving part after every useIt may cause mold and bacteria to grow.・ Please always use fresh water when cooking. Please discard water in water receiving part after cooking.
・ Since it may be hot, please wait and discard water in water receiving part and rinse it.
While heating heater and steam heating
Open the window Turn on the exhaust fan
This partgets hot too
Do not put your face or other body parts close to the door during or after cookingIt may cause burns.During and after steam heating, please be careful with heat and steam. Please be extra careful when opening the door as hot steam may come out.
Forbidden
CAUTION
Use thick commercially available mittens when putting and taking out foods and accessoriesIf you touch them directly, it may cause burns and injuries.
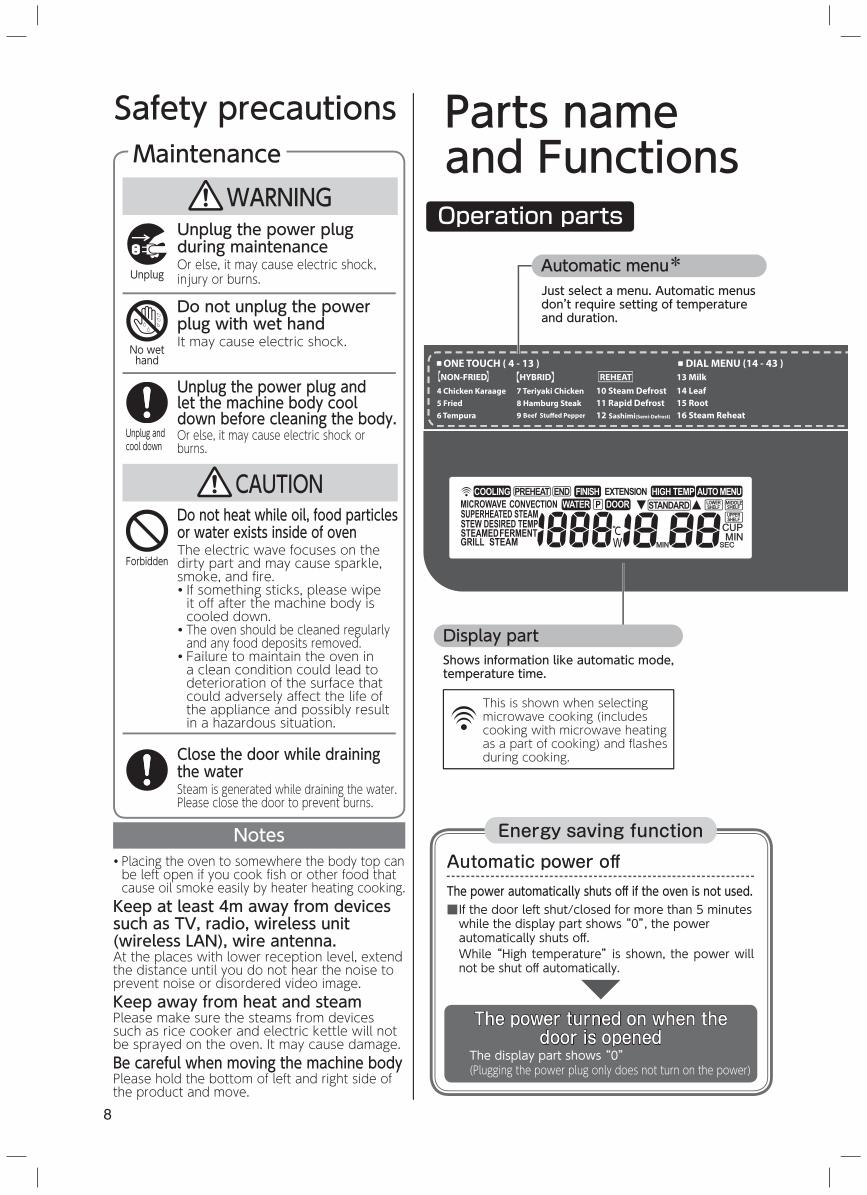
Shows information like automatic mode, temperature time.
Display part
This is shown when selecting microwave cooking (includes cooking with microwave heating as a part of cooking) and flashes during cooking.
Operation parts
Just select a menu. Automatic menus don,t require setting of temperature and duration.
Automatic menu*
8
・ Placing the oven to somewhere the body top can be left open if you cook fish or other food that cause oil smoke easily by heater heating cooking.Keep at least 4m away from devices such as TV, radio, wireless unit (wireless LAN), wire antenna.At the places with lower reception level, extend the distance until you do not hear the noise to prevent noise or disordered video image.Keep away from heat and steamPlease make sure the steams from devices such as rice cooker and electric kettle will not be sprayed on the oven. It may cause damage.Be careful when moving the machine bodyPlease hold the bottom of left and right side of the product and move.
Notes
Safety precautions Parts nameand Functions
Unplug the power plug during maintenanceOr else, it may cause electric shock, injury or burns.Unplug
Maintenance
Do not unplug the power plug with wet handIt may cause electric shock.No wet
hand
Unplug the power plug and let the machine body cool down before cleaning the body.Or else, it may cause electric shock or burns.
Unplug and cool down
Do not heat while oil, food particles or water exists inside of ovenThe electric wave focuses on the dirty part and may cause sparkle, smoke, and fire.・ If something sticks, please wipe it off after the machine body is cooled down.
・ The oven should be cleaned regularly and any food deposits removed.・ Failure to maintain the oven in a clean condition could lead to deterioration of the surface that could adversely affect the life of the appliance and possibly result in a hazardous situation.
Forbidden
Close the door while draining the waterSteam is generated while draining the water.Please close the door to prevent burns.
Automatic power off
The power automatically shuts off if the oven is not used.■ If the door left shut/closed for more than 5 minutes while the display part shows “0”, the power automatically shuts off .
While “High temperature” is shown, the power will not be shut off automatically.
Energy saving function
CAUTION
WARNING
The power turned on when the door is opened
The display part shows “0”(Plugging the power plug only does not turn on the power)
1COOKED RICE 2 DISH 3 2 DISHESDECISIONSETTING
ONE TOUCH
MICROWAVE CONVECTIONFERMENT
GRILL
MILK3 TYPESDEFROST
CANCEL
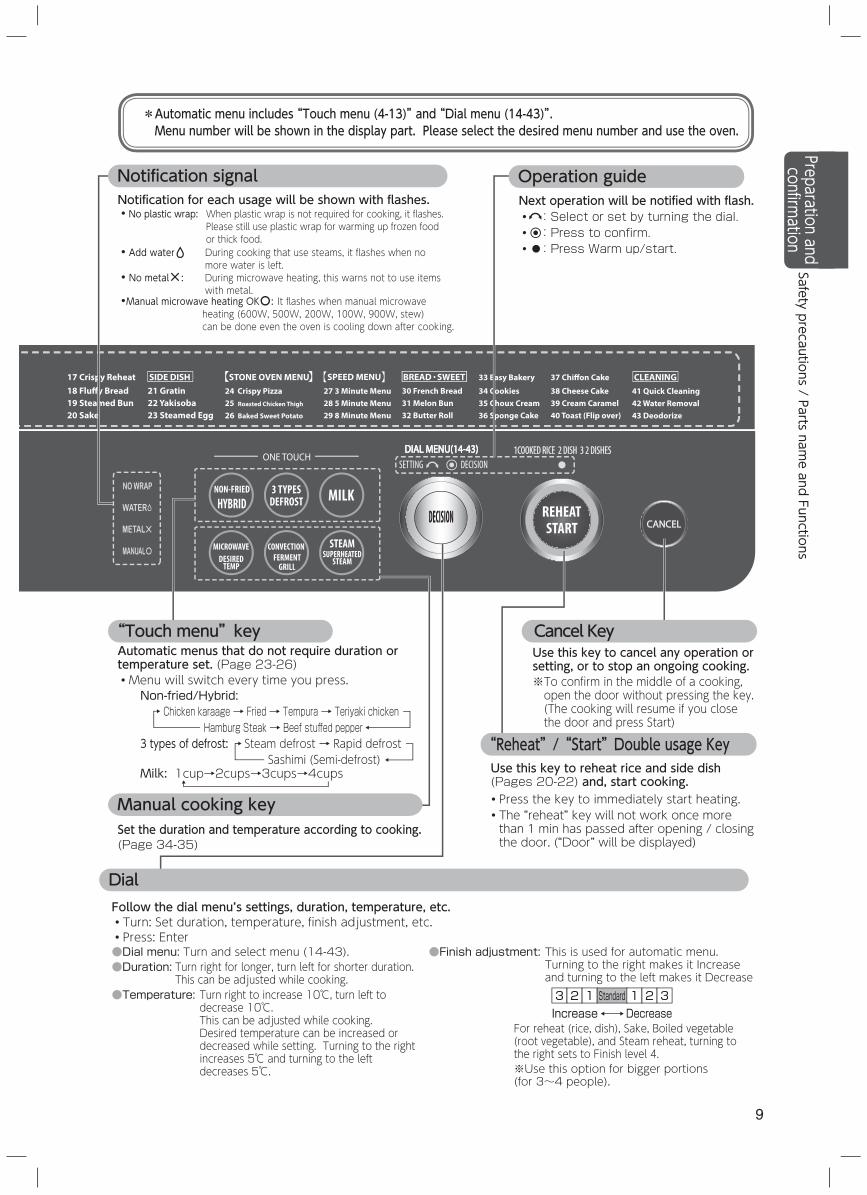
●Dial menu: Turn and select menu (14-43).●Duration: Turn right for longer, turn left for shorter duration.
This can be adjusted while cooking.●Temperature: Turn right to increase 10℃, turn left to
decrease 10℃.This can be adjusted while cooking.Desired temperature can be increased or decreased while setting. Turning to the right increases 5℃ and turning to the left decreases 5℃.
・Press the key to immediately start heating.・The “reheat” key will not work once more than 1 min has passed after opening / closing the door. (“Door” will be displayed)
Set the duration and temperature according to cooking.(Page 34-35)
Cancel KeyUse this key to cancel any operation or setting, or to stop an ongoing cooking.※To confirm in the middle of a cooking, open the door without pressing the key.(The cooking will resume if you close the door and press Start)
Increase Decrease3 2 1 1 2 3
Dial
Standard
●Finish adjustment: This is used for automatic menu.Turning to the right makes it Increase and turning to the left makes it Decrease
For reheat (rice, dish), Sake, Boiled vegetable (root vegetable), and Steam reheat, turning to the right sets to Finish level 4.※Use this option for bigger portions (for 3~4 people).
Follow the dial menu’s settings, duration, temperature, etc.・Turn: Set duration, temperature, finish adjustment, etc.・Press: Enter
Manual cooking key
Automatic menus that do not require duration or temperature set. (Page 23-26)・Menu will switch every time you press.
Non-fried/Hybrid: Chicken karaage → Fried → Tempura → Teriyaki chicken
Hamburg Steak → Beef stuffed pepper3 types of defrost: Steam defrost → Rapid defrost
Sashimi (Semi-defrost)Milk: 1cup→2cups→3cups→4cups
“Touch menu”key
“Reheat”/“Start”Double usage KeyUse this key to reheat rice and side dish (Pages 20-22) and, start cooking.
Next operation will be notified with flash.・ :Select or set by turning the dial.・ :Press to confirm.・ :Press Warm up/start.
Notification for each usage will be shown with flashes.・No plastic wrap: When plastic wrap is not required for cooking, it flashes.
Please still use plastic wrap for warming up frozen food or thick food.
・Add water During cooking that use steams, it flashes when no more water is left.
・No metal : During microwave heating, this warns not to use items with metal.
・Manual microwave heating OK : It flashes when manual microwave heating (600W, 500W, 200W, 100W, 900W, stew) can be done even the oven is cooling down after cooking.
Notification signal Operation guide
9
* Automatic menu includes “Touch menu (4-13)” and “Dial menu (14-43)”.Menu number will be shown in the display part. Please select the desired menu number and use the oven.
Preparation and confirm
ationSafety precautions / Parts nam
e and Functions
10
Parts name and Functions (continued)
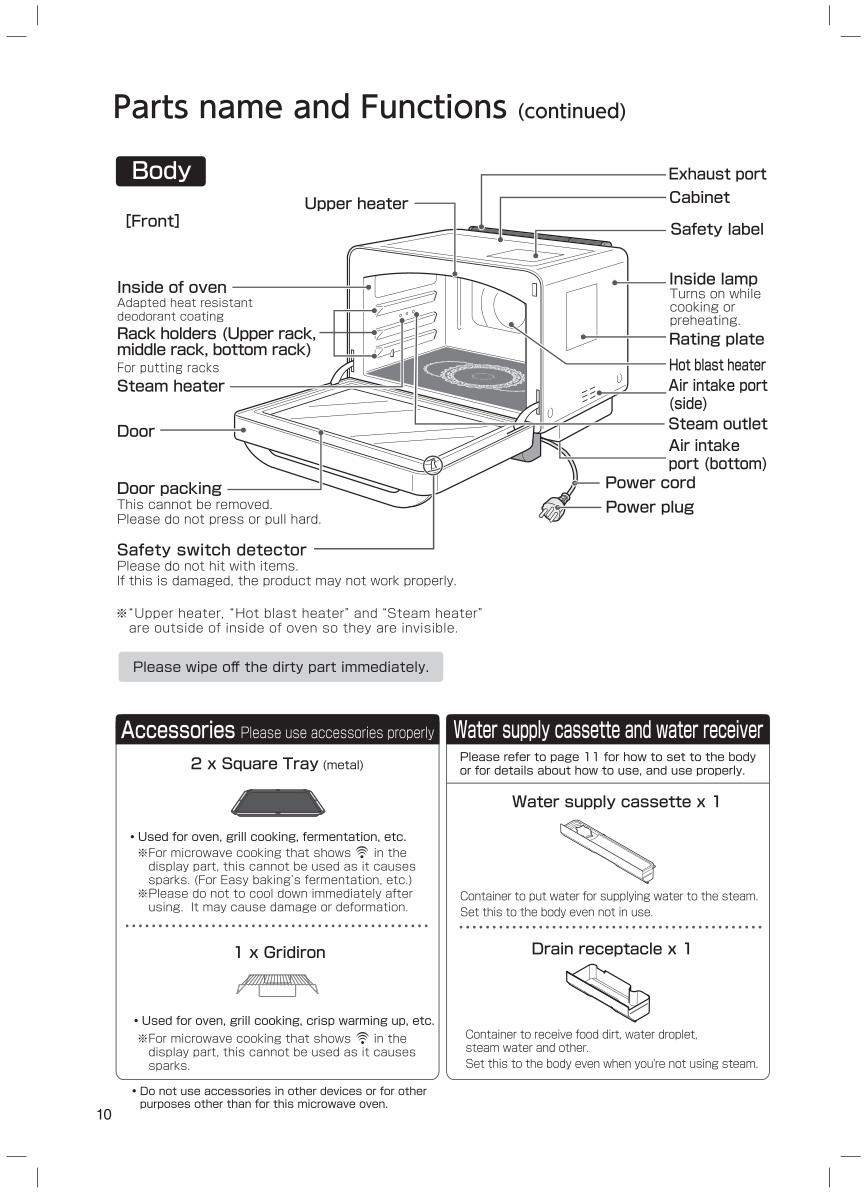
Body
[Front]
Inside of ovenAdapted heat resistant deodorant coating
Hot blast heater
Cabinet
Safety label
Rating plate
Door
Rack holders (Upper rack, middle rack, bottom rack)For putting racks
Exhaust port
Steam heater
Steam outlet
※‶Upper heater, ‶Hot blast heater” and “Steam heater” are outside of inside of oven so they are invisible.
Water supply cassette x 1
Drain receptacle x 1
Container to put water for supplying water to the steam.Set this to the body even not in use.
Container to receive food dirt, water droplet, steam water and other.Set this to the body even when you're not using steam.
Air intake port (bottom)
・Used for oven, grill cooking, fermentation, etc.※For microwave cooking that shows in the display part, this cannot be used as it causes sparks. (For Easy baking’s fermentation, etc.)※Please do not to cool down immediately after using. It may cause damage or deformation.
Please refer to page 11 for how to set to the body or for details about how to use, and use properly.
・Used for oven, grill cooking, crisp warming up, etc.※For microwave cooking that shows in the display part, this cannot be used as it causes sparks.
2 x Square Tray (metal)
1 x Gridiron
Air intake port (side)
Safety switch detectorPlease do not hit with items. If this is damaged, the product may not work properly.
Upper heater
Inside lampTurns on while cooking or preheating.
Door packingThis cannot be removed.Please do not press or pull hard.
Accessories Please use accessories properly Water supply cassette and water receiver
Please wipe off the dirty part immediately.
・Do not use accessories in other devices or for other purposes other than for this microwave oven.
Power plugPower cord
11
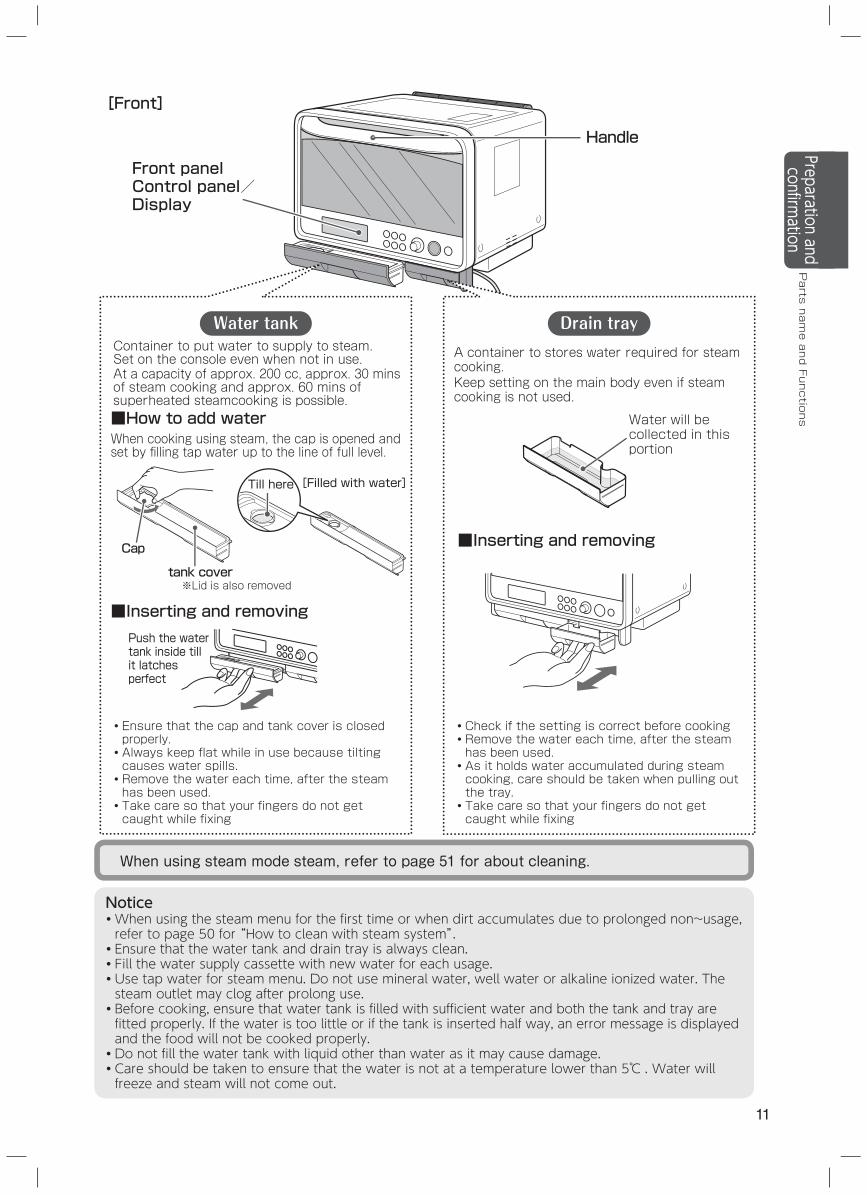
When using steam mode steam, refer to page 51 for about cleaning.
[Front]
Handle
Front panel Control panel/Display
・Check if the setting is correct before cooking・Remove the water each time, after the steam has been used.
・As it holds water accumulated during steam cooking, care should be taken when pulling out the tray.
・Take care so that your fingers do not get caught while fixing
A container to stores water required for steam cooking. Keep setting on the main body even if steam cooking is not used.
■Inserting and removing
When cooking using steam, the cap is opened and set by filling tap water up to the line of full level.
・Ensure that the cap and tank cover is closed properly.・Always keep flat while in use because tilting causes water spills.・Remove the water each time, after the steam has been used.・Take care so that your fingers do not get caught while fixing
■Inserting and removing
■How to add water
Container to put water to supply to steam.Set on the console even when not in use.At a capacity of approx. 200 cc, approx. 30 mins of steam cooking and approx. 60 mins of superheated steamcooking is possible.
Water will be collected in this portion
Cap
tank cover
[Filled with water]
※Lid is also removed
Till here
Push the water tank inside till it latches perfect
Drain trayWater tank
Notice・ When using the steam menu for the first time or when dirt accumulates due to prolonged non~usage, refer to page 50 for “How to clean with steam system”.
・ Ensure that the water tank and drain tray is always clean.・ Fill the water supply cassette with new water for each usage.・ Use tap water for steam menu. Do not use mineral water, well water or alkaline ionized water. The steam outlet may clog after prolong use.
・ Before cooking, ensure that water tank is filled with sufficient water and both the tank and tray are fitted properly. If the water is too little or if the tank is inserted half way, an error message is displayed and the food will not be cooked properly.
・ Do not fill the water tank with liquid other than water as it may cause damage.・ Care should be taken to ensure that the water is not at a temperature lower than 5℃ . Water will freeze and steam will not come out.
Preparation and confirm
ationParts name and Functions
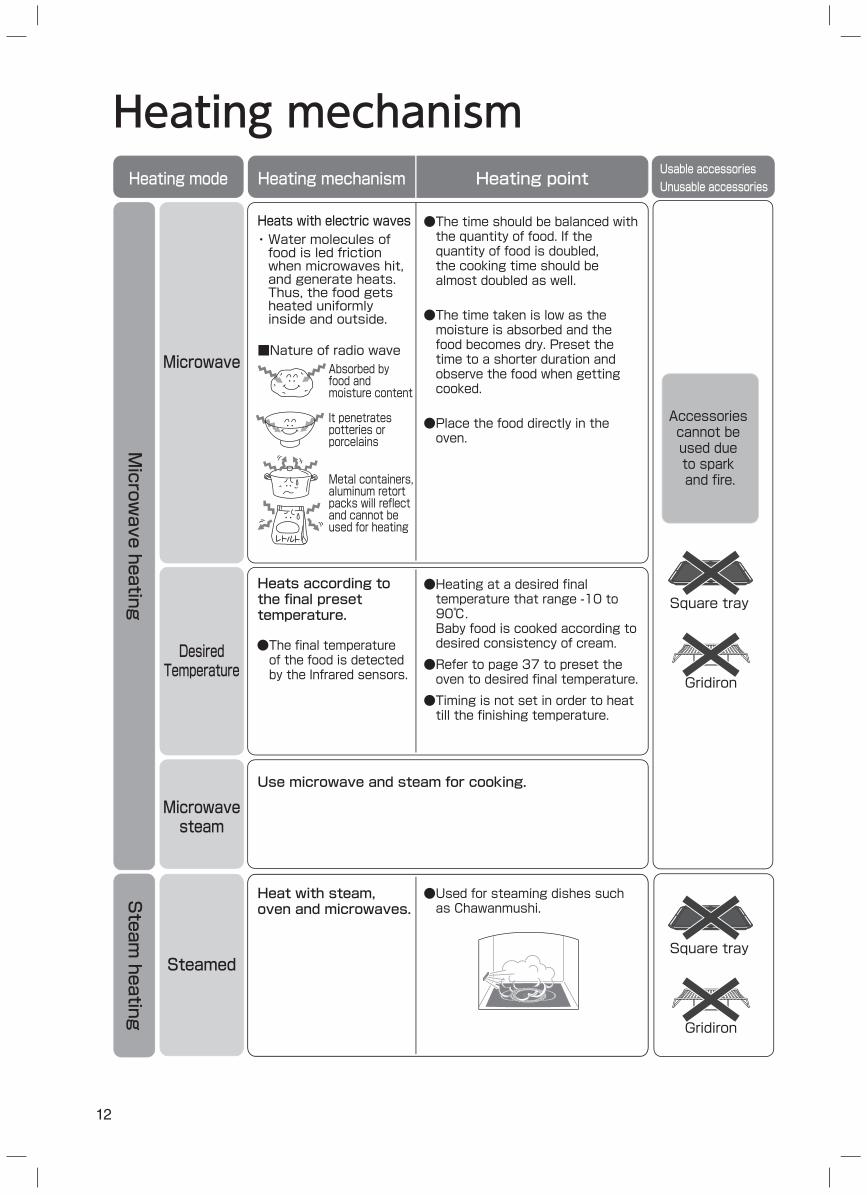
・Water molecules of food is led friction when microwaves hit, and generate heats.Thus, the food gets heated uniformly inside and outside.
●The time should be balanced with the quantity of food. If the quantity of food is doubled, the cooking time should be almost doubled as well.
●The time taken is low as the moisture is absorbed and the food becomes dry. Preset the time to a shorter duration and observe the food when getting cooked.
●Place the food directly in the oven.
Heating mode Heating mechanism Heating point
Microw
ave heatingSteam
heating
Heats with electric waves
■Nature of radio wave
●Heating at a desired final temperature that range -10 to 90℃.Baby food is cooked according todesired consistency of cream.●Refer to page 37 to preset the oven to desired final temperature.●Timing is not set in order to heat till the finishing temperature.
Heats according to the final preset temperature.
Absorbed by food and moisture content
It penetratespotteries or porcelains
Metal containers, aluminum retort packs will reflect and cannot be used for heating
Accessories cannot be used due to spark and fire.
Square tray
Gridiron
Square tray
Gridiron
Microwave
DesiredTemperature
●The final temperature of the food is detected by the Infrared sensors.
Usable accessoriesUnusable accessories
●Used for steaming dishes such as Chawanmushi.
Microwavesteam
Use microwave and steam for cooking.
Steamed
Heat with steam, oven and microwaves.
12
Heating mechanism
Heater heating
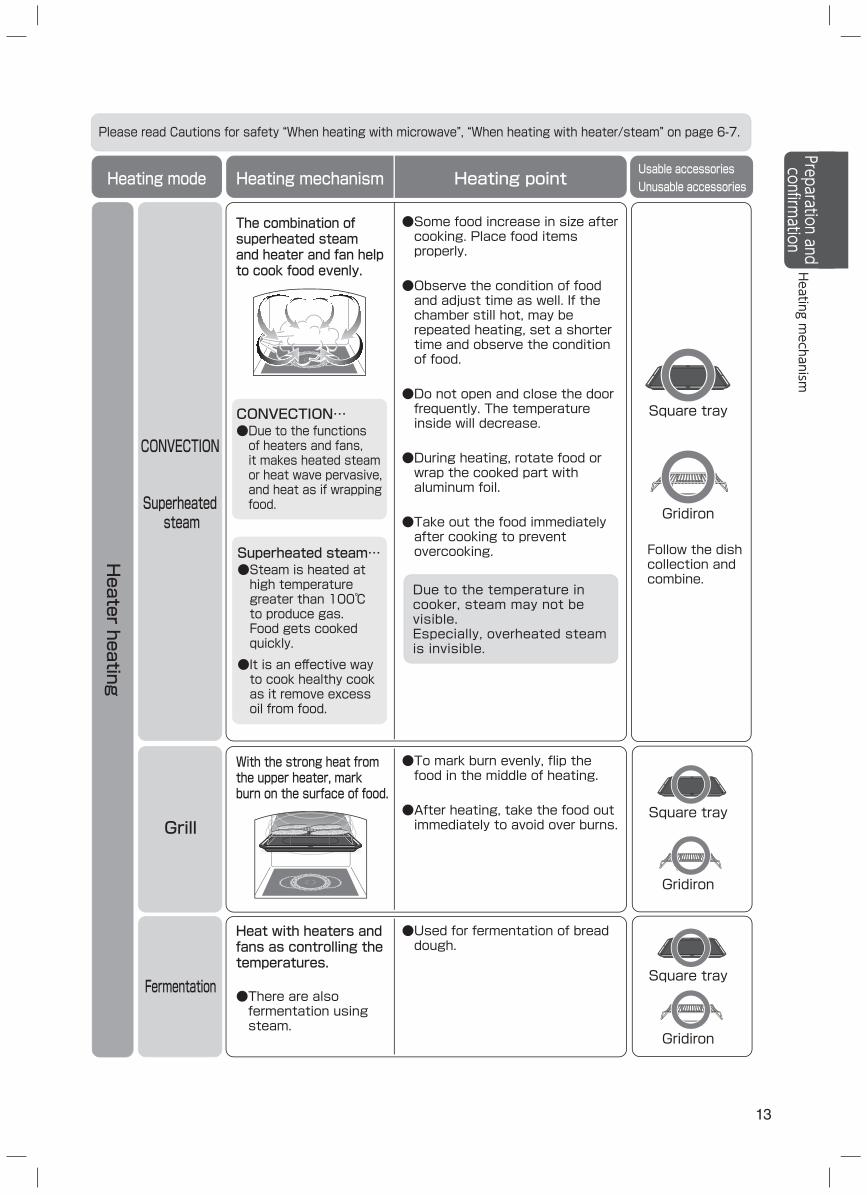
Follow the dish collection and combine.
The combination of superheated steam and heater and fan help to cook food evenly.
●Some food increase in size after cooking. Place food items properly.
●Observe the condition of food and adjust time as well. If thechamber still hot, may be repeated heating, set a shorter time and observe the condition of food.
●Do not open and close the door frequently. The temperature inside will decrease.
●During heating, rotate food or wrap the cooked part with aluminum foil.
●Take out the food immediately after cooking to prevent overcooking.
●To mark burn evenly, flip the food in the middle of heating.
●After heating, take the food out immediately to avoid over burns.Grill
Superheated steam
CONVECTION
Fermentation
Superheated steam…●Steam is heated at high temperature greater than 100℃ to produce gas. Food gets cooked quickly.
●It is an effective way to cook healthy cook as it remove excess oil from food.
CONVECTION…●Due to the functions of heaters and fans, it makes heated steam or heat wave pervasive, and heat as if wrapping food.
With the strong heat from the upper heater, mark burn on the surface of food.
Heat with heaters and fans as controlling the temperatures.
●Used for fermentation of bread dough.
●There are also fermentation using steam.
Due to the temperature in cooker, steam may not be visible.Especially, overheated steamis invisible.
Please read Cautions for safety “When heating with microwave”, “When heating with heater/steam” on page 6-7.
Heating mode Heating mechanism Heating point Usable accessoriesUnusable accessories
Square tray
Gridiron
Square tray
Gridiron
Square tray
Gridiron
13
Preparation and confirm
ationHeating m
echanism
14
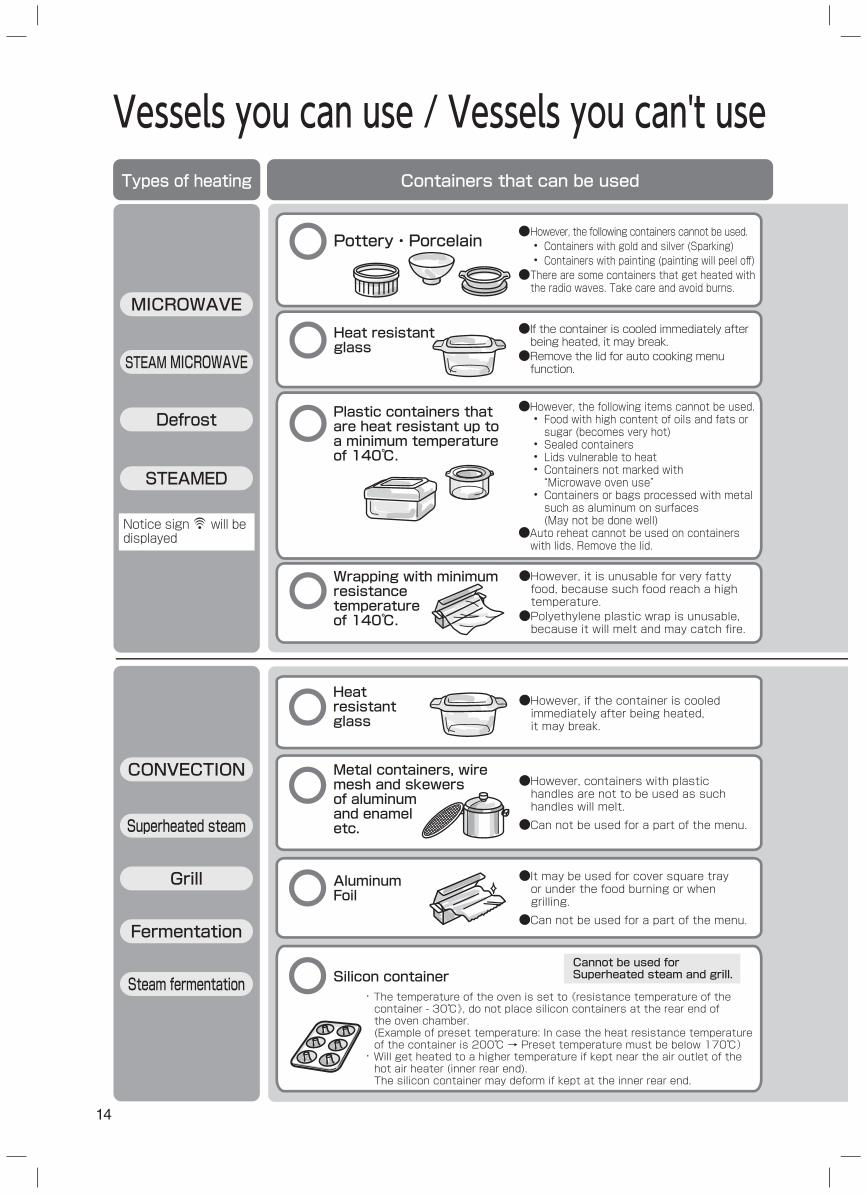
Vessels you can use / Vessels you can't useTypes of heating Containers that can be used
MICROWAVE
STEAM MICROWAVE
Defrost
CONVECTION
Notice sign will be displayed
Superheated steam
Grill
Fermentation
Steam fermentation
STEAMED
●However, the following containers cannot be used.• Containers with gold and silver (Sparking)• Containers with painting (painting will peel off)
●There are some containers that get heated with the radio waves. Take care and avoid burns.
Pottery・Porcelain
●If the container is cooled immediately after being heated, it may break.
●Remove the lid for auto cooking menu function.
Heat resistant glass
●However, if the container is cooled immediately after being heated, it may break.
Heat resistant glass
●However, containers with plastic handles are not to be used as such handles will melt.
●Can not be used for a part of the menu.
Metal containers, wire mesh and skewers of aluminum and enamel etc.
●It may be used for cover square tray or under the food burning or when grilling.
●Can not be used for a part of the menu.
Aluminum Foil
Silicon container
●However, it is unusable for very fatty food, because such food reach a high temperature.
●Polyethylene plastic wrap is unusable, because it will melt and may catch fire.
Wrapping with minimum resistance temperatureof 140℃.
・The temperature of the oven is set to 《resistance temperature of the container - 30℃》, do not place silicon containers at the rear end of the oven chamber.(Example of preset temperature: In case the heat resistance temperature of the container is 200℃ → Preset temperature must be below 170℃)
・Will get heated to a higher temperature if kept near the air outlet of the hot air heater (inner rear end). The silicon container may deform if kept at the inner rear end.
Cannot be used for Superheated steam and grill.
Plastic containers that are heat resistant up to a minimum temperature of 140℃.
●However, the following items cannot be used.• Food with high content of oils and fats or sugar (becomes very hot)• Sealed containers• Lids vulnerable to heat• Containers not marked with “Microwave oven use”• Containers or bags processed with metal such as aluminum on surfaces (May not be done well)
●Auto reheat cannot be used on containers with lids. Remove the lid.
15
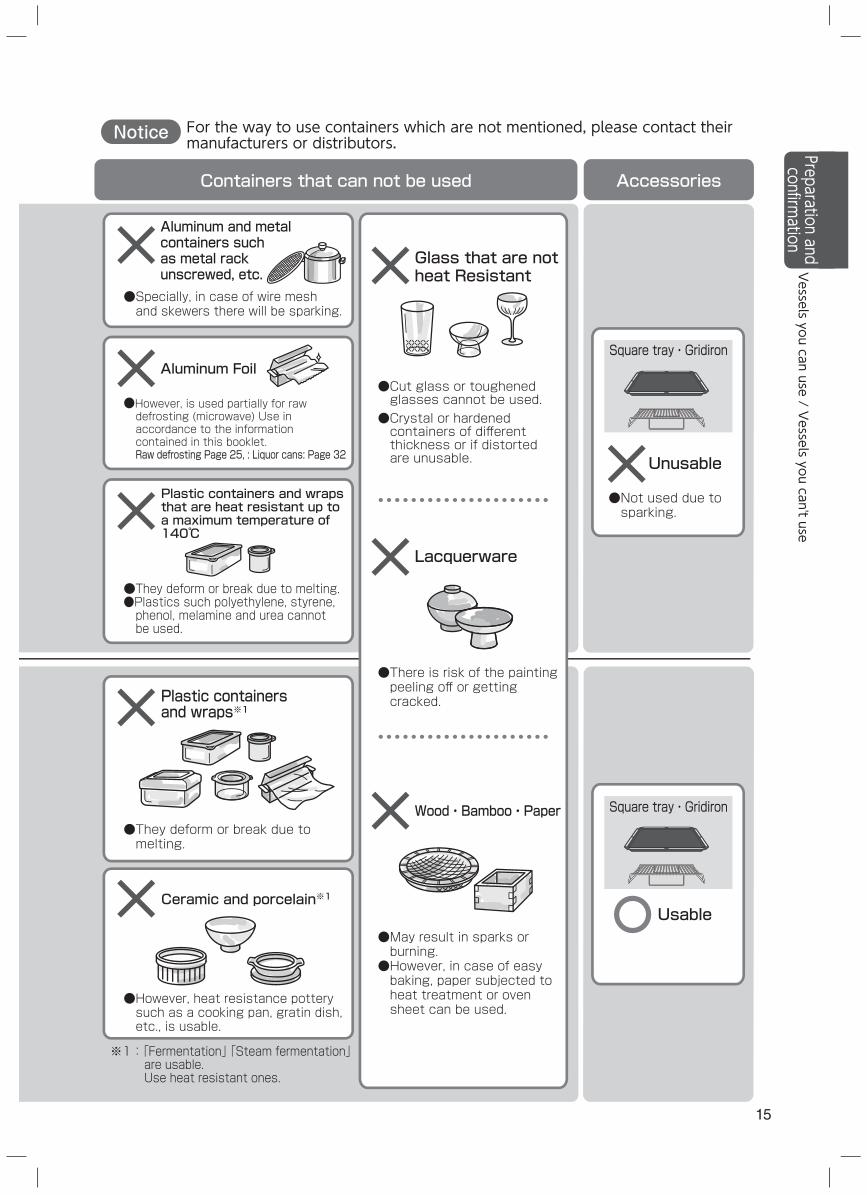
AccessoriesContainers that can not be used
Square tray・Gridiron
Unusable
●Not used due to sparking.
●Specially, in case of wire mesh and skewers there will be sparking.
●However, is used partially for raw defrosting (microwave) Use in accordance to the information contained in this booklet.
Raw defrosting Page 25, : Liquor cans: Page 32
●They deform or break due to melting.●Plastics such polyethylene, styrene,phenol, melamine and urea cannot be used.
Usable
Plastic containers and wraps※1
Aluminum and metal containers such as metal rack unscrewed, etc.
Aluminum Foil●Cut glass or toughened glasses cannot be used.
●Crystal or hardened containers of different thickness or if distorted are unusable.
Glass that are not heat Resistant
Wood・Bamboo・Paper
●May result in sparks or burning.
●However, in case of easy baking, paper subjected to heat treatment or oven sheet can be used.
Lacquerware
●There is risk of the painting peeling off or getting cracked.
Plastic containers and wraps that are heat resistant up to a maximum temperature of 140℃
●They deform or break due to melting.
Ceramic and porcelain※1
●However, heat resistance pottery such as a cooking pan, gratin dish, etc., is usable.
※1:「Fermentation」 「Steam fermentation」 are usable.Use heat resistant ones.
Square tray・Gridiron
Notice For the way to use containers which are not mentioned, please contact their manufacturers or distributors. Preparation and
confirmation
Vessels you can use / V
essels you can't use
16
CUPMIN
Open the window Switch on the fan
CUPMIN
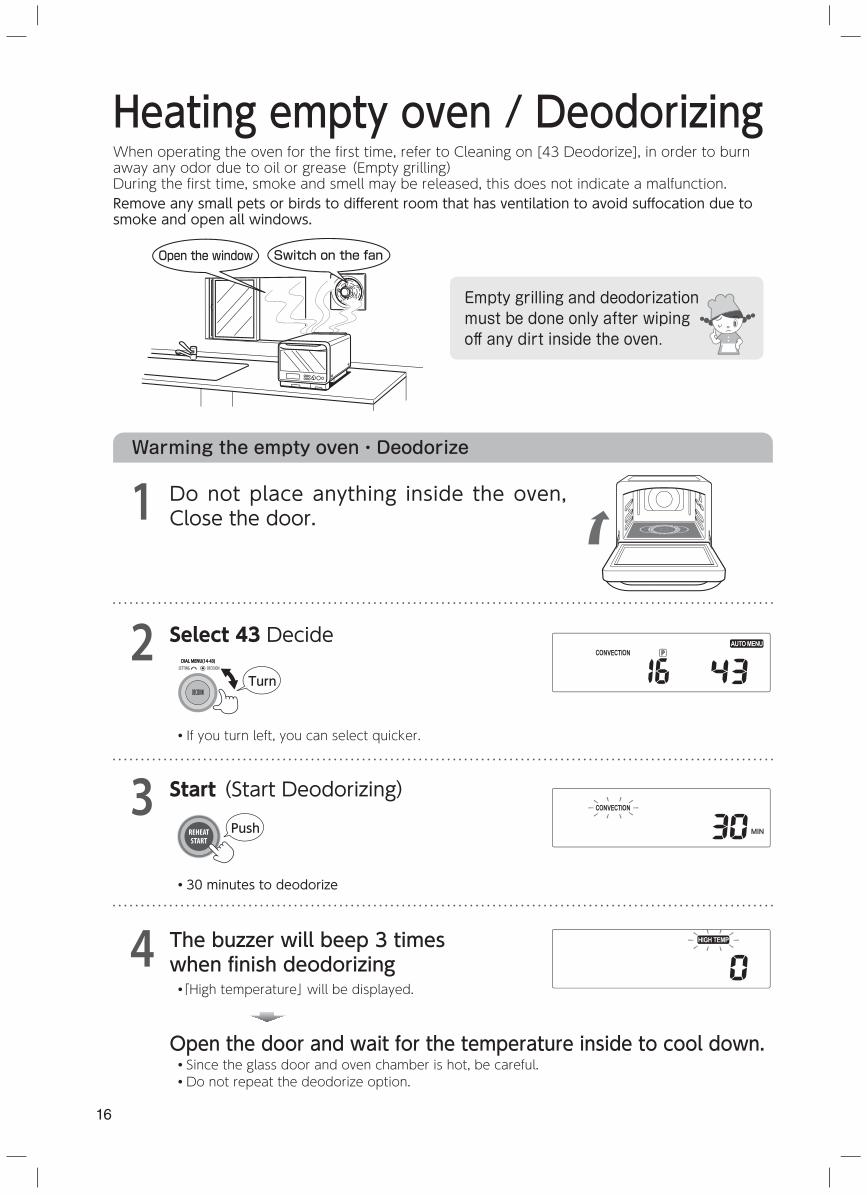
Heating empty oven / Deodorizing
Warming the empty oven・Deodorize
Do not place anything inside the oven, Close the door.1
3
2 Select 43 Decide
4 The buzzer will beep 3 times when fi nish deodorizing・ 「High temperature」 will be displayed.
Open the door and wait for the temperature inside to cool down.・ Since the glass door and oven chamber is hot, be careful.・ Do not repeat the deodorize option.
Start (Start Deodorizing)
・30 minutes to deodorize
・If you turn left, you can select quicker.
Empty grilling and deodorization must be done only after wiping off any dirt inside the oven.
When operating the oven for the first time, refer to Cleaning on [43 Deodorize], in order to burn away any odor due to oil or grease (Empty grilling)During the first time, smoke and smell may be released, this does not indicate a malfunction.Remove any small pets or birds to different room that has ventilation to avoid suffocation due to smoke and open all windows.
DECISIONSETTING
Turn
Push
17
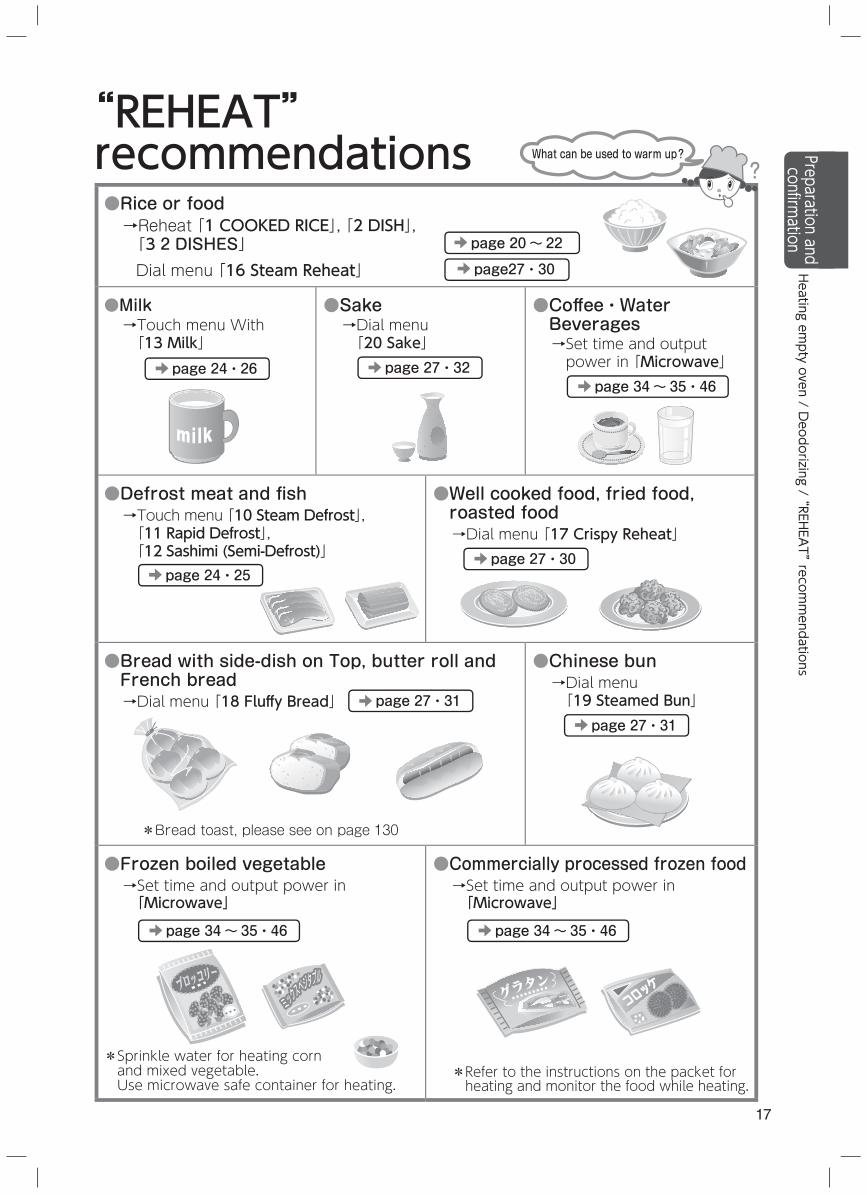
● Rice or food→ Reheat 「1 COOKED RICE」, 「2 DISH」,「3 2 DISHES」Dial menu 「16 Steam Reheat」
●Milk→ Touch menu With「13 Milk」
page 24・26
●Sake→ Dial menu「20 Sake」
page 27・32
● Coff ee・WaterBeverages→ Set time and output power in 「Microwave」
page 34 ~ 35・46
● Defrost meat and fi sh→ Touch menu 「10 Steam Defrost」,「11 Rapid Defrost」,「12 Sashimi (Semi-Defrost)」
page 24・25
● Well cooked food, fried food, roasted food→ Dial menu 「17 Crispy Reheat」
page 27・30
● Bread with side-dish on Top, butter roll and French bread→ Dial menu 「18 Fluff y Bread」 page 27・31
*Bread toast, please see on page 130
● Chinese bun→ Dial menu「19 Steamed Bun」 page 27・31
● Frozen boiled vegetable→ Set time and output power in 「Microwave」
page 34 ~ 35・46
* Sprinkle water for heating corn and mixed vegetable.Use microwave safe container for heating.
● Commercially processed frozen food→ Set time and output power in 「Microwave」
page 34 ~ 35・46
* Refer to the instructions on the packet for heating and monitor the food while heating.
page 20 ~ 22
page27・30
“REHEAT” recommendations What can be used to warm up ?
Heating empty oven / D
eodorizing / “REHEA
T” recommendations
Preparation and confirm
ation
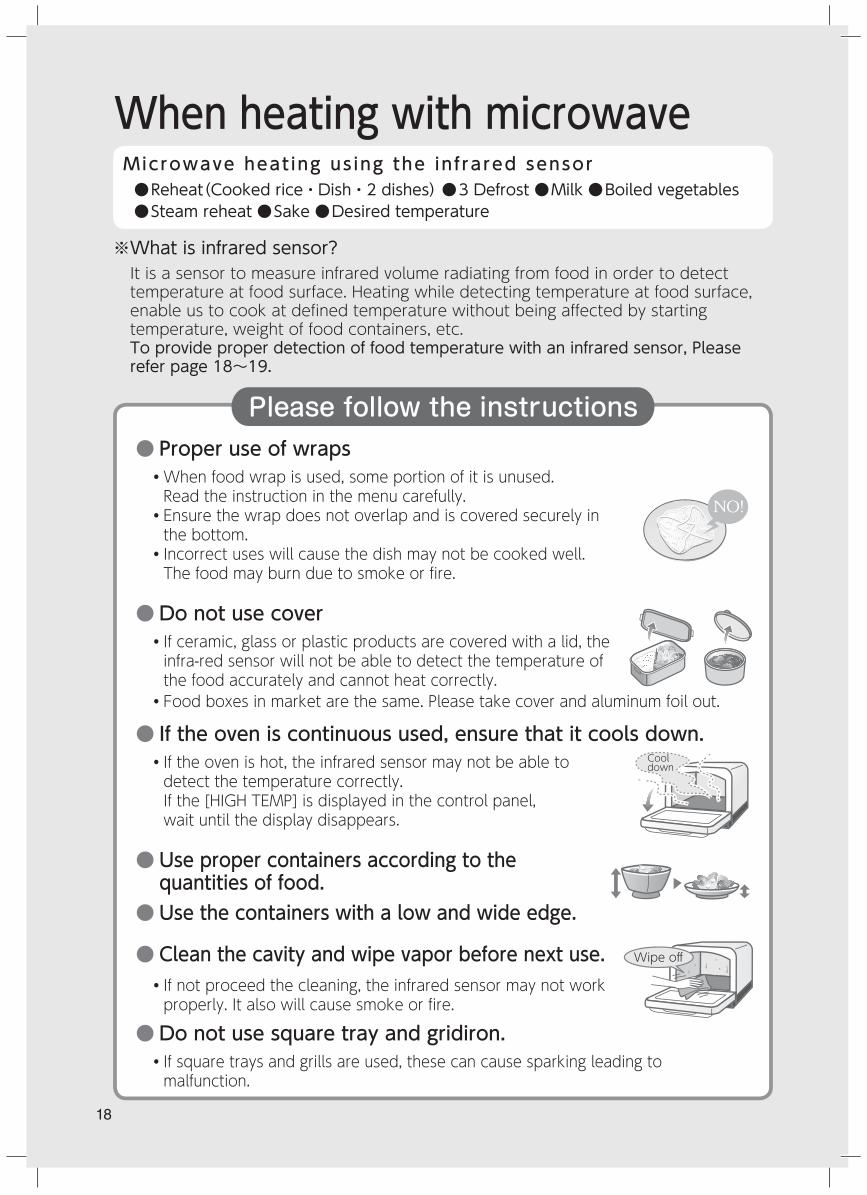
18
When heating with microwave●Reheat(Cooked rice・Dish・2 dishes) ●3 Defrost ●Milk ●Boiled vegetables ●Steam reheat ●Sake ●Desired temperature
※What is infrared sensor?It is a sensor to measure infrared volume radiating from food in order to detect temperature at food surface. Heating while detecting temperature at food surface, enable us to cook at defined temperature without being affected by starting temperature, weight of food containers, etc. To provide proper detection of food temperature with an infrared sensor, Please refer page 18~19.
Microwave heat ing us ing the in f rared sensor
Please follow the instructions● Proper use of wraps・ When food wrap is used, some portion of it is unused.Read the instruction in the menu carefully.・ Ensure the wrap does not overlap and is covered securely in the bottom.・ Incorrect uses will cause the dish may not be cooked well. The food may burn due to smoke or fire.
● Do not use cover・ If ceramic, glass or plastic products are covered with a lid, the infra-red sensor will not be able to detect the temperature of the food accurately and cannot heat correctly.・ Food boxes in market are the same. Please take cover and aluminum foil out.
● If the oven is continuous used, ensure that it cools down.・ If the oven is hot, the infrared sensor may not be able to detect the temperature correctly. If the [HIGH TEMP] is displayed in the control panel, wait until the display disappears.
● Use proper containers according to the quantities of food.
● Use the containers with a low and wide edge.
● Clean the cavity and wipe vapor before next use.・ If not proceed the cleaning, the infrared sensor may not work properly. It also will cause smoke or fire.
● Do not use square tray and gridiron.・ If square trays and grills are used, these can cause sparking leading to malfunction.
Cool down
Wipe off
19
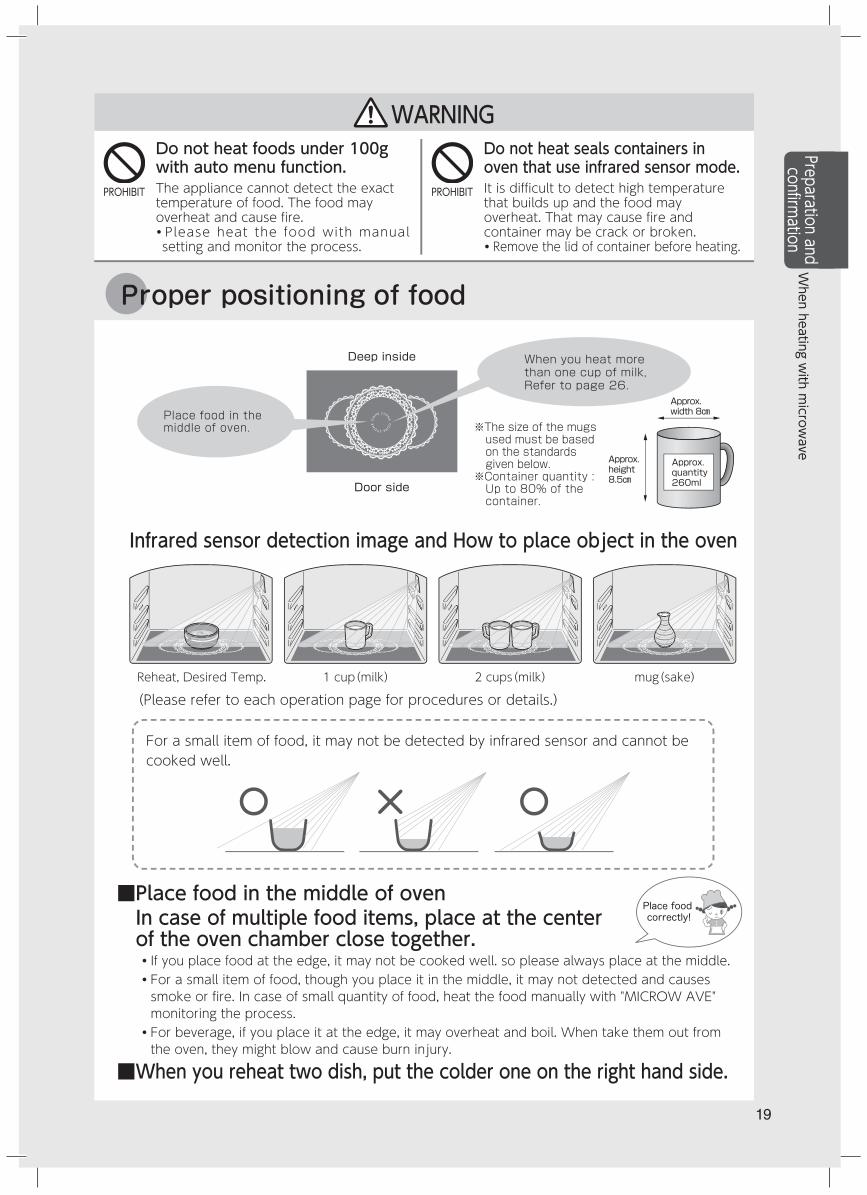
■ Place food in the middle of ovenIn case of multiple food items, place at the center of the oven chamber close together.・ If you place food at the edge, it may not be cooked well. so please always place at the middle.・ For a small item of food, though you place it in the middle, it may not detected and causes smoke or fire. In case of small quantity of food, heat the food manually with "MICROW AVE" monitoring the process.
・ For beverage, if you place it at the edge, it may overheat and boil. When take them out from the oven, they might blow and cause burn injury.
■ When you reheat two dish, put the colder one on the right hand side.
Do not heat seals containers in oven that use infrared sensor mode.It is difficult to detect high temperature that builds up and the food may overheat. That may cause fire and container may be crack or broken.・ Remove the lid of container before heating.
PROHIBIT
Do not heat foods under 100g with auto menu function.The appliance cannot detect the exact temperature of food. The food may overheat and cause fire.・ Please heat the food with manual setting and monitor the process.
PROHIBIT
Infrared sensor detection image and How to place object in the oven
Deep inside
Door side
Approx. width 8㎝
Approx. height 8.5㎝
Approx. quantity 260ml
When you heat more than one cup of milk,Refer to page 26.
※The size of the mugs used must be based on the standards given below.
※Container quantity : Up to 80% of the container.
Place food in the middle of oven.
(Please refer to each operation page for procedures or details.)Reheat, Desired Temp. 1 cup(milk) 2 cups(milk) mug(sake)
Place food correctly!
WARNING
For a small item of food, it may not be detected by infrared sensor and cannot be cooked well.
Proper positioning of food
Preparation and confirm
ation W
hen heating with m
icrowave
20
■ Heat Adjustment→ Can be increased or decreased by turning the dial to [INCREASE] or “DECREASE” within 10 seconds of starting.
・ Turn right [Increase] and left [Decrease] for selection. Increase and Decrease canbe select 1,2,3 levels both.
・ 〔Increase 4〕 can only be set to Rice or Dish.■ When you reheat food for three persons or more→ After starting, turn the dial to the right within 10 seconds, Set at 〔Increase 4〕
■ For further heating, once cooking is complete. [EXTENSION]→ This is done by rotating the dial to set the time within 1 minute after the completion of cooking and the process has to be monitored.
■ If the door is opened during the cooking process.→ Press “CANCEL” and heat manually with “MICROWAVE” while monitoring the process (see pages 34 and 35)
■ When you want to heat using preferred temperatures→ Heat setting the temperature with “DESIRED TEMP” (See Page 36 and 37)
DECREASE INCREASE
Basic operation (Ex:Reheat rice.)
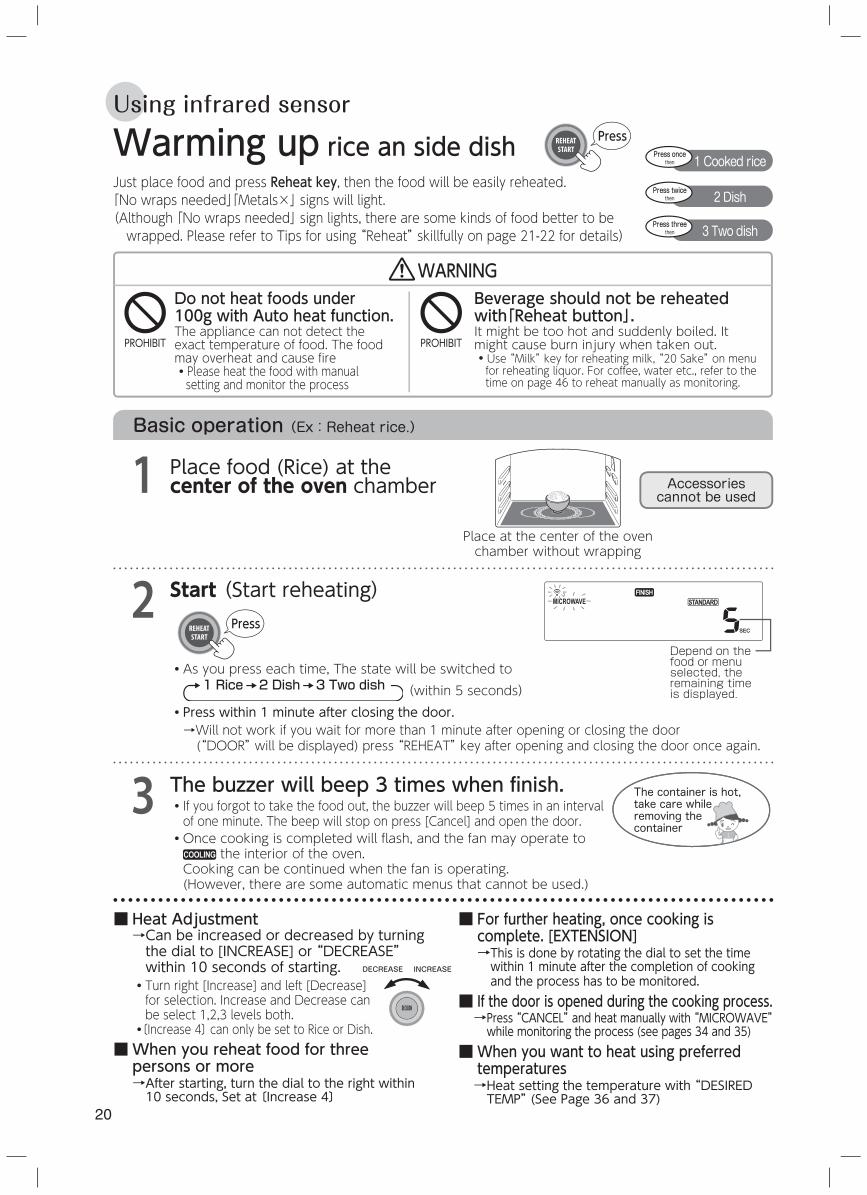
Warming up rice an side dish
Place food (Rice) at the center of the oven chamber
Start (Start reheating)
1
2
1 Cooked rice
2 Dish
3 Two dish
Press once then
Press twicethen
Press threethen
Do not heat foods under 100g with Auto heat function.The appliance can not detect the exact temperature of food. The food may overheat and cause fire・ Please heat the food with manual setting and monitor the process
WARNINGBeverage should not be reheated with「Reheat button」.It might be too hot and suddenly boiled. It might cause burn injury when taken out.・ Use “Milk” key for reheating milk, “20 Sake” on menu for reheating liquor. For coffee, water etc., refer to the time on page 46 to reheat manually as monitoring.
PROHIBITPROHIBIT
・ As you press each time, The state will be switched to 1 Rice 2 Dish 3 Two dish (within 5 seconds)
・ Press within 1 minute after closing the door.→ Will not work if you wait for more than 1 minute after opening or closing the door (“DOOR” will be displayed) press “REHEAT” key after opening and closing the door once again.
Place at the center of the oven chamber without wrapping
The buzzer will beep 3 times when fi nish.・ If you forgot to take the food out, the buzzer will beep 5 times in an interval of one minute. The beep will stop on press [Cancel] and open the door.・ Once cooking is completed will fl ash, and the fan may operate to
the interior of the oven.Cooking can be continued when the fan is operating. (However, there are some automatic menus that cannot be used.)
3 The container is hot, take care while removing the container
Just place food and press Reheat key, then the food will be easily reheated.「No wraps needed」「Metals×」 signs will light.(Although 「No wraps needed」 sign lights, there are some kinds of food better to be wrapped. Please refer to Tips for using “Reheat” skillfully on page 21-22 for details)
Accessories cannot be used
Using infrared sensor
Depend on the food or menu selected, the remaining time is displayed.
Press
Press
21
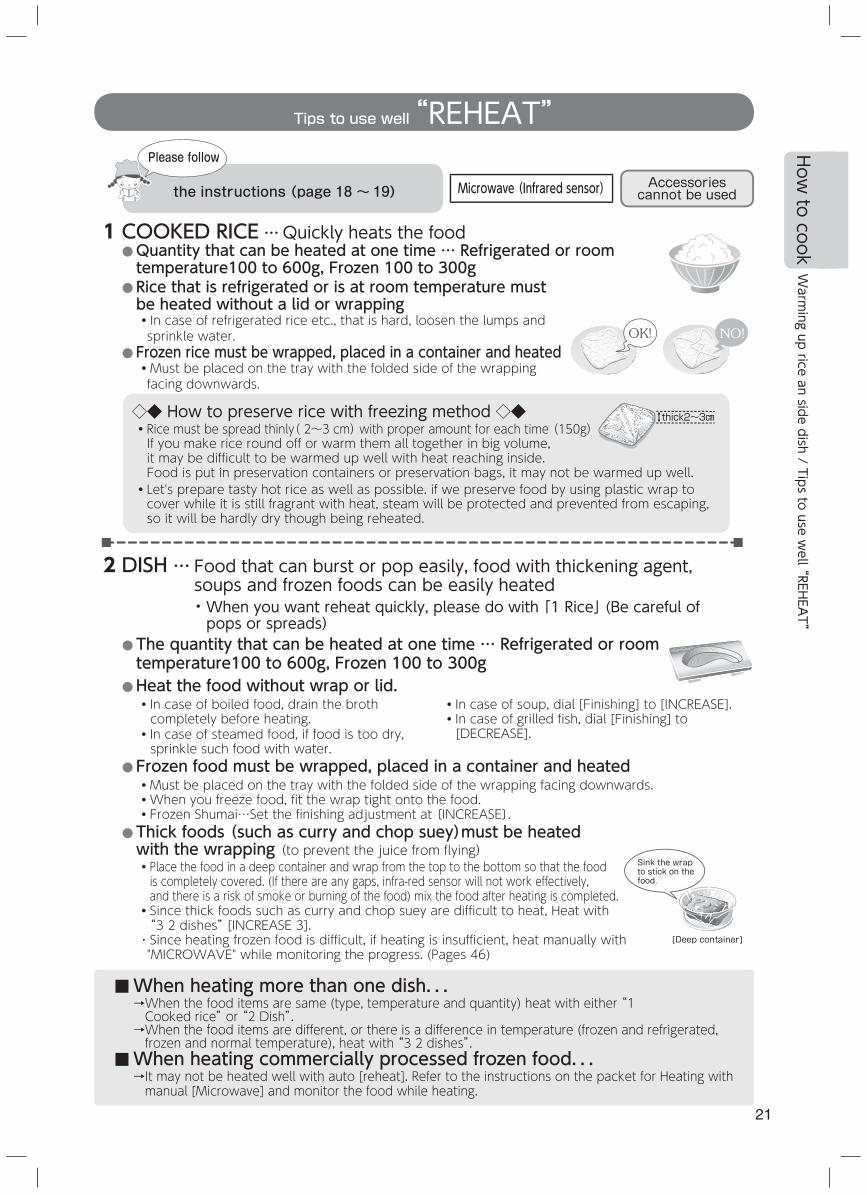
1 COOKED RICE …Quickly heats the food● Quantity that can be heated at one time … Refrigerated or room temperature100 to 600g, Frozen 100 to 300g
● Rice that is refrigerated or is at room temperature must be heated without a lid or wrapping・ In case of refrigerated rice etc., that is hard, loosen the lumps and sprinkle water.
● Frozen rice must be wrapped, placed in a container and heated・ Must be placed on the tray with the folded side of the wrapping facing downwards.
2 DISH … Food that can burst or pop easily, food with thickening agent, soups and frozen foods can be easily heated・ When you want reheat quickly, please do with 「1 Rice」 (Be careful of
pops or spreads)● The quantity that can be heated at one time … Refrigerated or room temperature100 to 600g, Frozen 100 to 300g
● Heat the food without wrap or lid.・In case of boiled food, drain the broth completely before heating.
・In case of soup, dial [Finishing] to [lNCREASE].・In case of grilled fish, dial [Finishing] to [DECREASE].・In case of steamed food, if food is too dry,
sprinkle such food with water.● Frozen food must be wrapped, placed in a container and heated・Must be placed on the tray with the folded side of the wrapping facing downwards.・When you freeze food, fit the wrap tight onto the food.・Frozen Shumai…Set the finishing adjustment at 〔INCREASE〕.
● Thick foods (such as curry and chop suey)must be heated with the wrapping (to prevent the juice from flying)・ Place the food in a deep container and wrap from the top to the bottom so that the food is completely covered. (If there are any gaps, infra-red sensor will not work effectively, and there is a risk of smoke or burning of the food) mix the food after heating is completed.・ Since thick foods such as curry and chop suey are difficult to heat, Heat with “3 2 dishes” [INCREASE 3].・ Since heating frozen food is difficult, if heating is insufficient, heat manually with "MICROWAVE" while monitoring the progress. (Pages 46)
Sink the wrap to stick on the food.
[Deep container]
◇◆ How to preserve rice with freezing method ◇◆・ Rice must be spread thinly( 2~3 cm) with proper amount for each time (150g)If you make rice round off or warm them all together in big volume, it may be difficult to be warmed up well with heat reaching inside. Food is put in preservation containers or preservation bags, it may not be warmed up well.
・ Let's prepare tasty hot rice as well as possible. if we preserve food by using plastic wrap to cover while it is still fragrant with heat, steam will be protected and prevented from escaping, so it will be hardly dry though being reheated.
thick2~3㎝
the instructions (page 18 ~ 19)
Tips to use well “REHEAT”
Accessories cannot be usedMicrowave (Infrared sensor)
■ When heating more than one dish...→ When the food items are same (type, temperature and quantity) heat with either “1 Cooked rice” or “2 Dish”.→ When the food items are different, or there is a difference in temperature (frozen and refrigerated, frozen and normal temperature), heat with “3 2 dishes”.
■ When heating commercially processed frozen food...→ It may not be heated well with auto [reheat]. Refer to the instructions on the packet for Heating with manual [Microwave] and monitor the food while heating.
Please follow How to cook
Warm
ing up rice an side dish / Tips to use well “
REHEAT”
22
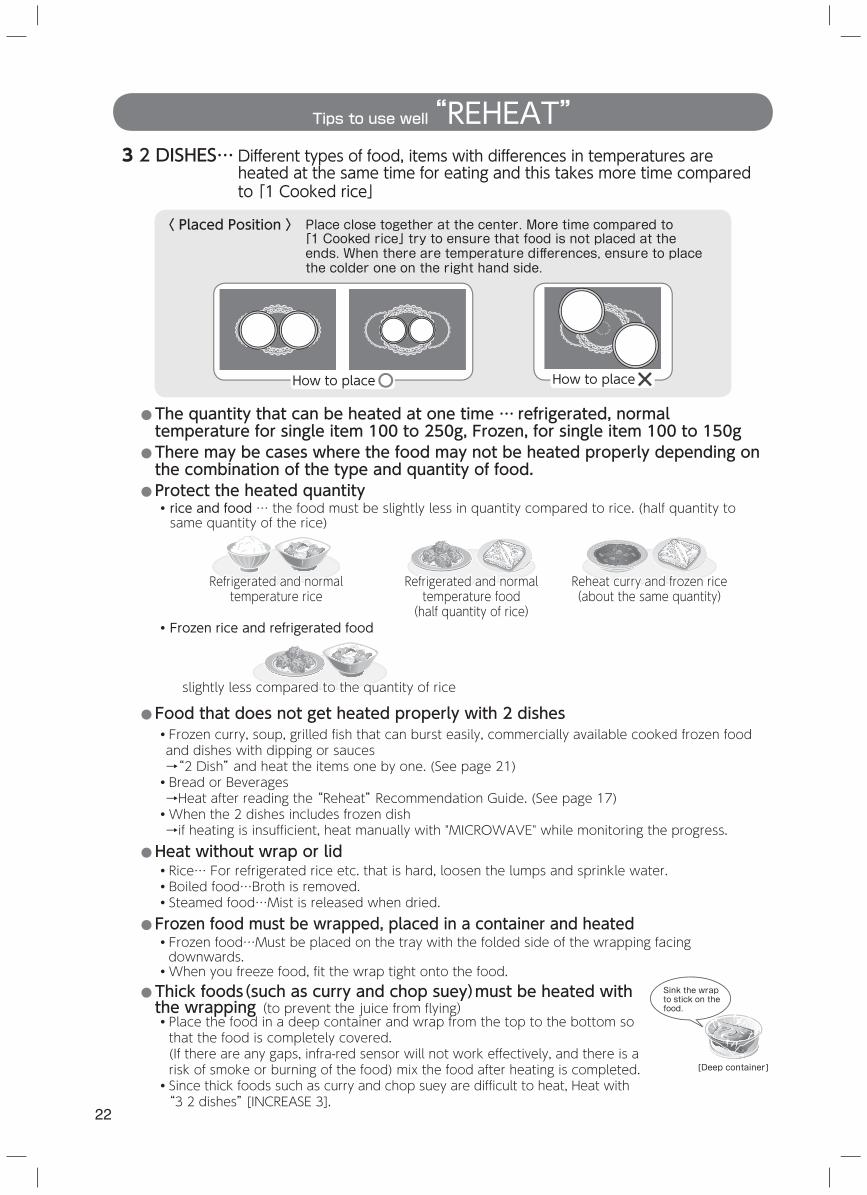
3 2 DISHES… Different types of food, items with differences in temperatures are heated at the same time for eating and this takes more time compared to 「1 Cooked rice」
〈 Placed Position 〉 Place close together at the center. More time compared to 「1 Cooked rice」 try to ensure that food is not placed at the ends. When there are temperature diff erences, ensure to place the colder one on the right hand side.
How to placeHow to place
● The quantity that can be heated at one time … refrigerated, normal temperature for single item 100 to 250g, Frozen, for single item 100 to 150g
● There may be cases where the food may not be heated properly depending on the combination of the type and quantity of food.
● Protect the heated quantity・ rice and food … the food must be slightly less in quantity compared to rice. (half quantity to same quantity of the rice)
Refrigerated and normal temperature food
(half quantity of rice)
Refrigerated and normal temperature rice
Reheat curry and frozen rice(about the same quantity)
・ Frozen rice and refrigerated food
slightly less compared to the quantity of rice
● Food that does not get heated properly with 2 dishes・ Frozen curry, soup, grilled fish that can burst easily, commercially available cooked frozen food and dishes with dipping or sauces→“2 Dish” and heat the items one by one. (See page 21)・ Bread or Beverages→Heat after reading the “Reheat” Recommendation Guide. (See page 17)・ When the 2 dishes includes frozen dish→if heating is insufficient, heat manually with "MICROWAVE" while monitoring the progress.
● Heat without wrap or lid・Rice… For refrigerated rice etc. that is hard, loosen the lumps and sprinkle water.・Boiled food…Broth is removed.・Steamed food…Mist is released when dried.
● Frozen food must be wrapped, placed in a container and heated・Frozen food…Must be placed on the tray with the folded side of the wrapping facing downwards.・When you freeze food, fit the wrap tight onto the food.
● Thick foods(such as curry and chop suey)must be heated with the wrapping (to prevent the juice from flying)・ Place the food in a deep container and wrap from the top to the bottom so that the food is completely covered.(If there are any gaps, infra-red sensor will not work effectively, and there is a risk of smoke or burning of the food) mix the food after heating is completed.
・ Since thick foods such as curry and chop suey are difficult to heat, Heat with “3 2 dishes” [INCREASE 3].
Tips to use well “REHEAT”
Sink the wrap to stick on the food.
[Deep container]
23
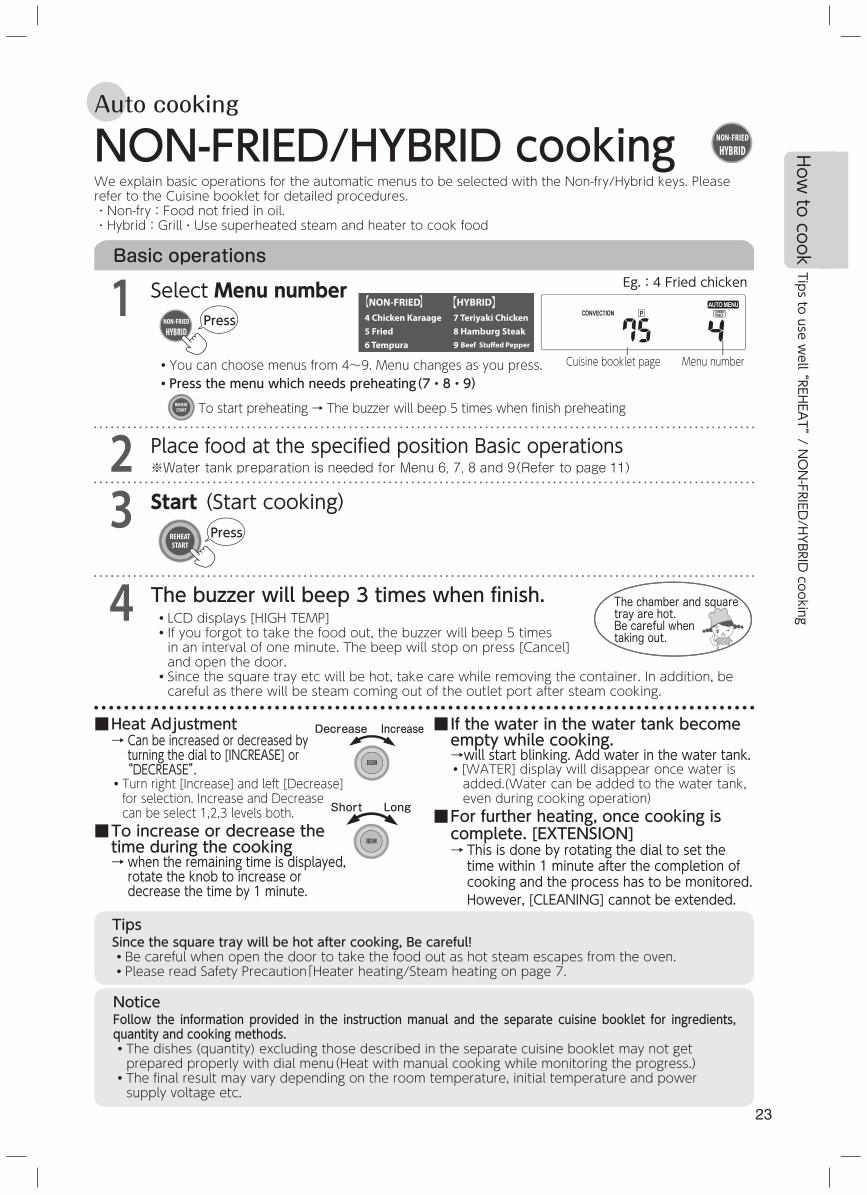
NON-FRIED/HYBRID cooking
Select Menu number1
23
Place food at the specifi ed position Basic operations
Basic operations
※ Water tank preparation is needed for Menu 6, 7, 8 and 9(Refer to page 11)
・You can choose menus from 4~9. Menu changes as you press.
Start (Start cooking)
4 The buzzer will beep 3 times when fi nish.・ LCD displays [HIGH TEMP]・ If you forgot to take the food out, the buzzer will beep 5 times in an interval of one minute. The beep will stop on press [Cancel] and open the door.
・ Since the square tray etc will be hot, take care while removing the container. In addition, be careful as there will be steam coming out of the outlet port after steam cooking.
・Press the menu which needs preheating(7・8・9)
To start preheating → The buzzer will beep 5 times when finish preheating
■ Heat Adjustment→ Can be increased or decreased by
turning the dial to [INCREASE] or “DECREASE”.
・ Turn right [Increase] and left [Decrease] for selection. Increase and Decrease can be select 1,2,3 levels both.
■ To increase or decrease the time during the cooking→ when the remaining time is displayed,
rotate the knob to increase or decrease the time by 1 minute.
■ If the water in the water tank become empty while cooking.→ will start blinking. Add water in the water tank.・ [WATER] display will disappear once water is added.(Water can be added to the water tank, even during cooking operation)
■ For further heating, once cooking is complete. [EXTENSION]→ This is done by rotating the dial to set the
time within 1 minute after the completion of cooking and the process has to be monitored.However, [CLEANING] cannot be extended.
The chamber and square tray are hot. Be careful when taking out.
Eg.:4 Fried chicken
Menu numberCuisine booklet page
We explain basic operations for the automatic menus to be selected with the Non-fry/Hybrid keys. Please refer to the Cuisine booklet for detailed procedures.・Non-fry:Food not fried in oil. ・Hybrid:Grill・Use superheated steam and heater to cook food
Auto cooking
TipsSince the square tray will be hot after cooking, Be careful!・ Be careful when open the door to take the food out as hot steam escapes from the oven.・ Please read Safety Precaution「Heater heating/Steam heating on page 7.
NoticeFollow the information provided in the instruction manual and the separate cuisine booklet for ingredients, quantity and cooking methods.・ The dishes (quantity) excluding those described in the separate cuisine booklet may not get prepared properly with dial menu(Heat with manual cooking while monitoring the progress.)
・ The final result may vary depending on the room temperature, initial temperature and power supply voltage etc.
Press
Press
Short Long
Decrease Increase
Tips to use well “
REHEAT” / N
ON-FRIED
/HYBRID cooking
How to cook
24
13-1 cup → 13-2 cup → 13-3 cup → 13-4 cup
10 Steam Defrost → 11 Rapid Defrost → 12 Sashimi(Semi-Defrost)
MILK
3 TYPESDEFROST
■ To select desired finishing,→ Select the menu, then turn the dial to adjust.
・ Turn right [INCREASE] and left [DECREASE] for selection. Increase and Decrease can be select 1, 2, 3 levels both.
DECREASE INCREASE
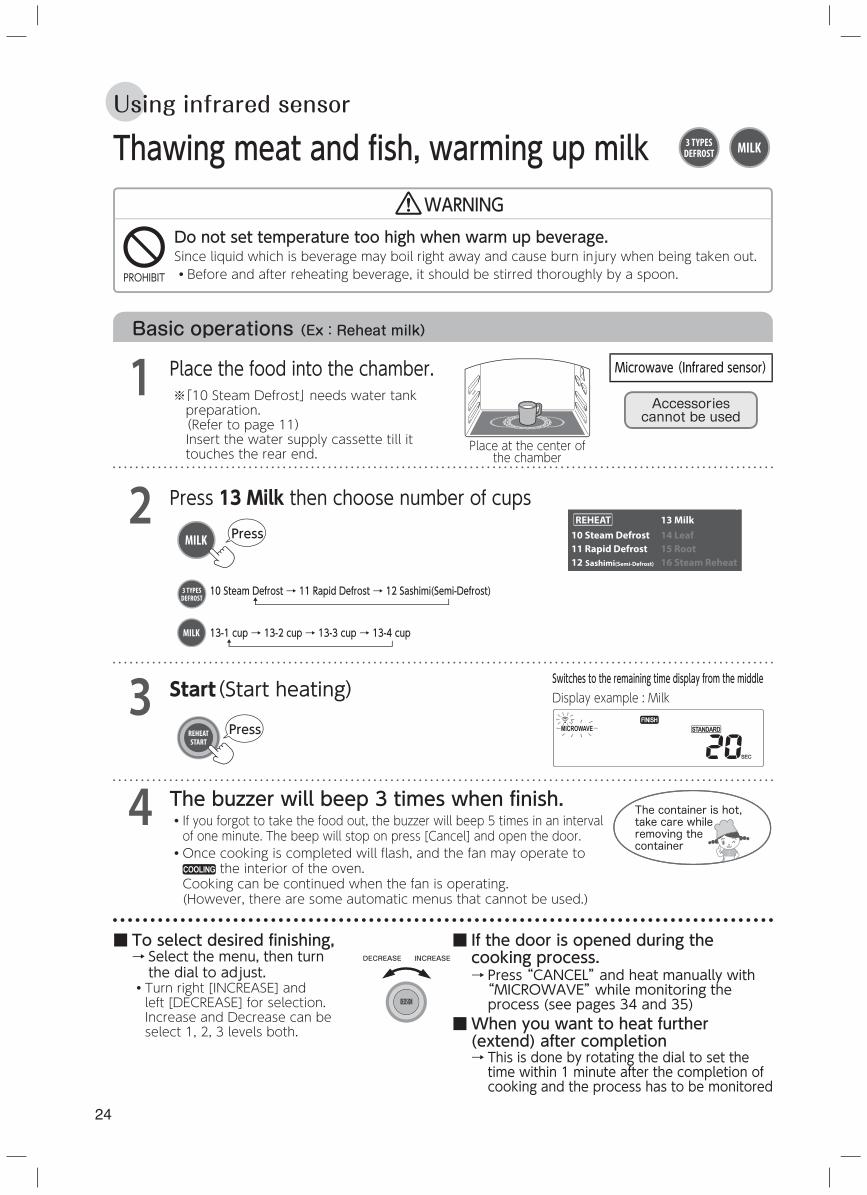
Place the food into the chamber.※ 「10 Steam Defrost」 needs water tank preparation.(Refer to page 11)Insert the water supply cassette till it touches the rear end.
1
2
3 Start(Start heating)
Press 13 Milk then choose number of cups
Basic operations (Ex:Reheat milk)
The container is hot, take care while removing the container
Display example : MilkSwitches to the remaining time display from the middle
Place at the center of the chamber
■ If the door is opened during the cooking process.→ Press “CANCEL” and heat manually with “MICROWAVE” while monitoring the process (see pages 34 and 35)
■ When you want to heat further (extend) after completion→ This is done by rotating the dial to set the time within 1 minute after the completion of cooking and the process has to be monitored
Thawing meat and fish, warming up milk
4 The buzzer will beep 3 times when fi nish.・ If you forgot to take the food out, the buzzer will beep 5 times in an interval of one minute. The beep will stop on press [Cancel] and open the door.
・ Once cooking is completed will fl ash, and the fan may operate to the interior of the oven.
Cooking can be continued when the fan is operating. (However, there are some automatic menus that cannot be used.)
Do not set temperature too high when warm up beverage.Since liquid which is beverage may boil right away and cause burn injury when being taken out.・ Before and after reheating beverage, it should be stirred thoroughly by a spoon.PROHIBIT
WARNING
MILK Press
Using infrared sensor
Accessories cannot be used
Microwave (Infrared sensor)
MILK3 TYPESDEFROST
Press
25
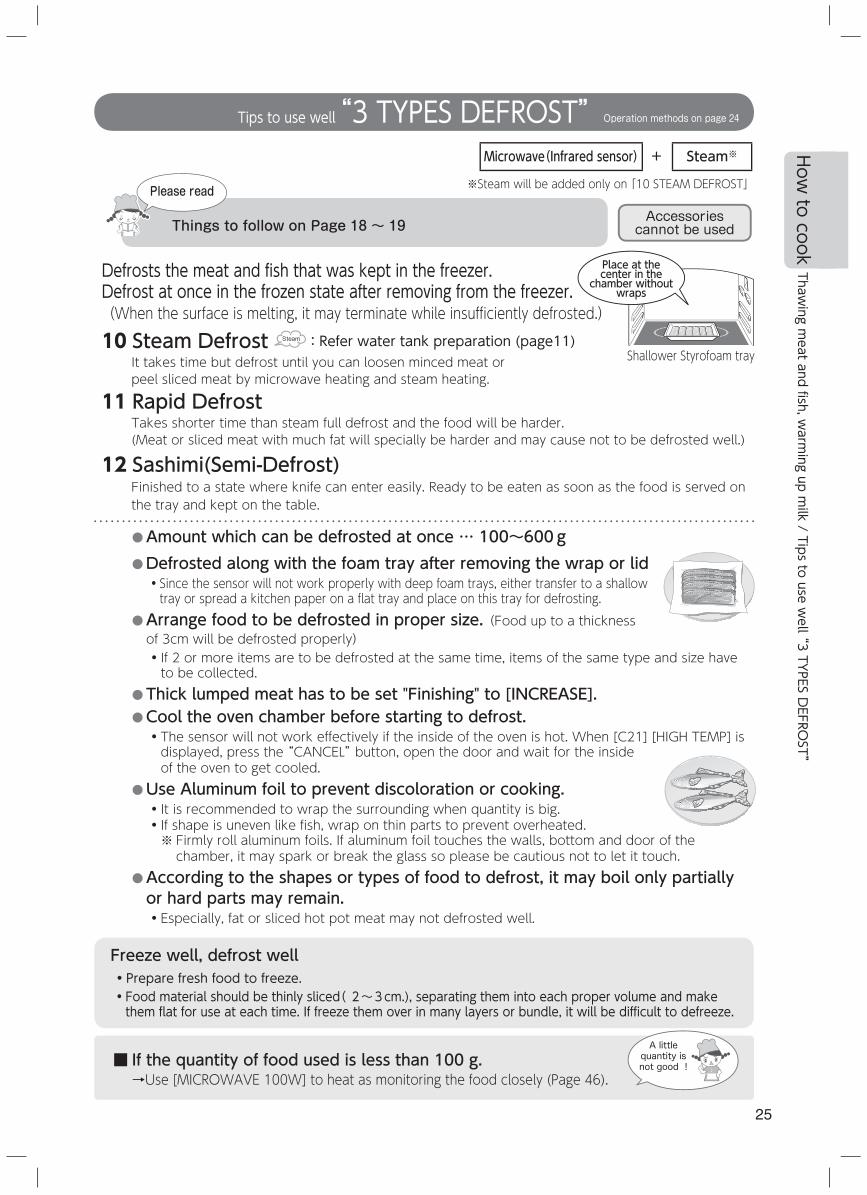
Defrosts the meat and fish that was kept in the freezer.Defrost at once in the frozen state after removing from the freezer.(When the surface is melting, it may terminate while insufficiently defrosted.)
10 Steam Defrost Steam :Refer water tank preparation (page11)It takes time but defrost until you can loosen minced meat or peel sliced meat by microwave heating and steam heating.
11 Rapid DefrostTakes shorter time than steam full defrost and the food will be harder.(Meat or sliced meat with much fat will specially be harder and may cause not to be defrosted well.)
12 Sashimi(Semi-Defrost)Finished to a state where knife can enter easily. Ready to be eaten as soon as the food is served on the tray and kept on the table.
●Amount which can be defrosted at once … 100~600g●Defrosted along with the foam tray after removing the wrap or lid・ Since the sensor will not work properly with deep foam trays, either transfer to a shallow tray or spread a kitchen paper on a flat tray and place on this tray for defrosting.
● Arrange food to be defrosted in proper size. (Food up to a thickness of 3cm will be defrosted properly)・ If 2 or more items are to be defrosted at the same time, items of the same type and size have to be collected.
● Thick lumped meat has to be set "Finishing" to [INCREASE].● Cool the oven chamber before starting to defrost.・ The sensor will not work effectively if the inside of the oven is hot. When [C21] [HIGH TEMP] is displayed, press the “CANCEL” button, open the door and wait for the inside of the oven to get cooled.
● Use Aluminum foil to prevent discoloration or cooking.・ It is recommended to wrap the surrounding when quantity is big.・ If shape is uneven like fish, wrap on thin parts to prevent overheated.※ Firmly roll aluminum foils. If aluminum foil touches the walls, bottom and door of the chamber, it may spark or break the glass so please be cautious not to let it touch.
● According to the shapes or types of food to defrost, it may boil only partially or hard parts may remain.・ Especially, fat or sliced hot pot meat may not defrosted well.
Tips to use well “3 TYPES DEFROST”Operation methods on page 24
■ If the quantity of food used is less than 100 g.→ Use [MICROWAVE 100W] to heat as monitoring the food closely (Page 46).
A little quantity is not good !
Freeze well, defrost well・ Prepare fresh food to freeze.・ Food material should be thinly sliced( 2~3cm.), separating them into each proper volume and make them flat for use at each time. If freeze them over in many layers or bundle, it will be difficult to defreeze.
Accessories cannot be used
Microwave(Infrared sensor) + Steam※
※Steam will be added only on 「10 STEAM DEFROST」
Place at the center in the
chamber without wraps
Shallower Styrofoam tray
Things to follow on Page 18 ~ 19
Please read
Thawing m
eat and fish, warming up m
ilk / Tips to use well “
3 TYPES DEFRO
ST”How
to cook
26
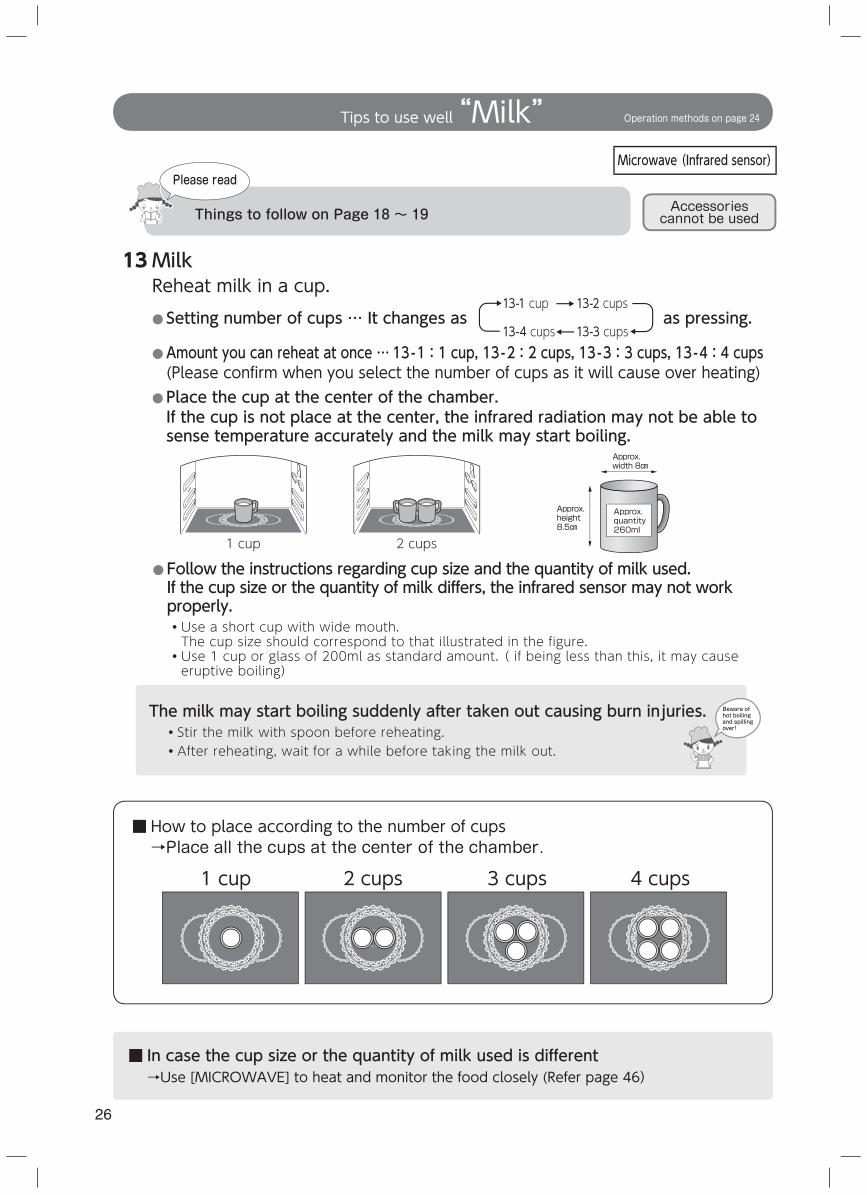
13 MilkReheat milk in a cup.
● Setting number of cups … It changes as as pressing.
● Amount you can reheat at once … 13-1:1 cup, 13-2:2 cups, 13-3:3 cups, 13-4:4 cups(Please confirm when you select the number of cups as it will cause over heating)
● Place the cup at the center of the chamber.If the cup is not place at the center, the infrared radiation may not be able to sense temperature accurately and the milk may start boiling.
● Follow the instructions regarding cup size and the quantity of milk used.If the cup size or the quantity of milk differs, the infrared sensor may not work properly.・ Use a short cup with wide mouth.The cup size should correspond to that illustrated in the figure.
・ Use 1 cup or glass of 200ml as standard amount. ( if being less than this, it may cause eruptive boiling)
13-1 cup 13-2 cups
13-4 cups 13-3 cups
Approx. width 8㎝
Approx. height 8.5㎝
Approx. quantity 260ml
1 cup 2 cups
Tips to use well “Milk” Operation methods on page 24
1 cup 2 cups 3 cups 4 cups
■ How to place according to the number of cups→Place all the cups at the center of the chamber.
■ In case the cup size or the quantity of milk used is different→Use [MICROWAVE] to heat and monitor the food closely (Refer page 46)
Beware of hot boiling and spilling over!
The milk may start boiling suddenly after taken out causing burn injuries.・Stir the milk with spoon before reheating.・After reheating, wait for a while before taking the milk out.
Accessories cannot be used
Microwave (Infrared sensor)
Things to follow on Page 18 ~ 19
Please read
27
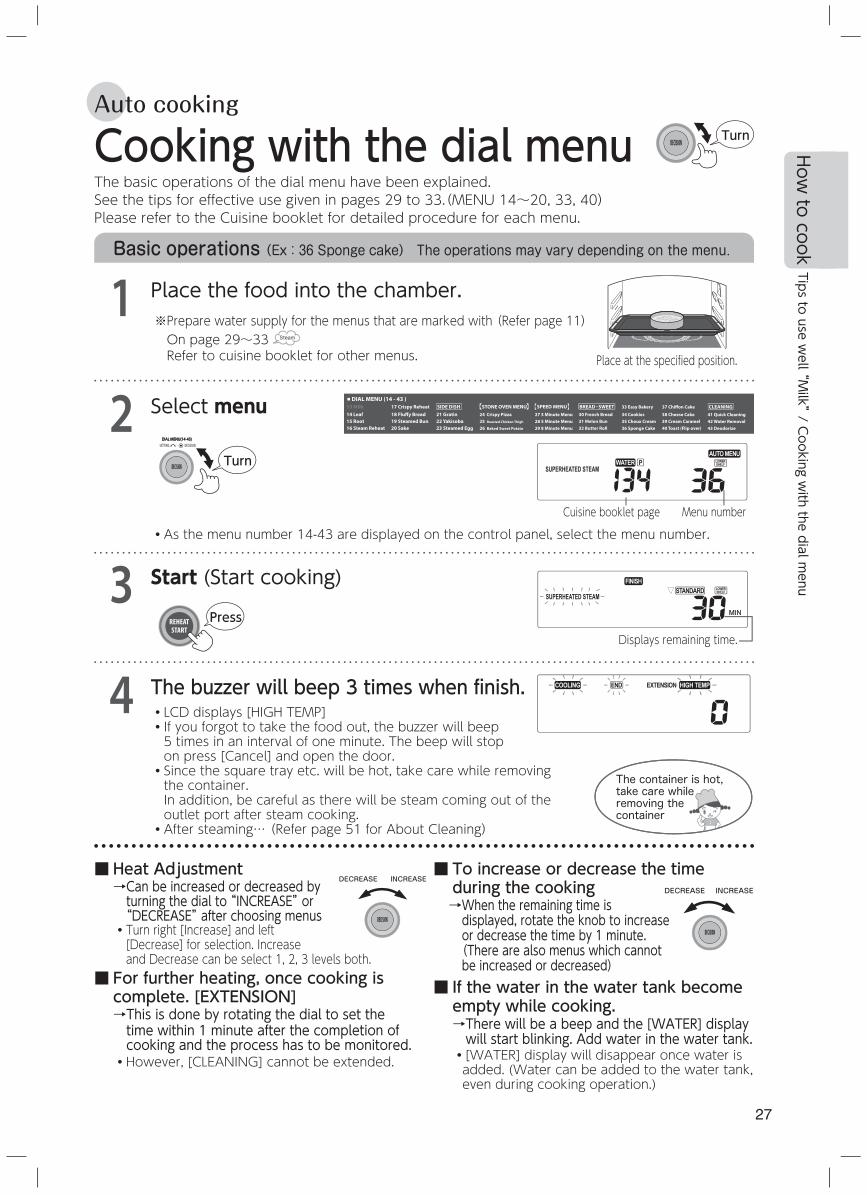
Basic operations (Ex:36 Sponge cake) The operations may vary depending on the menu.
Cooking with the dial menu
Place the food into the chamber.※ Prepare water supply for the menus that are marked with (Refer page 11)On page 29~33 Steam
Refer to cuisine booklet for other menus.
1
2
3
Select menu
・ As the menu number 14-43 are displayed on the control panel, select the menu number.
■ Heat Adjustment→ Can be increased or decreased by
turning the dial to “INCREASE” or “DECREASE” after choosing menus・ Turn right [Increase] and left [Decrease] for selection. Increase and Decrease can be select 1, 2, 3 levels both.
■ For further heating, once cooking is complete. [EXTENSION]→ This is done by rotating the dial to set the time within 1 minute after the completion of cooking and the process has to be monitored.
・However, [CLEANING] cannot be extended.
■ To increase or decrease the time during the cooking→ When the remaining time is
displayed, rotate the knob to increase or decrease the time by 1 minute.(There are also menus which cannot be increased or decreased)
■ If the water in the water tank become empty while cooking.→ There will be a beep and the [WATER] display will start blinking. Add water in the water tank.
・ [WATER] display will disappear once water is added. (Water can be added to the water tank, even during cooking operation.)
Start (Start cooking)
4 The buzzer will beep 3 times when fi nish.・ LCD displays [HIGH TEMP]・ If you forgot to take the food out, the buzzer will beep 5 times in an interval of one minute. The beep will stop on press [Cancel] and open the door.
・ Since the square tray etc. will be hot, take care while removing the container.In addition, be careful as there will be steam coming out of the outlet port after steam cooking.
・ After steaming… (Refer page 51 for About Cleaning)
Place at the specified position.
Press
Menu numberCuisine booklet page
Displays remaining time.
The basic operations of the dial menu have been explained.See the tips for effective use given in pages 29 to 33.(MENU 14~20, 33, 40)Please refer to the Cuisine booklet for detailed procedure for each menu.
The container is hot, take care while removing the container
Auto cookingTurn
DECISIONSETTING
Turn
DECREASE INCREASE
Tips to use well “
Milk” / C
ooking with the dial m
enu
DECREASE INCREASE
How to cook
28
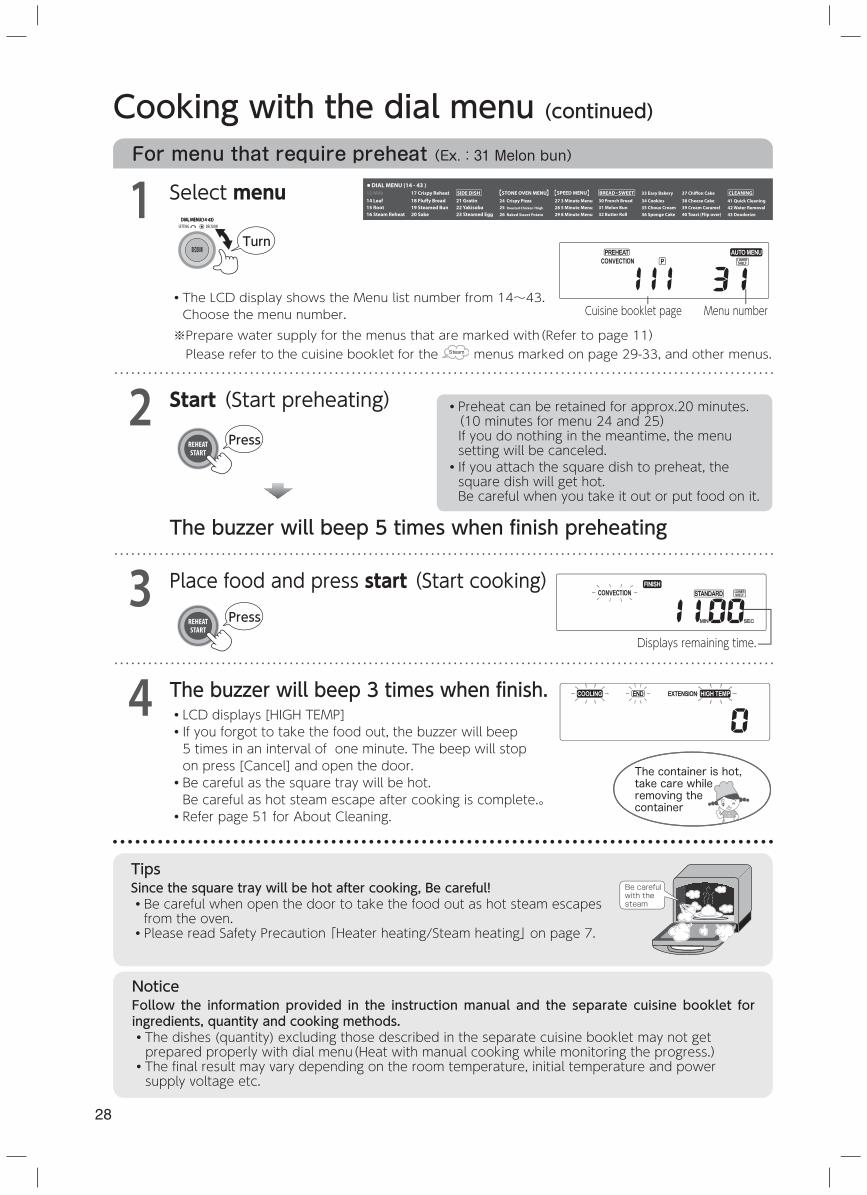
For menu that require preheat (Ex.:31 Melon bun)
NoticeFollow the information provided in the instruction manual and the separate cuisine booklet for ingredients, quantity and cooking methods.・ The dishes (quantity) excluding those described in the separate cuisine booklet may not get prepared properly with dial menu(Heat with manual cooking while monitoring the progress.)
・ The final result may vary depending on the room temperature, initial temperature and power supply voltage etc.
Select menu1
2
3
Start (Start preheating)
Place food and press start (Start cooking)
・ The LCD display shows the Menu list number from 14~43. Choose the menu number.※ Prepare water supply for the menus that are marked with(Refer to page 11)Please refer to the cuisine booklet for the Steam menus marked on page 29-33, and other menus.
・ Preheat can be retained for approx.20 minutes.(10 minutes for menu 24 and 25)If you do nothing in the meantime, the menu setting will be canceled.・ If you attach the square dish to preheat, the square dish will get hot.Be careful when you take it out or put food on it.
4 The buzzer will beep 3 times when fi nish.・ LCD displays [HIGH TEMP]・ If you forgot to take the food out, the buzzer will beep5 times in an interval of one minute. The beep will stop on press [Cancel] and open the door.
・ Be careful as the square tray will be hot.Be careful as hot steam escape after cooking is complete.。
・ Refer page 51 for About Cleaning.
TipsSince the square tray will be hot after cooking, Be careful!・ Be careful when open the door to take the food out as hot steam escapes from the oven.
・ Please read Safety Precaution 「Heater heating/Steam heating」 on page 7.
Be careful with the steam
Displays remaining time.
The container is hot, take care while removing the container
The buzzer will beep 5 times when finish preheating
Press
DECISIONSETTING
Turn
Press
Cooking with the dial menu (continued)
Menu numberCuisine booklet page
29
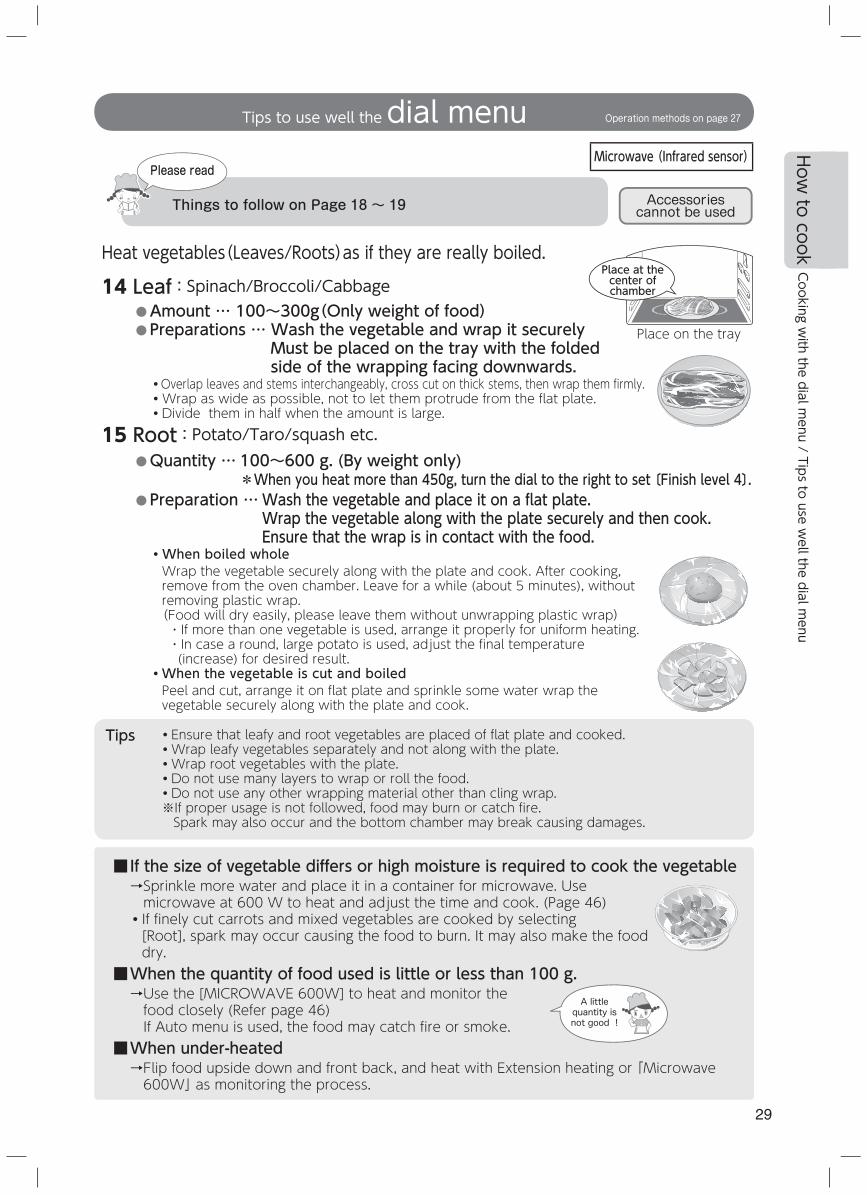
14 Leaf:Spinach/Broccoli/Cabbage●Amount … 100~300g(Only weight of food)●Preparations … Wash the vegetable and wrap it securely
Must be placed on the tray with the folded side of the wrapping facing downwards.
・Overlap leaves and stems interchangeably, cross cut on thick stems, then wrap them firmly.・Wrap as wide as possible, not to let them protrude from the flat plate.・Divide them in half when the amount is large.
15 Root:Potato/Taro/squash etc.●Quantity … 100~600 g. (By weight only)
* When you heat more than 450g, turn the dial to the right to set 〔Finish level 4〕.● Preparation … Wash the vegetable and place it on a flat plate.
Wrap the vegetable along with the plate securely and then cook. Ensure that the wrap is in contact with the food.
・ When boiled wholeWrap the vegetable securely along with the plate and cook. After cooking, remove from the oven chamber. Leave for a while (about 5 minutes), without removing plastic wrap.(Food will dry easily, please leave them without unwrapping plastic wrap)・If more than one vegetable is used, arrange it properly for uniform heating.・ In case a round, large potato is used, adjust the final temperature(increase) for desired result.
・ When the vegetable is cut and boiledPeel and cut, arrange it on flat plate and sprinkle some water wrap the vegetable securely along with the plate and cook.
・Ensure that leafy and root vegetables are placed of flat plate and cooked.・Wrap leafy vegetables separately and not along with the plate.・Wrap root vegetables with the plate.・Do not use many layers to wrap or roll the food.・Do not use any other wrapping material other than cling wrap.※ If proper usage is not followed, food may burn or catch fire.Spark may also occur and the bottom chamber may break causing damages.
Tips
Tips to use well the dial menu Operation methods on page 27
Heat vegetables(Leaves/Roots)as if they are really boiled.
■ If the size of vegetable differs or high moisture is required to cook the vegetable→ Sprinkle more water and place it in a container for microwave. Use microwave at 600 W to heat and adjust the time and cook. (Page 46)
・ If finely cut carrots and mixed vegetables are cooked by selecting [Root], spark may occur causing the food to burn. It may also make the food dry.
■ When the quantity of food used is little or less than 100 g.→ Use the [MICROWAVE 600W] to heat and monitor the food closely (Refer page 46)If Auto menu is used, the food may catch fire or smoke.
■ When under-heated→ Flip food upside down and front back, and heat with Extension heating or 「Microwave 600W」 as monitoring the process.
Accessories cannot be used
Microwave (Infrared sensor)
A little quantity is not good !
Place at the center of chamber
Place on the tray
Things to follow on Page 18 ~ 19
Please read
Cooking w
ith the dial menu / Tips to use w
ell the dial menu
How to cook
30
Tips to use well the dial menu Operation methods on page 27
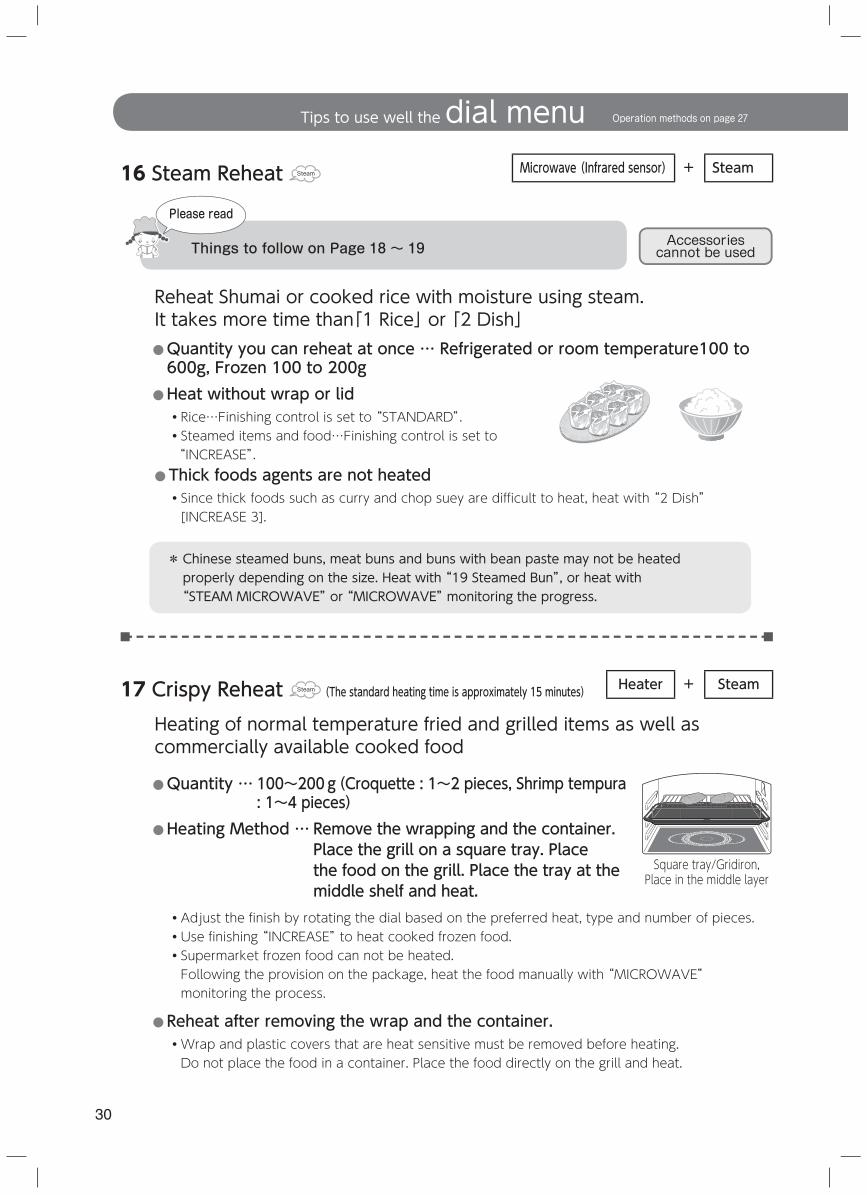
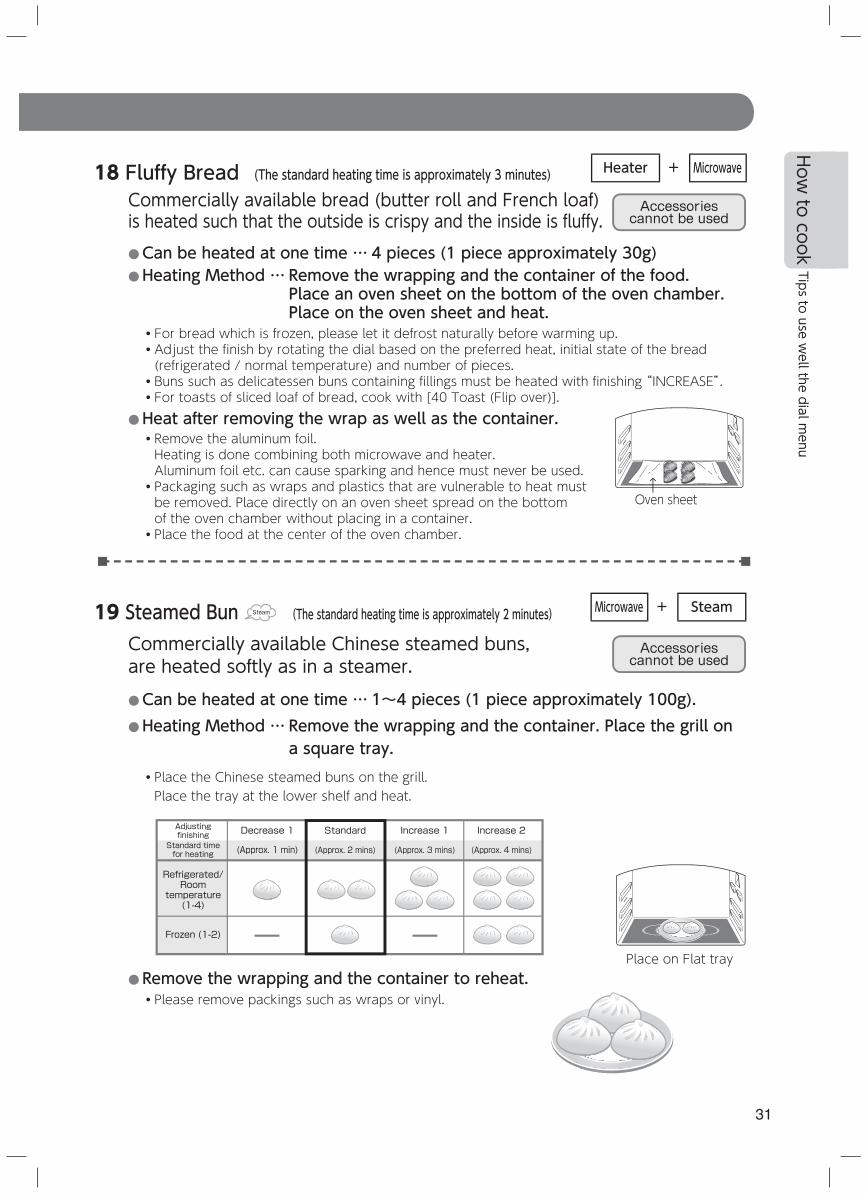
17 Crispy Reheat Steam (The standard heating time is approximately 15 minutes)
Heating of normal temperature fried and grilled items as well as commercially available cooked food
●Quantity … 100~200g(Croquette : 1~2 pieces, Shrimp tempura : 1~4 pieces)
● Heating Method … Remove the wrapping and the container. Place the grill on a square tray. Place the food on the grill. Place the tray at the middle shelf and heat.
・Adjust the finish by rotating the dial based on the preferred heat, type and number of pieces.・Use finishing “INCREASE” to heat cooked frozen food.・ Supermarket frozen food can not be heated.Following the provision on the package, heat the food manually with “MICROWAVE” monitoring the process.
● Reheat after removing the wrap and the container.・ Wrap and plastic covers that are heat sensitive must be removed before heating.Do not place the food in a container. Place the food directly on the grill and heat.
Reheat Shumai or cooked rice with moisture using steam.It takes more time than「1 Rice」 or 「2 Dish」● Quantity you can reheat at once … Refrigerated or room temperature100 to 600g, Frozen 100 to 200g
● Heat without wrap or lid・Rice…Finishing control is set to “STANDARD”.・ Steamed items and food…Finishing control is set to “INCREASE”.
● Thick foods agents are not heated・ Since thick foods such as curry and chop suey are difficult to heat, heat with “2 Dish” [INCREASE 3].
* Chinese steamed buns, meat buns and buns with bean paste may not be heated properly depending on the size. Heat with “19 Steamed Bun”, or heat with “STEAM MICROWAVE” or “MICROWAVE” monitoring the progress.
Square tray/Gridiron, Place in the middle layer
Heater + Steam
Accessories cannot be used
Microwave (Infrared sensor) + Steam 16 Steam Reheat Steam
Things to follow on Page 18 ~ 19
Please read
31
18 Fluffy Bread (The standard heating time is approximately 3 minutes)Commercially available bread (butter roll and French loaf) is heated such that the outside is crispy and the inside is fluffy.● Can be heated at one time … 4 pieces (1 piece approximately 30g)● Heating Method … Remove the wrapping and the container of the food.
Place an oven sheet on the bottom of the oven chamber. Place on the oven sheet and heat.
・For bread which is frozen, please let it defrost naturally before warming up.・ Adjust the finish by rotating the dial based on the preferred heat, initial state of the bread (refrigerated / normal temperature) and number of pieces.
・Buns such as delicatessen buns containing fillings must be heated with finishing “INCREASE”.・For toasts of sliced loaf of bread, cook with [40 Toast (Flip over)].
● Heat after removing the wrap as well as the container.・ Remove the aluminum foil.Heating is done combining both microwave and heater. Aluminum foil etc. can cause sparking and hence must never be used.
・ Packaging such as wraps and plastics that are vulnerable to heat must be removed. Place directly on an oven sheet spread on the bottom of the oven chamber without placing in a container.
・ Place the food at the center of the oven chamber.
Heater + Microwave
Accessories cannot be used
19 Steamed Bun Steam (The standard heating time is approximately 2 minutes)
Commercially available Chinese steamed buns, are heated softly as in a steamer.
●Can be heated at one time … 1~4 pieces (1 piece approximately 100g).● Heating Method … Remove the wrapping and the container. Place the grill on
a square tray.・ Place the Chinese steamed buns on the grill.Place the tray at the lower shelf and heat.
Refrigerated/Room
temperature (1-4)
Adjusting finishing
Standard time for heating
Frozen (1-2)
Standard
(Approx. 2 mins)
Increase 2
(Approx. 4 mins)
Increase 1
(Approx. 3 mins)
Decrease 1
(Approx. 1 min)
● Remove the wrapping and the container to reheat.・ Please remove packings such as wraps or vinyl.
Place on Flat tray
Oven sheet
Microwave + Steam
Accessories cannot be used
How to cook
Tips to use well the dial m
enu
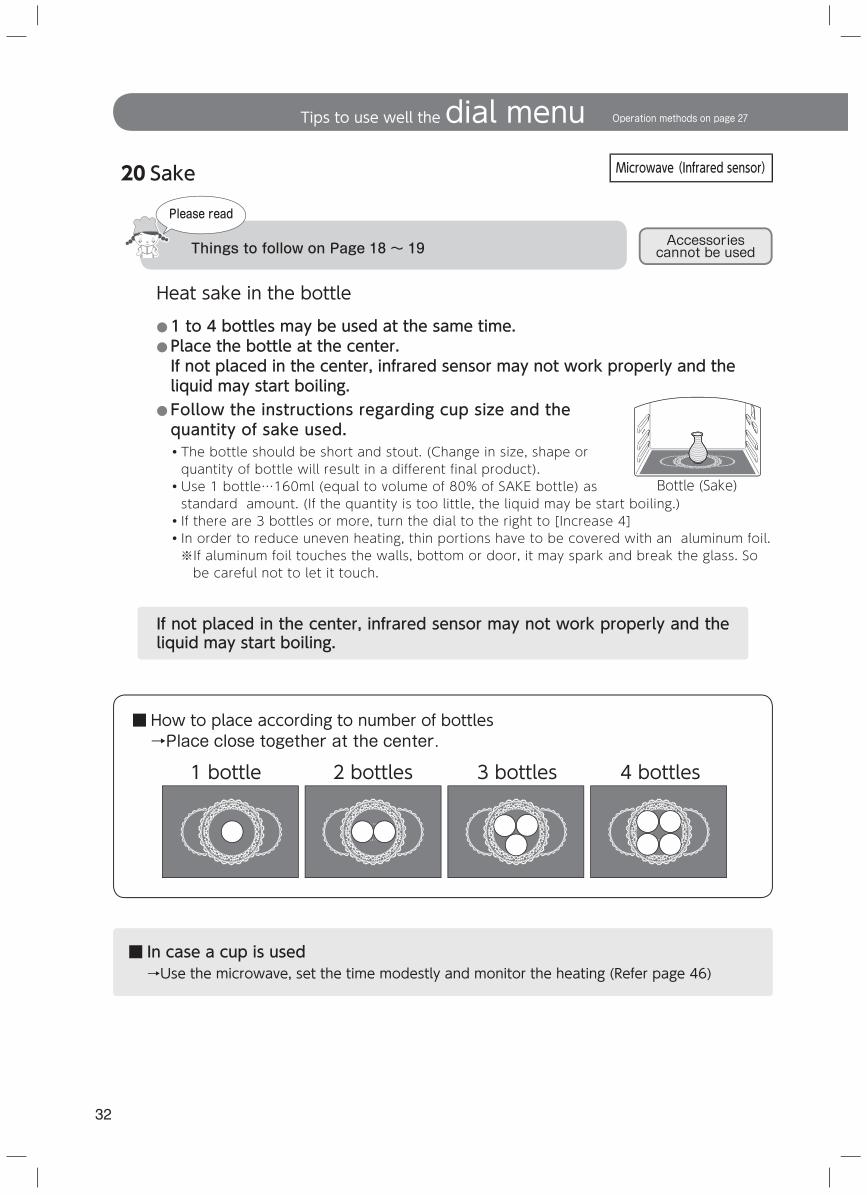
32
Heat sake in the bottle
●1 to 4 bottles may be used at the same time.● Place the bottle at the center.If not placed in the center, infrared sensor may not work properly and the liquid may start boiling.
● Follow the instructions regarding cup size and the quantity of sake used.・The bottle should be short and stout. (Change in size, shape or quantity of bottle will result in a different final product).
・Use 1 bottle…160ml (equal to volume of 80% of SAKE bottle) as standard amount. (If the quantity is too little, the liquid may be start boiling.)
・ If there are 3 bottles or more, turn the dial to the right to [Increase 4]・ In order to reduce uneven heating, thin portions have to be covered with an aluminum foil.※ If aluminum foil touches the walls, bottom or door, it may spark and break the glass. So be careful not to let it touch.
Bottle (Sake)
Microwave (Infrared sensor) 20 Sake
■ In case a cup is used→Use the microwave, set the time modestly and monitor the heating (Refer page 46)
1 bottle 2 bottles 3 bottles 4 bottles
■ How to place according to number of bottles→Place close together at the center.
If not placed in the center, infrared sensor may not work properly and the liquid may start boiling.
Tips to use well the dial menu Operation methods on page 27
Accessories cannot be usedThings to follow on Page 18 ~ 19
Please read
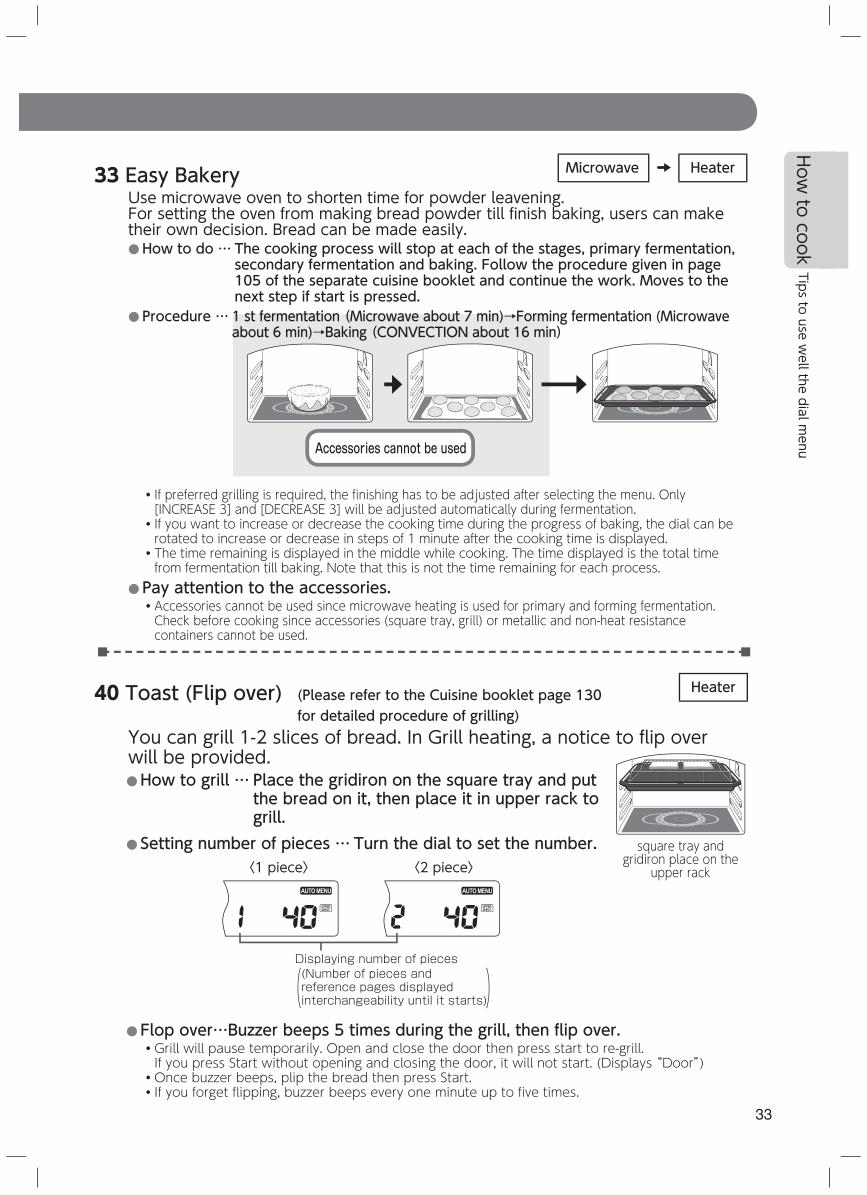
Accessories cannot be used
33
33 Easy BakeryUse microwave oven to shorten time for powder leavening.For setting the oven from making bread powder till finish baking, users can make their own decision. Bread can be made easily.● How to do … The cooking process will stop at each of the stages, primary fermentation,
secondary fermentation and baking. Follow the procedure given in page 105 of the separate cuisine booklet and continue the work. Moves to the next step if start is pressed.
● Procedure … 1 st fermentation (Microwave about 7 min)→Forming fermentation (Microwaveabout 6 min)→Baking (CONVECTION about 16 min)
・ If preferred grilling is required, the finishing has to be adjusted after selecting the menu. Only [INCREASE 3] and [DECREASE 3] will be adjusted automatically during fermentation.
・ If you want to increase or decrease the cooking time during the progress of baking, the dial can be rotated to increase or decrease in steps of 1 minute after the cooking time is displayed.
・ The time remaining is displayed in the middle while cooking. The time displayed is the total time from fermentation till baking. Note that this is not the time remaining for each process.
● Pay attention to the accessories.・ Accessories cannot be used since microwave heating is used for primary and forming fermentation.Check before cooking since accessories (square tray, grill) or metallic and non-heat resistance containers cannot be used.
40 Toast (Flip over) (Please refer to the Cuisine booklet page 130 for detailed procedure of grilling)
You can grill 1-2 slices of bread. In Grill heating, a notice to flip over will be provided.● How to grill … Place the gridiron on the square tray and put
the bread on it, then place it in upper rack to grill.
● Setting number of pieces … Turn the dial to set the number.
Displaying number of pieces(Number of pieces and reference pages displayed interchangeability until it starts) ( )
〈1 piece〉 〈2 piece〉
● Flop over… Buzzer beeps 5 times during the grill, then flip over.・ Grill will pause temporarily. Open and close the door then press start to re-grill. If you press Start without opening and closing the door, it will not start. (Displays “Door”)
・Once buzzer beeps, plip the bread then press Start.・If you forget flipping, buzzer beeps every one minute up to five times.
Microwave → Heater
Heater
square tray and gridiron place on the
upper rack
How to cook
Tips to use well the dial m
enu
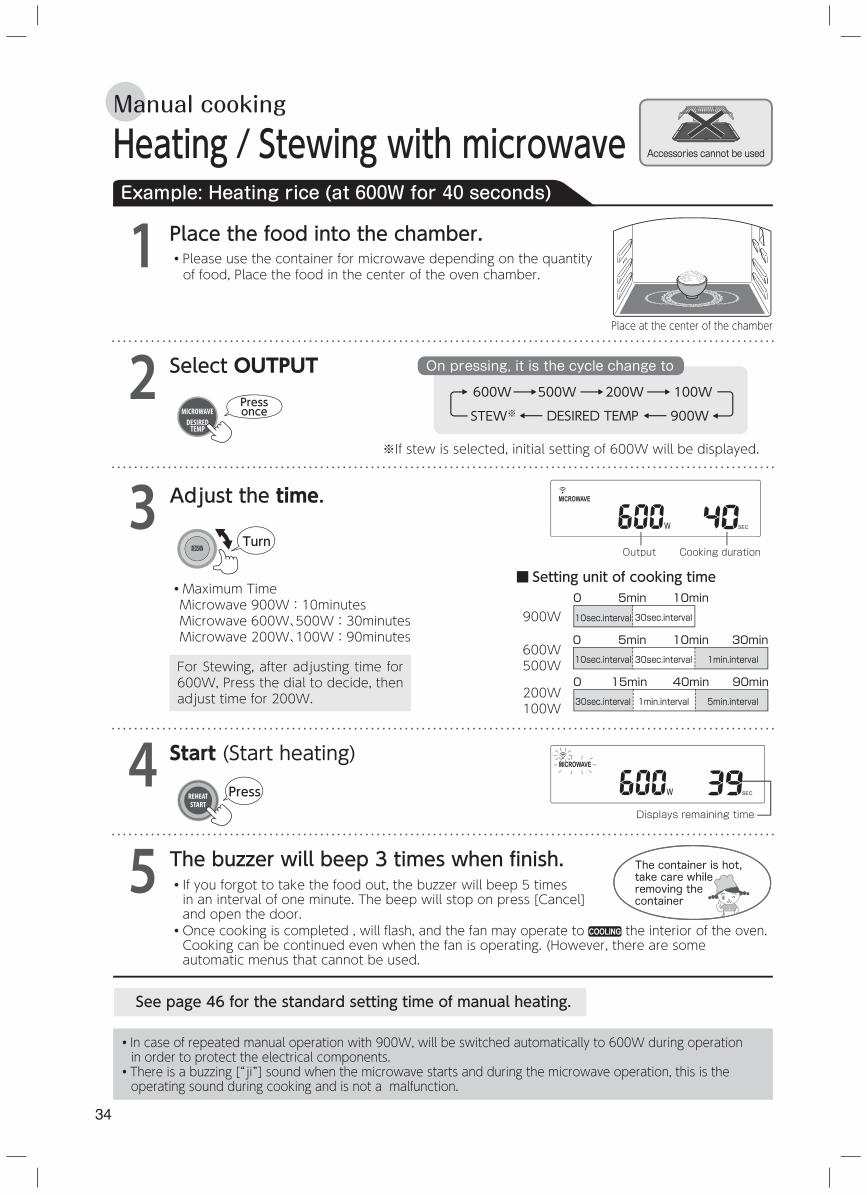
34
Heating / Stewing with microwave
Place the food into the chamber.・ Please use the container for microwave depending on the quantity of food, Place the food in the center of the oven chamber.
1
4
Adjust the time.
Select OUTPUT2
3
Start (Start heating)
See page 46 for the standard setting time of manual heating.
※If stew is selected, initial setting of 600W will be displayed.
・In case of repeated manual operation with 900W, will be switched automatically to 600W during operation in order to protect the electrical components.
・There is a buzzing [‶ji"] sound when the microwave starts and during the microwave operation, this is the operating sound during cooking and is not a malfunction.
5 The buzzer will beep 3 times when finish.・ If you forgot to take the food out, the buzzer will beep 5 times in an interval of one minute. The beep will stop on press [Cancel] and open the door.
・ Once cooking is completed , will fl ash, and the fan may operate to the interior of the oven.Cooking can be continued even when the fan is operating. (However, there are some automatic menus that cannot be used.
The container is hot, take care while removing the container
Example: Heating rice (at 600W for 40 seconds)
CUPMIN
Displays remaining time
Place at the center of the chamber
For Stewing, after adjusting time for 600W, Press the dial to decide, then adjust time for 200W.
Manual cooking
600W 500W 200W 100W
STEW※ 900WDESIRED TEMP
On pressing, it is the cycle change to
900W
0 5min 10min
10min
30min10sec.interval 30sec.interval
30sec.interval
1min.interval
200W100W
0 15min 40min 90min30sec.interval 1min.interval 5min.interval
0 5min
600W500W
10sec.interval
■ Setting unit of cooking time・ Maximum TimeMicrowave 900W:10minutesMicrowave 600W、500W:30minutesMicrowave 200W、100W:90minutes
Accessories cannot be used
Turn
Press
MICROWAVEPress once
CUPMIN
Cooking durationOutput
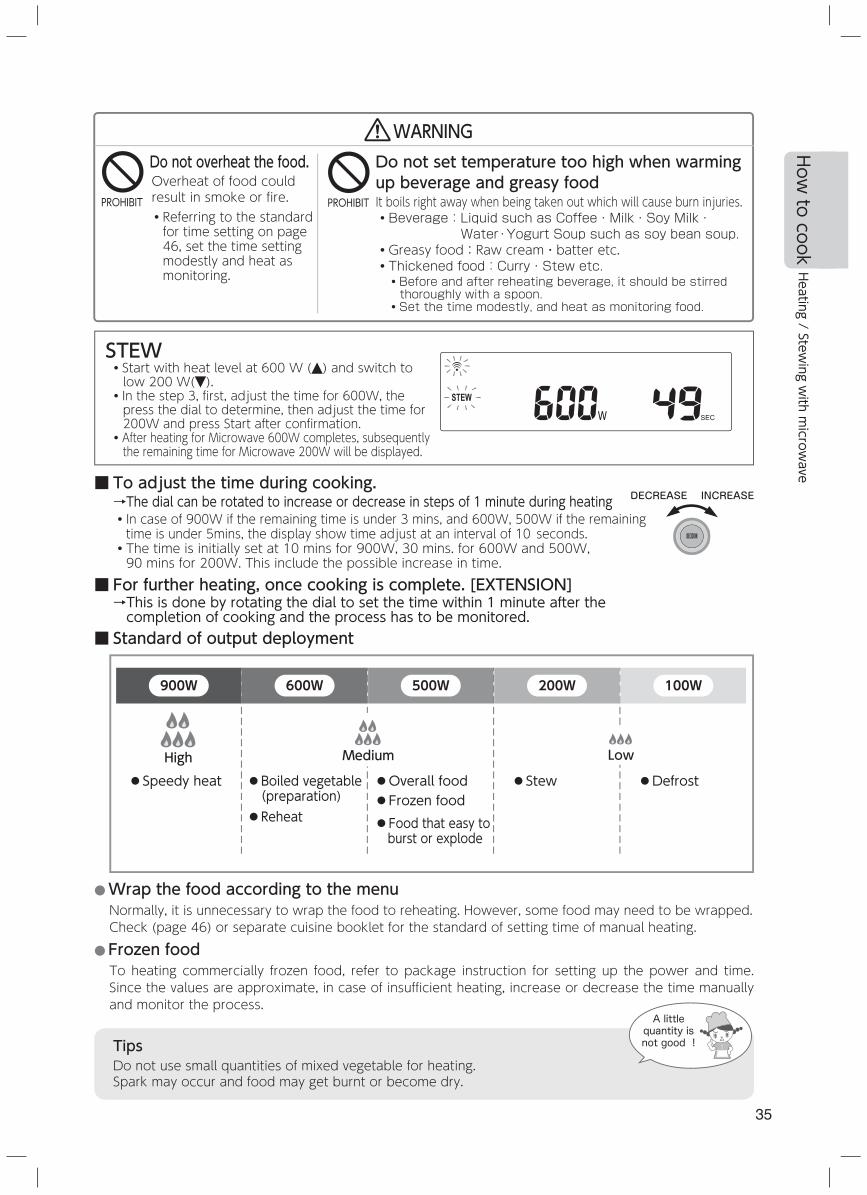
35
■ To adjust the time during cooking.→ The dial can be rotated to increase or decrease in steps of 1 minute during heating・ In case of 900W if the remaining time is under 3 mins, and 600W, 500W if the remaining time is under 5mins, the display show time adjust at an interval of 10⦆seconds.
・ The time is initially set at 10 mins for 900W, 30 mins. for 600W and 500W, 90 mins for 200W. This include the possible increase in time.
■ For further heating, once cooking is complete. [EXTENSION]→ This is done by rotating the dial to set the time within 1 minute after the completion of cooking and the process has to be monitored.
■ Standard of output deployment
TipsDo not use small quantities of mixed vegetable for heating. Spark may occur and food may get burnt or become dry.
● Wrap the food according to the menuNormally, it is unnecessary to wrap the food to reheating. However, some food may need to be wrapped.Check (page 46) or separate cuisine booklet for the standard of setting time of manual heating.
● Frozen foodTo heating commercially frozen food, refer to package instruction for setting up the power and time. Since the values are approximate, in case of insufficient heating, increase or decrease the time manually and monitor the process.
A little quantity is not good !
STEW・ Start with heat level at 600 W ( ) and switch to low 200 W( ).
・ In the step 3, first, adjust the time for 600W, the press the dial to determine, then adjust the time for 200W and press Start after confirmation.
・ After heating for Microwave 600W completes, subsequently the remaining time for Microwave 200W will be displayed.
CUPMIN
LowHigh● Speedy heat ● Boiled vegetable
(preparation)● Reheat
● Overall food● Frozen food● Food that easy to burst or explode
● Stew
Medium
● Defrost
900W 600W 500W 200W 100W
DECREASE INCREASE
Do not overheat the food.Overheat of food could result in smoke or fire.・ Referring to the standard for time setting on page 46, set the time setting modestly and heat as monitoring.
PROHIBIT
Do not set temperature too high when warming up beverage and greasy foodIt boils right away when being taken out which will cause burn injuries.・ Beverage: Liquid such as Coffee・Milk・Soy Milk・
Water・Yogurt Soup such as soy bean soup.・ Greasy food:Raw cream・batter etc.・ Thickened food:Curry・Stew etc.・ Before and after reheating beverage, it should be stirred thoroughly with a spoon.
・ Set the time modestly, and heat as monitoring food.
PROHIBIT
WARNING
How to cook
Heating / Stewing w
ith microw
ave
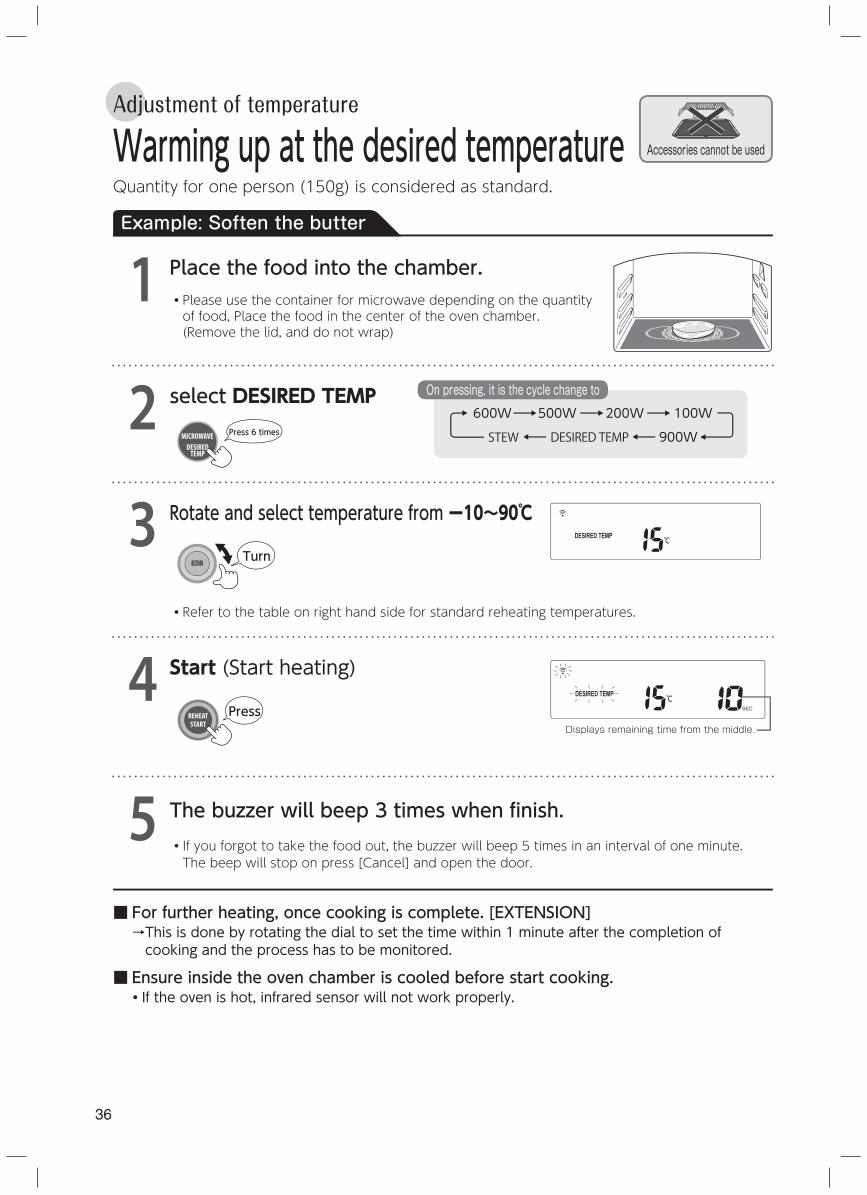
36
Warming up at the desired temperature
Place the food into the chamber.・ Please use the container for microwave depending on the quantity of food, Place the food in the center of the oven chamber. (Remove the lid, and do not wrap)
1
4
2
3 Rotate and select temperature from ー10~90℃
■ For further heating, once cooking is complete. [EXTENSION]→ This is done by rotating the dial to set the time within 1 minute after the completion of cooking and the process has to be monitored.
■ Ensure inside the oven chamber is cooled before start cooking.・If the oven is hot, infrared sensor will not work properly.
select DESIRED TEMP
・Refer to the table on right hand side for standard reheating temperatures.
Start (Start heating)
5 The buzzer will beep 3 times when finish.・ If you forgot to take the food out, the buzzer will beep 5 times in an interval of one minute. The beep will stop on press [Cancel] and open the door.
Example: Soften the butter
CUPMIN
CUPMIN
Displays remaining time from the middle.
Quantity for one person (150g) is considered as standard.
Adjustment of temperature
600W 500W 200W 100W
STEW 900WDESIRED TEMP
On pressing, it is the cycle change to
Accessories cannot be used
Turn
Press
MICROWAVE Press 6 times
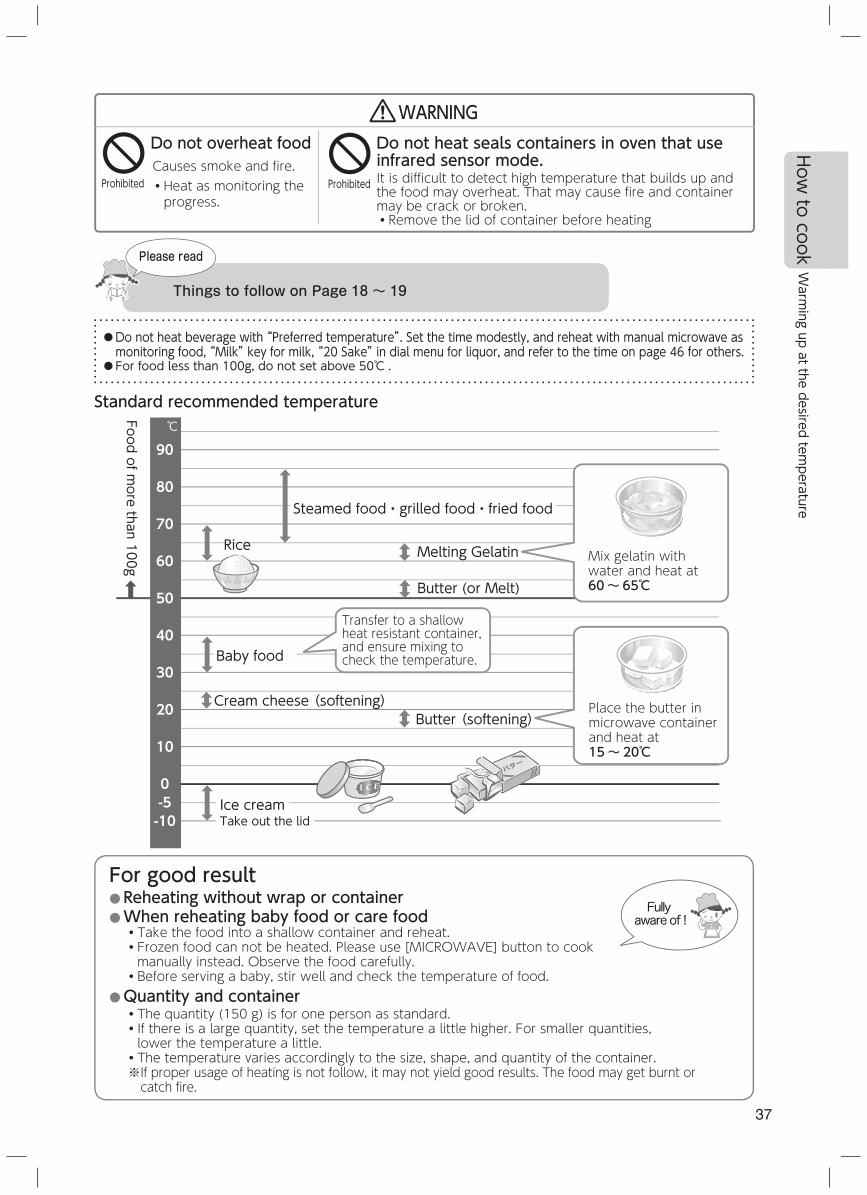
37
Standard recommended temperature
90
80
70
60
50
40
30
20
10
0-5-10
℃
Steamed food・grilled food・fried food
Rice
Baby food
Ice creamTake out the lid
Melting Gelatin
Butter (or Melt)
Butter (softening)Cream cheese (softening)
バター
Food of more than 100g
Place the butter in microwave container and heat at 15~ 20℃
Mix gelatin with water and heat at 60~ 65℃
Transfer to a shallow heat resistant container, and ensure mixing to check the temperature.
● Do not heat beverage with “Preferred temperature”. Set the time modestly, and reheat with manual microwave as monitoring food, “Milk” key for milk, “20 Sake” in dial menu for liquor, and refer to the time on page 46 for others.
● For food less than 100g, do not set above 50℃ .
For good result● Reheating without wrap or container● When reheating baby food or care food・Take the food into a shallow container and reheat.・ Frozen food can not be heated. Please use [MICROWAVE] button to cook manually instead. Observe the food carefully.・ Before serving a baby, stir well and check the temperature of food.
● Quantity and container・The quantity (150 g) is for one person as standard.・ If there is a large quantity, set the temperature a little higher. For smaller quantities, lower the temperature a little.・ The temperature varies accordingly to the size, shape, and quantity of the container.※ If proper usage of heating is not follow, it may not yield good results. The food may get burnt or catch fire.
Fully aware of !
Do not overheat foodCauses smoke and fire.・ Heat as monitoring the progress.
Prohibited
Do not heat seals containers in oven that use infrared sensor mode.It is difficult to detect high temperature that builds up and the food may overheat. That may cause fire and container may be crack or broken.・Remove the lid of container before heating
Prohibited
WARNING
Things to follow on Page 18 ~ 19
Please read
How to cook
Warming up at the desired tem
perature
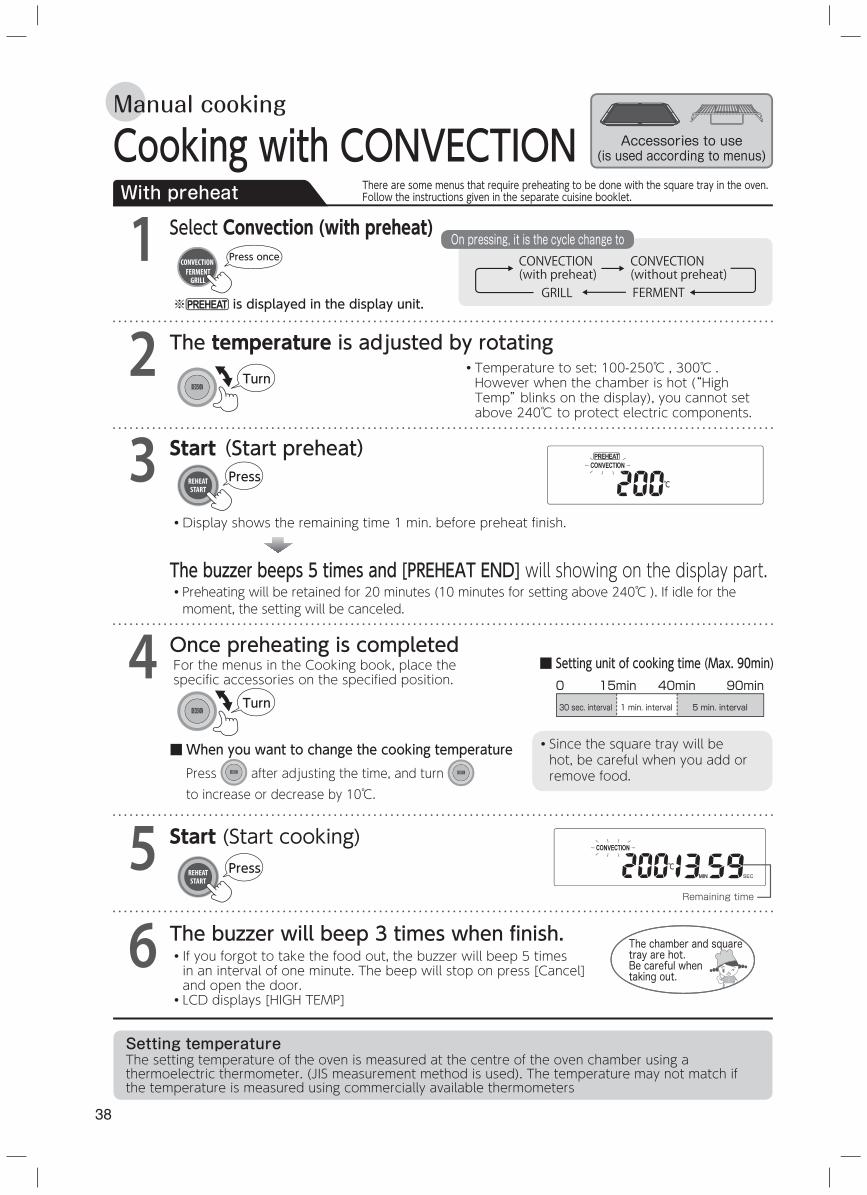
38
Cooking with CONVECTIONSelect Convection (with preheat)
The temperature is adjusted by rotating
Start (Start preheat)
Once preheating is completed
3
1
2
5 Start (Start cooking)
・ Temperature to set: 100-250℃ , 300℃ . However when the chamber is hot (“High Temp” blinks on the display), you cannot set above 240℃ to protect electric components.
There are some menus that require preheating to be done with the square tray in the oven.Follow the instructions given in the separate cuisine booklet.
・ Display shows the remaining time 1 min. before preheat finish.
The buzzer beeps 5 times and [PREHEAT END] will showing on the display part.
4・ Preheating will be retained for 20 minutes (10 minutes for setting above 240℃ ). If idle for the moment, the setting will be canceled.
・ Since the square tray will be hot, be careful when you add or remove food.
■ When you want to change the cooking temperaturePress after adjusting the time, and turn to increase or decrease by 10℃.
※ is displayed in the display unit.
The buzzer will beep 3 times when finish.6 ・ If you forgot to take the food out, the buzzer will beep 5 times in an interval of one minute. The beep will stop on press [Cancel] and open the door.
・LCD displays [HIGH TEMP]
Setting temperatureThe setting temperature of the oven is measured at the centre of the oven chamber using a thermoelectric thermometer. (JIS measurement method is used). The temperature may not match if the temperature is measured using commercially available thermometers
The chamber and square tray are hot. Be careful when taking out.
With preheat
CUPMIN
Remaining time
CUPMIN
■ Setting unit of cooking time (Max. 90min)0 15min 40min 90min30 sec. interval 1 min. interval 5 min. interval
For the menus in the Cooking book, place the specific accessories on the specified position.
Manual cooking
CONVECTION(with preheat)
CONVECTION(without preheat)
GRILL FERMENT
On pressing, it is the cycle change to
Turn
Press
CONVECTIONFERMENT
GRILL
Press once
Turn
Accessories to use(is used according to menus)
Press
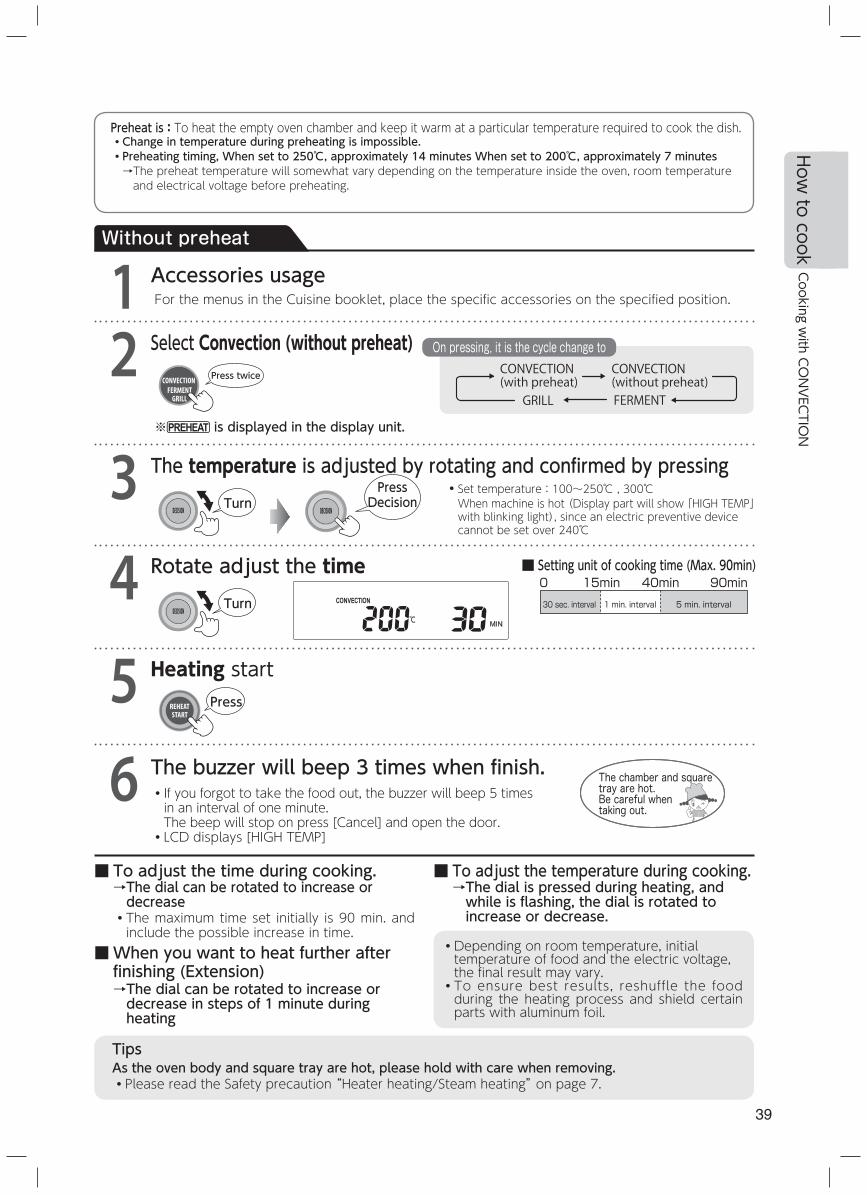
39
The temperature is adjusted by rotating and confirmed by pressing
Accessories usage1
4
・ Depending on room temperature, initial temperature of food and the electric voltage, the final result may vary.・ To ensure best results, reshuffle the food during the heating process and shield certain parts with aluminum foil.
Rotate adjust the time
2
3
Select Convection (without preheat)
※ is displayed in the display unit.
5 Heating start
The buzzer will beep 3 times when finish.6 ・ If you forgot to take the food out, the buzzer will beep 5 times in an interval of one minute.The beep will stop on press [Cancel] and open the door.
・LCD displays [HIGH TEMP]
■ To adjust the time during cooking.→ The dial can be rotated to increase or decrease
・ The maximum time set initially is 90 min. and include the possible increase in time.
■ To adjust the temperature during cooking.→ The dial is pressed during heating, and while is flashing, the dial is rotated to increase or decrease.
■ When you want to heat further after finishing (Extension)→ The dial can be rotated to increase or decrease in steps of 1 minute during heating
The chamber and square tray are hot. Be careful when taking out.
Without preheat
Preheat is: To heat the empty oven chamber and keep it warm at a particular temperature required to cook the dish.・ Change in temperature during preheating is impossible.・ Preheating timing, When set to 250℃, approximately 14 minutes When set to 200℃, approximately 7 minutes→ The preheat temperature will somewhat vary depending on the temperature inside the oven, room temperature and electrical voltage before preheating.
Press Decision
■ Setting unit of cooking time (Max. 90min)0 15min 40min 90min30 sec. interval 1 min. interval 5 min. interval
For the menus in the Cuisine booklet, place the specific accessories on the specified position.
CONVECTION(with preheat)
CONVECTION(without preheat)
GRILL FERMENT
On pressing, it is the cycle change to
・ Set temperature:100~250℃ , 300℃When machine is hot (Display part will show 「HIGH TEMP」with blinking light), since an electric preventive device cannot be set over 240℃
TipsAs the oven body and square tray are hot, please hold with care when removing.・ Please read the Safety precaution “Heater heating/Steam heating” on page 7.
Turn
CONVECTIONFERMENTGRILL
Press twice
Turn
Press
How to cook
Cooking w
ith CONVECTION
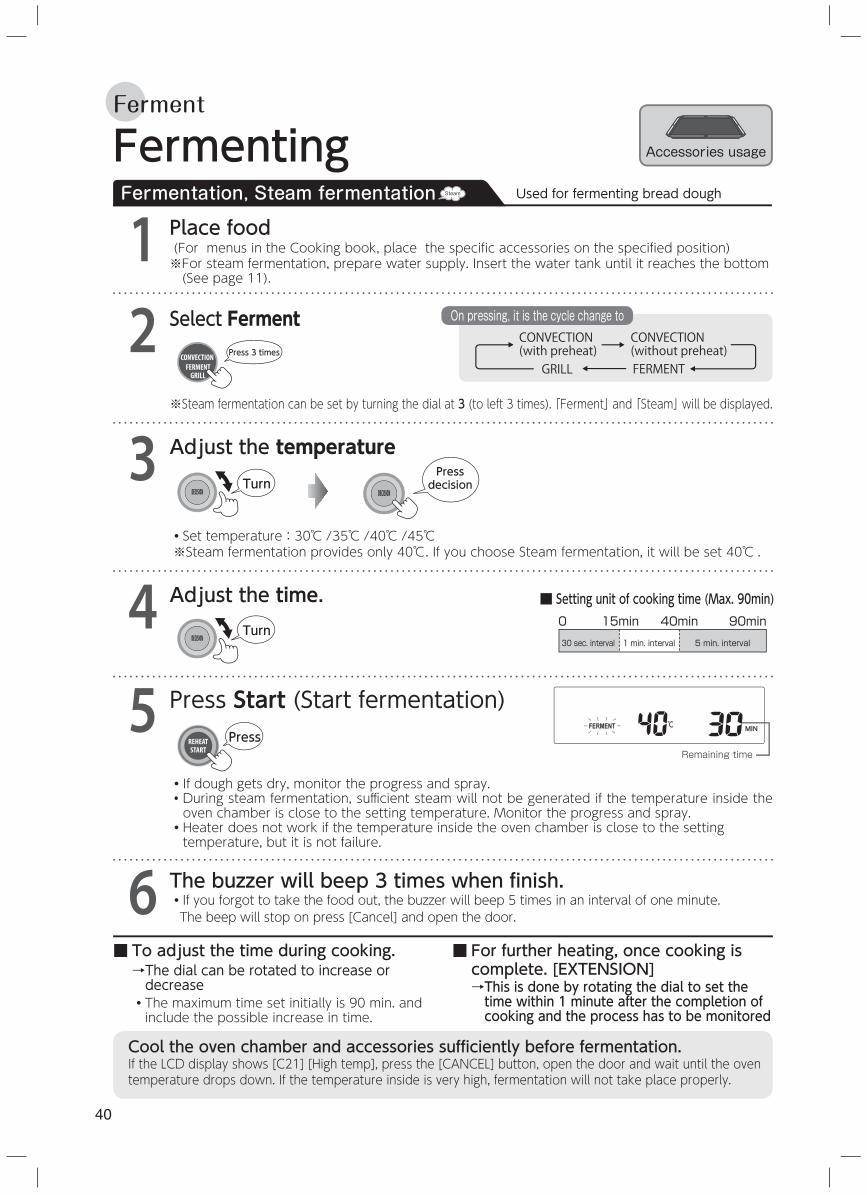
40
1Fermentation, Steam fermentation Steam
Fermenting
■ To adjust the time during cooking.→ The dial can be rotated to increase or decrease
・The maximum time set initially is 90 min. and include the possible increase in time.
Cool the oven chamber and accessories sufficiently before fermentation.If the LCD display shows [C21] [High temp], press the [CANCEL] button, open the door and wait until the oven temperature drops down. If the temperature inside is very high, fermentation will not take place properly.
Place food(For menus in the Cooking book, place the specific accessories on the specified position)※ For steam fermentation, prepare water supply. Insert the water tank until it reaches the bottom (See page 11).
2
■ For further heating, once cooking is complete. [EXTENSION]→ This is done by rotating the dial to set the time within 1 minute after the completion of cooking and the process has to be monitored
Select Ferment
Adjust the temperature
4 Adjust the time.
3・Set temperature:30℃ /35℃ /40℃ /45℃※Steam fermentation provides only 40℃. If you choose Steam fermentation, it will be set 40℃ .
5 Press Start (Start fermentation)
The buzzer will beep 3 times when finish.6 ・ If you forgot to take the food out, the buzzer will beep 5 times in an interval of one minute. The beep will stop on press [Cancel] and open the door.
・ If dough gets dry, monitor the progress and spray.・ During steam fermentation, suffi cient steam will not be generated if the temperature inside the oven chamber is close to the setting temperature. Monitor the progress and spray.
・ Heater does not work if the temperature inside the oven chamber is close to the setting temperature, but it is not failure.
CUPMIN
Remaining time
■ Setting unit of cooking time (Max. 90min)0 15min 40min 90min30 sec. interval 1 min. interval 5 min. interval
CONVECTION(with preheat)
CONVECTION(without preheat)
GRILL FERMENT
On pressing, it is the cycle change to
Ferment
Used for fermenting bread dough
Turn
Turn
Press decision
Accessories usage
CONVECTIONFERMENT
GRILL
Press 3 times
Press
※ Steam fermentation can be set by turning the dial at 3 (to left 3 times). 「Ferment」 and 「Steam」 will be displayed.

41
Cooking with GRILL
1
4
Example:Grilled Fish
Place food・ Place gridiron on square tray, then place food on it and put in chamber.
・ Because it is cooked with upper heater, upper layer is recommended.
・ If the height of food is high, do not use gridiron to cook.
■ Setting unit of cooking time (Max. 30min)0 5min 10min 30min10sec.interval 30sec.interval 1min.interval
2
3
■ To adjust the time during cooking.→ The dial can be rotated to increase or decrease in steps of 1 minute during heating・ The maximum time set initially is 30 min. and include the possible increase in time.
■ For further heating, once cooking is complete. [EXTENSION]→ This is done by rotating the dial to set the time within 1 minute after the completion of cooking and the process has to be monitored.
Select Grill
Adjust the time
Press Start (Start cooking)
The buzzer will beep 3 times when finish.・ If you forgot to take the food out, the buzzer will beep 5 times in an interval of one minute.The beep will stop on press [Cancel] and open the door.
・LCD displays [HIGH TEMP]
5
Accessories usage
Displays remaining time
CONVECTION(with preheat)
CONVECTION(without preheat)
GRILL FERMENT
On pressing , it is the cycle change to
Manual cooking
TipsBe careful when you take the food out as the oven chamber and the square tray will be hot.・ Please read the Safety precaution “Heater heating/Steam heating” on page 7.
・ For good result, turn the food during the process and press START again. The chamber and square
tray are hot. Be careful when taking out.
CONVECTIONFERMENT
GRILL
Press 4 times
Turn
Press
How to cook
Fermenting / C
ooking with G
RILL
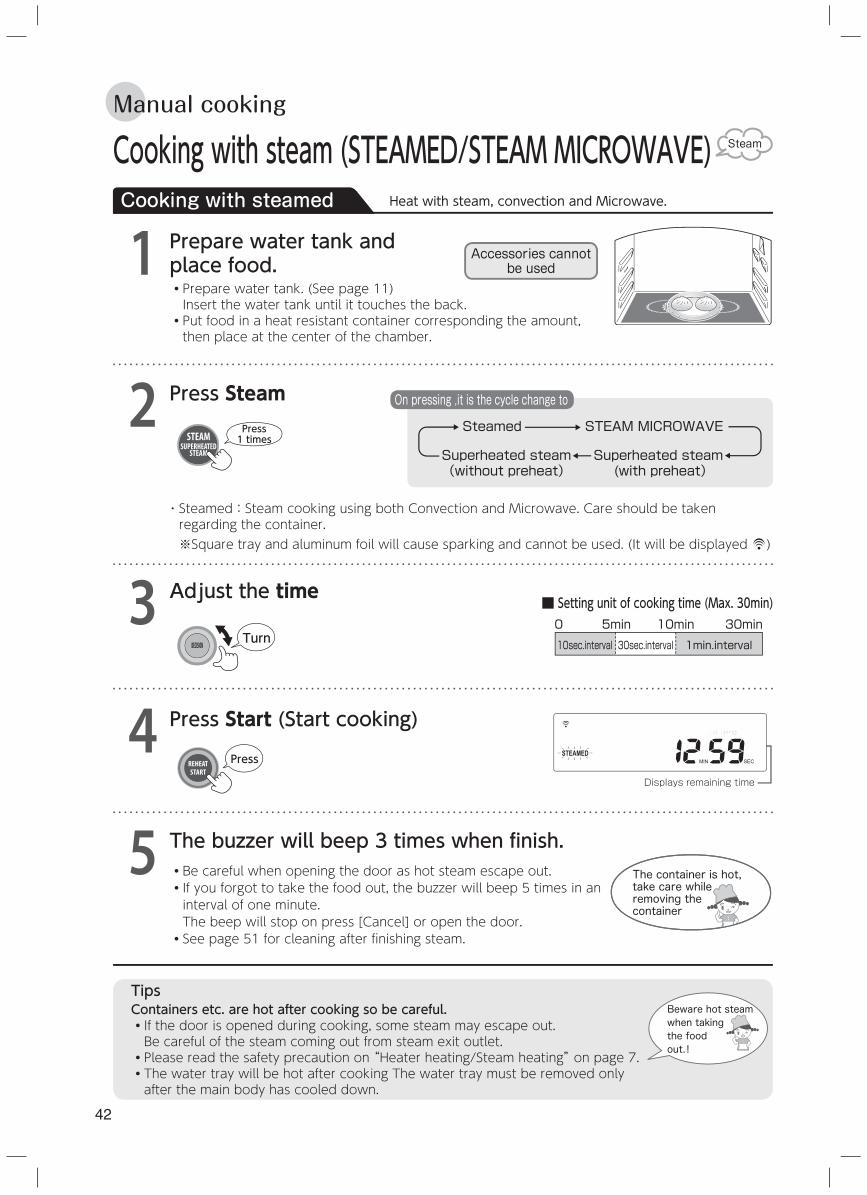
42
Cooking with steam (STEAMED/STEAM MICROWAVE) Steam
Prepare water tank and place food.・ Prepare water tank. (See page 11) Insert the water tank until it touches the back.
・ Put food in a heat resistant container corresponding the amount, then place at the center of the chamber.
1
・Steamed:Steam cooking using both Convection and Microwave. Care should be taken regarding the container.※Square tray and aluminum foil will cause sparking and cannot be used. (It will be displayed )
■ Setting unit of cooking time (Max. 30min)0 5min 10min 30min10sec.interval 30sec.interval 1min.interval
2 Press Steam
The container is hot, take care while removing the container
4
3 Adjust the time
Press Start (Start cooking)
・ Be careful when opening the door as hot steam escape out.・ If you forgot to take the food out, the buzzer will beep 5 times in an interval of one minute.The beep will stop on press [Cancel] or open the door.
・ See page 51 for cleaning after fi nishing steam.
TipsContainers etc. are hot after cooking so be careful.・ If the door is opened during cooking, some steam may escape out. Be careful of the steam coming out from steam exit outlet.
・ Please read the safety precaution on “Heater heating/Steam heating” on page 7. ・ The water tray will be hot after cooking The water tray must be removed only after the main body has cooled down.
Beware hot steam when taking the food out.!
The buzzer will beep 3 times when finish.5Displays remaining time
CUPMIN
Steamed STEAM MICROWAVE
Superheated steam(without preheat)
Superheated steam (with preheat)
On pressing ,it is the cycle change to
Manual cooking
Cooking with steamed
Accessories cannot be used
Press 1 times
Heat with steam, convection and Microwave.
Turn
Press

43
Prepare water tank and place food.・ Prepare water tank. (See page 11)Insert the water tank until it touches the back.
・ Put food in a heat resistant container corresponding the amount, then place at the center of the chamber.
1
2
3 Adjust the time
4 Press Start (Start cooking)
The buzzer will beep 3 times when finish.5The container is hot, take care while removing the container
Press Steam Microwave
■ To adjust the time during cooking.→ The dial can be rotated to increase or decrease in steps of 1 minute during heating
・ The maximum time set initially is 30 min. and include the possible increase in time.
■ If the water in the water tank become empty while cooking.→ There will be a beep and the [WATER] display will start blinking.
・ Add water in the water tank. [WATER] display will disappear once water is added. (Water can be added to the water tank, even during cooking operation.)
■ For further heating, once cooking is complete. [EXTENSION]→ This is done by rotating the dial to set the time within 1 minute after the completion of cooking and the process has to be monitored
CUPMIN
Displays remaining time
■ Setting unit of cooking time (Max. 30min)0 5min 10min 30min10sec.interval 30sec.interval 1min.interval
Steamed STEAM MICROWAVE
Superheated steam(without preheat)
Superheated steam (with preheat)
On pressing , it is the cycle change to
Cooking with Steam Microwave
Press
Press 2 times
Turn
・Use microwave(400W)and steam for heating. Care should be taken regarding the container.※Square tray and aluminum foil will cause sparking and cannot be used. (It will be displayed )
Heat with Microwave and Steam
・ Be careful when opening the door as hot steam escape out.・ If you forgot to take the food out, the buzzer will beep 5 times in an interval of one minute.The beep will stop on press [Cancel] or open the door.
・ See page 51 for cleaning after fi nishing steam.
Accessories cannot be used
How to cook
Cooking w
ith steam (STEA
MED/STEA
M MICROWAVE)
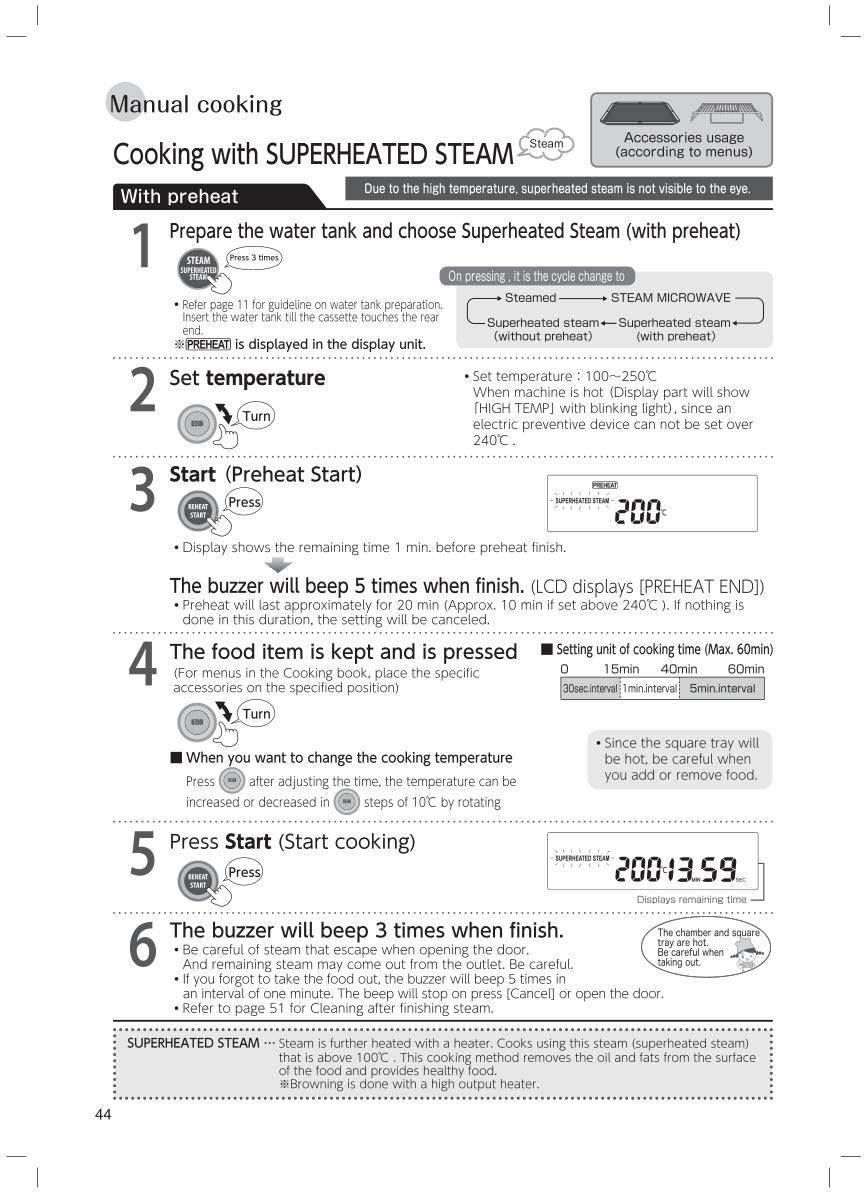
44
Cooking with SUPERHEATED STEAM Steam Accessories usage (according to menus)
Prepare the water tank and choose Superheated Steam (with preheat)
Set temperature
Start (Preheat Start)
4 The food item is kept and is pressed
3
1
2
5 Press Start (Start cooking)
・ Display shows the remaining time 1 min. before preheat finish.
・ Refer page 11 for guideline on water tank preparation.Insert the water tank till the cassette touches the rear end.※ is displayed in the display unit.
The buzzer will beep 3 times when finish.6 ・ Be careful of steam that escape when opening the door.And remaining steam may come out from the outlet. Be careful.
・If you forgot to take the food out, the buzzer will beep 5 times in an interval of one minute. The beep will stop on press [Cancel] or open the door.
・ Refer to page 51 for Cleaning after fi nishing steam.
The chamber and square tray are hot. Be careful when taking out.
With preheat
Steamed STEAM MICROWAVE
Superheated steam(without preheat)
Superheated steam (with preheat)
On pressing , it is the cycle change to
CUPMIN
Displays remaining time
CUPMIN
(For menus in the Cooking book, place the specific accessories on the specified position)
SUPERHEATED STEAM … Steam is further heated with a heater. Cooks using this steam (superheated steam) that is above 100℃ . This cooking method removes the oil and fats from the surface of the food and provides healthy food.※Browning is done with a high output heater.
Due to the high temperature, superheated steam is not visible to the eye.
Manual cooking
・ Set temperature:100~250℃When machine is hot (Display part will show「HIGH TEMP」 with blinking light), since an electric preventive device can not be set over 240℃ .
The buzzer will beep 5 times when finish. (LCD displays [PREHEAT END])・ Preheat will last approximately for 20 min (Approx. 10 min if set above 240℃ ). If nothing is done in this duration, the setting will be canceled.
■ Setting unit of cooking time (Max. 60min)0 15min 40min 60min30sec.interval 1min.interval 5min.interval
■ When you want to change the cooking temperaturePress after adjusting the time, the temperature can be increased or decreased in steps of 10℃ by rotating
・ Since the square tray will be hot, be careful when you add or remove food.
Press
Turn
Press 3 times
Turn
Press
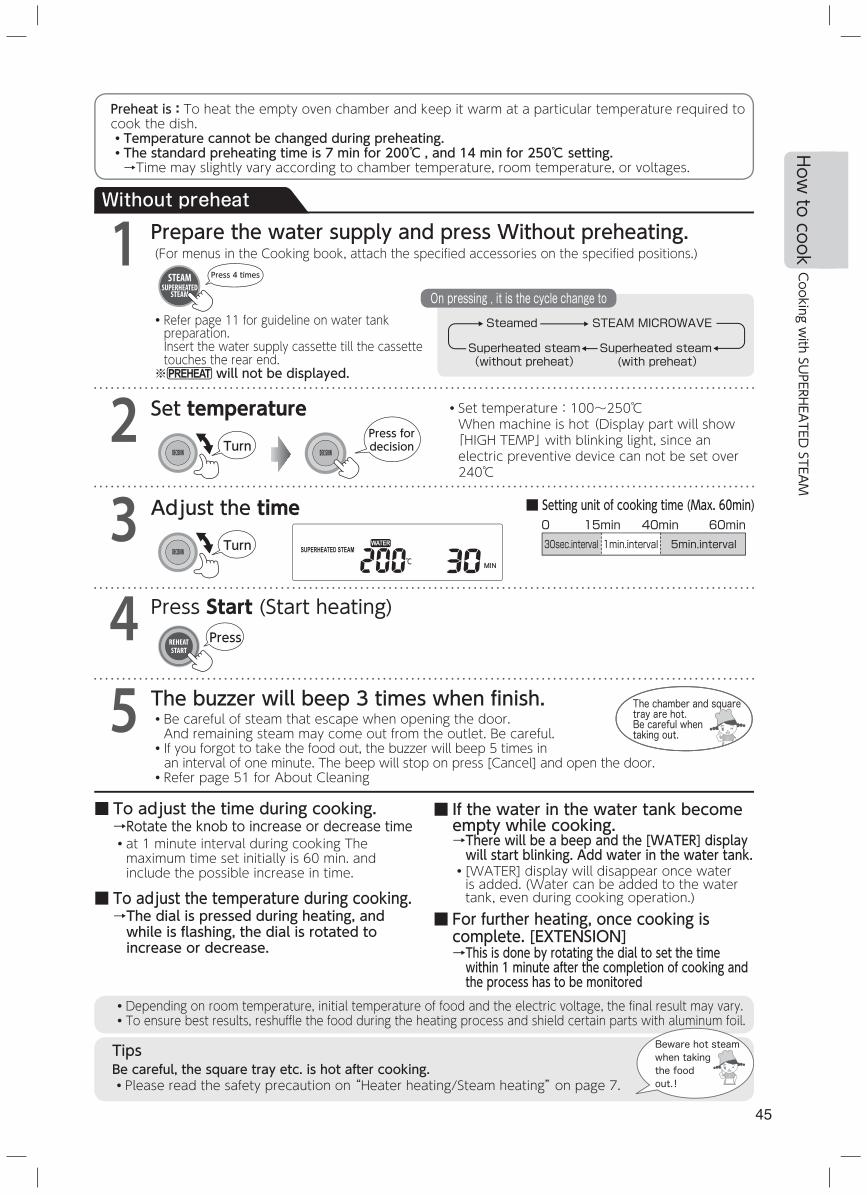
45
Set temperature
Prepare the water supply and press Without preheating.1
3 Adjust the time
2
・ Refer page 11 for guideline on water tank preparation.Insert the water supply cassette till the cassette touches the rear end.※ will not be displayed.
4 Press Start (Start heating)
The buzzer will beep 3 times when finish.5 ・ Be careful of steam that escape when opening the door.And remaining steam may come out from the outlet. Be careful.
・If you forgot to take the food out, the buzzer will beep 5 times in an interval of one minute. The beep will stop on press [Cancel] and open the door.
・ Refer page 51 for About Cleaning
■ To adjust the time during cooking.→ Rotate the knob to increase or decrease time・ at 1 minute interval during cooking The maximum time set initially is 60 min. and include the possible increase in time.
■ To adjust the temperature during cooking.→ The dial is pressed during heating, and while is flashing, the dial is rotated to increase or decrease.
■ For further heating, once cooking is complete. [EXTENSION]→ This is done by rotating the dial to set the time within 1 minute after the completion of cooking and the process has to be monitored
The chamber and square tray are hot. Be careful when taking out.
Without preheat
■ If the water in the water tank become empty while cooking.→ There will be a beep and the [WATER] display will start blinking. Add water in the water tank.
・ [WATER] display will disappear once water is added. (Water can be added to the water tank, even during cooking operation.)
■ Setting unit of cooking time (Max. 60min)0 15min 40min 60min30sec.interval 1min.interval 5min.interval
(For menus in the Cooking book, attach the specified accessories on the specified positions.)
・ Depending on room temperature, initial temperature of food and the electric voltage, the final result may vary.・ To ensure best results, reshuffle the food during the heating process and shield certain parts with aluminum foil.
TipsBe careful, the square tray etc. is hot after cooking.・ Please read the safety precaution on “Heater heating/Steam heating” on page 7.
・ Set temperature:100~250℃When machine is hot (Display part will show 「HIGH TEMP」 with blinking light, since an electric preventive device can not be set over 240℃
Beware hot steam when taking the food out.!
Steamed STEAM MICROWAVE
Superheated steam(without preheat)
Superheated steam (with preheat)
On pressing , it is the cycle change to
Preheat is:To heat the empty oven chamber and keep it warm at a particular temperature required to cook the dish.・ Temperature cannot be changed during preheating.・ The standard preheating time is 7 min for 200℃ , and 14 min for 250℃ setting.→ Time may slightly vary according to chamber temperature, room temperature, or voltages.
Press 4 times
Press for decisionTurn
Turn
Press
How to cook
Cooking w
ith SUPERHEA
TED STEA
M
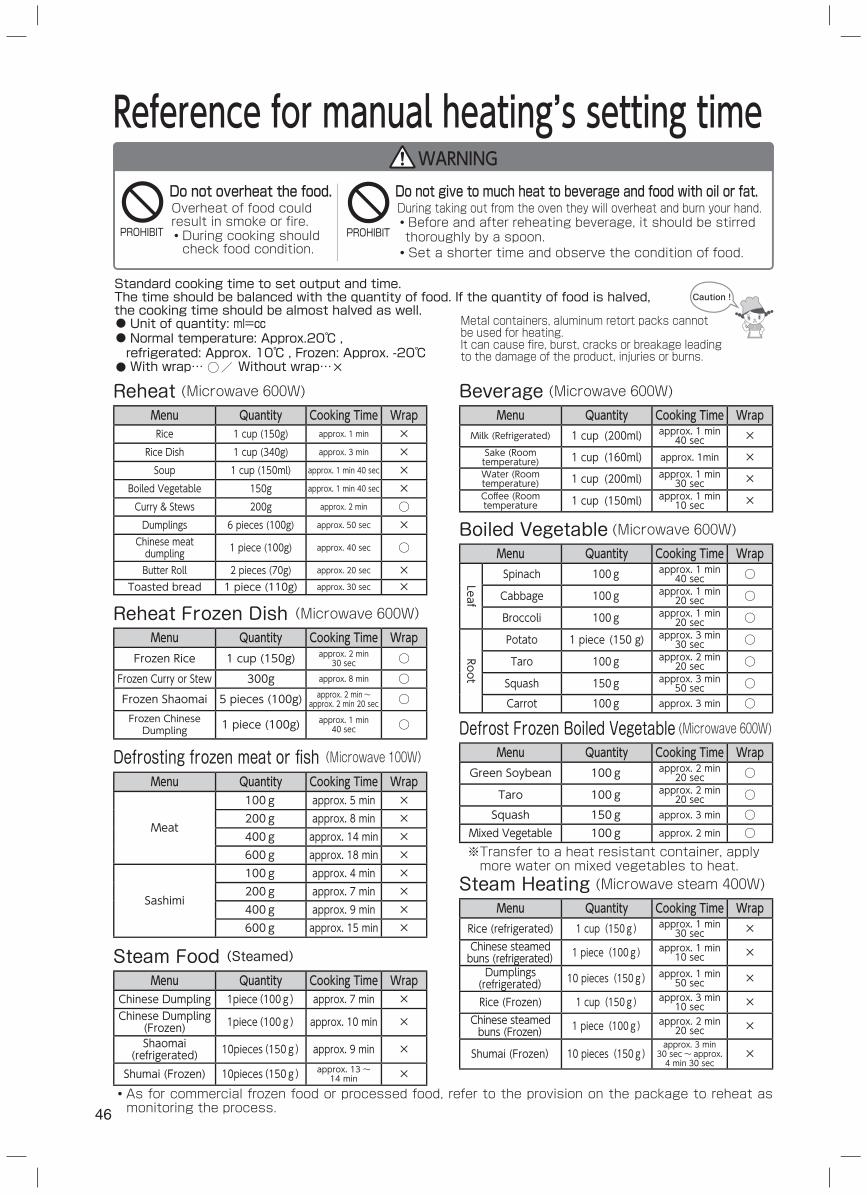
46
Do not overheat the food.Overheat of food could result in smoke or fire.・ During cooking should check food condition.
PROHIBIT
WARNINGDo not give to much heat to beverage and food with oil or fat.During taking out from the oven they will overheat and burn your hand.・ Before and after reheating beverage, it should be stirred thoroughly by a spoon.・ Set a shorter time and observe the condition of food.
PROHIBIT
Menu Quantity Cooking Time WrapRice 1 cup (150g) approx. 1 min ×
Rice Dish 1 cup (340g) approx. 3 min ×Soup 1 cup (150ml) approx. 1 min 40 sec ×
Boiled Vegetable 150g approx. 1 min 40 sec ×Curry & Stews 200g approx. 2 min ○Dumplings 6 pieces (100g) approx. 50 sec ×Chinese meat dumpling 1 piece (100g) approx. 40 sec ○
Butter Roll 2 pieces (70g) approx. 20 sec ×Toasted bread 1 piece (110g) approx. 30 sec ×
Reheat (Microwave 600W)
Menu Quantity Cooking Time WrapFrozen Rice 1 cup (150g) approx. 2 min
30 sec ○Frozen Curry or Stew 300g approx. 8 min ○Frozen Shaomai 5 pieces (100g) approx. 2 min ~
approx. 2 min 20 sec ○Frozen Chinese Dumpling 1 piece (100g) approx. 1 min
40 sec ○
Reheat Frozen Dish (Microwave 600W)
Menu Quantity Cooking Time Wrap
Meat
100g approx. 5 min ×200g approx. 8 min ×400g approx. 14 min ×600g approx. 18 min ×
Sashimi
100g approx. 4 min ×200g approx. 7 min ×400g approx. 9 min ×600g approx. 15 min ×
Defrosting frozen meat or fi sh(Microwave 100W)
Menu Quantity Cooking Time WrapChinese Dumpling 1piece(100g) approx. 7 min ×Chinese Dumpling
(Frozen) 1piece(100g) approx. 10 min ×
Shaomai (refrigerated) 10pieces(150g) approx. 9 min ×
Shumai (Frozen) 10pieces(150g) approx. 13 ~14 min ×
Steam Food (Steamed)
Menu Quantity Cooking Time WrapMilk (Refrigerated) 1 cup (200ml) approx. 1 min
40 sec ×Sake (Room temperature) 1 cup (160ml) approx. 1min ×Water (Room temperature) 1 cup (200ml) approx. 1 min
30 sec ×Coff ee (Room temperature 1 cup (150ml) approx. 1 min
10 sec ×
Beverage (Microwave 600W)
Menu Quantity Cooking Time Wrap
Leaf
Spinach 100g approx. 1 min 40 sec ○
Cabbage 100g approx. 1 min 20 sec ○
Broccoli 100g approx. 1 min 20 sec ○
Root
Potato 1 piece (150 g) approx. 3 min 30 sec ○
Taro 100g approx. 2 min 20 sec ○
Squash 150g approx. 3 min 50 sec ○
Carrot 100g approx. 3 min ○
Boiled Vegetable (Microwave 600W)
Menu Quantity Cooking Time WrapGreen Soybean 100g approx. 2 min
20 sec ○
Taro 100g approx. 2 min 20 sec ○
Squash 150g approx. 3 min ○Mixed Vegetable 100g approx. 2 min ○
Defrost Frozen Boiled Vegetable (Microwave 600W)
Menu Quantity Cooking Time WrapRice (refrigerated) 1 cup (150g) approx. 1 min
30 sec ×Chinese steamed buns (refrigerated) 1 piece (100g) approx. 1 min
10 sec ×Dumplings (refrigerated) 10 pieces (150g) approx. 1 min
50 sec ×
Rice (Frozen) 1 cup (150g) approx. 3 min 10 sec ×
Chinese steamed buns (Frozen) 1 piece (100g) approx. 2 min
20 sec ×
Shumai (Frozen) 10 pieces (150g)approx. 3 min 30 sec ~ approx. 4 min 30 sec
×
Steam Heating (Microwave steam 400W)
・ As for commercial frozen food or processed food, refer to the provision on the package to reheat as monitoring the process.
※ Transfer to a heat resistant container, apply more water on mixed vegetables to heat.
Standard cooking time to set output and time.The time should be balanced with the quantity of food. If the quantity of food is halved, the cooking time should be almost halved as well.● Unit of quantity: ml=㏄● Normal temperature: Approx.20℃ , refrigerated: Approx. 10℃ , Frozen: Approx. -20℃● With wrap… ○/ Without wrap…×
Metal containers, aluminum retort packs cannot be used for heating. It can cause fire, burst, cracks or breakage leading to the damage of the product, injuries or burns.
Reference for manual heating’s setting time
Caution !

47
About notification sound
■Pressing a button → Pip■ If 「Reheat」 is pressed one minute after the door has been opened or closed → Pipipipipi (Cooking will not start)*Press「Reheat」 after opening and closing the door once.
■ Finish cooking : beep beep beep■ Preheat complete, Fermentation complete → beep beep beep beep beep■ The food is not taken out after cooking is completed → Pipi Pipi Pipi (every 1 min interval)ー■ If you for get flipping over on Auto cooking “Toast” → Pipi Pipi Pipi every minute. ■ Indication of abnormality → Pipipipipipipi■ Refilling the water ・If cooking is suddenly stopped→Pipipipipipipi ・If cooking is not stop→Pipipi (every 1 min interval)
Beep sound notification for following operations and conditions.
How to cancel the buzzing sound.
To restore Notification sign/Operation guide
1
2
While displaying [0], press CANCEL and hold until you hear Pip Pip (Approx. 3⦆secs).
Continue to press MILK .
1
2
While displaying [0], press CANCEL and hold until you hear Pip Pip (Approx. 3 secs).
Continue to press 3 TYPESDEFROST .
■To restore the buzzer sound. → Repeat the steps of “How to cancel the buzzing sound”.
■To cancel all the buzzer sounds ■ To stop the buzzer sound when forgot to take out the food
■To restore the notification sign/operation guide to light → Repeat the steps of “How to restore”.
About notification signal/operation guide
1
2
While displaying [0], press CANCEL and hold until you hear Pip Pip (Approx. 3 secs).
Continue to press MICROWAVE .
Reference for manual heating’s setting tim
e / About notification sound / A
bout notification signal/operation guideHow to
cook
Notice
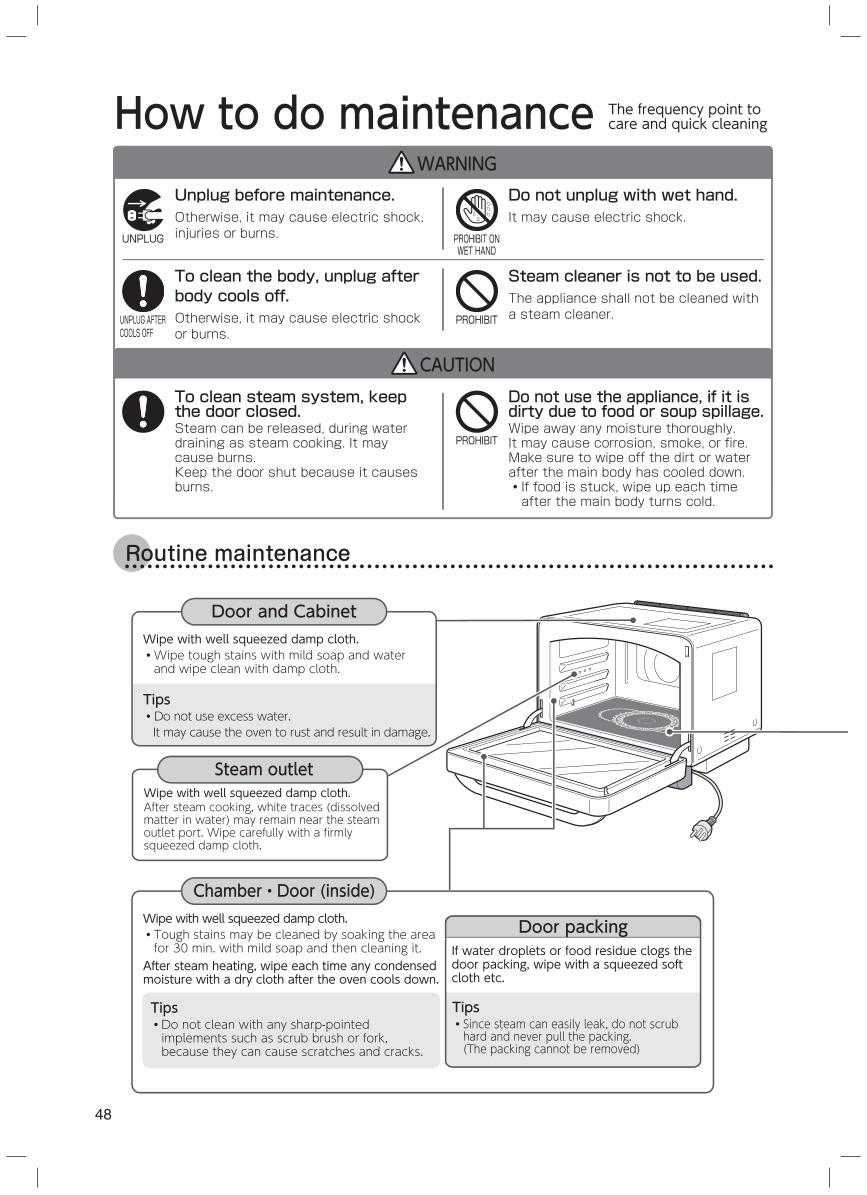
48
Door and CabinetWipe with well squeezed damp cloth.・Wipe tough stains with mild soap and water and wipe clean with damp cloth.
Tips・Do not use excess water.It may cause the oven to rust and result in damage.
Wipe with well squeezed damp cloth.After steam cooking, white traces (dissolved matter in water) may remain near the steam outlet port. Wipe carefully with a firmly squeezed damp cloth.
Steam outlet
Chamber・Door (inside)Wipe with well squeezed damp cloth.・Tough stains may be cleaned by soaking the area for 30 min. with mild soap and then cleaning it.After steam heating, wipe each time any condensedmoisture with a dry cloth after the oven cools down.
Tips・Do not clean with any sharp-pointed implements such as scrub brush or fork, because they can cause scratches and cracks.
If water droplets or food residue clogs the door packing, wipe with a squeezed soft cloth etc.
Tips・Since steam can easily leak, do not scrub hard and never pull the packing.(The packing cannot be removed)
Door packing
WARNINGUnplug before maintenance.Otherwise, it may cause electric shock, injuries or burns.UNPLUG PROHIBIT ON
WET HAND
Do not unplug with wet hand.It may cause electric shock.
CAUTION
To clean the body, unplug after body cools off.Otherwise, it may cause electric shock or burns.
UNPLUG AFTERCOOLS OFF
To clean steam system, keep the door closed.Steam can be released, during water draining as steam cooking. It may cause burns.Keep the door shut because it causes burns.
PROHIBIT
Do not use the appliance, if it is dirty due to food or soup spillage.Wipe away any moisture thoroughly. It may cause corrosion, smoke, or fire. Make sure to wipe off the dirt or water after the main body has cooled down.・ If food is stuck, wipe up each time after the main body turns cold.
Steam cleaner is not to be used.The appliance shall not be cleaned witha steam cleaner.PROHIBIT
Routine maintenance
How to do maintenance The frequency point to care and quick cleaning
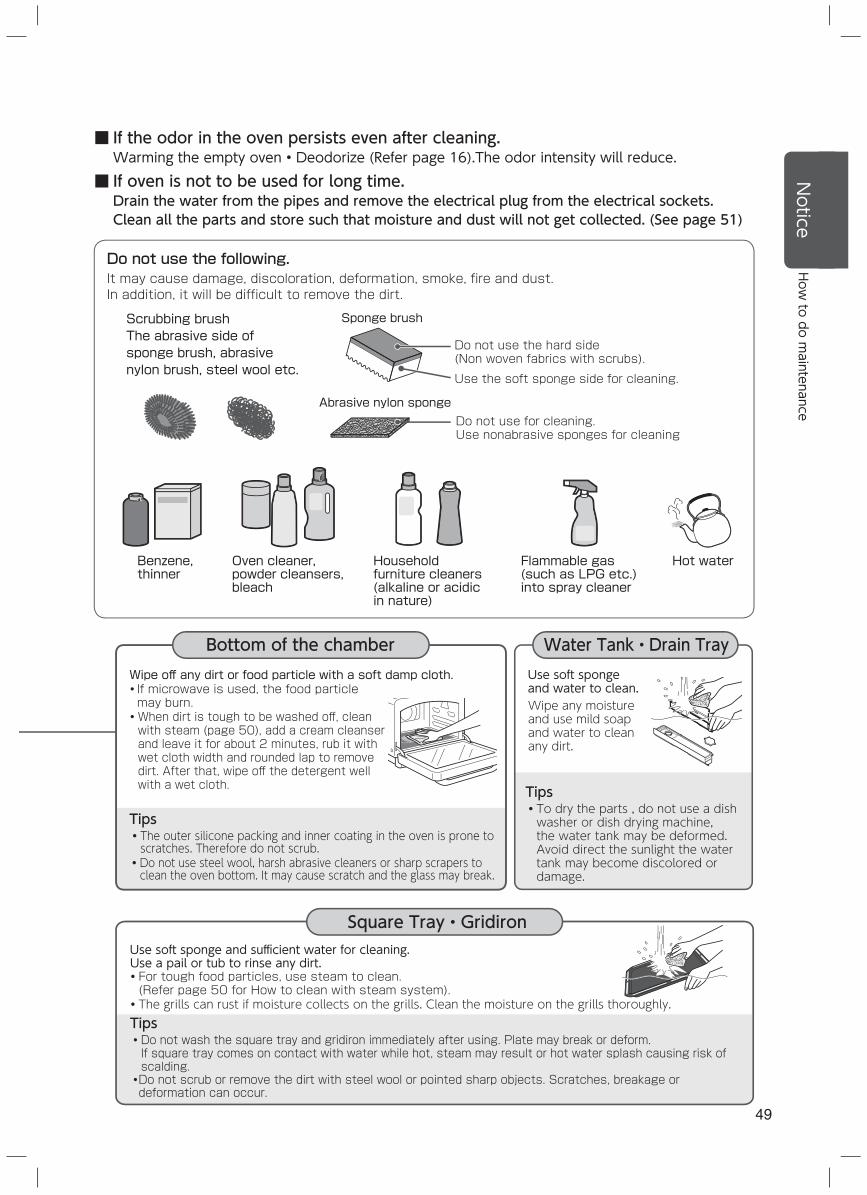
49
Tips・The outer silicone packing and inner coating in the oven is prone to scratches. Therefore do not scrub.
・Do not use steel wool, harsh abrasive cleaners or sharp scrapers to clean the oven bottom. It may cause scratch and the glass may break.
Water Tank・Drain TrayUse soft sponge and water to clean.Wipe any moisture and use mild soap and water to clean any dirt.
Tips・To dry the parts , do not use a dish washer or dish drying machine, the water tank may be deformed. Avoid direct the sunlight the water tank may become discolored or damage.
Square Tray・GridironUse soft sponge and sufficient water for cleaning.Use a pail or tub to rinse any dirt.・For tough food particles, use steam to clean. (Refer page 50 for How to clean with steam system).・The grills can rust if moisture collects on the grills. Clean the moisture on the grills thoroughly.Tips・Do not wash the square tray and gridiron immediately after using. Plate may break or deform. If square tray comes on contact with water while hot, steam may result or hot water splash causing risk of scalding.
・Do not scrub or remove the dirt with steel wool or pointed sharp objects. Scratches, breakage or deformation can occur.
Bottom of the chamberWipe off any dirt or food particle with a soft damp cloth.・If microwave is used, the food particle may burn.・When dirt is tough to be washed off, clean with steam (page 50), add a cream cleanser and leave it for about 2 minutes, rub it with wet cloth width and rounded lap to remove dirt. After that, wipe off the detergent well with a wet cloth.
■ If the odor in the oven persists even after cleaning.Warming the empty oven • Deodorize (Refer page 16).The odor intensity will reduce.
■ If oven is not to be used for long time.Drain the water from the pipes and remove the electrical plug from the electrical sockets. Clean all the parts and store such that moisture and dust will not get collected. (See page 51)
Do not use the following.It may cause damage, discoloration, deformation, smoke, fire and dust. In addition, it will be difficult to remove the dirt.
Sponge brush
Abrasive nylon sponge
Do not use the hard side (Non woven fabrics with scrubs).
Use the soft sponge side for cleaning.
Do not use for cleaning. Use nonabrasive sponges for cleaning
Benzene,thinner
Oven cleaner, powder cleansers, bleach
Household furniture cleaners (alkaline or acidic in nature)
Flammable gas (such as LPG etc.) into spray cleaner
Scrubbing brushThe abrasive side of sponge brush, abrasive nylon brush, steel wool etc.
Hot water
Notice
How to do m
aintenance
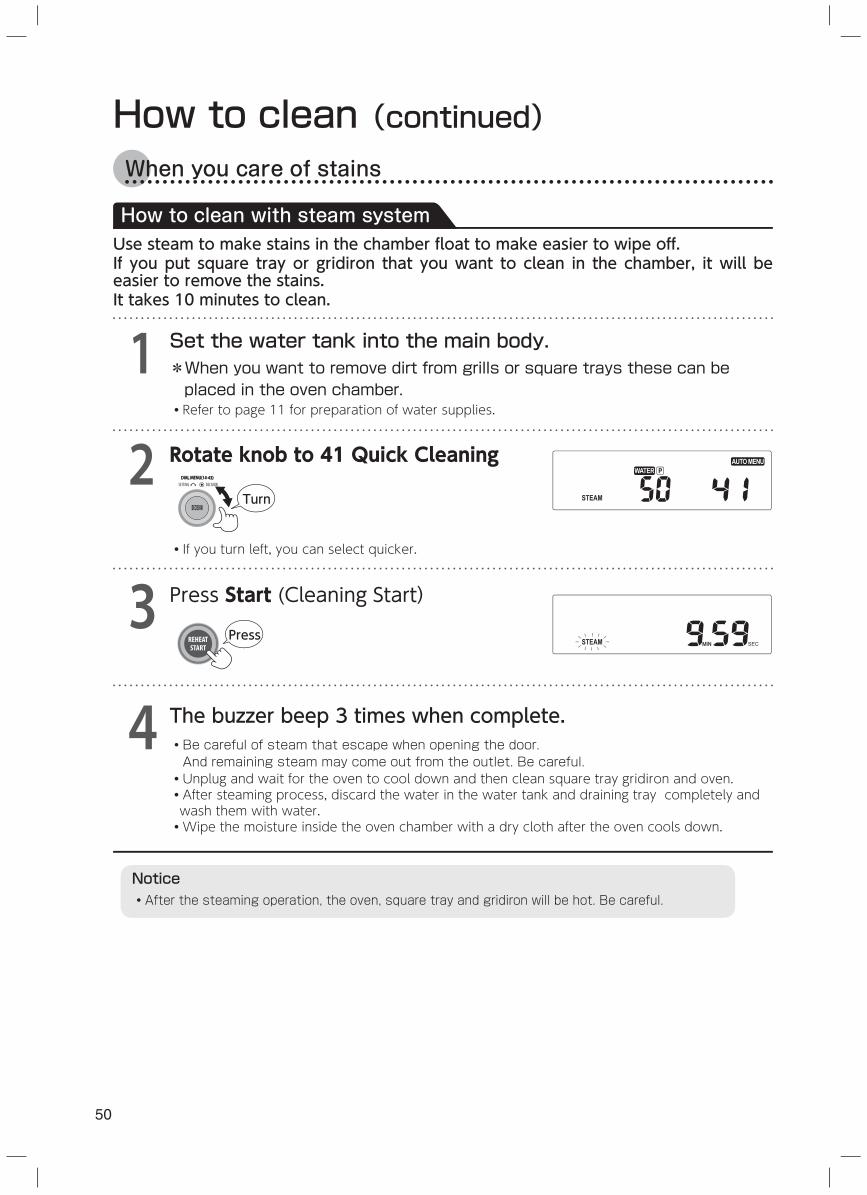
50
Set the water tank into the main body.*When you want to remove dirt from grills or square trays these can be placed in the oven chamber.
・ Refer to page 11 for preparation of water supplies.
Use steam to make stains in the chamber float to make easier to wipe off.If you put square tray or gridiron that you want to clean in the chamber, it will be easier to remove the stains.It takes 10 minutes to clean.
1
Notice・After the steaming operation, the oven, square tray and gridiron will be hot. Be careful.
How to clean with steam system
CUPMIN
When you care of stains
How to clean (continued)
2 Rotate knob to 41 Quick Cleaning
3 Press Start (Cleaning Start)
The buzzer beep 3 times when complete.4 ・ Be careful of steam that escape when opening the door.And remaining steam may come out from the outlet. Be careful.
・ Unplug and wait for the oven to cool down and then clean square tray gridiron and oven.・ After steaming process, discard the water in the water tank and draining tray completely and wash them with water.・Wipe the moisture inside the oven chamber with a dry cloth after the oven cools down.
・ If you turn left, you can select quicker.
Press
DECISIONSETTING
Turn
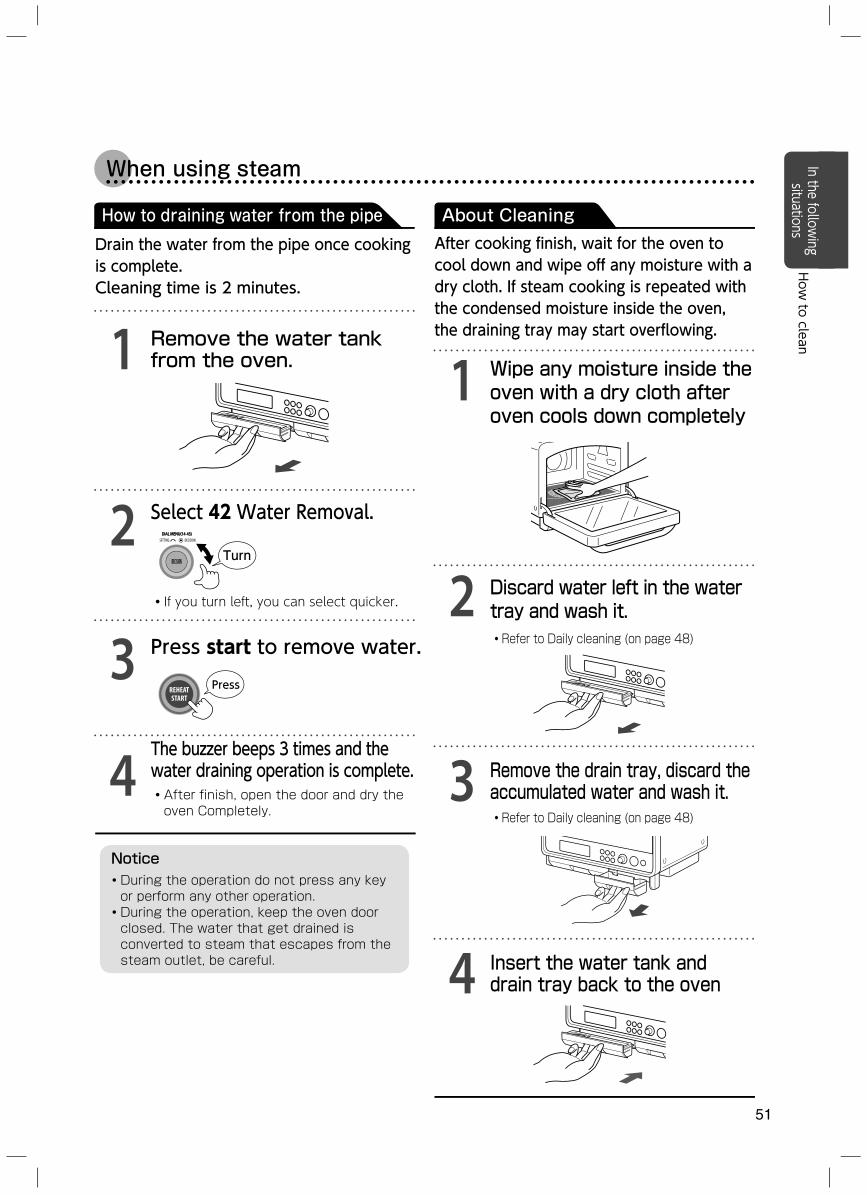
51
When using steam
Remove the water tank from the oven. Wipe any moisture inside the
oven with a dry cloth after oven cools down completely
Discard water left in the water tray and wash it.・Refer to Daily cleaning (on page 48)
Remove the drain tray, discard the accumulated water and wash it.・Refer to Daily cleaning (on page 48)
Insert the water tank and drain tray back to the oven
Drain the water from the pipe once cooking is complete.Cleaning time is 2 minutes.
After cooking finish, wait for the oven to cool down and wipe off any moisture with a dry cloth. If steam cooking is repeated with the condensed moisture inside the oven, the draining tray may start overflowing.1 1
Press start to remove water.
3
4
Notice・ During the operation do not press any key or perform any other operation.
・ During the operation, keep the oven door closed. The water that get drained is converted to steam that escapes from the steam outlet, be careful.
How to draining water from the pipe About Cleaning
Select 42 Water Removal.
32
2
The buzzer beeps 3 times and the water draining operation is complete.・ After finish, open the door and dry the oven Completely.
4
・ If you turn left, you can select quicker.
Press
DECISIONSETTING
Turn
In the following
situationsHow
to clean
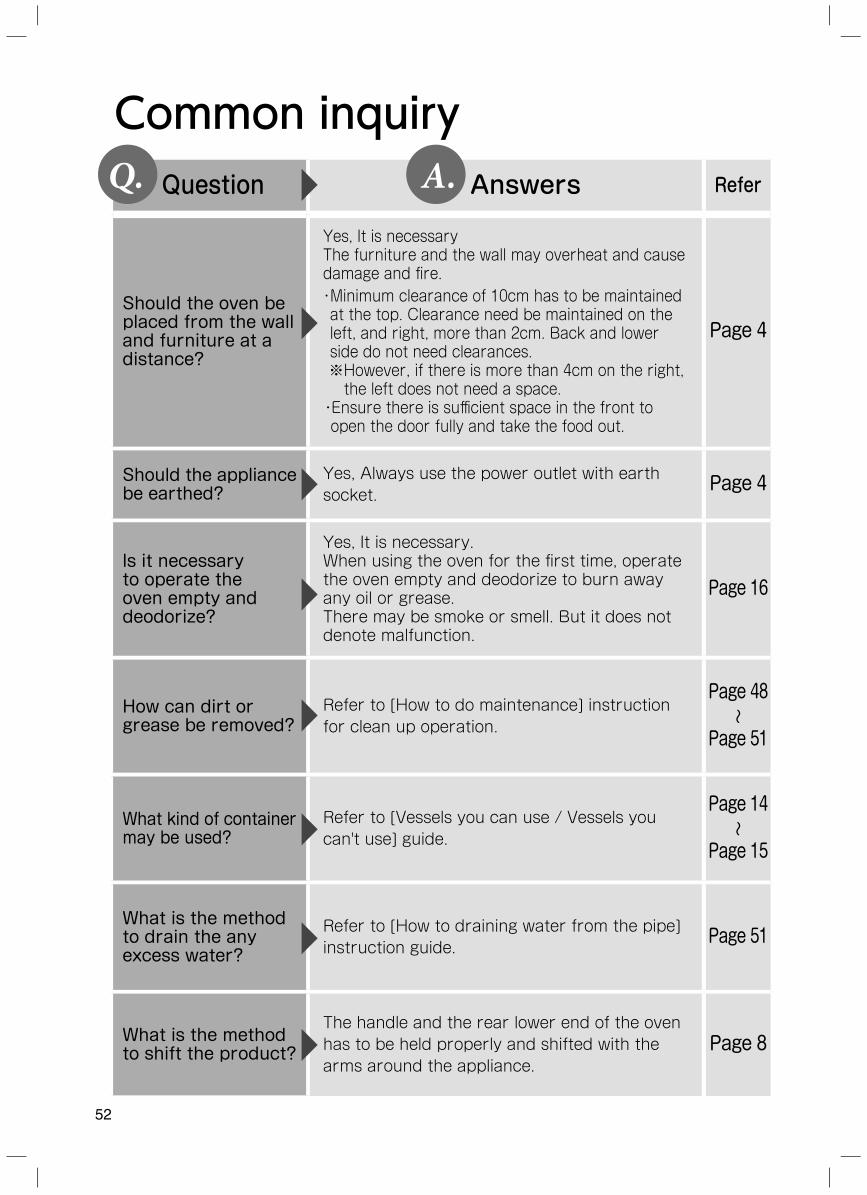
52
Common inquiry Question Answers Refer
Should the oven be placed from the wall and furniture at a distance?
Yes, It is necessaryThe furniture and the wall may overheat and cause damage and fi re.・ Minimum clearance of 10cm has to be maintained at the top. Clearance need be maintained on the left, and right, more than 2cm. Back and lower side do not need clearances. ※ However, if there is more than 4cm on the right, the left does not need a space.
・ Ensure there is suffi cient space in the front to open the door fully and take the food out.
Page 4
Should the appliance be earthed?
Yes, Always use the power outlet with earth socket.
Page 4
Is it necessary to operate the oven empty and deodorize?
Yes, It is necessary.When using the oven for the fi rst time, operate the oven empty and deodorize to burn away any oil or grease. There may be smoke or smell. But it does not denote malfunction.
Page 16
How can dirt or grease be removed?
Refer to [How to do maintenance] instruction for clean up operation.
Page 48
~Page 51
What kind of container may be used?
Refer to [Vessels you can use / Vessels you can't use] guide.
Page 14
~
Page 15
What is the method to drain the any excess water?
Refer to [How to draining water from the pipe] instruction guide.
Page 51
What is the method to shift the product?
The handle and the rear lower end of the oven has to be held properly and shifted with the arms around the appliance.
Page 8
Q. A.
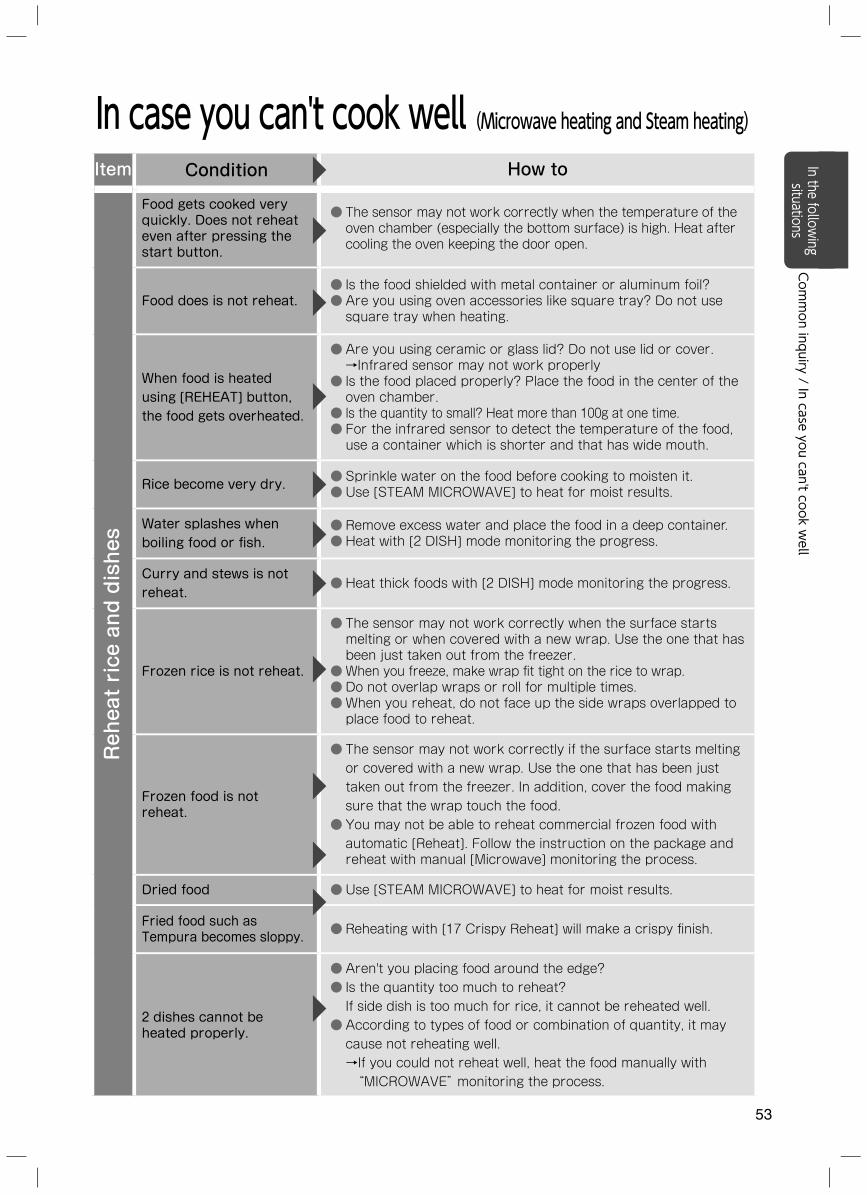
53
In case you can't cook well (Microwave heating and Steam heating)Item Condition How to
Reheat rice and dishes
Food gets cooked very quickly. Does not reheat even after pressing the start button.
● The sensor may not work correctly when the temperature of the oven chamber (especially the bottom surface) is high. Heat after cooling the oven keeping the door open.
Food does is not reheat.● Is the food shielded with metal container or aluminum foil?● Are you using oven accessories like square tray? Do not use
square tray when heating.
When food is heated using [REHEAT] button, the food gets overheated.
● Are you using ceramic or glass lid? Do not use lid or cover.→Infrared sensor may not work properly
● Is the food placed properly? Place the food in the center of the oven chamber.
● Is the quantity to small? Heat more than 100g at one time.● For the infrared sensor to detect the temperature of the food,
use a container which is shorter and that has wide mouth.
Rice become very dry. ● Sprinkle water on the food before cooking to moisten it.● Use [STEAM MICROWAVE] to heat for moist results.
Water splashes when boiling food or fi sh.
● Remove excess water and place the food in a deep container.● Heat with [2 DISH] mode monitoring the progress.
Curry and stews is not reheat.
● Heat thick foods with [2 DISH] mode monitoring the progress.
Frozen rice is not reheat.
● The sensor may not work correctly when the surface starts melting or when covered with a new wrap. Use the one that has been just taken out from the freezer.
● When you freeze, make wrap fi t tight on the rice to wrap.● Do not overlap wraps or roll for multiple times.● When you reheat, do not face up the side wraps overlapped to
place food to reheat.
Frozen food is not reheat.
● The sensor may not work correctly if the surface starts melting or covered with a new wrap. Use the one that has been just taken out from the freezer. In addition, cover the food making sure that the wrap touch the food.
● You may not be able to reheat commercial frozen food with automatic [Reheat]. Follow the instruction on the package and reheat with manual [Microwave] monitoring the process.
Dried food ● Use [STEAM MICROWAVE] to heat for moist results.
Fried food such as Tempura becomes sloppy. ● Reheating with [17 Crispy Reheat] will make a crispy fi nish.
2 dishes cannot be heated properly.
● Aren't you placing food around the edge?● Is the quantity too much to reheat?
If side dish is too much for rice, it cannot be reheated well.● According to types of food or combination of quantity, it may
cause not reheating well.→ If you could not reheat well, heat the food manually with “MICROWAVE” monitoring the process.
In the following
situationsCommon inquiry / In case you can't cook w
ell
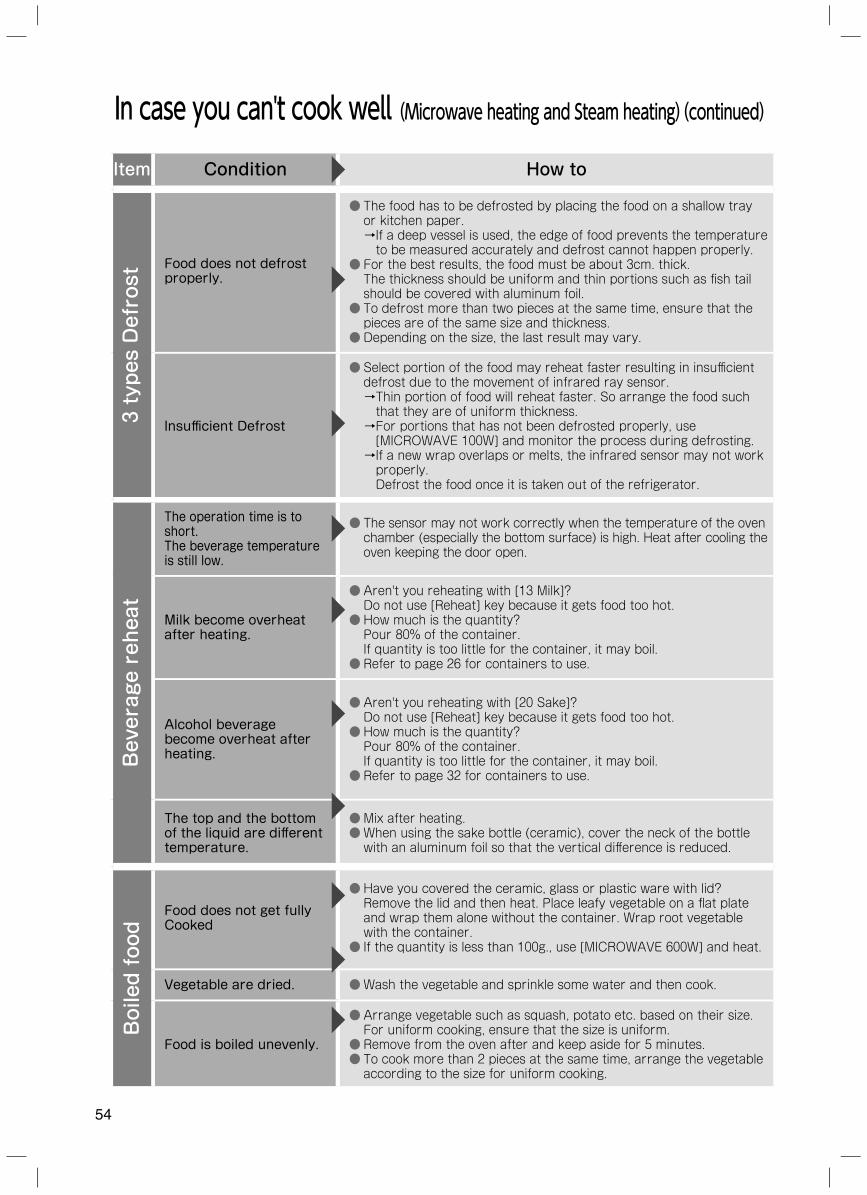
54
In case you can't cook well (Microwave heating and Steam heating)(continued)
Item Condition How to
3 types Defrost
Food does not defrost properly.
● The food has to be defrosted by placing the food on a shallow tray or kitchen paper.→ If a deep vessel is used, the edge of food prevents the temperature to be measured accurately and defrost cannot happen properly.
● For the best results, the food must be about 3cm. thick. The thickness should be uniform and thin portions such as fi sh tail should be covered with aluminum foil.
● To defrost more than two pieces at the same time, ensure that the pieces are of the same size and thickness.
● Depending on the size, the last result may vary.
Insuffi cient Defrost
● Select portion of the food may reheat faster resulting in insuffi cient defrost due to the movement of infrared ray sensor.→ Thin portion of food will reheat faster. So arrange the food such that they are of uniform thickness.
→ For portions that has not been defrosted properly, use [MICROWAVE 100W] and monitor the process during defrosting.
→ If a new wrap overlaps or melts, the infrared sensor may not work properly. Defrost the food once it is taken out of the refrigerator.
Beverage reheat
The operation time is to short.The beverage temperature is still low.
● The sensor may not work correctly when the temperature of the oven chamber (especially the bottom surface) is high. Heat after cooling the oven keeping the door open.
Milk become overheat after heating.
● Aren't you reheating with [13 Milk]? Do not use [Reheat] key because it gets food too hot.
● How much is the quantity?Pour 80% of the container.If quantity is too little for the container, it may boil.
● Refer to page 26 for containers to use.
Alcohol beverage become overheat after heating.
● Aren't you reheating with [20 Sake]?Do not use [Reheat] key because it gets food too hot.
● How much is the quantity?Pour 80% of the container.If quantity is too little for the container, it may boil.
● Refer to page 32 for containers to use.
The top and the bottom of the liquid are diff erent temperature.
● Mix after heating.● When using the sake bottle (ceramic), cover the neck of the bottle
with an aluminum foil so that the vertical diff erence is reduced.
Boiled food
Food does not get fullyCooked
● Have you covered the ceramic, glass or plastic ware with lid? Remove the lid and then heat. Place leafy vegetable on a fl at plate and wrap them alone without the container. Wrap root vegetable with the container.
● If the quantity is less than 100g., use [MICROWAVE 600W] and heat.
Vegetable are dried. ● Wash the vegetable and sprinkle some water and then cook.
Food is boiled unevenly.
● Arrange vegetable such as squash, potato etc. based on their size. For uniform cooking, ensure that the size is uniform.
● Remove from the oven after and keep aside for 5 minutes.● To cook more than 2 pieces at the same time, arrange the vegetable
according to the size for uniform cooking.
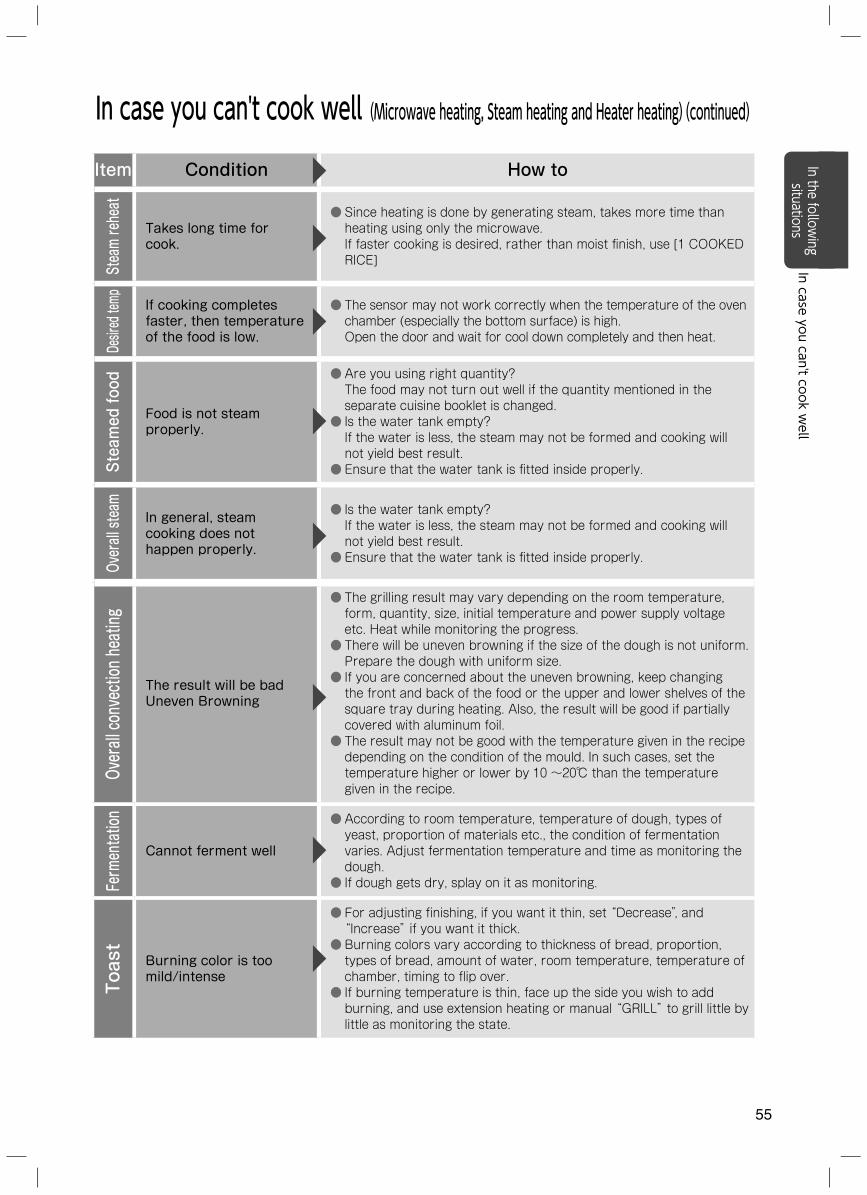
55
Item Condition How to
Steam reheat
Takes long time for cook.
● Since heating is done by generating steam, takes more time than heating using only the microwave.If faster cooking is desired, rather than moist fi nish, use [1 COOKED RICE]
Desired temp If cooking completes
faster, then temperature of the food is low.
● The sensor may not work correctly when the temperature of the oven chamber (especially the bottom surface) is high.Open the door and wait for cool down completely and then heat.
Steamed food
Food is not steam properly.
● Are you using right quantity? The food may not turn out well if the quantity mentioned in the separate cuisine booklet is changed.
● Is the water tank empty? If the water is less, the steam may not be formed and cooking will not yield best result.
● Ensure that the water tank is fi tted inside properly.
Overall steam
In general, steam cooking does not happen properly.
● Is the water tank empty? If the water is less, the steam may not be formed and cooking will not yield best result.
● Ensure that the water tank is fi tted inside properly.
Overall convection heating
The result will be bad Uneven Browning
● The grilling result may vary depending on the room temperature, form, quantity, size, initial temperature and power supply voltage etc. Heat while monitoring the progress.
● There will be uneven browning if the size of the dough is not uniform. Prepare the dough with uniform size.
● If you are concerned about the uneven browning, keep changing the front and back of the food or the upper and lower shelves of the square tray during heating. Also, the result will be good if partially covered with aluminum foil.
● The result may not be good with the temperature given in the recipe depending on the condition of the mould. In such cases, set the temperature higher or lower by 10 ~20℃ than the temperature given in the recipe.
Fermentation
Cannot ferment well
● According to room temperature, temperature of dough, types of yeast, proportion of materials etc., the condition of fermentation varies. Adjust fermentation temperature and time as monitoring the dough.
● If dough gets dry, splay on it as monitoring.
Toast
Burning color is too mild/intense
● For adjusting finishing, if you want it thin, set “Decrease”, and “Increase” if you want it thick.
● Burning colors vary according to thickness of bread, proportion, types of bread, amount of water, room temperature, temperature of chamber, timing to flip over.
● If burning temperature is thin, face up the side you wish to add burning, and use extension heating or manual “GRILL” to grill little by little as monitoring the state.
In case you can't cook well (Microwave heating, Steam heating and Heater heating)(continued)
In the following
situationsIn case you can't cook w
ell
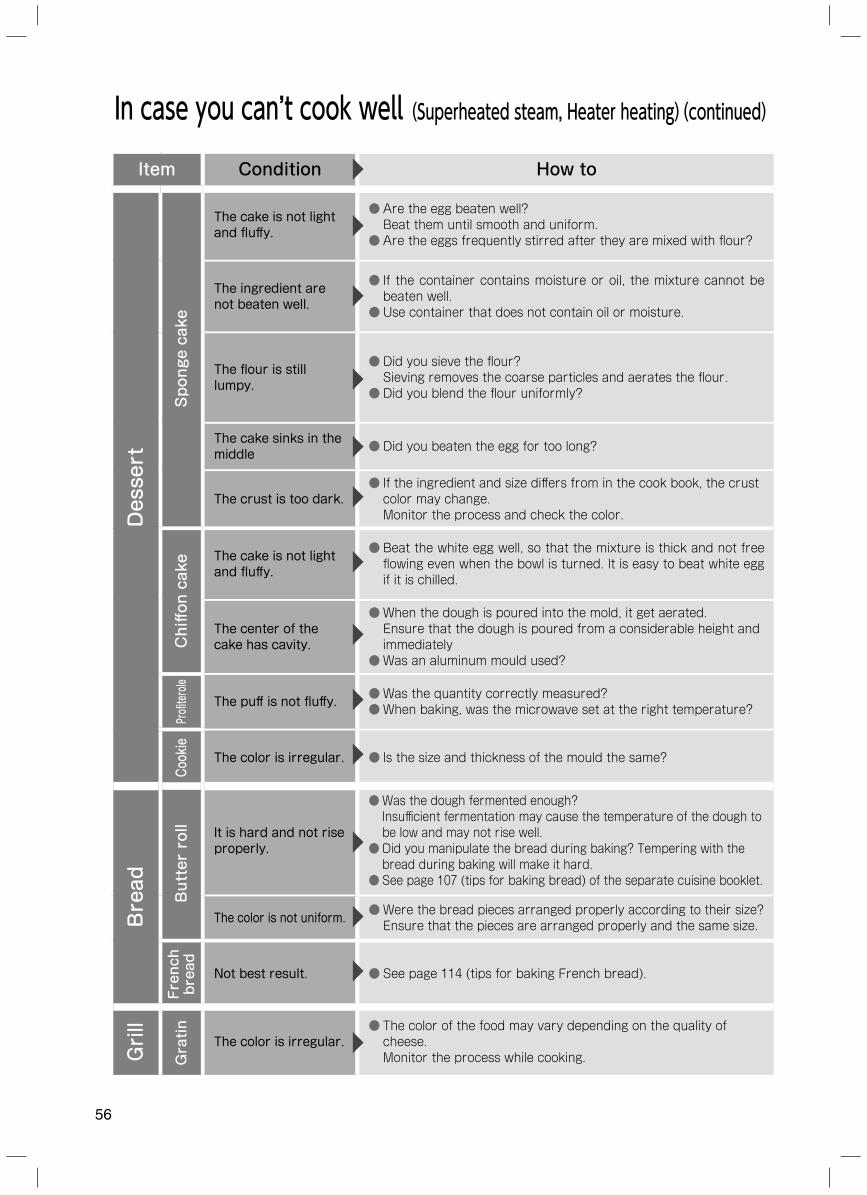
56
In case you can’t cook well (Superheated steam, Heater heating)(continued)
Item Condition How to
Dessert
Sponge cake
The cake is not light and fl uff y.
● Are the egg beaten well? Beat them until smooth and uniform.
● Are the eggs frequently stirred after they are mixed with fl our?
The ingredient are not beaten well.
● If the container contains moisture or oil, the mixture cannot be beaten well.
● Use container that does not contain oil or moisture.
The fl our is still lumpy.
● Did you sieve the fl our?Sieving removes the coarse particles and aerates the fl our.
● Did you blend the fl our uniformly?
The cake sinks in the middle ● Did you beaten the egg for too long?
The crust is too dark.● If the ingredient and size diff ers from in the cook book, the crust
color may change. Monitor the process and check the color.
Chiff on cake
The cake is not light and fl uff y.
● Beat the white egg well, so that the mixture is thick and not free fl owing even when the bowl is turned. It is easy to beat white egg if it is chilled.
The center of the cake has cavity.
● When the dough is poured into the mold, it get aerated. Ensure that the dough is poured from a considerable height and immediately
● Was an aluminum mould used?
Profi terole
The puff is not fl uff y. ● Was the quantity correctly measured?● When baking, was the microwave set at the right temperature?
Cookie
The color is irregular. ● Is the size and thickness of the mould the same?
Bread
Butter roll It is hard and not rise
properly.
● Was the dough fermented enough? Insuffi cient fermentation may cause the temperature of the dough to be low and may not rise well.
● Did you manipulate the bread during baking? Tempering with the bread during baking will make it hard.
● See page 107 (tips for baking bread) of the separate cuisine booklet.
The color is not uniform. ● Were the bread pieces arranged properly according to their size? Ensure that the pieces are arranged properly and the same size.
French
bread
Not best result. ● See page 114 (tips for baking French bread).
Grill
Gratin
The color is irregular.● The color of the food may vary depending on the quality of
cheese. Monitor the process while cooking.
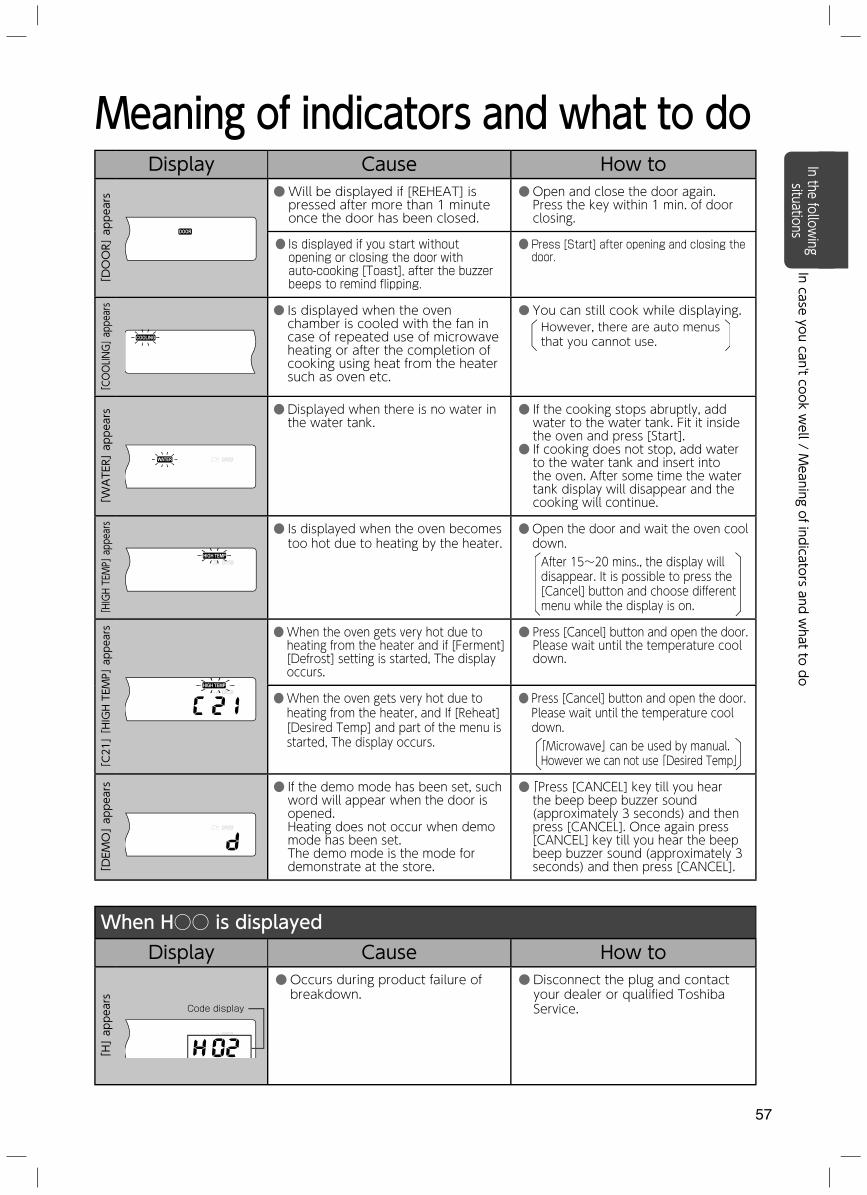
57
Meaning of indicators and what to doDisplay Cause How to
「DOOR
」 appears ● Will be displayed if [REHEAT] is
pressed after more than 1 minute once the door has been closed.
● Open and close the door again. Press the key within 1 min. of door closing.
● Is displayed if you start without opening or closing the door with auto-cooking [Toast], after the buzzer beeps to remind flipping.
● Press [Start] after opening and closing the door.
「COOLING
」 appears ● Is displayed when the oven
chamber is cooled with the fan in case of repeated use of microwave heating or after the completion of cooking using heat from the heater such as oven etc.
● You can still cook while displaying.However, there are auto menus that you cannot use.
「WATER
」 appears
CUPMIN
● Displayed when there is no water in the water tank.
● If the cooking stops abruptly, add water to the water tank. Fit it inside the oven and press [Start].
● If cooking does not stop, add water to the water tank and insert into the oven. After some time the water tank display will disappear and the cooking will continue.
「HIGH TEMP
」 appears
CUPMIN
● Is displayed when the oven becomes too hot due to heating by the heater.
● Open the door and wait the oven cool down.After 15~20 mins., the display will disappear. It is possible to press the [Cancel] button and choose different menu while the display is on.
「C21
」 「
HIGH TEMP
」 appears
CUPMIN
● When the oven gets very hot due to heating from the heater and if [Ferment] [Defrost] setting is started, The display occurs.
● Press [Cancel] button and open the door. Please wait until the temperature cool down.
● When the oven gets very hot due to heating from the heater, and If [Reheat] [Desired Temp] and part of the menu is started, The display occurs.
● Press [Cancel] button and open the door. Please wait until the temperature cool down.「Microwave」 can be used by manual.However we can not use 「Desired Temp」
「DEMO
」 appears
CUPMIN
● If the demo mode has been set, such word will appear when the door is opened.Heating does not occur when demo mode has been set.The demo mode is the mode for demonstrate at the store.
● 「Press [CANCEL] key till you hear the beep beep buzzer sound (approximately 3 seconds) and then press [CANCEL]. Once again press [CANCEL] key till you hear the beep beep buzzer sound (approximately 3 seconds) and then press [CANCEL].
When H○○ is displayedDisplay Cause How to
「H
」 appears
CUPMIN
Code display
● Occurs during product failure of breakdown.
● Disconnect the plug and contact your dealer or qualified Toshiba Service.
In the following
situationsIn case you can't cook w
ell / Meaning of indicators and w
hat to do
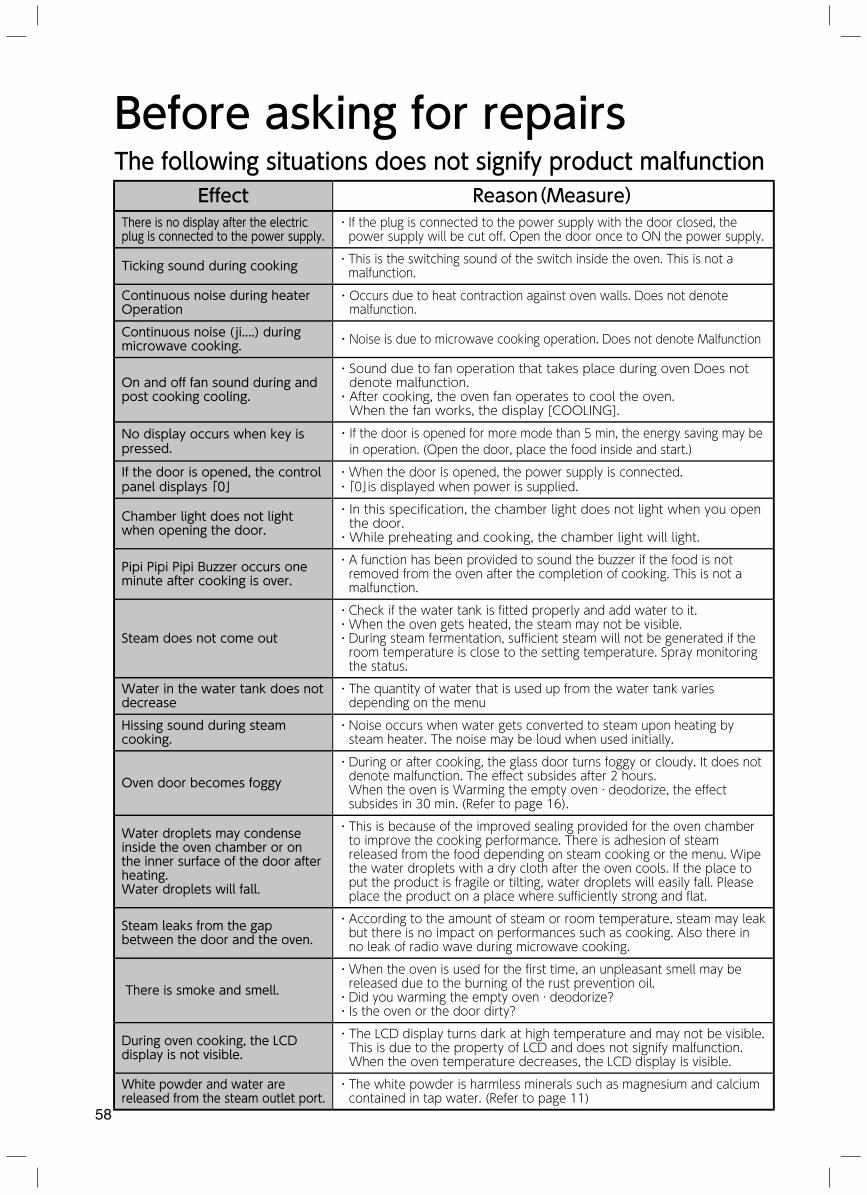
58
Before asking for repairsThe following situations does not signify product malfunction
Effect Reason(Measure)There is no display after the electric plug is connected to the power supply.
・ If the plug is connected to the power supply with the door closed, the power supply will be cut off. Open the door once to ON the power supply.
Ticking sound during cooking ・ This is the switching sound of the switch inside the oven. This is not a malfunction.
Continuous noise during heaterOperation
・ Occurs due to heat contraction against oven walls. Does not denote malfunction.
Continuous noise (ji....) during microwave cooking. ・ Noise is due to microwave cooking operation. Does not denote Malfunction
On and off fan sound during and post cooking cooling.
・ Sound due to fan operation that takes place during oven Does not denote malfunction.
・ After cooking, the oven fan operates to cool the oven.When the fan works, the display [COOLING].
No display occurs when key is pressed.
・ If the door is opened for more mode than 5 min, the energy saving may be in operation. (Open the door, place the food inside and start.)
If the door is opened, the control panel displays 「0」
・ When the door is opened, the power supply is connected.・ 「0」is displayed when power is supplied.
Chamber light does not light when opening the door.
・ In this specification, the chamber light does not light when you open the door.
・ While preheating and cooking, the chamber light will light.
Pipi Pipi Pipi Buzzer occurs one minute after cooking is over.
・ A function has been provided to sound the buzzer if the food is not removed from the oven after the completion of cooking. This is not a malfunction.
Steam does not come out
・ Check if the water tank is fitted properly and add water to it.・ When the oven gets heated, the steam may not be visible.・ During steam fermentation, sufficient steam will not be generated if the room temperature is close to the setting temperature. Spray monitoring the status.
Water in the water tank does not decrease
・ The quantity of water that is used up from the water tank varies depending on the menu
Hissing sound during steam cooking.
・ Noise occurs when water gets converted to steam upon heating by steam heater. The noise may be loud when used initially.
Oven door becomes foggy・ During or after cooking, the glass door turns foggy or cloudy. It does not denote malfunction. The effect subsides after 2 hours. When the oven is Warming the empty oven · deodorize, the effect subsides in 30 min. (Refer to page 16).
Water droplets may condense inside the oven chamber or on the inner surface of the door after heating. Water droplets will fall.
・ This is because of the improved sealing provided for the oven chamber to improve the cooking performance. There is adhesion of steam released from the food depending on steam cooking or the menu. Wipe the water droplets with a dry cloth after the oven cools. If the place to put the product is fragile or tilting, water droplets will easily fall. Please place the product on a place where sufficiently strong and flat.
Steam leaks from the gap between the door and the oven.
・ According to the amount of steam or room temperature, steam may leak but there is no impact on performances such as cooking. Also there in no leak of radio wave during microwave cooking.
There is smoke and smell.・ When the oven is used for the first time, an unpleasant smell may be released due to the burning of the rust prevention oil.
・ Did you warming the empty oven · deodorize?・ Is the oven or the door dirty?
During oven cooking, the LCD display is not visible.
・ The LCD display turns dark at high temperature and may not be visible. This is due to the property of LCD and does not signify malfunction. When the oven temperature decreases, the LCD display is visible.
White powder and water are released from the steam outlet port.
・ The white powder is harmless minerals such as magnesium and calcium contained in tap water. (Refer to page 11)
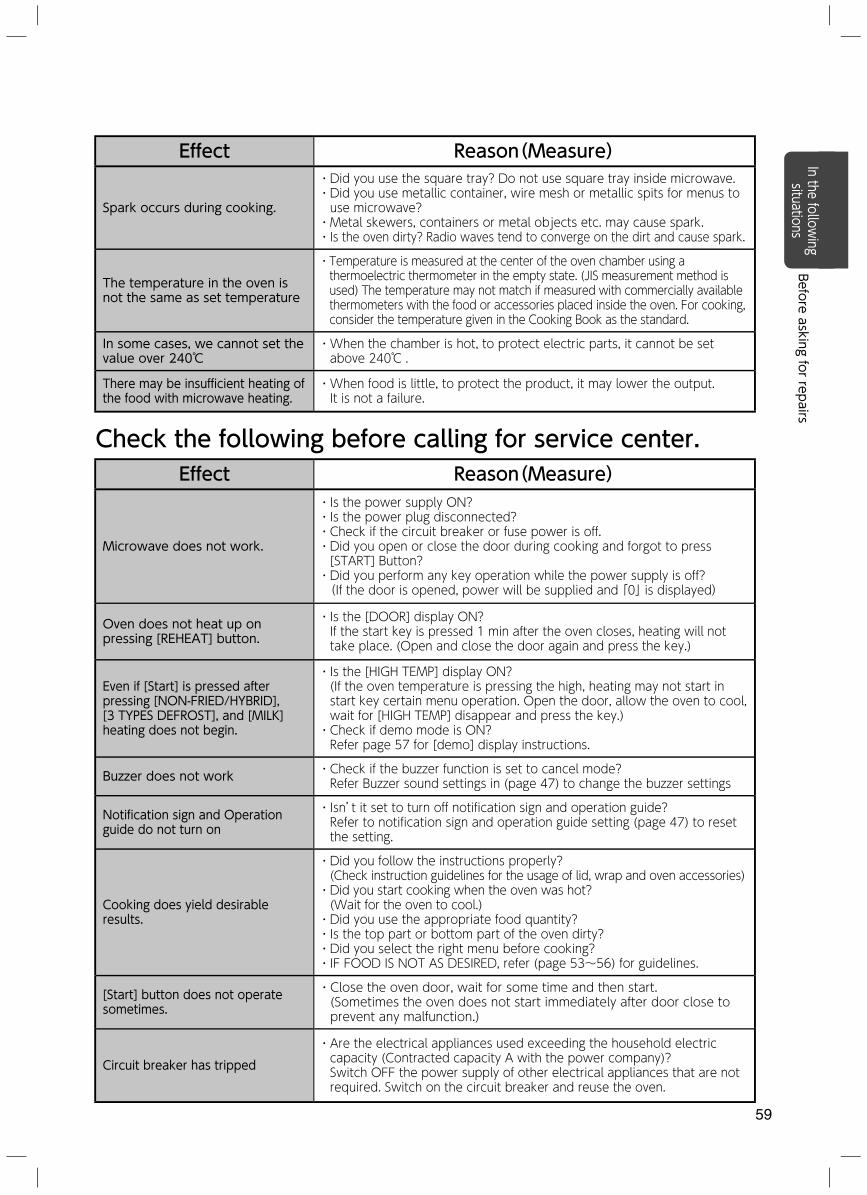
59
Check the following before calling for service center.Effect Reason(Measure)
Microwave does not work.
・ Is the power supply ON?・ Is the power plug disconnected?・ Check if the circuit breaker or fuse power is off.・ Did you open or close the door during cooking and forgot to press [START] Button?
・ Did you perform any key operation while the power supply is off?(If the door is opened, power will be supplied and 「0」 is displayed)
Oven does not heat up on pressing [REHEAT] button.
・ Is the [DOOR] display ON? If the start key is pressed 1 min after the oven closes, heating will not take place. (Open and close the door again and press the key.)
Even if [Start] is pressed after pressing [NON-FRIED/HYBRID], [3 TYPES DEFROST], and [MILK] heating does not begin.
・ Is the [HIGH TEMP] display ON?(If the oven temperature is pressing the high, heating may not start in start key certain menu operation. Open the door, allow the oven to cool, wait for [HIGH TEMP] disappear and press the key.)
・ Check if demo mode is ON? Refer page 57 for [demo] display instructions.
Buzzer does not work ・ Check if the buzzer function is set to cancel mode?Refer Buzzer sound settings in (page 47) to change the buzzer settings
Notification sign and Operation guide do not turn on
・ Isn’t it set to turn off notification sign and operation guide?Refer to notification sign and operation guide setting (page 47) to reset the setting.
Cooking does yield desirable results.
・ Did you follow the instructions properly? (Check instruction guidelines for the usage of lid, wrap and oven accessories)
・ Did you start cooking when the oven was hot?(Wait for the oven to cool.)
・ Did you use the appropriate food quantity?・ Is the top part or bottom part of the oven dirty?・ Did you select the right menu before cooking?・ IF FOOD IS NOT AS DESIRED, refer (page 53~56) for guidelines.
[Start] button does not operate sometimes.
・ Close the oven door, wait for some time and then start. (Sometimes the oven does not start immediately after door close to prevent any malfunction.)
Circuit breaker has tripped・ Are the electrical appliances used exceeding the household electric capacity (Contracted capacity A with the power company)?Switch OFF the power supply of other electrical appliances that are not required. Switch on the circuit breaker and reuse the oven.
Effect Reason(Measure)
Spark occurs during cooking.
・ Did you use the square tray? Do not use square tray inside microwave.・ Did you use metallic container, wire mesh or metallic spits for menus to use microwave?
・ Metal skewers, containers or metal objects etc. may cause spark.・ Is the oven dirty? Radio waves tend to converge on the dirt and cause spark.
The temperature in the oven is not the same as set temperature
・ Temperature is measured at the center of the oven chamber using a thermoelectric thermometer in the empty state. (JIS measurement method is used) The temperature may not match if measured with commercially available thermometers with the food or accessories placed inside the oven. For cooking, consider the temperature given in the Cooking Book as the standard.
In some cases, we cannot set the value over 240℃
・ When the chamber is hot, to protect electric parts, it cannot be set above 240℃ .
There may be insufficient heating of the food with microwave heating.
・ When food is little, to protect the product, it may lower the output.It is not a failure.
In the following
situationsBefore asking for repairs
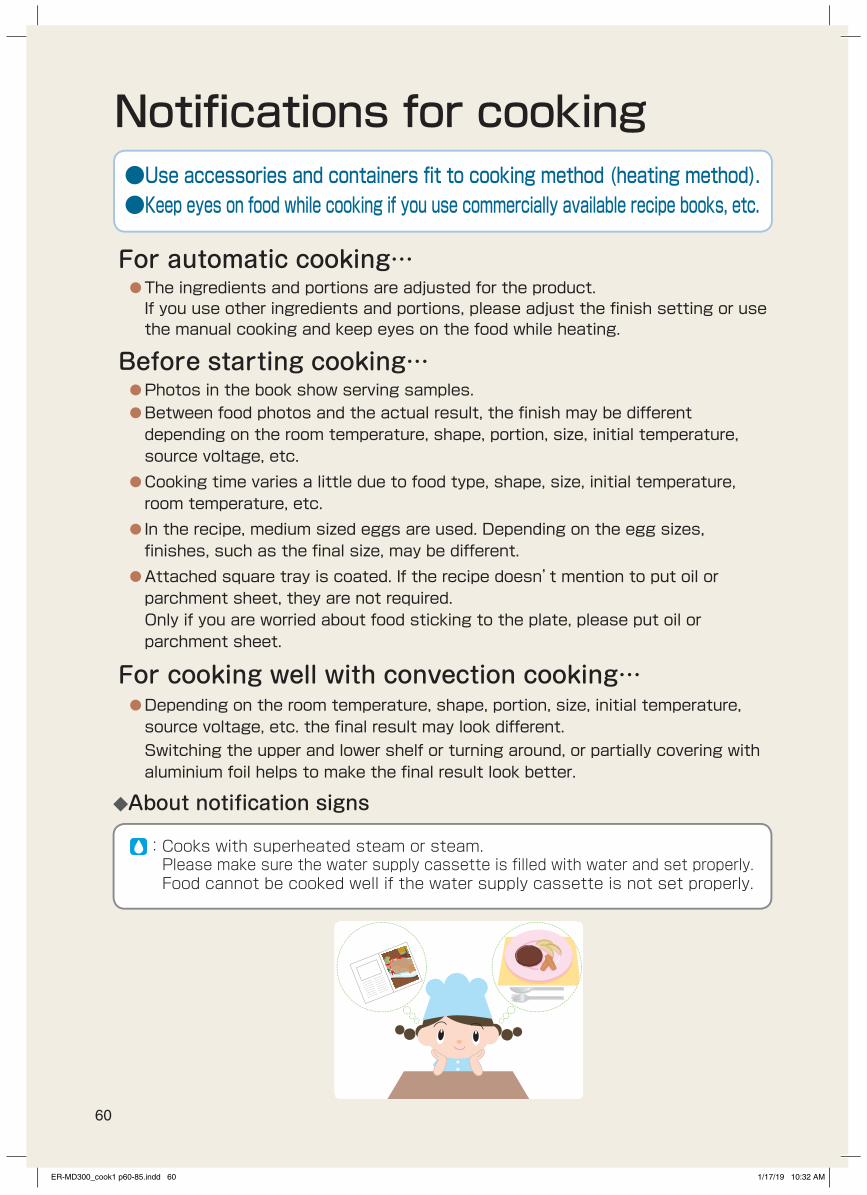
60
Notifications for cooking●Use accessories and containers fit to cooking method (heating method).●Keep eyes on food while cooking if you use commercially available recipe books, etc.
◆About notification signs
: Cooks with superheated steam or steam.Please make sure the water supply cassette is filled with water and set properly.Food cannot be cooked well if the water supply cassette is not set properly.
For automatic cooking…● The ingredients and portions are adjusted for the product. If you use other ingredients and portions, please adjust the finish setting or use the manual cooking and keep eyes on the food while heating.
Before starting cooking…● Photos in the book show serving samples.● Between food photos and the actual result, the finish may be different depending on the room temperature, shape, portion, size, initial temperature, source voltage, etc.
● Cooking time varies a little due to food type, shape, size, initial temperature, room temperature, etc.
● In the recipe, medium sized eggs are used. Depending on the egg sizes, finishes, such as the final size, may be different.
● Attached square tray is coated. If the recipe doesn’t mention to put oil or parchment sheet, they are not required.Only if you are worried about food sticking to the plate, please put oil or parchment sheet.
For cooking well with convection cooking…● Depending on the room temperature, shape, portion, size, initial temperature, source voltage, etc. the final result may look different. Switching the upper and lower shelf or turning around, or partially covering with aluminium foil helps to make the final result look better.
ER-MD300_cook1 p60-85.indd 60 1/17/19 10:32 AM
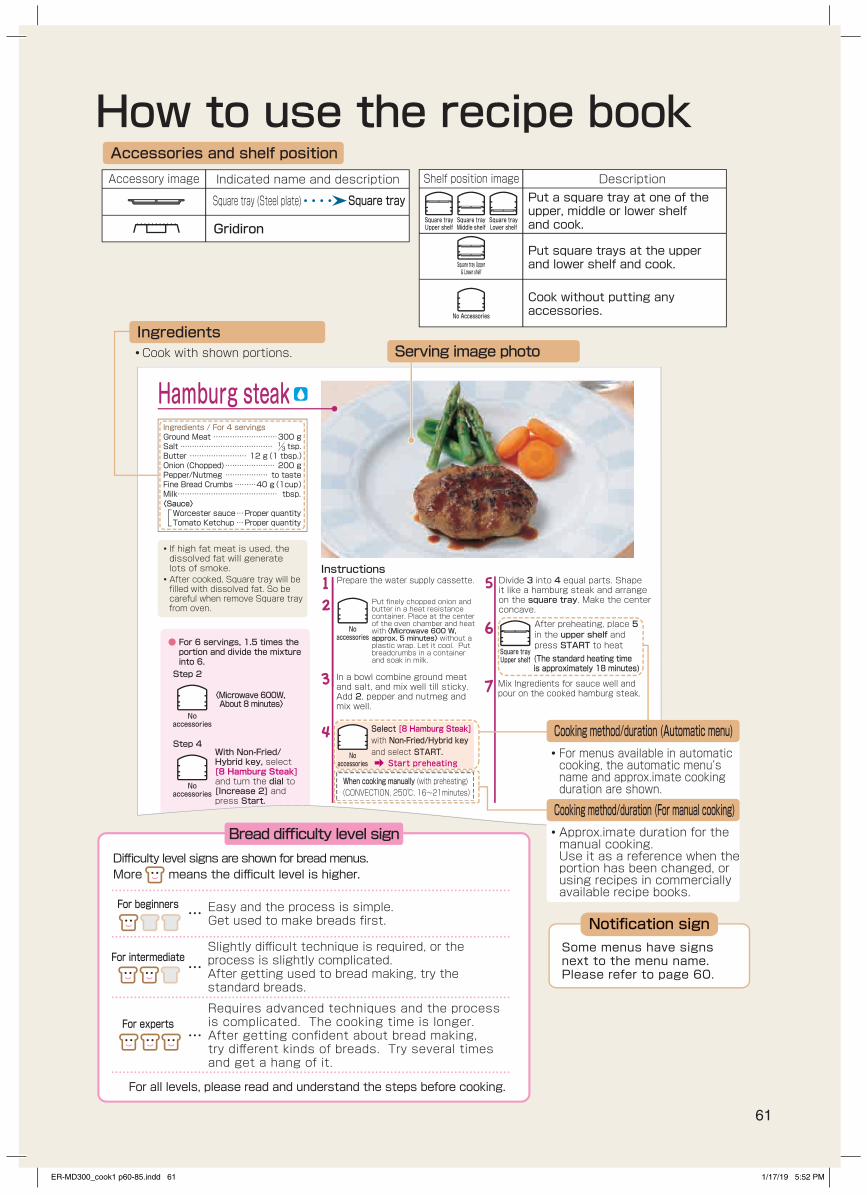
61
How to use the recipe book
Instructions
Hamburg steakIngredients / For 4 servingsGround Meat ………………………300 gSalt ………………………………… tsp.Butter …………………… 12 g(1 tbsp.)Onion (Chopped)………………… 200 gPepper/Nutmeg ……………… to tasteFine Bread Crumbs ………40 g(1cup)Milk…………………………………… tbsp.〈Sauce〉Worcester sauce…Proper quantityTomato Ketchup …Proper quantity
2
3
4
1
6
7
5
Select [8 Hamburg Steak]with Non-Fried/Hybrid key and select START. Start preheating
When cooking manually (with preheating)〈CONVECTION, 250℃, 16~21minutes〉
Divide 3 into 4 equal parts. Shape it like a hamburg steak and arrange on the square tray. Make the center concave.
After preheating, place 5 in the upper shelf and press START to heat(The standard heating time is approximately 18 minutes)
Mix Ingredients for sauce well and pour on the cooked hamburg steak.
Prepare the water supply cassette.
〈Microwave 600W, About 8 minutes〉
With Non-Fried/Hybrid key, select [8 Hamburg Steak] and turn the dial to [Increase 2] and press Start.
・Approx.imate duration for the manual cooking.Use it as a reference when the portion has been changed, or using recipes in commercially available recipe books.
Difficulty level signs are shown for bread menus.More means the difficult level is higher.
For all levels, please read and understand the steps before cooking.
Easy and the process is simple.Get used to make breads first.
Slightly difficult technique is required, or the process is slightly complicated.After getting used to bread making, try the standard breads.
Requires advanced techniques and the process is complicated. The cooking time is longer.After getting confident about bread making, try different kinds of breads. Try several times and get a hang of it.
Bread difficulty level sign
・ Cook with shown portions.Ingredients
Some menus have signs next to the menu name.Please refer to page 60.
Cooking method/duration (For manual cooking)
…
…
…
For beginners
For intermediate
For experts
Notification sign
Serving image photo
・If high fat meat is used, the dissolved fat will generate lots of smoke.
・After cooked, Square tray will be filled with dissolved fat. So be careful when remove Square tray from oven.
● For 6 servings, 1.5 times the portion and divide the mixture into 6.Step 2
・For menus available in automatic cooking, the automatic menu’s name and approx.imate cooking duration are shown.
Cooking method/duration (Automatic menu)
Square tray (Steel plate)
Accessory image Indicated name and description
Gridiron
Square traySquare trayUpper shelf
Square trayMiddle shelf
Square trayLower shelf
Accessories and shelf position
Put a square tray at one of the upper, middle or lower shelf and cook.
Cook without putting any accessories.
Square tray Upper& Lower shelf
No Accessories
Shelf position image Description
Put square trays at the upper and lower shelf and cook.
Square trayUpper shelf
Noaccessories
Noaccessories
Noaccessories
Noaccessories
Step 4
Put finely chopped onion and butter in a heat resistance container. Place at the center of the oven chamber and heat with 〈Microwave 600 W, approx. 5 minutes〉 without a plastic wrap. Let it cool. Put breadcrumbs in a container and soak in milk.
In a bowl combine ground meat and salt, and mix well till sticky. Add 2, pepper and nutmeg and mix well.
ER-MD300_cook1 p60-85.indd 61 1/17/19 5:52 PM

62
:Automatic cooking menu.
Grilled yellowtail ……………………… 67 Yellowtail teriyaki ……………………… 67 Salted salmon ………………………… 68 Dried fish ………………………………… 68 Grilled mackerel pike ………………… 68 Foil-baked Salmon …………………… 69 Herb Roasted Whitefish …………… 69 Seasoned Grilled Mackerel Pike … 70
Fried chicken …………………………… 75 Spring rolls ……………………………… 75 Miso stuffed Deep Fried Pork ……… 76 Deep Fried Prawn ……………………… 76 Deep Fried Chicken Roll with Japanese basil and Plum … 77 Kakiage…………………………………… 77 Deep fried sweet potato …………… 78 Prawn tempura ………………………… 78
Steamed Egg …………………………… 79 Okowa Rice ……………………………… 79 Chicken in Slices ……………………… 80 Steamed sablefish …………………… 80 Whitefish braised in Aromatic Vinegar … 80
Pork curry ……………………………… 81 Beef stew ……………………………… 81 Stir fried Chicken with Lotus Root … 82 Fried Tofu Soup with Mizuna ……… 82 Korean Bean Sprouts Soup ………… 83 Italian Vegetables Soup …………… 83 Mushroom and clam chowder ……… 84 Corn soup with tofu and bean‐starch vermicelli … 84 Hot and Sour soup …………………… 85 Chicken and Chinese Cabbage Soybean Milk Soup … 85
Scrambled egg (Plain / Ham / Cheese) … 86 Baked okra with cheese …………… 86 Stir fried bean sprouts with salty kelp … 86 Warm salad of mixed beans ……… 87 Mincemeat paste tofu ……………… 87 Baked avocado with cheese ……… 87 Shrimp and marinated vegetables … 88 Stir-fried potato with curry ………… 88 Bacon sauteed spinach …………… 88 Asian chicken stick …………………… 89 Stir-fried potato and bacon with butter … 89 Stir-fried vegetables ………………… 89 Taro hot salad ………………………… 90 Sauteed burdock ……………………… 90 Japanese mustard spinach in mild broth … 90 Stewed pumpkin ……………………… 91 Stewed hijiki …………………………… 91 Stewed eggplant ……………………… 91 Ratatouille ……………………………… 92 Stir fried pork with green pepper … 92 Steamed vegetable with sausage … 92 Stewed taro with ground pork …… 93 Stewed meat and potato …………… 93 Cod Kimchi-jjigae ……………………… 93 Sweet and sour pork ………………… 94 Mapo eggplant ………………………… 94 Meatballs in sweet and sour sauce … 94
Marinated vegetables grilled in oven …… 70 Grilled cabbage and bacon ………… 70 Macaroni Gratin ……………………… 71 White sauce …………………………… 71 Eggplant and Tomato Gratin ……… 72 Stir Fried Noodles …………………… 72 Grilled Vegetable ……………………… 73
Steak (Sirloin) ………………………… 64 Roasted beef …………………………… 64 Spare ribs ……………………………… 64 Pork in salt crust ……………………… 65 Meatloaf ………………………………… 65 Roasted chicken thigh ……………… 66 Roasted chicken ……………………… 66 Japanese Grilled Skewered Chicken … 66 Tandoori chicken ……………………… 67
Gr i l l (M e a t )
G r i l l ( F i s h )
Grill (Vegetables & others)
Non-Fried
S t e am
Stew
Easy menu
Hybrid Hamburg steak ………………………… 73 Chicken teriyaki ………………………… 74 Beef Stuffed Green Peppers ……… 74
ER-MD300_cook1 p60-85.indd 62 1/17/19 10:32 AM
Stir fried chicken and broccoli …… 95 Prawn and mushroom in chili sauce … 95 Seafood Fried Rice …………………… 95 Hashed beef …………………………… 96 Garlic chive and ham wrapped with seaweed … 96 Miso and butter flavored stewed pumpkin …… 96 Stir Fried Pork with Cabbage ……… 97 Chinese style Stewed Japanese mustard spinach and scallop ……… 97 Stir Fried Bitter Gourd with Egg … 97 Steamed pork rolled okra in microwave … 98 Spinach Salad with Cheese ………… 98 Lyon Potato …………………………… 98 Mushroom Salad ……………………… 99 Three Mixed Vegetables Salad …… 99 Chinese Mustard Green Salad with Sesame … 99 Undulated Surf Clam braised with Sake … 99 Pickled Tricolor Vegetables with Kelp … 100 Chinese-Style Pickled Cabbage …… 100 Japanese radish pickled in lemon … 100 Szechuan pork and fried tofu with sakura shrimp rice ……………… 101 Pork stewed in grated Japanese radish with ginger rice … 102 Chicken soy bean stew with carrot rice … 102 Chicken stewed in tomato balsamic vinegar with hijiki rice …… 103 Tomato and eggplant keema curry with garlic rice ………………… 103 Homemade tofu and variations …… 104
Easy bakery and variations …………105 Bread making ……………………………106 Tips for baking bread …………………107 Butter roll …………………………………108 Raisin butter roll ………………………108 Red bean bun ……………………………109 Plain bread ………………………………109 Cinnamon roll ……………………………110 Pão De Queijo …………………………110 Melon bread ……………………………111 French Bread ……………………………112 Tips on making French bread ………114 Epi / Small French bread ……………115 Stone convection bread ……………116 Sweet potato french bread …………117 Puffy white bun …………………………118 Croissant …………………………………119 Zwiebel brot ……………………………120 Rye and honey country bread ………121 Stollen ……………………………………122 Panettone ………………………………123
Strawberry jam ………………………… 130 Apple jam ………………………………… 130 Kiwi jam ………………………………… 130 Blueberry jam …………………………… 130 Apple pie ………………………………… 131 Cut-out cookie ………………………… 132 Cut-out cookie and variations ……… 132 Rock cookie …………………………… 133 Scone …………………………………… 133 Sponge cake …………………………… 134 Chocolate sponge cake …………… 135 Chiffon cake …………………………… 136 Chiffon and variations ……………… 137 Cream puff (from kiln) ………………… 138 Custard cream ………………………… 139 Chocolate cream ……………………… 139 Cream puff ……………………………… 140 Chocolate cream puff ………………… 140 Smooth pudding ……………………… 141 Pudding and variations ……………… 141 Pound cake ……………………………… 142 Baked apple …………………………… 142 Rolled cake ……………………………… 143 Rolled cake and variations ………… 143 Fresh chocolate (Nama chocolate) … 144 Gateau au chocolat ………………… 144 Brownie …………………………………… 145 Fondant chocolate …………………… 145 Baked cheesecake …………………… 146 Rare cheesecake ……………………… 146 Biscotti …………………………………… 147 Tuile ……………………………………… 147 Muffin …………………………………… 148 Lemon cake …………………………… 148 Sweet potato …………………………… 149 Baked Sweet potato ………………… 149 Steamed potato ……………………… 150 Brown sugar red bean paste Japanese cake ………………………… 150 Strawberry stuffed Dai fuku ……… 151 Chestnut steamed bean jelly ……… 151
Sweets
Easy menu
Bread & Pizza
English Muffin …………………………124 Le pain à la tomates concenteres …125 Grissini ……………………………………126 Focaccia …………………………………126 Fruit stick ………………………………127 Crispy Pizza ……………………………128 Crispy pizza (Prosciutto and roquette) …128 Pizza ………………………………………129 Pizza (Seafood) …………………………129 Pizza (Tuna and corn) …………………129 Toast ………………………………………130
Bread & Pizza
63
ER-MD300_cook1 p60-85.indd 63 1/18/19 11:50 AM
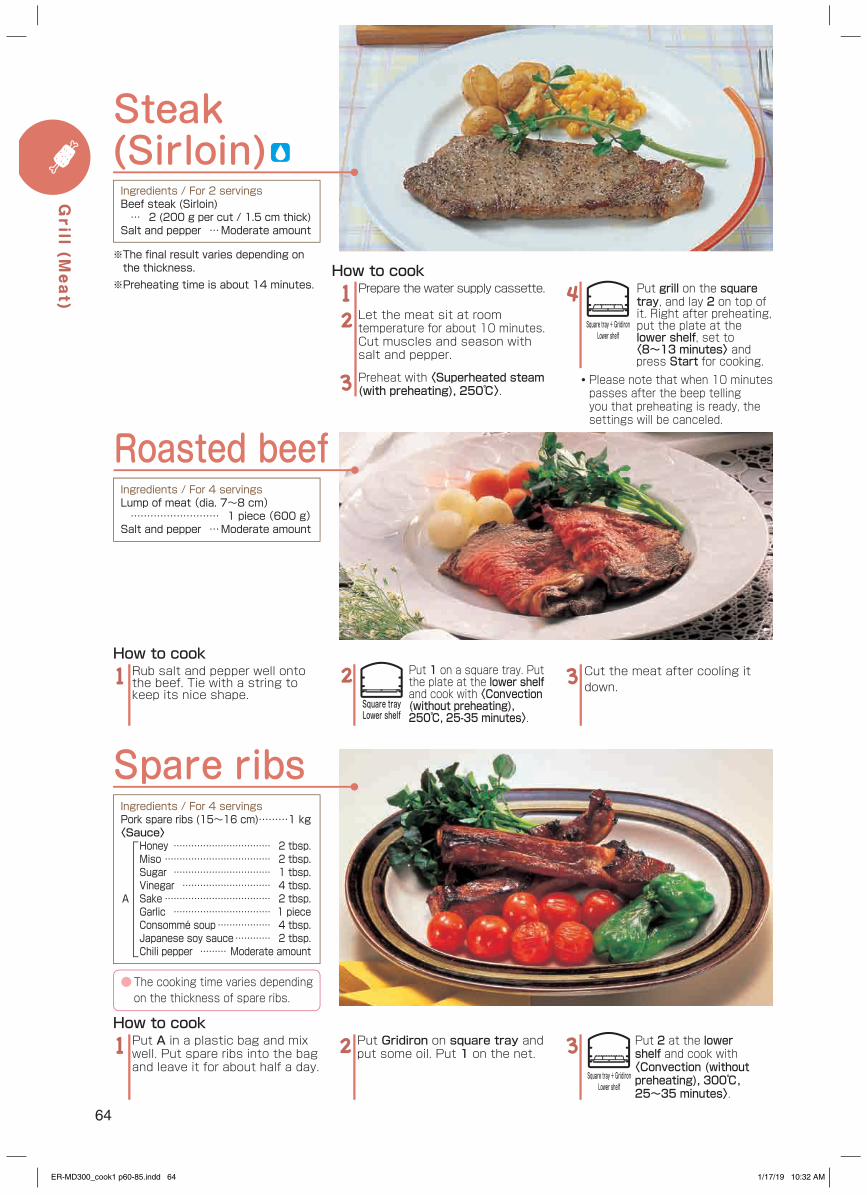
Steak (Sirloin)Ingredients / For 2 servingsBeef steak (Sirloin) … 2 (200 g per cut / 1.5 cm thick)Salt and pepper …Moderate amount
Prepare the water supply cassette.
Let the meat sit at room temperature for about 10 minutes.Cut muscles and season with salt and pepper.
Preheat with 〈Superheated steam (with preheating), 250℃〉.
12
3
Put grill on the square tray, and lay 2 on top of it. Right after preheating, put the plate at the lower shelf, set to 〈8~13 minutes〉 and press Start for cooking.
4
※The final result varies depending on the thickness.※Preheating time is about 14 minutes.
Square tray + GridironLower shelf
Roasted beefIngredients / For 4 servingsLump of meat (dia. 7~8 cm) ……………………… 1 piece (600 g)Salt and pepper …Moderate amount
Rub salt and pepper well onto the beef. Tie with a string to keep its nice shape.
1 Put 1 on a square tray. Put the plate at the lower shelf and cook with 〈Convection (without preheating), 250℃, 25-35 minutes〉.
2How to cook
Square trayLower shelf
Cut the meat after cooling it down.3
Spare ribs
● The cooking time varies depending on the thickness of spare ribs.
Ingredients / For 4 servingsPork spare ribs (15~16 cm) ………1 kg〈Sauce〉
Honey …………………………… 2 tbsp.Miso ……………………………… 2 tbsp.Sugar …………………………… 1 tbsp.Vinegar ………………………… 4 tbsp.Sake ……………………………… 2 tbsp.Garlic …………………………… 1 pieceConsommé soup ……………… 4 tbsp.Japanese soy sauce ………… 2 tbsp.Chili pepper ……… Moderate amount
Put Gridiron on square tray and put some oil. Put 1 on the net.2Put A in a plastic bag and mix
well. Put spare ribs into the bag and leave it for about half a day.
1 Put 2 at the lower shelf and cook with 〈Convection (without preheating), 300℃, 25~35 minutes〉.
3How to cook
A
Square tray + GridironLower shelf
How to cook
・ Please note that when 10 minutes passes after the beep telling you that preheating is ready, the settings will be canceled.
64
Grill (M
eat)
ER-MD300_cook1 p60-85.indd 64 1/17/19 10:32 AM
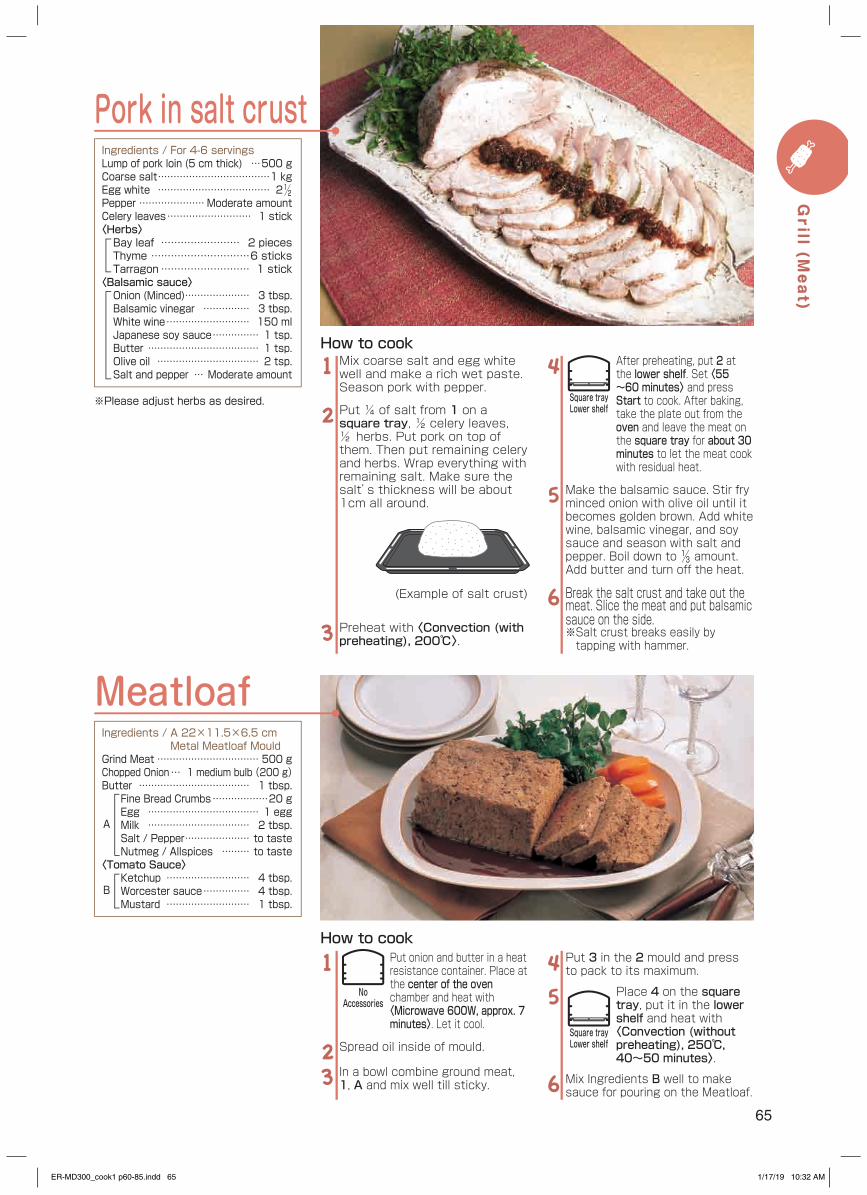
Put onion and butter in a heat resistance container. Place at the center of the oven chamber and heat with 〈Microwave 600W, approx. 7 minutes〉. Let it cool.
Spread oil inside of mould.
In a bowl combine ground meat, 1, A and mix well till sticky.
1
23
Put 3 in the 2 mould and press to pack to its maximum.
Place 4 on the square tray, put it in the lower shelf and heat with 〈Convection (without preheating), 250℃, 40~50 minutes〉.
Mix Ingredients B well to make sauce for pouring on the Meatloaf.
45
6
MeatloafIngredients / A 22×11.5×6.5 cm Metal Meatloaf MouldGrind Meat …………………………… 500 gChopped Onion … 1 medium bulb (200 g)Butter ……………………………… 1 tbsp.
Fine Bread Crumbs ………………20 gEgg ……………………………… 1 eggMilk …………………………… 2 tbsp.Salt / Pepper ………………… to tasteNutmeg / Allspices ……… to taste
〈Tomato Sauce〉Ketchup ……………………… 4 tbsp.Worcester sauce …………… 4 tbsp.Mustard ……………………… 1 tbsp.
A
B
Square trayLower shelf
NoAccessories
How to cook
Pork in salt crustIngredients / For 4-6 servingsLump of pork loin (5 cm thick) …500 gCoarse salt ………………………………1 kgEgg white ……………………………… 2½ Pepper …………………Moderate amountCelery leaves ……………………… 1 stick〈Herbs〉Bay leaf …………………… 2 piecesThyme …………………………6 sticksTarragon ……………………… 1 stick
〈Balsamic sauce〉Onion (Minced) ………………… 3 tbsp.Balsamic vinegar …………… 3 tbsp.White wine ……………………… 150 mlJapanese soy sauce …………… 1 tsp.Butter ……………………………… 1 tsp.Olive oil …………………………… 2 tsp.Salt and pepper … Moderate amount
Mix coarse salt and egg white well and make a rich wet paste. Season pork with pepper.
Put ¼ of salt from 1 on a square tray, ½ celery leaves, ½ ⦆herbs. Put pork on top of them. Then put remaining celery and herbs. Wrap everything with remaining salt. Make sure the salt’s thickness will be about 1cm all around.
Preheat with 〈Convection (with preheating), 200℃〉.
1
2
3
After preheating, put 2 at the lower shelf. Set 〈55~60 minutes〉 and press Start to cook. After baking, take the plate out from the oven and leave the meat on the square tray for about 30 minutes to let the meat cook with residual heat.
Make the balsamic sauce. Stir fry minced onion with olive oil until it becomes golden brown. Add white wine, balsamic vinegar, and soy sauce and season with salt and pepper. Boil down to ⅓ amount. Add butter and turn off the heat.
Break the salt crust and take out the meat. Slice the meat and put balsamic sauce on the side.※ Salt crust breaks easily by tapping with hammer.
4
5
6
How to cook
※ Please adjust herbs as desired. Square trayLower shelf
(Example of salt crust)
65
Grill (M
eat)
ER-MD300_cook1 p60-85.indd 65 1/17/19 10:32 AM
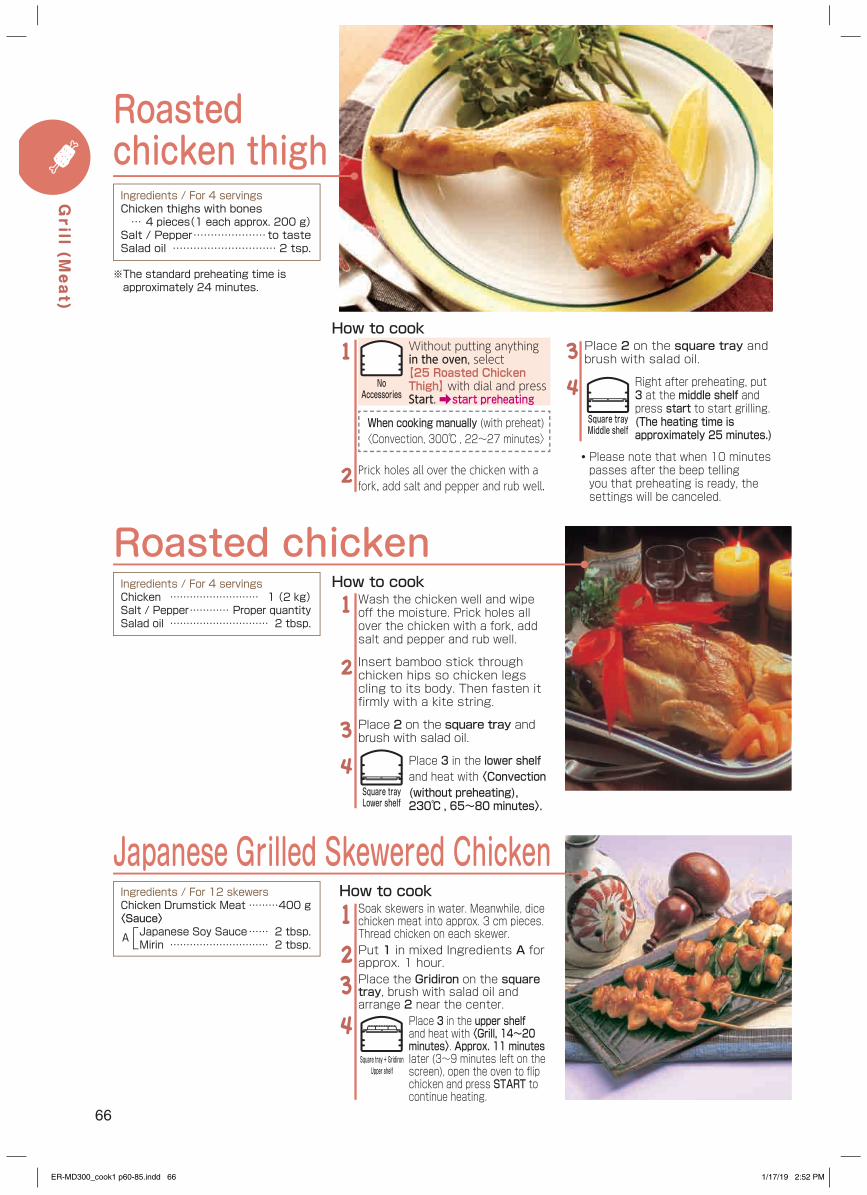
Roasted chickenIngredients / For 4 servingsChicken ……………………… 1 (2 kg)Salt / Pepper ………… Proper quantitySalad oil ………………………… 2 tbsp.
How to cookWash the chicken well and wipe off the moisture. Prick holes all over the chicken with a fork, add salt and pepper and rub well.
Insert bamboo stick through chicken hips so chicken legs cling to its body. Then fasten it firmly with a kite string.
Place 2 on the square tray and brush with salad oil.
Place 3 in the lower shelf and heat with 〈Convection (without preheating), 230℃ , 65~80 minutes〉.
1
2
3
4Square trayLower shelf
Japanese Grilled Skewered ChickenIngredients / For 12 skewersChicken Drumstick Meat ………400 g〈Sauce〉
Japanese Soy Sauce …… 2 tbsp.Mirin ………………………… 2 tbsp.
Soak skewers in water. Meanwhile, dice chicken meat into approx. 3 cm pieces. Thread chicken on each skewer.Put 1 in mixed Ingredients A for approx. 1 hour.Place the Gridiron on the square tray, brush with salad oil and arrange 2 near the center.
Place 3 in the upper shelf and heat with 〈Grill, 14~20 minutes〉. Approx. 11 minutes later (3~9 minutes left on the screen), open the oven to flip chicken and press START to continue heating.
1234
How to cook
A
Square tray + GridironUpper shelf
Place 2 on the square tray and brush with salad oil.
Right after preheating, put 3 at the middle shelf and press start to start grilling.(The heating time is approximately 25 minutes.)
3
4
Roasted chicken thighIngredients / For 4 servingsChicken thighs with bones … 4 pieces(1 each approx. 200 g)Salt / Pepper …………………to tasteSalad oil ………………………… 2 tsp.
How to cookWithout putting anything in the oven, select 【25 Roasted Chicken Thigh】 with dial and press Start. start preheating
Prick holes all over the chicken with a fork, add salt and pepper and rub well.
1
2
Square trayMiddle shelf
NoAccessories
When cooking manually (with preheat)〈Convection, 300℃ , 22~27 minutes〉
・ Please note that when 10 minutes passes after the beep telling you that preheating is ready, the settings will be canceled.
※ The standard preheating time is approximately 24 minutes.
66
Grill (M
eat)
ER-MD300_cook1 p60-85.indd 66 1/17/19 2:52 PM
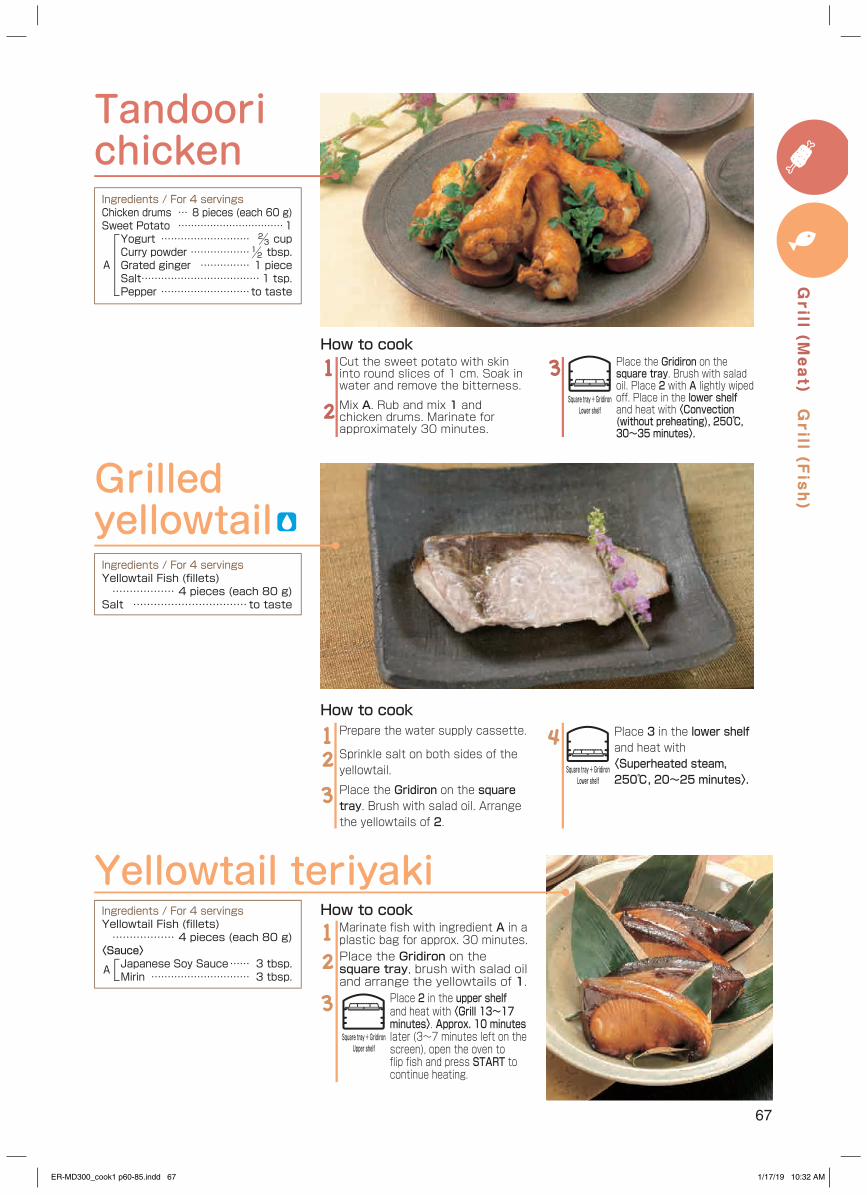
Ingredients / For 4 servingsChicken drums … 8 pieces (each 60 g)Sweet Potato ……………………………1Yogurt ……………………… ⅔ cupCurry powder ………………½ tbsp.Grated ginger …………… 1 pieceSalt……………………………… 1 tsp.Pepper ………………………to taste
A
How to cookCut the sweet potato with skin into round slices of 1 cm. Soak in water and remove the bitterness.
Mix A. Rub and mix 1 and chicken drums. Marinate for approximately 30 minutes.
1
2
Place the Gridiron on the square tray. Brush with salad oil. Place 2 with A lightly wiped off. Place in the lower shelf and heat with 〈Convection (without preheating), 250℃, 30~35 minutes〉.
3
Tandoori chicken
Grilled yellowtail
Prepare the water supply cassette.
Sprinkle salt on both sides of the yellowtail.
Place the Gridiron on the square tray. Brush with salad oil. Arrange the yellowtails of 2.
12
3
How to cook
Ingredients / For 4 servingsYellowtail Fish (fillets) ……………… 4 pieces (each 80 g)Salt ……………………………to taste
Square tray + GridironLower shelf
Yellowtail teriyakiIngredients / For 4 servingsYellowtail Fish (fillets) ……………… 4 pieces (each 80 g)〈Sauce〉
Japanese Soy Sauce …… 3 tbsp.Mirin ………………………… 3 tbsp.
Marinate fish with ingredient A in a plastic bag for approx. 30 minutes.Place the Gridiron on the square tray, brush with salad oil and arrange the yellowtails of 1.
Place 2 in the upper shelf and heat with 〈Grill 13~17 minutes〉. Approx. 10 minutes later (3~7 minutes left on the screen), open the oven to flip fish and press START to continue heating.
12
3
How to cook
A
Square tray + GridironUpper shelf
Place 3 in the lower shelf and heat with 〈Superheated steam, 250℃, 20~25 minutes〉.
4Square tray + Gridiron
Lower shelf
67
Grill (M
eat)
Grill (F
ish)
ER-MD300_cook1 p60-85.indd 67 1/17/19 10:32 AM
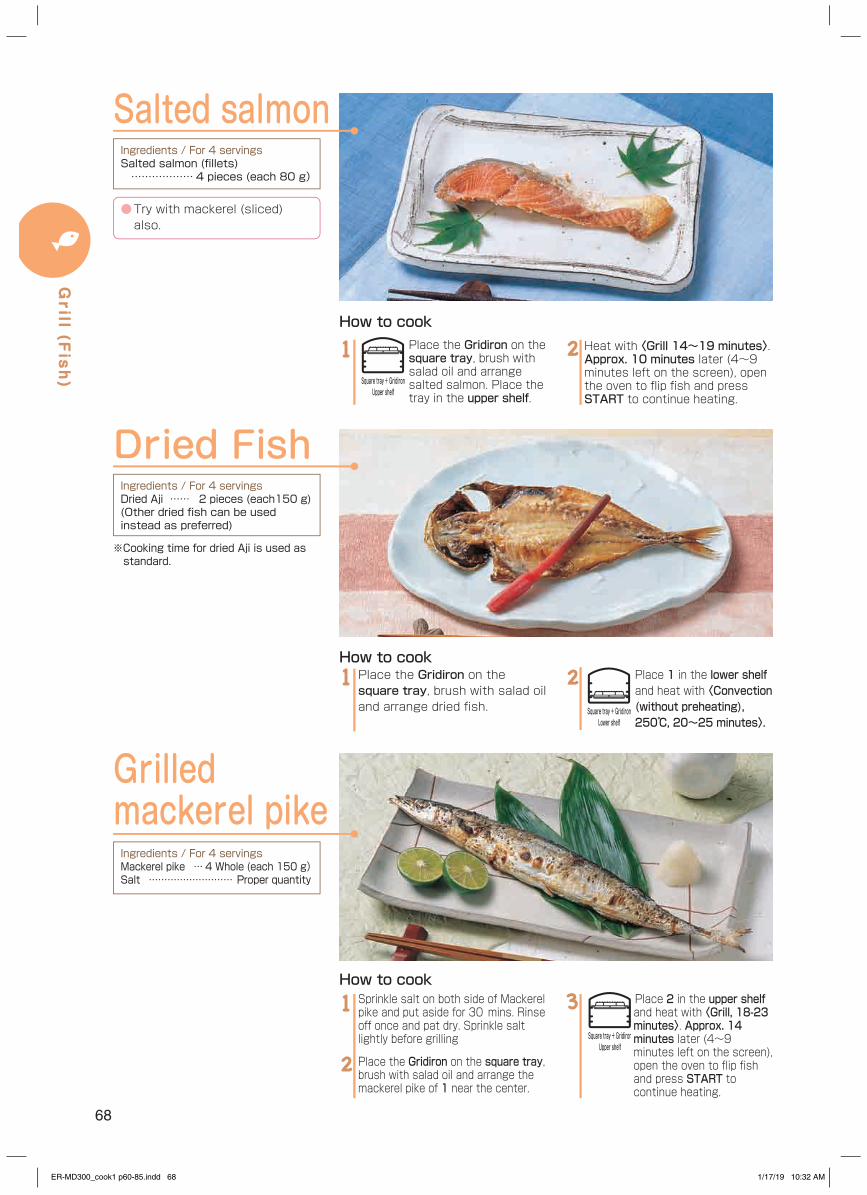
Dried FishIngredients / For 4 servingsDried Aji …… 2 pieces (each150 g)(Other dried fish can be used instead as preferred)
※Cooking time for dried Aji is used as standard.
Place 1 in the lower shelf and heat with 〈Convection (without preheating), 250℃, 20~25 minutes〉.
2Place the Gridiron on the square tray, brush with salad oil and arrange dried fish.
1How to cook
Square tray + GridironLower shelf
Ingredients / For 4 servingsSalted salmon (fillets) ……………… 4 pieces (each 80 g)
Salted salmon
Place the Gridiron on the square tray, brush with salad oil and arrange salted salmon. Place the tray in the upper shelf.
1How to cook
Square tray + GridironUpper shelf
● Try with mackerel (sliced) also.
Grilled mackerel pikeIngredients / For 4 servingsMackerel pike … 4 Whole (each 150 g)Salt ……………………… Proper quantity
Sprinkle salt on both side of Mackerel pike and put aside for 30⦆mins. Rinse off once and pat dry. Sprinkle salt lightly before grilling
Place the Gridiron on the square tray, brush with salad oil and arrange the mackerel pike of 1 near the center.
1
2
Place 2 in the upper shelf and heat with 〈Grill, 18-23 minutes〉. Approx. 14 minutes later (4~9 minutes left on the screen), open the oven to flip fish and press START to continue heating.
3How to cook
Square tray + GridironUpper shelf
Heat with 〈Grill 14~19 minutes〉. Approx. 10 minutes later (4~9 minutes left on the screen), open the oven to flip fish and press START to continue heating.
2
68
Grill (F
ish)
ER-MD300_cook1 p60-85.indd 68 1/17/19 10:32 AM
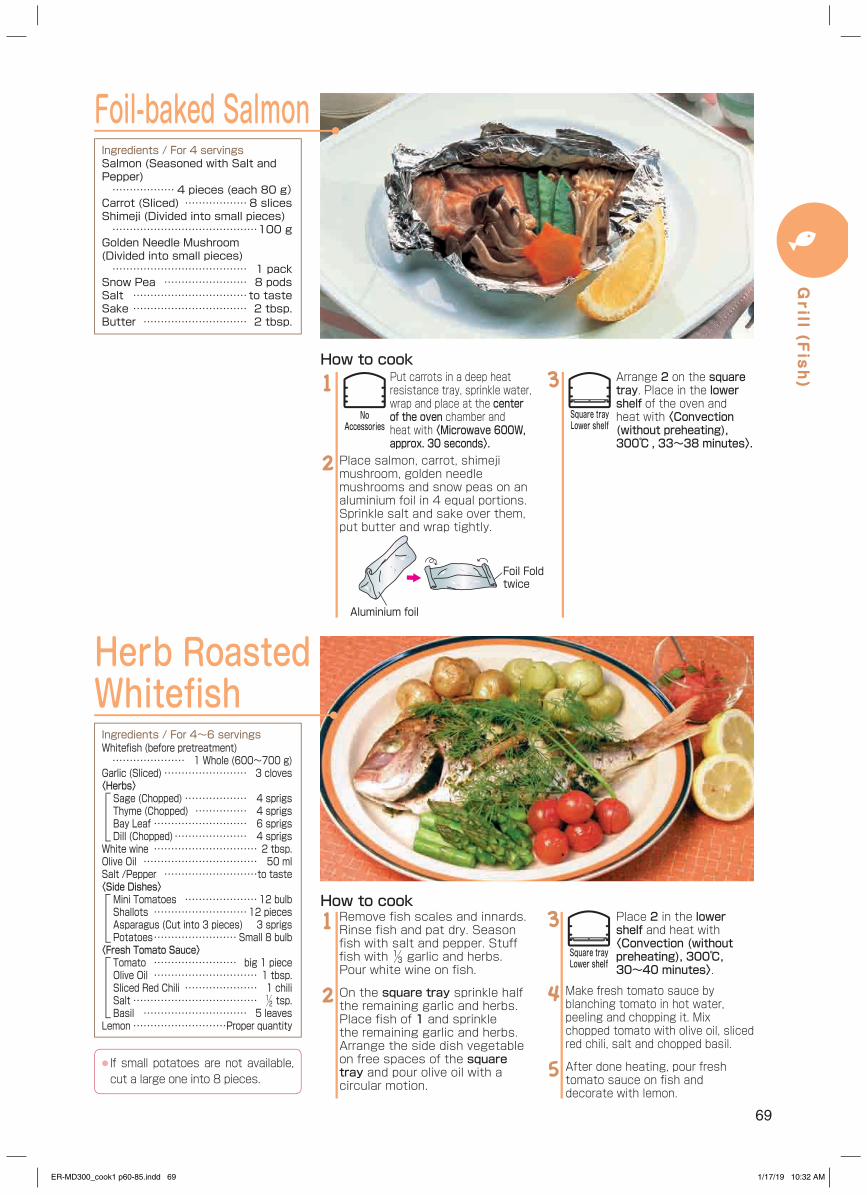
Arrange 2 on the square tray. Place in the lower shelf of the oven and heat with 〈Convection (without preheating), 300℃ , 33~38 minutes〉.
3
Foil-baked Salmon
How to cook
Ingredients / For 4 servingsSalmon (Seasoned with Salt and Pepper) ……………… 4 pieces (each 80 g)Carrot (Sliced) ………………8 slicesShimeji (Divided into small pieces) ……………………………………100 gGolden Needle Mushroom (Divided into small pieces) ………………………………… 1 packSnow Pea …………………… 8 podsSalt ……………………………to tasteSake …………………………… 2 tbsp.Butter ………………………… 2 tbsp.
Put carrots in a deep heat resistance tray, sprinkle water, wrap and place at the center of the oven chamber and heat with 〈Microwave 600W, approx. 30 seconds〉.
Place salmon, carrot, shimeji mushroom, golden needle mushrooms and snow peas on an aluminium foil in 4 equal portions. Sprinkle salt and sake over them, put butter and wrap tightly.
1
2
Square trayLower shelf
NoAccessories
Foil Fold twice
Aluminium foil
Herb Roasted WhitefishIngredients / For 4~6 servingsWhitefish (before pretreatment) ………………… 1 Whole (600~700 g)Garlic (Sliced) …………………… 3 cloves〈Herbs〉Sage (Chopped) ……………… 4 sprigsThyme (Chopped) …………… 4 sprigsBay Leaf ……………………… 6 sprigsDill (Chopped) ………………… 4 sprigs
White wine ………………………… 2 tbsp.Olive Oil …………………………… 50 mlSalt /Pepper ………………………to taste〈Side Dishes〉Mini Tomatoes …………………12 bulbShallots ………………………12 piecesAsparagus (Cut into 3 pieces) 3 sprigsPotatoes ……………………Small 8 bulb
〈Fresh Tomato Sauce〉Tomato …………………… big 1 pieceOlive Oil ………………………… 1 tbsp.Sliced Red Chili ………………… 1 chiliSalt ……………………………… ½ tsp.Basil ………………………… 5 leaves
Lemon ………………………Proper quantity
Remove fish scales and innards. Rinse fish and pat dry. Season fish with salt and pepper. Stuff fish with ⅓ garlic and herbs. Pour white wine on fish.
On the square tray sprinkle half the remaining garlic and herbs. Place fish of 1 and sprinkle the remaining garlic and herbs. Arrange the side dish vegetable on free spaces of the square tray and pour olive oil with a circular motion.
1
2
Place 2 in the lower shelf and heat with 〈Convection (without preheating), 300℃, 30~40 minutes〉.
Make fresh tomato sauce by blanching tomato in hot water, peeling and chopping it. Mix chopped tomato with olive oil, sliced red chili, salt and chopped basil.
After done heating, pour fresh tomato sauce on fish and decorate with lemon.
3
4
5
How to cook
● If small potatoes are not available, cut a large one into 8 pieces.
Square trayLower shelf
69
Grill (F
ish)
ER-MD300_cook1 p60-85.indd 69 1/17/19 10:32 AM
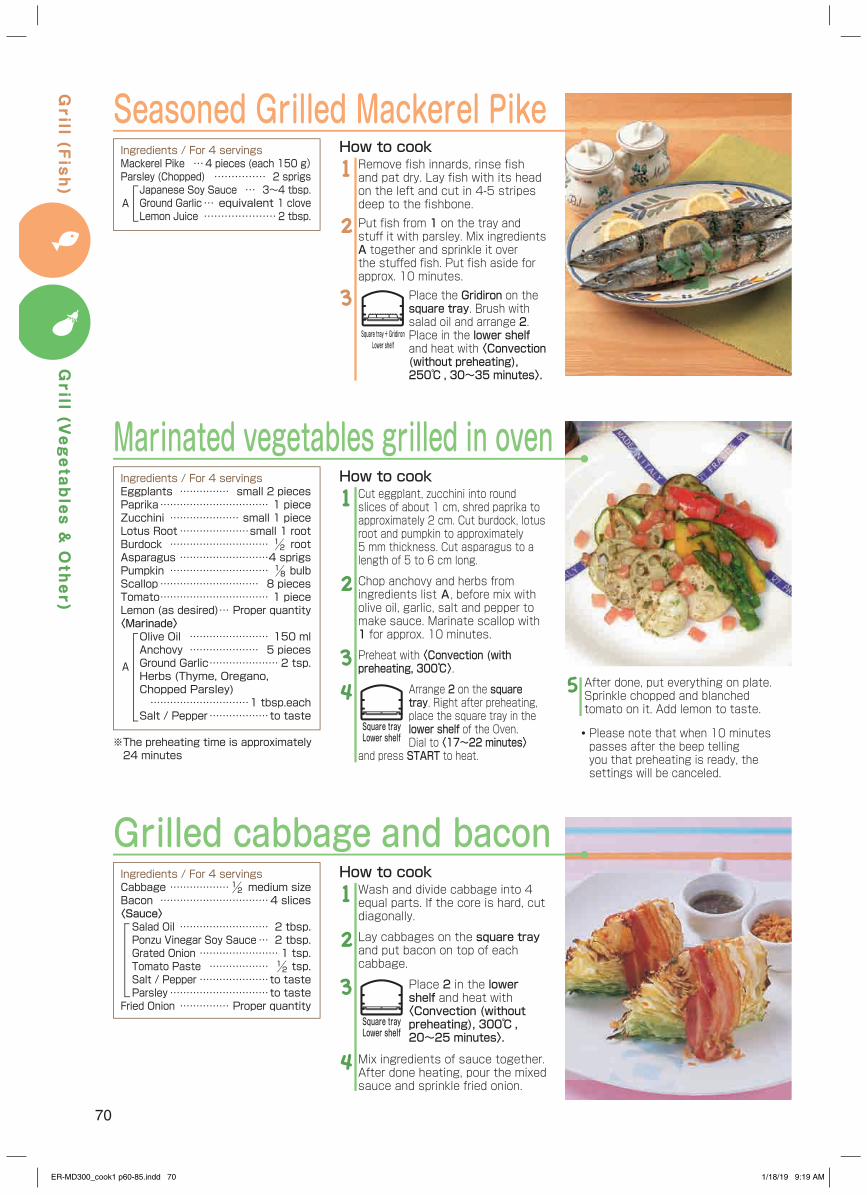
How to cookIngredients / For 4 servingsEggplants …………… small 2 piecesPaprika …………………………… 1 pieceZucchini ………………… small 1 pieceLotus Root …………………small 1 rootBurdock ………………………… ½ rootAsparagus ………………………4 sprigsPumpkin ………………………… ⅛ bulbScallop ………………………… 8 piecesTomato …………………………… 1 pieceLemon (as desired) … Proper quantity〈Marinade〉
Olive Oil …………………… 150 mlAnchovy ………………… 5 piecesGround Garlic ………………… 2 tsp.Herbs (Thyme, Oregano, Chopped Parsley) …………………………1 tbsp.eachSalt / Pepper ………………to taste
Marinated vegetables grilled in ovenCut eggplant, zucchini into round slices of about 1 cm, shred paprika to approximately 2 cm. Cut burdock, lotus root and pumpkin to approximately 5 mm thickness. Cut asparagus to a length of 5 to 6 cm long.
Chop anchovy and herbs from ingredients list A, before mix with olive oil, garlic, salt and pepper to make sauce. Marinate scallop with 1 for approx. 10 minutes.
Preheat with 〈Convection (with preheating, 300℃〉.
Arrange 2 on the square tray. Right after preheating, place the square tray in the lower shelf of the Oven. Dial to 〈17~22 minutes〉
and press START to heat.
1
2
34 After done, put everything on plate.
Sprinkle chopped and blanched tomato on it. Add lemon to taste.
5A
Square trayLower shelf
Wash and divide cabbage into 4 equal parts. If the core is hard, cut diagonally.
Lay cabbages on the square tray and put bacon on top of each cabbage.
Place 2 in the lower shelf and heat with 〈Convection (without preheating), 300℃ , 20~25 minutes〉.
Mix ingredients of sauce together. After done heating, pour the mixed sauce and sprinkle fried onion.
1
2
3
4
How to cook
Square trayLower shelf
Ingredients / For 4 servingsCabbage ………………½ medium sizeBacon ……………………………4 slices〈Sauce〉Salad Oil ……………………… 2 tbsp.Ponzu Vinegar Soy Sauce … 2 tbsp.Grated Onion …………………… 1 tsp.Tomato Paste ……………… ½ tsp.Salt / Pepper …………………to tasteParsley …………………………to taste
Fried Onion …………… Proper quantity
Grilled cabbage and bacon
Ingredients / For 4 servingsMackerel Pike …4 pieces (each 150 g)Parsley (Chopped) …………… 2 sprigs
Japanese Soy Sauce … 3~4 tbsp.Ground Garlic … equivalent 1 cloveLemon Juice …………………2 tbsp.
A
How to cookRemove fish innards, rinse fish and pat dry. Lay fish with its head on the left and cut in 4-5 stripes deep to the fishbone.Put fish from 1 on the tray and stuff it with parsley. Mix ingredients A together and sprinkle it over the stuffed fish. Put fish aside for approx. 10 minutes.
Place the Gridiron on the square tray. Brush with salad oil and arrange 2. Place in the lower shelf and heat with 〈Convection (without preheating), 250℃ , 30~35 minutes〉.
1
2
3
Seasoned Grilled Mackerel Pike
Square tray + GridironLower shelf
※ The preheating time is approximately 24 minutes
・ Please note that when 10 minutes passes after the beep telling you that preheating is ready, the settings will be canceled.
70
Grill (V
egetables & Other)
Grill (F
ish)
ER-MD300_cook1 p60-85.indd 70 1/18/19 9:19 AM
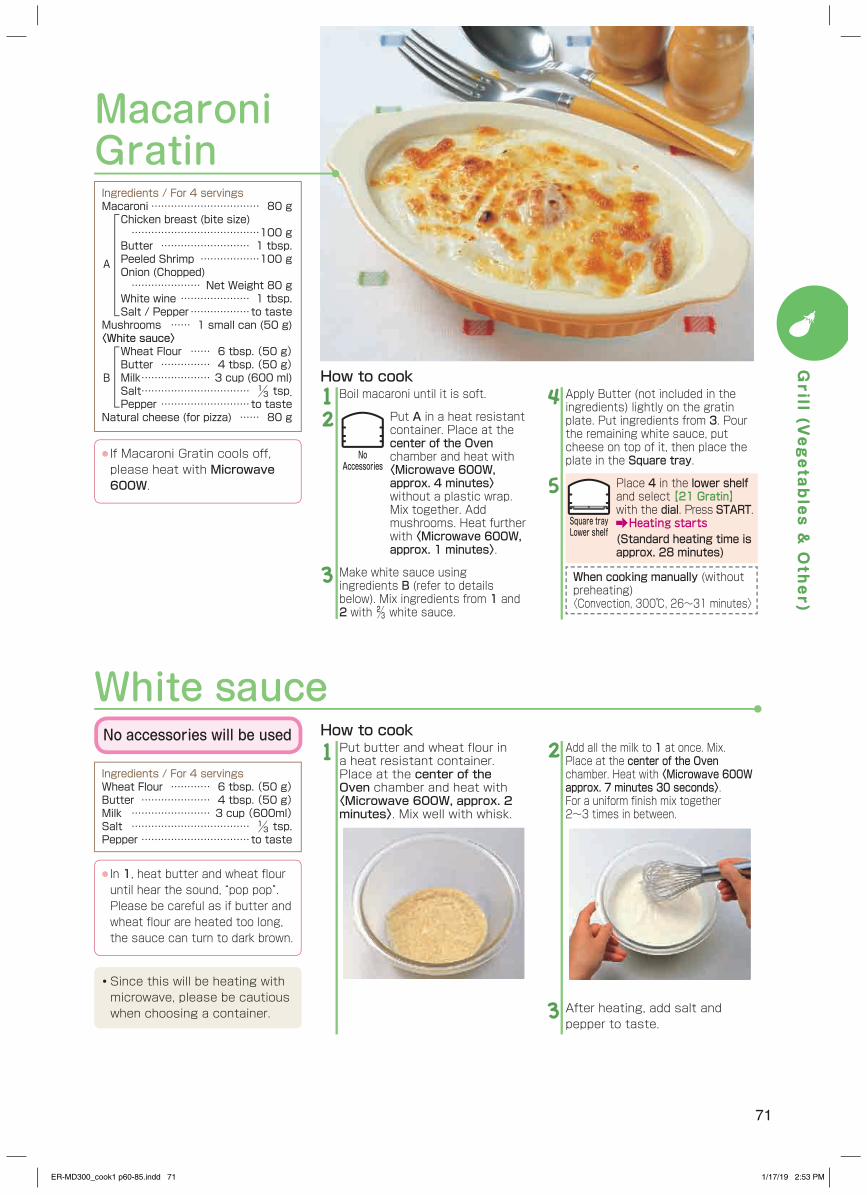
How to cook
Ingredients / For 4 servingsMacaroni …………………………… 80 gChicken breast (bite size) …………………………………100 gButter ……………………… 1 tbsp.Peeled Shrimp ………………100 gOnion (Chopped) ………………… Net Weight 80 gWhite wine ………………… 1 tbsp.Salt / Pepper ………………to taste
Mushrooms …… 1 small can (50 g)〈White sauce〉
Wheat Flour …… 6 tbsp. (50 g)Butter …………… 4 tbsp. (50 g)Milk ………………… 3 cup (600 ml)Salt…………………………… ⅓ tsp.Pepper ………………………to taste
Natural cheese (for pizza) …… 80 g
Macaroni Gratin
Boil macaroni until it is soft.
Put A in a heat resistant container. Place at the center of the Oven chamber and heat with 〈Microwave 600W, approx. 4 minutes〉 without a plastic wrap. Mix together. Add mushrooms. Heat further with 〈Microwave 600W, approx. 1 minutes〉.
Make white sauce using ingredients B (refer to details below). Mix ingredients from 1 and 2 with ⅔ white sauce.
12
3
Apply Butter (not included in the ingredients) lightly on the gratin plate. Put ingredients from 3. Pour the remaining white sauce, put cheese on top of it, then place the plate in the Square tray.
Place 4 in the lower shelf and select 【21 Gratin】 with the dial. Press START.Heating starts
(Standard heating time is approx. 28 minutes)
When cooking manually (without preheating)〈Convection, 300℃, 26~31 minutes〉
4
5
A
B
● If Macaroni Gratin cools off, please heat with Microwave 600W.
White sauce
Ingredients / For 4 servingsWheat Flour ………… 6 tbsp. (50 g)Butter ………………… 4 tbsp. (50 g)Milk …………………… 3 cup (600ml)Salt ……………………………… ⅓ tsp.Pepper ……………………………to taste
Put butter and wheat flour in a heat resistant container. Place at the center of the Oven chamber and heat with 〈Microwave 600W, approx. 2 minutes〉. Mix well with whisk.
1 Add all the milk to 1 at once. Mix. Place at the center of the Oven chamber. Heat with 〈Microwave 600W approx. 7 minutes 30 seconds〉. For a uniform finish mix together 2~3 times in between.
2
After heating, add salt and pepper to taste.
3
How to cook
● In 1, heat butter and wheat flour until hear the sound, “pop pop”. Please be careful as if butter and wheat flour are heated too long, the sauce can turn to dark brown.
・ Since this will be heating with microwave, please be cautious when choosing a container.
Square trayLower shelf
NoAccessories
No accessories will be used
71
Grill (V
egetables & Other)
ER-MD300_cook1 p60-85.indd 71 1/17/19 2:53 PM
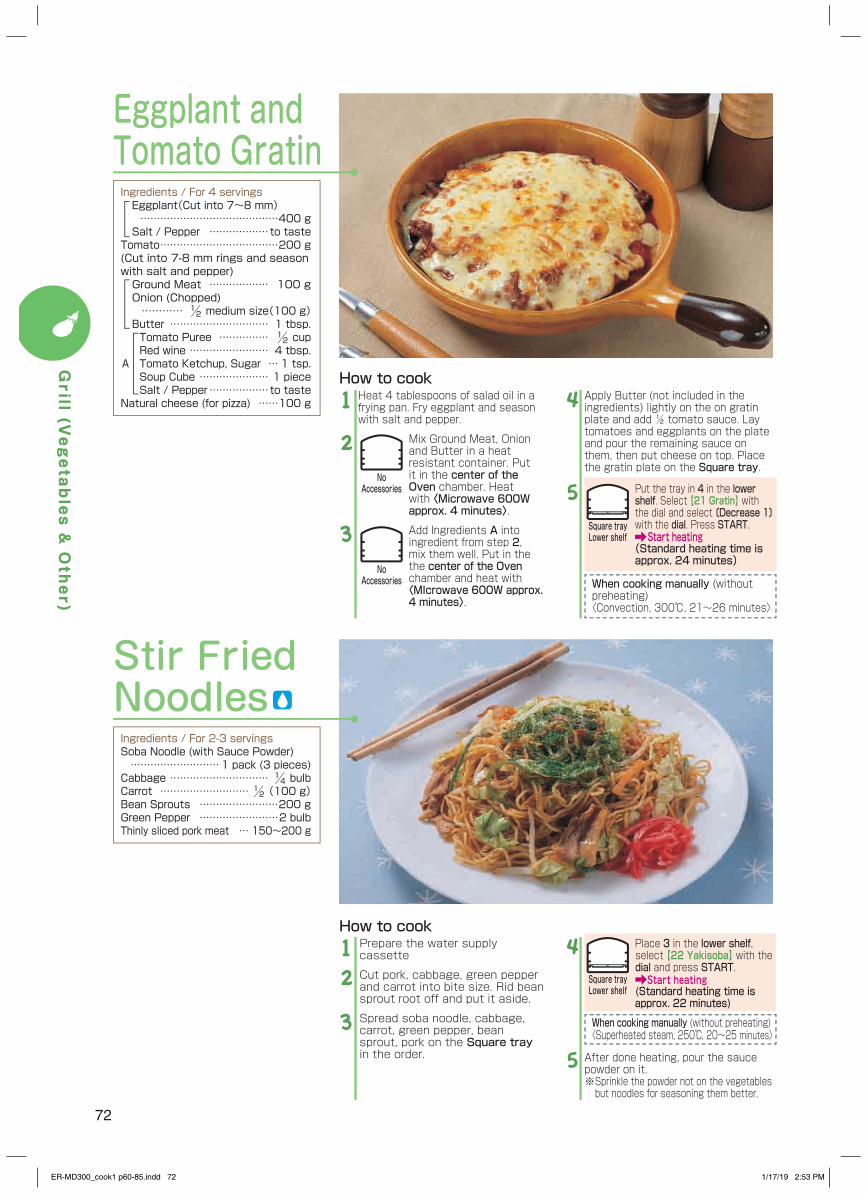
Eggplant and Tomato GratinIngredients / For 4 servingsEggplant(Cut into 7~8 mm) ……………………………………400 gSalt / Pepper ………………to taste
Tomato ………………………………200 g(Cut into 7-8 mm rings and season with salt and pepper)Ground Meat ……………… 100 gOnion (Chopped) ………… ½ medium size(100 g)Butter ………………………… 1 tbsp.Tomato Puree …………… ½ cupRed wine …………………… 4 tbsp.Tomato Ketchup, Sugar … 1 tsp.Soup Cube ………………… 1 pieceSalt / Pepper ………………to taste
Natural cheese (for pizza) ……100 gHeat 4 tablespoons of salad oil in a frying pan. Fry eggplant and season with salt and pepper.
Mix Ground Meat, Onion and Butter in a heat resistant container. Put it in the center of the Oven chamber. Heat with 〈Microwave 600W approx. 4 minutes〉.
Add Ingredients A into ingredient from step 2, mix them well. Put in the the center of the Oven chamber and heat with 〈MIcrowave 600W approx. 4 minutes〉.
1
2
3
Apply Butter (not included in the ingredients) lightly on the on gratin plate and add ½ tomato sauce. Lay tomatoes and eggplants on the plate and pour the remaining sauce on them, then put cheese on top. Place the gratin plate on the Square tray.
Put the tray in 4 in the lower shelf. Select 【21 Gratin】 with the dial and select 〔Decrease 1〕 with the dial. Press START. Start heating
(Standard heating time is approx. 24 minutes)
When cooking manually (without preheating)〈Convection, 300℃, 21~26 minutes〉
4
5
How to cookA
Square trayLower shelf
NoAccessories
NoAccessories
Stir Fried NoodlesIngredients / For 2-3 servingsSoba Noodle (with Sauce Powder) ………………………1 pack (3 pieces)Cabbage ………………………… ¼ bulbCarrot ………………………½ (100 g)Bean Sprouts ……………………200 gGreen Pepper ……………………2 bulbThinly sliced pork meat … 150~200 g
Prepare the water supply cassette
Cut pork, cabbage, green pepper and carrot into bite size. Rid bean sprout root off and put it aside.
Spread soba noodle, cabbage, carrot, green pepper, bean sprout, pork on the Square tray in the order.
12
3
Place 3 in the lower shelf, select 【22 Yakisoba】 with the dial and press START. Start heating
(Standard heating time is approx. 22 minutes)
When cooking manually (without preheating)〈Superheated steam, 250℃, 20~25 minutes〉
After done heating, pour the sauce powder on it.※ Sprinkle the powder not on the vegetables but noodles for seasoning them better.
4
5
How to cook
Square trayLower shelf
72
Grill (V
egetables & Other)
ER-MD300_cook1 p60-85.indd 72 1/17/19 2:53 PM
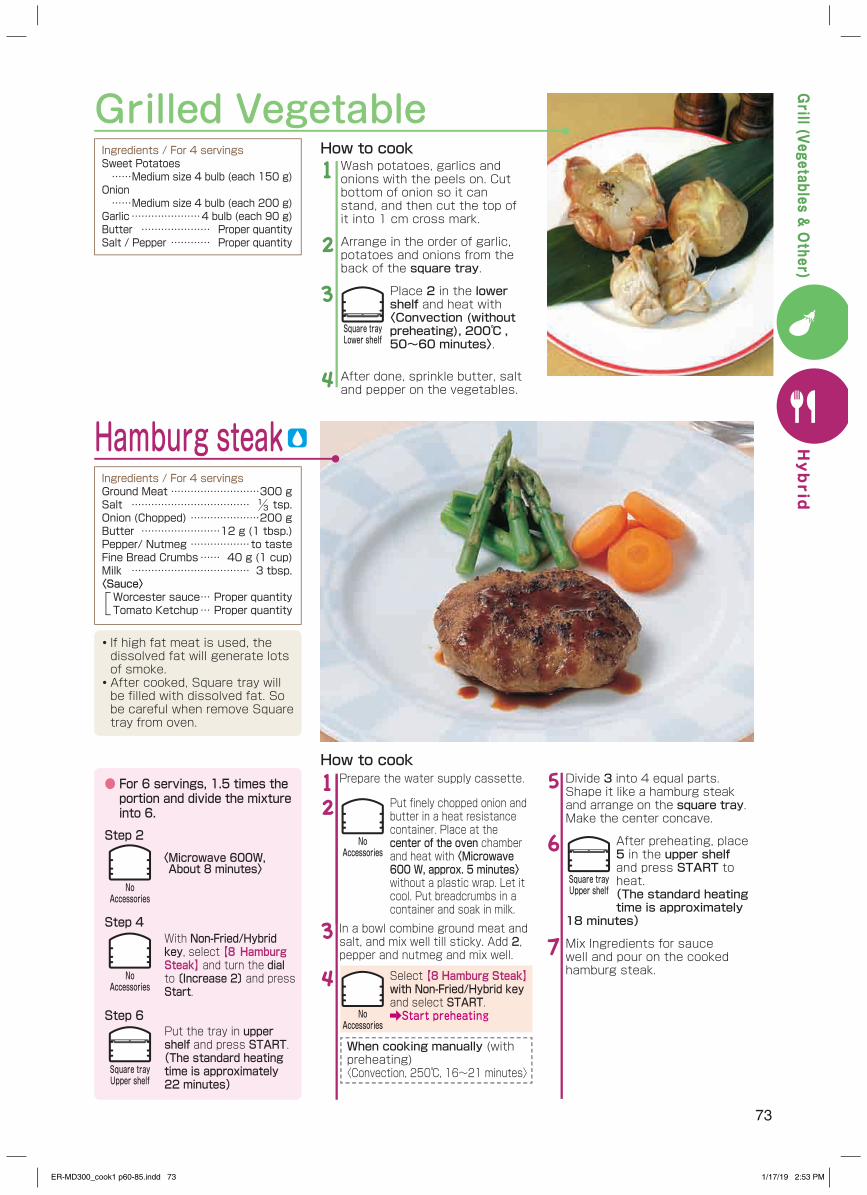
Prepare the water supply cassette.
Put finely chopped onion and butter in a heat resistance container. Place at the center of the oven chamber and heat with 〈Microwave 600 W, approx. 5 minutes〉 without a plastic wrap. Let it cool. Put breadcrumbs in a container and soak in milk.
In a bowl combine ground meat and salt, and mix well till sticky. Add 2, pepper and nutmeg and mix well.
Select 【8 Hamburg Steak】 with Non-Fried/Hybrid key and select START.Start preheating
When cooking manually (with preheating)〈Convection, 250℃, 16~21 minutes〉
12
3
4
Divide 3 into 4 equal parts. Shape it like a hamburg steak and arrange on the square tray. Make the center concave.
After preheating, place 5 in the upper shelf and press START to heat.(The standard heating time is approximately
18 minutes)
Mix Ingredients for sauce well and pour on the cooked hamburg steak.
5
6
7
Hamburg steakIngredients / For 4 servingsGround Meat ………………………300 gSalt ……………………………… ⅓ tsp.Onion (Chopped) …………………200 gButter ……………………12 g (1 tbsp.)Pepper/ Nutmeg ………………to tasteFine Bread Crumbs …… 40 g (1 cup)Milk ……………………………… 3 tbsp.〈Sauce〉Worcester sauce … Proper quantityTomato Ketchup … Proper quantity
・ If high fat meat is used, the dissolved fat will generate lots of smoke.・ After cooked, Square tray will be filled with dissolved fat. So be careful when remove Square tray from oven.
Square trayUpper shelf
NoAccessories
How to cook
NoAccessories
● For 6 servings, 1.5 times the portion and divide the mixture into 6.
Step 2
NoAccessories
〈Microwave 600W, About 8 minutes〉
Step 4
NoAccessories
Step 6
Square trayUpper shelf
With Non-Fried/Hybrid key, select 【8⦆Hamburg Steak】 and turn the dial to 〔Increase 2〕 and press Start.
Put the tray in upper shelf and press START.(The standard heating time is approximately 22 minutes)
Grilled VegetableIngredients / For 4 servingsSweet Potatoes ……Medium size 4 bulb (each 150 g)Onion ……Medium size 4 bulb (each 200 g)Garlic …………………4 bulb (each 90 g)Butter ………………… Proper quantitySalt / Pepper ………… Proper quantity
Wash potatoes, garlics and onions with the peels on. Cut bottom of onion so it can stand, and then cut the top of it into 1 cm cross mark.
Arrange in the order of garlic, potatoes and onions from the back of the square tray.
Place 2 in the lower shelf and heat with 〈Convection (without preheating), 200℃ , 50~60 minutes〉.
After done, sprinkle butter, salt and pepper on the vegetables.
1
2
3
4
How to cook
Square trayLower shelf
73
Hybrid
Grill (Vegetables &
Other)
ER-MD300_cook1 p60-85.indd 73 1/17/19 2:53 PM
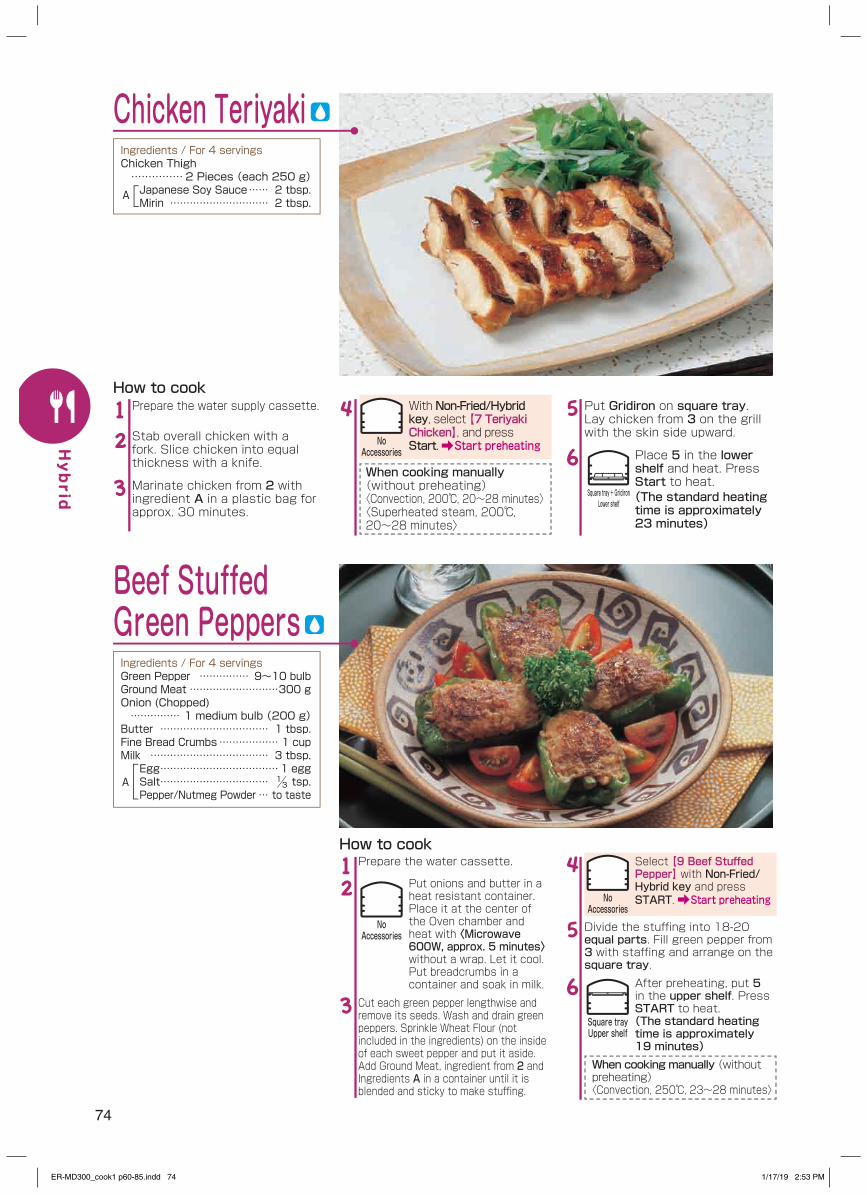
Beef Stuffed Green PeppersIngredients / For 4 servingsGreen Pepper …………… 9~10 bulbGround Meat ………………………300 gOnion (Chopped) …………… 1 medium bulb (200 g)Butter …………………………… 1 tbsp.Fine Bread Crumbs ……………… 1 cupMilk ……………………………… 3 tbsp.Egg ………………………………1 eggSalt…………………………… ⅓ tsp.Pepper/Nutmeg Powder … to taste
A
Prepare the water cassette.
Put onions and butter in a heat resistant container. Place it at the center of the Oven chamber and heat with 〈Microwave 600W, approx. 5 minutes〉 without a wrap. Let it cool. Put breadcrumbs in a container and soak in milk.
Cut each green pepper lengthwise and remove its seeds. Wash and drain green peppers. Sprinkle Wheat Flour (not included in the ingredients) on the inside of each sweet pepper and put it aside.Add Ground Meat, ingredient from 2 and Ingredients A in a container until it is blended and sticky to make stuffing.
12
3
Select 【9 Beef Stuffed Pepper】 with Non-Fried/Hybrid key and press START. Start preheating
Divide the stuffing into 18-20 equal parts. Fill green pepper from 3 with staffing and arrange on the square tray.
After preheating, put 5 in the upper shelf. Press START to heat.(The standard heating time is approximately 19 minutes)
When cooking manually (without preheating)〈Convection, 250℃, 23~28 minutes〉
4
5
6
How to cook
Square trayUpper shelf
NoAccessories
Chicken TeriyakiIngredients / For 4 servingsChicken Thigh ……………2 Pieces (each 250 g)Japanese Soy Sauce …… 2 tbsp.Mirin ………………………… 2 tbsp.
With Non-Fried/Hybrid key, select 【7 Teriyaki Chicken】, and press Start. Start preheating
When cooking manually (without preheating)〈Convection, 200℃, 20~28 minutes〉〈Superheated steam, 200℃, 20~28 minutes〉
4
A
Put Gridiron on square tray. Lay chicken from 3 on the grill with the skin side upward.
Place 5 in the lower shelf and heat. Press Start to heat.(The standard heating time is approximately 23 minutes)
5
6Square tray + Gridiron
Lower shelf
Prepare the water supply cassette.
Stab overall chicken with a fork. Slice chicken into equal thickness with a knife.
Marinate chicken from 2 with ingredient A in a plastic bag for approx. 30 minutes.
12
3
How to cook
NoAccessories
NoAccessories
74
Hybrid
ER-MD300_cook1 p60-85.indd 74 1/17/19 2:53 PM

Fried ChickenIngredients / For 4 servingsChicken Thigh …………… 2 pieces (each 250 g)Frying Powder (Available in the market) ……………………………………… 4 tbsp.
Cut each chicken meat into 8 pieces. Put cut chicken and frying powder in a plastic bag. Shake the plastic bag to mix chicken and frying powder together.
Put Gridiron on square tray. Lay Chicken from 1 on the grill.
1
2
How to cook
Ingredients / For 10 PiecesSliced Pork (Shredded) ………100 gSake …………………………… 2 tbsp.Cornstarch ……………………… 1 tsp.Salt …………………………… a pinch
Spring onion (Cut into fine strips) ……………………………………… 30 gCarrot (Cut into fine strips) …… 30 gJapanese Soy Sauce …… 1 tbsp.Oyster Sauce ……………… 1 tbsp.Cornstarch ………………… 1 tbsp.Shiitake Dashi Soup …… 1 tbsp.Sugar …………………………… 2 tsp.Sake …………………………… 2 tsp.Sesame Oil …………………… 2 tsp.Ginger sauce ………………… 1 tsp.Pepper ………………………to tasteBoiled Bamboo Shoot (Cut into fine strips) ………………………………… 50 gCelery (Cut into fine strips) 50 gShiitake (Soaked & chopped into small pieces) …………………………… 3 piecesBean Sprouts …………………100 gBean‐starch vermicelli … 15 g(Soak in water, drain and cut into 5 cm long)
Spring Roll Sheet ………… 10 sheets
A
B
Spring rolls
Prepare the water supply cassette.
Put shredded pork to a heat resistant container. Add sake, cornstarch and salt. Mix well. Add spring onion, carrot and mix. Place at the center of the oven chamber and heat with 〈Microwave 600W, approx. 2 minutes〉. After heating, loosen the mixture.Mix prepared Ingredients A and Ingredients B into ingredient from step 2. Cover it with plastic wrap and heat with 〈Microwave 600W, approx. 5 minutes〉.
12
3
Put the tray in step 2 in the lower shelf. Select 【4 Chicken Karaage】 with Non-Fried/Hybrid key and press START. Start heating
(Standard heating time is approx. 23 minutes)
When cooking manually (without preheating)〈Convection, 250℃, 20~25 minutes〉〈Superheated steam, 250℃, 20~25 minutes〉
3
How to cook
Square tray + GridironLower shelf
After done heating, blend heated mixture together and put it aside to cool off. Then divide blended mixture into 10 equal parts. Put each divided mixture on the corner of spring roll sheet. Fold the lower corner over the mixture and roll it up tightly. Fold both side corners to the center to prevent the mixture splitting off. Apply cornstarch mixed with water (not included in the ingredients) on the edge and roll over.
Place the gridiron on the square tray. Arrange 4 on the grill. Place the square tray in the lower shelf of the oven and heat with 〈Superheated steam (without preheating), 200℃ , 20~28 minutes〉.
4
5Square tray + Gridiron
Lower shelf
NoAccessories
NoAccessories
75
Non-Fried
ER-MD300_cook1 p60-85.indd 75 1/17/19 2:53 PM
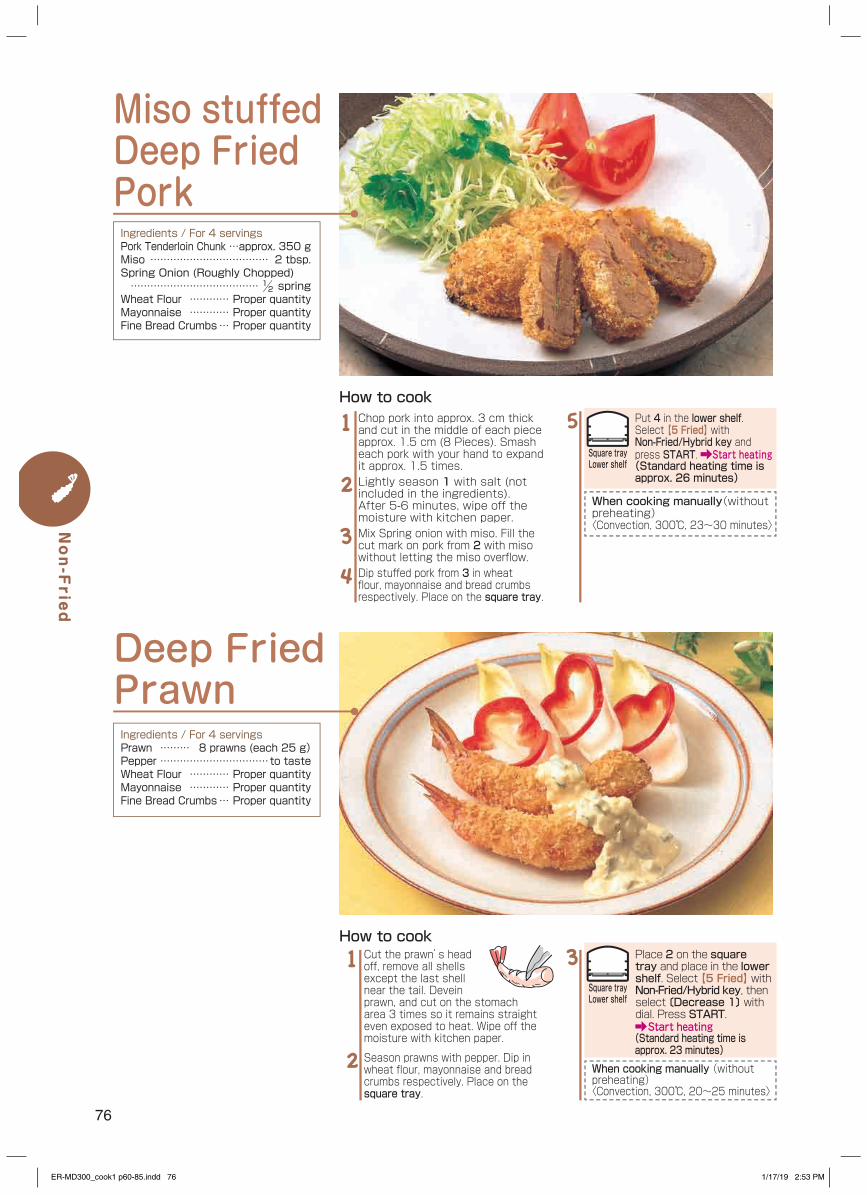
Chop pork into approx. 3 cm thick and cut in the middle of each piece approx. 1.5 cm (8 Pieces). Smash each pork with your hand to expand it approx. 1.5 times.Lightly season 1 with salt (not included in the ingredients). After 5-6 minutes, wipe off the moisture with kitchen paper.Mix Spring onion with miso. Fill the cut mark on pork from 2 with miso without letting the miso overflow.Dip stuffed pork from 3 in wheat flour, mayonnaise and bread crumbs respectively. Place on the square tray.
1
2
3
4
Put 4 in the lower shelf. Select 【5 Fried】 with Non-Fried/Hybrid key and press START. Start heating(Standard heating time is approx. 26 minutes)
When cooking manually(without preheating)〈Convection, 300℃, 23~30 minutes〉
5How to cook
Ingredients / For 4 servingsPork Tenderloin Chunk …approx. 350 gMiso ……………………………… 2 tbsp.Spring Onion (Roughly Chopped) …………………………………½ springWheat Flour ………… Proper quantityMayonnaise ………… Proper quantityFine Bread Crumbs … Proper quantity
Miso stuffed Deep Fried Pork
Square trayLower shelf
Cut the prawn’s head off, remove all shells except the last shell near the tail. Devein prawn, and cut on the stomach area 3 times so it remains straight even exposed to heat. Wipe off the moisture with kitchen paper.
Season prawns with pepper. Dip in wheat flour, mayonnaise and bread crumbs respectively. Place on the square tray.
1
2
Place 2 on the square tray and place in the lower shelf. Select 【5 Fried】 with Non-Fried/Hybrid key, then select 〔Decrease 1〕 with dial. Press START. Start heating
(Standard heating time is approx. 23 minutes)
When cooking manually (without preheating)〈Convection, 300℃, 20~25 minutes〉
3How to cook
Ingredients / For 4 servingsPrawn ……… 8 prawns (each 25 g)Pepper ……………………………to tasteWheat Flour ………… Proper quantityMayonnaise ………… Proper quantityFine Bread Crumbs … Proper quantity
Deep Fried Prawn
Square trayLower shelf
76
Non-Fried
ER-MD300_cook1 p60-85.indd 76 1/17/19 2:53 PM
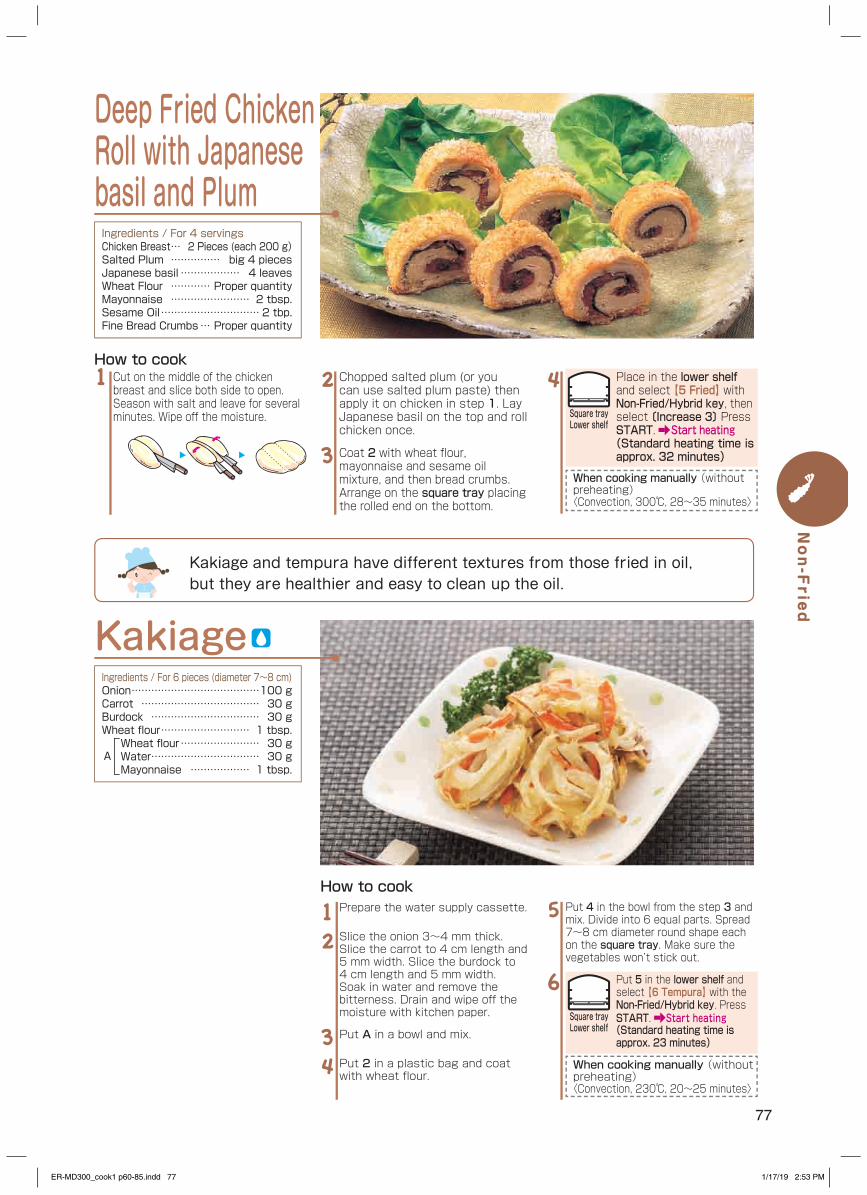
Cut on the middle of the chicken breast and slice both side to open. Season with salt and leave for several minutes. Wipe off the moisture.
1 Chopped salted plum (or you can use salted plum paste) then apply it on chicken in step 1. Lay Japanese basil on the top and roll chicken once.
Coat 2 with wheat flour, mayonnaise and sesame oil mixture, and then bread crumbs. Arrange on the square tray placing the rolled end on the bottom.
2
3
How to cook
Ingredients / For 4 servingsChicken Breast … 2 Pieces (each 200 g)Salted Plum …………… big 4 piecesJapanese basil ……………… 4 leavesWheat Flour ………… Proper quantityMayonnaise …………………… 2 tbsp.Sesame Oil ………………………… 2 tbp.Fine Bread Crumbs … Proper quantity
Deep Fried Chicken Roll with Japanese basil and Plum
Prepare the water supply cassette.
Slice the onion 3~4 mm thick. Slice the carrot to 4 cm length and 5 mm width. Slice the burdock to 4 cm length and 5 mm width. Soak in water and remove the bitterness. Drain and wipe off the moisture with kitchen paper.
Put A in a bowl and mix.
Put 2 in a plastic bag and coat with wheat flour.
12
34
Put 4 in the bowl from the step 3 and mix. Divide into 6 equal parts. Spread 7~8 cm diameter round shape each on the square tray. Make sure the vegetables won’t stick out.
Put 5 in the lower shelf and select 【6 Tempura】 with the Non-Fried/Hybrid key. Press START. Start heating(Standard heating time is approx. 23 minutes)
When cooking manually (without preheating)〈Convection, 230℃, 20~25 minutes〉
5
6
How to cook
Ingredients / For 6 pieces (diameter 7~8 cm)Onion …………………………………100 gCarrot ……………………………… 30 gBurdock …………………………… 30 gWheat flour ……………………… 1 tbsp.Wheat flour …………………… 30 gWater …………………………… 30 gMayonnaise ……………… 1 tbsp.
Kakiage
Square trayLower shelf
A
Kakiage and tempura have different textures from those fried in oil, but they are healthier and easy to clean up the oil.
Place in the lower shelf and select 【5 Fried】 with Non-Fried/Hybrid key, then select 〔Increase 3〕 Press START. Start heating(Standard heating time is approx. 32 minutes)
When cooking manually (without preheating)〈Convection, 300℃, 28~35 minutes〉
4Square trayLower shelf
77
Non-Fried
ER-MD300_cook1 p60-85.indd 77 1/17/19 2:53 PM
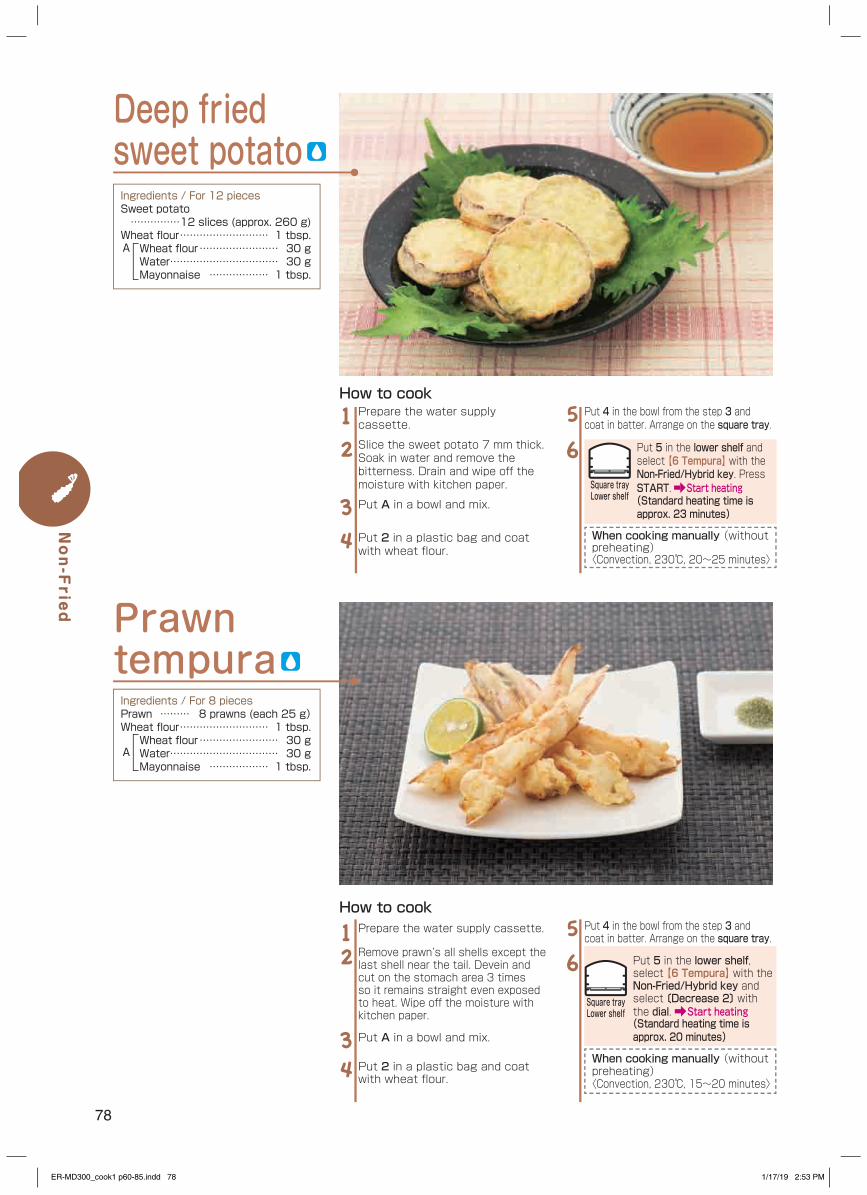
Prepare the water supply cassette.
Remove prawn’s all shells except the last shell near the tail. Devein and cut on the stomach area 3 times so it remains straight even exposed to heat. Wipe off the moisture with kitchen paper.
Put A in a bowl and mix.
Put 2 in a plastic bag and coat with wheat flour.
12
34
Prepare the water supply cassette.
Slice the sweet potato 7 mm thick. Soak in water and remove the bitterness. Drain and wipe off the moisture with kitchen paper.
Put A in a bowl and mix.
Put 2 in a plastic bag and coat with wheat flour.
12
34
Put 4 in the bowl from the step 3 and coat in batter. Arrange on the square tray.
Put 5 in the lower shelf and select 【6 Tempura】 with the Non-Fried/Hybrid key. Press START. Start heating(Standard heating time is approx. 23 minutes)
When cooking manually (without preheating)〈Convection, 230℃, 20~25 minutes〉
5
6
Put 4 in the bowl from the step 3 and coat in batter. Arrange on the square tray.
Put 5 in the lower shelf, select 【6 Tempura】 with the Non-Fried/Hybrid key and select 〔Decrease 2〕 with the dial. Start heating(Standard heating time is approx. 20 minutes)
When cooking manually (without preheating)〈Convection, 230℃, 15~20 minutes〉
56
How to cook
How to cook
Ingredients / For 12 piecesSweet potato ……………12 slices (approx. 260 g)Wheat flour ……………………… 1 tbsp.Wheat flour …………………… 30 gWater …………………………… 30 gMayonnaise ……………… 1 tbsp.
Ingredients / For 8 piecesPrawn ……… 8 prawns (each 25 g)Wheat flour ……………………… 1 tbsp.Wheat flour …………………… 30 gWater …………………………… 30 gMayonnaise ……………… 1 tbsp.
Deep fried sweet potato
Prawn tempura
Square trayLower shelf
Square trayLower shelf
A
A
78
Non-Fried
ER-MD300_cook1 p60-85.indd 78 1/17/19 2:53 PM
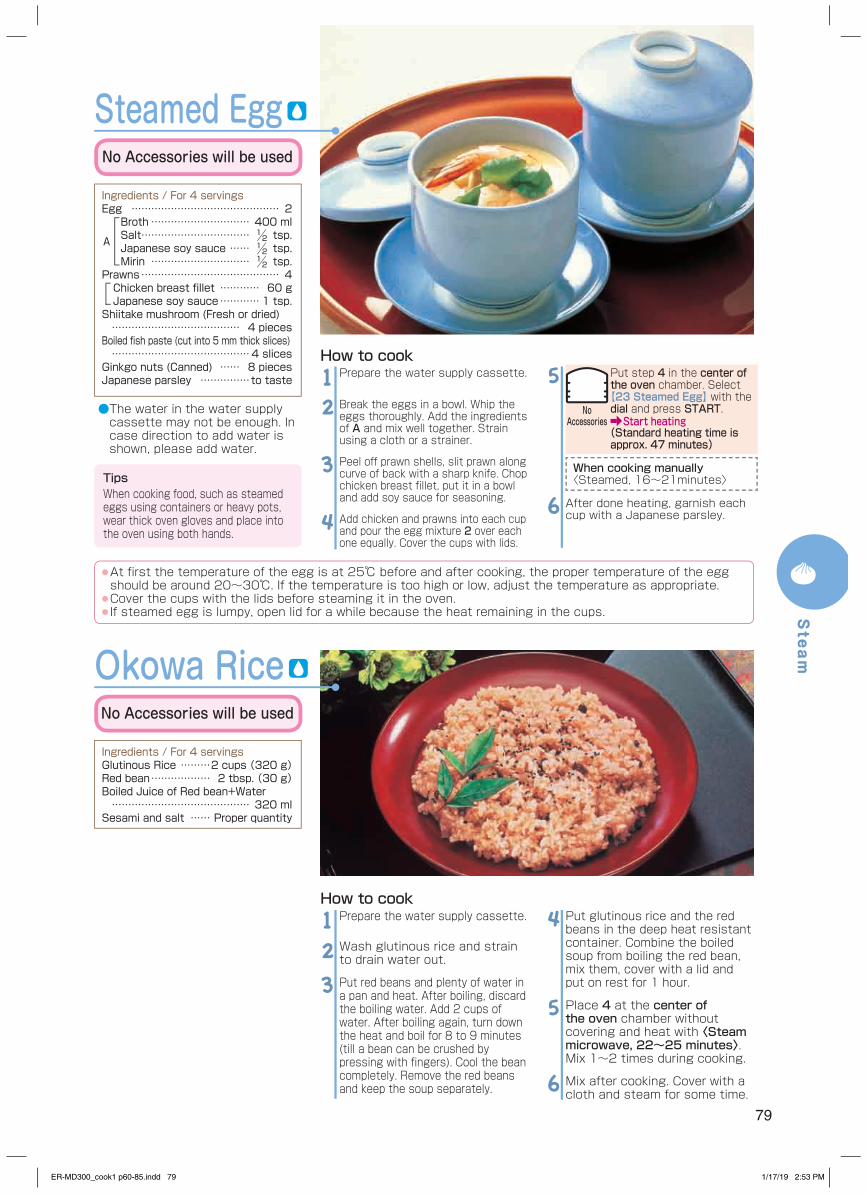
79
Prepare the water supply cassette.
Break the eggs in a bowl. Whip the eggs thoroughly. Add the ingredients of A and mix well together. Strain using a cloth or a strainer.
Peel off prawn shells, slit prawn along curve of back with a sharp knife. Chop chicken breast fillet, put it in a bowl and add soy sauce for seasoning.
Add chicken and prawns into each cup and pour the egg mixture 2 over each one equally. Cover the cups with lids.
12
3
4
Put step 4 in the center of the oven chamber. Select 【23 Steamed Egg】 with the dial and press START. Start heating
(Standard heating time is approx. 47 minutes)
When cooking manually〈Steamed, 16~21minutes〉
After done heating, garnish each cup with a Japanese parsley.
5
6
How to cook
Steamed Egg
Ingredients / For 4 servingsEgg ……………………………………… 2Broth ………………………… 400 mlSalt…………………………… ½ tsp.Japanese soy sauce …… ½ tsp.Mirin ………………………… ½ tsp.
Prawns …………………………………… 4Chicken breast fillet ………… 60 gJapanese soy sauce ………… 1 tsp.
Shiitake mushroom (Fresh or dried) ………………………………… 4 piecesBoiled fish paste (cut into 5 mm thick slices) ……………………………………4 slicesGinkgo nuts (Canned) …… 8 piecesJapanese parsley ……………to taste
A
● At first the temperature of the egg is at 25℃ before and after cooking, the proper temperature of the egg should be around 20~30℃. If the temperature is too high or low, adjust the temperature as appropriate.
● Cover the cups with the lids before steaming it in the oven.● If steamed egg is lumpy, open lid for a while because the heat remaining in the cups.
TipsWhen cooking food, such as steamed eggs using containers or heavy pots, wear thick oven gloves and place into the oven using both hands.
●The water in the water supply cassette may not be enough. In case direction to add water is shown, please add water.
No Accessories will be used
NoAccessories
Prepare the water supply cassette.
Wash glutinous rice and strain to drain water out.
Put red beans and plenty of water in a pan and heat. After boiling, discard the boiling water. Add 2 cups of water. After boiling again, turn down the heat and boil for 8 to 9 minutes (till a bean can be crushed by pressing with fingers). Cool the bean completely. Remove the red beans and keep the soup separately.
123
Put glutinous rice and the red beans in the deep heat resistant container. Combine the boiled soup from boiling the red bean, mix them, cover with a lid and put on rest for 1 hour.
Place 4 at the center of the oven chamber without covering and heat with 〈Steam microwave, 22~25 minutes〉. Mix 1~2 times during cooking.
Mix after cooking. Cover with a cloth and steam for some time.
4
5
6
How to cook
Ingredients / For 4 servingsGlutinous Rice ………2 cups (320 g)Red bean ……………… 2 tbsp. (30 g)Boiled Juice of Red bean+Water …………………………………… 320 mlSesami and salt …… Proper quantity
Okowa RiceNo Accessories will be used
Steam
ER-MD300_cook1 p60-85.indd 79 1/17/19 2:53 PM
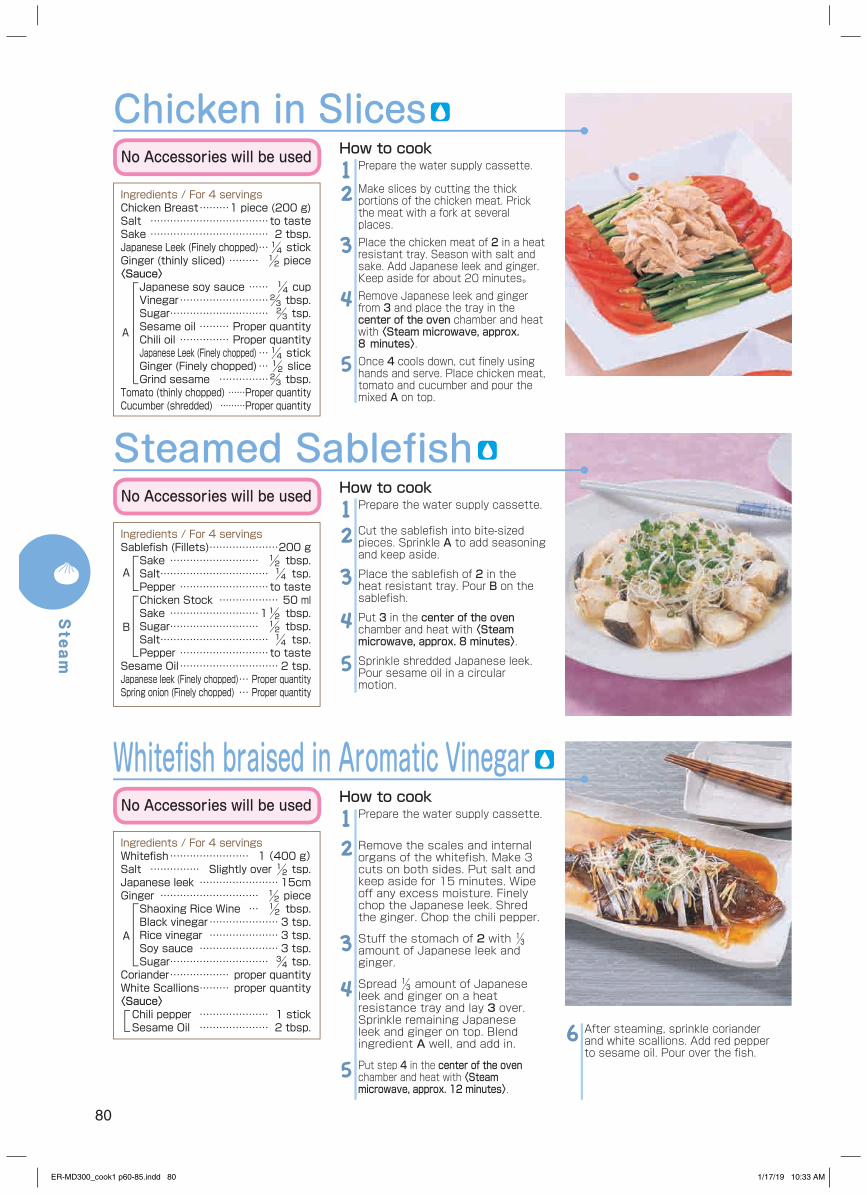
80
Prepare the water supply cassette.
Make slices by cutting the thick portions of the chicken meat. Prick the meat with a fork at several places.Place the chicken meat of 2 in a heat resistant tray. Season with salt and sake. Add Japanese leek and ginger. Keep aside for about 20 minutes。Remove Japanese leek and ginger from 3 and place the tray in the center of the oven chamber and heat with 〈Steam microwave, approx. 8⦆minutes〉.Once 4 cools down, cut finely using hands and serve. Place chicken meat, tomato and cucumber and pour the mixed A on top.
12
3
4
5
How to cook
Ingredients / For 4 servingsChicken Breast ………1 piece (200 g)Salt ………………………………to tasteSake ……………………………… 2 tbsp.Japanese Leek (Finely chopped) …¼ stickGinger (thinly sliced) ……… ½ piece〈Sauce〉
Japanese soy sauce …… ¼ cupVinegar ………………………⅔ tbsp.Sugar ………………………… ⅔ tsp.Sesame oil ……… Proper quantityChili oil …………… Proper quantityJapanese Leek (Finely chopped) …¼ stickGinger (Finely chopped) …½ sliceGrind sesame ……………⅔ tbsp.
Tomato (thinly chopped) ……Proper quantityCucumber (shredded) ………Proper quantity
Chicken in Slices
A
Steamed Sablefish
Ingredients / For 4 servingsSablefish (Fillets) …………………200 gSake ……………………… ½ tbsp.Salt…………………………… ¼ tsp.Pepper ………………………to tasteChicken Stock ……………… 50 mlSake ………………………1½ tbsp.Sugar ……………………… ½ tbsp.Salt…………………………… ¼ tsp.Pepper ………………………to taste
Sesame Oil ………………………… 2 tsp.Japanese leek (Finely chopped) … Proper quantitySpring onion (Finely chopped) … Proper quantity
B
Prepare the water supply cassette.
Cut the sablefish into bite-sized pieces. Sprinkle A to add seasoning and keep aside.
Place the sablefish of 2 in the heat resistant tray. Pour B on the sablefish.
Put 3 in the center of the oven chamber and heat with 〈Steam microwave, approx. 8 minutes〉.
Sprinkle shredded Japanese leek. Pour sesame oil in a circular motion.
12
3
4
5
How to cook
A
No Accessories will be used
No Accessories will be used
Whitefish braised in Aromatic Vinegar
Ingredients / For 4 servingsWhitefish …………………… 1 (400 g)Salt …………… Slightly over ½ tsp.Japanese leek ……………………15cmGinger ………………………… ½ pieceShaoxing Rice Wine … ½ tbsp.Black vinegar ………………… 3 tsp.Rice vinegar ………………… 3 tsp.Soy sauce …………………… 3 tsp.Sugar ………………………… ¾ tsp.
Coriander ……………… proper quantityWhite Scallions ……… proper quantity〈Sauce〉Chili pepper ………………… 1 stickSesame Oil ………………… 2 tbsp.
Prepare the water supply cassette.
Remove the scales and internal organs of the whitefish. Make 3 cuts on both sides. Put salt and keep aside for 15 minutes. Wipe off any excess moisture. Finely chop the Japanese leek. Shred the ginger. Chop the chili pepper.
Stuff the stomach of 2 with ⅓ amount of Japanese leek and ginger.
Spread ⅓ amount of Japanese leek and ginger on a heat resistance tray and lay 3 over. Sprinkle remaining Japanese leek and ginger on top. Blend ingredient A well, and add in.
Put step 4 in the center of the oven chamber and heat with 〈Steam microwave, approx. 12 minutes〉.
12
3
4
5
After steaming, sprinkle coriander and white scallions. Add red pepper to sesame oil. Pour over the fish.
6
How to cookNo Accessories will be used
A
Steam
ER-MD300_cook1 p60-85.indd 80 1/17/19 10:33 AM
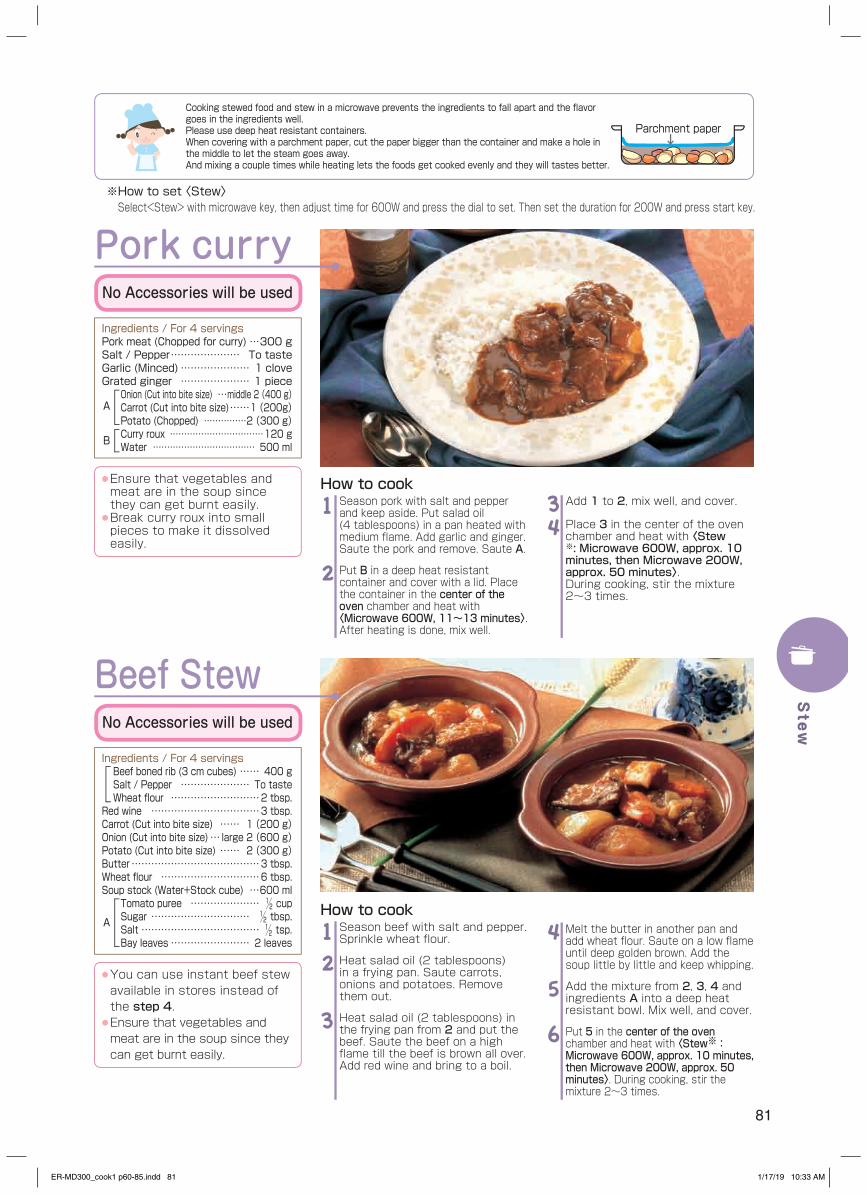
81
Pork curry
Ingredients / For 4 servingsPork meat (Chopped for curry) …300 gSalt / Pepper ………………… To tasteGarlic (Minced) ………………… 1 cloveGrated ginger ………………… 1 piece
Onion (Cut into bite size) …middle 2 (400 g)Carrot (Cut into bite size) ……1 (200g)Potato (Chopped) ……………2 (300 g)Curry roux ……………………………120 gWater ……………………………… 500 ml
● Ensure that vegetables and meat are in the soup since they can get burnt easily.
● Break curry roux into small pieces to make it dissolved easily.
Beef Stew
Ingredients / For 4 servingsBeef boned rib (3 cm cubes) …… 400 gSalt / Pepper ………………… To tasteWheat flour ………………………2 tbsp.
Red wine ……………………………3 tbsp.Carrot (Cut into bite size) …… 1 (200 g)Onion (Cut into bite size) … large 2 (600 g)Potato (Cut into bite size) …… 2 (300 g)Butter …………………………………3 tbsp.Wheat flour …………………………6 tbsp.Soup stock (Water+Stock cube) …600 ml
Tomato puree ………………… ½ cupSugar ………………………… ½ tbsp.Salt ……………………………… ½ tsp.Bay leaves …………………… 2 leaves
Season beef with salt and pepper. Sprinkle wheat flour.
Heat salad oil (2 tablespoons) in a frying pan. Saute carrots, onions and potatoes. Remove them out.
Heat salad oil (2 tablespoons) in the frying pan from 2 and put the beef. Saute the beef on a high flame till the beef is brown all over. Add red wine and bring to a boil.
12
3
Season pork with salt and pepper and keep aside. Put salad oil (4 tablespoons) in a pan heated with medium flame. Add garlic and ginger. Saute the pork and remove. Saute A.
Put B in a deep heat resistant container and cover with a lid. Place the container in the center of the oven chamber and heat with 〈Microwave 600W, 11~13 minutes〉. After heating is done, mix well.
1
2
Add 1 to 2, mix well, and cover.
Place 3 in the center of the oven chamber and heat with 〈Stew※: Microwave 600W, approx. 10 minutes, then Microwave 200W, approx. 50 minutes〉. During cooking, stir the mixture 2~3 times.
34
How to cook
How to cook
● You can use instant beef stew available in stores instead of the step 4.
● Ensure that vegetables and meat are in the soup since they can get burnt easily.
A
B
A
No Accessories will be used
No Accessories will be used
Cooking stewed food and stew in a microwave prevents the ingredients to fall apart and the flavor goes in the ingredients well.Please use deep heat resistant containers.When covering with a parchment paper, cut the paper bigger than the container and make a hole in the middle to let the steam goes away.And mixing a couple times while heating lets the foods get cooked evenly and they will tastes better.
Parchment paper
Melt the butter in another pan and add wheat flour. Saute on a low flame until deep golden brown. Add the soup little by little and keep whipping.
Add the mixture from 2, 3, 4 and ingredients A into a deep heat resistant bowl. Mix well, and cover.
Put 5 in the center of the oven chamber and heat with 〈Stew※: Microwave 600W, approx. 10 minutes, then Microwave 200W, approx. 50 minutes〉. During cooking, stir the mixture 2~3 times.
4
5
6
※ How to set 〈Stew〉Select<Stew> with microwave key, then adjust time for 600W and press the dial to set. Then set the duration for 200W and press start key.
Stew
ER-MD300_cook1 p60-85.indd 81 1/17/19 10:33 AM
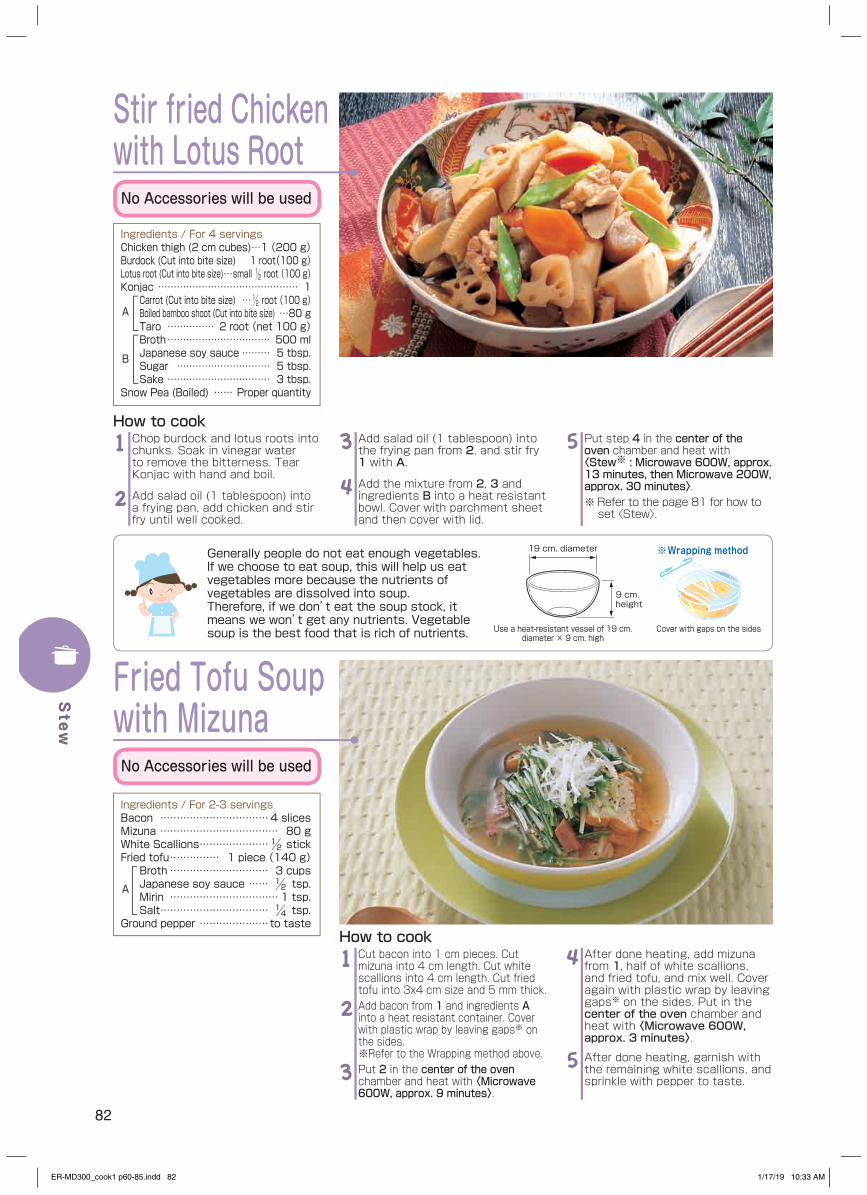
82
Stir fried Chicken with Lotus Root
Ingredients / For 4 servingsChicken thigh (2 cm cubes) …1 (200 g)Burdock (Cut into bite size) 1 root(100 g)Lotus root (Cut into bite size) …small ½ root (100 g)Konjac ……………………………………… 1
Carrot (Cut into bite size) …½ root (100 g)Boiled bamboo shoot (Cut into bite size) …80 gTaro …………… 2 root (net 100 g)Broth …………………………… 500 mlJapanese soy sauce ……… 5 tbsp.Sugar ………………………… 5 tbsp.Sake …………………………… 3 tbsp.
Snow Pea (Boiled) …… Proper quantity
Chop burdock and lotus roots into chunks. Soak in vinegar water to remove the bitterness. Tear Konjac with hand and boil.
Add salad oil (1 tablespoon) into a frying pan, add chicken and stir fry until well cooked.
1
2
Add salad oil (1 tablespoon) into the frying pan from 2, and stir fry 1 with A.
Add the mixture from 2, 3 and ingredients B into a heat resistant bowl. Cover with parchment sheet and then cover with lid.
3
4
Put step 4 in the center of the oven chamber and heat with 〈Stew※ : Microwave 600W, approx. 13 minutes, then Microwave 200W, approx. 30 minutes〉.※ Refer to the page 81 for how to set 〈Stew〉.
5How to cook
A
B
No Accessories will be used
Generally people do not eat enough vegetables. If we choose to eat soup, this will help us eat vegetables more because the nutrients of vegetables are dissolved into soup. Therefore, if we don’t eat the soup stock, it means we won’t get any nutrients. Vegetable soup is the best food that is rich of nutrients. Cover with gaps on the sides
19 cm. diameter
9 cm. height
Use a heat-resistant vessel of 19 cm.diameter × 9 cm. high
Wrapping method
Cut bacon into 1 cm pieces. Cut mizuna into 4 cm length. Cut white scallions into 4 cm length. Cut fried tofu into 3x4 cm size and 5 mm thick.Add bacon from 1 and ingredients A into a heat resistant container. Cover with plastic wrap by leaving gaps※ on the sides.※Refer to the Wrapping method above.Put 2 in the center of the oven chamber and heat with 〈Microwave 600W, approx. 9 minutes〉.
1
2
3
After done heating, add mizuna from 1, half of white scallions, and fried tofu, and mix well. Cover again with plastic wrap by leaving gaps※ on the sides. Put in the center of the oven chamber and heat with 〈Microwave 600W, approx. 3 minutes〉.
After done heating, garnish with the remaining white scallions, and sprinkle with pepper to taste.
4
5
How to cook
Ingredients / For 2-3 servingsBacon ……………………………4 slicesMizuna ……………………………… 80 gWhite Scallions …………………½ stickFried tofu …………… 1 piece (140 g)Broth ………………………… 3 cupsJapanese soy sauce …… ½ tsp.Mirin …………………………… 1 tsp.Salt…………………………… ¼ tsp.
Ground pepper …………………to taste
Fried Tofu Soup with Mizuna
A
No Accessories will be used
Stew
ER-MD300_cook1 p60-85.indd 82 1/17/19 10:33 AM
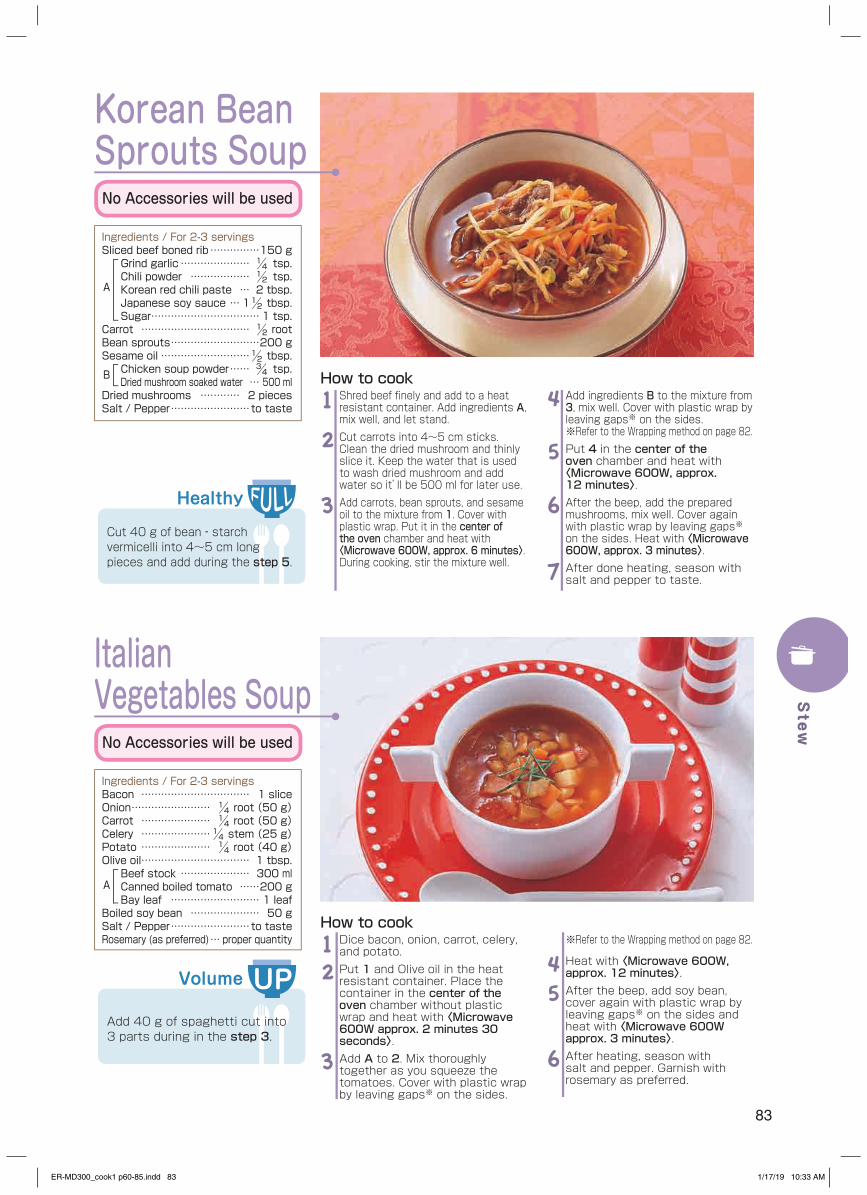
83
Korean Bean Sprouts Soup
Ingredients / For 2-3 servingsSliced beef boned rib ……………150 gGrind garlic ………………… ¼ tsp.Chili powder ……………… ½ tsp.Korean red chili paste … 2 tbsp.Japanese soy sauce … 1½ tbsp.Sugar …………………………… 1 tsp.
Carrot …………………………… ½ rootBean sprouts ………………………200 gSesame oil ………………………½ tbsp.Chicken soup powder …… ¾ tsp.Dried mushroom soaked water … 500 ml
Dried mushrooms ………… 2 piecesSalt / Pepper ……………………to taste
Shred beef finely and add to a heat resistant container. Add ingredients A, mix well, and let stand.Cut carrots into 4~5 cm sticks. Clean the dried mushroom and thinly slice it. Keep the water that is used to wash dried mushroom and add water so it’ll be 500 ml for later use.Add carrots, bean sprouts, and sesame oil to the mixture from 1. Cover with plastic wrap. Put it in the center of the oven chamber and heat with 〈Microwave 600W, approx. 6 minutes〉. During cooking, stir the mixture well.
1
2
3
Add ingredients B to the mixture from 3, mix well. Cover with plastic wrap by leaving gaps※ on the sides.※ Refer to the Wrapping method on page 82.Put 4 in the center of the oven chamber and heat with 〈Microwave 600W, approx. 12 minutes〉.After the beep, add the prepared mushrooms, mix well. Cover again with plastic wrap by leaving gaps※ on the sides. Heat with 〈Microwave 600W, approx. 3 minutes〉.After done heating, season with salt and pepper to taste.
4
5
6
7
How to cook
A
B
Healthy
Cut 40 g of bean‐starch vermicelli into 4~5 cm long pieces and add during the step 5.
No Accessories will be used
Volume
Italian Vegetables Soup
Ingredients / For 2-3 servingsBacon …………………………… 1 sliceOnion …………………… ¼ root (50 g)Carrot ………………… ¼ root (50 g)Celery …………………¼ stem (25 g)Potato ………………… ¼ root (40 g)Olive oil …………………………… 1 tbsp.Beef stock ………………… 300 mlCanned boiled tomato ……200 gBay leaf ……………………… 1 leaf
Boiled soy bean ………………… 50 gSalt / Pepper ……………………to tasteRosemary (as preferred) … proper quantity Dice bacon, onion, carrot, celery,
and potato.Put 1 and Olive oil in the heat resistant container. Place the container in the center of the oven chamber without plastic wrap and heat with 〈Microwave 600W approx. 2 minutes 30 seconds〉.Add A to 2. Mix thoroughly together as you squeeze the tomatoes. Cover with plastic wrap by leaving gaps※ on the sides.
12
3
※Refer to the Wrapping method on page 82.
Heat with 〈Microwave 600W, approx. 12 minutes〉.After the beep, add soy bean, cover again with plastic wrap by leaving gaps※ on the sides and heat with 〈Microwave 600W approx. 3 minutes〉.After heating, season with salt and pepper. Garnish with rosemary as preferred.
45
6
How to cook
Add 40 g of spaghetti cut into 3 parts during in the step 3.
A
No Accessories will be used
Stew
ER-MD300_cook1 p60-85.indd 83 1/17/19 10:33 AM
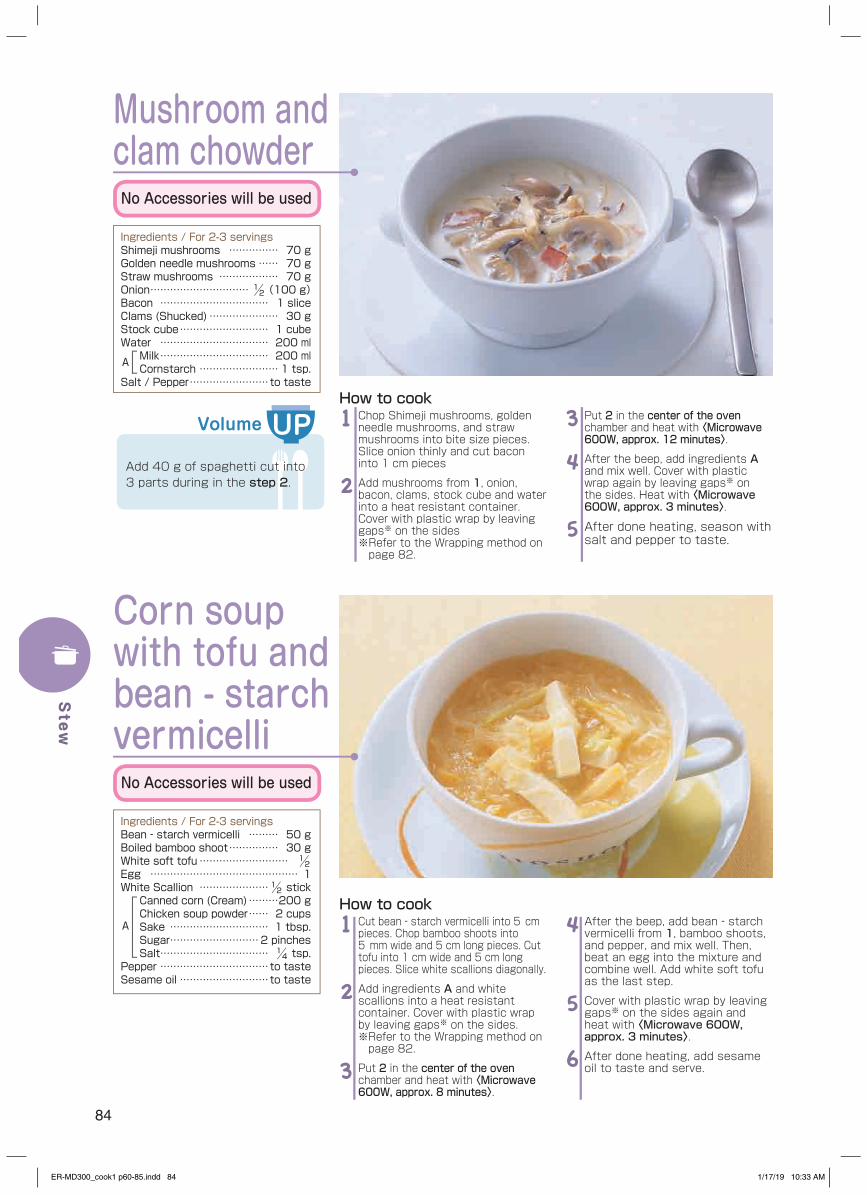
84
Volume
Mushroom and clam chowder
Ingredients / For 2-3 servingsShimeji mushrooms …………… 70 gGolden needle mushrooms …… 70 gStraw mushrooms ……………… 70 gOnion …………………………½ (100 g)Bacon …………………………… 1 sliceClams (Shucked) ………………… 30 gStock cube ……………………… 1 cubeWater …………………………… 200 mlMilk …………………………… 200 mlCornstarch …………………… 1 tsp.
Salt / Pepper ……………………to taste
Chop Shimeji mushrooms, golden needle mushrooms, and straw mushrooms into bite size pieces. Slice onion thinly and cut bacon into 1 cm pieces
Add mushrooms from 1, onion, bacon, clams, stock cube and water into a heat resistant container. Cover with plastic wrap by leaving gaps※ on the sides※ Refer to the Wrapping method on page 82.
1
2
Put 2 in the center of the oven chamber and heat with 〈Microwave 600W, approx. 12 minutes〉.
After the beep, add ingredients A and mix well. Cover with plastic wrap again by leaving gaps※ on the sides. Heat with 〈Microwave 600W, approx. 3 minutes〉.
After done heating, season with salt and pepper to taste.
3
4
5
How to cook
A
Add 40 g of spaghetti cut into 3 parts during in the step 2.
No Accessories will be used
Corn soup with tofu and bean - starch vermicelli
Cut bean‐starch vermicelli into 5⦆cm pieces. Chop bamboo shoots into 5⦆mm wide and 5 cm long pieces. Cut tofu into 1 cm wide and 5 cm long pieces. Slice white scallions diagonally.
Add ingredients A and white scallions into a heat resistant container. Cover with plastic wrap by leaving gaps※ on the sides.※ Refer to the Wrapping method on page 82.
Put 2 in the center of the oven chamber and heat with 〈Microwave 600W, approx. 8 minutes〉.
1
2
3
After the beep, add bean‐starch vermicelli from 1, bamboo shoots, and pepper, and mix well. Then, beat an egg into the mixture and combine well. Add white soft tofu as the last step.
Cover with plastic wrap by leaving gaps※ on the sides again and heat with 〈Microwave 600W, approx. 3 minutes〉.
After done heating, add sesame oil to taste and serve.
4
5
6
How to cook
Ingredients / For 2-3 servingsBean‐starch vermicelli ……… 50 gBoiled bamboo shoot …………… 30 gWhite soft tofu ……………………… ½ Egg ……………………………………… 1White Scallion …………………½ stickCanned corn (Cream) ………200 gChicken soup powder …… 2 cupsSake ………………………… 1 tbsp.Sugar ………………………2 pinchesSalt…………………………… ¼ tsp.
Pepper ……………………………to tasteSesame oil ………………………to taste
A
No Accessories will be usedStew
ER-MD300_cook1 p60-85.indd 84 1/17/19 10:33 AM

85
Healthy
Shred pork and add to a heat resistant container. Add ingredients A and marinade. Dice tofu into 1cm wide and 3 cm long pieces. Dice bamboo shoots and celery into 5 mm wide and 5 cm long pieces. Soak dried mushrooms and slice thinly.
Add pork from 1 into a container. Cover with plastic wrap. Put it in the center of the oven chamber and heat with 〈Microwave 600W approx. 4 minutes 30 seconds〉. During cooking, stir the mixture well.
Add bamboo shoots, mushrooms, chicken soup powder, and water to the mixture from 2. Cover with plastic wrap by leaving gaps※ on the sides.※ Refer to the Wrapping method on page 82.
1
2
3
Put 3 in the center of the oven chamber and heat with 〈Microwave 600W approx. 12 minutes〉.
After the beep, add celery and ingredients B, mix well. Beat egg into it and combine, then add tofu. Cover with plastic wrap by leaving gaps※ on the sides. Heat with 〈Microwave 600W approx. 3⦆minutes〉
After done heating, garnish with chili oil and coriander as preferred.
4
5
6
How to cook
Ingredients / For 2-3 servingsPork loin roll ………………………150 gGinger sauce ……………… ½ tsp.Sake ………………………… ½ tsp.Salt / Pepper ………………to tasteCornstarch ………………… ½ tsp.
Boiled bamboo shoots ………… 60 gDried mushroom …………… 2 piecesChicken soup powder …………… 1 tsp.Water …………………………… 500 mlWhite soft Tofu …………………… ⅓ Celery ……………………………… 20 gEgg ……………………………………… 1Vinegar ……………………… 1 tbsp.Sake …………………………½ tbsp.Japanese soy sauce …… ½ tsp.Salt…………………………… ⅓ tsp.Cornstarch …………………… 1 tsp.Water ……………………… 1⅓ tbsp.
Chili oil, Coriander (as preferred) … Proper quantity
Hot and Sour soup
A
B
Healthy
Cut 40 g of bean‐starch vermicelli into 4-5 cm long pieces and add during the step 3.
Chicken and Chinese Cabbage Soybean Milk Soup
Ingredients / For 2-3 servingsChicken breast ……………………200 gSake ……………………………… 1 tbsp.Chinese Cabbage ………………300 gGolden needle mushroom ……150 gWhite scallions …………………½ stickSesame oil ……………………… 1 tbsp.Chicken soup powder …… 1 tbsp.Water ………………………… 200 mlSake ………………………… 1 tbsp.Salt…………………………… ½ tsp.
Soybean milk …………………… 300 mlCornstarch ………………………… 1 tsp.
Cut chicken into bite-sized pieces. Rub sake over the pieces. Chop Chinese Cabbage and golden needle mushrooms into 4-5 cm pieces, and slice white scallion diagonally.Add chicken meat, bok choy, and sesame oil into a heat resistant container. Cover with plastic wrap. Put it in the center of the oven chamber and heat with 〈MIcrowave 600W, approx. 7 minutes 30 seconds〉. During cooking, stir the mixture well.Add golden needle mushrooms and ingredients A to the mixture from 2 and mix well. Cover with plastic wrap by leaving gaps※ on the sides.※Refer to the Wrapping method on page 82.
1
2
3
Put 3 in the center of the oven chamber and heat with 〈Microwave 600W, approx. 10 minutes〉.After the beep, add soybean milk, cornstarch, and white scallions, mix well. Cover with plastic wrap by leaving gaps※ on the sides 5 Heat with 〈Microwave 600W approx. 3⦆minutes〉
4
5
How to cook
Cut 200 g of peeled turnips into big pieces and add in the step 3 instead of adding golden needle mushroom.
A
No Accessories will be used
No Accessories will be used
Stew
ER-MD300_cook1 p60-85.indd 85 1/17/19 10:33 AM
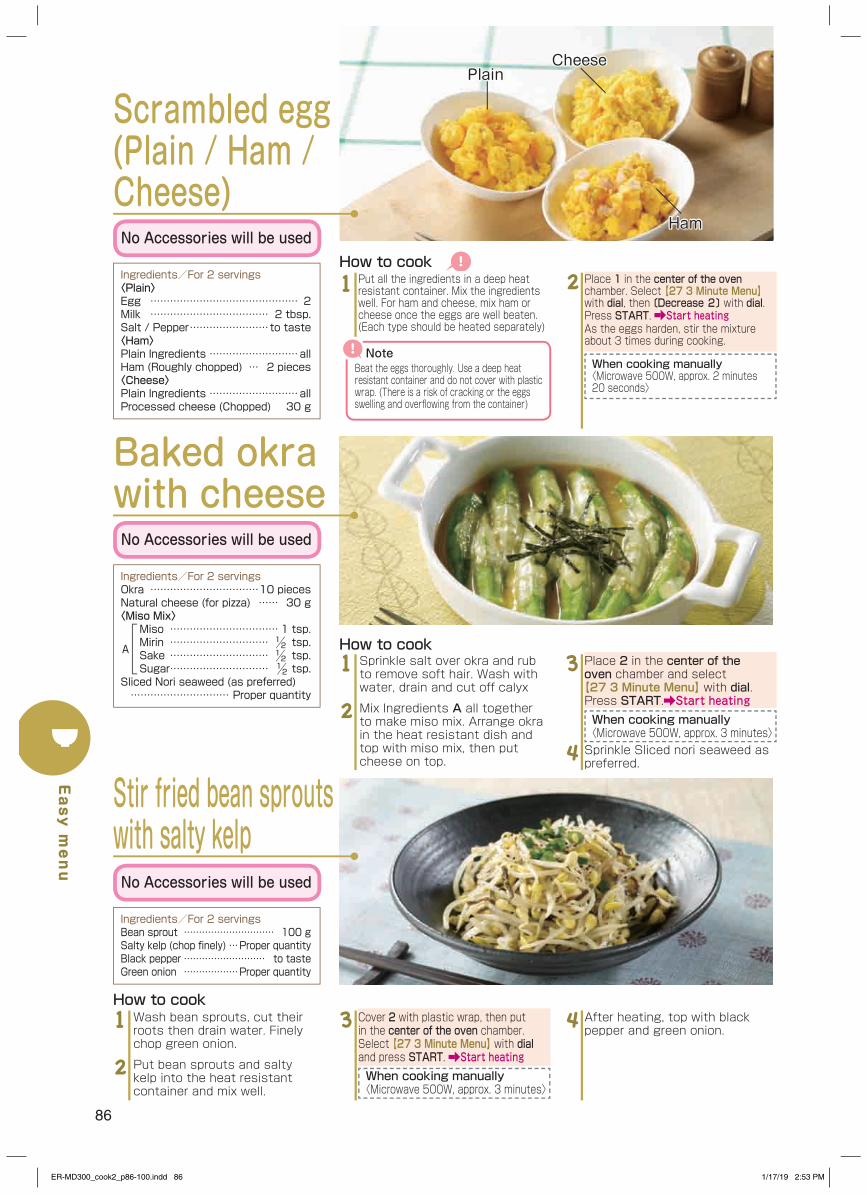
86
Put all the ingredients in a deep heat resistant container. Mix the ingredients well. For ham and cheese, mix ham or cheese once the eggs are well beaten.(Each type should be heated separately)
1 Place 1 in the center of the oven chamber. Select 【27 3 Minute Menu】with dial, then 〔Decrease 2〕 with dial. Press START. Start heatingAs the eggs harden, stir the mixture about 3 times during cooking.
When cooking manually〈Microwave 500W, approx. 2 minutes 20 seconds〉
2How to cook
Baked okra with cheese
Stir fried bean sprouts with salty kelp
Ingredients/For 2 servingsBean sprout ………………………… 100 gSalty kelp (chop finely) …Proper quantityBlack pepper ……………………… to tasteGreen onion ………………Proper quantity
Sprinkle salt over okra and rub to remove soft hair. Wash with water, drain and cut off calyx
Mix Ingredients A all together to make miso mix. Arrange okra in the heat resistant dish and top with miso mix, then put cheese on top.
1
2
Place 2 in the center of the oven chamber and select 【27 3 Minute Menu】 with dial. Press START. Start heatingWhen cooking manually〈Microwave 500W, approx. 3 minutes〉Sprinkle Sliced nori seaweed as preferred.
3
4
How to cook
Wash bean sprouts, cut their roots then drain water. Finely chop green onion.
Put bean sprouts and salty kelp into the heat resistant container and mix well.
1
2
Cover 2 with plastic wrap, then put in the center of the oven chamber. Select 【27 3 Minute Menu】 with dial and press START. Start heatingWhen cooking manually〈Microwave 500W, approx. 3 minutes〉
3How to cook
Scrambled egg (Plain / Ham / Cheese)No Accessories will be used
No Accessories will be used
No Accessories will be used
Ingredients/For 2 servings〈Plain〉Egg ……………………………………… 2Milk ……………………………… 2 tbsp.Salt / Pepper ……………………to taste〈Ham〉Plain Ingredients ………………………allHam (Roughly chopped) … 2 pieces〈Cheese〉Plain Ingredients ………………………allProcessed cheese (Chopped) 30 g
Ingredients/For 2 servingsOkra ……………………………10 piecesNatural cheese (for pizza) …… 30 g〈Miso Mix〉
Miso …………………………… 1 tsp.Mirin ………………………… ½ tsp.Sake ………………………… ½ tsp.Sugar ………………………… ½ tsp.
Sliced Nori seaweed (as preferred) ………………………… Proper quantity
PlainCheese
Ham
A
After heating, top with black pepper and green onion.4
NoteBeat the eggs thoroughly. Use a deep heat resistant container and do not cover with plastic wrap. (There is a risk of cracking or the eggs swelling and overfl owing from the container)
Easy menu
ER-MD300_cook2_p86-100.indd 86 1/17/19 2:53 PM

87
Put all ingredients except tofu into a heat resistant container and mix well.
1 Cover 1 with plastic wrap. Put it in the center of the oven chamber. Select 【27 3 Minute Menu】 with dial and press START. Start heating
When cooking manually〈Microwave 500W, approx. 3 minutes〉
2How to cook
Mincemeat paste tofuNo Accessories will be used
Ingredients/For 2 servingsTofu ………………………………½ packGround pork ……………………… 50 gWhite Scallions (Chopped) …… 5 cmMiso ………………………………½ tbsp.Sugar ………………………… ½ tbsp.Sake ……………………………… 1 tbsp.Broth ……………………………1½ tbsp.
Baked avocado with cheese
Cut outer part around the seed of avocado. Turn the fruit, left and right, and cut the avocado inhalf verlically. Use kitchen knife to stab the seed in straight angle. Turn the knife to take the seed out. Keep finger between shell and flesh, then slice shell by its length.
1 Put avocado, cheese, salt and pepper into a heat resistant container respectively.Place 2 in the center of the oven chamber. Select 【27 3 Minute Menu】 with dial and press START. Start heatingWhen cooking manually〈Microwave 500W, approx. 3 minutes〉
2
3
How to cook
No Accessories will be used
Ingredients/For 2 servingsAvocado (Ripe) ………………… 1 pieceNatural cheese (for pizza) …… 30 gSalt / Pepper ……………………to taste
Put A into the heat resistant container. Mix and cover with plastic wrap.Put 1 in the center of the oven chamber. Select 【27 3 Minute Menu】 with dial and press START. Start heatingWhen cooking manually〈Microwave 500W, approx. 3 minutes〉
1
2
How to cook
Warm salad of mixed beansNo Accessories will be used
Ingredients/For 2 servingsMixed Beans (Dried package) …… 100 gHam (1 cm cubes) …………………40 gShallot pickles (Coarsely chopped) …30 gPaprika (1 cm cubes) …………30 gOlive oil ……………………… 1 tbsp.Salt …………………………… ½ tsp.Pepper ……………………… to taste
Lemon juice …………………… 1 tbsp.Grated Cheese …………………… 2 tsp.Parsley (Chopped) ……………… 2 tsp.
AAfter heating, add lemon juice, grated cheese and parsley. Mix thoroughly.
3
After heating, mix once and put top on tofu.※If you prefer warm tofu, put tofu in a deep heat resistant container and heat with 〈Microwave 500W, approx. 3 minutes〉 and put miso on tofu.
3
Easy menu
ER-MD300_cook2_p86-100.indd 87 1/17/19 2:54 PM
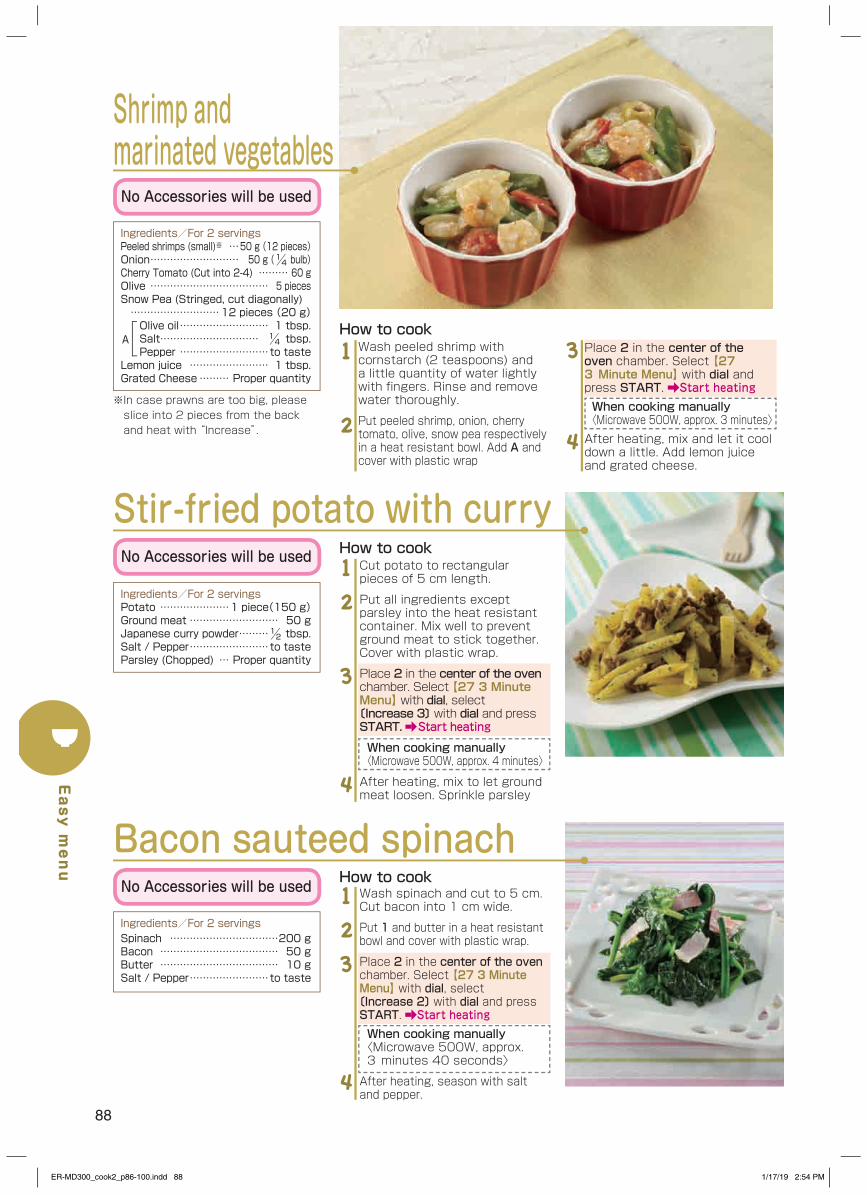
88
Wash peeled shrimp with cornstarch (2 teaspoons) and a little quantity of water lightly with fingers. Rinse and remove water thoroughly.
Put peeled shrimp, onion, cherry tomato, olive, snow pea respectively in a heat resistant bowl. Add A and cover with plastic wrap
1
2
How to cook
Shrimp and marinated vegetablesNo Accessories will be used
Ingredients/For 2 servingsPeeled shrimps (small)※ …50 g (12 pieces)Onion ……………………… 50 g (¼ bulb)Cherry Tomato (Cut into 2-4) ……… 60 gOlive ……………………………… 5 piecesSnow Pea (Stringed, cut diagonally) ………………………12 pieces (20 g)Olive oil ……………………… 1 tbsp.Salt………………………… ¼ tbsp.Pepper ………………………to taste
Lemon juice …………………… 1 tbsp.Grated Cheese ……… Proper quantity
A
※ In case prawns are too big, please slice into 2 pieces from the back and heat with “Increase”.
Place 2 in the center of the oven chamber. Select 【27 3⦆Minute Menu】 with dial and press START. Start heatingWhen cooking manually〈Microwave 500W, approx. 3 minutes〉After heating, mix and let it cool down a little. Add lemon juice and grated cheese.
3
4
Bacon sauteed spinachWash spinach and cut to 5 cm. Cut bacon into 1 cm wide.
Put 1 and butter in a heat resistant bowl and cover with plastic wrap.
Place 2 in the center of the oven chamber. Select 【27 3 Minute Menu】 with dial, select 〔Increase 2〕 with dial and press START. Start heatingWhen cooking manually〈Microwave 500W, approx. 3⦆minutes 40 seconds〉
After heating, season with salt and pepper.
123
4
How to cookNo Accessories will be used
Ingredients/For 2 servingsSpinach ……………………………200 gBacon ……………………………… 50 gButter ……………………………… 10 gSalt / Pepper ……………………to taste
Stir-fried potato with curry
Ingredients/For 2 servingsPotato …………………1 piece(150 g)Ground meat ……………………… 50 gJapanese curry powder ………½ tbsp.Salt / Pepper ……………………to tasteParsley (Chopped) … Proper quantity
Cut potato to rectangular pieces of 5 cm length.
Put all ingredients except parsley into the heat resistant container. Mix well to prevent ground meat to stick together. Cover with plastic wrap.
Place 2 in the center of the oven chamber. Select 【27 3 Minute Menu】 with dial, select 〔Increase 3〕 with dial and press START. Start heating
When cooking manually〈Microwave 500W, approx. 4 minutes〉
After heating, mix to let ground meat loosen. Sprinkle parsley
12
3
4
How to cookNo Accessories will be used
Easy menu
ER-MD300_cook2_p86-100.indd 88 1/17/19 2:54 PM
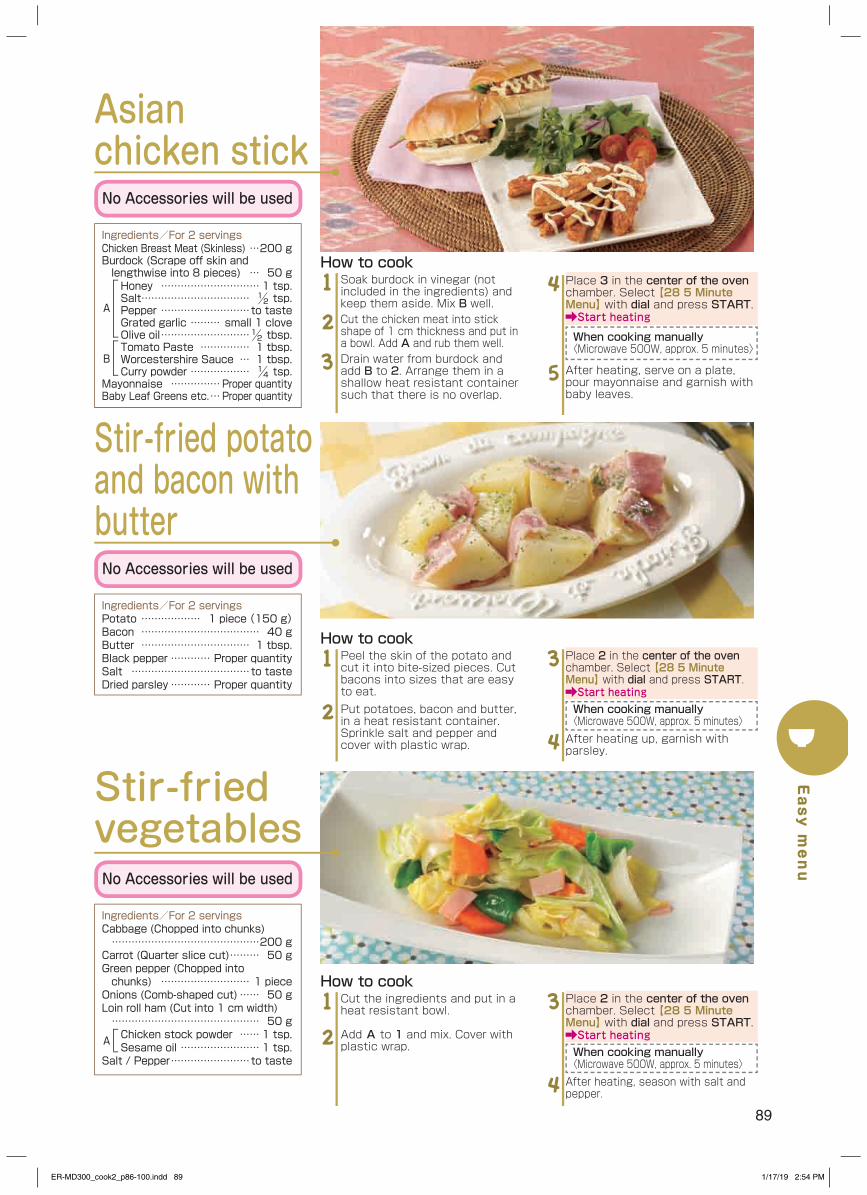
89
Asian chicken stick
Ingredients/For 2 servingsChicken Breast Meat (Skinless) …200 gBurdock (Scrape off skin and lengthwise into 8 pieces) … 50 gHoney ………………………… 1 tsp.Salt…………………………… ½ tsp.Pepper ………………………to tasteGrated garlic ……… small 1 cloveOlive oil ………………………½ tbsp.Tomato Paste …………… 1 tbsp.Worcestershire Sauce … 1 tbsp.Curry powder ……………… ¼ tsp.
Mayonnaise ……………Proper quantityBaby Leaf Greens etc. … Proper quantity
Soak burdock in vinegar (not included in the ingredients) and keep them aside. Mix B well.Cut the chicken meat into stick shape of 1 cm thickness and put in a bowl. Add A and rub them well.Drain water from burdock and add B to 2. Arrange them in a shallow heat resistant container such that there is no overlap.
1
2
3
How to cook
No Accessories will be used
A
B
Place 3 in the center of the oven chamber. Select 【28 5 Minute Menu】 with dial and press START. Start heating
When cooking manually〈Microwave 500W, approx. 5 minutes〉
After heating, serve on a plate, pour mayonnaise and garnish with baby leaves.
4
5
Stir-fried potato and bacon with butter
Ingredients/For 2 servingsPotato ……………… 1 piece (150 g)Bacon ……………………………… 40 gButter …………………………… 1 tbsp.Black pepper ………… Proper quantitySalt ………………………………to tasteDried parsley ………… Proper quantity
Peel the skin of the potato and cut it into bite-sized pieces. Cut bacons into sizes that are easy to eat.Put potatoes, bacon and butter, in a heat resistant container. Sprinkle salt and pepper and cover with plastic wrap.
1
2
Place 2 in the center of the oven chamber. Select 【28 5 Minute Menu】 with dial and press START. Start heatingWhen cooking manually〈Microwave 500W, approx. 5 minutes〉After heating up, garnish with parsley.
3
4
How to cook
No Accessories will be used
Stir-fried vegetables
Ingredients/For 2 servingsCabbage (Chopped into chunks) ………………………………………200 gCarrot (Quarter slice cut) ……… 50 gGreen pepper (Chopped into chunks) ……………………… 1 pieceOnions (Comb-shaped cut) …… 50 gLoin roll ham (Cut into 1 cm width) ……………………………………… 50 gChicken stock powder …… 1 tsp.Sesame oil …………………… 1 tsp.
Salt / Pepper ……………………to taste
Cut the ingredients and put in a heat resistant bowl.
Add A to 1 and mix. Cover with plastic wrap.
1
2
How to cook
No Accessories will be used
A
Place 2 in the center of the oven chamber. Select 【28 5 Minute Menu】 with dial and press START. Start heatingWhen cooking manually〈Microwave 500W, approx. 5 minutes〉After heating, season with salt and pepper.
3
4
Easy menu
ER-MD300_cook2_p86-100.indd 89 1/17/19 2:54 PM
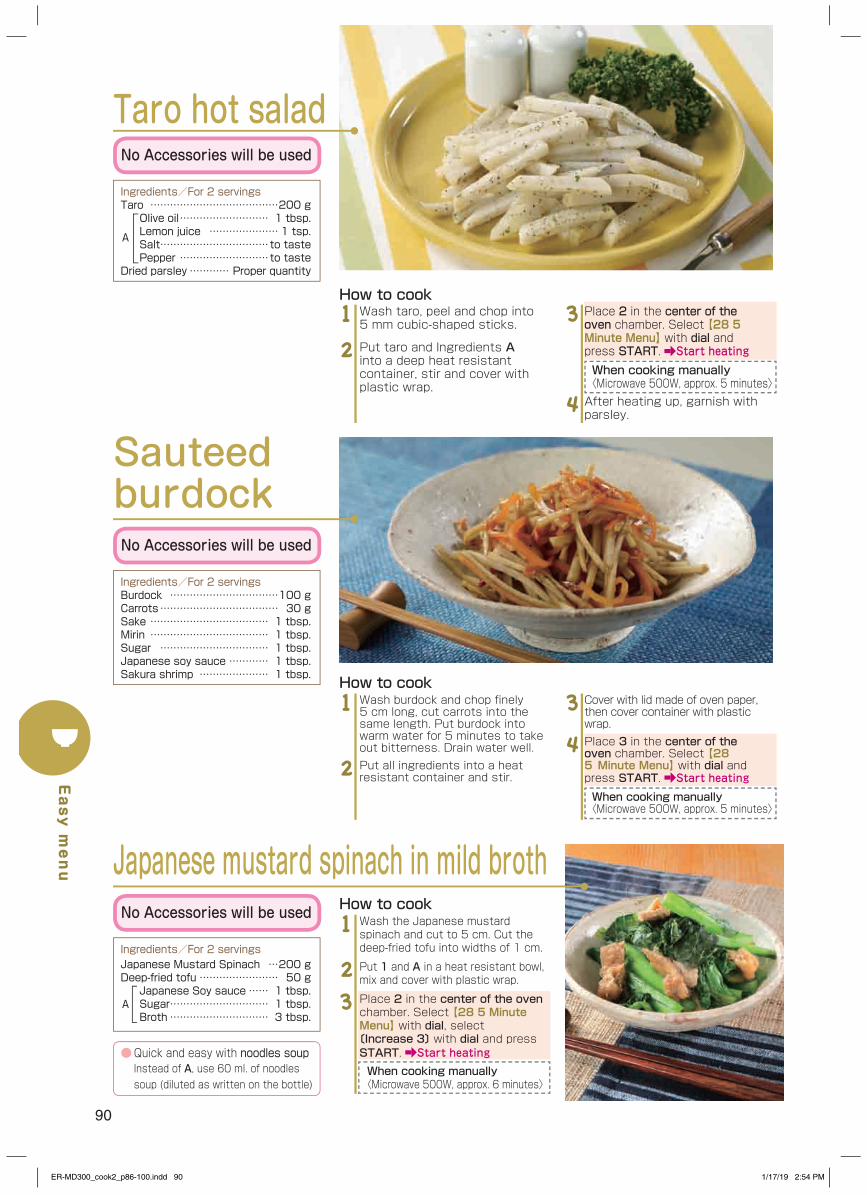
90
Japanese mustard spinach in mild broth
Ingredients/For 2 servingsJapanese Mustard Spinach …200 gDeep-fried tofu …………………… 50 gJapanese Soy sauce …… 1 tbsp.Sugar ………………………… 1 tbsp.Broth ………………………… 3 tbsp.
Wash the Japanese mustard spinach and cut to 5 cm. Cut the deep-fried tofu into widths of 1 cm.
Put 1 and A in a heat resistant bowl, mix and cover with plastic wrap.
Place 2 in the center of the oven chamber. Select 【28 5 Minute Menu】 with dial, select 〔Increase 3〕 with dial and press START. Start heatingWhen cooking manually〈Microwave 500W, approx. 6 minutes〉
1
23
How to cookNo Accessories will be used
A
Taro hot salad
Wash taro, peel and chop into 5 mm cubic-shaped sticks.
Put taro and Ingredients A into a deep heat resistant container, stir and cover with plastic wrap.
1
2
Place 2 in the center of the oven chamber. Select 【28 5 Minute Menu】 with dial and press START. Start heatingWhen cooking manually〈Microwave 500W, approx. 5 minutes〉After heating up, garnish with parsley.
3
4
How to cook
No Accessories will be used
Ingredients/For 2 servingsTaro …………………………………200 gOlive oil ……………………… 1 tbsp.Lemon juice ………………… 1 tsp.Salt……………………………to tastePepper ………………………to taste
Dried parsley ………… Proper quantity
A
Sauteed burdock
Ingredients/For 2 servingsBurdock ……………………………100 gCarrots ……………………………… 30 gSake ……………………………… 1 tbsp.Mirin ……………………………… 1 tbsp.Sugar …………………………… 1 tbsp.Japanese soy sauce ………… 1 tbsp.Sakura shrimp ………………… 1 tbsp.
Wash burdock and chop finely 5 cm long, cut carrots into the same length. Put burdock into warm water for 5 minutes to take out bitterness. Drain water well.Put all ingredients into a heat resistant container and stir.
1
2
Cover with lid made of oven paper, then cover container with plastic wrap.Place 3 in the center of the oven chamber. Select 【28 5⦆Minute Menu】 with dial and press START. Start heating
When cooking manually〈Microwave 500W, approx. 5 minutes〉
3
4
How to cook
No Accessories will be used
● Quick and easy with noodles soup Instead of A, use 60 ml. of noodles soup (diluted as written on the bottle)
Easy menu
ER-MD300_cook2_p86-100.indd 90 1/17/19 2:54 PM
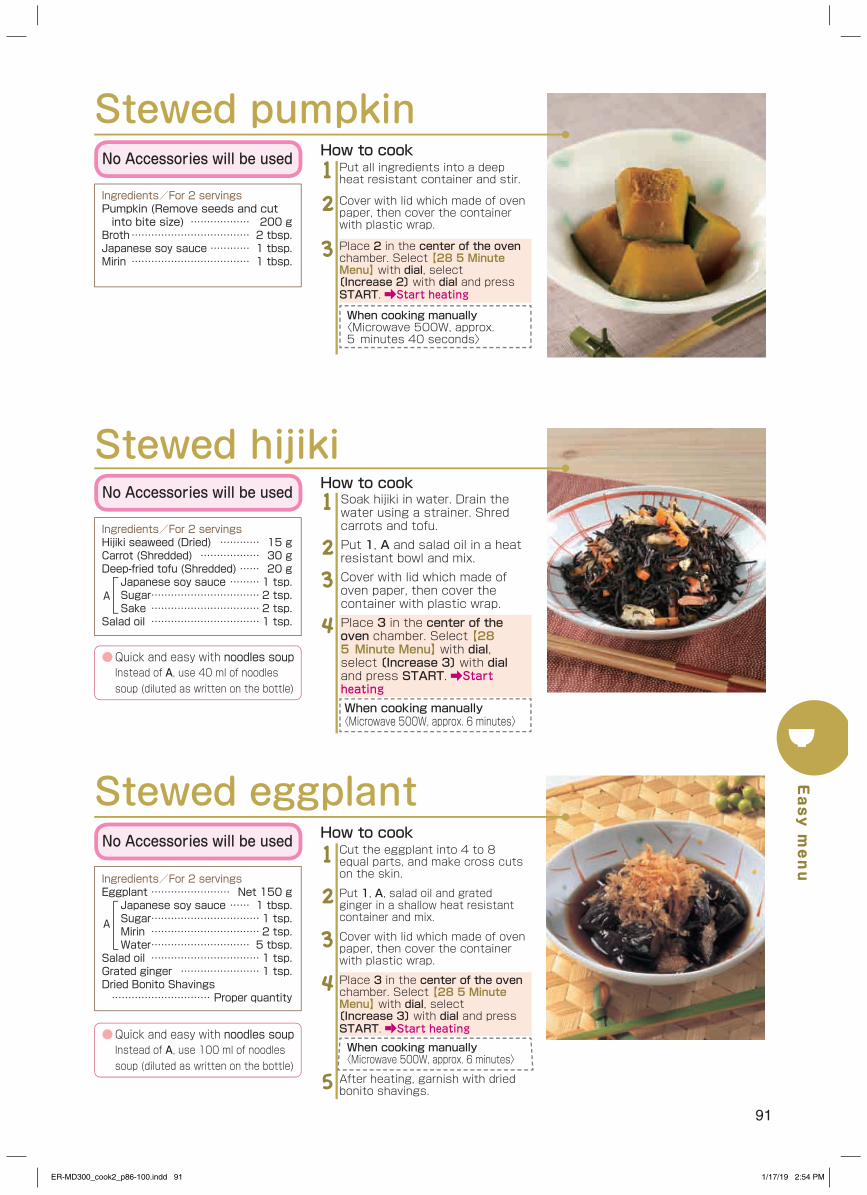
91
Stewed hijikiSoak hijiki in water. Drain the water using a strainer. Shred carrots and tofu.Put 1, A and salad oil in a heat resistant bowl and mix.Cover with lid which made of oven paper, then cover the container with plastic wrap.Place 3 in the center of the oven chamber. Select 【28 5⦆Minute Menu】 with dial, select 〔Increase 3〕 with dial and press START. Start heatingWhen cooking manually〈Microwave 500W, approx. 6 minutes〉
1
23
4
How to cookNo Accessories will be used
Ingredients/For 2 servingsHijiki seaweed (Dried) ………… 15 gCarrot (Shredded) ……………… 30 gDeep-fried tofu (Shredded) …… 20 gJapanese soy sauce ……… 1 tsp.Sugar …………………………… 2 tsp.Sake …………………………… 2 tsp.
Salad oil …………………………… 1 tsp.
A
Cut the eggplant into 4 to 8 equal parts, and make cross cuts on the skin.
Put 1, A, salad oil and grated ginger in a shallow heat resistant container and mix.
Cover with lid which made of oven paper, then cover the container with plastic wrap.
Place 3 in the center of the oven chamber. Select 【28 5 Minute Menu】 with dial, select 〔Increase 3〕 with dial and press START. Start heating
When cooking manually〈Microwave 500W, approx. 6 minutes〉
After heating, garnish with dried bonito shavings.
1
2
3
4
5
How to cook
Stewed eggplantNo Accessories will be used
Ingredients/For 2 servingsEggplant …………………… Net 150 gJapanese soy sauce …… 1 tbsp.Sugar …………………………… 1 tsp.Mirin …………………………… 2 tsp.Water ………………………… 5 tbsp.
Salad oil …………………………… 1 tsp.Grated ginger …………………… 1 tsp.Dried Bonito Shavings ………………………… Proper quantity
A
Put all ingredients into a deep heat resistant container and stir.
Cover with lid which made of oven paper, then cover the container with plastic wrap.
Place 2 in the center of the oven chamber. Select 【28 5 Minute Menu】 with dial, select 〔Increase 2〕 with dial and press START. Start heating
When cooking manually〈Microwave 500W, approx. 5⦆minutes 40 seconds〉
12
3
How to cook
Stewed pumpkinNo Accessories will be used
Ingredients/For 2 servingsPumpkin (Remove seeds and cut into bite size) ……………… 200 gBroth ……………………………… 2 tbsp.Japanese soy sauce ………… 1 tbsp.Mirin ……………………………… 1 tbsp.
● Quick and easy with noodles soup Instead of A, use 40 ml of noodles soup (diluted as written on the bottle)
● Quick and easy with noodles soup Instead of A, use 100 ml of noodles soup (diluted as written on the bottle)
Easy menu
ER-MD300_cook2_p86-100.indd 91 1/17/19 2:54 PM
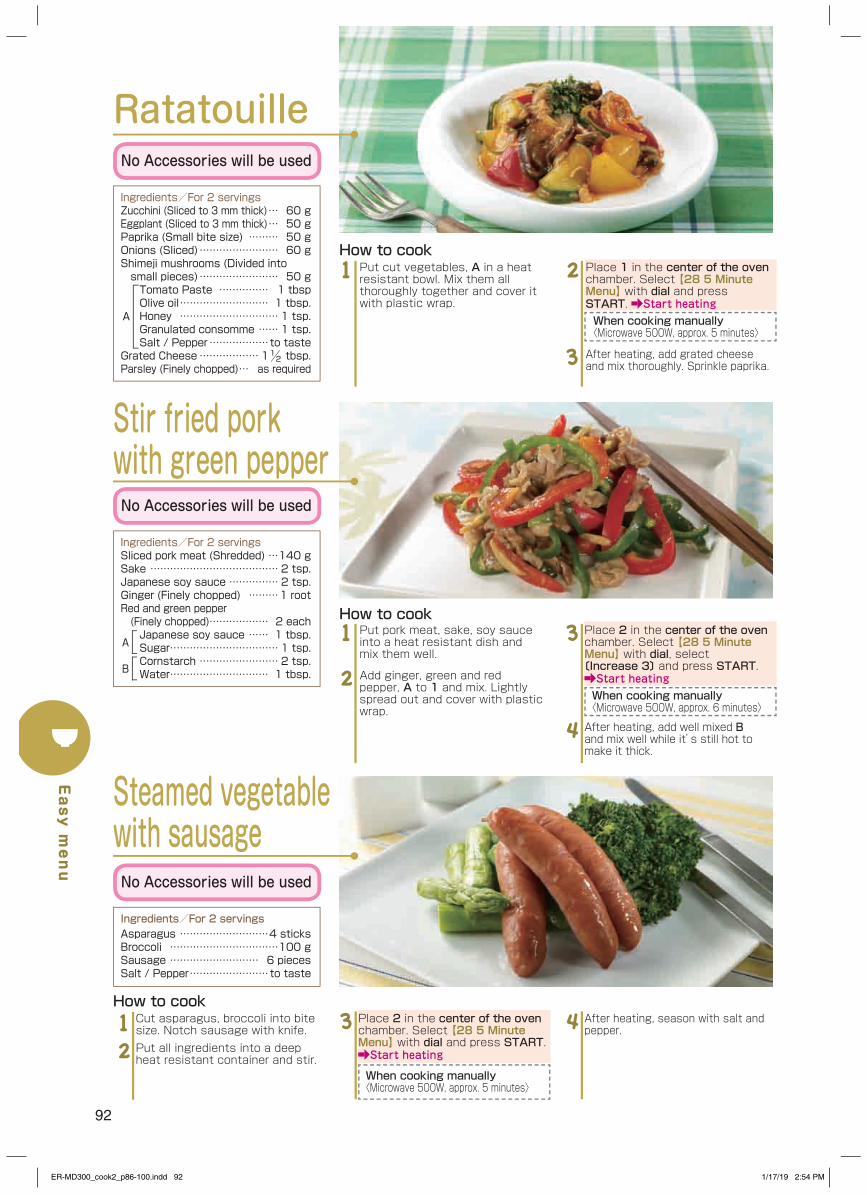
92
Ratatouille
Ingredients/For 2 servingsZucchini (Sliced to 3 mm thick) … 60 gEggplant (Sliced to 3 mm thick) … 50 gPaprika (Small bite size) ……… 50 gOnions (Sliced) …………………… 60 gShimeji mushrooms (Divided into small pieces) …………………… 50 gTomato Paste …………… 1 tbspOlive oil ……………………… 1 tbsp.Honey ………………………… 1 tsp.Granulated consomme …… 1 tsp.Salt / Pepper ………………to taste
Grated Cheese ……………… 1½ tbsp.Parsley (Finely chopped) … as required
Put cut vegetables, A in a heat resistant bowl. Mix them all thoroughly together and cover it with plastic wrap.
1How to cook
No Accessories will be used
A
Place 1 in the center of the oven chamber. Select 【28 5 Minute Menu】 with dial and press START. Start heatingWhen cooking manually〈Microwave 500W, approx. 5 minutes〉
After heating, add grated cheese and mix thoroughly. Sprinkle paprika.
22
3
Stir fried pork with green pepper
Put pork meat, sake, soy sauce into a heat resistant dish and mix them well.
Add ginger, green and red pepper, A to 1 and mix. Lightly spread out and cover with plastic wrap.
1
2
Place 2 in the center of the oven chamber. Select 【28 5 Minute Menu】 with dial, select 〔Increase 3〕 and press START. Start heatingWhen cooking manually〈Microwave 500W, approx. 6 minutes〉
After heating, add well mixed B and mix well while it’s still hot to make it thick.
3
4
How to cook
No Accessories will be used
Ingredients/For 2 servingsSliced pork meat (Shredded) …140 gSake ………………………………… 2 tsp.Japanese soy sauce …………… 2 tsp.Ginger (Finely chopped) ………1 rootRed and green pepper (Finely chopped)……………… 2 eachJapanese soy sauce …… 1 tbsp.Sugar …………………………… 1 tsp.Cornstarch …………………… 2 tsp.Water ………………………… 1 tbsp.
Cut asparagus, broccoli into bite size. Notch sausage with knife.Put all ingredients into a deep heat resistant container and stir.
12
How to cook
Steamed vegetable with sausageNo Accessories will be used
Ingredients/For 2 servingsAsparagus ………………………4 sticksBroccoli ……………………………100 gSausage ……………………… 6 piecesSalt / Pepper ……………………to taste
Place 2 in the center of the oven chamber. Select 【28 5 Minute Menu】 with dial and press START. Start heating
When cooking manually〈Microwave 500W, approx. 5 minutes〉
3
A
B
After heating, season with salt and pepper.4
Easy menu
ER-MD300_cook2_p86-100.indd 92 1/17/19 2:54 PM

93
Stewed taro with ground pork
Ingredients/For 2 servingsTaro (Cut into bite sizes) …Net 200 gGround pork ……………………… 50 gSoy sauce ……………………2 tsp.Sugar ……………………………2 tsp.Sake ……………………………2 tsp.Water ……………………… 3 tbsp.
Cornstarch …………………………1 tsp.
Peel the skin off the taro and cut into bite-size pieces. Put salt lightly (not included in the ingredients) and wash.Put ground pork, A and cornstarch in a heat resistant container. Mix thoroughly to prevent ground meat to stick together.Add taro from 1 to 2 and mix.
Cover with lid made of oven paper, then cover container with plastic wrap.
1
2
34
Place 4 in the center of the oven chamber. Select 【29 8 Minute Menu】 with dial, select 〔Decrease 3〕 with dial and press START. Start heating
When cooking manually〈Microwave 600W, approx. 6 minutes〉After heating, mix well so as to loosen the ground meat.
5
6
How to cook
No Accessories will be used
● Quick and easy with noodles soup Instead of A, use 70 ml of noodles soup (diluted as written on the bottle)
Cut ingredients in a heat resistant bowl. Add A and mix well.Cover with lid made of oven paper, then cover container with plastic wrap.
1
2
Place 2 in the center of the oven chamber. Select 【29 8⦆Minute Menu】 with dial and press START. Start heatingWhen cooking manually〈Microwave 600W, approx. 8 minutes〉
3How to cook
Stewed meat and potatoNo Accessories will be used
Ingredients/For 2 servingsPotato (Cut into bite sizes) …Net 200 gThinly sliced beef (Cut 5 cm wide) …100 gOnion (Cut to comb-shaped pieces) 50 gJapanese soy sauce …… 1 tbsp.Sugar ………………………… 1 tbsp.Sake ………………………… 1 tbsp.Water ………………………… 3 tbsp.
A
● Quick and easy with noodles soup Instead of A, use 80 ml of noodles soup (diluted as written on the bottle)
A
Cut the cod diagonally into 3 equal parts. Pour hot water to remove the smell.Mix chicken stock powder, Korean red chili paste, miso and water thoroughly.Put 1, 2 and A in a heat resistant bowl. Mix them lightly and add sesame oil. Cover with plastic wrap.
1
2
3
How to cook
Cod Kimchi-jjigaeNo Accessories will be used
Ingredients/For 2 servingsLightly salted cod (Fillet) …………………2 pieces (each 80 g)Japanese radish (Cut into 5 mm thick long pieces) ……… 80 gTofu (Cut into bite sizes) … 60 gShimeji mushrooms (Divided into small pieces) … 80 gKimchi ………………………… 80 g
Chicken stock powder (Franules) ……………………………………… 2 tsp.Korean red chilli paste …… 1½ tbsp.Miso ………………………………… 2 tsp.Water ……………………………… 80 mlSesame oil ……………………… 1 tbsp.Green Onions…………… 2 to 3 stalks
A
Place 3 in the center of the oven chamber. Select 【29 8 Minute Menu】 with dial and press START. Start heatingWhen cooking manually〈Microwave 600W, approx. 8 minutes〉
After heating, add green onions chopped into 5 cm, and mix to cook them in the residual heat.
4
5
Easy menu
ER-MD300_cook2_p86-100.indd 93 1/17/19 2:54 PM
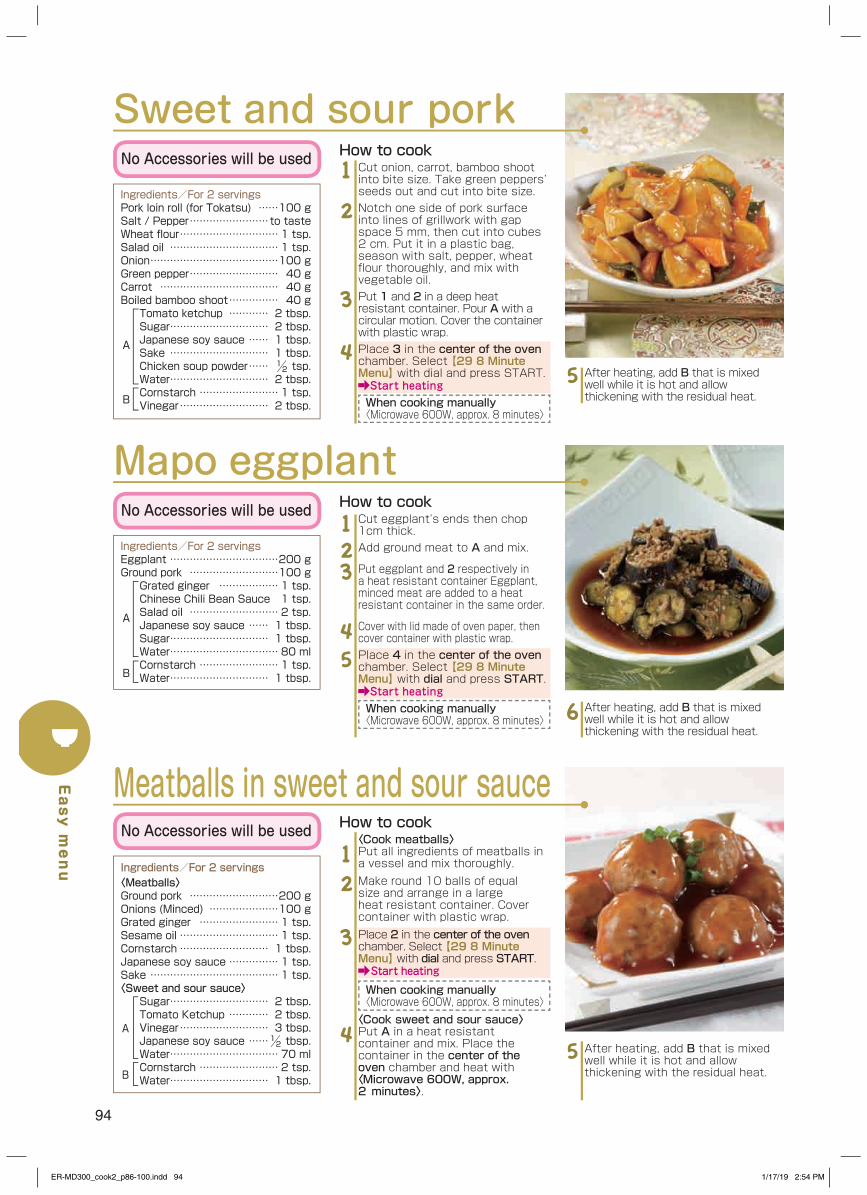
94
Sweet and sour pork
Ingredients/For 2 servingsPork loin roll (for Tokatsu) ……100 gSalt / Pepper ……………………to tasteWheat flour ………………………… 1 tsp.Salad oil …………………………… 1 tsp.Onion …………………………………100 gGreen pepper ……………………… 40 gCarrot ……………………………… 40 gBoiled bamboo shoot …………… 40 gTomato ketchup ………… 2 tbsp.Sugar ………………………… 2 tbsp.Japanese soy sauce …… 1 tbsp.Sake ………………………… 1 tbsp.Chicken soup powder …… ½ tsp.Water ………………………… 2 tbsp.Cornstarch …………………… 1 tsp.Vinegar ……………………… 2 tbsp.
How to cook
A
B
Mapo eggplant
Ingredients/For 2 servingsEggplant ……………………………200 gGround pork ………………………100 gGrated ginger ……………… 1 tsp.Chinese Chili Bean Sauce 1 tsp.Salad oil ……………………… 2 tsp.Japanese soy sauce …… 1 tbsp.Sugar ………………………… 1 tbsp.Water …………………………… 80 mlCornstarch …………………… 1 tsp.Water ………………………… 1 tbsp.
Cut eggplant’s ends then chop 1cm thick.Add ground meat to A and mix.
Put eggplant and 2 respectively in a heat resistant container Eggplant, minced meat are added to a heat resistant container in the same order.
Cover with lid made of oven paper, then cover container with plastic wrap.Place 4 in the center of the oven chamber. Select 【29 8 Minute Menu】 with dial and press START. Start heatingWhen cooking manually〈Microwave 600W, approx. 8 minutes〉
123
45
How to cook
No Accessories will be used
No Accessories will be used
Cut onion, carrot, bamboo shoot into bite size. Take green peppers’ seeds out and cut into bite size.Notch one side of pork surface into lines of grillwork with gap space 5 mm, then cut into cubes 2 cm. Put it in a plastic bag, season with salt, pepper, wheat flour thoroughly, and mix with vegetable oil.Put 1 and 2 in a deep heat resistant container. Pour A with a circular motion. Cover the container with plastic wrap.Place 3 in the center of the oven chamber. Select 【29 8 Minute Menu】 with dial and press START. Start heatingWhen cooking manually〈Microwave 600W, approx. 8 minutes〉
1
2
3
4After heating, add B that is mixed well while it is hot and allow thickening with the residual heat.
5
After heating, add B that is mixed well while it is hot and allow thickening with the residual heat.
6
B
A
Meatballs in sweet and sour sauce
Ingredients/For 2 servings〈Meatballs〉Ground pork ………………………200 gOnions (Minced) …………………100 gGrated ginger …………………… 1 tsp.Sesame oil ………………………… 1 tsp.Cornstarch ……………………… 1 tbsp.Japanese soy sauce …………… 1 tsp.Sake ………………………………… 1 tsp.〈Sweet and sour sauce〉
Sugar ………………………… 2 tbsp.Tomato Ketchup ………… 2 tbsp.Vinegar ……………………… 3 tbsp.Japanese soy sauce ……½ tbsp.Water …………………………… 70 mlCornstarch …………………… 2 tsp.Water ………………………… 1 tbsp.
〈Cook meatballs〉Put all ingredients of meatballs in a vessel and mix thoroughly.Make round 10 balls of equal size and arrange in a large heat resistant container. Cover container with plastic wrap.Place 2 in the center of the oven chamber. Select 【29 8 Minute Menu】 with dial and press START. Start heating
When cooking manually〈Microwave 600W, approx. 8 minutes〉〈Cook sweet and sour sauce〉Put A in a heat resistant container and mix. Place the container in the center of the oven chamber and heat with 〈Microwave 600W, approx. 2⦆minutes〉.
12
3
4
How to cookNo Accessories will be used
A
B
After heating, add B that is mixed well while it is hot and allow thickening with the residual heat.
5
Easy menu
ER-MD300_cook2_p86-100.indd 94 1/17/19 2:54 PM

95
Stir fried chicken and broccoli
Ingredients/For 4 servingsChicken thigh ……………………150 gSalt / Pepper ………………to tasteCornstarch …………………… 1 tsp.
Broccoli ………… ½ bunch (150 g)Onion ……………………………… ½ bulbSzechuan pickles (Seasoned) 30 g〈Sauce〉
Sesame Oil …………………½ tbsp.Japanese Soy Sauce ……½ tbsp.
Chop chicken into bite size and mix it with Ingredients A.Chop broccoli into small pieces and cut big branches lengthwise. Cut onion into wedge and cut into half. Chop Szechuan pickles.Mix ingredients in 1 and 2 in a deep heat resistant container. And add the ingredients B on top.Cover with plastic wrap softly. Place in the center of the oven chamber. Select 【29 8 Minute Menu】 with dial, select 〔Increase 1〕 with dial and press START. Start heatingWhen cooking manually〈Microwave 600W, approx. 8 minutes 30 seconds〉
12
3
4
How to cook
A
B
Prawn and mushroom in chili sauce
Ingredients/For 4 servingsPeeled Prawn (Big Size) ………250 gSake ………………………… 1 tbsp.Salt……………………………to tasteCornstarch …………………½ tbsp.
Chopped Scallions ………… ½ springShimeji (Divided into Small Pieces) …………………………………… 1 pack〈Sauce〉
Chili Sauce ……………… 1½ tbsp.Tomato Ketchup ………… 4 tbsp.Sesame Oil …………………½ tbsp.Hot Water ………………… ⅓ cupCornstarch …………………½ tbsp.Water ………………………… 1 tbsp.
Devein prawns and marinate in Ingredients A for approx. 10 mins.Mix prawns in 1, scallions and shimeji in a deep heat resistant container. Add Ingredients B and mix well.Cover with plastic wrap softly. Put in the center of the oven chamber. Select 【29 8 Minute Menu】 with dial, select 〔Increase 1〕 with dial and press START. Start heatingWhen cooking manually〈Microwave 600W, approx. 8 minutes 30 seconds〉
After heating, add C that is mixed well while it is hot and allow thickening with the residual heat.
12
3
4
How to cook
A
B
Seafood Fried Rice
Ingredients/For 4 servingsMixed Seafood ………… 150~200 gSake …………………………… 1 tsp.Japanese Soy Sauce ……… 1 tsp.Ginger Ale …………………… 1 tsp.Sesame Oil …………………… 1 tsp.Scallions (Chopped) … ½ spring
Green peas ………………………… 30 gCooked Rice (Warm) ……………400 gOyster Sauce …………… 1½ tbsp.Salt / Pepper ………………to taste
Egg …………………………………2 eggLettuce ……………………… 4 leaves
Blend Mixed Seafood (defrost first if it was freezed) with Ingredients A. Put it aside for approx. 10 mins.Mix ingredient from 1, Cooked Rice and Green peas in a deep heat resistant container. Add Ingredients B and mix well.Pour beaten egg on 2 and stir 1-2 times from the bottom. Place in the center of the oven chamber. Select 【29 8 Minute Menu】 with dial, select 〔Increase 1〕 with dial and press START. Start heatingWhen cooking manually〈Microwave 600W, approx. 8 minutes 30 seconds〉After done heating, stir it to crumble the egg. Sprinkle torn lettuce over the rice and serve on a plate.
1
2
3
4
How to cook
A
B
No Accessories will be used
No Accessories will be used
No Accessories will be used
C
Easy menu
ER-MD300_cook2_p86-100.indd 95 1/17/19 2:54 PM
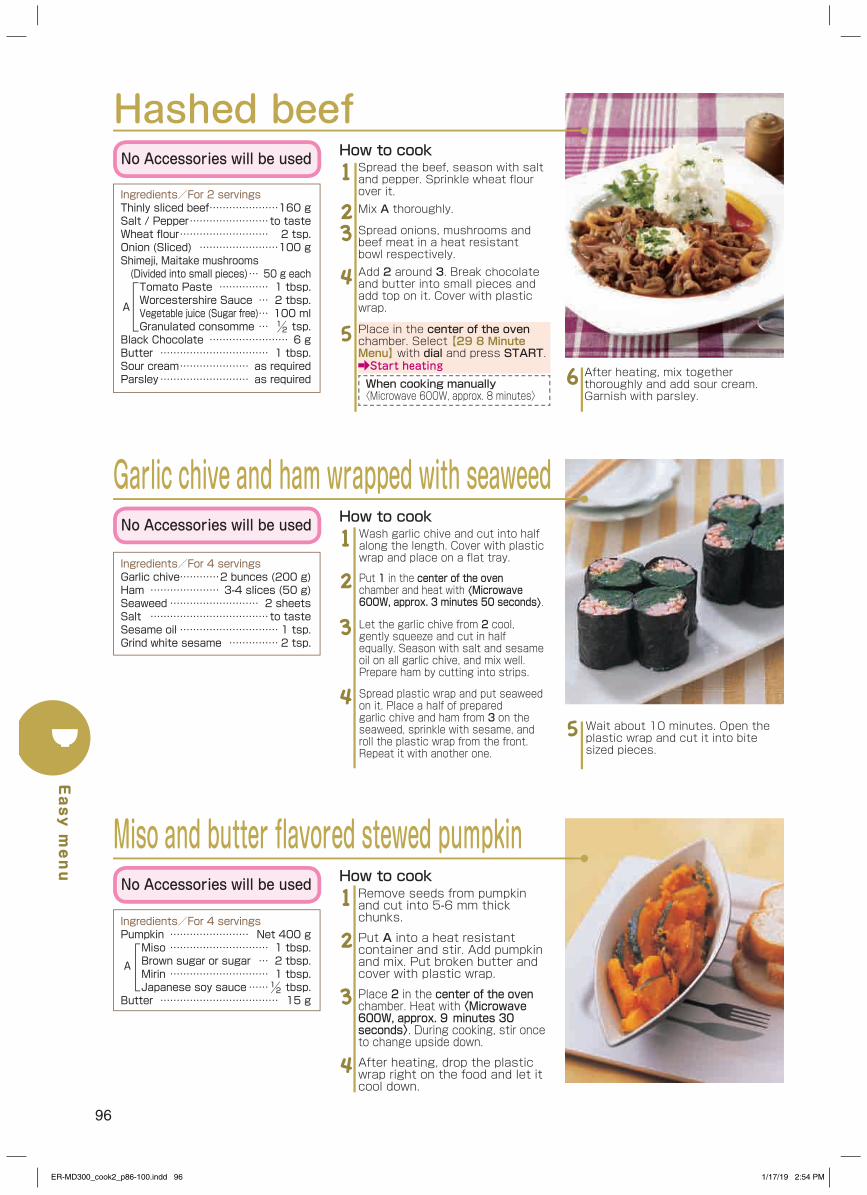
96
Wash garlic chive and cut into half along the length. Cover with plastic wrap and place on a flat tray.
Put 1 in the center of the oven chamber and heat with 〈Microwave 600W, approx. 3 minutes 50 seconds〉.
Let the garlic chive from 2 cool, gently squeeze and cut in half equally. Season with salt and sesame oil on all garlic chive, and mix well. Prepare ham by cutting into strips.
Spread plastic wrap and put seaweed on it. Place a half of prepared garlic chive and ham from 3 on the seaweed, sprinkle with sesame, and roll the plastic wrap from the front. Repeat it with another one.
1
2
3
4
How to cook
Garlic chive and ham wrapped with seaweed
Ingredients/For 4 servingsGarlic chive…………2 bunces (200 g)Ham ………………… 3-4 slices (50 g)Seaweed ……………………… 2 sheetsSalt ………………………………to tasteSesame oil ………………………… 1 tsp.Grind white sesame …………… 2 tsp.
No Accessories will be used
Hashed beef
Ingredients/For 2 servingsThinly sliced beef …………………160 gSalt / Pepper ……………………to tasteWheat flour ……………………… 2 tsp.Onion (Sliced) ……………………100 gShimeji, Maitake mushrooms (Divided into small pieces) … 50 g eachTomato Paste …………… 1 tbsp.Worcestershire Sauce … 2 tbsp.Vegetable juice (Sugar free) … 100 mlGranulated consomme … ½ tsp.
Black Chocolate …………………… 6 gButter …………………………… 1 tbsp.Sour cream ………………… as requiredParsley ……………………… as required
Spread the beef, season with salt and pepper. Sprinkle wheat flour over it.Mix A thoroughly.
Spread onions, mushrooms and beef meat in a heat resistant bowl respectively.Add 2 around 3. Break chocolate and butter into small pieces and add top on it. Cover with plastic wrap.
Place in the center of the oven chamber. Select 【29 8 Minute Menu】 with dial and press START. Start heatingWhen cooking manually〈Microwave 600W, approx. 8 minutes〉
1
23
4
5
How to cookNo Accessories will be used
After heating, mix together thoroughly and add sour cream. Garnish with parsley.
6
A
Remove seeds from pumpkin and cut into 5-6 mm thick chunks.
Put A into a heat resistant container and stir. Add pumpkin and mix. Put broken butter and cover with plastic wrap.
Place 2 in the center of the oven chamber. Heat with 〈Microwave 600W, approx. 9⦆minutes 30 seconds〉. During cooking, stir once to change upside down.
After heating, drop the plastic wrap right on the food and let it cool down.
1
2
3
4
How to cook
Miso and butter flavored stewed pumpkin
Ingredients/For 4 servingsPumpkin …………………… Net 400 g
Miso ………………………… 1 tbsp.Brown sugar or sugar … 2 tbsp.Mirin ………………………… 1 tbsp.Japanese soy sauce ……½ tbsp.
Butter ……………………………… 15 g
A
No Accessories will be used
Wait about 10 minutes. Open the plastic wrap and cut it into bite sized pieces.
5
Easy menu
ER-MD300_cook2_p86-100.indd 96 1/17/19 2:54 PM
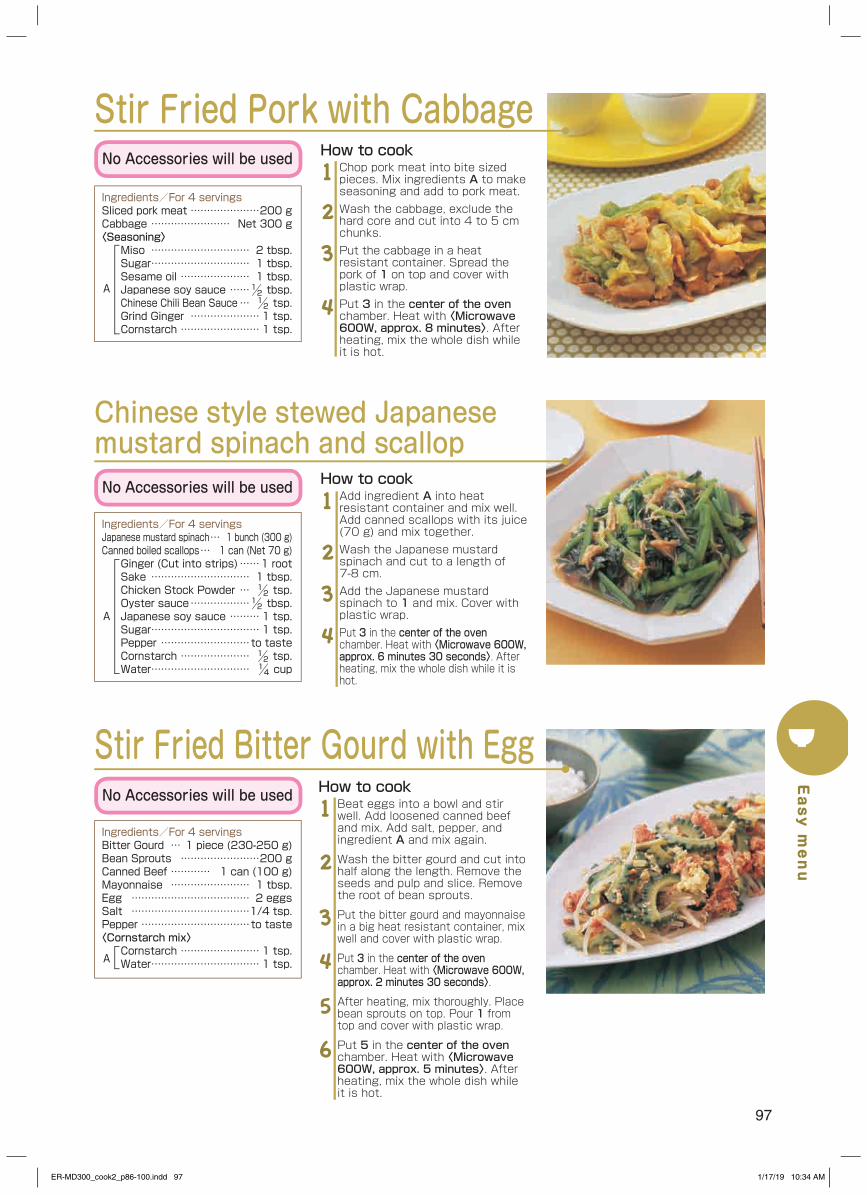
97
Chop pork meat into bite sized pieces. Mix ingredients A to make seasoning and add to pork meat.Wash the cabbage, exclude the hard core and cut into 4 to 5 cm chunks.Put the cabbage in a heat resistant container. Spread the pork of 1 on top and cover with plastic wrap.Put 3 in the center of the oven chamber. Heat with 〈Microwave 600W, approx. 8 minutes〉. After heating, mix the whole dish while it is hot.
1
2
3
4
How to cook
Stir Fried Pork with Cabbage
Ingredients/For 4 servingsSliced pork meat …………………200 gCabbage …………………… Net 300 g〈Seasoning〉
Miso ………………………… 2 tbsp.Sugar ………………………… 1 tbsp.Sesame oil ………………… 1 tbsp.Japanese soy sauce ……½ tbsp.Chinese Chili Bean Sauce … ½ tsp.Grind Ginger ………………… 1 tsp.Cornstarch …………………… 1 tsp.
A
Add ingredient A into heat resistant container and mix well. Add canned scallops with its juice (70 g) and mix together.Wash the Japanese mustard spinach and cut to a length of 7-8 cm.Add the Japanese mustard spinach to 1 and mix. Cover with plastic wrap.Put 3 in the center of the oven chamber. Heat with 〈Microwave 600W, approx. 6 minutes 30 seconds〉. After heating, mix the whole dish while it is hot.
1
2
3
4
How to cook
Chinese style stewed Japanese mustard spinach and scallop
Ingredients/For 4 servingsJapanese mustard spinach … 1 bunch (300 g)Canned boiled scallops … 1 can (Net 70 g)Ginger (Cut into strips) ……1 rootSake ………………………… 1 tbsp.Chicken Stock Powder … ½ tsp.Oyster sauce ………………½ tbsp.Japanese soy sauce ……… 1 tsp.Sugar …………………………… 1 tsp.Pepper ………………………to tasteCornstarch ………………… ½ tsp.Water ………………………… ¼ cup
A
No Accessories will be used
No Accessories will be used
Beat eggs into a bowl and stir well. Add loosened canned beef and mix. Add salt, pepper, and ingredient A and mix again.
Wash the bitter gourd and cut into half along the length. Remove the seeds and pulp and slice. Remove the root of bean sprouts.
Put the bitter gourd and mayonnaise in a big heat resistant container, mix well and cover with plastic wrap.
Put 3 in the center of the oven chamber. Heat with 〈Microwave 600W, approx. 2 minutes 30 seconds〉.
After heating, mix thoroughly. Place bean sprouts on top. Pour 1 from top and cover with plastic wrap.
Put 5 in the center of the oven chamber. Heat with 〈Microwave 600W, approx. 5 minutes〉. After heating, mix the whole dish while it is hot.
1
2
3
4
5
6
How to cook
Stir Fried Bitter Gourd with Egg
Ingredients/For 4 servingsBitter Gourd … 1 piece (230-250 g)Bean Sprouts ……………………200 gCanned Beef ………… 1 can (100 g)Mayonnaise …………………… 1 tbsp.Egg ……………………………… 2 eggsSalt ………………………………1/4 tsp.Pepper ……………………………to taste〈Cornstarch mix〉
Cornstarch …………………… 1 tsp.Water …………………………… 1 tsp.A
No Accessories will be used
Easy menu
ER-MD300_cook2_p86-100.indd 97 1/17/19 10:34 AM
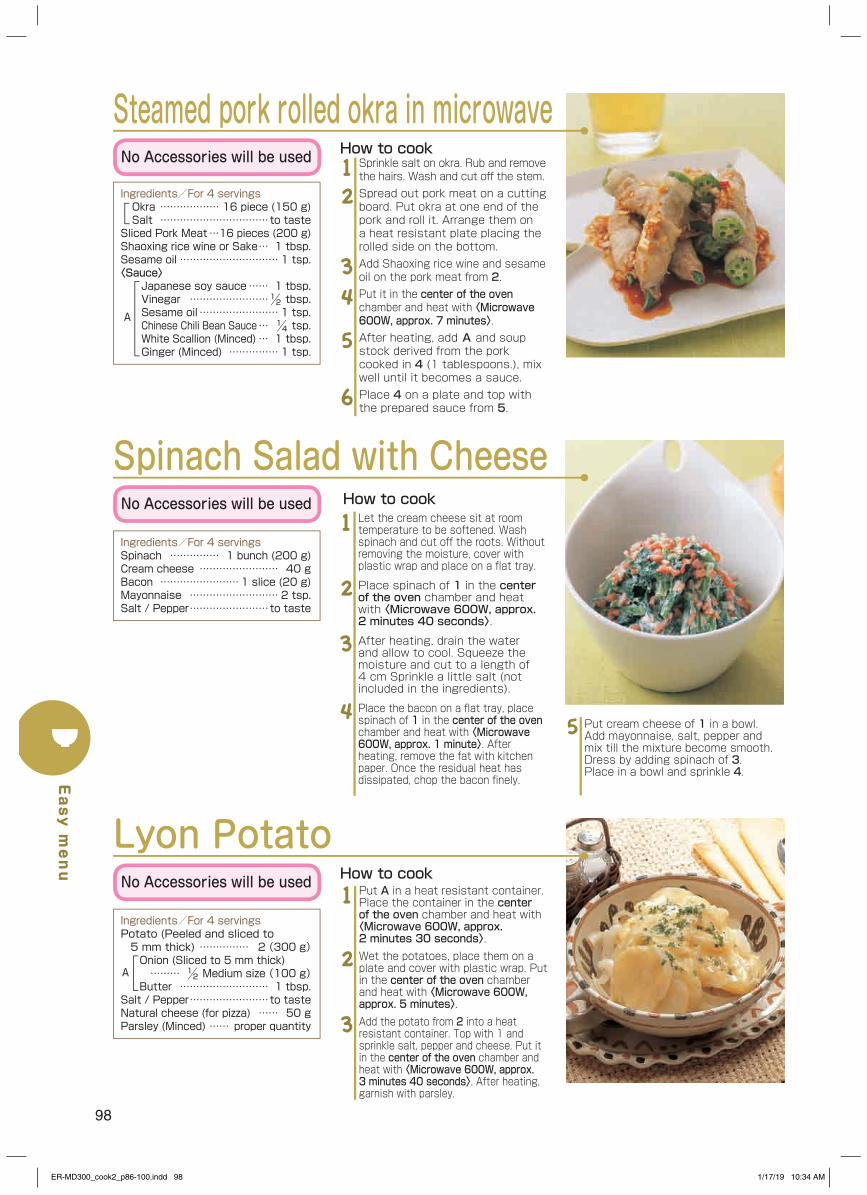
98
Let the cream cheese sit at room temperature to be softened. Wash spinach and cut off the roots. Without removing the moisture, cover with plastic wrap and place on a flat tray.
Place spinach of 1 in the center of the oven chamber and heat with 〈Microwave 600W, approx. 2 minutes 40 seconds〉.
After heating, drain the water and allow to cool. Squeeze the moisture and cut to a length of 4 cm Sprinkle a little salt (not included in the ingredients).
Place the bacon on a flat tray, place spinach of 1 in the center of the oven chamber and heat with 〈Microwave 600W, approx. 1 minute〉. After heating, remove the fat with kitchen paper. Once the residual heat has dissipated, chop the bacon finely.
1
2
3
4
How to cook
Put cream cheese of 1 in a bowl. Add mayonnaise, salt, pepper and mix till the mixture become smooth. Dress by adding spinach of 3. Place in a bowl and sprinkle 4.
5
Spinach Salad with Cheese
Ingredients/For 4 servingsSpinach …………… 1 bunch (200 g)Cream cheese …………………… 40 gBacon ……………………1 slice (20 g)Mayonnaise ……………………… 2 tsp.Salt / Pepper ……………………to taste
No Accessories will be used
Sprinkle salt on okra. Rub and remove the hairs. Wash and cut off the stem.Spread out pork meat on a cutting board. Put okra at one end of the pork and roll it. Arrange them on a heat resistant plate placing the rolled side on the bottom.Add Shaoxing rice wine and sesame oil on the pork meat from 2.Put it in the center of the oven chamber and heat with 〈Microwave 600W, approx. 7 minutes〉.After heating, add A and soup stock derived from the pork cooked in 4 (1 tablespoons.), mix well until it becomes a sauce.Place 4 on a plate and top with the prepared sauce from 5.
12
34
5
6
How to cook
Steamed pork rolled okra in microwave
Ingredients/For 4 servingsOkra ……………… 16 piece (150 g)Salt ……………………………to taste
Sliced Pork Meat …16 pieces (200 g)Shaoxing rice wine or Sake … 1 tbsp.Sesame oil ………………………… 1 tsp.〈Sauce〉
Japanese soy sauce …… 1 tbsp.Vinegar ……………………½ tbsp.Sesame oil …………………… 1 tsp.Chinese Chili Bean Sauce … ¼ tsp.White Scallion (Minced) … 1 tbsp.Ginger (Minced) …………… 1 tsp.
A
No Accessories will be used
Lyon Potato
Ingredients/For 4 servingsPotato (Peeled and sliced to 5 mm thick) …………… 2 (300 g)Onion (Sliced to 5 mm thick) ……… ½ Medium size (100 g)Butter ……………………… 1 tbsp.
Salt / Pepper ……………………to tasteNatural cheese (for pizza) …… 50 gParsley (Minced) …… proper quantity
Put A in a heat resistant container. Place the container in the center of the oven chamber and heat with 〈Microwave 600W, approx. 2 minutes 30 seconds〉.Wet the potatoes, place them on a plate and cover with plastic wrap. Put in the center of the oven chamber and heat with 〈Microwave 600W, approx. 5 minutes〉.Add the potato from 2 into a heat resistant container. Top with 1 and sprinkle salt, pepper and cheese. Put it in the center of the oven chamber and heat with 〈Microwave 600W, approx. 3 minutes 40 seconds〉. After heating, garnish with parsley.
1
2
3
How to cook
A
No Accessories will be used
Easy menu
ER-MD300_cook2_p86-100.indd 98 1/17/19 10:34 AM
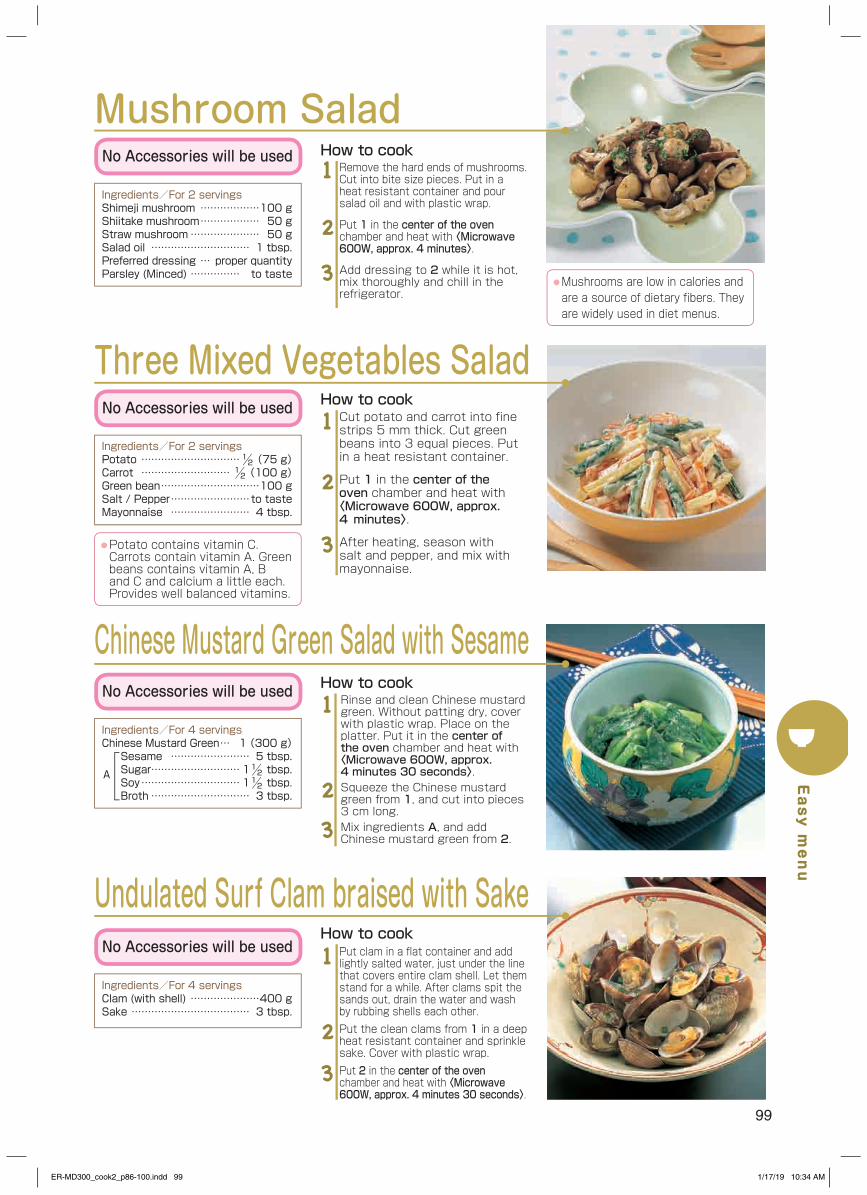
99
Ingredients/For 2 servingsShimeji mushroom ………………100 gShiitake mushroom ……………… 50 gStraw mushroom ………………… 50 gSalad oil ………………………… 1 tbsp.Preferred dressing … proper quantityParsley (Minced) …………… to taste
● Mushrooms are low in calories and are a source of dietary fibers. They are widely used in diet menus.
Mushroom SaladRemove the hard ends of mushrooms. Cut into bite size pieces. Put in a heat resistant container and pour salad oil and with plastic wrap.
Put 1 in the center of the oven chamber and heat with 〈Microwave 600W, approx. 4 minutes〉.
Add dressing to 2 while it is hot, mix thoroughly and chill in the refrigerator.
1
2
3
Cut potato and carrot into fine strips 5 mm thick. Cut green beans into 3 equal pieces. Put in a heat resistant container.
Put 1 in the center of the oven chamber and heat with 〈Microwave 600W, approx. 4⦆minutes〉.
After heating, season with salt and pepper, and mix with mayonnaise.
1
2
3
How to cook
How to cook
Three Mixed Vegetables Salad
● Potato contains vitamin C. Carrots contain vitamin A. Green beans contains vitamin A, B and C and calcium a little each. Provides well balanced vitamins.
Ingredients/For 2 servingsPotato …………………………½ (75 g)Carrot ………………………½ (100 g)Green bean …………………………100 gSalt / Pepper ……………………to tasteMayonnaise …………………… 4 tbsp.
No Accessories will be used
No Accessories will be used
Chinese Mustard Green Salad with Sesame
Ingredients/For 4 servingsChinese Mustard Green … 1 (300 g)Sesame …………………… 5 tbsp.Sugar ……………………… 1½ tbsp.Soy ………………………… 1½ tbsp.Broth ………………………… 3 tbsp.
Rinse and clean Chinese mustard green. Without patting dry, cover with plastic wrap. Place on the platter. Put it in the center of the oven chamber and heat with 〈Microwave 600W, approx. 4 minutes 30 seconds〉.Squeeze the Chinese mustard green from 1, and cut into pieces 3 cm long.Mix ingredients A, and add Chinese mustard green from 2.
1
2
3
How to cook
A
No Accessories will be used
Put clam in a flat container and add lightly salted water, just under the line that covers entire clam shell. Let them stand for a while. After clams spit the sands out, drain the water and wash by rubbing shells each other.Put the clean clams from 1 in a deep heat resistant container and sprinkle sake. Cover with plastic wrap.Put 2 in the center of the oven chamber and heat with 〈Microwave 600W, approx. 4 minutes 30 seconds〉.
1
2
3
How to cook
Undulated Surf Clam braised with Sake
Ingredients/For 4 servingsClam (with shell) …………………400 gSake ……………………………… 3 tbsp.
No Accessories will be used
Easy menu
ER-MD300_cook2_p86-100.indd 99 1/17/19 10:34 AM
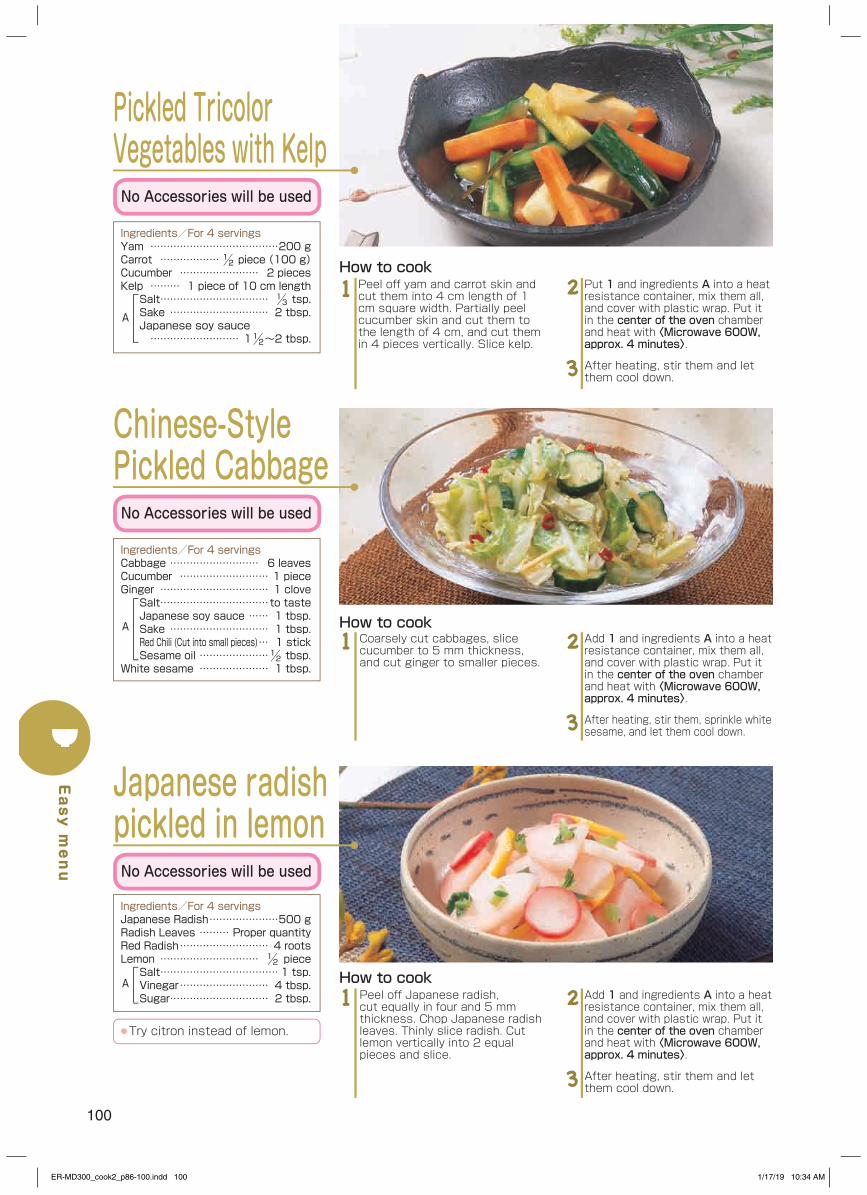
100
Ingredients/For 4 servingsYam …………………………………200 gCarrot ………………½ piece (100 g)Cucumber …………………… 2 piecesKelp ……… 1 piece of 10 cm lengthSalt…………………………… ⅓ tsp.Sake ………………………… 2 tbsp.Japanese soy sauce ……………………… 1½ ~2 tbsp.
Peel off yam and carrot skin and cut them into 4 cm length of 1 cm square width. Partially peel cucumber skin and cut them to the length of 4 cm, and cut them in 4 pieces vertically. Slice kelp.
1 Put 1 and ingredients A into a heat resistance container, mix them all, and cover with plastic wrap. Put it in the center of the oven chamber and heat with 〈Microwave 600W, approx. 4 minutes〉.
After heating, stir them and let them cool down.
2
3
How to cook
A
Chinese-Style Pickled Cabbage
Japanese radish pickled in lemon
Ingredients/For 4 servingsCabbage ……………………… 6 leavesCucumber ……………………… 1 pieceGinger …………………………… 1 cloveSalt……………………………to tasteJapanese soy sauce …… 1 tbsp.Sake ………………………… 1 tbsp.Red Chili (Cut into small pieces) … 1 stickSesame oil …………………½ tbsp.
White sesame ………………… 1 tbsp.
Ingredients/For 4 servingsJapanese Radish …………………500 gRadish Leaves ……… Proper quantityRed Radish ……………………… 4 rootsLemon ………………………… ½ pieceSalt……………………………… 1 tsp.Vinegar ……………………… 4 tbsp.Sugar ………………………… 2 tbsp.
Coarsely cut cabbages, slice cucumber to 5 mm thickness, and cut ginger to smaller pieces.
1 Add 1 and ingredients A into a heat resistance container, mix them all, and cover with plastic wrap. Put it in the center of the oven chamber and heat with 〈Microwave 600W, approx. 4 minutes〉.
After heating, stir them, sprinkle white sesame, and let them cool down.
2
3
How to cook
Peel off Japanese radish, cut equally in four and 5 mm thickness. Chop Japanese radish leaves. Thinly slice radish. Cut lemon vertically into 2 equal pieces and slice.
1 Add 1 and ingredients A into a heat resistance container, mix them all, and cover with plastic wrap. Put it in the center of the oven chamber and heat with 〈Microwave 600W, approx. 4 minutes〉.
After heating, stir them and let them cool down.
2
3
How to cook
Pickled Tricolor Vegetables with Kelp
A
A
● Try citron instead of lemon.
No Accessories will be used
No Accessories will be used
No Accessories will be used
Easy menu
ER-MD300_cook2_p86-100.indd 100 1/17/19 10:34 AM
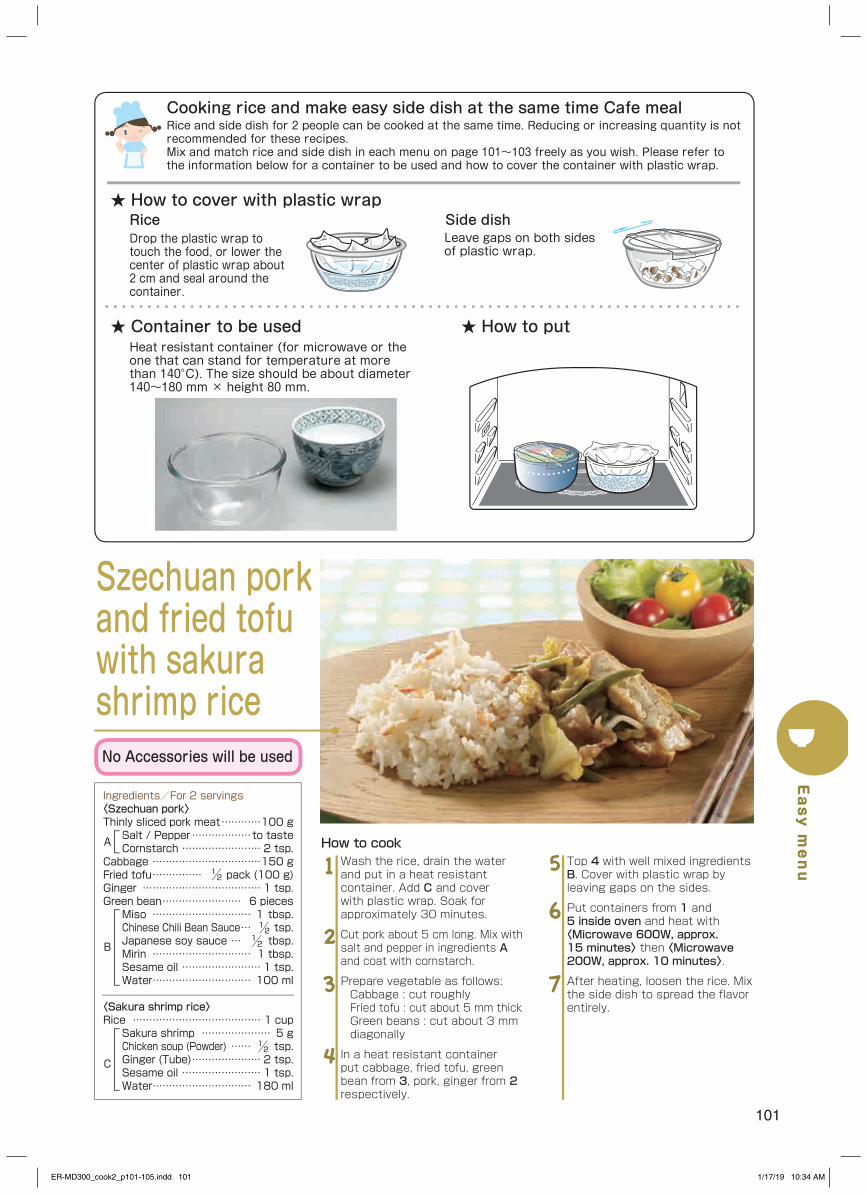
101
Cooking rice and make easy side dish at the same time Cafe mealRice and side dish for 2 people can be cooked at the same time. Reducing or increasing quantity is not recommended for these recipes.Mix and match rice and side dish in each menu on page 101~103 freely as you wish. Please refer to the information below for a container to be used and how to cover the container with plastic wrap.
Ingredients/For 2 servings〈Szechuan pork〉Thinly sliced pork meat …………100 gSalt / Pepper ………………to tasteCornstarch …………………… 2 tsp.
Cabbage ……………………………150 gFried tofu …………… ½ pack (100 g)Ginger ……………………………… 1 tsp.Green bean …………………… 6 piecesMiso ………………………… 1 tbsp.Chinese Chili Bean Sauce … ½ tsp.Japanese soy sauce … ½ tbsp.Mirin ………………………… 1 tbsp.Sesame oil …………………… 1 tsp.Water ………………………… 100 ml
〈Sakura shrimp rice〉Rice ………………………………… 1 cupSakura shrimp ………………… 5 gChicken soup (Powder) …… ½ tsp.Ginger (Tube) ………………… 2 tsp.Sesame oil …………………… 1 tsp.Water ………………………… 180 ml
Wash the rice, drain the water and put in a heat resistant container. Add C and cover with plastic wrap. Soak for approximately 30 minutes.
Cut pork about 5 cm long. Mix with salt and pepper in ingredients A and coat with cornstarch.
Prepare vegetable as follows:Cabbage : cut roughlyFried tofu : cut about 5 mm thickGreen beans : cut about 3 mm diagonally
In a heat resistant container put cabbage, fried tofu, green bean from 3, pork, ginger from 2 respectively.
1
2
3
4
Top 4 with well mixed ingredients B. Cover with plastic wrap by leaving gaps on the sides.
Put containers from 1 and 5 inside oven and heat with 〈Microwave 600W, approx. 15 minutes〉 then 〈Microwave 200W, approx. 10 minutes〉.
After heating, loosen the rice. Mix the side dish to spread the flavor entirely.
5
6
7
How to cookA
B
C
Szechuan pork and fried tofu with sakura shrimp rice
Drop the plastic wrap to touch the food, or lower the center of plastic wrap about 2 cm and seal around the container.
Heat resistant container (for microwave or the one that can stand for temperature at more than 140°C). The size should be about diameter 140~180 mm × height 80 mm.
★ How to cover with plastic wrap
★ Container to be used
Rice Side dish
★ How to put
No Accessories will be used
Leave gaps on both sides of plastic wrap.
Easy menu
ER-MD300_cook2_p101-105.indd 101 1/17/19 10:34 AM
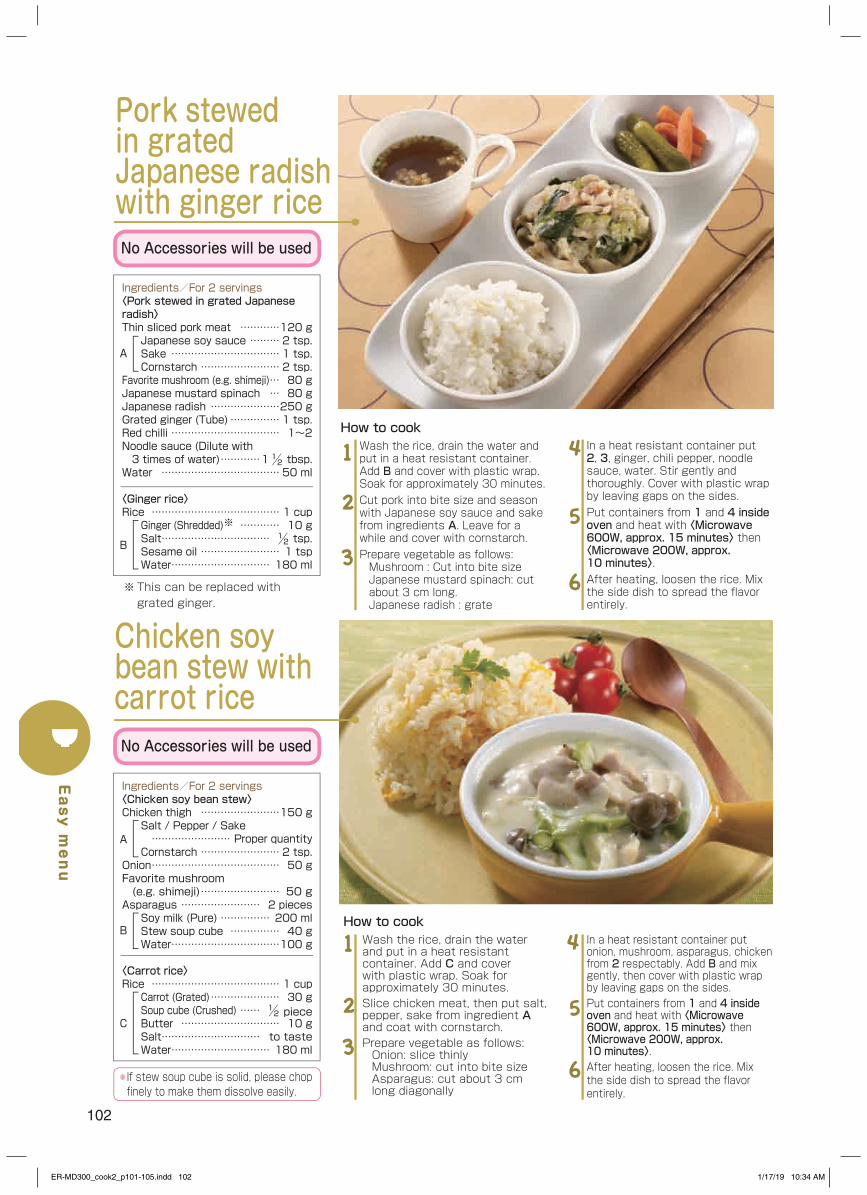
102
In a heat resistant container put 2, 3, ginger, chili pepper, noodle sauce, water. Stir gently and thoroughly. Cover with plastic wrap by leaving gaps on the sides.Put containers from 1 and 4 inside oven and heat with 〈Microwave 600W, approx. 15 minutes〉 then 〈Microwave 200W, approx. 10 minutes〉.After heating, loosen the rice. Mix the side dish to spread the flavor entirely.
4
5
6
Ingredients/For 2 servings〈Pork stewed in grated Japanese radish〉Thin sliced pork meat …………120 gJapanese soy sauce ……… 2 tsp.Sake …………………………… 1 tsp.Cornstarch …………………… 2 tsp.
Favorite mushroom (e.g. shimeji) … 80 gJapanese mustard spinach … 80 gJapanese radish …………………250 gGrated ginger (Tube) …………… 1 tsp.Red chilli …………………………… 1~2Noodle sauce (Dilute with 3 times of water) …………1½ tbsp.Water ……………………………… 50 ml
〈Ginger rice〉Rice ………………………………… 1 cup
Ginger (Shredded)※ ………… 10 gSalt…………………………… ½ tsp.Sesame oil …………………… 1 tspWater ………………………… 180 ml
Wash the rice, drain the water and put in a heat resistant container. Add B and cover with plastic wrap. Soak for approximately 30 minutes.Cut pork into bite size and season with Japanese soy sauce and sake from ingredients A. Leave for a while and cover with cornstarch.Prepare vegetable as follows:Mushroom : Cut into bite sizeJapanese mustard spinach: cut about 3 cm long.Japanese radish : grate
1
2
3
How to cook
A
B
Pork stewed in grated Japanese radish with ginger riceNo Accessories will be used
Ingredients/For 2 servings〈Chicken soy bean stew〉Chicken thigh ……………………150 gSalt / Pepper / Sake …………………… Proper quantityCornstarch …………………… 2 tsp.
Onion ………………………………… 50 gFavorite mushroom (e.g. shimeji) …………………… 50 gAsparagus …………………… 2 piecesSoy milk (Pure) …………… 200 mlStew soup cube …………… 40 gWater ……………………………100 g
〈Carrot rice〉Rice ………………………………… 1 cup
Carrot (Grated) ………………… 30 gSoup cube (Crushed) …… ½ pieceButter ………………………… 10 gSalt………………………… to tasteWater ………………………… 180 ml
A
Chicken soy bean stew with carrot riceNo Accessories will be used
In a heat resistant container put onion, mushroom, asparagus, chicken from 2 respectably. Add B and mix gently, then cover with plastic wrap by leaving gaps on the sides.Put containers from 1 and 4 inside oven and heat with 〈Microwave 600W, approx. 15 minutes〉 then 〈Microwave 200W, approx. 10 minutes〉.After heating, loosen the rice. Mix the side dish to spread the flavor entirely.
4
5
6
Wash the rice, drain the water and put in a heat resistant container. Add C and cover with plastic wrap. Soak for approximately 30 minutes.Slice chicken meat, then put salt, pepper, sake from ingredient A and coat with cornstarch.Prepare vegetable as follows:Onion: slice thinlyMushroom: cut into bite sizeAsparagus: cut about 3 cm long diagonally
1
2
3
How to cook
C
B
● If stew soup cube is solid, please chop finely to make them dissolve easily.
※ This can be replaced with grated ginger.
Easy menu
ER-MD300_cook2_p101-105.indd 102 1/17/19 10:34 AM
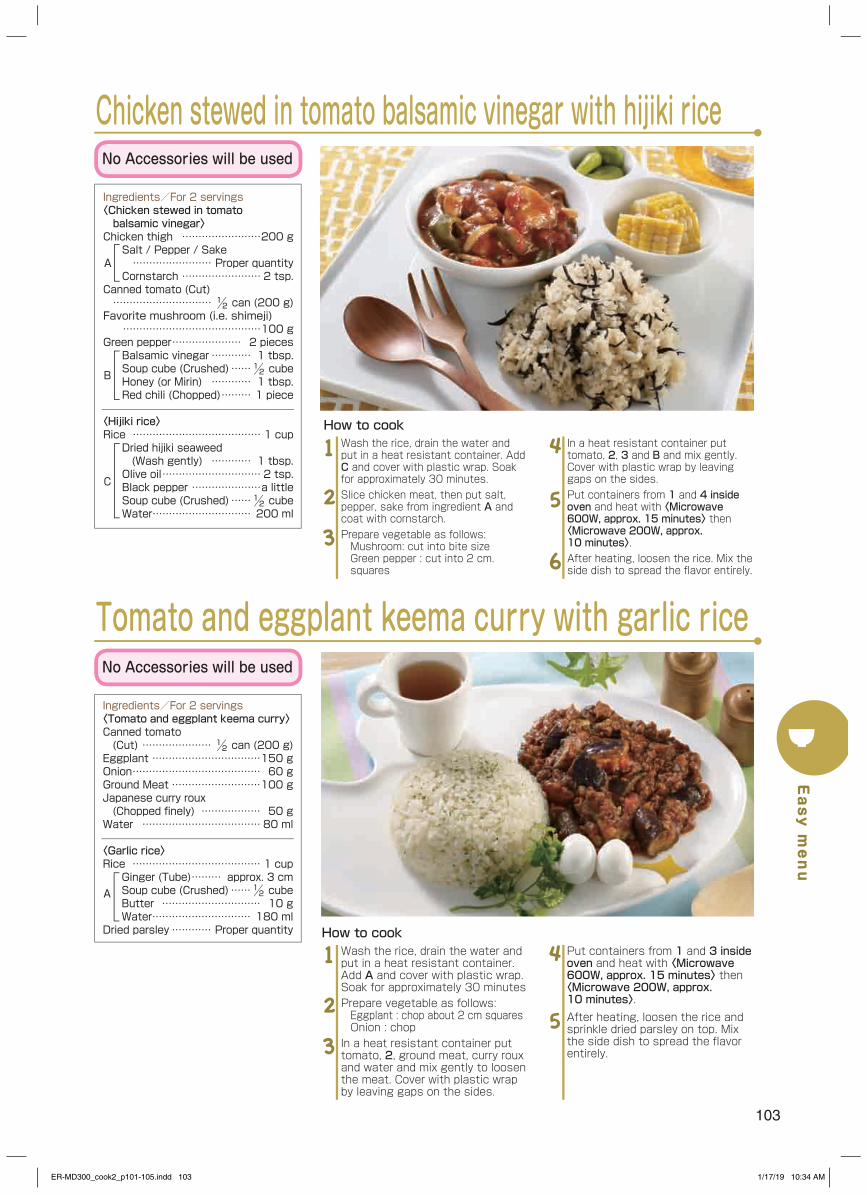
103
In a heat resistant container put tomato, 2, 3 and B and mix gently. Cover with plastic wrap by leaving gaps on the sides.Put containers from 1 and 4 inside oven and heat with 〈Microwave 600W, approx. 15 minutes〉 then 〈Microwave 200W, approx. 10 minutes〉.After heating, loosen the rice. Mix the side dish to spread the flavor entirely.
4
5
6
Ingredients/For 2 servings〈Chicken stewed in tomato balsamic vinegar〉Chicken thigh ……………………200 gSalt / Pepper / Sake …………………… Proper quantityCornstarch …………………… 2 tsp.
Canned tomato (Cut) …………………………½ can (200 g)Favorite mushroom (i.e. shimeji) ……………………………………100 gGreen pepper ………………… 2 piecesBalsamic vinegar ………… 1 tbsp.Soup cube (Crushed) ……½ cubeHoney (or Mirin) ………… 1 tbsp.Red chili (Chopped) ……… 1 piece
〈Hijiki rice〉Rice ………………………………… 1 cupDried hijiki seaweed (Wash gently) ………… 1 tbsp.Olive oil ………………………… 2 tsp.Black pepper …………………a littleSoup cube (Crushed) ……½ cubeWater ………………………… 200 ml
Wash the rice, drain the water and put in a heat resistant container. Add C and cover with plastic wrap. Soak for approximately 30 minutes.Slice chicken meat, then put salt, pepper, sake from ingredient A and coat with cornstarch.Prepare vegetable as follows:Mushroom: cut into bite sizeGreen pepper : cut into 2 cm. squares
1
2
3
How to cook
A
B
C
Chicken stewed in tomato balsamic vinegar with hijiki rice
Put containers from 1 and 3 inside oven and heat with 〈Microwave 600W, approx. 15 minutes〉 then 〈Microwave 200W, approx. 10 minutes〉.After heating, loosen the rice and sprinkle dried parsley on top. Mix the side dish to spread the flavor entirely.
4
5
Wash the rice, drain the water and put in a heat resistant container. Add A and cover with plastic wrap. Soak for approximately 30 minutesPrepare vegetable as follows:Eggplant : chop about 2 cm squaresOnion : chopIn a heat resistant container put tomato, 2, ground meat, curry roux and water and mix gently to loosen the meat. Cover with plastic wrap by leaving gaps on the sides.
1
2
3
Ingredients/For 2 servings〈Tomato and eggplant keema curry〉Canned tomato (Cut) …………………½ can (200 g)Eggplant ……………………………150 gOnion ………………………………… 60 gGround Meat ………………………100 gJapanese curry roux (Chopped finely) ……………… 50 gWater ……………………………… 80 ml
〈Garlic rice〉Rice ………………………………… 1 cupGinger (Tube) ……… approx. 3 cmSoup cube (Crushed) ……½ cubeButter ………………………… 10 gWater ………………………… 180 ml
Dried parsley ………… Proper quantity How to cook
A
Tomato and eggplant keema curry with garlic rice
No Accessories will be used
No Accessories will be used
Easy menu
ER-MD300_cook2_p101-105.indd 103 1/17/19 10:34 AM
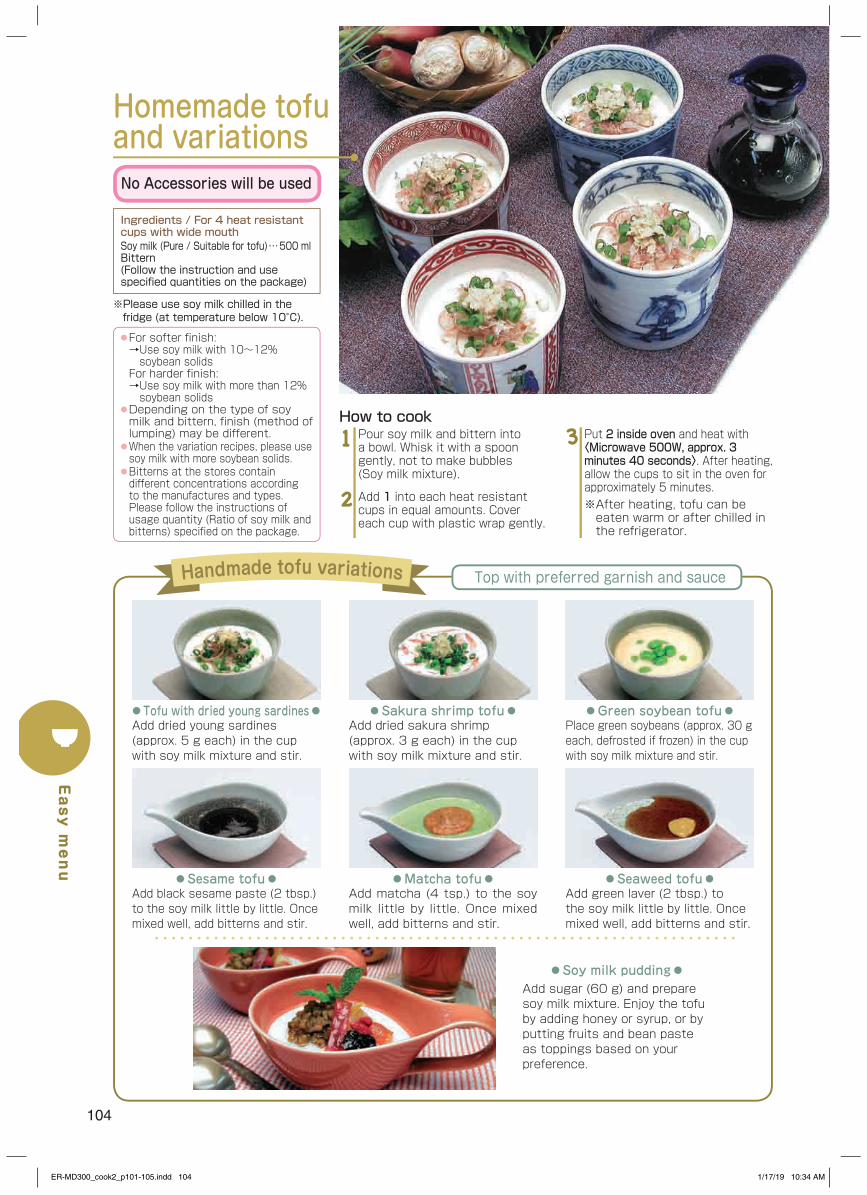
104
Handmade tofu variations
● Tofu with dried young sardines ●Add dried young sardines (approx. 5 g each) in the cup with soy milk mixture and stir.
● Sakura shrimp tofu ●Add dried sakura shrimp (approx. 3 g each) in the cup with soy milk mixture and stir.
● Green soybean tofu ●Place green soybeans (approx. 30 g each, defrosted if frozen) in the cup with soy milk mixture and stir.
● Sesame tofu ●Add black sesame paste (2 tbsp.) to the soy milk little by little. Once mixed well, add bitterns and stir.
● Matcha tofu ●Add matcha (4 tsp.) to the soy milk little by little. Once mixed well, add bitterns and stir.
● Seaweed tofu ●Add green laver (2 tbsp.) to the soy milk little by little. Once mixed well, add bitterns and stir.
Homemade tofu and variations
Ingredients / For 4 heat resistant cups with wide mouthSoy milk (Pure / Suitable for tofu) …500 mlBittern(Follow the instruction and use specified quantities on the package)
Pour soy milk and bittern into a bowl. Whisk it with a spoon gently, not to make bubbles (Soy milk mixture).
Add 1 into each heat resistant cups in equal amounts. Cover each cup with plastic wrap gently.
1
2
Put 2 inside oven and heat with 〈Microwave 500W, approx. 3 minutes 40 seconds〉. After heating, allow the cups to sit in the oven for approximately 5 minutes.※ After heating, tofu can be eaten warm or after chilled in the refrigerator.
3How to cook
※ Please use soy milk chilled in the fridge (at temperature below 10°C).
No Accessories will be used
● For softer finish: →Use soy milk with 10~12% soybean solidsFor harder finish:→ Use soy milk with more than 12% soybean solids
● Depending on the type of soy milk and bittern, finish (method of lumping) may be different.
● When the variation recipes, please use soy milk with more soybean solids.
● Bitterns at the stores contain different concentrations according to the manufactures and types. Please follow the instructions of usage quantity (Ratio of soy milk and bitterns) specified on the package.
Top with preferred garnish and sauce
● Soy milk pudding ●Add sugar (60 g) and prepare soy milk mixture. Enjoy the tofu by adding honey or syrup, or by putting fruits and bean paste as toppings based on your preference.
Easy menu
ER-MD300_cook2_p101-105.indd 104 1/17/19 10:34 AM
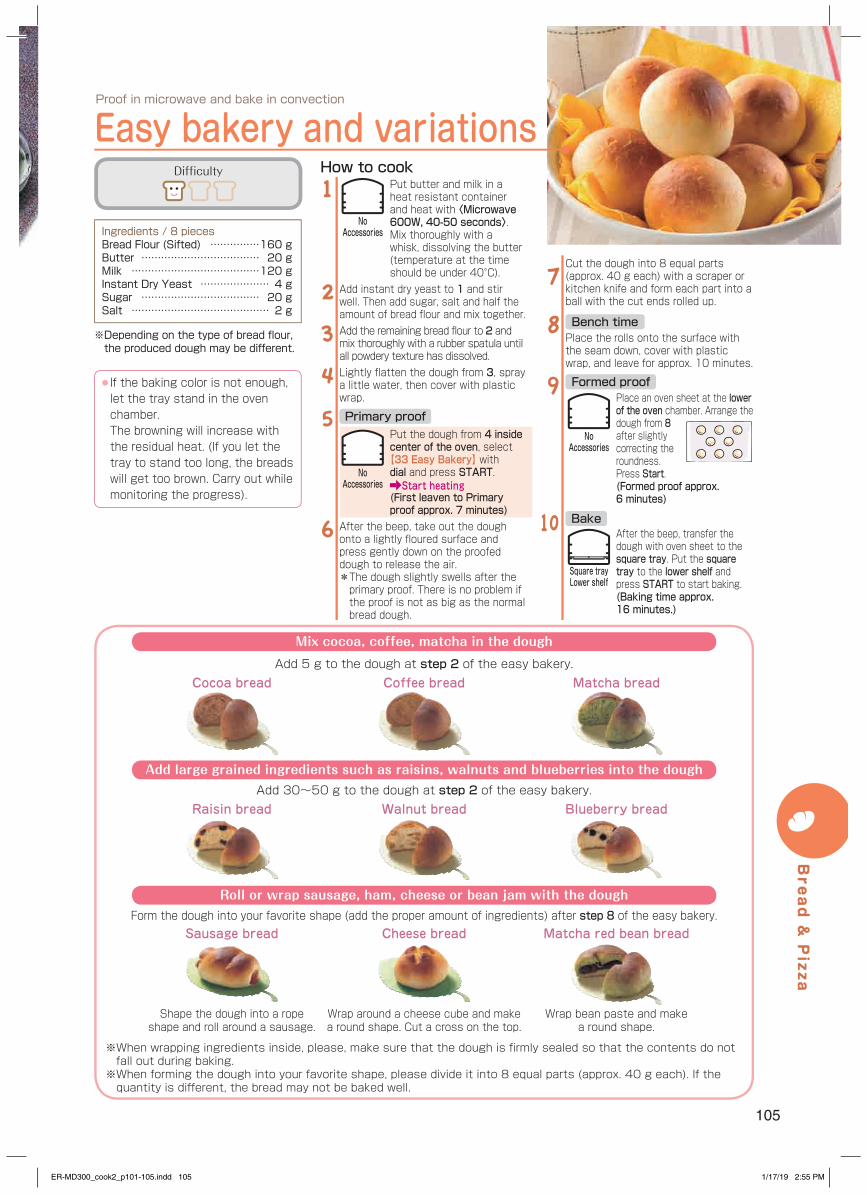
105
Ingredients / 8 piecesBread Flour (Sifted) ……………160 gButter ……………………………… 20 gMilk …………………………………120 gInstant Dry Yeast ………………… 4 gSugar ……………………………… 20 gSalt …………………………………… 2 g
Easy bakery and variations
※ Depending on the type of bread flour, the produced dough may be different.
Put butter and milk in a heat resistant container and heat with 〈Microwave 600W, 40-50 seconds〉. Mix thoroughly with a whisk, dissolving the butter (temperature at the time should be under 40°C).
Add instant dry yeast to 1 and stir well. Then add sugar, salt and half the amount of bread flour and mix together.Add the remaining bread flour to 2 and mix thoroughly with a rubber spatula until all powdery texture has dissolved.Lightly flatten the dough from 3, spray a little water, then cover with plastic wrap.
Put the dough from 4 inside center of the oven, select 【33 Easy Bakery】 with dial and press START. Start heating
(First leaven to Primary proof approx. 7 minutes)
After the beep, take out the dough onto a lightly floured surface and press gently down on the proofed dough to release the air.* The dough slightly swells after the primary proof. There is no problem if the proof is not as big as the normal bread dough.
1
2
3
4
5 Primary proof
6
Cut the dough into 8 equal parts (approx. 40 g each) with a scraper or kitchen knife and form each part into a ball with the cut ends rolled up.
Place the rolls onto the surface with the seam down, cover with plastic wrap, and leave for approx. 10 minutes.
Place an oven sheet at the lower of the oven chamber. Arrange the dough from 8 after slightly correcting the roundness. Press Start.(Formed proof approx. 6 minutes)
After the beep, transfer the dough with oven sheet to the square tray. Put the square tray to the lower shelf and press START to start baking.(Baking time approx. 16 minutes.)
7
8 Bench time
9 Formed proof
10 Bake
Cocoa breadAdd 5 g to the dough at step 2 of the easy bakery.
Add 30~50 g to the dough at step 2 of the easy bakery.
Form the dough into your favorite shape (add the proper amount of ingredients) after step 8 of the easy bakery.
Shape the dough into a rope shape and roll around a sausage.
※ When wrapping ingredients inside, please, make sure that the dough is firmly sealed so that the contents do not fall out during baking.※ When forming the dough into your favorite shape, please divide it into 8 equal parts (approx. 40 g each). If the quantity is different, the bread may not be baked well.
Matcha breadCoffee bread
Add large grained ingredients such as raisins, walnuts and blueberries into the dough
Raisin bread Walnut bread Blueberry bread
Roll or wrap sausage, ham, cheese or bean jam with the dough
Sausage bread
Wrap around a cheese cube and make a round shape. Cut a cross on the top.
Cheese bread
Wrap bean paste and make a round shape.
Matcha red bean bread
Mix cocoa, coffee, matcha in the dough
● If the baking color is not enough, let the tray stand in the oven chamber.The browning will increase with the residual heat. (If you let the tray to stand too long, the breads will get too brown. Carry out while monitoring the progress).
How to cook
Square trayLower shelf
NoAccessories
NoAccessories
Difficulty
NoAccessories
Proof in microwave and bake in convection
Bread & Pizza
ER-MD300_cook2_p101-105.indd 105 1/17/19 2:55 PM
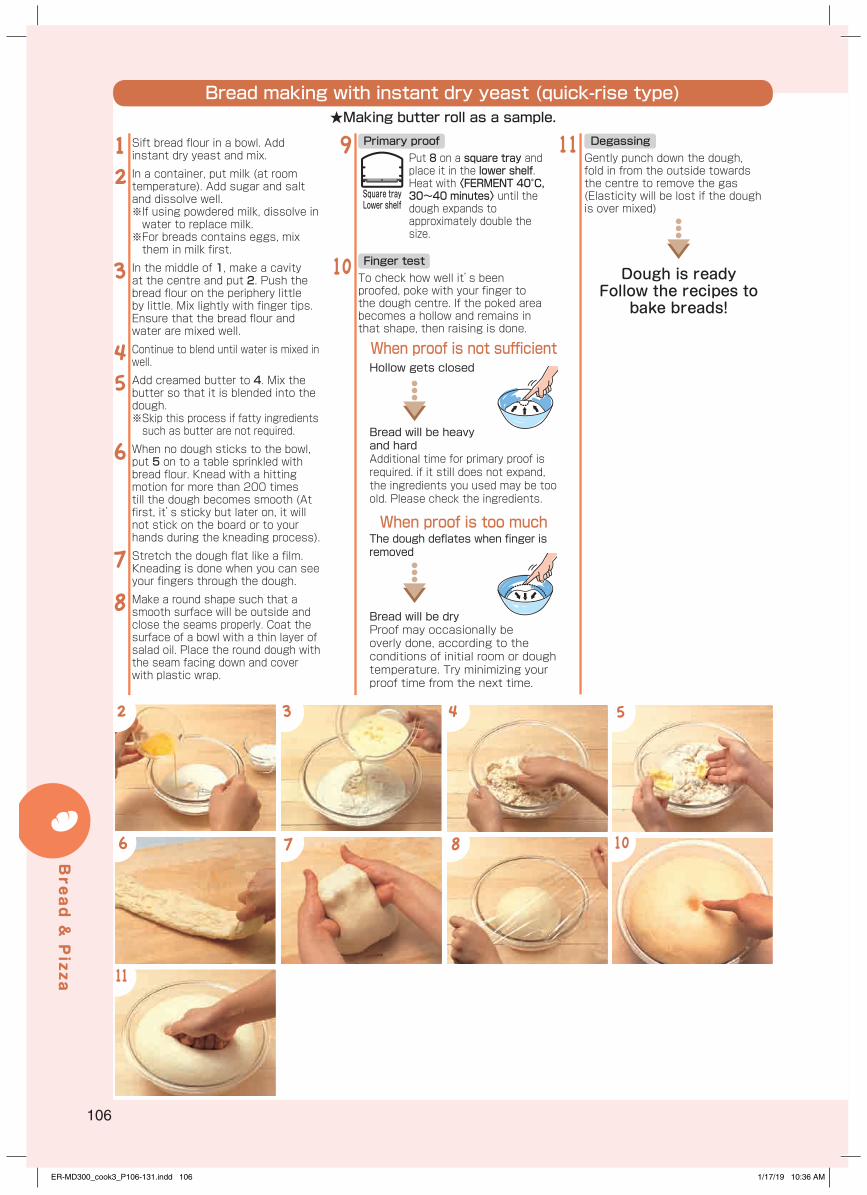
106
Sift bread flour in a bowl. Add instant dry yeast and mix.In a container, put milk (at room temperature). Add sugar and salt and dissolve well.※ If using powdered milk, dissolve in water to replace milk.※ For breads contains eggs, mix them in milk first.In the middle of 1, make a cavity at the centre and put 2. Push the bread flour on the periphery little by little. Mix lightly with finger tips. Ensure that the bread flour and water are mixed well.Continue to blend until water is mixed in well.Add creamed butter to 4. Mix the butter so that it is blended into the dough.※ Skip this process if fatty ingredients such as butter are not required.
When no dough sticks to the bowl, put 5 on to a table sprinkled with bread flour. Knead with a hitting motion for more than 200 times till the dough becomes smooth (At first, it’s sticky but later on, it will not stick on the board or to your hands during the kneading process).Stretch the dough flat like a film. Kneading is done when you can see your fingers through the dough.Make a round shape such that a smooth surface will be outside and close the seams properly. Coat the surface of a bowl with a thin layer of salad oil. Place the round dough with the seam facing down and cover with plastic wrap.
12
3
45
6
7
8
Put 8 on a square tray and place it in the lower shelf. Heat with 〈FERMENT 40°C,30~40 minutes〉 until the dough expands to approximately double the size.
To check how well it’s been proofed, poke with your finger to the dough centre. If the poked area becomes a hollow and remains in that shape, then raising is done.
9 Primary proof
10 Finger test
Gently punch down the dough, fold in from the outside towards the centre to remove the gas (Elasticity will be lost if the dough is over mixed)
11 Degassing
Dough is readyFollow the recipes to
bake breads!
When proof is not sufficientHollow gets closed
Bread will be heavy and hardAdditional time for primary proof is required. if it still does not expand, the ingredients you used may be too old. Please check the ingredients.
When proof is too muchThe dough deflates when finger is removed
Bread will be dryProof may occasionally be overly done, according to the conditions of initial room or dough temperature. Try minimizing your proof time from the next time.
Bread making with instant dry yeast (quick-rise type)★Making butter roll as a sample.
Square trayLower shelf
11
1087
543
6
2
Bread & Pizza
ER-MD300_cook3_P106-131.indd 106 1/17/19 10:36 AM
107
Tips for baking bread
It is not clear how much kneading is enough
The inside texture is rough
The whole bread is hard and the volume is small
Skin is hard
The finish of the bread changes each time
The dough does not settle even after kneading for a long time
It is not clear if formed proof is enough or not
Coupe (cutting the surface) makes the dough shrink
Why lukewarm water is used?
Stretch the dough little by little with hand. It’s done when you can see your fi ngers through the dough.However, the properties will be diff erent based on the dough, some doughs cannot be stretched to the extent it becomes transparent. Knead to the state where the dough becomes glossy and easy to stretch.
The texture is likely to be rough if the gas removal is insuffi cient during the forming process and if the proof time is too long.Especially for the breads baked in a mold, when the amount of the dough is less compared to the mold, the over proofed dough will result the rough texture. On the other hand, if the amount of the dough is more compared to the mold, this can result in insuffi cient proof giving a dense dark color.
If the moisture is insuffi cient, the dough becomes hard and it does not grow in size.Other reasons are:Yeast died because the temperature of water mixed to the fl our were too high.Ingredients were not measured accurately (not enough yeast, too much salt, too much bread fl our, etc.)Proof was not enough or too much.
The skin become hard if the surface of the dough dries up before baking or if the oven temperature is low and took long time to bake.* Bread’s skins tend to get hard when cooled down.Keep the bread in a plastic bag to prevent the bread from drying.
Height, shape and color can be infl uenced by the room temperature, and temperature, quality and portion of ingredient (fl our, water, etc.). Even breads prepared and baked using the same method, you might see the diff erences in the way of proof and browning.
The dough will take more time if the dough contains ingredients such as fats or milk in excess.Do not add more fl our just because the dough is sticky. Usually it’s because kneading is not enough. Knead well till the dough settles down.However, if the water temperature is high during the summer, the stickiness will not go away even when the dough is well knead.
The dough should expand double in size. (There may be cases where proof may not reach double the size depending on the mixture and the state of proof)When the surface of the dough is gently touched, soft elasticity such that the marks made by the fi nger slowly return back indicates it’s complete.If the proof time is too short (insuffi cient proof), the power of proof will be higher than the elongation of the dough. This may cause insuffi cient proof or bursting of the bottom or the sides. In addition, if the proof time is too long (excess proof), the dough cannot be expand in the oven any more. This causes the texture of the bread will become rough with a thick skin.
The dough is proofed too much. The state of proof diff ers depending on the temperature during proof or ingredient. Following the proof time in the recipe, sometimes it causes excess proof.Check the state of dough frequently and adjust time.
The ideal temperature for the yeast’s activity is 35-40° C. The activity stops below 4° C. On the other hand yeasts die when the water temperature is over 60° C so the extra attention is required.
★Preparing the dough
★Baked breads
Handling the doughHandle the dough with care. When dividing, use the kitchen knife, scraper or card to cut and separate. (Do not tear with hands)While rising, bench time, formed rising, or preheating, please make sure the dough does not dry out.Depending on the room temperature and humidity, increase the moisture content (milk or water) by approximately 5 g.
Bread & Pizza
ER-MD300_cook3_P106-131.indd 107 1/17/19 10:36 AM
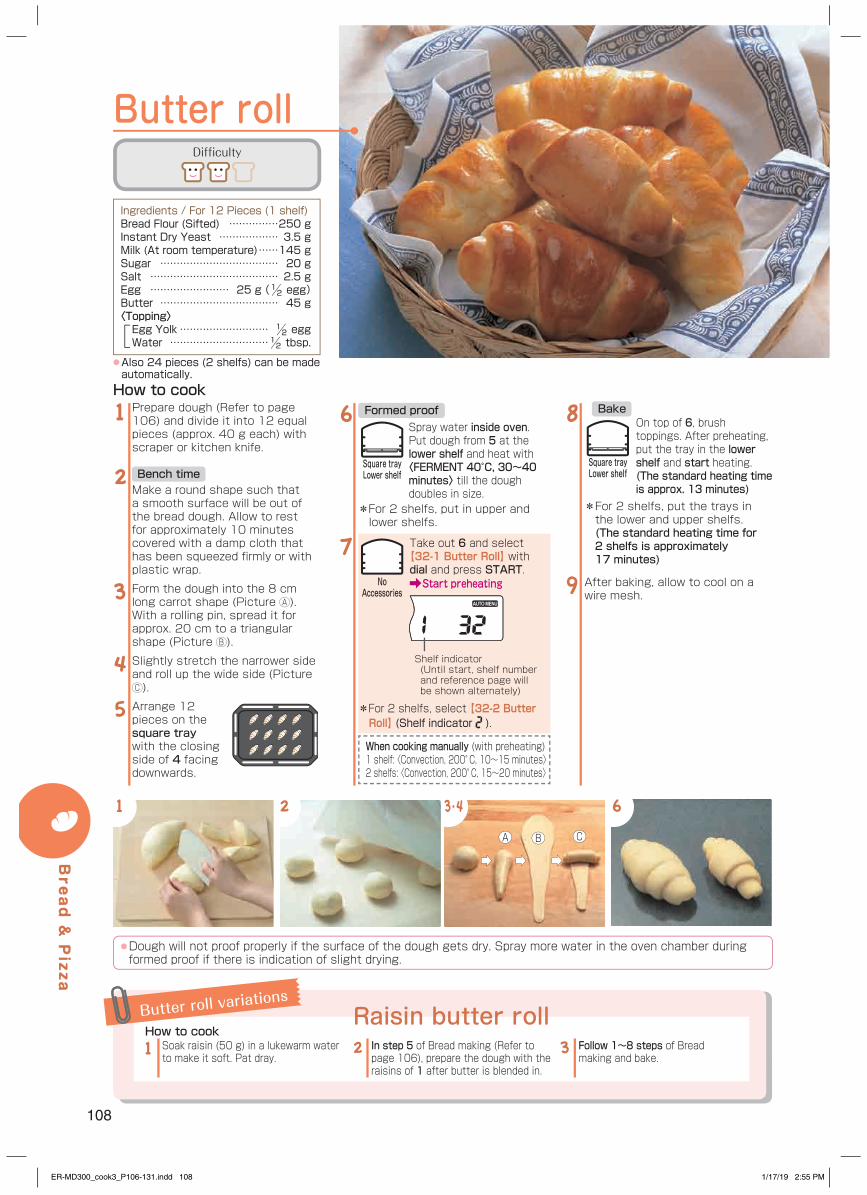
108
63・42
Spray water inside oven. Put dough from 5 at the lower shelf and heat with 〈FERMENT 40°C, 30~40minutes〉 till the dough doubles in size.
* For 2 shelfs, put in upper and lower shelfs.
Take out 6 and select 【32-1 Butter Roll】 with dial and press START. Start preheating
* For 2 shelfs, select 【32-2 Butter Roll】 (Shelf indicator ).
When cooking manually (with preheating)1 shelf: 〈Convection, 200° C, 10~15 minutes〉2 shelfs: 〈Convection, 200° C, 15~20 minutes〉
6 Formed proof
7
Prepare dough (Refer to page 106) and divide it into 12 equal pieces (approx. 40 g each) with scraper or kitchen knife.
Make a round shape such that a smooth surface will be out of the bread dough. Allow to rest for approximately 10 minutes covered with a damp cloth that has been squeezed firmly or with plastic wrap.
Form the dough into the 8 cm long carrot shape (Picture A ). With a rolling pin, spread it for approx. 20 cm to a triangular shape (Picture B ).
Slightly stretch the narrower side and roll up the wide side (Picture C ).
Arrange 12 pieces on the square tray with the closing side of 4 facing downwards.
1
2 Bench time
3
4
5
On top of 6, brush toppings. After preheating, put the tray in the lower shelf and start heating.(The standard heating time is approx. 13 minutes)
* For 2 shelfs, put the trays in the lower and upper shelfs. (The standard heating time for 2 shelfs is approximately 17 minutes)
After baking, allow to cool on a wire mesh.
8 Bake
9
How to cook
Butter roll
Square trayLower shelf
Square trayLower shelf
Ingredients / For 12 Pieces (1 shelf)Bread Flour (Sifted) ……………250 gInstant Dry Yeast ……………… 3.5 gMilk (At room temperature) ……145 gSugar ……………………………… 20 gSalt ………………………………… 2.5 gEgg …………………… 25 g (½ egg)Butter ……………………………… 45 g〈Topping〉Egg Yolk ……………………… ½ eggWater …………………………½ tbsp.
● Dough will not proof properly if the surface of the dough gets dry. Spray more water in the oven chamber during formed proof if there is indication of slight drying.
Difficulty
A CB
Butter roll variations
Raisin butter rollIn step 5 of Bread making (Refer to page 106), prepare the dough with the raisins of 1 after butter is blended in.
2Soak raisin (50 g) in a lukewarm water to make it soft. Pat dray.
1How to cook
NoAccessories
● Also 24 pieces (2 shelfs) can be made automatically.
Follow 1~8 steps of Bread making and bake.
3
1
Shelf indicator(Until start, shelf number and reference page will be shown alternately)
Bread & Pizza
ER-MD300_cook3_P106-131.indd 108 1/17/19 2:55 PM
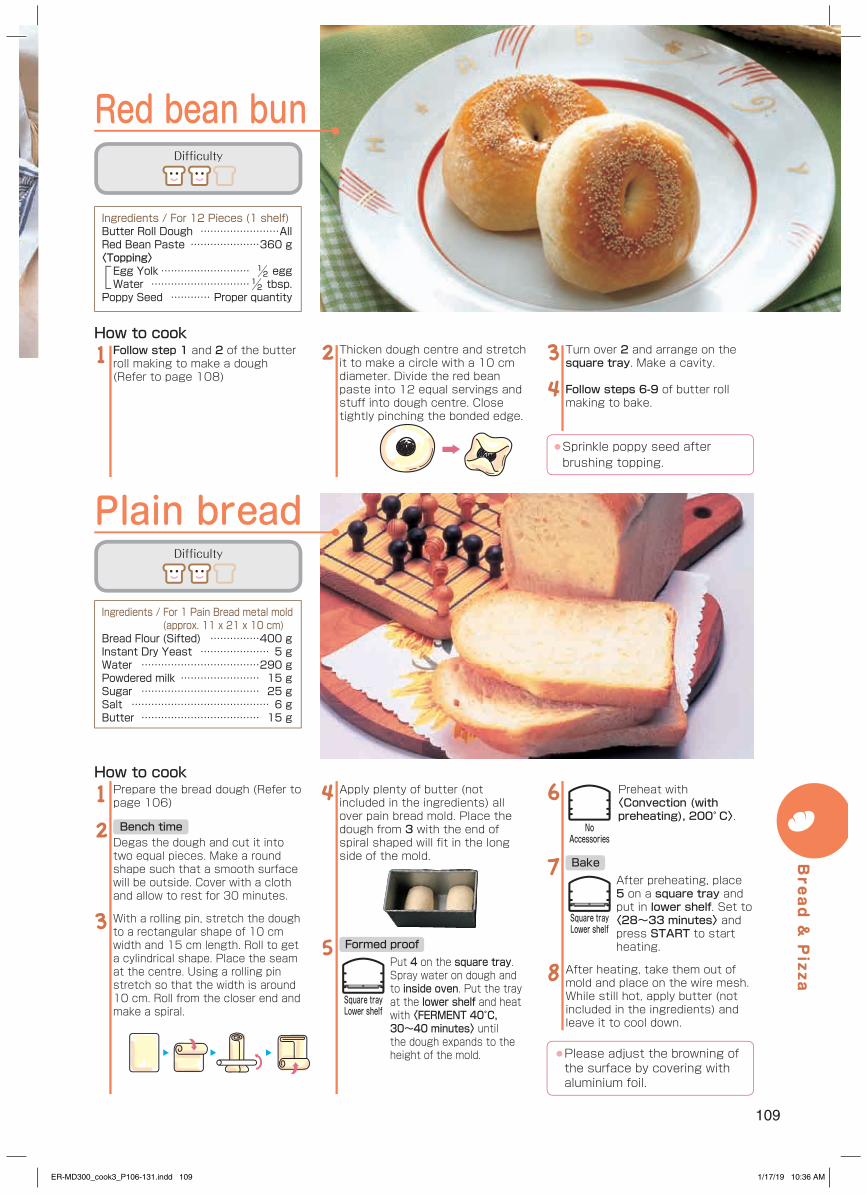
109
Ingredients / For 1 Pain Bread metal mold (approx. 11 x 21 x 10 cm)
Bread Flour (Sifted) ……………400 gInstant Dry Yeast ………………… 5 gWater ………………………………290 gPowdered milk …………………… 15 gSugar ……………………………… 25 gSalt …………………………………… 6 gButter ……………………………… 15 g
Apply plenty of butter (not included in the ingredients) all over pain bread mold. Place the dough from 3 with the end of spiral shaped will fit in the long side of the mold.
Put 4 on the square tray. Spray water on dough and to inside oven. Put the tray at the lower shelf and heat with 〈FERMENT 40°C, 30~40 minutes〉 until the dough expands to the height of the mold.
4
5 Formed proof
Preheat with 〈Convection (with preheating), 200° C〉.
After preheating, place 5 on a square tray and put in lower shelf. Set to 〈28~33 minutes〉 and press START to start heating.
After heating, take them out of mold and place on the wire mesh. While still hot, apply butter (not included in the ingredients) and leave it to cool down.
6
7 Bake
8
Plain bread
Prepare the bread dough (Refer to page 106)
Degas the dough and cut it into two equal pieces. Make a round shape such that a smooth surface will be outside. Cover with a cloth and allow to rest for 30 minutes.
With a rolling pin, stretch the dough to a rectangular shape of 10 cm width and 15 cm length. Roll to get a cylindrical shape. Place the seam at the centre. Using a rolling pin stretch so that the width is around 10 cm. Roll from the closer end and make a spiral.
1
2 Bench time
3
How to cook
Square trayLower shelf
Square trayLower shelf
Difficulty
Difficulty
Red bean bun
Ingredients / For 12 Pieces (1 shelf)Butter Roll Dough ……………………AllRed Bean Paste …………………360 g〈Topping〉Egg Yolk ……………………… ½ eggWater …………………………½ tbsp.
Poppy Seed ………… Proper quantity
Thicken dough centre and stretch it to make a circle with a 10 cm diameter. Divide the red bean paste into 12 equal servings and stuff into dough centre. Close tightly pinching the bonded edge.
2Follow step 1 and 2 of the butter roll making to make a dough (Refer to page 108)
1How to cook
Turn over 2 and arrange on the square tray. Make a cavity.
Follow steps 6-9 of butter roll making to bake.
3
4
● Sprinkle poppy seed after brushing topping.
NoAccessories
● Please adjust the browning of the surface by covering with aluminium foil.
Bread & Pizza
ER-MD300_cook3_P106-131.indd 109 1/17/19 10:36 AM
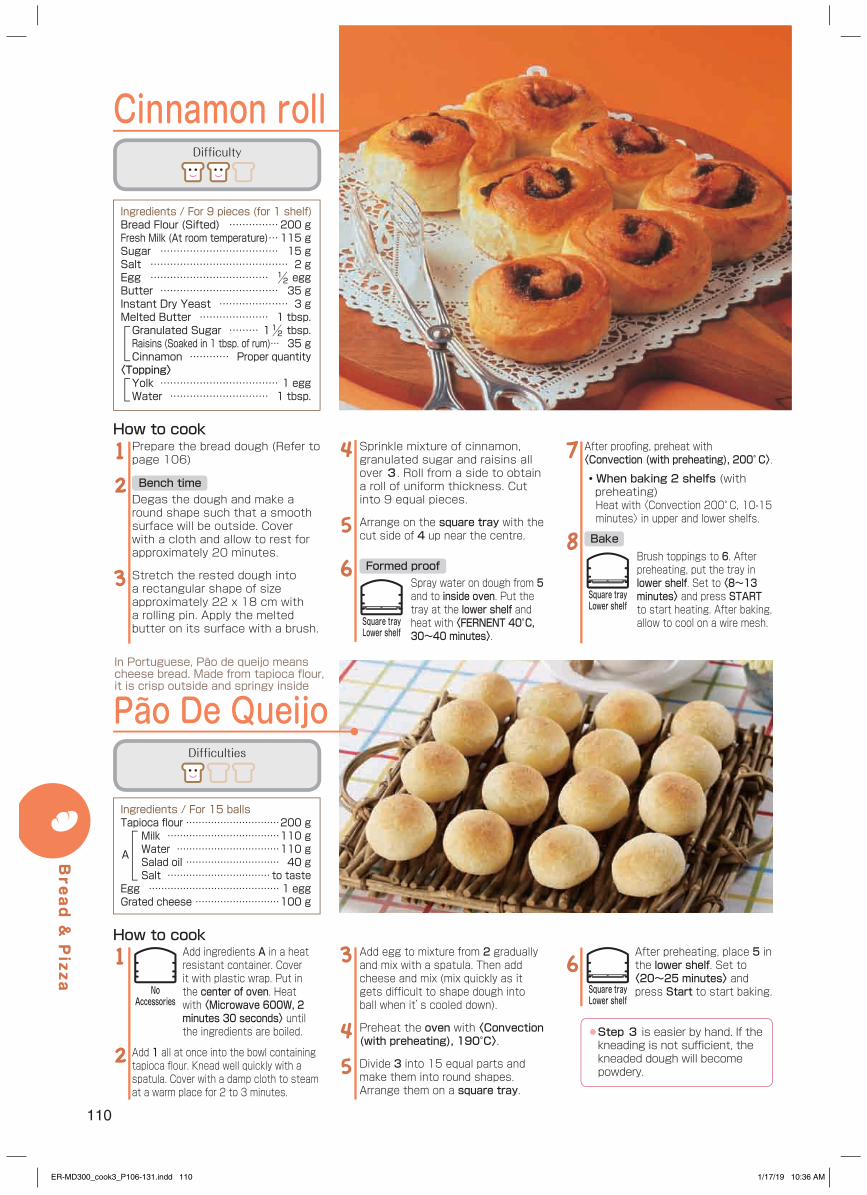
110
Cinnamon roll
Ingredients / For 9 pieces (for 1 shelf)Bread Flour (Sifted) ……………200 gFresh Milk (At room temperature) …115 gSugar ……………………………… 15 gSalt …………………………………… 2 gEgg ……………………………… ½ eggButter ……………………………… 35 gInstant Dry Yeast ………………… 3 gMelted Butter ………………… 1 tbsp.Granulated Sugar ……… 1½ tbsp.Raisins (Soaked in 1 tbsp. of rum) … 35 gCinnamon ………… Proper quantity
〈Topping〉Yolk ……………………………… 1 eggWater ………………………… 1 tbsp.
Sprinkle mixture of cinnamon, granulated sugar and raisins all over 3. Roll from a side to obtain a roll of uniform thickness. Cut into 9 equal pieces.
Arrange on the square tray with the cut side of 4 up near the centre.
Spray water on dough from 5 and to inside oven. Put the tray at the lower shelf and heat with 〈FERNENT 40°C, 30~40 minutes〉.
4
5
6 Formed proof
After proofing, preheat with 〈Convection (with preheating), 200° C〉.
・ When baking 2 shelfs (with preheating)Heat with 〈Convection 200° C, 10-15 minutes〉 in upper and lower shelfs.
Brush toppings to 6. After preheating, put the tray in lower shelf. Set to 〈8~13 minutes〉 and press START to start heating. After baking, allow to cool on a wire mesh.
7
8 Bake
Square trayLower shelf
Square trayLower shelf
Prepare the bread dough (Refer to page 106)
Degas the dough and make a round shape such that a smooth surface will be outside. Cover with a cloth and allow to rest for approximately 20 minutes.
Stretch the rested dough into a rectangular shape of size approximately 22 x 18 cm with a rolling pin. Apply the melted butter on its surface with a brush.
12 Bench time
3
How to cook
Difficulty
Pão De Queijo
Ingredients / For 15 ballsTapioca flour …………………………200 g
Milk ………………………………110 gWater ……………………………110 gSalad oil ………………………… 40 gSalt …………………………… to taste
Egg …………………………………… 1 eggGrated cheese ………………………100 g
In Portuguese, Pão de queijo means cheese bread. Made from tapioca fl our, it is crisp outside and springy inside
A
Add egg to mixture from 2 gradually and mix with a spatula. Then add cheese and mix (mix quickly as it gets difficult to shape dough into ball when it’s cooled down).
Preheat the oven with 〈Convection (with preheating), 190°C〉.
Divide 3 into 15 equal parts and make them into round shapes. Arrange them on a square tray.
3
4
5
After preheating, place 5 in the lower shelf. Set to 〈20~25 minutes〉 and press Start to start baking.
6Add ingredients A in a heat resistant container. Cover it with plastic wrap. Put in the center of oven. Heat with 〈Microwave 600W, 2 minutes 30 seconds〉 until the ingredients are boiled.
Add 1 all at once into the bowl containing tapioca flour. Knead well quickly with a spatula. Cover with a damp cloth to steam at a warm place for 2 to 3 minutes.
1
2
How to cook
Square trayLower shelf
● Step 3 is easier by hand. If the kneading is not sufficient, the kneaded dough will become powdery.
NoAccessories
Difficulties
Bread & Pizza
ER-MD300_cook3_P106-131.indd 110 1/17/19 10:36 AM
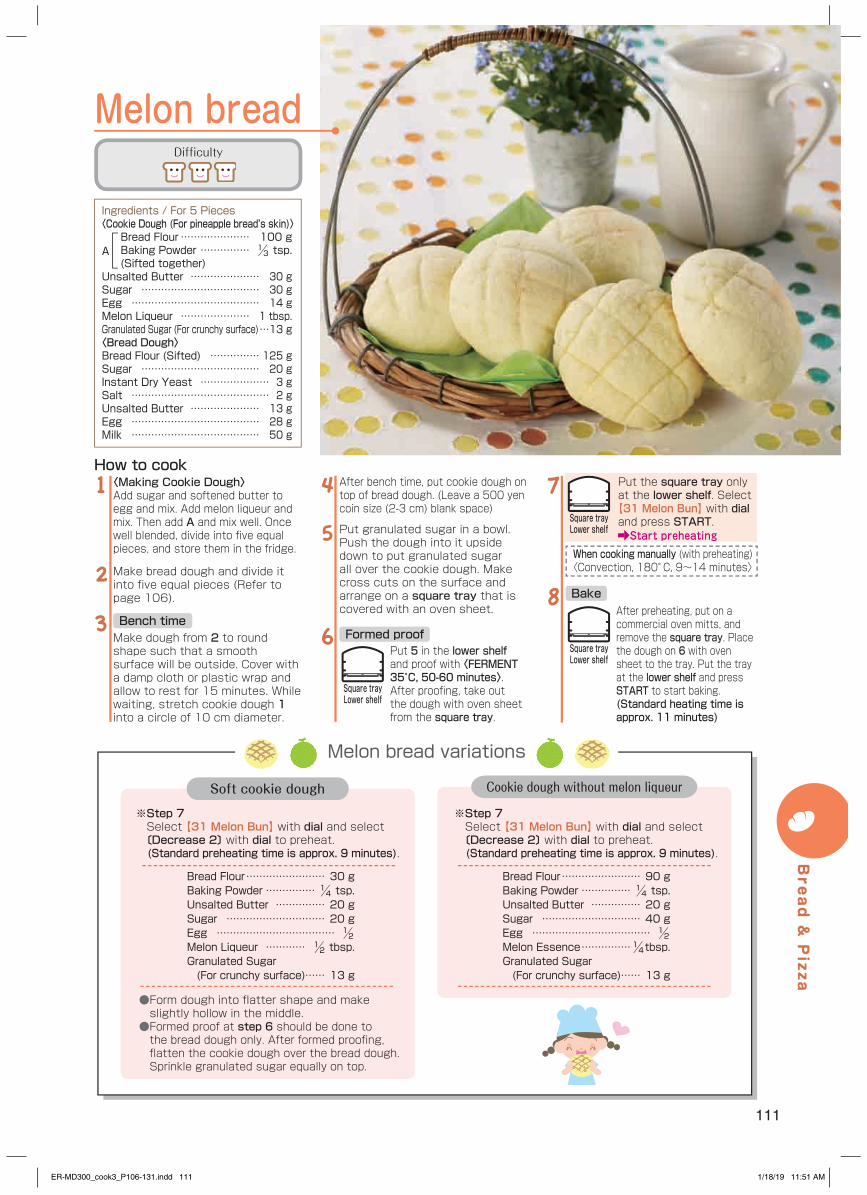
Melon bread variations
111
Soft cookie dough
Bread Flour …………………… 30 gBaking Powder ……………¼ tsp.Unsalted Butter …………… 20 gSugar ………………………… 20 gEgg ……………………………… ½ Melon Liqueur ………… ½ tbsp.Granulated Sugar (For crunchy surface)…… 13 g
Bread Flour …………………… 90 gBaking Powder ……………¼ tsp.Unsalted Butter …………… 20 gSugar ………………………… 40 gEgg ……………………………… ½ Melon Essence ……………¼ tbsp.Granulated Sugar (For crunchy surface)…… 13 g
● Form dough into flatter shape and make slightly hollow in the middle.● Formed proof at step 6 should be done to the bread dough only. After formed proofing, flatten the cookie dough over the bread dough. Sprinkle granulated sugar equally on top.
Cookie dough without melon liqueur
※ Step 7Select 【31 Melon Bun】 with dial and select 〔Decrease 2〕 with dial to preheat.(Standard preheating time is approx. 9 minutes).
※ Step 7Select 【31 Melon Bun】 with dial and select 〔Decrease 2〕 with dial to preheat.(Standard preheating time is approx. 9 minutes).
After bench time, put cookie dough on top of bread dough. (Leave a 500 yen coin size (2-3 cm) blank space)
Put granulated sugar in a bowl. Push the dough into it upside down to put granulated sugar all over the cookie dough. Make cross cuts on the surface and arrange on a square tray that is covered with an oven sheet.
Put 5 in the lower shelf and proof with 〈FERMENT 35°C, 50-60 minutes〉. After proofing, take out the dough with oven sheet from the square tray.
4
5
6 Formed proof
〈Making Cookie Dough〉Add sugar and softened butter to egg and mix. Add melon liqueur and mix. Then add A and mix well. Once well blended, divide into five equal pieces, and store them in the fridge.
Make bread dough and divide it into five equal pieces (Refer to page 106).
Make dough from 2 to round shape such that a smooth surface will be outside. Cover with a damp cloth or plastic wrap and allow to rest for 15 minutes. While waiting, stretch cookie dough 1 into a circle of 10 cm diameter.
1
2
Bench time3
Put the square tray only at the lower shelf. Select 【31 Melon Bun】 with dial and press START. Start preheating
When cooking manually (with preheating)〈Convection, 180° C, 9~14 minutes〉
After preheating, put on a commercial oven mitts, and remove the square tray. Place the dough on 6 with oven sheet to the tray. Put the tray at the lower shelf and press START to start baking.(Standard heating time is approx. 11 minutes)
7
8 Bake
How to cook
Melon bread
Ingredients / For 5 Pieces〈Cookie Dough (For pineapple bread’s skin)〉
Bread Flour ………………… 100 gBaking Powder …………… ⅓ tsp.(Sifted together)
Unsalted Butter ………………… 30 gSugar ……………………………… 30 gEgg ………………………………… 14 gMelon Liqueur ………………… 1 tbsp.Granulated Sugar (For crunchy surface) …13 g〈Bread Dough〉Bread Flour (Sifted) …………… 125 gSugar ……………………………… 20 gInstant Dry Yeast ………………… 3 gSalt …………………………………… 2 gUnsalted Butter ………………… 13 gEgg ………………………………… 28 gMilk ………………………………… 50 g
Square trayLower shelf
Square trayLower shelf
Difficulty
Square trayLower shelf
A
Bread & Pizza
ER-MD300_cook3_P106-131.indd 111 1/18/19 11:51 AM

112
Prepare the water supply cassette.
Dissolve salt in the water well.
Put special flour for French bread, powdered malt, and instant dry yeast into a bowl and blend them gently by hand.
Pour the water from step 2 into the mixture from step 3.Once blended into one, transfer to a board sprinkled thinly with flour.
Put your weight on your palm to knead and, from time to time, throw the dough onto the board from a lower position.
Try stretching the dough and kneading is completed when it turns into a thin layer (10~15 minutes). The dough’s kneading temperature should be approx. 24° C.
12 Making dough
3
4
5
6
Put dough from 6 in a bowl covered with salad oil. Cover with plastic wrap and proof at a place that is at a temperature of 25~27° C for approximately 120 minutes.
If you are proofing in the oven, put the dough on a square tray, and put the tray in the lower shelf. Proof with 〈FERMENT 30°C, 80~90 minutes〉 until the dough expands to approximately double its size.
Once the dough has risen a decent amount, do the finger test (refer to the step 10 of the bread making on page 106).Degas only to the extent of lightly correcting the shape and do not over degas.
Put 8 in a bowl, cover with plastic wrap again and proof at a place that is at a temperature of 25~27°C for approximately 60 minutes.
If you are proofing in the oven, put the dough on a square tray, and put the tray in the lower shelf. Proof with 〈FERMENT 30°C, 40~50 minutes〉 until the dough expands to approximately double its size.
7 Primary proof - first time
8
9 Primary proof - second time
How to cook
Ingredients / For 2 pieces of approx. 30 cm length
Special Flour for French Bread (Sifted) ………………………… 300 gPowdered Malt ……………………… 2 gInstant Dry Yeast ………………… 2 gWater …………………………… 190 gSalt …………………………………… 6 g
French Bread
※Standard heating time is approx. 11 minutes.
〈Things to prepare〉・Bread gage (or stick thermometer)・Canvas cloth・Oven sheet・Coupe knife・Board to transfer dough
Square trayLower shelf
Square trayLower shelf
Difficulty
Bread & Pizza
ER-MD300_cook3_P106-131.indd 112 1/17/19 10:36 AM
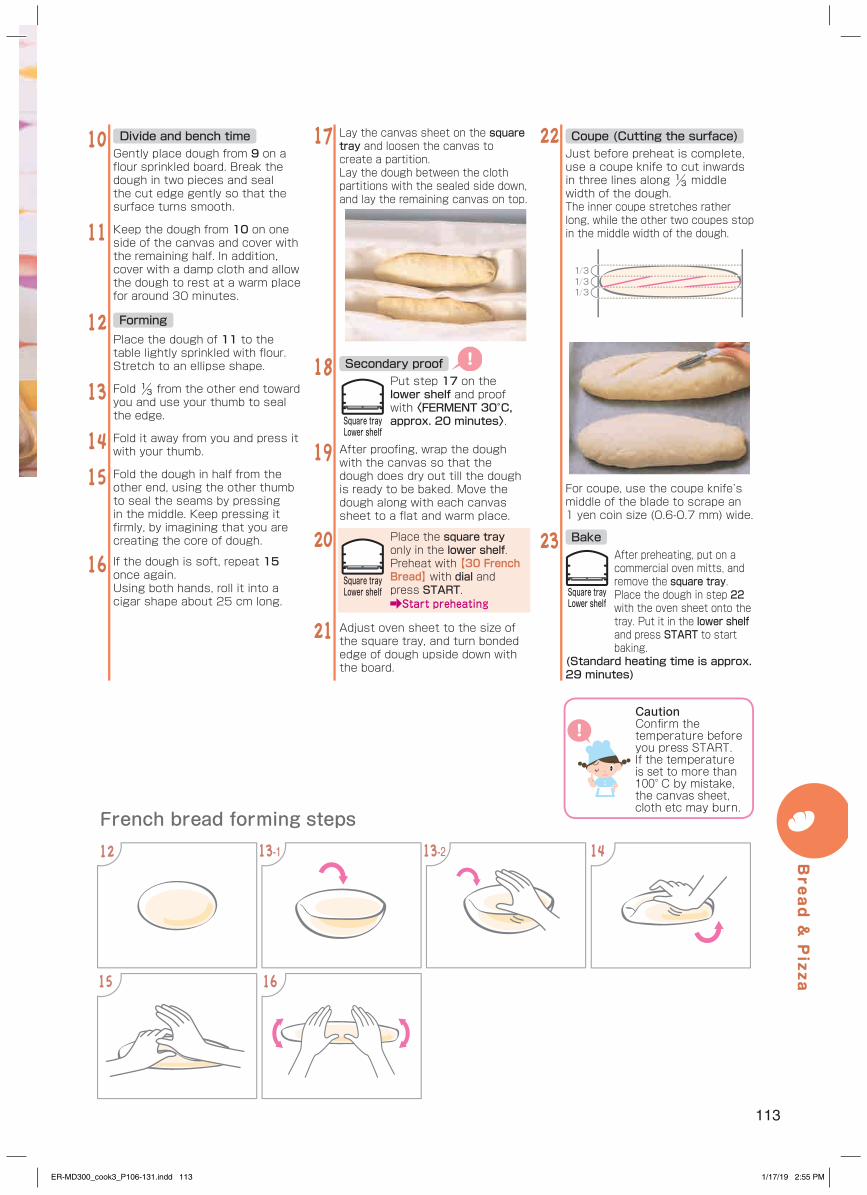
113
Gently place dough from 9 on a flour sprinkled board. Break the dough in two pieces and seal the cut edge gently so that the surface turns smooth.
Keep the dough from 10 on one side of the canvas and cover with the remaining half. In addition, cover with a damp cloth and allow the dough to rest at a warm place for around 30 minutes.
Place the dough of 11 to the table lightly sprinkled with flour. Stretch to an ellipse shape.
Fold ⅓ from the other end toward you and use your thumb to seal the edge.
Fold it away from you and press it with your thumb.
Fold the dough in half from the other end, using the other thumb to seal the seams by pressing in the middle. Keep pressing it firmly, by imagining that you are creating the core of dough.
If the dough is soft, repeat 15 once again.Using both hands, roll it into a cigar shape about 25 cm long.
10 Divide and bench time
11
12 Forming
13
14
15
16
Lay the canvas sheet on the square tray and loosen the canvas to create a partition.Lay the dough between the cloth partitions with the sealed side down, and lay the remaining canvas on top.
17
Put step 17 on the lower shelf and proof with 〈FERMENT 30°C, approx. 20 minutes〉.
After proofing, wrap the dough with the canvas so that the dough does dry out till the dough is ready to be baked. Move the dough along with each canvas sheet to a flat and warm place.
Place the square tray only in the lower shelf. Preheat with 【30 French Bread】 with dial and press START. Start preheating
Adjust oven sheet to the size of the square tray, and turn bonded edge of dough upside down with the board.
18 Secondary proof
19
20
21
Just before preheat is complete, use a coupe knife to cut inwards in three lines along ⅓ middle width of the dough.The inner coupe stretches rather long, while the other two coupes stop in the middle width of the dough.
22 Coupe (Cutting the surface)
For coupe, use the coupe knife’s middle of the blade to scrape an 1 yen coin size (0.6-0.7 mm) wide.
After preheating, put on a commercial oven mitts, and remove the square tray. Place the dough in step 22 with the oven sheet onto the tray. Put it in the lower shelf and press START to start baking.
(Standard heating time is approx. 29 minutes)
23 Bake
Square trayLower shelf
Square trayLower shelf
Square trayLower shelf
French bread forming steps
13-112 13-2 14
15 16
CautionConfi rm the temperature before you press START.If the temperature is set to more than 100° C by mistake, the canvas sheet, cloth etc may burn.
Bread & Pizza
ER-MD300_cook3_P106-131.indd 113 1/17/19 2:55 PM
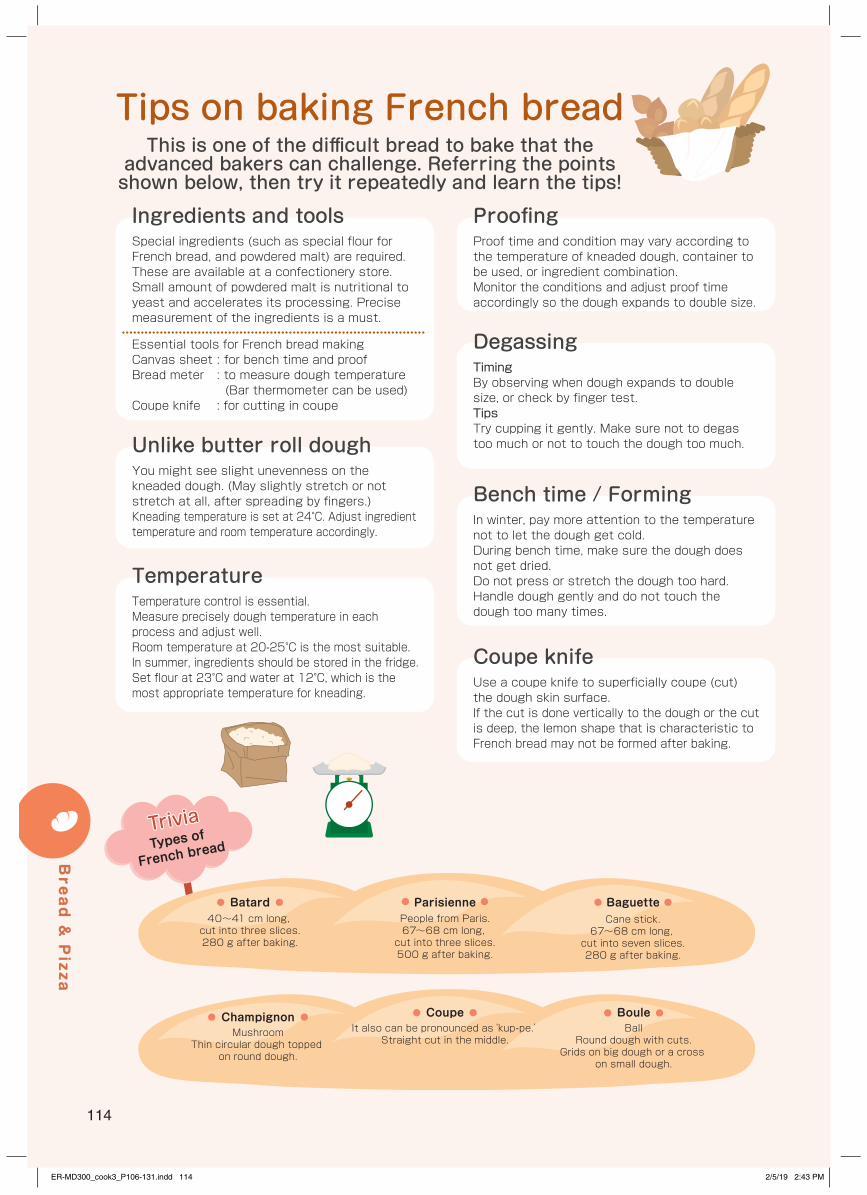
114
Bread & Pizza
Tips on baking French breadThis is one of the diffi cult bread to bake that the
advanced bakers can challenge. Referring the points shown below, then try it repeatedly and learn the tips!
Ingredients and toolsSpecial ingredients (such as special flour for French bread, and powdered malt) are required.These are available at a confectionery store.Small amount of powdered malt is nutritional to yeast and accelerates its processing. Precise measurement of the ingredients is a must.
Essential tools for French bread makingCanvas sheet : for bench time and proofBread meter : to measure dough temperature
(Bar thermometer can be used)Coupe knife : for cutting in coupe
Proofi ngProof time and condition may vary according to the temperature of kneaded dough, container to be used, or ingredient combination.Monitor the conditions and adjust proof time accordingly so the dough expands to double size.
DegassingTimingBy observing when dough expands to double size, or check by finger test.TipsTry cupping it gently. Make sure not to degas too much or not to touch the dough too much.
Bench time / FormingIn winter, pay more attention to the temperature not to let the dough get cold.During bench time, make sure the dough does not get dried.Do not press or stretch the dough too hard. Handle dough gently and do not touch the dough too many times.
Coupe knifeUse a coupe knife to superficially coupe (cut) the dough skin surface.If the cut is done vertically to the dough or the cut is deep, the lemon shape that is characteristic to French bread may not be formed after baking.
Unlike butter roll doughYou might see slight unevenness on the kneaded dough. (May slightly stretch or not stretch at all, after spreading by fingers.)Kneading temperature is set at 24°C. Adjust ingredient temperature and room temperature accordingly.
TemperatureTemperature control is essential.Measure precisely dough temperature in each process and adjust well.Room temperature at 20-25°C is the most suitable. In summer, ingredients should be stored in the fridge.Set flour at 23°C and water at 12°C, which is the most appropriate temperature for kneading.
BallRound dough with cuts.
Grids on big dough or a cross on small dough.
It also can be pronounced as‘kup-pe.’Straight cut in the middle.
People from Paris.67~68 cm long, cut into three slices.500 g after baking.
Cane stick.67~68 cm long, cut into seven slices.280 g after baking.
40~41 cm long, cut into three slices.280 g after baking.
MushroomThin circular dough topped
on round dough.
TriviaTriviaTypes o
f
French bread
Batard
Champignon Coupe Boule
Parisienne Baguette
ER-MD300_cook3_P106-131.indd 114 2/5/19 2:43 PM
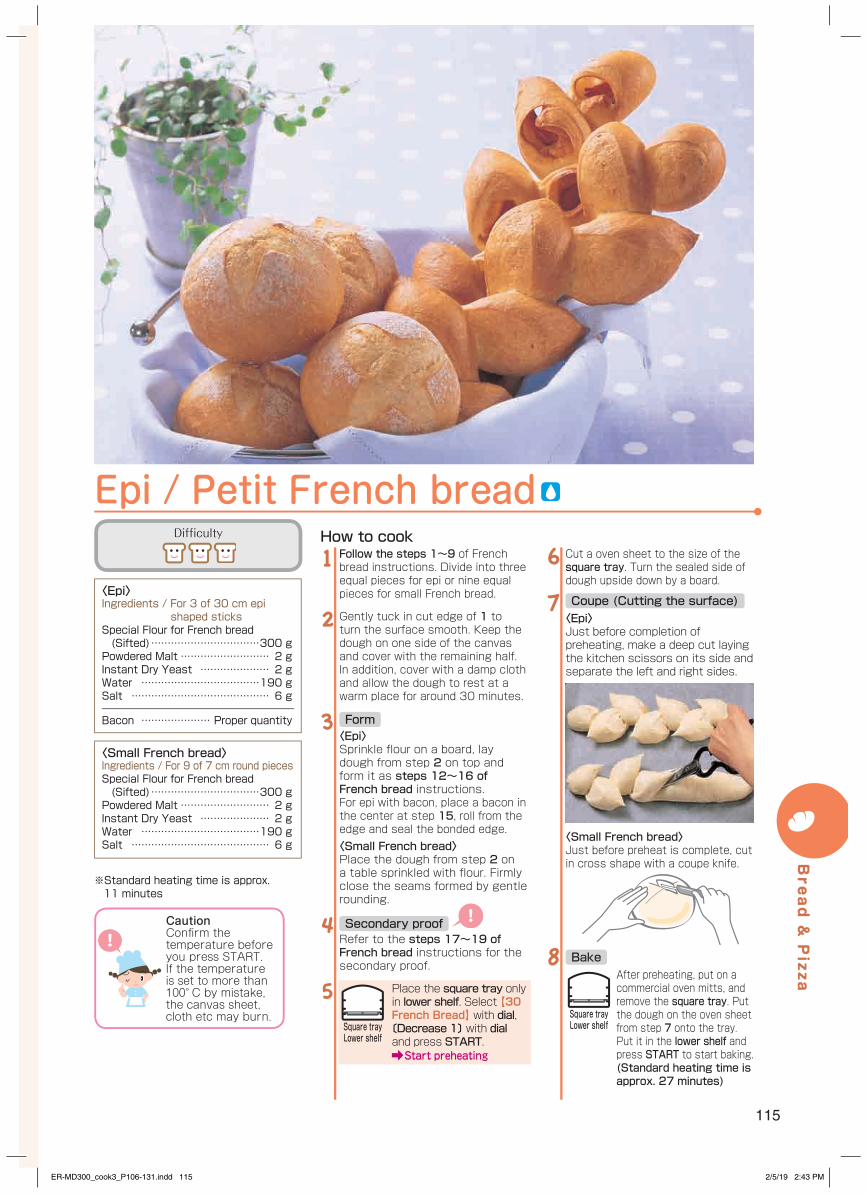
115
Follow the steps 1~9 of French bread instructions. Divide into three equal pieces for epi or nine equal pieces for small French bread.
Gently tuck in cut edge of 1 to turn the surface smooth. Keep the dough on one side of the canvas and cover with the remaining half. In addition, cover with a damp cloth and allow the dough to rest at a warm place for around 30 minutes.
〈Epi〉Sprinkle flour on a board, lay dough from step 2 on top and form it as steps 12~16 of French bread instructions.For epi with bacon, place a bacon in the center at step 15, roll from the edge and seal the bonded edge.〈Small French bread〉Place the dough from step 2 on a table sprinkled with flour. Firmly close the seams formed by gentle rounding.
Refer to the steps 17~19 of French bread instructions for the secondary proof.
Place the square tray only in lower shelf. Select 【30 French Bread】 with dial, 〔Decrease 1〕 with dial and press START.Start preheating
1
2
3 Form
4 Secondary proof
5
Cut a oven sheet to the size of the square tray. Turn the sealed side of dough upside down by a board.
〈Epi〉Just before completion of preheating, make a deep cut laying the kitchen scissors on its side and separate the left and right sides.
6
7 Coupe (Cutting the surface)
〈Small French bread〉Just before preheat is complete, cut in cross shape with a coupe knife.
After preheating, put on a commercial oven mitts, and remove the square tray. Put the dough on the oven sheet from step 7 onto the tray. Put it in the lower shelf and press START to start baking.(Standard heating time is approx. 27 minutes)
8 Bake
How to cook
Epi / Petit French bread
〈Small French bread〉Ingredients / For 9 of 7 cm round piecesSpecial Flour for French bread (Sifted) ……………………………300 gPowdered Malt ……………………… 2 gInstant Dry Yeast ………………… 2 gWater ………………………………190 gSalt …………………………………… 6 g
〈Epi〉Ingredients / For 3 of 30 cm epi
shaped sticksSpecial Flour for French bread (Sifted) ……………………………300 gPowdered Malt ……………………… 2 gInstant Dry Yeast ………………… 2 gWater ………………………………190 gSalt …………………………………… 6 g
Bacon ………………… Proper quantity
※Standard heating time is approx. 11 minutes
Square trayLower shelf
Square trayLower shelf
Difficulty
CautionConfi rm the temperature before you press START.If the temperature is set to more than 100° C by mistake, the canvas sheet, cloth etc may burn.
Bread & Pizza
ER-MD300_cook3_P106-131.indd 115 2/5/19 2:43 PM
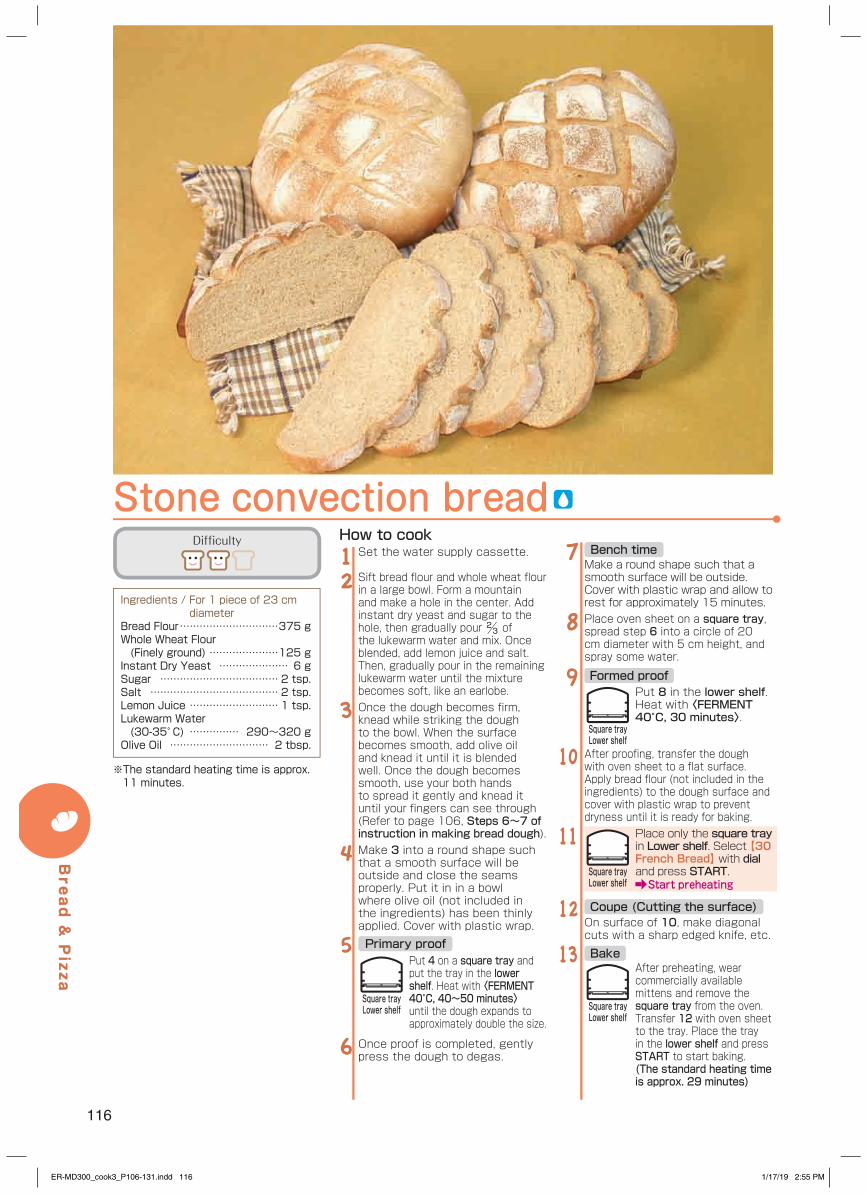
116
Set the water supply cassette.
Sift bread flour and whole wheat flour in a large bowl. Form a mountain and make a hole in the center. Add instant dry yeast and sugar to the hole, then gradually pour ⅔ of the lukewarm water and mix. Once blended, add lemon juice and salt. Then, gradually pour in the remaining lukewarm water until the mixture becomes soft, like an earlobe.Once the dough becomes firm, knead while striking the dough to the bowl. When the surface becomes smooth, add olive oil and knead it until it is blended well. Once the dough becomes smooth, use your both hands to spread it gently and knead it until your fingers can see through (Refer to page 106, Steps 6~7 of instruction in making bread dough).Make 3 into a round shape such that a smooth surface will be outside and close the seams properly. Put it in in a bowl where olive oil (not included in the ingredients) has been thinly applied. Cover with plastic wrap.
Put 4 on a square tray and put the tray in the lower shelf. Heat with 〈FERMENT 40°C, 40~50 minutes〉 until the dough expands to approximately double the size.
Once proof is completed, gently press the dough to degas.
12
3
4
5 Primary proof
6
Make a round shape such that a smooth surface will be outside. Cover with plastic wrap and allow to rest for approximately 15 minutes.Place oven sheet on a square tray, spread step 6 into a circle of 20 cm diameter with 5 cm height, and spray some water.
Put 8 in the lower shelf. Heat with 〈FERMENT 40°C, 30 minutes〉.
After proofing, transfer the dough with oven sheet to a flat surface. Apply bread flour (not included in the ingredients) to the dough surface and cover with plastic wrap to prevent dryness until it is ready for baking.
Place only the square tray in Lower shelf. Select 【30 French Bread】 with dial and press START.Start preheating
On surface of 10, make diagonal cuts with a sharp edged knife, etc.
After preheating, wear commercially available mittens and remove the square tray from the oven. Transfer 12 with oven sheet to the tray. Place the tray in the lower shelf and press START to start baking.(The standard heating time is approx. 29 minutes)
7 Bench time
8
9 Formed proof
10
11
12 Coupe (Cutting the surface)
13 Bake
How to cook
Ingredients / For 1 piece of 23 cm diameter
Bread Flour …………………………375 gWhole Wheat Flour (Finely ground) …………………125 gInstant Dry Yeast ………………… 6 gSugar ……………………………… 2 tsp.Salt ………………………………… 2 tsp.Lemon Juice ……………………… 1 tsp.Lukewarm Water (30-35° C) …………… 290~320 gOlive Oil ………………………… 2 tbsp.
Stone convection bread
※The standard heating time is approx. 11 minutes.
Square trayLower shelf
Square trayLower shelf
Square trayLower shelf
Square trayLower shelf
Difficulty
Bread & Pizza
ER-MD300_cook3_P106-131.indd 116 1/17/19 2:55 PM
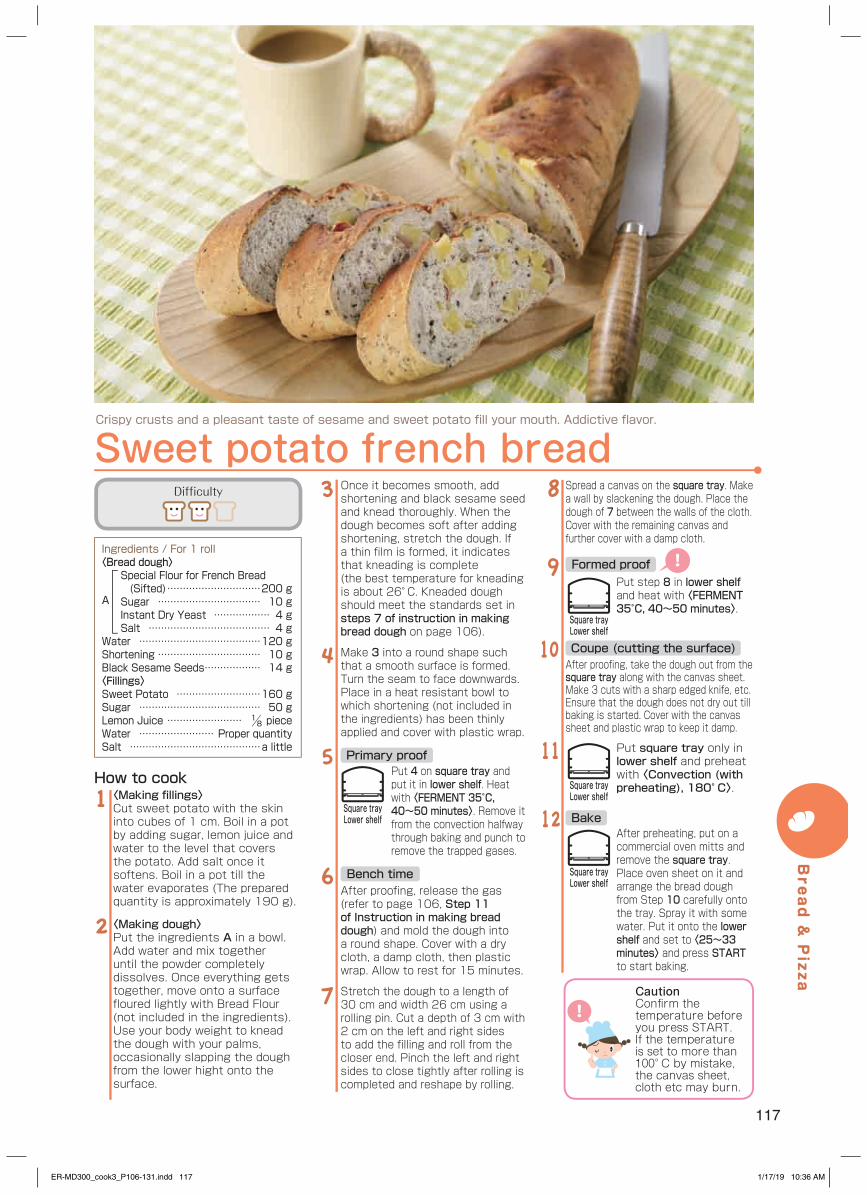
117
Sweet potato french bread
Ingredients / For 1 roll〈Bread dough〉
Special Flour for French Bread (Sifted) …………………………200 gSugar …………………………… 10 gInstant Dry Yeast ……………… 4 gSalt ………………………………… 4 g
Water …………………………………120 gShortening …………………………… 10 gBlack Sesame Seeds……………… 14 g〈Fillings〉Sweet Potato ………………………160 gSugar ………………………………… 50 gLemon Juice …………………… ⅛ pieceWater …………………… Proper quantitySalt ……………………………………a little
Once it becomes smooth, add shortening and black sesame seed and knead thoroughly. When the dough becomes soft after adding shortening, stretch the dough. If a thin film is formed, it indicates that kneading is complete (the best temperature for kneading is about 26° C. Kneaded dough should meet the standards set in steps 7 of instruction in making bread dough on page 106).
Make 3 into a round shape such that a smooth surface is formed. Turn the seam to face downwards. Place in a heat resistant bowl to which shortening (not included in the ingredients) has been thinly applied and cover with plastic wrap.
Put 4 on square tray and put it in lower shelf. Heat with 〈FERMENT 35°C, 40~50 minutes〉. Remove it from the convection halfway through baking and punch to remove the trapped gases.
After proofing, release the gas (refer to page 106, Step 11 of Instruction in making bread dough) and mold the dough into a round shape. Cover with a dry cloth, a damp cloth, then plastic wrap. Allow to rest for 15 minutes.
Stretch the dough to a length of 30 cm and width 26 cm using a rolling pin. Cut a depth of 3 cm with 2 cm on the left and right sides to add the filling and roll from the closer end. Pinch the left and right sides to close tightly after rolling is completed and reshape by rolling.
3
4
5 Primary proof
6 Bench time
7
Spread a canvas on the square tray. Make a wall by slackening the dough. Place the dough of 7 between the walls of the cloth. Cover with the remaining canvas and further cover with a damp cloth.
Put step 8 in lower shelf and heat with 〈FERMENT 35°C, 40~50 minutes〉.
After proofing, take the dough out from the square tray along with the canvas sheet. Make 3 cuts with a sharp edged knife, etc. Ensure that the dough does not dry out till baking is started. Cover with the canvas sheet and plastic wrap to keep it damp.
Put square tray only in lower shelf and preheat with 〈Convection (with preheating), 180° C〉.
After preheating, put on a commercial oven mitts and remove the square tray. Place oven sheet on it and arrange the bread dough from Step 10 carefully onto the tray. Spray it with some water. Put it onto the lower shelf and set to 〈25~33 minutes〉 and press START to start baking.
8
9 Formed proof
10 Coupe (cutting the surface)
11
12 Bake
〈Making fillings〉Cut sweet potato with the skin into cubes of 1 cm. Boil in a pot by adding sugar, lemon juice and water to the level that covers the potato. Add salt once it softens. Boil in a pot till the water evaporates (The prepared quantity is approximately 190 g).
〈Making dough〉Put the ingredients A in a bowl. Add water and mix together until the powder completely dissolves. Once everything gets together, move onto a surface floured lightly with Bread Flour (not included in the ingredients). Use your body weight to knead the dough with your palms, occasionally slapping the dough from the lower hight onto the surface.
1
2
How to cook
A
Square trayLower shelf
Square trayLower shelf
Square trayLower shelf
Square trayLower shelf
CautionConfi rm the temperature before you press START.If the temperature is set to more than 100° C by mistake, the canvas sheet, cloth etc may burn.
Crispy crusts and a pleasant taste of sesame and sweet potato fi ll your mouth. Addictive fl avor.
Difficulty
Bread & Pizza
ER-MD300_cook3_P106-131.indd 117 1/17/19 10:36 AM
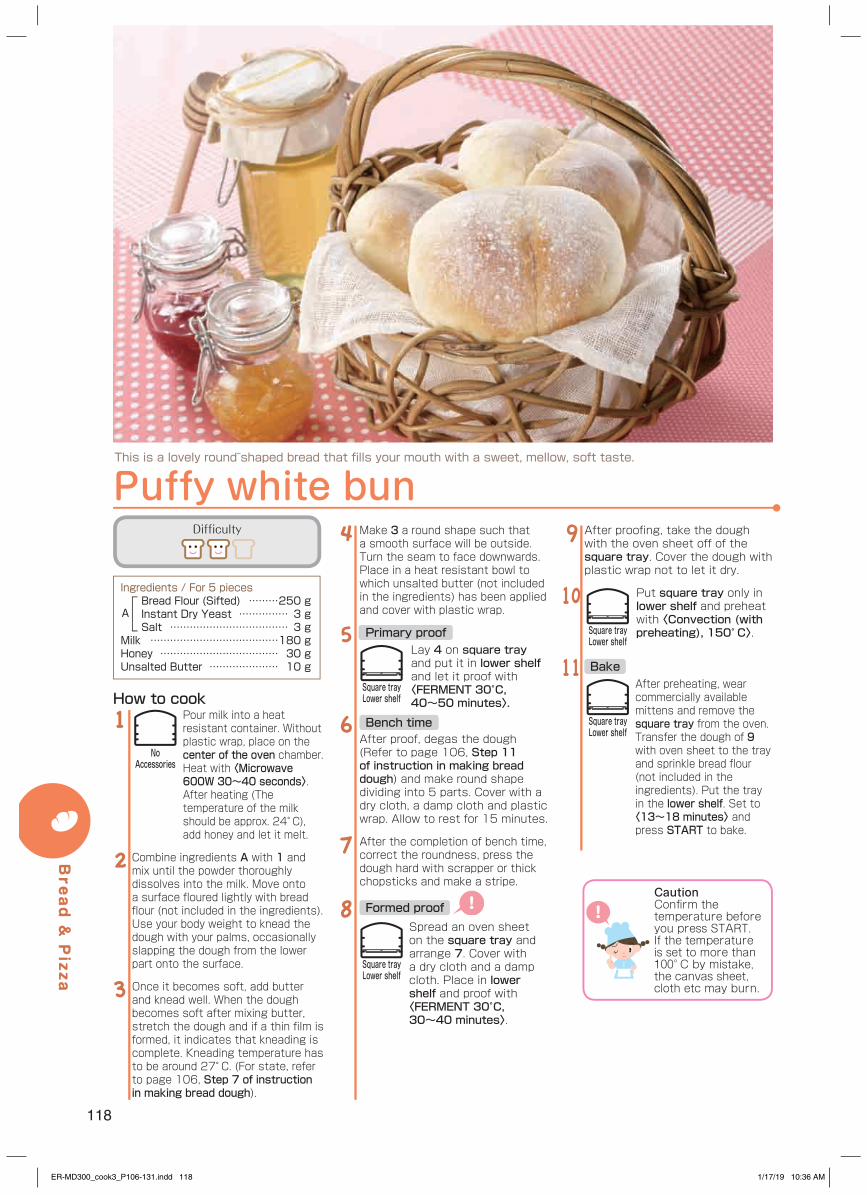
118
Ingredients / For 5 piecesBread Flour (Sifted) ………250 gInstant Dry Yeast …………… 3 gSalt ……………………………… 3 g
Milk …………………………………180 gHoney ……………………………… 30 gUnsalted Butter ………………… 10 g
Make 3 a round shape such that a smooth surface will be outside. Turn the seam to face downwards. Place in a heat resistant bowl to which unsalted butter (not included in the ingredients) has been applied and cover with plastic wrap.
Lay 4 on square tray and put it in lower shelf and let it proof with 〈FERMENT 30°C, 40~50 minutes〉.
After proof, degas the dough (Refer to page 106, Step 11 of instruction in making bread dough) and make round shape dividing into 5 parts. Cover with a dry cloth, a damp cloth and plastic wrap. Allow to rest for 15 minutes.
After the completion of bench time, correct the roundness, press the dough hard with scrapper or thick chopsticks and make a stripe.
Spread an oven sheet on the square tray and arrange 7. Cover with a dry cloth and a damp cloth. Place in lower shelf and proof with 〈FERMENT 30°C, 30~40 minutes〉.
4
5 Primary proof
6 Bench time
7
8 Formed proof
After proofing, take the dough with the oven sheet off of the square tray. Cover the dough with plastic wrap not to let it dry.
Put square tray only in lower shelf and preheat with 〈Convection (with preheating), 150° C〉.
After preheating, wear commercially available mittens and remove the square tray from the oven. Transfer the dough of 9 with oven sheet to the tray and sprinkle bread flour(not included in the ingredients). Put the tray in the lower shelf. Set to 〈13~18 minutes〉 and press START to bake.
9
10
11 Bake
Pour milk into a heat resistant container. Without
plastic wrap, place on the center of the oven chamber. Heat with 〈Microwave 600W 30~40 seconds〉. After heating (The temperature of the milk should be approx. 24° C), add honey and let it melt.
Combine ingredients A with 1 and mix until the powder thoroughly dissolves into the milk. Move onto a surface floured lightly with bread flour (not included in the ingredients). Use your body weight to knead the dough with your palms, occasionally slapping the dough from the lower part onto the surface.
Once it becomes soft, add butter and knead well. When the dough becomes soft after mixing butter, stretch the dough and if a thin film is formed, it indicates that kneading is complete. Kneading temperature has to be around 27° C. (For state, refer to page 106, Step 7 of instruction in making bread dough).
1
2
3
How to cook
ASquare trayLower shelf
Square trayLower shelf
Square trayLower shelf
Square trayLower shelf
NoAccessories
CautionConfi rm the temperature before you press START.If the temperature is set to more than 100° C by mistake, the canvas sheet, cloth etc may burn.
This is a lovely round̃shaped bread that fi lls your mouth with a sweet, mellow, soft taste.
Puffy white bunDifficulty
Bread & Pizza
ER-MD300_cook3_P106-131.indd 118 1/17/19 10:36 AM

119
Croissant
Ingredients / For 9 PiecesSpecial Flour for French Bread (Sifted) ……………………………120 gCake Flour (Sifted) ……………… 30 gInstant Dry Yeast ………………… 3 gSugar ………………………………… 8 gSalt …………………………………… 3 gWater ……………………………… 90 gUnsalted butter ………………… 15 gUnsalted butter for folding …… 90 g
Retrieve 6 from the refrigerator. Stretch to about 20 × 20 cm with a rolling pin. Place 7 in the middle of the dough and cover tightly so that there is no gap. Firmly close the seams.
Press 8 from centre towards outside with a rolling pin to spread it to a rectangular shape 6 mm thick. Fold the dough in thirds, cover with plastic wrap and store in the fridge for 30 minutes.
Stretch the dough to a rectangular shape again and fold in thirds. Chill approximately for 30 minutes.
Repeat spreading it into a rectangular shape, fold in thirds and store it in the fridge for approx. 60 minutes.
Stretch 11 into a rectangular shape of 15 × 40 cm, and cut it into 9 equal triangles, of which the bottom is 8 cm wide.
Cut 1 cm in the middle of the triangle at the bottom, stretch it slightly to both the left and right sides, and roll it up.
8
9
10
11
12
13
Put sugar, salt and ⅓ of water into a bowl and blend with a whisk to dissolve.
Add special flour for french bread and cake flour into mixture in step 1. Add remaining water and blend gently until entirely absorbed.
While it’s still powderly, add instant dry yeast and mix 2~3 times. Place it on board while not completely blended.
Tear butter gradually and apply to dough’s surface.
Press butter on board by tucking it in without kneading until it is well blended.
Once butter is well blended, combine into one, cover with plastic wrap and store it in the fridge for approx. 30 minutes.
Prepare butter sheet while the dough is cooling.Once the butter becomes soft at room temperature, place in a plastic bag. Stretch the butter to a sheet of 10 × 10 cm size using a rolling pin on the top of the bag. Chill in the refrigerator.
1
2
3
45
6
7
How to cook
Lay the oven sheet on the square tray. Put 9 pieces of dough from 13 with the seam down.
Spray water on 14 and put it in the lower shelf. Proof with 〈FERMENT 30°C, 50~60 minutes〉.
After preheating, remove the square tray from the oven.
Put square tray only in lower shelf and preheat with 〈Convection (with preheating), 200° C〉.
After preheating, put on a commercial oven mitts and remove the square tray. Place dough with oven sheet from 16 onto the tray. Put it onto the lower shelf and set to 〈18~23 minutes〉 and press START to start baking.
14
15 Formed proof
1617
18 Bake
Difficulty
Croissant forming steps
10cm7 8
20 20
DoughButter
9~11
Chill in fridge
12
1
2 4 6 8
3 5 7 9
8 cm
15 cm
About 40 cm13
Cut Open Roll Bend Crescentshape
Square trayLower shelf
Square trayLower shelf
Square trayLower shelf
Bread & Pizza
ER-MD300_cook3_P106-131.indd 119 1/17/19 10:36 AM
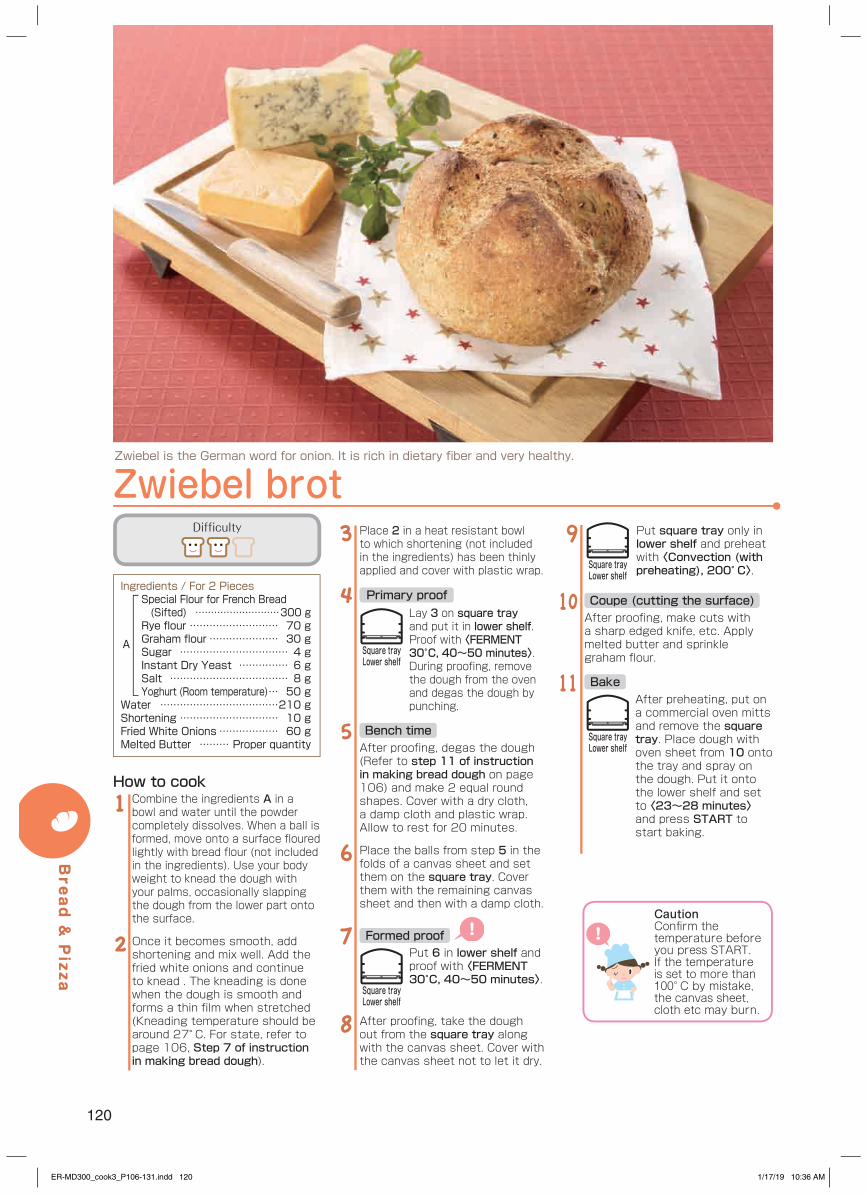
120
Zwiebel brotPlace 2 in a heat resistant bowl to which shortening (not included in the ingredients) has been thinly applied and cover with plastic wrap.
Lay 3 on square tray and put it in lower shelf. Proof with 〈FERMENT 30°C, 40~50 minutes〉. During proofing, remove the dough from the oven and degas the dough by punching.
After proofing, degas the dough (Refer to step 11 of instruction in making bread dough on page 106) and make 2 equal round shapes. Cover with a dry cloth, a damp cloth and plastic wrap. Allow to rest for 20 minutes.
Place the balls from step 5 in the folds of a canvas sheet and set them on the square tray. Cover them with the remaining canvas sheet and then with a damp cloth.
Put 6 in lower shelf and proof with 〈FERMENT 30°C, 40~50 minutes〉.
After proofing, take the dough out from the square tray along with the canvas sheet. Cover with the canvas sheet not to let it dry.
3
4 Primary proof
5 Bench time
6
7 Formed proof
8
Put square tray only in lower shelf and preheat with 〈Convection (with preheating), 200° C〉.
After proofing, make cuts with a sharp edged knife, etc. Apply melted butter and sprinkle graham flour.
After preheating, put on a commercial oven mitts and remove the square tray. Place dough with oven sheet from 10 onto the tray and spray on the dough. Put it onto the lower shelf and set to 〈23~28 minutes〉 and press START to start baking.
9
10 Coupe (cutting the surface)
11 Bake
Combine the ingredients A in a bowl and water until the powder completely dissolves. When a ball is formed, move onto a surface floured lightly with bread flour (not included in the ingredients). Use your body weight to knead the dough with your palms, occasionally slapping the dough from the lower part onto the surface.
Once it becomes smooth, add shortening and mix well. Add the fried white onions and continue to knead . The kneading is done when the dough is smooth and forms a thin film when stretched (Kneading temperature should be around 27° C. For state, refer to page 106, Step 7 of instruction in making bread dough).
1
2
How to cook
Square trayLower shelf
Square trayLower shelf
Square trayLower shelf
Square trayLower shelf
CautionConfi rm the temperature before you press START.If the temperature is set to more than 100° C by mistake, the canvas sheet, cloth etc may burn.
Zwiebel is the German word for onion. It is rich in dietary fi ber and very healthy.
Ingredients / For 2 PiecesSpecial Flour for French Bread (Sifted) ………………………300 gRye flour ……………………… 70 gGraham flour ………………… 30 gSugar …………………………… 4 gInstant Dry Yeast …………… 6 gSalt ……………………………… 8 gYoghurt (Room temperature) … 50 g
Water ………………………………210 gShortening ………………………… 10 gFried White Onions ……………… 60 gMelted Butter ……… Proper quantity
A
Difficulty
Bread & Pizza
ER-MD300_cook3_P106-131.indd 120 1/17/19 10:36 AM
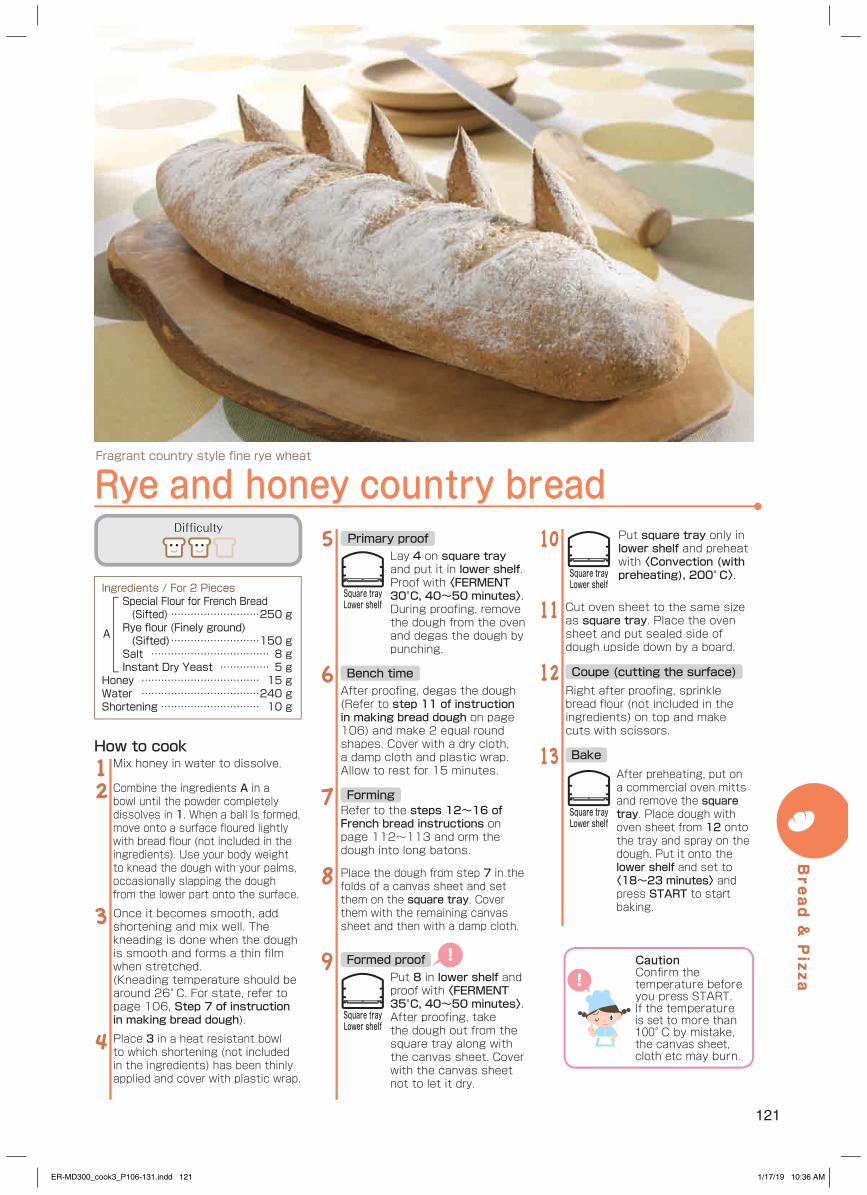
121
Ingredients / For 2 PiecesSpecial Flour for French Bread (Sifted) ………………………250 gRye flour (Finely ground) (Sifted) ………………………150 gSalt ……………………………… 8 gInstant Dry Yeast …………… 5 g
Honey ……………………………… 15 gWater ………………………………240 gShortening ………………………… 10 g
Lay 4 on square tray and put it in lower shelf. Proof with 〈FERMENT 30°C, 40~50 minutes〉. During proofing, remove the dough from the oven and degas the dough by punching.
After proofing, degas the dough (Refer to step 11 of instruction in making bread dough on page 106) and make 2 equal round shapes. Cover with a dry cloth, a damp cloth and plastic wrap. Allow to rest for 15 minutes.
Refer to the steps 12~16 of French bread instructions on page 112~113 and orm the dough into long batons.
Place the dough from step 7 in the folds of a canvas sheet and set them on the square tray. Cover them with the remaining canvas sheet and then with a damp cloth.
Put 8 in lower shelf and proof with 〈FERMENT 35°C, 40~50 minutes〉. After proofing, take the dough out from the square tray along with the canvas sheet. Cover with the canvas sheet not to let it dry.
5 Primary proof
6 Bench time
7 Forming
8
9 Formed proof
Put square tray only in lower shelf and preheat with 〈Convection (with preheating), 200° C〉.
Cut oven sheet to the same size as square tray. Place the oven sheet and put sealed side of dough upside down by a board.
Right after proofing, sprinkle bread flour (not included in the ingredients) on top and make cuts with scissors.
After preheating, put on a commercial oven mitts and remove the square tray. Place dough with oven sheet from 12 onto the tray and spray on the dough. Put it onto the lower shelf and set to 〈18~23 minutes〉 and press START to start baking.
10
11
12 Coupe (cutting the surface)
13 BakeMix honey in water to dissolve.
Combine the ingredients A in a bowl until the powder completely dissolves in 1. When a ball Is formed, move onto a surface floured lightly with bread flour (not included in the ingredients). Use your body weight to knead the dough with your palms, occasionally slapping the dough from the lower part onto the surface.
Once it becomes smooth, add shortening and mix well. The kneading is done when the dough is smooth and forms a thin film when stretched.(Kneading temperature should be around 26° C. For state, refer to page 106, Step 7 of instruction in making bread dough).
Place 3 in a heat resistant bowl to which shortening (not included in the ingredients) has been thinly applied and cover with plastic wrap.
12
3
4
How to cook
A
Square trayLower shelf
Square trayLower shelf
Square trayLower shelf
Square trayLower shelf
Fragrant country style fi ne rye wheat
Rye and honey country breadDifficulty
CautionConfi rm the temperature before you press START.If the temperature is set to more than 100° C by mistake, the canvas sheet, cloth etc may burn.
Bread & Pizza
ER-MD300_cook3_P106-131.indd 121 1/17/19 10:36 AM
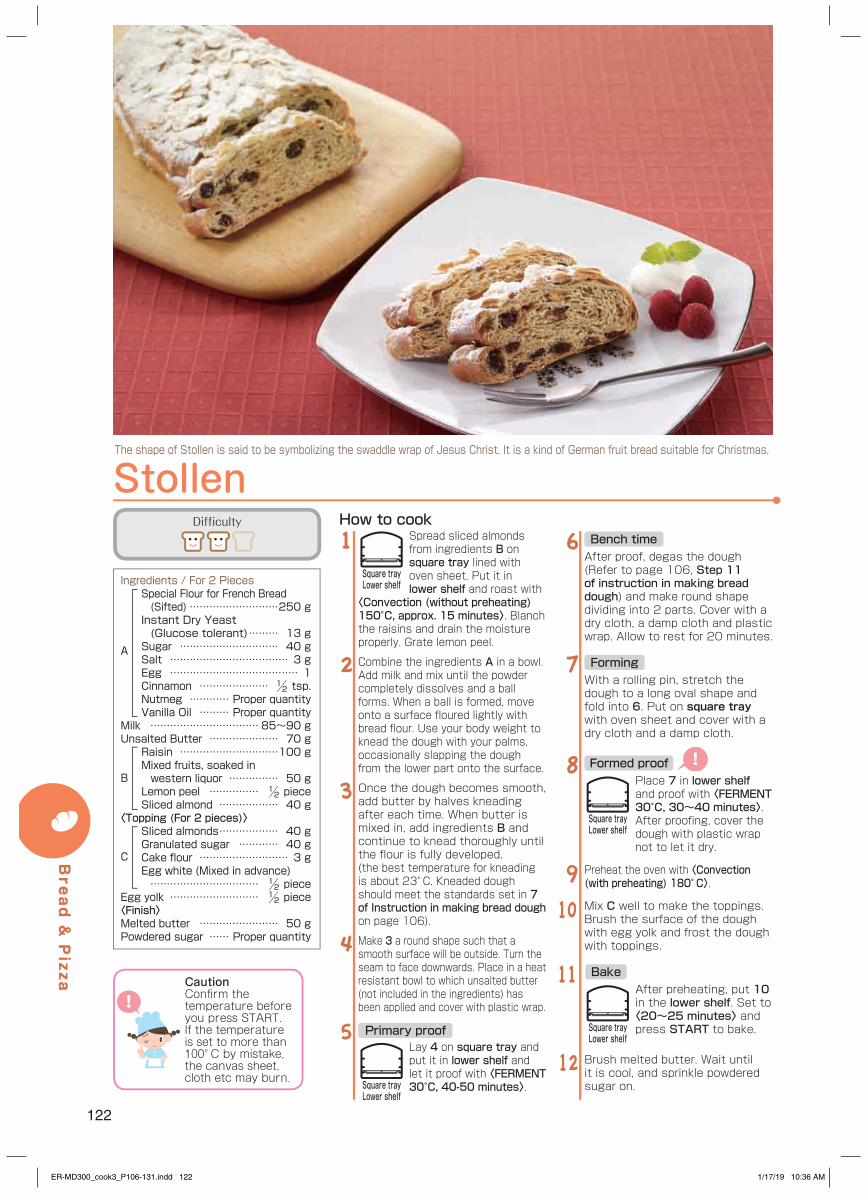
122
Stollen
Ingredients / For 2 PiecesSpecial Flour for French Bread (Sifted) ………………………250 gInstant Dry Yeast (Glucose tolerant) ……… 13 gSugar ………………………… 40 gSalt ……………………………… 3 gEgg ………………………………… 1Cinnamon ………………… ½ tsp.Nutmeg ………… Proper quantityVanilla Oil ……… Proper quantity
Milk …………………………… 85~90 gUnsalted Butter ………………… 70 g
Raisin …………………………100 gMixed fruits, soaked in western liquor …………… 50 gLemon peel …………… ½ pieceSliced almond ……………… 40 g
〈Topping (For 2 pieces)〉Sliced almonds ……………… 40 gGranulated sugar ………… 40 gCake flour ……………………… 3 gEgg white (Mixed in advance) …………………………… ½ piece
Egg yolk ……………………… ½ piece〈Finish〉Melted butter …………………… 50 gPowdered sugar …… Proper quantity
A
B
C
Spread sliced almonds from ingredients B on square tray lined with oven sheet. Put it in lower shelf and roast with
〈Convection (without preheating) 150°C, approx. 15 minutes〉. Blanch the raisins and drain the moisture properly. Grate lemon peel.
Combine the ingredients A in a bowl. Add milk and mix until the powder completely dissolves and a ball forms. When a ball is formed, move onto a surface floured lightly with bread flour. Use your body weight to knead the dough with your palms, occasionally slapping the dough from the lower part onto the surface.
Once the dough becomes smooth, add butter by halves kneading after each time. When butter is mixed in, add ingredients B and continue to knead thoroughly until the flour is fully developed. (the best temperature for kneading is about 23° C. Kneaded dough should meet the standards set in 7 of Instruction in making bread dough on page 106).
Make 3 a round shape such that a smooth surface will be outside. Turn the seam to face downwards. Place in a heat resistant bowl to which unsalted butter (not included in the ingredients) has been applied and cover with plastic wrap.
Lay 4 on square tray and put it in lower shelf and let it proof with 〈FERMENT 30°C, 40-50 minutes〉.
1
2
3
4
5 Primary proof
After proof, degas the dough (Refer to page 106, Step 11 of instruction in making bread dough) and make round shape dividing into 2 parts. Cover with a dry cloth, a damp cloth and plastic wrap. Allow to rest for 20 minutes.
With a rolling pin, stretch the dough to a long oval shape and fold into 6. Put on square tray with oven sheet and cover with a dry cloth and a damp cloth.
Place 7 in lower shelf and proof with 〈FERMENT 30°C, 30~40 minutes〉. After proofing, cover the dough with plastic wrap not to let it dry.
Preheat the oven with 〈Convection (with preheating) 180° C〉.
Mix C well to make the toppings. Brush the surface of the dough with egg yolk and frost the dough with toppings.
After preheating, put 10 in the lower shelf. Set to 〈20~25 minutes〉 and press START to bake.
Brush melted butter. Wait until it is cool, and sprinkle powdered sugar on.
6 Bench time
7 Forming
8 Formed proof
9
10
11 Bake
12
How to cook
Square trayLower shelf
Square trayLower shelf
Square trayLower shelf
Square trayLower shelf
The shape of Stollen is said to be symbolizing the swaddle wrap of Jesus Christ. It is a kind of German fruit bread suitable for Christmas.
Difficulty
CautionConfi rm the temperature before you press START.If the temperature is set to more than 100° C by mistake, the canvas sheet, cloth etc may burn.
Bread & Pizza
ER-MD300_cook3_P106-131.indd 122 1/17/19 10:36 AM

123
Ingredients / For 4 pieces of heat resistant paper made panettone mold
Bread Flour (Sifted) ………250 gSpecial Flour for French Bread (Sifted) …………………………150 gInstant Dry Yeast (Glucose tolerance) …… 10 gSugar ………………………… 75 gSalt ……………………………… 5 gBeaten egg ………………… 90 gRaw Cream …………………… 30 gYoghurt ……………………… 40 gMilk …………………………… 30 gWater ………………………… 70 gVanilla oil………… Proper quantity
Unsalted butter ………………… 60 gRaisin ………………………… 40 gOrange peel ………………… 20 gLemon peel …… From ½ pieceMixed fruits, soaked in western liquor ……………100 g
Beaten eggs ………………………… ½ Unsalted butter ………………… 10 g〈For decoration〉Powdered sugar …… Proper quantity
A
B
Traditional sweet and soft Italian bread with minced dry fruits
PanettoneChop orange peel. Blanch raisins and drain the moisture properly. Grate lemon peel.
Combine the ingredients A in a bowl. Add milk and mix until the powder completely dissolves and a ball forms. When a ball is formed, move onto a surface floured lightly with bread flour. Use your body weight to knead the dough with your palms, occasionally slapping the dough from the lower part onto the surface.
Once the dough becomes smooth, add butter by halves kneading after each time. When butter is mixed in, add ingredients B and continue to knead thoroughly until the flour is fully developed.(the best temperature for kneading is about 26°C. Kneaded dough should meet the standards set in 7 of Instruction in making bread dough on page 106).
Make 3 a round shape such that a smooth surface will be outside. Turn the seam to face downwards. Place in a heat resistant bowl to which unsalted butter (not included in the ingredients) has been applied and cover with plastic wrap.
Lay 4 on square tray and put it in lower shelf and let it proof with 〈FERMENT 30°C, 40~50 minutes〉.
After proof, degas the dough (Refer to page 106, Step 11 of instruction in making bread dough) and make round shape dividing into 4 parts. Cover with a dry cloth, a damp cloth and plastic wrap. Allow to rest for 20 minutes.
12
3
4
5 Primary proof
6 Bench time
Correct the roundness of the dough of 6. Place with the seam facing downwards in the mold. Arrange on square tray and cover with a dry cloth and a damp cloth.
Place 7 in lower shelf and proof with 〈FERMENT 30°C, 40~50 minutes〉 until the surface will be 1 cm lower than the height of the
mold. After proofing, cover the dough with plastic wrap not to let it dry.
Preheat the oven with 〈Convection (with preheating) 180° C〉. While preheating, brush egg on the surface of the dough, cut a cross coupe and put butter on the top.
After preheating, put 9 in the lower shelf. Set to 〈25~33 minutes〉 and press START to bake.
Wait until it is cool, and sprinkle powdered sugar on.
7 Forming
8 Formed proof
9
10 Bake
11
How to cook
Square trayLower shelf
Square trayLower shelf
Square trayLower shelf
● If the browning is uneven, turn the square tray during baking (Please be careful not to get burnt).
CautionConfi rm the temperature before you press START.If the temperature is set to more than 100° C by mistake, the canvas sheet, cloth etc may burn.
Difficulty
Bread & Pizza
ER-MD300_cook3_P106-131.indd 123 1/17/19 10:36 AM
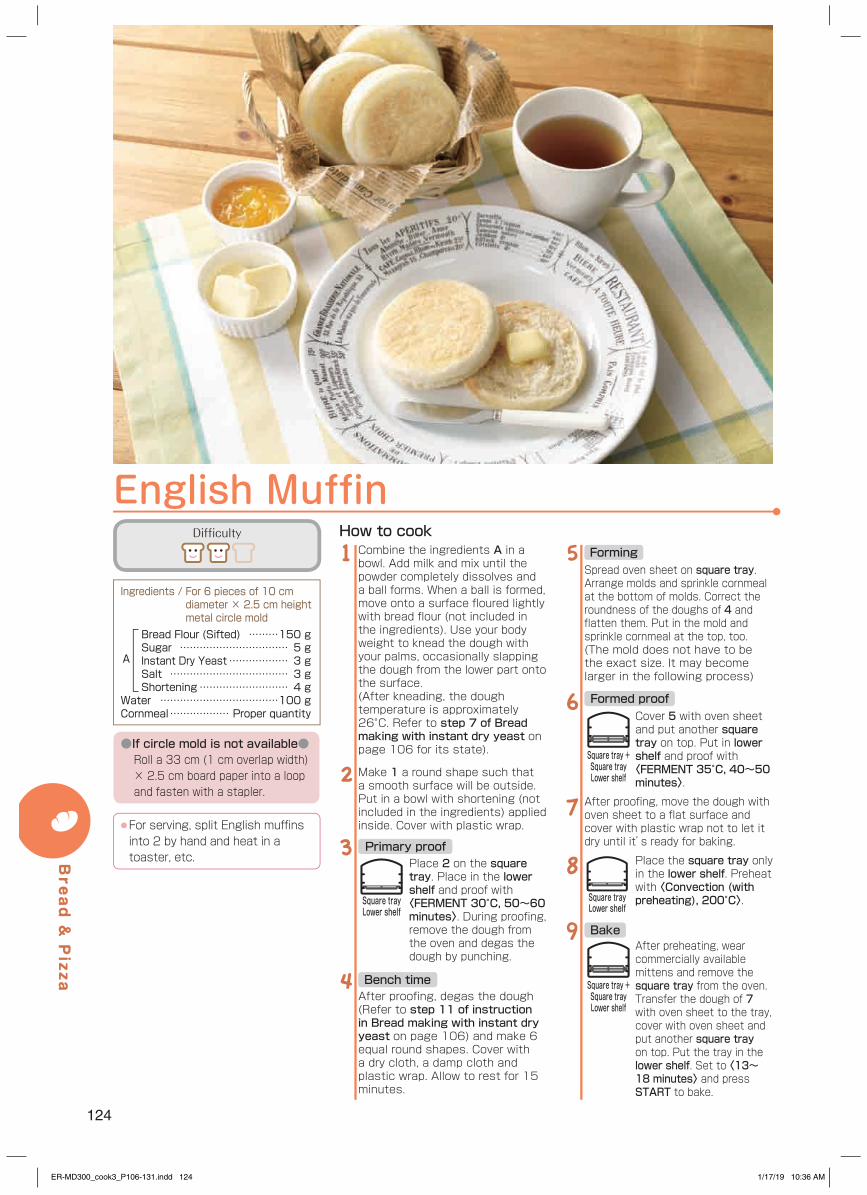
124
English Muffin
Spread oven sheet on square tray. Arrange molds and sprinkle cornmeal at the bottom of molds. Correct the roundness of the doughs of 4 and flatten them. Put in the mold and sprinkle cornmeal at the top, too.(The mold does not have to be the exact size. It may become larger in the following process)
Cover 5 with oven sheet and put another square tray on top. Put in lower shelf and proof with 〈FERMENT 35°C, 40~50 minutes〉.
After proofing, move the dough with oven sheet to a flat surface and cover with plastic wrap not to let it dry until it’s ready for baking.
Place the square tray only in the lower shelf. Preheat with 〈Convection (with preheating), 200°C〉.
After preheating, wear commercially available mittens and remove the square tray from the oven. Transfer the dough of 7 with oven sheet to the tray, cover with oven sheet and put another square tray on top. Put the tray in the lower shelf. Set to 〈13~18 minutes〉 and press START to bake.
5 Forming
6 Formed proof
7
8
9 Bake
Combine the ingredients A in a bowl. Add milk and mix until the powder completely dissolves and a ball forms. When a ball is formed, move onto a surface floured lightly with bread flour (not included in the ingredients). Use your body weight to knead the dough with your palms, occasionally slapping the dough from the lower part onto the surface. (After kneading, the dough temperature is approximately 26°C. Refer to step 7 of Bread making with instant dry yeast on page 106 for its state).
Make 1 a round shape such that a smooth surface will be outside. Put in a bowl with shortening (not included in the ingredients) applied inside. Cover with plastic wrap.
Place 2 on the square tray. Place in the lower shelf and proof with 〈FERMENT 30°C, 50~60 minutes〉. During proofing, remove the dough from the oven and degas the dough by punching.
After proofing, degas the dough (Refer to step 11 of instruction in Bread making with instant dry yeast on page 106) and make 6 equal round shapes. Cover with a dry cloth, a damp cloth and plastic wrap. Allow to rest for 15 minutes.
1
2
3 Primary proof
4 Bench time
How to cook
Square trayLower shelf
Square tray +Square trayLower shelf
Square tray +Square trayLower shelf
Square trayLower shelf
Difficulty
● For serving, split English muffins into 2 by hand and heat in a toaster, etc.
Ingredients / For 6 pieces of 10 cm diameter × 2.5 cm height metal circle mold
Bread Flour (Sifted) ………150 gSugar …………………………… 5 gInstant Dry Yeast ……………… 3 gSalt ……………………………… 3 gShortening ……………………… 4 g
Water ………………………………100 gCornmeal ……………… Proper quantity
A
●If circle mold is not available●Roll a 33 cm (1 cm overlap width) × 2.5 cm board paper into a loop and fasten with a stapler.
Bread & Pizza
ER-MD300_cook3_P106-131.indd 124 1/17/19 10:36 AM
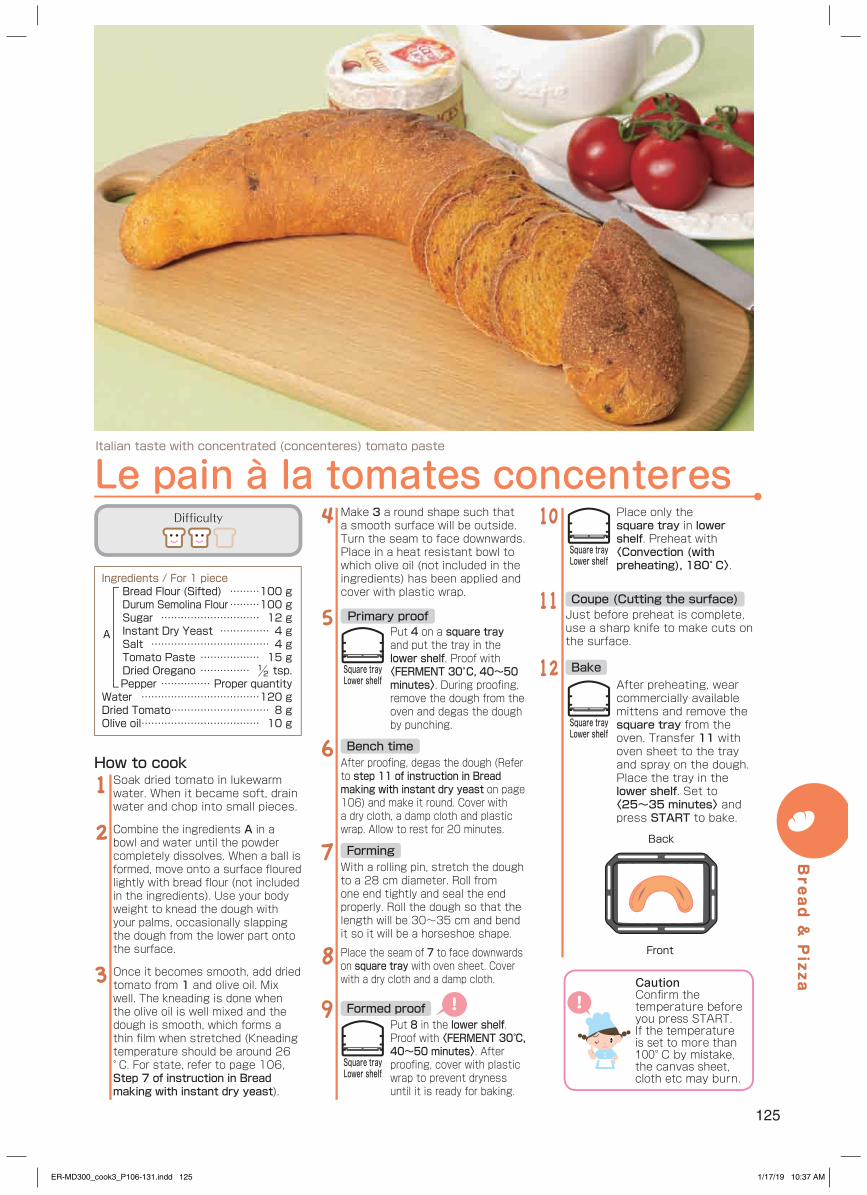
125
Ingredients / For 1 pieceBread Flour (Sifted) ………100 gDurum Semolina Flour ………100 gSugar ………………………… 12 gInstant Dry Yeast …………… 4 gSalt ……………………………… 4 gTomato Paste ……………… 15 gDried Oregano …………… ½ tsp.Pepper …………… Proper quantity
Water ………………………………120 gDried Tomato ………………………… 8 gOlive oil ……………………………… 10 g
Make 3 a round shape such that a smooth surface will be outside. Turn the seam to face downwards. Place in a heat resistant bowl to which olive oil (not included in the ingredients) has been applied and cover with plastic wrap.
Put 4 on a square tray and put the tray in the lower shelf. Proof with 〈FERMENT 30°C, 40~50 minutes〉. During proofing, remove the dough from the oven and degas the dough by punching.
After proofing, degas the dough (Refer to step 11 of instruction in Bread making with instant dry yeast on page 106) and make it round. Cover with a dry cloth, a damp cloth and plastic wrap. Allow to rest for 20 minutes.
With a rolling pin, stretch the dough to a 28 cm diameter. Roll from one end tightly and seal the end properly. Roll the dough so that the length will be 30~35 cm and bend it so it will be a horseshoe shape.
Place the seam of 7 to face downwards on square tray with oven sheet. Cover with a dry cloth and a damp cloth.
Put 8 in the lower shelf. Proof with 〈FERMENT 30°C, 40~50 minutes〉. After proofing, cover with plastic wrap to prevent dryness until it is ready for baking.
4
5 Primary proof
6 Bench time
7 Forming
8
9 Formed proof
Place only the square tray in lower shelf. Preheat with 〈Convection (with preheating), 180° C〉.
Just before preheat is complete, use a sharp knife to make cuts on the surface.
After preheating, wear commercially available mittens and remove the square tray from the oven. Transfer 11 with oven sheet to the tray and spray on the dough. Place the tray in the lower shelf. Set to 〈25~35 minutes〉 and press START to bake.
10
11 Coupe (Cutting the surface)
12 Bake
Soak dried tomato in lukewarm water. When it became soft, drain water and chop into small pieces.
Combine the ingredients A in a bowl and water until the powder completely dissolves. When a ball is formed, move onto a surface floured lightly with bread flour (not included in the ingredients). Use your body weight to knead the dough with your palms, occasionally slapping the dough from the lower part onto the surface.
Once it becomes smooth, add dried tomato from 1 and olive oil. Mix well. The kneading is done when the olive oil is well mixed and the dough is smooth, which forms a thin film when stretched (Kneading temperature should be around 26° C. For state, refer to page 106, Step 7 of instruction in Bread making with instant dry yeast).
1
2
3
How to cook
A
Square trayLower shelf
Square trayLower shelf
Square trayLower shelf
Square trayLower shelf
Italian taste with concentrated (concenteres) tomato paste
Le pain à la tomates concenteresDifficulty
Back
Front
CautionConfi rm the temperature before you press START.If the temperature is set to more than 100° C by mistake, the canvas sheet, cloth etc may burn.
Bread & Pizza
ER-MD300_cook3_P106-131.indd 125 1/17/19 10:37 AM
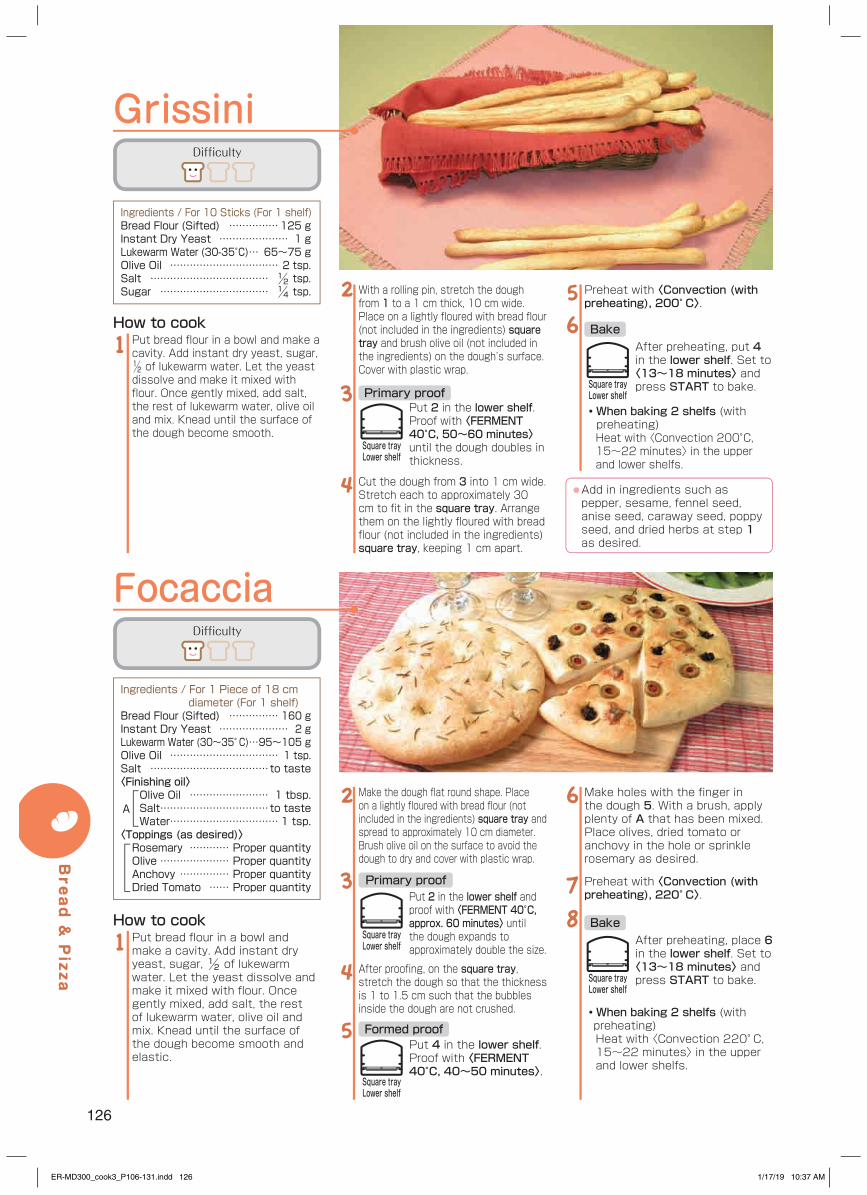
126
Grissini
Ingredients / For 10 Sticks (For 1 shelf)Bread Flour (Sifted) ……………125 gInstant Dry Yeast ………………… 1 gLukewarm Water (30-35°C) … 65~75 gOlive Oil …………………………… 2 tsp.Salt ……………………………… ½ tsp.Sugar …………………………… ¼ tsp.
Put bread flour in a bowl and make a cavity. Add instant dry yeast, sugar, ½ of lukewarm water. Let the yeast dissolve and make it mixed with flour. Once gently mixed, add salt, the rest of lukewarm water, olive oil and mix. Knead until the surface of the dough become smooth.
1
With a rolling pin, stretch the dough from 1 to a 1 cm thick, 10 cm wide. Place on a lightly floured with bread flour (not included in the ingredients) square tray and brush olive oil (not included in the ingredients) on the dough’s surface. Cover with plastic wrap.
Put 2 in the lower shelf. Proof with 〈FERMENT 40°C, 50~60 minutes〉 until the dough doubles in thickness.
Cut the dough from 3 into 1 cm wide. Stretch each to approximately 30 cm to fit in the square tray. Arrange them on the lightly floured with bread flour (not included in the ingredients) square tray, keeping 1 cm apart.
2
3 Primary proof
4
How to cook
● Add in ingredients such as pepper, sesame, fennel seed, anise seed, caraway seed, poppy seed, and dried herbs at step 1 as desired.
Ingredients / For 1 Piece of 18 cm diameter (For 1 shelf)
Bread Flour (Sifted) …………… 160 gInstant Dry Yeast ………………… 2 gLukewarm Water (30~35° C) …95~105 gOlive Oil …………………………… 1 tsp.Salt ………………………………to taste〈Finishing oil〉
Olive Oil …………………… 1 tbsp.Salt……………………………to tasteWater …………………………… 1 tsp.
〈Toppings (as desired)〉Rosemary ………… Proper quantityOlive ………………… Proper quantityAnchovy …………… Proper quantityDried Tomato …… Proper quantity
Put bread flour in a bowl and make a cavity. Add instant dry yeast, sugar, ½ of lukewarm water. Let the yeast dissolve and make it mixed with flour. Once gently mixed, add salt, the rest of lukewarm water, olive oil and mix. Knead until the surface of the dough become smooth and elastic.
1How to cook
Focaccia
AMake the dough flat round shape. Place on a lightly floured with bread flour (not included in the ingredients) square tray and spread to approximately 10 cm diameter. Brush olive oil on the surface to avoid the dough to dry and cover with plastic wrap.
Put 2 in the lower shelf and proof with 〈FERMENT 40°C,approx. 60 minutes〉 until the dough expands to approximately double the size.
After proofing, on the square tray, stretch the dough so that the thickness is 1 to 1.5 cm such that the bubbles inside the dough are not crushed.
Put 4 in the lower shelf. Proof with 〈FERMENT 40°C, 40~50 minutes〉.
2
3 Primary proof
4
5 Formed proof
Square trayLower shelf
Square trayLower shelf
Difficulty
Difficulty
Make holes with the finger in the dough 5. With a brush, apply plenty of A that has been mixed. Place olives, dried tomato or anchovy in the hole or sprinkle rosemary as desired.
Preheat with 〈Convection (with preheating), 220° C〉.
After preheating, place 6 in the lower shelf. Set to 〈13~18 minutes〉 and press START to bake.
・ When baking 2 shelfs (with preheating)Heat with 〈Convection 220° C, 15~22 minutes〉 in the upper and lower shelfs.
6
78 Bake
Square trayLower shelf
Preheat with 〈Convection (with preheating), 200° C〉.
After preheating, put 4 in the lower shelf. Set to 〈13~18 minutes〉 and press START to bake.
・ When baking 2 shelfs (with preheating)Heat with 〈Convection 200°C, 15~22 minutes〉 in the upper and lower shelfs.
56 Bake
Square trayLower shelf
Square trayLower shelf
Bread & Pizza
ER-MD300_cook3_P106-131.indd 126 1/17/19 10:37 AM
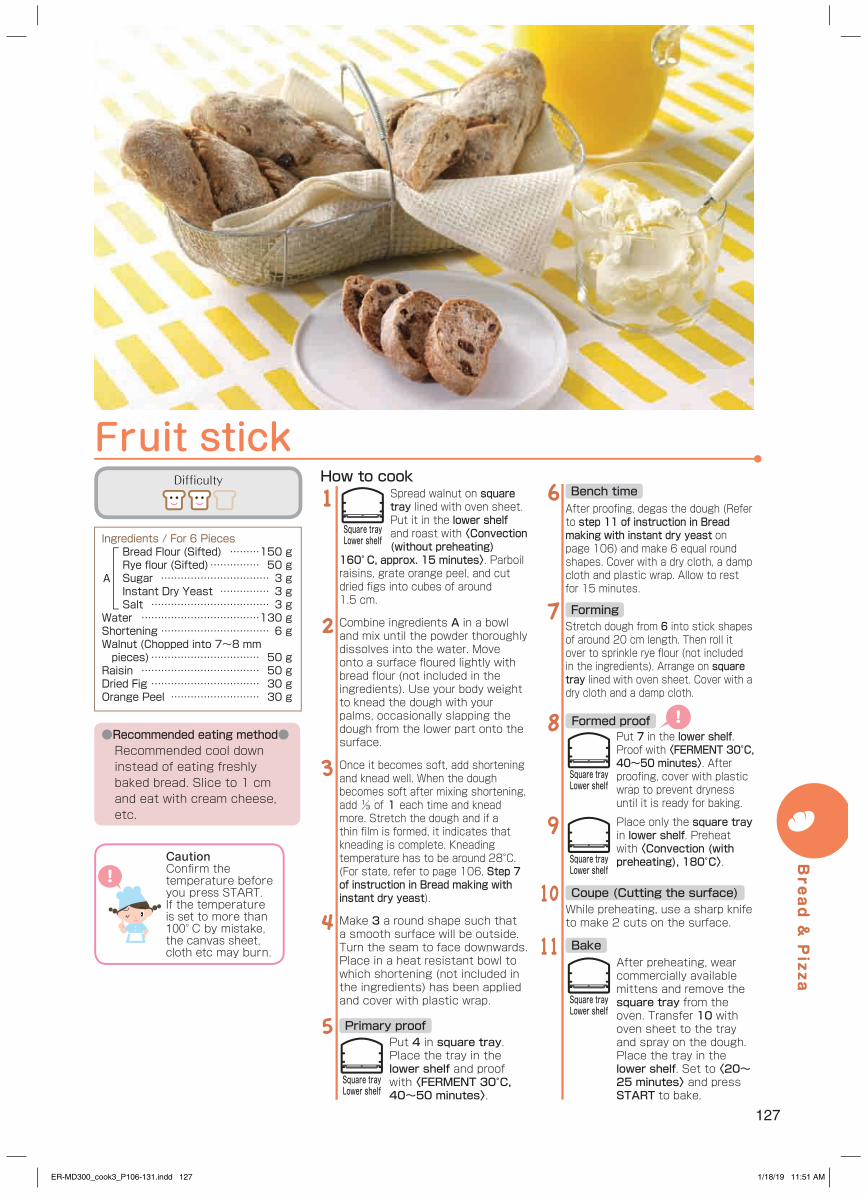
127
Ingredients / For 6 PiecesBread Flour (Sifted) ………150 gRye flour (Sifted) …………… 50 gSugar …………………………… 3 gInstant Dry Yeast …………… 3 gSalt ……………………………… 3 g
Water ………………………………130 gShortening …………………………… 6 gWalnut (Chopped into 7~8 mm pieces) …………………………… 50 gRaisin ……………………………… 50 gDried Fig …………………………… 30 gOrange Peel ……………………… 30 g
A
●Recommended eating method●Recommended cool down instead of eating freshly baked bread. Slice to 1 cm and eat with cream cheese, etc.
Spread walnut on square tray lined with oven sheet. Put it in the lower shelf and roast with 〈Convection (without preheating)
160° C, approx. 15 minutes〉. Parboil raisins, grate orange peel, and cut dried figs into cubes of around 1.5 cm.
Combine ingredients A in a bowl and mix until the powder thoroughly dissolves into the water. Move onto a surface floured lightly with bread flour (not included in the ingredients). Use your body weight to knead the dough with your palms, occasionally slapping the dough from the lower part onto the surface.
Once it becomes soft, add shortening and knead well. When the dough becomes soft after mixing shortening, add ⅓ of 1 each time and knead more. Stretch the dough and if a thin film is formed, it indicates that kneading is complete. Kneading temperature has to be around 28°C.(For state, refer to page 106, Step 7 of instruction in Bread making with instant dry yeast).
Make 3 a round shape such that a smooth surface will be outside. Turn the seam to face downwards. Place in a heat resistant bowl to which shortening (not included in the ingredients) has been applied and cover with plastic wrap.
Put 4 in square tray. Place the tray in the lower shelf and proof with 〈FERMENT 30°C, 40~50 minutes〉.
1
2
3
4
5 Primary proof
After proofing, degas the dough (Refer to step 11 of instruction in Bread making with instant dry yeast on page 106) and make 6 equal round shapes. Cover with a dry cloth, a damp cloth and plastic wrap. Allow to rest for 15 minutes.
Stretch dough from 6 into stick shapes of around 20 cm length. Then roll it over to sprinkle rye flour (not included in the ingredients). Arrange on square tray lined with oven sheet. Cover with a dry cloth and a damp cloth.
Put 7 in the lower shelf. Proof with 〈FERMENT 30°C, 40~50 minutes〉. After proofing, cover with plastic wrap to prevent dryness until it is ready for baking.
Place only the square tray in lower shelf. Preheat with 〈Convection (with preheating), 180°C〉.
While preheating, use a sharp knife to make 2 cuts on the surface.
After preheating, wear commercially available mittens and remove the square tray from the oven. Transfer 10 with oven sheet to the tray and spray on the dough. Place the tray in the lower shelf. Set to 〈20~25 minutes〉 and press START to bake.
6 Bench time
7 Forming
8 Formed proof
9
10 Coupe (Cutting the surface)
11 Bake
How to cook
Square trayLower shelf
Square trayLower shelf
Square trayLower shelf
Square trayLower shelf
Square trayLower shelf
Fruit stick
CautionConfi rm the temperature before you press START.If the temperature is set to more than 100° C by mistake, the canvas sheet, cloth etc may burn.
Difficulty
Bread & Pizza
ER-MD300_cook3_P106-131.indd 127 1/18/19 11:51 AM
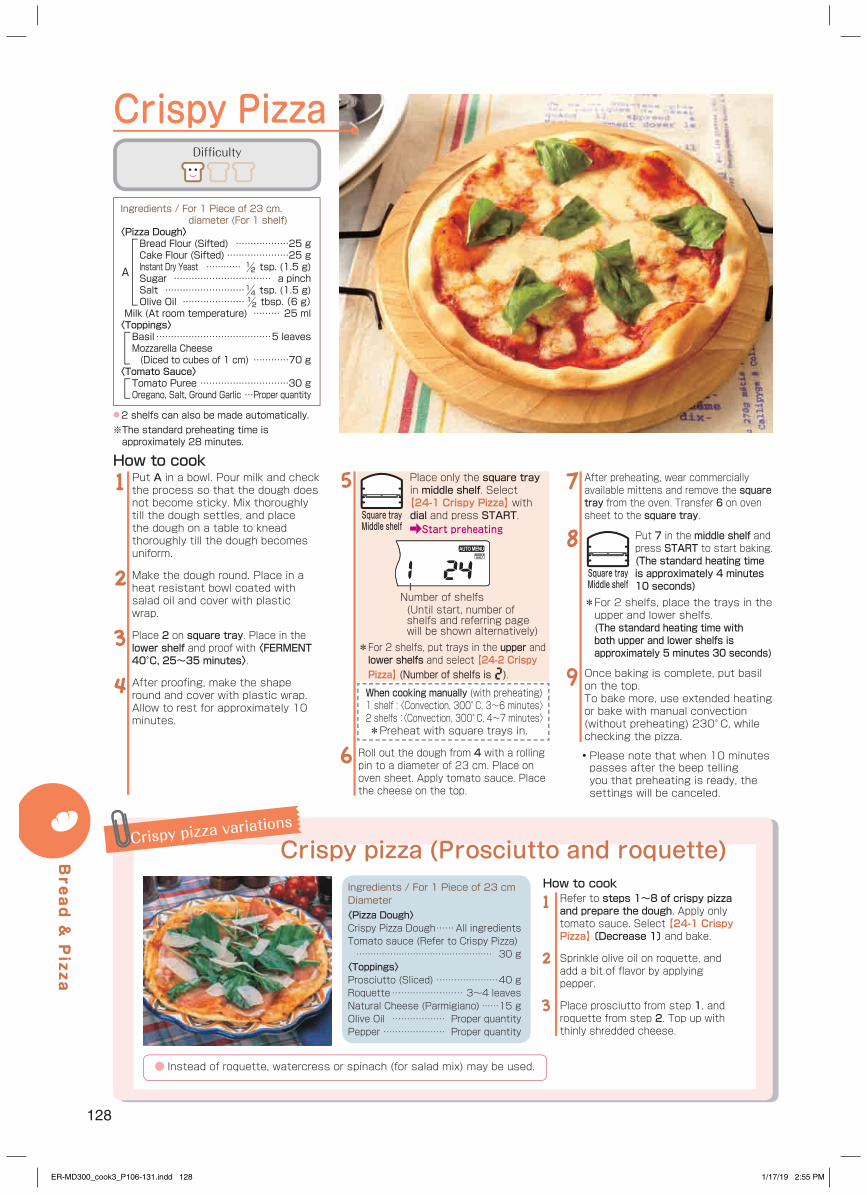
128
Crispy pizza variations
Crispy Pizza
Ingredients / For 1 Piece of 23 cm. diameter (For 1 shelf)
〈Pizza Dough〉Bread Flour (Sifted) ………………25 gCake Flour (Sifted) …………………25 gInstant Dry Yeast ………… ½ tsp. (1.5 g)Sugar …………………………… a pinchSalt ………………………¼ tsp. (1.5 g)Olive Oil …………………½ tbsp. (6 g)
Milk (At room temperature) ……… 25 ml〈Toppings〉Basil …………………………………5 leavesMozzarella Cheese (Diced to cubes of 1 cm) …………70 g
〈Tomato Sauce〉Tomato Puree …………………………30 gOregano, Salt, Ground Garlic …Proper quantity
Put A in a bowl. Pour milk and check the process so that the dough does not become sticky. Mix thoroughly till the dough settles, and place the dough on a table to knead thoroughly till the dough becomes uniform.
Make the dough round. Place in a heat resistant bowl coated with salad oil and cover with plastic wrap.
Place 2 on square tray. Place in the lower shelf and proof with 〈FERMENT 40°C, 25~35 minutes〉.
After proofing, make the shape round and cover with plastic wrap. Allow to rest for approximately 10 minutes.
1
2
3
4
Place only the square tray in middle shelf. Select 【24-1 Crispy Pizza】 with dial and press START. Start preheating
* For 2 shelfs, put trays in the upper and lower shelfs and select 【24-2 Crispy Pizza】 (Number of shelfs is ).
When cooking manually (with preheating)1 shelf : 〈Convection, 300° C, 3~6 minutes〉2 shelfs:〈Convection, 300° C, 4~7 minutes〉*Preheat with square trays in.
Roll out the dough from 4 with a rolling pin to a diameter of 23 cm. Place on oven sheet. Apply tomato sauce. Place the cheese on the top.
5
6
How to cook
●2 shelfs can also be made automatically.※ The standard preheating time is approximately 28 minutes.
● Instead of roquette, watercress or spinach (for salad mix) may be used.
Square trayMiddle shelf
Crispy pizza (Prosciutto and roquette)Ingredients / For 1 Piece of 23 cm Diameter〈Pizza Dough〉Crispy Pizza Dough ……All ingredientsTomato sauce (Refer to Crispy Pizza) ………………………………………… 30 g〈Toppings〉Prosciutto (Sliced) …………………40 gRoquette …………………… 3~4 leavesNatural Cheese (Parmigiano) ……15 gOlive Oil ……………… Proper quantityPepper ………………… Proper quantity
Refer to steps 1~8 of crispy pizza and prepare the dough. Apply only tomato sauce. Select 【24-1 Crispy Pizza】 〔Decrease 1〕 and bake.
Sprinkle olive oil on roquette, and add a bit of flavor by applying pepper.
Place prosciutto from step 1, and roquette from step 2. Top up with thinly shredded cheese.
1
2
3
How to cook
Difficulty
A
After preheating, wear commercially available mittens and remove the square tray from the oven. Transfer 6 on oven sheet to the square tray.
Put 7 in the middle shelf and press START to start baking.(The standard heating time is approximately 4 minutes 10 seconds)
* For 2 shelfs, place the trays in the upper and lower shelfs.(The standard heating time with both upper and lower shelfs is approximately 5 minutes 30 seconds)
Once baking is complete, put basil on the top.To bake more, use extended heating or bake with manual convection (without preheating) 230° C, while checking the pizza.
7
8
9
Number of shelfs(Until start, number of shelfs and referring page will be shown alternatively)
Square trayMiddle shelf
・ Please note that when 10 minutes passes after the beep telling you that preheating is ready, the settings will be canceled.
Bread & Pizza
ER-MD300_cook3_P106-131.indd 128 1/17/19 2:55 PM
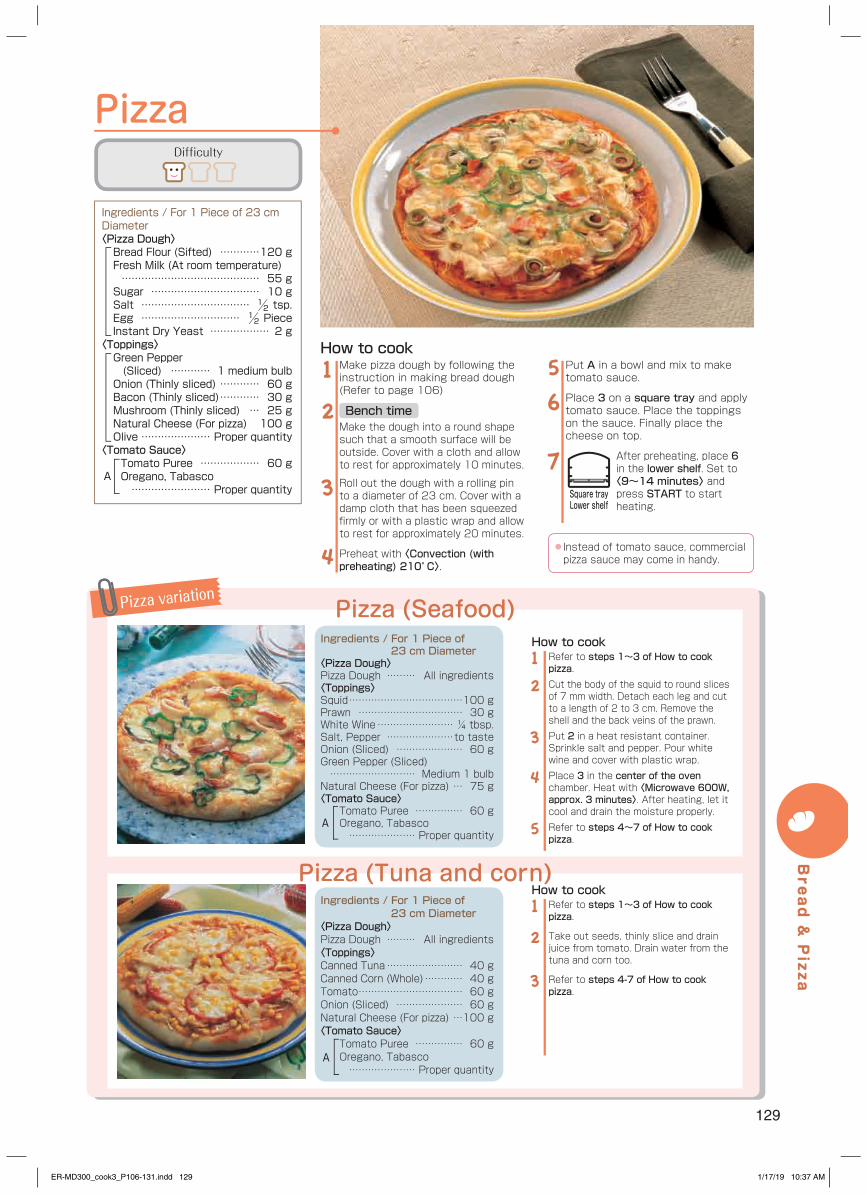
129
Pizza variation Pizza (Seafood)
Pizza (Tuna and corn)
Ingredients / For 1 Piece of 23 cm Diameter
〈Pizza Dough〉Pizza Dough ……… All ingredients〈Toppings〉Squid ………………………………100 gPrawn …………………………… 30 gWhite Wine …………………… ¼ tbsp.Salt, Pepper …………………to tasteOnion (Sliced) ………………… 60 gGreen Pepper (Sliced) ……………………… Medium 1 bulbNatural Cheese (For pizza) … 75 g〈Tomato Sauce〉
Tomato Puree …………… 60 gOregano, Tabasco ………………… Proper quantity
Ingredients / For 1 Piece of 23 cm Diameter
〈Pizza Dough〉Pizza Dough ……… All ingredients〈Toppings〉Canned Tuna …………………… 40 gCanned Corn (Whole) ………… 40 gTomato …………………………… 60 gOnion (Sliced) ………………… 60 gNatural Cheese (For pizza) …100 g〈Tomato Sauce〉
Tomato Puree …………… 60 gOregano, Tabasco ………………… Proper quantity
Refer to steps 1~3 of How to cook pizza.Cut the body of the squid to round slices of 7 mm width. Detach each leg and cut to a length of 2 to 3 cm. Remove the shell and the back veins of the prawn.Put 2 in a heat resistant container. Sprinkle salt and pepper. Pour white wine and cover with plastic wrap.Place 3 in the center of the oven chamber. Heat with 〈Microwave 600W, approx. 3 minutes〉. After heating, let it cool and drain the moisture properly.Refer to steps 4~7 of How to cook pizza.
1
2
3
4
5
Refer to steps 1~3 of How to cook pizza.
Take out seeds, thinly slice and drain juice from tomato. Drain water from the tuna and corn too.
Refer to steps 4-7 of How to cook pizza.
1
2
3
How to cook
How to cook
Pizza
Ingredients / For 1 Piece of 23 cm Diameter〈Pizza Dough〉Bread Flour (Sifted) …………120 gFresh Milk (At room temperature) …………………………………… 55 gSugar …………………………… 10 gSalt …………………………… ½ tsp.Egg ………………………… ½ PieceInstant Dry Yeast ……………… 2 g
〈Toppings〉Green Pepper (Sliced) ………… 1 medium bulbOnion (Thinly sliced) ………… 60 gBacon (Thinly sliced) ………… 30 gMushroom (Thinly sliced) … 25 gNatural Cheese (For pizza) 100 gOlive ………………… Proper quantity
〈Tomato Sauce〉Tomato Puree ……………… 60 gOregano, Tabasco …………………… Proper quantity
Put A in a bowl and mix to make tomato sauce.
Place 3 on a square tray and apply tomato sauce. Place the toppings on the sauce. Finally place the cheese on top.
After preheating, place 6 in the lower shelf. Set to 〈9~14 minutes〉 and press START to start heating.
56
7
How to cookMake pizza dough by following the instruction in making bread dough (Refer to page 106)
Make the dough into a round shape such that a smooth surface will be outside. Cover with a cloth and allow to rest for approximately 10 minutes.
Roll out the dough with a rolling pin to a diameter of 23 cm. Cover with a damp cloth that has been squeezed firmly or with a plastic wrap and allow to rest for approximately 20 minutes.
Preheat with 〈Convection (with preheating) 210° C〉.
1
2 Bench time
3
4
A
● Instead of tomato sauce, commercial pizza sauce may come in handy.
Square trayLower shelf
Difficulty
A
A
Bread & Pizza
ER-MD300_cook3_P106-131.indd 129 1/17/19 10:37 AM
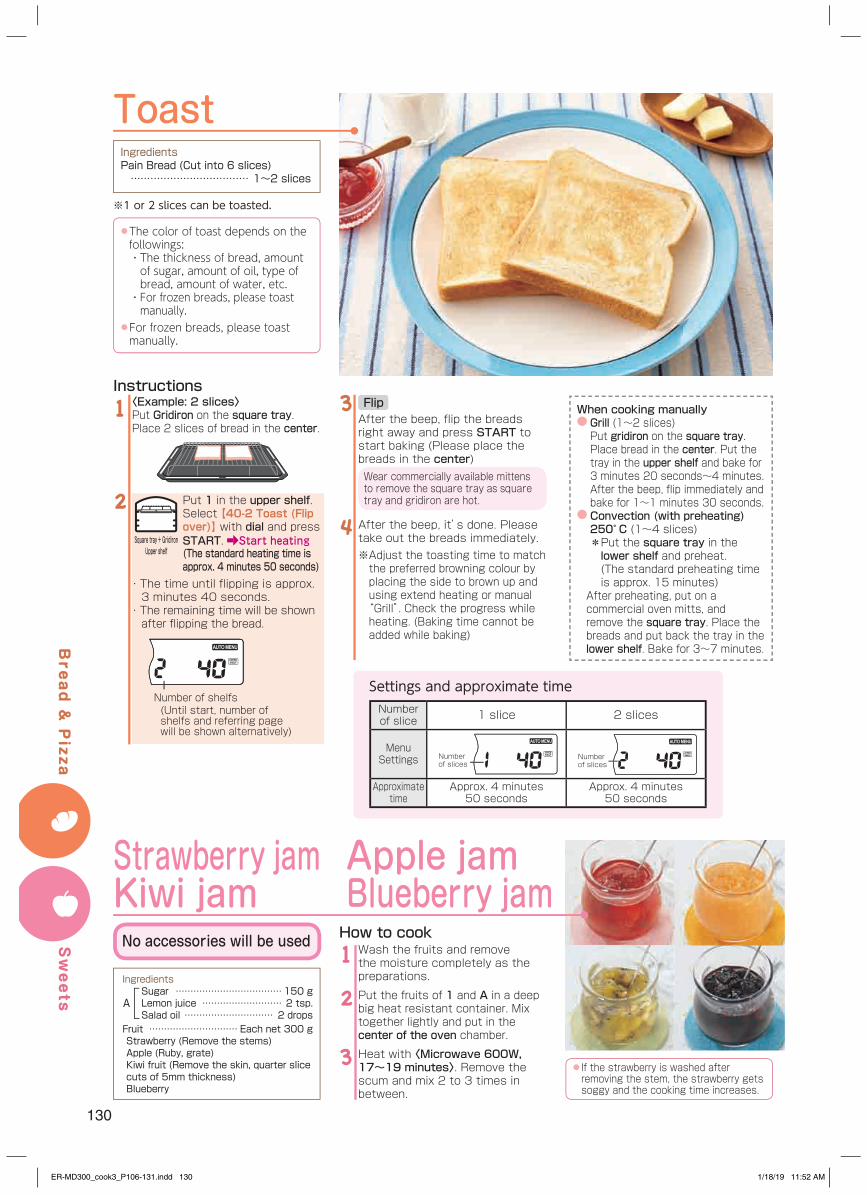
130
IngredientsSugar ………………………………150 gLemon juice ……………………… 2 tsp.Salad oil ………………………… 2 drops
Fruit ………………………… Each net 300 gStrawberry (Remove the stems)Apple (Ruby, grate)Kiwi fruit (Remove the skin, quarter slice cuts of 5mm thickness)Blueberry
● If the strawberry is washed after removing the stem, the strawberry gets soggy and the cooking time increases.
A
No accessories will be used Wash the fruits and remove the moisture completely as the preparations.
Put the fruits of 1 and A in a deep big heat resistant container. Mix together lightly and put in the center of the oven chamber.
Heat with 〈Microwave 600W, 17~19 minutes〉. Remove the scum and mix 2 to 3 times in between.
1
2
3
How to cook
Strawberry jamKiwi jam
Apple jamBlueberry jam
IngredientsPain Bread (Cut into 6 slices) ……………………………… 1~2 slices
Toast
※1 or 2 slices can be toasted.
〈Example: 2 slices〉Put Gridiron on the square tray. Place 2 slices of bread in the center.
Put 1 in the upper shelf. Select 【40-2 Toast (Flip over)】 with dial and press START. Start heating(The standard heating time is approx. 4 minutes 50 seconds)
・The time until flipping is approx. 3 minutes 40 seconds.
・The remaining time will be shown after flipping the bread.
1
2
Instructions
Square tray + GridironUpper shelf
After the beep, flip the breads right away and press START to start baking (Please place the breads in the center)Wear commercially available mittens to remove the square tray as square tray and gridiron are hot.
After the beep, it’s done. Please take out the breads immediately.※ Adjust the toasting time to match the preferred browning colour by placing the side to brown up and using extend heating or manual “Grill”. Check the progress while heating. (Baking time cannot be added while baking)
3 Flip
4
Number of shelfs(Until start, number of shelfs and referring page will be shown alternatively)
When cooking manually● Grill (1~2 slices)Put gridiron on the square tray. Place bread in the center. Put the tray in the upper shelf and bake for 3 minutes 20 seconds~4 minutes. After the beep, flip immediately and bake for 1~1 minutes 30 seconds.
● Convection (with preheating) 250° C (1~4 slices) * Put the square tray in the lower shelf and preheat.(The standard preheating time is approx. 15 minutes)
After preheating, put on a commercial oven mitts, and remove the square tray. Place the breads and put back the tray in the lower shelf. Bake for 3~7 minutes.
● The color of toast depends on the followings:・ The thickness of bread, amount of sugar, amount of oil, type of bread, amount of water, etc.・ For frozen breads, please toast manually.
● For frozen breads, please toast manually.
Settings and approximate timeNumber of slice 1 slice 2 slices
Menu Settings Number
of slicesNumber of slices
Approximate time
Approx. 4 minutes 50 seconds
Approx. 4 minutes 50 seconds
Bread & Pizza
Sweets
ER-MD300_cook3_P106-131.indd 130 1/18/19 11:52 AM
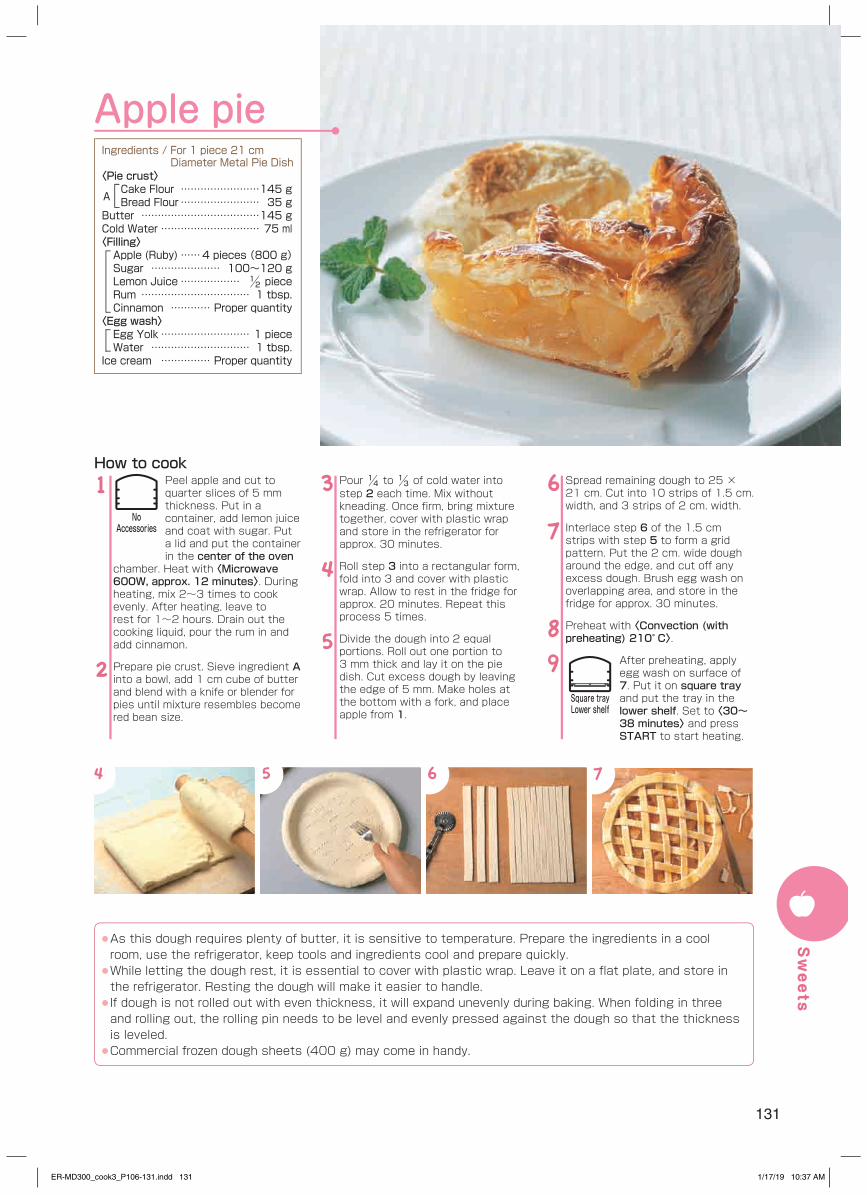
131
Peel apple and cut to quarter slices of 5 mm thickness. Put in a container, add lemon juice and coat with sugar. Put a lid and put the container in the center of the oven
chamber. Heat with 〈Microwave 600W, approx. 12 minutes〉. During heating, mix 2~3 times to cook evenly. After heating, leave to rest for 1~2 hours. Drain out the cooking liquid, pour the rum in and add cinnamon.
Prepare pie crust. Sieve ingredient A into a bowl, add 1 cm cube of butter and blend with a knife or blender for pies until mixture resembles become red bean size.
1
2
Pour ¼ to ⅓ of cold water into step 2 each time. Mix without kneading. Once firm, bring mixture together, cover with plastic wrap and store in the refrigerator for approx. 30 minutes.
Roll step 3 into a rectangular form, fold into 3 and cover with plastic wrap. Allow to rest in the fridge for approx. 20 minutes. Repeat this process 5 times.
Divide the dough into 2 equal portions. Roll out one portion to 3 mm thick and lay it on the pie dish. Cut excess dough by leaving the edge of 5 mm. Make holes at the bottom with a fork, and place apple from 1.
3
4
5
How to cook
Apple pieIngredients / For 1 piece 21 cm
Diameter Metal Pie Dish〈Pie crust〉
Cake Flour ……………………145 gBread Flour …………………… 35 g
Butter ………………………………145 gCold Water ………………………… 75 ml〈Filling〉Apple (Ruby) ……4 pieces (800 g)Sugar ………………… 100~120 gLemon Juice ……………… ½ pieceRum …………………………… 1 tbsp.Cinnamon ………… Proper quantity
〈Egg wash〉Egg Yolk ……………………… 1 pieceWater ………………………… 1 tbsp.
Ice cream …………… Proper quantity
A
● As this dough requires plenty of butter, it is sensitive to temperature. Prepare the ingredients in a cool room, use the refrigerator, keep tools and ingredients cool and prepare quickly.
● While letting the dough rest, it is essential to cover with plastic wrap. Leave it on a flat plate, and store in the refrigerator. Resting the dough will make it easier to handle.
● If dough is not rolled out with even thickness, it will expand unevenly during baking. When folding in three and rolling out, the rolling pin needs to be level and evenly pressed against the dough so that the thickness is leveled.
● Commercial frozen dough sheets (400 g) may come in handy.
Spread remaining dough to 25 × 21 cm. Cut into 10 strips of 1.5 cm. width, and 3 strips of 2 cm. width.
Interlace step 6 of the 1.5 cm strips with step 5 to form a grid pattern. Put the 2 cm. wide dough around the edge, and cut off any excess dough. Brush egg wash on overlapping area, and store in the fridge for approx. 30 minutes.
Preheat with 〈Convection (with preheating) 210° C〉.
After preheating, apply egg wash on surface of 7. Put it on square tray and put the tray in the lower shelf. Set to 〈30~38 minutes〉 and press START to start heating.
6
7
89
Square trayLower shelf
7654
NoAccessories
Sweets
ER-MD300_cook3_P106-131.indd 131 1/17/19 10:37 AM
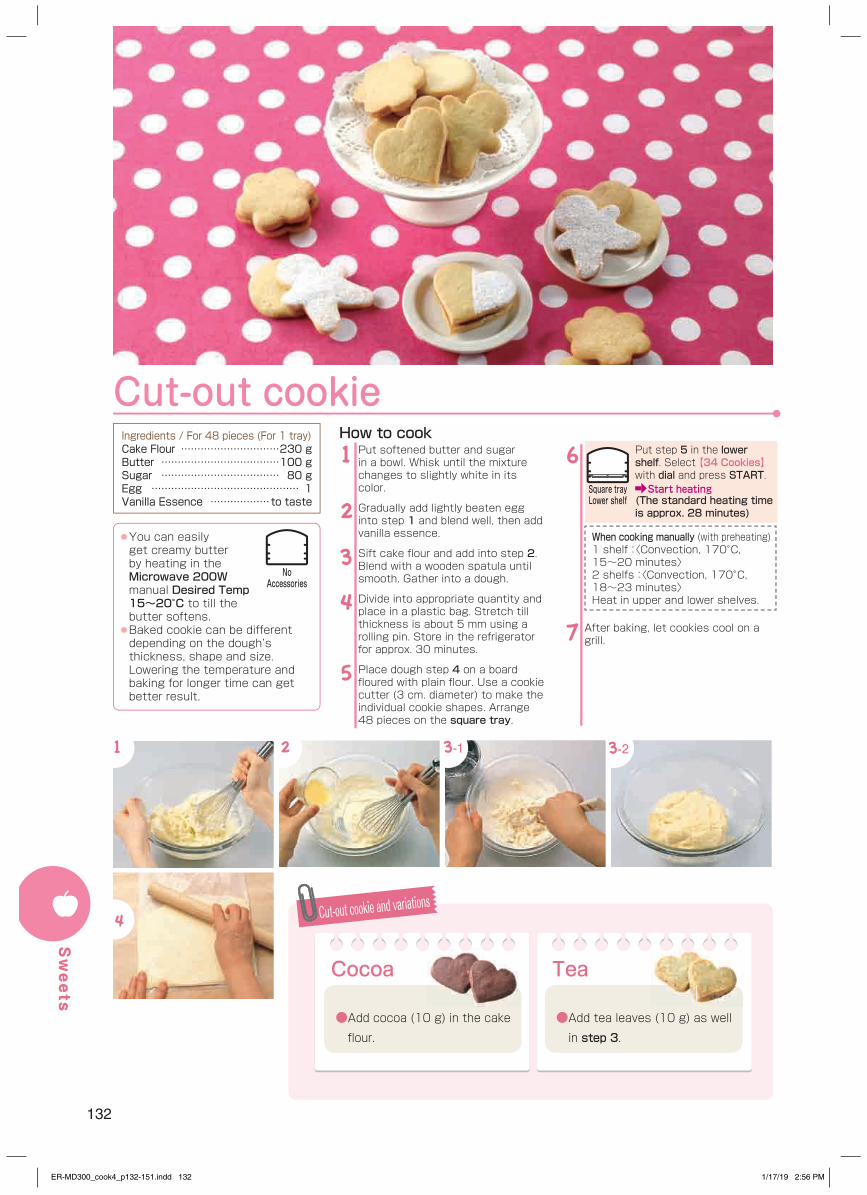
132
Cut-out cookiePut softened butter and sugar in a bowl. Whisk until the mixture changes to slightly white in its color.
Gradually add lightly beaten egg into step 1 and blend well, then add vanilla essence.
Sift cake flour and add into step 2. Blend with a wooden spatula until smooth. Gather into a dough.
Divide into appropriate quantity and place in a plastic bag. Stretch till thickness is about 5 mm using a rolling pin. Store in the refrigerator for approx. 30 minutes.
Place dough step 4 on a board floured with plain flour. Use a cookie cutter (3 cm. diameter) to make the individual cookie shapes. Arrange 48 pieces on the square tray.
1
2
3
4
5
Put step 5 in the lower shelf. Select 【34 Cookies】 with dial and press START. Start heating
(The standard heating time is approx. 28 minutes)
When cooking manually (with preheating)1 shelf:〈Convection, 170°C,15~20 minutes〉2 shelfs:〈Convection, 170°C,18~23 minutes〉Heat in upper and lower shelves.
After baking, let cookies cool on a grill.
6
7
How to cookIngredients / For 48 pieces (For 1 tray)Cake Flour …………………………230 gButter ………………………………100 gSugar ……………………………… 80 gEgg ……………………………………… 1Vanilla Essence ………………to taste
● You can easily get creamy butter by heating in the Microwave 200W manual Desired Temp 15~20°C to till the butter softens.
● Baked cookie can be different depending on the dough’s thickness, shape and size. Lowering the temperature and baking for longer time can get better result.
Square trayLower shelf
NoAccessories
3-23-12
4
1
Cut-out cookie and variations
TeaCocoa
● Add cocoa (10 g) in the cake flour.
● Add tea leaves (10 g) as well in step 3.
Sweets
ER-MD300_cook4_p132-151.indd 132 1/17/19 2:56 PM
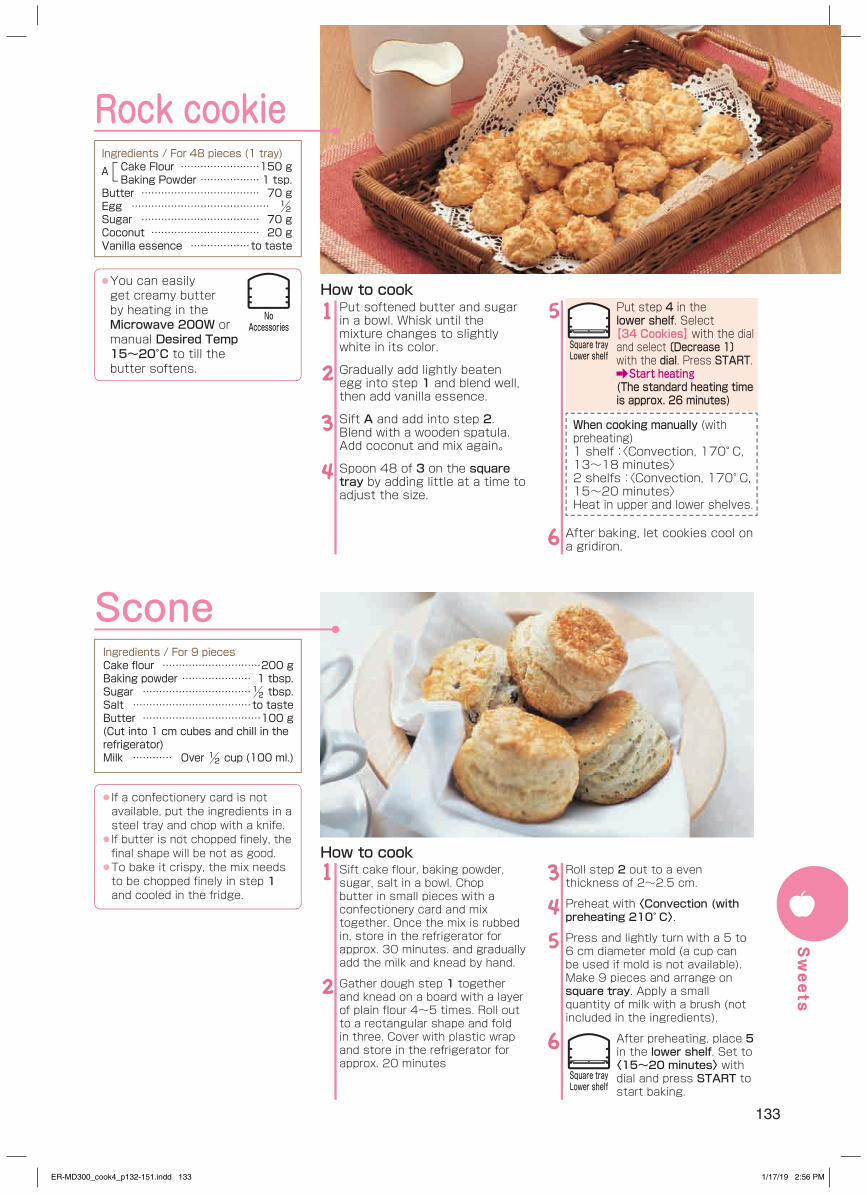
133
Put softened butter and sugar in a bowl. Whisk until the mixture changes to slightly white in its color.
Gradually add lightly beaten egg into step 1 and blend well, then add vanilla essence.
Sift A and add into step 2. Blend with a wooden spatula. Add coconut and mix again。
Spoon 48 of 3 on the square tray by adding little at a time to adjust the size.
1
2
3
4
Put step 4 in the lower shelf. Select 【34 Cookies】 with the dial and select 〔Decrease 1〕 with the dial. Press START.Start heating
(The standard heating time is approx. 26 minutes)
When cooking manually (with preheating)1 shelf:〈Convection, 170° C, 13~18 minutes〉2 shelfs:〈Convection, 170° C, 15~20 minutes〉Heat in upper and lower shelves.
After baking, let cookies cool on a gridiron.
5
6
How to cook
Sift cake flour, baking powder, sugar, salt in a bowl. Chop butter in small pieces with a confectionery card and mix together. Once the mix is rubbed in, store in the refrigerator for approx. 30 minutes. and gradually add the milk and knead by hand.
Gather dough step 1 together and knead on a board with a layer of plain flour 4~5 times. Roll out to a rectangular shape and fold in three. Cover with plastic wrap and store in the refrigerator for approx. 20 minutes
1
2
Roll step 2 out to a even thickness of 2~2.5 cm.
Preheat with 〈Convection (with preheating 210° C〉.
Press and lightly turn with a 5 to 6 cm diameter mold (a cup can be used if mold is not available). Make 9 pieces and arrange on square tray. Apply a small quantity of milk with a brush (not included in the ingredients).
After preheating, place 5 in the lower shelf. Set to 〈15~20 minutes〉 with dial and press START to start baking.
345
6
How to cook
Ingredients / For 48 pieces (1 tray)Cake Flour ……………………150 gBaking Powder ……………… 1 tsp.
Butter ……………………………… 70 gEgg …………………………………… ½ Sugar ……………………………… 70 gCoconut …………………………… 20 gVanilla essence ………………to taste
Ingredients / For 9 piecesCake flour …………………………200 gBaking powder ………………… 1 tbsp.Sugar ……………………………½ tbsp.Salt ………………………………to tasteButter ………………………………100 g (Cut into 1 cm cubes and chill in the refrigerator)Milk ………… Over ½ cup (100 ml.)
● If a confectionery card is not available, put the ingredients in a steel tray and chop with a knife.
● If butter is not chopped finely, the final shape will be not as good.
● To bake it crispy, the mix needs to be chopped finely in step 1 and cooled in the fridge.
Rock cookie
Scone
A
Square trayLower shelf
● You can easily get creamy butter by heating in the Microwave 200W or manual Desired Temp 15~20°C to till the butter softens.
NoAccessories
Square trayLower shelf
Sweets
ER-MD300_cook4_p132-151.indd 133 1/17/19 2:56 PM
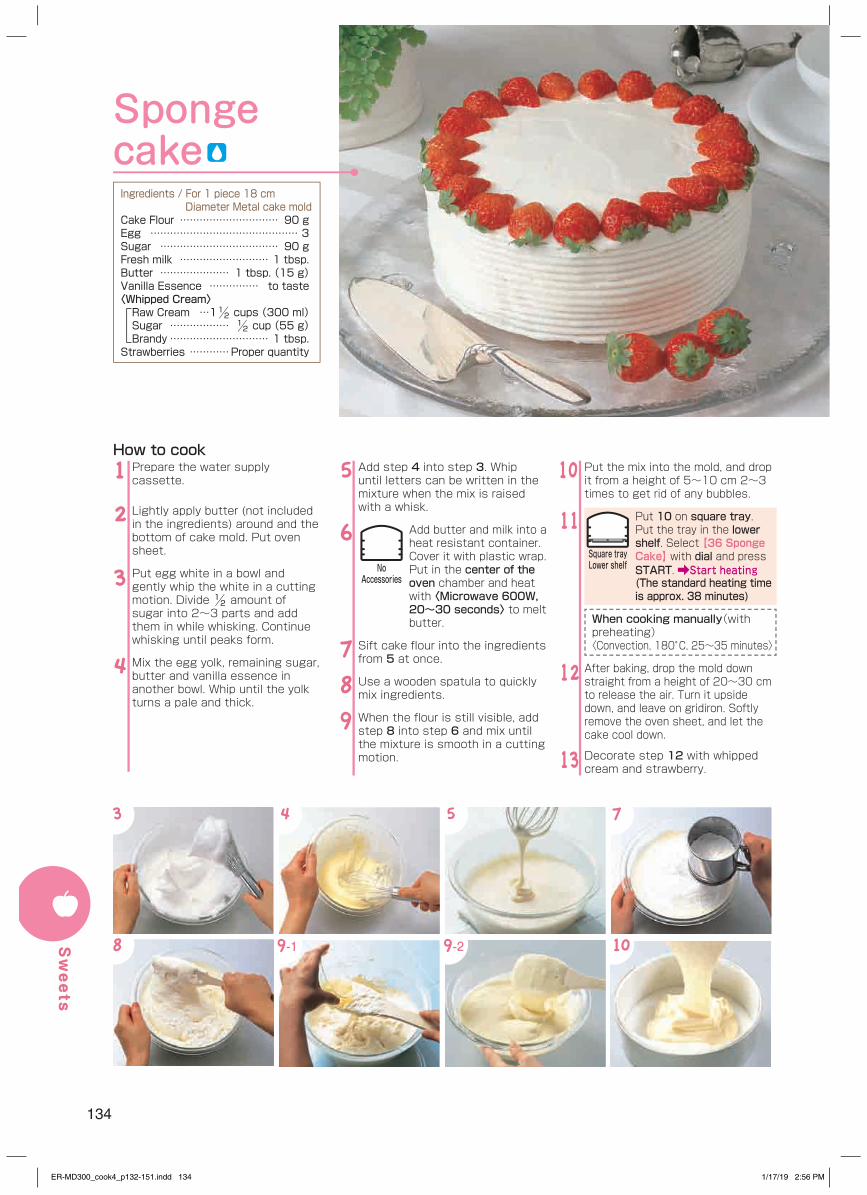
134
109-29-1
754
Sponge cakeIngredients / For 1 piece 18 cm
Diameter Metal cake moldCake Flour ………………………… 90 gEgg ……………………………………… 3Sugar ……………………………… 90 gFresh milk ……………………… 1 tbsp.Butter ………………… 1 tbsp. (15 g)Vanilla Essence …………… to taste〈Whipped Cream〉Raw Cream …1½ cups (300 ml)Sugar ……………… ½ cup (55 g)Brandy ………………………… 1 tbsp.
Strawberries …………Proper quantity
Prepare the water supply cassette.
Lightly apply butter (not included in the ingredients) around and the bottom of cake mold. Put oven sheet.
Put egg white in a bowl and gently whip the white in a cutting motion. Divide ½ amount of sugar into 2~3 parts and add them in while whisking. Continue whisking until peaks form.
Mix the egg yolk, remaining sugar, butter and vanilla essence in another bowl. Whip until the yolk turns a pale and thick.
1
2
3
4
Add step 4 into step 3. Whip until letters can be written in the mixture when the mix is raised with a whisk.
Add butter and milk into a heat resistant container. Cover it with plastic wrap. Put in the center of the oven chamber and heat with 〈Microwave 600W, 20~30 seconds〉 to melt butter.
Sift cake flour into the ingredients from 5 at once.
Use a wooden spatula to quickly mix ingredients.
When the flour is still visible, add step 8 into step 6 and mix until the mixture is smooth in a cutting motion.
5
6
7
8
9
How to cookPut the mix into the mold, and drop it from a height of 5~10 cm 2~3 times to get rid of any bubbles.
Put 10 on square tray. Put the tray in the lower shelf. Select 【36 Sponge Cake】 with dial and press START. Start heating(The standard heating time is approx. 38 minutes)
When cooking manually(with preheating)〈Convection, 180°C, 25~35 minutes〉
After baking, drop the mold down straight from a height of 20~30 cm to release the air. Turn it upside down, and leave on gridiron. Softly remove the oven sheet, and let the cake cool down.
Decorate step 12 with whipped cream and strawberry.
10
11
12
13
8
Square trayLower shelfNo
Accessories
3Sweets
ER-MD300_cook4_p132-151.indd 134 1/17/19 2:56 PM
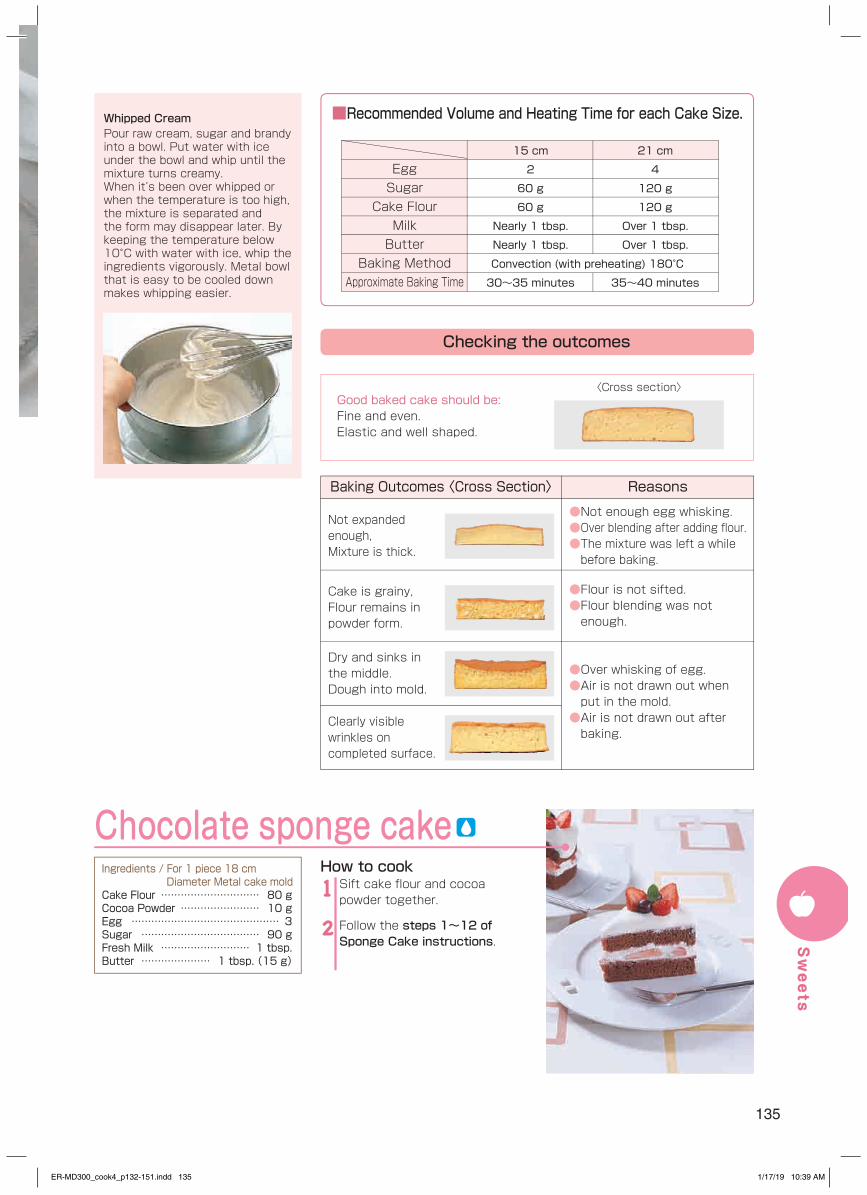
135
Sift cake flour and cocoa powder together.
Follow the steps 1~12 of Sponge Cake instructions.
1
2
How to cook
Chocolate sponge cakeIngredients / For 1 piece 18 cm
Diameter Metal cake moldCake Flour ………………………… 80 gCocoa Powder …………………… 10 gEgg ……………………………………… 3Sugar ……………………………… 90 gFresh Milk ……………………… 1 tbsp.Butter ………………… 1 tbsp. (15 g)
Checking the outcomes
EggSugar
Cake FlourMilkButter
Baking MethodApproximate Baking Time
15 cm
2
60 g
60 g
Nearly 1 tbsp.
Nearly 1 tbsp.
21 cm
4
120 g
120 g
Over 1 tbsp.
Over 1 tbsp.
30~35 minutes
Convection (with preheating) 180°C
35~40 minutes
■Recommended Volume and Heating Time for each Cake Size.
Good baked cake should be:Fine and even.Elastic and well shaped.
〈Cross section〉
●Not enough egg whisking.● Over blending after adding flour.● The mixture was left a while before baking.
Not expanded enough,Mixture is thick.
Cake is grainy,Flour remains in powder form.
●Flour is not sifted.● Flour blending was not enough.
Dry and sinks in the middle.Dough into mold.
●Over whisking of egg.● Air is not drawn out when put in the mold.
● Air is not drawn out after baking.
Clearly visible wrinkles on completed surface.
Baking Outcomes 〈Cross Section〉 Reasons
Whipped CreamPour raw cream, sugar and brandy into a bowl. Put water with ice under the bowl and whip until the mixture turns creamy.When it’s been over whipped or when the temperature is too high, the mixture is separated and the form may disappear later. By keeping the temperature below 10°C with water with ice, whip the ingredients vigorously. Metal bowl that is easy to be cooled down makes whipping easier.
Sweets
ER-MD300_cook4_p132-151.indd 135 1/17/19 10:39 AM
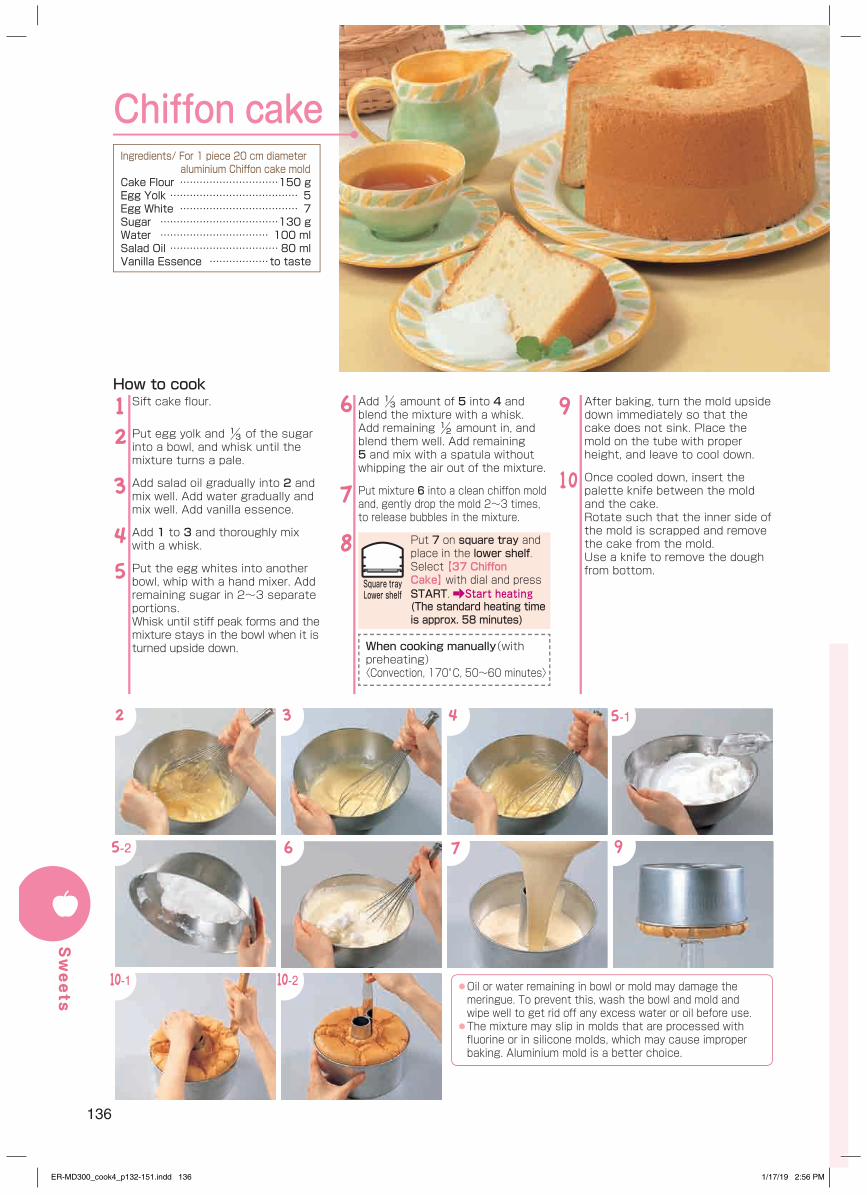
136
10-1
Chiffon cakeIngredients/ For 1 piece 20 cm diameter
aluminium Chiffon cake moldCake Flour …………………………150 gEgg Yolk ………………………………… 5Egg White ……………………………… 7Sugar ………………………………130 gWater …………………………… 100 mlSalad Oil …………………………… 80 mlVanilla Essence ………………to taste
Sift cake flour.
Put egg yolk and ⅓ of the sugar into a bowl, and whisk until the mixture turns a pale.
Add salad oil gradually into 2 and mix well. Add water gradually and mix well. Add vanilla essence.
Add 1 to 3 and thoroughly mix with a whisk.
Put the egg whites into another bowl, whip with a hand mixer. Add remaining sugar in 2~3 separate portions.Whisk until stiff peak forms and the mixture stays in the bowl when it is turned upside down.
12
3
4
5
Add ⅓ amount of 5 into 4 and blend the mixture with a whisk. Add remaining ½ amount in, and blend them well. Add remaining 5 and mix with a spatula without whipping the air out of the mixture.
Put mixture 6 into a clean chiffon mold and, gently drop the mold 2~3 times, to release bubbles in the mixture.
Put 7 on square tray and place in the lower shelf. Select 【37 Chiffon Cake】 with dial and press START. Start heating(The standard heating time is approx. 58 minutes)
When cooking manually(with preheating)〈Convection, 170°C, 50~60 minutes〉
6
7
8
How to cookAfter baking, turn the mold upside down immediately so that the cake does not sink. Place the mold on the tube with proper height, and leave to cool down.
Once cooled down, insert the palette knife between the mold and the cake.Rotate such that the inner side of the mold is scrapped and remove the cake from the mold.Use a knife to remove the dough from bottom.
9
10
976
5-143
5-2
2
10-2
Square trayLower shelf
● Oil or water remaining in bowl or mold may damage the meringue. To prevent this, wash the bowl and mold and wipe well to get rid off any excess water or oil before use.
● The mixture may slip in molds that are processed with fluorine or in silicone molds, which may cause improper baking. Aluminium mold is a better choice.
Sweets
ER-MD300_cook4_p132-151.indd 136 1/17/19 2:56 PM
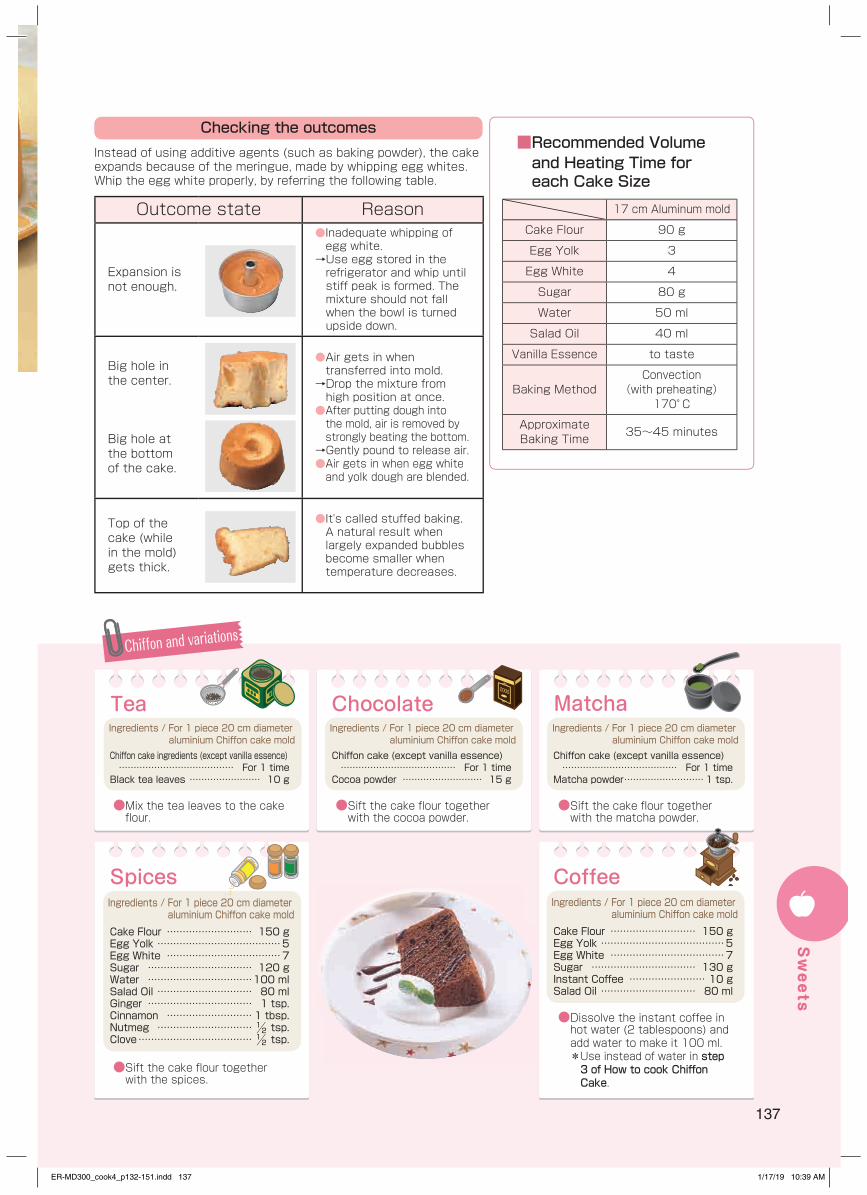
137
Chiffon and variations
MatchaChocolateIngredients / For 1 piece 20 cm diameter
aluminium Chiffon cake moldIngredients / For 1 piece 20 cm diameter
aluminium Chiffon cake moldChiffon cake (except vanilla essence) ………………………………… For 1 timeCocoa powder ……………………… 15 g
Chiffon cake (except vanilla essence) ………………………………… For 1 timeMatcha powder ………………………1 tsp.
Tea
CoffeeIngredients / For 1 piece 20 cm diameter
aluminium Chiffon cake mold
Ingredients / For 1 piece 20 cm diameter aluminium Chiffon cake mold
Cake Flour ……………………… 150 gEgg Yolk …………………………………5Egg White ………………………………7Sugar …………………………… 130 gInstant Coffee …………………… 10 gSalad Oil ………………………… 80 ml
Chiffon cake ingredients (except vanilla essence) ………………………………… For 1 timeBlack tea leaves …………………… 10 g
Spices
Cake Flour ……………………… 150 gEgg Yolk …………………………………5Egg White ………………………………7Sugar …………………………… 120 gWater ……………………………100 mlSalad Oil ………………………… 80 mlGinger …………………………… 1 tsp.Cinnamon ………………………1 tbsp.Nutmeg …………………………½ tsp.Clove ………………………………½ tsp.
Ingredients / For 1 piece 20 cm diameter aluminium Chiffon cake mold
● Mix the tea leaves to the cake flour.
● Sift the cake flour together with the cocoa powder.
● Sift the cake flour together with the matcha powder.
● Sift the cake flour together with the spices.
● Dissolve the instant coffee in hot water (2 tablespoons) and add water to make it 100 ml.* Use instead of water in step 3 of How to cook Chiffon Cake.
Outcome state Reason
Expansion is not enough.
● Inadequate whipping of egg white.→ Use egg stored in the refrigerator and whip until stiff peak is formed. The mixture should not fall when the bowl is turned upside down.
Big hole in the center.
Big hole at the bottom of the cake.
● Air gets in when transferred into mold.→ Drop the mixture from high position at once.
● After putting dough into the mold, air is removed by strongly beating the bottom.→ Gently pound to release air.● Air gets in when egg white and yolk dough are blended.
Top of the cake (while in the mold) gets thick.
● It's called stuffed baking.A natural result when largely expanded bubbles become smaller when temperature decreases.
Checking the outcomesInstead of using additive agents (such as baking powder), the cake expands because of the meringue, made by whipping egg whites. Whip the egg white properly, by referring the following table.
■ Recommended Volume and Heating Time for each Cake Size
17 cm Aluminum mold
Cake Flour 90 g
Egg Yolk 3
Egg White 4
Sugar 80 g
Water 50 ml
Salad Oil 40 ml
Vanilla Essence to taste
Baking MethodConvection
(with preheating)170° C
Approximate Baking Time 35~45 minutes
Sweets
ER-MD300_cook4_p132-151.indd 137 1/17/19 10:39 AM
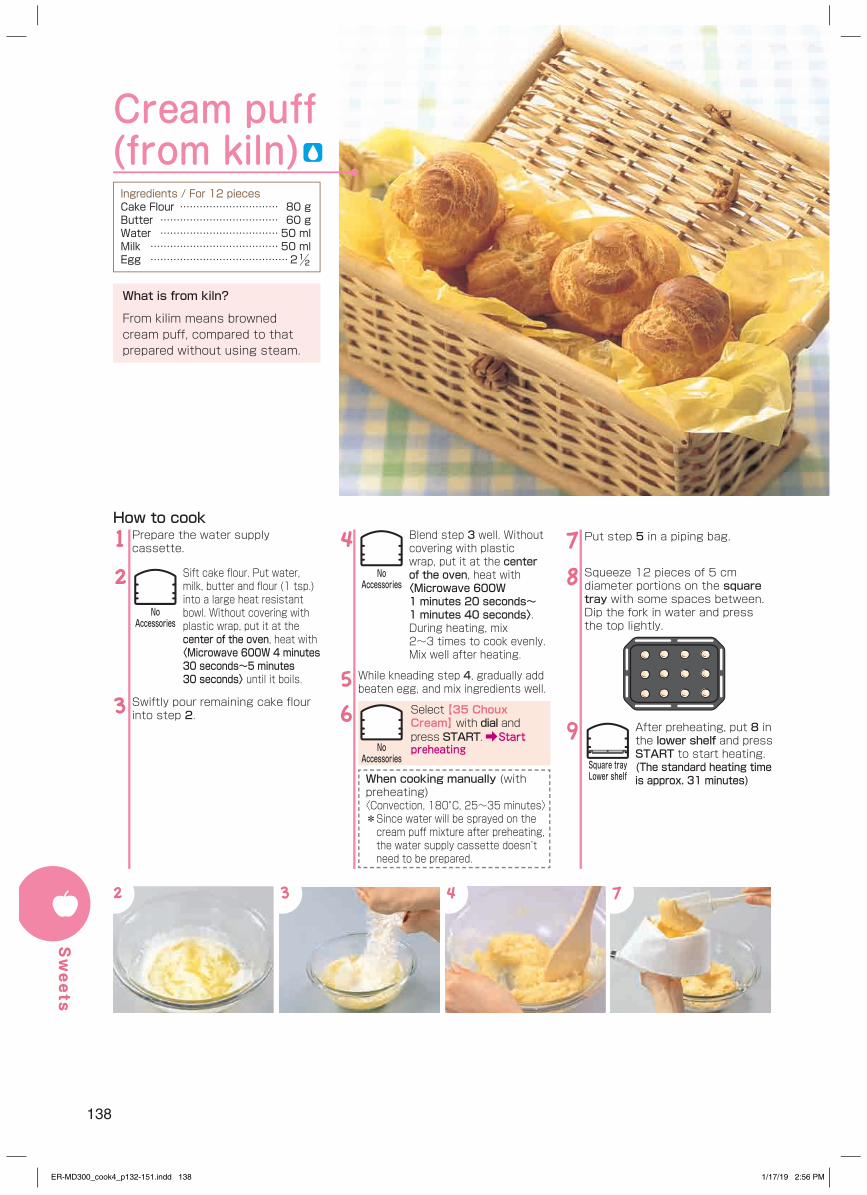
138
Cream puff (from kiln)Ingredients / For 12 piecesCake Flour ………………………… 80 gButter ……………………………… 60 gWater ……………………………… 50 mlMilk ………………………………… 50 mlEgg ……………………………………2½
Prepare the water supply cassette.
Sift cake flour. Put water, milk, butter and flour (1 tsp.) into a large heat resistant bowl. Without covering with plastic wrap, put it at the center of the oven, heat with 〈Microwave 600W 4 minutes 30 seconds~5 minutes 30 seconds〉 until it boils.
Swiftly pour remaining cake flour into step 2.
1
2
3
Blend step 3 well. Without covering with plastic wrap, put it at the center of the oven, heat with 〈Microwave 600W 1 minutes 20 seconds~1 minutes 40 seconds〉. During heating, mix 2~3 times to cook evenly. Mix well after heating.
While kneading step 4, gradually add beaten egg, and mix ingredients well.
Select 【35 Choux Cream】 with dial and press START. Start preheating
When cooking manually (with preheating)〈Convection, 180°C, 25~35 minutes〉* Since water will be sprayed on the cream puff mixture after preheating, the water supply cassette doesn’t need to be prepared.
4
56
How to cookPut step 5 in a piping bag.
Squeeze 12 pieces of 5 cm diameter portions on the square tray with some spaces between. Dip the fork in water and press the top lightly.
After preheating, put 8 in the lower shelf and press START to start heating.(The standard heating time is approx. 31 minutes)
7
8
9
What is from kiln?
From kilim means browned cream puff, compared to that prepared without using steam.
7432
Square trayLower shelf
NoAccessories
NoAccessories
NoAccessories
Sweets
ER-MD300_cook4_p132-151.indd 138 1/17/19 2:56 PM

139
Checking the outcomes
Good baked conditionExpands nicely in a perfect shape with hollow in the middle.
〈Cross Section〉
●The ingredients were not weighted properly.● Convection’s heating time was inaccurate.● Butter was not heated until it stews.● Flour was not mixed in while butter was stewing.●Flour blending was inadequate.● Flour blended dough got cold.
Spread outwards, but not risen.
Small, and rises in a disfigured shape.
Outcome state Reason
Make bite size pieces by squeezing a small portion of the cream puff mixture. Enjoy by piling up and tree like decorations.
Squeeze the cream puff mixture out into thin and long portions. Coat with white chocolate, Coffee or preferred flavors.
Custard cream
IngredientsCake Flour ……………………… 2 tbsp.Corn Starch …………………… 2 tbsp.Sugar ………………………………100 gMilk ……………………………… 400 mlEgg Yolk ………………………………… 2Vanilla Essence ………………to taste
Put cake flour, corn starch and sugar in a deep heat resistant bowl. Blending with a whisk. Add milk and blend until smooth. Add egg yolk and mix well.
1 Without plastic wrap, put 1 in the center of the oven chamber and heat with 〈Microwave 600W, 5 minutes 30 seconds〉. During heating, mix 2-3 times to cook evenly. Once finished, add vanilla essence
2How to cook
● If piping bag is not available, use a spoon to scoop the mixture.
● Heat until the butter stews. (See step 2 in “How to cook”).
● Blend the cake flour and the egg quickly.
Cream puff and variations
No accessories will be used
Chocolate creamIngredientCake Flour …………………… 1½ tbsp.Corn Starch ………………… 1½ tbsp.Sugar ……………………………… 80 gMilk ……………………………… 350 mlEgg Yolk ………………………………1½ Vanilla Essence ………………to tasteChocolate bar …………………… 80 g
How to cook
Variation
Finely grate the chocolate bar
Follow the steps 1 and 2 of How to cook custard cream.(Add the finely grated chocolate bar at step 1)
12
Sweets
ER-MD300_cook4_p132-151.indd 139 1/17/19 10:39 AM
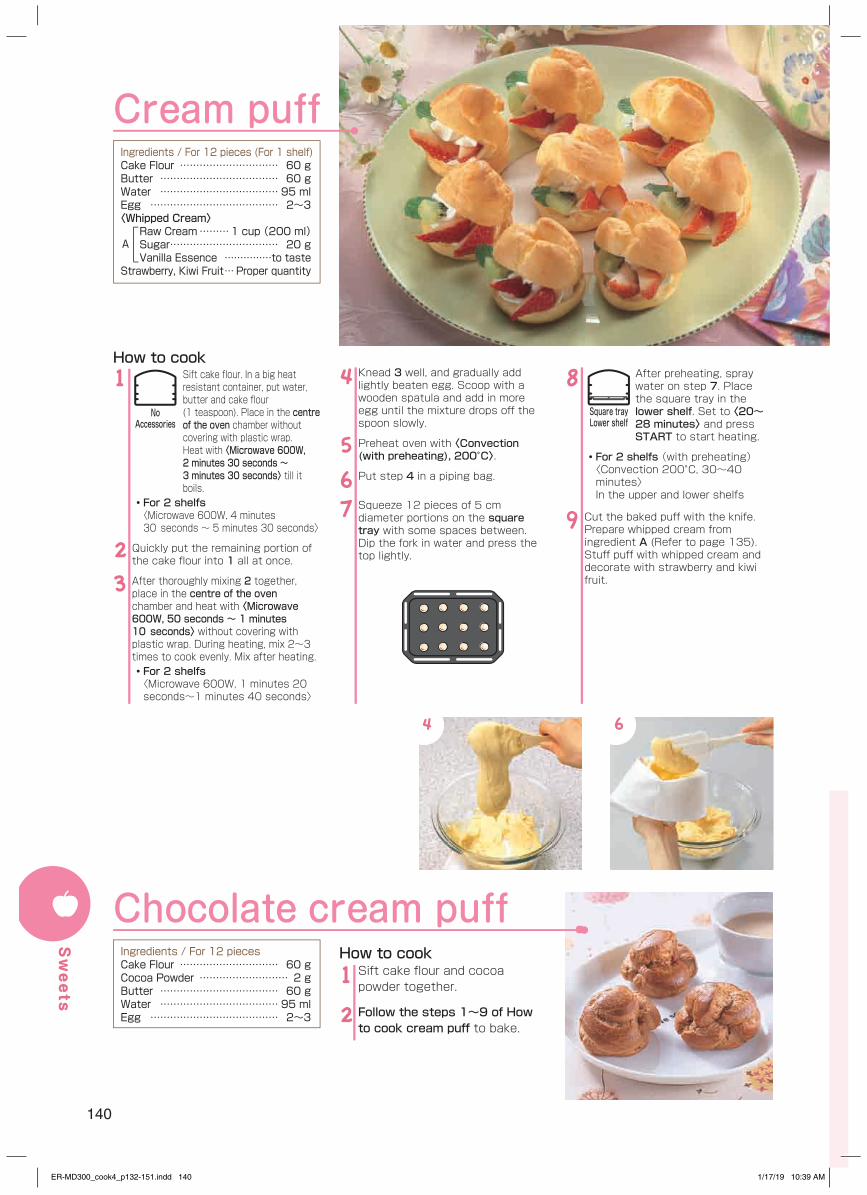
140
Knead 3 well, and gradually add lightly beaten egg. Scoop with a wooden spatula and add in more egg until the mixture drops off the spoon slowly.
Preheat oven with 〈Convection (with preheating), 200°C〉.
Put step 4 in a piping bag.
Squeeze 12 pieces of 5 cm diameter portions on the square tray with some spaces between. Dip the fork in water and press the top lightly.
4
567
Sift cake flour and cocoa powder together.
Follow the steps 1~9 of How to cook cream puff to bake.
1
2
How to cook
Chocolate cream puffIngredients / For 12 piecesCake Flour ………………………… 60 gCocoa Powder ……………………… 2 gButter ……………………………… 60 gWater ……………………………… 95 mlEgg ………………………………… 2~3
Ingredients / For 12 pieces (For 1 shelf)Cake Flour ………………………… 60 gButter ……………………………… 60 gWater ……………………………… 95 mlEgg ………………………………… 2~3〈Whipped Cream〉
Raw Cream ………1 cup (200 ml)Sugar …………………………… 20 gVanilla Essence ……………to taste
Strawberry, Kiwi Fruit … Proper quantity
A
Sift cake flour. In a big heat resistant container, put water, butter and cake flour (1 teaspoon). Place in the centre of the oven chamber without covering with plastic wrap. Heat with 〈Microwave 600W, 2 minutes 30 seconds ~ 3 minutes 30 seconds〉 till it boils.
・ For 2 shelfs〈Microwave 600W, 4 minutes 30⦆seconds ~ 5 minutes 30 seconds〉
Quickly put the remaining portion of the cake flour into 1 all at once.
After thoroughly mixing 2 together, place in the centre of the oven chamber and heat with 〈Microwave 600W, 50 seconds ~ 1 minutes 10⦆seconds〉 without covering with plastic wrap. During heating, mix 2~3 times to cook evenly. Mix after heating.・ For 2 shelfs〈Microwave 600W, 1 minutes 20 seconds~1 minutes 40 seconds〉
1
23
After preheating, spray water on step 7. Place the square tray in the lower shelf. Set to 〈20~28 minutes〉 and press START to start heating.
・ For 2 shelfs (with preheating)〈Convection 200°C, 30~40 minutes〉In the upper and lower shelfs
Cut the baked puff with the knife. Prepare whipped cream from ingredient A (Refer to page 135). Stuff puff with whipped cream and decorate with strawberry and kiwi fruit.
8
9
How to cook
Cream puff
Square trayLower shelf
64
NoAccessories
Sweets
ER-MD300_cook4_p132-151.indd 140 1/17/19 10:39 AM
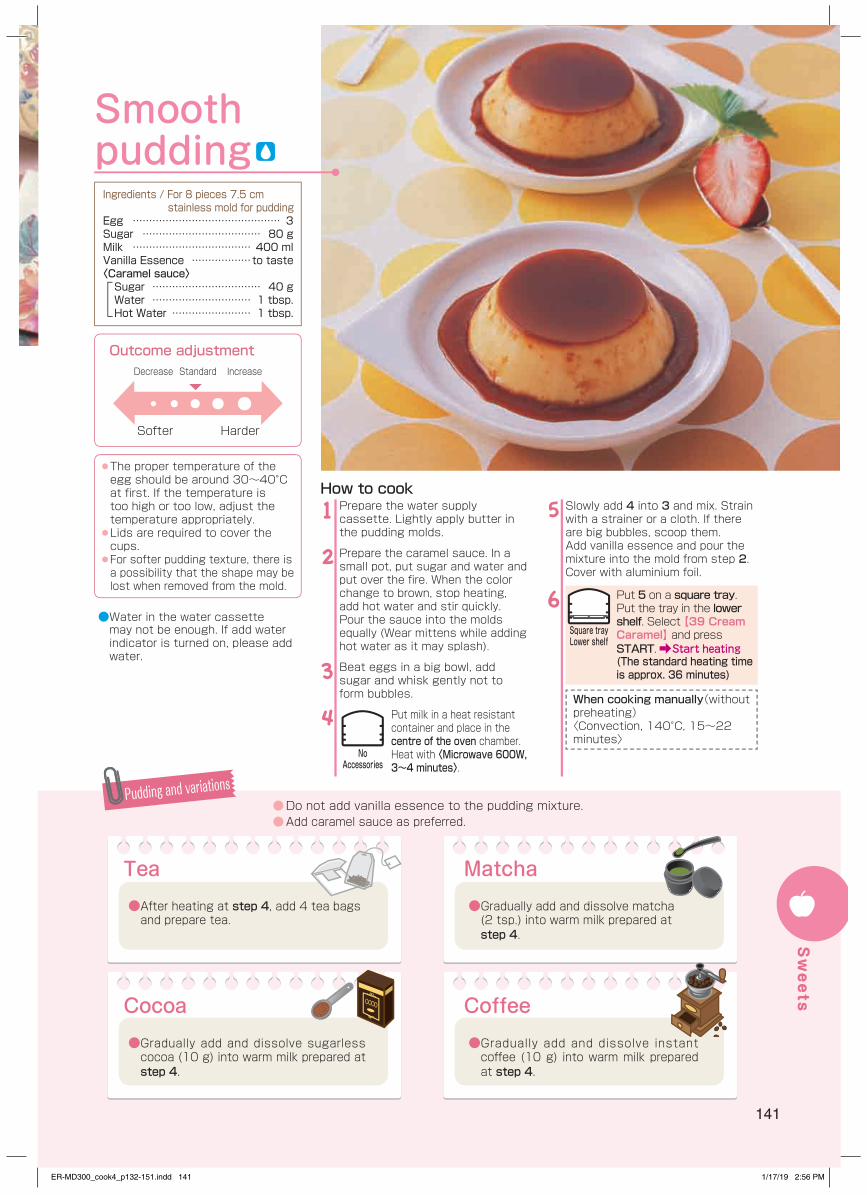
141
Smooth pudding
Prepare the water supply cassette. Lightly apply butter in the pudding molds.
Prepare the caramel sauce. In a small pot, put sugar and water and put over the fire. When the color change to brown, stop heating, add hot water and stir quickly. Pour the sauce into the molds equally (Wear mittens while adding hot water as it may splash).
Beat eggs in a big bowl, add sugar and whisk gently not to form bubbles.
Put milk in a heat resistant container and place in the centre of the oven chamber. Heat with 〈Microwave 600W, 3~4 minutes〉.
1
2
3
4
Slowly add 4 into 3 and mix. Strain with a strainer or a cloth. If there are big bubbles, scoop them. Add vanilla essence and pour the mixture into the mold from step 2. Cover with aluminium foil.
Put 5 on a square tray. Put the tray in the lower shelf. Select 【39 Cream Caramel】 and press START. Start heating(The standard heating time is approx. 36 minutes)
When cooking manually(without preheating)〈Convection, 140°C, 15~22 minutes〉
5
6
How to cook
Ingredients / For 8 pieces 7.5 cm stainless mold for pudding
Egg ……………………………………… 3 Sugar ……………………………… 80 gMilk ……………………………… 400 mlVanilla Essence ………………to taste〈Caramel sauce〉Sugar …………………………… 40 gWater ………………………… 1 tbsp.Hot Water …………………… 1 tbsp.
Outcome adjustmentDecrease
Softer
Increase
Harder
Standard
● The proper temperature of the egg should be around 30~40°Cat first. If the temperature is too high or too low, adjust the temperature appropriately.
● Lids are required to cover the cups.
● For softer pudding texture, there is a possibility that the shape may be lost when removed from the mold.
●Water in the water cassette may not be enough. If add water indicator is turned on, please add water.
Square trayLower shelf
NoAccessories
Pudding and variations
Tea
Cocoa
● After heating at step 4, add 4 tea bags and prepare tea.
● Gradually add and dissolve sugarless cocoa (10 g) into warm milk prepared at step 4.
Matcha
Coffee
● Gradually add and dissolve matcha (2 tsp.) into warm milk prepared at step 4.
● Gradually add and dissolve instant coffee (10 g) into warm milk prepared at step 4.
● Do not add vanilla essence to the pudding mixture.● Add caramel sauce as preferred.
Sweets
ER-MD300_cook4_p132-151.indd 141 1/17/19 2:56 PM
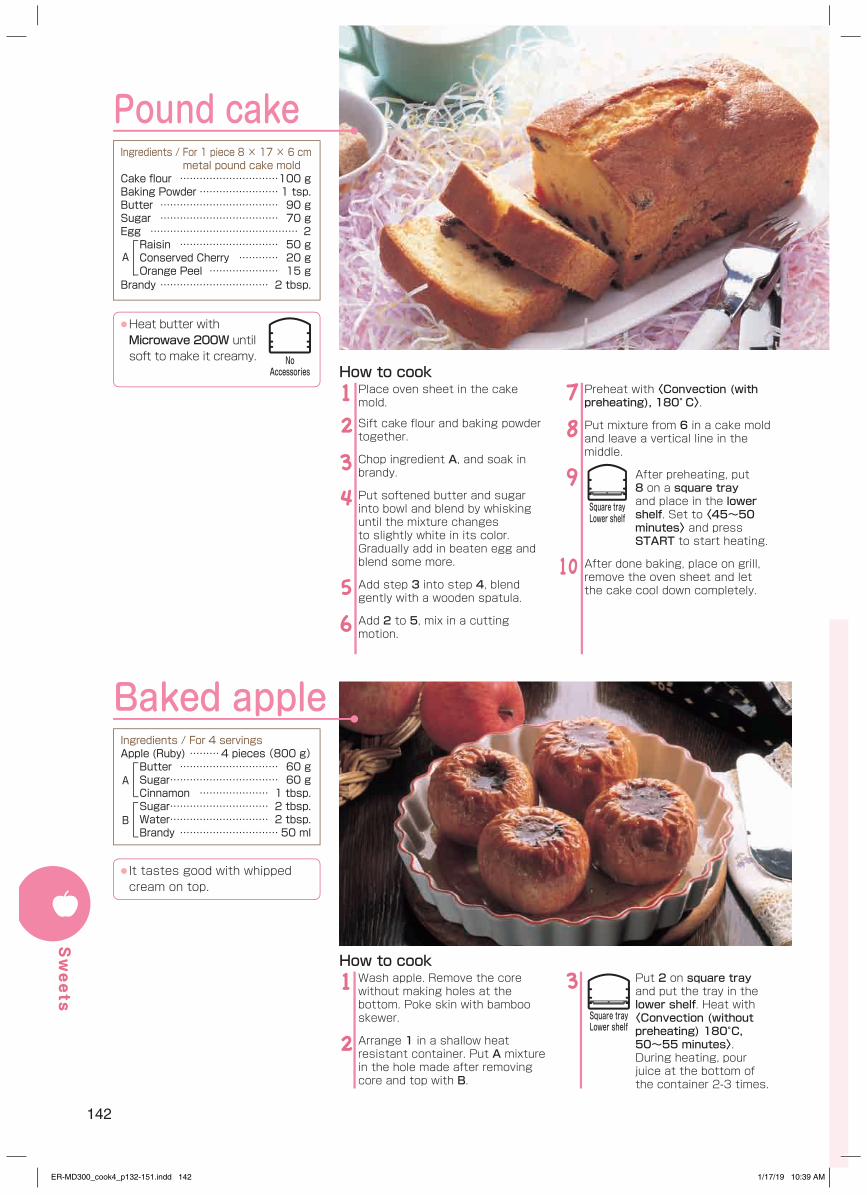
142
Place oven sheet in the cake mold.
Sift cake flour and baking powder together.
Chop ingredient A, and soak in brandy.
Put softened butter and sugar into bowl and blend by whisking until the mixture changes to slightly white in its color. Gradually add in beaten egg and blend some more.
Add step 3 into step 4, blend gently with a wooden spatula.
Add 2 to 5, mix in a cutting motion.
12
34
5
6
Preheat with 〈Convection (with preheating), 180° C〉.
Put mixture from 6 in a cake mold and leave a vertical line in the middle.
After preheating, put 8 on a square tray and place in the lower shelf. Set to 〈45~50 minutes〉 and press START to start heating.
After done baking, place on grill, remove the oven sheet and let the cake cool down completely.
7
8
9
10
How to cook
Pound cake
● Heat butter with Microwave 200W until soft to make it creamy.
Ingredients / For 1 piece 8 × 17 × 6 cmmetal pound cake mold
Cake flour …………………………100 gBaking Powder …………………… 1 tsp.Butter ……………………………… 90 gSugar ……………………………… 70 gEgg ……………………………………… 2Raisin ………………………… 50 gConserved Cherry ………… 20 gOrange Peel ………………… 15 g
Brandy …………………………… 2 tbsp.
A
Square trayLower shelf
NoAccessories
Wash apple. Remove the core without making holes at the bottom. Poke skin with bamboo skewer.
Arrange 1 in a shallow heat resistant container. Put A mixture in the hole made after removing core and top with B.
1
2
Put 2 on square tray and put the tray in the lower shelf. Heat with 〈Convection (without preheating) 180°C, 50~55 minutes〉. During heating, pour juice at the bottom of the container 2-3 times.
3How to cook
Baked apple
● It tastes good with whipped cream on top.
Ingredients / For 4 servingsApple (Ruby) ………4 pieces (800 g)Butter ………………………… 60 gSugar …………………………… 60 gCinnamon ………………… 1 tbsp.Sugar ………………………… 2 tbsp.Water ………………………… 2 tbsp.Brandy ………………………… 50 ml
A
B
Square trayLower shelf
Sweets
ER-MD300_cook4_p132-151.indd 142 1/17/19 10:39 AM
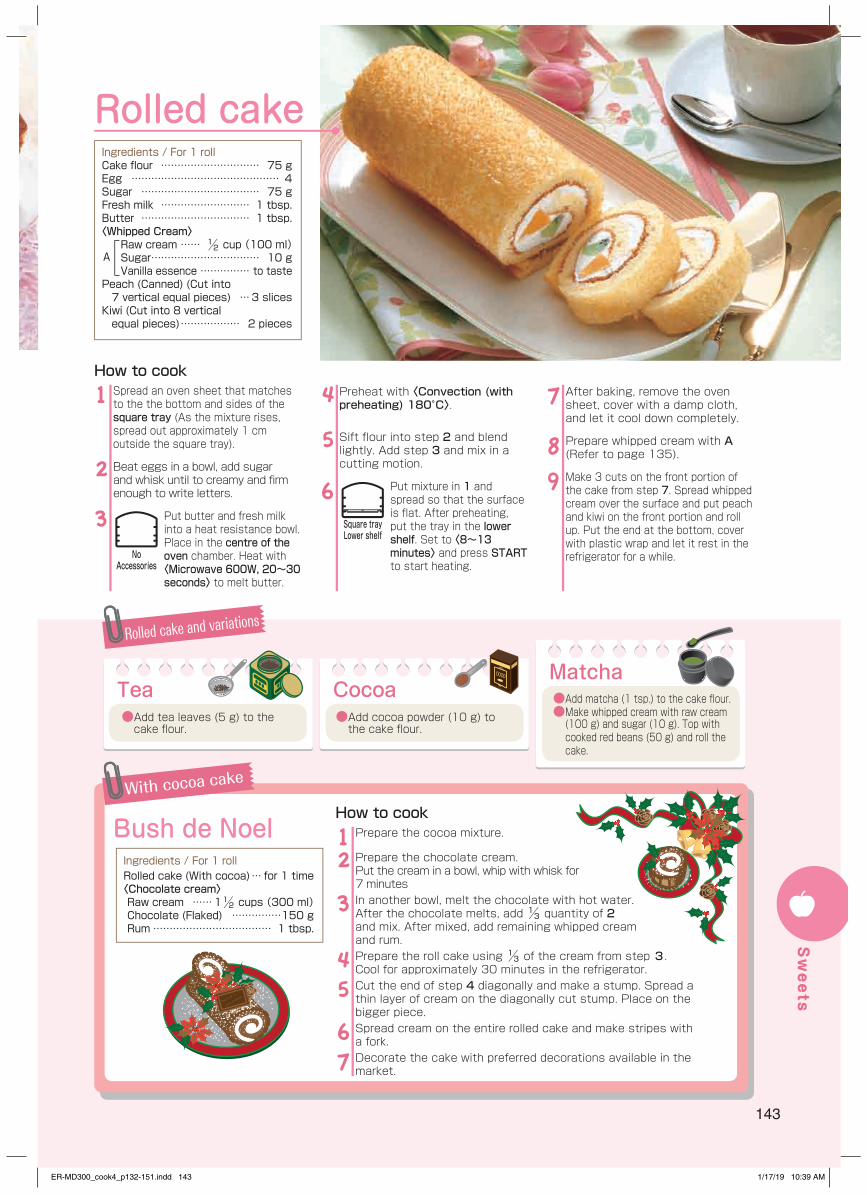
143
Bush de Noel
With cocoa cake
Rolled cake and variations
MatchaTea Cocoa
Rolled cake
Spread an oven sheet that matches to the the bottom and sides of the square tray (As the mixture rises, spread out approximately 1 cm outside the square tray).
Beat eggs in a bowl, add sugar and whisk until to creamy and firm enough to write letters.
Put butter and fresh milk into a heat resistance bowl. Place in the centre of the oven chamber. Heat with 〈Microwave 600W, 20~30 seconds〉 to melt butter.
1
2
3
Preheat with 〈Convection (with preheating) 180°C〉.
Sift flour into step 2 and blend lightly. Add step 3 and mix in a cutting motion.
Put mixture in 1 and spread so that the surface is flat. After preheating, put the tray in the lower shelf. Set to 〈8~13 minutes〉 and press START to start heating.
4
5
6
How to cook
Ingredients / For 1 rollCake flour ………………………… 75 gEgg ……………………………………… 4Sugar ……………………………… 75 gFresh milk ……………………… 1 tbsp.Butter …………………………… 1 tbsp.〈Whipped Cream〉
Raw cream …… ½ cup (100 ml)Sugar …………………………… 10 gVanilla essence …………… to taste
Peach (Canned) (Cut into 7 vertical equal pieces) …3 slicesKiwi (Cut into 8 vertical equal pieces) ……………… 2 pieces
A
NoAccessories
Ingredients / For 1 rollRolled cake (With cocoa) … for 1 time〈Chocolate cream〉Raw cream ……1½ cups (300 ml)Chocolate (Flaked) ……………150 gRum ……………………………… 1 tbsp.
Prepare the cocoa mixture.
Prepare the chocolate cream.Put the cream in a bowl, whip with whisk for 7 minutesIn another bowl, melt the chocolate with hot water. After the chocolate melts, add ⅓ quantity of 2 and mix. After mixed, add remaining whipped cream and rum.Prepare the roll cake using ⅓ of the cream from step 3. Cool for approximately 30 minutes in the refrigerator.Cut the end of step 4 diagonally and make a stump. Spread a thin layer of cream on the diagonally cut stump. Place on the bigger piece.Spread cream on the entire rolled cake and make stripes with a fork.Decorate the cake with preferred decorations available in the market.
12
3
45
67
How to cook
After baking, remove the oven sheet, cover with a damp cloth, and let it cool down completely.
Prepare whipped cream with A (Refer to page 135).
Make 3 cuts on the front portion of the cake from step 7. Spread whipped cream over the surface and put peach and kiwi on the front portion and roll up. Put the end at the bottom, cover with plastic wrap and let it rest in the refrigerator for a while.
7
89
Square trayLower shelf
● Add tea leaves (5 g) to the cake flour.
● Add cocoa powder (10 g) to the cake flour.
● Add matcha (1 tsp.) to the cake flour.● Make whipped cream with raw cream (100 g) and sugar (10 g). Top with cooked red beans (50 g) and roll the cake.
Sweets
ER-MD300_cook4_p132-151.indd 143 1/17/19 10:39 AM
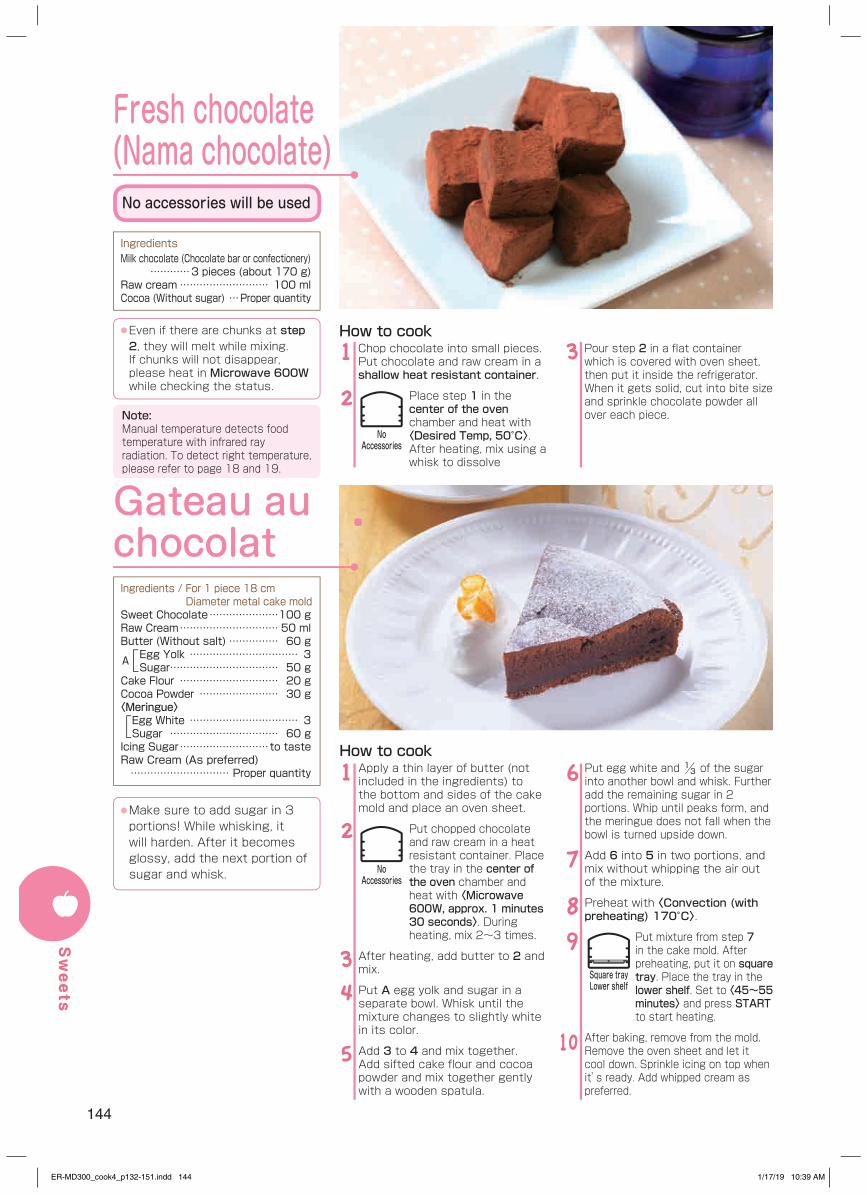
144
Apply a thin layer of butter (not included in the ingredients) to the bottom and sides of the cake mold and place an oven sheet.
Put chopped chocolate and raw cream in a heat resistant container. Place the tray in the center of the oven chamber and heat with 〈Microwave 600W, approx. 1 minutes 30 seconds〉. During heating, mix 2~3 times.
After heating, add butter to 2 and mix.
Put A egg yolk and sugar in a separate bowl. Whisk until the mixture changes to slightly white in its color.
Add 3 to 4 and mix together. Add sifted cake flour and cocoa powder and mix together gently with a wooden spatula.
1
2
34
5
Put egg white and ⅓ of the sugar into another bowl and whisk. Further add the remaining sugar in 2 portions. Whip until peaks form, and the meringue does not fall when the bowl is turned upside down.
Add 6 into 5 in two portions, and mix without whipping the air out of the mixture.
Preheat with 〈Convection (with preheating) 170°C〉.
Put mixture from step 7 in the cake mold. After preheating, put it on square tray. Place the tray in the lower shelf. Set to 〈45~55 minutes〉 and press START to start heating.
After baking, remove from the mold. Remove the oven sheet and let it cool down. Sprinkle icing on top when it’s ready. Add whipped cream as preferred.
6
7
89
10
How to cook
Gateau au chocolatIngredients / For 1 piece 18 cm
Diameter metal cake moldSweet Chocolate …………………100 gRaw Cream ………………………… 50 mlButter (Without salt) …………… 60 gEgg Yolk …………………………… 3Sugar …………………………… 50 g
Cake Flour ………………………… 20 gCocoa Powder …………………… 30 g〈Meringue〉Egg White …………………………… 3Sugar …………………………… 60 g
Icing Sugar ………………………to tasteRaw Cream (As preferred) ………………………… Proper quantity
● Make sure to add sugar in 3 portions! While whisking, it will harden. After it becomes glossy, add the next portion of sugar and whisk.
A
Square trayLower shelf
NoAccessories
Chop chocolate into small pieces. Put chocolate and raw cream in a shallow heat resistant container.
Place step 1 in the center of the oven chamber and heat with 〈Desired Temp, 50°C〉. After heating, mix using a whisk to dissolve
1
2
Pour step 2 in a flat container which is covered with oven sheet, then put it inside the refrigerator. When it gets solid, cut into bite size and sprinkle chocolate powder all over each piece.
3How to cook
Fresh chocolate (Nama chocolate)
● Even if there are chunks at step 2, they will melt while mixing. If chunks will not disappear, please heat in Microwave 600W while checking the status.
IngredientsMilk chocolate (Chocolate bar or confectionery) …………3 pieces (about 170 g)Raw cream ……………………… 100 mlCocoa (Without sugar) …Proper quantity
NoAccessories
No accessories will be used
Note:Manual temperature detects food temperature with infrared ray radiation. To detect right temperature, please refer to page 18 and 19.
Sweets
ER-MD300_cook4_p132-151.indd 144 1/17/19 10:39 AM
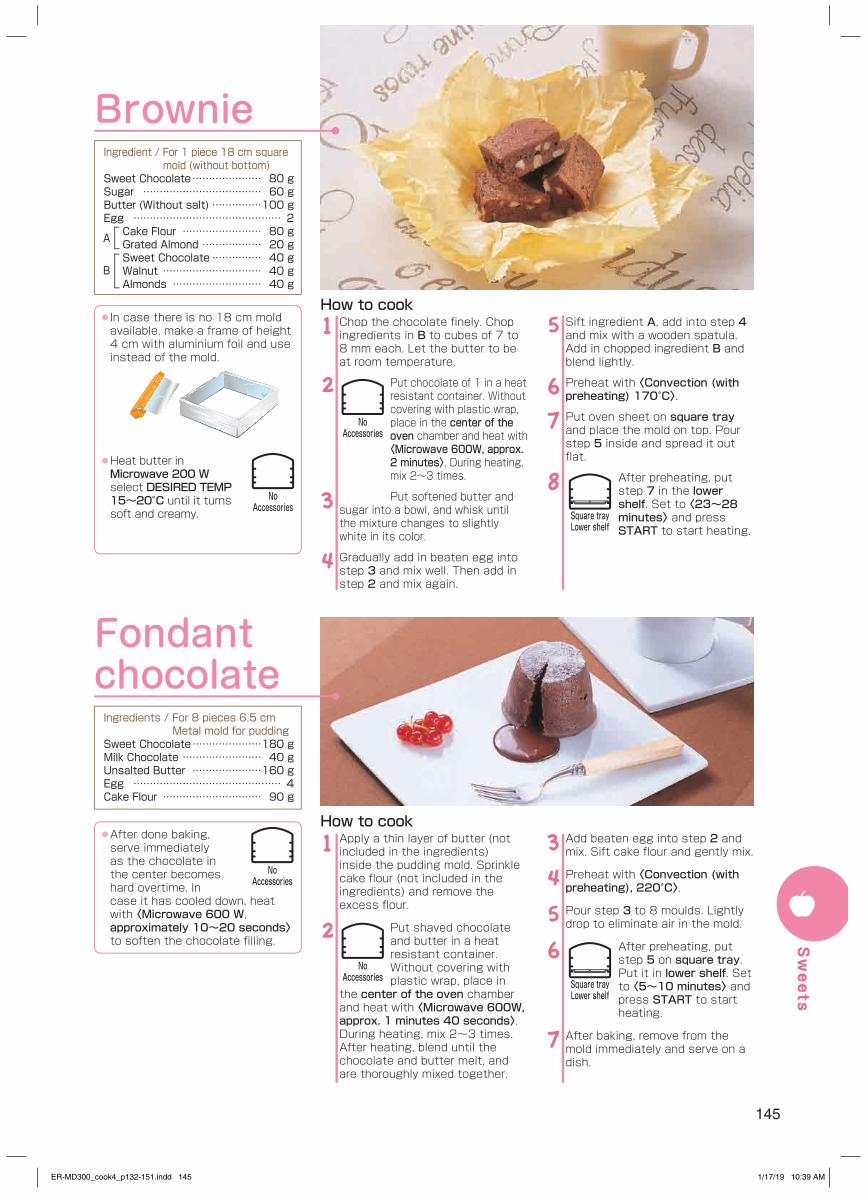
145
Chop the chocolate finely. Chop ingredients in B to cubes of 7 to 8 mm each. Let the butter to be at room temperature.
Put chocolate of 1 in a heat resistant container. Without covering with plastic wrap, place in the center of the oven chamber and heat with 〈Microwave 600W, approx. 2 minutes〉. During heating, mix 2~3 times.
Put softened butter and sugar into a bowl, and whisk until the mixture changes to slightly white in its color.
Gradually add in beaten egg into step 3 and mix well. Then add in step 2 and mix again.
1
2
3
4
Sift ingredient A, add into step 4 and mix with a wooden spatula. Add in chopped ingredient B and blend lightly.
Preheat with 〈Convection (with preheating) 170°C〉.
Put oven sheet on square tray and place the mold on top. Pour step 5 inside and spread it out flat.
After preheating, put step 7 in the lower shelf. Set to 〈23~28 minutes〉 and press START to start heating.
5
67
8
How to cook
Brownie
Apply a thin layer of butter (not included in the ingredients) inside the pudding mold. Sprinkle cake flour (not included in the ingredients) and remove the excess flour.
Put shaved chocolate and butter in a heat resistant container. Without covering with plastic wrap, place in
the center of the oven chamber and heat with 〈Microwave 600W, approx. 1 minutes 40 seconds〉. During heating, mix 2~3 times. After heating, blend until the chocolate and butter melt, and are thoroughly mixed together.
1
2
Add beaten egg into step 2 and mix. Sift cake flour and gently mix.
Preheat with 〈Convection (with preheating), 220°C〉.
Pour step 3 to 8 moulds. Lightly drop to eliminate air in the mold.
After preheating, put step 5 on square tray. Put it in lower shelf. Set to 〈5~10 minutes〉 and press START to start heating.
After baking, remove from the mold immediately and serve on a dish.
34
5
6
7
How to cook
Fondant chocolate
Ingredient / For 1 piece 18 cm square mold (without bottom)
Sweet Chocolate ………………… 80 gSugar ……………………………… 60 gButter (Without salt) ……………100 gEgg ……………………………………… 2Cake Flour …………………… 80 gGrated Almond ……………… 20 gSweet Chocolate …………… 40 gWalnut ………………………… 40 gAlmonds ……………………… 40 g
B
A
Ingredients / For 8 pieces 6.5 cm Metal mold for pudding
Sweet Chocolate …………………180 gMilk Chocolate …………………… 40 gUnsalted Butter …………………160 gEgg ……………………………………… 4Cake Flour ………………………… 90 g
● After done baking, serve immediately as the chocolate in the center becomes hard overtime. In case it has cooled down, heat with 〈Microwave 600 W, approximately 10~20 seconds〉 to soften the chocolate filling.
Square trayLower shelf
Square trayLower shelf
NoAccessories
NoAccessories
NoAccessories
● In case there is no 18 cm mold available, make a frame of height 4 cm with aluminium foil and use instead of the mold.
● Heat butter in Microwave 200 W select DESIRED TEMP 15~20°C until it turns soft and creamy.
NoAccessories
Sweets
ER-MD300_cook4_p132-151.indd 145 1/17/19 10:39 AM
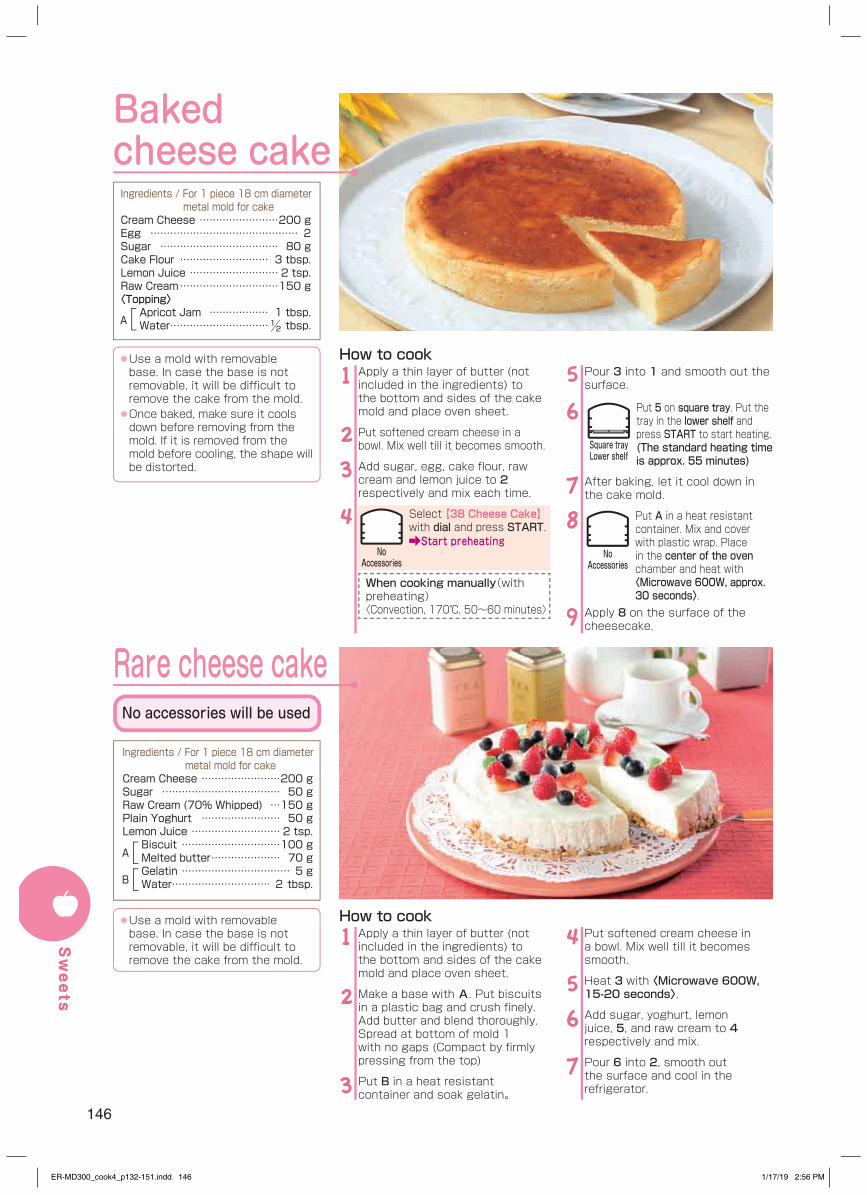
146
Apply a thin layer of butter (not included in the ingredients) to the bottom and sides of the cake mold and place oven sheet.
Put softened cream cheese in a bowl. Mix well till it becomes smooth.
Add sugar, egg, cake flour, raw cream and lemon juice to 2 respectively and mix each time.
Select 【38 Cheese Cake】 with dial and press START. Start preheating
When cooking manually(with preheating)〈Convection, 170°C, 50~60 minutes〉
1
23
4
Pour 3 into 1 and smooth out the surface.
Put 5 on square tray. Put the tray in the lower shelf and press START to start heating.(The standard heating time is approx. 55 minutes)
After baking, let it cool down in the cake mold.
Put A in a heat resistant container. Mix and cover with plastic wrap. Place in the center of the oven chamber and heat with 〈Microwave 600W, approx. 30 seconds〉.
Apply 8 on the surface of the cheesecake.
5
6
78
9
How to cook
Baked cheese cake
Square trayLower shelf
Apply a thin layer of butter (not included in the ingredients) to the bottom and sides of the cake mold and place oven sheet.
Make a base with A. Put biscuits in a plastic bag and crush finely. Add butter and blend thoroughly. Spread at bottom of mold 1 with no gaps (Compact by firmly pressing from the top)
Put B in a heat resistant container and soak gelatin。
1
2
3
Put softened cream cheese in a bowl. Mix well till it becomes smooth.
Heat 3 with 〈Microwave 600W, 15-20 seconds〉.
Add sugar, yoghurt, lemon juice, 5, and raw cream to 4 respectively and mix.
Pour 6 into 2, smooth out the surface and cool in the refrigerator.
4
56
7
How to cook
Rare cheese cake
Ingredients / For 1 piece 18 cm diameter metal mold for cake
Cream Cheese ……………………200 gSugar ……………………………… 50 gRaw Cream (70% Whipped) …150 gPlain Yoghurt …………………… 50 gLemon Juice ……………………… 2 tsp.Biscuit …………………………100 gMelted butter ………………… 70 gGelatin …………………………… 5 gWater ………………………… 2 tbsp.
A
B
● Use a mold with removable base. In case the base is not removable, it will be difficult to remove the cake from the mold.
● Once baked, make sure it cools down before removing from the mold. If it is removed from the mold before cooling, the shape will be distorted.
Ingredients / For 1 piece 18 cm diameter metal mold for cake
Cream Cheese ……………………200 gEgg ……………………………………… 2Sugar ……………………………… 80 gCake Flour ……………………… 3 tbsp.Lemon Juice ……………………… 2 tsp.Raw Cream …………………………150 g〈Topping〉
Apricot Jam ……………… 1 tbsp.Water …………………………½ tbsp.A
NoAccessories
● Use a mold with removable base. In case the base is not removable, it will be difficult to remove the cake from the mold.
No accessories will be used
NoAccessories
Sweets
ER-MD300_cook4_p132-151.indd 146 1/17/19 2:56 PM
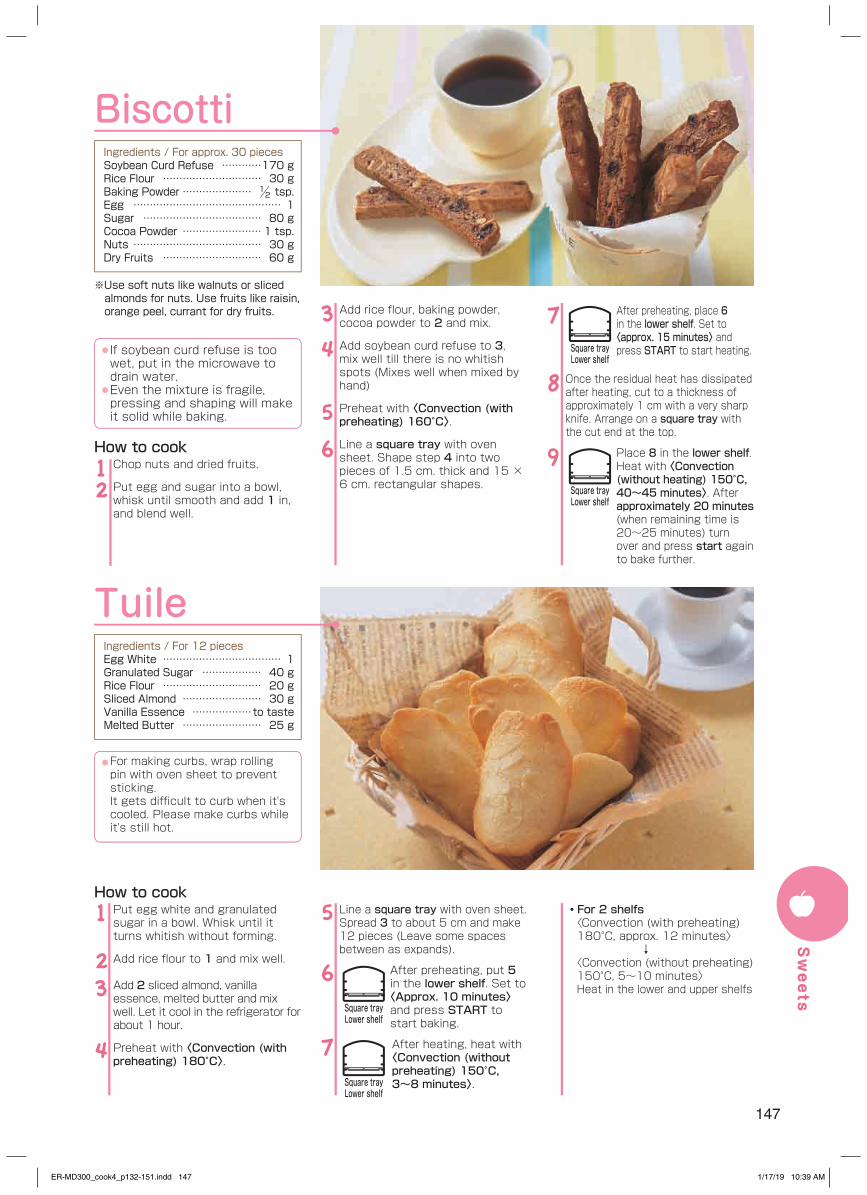
147
After preheating, place 6 in the lower shelf. Set to 〈approx. 15 minutes〉 and press START to start heating.
Once the residual heat has dissipated after heating, cut to a thickness of approximately 1 cm with a very sharp knife. Arrange on a square tray with the cut end at the top.
Place 8 in the lower shelf. Heat with 〈Convection (without heating) 150°C, 40~45 minutes〉. After approximately 20 minutes (when remaining time is 20~25 minutes) turn over and press start again to bake further.
7
8
9
Biscotti
● If soybean curd refuse is too wet, put in the microwave to drain water.
● Even the mixture is fragile, pressing and shaping will make it solid while baking.
Ingredients / For approx. 30 piecesSoybean Curd Refuse …………170 gRice Flour ………………………… 30 gBaking Powder ………………… ½ tsp.Egg ……………………………………… 1Sugar ……………………………… 80 gCocoa Powder …………………… 1 tsp.Nuts ………………………………… 30 gDry Fruits ………………………… 60 g
※Use soft nuts like walnuts or sliced almonds for nuts. Use fruits like raisin, orange peel, currant for dry fruits.
Square trayLower shelf
Square trayLower shelf
Chop nuts and dried fruits.
Put egg and sugar into a bowl, whisk until smooth and add 1 in, and blend well.
12
Add rice flour, baking powder, cocoa powder to 2 and mix.
Add soybean curd refuse to 3, mix well till there is no whitish spots (Mixes well when mixed by hand)
Preheat with 〈Convection (with preheating) 160°C〉.
Line a square tray with oven sheet. Shape step 4 into two pieces of 1.5 cm. thick and 15 × 6 cm. rectangular shapes.
34
5
6How to cook
Put egg white and granulated sugar in a bowl. Whisk until it turns whitish without forming.
Add rice flour to 1 and mix well.
Add 2 sliced almond, vanilla essence, melted butter and mix well. Let it cool in the refrigerator for about 1 hour.
Preheat with 〈Convection (with preheating) 180°C〉.
1
23
4
Line a square tray with oven sheet. Spread 3 to about 5 cm and make 12 pieces (Leave some spaces between as expands).
After preheating, put 5 in the lower shelf. Set to 〈Approx. 10 minutes〉 and press START to start baking.
After heating, heat with 〈Convection (without preheating) 150°C, 3~8 minutes〉.
5
6
7
How to cook
Tuile
● For making curbs, wrap rolling pin with oven sheet to prevent sticking.It gets difficult to curb when it's cooled. Please make curbs while it's still hot.
Ingredients / For 12 piecesEgg White ……………………………… 1Granulated Sugar ……………… 40 gRice Flour ………………………… 20 gSliced Almond …………………… 30 gVanilla Essence ………………to tasteMelted Butter …………………… 25 g
Square trayLower shelf
Square trayLower shelf
・ For 2 shelfs〈Convection (with preheating) 180°C, approx. 12 minutes〉 ↓〈Convection (without preheating) 150°C, 5~10 minutes〉Heat in the lower and upper shelfs
Sweets
ER-MD300_cook4_p132-151.indd 147 1/17/19 10:39 AM
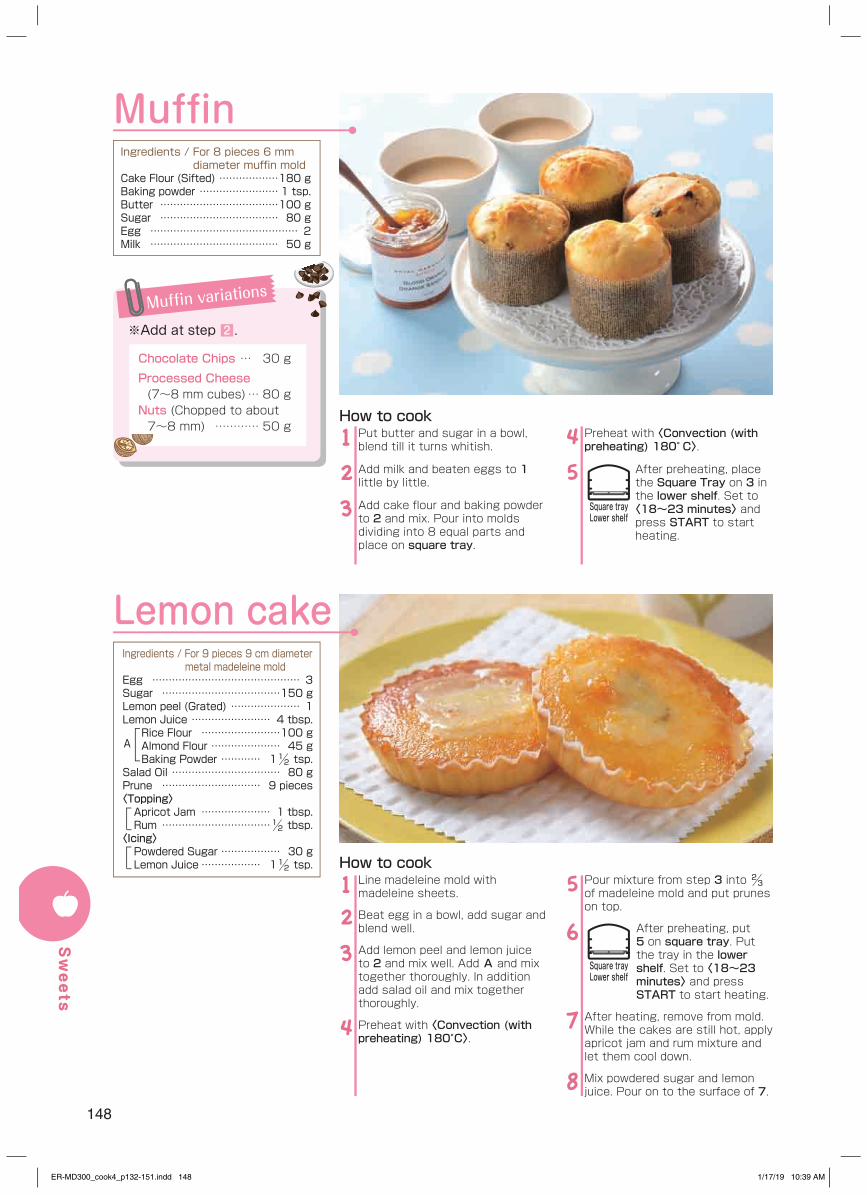
148
Lemon cake
Line madeleine mold with madeleine sheets.
Beat egg in a bowl, add sugar and blend well.
Add lemon peel and lemon juice to 2 and mix well. Add A and mix together thoroughly. In addition add salad oil and mix together thoroughly.
Preheat with 〈Convection (with preheating) 180°C〉.
12
3
4
Pour mixture from step 3 into ⅔ of madeleine mold and put prunes on top.
After preheating, put 5 on square tray. Put the tray in the lower shelf. Set to 〈18~23 minutes〉 and press START to start heating.
After heating, remove from mold. While the cakes are still hot, apply apricot jam and rum mixture and let them cool down.
Mix powdered sugar and lemon juice. Pour on to the surface of 7.
5
6
7
8
How to cook
Ingredients / For 9 pieces 9 cm diameter metal madeleine mold
Egg ……………………………………… 3Sugar ………………………………150 gLemon peel (Grated) ………………… 1Lemon Juice …………………… 4 tbsp.Rice Flour ……………………100 gAlmond Flour ………………… 45 gBaking Powder ………… 1½ tsp.
Salad Oil …………………………… 80 gPrune ………………………… 9 pieces〈Topping〉Apricot Jam ………………… 1 tbsp.Rum ……………………………½ tbsp.
〈Icing〉Powdered Sugar ……………… 30 gLemon Juice ……………… 1½ tsp.
A
Square trayLower shelf
Preheat with 〈Convection (with preheating) 180° C〉.
After preheating, place the Square Tray on 3 in the lower shelf. Set to 〈18~23 minutes〉 and press START to start heating.
4
5
MuffinIngredients / For 8 pieces 6 mm
diameter muffin moldCake Flour (Sifted) ………………180 gBaking powder …………………… 1 tsp.Butter ………………………………100 gSugar ……………………………… 80 gEgg ……………………………………… 2Milk ………………………………… 50 g
Put butter and sugar in a bowl, blend till it turns whitish.
Add milk and beaten eggs to 1 little by little.
Add cake flour and baking powder to 2 and mix. Pour into molds dividing into 8 equal parts and place on square tray.
12
3
How to cook
Square trayLower shelf
Muffin variations
※ Add at step 2 .
Chocolate Chips … 30 g
Processed Cheese (7~8 mm cubes) … 80 gNuts (Chopped to about 7~8 mm) ………… 50 g
Sweets
ER-MD300_cook4_p132-151.indd 148 1/17/19 10:39 AM
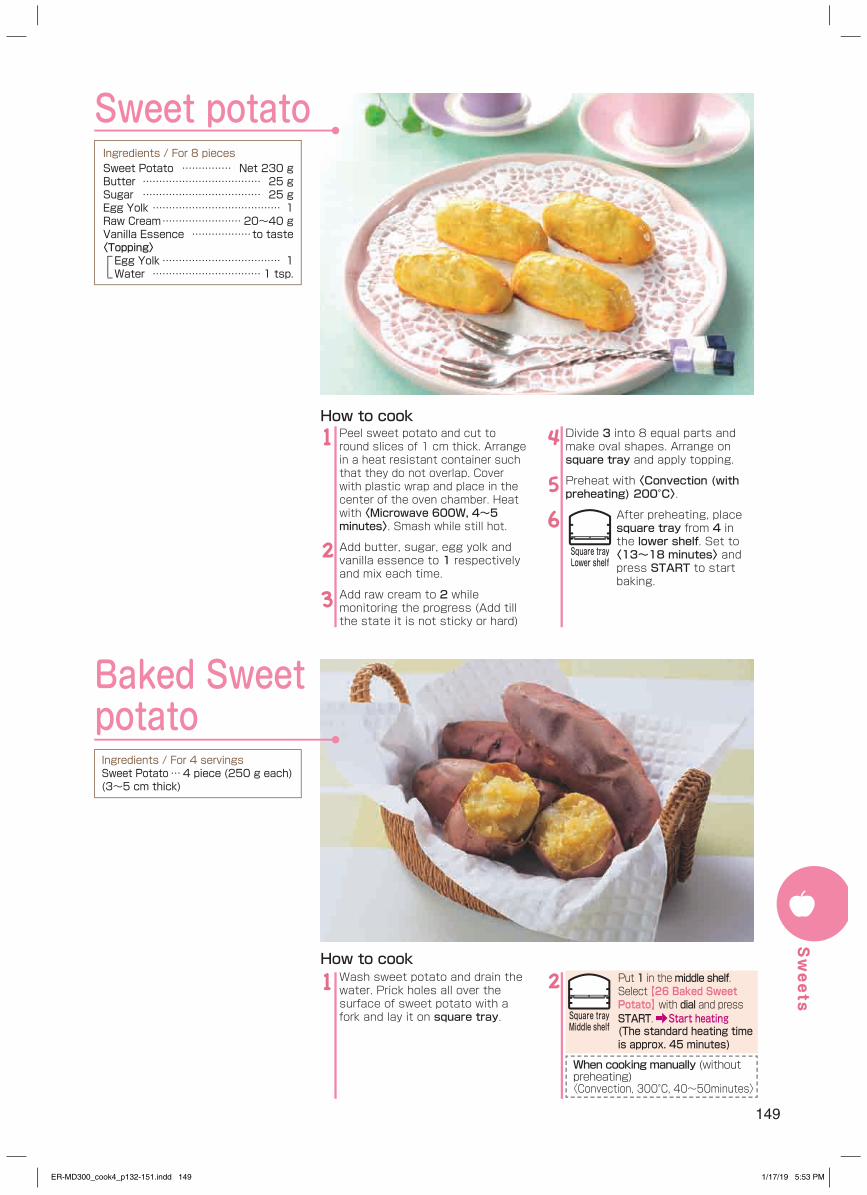
149
Baked Sweet potatoIngredients / For 4 servingsSweet Potato … 4 piece (250 g each)(3~5 cm thick)
Wash sweet potato and drain the water. Prick holes all over the surface of sweet potato with a fork and lay it on square tray.
1How to cook
Peel sweet potato and cut to round slices of 1 cm thick. Arrange in a heat resistant container such that they do not overlap. Cover with plastic wrap and place in the center of the oven chamber. Heat with 〈Microwave 600W, 4~5 minutes〉. Smash while still hot.
Add butter, sugar, egg yolk and vanilla essence to 1 respectively and mix each time.
Add raw cream to 2 while monitoring the progress (Add till the state it is not sticky or hard)
1
2
3
Divide 3 into 8 equal parts and make oval shapes. Arrange on square tray and apply topping.
Preheat with 〈Convection (with preheating) 200°C〉.
After preheating, place square tray from 4 in the lower shelf. Set to 〈13~18 minutes〉 and press START to start baking.
4
56
How to cook
Ingredients / For 8 piecesSweet Potato …………… Net 230 gButter ……………………………… 25 gSugar ……………………………… 25 gEgg Yolk ………………………………… 1Raw Cream …………………… 20~40 g Vanilla Essence ………………to taste〈Topping〉Egg Yolk ……………………………… 1Water …………………………… 1 tsp.
Sweet potato
Square trayLower shelf
Put 1 in the middle shelf. Select 【26 Baked Sweet Potato】 with dial and press START. Start heating(The standard heating time is approx. 45 minutes)
When cooking manually (without preheating)〈Convection, 300°C, 40~50minutes〉
2Square trayMiddle shelf
Sweets
ER-MD300_cook4_p132-151.indd 149 1/17/19 5:53 PM
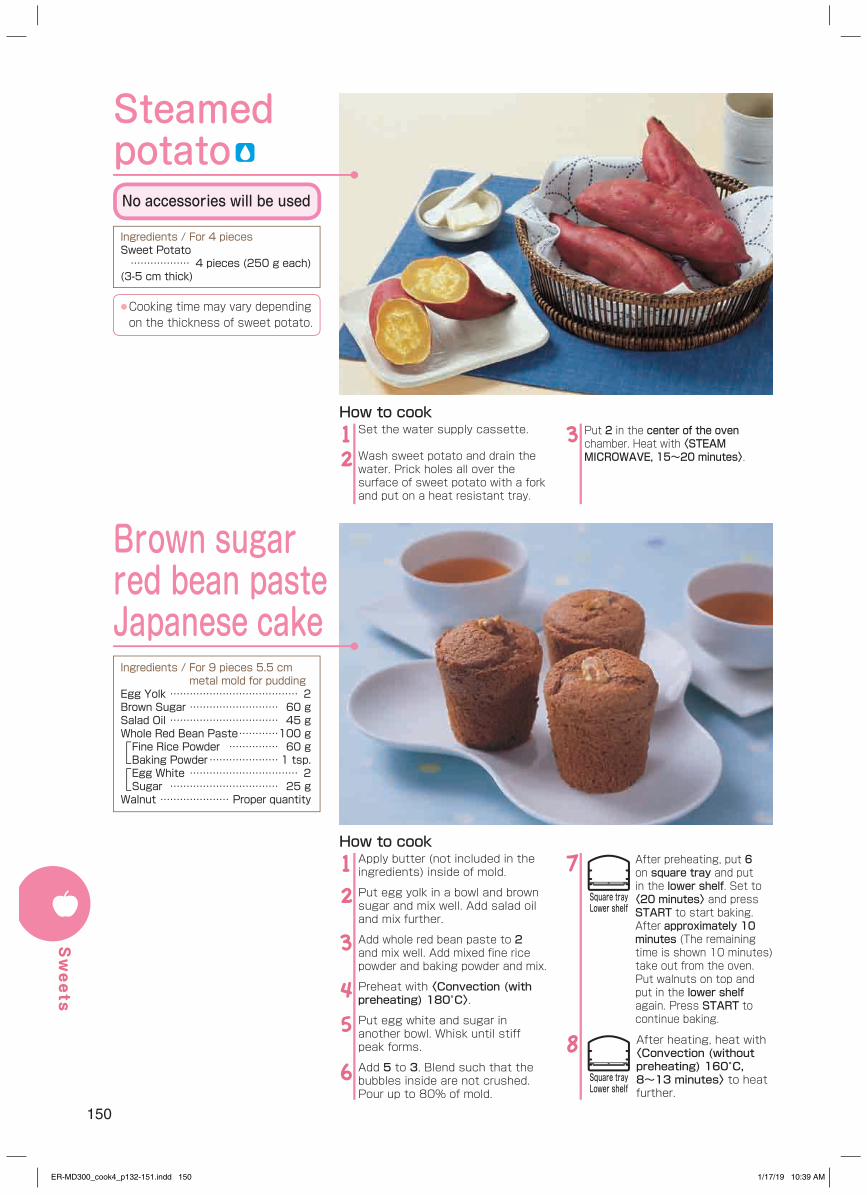
150
Apply butter (not included in the ingredients) inside of mold.
Put egg yolk in a bowl and brown sugar and mix well. Add salad oil and mix further.
Add whole red bean paste to 2 and mix well. Add mixed fine rice powder and baking powder and mix.
Preheat with 〈Convection (with preheating) 180°C〉.
Put egg white and sugar in another bowl. Whisk until stiff peak forms.
Add 5 to 3. Blend such that the bubbles inside are not crushed. Pour up to 80% of mold.
12
3
45
6
After preheating, put 6 on square tray and put in the lower shelf. Set to 〈20 minutes〉 and press START to start baking. After approximately 10 minutes (The remaining time is shown 10 minutes) take out from the oven. Put walnuts on top and put in the lower shelf again. Press START to continue baking.
After heating, heat with 〈Convection (without preheating) 160°C, 8~13 minutes〉 to heat further.
7
8
How to cook
Ingredients / For 9 pieces 5.5 cm metal mold for pudding
Egg Yolk ………………………………… 2Brown Sugar ……………………… 60 gSalad Oil …………………………… 45 gWhole Red Bean Paste …………100 gFine Rice Powder …………… 60 gBaking Powder ………………… 1 tsp.Egg White …………………………… 2Sugar …………………………… 25 g
Walnut ………………… Proper quantity
Brown sugar red bean paste Japanese cake
Square trayLower shelf
Square trayLower shelf
Steamed potato
Ingredients / For 4 piecesSweet Potato ……………… 4 pieces (250 g each)(3-5 cm thick)
Set the water supply cassette.
Wash sweet potato and drain the water. Prick holes all over the surface of sweet potato with a fork and put on a heat resistant tray.
12
How to cook
● Cooking time may vary depending on the thickness of sweet potato.
No accessories will be used
Put 2 in the center of the oven chamber. Heat with 〈STEAM MICROWAVE, 15~20 minutes〉.
3
Sweets
ER-MD300_cook4_p132-151.indd 150 1/17/19 10:39 AM
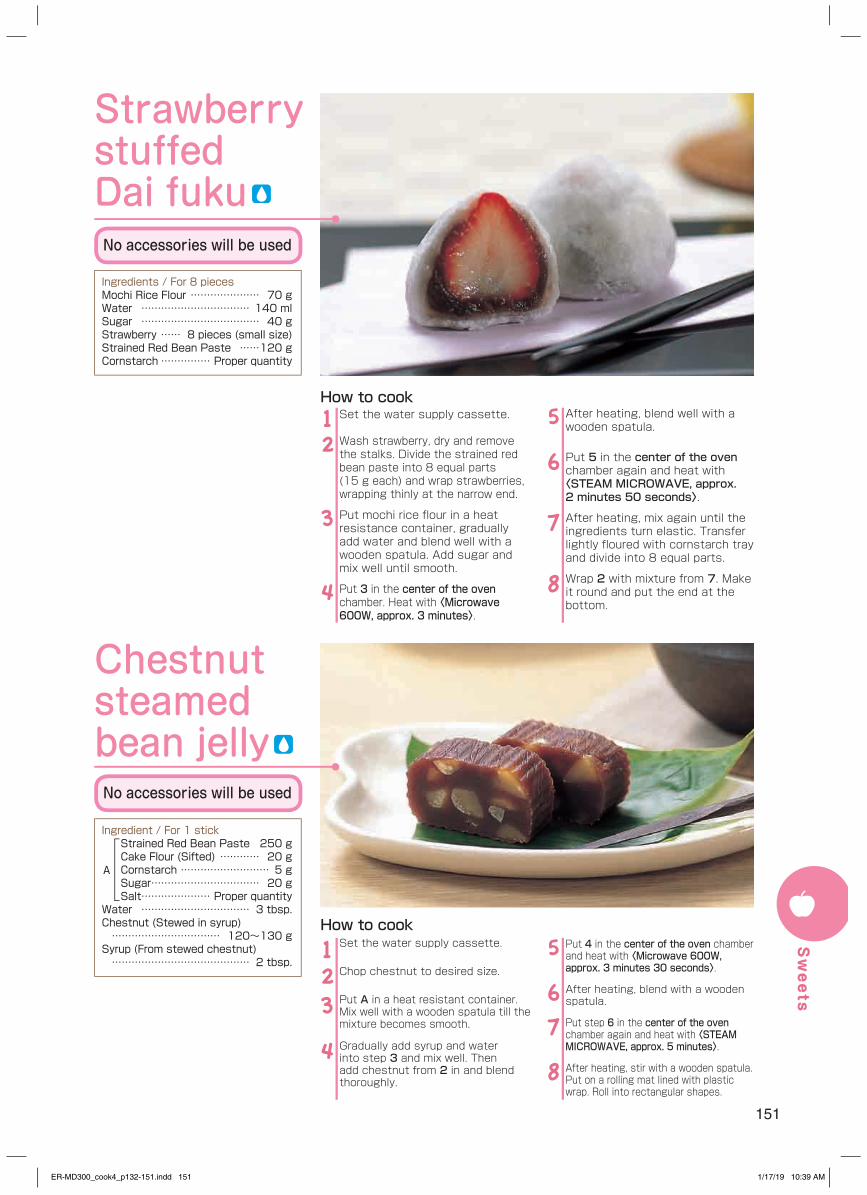
151
After heating, blend well with a wooden spatula.
Put 5 in the center of the oven chamber again and heat with 〈STEAM MICROWAVE, approx. 2 minutes 50 seconds〉.
After heating, mix again until the ingredients turn elastic. Transfer lightly floured with cornstarch tray and divide into 8 equal parts.
Wrap 2 with mixture from 7. Make it round and put the end at the bottom.
5
6
7
8
Put 4 in the center of the oven chamber and heat with 〈Microwave 600W, approx. 3 minutes 30 seconds〉.
After heating, blend with a wooden spatula.
Put step 6 in the center of the oven chamber again and heat with 〈STEAM MICROWAVE, approx. 5 minutes〉.
After heating, stir with a wooden spatula. Put on a rolling mat lined with plastic wrap. Roll into rectangular shapes.
5
67
8
Strawberry stuffed Dai fuku
Chestnut steamed bean jelly
Ingredients / For 8 piecesMochi Rice Flour ………………… 70 gWater …………………………… 140 mlSugar ……………………………… 40 gStrawberry …… 8 pieces (small size)Strained Red Bean Paste ……120 gCornstarch …………… Proper quantity
Ingredient / For 1 stickStrained Red Bean Paste 250 gCake Flour (Sifted) ………… 20 gCornstarch ……………………… 5 gSugar …………………………… 20 gSalt………………… Proper quantity
Water …………………………… 3 tbsp.Chestnut (Stewed in syrup) …………………………… 120~130 gSyrup (From stewed chestnut) …………………………………… 2 tbsp.
No accessories will be used
No accessories will be used
Set the water supply cassette.
Wash strawberry, dry and remove the stalks. Divide the strained red bean paste into 8 equal parts (15 g each) and wrap strawberries, wrapping thinly at the narrow end.
Put mochi rice flour in a heat resistance container, gradually add water and blend well with a wooden spatula. Add sugar and mix well until smooth.
Put 3 in the center of the oven chamber. Heat with 〈Microwave 600W, approx. 3 minutes〉.
12
3
4
How to cook
A
Set the water supply cassette.
Chop chestnut to desired size.
Put A in a heat resistant container. Mix well with a wooden spatula till the mixture becomes smooth.
Gradually add syrup and water into step 3 and mix well. Then add chestnut from 2 in and blend thoroughly.
123
4
How to cook
Sweets
ER-MD300_cook4_p132-151.indd 151 1/17/19 10:39 AM