create lists training
TRANSCRIPT
Create Lists Training
Facilitators
Steve Heser, MCFLS
This manual is a modified version of a Create Lists Manual created by Stephanie Zimmerman of the Library System of Lancaster County, Pennsylvania.
2
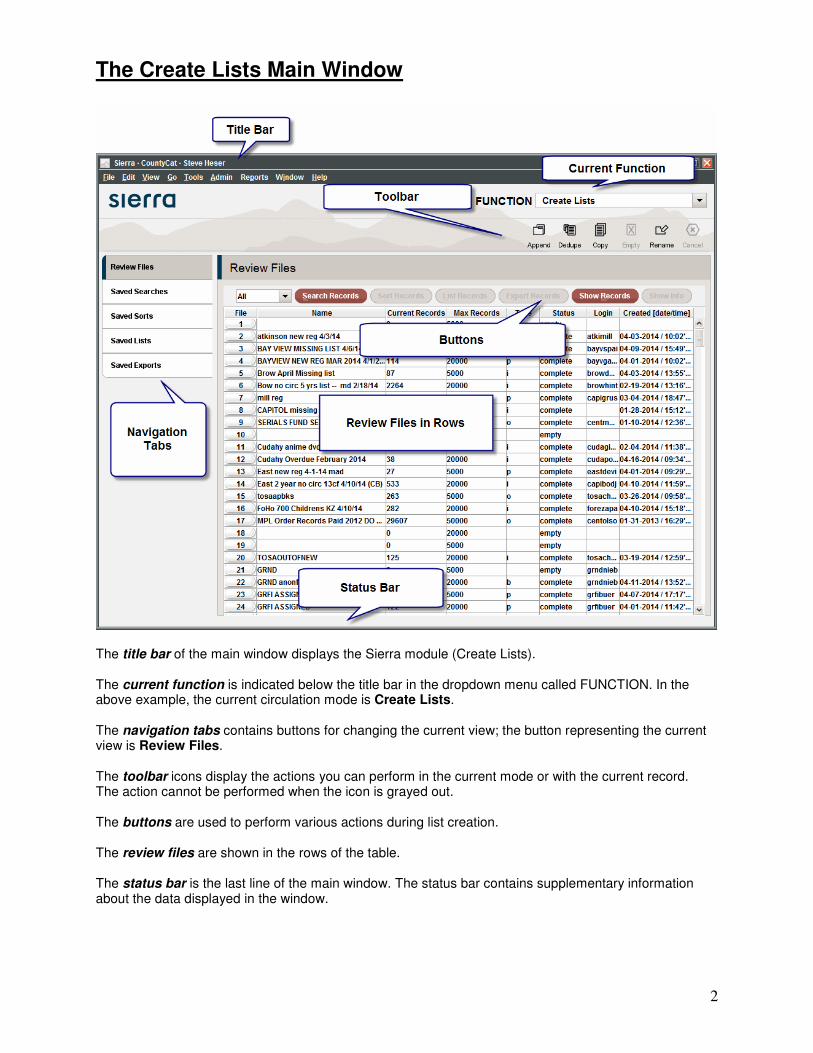
The Create Lists Main Window
The title bar of the main window displays the Sierra module (Create Lists). The current function is indicated below the title bar in the dropdown menu called FUNCTION. In the above example, the current circulation mode is Create Lists. The navigation tabs contains buttons for changing the current view; the button representing the current view is Review Files. The toolbar icons display the actions you can perform in the current mode or with the current record. The action cannot be performed when the icon is grayed out. The buttons are used to perform various actions during list creation. The review files are shown in the rows of the table. The status bar is the last line of the main window. The status bar contains supplementary information about the data displayed in the window.
3
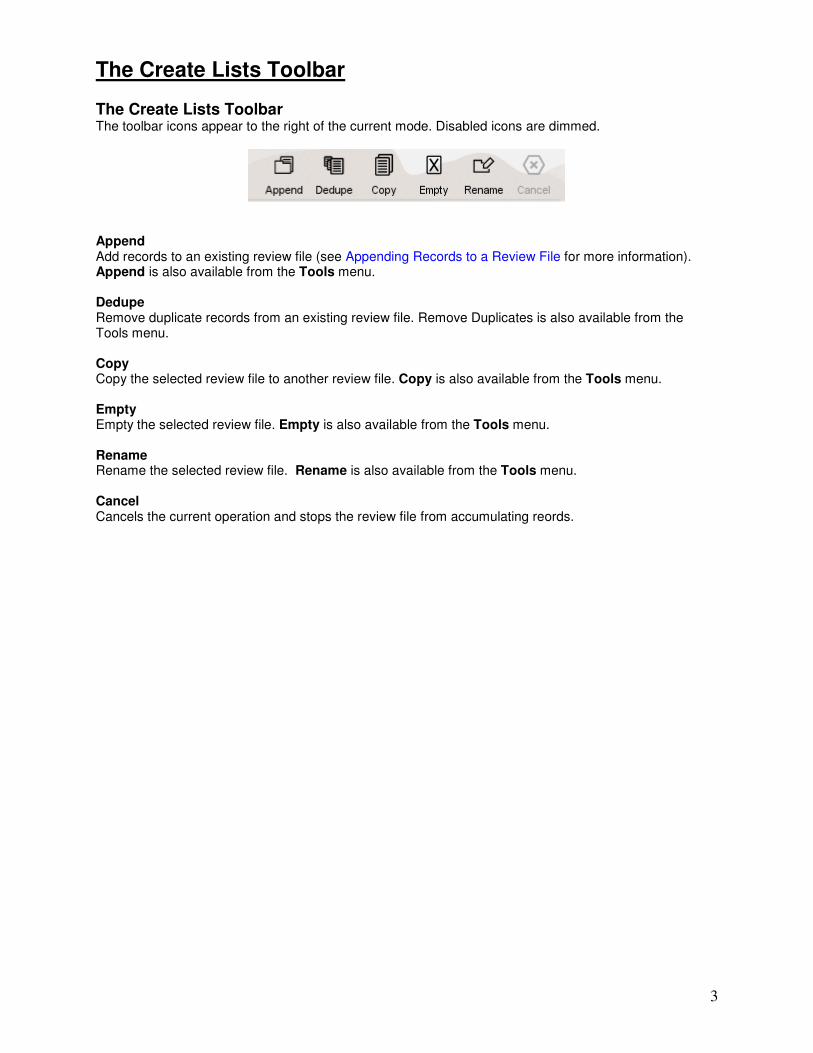
The Create Lists Toolbar The Create Lists Toolbar The toolbar icons appear to the right of the current mode. Disabled icons are dimmed.
Append Add records to an existing review file (see Appending Records to a Review File for more information). Append is also available from the Tools menu. Dedupe Remove duplicate records from an existing review file. Remove Duplicates is also available from the Tools menu. Copy Copy the selected review file to another review file. Copy is also available from the Tools menu. Empty Empty the selected review file. Empty is also available from the Tools menu. Rename Rename the selected review file. Rename is also available from the Tools menu. Cancel Cancels the current operation and stops the review file from accumulating reords.
4
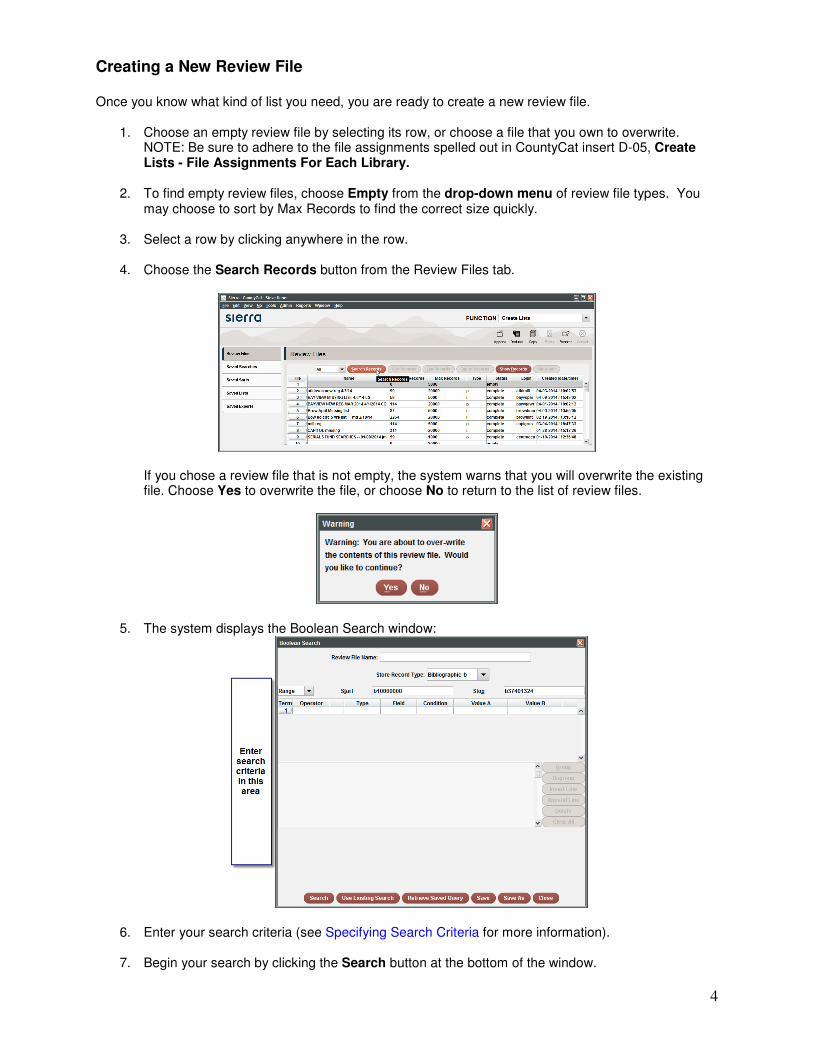
Creating a New Review File Once you know what kind of list you need, you are ready to create a new review file.
1. Choose an empty review file by selecting its row, or choose a file that you own to overwrite. NOTE: Be sure to adhere to the file assignments spelled out in CountyCat insert D-05, Create Lists - File Assignments For Each Library.
2. To find empty review files, choose Empty from the drop-down menu of review file types. You
may choose to sort by Max Records to find the correct size quickly.
3. Select a row by clicking anywhere in the row.
4. Choose the Search Records button from the Review Files tab.
If you chose a review file that is not empty, the system warns that you will overwrite the existing file. Choose Yes to overwrite the file, or choose No to return to the list of review files.
5. The system displays the Boolean Search window:
6. Enter your search criteria (see Specifying Search Criteria for more information).
7. Begin your search by clicking the Search button at the bottom of the window.
5
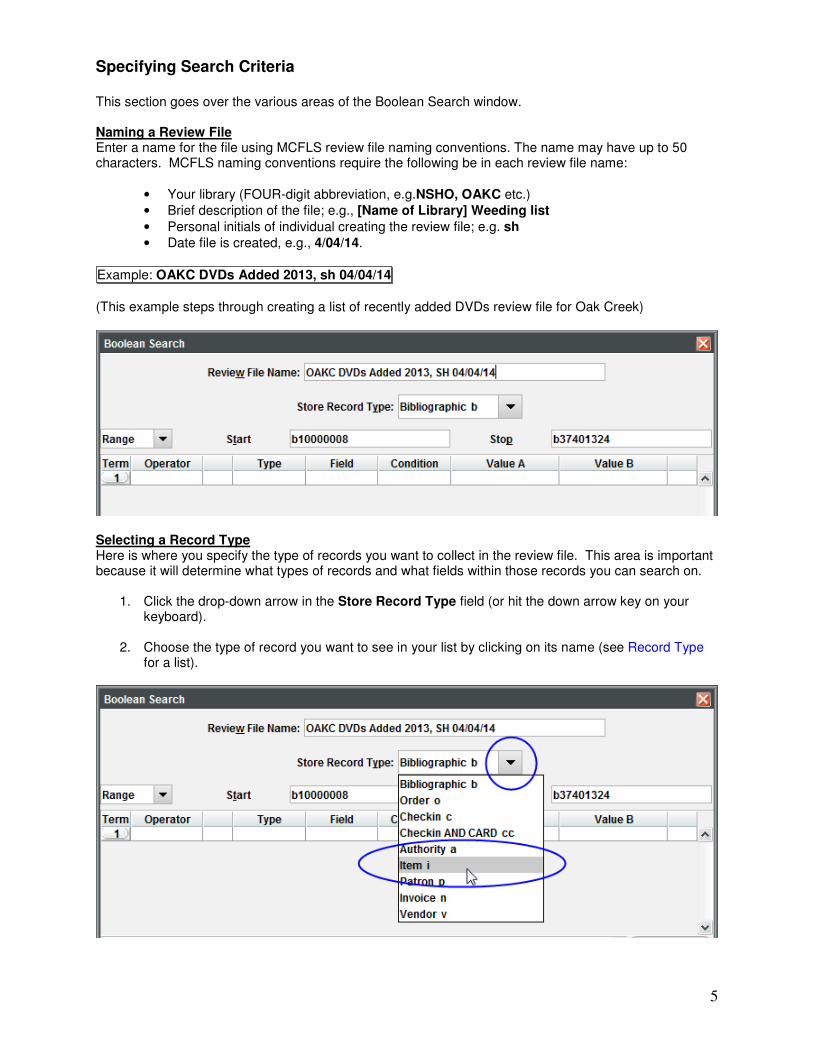
Specifying Search Criteria This section goes over the various areas of the Boolean Search window. Naming a Review File Enter a name for the file using MCFLS review file naming conventions. The name may have up to 50 characters. MCFLS naming conventions require the following be in each review file name:
• Your library (FOUR-digit abbreviation, e.g.NSHO, OAKC etc.) • Brief description of the file; e.g., [Name of Library] Weeding list • Personal initials of individual creating the review file; e.g. sh • Date file is created, e.g., 4/04/14.
Example: OAKC DVDs Added 2013, sh 04/04/14
(This example steps through creating a list of recently added DVDs review file for Oak Creek)
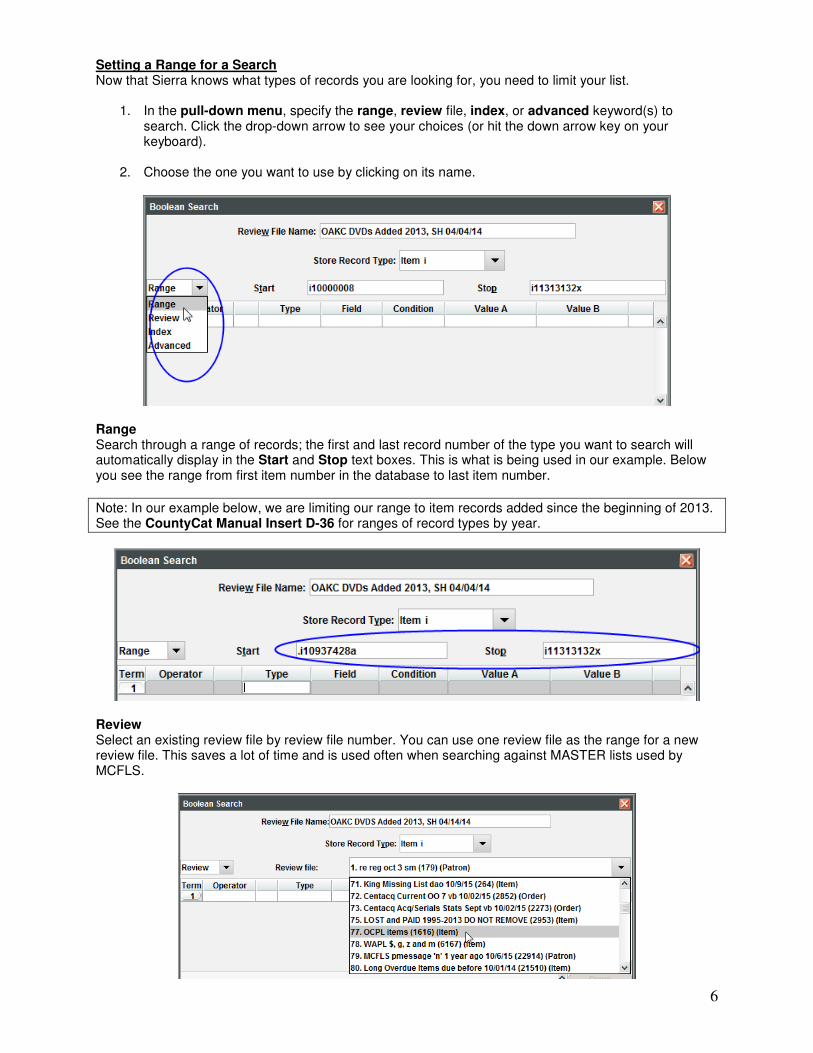
Selecting a Record Type Here is where you specify the type of records you want to collect in the review file. This area is important because it will determine what types of records and what fields within those records you can search on.
1. Click the drop-down arrow in the Store Record Type field (or hit the down arrow key on your keyboard).
2. Choose the type of record you want to see in your list by clicking on its name (see Record Type
for a list).
6
Setting a Range for a Search Now that Sierra knows what types of records you are looking for, you need to limit your list.
1. In the pull-down menu, specify the range, review file, index, or advanced keyword(s) to search. Click the drop-down arrow to see your choices (or hit the down arrow key on your keyboard).
2. Choose the one you want to use by clicking on its name.
Range Search through a range of records; the first and last record number of the type you want to search will automatically display in the Start and Stop text boxes. This is what is being used in our example. Below you see the range from first item number in the database to last item number.
Note: In our example below, we are limiting our range to item records added since the beginning of 2013. See the CountyCat Manual Insert D-36 for ranges of record types by year.
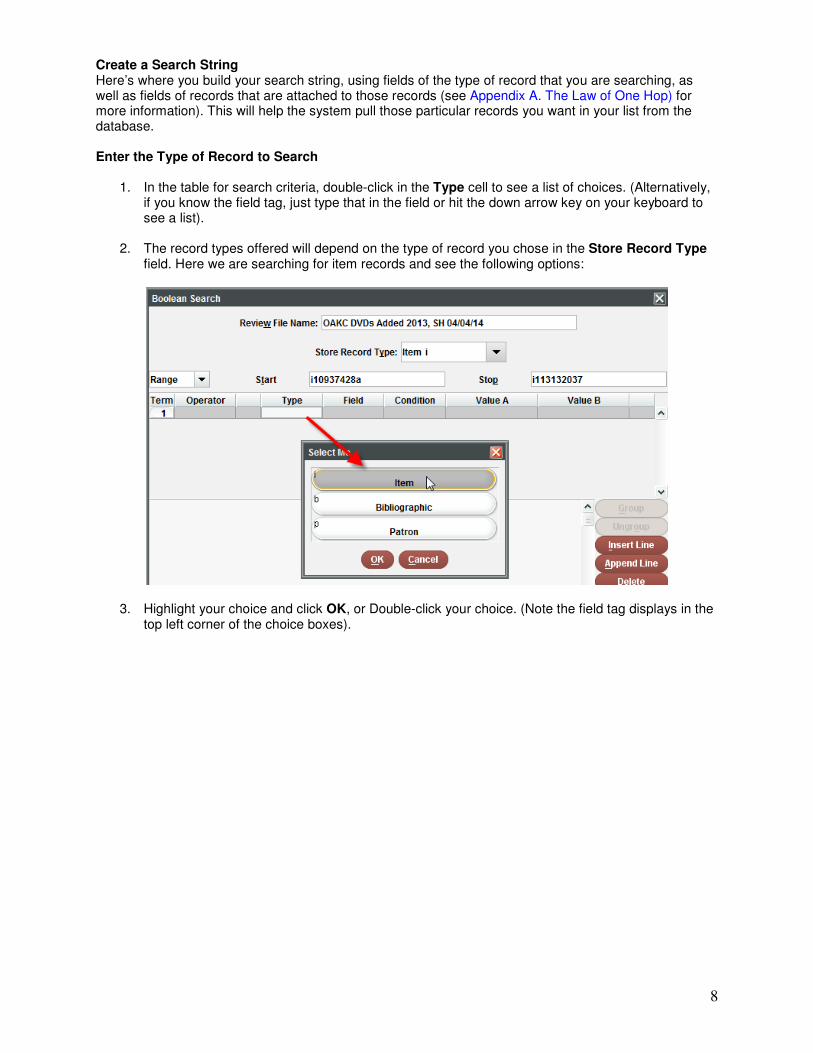
Review Select an existing review file by review file number. You can use one review file as the range for a new review file. This saves a lot of time and is used often when searching against MASTER lists used by MCFLS.

7
Index Search by author, title, call number, etc. Note that the drop-down menu for index choices varies depending on what record type you are searching. This screen shot shows the indices available for Item Records.
Advanced Search by advanced keyword syntax – fields a: (author), t: (title), s: (subject), n: (note), adjacency, truncation, wildcards, proximity operators etc. This screen shot shows a search for all items that have the word asthma in their subject line.
8
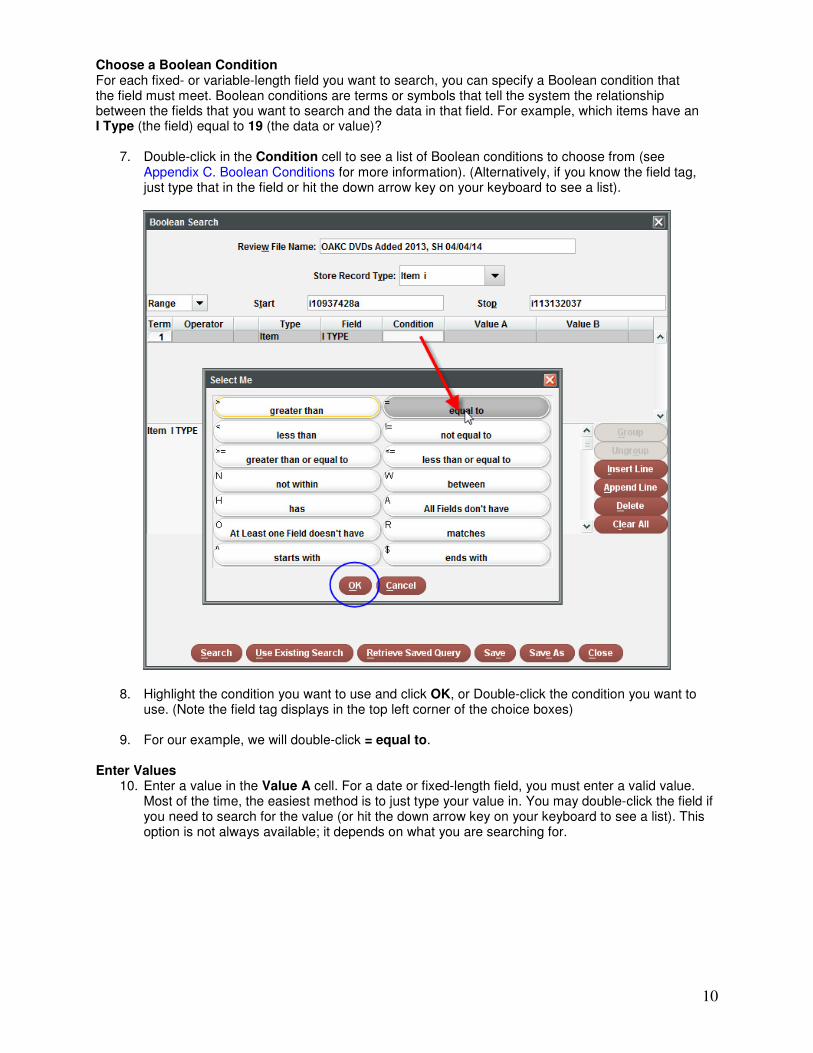
Create a Search String Here’s where you build your search string, using fields of the type of record that you are searching, as well as fields of records that are attached to those records (see Appendix A. The Law of One Hop) for more information). This will help the system pull those particular records you want in your list from the database. Enter the Type of Record to Search
1. In the table for search criteria, double-click in the Type cell to see a list of choices. (Alternatively, if you know the field tag, just type that in the field or hit the down arrow key on your keyboard to see a list).
2. The record types offered will depend on the type of record you chose in the Store Record Type field. Here we are searching for item records and see the following options:
3. Highlight your choice and click OK, or Double-click your choice. (Note the field tag displays in the top left corner of the choice boxes).

9
Enter the Field
4. Double-click in the Field cell to choose the field to search in. (Alternatively, if you know the field tag, just type that in the field or hit the down arrow key on your keyboard to see a list).
5. Choices here will vary depending on the Type of record you chose to search in the previous
steps. You can search fixed-length or variable-length fields of the record. Here we are searching for Item Record Fields and see the following Select Dialog Box:
6. Highlight the field you want and click OK, or Double-click your choice. (Note the field tag displays in the top left corner of the choice boxes) In our example, we want to make a list of items with recently added DVDs for our library, so the criteria needs to limit those ITEM TYPES to those for DVDs (19, 23 and 73-74). We will double-click the I TYPE data field to start adding these I TYPE values.
For more information about fixed-length and variable-length fields, see Appendix B in the back of this document.
10
Choose a Boolean Condition For each fixed- or variable-length field you want to search, you can specify a Boolean condition that the field must meet. Boolean conditions are terms or symbols that tell the system the relationship between the fields that you want to search and the data in that field. For example, which items have an I Type (the field) equal to 19 (the data or value)?
7. Double-click in the Condition cell to see a list of Boolean conditions to choose from (see Appendix C. Boolean Conditions for more information). (Alternatively, if you know the field tag, just type that in the field or hit the down arrow key on your keyboard to see a list).
8. Highlight the condition you want to use and click OK, or Double-click the condition you want to use. (Note the field tag displays in the top left corner of the choice boxes)
9. For our example, we will double-click = equal to.
Enter Values
10. Enter a value in the Value A cell. For a date or fixed-length field, you must enter a valid value. Most of the time, the easiest method is to just type your value in. You may double-click the field if you need to search for the value (or hit the down arrow key on your keyboard to see a list). This option is not always available; it depends on what you are searching for.
11
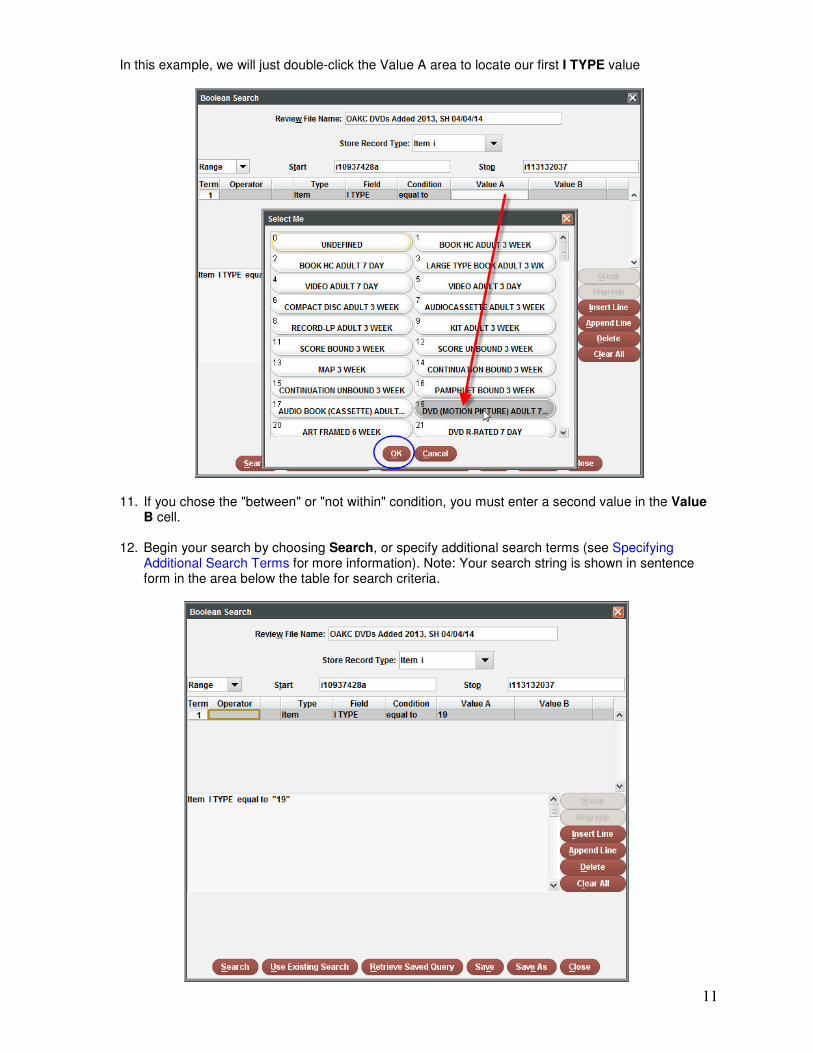
In this example, we will just double-click the Value A area to locate our first I TYPE value
11. If you chose the "between" or "not within" condition, you must enter a second value in the Value B cell.
12. Begin your search by choosing Search, or specify additional search terms (see Specifying Additional Search Terms for more information). Note: Your search string is shown in sentence form in the area below the table for search criteria.
12
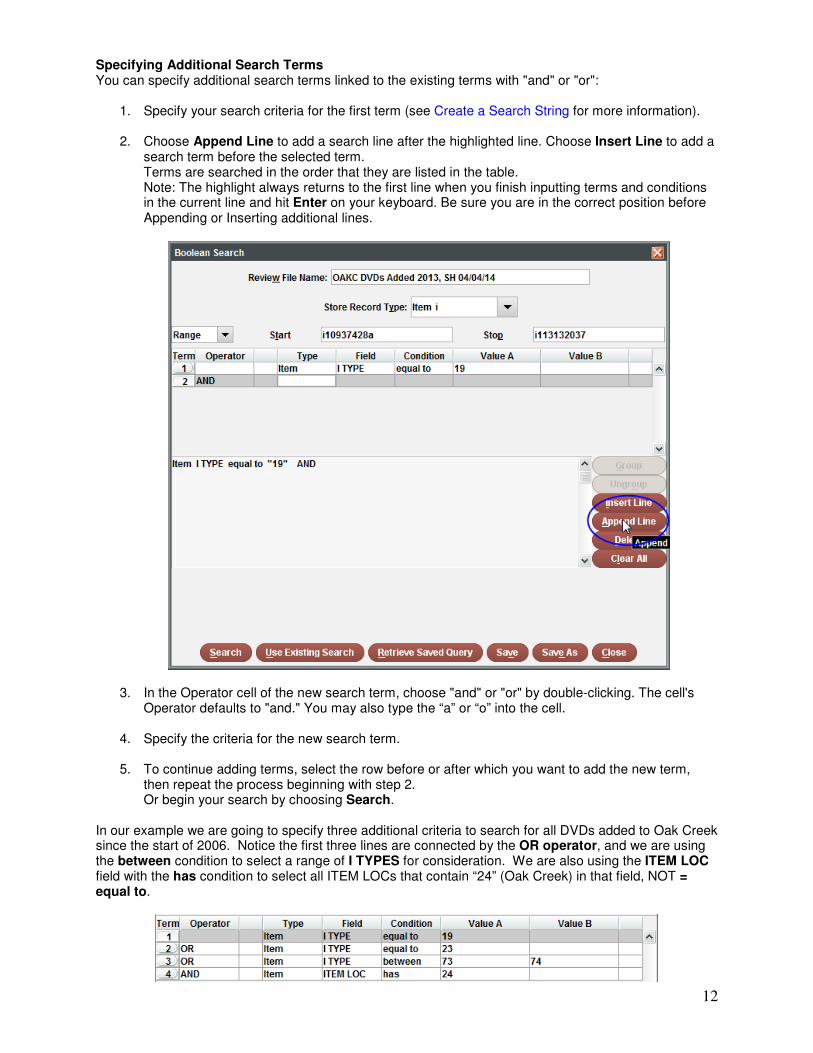
Specifying Additional Search Terms You can specify additional search terms linked to the existing terms with "and" or "or":
1. Specify your search criteria for the first term (see Create a Search String for more information).
2. Choose Append Line to add a search line after the highlighted line. Choose Insert Line to add a search term before the selected term. Terms are searched in the order that they are listed in the table. Note: The highlight always returns to the first line when you finish inputting terms and conditions in the current line and hit Enter on your keyboard. Be sure you are in the correct position before Appending or Inserting additional lines.
3. In the Operator cell of the new search term, choose "and" or "or" by double-clicking. The cell's Operator defaults to "and." You may also type the “a” or “o” into the cell.
4. Specify the criteria for the new search term.
5. To continue adding terms, select the row before or after which you want to add the new term, then repeat the process beginning with step 2. Or begin your search by choosing Search.
In our example we are going to specify three additional criteria to search for all DVDs added to Oak Creek since the start of 2006. Notice the first three lines are connected by the OR operator, and we are using the between condition to select a range of I TYPES for consideration. We are also using the ITEM LOC field with the has condition to select all ITEM LOCs that contain “24” (Oak Creek) in that field, NOT = equal to.
13
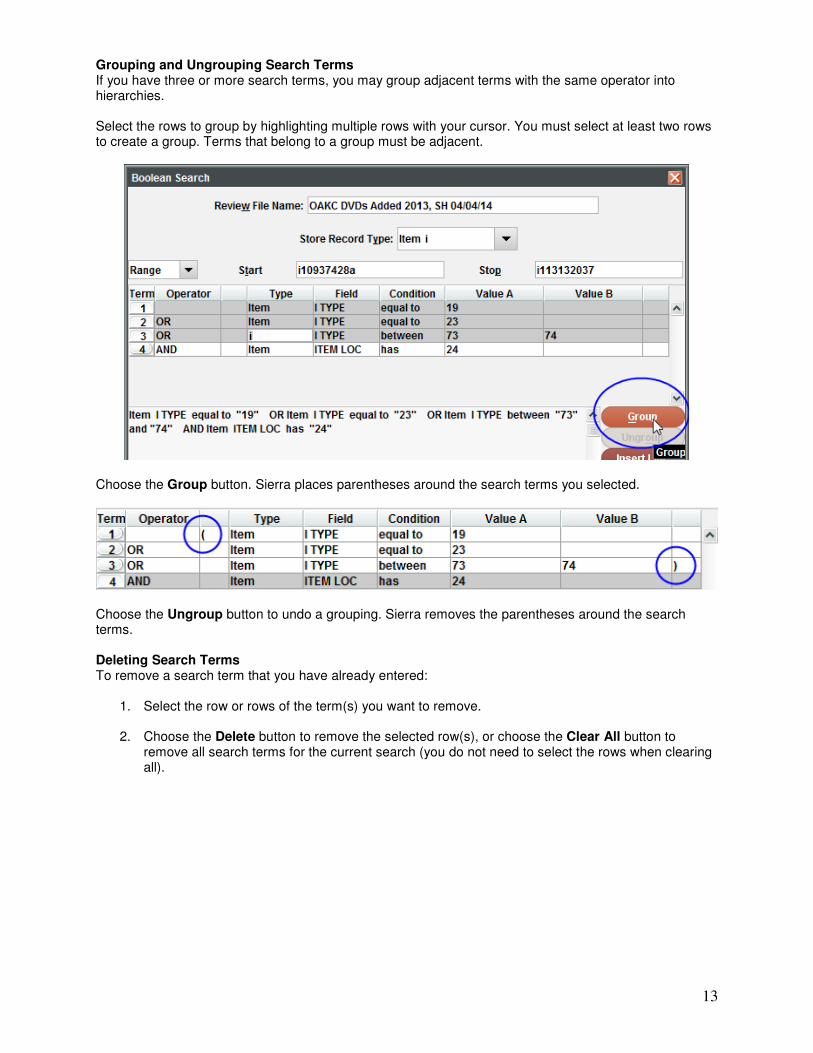
Grouping and Ungrouping Search Terms If you have three or more search terms, you may group adjacent terms with the same operator into hierarchies. Select the rows to group by highlighting multiple rows with your cursor. You must select at least two rows to create a group. Terms that belong to a group must be adjacent.
Choose the Group button. Sierra places parentheses around the search terms you selected.
Choose the Ungroup button to undo a grouping. Sierra removes the parentheses around the search terms. Deleting Search Terms To remove a search term that you have already entered:
1. Select the row or rows of the term(s) you want to remove.
2. Choose the Delete button to remove the selected row(s), or choose the Clear All button to remove all search terms for the current search (you do not need to select the rows when clearing all).
14
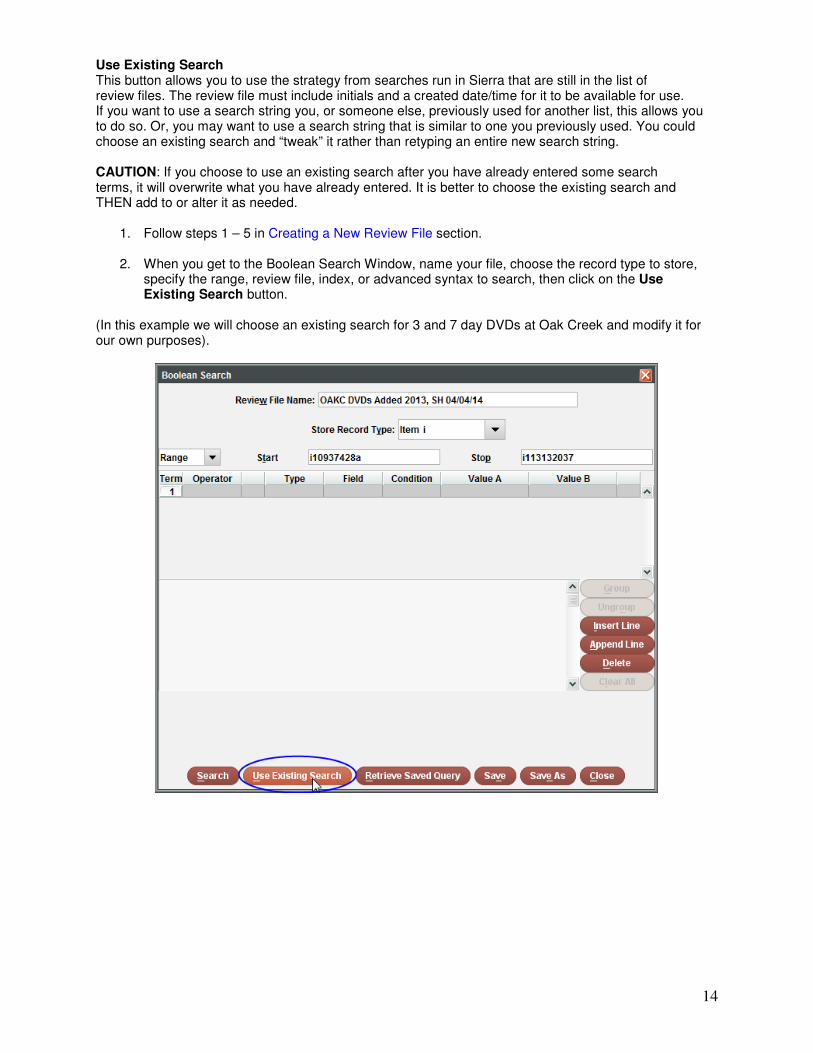
Use Existing Search This button allows you to use the strategy from searches run in Sierra that are still in the list of review files. The review file must include initials and a created date/time for it to be available for use. If you want to use a search string you, or someone else, previously used for another list, this allows you to do so. Or, you may want to use a search string that is similar to one you previously used. You could choose an existing search and “tweak” it rather than retyping an entire new search string. CAUTION: If you choose to use an existing search after you have already entered some search terms, it will overwrite what you have already entered. It is better to choose the existing search and THEN add to or alter it as needed.
1. Follow steps 1 – 5 in Creating a New Review File section.
2. When you get to the Boolean Search Window, name your file, choose the record type to store, specify the range, review file, index, or advanced syntax to search, then click on the Use Existing Search button.
(In this example we will choose an existing search for 3 and 7 day DVDs at Oak Creek and modify it for our own purposes).

15
3. This will open up the Existing Boolean Searches window. Select a line to see the details of the search string in the top half of the window.
4. Click the Use button to incorporate the strategy into your new search.
5. Add more search terms, or begin your search by choosing Search.
Here is the final search string for our example:
16
Retrieve Saved Query You can incorporate a previously saved search when you specify your search criteria (see Saving Searches for more information). CAUTION: If you choose to use a saved query after you have already entered some search terms, it will overwrite what you have already entered. It is better to choose the existing search and THEN add to or alter it as needed.
1. Follow steps 1 – 5 in Creating a New Review File section.
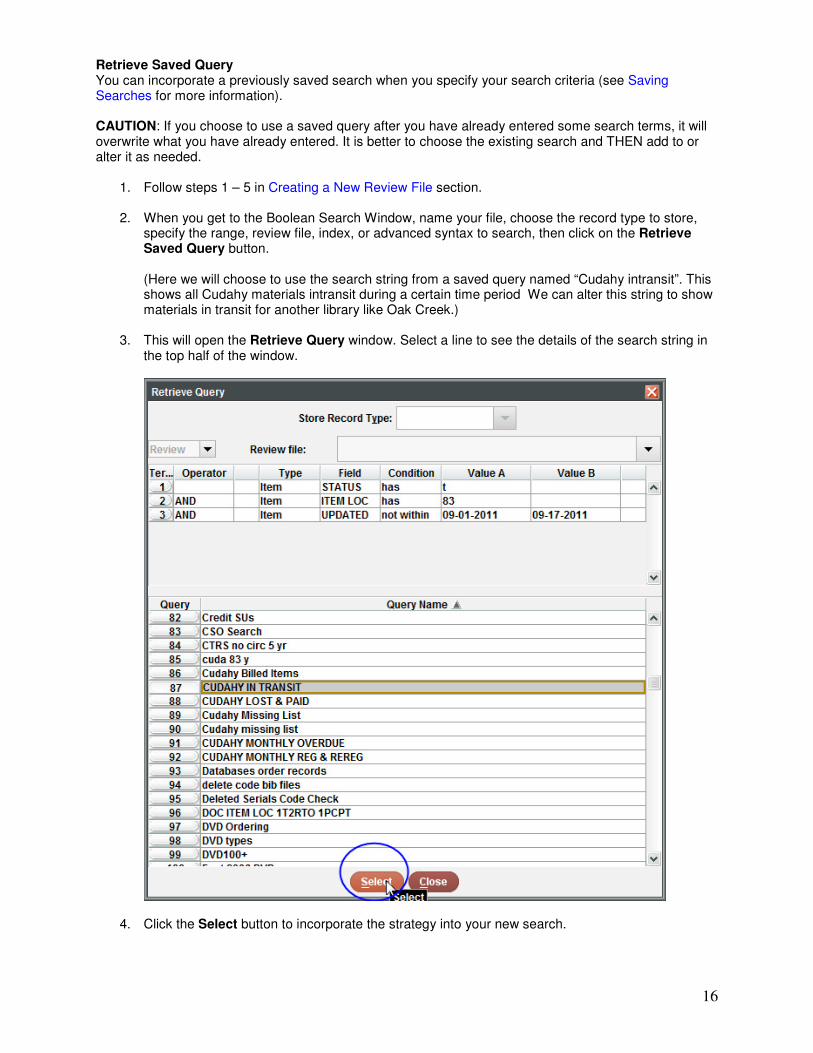
2. When you get to the Boolean Search Window, name your file, choose the record type to store, specify the range, review file, index, or advanced syntax to search, then click on the Retrieve Saved Query button. (Here we will choose to use the search string from a saved query named “Cudahy intransit”. This shows all Cudahy materials intransit during a certain time period We can alter this string to show materials in transit for another library like Oak Creek.)
3. This will open the Retrieve Query window. Select a line to see the details of the search string in the top half of the window.
4. Click the Select button to incorporate the strategy into your new search.
17
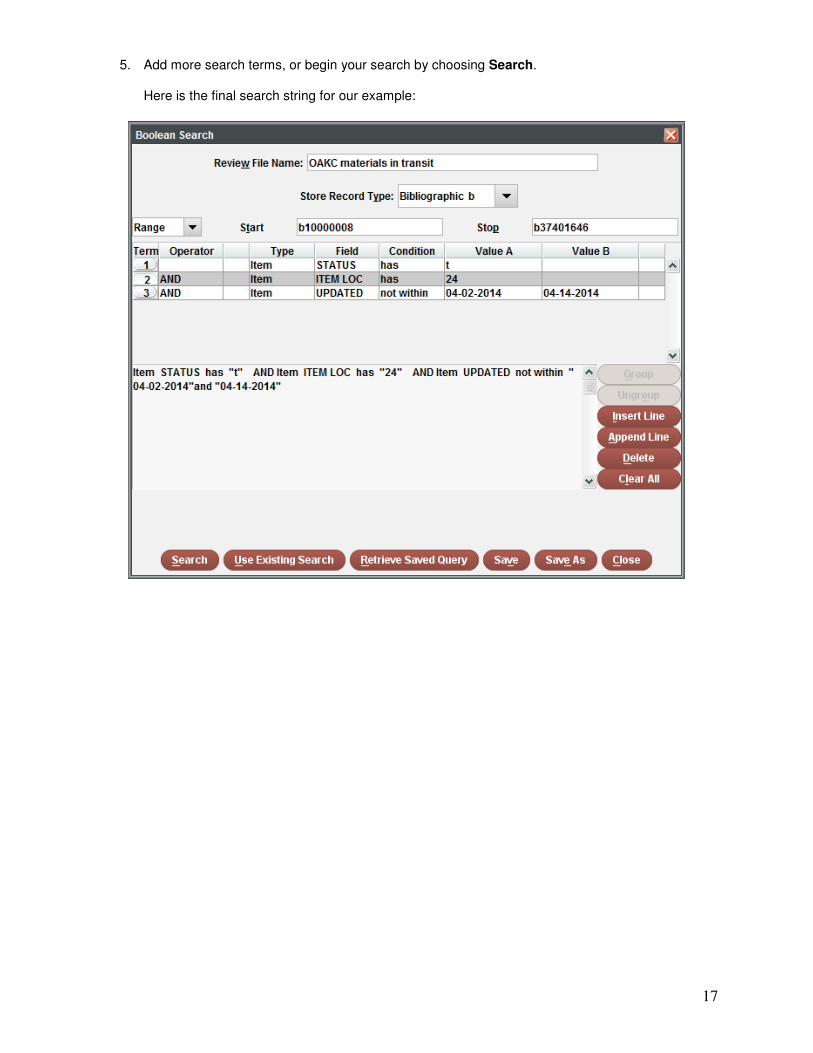
5. Add more search terms, or begin your search by choosing Search. Here is the final search string for our example:
18
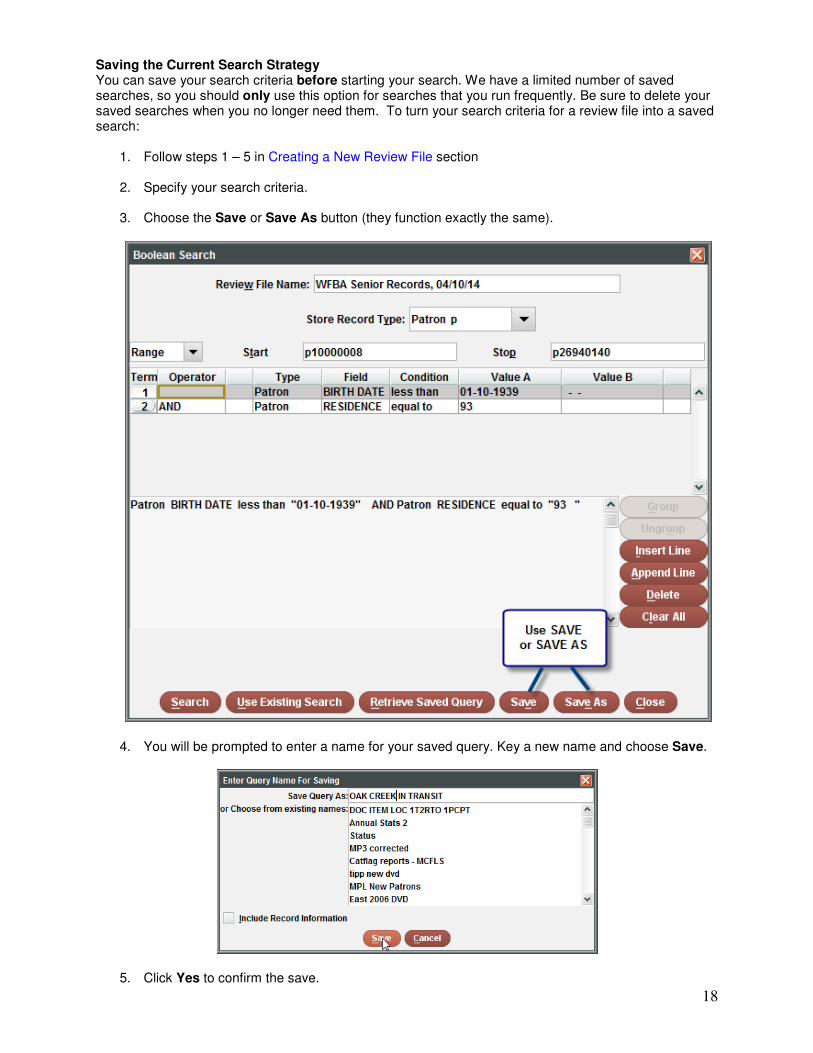
Saving the Current Search Strategy You can save your search criteria before starting your search. We have a limited number of saved searches, so you should only use this option for searches that you run frequently. Be sure to delete your saved searches when you no longer need them. To turn your search criteria for a review file into a saved search:
1. Follow steps 1 – 5 in Creating a New Review File section
2. Specify your search criteria.
3. Choose the Save or Save As button (they function exactly the same).
4. You will be prompted to enter a name for your saved query. Key a new name and choose Save.
5. Click Yes to confirm the save.
19
Controlling Your Search Begin your search by clicking Search at the bottom of the Boolean Search window. The Boolean Search window will close, and you’ll be taken back to the list of files in the Review Files tab of the Create Lists mode. The list you’re running will be highlighted. The Status column will show the words “in progress” indicating your list is being generated. Once the list is finished, you will see “complete” in the Status column.
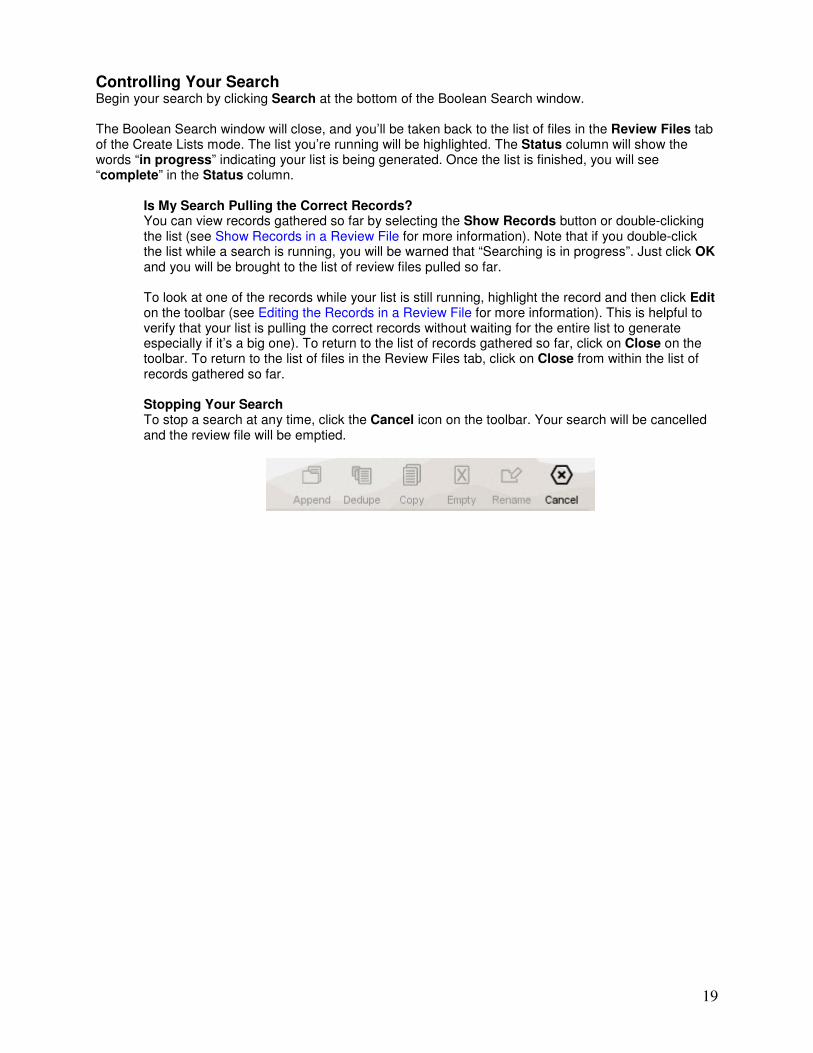
Is My Search Pulling the Correct Records? You can view records gathered so far by selecting the Show Records button or double-clicking the list (see Show Records in a Review File for more information). Note that if you double-click the list while a search is running, you will be warned that “Searching is in progress”. Just click OK and you will be brought to the list of review files pulled so far. To look at one of the records while your list is still running, highlight the record and then click Edit on the toolbar (see Editing the Records in a Review File for more information). This is helpful to verify that your list is pulling the correct records without waiting for the entire list to generate especially if it’s a big one). To return to the list of records gathered so far, click on Close on the toolbar. To return to the list of files in the Review Files tab, click on Close from within the list of records gathered so far. Stopping Your Search To stop a search at any time, click the Cancel icon on the toolbar. Your search will be cancelled and the review file will be emptied.
20
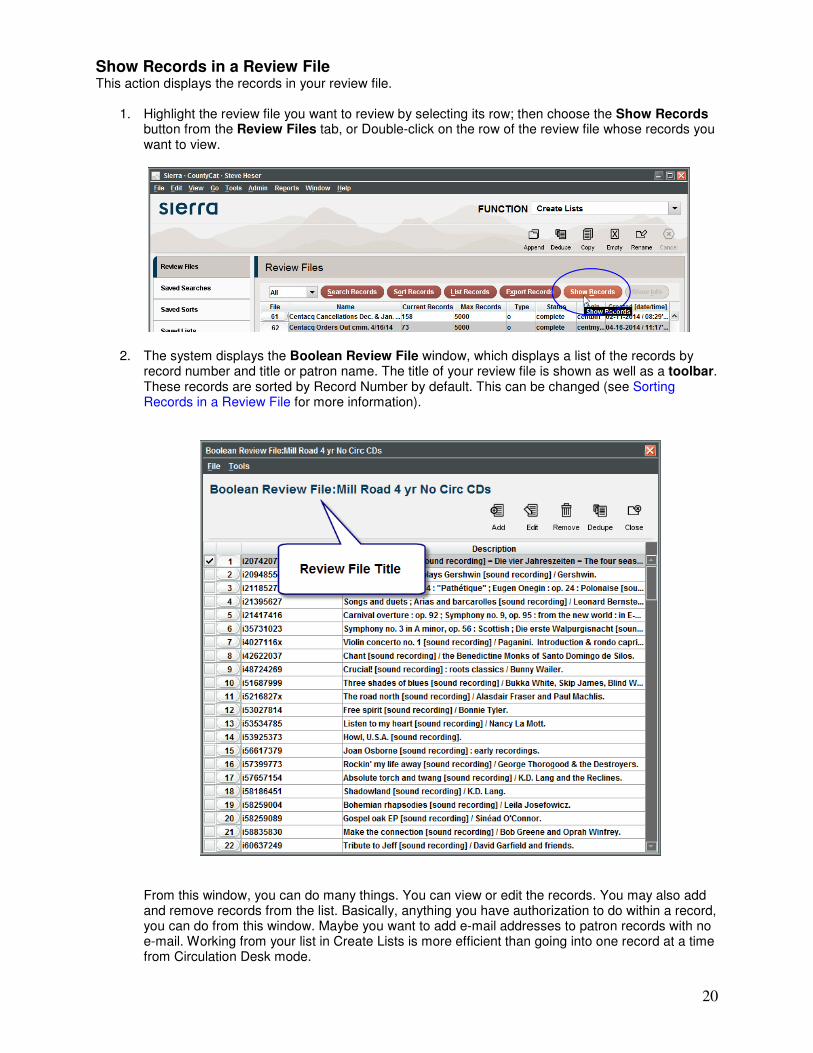
Show Records in a Review File This action displays the records in your review file.
1. Highlight the review file you want to review by selecting its row; then choose the Show Records button from the Review Files tab, or Double-click on the row of the review file whose records you want to view.
2. The system displays the Boolean Review File window, which displays a list of the records by record number and title or patron name. The title of your review file is shown as well as a toolbar. These records are sorted by Record Number by default. This can be changed (see Sorting Records in a Review File for more information).
From this window, you can do many things. You can view or edit the records. You may also add and remove records from the list. Basically, anything you have authorization to do within a record, you can do from this window. Maybe you want to add e-mail addresses to patron records with no e-mail. Working from your list in Create Lists is more efficient than going into one record at a time from Circulation Desk mode.
21
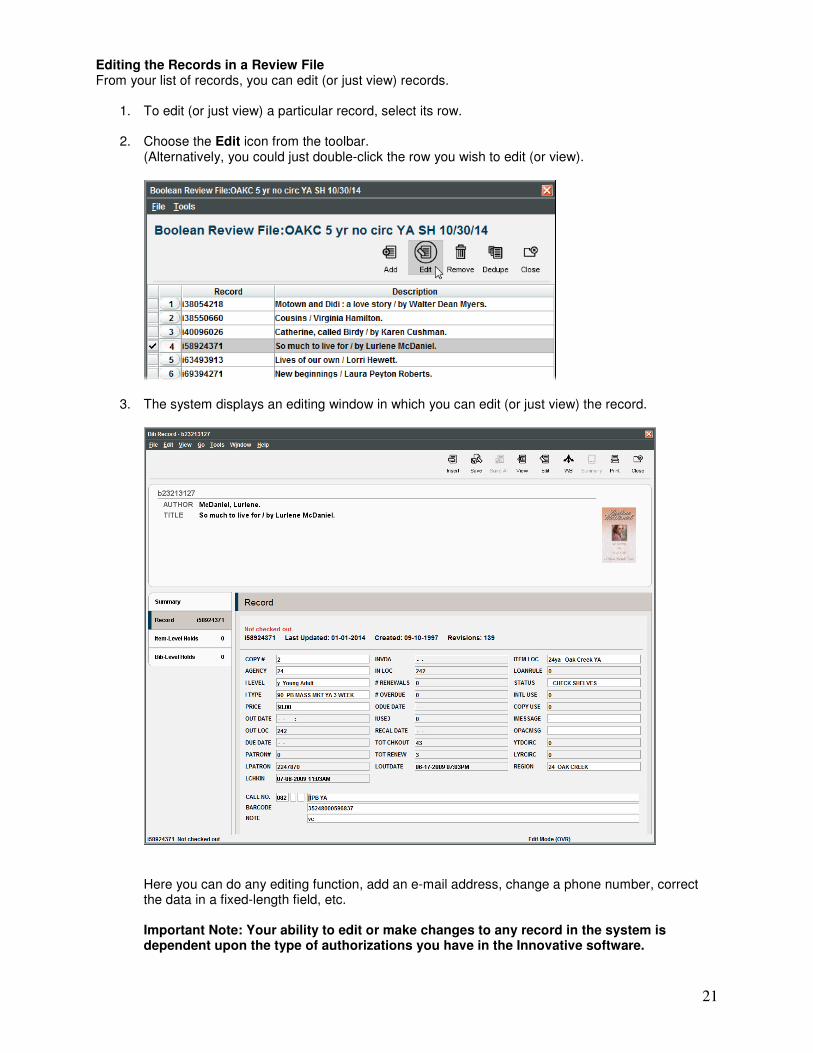
Editing the Records in a Review File From your list of records, you can edit (or just view) records.
1. To edit (or just view) a particular record, select its row.
2. Choose the Edit icon from the toolbar. (Alternatively, you could just double-click the row you wish to edit (or view).
3. The system displays an editing window in which you can edit (or just view) the record.
Here you can do any editing function, add an e-mail address, change a phone number, correct the data in a fixed-length field, etc. Important Note: Your ability to edit or make changes to any record in the system is dependent upon the type of authorizations you have in the Innovative software.
22
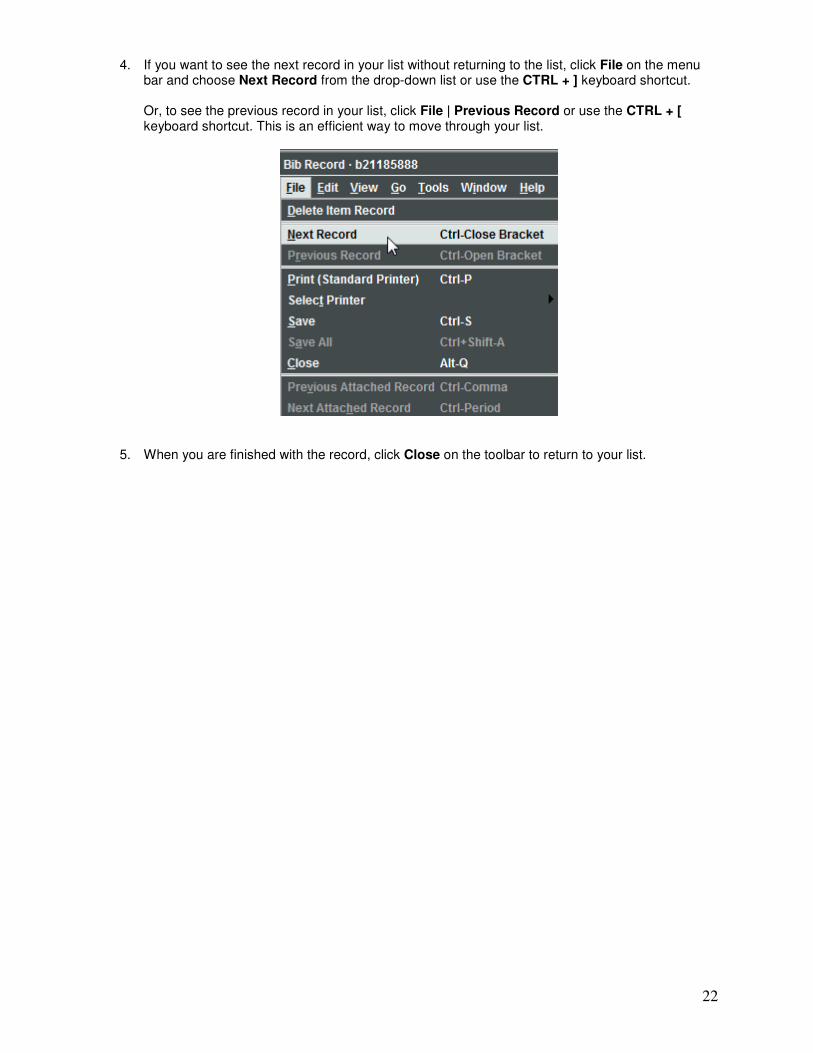
4. If you want to see the next record in your list without returning to the list, click File on the menu bar and choose Next Record from the drop-down list or use the CTRL + ] keyboard shortcut. Or, to see the previous record in your list, click File | Previous Record or use the CTRL + [ keyboard shortcut. This is an efficient way to move through your list.
5. When you are finished with the record, click Close on the toolbar to return to your list.
23
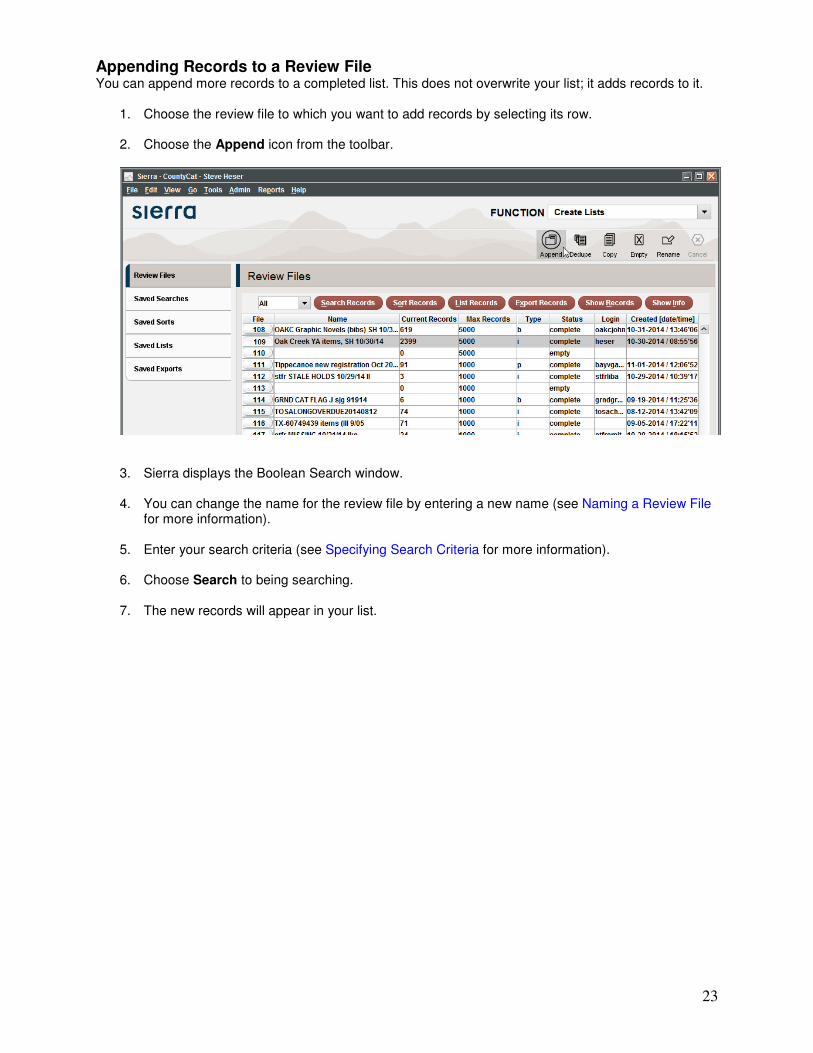
Appending Records to a Review File You can append more records to a completed list. This does not overwrite your list; it adds records to it.
1. Choose the review file to which you want to add records by selecting its row.
2. Choose the Append icon from the toolbar.
3. Sierra displays the Boolean Search window.
4. You can change the name for the review file by entering a new name (see Naming a Review File for more information).
5. Enter your search criteria (see Specifying Search Criteria for more information).
6. Choose Search to being searching.
7. The new records will appear in your list.

24
Merging Review Files If you want to merge two review files together, you have the option to do so by using the Append tool.
1. Choose one of the two review files that you want to merge by selecting its row.
2. Choose the Append icon from the toolbar. Sierra displays the Boolean Search window.
3. Choose Review from the Range drop-down list and select the review file you want to merge into the current review file.
4. Click Search. The two files have now been merged. The additional records are appended to the end of the first review file. The second review file remains intact. You may choose to delete the second review file if you no longer need it.
5. If necessary, remove duplicate records from your merged file by highlighting the merged review file and then clicking on the Dedupe icon on the toolbar.

25
Saving Searches Sierra allows you to save up to 100 search strategies so you should only use this option for searches that you run frequently. Be sure to delete your saved searches when you no longer need them. These strategies can be incorporated when you create a review file or add records to an existing review file. After you have saved search strategies, you can review them, modify them, or delete them. To save a search while creating your search strategy, see Saving the Current Search Strategy. Saving Search Criteria
1. Click on the Saved Searches tab in Create Lists mode.
2. Click the New button at the bottom of the list of saved searches.
26
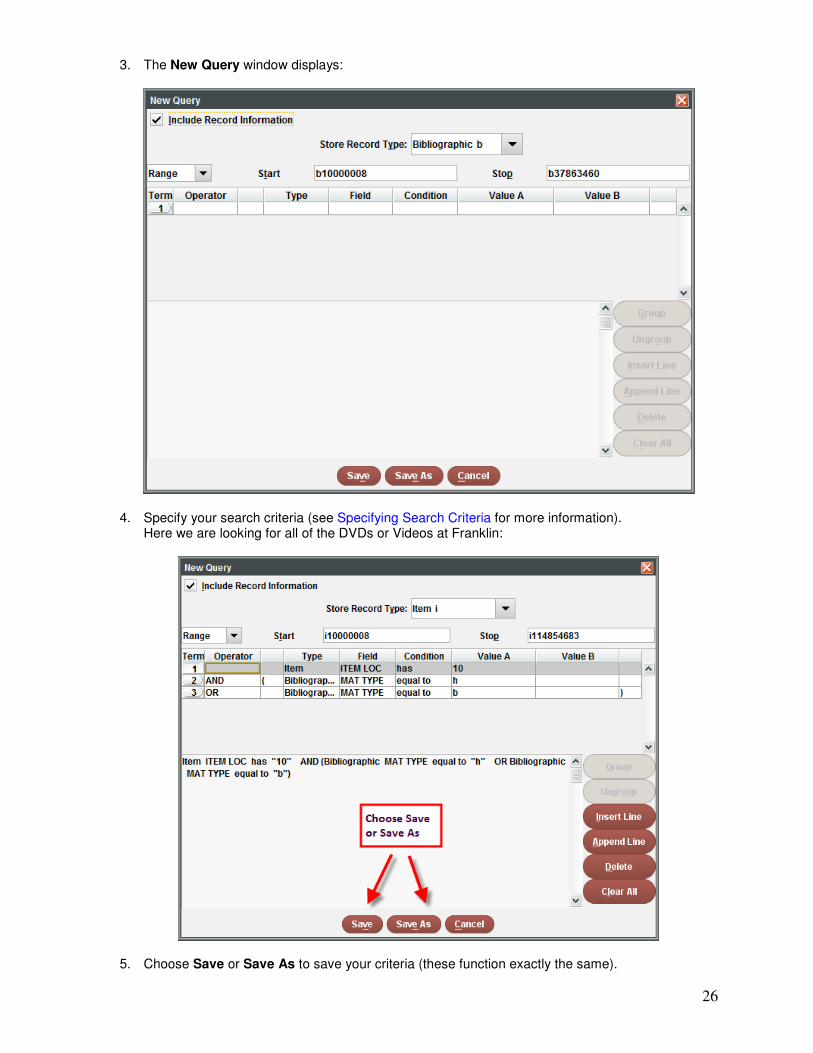
3. The New Query window displays:
4. Specify your search criteria (see Specifying Search Criteria for more information). Here we are looking for all of the DVDs or Videos at Franklin:
5. Choose Save or Save As to save your criteria (these function exactly the same).
27
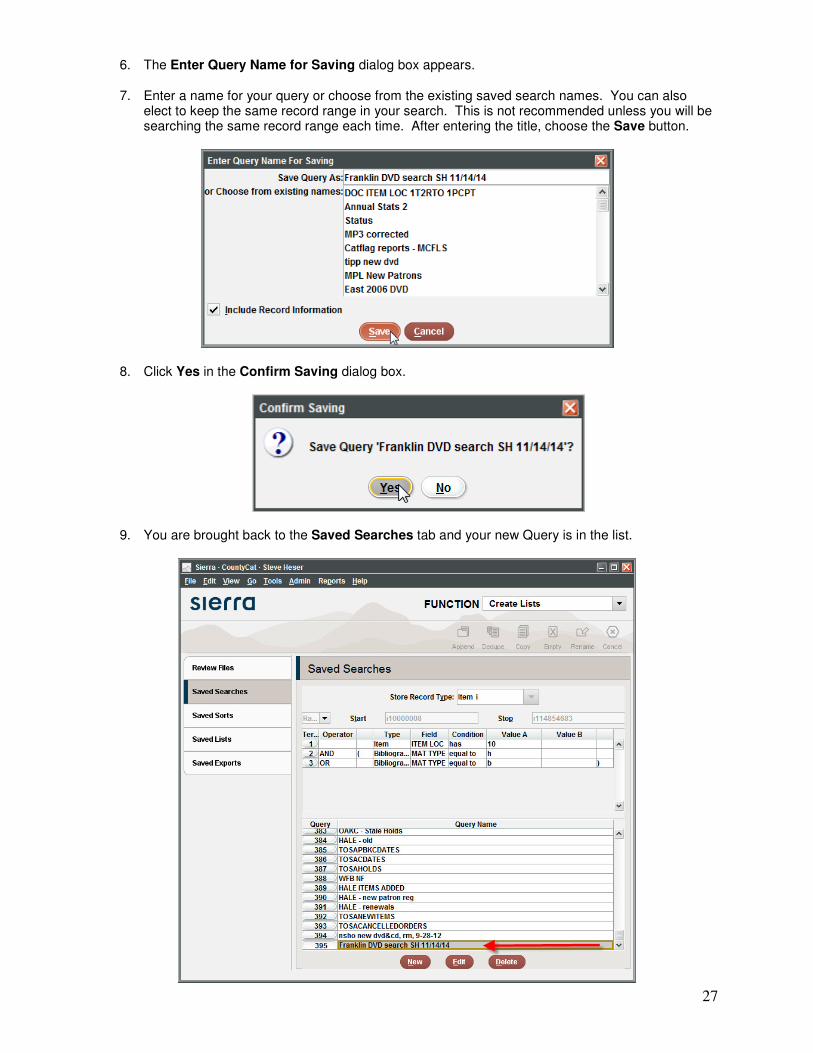
6. The Enter Query Name for Saving dialog box appears.
7. Enter a name for your query or choose from the existing saved search names. You can also elect to keep the same record range in your search. This is not recommended unless you will be searching the same record range each time. After entering the title, choose the Save button.
8. Click Yes in the Confirm Saving dialog box.
9. You are brought back to the Saved Searches tab and your new Query is in the list.
28
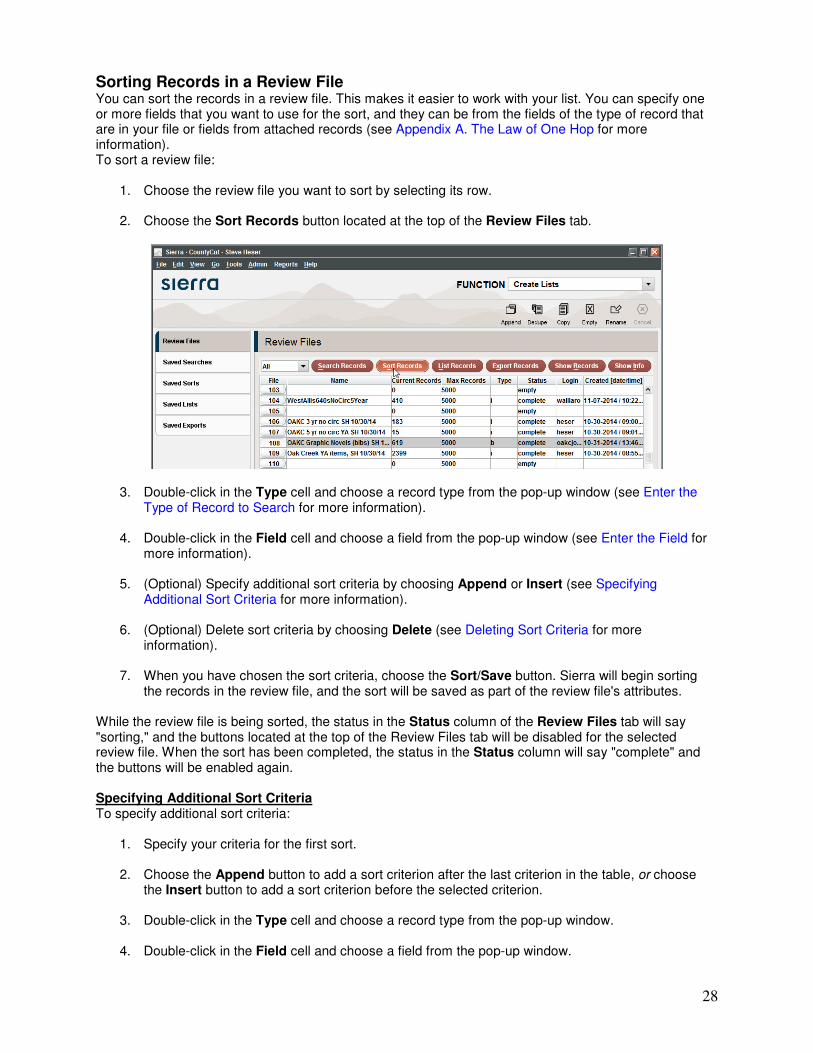
Sorting Records in a Review File You can sort the records in a review file. This makes it easier to work with your list. You can specify one or more fields that you want to use for the sort, and they can be from the fields of the type of record that are in your file or fields from attached records (see Appendix A. The Law of One Hop for more information). To sort a review file:
1. Choose the review file you want to sort by selecting its row.
2. Choose the Sort Records button located at the top of the Review Files tab.
3. Double-click in the Type cell and choose a record type from the pop-up window (see Enter the Type of Record to Search for more information).
4. Double-click in the Field cell and choose a field from the pop-up window (see Enter the Field for more information).
5. (Optional) Specify additional sort criteria by choosing Append or Insert (see Specifying Additional Sort Criteria for more information).
6. (Optional) Delete sort criteria by choosing Delete (see Deleting Sort Criteria for more information).
7. When you have chosen the sort criteria, choose the Sort/Save button. Sierra will begin sorting the records in the review file, and the sort will be saved as part of the review file's attributes.
While the review file is being sorted, the status in the Status column of the Review Files tab will say "sorting," and the buttons located at the top of the Review Files tab will be disabled for the selected review file. When the sort has been completed, the status in the Status column will say "complete" and the buttons will be enabled again. Specifying Additional Sort Criteria To specify additional sort criteria:
1. Specify your criteria for the first sort.
2. Choose the Append button to add a sort criterion after the last criterion in the table, or choose the Insert button to add a sort criterion before the selected criterion.
3. Double-click in the Type cell and choose a record type from the pop-up window.
4. Double-click in the Field cell and choose a field from the pop-up window.
29
5. Repeat steps 2 through 4 until you have specified all of the desired sort criteria.
6. Choose the Sort/Save button. Sierra will begin sorting the records in the review file, and the sort will be saved as part of the review file's attributes.
7. An unlimited number of sort criteria may be created. The records in the review file will be sorted in the order that the sort criteria are listed in the table. Think of this as primary, secondary, etc. sorts that are used in other programs like Microsoft Word© and Excel©.
Deleting Sort Criteria To remove a sort criterion from the table:
1. Select the row or rows of the sort(s) you want to remove.
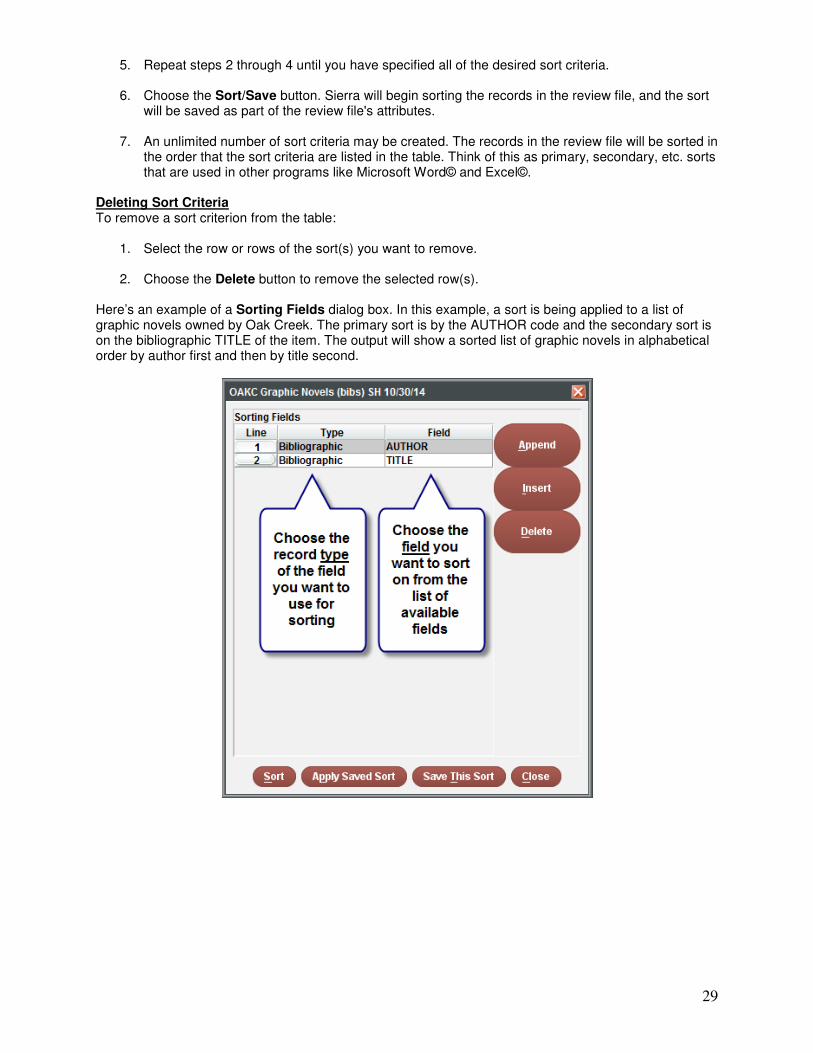
2. Choose the Delete button to remove the selected row(s). Here’s an example of a Sorting Fields dialog box. In this example, a sort is being applied to a list of graphic novels owned by Oak Creek. The primary sort is by the AUTHOR code and the secondary sort is on the bibliographic TITLE of the item. The output will show a sorted list of graphic novels in alphabetical order by author first and then by title second.
30
Using the Information in Your List Outside of Sierra Once you have created and sorted your list, you can work with the list within Sierra using Show Records, or you can take the information from your list outside of Sierra. You are limited in Show Records to only seeing the record number and description. It is necessary to look at individual records to see the data you are really looking for. This means looking at records one at a time, which is quite time consuming. A more efficient method is to choose what data you need in Sierra and take it with you. Two options are available for moving data outside of Sierra:
• Listing the Records
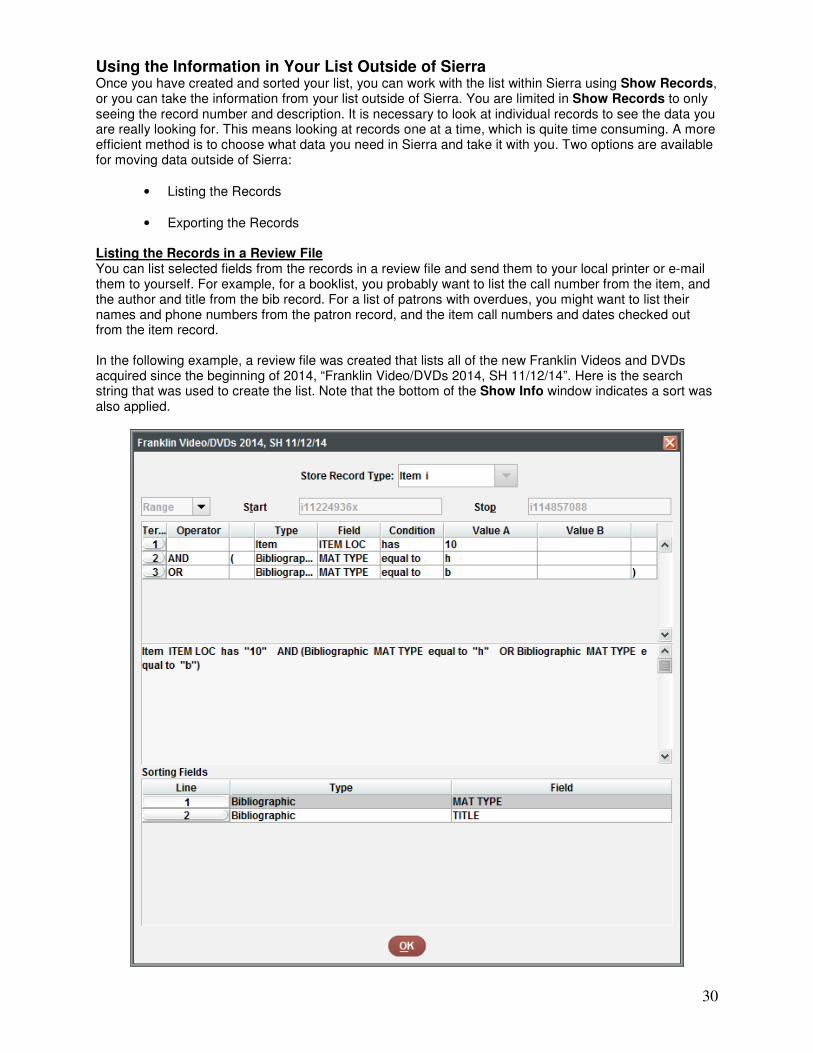
• Exporting the Records Listing the Records in a Review File You can list selected fields from the records in a review file and send them to your local printer or e-mail them to yourself. For example, for a booklist, you probably want to list the call number from the item, and the author and title from the bib record. For a list of patrons with overdues, you might want to list their names and phone numbers from the patron record, and the item call numbers and dates checked out from the item record. In the following example, a review file was created that lists all of the new Franklin Videos and DVDs acquired since the beginning of 2014, “Franklin Video/DVDs 2014, SH 11/12/14”. Here is the search string that was used to create the list. Note that the bottom of the Show Info window indicates a sort was also applied.
31
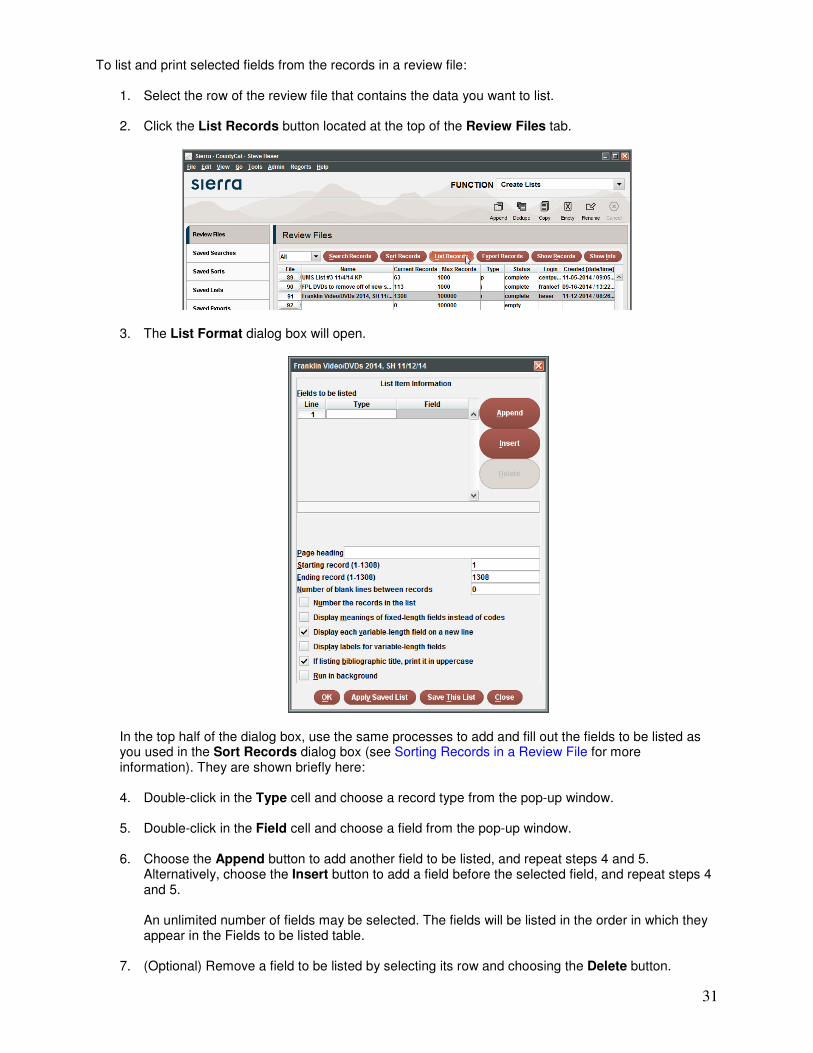
To list and print selected fields from the records in a review file:
1. Select the row of the review file that contains the data you want to list.
2. Click the List Records button located at the top of the Review Files tab.
3. The List Format dialog box will open.
In the top half of the dialog box, use the same processes to add and fill out the fields to be listed as you used in the Sort Records dialog box (see Sorting Records in a Review File for more information). They are shown briefly here: 4. Double-click in the Type cell and choose a record type from the pop-up window.
5. Double-click in the Field cell and choose a field from the pop-up window.
6. Choose the Append button to add another field to be listed, and repeat steps 4 and 5.
Alternatively, choose the Insert button to add a field before the selected field, and repeat steps 4 and 5. An unlimited number of fields may be selected. The fields will be listed in the order in which they appear in the Fields to be listed table.
7. (Optional) Remove a field to be listed by selecting its row and choosing the Delete button.
32
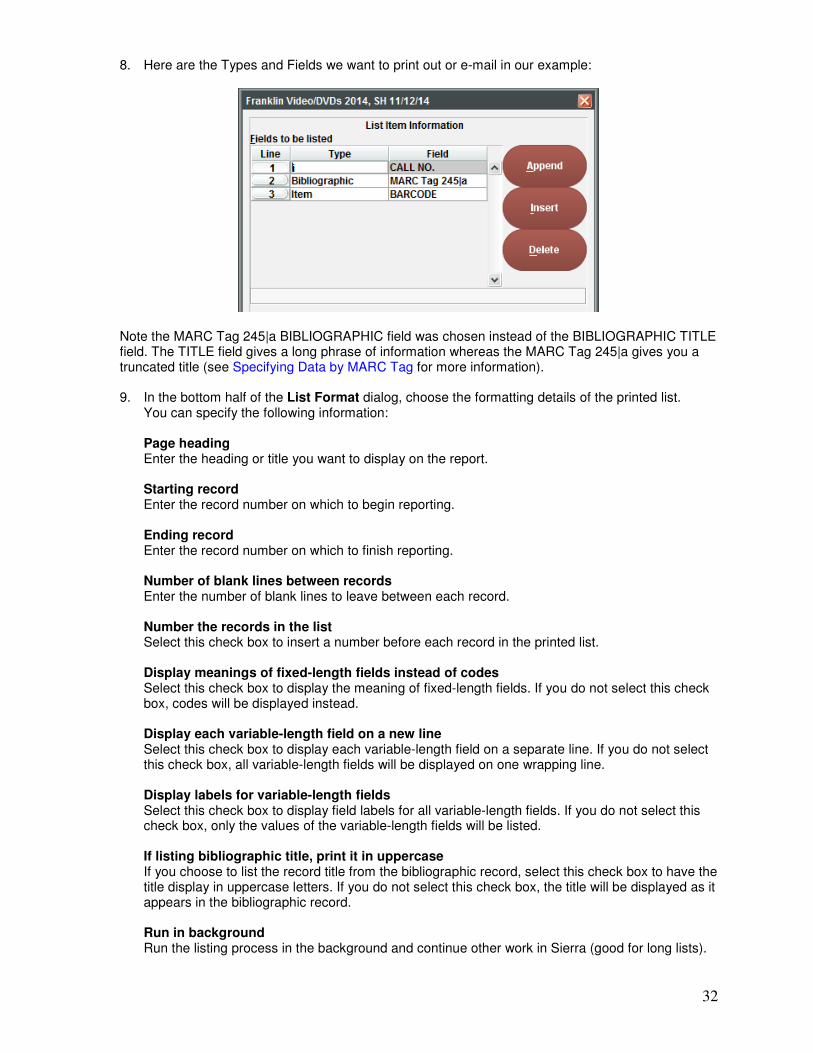
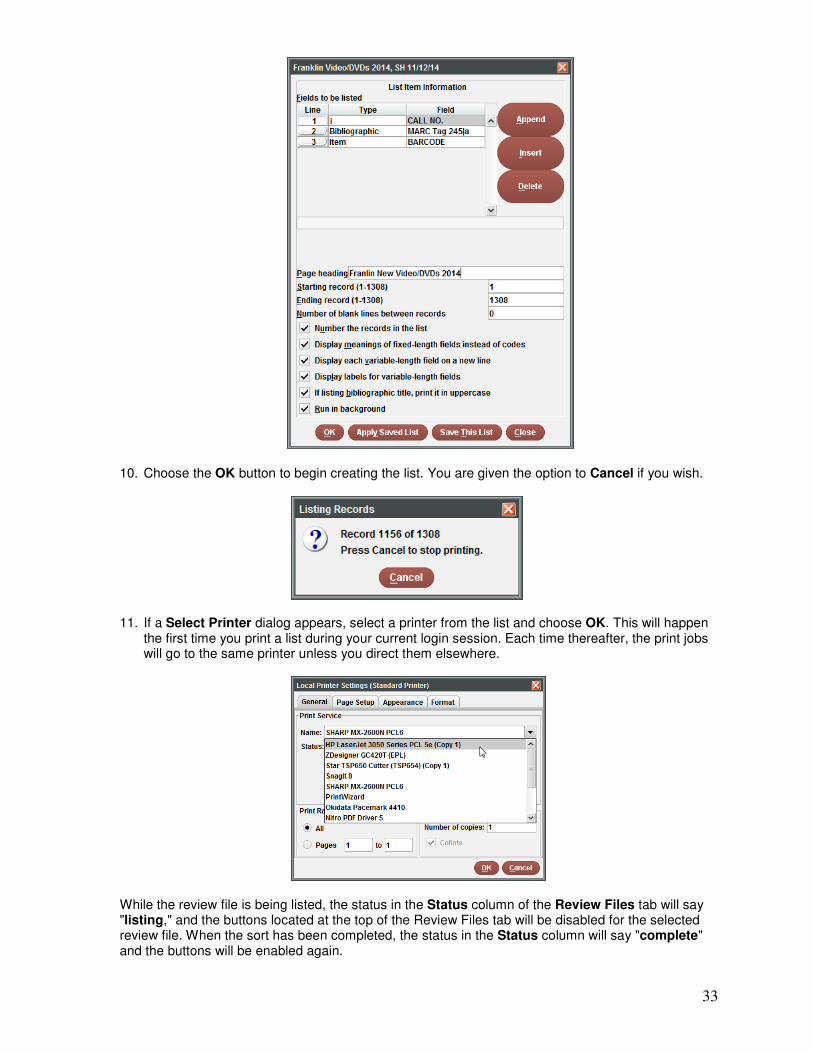
8. Here are the Types and Fields we want to print out or e-mail in our example:
Note the MARC Tag 245|a BIBLIOGRAPHIC field was chosen instead of the BIBLIOGRAPHIC TITLE field. The TITLE field gives a long phrase of information whereas the MARC Tag 245|a gives you a truncated title (see Specifying Data by MARC Tag for more information). 9. In the bottom half of the List Format dialog, choose the formatting details of the printed list.
You can specify the following information: Page heading Enter the heading or title you want to display on the report. Starting record Enter the record number on which to begin reporting. Ending record Enter the record number on which to finish reporting. Number of blank lines between records Enter the number of blank lines to leave between each record. Number the records in the list Select this check box to insert a number before each record in the printed list. Display meanings of fixed-length fields instead of codes Select this check box to display the meaning of fixed-length fields. If you do not select this check box, codes will be displayed instead. Display each variable-length field on a new line Select this check box to display each variable-length field on a separate line. If you do not select this check box, all variable-length fields will be displayed on one wrapping line. Display labels for variable-length fields Select this check box to display field labels for all variable-length fields. If you do not select this check box, only the values of the variable-length fields will be listed. If listing bibliographic title, print it in uppercase If you choose to list the record title from the bibliographic record, select this check box to have the title display in uppercase letters. If you do not select this check box, the title will be displayed as it appears in the bibliographic record. Run in background Run the listing process in the background and continue other work in Sierra (good for long lists).
33
10. Choose the OK button to begin creating the list. You are given the option to Cancel if you wish.
11. If a Select Printer dialog appears, select a printer from the list and choose OK. This will happen the first time you print a list during your current login session. Each time thereafter, the print jobs will go to the same printer unless you direct them elsewhere.
While the review file is being listed, the status in the Status column of the Review Files tab will say "listing," and the buttons located at the top of the Review Files tab will be disabled for the selected review file. When the sort has been completed, the status in the Status column will say "complete" and the buttons will be enabled again.
34
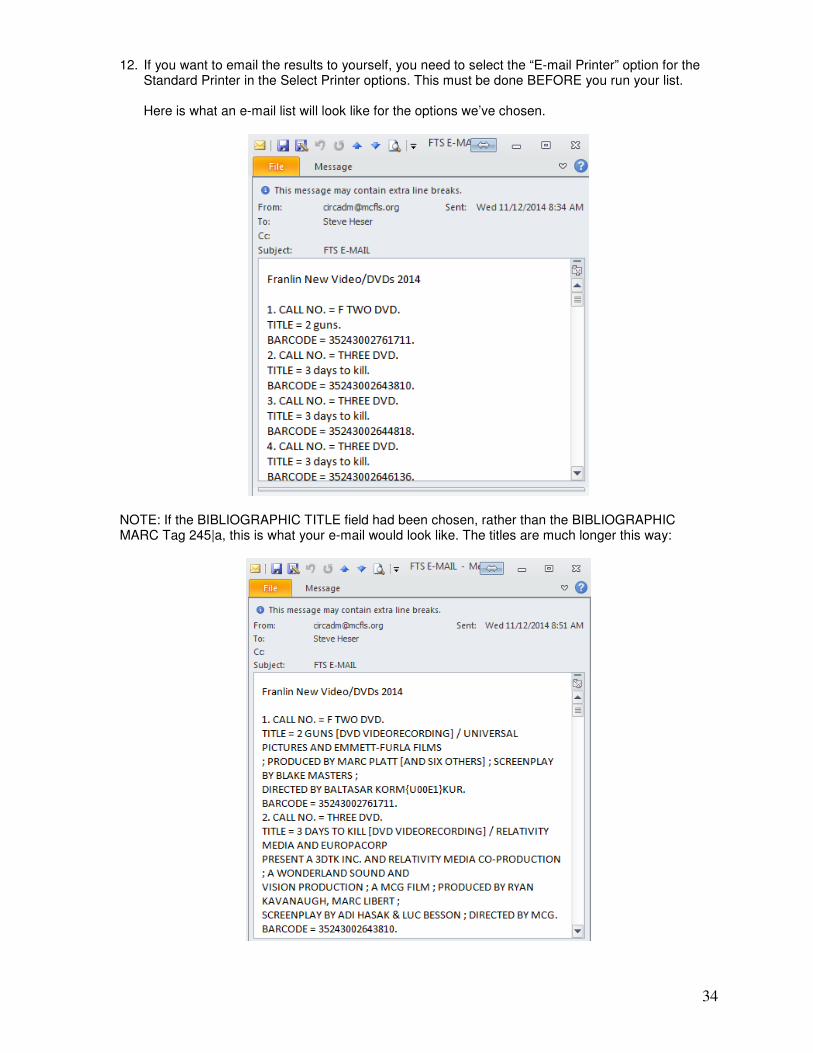
12. If you want to email the results to yourself, you need to select the “E-mail Printer” option for the Standard Printer in the Select Printer options. This must be done BEFORE you run your list. Here is what an e-mail list will look like for the options we’ve chosen.
NOTE: If the BIBLIOGRAPHIC TITLE field had been chosen, rather than the BIBLIOGRAPHIC MARC Tag 245|a, this is what your e-mail would look like. The titles are much longer this way:

35
Exporting the Records in a Review File The Sierra system offers the ability to export selected fields from a review file to a delimited file that is sent to the client PC. This exported file can be imported into many applications, such as Microsoft Excel© and Access©. In this example we’ll use a review file with items with STATUS “missing” or “claims returned” for Greendale. The goal is to export the information out and reformat the data to locate these items. The name of the review file is “Greendale Missing Claims Returned, SH 11/12/14. The information used to create this query is based on CountyCat manual insert C-39, “MISSING / CLAIMS RETURNED ITEMS” which is created for member libraries on a monthly basis in file 68.
To export selected fields from the records in a review file:
1. Select the row of the review file that contains the data you want to list.
2. Click the Export Records button located at the top of the Review Files tab.
36
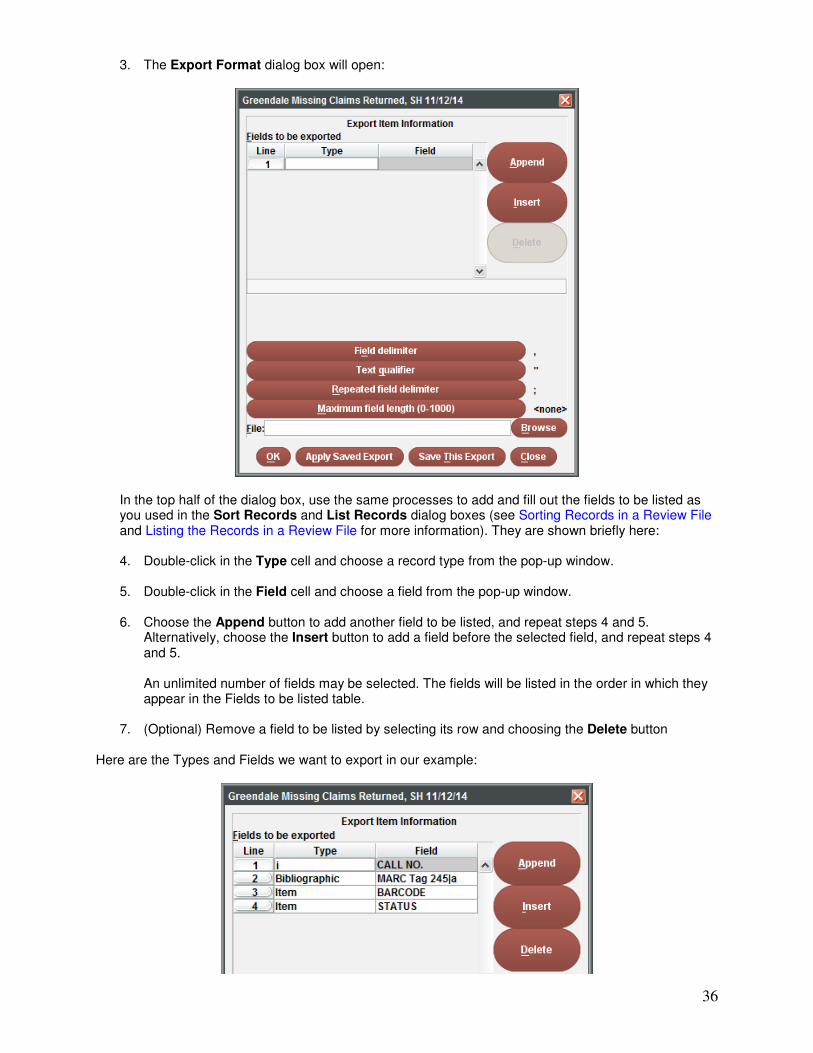
3. The Export Format dialog box will open:
In the top half of the dialog box, use the same processes to add and fill out the fields to be listed as you used in the Sort Records and List Records dialog boxes (see Sorting Records in a Review File and Listing the Records in a Review File for more information). They are shown briefly here: 4. Double-click in the Type cell and choose a record type from the pop-up window.
5. Double-click in the Field cell and choose a field from the pop-up window.
6. Choose the Append button to add another field to be listed, and repeat steps 4 and 5.
Alternatively, choose the Insert button to add a field before the selected field, and repeat steps 4 and 5. An unlimited number of fields may be selected. The fields will be listed in the order in which they appear in the Fields to be listed table.
7. (Optional) Remove a field to be listed by selecting its row and choosing the Delete button
Here are the Types and Fields we want to export in our example:
37
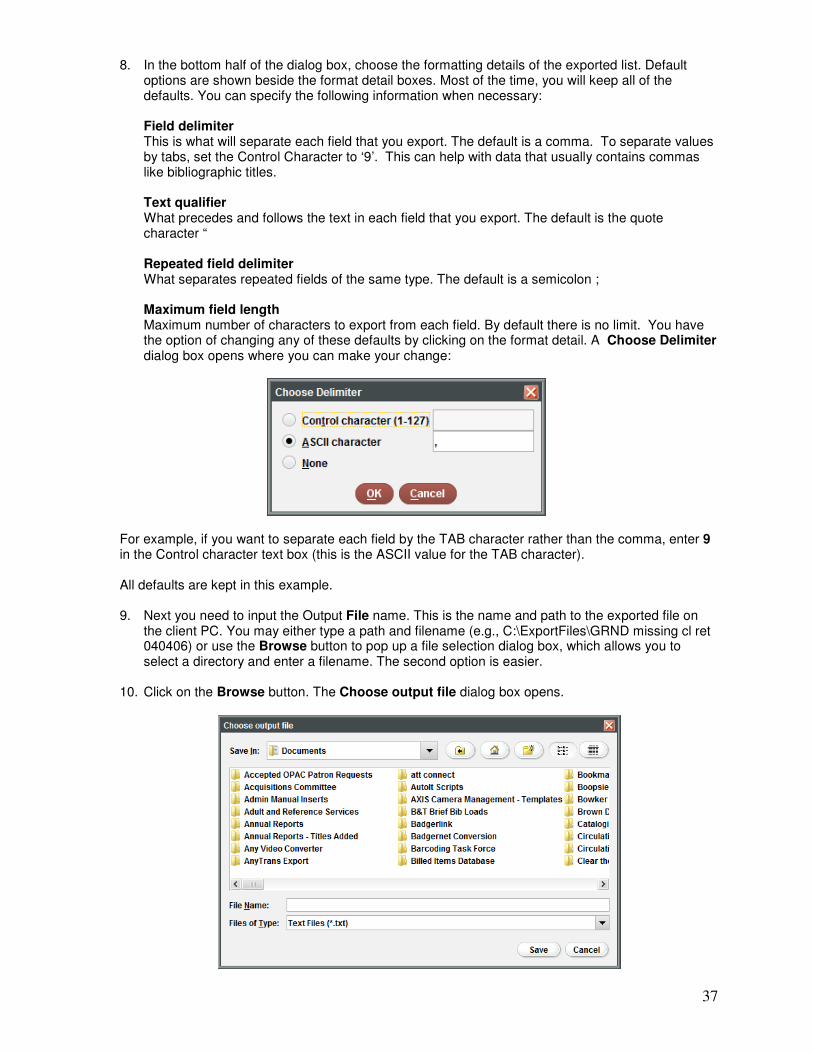
8. In the bottom half of the dialog box, choose the formatting details of the exported list. Default options are shown beside the format detail boxes. Most of the time, you will keep all of the defaults. You can specify the following information when necessary: Field delimiter This is what will separate each field that you export. The default is a comma. To separate values by tabs, set the Control Character to ‘9’. This can help with data that usually contains commas like bibliographic titles. Text qualifier What precedes and follows the text in each field that you export. The default is the quote character “ Repeated field delimiter What separates repeated fields of the same type. The default is a semicolon ; Maximum field length Maximum number of characters to export from each field. By default there is no limit. You have the option of changing any of these defaults by clicking on the format detail. A Choose Delimiter dialog box opens where you can make your change:
For example, if you want to separate each field by the TAB character rather than the comma, enter 9 in the Control character text box (this is the ASCII value for the TAB character).
All defaults are kept in this example.
9. Next you need to input the Output File name. This is the name and path to the exported file on
the client PC. You may either type a path and filename (e.g., C:\ExportFiles\GRND missing cl ret 040406) or use the Browse button to pop up a file selection dialog box, which allows you to select a directory and enter a filename. The second option is easier.
10. Click on the Browse button. The Choose output file dialog box opens.
38
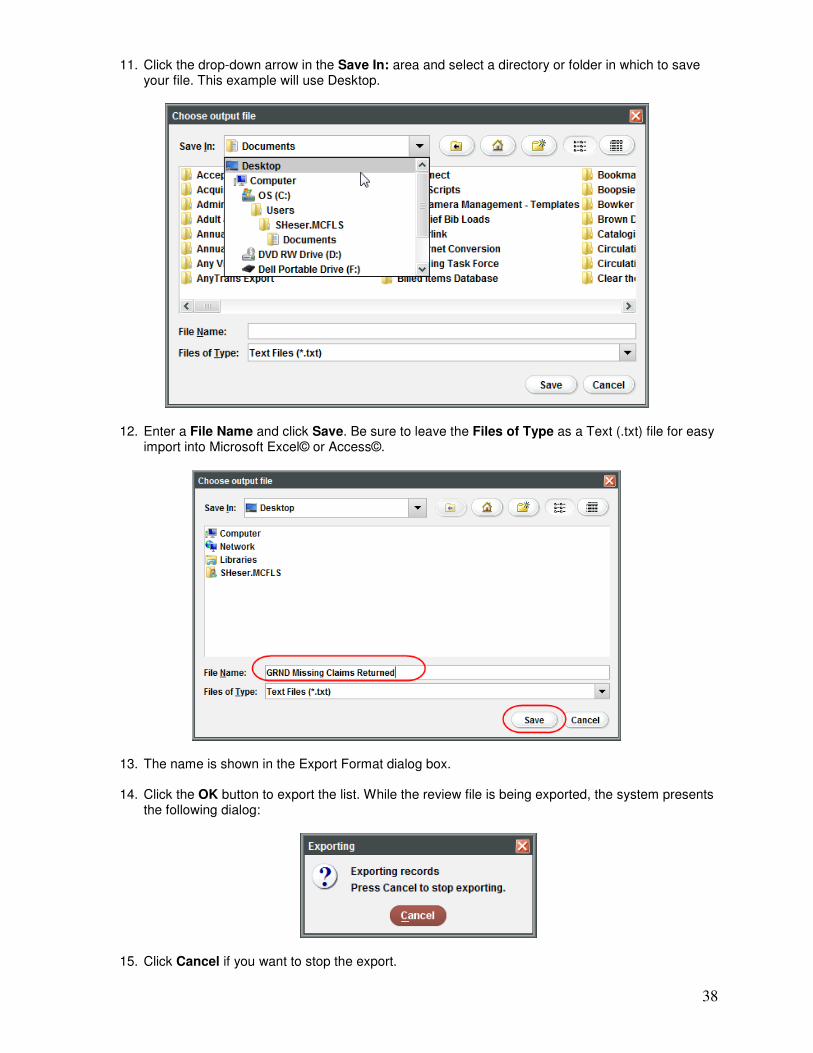
11. Click the drop-down arrow in the Save In: area and select a directory or folder in which to save your file. This example will use Desktop.
12. Enter a File Name and click Save. Be sure to leave the Files of Type as a Text (.txt) file for easy import into Microsoft Excel© or Access©.
13. The name is shown in the Export Format dialog box.
14. Click the OK button to export the list. While the review file is being exported, the system presents the following dialog:
15. Click Cancel if you want to stop the export.
39
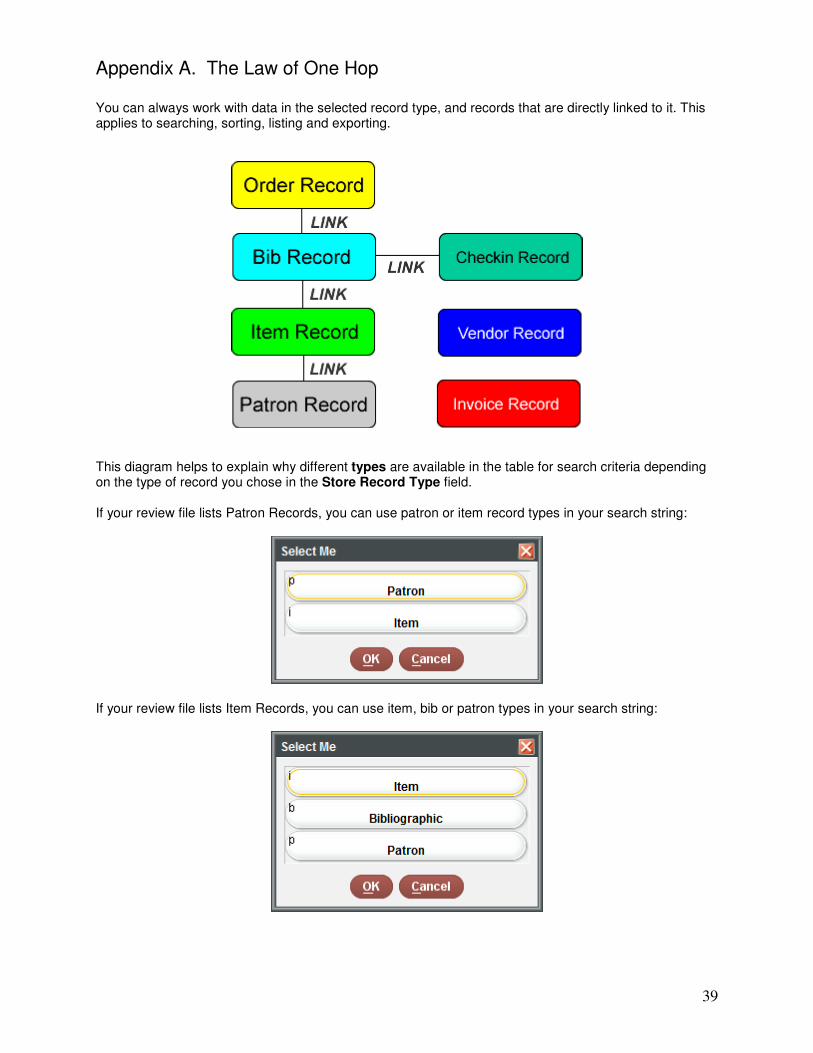
Appendix A. The Law of One Hop You can always work with data in the selected record type, and records that are directly linked to it. This applies to searching, sorting, listing and exporting.
This diagram helps to explain why different types are available in the table for search criteria depending on the type of record you chose in the Store Record Type field. If your review file lists Patron Records, you can use patron or item record types in your search string:
If your review file lists Item Records, you can use item, bib or patron types in your search string:
40
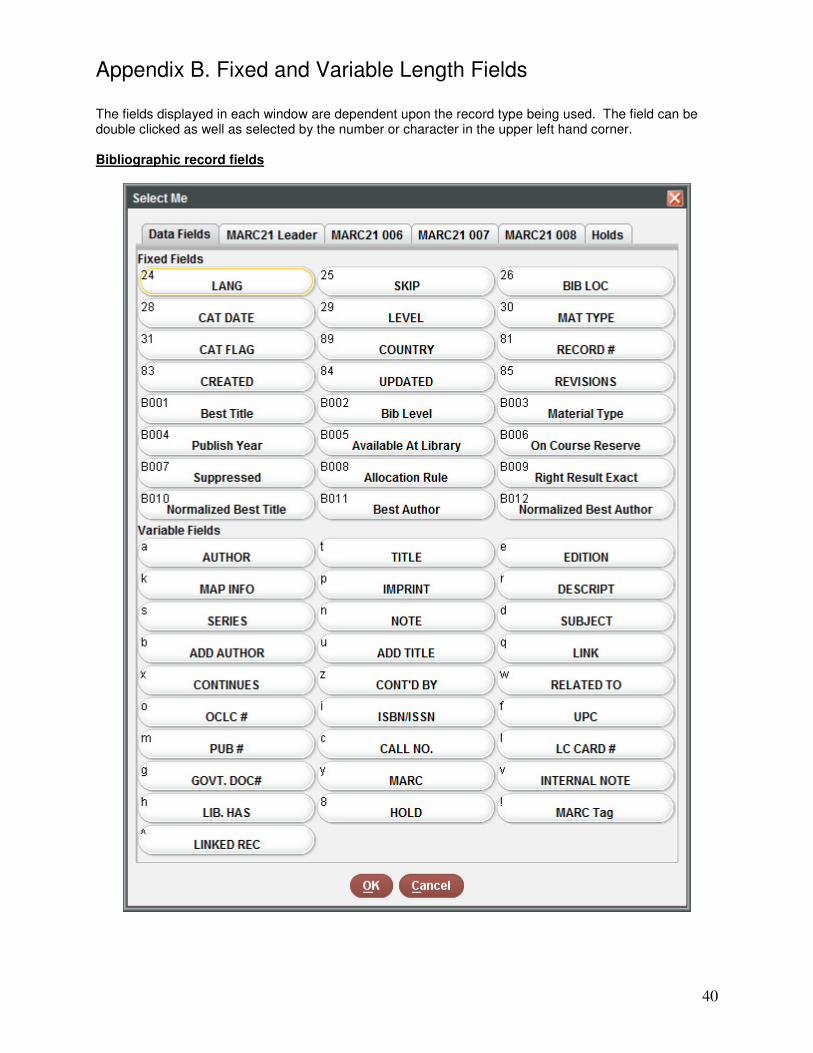
Appendix B. Fixed and Variable Length Fields The fields displayed in each window are dependent upon the record type being used. The field can be double clicked as well as selected by the number or character in the upper left hand corner. Bibliographic record fields

41
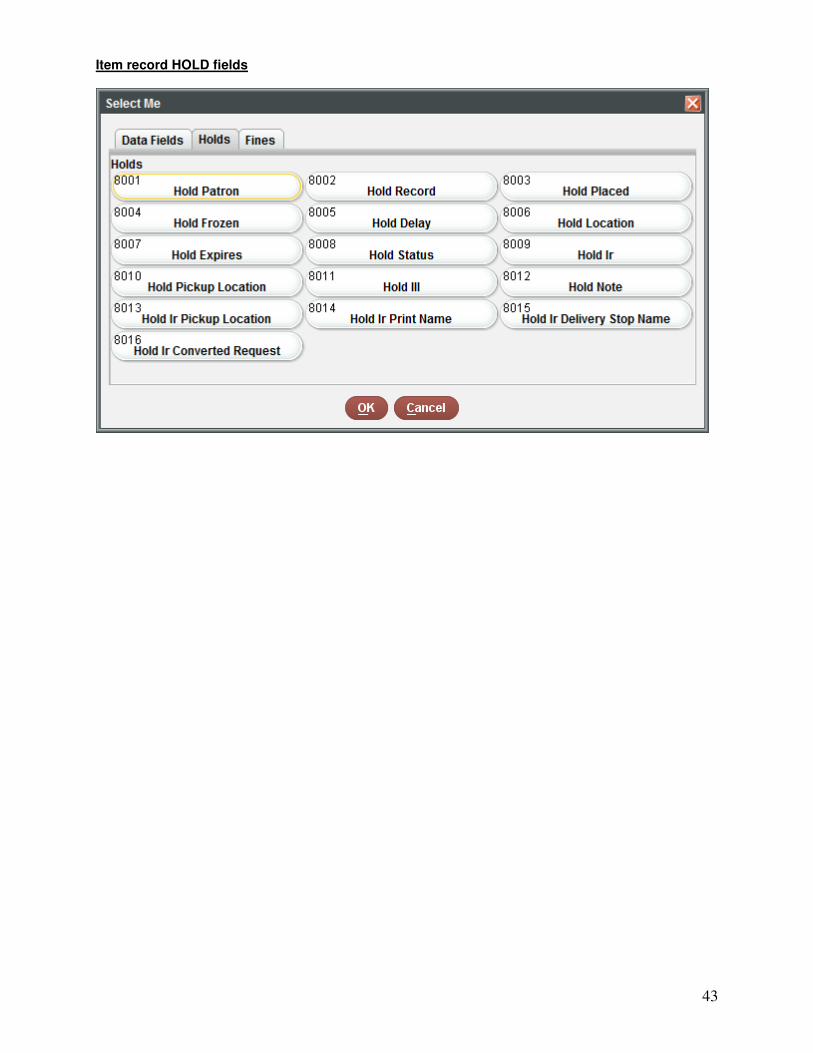
Bibliographic record HOLD fields
42
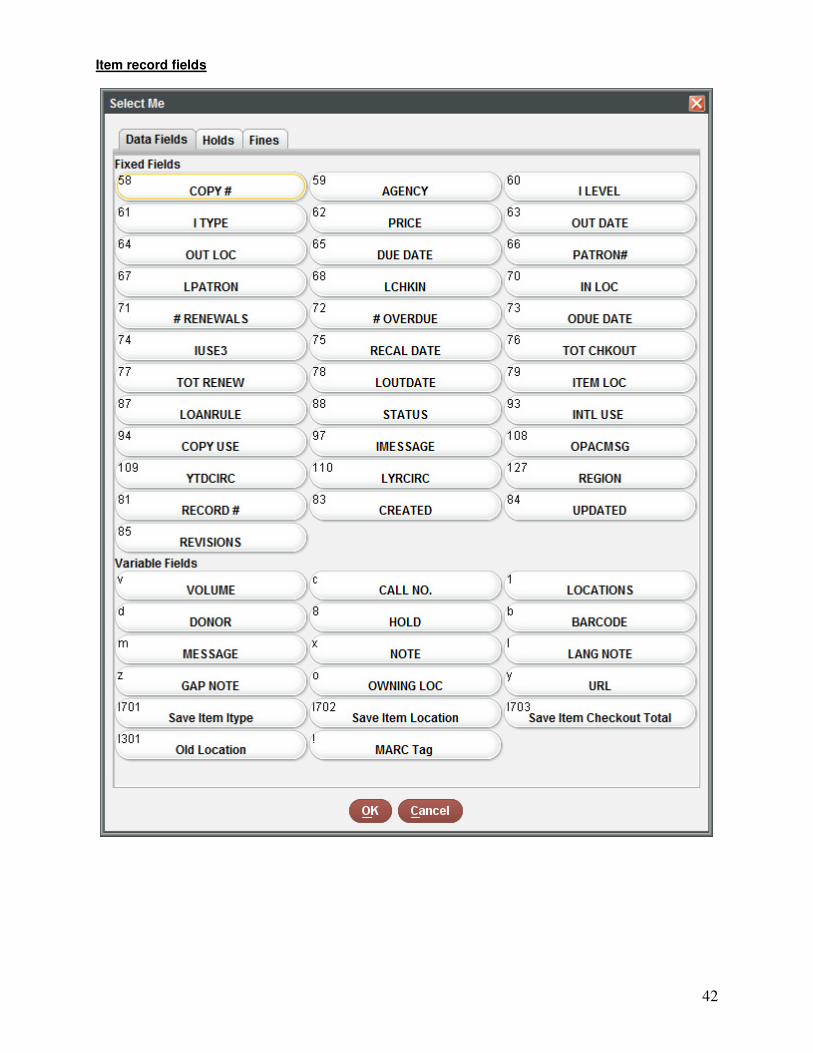
Item record fields
43
Item record HOLD fields
44
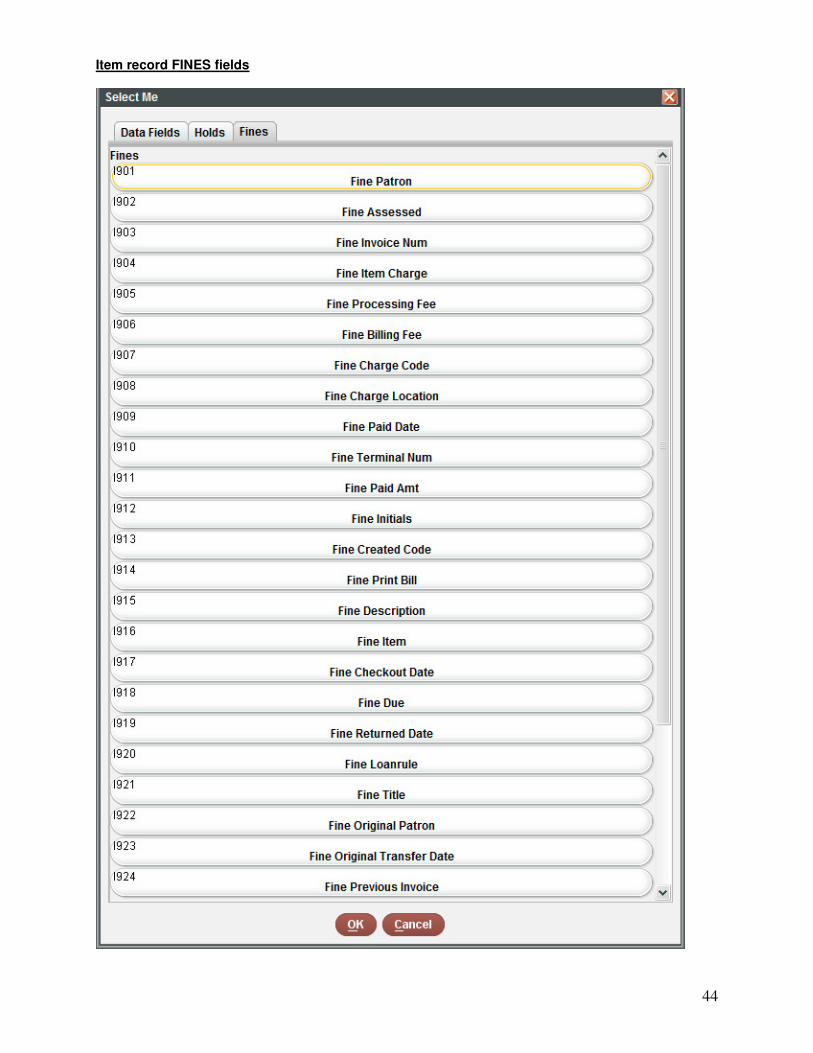
Item record FINES fields
45
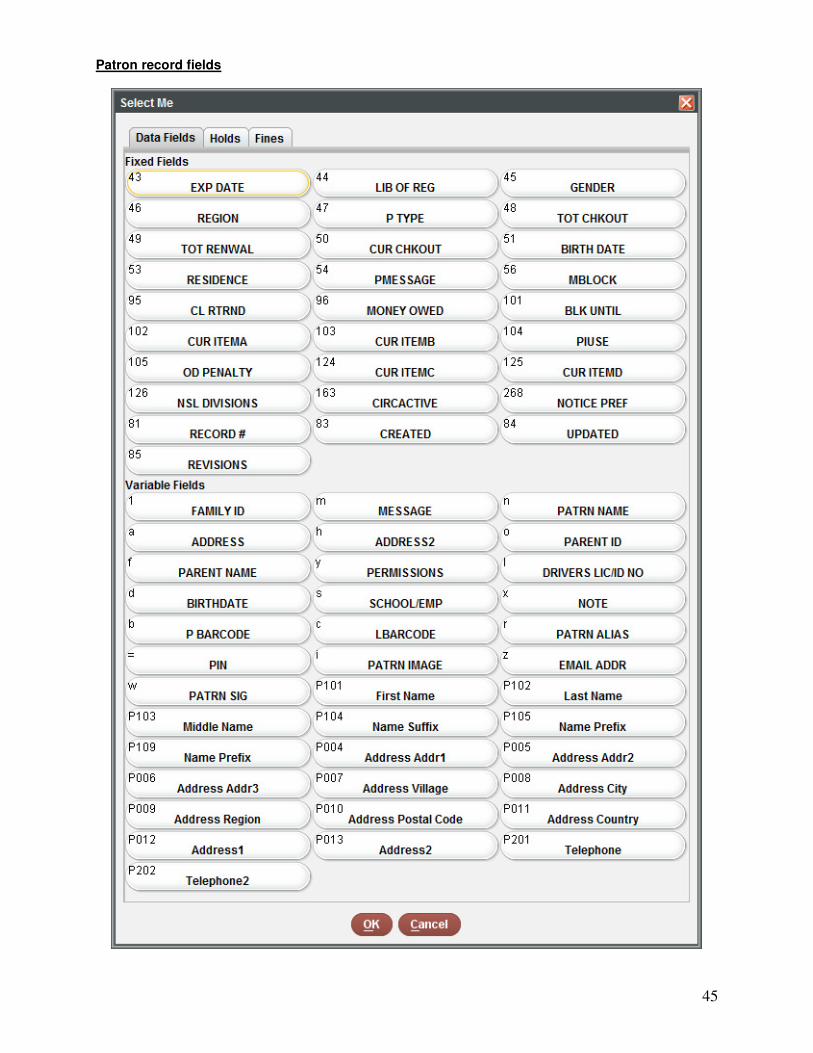
Patron record fields
46
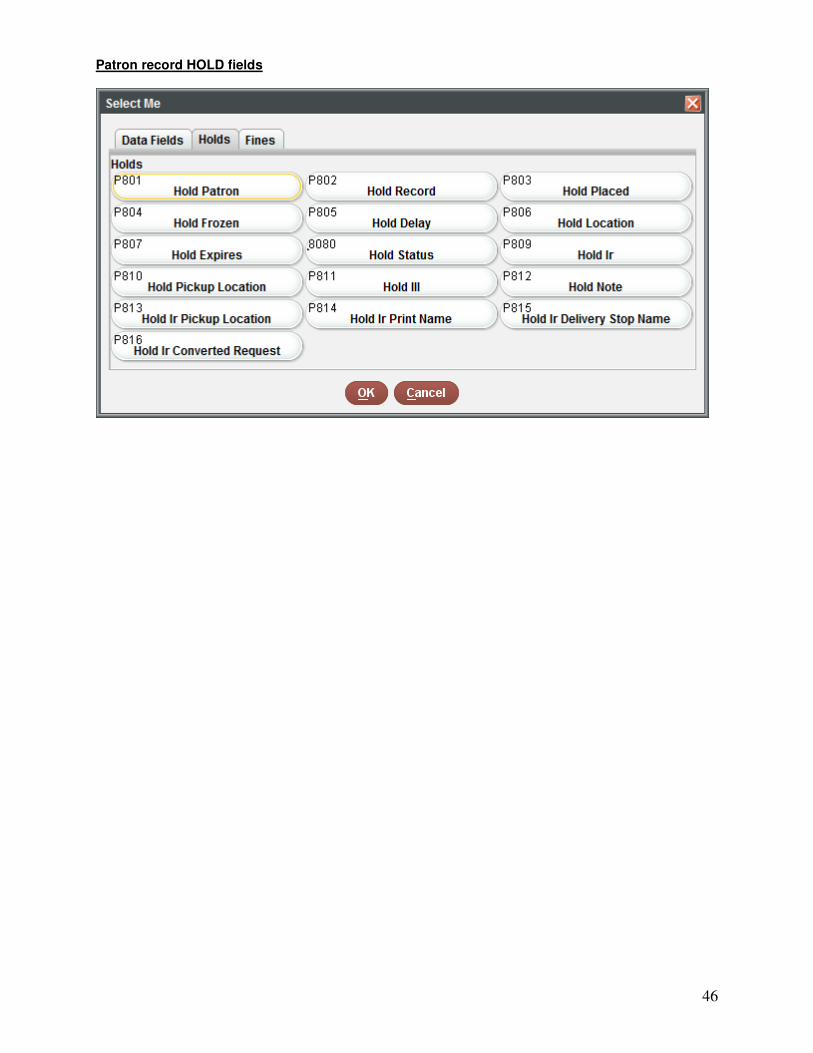
Patron record HOLD fields
47
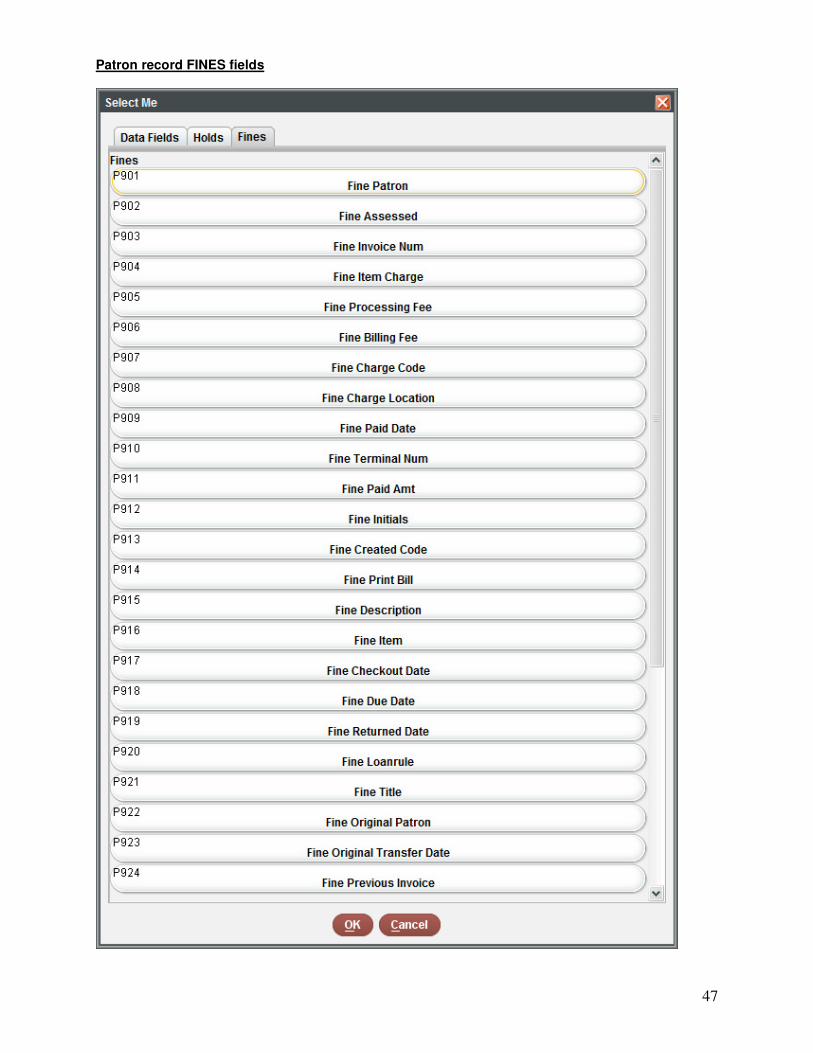
Patron record FINES fields
48
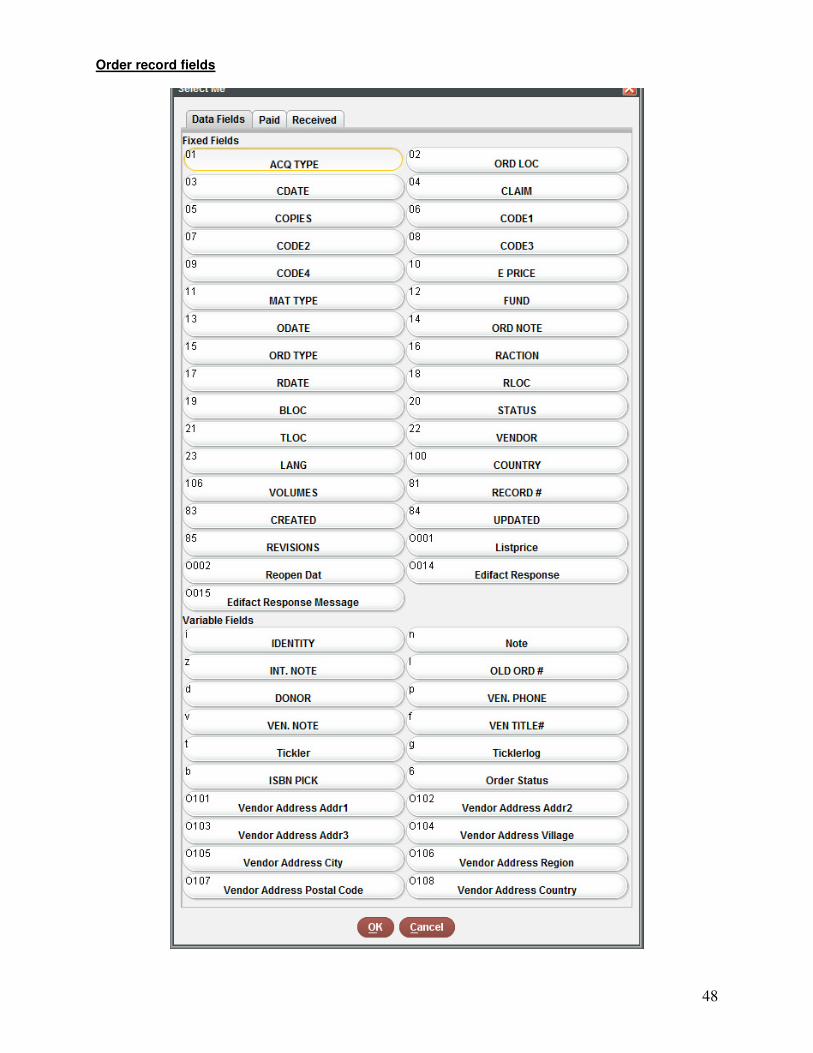
Order record fields
49
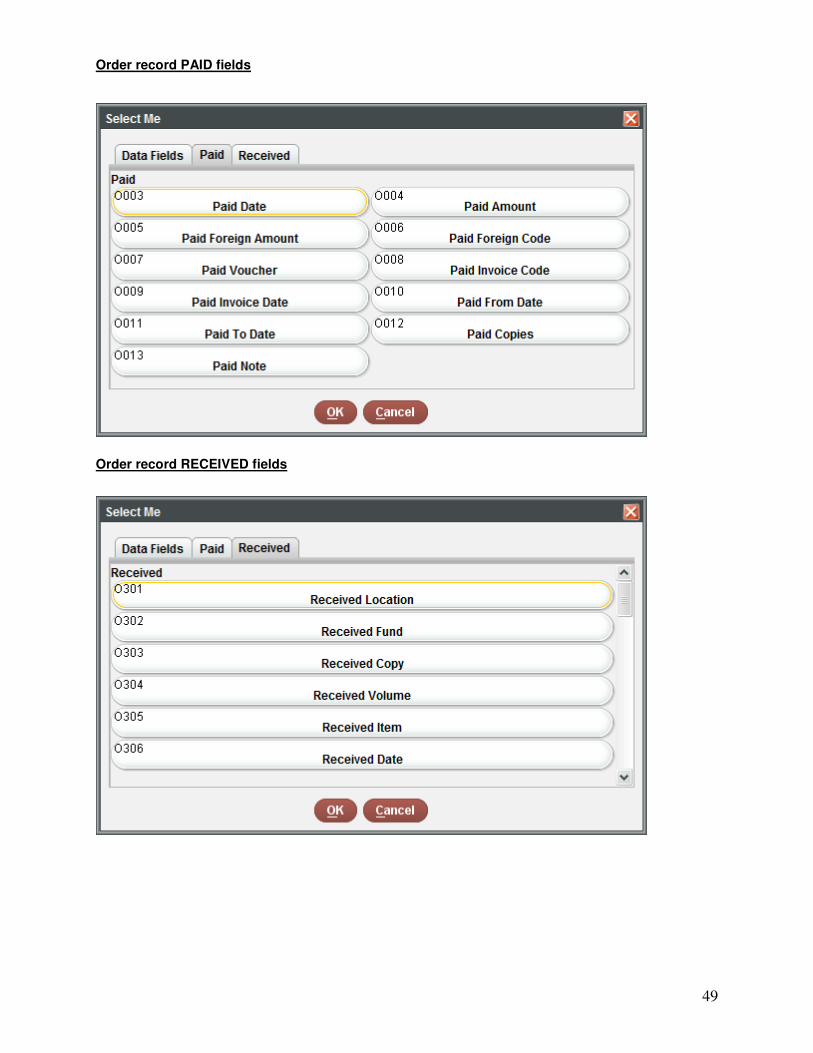
Order record PAID fields
Order record RECEIVED fields
50
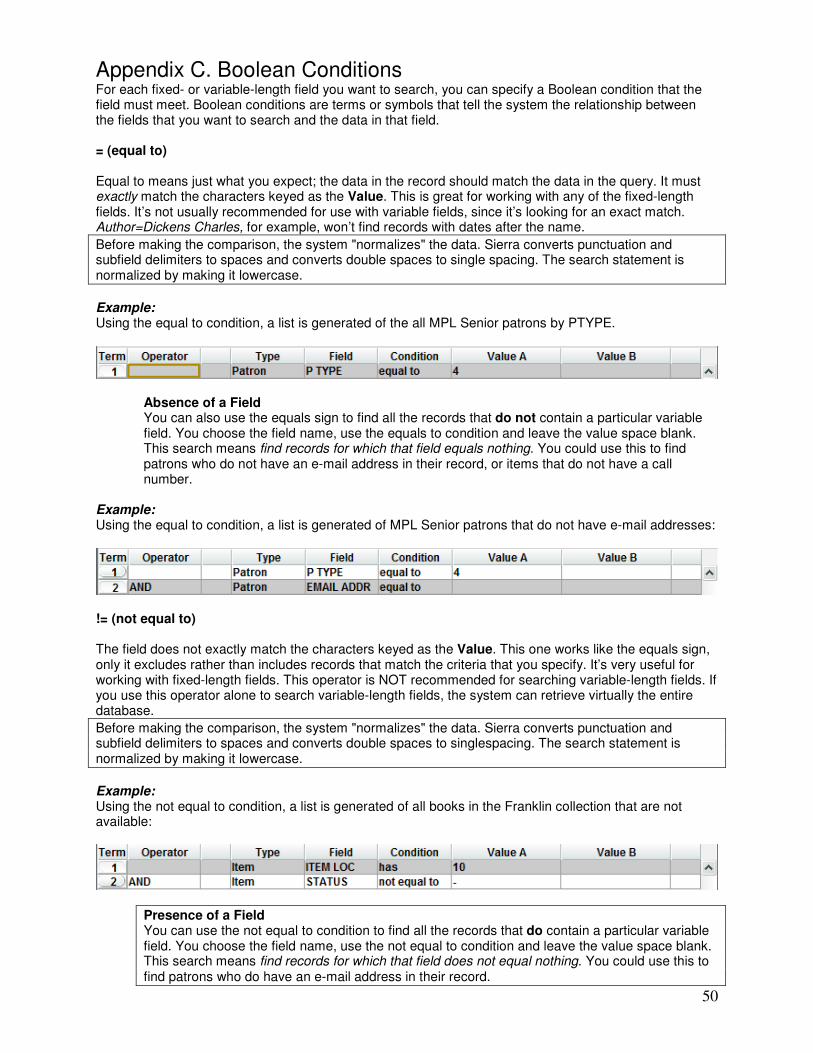
Appendix C. Boolean Conditions For each fixed- or variable-length field you want to search, you can specify a Boolean condition that the field must meet. Boolean conditions are terms or symbols that tell the system the relationship between the fields that you want to search and the data in that field. = (equal to) Equal to means just what you expect; the data in the record should match the data in the query. It must exactly match the characters keyed as the Value. This is great for working with any of the fixed-length fields. It’s not usually recommended for use with variable fields, since it’s looking for an exact match. Author=Dickens Charles, for example, won’t find records with dates after the name.
Before making the comparison, the system "normalizes" the data. Sierra converts punctuation and subfield delimiters to spaces and converts double spaces to single spacing. The search statement is normalized by making it lowercase.
Example: Using the equal to condition, a list is generated of the all MPL Senior patrons by PTYPE.
Absence of a Field You can also use the equals sign to find all the records that do not contain a particular variable field. You choose the field name, use the equals to condition and leave the value space blank. This search means find records for which that field equals nothing. You could use this to find patrons who do not have an e-mail address in their record, or items that do not have a call number.
Example: Using the equal to condition, a list is generated of MPL Senior patrons that do not have e-mail addresses:
!= (not equal to) The field does not exactly match the characters keyed as the Value. This one works like the equals sign, only it excludes rather than includes records that match the criteria that you specify. It’s very useful for working with fixed-length fields. This operator is NOT recommended for searching variable-length fields. If you use this operator alone to search variable-length fields, the system can retrieve virtually the entire database.
Before making the comparison, the system "normalizes" the data. Sierra converts punctuation and subfield delimiters to spaces and converts double spaces to singlespacing. The search statement is normalized by making it lowercase.
Example: Using the not equal to condition, a list is generated of all books in the Franklin collection that are not available:
Presence of a Field You can use the not equal to condition to find all the records that do contain a particular variable field. You choose the field name, use the not equal to condition and leave the value space blank. This search means find records for which that field does not equal nothing. You could use this to find patrons who do have an e-mail address in their record.
51
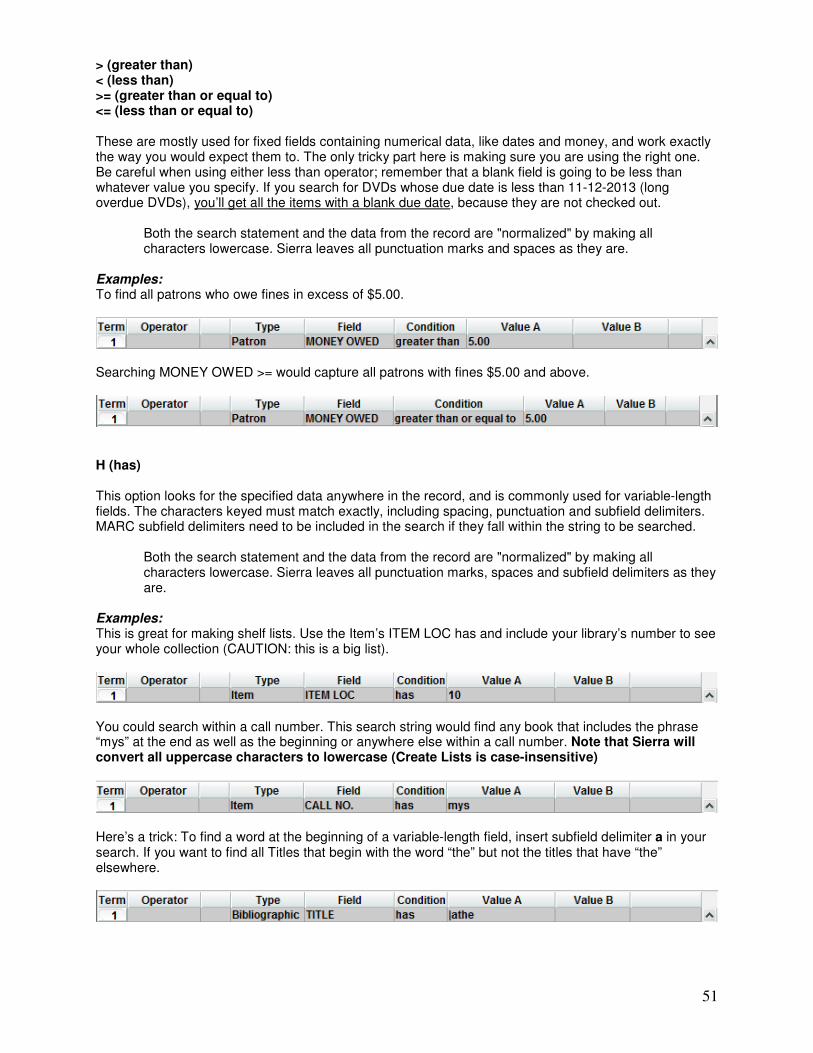
> (greater than) < (less than) >= (greater than or equal to) <= (less than or equal to) These are mostly used for fixed fields containing numerical data, like dates and money, and work exactly the way you would expect them to. The only tricky part here is making sure you are using the right one. Be careful when using either less than operator; remember that a blank field is going to be less than whatever value you specify. If you search for DVDs whose due date is less than 11-12-2013 (long overdue DVDs), you’ll get all the items with a blank due date, because they are not checked out.
Both the search statement and the data from the record are "normalized" by making all characters lowercase. Sierra leaves all punctuation marks and spaces as they are.
Examples: To find all patrons who owe fines in excess of $5.00.
Searching MONEY OWED >= would capture all patrons with fines $5.00 and above.
H (has) This option looks for the specified data anywhere in the record, and is commonly used for variable-length fields. The characters keyed must match exactly, including spacing, punctuation and subfield delimiters. MARC subfield delimiters need to be included in the search if they fall within the string to be searched.
Both the search statement and the data from the record are "normalized" by making all characters lowercase. Sierra leaves all punctuation marks, spaces and subfield delimiters as they are.
Examples: This is great for making shelf lists. Use the Item’s ITEM LOC has and include your library’s number to see your whole collection (CAUTION: this is a big list).
You could search within a call number. This search string would find any book that includes the phrase “mys” at the end as well as the beginning or anywhere else within a call number. Note that Sierra will convert all uppercase characters to lowercase (Create Lists is case-insensitive)
Here’s a trick: To find a word at the beginning of a variable-length field, insert subfield delimiter a in your search. If you want to find all Titles that begin with the word “the” but not the titles that have “the” elsewhere.
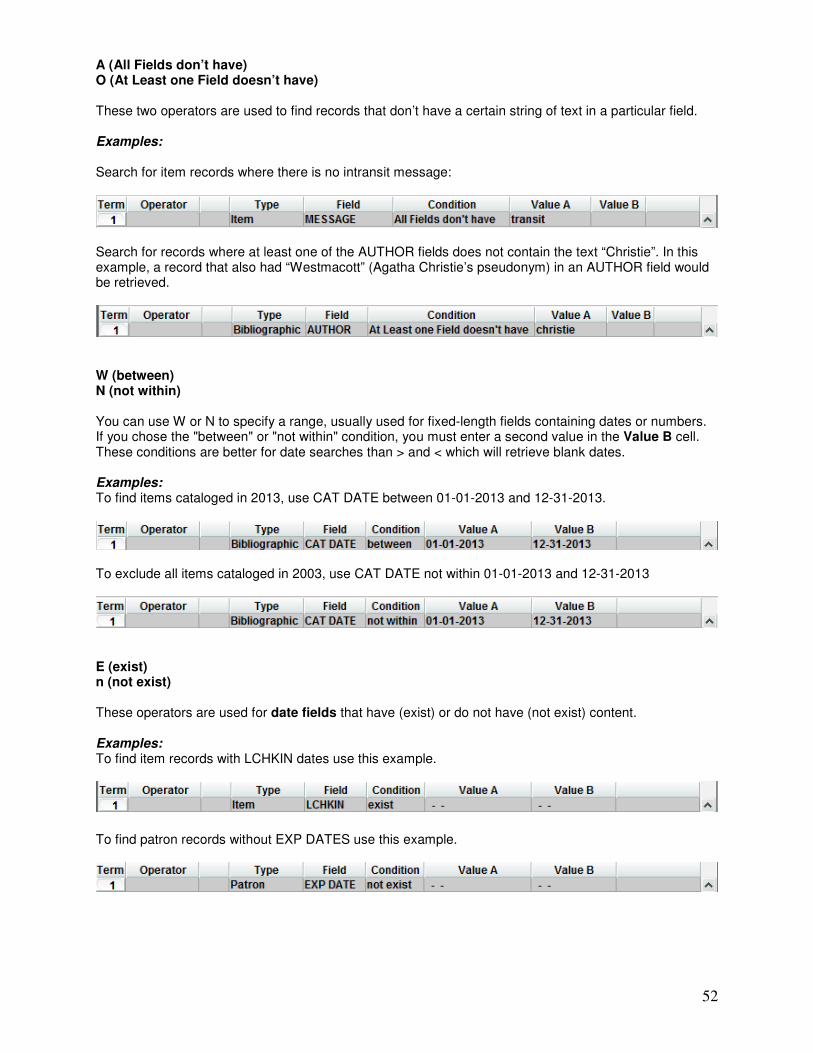
52
A (All Fields don’t have) O (At Least one Field doesn’t have) These two operators are used to find records that don’t have a certain string of text in a particular field. Examples: Search for item records where there is no intransit message:
Search for records where at least one of the AUTHOR fields does not contain the text “Christie”. In this example, a record that also had “Westmacott” (Agatha Christie’s pseudonym) in an AUTHOR field would be retrieved.
W (between) N (not within) You can use W or N to specify a range, usually used for fixed-length fields containing dates or numbers. If you chose the "between" or "not within" condition, you must enter a second value in the Value B cell. These conditions are better for date searches than > and < which will retrieve blank dates. Examples: To find items cataloged in 2013, use CAT DATE between 01-01-2013 and 12-31-2013.
To exclude all items cataloged in 2003, use CAT DATE not within 01-01-2013 and 12-31-2013
E (exist) n (not exist) These operators are used for date fields that have (exist) or do not have (not exist) content. Examples: To find item records with LCHKIN dates use this example.
To find patron records without EXP DATES use this example.
53
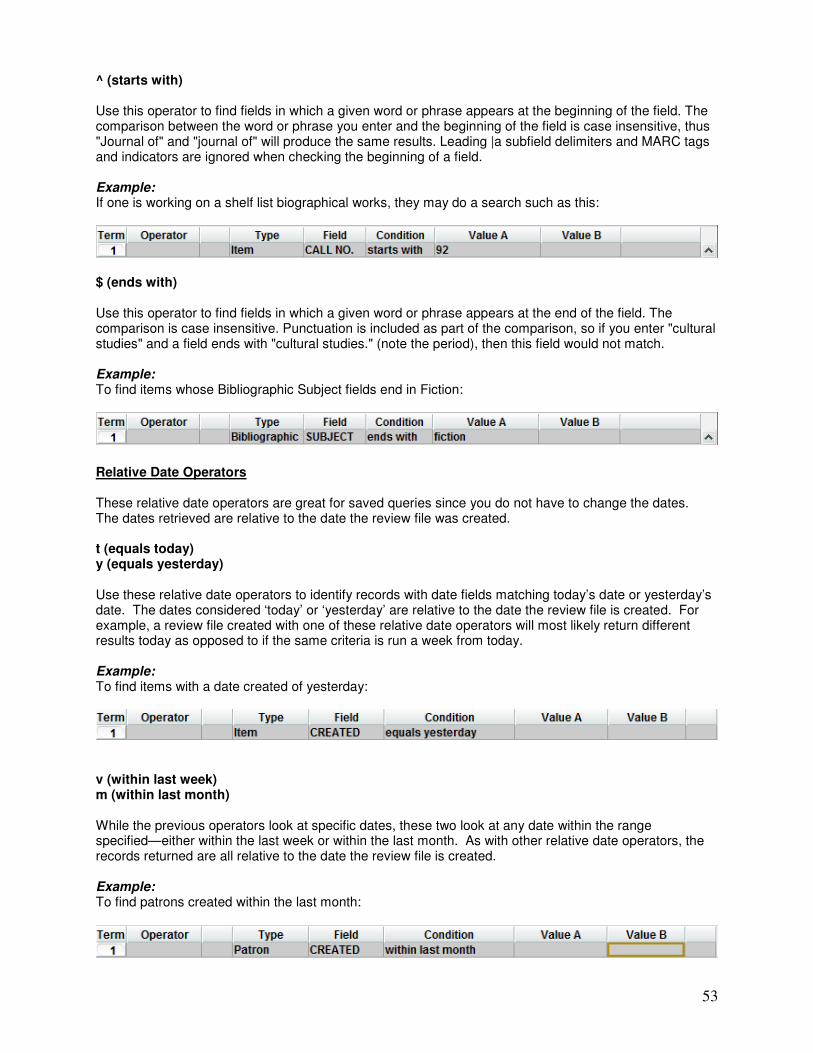
^ (starts with) Use this operator to find fields in which a given word or phrase appears at the beginning of the field. The comparison between the word or phrase you enter and the beginning of the field is case insensitive, thus "Journal of" and "journal of" will produce the same results. Leading |a subfield delimiters and MARC tags and indicators are ignored when checking the beginning of a field. Example: If one is working on a shelf list biographical works, they may do a search such as this:
$ (ends with) Use this operator to find fields in which a given word or phrase appears at the end of the field. The comparison is case insensitive. Punctuation is included as part of the comparison, so if you enter "cultural studies" and a field ends with "cultural studies." (note the period), then this field would not match. Example: To find items whose Bibliographic Subject fields end in Fiction:
Relative Date Operators These relative date operators are great for saved queries since you do not have to change the dates. The dates retrieved are relative to the date the review file was created. t (equals today) y (equals yesterday) Use these relative date operators to identify records with date fields matching today’s date or yesterday’s date. The dates considered ‘today’ or ‘yesterday’ are relative to the date the review file is created. For example, a review file created with one of these relative date operators will most likely return different results today as opposed to if the same criteria is run a week from today. Example: To find items with a date created of yesterday:
v (within last week) m (within last month) While the previous operators look at specific dates, these two look at any date within the range specified—either within the last week or within the last month. As with other relative date operators, the records returned are all relative to the date the review file is created. Example: To find patrons created within the last month:
54
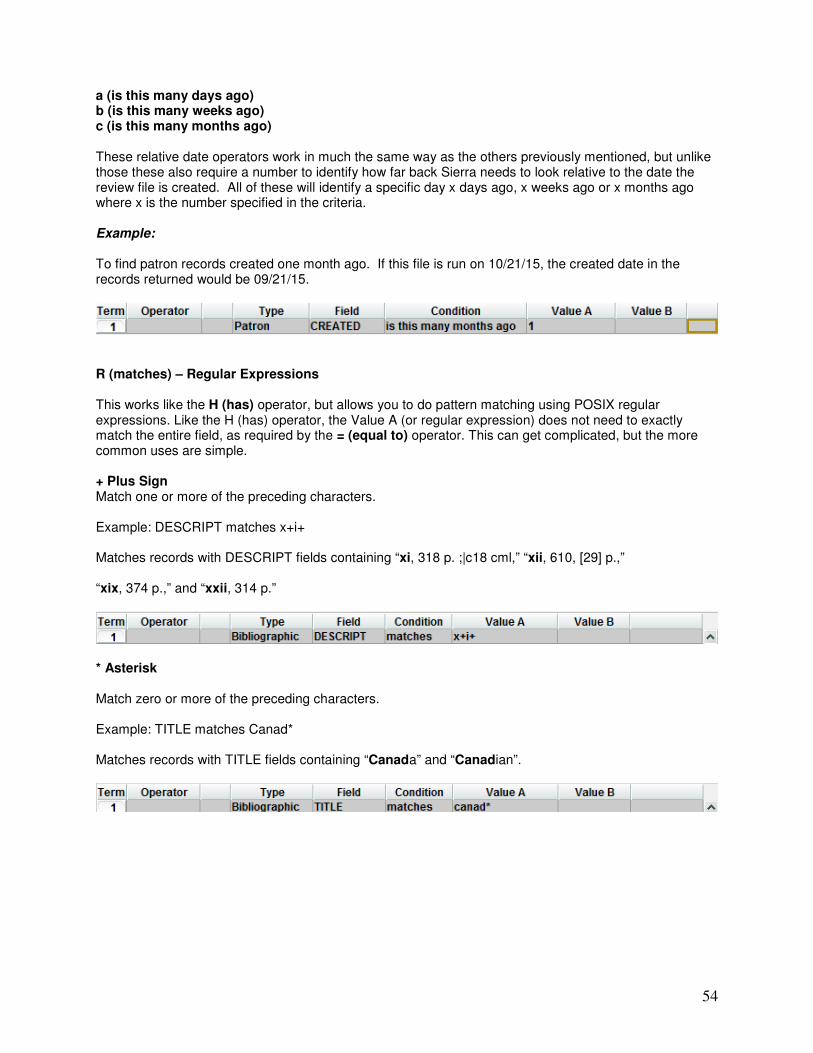
a (is this many days ago) b (is this many weeks ago) c (is this many months ago) These relative date operators work in much the same way as the others previously mentioned, but unlike those these also require a number to identify how far back Sierra needs to look relative to the date the review file is created. All of these will identify a specific day x days ago, x weeks ago or x months ago where x is the number specified in the criteria. Example: To find patron records created one month ago. If this file is run on 10/21/15, the created date in the records returned would be 09/21/15.
R (matches) – Regular Expressions This works like the H (has) operator, but allows you to do pattern matching using POSIX regular expressions. Like the H (has) operator, the Value A (or regular expression) does not need to exactly match the entire field, as required by the = (equal to) operator. This can get complicated, but the more common uses are simple. + Plus Sign Match one or more of the preceding characters. Example: DESCRIPT matches x+i+ Matches records with DESCRIPT fields containing “xi, 318 p. ;|c18 cml,” “xii, 610, [29] p.,” “xix, 374 p.,” and “xxii, 314 p.”
* Asterisk Match zero or more of the preceding characters. Example: TITLE matches Canad* Matches records with TITLE fields containing “Canada” and “Canadian”.