bloody -oscar macro
TRANSCRIPT
Bloody - Oscar Macro
With Oscar Macro Editing software, you may edit your own macros using combination of simple logic commands (such as “Loop”, “If”, “Equal to”,
“Interval Repeat”, “Jump”…etc.) or by using command combinations (like “Change the Time Delay between commands”, “Control cursor
absolute/relative positions”, “Mouse simulation”, “Keyboard simulation”, “Record the keyboard & mouse actions”…etc.). You may edit those repetitive
mouse and keyboard operations by using powerful macro commands, it reduces finger fatigue and substitutes complicate gaming actions by just a
simple click to execute macros.
There are 2 major macro applications:
1.General macros: You may edit and save macros, then assigned to Bloody “Button” on the main screen as shown.
2.Dedicated to “M-Macro”:In Headshot 5 firearm adjustment modes, the “M-Macro” is used to edit firearm adjustment and, by default, save to
mouse left button (details please see last 4 pages).
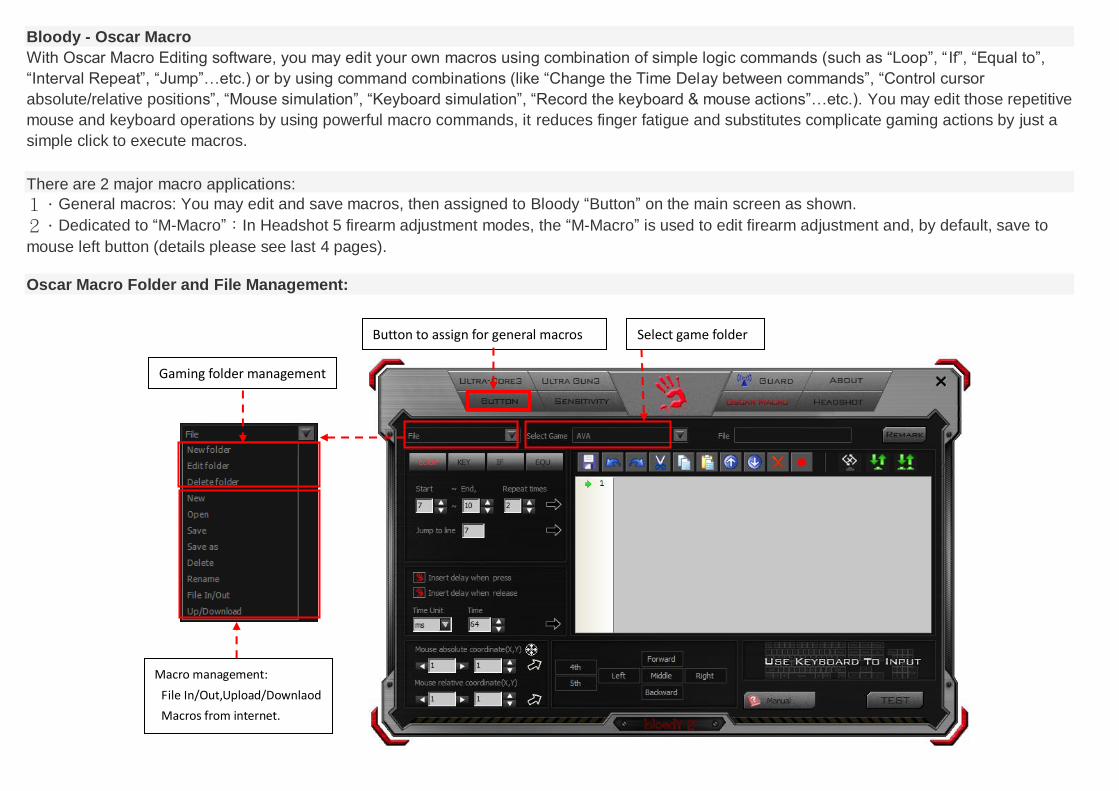
Oscar Macro Folder and File Management:
Button to assign for general macros
Macro management:
File In/Out,Upload/Downlaod
Macros from internet.
Gaming folder management
Select game folder
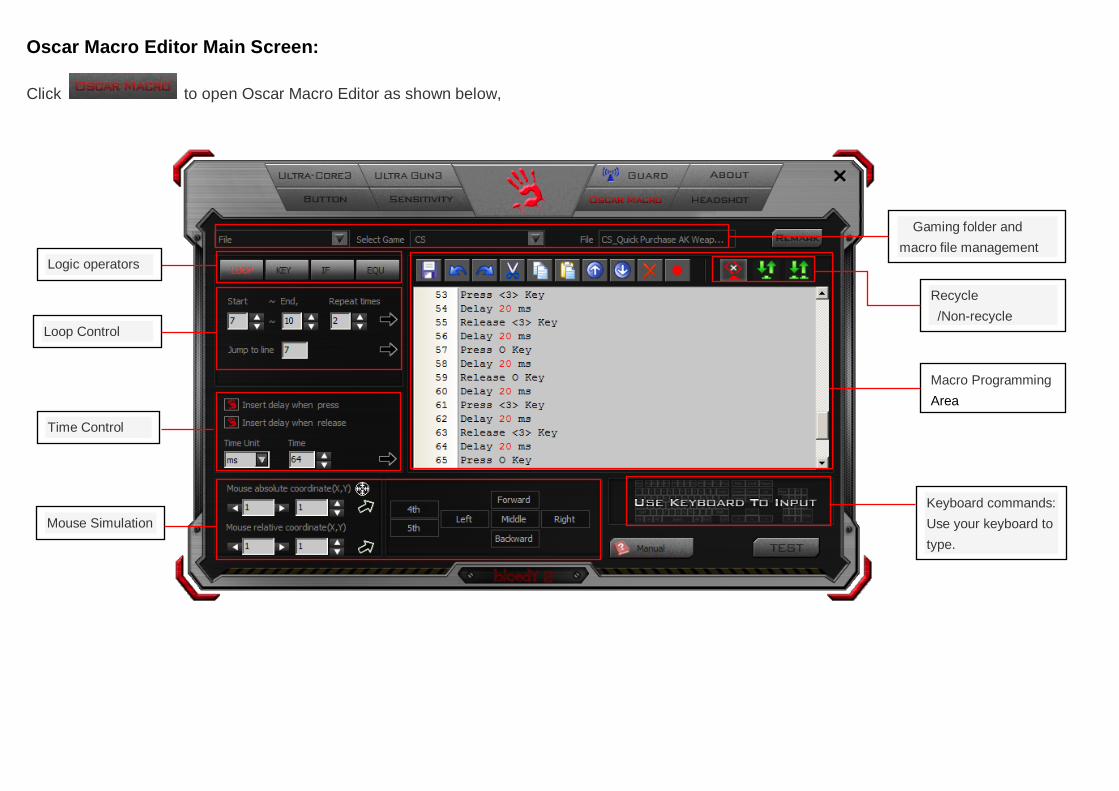
Oscar Macro Editor Main Screen:
Click to open Oscar Macro Editor as shown below,
Logic operators
Loop Control
Time Control
Mouse Simulation
Macro Programming
Area
Recycle
/Non-recycle
Keyboard commands:
Use your keyboard to
type.
Gaming folder and
macro file management
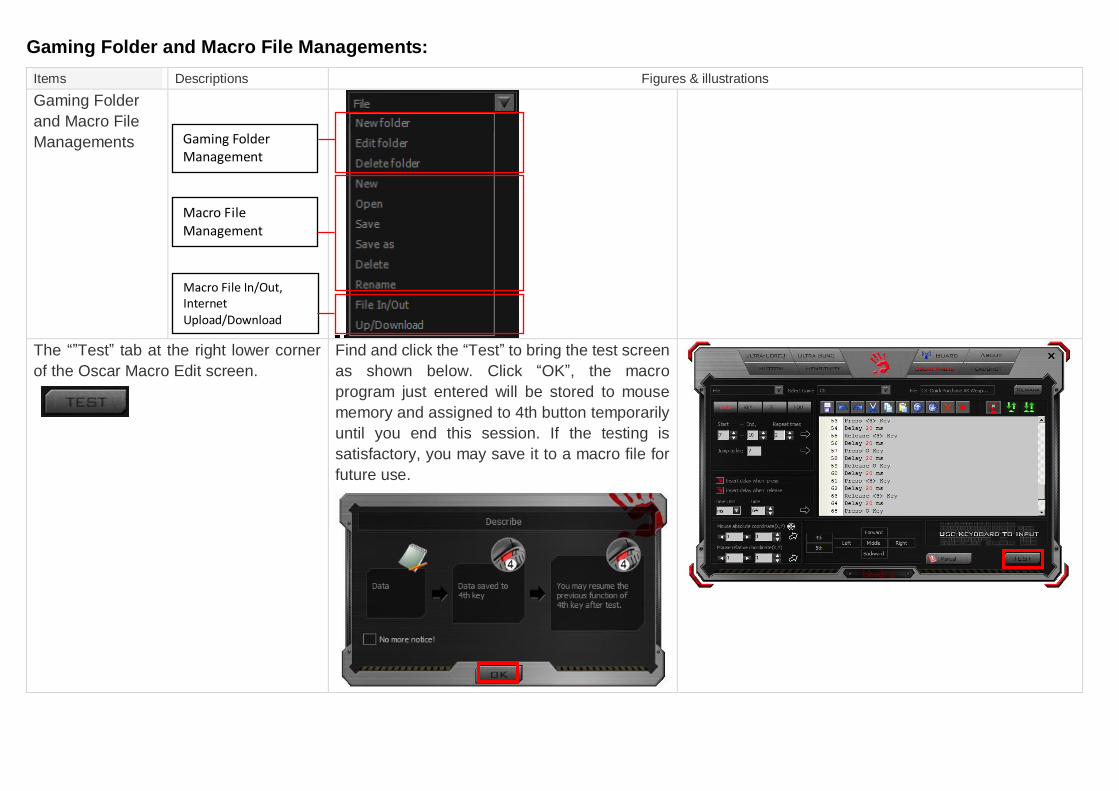
Gaming Folder and Macro File Managements:
Items Descriptions Figures & illustrations
Gaming Folder
and Macro File
Managements
The “”Test” tab at the right lower corner
of the Oscar Macro Edit screen.
Find and click the “Test” to bring the test screen
as shown below. Click “OK”, the macro
program just entered will be stored to mouse
memory and assigned to 4th button temporarily
until you end this session. If the testing is
satisfactory, you may save it to a macro file for
future use.
Gaming Folder Management
Macro File Management
Macro File In/Out, Internet Upload/Download
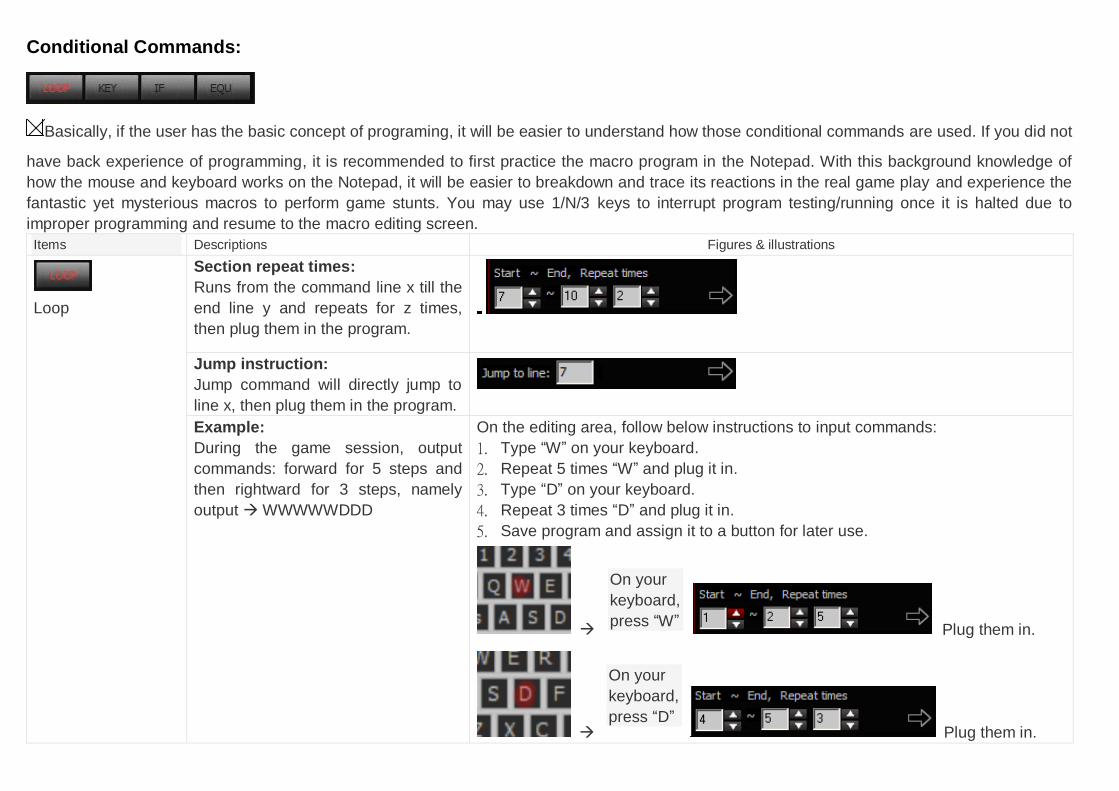
Conditional Commands:
Basically, if the user has the basic concept of programing, it will be easier to understand how those conditional commands are used. If you did not
have back experience of programming, it is recommended to first practice the macro program in the Notepad. With this background knowledge of
how the mouse and keyboard works on the Notepad, it will be easier to breakdown and trace its reactions in the real game play and experience the
fantastic yet mysterious macros to perform game stunts. You may use 1/N/3 keys to interrupt program testing/running once it is halted due to
improper programming and resume to the macro editing screen.
Items Descriptions Figures & illustrations
Loop
Section repeat times:
Runs from the command line x till the
end line y and repeats for z times,
then plug them in the program.
Jump instruction:
Jump command will directly jump to
line x, then plug them in the program.
Example:
During the game session, output
commands: forward for 5 steps and
then rightward for 3 steps, namely
output WWWWWDDD
On the editing area, follow below instructions to input commands:
1. Type “W” on your keyboard.
2. Repeat 5 times “W” and plug it in.
3. Type “D” on your keyboard.
4. Repeat 3 times “D” and plug it in.
5. Save program and assign it to a button for later use.
Plug them in.
Plug them in.
On your
keyboard,
press “W”
On your
keyboard,
press “D”
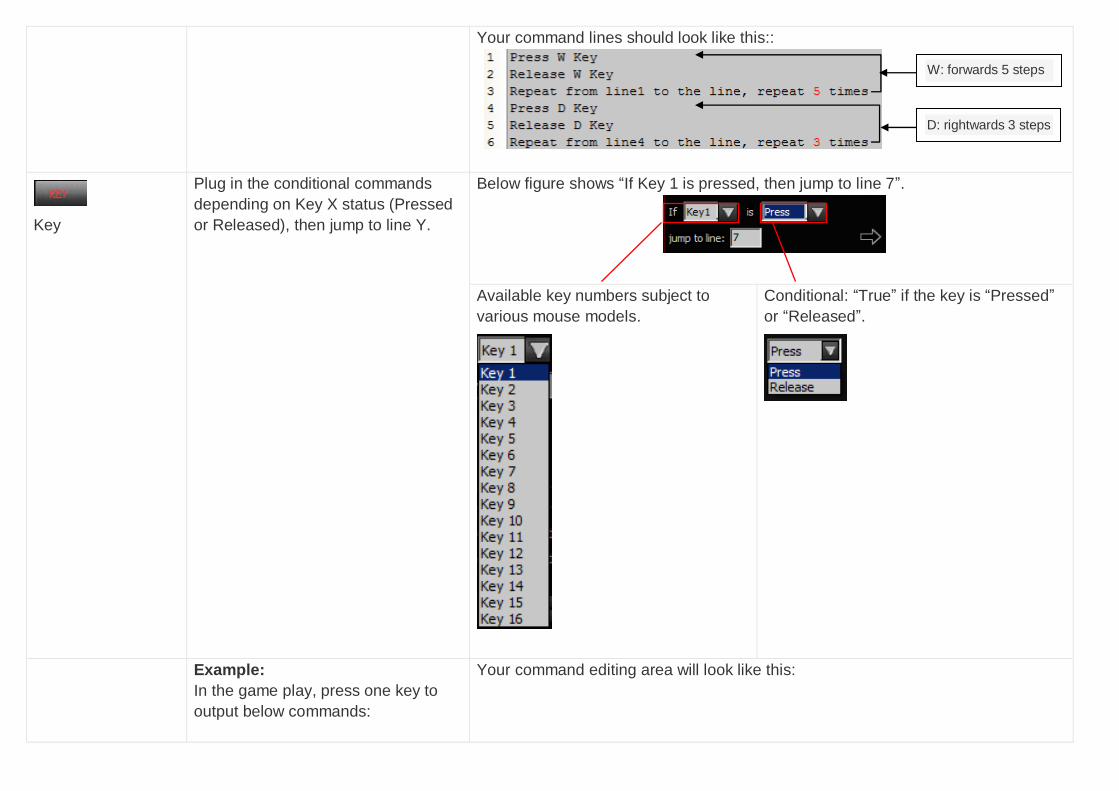
Your command lines should look like this::
Key
Plug in the conditional commands
depending on Key X status (Pressed
or Released), then jump to line Y.
Below figure shows “If Key 1 is pressed, then jump to line 7”.
Available key numbers subject to
various mouse models.
Conditional: “True” if the key is “Pressed”
or “Released”.
Example:
In the game play, press one key to
output below commands:
Your command editing area will look like this:
D: rightwards 3 steps
W: forwards 5 steps
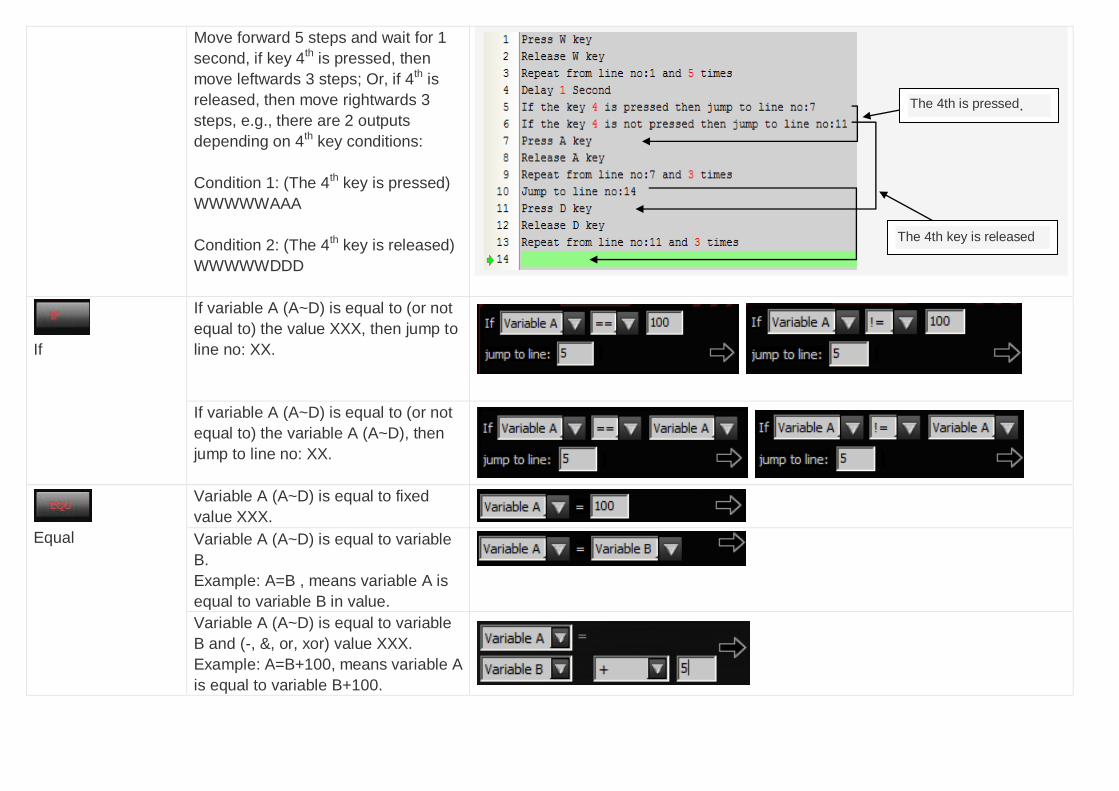
Move forward 5 steps and wait for 1
second, if key 4th is pressed, then
move leftwards 3 steps; Or, if 4th is
released, then move rightwards 3
steps, e.g., there are 2 outputs
depending on 4th key conditions:
Condition 1: (The 4th key is pressed)
WWWWWAAA
Condition 2: (The 4th key is released)
WWWWWDDD
If
If variable A (A~D) is equal to (or not
equal to) the value XXX, then jump to
line no: XX.
If variable A (A~D) is equal to (or not
equal to) the variable A (A~D), then
jump to line no: XX.
Equal
Variable A (A~D) is equal to fixed
value XXX.
Variable A (A~D) is equal to variable
B.
Example: A=B , means variable A is
equal to variable B in value.
Variable A (A~D) is equal to variable
B and (-, &, or, xor) value XXX.
Example: A=B+100, means variable A
is equal to variable B+100.
The 4th is pressed.
The 4th key is released
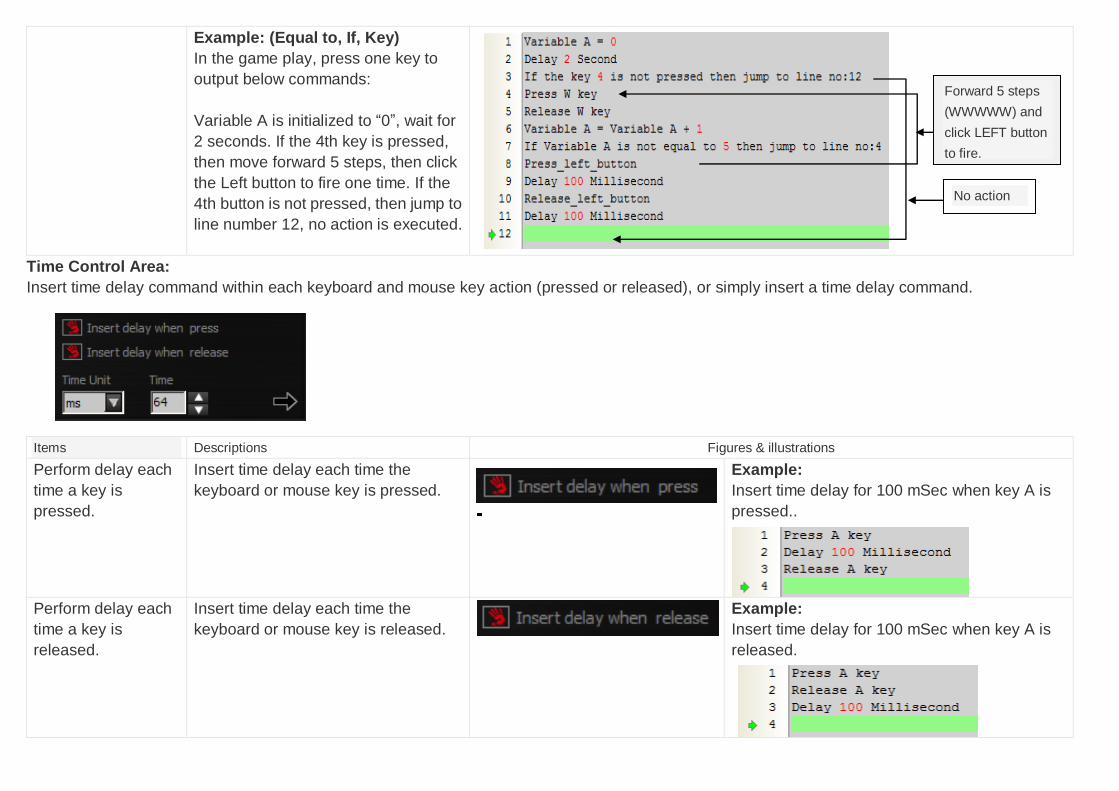
Example: (Equal to, If, Key)
In the game play, press one key to
output below commands:
Variable A is initialized to “0”, wait for
2 seconds. If the 4th key is pressed,
then move forward 5 steps, then click
the Left button to fire one time. If the
4th button is not pressed, then jump to
line number 12, no action is executed.
Time Control Area:
Insert time delay command within each keyboard and mouse key action (pressed or released), or simply insert a time delay command.
Items Descriptions Figures & illustrations
Perform delay each
time a key is
pressed.
Insert time delay each time the
keyboard or mouse key is pressed.
Example:
Insert time delay for 100 mSec when key A is
pressed..
Perform delay each
time a key is
released.
Insert time delay each time the
keyboard or mouse key is released.
Example:
Insert time delay for 100 mSec when key A is
released.
No action
Forward 5 steps
(WWWWW) and
click LEFT button
to fire.
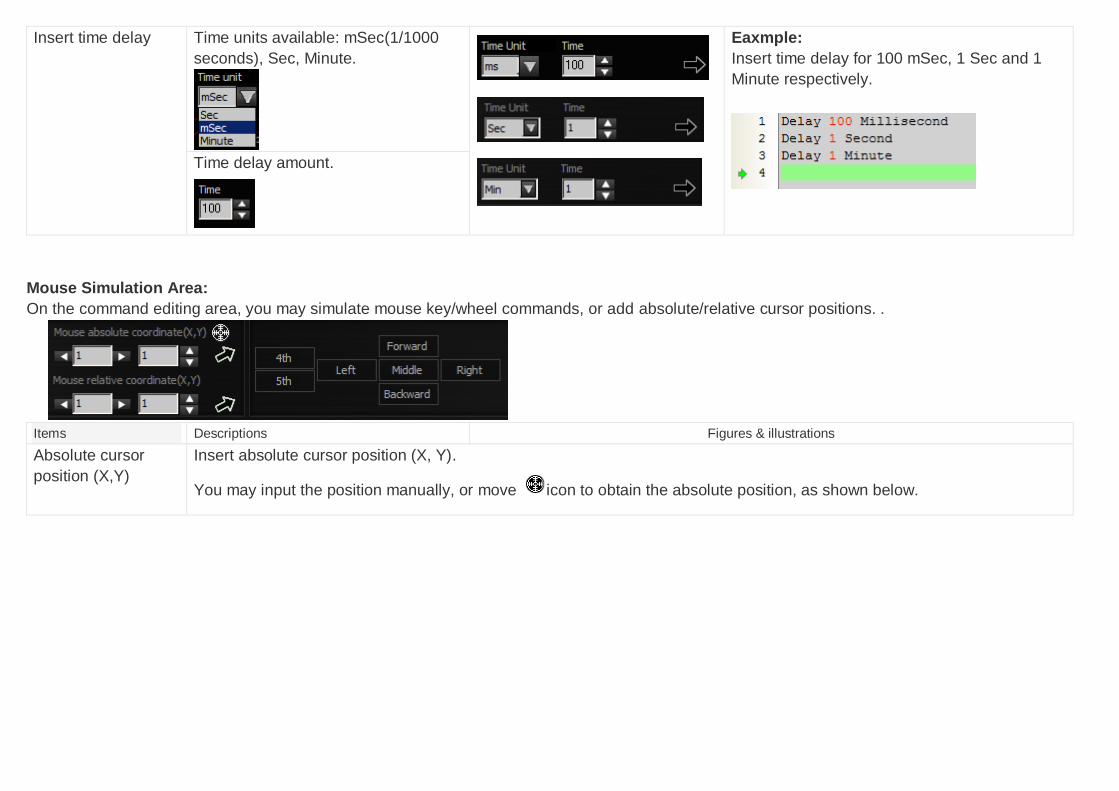
Insert time delay Time units available: mSec(1/1000
seconds), Sec, Minute.
Eaxmple:
Insert time delay for 100 mSec, 1 Sec and 1
Minute respectively.
Time delay amount.
Mouse Simulation Area:
On the command editing area, you may simulate mouse key/wheel commands, or add absolute/relative cursor positions. .
Items Descriptions Figures & illustrations
Absolute cursor
position (X,Y)
Insert absolute cursor position (X, Y).
You may input the position manually, or move icon to obtain the absolute position, as shown below.
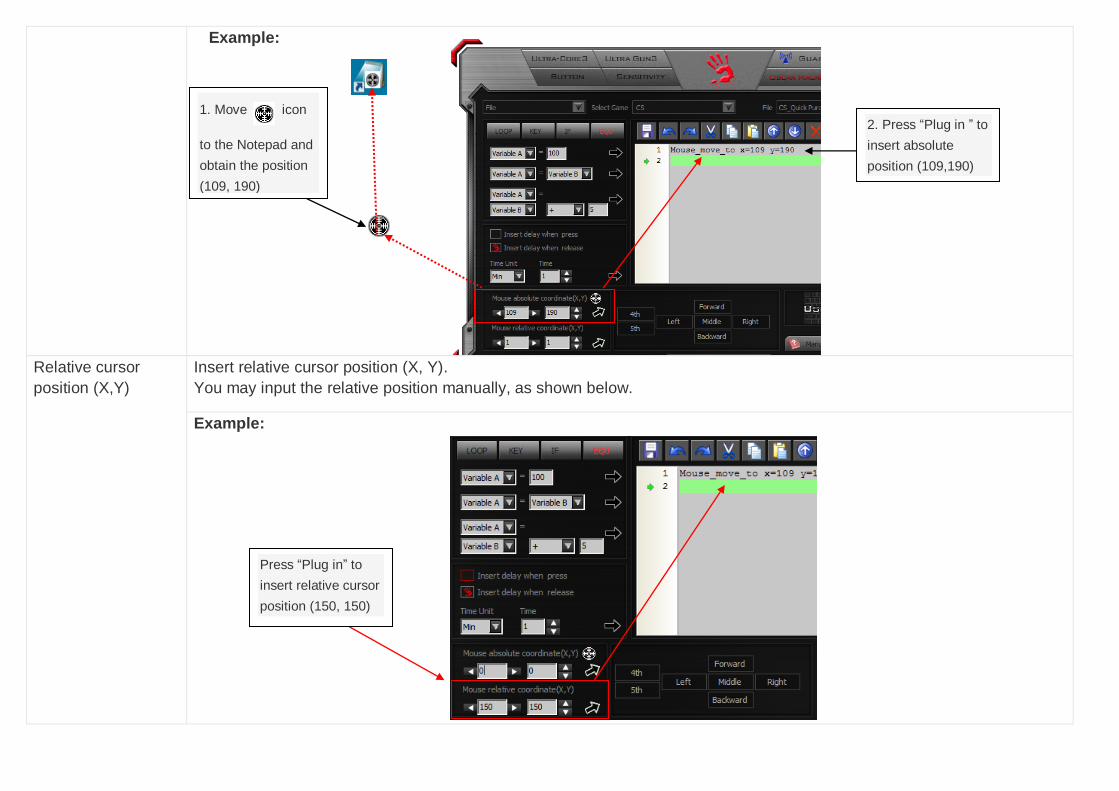
Example:
Relative cursor
position (X,Y)
Insert relative cursor position (X, Y).
You may input the relative position manually, as shown below.
Example:
2. Press “Plug in ” to
insert absolute
position (109,190)
Press “Plug in” to
insert relative cursor
position (150, 150)
1. Move icon
to the Notepad and
obtain the position
(109, 190)
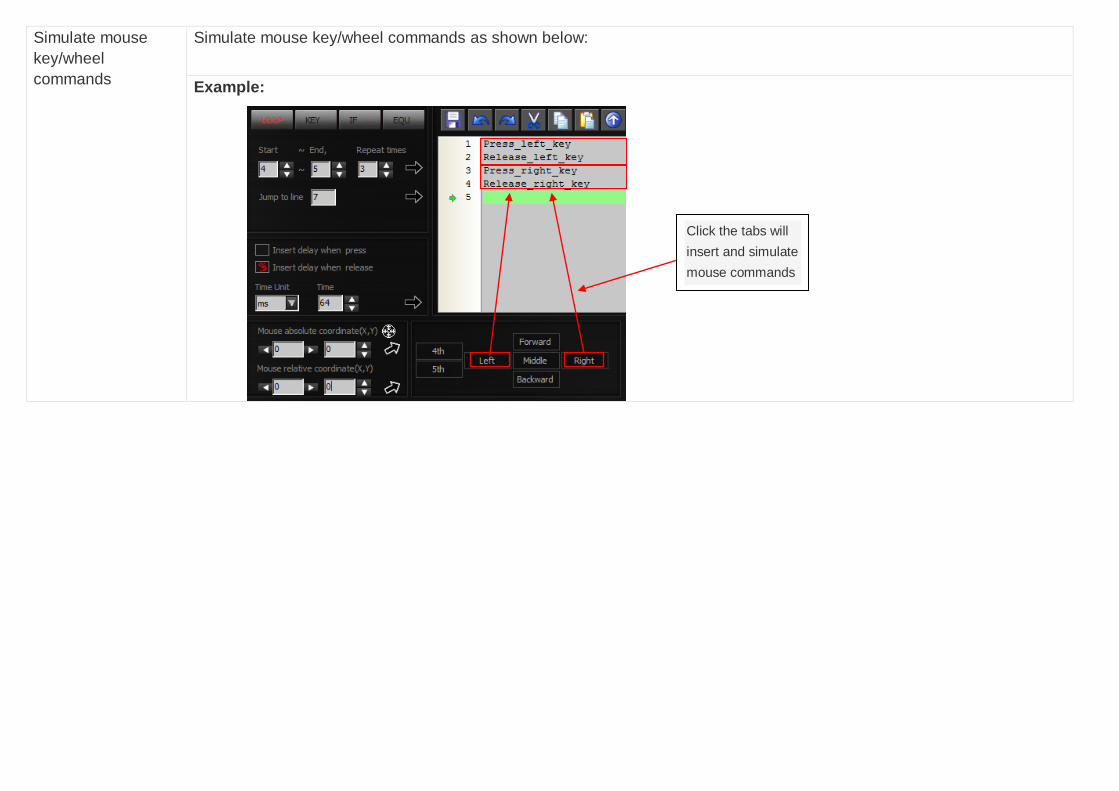
Simulate mouse
key/wheel
commands
Simulate mouse key/wheel commands as shown below:
Example:
Click the tabs will
insert and simulate
mouse commands
Keyboard Command Area:
Items Descriptions Figures & illustrations
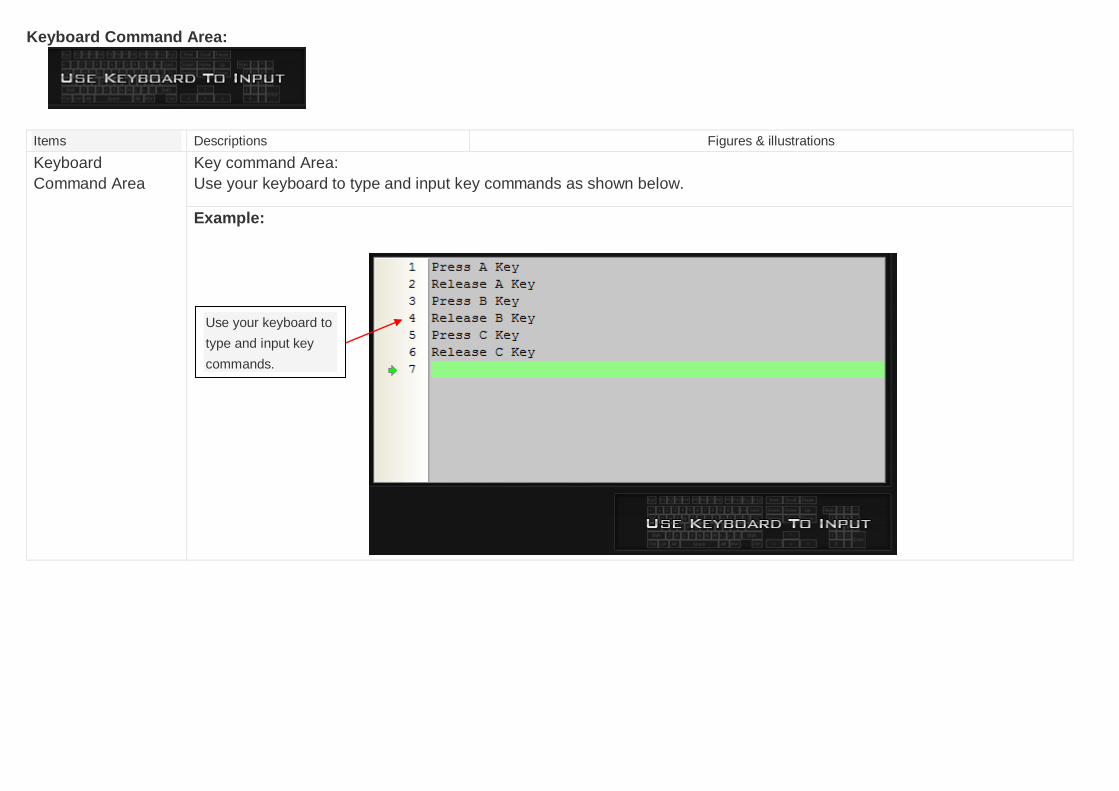
Keyboard
Command Area
Key command Area:
Use your keyboard to type and input key commands as shown below.
Example:
Use your keyboard to
type and input key
commands.
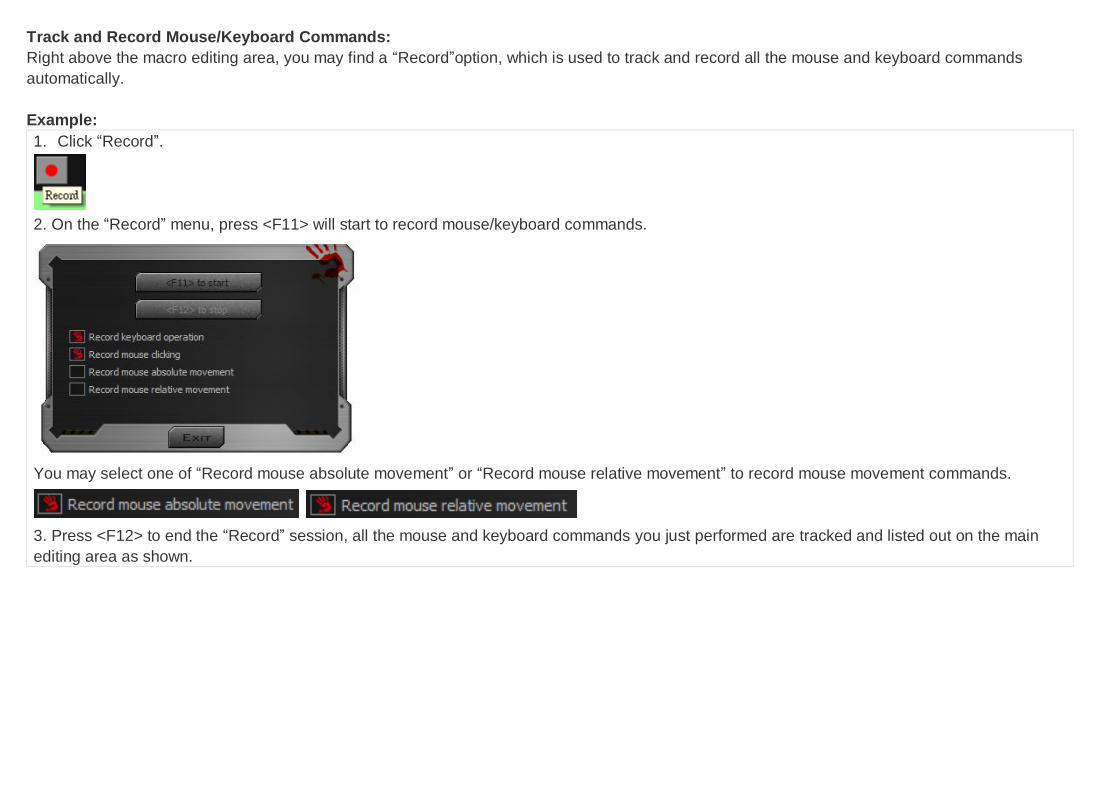
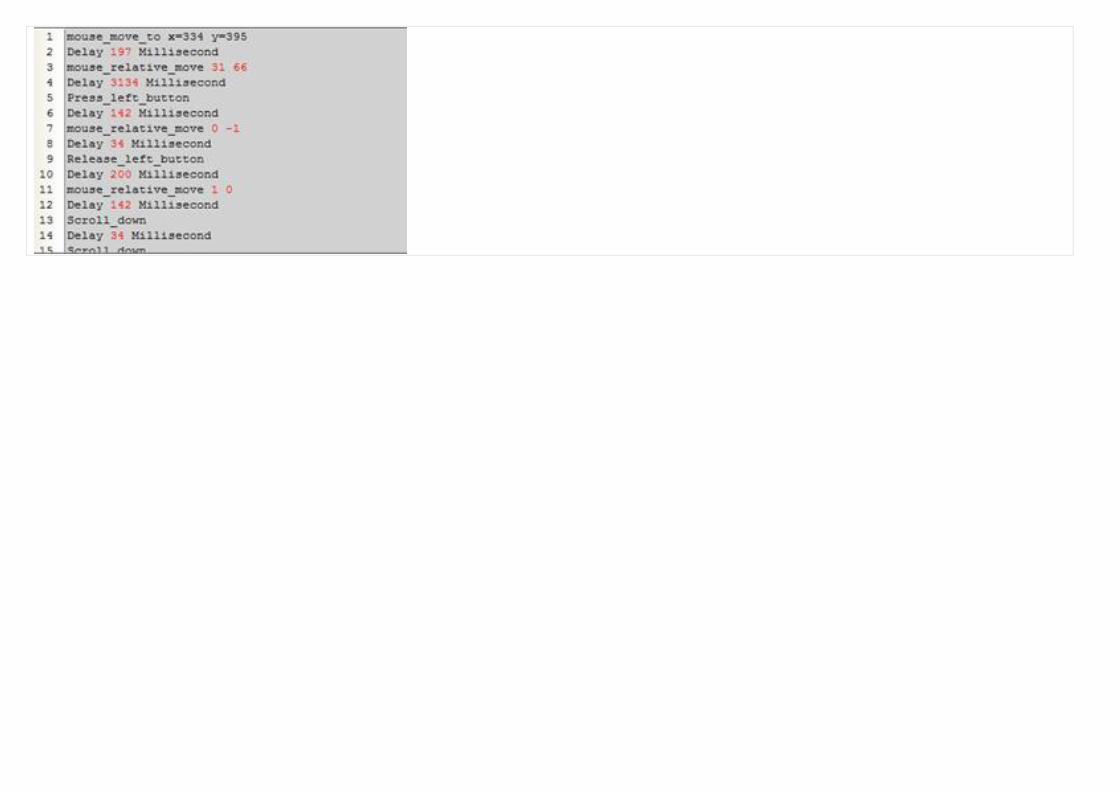
Track and Record Mouse/Keyboard Commands:
Right above the macro editing area, you may find a “Record”option, which is used to track and record all the mouse and keyboard commands
automatically.
Example:
1. Click “Record”.
2. On the “Record” menu, press <F11> will start to record mouse/keyboard commands.
You may select one of “Record mouse absolute movement” or “Record mouse relative movement” to record mouse movement commands.
3. Press <F12> to end the “Record” session, all the mouse and keyboard commands you just performed are tracked and listed out on the main
editing area as shown.

Recycle / Non-recycle Loops:
You may find the ready-made “Loop Types” above the main editing area, including “Play Macro Once Only” and “Play Macro Repeatedly”.
Also there are 2 options for the “Play Macro Repeatedly” including “Press to start. Release to stop” and “Press to start. Re-press to stop” as shown
below,
Play Macro Once Only
Play Macro Repeatedly Press to start. Release to stop”
Press to start. Re-press to stop
Items Descriptions Figures & illustrations
Non-repeat play Each time the left button is pressed, the
macro will be executed one time without
repeat.
Example:
The below program is edited and
saved to mouse 4th button
Press mouse 4th button and release it, it will
output ”AB”.
Play Macro
Repeatedly
In the game play, to perform repetitive actions, you may use below 2 loop types:
Loop type 1:
“Press to start. Release to stop”
Example:
The below program is edited and
saved to mouse 4th button
Press mouse 4th button, it will output ”
ABABABAB…” repeatedly until the mouse
4th button is released.
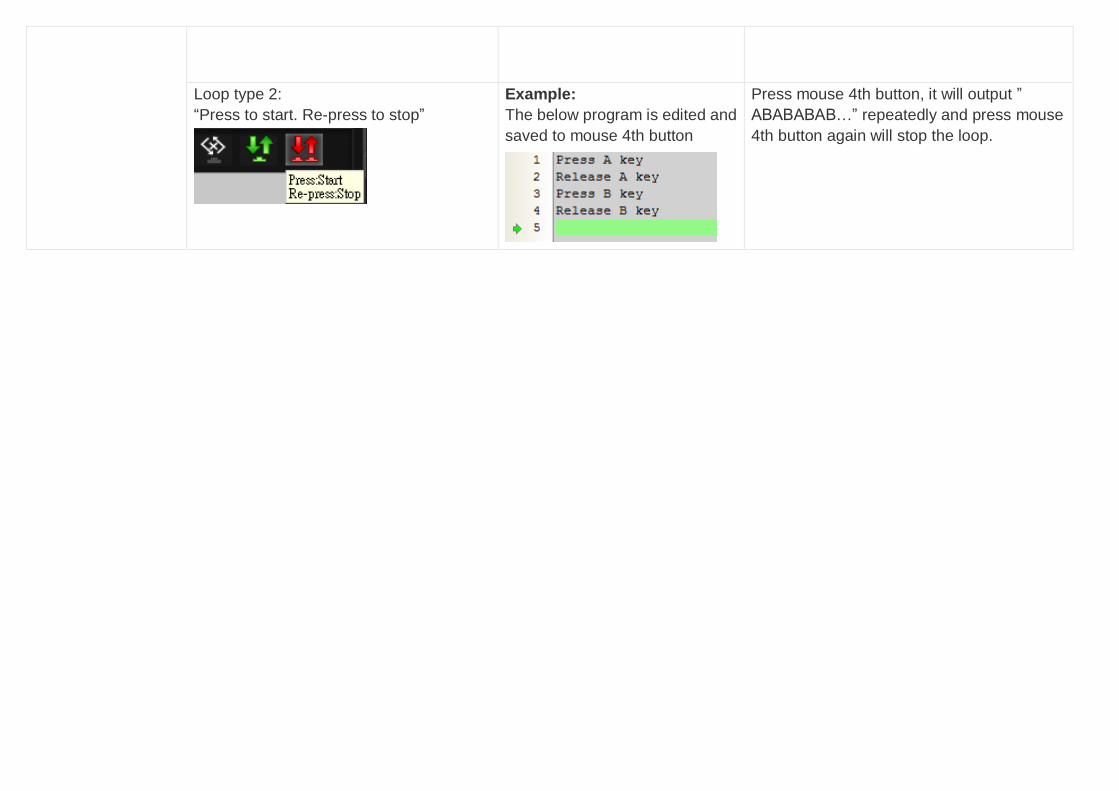
Loop type 2:
“Press to start. Re-press to stop”
Example:
The below program is edited and
saved to mouse 4th button
Press mouse 4th button, it will output ”
ABABABAB…” repeatedly and press mouse
4th button again will stop the loop.
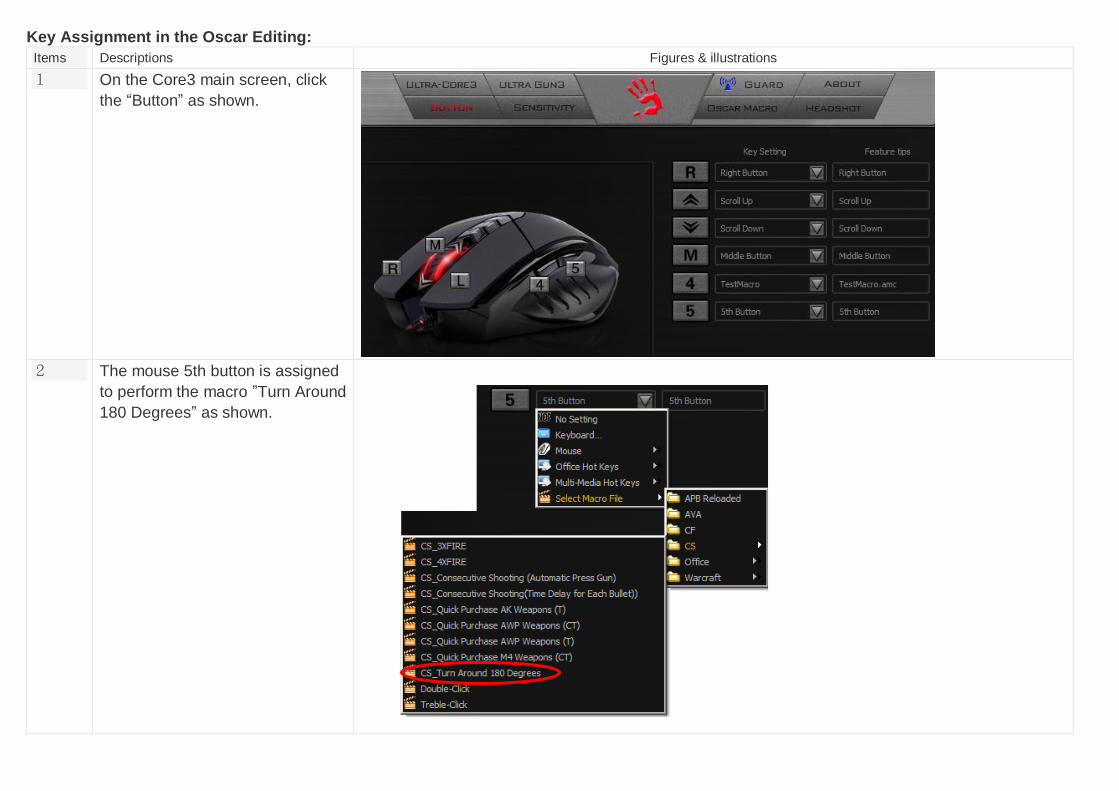
Key Assignment in the Oscar Editing:
Items Descriptions Figures & illustrations
1 On the Core3 main screen, click
the “Button” as shown.
2 The mouse 5th button is assigned
to perform the macro ”Turn Around
180 Degrees” as shown.
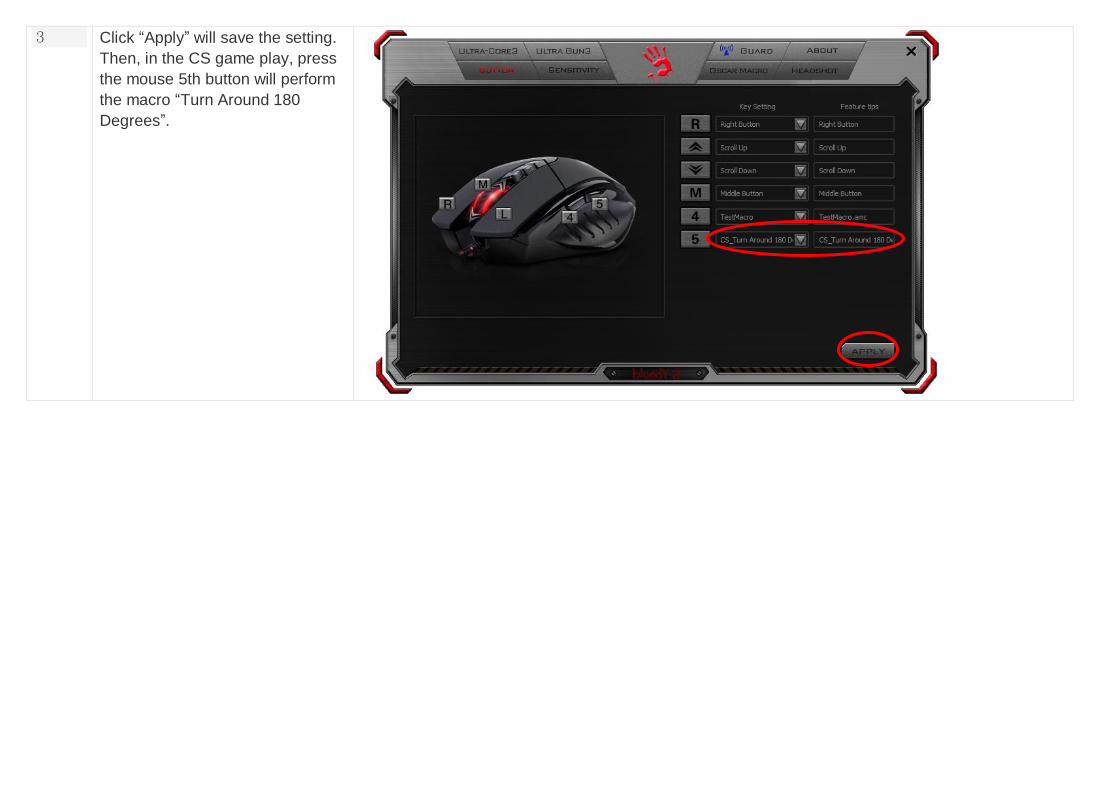
3 Click “Apply” will save the setting.
Then, in the CS game play, press
the mouse 5th button will perform
the macro “Turn Around 180
Degrees”.
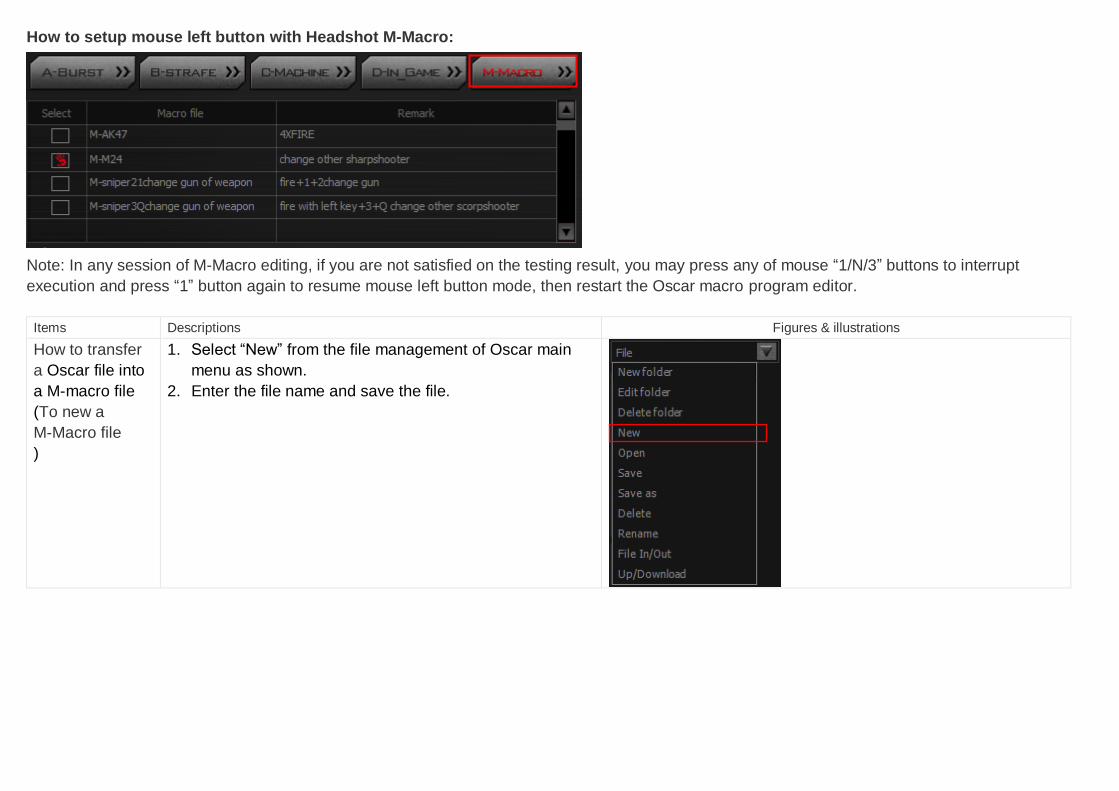
How to setup mouse left button with Headshot M-Macro:
Note: In any session of M-Macro editing, if you are not satisfied on the testing result, you may press any of mouse “1/N/3” buttons to interrupt
execution and press “1” button again to resume mouse left button mode, then restart the Oscar macro program editor.
Items Descriptions Figures & illustrations
How to transfer
a Oscar file into
a M-macro file
(To new a
M-Macro file
)
1. Select “New” from the file management of Oscar main
menu as shown.
2. Enter the file name and save the file.
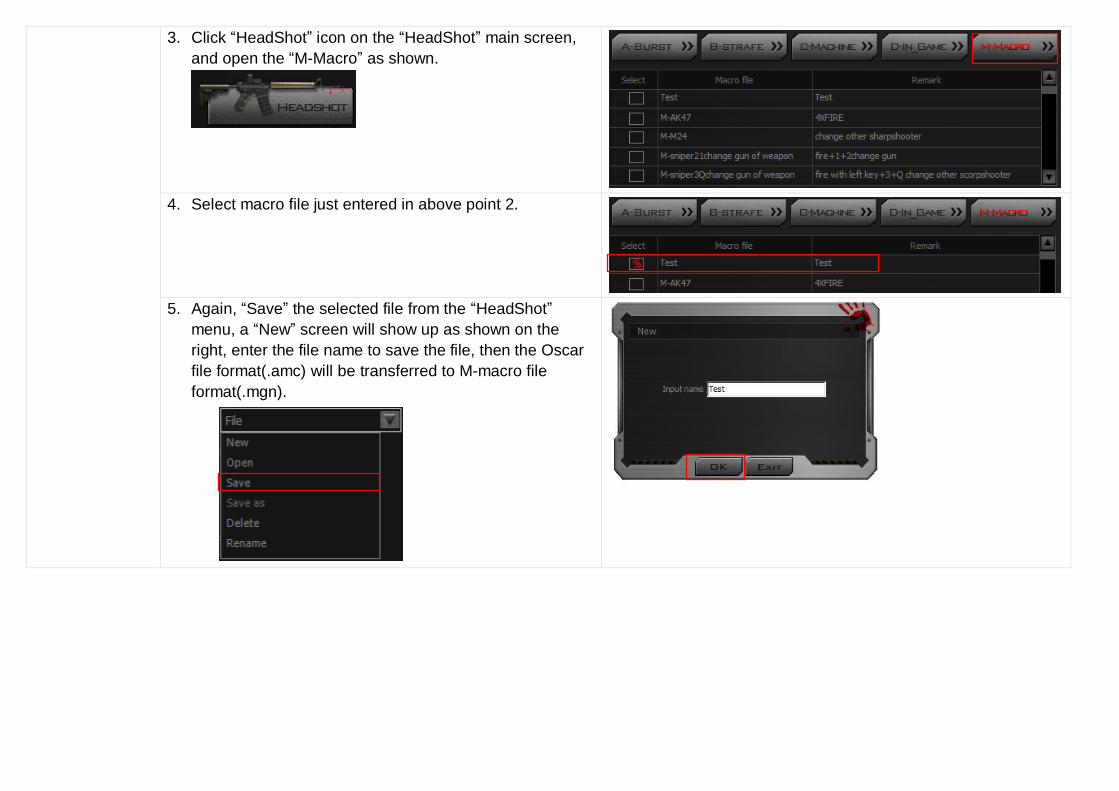
3. Click “HeadShot” icon on the “HeadShot” main screen,
and open the “M-Macro” as shown.
4. Select macro file just entered in above point 2.
5. Again, “Save” the selected file from the “HeadShot”
menu, a “New” screen will show up as shown on the
right, enter the file name to save the file, then the Oscar
file format(.amc) will be transferred to M-macro file
format(.mgn).
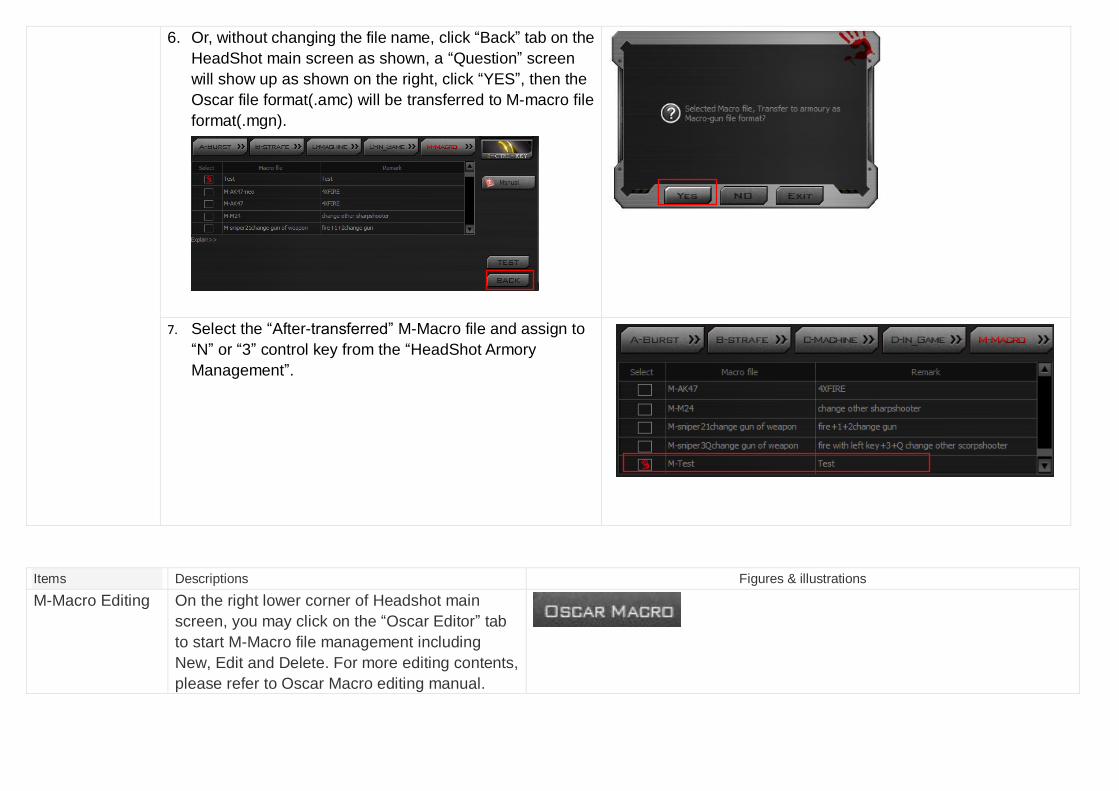
6. Or, without changing the file name, click “Back” tab on the
HeadShot main screen as shown, a “Question” screen
will show up as shown on the right, click “YES”, then the
Oscar file format(.amc) will be transferred to M-macro file
format(.mgn).
7. Select the “After-transferred” M-Macro file and assign to
“N” or “3” control key from the “HeadShot Armory
Management”.
Items Descriptions Figures & illustrations
M-Macro Editing
On the right lower corner of Headshot main
screen, you may click on the “Oscar Editor” tab
to start M-Macro file management including
New, Edit and Delete. For more editing contents,
please refer to Oscar Macro editing manual.
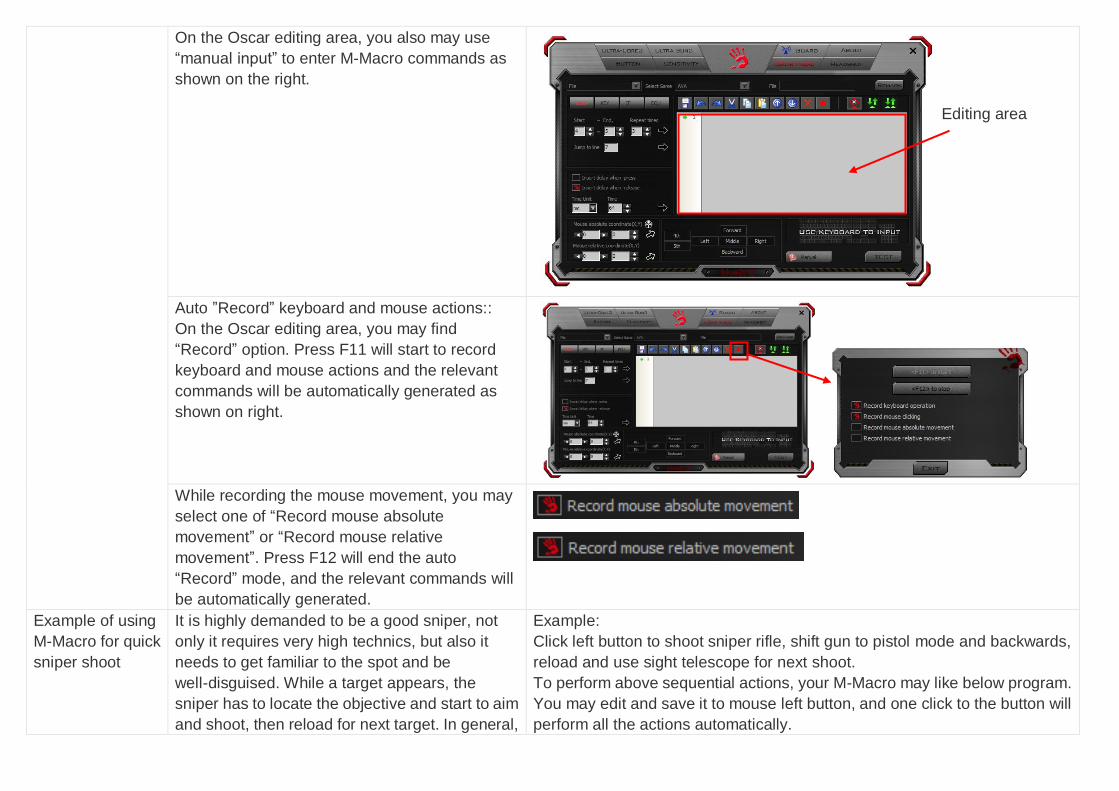
On the Oscar editing area, you also may use
“manual input” to enter M-Macro commands as
shown on the right.
Auto ”Record” keyboard and mouse actions::
On the Oscar editing area, you may find
“Record” option. Press F11 will start to record
keyboard and mouse actions and the relevant
commands will be automatically generated as
shown on right.
While recording the mouse movement, you may
select one of “Record mouse absolute
movement” or “Record mouse relative
movement”. Press F12 will end the auto
“Record” mode, and the relevant commands will
be automatically generated.
Example of using
M-Macro for quick
sniper shoot
It is highly demanded to be a good sniper, not
only it requires very high technics, but also it
needs to get familiar to the spot and be
well-disguised. While a target appears, the
sniper has to locate the objective and start to aim
and shoot, then reload for next target. In general,
Example:
Click left button to shoot sniper rifle, shift gun to pistol mode and backwards,
reload and use sight telescope for next shoot.
To perform above sequential actions, your M-Macro may like below program.
You may edit and save it to mouse left button, and one click to the button will
perform all the actions automatically.
Editing area
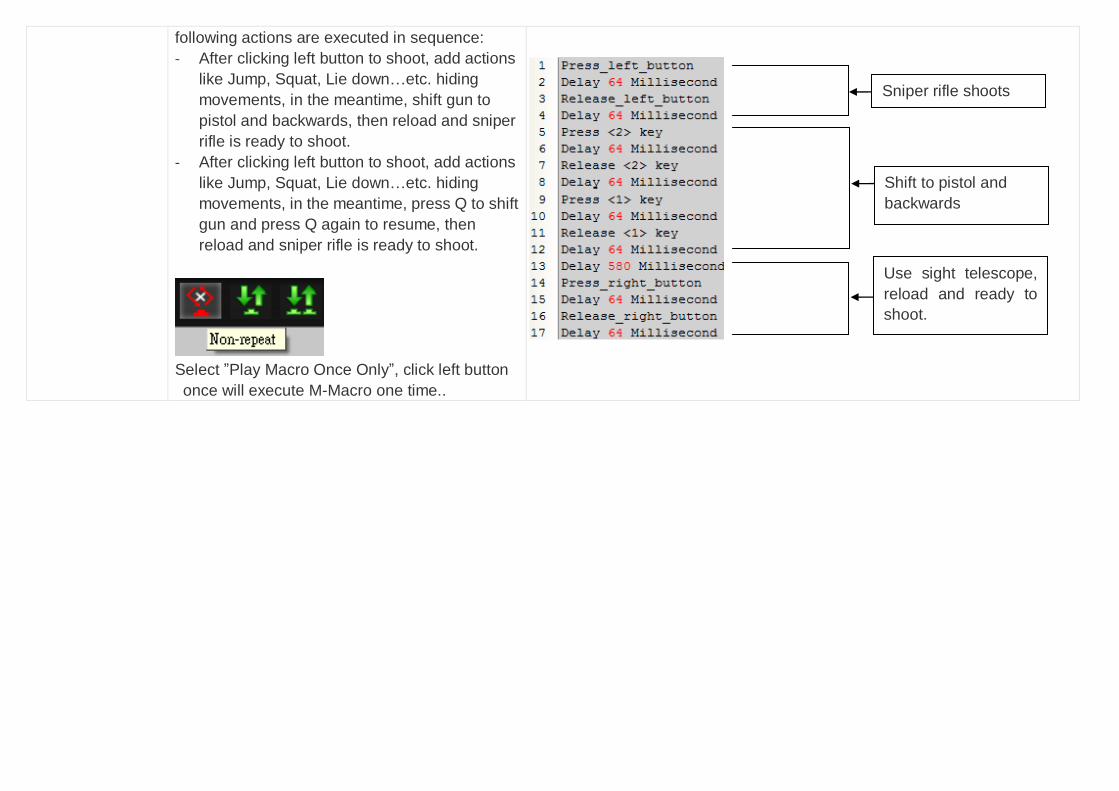
following actions are executed in sequence:
- After clicking left button to shoot, add actions
like Jump, Squat, Lie down…etc. hiding
movements, in the meantime, shift gun to
pistol and backwards, then reload and sniper
rifle is ready to shoot.
- After clicking left button to shoot, add actions
like Jump, Squat, Lie down…etc. hiding
movements, in the meantime, press Q to shift
gun and press Q again to resume, then
reload and sniper rifle is ready to shoot.
Select ”Play Macro Once Only”, click left button
once will execute M-Macro one time..
Sniper rifle shoots
Use sight telescope,
reload and ready to
shoot.
Shift to pistol and
backwards