belt conveyors - elcom
TRANSCRIPT

Belt conveyors
User & maintenance manual
Translation of the original manual, version 02

I02-202 User & maintenance manual Version 02 (translation of the original manual) of belt conveyors
Version tracking :
Version Date Description of modifications Prepared by Approved by
00 14/12/17 Initial / New index S.MAIRET G. AMOROSO
01 03/04/18 Addition of noise level + addition of annexes (ISO 9001 and 14001 certificates + information on the declaration of incorporation)
S.MAIRET G. AMOROSO
02 18/09/18 2015 edition of ISO 9001 and 14001 standards: deletion of expired certificates
S. MAIRET S. MAIRET

I02-202 User & maintenance manual Version 02 (translation of the original manual) of belt conveyors
Table of contents
1 Introduction ........................................................................................................................ 1
2 General information ........................................................................................................... 2
2.1 Applicable standards ................................................................................................... 2
2.2 Applications ................................................................................................................. 2
2.3 Recommended environment ....................................................................................... 2
2.4 Safety rules .................................................................................................................. 3
2.5 Special rules and safety instructions ........................................................................... 4
2.6 Safety instructions for the motor ................................................................................ 5
2.7 Additional information ................................................................................................ 5
3 Technical specification ........................................................................................................ 6
3.1 Conveyor types ............................................................................................................ 6
3.2 Motors ....................................................................................................................... 10
3.3 Conveyor start-up and shut down ............................................................................. 10
3.4 Frequency converter ................................................................................................. 11
3.5 Option : Frequency variator ...................................................................................... 11
3.6 Dimensions of the conveyors .................................................................................... 12
3.7 Belts ........................................................................................................................... 12
4 Commissioning .................................................................................................................. 12
4.1 Safety instructions ..................................................................................................... 12
4.2 Description of delivery............................................................................................... 13
4.3 Setting up of the conveyor ........................................................................................ 14
4.4 Changing the motor position (case of a central motor) ............................................ 15
4.5 Position of the tensioning screws .............................................................................. 16
5 Maintenance manual ........................................................................................................ 19
5.1 Motor dismounting .................................................................................................... 20
5.2 Installation of the new motor .................................................................................... 22
5.3 Replacing the conveyor belt ...................................................................................... 23
5.4 Adjusting the conveying belt - Case of a flat belt ...................................................... 24
5.5 Adjusting the conveying belt - Case of a timing belt ................................................. 28
5.6 Adjusting the belt position ........................................................................................ 28
6 Responsability ................................................................................................................... 33
7 Customer service .............................................................................................................. 33
8 ANNEXES ........................................................................................................................... 34
8.1 Declaration of incorporation and exploded view ...................................................... 34
8.2 Quality and environmental commitment: ISO certifications .................................... 34

I02-202 User & maintenance manual Version 02 (translation of the original manual) of belt conveyors Page 1 sur 35
1 INTRODUCTION
Please find below the instructions for use regarding the Flat belt conveyors and Timing belt
conveyors.
Safety instructions
In this user guide, the safety points are identified by the pictogram:
These safety instructions must be read before the installation and followed during the start-
up. The people in charge of the equipment installation, start-up and maintenance must have
fully read this instruction for use manual.
This guide must be kept within easy reach of users and close to conveyors. Maintenance staff
and users are responsible for this instruction for use manual. This manual must always be
complete and legible.

I02-202 User & maintenance manual Version 02 (translation of the original manual) of belt conveyors Page 2 of 34
2 GENERAL INFORMATION 2.1 Applicable standards
According to the European Directive 2006/42/EC, the elcom belt conveyors are considered as partly completed machinery. They are therefore not subject to a CE declaration of conformity.
However, the following standards are taken into account in the design of elcom belt conveyors:
- Directive 2006 /42/CE relating to machinery
- Council Directive 73/23/EEC relating to electrical equipment
The elcom company ensures the quality of its products and a customer service recognized by the ISO 9001 certification. To contribute to the protection of the environment, elcom company is also ISO 14001 certified.
2.2 Applications
elcom belt conveyors are designed for the transport of individual parts of light to medium weight. They are not recommended for the transport of materials such as sand and dusty products (pellets…) or sharp edges (e.g. punching scrap, scrap metals…).
Each conveyor is built and tested for a specific use. In case of load change, please contact us. The operational safety is only ensured when the equipment is used correctly.
2.3 Recommended environment
To ensure the proper functioning of the belt conveyor on an optimum shelf life, please follow the following advice:
- Operating temperature between 0 to 40 ° C, - Avoid dusty or smoky atmospheres, - Avoid the accumulation of parts with cutting edges on the conveyor, - Avoid placing the machine in direct exposure to UV rays. - Remove the parts that would have fallen under the belt.

I02-202 User & maintenance manual Version 02 (translation of the original manual) of belt conveyors Page 3 of 34
2.4 Safety rules
The following safety instructions and regulations mentioned below must be imperatively followed:
- Directive 2006/42/CE on machinery relating to safety,
- EN 619 - Continuous handling equipment and systems safety and EMC requirements for equipment for mechanical handling of unit loads,
- EN ISO 12100 Safety of machinery, equipments and installations,
- EN 60204 Safety of machinery - Electrical equipment of machines.
Part 1: General requirements,
- EN 349 Safety of machinery ― Minimum gaps to avoid crushing of parts of the human body,
- Directive 2006/95/ relating to electrical equipment designed for use within certain
voltage limits,
- Directive 2006/95/ relating to the minimum requirements for the provision of safety and/or health signs at work,
- BGR 500 chap. 2.9 – Regulations concerning the energy, textile and electrical
equipment industries -Continuous handling equipment's use.
x The documentation is inseparable from the machine. It must be kept near the machine. The recommendations, instructions regarding the implementation and the use must be followed. This represents a prerequisite for a correct use of the equipment.
x elcom ensures all necessary guarantees and meets its responsibilities regarding safety, reliability and operating safety of its equipment only if the assembly, settings, potential modifications, maintenance operations were carried out by elcom or an elcom qualified representative.The operating conditions must be compliant with the specifications mentioned hereby.

I02-202 User & maintenance manual Version 02 (translation of the original manual) of belt conveyors Page 4 of 34
2.5 Special rules and safety instructions
The safety rules relating to conveyors and especially those about electrical equipment must be followed in all operating phases: assembly, transport and production. Failure to observe these rules would be considered as an incorrect use of the conveyor. Operating a conveyor in an explosive environment is strictly forbidden. Exceptions for specific environments are allowed only by written approvals. Never carry out maintenance operations alone. A second technician must
necessarily be present to turn off the power and give first aid if needed.
The change in a motor position or removal of safety parts should be done only when the conveyor is unplugged from any power source.
When handling conveyor in operation (adjustment of belt tensioning), ensure that no part of the body especially the hands, hair and fingers pass through the area between moving parts (belt, drive, transmission...). Appropriate protective measures must be enforced. Long hair can get stuck between the drive and pulleys. Users working in front and around the conveyor must tie their hair and wear a hairnet. It cannot be excluded that the components or parts in accumulation at the junction between other machines or devices may create a risk of pinching. The transported parts and the conveyor have to be tested after the putting into operation to check whether a risk exists. If a risk exists, the appropriate protective measures must be taken to remedy the situation. If this is not possible for operational or technical reasons, signs should be placed in the danger zone. The person responsible for this machine set-up must inform the users of the dangers of the area in which they work. The parts of the conveyor that rotate such as driving, idling and tensioning pulleys constitute basically a danger. Therefore, no unrelated item with the use of the conveyor must be placed on the conveyor or on the pulleys. This is particularly true for strings, pieces of cloth...
Work in the area of the conveyor must not be carried out with loose-fitting
clothing or hanging jewelry.
Conveyors have, depending on their type of construction, belts and pulleys. It is
possible in very rare cases that parts cling to the belt or pass under the belt and
get caught up in the drive.

I02-202 User & maintenance manual Version 02 (translation of the original manual) of belt conveyors Page 5 of 34
This risk increases as the belt is provided with a cleat. The risks for the carried parts, the conveyor and employees must be evaluated by the person responsible for the installation and reduced by the implementation of appropriate measures.
2.6 Safety instructions for the motor
The power supply is designed so that the system cannot start unintentionally. In
the case of a power failure, switch off the conveyor: It may restart automatically
when power returns, which can cause severe damage to the machine or cause
injuries to the operator.
The conveyor can only be operated after that the electrical connections are
carried out in accordance with the regulations. See point 2.4
Before each start-up of the installation, check that the conveyor or its power
supply suffered no damage. The damage must be repaired immediately. A
damaged conveyor or conveyor with a damaged power supply must not be
started.
If malfunctions or imminent danger occur, the installation must be switched off by pressing the nearest emergency stop button or the main switch. If the conveyor is equipped with a plug, unplug immediately.
2.7 Additional information
These instructions aim at ensuring the safety of persons and the proper functioning of the belt
conveyor. If you want to use the belt conveyor in other conditions, please contact us.
Other information is available at the elcom website in the documentation section.
http://elcom-automation.com/conveyors/documentation

I02-202 User & maintenance manual Version 02 (translation of the original manual) of belt conveyors Page 6 of 34
3 TECHNICAL SPECIFICATION
The elcom conveyor essentially consists of an aluminum frame, a sliding plate, a driving unit,
an idling unit and a conveying belt.
The driving unit consists of engine supports, driving pulleys to drive the conveyor belt. On the
opposite side of the belt conveyor is the idling block. It mainly consists of an idling pulley with
pulley supports.
Additional modules such as lower belt support, lateral guides and conveyor stands to be
fastened on the floor are also available.
The noise level is below 70 decibels.
Belts, dimensions and additional modules are customized to each type of use of the conveyor.
You will find below standard versions of our conveyors.
3.1 Conveyor types
In the following paragraphs, A represents the width of the conveyor and L the total length.
Conveyor 20 – Width 20
Central drive Width A = 20 mm
Length L = 200 to 3000 mm
Belt width = 17 mm

I02-202 User & maintenance manual Version 02 (translation of the original manual) of belt conveyors Page 7 of 34
Conveyor 20 – Width 40 – 80 – 160
Central drive
Width A = 40, 80, 160 mm
Length L = 300 to 3000 mm
Belt width = A – 5 mm
Conveyor 40
End drive (motor beside or below) and central drive with flat belt
Width A = 40 – 80 – 120 – 160 – 200 – 250 – 300 – 400 mm
Length L = 400 to 6000 mm
Belt width = (A – 5) mm
L mini = 400 for width 40 to 250
A x 1,5 for width 300 and 400
End drive (motor beside or below) and central drive with timing belt
Width A = 40 – 80 mm
Length L = 400 to 6000 mm
Belt width = 32 – 72 mm

I02-202 User & maintenance manual Version 02 (translation of the original manual) of belt conveyors Page 8 of 34
Conveyor 40 Double Belt
End drive and central drive (internal and motor beside)
Width = 40 – 80 mm
Length L = 400 – 6000 mm
Flat belt width = (A – 5) mm
Timing belt width = 32 – 72 mm
Conveyor 80
End drive flat belt Motor 90W
Width A 160 a 600 mm
Lenght L=400 a 3130
Belt width = A - 10mm
End drive flat belt Motor 250W
Width A 160 a 1000 mm
Lenght L=400 a 6130
Belt widht = A - 10mm

I02-202 User & maintenance manual Version 02 (translation of the original manual) of belt conveyors Page 9 of 34
Conveyor 90
End drive (motor beside or below)
Width A = 500 – 600 – 700 – 800 – 1000 mm
Length L = 500 to 6000 mm
Belt width = (A – 10) mm
L mini = A x 1,5
End drive with timing belt.
Width A = 40 – 80 – 120 mm
Length L = 500 to 6000 mm
Timing belt width = 25 – 50 – 100 mm
Conveyor 90 double belt
End drive with timing belt
Width A = 40 – 80 – 120 mm
Length L = 500 à 6000 mm
Timing belt width = 25 – 50 – 100 mm
Conveyor with motorized

I02-202 User & maintenance manual Version 02 (translation of the original manual) of belt conveyors Page 10 of 34
Width A (mm) : 500, 600, 700, 800
Maxi lenght : 4 000
Width of belt: 490, 590, 690, 790
3.2 Motors
The motors installed on elcom conveyors are
standard motors from our supplier.
Motorisation Power Maximum curent Protection (IP)
230V mono 50Hz 0,09kW 0,83A IP54
230-400V tri 50Hz 0,09kW 0,4A à 400V 0,68A à 230V
IP54
230-400V tri 50Hz 0,25kW 0,83A à 400V 1,44A à 230V
IP54
3.3 Conveyor start-up and shut down
The conveyor system must be operated by qualified staff.
3.3.1 Conveyor with plug
The conveyor can be equipped with a plug (designed according to the customer’s specifications). The plug replaces a separate on/off switch. Before plugging the conveyor, check the immediate surroundings and potential dangers. Take care particularly to deterioration of the conveyor and of its electrical cables.
The conveyor switch off is made by pulling the plug from the socket.
In the version with plug, make sure that at no time the electric power cable is overstretched.

I02-202 User & maintenance manual Version 02 (translation of the original manual) of belt conveyors Page 11 of 34
3.3.2 Conveyor with on/off switch or frequency converter If the conveyor is equipped with an on/off switch, check the conveyor and its immediate environment to eliminate potential dangers before starting the conveyor. Pay particular attention to the conveyor potential damages and to electric cables.
3.4 Frequency converter
2 references:
- Ref. CELE 30 001 for 100W maximum, delivered non wired. - Ref. CELE 30 002 for 400W maximum
Input 230V mono 50Hz, output 230V.
Operating range of standard engine: +/- 20% of the speed of the conveyor without forced ventilation.
Ability to use a motor with forced ventilation.
More information on http://www.deltaacdrives.com
3.5 Option : Frequency variator
Ref CELE 01201
Input 230V; 50-60Hz
Output 0-230V
370W
IP54
Ref CELE02201
Input 230V; 50-60Hz
Output 0-230V
370W
IP54
More information on http://www.reo.de

I02-202 User & maintenance manual Version 02 (translation of the original manual) of belt conveyors Page 12 of 34
3.6 Dimensions of the conveyors
The dimensions of the conveyors and their related belts are available in the belt conveyors catalogue. It can be downloaded from the internet address: http://elcom-automation.com/conveyors/documentation
3.7 Belts Several belts can be used depending on the desired applications. More details on the elcom website:
http://elcom-automation.com/conveyors/documentation
4 COMMISSIONING
4.1 Safety instructions
The installation of the conveyor must be made by qualified staff. All electrical and pneumatic connections must be carried out by experts. Observe all safety regulations and wear the necessary protective equipment.
The electrical and mechanical intervention on the conveyor must be carried out by qualified persons (electrician/mechanic).
The start-up work, repair and maintenance must be performed by qualified and authorized staff who will take into account the instructions given in this manual.
During the installation, repair and maintenance work, the conveyor must be disconnected from the power supply.
While working, be careful that no third party can be injured in the fall or flying parts. Take appropriate action on this matter.
Before the commissioning, all electrical connections work must have been tested in accordance with guidelines mentioned in this manual.

I02-202 User & maintenance manual Version 02 (translation of the original manual) of belt conveyors Page 13 of 34
During the commissioning, the installation must be carried out by a qualified and appropriate staff. It is only when this qualified staff is sure of the perfect state of the equipment that the conveyor can be used.
All foreign bodies such as loose screws, tools should be removed from the work area. These parts must in particular not be located over or under the conveyor belt.
All provided safety housings and security systems have to be put back in place and tested before restarting.
During transport, the legal regulations must be respected. In particular, no one should pass under a suspended load.
4.2 Description of delivery
The conveyor is, unless otherwise agreed, delivered packed with on a strengthened and film-wrapped pallet.
The conveyor is delivered assembled and tested.

I02-202 User & maintenance manual Version 02 (translation of the original manual) of belt conveyors Page 14 of 34
4.3 Setting up of the conveyor
The end user must only carry out the necessary connections, level the conveyor and fasten it during the assembly of the conveyor. If the installation is not levelled, the belt can run out of the conveyor and cause damage to the conveyor with a risk of injury.
In addition, excessive tensions of the belt are absolutely to be avoided. These tensions can change the shape of the support and thus lead to a movement of the axis of the belt.
The conveyor line must be removed from its packaging. Mount the conveyor line according to the mounting layout, if provided. All the necessary protection devices must be assembled.
The electrical connection should only be done by a qualified electrician according to the wiring diagram in the electrical box. On this point, the current regulations must be followed.
Conveyors that are not delivered fully assembled have to be mounted according to the corresponding installation instructions and the proper functioning of the conveyors must be tested.
Possible motor positions
The motor can be rotated through four different angles and their symmetry, on each side of
the conveyor. There are therefore 16 possible motor positions. Exceptions: a specific choice
of options, special equipment or special lay-out chosen by the customer.

I02-202 User & maintenance manual Version 02 (translation of the original manual) of belt conveyors Page 15 of 34
4.4 Changing the motor position (case of a central motor)
In the case of a central conveyor drive, the motor can be moved along the rails. The conveyor
is delivered with an installed engine. Loosen the motor fastening screws.
Slide the motor along the profiles.
Tighten the engine fastening screws
To ensure proper operation of the conveyor, it is imperative to maintain a good
squaring. Make sure that both sides of the motor support are moved with an
equal dimension.
Fastening screw

I02-202 User & maintenance manual Version 02 (translation of the original manual) of belt conveyors Page 16 of 34
4.5 Position of the tensioning screws
End drive – motor on the side The motor is positioned on the side of the belt at the end drive of the conveyor.
2 tensioning screws are located at the extremity.
Direct drive.
Simplified assembly and dismantling.
A tensioning screw on each side of the conveyor.
Tensioning screws

I02-202 User & maintenance manual Version 02 (translation of the original manual) of belt conveyors Page 17 of 34
End drive under the belt
This lay-out allows the motor installation while
minimizing the lateral space requirement.
It operates with a timing belt drive that
transfers torque from the drive to the idling
roller.
2 tensioning screws are provided on the
driving side for the tensioning belt and
control.
Tensioning screws

I02-202 User & maintenance manual Version 02 (translation of the original manual) of belt conveyors Page 18 of 34
Central drive – motor beside
The motor is located next to the belt at the
required place.
8 motors positions are possible.
2 idling pulleys.
2 tension pulleys.
4 tensioning screws positioned on the
motor support.
Tensioning screws

I02-202 User & maintenance manual Version 02 (translation of the original manual) of belt conveyors Page 19 of 34
Adjusting the belt tensioning
The conveyor is delivered with an installed belt. The belt tensioning was already made and tested. It is therefore not necessary to adjust the belt when you receive the conveyor.
The belt tensioning depends on the type of belt used. Follow the belt manufacturer's recommendations.
Make sure that the belt is not slowed down in its running: a too tight installation on a belt side can put strain on the belt. Avoid any parts that can rub continuously on the conveyor. Caution! This can then greatly damage the conveyor belt.
5 MAINTENANCE MANUAL
If any of the parts that constitute the conveyor is damaged or broken, it is possible to replace
it just by following the instructions:
The conveyor must be cleaned at regular intervals to ensure trouble-free operating
and to reduced wear.
The proper functioning of wear parts must be checked regularly.
Tools and equipment must not come into contact with electrical conductors or cause
short circuits.
Before starting up the conveyor again, the proper functioning of the conveyor must be
controlled.

I02-202 User & maintenance manual Version 02 (translation of the original manual) of belt conveyors Page 20 of 34
5.1 Motor dismounting
If necessary, the motor can easily be dismounted.
Case of a gear motor for an end drive conveyor. Motor beside.
First remove the securing clip.
Then remove the motor and its flange from the conveyor for maintenance.
Next, remove the motor and the motor flange to carry out the maintenance of the drive shaft.
The shaft must be protected against corrosion with copper grease. Installation without the
use of a suitable corrosion protection can cause damage to the gear and the drive shaft.
Securing clip Screw and anti-rotating bush

I02-202 User & maintenance manual Version 02 (translation of the original manual) of belt conveyors Page 21 of 34
Case of a gear motor for a central drive conveyor. Motor beside.
Case of a gear motor positioned below for an end drive conveyor
Securing clip
Screw and anti-rotating bush
Fastening screws
The procedure is the same as for a
gear motor positioned beside on an
end drive conveyor.
Remove the belt protective housing.
Loosen the motor fastening screws.
Remove the motor and the shaft with the pulley
mounted on.
Remove the drive shaft with the pulley still
mounted on.
Grease the shaft with copper grease.
Reassemble by following the steps in reverse
order.

I02-202 User & maintenance manual Version 02 (translation of the original manual) of belt conveyors Page 22 of 34
5.2 Installation of the new motor
Before installing the motor, make sure that the rod is correctly greased with copper grease.
The grease must completely cover the motor shaft.
Reassemble the motor in the desired position.
The position is set by the aluminum flange
attached to the motor.
Once the motor installed on the shaft, put the
securing clip back in place on anti-rotating bush.
Use copper grease for the motor shaft. Meltdown risks of the shaft on the
motor are possible in case of bad lubrication.
Motor indexing
Screw and anti-rotating bush
Greased motor shaft

I02-202 User & maintenance manual Version 02 (translation of the original manual) of belt conveyors Page 23 of 34
5.3 Replacing the conveyor belt
To replace the belt, it is first necessary to release it to get it out.
First of all, disassemble the engine (see paragraph 5.1).
Then take away the parts that could interfere with the belt removal: fastening stands, lateral guides...
Loosen the belt using the tension bolts.
- For an end drive motor, the tension bolts are located on the motor side only. Unscrew them to remove the tensioning of the belt.
- For a central drive motor, tension bolts are located on the motor support. Unscrew them to remove the tension of the belt.
Place new belt in place of the old one.
In the case of a saw-tooth welding, there is no rotation direction of the belt.
In the case of a beveled welding, take the conveying belt direction into account: the beveling
must be positioned so that the conveyed parts will not be disturbed.
Then proceed to the tensioning adjustment of the conveyor belt. (See section 5.5 of this manual).
Finally reassemble the motor and the additional parts (fastening stands, lateral guides...)
Conveying direction
Side view
Upper view
Side view
Upper view
Belt thickness
Belt thickness

I02-202 User & maintenance manual Version 02 (translation of the original manual) of belt conveyors Page 24 of 34
5.4 Adjusting the conveying belt - Case of a flat belt
Necessary tools to adjust the belt:
- Measuring tape, - Pencil, - Hex key of 6.
Once the belt is in place, make two marks of one meter apart in the conveying direction.
Adjust the tensioning using the tension bolts located in the motor area.
The tensioning should be adjusted so that the belt stretching meets the supplier's
recommendations. In most cases, the recommendation to respect is a 0.5% stretching.
Before adjustment, the lower side is visible After adjustment, the belt is tightened
Adjust the setting of the tensioners until the two marks made on the belt are spaced of 1005
cm (The 5mm correspond to a 0.5% stretching that can be applied to most of belts. However
this value may vary, we advise you to check the stretching tension with the belt supplier).
Please note that conveyors over 250 mm must not undergo a higher tensioning than the one mentioned above. This would result in damage to driving and idling units. In this case, please contact our technicians.
1000 mm
1005mm

I02-202 User & maintenance manual Version 02 (translation of the original manual) of belt conveyors Page 25 of 34
Case of an end drive motor (motor beside): inner view of the tensioners
The tension rod is supported by the end of the aluminum profile. By screwing the tension
screw, the tensioner shifts and stretches the belt.
NOTE: It is important to loosen the tensioner fastening screw before making this
adjustment.
Tension rod
Tensioner fastening screw
Tensioning screw

I02-202 User & maintenance manual Version 02 (translation of the original manual) of belt conveyors Page 26 of 34
It is also better to perform the belt tensioning in static first without the motor being mounted on the shaft. In this way, the force induced by the weight of the motor does not interfere with the setting.
Then reassemble the conveyor parts to return to its original shape.
Finally perform a dynamic adjustment following the recommendations of paragraph 4.5 of this document.
At the end of the setting, retighten the fastening screws of the tensioner and then tighten the tensioning screw a quarter turn to fix the setting.
- Case of a central motor
Setting principle is the same. Only the position of the tension screws changes. We advise you to use the tension screws only on one side (in the case of a belt conveyor with a large width, it may be necessary to use both sides).
Inner view of the central motor support:
The belt setting is carried out using the tension screw 2. The tension screw 1 should preferably remain fixed and is used only if it is impossible to get a good setting with the tension screw 2.
Anti-winding pulleys
Tensioning screw 1 Tensioning screw 2
Belt track
In static, to ensure proper operation of the conveyor, it is imperative to maintain
a good squaring. Make sure that both sides of the motor support are moved with
an equal dimension.

I02-202 User & maintenance manual Version 02 (translation of the original manual) of belt conveyors Page 27 of 34
In case of a motor positioned below, the adjustment is identical to the motor placed beside.
The screws are located on the tensioner at the extremity of the conveyor.
In all cases, finally perform a dynamic adjustment according to the recommendations of the
paragraph 5.5 of this document.
Fastening screw
This screw is available on
each side of the belt.
Tensioning screw
- Case of a central motor

I02-202 User & maintenance manual Version 02 (translation of the original manual) of belt conveyors Page 28 of 34
5.5 Adjusting the conveying belt - Case of a timing belt
The technique is similar to the flat belt, but the tension of the belt is different. The adjustment is made with a stretch of 0.1%.
5.6 Adjusting the belt position
Using the tensioner
Use the tensioners to correct the path of the curve and make it quite linear.
By screwing and unscrewing the adjusting screw on one side of the conveyor, the motor position changes, which allows adjusting the belt position.
Use this method on the motor support which achieves the expected result in the following cases.
NOTE: the screws of the motor support must be loosened during the adjustment to allow the motor support to slide on the rail. Once the setting made, tighten the screws and check the proper functioning of the conveyor.
At the end of the adjustment after tightening the fastening screws again, tighten the tensioning screw a quarter turn to "lock" the adjustment.
Fastening screw
Tensioning screw
Motor support
I02-202 User & maintenance manual Version 02 (translation of the original manual) of belt conveyors Page 29 of 34
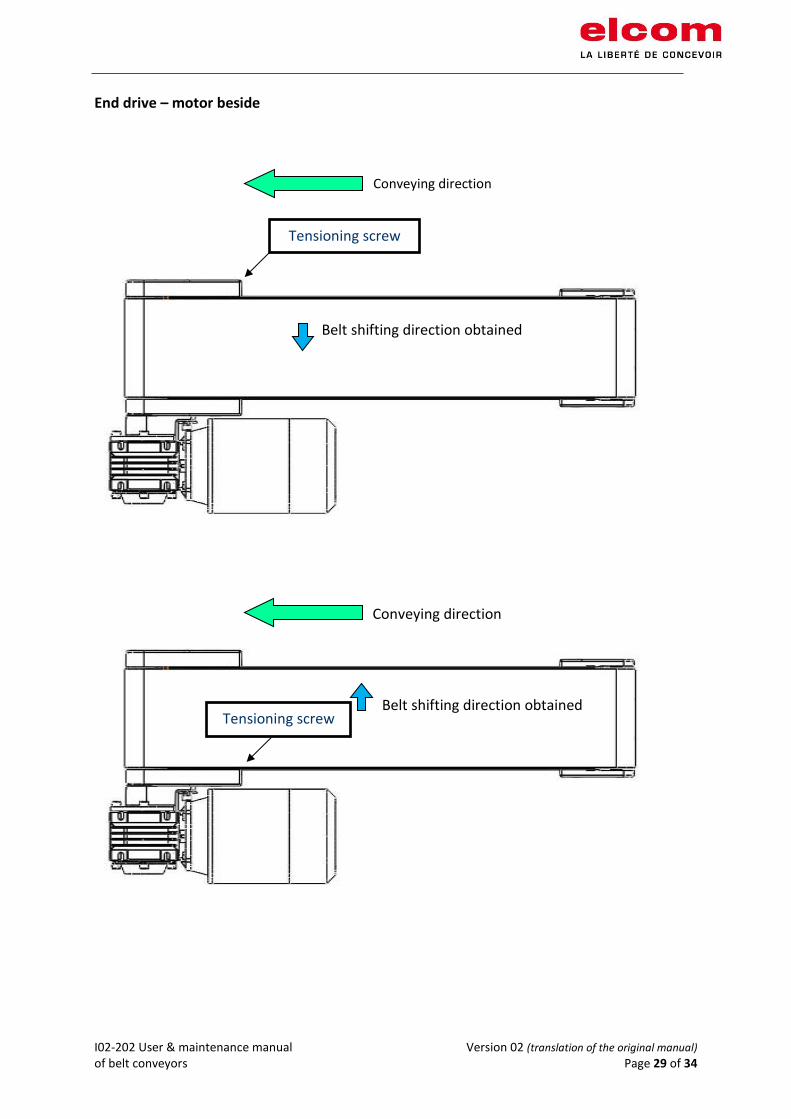
End drive – motor beside
Tensioning screw
Conveying direction
Belt shifting direction obtained
Conveying direction
Belt shifting direction obtained Tensioning screw

I02-202 User & maintenance manual Version 02 (translation of the original manual) of belt conveyors Page 30 of 34
End drive – motor below
Conveying direction
Belt shifting direction obtained
Conveying direction
Belt shifting direction obtained
Tensioning screw
Tensioning screw

I02-202 User & maintenance manual Version 02 (translation of the original manual) of belt conveyors Page 31 of 34
Central drive – motor beside
Conveying direction
Belt shifting direction obtained
Conveying direction
Belt shifting direction obtained
Tensioning screw
Tensioning screw

I02-202 User & maintenance manual Version 02 (translation of the original manual) of belt conveyors Page 32 of 34
Conveying direction
Belt shifting direction obtained
Tensioning screw
Conveying direction
Belt shifting direction obtained
Tensioning screw

I02-202 User & maintenance manual Version 02 (translation of the original manual) of belt conveyors Page 33 of 34
6 RESPONSABILITY
elcom cannot be held responsible for any damages or harms due to non-authorised
modification of the any parts, specially the safety parts.
Only the original components can be used for maintenance or fixing.
elcom cannot be held responsible for any malfunction if some spare parts have been used
without the validation of elcom.
elcom keeps the right to realise improvements and technical modification without any further
notice.
7 CUSTOMER SERVICE
Do not hesitate to contact us for any question or advice. It’s our duty to help you.
Tel: + 33 (0)4 74 43 99 61
Email : [email protected]
Address : 1 rue Isaac Asimov ZAC La Maladière 38300 Bourgoin-Jallieu
France
Prior to any contact, please note the serial number of the conveyor. It is written on the sticker
present on the conveyor.

I02-202 User & maintenance manual Version 02 (translation of the original manual) of belt conveyors Page 34 of 34
8 ANNEXES
8.1 Declaration of incorporation and exploded view
As a quasi-machine, manufactured and sold conveyors are subjects of a declaration of
incorporation. The latter is transmitted at the time of delivery, accompanied by the exploded
view of the motorized equipment.
8.2 Quality and environmental commitment: ISO certifications Our company is recognized according to the following ISO standards and their respective
evolutions since our first certification:
- Quality Management through ISO 9001 [since 2002]
- Environmental Management through ISO 14001 [since 2013]
All our current certificates are available for download in French, English and German on our
website http://elcom-automation.com/