assembly / disassembly and operational check
TRANSCRIPT
For
heal
thca
re p
rofe
ssio
nal u
se o
nly.
The
illu
stra
ted
imag
e do
es n
ot r
epre
sent
a c
onne
ctio
n
betw
een
the
use
of t
he m
edic
al d
evic
e de
scrib
ed, n
or it
s pe
rfor
man
ce.
Assembly / Disassembly and Operational check

Mathys Ltd Bettlach • Robert Mathys Strasse 5 • P. O. Box • 2544 Bettlach • Switzerland • www.mathysmedical.com
Content
A Assembly / Disassembly • Knee instruments • Hip instruments • Shoulder instruments • Finger instruments
B Operational check

Mathys Ltd Bettlach • Robert Mathys Strasse 5 • P. O. Box • 2544 Bettlach • Switzerland • www.mathysmedical.com
2
1a
1b
1c
A
A 1.1
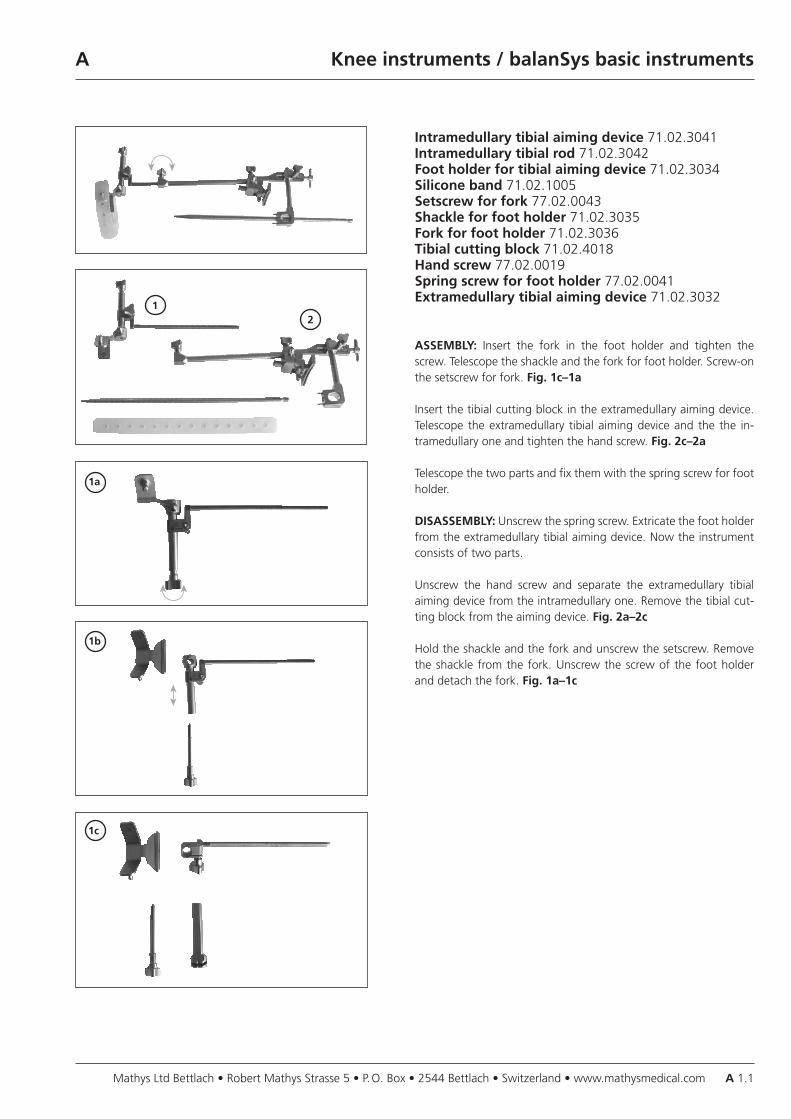
Intramedullary tibial aiming device 71.02.3041Intramedullary tibial rod 71.02.3042Foot holder for tibial aiming device 71.02.3034Silicone band 71.02.1005Setscrew for fork 77.02.0043Shackle for foot holder 71.02.3035Fork for foot holder 71.02.3036Tibial cutting block 71.02.4018Hand screw 77.02.0019Spring screw for foot holder 77.02.0041Extramedullary tibial aiming device 71.02.3032
ASSEMBLY: Insert the fork in the foot holder and tighten the screw. Telescope the shackle and the fork for foot holder. Screw-on the setscrew for fork. Fig. 1c–1a
Insert the tibial cutting block in the extramedullary aiming device. Telescope the extramedullary tibial aiming device and the the in-tramedullary one and tighten the hand screw. Fig. 2c–2a
Telescope the two parts and fix them with the spring screw for foot holder.
DISASSEMBLY: Unscrew the spring screw. Extricate the foot holder from the extramedullary tibial aiming device. Now the instrument consists of two parts.
Unscrew the hand screw and separate the extramedullary tibial aiming device from the intramedullary one. Remove the tibial cut-ting block from the aiming device. Fig. 2a–2c
Hold the shackle and the fork and unscrew the setscrew. Remove the shackle from the fork. Unscrew the screw of the foot holder and detach the fork. Fig. 1a–1c
Knee instruments / balanSys basic instruments
1
A
Mathys Ltd Bettlach • Robert Mathys Strase 5 • P. O. Box • 2544 Bettlach • Switzerland • www.mathysmedical.comA 1.2
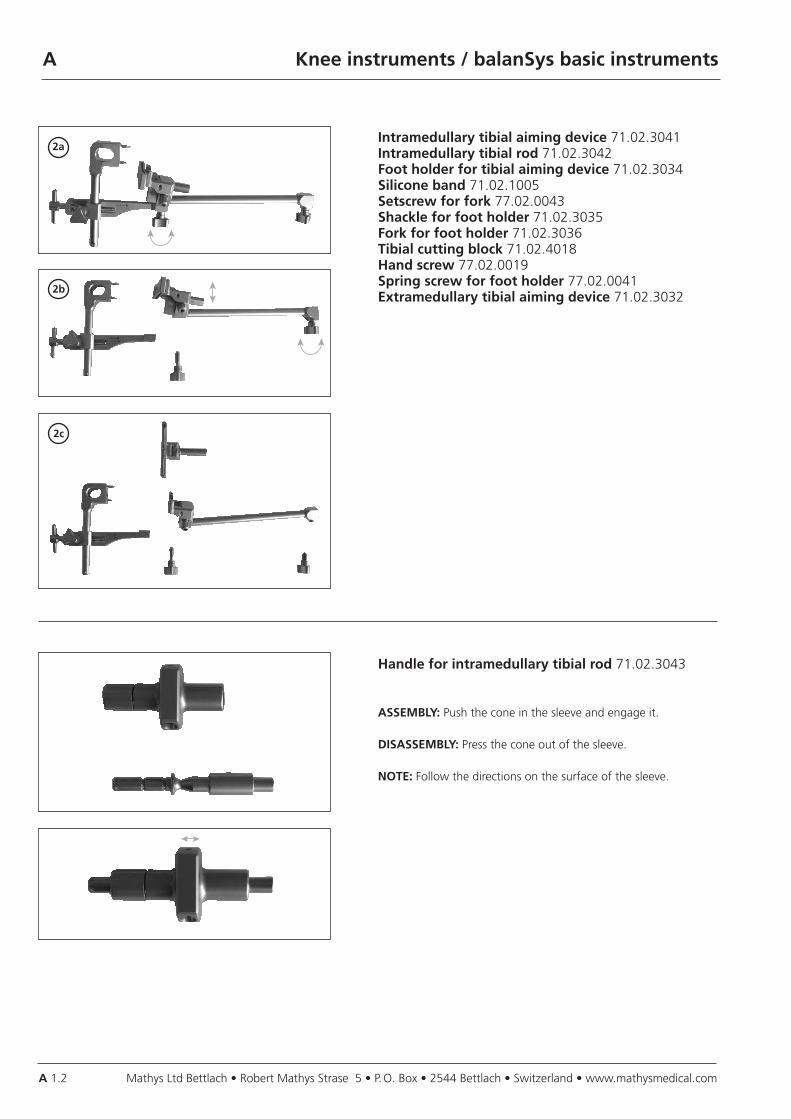
Intramedullary tibial aiming device 71.02.3041Intramedullary tibial rod 71.02.3042Foot holder for tibial aiming device 71.02.3034Silicone band 71.02.1005Setscrew for fork 77.02.0043Shackle for foot holder 71.02.3035Fork for foot holder 71.02.3036Tibial cutting block 71.02.4018Hand screw 77.02.0019Spring screw for foot holder 77.02.0041Extramedullary tibial aiming device 71.02.3032
2a
2b
2c
Handle for intramedullary tibial rod 71.02.3043
ASSEMBLY: Push the cone in the sleeve and engage it.
DISASSEMBLY: Press the cone out of the sleeve.
NOTE: Follow the directions on the surface of the sleeve.
Knee instruments / balanSys basic instruments
A
Mathys Ltd Bettlach • Robert Mathys Strase 5 • P. O. Box • 2544 Bettlach • Switzerland • www.mathysmedical.com A 1.3
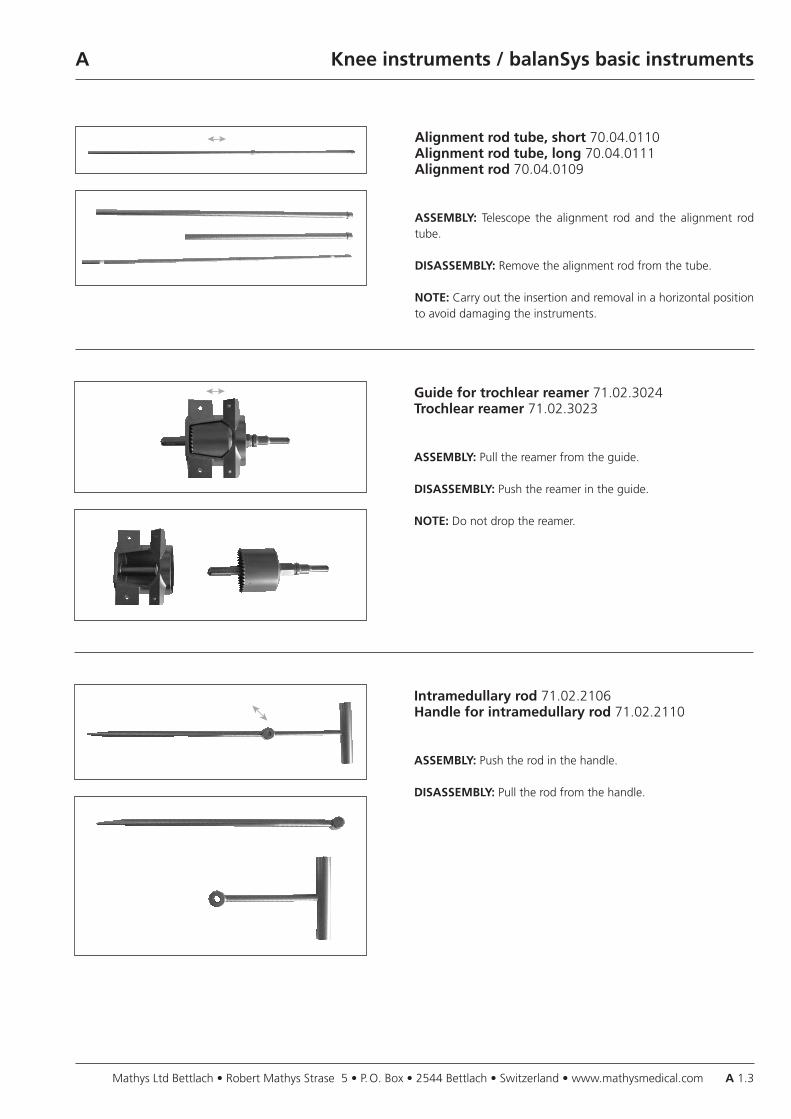
Alignment rod tube, short 70.04.0110Alignment rod tube, long 70.04.0111Alignment rod 70.04.0109
ASSEMBLY: Telescope the alignment rod and the alignment rod tube.
DISASSEMBLY: Remove the alignment rod from the tube.
NOTE: Carry out the insertion and removal in a horizontal position to avoid damaging the instruments.
Guide for trochlear reamer 71.02.3024Trochlear reamer 71.02.3023
ASSEMBLY: Pull the reamer from the guide.
DISASSEMBLY: Push the reamer in the guide.
NOTE: Do not drop the reamer.
Intramedullary rod 71.02.2106Handle for intramedullary rod 71.02.2110
ASSEMBLY: Push the rod in the handle.
DISASSEMBLY: Pull the rod from the handle.
Knee instruments / balanSys basic instruments
Mathys Ltd Bettlach • Robert Mathys Strasse 5 • P. O. Box • 2544 Bettlach • Switzerland • www.mathysmedical.comA 1.4
A
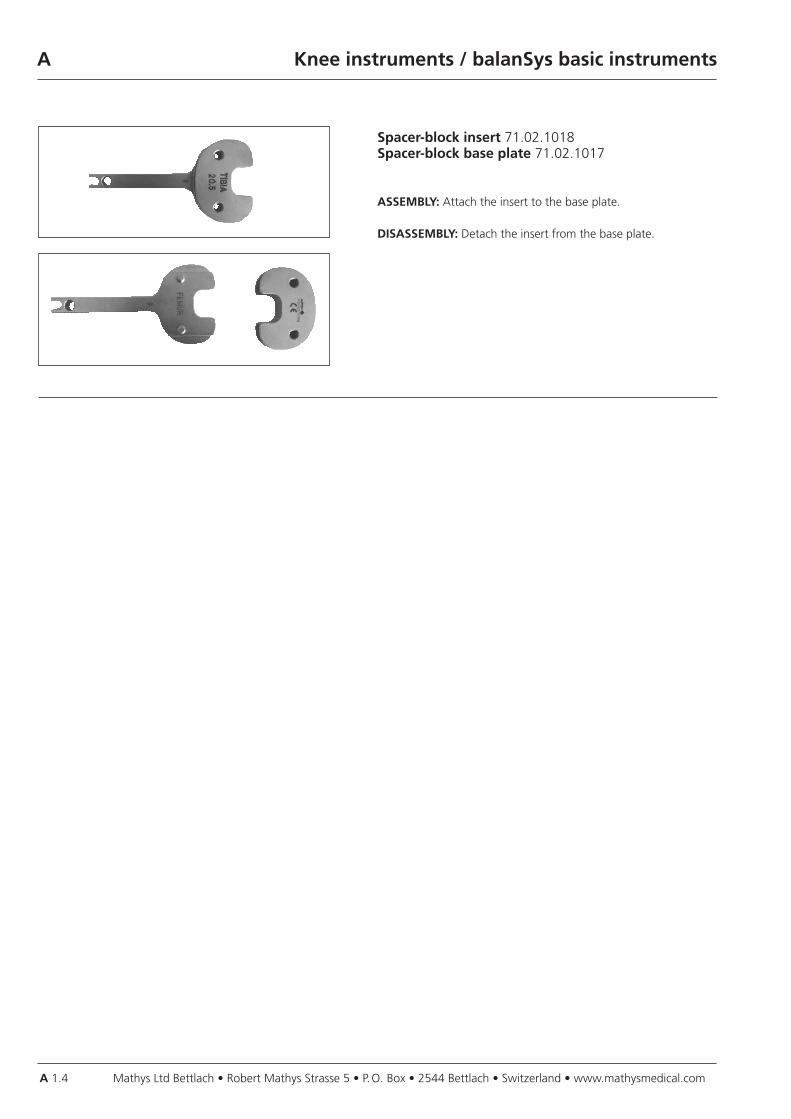
Spacer-block insert 71.02.1018Spacer-block base plate 71.02.1017
ASSEMBLY: Attach the insert to the base plate.
DISASSEMBLY: Detach the insert from the base plate.
Knee instruments / balanSys basic instruments
A
A 1.5Mathys Ltd Bettlach • Robert Mathys Strasse 5 • P. O. Box • 2544 Bettlach • Switzerland • www.mathysmedical.com
Knee instruments / balanSys standard instruments
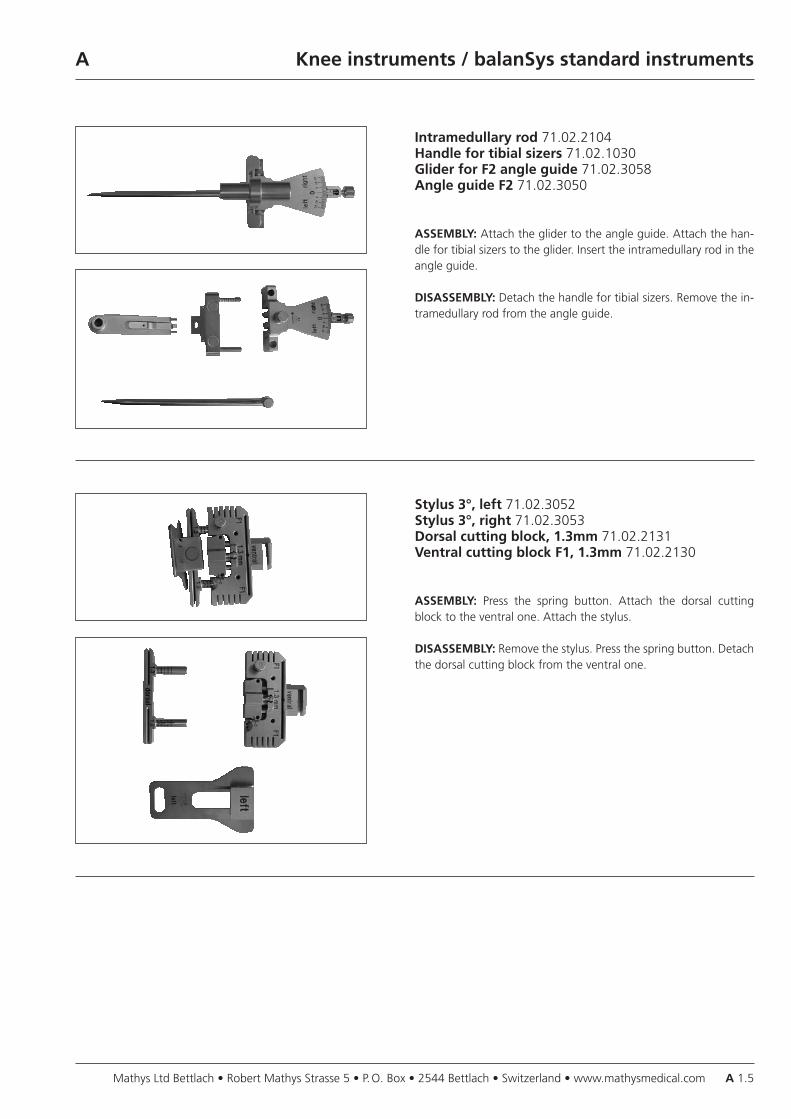
Intramedullary rod 71.02.2104Handle for tibial sizers 71.02.1030Glider for F2 angle guide 71.02.3058Angle guide F2 71.02.3050
ASSEMBLY: Attach the glider to the angle guide. Attach the han-dle for tibial sizers to the glider. Insert the intramedullary rod in the angle guide.
DISASSEMBLY: Detach the handle for tibial sizers. Remove the in-tramedullary rod from the angle guide.
Stylus 3°, left 71.02.3052Stylus 3°, right 71.02.3053Dorsal cutting block, 1.3mm 71.02.2131Ventral cutting block F1, 1.3mm 71.02.2130
ASSEMBLY: Press the spring button. Attach the dorsal cutting block to the ventral one. Attach the stylus.
DISASSEMBLY: Remove the stylus. Press the spring button. Detach the dorsal cutting block from the ventral one.
Mathys Ltd Bettlach • Robert Mathys Strasse 5 • P. O. Box • 2544 Bettlach • Switzerland • www.mathysmedical.comA 1.6
A Knee instruments / balanSys patella
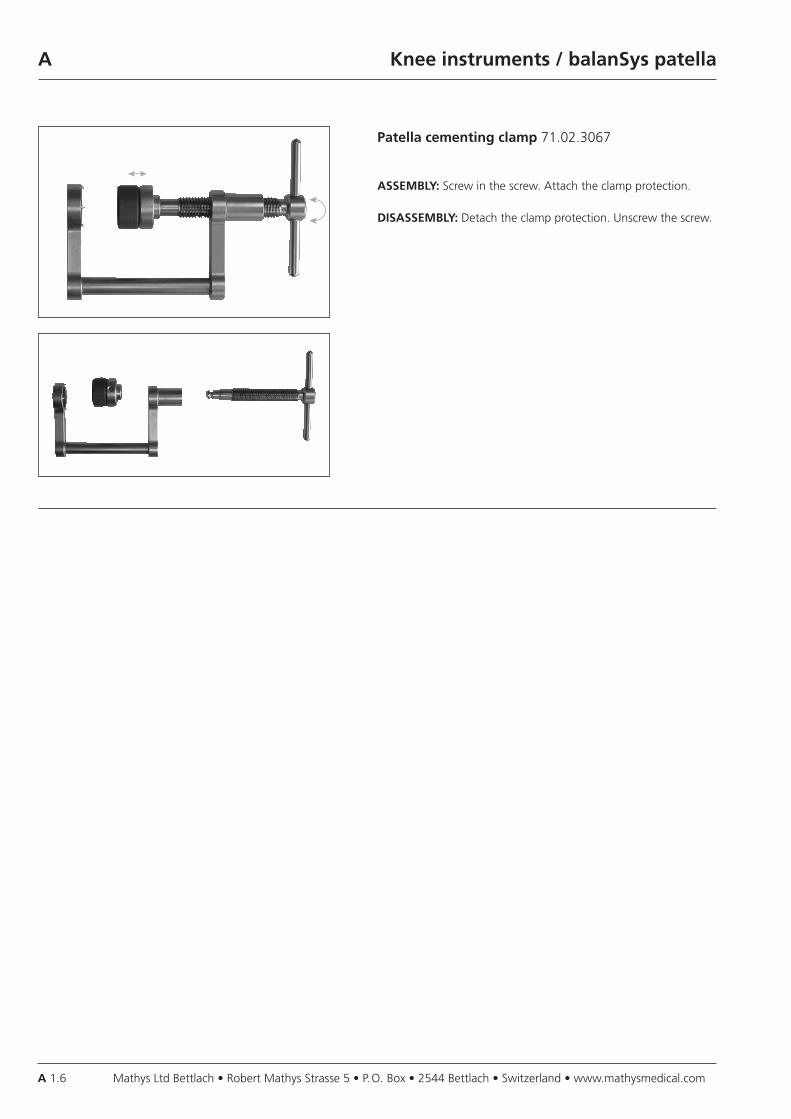
Patella cementing clamp 71.02.3067
ASSEMBLY: Screw in the screw. Attach the clamp protection.
DISASSEMBLY: Detach the clamp protection. Unscrew the screw.
A
A 1.7Mathys Ltd Bettlach • Robert Mathys Strasse 5 • P. O. Box • 2544 Bettlach • Switzerland • www.mathysmedical.com
Knee instruments / balanSys trial prostheses
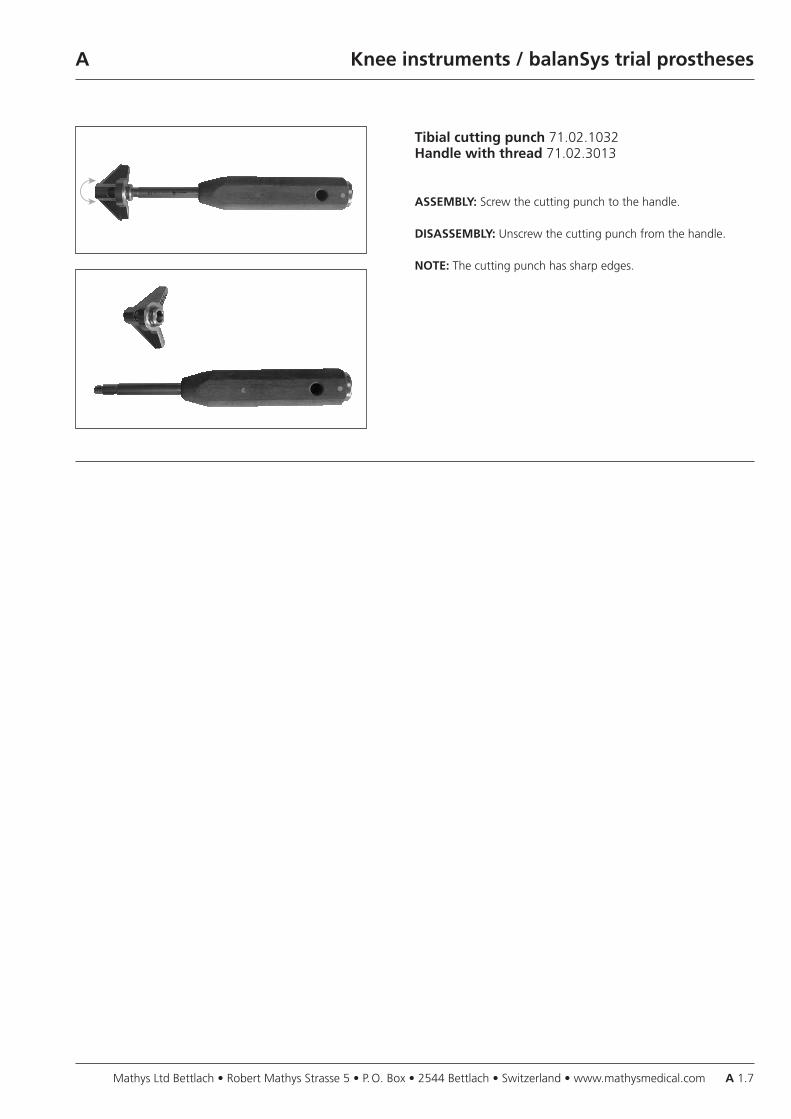
Tibial cutting punch 71.02.1032Handle with thread 71.02.3013
ASSEMBLY: Screw the cutting punch to the handle.
DISASSEMBLY: Unscrew the cutting punch from the handle.
NOTE: The cutting punch has sharp edges.
Mathys Ltd Bettlach • Robert Mathys Strasse 5 • P. O. Box • 2544 Bettlach • Switzerland • www.mathysmedical.com
A
A 1.8
Knee instruments / balanSys UNI
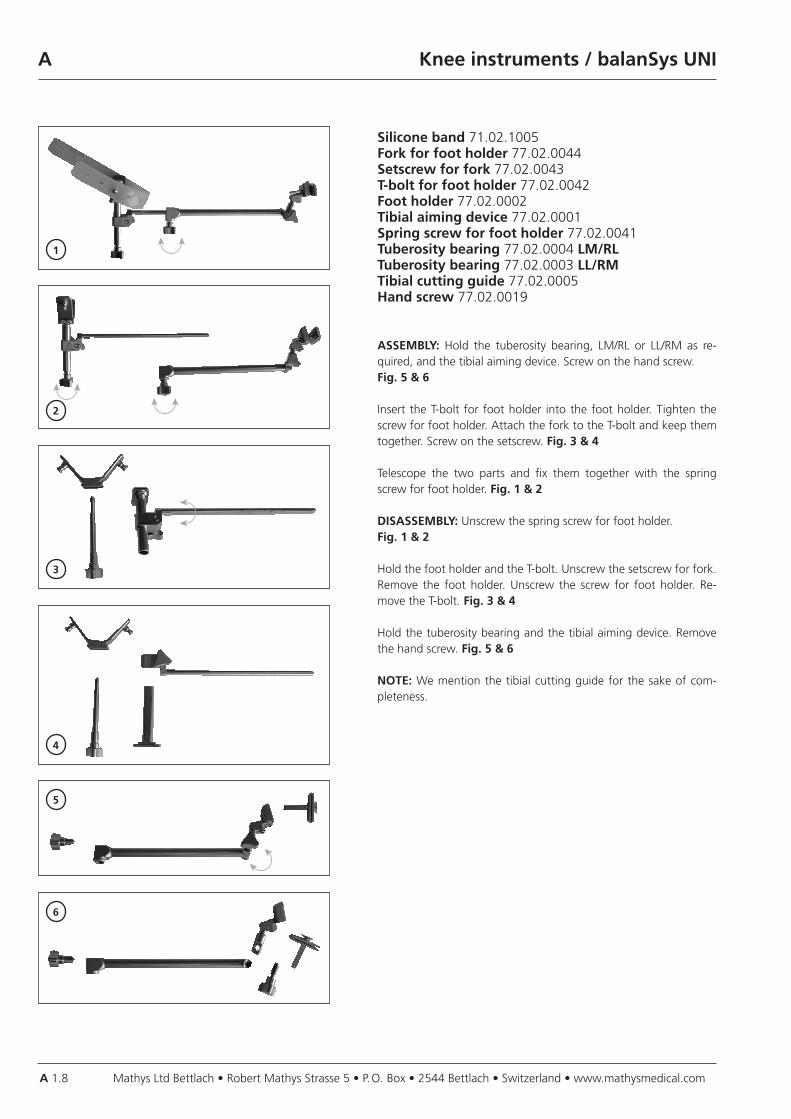
Silicone band 71.02.1005Fork for foot holder 77.02.0044Setscrew for fork 77.02.0043T-bolt for foot holder 77.02.0042Foot holder 77.02.0002Tibial aiming device 77.02.0001Spring screw for foot holder 77.02.0041Tuberosity bearing 77.02.0004 LM/RLTuberosity bearing 77.02.0003 LL/RMTibial cutting guide 77.02.0005Hand screw 77.02.0019
ASSEMBLY: Hold the tuberosity bearing, LM/RL or LL/RM as re-quired, and the tibial aiming device. Screw on the hand screw. Fig. 5 & 6
Insert the T-bolt for foot holder into the foot holder. Tighten the screw for foot holder. Attach the fork to the T-bolt and keep them together. Screw on the setscrew. Fig. 3 & 4
Telescope the two parts and fix them together with the spring screw for foot holder. Fig. 1 & 2
DISASSEMBLY: Unscrew the spring screw for foot holder. Fig. 1 & 2
Hold the foot holder and the T-bolt. Unscrew the setscrew for fork.Remove the foot holder. Unscrew the screw for foot holder. Re-move the T-bolt. Fig. 3 & 4
Hold the tuberosity bearing and the tibial aiming device. Remove the hand screw. Fig. 5 & 6 NOTE: We mention the tibial cutting guide for the sake of com-pleteness.
1
2
3
4
5
6
A
A 1.9Mathys Ltd Bettlach • Robert Mathys Strasse 5 • P. O. Box • 2544 Bettlach • Switzerland • www.mathysmedical.com
Knee instruments / balanSys UNI
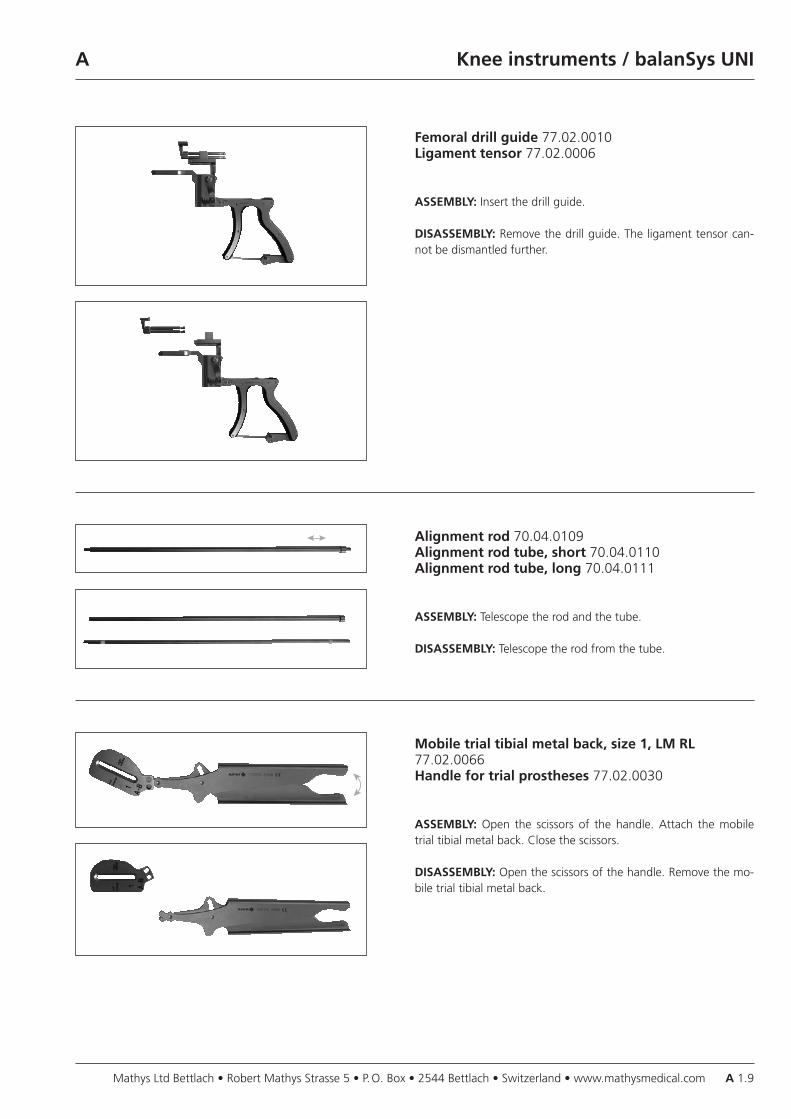
Femoral drill guide 77.02.0010Ligament tensor 77.02.0006
ASSEMBLY: Insert the drill guide.
DISASSEMBLY: Remove the drill guide. The ligament tensor can-not be dismantled further.
Alignment rod 70.04.0109Alignment rod tube, short 70.04.0110Alignment rod tube, long 70.04.0111
ASSEMBLY: Telescope the rod and the tube.
DISASSEMBLY: Telescope the rod from the tube.
Mobile trial tibial metal back, size 1, LM RL77.02.0066Handle for trial prostheses 77.02.0030
ASSEMBLY: Open the scissors of the handle. Attach the mobile trial tibial metal back. Close the scissors.
DISASSEMBLY: Open the scissors of the handle. Remove the mo-bile trial tibial metal back.
Mathys Ltd Bettlach • Robert Mathys Strasse 5 • P. O. Box • 2544 Bettlach • Switzerland • www.mathysmedical.comA 1.10
A Knee instruments / balanSys 4in1
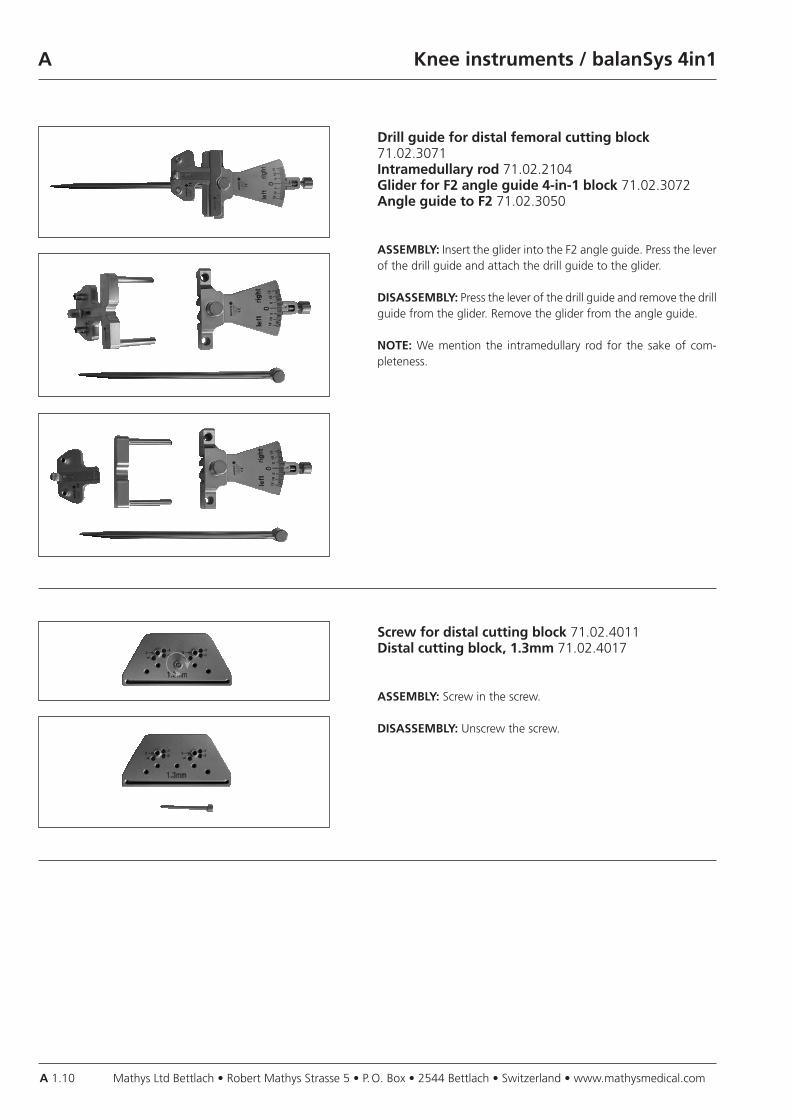
Drill guide for distal femoral cutting block71.02.3071Intramedullary rod 71.02.2104Glider for F2 angle guide 4-in-1 block 71.02.3072Angle guide to F2 71.02.3050
ASSEMBLY: Insert the glider into the F2 angle guide. Press the lever of the drill guide and attach the drill guide to the glider.
DISASSEMBLY: Press the lever of the drill guide and remove the drill guide from the glider. Remove the glider from the angle guide.
NOTE: We mention the intramedullary rod for the sake of com-pleteness.
Screw for distal cutting block 71.02.4011Distal cutting block, 1.3mm 71.02.4017
ASSEMBLY: Screw in the screw.
DISASSEMBLY: Unscrew the screw.
A
A 1.11Mathys Ltd Bettlach • Robert Mathys Strasse 5 • P. O. Box • 2544 Bettlach • Switzerland • www.mathysmedical.com
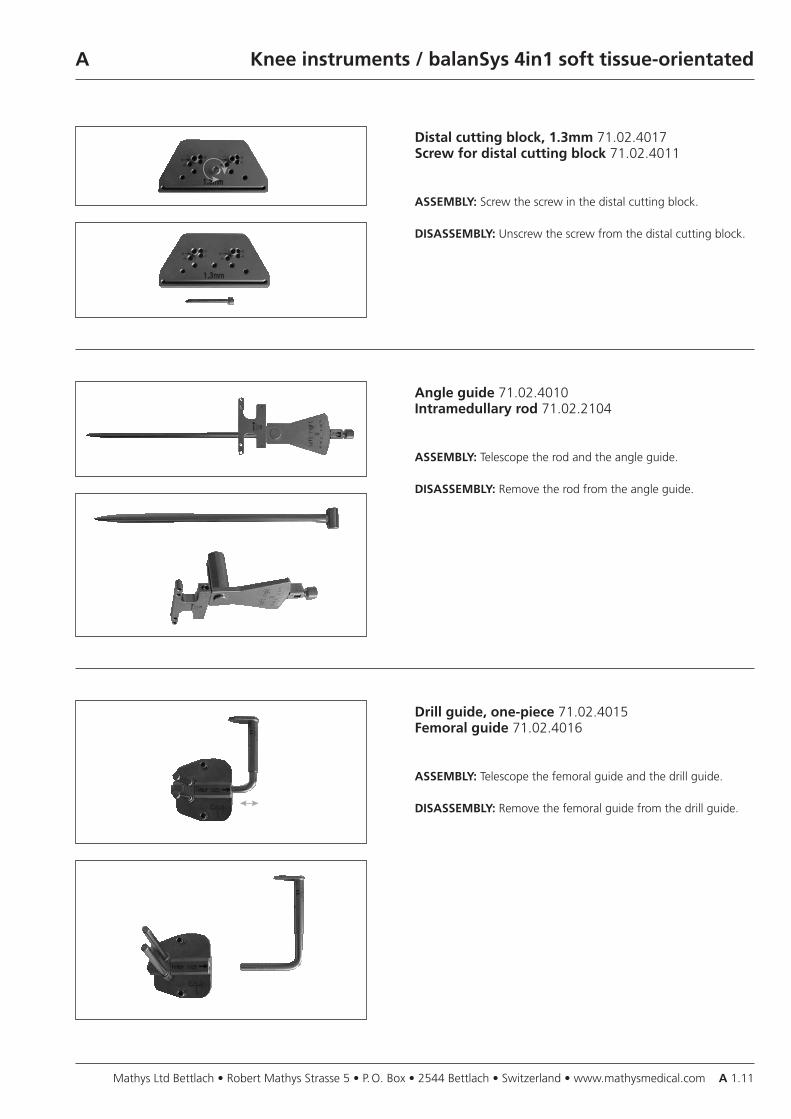
Distal cutting block, 1.3mm 71.02.4017Screw for distal cutting block 71.02.4011
ASSEMBLY: Screw the screw in the distal cutting block.
DISASSEMBLY: Unscrew the screw from the distal cutting block.
Knee instruments / balanSys 4in1 soft tissue-orientated
Angle guide 71.02.4010Intramedullary rod 71.02.2104
ASSEMBLY: Telescope the rod and the angle guide.
DISASSEMBLY: Remove the rod from the angle guide.
Drill guide, one-piece 71.02.4015Femoral guide 71.02.4016
ASSEMBLY: Telescope the femoral guide and the drill guide.
DISASSEMBLY: Remove the femoral guide from the drill guide.
Mathys Ltd Bettlach • Robert Mathys Strasse 5 • P. O. Box • 2544 Bettlach • Switzerland • www.mathysmedical.comA 1.12
A Knee instruments / balanSys 4in1 soft tissue-orientated
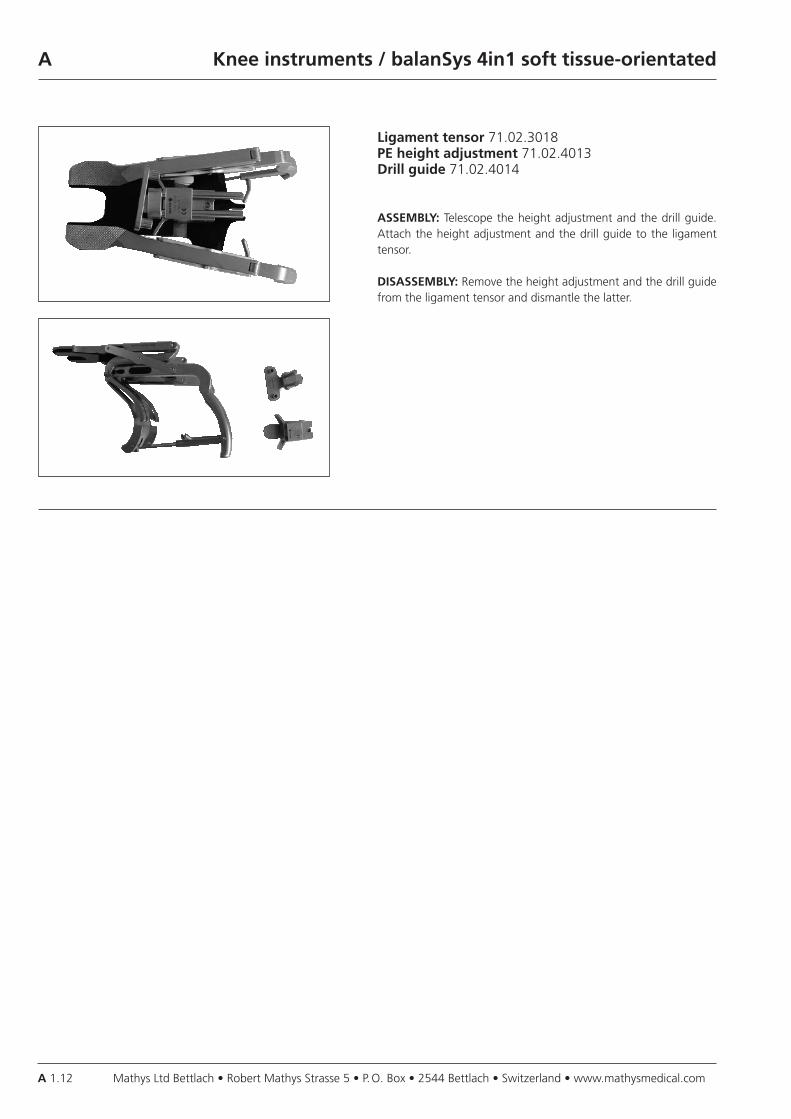
Ligament tensor 71.02.3018PE height adjustment 71.02.4013Drill guide 71.02.4014
ASSEMBLY: Telescope the height adjustment and the drill guide. Attach the height adjustment and the drill guide to the ligament tensor.
DISASSEMBLY: Remove the height adjustment and the drill guide from the ligament tensor and dismantle the latter.
A
A 1.13Mathys Ltd Bettlach • Robert Mathys Strasse 5 • P. O. Box • 2544 Bettlach • Switzerland • www.mathysmedical.com
Knee instruments / balanSys PS
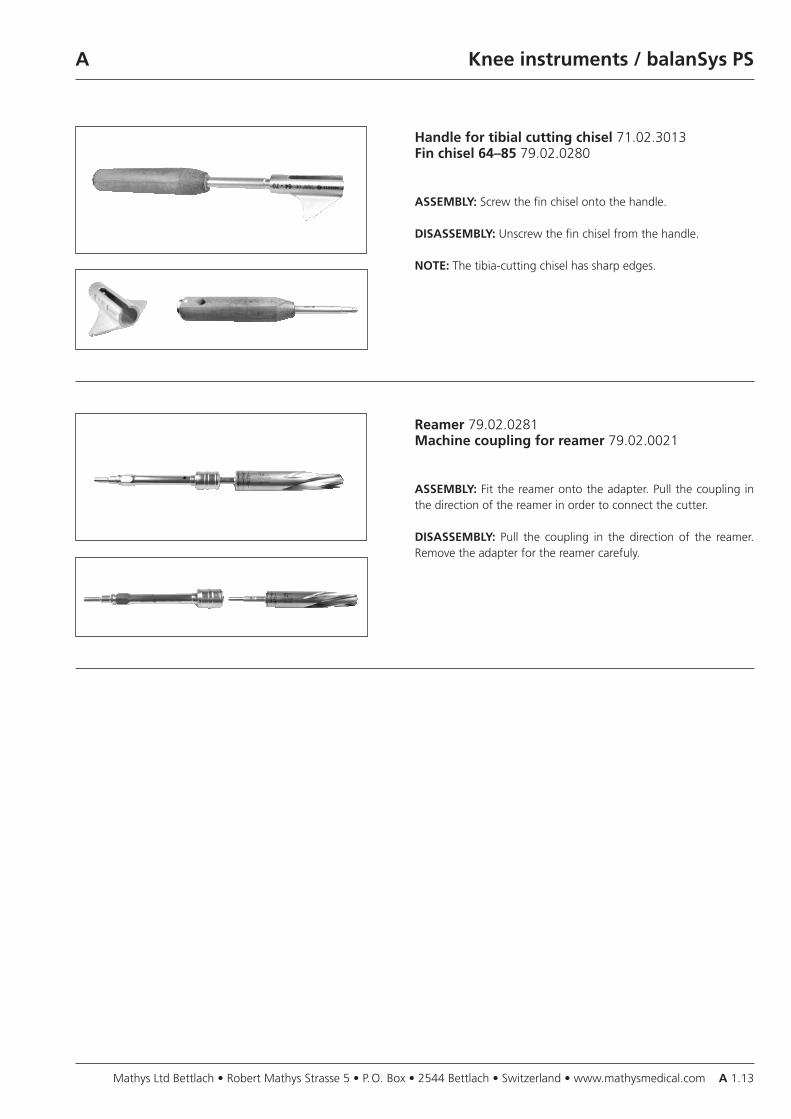
Handle for tibial cutting chisel 71.02.3013Fin chisel 64–85 79.02.0280
ASSEMBLY: Screw the fin chisel onto the handle.
DISASSEMBLY: Unscrew the fin chisel from the handle.
NOTE: The tibia-cutting chisel has sharp edges.
Reamer 79.02.0281Machine coupling for reamer 79.02.0021
ASSEMBLY: Fit the reamer onto the adapter. Pull the coupling in the direction of the reamer in order to connect the cutter.
DISASSEMBLY: Pull the coupling in the direction of the reamer. Remove the adapter for the reamer carefuly.


Mathys Ltd Bettlach • Robert Mathys Strasse 5 • P. O. Box • 2544 Bettlach • Switzerland • www.mathysmedical.com
A
A 2.1
Hip instruments / hip heads / bipolar
Cup impactor, curved 3.14.547Combination bolt 54.02.4101
ASSEMBLY: Screw the combination bolt on the cup impactor.
DISASSEMBLY: Unscrew the combined bolt from the cup impac-tor.

Mathys Ltd Bettlach • Robert Mathys Strasse 5 • P. O. Box • 2544 Bettlach • Switzerland • www.mathysmedical.com A 2.2.1
A
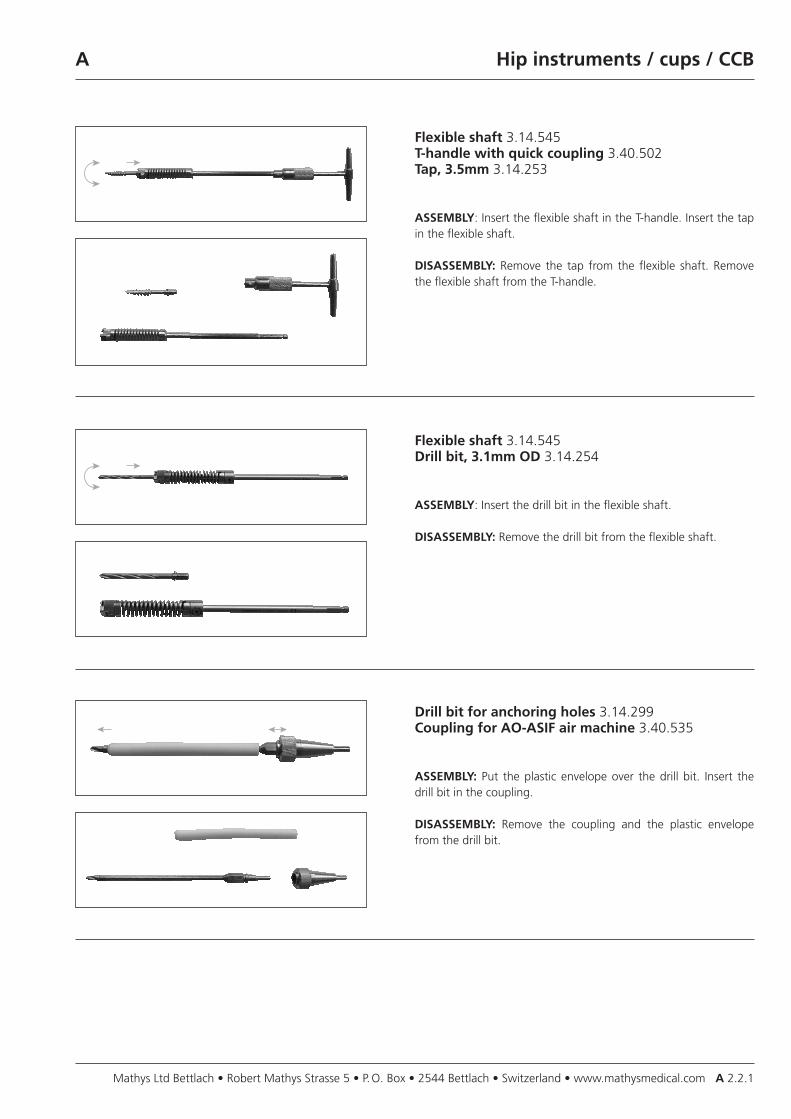
Flexible shaft 3.14.545T-handle with quick coupling 3.40.502Tap, 3.5mm 3.14.253
ASSEMBLY: Insert the flexible shaft in the T-handle. Insert the tap in the flexible shaft.
DISASSEMBLY: Remove the tap from the flexible shaft. Remove the flexible shaft from the T-handle.
Flexible shaft 3.14.545Drill bit, 3.1mm OD 3.14.254
ASSEMBLY: Insert the drill bit in the flexible shaft.
DISASSEMBLY: Remove the drill bit from the flexible shaft.
Drill bit for anchoring holes 3.14.299Coupling for AO-ASIF air machine 3.40.535
ASSEMBLY: Put the plastic envelope over the drill bit. Insert the drill bit in the coupling.
DISASSEMBLY: Remove the coupling and the plastic envelope from the drill bit.
Hip instruments / cups / CCB
Mathys Ltd Bettlach • Robert Mathys Strasse 5 • P. O. Box • 2544 Bettlach • Switzerland • www.mathysmedical.comA 2.2.2
A Hip instruments / cups / CCN
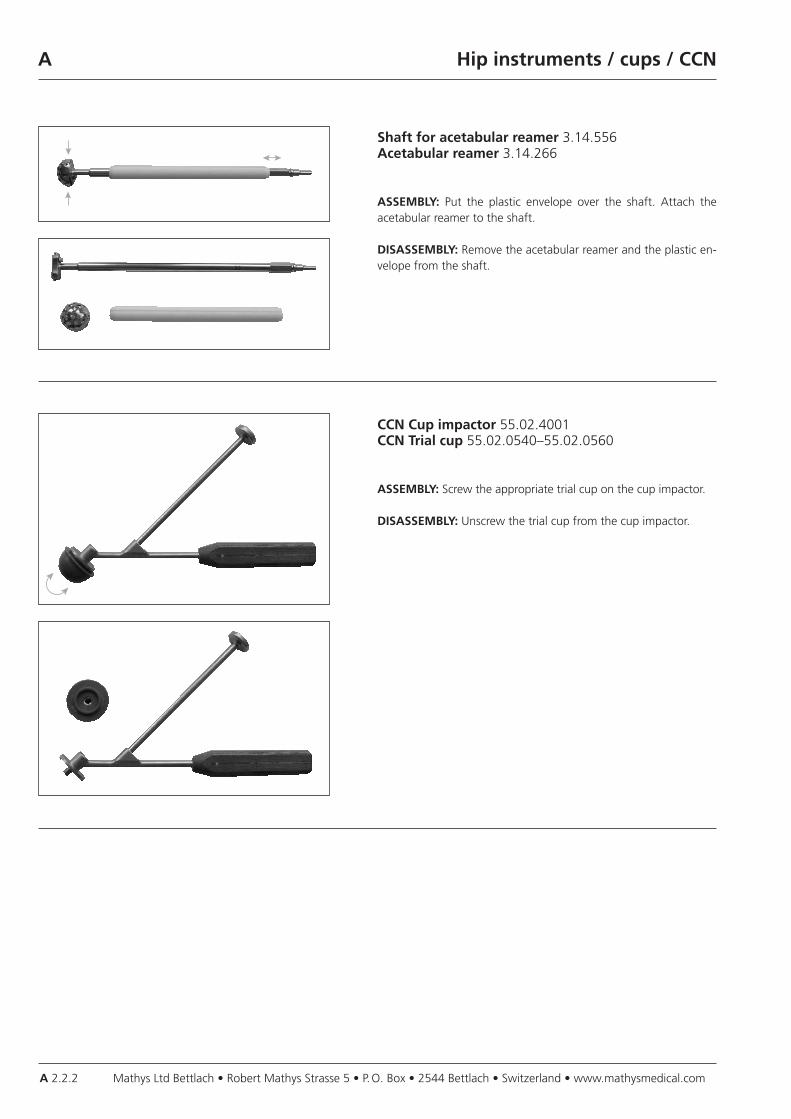
Shaft for acetabular reamer 3.14.556Acetabular reamer 3.14.266
ASSEMBLY: Put the plastic envelope over the shaft. Attach the acetabular reamer to the shaft.
DISASSEMBLY: Remove the acetabular reamer and the plastic en-velope from the shaft.
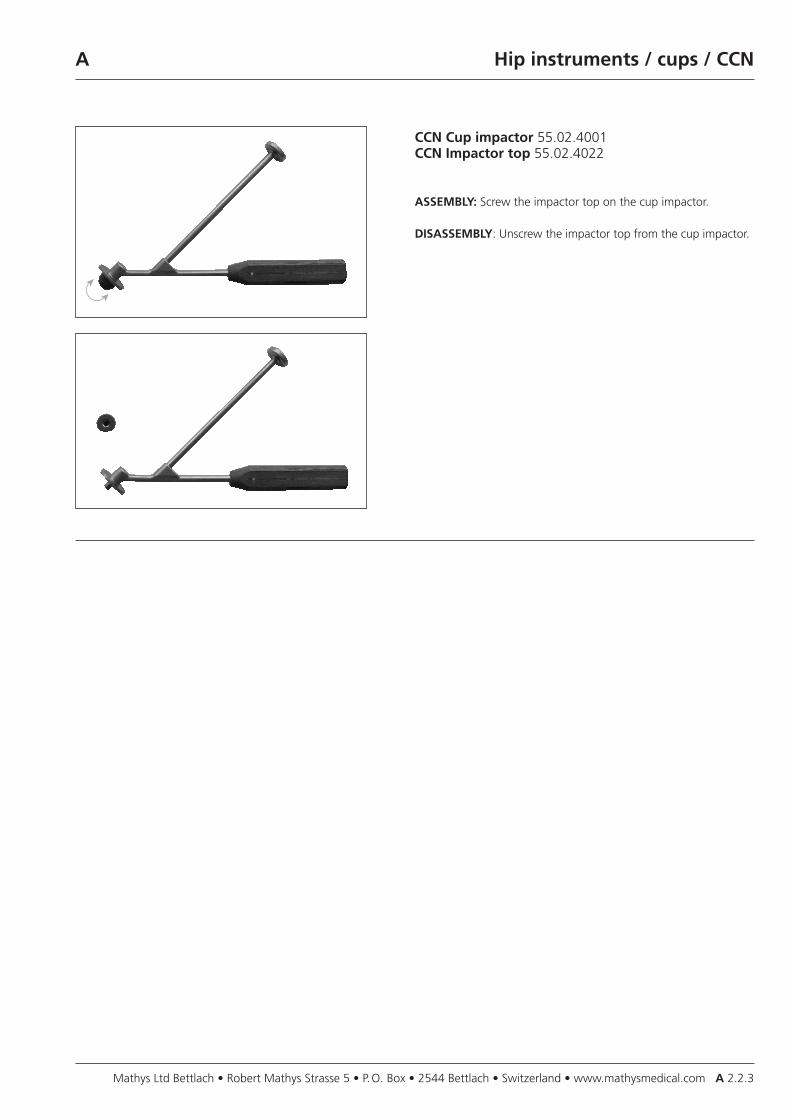
CCN Cup impactor 55.02.4001CCN Trial cup 55.02.0540–55.02.0560
ASSEMBLY: Screw the appropriate trial cup on the cup impactor.
DISASSEMBLY: Unscrew the trial cup from the cup impactor.
Mathys Ltd Bettlach • Robert Mathys Strasse 5 • P. O. Box • 2544 Bettlach • Switzerland • www.mathysmedical.com A 2.2.3
A
CCN Cup impactor 55.02.4001CCN Impactor top 55.02.4022
ASSEMBLY: Screw the impactor top on the cup impactor.
DISASSEMBLY: Unscrew the impactor top from the cup impactor.
Hip instruments / cups / CCN
Mathys Ltd Bettlach • Robert Mathys Strasse 5 • P. O. Box • 2544 Bettlach • Switzerland • www.mathysmedical.comA 2.2.4
A Hip instruments / cups / expanSys
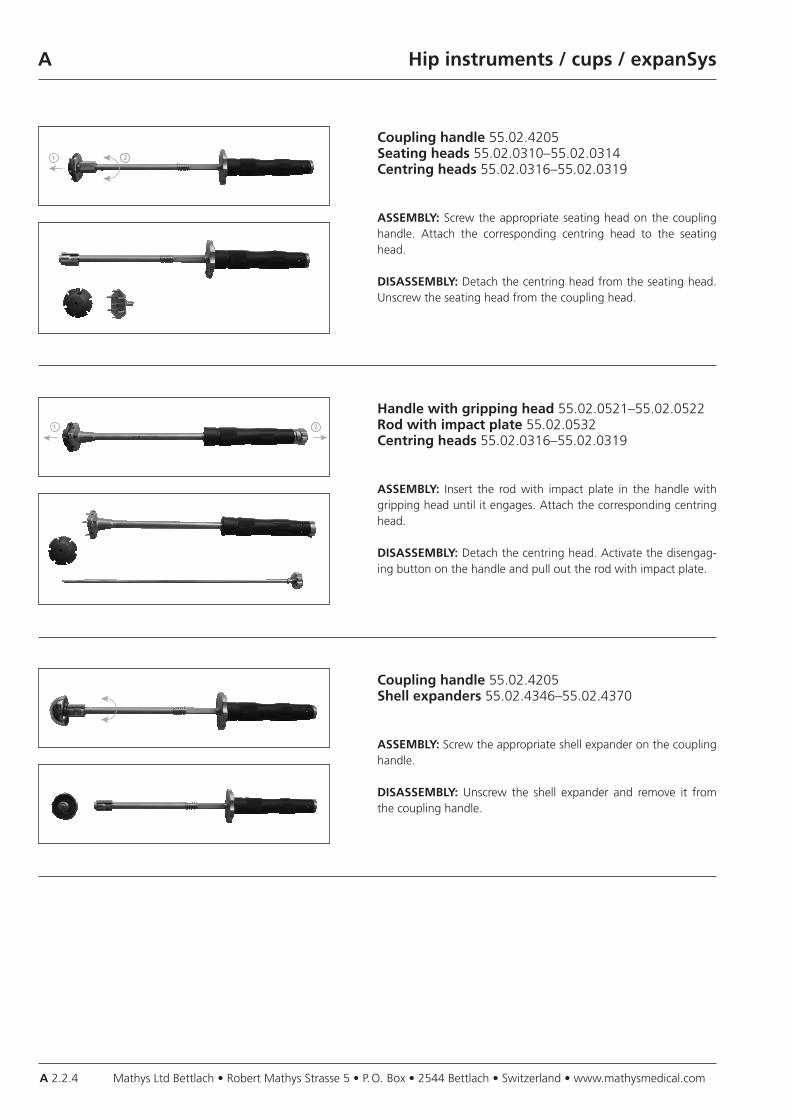
Coupling handle 55.02.4205Seating heads 55.02.0310–55.02.0314Centring heads 55.02.0316–55.02.0319
ASSEMBLY: Screw the appropriate seating head on the coupling handle. Attach the corresponding centring head to the seating head.
DISASSEMBLY: Detach the centring head from the seating head. Unscrew the seating head from the coupling head.
1 2
Handle with gripping head 55.02.0521–55.02.0522Rod with impact plate 55.02.0532Centring heads 55.02.0316–55.02.0319
ASSEMBLY: Insert the rod with impact plate in the handle with gripping head until it engages. Attach the corresponding centring head.
DISASSEMBLY: Detach the centring head. Activate the disengag-ing button on the handle and pull out the rod with impact plate.
1 2
Coupling handle 55.02.4205Shell expanders 55.02.4346–55.02.4370
ASSEMBLY: Screw the appropriate shell expander on the coupling handle.
DISASSEMBLY: Unscrew the shell expander and remove it from the coupling handle.
Mathys Ltd Bettlach • Robert Mathys Strasse 5 • P. O. Box • 2544 Bettlach • Switzerland • www.mathysmedical.com A 2.2.5
A Hip instruments / cups / expanSys
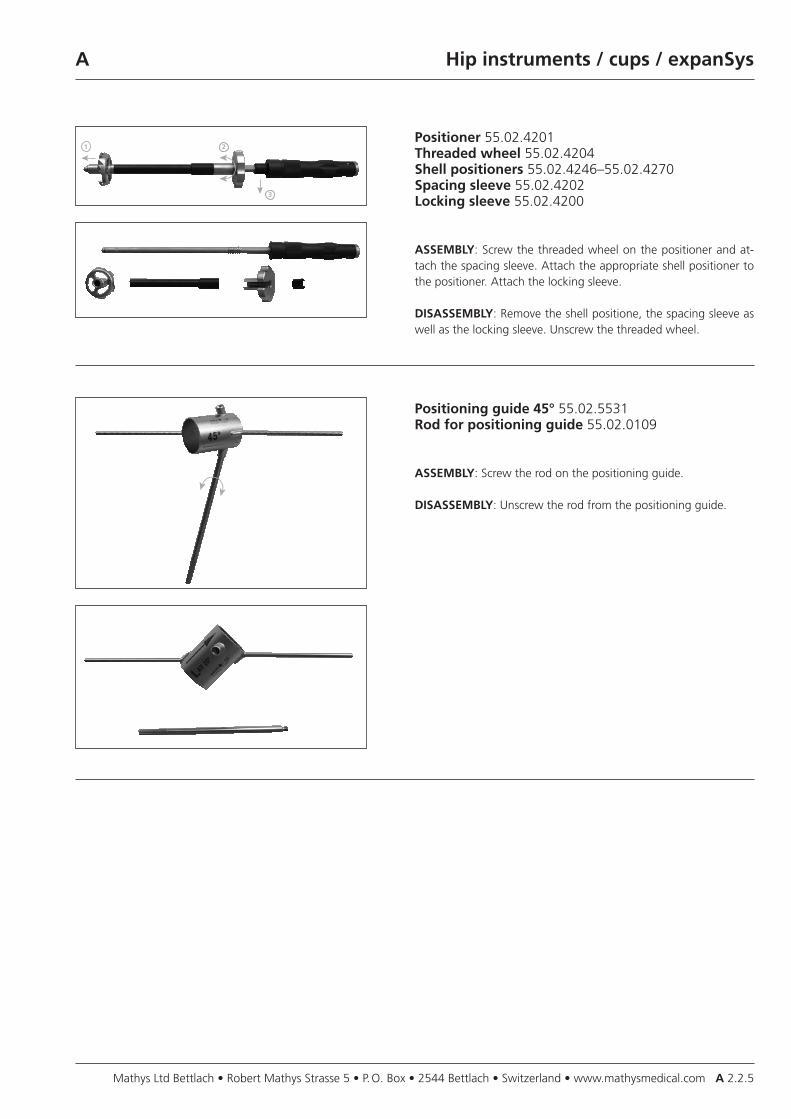
Positioner 55.02.4201Threaded wheel 55.02.4204Shell positioners 55.02.4246–55.02.4270Spacing sleeve 55.02.4202Locking sleeve 55.02.4200
ASSEMBLY: Screw the threaded wheel on the positioner and at-tach the spacing sleeve. Attach the appropriate shell positioner to the positioner. Attach the locking sleeve.
DISASSEMBLY: Remove the shell positione, the spacing sleeve as well as the locking sleeve. Unscrew the threaded wheel.
1 2
3
Positioning guide 45° 55.02.5531Rod for positioning guide 55.02.0109
ASSEMBLY: Screw the rod on the positioning guide.
DISASSEMBLY: Unscrew the rod from the positioning guide.
Mathys Ltd Bettlach • Robert Mathys Strasse 5 • P. O. Box • 2544 Bettlach • Switzerland • www.mathysmedical.comA 2.2.6
A Hip instruments / cups / reamers
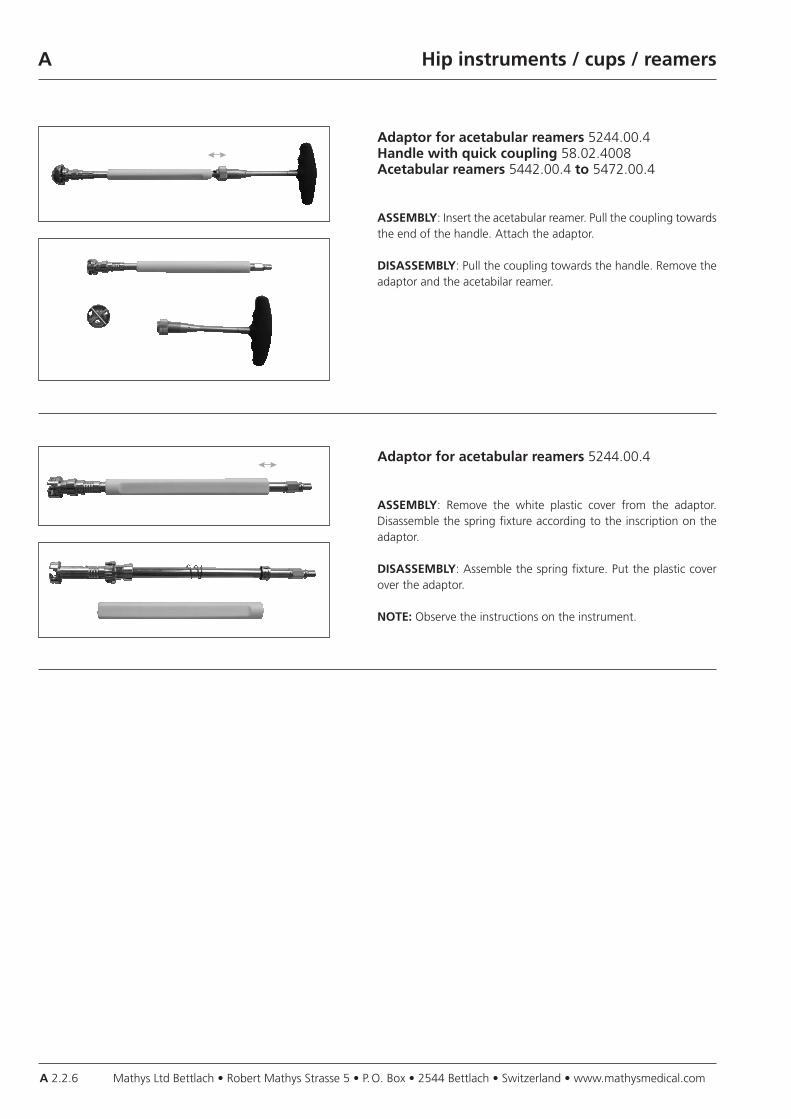
Adaptor for acetabular reamers 5244.00.4Handle with quick coupling 58.02.4008Acetabular reamers 5442.00.4 to 5472.00.4
ASSEMBLY: Insert the acetabular reamer. Pull the coupling towards the end of the handle. Attach the adaptor.
DISASSEMBLY: Pull the coupling towards the handle. Remove the adaptor and the acetabilar reamer.
Adaptor for acetabular reamers 5244.00.4
ASSEMBLY: Remove the white plastic cover from the adaptor. Disassemble the spring fixture according to the inscription on the adaptor.
DISASSEMBLY: Assemble the spring fixture. Put the plastic cover over the adaptor.
NOTE: Observe the instructions on the instrument.
Mathys Ltd Bettlach • Robert Mathys Strasse 5 • P. O. Box • 2544 Bettlach • Switzerland • www.mathysmedical.com A 2.2.7
A Hip instruments / cups / reamers
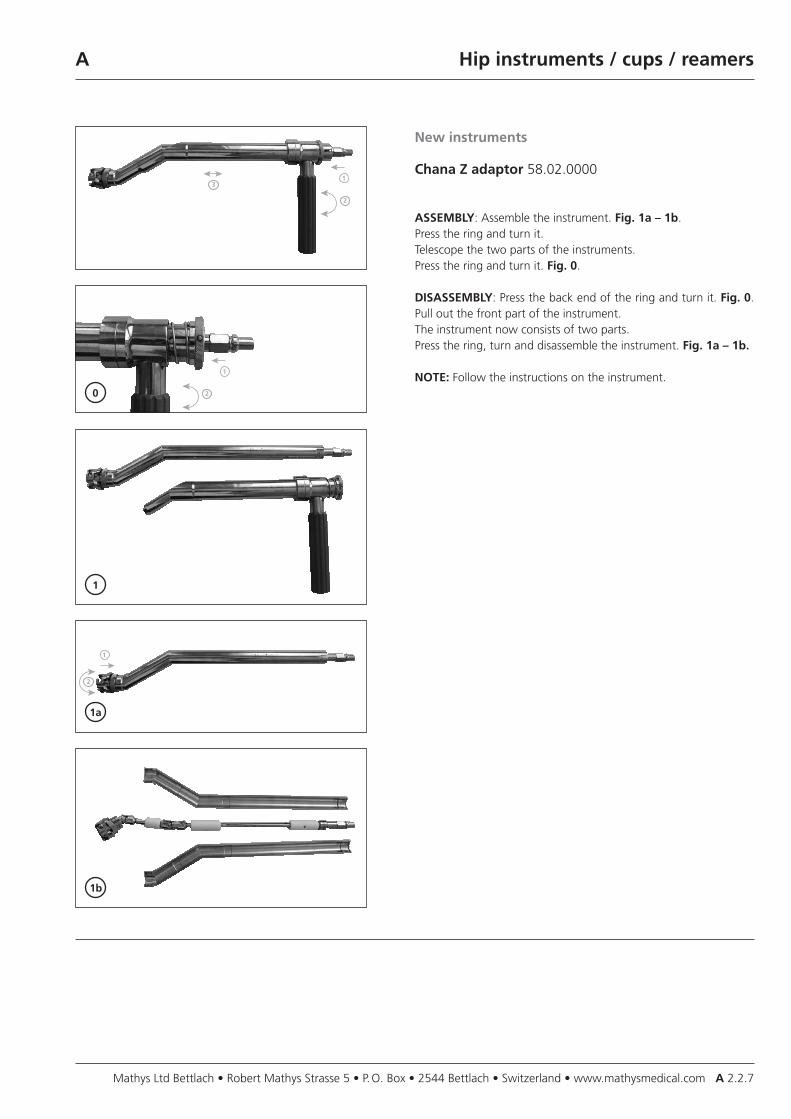
New instruments
Chana Z adaptor 58.02.0000
ASSEMBLY: Assemble the instrument. Fig. 1a – 1b. Press the ring and turn it. Telescope the two parts of the instruments.Press the ring and turn it. Fig. 0.
DISASSEMBLY: Press the back end of the ring and turn it. Fig. 0. Pull out the front part of the instrument. The instrument now consists of two parts.Press the ring, turn and disassemble the instrument. Fig. 1a – 1b.
NOTE: Follow the instructions on the instrument.
1
2
3
1
20
1
1a
1
2
1b
Mathys Ltd Bettlach • Robert Mathys Strasse 5 • P. O. Box • 2544 Bettlach • Switzerland • www.mathysmedical.comA 2.2.8
A Hip instruments / cups / RM Classic cup
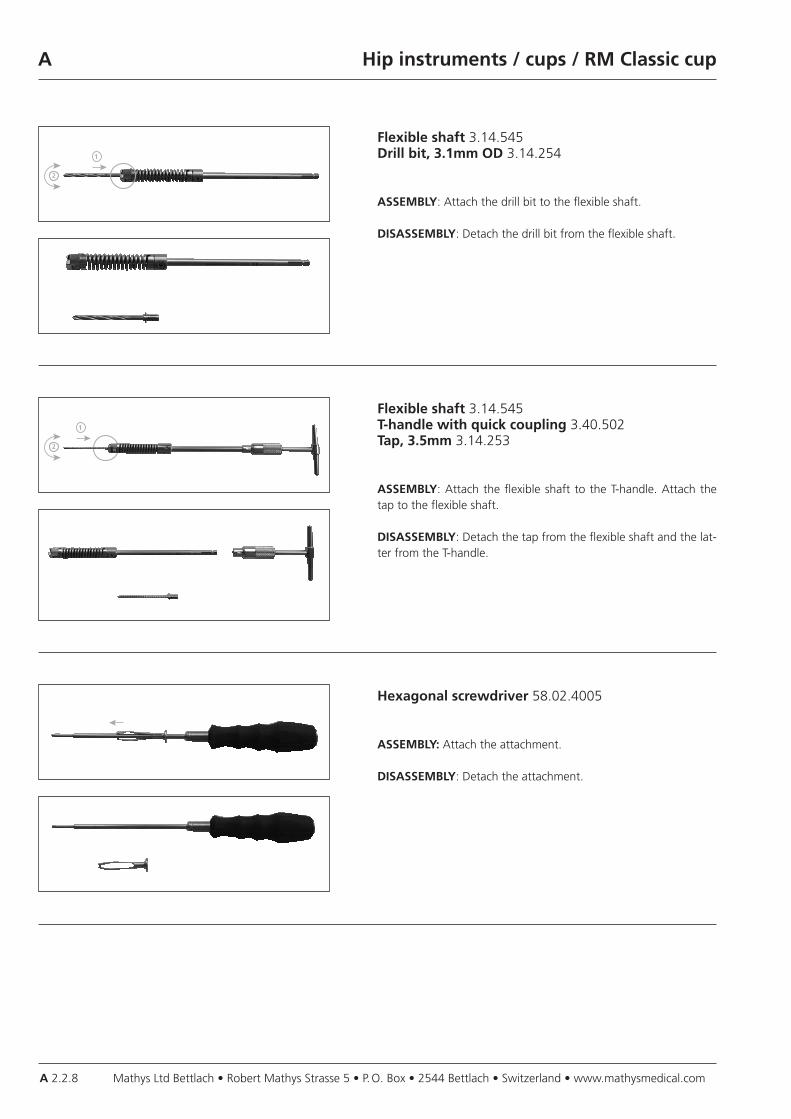
Flexible shaft 3.14.545Drill bit, 3.1mm OD 3.14.254
ASSEMBLY: Attach the drill bit to the flexible shaft.
DISASSEMBLY: Detach the drill bit from the flexible shaft.
1
2
Flexible shaft 3.14.545T-handle with quick coupling 3.40.502Tap, 3.5mm 3.14.253
ASSEMBLY: Attach the flexible shaft to the T-handle. Attach the tap to the flexible shaft.
DISASSEMBLY: Detach the tap from the flexible shaft and the lat-ter from the T-handle.
1
2
Hexagonal screwdriver 58.02.4005
ASSEMBLY: Attach the attachment.
DISASSEMBLY: Detach the attachment.
Mathys Ltd Bettlach • Robert Mathys Strasse 5 • P. O. Box • 2544 Bettlach • Switzerland • www.mathysmedical.com A 2.2.9
A Hip instruments / cups / RM Classic cup
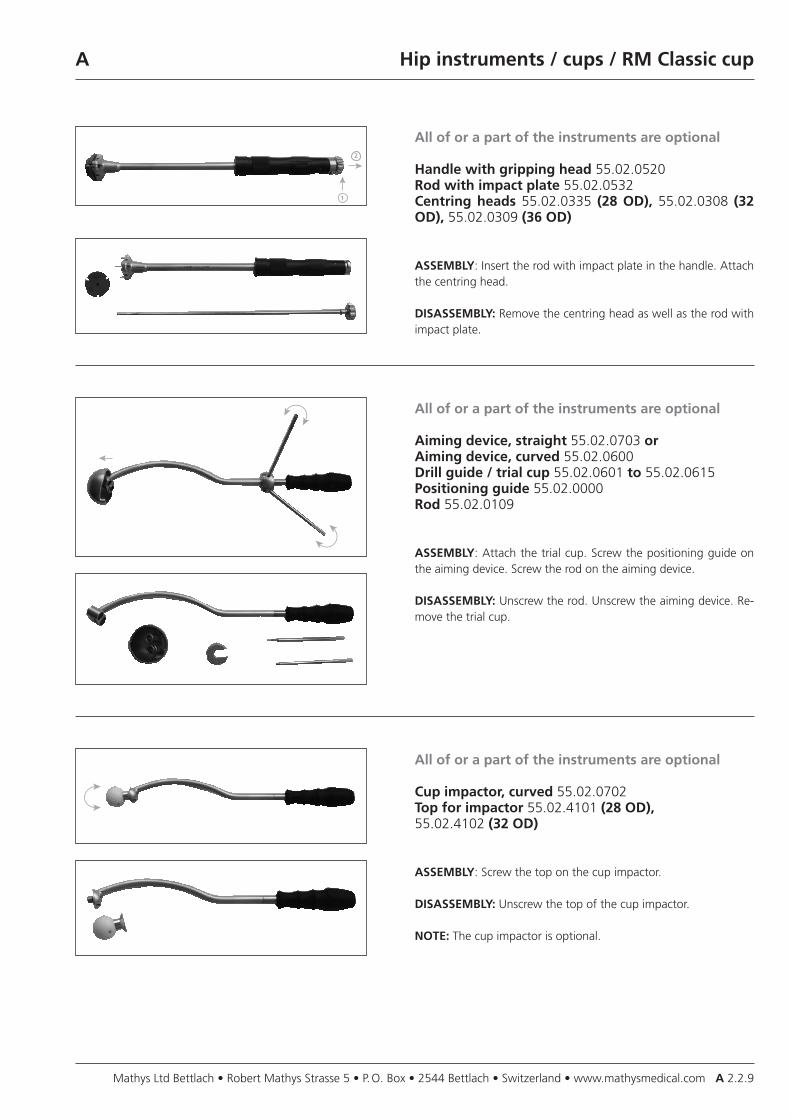
All of or a part of the instruments are optional
Handle with gripping head 55.02.0520Rod with impact plate 55.02.0532Centring heads 55.02.0335 (28 OD), 55.02.0308 (32 OD), 55.02.0309 (36 OD)
ASSEMBLY: Insert the rod with impact plate in the handle. Attach the centring head.
DISASSEMBLY: Remove the centring head as well as the rod with impact plate.
1
2
All of or a part of the instruments are optional
Aiming device, straight 55.02.0703 or Aiming device, curved 55.02.0600Drill guide / trial cup 55.02.0601 to 55.02.0615Positioning guide 55.02.0000Rod 55.02.0109
ASSEMBLY: Attach the trial cup. Screw the positioning guide on the aiming device. Screw the rod on the aiming device.
DISASSEMBLY: Unscrew the rod. Unscrew the aiming device. Re-move the trial cup.
All of or a part of the instruments are optional
Cup impactor, curved 55.02.0702Top for impactor 55.02.4101 (28 OD), 55.02.4102 (32 OD)
ASSEMBLY: Screw the top on the cup impactor.
DISASSEMBLY: Unscrew the top of the cup impactor.
NOTE: The cup impactor is optional.
Mathys Ltd Bettlach • Robert Mathys Strasse 5 • P. O. Box • 2544 Bettlach • Switzerland • www.mathysmedical.comA 2.2.10
A Hip instruments / cups / RM Pressfit
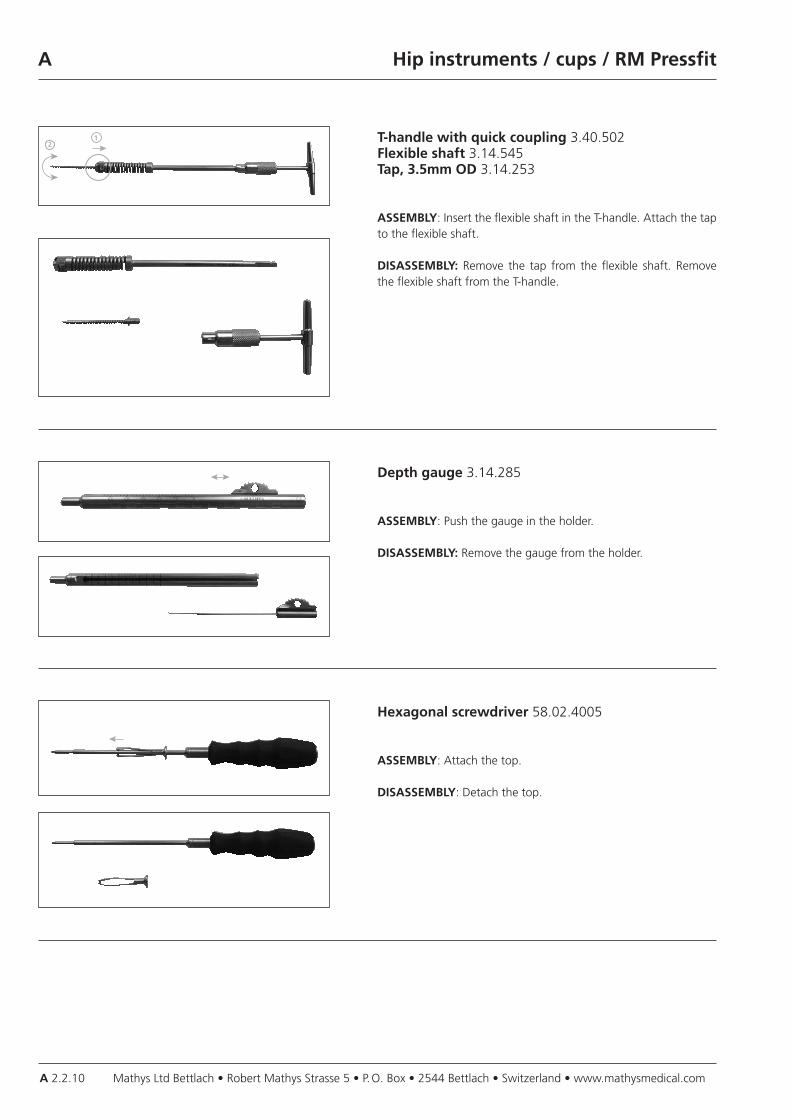
T-handle with quick coupling 3.40.502Flexible shaft 3.14.545Tap, 3.5mm OD 3.14.253
ASSEMBLY: Insert the flexible shaft in the T-handle. Attach the tap to the flexible shaft.
DISASSEMBLY: Remove the tap from the flexible shaft. Remove the flexible shaft from the T-handle.
12
Depth gauge 3.14.285
ASSEMBLY: Push the gauge in the holder.
DISASSEMBLY: Remove the gauge from the holder.
Hexagonal screwdriver 58.02.4005
ASSEMBLY: Attach the top.
DISASSEMBLY: Detach the top.
Mathys Ltd Bettlach • Robert Mathys Strasse 5 • P. O. Box • 2544 Bettlach • Switzerland • www.mathysmedical.com A 2.2.11
A Hip instruments / cups / RM Pressfit
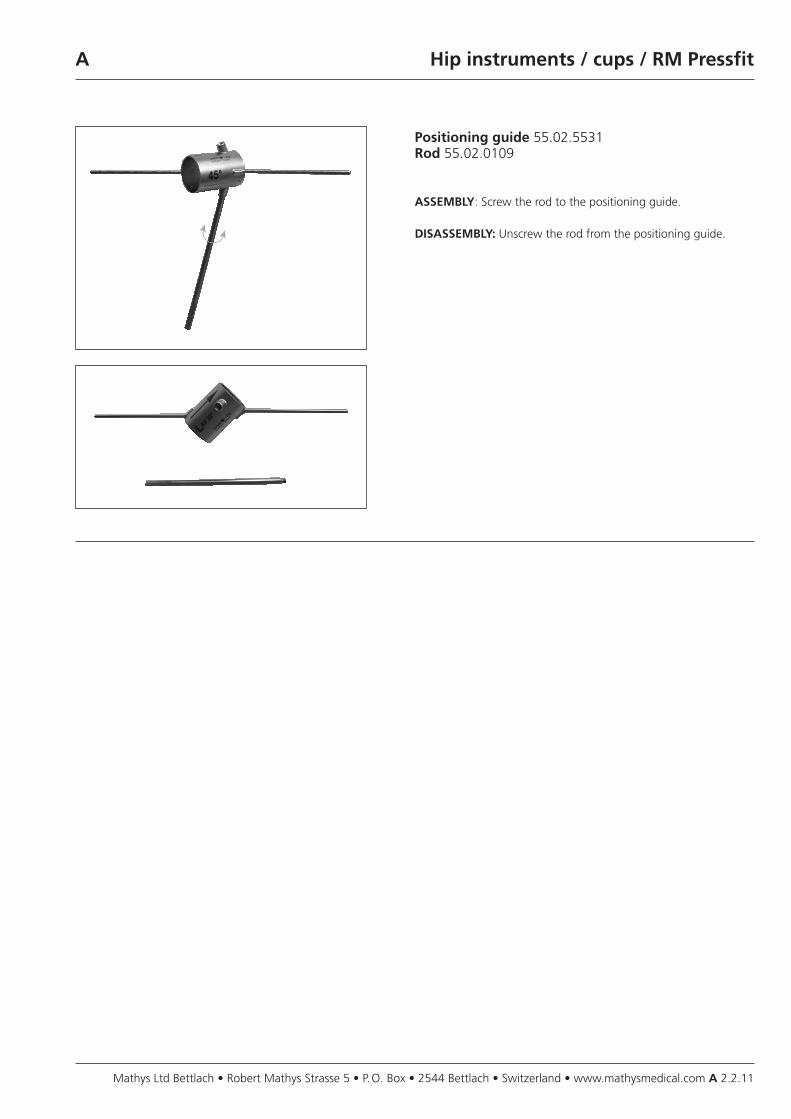
Positioning guide 55.02.5531Rod 55.02.0109
ASSEMBLY: Screw the rod to the positioning guide.
DISASSEMBLY: Unscrew the rod from the positioning guide.
Mathys Ltd Bettlach • Robert Mathys Strasse 5 • P. O. Box • 2544 Bettlach • Switzerland • www.mathysmedical.comA 2.2.12
A Hip instruments / cups / Rotacup
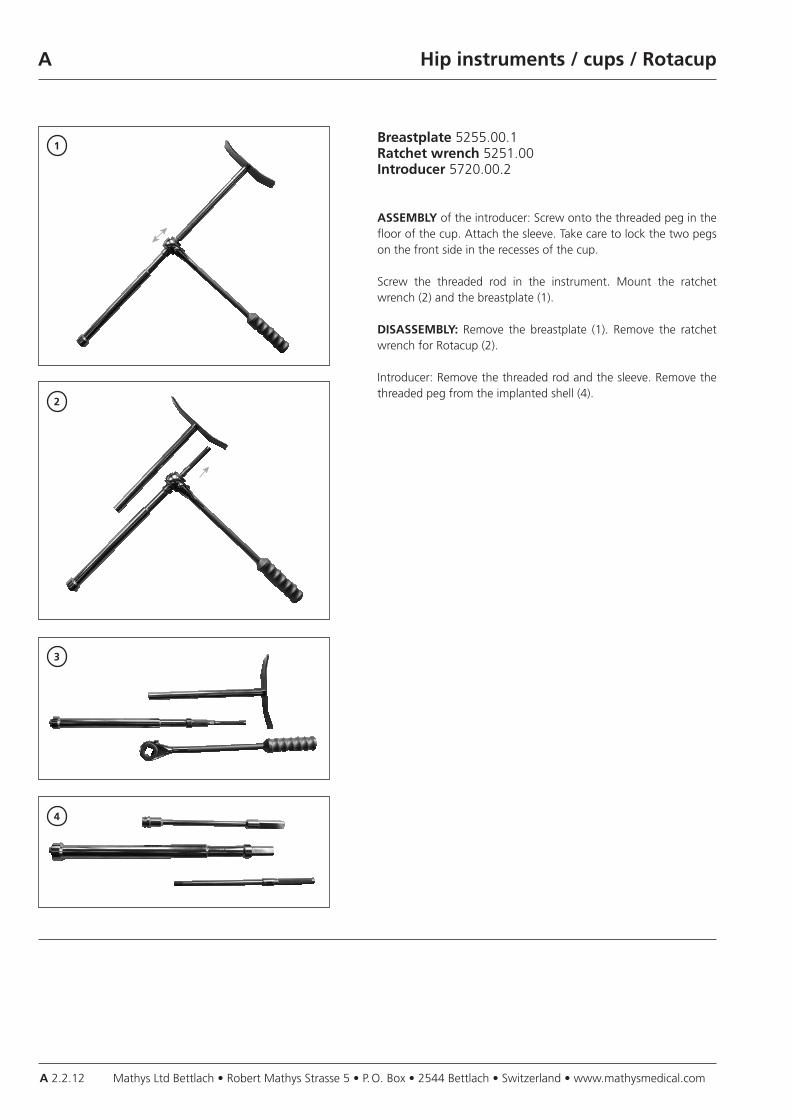
Breastplate 5255.00.1Ratchet wrench 5251.00Introducer 5720.00.2
ASSEMBLY of the introducer: Screw onto the threaded peg in the floor of the cup. Attach the sleeve. Take care to lock the two pegs on the front side in the recesses of the cup.
Screw the threaded rod in the instrument. Mount the ratchet wrench (2) and the breastplate (1).
DISASSEMBLY: Remove the breastplate (1). Remove the ratchet wrench for Rotacup (2).
Introducer: Remove the threaded rod and the sleeve. Remove the threaded peg from the implanted shell (4).
1
2
3
4
Mathys Ltd Bettlach • Robert Mathys Strasse 5 • P. O. Box • 2544 Bettlach • Switzerland • www.mathysmedical.com A 2.2.13
A Hip instruments / cups / seleXys
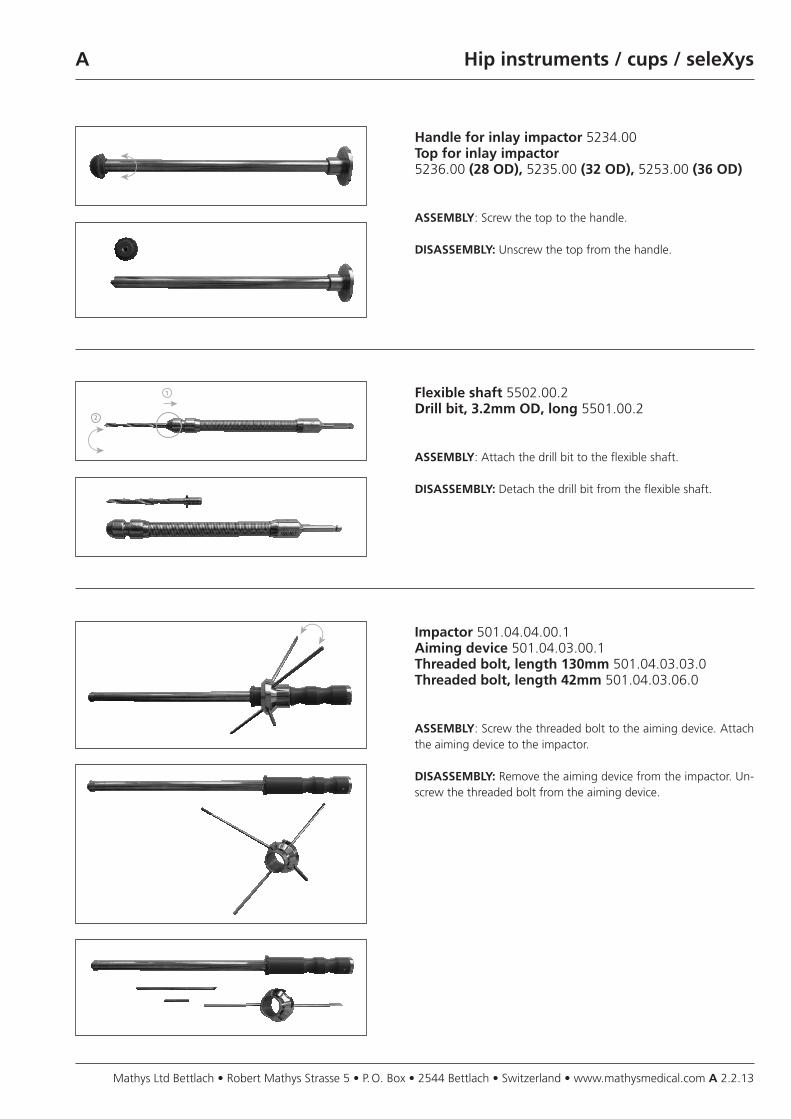
Handle for inlay impactor 5234.00Top for inlay impactor 5236.00 (28 OD), 5235.00 (32 OD), 5253.00 (36 OD)
ASSEMBLY: Screw the top to the handle.
DISASSEMBLY: Unscrew the top from the handle.
Flexible shaft 5502.00.2Drill bit, 3.2mm OD, long 5501.00.2
ASSEMBLY: Attach the drill bit to the flexible shaft.
DISASSEMBLY: Detach the drill bit from the flexible shaft.
1
2
Impactor 501.04.04.00.1Aiming device 501.04.03.00.1Threaded bolt, length 130mm 501.04.03.03.0Threaded bolt, length 42mm 501.04.03.06.0
ASSEMBLY: Screw the threaded bolt to the aiming device. Attach the aiming device to the impactor.
DISASSEMBLY: Remove the aiming device from the impactor. Un-screw the threaded bolt from the aiming device.
Mathys Ltd Bettlach • Robert Mathys Strasse 5 • P. O. Box • 2544 Bettlach • Switzerland • www.mathysmedical.comA 2.2.14
A Hip instruments / cups / seleXys
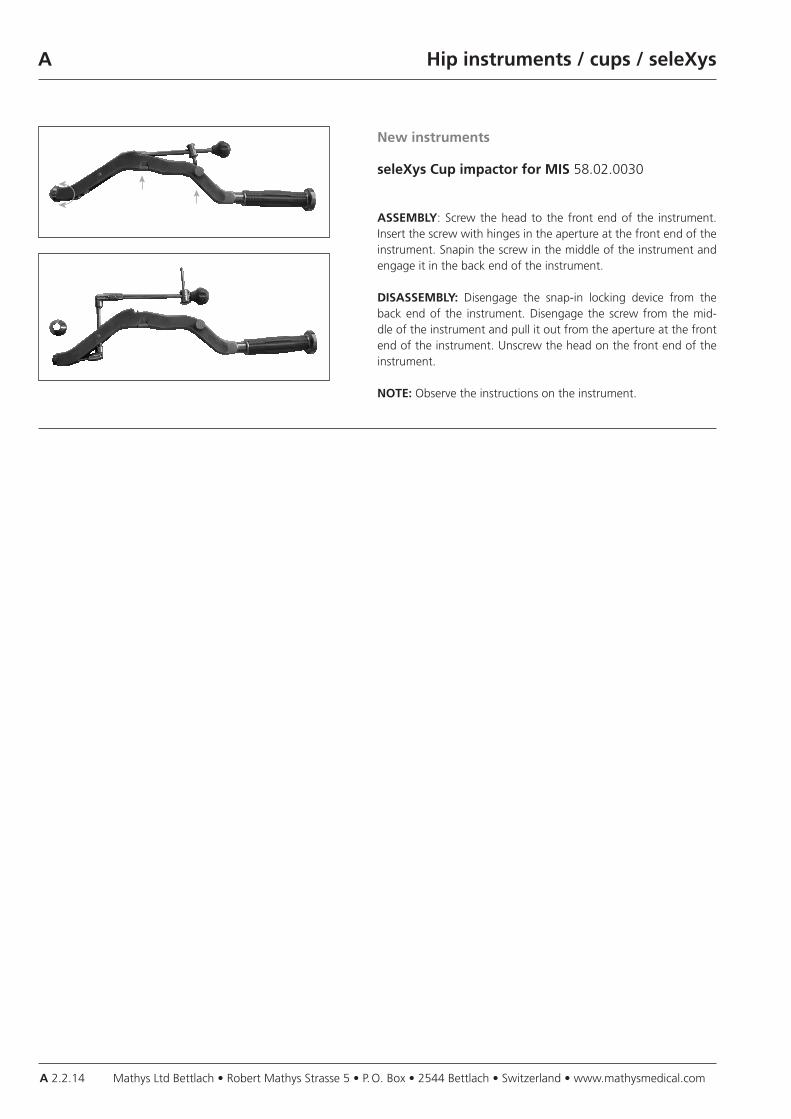
New instruments
seleXys Cup impactor for MIS 58.02.0030
ASSEMBLY: Screw the head to the front end of the instrument. Insert the screw with hinges in the aperture at the front end of the instrument. Snapin the screw in the middle of the instrument and engage it in the back end of the instrument.
DISASSEMBLY: Disengage the snap-in locking device from the back end of the instrument. Disengage the screw from the mid-dle of the instrument and pull it out from the aperture at the front end of the instrument. Unscrew the head on the front end of the instrument.
NOTE: Observe the instructions on the instrument.
Mathys Ltd Bettlach • Robert Mathys Strasse 5 • P. O. Box • 2544 Bettlach • Switzerland • www.mathysmedical.com A 2.3.1
A
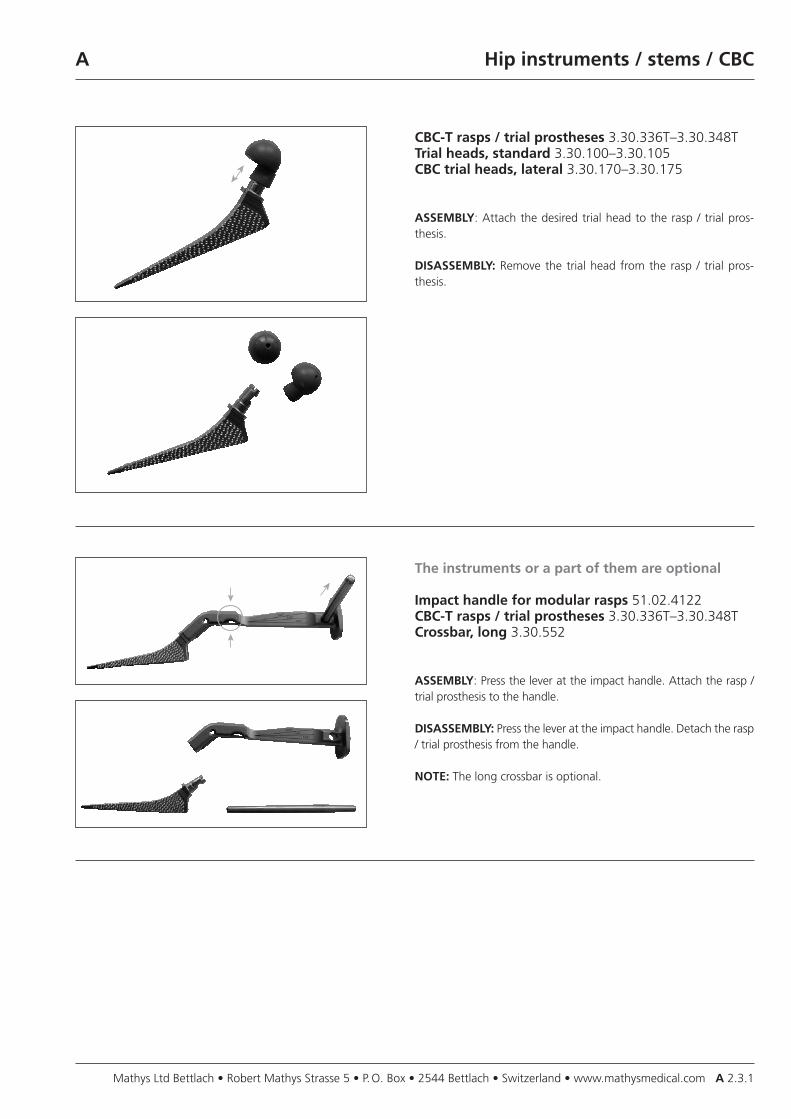
CBC-T rasps / trial prostheses 3.30.336T–3.30.348TTrial heads, standard 3.30.100–3.30.105CBC trial heads, lateral 3.30.170–3.30.175
ASSEMBLY: Attach the desired trial head to the rasp / trial pros-thesis.
DISASSEMBLY: Remove the trial head from the rasp / trial pros-thesis.
Hip instruments / stems / CBC
The instruments or a part of them are optional
Impact handle for modular rasps 51.02.4122CBC-T rasps / trial prostheses 3.30.336T–3.30.348TCrossbar, long 3.30.552
ASSEMBLY: Press the lever at the impact handle. Attach the rasp / trial prosthesis to the handle.
DISASSEMBLY: Press the lever at the impact handle. Detach the rasp / trial prosthesis from the handle.
NOTE: The long crossbar is optional.
Mathys Ltd Bettlach • Robert Mathys Strasse 5 • P. O. Box • 2544 Bettlach • Switzerland • www.mathysmedical.comA 2.3.2
A
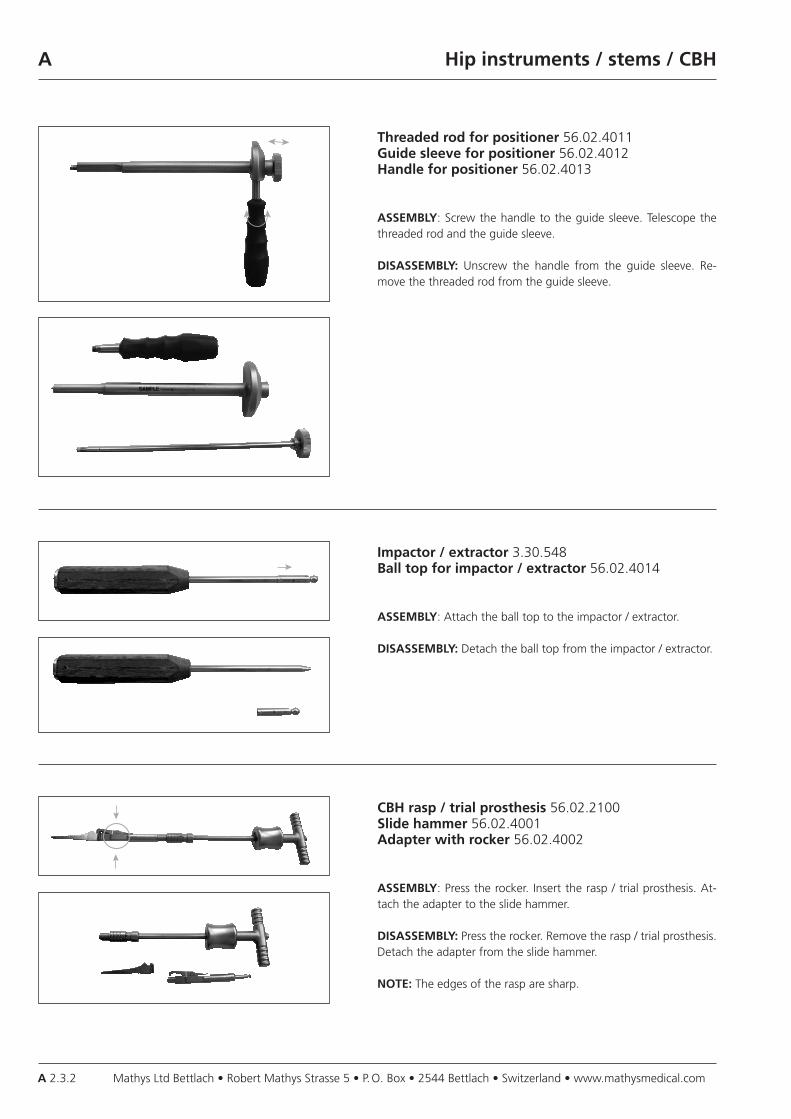
Threaded rod for positioner 56.02.4011Guide sleeve for positioner 56.02.4012Handle for positioner 56.02.4013
ASSEMBLY: Screw the handle to the guide sleeve. Telescope the threaded rod and the guide sleeve.
DISASSEMBLY: Unscrew the handle from the guide sleeve. Re-move the threaded rod from the guide sleeve.
Hip instruments / stems / CBH
Impactor / extractor 3.30.548Ball top for impactor / extractor 56.02.4014
ASSEMBLY: Attach the ball top to the impactor / extractor.
DISASSEMBLY: Detach the ball top from the impactor / extractor.
CBH rasp / trial prosthesis 56.02.2100Slide hammer 56.02.4001Adapter with rocker 56.02.4002
ASSEMBLY: Press the rocker. Insert the rasp / trial prosthesis. At-tach the adapter to the slide hammer.
DISASSEMBLY: Press the rocker. Remove the rasp / trial prosthesis. Detach the adapter from the slide hammer.
NOTE: The edges of the rasp are sharp.
Mathys Ltd Bettlach • Robert Mathys Strasse 5 • P. O. Box • 2544 Bettlach • Switzerland • www.mathysmedical.com A 2.3.3
A
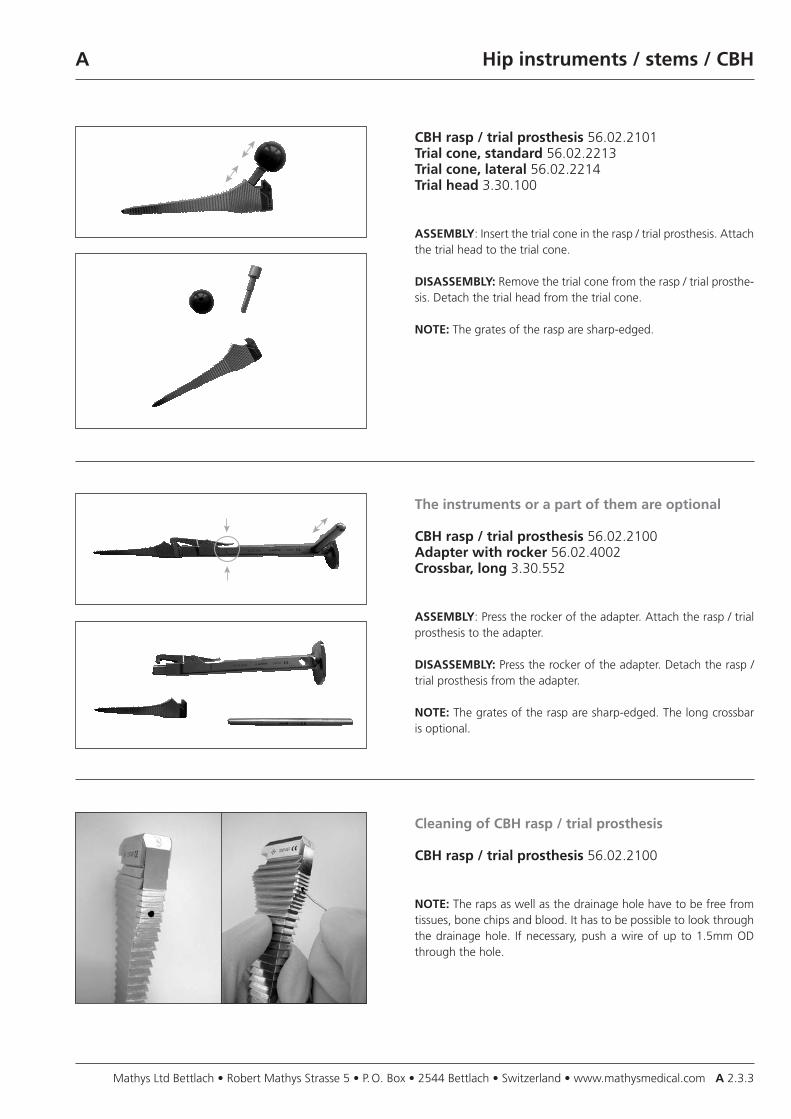
CBH rasp / trial prosthesis 56.02.2101Trial cone, standard 56.02.2213Trial cone, lateral 56.02.2214Trial head 3.30.100
ASSEMBLY: Insert the trial cone in the rasp / trial prosthesis. Attach the trial head to the trial cone.
DISASSEMBLY: Remove the trial cone from the rasp / trial prosthe-sis. Detach the trial head from the trial cone.
NOTE: The grates of the rasp are sharp-edged.
Hip instruments / stems / CBH
The instruments or a part of them are optional
CBH rasp / trial prosthesis 56.02.2100Adapter with rocker 56.02.4002Crossbar, long 3.30.552
ASSEMBLY: Press the rocker of the adapter. Attach the rasp / trial prosthesis to the adapter.
DISASSEMBLY: Press the rocker of the adapter. Detach the rasp / trial prosthesis from the adapter.
NOTE: The grates of the rasp are sharp-edged. The long crossbar is optional.
Cleaning of CBH rasp / trial prosthesis
CBH rasp / trial prosthesis 56.02.2100
NOTE: The raps as well as the drainage hole have to be free from tissues, bone chips and blood. It has to be possible to look through the drainage hole. If necessary, push a wire of up to 1.5mm OD through the hole.
Mathys Ltd Bettlach • Robert Mathys Strasse 5 • P. O. Box • 2544 Bettlach • Switzerland • www.mathysmedical.comA 2.3.4
A
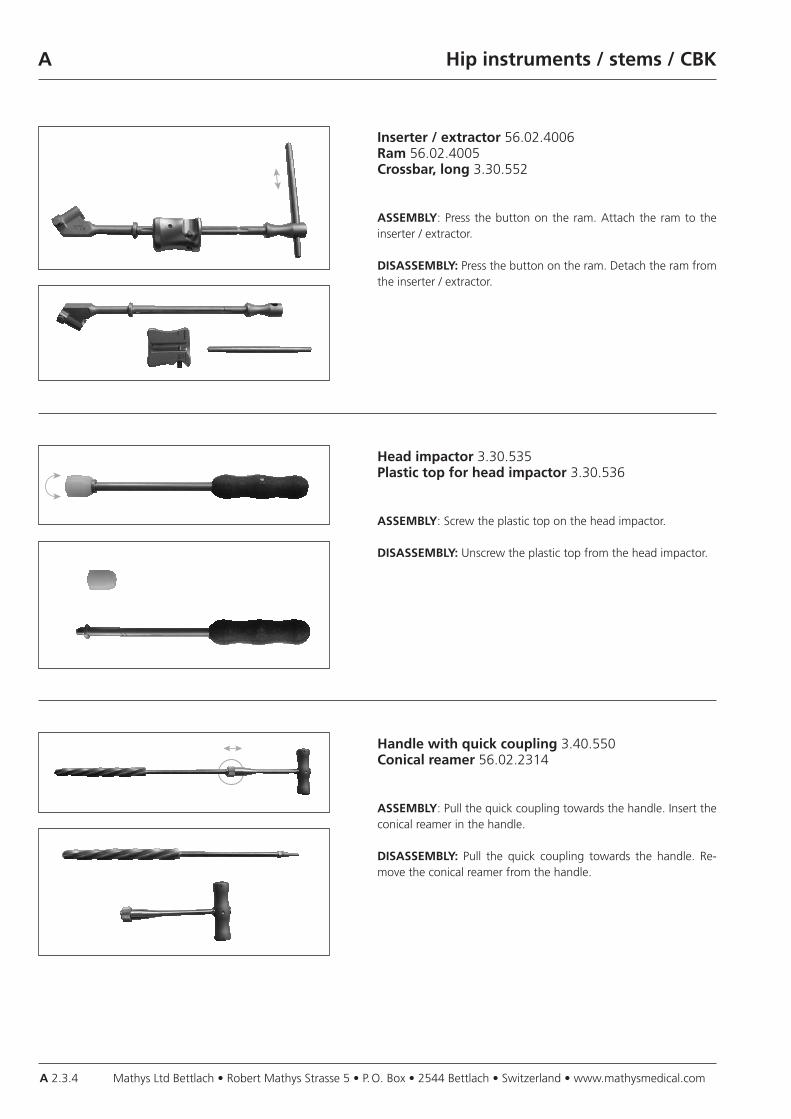
Inserter / extractor 56.02.4006Ram 56.02.4005Crossbar, long 3.30.552
ASSEMBLY: Press the button on the ram. Attach the ram to the inserter / extractor.
DISASSEMBLY: Press the button on the ram. Detach the ram from the inserter / extractor.
Hip instruments / stems / CBK
Head impactor 3.30.535Plastic top for head impactor 3.30.536
ASSEMBLY: Screw the plastic top on the head impactor.
DISASSEMBLY: Unscrew the plastic top from the head impactor.
Handle with quick coupling 3.40.550Conical reamer 56.02.2314
ASSEMBLY: Pull the quick coupling towards the handle. Insert the conical reamer in the handle.
DISASSEMBLY: Pull the quick coupling towards the handle. Re-move the conical reamer from the handle.
Mathys Ltd Bettlach • Robert Mathys Strasse 5 • P. O. Box • 2544 Bettlach • Switzerland • www.mathysmedical.com A 2.3.5
A
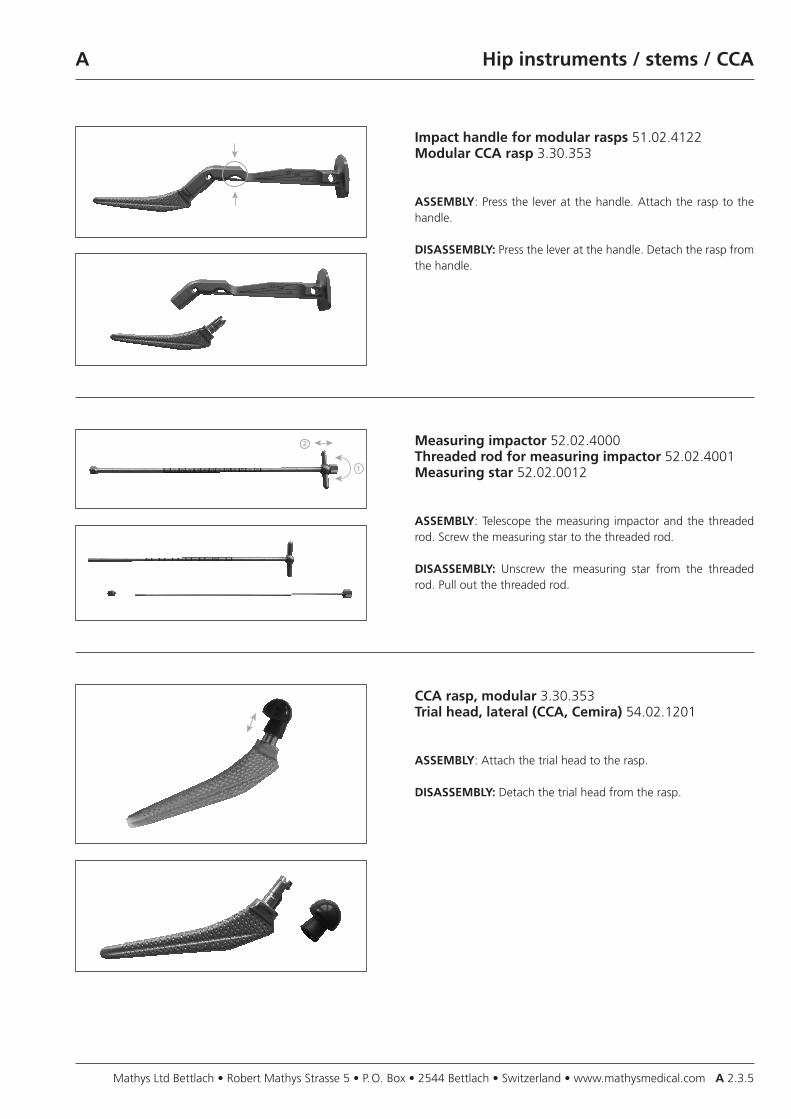
Impact handle for modular rasps 51.02.4122Modular CCA rasp 3.30.353
ASSEMBLY: Press the lever at the handle. Attach the rasp to the handle.
DISASSEMBLY: Press the lever at the handle. Detach the rasp from the handle.
Hip instruments / stems / CCA
Measuring impactor 52.02.4000Threaded rod for measuring impactor 52.02.4001Measuring star 52.02.0012
ASSEMBLY: Telescope the measuring impactor and the threaded rod. Screw the measuring star to the threaded rod.
DISASSEMBLY: Unscrew the measuring star from the threaded rod. Pull out the threaded rod.
1
2
CCA rasp, modular 3.30.353Trial head, lateral (CCA, Cemira) 54.02.1201
ASSEMBLY: Attach the trial head to the rasp.
DISASSEMBLY: Detach the trial head from the rasp.
Mathys Ltd Bettlach • Robert Mathys Strasse 5 • P. O. Box • 2544 Bettlach • Switzerland • www.mathysmedical.comA 2.3.6
A
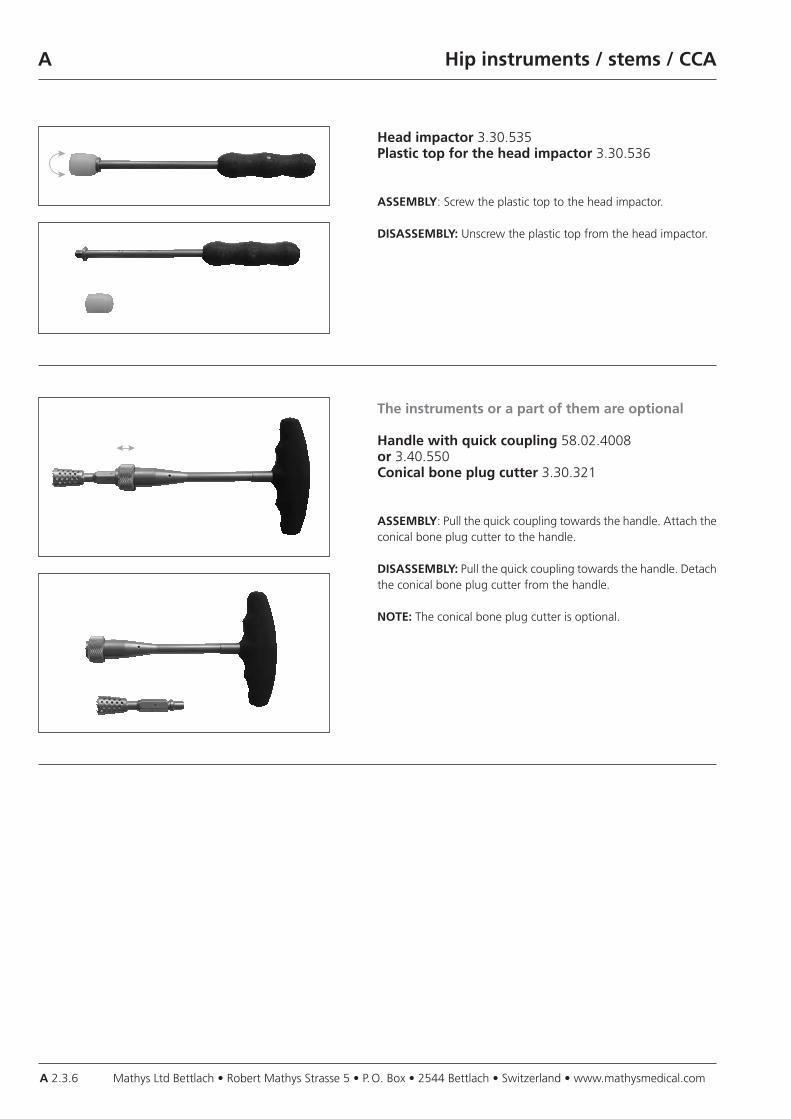
Head impactor 3.30.535Plastic top for the head impactor 3.30.536
ASSEMBLY: Screw the plastic top to the head impactor.
DISASSEMBLY: Unscrew the plastic top from the head impactor.
Hip instruments / stems / CCA
The instruments or a part of them are optional
Handle with quick coupling 58.02.4008 or 3.40.550Conical bone plug cutter 3.30.321
ASSEMBLY: Pull the quick coupling towards the handle. Attach the conical bone plug cutter to the handle.
DISASSEMBLY: Pull the quick coupling towards the handle. Detach the conical bone plug cutter from the handle.
NOTE: The conical bone plug cutter is optional.
Mathys Ltd Bettlach • Robert Mathys Strasse 5 • P. O. Box • 2544 Bettlach • Switzerland • www.mathysmedical.com A 2.3.7
A
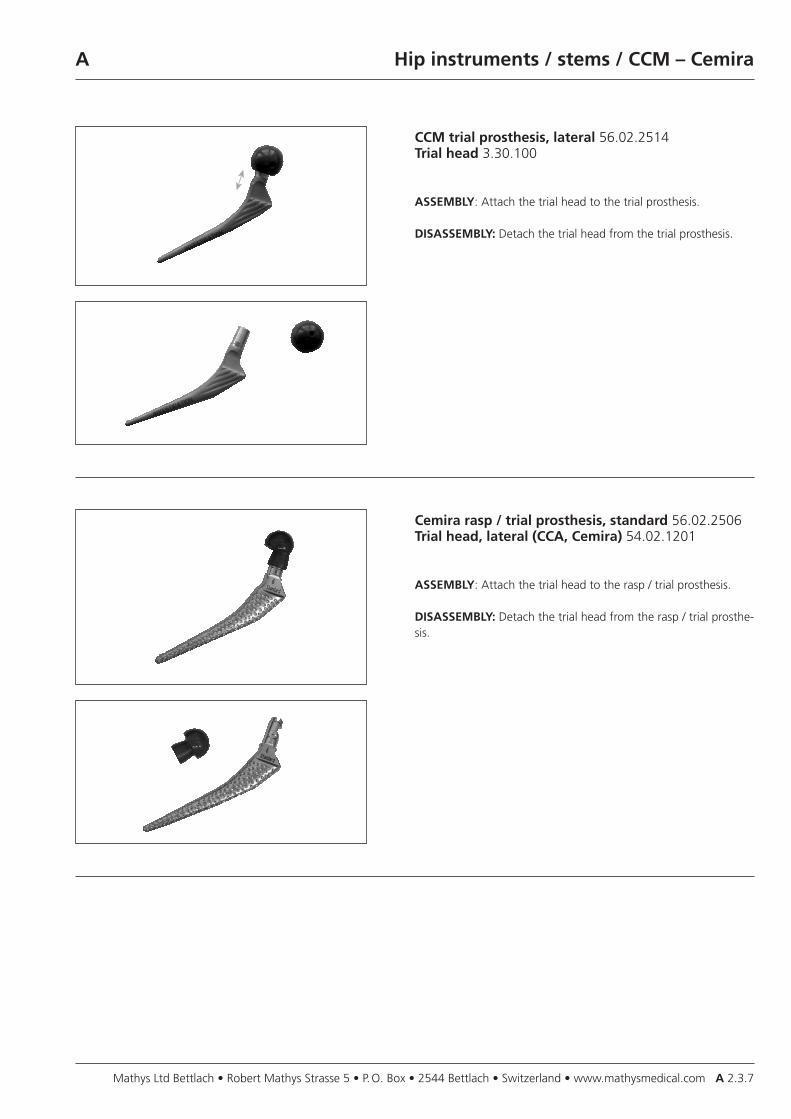
CCM trial prosthesis, lateral 56.02.2514Trial head 3.30.100
ASSEMBLY: Attach the trial head to the trial prosthesis.
DISASSEMBLY: Detach the trial head from the trial prosthesis.
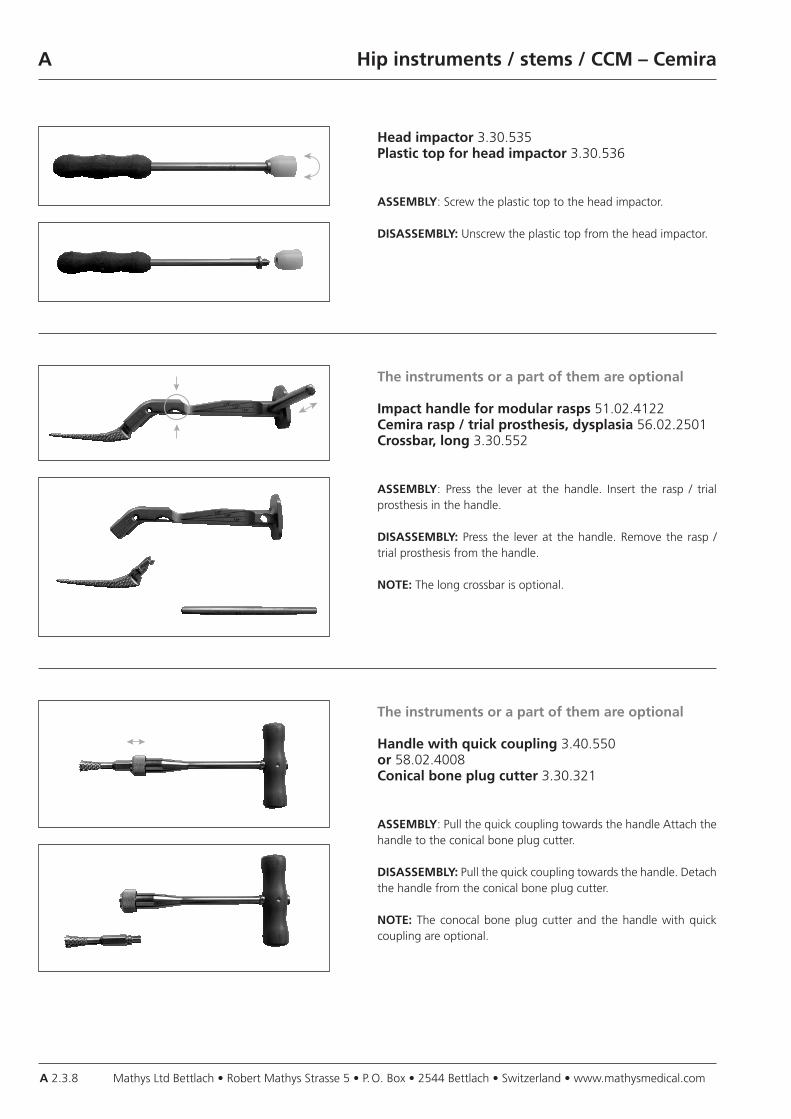
Hip instruments / stems / CCM – Cemira
Cemira rasp / trial prosthesis, standard 56.02.2506Trial head, lateral (CCA, Cemira) 54.02.1201
ASSEMBLY: Attach the trial head to the rasp / trial prosthesis.
DISASSEMBLY: Detach the trial head from the rasp / trial prosthe-sis.
Mathys Ltd Bettlach • Robert Mathys Strasse 5 • P. O. Box • 2544 Bettlach • Switzerland • www.mathysmedical.comA 2.3.8
A
Head impactor 3.30.535Plastic top for head impactor 3.30.536
ASSEMBLY: Screw the plastic top to the head impactor.
DISASSEMBLY: Unscrew the plastic top from the head impactor.
Hip instruments / stems / CCM – Cemira
The instruments or a part of them are optional
Impact handle for modular rasps 51.02.4122Cemira rasp / trial prosthesis, dysplasia 56.02.2501Crossbar, long 3.30.552
ASSEMBLY: Press the lever at the handle. Insert the rasp / trial prosthesis in the handle.
DISASSEMBLY: Press the lever at the handle. Remove the rasp / trial prosthesis from the handle.
NOTE: The long crossbar is optional.
The instruments or a part of them are optional
Handle with quick coupling 3.40.550 or 58.02.4008Conical bone plug cutter 3.30.321
ASSEMBLY: Pull the quick coupling towards the handle Attach the handle to the conical bone plug cutter.
DISASSEMBLY: Pull the quick coupling towards the handle. Detach the handle from the conical bone plug cutter.
NOTE: The conocal bone plug cutter and the handle with quick coupling are optional.

Mathys Ltd Bettlach • Robert Mathys Strasse 5 • P. O. Box • 2544 Bettlach • Switzerland • www.mathysmedical.com A 2.3.9
A
Flexible reamers 56.02.6184–56.02.6194T-handle with quick coupling 56.02.6182
ASSEMBLY: Attach the flexible reamer to the T-handle.
DISASSEMBLY: Detach the flexible reamer from the T-handle.
Hip instruments / stems / Centris
Impactor 56.02.6035
ASSEMBLY: Screw the stem fixation to the handle.
DISASSEMBLY: Unscrew the stem fixation from the handle.
Impact handle for modular Centris rasps 56.02.6001Modular Centris rasps 56.02.6130–56.02.6141
ASSEMBLY: Open the lever of the impactor. Attach the rasp to the impactor. Close the lever.
DISASSEMBLY: Open the lever of the impactor. Detach the rasp from the impactor. Close the lever.
Mathys Ltd Bettlach • Robert Mathys Strasse 5 • P. O. Box • 2544 Bettlach • Switzerland • www.mathysmedical.comA 2.3.10
A
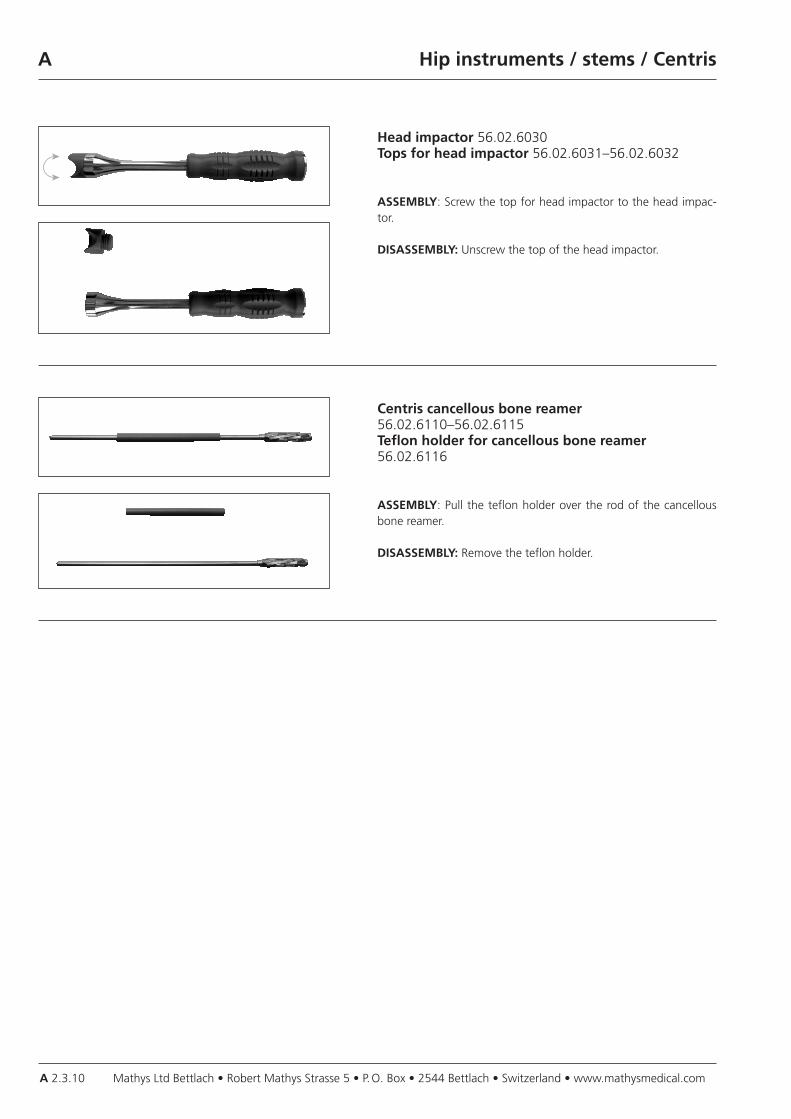
Head impactor 56.02.6030Tops for head impactor 56.02.6031–56.02.6032
ASSEMBLY: Screw the top for head impactor to the head impac-tor.
DISASSEMBLY: Unscrew the top of the head impactor.
Hip instruments / stems / Centris
Centris cancellous bone reamer 56.02.6110–56.02.6115Teflon holder for cancellous bone reamer56.02.6116
ASSEMBLY: Pull the teflon holder over the rod of the cancellous bone reamer.
DISASSEMBLY: Remove the teflon holder.
Mathys Ltd Bettlach • Robert Mathys Strasse 5 • P. O. Box • 2544 Bettlach • Switzerland • www.mathysmedical.com A 2.3.11
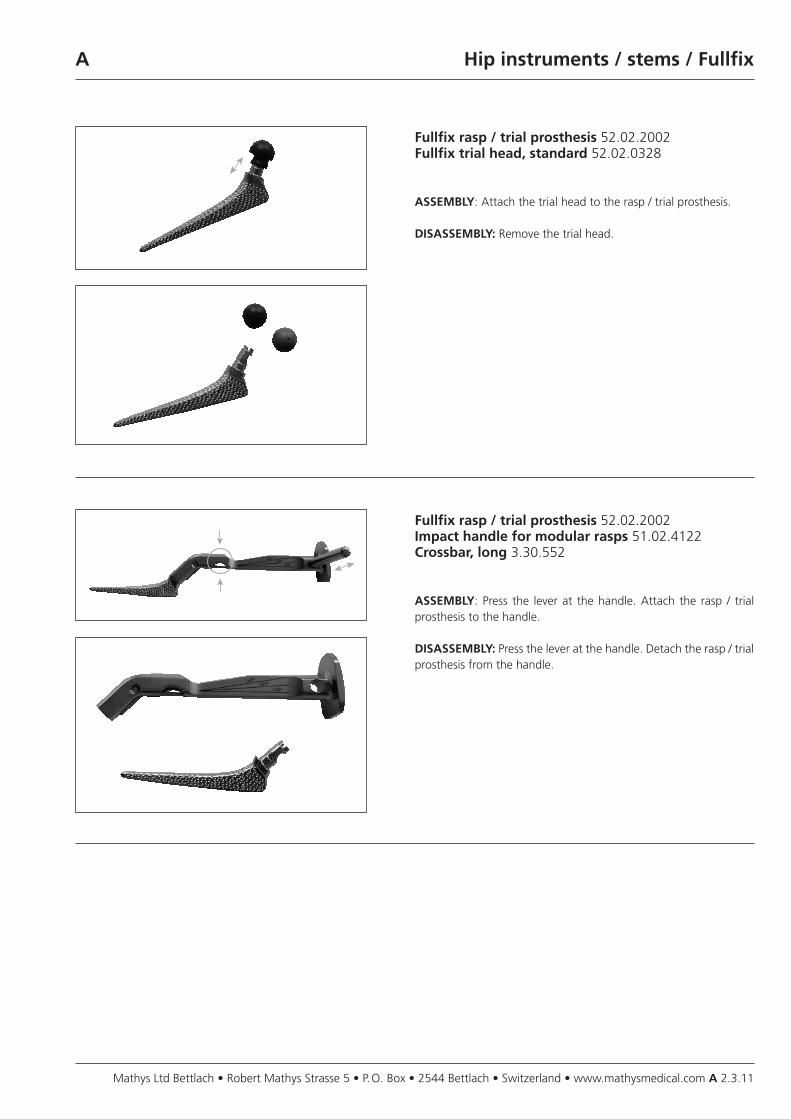
A Hip instruments / stems / Fullfix
Fullfix rasp / trial prosthesis 52.02.2002Impact handle for modular rasps 51.02.4122Crossbar, long 3.30.552
ASSEMBLY: Press the lever at the handle. Attach the rasp / trial prosthesis to the handle.
DISASSEMBLY: Press the lever at the handle. Detach the rasp / trial prosthesis from the handle.
Fullfix rasp / trial prosthesis 52.02.2002Fullfix trial head, standard 52.02.0328
ASSEMBLY: Attach the trial head to the rasp / trial prosthesis.
DISASSEMBLY: Remove the trial head.
Mathys Ltd Bettlach • Robert Mathys Strasse 5 • P. O. Box • 2544 Bettlach • Switzerland • www.mathysmedical.comA 2.3.12
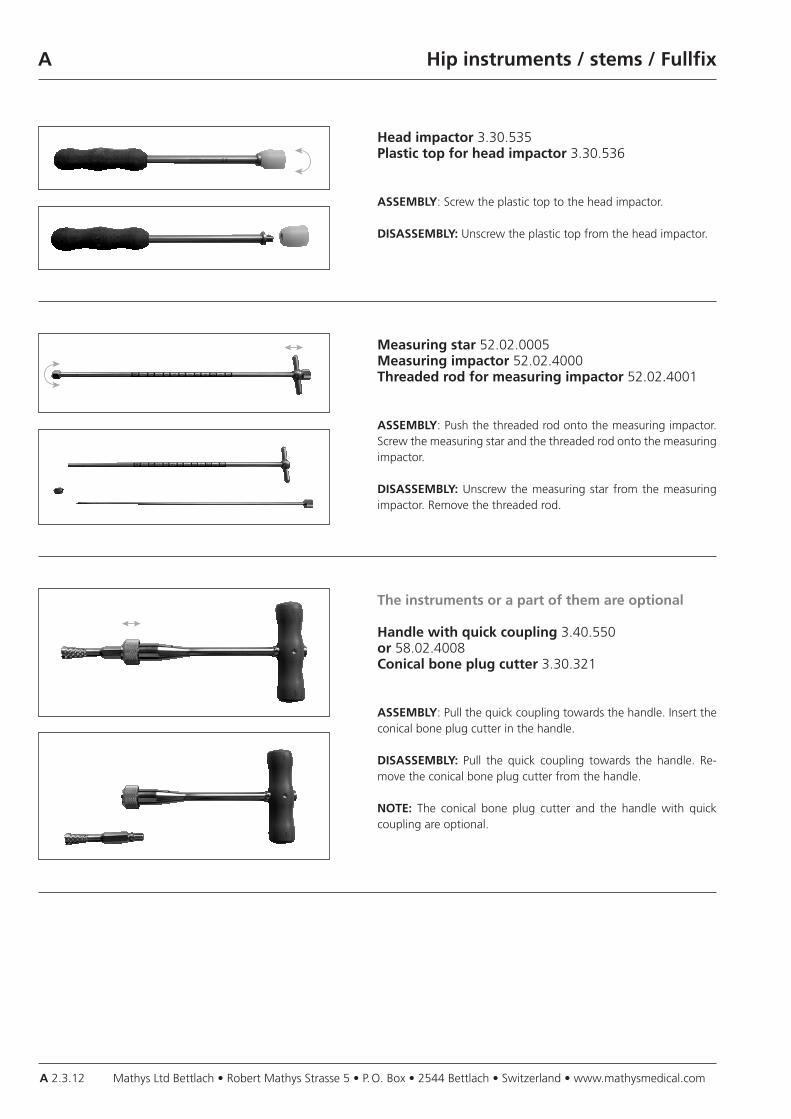
A
Head impactor 3.30.535Plastic top for head impactor 3.30.536
ASSEMBLY: Screw the plastic top to the head impactor.
DISASSEMBLY: Unscrew the plastic top from the head impactor.
Hip instruments / stems / Fullfix
Measuring star 52.02.0005Measuring impactor 52.02.4000Threaded rod for measuring impactor 52.02.4001
ASSEMBLY: Push the threaded rod onto the measuring impactor. Screw the measuring star and the threaded rod onto the measuring impactor.
DISASSEMBLY: Unscrew the measuring star from the measuring impactor. Remove the threaded rod.
The instruments or a part of them are optional
Handle with quick coupling 3.40.550 or 58.02.4008Conical bone plug cutter 3.30.321
ASSEMBLY: Pull the quick coupling towards the handle. Insert the conical bone plug cutter in the handle.
DISASSEMBLY: Pull the quick coupling towards the handle. Re-move the conical bone plug cutter from the handle.
NOTE: The conical bone plug cutter and the handle with quick coupling are optional.
Mathys Ltd Bettlach • Robert Mathys Strasse 5 • P. O. Box • 2544 Bettlach • Switzerland • www.mathysmedical.com A 2.3.13
A
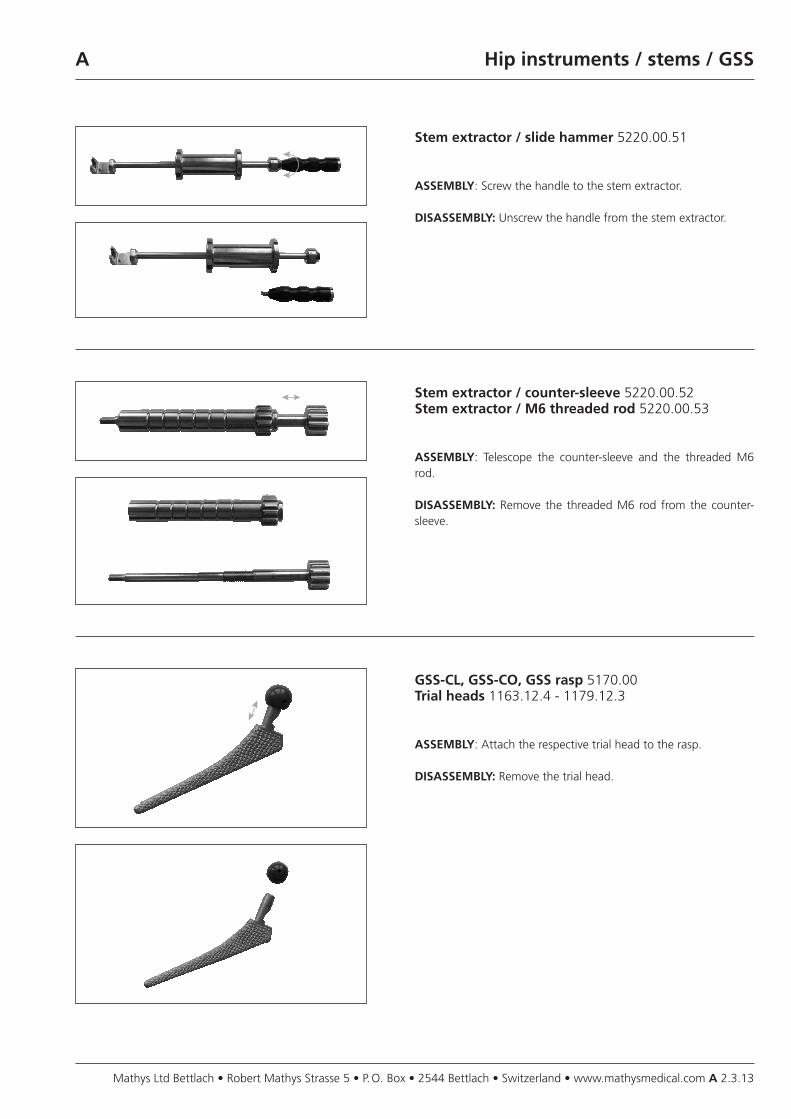
Stem extractor / slide hammer 5220.00.51
ASSEMBLY: Screw the handle to the stem extractor.
DISASSEMBLY: Unscrew the handle from the stem extractor.
Hip instruments / stems / GSS
Stem extractor / counter-sleeve 5220.00.52 Stem extractor / M6 threaded rod 5220.00.53
ASSEMBLY: Telescope the counter-sleeve and the threaded M6 rod.
DISASSEMBLY: Remove the threaded M6 rod from the counter-sleeve.
GSS-CL, GSS-CO, GSS rasp 5170.00Trial heads 1163.12.4 - 1179.12.3
ASSEMBLY: Attach the respective trial head to the rasp.
DISASSEMBLY: Remove the trial head.
Mathys Ltd Bettlach • Robert Mathys Strasse 5 • P. O. Box • 2544 Bettlach • Switzerland • www.mathysmedical.comA 2.3.14
A
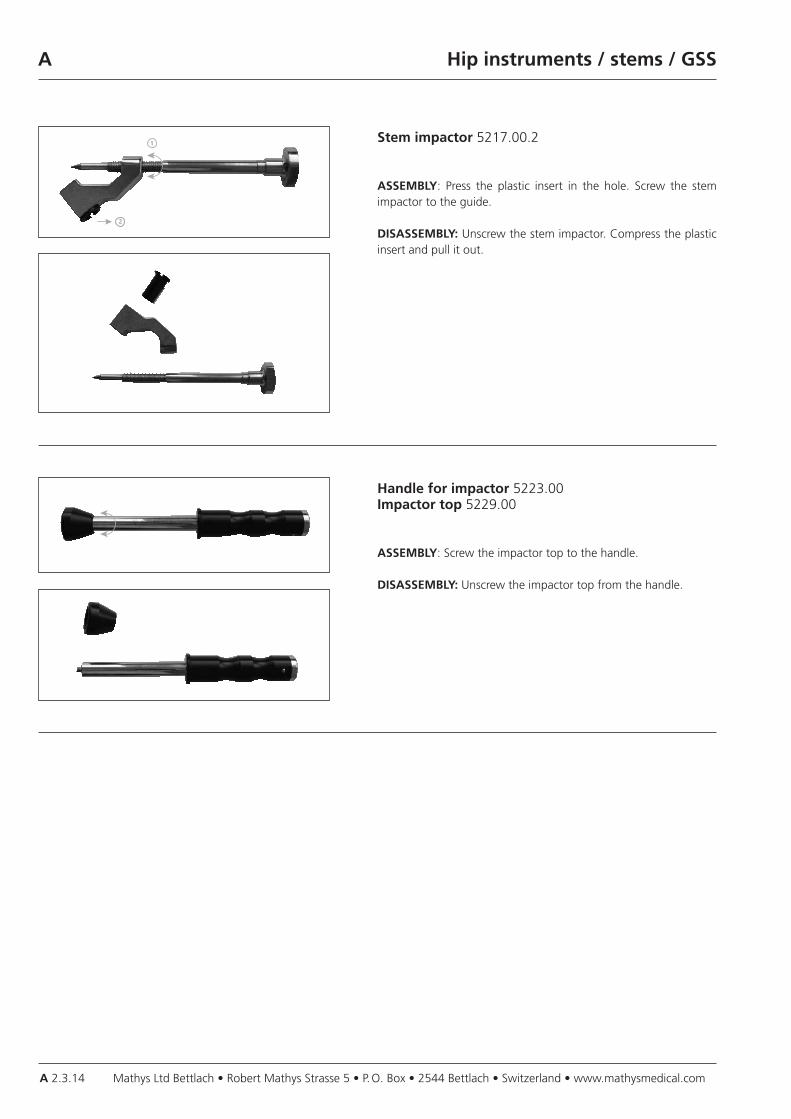
Stem impactor 5217.00.2
ASSEMBLY: Press the plastic insert in the hole. Screw the stem impactor to the guide.
DISASSEMBLY: Unscrew the stem impactor. Compress the plastic insert and pull it out.
Hip instruments / stems / GSS
1
2
Handle for impactor 5223.00Impactor top 5229.00
ASSEMBLY: Screw the impactor top to the handle.
DISASSEMBLY: Unscrew the impactor top from the handle.
Mathys Ltd Bettlach • Robert Mathys Strasse 5 • P. O. Box • 2544 Bettlach • Switzerland • www.mathysmedical.com A 2.3.15
A
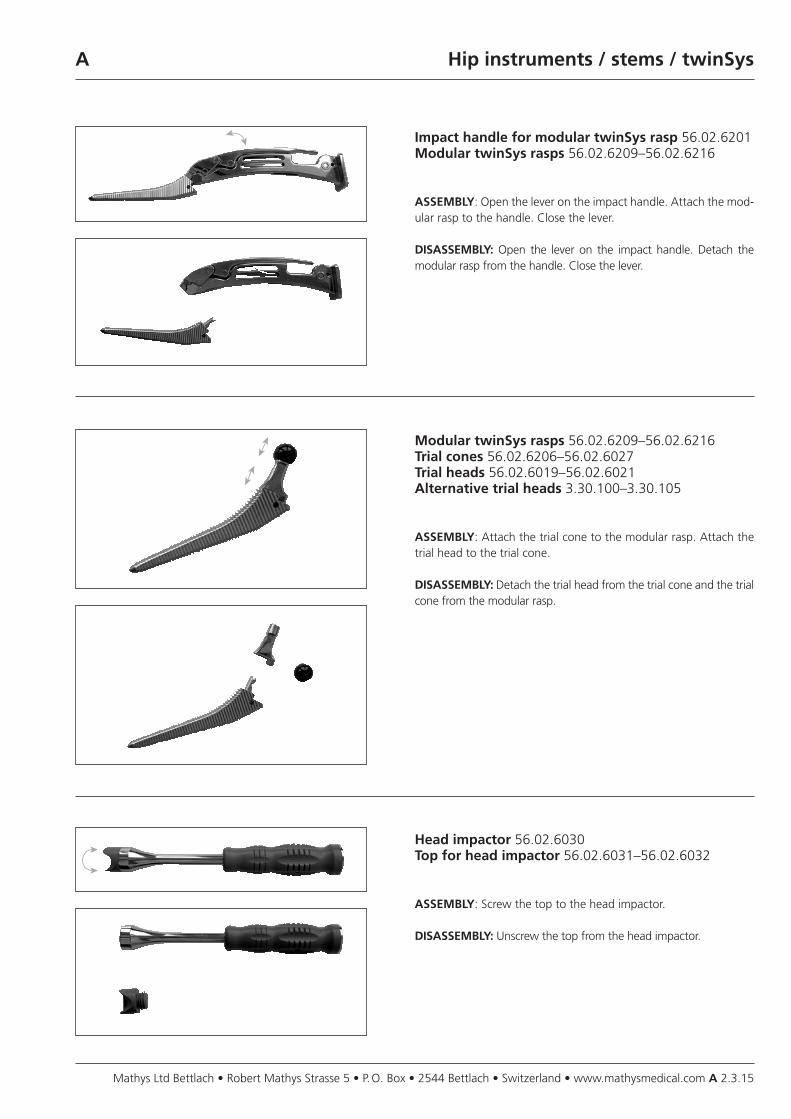
Impact handle for modular twinSys rasp 56.02.6201Modular twinSys rasps 56.02.6209–56.02.6216
ASSEMBLY: Open the lever on the impact handle. Attach the mod-ular rasp to the handle. Close the lever.
DISASSEMBLY: Open the lever on the impact handle. Detach the modular rasp from the handle. Close the lever.
Hip instruments / stems / twinSys
Modular twinSys rasps 56.02.6209–56.02.6216Trial cones 56.02.6206–56.02.6027Trial heads 56.02.6019–56.02.6021Alternative trial heads 3.30.100–3.30.105
ASSEMBLY: Attach the trial cone to the modular rasp. Attach the trial head to the trial cone.
DISASSEMBLY: Detach the trial head from the trial cone and the trial cone from the modular rasp.
Head impactor 56.02.6030Top for head impactor 56.02.6031–56.02.6032
ASSEMBLY: Screw the top to the head impactor.
DISASSEMBLY: Unscrew the top from the head impactor.
Mathys Ltd Bettlach • Robert Mathys Strasse 5 • P. O. Box • 2544 Bettlach • Switzerland • www.mathysmedical.comA 2.3.16
A
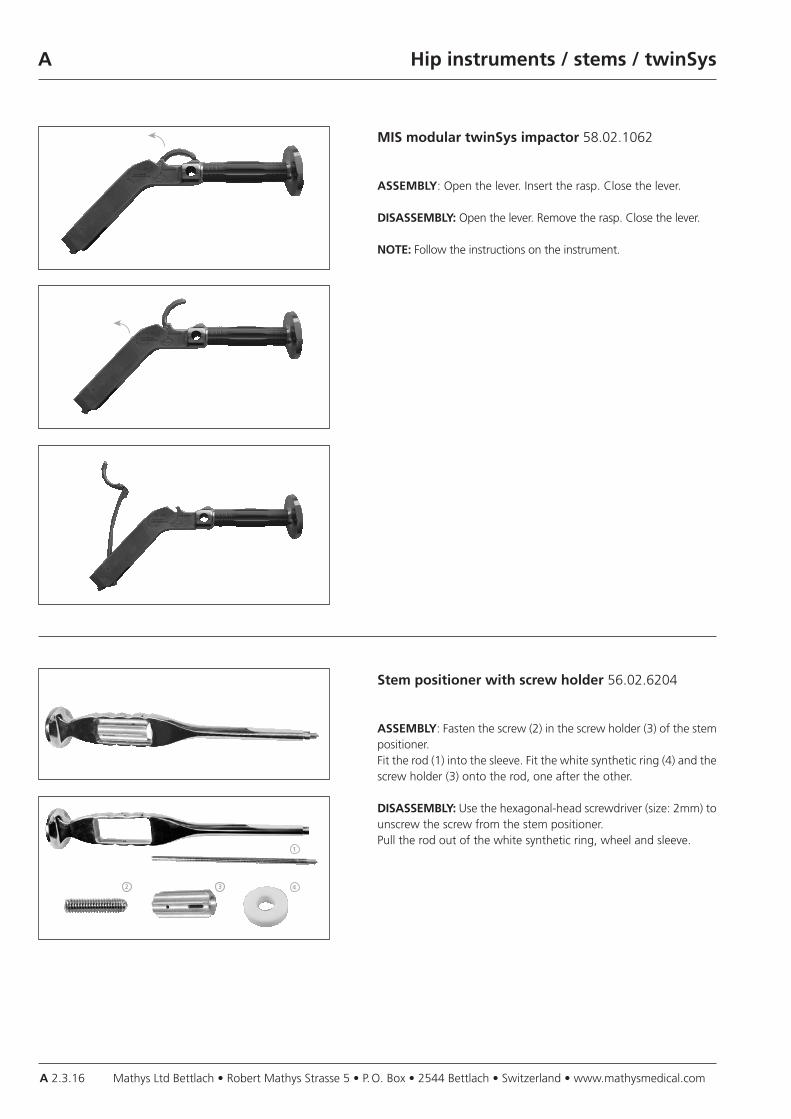
MIS modular twinSys impactor 58.02.1062
ASSEMBLY: Open the lever. Insert the rasp. Close the lever.
DISASSEMBLY: Open the lever. Remove the rasp. Close the lever.
NOTE: Follow the instructions on the instrument.
Hip instruments / stems / twinSys
Stem positioner with screw holder 56.02.6204
ASSEMBLY: Fasten the screw (2) in the screw holder (3) of the stem positioner.Fit the rod (1) into the sleeve. Fit the white synthetic ring (4) and the screw holder (3) onto the rod, one after the other.
DISASSEMBLY: Use the hexagonal-head screwdriver (size: 2mm) to unscrew the screw from the stem positioner.Pull the rod out of the white synthetic ring, wheel and sleeve.
1
2 3 4
Mathys Ltd Bettlach • Robert Mathys Strasse 5 • P. O. Box • 2544 Bettlach • Switzerland • www.mathysmedical.com A 3.1.1
A Shoulder instruments / Affinis
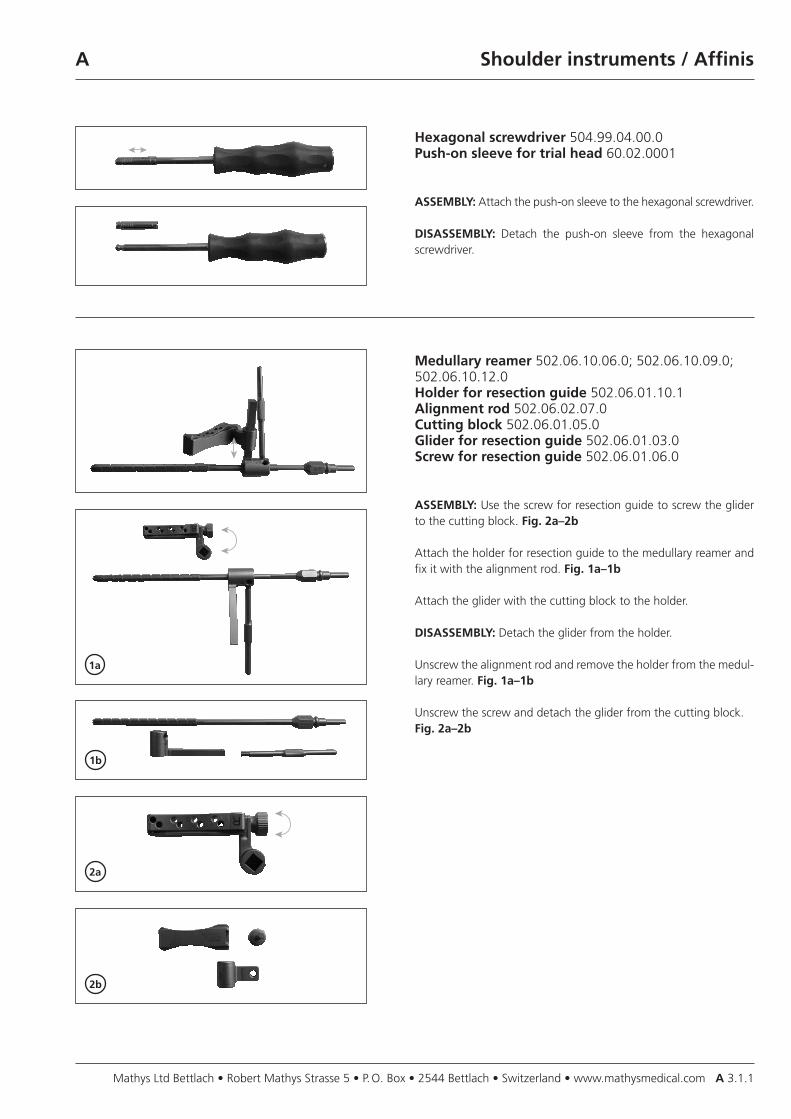
Hexagonal screwdriver 504.99.04.00.0Push-on sleeve for trial head 60.02.0001
ASSEMBLY: Attach the push-on sleeve to the hexagonal screwdriver.
DISASSEMBLY: Detach the push-on sleeve from the hexagonal screwdriver.
Medullary reamer 502.06.10.06.0; 502.06.10.09.0;502.06.10.12.0Holder for resection guide 502.06.01.10.1Alignment rod 502.06.02.07.0Cutting block 502.06.01.05.0Glider for resection guide 502.06.01.03.0Screw for resection guide 502.06.01.06.0
ASSEMBLY: Use the screw for resection guide to screw the glider to the cutting block. Fig. 2a–2b
Attach the holder for resection guide to the medullary reamer and fix it with the alignment rod. Fig. 1a–1b
Attach the glider with the cutting block to the holder.
DISASSEMBLY: Detach the glider from the holder.
Unscrew the alignment rod and remove the holder from the medul-lary reamer. Fig. 1a–1b
Unscrew the screw and detach the glider from the cutting block. Fig. 2a–2b
1a
1b
2a
2b
Mathys Ltd Bettlach • Robert Mathys Strasse 5 • P. O. Box • 2544 Bettlach • Switzerland • www.mathysmedical.comA 3.1.2
A Shoulder instruments / Affinis
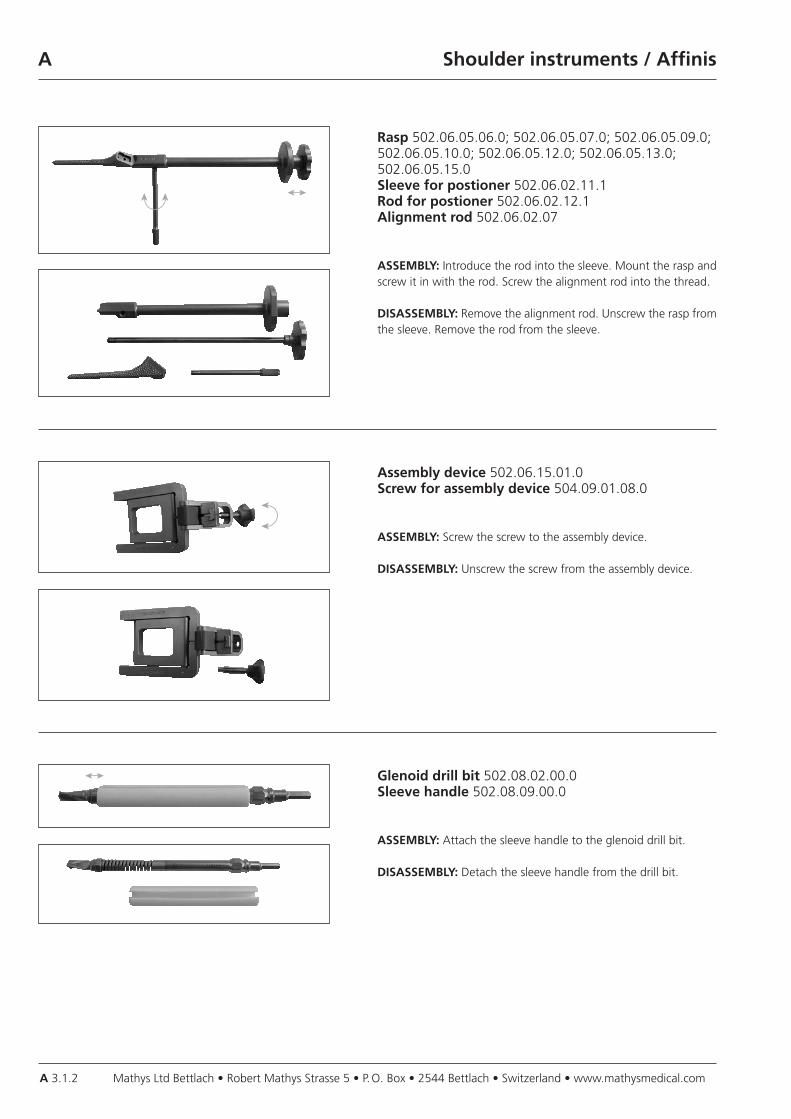
Rasp 502.06.05.06.0; 502.06.05.07.0; 502.06.05.09.0;502.06.05.10.0; 502.06.05.12.0; 502.06.05.13.0; 502.06.05.15.0Sleeve for postioner 502.06.02.11.1Rod for postioner 502.06.02.12.1Alignment rod 502.06.02.07
ASSEMBLY: Introduce the rod into the sleeve. Mount the rasp and screw it in with the rod. Screw the alignment rod into the thread. DISASSEMBLY: Remove the alignment rod. Unscrew the rasp from the sleeve. Remove the rod from the sleeve.
Assembly device 502.06.15.01.0Screw for assembly device 504.09.01.08.0
ASSEMBLY: Screw the screw to the assembly device.
DISASSEMBLY: Unscrew the screw from the assembly device.
Glenoid drill bit 502.08.02.00.0Sleeve handle 502.08.09.00.0
ASSEMBLY: Attach the sleeve handle to the glenoid drill bit.
DISASSEMBLY: Detach the sleeve handle from the drill bit.
Mathys Ltd Bettlach • Robert Mathys Strasse 5 • P. O. Box • 2544 Bettlach • Switzerland • www.mathysmedical.com A 3.1.3
A Shoulder instruments / Affinis
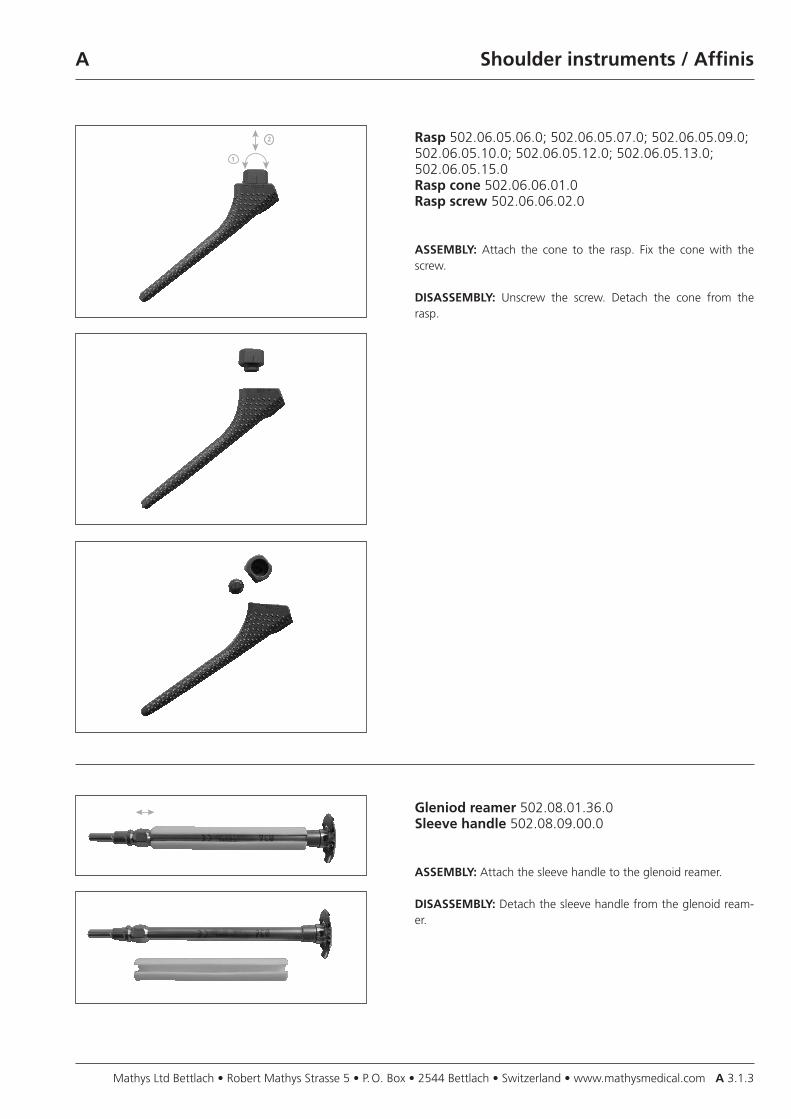
Rasp 502.06.05.06.0; 502.06.05.07.0; 502.06.05.09.0;502.06.05.10.0; 502.06.05.12.0; 502.06.05.13.0; 502.06.05.15.0Rasp cone 502.06.06.01.0Rasp screw 502.06.06.02.0
ASSEMBLY: Attach the cone to the rasp. Fix the cone with the screw.
DISASSEMBLY: Unscrew the screw. Detach the cone from the rasp.
1
2
Gleniod reamer 502.08.01.36.0Sleeve handle 502.08.09.00.0
ASSEMBLY: Attach the sleeve handle to the glenoid reamer.
DISASSEMBLY: Detach the sleeve handle from the glenoid ream-er.
A 3.1.4
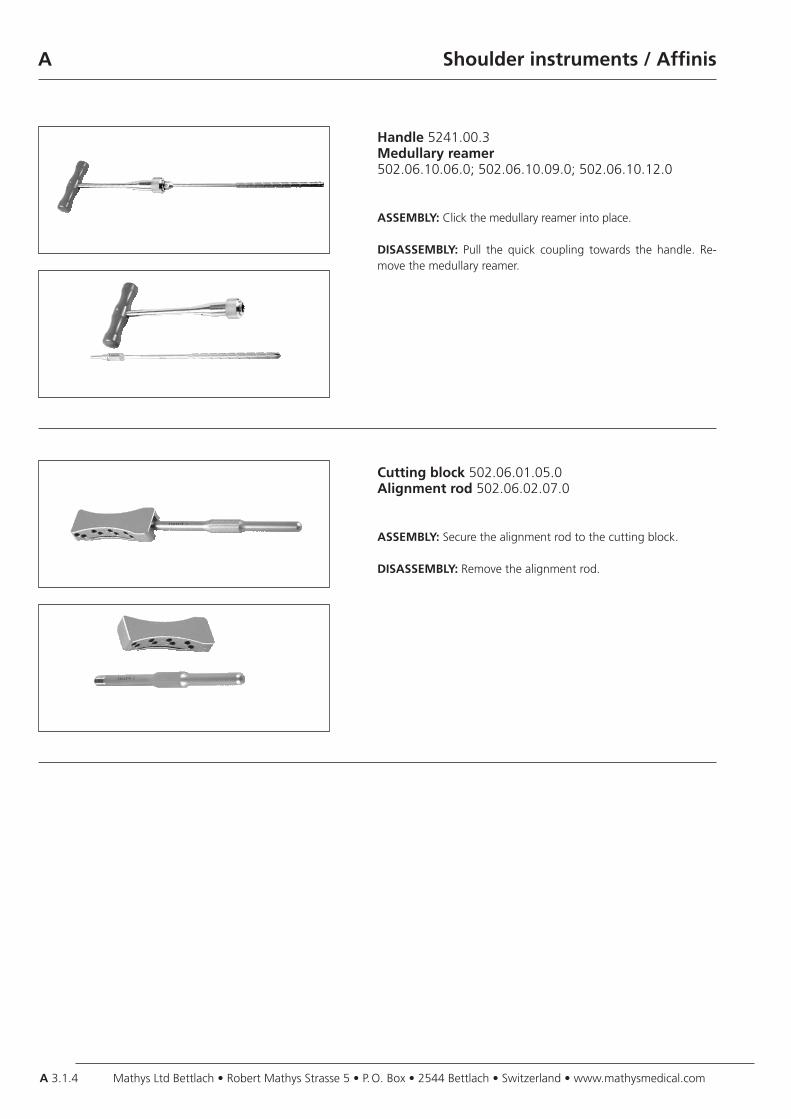
Handle 5241.00.3Medullary reamer 502.06.10.06.0; 502.06.10.09.0; 502.06.10.12.0
ASSEMBLY: Click the medullary reamer into place.
DISASSEMBLY: Pull the quick coupling towards the handle. Re-move the medullary reamer.
Cutting block 502.06.01.05.0Alignment rod 502.06.02.07.0
ASSEMBLY: Secure the alignment rod to the cutting block.
DISASSEMBLY: Remove the alignment rod.
A Shoulder instruments / Affinis
Mathys Ltd Bettlach • Robert Mathys Strasse 5 • P. O. Box • 2544 Bettlach • Switzerland • www.mathysmedical.com
Mathys Ltd Bettlach • Robert Mathys Strasse 5 • P. O. Box • 2544 Bettlach • Switzerland • www.mathysmedical.com A 3.1.5
A
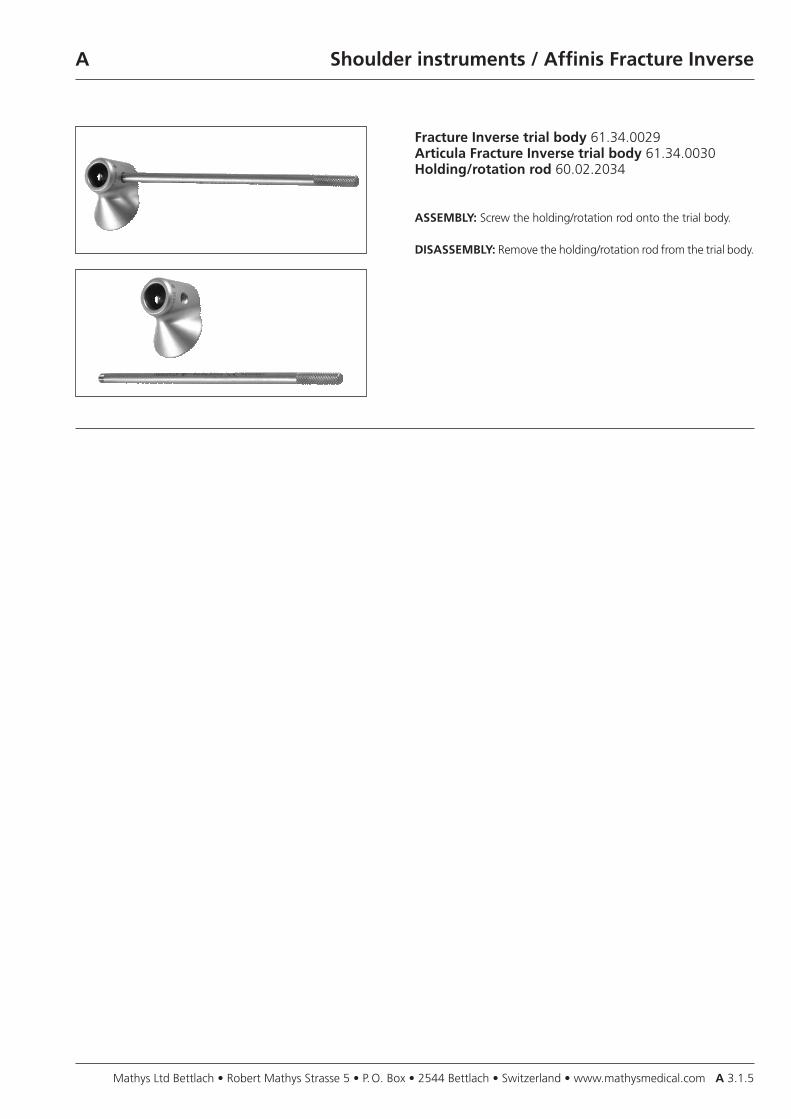
Fracture Inverse trial body 61.34.0029Articula Fracture Inverse trial body 61.34.0030Holding/rotation rod 60.02.2034
ASSEMBLY: Screw the holding/rotation rod onto the trial body.
DISASSEMBLY: Remove the holding/rotation rod from the trial body.
Shoulder instruments / Affinis Fracture Inverse
A 3.1.6
A Shoulder instruments / Affinis Inverse
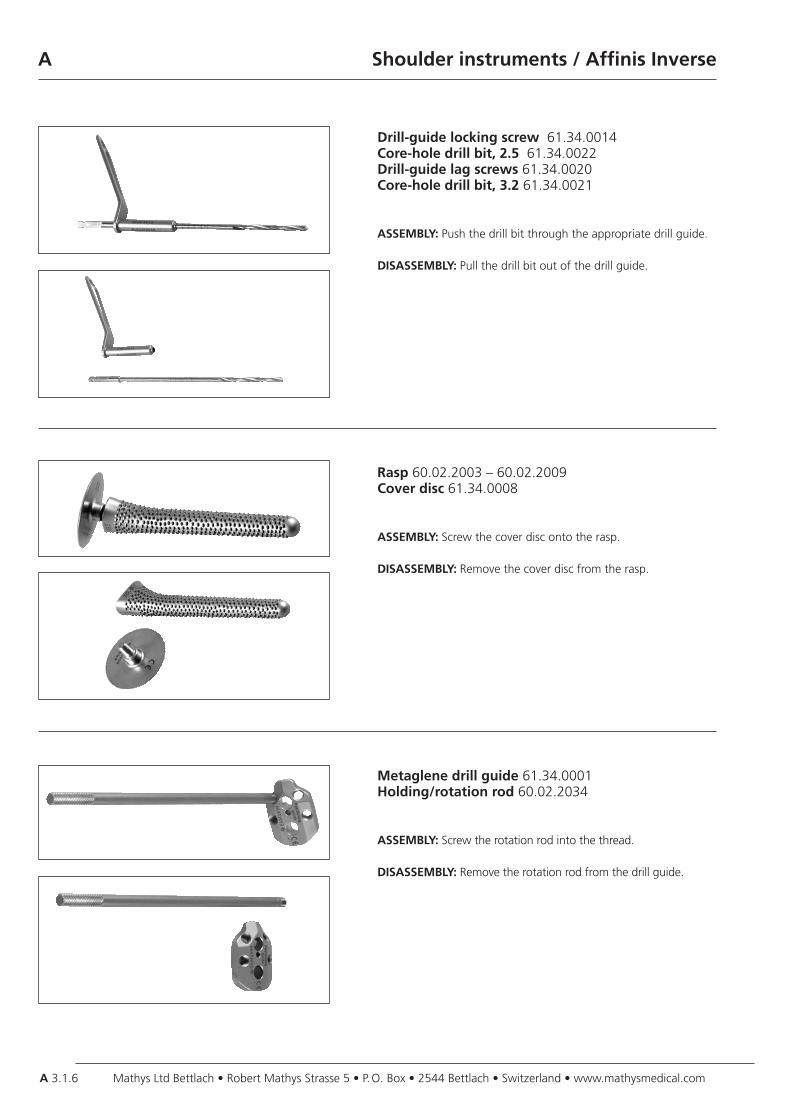
Drill-guide locking screw 61.34.0014Core-hole drill bit, 2.5 61.34.0022Drill-guide lag screws 61.34.0020Core-hole drill bit, 3.2 61.34.0021
ASSEMBLY: Push the drill bit through the appropriate drill guide.
DISASSEMBLY: Pull the drill bit out of the drill guide.
Rasp 60.02.2003 – 60.02.2009Cover disc 61.34.0008
ASSEMBLY: Screw the cover disc onto the rasp.
DISASSEMBLY: Remove the cover disc from the rasp.
Metaglene drill guide 61.34.0001Holding/rotation rod 60.02.2034
ASSEMBLY: Screw the rotation rod into the thread.
DISASSEMBLY: Remove the rotation rod from the drill guide.
Mathys Ltd Bettlach • Robert Mathys Strasse 5 • P. O. Box • 2544 Bettlach • Switzerland • www.mathysmedical.com
Mathys Ltd Bettlach • Robert Mathys Strasse 5 • P. O. Box • 2544 Bettlach • Switzerland • www.mathysmedical.com A 3.1.7
A Shoulder instruments / Affinis Inverse
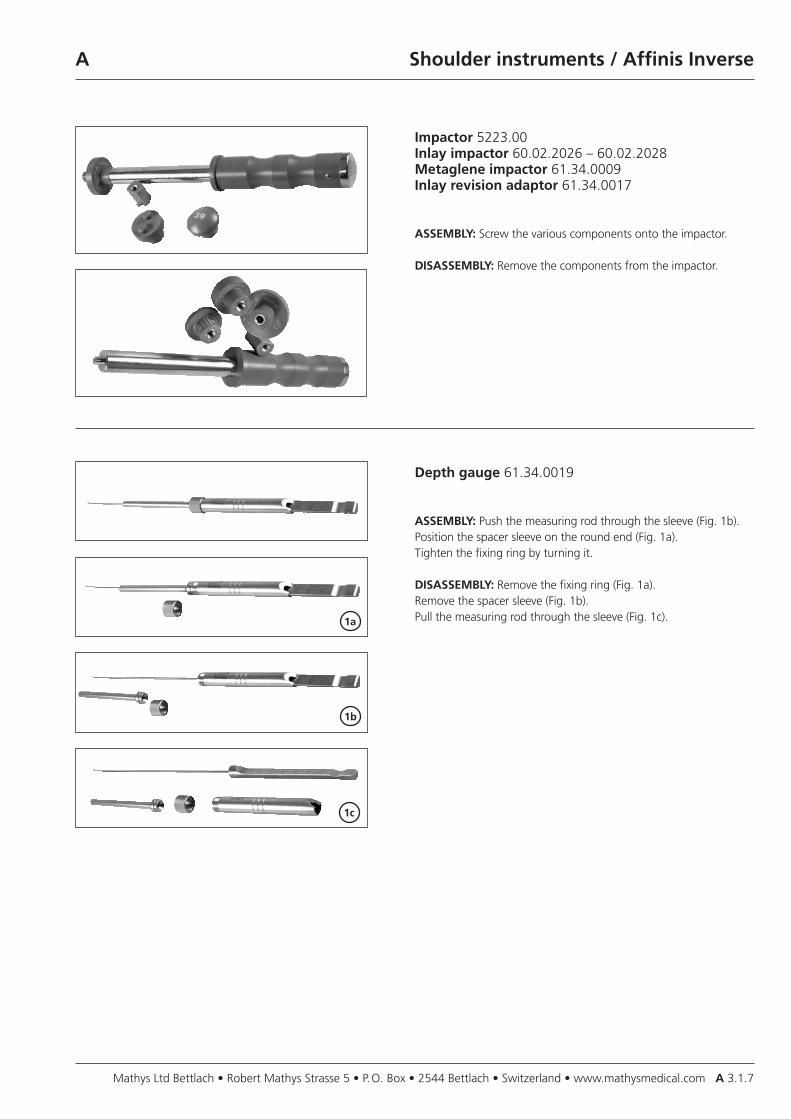
Impactor 5223.00Inlay impactor 60.02.2026 – 60.02.2028Metaglene impactor 61.34.0009Inlay revision adaptor 61.34.0017
ASSEMBLY: Screw the various components onto the impactor.
DISASSEMBLY: Remove the components from the impactor.
Depth gauge 61.34.0019
ASSEMBLY: Push the measuring rod through the sleeve (Fig. 1b).Position the spacer sleeve on the round end (Fig. 1a).Tighten the fixing ring by turning it.
DISASSEMBLY: Remove the fixing ring (Fig. 1a).Remove the spacer sleeve (Fig. 1b).Pull the measuring rod through the sleeve (Fig. 1c).1a
1b
1c
A 3.1.8
A Shoulder instruments / Affinis Inverse
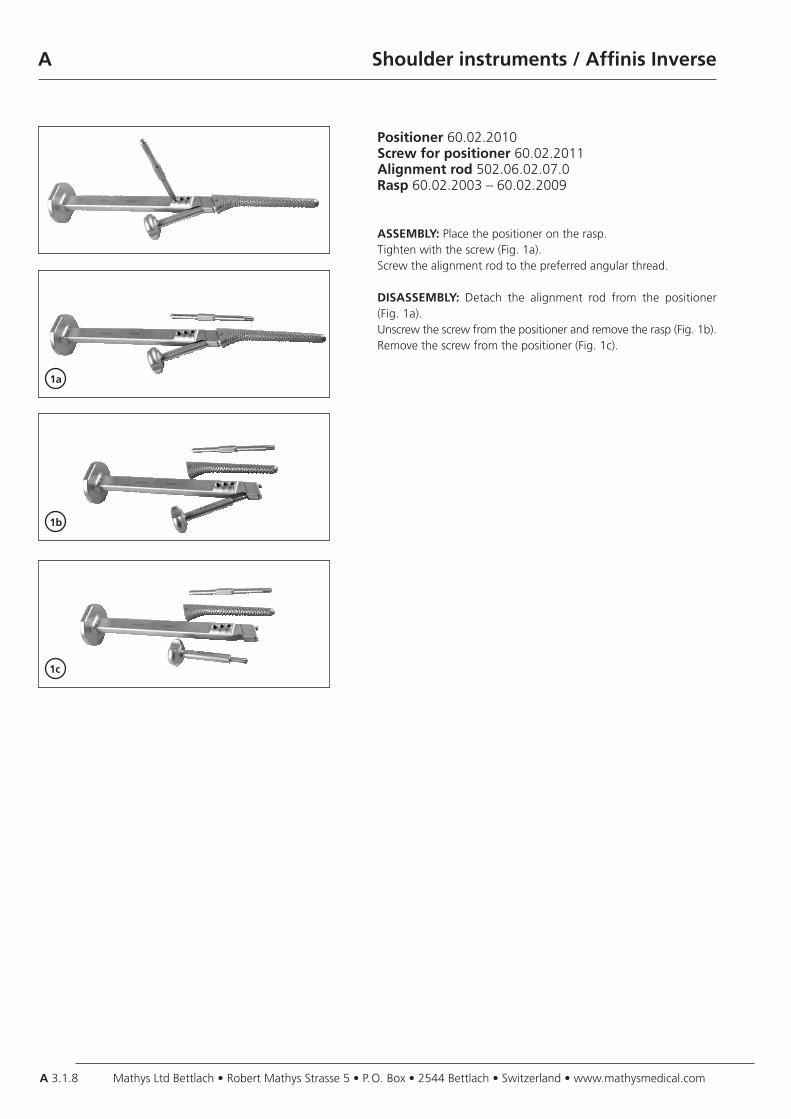
Positioner 60.02.2010Screw for positioner 60.02.2011Alignment rod 502.06.02.07.0Rasp 60.02.2003 – 60.02.2009
ASSEMBLY: Place the positioner on the rasp.Tighten with the screw (Fig. 1a).Screw the alignment rod to the preferred angular thread.
DISASSEMBLY: Detach the alignment rod from the positioner (Fig. 1a).Unscrew the screw from the positioner and remove the rasp (Fig. 1b).Remove the screw from the positioner (Fig. 1c).
1a
1b
1c
Mathys Ltd Bettlach • Robert Mathys Strasse 5 • P. O. Box • 2544 Bettlach • Switzerland • www.mathysmedical.com
Mathys Ltd Bettlach • Robert Mathys Strasse 5 • P. O. Box • 2544 Bettlach • Switzerland • www.mathysmedical.com A 3.1.9
A Shoulder instruments / Affinis Short
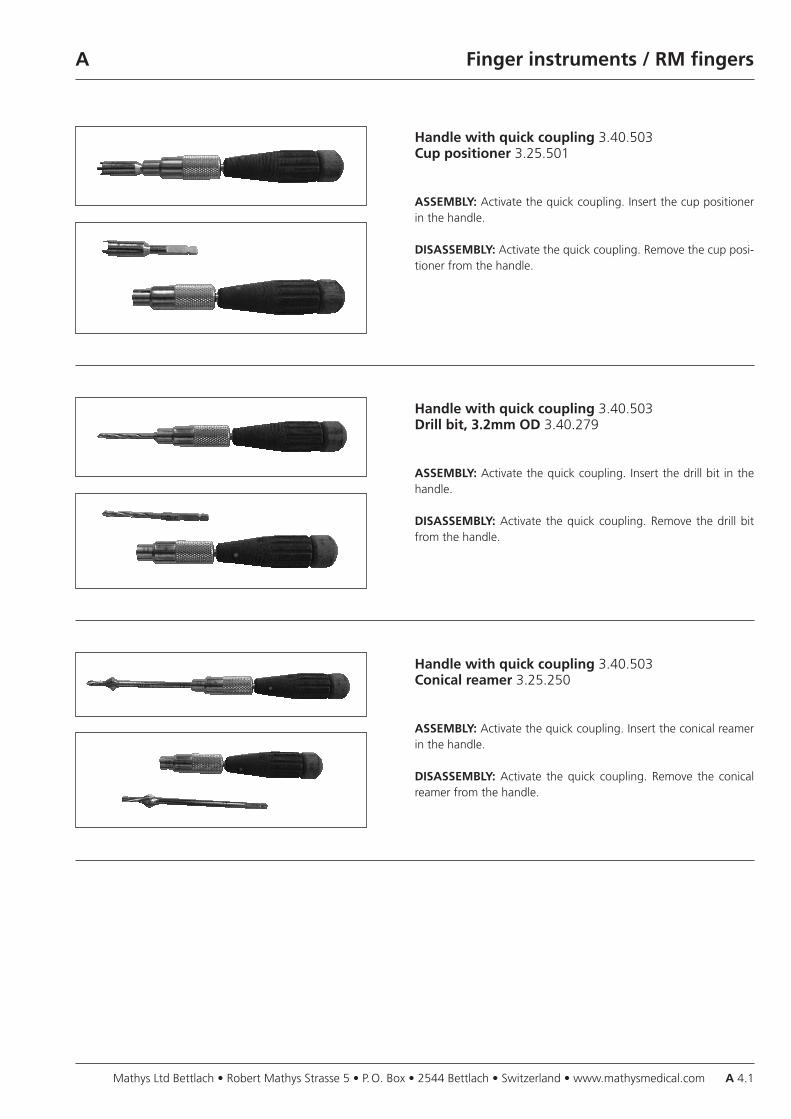
Impactor 61.34.0091 – 61.34.0096Trial cone 61.34.0123
ASSEMBLY: Screw the trial cone onto the impactor.
DISASSEMBLY: Remove the trial cone from the impactor.
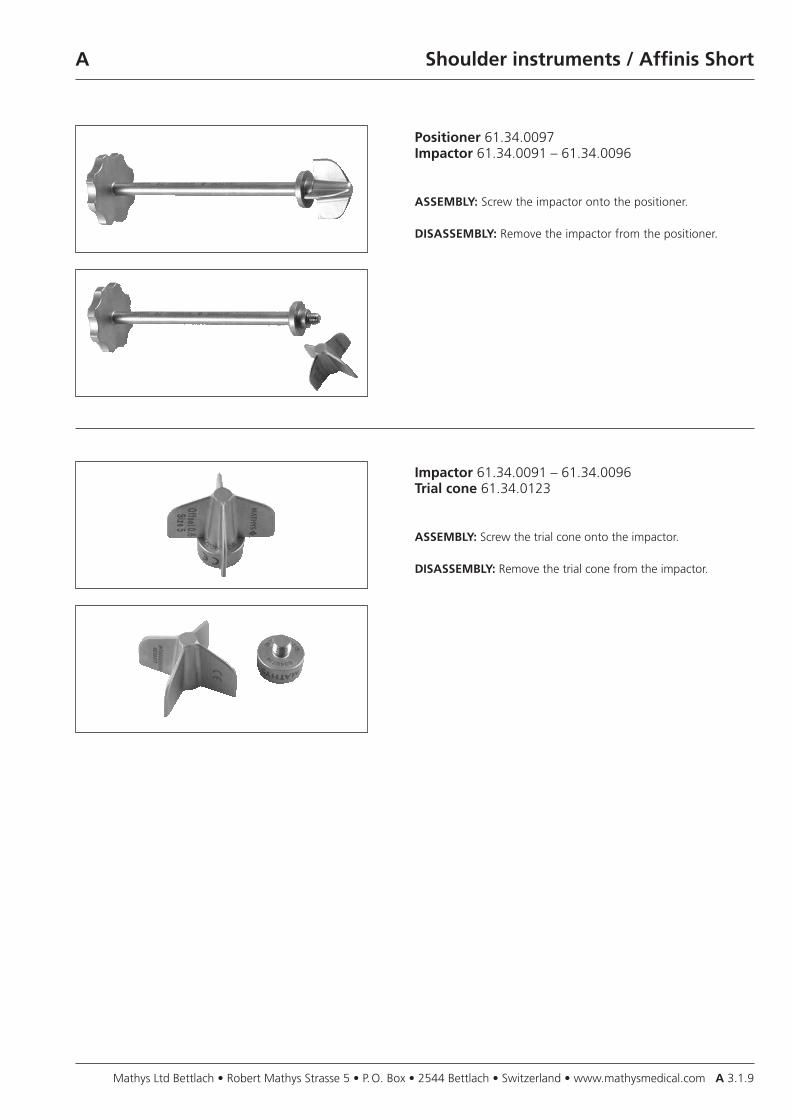
Positioner 61.34.0097Impactor 61.34.0091 – 61.34.0096
ASSEMBLY: Screw the impactor onto the positioner.
DISASSEMBLY: Remove the impactor from the positioner.

Mathys Ltd Bettlach • Robert Mathys Strasse 5 • P. O. Box • 2544 Bettlach • Switzerland • www.mathysmedical.com A 4.1
A
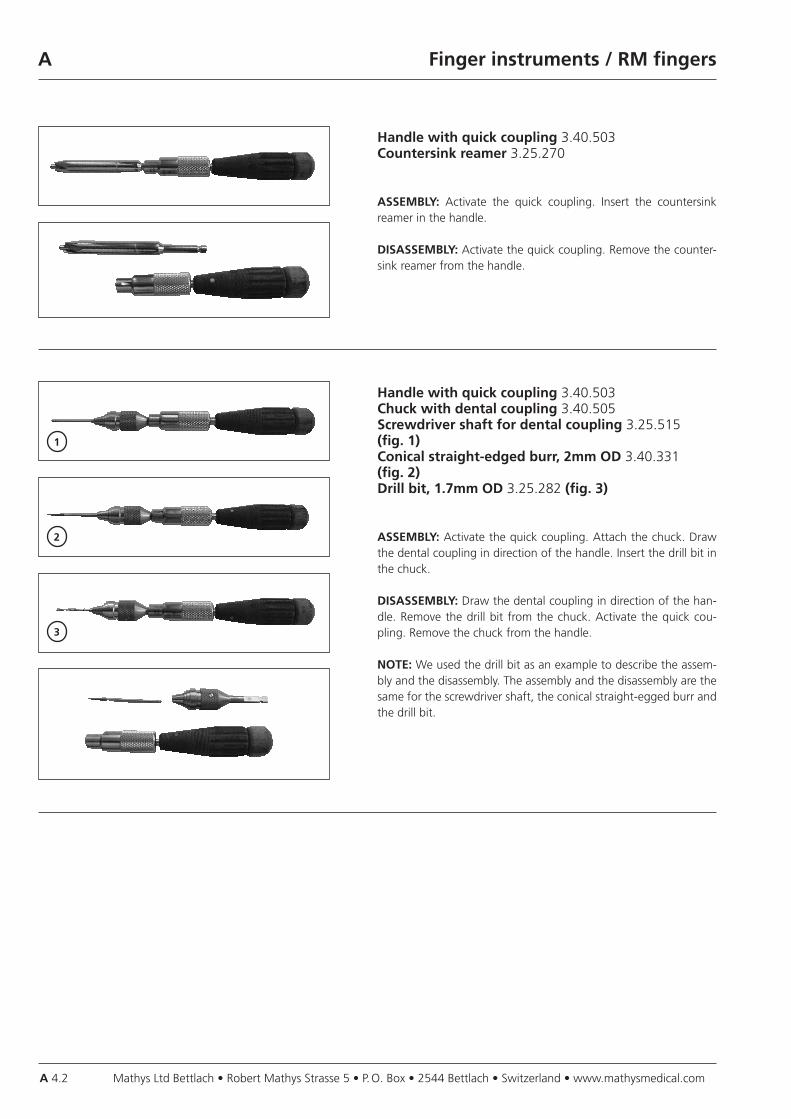
Handle with quick coupling 3.40.503Cup positioner 3.25.501
ASSEMBLY: Activate the quick coupling. Insert the cup positioner in the handle.
DISASSEMBLY: Activate the quick coupling. Remove the cup posi-tioner from the handle.
Handle with quick coupling 3.40.503Drill bit, 3.2mm OD 3.40.279
ASSEMBLY: Activate the quick coupling. Insert the drill bit in the handle.
DISASSEMBLY: Activate the quick coupling. Remove the drill bit from the handle.
Handle with quick coupling 3.40.503Conical reamer 3.25.250
ASSEMBLY: Activate the quick coupling. Insert the conical reamer in the handle.
DISASSEMBLY: Activate the quick coupling. Remove the conical reamer from the handle.
Finger instruments / RM fingers
Mathys Ltd Bettlach • Robert Mathys Strasse 5 • P. O. Box • 2544 Bettlach • Switzerland • www.mathysmedical.comA 4.2
A Finger instruments / RM fingers
Handle with quick coupling 3.40.503Countersink reamer 3.25.270
ASSEMBLY: Activate the quick coupling. Insert the countersink reamer in the handle.
DISASSEMBLY: Activate the quick coupling. Remove the counter-sink reamer from the handle.
Handle with quick coupling 3.40.503Chuck with dental coupling 3.40.505Screwdriver shaft for dental coupling 3.25.515(fig. 1)Conical straight-edged burr, 2mm OD 3.40.331 (fig. 2)Drill bit, 1.7mm OD 3.25.282 (fig. 3)
ASSEMBLY: Activate the quick coupling. Attach the chuck. Draw the dental coupling in direction of the handle. Insert the drill bit in the chuck.
DISASSEMBLY: Draw the dental coupling in direction of the han-dle. Remove the drill bit from the chuck. Activate the quick cou-pling. Remove the chuck from the handle.
NOTE: We used the drill bit as an example to describe the assem-bly and the disassembly. The assembly and the disassembly are the same for the screwdriver shaft, the conical straight-egged burr and the drill bit.
1
2
3
Mathys Ltd Bettlach • Robert Mathys Strasse 5 • P. O. Box • 2544 Bettlach • Switzerland • www.mathysmedical.com A 4.3
Finger instruments / RM fingersA
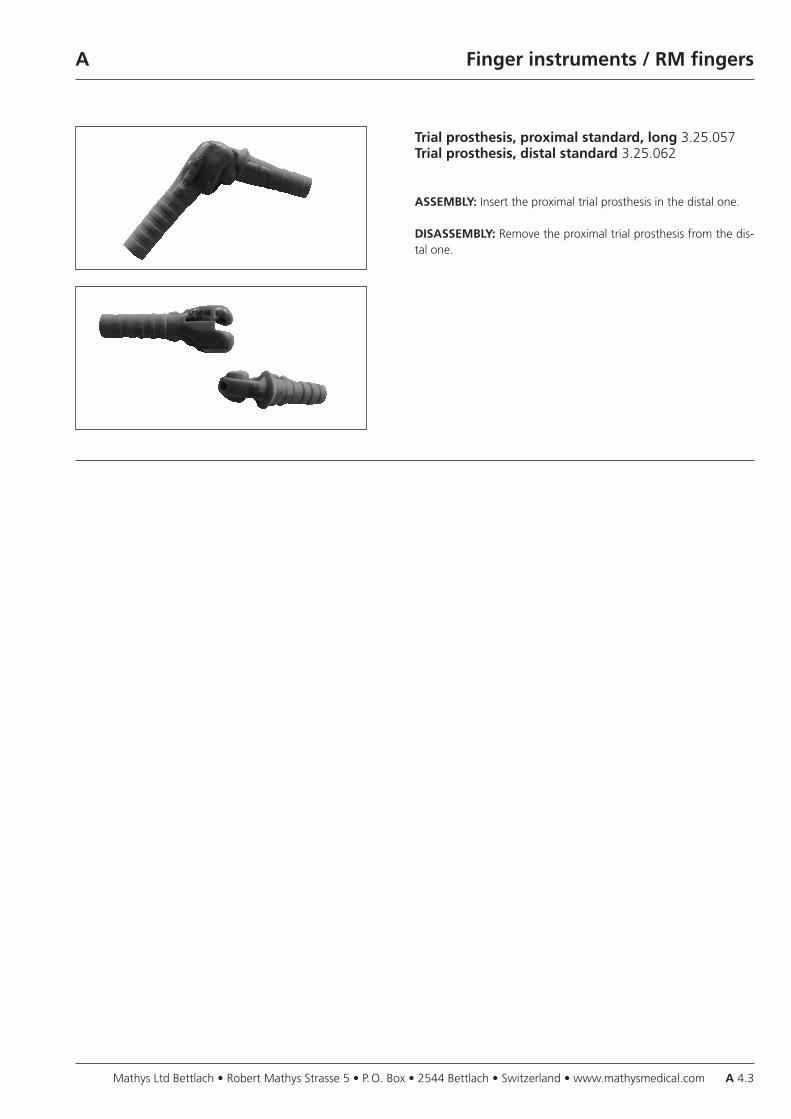
Trial prosthesis, proximal standard, long 3.25.057Trial prosthesis, distal standard 3.25.062
ASSEMBLY: Insert the proximal trial prosthesis in the distal one.
DISASSEMBLY: Remove the proximal trial prosthesis from the dis-tal one.

Mathys Ltd Bettlach • Robert Mathys Strasse 5 • P. O. Box • 2544 Bettlach • Switzerland • www.mathysmedical.com B 1
Operational check B
Contents
General procedure for the adjustment and calibration of Mathys instruments B 1Drill bits B 2Medullary reaming heads B 2Reamers B 3Hollow reamers B 3Taps B 4Drill guides B 4Quick coupling B 5Instruments with spring-loaded bearing B 5Hexagonal screwdrivers B 5Instruments with cams B 6Sleeves B 6Flexible reaming shaft B 7Threaded instruments B 7Instruments with threaded connections B 8Instruments with plastic parts B 8Rubber band B 9Instruments with holding arms B 9Soft tissue retractors B 10Bone retractors B 10Bone hooks B 10Scissors B 11Toothed curettes B 11Chisels and gouges B 12Forceps B 12Sharp edges B 13Engaging device B 13Gripper B 14
General procedure for the adjustment and calibra-tion of Mathys instruments
Only Mathys Ltd Bettlach may repair, adjust and calibrate the Ma-thys instruments. In case of unauthorised interventions by third per-sons, we will decline any guarantee claims.
Mathys Ltd Bettlach • Robert Mathys Strasse 5 • P. O. Box • 2544 Bettlach • Switzerland • www.mathysmedical.comB 2
Operational check B
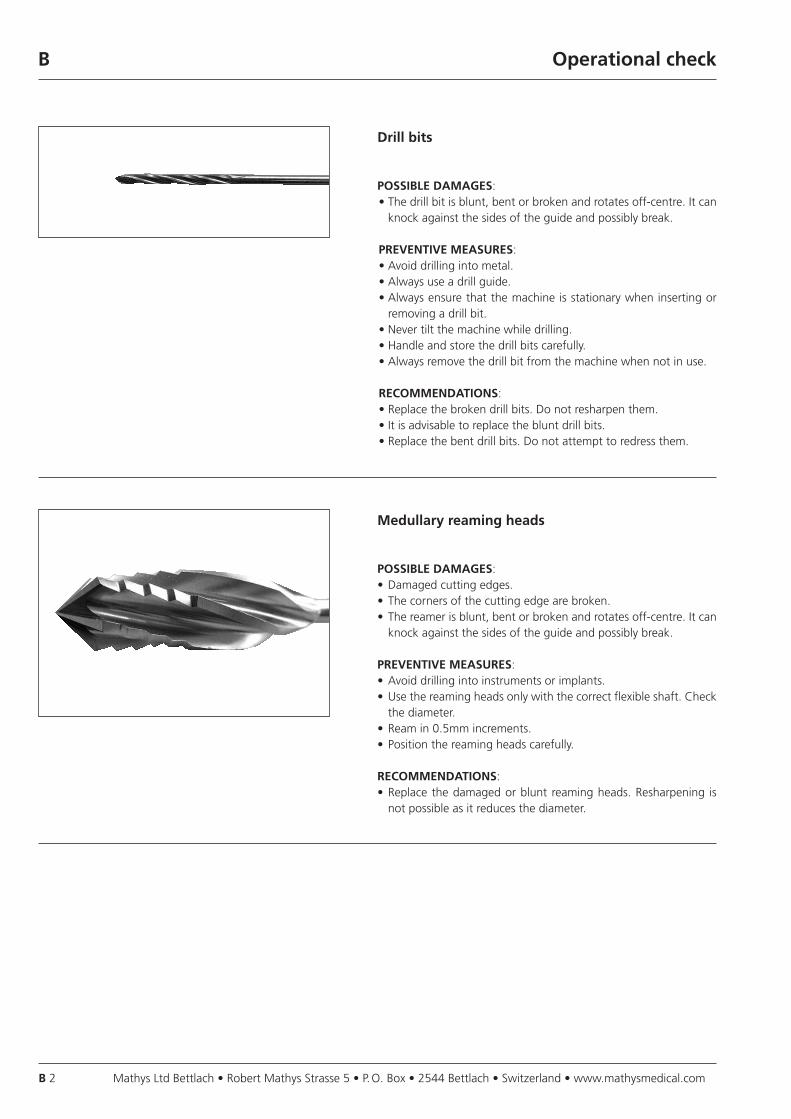
Drill bits
POSSIBLE DAMAGES: • The drill bit is blunt, bent or broken and rotates off-centre. It can
knock against the sides of the guide and possibly break.
PREVENTIVE MEASURES: • Avoid drilling into metal.• Always use a drill guide.• Always ensure that the machine is stationary when inserting or
removing a drill bit.• Never tilt the machine while drilling.• Handle and store the drill bits carefully.• Always remove the drill bit from the machine when not in use.
RECOMMENDATIONS: • Replace the broken drill bits. Do not resharpen them.• It is advisable to replace the blunt drill bits.• Replace the bent drill bits. Do not attempt to redress them.
Medullary reaming heads
POSSIBLE DAMAGES: • Damaged cutting edges.• The corners of the cutting edge are broken.• The reamer is blunt, bent or broken and rotates off-centre. It can
knock against the sides of the guide and possibly break.
PREVENTIVE MEASURES: • Avoid drilling into instruments or implants.• Use the reaming heads only with the correct flexible shaft. Check
the diameter.• Ream in 0.5mm increments.• Position the reaming heads carefully.
RECOMMENDATIONS: • Replace the damaged or blunt reaming heads. Resharpening is
not possible as it reduces the diameter.
Mathys Ltd Bettlach • Robert Mathys Strasse 5 • P. O. Box • 2544 Bettlach • Switzerland • www.mathysmedical.com B 3
Operational check B
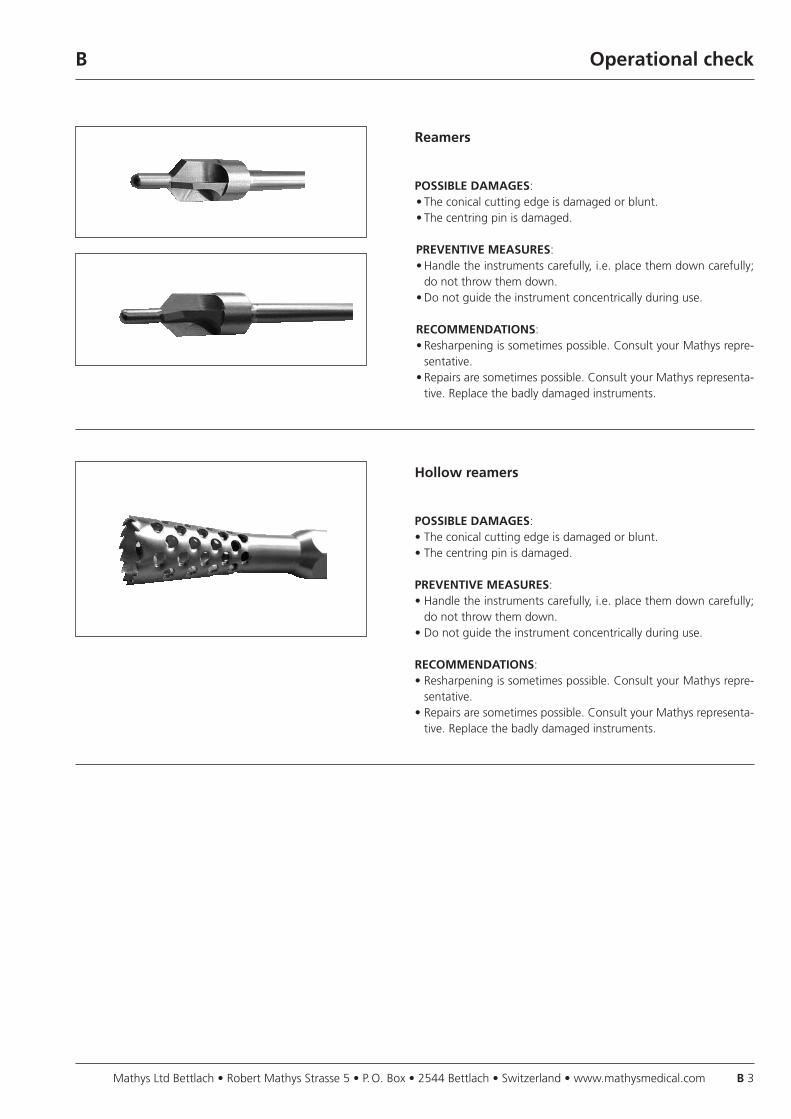
Reamers
POSSIBLE DAMAGES: • The conical cutting edge is damaged or blunt.• The centring pin is damaged.
PREVENTIVE MEASURES: • Handle the instruments carefully, i.e. place them down carefully;
do not throw them down.• Do not guide the instrument concentrically during use.
RECOMMENDATIONS: • Resharpening is sometimes possible. Consult your Mathys repre-
sentative.• Repairs are sometimes possible. Consult your Mathys representa-
tive. Replace the badly damaged instruments.
Hollow reamers
POSSIBLE DAMAGES: • The conical cutting edge is damaged or blunt.• The centring pin is damaged.
PREVENTIVE MEASURES: • Handle the instruments carefully, i.e. place them down carefully;
do not throw them down.• Do not guide the instrument concentrically during use.
RECOMMENDATIONS: • Resharpening is sometimes possible. Consult your Mathys repre-
sentative.• Repairs are sometimes possible. Consult your Mathys representa-
tive. Replace the badly damaged instruments.

Mathys Ltd Bettlach • Robert Mathys Strasse 5 • P. O. Box • 2544 Bettlach • Switzerland • www.mathysmedical.comB 4
Operational check B
Taps
POSSIBLE DAMAGES: • The thread is damaged. The teeth are broken or blunt. • The tap is bent or twisted.• The (quick) coupling end is damaged.
PREVENTIVE MEASURES: • Always use a tissue-protecting sleeve.• Avoid forced turning of the tap in the bone.• Remove the bone chips from the hole: two turns clockwise, one
half-turn anticlockwise.• After each application, remove the bone chips from the grooves
of the tap with a sharp instrument.• Place a protective cap over the tap when it is not in use.• Use only well fitting (quick) coupling ends.
RECOMMENDATIONS: • Replace the damaged instrument. Resharpening is not possible. • Replace the damaged instrument.
Drill guides
POSSIBLE DAMAGES: • The teeth are damaged or worn.• The guide sleeve or the cylinder is bent and blocked.
PREVENTIVE MEASURES: • Do not use the sleeve on metal (plates).• Avoid a forced insertion of the instrument into hard bone.• Handle the instrument carefully.• Avoid drilling into the instrument. Insert the drill bit until it con-
tacts the bone when the machine is stationary. Do not tilt.• Do not use forceps to hold the instrument• Thoroughly clean the cylinder and the guide sleeve.
RECOMMENDATIONS: • Replace the instrument. • Slightly deformed sleeves can be repaired. Consult your Mathys
representative. Replace a badly damaged sleeve.
Mathys Ltd Bettlach • Robert Mathys Strasse 5 • P. O. Box • 2544 Bettlach • Switzerland • www.mathysmedical.com B 5
Operational check B
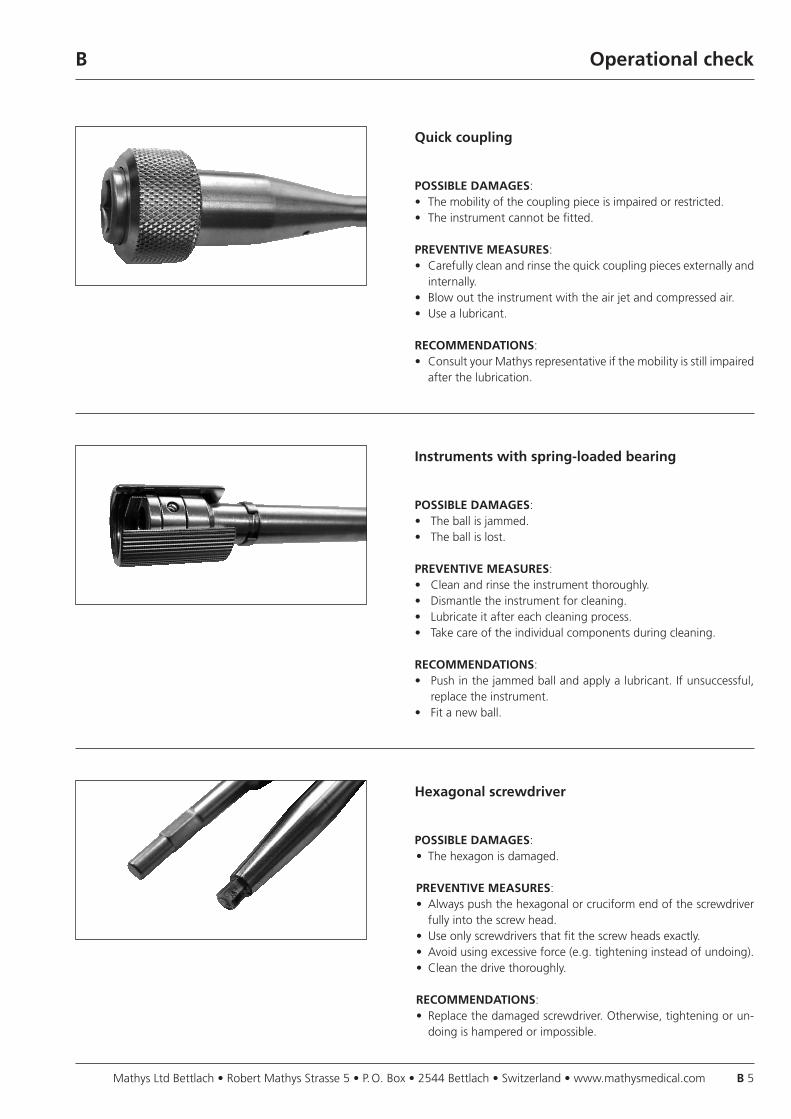
Quick coupling
POSSIBLE DAMAGES: • The mobility of the coupling piece is impaired or restricted.• The instrument cannot be fitted.
PREVENTIVE MEASURES: • Carefully clean and rinse the quick coupling pieces externally and
internally.• Blow out the instrument with the air jet and compressed air.• Use a lubricant.
RECOMMENDATIONS: • Consult your Mathys representative if the mobility is still impaired
after the lubrication.
Instruments with spring-loaded bearing
POSSIBLE DAMAGES: • The ball is jammed. • The ball is lost.
PREVENTIVE MEASURES: • Clean and rinse the instrument thoroughly.• Dismantle the instrument for cleaning.• Lubricate it after each cleaning process.• Take care of the individual components during cleaning.
RECOMMENDATIONS: • Push in the jammed ball and apply a lubricant. If unsuccessful,
replace the instrument.• Fit a new ball.
Hexagonal screwdriver
POSSIBLE DAMAGES: • The hexagon is damaged.
PREVENTIVE MEASURES: • Always push the hexagonal or cruciform end of the screwdriver
fully into the screw head.• Use only screwdrivers that fit the screw heads exactly.• Avoid using excessive force (e.g. tightening instead of undoing).• Clean the drive thoroughly.
RECOMMENDATIONS: • Replace the damaged screwdriver. Otherwise, tightening or un-
doing is hampered or impossible.
Mathys Ltd Bettlach • Robert Mathys Strasse 5 • P. O. Box • 2544 Bettlach • Switzerland • www.mathysmedical.comB 6
Operational check B
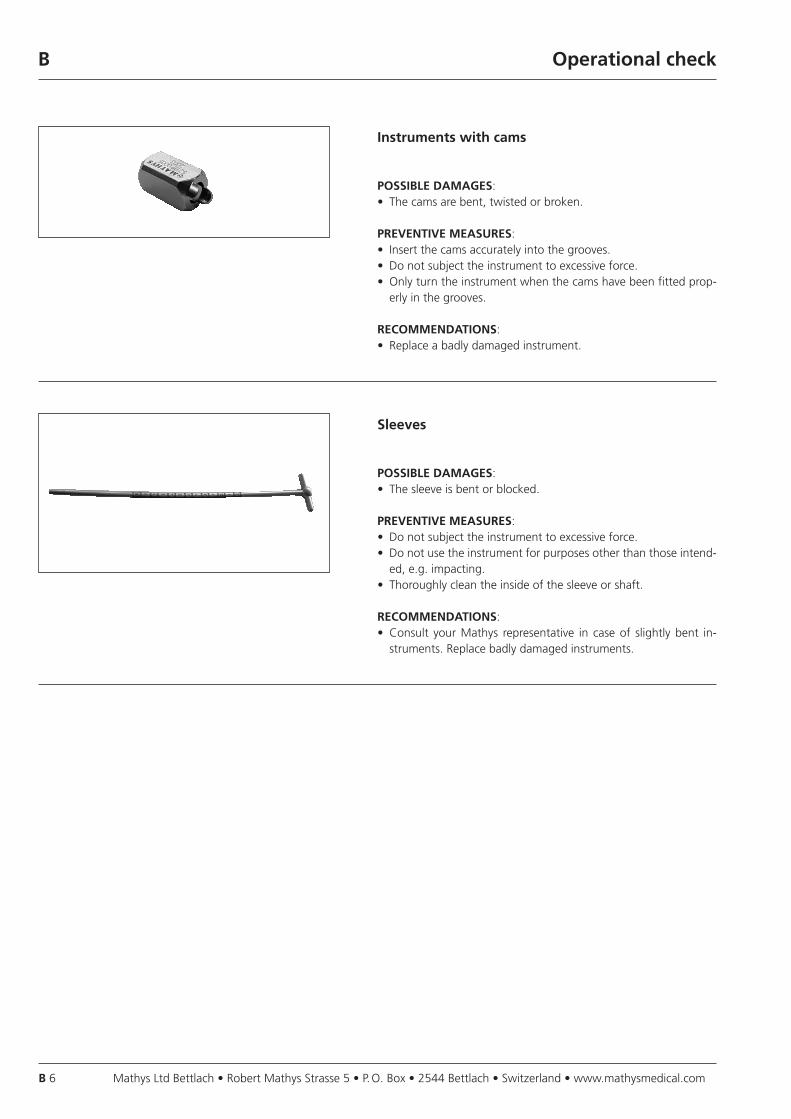
Instruments with cams
POSSIBLE DAMAGES: • The cams are bent, twisted or broken.
PREVENTIVE MEASURES: • Insert the cams accurately into the grooves.• Do not subject the instrument to excessive force.• Only turn the instrument when the cams have been fitted prop-
erly in the grooves.
RECOMMENDATIONS: • Replace a badly damaged instrument.
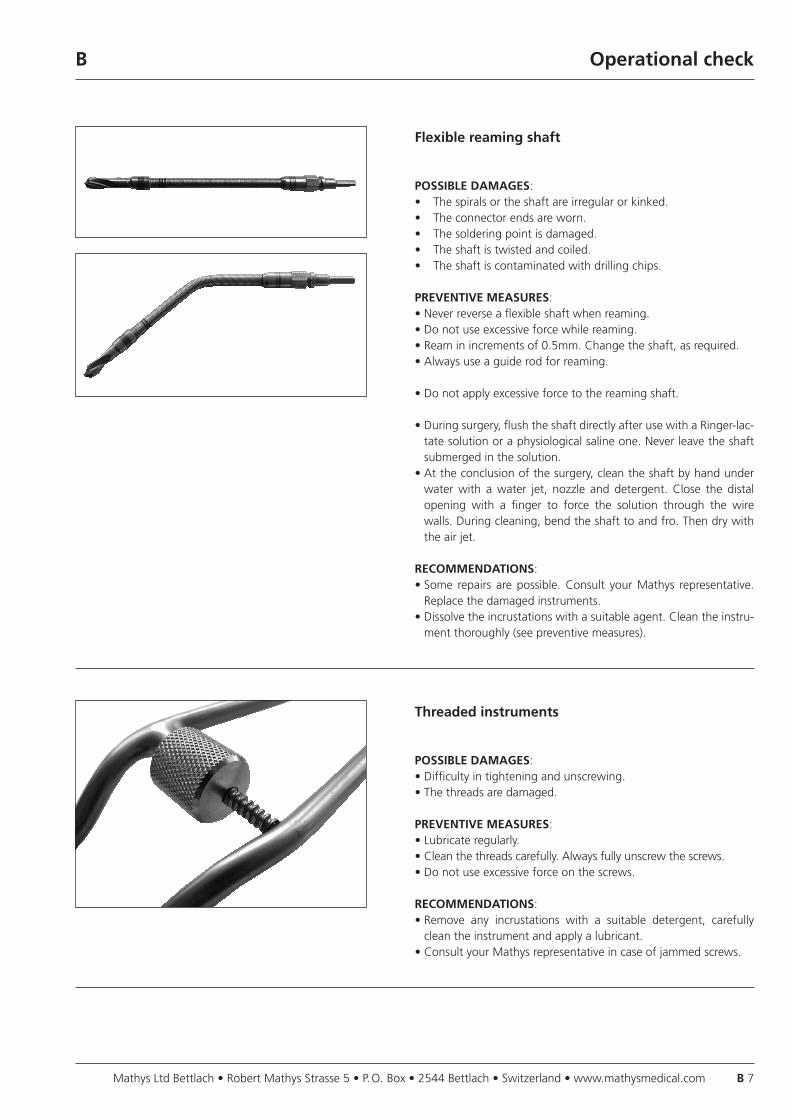
Sleeves
POSSIBLE DAMAGES: • The sleeve is bent or blocked.
PREVENTIVE MEASURES: • Do not subject the instrument to excessive force.• Do not use the instrument for purposes other than those intend-
ed, e.g. impacting.• Thoroughly clean the inside of the sleeve or shaft.
RECOMMENDATIONS: • Consult your Mathys representative in case of slightly bent in-
struments. Replace badly damaged instruments.
Mathys Ltd Bettlach • Robert Mathys Strasse 5 • P. O. Box • 2544 Bettlach • Switzerland • www.mathysmedical.com B 7
Operational check B
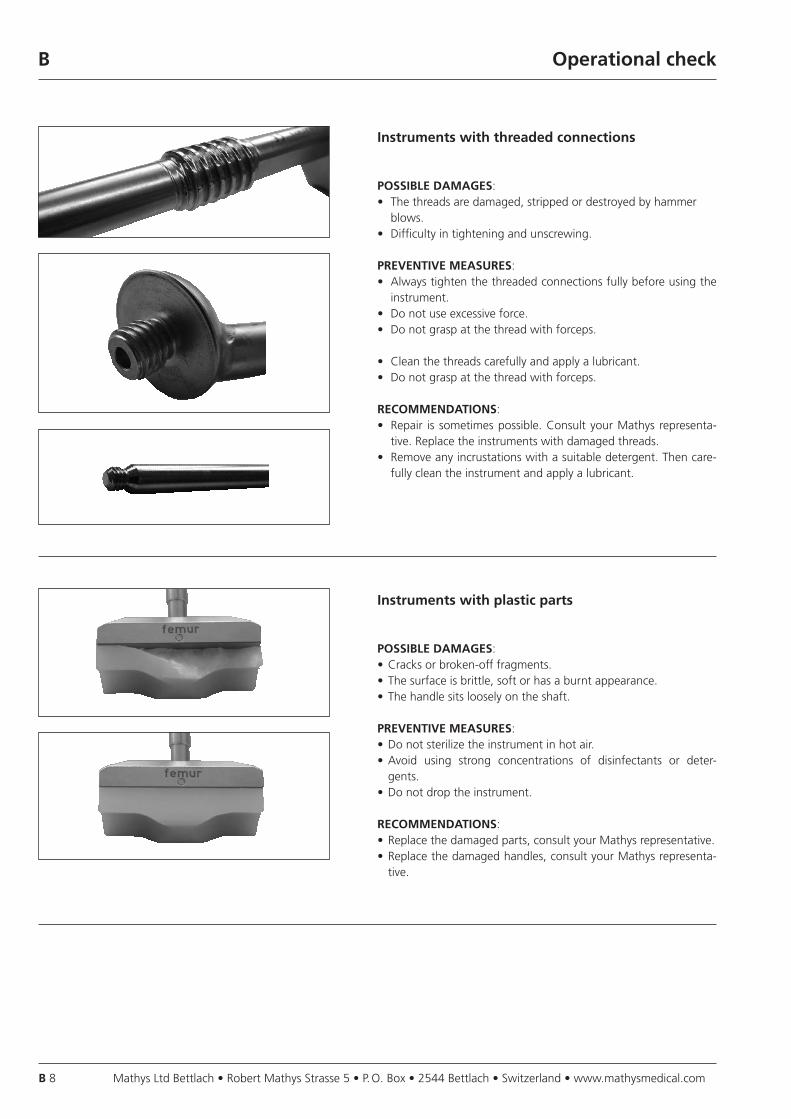
Flexible reaming shaft
POSSIBLE DAMAGES: • The spirals or the shaft are irregular or kinked.• The connector ends are worn.• The soldering point is damaged.• The shaft is twisted and coiled.• The shaft is contaminated with drilling chips.
PREVENTIVE MEASURES: • Never reverse a flexible shaft when reaming.• Do not use excessive force while reaming.• Ream in increments of 0.5mm. Change the shaft, as required.• Always use a guide rod for reaming.
• Do not apply excessive force to the reaming shaft.
• During surgery, flush the shaft directly after use with a Ringer-lac-tate solution or a physiological saline one. Never leave the shaft submerged in the solution.
• At the conclusion of the surgery, clean the shaft by hand under water with a water jet, nozzle and detergent. Close the distal opening with a finger to force the solution through the wire walls. During cleaning, bend the shaft to and fro. Then dry with the air jet.
RECOMMENDATIONS: • Some repairs are possible. Consult your Mathys representative.
Replace the damaged instruments.• Dissolve the incrustations with a suitable agent. Clean the instru-
ment thoroughly (see preventive measures).
Threaded instruments
POSSIBLE DAMAGES: • Difficulty in tightening and unscrewing.• The threads are damaged.
PREVENTIVE MEASURES: • Lubricate regularly.• Clean the threads carefully. Always fully unscrew the screws.• Do not use excessive force on the screws.
RECOMMENDATIONS: • Remove any incrustations with a suitable detergent, carefully
clean the instrument and apply a lubricant.• Consult your Mathys representative in case of jammed screws.
Mathys Ltd Bettlach • Robert Mathys Strasse 5 • P. O. Box • 2544 Bettlach • Switzerland • www.mathysmedical.comB 8
Operational check B
Instruments with threaded connections
POSSIBLE DAMAGES: • The threads are damaged, stripped or destroyed by hammer blows.• Difficulty in tightening and unscrewing.
PREVENTIVE MEASURES: • Always tighten the threaded connections fully before using the
instrument.• Do not use excessive force.• Do not grasp at the thread with forceps.
• Clean the threads carefully and apply a lubricant.• Do not grasp at the thread with forceps.
RECOMMENDATIONS: • Repair is sometimes possible. Consult your Mathys representa-
tive. Replace the instruments with damaged threads.• Remove any incrustations with a suitable detergent. Then care-
fully clean the instrument and apply a lubricant.
Instruments with plastic parts
POSSIBLE DAMAGES: • Cracks or broken-off fragments.• The surface is brittle, soft or has a burnt appearance.• The handle sits loosely on the shaft.
PREVENTIVE MEASURES: • Do not sterilize the instrument in hot air.• Avoid using strong concentrations of disinfectants or deter-
gents.• Do not drop the instrument.
RECOMMENDATIONS: • Replace the damaged parts, consult your Mathys representative.• Replace the damaged handles, consult your Mathys representa-
tive.
Mathys Ltd Bettlach • Robert Mathys Strasse 5 • P. O. Box • 2544 Bettlach • Switzerland • www.mathysmedical.com B 9
Operational check B
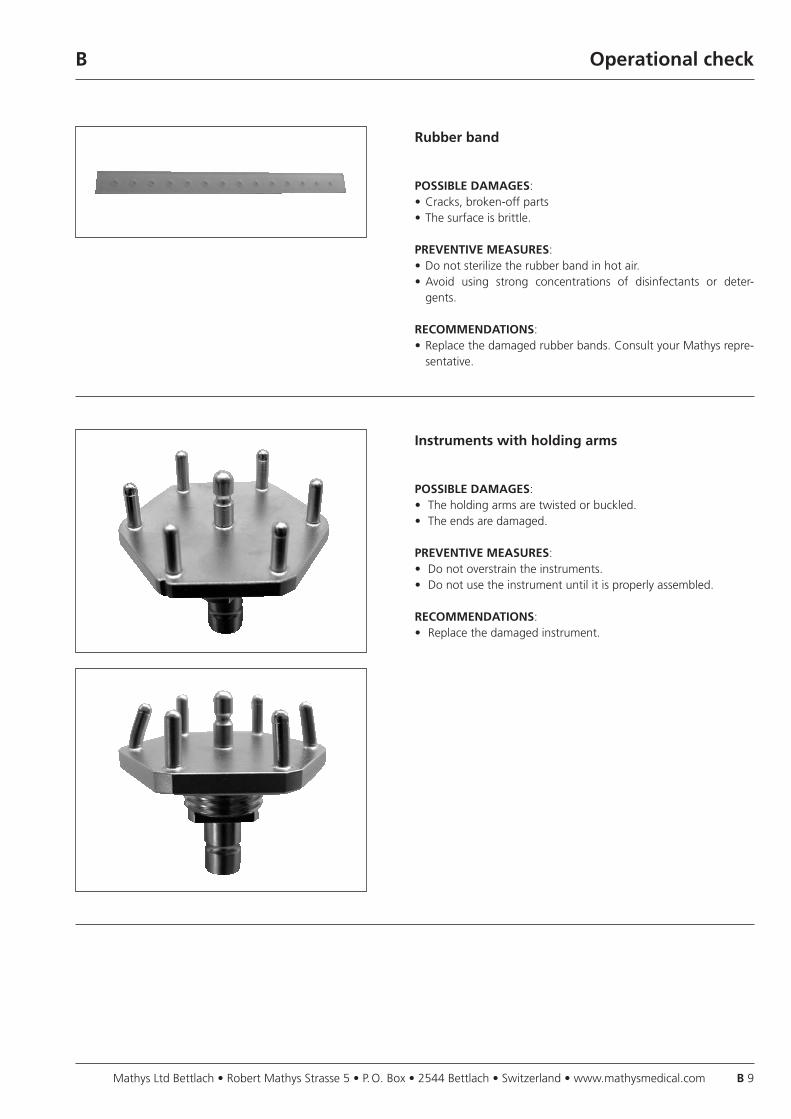
Rubber band
POSSIBLE DAMAGES: • Cracks, broken-off parts• The surface is brittle.
PREVENTIVE MEASURES: • Do not sterilize the rubber band in hot air.• Avoid using strong concentrations of disinfectants or deter-
gents.
RECOMMENDATIONS: • Replace the damaged rubber bands. Consult your Mathys repre-
sentative.
Instruments with holding arms
POSSIBLE DAMAGES: • The holding arms are twisted or buckled.• The ends are damaged.
PREVENTIVE MEASURES: • Do not overstrain the instruments.• Do not use the instrument until it is properly assembled.
RECOMMENDATIONS: • Replace the damaged instrument.

Mathys Ltd Bettlach • Robert Mathys Strasse 5 • P. O. Box • 2544 Bettlach • Switzerland • www.mathysmedical.comB 10
Operational check B
Soft tissue rectractors
POSSIBLE DAMAGES: • The retractor has been accidentally pierced, bent or has a sharp
burr.
PREVENTIVE MEASURES: • Do not overstrain the soft tissue retractor, do not drill into it.
RECOMMENDATIONS: • Some repairs are possible. Consult your Mathys representative.
Bone retractors
POSSIBLE DAMAGES: • The retractor has been accidentally drilled into, bent, or has a
sharp burr.
PREVENTIVE MEASURES: • Do not overstrain the bone retractor, do not drill into it.
RECOMMENDATIONS: • Some repairs are possible. Consult your Mathys representative.
Bone hooks
POSSIBLE DAMAGES: • The tips are deformed or broken off.
PREVENTIVE MEASURES: • Do not overstrain the bone hooks.
RECOMMENDATIONS: • Some repairs are possible. Consult your Mathys representative.
Mathys Ltd Bettlach • Robert Mathys Strasse 5 • P. O. Box • 2544 Bettlach • Switzerland • www.mathysmedical.com B 11
Operational check B
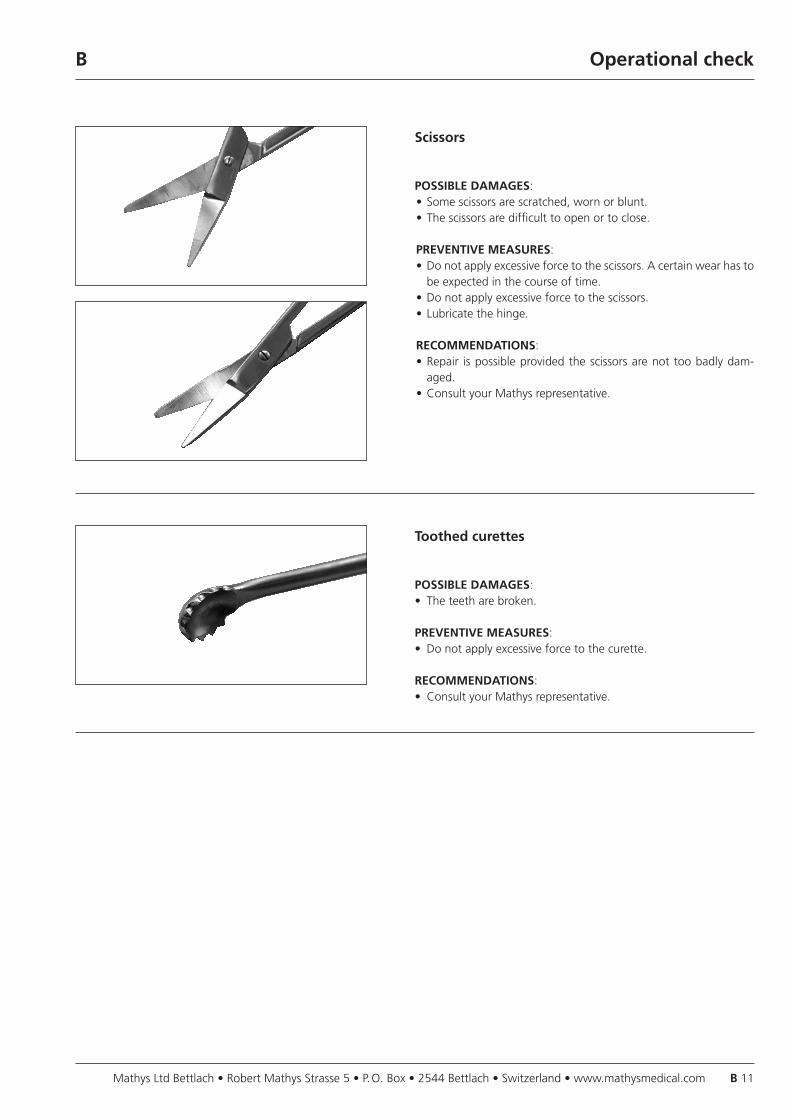
Scissors
POSSIBLE DAMAGES: • Some scissors are scratched, worn or blunt.• The scissors are difficult to open or to close.
PREVENTIVE MEASURES: • Do not apply excessive force to the scissors. A certain wear has to
be expected in the course of time.• Do not apply excessive force to the scissors.• Lubricate the hinge.
RECOMMENDATIONS: • Repair is possible provided the scissors are not too badly dam-
aged. • Consult your Mathys representative.
Toothed curettes
POSSIBLE DAMAGES: • The teeth are broken.
PREVENTIVE MEASURES: • Do not apply excessive force to the curette.
RECOMMENDATIONS: • Consult your Mathys representative.
Mathys Ltd Bettlach • Robert Mathys Strasse 5 • P. O. Box • 2544 Bettlach • Switzerland • www.mathysmedical.comB 12
Operational check B
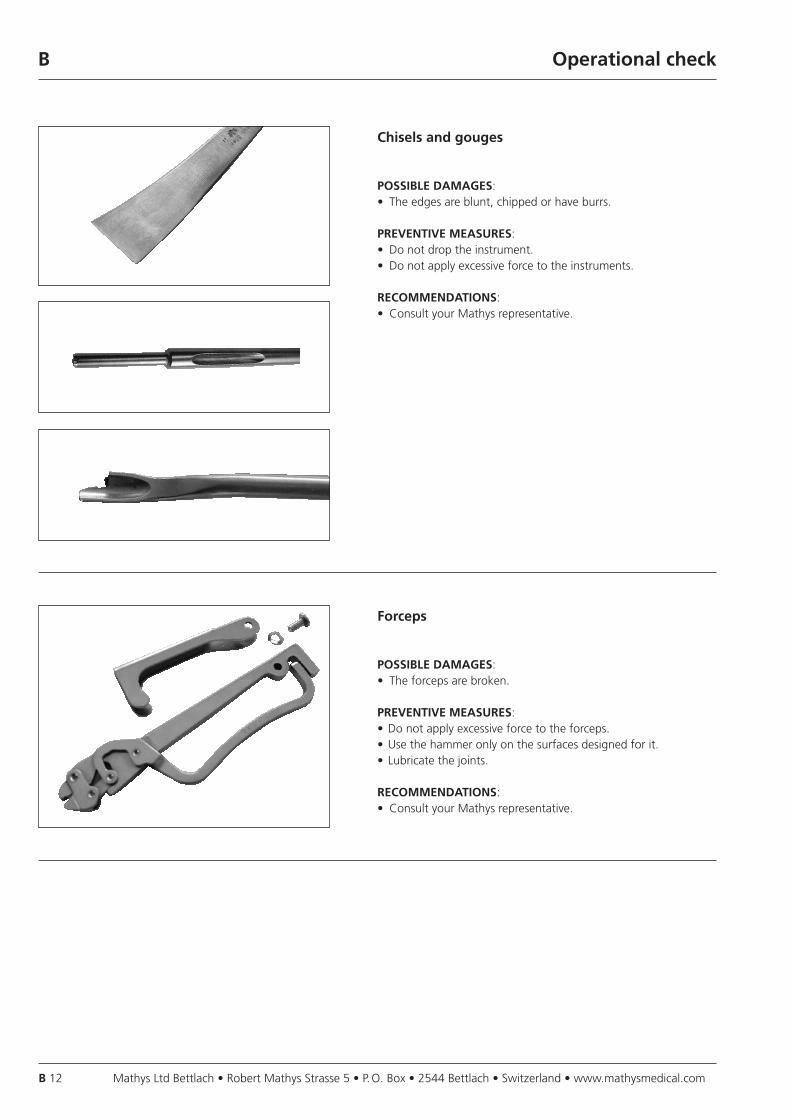
Chisels and gouges
POSSIBLE DAMAGES: • The edges are blunt, chipped or have burrs.
PREVENTIVE MEASURES: • Do not drop the instrument.• Do not apply excessive force to the instruments.
RECOMMENDATIONS: • Consult your Mathys representative.
Forceps
POSSIBLE DAMAGES: • The forceps are broken.
PREVENTIVE MEASURES: • Do not apply excessive force to the forceps.• Use the hammer only on the surfaces designed for it.• Lubricate the joints.
RECOMMENDATIONS: • Consult your Mathys representative.

Mathys Ltd Bettlach • Robert Mathys Strasse 5 • P. O. Box • 2544 Bettlach • Switzerland • www.mathysmedical.com B 13
Operational check B
Sharp edges
POSSIBLE DAMAGES: • The edges are broken or blunt.
PREVENTIVE MEASURES: • Use the instrument properly and do not overstrain it. • Do not drop the instrument.• Insert the instrument manually into the guide before impacting it
with the hammer.
RECOMMENDATIONS: • Replace the damaged instruments. Resharpening is not possible.
Consult your Mathys representative.
Engaging device
POSSIBLE DAMAGES: • The teeth are broken, damaged or blunt.
PREVENTIVE MEASURES: • Use the instrument properly.
RECOMMENDATIONS: • Replace the badly damaged instruments.
Mathys Ltd Bettlach • Robert Mathys Strasse 5 • P. O. Box • 2544 Bettlach • Switzerland • www.mathysmedical.comB 14
Operational check B
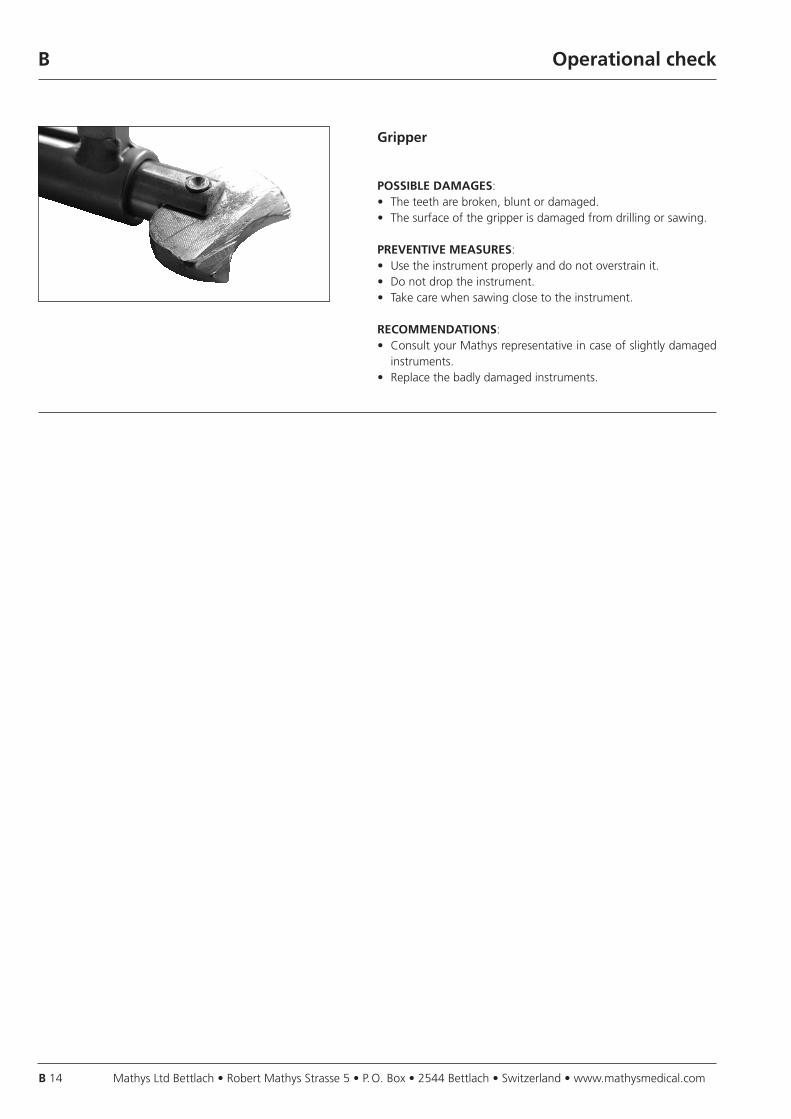
Gripper
POSSIBLE DAMAGES: • The teeth are broken, blunt or damaged.• The surface of the gripper is damaged from drilling or sawing.
PREVENTIVE MEASURES: • Use the instrument properly and do not overstrain it. • Do not drop the instrument.• Take care when sawing close to the instrument.
RECOMMENDATIONS: • Consult your Mathys representative in case of slightly damaged
instruments.• Replace the badly damaged instruments.

Local Marketing Partners in over 30 countries worldwide …
Mathys Ltd Bettlach • Robert Mathys Strasse 5 • P. O. Box • 2544 Bettlach • Switzerland
Australia Mathys Orthopaedics Pty Ltd Lane Cove West, NSW 2066 Tel: +61 2 9417 9200 [email protected]
Austria Mathys Orthopädie GmbH 2351 Wiener Neudorf Tel: +43 2236 860 999 [email protected]
Belgium Mathys Orthopaedics Belux N.V.-S.A. 3001 Leuven Tel: +32 16 38 81 20 [email protected]
France Mathys Orthopédie S.A.S 63360 Gerzat Tel: +33 4 73 23 95 95 [email protected]
Germany Mathys Orthopädie GmbH «Centre of Excellence Sales» Bochum 44809 Bochum Tel: +49 234 588 59 0 [email protected]
«Centre of Excellence Ceramics» Mörsdorf 07646 Mörsdorf/Thür. Tel: +49 364 284 94 0 [email protected]
«Centre of Excellence Production» Hermsdorf 07629 Hermsdorf Tel: +49 364 284 94 110 [email protected]
Italy Mathys Ortopedia S.r.l. 20141 Milan
Tel: +39 02 5354 2305 [email protected]
Japan Mathys KK Tokyo 108-0075 Tel: +81 3 3474 6900 [email protected]
New Zealand Mathys Ltd. Auckland Tel: +64 9 478 39 00 [email protected]
Netherlands Mathys Orthopaedics B.V. 3001 Leuven Tel: +31 88 1300 500 [email protected]
P. R. China Mathys (Shanghai) Medical Device Trading Co., Ltd Shanghai, 200041 Tel: +86 21 6170 2655 [email protected]
Switzerland Mathys (Schweiz) GmbH 2544 Bettlach Tel: +41 32 644 1 458 [email protected]
United Kingdom Mathys Orthopaedics Ltd Alton, Hampshire GU34 2QL Tel: +44 8450 580 938 [email protected]
Item
no.
336
.040
.024
0
1-05
10-0
6 2
010-
05
© M
athy
s Lt
d Be
ttla
ch