2wire 2701 modem - user guide & wireless home networking
TRANSCRIPT
1
Wireless Home Networking Reference Guide
WHNRGE0709_BBLP9-015_eng_36pager 1 10/07/09 12:52 PM
2
Bell Internet Service AgreementUse of the Bell Internet service is subject to the terms and conditionsof the applicable Bell Internet Service Agreement. By installing and/orusing the service, you are accepting these terms and conditions. TheBell Internet Service Agreement is included in your installation kit and is available at bell.ca/agreements. If you do not agree with these terms and conditions, refer to the Refund/Cancellation Policies section of the Bell Internet Service Agreement for information on cancelling the service.
WHNRGE0709_BBLP9-015_eng_36pager 2 10/07/09 12:52 PM

3
Bell Internet personal account informationPlease write down your personal account information (provided in your Welcome Letter) in the space below. You will need this information to set up your Internet service or if calling in for technical support or general inquiries about the service.
Note: If you are an existing customer or purchased your service in a retail store, your account information was provided to you at the time of purchase or registration.
If you misplace your Bell Internet User ID (b1#) or Access Password, visit bell.ca/getInternetID for instructions on how to retrieve this information online or contact us at 310-SURF (310-7873).
Bell Internet PIN:
User ID:
Access Password:
Home Network Settings SSID:(on the underside of your modem)
WEP key:(on the underside of your modem)
Home Networkadministrator password:
Email informationMain email address:
Main email password:
My Bell ProfileCreate a My Bell profile to manage all of your accounts online. To log in, you will need a My Bell username and password that can be created at bell.ca/myinternet. Once you have set up your Bell Internet email address and My Bell profile, please fill out the rest of your personal account information below.
My Bell username:
Password:
WHNRGE0709_BBLP9-015_eng_36pager 3 10/07/09 12:52 PM
4
Table of contents
Customer support quick reference 5Introduction to wireless 6Modifying your home network settings 19Tips & troubleshooting 31Using Dial-up access 34
WHNRGE0709_BBLP9-015_eng_36pager 4 10/07/09 12:52 PM
5
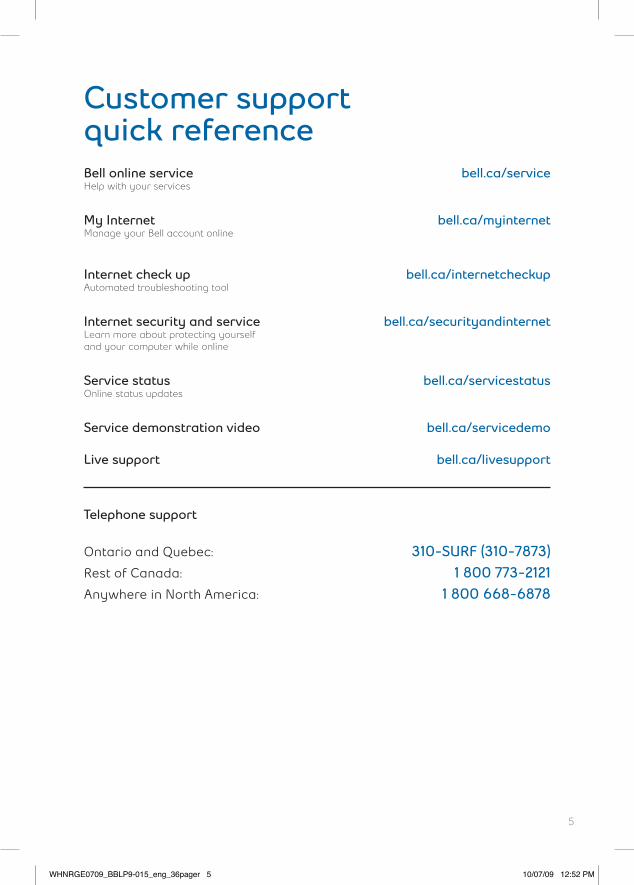
Customer support quick referenceBell online service bell.ca/serviceHelp with your services
My Internet bell.ca/myinternetManage your Bell account online
Internet check up bell.ca/internetcheckupAutomated troubleshooting tool
Internet security and service bell.ca/securityandinternetLearn more about protecting yourself and your computer while online
Service status bell.ca/servicestatusOnline status updates
Service demonstration video bell.ca/servicedemo
Live support bell.ca/livesupport
Telephone support
Ontario and Quebec: 310-SURF (310-7873)Rest of Canada: 1 800 773-2121Anywhere in North America: 1 800 668-6878
WHNRGE0709_BBLP9-015_eng_36pager 5 10/07/09 12:52 PM
6
Introduction to wireless
This section will guide you through the process of creating a wireless connection to your wireless Home Networking modem from Bell. Every wireless adapter model is unique and has its own software and user manual. Please refer to the manufacturer’s user manual for specific instructions and troubleshooting assistance. Unless otherwise stated by Bell, technical support is not provided for wireless adapters. Please visit bell.ca/wirelessnetworking for more information.
WHNRGE0709_BBLP9-015_eng_36pager 6 10/07/09 12:52 PM
7
Wireless Home Networking terminology802.11 - This is the general standard for wireless local area networks.Your wireless Home Networking modem is both 802.11b (11 Mbps) and 802.11g (54 Mbps) and is designed to work with most wireless adapters using these standards.
SSID - Service Set Identifier. This is also known as your Network Name, Service Area or a variety of other terms. It is the name of the network being broadcast from your modem; you set this name when you enable wireless access during the initial configuration.
WEP - Wired Equivalent Privacy. This is the encryption used to protect data transmitted over your wireless network. There are various levels of security. Your modem is set to 128 bit by default. The WEP key is the 26-hexadecimal-character key you wrote down when enabling wireless access. It is imperative that this key be typed correctly when connecting to your wireless network, as one mistyped character will prevent connection to the network.
Channel - The 802.11b and 802.11g standard is broadcast over 11 overlapping channels. If there are other access points (routers/modems transmitting wirelessly) in your area, set them to different channels. It is best to set them 5 apart from each other (e.g. 1, 6 and 11) to avoid interference.
Wireless Interference - Home appliances such as 2.4 GHz cordless phones, RF remote controls, wireless cameras, etc., or physical obstacles (in the line of sight) such as a wall, can cause signal interference. Place your wireless Home Networking modem in a central location in your home to allow for the greatest connection range.
WHNRGE0709_BBLP9-015_eng_36pager 7 10/07/09 12:52 PM
8
Configuring your computer to work wirelesslyFollow the steps below to enable your Home Networking modem to work wirelessly with your computer.
Before you begin
Please ensure you: - have successfully completed activating your Home
Networking modem (Step 3 in the Self-Install Guide). - are able to connect to the Internet when using the provided
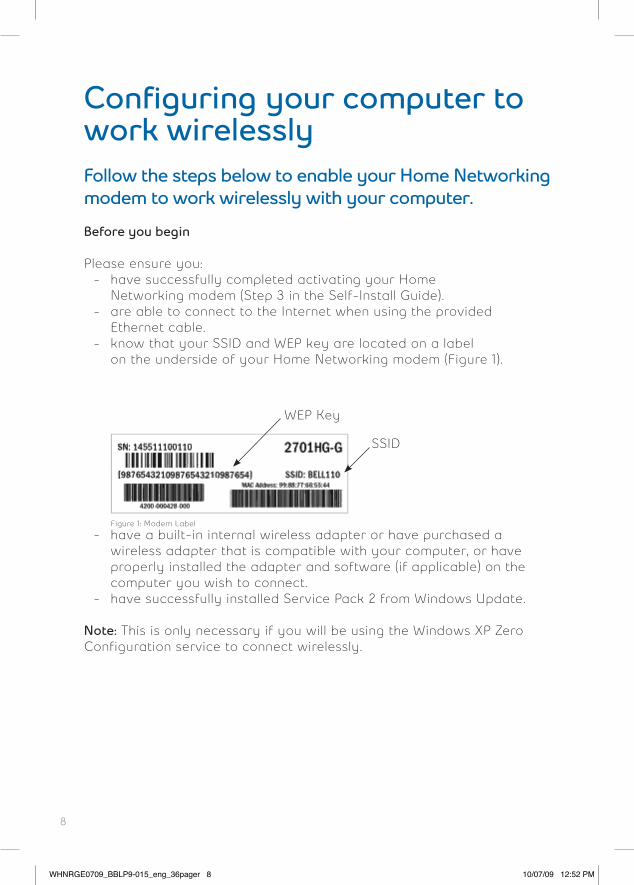
Ethernet cable. - know that your SSID and WEP key are located on a label
on the underside of your Home Networking modem (Figure 1).
- have a built-in internal wireless adapter or have purchased a wireless adapter that is compatible with your computer, or have properly installed the adapter and software (if applicable) on the computer you wish to connect.
- have successfully installed Service Pack 2 from Windows Update.
Note: This is only necessary if you will be using the Windows XP Zero Configuration service to connect wirelessly.
SSID
WEP Key
Figure 1: Modem Label
WHNRGE0709_BBLP9-015_eng_36pager 8 10/07/09 12:52 PM
9
Based on your computer and connection, select one of the following sections that apply to you:
I) Laptops with built-in wireless adaptersII) Wireless adapters using your adapter’s softwareIII) Connecting to wireless networks with Windows XPIV) Connecting to wireless networks with Windows Vista
I) Laptops with built-in wireless adapters
Your laptop may have come with specific software to be used for connecting to wireless networks. It is advisable that you use this software to connect as it will allow for enhanced usability and features.
1. Turn on your internal wireless adapter. There will be a small on/offbutton or switch located somewhere on your laptop (consult your Owner’s Guide if you cannot locate the switch). The symbol for wireless looks similar to a small beacon with airwaves.
2. When the wireless feature is turned on, your wireless softwareshould run automatically. If it does not, double-click the wireless program’s small icon in your system tray. To manually run the program go to the Start menu, then Programs, and then locate your software name. Alternatively, your wireless adapter’s software may be located in the Control Panel. You will need to use this software to set up a profile to connect wirelessly. Once you have saved a profile, it will connect automatically every time.
3. Navigate through the software to find a listing of availablenetworks. There may be a button called Available Networksor Scan all Available Networks. Click this button. Your wirelessadapter will now search for all available networks within range.
WHNRGE0709_BBLP9-015_eng_36pager 9 10/07/09 12:52 PM
10
4. Your Network Name (SSID) should appear. If it does, proceed to the next step. If your network name does not appear, follow these suggestions:
- Are you within range? Try moving the wireless Home Networking modem closer to the computer while trying to connect.
- Try restarting/rebooting your computer with the wireless adapter switch turned on.
- Have you changed any of the Advanced Settings on the modem? (For instance, broadcast mode may be disabled.)
- If you still have your Ethernet cable connected, unplug it and try again.
5. You will now need to enter your WEP key. If your WEP key is 128-bit encryption (preshared), you may need to select this level of encryption from a drop-down menu. Type in this key, do not cut and paste it from another window. Also, do not use the passphrase option if available.
6. Save your profile, and if there is an option to always connect withthis profile, select it. You can save this profile with the name of your choice. This will not affect the SSID name you selected earlier.
7. The software will now attempt to connect using this profile.
WHNRGE0709_BBLP9-015_eng_36pager 10 10/07/09 12:52 PM
11
8. You should now be connected and your connection strength willshow in the system tray.
If you find that your connection is unstable (disconnects frequently):
Windows XP users may need to disable the Windows XP Zero Configuration service. To do this, follow these steps:
- Click Start, then Control Panel, then Network and Internet Connections.
- Click the Network Connections icon. - Click the Wireless Network Connection icon. - Click the View available wireless networks link. - Click Change advanced settings (if you have Windows XP
Service Pack 2). - From the Wireless Networks Connection Properties window,
click the Wireless Networks tab. - Uncheck the Use Windows to configure my wireless network
settings box. - Click OK. - Ensure that you do not have any conflicts described earlier.
(For example: channel conflicts, physical obstructions, 2.4Ghz cordless phones, etc.)
WHNRGE0709_BBLP9-015_eng_36pager 11 10/07/09 12:52 PM
12
II) Wireless adapters using your adapter’s software
We highly recommend using the documentation provided with your wireless adapter. The following information is a generic guideline to assist you in this process and it is not intended to replace the documentation that came with your adapter.
1. Run the adapter’s software. You may be able to double-click thesmall icon in your system tray to launch the software. To manually run the program go to the Start menu, then Programs, then locate your software name. Alternatively, your wireless adapter software may be located in the Control Panel. You will need to use this software to set up a profile to connect wirelessly. Once you have saved a profile, it will connect automatically every time.
2. During the setup, you may be prompted to enter your Network Name(SSID). Alternatively, navigate through the software to find a listing of available networks. There may be a button called Available Networks or Scan all Available Networks. Click this button. Your wireless adapter will now search for all available networks within range. Your network name (SSID) should be displayed. If it is, proceed to the next step. If your network name is not displayed, follow these suggestions:
- Are you within range? Try moving the wireless Home Networking modem closer to the computer while trying to connect.
- Try restarting/rebooting your computer with the wireless adapter connected and turned on.
- Have you changed any of the Advanced Settings on the modem? (For instance, broadcast mode may be disabled.)
- If your wireless adapter has any indicator lights, they should be flashing when trying to connect or search for networks. If these lights are not flashing, there may be a problem with your adapter. Please contact the wireless adapter’s manufacturer for product support.
WHNRGE0709_BBLP9-015_eng_36pager 12 10/07/09 12:52 PM
13
3. You will now need to enter your WEP key. Your WEP key is 128-bit encryption (preshared). You may need to select this level of encryption from a drop-down menu. Type in this key, do not cut and paste it from another window. Also, do not use the passphrase option if available.
4. If there is an option to save your profile, please do so, and if there is an option to always connect with this profile, select it. You can save this profile with the name of your choice. This will not affect the SSID name you selected earlier.
5. The software will now attempt to connect using this profile.
6. You should now be connected and your connection strength mayshow in the wireless software window.
WHNRGE0709_BBLP9-015_eng_36pager 13 10/07/09 12:52 PM
14
III) Connecting to wireless networks with Windows XP
Before you begin, please carefully read the documentation thatcame with your wireless adapter. The instructions included with your adapter may include specific steps required to connect wirelessly. Pleasefollow these steps before proceeding. If your wireless adapter doesnot explicitly say that you must use the provided software, you maychoose the Windows XP utility. In order to use this utility, you must be aWindows XP user with Service Pack 2 installed. These instructions willassist you in setting up your connection using the Windows XP wirelessutility.
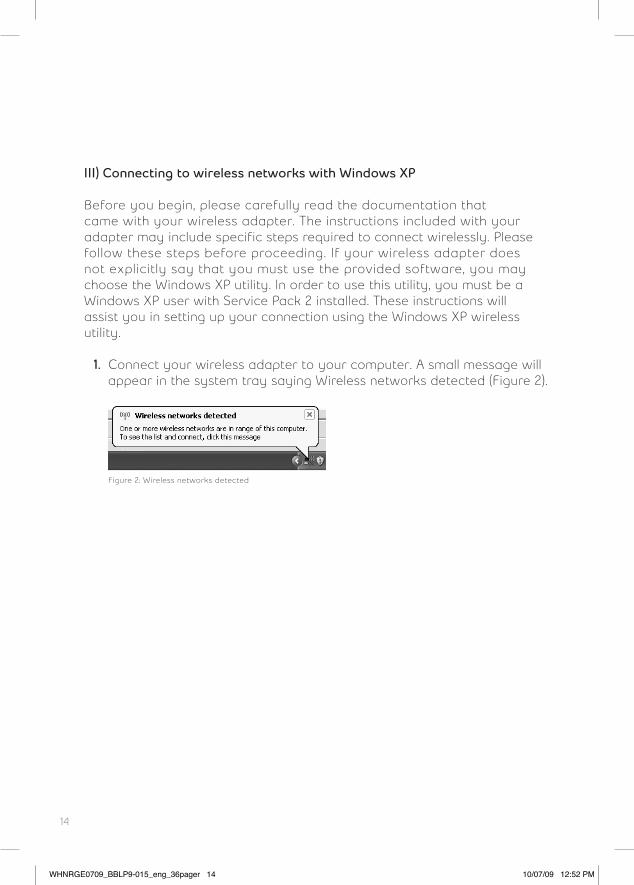
1. Connect your wireless adapter to your computer. A small message will appear in the system tray saying Wireless networks detected (Figure 2).
Figure 2: Wireless networks detected
WHNRGE0709_BBLP9-015_eng_36pager 14 10/07/09 12:52 PM
15
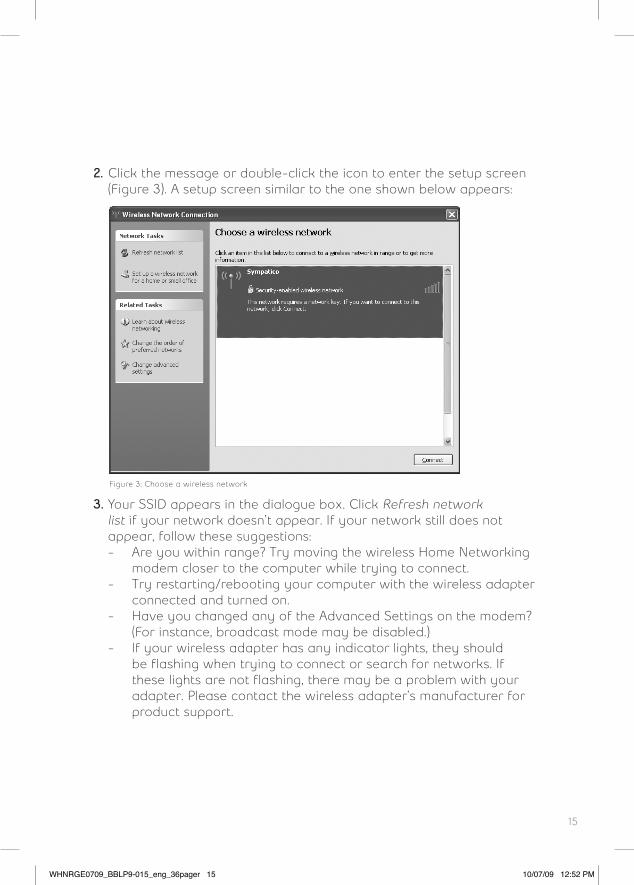
2. Click the message or double-click the icon to enter the setup screen(Figure 3). A setup screen similar to the one shown below appears:
3. Your SSID appears in the dialogue box. Click Refresh networklist if your network doesn’t appear. If your network still does notappear, follow these suggestions:
- Are you within range? Try moving the wireless Home Networkingmodem closer to the computer while trying to connect.
- Try restarting/rebooting your computer with the wireless adapter connected and turned on.
- Have you changed any of the Advanced Settings on the modem?(For instance, broadcast mode may be disabled.)
- If your wireless adapter has any indicator lights, they should be flashing when trying to connect or search for networks. If these lights are not flashing, there may be a problem with your adapter. Please contact the wireless adapter’s manufacturer for product support.
Figure 3: Choose a wireless network
WHNRGE0709_BBLP9-015_eng_36pager 15 10/07/09 12:52 PM
16
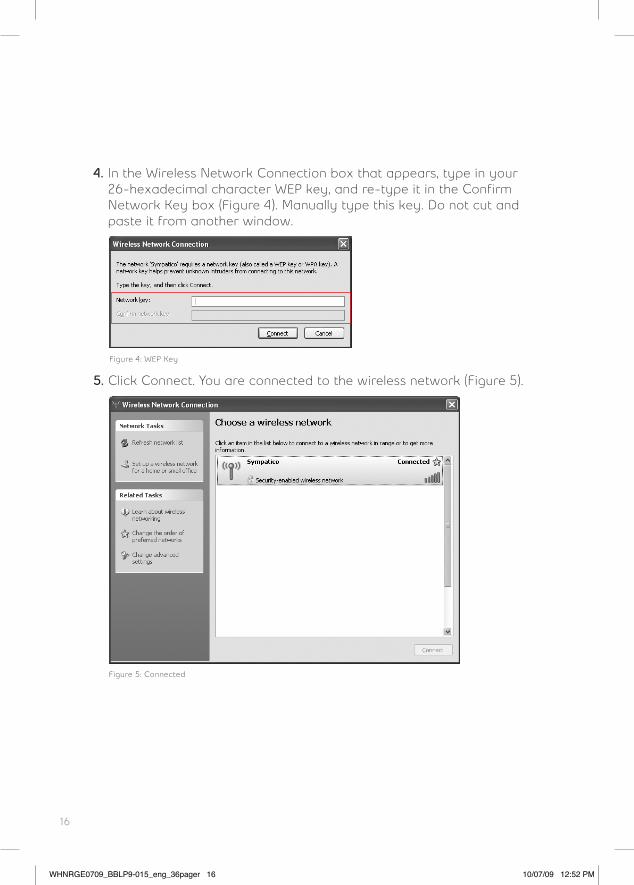
4. In the Wireless Network Connection box that appears, type in your26-hexadecimal character WEP key, and re-type it in the Confirm Network Key box (Figure 4). Manually type this key. Do not cut and paste it from another window.
5. Click Connect. You are connected to the wireless network (Figure 5).
Figure 4: WEP Key
Figure 5: Connected
WHNRGE0709_BBLP9-015_eng_36pager 16 10/07/09 12:52 PM
17
IV) Connecting to wireless networks with Windows Vista
1. Click Start, then click Connect to.
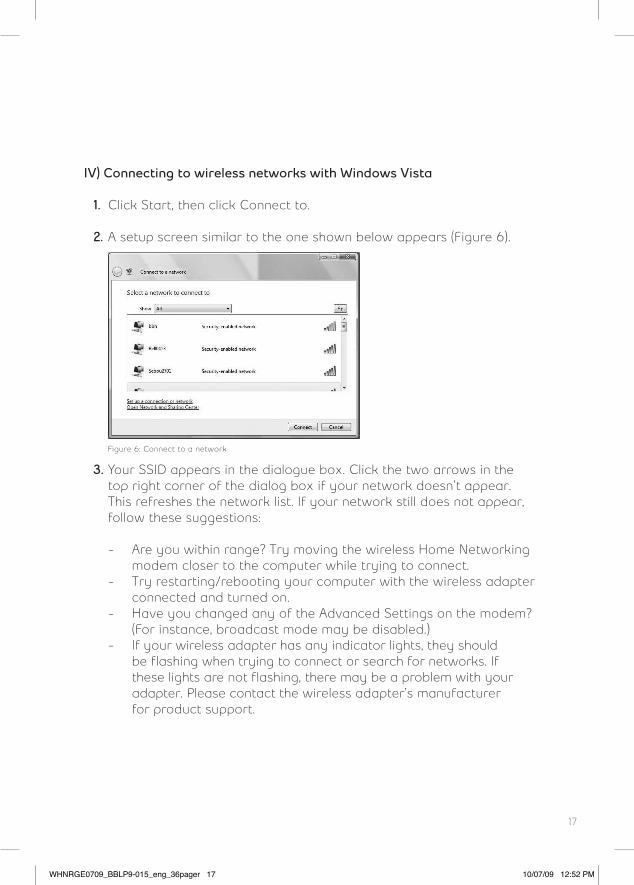
2. A setup screen similar to the one shown below appears (Figure 6).
3. Your SSID appears in the dialogue box. Click the two arrows in thetop right corner of the dialog box if your network doesn’t appear. This refreshes the network list. If your network still does not appear, follow these suggestions:
- Are you within range? Try moving the wireless Home Networking modem closer to the computer while trying to connect.
- Try restarting/rebooting your computer with the wireless adapter connected and turned on.
- Have you changed any of the Advanced Settings on the modem? (For instance, broadcast mode may be disabled.)
- If your wireless adapter has any indicator lights, they should be flashing when trying to connect or search for networks. If these lights are not flashing, there may be a problem with your adapter. Please contact the wireless adapter’s manufacturer for product support.
Figure 6: Connect to a network
WHNRGE0709_BBLP9-015_eng_36pager 17 10/07/09 12:52 PM
18
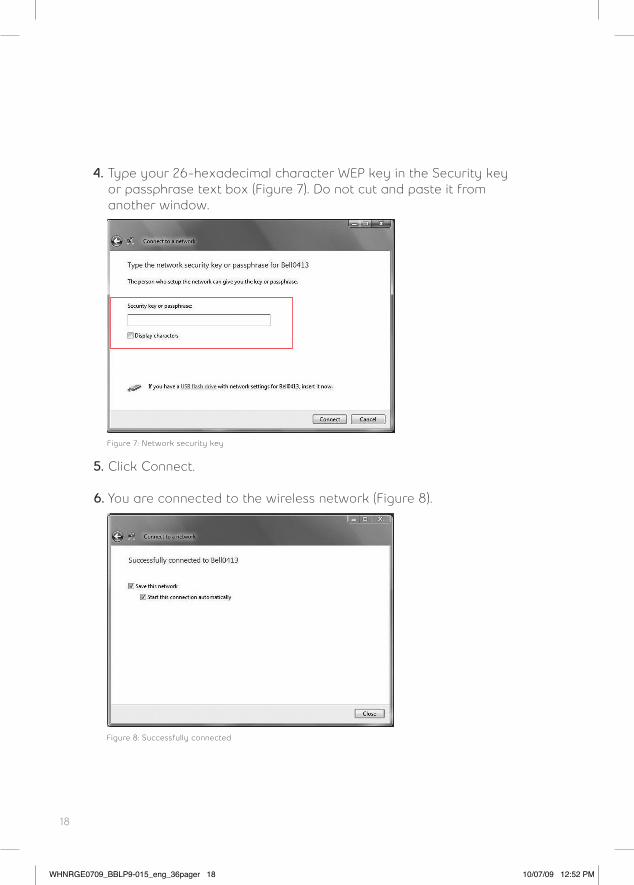
4. Type your 26-hexadecimal character WEP key in the Security key or passphrase text box (Figure 7). Do not cut and paste it from another window.
5. Click Connect.
6. You are connected to the wireless network (Figure 8).
Figure 7: Network security key
Figure 8: Successfully connected
WHNRGE0709_BBLP9-015_eng_36pager 18 10/07/09 12:52 PM
19
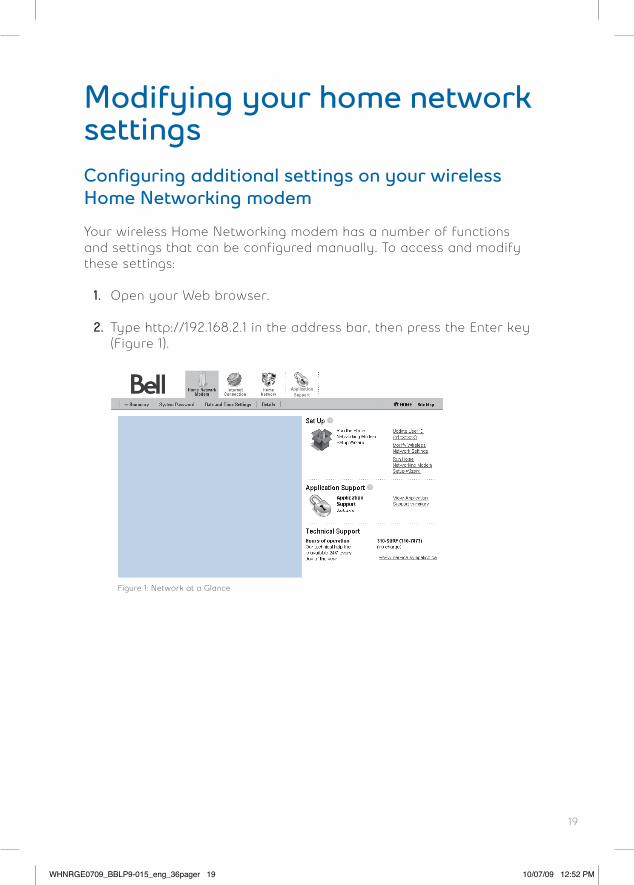
Modifying your home network settingsConfiguring additional settings on your wirelessHome Networking modem
Your wireless Home Networking modem has a number of functions and settings that can be configured manually. To access and modify these settings:
1. Open your Web browser.
2. Type http://192.168.2.1 in the address bar, then press the Enter key (Figure 1).
Figure 1: Network at a Glance
WHNRGE0709_BBLP9-015_eng_36pager 19 10/07/09 12:52 PM
20
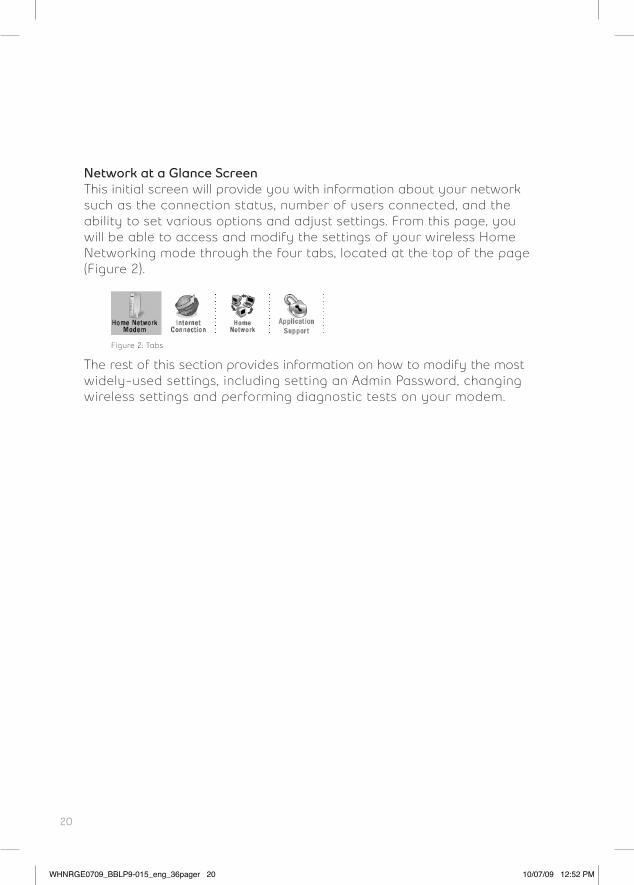
Network at a Glance ScreenThis initial screen will provide you with information about your networksuch as the connection status, number of users connected, and theability to set various options and adjust settings. From this page, youwill be able to access and modify the settings of your wireless HomeNetworking mode through the four tabs, located at the top of the page(Figure 2).
The rest of this section provides information on how to modify the mostwidely-used settings, including setting an Admin Password, changingwireless settings and performing diagnostic tests on your modem.
Figure 2: Tabs
WHNRGE0709_BBLP9-015_eng_36pager 20 10/07/09 12:52 PM
21
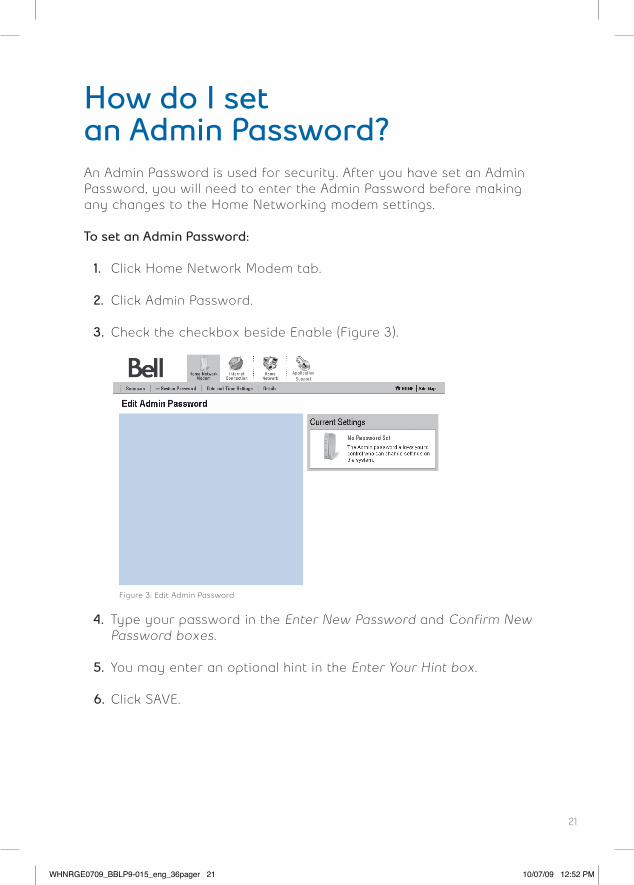
How do I set an Admin Password?An Admin Password is used for security. After you have set an AdminPassword, you will need to enter the Admin Password before making any changes to the Home Networking modem settings.
To set an Admin Password:
1. Click Home Network Modem tab.
2. Click Admin Password.
3. Check the checkbox beside Enable (Figure 3).
4. Type your password in the Enter New Password and Confirm NewPassword boxes.
5. You may enter an optional hint in the Enter Your Hint box.
6. Click SAVE.
Figure 3: Edit Admin Password
WHNRGE0709_BBLP9-015_eng_36pager 21 10/07/09 12:52 PM
22
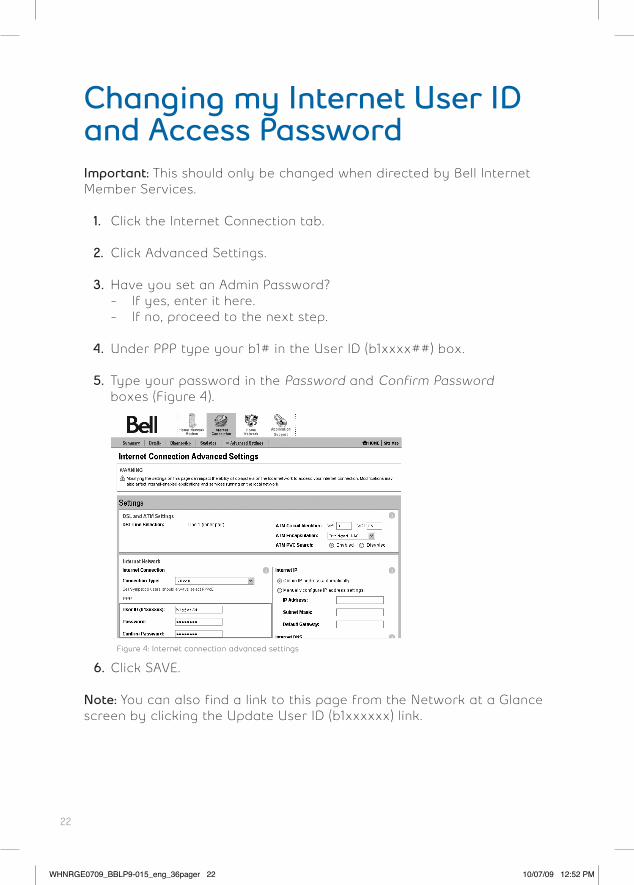
Changing my Internet User ID and Access PasswordImportant: This should only be changed when directed by Bell Internet Member Services.
1. Click the Internet Connection tab.
2. Click Advanced Settings.
3. Have you set an Admin Password? - If yes, enter it here. - If no, proceed to the next step.
4. Under PPP type your b1# in the User ID (b1xxxx##) box.
5. Type your password in the Password and Confirm Passwordboxes (Figure 4).
6. Click SAVE.
Note: You can also find a link to this page from the Network at a Glance screen by clicking the Update User ID (b1xxxxxx) link.
Figure 4: Internet connection advanced settings
WHNRGE0709_BBLP9-015_eng_36pager 22 10/07/09 12:52 PM
23
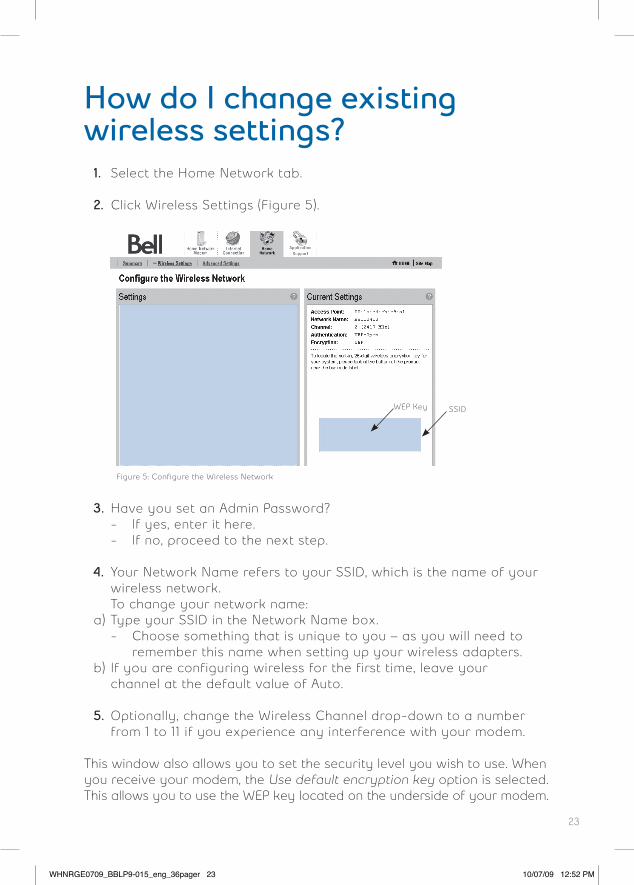
How do I change existing wireless settings? 1. Select the Home Network tab.
2. Click Wireless Settings (Figure 5).
3. Have you set an Admin Password? - If yes, enter it here. - If no, proceed to the next step.
4. Your Network Name refers to your SSID, which is the name of yourwireless network.
To change your network name: a) Type your SSID in the Network Name box. - Choose something that is unique to you – as you will need to
remember this name when setting up your wireless adapters. b) If you are configuring wireless for the first time, leave your
channel at the default value of Auto.
5. Optionally, change the Wireless Channel drop-down to a numberfrom 1 to 11 if you experience any interference with your modem.
This window also allows you to set the security level you wish to use. When you receive your modem, the Use default encryption key option is selected. This allows you to use the WEP key located on the underside of your modem.
Figure 5: Configure the Wireless Network
SSIDWEP Key
WHNRGE0709_BBLP9-015_eng_36pager 23 10/07/09 12:52 PM
24
Do you wish to set your own WEP key?If yes, follow the instructions below.If no, click SAVE.
1. Click the Use custom pass phrase option.
2. Change the Authentication drop down menu to one of the followingfive options: WEP-Open, WEP-Shared, WPA-PSK, WPA2-PSK, or WPA-PSK and WPA2-PSK.
WEP-Open: Offers the same security offered by a wired network (LAN)with encrypted packets. This option offers either 64-bit or 128-bitencryption. In this mode, WEP keys are always authenticated at thedevice level. After authentication, data is then encrypted between thegateway and the connected device.
WEP-Shared: Similar to WEP-Open but in this mode, WEP keys accepta string of unencrypted data from a device. The wireless HomeNetworking modem encrypts with a WEP key and sends back theencrypted data to the attached device.
To use either of these two options, please enter one of the following inthe Key field: - To enable 64-bit encryption, enter a 10 character key, using only
hexadecimal characters. Alternatively, you may also use a 5 ASCII character key.
- To enable 128-bit encryption, enter a 26 character key, using only hexadecimal characters. Alternatively, you may also use a 13 ASCII character key.
Note: Hexadecimal characters can only be numbers 0-9 and/or letters A-F.
WHNRGE0709_BBLP9-015_eng_36pager 24 10/07/09 12:52 PM
25
WPA-PSK: This supports TKIP (Temporal Key Integrity Protocol)which allows verification of the security configuration after theencryption keys are determined, synchronizes changing of theunicast encryption key for each frame, and then determines aunique starting unicast encryption key for each pre-shared keyauthentication.
WPA2-PSK: This supports AES (Advanced Encryption Standard)which is a private key algorithm that ranges from 128- to 256-bits.
WPA-PSK and WPA2-PSK: Turns on both WPA-PSK and WPA2-PSK mode.
To use any of these three options, please enter one of the following in the Key field:
- A 64 character key, using only hexadecimal characters. - An ASCII “pass phrase” between 8 and 63 alphanumeric characters. - Click SAVE.
Important: If you changed the network name or key, you will need to reconfigure your wireless network on your computer.
WHNRGE0709_BBLP9-015_eng_36pager 25 10/07/09 12:52 PM
26
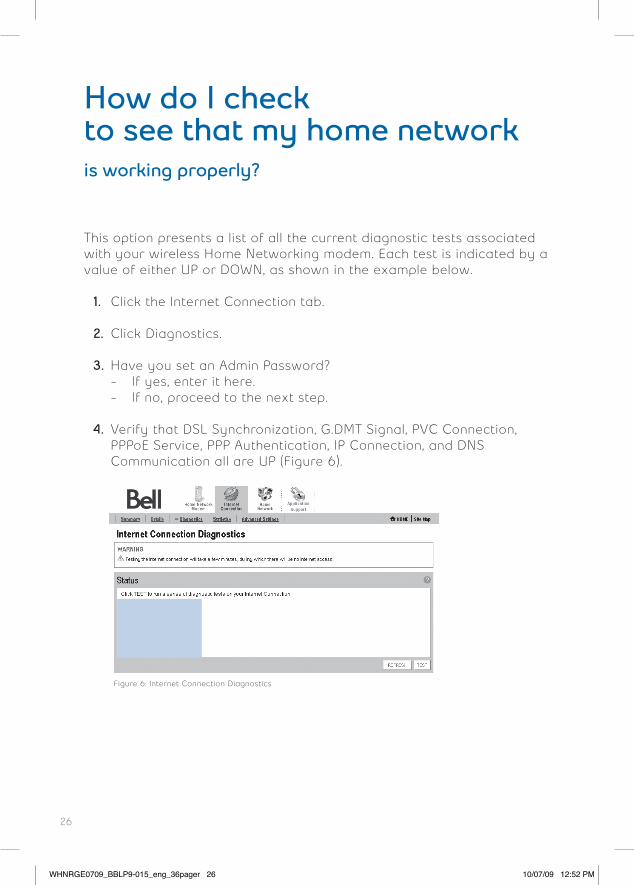
How do I check to see that my home network is working properly?
This option presents a list of all the current diagnostic tests associatedwith your wireless Home Networking modem. Each test is indicated by avalue of either UP or DOWN, as shown in the example below.
1. Click the Internet Connection tab.
2. Click Diagnostics.
3. Have you set an Admin Password? - If yes, enter it here. - If no, proceed to the next step.
4. Verify that DSL Synchronization, G.DMT Signal, PVC Connection,PPPoE Service, PPP Authentication, IP Connection, and DNS Communication all are UP (Figure 6).
Figure 6: Internet Connection Diagnostics
WHNRGE0709_BBLP9-015_eng_36pager 26 10/07/09 12:52 PM

27
How do I configure my home networkto let me use specific applications such as online games?
Selecting this option takes you to the Edit Applications Settingsscreen. The Edit Applications feature provides various methods ofkeeping individual users or computers hidden behind a single outwardfacing address. This helps prevent outside computers from accessingthe devices on your network, yet allows your devices access to theInternet and related applications.
To edit Application Settings:
1. Click the Application Support tab.
2. Click Enable Application Support at the top of the screen.
3. Have you set an Admin Password? - If yes, enter it here. - If no, proceed to the next step.
4. Under Select a computer, click the computer that currently hasthe application.
5. Click Allow individual application(s) under Edit applicationsettings for this computer.
WHNRGE0709_BBLP9-015_eng_36pager 27 10/07/09 12:52 PM
28
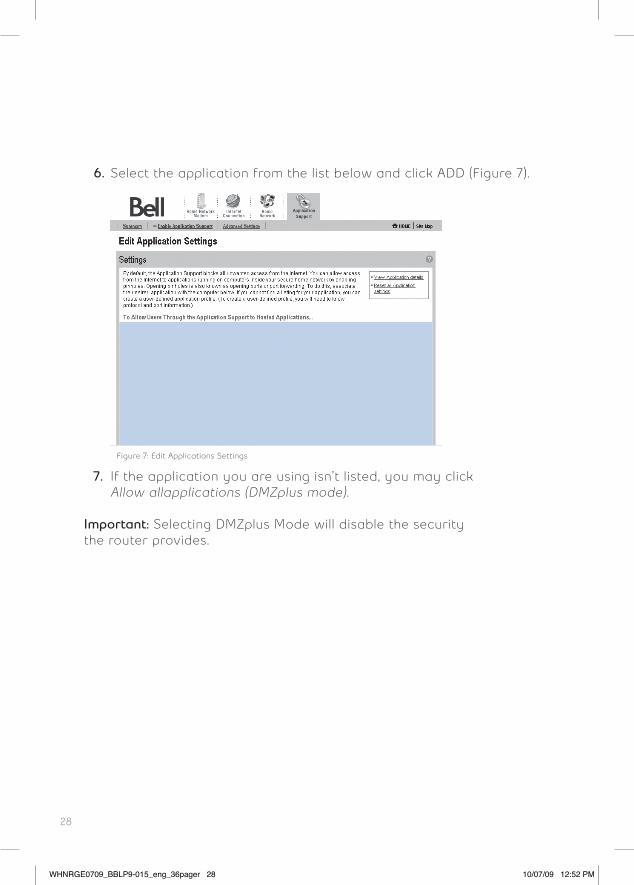
6. Select the application from the list below and click ADD (Figure 7).
7. If the application you are using isn’t listed, you may click Allow allapplications (DMZplus mode).
Important: Selecting DMZplus Mode will disable the security the router provides.
Figure 7: Edit Applications Settings
WHNRGE0709_BBLP9-015_eng_36pager 28 10/07/09 12:52 PM
29
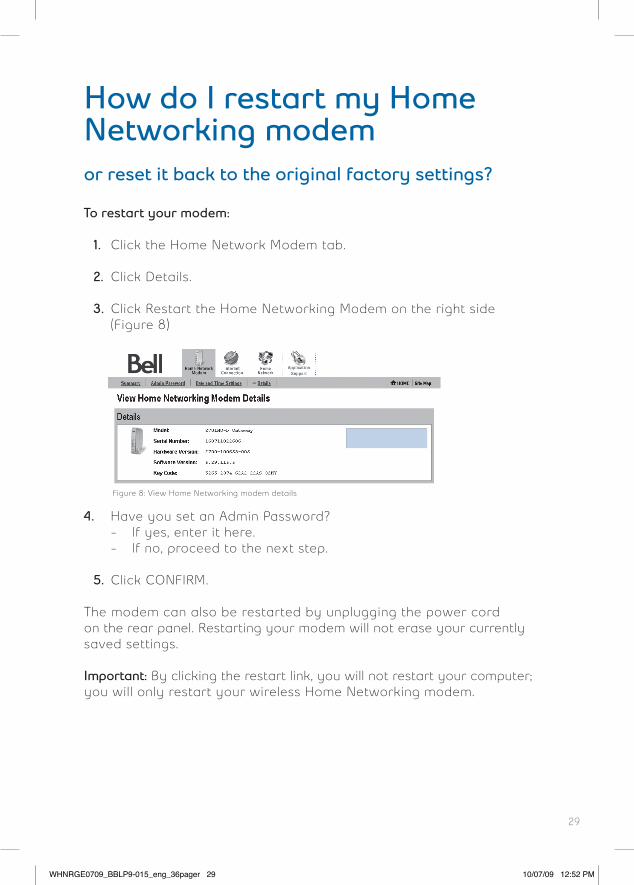
How do I restart my Home Networking modemor reset it back to the original factory settings?
To restart your modem:
1. Click the Home Network Modem tab.
2. Click Details.
3. Click Restart the Home Networking Modem on the right side (Figure 8)
4. Have you set an Admin Password? - If yes, enter it here. - If no, proceed to the next step.
5. Click CONFIRM.
The modem can also be restarted by unplugging the power cord on the rear panel. Restarting your modem will not erase your currently saved settings. Important: By clicking the restart link, you will not restart your computer; you will only restart your wireless Home Networking modem.
Figure 8: View Home Networking modem details
WHNRGE0709_BBLP9-015_eng_36pager 29 10/07/09 12:52 PM
30
Reset to factory defaults
The Reset to Factory Defaults option should be used when you need to recover the factory default settings. This might be necessary when
- a custom configuration did not go as planned, - a new configuration is desired, - the wireless Home Networking modem does not appear
to be working properly.
Important: This option resets all personalized settings on your modem.
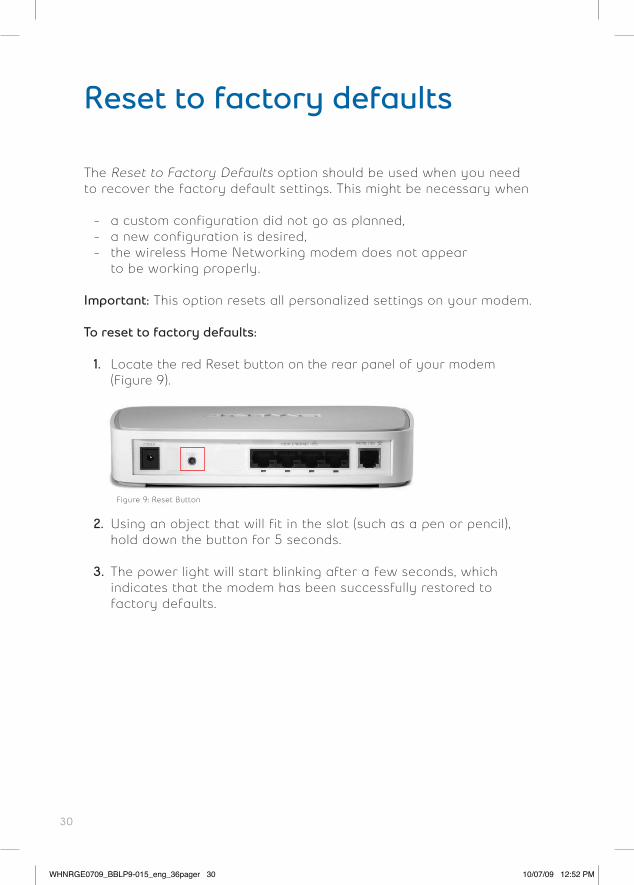
To reset to factory defaults:
1. Locate the red Reset button on the rear panel of your modem (Figure 9).
2. Using an object that will fit in the slot (such as a pen or pencil), hold down the button for 5 seconds.
3. The power light will start blinking after a few seconds, which indicates that the modem has been successfully restored to factory defaults.
Figure 9: Reset Button
WHNRGE0709_BBLP9-015_eng_36pager 30 10/07/09 12:52 PM
31
Tips & troubleshooting
Quick-fix SolutionsInternet Check-up can help troubleshoot most common Internetproblems. It is available online anytime you need it and can automatically configure an email account, optimize your browser settings, and check your computer settings. These are just a few examples of what is available when you visit bell.ca/internetfix.
FAQs
Why do I get an error message after entering my Bell Internet User ID and Access Password? It is very important that you enter your Bell Internet account information as accurately as possible, keep in mind it is case sensitive. Mistyping your User ID or Access Password may result in problems. You will find your Bell Internet User ID and Access Password in your Welcome Letter.
Note: If you are an existing customer or purchased your service in a Retail store, your Account Information was provided to you at the time of purchase or registration.
If you cannot locate your Bell Internet User ID (b1#) or Password, visit bell.ca/getInternetID for instructions on retrieving this information online or contact us at 310-SURF (310-7873).
Do I really need telephone filters?Yes. Filters are necessary to block interference that the modem cancause. If you did not receive enough filters with your installation kit, youcan order more from bell.ca/myinternet. If you are ordering additional filters, keep any phones without a filter unplugged until your order arrives.
WHNRGE0709_BBLP9-015_eng_36pager 31 10/07/09 12:52 PM
32
Why am I being prompted to specify the correct networkinterface card (NIC)?Depending on your computer’s hardware configuration, you may beprompted to specify the correct network interface card (NIC) for the Bell Internet service. This might happen if you have previouslyinstalled USB modem drivers on your computer or if you have more than one Ethernet card installed in your computer. Please select the network card that you have connected to the Bell Home Networking modem with the Ethernet cable.
I am experiencing speeds that are slower than normal. What can I do?Try restarting/rebooting your modem which means turning the power off for 3 minutes and then turning the power back on. You should always try this as a first step before calling for technical support. To ensure your modem works at its optimum level, you should restart/reboot your modem once every two weeks.
How long should my modem cables be?To ensure your service works at its optimum performance, be sure to use the cables included in your kit. The telephone cable (RJ11) attached to the wall jack and to the back of your modem should be 6’ or less in length. Anything longer than 6’ can result in reducing the quality of your Internet speeds. You may use a longer Ethernet cable (RJ45) than the one provided, as the length of the Ethernet cable will not slow down the speed of your Internet service.
What do the lights on my Home Networking modem mean?If the Power light is red:Restart your modem by unplugging the power cord on the rear panel.If this does not resolve the issue, the modem may be defective.Please call 310-SURF (310-7873).
If the DSL light is flashing green:Ensure you have waited at least 2 minutes for the synchronizationprocess to complete. Check that a filter is used on all devices connected to your phone line with the exception of your Home Networking modem – this should not be using a filter.
WHNRGE0709_BBLP9-015_eng_36pager 32 10/07/09 12:52 PM
33
If the Internet light is red:Open your Internet browser and you will be prompted to enter yourBell Internet User ID and Access Password which can be found inyour Welcome Letter. If this does not resolve the issue, there may be a problem with your account. Please call 310-SURF (310-7873).
Why can I not see the Activation Page?Ensure that your computer is using the correct proxy settings:
1. In Internet Explorer, click the Tools menu, then click Internet Options.
2. Click the Connection tab.
3. Click the LAN Settings button to display the Local Area Network(LAN) Settings window.
4. Ensure that Use automatic configuration script and Use a proxyserver for your LAN are unchecked.
Ensure that a home page is set with your Internet browser:
1. In Internet Explorer, go to the Tools menu, then click Internet Options.
2. Under the General tab, verify that a website is entered in theAddress field.
3. If the field contains about: blank, please replace it with an actualInternet website address, such as bell.ca/internetstart.
WHNRGE0709_BBLP9-015_eng_36pager 33 10/07/09 12:52 PM
34
Using Dial-up Access
As a Bell Internet member, you have the ability to use your service when travelling away from home. This feature is called Roaming*. Roaming enables you to connect to the Internet from almost anywhere within Canada by using your Bell Internet account information and a local phone number to access the Internet.
To find out more about this feature including instructions on setting up a dial-up connection, please visit: bell.ca/dialsetup.
For a complete list of all Bell Internet dial-up numbers across Canada,visit: bell.ca/dialupnumbers.
* Dial-up remote access is available where technology permits. Dial-up roaming access will be billed at $1.50/hour. Long distance charges may apply. Taxes not included.
WHNRGE0709_BBLP9-015_eng_36pager 34 10/07/09 12:52 PM
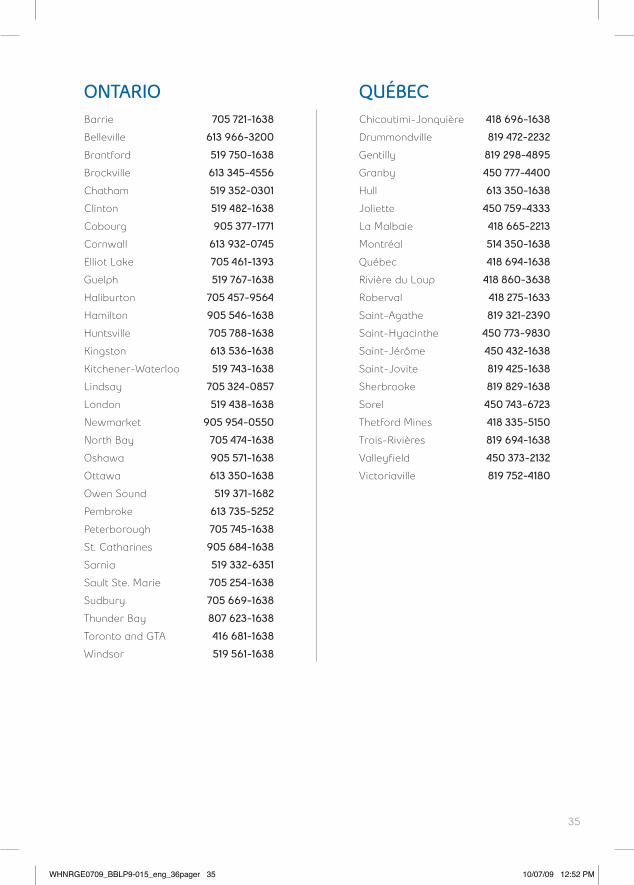
35
ONTARIOBarrie 705 721-1638
Belleville 613 966-3200
Brantford 519 750-1638
Brockville 613 345-4556
Chatham 519 352-0301
Clinton 519 482-1638
Cobourg 905 377-1771
Cornwall 613 932-0745
Elliot Lake 705 461-1393
Guelph 519 767-1638
Haliburton 705 457-9564
Hamilton 905 546-1638
Huntsville 705 788-1638
Kingston 613 536-1638
Kitchener-Waterloo 519 743-1638
Lindsay 705 324-0857
London 519 438-1638
Newmarket 905 954-0550
North Bay 705 474-1638
Oshawa 905 571-1638
Ottawa 613 350-1638
Owen Sound 519 371-1682
Pembroke 613 735-5252
Peterborough 705 745-1638
St. Catharines 905 684-1638
Sarnia 519 332-6351
Sault Ste. Marie 705 254-1638
Sudbury 705 669-1638
Thunder Bay 807 623-1638
Toronto and GTA 416 681-1638
Windsor 519 561-1638
QUÉBECChicoutimi-Jonquière 418 696-1638
Drummondville 819 472-2232
Gentilly 819 298-4895
Granby 450 777-4400
Hull 613 350-1638
Joliette 450 759-4333
La Malbaie 418 665-2213
Montréal 514 350-1638
Québec 418 694-1638
Rivière du Loup 418 860-3638
Roberval 418 275-1633
Saint-Agathe 819 321-2390
Saint-Hyacinthe 450 773-9830
Saint-Jérôme 450 432-1638
Saint-Jovite 819 425-1638
Sherbrooke 819 829-1638
Sorel 450 743-6723
Thetford Mines 418 335-5150
Trois-Rivières 819 694-1638
Valleyfield 450 373-2132
Victoriaville 819 752-4180
WHNRGE0709_BBLP9-015_eng_36pager 35 10/07/09 12:52 PM

Service available to residential customers where technology permits. Subject to change without prior notice. No service provides absolute protection. Other conditions apply including minimum system requirement. Subject to service agreements available at bell.ca/agreements.
WHNRGE0709
WHNRGE0709_BBLP9-015_eng_36pager 36 10/07/09 12:52 PM