18-volt drills hand plane primer - woodtools
TRANSCRIPT
Learn How. Discover Why. Build Better.
APRIL 2008ISSUE #168
■
■
■
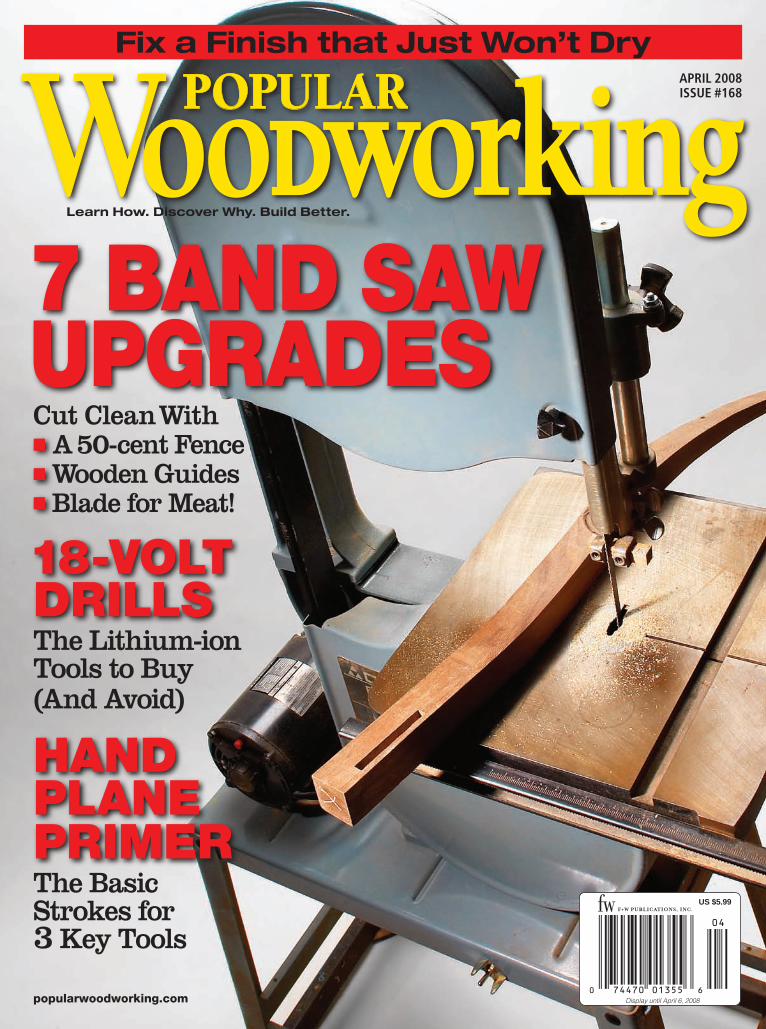
Cut Clean With■ A 50-cent Fence ■ Wooden Guides ■ Blade for Meat!
7 Band Saw UpgradeS
Fix a Finish that Just Won’t Dry
The Lithium-ion Tools to Buy (And Avoid)
The Basic Strokes for3 Key Tools
74470 013550 6
04
US $5.99
Display until April 6, 2008popularwoodworking.com
18-volt drillS
Hand plane primer

MADE INISO 9001FACTORY!
INCLUDES
FENCE
INCLUDES
FENCE & CAST IRON MITER GAUGE
INCLUDESFREE SAFETYPUSH BLOCKS
G9860 INCLUDES FREE H2404
KNIFE SETTING JIG
MADE INISO 9001FACTORY!
INCLUDESFREE SAFETYPUSH BLOCKS
INCLUDESFREE SAFETYPUSH BLOCKS
INCLUDESFREE SAFETYPUSH BLOCKS
MADE IN ISO9001 FACTORY!
POP0803

MADE INISO 9001FACTORY!
INCLUDES
FENCE
INCLUDES
FENCE & CAST IRON MITER GAUGE
INCLUDESFREE SAFETYPUSH BLOCKS
G9860 INCLUDES FREE H2404
KNIFE SETTING JIG
MADE INISO 9001FACTORY!
INCLUDESFREE SAFETYPUSH BLOCKS
INCLUDESFREE SAFETYPUSH BLOCKS
INCLUDESFREE SAFETYPUSH BLOCKS
MADE IN ISO9001 FACTORY!
POP0803CIRCLE #123 ON FREE INFORMATION CARD.

No one knows more about making one-handed bar clamps than the company that invented them. IRWIN® QUICK-GRIP® designs more innovative features in more sizes with more quality than anyone. That’s why more serious hobbyists, pros and DIYers choose IRWIN QUICK-GRIP clamps than any other. Keep them handy.
© 2008 IRWIN Industrial Tools. All Rights Reserved. www.irwin.com/quick-grip
The Handiest Clamps On Earth
QuickRelease™
Trigger
CIRCLE #126 ON FREE INFORMATION CARD.
popularwoodworking.com ■ �
Learn How. Discover Why. Build Better.
APRIL 2008
Fe atures
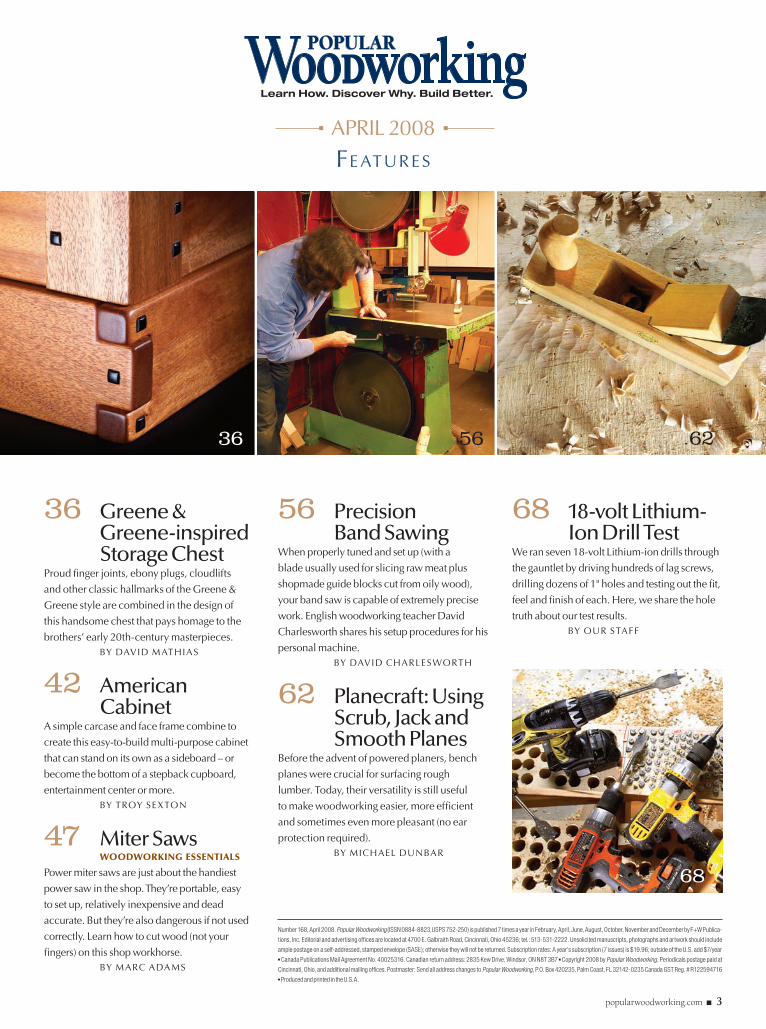
36 Greene&Greene-inspiredStorageChest
Proud finger joints, ebony plugs, cloudlifts
and other classic hallmarks of the Greene &
Greene style are combined in the design of
this handsome chest that pays homage to the
brothers’ early 20th-century masterpieces. by dAvId mAthIAs
42 AmericanCabinet
A simple carcase and face frame combine to
create this easy-to-build multi-purpose cabinet
that can stand on its own as a sideboard – or
become the bottom of a stepback cupboard,
entertainment center or more. by tRoy sexton
47 MiterSaws woodworkingessentials
Power miter saws are just about the handiest
power saw in the shop. they’re portable, easy
to set up, relatively inexpensive and dead
accurate. but they’re also dangerous if not used
correctly. Learn how to cut wood (not your
fingers) on this shop workhorse. by mARc AdAms
56 PrecisionBandSawing
When properly tuned and set up (with a
blade usually used for slicing raw meat plus
shopmade guide blocks cut from oily wood),
your band saw is capable of extremely precise
work. english woodworking teacher david
charlesworth shares his setup procedures for his
personal machine. by dAvId chARLesWoRth
62 Planecraft:UsingScrub,JackandSmoothPlanes
before the advent of powered planers, bench
planes were crucial for surfacing rough
lumber. today, their versatility is still useful
to make woodworking easier, more efficient
and sometimes even more pleasant (no ear
protection required). by mIchAeL dunbAR
68 18-voltLithium-IonDrillTest
We ran seven 18-volt Lithium-ion drills through
the gauntlet by driving hundreds of lag screws,
drilling dozens of 1" holes and testing out the fit,
feel and finish of each. here, we share the hole
truth about our test results. by ouR stAff
36 6256
68
Number 168, April 2008. Popular Woodworking (ISSN 0884-8823,USPS 752-250) is published 7 times a year in February, April, June, August, October, November and December by F+W Publica-
tions, Inc. Editorial and advertising offices are located at 4700 E. Galbraith Road, Cincinnati, Ohio 45236; tel.: 513-531-2222. Unsolicited manuscripts, photographs and artwork should include
ample postage on a self-addressed, stamped envelope (SASE); otherwise they will not be returned. Subscription rates: A year’s subscription (7 issues) is $19.96; outside of the U.S. add $7/year ■ Canada Publications Mail Agreement No. 40025316. Canadian return address: 2835 Kew Drive, Windsor, ON N8T 3B7 ■ Copyright 2008 by Popular Woodworking. Periodicals postage paid at
Cincinnati, Ohio, and additional mailing offices. Postmaster: Send all address changes to Popular Woodworking, P.O. Box 420235, Palm Coast, FL 32142-0235 Canada GST Reg. # R122594716 ■ Produced and printed in the U.S.A.
� ■ Popular Woodworking April 2008
APRIL 2008
regul ar s
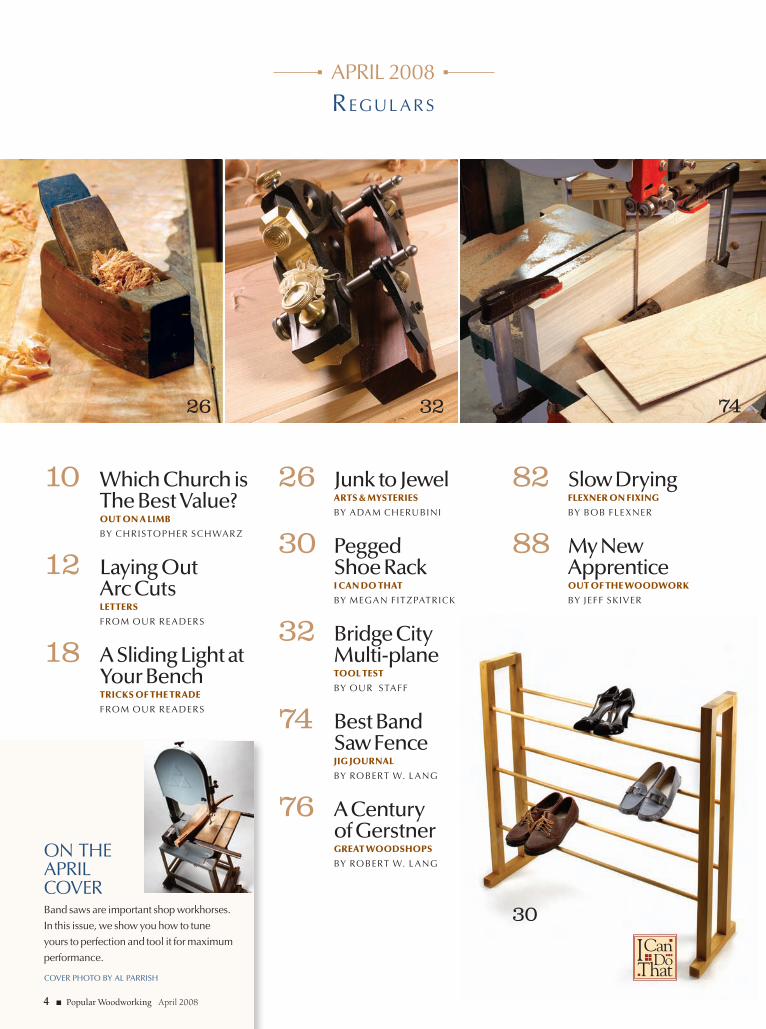
band saws are important shop workhorses.
In this issue, we show you how to tune
yours to perfection and tool it for maximum
performance.
coveR Photo by AL PARRIsh
on the APRIL coveR
30
10 WhichChurchisTheBestValue?
oUtonaliMB
by chRIstoPheR schWAR Z
12 LayingOutArcCuts
letters
fRom ouR ReAdeRs
18 ASlidingLightatYourBench
triCksoFtHetrade
fRom ouR ReAdeRs
26 JunktoJewel arts&MYsteries
by AdAm cheRubInI
30 PeggedShoeRack
iCandotHat
by meGAn fItZPAtRIck
32 BridgeCityMulti-plane
tooltest
by ouR stAff
74 BestBandSawFence
JigJoUrnal
by RobeRt W. LAnG
76 ACenturyofGerstner
greatwoodsHoPs
by RobeRt W. LAnG
82 SlowDrying FleXneronFiXing
by bob fLexneR
88 MyNewApprentice
oUtoFtHewoodwork
by jeff skIveR
26 32 74

CIRCLE #136 ON FREE INFORMATION CARD.
popularwoodworking.com■ Contact Customer Servicepopularwoodworking.com/customerservice
■ Free Project Planspopularwoodworking.com/projectplans
■ Article Indexpopularwoodworking.com/articleindex
■ Tool Reviewspopularwoodworking.com/toolreviews
■ Magazine Extraspopularwoodworking.com/magazineextras
■ Editor Blogspopularwoodworking.com/blogs
■ Writer’s Guidelinespopularwoodworking.com/writersguidelines
■ Contact the Staffpopularwoodworking.com/contactus
� ■ Popular Woodworking April 2008
APRIL 2008
Online
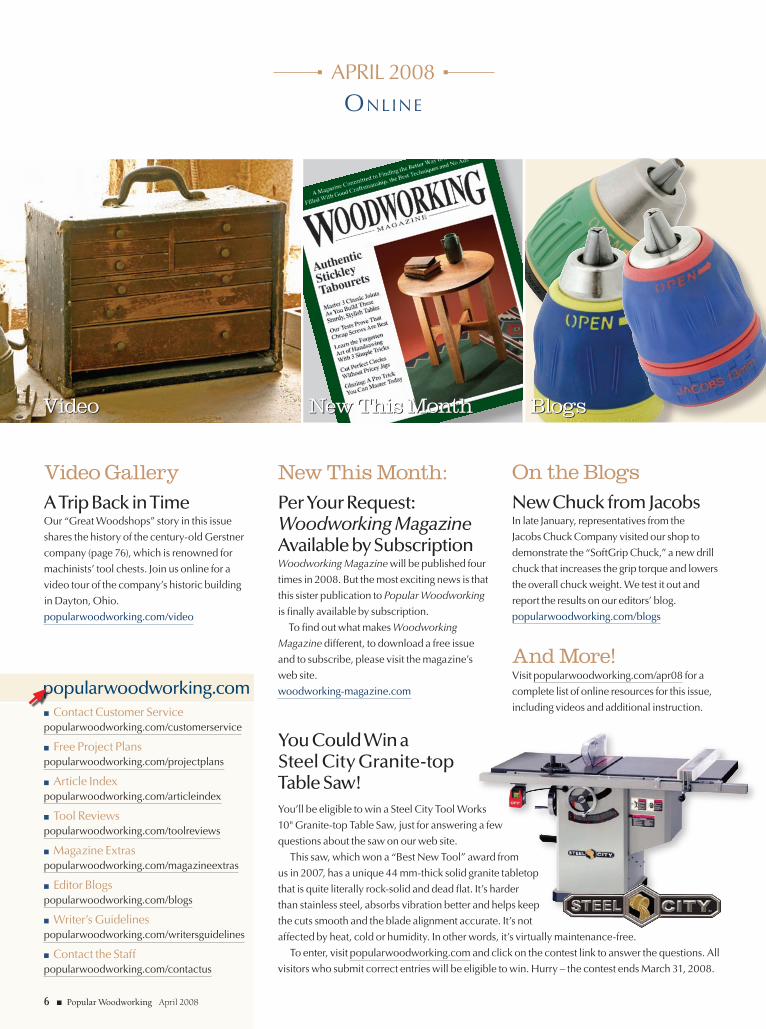
On the BlogsNew Chuck from JacobsIn late January, representatives from the
Jacobs Chuck Company visited our shop to
demonstrate the “SoftGrip Chuck,” a new drill
chuck that increases the grip torque and lowers
the overall chuck weight. We test it out and
report the results on our editors’ blog.
popularwoodworking.com/blogs
Video GalleryA Trip Back in TimeOur “Great Woodshops” story in this issue
shares the history of the century-old Gerstner
company (page 76), which is renowned for
machinists’ tool chests. Join us online for a
video tour of the company’s historic building
in Dayton, Ohio.
popularwoodworking.com/video
New This Month: Per Your Request: Woodworking Magazine Available by SubscriptionWoodworking Magazine will be published four
times in 2008. But the most exciting news is that
this sister publication to Popular Woodworking
is finally available by subscription.
To find out what makes Woodworking
Magazine different, to download a free issue
and to subscribe, please visit the magazine’s
web site.
woodworking-magazine.com
You Could Win a Steel City Granite-top Table Saw!You’ll be eligible to win a Steel City Tool Works
10" Granite-top Table Saw, just for answering a few
questions about the saw on our web site.
This saw, which won a “Best New Tool” award from
us in 2007, has a unique 44 mm-thick solid granite tabletop
that is quite literally rock-solid and dead flat. It’s harder
than stainless steel, absorbs vibration better and helps keep
the cuts smooth and the blade alignment accurate. It’s not
affected by heat, cold or humidity. In other words, it’s virtually maintenance-free.
To enter, visit popularwoodworking.com and click on the contest link to answer the questions. All
visitors who submit correct entries will be eligible to win. Hurry – the contest ends March 31, 2008.
BlogsBlogsNew This MonthNew This MonthVideoVideo
And More!Visit popularwoodworking.com/apr08 for a
complete list of online resources for this issue,
including videos and additional instruction.

TODAY I DISCOVERED NEWGORILLA WOOD GLUEIS TOUGH ENOUGH FOR EVERY WOODWORKING JOBAND THAT A PERFECT DOVETAIL JOINT CAN MAKE A GROWN MAN CRY
FOR THE TOUGHEST JOBS ON PLANET EARTH.™
1-800-966-3458 • GORILLATOUGH.COM
© 2
008
Gor
illa
Glu
e C
ompa
ny W
GF
WO
1
CIRCLE #120 ON FREE INFORMATION CARD.

Learn How. Discover Why. Build Better.
®Contributors
Michael Dunbar After earning a degree in French and an early career as a newspaperman, since 1971 Mike has completely immersed himself in the craft of Windsor chairbuilding. He’s built hundreds of chairs and has taught thousands of students the craft at The Windsor Institute in Hampton, N.H. Now, he also shares his expertise (and humor) with weekly online posts on his blog, The Windsor Chronicles (thewindsorinstitute.com/blog).
In this issue, for the first part of his article on planecraft, Mike writes about proper use of scrub, jack and smooth planes (page 62).
David Charlesworth is a furniture maker and the author of three woodworking books. Since 1977, he’s specialized in helping others learn his craft. David lives in Devon, England, where he teaches at Harton Manor Workshops. His blog, at davidcharlesworth.co.uk/blog, includes wood-working articles and techniques, personal stories and the occasional history lesson. In this issue, he shares his expertise on using the band saw as a pre-cision machine (page 56).
Linda Watts Although her name doesn’t appear often in the magazine, Popular Woodworking’s art director has more experience in woodworking journalism than any member of our staff. She began her design career in the late ’70s at Shopsmith Inc., where she produced Hands On! magazine. Linda then partnered with author Nick Engler to produce more than 60 books on woodworking before joining the PW staff in 2002.
David Mathias By day, David teaches computer science courses at the Ohio State University. By night (and whenever else possible), he’s a hobbyist woodworker with a particular love of American Arts & Crafts furniture. David shares his plans for a storage chest in the Greene & Greene style (with a few design twists of his own) beginning on page 36. Read more about David and his woodworking journey on his blog at web.mac.com/dmath/Woodworking.
� ■ Popular Woodworking April 2008
Copyright ©2008 by F+W Publications, Inc. All rights reserved. Popular Woodworking is a registered trademark of F+W Publications.
SUBSCRIPTION SERVICES: Subscription inquiries, orders and address changes can be made at popularwoodworking.com (click on “Customer Service”). Or by mail: Popular Woodworking, P.O. Box 420235, Palm Coast, FL 32142-0235. Or call toll-free 877-860-9140 or 386-246-3369. Include your address with all inquiries. Allow 6 to 8 weeks for delivery.
NEWSSTAND DISTRIBUTION: Curtis Circulation Co., 730 River Road, New Milford, NJ 07646
ATTENTION RETAILERS:To carry Popular Woodworking in your store, call 800-894-4656 or write Magazine Retail Sales, P.O. Box 5014, Iola, WI 54945-5014.
BACk ISSUES are available. Call 800-258-0929 for pricing or visit popularwoodworking.com. Send check or money order to: Popular Woodworking Back Issues, F+W Publications Products, 700 E. State St., Iola, WI 54990. Please specify publication, month and year.
Learn How. Discover Why. Build Better.
®
APRIL 2008, VOL. 28, NO. 2
popularwoodworking.com
EDITORIAL OFFICES 513-531-2690
Publisher & GrouP editorial director Steve Shanesy
editor Christopher Schwarz X1407 ■ [email protected]
art director Linda Watts X1396 ■ [email protected]
senior editor Robert W. Lang X1327 ■ [email protected]
senior editor Glen D. Huey X1293 ■ [email protected]
manaGinG editor Megan Fitzpatrick X1348 ■ [email protected]
PhotoGraPher Al Parrish
contributinG editors
Adam Cherubini, Bob Flexner, Troy Sexton
F+W PUBLICATIONS INC.
chairman & ceo David H. Steward
cfo John Speridakos
vP, manufacturinG Barbara Ann Schmitz
executive vP, interactive media John Lerner
director, it Mike Kuehn
F+W PUBLICATIONS, INC. MAGAZINE GROUP
President David Blansfield
vP, consumer marketinG Sara DeCarlo
director, business PlanninG Tom Wiandt
conference director Sara Dumford
circulation director Linda Engel
newsstand director Susan Rose
director, diGital media solutions Michael Kushner
Production coordinator Debbie Thomas
AdvERTISINGadvertisinG director Don Schroder331 N. Arch St., Allentown, PA 18104tel. 610-821-4425; faX [email protected]
disPlaY and classified advertisinG sales coordinator
Nancy Millertel. 513-531-2690 [email protected]
SUBSCRIPTION SERVICES: Subscription inquiries, orders and address changes can be made at popularwoodworking.com (click on “Customer Service”). Or by mail: Popular Woodworking, P.O. Box 420235, Palm Coast, FL 32142-0235. Or call toll-free 877-860-9140 or 386-246-3369. Include your address with all inquiries. Allow 6 to 8 weeks for delivery.
NEWSSTAND DISTRIBUTION: Curtis Circulation Co., 730 River Road, New Milford, NJ 07646
ATTENTION RETAILERS:To carry Popular Woodworking in your store, call 800-894-4656 or write Magazine Retail Sales, P.O. Box 5014, Iola, WI 54945-5014.
BACk ISSUES are available. Call 800-258-0929 for pricing or visit popularwoodworking.com. Send check or money order to: Popular Woodworking Back Issues, F+W Publications Products, 700 E. State St., Iola, WI 54990. Please specify publication, month and year.

How ItWorks!
Two large cutter wings shear upward to remove most of the stock for fast, extremely smooth cuts.
Two small cutter wings shear downward for an ultra-fi ne fi nish, even when routing crossgrain in delicate materials!
To sign up for Freud’s e-mail newsletter or to fi nd a dealer near you visit: www.freudtools.comRed router bits are a registered trademark of Freud America, Inc. (US) 1-800-472-7307
Precisely the best
For A Smooth Sanded Finish... ...Without The Rework!
What’s The Secret To FlawlessEdgeProfi lesWithNOREWORK?
U.S. Patent No. 8,899,252
Freud’sExclusive4 CutterDesign
12
34
All OtherRouter Bit2 Cutter Design
“Mirror-smooth fi nish with sharp, clean details!” – Chris Marshall, Woodworker’s Journal
“Super-smooth cuts!” – Glen Huey, Popular Woodworking
• Classical Cove & Round Bit• Rounding Over Bit, 3/8” Radius• Rounding Over Bit, 1/2” Radius• Rounding Over Bit, 1” Radius
• Beading Bit, 5/16” Radius• Beading Bit, 1-1/8” Radius• Table Top Classical Bold Bit• Table Edge Bit
• Rounding Over Bit, 5/8” Radius• Rounding Over Bit, 1-1/2” Radius• Raised Panel Bits
Look For These Popular Profi les in 1/2” Shank Quadra-Cut™ Design:
Freud’s New Quadra-Cut™ Cutter Design
CIRCLE #118 ON FREE INFORMATION CARD.
10 ■ Popular Woodworking April 2008
Out On a Limbb y c h r i s t O p h e r s c h w a r z , e d i t O r
Learn How. Discover Why. Build Better.
®
Which Church is The Best Value?
more like $3,300). Who in their right mind would pay $3,300 for a 15" planer today? A 71⁄4" Makita circular saw was $118 in 1980 – I paid $99 for my Makita circular saw a few years ago.
Whether you admit it or not, we are spoiled by low-price imported tools. Com-panies such as Grizzly Industrial, Delta
and Jet now manufacture in the Far East where labor costs are far lower. And it’s a testament to these companies and their industriousness that the tools
they bring back in con-tainer ships are – for the most part – well made and well suited for the
modern shop. I won’t r u n do w n the imported tools. I have
many of them in my shop at home.
So if these imported tools are so good, why do
we write about expensive tools? Because not everything is about price.
If it were, I’d tell you to buy all your tools at garage sales and auctions.
I know people who have equipped an entire shop for less than $1,000 this way. But that’s not for me.
Aside from my family, my deepest per-sonal relationships are with my tools. They are the extensions of my hands, my imagi-nation, my soul. And just like choosing a spouse, a hobby or a church, there are some things that should have absolutely nothing to do with money. PW
PHOTOs frOm THe 1980 fine TOOl sHOP caTalOgue
Whenever we write about premium tools – such as Festool, Fein and Lie-Nielsen – it’s inevitable that I’ll get a few phone calls, letters and e-mails from angry readers.
Their sentiment goes something like this: Why do we write about tools that are grossly overpriced? And why don’t we take these manufacturers to task for their outrageous prices?
Fair question. And I’ll tell you why. There are indeed tools out there that have outra-geous price tags, but they are not on the tools from Festool, Fein, and Lie-Nielsen.
Instead, I think the crazy prices are on the tools at the home centers. They are out-rageously low. Here’s a fact: Most consumer-grade tools today are cheaper than they were in 1987. And not just in terms of inflation-adjusted dollars. Sometimes, the actual prices today are lower than prices charged a few decades ago.
To remind me of this truth, I keep a couple tool catalogs that belonged to my grandfather. One of them, from 1980, is for the now-vanished “Fine Tool Shop” in West-port, Conn., where my grandfather bought his hand tools and power tools.
The price list is astonishing.My favorite part is to browse the Makita
section. At the time, Makita was the Far East importer and the low-price upstart that was competing with the domestic woodwork-ing brands, such as Rockwell and Porter-Cable. A Makita 15" planer was $1,380 in 1980 (adjust that for inflation and the price is
Customer ServiceHow can I contact customer service with questions regarding my subscription, including a lost or damaged issue? Visit popularwoodworking.com/customerservice. Or write to Popular Woodworking, P.O. Box 420235, Palm coast, fl 32142-0235. Or, if you prefer the telephone, call toll-free 877-860-9140 and a customer service representative will be happy to help you.
When does my subscription expire?The date of your subscription expiration appears on your magazine mailing label, above your name. The date indicates the last issue in your subscription.
Can I get back issues of Popular Woodworking?Back issues are available while supplies last. Visit popularwoodworking.com/backissues. Or if you know the exact month and year of the issue you want, call our customer service department toll-free at 800-258-0929 to order.
What if I want more information about the projects and tools I read about in Popular Woodworking? for all editorial questions, please write to Popular Woodworking editorial, 4700 e. galbraith road, cincinnati, OH 45236. Or e-mail [email protected].
Does Popular Woodworking offer group discounts?group discounts are available by special arrangement with the publisher. for more details, send an e-mail to Debbie Paolello at [email protected] or call 513-531-2690 x1296.
Our Privacy Promise to YouWe make portions of our customer list available to carefully screened companies that offer products and services we believe you may enjoy. if you do not want to receive offers and/or information, please let us know by contacting us at:
list manager, f+W Publications4700 e. galbraith roadcincinnati, OH 45236
Safety Notesafety is your responsibility. manufacturers place safety devices on their equipment for a reason. in many photos you see in Popular Woodworking, these have been removed to provide clarity. in some cases we’ll use an awkward body position so you can better see what’s being demonstrated. Don’t copy us. Think about each procedure you’re going to perform beforehand.
QUALITY WOODWORKING TOOLS • SUPPLIES • ADVICE®
Dept: 08PW04P
For A Free Catalog Or To Find Your Local Woodcraft Store, Visit www.woodcraft.com Or Call 800-542-9115.
Two great companies began in 1928, Woodcraft and General Finishes! Today General Finishes makes some of the finest wood finishes in the country. They are easy to use, the colors are fabulous and the top coats are strong and long wearing. Whether you want the bold, luscious colors of water based paints and stains, the look of aged wood that has acquired a patina from generations of use or the classic traditional wood tones of our wipe-on oil base finishes, General Finishes has the finish for you.
Quality Since 1928
Woodcraft has been “Helping You Make Wood Work”
for 80 years! Woodcraft – your source
for quality tools, supplies and advice.
CIRCLE #155 ON FREE INFORMATION CARD.
12 ■ Popular Woodworking April 2008
Lettersf r o m o u r r e a d e r s
illustration by hayes shanesy
What’s the Best Method for Laying Out Arc Cuts?
I am interested in building the Shaker Shelf from the June 2007 issue of Popular Woodworking (#162). I am a novice and am learning many of the techniques of basic woodworking. I have one question about the project: Just how do I position the arc cuts for the “curvy bottoms?” I have never done a curved cut from anything other than a pattern before.
— Jim McCulley, Albany, New York
Below is a simple drawing of the side of the shelf, and I’ll walk you through the steps that I would take to lay out the arc cuts.
Axial Hole and Brass Pin Makes Tops Turn More EasilyPermit me to suggest an improvement to Judy Ditmer’s top-turning process (December 2007, issue #166, “At the Lathe”), that was taught me by my excellent lathe instructor, John Albachten.
Drill an axial hole in the dowel blanks before assembling the dowel and the body and chucking it in the lathe. A 1⁄16" centered hole, 1" long, drilled with a simple fixture in the drill press, will later seat a #16 escutch-eon pin. The top will spin merrily and long on the brass head of the pin.
— John Kahler, Liberty Township, Ohio
Starting at the back and bottom edge of the side, measure up 11⁄2" from the corner and draw a square line across the board, then use a compass to draw a quarter circle, pivoting from the back edge of the board. From the end of that arc, measure toward the front of the side 31⁄2" and draw a line perpendicular to the first line. The intersection is the pivot point for the 31⁄2" radius arc. It is also a quarter circle.
If you plumb directly up 21⁄4" from the end of that arc on the line, that will be the pivot point for the last arc.
At this point the curvy edge is drawn. Cut the arcs with a jigsaw.— Glen D. Huey, senior editor
How Does One Attach the Web Frame to the ‘Lost Stickley Table’I have thoroughly read your article on the lost Stickley table (November 2006, issue #158) but it is still unclear how the web is attached to the rest of the assembly. It appears to me to be glued in place – but that seems way too simple.
— Henry Hilliard, via e-mail
It really is that simple; sorry if I wasn’t clear about it in the article. You can either push the web frame up from below after everything else is assembled, or during assembly before putting on the final pair of legs. I made two of those tables
and did one each way – it doesn’t make much dif-ference which way it’s done, but sliding the web up after assembly allows you to trim the assem-bled frame with a block plane if it is a bit big.
There is plenty of long-grain-to-long-grain surface, so glue alone will hold the frame securely in place.
— Robert W. Lang, senior editor
Brass Pins for Barrister ShelvesWhere do I find the brass pins used in making the Barrister Bookcase in the April 2007 issue (#161) of Popular Woodworking?
— Myron Cole, Bartlett, Tennesseecontinued on page 15

Made in U.S.A.
woodpeck.com1-800-752-0725
SALE$10995
WoodpeckersLE ROUTER FENCE
www.BridgeCityTools.comJoin our email list and receive exclusive offers!
BRASS | ROSEWOOD INLAY | SATIN CHROMED
READS LEFT TO RIGHT AND RIGHT TO LEFT
800-253-3332
CS-6 Combination Square
NEW
Visit infinitytools.com for the video
CUTTING TOOLS™
Item: COP-100
877-USA-BITS
Professional Coping Sled
Sale$119 90
Multi-Purpose Routing Jig
Call 866.966.3728or visit www.chipsfly.com
• mortises• tenons• dovetails• raised panels• and a lot more!
One tool, any wood joint
Guides router for:
Available in June ‘08
Leigh Router Joinery Jigs
Available at these fine dealers: Highland Hardware • Lee Valley Tools • RocklerWoodworking and Hardware • Woodcraft Supply • Woodworker’s Supply
800-663-8932
Wood Products, Inc.
4620 GA Highway 123 • Toccoa, GA 30577 • E-mail: [email protected]
ORDER ONLINE:
www.osbornewood.comORDER LINE:
1.800.849.8876CALL FOR A CATALOG:
1.800.746.3233
1141
1435
1438
4003
4203
4076
4091
4102
4116
Osborne wood products are now offering some of its table legs and bun feet in square shapes.
Square Shapes
Available in: ·Alder ·Cherry ·Soft Maple ·Red Oak
CIRCLE #138 ON FREE INFORMATION CARD.
CIRCLE #125 ON FREE INFORMATION CARD.
CIRCLE #109 ON FREE INFORMATION CARD.
CIRCLE #158 ON FREE INFORMATION CARD.
CIRCLE #107 ON FREE INFORMATION CARD.

Arrow Fastener Co., Inc.
271 Mayhill Street, Saddle Brook, NJ 07663Phone: 1-201- 843-6900 Fax: 1-201-843-3911
Canada: Jardel Distributors, Inc.
6505 Metropolitan Blvd. East, Montreal, Quebec H1P 1X9Phone: 1-514-321-3983 Fax: 1-514-321-9424
Arrow Fastener U.K. Ltd.Unit 5 ZK Park, 23 Commerce Way, Croydon CRO 4ZS, Surreywww.arrowfastener.com © 2007 Arrow Fastener Company, Inc.
Introducing the new innovative CT50™
Professional Cordless Staple GunIntroducing Arrow’s new innovative quality
tool, the CT50™. More than just a sleek, light weight design, this cordless wonder is a rugged, heavy duty staple gun that appeals to everyone, from the do-it-yourselfer to the contractor.
The light weight 10.8v Lithium-ion battery guarantees more power, while firing up to 1500 staples on a single charge. Its unique “on-board”
battery design maintains perfect balance for increased control and accuracy.
The ultra-bright “LED guide light” will light any surface with precision positioning of the staple location. The adjustable “depth of drive” control lets you perfectly fire each staple to the desired depth.
Unique to the CT50™ this tool holds two full strips of any of the six Arrow T50® staple sizes
saving time on the project.All this, and more, in a well thought out,
ergonomically designed, professional tool that will make any project faster and easier for both the pro and do-it-yourselfer. The additional endless list of features will ensure a professional finish to every project.
EVOLUTIONARY!Adjustable Depth of Drive Dial
Easy-releasestaple pusher
Non-skidbattery grip
Staple exit guides
At-a-glance staple supply window
Holds 2 full strips of T50®
staples–shoots over 1500 staples per charge
LED guide light
Easy-releasebattery
LEDBattery meter
Safety trigger switch
10.8v lithium ION battery
CIRCLE #102 ON FREE INFORMATION CARD.
Question? Comment? We want to hear from you.Popular Woodworking welcomes comments from readers about the magazine or wood-working in general, as well as questions on all areas of woodworking. We are more than happy to share our woodworking experience with you by answering your questions or adding some clarity to whatever aspect of the craft you are unsure about, and if you have a complaint, we want to address it whenever possible.
Though we receive a good deal of mail, we try to respond to all correspondence in a prompt manner. Published correspondence may be edited for length or style. All correspondence becomes the property of Popular Woodworking.
Send your questions and comments via e-mail to [email protected], via fax to 513-891-7196, or by mail to: Letters Popular Woodworking 4700 E. Galbraith Road Cincinnati, OH 45236
popularwoodworking.com ■ 15
Letters
I found a stick of 1⁄4" brass rod at my local Ace hardware store then cut the pieces to the required size. If you cannot find any brass rod you can use 1⁄4" steel rod or perhaps a wooden dowel. But, I would turn to wood in only the most dire of cir-cumstances.
— Glen D. Huey, senior editor
Hybrid Table Saw ArticleI can’t believe you did an article on hybrid table saws (November 2007, issue #165) and didn’t even review one of the first saws to appear in this category – the DeWalt 746. Why didn’t you include it?
— Curt Clark, Elk Grove, California
When we discussed hybrid saws we looked at features we wouldn’t work without. One unani-mous conclusion was a Biesemeyer or Biese-meyer-style rip fence.
This fence system allows many opportunities for extra-curricular work such as attaching jigs – and the stalwart design is all but an industry standard.
Unfortunately, the DeWalt hybrid saw does not come with this type of fence. That eliminated it from consideration. I wish DeWalt would at least offer the DW746 with a Biesemeyer fence design as an option. We would have pulled one in for testing in a minute. I too, would like to see how the DeWalt stacks up against the competi-tion. PW
— Glen D. Huey, senior editor
continued from page 12
CIRCLE #119 ON FREE INFORMATION CARD.
CIRCLE #100 ON FREE INFORMATION CARD.

popwood.com/winshopaaaa aaa
37-350A
8" Jointer 50" Unisaw
36-L31X-BC50
10111010" Saw Blade
35-7654
371K
Compact Belt Sander
17" Drill Press
17-959L
13" Planer
22-580
Titebond OriginalTitebond OriginalHiPURformer™ Advanced Bonding System
Molding & Trim Glue Titebond IIIUltimate Wood Glue
PCRBS10
Router Bit Set
9966
12-volt Cordless Drill
C2002
Air Compressor
PIN100
Pin Nailer
BN200A
Brad Nailer
BACK BY POPULAR DEMAND!
popwood.com/winshop
This $15,000 DREAM TEAM could be yours!
557
Plate Joiner
77240
24" Omni Jig
895PK
2 1/4 HP Multi-base Router Kit
The All-Star Workshop Giveaway is sponsored by:
POPULAR WOODWORKING'S “ALL-STAR WORKSHOP GIVE-AWAY” SWEEPSTAKES These are only abbreviated rules. The “All-Star Workshop Giveaway” Sweepstakes is subject to Offi cial Rules available during promotion period (8/20/07 – 4/30/08) at www.popwood.com/winshop. See Offi cial Rules for complete en-try details and prize descriptions. NO PURCHASE OR SUBSCRIP-TION NECESSARY TO ENTER OR WIN. Must be legal resident of the U.S. or Canada (excluding Quebec) who has reached the age of majority in the participant’s jurisdiction of residence to enter. One Grand Prize—Woodworker’s Home Workshop valued at US$15,000. Odds of winning depend on number of entries. Void in Quebec and where prohibited. Sponsor: F+W Publications, Inc., 4700 E. Galbraith Road, Cincinnati, OH 45236 USA
KBK 2450
Bar Clamp Assort. with Rack
BTB30A TG5.512+2K
Heavy Duty Bar Clamps
Cabinet Door Kit
Entry Deadline: Midnight, Eastern Standard Time, April 30, 2008 (Complete prizes and contest rules are also available at www.popwood.com/winshop)
ENTERONLINE TODAY!
Enter for your chance to win a complete shop that features all you see here.
28-475X
14" Band Saw
8" Bench Grinder
GR450
10111010" Saw Blade
35-7640
Polyurethane Glue
18 ■ Popular Woodworking April 2008
continued on page 20
Tricks of The Tradee d i T e d b y p a u l a n T h o n y
illustrations by Matt bantly
The Winner:
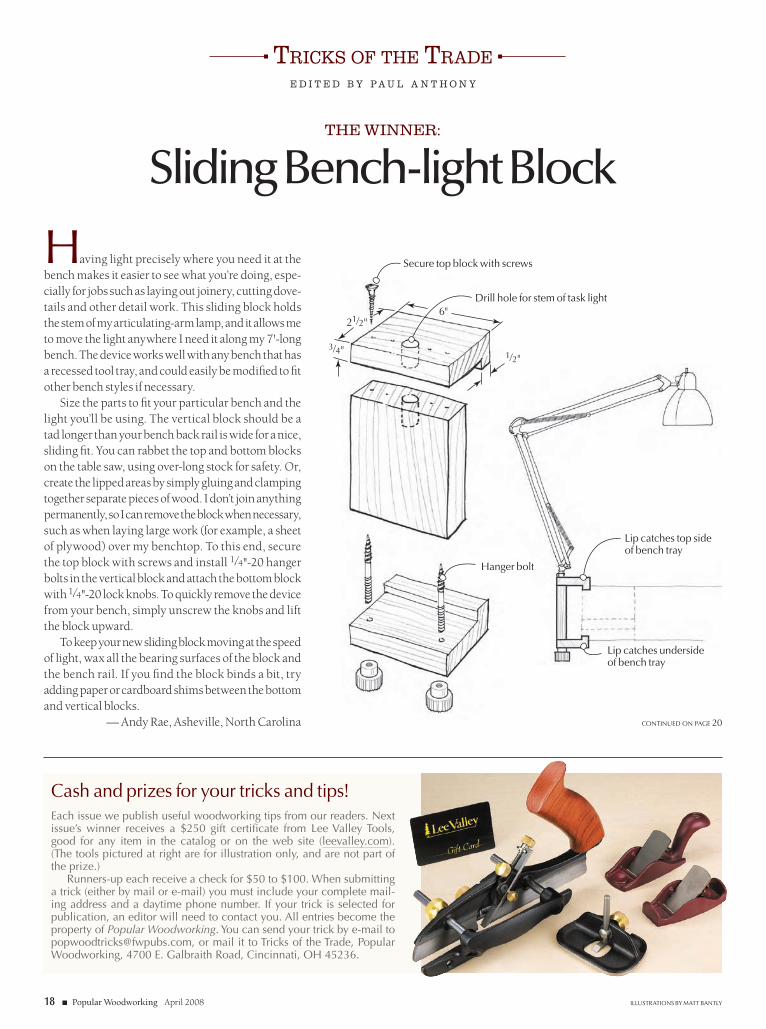
Sliding Bench-light Block
Having light precisely where you need it at the bench makes it easier to see what you’re doing, espe-cially for jobs such as laying out joinery, cutting dove-tails and other detail work. This sliding block holds the stem of my articulating-arm lamp, and it allows me to move the light anywhere I need it along my 7'-long bench. The device works well with any bench that has a recessed tool tray, and could easily be modified to fit other bench styles if necessary.
Size the parts to fit your particular bench and the light you’ll be using. The vertical block should be a tad longer than your bench back rail is wide for a nice, sliding fit. You can rabbet the top and bottom blocks on the table saw, using over-long stock for safety. Or, create the lipped areas by simply gluing and clamping together separate pieces of wood. I don’t join anything permanently, so I can remove the block when necessary, such as when laying large work (for example, a sheet of plywood) over my benchtop. To this end, secure the top block with screws and install 1⁄4"-20 hanger bolts in the vertical block and attach the bottom block with 1⁄4"-20 lock knobs. To quickly remove the device from your bench, simply unscrew the knobs and lift the block upward.
To keep your new sliding block moving at the speed of light, wax all the bearing surfaces of the block and the bench rail. If you find the block binds a bit, try adding paper or cardboard shims between the bottom and vertical blocks.
— Andy Rae, Asheville, North Carolina
Drill hole for stem of task light
secure top block with screws
21⁄2"
3⁄4" 1⁄2"
6"
Hanger bolt
lip catches top side of bench tray
lip catches underside of bench tray
Cash and prizes for your tricks and tips!Each issue we publish useful woodworking tips from our readers. next issue’s winner receives a $250 gift certificate from lee Valley tools, good for any item in the catalog or on the web site (leevalley.com). (the tools pictured at right are for illustration only, and are not part of the prize.)
runners-up each receive a check for $50 to $100. When submitting a trick (either by mail or e-mail) you must include your complete mail-ing address and a daytime phone number. if your trick is selected for publication, an editor will need to contact you. all entries become the property of Popular Woodworking. you can send your trick by e-mail to [email protected], or mail it to tricks of the trade, Popular Woodworking, 4700 E. Galbraith road, Cincinnati, oH 45236.

Quality Blades for America’s CraftsmenSerious woodworkers demand perfection.That’s why so many of them choose Forrest saw blades.
Forrest quality is legendary. Our proprietarymanufacturing process, hand straightening,and unique grade of C-4 micrograin carbidegive you smooth, quiet cuts without splintering, scratching, or tearouts. In fact,independent tests rate our blades as #1 forrip cuts and crosscuts.
Forrest saw blades are simply the best thatmoney can buy. They’re made in the USA bythe same family-owned business that’s beenproducing and sharpening them for over 55years. And they’re backed by a 30-day moneyback guarantee. It’s no wonder that seriouswoodworkers give them such high praise!
“Your blades are without question thebest by miles, and I have tried them all.”Bob Jensen–Fridley, MN
“These are the finest blades I have everowned and you should be proud of yourquality product.”Patrick T. Hankard–South Windsor, CT
“[Forrest blades] cut true, with no vibration.I was a carpenter by trade for over 60years and continue to be an active wood-worker. So, I can say with confidence thatForrest blades are the best.”Carl Stude–Burbank, CA
The message is clear. If you’re looking forquality, performance, and value, it pays tochoose Forrest blades every time.
Our Most Popular Blades:Woodworker II – Thisaward-winning, all purposeblade is the finest of its type. It turns big jobs intoeasy-to-handle ones.
Dado-King – The world’sfinest multi-tooth dado set.It works effectively in alldirections—with the grain or across it.
Chop Master – Producesperfect miters every time—with no bottom splinters. You get smooth edges on all types of wood.
Woodworker I – Great for table and radial saws.It trims and crosscuts allwoods up to 2" and is ideal for plywood.
Duraline Hi A/T – Our bestblade for birch and oak plyveneers. It also delivers aclean cut on melamine andvinyl over particle board.
Forrest blades come in a wide variety ofsizes and are available for practically every application. Call or send for our complete list of products.
Three Convenient Ways To OrderWe back our blades with a 30-day moneyback guarantee. So, choose the methodmost convenient for you and order today:
• Visit one of our fine-quality dealers or retailers.
• Call us toll free at 1-800-733-7111.(In NJ, 973-473-5236) Ask about special discounts, free shipping on orders over $275, and discounts for blade sharpening.
• Contact our internet store:www.ForrestBlades.com
© 2007 Forrest Manufacturing* As seen in Fine Woodworking’s 2004 Tool Guide, pg.121.
Woodworker IIFine Woodworking*
Woodworker IIWood Magazine
Woodworker IIWoodshop News
Chop MasterWoodshop News
Dado KingWood Magazine
Dado KingWoodshop News
Duraline Hi-ATWoodshop News
Custom Woodworker IIWoodshop News
Code PW
CIRCLE #116 ON FREE INFORMATION CARD.
20 ■ Popular Woodworking April 2008
continued from page 18
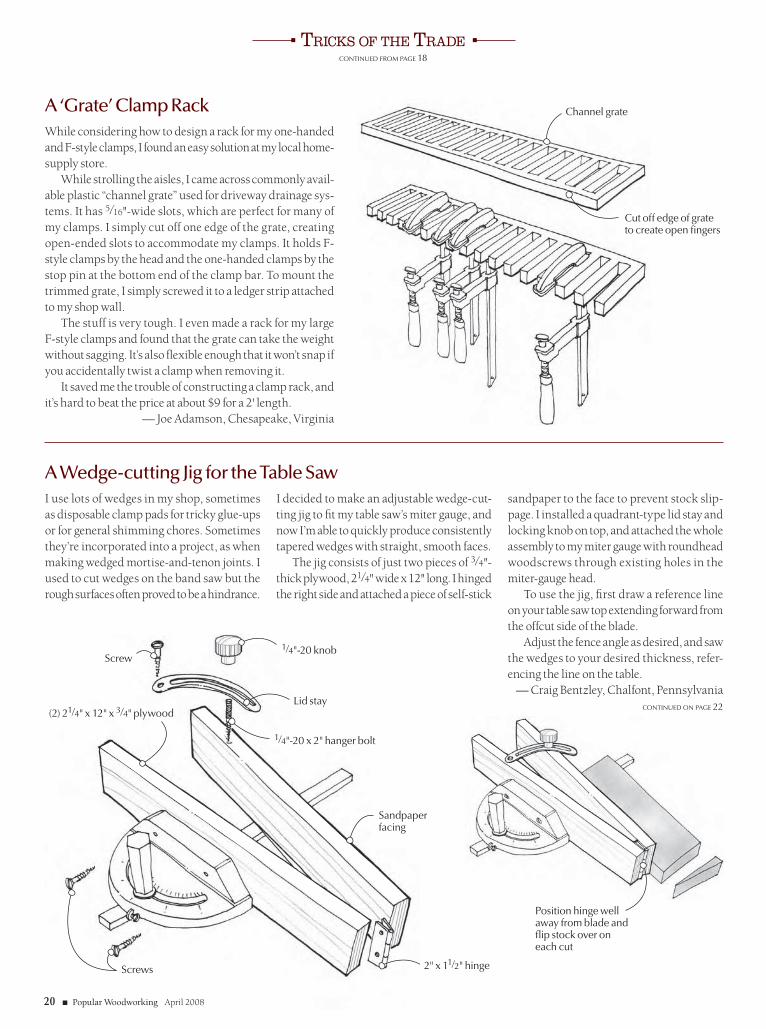
A ‘Grate’ Clamp Rack While considering how to design a rack for my one-handed and F-style clamps, I found an easy solution at my local home-supply store.
While strolling the aisles, I came across commonly avail-able plastic “channel grate” used for driveway drainage sys-tems. It has 5⁄16"-wide slots, which are perfect for many of my clamps. I simply cut off one edge of the grate, creating open-ended slots to accommodate my clamps. It holds F-style clamps by the head and the one-handed clamps by the stop pin at the bottom end of the clamp bar. To mount the trimmed grate, I simply screwed it to a ledger strip attached to my shop wall.
The stuff is very tough. I even made a rack for my large F-style clamps and found that the grate can take the weight without sagging. It’s also flexible enough that it won’t snap if you accidentally twist a clamp when removing it.
It saved me the trouble of constructing a clamp rack, and it’s hard to beat the price at about $9 for a 2' length.
— Joe Adamson, Chesapeake, Virginia
Channel grate
Cut off edge of grate to create open fingers
Lid stay
Sandpaper facing
Screws
Screw1⁄4"-20 knob
1⁄4"-20 x 2" hanger bolt
(2) 21⁄4" x 12" x 3⁄4" plywood
2" x 11⁄2" hinge
20 ■ Popular Woodworking April 2008
Tricks of The Trade
I use lots of wedges in my shop, sometimes as disposable clamp pads for tricky glue-ups or for general shimming chores. Sometimes they’re incorporated into a project, as when making wedged mortise-and-tenon joints. I used to cut wedges on the band saw but the rough surfaces often proved to be a hindrance.
A Wedge-cutting Jig for the Table SawI decided to make an adjustable wedge-cut-ting jig to fit my table saw’s miter gauge, and now I’m able to quickly produce consistently tapered wedges with straight, smooth faces.
The jig consists of just two pieces of 3⁄4"-thick plywood, 21⁄4" wide x 12" long. I hinged the right side and attached a piece of self-stick
sandpaper to the face to prevent stock slip-page. I installed a quadrant-type lid stay and locking knob on top, and attached the whole assembly to my miter gauge with roundhead woodscrews through existing holes in the miter-gauge head.
To use the jig, first draw a reference line on your table saw top extending forward from the offcut side of the blade.
Adjust the fence angle as desired, and saw the wedges to your desired thickness, refer-encing the line on the table.
— Craig Bentzley, Chalfont, Pennsylvaniacontinued on page 22
Position hinge well away from blade and flip stock over on each cut
Get your FREE catalog today!Online: www.rockler.com Phone: 1-800-403-9736 (Code 834)Stores Nationwide!
Create with ConfidenceTM
33113
You won’t have to squint to read thejumbo-sized scale on our new Table Saw CrosscutSled; it makes precise adjustments a breeze. For $50less than comparable sleds, you’ll get first-rate accuracy, complete with a flip-up stop and hold-downclamp — all for only $119.99.
AccuracySummer Classes 2008
Portland Oregon
503.284.1644 www.northwestwoodworking.com
A SCHOOL FOR WOODWORKING
CIRCLE #133 ON FREE INFORMATION CARD.
CIRCLE #152 ON FREE INFORMATION CARD. CIRCLE #146 ON FREE INFORMATION CARD.
CIRCLE #145 ON FREE INFORMATION CARD.

22 ■ Popular Woodworking April 2008
continued from page 20
Customized Clothespin Clamp and WedgeWhen working on small projects, I often need to glue odd-shaped mouldings and tiny trim to box sides and other pieces. Not much pressure is required to hold these small pieces in place, and I find that the humble wooden clothespin is often the perfect clamp for the job. Cheap and easily available, spring clothespins are easily tailored for custom clamping. For example, when gluing moulding to the edge of a piece of wood, one jaw of the clothespin can be filed, sanded or sawn to fit the profile of the moulding while the other jaw can be tapered parallel to the first. This applies con-sistent clamping pressure across the width of the moulding.
As an added benefit, disassembling a spring clothespin quickly yields a couple wedges, which can also be helpful for shimming dur-ing some gluing operations. The tapered end can be easily modified with a sander or other woodworking tool to whatever suitable taper is needed for the application. pw
— Barry Sleepwell, Austin, Texas
Power-sand to desired taper for wedging
Shape clothespin jaw to suit piece being clamped
Tricks of The Trade
Here’s what makes the DR® POWER GRADER the fastest, easiest,and simply the best do-it-yourself road-grooming solution ever —
MAINTAIN YOUR DRIVEWAY WITH THE DR® POWER GRADER!
PATENTED DESIGN enables you toloosen and regrade enormous amounts of materials with minimal power.
POWERED ACTUATOR allows you to control how deeply you remove and regrade material with the push of a button.
CARBIDE-TIPPED SCARIFYINGTEETH loosen the hardest composite surfaces.
FILLS IN POTHOLES and wash-outs,and smoothes washboard on gravel, limestone,dirt, or sand roads without hauling in new material, shoveling, or raking.
CALL NOW! Get a FREE DVD and Catalogwith full details including models, low, factory-direct prices, and our 6-Month Risk-Free Trial offer.
1-888-213-2283www.DRpowergrader.com
TOLLFREE
© 2
008
CH
P, I
nc.
605
95X
6-MONTHRISK-FREETRIAL!
6-MONTHRISK-FREETRIAL!
Register to WIN3 Easy Steps to Enter
This deluxe 10" granite-top table saw from Steel City Tool Works could be yours! Register your entry at PopularWoodworking.com by March 31, 2008, and you could win this fantastic saw. Just check out these industrial-grade features:
44 mm (~1.75") thick granite tabletopis a Steel City exclusivefeature that providesunsurpassed wearand corrosion resistance.
Precision-ground solid granite tabletop is huge at 44" x 27" with two T-slots for miter gauge.
Industrial 30" T-squaretype fence systemprovides unmatchedprecision and accuracy.
Single poly-V-belt drive systemand two arbor bearingsgive long life, greater stability and power to the blade.
Massive cabinet-mounted trunnionseliminate vibration and ensure properblade alignment.
Heavy Duty 3 HP dual capacitor TEFC motorfeatures magneticsafety controls.
Brought to you by:
This Steel City Table Saw!
BY TOOL GUYS FOR TOOL GUYS.
Go to PopularWoodworking.com...Answer 4 Simple Questions...Submit Your Entry
BY WOODWORKERS. FOR WOODWORKERS.BY WOODWORKERS. FOR WOODWORKERS.

CIRCLE #159 ON FREE INFORMATION CARD.

WOODWORKER’S BOOK CLUB
with a 4th book for just $9.99 ( plus shipping/handling )
I’m adding $7.99 shipping & handling for a total payment of $17.98.
YES! I want to join WoodWorker’s Book Club. Please send me:
Signature _________________________________________________________
Name ____________________________________________________________
Address _________________________________________________________
City ___________________________________ State/Prov. ________________
ZIP/PC ____________________ Phone ( ___ ___ ___ ) ___ ___ ___ - ___ ___ ___ ___
E-mail ____________________________________________________________Offer good for new members in U.S. and Canada only. Add sales tax if applicable. In Canada provide a street address and remit in U.S. funds; enclose $10.39 s&h and $1.22 GST for a total of $21.60. One membership per household. Allow 3-4 weeks for delivery. The Club reserves the right to approve all applications and may cancel membership at any time.
I have read How the Club Works and understand that I am under NO OBLIGATION to buy any more books.
ACCT # EXP. DATE
Check/money order enclosed (or)Charge my VISA MC AmEx
There is NO OBLIGATIONto buy any more books!
Uncover the secrets to getting the perfect finish — every time! Finishing guru Bob Flexner shows you how.
A $3.95 value, yours FREE with membership!
Join today to receive a FREE Gift!
BONUS
P.O. Box 9274 Central Islip, NY 11722-9274
MAIL TO
www.WoodWorkersBookClub.com
MEMBERSHIP SAVINGS CERTIFICATE
#70697-8 $24.99 pb
#Z0835-0 $24.99 pb #Z0595-0 $24.99 pb #70725-7 $24.99 hc
#70668-9 $22.99 pb #70547-5 $24.99 pb
• NO-OBLIGATION OFFER means you’ll never have to buy another book unless YOU want to!
• EARN FREE BOOKS Every book you buy at regular Club prices counts toward a FREE Book!
• HARD-TO-BEAT SAVINGS of 15-50% off every book you buy!
• FREE INFORMATION-PACKED CLUB BULLETIN filled with top-notch books — chosen by woodworkersfor woodworkers!
Prices are publishers’ list prices.
YOU SAVE MONEY & GET THESE SPECIAL MEMBERSHIP PRIVILEGES!
#Z1981-0 $29.99 hc #Z2115-0 $29.99 pb
#70627-5 $24.99 pb
#70690-3 $22.99 pb
#Z0991-0 $19.99 pb
#Z1553-0 $19.99 hc
#70656-4 $24.99 pb
#70693-7 $24.99 pb
#Z0030-0 $26.99 pb #Z0564-0 $30.00 hc #70649-9 $24.99 pb
#70653-1 $24.99 pb
#70626-7 $24.99 pb#70704-2 $24.99 pb
#Z0489-0 $24.99 pb
• EASY-TO-USE MEMBERS-ONLY WEB SITE View our comprehensive catalog of books and U-BILD plans (450+!). Plus you can accept or decline your main selection and browse actual pages of books!
• FREE SHIPPING AND HANDLINGwhen you prepay your orders after this joining offer!
• MONEY-BACK GUARANTEE If you’re not 100% satisfied with any book you buy, return it within 15 days for a prompt refund...no questions asked!Join online @
for an even larger book selection!
VISA/MasterCard/AmEx Orders Call TOLL FREE 1-800-448-0912 9a.m.-7p.m. M-F 9a.m.-6p.m. Sat EST
My 1ST BOOK FREE
Plus My FREE Gift
My 2ND BOOK FREE
My 3RD BOOK FREE
My 4TH Book For $9.99
#Z0815-0 $24.99 pb #Z0031-0 $26.99 pb #Z0978-0 $24.99 pb
2BookSet
#Z0437-0 $29.98 hcCounts As One Selection
MAIL YOUR MEMBERSHIP
SAVINGS CERTIFICATETODAY!
HURRY!
A division of F+W Publications, Inc.
(Lay-Flat Spiral Binding)
www.WoodWorkersBookClub.com
OR
DER
CO
DE:
KA
B08P
W
#70710-9 $29.99 hc(Lay-Flat Spiral Binding)
#70692-9 $24.99 pb
#70579-8 $26.99 pb
NEW
NEWNEWNEW
NEWNEW
or
de
r c
od
e: K
Ad
08P
W
Arts & Mysteriesb y A d A M c h e r u b i n i
26 ■ Popular Woodworking April 2008 photos by the author
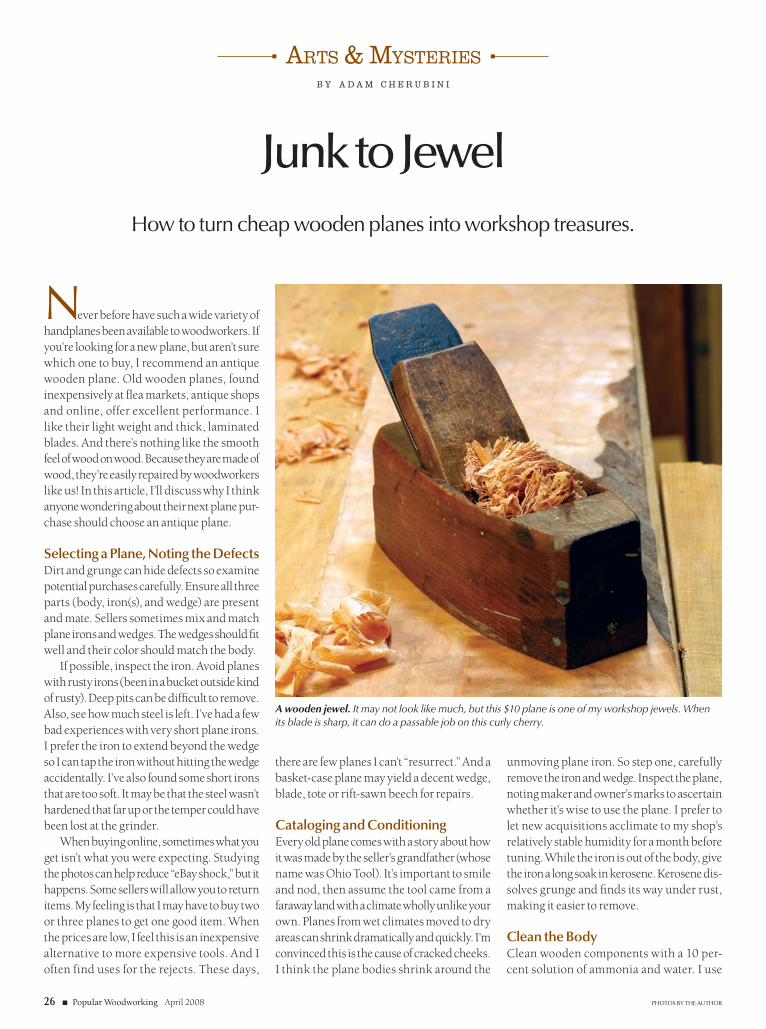
Junk to Jewel
Never before have such a wide variety of handplanes been available to woodworkers. If you’re looking for a new plane, but aren’t sure which one to buy, I recommend an antique wooden plane. Old wooden planes, found inexpensively at flea markets, antique shops and online, offer excellent performance. I like their light weight and thick, laminated blades. And there’s nothing like the smooth feel of wood on wood. Because they are made of wood, they’re easily repaired by woodworkers like us! In this article, I’ll discuss why I think anyone wondering about their next plane pur-chase should choose an antique plane.
Selecting a Plane, Noting the DefectsDirt and grunge can hide defects so examine potential purchases carefully. Ensure all three parts (body, iron(s), and wedge) are present and mate. Sellers sometimes mix and match plane irons and wedges. The wedges should fit well and their color should match the body.
If possible, inspect the iron. Avoid planes with rusty irons (been in a bucket outside kind of rusty). Deep pits can be difficult to remove. Also, see how much steel is left. I’ve had a few bad experiences with very short plane irons. I prefer the iron to extend beyond the wedge so I can tap the iron without hitting the wedge accidentally. I’ve also found some short irons that are too soft. It may be that the steel wasn’t hardened that far up or the temper could have been lost at the grinder.
When buying online, sometimes what you get isn’t what you were expecting. Studying the photos can help reduce “eBay shock,” but it happens. Some sellers will allow you to return items. My feeling is that I may have to buy two or three planes to get one good item. When the prices are low, I feel this is an inexpensive alternative to more expensive tools. And I often find uses for the rejects. These days,
there are few planes I can’t “resurrect.” And a basket-case plane may yield a decent wedge, blade, tote or rift-sawn beech for repairs.
Cataloging and ConditioningEvery old plane comes with a story about how it was made by the seller’s grandfather (whose name was Ohio Tool). It’s important to smile and nod, then assume the tool came from a faraway land with a climate wholly unlike your own. Planes from wet climates moved to dry areas can shrink dramatically and quickly. I’m convinced this is the cause of cracked cheeks. I think the plane bodies shrink around the
A wooden jewel. It may not look like much, but this $10 plane is one of my workshop jewels. When its blade is sharp, it can do a passable job on this curly cherry.
unmoving plane iron. So step one, carefully remove the iron and wedge. Inspect the plane, noting maker and owner’s marks to ascertain whether it’s wise to use the plane. I prefer to let new acquisitions acclimate to my shop’s relatively stable humidity for a month before tuning. While the iron is out of the body, give the iron a long soak in kerosene. Kerosene dis-solves grunge and finds its way under rust, making it easier to remove.
Clean the Body Clean wooden components with a 10 per-cent solution of ammonia and water. I use
how to turn cheap wooden planes into workshop treasures.
the ethics of using antique planes
popularwoodworking.com ■ 27
nothing more abrasive than old toothbrushes. Trying to make an antique plane look new is time consuming and hurts its value. Planes don’t actually need a finish applied to them. Oils, waxes and other finishes do nothing to “restore” or protect wood. Wood only needs protection from UV light and benefits from environments with stable humidity (think art museum). I’m not convinced that linseed or tung oils or various waxes will hurt your plane. But don’t kid yourself into thinking such finishes are required to protect it.
Preparing the Blade Once the blade is out of the kerosene, wipe it clean. Before honing it, inspect the top of the iron. Some ham-fisted workmen of yore used steel hammers to adjust their plane irons and the tops are sometimes peened over, forming a sharp edge. This portion of most plane irons is wrought iron and can be filed. This is best done now before you’ve invested a lot of time in the edge. Holding these tapered blades in a vise can be tricky. You don’t want the blade to slip out, damaging its edge – or you.
SharpeningI’ve never encountered a plane iron with a perfectly flat back. So either every workman of yore was a hack, or we’re asking too much from our plane blades. I’m not convinced plane backs have to be flat to function. The steel must be polished and clean, but a little crowning doesn’t render the tool unusable (think of carv-ing chisels). In fact it can be advantageous in smoothers. Consider it a back bevel! I think flattening the back has more to do with aiding sharpening than facilitating use. If you want to flatten your blades just because, I’ve had suc-cess with open-mesh drywall screens on glass, and lots of elbow grease. But I recommend just polishing what you have first. If it doesn’t work, you can always flatten the back later.
I grind the bevel on a grinder (sometimes electric, sometimes foot-powered). I prefer to grind a low bevel angle, maybe 20°, then freehand grind a secondary bevel. But feel free to try it any way you feel comfortable. One thing you will find is that the laminated blades are quick and easy to sharpen. These blades feature a thin piece of high-carbon steel forge-welded to a wrought iron body (wrought iron has almost no carbon, cast iron has lots of carbon). The wrought iron is soft, so honing a thick blade with a wide bevel is wonderfully easy.
I think it’s fine to buy old tools and use them. If we don’t buy them, restaurant decorators will. In light of this reality, we’re probably better equipped to care for these planes. I often say, “such and such a plane is a museum piece,” but the Mercer Museum aside, I don’t exactly see that many old tools in the museums I frequent. We may well be the best alternative for these old tools. so I say buy them and use them, but take a stew-
ardly approach to restoring and preserving them. First, find out what you have before you put it to work. Check the maker’s mark, typi-cally found on the plane’s front end (or toe), against those found in “a Guide to the Makers of american Wooden planes” by emil pollak, and “british plane Makers from 1700” by W.L Goodman, revised by Mark and Jane rees. you could have a valuable or rare plane that would make sense to set aside or sell. — aC
A bargain treasure. I paid $20 + shipping
for this plow plane. When I got it, I real-
ized it was maple, not the typical
beech, and had sev-eral of the features I would expect of
18th-century tools. So I put it aside.
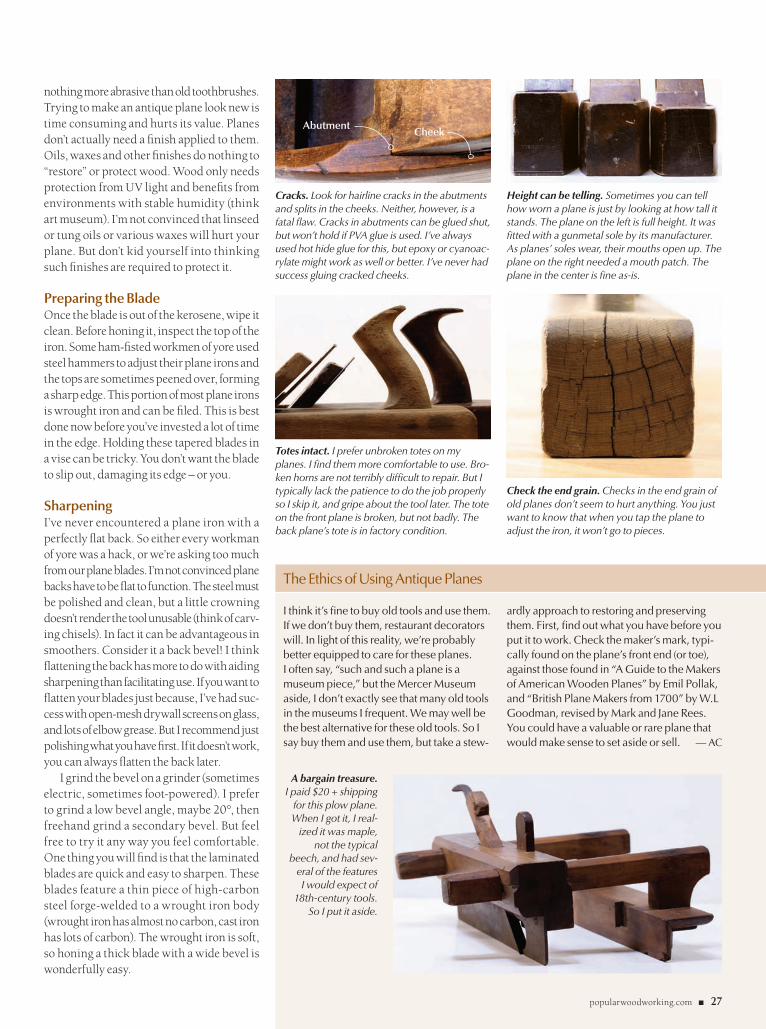
Cracks. Look for hairline cracks in the abutments and splits in the cheeks. Neither, however, is a fatal flaw. Cracks in abutments can be glued shut, but won’t hold if PVA glue is used. I’ve always used hot hide glue for this, but epoxy or cyanoac-rylate might work as well or better. I’ve never had success gluing cracked cheeks.
AbutmentCheek
Height can be telling. Sometimes you can tell how worn a plane is just by looking at how tall it stands. The plane on the left is full height. It was fitted with a gunmetal sole by its manufacturer. As planes’ soles wear, their mouths open up. The plane on the right needed a mouth patch. The plane in the center is fine as-is.
Totes intact. I prefer unbroken totes on my planes. I find them more comfortable to use. Bro-ken horns are not terribly difficult to repair. But I typically lack the patience to do the job properly so I skip it, and gripe about the tool later. The tote on the front plane is broken, but not badly. The back plane’s tote is in factory condition.
Check the end grain. Checks in the end grain of old planes don’t seem to hurt anything. You just want to know that when you tap the plane to adjust the iron, it won’t go to pieces.
Arts & Mysteries
28 ■ Popular Woodworking April 2008
Fit the BladeThe blade should seat well on the bed of the plane. If a cap iron is present, ensure the slot for its retaining screw is deep enough for the screw’s head. Fit the wedge and inspect for gaps along the abutments – I use an angled feeler gauge. The ends of the wedge should be faired to allow shavings to pass easily.
Sole: How Flat?Smoothers and try planes need fairly flat soles. You should periodically check your wooden planes with a straightedge. Small corrections can be made with sandpaper glued to a flat surface. Unlike as with metal planes, sandpa-per cuts wooden soles quickly, so be careful and check the sole frequently.
For a smoother especially, I think it is important to have the area in front of the blade (called the wear) in the same plane as the toe and heel. Hollow spots between these three areas can be tolerated. Realize that the sole of your wooden plane won’t remain flat. It will wear and it will move seasonally. I recommend that you do as little as possible to your plane’s sole and see how it works. True the sole only when the plane’s performance demands it. When my planes’ soles go concave, the planes either don’t cut or cut too thick a shaving. So if you are having either problem, check the sole. The clogging happens to planes with tight mouths so this fundamentally isn’t an issue for a jack plane with a 1⁄4"-wide mouth.
Mouth PatchesIt’s my understanding that tight-mouthed planes perform better on curly woods. The tight mouth stops the blade from splitting chunks from the board. Worn wooden planes
typically have wide mouths, but you can inlay a piece of wood (metal? plastic?) to effectively tighten the mouth of your plane.
Conclusion: The Plane TruthI really like using antique wooden planes – the way they work and feel. But I especially like the lessons they’ve taught me. Invariably, antique wooden handplanes are imperfect tools. Using them despite their imperfections has taught me to understand what is really required in a plane. I’ve found that jack planes need little but a sharp blade. And that the blade really doesn’t need a flat back. For me, a nicely shaped tote is a jack plane’s most important feature.
The key attribute of a try plane is its length – the longer the better. It needn’t have an espe-cially tight mouth. I think it’s difficult to get an edge really straight if the sole isn’t flat. My advice is to check it often, and check your work. I think you’ll find that there is a “good enough” sole flatness. With smooth planes you can experiment how a back bevel, a really flat sole, or a tight mouth affect performance. All of these are fairly easy to adjust and readjust.
We should probably ask whether it’s nec-essary to fully understand how planes work,
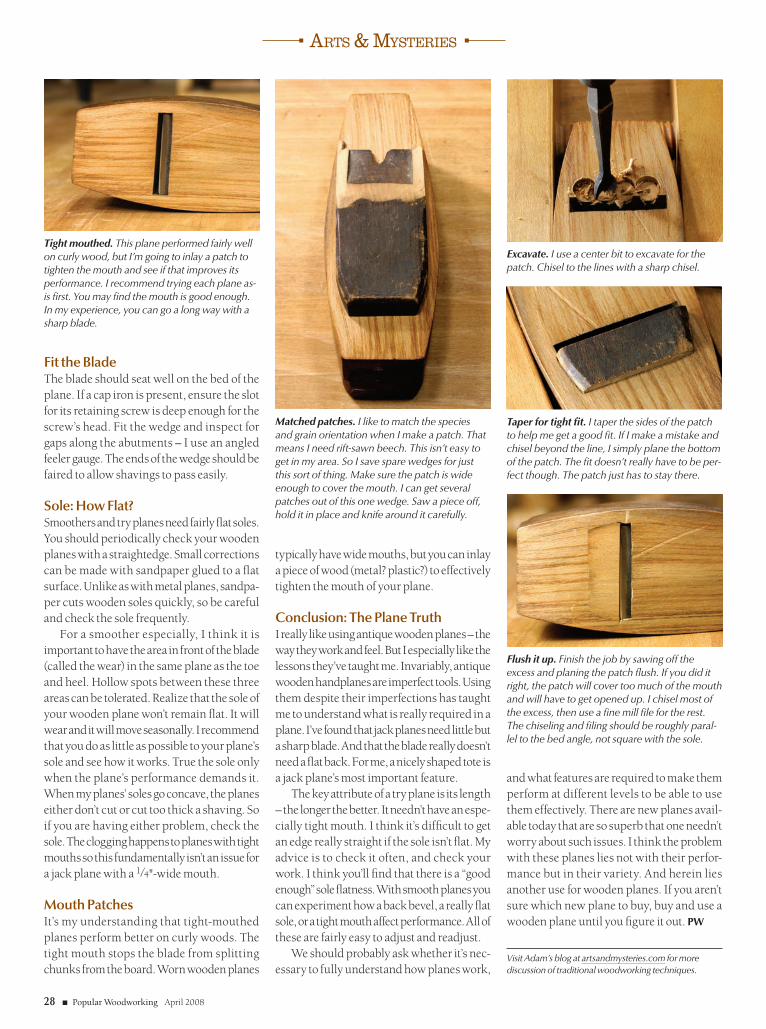
Tight mouthed. This plane performed fairly well on curly wood, but I’m going to inlay a patch to tighten the mouth and see if that improves its performance. I recommend trying each plane as-is first. You may find the mouth is good enough. In my experience, you can go a long way with a sharp blade.
Matched patches. I like to match the species and grain orientation when I make a patch. That means I need rift-sawn beech. This isn’t easy to get in my area. So I save spare wedges for just this sort of thing. Make sure the patch is wide enough to cover the mouth. I can get several patches out of this one wedge. Saw a piece off, hold it in place and knife around it carefully.
Excavate. I use a center bit to excavate for the patch. Chisel to the lines with a sharp chisel.
Taper for tight fit. I taper the sides of the patch to help me get a good fit. If I make a mistake and chisel beyond the line, I simply plane the bottom of the patch. The fit doesn’t really have to be per-fect though. The patch just has to stay there.
Flush it up. Finish the job by sawing off the excess and planing the patch flush. If you did it right, the patch will cover too much of the mouth and will have to get opened up. I chisel most of the excess, then use a fine mill file for the rest. The chiseling and filing should be roughly paral-lel to the bed angle, not square with the sole.
and what features are required to make them perform at different levels to be able to use them effectively. There are new planes avail-able today that are so superb that one needn’t worry about such issues. I think the problem with these planes lies not with their perfor-mance but in their variety. And herein lies another use for wooden planes. If you aren’t sure which new plane to buy, buy and use a wooden plane until you figure it out. PW
Visit Adam’s blog at artsandmysteries.com for more discussion of traditional woodworking techniques.

CIRCLE #157 ON FREE INFORMATION CARD.CIRCLE #169 ON FREE INFORMATION CARD.
30 ■ Popular Woodworking April 2008
I Can Do ThaTb y m e g a n f I T z p a T r I C k
lead photo by al parrish; illustrations by mary jane favorite
Pegged Shoe Rack
in this “I Can Do That” column, we introduce the use of pegs instead of hardware to hold the project together.
This simple shoe rack uses five pieces of 2" x 2" x 36" poplar (which is actually 11⁄2" square) for the uprights, feet and rails; six 5⁄8" x 48" poplar dowels for the crossbars; and one 3⁄8" x 48" poplar dowel for the pegs.
A good lesson when working with dowels is that not all of them are created equal. Before you start, measure your dowel diameters then select the drill bit to match the smallest one. (Although I bought 5⁄8" dowels, three of them were actually closer to 9⁄16".)
First, cut the crossbars to length. I decided on a 36" span, long enough to hold five pairs of women’s dress shoes. With six dowels to cut to the same length, measure and mark one, then set up a stop-block on the miter-saw fence and cut each to 38". The additional 2" is to seat the dowels 1" at both ends in the uprights.
While at the miter saw, cut your two 12" feet and two 5" rails – again, with a stop-block. Then, pencil a line on the right-hand side of your fence at 21⁄2", and cut 16 21⁄2" pegs from the 3⁄8" dowel (only 12 are needed, but extra is never bad). Holding the dowel in place against the fence on the left side and cutting these short pieces to the right side of the blade keeps your hands safely away from the blade. Once your pegs are cut, slightly taper one end on each a bit to make them easier to drive into place. An old-fashioned pencil sharpener on its largest setting works well for this task.
The uprights are 36" in length so no cut-ting is needed on these.
Next, align the two feet and clamp them together to lay out the locations of the four uprights and the dowels to join them. First, measure 2" from either end and use a com-
bination square to mark a line across both pieces; then measure 11⁄2" from those marks and strike another line across both pieces. Mark a diagonal line from corner to corner of the resulting squares on each foot. I eye-balled the placement (along the diagonal line) for each of the four 3⁄8" pegs that are driven through each foot to seat into the bottom ends of the uprights.
Now move on to the layout of the crossbars in the uprights. Again, it’s important that they align perfectly across the width. Clamp the two back uprights together and mark across both simultaneously for the crosspiece loca-tions at 10", 20" and 30" up from the bot-tom. Mark the center point in each location (3⁄4" from either edge). The crosspieces in the front uprights are offset down 11⁄2" from
those in the back. Clamp one of the uprights lengthwise (marked side up) securely in your Workmate, chuck the appropriate bit in your drill, put a piece of tape 1" from the tip of your bit to act as a depth stop, and drill a 1"-deep hole in each marked location on the upright, then repeat on each.
Then clamp each of the feet securely to drill through-holes that match the size of your pegs in all eight marked locations. Keep your drill level for this operation; you’ll be using the foot as a jig to drill the corresponding 1"-deep holes into the ends of the uprights, and you need these to align straight.
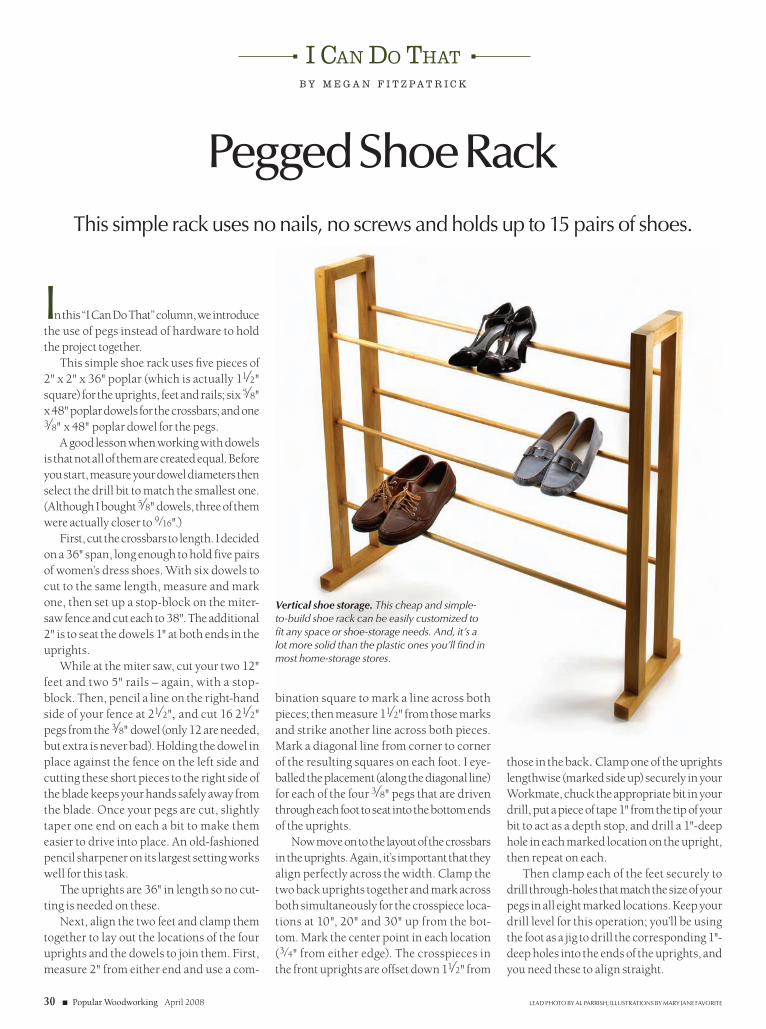
Vertical shoe storage. This cheap and simple-to-build shoe rack can be easily customized to fit any space or shoe-storage needs. And, it’s a lot more solid than the plastic ones you’ll find in most home-storage stores.
this simple rack uses no nails, no screws and holds up to 15 pairs of shoes.

popularwoodworking.com ■ 31
39"36"
36"
38"
10"
20"
30"
8"5"
12"2"
81⁄2"
181⁄2"
281⁄2"
371⁄2"
11⁄2"11⁄2"
11⁄2"
11⁄2"11⁄2"
Now clamp the two front uprights together with your already-drilled holes facing down, and mark the location for 3⁄8" through-holes at the top, 3⁄4" down from the top edge, and 3⁄4" in from either side, then drill straight through. As on the feet, this hole will be used as a jig to drill corresponding 1"-deep holes in the two top rails between the uprights.
Now clamp one of the back uprights loosely lengthwise in the Workmate vise with the holes along the length facing upward, leaving enough room at the bottom to align the foot with the layout marks you made, then clamp everything tightly together. Wrap a piece of painter’s tape 21⁄2" from the bit tip to mark the hole depth. Use the through-holes in the feet as a guide to drill two 1"-deep holes into the bottom of the upright.
Before you unclamp this setup, put glue in the holes and drive the two pegs in with a ham-mer or mallet. Try to seat the pegs completely so you have sufficient holding force between the two pieces (if you’ve a bit of peg sticking out, you can later sand it flush). Clamp the cor-
responding front upright (holes facing down) to the foot, drill your holes and seat the pegs. Do the same with the other side.
It’s time to add the crosspieces. Lay one assembled side flat on the ground, holes fac-ing up, and dry-fit your dowels. Remember – some of your crosspieces may be a bit larger than your holes, so you may need to sand them to fit. When all the dowels fit, add glue to the holes, and seat the dowels with a hammer.
Now grab the other side assembly, smear glue around the holes and line up the cross-pieces in their corresponding holes. Once you have the side aligned, hammer the side down until the crosspieces are seated; let the glue dry. (If you have long enough clamps, use them to pull everything tight together.)
Add the rails, using the through-holes in the uprights as guides. Once you have the rails in place to square everything up, clamp them tightly and drill through the uprights 1" into the holes. Brace your rack against something solid so you can swing your hammer with
enough force to seat the pegs and not just scoot the rack across the floor with each whack.
Sand all surfaces (and any proud pegs flush) before finishing. I used two coats of amber shellac, sanding with #360 grit between coats. Shellac can be tricky to work with though; it dries very quickly so it’s hard to keep a wet edge and get a uniform coat. If I build another shoe rack, I’ll likely succumb to the siren’s call of spray paint or spray lacquer. PW
Megan is the managing editor of popular Woodworking. Contact her at [email protected] or 513-531-2690x1348.
pegged shoe rack
No. item dimeNsioNs(iNches) material t W l
❏ 4 uprights 11⁄2 11⁄2 36 poplar
❏ 2 feet 11⁄2 11⁄2 12 poplar
❏ 2 rails 11⁄2 11⁄2 5 poplar
❏ 6 Crossbars 5⁄8 dia. 38 dowel
❏ 12 pegs 3⁄8 dia. 2 dowel
our “i Can do that” column features projects that can be completed by any woodworker with a modest (but decent) kit of tools in less than two days of shop time, and using raw materials that are available at any home cen-ter. We offer a free online manual in pdf format that explains all the tools and shows you how to perform the basic operations in a step-by-step format. you’ll learn to rip with a jigsaw, crosscut with a miter saw and drill
straight with the help of our manual.
visit iCandothatextras.com to download the free manual.
about this Column
Final alignment. The last step is to clamp the rails in place, drill, add glue then seat the pegs. You’ll need to brace the rack against a solid surface as you seat the pegs; otherwise, the rack will move with each tap – and the pegs won’t.
Stop-block. Here, I’ve set up a stop-block on the miter saw fence with a piece of offcut and a spring clamp. This saves a lot of time by not having to measure and mark each piece.
Drill straight. As you drill through the foot into the bottom of the upright, keep your drill level.
elevation profile
Stop-block
32 ■ Popular Woodworking April 2008
Tool TesTb y T h e p o p u l a r w o o d w o r k i n g s T a f f
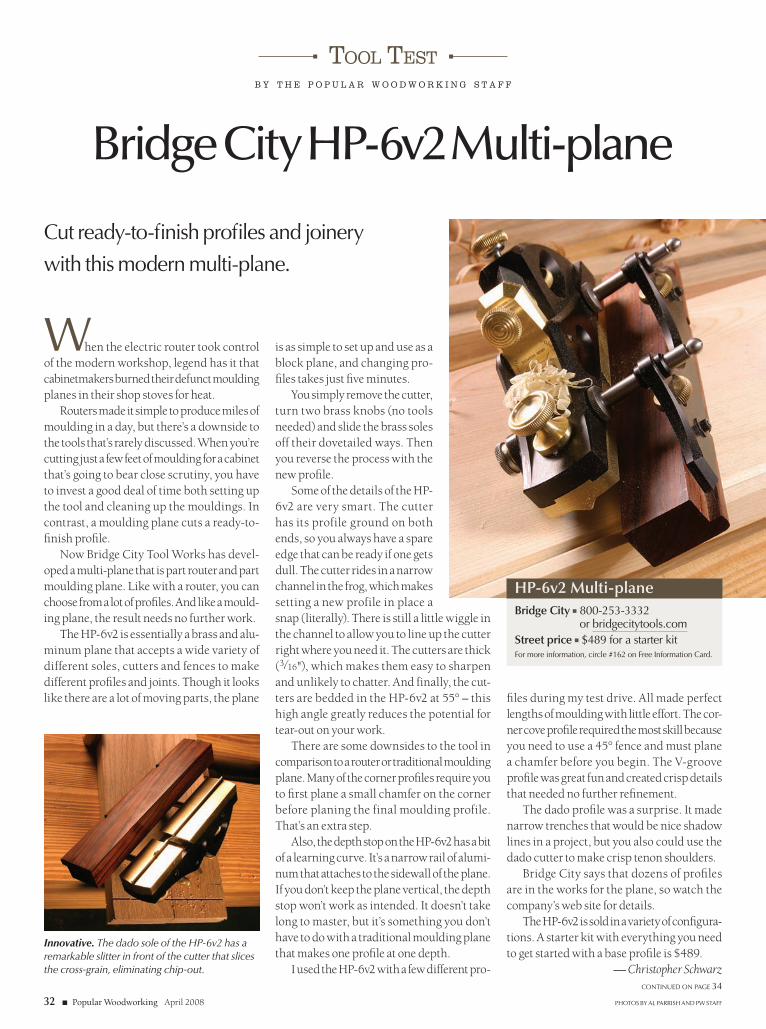
When the electric router took control of the modern workshop, legend has it that cabinetmakers burned their defunct moulding planes in their shop stoves for heat.
Routers made it simple to produce miles of moulding in a day, but there’s a downside to the tools that’s rarely discussed. When you’re cutting just a few feet of moulding for a cabinet that’s going to bear close scrutiny, you have to invest a good deal of time both setting up the tool and cleaning up the mouldings. In contrast, a moulding plane cuts a ready-to-finish profile.
Now Bridge City Tool Works has devel-oped a multi-plane that is part router and part moulding plane. Like with a router, you can choose from a lot of profiles. And like a mould-ing plane, the result needs no further work.
The HP-6v2 is essentially a brass and alu-minum plane that accepts a wide variety of different soles, cutters and fences to make different profiles and joints. Though it looks like there are a lot of moving parts, the plane
is as simple to set up and use as a block plane, and changing pro-files takes just five minutes.
You simply remove the cutter, turn two brass knobs (no tools needed) and slide the brass soles off their dovetailed ways. Then you reverse the process with the new profile.
Some of the details of the HP-6v2 are very smart. The cutter has its profile ground on both ends, so you always have a spare edge that can be ready if one gets dull. The cutter rides in a narrow channel in the frog, which makes setting a new profile in place a snap (literally). There is still a little wiggle in the channel to allow you to line up the cutter right where you need it. The cutters are thick (3⁄16"), which makes them easy to sharpen and unlikely to chatter. And finally, the cut-ters are bedded in the HP-6v2 at 55° – this high angle greatly reduces the potential for tear-out on your work.
There are some downsides to the tool in comparison to a router or traditional moulding plane. Many of the corner profiles require you to first plane a small chamfer on the corner before planing the final moulding profile. That’s an extra step.
Also, the depth stop on the HP-6v2 has a bit of a learning curve. It’s a narrow rail of alumi-num that attaches to the sidewall of the plane. If you don’t keep the plane vertical, the depth stop won’t work as intended. It doesn’t take long to master, but it’s something you don’t have to do with a traditional moulding plane that makes one profile at one depth.
I used the HP-6v2 with a few different pro-
files during my test drive. All made perfect lengths of moulding with little effort. The cor-ner cove profile required the most skill because you need to use a 45° fence and must plane a chamfer before you begin. The V-groove profile was great fun and created crisp details that needed no further refinement.
The dado profile was a surprise. It made narrow trenches that would be nice shadow lines in a project, but you also could use the dado cutter to make crisp tenon shoulders.
Bridge City says that dozens of profiles are in the works for the plane, so watch the company’s web site for details.
The HP-6v2 is sold in a variety of configura-tions. A starter kit with everything you need to get started with a base profile is $489.
— Christopher Schwarzcontinued on page 34
HP-6v2 Multi-planeBridge City ■ 800-253-3332
or bridgecitytools.comStreet price ■ $489 for a starter kitFor more information, circle #162 on Free Information Card.
Cut ready-to-finish profiles and joinery
with this modern multi-plane.
Bridge City HP-6v2 Multi-plane
photos by al parrIsh and pW staFF
Innovative. The dado sole of the HP-6v2 has a remarkable slitter in front of the cutter that slices the cross-grain, eliminating chip-out.

CIRCLE #142 ON FREE INFORMATION CARD.
Filtration At Its FinestYour shop may look clean, but how clean is the air? Take no chances when it comes to your health. The all-new Powermatic PM1200 Air Filtration System traps up to 99% of all 5-micron and 1-micron particles known to cause health risks. Clean air is so important, and Powermatic has made it easier than ever to attain with an Instant Filter Access Assembly, Radio Frequency (RF) Remote and Programmable Shut Off option. Trust the finest in filtration and trust in the woodworking industry’s Gold Standard since 1921…Powermatic.
GUARD SLIDES OFF WITHOUT TOOLS, FOR INSTANT FILTER ACCESS
FOR MORE INFORMATIONPLEASE VISIT Powermatic.com/pw
©2008 W
MH
TOO
L GR
OU
P, INC
. The color GO
LD is a registered tradem
ark of WM
H Tool G
roup, Inc.
RF REMOTE CONTROL WITH LCD
34 ■ Popular Woodworking April 2008
Tool TesT
Not Your Grandfather’s Circular SawI can only imagine the grin on Grandad’s face if he were to use the Festool TS55EQ. It’s not the ordinary circular saw with which he toiled.
This is a plunge-cut saw. The blade plunges into the work to make the cut, then retracts into the saw when finished. During the cut-ting process you might not fully appreciate this feature; however you’ll love it when you set the saw down after cutting. It sits flat.
Features on the TS55EQ that make it stand out are numerous. First, the saw, when placed on a guide rail (more about that later), is set at a slight angle. It’s toed in. This all but eliminates the blade burning as you cut. That both extends blade life and leaves a smooth cut.
Next is depth adjustment. The TS55EQ plunges from 0-55 mm in depth (nearly 21⁄4") in 1 mm increments. No more cutting into the sawhorses; simply dial in the correct setting on the depth stop. Or, how about cutting dados and grooves with this saw? It can be accom-plished by setting the depth stop.
Other interesting features are the spring-loaded retractable riving knife that moves with
the blade (it keeps kickback at bay), a “Fast-Fix” blade-changing system that disengages the on/off switch and locks blade rotation making blade changes quick, and a rotating dust port that helps keep dust collection con-nected throughout the sawing process. With dust collection attached, this saw is virtually dust-free.
Cuts made with the saw alone are good, but the real beauty comes when using the saw with an aluminum guide rail (a 55" guide rail and 48-tooth carbide blade are included as part of the saw system package). This is where the real magic starts.
Setup on the saw is minimal. Pull the tool from its Systainer (a safe storage box), align it with the guide then make a small adjustment to achieve zero play as the saw travels along the rail. Now you’re ready to cut straight.
After the first cut using the guide rail, you’re able to align the rail with your layout lines so accuracy is a snap. You don’t even have to clamp the guide rail to the work. Backing strips hold the guide in position.
— Glen D. Huey
TS55EQ Circular SawTooltechnic Systems, LLC ■ 888-337-8600 or festoolusa.comStreet price ■ $440 (package)For more information, circle #164 on Free Information Card.
Japanese Super Stones Don’t Need SoakingThe only thing better than a Japanese waterstone is a Japanese waterstone that doesn’t require 10 minutes of soaking before you begin sharpening.
A new line of “Super Stones,” made by Naniwa Abrasives, are priced so that the next time you need to replace a waterstone, you’ll upgrade to these stones, which require just a spritz of water to begin.
The Super Stones cut as fast as premium man-made waterstones and stay fairly flat in use (be sure to flatten any new waterstone first thing out of the box, however).
The Super Stones are available in this country in five useful grits: #500 for repair-ing nicked edges; #1,000 for workaday edge shaping; and #5,000, #8,000 and #12,000 for getting a high polish on your tools. (A basic set would be #1,000, #5,000 and #12,000.)
The Super Stones are 3⁄8" thick, 23⁄4" wide and 81⁄4" long. Each stone comes on a sturdy plastic base with rubber feet.
The Super Stones cut as quickly as the other brands of waterstones I’ve used, such as Norton, King and Shapton. And they work just fine with the modern A2 steel that is becoming prevalent in hand tools.
The Super Stones are poised to compete with the Shapton GlassStones, so some direct comparisons are warranted. The Super Stones are less expensive in every grit, from $9 to $25 less each, and they are about twice as thick. And I like the included plastic base on the Super Stones – with the GlassStones you need to buy or make a stone holder. Also, I liked that the Super Stones came in different colors compared to the all-white GlassStones; this helped me quickly identify which grit was next – however, I wish the #1,000 and #5,000 weren’t both light blue.
However, the Shaptons are harder stones and they seemed to stay f latter when put through the same amount of use. So I don’t know if the extra thickness of the Super Stones will translate to the stone lasting twice as long as the Shaptons. Also, I could gouge the Super Stones’ abrasive with the corner of a narrow iron or chisel on occasion due to the softness of the abrasive.
In the end, the Super Stones are a definite improvement compared to many traditional waterstones and are serious competition for the Shaptons in my book. PW
— CS
Super StonesTools for Working Wood ■ 800-426-4613 or toolsforworkingwood.comStreet price ■ $27.95 to $74.95For more information, circle #163 on Free Information Card.
continued from page 32

CIRCLE #114 ON FREE INFORMATION CARD.

opening photos by al parrish; step photos by the author; illustrations by robert w. lang
Greene & Greene-inspiredStorage Chest
b y dav i d m at h i a s
Classic design elements
combine to create
a new design.
True to form. This mahogany storage chest was designed to reflect the distinctive style of California architects Charles and Henry Greene.
36 ■ Popular Woodworking April 2008
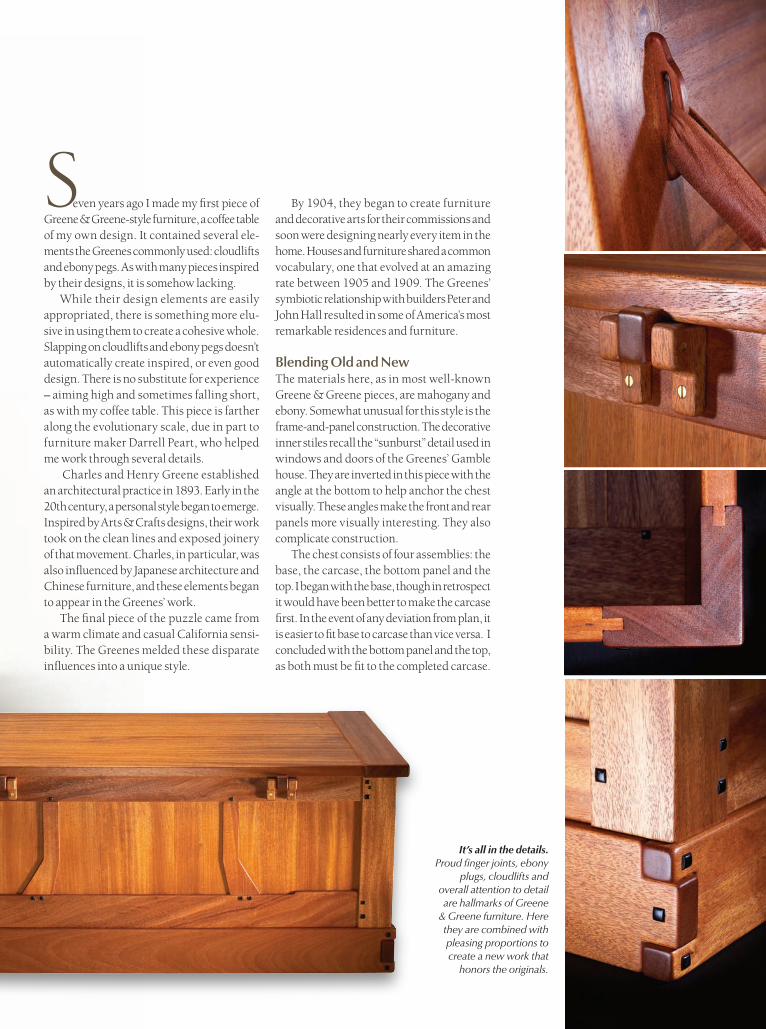
Seven years ago I made my first piece of Greene & Greene-style furniture, a coffee table of my own design. It contained several ele-ments the Greenes commonly used: cloudlifts and ebony pegs. As with many pieces inspired by their designs, it is somehow lacking.
While their design elements are easily appropriated, there is something more elu-sive in using them to create a cohesive whole. Slapping on cloudlifts and ebony pegs doesn’t automatically create inspired, or even good design. There is no substitute for experience – aiming high and sometimes falling short, as with my coffee table. This piece is farther along the evolutionary scale, due in part to furniture maker Darrell Peart, who helped me work through several details.
Charles and Henry Greene established an architectural practice in 1893. Early in the 20th century, a personal style began to emerge. Inspired by Arts & Crafts designs, their work took on the clean lines and exposed joinery of that movement. Charles, in particular, was also influenced by Japanese architecture and Chinese furniture, and these elements began to appear in the Greenes’ work.
The final piece of the puzzle came from a warm climate and casual California sensi-bility. The Greenes melded these disparate influences into a unique style.
By 1904, they began to create furniture and decorative arts for their commissions and soon were designing nearly every item in the home. Houses and furniture shared a common vocabulary, one that evolved at an amazing rate between 1905 and 1909. The Greenes’ symbiotic relationship with builders Peter and John Hall resulted in some of America’s most remarkable residences and furniture.
Blending Old and NewThe materials here, as in most well-known Greene & Greene pieces, are mahogany and ebony. Somewhat unusual for this style is the frame-and-panel construction. The decorative inner stiles recall the “sunburst” detail used in windows and doors of the Greenes’ Gamble house. They are inverted in this piece with the angle at the bottom to help anchor the chest visually. These angles make the front and rear panels more visually interesting. They also complicate construction.
The chest consists of four assemblies: the base, the carcase, the bottom panel and the top. I began with the base, though in retrospect it would have been better to make the carcase first. In the event of any deviation from plan, it is easier to fit base to carcase than vice versa. I concluded with the bottom panel and the top, as both must be fit to the completed carcase.
Greene & Greene-inspiredStorage Chest
It’s all in the details. Proud finger joints, ebony
plugs, cloudlifts and overall attention to detail are hallmarks of Greene
& Greene furniture. Here they are combined with pleasing proportions to create a new work that
honors the originals.
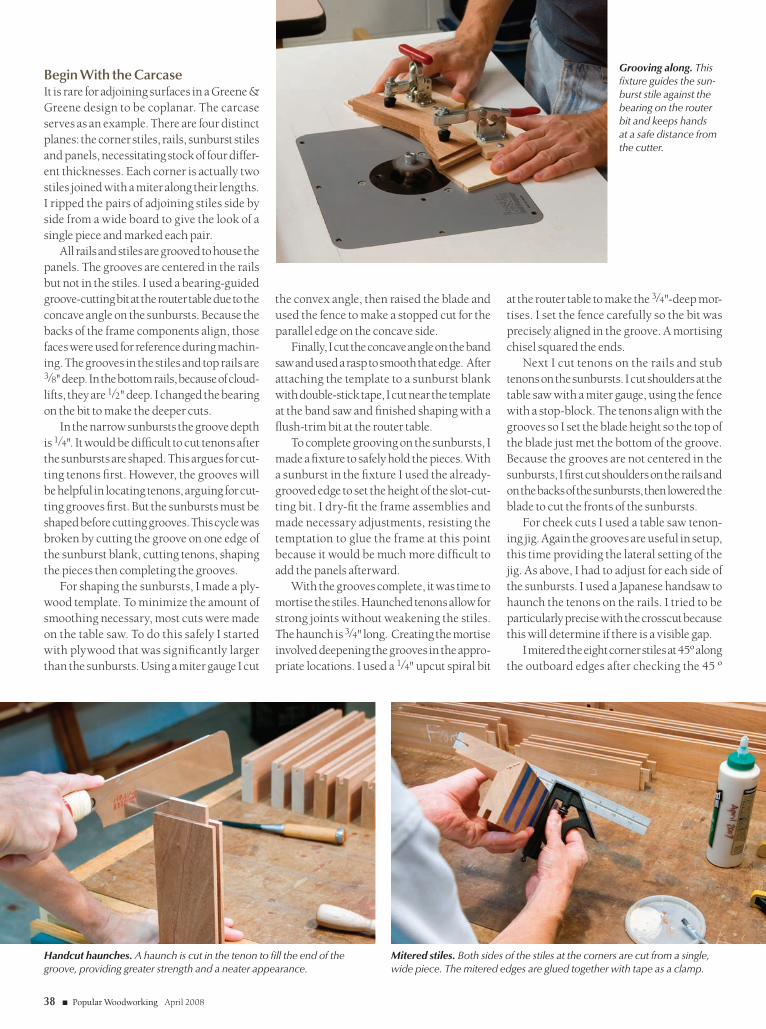
38 ■ Popular Woodworking April 2008
the convex angle, then raised the blade and used the fence to make a stopped cut for the parallel edge on the concave side.
Finally, I cut the concave angle on the band saw and used a rasp to smooth that edge. After attaching the template to a sunburst blank with double-stick tape, I cut near the template at the band saw and finished shaping with a flush-trim bit at the router table.
To complete grooving on the sunbursts, I made a fixture to safely hold the pieces. With a sunburst in the fixture I used the already-grooved edge to set the height of the slot-cut-ting bit. I dry-fit the frame assemblies and made necessary adjustments, resisting the temptation to glue the frame at this point because it would be much more difficult to add the panels afterward.
With the grooves complete, it was time to mortise the stiles. Haunched tenons allow for strong joints without weakening the stiles. The haunch is 3⁄4" long. Creating the mortise involved deepening the grooves in the appro-priate locations. I used a 1⁄4" upcut spiral bit
at the router table to make the 3⁄4"-deep mor-tises. I set the fence carefully so the bit was precisely aligned in the groove. A mortising chisel squared the ends.
Next I cut tenons on the rails and stub tenons on the sunbursts. I cut shoulders at the table saw with a miter gauge, using the fence with a stop-block. The tenons align with the grooves so I set the blade height so the top of the blade just met the bottom of the groove. Because the grooves are not centered in the sunbursts, I first cut shoulders on the rails and on the backs of the sunbursts, then lowered the blade to cut the fronts of the sunbursts.
For cheek cuts I used a table saw tenon-ing jig. Again the grooves are useful in setup, this time providing the lateral setting of the jig. As above, I had to adjust for each side of the sunbursts. I used a Japanese handsaw to haunch the tenons on the rails. I tried to be particularly precise with the crosscut because this will determine if there is a visible gap.
I mitered the eight corner stiles at 45º along the outboard edges after checking the 45 º
Begin With the CarcaseIt is rare for adjoining surfaces in a Greene & Greene design to be coplanar. The carcase serves as an example. There are four distinct planes: the corner stiles, rails, sunburst stiles and panels, necessitating stock of four differ-ent thicknesses. Each corner is actually two stiles joined with a miter along their lengths. I ripped the pairs of adjoining stiles side by side from a wide board to give the look of a single piece and marked each pair.
All rails and stiles are grooved to house the panels. The grooves are centered in the rails but not in the stiles. I used a bearing-guided groove-cutting bit at the router table due to the concave angle on the sunbursts. Because the backs of the frame components align, those faces were used for reference during machin-ing. The grooves in the stiles and top rails are 3⁄8" deep. In the bottom rails, because of cloud-lifts, they are 1⁄2" deep. I changed the bearing on the bit to make the deeper cuts.
In the narrow sunbursts the groove depth is 1⁄4". It would be difficult to cut tenons after the sunbursts are shaped. This argues for cut-ting tenons first. However, the grooves will be helpful in locating tenons, arguing for cut-ting grooves first. But the sunbursts must be shaped before cutting grooves. This cycle was broken by cutting the groove on one edge of the sunburst blank, cutting tenons, shaping the pieces then completing the grooves.
For shaping the sunbursts, I made a ply-wood template. To minimize the amount of smoothing necessary, most cuts were made on the table saw. To do this safely I started with plywood that was significantly larger than the sunbursts. Using a miter gauge I cut
Grooving along. This fixture guides the sun-burst stile against the bearing on the router bit and keeps hands at a safe distance from the cutter.
Handcut haunches. A haunch is cut in the tenon to fill the end of the groove, providing greater strength and a neater appearance.
Mitered stiles. Both sides of the stiles at the corners are cut from a single, wide piece. The mitered edges are glued together with tape as a clamp.
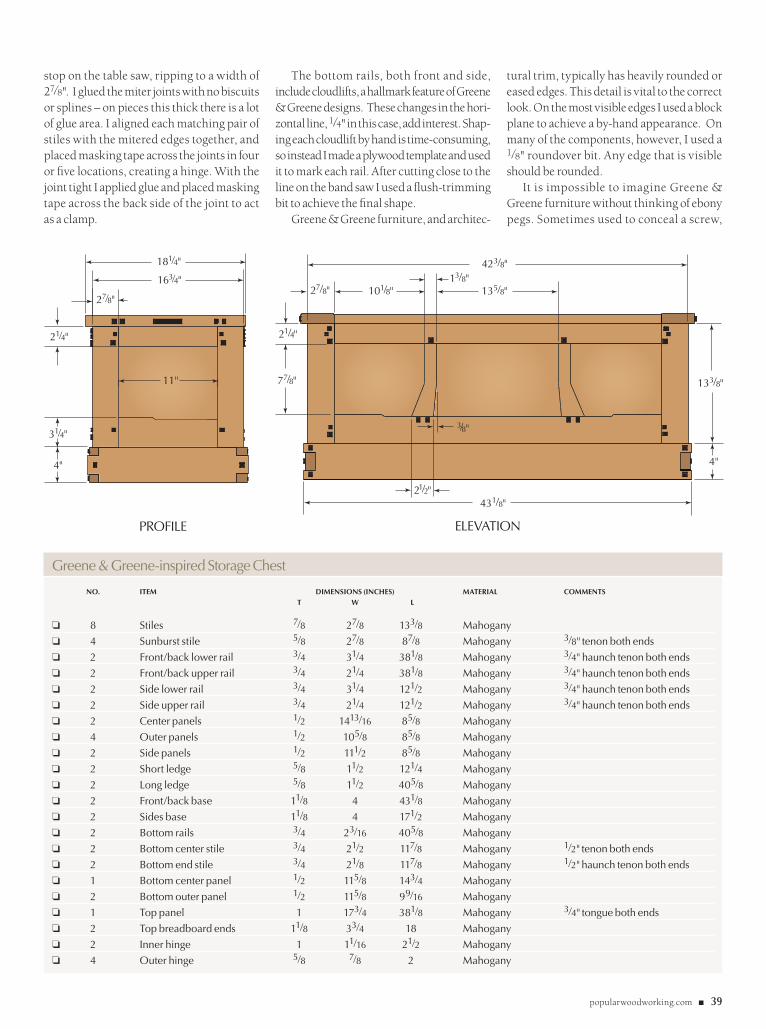
popularwoodworking.com ■ 39
stop on the table saw, ripping to a width of 27⁄8". I glued the miter joints with no biscuits or splines – on pieces this thick there is a lot of glue area. I aligned each matching pair of stiles with the mitered edges together, and placed masking tape across the joints in four or five locations, creating a hinge. With the joint tight I applied glue and placed masking tape across the back side of the joint to act as a clamp.
The bottom rails, both front and side, include cloudlifts, a hallmark feature of Greene & Greene designs. These changes in the hori-zontal line, 1⁄4" in this case, add interest. Shap-ing each cloudlift by hand is time-consuming, so instead I made a plywood template and used it to mark each rail. After cutting close to the line on the band saw I used a flush-trimming bit to achieve the final shape.
Greene & Greene furniture, and architec-
tural trim, typically has heavily rounded or eased edges. This detail is vital to the correct look. On the most visible edges I used a block plane to achieve a by-hand appearance. On many of the components, however, I used a 1⁄8" roundover bit. Any edge that is visible should be rounded.
It is impossible to imagine Greene & Greene furniture without thinking of ebony pegs. Sometimes used to conceal a screw,
greene & greene-inspired storage Chest
No. item dimeNsioNs(iNches) material commeNts t W l
❏ 8 stiles 7⁄8 27⁄8 133⁄8 mahogany
❏ 4 sunburst stile 5⁄8 27⁄8 87⁄8 mahogany 3⁄8" tenon both ends
❏ 2 Front/back lower rail 3⁄4 31⁄4 381⁄8 mahogany 3⁄4" haunch tenon both ends
❏ 2 Front/back upper rail 3⁄4 21⁄4 381⁄8 mahogany 3⁄4" haunch tenon both ends
❏ 2 side lower rail 3⁄4 31⁄4 121⁄2 mahogany 3⁄4" haunch tenon both ends
❏ 2 side upper rail 3⁄4 21⁄4 121⁄2 mahogany 3⁄4" haunch tenon both ends
❏ 2 Center panels 1⁄2 1413⁄16 85⁄8 mahogany
❏ 4 outer panels 1⁄2 105⁄8 85⁄8 mahogany
❏ 2 side panels 1⁄2 111⁄2 85⁄8 mahogany
❏ 2 short ledge 5⁄8 11⁄2 121⁄4 mahogany
❏ 2 long ledge 5⁄8 11⁄2 405⁄8 mahogany
❏ 2 Front/back base 11⁄8 4 431⁄8 mahogany
❏ 2 sides base 11⁄8 4 171⁄2 mahogany
❏ 2 bottom rails 3⁄4 23⁄16 405⁄8 mahogany
❏ 2 bottom center stile 3⁄4 21⁄2 117⁄8 mahogany 1⁄2" tenon both ends
❏ 2 bottom end stile 3⁄4 21⁄8 117⁄8 mahogany 1⁄2" haunch tenon both ends
❏ 1 bottom center panel 1⁄2 115⁄8 143⁄4 mahogany
❏ 2 bottom outer panel 1⁄2 115⁄8 99⁄16 mahogany
❏ 1 top panel 1 173⁄4 381⁄8 mahogany 3⁄4" tongue both ends
❏ 2 top breadboard ends 11⁄8 33⁄4 18 mahogany
❏ 2 inner hinge 1 11⁄16 21⁄2 mahogany
❏ 4 outer hinge 5⁄8 7⁄8 2 mahogany
11"
181⁄4"
21⁄4"
163⁄4"
31⁄4"
27⁄8"
4"
423/8"
135/8"101/8"
77/8"
21/4"
27/8"
133/8"
431/8"
4"
13/8"
21/2"
3/8"
proFile elevation
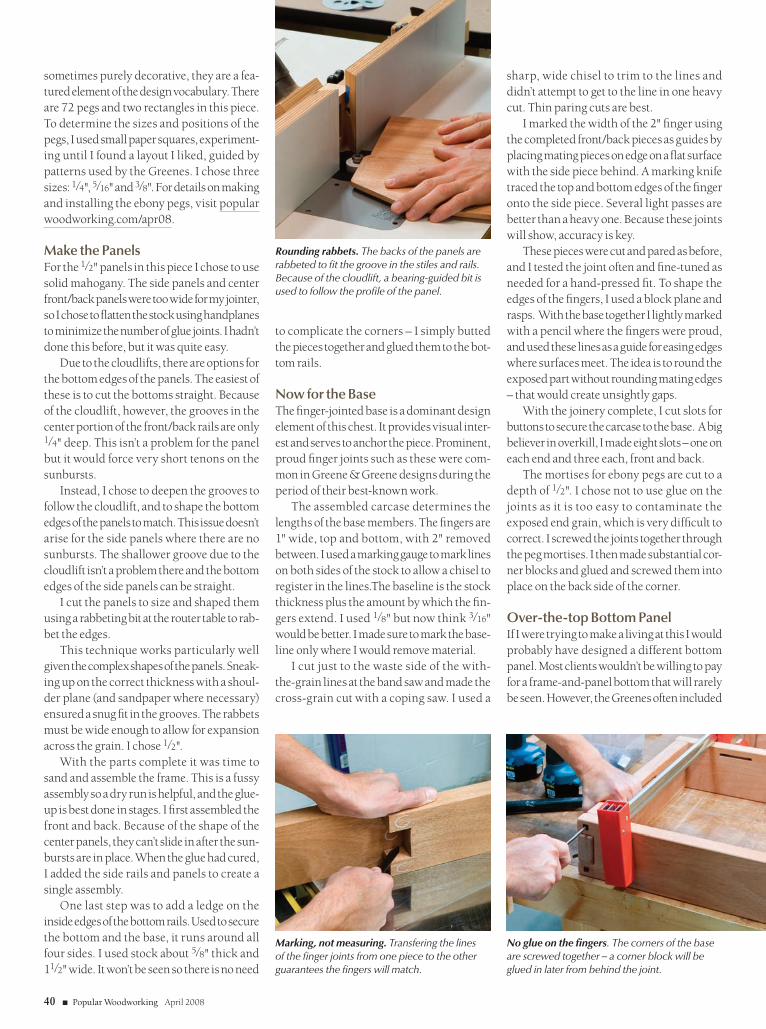
40 ■ Popular Woodworking April 2008
sometimes purely decorative, they are a fea-tured element of the design vocabulary. There are 72 pegs and two rectangles in this piece. To determine the sizes and positions of the pegs, I used small paper squares, experiment-ing until I found a layout I liked, guided by patterns used by the Greenes. I chose three sizes: 1⁄4", 5⁄16" and 3⁄8". For details on making and installing the ebony pegs, visit popular woodworking.com/apr08.
Make the PanelsFor the 1⁄2" panels in this piece I chose to use solid mahogany. The side panels and center front/back panels were too wide for my jointer, so I chose to flatten the stock using handplanes to minimize the number of glue joints. I hadn’t done this before, but it was quite easy.
Due to the cloudlifts, there are options for the bottom edges of the panels. The easiest of these is to cut the bottoms straight. Because of the cloudlift, however, the grooves in the center portion of the front/back rails are only 1⁄4" deep. This isn’t a problem for the panel but it would force very short tenons on the sunbursts.
Instead, I chose to deepen the grooves to follow the cloudlift, and to shape the bottom edges of the panels to match. This issue doesn’t arise for the side panels where there are no sunbursts. The shallower groove due to the cloudlift isn’t a problem there and the bottom edges of the side panels can be straight.
I cut the panels to size and shaped them using a rabbeting bit at the router table to rab-bet the edges.
This technique works particularly well given the complex shapes of the panels. Sneak-ing up on the correct thickness with a shoul-der plane (and sandpaper where necessary) ensured a snug fit in the grooves. The rabbets must be wide enough to allow for expansion across the grain. I chose 1⁄2".
With the parts complete it was time to sand and assemble the frame. This is a fussy assembly so a dry run is helpful, and the glue-up is best done in stages. I first assembled the front and back. Because of the shape of the center panels, they can’t slide in after the sun-bursts are in place. When the glue had cured, I added the side rails and panels to create a single assembly.
One last step was to add a ledge on the inside edges of the bottom rails. Used to secure the bottom and the base, it runs around all four sides. I used stock about 5⁄8" thick and 11⁄2" wide. It won’t be seen so there is no need
to complicate the corners – I simply butted the pieces together and glued them to the bot-tom rails.
Now for the BaseThe finger-jointed base is a dominant design element of this chest. It provides visual inter-est and serves to anchor the piece. Prominent, proud finger joints such as these were com-mon in Greene & Greene designs during the period of their best-known work.
The assembled carcase determines the lengths of the base members. The fingers are 1" wide, top and bottom, with 2" removed between. I used a marking gauge to mark lines on both sides of the stock to allow a chisel to register in the lines.The baseline is the stock thickness plus the amount by which the fin-gers extend. I used 1⁄8" but now think 3⁄16" would be better. I made sure to mark the base-line only where I would remove material.
I cut just to the waste side of the with-the-grain lines at the band saw and made the cross-grain cut with a coping saw. I used a
sharp, wide chisel to trim to the lines and didn’t attempt to get to the line in one heavy cut. Thin paring cuts are best.
I marked the width of the 2" finger using the completed front/back pieces as guides by placing mating pieces on edge on a flat surface with the side piece behind. A marking knife traced the top and bottom edges of the finger onto the side piece. Several light passes are better than a heavy one. Because these joints will show, accuracy is key.
These pieces were cut and pared as before, and I tested the joint often and fine-tuned as needed for a hand-pressed fit. To shape the edges of the fingers, I used a block plane and rasps. With the base together I lightly marked with a pencil where the fingers were proud, and used these lines as a guide for easing edges where surfaces meet. The idea is to round the exposed part without rounding mating edges – that would create unsightly gaps.
With the joinery complete, I cut slots for buttons to secure the carcase to the base. A big believer in overkill, I made eight slots – one on each end and three each, front and back.
The mortises for ebony pegs are cut to a depth of 1⁄2". I chose not to use glue on the joints as it is too easy to contaminate the exposed end grain, which is very difficult to correct. I screwed the joints together through the peg mortises. I then made substantial cor-ner blocks and glued and screwed them into place on the back side of the corner.
Over-the-top Bottom PanelIf I were trying to make a living at this I would probably have designed a different bottom panel. Most clients wouldn’t be willing to pay for a frame-and-panel bottom that will rarely be seen. However, the Greenes often included
Rounding rabbets. The backs of the panels are rabbeted to fit the groove in the stiles and rails. Because of the cloudlift, a bearing-guided bit is used to follow the profile of the panel.
Marking, not measuring. Transfering the lines of the finger joints from one piece to the other guarantees the fingers will match.
No glue on the fingers. The corners of the base are screwed together – a corner block will be glued in later from behind the joint.

popularwoodworking.com ■ 41
For additional text and photos showing how to create the hinges, leather strap holders and ebony plugs, and drawings of the sunburst stiles and bottom panel, go to:
popularwoodworking.com/apr08
Online EXTRAS
such seldom-seen details. For example, the index pins between the halves of the Gamble dining table are highly polished ebony. To this end, I placed a 1⁄4" ebony peg at each mortise-and-tenon joint in the bottom panel. Absent from the original design, I added them on a whim, creating a wonderful surprise for those who open the chest.
This frame-and-panel assembly is much more straightforward than the carcase. There are two rails and four stiles. The two center stiles align with the bottoms of the sunbursts. The joinery is much as before: haunched ten-ons and mortises at the ends, stub tenons on the two center stiles. Once again, panels are 1⁄2" solid mahogany with edges rabbeted to fit a 1⁄4"-wide groove.
Finishing at the TopTop panels flanked by proud breadboard ends are another Greene & Greene hallmark. While many breadboards are purely functional, in the Greenes’ hands they became a happy syn-thesis of function and beauty. In this chest, the inboard edges of the breadboards align with the stiles for a clean, cohesive look.
The top is the most visible part of this chest so I chose stock carefully. I had two wide planks so I was able to make the panel with only one glue joint. Of course, 11" boards are way beyond the capability of my jointer. To flatten these I used a sled that fully supports one side of the board (even if twisted) allowing the planer to flatten the other face.
The breadboard ends are 1⁄8" thicker than the panel and the length is 1⁄4" greater than the width of the panel. The breadboards attach with 1⁄4"-thick by 3⁄4"-wide tongues on the panels and corresponding grooves, stopped 3⁄4" from the ends, in the breadboards. I made the tongues with a straight bit in my plunge router and set the maximum depth to 3⁄8".
I measured the distance from the bit to the edge of the router baseplate and added 3⁄4". A straightedge was clamped to the top at the calculated distance from the end, making sure that it was square. I made the cut in sev-eral progressively deeper passes, then used a fine-toothed handsaw and chisels to remove
3⁄4" of the tongue at each corner.For the stopped grooves in the breadboard
ends, I used an upcut-spiral bit at the router table. I set the distance between the fence and bit equal to the size of the shoulder below the tongue. It is better to err with a larger distance rather than smaller since it is easier to plane the breadboard level with the panel than vice versa. I marked the fence to indicate where to start and stop cuts and again, made progres-sively deeper passes. I then test-fit the bread-boards, making adjustments to the tongues with a shoulder plane.
Each breadboard has four ebony pegs and one rectangle. The smaller pegs are not centered on the thickness of the breadboard; rather their bottom edges are flush with the larger pegs. I drilled pilot holes through the middle of the bar mortise and through the 3⁄8" mortises for screws to secure the breadboards. The outboard holes are elongated to allow for expansion/contraction of the top. The bread-boards are glued only along the center 6".
For maximum authenticity, “stacking” small butt hinges to create a continuous hinge, is called for. However, I thought this piece required something more decorative. I con-sidered strap hinges but they are more rustic than I wanted. I decided to make wooden hinges, which opened up an infinite range of design possibilities. My design evokes the finger joints in the base. For details on mak-ing the hinges and leather strap lid stop, visit popularwoodworking.com/apr08.
Finishing UpI like the look of mahogany as it darkens natu-rally, with no stains or dyes, so I chose to finish with Waterlox Original Satin, a wiping varnish that is foolproof. It looks great and is easy to maintain and repair. For this project, I finished the four subassemblies separately.
I wiped on the first coat and wiped off any excess after a few minutes. Don’t let it sit too long or it will get sticky. I allowed the first coat to cure and scuff sanded with #400 grit. I then wiped on several more coats, one per day, with no sanding in between. After the last coat cured for a few days, I very lightly sanded with #1,000 grit. This reduces the sheen and gives the surfaces a terrific feel.
After waiting several additional days, I assembled the components. First was the bot-tom panel. I put it in place and drilled pilot holes through countersunk holes in the ledge. I used #6-11⁄4" screws. With the bottom in place, I attached the base with buttons made
from mahogany scrap. I drilled pilot holes through the holes in the buttons, and used the same size screws for this step.
Finally, I attached the top. For the hinge pins, I cut brass rod to length, then filed and polished the ends. After positioning the top, I tapped the pins into place; no need to secure them, friction is my friend.
Most Greene & Greene pieces I’ve made are similar to items designed by the brothers. This piece is unlike anything that I’m aware of in their canon. It was enjoyable to work in the style but outside the box, to solve the design and construction problems without benefit of historical solutions. It’s too soon for me to have any perspective about the piece, but my wife says it’s her new favorite. And that’s about as good as it gets. pW
David ‘s woodworking is interrupted by his day job teaching computer science at Ohio State University. His article on constructing Greene & Greene-style drawers appeared in the February 2007 issue (#160).
Tip of the tongue. The wide tongue is created with a 3⁄4" router bit. The straightedge clamped across the top serves as a guide.
Handsome hinges. Shop-made wooden hinges, mortised to the top and screwed to the back, reflect the finger joints in the base.
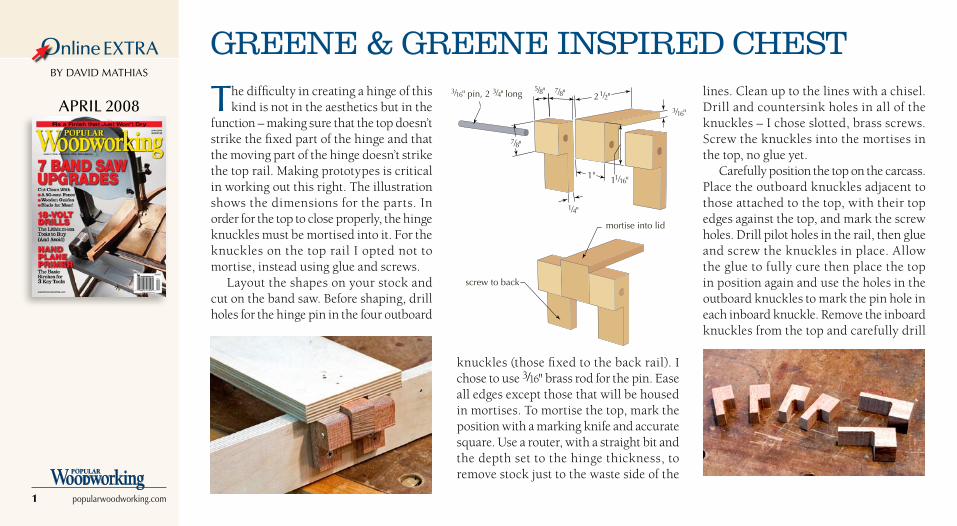
Online EXTRA
5/8"
1/4"
7/8"
7/8" 2 1/2"3/16"
11/16"1"
3/16" pin, 2 3/4" long
mortise into lid
screw to back
The difficulty in creating a hinge of this kind is not in the aesthetics but in the
function – making sure that the top doesn’t strike the fixed part of the hinge and that the moving part of the hinge doesn’t strike the top rail. Making prototypes is critical in working out this right. The illustration shows the dimensions for the parts. In order for the top to close properly, the hinge knuckles must be mortised into it. For the knuckles on the top rail I opted not to mortise, instead using glue and screws.
Layout the shapes on your stock and cut on the band saw. Before shaping, drill holes for the hinge pin in the four outboard
knuckles (those fixed to the back rail). I chose to use 3/16" brass rod for the pin. Ease all edges except those that will be housed in mortises. To mortise the top, mark the position with a marking knife and accurate square. Use a router, with a straight bit and the depth set to the hinge thickness, to remove stock just to the waste side of the
lines. Clean up to the lines with a chisel. Drill and countersink holes in all of the knuckles – I chose slotted, brass screws. Screw the knuckles into the mortises in the top, no glue yet.
Carefully position the top on the carcass. Place the outboard knuckles adjacent to those attached to the top, with their top edges against the top, and mark the screw holes. Drill pilot holes in the rail, then glue and screw the knuckles in place. Allow the glue to fully cure then place the top in position again and use the holes in the outboard knuckles to mark the pin hole in each inboard knuckle. Remove the inboard knuckles from the top and carefully drill
BY DAVID MATHIAS
APRIL 2008
GREENE & GREENE INSPIRED CHEST
1 popularwoodworking.com

Online EXTRA
the pin holes. Replace the knuckles into the top this time using glue and screws.
Obviously these hinges have no way to prevent the top from swinging too far. Some form of stop is required. In the spirit of, “In for a penny, in for a pound,” I decided to
make that as well. Greene & Greene often used leather straps to suspend lighting fixtures. A strap would also do a very good job of restraining the top, simply attached to top and frame.
For attachment points I made two very small brackets with an almost organic shape. First I made a paper template in the desired shape. I traced this onto card stock which I cut out and used to trace the shape onto thin stock. Before cutting the pieces from the stock, cut the slot for the leather strap by drilling a series of holes with a 3/32" bit. Use a chisel and utility knife to clean up. Cut out the brackets at the band saw and shape with rasps and sandpaper. When locating the brackets, be sure that they will
not meet when the top is closed, and glue them in place.
There are numerous possibilities for the leather strap and I’m not convinced that I’ll stick with version 1.0. I may take the chest to an upholsterer to have the leather stitched in place. For now, I’ve used brass rivets to attach loops through the brackets. The easy-to-use rivets are available at craft stores (I found them in the leather section).
2 popularwoodworking.com
BY DAVID MATHIAS
APRIL 2008
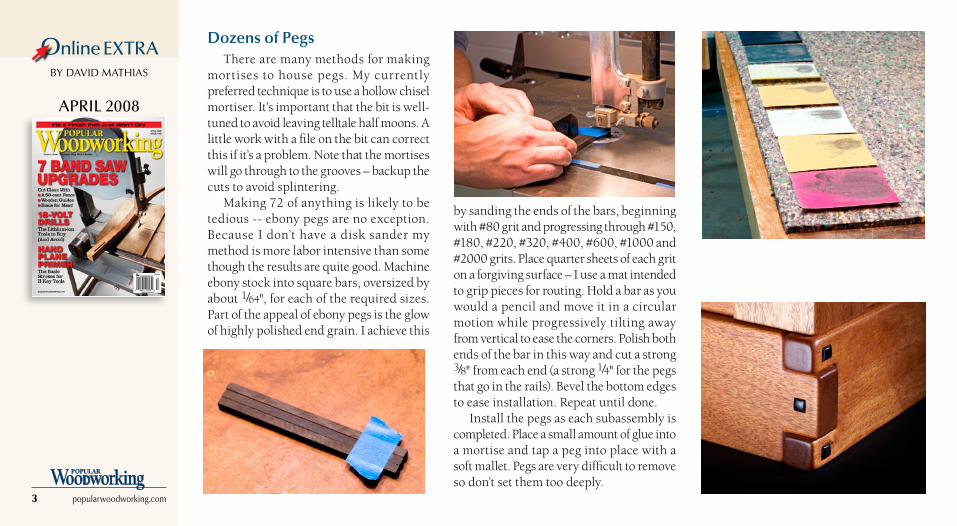
Online EXTRADozens of Pegs
There are many methods for making mortises to house pegs. My currently preferred technique is to use a hollow chisel mortiser. It’s important that the bit is well-tuned to avoid leaving telltale half moons. A little work with a file on the bit can correct this if it’s a problem. Note that the mortises will go through to the grooves – backup the cuts to avoid splintering.
Making 72 of anything is likely to be tedious -- ebony pegs are no exception. Because I don’t have a disk sander my method is more labor intensive than some though the results are quite good. Machine ebony stock into square bars, oversized by about 1/64", for each of the required sizes. Part of the appeal of ebony pegs is the glow of highly polished end grain. I achieve this
by sanding the ends of the bars, beginning with #80 grit and progressing through #150, #180, #220, #320, #400, #600, #1000 and #2000 grits. Place quarter sheets of each grit on a forgiving surface – I use a mat intended to grip pieces for routing. Hold a bar as you would a pencil and move it in a circular motion while progressively tilting away from vertical to ease the corners. Polish both ends of the bar in this way and cut a strong 3/8" from each end (a strong 1/4" for the pegs that go in the rails). Bevel the bottom edges to ease installation. Repeat until done.
Install the pegs as each subassembly is completed. Place a small amount of glue into a mortise and tap a peg into place with a soft mallet. Pegs are very difficult to remove so don’t set them too deeply.
3 popularwoodworking.com
BY DAVID MATHIAS
APRIL 2008
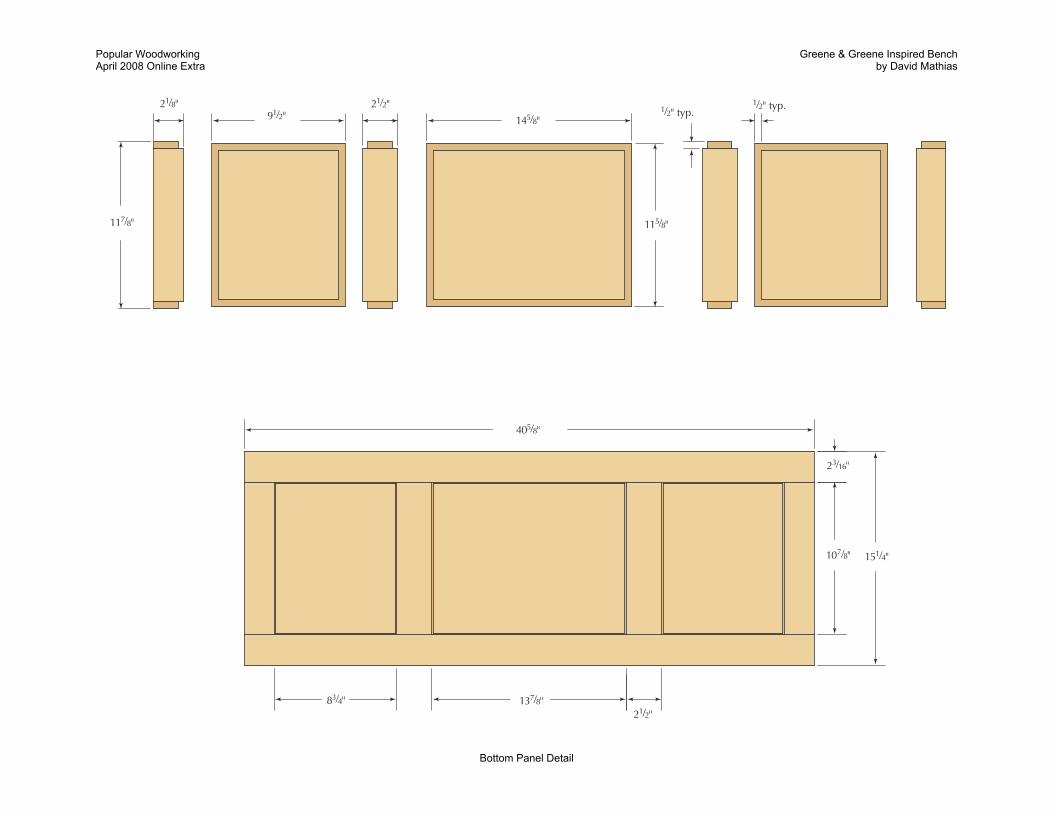
145/8"
21/8"91/2"
21/2" 1/2" typ.1/2" typ.
115/8"
405/8"
151/4"107/8"
23/16"
21/2"137/8"83/4"
117/8"
Popular WoodworkingApril 2008 Online Extra
Greene & Greene Inspired Benchby David Mathias
Bottom Panel Detail

5/8"
1/4"
7/8"
7/8" 2 1/2"3/16"
11/16"1"
3/16" pin, 2 3/4" long
mortise into lid
screw to back
Popular WoodworkingApril 2008 Online Extra
Greene & Greene Inspired Benchby David Mathias
Popular WoodworkingApril 2008 Online Extra
Greene & Greene Inspired Benchby David Mathias
Hinge Detail
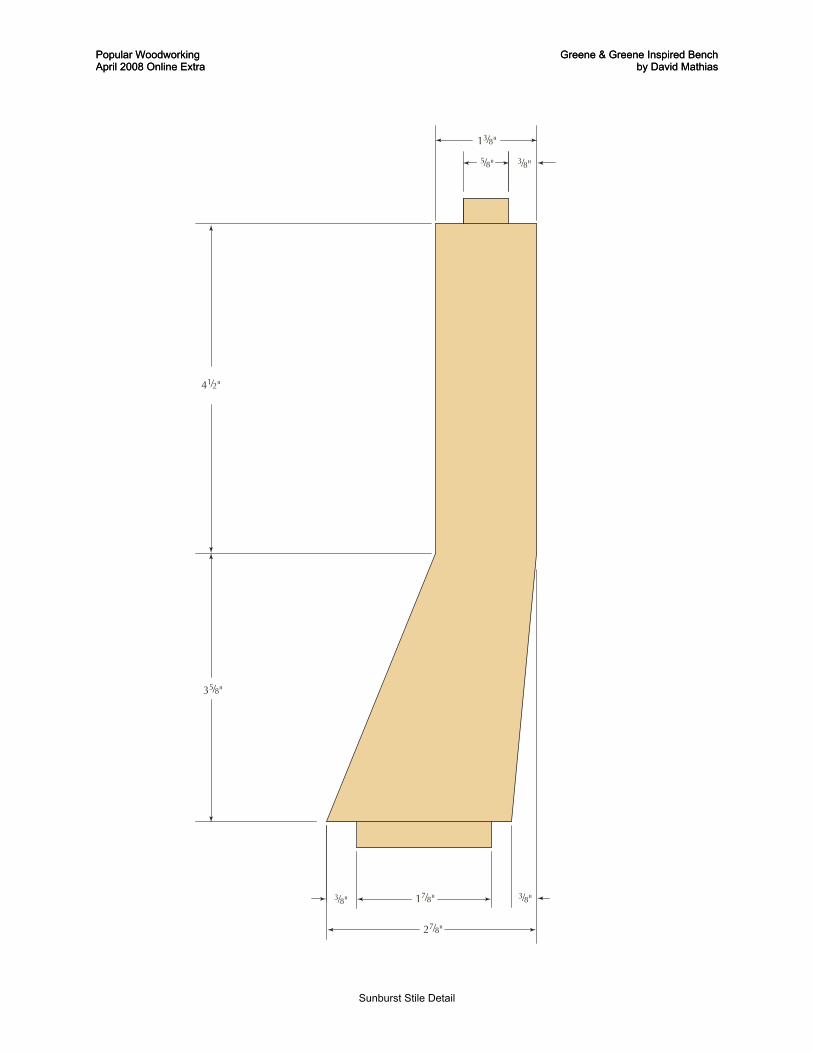
13/8"
41/2"
35/8"
17/8" 3/8"3/8"
27/8"
5/8" 3/8"
Popular WoodworkingApril 2008 Online Extra
Greene & Greene Inspired Benchby David Mathias
Popular WoodworkingApril 2008 Online Extra
Greene & Greene Inspired Benchby David Mathias
Sunburst Stile Detail
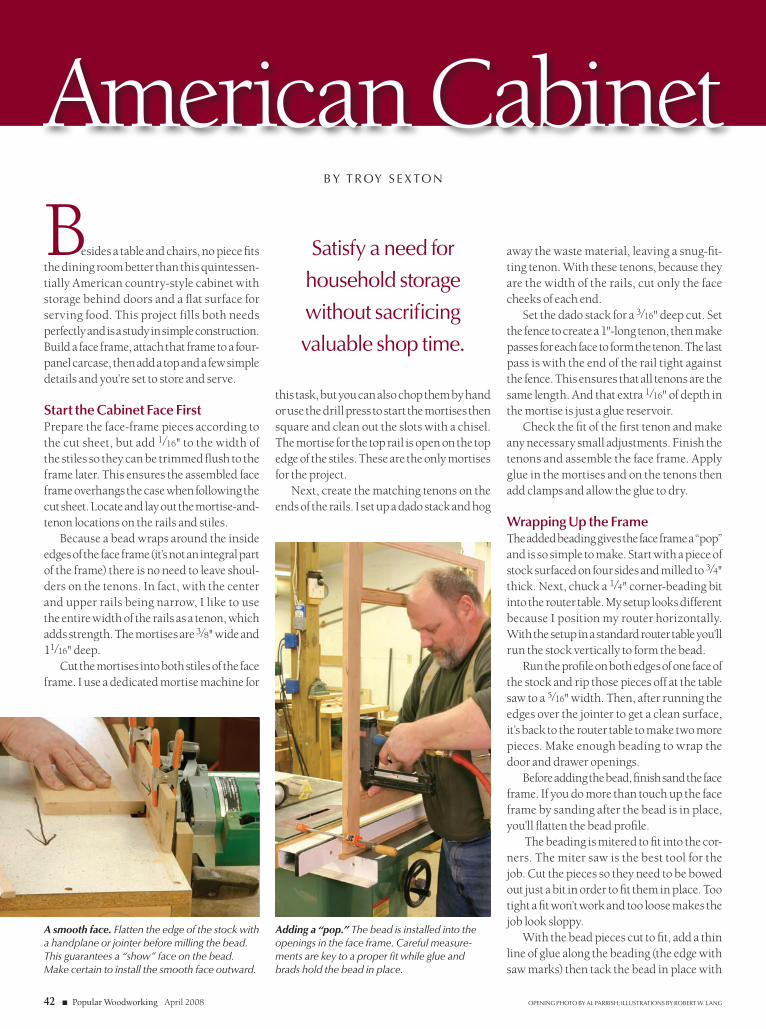
42 ■ Popular Woodworking April 2008 opening photo by al parrish; illustrations by robert w. lang
b y t r oy s e x to n
American Cabinetsatisfy a need for
household storage
without sacrificing
valuable shop time.
Besides a table and chairs, no piece fits the dining room better than this quintessen-tially American country-style cabinet with storage behind doors and a flat surface for serving food. This project fills both needs perfectly and is a study in simple construction. Build a face frame, attach that frame to a four-panel carcase, then add a top and a few simple details and you’re set to store and serve.
Start the Cabinet Face FirstPrepare the face-frame pieces according to the cut sheet, but add 1⁄16" to the width of the stiles so they can be trimmed flush to the frame later. This ensures the assembled face frame overhangs the case when following the cut sheet. Locate and lay out the mortise-and-tenon locations on the rails and stiles.
Because a bead wraps around the inside edges of the face frame (it’s not an integral part of the frame) there is no need to leave shoul-ders on the tenons. In fact, with the center and upper rails being narrow, I like to use the entire width of the rails as a tenon, which adds strength. The mortises are 3⁄8" wide and 11⁄16" deep.
Cut the mortises into both stiles of the face frame. I use a dedicated mortise machine for
this task, but you can also chop them by hand or use the drill press to start the mortises then square and clean out the slots with a chisel. The mortise for the top rail is open on the top edge of the stiles. These are the only mortises for the project.
Next, create the matching tenons on the ends of the rails. I set up a dado stack and hog
away the waste material, leaving a snug-fit-ting tenon. With these tenons, because they are the width of the rails, cut only the face cheeks of each end.
Set the dado stack for a 3⁄16" deep cut. Set the fence to create a 1"-long tenon, then make passes for each face to form the tenon. The last pass is with the end of the rail tight against the fence. This ensures that all tenons are the same length. And that extra 1⁄16" of depth in the mortise is just a glue reservoir.
Check the fit of the first tenon and make any necessary small adjustments. Finish the tenons and assemble the face frame. Apply glue in the mortises and on the tenons then add clamps and allow the glue to dry.
Wrapping Up the FrameThe added beading gives the face frame a “pop” and is so simple to make. Start with a piece of stock surfaced on four sides and milled to 3⁄4" thick. Next, chuck a 1⁄4" corner-beading bit into the router table. My setup looks different because I position my router horizontally. With the setup in a standard router table you’ll run the stock vertically to form the bead.
Run the profile on both edges of one face of the stock and rip those pieces off at the table saw to a 5⁄16" width. Then, after running the edges over the jointer to get a clean surface, it’s back to the router table to make two more pieces. Make enough beading to wrap the door and drawer openings.
Before adding the bead, finish sand the face frame. If you do more than touch up the face frame by sanding after the bead is in place, you’ll flatten the bead profile.
The beading is mitered to fit into the cor-ners. The miter saw is the best tool for the job. Cut the pieces so they need to be bowed out just a bit in order to fit them in place. Too tight a fit won’t work and too loose makes the job look sloppy.
With the bead pieces cut to fit, add a thin line of glue along the beading (the edge with saw marks) then tack the bead in place with
A smooth face. Flatten the edge of the stock with a handplane or jointer before milling the bead. This guarantees a “show” face on the bead. Make certain to install the smooth face outward.
Adding a “pop.” The bead is installed into the openings in the face frame. Careful measure-ments are key to a proper fit while glue and brads hold the bead in place.
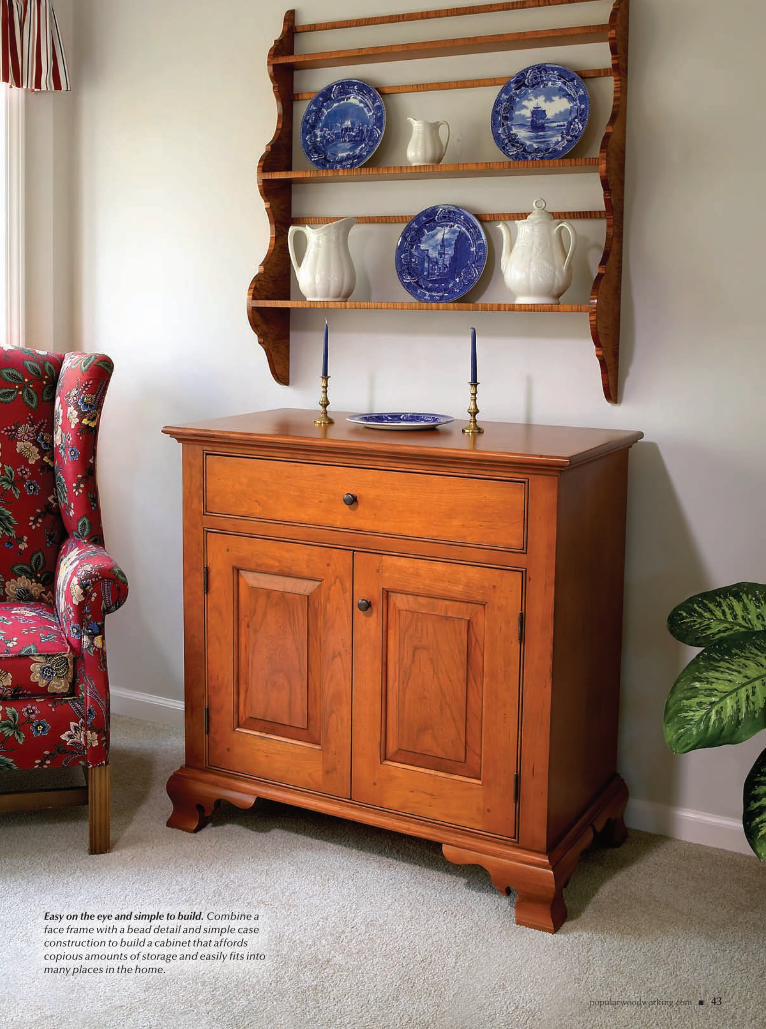
popularwoodworking.com ■ 43
American Cabinet
Easy on the eye and simple to build. Combine a face frame with a bead detail and simple case construction to build a cabinet that affords copious amounts of storage and easily fits into many places in the home.
44 ■ Popular Woodworking April 2008
29"331⁄2"
21⁄4"
4"
36"
36"
3"
5"
203⁄4"
283⁄8"
55⁄8"
213⁄8"
21⁄4"
1"
11⁄4"
351⁄4"
33⁄4"61⁄4"
63⁄8"
171⁄4"
19"
1 grid square = 1⁄2"
small brads. The brads act as clamps until the glue sets.
The Case is NailedBegin the carcase by milling to size the panels for the sides, fixed shelves, adjustable shelf and the top. That’s a good amount of work, but they are the only panels needed for the cabinet. You could forego the milling for the top and adjustable-shelf panels at this time if you want to divide the job. These two panels are needed later.
At the table saw, set a dado stack for a 3⁄4"-wide x 1⁄4"-high cut. Position the fence to cut dados in the side panels for the fixed shelves. Locate the fence so the top face of the bottom panel ends up a 1⁄4" above the top edge of the bead on the lower face-frame rail (the 1⁄4" step acts as a door stop). Then set the fence so the top face of the top shelf is flush with the top edge of the bead on the face frame’s middle rail. Gather these measurements from your assembled face frame.
Once the dados are cut, add an auxiliary fence to the table saw and bury the dado stack 1⁄4" into the extra fence. The 1⁄2" that’s exposed is the amount needed for the rabbet that will house the cabinet’s backboards. Rabbet the back edges of both case sides.
Before starting any assembly, drill 1⁄4" holes for the adjustable shelf. I have a jig for this task,
but I’ve seen woodworkers use pegboard and a 1⁄4" drill bit, too. Clamp your hole-drilling jig against either fixed shelf, but make sure to use the same shelf throughout the process; that keeps the holes aligned. I place the holes 2" in from the front edge and the same distance in from the rabbet at the back edge.
With the adjustable-shelf holes drilled,
Spring tension. If the fit is correct, you should need to bow the bead in order to slide the piece into the face frame.
elevation profile
foot profile
No time to spare. To keep the glue from running out of the dado joint you’ll have to move quickly. Any hesitation with the case side inverted results in a lengthy glue clean-up.
popularwoodworking.com ■ 45
american Cabinet
No. item dimeNsioNs(iNches) material commeNts t W l
❏ 2 face frame stiles 3⁄4 21⁄4 351⁄4 Cherry
❏ 1 ff top rail 3⁄4 11⁄4 311⁄8 Cherry 1" tenon both ends
❏ 1 ff middle rail 3⁄4 1 311⁄8 Cherry 1" tenon both ends
❏ 1 ff bottom rail 3⁄4 21⁄4 311⁄8 Cherry 1" tenon both ends
❏ 6 ff bead stock 5⁄16 3⁄4 30 Cherry
❏ 2 sides 3⁄4 171⁄4 351⁄4 Cherry
❏ 1 top 3⁄4 191⁄4 36 Cherry
❏ 2 fixed shelves 3⁄4 163⁄4 321⁄2 poplar
❏ 1 adjustable shelf 3⁄4 161⁄2 313⁄4 poplar
❏ 3 Door stiles 3⁄4 3 203⁄4 Cherry
❏ 1 Door stile (wide) 3⁄4 31⁄2 203⁄4 Cherry
❏ 2 Door top rails 3⁄4 3 9 Cherry Cope/stick joint
❏ 2 Door bottom rail 3⁄4 4 9 Cherry Cope/stick joint
❏ 2 raised panels 5⁄8 87⁄8 141⁄2 Cherry
❏ 1 Drawer front 3⁄4 5 283⁄8 Cherry
❏ 2 foot stock 11⁄4 5 30 Cherry 3 feet per piece
❏ 1 Moulding stock 3⁄4 5 30 Cherry all cove mouldings
❏ 1 Cleat 3⁄4 11⁄2 32 poplar attach to underside of top
❏ 2 Drawer guides 1⁄2 3⁄4 17 poplar
❏ 1 back 1⁄2 33 293⁄4 poplar shiplapped boards
❏ 1 thumb-turn 1⁄2 3⁄4 13⁄4 Cherry
it’s time to assemble the case. Place a bead of glue into the dados of one case side before slipping the fixed shelves into position. Now comes the tricky part of the case construc-tion. Add glue into the dados of the second case side and position the shelves so they slip into those dados. This is tricky because you
need to get the joint assembled before the glue drips from the dados.
Align the shelves flush with the front edge of the case sides. Use a framing square to mark the location of the center of the shelves on the exterior of the sides, then with a brad nailer add five 11⁄2" brads through the case sides
A simple connection. What could be easier than connecting the sides to the shelves with brads? Drawing a line at the center of the joint provides a nailing location and translates into efficient work.
Get your face on. Check the fit of the face frame. If everything is correct, add a bead of glue to the case’s front edge and position the frame on the case. You can add clamps if you like, but brads should hold the frame tight.
and into the fixed shelves. Flip the case then install brads in the opposite side.
Putting a Face to the CabinetDry-fit the face frame to the case checking both for overhang at the sides and that the fixed shelves line up with the beaded rails. If everything’s a go, add a bead of glue to the front edge of the case then carefully position the frame. Tack it to the case with brads, again making sure to align the shelves to the rails. Allow the assembly to dry.
The next step is to trim the face frame to the case. This is where having the extra 1⁄16" on the frame makes life simple. Use a router with a flush-trim bit to flush the frame to the sides. I always climb-cut (work against the rotation of the router bit) as I trim. The last thing you want to have happen is to catch the grain and rip the face frame causing irrepa-rable damage.
If you haven’t milled the top to size, now’s the time. With the top prepared, use a 3⁄8" roundover bit to profile the front and ends of the panel; shape both top and bottom. Take time to sand the edges before affixing the top to the case. Then, position the top on the case so that there is equal overhang on either end and the top piece is flush at the back. This time use a 2" brad through the top and into the sides and front top rail. A small bead of glue along the front rail reinforces the joint.
Flip the case onto the top to install the 3⁄4" x 3⁄4" cove moulding. Make enough for the
Trimming the fat. The extra 1⁄16" added to the face frame stiles ensures the frame overhangs the sides of the case. Any remaining material must be removed. A flush-trim router bit with a bot-tom-mount bearing is the perfect solution.
supplies
Woodworker’s Supply800-645-9292 or woodworker.com
2 ■ amerock non-mortising hinges #891-749, $3.69
1 bag ■ plated steel shelf pins #857-330, $4.09
Horton Brass800-754-9127 or horton-brasses.com
1 ■ cupboard turn #h-97, call for pricing
1 ■ solid brass knob #p-97, call for pricing
Prices correct at time of publication.
46 ■ Popular Woodworking April 2008
transition moulding for the base at the same time. Finish sand the intersection of the case to the top before adding the cove; you won’t be able to get to this area easily after the cove is in place. Fit the moulding to the case with miters at the corners, then attach it to the case with brads. A bit of glue along the front and the first 4" back on each side adds strength as well as keeps the miters tight. At this time, add a cleat for the backboards. It is attached to the underside of the top and flush with the rabbets in the sides.
Fascia FeetThe ogee bracket feet are a facade. They are fit to the cabinet and look great, but they do not carry the cabinet’s weight. Instead hold them slightly off the end of the face-frame stiles and the ends of the case sides as they’re installed. If you want to simplify the building process even more, use a bracket-style foot in place of the ogee. Both designs work identically.
If you plan to forge ahead and create the ogee feet, begin by laying out the profile on the ends of the stock. Next cut a cove at the table saw just as you would to make a piece of cove moulding. Match the size of the cove to the foot profile. (For more information on making ogee bracket feet, see Lonnie Bird’s article in the August 2005 issue, #156.)
With the cove profile complete, place the stock at the table saw fence with the top edge on the table. Adjust both the fence and the angle of the blade to remove as much of the profile of the curved top edge as possible without touching the lines. Make a couple passes adjusting the fence to remove more waste material with each pass. From here you should be able to finalize the shape of the feet with a rasp or power sander.
Next, cut the foot stock to length and create a 45º bevel on four of the pieces; you’ll need two matching sets. The rear feet are simply cut square. Lay out the scrollwork on each foot, then at the band saw or scrollsaw cut to the lines and clean up any rough edges with a spindle sander or hand tools.
Adding the FeetPosition the feet on the case and remember to hold them about 1⁄16" off the bottom edge. You’ll notice there is material showing behind the feet. Trace the profile of each foot, then remove that waste with a jigsaw. Don’t worry about the look; just get the waste out of the way. All the edges are covered with the feet and the cove moulding that wraps the case.
Nail from the back of the case to attach the feet. Add glue to the miters to help hold them tight. Next, install the remaining cove moulding at the top edge of the feet. The cove is attached to the case with brads. These miters should be reinforced with glue as well.
Drawer, Doors and BackThe drawer for this cabinet is made in a tradi-tional method. The sides join the back with through dovetails and the front is attached to the sides with half-blind dovetails. The drawer bottom is slid into grooves in the sides and in the drawer front. It is secured in the drawer with nails that extend through the bottom into the drawer back. The drawer rides on the fixed upper shelf. Drawer guides, butted to the face frame and held with brads, keep the drawer running straight.
The door joints are cut with a cope-and-stick set at my router table. The right-hand door in the photo has a rabbet cut into the rear of the left stile. That rabbet fits over a matching rabbet cut in the right stile of the left door. That stile is the 31⁄2"-wide stock.
With the door frames dry fit, measure the raised-panel openings then make two raised panels using either a table saw or router bit.
Check the fit of the panels then assemble the doors using glue in the rail-and-stile joint only. No glue is used in the raised-panel area. Install pegs to give the cabinet an antique look.
Once dry, carefully hang the doors to the opening with simple butt hinges. The left door is held to the case with a wooden thumb-turn located behind the right-hand stile. It catches the middle rail.
The backboards continue the bead detail from the case front. Create the shiplap joint then add the bead detail to the individual pieces. As always, I spaced the boards using Popsicle sticks and nailed them to the case – all after finishing the cabinet. The finish is a mixture of aniline dye with three coats of spray lacquer.
While this piece usually sits mainly in din-ing rooms, it is a great project for anywhere you need storage. If you build it, I’m certain you’ll find a place to show it off and use it. pW
Troy runs Sexton Classic American Furniture, a custom furniture-making business in Sunbury, Ohio, and is a long-time contributing editor to popular woodworking magazine.
One foot at a time. Place the feet on the case and mark the profile. Cut away the waste mate-rial after connecting the top edge of the feet across the case, both front and sides. Don’t be too concerned with the task; the feet and transi-tion moulding cover any raw edges.
Make cove mould-ing safely. The small cove mould-ing is made using a wide board at a router table. Next, rip the moulding to its final width at the table saw. Fit the cove to the case then attach with brads.
for information on sizing drawer parts, see the video at:
popularwoodworking.com/video
Online EXTRAS
WoodWorking
Essentials
Power miter saws, for the most part, are saws of our generation. They were first introduced to the hobbyist market in the mid-1970s but really took off in the 1980s. They have become so popu-lar that they have all but replaced the radial-arm saw.
Power miter saws are about the hand-iest of all power saws because they are:
• portable• easy to set up• relatively inexpensive• very accurate• available in a variety of sizes (both
in blade size and horsepower).Above all, miter saws have a high
degree of precision, consistency and repeatability; you can shave off just a lit-tle bit until you get the perfect cut. And when used properly can be very safe.
One of the greatest attributes of power miter saws is that not only do they do a great job making perfect 90°
A Better Way to Work • Part 4
by Marc Adams
Slice, don’t chop. When properly set up and used, the power miter saw is an accurate and safe machine.
Miter Saws
photos by al parrish
cuts, they also can make angle and compound cuts up to 45° to either side of the blade. Most saws have built-in brakes that help stop the blade after the trigger is released. And there are specific miter saws with specific blades (and techniques) that can cut through most anything, including plastic, metal, paper products, composites, stone, solid-surface materials and of course flesh and bone.
The Limitations of Miter SawsThere are some things that miter saws can’t do. They can’t rip wood or cross-cut wide boards. Besides these obvious limitations, they are not made for dado blades or moulding heads and cannot (or should not) make special surface cuts, such as flutes, reeds, tapers, rab-bets or tenons. Power miter saws also cannot make horizontal cuts such as rotary planing, shaping or sanding.
So the million-dollar question is: Why have these simple machines all but eliminated the definitely more ver-satile radial-arm saw? The easy answer is accuracy. The practical answer is safety. I started on a radial-arm saw and have routed, shaped, ripped, turned and drilled on that machine, and fortunately I never got hurt – but not a one of those operations was safe or very effective.
There are other machines in today’s workshop that simply do a better job for each of those specific tasks. And when you get right down to it, most people simply use radial-arm saws for crosscutting only. The motion of the blade lurching forward when cutting, the lack of accuracy in the finished cut and the cumbersome size of the machine, along with alignment and control issues, have made the radial-arm saw a dinosaur in today’s wood-working shop. Today, clearly the saw of choice for crosscuts and mitering is the power miter saw.
Because power miter saws weren’t around when most of us took high-school shop class, the majority of woodworkers were never taught the correct and safe way to use this unimposing machine. It’s a saw that should demand as much respect as any other stationary power tool in the shop. Through a better understanding of the
actions that take place when using this machine, along with safe and sound rules, this saw should perform perfectly every time.
Factors to ConsiderThis saw often goes by the nickname “chop saw.” The word “chop” reminds me of words like “hack” and “split” and “slash.” It also makes me think of a “fast” action to cut one board into two boards, which unfortunately can add to haste. I agree that there are jobs when simply cutting one board into two boards, without regard to accu-racy, is necessary. But swiftness should never take precedence over technique. Whenever I make a cut on a power miter saw, whether it’s of the highest degree of accuracy or simply cutting a board to a more manageable size, I use the same cutting technique with total and absolute regard to safety.
Most power miter saws have a small degree of runout, which is a bit of wobble in the arbor. If you are one of those people who keeps changing blades in hopes of finding that perfect cut, be aware it’s more than likely not in the performance of the blade – it’s runout from the saw.
Here’s a test. Unplug your saw, firmly grab the blade and try to move it side to side. More than likely you will feel a little “play” or “slop.” Most saws have runout, which is why I prefer to use a 10" power miter saw for all my fine, highly accurate cuts and my 12" saw for general cutting. (This of course assumes that the width of wood is within the limits of the cutting depth of the saw.)
An 8" or 10" blade will distribute this wobble over a lesser diameter than a 12" blade, which in turn creates a finer and cleaner cut. Unfortunately, I have no solutions on how to eliminate a mechanical problem with your saw. Just be aware that most power miter saws do have this characteristic.
Also remember that a fast action when cutting will always create a sloppy cut, and cuts that are too slow will burnish or burn the wood. Take your time during the cutting process and let the blade cut at its pace – not yours. The same blade will cut differ-ently through wet wood versus dry wood and dense wood versus softwood and so on. You must compensate by learning to listen and feel how a blade reacts to the material it is cutting.
Lots of exposure. Since power miter saw manufacturers added the compound-cutting feature, the guards have had to expose the user to the blade more. Note how much blade is evident as the motor carriage is pulled down. It goes from fully covered (left) to fairly exposed (right).
48 ■ Popular Woodworking April 2008
Compound Cuts Compound The Safety IssueToday almost all power miter saws offer the “compound” feature. With compound miter saws, the motor not only pivots left and right but it also can be tilted to either side to make beveled cuts. This feature is great for projects that require cuts to take place in two planes, such as a box with corners that are mitered and tapered or cutting crown moulding, which adds to the versatility of the machine.
This pivoting of the motor, how-ever, has caused the engineers to recon-figure the tool’s guarding system. The old guard on a power miter saw was a simple yet effective shield that enclosed the blade at all times. The user always had the plastic shield between his or her hands and the blade. But when manufacturers added the pivot feature, which allows for compound cuts, the guard system had to be completely re-engineered. This new guard is much less effective than its predecessor, but it is the only solution to offering some type of protection on a saw that moves in multiple planes.
Today, it makes no difference if you are making square, angled or com-pound cuts. The guard on all power compound miter saws exhibits a lot of blade exposure during any cutting pro-cedure. As a user of these types of saws, you must be aware of this potentially dangerous exposure and how it affects the process of using this machine.
My best guess is that most hobbyist woodworkers, cabinetmakers and fur-niture makers make square or angled cuts more than 98 percent of the time when using power miter saws. That means that less than 2 percent of the cuts will actually involve the “com-pound” feature. Now that we know that the guards on these machines are designed to accommodate the com-pound feature, and knowing that it cre-ates more blade exposure, that would mean that 98 percent of the time, (under normal cutting circumstances) you are at more risk from blade expo-sure due to a guard that is designed for less than 2 percent of the cuts you will make. That’s not a very fair trade for general safety usage.
The other issue that goes along with
compound saws is that you now have to keep a vigil on both the X and Y axes of a compound cut – unlike on a regular miter saw where the Y axis is permanently set.
The compound feature can also spoil your accuracy with straight cuts. You should always be careful when carrying or lifting these compound machines by the motor because it can change the stop settings for the com-pound feature.
At times it might be convenient to make multiple cuts at the same time by stacking lumber. This can safely be done by making sure that all the boards are tight against the fence and, if dif-ferent in size, stacked from the largest on the bottom to the smallest on the top. Be aware that there will always be some risk of inconsistencies in the size
of each piece as well as accuracy of the angle of the cut. If your saw is slightly out of perpendicular it will cause the board on top to be different than the board on the bottom. When accuracy matters I would never stack-cut.
How to Add Accuracy and SafetyLumber with bows, twists, cups or warps can be especially challenging to cut on a miter saw. Remember: There are rules for keeping your stock under control. If your wood has a bow or an edge that is not straight, it is very important that the board be situated so that the flattest or straightest part of the board is at the point of contact with the blade. This will prevent pinching. Never make any cut unless the material is secured on the table and against the fence (see the photo below).
Straight edges equal more control. When you place a piece of stock against the fence of the power miter saw, always put the straightest edge against the fence. If the stock is rough, make sure that the board contacts the fence for a distance that is equal to the length of the saw’s built-in fence on one side of the blade. Shown is a board that should be flipped over.
A gap here is unsafe
Flip board and check this edge
popularwoodworking.com ■ 49
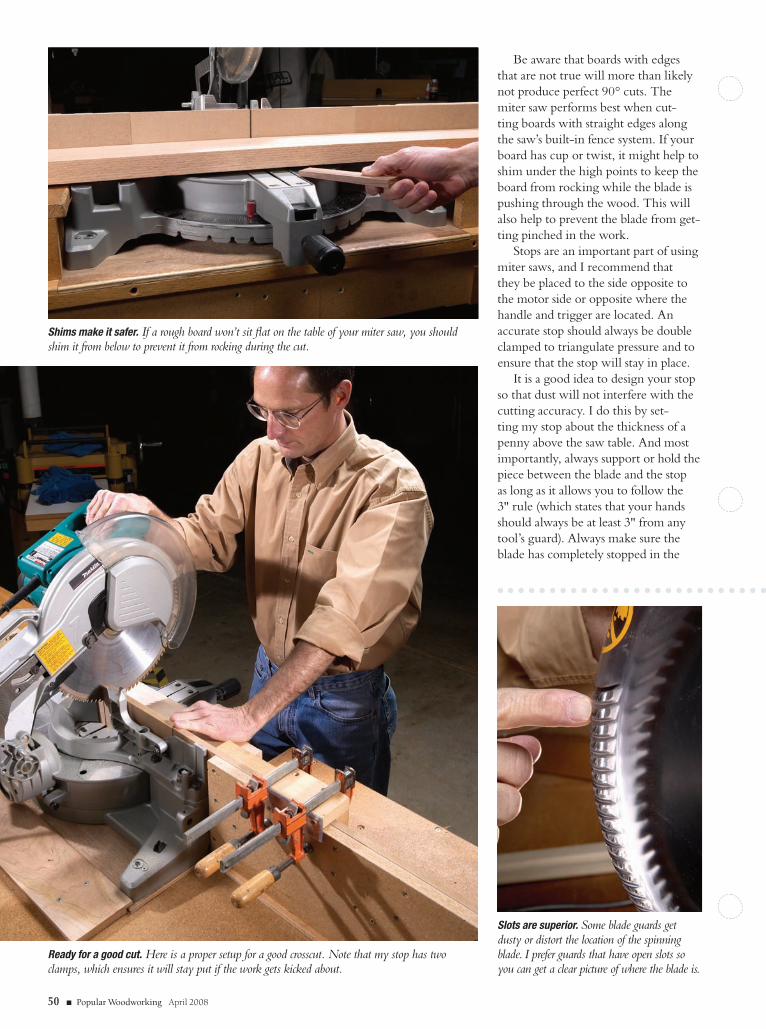
Be aware that boards with edges that are not true will more than likely not produce perfect 90° cuts. The miter saw performs best when cut-ting boards with straight edges along the saw’s built-in fence system. If your board has cup or twist, it might help to shim under the high points to keep the board from rocking while the blade is pushing through the wood. This will also help to prevent the blade from get-ting pinched in the work.
Stops are an important part of using miter saws, and I recommend that they be placed to the side opposite to the motor side or opposite where the handle and trigger are located. An accurate stop should always be double clamped to triangulate pressure and to ensure that the stop will stay in place.
It is a good idea to design your stop so that dust will not interfere with the cutting accuracy. I do this by set-ting my stop about the thickness of a penny above the saw table. And most importantly, always support or hold the piece between the blade and the stop as long as it allows you to follow the 3" rule (which states that your hands should always be at least 3" from any tool’s guard). Always make sure the blade has completely stopped in the
Shims make it safer. If a rough board won’t sit flat on the table of your miter saw, you should shim it from below to prevent it from rocking during the cut.
Ready for a good cut. Here is a proper setup for a good crosscut. Note that my stop has two clamps, which ensures it will stay put if the work gets kicked about.
Slots are superior. Some blade guards get dusty or distort the location of the spinning blade. I prefer guards that have open slots so you can get a clear picture of where the blade is.
50 ■ Popular Woodworking April 2008
down position before it is raised back up – especially when stops are being used. If the blade is still rotating as it comes back up through the wood that’s trapped between the blade and the stop, it could lift the trapped wood, ruin the blade, possibly damage the wood and more than likely knock your stop out of place.
Power miter saws can be used with either hand running the trigger. These machines are ambidextrous. It is very important that you never cross your arms when making any cut. There is nothing wrong with positioning yourself to use your left hand on the trigger or positioning yourself to use your right hand on the trigger. As a matter of fact, several brands have a dual trigger switch that adapt for both right- and left-handed people.
Because all guards are made out of some type of plastic, it can be hard to get a clear and undistorted view of the blade when aligning the cut. Some manufacturers place slots in the front edge of the guard, which is designed to give a clear, straight-on view of the blade for easy alignment.
Make a Disposable FenceOne of the best ways to enhance the accuracy and quality of a cut on a miter saw is to add a disposable/sacrificial sub-fence. This sub-fence can do three things to help enhance the perfor-mance of the cut. First, it will help eliminate all potential kickbacks (with proper cutting techniques).
Second, it will help eliminate tear-out on the back edge of the board. And third, once the sub-fence is cut, it will identify exactly where the right- and left-hand sides of the blade are. This helps setup and locates board placement for very accurate cuts. It will eliminate guessing where the blade will cut; you now will know exactly where the blade will be.
Here is what I do to make my saws perform better. I use a scrap piece of 1⁄2"-thick MDF or particleboard that is at least as long as the two fences on the saw and as tall as possible while still allowing the motor/handle to be drawn completely down into the tool’s cutting pocket. I use exterior-grade carpet tape to hold the sub-fence
Stuck, secure and super-accurate. I install replaceable sub-fences on my miter saw to control tear-out and increase my accuracy. Here I’m installing one with exterior-grade carpet tape (top). Then I simply press it into place (bottom).
One slice to accuracy. With the sub-fence installed, I’ll make a straight cut into it (left). Now I know exactly where my saw will cut when crosscutting my stock. I simply line up the mark on my board with the kerf in the sub-fence (right).
popularwoodworking.com ■ 51
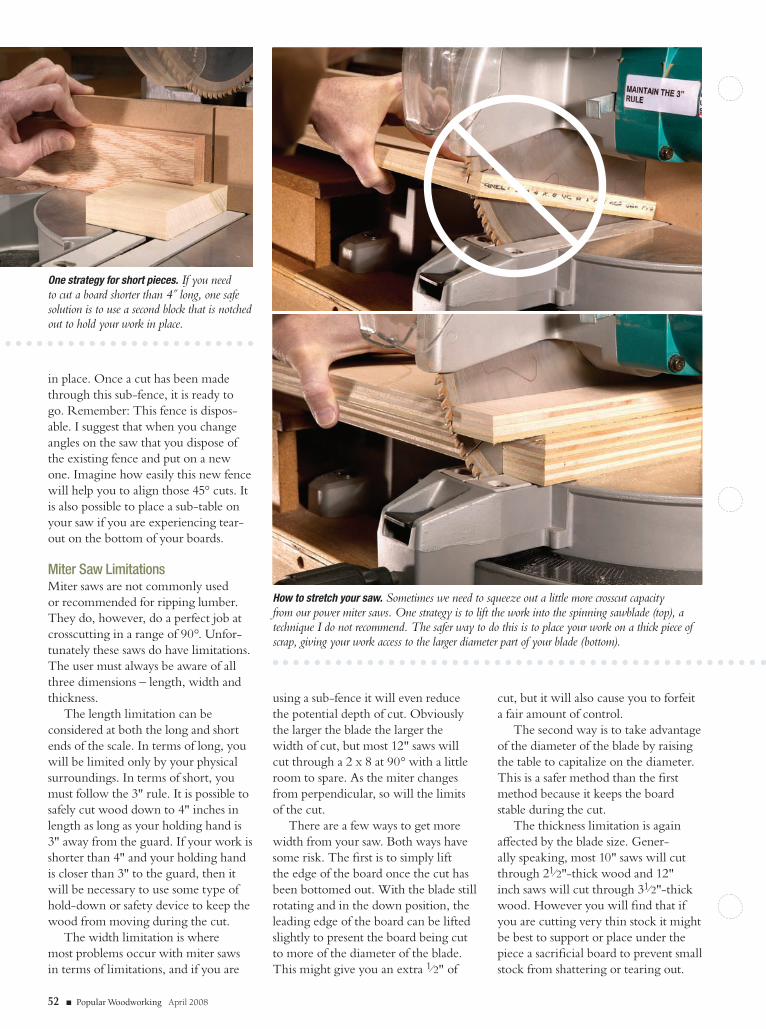
in place. Once a cut has been made through this sub-fence, it is ready to go. Remember: This fence is dispos-able. I suggest that when you change angles on the saw that you dispose of the existing fence and put on a new one. Imagine how easily this new fence will help you to align those 45° cuts. It is also possible to place a sub-table on your saw if you are experiencing tear-out on the bottom of your boards.
Miter Saw LimitationsMiter saws are not commonly used or recommended for ripping lumber. They do, however, do a perfect job at crosscutting in a range of 90°. Unfor-tunately these saws do have limitations. The user must always be aware of all three dimensions – length, width and thickness.
The length limitation can be considered at both the long and short ends of the scale. In terms of long, you will be limited only by your physical surroundings. In terms of short, you must follow the 3" rule. It is possible to safely cut wood down to 4" inches in length as long as your holding hand is 3" away from the guard. If your work is shorter than 4" and your holding hand is closer than 3" to the guard, then it will be necessary to use some type of hold-down or safety device to keep the wood from moving during the cut.
The width limitation is where most problems occur with miter saws in terms of limitations, and if you are
using a sub-fence it will even reduce the potential depth of cut. Obviously the larger the blade the larger the width of cut, but most 12" saws will cut through a 2 x 8 at 90° with a little room to spare. As the miter changes from perpendicular, so will the limits of the cut.
There are a few ways to get more width from your saw. Both ways have some risk. The first is to simply lift the edge of the board once the cut has been bottomed out. With the blade still rotating and in the down position, the leading edge of the board can be lifted slightly to present the board being cut to more of the diameter of the blade. This might give you an extra 1⁄2" of
cut, but it will also cause you to forfeit a fair amount of control.
The second way is to take advantage of the diameter of the blade by raising the table to capitalize on the diameter. This is a safer method than the first method because it keeps the board stable during the cut.
The thickness limitation is again affected by the blade size. Gener-ally speaking, most 10" saws will cut through 21⁄2"-thick wood and 12" inch saws will cut through 31⁄2"-thick wood. However you will find that if you are cutting very thin stock it might be best to support or place under the piece a sacrificial board to prevent small stock from shattering or tearing out.
One strategy for short pieces. If you need to cut a board shorter than 4˝ long, one safe solution is to use a second block that is notched out to hold your work in place.
How to stretch your saw. Sometimes we need to squeeze out a little more crosscut capacity from our power miter saws. One strategy is to lift the work into the spinning sawblade (top), a technique I do not recommend. The safer way to do this is to place your work on a thick piece of scrap, giving your work access to the larger diameter part of your blade (bottom).
52 ■ Popular Woodworking April 2008
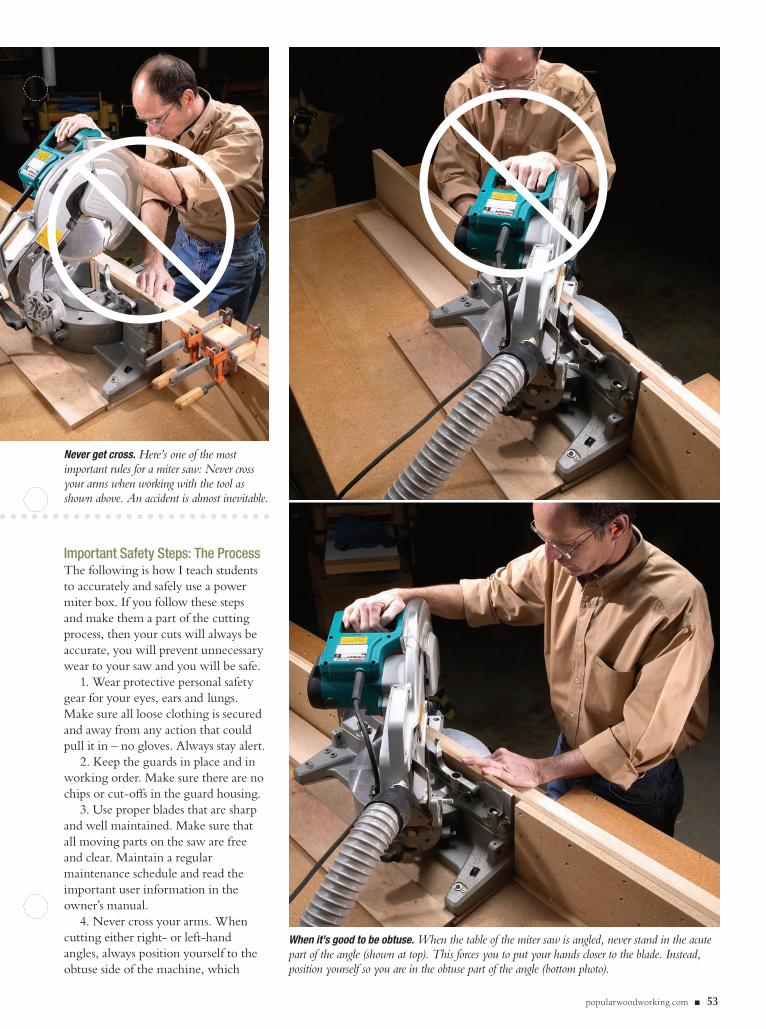
Important Safety Steps: The ProcessThe following is how I teach students to accurately and safely use a power miter box. If you follow these steps and make them a part of the cutting process, then your cuts will always be accurate, you will prevent unnecessary wear to your saw and you will be safe.
1. Wear protective personal safety gear for your eyes, ears and lungs. Make sure all loose clothing is secured and away from any action that could pull it in – no gloves. Always stay alert.
2. Keep the guards in place and in working order. Make sure there are no chips or cut-offs in the guard housing.
3. Use proper blades that are sharp and well maintained. Make sure that all moving parts on the saw are free and clear. Maintain a regular maintenance schedule and read the important user information in the owner’s manual.
4. Never cross your arms. When cutting either right- or left-hand angles, always position yourself to the obtuse side of the machine, which
Never get cross. Here’s one of the most important rules for a miter saw: Never cross your arms when working with the tool as shown above. An accident is almost inevitable.
When it’s good to be obtuse. When the table of the miter saw is angled, never stand in the acute part of the angle (shown at top). This forces you to put your hands closer to the blade. Instead, position yourself so you are in the obtuse part of the angle (bottom photo).
popularwoodworking.com ■ 53
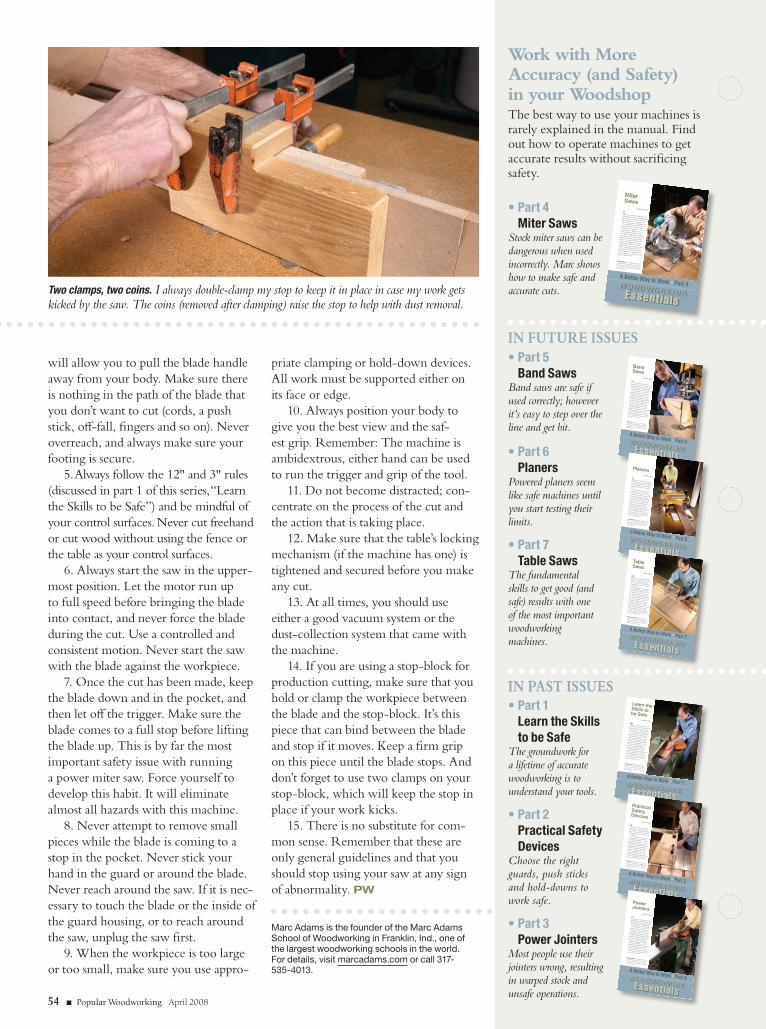
WoodWorkingEssentials
Since we all heard the joke about the woodworker in a bar who holds up two fingers to order four beers. Or the one about “What does a woodworker do with the third hole on a bowling ball?”I can’t tell you how many times I’ve
introduced myself as a woodworker and had the first response be, “Let me see your fingers.” Why has our craft become known for being so danger-ous? Why is woodworking considered
as hazardous by those who don’t do it? Why do certain professionals such as musicians, surgeons and NFL quar-terbacks stay completely away from woodworking? Why is it that tool manufacturers don’t help promote safety
better – especially because they bear the brunt of liability issues? Or better yet, why don’t they require some kind of user-competency test before you can purchase their products?
A Better Way to Work • Part 4
by Marc Adams
Fix the problem. Controlling your stock in a safe manner will also improve your confidence and the accuracy of your results. By learning a few simple rules to work by, you won’t be cut by your machinery.
photos by al parrish
WoodWorkingEssentials
We’ve all heard the joke about the woodworker in a bar who holds up two fingers to order four beers. Or the one about “What does a woodworker do with the third hole on a bowling ball?”I can’t tell you how many times I’ve
introduced myself as a woodworker and had the first response be, “Let me see your fingers.” Why has our craft become known for being so danger-ous? Why is woodworking considered
as hazardous by those who don’t do it? Why do certain professionals such as musicians, surgeons and NFL quar-terbacks stay completely away from woodworking? Why is it that tool manufacturers don’t help promote safety
better – especially because they bear the brunt of liability issues? Or better yet, why don’t they require some kind of user-competency test before you can purchase their products?
A Better Way to Work • Part 1
by Marc Adams
Accurate and safe. Controlling your stock in a safe manner will also improve your confidence and the accuracy of your results. By learning a few simple rules to work by, you won’t be cut by your machinery.
photos by al parrish
WoodWorkingEssentials
go all heard the joke about the woodworker in a bar who holds up two fingers to order four beers. Or the one about “What does a woodworker do with the third hole on a bowling ball?”
I can’t tell you how many times I’ve introduced myself as a woodworker and had the first response be, “Let me see your fingers.” Why has our craft become known for being so danger-ous? Why is woodworking considered as hazardous by those who don’t do it? Why do certain professionals such as musicians, surgeons and NFL quar-terbacks stay completely away from woodworking? Why is it that tool manufacturers don’t help promote safety better – especially because they bear the brunt of liability issues? Or better yet, why don’t they require some kind of user-competency test before you can purchase their products?
A Better Way to Work • Part 5
by Marc Adams
Watch out. Controlling your stock in a safe manner will also improve your confidence and the accuracy of your results. By learning a few simple rules to work by, you won’t be cut by your machinery.
photos by al parrish
WoodWorkingEssentials
Surely you’ve heard the joke about the woodworker in a bar who holds up two fingers to order four beers. Or the one about “What does a woodworker do with the third hole on a bowling ball?”
I can’t tell you how many times I’ve introduced myself as a woodworker and had the first response be, “Let me see your fingers.” Why has our craft become known for being so danger-ous? Why is woodworking considered as hazardous by those who don’t do it? Why do certain professionals such as musicians, surgeons and NFL quar-terbacks stay completely away from woodworking? Why is it that tool manufacturers don’t help promote safety better – especially because they bear the brunt of liability issues? Or better yet, why don’t they require some kind of user-competency test before you can purchase their products?
A Better Way to Work • Part 6
by Marc Adams
Plainly spoken. Controlling your stock in a safe manner will also improve your confidence and the accuracy of your results. By learning a few simple rules to work by, you won’t be cut by your machinery.
photos by al parrish
WoodWorkingEssentials
Many of you have heard the joke about the woodworker in a bar who holds up two fingers to order four beers. Or the one about “What does a woodworker do with the third hole on a bowling ball?”I can’t tell you how many times I’ve introduced myself as a woodworker and had the first response be, “Let me see your fingers.” Why has our craft become known for being so danger-ous? Why is woodworking considered as hazardous by those who don’t do it? Why do certain professionals such as musicians, surgeons and NFL quar-terbacks stay completely away from woodworking? Why is it that tool manufacturers don’t help promote safety better – especially because they bear the brunt of liability issues? Or better yet, why don’t they require some kind of user-competency test before you can purchase their products?
A Better Way to Work • Part 7
by Marc Adams
We all know to be careful. Controlling your stock in a safe manner will also improve your confidence and the accuracy of your results. By learning a few simple rules to work by, you won’t be cut by your machinery.
photos by al parrish
WoodWorkingEssentials
now many of you have heard the joke about the woodworker in a bar who holds up two fingers to order four beers. Or the one about “What does a woodworker do with the third hole on a bowling ball?”I can’t tell you how many times I’ve introduced myself as a woodworker and had the first response be, “Let me see your fingers.” Why has our craft become known for being so danger-ous? Why is woodworking considered as hazardous by those who don’t do it? Why do certain professionals such as musicians, surgeons and NFL quar-terbacks stay completely away from woodworking? Why is it that tool manufacturers don’t help promote safety better – especially because they bear the brunt of liability issues? Or better
A Better Way to Work • Part 2
by Marc Adams
Be cautious. Controlling your stock in a safe manner will also improve your confidence and the accuracy of your results. By learning a few simple rules to work by, you won’t be cut by your machinery.
photos by al parrish
will allow you to pull the blade handle away from your body. Make sure there is nothing in the path of the blade that you don’t want to cut (cords, a push stick, off-fall, fingers and so on). Never overreach, and always make sure your footing is secure.
5. Always follow the 12" and 3" rules (discussed in part 1 of this series, “Learn the Skills to be Safe”) and be mindful of your control surfaces. Never cut freehand or cut wood without using the fence or the table as your control surfaces.
6. Always start the saw in the upper-most position. Let the motor run up to full speed before bringing the blade into contact, and never force the blade during the cut. Use a controlled and consistent motion. Never start the saw with the blade against the workpiece.
7. Once the cut has been made, keep the blade down and in the pocket, and then let off the trigger. Make sure the blade comes to a full stop before lifting the blade up. This is by far the most important safety issue with running a power miter saw. Force yourself to develop this habit. It will eliminate almost all hazards with this machine.
8. Never attempt to remove small pieces while the blade is coming to a stop in the pocket. Never stick your hand in the guard or around the blade. Never reach around the saw. If it is nec-essary to touch the blade or the inside of the guard housing, or to reach around the saw, unplug the saw first.
9. When the workpiece is too large or too small, make sure you use appro-
priate clamping or hold-down devices. All work must be supported either on its face or edge.
10. Always position your body to give you the best view and the saf-est grip. Remember: The machine is ambidextrous, either hand can be used to run the trigger and grip of the tool.
11. Do not become distracted; con-centrate on the process of the cut and the action that is taking place.
12. Make sure that the table’s locking mechanism (if the machine has one) is tightened and secured before you make any cut.
13. At all times, you should use either a good vacuum system or the dust-collection system that came with the machine.
14. If you are using a stop-block for production cutting, make sure that you hold or clamp the workpiece between the blade and the stop-block. It’s this piece that can bind between the blade and stop if it moves. Keep a firm grip on this piece until the blade stops. And don’t forget to use two clamps on your stop-block, which will keep the stop in place if your work kicks.
15. There is no substitute for com-mon sense. Remember that these are only general guidelines and that you should stop using your saw at any sign of abnormality. PW
Marc Adams is the founder of the Marc Adams School of Woodworking in Franklin, Ind., one of the largest woodworking schools in the world. For details, visit marcadams.com or call 317- 535-4013.
Two clamps, two coins. I always double-clamp my stop to keep it in place in case my work gets kicked by the saw. The coins (removed after clamping) raise the stop to help with dust removal.
Work with More Accuracy (and Safety) in your WoodshopThe best way to use your machines is rarely explained in the manual. Find out how to operate machines to get accurate results without sacrificing safety.
• Part 4 Miter Saws
Stock miter saws can be dangerous when used incorrectly. Marc shows how to make safe and accurate cuts.
• Part 5 Band Saws
Band saws are safe if used correctly; however it’s easy to step over the line and get bit.
• Part 6 Planers
Powered planers seem like safe machines until you start testing their limits.
• Part 7 Table Saws
The fundamental skills to get good (and safe) results with one of the most important woodworking machines.
IN FUTURE ISSUES
IN PAST ISSUES• Part 1
Learn the Skills to be Safe
The groundwork for a lifetime of accurate woodworking is to understand your tools.
• Part 2 Practical Safety Devices
Choose the right guards, push sticks and hold-downs to work safe.
• Part 3 Power Jointers
Most people use their jointers wrong, resulting in warped stock and unsafe operations.
WoodWorkingEssentials
once we all heard the joke about the woodworker in a bar who holds up two fingers to order four beers. Or the one about “What does a woodworker do with the third hole on a bowling ball?”
I can’t tell you how many times I’ve introduced myself as a woodworker and had the first response be, “Let me see your fingers.” Why has our craft become known for being so danger-ous? Why is woodworking considered as hazardous by those who don’t do it? Why do certain professionals such as musicians, surgeons and NFL quar-terbacks stay completely away from woodworking? Why is it that tool manufacturers don’t help promote safety better – especially because they bear the brunt of liability issues? Or better yet, why don’t they require some kind of user-competency test before you can purchase their products?
A Better Way to Work • Part 3
by Marc Adams
Watch your fingers. Controlling your stock in a safe manner will also improve your confidence and the accuracy of your results. By learning a few simple rules to work by, you won’t be cut by your machinery.
photos by al parrish
54 ■ Popular Woodworking April 2008

CIRCLE #137 ON FREE INFORMATION CARD. CIRCLE #156 ON FREE INFORMATION CARD.
CIRCLE #122 ON FREE INFORMATION CARD. CIRCLE #166 ON FREE INFORMATION CARD.
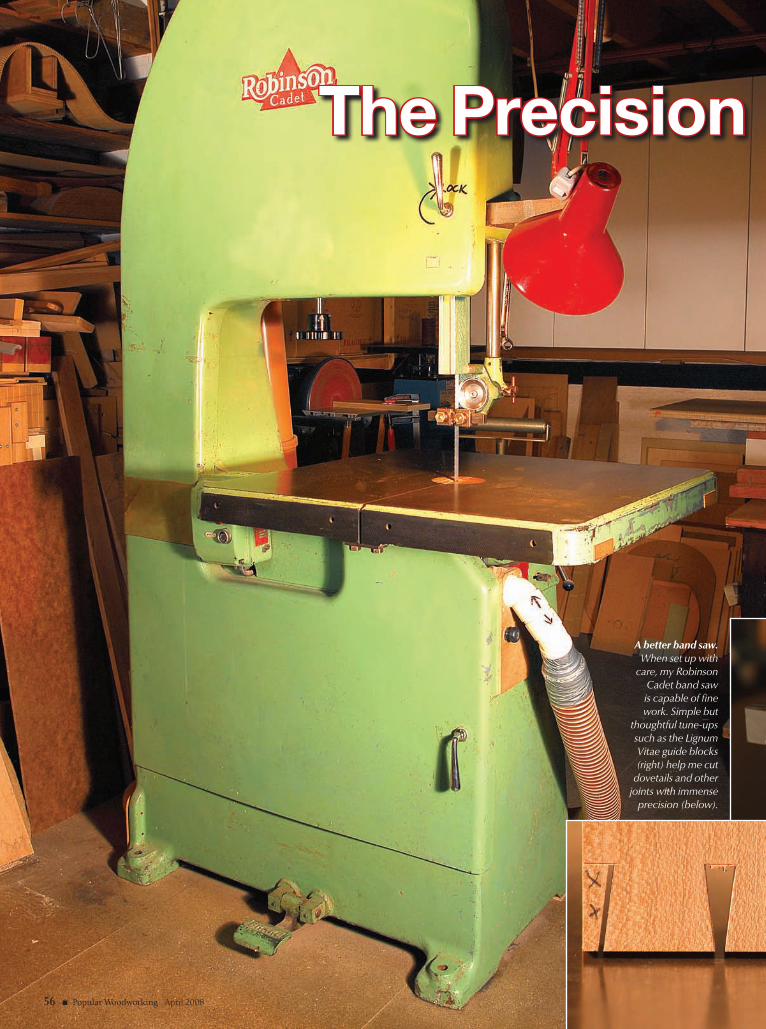
56 ■ Popular Woodworking April 2008
The Precision Band Saw
A better band saw. When set up with
care, my Robinson Cadet band saw is capable of fine work. Simple but
thoughtful tune-ups such as the Lignum Vitae guide blocks (right) help me cut
dovetails and other joints with immense
precision (below).
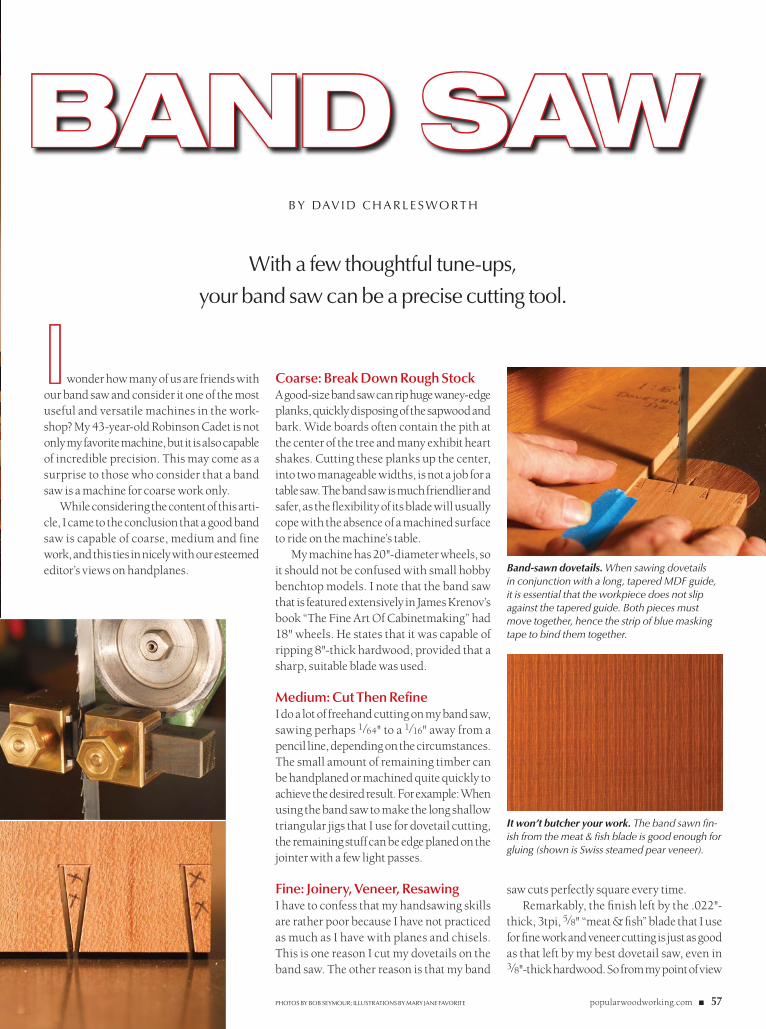
popularwoodworking.com ■ 57
The Precision
I wonder how many of us are friends with our band saw and consider it one of the most useful and versatile machines in the work-shop? My 43-year-old Robinson Cadet is not only my favorite machine, but it is also capable of incredible precision. This may come as a surprise to those who consider that a band saw is a machine for coarse work only.
While considering the content of this arti-cle, I came to the conclusion that a good band saw is capable of coarse, medium and fine work, and this ties in nicely with our esteemed editor’s views on handplanes.
saw cuts perfectly square every time.Remarkably, the finish left by the .022"-
thick, 3tpi, 5⁄8" “meat & fish” blade that I use for fine work and veneer cutting is just as good as that left by my best dovetail saw, even in 3⁄8"-thick hardwood. So from my point of view
b y Dav i D C h a r l e s wo rt h
with a few thoughtful tune-ups,
your band saw can be a precise cutting tool.
Coarse: Break Down Rough StockA good-size band saw can rip huge waney-edge planks, quickly disposing of the sapwood and bark. Wide boards often contain the pith at the center of the tree and many exhibit heart shakes. Cutting these planks up the center, into two manageable widths, is not a job for a table saw. The band saw is much friendlier and safer, as the flexibility of its blade will usually cope with the absence of a machined surface to ride on the machine’s table.
My machine has 20"-diameter wheels, so it should not be confused with small hobby benchtop models. I note that the band saw that is featured extensively in James Krenov’s book “The Fine Art Of Cabinetmaking” had 18" wheels. He states that it was capable of ripping 8"-thick hardwood, provided that a sharp, suitable blade was used.
Medium: Cut Then RefineI do a lot of freehand cutting on my band saw, sawing perhaps 1⁄64" to a 1⁄16" away from a pencil line, depending on the circumstances. The small amount of remaining timber can be handplaned or machined quite quickly to achieve the desired result. For example: When using the band saw to make the long shallow triangular jigs that I use for dovetail cutting, the remaining stuff can be edge planed on the jointer with a few light passes.
Fine: Joinery, Veneer, ResawingI have to confess that my handsawing skills are rather poor because I have not practiced as much as I have with planes and chisels. This is one reason I cut my dovetails on the band saw. The other reason is that my band
Band Saw
Band-sawn dovetails. When sawing dovetails in conjunction with a long, tapered MDF guide, it is essential that the workpiece does not slip against the tapered guide. Both pieces must move together, hence the strip of blue masking tape to bind them together.
It won’t butcher your work. The band sawn fin-ish from the meat & fish blade is good enough for gluing (shown is Swiss steamed pear veneer).
Photos by bob seymour; illustrations by mary Jane Favorite
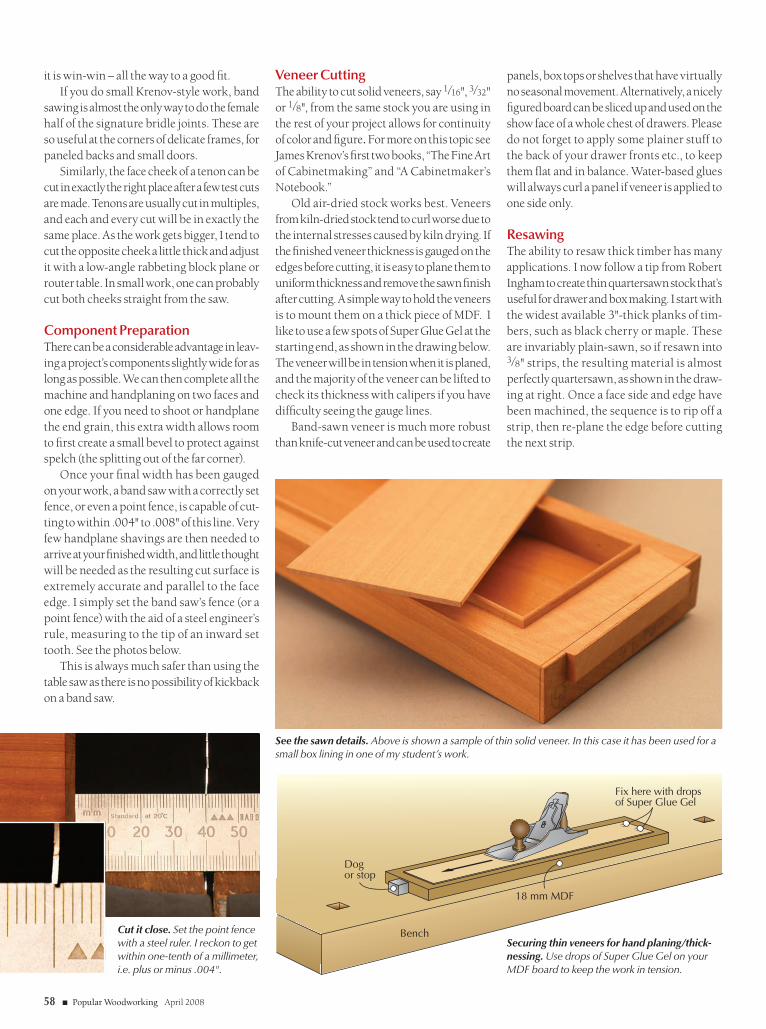
58 ■ Popular Woodworking April 2008
18 mm MDF
Dogor stop
Fix here with dropsof Super Glue Gel
Bench
it is win-win – all the way to a good fit.If you do small Krenov-style work, band
sawing is almost the only way to do the female half of the signature bridle joints. These are so useful at the corners of delicate frames, for paneled backs and small doors.
Similarly, the face cheek of a tenon can be cut in exactly the right place after a few test cuts are made. Tenons are usually cut in multiples, and each and every cut will be in exactly the same place. As the work gets bigger, I tend to cut the opposite cheek a little thick and adjust it with a low-angle rabbeting block plane or router table. In small work, one can probably cut both cheeks straight from the saw.
Component PreparationThere can be a considerable advantage in leav-ing a project’s components slightly wide for as long as possible. We can then complete all the machine and handplaning on two faces and one edge. If you need to shoot or handplane the end grain, this extra width allows room to first create a small bevel to protect against spelch (the splitting out of the far corner).
Once your final width has been gauged on your work, a band saw with a correctly set fence, or even a point fence, is capable of cut-ting to within .004" to .008" of this line. Very few handplane shavings are then needed to arrive at your finished width, and little thought will be needed as the resulting cut surface is extremely accurate and parallel to the face edge. I simply set the band saw’s fence (or a point fence) with the aid of a steel engineer’s rule, measuring to the tip of an inward set tooth. See the photos below.
This is always much safer than using the table saw as there is no possibility of kickback on a band saw.
Veneer CuttingThe ability to cut solid veneers, say 1⁄16", 3⁄32" or 1⁄8", from the same stock you are using in the rest of your project allows for continuity of color and figure. For more on this topic see James Krenov’s first two books, “The Fine Art of Cabinetmaking” and “A Cabinetmaker’s Notebook.”
Old air-dried stock works best. Veneers from kiln-dried stock tend to curl worse due to the internal stresses caused by kiln drying. If the finished veneer thickness is gauged on the edges before cutting, it is easy to plane them to uniform thickness and remove the sawn finish after cutting. A simple way to hold the veneers is to mount them on a thick piece of MDF. I like to use a few spots of Super Glue Gel at the starting end, as shown in the drawing below. The veneer will be in tension when it is planed, and the majority of the veneer can be lifted to check its thickness with calipers if you have difficulty seeing the gauge lines.
Band-sawn veneer is much more robust than knife-cut veneer and can be used to create
panels, box tops or shelves that have virtually no seasonal movement. Alternatively, a nicely figured board can be sliced up and used on the show face of a whole chest of drawers. Please do not forget to apply some plainer stuff to the back of your drawer fronts etc., to keep them flat and in balance. Water-based glues will always curl a panel if veneer is applied to one side only.
ResawingThe ability to resaw thick timber has many applications. I now follow a tip from Robert Ingham to create thin quartersawn stock that’s useful for drawer and box making. I start with the widest available 3"-thick planks of tim-bers, such as black cherry or maple. These are invariably plain-sawn, so if resawn into 3⁄8" strips, the resulting material is almost perfectly quartersawn, as shown in the draw-ing at right. Once a face side and edge have been machined, the sequence is to rip off a strip, then re-plane the edge before cutting the next strip.
Cut it close. Set the point fence with a steel ruler. I reckon to get within one-tenth of a millimeter, i.e. plus or minus .004".
Securing thin veneers for hand planing/thick-nessing. Use drops of Super Glue Gel on your MDF board to keep the work in tension.
See the sawn details. Above is shown a sample of thin solid veneer. In this case it has been used for a small box lining in one of my student’s work.
popularwoodworking.com ■ 59
1⁄16" camberis essential to
keep blade oncenter
11⁄2"
1⁄16"
BladeTires of vulcanizedrubber or cork
Radialcross sectionthroughwheel
Growth rings
10" to 12"
3"
When starting a straight cut, there is just enough flat to support the work. Blade
Timber
Line tobe cut
Quick action clamp
Point fence
Block
Feed
Laminations for curved work that are cut from solid wood are very similar to veneers. It is extremely wasteful and potentially danger-ous to cut these on a table saw with its wide kerf. We are turning more wood to dust than we are keeping.
Meat & Fish BladesI am fond of using stainless “meat & fish” blades for all my precision cutting. These are manufactured primarily for the food industry. They are thinner and have less set than stan-dard wood-cutting blades. The consequences of this strategy are:
1. The kerf is only about 1.1 mm wide, which creates less waste.
2. The surface finish is much smoother than from a blade with regular set. I feel the surface is quite good enough for gluing, but if one wishes to plane it totally smooth, only a few shavings are necessary.
3. The blades are absolutely useless for anything other than very gentle curves or straight cutting!
An ex-student tipped me off about these blades years ago. We use regular blades for heavy cutting and rough work, but change over for fine work. My current favorite comes from Atlanta SharpTech (sharptech.com or 800-462-7297; the blades are sold as “general all-purpose” blades for the food industry). These are beautifully wrapped and prepared. The back edge has been smoothed and rounded over, a job one usually has to do for oneself with a slipstone. I have to order 10 blades at a time, as they are an industrial supplier. The cost is slightly higher than a wood-cutting blade, but I think these blades are worth it.
Machine SetupUnfortunately, to perform all these wonder-ful precision operations, you need a robust machine that is capable of good blade tension and is correctly set up with a suitable blade.
There is not room here to delve into all the details of setup, and there are excellent encyclopedic books on band saws, such as “The New Complete Guide to the Band Saw” (Fox Chapel) by Mark Duginske.
In brief, the frame must be rigid enough to sustain considerable blade tension with-out twisting. The wheels must be in the same plane, with true, slightly cambered tires. Out-of-true or unbalanced wheels create vibration. It is not possible to get the blade to track in the center of the tires unless there is a camber present across the width of the tire surface.
A sharp suitable blade, well-set guides and correct feed angle are the other prerequisites for successful cutting.
My Robinson CadetI was extremely lucky to find the Robinson, which was being sold by a very crude, cheap pine kitchen outfit in Bideford, my local port and market town. The band saw was in a rather battered state but fundamentally sound.
We “turned” the surface of the tires, in the machine, with a large wood turning scraping tool (no blade on the wheels, of course). The surface of the vulcanized rubber was trued and
Resawing. Rip wide (3") thick planks to create thin (3⁄8") quartered stuff.
Cut then curved. This example of curved, tapered lamination in English oak shows how the glue lines can virtually disappear. They only become visible near the end, in the waste piece, where the clamping pressure was not adequate.
Essential camber. Band saw tires are typically cambered. If you’re having trouble keeping your blade on track, you might investigate your tires.
the vital 1⁄16" camber across the width rein-stated. Having taken the blade off, the bottom wheel was turned under power, with a jerry-rigged tool rest, and the top wheel was done with my students supplying human power. I am certain that these operations aren’t recom-mended on safety grounds; fortunately, most band saw tires already have this camber.
The machine had no fence and initially I thought it would be expensive to get a metal fabricator to make one up. Just to get going, we used a nicely planed up bit of oak about 5' long and 43⁄4" x 3" in section. It is still in use to this day, and we learned one of the most important things about band saws by using it. The feed
The point fence. Here you can see how I position the flat of the point fence in front of the blade.
toP view
60 ■ Popular Woodworking April 2008
Feed
Test board
Observeeven gapshere
angle is paramount, and it is rarely at right angles to the front of the table! So any band saw that does not have an adjustable fence is made by scoundrels or nincompoops.
(Some authors suggest that feed direction can be corrected by the position of the blade on the crowned wheel, and this may be true in some cases. However if the guides are not aligned with the table this may not work.)
What’s more, feed direction can change in the twinkling of an eye if the blade’s set on one side of the blade should be blunted by mineral inclusions in the wood. This is one of the reasons why the point fence is so use-ful. The operator is in control of feed direc-tion and can adjust it as necessary. (You may have noticed that badly set handsaws that have more set on one side than the other cut a curved line).
Determining Correct Feed Angle and Fence OrientationWe take a parallel piece of scrap about 2' long and 4" to 6" wide. A face side and two parallel edges are needed. MDF is ideal but plywood or solid wood will do as long as it does not spring when cut. Use a pencil gauge to draw a line parallel to one edge, perhaps 2" in from the left side of the board. Now saw this line freehand while using a point fence (or place a stationary finger on the table to act as a point fence).
Saw slowly and experiment with the feed angle as the cut proceeds. I watch the back of the sawblade in the kerf. You have found the correct feed angle when the back of the blade is touching neither side of the kerf. Ideally the back is exactly centered in the kerf, though serious trouble begins only when one side is pressing hard against either side.
It should be possible to establish the correct
feed angle when one is about halfway through the length of the setting board. When satis-fied, stop the machine without disturbing the angle of the board.
Set up a straightedge parallel to the edge of the test piece, near the right-hand edge of the saw’s machine table. Then make three marks with a fine permanent marker.
My table is well waxed, so I remove the wax locally with acetone and apply three strips of tape where the marks are to be made. Then I set up my oak fence parallel to these marks.
I know this sounds rather cumbersome but it is worth the effort. If you have an adjustable fence, you can simply make ripping cuts in scrap and observe the position of the back edge of the blade in the kerf. It should be centered without touching either edge.
Exciting and undesirable things happen if the fence and feed angle are not correct. You can easily show this by deliberately holding (or clamping) a temporary fence crooked. In one direction the work drifts away from the fence and is ruined; in the other the blade starts to be alarmingly deflected toward the fence and you can see that breakage will fol-low shortly.
The Point FenceIf you practice and become familiar with a point fence you will rarely use anything else. It is a little intimidating for beginners, as some
lateral twist must be applied to the workpiece at the start, and for the majority of the cut. The vital requirement is that the work does not drift away from the point (which is in fact a small flat) during the cut. The flat is essential for the start of a cut and must be positioned correctly relative to the cutting edge of the blade. Point fences can be made at differing heights, and setting one is a breeze as only one ruler measurement need be made. (A single quick-acting clamp secures the fence).
If my guides are in good condition, I reckon to be able to set the cut width to plus or minus about .004". If test cuts are made and calipers used to measure the result, it is possible to get even closer. This is fantastic for precision jig making. The component can be gauged, cut from a board and cleaned up with no more than five or six fine shavings.
Lignum Vitae Guide BlocksWhen it arrived, the Robinson had some rather unusual bent sheet metal guides. These were difficult to prepare (by filing) and even more difficult to set up.
So I decided to use Lignum Vitae sticks and contrived a holder to fix them with a simple screw clamp. Two holders were needed, as good machines have a set of guides below and above the table. True Lignum is now an endan-gered species, but you can use any dense, oily exotic wood.
Getting the drift. Establish the correct feed angle with a point fence, a parallel-sided workpiece and a line from a pencil gauge. Experiment with the feed angle until the back of the blade is centered in the saw kerf (right).
Well fed. The angle you are feeding your work into the blade is correct when the back edge of the blade is centered in the kerf.
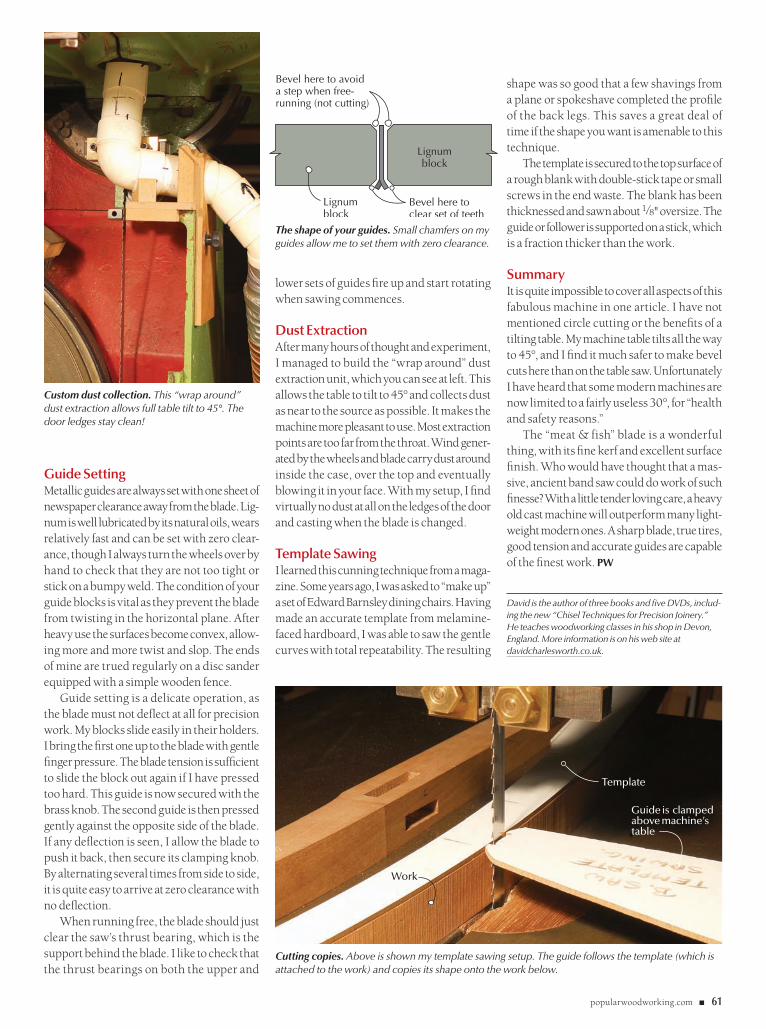
popularwoodworking.com ■ 61
Lignumblock
Lignumblock
Bevel here to avoid a step when free-running (not cutting)
Bevel here to clear set of teeth
Guide SettingMetallic guides are always set with one sheet of newspaper clearance away from the blade. Lig-num is well lubricated by its natural oils, wears relatively fast and can be set with zero clear-ance, though I always turn the wheels over by hand to check that they are not too tight or stick on a bumpy weld. The condition of your guide blocks is vital as they prevent the blade from twisting in the horizontal plane. After heavy use the surfaces become convex, allow-ing more and more twist and slop. The ends of mine are trued regularly on a disc sander equipped with a simple wooden fence.
Guide setting is a delicate operation, as the blade must not deflect at all for precision work. My blocks slide easily in their holders. I bring the first one up to the blade with gentle finger pressure. The blade tension is sufficient to slide the block out again if I have pressed too hard. This guide is now secured with the brass knob. The second guide is then pressed gently against the opposite side of the blade. If any deflection is seen, I allow the blade to push it back, then secure its clamping knob. By alternating several times from side to side, it is quite easy to arrive at zero clearance with no deflection.
When running free, the blade should just clear the saw’s thrust bearing, which is the support behind the blade. I like to check that the thrust bearings on both the upper and
lower sets of guides fire up and start rotating when sawing commences.
Dust ExtractionAfter many hours of thought and experiment, I managed to build the “wrap around” dust extraction unit, which you can see at left. This allows the table to tilt to 45° and collects dust as near to the source as possible. It makes the machine more pleasant to use. Most extraction points are too far from the throat. Wind gener-ated by the wheels and blade carry dust around inside the case, over the top and eventually blowing it in your face. With my setup, I find virtually no dust at all on the ledges of the door and casting when the blade is changed.
Template SawingI learned this cunning technique from a maga-zine. Some years ago, I was asked to “make up” a set of Edward Barnsley dining chairs. Having made an accurate template from melamine-faced hardboard, I was able to saw the gentle curves with total repeatability. The resulting
shape was so good that a few shavings from a plane or spokeshave completed the profile of the back legs. This saves a great deal of time if the shape you want is amenable to this technique.
The template is secured to the top surface of a rough blank with double-stick tape or small screws in the end waste. The blank has been thicknessed and sawn about 1⁄8" oversize. The guide or follower is supported on a stick, which is a fraction thicker than the work.
SummaryIt is quite impossible to cover all aspects of this fabulous machine in one article. I have not mentioned circle cutting or the benefits of a tilting table. My machine table tilts all the way to 45°, and I find it much safer to make bevel cuts here than on the table saw. Unfortunately I have heard that some modern machines are now limited to a fairly useless 30°, for “health and safety reasons.”
The “meat & fish” blade is a wonderful thing, with its fine kerf and excellent surface finish. Who would have thought that a mas-sive, ancient band saw could do work of such finesse? With a little tender loving care, a heavy old cast machine will outperform many light-weight modern ones. A sharp blade, true tires, good tension and accurate guides are capable of the finest work. PW
David is the author of three books and five DVDs, includ-ing the new “Chisel Techniques for Precision Joinery.” He teaches woodworking classes in his shop in Devon, England. More information is on his web site at davidcharlesworth.co.uk.
Custom dust collection. This “wrap around” dust extraction allows full table tilt to 45°. The door ledges stay clean!
Cutting copies. Above is shown my template sawing setup. The guide follows the template (which is attached to the work) and copies its shape onto the work below.
The shape of your guides. Small chamfers on my guides allow me to set them with zero clearance.
Template
Work
Guide is clamped above machine’s table

62 ■ Popular Woodworking April 2008 Photos by megan fitzPatrick
Planecraft, Part I:
Scrub, Jack & Smooth Planes
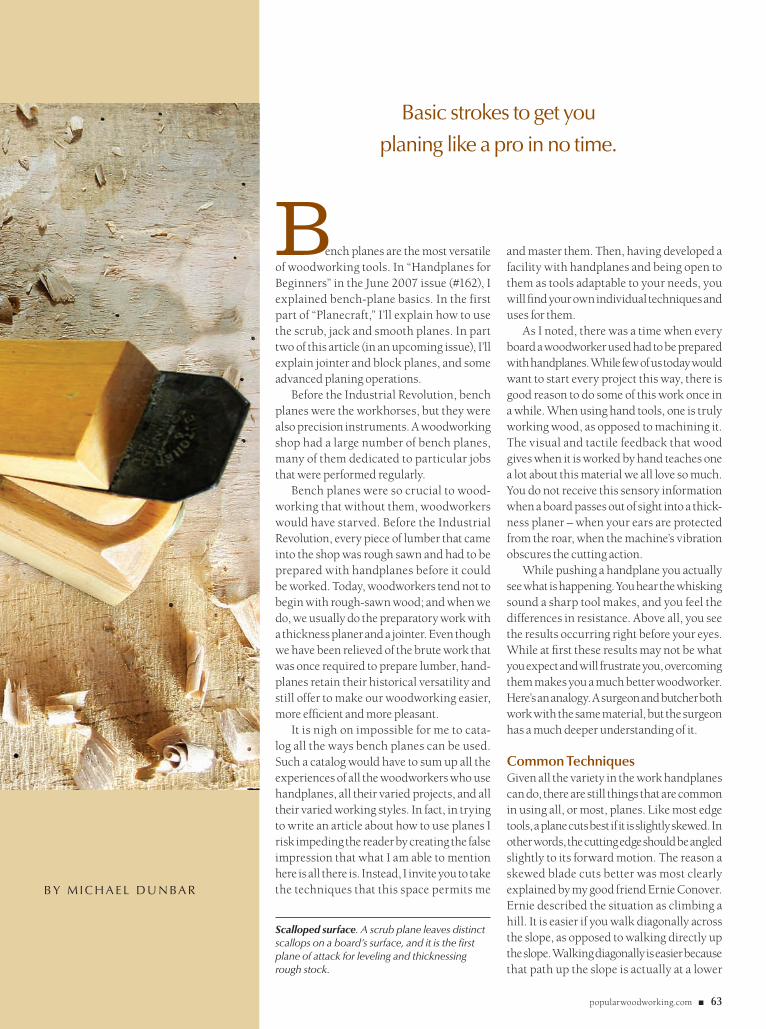
popularwoodworking.com ■ 63
Bench planes are the most versatile of woodworking tools. In “Handplanes for Beginners” in the June 2007 issue (#162), I explained bench-plane basics. In the first part of “Planecraft,” I’ll explain how to use the scrub, jack and smooth planes. In part two of this article (in an upcoming issue), I’ll explain jointer and block planes, and some advanced planing operations.
Before the Industrial Revolution, bench planes were the workhorses, but they were also precision instruments. A woodworking shop had a large number of bench planes, many of them dedicated to particular jobs that were performed regularly.
Bench planes were so crucial to wood-working that without them, woodworkers would have starved. Before the Industrial Revolution, every piece of lumber that came into the shop was rough sawn and had to be prepared with handplanes before it could be worked. Today, woodworkers tend not to begin with rough-sawn wood; and when we do, we usually do the preparatory work with a thickness planer and a jointer. Even though we have been relieved of the brute work that was once required to prepare lumber, hand-planes retain their historical versatility and still offer to make our woodworking easier, more efficient and more pleasant.
It is nigh on impossible for me to cata-log all the ways bench planes can be used. Such a catalog would have to sum up all the experiences of all the woodworkers who use handplanes, all their varied projects, and all their varied working styles. In fact, in trying to write an article about how to use planes I risk impeding the reader by creating the false impression that what I am able to mention here is all there is. Instead, I invite you to take the techniques that this space permits me
and master them. Then, having developed a facility with handplanes and being open to them as tools adaptable to your needs, you will find your own individual techniques and uses for them.
As I noted, there was a time when every board a woodworker used had to be prepared with handplanes. While few of us today would want to start every project this way, there is good reason to do some of this work once in a while. When using hand tools, one is truly working wood, as opposed to machining it. The visual and tactile feedback that wood gives when it is worked by hand teaches one a lot about this material we all love so much. You do not receive this sensory information when a board passes out of sight into a thick-ness planer – when your ears are protected from the roar, when the machine’s vibration obscures the cutting action.
While pushing a handplane you actually see what is happening. You hear the whisking sound a sharp tool makes, and you feel the differences in resistance. Above all, you see the results occurring right before your eyes. While at first these results may not be what you expect and will frustrate you, overcoming them makes you a much better woodworker. Here’s an analogy. A surgeon and butcher both work with the same material, but the surgeon has a much deeper understanding of it.
Common TechniquesGiven all the variety in the work handplanes can do, there are still things that are common in using all, or most, planes. Like most edge tools, a plane cuts best if it is slightly skewed. In other words, the cutting edge should be angled slightly to its forward motion. The reason a skewed blade cuts better was most clearly explained by my good friend Ernie Conover. Ernie described the situation as climbing a hill. It is easier if you walk diagonally across the slope, as opposed to walking directly up the slope. Walking diagonally is easier because that path up the slope is actually at a lower
Scrub, Jack & Smooth Planes
b y m i c h a e l d u n ba r
basic strokes to get you
planing like a pro in no time.
Scalloped surface. A scrub plane leaves distinct scallops on a board’s surface, and it is the first plane of attack for leveling and thicknessing rough stock.
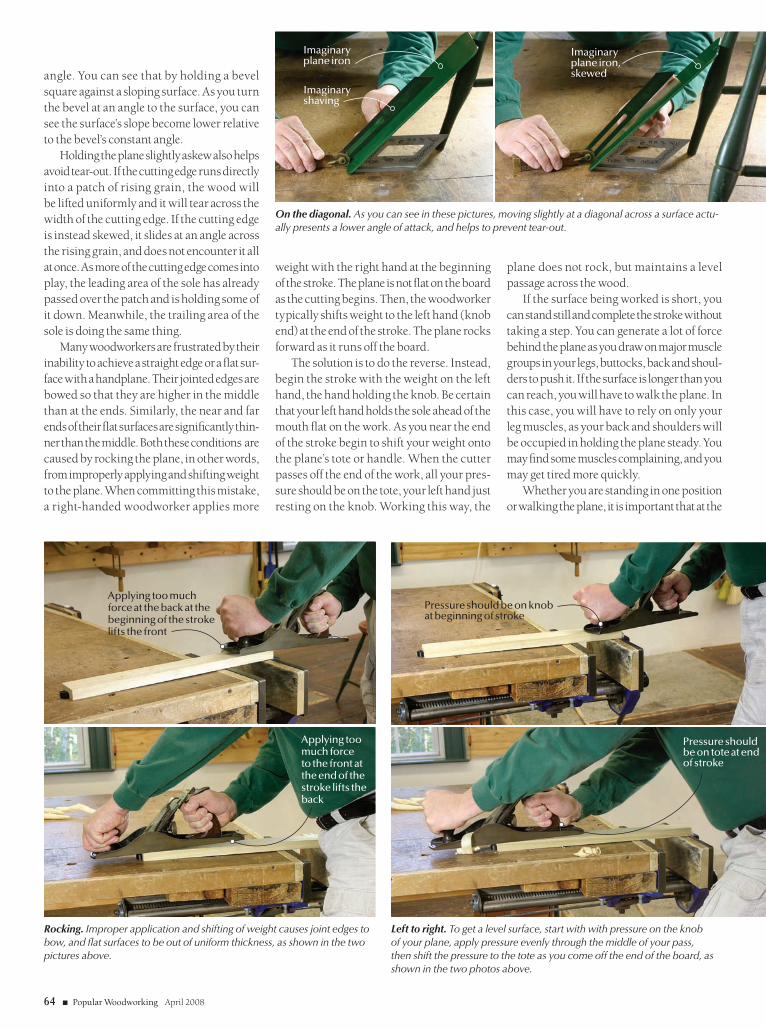
64 ■ Popular Woodworking April 2008
Applying too much force at the back at the beginning of the stroke lifts the front
Pressure should be on knob at beginning of stroke
Pressure should be on tote at end of stroke
angle. You can see that by holding a bevel square against a sloping surface. As you turn the bevel at an angle to the surface, you can see the surface’s slope become lower relative to the bevel’s constant angle.
Holding the plane slightly askew also helps avoid tear-out. If the cutting edge runs directly into a patch of rising grain, the wood will be lifted uniformly and it will tear across the width of the cutting edge. If the cutting edge is instead skewed, it slides at an angle across the rising grain, and does not encounter it all at once. As more of the cutting edge comes into play, the leading area of the sole has already passed over the patch and is holding some of it down. Meanwhile, the trailing area of the sole is doing the same thing.
Many woodworkers are frustrated by their inability to achieve a straight edge or a flat sur-face with a handplane. Their jointed edges are bowed so that they are higher in the middle than at the ends. Similarly, the near and far ends of their flat surfaces are significantly thin-ner than the middle. Both these conditions are caused by rocking the plane, in other words, from improperly applying and shifting weight to the plane. When committing this mistake, a right-handed woodworker applies more
weight with the right hand at the beginning of the stroke. The plane is not flat on the board as the cutting begins. Then, the woodworker typically shifts weight to the left hand (knob end) at the end of the stroke. The plane rocks forward as it runs off the board.
The solution is to do the reverse. Instead, begin the stroke with the weight on the left hand, the hand holding the knob. Be certain that your left hand holds the sole ahead of the mouth flat on the work. As you near the end of the stroke begin to shift your weight onto the plane’s tote or handle. When the cutter passes off the end of the work, all your pres-sure should be on the tote, your left hand just resting on the knob. Working this way, the
plane does not rock, but maintains a level passage across the wood.
If the surface being worked is short, you can stand still and complete the stroke without taking a step. You can generate a lot of force behind the plane as you draw on major muscle groups in your legs, buttocks, back and shoul-ders to push it. If the surface is longer than you can reach, you will have to walk the plane. In this case, you will have to rely on only your leg muscles, as your back and shoulders will be occupied in holding the plane steady. You may find some muscles complaining, and you may get tired more quickly.
Whether you are standing in one position or walking the plane, it is important that at the
On the diagonal. As you can see in these pictures, moving slightly at a diagonal across a surface actu-ally presents a lower angle of attack, and helps to prevent tear-out.
Rocking. Improper application and shifting of weight causes joint edges to bow, and flat surfaces to be out of uniform thickness, as shown in the two pictures above.
Left to right. To get a level surface, start with with pressure on the knob of your plane, apply pressure evenly through the middle of your pass, then shift the pressure to the tote as you come off the end of the board, as shown in the two photos above.
Imaginary shaving
Applying too much force to the front at the end of the stroke lifts the back
Imaginary plane iron
Imaginary plane iron, skewed
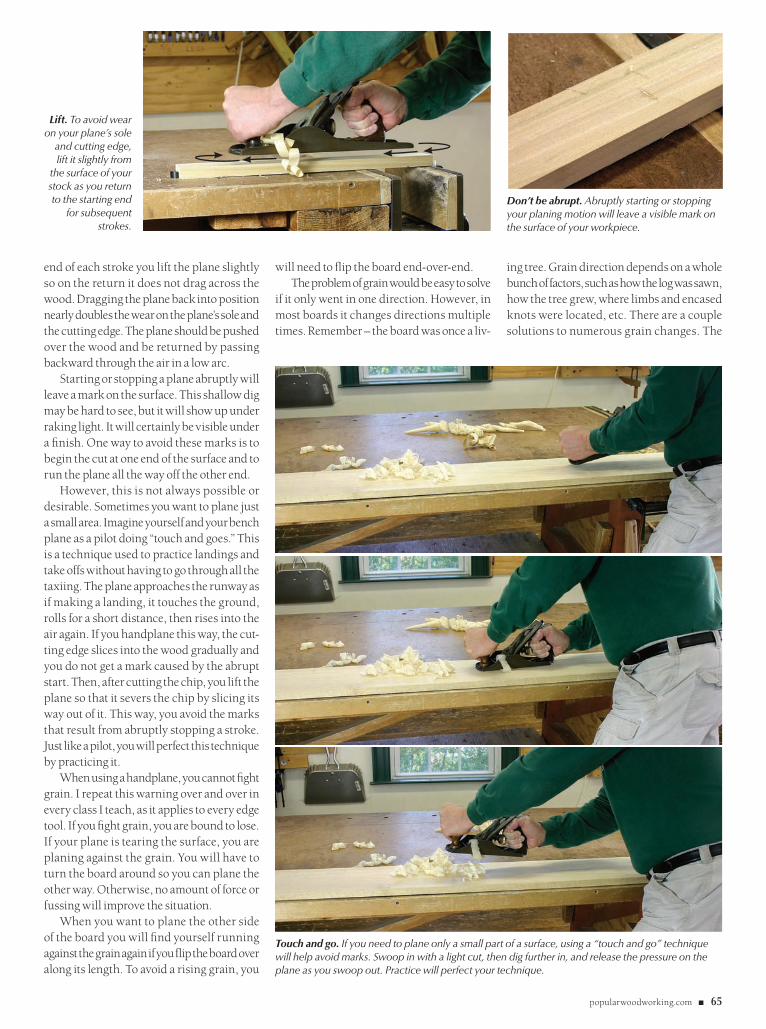
popularwoodworking.com ■ 65
end of each stroke you lift the plane slightly so on the return it does not drag across the wood. Dragging the plane back into position nearly doubles the wear on the plane’s sole and the cutting edge. The plane should be pushed over the wood and be returned by passing backward through the air in a low arc.
Starting or stopping a plane abruptly will leave a mark on the surface. This shallow dig may be hard to see, but it will show up under raking light. It will certainly be visible under a finish. One way to avoid these marks is to begin the cut at one end of the surface and to run the plane all the way off the other end.
However, this is not always possible or desirable. Sometimes you want to plane just a small area. Imagine yourself and your bench plane as a pilot doing “touch and goes.” This is a technique used to practice landings and take offs without having to go through all the taxiing. The plane approaches the runway as if making a landing, it touches the ground, rolls for a short distance, then rises into the air again. If you handplane this way, the cut-ting edge slices into the wood gradually and you do not get a mark caused by the abrupt start. Then, after cutting the chip, you lift the plane so that it severs the chip by slicing its way out of it. This way, you avoid the marks that result from abruptly stopping a stroke. Just like a pilot, you will perfect this technique by practicing it.
When using a handplane, you cannot fight grain. I repeat this warning over and over in every class I teach, as it applies to every edge tool. If you fight grain, you are bound to lose. If your plane is tearing the surface, you are planing against the grain. You will have to turn the board around so you can plane the other way. Otherwise, no amount of force or fussing will improve the situation.
When you want to plane the other side of the board you will find yourself running against the grain again if you flip the board over along its length. To avoid a rising grain, you
will need to flip the board end-over-end. The problem of grain would be easy to solve
if it only went in one direction. However, in most boards it changes directions multiple times. Remember – the board was once a liv-
Lift. To avoid wear on your plane’s sole
and cutting edge, lift it slightly from
the surface of your stock as you return to the starting end
for subsequent strokes.
Don’t be abrupt. Abruptly starting or stopping your planing motion will leave a visible mark on the surface of your workpiece.
Touch and go. If you need to plane only a small part of a surface, using a “touch and go” technique will help avoid marks. Swoop in with a light cut, then dig further in, and release the pressure on the plane as you swoop out. Practice will perfect your technique.
ing tree. Grain direction depends on a whole bunch of factors, such as how the log was sawn, how the tree grew, where limbs and encased knots were located, etc. There are a couple solutions to numerous grain changes. The
66 ■ Popular Woodworking April 2008
first is to change directions of planing as the grain changes in the board. The second is to plane in one direction regardless of the grain changes and to clean up later with a smooth plane. I will go into greater detail about spe-cific situations below.
If your board has a clean-sawn edge (as opposed to a rough edge) you can usually tell which way the grain is running. Examine the edge. If the layers of growth are rising toward you, the plane will likely tear the surface. Depending on the angle of rise, the depth of the cutter and the frog setting, your first pass can create a very messy torn surface that will require a lot of work to remove.
Scrub PlaneThe first plane used for preparing stock is the scrub plane. This plane was part of the con-tinental European woodworking tradition. The Anglo-American woodworking tradi-tion used a jack plane for the same purpose. A scrub plane does the same work as a power jointer, in that the tool flattens one surface of a board. While the width of your jointer’s bed limits the width of board you can run over it, the only limitation on the width of the board you can work with a scrub plane is the length of your arms.
A scrub plane has a short stock, or body. Its most obvious feature is a cutting edge that is almost semi-circular. This extreme edge is suited for its very specific job – knocking down high spots, and doing it in very short order. The nearly semi-circular edge allows the plane to take a deep, narrow shaving without choking. This means the tool can hog off a lot of wood very quickly. However, it will leave behind a very coarse surface.
Begin the scrub plane’s work by laying the rough stock on the bench. If the board is cupped or has wind, the scrub plane will remove these problems and quickly bring the
board closer to flat. If the cupping or warp is not obvious, these high spots can be made more apparent by using a straightedge and winding sticks. A scrub plane is used with a short, quick and powerful stroke at an angle across the surface of the board. When the straightedge and winding sticks confirm that the board is flat (although the surface is quite rough), you can run the board through your thickness planer. Place the scrubbed surface on the bed and flatten the opposite side. Then, turn the board over and use the
Against the grain. If you plane against your wood’s grain, you’ll tear the surface, no matter how much fuss and time you put into it. Simply turn the board around, or plane in the other direction, following the grain.
Learn to read. To avoid tear-out, it’s important to learn how to read the grain of a board. Examine the edge and set up your work so the layers of growth are facing away from you, and plane in that direction.
Curved edge. A scrub plane’s most obvious feature is a cutting edge that is almost semi-circular.
Quick work. The scrub plane’s blade makes it the ideal tool for knocking down high spots with quick, powerful strokes.
thickness planer to remove the scrub plane marks. If instead you want to continue using handplanes, move on to the jack to clean up the scrubbed surface. Then, invert the board and repeat the process on the other side.
The most common non-traditional use for a scrub plane in today’s woodworking is to create a suggestion of hand work. You will frequently note a scrub plane has been run over dark, stained pine surfaces of the tables and booths in a restaurant trying to simu-late an early or a rustic setting. Of course, no woodworker in the past would have left such a surface, as it would have been considered shoddy craftsmanship. A true handplaned surface is much finer and more subtle.
Jack PlaneThe next plane in the process of preparing stock is the jack. The jack is frequently mis-identified by woodworkers who call it a scrub plane. The two tools are very different. “Jack” is an archaic word that was applied to anything that did hard, or heavy work. Indeed, the jack always has been, and remains, the workhorse of bench planes. English and American wood-workers used the plane for the same purpose as the scrub – to flatten a board by knocking off the high spots. The jack’s cutting edge is also crested, but nowhere near as much as a scrub’s almost semi-circular blade.
As coarse as the jack plane is in comparison to the smooth plane, it was still the plane used to prepare the wood used in pre-industrial building interiors. Jack-plane tracks appear on most wide surfaces such a door panels and wainscoting in any building built before about 1850. Although frequently obscured by the paint layers that accumulate over 200 years, they are there. Thus, an early interior had a subtle texture that played with light and shadow. The effect is lacking from most repro-duction interiors and its absence is immedi-ately obvious to the knowledgeable eye.
The jack was also used in making furni-ture, and the presence of its particular track is one of the first details the connoisseur looks for when determining a piece of furniture’s authenticity. Utilitarian furniture, such as cupboards, frequently retain the jack-plane track on visible surfaces. However, visible surfaces of better-quality work were smoothed with a smooth plane. Only unseen surfaces such as drawer bottoms and backboards were left as they came from the jack plane.
These are some of the finer points that furniture reproducers aiming for an antique
Tear-out
Plane face in this direction
Rising grain on edge
popularwoodworking.com ■ 67
collector clientele should understand, as this clientele recognizes these details. I do the same, leaving the jack-plane track on all unseen surfaces. The bottom of the seat of each of my Windsor chairs always has jack-plane tracks.
Whereas the scrub is used with a short, quick stroke at an angle across the surface, the jack is pushed along the board’s face. If the board is short, this can be done with the shoulders, but on a longer board, the plane must be walked.
Smooth PlaneA smooth plane is used for the task its name implies. It is the plane that completes the pro-cess of stock preparation by smoothing its visi-ble, wide surfaces. A board off the smooth plane is ready to be worked – to be cut into smaller pieces or joined. Because it too is used on the surface of boards, its cutter is also crested. How-ever, this cresting borders on imperceptible. It is best seen by comparing the cutting edge to a straightedge. The smooth plane will also leave
a track, but its subtle undulations can easily be removed by sanding or scraping.
Even if you do all your stock preparation with machines, I recommend handplaning all visible surfaces. Jointers and planers work by slicing away narrow, closely spaced scallops. These scallops will show up under a finish. I am proud of my ability to use hand tools and I will unapologetically leave the subtle evidence of my smooth plane. While I use woodwork-ing machines all the time, there is no pride involved, as I do not get any better results than anyone else using the same machine. Thus, I plane away machine marks.
A smooth plane will also clean up the tears in a surface that result from planing against the grain with the jack. As I noted, few boards are so perfect the grain does not change direc-tion somewhere along their length. In fact, the patterns created by changes in grain direction are what makes wood interesting to look at. It is what causes the curl in curly maple and the flame in flame birch. There is nothing more bland than a board of straight-grained pine, basswood or yellow poplar.
For cleaning up problem areas I maintain a Stanley Bed Rock 604 that is sharpened and tuned so it is a precision instrument. It will handle most problems caused by changes in grain direction. However, there are situ-ations where other techniques are helpful. As a tree grows, numerous things can occur that will give a woodworker fits. Lower limbs die and break off, or the tree experiences an injury. Later layers of growth cover this area, and on the tree this healing will eventually appear as a bump or swelling. If the tree grows long enough, the bump becomes covered by enough layers of growth that it smoothes out and may not even be visible in the bark. How-
ever, it did not disappear inside. The layers of growth still have an undulation in them. As the tree is sawn into lumber the saw passes through this swelling, and what remains of it ends up in the middle of a board. It will appear as a whorl, or a cat’s face. If you buy the board, the results of the tree’s healing become your problem.
The grain will change directions either in the middle or on the edges of the cat’s face. Your plane will typically cause it to tear on one side or the other. The solution is to determine whether the grain in the surface you are plan-ing is concave or convex. It will be one way on one side, and the other on the opposite sur-face. Use the touch-and-go technique. If the cat’s face is convex, you need to plane toward the center from one side. As the cutting edge approaches the center, lift the plane to sever the chip. Do the same from the other side. By overlapping the strokes in the middle of a convex cat’s face, you can avoid tear-out.
If the cat’s face is concave, you do the oppo-site. Start planing in the center toward the edges of the cat’s face.
Knots are another problem. Each knot is individual and you need to observe where the surface is tearing and reverse your stroke. If none of these other techniques work, some-times it helps to plane at a slight angle to the blemish. Note, the strokes used around cat’s faces, knots or other tricky areas are usually very short. Also, no matter what you do, some-times a scraper and sandpaper are the only answer. PW
A chairmaker since 1971, Michael is the founder of The Windsor Institute in Hampton, N.H., where he teaches hundreds of students each year to build Windsor chairs. Visit thewindsorinstitute.com for more information and to read his blog.
Sight lines. Winding sticks can be used to confirm if a board is flat — or to help identify high spots.
Underneath. The jack plane leaves slight but visble scallops; unseen surfaces on quality pieces, such as the bottom of this 19th-century drawer, were left with the jack’s surface. This can be useful in helping to identify authentic antiques.
Almost imperceptible. A smooth plane has such a slight crest on the cutter that it’s almost imper-ceptible, even with a straightedge held against it. This plane leaves a surface smooth to the touch.

68 ■ Popular Woodworking April 2008
lithium-ionDrills
In December 2005 (issue #152), Popular Wood-working tested 14.4-volt drills and used the results to determine if moving up from a 12v drill was worth the investment. In that test, each battery was either Nickel-cadmium (Ni-Cd) or Nickel-metal hydride (Ni-MH). Today there’s a change in battery power. Gone from the headlines are the Ni-Cd and Ni-MH batteries – replaced by a Lithium-ion (Li-ion) battery. Of course, that meant we had another test to run.
The Lithium-ion BatteryWhat makes the Li-ion battery different – and is it better? With Li-ion batteries you get an increase in power with a decrease in the overall weight of the battery. (We tested 18v drills that weigh less than the old technology’s 14.4v tools). That’s
b y t h e p o p u l a r wo o dwo r k i n g s ta f f
we test more powerful, less weighty designs
that are powered by new battery technology.
popularwoodworking.com ■ 69PhoTo By AL PArrish
just one of the improvements of the new bat-tery design.
Other improvements include an increased number of cycles (number of times you can recharge the battery) and friendlier charge-holding abilities. The charge on Li-ion bat-teries does not dissipate when the tool is at rest, something inherent in Ni-Cd and Ni-MH batteries. Happily, this is all packaged in an introductory tool with a retail price lower than that of the earlier technologies.
So the big question is, are the drills better
than before because of new battery technol-ogy? Will the tools run longer when put to the test? Will the test results show substantial increases?
how We Tested the ToolsWe kept the parameters of the previous test-ing so you could draw conclusions based on the results. We fully charged the batteries and drilled 1" holes through 13⁄4" poplar using a newly purchased spade bit for each drill and the speed setting at the highest level. (The Skil has only one speed setting while the DeWalt DC927KL has three settings, of which we used the second level).
We kept at it constantly, drilling as many holes as possible until the batteries gave out. (The drill simply quits when a Li-ion battery is the power source, unlike the earlier bat-
teries that fade away like the wicked witch in “Wizard of Oz”.) Also, as in the earlier test, we recorded the temperatures both at the motor and at the battery because heat could affect the battery’s longevity.
The second phase of our test examined the torque of the drill. After again charging the batteries to full power, we tested the drills by driving 11⁄2"-long 1⁄4" lag screws using the low-speed setting. You can have the most powerful battery available, but if the drill has little or no torque, you’ll have issues seating your screws into your project.
In addition, we recorded the weight of the drill with and without a battery, the revolu-tions per minute (RPM) at each speed level, as well as the cost of replacement batteries and the time it took to fully charge each unit. These results are shown in the chart on page 72.
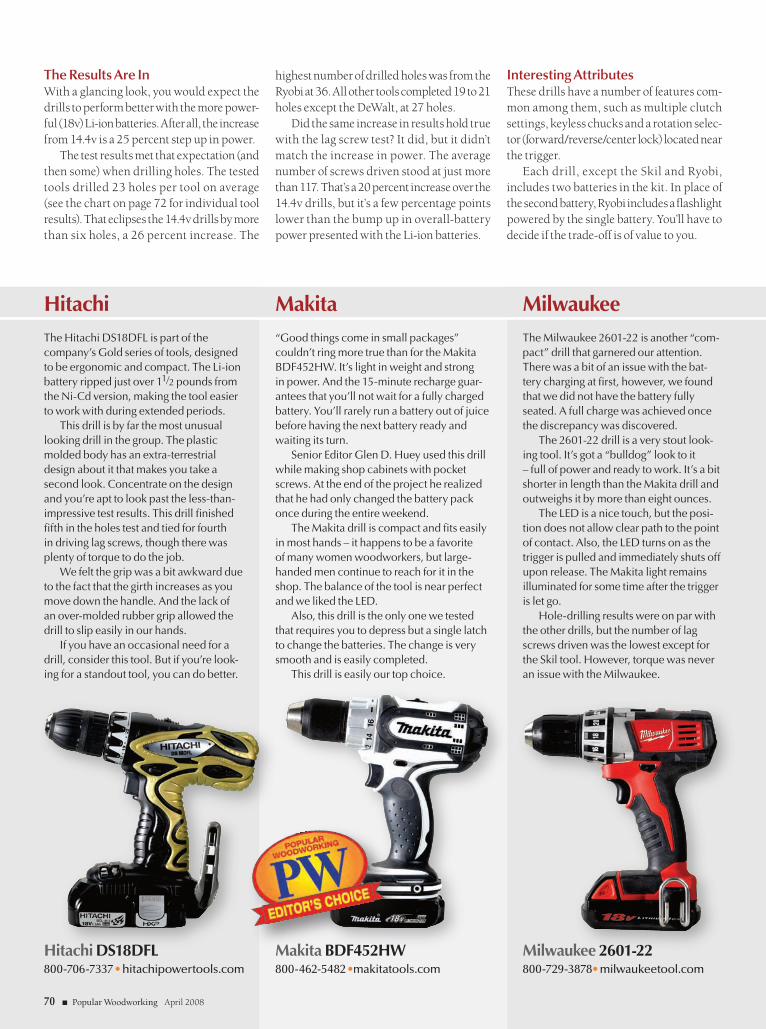
The results Are inWith a glancing look, you would expect the drills to perform better with the more power-ful (18v) Li-ion batteries. After all, the increase from 14.4v is a 25 percent step up in power.
The test results met that expectation (and then some) when drilling holes. The tested tools drilled 23 holes per tool on average (see the chart on page 72 for individual tool results). That eclipses the 14.4v drills by more than six holes, a 26 percent increase. The
highest number of drilled holes was from the Ryobi at 36. All other tools completed 19 to 21 holes except the DeWalt, at 27 holes.
Did the same increase in results hold true with the lag screw test? It did, but it didn’t match the increase in power. The average number of screws driven stood at just more than 117. That’s a 20 percent increase over the 14.4v drills, but it’s a few percentage points lower than the bump up in overall-battery power presented with the Li-ion batteries.
interesting AttributesThese drills have a number of features com-mon among them, such as multiple clutch settings, keyless chucks and a rotation selec-tor (forward/reverse/center lock) located near the trigger.
Each drill, except the Skil and Ryobi, includes two batteries in the kit. In place of the second battery, Ryobi includes a flashlight powered by the single battery. You’ll have to decide if the trade-off is of value to you.
70 ■ Popular Woodworking April 2008
Hitachi DS18DFL 800-706-7337 • hitachipowertools.com
Milwaukee 2601-22800-729-3878• milwaukeetool.com
Hitachithe hitachi ds18dfl is part of the company’s gold series of tools, designed to be ergonomic and compact. the li-ion battery ripped just over 11⁄2 pounds from the ni-Cd version, making the tool easier to work with during extended periods.
this drill is by far the most unusual looking drill in the group. the plastic molded body has an extra-terrestrial design about it that makes you take a second look. Concentrate on the design and you’re apt to look past the less-than-impressive test results. this drill finished fifth in the holes test and tied for fourth in driving lag screws, though there was plenty of torque to do the job.
we felt the grip was a bit awkward due to the fact that the girth increases as you move down the handle. and the lack of an over-molded rubber grip allowed the drill to slip easily in our hands.
if you have an occasional need for a drill, consider this tool. but if you’re look-ing for a standout tool, you can do better.
Makita“good things come in small packages” couldn’t ring more true than for the Makita bdf452hw. it’s light in weight and strong in power. and the 15-minute recharge guar-antees that you’ll not wait for a fully charged battery. you’ll rarely run a battery out of juice before having the next battery ready and waiting its turn.
senior editor glen d. huey used this drill while making shop cabinets with pocket screws. at the end of the project he realized that he had only changed the battery pack once during the entire weekend.
the Makita drill is compact and fits easily in most hands – it happens to be a favorite of many women woodworkers, but large-handed men continue to reach for it in the shop. the balance of the tool is near perfect and we liked the led.
also, this drill is the only one we tested that requires you to depress but a single latch to change the batteries. the change is very smooth and is easily completed.
this drill is easily our top choice.
Milwaukeethe Milwaukee 2601-22 is another “com-pact” drill that garnered our attention. there was a bit of an issue with the bat-tery charging at first, however, we found that we did not have the battery fully seated. a full charge was achieved once the discrepancy was discovered.
the 2601-22 drill is a very stout look-ing tool. it’s got a “bulldog” look to it – full of power and ready to work. it’s a bit shorter in length than the Makita drill and outweighs it by more than eight ounces.
the led is a nice touch, but the posi-tion does not allow clear path to the point of contact. also, the led turns on as the trigger is pulled and immediately shuts off upon release. the Makita light remains illuminated for some time after the trigger is let go.
hole-drilling results were on par with the other drills, but the number of lag screws driven was the lowest except for the skil tool. however, torque was never an issue with the Milwaukee.
Makita BDF452HW800-462-5482 •makitatools.com
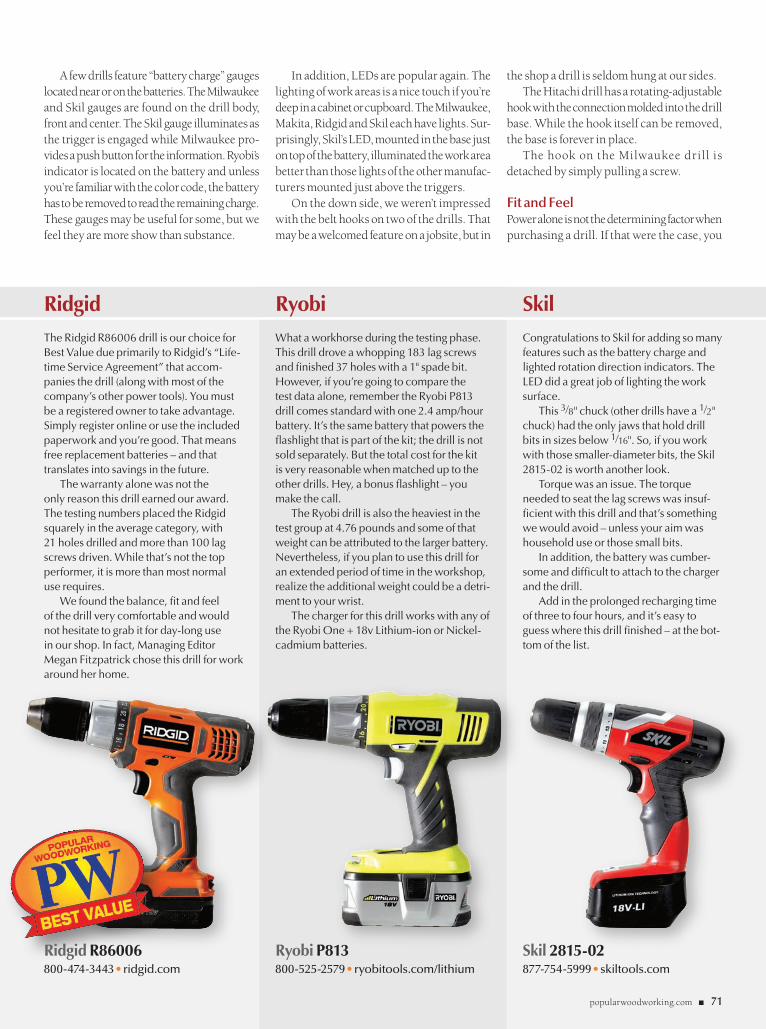
popularwoodworking.com ■ 71
A few drills feature “battery charge” gauges located near or on the batteries. The Milwaukee and Skil gauges are found on the drill body, front and center. The Skil gauge illuminates as the trigger is engaged while Milwaukee pro-vides a push button for the information. Ryobi’s indicator is located on the battery and unless you’re familiar with the color code, the battery has to be removed to read the remaining charge. These gauges may be useful for some, but we feel they are more show than substance.
In addition, LEDs are popular again. The lighting of work areas is a nice touch if you’re deep in a cabinet or cupboard. The Milwaukee, Makita, Ridgid and Skil each have lights. Sur-prisingly, Skil’s LED, mounted in the base just on top of the battery, illuminated the work area better than those lights of the other manufac-turers mounted just above the triggers.
On the down side, we weren’t impressed with the belt hooks on two of the drills. That may be a welcomed feature on a jobsite, but in
the shop a drill is seldom hung at our sides.The Hitachi drill has a rotating-adjustable
hook with the connection molded into the drill base. While the hook itself can be removed, the base is forever in place.
The hook on the Milwaukee drill is detached by simply pulling a screw.
Fit and FeelPower alone is not the determining factor when purchasing a drill. If that were the case, you
Ryobi P813800-525-2579 • ryobitools.com/lithium
Skil 2815-02877-754-5999 • skiltools.com
Ridgidthe ridgid r86006 drill is our choice for best Value due primarily to ridgid’s “life-time service agreement” that accom-panies the drill (along with most of the company’s other power tools). you must be a registered owner to take advantage. simply register online or use the included paperwork and you’re good. that means free replacement batteries – and that translates into savings in the future.
the warranty alone was not the only reason this drill earned our award. the testing numbers placed the ridgid squarely in the average category, with 21 holes drilled and more than 100 lag screws driven. while that’s not the top performer, it is more than most normal use requires.
we found the balance, fit and feel of the drill very comfortable and would not hesitate to grab it for day-long use in our shop. in fact, Managing editor Megan fitzpatrick chose this drill for work around her home.
Ryobiwhat a workhorse during the testing phase. this drill drove a whopping 183 lag screws and finished 37 holes with a 1" spade bit. however, if you’re going to compare the test data alone, remember the ryobi p813 drill comes standard with one 2.4 amp/hour battery. it’s the same battery that powers the flashlight that is part of the kit; the drill is not sold separately. but the total cost for the kit is very reasonable when matched up to the other drills. hey, a bonus flashlight – you make the call.
the ryobi drill is also the heaviest in the test group at 4.76 pounds and some of that weight can be attributed to the larger battery. nevertheless, if you plan to use this drill for an extended period of time in the workshop, realize the additional weight could be a detri-ment to your wrist.
the charger for this drill works with any of the ryobi one + 18v lithium-ion or nickel-cadmium batteries.
SkilCongratulations to skil for adding so many features such as the battery charge and lighted rotation direction indicators. the led did a great job of lighting the work surface.
this 3⁄8" chuck (other drills have a 1⁄2" chuck) had the only jaws that hold drill bits in sizes below 1⁄16". so, if you work with those smaller-diameter bits, the skil 2815-02 is worth another look.
torque was an issue. the torque needed to seat the lag screws was insuf-ficient with this drill and that’s something we would avoid – unless your aim was household use or those small bits.
in addition, the battery was cumber-some and difficult to attach to the charger and the drill.
add in the prolonged recharging time of three to four hours, and it’s easy to guess where this drill finished – at the bot-tom of the list.
Ridgid R86006800-474-3443 • ridgid.com
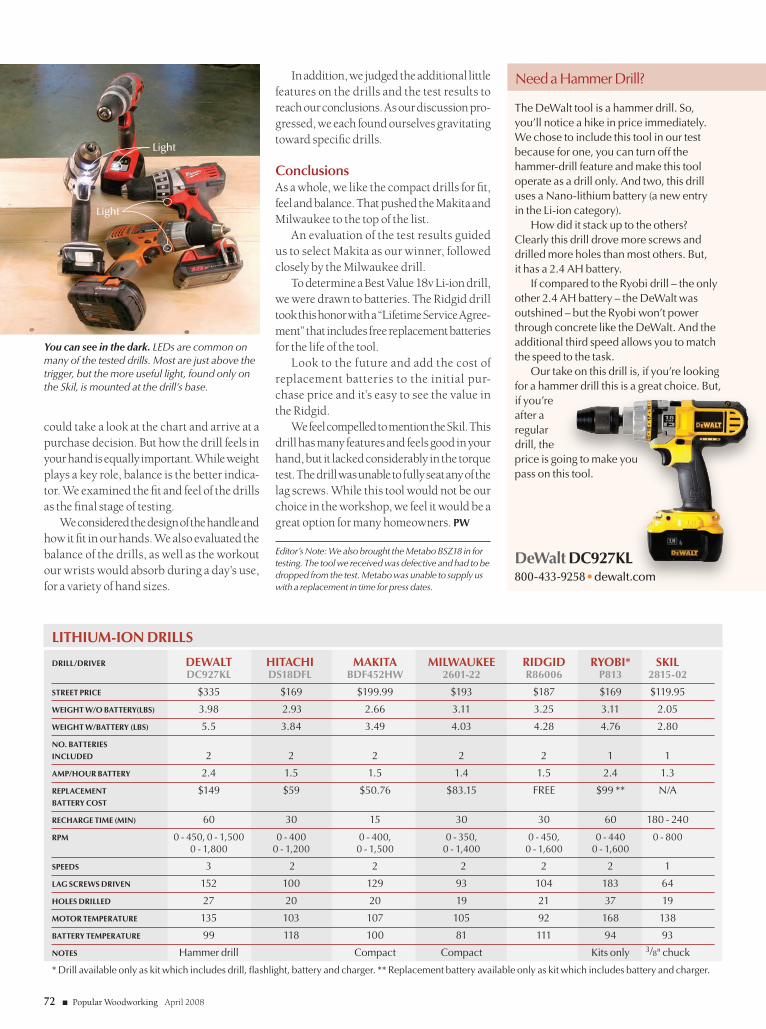
need a hammer drill?
72 ■ Popular Woodworking April 2008
LITHIUM-ION DRILLS
DRILL/DRIveR DeWaLT HITacHI MakITa MILWaUkee RIDgID RyOBI* SkIL Dc927kL DS18DFL BDF452HW 2601-22 R86006 P813 2815-02
STReeT PRIce $335 $169 $199.99 $193 $187 $169 $119.95
WeIgHT W/O BaTTeRy(LBS) 3.98 2.93 2.66 3.11 3.25 3.11 2.05
WeIgHT W/BaTTeRy (LBS) 5.5 3.84 3.49 4.03 4.28 4.76 2.80
NO. BaTTeRIeS
INcLUDeD 2 2 2 2 2 1 1
aMP/HOUR BaTTeRy 2.4 1.5 1.5 1.4 1.5 2.4 1.3
RePLaceMeNT $149 $59 $50.76 $83.15 free $99 ** n/a BaTTeRy cOST
RecHaRge TIMe (MIN) 60 30 15 30 30 60 180 - 240
RPM 0 - 450, 0 - 1,500 0 - 400 0 - 400, 0 - 350, 0 - 450, 0 - 440 0 - 800 0 - 1,800 0 - 1,200 0 - 1,500 0 - 1,400 0 - 1,600 0 - 1,600
SPeeDS 3 2 2 2 2 2 1
Lag ScReWS DRIveN 152 100 129 93 104 183 64
HOLeS DRILLeD 27 20 20 19 21 37 19
MOTOR TeMPeRaTURe 135 103 107 105 92 168 138
BaTTeRy TeMPeRaTURe 99 118 100 81 111 94 93
NOTeS hammer drill Compact Compact kits only 3/8" chuck
* drill available only as kit which includes drill, flashlight, battery and charger. ** replacement battery available only as kit which includes battery and charger.
could take a look at the chart and arrive at a purchase decision. But how the drill feels in your hand is equally important. While weight plays a key role, balance is the better indica-tor. We examined the fit and feel of the drills as the final stage of testing.
We considered the design of the handle and how it fit in our hands. We also evaluated the balance of the drills, as well as the workout our wrists would absorb during a day’s use, for a variety of hand sizes.
In addition, we judged the additional little features on the drills and the test results to reach our conclusions. As our discussion pro-gressed, we each found ourselves gravitating toward specific drills.
ConclusionsAs a whole, we like the compact drills for fit, feel and balance. That pushed the Makita and Milwaukee to the top of the list.
An evaluation of the test results guided us to select Makita as our winner, followed closely by the Milwaukee drill.
To determine a Best Value 18v Li-ion drill, we were drawn to batteries. The Ridgid drill took this honor with a “Lifetime Service Agree-ment” that includes free replacement batteries for the life of the tool.
Look to the future and add the cost of replacement batteries to the initial pur-chase price and it’s easy to see the value in the Ridgid.
We feel compelled to mention the Skil. This drill has many features and feels good in your hand, but it lacked considerably in the torque test. The drill was unable to fully seat any of the lag screws. While this tool would not be our choice in the workshop, we feel it would be a great option for many homeowners. PW
Editor’s Note: We also brought the Metabo BSZ18 in for testing. The tool we received was defective and had to be dropped from the test. Metabo was unable to supply us with a replacement in time for press dates.
You can see in the dark. LEDs are common on many of the tested drills. Most are just above the trigger, but the more useful light, found only on the Skil, is mounted at the drill’s base.
the dewalt tool is a hammer drill. so, you’ll notice a hike in price immediately. we chose to include this tool in our test because for one, you can turn off the hammer-drill feature and make this tool operate as a drill only. and two, this drill uses a nano-lithium battery (a new entry in the li-ion category).
how did it stack up to the others? Clearly this drill drove more screws and drilled more holes than most others. but, it has a 2.4 ah battery.
if compared to the ryobi drill – the only other 2.4 ah battery – the dewalt was outshined – but the ryobi won’t power through concrete like the dewalt. and the additional third speed allows you to match the speed to the task.
our take on this drill is, if you’re looking for a hammer drill this is a great choice. but, if you’re after a regular drill, the price is going to make you pass on this tool.
Light
Light
DeWalt Dc927kL800-433-9258 • dewalt.com

For more information call 800 344-3348 or e-mail: [email protected]
RETAIL FRANCHISE OPPORTUNITIES • SUPPORT • TRAINING™
Dept: F08PW04Q
“When I think about owning my own business … When woodworking is your passion, and owning your own business is your goal, Woodcraft can help you take your skill and expertise to the retail level.
Bill Carroll CFEDirector Of Franchising
I’m Bill Carroll, call me & I’ll show you how you can own a Woodcraft franchise.
… I think of Woodcraft”
1177 Rosemar RoadP.O. Box 1686Parkersburg, WV 26102-1686
Craftsmen around the world
have discovered the secret of
better quality work. The Razor
Saw cuts by pulling and will
give a cleaner, more accurate
cut in half the time.
Purchase a RAZOR SAW now
and we will include our 102
page catalog of the world’s
finest woodworking tools. Or
send $2.00 for a two year sub-
scription to our Catalog.
www.japanwoodworker.com
Dept P1
Subscribe today and become one of the first wood-workers to receive 1-year of Woodworking Magazine mailed right to your door! You’ll get a publication committed to finding a better way to build.Each issue is overflowing with the in-depth knowl-edge you need to achieve true craftsmanship. You’ll discover …■ Groundbreaking techniques for power and hand
tools you won’t find anywhere else■ Honest reviews of important tools that other magazines ignore■ Foolproof plans for authentic Shaker and Arts & Crafts classics■ Sensible shop tricks you’ll put to use right away■ And no advertising — ever!
Subscribe Now!CIRCLE #127 ON FREE INFORMATION CARD.
CIRCLE #149 ON FREE INFORMATION CARD.
CIRCLE #167 ON FREE INFORMATION CARD.CIRCLE #160 ON FREE INFORMATION CARD.
4 issues for just$19.96
Don’t miss out on this exclusive Charter Subscription Offer!
OrDer NOw at woodworking-magazine.com or call 800-283-3542!
74 ■ Popular Woodworking April 2008
Jig Journalb y r o b e r t w. l a n g
lead photo by al parrish
Best Band Saw Fence
every time we bring a new band saw into our shop for testing, I make the same obser-vation, which is actually a complaint. My co-workers know it by heart, and they know it is coming as the parts come out of the crate. “Why don’t they take the money that they put into this fancy fence and either increase the quality somewhere else on the machine, or lower the price?”
I learned about band saws before the era of tension-release levers and aluminum extru-sions. Let me make it clear that I’m not just a cranky old curmudgeon. I’ve welcomed and adopted many innovations during the last 20 years, but I just don’t get band saw fences. Take back the bells and whistles please and give me a heavy old cast iron saw. I already have the fence; and if you have a straight piece of wood and a couple clamps, then so do you.
For most straight cuts at the band saw, any fence is a lot more trouble than it is worth. Unless you’re making a number of repeated, precise cuts, the time spent setting up a fence is time wasted, and the fence will likely be in the way when making other cuts.
If you’re making a number of rips, cut-ting joints or resawing, a fence makes sense, but a straight piece of wood clamped to the saw table will work as well or better than any commercial fence. The bonus is that it won’t cost you anything, and it won’t be in the way when you don’t need it.
Give Yourself a HandFor the majority of straight cuts, simply mark-ing a line on the work and cutting to the line is more efficient and equal in quality to a fence- guided cut. I plant my left hand on the table next to the work (as seen at the top of the next page) and use that as a guide.
If the saw tends to drift, a slight increase in pressure from either your extended index
finger or your thumb changes the angle of the work, and that does the trick. When the board approaches the end of the cut, I extend my thumb and fingers to help push the last few inches of the work past the blade.
Rip cuts made on the band saw aren’t quite as straight and even as rip cuts made on the
table saw. If that kind of precision is needed, I head to the table saw, or make the cut a hair wide at the band saw then trim back to the line with a handplane or on the jointer.
I know that some woodworkers have been convinced to do all their ripping on the band saw, but that is slow and awkward on all but
Nothing fancy. Most band saw fences are more show and style than substance. A simple piece of wood and a couple clamps work just as well, and even have some advantages.
Compact, simple to use, infinitely adjustable – and free.
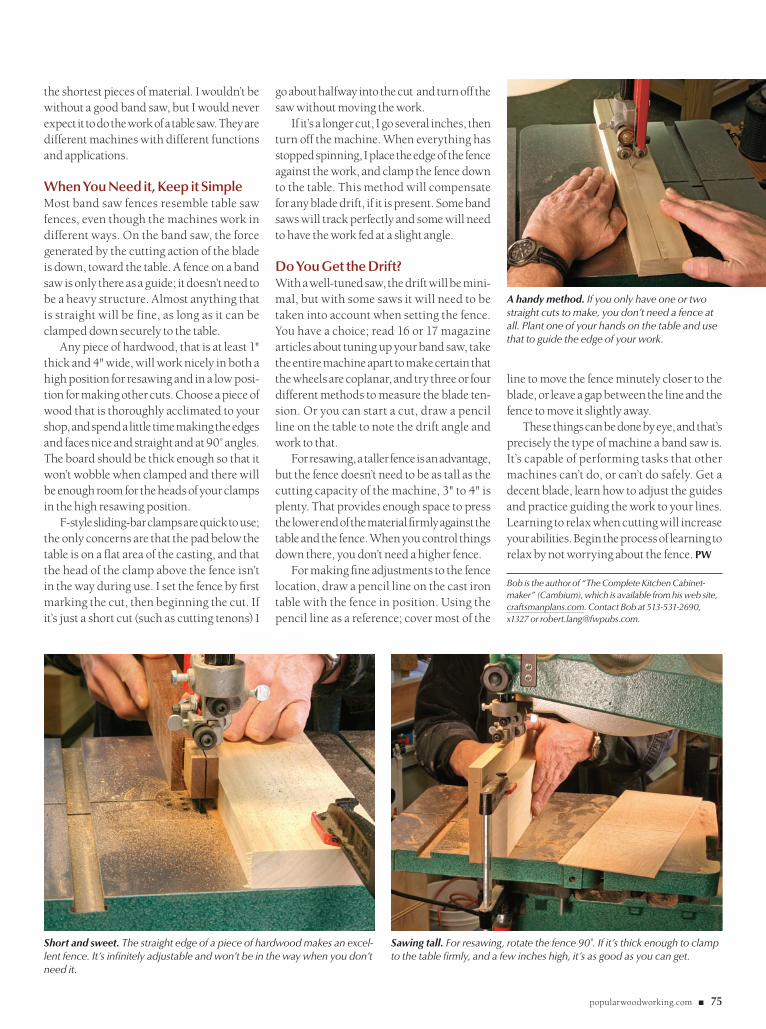
popularwoodworking.com ■ 75
the shortest pieces of material. I wouldn’t be without a good band saw, but I would never expect it to do the work of a table saw. They are different machines with different functions and applications.
When You Need it, Keep it SimpleMost band saw fences resemble table saw fences, even though the machines work in different ways. On the band saw, the force generated by the cutting action of the blade is down, toward the table. A fence on a band saw is only there as a guide; it doesn’t need to be a heavy structure. Almost anything that is straight will be fine, as long as it can be clamped down securely to the table.
Any piece of hardwood, that is at least 1" thick and 4" wide, will work nicely in both a high position for resawing and in a low posi-tion for making other cuts. Choose a piece of wood that is thoroughly acclimated to your shop, and spend a little time making the edges and faces nice and straight and at 90˚ angles. The board should be thick enough so that it won’t wobble when clamped and there will be enough room for the heads of your clamps in the high resawing position.
F-style sliding-bar clamps are quick to use; the only concerns are that the pad below the table is on a flat area of the casting, and that the head of the clamp above the fence isn’t in the way during use. I set the fence by first marking the cut, then beginning the cut. If it’s just a short cut (such as cutting tenons) I
go about halfway into the cut and turn off the saw without moving the work.
If it’s a longer cut, I go several inches, then turn off the machine. When everything has stopped spinning, I place the edge of the fence against the work, and clamp the fence down to the table. This method will compensate for any blade drift, if it is present. Some band saws will track perfectly and some will need to have the work fed at a slight angle.
Do You Get the Drift?With a well-tuned saw, the drift will be mini-mal, but with some saws it will need to be taken into account when setting the fence. You have a choice; read 16 or 17 magazine articles about tuning up your band saw, take the entire machine apart to make certain that the wheels are coplanar, and try three or four different methods to measure the blade ten-sion. Or you can start a cut, draw a pencil line on the table to note the drift angle and work to that.
For resawing, a taller fence is an advantage, but the fence doesn’t need to be as tall as the cutting capacity of the machine, 3" to 4" is plenty. That provides enough space to press the lower end of the material firmly against the table and the fence. When you control things down there, you don’t need a higher fence.
For making fine adjustments to the fence location, draw a pencil line on the cast iron table with the fence in position. Using the pencil line as a reference; cover most of the
A handy method. If you only have one or two straight cuts to make, you don’t need a fence at all. Plant one of your hands on the table and use that to guide the edge of your work.
line to move the fence minutely closer to the blade, or leave a gap between the line and the fence to move it slightly away.
These things can be done by eye, and that’s precisely the type of machine a band saw is. It’s capable of performing tasks that other machines can’t do, or can’t do safely. Get a decent blade, learn how to adjust the guides and practice guiding the work to your lines. Learning to relax when cutting will increase your abilities. Begin the process of learning to relax by not worrying about the fence. pw
Bob is the author of “The Complete Kitchen Cabinet-maker” (Cambium), which is available from his web site, craftsmanplans.com. Contact Bob at 513-531-2690, x1327 or [email protected].
Short and sweet. The straight edge of a piece of hardwood makes an excel-lent fence. It’s infinitely adjustable and won’t be in the way when you don’t need it.
Sawing tall. For resawing, rotate the fence 90˚. If it’s thick enough to clamp to the table firmly, and a few inches high, it’s as good as you can get.
76 ■ Popular Woodworking April 2008
Great Woodshopsb y r o b e r t W. l a n G
For video of our editors’ visit to H. Gerstner & Sons, go to:
popularwoodworking.com/apr08
Online EXTRAS
pHotoS by tHe autHor
A Century of Gerstner
the dream of starting a nice little business is common among woodworkers, and it isn’t anything new. In 1906, Harry Gerstner fol-lowed his dream and established H. Gerstner & Sons in Dayton, Ohio.
It started the way many of these stories do. Harry worked as a patternmaker, made himself a nice tool chest, and sold one to an envious co-worker. Within a few months he left his job, and within a few years he was doing well enough to move out of his garage. In 1913 he built the structure that his com-pany still occupies.
Harry developed a product that soon became the standard for machinists and tool-and-die makers. At the time, showing a prospective employer your tools was part of the job interview, and if you showed up with a Gerstner chest full of Starrett tools you made a great first impression. Often, that was enough to land a job.
Harry also developed a process for manu-facturing that is a model of efficiency. Before anyone ever heard the term “work-cell,” Ger-stner employees were assembling chests and drawers using machines dedicated to perform-ing one step in a complex process. The same basic methods are used today, and some of the equipment and work areas are nearly as old as the building itself.
As Senior Editor Glen D. Huey and I toured the building, we kept saying, “this is the way a woodshop should be.” The ceilings are high, the floors are wood, and natural light fills the area from an abundance of windows. Despite
the old-time atmosphere, there is an efficient dust-collection system and up-to-date spray booth for finishing.
While there are plenty of links to the past, the company has survived by adapting to changing times. Dental tool cabinets once represented one-third of sales, until OSHA regulations adopted in the 1970s required dental tools to be stored in containers that could be sterilized in an autoclave. Quarter-sawn white oak is a strong wood, but it won’t hold up to that.
Using the product you make. At most work-stations in the Gerstner shop, the company’s toolchests are in daily use. Some are of recent manufacture, and some are decades old. All of them serve their purpose and function well.
Well-deserved reputation. Gerstner chests became the standard because of their fit and finish. Side-hung drawers move easily on maple runners for decades.
one woodworker’s toolbox launched this thriving family business.
popularwoodworking.com ■ 77
Changes in manufacturing have reduced the number of machinists, and the need for those remaining to keep a lot of hand tools. Today, the strongest market for these chests is among collectors. Not collectors of tools or tool chests, but collectors of anything small, such as pocket knives or arrowheads.
As with any object nicely made from solid wood, these tool chests are not cheap. When the company first started, the target price was a week’s wages for a journeyman machinist. In 1906 in Dayton, Ohio, the work week was 60 hours long and paid 10 cents an hour. The price today is roughly the same in terms of wages; a week’s pay for a machinist will buy you a very nice chest.
Today, Gerstner employs about a dozen men, cross-trained on the various operations that comprise the making of a solid box with sweet sliding drawers. Quartersawn white oak was once the dominant material, but cherry has become more popular in recent years. Chests are also made of walnut, maple and exotic woods.
The process starts with rough kiln-dried lumber, and the tool chests are made in batches of up to 50. Wood is selected, ripped and planed, then stacked on carts in the rough mill area. The carts are rolled to a machining and assembly area on the first floor. In this area, parts are cut to size and tongue-and-groove joints are milled.
Modern Methods, Vintage ToolsMaking essentially the same product for a century leads to methods that work well and work efficiently. Each standard operation has a machine or workstation dedicated to that one task. Most of these are table-saw based, and many of the saws have been in the same place, performing the same task since before World War II.
There are also several machines that were custom made to perform one function. The machine in the photo at center left on this page is a good example. Four saw blades are mounted on a shaft behind a small sliding table. Drawer sides are cut to length, and a groove is cut in both ends in one quick step.
Tongue-and-groove joints are the main method of holding the cases and drawers together. The sides of the cases are made of three pieces of wood, with a cross-grain end forming the till and top of the box. The box top is part of the initial assembly, and is cut off to ensure grain match and fit.
Step back in time. On the second floor, this area is used for fitting drawers to cases, and preparing work for finishing.
This is your grandfather’s table saw. Box lids are separated from cases on this vintage saw. Sound construction and constant maintenance keep many old machines in use.
Purpose-built and still on the job. This custom-made machine cuts drawer sides to length, and puts a groove in each end with one stroke of a sliding table.
Old and new, side by side. Behind this vintage table saw sits a modern CNC router. Both machines see daily use.
78 ■ Popular Woodworking April 2008
Great Woodshops
Drawer fronts are grouped together for matching grain, and these groups are num-bered and kept together throughout the manufacturing process. Each drawer is fit to a specific opening in a specific chest.
You can almost imagine being back in time to the 1920s or 1930s until you notice that all of the machinery is guarded to meet modern safety requirements. The other thing that snaps you back to the present day is the CNC router in the midst of the vintage machinery.
Drawer dividers and the box tops and bottoms are fit in stopped grooves milled in the sides of the cases. There is also a shallow groove for each drawer runner – a small piece of hard maple. The drawers are side hung; a groove in the drawer side fits neatly on the runner. We saw chests that were nearly 100 years old with perfectly functioning drawers. These grooves were once cut on pin routers with templates, but the CNC machine has added speed and accuracy to the process.
The cases are assembled at a bench near the CNC machine, and placed in specially made presses until the glue has dried. Drawers are
Taking work to the next level. A rope-operated elevator moves work between floors in the factory.
All together now. With all the joints milled pre-cisely, Terrell Adams assembles boxes in a quick, well-practiced process.
One mighty clamp. Custom presses are used to clamp assembled cases. Similar presses are used for assembling drawers.
also clamped in similar presses, saving time and eliminating the need to tighten many clamps repetitively.
When the assembled boxes are removed from the press, they are stacked on carts and are ready to be moved upstairs for fitting and finishing. How they get there brings us back to the historic nature of the building.
Moving Up the Old-Fashioned WayThe freight elevator is manually operated. The elevator is original to the building, and the counter-weighted car moves easily between f loors by pulling on a rope. In the 1970s
Home again for R & R. The chest in the foreground is brand new. The other one is a vintage chest, refinished and refurbished to look like new.

popularwoodworking.com ■ 79
Made like they used to. A seven-drawer chest like this was used by the Wright brothers. A vin-tage sales catalog sits on a newly made model.
upgrades were considered, but meeting cur-rent regulations would have been prohibi-tively expensive. Keeping the elevator original allowed it to be grandfathered in.
After being unloaded on the second floor, assembled chests begin a circular trip around the building. The outsides of the cases are sanded so that all the joints are flush and the tops are cut off. The boxes are moved around the corner to another area where each drawer is fitted to its opening and a bead detail is added to the bottom of each drawer front. After fitting, the boxes travel to a finishing area and spray booth.
Oak and cherry cases are stained; walnut and maple cases receive a clear finish. In this area of the plant, you may also find an antique Gerstner chest being repaired or refinished. Restoring old cases is a small portion of the company’s business, and the cost of restoration can equal the cost of a complete new chest. You can also find old chests in use on benches and window sills around the shop.
Outside the spray booth is an area where hardware is installed. All of the mounting holes for the hardware attached to the cases are drilled on the CNC machine before assem-bly, and the holes for the brass knobs on the drawer fronts are bored using templates to center them on the drawer front.
The last steps before packing are the glu-
Still on the job. The fit of drawers in finished cases are checked a final time, and the finish is touched-up before packing. Employee Walter Rickard has worked for Gerstner for 19 years.
ing of felt to the drawer bottoms, a final check of the drawer’s operation, and an overall inspection and touch up. Completed chests are packed in corrugated cartons, and this old-time process winds up with a modern touch. Chests are protected from damage dur-ing shipping by expanding foam between the chest and the carton.
Working With HistoryAs you might expect, an ongoing operation in an historic building comes with a sense of history. At Gerstner, the history is very much a part of things. Since moving into the build-ing in 1913, hardly any paperwork has been thrown away. With the company still owned by Harry Gerstner’s descendants, it is the ulti-mate Grandpa’s basement.
Old documents include business records, original brochures and catalogs; a large, cus-tom-made cabinet in the office hall contains hundreds of original drawings. One room on the first floor is devoted to a showroom that is also a museum. Brand-new chests sit beside shelves of old chests. One of the old pieces was willed back to the company because the owner figured that his children wouldn’t appreciate or take care of it.
It’s in good hands, along with other vin-tage boxes, including the first toolbox made by Harry Gerstner for his own use. That box sits in the office of the company president, underneath a limited-edition chest made for the company’s100th anniversary.
The company gets requests from wood-workers for plans for their chests, but these are not available, nor are sales and production figures. Once a year, in June, a special sale is held at the factory. The high standards for the finished chests generate a number of “seconds” that are sold at a substantial discount.
At the sale, there are usually a few chests with cosmetic problems that appear early in the production process. These are sold in pieces if you want to assemble your own. For more information on the annual sale call 937-228-1662 or visit GerstnerUsa.com on the web. PW
Bob is a senior editor of popular Woodworking and author of several books on Craftsman-style furniture. His web site is craftsmanplans.com.
No generation gap. In the company president’s office, a limited edition 100th anniversary chest rests on the first toolbox made by the founder.
Get your hands on Woodworking Magazine — now in book form!
Woodworking Magazine —The Book
We’re pleased to offer the first seven issues of Woodworking Magazine in book form—252 pages and the only place you’ll find the sold-out issues in print form.
Woodworking Magazine, a sister publication of Popular Woodworking,teaches the fundamental knowledge necessary for good craftsmanship.
In each issue, we challenge woodworking’s conventional wisdom to find the techniques, materials and tools that work best.
Order your copy today atwoodworking-magazine.com/books
80 ■ Popular Woodworking April 2008
Product Index
AdhesivesFranklin International C4 117 titebond.comGorilla Glue 7 120 gorillaglue.com
Bits, BlAdes & CuttersAmana Tool 15 100 amanatool.comForrest Mfg. 19 116 forrestblades.comFreud USA 9 118 freudtools.comInfinity Tools 13 125 infinitytools.comRidge Carbide Tools 84 144 ridgecarbidetool.comRouterbits.com 84 147 routerbits.comWoodline USA 29 157 woodline.com
Books & videosWoodworker’s Book Club 24-25, 86 — woodworkersbookclub.com
FAstenersArrow Fasteners 14 102 arrowfasteners.com
Finishes & suPPliesCritter Spray Products 87 170 crittersprayproducts.com
Furniture & ProjeCt PArtsOsborne Wood Products 13, 55 138, 166 osbornewood.com
hAnd toolsBlue Spruce Toolworks 85 105 bluesprucetoolworks.comBob’s Rule 87 106 bobsrule.comBridge City Toolworks 13 107 bridgecitytools.comCraftsman Studio 85 110 craftsmanstudio.comCrown Plane Co. 84 111 crownplane.comFine Tool Journal 85 115 finetoolj.comIrwin Industrial Tool 2 126 irwin.comJapan Woodworker 73 127 thejapanwoodworker.comLie-Nielsen Toolworks 87 129 lie-nielsen.comManny’s Woodworker’s Place 84 131 mannyswoodworkersplace.comPowell Manufacturing 84 141 planeperfect.comTools for Working Wood 21 152 toolsforworkingwood.comZona 84 168 zonatool.com
hArdWAreWhitechapel Ltd. 55 156 whitechapel-ltd.comWoodworker’s Hardware 73 160 wwhardware.com
kits & PlAnsAmerican Furniture Design 85 101 americanfurnituredsgn.comCraftsman Plans 85 — craftsmanplans.comPygmy Boats 84 — pygmyboats.comSaturday Sawdust 84 148 saturdaysawdust.comTexas Knifemaker 85 151 texasknife.comU-Bild.com 84 153 u-bild.com
MisCellAneousDR Power 22 — drpower.com
PoWer tool ACCessoriesBeall Tool Company 84 104 bealltool.comCraftsman Gallery 13 109 thecraftsmangallery.comFeatherBow 84 113 featherbow.comKeller & Company 84 128 kellerdovetail.comLeigh Industries 13 — leighjigs.comWoodpeckers 13 158 woodpeck.com
PoWer toolsBob Marino’s Festool Store 87 — bobmarinosbesttools.comCarveWright 85 108 carvewright.comFein Power Tools 35 114 feinus.comGeneral International 15 119 general.caGrex USA 55 122 grexusa.comGrizzly Industrial C2-1 123 grizzly.comOneway 55 137 oneway.on.caPowermatic 33 142 powermatic.comRJR Studios 29 169 rjrstudios.comRikon Power Tools 21 145 rikontools.com
PAGE# CIRCLE# WEBADDRESS PAGE#CIRCLE# WEBADDRESS
PoWer tools, cont’dShopbot 73 149 shopbottools.comSteel City Toolworks C3 150 steelcitytoolworks.comWoodstock International 23 159 woodstockinternational.com
sAWMills & kilnsGranberg International 85 121 granberg.comNorwood Industries 84 134 norwoodindustries.com
sChool/instruCtion Marc Adams School 87 132 marcadams.comNorthwest Woodworking Studio 21, 84 133, 165 northwestwoodworking.comOld English Academy of Woodworking 85 135 oefcc.comPhiladelphia Furniture Workshop 84 140 philadelphiafurnitureworkshop.com
shoP ACCessories Oneida Air Systems 5 136 oneida-air.com
turning suPPlies Augums Pen Works 85 103 augumspenworks.comPackard Woodworks 84 139 packardwoodworks.com
Wood & veneers Curious Woods 85 112 curiouswoods.comM.L. Condon 85 130 —Wall Lumber 87 154 walllumber.comWoodfinder 85 — woodfinder.comWoodworker’s Source 85 161 woodworkerssource.com
WoodWorking CAtAlogs Hartville Tool 87 124 hartvilletool.comRockler 21 146 rockler.comWoodcraft 11, 73 155, 167 woodcraft.com

To purchase your downloadable issues, visit woodworking-magazine.com/backissues
You can now download single issues of Woodworking Magazinefor just $6 each. Each issue is fully searchable and can be easily viewed and printed using Adobe Acrobat’s free reader (If you don’t have it already, you can download it at adobe.com.)
Digital downloads of Woodworking Magazine
now available on our site!
Streaming Video Player • Finishing Section Complete Article Index • PW Staff Blogs • Online Bookstore
Get a daily dose of FREE woodworking insight at popularwoodworking.com!
You’ll fi nd fresh project plans, articles and techniques every day of the week at popularwoodworking.com —
and these FREE resources are already available for use:
popularwoodworking.com ■ 81
AdvertIser IndexADVERTISER PAGE# CIRCLE# WEBADDRESS
Amana Tool 15 100 amanatool.comAmerican Furniture Design 85 101 americanfurnituredsgn.comArrow Fasteners 14 102 arrowfasteners.comAugums Pen Works 85 103 augumspenworks.comBeall Tool Company 84 104 bealltool.comBlue Spruce Toolworks 85 105 bluesprucetoolworks.comBob Marino’s Festool Store 87 — bobmarinosbesttools.comBob’s Rule 87 106 bobsrule.comBridge City Toolworks 13 107 bridgecitytools.comCarveWright 85 108 carvewright.comCraftsman Gallery 13 109 thecraftsmangallery.comCraftsman Plans 85 — craftsmanplans.comCraftsman Studio 85 110 craftsmanstudio.comCritter Spray Products 87 170 crittersprayproducts.comCrown Plane Co. 84 111 crownplane.comCurious Woods 85 112 curiouswoods.comDR Power 22 — drpower.comFeatherBow 84 113 featherbow.comFein Power Tools 35 114 feinus.comFine Tool Journal 85 115 finetoolj.comForrest Mfg. 19 116 forrestblades.comFranklin International C4 117 titebond.comFreud USA 9 118 freudtools.comGeneral International 15 119 general.caGorilla Glue 7 120 gorillaglue.comGranberg International 85 121 granberg.comGrex USA 55 122 grexusa.comGrizzly Industrial C2-1 123 grizzly.comHartville Tool 87 124 hartvilletool.comInfinity Tools 13 125 infinitytools.comIrwin Industrial Tool 2 126 irwin.comJapan Woodworker 73 127 thejapanwoodworker.comKeller & Company 84 128 kellerdovetail.comLeigh Industries 13 — leighjigs.comLie-Nielsen Toolworks 87 129 lie-nielsen.comM.L. Condon 85 130 —Manny’s Woodworker’s Place 84 131 mannyswoodworkersplace.comMarc Adams School 87 132 marcadams.comNorthwest Woodworking Studio 21, 84 133, 165 northwestwoodworking.comNorwood Industries 84 134 norwoodindustries.comOld English Academy of Woodworking 85 135 oefcc.comOneida Air Systems 5 136 oneida-air.comOneway 55 137 oneway.on.caOsborne Wood Products 13, 55 138, 166 osbornewood.comPackard Woodworks 84 139 packardwoodworks.comPhiladelphia Furniture Workshop 84 140 philadelphiafurnitureworkshop.comPowell Manufacturing 84 141 planeperfect.comPowermatic 33 142 powermatic.comPygmy Boats 84 — pygmyboats.comRJR Studios 29 169 rjrstudios.comRidge Carbide Tools 84 144 ridgecarbidetool.comRikon Power Tools 21 145 rikontools.comRockler 21 146 rockler.comRouterbits.com 84 147 routerbits.comSaturday Sawdust 84 148 saturdaysawdust.comShopbot 73 149 shopbottools.comSteel City Toolworks C3 150 steelcitytoolworks.comTexas Knifemaker 85 151 texasknife.comTools for Working Wood 21 152 toolsforworkingwood.comU-Bild.com 84 153 u-bild.comWall Lumber 87 154 walllumber.comWhitechapel Ltd. 55 156 whitechapel-ltd.comWoodcraft 11, 73 155, 167 woodcraft.comWoodfinder 85 — woodfinder.comWoodline USA 29 157 woodline.comWoodpeckers 13 158 woodpeck.comWoodstock International 23 159 woodstockinternational.comWoodworker’s Book Club 24-25, 86 — woodworkersbookclub.comWoodworker’s Hardware 73 160 wwhardware.comWoodworker’s Source 85 161 woodworkerssource.comZona 84 168 zonatool.com
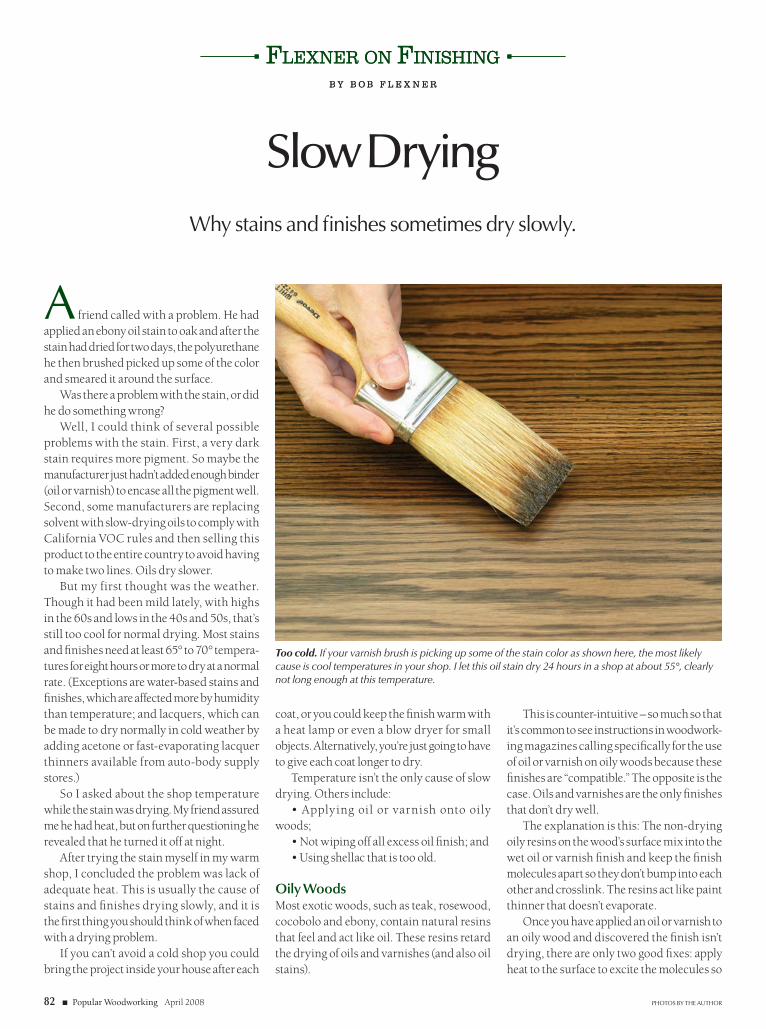
82 ■ Popular Woodworking April 2008
Flexner on Finishingb y b o b F l e x n e r
Flexner on Finishingb y b o b F l e x n e r
photos by the author
Slow Drying
a friend called with a problem. He had applied an ebony oil stain to oak and after the stain had dried for two days, the polyurethane he then brushed picked up some of the color and smeared it around the surface.
Was there a problem with the stain, or did he do something wrong?
Well, I could think of several possible problems with the stain. First, a very dark stain requires more pigment. So maybe the manufacturer just hadn’t added enough binder (oil or varnish) to encase all the pigment well. Second, some manufacturers are replacing solvent with slow-drying oils to comply with California VOC rules and then selling this product to the entire country to avoid having to make two lines. Oils dry slower.
But my first thought was the weather. Though it had been mild lately, with highs in the 60s and lows in the 40s and 50s, that’s still too cool for normal drying. Most stains and finishes need at least 65° to 70° tempera-tures for eight hours or more to dry at a normal rate. (Exceptions are water-based stains and finishes, which are affected more by humidity than temperature; and lacquers, which can be made to dry normally in cold weather by adding acetone or fast-evaporating lacquer thinners available from auto-body supply stores.)
So I asked about the shop temperature while the stain was drying. My friend assured me he had heat, but on further questioning he revealed that he turned it off at night.
After trying the stain myself in my warm shop, I concluded the problem was lack of adequate heat. This is usually the cause of stains and finishes drying slowly, and it is the first thing you should think of when faced with a drying problem.
If you can’t avoid a cold shop you could bring the project inside your house after each
coat, or you could keep the finish warm with a heat lamp or even a blow dryer for small objects. Alternatively, you’re just going to have to give each coat longer to dry.
Temperature isn’t the only cause of slow drying. Others include:
• Applying oil or varnish onto oily woods;
• Not wiping off all excess oil finish; and• Using shellac that is too old.
Oily WoodsMost exotic woods, such as teak, rosewood, cocobolo and ebony, contain natural resins that feel and act like oil. These resins retard the drying of oils and varnishes (and also oil stains).
This is counter-intuitive – so much so that it’s common to see instructions in woodwork-ing magazines calling specifically for the use of oil or varnish on oily woods because these finishes are “compatible.” The opposite is the case. Oils and varnishes are the only finishes that don’t dry well.
The explanation is this: The non-drying oily resins on the wood’s surface mix into the wet oil or varnish finish and keep the finish molecules apart so they don’t bump into each other and crosslink. The resins act like paint thinner that doesn’t evaporate.
Once you have applied an oil or varnish to an oily wood and discovered the finish isn’t drying, there are only two good fixes: apply heat to the surface to excite the molecules so
Too cold. If your varnish brush is picking up some of the stain color as shown here, the most likely cause is cool temperatures in your shop. I let this oil stain dry 24 hours in a shop at about 55°, clearly not long enough at this temperature.
Why stains and finishes sometimes dry slowly.
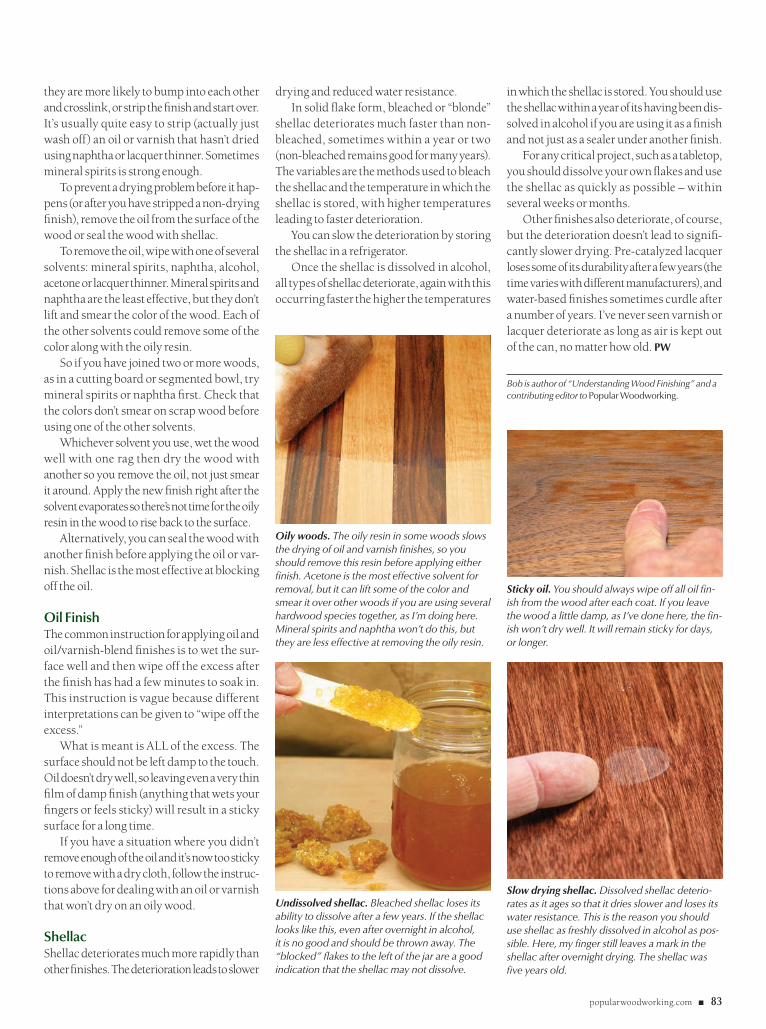
popularwoodworking.com ■ 83
they are more likely to bump into each other and crosslink, or strip the finish and start over. It’s usually quite easy to strip (actually just wash off) an oil or varnish that hasn’t dried using naphtha or lacquer thinner. Sometimes mineral spirits is strong enough.
To prevent a drying problem before it hap-pens (or after you have stripped a non-drying finish), remove the oil from the surface of the wood or seal the wood with shellac.
To remove the oil, wipe with one of several solvents: mineral spirits, naphtha, alcohol, acetone or lacquer thinner. Mineral spirits and naphtha are the least effective, but they don’t lift and smear the color of the wood. Each of the other solvents could remove some of the color along with the oily resin.
So if you have joined two or more woods, as in a cutting board or segmented bowl, try mineral spirits or naphtha first. Check that the colors don’t smear on scrap wood before using one of the other solvents.
Whichever solvent you use, wet the wood well with one rag then dry the wood with another so you remove the oil, not just smear it around. Apply the new finish right after the solvent evaporates so there’s not time for the oily resin in the wood to rise back to the surface.
Alternatively, you can seal the wood with another finish before applying the oil or var-nish. Shellac is the most effective at blocking off the oil.
Oil FinishThe common instruction for applying oil and oil/varnish-blend finishes is to wet the sur-face well and then wipe off the excess after the finish has had a few minutes to soak in. This instruction is vague because different interpretations can be given to “wipe off the excess.”
What is meant is ALL of the excess. The surface should not be left damp to the touch. Oil doesn’t dry well, so leaving even a very thin film of damp finish (anything that wets your fingers or feels sticky) will result in a sticky surface for a long time.
If you have a situation where you didn’t remove enough of the oil and it’s now too sticky to remove with a dry cloth, follow the instruc-tions above for dealing with an oil or varnish that won’t dry on an oily wood.
ShellacShellac deteriorates much more rapidly than other finishes. The deterioration leads to slower
drying and reduced water resistance.In solid flake form, bleached or “blonde”
shellac deteriorates much faster than non-bleached, sometimes within a year or two (non-bleached remains good for many years). The variables are the methods used to bleach the shellac and the temperature in which the shellac is stored, with higher temperatures leading to faster deterioration.
You can slow the deterioration by storing the shellac in a refrigerator.
Once the shellac is dissolved in alcohol, all types of shellac deteriorate, again with this occurring faster the higher the temperatures
in which the shellac is stored. You should use the shellac within a year of its having been dis-solved in alcohol if you are using it as a finish and not just as a sealer under another finish.
For any critical project, such as a tabletop, you should dissolve your own flakes and use the shellac as quickly as possible – within several weeks or months.
Other finishes also deteriorate, of course, but the deterioration doesn’t lead to signifi-cantly slower drying. Pre-catalyzed lacquer loses some of its durability after a few years (the time varies with different manufacturers), and water-based finishes sometimes curdle after a number of years. I’ve never seen varnish or lacquer deteriorate as long as air is kept out of the can, no matter how old. pw
Bob is author of “Understanding Wood Finishing” and a contributing editor to popular Woodworking.
Slow drying shellac. Dissolved shellac deterio-rates as it ages so that it dries slower and loses its water resistance. This is the reason you should use shellac as freshly dissolved in alcohol as pos-sible. Here, my finger still leaves a mark in the shellac after overnight drying. The shellac was five years old.
Undissolved shellac. Bleached shellac loses its ability to dissolve after a few years. If the shellac looks like this, even after overnight in alcohol, it is no good and should be thrown away. The “blocked” flakes to the left of the jar are a good indication that the shellac may not dissolve.
Sticky oil. You should always wipe off all oil fin-ish from the wood after each coat. If you leave the wood a little damp, as I’ve done here, the fin-ish won’t dry well. It will remain sticky for days, or longer.
Oily woods. The oily resin in some woods slows the drying of oil and varnish finishes, so you should remove this resin before applying either finish. Acetone is the most effective solvent for removal, but it can lift some of the color and smear it over other woods if you are using several hardwood species together, as I’m doing here. Mineral spirits and naphtha won’t do this, but they are less effective at removing the oily resin.

woodworker’s Marketplace
84 ■ Popular Woodworking April 2008
circle #147 on free information card. circle #104 on free information card.
circle #168 on free information card.
U - B I L D . COMHundreds of full-size woodworking plans at low prices. Free downloadable mini-plans. Indoor, outdoor, children’s and holiday projects at all skill levels. 48-page catalog $2.00 (refunded on 1st order) call (800) 828-2453.
circle #153 on free information card.
You can build real Antique Reproduction Furniture projects, because my project plans
themselves are antique reproductions...
circle #148 on free information card.
Call For Your Free Catalog1-888-811-7269
Rou erbits.comBits, Blades, Books, & More...
Whiteside Router Bits Systimatic Saw Blades Bench Dog
Fisch Forstner Bitswww.Routerbits.com
circle #144 on free information card.
Powell Mfg. Co. (781) 237- 4876396 Washington St. #114, Wellesley, MA 02481 USA
& DRESSING PLATES
www.planeperfect.com
ODATE CROWNING
circle #139 on free information card.
circle #140 on free information card.
circle #141 on free information card.
circle #134 on free information card.
Mastery Programs
A School for Woodworking
Hands-On Furniture Making Courses in Portland Oregon
DISTANCE & RESIDENT MASTERY PROGRAMSwith Gary Rogowski
Study Design - Practice Skills - Learn the Craft
circle #165 on free information card.
FEATHERBOW
860-209-5786 featherbow.com137 TROUTSTREAM DRIVE, VERNON, CT. 06066
Made in USAPat. Pending
FeatherBow 3 in1$29.95
• Traditional featherboard• Single feather• Bow with 10LB and35LB Gauge
Fits in standard 3/4" miter slot. Comes with 5 push sticksFeatherBow Jr. 2 in1
$17.95• Single feather for light work• Bow that holds your work down
circle #113 on free information card.
circle #131 on free information card.circle #128 on free information card.
circle #111 on free information card.
1-800-331-4718 Fax 1-740-345-5880www.bealltool.com Dpt. PW
THE BEALL TOOL CO.
Magnets on the sides cling to metalsurfaces.
Accuratelyreads relative
anglesPat . Pend.
22.50
ON/OFF
ABS
THE BEALL TOOL CO.
BOXTTo
L
Also gauges actual level

woodworker’s Marketplace
popularwoodworking.com ■ 85
circle #135 on free information card.
circle #121 on free information card.
18115 N. Black Canyon Hwy. • Phoenix,AZ 85023645 W. Elliott Rd. • Tempe,AZ 85284
3441 S. Palo Verde • Tucson,AZ 85713
exoticwoods.net800.423.2450
Wood Descriptions • Secure Online Ordering
HARDWOODSLumber • Veneer • Turning Stock
circle #161 on free information card.
Call 888-461-8632 www.texasknife.comFree catalog
Texas Knifemaker’s Supply
*Easy transition from woodworking to knife making because you already have the tools *Pre-made fi nished blanks ready to assemble
Make knives for fun and profi t. We have all the supplies & kits for
custom knifemaking.
circle #151 on free information card.
HARDWOODFLOORING
Any length, any width,any specie
Milled to spec for floors, bases,feature strips, transitions,
nosing, stair parts, moulding.
Call for a FAST,FREE QUOTEFREE
LumberCatalog!
266 Ferris Avenue, White Plains, NY 10603Phone: (914) 946-4111 • Fax: (914) 946-3779
Call us at713.473.6572 or
Visit us at www.carvewright.com/pww
Simpleto use
ComputerControlled
WoodcarvingMachine
W O O D W O R K I N G S Y S T E M
circle #108 on free information card.
Fine Tool Journal27 Fickett Rd.,
Pownal, ME 04069(800) 248-8114
www.FineToolJ.com/LN
Lie-Nielsen Standard or LowAngle Block Plane.Special $135.00.
Always FreeUS Shipping on
Lie-Nielsen Tools!Full li
ne
on web.
circle #115 on free information card.
circle #112 on free information card.
Craft smanStudio.comFine Tools - Fair Prices - Fast Shipping
4848 Ronson Ct • Suite L • San Diego, CA 888-500-9093
New Shapton GlassStonesTHE PROFESSIONAL’S CHOICE
Fast Cutting - Long WearingNo soaking - wet & sharpen
Grits from 220 to 30000
FREE SHIPPINGExpires 4/30/08 - Online Orders only
circle #105 on free information card.
circle #130 on free information card.
circle #103 on free information card.
circle #110 on free information card.
circle #101 on free information card.

classifiedClassified rate is $5.00 per word, 15-word mini-mum. Order must be accompanied by payment; ads are non-commissionable. Send to: Popular Wood-working, 4700 E. Galbraith Rd., Cincinnati, OH 45236 or Don Schroder, [email protected]. Phone: 610-821-4425, Fax: 610-821-7884.
Bits, Blades & CuttersPlaner knives anyone can change at a price anyone can afford. Instant, accurate knife changes. Every machine, every time. German quality. Time-proven performance. Superior customer service. www.dispozablade.com. 800-557-8092.
Finishing Supplies & EquipmentsPray-on sUeDe – Line boxes easily. Free brochure with sample. DonJer, 13142 Murphy Road, Winne-bago, IL 61088; 800-336-6537; www.donjer.com.
Hand ToolsDi legno WooDshoP sUPPly. Quality wood-working hand tools at an affordable price. www.dlws.com or 1-877-208-4298.
Plans & Kitscarlyle lynch measUreD DraWings. Museum and private collection furniture plans by Carlyle Lynch. www.carlylelynch.comFree home bar Plans. Build your own classic oak bar. Free 23 page PDF file contains complete assem-bly instructions. www.bobsplans.com
Power ToolsFein Tools – YOU’RE JUST ONE CLICK AWAY from the Fein Tools that you can’t do without - MultiMaster Tools - Sanders - Routers - Grinder - Vacuums and more, plus all Accessories and Parts. http://www.waltertool.com or 800-356-6926.WWW.ToolsanDmore.Us Full line of Shop Fox® Machinery. 1000’s of Woodworking Tools. Low Prices, Fast Shipping. 352/754-9335.
Real EstatehobbyisT sancTUary. 3BD 2.5BA Rambler with large open sunroom/discussion area with showcase shelving overlooks treed acre. Walkout basement has 2 large hobby workshops, storage rooms, and display classroom. Double garage plus off street parking. Handicapped accessible, easy drive to D.C. Judi Beckrich, C-21 New Millenium 800/952-2516. [email protected]
Schools/InstructionWooDWorking coUrse Novice through inter-mediate, self-paced. Interactive CD-ROM based. Windows compatible. Only $29.00. Order at www.fineboxes.com or 613-821-5160.John c. camPbell Folk school, Brasstown, NC. Courses for all skill levels. Weeklong and weekend classes year-round, taught by nationally known instructors. Friendly, supportive environ-ment. Comfortable, on-campus housing. Delicious meals served three times a day. www.folkschool.org. 800/365-5724The acanThUs WorkshoP, llc – Traditional woodworking education with lead instructor, Charles Bender, using conventional hand tools and modern machinery. Call 610-970-5862 or visit www.acanthus.com.bUilD yoUr oWn gUiTar. Luthiers School International. 2-week hands-on acoustic guitar making. May 18-31, 2008. Limit 6 students. Call Harry: 707/823-3537. [email protected]. www.fleishmaninstruments.com
Wood & VeneersWWW.WalnUTWooDs.neT Black Walnut Burl Veneer, lumber, turning stock, gunstocks. Buck-eye Burl slabs. Call 559-277-8456, Newton Woods, Fresno, CAbirDseye maPle $8.00bF – Domestic, figured, and quartersawn lumber. Lowest prices. (937) 572-9663. www.crlumber.com Xenia, Ohio.
To find out more visit us at
KWA08FA
5 Great Reasons to Join Now:
ExclusiveNO RISK
MONEY-BACK GUARANTEE
Hard-to-BeatSAVINGS UP
TO 65%
FREE SHIPPING& HANDLINGon prepaid orders
Easy-to-EarnFREE REWARD BOOKS
Shop-at-Home CONVENIENCE
NO RISK!NO
OBLIGATION

circle #154 on free information card.
circle #106 on free information card.
circle #124 on free information card.
circle #132 on free information card.
circle #129 on free information card.
circle #170 on free information card.
FESTOOLBOB MARINOSERVICE AS IT SHOULD BE!
• “Excellent customer service is my highest priority”
• “I know the Tools”
• “I use the Tools”
• “They are the only Tools I sell”
1.866.FESTOOL(337.8665)
Glen Ridge, NJ
On Orders of $150.00 and Up
No Sales Tax
On Orders Placed Outside New Jersey
See why Festool's lineup of portablepower tools is your best choice both in the shop and on-site.
DOMINO NOW!
Bob with the Domino
ORDER YOUR
Free Shipping!
Colle ct d!e
Marc Adams School of Woodworking
is committed to ne woodworking excellence
through hands-on learning experiences
with the best woodworkers of modern time.
Diverse curriculum
50 world-class instructors
Short-term, intensive classes
Check out 2008 workshops onlinewww.marcadams.com
317-535-4013
OLIVER MACHINERY DEALERHARDWOOD PLYWOOD
CUSTOM RAISED PANEL DOORSCUSTOM PLANK HRDWD FLOORING
THIN CRAFTWOODEXOTIC LUMBER
UPSSpecials
Above prices are for 100' quantities of kilndried roughlumber sold by the Bd. Ft. FOB Mayodan, NC. Call forquantity discounts. Other sizes and grades available.
Above prices are 20 bd. ft. bundles of clearkilndried lumber 3"-10" wide • 3'-5' long (Randomwidths & lengths) Surfaced 2 sides or rough.Delivered UPS prepaid in the Continental U.S.
STEVE WALL LUMBER CO.Quality Hardwoods and Woodworking machinery For The Craftsman
and Educational Institutions
Send $1.00 For Lumber CatalogPrices Subject to Change Without Notice
STEVE H. WALLLUMBER CO.
BOX 287MAYODAN, N.C. 27027
336-427-06371-800-633-4062
FAX 336-427-7588Email: [email protected]: www.walllumber.com
Ash .............................. 4/4 Select $ 2.60 ........................................ $ 94.00Basswood ................... 4/4 Select $ 1.95 ........................................ $ 80.00Birch ............................ 4/4 Select $ 3.55 ........................................ $ 108.00Butternut ..................... 4/4 1C $ 2.95 ........................................ $ 88.00Cherry ......................... 4/4 Select $ 4.90 ........................................ $ 117.00Hickory - Pecan .......... 4/4 Select $ 3.00 ........................................ $ 100.00Mahogany (Genuine) .. 4/4 Select $ 4.70 ........................................ $ 112.00Maple (Hard) ............... 4/4 Select $ 3.45 ........................................ $ 108.00Maple (Soft) ................ 4/4 Select $ 2.50 ........................................ $ 88.00Poplar ......................... 4/4 Select $ 1.80 ........................................ $ 78.00Red Oak ...................... 4/4 Select $ 2.70 ........................................ $ 96.00Walnut ......................... 4/4 Select $ 4.90 ........................................ $ 115.00White Oak ................... 4/4 Select $ 2.70 ........................................ $ 96.00Cedar (Aromatic Red) . 4/4 1C+Btr. $ 1.80 ........................................ $ 78.00Cypress ....................... 4/4 Select $ 2.60 ........................................ $ 90.00White Pine ................... 4/4 F.G. $ 1.25 ........................................ $ 70.00Yellow Pine ................. 4/4 Clear $ 2.30 ........................................ $ 82.00
SEE OUR
CATALOG ON
THE WEB!
FREECATALOG!
Your Source ForEssential, Unique,
& Hard To
Find Tools!
800-345-2396
hartvilletool.com
Lowest
Prices
Guaranteed!
Available at:· Lee Valley Tools Ltd. 1 800 871-8158· Woodcraft Supply Corp. 1 800 225-1153· Amazon.com 1 800 635-5140 Email: [email protected] www.crittersprayproducts.com
SPEND YOUR TIME ON THE FINISH — NOT THE CLEANUP!Polyurethanes • Lacquers • Latex • Enamels • Stains Easy to operate!
Easy to clean!Economical!
Circular spray pattern
Professional Results!
The 118 SIPHON GUN includes a 16 oz. standardsealer jar... this system is ideal for storing differentcolors stains or paints for a quick - fast setup.
CRITTERSPRAY PRODUCTS
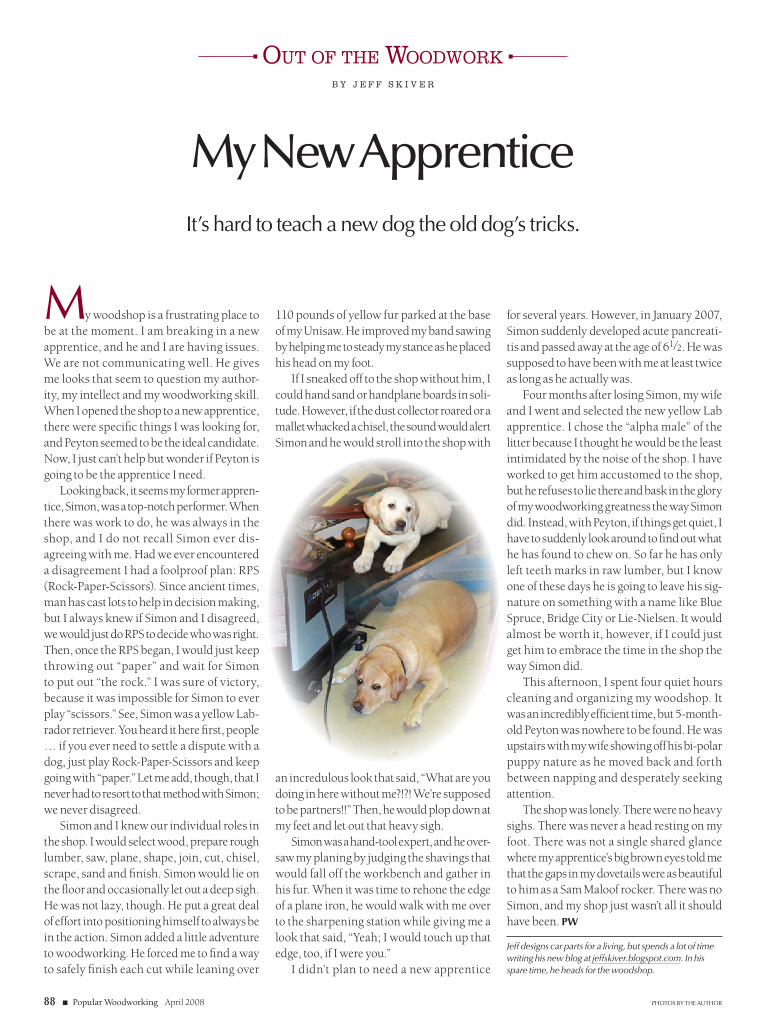
88 ■ Popular Woodworking April 2008
Out Of the WOOdWOrkb y j e f f s k i v e r
photos by the author
My New Apprentice
My woodshop is a frustrating place to be at the moment. I am breaking in a new apprentice, and he and I are having issues. We are not communicating well. He gives me looks that seem to question my author-ity, my intellect and my woodworking skill. When I opened the shop to a new apprentice, there were specific things I was looking for, and Peyton seemed to be the ideal candidate. Now, I just can’t help but wonder if Peyton is going to be the apprentice I need.
Looking back, it seems my former appren-tice, Simon, was a top-notch performer. When there was work to do, he was always in the shop, and I do not recall Simon ever dis-agreeing with me. Had we ever encountered a disagreement I had a foolproof plan: RPS (Rock-Paper-Scissors). Since ancient times, man has cast lots to help in decision making, but I always knew if Simon and I disagreed, we would just do RPS to decide who was right. Then, once the RPS began, I would just keep throwing out “paper” and wait for Simon to put out “the rock.” I was sure of victory, because it was impossible for Simon to ever play “scissors.” See, Simon was a yellow Lab-rador retriever. You heard it here first, people … if you ever need to settle a dispute with a dog, just play Rock-Paper-Scissors and keep going with “paper.” Let me add, though, that I never had to resort to that method with Simon; we never disagreed.
Simon and I knew our individual roles in the shop. I would select wood, prepare rough lumber, saw, plane, shape, join, cut, chisel, scrape, sand and finish. Simon would lie on the floor and occasionally let out a deep sigh. He was not lazy, though. He put a great deal of effort into positioning himself to always be in the action. Simon added a little adventure to woodworking. He forced me to find a way to safely finish each cut while leaning over
110 pounds of yellow fur parked at the base of my Unisaw. He improved my band sawing by helping me to steady my stance as he placed his head on my foot.
If I sneaked off to the shop without him, I could hand sand or handplane boards in soli-tude. However, if the dust collector roared or a mallet whacked a chisel, the sound would alert Simon and he would stroll into the shop with
for several years. However, in January 2007, Simon suddenly developed acute pancreati-tis and passed away at the age of 61⁄2. He was supposed to have been with me at least twice as long as he actually was.
Four months after losing Simon, my wife and I went and selected the new yellow Lab apprentice. I chose the “alpha male” of the litter because I thought he would be the least intimidated by the noise of the shop. I have worked to get him accustomed to the shop, but he refuses to lie there and bask in the glory of my woodworking greatness the way Simon did. Instead, with Peyton, if things get quiet, I have to suddenly look around to find out what he has found to chew on. So far he has only left teeth marks in raw lumber, but I know one of these days he is going to leave his sig-nature on something with a name like Blue Spruce, Bridge City or Lie-Nielsen. It would almost be worth it, however, if I could just get him to embrace the time in the shop the way Simon did.
This afternoon, I spent four quiet hours cleaning and organizing my woodshop. It was an incredibly efficient time, but 5-month-old Peyton was nowhere to be found. He was upstairs with my wife showing off his bi-polar puppy nature as he moved back and forth between napping and desperately seeking attention.
The shop was lonely. There were no heavy sighs. There was never a head resting on my foot. There was not a single shared glance where my apprentice’s big brown eyes told me that the gaps in my dovetails were as beautiful to him as a Sam Maloof rocker. There was no Simon, and my shop just wasn’t all it should have been. pw
Jeff designs car parts for a living, but spends a lot of time writing his new blog at jeffskiver.blogspot.com. In his spare time, he heads for the woodshop.
an incredulous look that said, “What are you doing in here without me?!?! We’re supposed to be partners!!” Then, he would plop down at my feet and let out that heavy sigh.
Simon was a hand-tool expert, and he over-saw my planing by judging the shavings that would fall off the workbench and gather in his fur. When it was time to rehone the edge of a plane iron, he would walk with me over to the sharpening station while giving me a look that said, “Yeah; I would touch up that edge, too, if I were you.”
I didn’t plan to need a new apprentice
It’s hard to teach a new dog the old dog’s tricks.

Tables and fences made of solid granite. It makes perfect sense if you think about it. Granite is harderthan stainless steel. It absorbs vibration better. It will never rust, spring, twist or warp. It resists scratches
and stains. And it provides a seamless, continuous work surface. So we kept asking ourselves, “whywouldn’t we use solid granite tabletops?” But a better question might be, “why hasn’t anyone else?”
With other new features including a cabinet saw with a riving knife guard system and jointers with the largest, flattest fences available, you could say we’ve entered a new era of tool making.
Visit steelcitytoolworks.com to find your nearest distributor.
WELCOME TO THE NEW STONE AGE.
Introducing HARDCORE Solid Granite table and fence systems on select Steel City machines.
BY WOODWORKERS. FOR WOODWORKERS.
Sept. 1, 2007-
March 31, 2008
ROCK SOLID
REBATES
CIRCLE #150 ON FREE INFORMATION CARD.
CIRCLE #117 ON FREE INFORMATION CARD.