a locksport primer
TRANSCRIPT
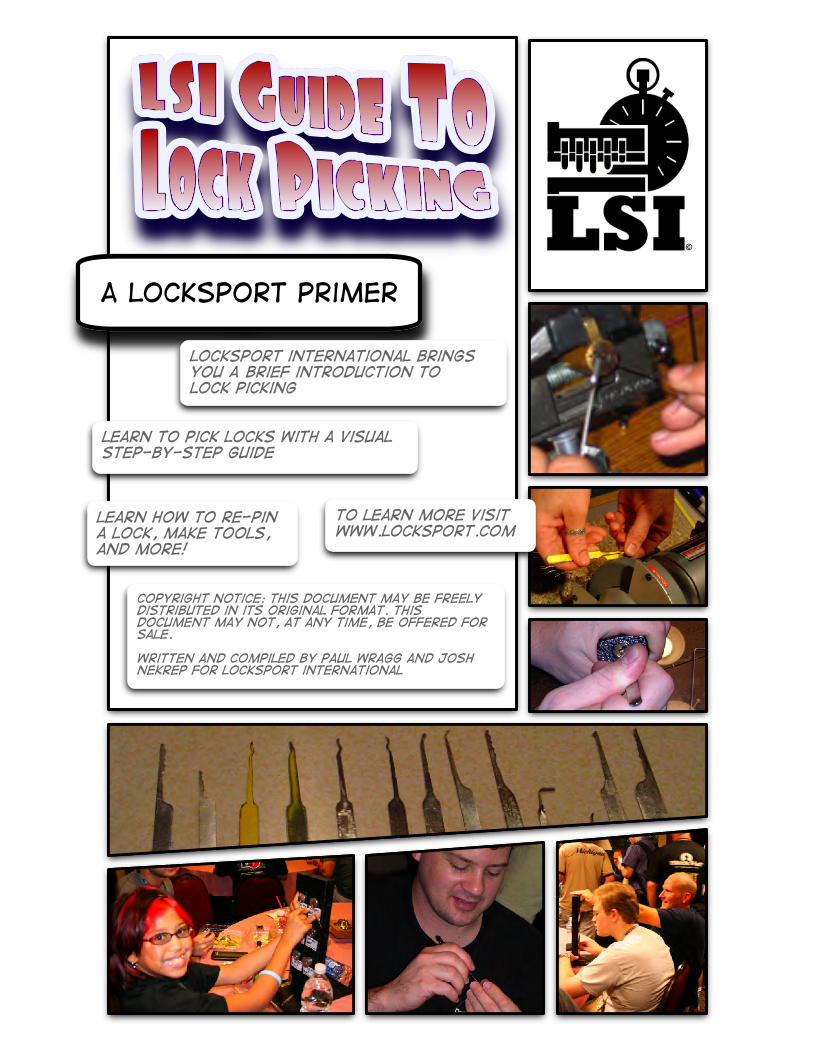
A locksport primer
locksport international brings you A Brief introduction tolock picking
learn to pick locks with a visual step-by-step guide
to learn more visit www.locksport.com
copyright notice: This document may be freely distributed in its original format. this document may not, at any time, be offered for sale.
Written and compiled by Paul wragg and Josh nekrep for locksport international
learn how to re-pin a lock, make tools, and more!
table of contents:
1. Introducing LSI.......................1.2. How Locks work......................2
3. re-pinning a lock....................4
4. the pencil trick.......................8
5. mechanical defects.................9
6. applying tension...................10
7. the binding effect..................11
7. possible pin states................12
8. a brief intro to tool making..13
9. where to buy tools................17
10. where to get more info.......18
11. why get involved with lsi.......19
12. lsi membership application...20

INtroducing Locksport International
From all of us at Locksport International, I'd like to thank youfor picking up this guide. We hope you will find it helpful as you take on the new challenge of learning to pick locks. Butfirst, allow me to tell you a little about LSI.
In early spring of 2005 Josh Nekrep (digital_blue on lockpicking101.com) approached Kim Bohnet (Varjeal, siteadministrator on lockpicking101.com) with the idea of startinga club with the purpose of bringing lockpicking enthusiasts together and promoting the sport/hobby with face-to-face interaction. At the time there were a couple large regional clubs (SSDeV in Germany and TOOOL in The Netherlands) but there was no broad-based club. Kim and Josh saw a need for an organization that would be open to members all over the world and set about making it happen. It was felt that it would
be easier and more effective for individuals to start a local lockpicking club if much of the groundwork were already laid for them, and if they had the opportunity to share resources with other associated clubs. Kim and Josh quickly recruited Devon McDormand (frostbyte on lockpicking101.com) to sit as Treasurer. After much discussion (5 minute conversation on MSN) it was decided that Kim would act as President of the association and Josh would take the role of Administrative Director. The term “Locksports” was adopted as a means of distinguishing what hobby/sport lockpicking enthusiasts do from what locksmiths do. The three founding members set about laying the foundation for what they hoped would someday be a large organization. A short time later, Matt Fiddler and Doug Farre were brought on to sit on the board of directors. Since then, LSI has worked to bring locksport enthusiasts together. As individuals come forward to pioneer locksport groups in their area, LSI continues to grow and organize.
Locksport is a fun, challenging hobby, and one that is gaining ground around the world. Members gather together to learn from each other, share tools and locks, research security vulnerabilities, and most of all, have fun!
If you are interested in starting an LSI chapter in your area, see the "How To Get involved With LSI" section at the back of this guide.
page 1
You may only pick locks that you own, or those to which you've been given explicit permission to pick by the rightful owner
locksport is an honest, ethical, and legitimate hobby. unfortunately, the whole world hasn't figured that out yet (though we're working on it!). because the lay person has a tendency to perceive what we do as somehow nefarious, it is extra important that we commit to following a strict code of ethics. for this reason, the above credo is non-negotiable in the locksport community. lock picking should never, ever be used to illegal or even questionable purposes.
please do not misuse this information. we assume no responsibility for your actions, and in no way condone immoral activity.help keep locksport fun for all by following strictly the one rule.
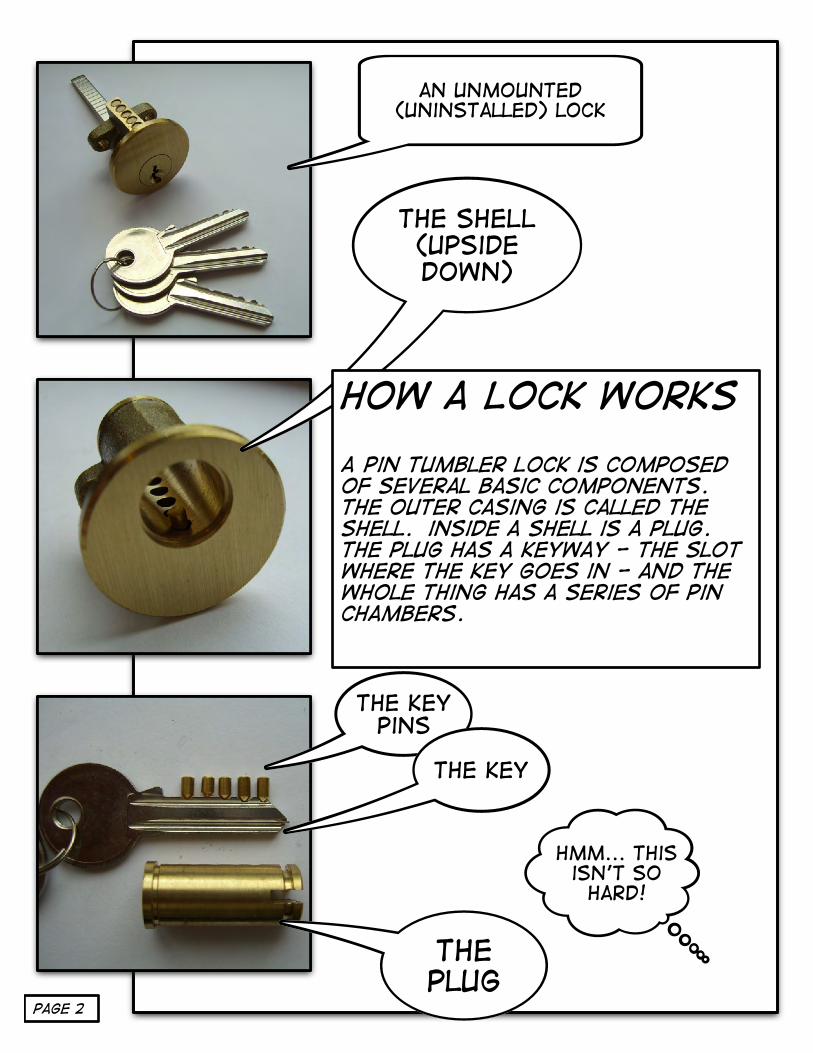
THE SHELL (upside down)
HOW A LOCK WORKS
A pin tumbler Lock is composed of several basic components. the outer casing is called the shell. inside a shell is a plug. the plug has a keyway - the slot where the key goes in - and the whole thing has a series of pin chambers.
the plug
The KEy Pins
the key
hmm... this isn't so
hard!
an unmounted (uninstalled) lock
page 2
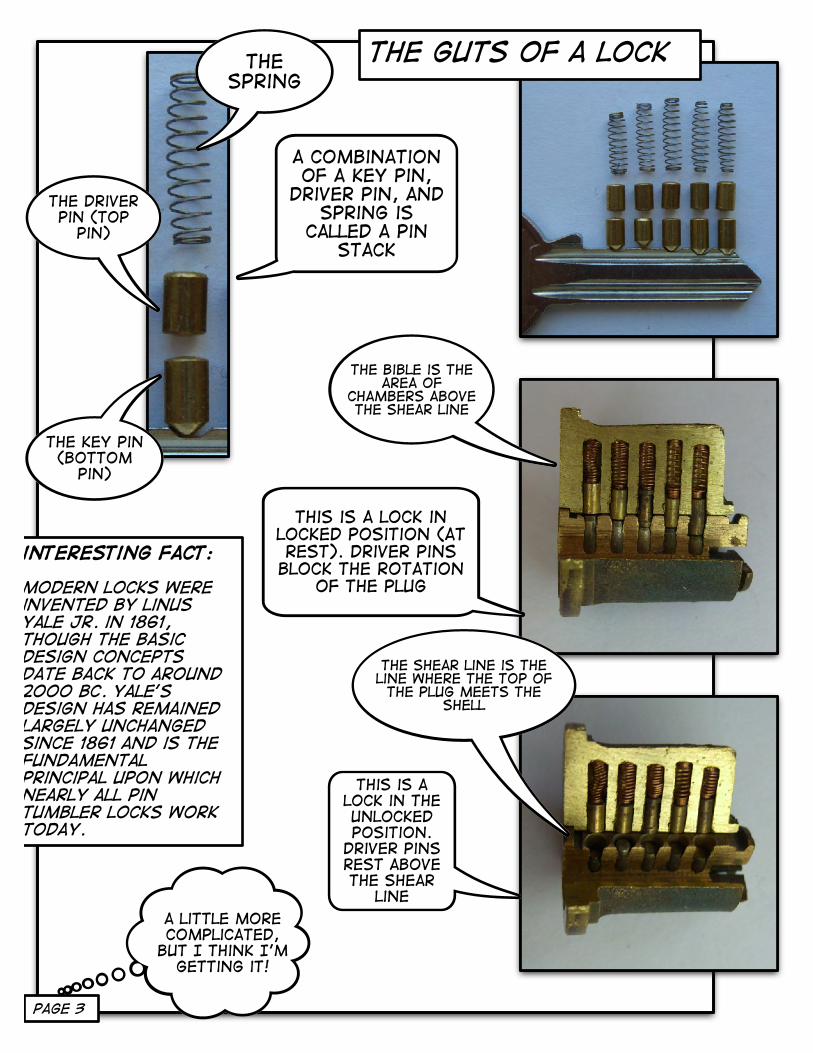
the spring
the driver pin (top
pin)
the key pin (bottom
pin)
this is a lock in locked position (at rest). driver pins
block the rotation of the plug
the bible is the area of
chambers above the shear line
the shear line is the line where the top of the plug meets the
shell
a combination of a key pin,
driver pin, and spring is
called a pin stack
a little more complicated,
but I think I'm getting it!
the guts of a lock
interesting fact:
modern locks were invented by linus yale jr. in 1861, though the basic design concepts date back to around 2000 bc. yale's design has remained largely unchanged since 1861 and is the fundamental principal upon which nearly all pin tumbler locks work today.
this is a lock in the unlocked position.
driver pins rest above the shear
line
page 3
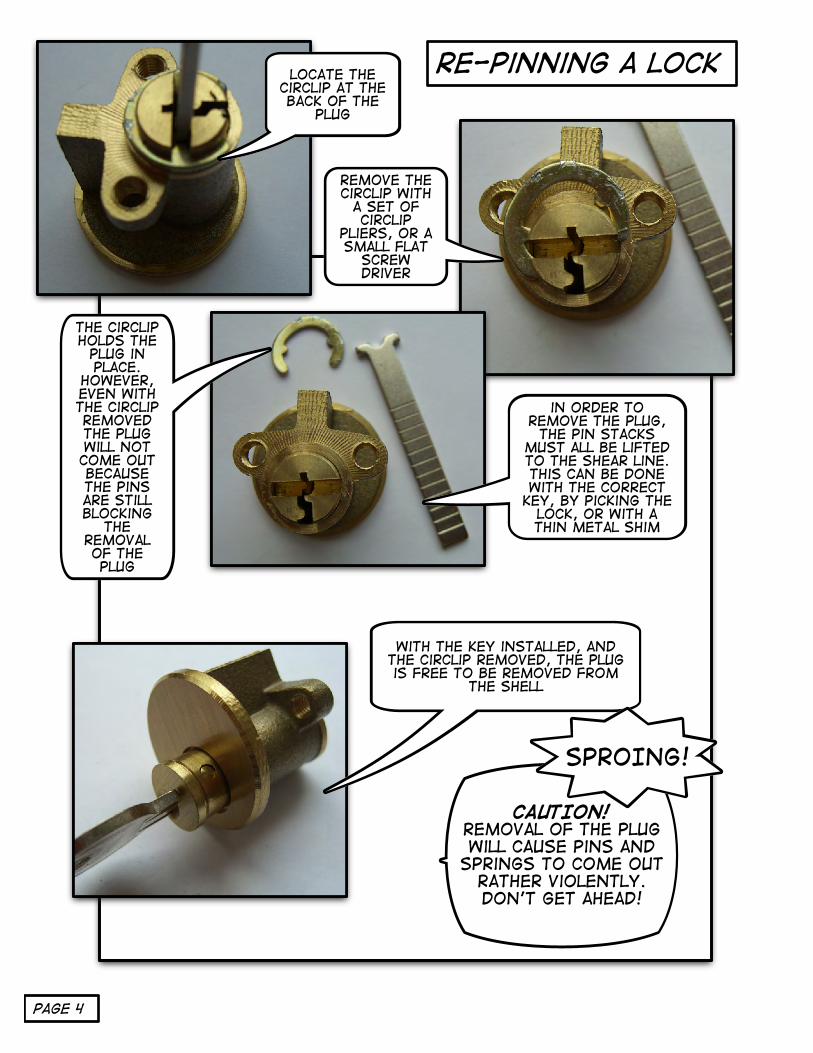
CAUTION!removal of the plug will cause pins and
springs to come out rather violently. don't get ahead!
locate the circlip at the back of the
plug
remove the circlip with
a set of circlip
pliers, or a small flat
screw driver
the circlip holds the
plug in place.
however, even with the circlip removed the plug will not come out because the pins are still blocking
the removal of the plug
in order to remove the plug,
the pin stacks must all be lifted to the shear line. this can be done with the correct
key, by picking the lock, or with a thin metal shim
re-pinning a lock
with the key installed, and the circlip removed, the plug is free to be removed from
the shell
SPROING!
page 4
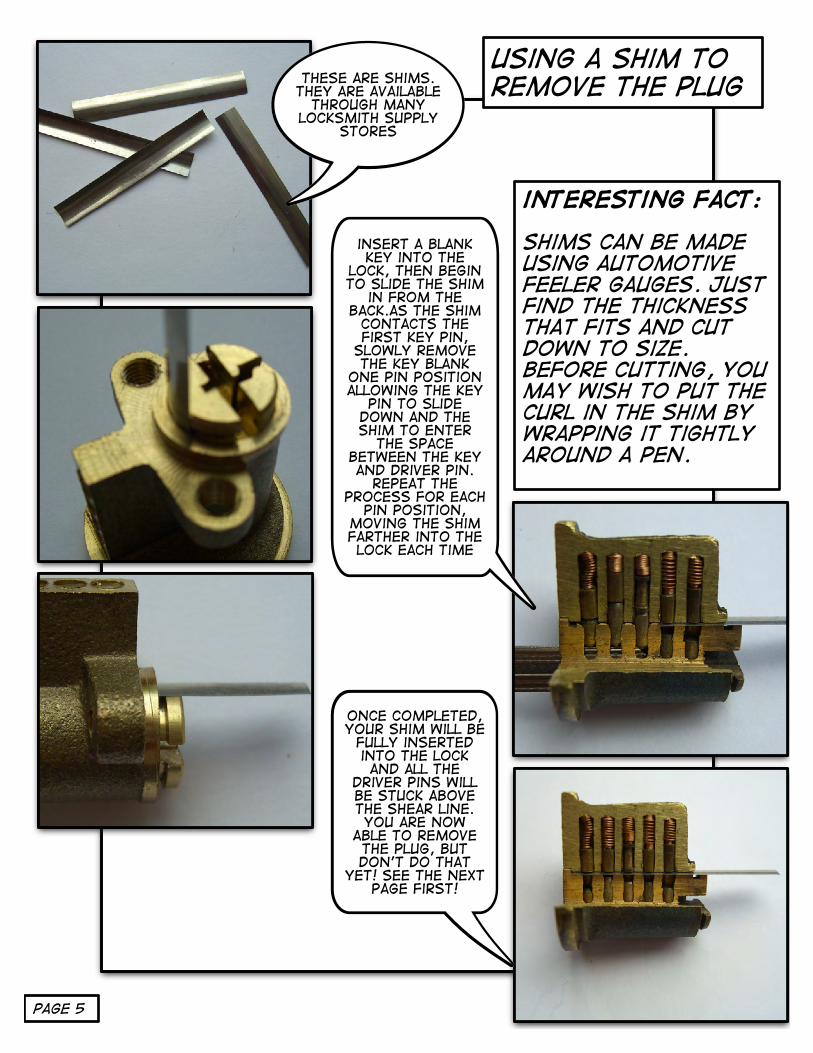
these are shims. they are available
through many locksmith supply
stores
insert a blank key into the
lock, then begin to slide the shim
in from the back.as the shim
contacts the first key pin,
slowly remove the key blank
one pin position allowing the key
pin to slide down and the shim to enter
the space between the key and driver pin.
repeat the process for each
pin position, moving the shim farther into the lock each time
once completed, your shim will be
fully inserted into the lock and all the
driver pins will be stuck above the shear line. you are now
able to remove the plug, but don't do that
yet! see the next page first!
using a shim to remove the plug
interesting fact:
shims can be made using automotive feeler gauges. just find the thickness that fits and cut down to size. before cutting, you may wish to put the curl in the shim by wrapping it tightly around a pen.
page 5
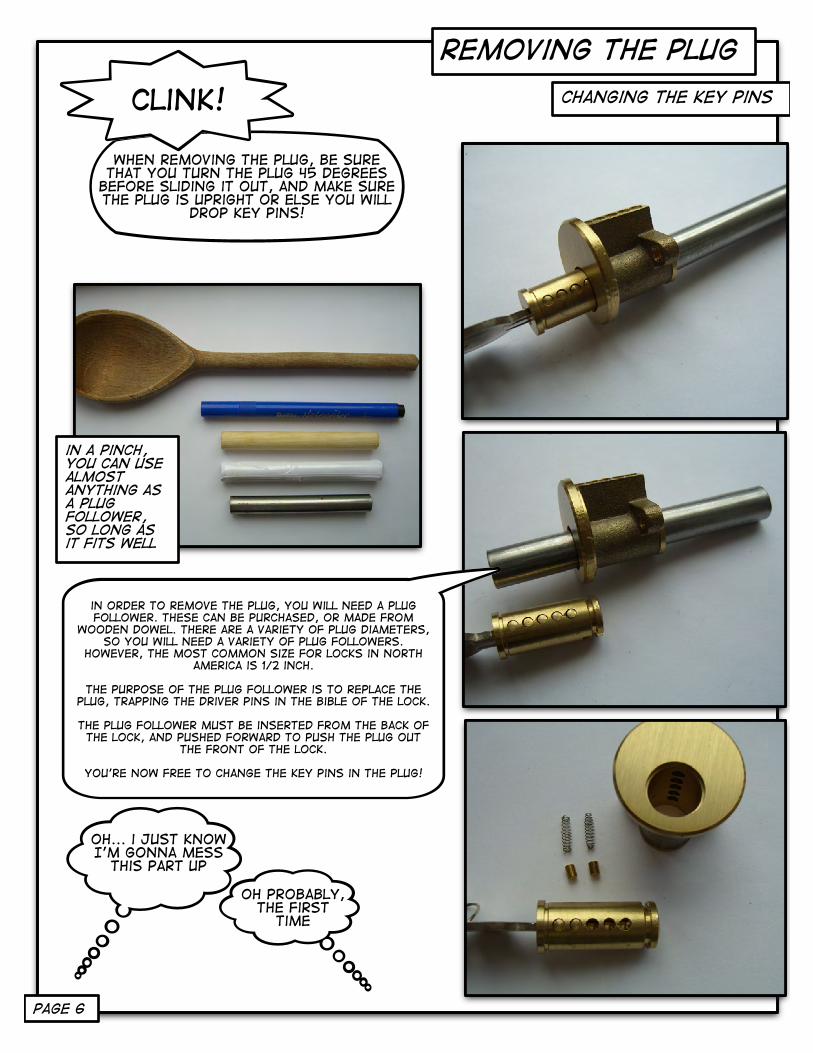
in order to remove the plug, you will need a plug follower. these can be purchased, or made from
wooden dowel. there are a variety of plug diameters, so you will need a variety of plug followers.
however, the most common size for locks in north america is 1/2 inch.
the purpose of the plug follower is to replace the plug, trapping the driver pins in the bible of the lock.
the plug follower must be inserted from the back of the lock, and pushed forward to push the plug out
the front of the lock.
You're now free to change the key pins in the plug!
when removing the plug, be sure that you turn the plug 45 degrees
before sliding it out, and make sure the plug is upright or else you will
drop key pins!
clink!
removing the plug
oh... i just know I'm gonna mess
this part up
oh probably, the first
time
changing the key pins
in a pinch, you can use almost anything as a plug follower, so long as it fits well
page 6
changing the driver pins
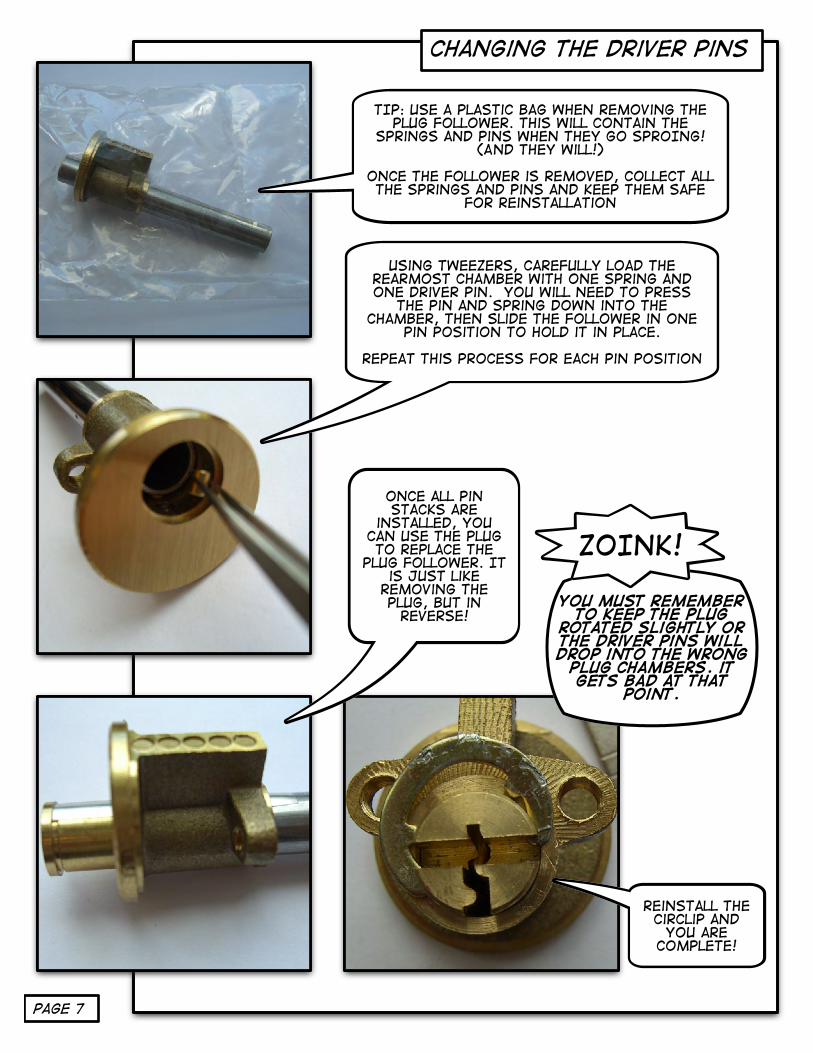
TIP: Use a plastic bag when removing the plug follower. This will contain the
springs and pins when they go SPROING! (And they will!)
once the follower is removed, collect all the springs and pins and keep them safe
for reinstallation
using tweezers, carefully load the rearmost chamber with one spring and one driver pin. you will need to press
the pin and spring down into the chamber, then slide the follower in one
pin position to hold it in place.
repeat this process for each pin position
once all pin stacks are
installed, you can use the plug to replace the
plug follower. It is just like
removing the plug, but in
reverse!
reinstall the circlip and
you are complete!
you must remember to keep the plug
rotated slightly or the driver pins will drop into the wrong
plug chambers. it gets bad at that
point.
ZOINK!
page 7

The pencil trick
line up tip of hook with pin
position on key
Mark in line with shoulder
of key
shoulder
the pencil trick is great for the beginner. by marking out the positions of each pin, you will have a visual guide to help you know when you are directly under each pin. when the pick is in the lock, line each marking up with the face of the lock and you will know you're lined up. by knowing just when you're under each pin, you will be able to better understand the feel of lining up with a pin.
wow! what a good idea!
page 8
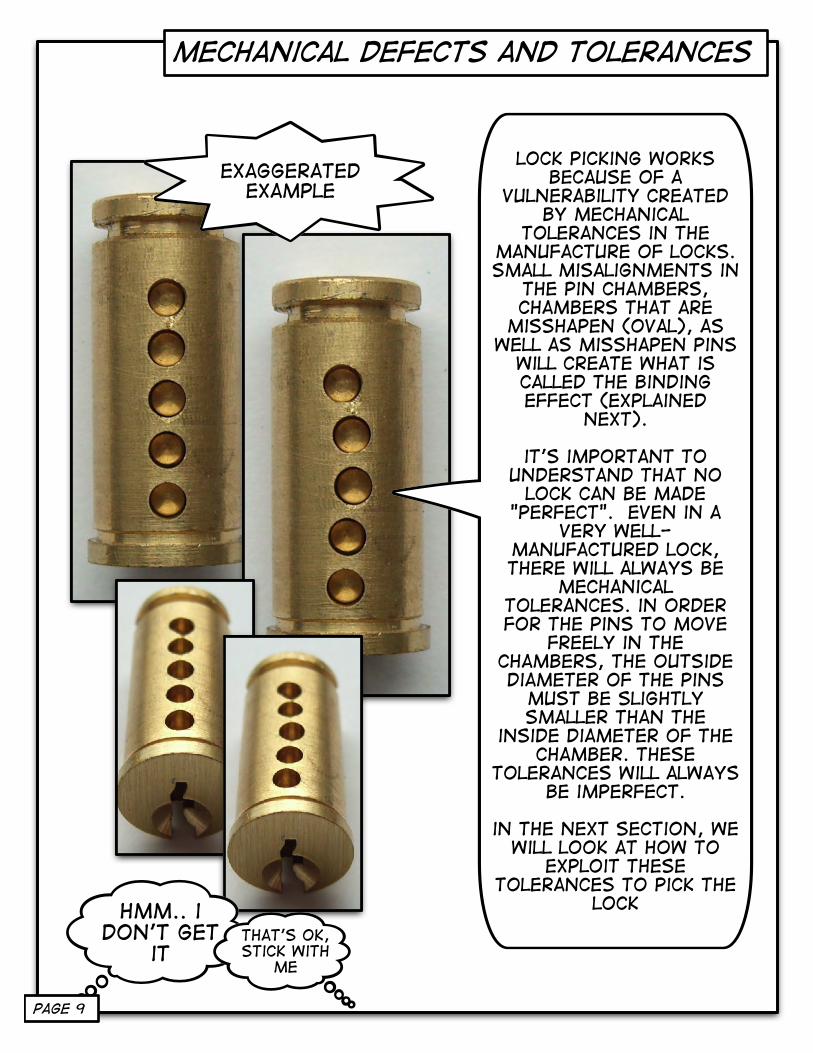
mechanical defects and tolerances
lock picking works because of a
vulnerability created by mechanical
tolerances in the manufacture of locks. small misalignments in
the pin chambers, chambers that are
misshapen (oval), as well as misshapen pins
will create what is called the binding effect (explained
next).
it's important to understand that no
lock can be made "perfect". Even in a
very well-manufactured lock, there will always be
mechanical tolerances. in order for the pins to move
freely in the chambers, the outside diameter of the pins
must be slightly smaller than the
inside diameter of the chamber. these
tolerances will always be imperfect.
in the next section, we will look at how to
exploit these tolerances to pick the
lock
exaggerated example
hmm.. i don't get
itthat's ok, stick with
me
page 9
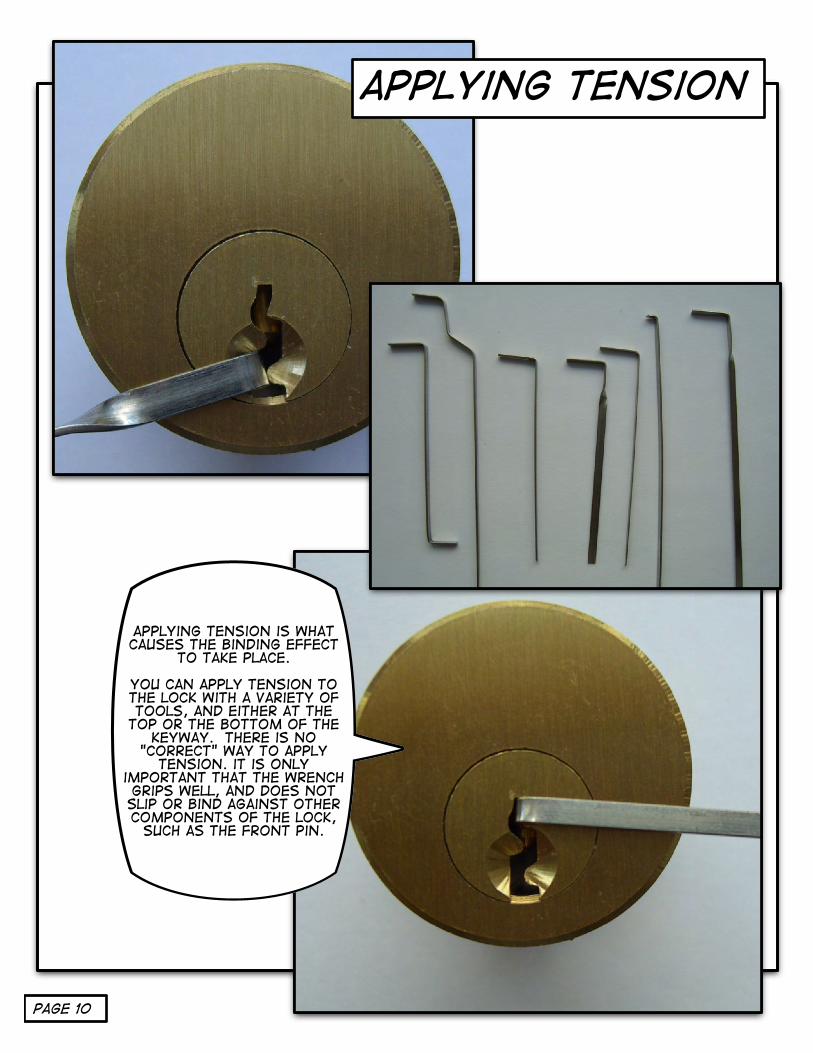
applying tension
applying tension is what causes the binding effect
to take place.
you can apply tension to the lock with a variety of tools, and either at the
top or the bottom of the keyway. there is no
"correct" way to apply tension. it is only
important that the wrench grips well, and does not slip or bind against other components of the lock,
such as the front pin.
page 10
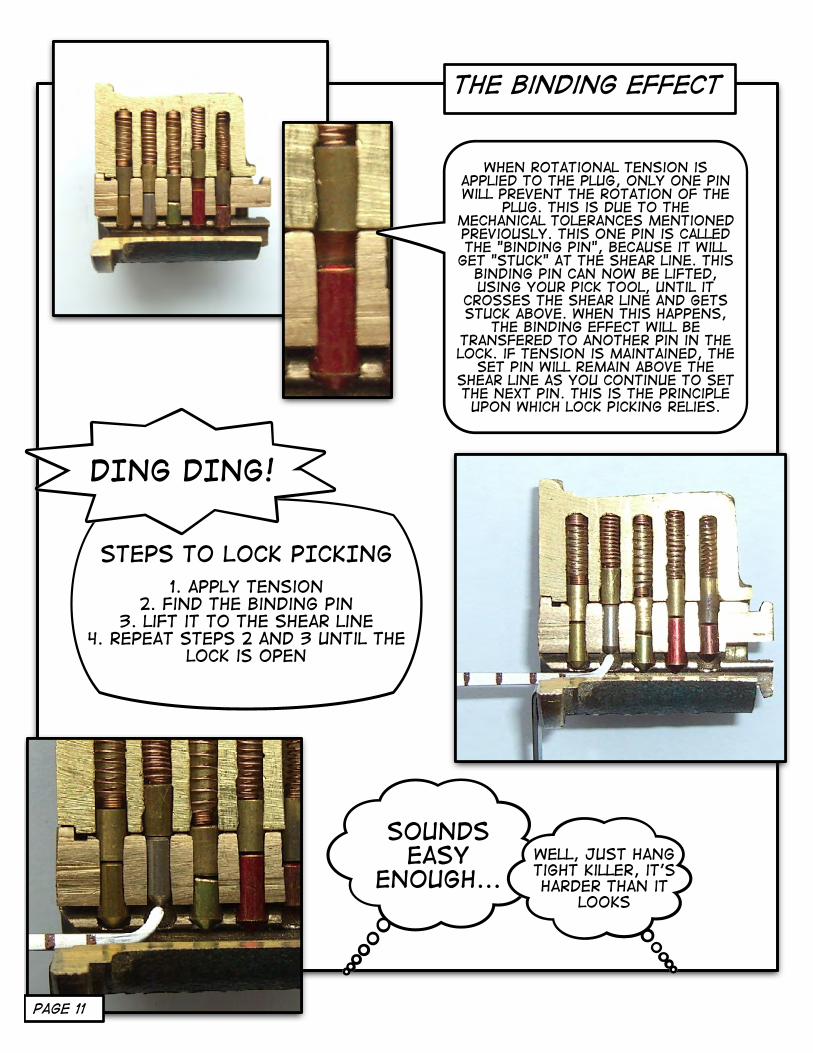
the binding effect
when rotational tension is applied to the plug, only one pin will prevent the rotation of the
plug. this is due to the mechanical tolerances mentioned previously. this one pin is called the "binding pin", because it will
get "stuck" at the shear line. this binding pin can now be lifted, using your pick tool, until it
crosses the shear line and gets stuck above. when this happens,
the binding effect will be transfered to another pin in the lock. if tension is maintained, the
set pin will remain above the shear line as you continue to set the next pin. this is the principle upon which lock picking relies.
STEPS TO LOCK PICKING
1. apply tension2. find the binding pin
3. lift it to the shear line4. repeat steps 2 and 3 until the
lock is open
DING DING!
Sounds easy
enough...well, just hang tight killer, it's harder than it
looks
page 11
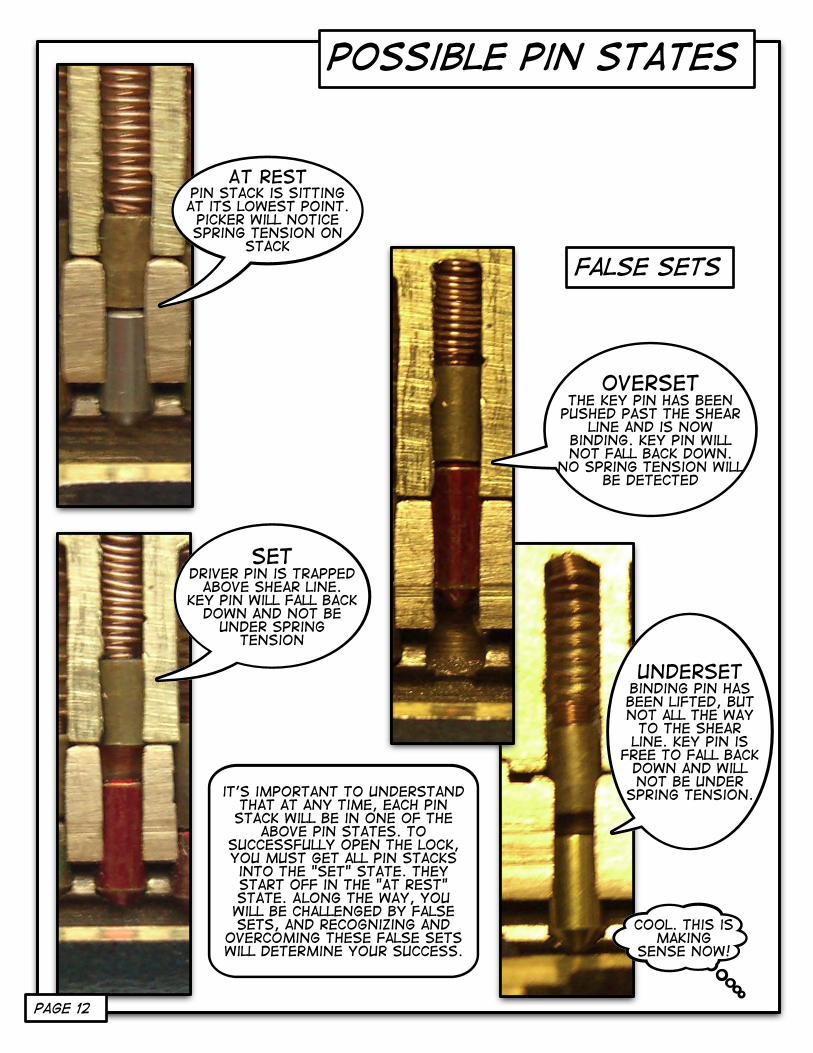
AT restpin stack is sitting at its lowest point. picker will notice spring tension on
stack
SETdriver pin is trapped
above shear line. key pin will fall back
down and not be under spring
tension
oversetthe key pin has been
pushed past the shear line and is now
binding. key pin will not fall back down.
no spring tension will be detected
undersetbinding pin has been lifted, but not all the way
to the shear line. key pin is
free to fall back down and will not be under
spring tension.
false sets
possible pin states
it's important to understand that at any time, each pin stack will be in one of the
above pin states. to successfully open the lock, you must get all pin stacks into the "set" state. they start off in the "at rest" state. Along the way, you will be challenged by false sets, and recognizing and
overcoming these false sets will determine your success.
Cool. this is making
sense now!
page 12

A BRIEF INTRO TO TOOL MAKING
FOR THIS EXERCISE, YOU'LL
NEED A BENCH GRINDER, SAFETY GLASSES, A GLASS OF WATER, AND A HACKSAW BLADE.
YOU'LL ALSO WANT SAND PAPER (emery paper) IN
A VARIETY OF GRITS, AND SOME
PATIENCE.
MAKING A PICK FROM A HACKSAW BLADE
get yourself a pick template. These can
be found online. Check at
lockpicking101.com for pick templates. Print the template
to scale and cut out the shape of the
pick, gluing it to the hacksaw blade with a conventional glue
stick
OK, so far so good.
next comes the scary
part!
scary part?
No, not really, but you have to be careful
importantALWAYS WEAR EYE
PROTECTION AND WORK IN A WELL VENTILATED AREA
WHEN SANDING OR GRINDING
USING YOUR BENCH GRINDER, REMOVE THE
TEETH FROM THE HACKSAW BLADE.
IMPORTANT NOTES
THERE ARE A LOT OF MATERIALS THAT ARE GREAT FOR MAKING
PICKS, AND A VARIETY OF TOOLS THAT CAN BE USED. WE HAVE DECIDED
TO USE A HACKSAW BLADE AND A BENCH GRINDER FOR THIS EXERCISE BECAuSE BOTH ARE WIDELY AVAILABLE AND PRODUCE GOOD
RESULTS. SEE THE NEXT PAGE FOR IMPORTANT
TIPS ON BENCH GRINDER SAFETY AND
TECHNIQUE!
page 13
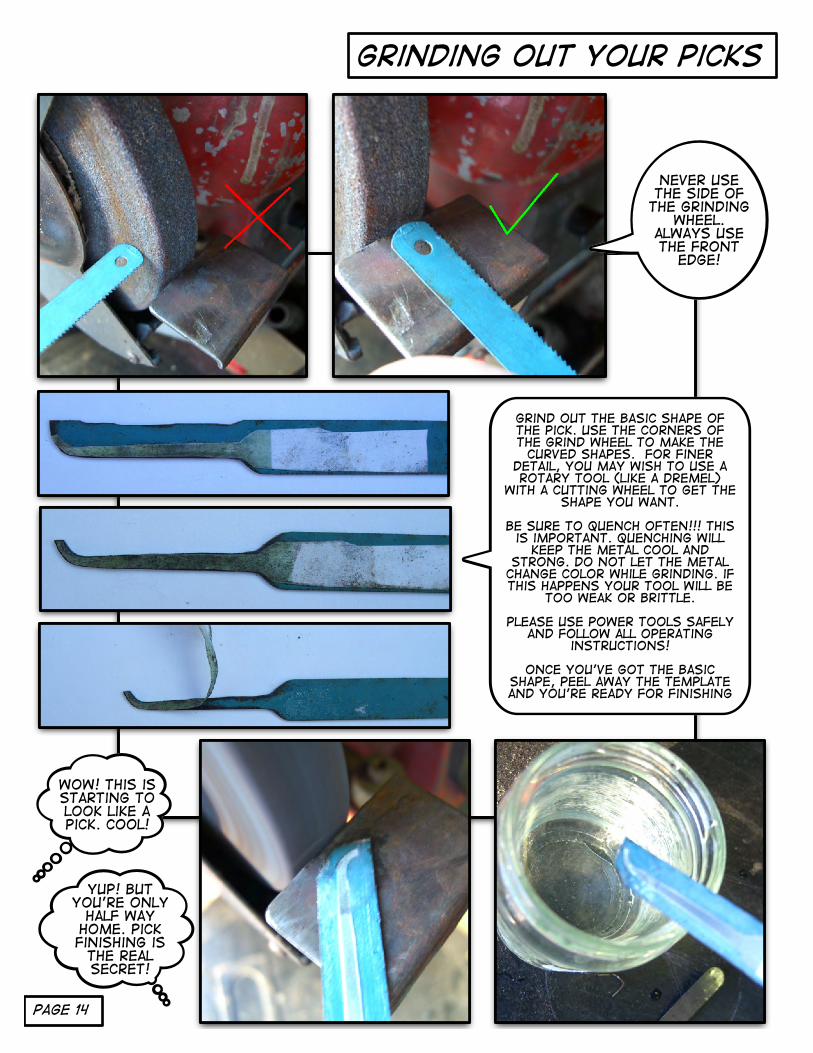
grinding out your picks
never use the side of
the grinding wheel.
always use the front
edge!
grind out the basic shape of the pick. use the corners of the grind wheel to make the
curved shapes. for finer detail, you may wish to use a rotary tool (like a dremel)
with a cutting wheel to get the shape you want.
be sure to quench often!!! this is important. quenching will
keep the metal cool and strong. do not let the metal
change color while grinding. if this happens your tool will be
too weak or brittle.
please use power tools safely and follow all operating
instructions!
once you've got the basic shape, peel away the template and you're ready for finishing
wow! This is starting to look like a pick. cool!
yup! but you're only
half way home. pick finishing is
the real secret!
page 14
pick finishing
pick finishing is where it's at. Get good at this! the smoother your picks, the
easier they will move through the lock, the better feedback you'll get from the pins, and the better you'll be at picking
locks!
start with a heavier grit of sand paper (emery paper), perhaps between 150 and
200 grit, and then work your way to progressively finer and finer grits,
finishing with somewhere between 1100 and 2000 grit.
for the rough finishing, wrap the paper around a block of wood and sand all surfaces, paying special attention to
the edges of the neck and tip of the pick.
for the tight corners, try wrapping the paper around a chop stick.
sand the picks until you get a very shiny, very smooth finish.
beginner's tip!
when you think you've sanded enough, you're
probably only half finished! you want these babies to
look like little mirrors! it's a lot of work, but worth it
in the end!
once you're happy with the level of sanding, you may
wish to really shine them up! try
taking a rotary tool (dremel)
with a hard felt polishing wheel
and some polishing
compound. you'll be amazed at the
difference!
My hands are numb from
all this sanding!
no kidding!welcome to my world...
page 15
to start, lay the pick flat on a surface
and sand.
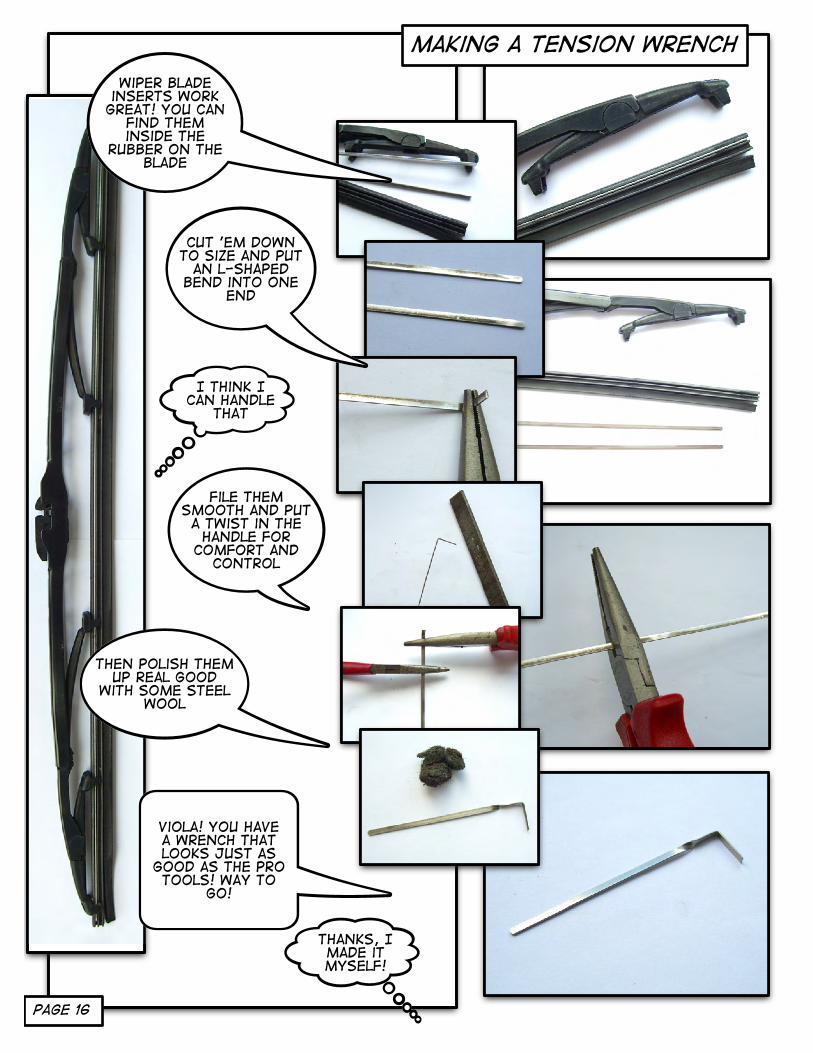
making a tension wrench
wiper blade inserts work
great! you can find them inside the
rubber on the blade
Cut 'em down to size and put
an l-shaped bend into one
end
I think I can handle
that
file them smooth and put a twist in the
handle for comfort and
control
then polish them up real good
with some steel wool
viola! you have a wrench that looks just as
good as the pro tools! way to
go!
thanks, I made it myself!
page 16
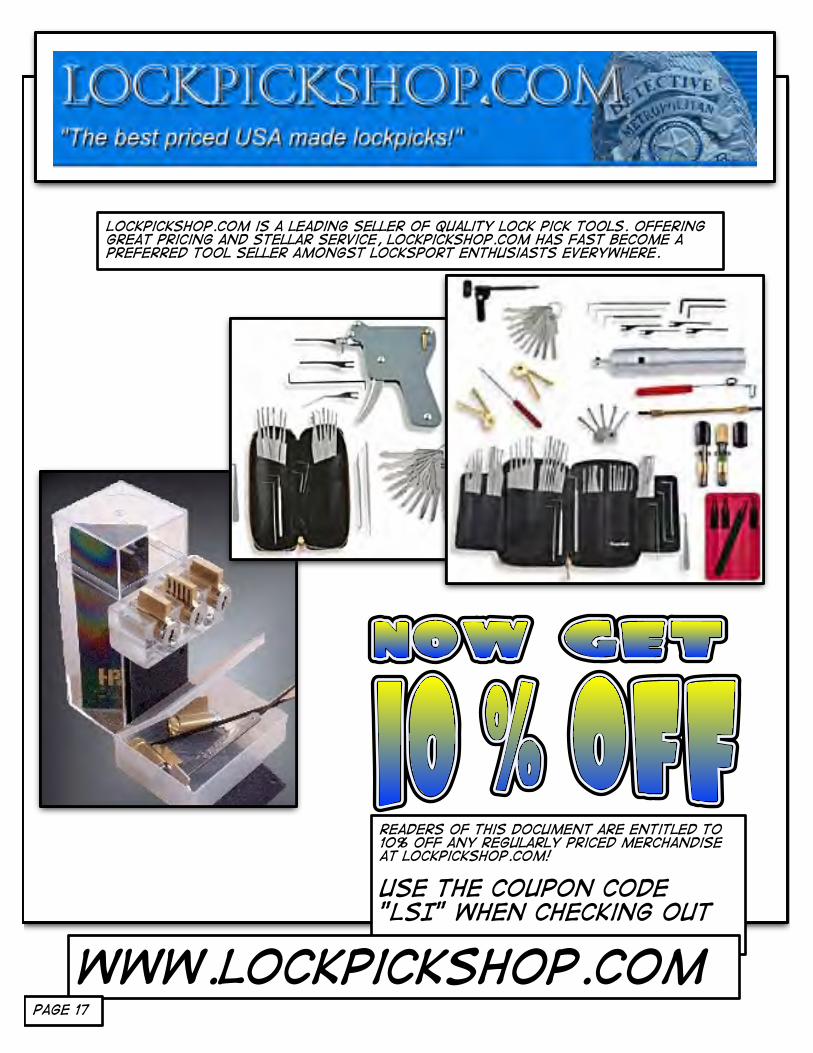
LOckpickshop.com is a leading seller of quality lock pick tools. offering great pricing and stellar service, lockpickshop.com has fast become a preferred tool seller amongst locksport enthusiasts everywhere.
readers of this document are entitled to 10% off any regularly priced merchandise at lockpickshop.com!
USE THE COUPON CODE "LSI" when checking out
www.lockpickshop.compage 17

w w w . l o c k p i c k i n g 1 0 1 . c o m
Every day, hundreds (possibly thousands) of enthusiasts gather together in the worlds leading online locksport community. lockpicking101 serves as a huge resource of information on every locksport topic imaginable. members regularly answer questions and discuss topics of technique, tools, locks, and more! there is no better place online for the locksport hobbyist to hang out and learn!
WHere to get more info
www.locksport.com
locksport international is looking for pioneers to form locksport groups in your area!
page 18

why get involved in LSI?
because it's fun! picking locks is cool. But many have discovered that getting
involved in a locksport group is even cooler. members
participate in contests and a ranking system. they learn
together, challenge each other, and most important,
they have fun together!
page 19