build great products - jama software
TRANSCRIPT

© 2018 Jama Software, Inc.
JIRA Connector User Guide Version: 8.24
build great products

JIRA Connector User Guide Version: 8.242
© 2018 Jama Software, Inc.
Table of Contents
Part I JIRA Connector 3
................................................................................................................................... 31 Get Started
................................................................................................................................... 52 System Setup
.......................................................................................................................................................... 5Jama Pre-Configuration
.......................................................................................................................................................... 7JIRA Pre-Configuration
................................................................................................................................... 93 Synchronization Configuration
.......................................................................................................................................................... 10Create a Connection
.......................................................................................................................................................... 11Map Projects
.......................................................................................................................................................... 12Map Item Types
.......................................................................................................................................................... 14Map Item Fields
................................................................................................................................... 174 Work with Synchronized Items

JIRA Connector 3
© 2018 Jama Software, Inc.
1 JIRA Connector
The JIRA Connector helps bridge the gap between ProductManagement and Development. Create items in Jama, and the
connector will keep JIRA up-to-date!
Note: This is a legacy connector. If you are interested in settingup new integrations, read about our Tasktop Integration Hub.
1.1 Get Started
Why choose the JIRA Connector?The Jama Connector for JIRA creates collaboration between product management and development
teams. When each team can use the tool they are most comfortable with, greater efficiency and
productivity results.
What can the JIRA Connector be used for?The JIRA Connector syncs item types in Jama with issue types in JIRA. The Jama administrator will
establish a sync schedule that runs behind-the-scenes. The administrator chooses which item types and
fields to sync between the applications, and the Connector will create new items or sync updated
information.
Note: The Connector will not sync a pre-existing Jama item with a pre-existing JIRA issue.
A few common examples of how the JIRA Connector can be used:
Defect to Defect:
Defects can be created in Jama, which will then create defects in JIRA. The defect's life-cycle can then
be managed in JIRA by the development team. Once complete, the defect is updated in Jama so the
JIRA Connector User Guide 4
© 2018 Jama Software, Inc.
Business Analyst or QA knows the defect is complete and ready for testing or documentation.
Requirement to Story:
Business Analysts (BA) use Jama to gather, collaborate, and define requirements for a product. Once a
requirement is ready for implementation, the BA can set the requirements to a status of "Approved for
development." The JIRA connector can even be configured to use a filter to synchronize only the
requirements in Jama that match this status. Once a requirement is synchronized and an associated
Feature in JIRA is created, the development team can prioritize and schedule the JIRA Feature while
knowing the BA is aware of the progress.
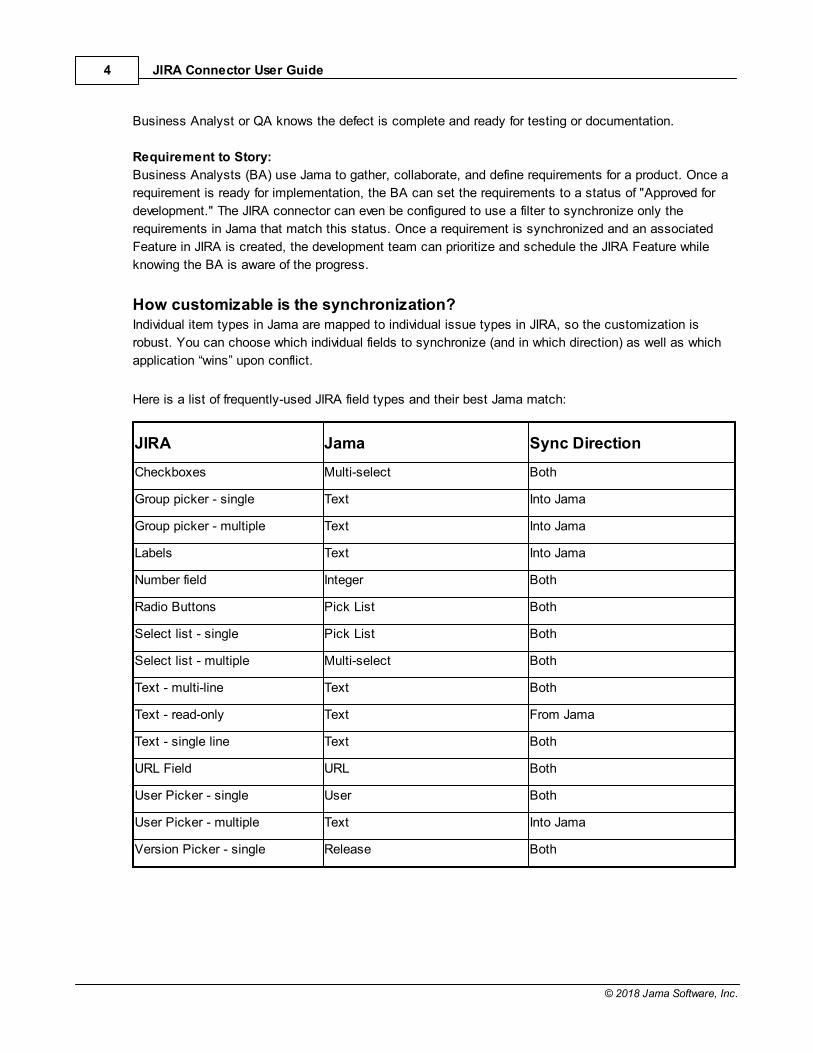
How customizable is the synchronization?Individual item types in Jama are mapped to individual issue types in JIRA, so the customization is
robust. You can choose which individual fields to synchronize (and in which direction) as well as which
application “wins” upon conflict.
Here is a list of frequently-used JIRA field types and their best Jama match:
JIRA Jama Sync Direction
Checkboxes Multi-select Both
Group picker - single Text Into Jama
Group picker - multiple Text Into Jama
Labels Text Into Jama
Number field Integer Both
Radio Buttons Pick List Both
Select list - single Pick List Both
Select list - multiple Multi-select Both
Text - multi-line Text Both
Text - read-only Text From Jama
Text - single line Text Both
URL Field URL Both
User Picker - single User Both
User Picker - multiple Text Into Jama
Version Picker - single Release Both

JIRA Connector 5
© 2018 Jama Software, Inc.
1.2 System Setup
It will take approximately 45 minutes for the initial configuration. Each additional project or item type
takes about five minutes. There are some required changes to make to JIRA. For most effective use,
optional changes to Jama and JIRA may need to be made.
Verify the supported software
Ensure Pick List parity
Pick List item types in Jama and Select Lists in JIRA must have options that match exactly. If the values
do not match, the value will not update in either direction. The below example illustrates this: a Priority
field with five selections has a final value of “Rejected” in Jama’s pick list, but the JIRA Select List has
the final selection set as “Trivial.”
The initial four values will sync because they are equal, however, this final field of "Rejected" and "Trivial"
will not. The pick lists do not have to be in the same order to work. Tip: make sure there are no extra
spaces in the pick list configurations.
Note: If an issue is being newly synchronized from Jama to JIRA, it will fail upon creation if a value in the
Jama pick list does not have a corresponding match in the JIRA pick list.
1.2.1 Jama Pre-Configuration
Setting up the Sync
Check on two things in Jama before setting up the sync:

JIRA Connector User Guide 6
© 2018 Jama Software, Inc.
1. Manual creation of JIRA custom fields: There are JIRA fields that may be helpful to pull into Jama.You must manually create these fields in Jama before they can be mapped to JIRA.
Examples:Assigned to: It may be beneficial to have each system track its own assignee. Create a “JIRA AssignedTo “ field in Jama that is type String or Text (User type will work if the user names are the same in bothJama and JIRA). Likewise, in JIRA, create a “Jama Assigned To” field.
Release: Releases in Jama and Versions in JIRA can be synced, as long as the names match exactly.Note: Jama does not have a multi-select release field. However, a custom multi-select field that matchesthe JIRA fields can be created.
Components: JIRA uses components as a Multiple Select List. In Jama, create a custom field multi-select list with values matching the components in JIRA.
JIRA Status: This field is tied to JIRA's Workflow process, so the values cannot be updated from Jama.However, it may be useful to track this. In Jama, add a new custom text field called JIRA Status. Mapthis as a one-way sync from JIRA's Status Pick List.
Sprint: Map this as a one-way sync into a Jama text field.
Security Level: Map as one-way sync into a Jama text field.
Note: In order to track JIRA changes in Jama, five required fields will be automatically added to mapped
item types. These fields will be read-only, and updated one-way, from JIRA to Jama.
JIRA Key: Formatted ID from JIRA. JIRA URL: Link to the JIRA issue. Last Updated in JIRA: Date the item was last modified in JIRA. Last Sync with JIRA: Date the item was last synchronized with JIRA. Last JIRA Sync Version: Version number of the JIRA issue that was last synced with Jama.
2. Using Jama's Workflow feature with JIRA Connector: Jama’s Workflow function may be enabled
on items that are synced with JIRA. However, the Workflow transition must leave the item in an unlocked
state. If an item is locked in Jama for any reason, it will not sync to JIRA. Additionally, the JIRA field

JIRA Connector 7
© 2018 Jama Software, Inc.
needs to be a custom text field, not a pick list.
1.2.2 JIRA Pre-Configuration
There are three steps to complete in the JIRA Pre-Configuration process:
1. Enable Wiki Render Macro
Jama uses rich text (HTML) for comments and descriptions. For this information to render correctlyin JIRA, the Wiki Renderer needs to be enabled:
In JIRA, navigate to Administration > Add-Ons > Manage Add-Ons.
Make sure drop-down is set to “All Add-Ons”.
Navigate down to “Wiki Renderer Macros Plugin” in the System Add-Ons section and enable it.
Expand “Manage plugin modules” box at the bottom and enable the HTML module.
Note: Hosted instances of JIRA cannot use Wiki Renderer. Therefore, HTML tags may appear in
fields. To avoid this, when in Jama select the “Use Plain Text in JIRA” option to strip rich textformatting to ensure no HTML tags will appear in fields. However, if you use HTML in the fields, theymay still be encoded in JIRA (e.g. if you type “ ” in Jama, it could appear in JIRA as a space).
2. Enable HTML Macro
The HTML Macro needs to be applied to fields that are synced with rich text fields in Jama, such as

JIRA Connector User Guide 8
© 2018 Jama Software, Inc.
descriptions and comments.
In JIRA, navigate to Administration > Custom Fields > Default Field Configuration and select“Renderers” on the pertinent JIRA fields.
Set the “Active Renderer” to “Wiki Style Renderer” and select Update.
Note: HTML tags may appear in fields for Hosted instances of JIRA.
3. Set User PermissionsThe following table outlines permissions required for the JIRA Connector to work properly.
Permission Scope Why this is needed
JIRA Users System Log into JIRA
Browse project Project Browse a project and viewitems within that project
Create Issues Project Create issues
Edit Issues Project Edit issues
Assign Issues Project Set an issue Assignee
Modify Reporter Project Set an issue Reporter
Set Issue Security Project Set Issue Security
Add Comments Project Add comments
Create Attachments Project Sync items with images intext fields
Note: The JIRA connector enforces the same permissions as JIRA. For example, if a user does notbelong to a project, they will not see that project in the JIRA connector.

JIRA Connector 9
© 2018 Jama Software, Inc.
4. Recommended Manual Field Additions
Jama has several fields that may be used to track progress in JIRA. If progress made in Jama shouldbe tracked in JIRA, these fields need to be created for synchronization to occur.
Recommendations:Jama Status: The Status field in JIRA cannot be modified by the sync. A new field needs to becreated to display the Jama status. This custom field in JIRA needs to have pick list values thatmatch Jama’s Status pick list.
Jama Assigned To: As recommended in the Jama pre-configuration, tracking each application’sAssignee is helpful. Create a custom field in JIRA to map the Jama Assigned To field.
Jama Url: Link to the Jama item.
Note: It is recommended to create components and releases in JIRA that are named exactly the
same as they are in Jama.
1.3 Synchronization Configuration
When in Jama, open the Admin page and select the JIRA Connector link.
The basic steps are:

JIRA Connector User Guide 10
© 2018 Jama Software, Inc.
1. Creating a Connection - Configuring the JIRA Connector in Jama.
2. Synchronizing a project - Multiple Jama projects can be synchronized to JIRA.
3. Synchronizing a set -Multiple Jama sets in a project can be synchronized to JIRA.
4. Mapping Set Fields - Individual fields in each set can be mapped with rules defined for each.
1.3.1 Create a Connection
1. Select Admin in the Jama header. If you do not see this link, you do not have Administratorrights. Select the JIRA Connector menu item at the left.
2. Select Add JIRA Connection to input your settings.
JIRA URL This is the URL used to access your JIRA instance. If your instance is hosted byAtlassian, the url will look something like: https://yourinstance.atlassian.com.
JIRA User The JIRA user needs to be in the JIRA Users group and have permissions to Browse

JIRA Connector 11
© 2018 Jama Software, Inc.
projects, Create Issues, Edit Issues, Add Comments, Create Attachments andpossibly Modify Reporter (if mapping Assignee field).
JIRAPassword
The password for the specified JIRA user
Jama User This is the user in Jama that runs the synchronization job. The user must haveorganization admin permissions. It is recommended to create a user in Jama called"JIRA User" and assign it a floating creator license.
Synchronizationschedule
There are two options for defining the schedule.
1. Simple Scheduling is an interval defined in minutes. We recommend timing to beas infrequent as possible.
60: This is a 1 hour interval and is sufficient if you need frequent updates.
720: This is a 12 hour interval, which ensures the synchronization happens atleast daily.
2. Advanced Scheduling enables more complicated intervals. You can use a Cronstring to specify complex scheduling. Example cron strings:
"0 0 12 * * ?" Fire at 12pm every day.
"0 0/5 14 * * ?" Fire every 5 minutes starting at 2pm and ending at 2:55pm,every day.
"0 15 10 ? * 6L" Fire at 10:15am on the last Friday of every month.
FailureNotification
When synchronization fails, the admin can either choose not to receive notifications(default) or he can designate a specific user to receive a notification the first time aftera failure. If email notification is enabled, this user will also receive a notification the firsttime a synchronization is successful after a failure.
Enablesynchronization
This box needs to be checked for the synchronization to occur.
Use PlainText in JIRA
Select this to ensure that any rich text formatting will be stripped from data whencopied from Jama to JIRA (see Jama Pre-Configuration to determine if this isnecessary).
TestConnection
Select this to test your connections settings
1.3.2 Map Projects
Once a connection has been created, the project can be synchronized.
1. Select Add project mapping.
2. Select the Jama project and the corresponding JIRA project.
3. Select Save and Close.

JIRA Connector User Guide 12
© 2018 Jama Software, Inc.
1.3.3 Map Item Types
Once the project is mapped, the item type groups need to be mapped. In Jama, items can be found insets; in JIRA, they are considered a type. Note: Jama only supports a specific item being synced withone connector.
1. Select the row that contains the project to sync.

JIRA Connector 13
© 2018 Jama Software, Inc.
2. Select Add item type mapping. If a mapping exists, select Edit Details to make changes.
3. Map Jama item type to JIRA Issue Type, using Jama Location and JIRA Type pick lists.
4. Configure how comments are synced between the projects.
Do Not Synchronize - No comments will be shared between JIRA and Jama.
One Way: From Jama - Only comments added in Jama will sync to JIRA.
One Way: Into Jama - Only comments added in JIRA will sync to Jama.
Bi-directional - Comments added in Jama or JIRA will sync to the other application.
5. Select which items from Jama are to be synced to JIRA. Note: Jama only supports a specificitem being synced with one connector.
Do not synchronize items from Jama to JIRA - No items in Jama will be created in JIRAor synced.
Synchronize all items of this type - Ensure that all Jama items of this type are synced toJIRA.
Synchronize only items that match this query - If only certain Jama items need to be
synced, a Lucene search query can be used. Note: Before using this query, make sure to
test it in Jama's search to ensure it returns the results you expect.
Examples:
o status:"Approved"
o flag1:true
o status:"Approved" AND flag1:true
Note: You cannot map a Jama location to more than one JIRA project. Each Jama set can be
linked to just one JIRA project.
6. Select which items created in JIRA are to be synced to Jama.
Do not synchronize items from JIRA to Jama - No items in JIRA will be synced orcreated in Jama.
Synchronize items that match this JIRA filter - Select the appropriate JIRA filter. Note:The JIRA user indicated in the Connector must have marked the filter as a favorite.
7. Check Synchronization Enabled for this Mapping to turn sync on or off.

JIRA Connector User Guide 14
© 2018 Jama Software, Inc.
1.3.4 Map Item Fields
Once the item types have been configured, the field mappings must be completed.
1. Make sure there is a project selected in the Mapped Projects section. In the Mapped Item Types
section, select Edit field mappings.

JIRA Connector 15
© 2018 Jama Software, Inc.
2. Select the JIRA Field from the pick list that you would like to map.
Note: If any of the JIRA fields are required, a Jama field must be mapped to it, or the item will notsynchronize.
3. Choose the appropriate Sync Mode for the field mapping.
On Creation Only - This field will only be imported only on the first sync.
One Way: From Jama - Only changes made in Jama will sync to JIRA. Any changesmade to the field in JIRA will be overwritten by the Jama sync.
One Way: Into Jama -Only comments added in JIRA will sync to Jama. Any changes tothe field in Jama will be overwritten by the JIRA sync.
Bi-directional - items added or changes made in Jama or JIRA will sync to the otherapplication. If changes are made in both systems, the Conflict Resolution Mapping willdetermine which application to update.
Note: If the Plain Text has been selected when creating the connection, rich text will bestripped from fields before they are imported into JIRA. If the fields are then synced toJama, they will remain plain text.
4. For fields mapped with Bi-directional Sync Mode, select a Conflict Resolution.
Use Jama - Jama's data will be used when changes have been made to both applications.
Use JIRA - JIRA's data will be used when changes have been made to both applications.
5. Select Save and close.
Clearing Synced Data
When a set is synchronized, Jama items are given several JIRA-required fields.These read-only fields willneed to be cleared to establish a new mapping.
JIRA Key When the sync first runs or an item is added to the job, the Jama item is given a JIRAID for reference.

JIRA Connector User Guide 16
© 2018 Jama Software, Inc.
JIRA URL This gives Jama users a direct link to the item in JIRA.
Last Updatedin JIRA
To prevent conflicts and unnecessary changes, the date the item was last modified inJIRA is displayed in the Jama item.
How to Clear Synchronization Data
1. Select Admin in the Jama header.
2. Select Clear Synchronization Data. This will clear the contents from all fields used to makeand track synchronization.
3. This window will present you with a checkbox to clear mappings. If "Additionally, remove all of
the current mappings from this JIRA configuration” is checked, all field mappings for all
projects will be cleared.
4. Select Clear Synchronization Data to delete the information from the mapping. Note: The
synced items will not be deleted.
5. Check a Jama item that was previously synced. All of the SYS_JIRA fields, such as JIRA URL
and Last Updated in JIRA, should be cleared. Note: If you clear all sync data and then map
the same items from Jama to JIRA, you will be creating duplicates in JIRA. The items will have
new IDs after clearing mapping, so any previously created items will not be synced with.

JIRA Connector 17
© 2018 Jama Software, Inc.
1.4 Work with Synchronized Items
Congratulations! At this point you have configured both Jama and JIRA and the synchronization
mappings are all in place....now what?
At this point users can create and edit items in Jama and watch them magically appear in JIRA. Users inJIRA can now work on the JIRA item adding comments with the confidence that the users in Jama willsee the changes.