zenoss core installation guide r5.0.0 latest
DESCRIPTION
Muy buenoTRANSCRIPT

Zenoss Core InstallationGuideRelease 5.0.x
Zenoss, Inc.
www.zenoss.com

2
Zenoss Core Installation Guide
Copyright © 2015 Zenoss, Inc. All rights reserved.
Zenoss and the Zenoss logo are trademarks or registered trademarks of Zenoss, Inc., in the United States and other countries. All other trademarks, logos,and service marks are the property of Zenoss or other third parties. Use of these marks is prohibited without the express written consent of Zenoss, Inc., orthe third-party owner.
Flash is a registered trademark of Adobe Systems Incorporated.
Oracle, the Oracle logo, Java, and MySQL are registered trademarks of the Oracle Corporation and/or its affiliates.
Linux is a registered trademark of Linus Torvalds.
RabbitMQ is a trademark of VMware, Inc.
SNMP Informant is a trademark of Garth K. Williams (Informant Systems, Inc.).
Sybase is a registered trademark of Sybase, Inc.
Tomcat is a trademark of the Apache Software Foundation.
VMware is a registered trademark or trademark of VMware, Inc. in the United States and/or other jurisdictions.
Windows is a registered trademark of Microsoft Corporation in the United States and other countries.
All other companies and products mentioned are trademarks and property of their respective owners.
Part Number: 1051.15.196
Zenoss, Inc.11305 Four Points DriveBldg 1 - Suite 300Austin, Texas 78726

3
ContentsPreface.................................................................................................................................. 4
Chapter 1: Planning your deployment............................................................ 5Introduction to Control Center......................................................................................................................................5Deployment considerations............................................................................................................................................. 5Hardware requirements.................................................................................................................................................... 6Operating system requirements...................................................................................................................................... 9Security considerations................................................................................................................................................... 10Packaging considerations................................................................................................................................................12Supported clients and browsers................................................................................................................................... 12
Chapter 2: Installing on RHEL or CentOS hosts......................................... 13Installing a master host..................................................................................................................................................13Installing a resource pool host..................................................................................................................................... 17
Chapter 3: Installing on Ubuntu hosts......................................................... 22Installing a master host..................................................................................................................................................22Installing a resource pool host..................................................................................................................................... 26
Chapter 4: Starting and tuning Zenoss Core................................................ 31Enabling access to the Control Center web interface..............................................................................................31Deploying the Zenoss Core application..................................................................................................................... 32Changing default passwords..........................................................................................................................................35Enabling access to application-level services............................................................................................................. 36Configuring OpenTSDB compaction..........................................................................................................................38Installing the Quilt package.......................................................................................................................................... 39Installing the Percona Toolkit.......................................................................................................................................40Starting the Zenoss Core application..........................................................................................................................40Deleting the RabbitMQ guest user account...............................................................................................................41Stopping Control Center and applications................................................................................................................. 41
Zenoss Core Installation Guide
4
PrefaceZenoss Core Installation Guide provides detailed instructions for installing Zenoss Core (Zenoss Core).
Related publications
Title Description
Zenoss Core Administration Guide Provides an overview of Zenoss Core architecture andfeatures, as well as procedures and examples to help usethe system.
Zenoss Core Release Notes Describes known issues, fixed issues, and late-breakinginformation not already provided in the publisheddocumentation set.
Zenoss Core Upgrade Guide Provides procedures for upgrading to the current releaseof Control Center and Zenoss Core.
Additional information and comments
Zenoss welcomes your comments and suggestions regarding our documentation. To share your comments, pleasesend an email to [email protected]. In the email, include the document title and part number. The part numberappears at the end of the list of trademarks, at the front of this guide.

Planning your deployment
5
Planning your deployment 1This release features Control Center, the open-source, application service orchestrator based on Docker and built byZenoss. Control Center greatly simplifies the installation, deployment, and management of Zenoss Core.
This chapter describes the platform considerations and requirements of Control Center and Zenoss Core, forplanning purposes.
Introduction to Control CenterA Control Center cluster contains one or more resource pools. A resource pool is a collection of compute, network,and storage resources (real or virtual hosts). The default resource pool includes the Control Center master host. Themaster host assigns a service to a resource pool and then that service is distributed to one of the hosts containedin the resource pool. Also, the master host maintains the local Docker repository and a distributed file system forapplication data. This separate volume enables Control Center to start new instances of services on another host inthe resource pool if a host fails. Volume drivers create and manage snapshots, and perform rollbacks, so that Dockerimages and application data stay in sync.
Deployment considerationsThe features of Control Center in this release affect deployments of Zenoss Core in the following ways.
■ This release supports Docker version 1.5.0 only. If a more recent version of Docker is installed on a host, theinstallation process reverts it to 1.5.0. To prevent unnecessary downtime, please ensure that any security ormaintenance tools in your environment do not upgrade Docker automatically.
■ All hosts in a resource pool should have identical hardware resources (real or virtual).■ Docker supports running identical containers under a variety of Linux operating systems. Control Center
supports the Ubuntu, RHEL, and CentOS distributions, but combining hosts that are running differentoperating systems in the same resource pool is currently untested and unsupported.
■ Resource pools other than the default pool are known as distributed resource pools. You may create any numberof distributed resource pools, and assign specific services to them. A common choice is to create distributedresource pools in different subnets or security zones to deploy Zenoss Core collector instances closer to themonitored devices on the subnets. Currently, the procedures for creating distributed resource pools are identicalto the procedures for creating any other resource pool.
■ To assign a service to a specific host, create a separate resource pool, add only the desired host to the pool, andthen assign the service to the separate pool.
■ Zenoss Core collector services are stateless, so their storage requirements are very lightweight compared tostateful services like MariaDB.

Zenoss Core Installation Guide
6
■ The default volume type for application data is rsync, which is sufficient for development deployments only.For all other uses, Zenoss supports Btrfs. The installation procedures include example steps for creating Btrfsfile systems.
■ Copy-on-write file systems like Brtfs can experience unrecoverable errors when the underlying disk space reachescapacity. Zenoss recommends allocating very large reserves of disk space to Btrfs file systems.
■ The amount of disk space that a Btrfs file system is using may not be reported accurately by standard filesystem utilities such as df. To retrieve accurate statistics, use a Btrfs-specific command, such as sudo btrfsfilesystem show /dev/sdb2.
■ By default, Control Center deletes snapshots after 12 hours. You may increase the value by setting theSERVICED_SNAPSHOT_TTL variable in the defaults file, /etc/default/serviced.
■ By default, Logstash logs are retained for 14 days and may consume up to 10 Gigabytes of disk space. Oncethey go beyond these limits, the logs are removed. Use the Control Center or serviced to modify the defaultvalues for SERVICED_LOGSTASH_MAX_DAYS and SERVICED_LOGSTASH_MAX_SIZE.
■ Control Center Internal Services includes Logstash, a Docker repository, and OpenTSDB. If these servicesare already established in your environment, you may replace their default endpoints with the endpoints ofyour existing services. However, the performance and availability of the services affects the performance andavailability of Control Center (and Zenoss Core).
■ Using virtual machines for Control Center and Zenoss Core is supported. However, pausing a virtual machineis not supported because Control Center relies on timestamps and clocks to keep services in sync. Shut down allservices cleanly before pausing or stopping a virtual machine.
■ The software upgrade process for this release uses Docker images. Each upgrade installs a new Zenoss Core image,and removes all layers that are not part of the new image. This ensures that each upgrade brings Zenoss Core toa tested and supported state. However, any customizations of Zenoss Core are lost, unless those customizationsare managed with a combination of Control Center scripts and a patch system like Quilt. Zenoss recommendsQuilt. The installation procedures, provided later in this document, include an option to install it.
Hardware requirementsControl Center and Zenoss Core require real or virtual hosts that implement the 64-bit version of the x86instruction set, and support one of the required operating systems. Hardware requirements vary by role (master orresource pool host) and by the services assigned to a host's pool.
Master host requirements
The default resource pool contains the Control Center master host and, in the default configuration, hosts forall of the services of Zenoss Core. The hosts in the default resource pool should meet the following, minimumrequirements:
■ 4 CPU cores (64-bit only; real or virtual)■ 20GB RAM■ 1 network interface controller (must support TCP/IP)■ The network latency among all hosts in a resource pool should be less than 5 milliseconds■ Local storage is recommended, and SAN storage is supported
Master host storage requirements vary by collection rate, frequency of backups, and the type of data stored inspecific locations. For example, a Zenoss Core collection rate of 25,000 metrics per second can require 1TB ofstorage in 60 days, depending on OpenTSBD compaction settings.
The Control Center master host requires adequate storage for backup files. The Control Center web interfacestores backup files in /opt/serviced/var/backups, and uses a subdirectory, /opt/serviced/var/backups/restore, for temporary files created during restorations. A typical backup is several gigabytes, andthe restore directory uses an equivalent amount. Currently, using a symbolic link for /opt/serviced/var/backups is not supported.
Planning your deployment
7
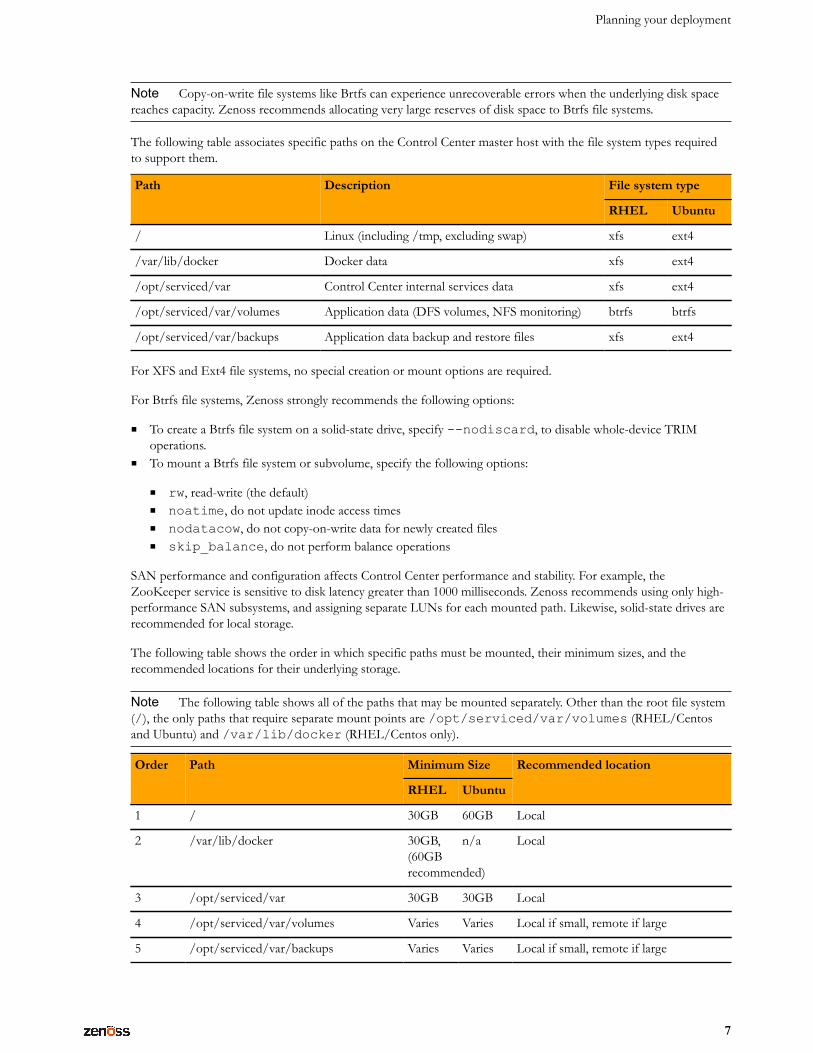
Note Copy-on-write file systems like Brtfs can experience unrecoverable errors when the underlying disk spacereaches capacity. Zenoss recommends allocating very large reserves of disk space to Btrfs file systems.
The following table associates specific paths on the Control Center master host with the file system types requiredto support them.
File system typePath Description
RHEL Ubuntu
/ Linux (including /tmp, excluding swap) xfs ext4
/var/lib/docker Docker data xfs ext4
/opt/serviced/var Control Center internal services data xfs ext4
/opt/serviced/var/volumes Application data (DFS volumes, NFS monitoring) btrfs btrfs
/opt/serviced/var/backups Application data backup and restore files xfs ext4
For XFS and Ext4 file systems, no special creation or mount options are required.
For Btrfs file systems, Zenoss strongly recommends the following options:
■ To create a Btrfs file system on a solid-state drive, specify --nodiscard, to disable whole-device TRIMoperations.
■ To mount a Btrfs file system or subvolume, specify the following options:
■ rw, read-write (the default)■ noatime, do not update inode access times■ nodatacow, do not copy-on-write data for newly created files■ skip_balance, do not perform balance operations
SAN performance and configuration affects Control Center performance and stability. For example, theZooKeeper service is sensitive to disk latency greater than 1000 milliseconds. Zenoss recommends using only high-performance SAN subsystems, and assigning separate LUNs for each mounted path. Likewise, solid-state drives arerecommended for local storage.
The following table shows the order in which specific paths must be mounted, their minimum sizes, and therecommended locations for their underlying storage.
Note The following table shows all of the paths that may be mounted separately. Other than the root file system(/), the only paths that require separate mount points are /opt/serviced/var/volumes (RHEL/Centosand Ubuntu) and /var/lib/docker (RHEL/Centos only).
Minimum SizeOrder Path
RHEL Ubuntu
Recommended location
1 / 30GB 60GB Local
2 /var/lib/docker 30GB,(60GBrecommended)
n/a Local
3 /opt/serviced/var 30GB 30GB Local
4 /opt/serviced/var/volumes Varies Varies Local if small, remote if large
5 /opt/serviced/var/backups Varies Varies Local if small, remote if large

Zenoss Core Installation Guide
8
Note An under-resourced master host does not function properly. Please do not deploy Control Center andZenoss Core on a master host that does not meet the minimum requirements.
The Docker, Control Center, and Zenoss Core packages require approximately 5GB of disk space.
Master host configuration examples
The following table shows an example RHEL/CentOS master host with a local xfs file system and remote btrfs filesystem.
Mount Point Type Size Description
/ xfs 90GB Local disk. Includes space for internal services data and somebackups.
(none) swap 15GB Local disk.
/var/lib/docker xfs 60GB Local disk.
/opt/serviced/var/volumes btrfs 1TB Remote SAN.
The following table shows an example Ubuntu master host with a remote btrfs file system. The root file systemincludes the required minimum space for all other paths.
Mount Point Type Size Description
/ ext4 120GB Local disk. Includes space for Docker, internal services, andsome backups.
(none) swap 15GB Local disk.
/opt/serviced/var/volumes btrfs 1TB Remote SAN.
Resource pool host requirements
The hosts in resource pools other than the default resource pool need enough RAM, CPU, and storage resourcesto support the services assigned to the pool. The network latency among all hosts in a resource pool should be lessthan 5 milliseconds. The hardware specifications of all hosts in a resource pool should be identical.
The storage requirements of hosts other than the master host do not include space for application data, which isstored excusively on the master host and mounted everywhere else. Storage is needed only for Linux, swap, andDocker.
Resource pool host configuration examples
The following table shows an example RHEL/CentOS resource pool host.
Mount Point Type Size
/ xfs 30GB
(none) swap 15GB
/var/lib/docker xfs 30GB
The following table shows an example Ubuntu resource pool host.
Mount Point Type Size
/ ext4 60GB
Planning your deployment
9
Mount Point Type Size
(none) swap 15GB
/var/lib/docker ext4 30GB
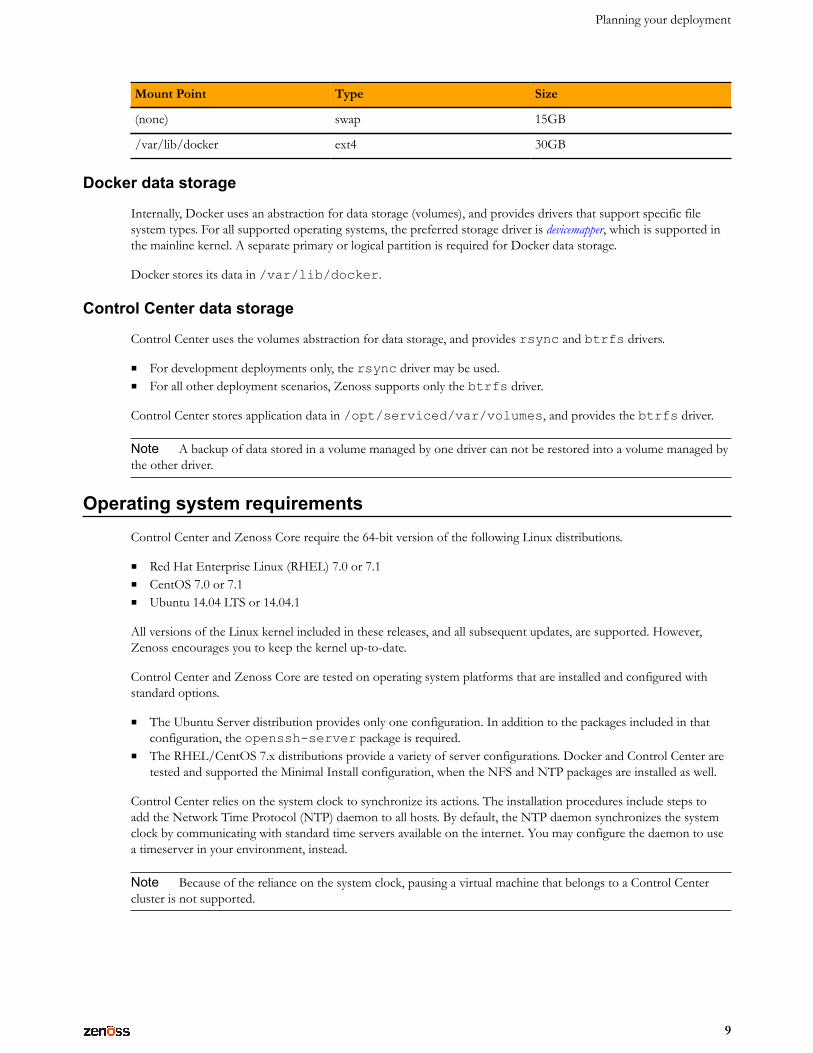
Docker data storage
Internally, Docker uses an abstraction for data storage (volumes), and provides drivers that support specific filesystem types. For all supported operating systems, the preferred storage driver is devicemapper, which is supported inthe mainline kernel. A separate primary or logical partition is required for Docker data storage.
Docker stores its data in /var/lib/docker.
Control Center data storage
Control Center uses the volumes abstraction for data storage, and provides rsync and btrfs drivers.
■ For development deployments only, the rsync driver may be used.■ For all other deployment scenarios, Zenoss supports only the btrfs driver.
Control Center stores application data in /opt/serviced/var/volumes, and provides the btrfs driver.
Note A backup of data stored in a volume managed by one driver can not be restored into a volume managed bythe other driver.
Operating system requirementsControl Center and Zenoss Core require the 64-bit version of the following Linux distributions.
■ Red Hat Enterprise Linux (RHEL) 7.0 or 7.1■ CentOS 7.0 or 7.1■ Ubuntu 14.04 LTS or 14.04.1
All versions of the Linux kernel included in these releases, and all subsequent updates, are supported. However,Zenoss encourages you to keep the kernel up-to-date.
Control Center and Zenoss Core are tested on operating system platforms that are installed and configured withstandard options.
■ The Ubuntu Server distribution provides only one configuration. In addition to the packages included in thatconfiguration, the openssh-server package is required.
■ The RHEL/CentOS 7.x distributions provide a variety of server configurations. Docker and Control Center aretested and supported the Minimal Install configuration, when the NFS and NTP packages are installed as well.
Control Center relies on the system clock to synchronize its actions. The installation procedures include steps toadd the Network Time Protocol (NTP) daemon to all hosts. By default, the NTP daemon synchronizes the systemclock by communicating with standard time servers available on the internet. You may configure the daemon to usea timeserver in your environment, instead.
Note Because of the reliance on the system clock, pausing a virtual machine that belongs to a Control Centercluster is not supported.

Zenoss Core Installation Guide
10
Networking requirements
On startup, Docker creates the docker0 virtual interface and selects an unused IP address and subnet (typically,172.17.42.1/16) to assign to the interface. The virtual interface is used as a virtual Ethernet bridge, and automaticallyforwards packets among real and virtual interfaces attached to it. The host and all of its containers communicateamong one another through this virtual bridge.
Docker can only check directly-connected routes, so the subnet it chooses for the virtual bridge may beinappropriate for your environment. To customize the virtual bridge subnet, refer to Docker's advanced networkconfiguration article.
The default configurations of firewall utilities such as Uncomplicated Firewall (Ubuntu) and FirewallD (RHEL/CentOS) include rules that can conflict with Docker, and therefore, Control Center and Zenoss Core. The followinginteractions illustrate the conflicts:
■ The ufw daemon drops all forwarding traffic.■ The firewalld daemon removes the DOCKER chain from iptables when it starts or restarts.■ Under systemd, firewalld is started before Docker. However, if you start or restart firewalld while
Docker is running, you need to restart Docker.
If you are using a firewall utlity, please ensure that it does not conflict with Docker.
If you are not using a firewall utlity, your firewall settings may still prevent communications over the Docker virtualbridge. This occurs when iptables INPUT rules restrict most traffic. To ensure that the bridge works properly,append an INPUT rule to your iptables configuration that allows traffic on the bridge subnet. For example, ifdocker0 is bound to 172.17.42.1/16, then the following, non-specific command ensures that the bridge works.
iptables -A INPUT -d 172.17.0.0/16 -j ACCEPT
Note The preceding command is only an example. Please consult your networking specialist before modifyingyour iptables configuration.
Additional requirements
Control Center requires a 16-bit, private IPv4 network for communications among hosts in its resource pools. Thedefault network is 10.3/16. If this network is already in use in your environment, you may select any valid IPv4 16-bit address space during installation.
This release of Control Center relies on Network File System (NFS) for its distributed file system implementation.For this reason, hosts in a Control Center cluster may not run a general-purpose NFS server, and all hosts requireNFS.
All hosts in Control Center resource pools must
■ be able to resolve the hostnames of all other resource pool hosts to IPv4 addresses (for example, if the public IPaddress of your (master) host is 10.0.0.1, then the hostname -i command should return 10.0.0.1)
■ respond with an IPv4 address other than 127.x.x.x when ping Hostname is invoked■ return a unique result from the hostid command
Security considerationsDuring installation, Control Center has no knowledge of the port requirements of the applications it is to manage,so the installation procedure includes disabling the firewall. After both Control Center and Zenoss Core areinstalled, you may close unused ports.

Planning your deployment
11
Control Center includes a virtual multiplexer (mux), to aggregate the UDP and TCP traffic among the services itmanages. The aggregation is opaque to services, and mux traffic is encrypted when it travels among containers onremote hosts. (Traffic among containers on the same host is not encrypted.) The mux, along with the distributed filesystem, enables Control Center to deploy services to any pool host, rapidly. The mux also reduces the number ofopen ports required on a Control Center host to a predictable set.
The following illustration identifies the ports that Control Center requires for its operations. All of the ports except4979 are configurable. All traffic is TCP.
Note Control Center relies on the system clock to synchronize its actions, and indirectly, NTP, to synchronizeclocks among multiple hosts. In the default configuration of ntpd, the firewalls of master and resource pool hostsmust support an incoming UDP connection on port 123.
Figure 1: Port requirements for Control Center hosts
Additional considerations
■ To gain access to the Control Center web interface, users must have login accounts on the Control Center masterhost. (Pluggable Authentication Modules (PAM) is supported.) By default, the users must be members of thesudo group (Ubuntu hosts) or the wheel group (RHEL/CentOS hosts). The default group may be changedby setting the SERVICED_ADMIN_GROUP variable, and the replacement group does not need superuserprivileges.
■ The serviced startup script sets the hard and soft open files limit to 1048576, but does not modify the /etc/sysconfig/limits.conf file.
■ Control Center does not support Security Enhanced Linux in enforcing mode. The installation procedures includesteps to set the mode to disabled.
■ On RHEL/CentOS systems, the FirewallD service can conflict with Docker, and therefore, Control Center andZenoss Core. For more information, see Networking requirements on page 10.

Zenoss Core Installation Guide
12
Packaging considerationsControl Center is designed to support any application that includes one or more services that are built into Dockercontainers. A service definition template contains the specifications of application services, in JSON format. Thedefinition of each service includes the IDs of the Docker images needed to run the service.
Control Center, and the service definition templates for Zenoss Core, are distributed as Debian (apt) and Redhat(yum/rpm) packages. The packages are available at public repositories maintained by Zenoss. The Docker imagesthat Zenoss Core requires are available at the Zenoss Docker Hub repository. So, the default installation processrequires internet access. However, all of the repositories may be mirrored, so offline installations are supported aswell.
Note The Docker images for Zenoss Core are available in a public Zenoss repository at Docker Hub. No specialpermissions are required to pull the images.
Supported clients and browsersThe client operating systems and web browser combinations supported in this release.
■ All browsers must have Adobe® Flash® Player 11 installed, or a more recent version.■ Compatibility mode is not supported in Internet Explorer.
Client OS Supported Browsers
Internet Explorer 11 (enterprise mode is supported)
Internet Explorer 10
Firefox 30 and above
Windows 7 and 8.1
Chrome 30 and above
Firefox 30Windows Server 2012 R2
Chrome 36
Firefox 30 and aboveMacintosh OS/X 10.9
Chrome 36 and above
Firefox 30 and aboveUbuntu 14.04 LTS
Chrome 37 and above
Firefox 30 and aboveRed Hat Enterprise Linux 6.5,CentOS 6.5
Chrome 37 and above

Installing on RHEL or CentOS hosts
13
Installing on RHEL or CentOS hosts 2The procedures in this chapter install Control Center and Zenoss Core on one or more Red Hat EnterpriseLinux (RHEL) 7.x or CentOS 7.x hosts. Please review the information in Planning your deployment on page 5 beforeperforming these procedures.
Note The procedures in this chapter include example steps to create a Btrfs file system. The steps may not beappropriate for your environment. If so, please refer to your operating system documentation to create a Btrfs filesystem using a different method.
Each deployment must have one master host, and may include one or more resource pool hosts. Install the masterhost first, and then install resource pool hosts.
Installing a master hostPerform the procedures in this section to install Control Center and Zenoss Core on a master host.
Preparing the master host operating systemPerform this procedure to prepare a Red Hat Enterprise Linux (RHEL) 7.x or CentOS 7.x host to function as theControl Center master host.
1 Log in to the target master host as root, or as a user with superuser privileges.2 Verify that the host implements the 64-bit version of the x86 instruction set.
uname -m
■ If the output is x86_64, the architecture is 64-bit. Proceed to the next step.■ If the ouptut is i386/i486/i586/i686, the architecture is 32-bit. Stop this procedure and select a
different host.3 Disable the firewall.
systemctl stop firewalld && systemctl disable firewalld
Note If firewalld.service is currently not running, this command returns "Failed to issuemethod call: Unit firewalld.service not loaded". This means the firewall is alreadydisabled. Proceed to the next step.
4 Optional: Enable persistent storage for log files, if desired.
Zenoss Core Installation Guide
14
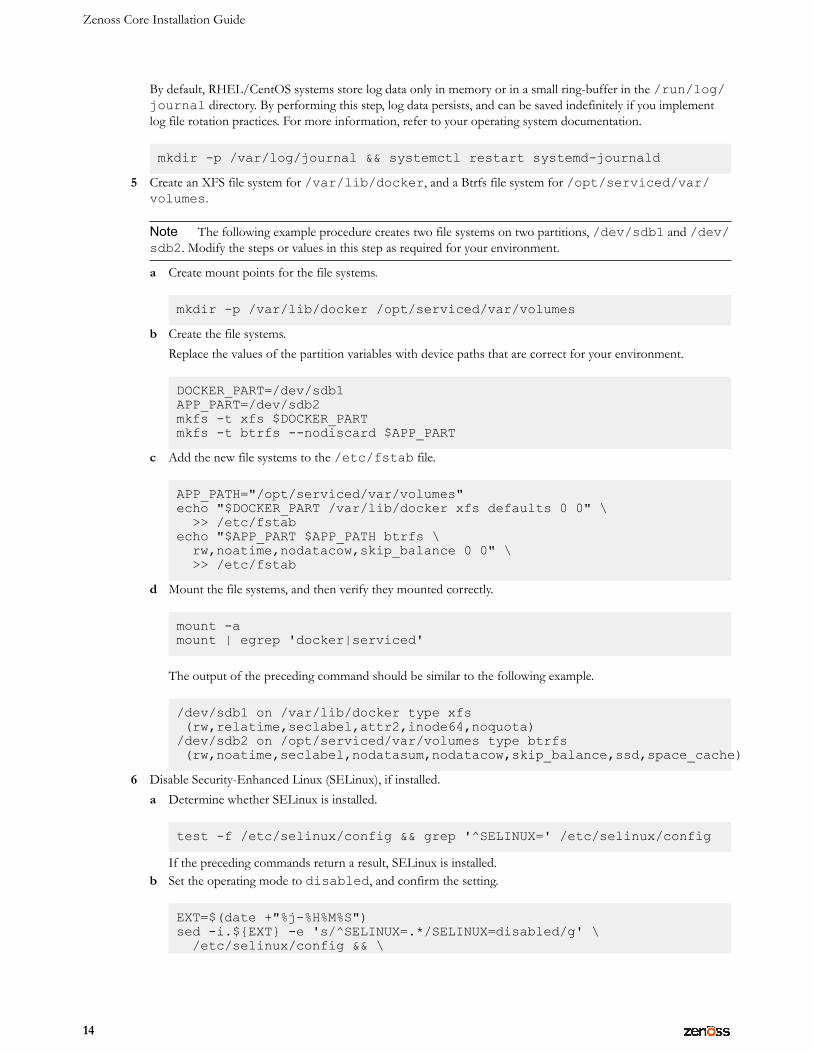
By default, RHEL/CentOS systems store log data only in memory or in a small ring-buffer in the /run/log/journal directory. By performing this step, log data persists, and can be saved indefinitely if you implementlog file rotation practices. For more information, refer to your operating system documentation.
mkdir -p /var/log/journal && systemctl restart systemd-journald
5 Create an XFS file system for /var/lib/docker, and a Btrfs file system for /opt/serviced/var/volumes.
Note The following example procedure creates two file systems on two partitions, /dev/sdb1 and /dev/sdb2. Modify the steps or values in this step as required for your environment.
a Create mount points for the file systems.
mkdir -p /var/lib/docker /opt/serviced/var/volumes
b Create the file systems.Replace the values of the partition variables with device paths that are correct for your environment.
DOCKER_PART=/dev/sdb1APP_PART=/dev/sdb2mkfs -t xfs $DOCKER_PARTmkfs -t btrfs --nodiscard $APP_PART
c Add the new file systems to the /etc/fstab file.
APP_PATH="/opt/serviced/var/volumes"echo "$DOCKER_PART /var/lib/docker xfs defaults 0 0" \ >> /etc/fstabecho "$APP_PART $APP_PATH btrfs \ rw,noatime,nodatacow,skip_balance 0 0" \ >> /etc/fstab
d Mount the file systems, and then verify they mounted correctly.
mount -amount | egrep 'docker|serviced'
The output of the preceding command should be similar to the following example.
/dev/sdb1 on /var/lib/docker type xfs (rw,relatime,seclabel,attr2,inode64,noquota)/dev/sdb2 on /opt/serviced/var/volumes type btrfs (rw,noatime,seclabel,nodatasum,nodatacow,skip_balance,ssd,space_cache)
6 Disable Security-Enhanced Linux (SELinux), if installed.a Determine whether SELinux is installed.
test -f /etc/selinux/config && grep '^SELINUX=' /etc/selinux/config
If the preceding commands return a result, SELinux is installed.b Set the operating mode to disabled, and confirm the setting.
EXT=$(date +"%j-%H%M%S")sed -i.${EXT} -e 's/^SELINUX=.*/SELINUX=disabled/g' \ /etc/selinux/config && \

Installing on RHEL or CentOS hosts
15
grep '^SELINUX=' /etc/selinux/config
A reboot is required to complete the configuration change, and a reboot is the last step of this procedure.7 Install and start the Dnsmasq package.
systemctl enable dnsmasq && systemctl start dnsmasq
8 Install and configure the NTP package.a Install the package.
yum install -y ntp && systemctl enable ntpd
b Configure ntpd to start when the system starts.Currently, an unresolved issue associated with NTP prevents ntpd from restarting correctly after a reboot,and the following commands provide a workaround to ensure that it does.
echo "systemctl start ntpd" >> /etc/rc.d/rc.localchmod +x /etc/rc.d/rc.local
c Start ntpd.
systemctl start ntpd
9 Download and install the Zenoss repository package.
rpm -ivh http://get.zenoss.io/yum/zenoss-repo-1-1.x86_64.rpmyum clean all
10 Reboot the host.
reboot
Installing Control Center and Zenoss Core
1 Log in to the master host as root, or as a user with superuser privileges.2 Install Control Center, Zenoss Core, and Docker, and then start Docker.
yum --enablerepo=zenoss-stable install -y zenoss-core-servicesystemctl start docker
3 Note This step is only required for RHEL/Centos 7.1 systems.
Optional: Configure and restart the NFS server.Currently, an unresolved issue in prevents the NFS server from starting correctly. The following commands providea workaround to ensure that it does.a In the /usr/lib/systemd/system/nfs-server.service file, change rpcbind.target to
rpcbind.service.
EXT=$(date +"%j-%H%M%S")sed -i.${EXT} \ -e 's/\(Requires=.*\)rpcbind.target/\1rpcbind.service/' \ /usr/lib/systemd/system/nfs-server.service

Zenoss Core Installation Guide
16
b Reload the NFS configuration.
systemctl daemon-reload
4 Configure and restart Docker.a Identify the IPv4 address and subnet Docker has selected for its virtual Ethernet bridge.
ip addr | grep -A 2 'docker0:' | grep inet
Note Typically, the address and subnet is 172.17.42.1/16. For more information about changing theselection, refer to Docker's advanced network configuration article.
b Add the devicemapper and DNS flags to the Docker startup options.If you change the virtual bridge subnet, replace the IP address in the following command.
echo 'DOCKER_OPTS="-s devicemapper --dns=172.17.42.1"' \ >> /etc/sysconfig/docker
c Stop and restart Docker.
systemctl stop docker && systemctl start docker
5 Change the volume type for application data.
The /etc/default/serviced file contains variables that define the character of an instance of ControlCenter. For more information about serviced configuration options, refer to the Control Center onlinedocumentation.
The following sed command changes the value of the SERVICED_FS_TYPE variable from the default,rsync, to btrfs.
EXT=$(date +"%j-%H%M%S")sed -i.${EXT} \ -e 's|^#[^S]*\(SERVICED_FS_TYPE=\).*$|\btrfs|' \ /etc/default/serviced
6 Optional: Configure the master host for a multi-host deployment, if desired.
The default values in /etc/default/serviced configure Control Center for a single-host deployment.To enable a multi-host deployment, change the following variables.HOME
The path docker uses to locate the .dockercfg authentication file. Docker Hub credentials are storedin the file.
SERVICED_REGISTRYDetermines whether serviced uses a local registry to store Docker images. Set the value to 1, true.
SERVICED_AGENTDetermines whether a serviced instance acts as a resource pool host. A resource pool host runsapplication services scheduled for the resource pool to which it belongs. Set the value to 1, true.
SERVICED_MASTERDetermines whether a serviced instance acts as the Control Center master host. The master host runsthe application services scheduler and other internal services, including the web server for the ControlCenter web interface. A serviced instance may be configured as both an agent and a master. Set thevalue to 1, true.

Installing on RHEL or CentOS hosts
17
The following commands make the required edits to /etc/default/serviced.
EXT=$(date +"%j-%H%M%S")sed -i.${EXT} -e 's|^#[^H]*\(HOME=/root\)|\1|' \ -e 's|^#[^S]*\(SERVICED_REGISTRY=\).|\11|' \ -e 's|^#[^S]*\(SERVICED_AGENT=\).|\11|' \ -e 's|^#[^S]*\(SERVICED_MASTER=\).|\11|' \ /etc/default/serviced
7 Optional: Specify an alternate private subnet for Control Center, if necessary.
By default, Control Center uses the 10.3/16 private subnet for virtual IP addresses. If your environmentalready uses 10.3/16 for other purposes, select an unused subnet for Control Center and add it to the /etc/default/serviced file.
Note RFC 1918 restricts private networks to the 10/8, 172.16/12, and 192.168/16 address spaces. However,Control Center accepts any valid, 16-bit, IPv4 address space for its private network.
For example, to set the private subnet for Control Center to 10.20/16, uncomment theSERVICED_VIRTUAL_ADDRESS_SUBNET variable, and then set its value to 10.20.
The following commands make the required edits to /etc/default/serviced.
SUBNET=10.20EXT=$(date +"%j-%H%M%S")test ! -z "${SUBNET}" && \sed -i.${EXT} -e \ 's|^#[^S]*\(SERVICED_VIRTUAL_ADDRESS_SUBNET=\).*|\1'${SUBNET}'|' \ /etc/default/serviced
8 Start the Control Center service (serviced).
systemctl start serviced
To monitor progress, enter the following command:
journalctl -u serviced -f
The serviced daemon invokes docker to pull its internal services image from Docker Hub. The ControlCenter web interface is unavailable until the image is installed and the services are started. The process takesapproximately 5-10 minutes.
■ To configure resource pool hosts, proceed to Preparing a resource pool host on page 17.■ To start Zenoss Core, proceed to Starting and tuning Zenoss Core on page 31.
Installing a resource pool hostPerform the procedures in this section to install Control Center on a resource pool host. Repeat the procedures foreach host you wish to add to your Zenoss Core deployment.
Preparing a resource pool hostPerform this procedure to prepare a Red Hat Enterprise Linux (RHEL) 7.0 or CentOS 7.0 host as a Control Centerresource pool host.
1 Log in to the master host as root, or as a user with superuser privileges.
Zenoss Core Installation Guide
18
2 Verify that the host implements the 64-bit version of the x86 instruction set.
uname -m
■ If the output is x86_64, the architecture is 64-bit. Proceed to the next step.■ If the ouptut is i386/i486/i586/i686, the architecture is 32-bit. Stop this procedure and select a
different host.3 Disable the firewall.
systemctl stop firewalld && systemctl disable firewalld
Note If firewalld.service is currently not running, this command returns "Failed to issuemethod call: Unit firewalld.service not loaded". This means the firewall is alreadydisabled. Proceed to the next step.
4 Optional: Enable persistent storage for log files, if desired.By default, RHEL/CentOS systems store log data only in memory or in a small ring-buffer in the /run/log/journal directory. By performing this step, log data persists, and can be saved indefinitely if you implementlog file rotation practices. For more information, refer to your operating system documentation.
mkdir -p /var/log/journal && systemctl restart systemd-journald
5 Create an XFS file system for Docker.
Note The following example procedure creates a file system on the /dev/sdb1 partition. Modify the stepsor values in this procedure as required for your environment.
a Create a mount point for the XFS file system.
mkdir /var/lib/docker
b Create the file system.
DOCKER_PART=/dev/sdb1mkfs -t xfs $DOCKER_PART
c Add the new file system to the /etc/fstab file.
echo "$DOCKER_PART /var/lib/docker xfs defaults 0 0" \ >> /etc/fstab
d Mount the file system, and then verify it mounted correctly.
mount -amount | grep docker
The output of the preceding command should be similar to the following example.
/dev/sdb1 on /var/lib/docker type xfs (rw,relatime,seclabel,attr2,inode64,noquota)
6 Disable Security-Enhanced Linux (SELinux), if installed.

Installing on RHEL or CentOS hosts
19
a Determine whether SELinux is installed.
test -f /etc/selinux/config && grep '^SELINUX=' /etc/selinux/config
If the preceding commands return a result, SELinux is installed.b Set the operating mode to disabled, and confirm the setting.
EXT=$(date +"%j-%H%M%S")sed -i.${EXT} -e 's/^SELINUX=.*/SELINUX=disabled/g' \ /etc/selinux/config && \grep '^SELINUX=' /etc/selinux/config
A reboot is required to complete the configuration change, and a reboot is the last step of this procedure.7 Install and start the Dnsmasq package.
systemctl enable dnsmasq && systemctl start dnsmasq
8 Install and configure the NTP package.a Install the package.
yum install -y ntp && systemctl enable ntpd
b Configure ntpd to start when the system starts.Currently, an unresolved issue associated with NTP prevents ntpd from restarting correctly after a reboot,and the following commands provide a workaround to ensure that it does.
echo "systemctl start ntpd" >> /etc/rc.d/rc.localchmod +x /etc/rc.d/rc.local
c Start ntpd.
systemctl start ntpd
9 Download and install the Zenoss repository package.
rpm -ivh http://get.zenoss.io/yum/zenoss-repo-1-1.x86_64.rpmyum clean all
10 Reboot the host.
reboot
Proceed to the next procedure, Installing Control Center on page 19.
Installing Control Center
1 Log in to the resource pool host as root, or as a user with superuser privileges.2 Install Control Center and Docker, and then start Docker.
yum --enablerepo=zenoss-stable install -y servicedsystemctl start docker
3 Configure and restart Docker.

Zenoss Core Installation Guide
20
a Identify the IPv4 address and subnet Docker has selected for its virtual Ethernet bridge.
ip addr | grep -A 2 'docker0:' | grep inet
Note Typically, the address and subnet is 172.17.42.1/16. For more information about changing theselection, refer to Docker's advanced network configuration article.
b Add the devicemapper and DNS flags to the Docker startup options.If you change the virtual bridge subnet, replace the IP address in the following command.
echo 'DOCKER_OPTS="-s devicemapper --dns=172.17.42.1"' \ >> /etc/sysconfig/docker
c Stop and restart Docker.
systemctl stop docker && systemctl start docker
4 Configure the resource pool host for a multi-host deployment.a Create a variable for the IP address or hostname of the master host.
If you use the hostname, all hosts in your Control Center deployment must be able to resolve the hostname,either through an entry in /etc/hosts or through a nameserver on your network.
Note Replace 192.0.2.10 with the IP address of your Control Center master host.
MHOST=192.0.2.10
b Change variables in the Control Center defaults file.
The default values in /etc/default/serviced configure Control Center for a single-hostdeployment. To enable a multi-host deployment, uncomment and change the following variables.HOME
The path docker uses to locate the .dockercfg authentication file. Docker Hub credentials arestored in the file.
SERVICED_REGISTRYDetermines whether serviced uses a local registry to store Docker images. Set the value to 1, true.
SERVICED_AGENTDetermines whether a serviced instance acts as a resource pool host. Set the value to 1, true.
SERVICED_MASTERDetermines whether a serviced instance acts as the Control Center master host. Set the value to 0,false.
SERVICED_MASTER_IPThe IP address of the serviced instance configured as the master. Set the SERVICED_MASTER_IPvariable to the IP address of the master host, then uncomment SERVICED_MASTER_IP andall other variables that reference it (SERVICED_ZK, SERVICED_DOCKER_REGISTRY,SERVICED_ENDPOINT, SERVICED_LOG_ADDRESS, SERVICED_LOGSTASH_ES, andSERVICED_STATS_PORT). Finally, replace the variable that reference SERVICED_MASTER_IPwith the IP address of the master host.
The following commands make the required edits to /etc/default/serviced.
EXT=$(date +"%j-%H%M%S")test ! -z "${MHOST}" && \

Installing on RHEL or CentOS hosts
21
sed -i.${EXT} -e 's|^#[^H]*\(HOME=/root\)|\1|' \ -e 's|^#[^S]*\(SERVICED_REGISTRY=\).|\11|' \ -e 's|^#[^S]*\(SERVICED_AGENT=\).|\11|' \ -e 's|^#[^S]*\(SERVICED_MASTER=\).|\10|' \ -e 's|^#[^S]*\(SERVICED_MASTER_IP=\).*|\1'${MHOST}'|' \ -e '/=$SERVICED_MASTER_IP/ s|^#[^S]*||' \ -e 's|\($SERVICED_MASTER_IP\)|'${MHOST}'|' \ /etc/default/serviced
5 Optional: Specify an alternate private subnet for Control Center, if necessary.
By default, Control Center uses the 10.3/16 private subnet for virtual IP addresses. If your environmentalready uses 10.3/16 for other purposes, select an unused subnet for Control Center and add it to the /etc/default/serviced file.
Note RFC 1918 restricts private networks to the 10/8, 172.16/12, and 192.168/16 address spaces. However,Control Center accepts any valid, 16-bit, IPv4 address space for its private network.
For example, to set the private subnet for Control Center to 10.20/16, uncomment theSERVICED_VIRTUAL_ADDRESS_SUBNET variable, and then set its value to 10.20.
The following commands make the required edits to /etc/default/serviced.
SUBNET=10.20EXT=$(date +"%j-%H%M%S")test ! -z "${SUBNET}" && \sed -i.${EXT} -e \ 's|^#[^S]*\(SERVICED_VIRTUAL_ADDRESS_SUBNET=\).*|\1'${SUBNET}'|' \ /etc/default/serviced
6 Start the Control Center service.
systemctl start serviced
To monitor progress, enter the following command.
journalctl -u serviced -f
■ To configure additional hosts, return to Preparing a resource pool host on page 17.■ To start Zenoss Core, proceed to Starting and tuning Zenoss Core on page 31.
Zenoss Core Installation Guide
22
Installing on Ubuntu hosts 3The procedures in this chapter install Control Center and Zenoss Core on one or more Ubuntu 14.04 LTS hosts.Please review the information in Planning your deployment on page 5 before performing these procedures.
In addition, the procedures in this chapter require access to public Zenoss repositories or local mirrors of Zenossrepositories.
These procedures include example steps to create a Btrfs partition on a separate disk, which may not be appropriatefor your environment. To create a Btrfs partition in a different way, please refer to your operating systemdocumentation.
Each deployment must have one master host, and may include one or more resource pool hosts. Install the masterhost first, and then install resource pool hosts.
Installing a master hostPerform the procedures in this section to install Control Center and Zenoss Core on a master host.
Preparing the master hostFollow this procedure to prepare an Ubuntu host for Control Center.
1 Log in to the target host as root or as a user with sudo privileges.2 Verify that the host implements the 64-bit version of the x86 instruction set.
uname -m
■ If the output is x86_64, the architecture is 64-bit. Proceed to the next step■ If the output is i386/i486/i586/i686, the architecture is 32-bit. Stop this procedure and select a
different host.3 Create an Ext4 file system for /var/lib/docker, and a Btrfs file system for /opt/serviced/var/
volumes.
Note The following example procedure creates two file systems on two partitions, /dev/sdb1 and /dev/sdb2. Modify the steps or values in this procedure as required for your environment.
a Create mount points for the file systems.
sudo mkdir -p /var/lib/docker /opt/serviced/var/volumes

Installing on Ubuntu hosts
23
b Create the file systems.Replace the values of the partition variables with device paths that are correct for your environment.
sudo mkfs.ext4 /dev/sdb1sudo mkfs.btrfs --nodiscard /dev/sdb2
c Add the new file systems to the /etc/fstab file.
sudo sh -c 'echo \ "/dev/sdb1 /var/lib/docker ext4 defaults 0 0" \ >> /etc/fstab'sudo sh -c 'echo \ "/dev/sdb2 /opt/serviced/var/volumes btrfs \ rw,noatime,nodatacow,skip_balance 0 0" \ >> /etc/fstab'
d Mount the file systems, and then verify they mounted correctly.
sudo mount -asudo mount | egrep 'docker|serviced'
The output of the preceding command should be similar to the following example.
/dev/sdb1 on /var/lib/docker type ext4 (rw,relatime,seclabel,attr2,inode64,noquota)/dev/sdb2 on /opt/serviced/var/volumes type btrfs (rw,noatime,seclabel,nodatasum,nodatacow,skip_balance,ssd,space_cache)
4 Disable the firewall.
sudo ufw disable
5 Disable Security-Enhanced Linux (SELinux), if installed.a Determine whether SELinux is installed.
test -f /etc/selinux/config && grep '^SELINUX=' /etc/selinux/config
If the preceding commands return a result, SELinux is installed.b Set the operating mode to disabled, and confirm the setting.
EXT=$(date +"%j-%H%M%S")sudo sed -i.${EXT} -e 's/^SELINUX=.*/SELINUX=disabled/g' \ /etc/selinux/config && \grep '^SELINUX=' /etc/selinux/config
A reboot is required to complete the configuration change, and a reboot is the last step of this procedure.6 Install Docker.
sudo sh -c 'echo "deb http://get.docker.com/ubuntu docker main" \ > /etc/apt/sources.list.d/docker.list'sudo apt-key adv --keyserver hkp://keyserver.ubuntu.com:80 \ --recv-keys 36A1D7869245C8950F966E92D8576A8BA88D21E9sudo apt-get updatesudo apt-get install -y lxc-docker-1.5.0
7 Configure and restart Docker.

Zenoss Core Installation Guide
24
a Identify the IPv4 address and subnet Docker has selected for its virtual Ethernet bridge.
ifconfig | grep -A 1 'docker0' | grep inet
Note Typically, the address and subnet is 172.17.42.1/16. For more information about changing theselection, refer to Docker's advanced network configuration article.
b Add the storage driver and DNS flags to the Docker startup options.If you change the virtual bridge subnet, replace the IP address in the following command.
MYOPTS='\nDOCKER_OPTS="-s devicemapper --dns=172.17.42.1"'sudo sed -i -e '/^#DOCKER_OPTS=/ s|$|'"${MYOPTS}"'|' \ /etc/default/docker
c Add the current user to the Docker group.
sudo usermod -aG docker $USER
d Stop and restart Docker.
sudo stop docker && sudo start docker
8 Install the Zenoss OpenPGP public key.
sudo apt-key adv --keyserver keys.gnupg.net --recv-keys AA5A1AD7
9 Add the Zenoss repository to the list of repositories.If you are using a local mirror of the public Zenoss repository, replace the value of the REPO variable with yourmirror's address in the following commands.
REPO=http://get.zenoss.io/apt/ubuntusudo sh -c 'echo "deb [ arch=amd64 ] '${REPO}' trusty universe" \ > /etc/apt/sources.list.d/zenoss.list'
10 Update the Ubuntu repository database.
sudo apt-get update
11 Install the NTP package and start ntpd.
sudo apt-get install -y ntp
12 Reboot the host.
sudo reboot
Installing on the master hostPerform this procedure to install Control Center and Zenoss Core on the master host.
1 Log in to the target host as a user with sudo and docker privileges.2 Install the Zenoss Core service template.
sudo apt-get install -y zenoss-core-service
Installing on Ubuntu hosts
25
3 Change the volume type for application data.
The /etc/default/serviced file contains variables that define the character of an instance of ControlCenter. For more information about serviced configuration options, refer to the Control Center help.
The following sed command changes the value of the SERVICED_FS_TYPE variable from the default,rsync, to btrfs.
EXT=$(date +"%j-%H%M%S")sudo sed -i.${EXT} \ -e 's|^#[^S]*\(SERVICED_FS_TYPE=\).*$|\1btrfs|' \ /etc/default/serviced
4 Optional: Configure the master host for multi-host deployment, if desired.
The default values in the Control Center defaults file, /etc/default/serviced, configure ControlCenter for a single-host deployment. To enable a multi-host deployment, uncomment and change the followingvariables.HOME
The path docker uses to locate the .dockercfg authentication file. Docker Hub credentials are storedin the file.
SERVICED_REGISTRYDetermines whether serviced uses a local registry to store Docker images. Set the value to 1, true.
SERVICED_AGENTDetermines whether a serviced instance acts as a resource pool host. A resource pool host runsapplication services scheduled for the resource pool to which it belongs. Set the value to 1, true.
SERVICED_MASTERDetermines whether a serviced instance acts as the Control Center master host. The master host runsthe application services scheduler and other internal services, including the web server for the ControlCenter web interface. A serviced instance may be configured as both an agent and a master. Set thevalue to 1, true.
The following commands make the required edits to /etc/default/serviced.
EXT=$(date +"%j-%H%M%S")sudo sed -i.${EXT} -e 's|^#[^H]*\(HOME=/root\)|\1|' \ -e 's|^#[^S]*\(SERVICED_REGISTRY=\).|\11|' \ -e 's|^#[^S]*\(SERVICED_AGENT=\).|\11|' \ -e 's|^#[^S]*\(SERVICED_MASTER=\).|\11|' \ /etc/default/serviced
5 Optional: Specify an alternate private subnet for Control Center, if necessary.
By default, Control Center uses the 10.3/16 private subnet for virtual IP addresses. If your environmentalready uses 10.3/16 for other purposes, select an unused subnet for Control Center, and add it to the /etc/default/serviced file.
Note RFC 1918 restricts private networks to the 10/8, 172.16/12, and 192.168/16 address spaces. However,Control Center accepts any valid, 16-bit, IPv4 address space for its private network.
For example, to set the private subnet for Control Center to 10.20/16, uncomment theSERVICED_VIRTUAL_ADDRESS_SUBNET variable, and then set its value to 10.20.
Zenoss Core Installation Guide
26
The following commands make the required edits to /etc/default/serviced.
SUBNET=10.20EXT=$(date +"%j-%H%M%S")test ! -z "${SUBNET}" && \sudo sed -i.${EXT} -e \ 's|^#[^S]*\(SERVICED_VIRTUAL_ADDRESS_SUBNET=\).*|\1'${SUBNET}'|' \ /etc/default/serviced
6 Start the Control Center service.
sudo start serviced
The serviced daemon invokes docker to pull its internal services image from Docker Hub. The ControlCenter web interface is unavailable until the image is installed and the services are started. The process takesapproximately 5-10 minutes.
7 Configure resource pool hosts or start Zenoss Core.
■ To configure resource pool hosts, proceed to Preparing a resource pool host on page 26.■ To start Zenoss Core, proceed to Starting and tuning Zenoss Core on page 31.
Installing a resource pool hostPerform the procedures in this section to install Control Center on a resource pool host. Repeat the procedures foreach host you wish to add to your Zenoss Core deployment.
Preparing a resource pool hostFollow this procedure to prepare an Ubuntu host for Control Center.
1 Log in to the target host as root or as a user with sudo privileges.2 Verify that the host implements the 64-bit version of the x86 instruction set.
uname -m
■ If the output is x86_64, the architecture is 64-bit. Proceed to the next step■ If the output is i386/i486/i586/i686, the architecture is 32-bit. Stop this procedure and select a
different host.3 Disable the firewall.
sudo ufw disable
4 Create an Ext4 file system for /var/lib/docker.
Note The following example procedure creates one file system on one partition, /dev/sdb1. Modify thesteps or values in this step as required for your environment.
a Create a mount point for the file system.
sudo mkdir -p /var/lib/docker
b Create the file system.

Installing on Ubuntu hosts
27
Replace the values of the partition variables with device paths that are correct for your environment.
sudo mkfs.ext4 /dev/sdb1
c Add the new file system to the /etc/fstab file.
sudo sh -c 'echo \ "/dev/sdb1 /var/lib/docker ext4 defaults 0 0" \ >> /etc/fstab'
d Mount the file system, and then verify it mounted correctly.
sudo mount -a && sudo mount | egrep docker
The output of the preceding command should be similar to the following example.
/dev/sdb1 on /var/lib/docker type ext4 (rw,relatime,seclabel,attr2,inode64,noquota)
5 Disable Security-Enhanced Linux (SELinux), if installed.a Determine whether SELinux is installed.
test -f /etc/selinux/config && grep '^SELINUX=' /etc/selinux/config
If the preceding commands return a result, SELinux is installed.b Set the operating mode to disabled, and confirm the setting.
EXT=$(date +"%j-%H%M%S")sudo sed -i.${EXT} -e 's/^SELINUX=.*/SELINUX=disabled/g' \ /etc/selinux/config && \grep '^SELINUX=' /etc/selinux/config
A reboot is required to complete the configuration change, and a reboot is the last step of this procedure.6 Install Docker.
sudo sh -c 'echo "deb http://get.docker.com/ubuntu docker main" \ > /etc/apt/sources.list.d/docker.list'sudo apt-key adv --keyserver hkp://keyserver.ubuntu.com:80 \ --recv-keys 36A1D7869245C8950F966E92D8576A8BA88D21E9sudo apt-get updatesudo apt-get install -y lxc-docker-1.5.0
7 Configure and restart Docker.a Identify the IPv4 address and subnet Docker has selected for its virtual Ethernet bridge.
ifconfig | grep -A 1 'docker0' | grep inet
Note Typically, the address and subnet is 172.17.42.1/16. For more information about changing theselection, refer to Docker's advanced network configuration article.
b Add the storage driver and DNS flags to the Docker startup options.If you change the virtual bridge subnet, replace the IP address in the following command.
MYOPTS='\nDOCKER_OPTS="-s devicemapper --dns=172.17.42.1"'sudo sed -i -e '/^#DOCKER_OPTS=/ s|$|'"${MYOPTS}"'|' \

Zenoss Core Installation Guide
28
/etc/default/docker
c Add the current user to the Docker group.
sudo usermod -aG docker $USER
d Stop and restart Docker.
sudo stop docker && sudo start docker
8 Install the Zenoss OpenPGP public key.
sudo apt-key adv --keyserver keys.gnupg.net --recv-keys AA5A1AD7
9 Add the Zenoss repository to the list of repositories.If you are using a local mirror of the public Zenoss repository, replace the value of the REPO variable with yourmirror's address in the following commands.
REPO=http://get.zenoss.io/apt/ubuntusudo sh -c 'echo "deb [ arch=amd64 ] '${REPO}' trusty universe" \ > /etc/apt/sources.list.d/zenoss.list'
10 Update the Ubuntu repository database.
sudo apt-get update
11 Install the NTP package and start ntpd.
sudo apt-get install -y ntp
12 Reboot the host.
sudo reboot
Installing Control Center
1 Log in to the host as a user with sudo and docker privileges.2 Install Control Center
sudo apt-get install -y serviced
3 Configure the resource pool host for a multi-host deployment.a Create a variable for the IP address or hostname of the master host.
If you use the hostname, all hosts in your Control Center deployment must be able to resolve the hostname,either through an entry in /etc/hosts or through a nameserver on your network.
Note Replace 192.0.2.10 with the IP address of your Control Center master host.
MHOST=192.0.2.10
b Change variables in the Control Center defaults file.
The default values in /etc/default/serviced configure Control Center for a single-hostdeployment. To enable a multi-host deployment, uncomment and change the following variables.

Installing on Ubuntu hosts
29
HOMEThe path docker uses to locate the .dockercfg authentication file. Docker Hub credentials arestored in the file.
SERVICED_REGISTRYDetermines whether serviced uses a local registry to store Docker images. Set the value to 1, true.
SERVICED_AGENTDetermines whether a serviced instance acts as a resource pool host. Set the value to 1, true.
SERVICED_MASTERDetermines whether a serviced instance acts as the Control Center master host. Set the value to 0,false.
SERVICED_MASTER_IPThe IP address of the serviced instance configured as the master. Set the SERVICED_MASTER_IPvariable to the IP address of the master host, then uncomment SERVICED_MASTER_IP andall other variables that reference it (SERVICED_ZK, SERVICED_DOCKER_REGISTRY,SERVICED_ENDPOINT, SERVICED_LOG_ADDRESS, SERVICED_LOGSTASH_ES, andSERVICED_STATS_PORT).
The following commands make the required edits to /etc/default/serviced.
EXT=$(date +"%j-%H%M%S")test ! -z "${MHOST}" && \sudo sed -i.${EXT} -e 's|^#[^H]*\(HOME=/root\)|\1|' \ -e 's|^#[^S]*\(SERVICED_REGISTRY=\).|\11|' \ -e 's|^#[^S]*\(SERVICED_AGENT=\).|\11|' \ -e 's|^#[^S]*\(SERVICED_MASTER=\).|\10|' \ -e 's|^#[^S]*\(SERVICED_MASTER_IP=\).*|\1'${MHOST}'|' \ -e '/=$SERVICED_MASTER_IP/ s|^#[^S]*||' \ /etc/default/serviced
4 Optional: Specify an alternate private subnet for Control Center, if necessary.
By default, Control Center uses the 10.3/16 private subnet for virtual IP addresses. If your environmentalready uses 10.3/16 for other purposes, select an unused subnet for Control Center, and add it to the /etc/default/serviced file.
Note RFC 1918 restricts private networks to the 10/8, 172.16/12, and 192.168/16 address spaces. However,Control Center accepts any valid, 16-bit, IPv4 address space for its private network.
For example, to set the private subnet for Control Center to 10.20/16, uncomment theSERVICED_VIRTUAL_ADDRESS_SUBNET variable, and then set its value to 10.20.
The following commands make the required edits to /etc/default/serviced.
SUBNET=10.20EXT=$(date +"%j-%H%M%S")test ! -z "${SUBNET}" && \sudo sed -i.${EXT} -e \ 's|^#[^S]*\(SERVICED_VIRTUAL_ADDRESS_SUBNET=\).*|\1'${SUBNET}'|' \ /etc/default/serviced
5 Start the Control Center service.
sudo start serviced

Zenoss Core Installation Guide
30
■ To configure additional hosts, return to Preparing a resource pool host on page 26.■ To start Zenoss Core, proceed to Starting and tuning Zenoss Core on page 31.
Starting and tuning Zenoss Core
31
Starting and tuning Zenoss Core 4The procedures in this chapter demonstrate how to start Zenoss Core for the first time, and how to install optionalpackages. Some of the procedures are optional, depending on whether your deployment is single-host or multi-host.For best results, perform the procedures in the order in which they appear in this chapter.
Enabling access to the Control Center web interfaceTo gain access to the Control Center web interface, users must be members of the Control Center administrativegroup on the master host. The default administrative group is the system group. (On Ubuntu hosts, the systemgroup is sudo; on RHEL/CentOS hosts, it is wheel.) You may add users to the system group, or designate aregular group as the administrative group.
1 Log in to the master host as root or as a user with sudo privileges.2 Add users to the administrative group.
■ To add users to the default administrative group (the system group) enter one of the following commandsfor each user to add.
■ Ubuntu hosts: sudo usermod -aG sudo User■ RHEL/CentOS hosts: sudo usermod -aG wheel User
■ To designate a regular group as the administrative group, perform the remaining steps of this pocedure.3 Create a variable for the group to designate as the administrative group.
In this example, the name of group to create is serviced. You may choose any name, or use an existinggroup.
GROUP=serviced
4 Create a new group, if necessary.
■ Ubuntu hosts: sudo addgroup ${GROUP}■ RHEL/CentOS hosts: sudo groupadd ${GROUP}
5 Add one or more existing users to the group to designate as the administrative group.Repeat the following command for each user to add.
sudo usermod -aG ${GROUP} User
6 Change the value of the SERVICED_ADMIN_GROUP variable in /etc/default/serviced.
EXT=$(date +"%j-%H%M%S")
Zenoss Core Installation Guide
32
test ! -z "${GROUP}" && sudo sed -i.${EXT} -e \ 's|^#[^S]*\(SERVICED_ADMIN_GROUP=\).*$|\1'${GROUP}'|' \ /etc/default/serviced || \ echo "** GROUP undefined; no edit performed"
7 Optional: Prevent root users and members of the sudo or wheel groups from gaining access to the ControlCenter web interface.
EXT=$(date +"%j-%H%M%S")sudo sed -i.${EXT} \ -e 's|^#[^S]*\(SERVICED_ALLOW_ROOT_LOGIN=\).*$|\10|' \ /etc/default/serviced
8 Restart Control Center.
■ Ubuntu hosts: sudo stop serviced && sudo start serviced■ RHEL/CentOS hosts: systemctl stop serviced && systemctl start serviced
Deploying the Zenoss Core applicationPerform this procedure after enabling client access.
1 Log in to the Control Center web interface.
For example, if the master host is mypc, then the address of the Control Center web interface is https://mypc.
Note Access to this interface is restricted to users with accounts on the Control Center master host.
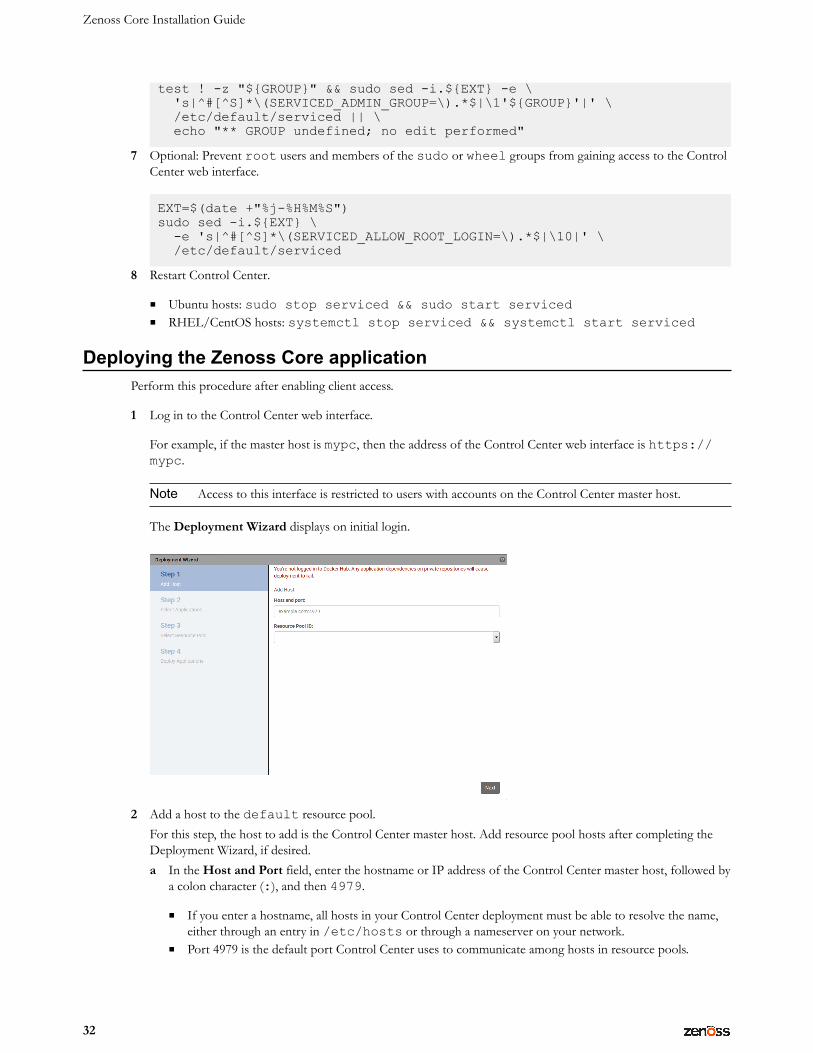
The Deployment Wizard displays on initial login.
2 Add a host to the default resource pool.For this step, the host to add is the Control Center master host. Add resource pool hosts after completing theDeployment Wizard, if desired.a In the Host and Port field, enter the hostname or IP address of the Control Center master host, followed by
a colon character (:), and then 4979.
■ If you enter a hostname, all hosts in your Control Center deployment must be able to resolve the name,either through an entry in /etc/hosts or through a nameserver on your network.
■ Port 4979 is the default port Control Center uses to communicate among hosts in resource pools.

Starting and tuning Zenoss Core
33
b In the Resource Pool ID field, select default from the list, and then click Next.3 Select an application to deploy.
a Mark the Zenoss.core (v5.0) checkbox.
b Click Next.4 Select a resource pool for the application.
a Select the radio button of the default pool.
b Click Next.5 Deploy the application to the resource pool.
a In the Deployment ID field, enter an identifier for this deployment of the application.

Zenoss Core Installation Guide
34
b Click Deploy.Control Center pulls the application's images from the Zenoss repository at Docker Hub, which takes 20-30minutes.
c When the Deployment Wizard completes, refresh the browser window to update the Applications table.6 Optional: Add hosts to the default resource pool or other resource pools, if desired.
■ To add hosts to the default resource pool, see Adding a host to a resource pool on page 35.■ To add hosts to other resource pools, see Creating a resource pool on page 34.
Creating a resource pool
1 Log in to the Control Center web interface.2 In the Control Center menu bar, click Resource Pools.
3 On the Resource Pools page, click the +Resource Pool button, located at the right side of the page.
4 In the Resource Pool field of the Add Resource Pool dialog, enter a name for the new resource pool.5 Optional: In the Description field, enter a brief description of the purpose of the new resource pool, and then
click Add Resource Pool.
To add hosts to the new resource pool, see Adding a host to a resource pool on page 35.
Starting and tuning Zenoss Core
35
Adding a host to a resource pool
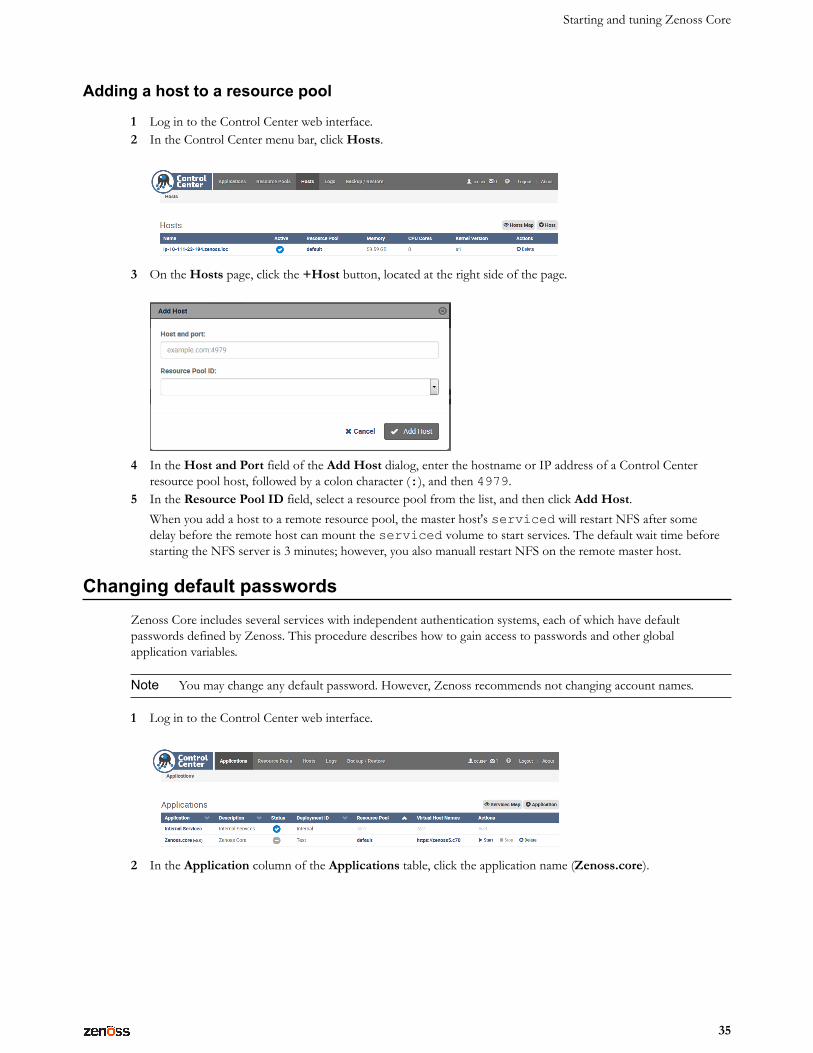
1 Log in to the Control Center web interface.2 In the Control Center menu bar, click Hosts.
3 On the Hosts page, click the +Host button, located at the right side of the page.
4 In the Host and Port field of the Add Host dialog, enter the hostname or IP address of a Control Centerresource pool host, followed by a colon character (:), and then 4979.
5 In the Resource Pool ID field, select a resource pool from the list, and then click Add Host.When you add a host to a remote resource pool, the master host's serviced will restart NFS after somedelay before the remote host can mount the serviced volume to start services. The default wait time beforestarting the NFS server is 3 minutes; however, you also manuall restart NFS on the remote master host.
Changing default passwordsZenoss Core includes several services with independent authentication systems, each of which have defaultpasswords defined by Zenoss. This procedure describes how to gain access to passwords and other globalapplication variables.
Note You may change any default password. However, Zenoss recommends not changing account names.
1 Log in to the Control Center web interface.
2 In the Application column of the Applications table, click the application name (Zenoss.core).

Zenoss Core Installation Guide
36
3 In the application title line, click Edit Variables.
4 Change the default password of the RabbitMQ service.a In the Edit Variables dialog, locate the global.conf.amqppassword variable.b Replace the default value, zenoss, with a new password.
5 Change the default password of the Zenoss authentication proxy.a In the Edit Variables dialog, locate the global.conf.zauth-password variable.b Replace the default value, MY_PASSWORD, with a new password.
6 Edit other passwords as desired, and then click Save Changes.
Enabling access to application-level servicesControl Center proxies the IP addresses of the services it manages, and the addresses can change during normaloperations. To facilitate access, Control Center provides virtual host aliases for Zenoss Core, HBase, OpenTSDB,and RabbitMQ.
Note For each virtual host alias in the following table, substitute the hostname of your Control Center masterhost for Master.
Virtual host alias Application Description
https://zenoss5.Master Zenoss Core The browser interface of Zenoss Core.
https://hbase.Master Apache HBase The browser interface of the Apache HBaseinstance in which OpenTSDB stores devicemonitoring data.
https://opentsdb.Master OpenTSDB The browser interface of the OpenTSDBdatabase which Zenoss Core uses to manage andmanipulate device monitoring data.
https://rabbitmq.Master RabbitMQ The administrative interface of the RabbitMQservice.

Starting and tuning Zenoss Core
37
To enable access to application-level services, configure network-wide access, or configure client systemsindividually.
■ To configure network-wide access, ask your network administrator to add the virtual host aliases to a DNSserver.
■ To configure client systems individually, add the virtual host aliases to the C:\Windows\System32\drivers\etc\hosts file (Windows systems) or the /etc/hosts file (Linux and OS/Xsystems).
Note You may create additional virtual host aliases for each of the services identified in the preceding table. Formore information, see Creating virtual host aliases on page 38.
Virtual host alias name resolution
The following line shows the syntax of the entry to add to a DNS server or to a client system's name resolution file.
IP-Address Host.Domain Host zenoss5.Host hbase.Host opentsdb.Host rabbitmq.Host
The following entry is for a master host at IP address 192.0.2.12, named cc, in the big.io domain.
192.0.2.12 cc.big.io cc zenoss5.cc hbase.cc opentsdb.cc rabbitmq.cc
Configuring name resolution on a Windows 7 systemTo perform this procedure, you need Windows Administrator privileges.
1 Log in to the Windows 7 system as a user with Administrator privileges.2 From the Start menu, highlight All Programs > Accessories > Notepad.3 Right click, and then select Run as administrator.4 From the Notepad File menu, select Open.5 In the File name field of the Open window, enter C:\Windows\System32\drivers\etc\hosts.6 Add the name resolution entry for your Control Center master host to the end of the file.
For example, the following entry is for a master host at IP address 192.0.2.12, named cc, in the big.iodomain.
192.0.2.12 cc.big.io cc zenoss5.cc hbase.cc opentsdb.cc rabbitmq.cc
7 Save the file, and then exit Notepad.
Configuring name resolution on a Linux or OS/X systemTo perform this procedure, you need superuser privileges on the client system.
1 Log in to the client system as root or as a user with sudo privileges.2 Add the name resolution entry for your Control Center master host to the end of the file.
For example, the following entry is for a master host at IP address 192.0.2.12, named cc, in the big.iodomain.
192.0.2.12 cc.big.io cc zenoss5.cc hbase.cc opentsdb.cc rabbitmq.cc
3 Save the file, and then close the editor.
Zenoss Core Installation Guide
38
Creating virtual host aliases
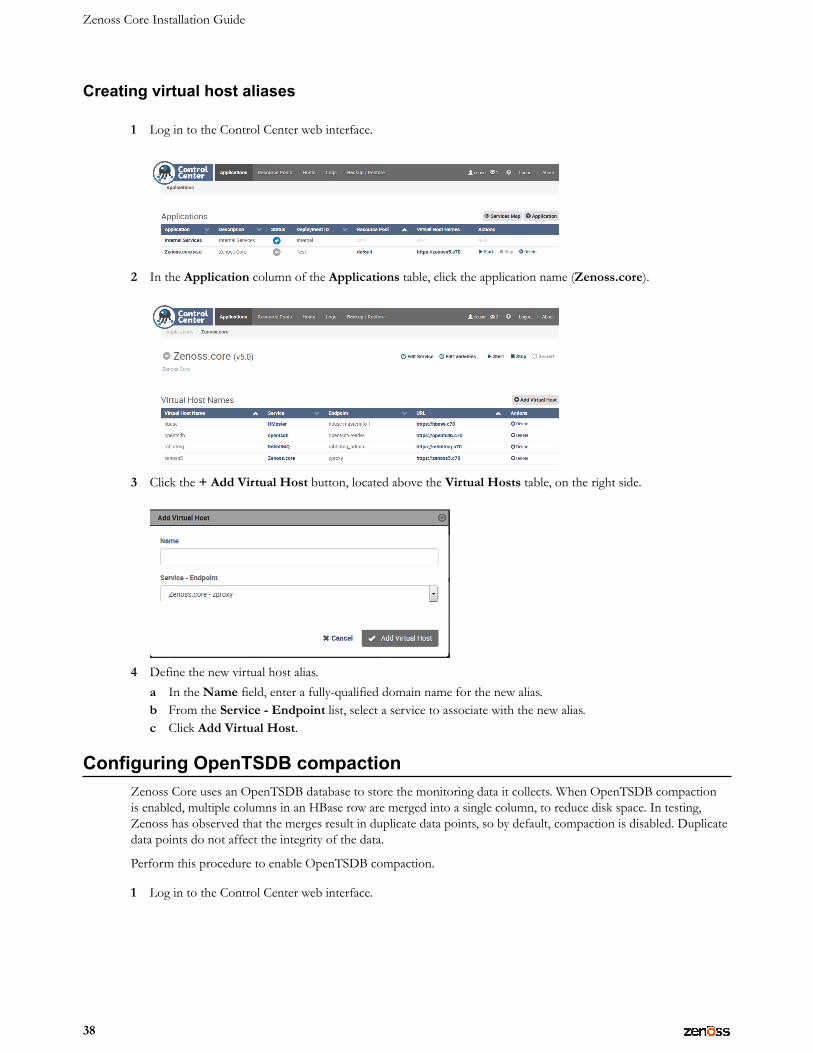
1 Log in to the Control Center web interface.
2 In the Application column of the Applications table, click the application name (Zenoss.core).
3 Click the + Add Virtual Host button, located above the Virtual Hosts table, on the right side.
4 Define the new virtual host alias.a In the Name field, enter a fully-qualified domain name for the new alias.b From the Service - Endpoint list, select a service to associate with the new alias.c Click Add Virtual Host.
Configuring OpenTSDB compactionZenoss Core uses an OpenTSDB database to store the monitoring data it collects. When OpenTSDB compactionis enabled, multiple columns in an HBase row are merged into a single column, to reduce disk space. In testing,Zenoss has observed that the merges result in duplicate data points, so by default, compaction is disabled. Duplicatedata points do not affect the integrity of the data.
Perform this procedure to enable OpenTSDB compaction.
1 Log in to the Control Center web interface.

Starting and tuning Zenoss Core
39
2 In the Application column of the Applications table, click the application name (Zenoss.core).
3 In the application title line, click Edit Variables.
4 In the Edit Variables dialog, scroll to the bottom of the list.5 Change the value of the tsd.storage.enable_compaction variable from False to True.6 Click Save Changes.
Installing the Quilt packagePerform this procedure to install the Quilt patch management system into a Zenoss Core image.
1 Log in to the Control Center master host as a user with serviced CLI privileges.2 Copy the following script and paste it into a file (in this example, quilt.txt) on the master host.
DESCRIPTION quilt.txt -- add Quilt to a Zenoss imageVERSION zenoss-quilt-1.0REQUIRE_SVCSNAPSHOT
# Download the EPEL RPMSVC_EXEC COMMIT Zenoss.resmgr yum install -y epel-release# Download repository metadataSVC_EXEC COMMIT Zenoss.resmgr yum makecache -y# Install quiltSVC_EXEC COMMIT Zenoss.resmgr yum install -y quilt# Remove EPEL
Zenoss Core Installation Guide
40
SVC_EXEC COMMIT Zenoss.resmgr yum erase -y epel-release# Clean up yum cachesSVC_EXEC COMMIT Zenoss.resmgr yum clean all
3 Verify the syntax of the script file.
serviced script parse quilt.txt
■ If the preceding command returns no result, proceed to the next step.■ If the preceding command returns an error, correct the error and parse the file again.
4 Install the Quilt package.
serviced script run quilt.txt --service Zenoss.core
Installing the Percona ToolkitThe Percona Toolkit is a collection of helpful utilities for MySQL and MariaDB databases. It uses the GNU GPL v2license, so Zenoss can not distribute it. All installations of Zenoss Core should install this package.
1 Log in to the Control Center master host as a user with serviced CLI privileges.2 Install the package.
serviced service run zope install-percona
At the end of the installation process, the message Container not commited is displayed. This isnormal. The tools are installed in the distributed file system, not in an image.
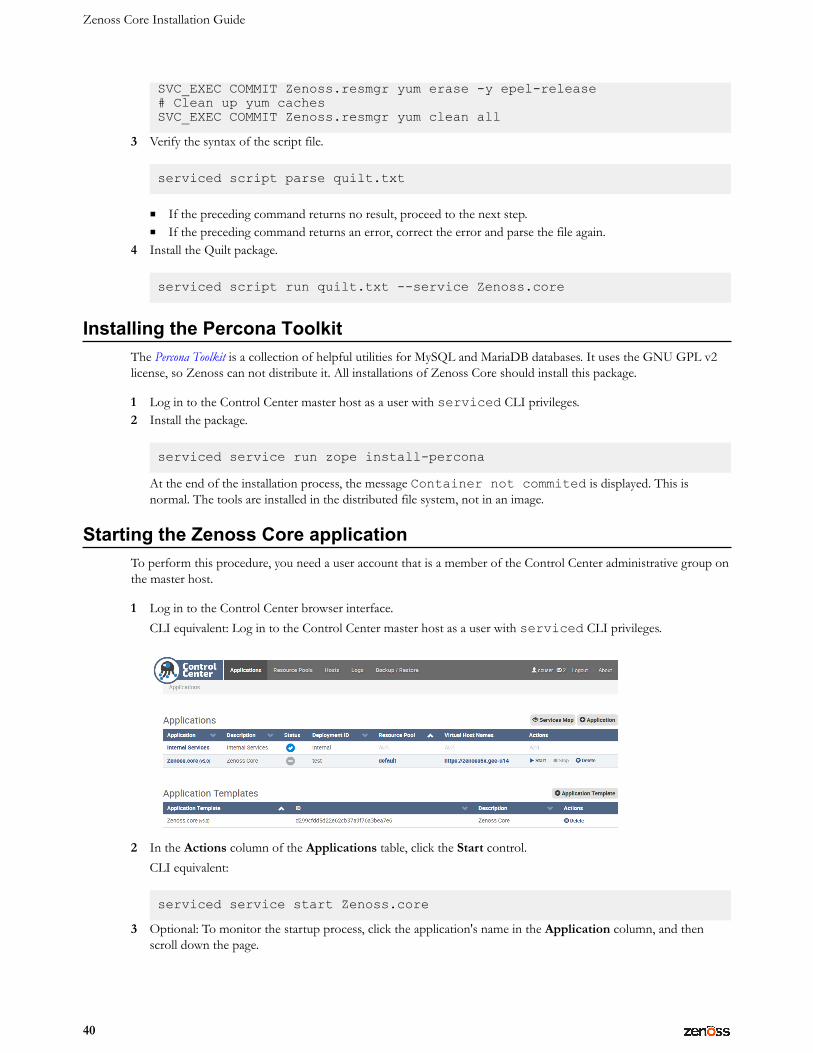
Starting the Zenoss Core applicationTo perform this procedure, you need a user account that is a member of the Control Center administrative group onthe master host.
1 Log in to the Control Center browser interface.CLI equivalent: Log in to the Control Center master host as a user with serviced CLI privileges.
2 In the Actions column of the Applications table, click the Start control.CLI equivalent:
serviced service start Zenoss.core
3 Optional: To monitor the startup process, click the application's name in the Application column, and thenscroll down the page.
Starting and tuning Zenoss Core
41
CLI equivalent:
serviced service status Zenoss.core
Deleting the RabbitMQ guest user accountBy default, RabbitMQ distributions include the guest user account. To prevent security issues, Zenossrecommends deleting the account.
1 Log in to the Control Center master host as a user with serviced CLI privileges.2 Attach to the RabbitMQ container.
serviced service attach rabbitmq
3 Delete the guest user account.
rabbitmqctl delete_user guest
4 Exit the container session.
exit
5 Restart the RabbitMQ service.
serviced service restart rabbitmq
Stopping Control Center and applicationsTo perform this procedure, you need a user account on the Control Center master host with serviced CLIprivileges.
Control Center is a distributed system that relies on the system clock (and NTP) to coordinate application services.Consequently, pausing or stopping the Control Center master host operating system can leave Control Center inan unknown state, which requires manual intervention to undo. If your Control Center master host is managed byanother application, Zenoss strongly recommends following the procedure in this section to stop Control Center,before pausing or stopping the master host.
1 Log in to the Control Center master host as a user with serviced CLI privileges.2 Stop applications.
For example, to stop Zenoss Core, enter the following command:
sudo serviced service stop Zenoss.core
To monitor the stop, enter the following command:
sudo serviced service status Zenoss.core
3 Stop Control Center.
■ RHEL/CentOS hosts: systemctl stop serviced■ Ubuntu hosts: sudo stop serviced
The Control Center master host operating system may be paused, stopped, or restarted.