verifonevx820 duet - first data · vx820duet-qsg-2015-08 (english) page 3 getting to know the vx820...
TRANSCRIPT

VX820Duet-QSG-2015-08 (English)
Quick Setup Guide
VeriFoneVX820 Duet

VX820Duet-QSG-2015-08 (English)
Page 2
Thank you for choosing a First Data Terminal First Data terminals are some of the fastest, most secure point-of-sale terminals available. Installation is quick and easy. Simply follow the instructions and begin accepting card transactions today.
What’s in the box? � VeriFone Vx820 Duet base and PIN pad
� Thermal Paper Roll
� Telephone Cord and/or Ethernet Cable
� Two-piece AC Power Supply
What else will you need? If connecting through Cable:
� Router
� Modem
� Ethernet Cable
� Coaxial Cable
If connecting through DSL:
� Router
� Modem
� Ethernet Cable (2)
To prevent damage to the FD Terminals and connected devices, we strongly recommend using a surge protector or UPS (Uninterruptible Power Supply) with a battery backup and phone/fax protection.

VX820Duet-QSG-2015-08 (English)
Page 3
Getting to know the Vx820 Duet
The picture shows a VX820 Duet terminal.
Port ConnectionsPHONE: For dial-up transactions using a phone line.
USB AND RS232: These ports are not in use, but may be used for future enhancements such as peripheral pin pads, cheque readers, or used for technical intervention or downloads.
ETHERNET: For Internet transactions using Cable or DSL.
AC INPUT: To connect your power supply to a wall outlet.
VX820Duet-QSG-2015-08 (English)
Page 4
Let’s get started...TYPICAL SET-UP TIME: 10-15 minutes
Where to put the FD TerminalPlace the terminal on a desk or tabletop. Avoid areas with direct sunlight, objects that radiate heat, excessive dust and other electrical devices that can cause excessive voltage. Placing the terminal on top of, or too close to magnetic security devices, may interfere with the device function and communications.
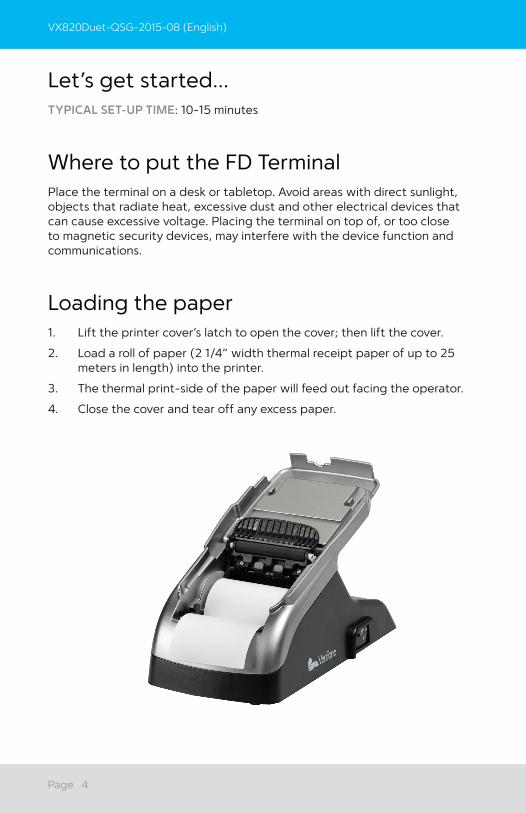
Loading the paper1. Lift the printer cover’s latch to open the cover; then lift the cover.
2. Load a roll of paper (2 1/4” width thermal receipt paper of up to 25 meters in length) into the printer.
3. The thermal print-side of the paper will feed out facing the operator.
4. Close the cover and tear off any excess paper.

VX820Duet-QSG-2015-08 (English)
Page 5
MODEM
Câble Ethernet
Câble coaxial
CABLEOUTLET
ROUTER
Get connectedYou may choose an IP connection (DSL or cable) or dial-up. If you choose dial-up you must use a dedicated analogue phone line, which may be the same line as that which your fax machine connects to.
Telephone line sharing increases risks of communication failures, and additional services such as call waiting, voicemail alerts, and other dial tone interference may cause communication failures.
DSL
cabLe
MODEM
Ethernet Cable
Telephone Cable
DSLOUTLET
ROUTER
VX820Duet-QSG-2015-08 (English)
Page 6
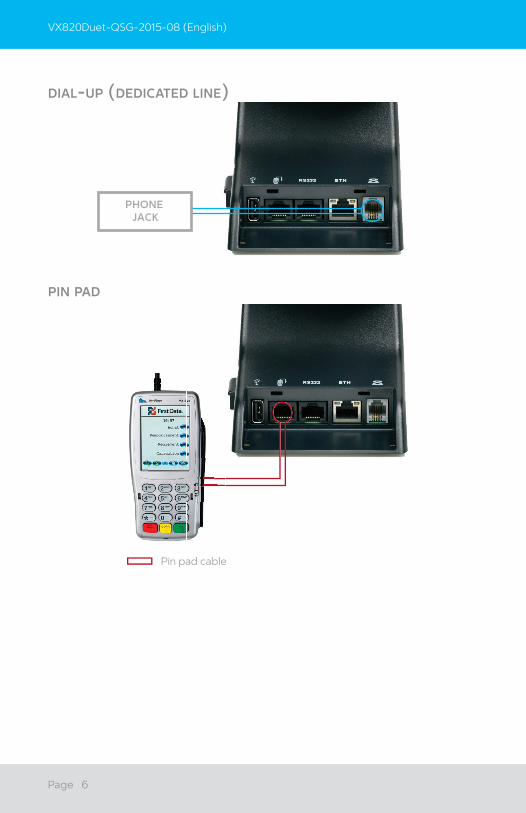
DiaL-up (DeDicateD Line)
3
PHONE JACK
pin paD
3
Pin pad cable

VX820Duet-QSG-2015-08 (English)
Page 7
Plug in the powerBefore using the power supply, please connect all peripherals to the terminal. Failure to do so may result in damage to the unit or connected devices.
Connect the power cord to the power supply via the three-prong end and receiver.
Find the power input on the side of the terminal base.
Connect the single-pole AC adapter plug to the power input.
Turn the plug so that cord is directed toward the back of the terminal.
The power supply should be the last item connected to the unit. Plug the adapter into a surge protector (strongly recommended) or a standard 120V electrical outlet.
POWER PACK: Input: 100 - 240 V AC, 50/60Hz OUTPUT: 9 V DC, 4 A

VX820Duet-QSG-2015-08 (English)
Page 8
Using the CHIP readerCHIP insertion should be done by your customer, you should pass the pin pad to the customer and have them insert their card and complete the transaction.
With the idle message displayed, select the desired transaction type. Insert the card, face up, with the CHIP side towards the terminal and insert into the CHIP reader, until it stops. You may feel a slight click into place.
If the CHIP read fails, check the card position and try again. If prompted to swipe the card, use the card reader to swipe the magnetic stripe instead Follow the remaining prompts to complete the transaction. Refer to Quick Reference Guide for details.
Using the card reader
With the idle message displayed, select the desired transaction type. Insert the card into the card reader slot, with the magnetic stripe lying in the slot and facing the terminal.
Slide the card in either direction through the slot without stopping. If the card swipe fails, check the position of the magnetic stripe and slide the card again. If failure persists, the card’s stripe may be damaged, user will have to manually enter the account number on the keypad. Follow remaining prompts on the display to complete the transaction.
Using the keypad and touch screen
The Vx820 Duet has 15 physical keys that can be used to select numbers, letters, and to enter data. And many functions such as selecting transaction types are controlled by Softkeys on the touch screen.
Refer to Quick Reference Guide for details.
VX820Duet-QSG-2015-08 (English)
© 2015 First Data Canada Ltd. is a registered ISO/MSP of Wells Fargo Financial Cor-poration Canada, Toronto, ON, Canada. All Rights Reserved. All trademarks, service marks and trade names referenced in this material are the property of their respective owners.
www.firstdatacanada.ca