using the principia suite -...
TRANSCRIPT
Using the Pr inc ip ia Su i te
Version 2.0 i
Overview - - - - - - - - - - - - - - - - - - - - - - - - - - - - - - - - - - - - - -1
Generating Research Mode Reports. . . . . . . . . . . . . . . . . . . . . . . . . . . . . . . . . . . . . . . . . . . 2
Overview - - - - - - - - - - - - - - - - - - - - - - - - - - - - - - - - - - - - - -2Generating the Investment Detail Report - - - - - - - - - - - - - - - - - - - - - - -2Generating the Fund vs. Fund (PDF) - - - - - - - - - - - - - - - - - - - - - - - - -4Generating the Investment Comparison Report - - - - - - - - - - - - - - - - - - - 6Importing from Excel - - - - - - - - - - - - - - - - - - - - - - - - - - - - - - - 11
Accessing Analyst Mode . . . . . . . . . . . . . . . . . . . . . . . . . . . . . . . . . . . . . . . . . . . . . . . . . . 14
Overview - - - - - - - - - - - - - - - - - - - - - - - - - - - - - - - - - - - - - 14Accessing Analyst Mode - - - - - - - - - - - - - - - - - - - - - - - - - - - - - 14
Generating Portfolio Mode Reports . . . . . . . . . . . . . . . . . . . . . . . . . . . . . . . . . . . . . . . . . . 15
Overview - - - - - - - - - - - - - - - - - - - - - - - - - - - - - - - - - - - - - 15Generating the FINRA-reviewed report - - - - - - - - - - - - - - - - - - - - - - - 15Generating the Portfolio Comparison report - - - - - - - - - - - - - - - - - - - - - 15Generating Batch Reports - - - - - - - - - - - - - - - - - - - - - - - - - - - - - 15What to consider before generating batch reports - - - - - - - - - - - - - - - - - 15How to set the parameters for batch reports - - - - - - - - - - - - - - - - - - - - 16How to generate batch reports - - - - - - - - - - - - - - - - - - - - - - - - - - - 18
Creating Investment Policy Statements . . . . . . . . . . . . . . . . . . . . . . . . . . . . . . . . . . . . . . 20
Overview - - - - - - - - - - - - - - - - - - - - - - - - - - - - - - - - - - - - - 20Creating an Investment Policy Statement - - - - - - - - - - - - - - - - - - - - - - 20Entering Financial goals - - - - - - - - - - - - - - - - - - - - - - - - - - - - - - 21Entering information for Associated Parties - - - - - - - - - - - - - - - - - - - - - 22Entering a client’s Risk Tolerance - - - - - - - - - - - - - - - - - - - - - - - - - - 23Entering a client’s Financial Constraints - - - - - - - - - - - - - - - - - - - - - - - 24Creating a Proposed Portfolio - - - - - - - - - - - - - - - - - - - - - - - - - - - 25Selecting securities for a portfolio - - - - - - - - - - - - - - - - - - - - - - - - - 26Establishing portfolio monitoring for an IPS - - - - - - - - - - - - - - - - - - - - - 27Establishing the portfolio implementation settings for an IPS - - - - - - - - - - - - - 28Selecting and entering the report settings - - - - - - - - - - - - - - - - - - - - - 29Saving an IPS report in Microsoft Word - - - - - - - - - - - - - - - - - - - - - - - 30Opening and editing an Investment Policy Statement - - - - - - - - - - - - - - - - 31Adding Your Own Selections in the IPS Window - - - - - - - - - - - - - - - - - - 31Adding selections for Classification - - - - - - - - - - - - - - - - - - - - - - - - - 31Adding selections for Assessment Method - - - - - - - - - - - - - - - - - - - - - 33
ii Version 2.0
Adding Securities for Portfolio Monitoring - - - - - - - - - - - - - - - - - - - - - 34Adding selections for Portfolio Securities - - - - - - - - - - - - - - - - - - - - - - 35
Generating Sales/Hypothetical Reports . . . . . . . . . . . . . . . . . . . . . . . . . . . . . . . . . . . . . . . 36
Overview - - - - - - - - - - - - - - - - - - - - - - - - - - - - - - - - - - - - - 36How do I create a hypothetical illustration? - - - - - - - - - - - - - - - - - - - - - 37
Step 1—Selecting Securities for a Hypothetical Illustration . . . . . . . . . . . . . . . . . . . . . . 38
Overview - - - - - - - - - - - - - - - - - - - - - - - - - - - - - - - - - - - - - 38Creating a list of investments for the illustration - - - - - - - - - - - - - - - - - - - 38Editing or saving custom settings for a hypothetical report - - - - - - - - - - - - - 39Selecting a type of illustration - - - - - - - - - - - - - - - - - - - - - - - - - - - 40
Step 2—Choosing a Time Period for the Illustration . . . . . . . . . . . . . . . . . . . . . . . . . . . . . 41
Overview - - - - - - - - - - - - - - - - - - - - - - - - - - - - - - - - - - - - - 41Selecting a time period for the illustration - - - - - - - - - - - - - - - - - - - - - 41
Step 3—Setting the Initial Investment for the Illustration . . . . . . . . . . . . . . . . . . . . . . . . 42
Overview - - - - - - - - - - - - - - - - - - - - - - - - - - - - - - - - - - - - - 42Entering the initial investment value - - - - - - - - - - - - - - - - - - - - - - - - 42
Step 4—Determining Subsequent Investments or Withdrawals . . . . . . . . . . . . . . . . . . . 43
Overview - - - - - - - - - - - - - - - - - - - - - - - - - - - - - - - - - - - - - 43Setting the values for subsequent investments or withdrawals - - - - - - - - - - - - 43How can I set up a customized investment or withdrawal schedule? - - - - - - - - - 44
Step 5—Deducting Plan Fees from the Illustration . . . . . . . . . . . . . . . . . . . . . . . . . . . . . . 45
Overview - - - - - - - - - - - - - - - - - - - - - - - - - - - - - - - - - - - - - 45Deciding how to take out management fees - - - - - - - - - - - - - - - - - - - - 45
Step 6—Rebalancing or Transferring Investments . . . . . . . . . . . . . . . . . . . . . . . . . . . . . . 46
Overview - - - - - - - - - - - - - - - - - - - - - - - - - - - - - - - - - - - - - 46How to rebalance investments - - - - - - - - - - - - - - - - - - - - - - - - - - - 46How to transfer investments - - - - - - - - - - - - - - - - - - - - - - - - - - - - 47
Step 7—Choosing the Options for the Output Report . . . . . . . . . . . . . . . . . . . . . . . . . . . . 48
Overview - - - - - - - - - - - - - - - - - - - - - - - - - - - - - - - - - - - - - 48Determining taxes for the portfolio - - - - - - - - - - - - - - - - - - - - - - - - - 48Specifying display options for the illustration - - - - - - - - - - - - - - - - - - - - 49Selecting reports for the hypothetical illustration - - - - - - - - - - - - - - - - - - 50Generating the hypothetical report - - - - - - - - - - - - - - - - - - - - - - - - - 50How do I open a saved hypothetical illustration? - - - - - - - - - - - - - - - - - - 50
Generating Sales and Presentation Material . . . . . . . . . . . . . . . . . . . . . . . . . . . . . . . . . . . 51
Overview - - - - - - - - - - - - - - - - - - - - - - - - - - - - - - - - - - - - - 51What is covered in the manual? - - - - - - - - - - - - - - - - - - - - - - - - - - 51Requirements for Accessing the Presentation and Education Module - - - - - - - - - 51
Accessing the Presentation and Education library . . . . . . . . . . . . . . . . . . . . . . . . . . . . . . 52
Overview - - - - - - - - - - - - - - - - - - - - - - - - - - - - - - - - - - - - - 52Opening a Professional Presentation from the Slide Titles window. - - - - - - - - - - 52

Version 2.0 iii
Opening a presenation from the Introduction slide - - - - - - - - - - - - - - - - - 53Customizing a presentation with a company logo - - - - - - - - - - - - - - - - - - 54
Using the Pr inc ip ia Su i te
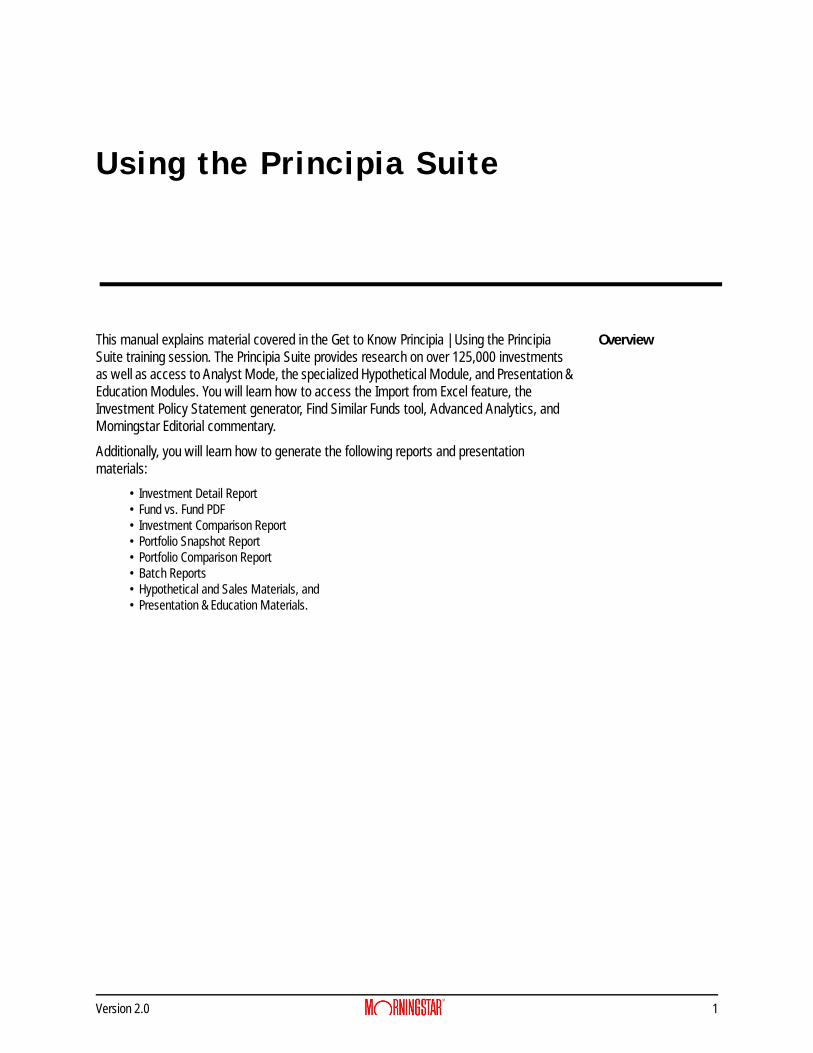
OverviewThis manual explains material covered in the Get to Know Principia |Using the Principia Suite training session. The Principia Suite provides research on over 125,000 investments as well as access to Analyst Mode, the specialized Hypothetical Module, and Presentation & Education Modules. You will learn how to access the Import from Excel feature, the Investment Policy Statement generator, Find Similar Funds tool, Advanced Analytics, and Morningstar Editorial commentary.
Additionally, you will learn how to generate the following reports and presentation materials:
• Investment Detail Report• Fund vs. Fund PDF• Investment Comparison Report• Portfolio Snapshot Report• Portfolio Comparison Report• Batch Reports• Hypothetical and Sales Materials, and• Presentation & Education Materials.
Version 2.0 1
Generating Research Mode Reports Overview
Generating Research Mode Reports
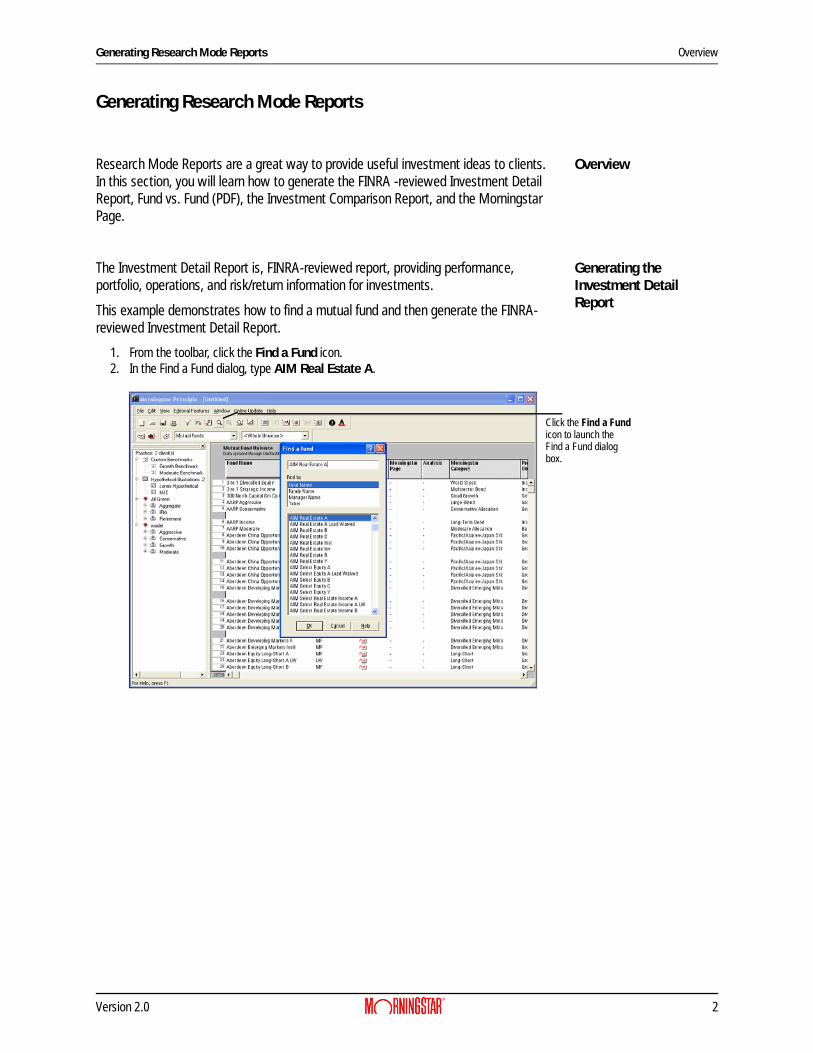
OverviewResearch Mode Reports are a great way to provide useful investment ideas to clients. In this section, you will learn how to generate the FINRA -reviewed Investment Detail Report, Fund vs. Fund (PDF), the Investment Comparison Report, and the Morningstar Page.
Generating the Investment Detail Report
The Investment Detail Report is, FINRA-reviewed report, providing performance, portfolio, operations, and risk/return information for investments.
This example demonstrates how to find a mutual fund and then generate the FINRA-reviewed Investment Detail Report.
1. From the toolbar, click the Find a Fund icon.2. In the Find a Fund dialog, type AIM Real Estate A.
Click the Find a Fundicon to launch theFind a Fund dialogbox.
Version 2.0 2
Generating Research Mode Reports
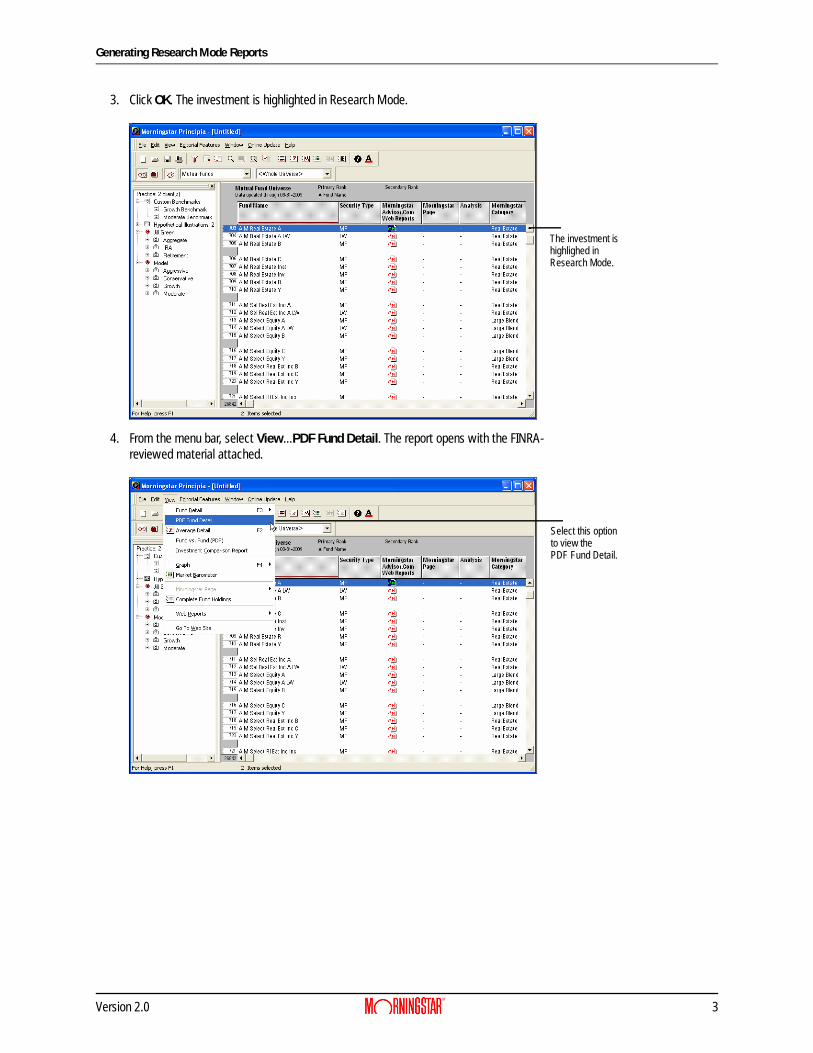
3. Click OK. The investment is highlighted in Research Mode.
4. From the menu bar, select View...PDF Fund Detail. The report opens with the FINRA-reviewed material attached.
The investment ishighlighed inResearch Mode.
Select this optionto view thePDF Fund Detail.
Version 2.0 3

Generating Research Mode Reports Generating the Fund vs. Fund (PDF)
Generating the Fund vs. Fund (PDF)
To view the Fund vs. Fund Report (PDF), do the following:
1. From the menu bar, click File...New.
2. The New dialog box appears. Click OK to reset the universe.
3. From the toolbar, click the Find a Fund icon.4. In the Find a Fund dialog, type AIM Real Estate A and then click OK. The investment is
highlighted in Research Mode.5. Click the Find a Fund icon.
Click New to resetthe Mutual Fund database.
Make sure Mutual FundResearch Mode Fileis selected.
Version 2.0 4
Generating Research Mode Reports
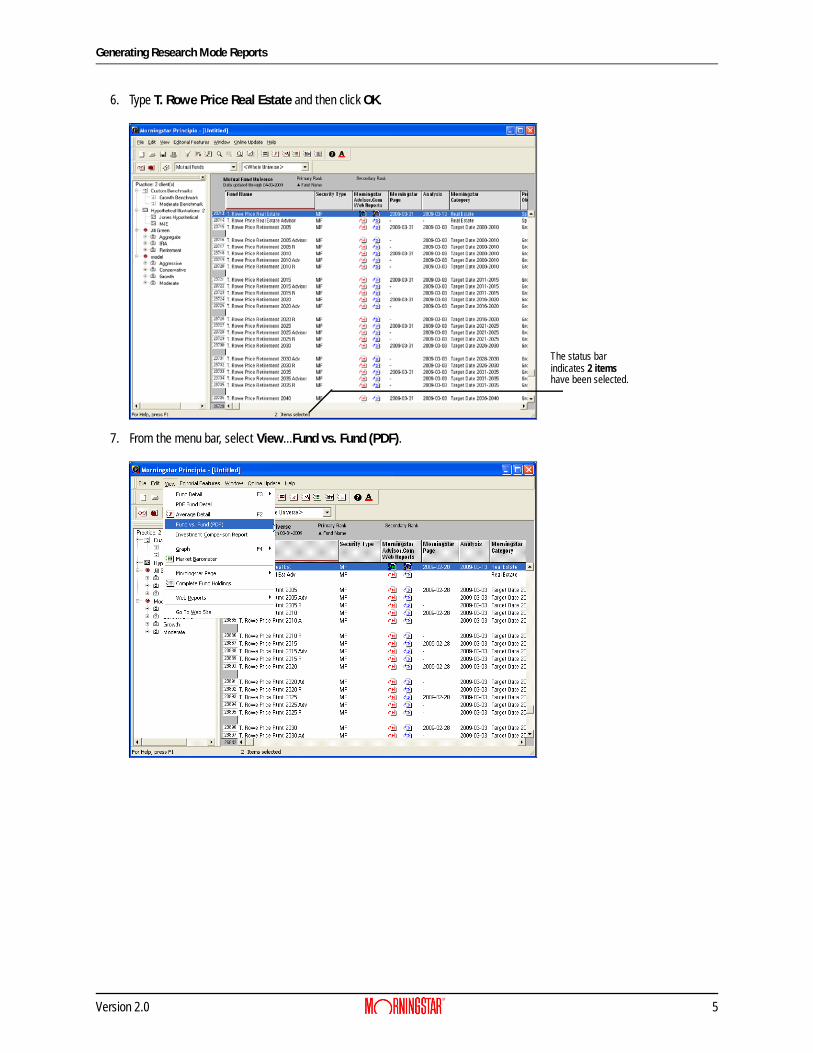
6. Type T. Rowe Price Real Estate and then click OK.
7. From the menu bar, select View...Fund vs. Fund (PDF).
The status barindicates 2 itemshave been selected.
Version 2.0 5
Generating Research Mode Reports Generating the Investment Comparison Report
Generating the Investment Comparison Report
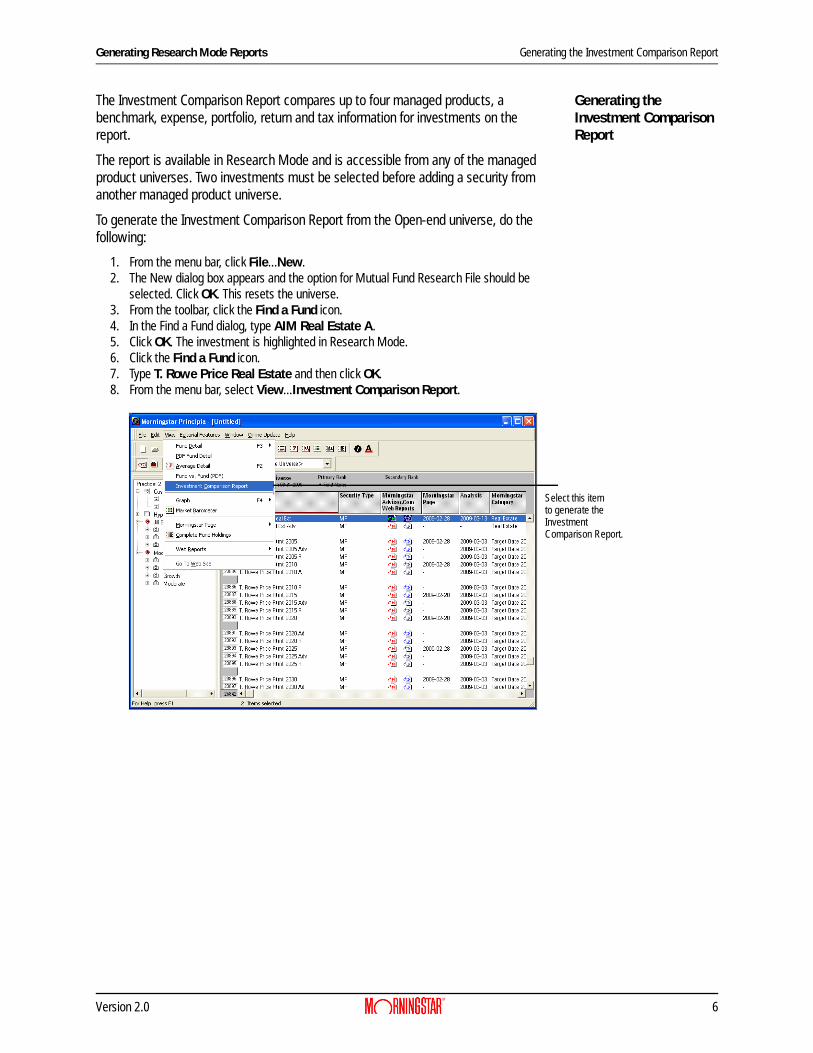
The Investment Comparison Report compares up to four managed products, a benchmark, expense, portfolio, return and tax information for investments on the report.
The report is available in Research Mode and is accessible from any of the managed product universes. Two investments must be selected before adding a security from another managed product universe.
To generate the Investment Comparison Report from the Open-end universe, do the following:
1. From the menu bar, click File...New. 2. The New dialog box appears and the option for Mutual Fund Research File should be
selected. Click OK. This resets the universe.3. From the toolbar, click the Find a Fund icon.4. In the Find a Fund dialog, type AIM Real Estate A.5. Click OK. The investment is highlighted in Research Mode.6. Click the Find a Fund icon.7. Type T. Rowe Price Real Estate and then click OK.8. From the menu bar, select View...Investment Comparison Report.
Select this itemto generate theInvestmentComparison Report.
Version 2.0 6
Generating Research Mode Reports Generating the Investment Comparison Report
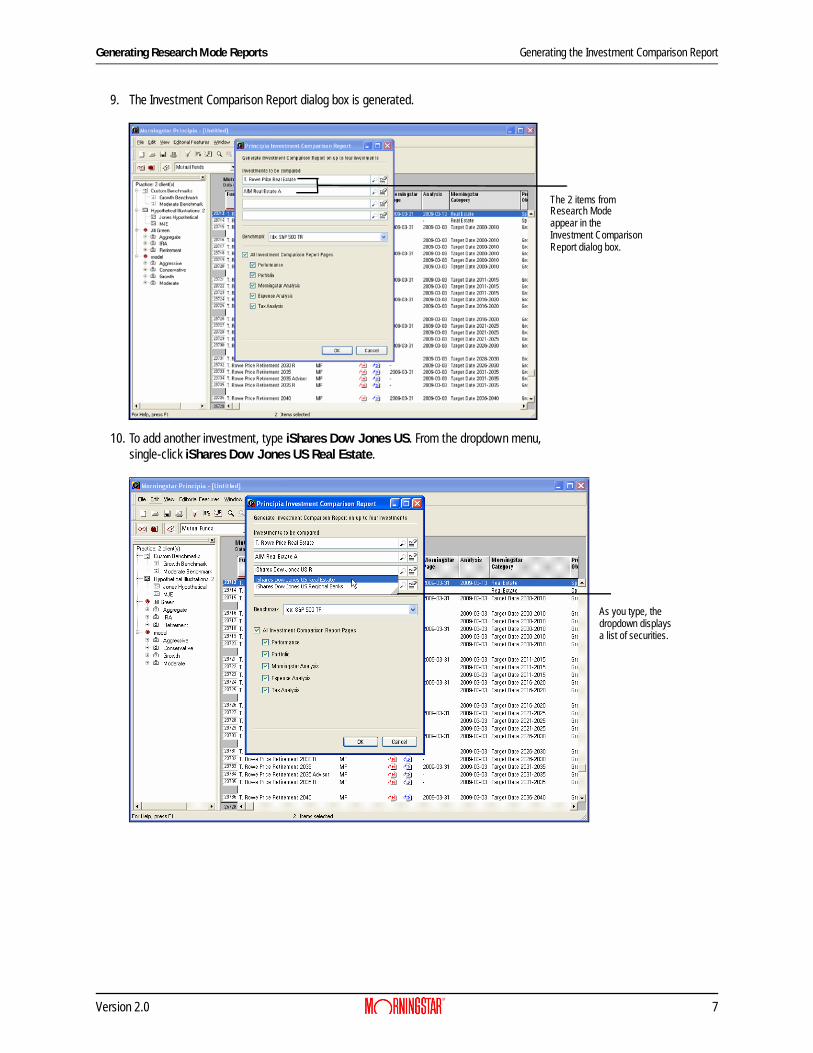
9. The Investment Comparison Report dialog box is generated.
10. To add another investment, type iShares Dow Jones US. From the dropdown menu, single-click iShares Dow Jones US Real Estate.
The 2 items fromResearch Modeappear in theInvestment ComparisonReport dialog box.
As you type, the
dropdown displaysa list of securities.
Version 2.0 7
Generating the Investment Comparison Report Generating Research Mode Reports
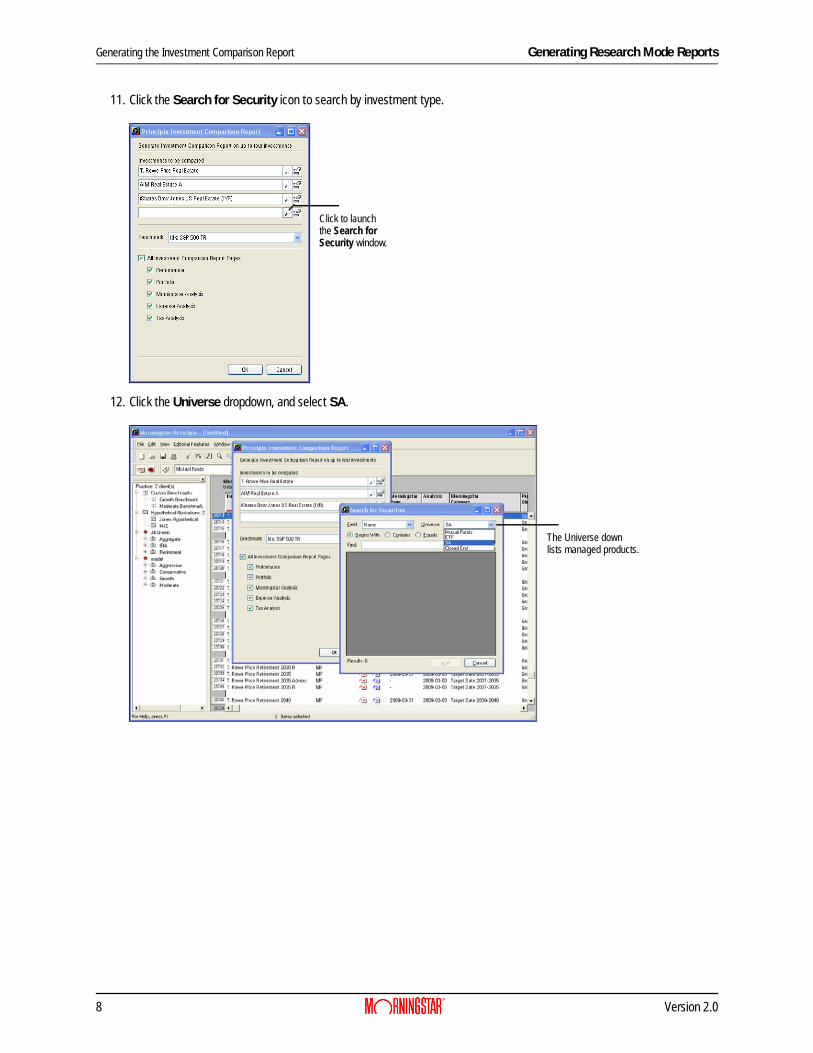
11. Click the Search for Security icon to search by investment type.
12. Click the Universe dropdown, and select SA.
Click to launchthe Search for Security window.
The Universe downlists managed products.
8 Version 2.0
Generating Research Mode Reports Generating the Investment Comparison Report
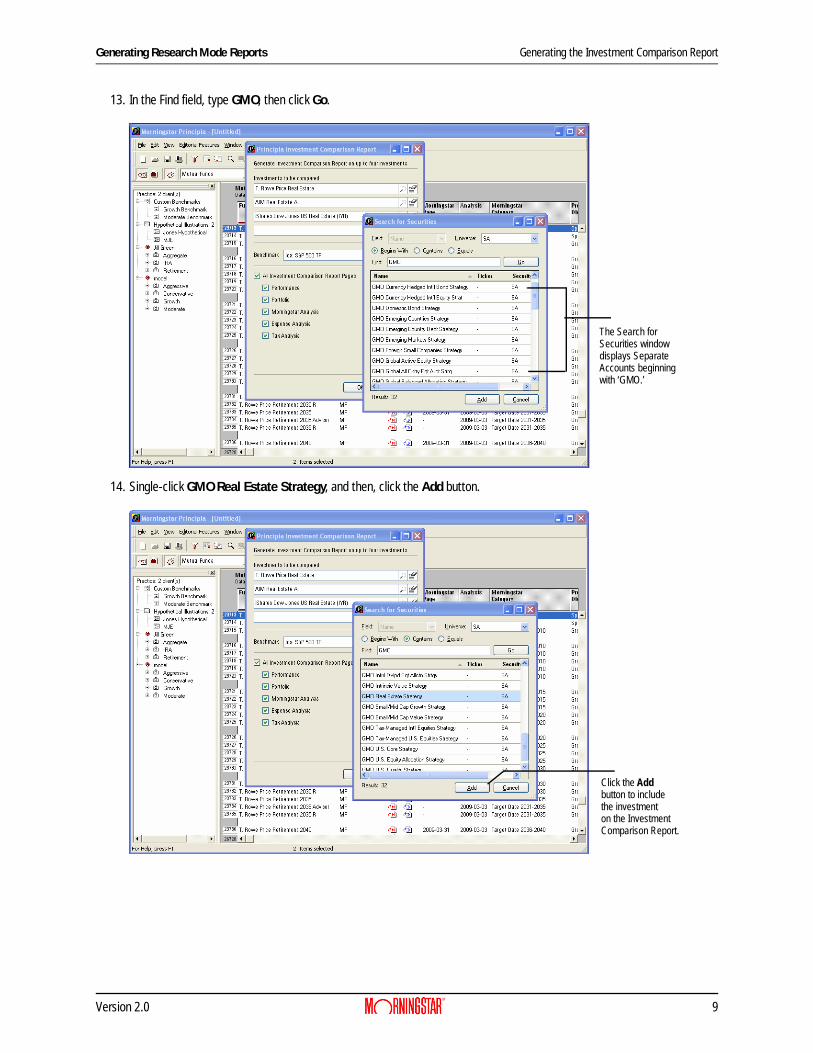
13. In the Find field, type GMO, then click Go.
14. Single-click GMO Real Estate Strategy, and then, click the Add button.
The Search forSecurities windowdisplays SeparateAccounts beginningwith ‘GMO.’
Click the Addbutton to includethe investmenton the InvestmentComparison Report.
Version 2.0 9
Generating Research Mode Reports
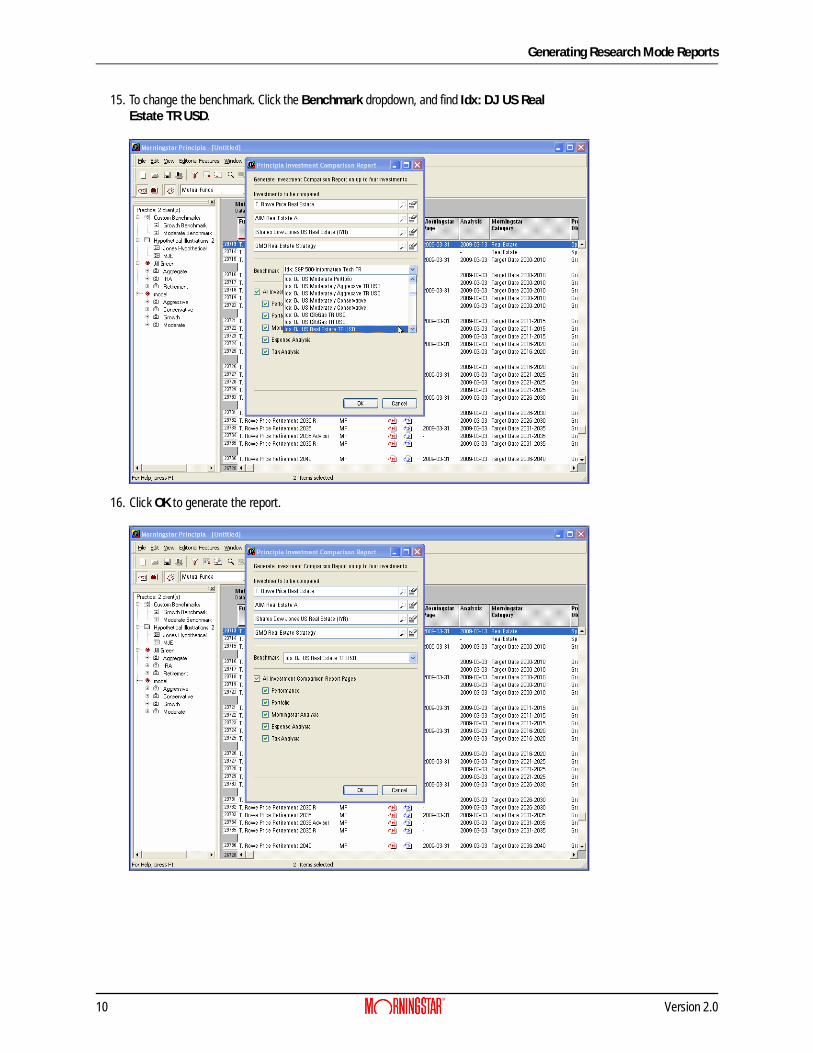
15. To change the benchmark. Click the Benchmark dropdown, and find Idx: DJ US Real Estate TR USD.
16. Click OK to generate the report.
10 Version 2.0
Generating Research Mode Reports Importing from Excel
Importing from ExcelImporting allows you to create a list of investments in Research Mode based on securities you have in a saved Excel file.
Importing a list of investments requires the following information in an Excel file:
• A security must be listed in a horizontal format. • A security must have a ticker, a CUSIP, or a security name as an identifier. • The securities must be on the first sheet of the Excel file.• The first row is assumed to contain column headers and will be ignored.• Principia will only identify securities that are available in the universe from which you
launch the import function.• The first security must be found with in the top 200 rows.• 10 consecutive empty rows designate the end of the list.• The number of rows can not exceed 65,000.
Before you import the Excel file, take note of the ticker, CUSIP, or security name column header as you will need to enter that information during the import process.
To import a list of securities from a saved Excel file, do the following:
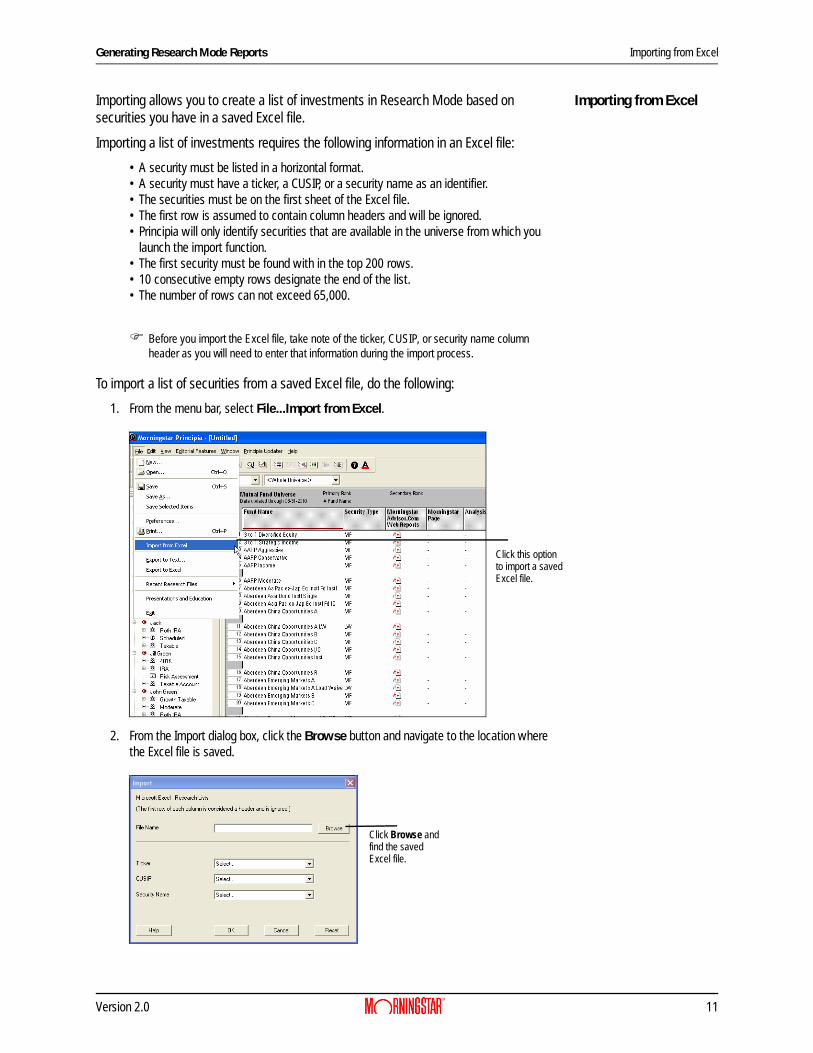
1. From the menu bar, select File...Import from Excel.
2. From the Import dialog box, click the Browse button and navigate to the location where the Excel file is saved.
Click this optionto import a savedExcel file.
Click Browse andfind the savedExcel file.
Version 2.0 11
Importing from Excel Generating Research Mode Reports
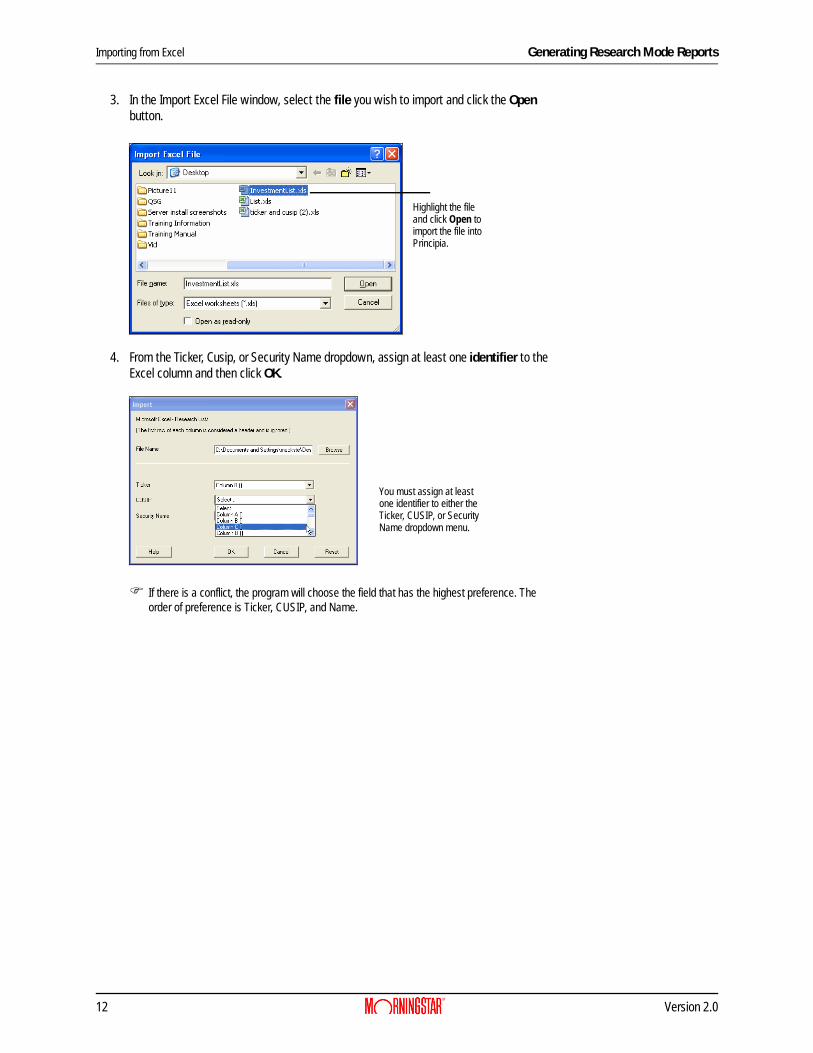
3. In the Import Excel File window, select the file you wish to import and click the Open button.
4. From the Ticker, Cusip, or Security Name dropdown, assign at least one identifier to the Excel column and then click OK.
If there is a conflict, the program will choose the field that has the highest preference. The order of preference is Ticker, CUSIP, and Name.
Highlight the fileand click Open to import the file intoPrincipia.
You must assign at leastone identifier to either theTicker, CUSIP, or Security Name dropdown menu.
12 Version 2.0
Generating Research Mode Reports Importing from Excel
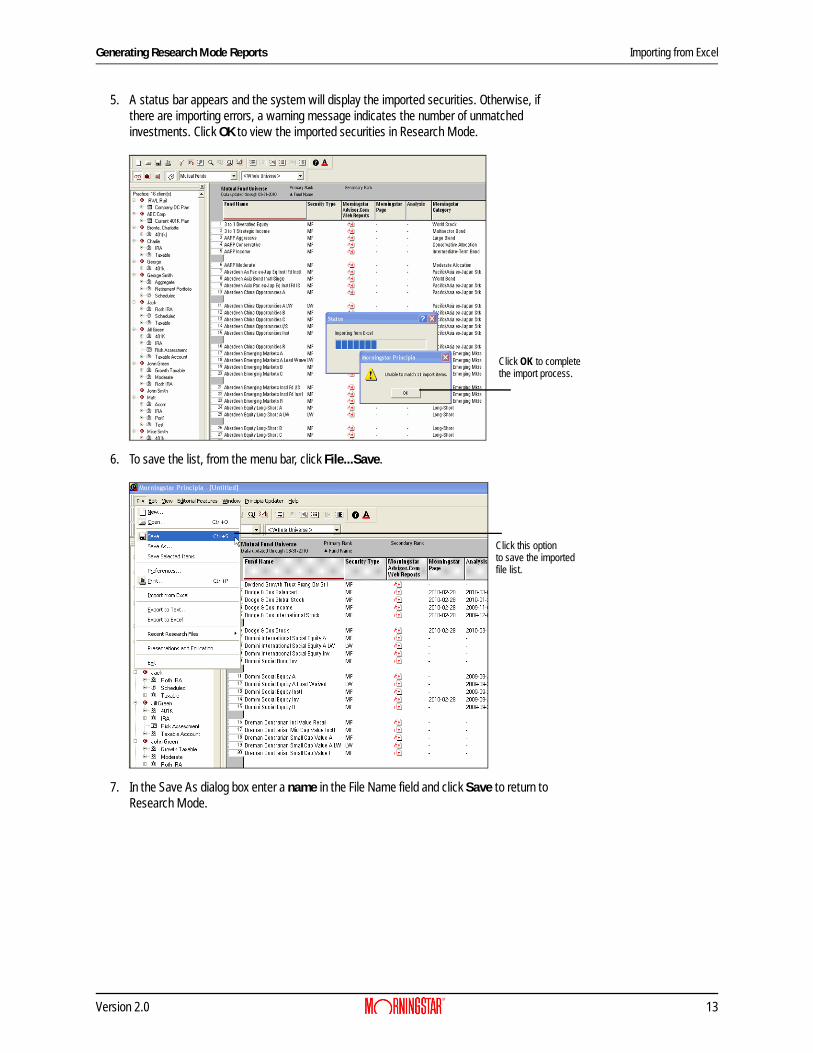
5. A status bar appears and the system will display the imported securities. Otherwise, if there are importing errors, a warning message indicates the number of unmatched investments. Click OK to view the imported securities in Research Mode.
6. To save the list, from the menu bar, click File...Save.
7. In the Save As dialog box enter a name in the File Name field and click Save to return to Research Mode.
Click OK to complete the import process.
Click this optionto save the importedfile list.
Version 2.0 13

Overview Accessing Analyst Mode
Accessing Analyst Mode
OverviewAnalyst Mode provides access to Morningstar commentary, target-date reports, and Talking Points reports where you can view Analyst’s view on different markets.
Accessing Analyst Mode
To access Analyst Mode, do the following:
1. Click the Analyst Mode icon.
2. Click
14 Version 2.0
Generating Portfolio Mode Reports Overview
Generating Portfolio Mode Reports
OverviewFrom Portfolio Mode, you can generate he FINRA-reviewed Snapshot Report as well as the Portfolio Comparison Report. Portfolio Mode reports provide an in-depth synopsis of a client’s portfolio, with asset class and investment style breakdowns, information, and top holdings. You will also learn about batch reporting and how to create an Investment Policy Statement.
Generating the FINRA-reviewed report
To generate the FINRA-reviewed Snapshot report, do the following:
1. Make sure you are in the Snapshot View.2. From the Advisor Palette, double-click a portfolio to open it.3. From the menu bar, click File…Generate Portfolio Snapshot (PDF). The Portfolio
Snapshot Report (PDF) opens with the FINRA compliance material.
Generating the Portfolio Comparison report
With the Principia Suite module, you will gain access to the Portfolio Comparison Report PDF. The report compares portfolio composition, Style Box Analysis, Sector Weightings, and trailing returns for two portfolios.
To generate the Portfolio Comparison Report (PDF), do the following:
1. Make sure you are in the Snapshot View.2. In the Advisor Palette, highlight a portfolio.3. Then, <CTRL> + click on a second portfolio. 4. From the menu bar, click File…Generate Portfolio Comparison Report (PDF).
Generating Batch Reports
Batch reports can be generated only from the Snapshot view in Portfolio Mode. When you generate batch reports from Principia, you need to select the clients whose portfolios will be included in the batch. You cannot select individual portfolios from a client; all of them will be included. For each portfolio, a Portfolio Snapshot report will be generated, as well as one Investment Detail Report for each security type in the portfolio.
For example, if a portfolio contains four mutual funds, two stocks and one ETF, the batch reporting process will generate four files:
• Portfolio Snapshot• Investment Detail Report for Mutual Funds• Investment Detail Report for Stocks, and• Investment Detail Report for Exchange-Traded Funds.
What to consider before generating batch reports
Before generating batch reports, keep the following points in mind:
• You’ll want to select which clients to include when the reports are generated. You can easily include all clients at once if you want.
• You need to decide whether only the Portfolio Snapshot report will be created, or whether you also want to generate the Investment Detail Reports as well.
• You need to decide where the reports will reside once they are created. By default, they will be saved to the main Principia User folder. You can select a different, existing
Version 2.0 15
How to set the parameters for batch reports Generating Portfolio Mode Reports
folder, or you can create new folders. The new folders could be named for each client, or for the time period (e.g., 2010 Q1 Batch Reports) in which the reports were created.
How to set the parameters for batch reports
Setting the parameters for batch reports involves the following:
• Choose which clients to include in the batch• Decide whether to include the Investment Detail Report as part of the batch, and• Select a location for each client where the reports will be housed. This makes it easy to
find the reports once they are generated.
To set the parameters for a batch report, do the following:
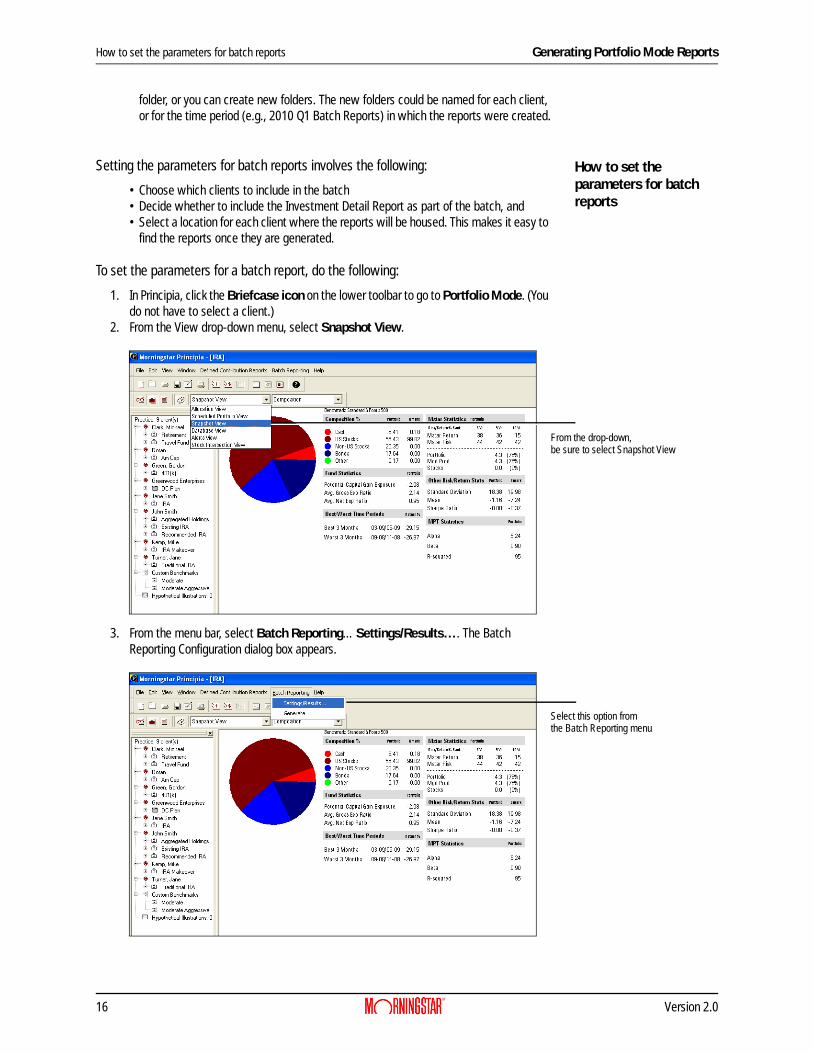
1. In Principia, click the Briefcase icon on the lower toolbar to go to Portfolio Mode. (You do not have to select a client.)
2. From the View drop-down menu, select Snapshot View.
3. From the menu bar, select Batch Reporting…Settings/Results…. The Batch Reporting Configuration dialog box appears.
From the drop-down, be sure to select Snapshot View
Select this option from the Batch Reporting menu
16 Version 2.0
Generating Portfolio Mode Reports How to set the parameters for batch reports
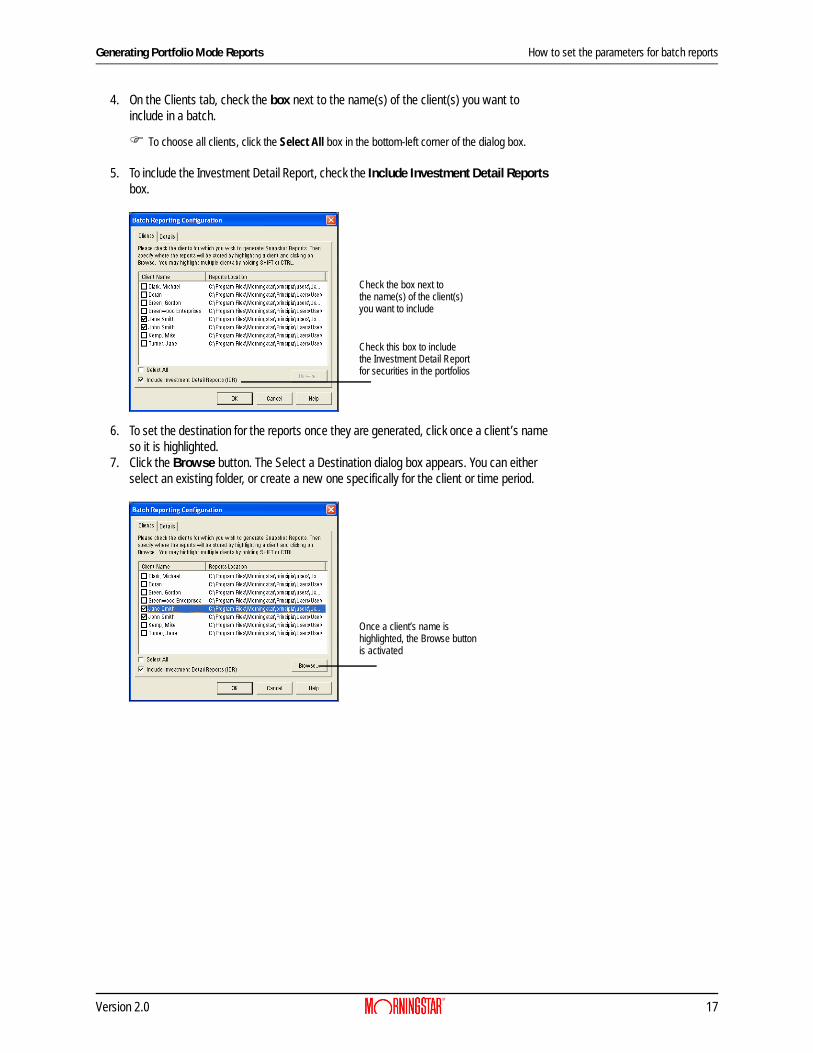
4. On the Clients tab, check the box next to the name(s) of the client(s) you want to include in a batch.
To choose all clients, click the Select All box in the bottom-left corner of the dialog box.
5. To include the Investment Detail Report, check the Include Investment Detail Reports box.
6. To set the destination for the reports once they are generated, click once a client’s name so it is highlighted.
7. Click the Browse button. The Select a Destination dialog box appears. You can either select an existing folder, or create a new one specifically for the client or time period.
Check the box next to the name(s) of the client(s)you want to include
Check this box to include the Investment Detail Report for securities in the portfolios
Once a client’s name is highlighted, the Browse button is activated
Version 2.0 17
How to generate batch reports Generating Portfolio Mode Reports
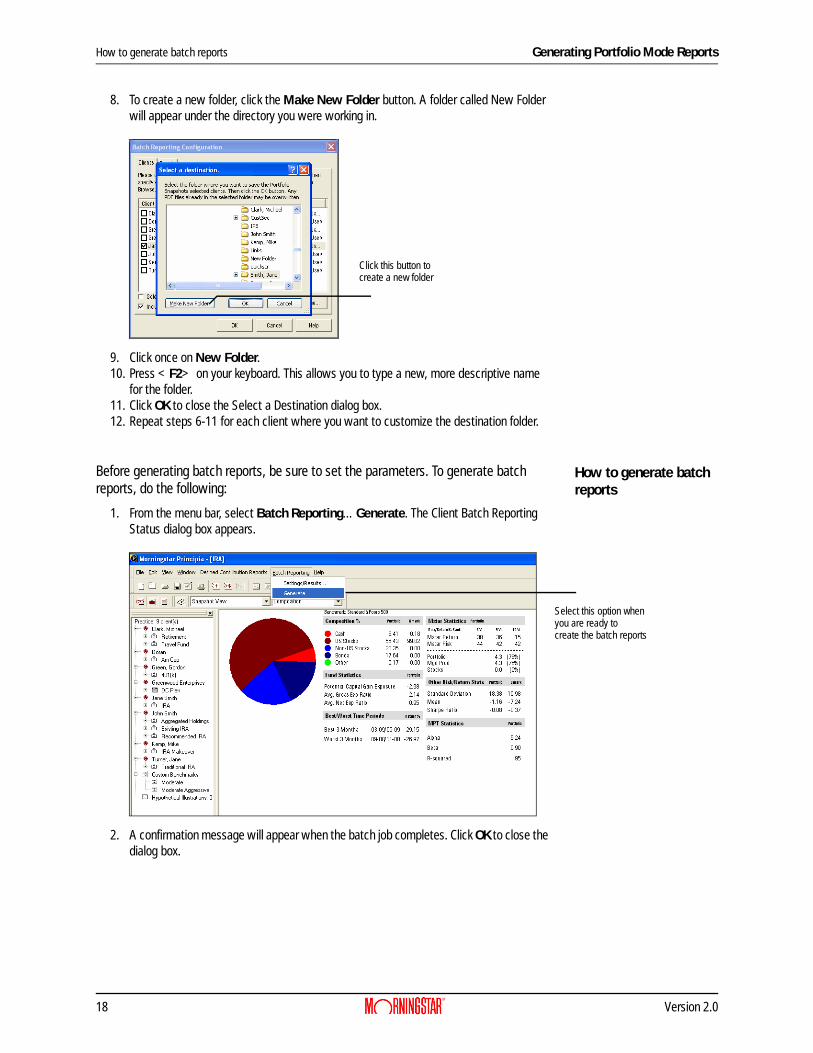
8. To create a new folder, click the Make New Folder button. A folder called New Folder will appear under the directory you were working in.
9. Click once on New Folder.10. Press <F2> on your keyboard. This allows you to type a new, more descriptive name
for the folder.11. Click OK to close the Select a Destination dialog box. 12. Repeat steps 6-11 for each client where you want to customize the destination folder.
How to generate batch reports
Before generating batch reports, be sure to set the parameters. To generate batch reports, do the following:
1. From the menu bar, select Batch Reporting…Generate. The Client Batch Reporting Status dialog box appears.
2. A confirmation message will appear when the batch job completes. Click OK to close the dialog box.
Click this button to create a new folder
Select this option when you are ready to create the batch reports
18 Version 2.0
Generating Portfolio Mode Reports How to generate batch reports
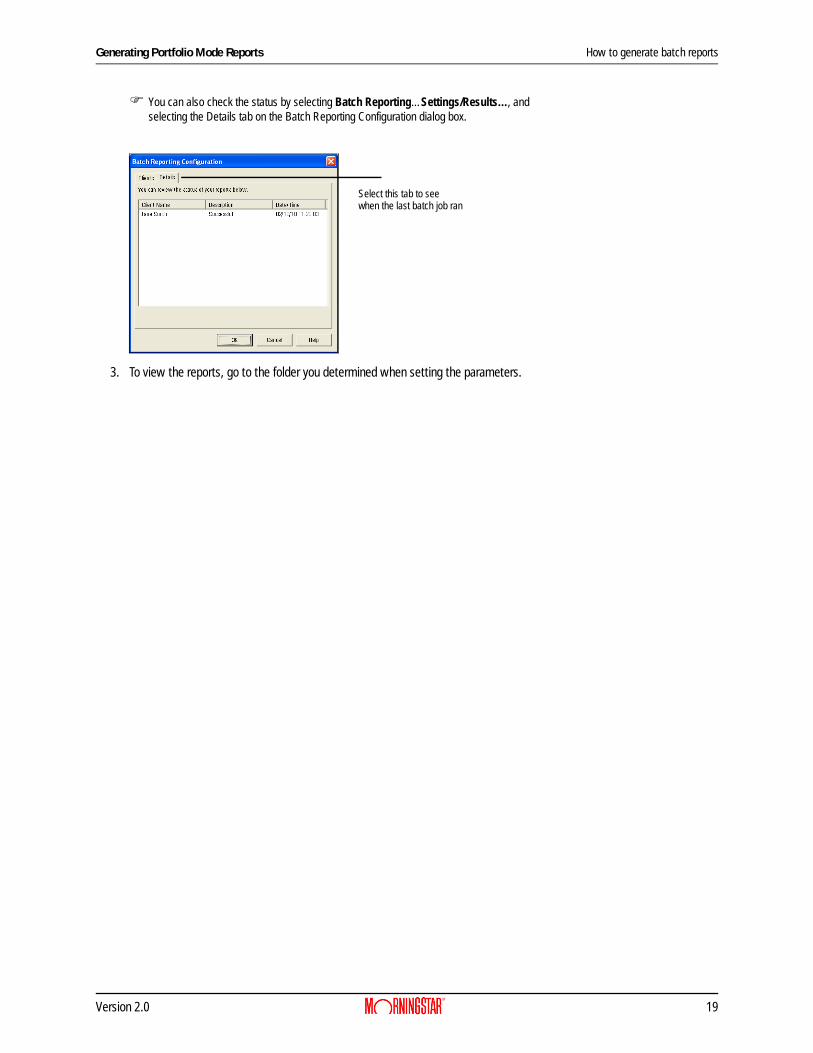
You can also check the status by selecting Batch Reporting…Settings/Results…, and selecting the Details tab on the Batch Reporting Configuration dialog box.
3. To view the reports, go to the folder you determined when setting the parameters.
Select this tab to see when the last batch job ran
Version 2.0 19

Overview Creating Investment Policy Statements
Creating Investment Policy Statements
OverviewThis section will show you how to create an IPS for a client.
Creating an Investment Policy Statement
To create an Investment Policy Statement do the following:
4. From the Advisor Palette in the Portfolio Mode of Principia, right-click once on a client's name to select it.
5. From the menu, click New…Investment Policy Statement. The Morningstar Investment Policy Statement window appears.
The table below provides information about the fields available on the General Information step.
Right-click on aclient’s name, thenselect New Investment PolicyStatement
Field Name Description
Client NameThis is the client file name you selected in Principia before opening the IPS wizard. This should be entered automatically for you.
Proposal NameType a name for the proposal here. This will appear on the cover page of the report.
Proposal PurposeEnter the main purpose of the plan. For example: To establish a retirement plan for Jill Green.
20 Version 2.0
Creating Investment Policy Statements Entering Financial goals
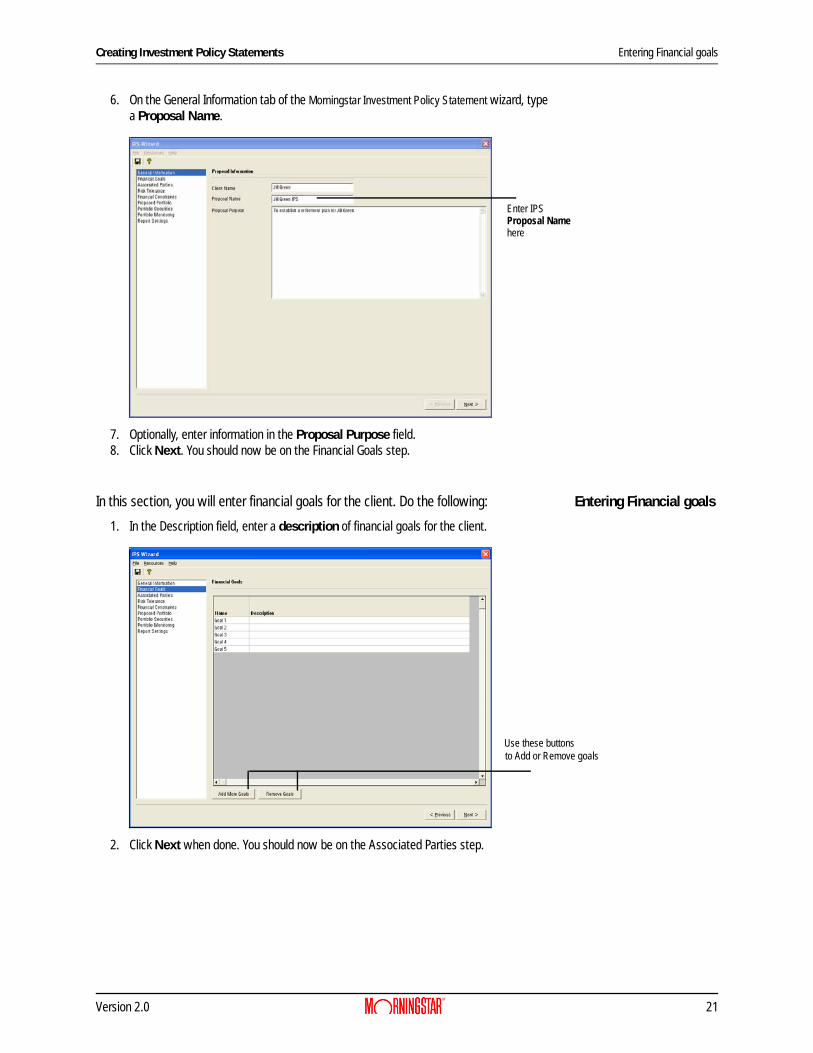
6. On the General Information tab of the Morningstar Investment Policy Statement wizard, type a Proposal Name.
7. Optionally, enter information in the Proposal Purpose field.8. Click Next. You should now be on the Financial Goals step.
Entering Financial goalsIn this section, you will enter financial goals for the client. Do the following:
1. In the Description field, enter a description of financial goals for the client.
2. Click Next when done. You should now be on the Associated Parties step.
Enter IPSProposal Namehere
Use these buttonsto Add or Remove goals
Version 2.0 21

Entering information for Associated Parties Creating Investment Policy Statements
Entering information for Associated Parties
In this section, you will enter the information for all parties associated with this plan. To enter information for Associated Parties, do the following:
1. From the form area at the bottom of the step, make a selection from the Classification field.
2. Enter name and demographic information in the rest of the form area.
3. To save the data and have it appear in the grid at the top of the step, click on the row for Party 2.
4. Repeat steps 1-3 for all additional parties.
To add a sixth party (or more), click the Add Party button. To delete a party, select the party’s row, then click the Delete Party button. To erase information in the form area, click the Reset button.
5. Click Next. You should now be on the Risk Tolerance step.
Select a Classificationfor the Associated Party.
This section displaysinformation forAssociated Parties
22 Version 2.0
Creating Investment Policy Statements Entering a client’s Risk Tolerance
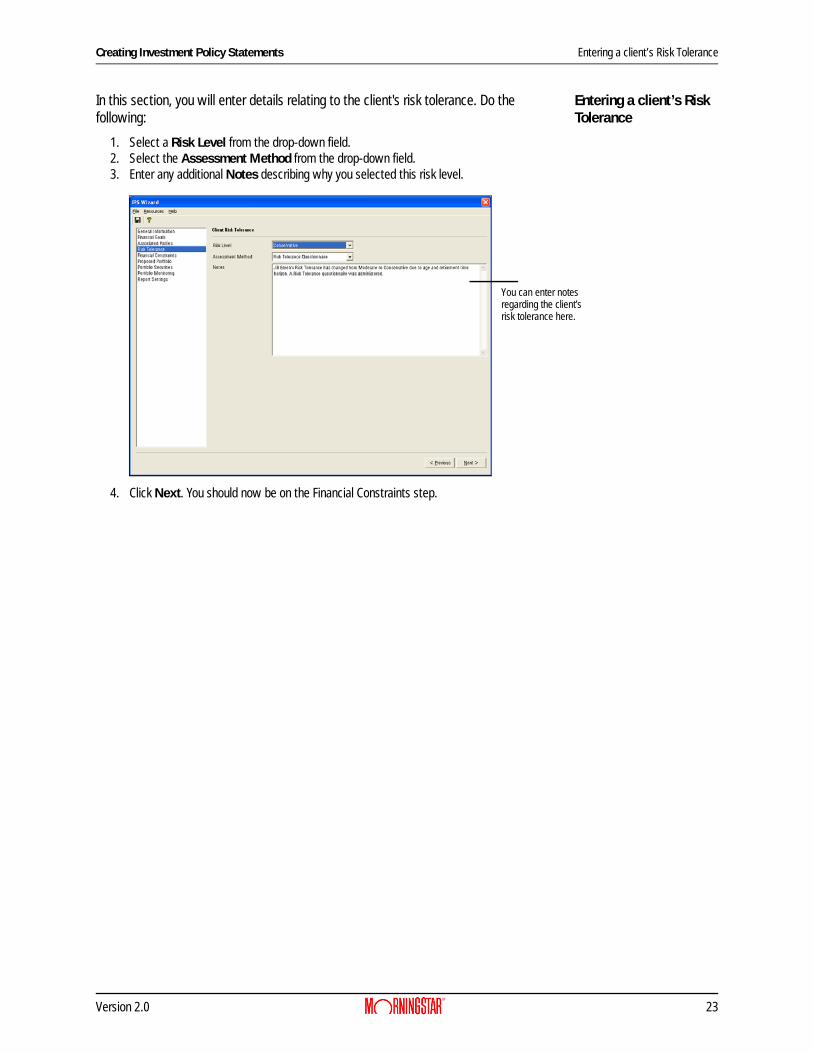
Entering a client’s Risk Tolerance
In this section, you will enter details relating to the client's risk tolerance. Do the following:
1. Select a Risk Level from the drop-down field. 2. Select the Assessment Method from the drop-down field. 3. Enter any additional Notes describing why you selected this risk level.
4. Click Next. You should now be on the Financial Constraints step.
You can enter notesregarding the client’srisk tolerance here.
Version 2.0 23

Entering a client’s Financial Constraints Creating Investment Policy Statements
Entering a client’s Financial Constraints
In this section, you will enter details relating to the client’s financial constraints. Do the following:
1. In the Value of assets included in Plan $ field, enter a dollar amount. 2. Enter any Liquidity Constraints. 3. Enter any Tax Constraints.4. Enter the Marginal Federal Rate %.5. Enter the State Rate %.6. Enter the Local Rate %.7. Enter Other Constraints.
8. Click Next. You should now be on the Proposed Portfolio step.
Liquidity, Tax, andOther Constraintscan be added to theappropriate sectionsof this window
24 Version 2.0
Creating Investment Policy Statements Creating a Proposed Portfolio
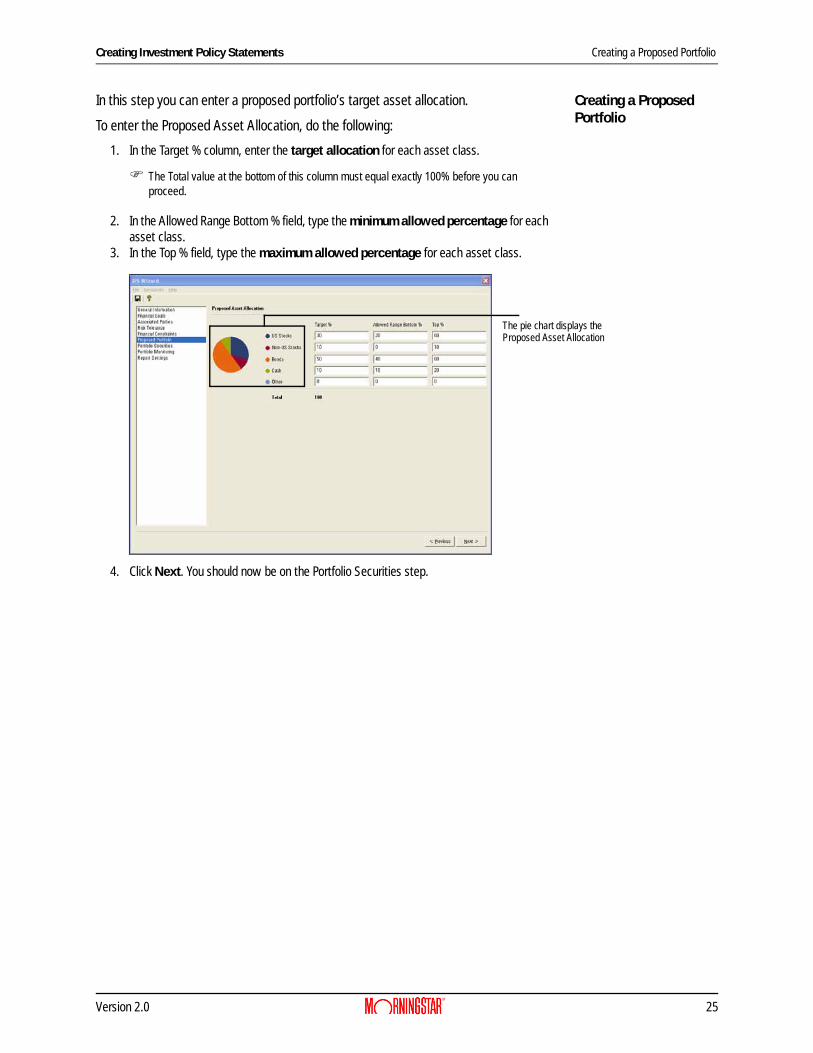
Creating a Proposed Portfolio
In this step you can enter a proposed portfolio’s target asset allocation.
To enter the Proposed Asset Allocation, do the following:
1. In the Target % column, enter the target allocation for each asset class.
The Total value at the bottom of this column must equal exactly 100% before you can proceed.
2. In the Allowed Range Bottom % field, type the minimum allowed percentage for each asset class.
3. In the Top % field, type the maximum allowed percentage for each asset class.
4. Click Next. You should now be on the Portfolio Securities step.
The pie chart displays theProposed Asset Allocation
Version 2.0 25
Selecting securities for a portfolio Creating Investment Policy Statements
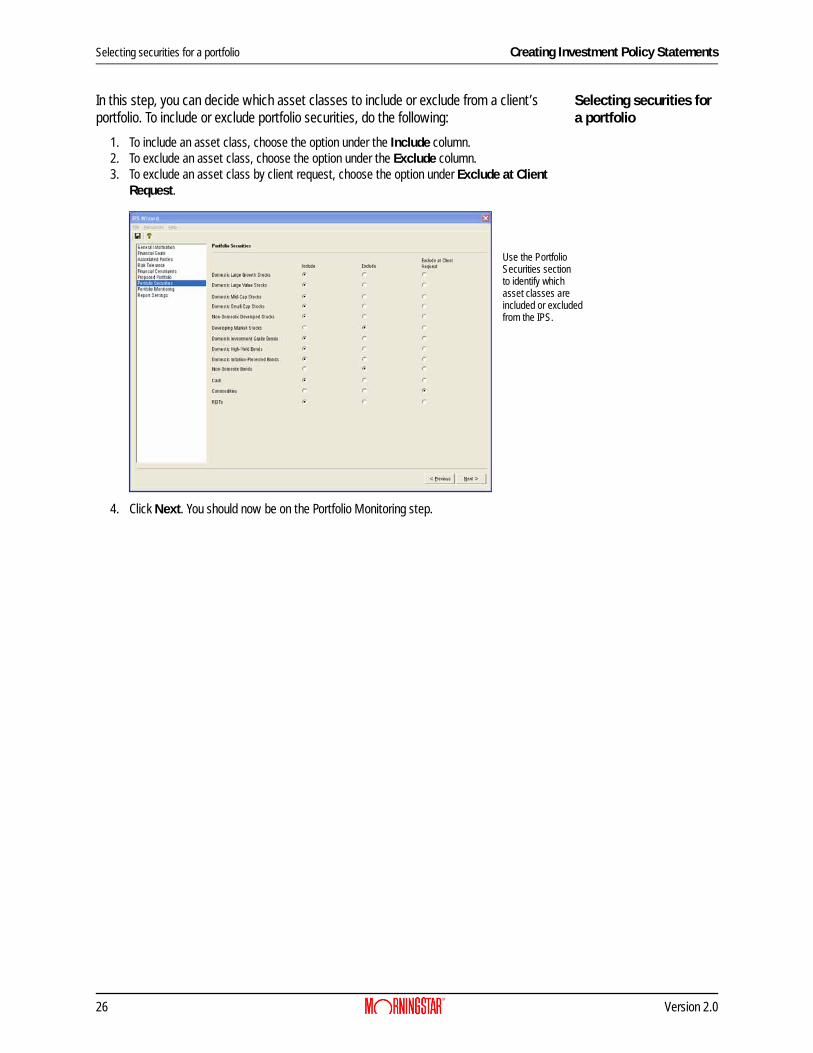
Selecting securities for a portfolio
In this step, you can decide which asset classes to include or exclude from a client’s portfolio. To include or exclude portfolio securities, do the following:
1. To include an asset class, choose the option under the Include column.2. To exclude an asset class, choose the option under the Exclude column. 3. To exclude an asset class by client request, choose the option under Exclude at Client
Request.
4. Click Next. You should now be on the Portfolio Monitoring step.
Use the PortfolioSecurities sectionto identify whichasset classes areincluded or excludedfrom the IPS.
26 Version 2.0
Creating Investment Policy Statements Establishing portfolio monitoring for an IPS
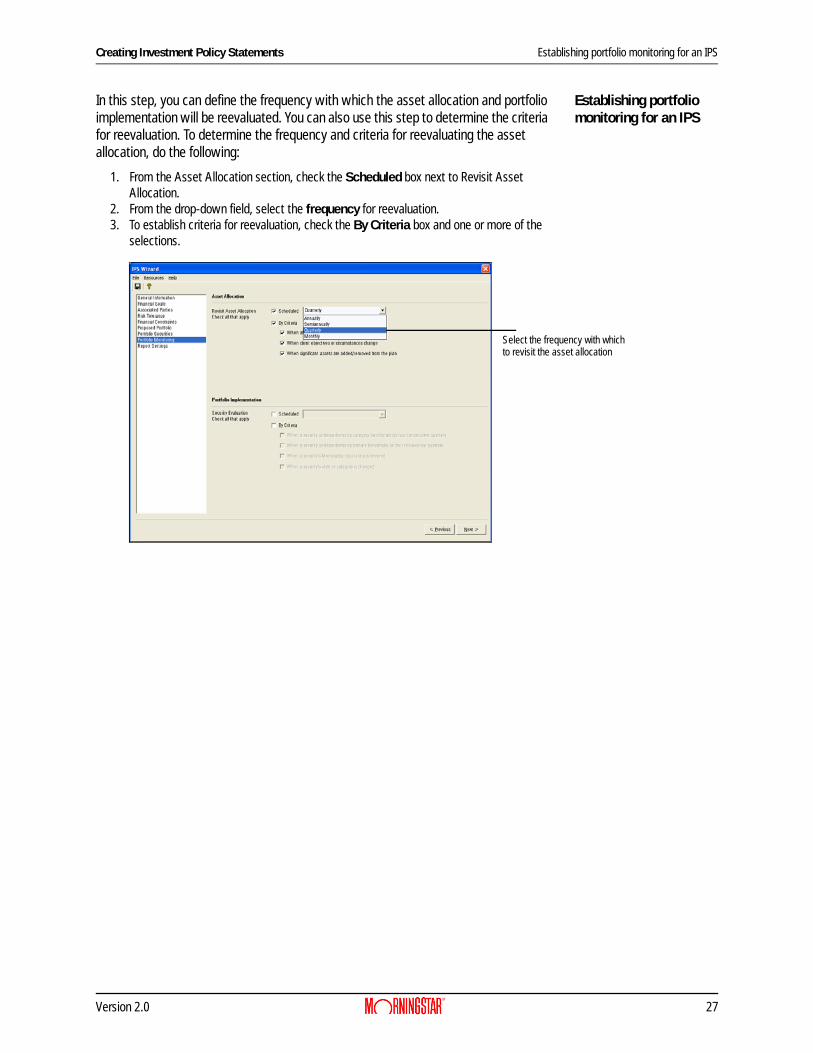
Establishing portfolio monitoring for an IPS
In this step, you can define the frequency with which the asset allocation and portfolio implementation will be reevaluated. You can also use this step to determine the criteria for reevaluation. To determine the frequency and criteria for reevaluating the asset allocation, do the following:
1. From the Asset Allocation section, check the Scheduled box next to Revisit Asset Allocation.
2. From the drop-down field, select the frequency for reevaluation.3. To establish criteria for reevaluation, check the By Criteria box and one or more of the
selections.
Select the frequency with whichto revisit the asset allocation
Version 2.0 27
Establishing the portfolio implementation settings for an IPS Creating Investment Policy Statements
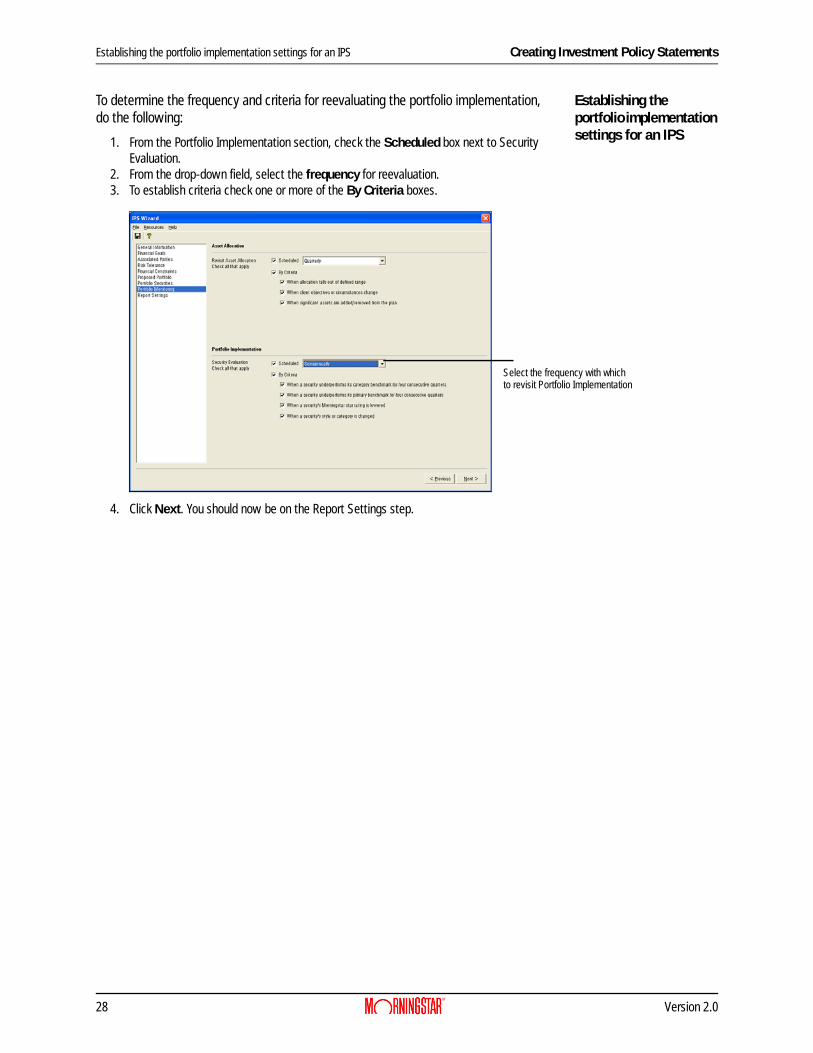
Establishing the portfolio implementation settings for an IPS
To determine the frequency and criteria for reevaluating the portfolio implementation, do the following:
1. From the Portfolio Implementation section, check the Scheduled box next to Security Evaluation.
2. From the drop-down field, select the frequency for reevaluation.3. To establish criteria check one or more of the By Criteria boxes.
4. Click Next. You should now be on the Report Settings step.
Select the frequency with whichto revisit Portfolio Implementation
28 Version 2.0
Creating Investment Policy Statements Selecting and entering the report settings
Selecting and entering the report settings
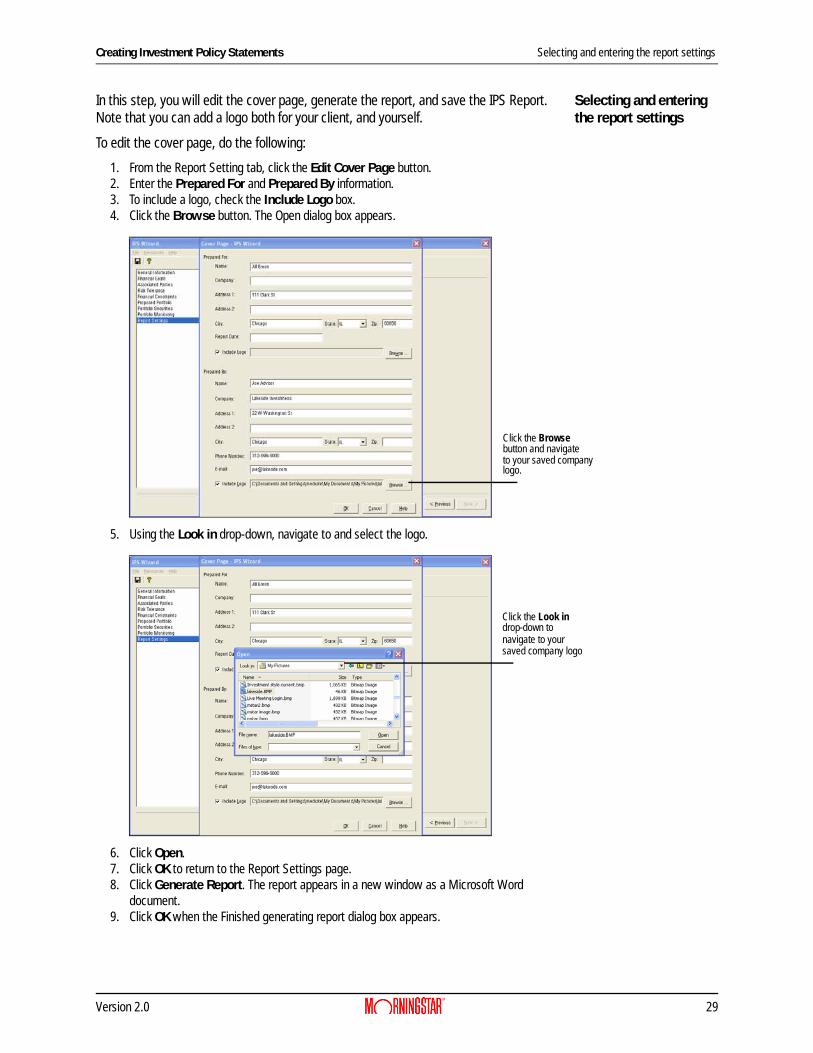
In this step, you will edit the cover page, generate the report, and save the IPS Report. Note that you can add a logo both for your client, and yourself.
To edit the cover page, do the following:
1. From the Report Setting tab, click the Edit Cover Page button.2. Enter the Prepared For and Prepared By information.3. To include a logo, check the Include Logo box.4. Click the Browse button. The Open dialog box appears.
5. Using the Look in drop-down, navigate to and select the logo.
6. Click Open. 7. Click OK to return to the Report Settings page.8. Click Generate Report. The report appears in a new window as a Microsoft Word
document.9. Click OK when the Finished generating report dialog box appears.
Click the Browsebutton and navigateto your saved companylogo.
Click the Look indrop-down tonavigate to yoursaved company logo
Version 2.0 29
Saving an IPS report in Microsoft Word Creating Investment Policy Statements
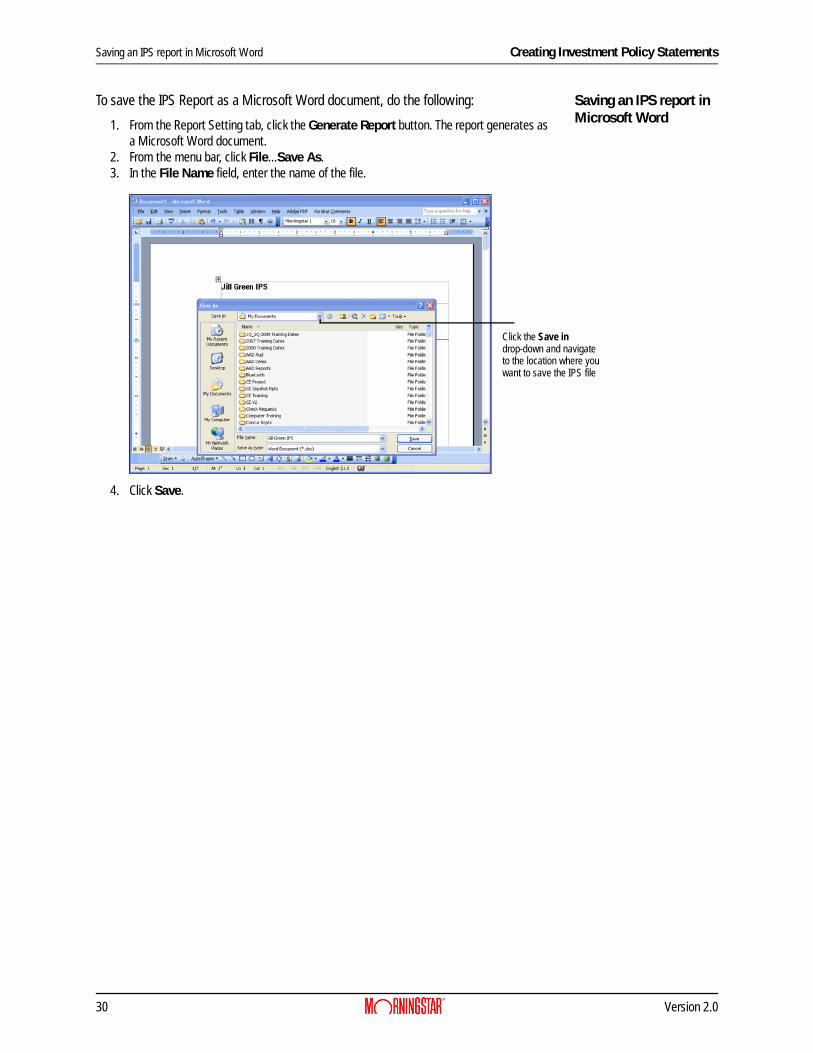
Saving an IPS report in Microsoft Word
To save the IPS Report as a Microsoft Word document, do the following:
1. From the Report Setting tab, click the Generate Report button. The report generates as a Microsoft Word document.
2. From the menu bar, click File...Save As.3. In the File Name field, enter the name of the file.
4. Click Save.
Click the Save indrop-down and navigateto the location where youwant to save the IPS file
30 Version 2.0
Creating Investment Policy Statements Opening and editing an Investment Policy Statement
Opening and editing an Investment Policy Statement
To open or edit an IPS, do the following:
1. From the Advisor Palette in the Portfolio Mode of Principia, right-click once a client's name to select it.
2. From the menu, click Edit Investment Policy Statement. The IPS Wizard window appears.
3. Make any modifications you want, then click the Save icon. 4. From the menu bar, select File…Exit when all changes have been made.
Adding Your Own Selections in the IPS Window
This section will show you how to add selections to a number of different drop-down fields available on most of the tabs in the Investment Policy Statement wizard. If the existing options do not meet your needs, this is your chance to create values that match your practice.
You can add new selections for the following tabs and items:
• Associated Parties/Classification• Financial Constraints/Assessment Method• Financial Constraints/Risk Level• Portfolio Monitoring/Allocation by Criteria• Portfolio Monitoring/Evaluation by Criteria• Portfolio Monitoring/Revisit Schedule• Portfolio Monitoring/Security Evaluation Schedule• Proposed Portfolio/Portfolio Securities.
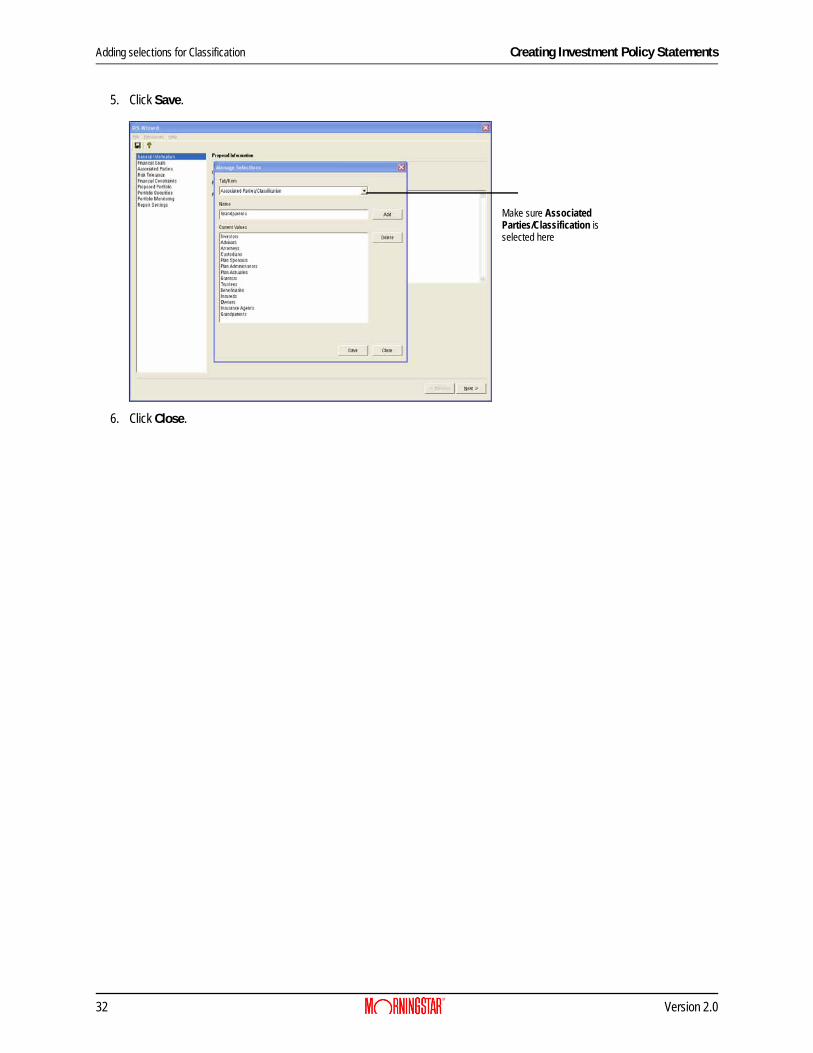
Adding selections for Classification
To create additional items for the Classification drop-down field in the Associated Parties tab, do the following:
1. From the menu bar, select Resources...Edit. The Manage Selections dialog box appears.
2. From the Tab/Item drop-down field, be sure Associated Parties/Classification is selected.
3. Type a Name for the selection. 4. Click Add.
Version 2.0 31
Adding selections for Classification Creating Investment Policy Statements
5. Click Save.
6. Click Close.
Make sure AssociatedParties/Classification isselected here
32 Version 2.0
Creating Investment Policy Statements Adding selections for Assessment Method
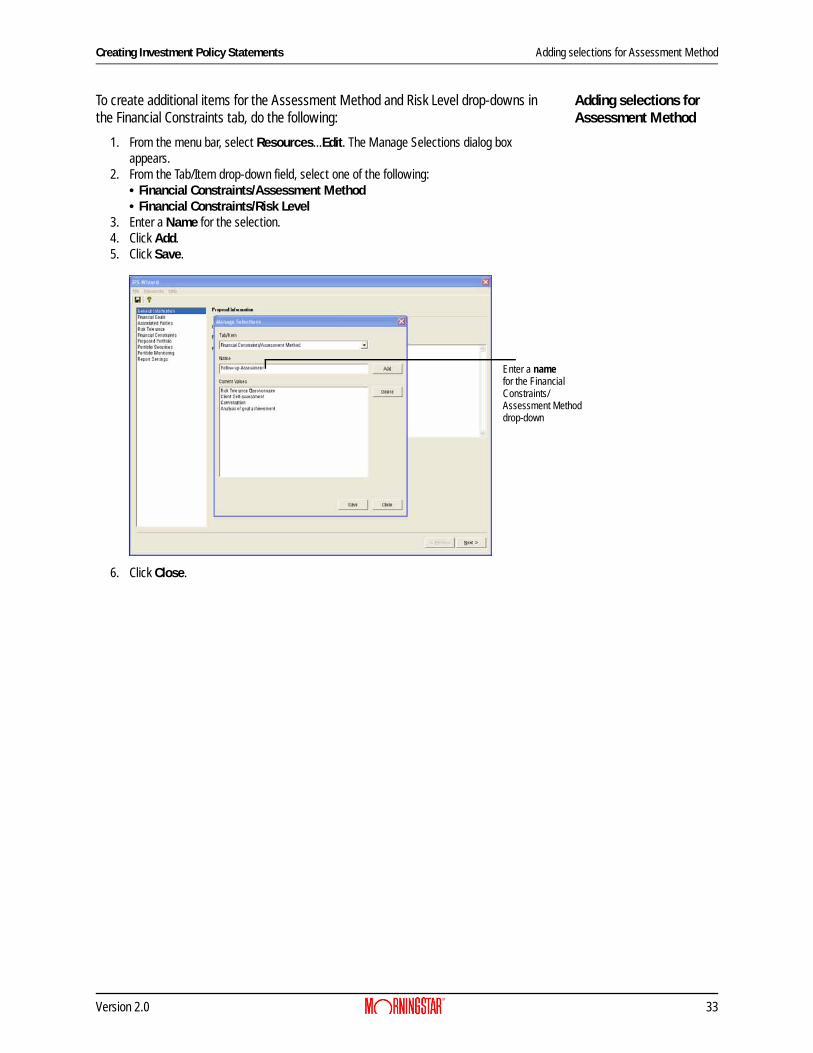
Adding selections for Assessment Method
To create additional items for the Assessment Method and Risk Level drop-downs in the Financial Constraints tab, do the following:
1. From the menu bar, select Resources...Edit. The Manage Selections dialog box appears.
2. From the Tab/Item drop-down field, select one of the following:• Financial Constraints/Assessment Method• Financial Constraints/Risk Level
3. Enter a Name for the selection. 4. Click Add.5. Click Save.
6. Click Close.
Enter a namefor the FinancialConstraints/Assessment Methoddrop-down
Version 2.0 33
Adding Securities for Portfolio Monitoring Creating Investment Policy Statements
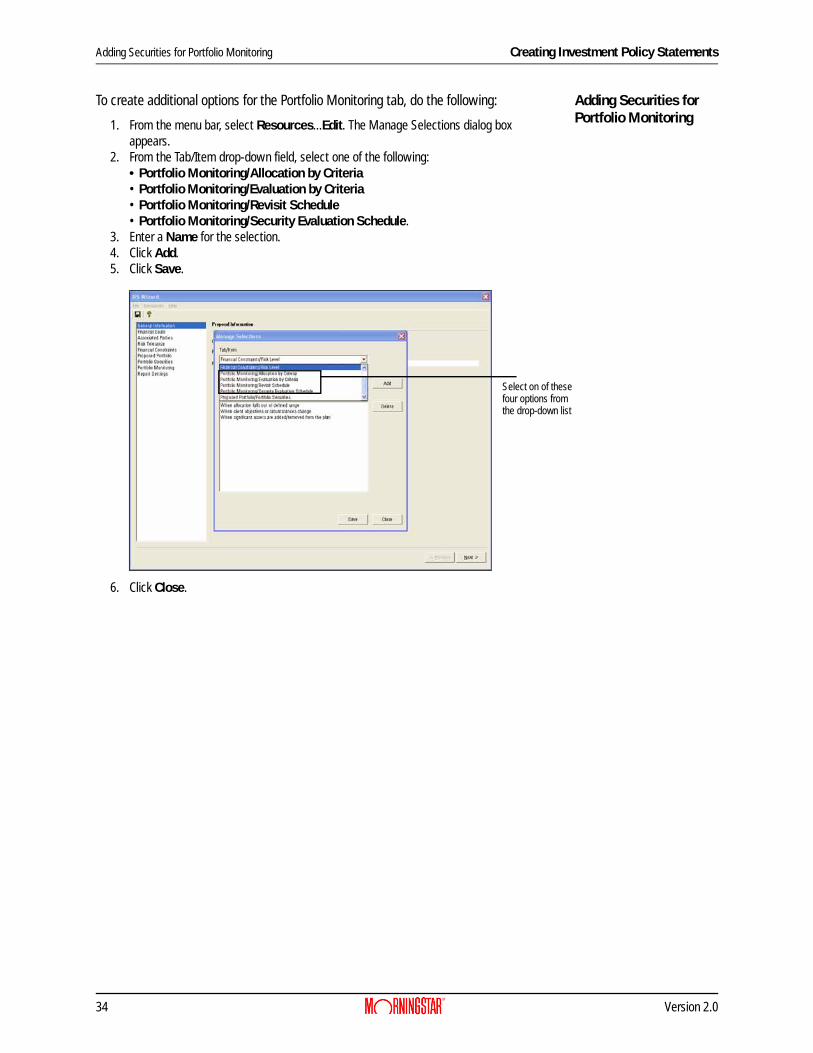
Adding Securities for Portfolio Monitoring
To create additional options for the Portfolio Monitoring tab, do the following:
1. From the menu bar, select Resources...Edit. The Manage Selections dialog box appears.
2. From the Tab/Item drop-down field, select one of the following:• Portfolio Monitoring/Allocation by Criteria • Portfolio Monitoring/Evaluation by Criteria • Portfolio Monitoring/Revisit Schedule • Portfolio Monitoring/Security Evaluation Schedule.
3. Enter a Name for the selection. 4. Click Add.5. Click Save.
6. Click Close.
Select on of thesefour options fromthe drop-down list
34 Version 2.0

Creating Investment Policy Statements Adding selections for Portfolio Securities
Adding selections for Portfolio Securities
To create additional portfolio securities for the Proposed Portfolio tab, do the following:
1. From the menu bar, select Resources...Edit. The Manage Selections dialog box appears.
2. In the Tab/Item drop-down field, select Portfolio Monitoring/Portfolio Securities. 3. Enter a Name for the selection. 4. Click Add.5. Click Save.
6. Click Close.
Click Add after typing a namefor the new Portfolio Security
Version 2.0 35
Overview Generating Sales/Hypothetical Reports
Generating Sales/Hypothetical Reports
OverviewThis document explains how to use the Sales/Hypothetical tool in Principia. The Sales/Hypothetical tool is a seven-step wizard that allows you to run a historical report showing the performance of a portfolio or a list of investments. You can also run a comparison between a set of investments.
You might find it quickest to run a hypothetical if you have already created a portfolio for a client, since the Hypothetical tool will allow you to import these without having to re-create them.
Building a hypothetical illustration involves the following seven steps:
1. Select the securities (up to 20) for the illustration.2. Choose a time period for the illustration (default is trailing 12 months).3. Set an initial investment for the illustration (default is $10,000).4. Denote any subsequent investments to or withdrawals from the illustration.5. Deduct any management fees from the portfolio.6. Decide whether to do any rebalancing or transferring within the illustration.7. Account for any tax implications, choose a benchmark for the report, select graph
options and decide which other reports to produce along with the illustration.
A PDF report is generated after the final step. This PDF file can be saved, printed, or sent via Email. Appropriate disclosure materials are included in the PDF.
36 Version 2.0
Generating Sales/Hypothetical Reports How do I create a hypothetical illustration?
How do I create a hypothetical illustration?
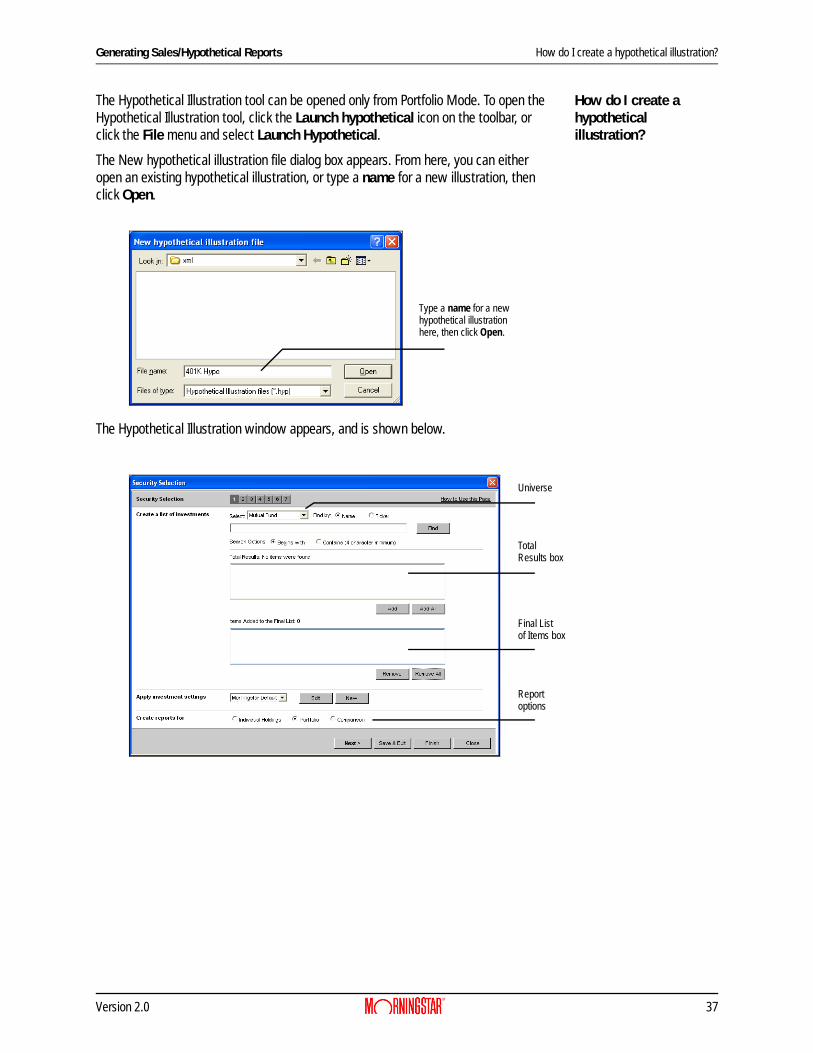
The Hypothetical Illustration tool can be opened only from Portfolio Mode. To open the Hypothetical Illustration tool, click the Launch hypothetical icon on the toolbar, or click the File menu and select Launch Hypothetical.
The New hypothetical illustration file dialog box appears. From here, you can either open an existing hypothetical illustration, or type a name for a new illustration, then click Open.
The Hypothetical Illustration window appears, and is shown below.
Type a name for a new hypothetical illustration here, then click Open.
Universe
Total Results box
Final List
Report options
of Items box
Version 2.0 37
Overview Step 1—Selecting Securities for a Hypothetical Illustration
Step 1—Selecting Securities for a Hypothetical Illustration
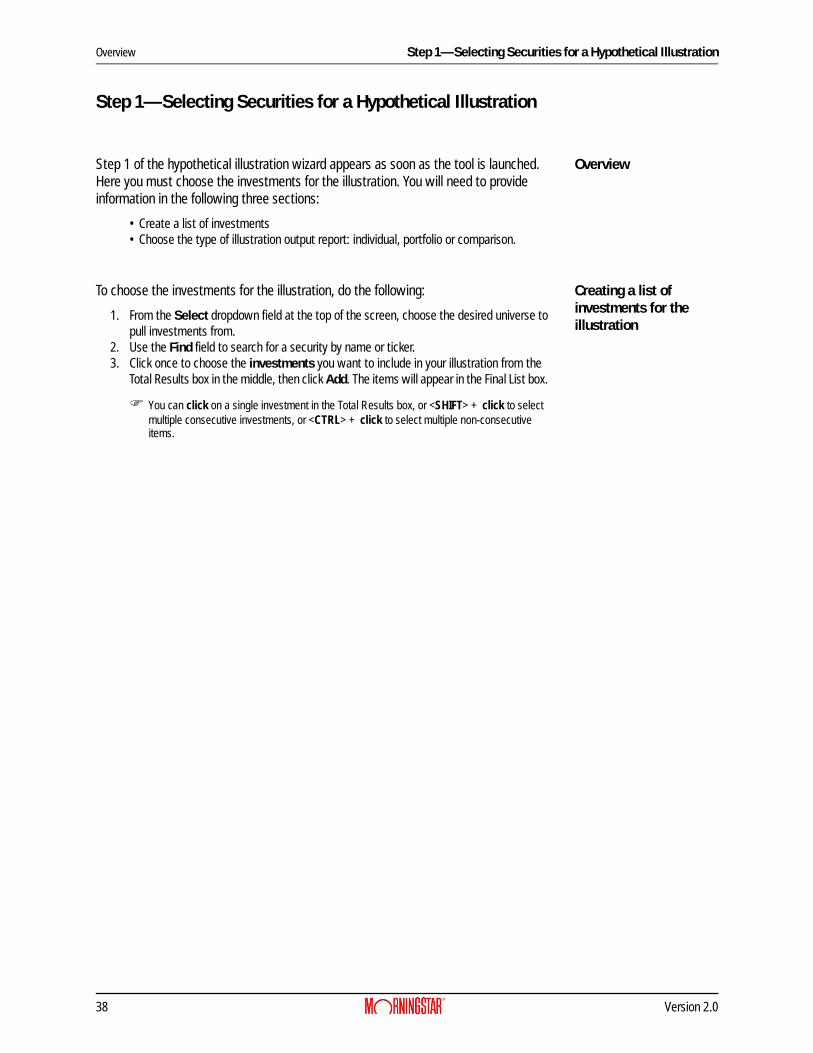
OverviewStep 1 of the hypothetical illustration wizard appears as soon as the tool is launched. Here you must choose the investments for the illustration. You will need to provide information in the following three sections:
• Create a list of investments• Choose the type of illustration output report: individual, portfolio or comparison.
Creating a list of investments for the illustration
To choose the investments for the illustration, do the following:
1. From the Select dropdown field at the top of the screen, choose the desired universe to pull investments from.
2. Use the Find field to search for a security by name or ticker. 3. Click once to choose the investments you want to include in your illustration from the
Total Results box in the middle, then click Add. The items will appear in the Final List box.
You can click on a single investment in the Total Results box, or <SHIFT> + click to select multiple consecutive investments, or <CTRL> + click to select multiple non-consecutive items.
38 Version 2.0
Step 1—Selecting Securities for a Hypothetical Illustration Editing or saving custom settings for a hypothetical report
Editing or saving custom settings for a hypothetical report
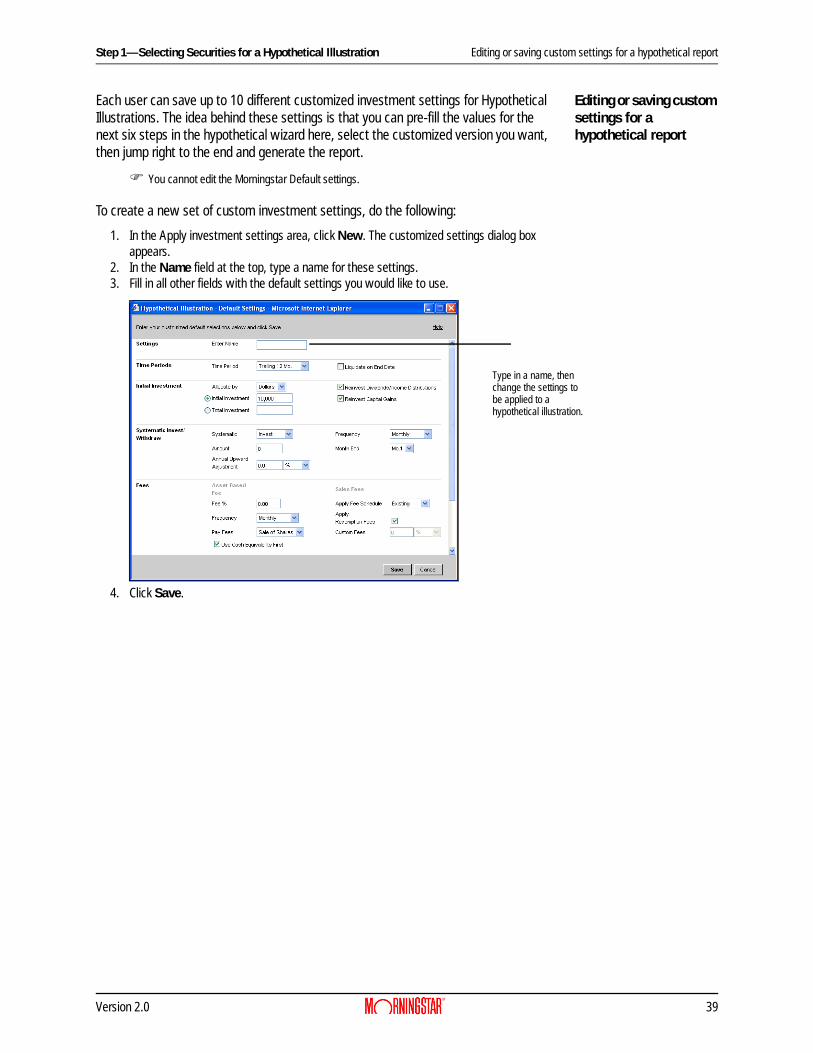
Each user can save up to 10 different customized investment settings for Hypothetical Illustrations. The idea behind these settings is that you can pre-fill the values for the next six steps in the hypothetical wizard here, select the customized version you want, then jump right to the end and generate the report.
You cannot edit the Morningstar Default settings.
To create a new set of custom investment settings, do the following:
1. In the Apply investment settings area, click New. The customized settings dialog box appears.
2. In the Name field at the top, type a name for these settings. 3. Fill in all other fields with the default settings you would like to use.
4. Click Save.
Type in a name, then change the settings to be applied to a hypothetical illustration.
Version 2.0 39
Selecting a type of illustration Step 1—Selecting Securities for a Hypothetical Illustration
Selecting a type of illustration
To decide which type of hypothetical report to run, you must choose between one of the following:
• Individual Investments• Portfolio• Comparison Report
See the table below for information on each of these options.
Click Next to go to step 2 in the hypothetical illustration wizard.
Option Comments
Individual Holdings
Allows you to see separate information up to 20 investments, rather than as an aggregate portfolio. You cannot do any rebalancing or transferring with this option.
Keep in mind that the more investments you choose, the longer it will take to produce the report.
PortfolioThe default option. Produces a single hypothetical illustration based on all investments. Limit of 20 investments.
Comparison Report
Allows you to see the hypothetical of multiple investments. The fewer investments used here, the easier the hypothetical illustration graph will be to read. You cannot do any rebalancing or transferring with this option.
40 Version 2.0
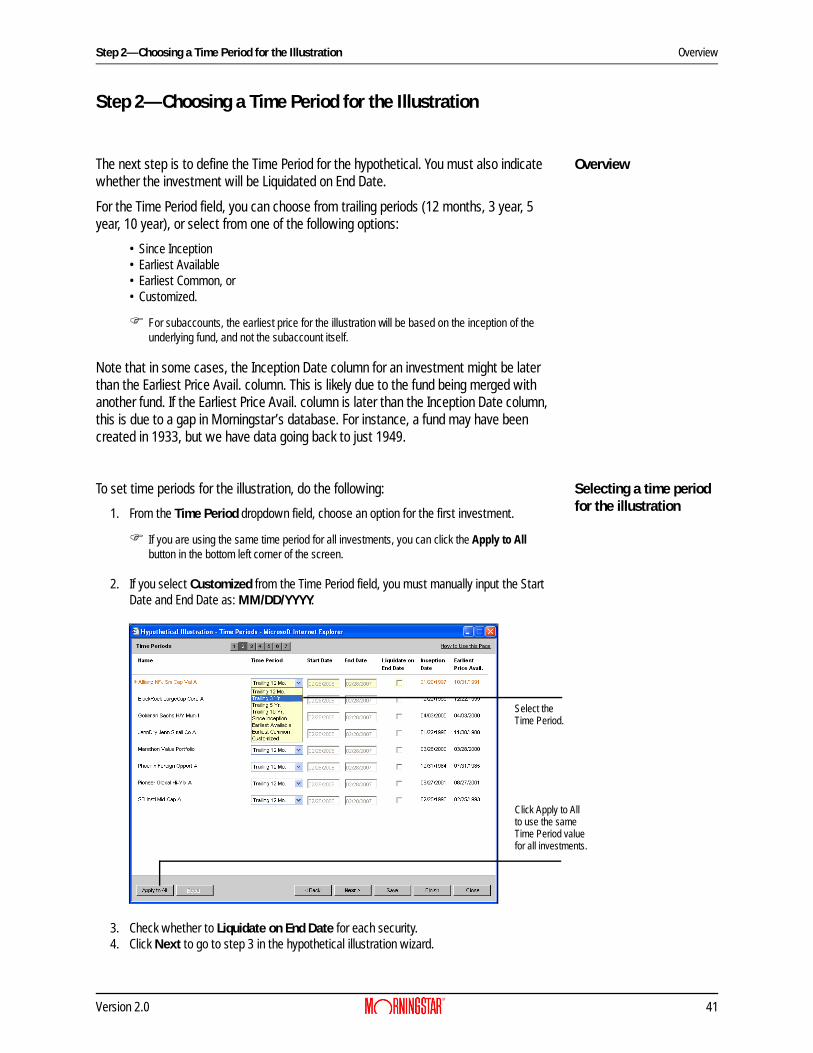
Step 2—Choosing a Time Period for the Illustration Overview
Step 2—Choosing a Time Period for the Illustration
OverviewThe next step is to define the Time Period for the hypothetical. You must also indicate whether the investment will be Liquidated on End Date.
For the Time Period field, you can choose from trailing periods (12 months, 3 year, 5 year, 10 year), or select from one of the following options:
• Since Inception• Earliest Available• Earliest Common, or• Customized.
For subaccounts, the earliest price for the illustration will be based on the inception of the underlying fund, and not the subaccount itself.
Note that in some cases, the Inception Date column for an investment might be later than the Earliest Price Avail. column. This is likely due to the fund being merged with another fund. If the Earliest Price Avail. column is later than the Inception Date column, this is due to a gap in Morningstar’s database. For instance, a fund may have been created in 1933, but we have data going back to just 1949.
Selecting a time period for the illustration
To set time periods for the illustration, do the following:
1. From the Time Period dropdown field, choose an option for the first investment.
If you are using the same time period for all investments, you can click the Apply to All button in the bottom left corner of the screen.
2. If you select Customized from the Time Period field, you must manually input the Start Date and End Date as: MM/DD/YYYY.
3. Check whether to Liquidate on End Date for each security. 4. Click Next to go to step 3 in the hypothetical illustration wizard.
Select the
Click Apply to All
Time Period.
to use the same Time Period value for all investments.
Version 2.0 41
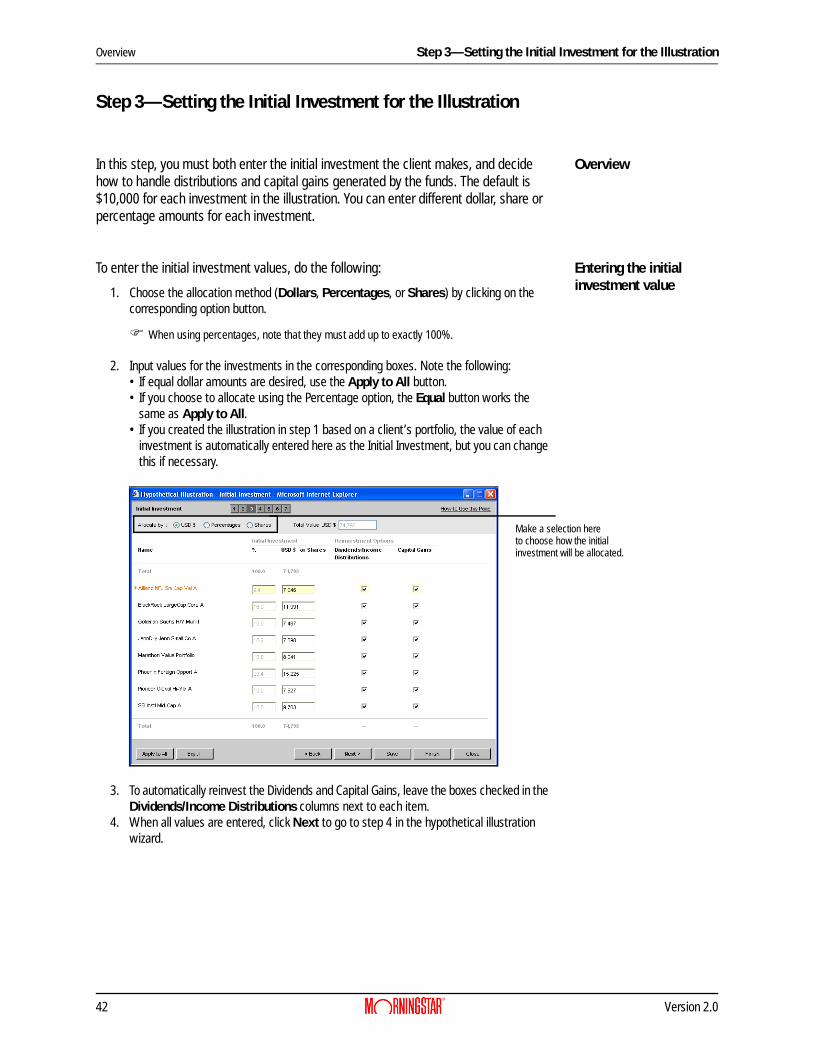
Overview Step 3—Setting the Initial Investment for the Illustration
Step 3—Setting the Initial Investment for the Illustration
OverviewIn this step, you must both enter the initial investment the client makes, and decide how to handle distributions and capital gains generated by the funds. The default is $10,000 for each investment in the illustration. You can enter different dollar, share or percentage amounts for each investment.
Entering the initial investment value
To enter the initial investment values, do the following:
1. Choose the allocation method (Dollars, Percentages, or Shares) by clicking on the corresponding option button.
When using percentages, note that they must add up to exactly 100%.
2. Input values for the investments in the corresponding boxes. Note the following:• If equal dollar amounts are desired, use the Apply to All button. • If you choose to allocate using the Percentage option, the Equal button works the
same as Apply to All.• If you created the illustration in step 1 based on a client’s portfolio, the value of each
investment is automatically entered here as the Initial Investment, but you can change this if necessary.
3. To automatically reinvest the Dividends and Capital Gains, leave the boxes checked in the Dividends/Income Distributions columns next to each item.
4. When all values are entered, click Next to go to step 4 in the hypothetical illustration wizard.
Make a selection here to choose how the initial investment will be allocated.
42 Version 2.0
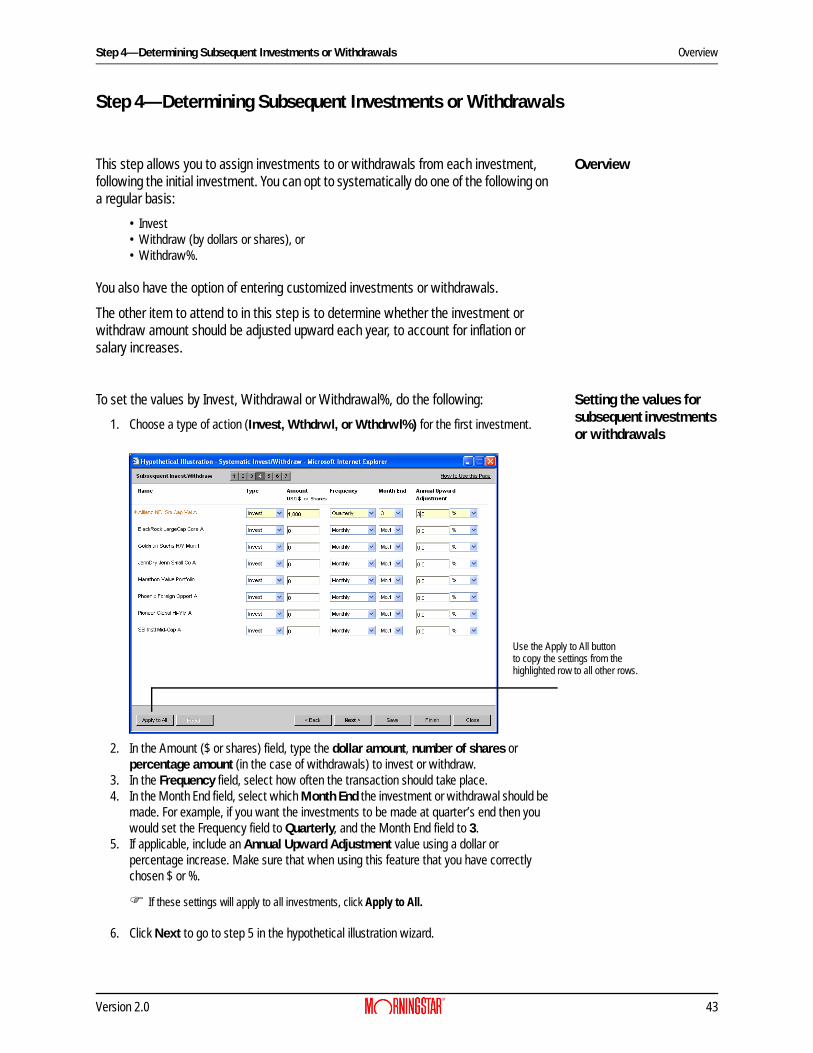
Step 4—Determining Subsequent Investments or Withdrawals Overview
Step 4—Determining Subsequent Investments or Withdrawals
OverviewThis step allows you to assign investments to or withdrawals from each investment, following the initial investment. You can opt to systematically do one of the following on a regular basis:
• Invest• Withdraw (by dollars or shares), or • Withdraw%.
You also have the option of entering customized investments or withdrawals.
The other item to attend to in this step is to determine whether the investment or withdraw amount should be adjusted upward each year, to account for inflation or salary increases.
Setting the values for subsequent investments or withdrawals
To set the values by Invest, Withdrawal or Withdrawal%, do the following:
1. Choose a type of action (Invest, Wthdrwl, or Wthdrwl%) for the first investment.
2. In the Amount ($ or shares) field, type the dollar amount, number of shares or percentage amount (in the case of withdrawals) to invest or withdraw.
3. In the Frequency field, select how often the transaction should take place.4. In the Month End field, select which Month End the investment or withdrawal should be
made. For example, if you want the investments to be made at quarter’s end then you would set the Frequency field to Quarterly, and the Month End field to 3.
5. If applicable, include an Annual Upward Adjustment value using a dollar or percentage increase. Make sure that when using this feature that you have correctly chosen $ or %.
If these settings will apply to all investments, click Apply to All.
6. Click Next to go to step 5 in the hypothetical illustration wizard.
Use the Apply to All button to copy the settings from thehighlighted row to all other rows.
Version 2.0 43
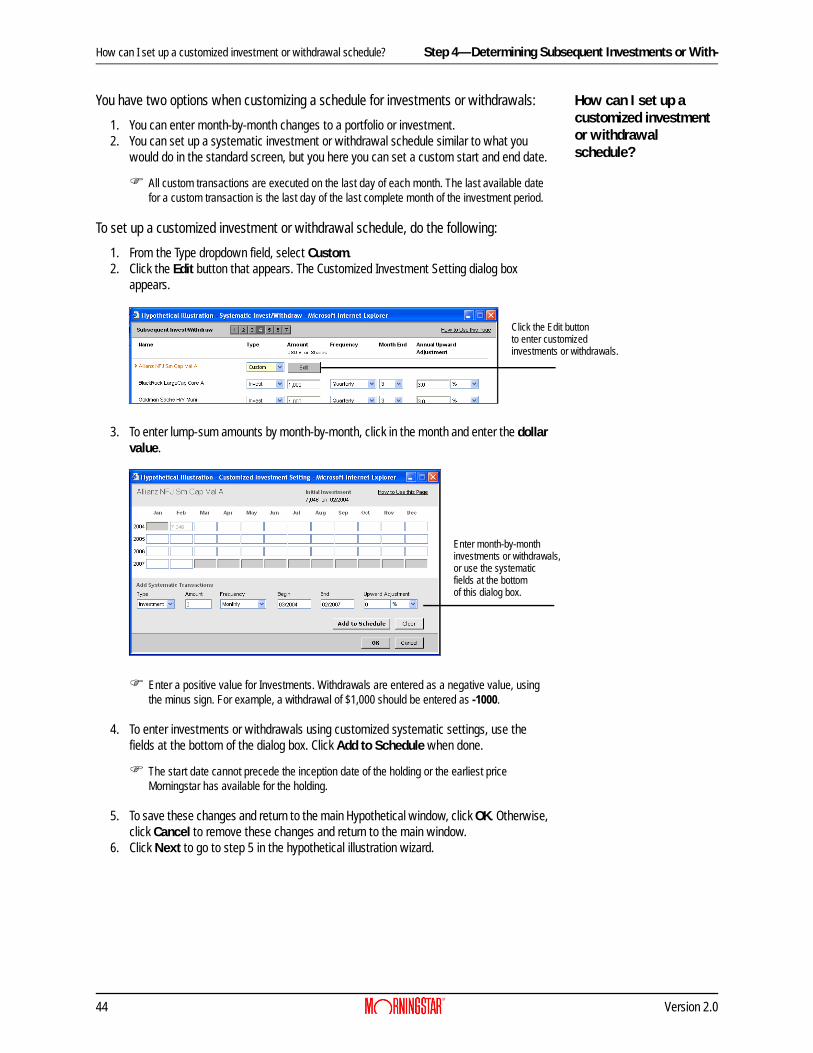
How can I set up a customized investment or withdrawal schedule? Step 4—Determining Subsequent Investments or With-
How can I set up a customized investment or withdrawal schedule?
You have two options when customizing a schedule for investments or withdrawals:
1. You can enter month-by-month changes to a portfolio or investment.2. You can set up a systematic investment or withdrawal schedule similar to what you
would do in the standard screen, but you here you can set a custom start and end date.
All custom transactions are executed on the last day of each month. The last available date for a custom transaction is the last day of the last complete month of the investment period.
To set up a customized investment or withdrawal schedule, do the following:
1. From the Type dropdown field, select Custom.2. Click the Edit button that appears. The Customized Investment Setting dialog box
appears.
3. To enter lump-sum amounts by month-by-month, click in the month and enter the dollar value.
Enter a positive value for Investments. Withdrawals are entered as a negative value, using the minus sign. For example, a withdrawal of $1,000 should be entered as -1000.
4. To enter investments or withdrawals using customized systematic settings, use the fields at the bottom of the dialog box. Click Add to Schedule when done.
The start date cannot precede the inception date of the holding or the earliest price Morningstar has available for the holding.
5. To save these changes and return to the main Hypothetical window, click OK. Otherwise, click Cancel to remove these changes and return to the main window.
6. Click Next to go to step 5 in the hypothetical illustration wizard.
Click the Edit button to enter customized investments or withdrawals.
Enter month-by-month investments or withdrawals, or use the systematic fields at the bottom of this dialog box.
44 Version 2.0
Step 5—Deducting Plan Fees from the Illustration Overview
Step 5—Deducting Plan Fees from the Illustration
OverviewAll expenses associated with investments will automatically be deducted by the wizard. This step is for you to record management fees against the portfolio.
In this screen, you must do the following:
• Decide how often to take out fees from the portfolio• Determine what to charge for front-load fees, and• Determine whether to charge back-end or redemption fees
The hypothetical wizard does not calculate rights of accumulation charges.
Deciding how to take out management fees
You can deduct management fees by having a client pay them out of pocket.
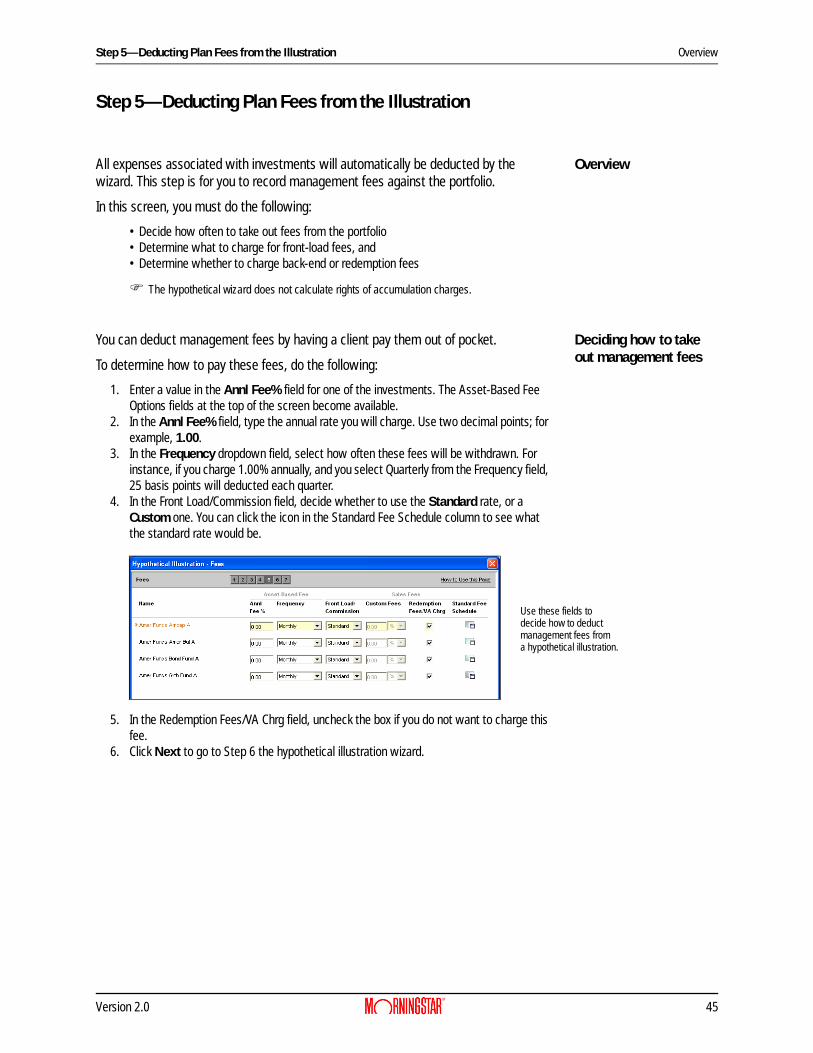
To determine how to pay these fees, do the following:
1. Enter a value in the Annl Fee% field for one of the investments. The Asset-Based Fee Options fields at the top of the screen become available.
2. In the Annl Fee% field, type the annual rate you will charge. Use two decimal points; for example, 1.00.
3. In the Frequency dropdown field, select how often these fees will be withdrawn. For instance, if you charge 1.00% annually, and you select Quarterly from the Frequency field, 25 basis points will deducted each quarter.
4. In the Front Load/Commission field, decide whether to use the Standard rate, or a Custom one. You can click the icon in the Standard Fee Schedule column to see what the standard rate would be.
5. In the Redemption Fees/VA Chrg field, uncheck the box if you do not want to charge this fee.
6. Click Next to go to Step 6 the hypothetical illustration wizard.
Use these fields to decide how to deduct management fees from a hypothetical illustration.
Version 2.0 45

Overview Step 6—Rebalancing or Transferring Investments
Step 6—Rebalancing or Transferring Investments
OverviewYou cannot both rebalance a portfolio and transfer assets from one investment to another; only one method can be chosen. By default, the tool assumes no rebalancing or transfers.
In most cases, assets can be rebalanced on a monthly, quarterly, semi-annual or annual basis.
Note the following rules about transfers:
• For variable accounts, the only option is to use a Cash transfer (1-time or Systematic).
How to rebalance investments
To rebalance investments, do the following:
1. From the drop down menu in the upper left corner, make sure Rebalance is selected.2. From the Frequency dropdown field, choose one of the following:
• Quarterly• Semi-annually, or• Annually.
3. Input the desired rebalancing percentages. It defaults to equal amounts for qualifying investments. Note that the total must equal 100%.
Any fixed account will not be included in the future rebalancing calculation.
Select the Frequencyfor rebalancing from this field.
46 Version 2.0
Step 6—Rebalancing or Transferring Investments How to transfer investments
How to transfer investments
To transfer value from one investment to another, do the following:
1. From the dropdown menu in the upper left corner, select Transfer. Note the changes to the interface (shown below).
2. In the From dropdown field, select an investment to transfer holdings from.3. In the To dropdown field, select the investment the holdings will be transferred to.4. Define the transfer Type in the next menu based on the information in the table below:
The types available to you will depend on the kind of investment you are working with.
5. Choose the Frequency (only necessary for Cash-Syst type transfers) of the transfer.6. Determine whether transfer is in dollars ($) or percentages (%).7. Enter the dollar or percentage Amount to be transferred. 8. Input the Start Date and End Date for the transfers.
Cash-1 time transfers require only a Start Date. Multiple Cash-1 time transfers can be made with the same two investments to simulate random transfers.
9. Decide whether to Charge Fees for the transaction.10. Click Next or Finish to advance to step 7 in the hypothetical illustration wizard.
Note how the screen changes in Step 6 when you select Transfer from this dropdown field.
Type Meaning
Cash-SystThis setting transfers dollar/percentage amounts systematically. You must choose a Frequency when selecting this option.
Cash-1 TimeThis option is for a one-time dollar/percentage amount transfer. You do not need to choose a frequency, only the Start Date of the transaction.
Cap Gain + Inc Transfers both capital gains and income.
Income Transfers income only.
Cap Gains Transfers capital gains only.
Version 2.0 47
Overview Step 7—Choosing the Options for the Output Report
Step 7—Choosing the Options for the Output Report
OverviewThe final step of the hypothetical wizard allows you to do the following:
• Determine whether and how much to deduct for taxes• Specify whether a benchmark will be included on the output report• Decide how the performance results will be displayed• Include other report materials, including a customized cover page, Portfolio Snapshot
report and Investment Detail report on the individual holdings of the portfolio
Determining taxes for the portfolio
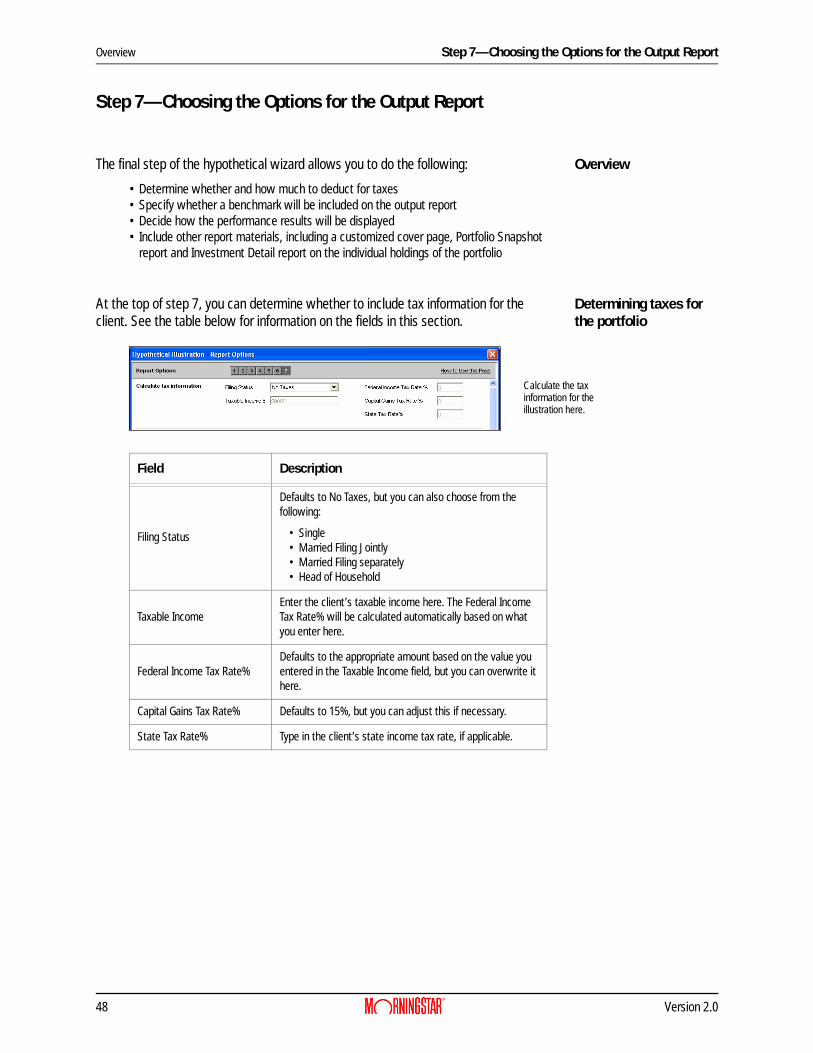
At the top of step 7, you can determine whether to include tax information for the client. See the table below for information on the fields in this section.
Calculate the tax information for the illustration here.
Field Description
Filing Status
Defaults to No Taxes, but you can also choose from the following:
• Single• Married Filing Jointly• Married Filing separately• Head of Household
Taxable IncomeEnter the client’s taxable income here. The Federal Income Tax Rate% will be calculated automatically based on what you enter here.
Federal Income Tax Rate%Defaults to the appropriate amount based on the value you entered in the Taxable Income field, but you can overwrite it here.
Capital Gains Tax Rate% Defaults to 15%, but you can adjust this if necessary.
State Tax Rate% Type in the client’s state income tax rate, if applicable.
48 Version 2.0
Step 7—Choosing the Options for the Output Report Specifying display options for the illustration
Specifying display options for the illustration
In the next section in step 7, you can determine the following:
• Whether to include a benchmark on the illustration• Which benchmark to use• Whether to display returns on a monthly, quarterly, semi-annual or annual basis• Whether to show net dollars invested in the portfolio, and• Whether to show the Holdings Summary on the report as a Mountain graph, or
Stacked Bar chart.
To specify the display options for the hypothetical illustration report, do the following:
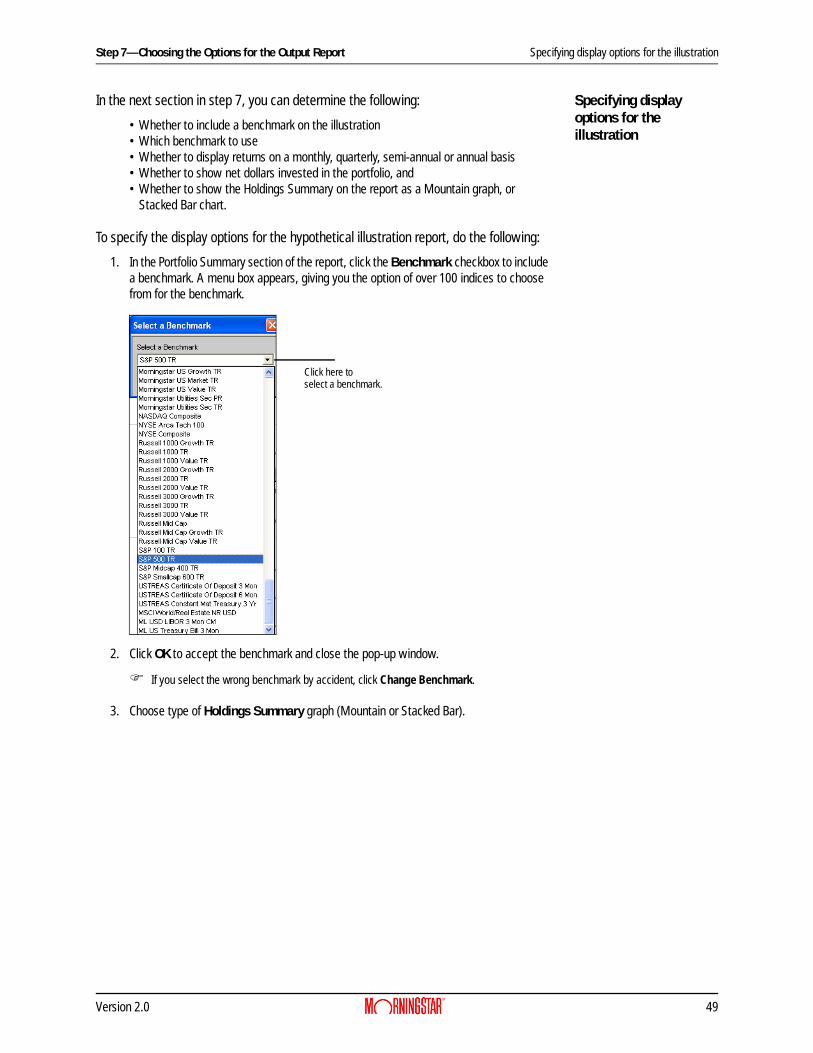
1. In the Portfolio Summary section of the report, click the Benchmark checkbox to include a benchmark. A menu box appears, giving you the option of over 100 indices to choose from for the benchmark.
2. Click OK to accept the benchmark and close the pop-up window.
If you select the wrong benchmark by accident, click Change Benchmark.
3. Choose type of Holdings Summary graph (Mountain or Stacked Bar).
Click here to select a benchmark.
Version 2.0 49

Selecting reports for the hypothetical illustration Step 7—Choosing the Options for the Output Report
Selecting reports for the hypothetical illustration
In addition to the hypothetical analysis, you can also include the following:
• Custom cover page• Portfolio Snapshot report• Investment Detail report (for each investment in the portfolio), and• Disclosure Materials
Note that the Portfolio Snapshot report is available only when you create a Portfolio hypothetical, and not when running a hypothetical based on Individual Holdings, or a Comparison hypothetical.
Check the box next to each option to include it.
Generating the hypothetical report
To generate the hypothetical illustration, click the Generate Report button. The Hypothetical Illustration opens in Acrobat as a PDF.
How do I open a saved hypothetical illustration?
To open a hypothetical illustration, do the following:
1. From Portfolio mode, click the Launch hypothetical icon. The New hypothetical illustration file dialog box appears.
2. Click once to select the name of the illustrating you want to open.
3. Click Open. The hypothetical’s settings automatically appear in the wizard. You can click Finish to go to the final step and generate the report.
Select the name of an illustration, then click Open.
50 Version 2.0
Generating Sales and Presentation Material Overview
Generating Sales and Presentation Material
OverviewThis section instructs you in the use of the Principia Presentation and Education Module. The Presentation and Education library is a collection of communication resources designed to assist advisor during client interactions. Microsoft PowerPoint presentations introduce time tested investment principles, while investor brochures available as PDF files address common retirement risks.
What is covered in the manual?
You will learn how to:
• Open PowerPoint Presentation• Customize and brand a PowerPoint Presentation• Generate Sales and Investment brochures
Requirements for Accessing the Presentation and Education Module
Due to our current software requirements, Principia Presentations and Education tool may not be able to open the PowerPoint slides successfully if you have a version of Microsoft Office PowerPoint other than that of 2000 or higher. However, you can open the slides directly from the install directory of Principia Presentations and Education. The default directory is C:\Program Files\Morningstar\Principia\PE
Version 2.0 51
Overview Accessing the Presentation and Education library
Accessing the Presentation and Education library
OverviewThe Presenation and Education is launched from its on icon and is run independent from Principia. After clicking the icon, the software package is launched. The system displays an index where you can access:
• Professional Presenation PowerPoint slides• Investor Brochures PDF files• Sales Ideas PDF files• Education, and• Other Features
OverviewThis section shows you how to access the Professional Presentation materials. You can open a presentation with the first slide, or select a specific title from with in a presentation.
Opening a Professional Presentation from the Slide Titles window.
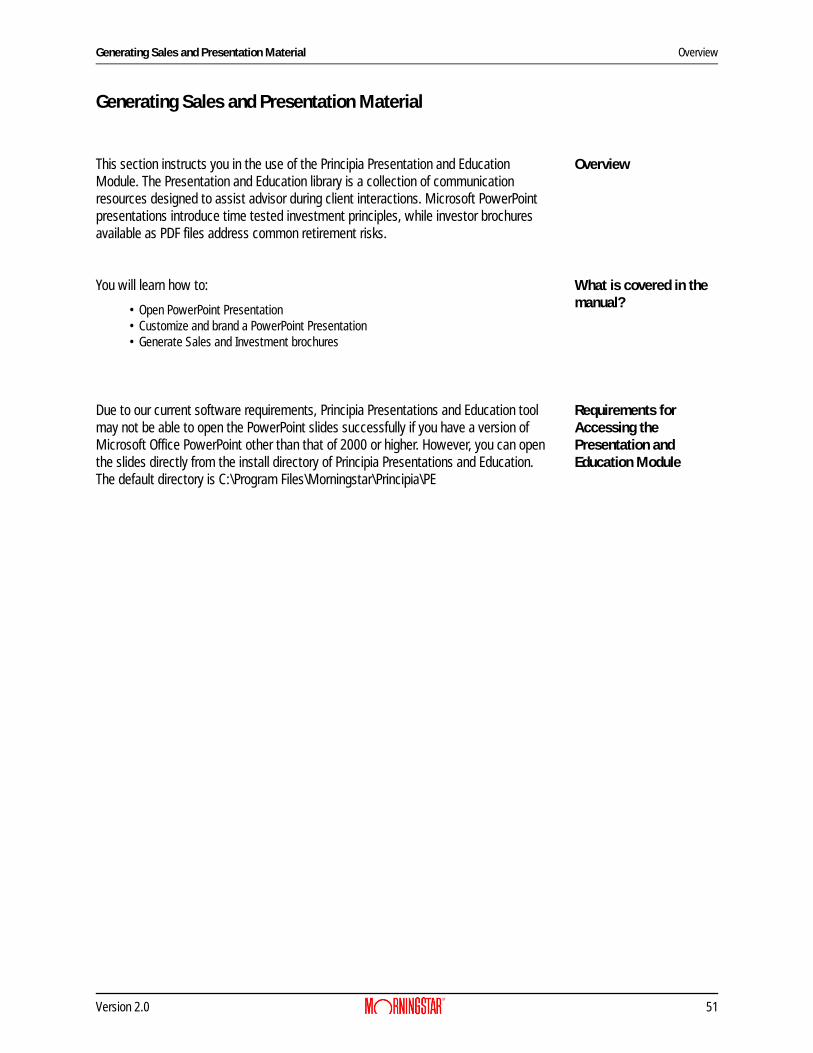
To open a Professional Presentation file from the Slide Titles section, do the following:
1. Make sure the Browse tab is open, and then single-click Investor Behavior from the left hand pane.
2. From the right hand pane of the Browse tab, highlight Regret: Action Versus Inaction, and then, single-click the Open File button.
52 Version 2.0

Accessing the Presentation and Education library Opening a presenation from the Introduction slide
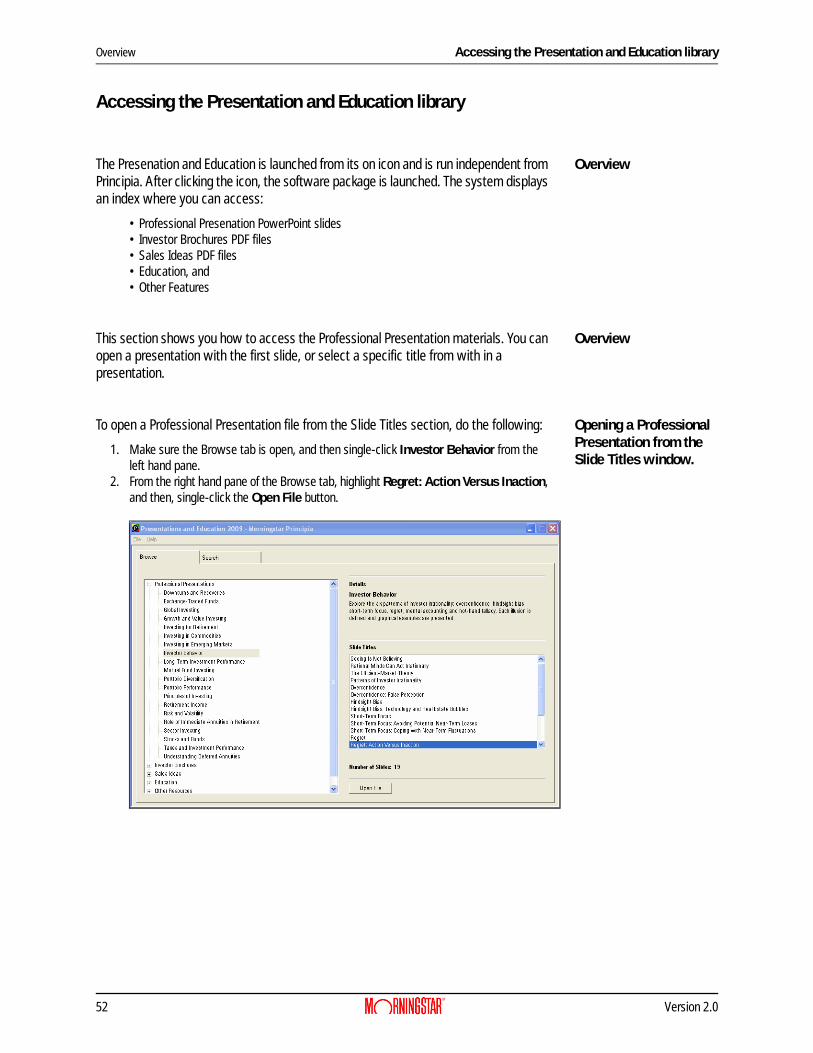
3. Microsoft PowerPoint opens, and displays the Regret: Action Versus Inaction slide from the Investor Behavior presentation.
Opening a presenation from the Introduction slide
A presentation can also be opened from the first slide in the presentation.
To open a presentation and view from the first slide, do the following:
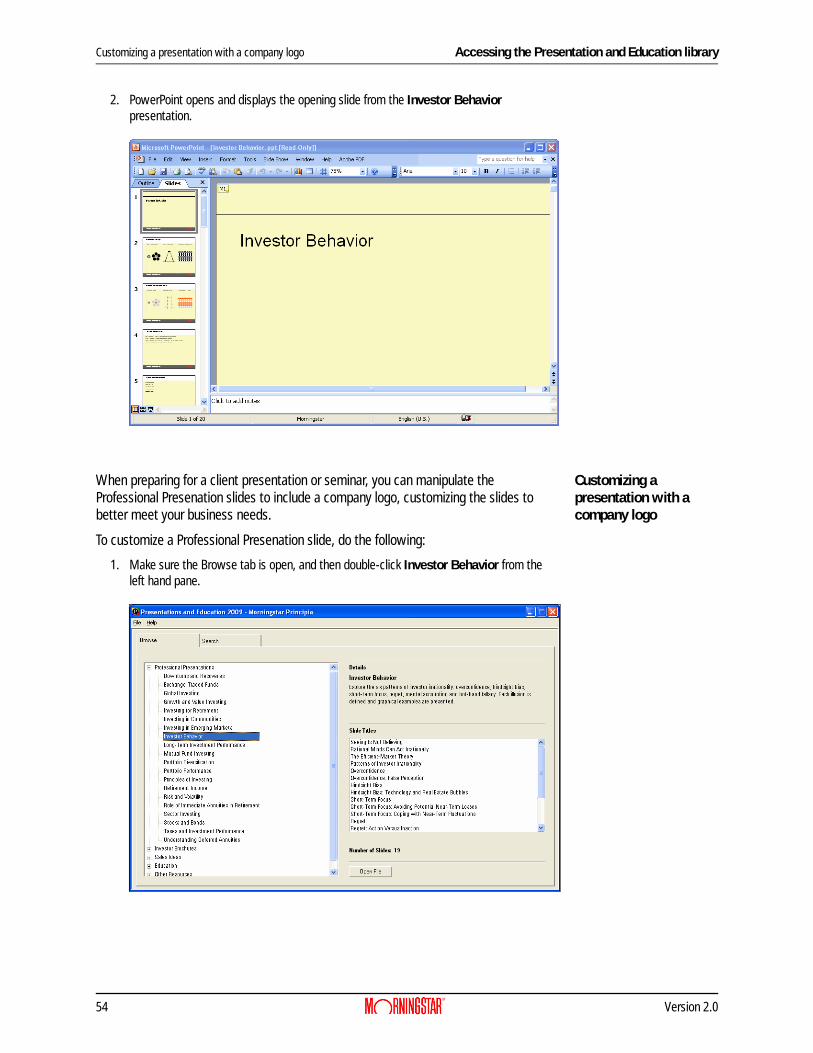
1. Make sure the Browse tab is open, and then double-click Investor Behavior from the left hand pane.
The Notes sectionsummarizes key datapoints in the slide.
Version 2.0 53
Customizing a presentation with a company logo Accessing the Presentation and Education library
2. PowerPoint opens and displays the opening slide from the Investor Behavior presentation.
Customizing a presentation with a company logo
When preparing for a client presentation or seminar, you can manipulate the Professional Presenation slides to include a company logo, customizing the slides to better meet your business needs.
To customize a Professional Presenation slide, do the following:
1. Make sure the Browse tab is open, and then double-click Investor Behavior from the left hand pane.
54 Version 2.0
Accessing the Presentation and Education library Customizing a presentation with a company logo
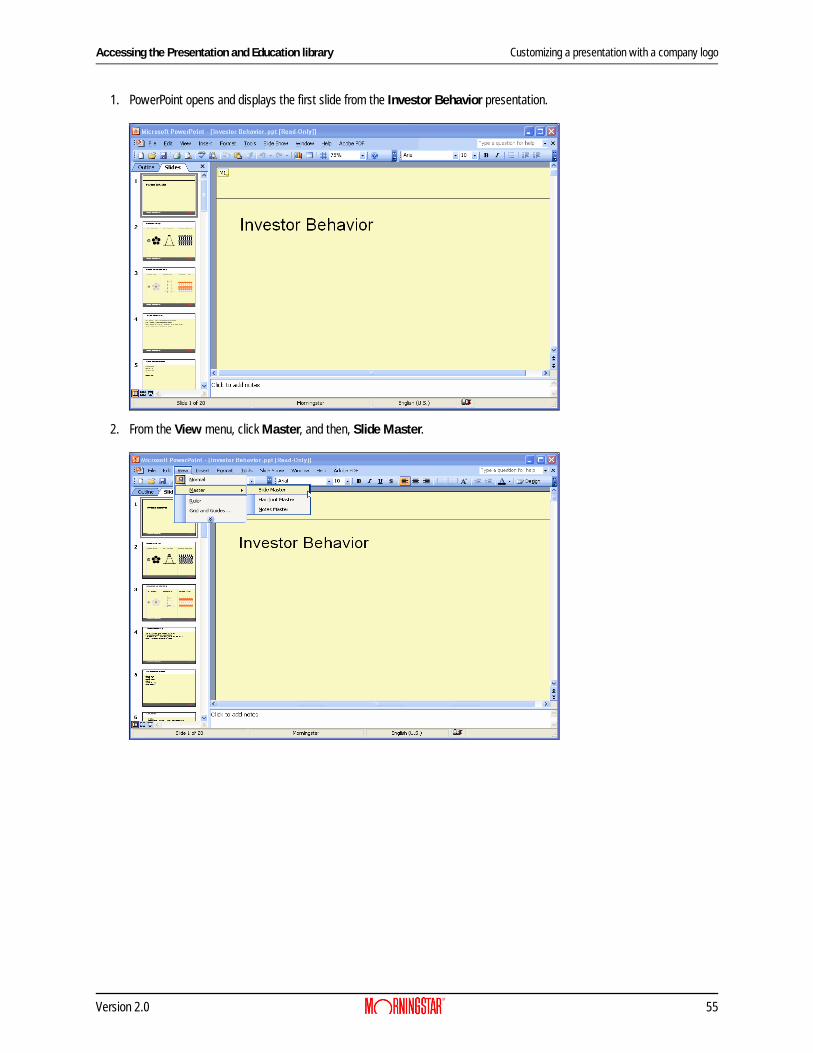
1. PowerPoint opens and displays the first slide from the Investor Behavior presentation.
2. From the View menu, click Master, and then, Slide Master.
Version 2.0 55
Customizing a presentation with a company logo Accessing the Presentation and Education library
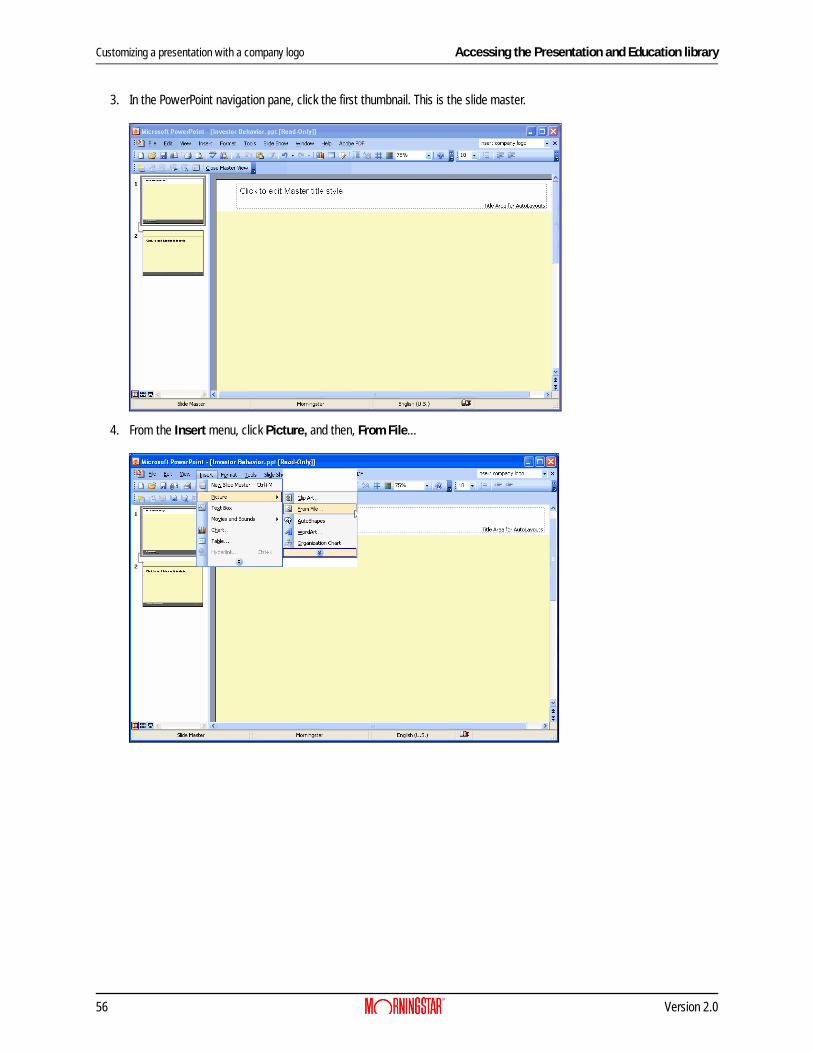
3. In the PowerPoint navigation pane, click the first thumbnail. This is the slide master.
4. From the Insert menu, click Picture, and then, From File...
56 Version 2.0
Accessing the Presentation and Education library Customizing a presentation with a company logo
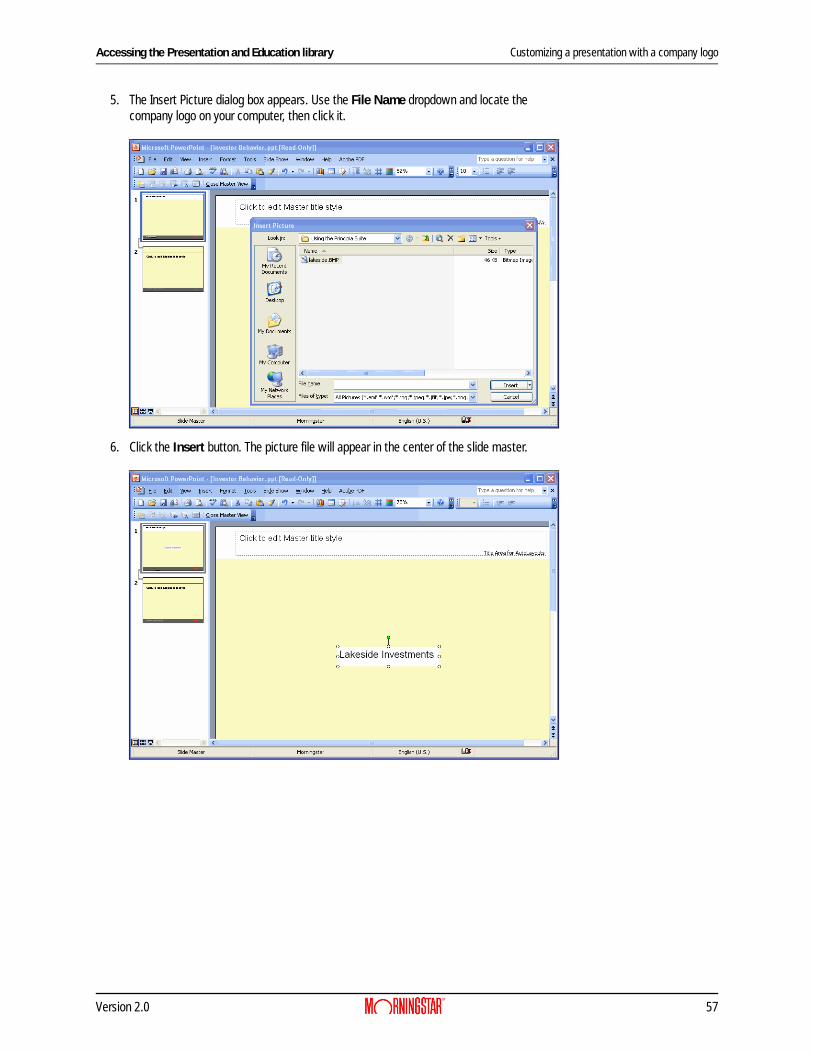
5. The Insert Picture dialog box appears. Use the File Name dropdown and locate the company logo on your computer, then click it.
6. Click the Insert button. The picture file will appear in the center of the slide master.
Version 2.0 57
Customizing a presentation with a company logo Accessing the Presentation and Education library
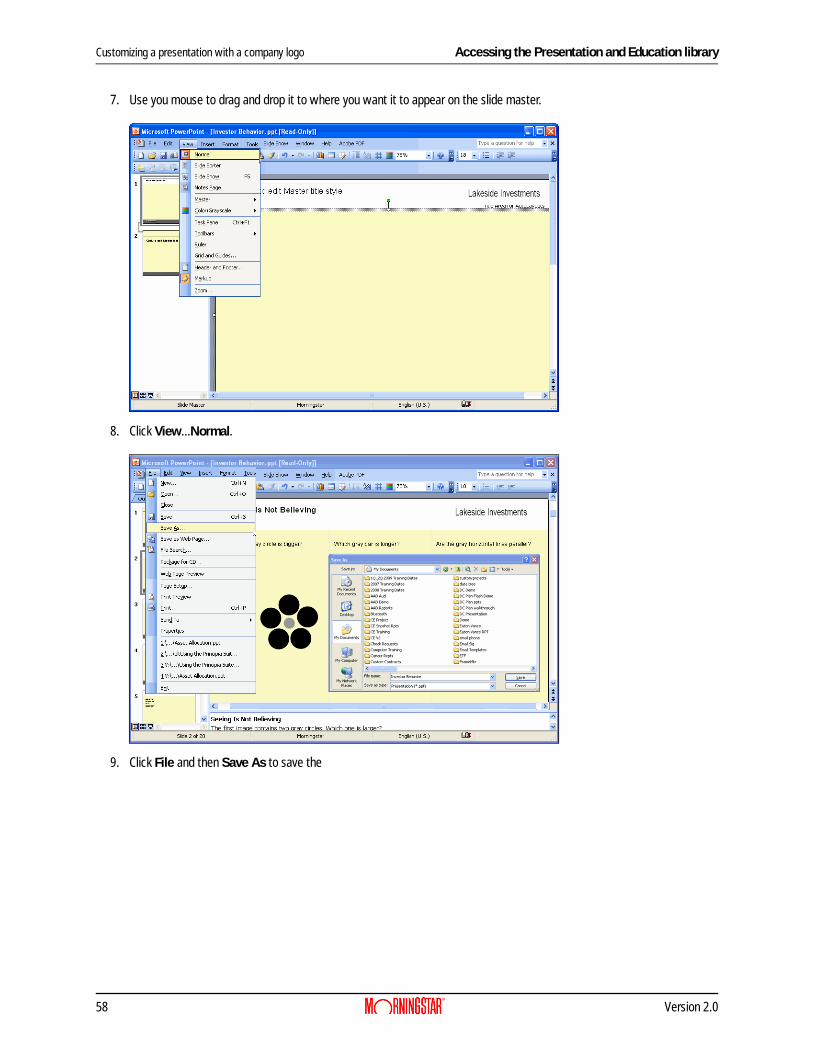
7. Use you mouse to drag and drop it to where you want it to appear on the slide master.
8. Click View...Normal.
9. Click File and then Save As to save the
58 Version 2.0