using adobe illustrator for mechanical engineering design
TRANSCRIPT
Using Adobe Illustrator for mechanical engineering design
by
Kim Zalatan
Submitted to the Department of Mechanical Engineeringin Partial Fulfillment of the Requirements for the
Degree ofARCHIVEs
Bachelor of Science in Mechanical Engineeringat the
Massachusetts Institute of Technology
JUT 20 2011June 2011
@2011 Kim ZalatanAll rights reserved
The author hereby grants to MIT permission to reproduce and todistribute publicly paper and electronic copies of this thesis document in whole or in part
in any medium now known or hereafter created.
S ignature of A uthor.....................................................Department of 1Vlechanical Engineering
May 6, 2011
C ertified by ...............................David R. Wallace
Pro99 of Mechanical EngineeringISor
Accepted by ......................................John H. Lienhard V
Samuel C. Collins P6r~Tissor of Mechanical EngineeringUndergraduate Officer


Using Adobe Illustrator for mechanical engineering design
By
Kim Zalatan
Submitted to the Department of Mechanical Engineeringon May 6, 2011 in Partial Fulfillment of the
Requirements for the Degree of Bachelor of Science inMechanical Engineering
AbstractSketching by hand is important in the creative process because it promotes
reinterpretation through ambiguity. Adobe Illustrator is a valuable tool for an engineer tomake professional-looking presentation drawings. The project conducted as this thesiswas to create a website tutorial to teach students at Massachusetts Institute ofTechnology enrolled in 2.009, the senior capstone product design course, the basics ofIllustrator. A study was conducted on two subjects to judge the effectiveness of thewebsite tutorial project at teaching how to use Illustrator. The subjects had no previousexperience with the program. Both of these subjects were able to learn the basics ofIllustrator and create a simple logo design in under two hours. They reported that thetutorial gave them enough knowledge of the program to then experiment on their own tocontinue learning Illustrator. While this tutorial is not meant to teach all aspects of theprogram, it has been shown to be effective at teaching people with no Illustratorbackground how to create a simple but useful design that could function in the scope of2.009.
Thesis Supervisor: David R. WallaceTitle: Professor of Mechanical Engineering

AcknowledgmentsI am grateful to Professor David Wallace for his support of this project and all his
advice along the way. This project would have been far less successful if not from the
help of William Pickeral in HTML, CSS, and web design. Finally, I would like to thank my
family and friends for helping with this project by being study subjects.
Table of contentsList of figures .................................................................................................... 61. Introduction .................................................................................................... 72. Theory of sketching, drawing, and computer-based drawing.....................8
2.1 Ambiguity and transformations in sketching ..................................................... 82.2 Engineering sketching ......................................................................................... 92.3 Use of Illustrator in product design .................................................................... 10
3. Tutorial design ............................................................................................... 123.1 Lesso ns .................................................................................................................... 12
3 .1 .1 O v e rv ie w ...................................................................................................................................................... 1 23 .1 .2 S e le ct to o ls .................................................................................................................................................. 1 33 .1 .3 P e n to o l ........................................................................................................................................................ 1 33 .1 .4 S tro k e ............................................................................................................................................................ 1 43 .1.5 C o lo rs/g rad ien t ........................................................................................................................................ 143 .1 .6 L a y e rs ............................................................................................................................................................ 1 5
3.2 P rojects ..................................................................................................................... 153 .2 .1 P o ste r sk etch ............................................................................................................................................. 1 53 .2 .2 P o ste r lay o u t..............................................................................................................................................1 63 .2 .3 S to ry b o a rd .................................................................................................................................................. 1 63 .2 .4 L o g o ............................................................................................................................................................... 1 63 .2 .5 S lid e s ............................................................................................................................................................. 1 6
3.3 Useful links........................................................................................................... 174. Experimental design.......................................................................................17
4.1 S u bjects .................................................................................................................... 174.2 Task/prompt ........................................................................................................ 174.3 Outcome evaluation ............................................................................................ 18
5. Results and discussion................................................................................ 186. Conclusions .................................................................................................... 21References..............................................................................................................23
Appendix ................................................................................................................. 25

List of figures
Figure 1: Subject B's experim entation............................................................. 19Figure 2: Subject A's logo ................................................................................. 20Figure 3: Subject B's logo ................................................................................. 20
1. IntroductionThe product design process for an engineer is not completely understood, however,
it has long been known that the act of sketching plays an important role. Sketching is a
process by which the sketcher externalizes an internal idea or image. Sketching starts
in the ideation phase and continues even as the design becomes more tangible.
Engineering sketching is different than an artist sketching as it is a technique to achieve
conceptual design. (Company 2009) Ferguson introduces three types of sketches
utilized by engineers- thinking sketches, talking sketches, and prescriptive sketches.
(Ferguson 1992) These types of sketches each serve different purposes in engineering
design, but all draw upon the common language of sketching, in which lines and shapes
create symbolic meanings. (Goel 1995; Purcell & Gero 1998 ; Prats & Garner 2006;
Plimmer & Apperley 2001)
A 2003 study conducted by the American Society for Engineering Education
(ASEE), determined that the ability to sketch objects by hand was the second most
important skill for an engineer. Engineering students are taught how to use CAD
programs such as Solidworks or ProEngineer in order to make both solid models as well
as engineering drawings (which are a type of prescriptive drawings). Other types of
designers, industrial designers, graphic designers and artists, are taught how to use
Adobe Illustrator, to make vector images of varying complexity. This program is a very
powerful tool, and can have a lot of value to a mechanical engineer for making visually
clear sketches or drawings of a product or idea that others can easily understand.
The point of this thesis is to create a 'crash course' in Adobe Illustrator for
engineering students taking Massachusetts Institute of Technology's (MIT) product
design course, 2.009. This crash course will expose them to each of the essential tools
and encourage them to explore other less essential tools and options. The tutorial is
formatted as a website to allow for the posting of videos showing how to use the tools,
but also includes text and images. The student starts by learning how to use the
individual tools in the lessons section of the site. They are then ready to move on to the
project section where the essential tools will be used together to demonstrate how to
make a few simple but useful projects for the course. Emphasis is placed on why the
projects are useful to the course, and to the product design process.
2. Theory of sketching, drawing, and computer-based drawing2.1 Ambiguity and transformations in sketching
In order for sketching to be an effective tool for the creative process, sketching must
be ambiguous. (Goel 1995; Garner 1990; Purcell & Gero 1998;) When sketching on
paper, the creative process continues as the drawing is created; the creation of one
hand drawn sketch leads to an idea for the next sketch. Garner defines this ambiguity
as the production of a sketch whose flexibility deliberately provokes a variety of
interpretations. (Garner 1990) It is believed that overly detailed sketches at an early
design stage may stifle creativity and discourage the search for alternative design
solutions. (Garner 1990)
Through sketching exercises, designers often create a set of related sketches called
a design family. These designs often represent the same idea and may be views of the
same idea with emphasis on a different attribute or view. (Prats, et all 2009; Prats &
Garner 2006) As the designer sketches, the sketches undergo what Goel calls
transformations. (Goel 1995; Prats, et all 2009) He identifies two different types of
transformations, which he calls vertical transformations and lateral transformations.
Vertical transformations manipulate the idea into a different version of the previous idea;
this could be a different view of the same idea or the same idea with a focus on a
different part of it. Lateral transformations are conversions from one idea to a new idea;
it is through these reinterpretations that new ideas are created. Lateral transformations
are catalyzed by the ambiguity inherent in hand sketches.
Designers often create a great many sketches early in the design process solely for
their own benefit. (Garner 1990) The desire of designers to create a great many
sketches may lie in this technique's ability to maximize the number of lateral
transformations allowing the designer to arrive at the optimal design solution. This
follows along with the brainstorming strategy that the quantity of the ideas is more
important than the individual quality of the ideas. (Lieu & Sorby 2009)
2.2 Engineering sketching
Ferguson introduces the three types of engineering sketches: thinking sketches,
talking sketches, and prescriptive sketches. (Fergusson 1992) Thinking sketches are
the externalization of the concept from one's imagination. They may or may not have
annotations as they are meant only for the drawer. They are best executed by hand to
capitalize on the ambiguity and rapidity of sketching. When designers communicate
together they often sketch together to exchange ideas, creating talking sketches. The
prescriptive sketches of today are mainly made from CAD programs, but in the past
drafting methods were used. These are annotated so that someone else can
understand and/or create the object depicted. However, CAD is not ambiguous enough
to promote lateral transformations; in order to create a sketch in CAD, the object must
be entirely thought out.
Yang showed that there might be a correlation between sketching in the first half of
a design project and the design outcome in the form of contest results. (Yang 2009)
This study suggests that engineers who sketch more in the beginning of a project will
have a more successful outcome. These sketches may be kept in a design notebook of
some kind. Lieu believes sketching is an important practical, as well as teaching tool, for
engineers. (Lieu & Sorby 2009)
2.3 Use of Illustrator in product design
In the context of the product design course, 2.009, many different types of visual
representations are used. These can include informal sketches and chalkboard
drawings when ideating or creating new design solutions as a team, printed prescriptive
drawings of parts to be machined, thinking sketches done in an individual's lab
notebook, and drawings/graphics for presentations. Adobe Illustrator is not the right
program to create all of these types of drawings; it shouldn't replace fast thinking or
collaborative drawings or the precision of drawings generated by a CAD program. More
and more of the graphical communication used by engineers today is of the formal type
used in digital presentations to technical reports. (Rose 2005) Adobe Illustrator is a
great option for creating formal visuals for presentations. Tofan noted that Illustrator can
be a helpful tool for chemists and chemical engineers to use to when creating drawings
for research papers, books, and lab manuals. (Tofan 2008, 2009)
Presentations in 2.009 are often given using visual aids. Earlier presentations in the
semester might make use of poster boards as the visual aids, while later presentations
may use PowerPoint or Keynote. Both types of these visual aids need to be clear and
visible by the audience who may be far away. They also need to have the right level of
ambiguity. A drawing done it Illustrator is more ambiguous then a product render
created from a CAD model, but less ambiguous than a hand drawn sketch. As the
product ideas get more and more finalized, the ambiguity of how it is represented needs
to be lessened. In the early to middle presentations, the drawings need to be somewhat
ambiguous and Illustrator is a good way to achieve that. The final presentation needs to
be very concrete so a solid model render is a better graphic to use.
Advantages of using Illustrator for product representations include unlimited drawing
space, easy storage of iterations, unlimited editing capabilities, a digital format, which
makes it easy to add to presentations or reproduce, and any complicated curvature can
be exported to .dxf for later importation into a CAD program. When working from an
Illustrator drawing, it is easy to explore many different designs in a design family without
having to redraw anything; one can duplicate the original drawing and make changes
with relative ease. It is also easy to control the ambiguity of the drawing by changing the
amount of detail; Illustrator drawings can consist of just line in black and white, or can
have color and shading.
It is important to remember that the use of Illustrator does not replace hand
sketching, but merely supplements it. The purpose of sketches is by in large distinct
from that of presentation drawings. (Buxton 2007) Ottosson noted that students who
tried to start the design process drawing with computer based methods experienced

trouble in the concept-selection phase. (Ottosson 1998) Sketches also present an
excellent starting point for creating a drawing in Illustrator. Hand sketches can be
scanned in and traced using the pen tool; this may help new users to Illustrator avoid
the potential difficulty starting to work from a blank document
3. Tutorial designThe homepage of the tutorial website explains that this tutorial is only meant to be a
'crash course' in Illustrator. It is intended to get students started with the program and
that it is recommended that for further study they refer to the useful links section of the
website.
3.1 LessonsThe lessons cover each of the 'essential' tools in Illustrator. The tools are
introduced, and experimentation with each tool is encouraged.
3.1.1 OverviewIn the overview section the student is introduced to the overall layout of Illustrator.
This includes the menu and control bar on the top of the screen, as well as both the
right and main (left) tool panels.
The overview section describes how to change the size of the document using the
edit artboard tool to crop the image or to make the drawing bigger.
The webpage describes the different types of tools on both of the tool panels,
highlighting the very important tools on both of the palettes, including the selection tools,
the pen tool, the color options, the stroke options, the gradient options, and the layers
panel.

The section briefly covers how to turn your drawing into a standard image file
through exporting it.
3.1.2 Select toolsThis section covers the four main selection tools in Illustrator. The first tool is the
main selection tool. This tool selects shapes as a whole. You can use it to resize a
shape, move a shape, or to rotate a shape.
The next selection tool is the direct selection tool. This tool selects only one point or
line segment in a shape. It can be used to manipulate a shape after it has been drawn
with the pen tool.
The last two tools are the magic wand tool, which selects an area of one color or the
lasso tool, which selects many objects by drawing a shape around them.
3.1.3 Pen toolThe pen tool is the most important tool to learn in Illustrator. It can be used to create
any number of both straight and curved line segments. By clicking from place to place,
one can create straight-line segments. To make a curved line segment, when clicking at
the next point, one must hold the mouse button down- a handle will appear to modify
the curvature. When creating the next point, the pen tool will automatically match the
curvature that was created on the last point, to make the whole shape appear smooth. If
this is not desired, one should click again on the previous point to remove the second
half of the handle.
A good way to practice using the pen tool is to trace photos. The page has a video
tutorial and some example images.

The page also discusses the shapes tool and the other pen tools, such as the add,
delete, and convert anchor point tools.
3.1.4 StrokeThe stroke options section teaches how to make changes to the appearance of
shapes you create by varying the stroke options. The options include fill color, stroke
color, stroke width and profile.
The color options on the control panel or in the main tools palette change the colors.
The no-fill button is for making either a stroke outline or a fill on the shape transparent.
The right tools panel provides even more stroke options, such as adding
arrowheads, different caps, corners, and making the line dashed.
CS5 adds the functionality to create your own stroke profile, by allowing the user to
change the width of the stroke along its length using the width tool.
3.1.5 Colors/gradientThere are many ways to pick a color in Illustrator. Illustrator can use different
standards for specifying color, like RGB, CMYK, or HTML. There is also a color field
that a color can be selected from.
Swatches are another useful feature that Illustrator has for dealing with colors.
When working on a project the designer can create swatches of all the colors they want
to use so they are easy to access from the right tools panel.
The eyedropper tool picks up any color from another part of the drawing or from a
placed photo.
The gradient options panel from the right tools can be used to create unique
gradients. Adding more colors to the gradient can be by clicking below the gradient
slider. The grey diamonds can be moved and to change the look of the gradient. The
angle of rotation is also adjustable to change how the gradient fills the shape. The
webpage shows two examples of gradients.
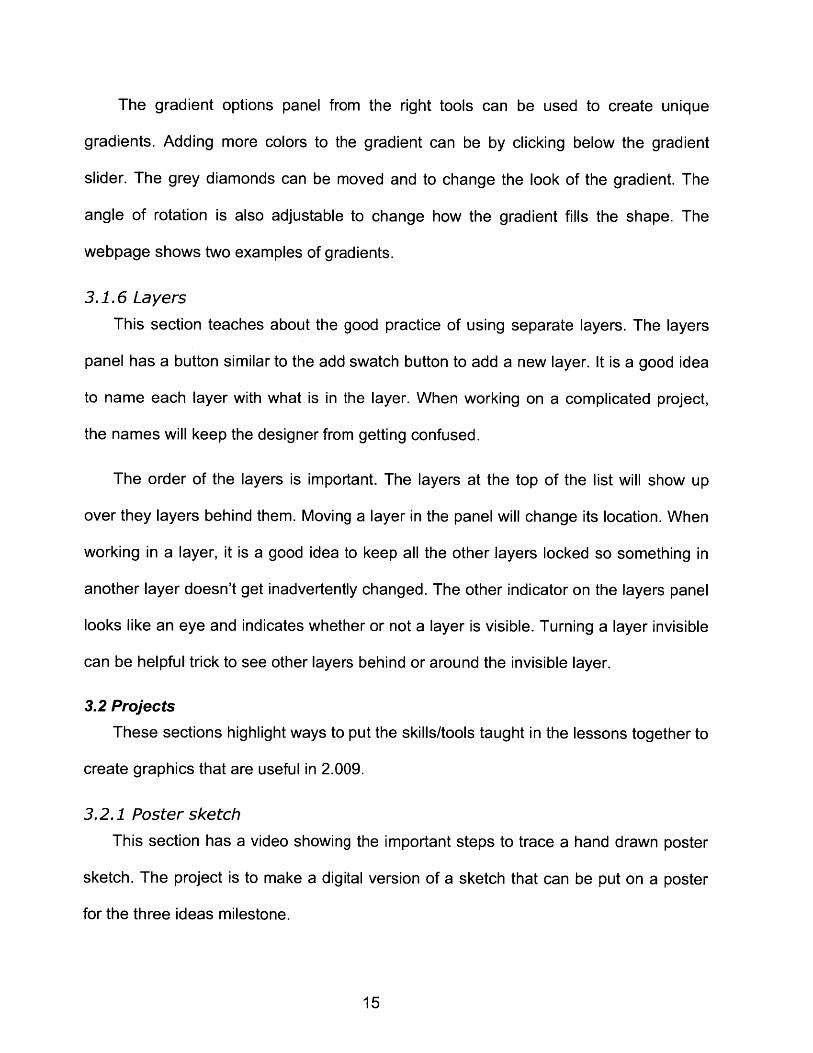
3.1.6 LayersThis section teaches about the good practice of using separate layers. The layers
panel has a button similar to the add swatch button to add a new layer. It is a good idea
to name each layer with what is in the layer. When working on a complicated project,
the names will keep the designer from getting confused.
The order of the layers is important. The layers at the top of the list will show up
over they layers behind them. Moving a layer in the panel will change its location. When
working in a layer, it is a good idea to keep all the other layers locked so something in
another layer doesn't get inadvertently changed. The other indicator on the layers panel
looks like an eye and indicates whether or not a layer is visible. Turning a layer invisible
can be helpful trick to see other layers behind or around the invisible layer.
3.2 ProjectsThese sections highlight ways to put the skills/tools taught in the lessons together to
create graphics that are useful in 2.009.
3.2.1 Poster sketchThis section has a video showing the important steps to trace a hand drawn poster
sketch. The project is to make a digital version of a sketch that can be put on a poster
for the three ideas milestone.
3.2.2 Poster layoutThis section has a video showing how to use Adobe InDesign to use the poster
sketch to complete a poster layout.
3.2.3 StoryboardThis page explains what a project storyboard is and includes links to the 2.774J
project storyboards for reference. It has an example storyboard from a previous 2.009
project and explains how to create an effective storyboard grid. This project page also
covers how to utilize copy paste to make creating s storyboard easier. When adding
human forms or hands, it may be helpful to trace from a picture of a real person or a
mannequin, so links are provided with resources for both.
3.2.4 LogoThe logo project page explains why a logo is important and has a link to a great
explanation of the process that can go into creating a logo. It recommends that the
student look to other logos in the industry/market unto which their product belongs. This
can help them get a good idea of the types of designs that their logo needs to fit in with.
The page also gives several good resources for free and interesting fonts online.
Because the online fonts probably wont be perfect, there is a video tutorial of how to
manually manipulate a font.
3.2.5 SlidesThis page briefly covers two of Keynote's features. The first is the alpha feature,
which the student can use to remove the background of any photograph in their slides.
The second is the Magic Move slide transition. This transition can take any two slides
that have repeated elements on them and move them from their positions/orientations

on the first slide to that of the second. The student can use this to create simple
animations for their presentation.
3.3 Useful links
This page has a list of other helpful tutorials that students may want to make use of
for more practice with Adobe Illustrator. The full list is on the last page in the Appendix.
4. Experimental designA study was conducted to measure the successfulness of the tutorial in helping
inexperienced Adobe Illustrator users make a finished project.
4.1 Subjects
Two subjects were chosen for this study. They were chosen based on their age,
adeptness at using a computer, previous experience with Illustrator, and time availability
to complete the study.
Subject A is a 56-year-old construction project manager. He is used to working with
architectural plans, but is not familiar with drafting software or Adobe Illustrator. He is
somewhat comfortable using a computer.
Subject B is a 20-year-old Babson student majoring in business. She has never
used Illustrator before, and is comfortable using a computer.
4.2 Task/prompt
The subjects were asked to review the website tutorial created as part of this thesis.
They were given an Apple computer with Adobe Creative Suite 5 installed on it and
Internet access. They were encouraged to use any additional online resources they
wanted. They were not given a drawing tablet, but they were given access to paper and
a pencil in case they wanted to sketch ideas before beginning the prompt.
The prompt that they were given was to create a logo for Bob's Birdhouses. They
were told that logo should consist of the company name (Bob's Birdhouses) as well as
some sort of drawing.
The logo was chosen as the project for the prompt because of its possibility to be
either simple or complex depending on its designer. It also incorporates many of the
skills taught by the tutorial, like the pen tool, fonts, colors, and stroke.
4.3 Outcome evaluationCareful observation of the subjects was made while they went through the tutorial.
They were asked to describe anything about the tutorial that confused them or that
needed more explanation. Notes were taken during the study. Participants were asked
to explain their process of logo creation and any experimentation they did in Illustrator
during the tutorials. Both their experimentation and logo designs were saved and are
discussed in the next section.
5. Results and discussionThroughout the course of the study, many ideas for changes/additions to the
website tutorial were suggested by subjects, or by their actions. These changes have
since been enacted to ultimately make the tutorial easier to understand.
Both subjects were timed through the course of the tutorial. The times were
recorded for how long they spent using the tutorial and experimenting, and how long
they worked on their logo design. The results are shown in Table 1. Subject A did not
utilize Illustrator at all as he was going through the tutorial. When creating a logo, he got
frustrated and created a second document to restart. Both the initial and the second
attempt's times are documented in the table. Subject B spent longer going through the
tutorials because after she read through a section she would go try what she learned in
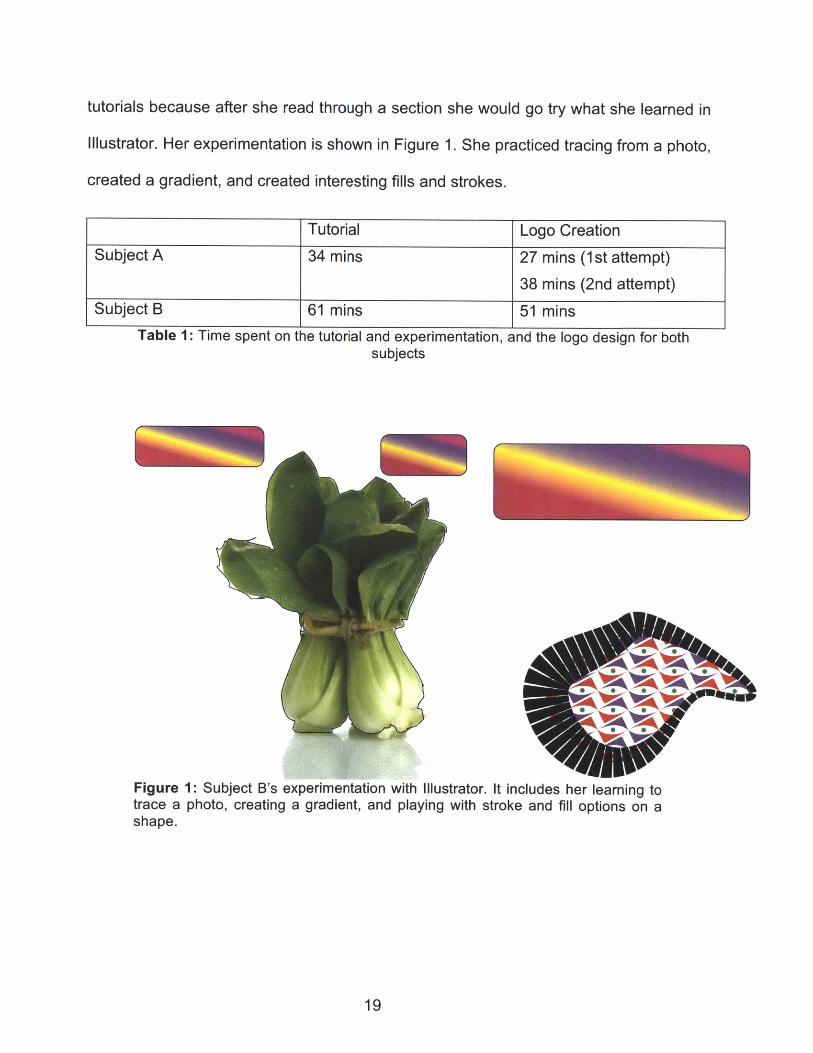
Illustrator. Her experimentation is shown in Figure 1. She practiced tracing from a photo,
created a gradient, and created interesting fills and strokes.
Tutorial Logo CreationSubject A 34 mins 27 mins (1st attempt)
38 mins (2nd attempt)Subject B 61 mins 51 mins
Table 1: Time spent on the tutorial and experimentation, and the logo design for bothsubjects
Figure 1: Subject B's experimentation with Illustrator. It includes her learning totrace a photo, creating a gradient, and playing with stroke and fill options on ashape.

Neither subject utilized the paper that was provided to them for sketching. This
probably indicates that they didn't feel like exploring any other design solutions to the
prompt. However, Subject A did start over with a new design, but this action was largely
motivated by frustration. The final logo creations are shown in Figures 2 and 3.
Figure 2: Subject A's finished logo design.
Bob's
irdhousesFigure 3: Subject B's finished logo design.
20

Subject B seems to have a much firmer understanding of what constitutes a logo;
Subject A's logo design seems to be better suited as an image of the product the
hypothetical Bob's Birdhouses company would sell. However, evaluating the success of
this undergraduate thesis project does not lie in the overall effectiveness of the created
logo, but in the ability of two people of various ages with no previous exposure to
Illustrator to create a functional image from the program.
6. ConclusionsSketching is a very important part of the design process. The ambiguity inherent in
drawings produced by hand promotes reevaluation in ways that can create lateral
transformations. These transformations define the process of sketching to generate new
design solutions to a problem. For a mechanical engineer, sketching is an important
tool. For more formal presentation drawings, Adobe Illustrator is a good tool for
engineers to learn.
Many MIT students enrolled in 2.009, the senior product design course, don't have
enough time to learn how to use every feature of Adobe Illustrator. However, a tutorial
such as the one created for this thesis project, has been shown to be able to teach the
basics of Illustrator to someone who has never used the program before. In the study,
the tutorials taught the two subjects enough about Illustrator to create logos for a
hypothetical company. The subjects reported that they felt they could now experiment
with Illustrator on their own to learn the rest of the tools.
This project will become a resource website to those students in 2.009 who are
looking to make professional looking drawings for presentations. In a future iteration of
the project, the website could be expanded upon to include quick tutorials for many of

the other tools. It could also be helpful to have a forum-type environment where
students could help each other learn Illustrator by answering each other's questions.
ReferencesBarr, R. E. (2004). The current status of graphical communication in engineeringeducation. 3 4th ASEE/IEEE Frontiers in Education Conference, Savannah, GA,October 20-23. S1 D8-S1 D13.
Buxton, B. (2007). Sketching user experiences: Getting the design right and the rightdesign. Amsterdam: Elsevier.
Company, P., M. Contero, P. Varley, et all. (2009). Computer-aided sketching as a toolto promote innovation in the new product development process. Computers in Industry,60. 592-603.
Ferguson, E. S. (1992). Engineering and the mind's eye. Cambridge, Mass: MIT Press.Garner, S. W. (1990). Drawing and designing: The case for reappraisal. Journal of Art &Design Education, 9 (1). 39-55.
Goel, V. (1995). Sketches of thought. Cambridge: The MIT Press.Horveth, I. (2004). A treatise on order in engineering design research. Research inEngineering Design, 15. 155-181.
Israel, J. H., E. Wiese, M. Mateescu, et all. (2009). Investigating three-dimensionalsketching for early conceptual design-Results from expert discussions and userstudies. Computers & Graphics, 33. 462-473.
Lieu, D. K., & Sorby, S. A. (2009). Visualization, modeling, and graphics for engineeringdesign. Clifton Park, NY: Delmar Cengage Learning.
Menezes, A., & B. Lawson. (2006). How designers perceive sketches. Design Studies,27 (5). 571-585.
McCormick, D. (2007). Seeing Mechanical - A case for advancing the role of sketchingin the art of engineering. Mechanical Engineering: the Journal of the American Societyof Mechanical Engineers, 129 (9). 35.
Ottosson, S. (1998). Qualified product design needs a proper combination of pencil-aided design and model-aided design before product data management. Journal ofEngineering Design, 9 (2). 107-119.
Plimmer, B., & M. Apperley. (2001). Computer-aided sketching to capture preliminarydesign. Third Australasian Conference on User Interfaces, 7. 9-12.
Prats, M., & S. Garner. (2006). Observations on ambiguity in design sketches. Tracey:the online journal of contemporary drawing research. Retrieved on 4.3.11 fromhttp://www.lboro.ac.uk/departments/sota/tracey/ambi/pratsgarner.html
Prats, M., S. Lim, I. Jowers, et all. (2009). Transforming shape in design: Observationsfrom studies in sketching. Design Studies, 30. 503-520.
Purcell, A. T., & J. S. Gero. (1998). Drawings and the design process. Design Studies,19 (4). 389-430.
Rose, A. T. (2005). Graphical communication using hand-drawn sketches in civilengineering. Journal of Professional Issues in Engineering Education and Practice,131 (4). 238-247.

Stiny, G. (1975). Pictorial and formal aspects of shape and shape grammars. Bassel:Birkhsuser Verlag.
Tofan, D. (2008). Drawing chemical equipment with adobe illustrator, part 1: Basicdrawing and selection tools. Computing in Science and Engineering, 10, 6, 100-102.
Tofan, D. (2009). Drawing chemical equipment with Adobe illustrator, Part 2: Creatingand modifying shapes. Computing in Science and Engineering, 11, 1, 59-61.
Tofan, D. (2009). Drawing chemical equipment with Adobe Illustrator, Part 3: Gradients,retouching, and more objects. Computing in Science and Engineering, 11, 2, 60-61.
Tversky, B. (2002). What do sketches say about thinking?. AAAI Spring SymposiumSeries- Sketch Understanding. 148-152.
Yang, M. C. (2009). Observations on concept generation and sketching in engineeringdesign. Research in Engineering Design, 20. 1-11.
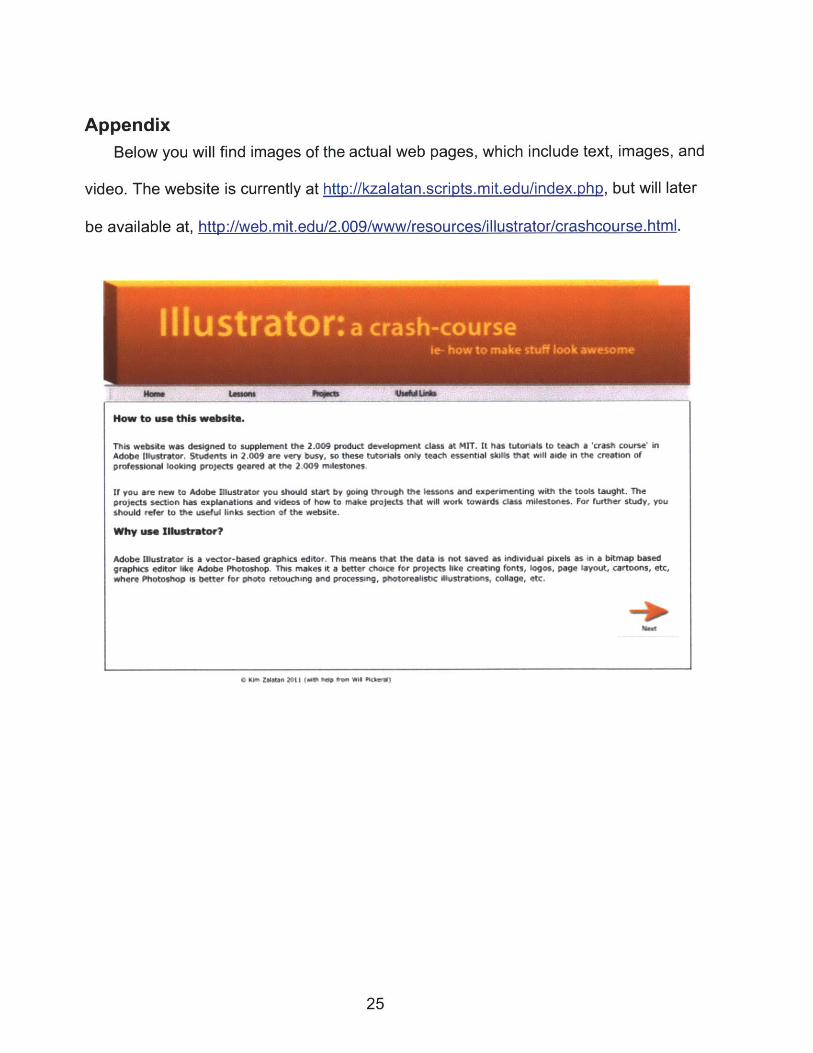
AppendixBelow you will find images of the actual web pages, which include text, images, and
video. The website is currently at http://kzalatan.scripts.mit.edu/index.php, but will later
be available at, http://web.mit.edu/2.009/www/resources/illustrator/crashcourse.html.
How to use this website.
This website was designed to supplement the 2.009 product development class at MIT. It has tutorials to teach a 'crash course' inAdobe ilustrator, Students in 2.09 are very busy, so these tutorials oniy teach essential skilis that mI aide in the creation ofprofessional looking projects geared at the 2,009 milestones
If you are new to Adobe Illustrator you should start by going through the lessons and experimenting with the tools taught. Theprojects section has explanations and videos of how to make projects that will work towards class milestones. For further study, youshould refer to the useful links section *f the website.
Why sm Ilkstrator?
Adobe Illustrator is a vector-based graphics editor. This means that the data is not saved as individual pixels as in a bitmap basedgraphics editor like Adobe Photoshop. This makes it a better choice for projects like creating fonts, logos, page layout, cartoons, etc,where Photoshop is better for photo retouching and processing, photorealistic illustraons, collage, etc.
0 kom zalamn 2011 (MV' p' fwm *01 "e"e1
Home Lessons
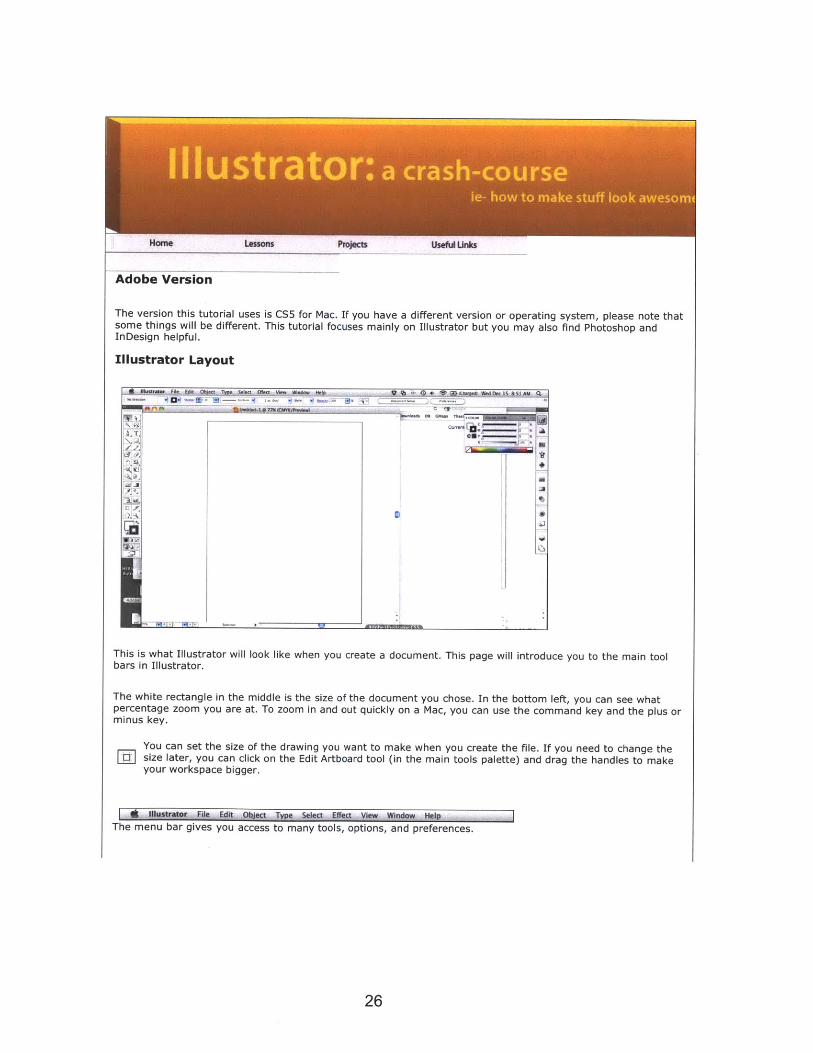
Adobe Version
The version this tutorial uses is CS5 for Mac. If you have a different version or operating system, please note thatsome things will be different. This tutorial focuses mainly on Illustrator but you may also find Photoshop andInDesign helpful.
Illustrator Layout
-. 0 11,M bWdDKI SA
This is what Illustrator will look like when you create a document. This page will introduce you to the main toolbars in Illustrator.
The white rectangle in the middle is the size of the document you chose. In the bottom left, you can see whatpercentage zoom you are at. To zoom in and out quickly on a Mac, you can use the command key and the plus orminus key.
You can set the size of the drawing you want to make when you create the file. If you need to change the151 size later, you can click on the Edit Artboard tool (in the main tools palette) and drag the handles to make
your workspace bigger.
h meustrator File Edit Object Type Select Effect View Windop HelpThe menu bar gives you access to many tools, options, and preferences.
FMOcts UseMWLlnls
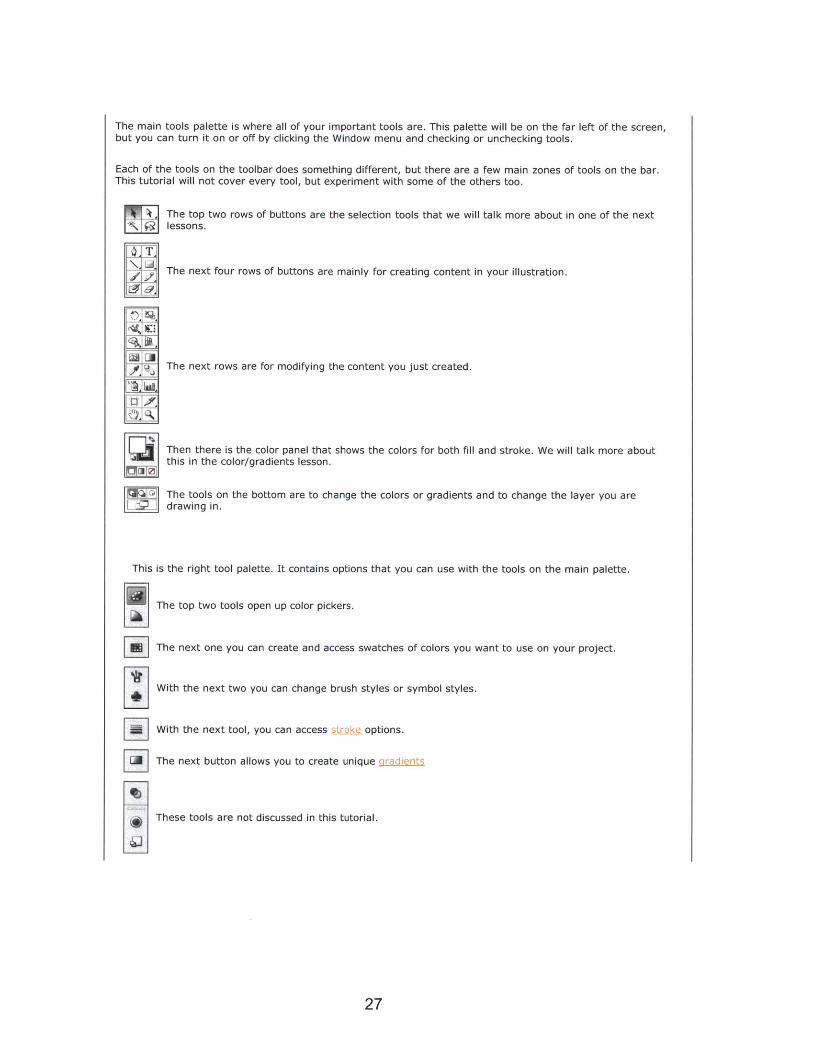
The main tools palette is where all of your important tools are. This palette will be on the far left of the screen,but you can turn it on or off by clicking the Window menu and checking or unchecking tools.
Each of the tools on the toolbar does something different, but there are a few main zones of tools on the bar.This tutorial will not cover every tool, but experiment with some of the others too.
LTii
91.!~i
The top two rows of buttons are the selection tools that we will talk more about in one of the nextlessons.
The next four rows of buttons are mainly for creating content in your illustration.
The next rows are for modifying the content you just created.
Then there is the color panel that shows the colors for both fill and stroke. We will talk more aboutthis in the color/gradients lesson.
The tools on the bottom are to change the colors or gradients and to change the layer you areI drawing in.
This is the right tool palette. It contains options that you can use with the tools on the main palette.H The top two tools open up color pickers.
Fi The next one you can create and access swatches of colors you want to use on your project.
With the next two you can change brush styles or symbol styles.
With the next tool, you can access stroke options.
Gj The next button allows you to create unique gradients
These tools are not discussed in this tutorial.

4 This is the button to open the Layer-s. viewer.
Nsectc -trtorm 2pt Oval stye opacy:'
This is the control bar. It changes what options are on it based on the tool you are currently using. (The optionsshown are when the Pen tool is in use).
Saving an Image
To save your work as an image, you can use the export button in the File menu. You can save your image asvarious types of image files. If you plan on printing your image, make sure you select 300 DPI for the best finalprint quality.
4-MPrevious Next
@ Kim Zalatan 2011 (with help from Will Pickeral)
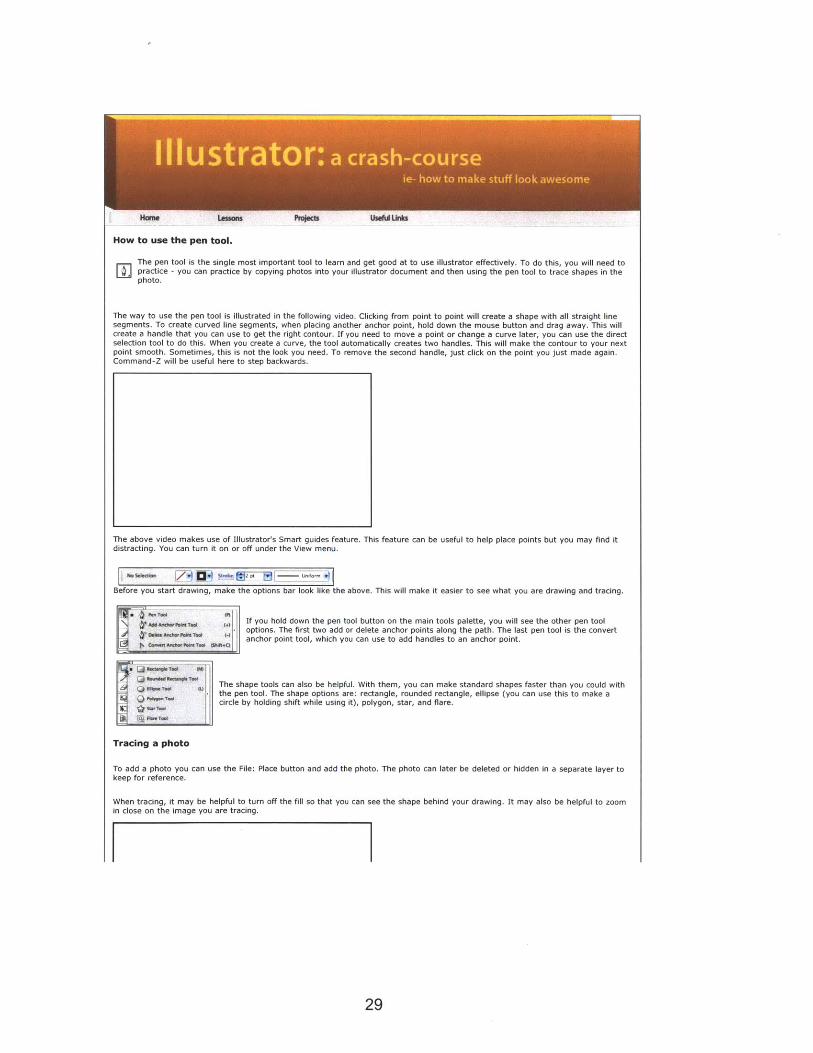
How to use the pen tool.
The pen tool is the single most important tool to learn and get good at to use illustrator effectively. To do this, you will need toM practice - you can practice by copying photos into your illustrator document and then using the pen tool to trace shapes in the
photo.
The way to use the pen tool is illustrated in the following video. Clicking from point to point will create a shape with all straight linesegments. To create curved line segments, when placing another anchor point, hold down the mouse button and drag away. This willcreate a handle that you can use to get the right contour. If you need to move a point or change a curve later, you can use the directselection tool to do this. When you create a curve, the tool automatically creates two handles. This will make the contour to your nextpoint smooth. Sometimes, this is not the look you need. To remove the second handle, just click on the point you just made again.Command-Z will be useful here to step backwards.
The above video makes use of Illustrator's Smart guides feature. This feature can be useful to help place points but you may find itdistracting. You can turn it on or off under the View menu.
Before you start drawing, make the options bar look like the above. This will make it easier to see what you are drawing and tracing.
1K Mar Io T"If you hold down the pen tool button on the main tools palette, you will see the other pen tooloptions. The first two add or delete anchor points along the path. The last pen tool is the convertanchor point tool, which you can use to add handles to an anchor point.
5 Jfa..,deO t row M
-- TThe shape tools can also be helpful. With them, you can make standard shapes faster than you could with- the pen tool. The shape options are: rectangle, rounded rectangle, ellipse (you can use this to make a
circle by holding shift while using it), polygon, star, and flare.
Tracing a photo
To add a photo you can use the File: Place button and add the photo. The photo can later be deleted or hidden in a separate layer tokeep for reference.
When tracing, it may be helpful to turn off the fill so that you can see the shape behind your drawing. It may also be helpful to zoomin close on the image you are tracing.
29
u St r ato r: a crash-cou rsee how to onke stuff look aw-esome
Lsos UseM Unla
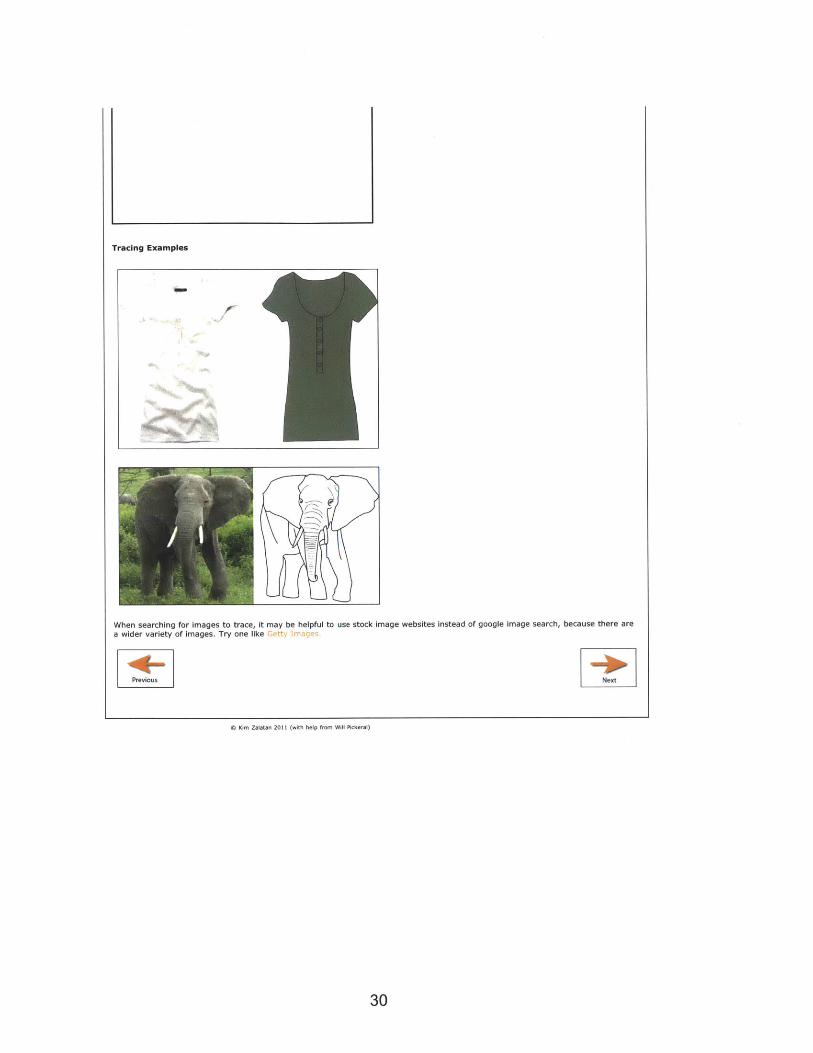
Tracing Examples
When searching for images to trace, it may be helpful to use stock image websites instead of google image search, because there area wider variety of images. Try one like Gett, imagies
Nest
@ Kim Zalatan 2011 (with help from Will Pickeral)
30
Previous
Wdd Lkft
How to select things.
There are four main selection tools we will be working with in these tutorials.
The main selection tool is the first tool. It selects entire paths or shapes together. The video below shows what you can do withthis tool.
The next selection tool is the direct selection tool. This tool is extremely useful because you can select one point in a path orobject and manipulate it. A good way to move a point a small amount is to use the arrow keys.
The tools below the selection tool is the magic wand tool. Use this to select one region of the same color.
This is the lasso tool. With this tool you can select large groups of objects by drawing a path around the objects you want toselect.
u Strator:e a crash course
"am

When resizing items, you may find the Shift key useful. Holding this key while resizing an object will constrain it to its original ratio.
Previous Next
@ Kim Zalatan 2011 (with help from Will Pickeral)
U St atOr: a crash-course
je- how to makte stuff look -- onie
Stroke options for the pen tool.
When drawing with the pen tool you can edit some of the more important attributes about your sketch, including fill color, outlinecolor, stroke width, opacity, etc.
You can change the color of the stroke and the fill of the shape you are drawing. You can select to have no fill or nostroke outline by using the 2 no fill button.
CU~d Uf
d~ 4ZdL1 A Uhg
You can also change these things later by selecting the line and using stroke options.
The panel opens up from the right tools palette and has options to change the stroke width, changehow the ends of the line look, add arrowheads, make the line dashed, etc.
e Play around with some of these options to learn how to get the look you want.
In CS5, there is the added functionality to change the width of the stroke at any point. You can use the width tool to do this.Click and hold on any spot along the stroke to make the stroke width what you want.
33
Nomw Lamms P1lcs UUseulnks
Previous Next
@ Kim Zalatan 2011 (with help from Will Pickeral)

Home Lamn
Color Stuff.
There are few different ways to change/pick a color in Illustrator. The first is by CMYK values, the acronym stands for cyan, magenta,yellow, and black. This is a standard method used to specify colors for printers. Another one is RGB (red, green, blue). You can specifya color by its HMTL color code. Or you can just drag your mouse the color picker around until you find a color you like.
Eib F71%Y A"""""""'F 1"These are the color options that you can access from the right tools palette. You can change the colorby changing the CMYK values, or clicking somewhere on the color line below.
H Fa- Double clicking on a selected color will bring up the color picker in the middle ofs: lS---ol % the screen. This gives you more options for how to select the color (including RGB
and HTML values).Ol t C 6: [is ~| %
# 1669933 K: 4 %
S * The swatches panel can be accessed from the right tools palette. Swatches are colors that you haveE E already created and you can save them to access them quickly. It can be very useful to put the palette
of colors you are using for a project into the swatches panel.
To add a new swatch to the panel, have the color selected using the color picker, and hit the add swatch button at the bottomright of the swatch panel.
P When trying to get a certain color, you may find the eyedropper tool helpful. The eyedropper tool can pick up any color from a'1 picture or your illustration.
Using the gradient tool.
The gradient tool is very useful for making objects look more natural. There are two gradient tools, one in the main toolspalette and one in the right tools. Once you click on the fill you want to convert to a gradient, then click on the gradient optionsin the right tools panel.
MOOVA E O-E8~~ZZ~
tj You can add as many colors to the gradient you are creating as you want. Gradients can also be savedas swatches. You can move the location of any color on your gradient by dragging the solid color onthe bottom of the gradient slider. The grey diamonds on the top of the slider can also be moved tochange the look of the gradient. You can specify an angle of rotation for the gradient as well, or makea radial gradient.
35

Gradient Examples.
Linear Gradients
Radial Gradient
Previous
@ Kim Zalatan 2011 (with help from Will Pickeral)
Next

HOm
How to use layers.
6ussns usnWLhMW
Layers are helpful to group and isolate elements of a drawing. When tracing from a picture, for example, it is very helpful to have thepicture in a separate layer from the what you are drawing.
The layer panel can be opened from the right tools palette. You can add a new layer using thenew layer button. It is a good practice to give each layer a name with what it containsinstead of the default name "Layer #". When working on a complicated drawing, you could have
A many layers and naming them will save time later.
The order of the layers in the panel shows which layers are on top of the other layers. The layer at the top of the list will show up infront of the other layers behind it in the panel. Changing the order of the layers in the panel can drastically change how your imagelooks.
The two indicators next to the layer in the panel have important meanings. The eyeball indicator denotes whether a layer is visible ornot. Clicking on the eye will hide a layer, and clicking it again will show it. This is useful to quickly check how a layer looks withoutother layers in the way. The lock next to the layer denotes whether or not a layer is locked. Locked layers cannot be selected oredited. When working on a layer it is good practice to have all other layers locked so you don't accidentally change a layer that youdidn't mean to.
To draw in a specific layer, you will need to select that layer in the panel and then start drawing. If other layers are unlocked and youclick on something in a different layer, the program switches you to that layer. You can tell what layer something is in by its selectioncolor, which will match up to the color in the panel next to its name. If you are tracing from a picture, you should put the picture in alayer behind the layer you will draw in and lock it.
You have now finished the lessons section! Go try one of the projects! :)
Previous Ns
@ Kim Zalatan 2011 (with help from Will Pickeral)
rjcu
Why create a poster sketch?
For the three ideas presentation, each team needs to creat professional posters that can be viewed and understood from far away.Poster images can be created in Illustrator and the layout can be done in Adobe InDesign (explained in the next project). Sketchesdone in Illustrator are graphic, professional looking, and can be put onto a poster using the plotter.
Creating a poster sketch.
The following video shows the main steps in creating a quick poster sketch of an idea for the three ideas milestone. It is normallyfaster to start with a hand-sketched rough idea than to start from scratch in Illustrator.
First, you should place your scanned sketch. Make sure this is in a separate, locked layer. Then create another layer to work in andstart using the pen tool to trace the shapes from your sketch. Don't worry about being completely accurate the first time as you canmake tweaks when you are done with all the shapes. If you place a point wrong, you can undo it with Command-z.
As you trace different sections of the sketch, shapes may overlap. You can put them in different layers. This gives you the option totoggle whether or not they are visible.
After you have traced all the basic shapes, you can use the direct selection tool to make all of them fit together better. Zoom infurther when making small adjustments using Command +.
When you are done with the sketch, you can export the image to a image file.

Previous
@ Kim Zalatan 2011 (with help from Will Pickeral)
39
Next

Why create a poster layout?
Now that you have your ideas sketched, you will want to create a poster layout that you can puts each of the sketches on. If yourwhole team uses the same layout, your team will look unified at the presentations.
Creating a poster layout.
In this tutorial you will learn how to use another Adobe Creative Suite Program, InDesign, to make a layout for a poster. This programis set up very similarly to Adobe Illustrator, having many of the same or similar tools, but is designed to create layouts.
The units for creating a new document are in picas. You can use illustrator to convert to these units by putting in the document size ininches and changing the units to picas . 144 by 216 picas is equal to 2 by 3 feet.
The video below will show you how to go about putting your information for the three ideas milestone into a poster. You will want yourposter to have a simple but colored design to identify your team. Make sure that the text you use is large enough to be seen from faraway.
Example Poster
40

Kce-O-Therm
Market: $100 millionScope: Portable heater/coolerFeasibility: 60 wat battery powered
Previous
C Kim Zalatan 2011 (with help from Will Pickeral)
Next
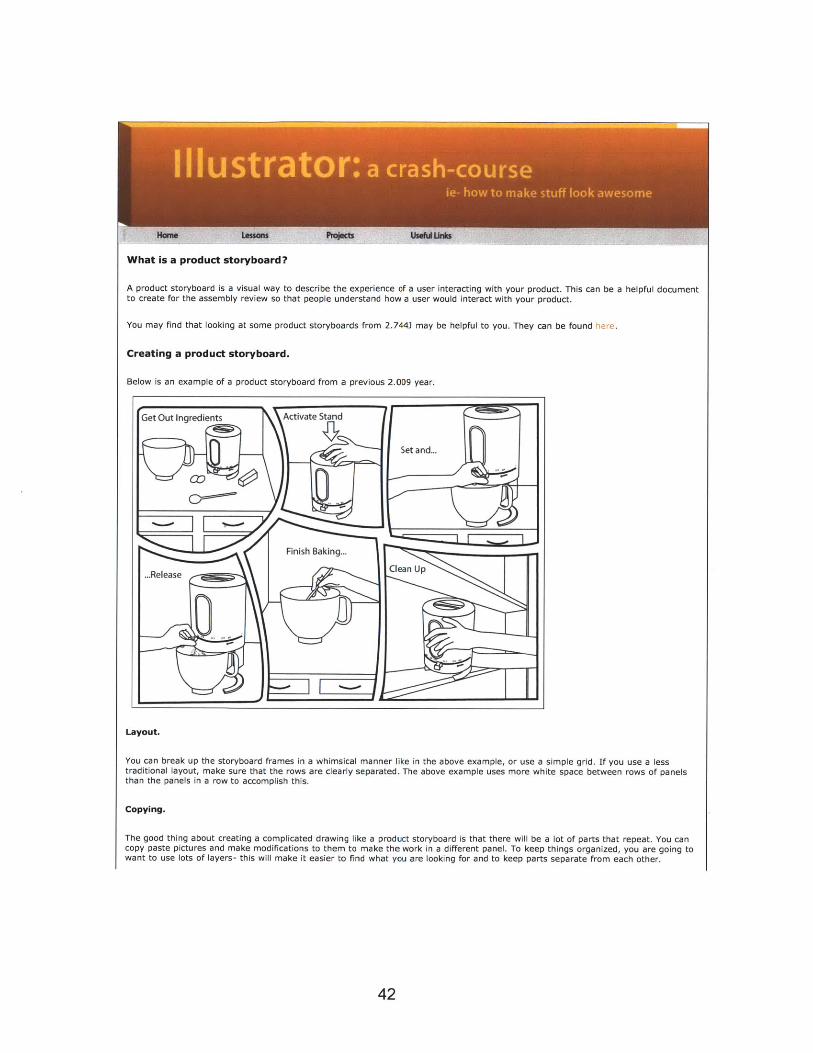
What is a product storyboard?
A product storyboard is a visual way to describe the experience of a user interacting with your product. This can be a helpful documentto create for the assembly review so that people understand how a user would interact with your product.
You may find that looking at some product storyboards from 2.744. may be helpful to you. They can be found here.
Creating a product storyboard.
Below is an example of a product storyboard from a previous 2.009 year.
Layout.
You can break up the storyboard frames in a whimsical manner like in the above example, or use a simple grid. If you use a lesstraditional layout, make sure that the rows are clearly separated. The above example uses more white space between rows of panelsthan the panels in a row to accomplish this.
Copying.
The good thing about creating a complicated drawing like a product storyboard is that there will be a lot of parts that repeat. You cancopy paste pictures and make modifications to them to make the work in a different panel. To keep things organized, you are going towant to use lots of layers- this will make it easier to find what you are looking for and to keep parts separate from each other.

Drawing people and hands.
It can be hard to draw people interacting with your product. You may find this page of hand and body mannequins helpful for tracingwhen adding people to your storyboard. Mannequns for Tracinq. You may also find Getty Images useful for finding people/hands in theright position to trace.
Previous Next
@ Kim Zalatan 2011 (with help from Will Pickeral)
43

Why is a logo so important?
A logo is usually someone's first impression into your product and brand. A logo can convey things about your brand or brandreputation.
Before starting to work on a logo design, your team will want to have a finalized product name that everyone is happy with. Youshould take a look at other logos in the product category/industry that your product is in to get some ideas of various design featuresof these logos.
A great example of the logo design process is illustrated here. You may find it helpful to look at this example before starting.
The logos below, for example are all from the small appliance/kitchen accessory brands. You can see that there are 3 trends in theselogos- all black, red or red/black, and colors with a cool tone.
FOR THF WAY IT" MAD'
orkolKRUPS Tovolo'
*KUHN ,FRKN Tupperware'- 1 ML4Awsu
Cuisipro. Progressre
How to create a product logo.
Looking at the other logos in your product sector can give you a good idea of what to try with your logo. The first thing to do once youhave an idea of what you want your logo to look like is to find the right font.
The following websites are some good ones that have free fonts. Don't worry if the font you choose is not exactly perfect- how tomodify them is below.1001 Free FontsDa FontUrban Fonts
The video below shows how to customize a font. You can start by creating a text box and typing the text of your logo. You can add astroke to your font to outline in it in a different color or just to make the font thicker. You can change the position of individualcharacters within the text box. However, a easier way to move the letters around in a logo is to select the text box and right click onit. From there, choose the 'Create Outlines' option and Illustrator will convert the text into a drawing like something you could createwith the pen tool. From there, you can move around letters or even alter the way the font looks.
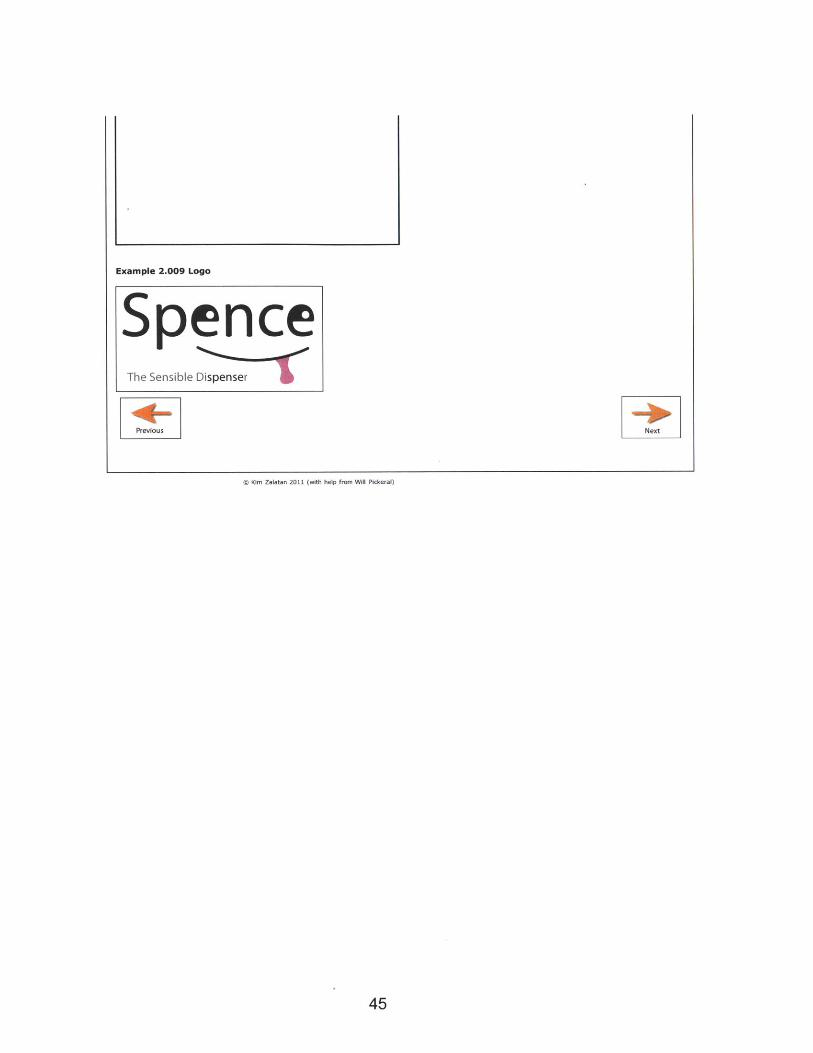
Example 2.009 Logo
SpenceThe Sensible Dispenser
Previous Next
@ Kim Zalatan 2011 (with help from Will Pickeral)
45
Why use Keynote?
2.009 final presentations are a big deal. You will want your presentation materials to be as professional looking as possible. Keynote isthe Apple equivalent of Power Point, and has features that Power Point does not. These features include the ability to remove coloredbackgrounds from photos, and slide transitions that help with animation, and both are explained below.
How to make your slides look great.
In keynote, you can use the alpha tool to remove a background from a photo. This will make your slides look very clean andprofessional. To use tool, simply click on an area of the background color and hold while pulling away. The sections that will beremoved become highlighted. When you release the mouse, the areas will be removed. Just be careful not to remove the areas of thephoto you want.
To make simple animations of how mechanisms work, you can use Keynote's Magic Move transition. To use this feature, you will needto create multiple slides with the same images, words, letters, etc on them. The repeated elements can be different sizes, in differentpositions,in different orientations, etc. When you apply the Magic Move slide transition between these slides, the transition willautomatically move the repeated elements to their new positions/orientations.
Previous
@ Kim Zalatan 2011 (with help from Will Pickeral)
46
Next

Lots of useful links.
From a Sketch to IllustratorThis website has some some great tips about how to create a Illustrator image when starting from a hand drawn sketch.
Techica Ii ustratcion with IllustratorThis website has some tutorials about how to create technical looking drawings using Adobe Illustrator. Going through these tutorialswill help you get more comfortable with the pen tool as well as others.
Iluscratina, ai [P dThis tutorial video will show you how to illustrate an iPod using techniques in Illustrator. It has some good use of gradients to makethe iPod appear three dimensional.
Smashing Magcazine's List of 60+ Logo Design ToralsThis list has a lot of interesting tutorials on the process of logo design. Some of the tutorials show how to make a specific logo inIllustrator, and these would be good tutorials to do for more practice in Illustrator.
Brush TutonalThis tutorial explains Illustrator brushes, which weren't covered in these tutorials. However, this tutorial will introduce you to how/whyto use them.
Gocd-TutorialsGood-Tutorials has a large variety of Illustrator tutorials on how to draw specific things. If you practice on these, you will learndifferent techniques.
Previous
@ Kim Zalatan 2011 (with help from Will Pickeral)
47