storming the danevirke - wargamesillustrated.net
TRANSCRIPT

BACKGROUND
The background for this scenario is simple: watch the climax of almost any low budget 1980s straight-to-video Action movie and there you have it - an attempted snatch!
In this scenario, the attacker must rescue a Hostage - intelligence and surveillance teams have done their jobs well and have identified where the Hostage is being held. Negotiations have failed, so it’s time to send in a snatch team.
• The attacker must rescue the Hostage and remove them from the table.
• The defender must prevent this from happening.
• If the Hostage is killed, both sides lose.
This scenario can easily be switched to any genre setting, but I’ve chosen a modern/near-future world and presented two squads for this setting. Old West, WW2 commandos, Sci Fi,
STORMING THE STORMING THE DANEVIRKEDANEVIRKE
German Action movie The Commander. In this instance, a ‘dead Hostage’ means that the gadget has been damaged beyond repair or data retrieval.
TABLETOP LAYOUT
Intel and eyes in the sky have located the Hostage’s whereabouts, secured in a small building on the centre spot of the board (in the central area). You need to place a building there to represent this, ideally single-storey. If your only building options are taller you can ignore the higher storeys for this scenario, or fight your way to the upper floors using floor plans.
The Hostage’s building counts as cover. The attacker must enter the area at some point to release the Hostage (see the Rescue Action, detailed later).
Other terrain layout depends on your setting. Denser terrain gives a very different game to open terrain, so try both. One player should lay the terrain,
Superheroes, and many others can be used - whatever takes your fancy. The Wi team have raided their figure options and mixed some of North Star’s Fistful of Kung Fu figures with modern military options. The Hostage here is a gang kingpin who the ‘SWAT-ish’ team are trying to snatch up and use as an informant. The crims are trying to prevent it from happening.
The squads I’ve suggested for this scenario are a good example of Blam! Blam! Aargh! squad building - they’re not built to equal points values; instead, they are designed to create an interesting interAction on the tabletop and generate an exciting game. With squads such as these, it’s a nice idea to play the scenario twice, with each player controlling each side once.
You could, of course, change the Hostage to a gadget, code-breaking device, or (my personal favourite) a ‘floppy disk’, as rescued by Lewis Collins in the Italo-
SNATCH!SNATCH!Did the free rules last issue leave you hungry for more grid gaming Action?
Have no fear, Daniel Mersey is here, with a new scenario for his game of Blam! Blam! Aargh!
On the mean streets of Super Megalopolis, criminal gangs clash with the forces of order!
BLAM! BLAM! AARGH!BLAM! BLAM! AARGH!
RAT-TAT-TAT!RAT-TAT-TAT!DADDADDADADADDADDADA

BLA
M! B
LAM
! A
AR
GH
!
and the other player then chooses whether to play as the attacker or the defender.
Once attacker and defender are decided, the defender places their models as they wish on the tabletop. There must be at least one but no more than two models in the Hostage’s area. You’ve seen the movies; these Hostages are never guarded as well as they should be!
The attacker does not place any models until the first Phase’s Blind Bidding has taken place. Whoever wins the first bid must choose the Move Action; the attacker uses this to start moving models onto the tabletop into any edge areas they choose.
SPECIAL RULES
The Hostage
Represent the Hostage with a suitable model, which starts the game in the central area. The Hostage only moves when controlled by the attacker.
The Hostage may never be moved by the defender and cannot be deliberately targeted by either player.
The attacker may only move the Hostage once they have been freed with a successful Rescue Action (see below). Select one attacking model in the Hostage’s area and move the Hostage along with that model whenever it moves (the Hostage’s movement is free and costs no additional activation). The attacker is aiming to move the Hostage off the table.
“Caught in the crossfire” - After the Hostage has been freed, any Shoot Actions into the area containing the Hostage model may result in the accidental death of the Hostage. If any Shoot Action rolls more 1s than it rolls total hits, the Hostage is gunned down. Neither side wants this, so be careful!
The Hostage is not affected by Fight Actions.
Hiding out in Jane’s Diner, the main
objective building in this game, the crims protect the kingpin.
We’ve put loads of crims in to make for
a dramatic image. In game no more
than two may be in this area.
Instead of using a SAW, our Crim Hard Case has magic that we are treating as unctioning in exactly the way that a semi-automatic weapon would. It fits the
look and feel of the figures far better!
NEW ACTION: RESCUE
Rescue can only be used by the attacker, and only if both of the following circumstances exist:
1. The attacker has at least one Non-Stun Token model in the area where the Hostage is held.
2. The defender has no Non-Stun Token models in that area.
There is no dice roll required - the Rescue Action automatically succeeds as the rescuers have done this before and came well equipped! This frees the Hostage; that model may now be moved by the attacker as part of any future Move Action (see the previous section).
This is chosen in the same way as any other Action, except that only the attacker may choose it - they must win the Initiative to use it. The defender
does not get to carry out the same Action: when the attacker chooses Rescue, the defender cannot take any Action.
VICTORY
The attacker must rescue the Hostage and remove them from the table. As soon as the first attacker model is placed on the table, the Hostage rescue has begun. They must keep at least one (living!) model on the table at all times until the Hostage is escorted from the table.
• The defender must prevent this from happening. Once the attacker enters the table, the attacker must have at least one model in play until the Hostage is removed from play - if this is not the case at any point, the defender wins.
• If the Hostage is killed, both sides lose.
There is no time limit on operations.
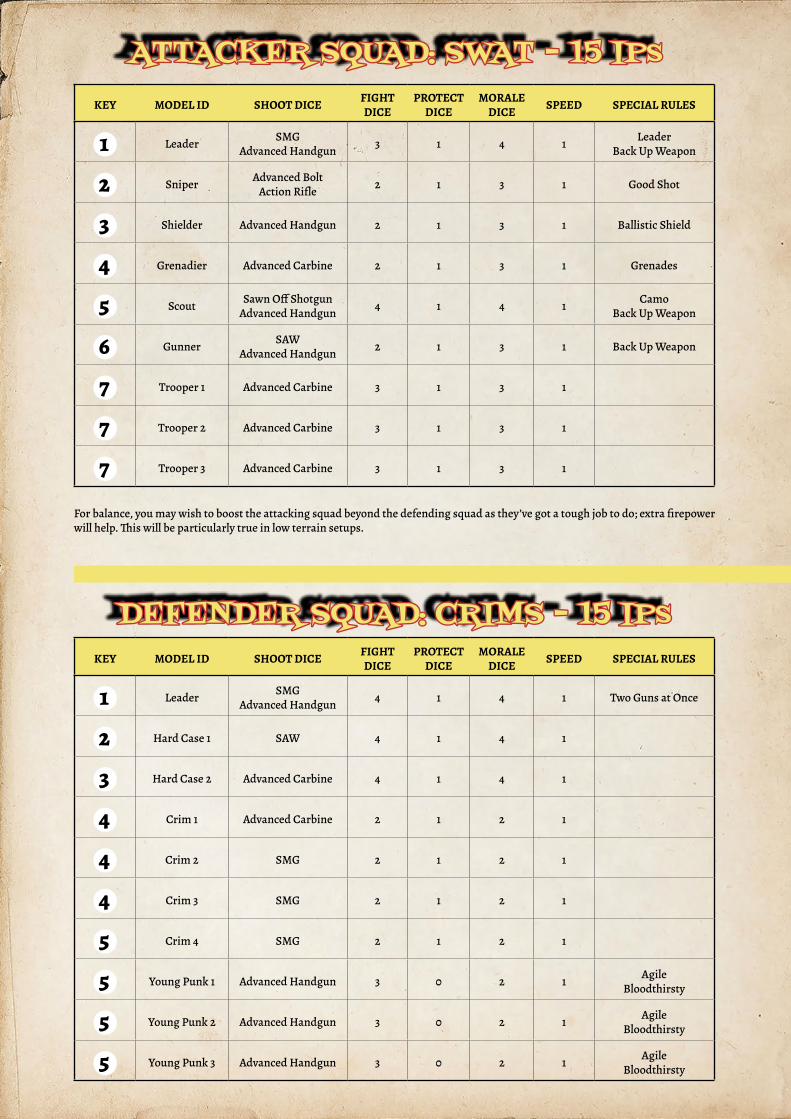
ATTACKER SQUAD: SWAT - 15 IPsATTACKER SQUAD: SWAT - 15 IPs
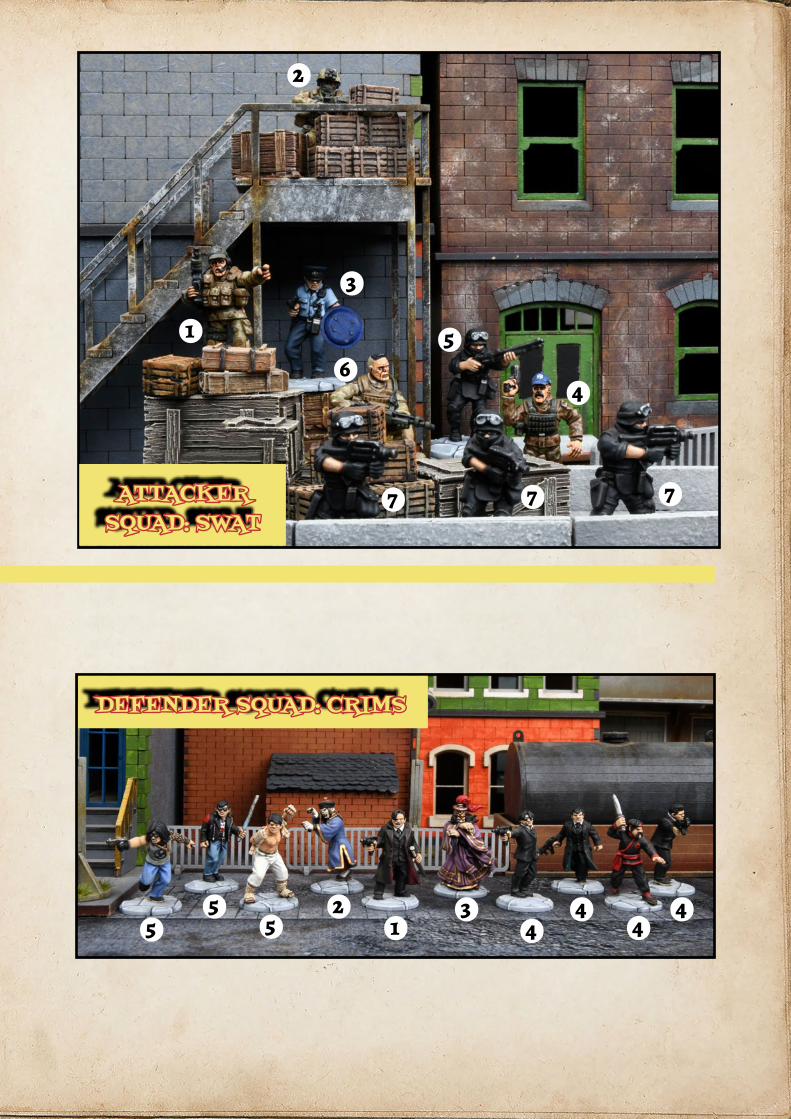
DEFENDER SQUAD: CRIMS - 15 IPsDEFENDER SQUAD: CRIMS - 15 IPs
KEY MODEL ID SHOOT DICE FIGHT DICE
PROTECT DICE
MORALE DICE SPEED SPECIAL RULES
1 Leader SMGAdvanced Handgun 3 1 4 1 Leader
Back Up Weapon
2 Sniper Advanced Bolt Action Rifle 2 1 3 1 Good Shot
3 Shielder Advanced Handgun 2 1 3 1 Ballistic Shield
4 Grenadier Advanced Carbine 2 1 3 1 Grenades
5 Scout Sawn Off ShotgunAdvanced Handgun 4 1 4 1 Camo
Back Up Weapon
6 Gunner SAWAdvanced Handgun 2 1 3 1 Back Up Weapon
7 Trooper 1 Advanced Carbine 3 1 3 1
7 Trooper 2 Advanced Carbine 3 1 3 1
7 Trooper 3 Advanced Carbine 3 1 3 1
KEY MODEL ID SHOOT DICE FIGHT DICE
PROTECT DICE
MORALE DICE SPEED SPECIAL RULES
1 Leader SMGAdvanced Handgun 4 1 4 1 Two Guns at Once
2 Hard Case 1 SAW 4 1 4 1
3 Hard Case 2 Advanced Carbine 4 1 4 1
4 Crim 1 Advanced Carbine 2 1 2 1
4 Crim 2 SMG 2 1 2 1
4 Crim 3 SMG 2 1 2 1
5 Crim 4 SMG 2 1 2 1
5 Young Punk 1 Advanced Handgun 3 0 2 1 AgileBloodthirsty
5 Young Punk 2 Advanced Handgun 3 0 2 1 AgileBloodthirsty
5 Young Punk 3 Advanced Handgun 3 0 2 1 AgileBloodthirsty
For balance, you may wish to boost the attacking squad beyond the defending squad as they’ve got a tough job to do; extra firepower will help. This will be particularly true in low terrain setups.
1
3
6
7 7 7
4
5
2
55
52 3 4 4
1 4 4
ATTACKER ATTACKER SQUAD: SWATSQUAD: SWAT
DEFENDER SQUAD: CRIMSDEFENDER SQUAD: CRIMS