siriusxm universal boombox - satellite & internet radio · installing the indoor/outdoor home...
TRANSCRIPT

SiriusXM Universal Boombox
User Guide


3
Table of Contents
Introduction . . . . . . . . . . . . . . . . . . . . . . . . . . . . . . . . . . . . . . . . . . . . . . . . . . . . 4Safety Precautions. . . . . . . . . . . . . . . . . . . . . . . . . . . . . . . . . . . . . . . . . . . . . . . . . . . . . . . . . . . 5Warnings . . . . . . . . . . . . . . . . . . . . . . . . . . . . . . . . . . . . . . . . . . . . . . . . . . . . . . . . . . . . . . . . . . . 5What’s in the Box? . . . . . . . . . . . . . . . . . . . . . . . . . . . . . . . . . . . . . . . . . . . . . . . . . . . . . . . . . . . 7Controls and Connectors . . . . . . . . . . . . . . . . . . . . . . . . . . . . . . . . . . . . . . . . . . . . . . . . . . . . . . 8
Installation . . . . . . . . . . . . . . . . . . . . . . . . . . . . . . . . . . . . . . . . . . . . . . . . . . . . 10Installing the Radio Dock Adapter for Your Radio . . . . . . . . . . . . . . . . . . . . . . . . . . . . . . . . .10Docking the Radio . . . . . . . . . . . . . . . . . . . . . . . . . . . . . . . . . . . . . . . . . . . . . . . . . . . . . . . . . . . 11Connecting the Home Power Adapter . . . . . . . . . . . . . . . . . . . . . . . . . . . . . . . . . . . . . . . . . . . 11Removing the Radio Dock Adapter . . . . . . . . . . . . . . . . . . . . . . . . . . . . . . . . . . . . . . . . . . . . . 12Installing the Indoor/Outdoor Home Antenna . . . . . . . . . . . . . . . . . . . . . . . . . . . . . . . . . . . . 13Using Your Universal Boombox Outdoors or On-The-Go . . . . . . . . . . . . . . . . . . . . . . . . . . .14Using Your Universal Boombox Indoors . . . . . . . . . . . . . . . . . . . . . . . . . . . . . . . . . . . . . . . . .14Other Indoor/Outdoor Antenna Installation Suggestions . . . . . . . . . . . . . . . . . . . . . . . . . .15
Subscribing to the Sirius or XM Service . . . . . . . . . . . . . . . . . . . . . . . . . . . . 19
Operation . . . . . . . . . . . . . . . . . . . . . . . . . . . . . . . . . . . . . . . . . . . . . . . . . . . . .20
Optional Accessories . . . . . . . . . . . . . . . . . . . . . . . . . . . . . . . . . . . . . . . . . . . .22
Troubleshooting . . . . . . . . . . . . . . . . . . . . . . . . . . . . . . . . . . . . . . . . . . . . . . . . 23
Specifications . . . . . . . . . . . . . . . . . . . . . . . . . . . . . . . . . . . . . . . . . . . . . . . . . .25
IC Statement . . . . . . . . . . . . . . . . . . . . . . . . . . . . . . . . . . . . . . . . . . . . . . . . . .26
Copyrights & Tradexmp3marks . . . . . . . . . . . . . . . . . . . . . . . . . . . . . . . . . . . . 27
Indoor/Outdoor Antenna Template . . . . . . . . . . . . . . . . . . . . . . . . . . . . . . . . .28
Sirius or XM Radio ID . . . . . . . . . . . . . . . . . . . . . . . . . . . . . . . . . . . . . . . . . . .29

4
Introduction
Congratulations on the purchase of your new SiriusXM Universal Boombox for SiriusXM Plug and Play Radios!
Your new SiriusXM Universal Boombox lets you enjoy satellite radio entertainment in your home, office, or other location. Use this guide for the proper installation.
The Universal Boombox will work with most Sirius and XM Plug and Play Radios. It is compatible with the Plug and Play Radios listed below as well as with any newer models sold subsequently:
• Sportster 6, 5
• Starmate 8, 7, 6, 5, 4, 3
• Stratus 7, 6, 5, 4, 3
• XpressRCi, XpressRC, XpressR, ExpressEZ, Xpress
• Onyx, Onyx EZ, Onyx Plus
• Edge
For the latest information about this and other SiriusXM product and accessories, visit shop .siriusxm .ca.

5
Safety PrecautionsBe sure to observe the following warnings. Failure to follow these safety instructions and warnings may result in a serious accident and/or personal injury.
• Installation must be performed according to this installation guide. Sirius XM Canada, Inc. is not responsible for issues arising from installations not performed according to the procedures in this guide.
• Use only the provided Home Power Adapter.
• Do not install the Universal Boombox where it will be exposed to high levels of humidity, moisture, or dust.
• To avoid short circuits, do not open the unit, and never put or leave any metallic objects (coins, tools, etc.) inside the unit.
• If the unit emits smoke or unusual odors, turn the power off immediately, and disconnect the unit from any power source.
• Do not drop the unit or subject it to strong shocks.
• The installation and use suggestions contained in this guide are subject to any restrictions or limitations that may be imposed by applicable law. The purchaser/user should check applicable law for any restrictions or limitations before installing and/or operating this unit.
Warnings• Opening the case may result in electric shock.
• Make sure that you insert the Home Power Adapter’s plug all the way into the outlet.
• Insert the Radio into the Universal Boombox only when the Universal Boombox is off.
• This device should be unplugged from the AC outlet during a thunder and
Introduction
6
lightning storm, and when the device will not be used for an extended period of time.
• Use the power cord of the Home Power Adapter to disconnect the device from the power source To begin using the device again, reconnect it to an AC outlet.
• Connect the device to an easily accessible AC outlet, so that the device can be quickly disconnected, if necessary.
Cleaning
DANGER! Unplug the Home Power Adapter and/or remove the batteries during the cleaning to avoid any electrical shock hazard.
Clean the hard surfaces of the Universal Boombox with an optical-grade microchamois or microfiber cloth. Clean the soft surfaces of the speakers with a dry lint brush.
• Do not use paper products to clean the Universal Boombox. Paper products may feel soft to the touch but they are too rough for the Universal Boombox.
• Do not use any type of abrasive pad or scouring powder to clean the Universal Boombox. Doing so will scratch the finish and may damage the controls.
• Do not use solvents such as alcohol or benzene, or any product that has alcohol in it (such as Windex), to clean the Universal Boombox.
Introduction

7
What’s in the Box?The following items are included with your purchase of the Universal Boombox. Unpack the kit carefully and make sure that everything shown is present. If anything is missing or damaged, or if the Universal Boombox fails to operate properly, notify your dealer immediately. It is recommended that you retain the original carton and packing materials in case you need to ship your Universal Boombox in the future.
Universal Boombox
Adapter 1 (Sirius Radios)
Adapter 2 (XM Radios)
Indoor/Outdoor Home AntennaHome Power Adapter Power Cord
Radio Dock Adapters
Introduction
8
Introduction
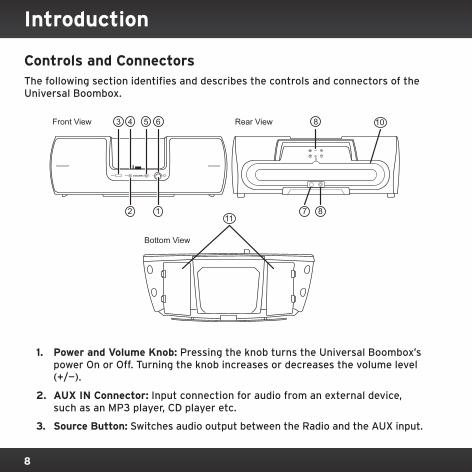
Controls and ConnectorsThe following section identifies and describes the controls and connectors of the Universal Boombox.
source aux in
63Front View Rear View
Bottom View
84 5
1211
10
87
1 . Power and Volume Knob: Pressing the knob turns the Universal Boombox’s power On or Off. Turning the knob increases or decreases the volume level (+/—).
2 . AUX IN Connector: Input connection for audio from an external device, such as an MP3 player, CD player etc.
3 . Source Button: Switches audio output between the Radio and the AUX input.
9
4 . Radio Dock Adapter Slot: Holds adapter for the Radio.
5 . Headphone Connector: Stereo headphone jack to privately listen to the Universal Boombox.
6 . Power On/Low Battery Light: The light is a constant blue when the Universal Boombox is powered on. The light will turn red when the batteries in the Universal Boombox are nearly discharged and need replacement.
7 . DC POWER Connector: Connection for the Home Power Adapter. (DC Power)
8 . ANTENNA Connector: Connection for the Indoor/Outdoor Home Antenna (Antenna).
9 . Antenna Storage: Storage area for the Indoor/Outdoor Home Antenna.
10 . Cable Storage: Storage area for the antenna cable.
11 . Battery Compartments: Two battery compartments for a total of eight “D” size cells.
Introduction

10
Installing the Radio Dock Adapter for Your Radio1 . Select the Dock Adapter for your Radio by referring to “What’s in the Box?”
on page 7 to identify the adapter, or turn the adapters over and locate the name imprinted on the underside of the adapter:
Sirius: Adapter 1 for all Sirius Radios. XM: Adapter 2 for all XM Radios.
2 . Install the Radio Dock Adapter for your Radio into the Universal Boombox as shown. Align the Radio Dock Adapter in the Universal Boombox and gently press it until it snaps into place.
Installation
SiriusXM & XM

11
Docking the RadioPlace your Plug and Play Radio into the Universal Boombox as follows:
1 . Be sure the Universal Boombox is powered off.
2 . Align the Radio with the Radio Dock Adapter and connector.
3 . Once aligned, gently press the Radio down so that it slides down the Radio Dock Adapter and onto the connector until it is fully seated in the Universal Boombox.
Connecting the Home Power AdapterThe Universal Boombox can operate on either batteries (8 “D” cells) or by using the Home Power Adapter. Connect the Home Power Adapter to the DC Power connector at the rear of the Universal Boombox. (Refer to “Controls and Connectors” on page 8.) Connect the Power Cord to the Home Power Adapter and plug it into an AC outlet.
Installation
12
Installation
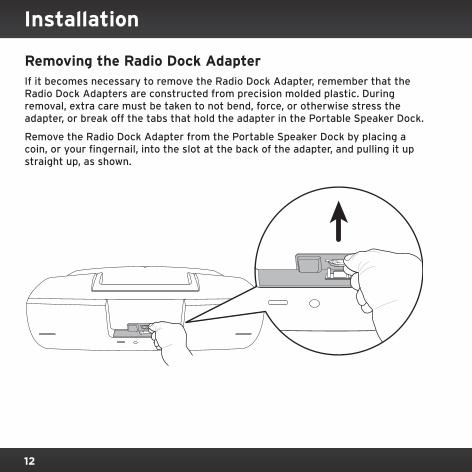
Removing the Radio Dock AdapterIf it becomes necessary to remove the Radio Dock Adapter, remember that the Radio Dock Adapters are constructed from precision molded plastic. During removal, extra care must be taken to not bend, force, or otherwise stress the adapter, or break off the tabs that hold the adapter in the Portable Speaker Dock.
Remove the Radio Dock Adapter from the Portable Speaker Dock by placing a coin, or your fingernail, into the slot at the back of the adapter, and pulling it up straight up, as shown.

13
Installing the Indoor/Outdoor Home AntennaBefore installing the Indoor/Outdoor Home Antenna, please read this entire section.
The Indoor/Outdoor Home Antenna should be placed into the storage area on the top of the Universal Boombox as shown below. The antenna clamshell should face the sky. Wrap the excess antenna cable around the storage area at the rear, and plug the antenna cable into the Antenna connector.
Please visit siriusxm .ca/homeinstall for more information on home antenna installation. You can also find out information about various signal distribution accessories for the home, such as the Echo Home Wireless Signal Repeater System or the 50’ Antenna Extension Cable, both available for purchase at shop .siriusxm .ca. These accessories can aid you in receiving the satellite signal at home. (See “Optional Accessories” on page 22.)
Installation
14
Using Your Universal Boombox Outdoors or On-The-GoIf you are using the Universal Boombox outdoors, try using it with the antenna in the storage area. Place the Universal Boombox where there are no obstructions to block the antenna’s view of the sky, such as trees, bridges, buildings, etc.
If the reception is not good, then remove the antenna and position it facing south. Not sure which way is south? Try pointing the antenna in different directions until the reception improves. Wait a few seconds each time you reposition it for the Universal Boombox to receive the signal.
Using Your Universal Boombox IndoorsIf you are using the Universal Boombox indoors try experimenting with the antenna to get a feel for the reception in your location. Move the antenna around the room or from room to room. Aim it from different windows. In major metropolitan areas, you might find that you get great reception in several locations without worrying too much about aim and placement.
Refer to your Radio’s User Guide for instructions, and access the Signal Indicator or Antenna Aiming screen of your Radio to see a visual indication of signal strength. If you’re receiving a good Satellite and Terrestrial signal strength, you’re done. If not, try some of the suggestions which follow.
S
Installation
Signal Indicator
SATELLITE
TERRESTRIAL
*The screen shown above is rep- resentative and may differ from the screen displayed on your Radio.
15
Other Indoor/Outdoor Antenna Installation SuggestionsIf you find you are getting a signal, but it’s inconsistent, try moving the Indoor/Outdoor Home Antenna closer to a window, ideally one that is facing due south.
Not sure which way is south? Think about where the sun rises (in the east) and sets (in the west). Then stand so that east is to your left and you’ll be facing south. Is there a window in the direction you’re facing? Move the antenna closer to the window.
TIP! Still not sure which way is south or where to place your antenna? Look up your location on an online mapping Web site that offers satellite views of street addresses where you can easily see which way is south, and what window may offer an unobstructed view of the sky.
Another easy method is to start at any window, then work from window to window in a simple pattern to find the window gives the best signal strength. Note that the antenna must also have an unobstructed view. No trees or buildings blocking its aim. If the antenna is aimed through a window, be aware that blinds, screens, or any other non-glass elements such as thermal insulation can sometimes cause reception issues. If this is the case, you may want to use
S
SOUTH
Installation
16
another window or place the antenna outside of the window.
If you find a window that gives you good signal strength, you can place the antenna on the windowsill. The antenna may need to be placed on something to raise it above the level of the window frame.
If you don’t have a window where you receive a consistent signal, or placing the antenna in a window is not a practical solution for you, BETTER reception can be achieved by placing the antenna outside on a window ledge, porch, table, or patio. The location you choose should provide the antenna with a clear view of the southern sky.
If none of the previous solutions work for you, then the BEST reception can be achieved by mounting the antenna outdoors on a wall or soffit, with a clear view of the southern sky.
If you decide to do this more permanent antenna installation, you’ll probably want to purchase a second indoor/outdoor antenna, so that you’ll have one to use with the Universal Boombox when on-the-go. An additional antenna can be purchased at shop .siriusxm .ca.
Note that you will want to consider any potential hazards when you choose
OUTDOORS
SOUTH
SOFFIT
SOUTH
Installation

17
the mounting location, and possibly consider professional installation. Sirius XM Canada, Inc. is not liable for any damages.
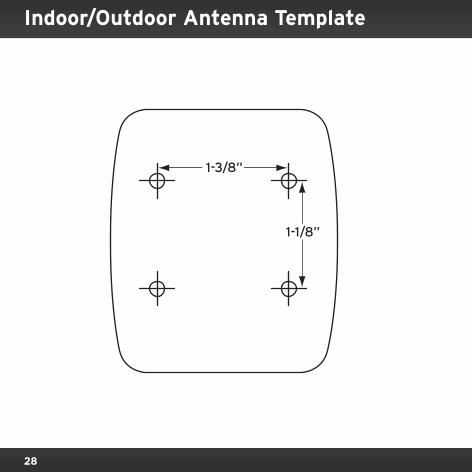
To mount the antenna, you will need four screws (sold separately) with a 1/4” head (e.g., an M3 screw), and that are suitable for the material onto which you are affixing the antenna, (e.g., wood, metal, etc.). The screws should be spaced 1-3/8” apart horizontally and 1-1/8” vertically. Refer to the “Indoor/Outdoor Antenna Template” on page 28.
Once you have found a suitable location for the antenna, route the antenna cable to the Universal Boombox. Be sure you avoid any obstructions that could crimp, kink, or twist the cable. Use protective grommets wherever rough openings are encountered. If the antenna is installed outdoors, route the cable from the antenna location to the interior of the home, working the cable through the basement, under a window sill, etc., and make adjustments to take up cable slack as necessary.
TIP! If your indoor/outdoor antenna’s cable isn’t long enough, visit shop .siriusxm .ca and consider a 50 ft. Indoor/Outdoor Home Antenna Extension Cable or a Home Distribution Kit.
If the signal is good for either Satellite or Terrestrial (or both), and you are hearing the audio from the Radio, the antenna installation is complete. (Refer to your Radio’s User Guide for instructions on how to access the Signal Indicator or Antenna Aiming screen.)
If the signal reception is low, or intermittent, try another location for the antenna. Verify that the antenna is pointed south, and that the antenna’s view of the sky is not blocked by a tree, a building, a bridge, or anything else. Adjust until you are
1-3/8 in
1-1/8 in
Installation

18
receiving a good signal.
The Indoor/Outdoor Home Antenna’s reception can also be tweaked by opening or closing the antenna clamshell, and turning the antenna. While observing the signal strength, make small adjustments to the angle of tilt of the clamshell until the highest possible signal strength is achieved. If you have not wall-mounted the antenna, turn the antenna slightly to the right or left and observe if the signal strength increases. For each tweak, allow a few seconds in each position to determine if the signal strength increases.
SOUTH
Installation
19
Subscribing to the Sirius or XM Service
If you have not yet subscribed to the Sirius or XM satellite radio service, you’ll need to before you can listen to SiriusXM programming on your Radio. To subscribe, refer to your Radio’s User Guide, or do the following:
1 . Be sure that your Radio is correctly installed as described in this guide, is in the Universal Boombox, and that the antenna is oriented to receive the satellite signal.
2 . Press the Power/Volume knob to turn on the Universal Boombox. If the Radio does not turn on at the same time, turn the Radio on.
3 . After the start up sequence, the Radio may update the channel line-up. Wait until the channel updates have completed before pressing any buttons.
4 . Once the channels have been updated, the Radio should tune to channel 184 (Sirius) or channel 1 (XM). You will not be able to listen to other channels until you activate your subscription.
5 . Use the Radio’s channel up/down buttons to tune to channel 0 to display the Radio’s unique Sirius ID (SID) or Radio ID number. You can also tune to channel 0 by using the Remote Control: Press the Select button, then the 0 (zero) button, and then press the Select button again. The SID or Radio ID are also available on the Radio’s packaging, and may also be accessed by pressing the MENU button and selecting Sirius ID or Radio ID. Write the SID or Radio ID down in the space provided near the end of this guide.
6 . Have your credit card handy and visitsiriusxm .ca/activate and follow the prompts to activate your subscription. You can also call SiriusXM customer care at 1-888-539-7474.
7 . When you have successfully subscribed to the Sirius or XM service, and the Radio has been updated with your subscription information, an alert will be displayed. To continue, press any button.
You are now ready to begin enjoying satellite radio, and can tune to other channels.
20
Operation
Power on the Universal Boombox by pressing the Power/Volume knob on the front panel. The light on the front panel surrounding the knob should light up blue to indicate power is on. If the Radio does not power on at the same time, press the Power button on the Radio. You should now hear the Sirius or XM audio. If you do not, increase the volume of the Universal Boombox by turning the Power/Volume knob clockwise (+).
Your Radio remembers whether it was on or off when power to the Radio is turned off at the time the Universal Boombox is turned off. Therefore, if your Radio was on at the time you turned the Universal Boombox off, when you turn the Universal Boombox back on, the Radio will turn on also. If the Radio was off at the time you turned off the Universal Boombox, you’ll need to turn the Radio on also when you turn on the Universal Boombox.
Batteries
Battery life is dependent upon several factors, including:
• The model of your Radio.
• The strength of the satellite signal.
• The volume level the Universal Boombox is set at.
• The type of audio playing, i.e., talk or music, and music with heavy bass which requires greater power to drive the woofer.
• Type and freshness of the batteries.
With fresh batteries, battery life is estimated at approximately 8 hours at half volume. Expect the actual battery life to vary.
When the Universal Boombox is powered on the light on the front panel surrounding the Power/Volume knob is normally blue. When the light turns red, that indicates the battery power is low. Replace the batteries.

21
Operation
Using the AUX Input
If you want to listen to an external audio device such as an MP3 player or CD player through the Universal Boombox, do the following:
1 . Initially set the volume level on the audio device to mid-range.
2 . Connect the output of the audio device to the Aux In connector on the front panel of the Universal Boombox. Press the source button to select the AUX input.
3 . Adjust the volume on the audio device to obtain satisfactory audio output from the Universal Boombox. If the sound is distorted, lower the volume level on the audio device and increase the volume level on the Universal Boombox.
Headphones
To listen using headphone, connect your headphones to the Headphone connector on the front panel of the Universal Boombox.
22
The following optional accessories are available for purchase from your SiriusXM retailer or at siriusxm .ca to maximize your SiriusXM experience.
SiriusXM Home Distribution Kit
Connect up to two Sirius or XM Radios to an outdoor antenna up to 150 feet away using standard off-the-shelf RG6 cables. These are the same type of cables that are used in cable and satellite TV installations and can be found in any local hardware store.
• Connects up to two Sirius or XM Radios using only one outdoor antenna.
• Uses standard RG6 satellite/cable TV cable for routing the satellite signal.
• Each Sirius or XM Radio can be placed up to 150’ away from the outdoor antenna.
• Flexible mounting options - mount your outdoor antenna on an exterior wall, mast, or pole.
• Compatible with all single-input Sirius and XM Radios and home tuners.
Kit includes the SiriusXM outdoor antenna, antenna mounting hardware, splitter, and adapter cables.
50’ Antenna Extension Cable
The 50’ Antenna Extension Cable extends the reach of your SiriusXM antenna cable by an additional 50 feet. It includes a built-in signal amplifier to ensure reliable reception of the satellite signal.
Optional Accessories

23
Symptom Solution
Universal Boombox does not power on
The Home Power Adapter is not connected, or the AC outlet into which it is plugged is not working. Check that the Home Power Adapter is connected to the Universal Boombox. Try plugging the Home Power Adapter into a different outlet.
Batteries are not installed, are installed incorrectly, or are bad. Install new batteries, if necessary, observing the correct polarity.
Universal Boombox does not operate on batteries
When the Home Power Adapter is connected to the Universal Boombox, the battery operation is disabled. Disconnect the Home Power Adapter.
If the power light is red, this indicates that the batteries need to be replaced. Install new batteries, if necessary, observing the correct polarity.
Radio displays: Antenna Not Detected
The Indoor/Outdoor Home Antenna is not properly connected to the Universal Boombox. Check the antenna connection to the Universal Boombox.
Radio is not completely seated into the Universal Boombox. Re-seat the Radio into the Universal Boombox.
Troubleshooting

24
Troubleshooting Continued
Symptom Solution
Radio displays: Acquiring Signal
No satellite signal is being received. Check for obstacles over or around the antenna.
Ensure that the antenna is pointed in the right direction toward the sky for your area to be able to see the satellites. Change the location of the antenna to eliminate nearby obstacles (buildings, trees, overhangs etc.).
No sound from the Universal Boombox speakers
Power/Volume knob is in the extreme counter clockwise (-) position. Turn it clockwise toward the (+) position.
Headphones are connected to the Universal Boombox. Disconnect the headphones.
An audio device is connected to the Aux In connection and is not producing sound. Press the source button to select audio output from the Radio.
Troubleshooting
25
Specifications
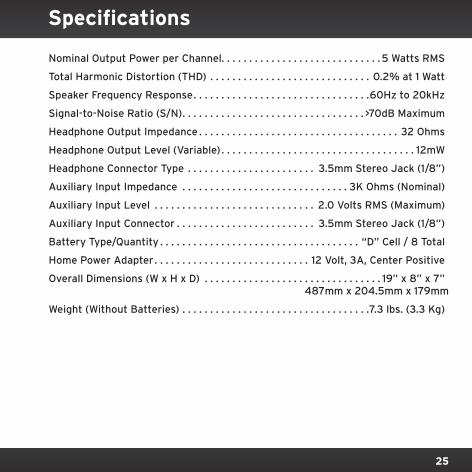
Nominal Output Power per Channel. . . . . . . . . . . . . . . . . . . . . . . . . . . . .5 Watts RMS
Total Harmonic Distortion (THD) . . . . . . . . . . . . . . . . . . . . . . . . . . . . . 0.2% at 1 Watt
Speaker Frequency Response . . . . . . . . . . . . . . . . . . . . . . . . . . . . . . . .60Hz to 20kHz
Signal-to-Noise Ratio (S/N) . . . . . . . . . . . . . . . . . . . . . . . . . . . . . . . . . >70dB Maximum
Headphone Output Impedance . . . . . . . . . . . . . . . . . . . . . . . . . . . . . . . . . . . . 32 Ohms
Headphone Output Level (Variable) . . . . . . . . . . . . . . . . . . . . . . . . . . . . . . . . . . . 12mW
Headphone Connector Type . . . . . . . . . . . . . . . . . . . . . . . 3.5mm Stereo Jack (1/8”)
Auxiliary Input Impedance . . . . . . . . . . . . . . . . . . . . . . . . . . . . . . 3K Ohms (Nominal)
Auxiliary Input Level . . . . . . . . . . . . . . . . . . . . . . . . . . . . . 2.0 Volts RMS (Maximum)
Auxiliary Input Connector . . . . . . . . . . . . . . . . . . . . . . . . . 3.5mm Stereo Jack (1/8”)
Battery Type/Quantity . . . . . . . . . . . . . . . . . . . . . . . . . . . . . . . . . . . . “D” Cell / 8 Total
Home Power Adapter . . . . . . . . . . . . . . . . . . . . . . . . . . . . 12 Volt, 3A, Center Positive
Overall Dimensions (W x H x D) . . . . . . . . . . . . . . . . . . . . . . . . . . . . . . . . 19” x 8” x 7”487mm x 204.5mm x 179mm
Weight (Without Batteries) . . . . . . . . . . . . . . . . . . . . . . . . . . . . . . . . . .7.3 lbs. (3.3 Kg)

26
IC Statement
Warning
Changes or modifications not expressly approved by the manufacturer could void the user’s authority to operate the equipment.
Canadian Compliance
This Class B digital apparatus complies with Canadian ICES-003.
IC STATEMENT
Operation is subject to the following two conditions: (1) this device may not cause interference, and (2) this device must accept any interference, including interference that may cause undesired operation of the device. For product available in the Canada market, only channel 1~11 can be operated. Selection of other channels is not possible. This device and its antenna(s) must not be co-located or operation in conjunction with any other antenna or transmitter. To reduce potential radio interference to other users, the antenna type and its gain should be so chosen that the equivalent isotropically radiated power (e.i.r.p) is not more than that permitted for successful communication. IC Radiation Exposure Statement: This equipment complies with IC RSS-102 radiation exposure limits set forth for an uncontrolled environment. This equipment should be installed and operated with minimum distance 20cm between the radiator & your body.

27
© 2016 Sirius XM Canada Inc. “SiriusXM”, the SiriusXM logo, channel names and logos are trademarks of Sirius XM Radio Inc. and are used under license. “NFL” and the NFL Shield design are trademarks of the National Football League. NASCAR® is a registered trademark of the National Association for Stock Car Auto Racing, Inc. The NBA and NBA member team identifications are the intellectual property of NBA Properties, Inc. and the respective NBA member teams. © 2016 NBA Properties, Inc. All rights reserved. NHL and the NHL Shield are registered trademarks of the National Hockey League. © NHL 2016. Elvis Radio logo © EPE Reg. U.S. Pat & TM off. CFL® is a registered trademark of the Canadian Football League. All other trademarks, service marks, images and logos are property of their respective owners and are used with permission. All Rights Reserved. Required subscription sold separately. Premier subscription required for some channels. Prices and programming is subject to change. See Customer Agreement for complete terms at siriusxm.ca.
Copyrights & Trademarks
28
1-3/8”
1-1/8”
Indoor/Outdoor Antenna Template

29
Write down the Sirius ID (SID) or XM Radio ID of your Radio in the space provided below.
ID:
Sirius or XM Radio ID


siriusxm .ca
Sirius XM Canada Inc .135 Liberty St . - 4th floorToronto, Ontario, M6K 1A71-888-539-(7474)
© 2016 Sirius XM Canada Inc.
SXMB2C User Guide 160210a