sametime 9.0.1 integration guide - · ibm collaboration solutions, ibm software group, ... install...
TRANSCRIPT

Sametime 9.0.1 Integration Guide
Integrating Sametime 9.0.1 with Domino 9.0.1, iNotes 9.0.1, Connections 5.5, and WebSphere Portal 8.5
Imran Khan Alicia Casarrubios
IBM Collaboration Solutions, IBM Software Group, Mulhuddart, Ireland

IBM Sametime 9.0.1 Integration Guide 2
Contents Configuring Sametime 9.0.1 ............................................................................................................................................ 3
Configuring Single Sign-On for Sametime ............................................................................................................... 3
Exporting the LTPA token for use in other products .............................................................................................. 4Configuring the limits.conf file for Sametime .................................................................................................. 4
Configuring Domino 9.0.1 ................................................................................................................................................ 6
Configuring Single Sign-On for Domino ................................................................................................................... 6
Configuring the limits.conf file for Domino ............................................................................................................... 6
Configuring iNotes 9.0.1 ................................................................................................................................................... 7
Configuring Connections 5.5 ........................................................................................................................................... 8
Configuring single sign-on for Connections ............................................................................................................. 8
Importing the LTPA token key file from Sametime ................................................................................................. 8
Enabling Sametime awareness in Connections ..................................................................................................... 9
Verifying the integration between Sametime and Connections .......................................................................... 10
Configuring WebSphere Portal 8.5 ............................................................................................................................... 11
Enabling security for Portal ...................................................................................................................................... 11
Configuring single sign-on for Portal ...................................................................................................................... 11
Importing the LTPA token key file from Sametime ............................................................................................... 12
Configuring available realm definitions for Portal ................................................................................................. 12
Configuring the current repository for Portal ......................................................................................................... 15
Ensuring that all Portal nodes use the same run-time security settings ........................................................... 15
Configuring Portal to use the Sametime Proxy Server ........................................................................................ 16
Creating resource environment providers ........................................................................................................ 16
Configuring the Portal profile to include the Sametime Proxy Server module ........................................... 16
Troubleshooting ............................................................................................................................................................... 18
Unable to log in to Sametime Proxy Server .......................................................................................................... 18
SSL certificates .......................................................................................................................................................... 18
Resources ......................................................................................................................................................................... 20
References ....................................................................................................................................................................... 21
About the authors ............................................................................................................................................................ 21
© Copyright IBM Corporation 2016.
US Government Users Restricted Rights – Use, duplication or disclosure restricted by GSA ADP Schedule
Contract with IBM Corp.
IBM Sametime 9.0.1 Integration Guide 3
Configuring Sametime 9.0.1 To set up an integrated Sametime 9.0.1 configuration using RHEL 6.4, deploy each of the following servers on computers with 20 GB + 30 GB VD, 2 virtual CPUs at 2GHz, and 4 GB memory:
• DB2 • Sametime System Console • Sametime Proxy Server • Sametime Community Server • Sametime Meeting Server • Sametime Advanced Server
Configuring Single Sign-On for Sametime Single Sign-On (SSO) must be configured across all of the Sametime components. In essence, all this entails is generating an SSO token on the WebSphere Application Server and importing the token into Domino. Configure SSO in Sametime by completing the following steps: 1. Log in to the WebSphere Integrated System console of your deployment manager (typically
the Sametime System Console) at: http://host_name:port/ibm/console
2. Click Security > Global Security. 3. In the Authentication section, expand Web and SIP security, and then click Single sign-on
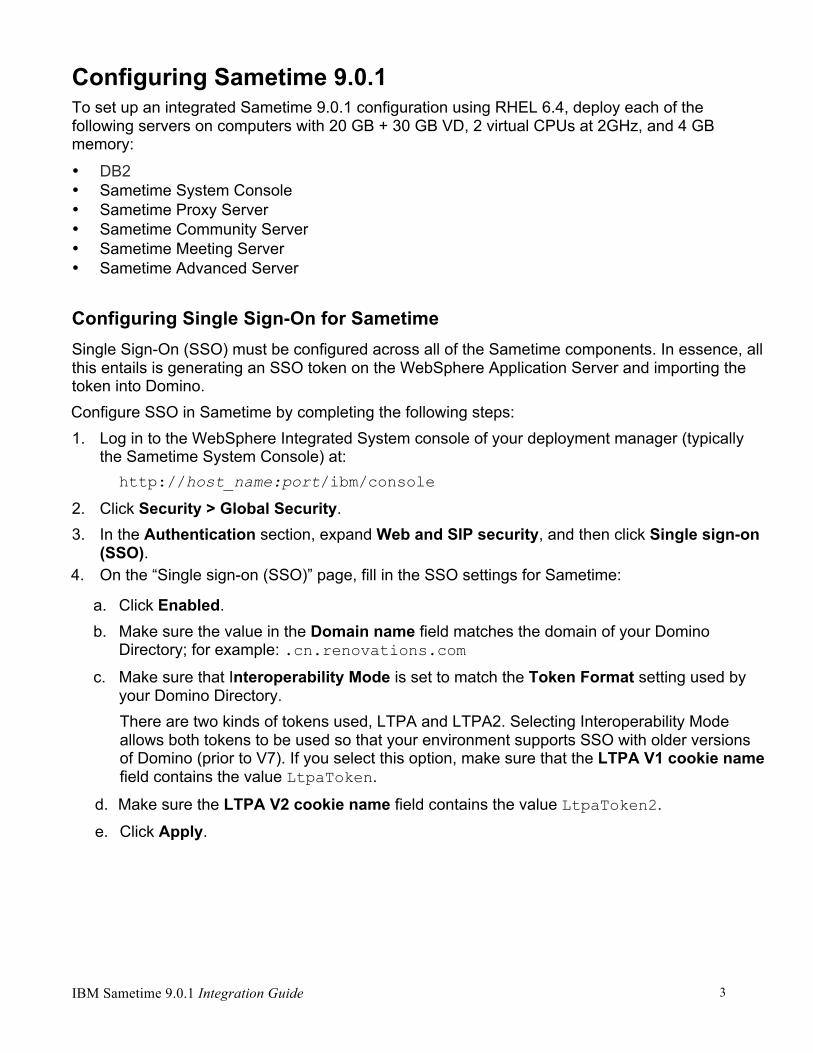
(SSO). 4. On the “Single sign-on (SSO)” page, fill in the SSO settings for Sametime:
a. Click Enabled. b. Make sure the value in the Domain name field matches the domain of your Domino
Directory; for example: .cn.renovations.com
c. Make sure that Interoperability Mode is set to match the Token Format setting used by your Domino Directory. There are two kinds of tokens used, LTPA and LTPA2. Selecting Interoperability Mode allows both tokens to be used so that your environment supports SSO with older versions of Domino (prior to V7). If you select this option, make sure that the LTPA V1 cookie name field contains the value LtpaToken.
d. Make sure the LTPA V2 cookie name field contains the value LtpaToken2.
e. Click Apply.
IBM Sametime 9.0.1 Integration Guide 4
Figure 1. Single sign-on settings
5. Ensure that the option Web inbound security attribute propagation is NOT selected. (If you change it now, click Apply to save the change you are making.)
6. Click the Save link in the “Messages” box to update the master configuration. Leave the Integrated Solutions Console open for the next task.
Exporting the LTPA token for use in other products Export the LTPA token for use in other products by completing the following steps: 1. Return to the navigation list and click Security > Global Security. 2. In the “Authentication” section, click LTPA. 3. In the “Cross-cell single sign-on” section, create a password, provide a path and file name for
storing the file (for example, C:\ssoLtpa.key), and then click Export keys.
If you do not specify a path when saving the file, the default location is the Dmgr folder; for example, on Windows: C:\Program Files(x86)\IBM\WebSphere\AppServer\profiles\...DMgr
Configuring the limits.conf file for Sametime 1. Configure the /etc/security/limits.conf file on the Sametime Community Server with
the following values, and then restart the server: * hard nofile 65535
* soft nofile 65535

IBM Sametime 9.0.1 Integration Guide 5
2. Configure the /etc/security/limits.conf file on the Sametime Proxy Server with the following values, and then restart the server:
* hard nofile 65000
* soft nofile 65000
3. Configure the /etc/security/limits.conf file on the Sametime Advanced Server with the following values, and then restart the server:
* hard nofile 65535
* soft nofile 65535
4. Configure the /etc/security/limits.conf file on the Sametime Meeting Server with the following values, and then restart the server:
* hard nofile 65535
* soft nofile 65535

IBM Sametime 9.0.1 Integration Guide 6
Configuring Domino 9.0.1 Configure Domino to support single sign-on.
Configuring Single Sign-On for Domino On the Domino server where the Domino Directory resides, use the Domino Administrator client to import the SSO key that you exported from Sametime: 1. Copy the key file (for example, ssoLtpa.key) from Sametime to the computer where the
Domino Directory resides. 2. Start the Domino Administrator client. 3. Click File > Open Server, provide the Domino Directory server's address, and then click OK.
If the server view does not display, you might need to temporarily drop the firewall. 4. From the navigation list, expand Web and click Web Server Configurations.
Tip: You might need to scroll to the beginning of the page to see the “Web SSO Configurations” section.
5. In the “Web SSO Configurations” section, select Web SSO Configuration for Ltpa Token, and then click Edit Document.
6. Click Keys > Import WebSphere LTPA Keys, and select the key file that you copied from Sametime. Verify that:
� The DNS domain is the same as on the Sametime server where you exported the key file, and that it begins with a . (dot), as in: .ne.renovations.com
� The Domino Server Names field under “Participating Servers” is set correctly (for example, host_name/ibm)
� The timeout and other details are set correctly 7. Click Save & Close. 8. Restart the Domino server for this change to take effect.
Configuring the limits.conf file for Domino Configure the /etc/security/limits.conf file on the Domino server with the following values, and then restart the server: * hard nofile 65535 * soft nofile 65535
IBM Sametime 9.0.1 Integration Guide 7
Configuring iNotes 9.0.1 Integration between iNotes and Sametime requires the use of the Sametime Proxy Server. Install the Sametime Proxy Server as part of your Sametime 9.0.1 deployment, and then update Domino settings to enable iNotes users to access Sametime features. 1. On the Domino server that is configured as a web server for iNotes, open the notes.ini file
in a text editor. 2. Set the following properties to enable iNotes integration with Sametime:
iNotes_WA_SametimeProxy=1 Enables integration between iNotes and the Sametime web client. iNotes_WA_SametimeProxyServer=http://STPS_host.domain:port Specifies the non-secured protocol, address, and (optional) port of the Sametime Proxy Server for the iNotes client to use. For example: http://STPS.ne.renovations.com
iNotes_WA_SametimeProxyServerSSL=https://STPS_host.domain:port Specifies the secured protocol, address, and (optional) port of the Smaetime Proxy Server for the iNotes client to use when SSL is enabled. For example: https://STPS.ne.renovations.com
iNotes_WA_SametimeProxyLogin=1 Enables a forced log in that prompts users with the Sametime login screen. Use a forced log in whenever you need to authenticate iNotes users who are accessing Sametime; for example, when you do not have single sign-on configured between Domino and Sametime.
3. Save and close the notes.ini file.
4. Restart the Domino server.
IBM Sametime 9.0.1 Integration Guide 8
Configuring Connections 5.5 Make sure that the single sign-on configurations are the same for the Sametime and Connections environments, and import the LTPA key file from Sametime.
Configuring single sign-on for Connections Complete the following steps to configure SSO in Connections using the same settings as you configured for Sametime: 1. Log in to the WebSphere Integrated System console of your Connections deployment
manager as the WebSphere administrator. 2. Configure SSO settings:
a. In the navigation list, click Security > Global Security. b. In the “Authentication” section, click Web and SIP security > Single sign-on (SSO). c. Use the same SSO settings as you did for Sametime. d. Click Apply. e. Click the Save link in the “Messages” box to update the master configuration.
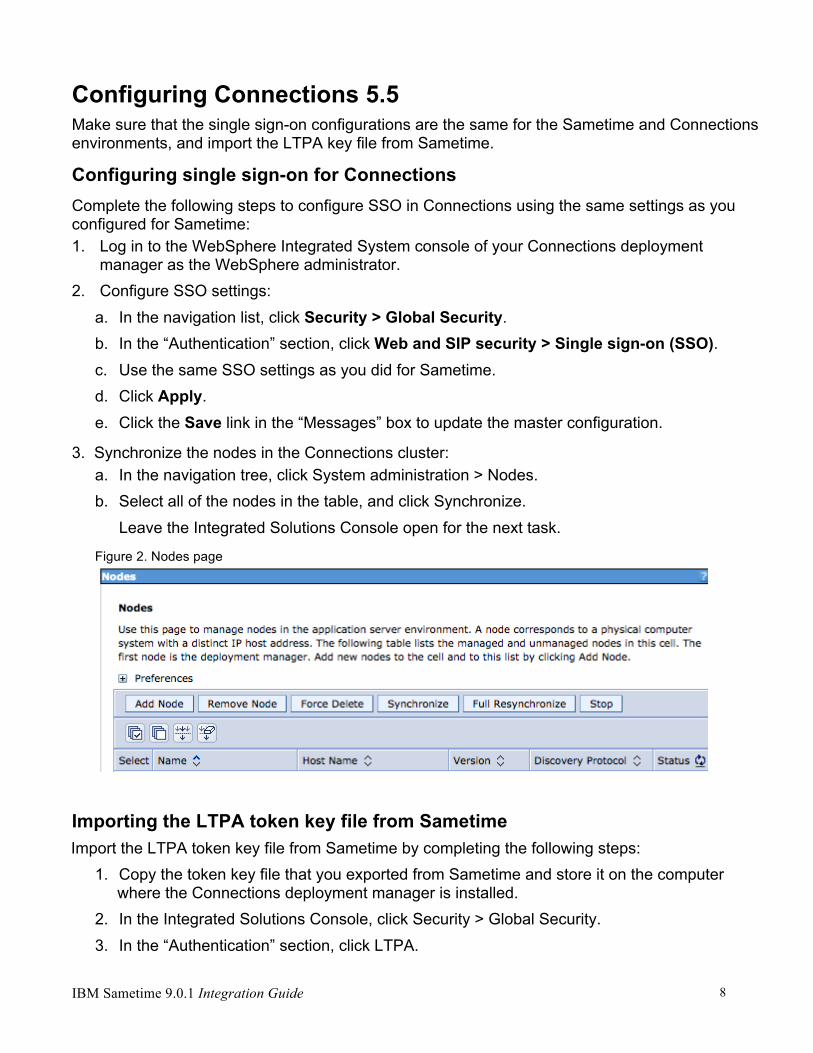
3. Synchronize the nodes in the Connections cluster: a. In the navigation tree, click System administration > Nodes. b. Select all of the nodes in the table, and click Synchronize.
Leave the Integrated Solutions Console open for the next task.
Figure 2. Nodes page
Importing the LTPA token key file from Sametime Import the LTPA token key file from Sametime by completing the following steps:
1. Copy the token key file that you exported from Sametime and store it on the computer where the Connections deployment manager is installed.
2. In the Integrated Solutions Console, click Security > Global Security. 3. In the “Authentication” section, click LTPA.
IBM Sametime 9.0.1 Integration Guide 9
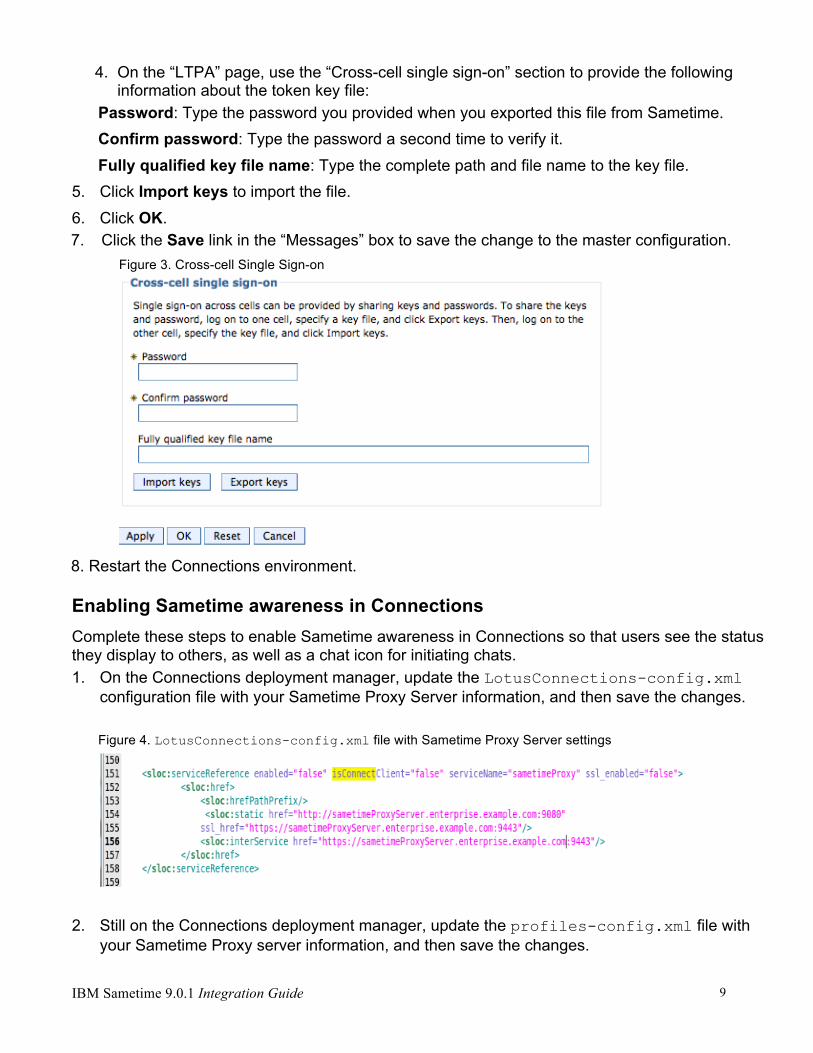
4. On the “LTPA” page, use the “Cross-cell single sign-on” section to provide the following information about the token key file:
Password: Type the password you provided when you exported this file from Sametime. Confirm password: Type the password a second time to verify it. Fully qualified key file name: Type the complete path and file name to the key file.
5. Click Import keys to import the file. 6. Click OK. 7. Click the Save link in the “Messages” box to save the change to the master configuration.
Figure 3. Cross-cell Single Sign-on
8. Restart the Connections environment.
Enabling Sametime awareness in Connections Complete these steps to enable Sametime awareness in Connections so that users see the status they display to others, as well as a chat icon for initiating chats. 1. On the Connections deployment manager, update the LotusConnections-config.xml
configuration file with your Sametime Proxy Server information, and then save the changes.
Figure 4. LotusConnections-config.xml file with Sametime Proxy Server settings
2. Still on the Connections deployment manager, update the profiles-config.xml file with
your Sametime Proxy server information, and then save the changes.

IBM Sametime 9.0.1 Integration Guide 10
Figure 5. Profiles-config.xml file with Sametime Proxy Server settings
3. Synchronize the nodes in the Connections cluster:
a. In the navigation tree, click System administration > Nodes.
b. Select all of the nodes in the table, and click Synchronize. 4. Restart the environment.
Verifying the integration between Sametime and Connections Start Connections and verify that you are automatically logged in to Sametime. Your Sametime status displays in the bottom right-hand corner of Connections, along with a chat icon. Figure 6: Sametime integration points in Connections user interface
Use the chat icon to start a chat with another user. View a user's business card and start a chat from the business card. Verify that the user's status remains displayed correctly when you select different applications in Connections, such as blogs or wikis.

IBM Sametime 9.0.1 Integration Guide 11
Configuring WebSphere Portal 8.5 Use these steps to enable security and configure single sign-on for Portal 8.5
Enabling security for Portal 1. On the deployment manager for Portal, log in to the WebSphere Integrated System Console
as the WebSphere administrator: http://Host_Name:Port_Number/ibm/console
2. Click Security > Global Security. 3. In the “Administrative security” section, select Enable administrative security. 4. In the “Application security” section, select Enable application security. 5. Click Apply. Leave the Integrated Solutions Console open for the next task.
Figure 7: Global Security settings
Configuring single sign-on for Portal 1. Return to the navigation list and click Security > Global Security. 2. Click Web and SIP Security and then click Single Sign-On (SSO). 3. In the “General Properties” section, select Enabled, and then type the Domain name.

IBM Sametime 9.0.1 Integration Guide 12
Figure 8. Global Security - Single Sign-on (SSO)
7. Ensure that the option Web inbound security attribute propagation is NOT selected. (If you change it now, click Apply to save the change you are making.)
8. Click the Save link in the “Messages” box to update the master configuration. Leave the Integrated Solutions Console open for the next task.
Importing the LTPA token key file from Sametime Import the LTPA token from Sametime by completing the following steps: 1. Copy the token file that you exported from Sametime and store it on the computer where the Portal deployment manager is installed. 2. In the Integrated Solutions Console, click Security > Global Security. 3. In the “Authentication” section, click LTPA. 4. On the “LTPA” page, use the “Cross-cell single sign-on” section to provide the following information about the token key file: Password: Type the password you provided when you exported this file from Sametime. Confirm password: Type the password a second time to verify it. Fully qualified key file name: Type the complete path and file name to the key file. 5. Click Import keys to import the file. 6. Click OK. 7. Click the Save link in the “Messages” box to save the change to the master configuration. 8. Restart the Portal environment.
Configuring available realm definitions for Portal Use these steps to configure the available realm definitions:

IBM Sametime 9.0.1 Integration Guide 13
1. Navigate to Security > Global Security > Available realm definitions. 2. Select Federated repositories and click Configure > Manage repositories. 3. Click Add and provide the repository settings:

IBM Sametime 9.0.1 Integration Guide 14
Figure 9: Repository settings
a. In the “General Properties” section, type a Repository identifier. b. Select the Directory Type from the list. c. Complete the following fields:
◦ Primary host name ◦ Bind distinguished name ◦ Bind password
2. Click Add Base entry to Realm and enter the details for your LDAP server, as shown in Figure 10.
Figure 10: Global Security - Add Base Entry to Realm
3. Click Apply. 4. Click the Save link in the “Messages” box to save the change to the master configuration.
Leave the Integrated Solutions Console open for the next task.

IBM Sametime 9.0.1 Integration Guide 15
Configuring the current repository for Portal 1. Return to the navigation list and click Security > Global Security > Available realm
definitions. 2. Select Federated repositories, and then click Configure. 3. For the field Realm name, change the entry to point to the LDAP you are using. 4. Click OK. 5. Click the Save link in the “Messages” box to update the master configuration.
Figure 11. Federated repositories
6. Return to the navigation list and click Security > Global Security > Available realm
definitions: Federated repositories. 7. Click Set as current. 8. Click OK. 9. Click the Save link in the “Messages” box to update the master configuration.
Ensuring that all Portal nodes use the same run-time security settings The security configuration is enabled or modified in the Network Deployment environment of Portal Server. Ensure that all processes in the Portal deployment use the same security run-time settings by completing the following steps: 1. Synchronize all nodes in the deployment:
a. In the navigation tree, click System administration > Nodes. b. Select all nodes in the table, and click Synchronize.
2. If any node agents are currently stopped, issue a manual syncNode command before starting that node agent.

IBM Sametime 9.0.1 Integration Guide 16
3. Stop all processes in the entire cell, including the deployment manager, node agents, and application servers.
4. Restart all processes in the cell in the following sequence: restart the deployment manager and node agents first, then restart the application servers.
Configuring Portal to use the Sametime Proxy Server Configure the Portal environment resources to include the Sametime Proxy Server, and then update the Portal profile to include the Sametime Proxy Server module.
Creating resource environment providers 1. On the deployment manager for Portal, log in to the WebSphere Integrated Solutions Console
as the WebSphere administrator. 2. Click Resources > Resource Environment Providers. 3. Open the WP CommonComponentConfigService provider. 4. Verify or create the following custom properties: cc.sametime.proxy.enabled
Set the value to true to enable integration with Sametime. cc.sametime.proxy.scheme
Set the value to http or https to indicate whether SSL is enabled on the Sametime Proxy Server. Specifying this setting incorrectly will prevent integration with Sametime.
cc.sametime.proxy.host Set the value to the fully qualified host name of your Sametime Proxy Server using the
formation Host_name.Domain_name; for example: STPS.ne.revonations.com cc.sametime.proxy.port
Set the value to the port of your Sametime Proxy Server. cc.sametime.connect.client
Set the value to false. If you set the value to true, the Sametime Proxy Server uses the Sametime Connect client, which is installed on the Sametime Proxy Server.
cc.sametime.proxy.version Set the value to match the proxy version in your deployment.
5. Click OK. 6. Click the Save link the “Messages” box to update the master configuration.
Configuring the Portal profile to include the Sametime Proxy Server module 1. Connect to Portal using a WebDAV client as explained in Using WebDAV with WebSphere
Portal (see the Resources section). 2. Navigate to the profiles folder: /fs-type1/themes/Portal8.0/profiles.

IBM Sametime 9.0.1 Integration Guide 17
3. Copy the profile_full.json file to your WebDAV client.
4. Make a back-up copy of the file using a unique name. 5. Edit the profile_full.json file and add wp_sametime_proxy to the moduleIDs section of the profile. 6. Copy this customized profile to the Portal deployment manager. 7. Restart the Portal server to active the profile.

IBM Sametime 9.0.1 Integration Guide 18
Troubleshooting
Unable to log in to Sametime Proxy Server The SSO configuration between Domino and the Sametime Proxy Server is not correct. Verify that the same domain value is used in Domino and the Sametime System Console.
SSL certificates If you see errors related to SSL certificates, make sure that you have correctly enabled SSL on all servers and exchanged certificates. The SSL certificates must be exchanged between Connections and Portal, and between Sametime and Portal. 12/09/16 14:38:29:949 IST] 0000005f servlet I com.ibm.ws.webcontainer.servlet.ServletWrapper init SRVE0242I: [wps] [/wps] [login]: Initialization successful. [12/09/13 14:59:16:668 IST] 0000005c WSX509TrustMa E CWPKI0022E: SSL HANDSHAKE FAILURE: A signer with SubjectDN "". The signer may need to be added to local trust store located in SSL configuration alias "NodeDefaultSSLSettings" loaded from SSL configuration file "security.xml". The extended error message from the SSL handshake exception is: "PKIX path building failed: java.security.cert.CertPathBuilderException: PKIXCertPathBuilderImpl could not build a valid CertPath.; internal cause is: java.security.cert.CertPathValidatorException: The certificate issued by is not trusted; internal cause is: java.security.cert.CertPathValidatorException: Certificate chaining error". [12/09/16 14:59:16:668 IST] 0000005c SystemOut O [12/09/16 14:59:16:668 IST] 0000005c SystemOut O CWPKI0022E: SSL HANDSHAKE FAILURE: A signer with SubjectDN. The signer may need to be added to local trust store located in SSL configuration alias "NodeDefaultSSLSettings" loaded from SSL configuration file "security.xml". The extended error message from the SSL handshake exception is: "PKIX path building failed: java.security.cert.CertPathBuilderException: PKIXCertPathBuilderImpl could not build a valid CertPath.; internal cause is: java.security.cert.CertPathValidatorException: The certificate issued by xxxxxxxxxxx is not trusted; internal cause is: java.security.cert.CertPathValidatorException: Certificate chaining error". [12/09/16 14:59:16:668 IST] 0000005c SystemOut O [12/09/16 14:59:16:668 IST] 0000005c SystemOut O [12/09/16 14:59:16:668 IST] 0000005c SystemOut O CWPKI0428I: The signer might need to be added to the local trust store. You can use the Retrieve from port option in the administrative console to retrieve the certificate and resolve the problem. If you determine that the request is trusted.
IBM Sametime 9.0.1 Integration Guide 19
Complete the following steps to import a certificate into WebSphere Application Server: 1. On the server where you want to import a certificate, log in to the WebSphere Integrated
Solutions Console as the WebSphere administrator. 2. Click Security > SSL certificate and key management. 3. Under “Configuration settings”, click Manage endpoint security configurations. 4. Select the appropriate outbound configuration to get to the appropriate management scope:
(cell):Cell_Name:(node):Node_Name
5. Under “Related Items”, click Key stores and certificates, and then click the NodeDefaultTrustStore key store.
6. Under “Additional Properties”, click Signer certificates and then click Retrieve From Port. 7. Fill in the following fields to indicate where the certificate is located:
Host: Type the host name of the server where the certificate is stored. Port: Type the port number (for example, 8881) that the server is listening on.
Alias: Type an alias for the certificate; for example: Host_Name_cert.
8. Click Retrieve Signer Information. 9. Verify that the certificate information is for a certificate that you can trust. 10. Click Apply; then click the Save link the “Messages” box to save the change to the master
configuration.

IBM Sametime 9.0.1 Integration Guide 20
Resources
Integrating SPNEGO with IBM Sametime 8.5.2 components using IBM WebSphere Application Server
http://public.dhe.ibm.com/software/dw/lotus/IntegratingSPNEGOwithSametime8.5.2_WAS7.0.15Updated.pdf
IBM Sametime V9.0.1 documentation http://www.ibm.com/support/knowledgecenter/SSKTXQ_9.0.1/admin/welcome/welcome.html?cm_mc_uid=01431741422614484488446&cm_mc_sid_50200000=1479296995
IBM Sametime Wiki https://www-10.lotus.com/ldd/stwiki.nsf IBM Connections Wiki
https://www-10.lotus.com/ldd/lcwiki.nsf IBM Notes and Domino Wiki https://www-10.lotus.com/ldd/dominowiki.nsf IBM WebSphere Portal Wiki https://www-10.lotus.com/ldd/portalwiki.nsf/

IBM Sametime 9.0.1 Integration Guide 21
References
Configuring Portal V8 documentation http://www.lotus.com/ldd/portalwiki.nsf/xpDocViewer.xsp?lookupName=IBM+WebSphere+Portal+8+Product+Documentation#action=openDocument&res_title=Configuring_Sametime_Proxy_wp8&content=pdcontent
Deploying Lotus iNotes 8.5.3 with Sametime Proxy 8.5.2 http://www.lotus.com/ldd/dominowiki.nsf/xpDocViewer.xsp?lookupName=Lotus%20iNotes%20deployment%20scenarios&documentId=37E250FFEFFF23C68525792C0059B75E&action=openDocument&rev=true&mode=original&content=pdcontent
Integrating SPNEGO with IBM Sametime components with on a federated deployment, June 2012, Conall O'Cofaigh
http://www.ibm.com/developerworks/lotus/documentation/spnegosametime/
About the authors Imran Khan is a Level 2 Sametime Technical Lead. He has been with IBM since 2006, with a focus / special attention on Sametime development, support, cross-product interoperability, and security architecture. Imran has worked on Level 2 Customer Support for the past 6 years. Alicia Casarrubios joined the Level 2 Sametime Support team in May 2016. Since then, Alicia has been engaged in a number of customer projects involving Sametime clustering and deployments. Previous to this assignment, Alicia worked on the Sametime Verification Test team. Alicia has been with IBM since 2009, focusing on integration and interoperability across Sametime products.