request single day absence - und: university … · web viewafter the initial rollout for each...
TRANSCRIPT
North DakotaUniversity System
Absence ManagementEmployee Self Service
Training ManualPEOPLESOFT
VERSION 9.1
1
Table of ContentsEmployee Self Service - Absence Management overview.............................................................3
REQUEST SINGLE DAY ABSENCE (FULL DAY)................................................................................4
VIEWING ABSENCE REQUEST HISTORY, VIEWING ABSENCE BALANCES AND FORECASTING.................8
VIEW ABSENCE BALANCES - DETAIL........................................................................................................9
Absence Request Scenarios..............................................................................................................11
REQUEST SINGLE DAY ABSENCE (partial day).......................................................................................11
REQUEST MULTIPLE DAY ABSENCE (full days)......................................................................................12
REQUEST SINGLE SHIFT ABSENCE CROSSING MIDNIGHT.....................................................................13
SUBMIT or EDIT A Saved Absence..............................................................................................14
EDIT A PUSHED BACK ABSENCE...............................................................................................15
2
Employee Self Service - ABSENCE MANAGEMENT
OVERVIEW
After the initial rollout for each campus, all employees who earn leave will request time off through the Absence Management module in PeopleSoft. This applies to all types of leave: sick (with the subset of dependent sick), annual, comp time, jury, military and funeral.
An absence can be requested for an event that occurred in the past (e.g. a sick day) or for an event to occur in the future, such as annual leave. All absences should be entered by the employee, and approved by the supervisor, no later than the end of the pay period in which the absence occurs.
An absence cannot be requested for a date an employee is not scheduled to workEmployee balances reflect the pay period of the most recent check. For example, if today is April 22; the last paycheck was April 15th, the pay period for April 15th paycheck is March 16th-31st. The leave balances would be current as of March 31st. Please contact your Human Resources/Payroll Office if you feel your balances are incorrect.
NOTE: During the initial rollout, leave balances from the old method of taking leave will not display in Absence Management until after the first payroll runs under the new method. This is a planned part of the conversion process._____________________________________________________________________________
The business process under the new process is as follows:1. An employee signs into PeopleSoft and enters a leave request before (for planned
absences) or after (for unplanned absences) an event.2. The supervisor signs into HRMS and reviews absence approvals as needed3. The supervisor has three choices for taking action on the request:
a. Approve – the employee receives an approval emailb. Deny – the employee receives a denial emailc. Push back – the employee receives an email requesting modification of the
request.4. If the request is approved, it is processed in the next pay cycle.
_______________________________________________________________________NOTE: Once an absence request has been approved, it cannot be canceled by the employee or the supervisor. Let your supervisor know if you need to cancel a submitted or approved absence request
3
REQUEST SINGLE DAY ABSENCE (FULL DAY)
Click on Absence Request Link on the home page once logged into HR or you can navigate to the Absence Request
Self Service>Time Reporting>Report Time>Absence Request
The resulting screen will look like this:
4
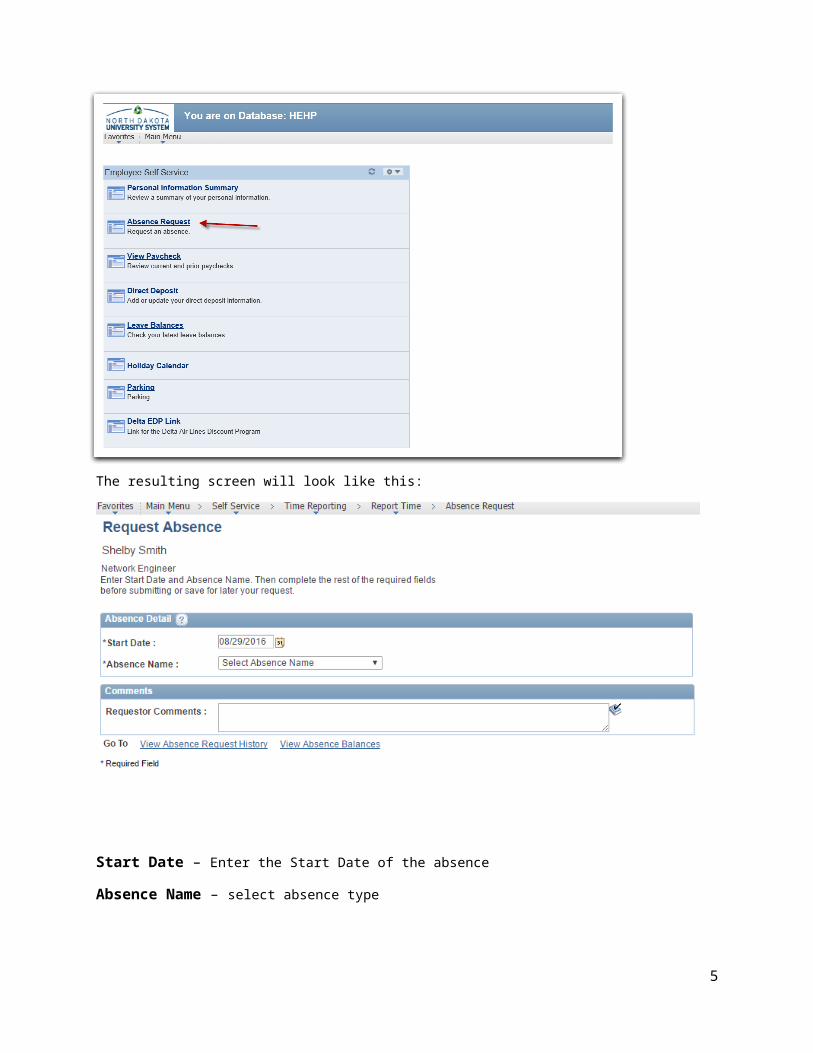
Start Date – Enter the Start Date of the absence
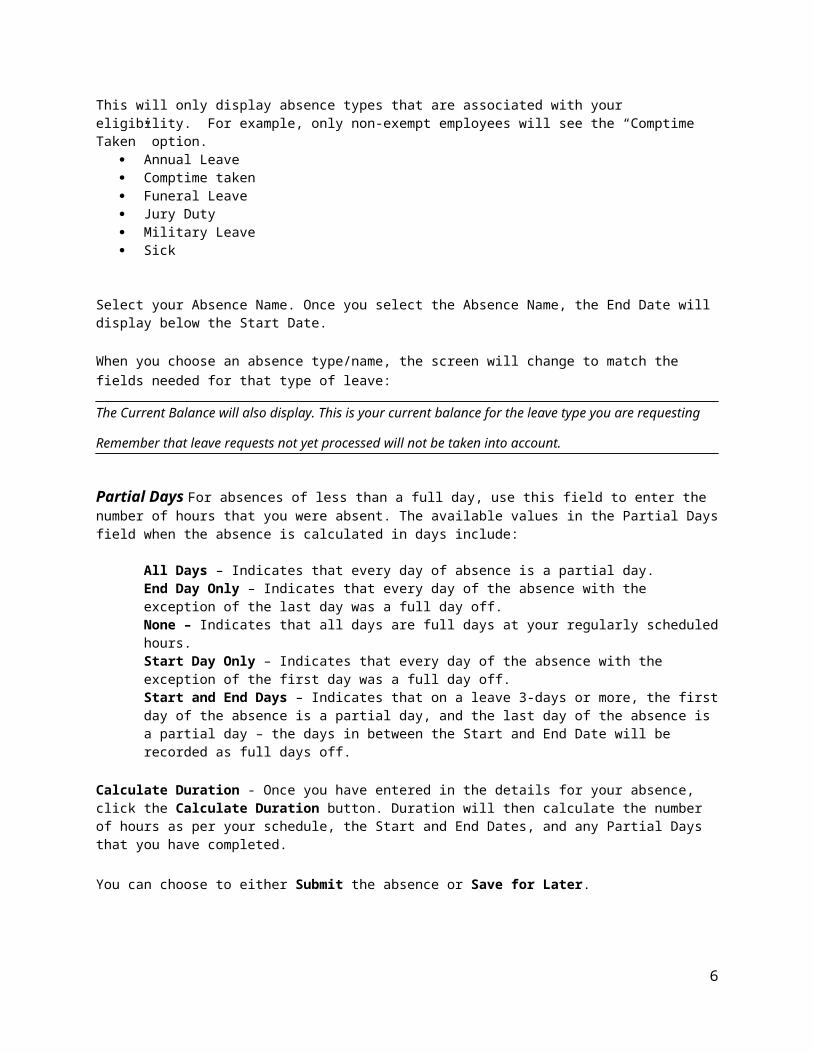
Absence Name – select absence type This will only display absence types that are associated with your eligibility. For example, only non-exempt employees will see the “Comptime Taken” option.
Annual Leave Comptime taken Funeral Leave Jury Duty Military Leave Sick
Select your Absence Name. Once you select the Absence Name, the End Date will display below the Start Date.
When you choose an absence type/name, the screen will change to match the fields needed for that type of leave:
The Current Balance will also display. This is your current balance for the leave type you are requesting
Remember that leave requests not yet processed will not be taken into account.
Partial Days For absences of less than a full day, use this field to enter the number of hours that you were absent. The available values in the Partial Days field when the absence is calculated in days include:
All Days – Indicates that every day of absence is a partial day. End Day Only – Indicates that every day of the absence with the exception of the last day was a full day off. None – Indicates that all days are full days at your regularly scheduled hours. Start Day Only – Indicates that every day of the absence with the exception of the first day was a full day off. Start and End Days – Indicates that on a leave 3-days or more, the first day of the absence is a partial day, and the last day of the absence is a partial day – the days in between the Start and End Date will be recorded as full days off.
Calculate Duration - Once you have entered in the details for your absence, click the Calculate Duration button. Duration will then calculate the number of hours as per your schedule, the Start and End Dates, and any Partial Days that you have completed.
You can choose to either Submit the absence or Save for Later.
5
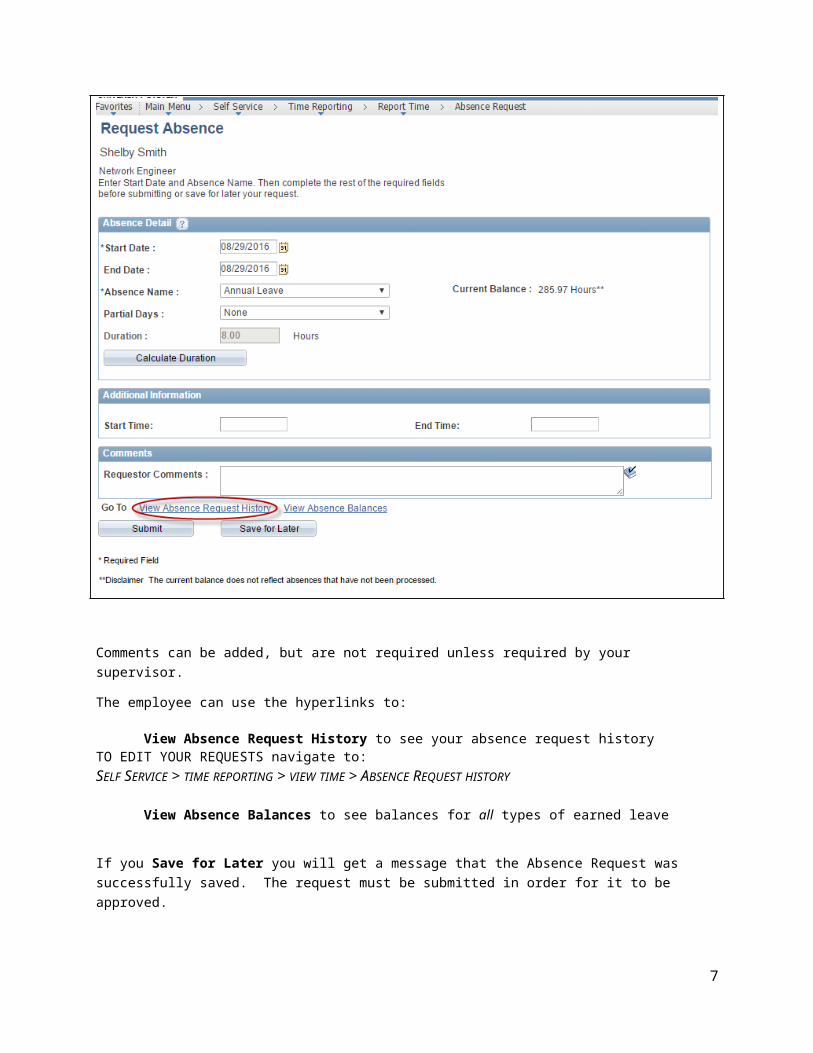
Comments can be added, but are not required unless required by your supervisor.
The employee can use the hyperlinks to:
View Absence Request History to see your absence request history TO EDIT YOUR REQUESTS navigate to:SELF SERVICE > TIME REPORTING > VIEW TIME > ABSENCE REQUEST HISTORY
View Absence Balances to see balances for all types of earned leave
If you Save for Later you will get a message that the Absence Request was successfully saved. The request must be submitted in order for it to be approved.
Once the Absence Request is ready to be submitted, and the employee chooses the Submit button, the following message will display:
After choosing “Yes” you will receive confirmation the Absence Request was successfully submitted, click OK
6
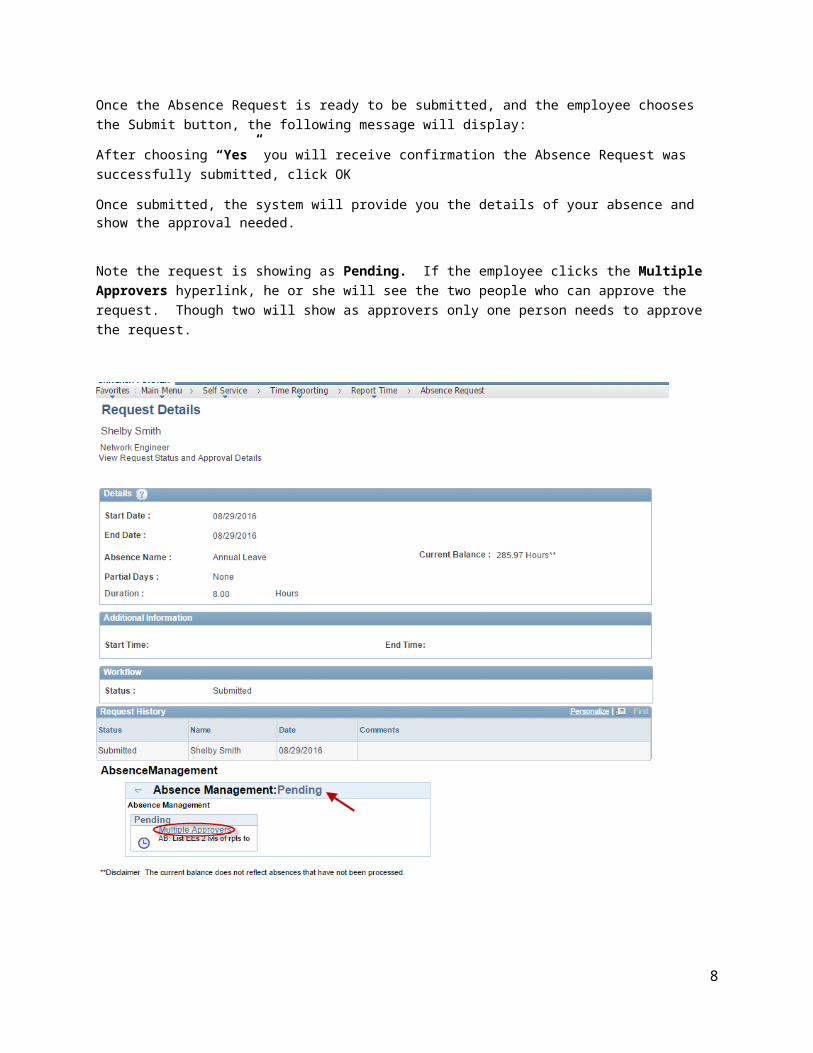
Once submitted, the system will provide you the details of your absence and show the approval needed.
Note the request is showing as Pending. If the employee clicks the Multiple Approvers hyperlink, he or she will see the two people who can approve the request. Though two will show as approvers only one person needs to approve the request.
7
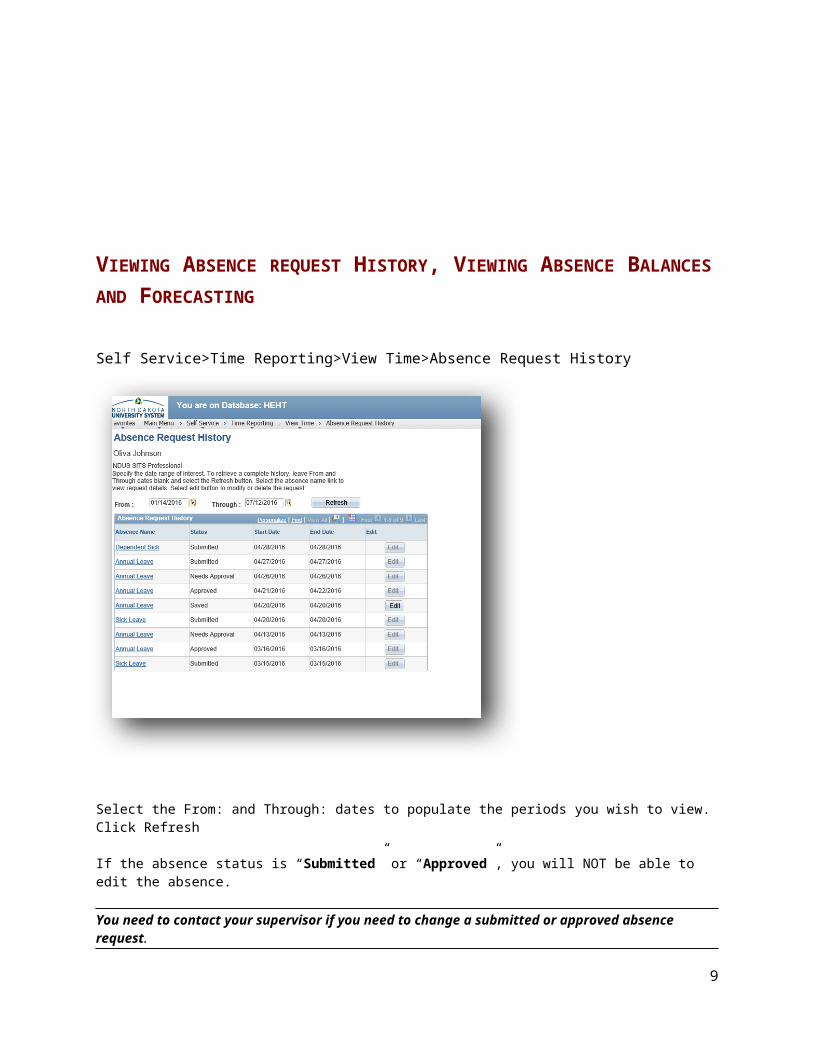
VIEWING ABSENCE REQUEST HISTORY, VIEWING ABSENCE BALANCES AND FORECASTING
Self Service>Time Reporting>View Time>Absence Request History
Select the From: and Through: dates to populate the periods you wish to view. Click Refresh
If the absence status is “Submitted” or “Approved”, you will NOT be able to edit the absence.
You need to contact your supervisor if you need to change a submitted or approved absence request.
To edit a “Saved” Absence Request, click on the EDIT button, complete the details of the absence request.
The supervisor can take the following action with the Absence Request: 1. Approve
2. Deny3. Push back
In all three instances, the employee will receive a PeopleSoft-generated email informing them of the outcome. If the employee has any questions, they should consult their supervisor.
8
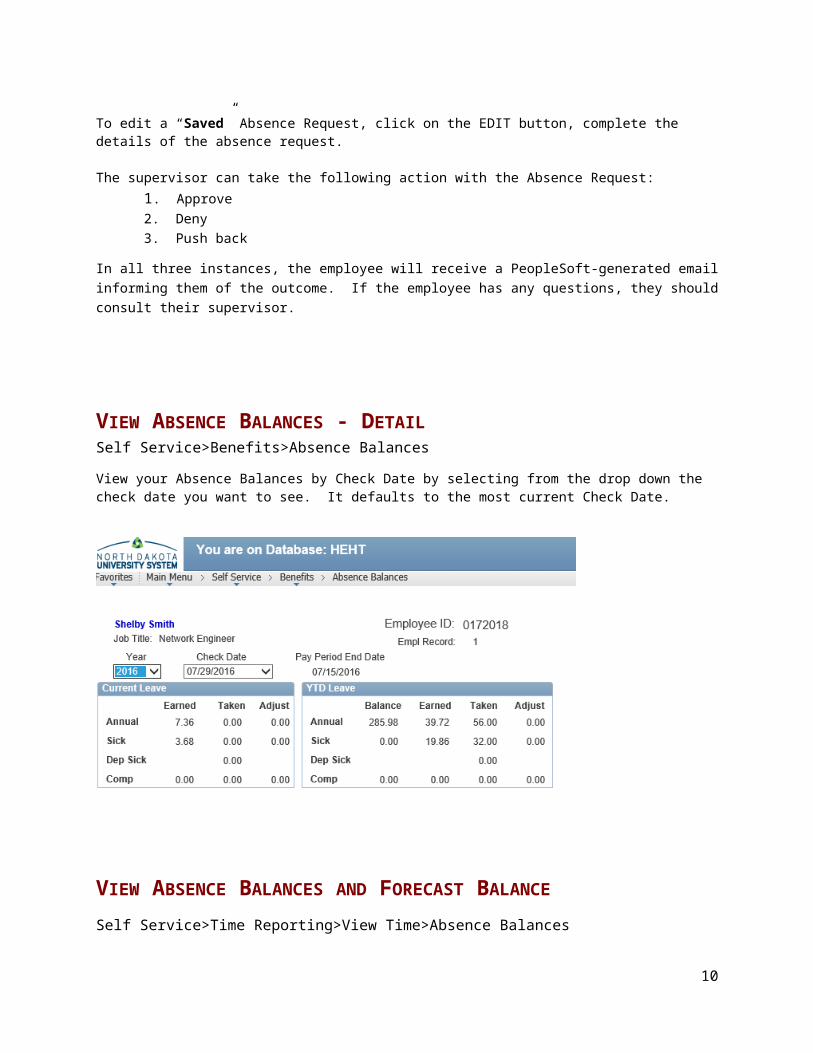
VIEW ABSENCE BALANCES - DETAILSelf Service>Benefits>Absence Balances
View your Absence Balances by Check Date by selecting from the drop down the check date you want to see. It defaults to the most current Check Date.
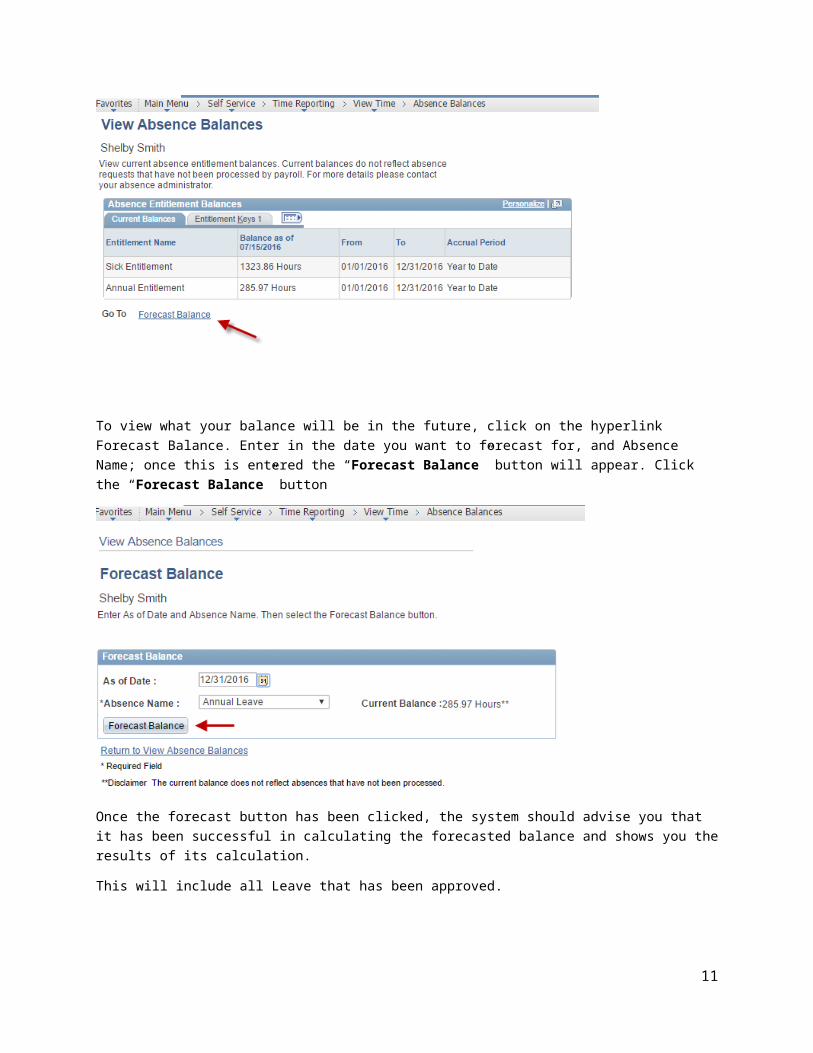
VIEW ABSENCE BALANCES AND FORECAST BALANCE
Self Service>Time Reporting>View Time>Absence Balances
9
To view what your balance will be in the future, click on the hyperlink Forecast Balance. Enter in the date you want to forecast for, and Absence Name; once this is entered the “Forecast Balance” button will appear. Click the “Forecast Balance” button
Once the forecast button has been clicked, the system should advise you that it has been successful in calculating the forecasted balance and shows you the results of its calculation.
This will include all Leave that has been approved.
10
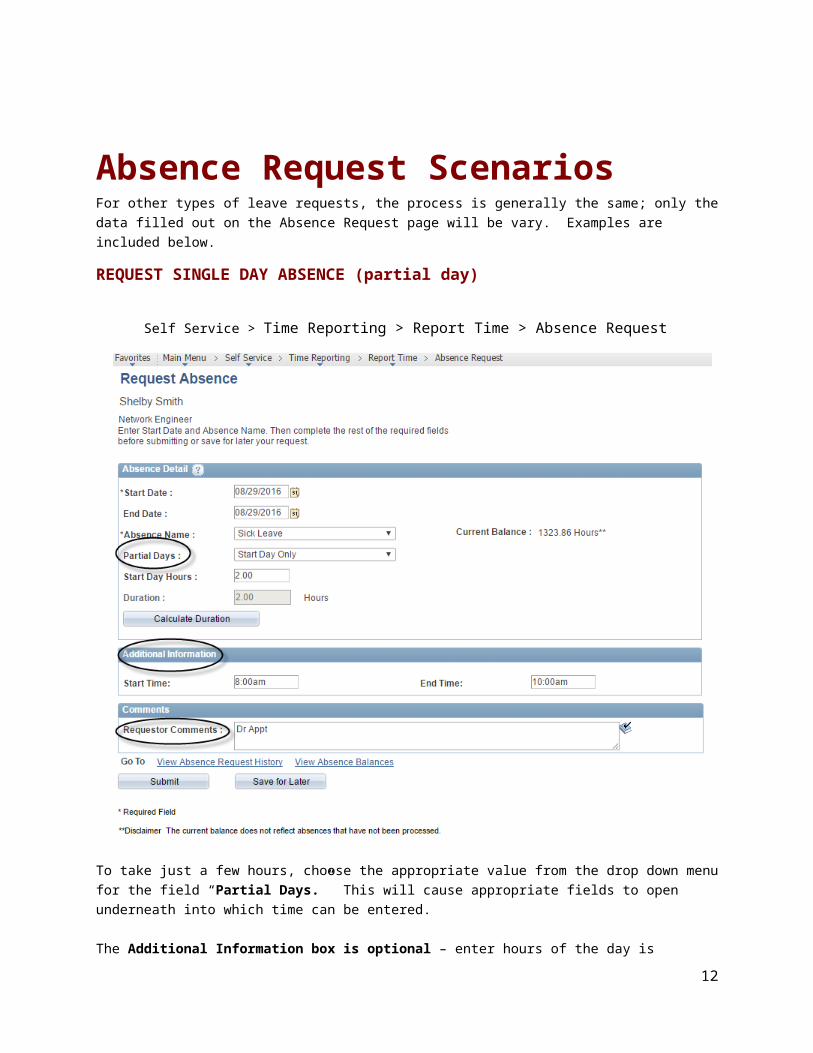
Absence Request ScenariosFor other types of leave requests, the process is generally the same; only the data filled out on the Absence Request page will be vary. Examples are included below.
REQUEST SINGLE DAY ABSENCE (partial day)
Self Service > Time Reporting > Report Time > Absence Request
To take just a few hours, choose the appropriate value from the drop down menu for the field “Partial Days.” This will cause appropriate fields to open underneath into which time can be entered.
The Additional Information box is optional – enter hours of the day is requested to do so by your supervisor. This is information only, it does not calculate any absence
The Comments box is also optional. Enter information here if requested to do so by your supervisor.
11
Remember that this data is viewed by your supervisor, and people in the HR/Payroll office. Refrain from entering any personal medical data.
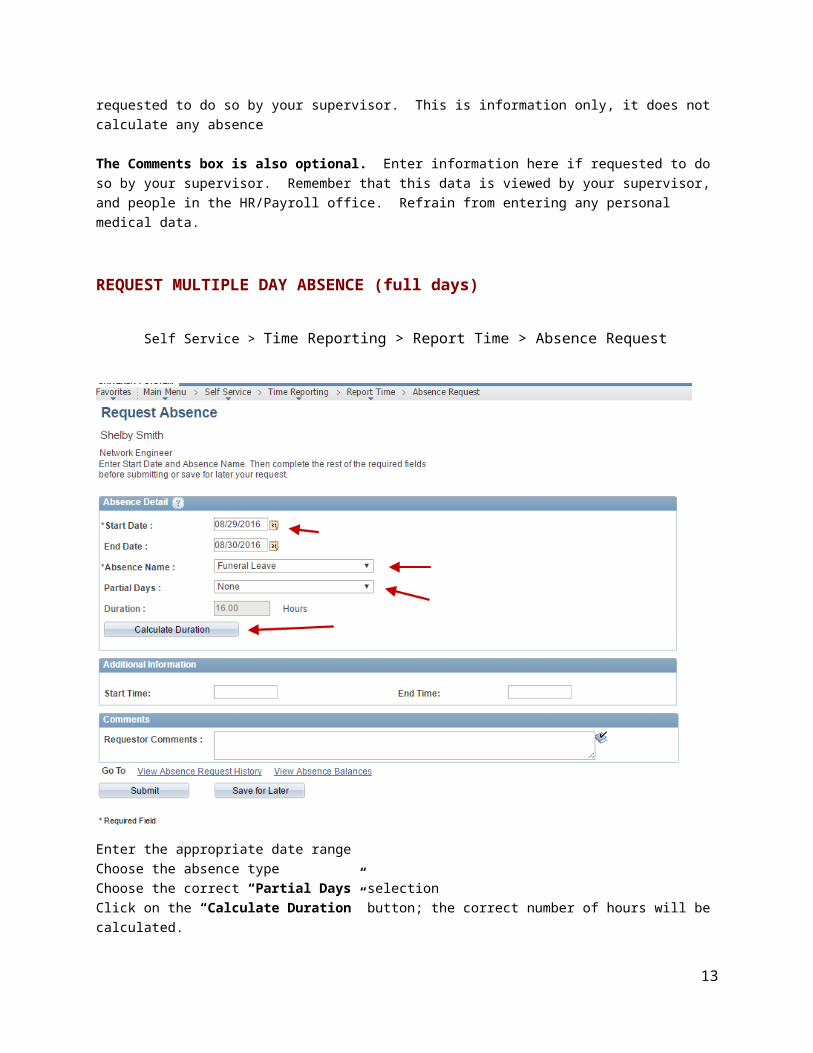
REQUEST MULTIPLE DAY ABSENCE (full days)
Self Service > Time Reporting > Report Time > Absence Request
Enter the appropriate date rangeChoose the absence typeChoose the correct “Partial Days” selectionClick on the “Calculate Duration” button; the correct number of hours will be calculated.
As before, the Additional Information box and the Comments box are optional as designated by your supervisor.
12
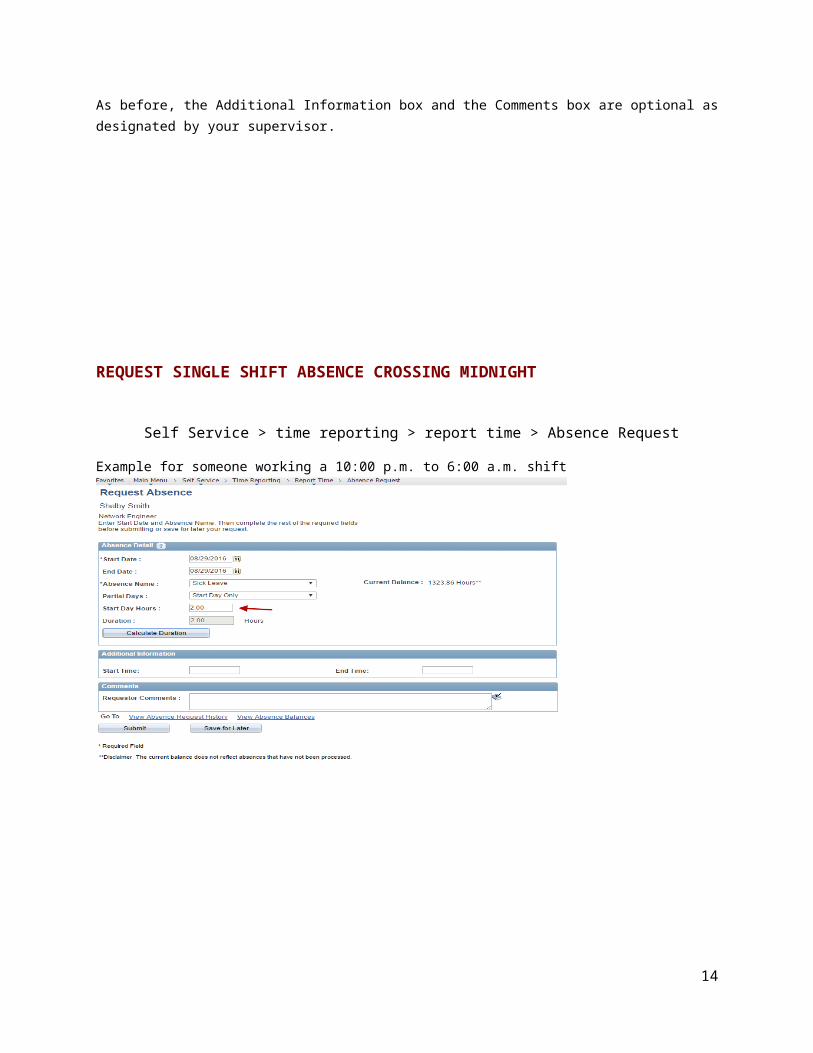
REQUEST SINGLE SHIFT ABSENCE CROSSING MIDNIGHT
Self Service > time reporting > report time > Absence Request
Example for someone working a 10:00 p.m. to 6:00 a.m. shift
13
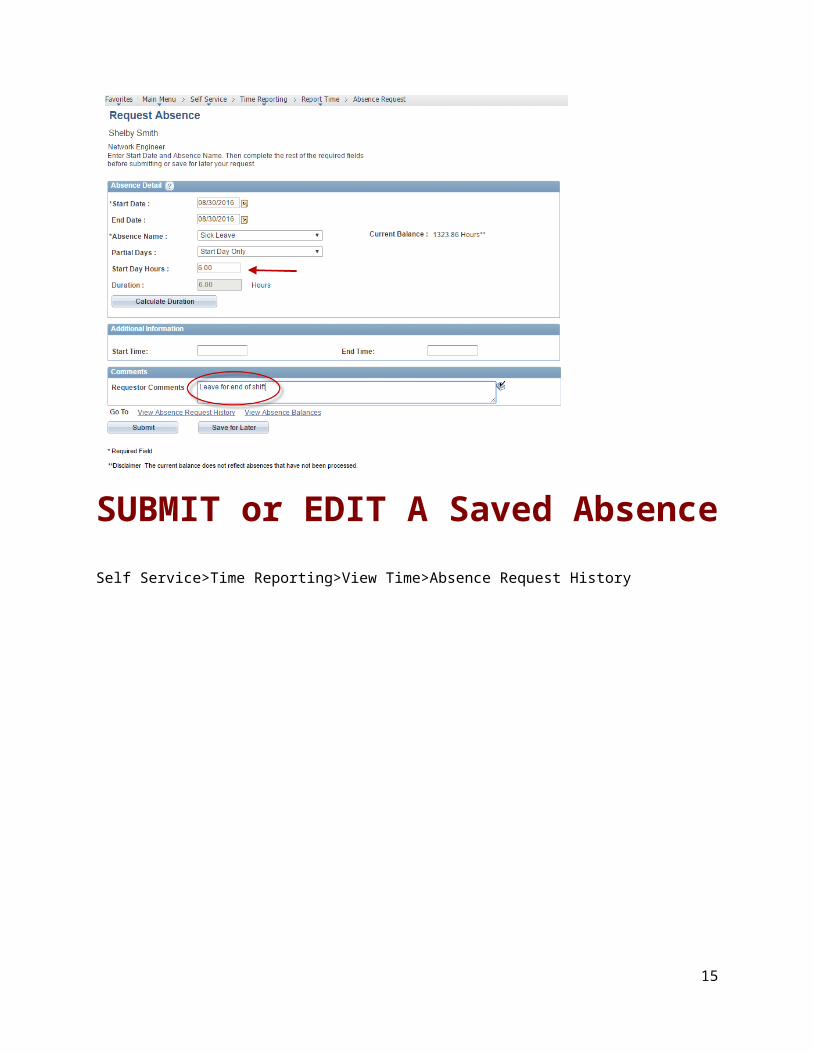
SUBMIT or EDIT A Saved AbsenceSelf Service>Time Reporting>View Time>Absence Request History
Choose the “Edit” button for the leave entry with a “Saved” status.
The saved page will open:
The data can be edited as needed.
Once finished, choose “Submit.”
14
EDIT A PUSHED BACK ABSENCE Self Service > Time Reporting > View Time > Absence Request History
Choose the “Edit” button for the leave entry with a “Push Back” status.
The saved page will open
The data can be edited as needed.
Add comments (optional)
Once finished, choose “Submit.”
The leave balances will no longer appear on your view paycheck in self-service. They can be viewed on-line on the Employee View Absence Balances via Self Service
Self Service>Benefits>Absence Balances
15

16