personally driver fitted left foot gas pedal model 3545 ... · use of this product with adjustable...
TRANSCRIPT

Use of this productwith adjustableaccelerator andbrake pedals may result in seriousbodily injury, death and/or property damage.
DANGER
Left Foot Gas PedalModel 3545
Installation and Owners Manual
PATENT NO.: US 6,494,115 B1
Personally Driver Fitted

Many states either require or recommend that anyone using our products have a driver
evaluation prior to installation.We recommend all customers have a driver
evaluation performed by a qualified evaluator. If you should need assistance contact
www.driver-ed.orgor
Discover Your Mobility Inc. at toll free 866-868-9694.
www.discovermymobility.com
Information

1
Table of Contents
Warnings and Cautions . . . . . . . . . . . . . . . . . . . . . . . . . . . . . . . . 2
Determining Base Plate Location . . . . . . . . . . . . . . . . . . . . . . . . 3
Marking Base Plate Location . . . . . . . . . . . . . . . . . . . . . . . . . . . 4
Mounting Left Foot Gas Pedal Base and Base Plate . . . . . . . . . . 4
Attaching Left Foot Gas Pedal to Base . . . . . . . . . . . . . . . . . . . . 5
Adjusting Left Foot Gas Pedal Position. . . . . . . . . . . . . . . . . . . . 6
Removing Left Foot Gas Pedal From Base . . . . . . . . . . . . . . . . . 7
Post Installation Dealer Inspection . . . . . . . . . . . . . . . . . . . . . . 7-8
Left Foot Gas Pedal Operating Instructions . . . . . . . . . . . . . . . . . 9
Maintenance. . . . . . . . . . . . . . . . . . . . . . . . . . . . . . . . . . . . . 10-11
Warranty . . . . . . . . . . . . . . . . . . . . . . . . . . . . . . . . . . . . . . . 12-13
Parts Listing. . . . . . . . . . . . . . . . . . . . . . . . . . . . . . . . . . . . . 14-15
90524-000 Revision G
WARNING: NOT RECOMMENDED FOR TRANSFERFROM ONE VEHICLE TO THE NEXT
FOR ASSISTANCE OR PARTS Call: (866) 868-9694
Fax: (574) 542-2132

2
Warnings and Cautions
General Installation and Operation Warnings
THIS PRODUCT MUST BE INSTALLED ONLY BY AN AUTHORIZED MOBILITY PRODUCTS & DESIGN DEALER.
ONLY TRAINED OPERATORS MUST OPERATE THIS DEVICE.
KEEP THE DEVICE MAINTAINED REGULARLY. (ACCORDINGTO THE MAINTENANCE RECOMMENDATIONS)
INSPECT THE DEVICE PRIOR TO EVERY OPERATION.
DO NOT USE THE ACCELERATOR GUARD AS A FOOT REST.REFER TO FIGURE 5.
IF SOMEONE OTHER THAN THE TRAINED OPERATOR IS USINGTHE VEHICLE, THE LEFT FOOT GAS PEDAL MUST BEREMOVED. REFER TO FIGURE 7.
PLACE THE WARNING DECAL ON THE INSIDE OF THEVEHICLE WINDSHIELD. DECAL MUST BE VISIBLE BY THEDRIVER WHEN SEATED AND MUST NOT IMPAIR VISIBILITY.
THE LEFT FOOT GAS PEDAL IS TO BE USED ON VEHICLESEQUIPPED WITH AUTOMATIC TRANSMISSION ONLY.
READ AND UNDERSTAND THIS MANUAL PRIOR TOINSTALLING AND OPERATING.
DO NOT INSTALL THE BASE PLATE ON TOP OF FLOOR MATSOR ANY OTHER LOOSE FLOOR COVERING NOT ATTACHED BYVEHICLE'S ORIGINAL MANUFACTURER.
CAUTIONINDICATES A POTENTIALLY
HAZARDOUS SITUATION THAT,IF NOT AVOIDED COULD
CAUSE DAMAGE TO THE PRODUCT,VEHICLE, OR MODERATE INJURY
TO THE INSTALLER OR OTHERPEOPLE.
WARNINGINDICATES A POTENTIALLY
HAZARDOUS SITUATION THAT,IF NOT AVOIDED COULD
CAUSE SERIOUS BODILY INJURYAND / OR PROPERTY DAMAGE.

3
Step 1) Determining Base Plate LocationWith the Base attached to the LFGP (LeftFoot Gas Pedal) assembly, follow these threesteps to determine the Base Plate location.
1A) Left to Right: A 3/16” (approx.) gap should be visiblebetween the flat part of the Actuator Arm Assembly and the OEMgas pedal.
3/16”
Correct Wrong Wrong
1B) Front to Back: The adjustable slide of the Actuator Armshould be parallel with the OEM gas pedal.
Correct Wrong
Incorrect spacing
Acceptable oninclined floor
1C) Actuator Arm Adjustment: For OEM (Original EquipmentManufacturer) gas pedals with a pivot: The Roller should be locat-ed above and close to the pivot (roller must not be located even with, or below the OEM gas pedal pivot point). Forsolid OEM gas pedals (no pivot): The Roller should be locatedbetween the top 1⁄2 and 3⁄4 of the OEM gas pedal.
Correct Wrong WrongAcceleratorPivot
WARNINGIMPROPER ADJUSTMENT OR
INSTALLATION OF THE LEFT FOOT
GAS PEDAL, MAY RESULT IN THE
OEM PEDAL BEING LOCKED IN
THE PARTIAL OR FULL ACTIVATION
POSITION
Figure 1
Figure 3
1/2”Minimum
Figure 2
WARNINGThis product must beinstalled only by anauthorized MPD dealer

4
Step 2) Marking Base Plate LocationOnce the properlocation of the LeftFoot Gas Pedal isdetermined, mark byplacing tape along 2edges of the LockoutBase.
CAUTIONPrior to drilling the mount holes, check for obstructions such as wiring, fuel lines, etc. under the carpet and vehicle floor
Step 3) Mount LFGP and Base Plate
Place LFGP Base Plate on the floor in the area previously marked(the slot in Base Plate should be toward the front, left side asshown in figure 4).
Check under vehicle and under the carpet to make sure you don’tdrill into unwanted objects (such as… gas lines, brake lines, wires,etc.).
Using the Base Plate as a template, drill four holes for the mounting bolts using a 9/32” drill bit.
Secure LFGP Base Plate, Spacers, and Base to the floor using thebolts provided.
1/4” Bolts
Lockout Base
Spacers (2)
Base Plate
1/4” Fender Washers
1/4” Nylock Nuts(torque to 50 to 70in./lbs
Figure 4
WARNINGDo not install the BasePlate on the top of floormats or any other loosefloor covering notattached by the vehiclesoriginal manufacturer.

5
Step 4) Attach LFGP to Base
A. Hold on to the LFGP Accelerator Guard and Actuator Arm withone hand.
B. Push the LFGP down into the slots of the Base.
C. Slide the LFGP to the right until it latches. At this time be surethe LFGP is secure and the Latch is completelyengaged. Refer to caution note.
STEP C
STEP B
Actuator Arm
Accelerator Guard
CAUTION1) If the red mark on the latch is visible, unit is not latched. Do not use until securely latched.2) This device has been adjusted for this vehicle. Do not use in other vehicles.
Figure 5
6
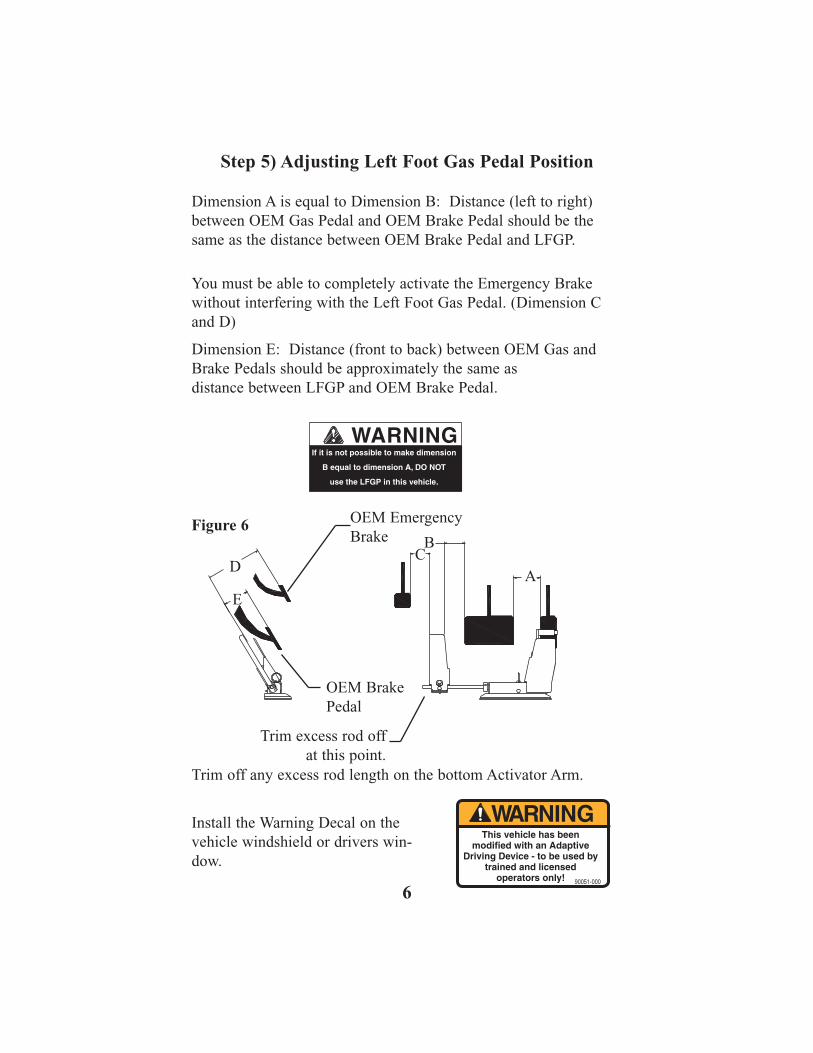
Step 5) Adjusting Left Foot Gas Pedal Position
Dimension A is equal to Dimension B: Distance (left to right)between OEM Gas Pedal and OEM Brake Pedal should be thesame as the distance between OEM Brake Pedal and LFGP.
You must be able to completely activate the Emergency Brakewithout interfering with the Left Foot Gas Pedal. (Dimension Cand D)
Dimension E: Distance (front to back) between OEM Gas andBrake Pedals should be approximately the same asdistance between LFGP and OEM Brake Pedal.
A
BC
D
E
OEM EmergencyBrake
OEM BrakePedal
Trim excess rod offat this point.
WARNINGIf it is not possible to make dimension
B equal to dimension A, DO NOT
use the LFGP in this vehicle.
Install the Warning Decal on thevehicle windshield or drivers win-dow.
Trim off any excess rod length on the bottom Activator Arm.
Figure 6
W RNINGAThis vehicle has been
modified with an Adaptive Driving Device - to be used by
trained and licensed operators only! 90051-000

7
Step 6) Removing LFGP From BaseA. Lift the key ring on LFGP assembly.
B. While lifting and holding the key ring up, slide the LockoutBase to the left.
C. When the assembly begins to move, release the key ring andcontinue to slide the assembly left until it can be lifted out ofBase.
Step A
Step B
Step C
Step 7) Post Installation Inspection by InstallingDealer
1) Make sure that all the fasteners are secure and the Base is rigidwith the vehicle floor.
2) Verify the Left Foot Gas Pedal latching mechanism worksproperly by removing and attaching the mechanism three or more times. When attaching, notice:
A) The Base latches in the slots with minimal effort. The latch should engage so the red line on the latch does not show.
B) When removing, the latch should disengage smoothly, and the Base should slide out of the slots with little effort. It should not be necessary to use anytools to remove the LFGP from the Base.
Figure 7

8
Post Installation Inspection Continued
3) Verify correct operation of the Left Foot Gas Pedal:A) With the engine off, make sure the LFGP operatesfreely and has the proper clearances outlined in theseinstructions.
B) Verify the force it takes to operate the Left Foot Gas Pedal is similar to the force it takes to operatethe OEM accelerator.
C) Verify the operation is a smooth motion. It shouldnot stick at any point.
D) Completely depress LFGP. It mustnot lock in a partial orfully accelerated position.
WARNINGIMPROPER ADJUSTMENT OR
INSTALLATION OF THE LEFT FOOT
GAS PEDAL, MAY RESULT IN THE
OEM PEDAL BEING LOCKED IN
THE PARTIAL OR FULL ACTIVATION
POSITION
4) Press on the Accelerator Guard lightly to determine that itwill not contact the Actuator Arm. If it does, refer to step 1Bto readjust
5) Make sure the OEM Parking Brake Pedal or mechanismdoes not activate or interfere with the operation of the LFGP.
6) Test drive the vehicle yourself, after installation or any adjustments, to ensure the LFGP is functioning properly. Verifythat the vehicle will go into passing gear and return to idle.
7) Make sure the customer has had proper training by a Certified Driver Rehabilitation Specialist.
8) Ensure the Left Foot Gas Pedal has been adjusted for thedriver’s comfort and fit.
10) Give this manual to the customer.
9) Record vehicle information ondecal located on back side of Accelerator Guard. (To ensure thatif the LFGP is removed, it is reattached into the same vehicle.)
Vehicle I.D.
Model
Year Make2002 DodgeCaravan

9
Left Foot Gas Pedal Operating Instructions
We recommend all customers have a driver evaluation performedby a qualified evaluator.
The Left Foot Gas Pedal transfers the force of the drivers left foot tothe OEM accelerator pedal. It operates the same way as the OEMaccelerator pedal, except the left foot is used instead of the rightfoot.
The Left Foot Gas Pedal can be quickly attached (refer to step 4,figure 5) and is to be used by TRAINED OPERATORS ONLY.
The Left Foot Gas Pedal is designed to be quickly detached (referto step 6, figure 7) and MUST BE REMOVED IF SOMEONEOTHER THAN THE TRAINED OPERATOR IS USING THEVEHICLE.
The accelerator guard is designed to guard the OEM acceleratorfrom unintentional operation. The accelerator guard is NOT AFOOT REST. Except for performing a post installation inspection, DO NOT PUSH ON THE ACCELERATOR GUARDFOR ANY REASON.
Before each use:Make sure the Left Foot Gas Pedal is properlyseated in the Base, and the red mark is not visible.
Make sure the Left Foot Gas Pedal operatesfreely and properly.
Make sure nothing is obstructing the operation ofthe Left Foot Gas Pedal (i.e.. Keep floor clean ofrocks, mud, ice, and any form of debris)
Make sure all fasteners are secure.
Alternate between the LFGP and the brake with left foot to furtherfamiliarize yourself with the function.

10
Maintenance
As the owner and user of the Left Foot Gas Pedal, it is yourobligation to follow through with the required maintenance.
Regular cleaning is required to ensure optimum performance.
It is required that every 3 months:
Vacuum out the Base and clean out any debris from underthe Base.
Verify that the LFGP Roller moves freely.
Verify that the LFGP Latch moves freely. If needed, a dropof light weight oil may be applied to the latch, latch pin,and/or spacer. Remove any excess oil.
It is required that every 6 months:
Have an authorized Mobility Products & Design dealerinspect, and maintain the unit. Document any workcompleted on the chart provided.

11
DealerSignature
Date Maintenance or ServicePerformed
PartsReplaced

12
Warranty Policy
Mobility Products & Design products are warranted to be free from defects in materialand workmanship for a period of two (2) years from the date of the original customer’spurchase. All warning messages on labels must be adhered to strictly, and regular maintenance procedures must be followed.
This Warranty is effective only if the products or parts of the product have been installedin accordance with Mobility Products & Design’s written recommendations and with established installation practices and by an authorized dealer of Mobility Products &Design. Mobility Products & Design does not assume liability for defective products notmanufactured or supplied by it, even though some products are used in conjunction withMobility Products & Design products. Any and all claims for Warranty adjustments mustbe originated within the twenty-four (24) months Warranty period and must be submittedby an authorized Mobility Products & Design dealer in accordance with establishedMobility Products & Design Warranty Claim procedures. The properly completedWarranty Registration must be on file at the office of Mobility Products & Design, forany Warranty claim to be considered. The Warranty period begins upon installation of theproduct or the date the product is placed in service.
If, within such a Warranty period, any part of the product shall be proved to MobilityProducts & Design’s satisfaction to be defective, such part shall be repaired or replaced atMobility Products & Design’s option. Mobility Products & Design’s sole obligation andthe customer’s exclusive remedy, hereunder, shall be limited to such part repair orreplacement.
Service under this Warranty is available from the authorized Mobility Products & Designdealer who installed the equipment. If such dealer is not available, you may call(800) 488-7688 for the name of another servicing dealer or visit our websitewww.mobilityproductsdesign.com and click on Dealer Locator.
NO RETURNS WILL BE ACCEPTED WITHOUT FIRST OBTAINING A SHIPPINGAUTHORIZATION AND WARRANTY AUTHORIZATION RETURN GOOD NUMBER FROM MOBILITY PRODUCTS & DESIGN SHIPMENTS SENT FREIGHTCOLLECT OR C.O.D. WILL BE REFUSED, UNLESS PREVIOUSLY AUTHORIZED.
Mobility Products & Design, reserves the right to inspect any product or part which issubject of a Warranty claim in order to make final determination of the validity of suchclaim. Damage due to misuse, improper maintenance, improper installation, or damagefrom mishap or collision, is not covered.
In any event, Mobility Products & Design’s liability extends only to the repair or replacement of such components as are necessary to restore the product to normal operating condition. All other claims or liabilities are expressly denied.

13
This Warranty states the entire liability of Mobility Products & Design with respect tothe products it manufactures. It is exclusive; and in lieu of all warranties expressed orimplied, including but not limited to implied warranties of merchantability and fitnessfor particular use unless applicable by law, and then shall not extend beyond the minimum law or the duration of the express Warranty whichever is less. Under nocircumstances will Mobility Products & Design be responsible for incidental orconsequential damage arising out of the use of any of it’s products or any breach of thiswarranty, and any such damages are specifically excluded from this Warranty.
Some states do not allow limitations on how long implied warranties last, so the abovelimitation with respect to implied warranties may not apply. Some states do not allow theexclusion or limitation of incidental, or consequential damages, so the above limitationor exclusion with respect to incidental or consequential damages may not apply.
This Warranty gives you, the customer, specific legal rights and you may have otherrights which vary from state to state.
AGAIN, THE WARRANTY REGISTRATION CARD MUST BE COMPLETELYFILLED OUT, SIGNED AND IN POSSESSION OF MOBILITY PRODUCTS &DESIGN’S WARRANTY DEPARTMENT WITHIN THIRTY (30) DAYS AFTERINSTALLATION TO BE RECORDED AND RECOGNIZED. NO WARRANTY WILLBE AUTHORIZED UNLESS THIS IS COMPLETED.
This Warranty is to the original purchaser only and is not transferable, and applies onlyto vehicles with power brakes, power steering and automatic transmission. Any productsinstalled on vehicles without these features is strictly prohibited.
This Warranty extends only to those products that are installed or used in transportationvehicles. Any other use of any of the products manufactured by Mobility Products &Design, other than as prescribed, are not authorized by Mobility Products & Design, andMobility Products & Design will make no warranty with respect to such non-conforming, unauthorized use or installation. Any changes to the product by anyperson or dealer, will also cause the Warranty to be null and void. Any person or dealerwho uses or installs any product of Mobility Products & Design for a use other thanstated above, does so at their own risk with the full knowledge and understanding thatthe Warranty is null and void. Any use other than in transportation vehicles for handicapped persons, unless agreed to and approved in writing by the company shallrender the Warranty null and void.
This Warranty will not apply if the product is used or submitted in contests or testingprograms. Your vehicle must conform to all Federal Motor Vehicle Safety Standards
(FMVSS) for the Warranty to be valid.

14
Ve
hic
le I
.D.
Mod
el
Year
Mak
e
9052
3-00
0M
ount
on
top
of u
nit.
9052
9-00
0M
ount
on
Acc
eler
ator
Gua
rd
9005
1-00
0m
ount
on
win
dshi
eld
9054
9-00
0V
ehic
le ID
dec
allo
cate
d be
hind
Acc
eler
ator
Gua
rd
9044
2-00
0S
eria
l Num
ber
Mou
nt u
nder
asm
.be
hind
fron
t edg
e
WR
NIN
GA
Th
is v
ehic
le h
as b
een
m
od
ifie
d w
ith
an
Ad
apti
ve
Dri
vin
g D
evic
e -
to b
e u
sed
by
trai
ned
an
d li
cen
sed
o
per
ato
rs o
nly
!90
051-
000
Parts Diagram

15
ITEM PART NO. QTY DESCRIPTION1 N/A 1 NOT SOLD SEPARATELY
2 91252-000 2 NYLINER
3 69185-000 1 WELD, LFGP BOTTOM ACTUATOR ARM
4 69751-000 1 ASSEMBLY, LFGP UPPER ACTUATOR ARM
5 69144-000 1 COLLAR, LEFT FOOT GAS PEDAL
6 69193-000 1 LFGP LOCKOUT BASE
7 69198-000 2 LFGP SPACER
8 69194-000 1 LFGP LOCKOUT BASE PLATE
9 69141-000 1 CLAMP
10 69221-000 1 LFGP CLAMP PLATE
11 69195-000 1 LFGP PEDAL
12 81068-000 2 1/4 - 20 x 3/4 BHCS SS
13 81090-000 4 1/4 - 20 x 2 BHCS SS
14 82008-000 4 1/4 WASHER, FENDER
15 83011-000 6 1/4 - 20 NUT, NYLOCK
16 99296-000 1 LFGP SAFETY TRACK
17 84027-000 1 1/4 - 20 x 1/4 SET SCREW
18 82013-000 3 1/4 WASHER FLAT SAE
19 80013-000 2 1/4 - 20 x 3/4 HHCS
Parts Listing
