nokia intellisync mobile suite client guide - palm … intellisync mobile suite client guide - palm...
TRANSCRIPT
Published May 2008
Nokia Intellisync Mobile SuiteClient Guide
Palm OS Platform
COPYRIGHTCopyright © 1997 - 2008 Nokia Corporation. All rights reserved. Nokia, Nokia Connecting People, Intellisync, and Intellisync logo are trademarks or registered trademarks of Nokia Corporation. Other trademarks mentioned are the property of their respective owners.
RESTRICTED RIGHTS LEGENDUse, duplication, or disclosure by the United States Government is subject to restrictions as set forth in subparagraph (c)(1)(ii) of the Rights in Technical Data and Computer Software clause at DFARS 252.227-7013.
Notwithstanding any other license agreement that may pertain to, or accompany the delivery of, this computer software, the rights of the United States Government regarding its use, reproduction, and disclosure are as set forth in the Commercial Computer Software-Restricted Rights clause at FAR 52.227-19.
IMPORTANT NOTE TO USERS
THIS SOFTWARE, HARDWARE, AND DOCUMENTATION IS PROVIDED BY NOKIA INC. AS IS AND ANY EXPRESS OR IMPLIED WARRANTIES, INCLUDING, BUT NOT LIMITED TO, IMPLIED WARRANTIES OF MERCHANTABILITY AND FITNESS FOR A PARTICULAR PURPOSE ARE DISCLAIMED. IN NO EVENT SHALL NOKIA, OR ITS AFFILIATES, SUBSIDIARIES OR SUPPLIERS BE LIABLE FOR ANY DIRECT, INDIRECT, INCIDENTAL, SPECIAL, EXEMPLARY, OR CONSEQUENTIAL DAMAGES (INCLUDING, BUT NOT LIMITED TO, PROCUREMENT OF SUBSTITUTE GOODS OR SERVICES; LOSS OF USE, DATA, OR PROFITS; OR BUSINESS INTERRUPTION) HOWEVER CAUSED AND ON ANY THEORY OF LIABILITY, WHETHER IN CONTRACT, STRICT LIABILITY, OR TORT (INCLUDING NEGLIGENCE OR OTHERWISE) ARISING IN ANY WAY OUT OF THE USE OF THIS SOFTWARE, EVEN IF ADVISED OF THE POSSIBILITY OF SUCH DAMAGE.
Nokia operates a policy of continuous development. Therefore we reserve the right to make changes and improvements to any of the products described in this document without prior notice.
050208
2 Nokia Intellisync Mobile Suite Client Guide - Palm OS Platform
Nokia Contact InformationCorporate Headquarters
Regional Contact Information
Nokia Customer Support
Web Site http://www.nokia.com
Telephone 1-888-477-4566 or 1-650-625-2000
Fax 1-650-691-2170
Mail Address
Nokia Inc.313 Fairchild DriveMountain View, California94043-2215 USA
Americas Nokia Inc.313 Fairchild DriveMountain View, CA 94043-2215USA
Tel: 1-877-997-9199Outside USA and Canada: +1 512-437-7089email: [email protected]
Europe, Middle East, and Africa
Nokia House, Summit AvenueSouthwood, FarnboroughHampshire GU14 ONG UK
Tel: UK: +44 161 601 8908Tel: France: +33 170 708 166email: [email protected]
Asia-Pacific 438B Alexandra Road#07-00 Alexandra TechnoparkSingapore 119968
Tel: +65 6588 3364email: [email protected]
Web Site: https://support.nokia.com/
Americas Europe
Voice: 1-888-361-5030 or 1-613-271-6721
Voice: +44 (0) 125-286-8900
Fax: 1-613-271-8782 Fax: +44 (0) 125-286-5666
Asia-Pacific
Voice: +65-67232999
Fax: +65-67232897
050602
Nokia Intellisync Mobile Suite Client Guide - Palm OS Platform

4 Nokia Intellisync Mobile Suite Client Guide - Palm OS Platform
Contents
1 Setting Up Your Device . . . . . . . . . . . . . . . . . . . . . . . . . . . . . . . . . . . . . . . . . . . . . . 7Installation Options. . . . . . . . . . . . . . . . . . . . . . . . . . . . . . . . . . . . . . . . . . . . . . . . . . . 7
Installing From Your Device Browser . . . . . . . . . . . . . . . . . . . . . . . . . . . . . . . . . . . 8Checking the Connection Status . . . . . . . . . . . . . . . . . . . . . . . . . . . . . . . . . . . . . . . 9Uninstalling Nokia Intellisync Mobile Suite . . . . . . . . . . . . . . . . . . . . . . . . . . . . . . 10
2 Configuring Synchronization Settings . . . . . . . . . . . . . . . . . . . . . . . . . . . . . . . . 11Synchronizing Your Device . . . . . . . . . . . . . . . . . . . . . . . . . . . . . . . . . . . . . . . . . . . 11Modifying Your Synchronization Settings. . . . . . . . . . . . . . . . . . . . . . . . . . . . . . . . . 11
Selecting the Data to Synchronize . . . . . . . . . . . . . . . . . . . . . . . . . . . . . . . . . . . . 11Configuring Email Settings . . . . . . . . . . . . . . . . . . . . . . . . . . . . . . . . . . . . . . . . . 12
Selecting When to Synchronize . . . . . . . . . . . . . . . . . . . . . . . . . . . . . . . . . . . . . . 12Guidelines for Setting up Push Options . . . . . . . . . . . . . . . . . . . . . . . . . . . . . . . 13
Configuring Notification Settings . . . . . . . . . . . . . . . . . . . . . . . . . . . . . . . . . . . . . . 13Configuring Security Settings . . . . . . . . . . . . . . . . . . . . . . . . . . . . . . . . . . . . . . . . 14Configuring Connection Settings. . . . . . . . . . . . . . . . . . . . . . . . . . . . . . . . . . . . . . 14
3 Using SyncMail . . . . . . . . . . . . . . . . . . . . . . . . . . . . . . . . . . . . . . . . . . . . . . . . . . . 17Using SyncMail. . . . . . . . . . . . . . . . . . . . . . . . . . . . . . . . . . . . . . . . . . . . . . . . . . . . . 17
Viewing Email Messages . . . . . . . . . . . . . . . . . . . . . . . . . . . . . . . . . . . . . . . . . . . 17Individual Email Account . . . . . . . . . . . . . . . . . . . . . . . . . . . . . . . . . . . . . . . . . . 17Multiple Email Accounts . . . . . . . . . . . . . . . . . . . . . . . . . . . . . . . . . . . . . . . . . . . 17
Reading Email Messages . . . . . . . . . . . . . . . . . . . . . . . . . . . . . . . . . . . . . . . . . . . 20Responding to Meeting Requests . . . . . . . . . . . . . . . . . . . . . . . . . . . . . . . . . . . 21Viewing Attachments . . . . . . . . . . . . . . . . . . . . . . . . . . . . . . . . . . . . . . . . . . . . . 21
Creating Email Messages . . . . . . . . . . . . . . . . . . . . . . . . . . . . . . . . . . . . . . . . . . . 22Creating Meeting Requests. . . . . . . . . . . . . . . . . . . . . . . . . . . . . . . . . . . . . . . . . . 23Managing Email Preferences . . . . . . . . . . . . . . . . . . . . . . . . . . . . . . . . . . . . . . . . 24
Configuring General Preferences. . . . . . . . . . . . . . . . . . . . . . . . . . . . . . . . . . . . 24Configuring Email Folder Preferences . . . . . . . . . . . . . . . . . . . . . . . . . . . . . . . . 25
Using Out of Office . . . . . . . . . . . . . . . . . . . . . . . . . . . . . . . . . . . . . . . . . . . . . . . . 25Using Directory Search . . . . . . . . . . . . . . . . . . . . . . . . . . . . . . . . . . . . . . . . . . . . . 27
4 Protecting Your Device and Data . . . . . . . . . . . . . . . . . . . . . . . . . . . . . . . . . . . . . 29Locking Your Device . . . . . . . . . . . . . . . . . . . . . . . . . . . . . . . . . . . . . . . . . . . . . . . 29
Assigning a Power-on Password . . . . . . . . . . . . . . . . . . . . . . . . . . . . . . . . . . . . 29
Nokia Intellisync Mobile Suite Client Guide - Palm OS Platform 5

Changing a Power-on Password. . . . . . . . . . . . . . . . . . . . . . . . . . . . . . . . . . . . 30Power-on Password Character Settings . . . . . . . . . . . . . . . . . . . . . . . . . . . . . . 30Power-on Password Idle Time Settings . . . . . . . . . . . . . . . . . . . . . . . . . . . . . . 31Outbound Phone Call Settings . . . . . . . . . . . . . . . . . . . . . . . . . . . . . . . . . . . . . 31
Protecting Your Data . . . . . . . . . . . . . . . . . . . . . . . . . . . . . . . . . . . . . . . . . . . . . . 31
6 Nokia Intellisync Mobile Suite Client Guide - Palm OS Platform
Installation Options
1 Setting Up Your Device
This chapter contains information for installing Nokia Intellisync Mobile Suite on your device.
Installation OptionsThe following options are available for installing the Nokia Intellisync Mobile Suite on your device:
Access the Web site to send an SMS message to your device and initiate the installation.Access your device browser and initiate the installation.
Installing from the Installation Web SiteWhen you send an SMS message, and the installation file downloads, you may incur charges from your carrier. The download could take a few minutes, during which time you cannot make or receive phone calls.
To start the Web site installation process1. From your PC browser, enter the URL provided by your system administrator.
The Nokia Intellisync Mobile Suite Login page appears.2. Enter your user name and password, then click Login.
The Verify Your Account Settings page appears.3. Select your time zone from the list, and then check the I’ve Verified That The Above Time
Zone Is Correct check box.4. Select your country from the list. 5. Type your work address, city, state, and ZIP/Postal code. 6. Type your first and last name, your email address, and then click Next.
The Device Selection page appears.7. Select Palm and then click Next.
The Install Software page appears.8. Type your device phone number and click Send.
Nokia Intellisync Mobile Suite Client Guide - Palm OS Platform 7

1 Setting Up Your Device
9. Click Send Message.A Web page notifies you that a text message was sent to your device.
10. Open the text message on your device and select the installation file link.11. Select the Install Software link.
The Download dialog box appears.12. Select Open File After Download, then select Yes.
The client download status bar appears at the top of the screen.13. Select Save when the download completes.
The installation begins. When it completes, the Nokia Intellisync Mobile Suite main screen appears.
14. Select Sync.15. Enter your user password and select OK.
A screen appears with the initial synchronization session options.16. Choose one of the following options.
Refresh—replaces the calendar data on your device with calendar data from the server.Merge—combines the calendar data from the server with the calendar data on your device. Selecting this option may cause duplicate entries.
When the synchronization session completes, the Nokia Intellisync Mobile Suite main screen appears. Select Sync Progress to view details of the synchronization.
NoteIf your device does not automatically synchronize with the server, you can initiate a manual synchronization. Open Nokia Intellisync Mobile Suite on your device and select Sync.
17. From the Install Software page on the Web site, click Done.The Settings page appears. Your Palm device appears in the Device Name list. Nokia Intellisync Mobile Suite is successfully installed on your device.
Installing From Your Device Browser
To start the installation process from your device1. From your device browser, type the URL provided by your system administrator, and then
type /install at the end of the URL. For example, http//<url>/install.2. Click Start.3. Enter your user name and password, then click Next.
8 Nokia Intellisync Mobile Suite Client Guide - Palm OS Platform

Installation Options
4. Select the Install Software link.The Download dialog box appears.
5. Select Open File After Download.6. The Download screen appears.7. Select Save To > Device > Yes.
The client download status bar appears at the top of the screen.8. When the download completes, select Save.
The installation begins. When the installation completes, the Nokia Intellisync Mobile Suite main screen appears.
9. Select Sync.10. Enter your user password and select OK.
A screen appears with the initial synchronization session options.11. Choose one of the following options.
Refresh—replaces the calendar data on your device with calendar data from the server.Merge—combines the calendar data from the server with the calendar data on your device. Selecting this option may cause duplicate entries.
When the synchronization session completes, the Nokia Intellisync Mobile Suite main screen appears. Select Sync Progress to view details of the synchronization.
NoteIf your device does not automatically synchronize with the server, you can initiate a manual synchronization. Open Nokia Intellisync Mobile Suite on your device and select Sync.
Checking the Connection StatusYou can check the connection status between your device and the Nokia Intellisync Mobile Suite server including the last push and pending push details.
To check the connection status1. Select the Intellisync icon.
The Nokia Intellisync Mobile Suite main menu appears. 2. Select the antenna in the top right corner of the main screen.
The Connection Status screen appears.
Nokia Intellisync Mobile Suite Client Guide - Palm OS Platform 9

1 Setting Up Your Device
Uninstalling Nokia Intellisync Mobile SuiteIf for some reason you need to remove Nokia Intellisync Mobile Suite from your device, you can perform the following uninstall procedure.
To uninstall Nokia Intellisync Mobile Suite1. Select the Intellisync icon.
The Nokia Intellisync Mobile Suite main menu appears.2. Select Menu > About > Uninstall.
10 Nokia Intellisync Mobile Suite Client Guide - Palm OS Platform

Synchronizing Your Device
2 Configuring Synchronization Settings
Synchronizing Your DeviceNokia Intellisync Mobile Suite synchronizes your email messages and Personal Information Manager (PIM) on your device with your company's server.
To synchronize your device1. Select the Intellisync icon on your device.
The Nokia Intellisync Mobile Suite main screen appears. 2. Select Sync.
When the synchronization session completes, the Nokia Intellisync Mobile Suite main screen appears. Select Sync Progress to view details of the synchronization.
Modifying Your Synchronization SettingsIf your administrator allows you to change your default synchronization settings, you can configure Nokia Intellisync Mobile Suite to suit your individual requirements.
Selecting the Data to SynchronizeYou can select specific items to synchronize during synchronization sessions. The information that you specify synchronizes during manual and timed interval synchronization.
NoteWhat To Sync settings apply only to manual and timed interval synchronization sessions. These settings do not apply to Push synchronization.
To configure What To Sync settings1. Using your device, select the Intellisync icon.
The Nokia Intellisync Mobile Suite main menu appears.
Nokia Intellisync Mobile Suite Client Guide - Palm OS Platform 11
2 Configuring Synchronization Settings
2. Select Settings > What To Sync. The What To Sync screen appears.
3. Select or clear the appropriate check boxes to enable or disable synchronization of your SyncMail folders (Inbox, Outbox, Sent, and Drafts) and PIM information (Calendar, Contacts, Tasks, Memos, and Travel Info).
4. Select OK to return to the Settings screen.
Configuring Email SettingsComplete the following steps to specify conditions for synchronizing mail Inbox, Sent Items, and Drafts email messages:1. Using your device, select the Intellisync icon.
The Nokia Intellisync Mobile Suite main menu appears. 2. Select Settings > What To Sync.
The What To Sync screen appears. 3. Choose Settings next to the email item (Inbox, Outbox, Sent, or Drafts).4. Select or clear the appropriate check boxes to enable or disable the following settings as
necessary:Truncate After. Enter the maximum number of characters to display for email messages.Remove Older Than. Enter the number of days to retain email messages on your device. Based on your permissions, your administrator may have disabled this setting.Download Attachments. Enable if you want attachments to be downloaded on your device.Max Attachment Size. Enable to enter the maximum size for attachments. Only Certain Types Of Files. Enable to enter valid attachment types. Overwrite With Server Data. Enable setting to overwrite any device data with data from your company's server.
5. Select OK to return to the What To Sync screen, and then select OK to return to the Settings screen.
Selecting When to SynchronizeYou can select the timing and frequency of your device’s attempts to synchronize data over the network.
To configure When To Sync settings1. Using your device, select the Intellisync icon.
The Nokia Intellisync Mobile Suite main menu appears. 2. Select Settings > When To Sync.
The When To Sync screen appears.
12 Nokia Intellisync Mobile Suite Client Guide - Palm OS Platform
Modifying Your Synchronization Settings
3. Select or clear the appropriate check boxes to enable or disable the following settings as necessary:Push. Select to automatically synchronize email messages and PIM information.
NoteIf Push is enabled, the Nokia Intellisync server sends email and PIM changes to your device automatically. For PIM changes initiated on your device, the client checks your Contacts, Tasks, Memos, and Calendar folders every 20 minutes and sends changes to the server.
Timed Interval. Select an interval from the list to indicate the frequency with which you want synchronization to occur.Limit Sync. Select the daily or weekday setting for synchronization.Not Before. Enter the earliest time when synchronization can run.Not After. Enter the latest time when synchronization can run.Minimal Battery Level. Enter a percentage of battery life at which you want to disable synchronization.
4. Select Advanced. The Advanced screen appears.
5. Select the Use Network Push check box to automatically initiate a network connection to synchronize email messages and PIM information.
6. Select OK to return to the When To Sync screen, and then select OK to return to the Settings screen.
Guidelines for Setting up Push OptionsUse the following guidelines for setup and management of Push options. Because everyone has different levels of email activity, settings for each person may vary. These guidelines help you determine the optimum setup for your conditions.
Because your device synchronizes more often when you use the Push option, your device is powered-on more often. Adjust the power settings on your device to minimize battery drain. You may want to disable synchronization when battery power is below 20 percent.
Configuring Notification SettingsYou can manage the notification settings when you receive incoming data.
To configure Notification settings1. Using your device, select the Intellisync icon.
The Nokia Intellisync Mobile Suite main menu appears.
Nokia Intellisync Mobile Suite Client Guide - Palm OS Platform 13
2 Configuring Synchronization Settings
2. Select Settings > Notifications. The Notification screen appears.
3. Select or clear the following check boxes as necessary:Notify When Data Received. Enable or disable sounds and alerts.Vibrate. Enable or disable the device to vibrate when notification received.Tones. Enable or disable to use a tone when the device receives new data.Volume. Select a volume level for the tone.Show Alert. Enable or disable to show an alert when the device receives new data.
Configuring Security SettingsYou can prevent an unauthorized person from initiating a manual synchronization on your device by enforcing a password every time your device is locked, turned off, or in sleep mode. For more information, see Chapter 4, “Protecting Your Device and Data.”
Configuring Connection SettingsYou can modify the connection settings to manage your synchronization sessions.
To configure Connection settings1. Using your device, select the Intellisync icon.
The Nokia Intellisync Mobile Suite main menu appears. 2. Select Settings > Connection.
The Connection Settings screen appears. 3. Modify the following settings as necessary:
User Name. Enter a valid user name to access the server.Server Name. Enter the server address used to connect to your server.Connection Management. Select the connection type for the server; for example, whether to leave the connection active or to hang up if the connection is not needed.Detailed Progress Screen. Select this check box to display detailed information during synchronization.
NoteContact your system administrator for appropriate values before you modify any connection settings.
4. Select Advanced. The Advanced screen appears.
14 Nokia Intellisync Mobile Suite Client Guide - Palm OS Platform

Modifying Your Synchronization Settings
5. Modify the following fields as necessary:Use Proxy Server. Select this check box to use a proxy server.Address. Enter the address of the proxy server.Port. Enter the port of the proxy server.Bypass For Local Addresses. Select this check box to bypass proxy server with a local address.Username. Enter the user name of the local address.Password. Enter the password of the local address.Enable Other Sync Apps. Select this check box to use other synchronization conduits such as Outlook or Palm Desktop.
NoteSelecting Enable Other Sync Apps may cause data duplication or prevent data synchronization with the Nokia Intellisync Mobile Suite server.
6. Select OK to return to the Connection Settings screen.
Nokia Intellisync Mobile Suite Client Guide - Palm OS Platform 15
2 Configuring Synchronization Settings
16 Nokia Intellisync Mobile Suite Client Guide - Palm OS Platform
Using SyncMail
3 Using SyncMail
Using SyncMailWith Nokia Intellisync SyncMail, you can view and manage your email messages. When you install Nokia Intellisync Mobile Suite to your device, SyncMail acts as the primary email client. Palm Mail and other Palm Mail-compatible clients do not work in conjunction with SyncMail.
Viewing Email MessagesYou can quickly view your email messages, meeting requests, and attachments by using SyncMail.
Individual Email AccountIf you have only one email account set up on your device, you can easily access your email messages using SyncMail.
To view an individual email account1. Using your device, select the Intellisync icon.
The Nokia Intellisync Mobile Suite main screen appears.2. Select Email.
The Email screen appears. 3. Select Inbox to access other folders such as Deleted, Drafts, Outbox, and Sent.
Multiple Email AccountsIf the server you synchronize with supports multiple email accounts, you can monitor more than one email account on your device. Messages from multiple email accounts can be sorted by account or combined into one inbox.
To view multiple email accounts1. Using your device, select the Intellisync icon.
The Nokia Intellisync Mobile Suite main screen appears
Nokia Intellisync Mobile Suite Client Guide - Palm OS Platform 17
3 Using SyncMail
2. Select Email. The Email screen appears.
3. Select Email > Mail. Select a mailbox named for an email provider to view your messages from that provider.Select All Messages to view all of your messages in one inbox. Select Work to access your corporate email account mailbox, if available.
NoteThe Mail menu appears only if you have your device set up to monitor multiple email accounts.
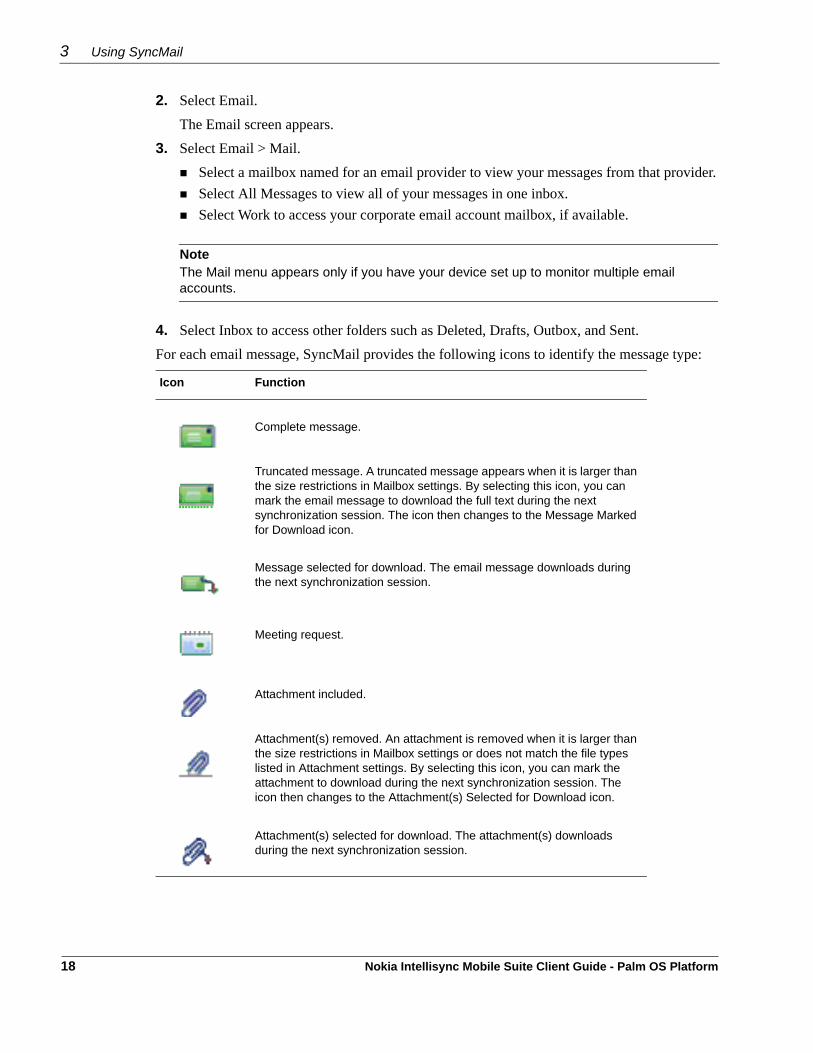
4. Select Inbox to access other folders such as Deleted, Drafts, Outbox, and Sent.For each email message, SyncMail provides the following icons to identify the message type:
Icon Function
Complete message.
Truncated message. A truncated message appears when it is larger than the size restrictions in Mailbox settings. By selecting this icon, you can mark the email message to download the full text during the next synchronization session. The icon then changes to the Message Marked for Download icon.
Message selected for download. The email message downloads during the next synchronization session.
Meeting request.
Attachment included.
Attachment(s) removed. An attachment is removed when it is larger than the size restrictions in Mailbox settings or does not match the file types listed in Attachment settings. By selecting this icon, you can mark the attachment to download during the next synchronization session. The icon then changes to the Attachment(s) Selected for Download icon.
Attachment(s) selected for download. The attachment(s) downloads during the next synchronization session.
18 Nokia Intellisync Mobile Suite Client Guide - Palm OS Platform
Using SyncMail
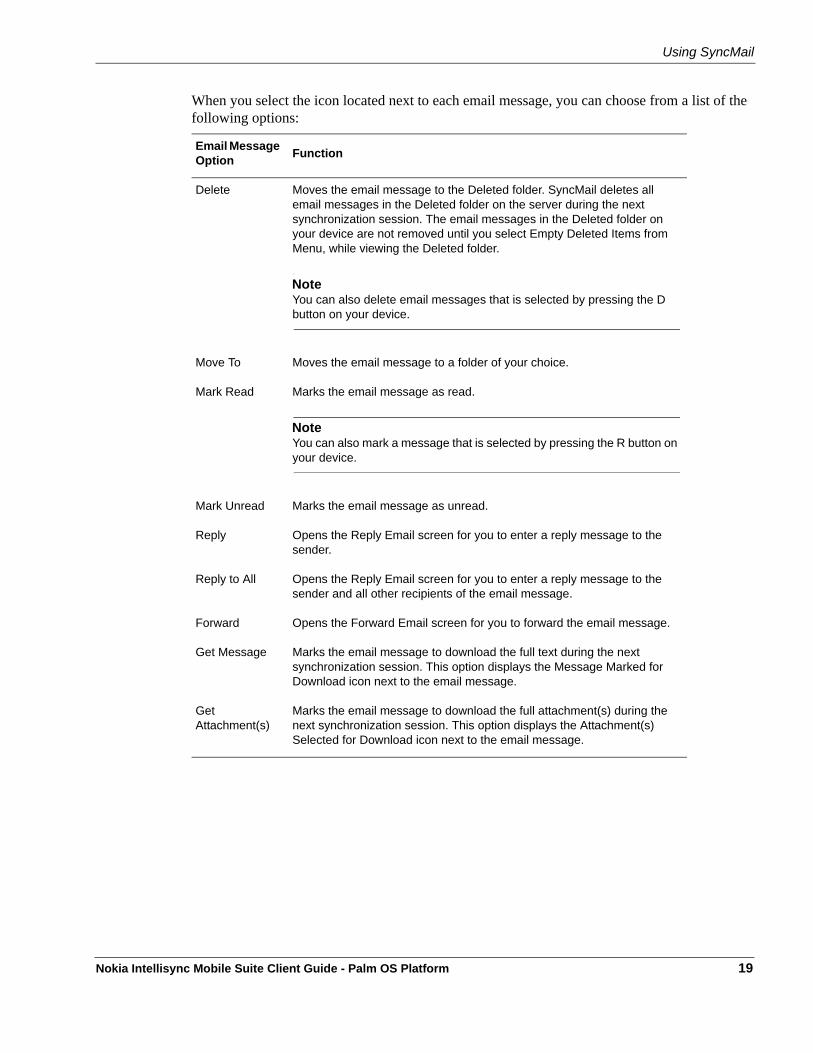
When you select the icon located next to each email message, you can choose from a list of the following options:
Email Message Option Function
Delete Moves the email message to the Deleted folder. SyncMail deletes all email messages in the Deleted folder on the server during the next synchronization session. The email messages in the Deleted folder on your device are not removed until you select Empty Deleted Items from Menu, while viewing the Deleted folder.
NoteYou can also delete email messages that is selected by pressing the D button on your device.
Move To Moves the email message to a folder of your choice.
Mark Read Marks the email message as read.
NoteYou can also mark a message that is selected by pressing the R button on your device.
Mark Unread Marks the email message as unread.
Reply Opens the Reply Email screen for you to enter a reply message to the sender.
Reply to All Opens the Reply Email screen for you to enter a reply message to the sender and all other recipients of the email message.
Forward Opens the Forward Email screen for you to forward the email message.
Get Message Marks the email message to download the full text during the next synchronization session. This option displays the Message Marked for Download icon next to the email message.
Get Attachment(s)
Marks the email message to download the full attachment(s) during the next synchronization session. This option displays the Attachment(s) Selected for Download icon next to the email message.
Nokia Intellisync Mobile Suite Client Guide - Palm OS Platform 19
3 Using SyncMail
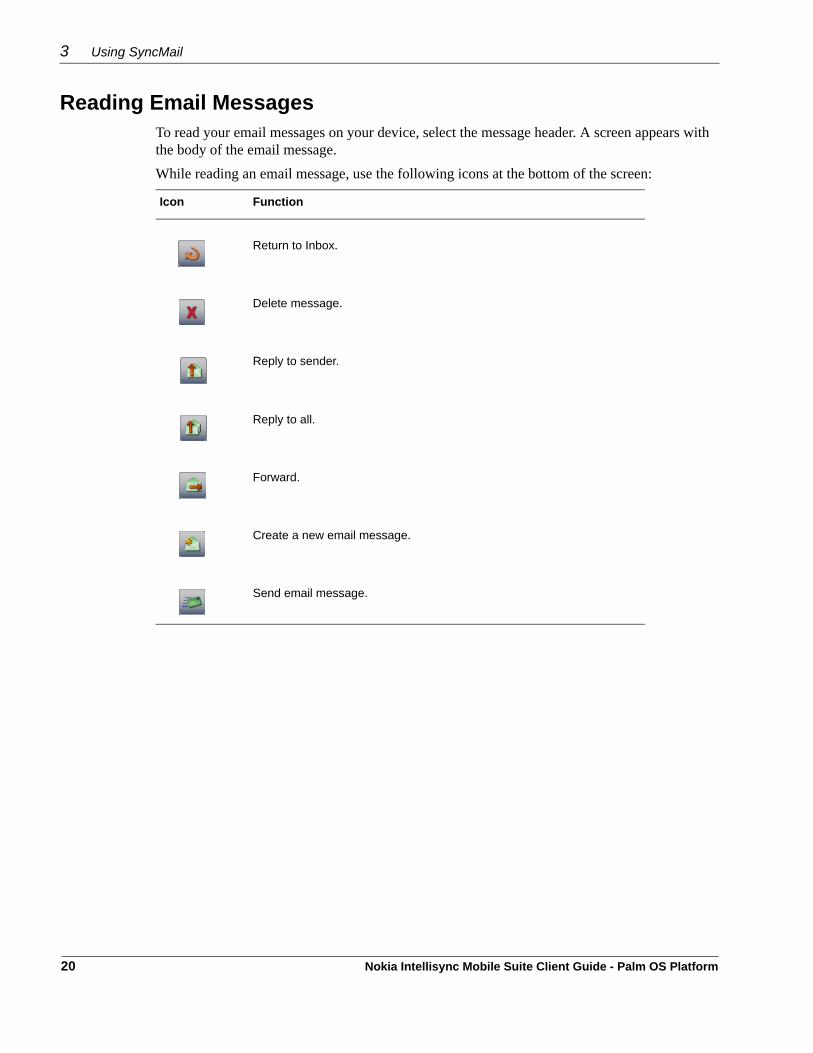
Reading Email MessagesTo read your email messages on your device, select the message header. A screen appears with the body of the email message. While reading an email message, use the following icons at the bottom of the screen:
Icon Function
Return to Inbox.
Delete message.
Reply to sender.
Reply to all.
Forward.
Create a new email message.
Send email message.
20 Nokia Intellisync Mobile Suite Client Guide - Palm OS Platform
Using SyncMail
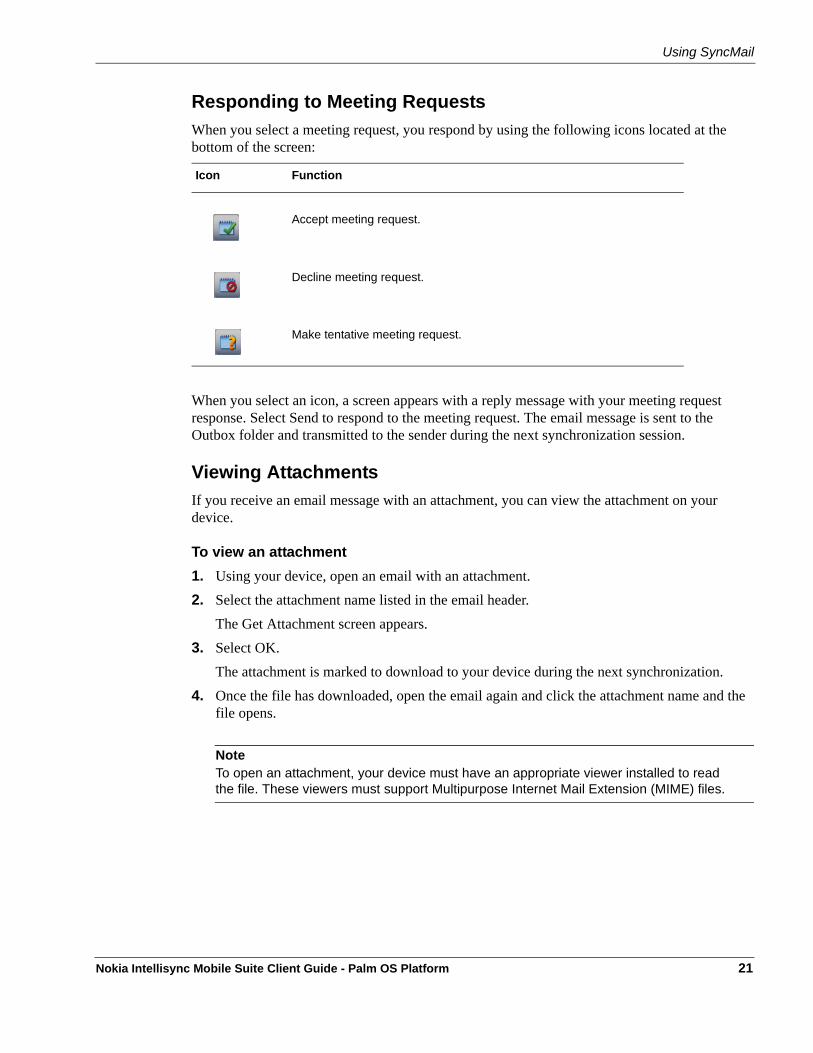
Responding to Meeting RequestsWhen you select a meeting request, you respond by using the following icons located at the bottom of the screen:
When you select an icon, a screen appears with a reply message with your meeting request response. Select Send to respond to the meeting request. The email message is sent to the Outbox folder and transmitted to the sender during the next synchronization session.
Viewing AttachmentsIf you receive an email message with an attachment, you can view the attachment on your device.
To view an attachment 1. Using your device, open an email with an attachment.2. Select the attachment name listed in the email header.
The Get Attachment screen appears.3. Select OK.
The attachment is marked to download to your device during the next synchronization. 4. Once the file has downloaded, open the email again and click the attachment name and the
file opens.
NoteTo open an attachment, your device must have an appropriate viewer installed to read the file. These viewers must support Multipurpose Internet Mail Extension (MIME) files.
Icon Function
Accept meeting request.
Decline meeting request.
Make tentative meeting request.
Nokia Intellisync Mobile Suite Client Guide - Palm OS Platform 21
3 Using SyncMail
Creating Email MessagesYou can create email messages on your device.
To create an email message1. Using your device, select the Intellisync icon.
The Nokia Intellisync Mobile Suite main screen appears.2. Select Email.
The Email screen appears. 3. Select New Email at the bottom of the screen.
The New Message screen appears. 4. Enter an email address in the To field or populate from either your contacts or company
directory. Populate from Contacts:a. Select New Message > Message > Check Contacts. b. Type the first few letters in the first or last name in the Look Up field.c. Highlight the contact email address from the list. Populate from your company directory:a. Select New Message > Message > Check Directory.b. Enter a name or telephone number to find in the corporate directory.c. Select Search.d. Select the name of the contact that you want to add.e. Select the email address from the directory data for that contact.
NoteYou may enter several email addresses by separating them with a semi-colon.
5. Enter text in the optional Subject field.6. Enter your message in the email body.7. Select Send.
Your email message is sent to the Outbox folder and transmitted during the next synchronization session.
22 Nokia Intellisync Mobile Suite Client Guide - Palm OS Platform

Using SyncMail
When creating an email message, you can also use the following icons at the bottom of the screen:
Creating Meeting RequestsYou can create meeting requests on your device.
To create a meeting request1. Using your device, select the Intellisync icon.
The Nokia Intellisync Mobile Suite main screen appears2. Select Email.
The Email screen appears. 3. Select New Meeting Request.
The Create Meeting screen appears. 4. Enter an email address in the To field or populate from either your contacts or company
directory. Populate from Contacts:a. Select Create Meeting > Meeting > Check Contacts. b. Type the first few letters in the first or last name in the Look Up field.c. Highlight the contact email address from the list. Populate from your company directory:a. Select Create Meeting > Meeting > Check Directory.b. Enter a name or telephone number to find in the corporate directory.c. Select Search.d. Select the name of the contact that you want to add.e. Select the email address from the directory data for that contact.
NoteYou may enter several email addresses by separating them with a semi-colon.
Icon Function
Ready Text. Select from a list of preformatted text for quick responses.
Save message to Drafts folder.
Nokia Intellisync Mobile Suite Client Guide - Palm OS Platform 23
3 Using SyncMail
5. Enter the necessary information for the meeting request.6. Select OK.
Your meeting request is sent to the Outbox folder and transmitted during the next synchronization session.
NoteNot all devices support recurring calendar events. Nokia recommends that you edit events directly in the application that you used to create them.
Managing Email PreferencesYou can configure SyncMail to suit your individual email requirements regarding general settings and standard email folders. The types of SyncMail preferences include the following:
General. These settings affect the general functionality of your email messages.Inbox. These settings affect the way you manage email messages in the Inbox folder.Outbox. These settings affect the way you manage email messages in the Outbox folder.Drafts. These settings affect the way you manage your email messages in the Drafts folder.Sent. These settings affect the way you manage email messages in the Sent folder.Deleted. These settings affect the way you manage email messages in the Deleted folder.
Configuring General PreferencesSyncMail general preferences allow you to select settings for your email messages.
To configure email general preferences1. Using your device, select the Intellisync icon.
The Nokia Intellisync Mobile Suite main screen appears2. Select Email.
The Email screen appears. 3. Select Email > Options > Preferences.
The Preferences screen appears.4. Select the General tab, and modify the following fields as necessary.
When Replying, Include Body. Select this check box to enter leading text before the body of each reply email message.Include Signature. Select this check box to enter a custom signature for each email message.
5. Select OK to return to the Email screen.
24 Nokia Intellisync Mobile Suite Client Guide - Palm OS Platform
Using SyncMail
Configuring Email Folder PreferencesThe SyncMail preferences allow you to select settings for email messages located in the standard email folders (Inbox, Outbox, Drafts, Sent, and Deleted).
To configure email folder preferences1. Using your device, select the Intellisync icon.
The Nokia Intellisync Mobile Suite main screen appears2. Select Email.
The Email screen appears. 3. Select Email > Options > Preferences.
The Preferences screen appears.4. Select the appropriate tab (Inbox, Outbox, Drafts, Sent or Deleted).5. Modify the following fields as necessary:
Show Date/Time. Select this check box to display the date and time of email messages.Show Size. Select this check box to display the size of email messages.Show Multi-Select. Select this check box to select multiple email messages. This preference displays a check box beside each email message for multiple selections.Header. Select the amount of header information to show for each email message.After Deleting A Message. Select from the list what to display after deleting an email message.
6. Select Sync Settings. The Mailbox Settings screen appears. The settings are the same as the mailbox settings that are available on the What To Sync settings screen.
Using Out of OfficeThe Out of Office feature automatically replies to incoming messages when you are away or unavailable.
NoteYour server configuration determines whether the Out of Office feature is available.
If you are using Lotus Domino version 8 with a courier ID access, you must enable and disable the feature from either the device or the Lotus Notes Client. You cannot enable from one source and disable from the other.
Nokia Intellisync Mobile Suite Client Guide - Palm OS Platform 25
3 Using SyncMail
To enable Out of Office1. Using your device, select the Intellisync icon.
The Nokia Intellisync Mobile Suite main screen appears2. Select Email.
The Email screen appears. 3. Select Email > Options > Out of Office.
The Out of Office screen appears.4. Modify the following fields as necessary:
I Am Out Of The Office. Select this check box to enable Out of Office.
Start. Enter the date to turn on the Out of Office feature.Return. Enter the date to turn off the Out of Office feature.
NoteYour server configuration determines whether the Start and Return options are available.
Reply Message. Type the reply to messages received while you are away or unavailable.
5. Select OK to return to the Email screen.
To disable Out of Office1. Using your device, select the Intellisync icon.
The Nokia Intellisync Mobile Suite main screen appears2. Select Email.
The Email screen appears. 3. Select Email > Options > Out of Office.
The Out of Office screen appears.4. Deselect the check box beside I Am Out Of The Office.
26 Nokia Intellisync Mobile Suite Client Guide - Palm OS Platform
Using SyncMail
Using Directory SearchDirectory Search allows you to search for contacts in your company directory. You can perform a directory search from the Nokia Intellisync Mobile Suite main screen or while creating a message or meeting request.
NoteDirectory Search is only available if your company has enabled this feature.
To search your directory from the Nokia Intellisync Mobile Suite main screen1. Using your device, select the Intellisync icon.
The Nokia Intellisync Mobile Suite main screen appears2. Select Directory.
The Directory Search screen appears.3. Enter the name or telephone number for the contact to search for in the directory.4. Select Search to begin the search process.
A list of matching records appears.5. Select a contact from the list of matching records.
The record for the contact appears.
To search your directory while creating a message or meeting request1. You can search for a contact in your directory while creating a message or meeting.
From the New Message screen, select New Message > Message > Check Directory. From the Create Meeting screen, select Create Meeting > Meeting > Check Directory.
The Directory Search screen appears.2. Enter a name or telephone number to search for in the corporate directory.3. Select Search.
A list of matching records appears.4. Select a contact from the list of matching records.
The directory data for the contact appears.5. Select the email address for the contact that you want to add.
The email address for the contact is placed in the To field of the message or meeting request.
Nokia Intellisync Mobile Suite Client Guide - Palm OS Platform 27

3 Using SyncMail
28 Nokia Intellisync Mobile Suite Client Guide - Palm OS Platform
4 Protecting Your Device and Data
Nokia Intellisync Mobile Suite provides additional security features that your system administrator delivers through profiles or that you can set up on your device.This chapter provides information about how to add such security features as
locking your deviceenforcing a password after your device is locked, turned off, or in sleep modeautomatically deleting your personal information when your device is lost or stolen
Locking Your DeviceThe Power-on-Password security feature allows you to enforce a password every time your device is locked, turned off, or in sleep mode. The first time you synchronize your device after the system administrator enables this feature, a prompt appears on your device to create a password.
To create an initial power-on password1. On your device, enter a password in the Password field.2. Re-enter the password in the Confirm Password field.3. Save your changes.
NoteIf you forget your password, contact the system administrator.
Assigning a Power-on PasswordEven if the Power-on-Password security feature is disabled, you can create a password on your own.
To assign a power-on password1. Using your device, select the Intellisync icon. 2. Select Security.
3. Select the Unassigned field.
Nokia Intellisync Mobile Suite Client Guide - Palm OS Platform 29

4 Protecting Your Device and Data
4. Enter a new password, and choose OK.5. Enter the new password again, and choose OK.6. Do one of the following:
To return to the Nokia Intellisync Mobile Suite main screen, select Done.To set the password and turn off the device, select Lock & Turn Off.
Changing a Power-on PasswordYou may change your password any time once your administrator has power-on password enabled.
To change a power-on password1. Using your device, select the Intellisync icon. 2. Select Security. 3. Select the Assigned field.4. Enter your current password, and choose OK
5. Enter a new password, and choose OK.6. Enter the new password again, and choose OK.7. Do one of the following:
To return to the Nokia Intellisync Mobile Suite main screen, select Done.To set the password and turn off the device, select Lock & Turn Off.
Power-on Password Character SettingsYour system administrator can set up the password to meet one of the following restrictions:
Type Restrictions
4 numeric characters Exactly 4 characters; numbers only
4 alphanumeric characters Exactly 4 characters; numbers and (case-sensitive) letters only
5 to 40 alphanumeric characters
From 5 to 40 characters; numbers and (case-sensitive) letters only
8 to 40 multi-characters From 8 to 40 characters; must include at least one of each of the following:• lowercase letter (case-sensitive) • uppercase letter (case-sensitive) • numerical digit• any of the following characters: - ( ) ! ? . : / +
30 Nokia Intellisync Mobile Suite Client Guide - Palm OS Platform
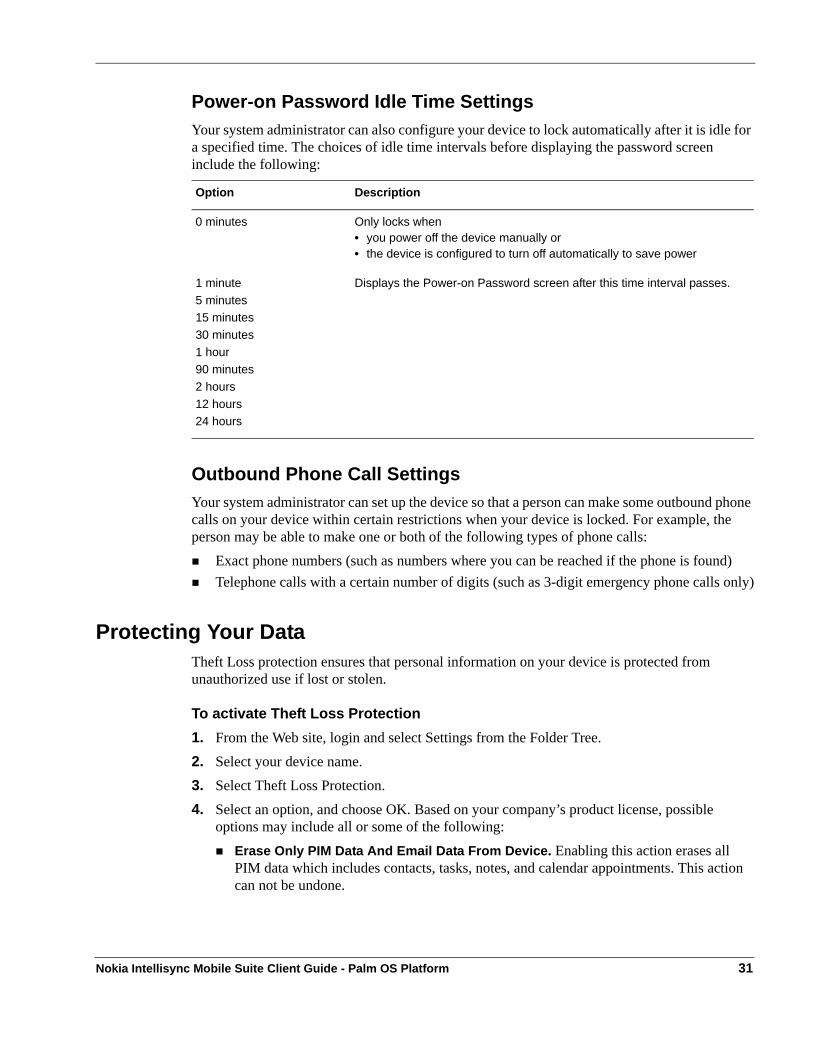
Power-on Password Idle Time SettingsYour system administrator can also configure your device to lock automatically after it is idle for a specified time. The choices of idle time intervals before displaying the password screen include the following:
Outbound Phone Call SettingsYour system administrator can set up the device so that a person can make some outbound phone calls on your device within certain restrictions when your device is locked. For example, the person may be able to make one or both of the following types of phone calls:
Exact phone numbers (such as numbers where you can be reached if the phone is found)Telephone calls with a certain number of digits (such as 3-digit emergency phone calls only)
Protecting Your DataTheft Loss protection ensures that personal information on your device is protected from unauthorized use if lost or stolen.
To activate Theft Loss Protection1. From the Web site, login and select Settings from the Folder Tree.2. Select your device name.3. Select Theft Loss Protection.4. Select an option, and choose OK. Based on your company’s product license, possible
options may include all or some of the following:Erase Only PIM Data And Email Data From Device. Enabling this action erases all PIM data which includes contacts, tasks, notes, and calendar appointments. This action can not be undone.
Option Description
0 minutes Only locks when• you power off the device manually or• the device is configured to turn off automatically to save power
1 minute5 minutes15 minutes30 minutes1 hour90 minutes2 hours12 hours24 hours
Displays the Power-on Password screen after this time interval passes.
Nokia Intellisync Mobile Suite Client Guide - Palm OS Platform 31
4 Protecting Your Device and Data
Hard Reset The Device, Deleting All User Data And Files. Enabling this action will delete all of your data and files from the device. This action can not be undone.Lock The Device. Enabling this features forces a user to provide and confirm a password to unlock the device.
NoteThe Erase Data and Hard Reset options cannot be undone.
Your system administrator can also invoke these Theft Loss Protection features and can also configure the device to delete specified files from your device, if lost or stolen.
Theft Loss protection options remain effective until you or your system administrator resets the options.
32 Nokia Intellisync Mobile Suite Client Guide - Palm OS Platform