patient & caregiver educaton about your central … · about your central venous catheter for...
TRANSCRIPT

About Your Central Venous Catheter for Pediatric Patients 1 of 9
PATIENT & CAREGIVER EDUCATON
About Your Central Venous Catheter for Pediatric Patients
This information will teach you about the placement and care of your central venous catheter (CVC). For the rest of this resource, our use of the words “you” and “your” refers to you or your child.
A CVC is placed in a large vein below the collarbone (see Figure 1). There are many different types of catheters (thin, flexible tubes) and your doctor will decide which is best for you. All devices have 1 central catheter that enters your body. On the outside, the catheter may divide into 1, 2, or 3 lumens. Each lumen has a clamp and a needleless connector on the end.
Your CVC can be used to give:
• Fluids
• Chemotherapy and other medications
• Blood transfusions
• Intravenous (IV) nutrition
The advantages of having a catheter are:
• You won’t need as many needle sticks.
• It can stay in your body for as long as a few years and be removed when it is no longer needed.
Your CVC will stay in place for your entire treatment.
Your nurse will teach you how to care for your CVC. You can have a caregiver, family member, or friend learn with you. You will learn how to use sterile technique to change your dressing. This will minimize your risk for infection. You will also learn how to change your needleless connectors and disinfection caps (SwabCaps®), as well as flush your catheter using a syringe with normal saline solution. You must flush your catheter to keep blood clots from forming inside of it. After you go home, use this information to help you remember the steps to care for your catheter.
Figure 1: Central venous catheter (CVC)

About Your Central Venous Catheter for Pediatric Patients 2 of 9
Before Your Procedure
Ask about your medications
You may need to stop taking some of your medications before your procedure. Talk with your doctor about which medications are safe for you. We have included some common examples below.
• If you take medication to thin your blood, ask your doctor what to do. Some examples are aspirin, warfarin (Coumadin®), dalteparin (Fragmin®), heparin, tinzaparin (Innohep®), enoxaparin (Lovenox®), clopidogrel (Plavix®), cilostazol (Pletal®), prasugrel (Effient®), and ticlopidine (Ticlid®). These medications can be used to treat blood clots or to prevent a heart attack or stroke.
• If you take insulin or other medications for diabetes, you may need to change the dose before your procedure. Ask the doctor who prescribes your diabetes medication what you should do the morning of your procedure.
• If you take aspirin, ask your doctor if you need to stop taking it before your procedure. Whether he or she recommends you stop taking it will depend on the reason you are taking it. Please review the information in Common Medications Containing Aspirin and Other Nonsteroidal Anti-Inflammatory Drugs (NSAIDs) for examples of what not to take and what to take instead.
• Do not take vitamin E 10 days before your procedure, or as directed by your doctor.
Tell us if you’re sick
If you develop any illness (fever, cold, sore throat, or flu) before your procedure, please call your doctor.
2 days before your procedure
A nurse or session assistant will call you 1 business day before your procedure. He or she will tell you where to go the day of your procedure and what time you should arrive. If your procedure is scheduled on a Monday, you will be called on Friday. If you do not receive a call by 4:00 pm, please call (212) 639-5948. Check the box next to the location of your procedure.
ȗ Pediatric Day Hospital (PDH) 1275 York Avenue (between East 67th and East 68th Streets) B elevator to 9th floor
ȗ Presurgical Center (PSC) 1275 York Avenue (between East 67th and East 68th Streets) B elevator to 6th floor
1 day before your procedure
Do not eat or drink anything after midnight the night before your procedure. This includes water, gum, and hard candy.
Write in your admission time Date __________ Time __________

About Your Central Venous Catheter for Pediatric Patients 3 of 9
The Day of Your Procedure
On the day of your procedure, please be aware that many things can affect the start time of your procedure. The procedure before yours may last longer than expected. An emergency procedure may need to be done in the room you are scheduled to be in. If there is a delay in your start time, we will let you know.
Morning of your procedure
Ask your doctor or nurse which medications you should take the morning of your procedure.
Things to remember
• You can shower, but do not put on any lotions, creams, powders, deodorant, makeup, or perfumes.
• Remove all jewelry, including body piercings.
• Leave valuables, such as credit cards and jewlery, at home.
• Before you are taken into the operating room, you may be asked to remove your hearing aids, dentures, prosthetic device(s), wig, and religious articles, such as a rosary.
What to bring with you
ȗ A list of the medications you take at home
ȗ A case for your glasses or contacts
ȗ Your Health Care Proxy form, if you have completed one
ȗ Medications for breathing problems (such as inhalers) and/or medications for chest pain
ȗ If you use a CPAP or BiPAP machine to sleep at night, please bring your machine with you, if possible. If you can’t bring your machine with you, we will give you one to use while you are in the hospital.
ȗ This guide
Where to park
Parking at MSK is available in the garage on East 66th Street between York and First Avenues. To reach the garage, enter East 66th Street from York Avenue. The garage is located about a quarter of a block in from York Avenue, on the right-hand (north) side of the street. A tunnel connects the garage to the hospital. There are also other garages nearby, including four on East 69th Street between First and Second Avenues and three on East 65th Street between First and Second Avenues. For questions about prices, call (212) 639-2338.
Tell us who you are
You will be asked to state and spell your name and date of birth many times. This is for your safety. Patients with the same or similar names may be having a procedure on the same day.
Tell your nurse about medications you’ve taken
A nurse will meet with you before your procedure. Tell him or her the dose of any medications you took after midnight and the time you took them.
Firs
t A
venu
e
E 67th St
E 68th St
E 66th St
E 65th St
E 69th St
York
Ave
nue
Seco
nd A
venu
e
P
M
P = ParkingM = Memorial Sloan Kettering

About Your Central Venous Catheter for Pediatric Patients 4 of 9
Get dressed for your procedure
You will be given a hospital gown, robe, and nonskid socks to wear.
During Your Procedure
A small incision (surgical cut) will be made just below your collarbone. This area of your body will be numbed with a local anesthetic. The catheter will be inserted through this small incision and threaded into your vein.
The incision will be stitched closed. Your catheter will be stitched to your skin at the point where it exits your body so that it will stay in place.
After Your Procedure
What to expect
When you wake up after your procedure, you will be in the Post Anesthesia Care Unit (PACU). Your nurse will continue to monitor your body temperature, pulse, blood pressure, and oxygen levels. Once you are fully awake, your nurse will give you a drink and a light snack. He or she will remove your IV line. If you have someone waiting with you, your nurse will explain your discharge instructions to both of you before you go home.
Prepare the following emergency kit and keep it with you at all times:
• Two toothless clamps
• Dressing change kit
• Your doctor’s office and emergency telephone numbers
Caring for your exit site
You may have some discomfort at your exit site and along the tunnel. Ask your nurse for medication to relieve your pain.
After your procedure, you can shower. However, you should not submerge your catheter in water (e.g., a bathtub or swimming pool).
Your dressings need to be kept dry for 24 hours following your procedure. You must change your dressings 24 hours after your procedure. Two days after your procedure, you can remove the dressing that covers the small incision near your collarbone. After that, you can leave it open to the air. The strips of adhesive tape that cover your incision should be left in place until they start to peel off. This should happen about 3 to 5 days after your procedure. The point where the catheter exits your skin will still need to be covered with a dressing. The stitch at this site keeps your catheter in place until the cuff becomes anchored in the tunnel under your skin.
Your doctors and nurses will give you instructions on what exercises and movements you can do while your incisions are healing. Check with your doctor or nurse before starting heavy exercises, such as:
• Running
• Jogging
• Lifting weights
About Your Central Venous Catheter for Pediatric Patients 5 of 9
Changing Your Dressing, Needleless Connectors, and Disinfection Caps
• Do not do your catheter care in the bathroom after a shower. The steam from a shower can create a moist environment under your dressing and affect the adhesive.
• You will see the folded Map for Dressing Change: CVC inside this resource. Use it to follow the step-by-step instructions for changing your dressing. This is when you will use sterile technique. You will not be able to touch the booklet then because that would break sterile technique. Open the map and spread it out where you can see it.
• You will use a Tegaderm™ CHG dressing to cover your exit site. Change your dressing once a week, as long as it stays dry, intact, and clean. Change it on the same day you change your needleless connectors and disinfection caps and flush your catheter.
• If the Tegaderm™ CHG gel pad becomes swollen, change your dressing. You can test the gel pad by applying pressure to it with your index (pointer) finger. If you see an indent, the gel pad is swollen and your dressing should be changed. This can happen if there is a lot of sweat under your dressing.
• If you have problems with your skin, such as irritability or sensitivity, your nurse may suggest a different type of dressing. In that case, you may need to change it more often than once a week. No matter which dressing you are using, always change it right away if it starts to come off or gets wet. Do not just put another dressing or tape over it.
Equipment
• One dressing change kit
• Nonsterile gloves
• Paper tape
• One disinfection cap for each lumen
• Alternative dressing or needleless connector, if given to you by your nurse
• A mirror that can stand up on a table (a makeup mirror works well)
Sterile procedure for changing your dressing
1. Prepare a clean area in which to work. Remember not to change your dressing in the bathroom after a shower.
2. Gather your equipment. Wash your hands thoroughly with warm water and antibacterial soap or use hand sanitizer.
3. Get into a comfortable position. Unpin the catheter from your clothing, if necessary. Open or remove your clothing to expose the catheter.
4. Check to make sure that the catheter clamps are closed.
5. Open the Map for Dressing Change: CVC instructions enclosed in this booklet and spread it out where you can see it. The procedural checklist that comes in your kit is a summary of basic information and should be used alongside this resource. Please refer to the side as instructed by your nurse.

About Your Central Venous Catheter for Pediatric Patients 6 of 9
6. Open and remove the outer packaging of the dressing change kit. The masks will be right on top (see Figure 2). Both you and the person helping you change your dressing need to wear a mask. Do not touch anything else inside the kit.
7. Put on the nonsterile gloves. Remove the old dressing by gently grasping an edge of the dressing and slowly peeling it off your skin toward the exit site. As you peel the dressing back, place your thumb or forefinger on the gel pad to secure the catheter. To make it easier to remove, wipe the area underneath the gel pad with an alcohol pad. Make sure the entire gel pad comes off with the dressing. Throw away the gloves and old dressing.
8. Without touching the area, inspect the exit site and the skin around it. It is easier to do this by looking in the mirror. Call your doctor or nurse after you complete the dressing change if you notice any signs of infection or irritation, such as:
• Red or raw skin
• Swelling
• Any drainage from the exit site
• Leakage around your catheter
9. Open the wrapper of the kit. If given to you by your nurse, open the package of the alternative dressing or needleless connector onto the sterile field. Follow steps 10-20 on the Map for Dressing Change: CVC instructions to complete the dressing change.
You are done with the sterile part of your dressing change. Keep your gloves and mask on to change the needleless connectors and disinfection caps on your catheter. You will do this once a week.
Changing your needleless connectors and disinfection caps
21. You will change the needleless connector and disinfection cap on each lumen of your catheter. Make sure you have 3 alcohol pads for each lumen.
22. Check to make sure that the clamps on your lumens are closed before you change your needleless connectors and disinfection caps.
23. Even though your gloves are on, they will no longer be sterile if you touched your skin when you put on your dressing, so do not touch the inner part of the catheter tip or needleless connector. Using an alcohol pad, hold your catheter with your nondominant hand close to, but not touching, the needleless connector (see Figure 3).
24. Using your dominant hand, scrub the connection site for 15 seconds with another alcohol pad and allow it to dry for 15 seconds. Twist off the old needleless connector. Throw away the old needleless connector and alcohol pad.
Figure 2: Dressing change kit
Figure 3: Holding the catheter

About Your Central Venous Catheter for Pediatric Patients 7 of 9
25. Scrub the end of your catheter with a new alcohol pad for 15 seconds and allow it to dry for 15 seconds.
26. Pick up the new needleless connector with your dominant hand. If there is a cover in place over the new needleless connector, remove it and then twist the new needleless connector onto your catheter (see Figure 4).
27. If you won’t be flushing your catheter immediately, apply the disinfection cap to the end of the needleless connector.
28. Repeat steps 21-27 for the second and third lumens.
29. Remove your mask and sterile gloves. Throw them away.
30. Decide on the most comfortable way for you to leave your catheter. You can:
• Tuck it inside of your bra if you wear one.
• If you will pin your catheter to your clothing, prepare 1 piece of 3-inch paper tape. Fold down the edges of the tape (see Figure 5). Leave enough sticky tape so you can wrap the tape around all of your lumens. Gather the lumens with the paper tape, put a safety pin through the folded edges, and pin it to the inside of your clothing.
• Tape it to your skin.
Leave the catheter hanging loose only if you are sure it will not be pulled.
Flushing Your Catheter
You should flush your catheter with normal saline solution once a week on the same day that you change your dressing and needleless connectors. Flushing the lumens of your catheter will prevent your lines from becoming clogged.
Equipment:
• One prefilled, 10 mL syringe containing normal saline solution. You will need 1 syringe for each lumen
• Nonsterile gloves
• Two alcohol pads for each lumen
• One disinfection cap for each lumen
Steps to flushing your catheter
1. Gather your equipment.
2. Wash your hands thoroughly with warm water and antibacterial soap. Dry them with a clean towel or a paper towel. Put on a pair of nonsterile gloves.
Figure 4: Twisting on the new needleless connector
Figure 5: Paper tape
3”
About Your Central Venous Catheter for Pediatric Patients 8 of 9
3. To release the air bubbles in the syringe, gently tap the side of the syringe. Point the syringe up as you do this. Loosen but do not remove the cap on the syringe. Press the plunger on the syringe until the air is pushed out. Retighten the cap.
4. Pick up 1 lumen. If you have a disinfection cap, remove it. If you don’t have a disinfection cap, scrub the end of the needleless connector with an alcohol pad for 15 seconds and allow it to dry for 15 seconds.
5. Remove the cap from the syringe. Throw away the cap. Make sure that nothing touches the clean end of the needleless connector while you are doing this.
6. Carefully push the syringe into the needleless connector and twist it in a clockwise (to the right) direction until the connection feels secure. Unclamp the lumen. If you can’t inject the saline, stop and check to be sure that the lumen is unclamped and there are no twists or other blockages in the tubing. Try to inject the saline again. If you still can’t inject the saline, do not use extra pressure to flush the line. Remove the syringe, reclamp your catheter, and call your doctor or nurse.
7. Use the following push/pause method to flush your catheter:
• Quickly inject ⅓ of the saline.
• Pause.
• Repeat.
• Inject the last ⅓ of the saline. After the injection, clamp your catheter.
8. Untwist the syringe from the lumen and throw it away.
9. Attach a new disinfection cap to the end of the needleless connector.
10. Repeat steps 3-11 for each lumen.
11. Reclamp the lumens.
12. Throw away your mask and gloves and wash your hands thoroughly.
Caring for Your CVC
• Do not submerge your catheter in water (e.g., a bathtub or swimming pool).
• Clamp the lumens when your catheter is not in use.
• Keep your catheter secure at all times to avoid pulling it. You can tape the lumens of your catheter to your skin, tuck them into a bra if you wear one, or pin them to your clothing. Ask your nurse about the best way to secure your catheter. Avoid placing tape over the connection site.
• If your catheter is leaking at any time, clamp it above the leak. Use the white catheter clamp on the catheter, if possible. If the white clamp is not available, use the clamp found in the emergency kit. Wipe the area that is leaking with an alcohol pad. Cover the site with tape. Call your doctor or nurse immediately. Catheters can often be repaired.
Guidelines for showering
While your catheter is in place, it is especially important to take good care of your skin to reduce your risk of infection. We recommend that you wash with Hibiclens® every day while your catheter is in place. It contains a fast-acting antiseptic called chlorhexidine gluconate (CHG) that kills germs that live on your skin and will reduce your risk of infection. Hibiclens® can work for up to 6 hours after using it. You will be sent home with a small bottle when you are discharged from the hospital.

About Your Central Venous Catheter for Pediatric Patients 9 of 9
Instructions for using Hibiclens®
• If you are washing your hair, shampoo and rinse thoroughly.
• Wash your face with regular soap.
• Rinse your body with warm water from the neck down.
• Apply Hibiclens® to a washcloth or directly to the skin being cleansed. Wash gently. Do not dilute the Hibiclens®.
• Rinse thoroughly with warm water and pat yourself dry.
Important points to remember when using Hibiclens®
• Do not use Hibiclens® on children who are younger than 2 months old.
• Do not use Hibiclens® if you are allergic to chlorhexidine.
• Do not use Hibiclens® on your face, ears, genital region, or on deep wounds.
• Do not use regular soap, lotion, powder, or deodorant after washing with Hibiclens®.
You can shower with your catheter in place using a one-time-use waterproof cover that goes over your dressing. Each time you shower, cover the Tegaderm™ CHG dressing completely with a new waterproof cover to protect it from getting wet.
• To put on the waterproof cover, peel off the top and side strips. Place the top edge above your dressing. Smooth it down over your dressing. Do the same for the bottom part of your dressing, making sure that the bottom edge of the waterproof cover is below your dressing. Make sure the lumens of your catheter are tucked into thewaterproof cover and completely covered.
• Do not let the tape on the waterproof cover touch the Tegaderm™ CHG dressing. It can lift your dressing when you remove the waterproof cover after showering.
• Dry the waterproof cover before removing it.
• Do not shower for longer than 15 minutes. Use warm water, not hot water. This will help prevent the waterproof cover from coming off.
• Do not submerge your catheter in water.
• If your dressing gets wet, change it.
Call Your Doctor or Nurse Immediately if You:
• Have redness, swelling, or drainage around the area where the catheter exits your body
• Are unable to flush your catheter
• Have a temperature of 100.4° F (38° C) or higher or chills when you flush your catheter
• Have a break or leak in your catheter or if your needleless connector falls off
• Have an unexplained problem with your catheter
You can contact your healthcare providers directly Monday through Friday from 9:00 am to 5:00 pm. After 5:00 pm, during the weekend, and on holidays, please call (212) 639-2000 and ask for the pediatric doctor on call.
©2014 Memorial Sloan Kettering Cancer Center1275 York Avenue, New York, New York 10065B-224
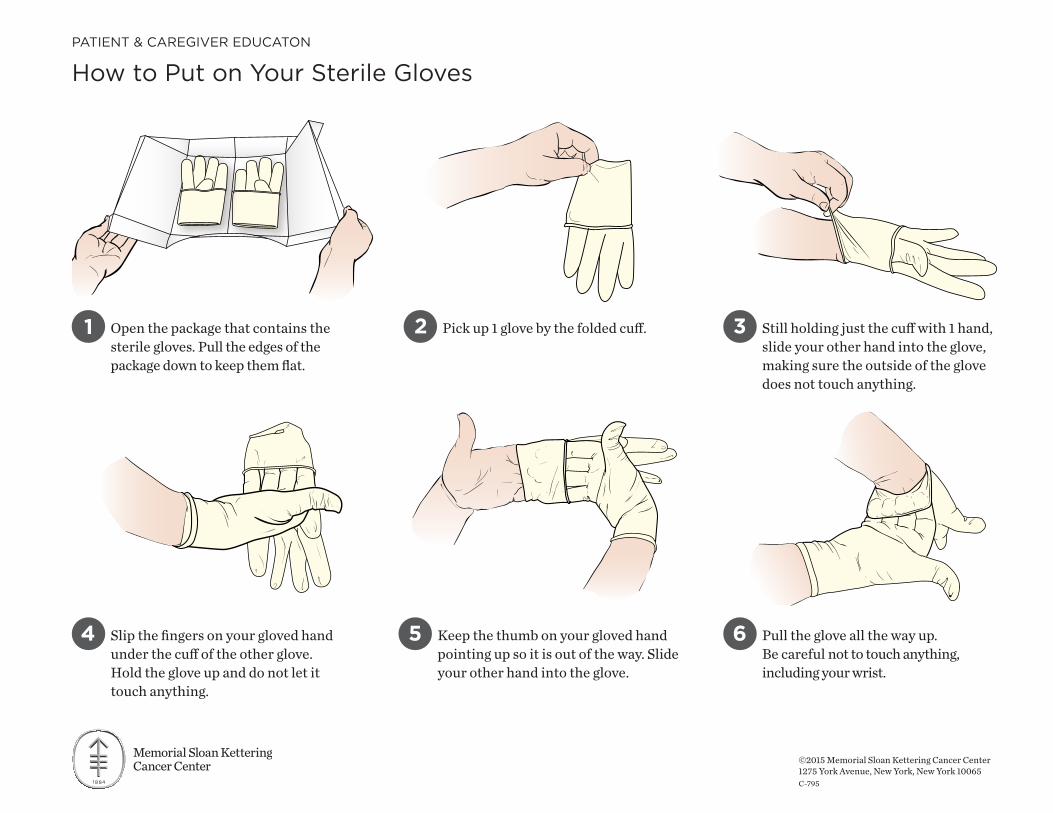
How to Put on Your Sterile Gloves
Pick up 1 glove by the folded cuff.2
©2015 Memorial Sloan Kettering Cancer Center1275 York Avenue, New York, New York 10065C-795
Keep the thumb on your gloved hand pointing up so it is out of the way. Slide your other hand into the glove.
5 Pull the glove all the way up. Be careful not to touch anything, including your wrist.
6
Still holding just the cuff with 1 hand, slide your other hand into the glove, making sure the outside of the glove does not touch anything.
3
Slip the fingers on your gloved hand under the cuff of the other glove. Hold the glove up and do not let it touch anything.
4
Open the package that contains the sterile gloves. Pull the edges of the package down to keep them flat.
1
PATIENT & CAREGIVER EDUCATON

14. With your nondominant hand, grasp the catheter using an alcohol pad (see Figure 2). Do not touch the catheter itself. Touch only the alcohol pad. Hold the catheter away from your chest.
15. Pick up the Chloraprep®. Beginning at the exit site, scrub up and down and side to side with the Chloraprep® to make a 2-inch box (see Figure 3). Do this for 30 seconds. Discard the Chloraprep®.
16. Allow the site to dry for at least 30 seconds. Do not fan or blow on the site to speed up the drying. Hold the catheter away while it dries.
17. Take another alcohol pad in your dominant hand. Place it around the catheter, just above where it separates into lumens. Grasp the catheter with the alcohol wipe. Hold the catheter up and use another alcohol pad in your nondominant hand to clean the catheter. Start at the exit site and gently wipe down to the hub using a new alcohol pad for each lumen. (see Figure 4). Do not pull on the catheter.
If the exit site is red, raw, swollen, or has drainage, notify your doctor after you finish the dressing change.
Figure 3: Cleaning the exit site
Figure 4: Cleaning the catheter
Map for Dressing Change for Pediatric Patients: CVC
NOTE: From this point on, do not touch the catheter or your skin except with an alcohol pad. This will decrease your risk of getting an infection.
10. Wash your hands thoroughly with warm water and antibacterial soap or use the hand sanitizer packet provided on the outside of the kit.
11. Take the package with the sterile gloves out of the tray. Be careful not to touch anything else in the tray. Put on the sterile gloves, touching only the inside of the sterile glove with your bare hand. Be careful not to touch anything except what is in the dressing change tray after your gloves are on. Take out the sterile paper drape, unfold it, and place it on your work area. Move everything from inside the dressing change tray onto the sterile drape.
12. Open and remove all the alcohol pads. Put the alcohol pads back onto the tray. Put the wrappers to the side or drop them in the trash.
13. Pick up the ChloraPrep® applicator with your dominant hand. Pinch the wings on the side together until you hear a click (see Figure 1). This will make the antiseptic soak into the applicator sponge. You must press very hard to make the click sound.
2
Figure 1: ChloraPrep® applicator
3
Figure 2: Holding the catheter
18. Apply the No Sting Barrier Film to your skin. Paint it on in the shape of an open rectangle about the size of the Tegaderm® CHG dressing. Allow it to dry completely. The No Sting Barrier Film will help the dressing stick to your skin.
19. Peel the backing off of the Tegaderm® CHG dressing (see Figure 5). Position it with the triangle shape over the catheter. Center the gel pad over the exit site and smooth down the dressing edge. Do not stretch the dressing when applying.
20. Grasp the round plastic tab on the outside and peel the plastic off all the way around the dressing (see Figure 6). You may press on the outside of the dressing to make sure it is intact (see Figure 7).
Continue the instructions in the booklet.
Figure 5: Tegaderm® CHG dressing
Figure 6: Applying the Tegaderm® CHG dressing
SkinGel pad
Figure 7: Tegaderm® CHG dressing on skin
©2014 Memorial Sloan Kettering Cancer Center1275 York Avenue, New York, New York 10065C-821
PATIENT & CAREGIVER EDUCATON