olv supplier training guide - amway documents/ab… · olv supplier training guide olv ... the olv...
TRANSCRIPT

1
OLV Supplier Training Guide OLV – Overview of Functionality and Expectations…page 2 Initial Setup:
• Registration: Terms and Conditions, Create User and Company Profiles…page 3 • Change Password…page 6 • Add Users…page 7 • Set Alerts…page 11 • OLV Technical Support Contact…page 14
General Navigation:
• Log-in and Home Page Overview…page 15 • Order Search Options…page 16 • Icon Definitions…page 19
Acknowledging Orders:
• Anatomy of an Order – Review before Acknowledging…page 20 • Calculating Collect Shipment Purchase Order Dates…page 22 • Acknowledgement Submission…page 23
– Submitting changes to price, date and quantity – Addition of miscellaneous charges
• Acknowledging Revised Orders – Explanation of Order Revisions…page 26 Special Situations:
• Cancelled Orders…page 27 • Split Shipments…page 28 • Submitting Revisions to Orders in “Acknowledged” Status…page 29
Invoicing:
• Invoice Creation and Submission…page 32 • Print Invoices…page 36
Rev. date: June 24, 2009

2OLV – Overview of Functionality and Expectations The OLV system simplifies activities you perform to respond to Amway’s orders – it allows better tracking of orders and has functionality to easily create and submit invoices. Following is a summary of expectations:
• You must acknowledge: – All new orders – All order revisions (any changes you submit during an acknowledgement
will create a revised order that will need to be re-acknowledged – see page 26 for more details) • You will receive revised orders in the following situations:
You or Amway change a unit quantity or date You or Amway change a price Amway cancels a line item
• Amway requires that order acknowledgements be submitted within 72 hours (3
days). • If Amway does not receive an acknowledgement within three days, you will
receive an automatic email notification – an EDI Overdue Acknowledgement Report – indicating that the acknowledgement is overdue. The email notifications will continue until the acknowledgement is submitted.
• You must Invoice via OLV
Questions on Order Content:
• If you have any questions regarding order content, contact Amway: – All questions related to price should be directed to the
Amway Buying Assistant. – All other questions (quantities, dates, and other issues) should be directed
to the Amway planner (the contact listed in the “Order Header”, page 21). Rev. date: June 24, 2009

3Registration You will receive an email invitation to register in OLV Note: The first user to register in OLV will be the “Administrator” and will set Alerts and invite additional users
Click on URL provided in invitation to enter registration system
First page reviews registration process
Rev. date: June 24, 2009

4Review and accept the GXS Terms and Conditions NOTE: Please accept the T&C agreement as-is. It was written for suppliers who pay to use the application. Amway is paying all fees, and therefore these T&Cs do not apply, but you cannot continue the registration without accepting.
Click “Terms and Conditions Agreement” on left
Create User Profile
Click “User Profile” on left and enter contact information. Scroll to enter language preference, login credentials and password recovery questions
Rev. date: June 24, 2009

5Create Company Profile If your company is not currently registered, the first user from the company to register will be the OLV Administrator and must provide company information.
Click “Company Profile” on left, enter information
As a final step, Click “Review and Submit” on left Review registration information, Click “Submit” Upon registration approval, you will receive an email with login information
This concludes: Registration: Terms and Conditions, Create User and Company Profiles
Rev. date: June 24, 2009

6Add Users and Change Password
Use “Company Profile” to: o Update personal user account o Change password o Add Users
Change Password
Click “Company Profile” Click “Change Password”
Rev. date: June 24, 2009

7Add Users NOTE: Only the OLV “Administrator” can add users There are two ways to add a user: manually or by invitation. The Manual process should be used if there are a low number of users and the Administrator knows the profile information. Most suppliers use the Manual process. Manually Add A User: Administrator:
• Click “Company Profile” from OLV Home Page • In “User Maintenance” section, Click “Create New User” • Complete all the information required, including time zone.
o For Login ID use the person’s first initial and full last name (such as jsmith for john smith)
o For Password use the word “password” (it must be at least 8 characters in length) Note: The user will be asked to change password when they login the first time.
• Click “Administrator” box at the bottom of screen if User should have Administrator capabilities
• Click “Submit” – a new screen will appear to indicate the functions User will be allowed. They include:
o Company Administrator o PO Viewer, view access only (sometimes used by sales representatives) o Invoice View, view access only (sometimes used by sales representatives) o PO Acknowledger (used by customer service groups) o Invoice Creator (used by customer service groups or finance groups)
• You must then contact User to: o provide them with the GXS web address, o provide them with their ID and Password
• When new User logs-in for the first time they will see the screen shown below after they have entered the ID and Password that you provided.
o Their new password MUST BE at least 8 characters in length. o If a User forgets their password, but tries to login more than 5 times, their
password will get locked. The administrator will have to go into User Maintenance, Update Users and unlock the password. The administrator can also assign a new password if necessary.
Rev. date: June 24, 2009

8Invite New User The difference between this process and the Manual addition is that the Administrator sends an invitation to the new users(s) and the user(s) complete their profile. Administrator:
• Click “Company Profile” from OLV Home Page • In “Tools” section, Click “Invitation Tool” • Click “Create Invitation”
o If this invitation is for one user, call it by the user’s last name o If this invitation is for more than one user, call it by the function, location or date, it is
your choice o Invitee Type is “User” o “Notes” do not go with the invite o Invitation Type is “Unique” o Approval Type is “Automatic” (otherwise Administrator will have to approve
registration) • Click “Next Step”
o Expiration Date is your choice o Application & Roles, select those that apply:
Typically either PO Acknowledger for Customer Service and/or Invoice Creator for Accounts Receivable if they are entering invoice information
Some companies use PO Viewer and Invoice Viewer for their Sales Representatives
Companies with multiple locations may have more than one administrator • Email details: As shown below:
o First line, select the language for the email. o Enter emails in the Email Address (es) box, send a copy of the invite to yourself and
enter a message that explains why they are receiving the invitation. Inform people that they will be receiving the invite before sending the invitation.
o Click Next Step
• A review screen will appear where you can edit the information entered, if everything is
okay Click “Send” Rev. date: June 24, 2009

9User will receive Invitation email below: You are invited to join the following marketplace. Invitation from: [supplier company name] Marketplace: OLV Community Marketplace role: Supplier This invitation includes a subscription to the following. Application: OLV Role: PO Acknowledger, Invoice Creator (w/ po only) The registration process should take approximately ten minutes. Register and create your account by going to the following website before the expiration date. URL: https://staging.gxsolc.com/raa/reg/en/registration/RegInvitationVerification.process.preload.regctrl?invitation_code=1070815986 Expiration Date: 09/12/2007 If you manually enter the above URL, you may need to enter the following code before the above expiration date. Invitation Code: 1070815986 When you submit your registration, it will be approved by your administrator, and you will receive an email stating that your account is activated. This invitation allows you to register in the Access Business Group website to acknowledge purchase orders and submit invoices. Please follow the instructions, call if you have questions. If you have questions about the registration process or your registration status, please contact: {Administrator First Name] Phone Number [Administrator email address] When User receives email invitation they should:
• Click on the link in the email, they will be taken to the screen below • Complete their profile (profile screens are not shown in this document) • Write down the User ID and Password they created for themselves Rev. date: June 24, 2009

10• The last registration screen will also show a Tracking ID, this should also be written
down • After User completes registration, they will receive an email confirmation from the system. NOTE: At this time an email address can be used only once, this is a problem if a company has an administrator for more than one login. We are working with GXS to resolve this issue.
SET ALERTS
Rev. date: June 24, 2009

11Note: The “Alerts” option is only available to the OLV “Administrator” (Refer to “Create User Profile”, page 4) Activate OLV Alerts to receive an automated e-mail for new or revised orders, and to receive alerts on the Home page
On the Home Page, click on “Alerts”
A new screen will appear:
To Set Alerts: Rev. date: June 24, 2009

12Enter Recipient email address(es):
Under “Company Settings” tab, enter your email address in “Email Address” field and click “Add”. Email address will then appear in box “Email Recipient List”. Repeat to add more recipient emails.
Note: If these users are also going to acknowledge or invoice orders they will have to be setup by your Administrator as Users. (Refer to “Add Users”, page 7)
In the ‘“From” Email Address”, enter the email address of the Amway Buying Assistant or Planner that you work with most frequently. This address is an indicator of which company is sending you orders. It is not intended to show you each person sending you a purchase order.
Note: This field will only hold one address and has a limit of 36 characters. If the Amway address is too long, replace “accessbusinessgroup.com” with “amway.com”, and leave the Amway employee name the same. Example: “[email protected]” would be [email protected]
Select Alerts: Rev. date: June 24, 2009

13 Scroll down, and under “New Documents” Click on “New Orders. This will send
you an email message whenever a New Order or Change Order is sent to you by Amway.
IMPORTANT – ON THIS SAME SCREEN, SCROLL DOWN AND MAKE SURE THAT ALL
OTHER ALERTS ARE CLEAR. NO OTHER ALERTS SHOULD BE CHECKED.
Scroll to top of screen and Click on “Message Center Settings” tab. Click on “New Order” and “Order Acknowledgement” Click on “Preview”, on the left of screen Click on “Submit”. A pop-up window will appear asking if you want to submit these
changes, Click “Yes”
Rev. date: June 24, 2009

14OLV Technical Support Contact Note: You will contact GXS for help with login issues or resetting passwords. Amway cannot help with these issues. When you Contact GXS:
• Have your company name, phone number, and your Client ID ready. (If you do not have a Client ID, you can provide your name and email.)
• Identify that you are using Order Lifecycle Visibility. • Provide a detailed description of the problem.
To contact GXS for assistance with Order Lifecycle Visibility:
• Call 1-800-EDI-CALL (1-800-334-2255). After you hear the welcome message, press 2029.
• Support is available from 8:00 - 17:00 ET, Monday - Friday. After business hours, calls roll to voicemail and will be returned during the next business day.
• You can also send an email to: [email protected]
Rev. date: June 24, 2009

15Log-in and Home Page Overview
Access the system at the https://olv.gxsolc.com URL Enter login credentials
The OLV Home page Action panel contains links for locating and/or creating specific types of documents and performing administrative tasks
The Message Center contains links for locating documents that need your attention. Note: Amway does not use “Schedules to Commit” function
Note: If “Alerts” are not set, the “Message Center” will not function, see Page 11
Action panel
Message Center
Rev. date: June 24, 2009

16Order Search Options
“New or Changed Orders” links to new/revised orders. “Orders to Acknowledge” are orders viewed but not acknowledged
Alternately, you can use the “Order Search” function to locate orders using a criteria query.
Entering a PO via “New or Changed Orders” link
Click “New or Changed Orders”, then Click on a chosen order link
Rev. date: June 24, 2009

17Entering a PO via “Order Search” link
Click “Order Search”
“Order Search” allows for selection by search criteria, individually or in combination, such as Order Status with a date range. Or by OLV status, for example: new, viewed, acknowledged, cancelled, etc. NOTE: asterisk is a wildcard when combined with at least one character.
Rev. date: June 24, 2009

18“Order Search Results”
System will display a list of orders, based on search criteria Status column icons are auto-assigned (see next page for explanation)
Rev. date: June 24, 2009

19 Icon Definitions NOTE: If Amway submits an Order Change, the status icons will be reset to reflect that the new version of the document has not been viewed or acknowledged. The binocular and acknowledgment icons will no longer appear.
Partially Invoiced
Purchase order has been cancelled – this red X will also show at the “Details” line level
Non-conforming delivery commitment - AMWAY submits a schedule change to a previously committed order. Supplier must re-acknowledge
Partially Accepted Identifies order accepted by submitting changes
Fully Invoiced
Full delivery commitment
Partial delivery commitment
Acknowledged as “Rejected” Note: Never reject an order without first calling AMWAY Planner
Acknowledged as “Accepted”
Order received or viewed by user in OLV. Identifies a “touched” order (opened, printed, or downloaded)
Description Icon
Rev. date: June 24, 2009

20Acknowledging New Orders Anatomy of an Order – Review before Acknowledging
Locate Order to acknowledge (see page 16 for Order search options) “Order Search Results” below shows list of new or changed orders Click on the order number to begin reviewing order content
“Header” shows Buyer and Supplier information for the order. To view all, scroll or use the “Section Navigation” links
“Terms and Instructions” includes link to Amway Supplier Portal “Order Actions” include “Detail Print”, Click to print the order
Rev. date: June 24, 2009

21 Alternate view of “Header” shows Planner contact, ship-to address, shipping terms, payment terms, etc.
NOTE: If any “Header” information is incorrect, contact Buying Assistant
Click “Details” tab to view order line items and schedule
Rev. date: June 24, 2009

22 Line Item information is shown in beige area of “Details” The system shows the product description, quantity ordered, part number, unit price and extended price
Below is Line Detail Clarification:
Click on ellipsis (…) to view detailed description and any comments that have been added to the line attachment. During Acknowledgement, you will enter a “Commit Date”, which is the same as “Promised Delivery Date”. For shipments arranged by Supplier, this is the date you will have order at “Ship-To Address”. For Suppliers with Collect shipping terms (terms appear at “Header” tab), you must call Amway by the “Ship Available” date. If you can not meet the “Ship Available” date listed, you must calculate a new Promised Delivery/Commit date. To calculate: find the difference in days between the “Ship Available” and “Promised Delivery” dates. Add this number to your desired “Ship Available” date – this is the date you will acknowledge as the “Promised”/“Commit” date. In example above: difference is 6 days, so for a desired “Ship Available” of 11/20, acknowledge a “Promised/Commit” date of 11/26. NOTE: “Ship Available Date” does not appear in “Acknowledge” view, so make note of date Rev. date: June 24, 2009

23Acknowledgement Submission Important: you must acknowledge before order is received, otherwise order will remain on the Home Page under “Orders to Acknowledge” link
“Order Actions” are the same on both the “Header” and “Detail” tab Click “Acknowledge” to enter Acknowledgement function
Acknowledgement fields will be blank – Click “Accept All Items” Note: Do Not Click “Reject All Items”, unless you have first informed Amway Planner that you are unable to fill order
Rev. date: June 24, 2009
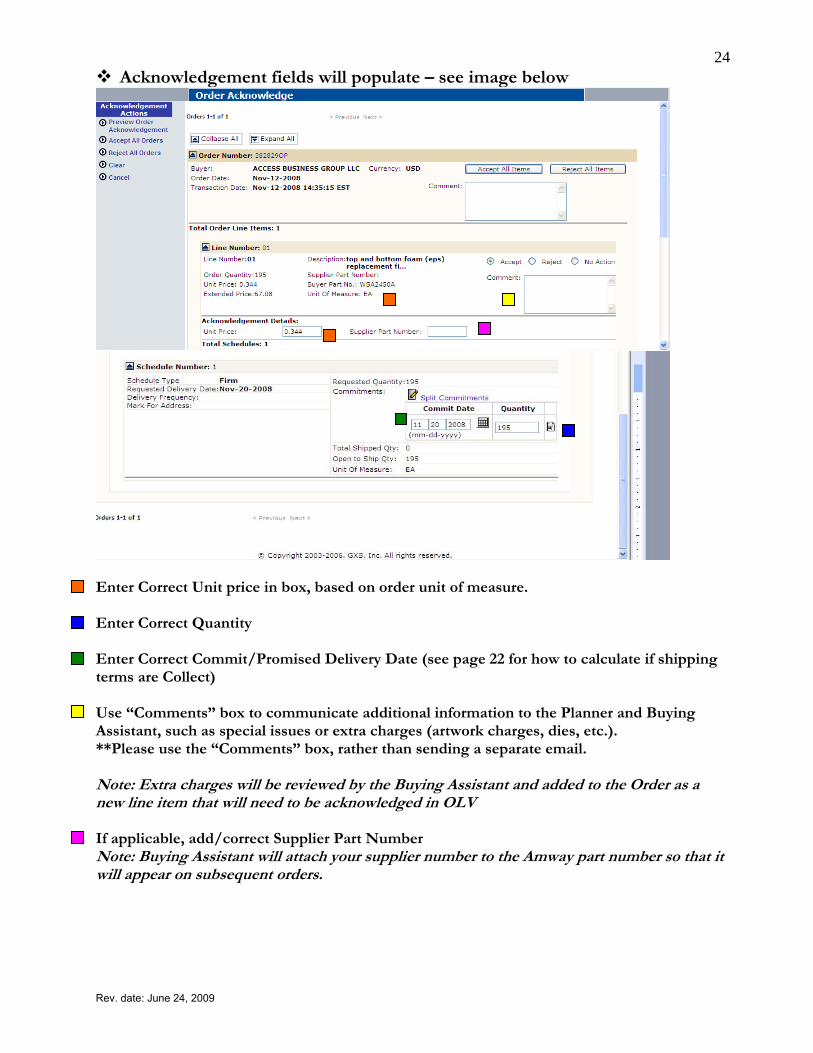
24 Acknowledgement fields will populate – see image below
Enter Correct Unit price in box, based on order unit of measure. Enter Correct Quantity Enter Correct Commit/Promised Delivery Date (see page 22 for how to calculate if shipping terms are Collect) Use “Comments” box to communicate additional information to the Planner and Buying Assistant, such as special issues or extra charges (artwork charges, dies, etc.). **Please use the “Comments” box, rather than sending a separate email. Note: Extra charges will be reviewed by the Buying Assistant and added to the Order as a new line item that will need to be acknowledged in OLV If applicable, add/correct Supplier Part Number Note: Buying Assistant will attach your supplier number to the Amway part number so that it will appear on subsequent orders. Rev. date: June 24, 2009

25 After Entering changes, Click “Preview Order Acknowledgement”
Changes made to price will appear in red. Review and Click “Submit” Click “Modify Order Acknowledgement” if corrections are needed
After clicking “Submit”, screen shows acknowledgement was submitted If you submitted changes, you’ll receive a revised order to re-acknowledge (see page 26 for explanation of acknowledging revisions)
Rev. date: June 24, 2009

26Acknowledging Revised Order – Explanation of Revisions
• A change to Date and/or Quantity will trigger a real-time update to Amway’s ERP system, and an order change is immediately generated.
• A change to Price will be manually reviewed and entered into Amway’s ERP
system. This will generate a separate order change which should be received within 24 hours. NOTE: If you have changed a Date and/or Quantity, AND a Price, wait until you receive an order change reflecting the corrected price before acknowledging the new order change.
• Once an Order is in “Acknowledged” status (icon with two purple checks), you
are limited to the following changes: (see page 19) – Changes to quantity – Changes to delivery commitment date(s) – Line splits for the delivery commitment dates
NOTE: If you need to make a price change to an Acknowledged Order, contact the Buying Assistant. They will enter changes, and you will receive a Revised Order to acknowledge.
Revised orders have a red flag indicating where changes were made – Click on the flag to view the change
Revised Orders also have “History” tab available to view previous versions Acknowledge Revised Orders as New Orders (page 23), all changes accepted
Rev. date: June 24, 2009

27Special Situations Cancelled Orders
If Amway cancels all lines on an order, a red “X” will appear at the Order Status level (see first image). If there are multiple Order lines and only one is cancelled, the red “X” will only show at Order Details level (second image)
Until you view order details, the cancelled order will stay on the “New or Changed Orders” list. Click on the blue order number to view order details
Cancelled Orders and lines will have a red “X” at the Order Details line level Cancelled Orders do not have the “Acknowledge” function – you must contact the Planner directly to confirm Order cancellation. Note: if there are additional open lines, you will be able to acknowledge those lines
Once a Cancelled Order has been viewed, it will no longer be listed under “New or Changed Orders” on your Home page
Order Search will find all cancelled POs by “Cancelled” status
Rev. date: June 24, 2009

28Split Shipments
Click “Split Commitments” at the Detail level during Order Acknowledgement, after clicking “Accept All Items”
Enter new dates and quantities Note: total quantity must equal original requested quantity. If you need to make a quantity increase/decrease AND a split shipment, you must first acknowledge with quantity change, then acknowledge the revised order with the split shipment
Click “Copy Split Commitments” to accept and return to acknowledgement. Click “Preview Acknowledgement” and “Submit”
Rev. date: June 24, 2009

29Submitting Revisions to Orders in “Acknowledged” Status NOTE: Once an Order is in “Acknowledged” status (icon with two purple checks), you are limited to the following changes:
– Changes to quantity – Changes to delivery commitment date(s) – Line splits for the delivery commitment dates
**If you need to make a price change to an Acknowledged Order, contact the Buying Assistant. They will enter changes, and you will receive a Revised Order to acknowledge.
Acknowledged Order will show Acknowledgement “Accepted” “Acknowledge” function will be inactive (gray) under “Order Actions”
Rev. date: June 24, 2009

30Change OR Split Commitment Date on Acknowledged Order:
Find Order using “Order Search” option on Home Page (see page 16) Either enter Order Number (including order suffix – op, ou, etc.) Or search by status, in this case “Acknowledged”
EITHER: Click “Select” box and Click “Commit Delivery”
OR: Click blue Order Number to enter PO THEN: Click “Commit Delivery”
Rev. date: June 24, 2009

31 Enter new “Commit Date” AND/OR new “Quantity” OR Click “Split Commitments” to enter multiple “Commit” dates
NOTE: Split Commitments must equal original total order quantity Click “Preview”
Click “Submit”
OLV will confirm Commitment Note: You will receive a revised order to acknowledge
Rev. date: June 24, 2009
32Invoicing: Invoice Creation and Submission
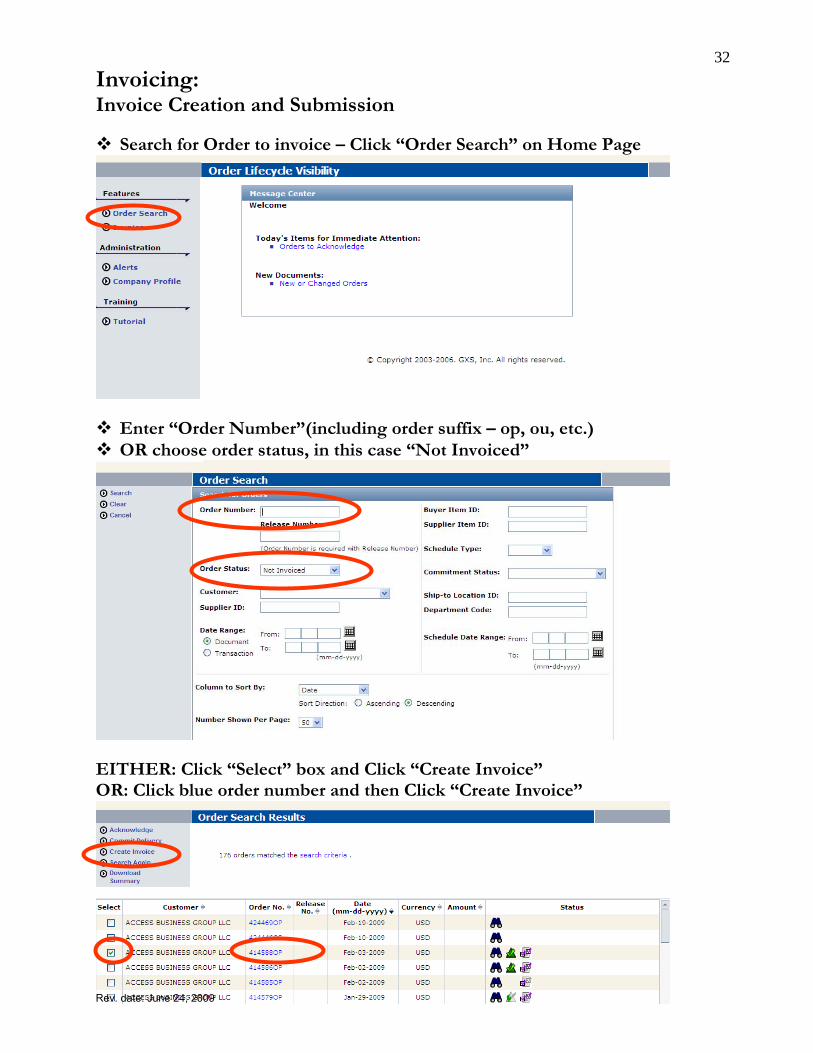
Search for Order to invoice – Click “Order Search” on Home Page
Enter “Order Number”(including order suffix – op, ou, etc.) OR choose order status, in this case “Not Invoiced”
EITHER: Click “Select” box and Click “Create Invoice” OR: Click blue order number and then Click “Create Invoice”
Rev. date: June 24, 2009

33 “Create Invoice” function appears, see image below:
Enter Invoice Number and Date Packing List number is required **If unit price is incorrect, you can not change it on the invoice. Cancel invoice creation and contact Buying Assistant to correct price Enter Invoice Quantity for each line NOTE: You do not have to invoice every line at once. Also, if quantity is not accepted, contact Buying Assistant “Remarks” field is not used by Amway Click “Special Charges” to enter tax or other charges, see next page
Rev. date: June 24, 2009

34 Special Charges list is shown below and should be entered at the time invoice is submitted
If you have a multi-line order, but charges apply to all lines, enter the charges against line one only NOTE: Miscellaneous charges pertaining to individual line items are not entered here. See page 24 for instructions on acknowledging item charges
Scroll down to complete invoice:
If Currency is incorrect, contact Buying Assistant immediately and cancel submission of invoice You can enter freight charges. Note: If freight charges do not match shipping terms, invoice will have to be reviewed before being approved for payment. Enter Shipment Date and Carrier (if supplier manages freight) Rev. date: June 24, 2009

35 After all information is entered, Click on “Preview Invoice”
Review Invoice at “Header” and “Detail” tabs Click “Submit”
OLV will acknowledge invoice submission
Rev. date: June 24, 2009

36Print Invoices
Click “Order Search” option on Home Page Enter corresponding Order Number – you cannot search by Invoice Number. ” Include order suffix – op, ou, etc.
OR, search by “Order Status” – “Fully” or “Partially” Invoiced Click “Search”
Click desired blue Order Number
Rev. date: June 24, 2009

37 Enter Order and Click “Invoice” tab Click blue Invoice Number
Click “Print”, a new window will appear, click “Print”
Rev. date: June 24, 2009