monza 889dxs review 17.02.2006 - discountscooters.co.uk · within this manual before attempting to...
TRANSCRIPT

Monza MODEL: S-889DXS
USER MANUAL
Please ensure that this manual is read and understood before using the scooter.
Feb 06
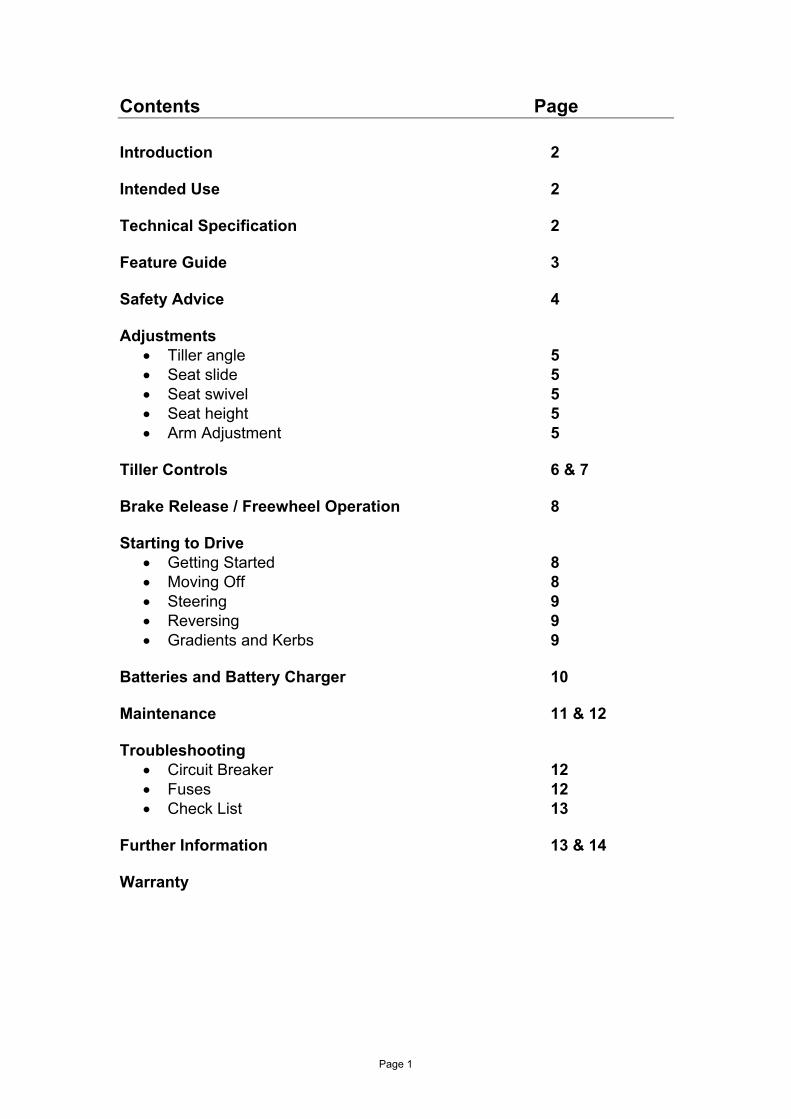
Contents Page Introduction 2 Intended Use 2 Technical Specification 2 Feature Guide 3 Safety Advice 4 Adjustments
• Tiller angle 5 • Seat slide 5 • Seat swivel 5 • Seat height 5 • Arm Adjustment 5
Tiller Controls 6 & 7 Brake Release / Freewheel Operation 8 Starting to Drive
• Getting Started 8 • Moving Off 8 • Steering 9 • Reversing 9 • Gradients and Kerbs 9
Batteries and Battery Charger 10 Maintenance 11 & 12 Troubleshooting
• Circuit Breaker 12 • Fuses 12 • Check List 13
Further Information 13 & 14 Warranty
Page 1
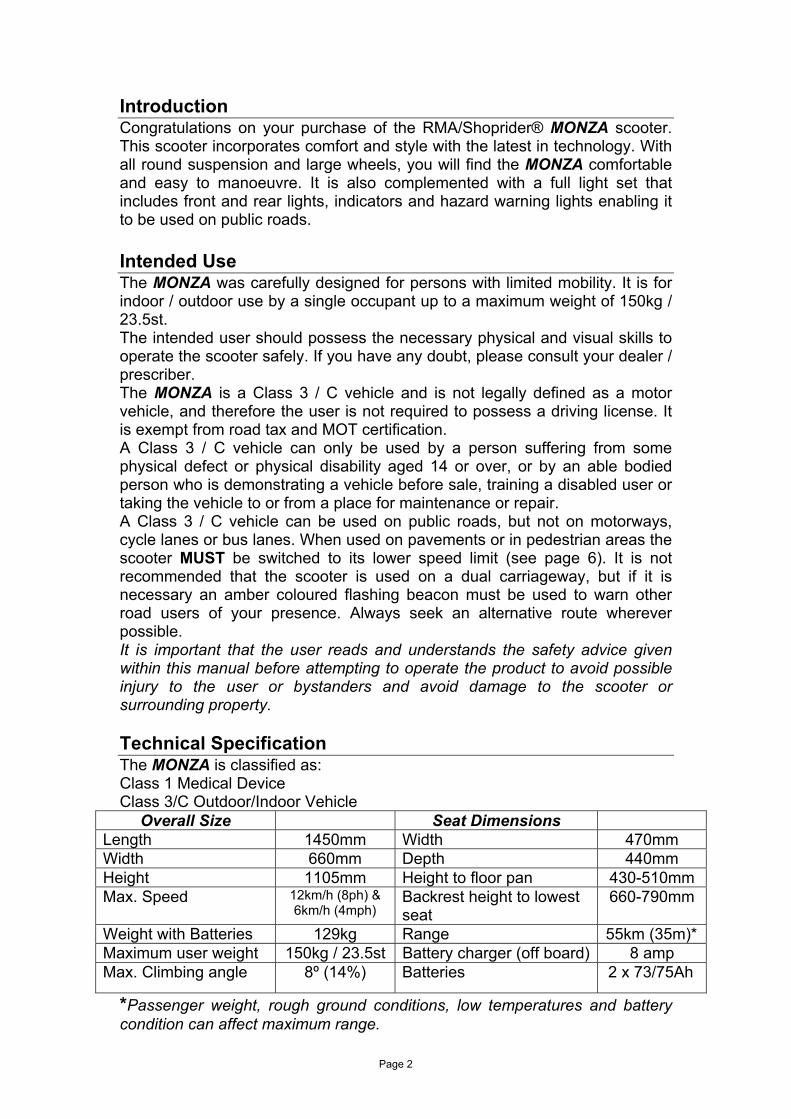
Introduction Congratulations on your purchase of the RMA/Shoprider® MONZA scooter. This scooter incorporates comfort and style with the latest in technology. With all round suspension and large wheels, you will find the MONZA comfortable and easy to manoeuvre. It is also complemented with a full light set that includes front and rear lights, indicators and hazard warning lights enabling it to be used on public roads. Intended Use The MONZA was carefully designed for persons with limited mobility. It is for indoor / outdoor use by a single occupant up to a maximum weight of 150kg / 23.5st. The intended user should possess the necessary physical and visual skills to operate the scooter safely. If you have any doubt, please consult your dealer / prescriber. The MONZA is a Class 3 / C vehicle and is not legally defined as a motor vehicle, and therefore the user is not required to possess a driving license. It is exempt from road tax and MOT certification. A Class 3 / C vehicle can only be used by a person suffering from some physical defect or physical disability aged 14 or over, or by an able bodied person who is demonstrating a vehicle before sale, training a disabled user or taking the vehicle to or from a place for maintenance or repair. A Class 3 / C vehicle can be used on public roads, but not on motorways, cycle lanes or bus lanes. When used on pavements or in pedestrian areas the scooter MUST be switched to its lower speed limit (see page 6). It is not recommended that the scooter is used on a dual carriageway, but if it is necessary an amber coloured flashing beacon must be used to warn other road users of your presence. Always seek an alternative route wherever possible. It is important that the user reads and understands the safety advice given within this manual before attempting to operate the product to avoid possible injury to the user or bystanders and avoid damage to the scooter or surrounding property. Technical Specification The MONZA is classified as: Class 1 Medical Device Class 3/C Outdoor/Indoor Vehicle
Overall Size Seat Dimensions Length 1450mm Width 470mm Width 660mm Depth 440mm Height 1105mm Height to floor pan 430-510mm Max. Speed 12km/h (8ph) &
6km/h (4mph) Backrest height to lowest seat
660-790mm
Weight with Batteries 129kg Range 55km (35m)*Maximum user weight 150kg / 23.5st Battery charger (off board) 8 amp Max. Climbing angle 8º (14%) Batteries 2 x 73/75Ah
*Passenger weight, rough ground conditions, low temperatures and battery condition can affect maximum range.
Page 2

Feature Guide
1. Rear view mirror 2. Tiller controls 3. Fully adjustable ‘Captain’s’ seat 4. Rear anti-tippers 5. 315mm (13”) pneumatic rear wheels with non-marking tyres 6. Full lights set 7. Adjustable angle steering tiller 8. Handy front basket
123
4
56
7
8
Page 3
Safety Advice DO:
• Read this manual carefully before using your scooter. • Turn the power off when transferring to and from the scooter. • Select a slow speed when going down gradients or over uneven
ground. • Keep your feet inside the scooter whilst driving. • Ensure the batteries are fully charged before your journey. • Avoid rough or soft terrain and long grass wherever possible. • Be aware of other road users and pedestrians. If driving on the road
you MUST adhere to the Highway Code. • Use lights whenever necessary. • Turn the power off when not in use. • Follow the maintenance guide to ensure safe operation of the scooter. • Always remove the keys if leaving the scooter unattended.
Unauthorised persons/children may use the scooter resulting in injury. DO NOT:
• Carry passengers. • Exceed inclines over 8° (14%). • Traverse inclines. • Attempt inclines if the surface is slippery. • Turn sharply at full speed. • Exit or enter the scooter unless the power is switched off. • Switch off the power whilst driving – this will cause the scooter to stop
abruptly and could damage the controls. • Use the scooter where you cannot safely or legally walk. • Attempt to climb kerbs over 10cm (4”) high. • Use the scooter if under the influence of alcohol or any medication. • Use a mobile phone whilst driving. • Attempt to negotiate steps or escalators. • Sit on the scooter if being transported in a vehicle. • Attempt to tow any other devices. • Exceed the stated weight limit. • Connect any other devices to the batteries as this could cause
permanent damage and void your warranty. • Use any other batteries/charger other than those supplied by RMA. • Travel through water or over soft terrain (mud, sand etc.). • Lift the scooter by the shroud assembly or any plastic part. • Sharply shift your centre of gravity as this could make the scooter
unstable. Every care has been taken to ensure that your scooter will give you safe, reliable service provided you adhere to the advice given above.
Page 4
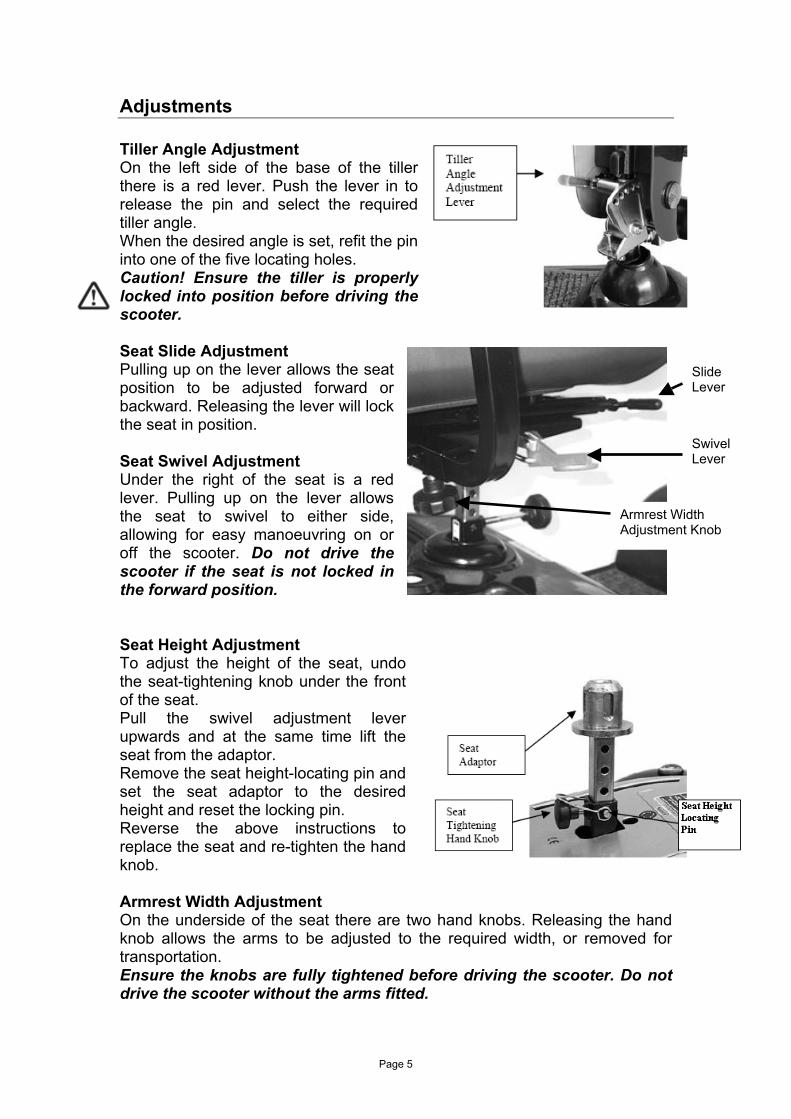
Adjustments Tiller Angle Adjustment On the left side of the base of the tiller there is a red lever. Push the lever in to release the pin and select the required tiller angle. When the desired angle is set, refit the pin into one of the five locating holes. Caution! Ensure the tiller is properly locked into position before driving the scooter. Seat Slide Adjustment Pulling up on the lever allows the seat position to be adjusted forward or backward. Releasing the lever will lock the seat in position. Seat Swivel Adjustment Under the right of the seat is a red lever. Pulling up on the lever allows the seat to swivel to either side, allowing for easy manoeuvring on or off the scooter. Do not drive the scooter if the seat is not locked in the forward position. Seat Height Adjustment To adjust the height of the seat, undo the seat-tightening knob under the front of the seat. Pull the swivel adjustment lever upwards and at the same time lift the seat from the adaptor. Remove the seat height-locating pin and set the seat adaptor to the desired height and reset the locking pin. Reverse the above instructions to replace the seat and re-tighten the hand knob. Armrest Width Adjustment On the underside of the seat there are two hand knobs. Releasing the hand knob allows the arms to be adjusted to the required width, or removed for transportation. Ensure the knobs are fully tightened before driving the scooter. Do not drive the scooter without the arms fitted.
Slide Lever
Swivel Lever
Armrest Width Adjustment Knob
Page 5
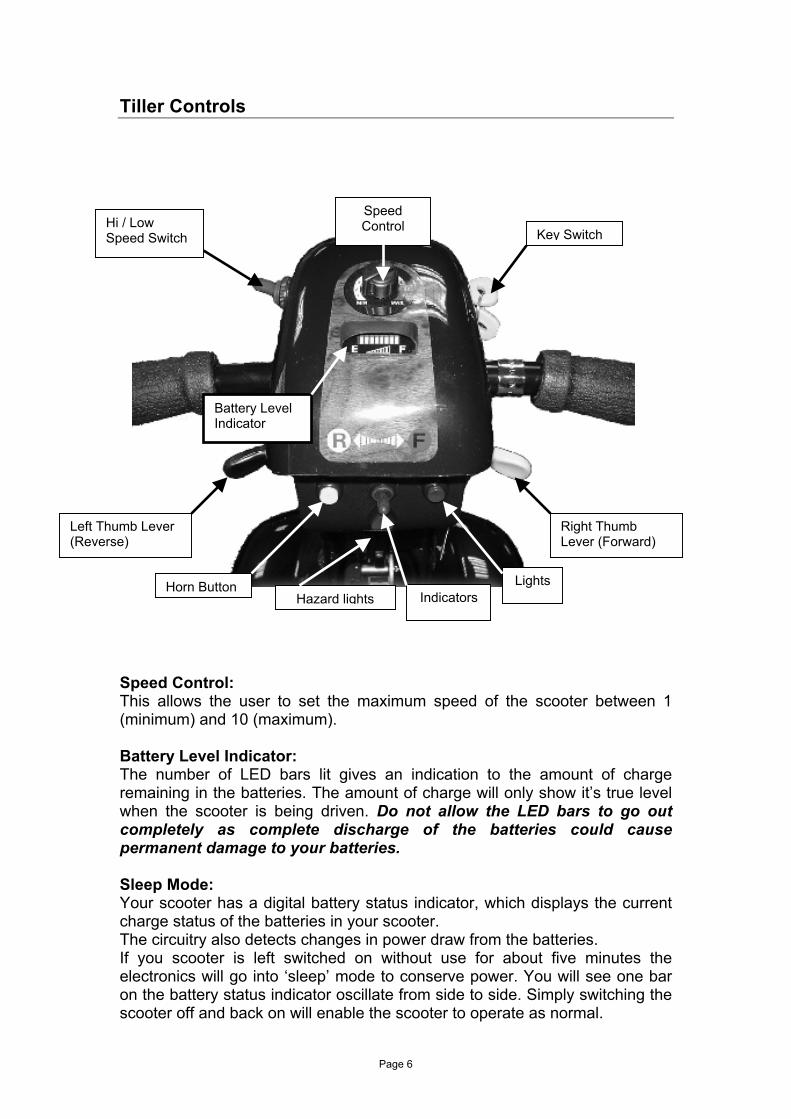
Tiller Controls
Speed Control: This allows the user to set the maximum speed of the scooter between 1 (minimum) and 10 (maximum). Battery Level Indicator: The number of LED bars lit gives an indication to the amount of charge remaining in the batteries. The amount of charge will only show it’s true level when the scooter is being driven. Do not allow the LED bars to go out completely as complete discharge of the batteries could cause permanent damage to your batteries. Sleep Mode: Your scooter has a digital battery status indicator, which displays the current charge status of the batteries in your scooter. The circuitry also detects changes in power draw from the batteries. If you scooter is left switched on without use for about five minutes the electronics will go into ‘sleep’ mode to conserve power. You will see one bar on the battery status indicator oscillate from side to side. Simply switching the scooter off and back on will enable the scooter to operate as normal.
Speed Control
Right Thumb Lever (Forward)
Left Thumb Lever (Reverse)
LightsIndicatorsHazard lights
Horn Button
Hi / Low Speed Switch Key Switch
Battery Level Indicator
Page 6
Continued….. Constant speed use As the circuitry senses changes in power draw it is possible that on journeys where your speed is constant for an extended period of time that you will see the single bar oscillate even though the scooter is in motion. This is due to the prolonged period of no change in power draw. This is perfectly normal and by simply adjusting your speed for a moment will change the battery status indicator back to normal. High/Low Speed Switch: This sets the maximum high speed for the scooter. This MUST be set to low when used in pedestrian areas. The ‘HIGH’ setting should only be selected when used on the road. Hazard Lights: This red button operates all of the indicators simultaneously. Lights: This blue button operates the main front and rear lights. Key Switch: The key switch operates the main power for the scooter. When turned clockwise the battery level indicator should light up indicating that the scooter is on. There is a small delay before the thumb lever controls operate as the controller checks the main circuits. Never leave the key in the switch unattended to prevent unauthorised use. Do not turn the power to stop the scooter unless it is an emergency. The scooter will stop very sharply if stopped in this way. Horn: This yellow button operates the scooter’s horn. The horn should only be used to warn others of your presence and not as any form of rebuke. Finger Lever Control: The left thumb lever controls the reverse and the right thumb lever controls the forward motion of the scooter. The further you push the lever the faster the scooter will travel. Releasing the lever will slow the scooter to a safe stop and the electro-magnetic brakes will apply automatically. Charging Port: This is situated just below the key switch. Slide the cover to access the socket. Please refer to page 9 & 10 ‘Batteries and Battery Charger’ Indicator Switch: This switch operates the indicator lights of the scooter. Please use the indicators at all times when making manoeuvres on roads.
Page 7
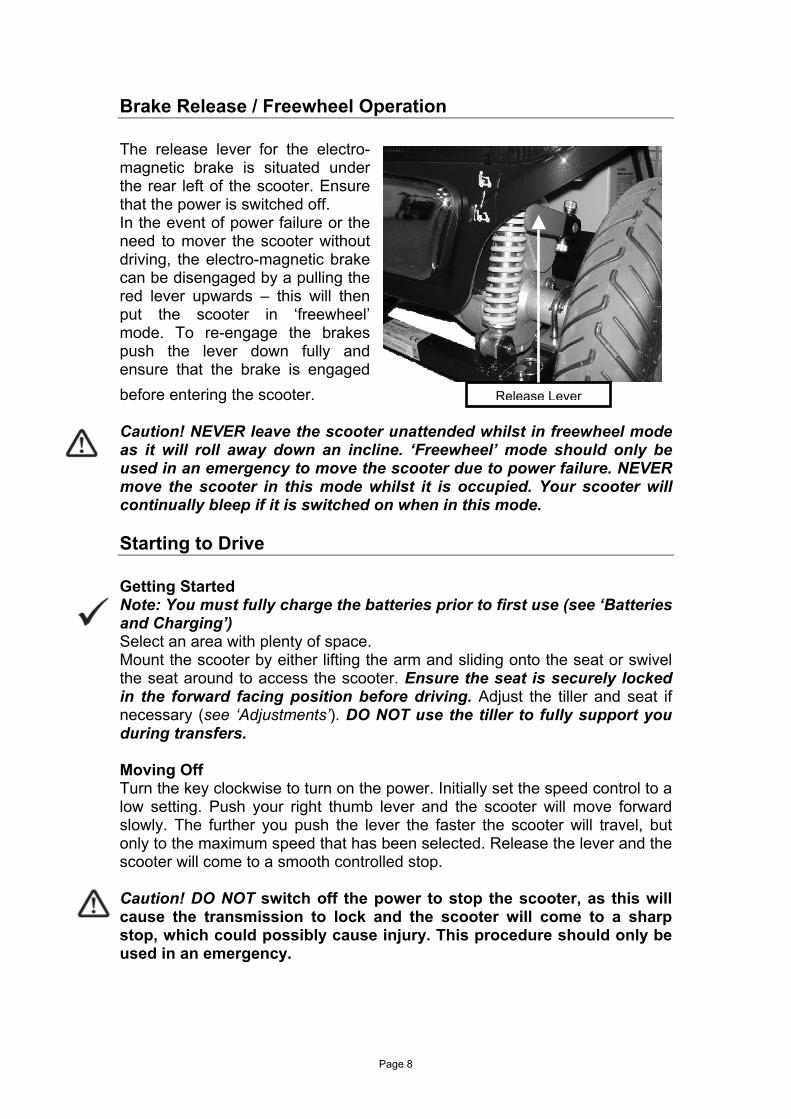
Brake Release / Freewheel Operation The release lever for the electro-magnetic brake is situated under the rear left of the scooter. Ensure that the power is switched off. In the event of power failure or the need to mover the scooter without driving, the electro-magnetic brake can be disengaged by a pulling the red lever upwards – this will then put the scooter in ‘freewheel’ mode. To re-engage the brakes push the lever down fully and ensure that the brake is engaged before entering the scooter. Caution! NEVER leave the scooter unattended whilst in freewheel mode as it will roll away down an incline. ‘Freewheel’ mode should only be used in an emergency to move the scooter due to power failure. NEVER move the scooter in this mode whilst it is occupied. Your scooter will continually bleep if it is switched on when in this mode. Starting to Drive Getting Started Note: You must fully charge the batteries prior to first use (see ‘Batteries and Charging’) Select an area with plenty of space. Mount the scooter by either lifting the arm and sliding onto the seat or swivel the seat around to access the scooter. Ensure the seat is securely locked in the forward facing position before driving. Adjust the tiller and seat if necessary (see ‘Adjustments’). DO NOT use the tiller to fully support you during transfers. Moving Off Turn the key clockwise to turn on the power. Initially set the speed control to a low setting. Push your right thumb lever and the scooter will move forward slowly. The further you push the lever the faster the scooter will travel, but only to the maximum speed that has been selected. Release the lever and the scooter will come to a smooth controlled stop. Caution! DO NOT switch off the power to stop the scooter, as this will cause the transmission to lock and the scooter will come to a sharp stop, which could possibly cause injury. This procedure should only be used in an emergency.
Release Lever
Page 8

Continued….. Steering Steering the scooter is light and easy. Ensure when starting off you give a wide clearance when turning so that the rear wheels can clear any obstacle that you are passing. When steering through limited spaces such as doorways or when turning around, turn the tiller handle in the direction you want to go and gently apply the power. NEVER turn sharply when travelling at high speed as this may affect stability. The maximum speed should be set at 50%. Reversing Before reversing ensure that the area behind the scooter is free from any hazards or obstructions. Adjust the speed setting low before you reverse. Press the left thumb lever and steer wide of all corners and obstacles. Caution! Do not reverse onto a main thoroughfare. Take care, objects in the rear view mirror will appear to be further away from the back of the scooter than they actually are. Gradients and Kerbs We recommend that wherever possible that a suitable access point such as a drop kerb or ramp be used. The necessity to climb a kerb directly should be as a last resort. If negotiating a gradient or kerb (up to 6cm), always address the situation at an angle of 90° to ensure stability of the scooter. Do not hit a kerb at speed, drive slowly until you reach the kerb then apply more power to travel over the obstacle. Do not turn sharply on any slope moving forwards or backwards.
Caution! Always ensure that the power is turned off when entering or dismounting the scooter. Take plenty of time to become familiar with the way that the scooter behaves. DO NOT drive on public roads until you have the confidence and ability to do so.
Page 9

Batteries and Battery Charger Batteries The MONZA is supplied with two, maintenance free, sealed lead acid AGM batteries. These are fitted under the seat on the scooter. Battery performance can be affected by low temperatures, rough terrain and the weight of the user. Your battery gauge is a guide only on the level of charge remaining in the batteries. An active user can use 30% of the battery capacity or more per day. An inactive user may only use 50% of the battery capacity in a week. Battery Charger Charge the batteries completely (8-12 hours) prior to first use. Batteries supplied with your scooter are specially designed for use on powerchairs and scooters and require an automatic battery charger. These chargers have an electronic switch that terminates the charge when the batteries are full. The battery charger is an 8-amp switch mode type off board. The charger is able to read the level of charge in the batteries and will switch off when the batteries are fully charged. To charge the batteries connect the plug lead into the charging socket (page 7) on the tiller or under the lid (page 3) and the 3-pin plug into the wall socket and switch on. The battery charger has two lights. A constant red light will show when the battery charger is connected (this will flash if there is a break in the connection). The orange light indicates that the batteries are receiving charge, this will change to green when the charging cycle is complete. Caution: Always charge the batteries in a well-ventilated indoor area. You must still maintain charging the batteries even if the scooter is not to be used for a prolonged period of time (2 to 3 weeks). Failure to do so could result in permanent damage and render the batteries unusable. Wherever possible do not interrupt the charge cycle until the batteries are fully charged. Continual interruption can permanently damage the batteries. If the charging lead should become damaged discontinue use immediately and seek a replacement from your dealer. Disposing and recycling of used batteries Batteries must always be recycled correctly. Do not dispose of them with your domestic refuge. For further information regarding your nearest recycling facility please contact your local authority.
Page 10
Maintenance Cleaning the Scooter When cleaning the scooter please pay attention to the following points:
• Only use a damp cloth and gentle detergent. • DO NOT use any abrasive products. • DO NOT use a hose or pressure washing equipment. • AVOID water contact with any electrical components. • DO NOT put the scooter through an automated car wash or similar.
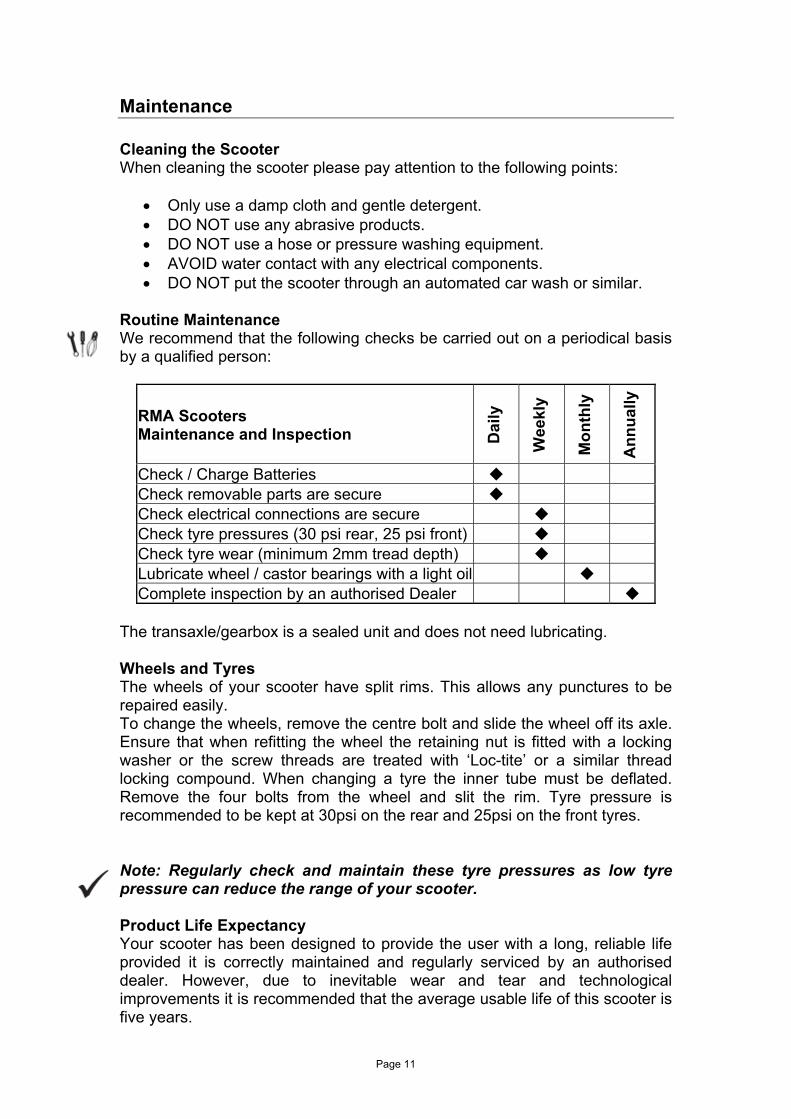
Routine Maintenance We recommend that the following checks be carried out on a periodical basis by a qualified person:
RMA Scooters Maintenance and Inspection D
aily
Wee
kly
Mon
thly
Ann
ually
Check / Charge Batteries Check removable parts are secure Check electrical connections are secure Check tyre pressures (30 psi rear, 25 psi front) Check tyre wear (minimum 2mm tread depth) Lubricate wheel / castor bearings with a light oil Complete inspection by an authorised Dealer
The transaxle/gearbox is a sealed unit and does not need lubricating. Wheels and Tyres The wheels of your scooter have split rims. This allows any punctures to be repaired easily. To change the wheels, remove the centre bolt and slide the wheel off its axle. Ensure that when refitting the wheel the retaining nut is fitted with a locking washer or the screw threads are treated with ‘Loc-tite’ or a similar thread locking compound. When changing a tyre the inner tube must be deflated. Remove the four bolts from the wheel and slit the rim. Tyre pressure is recommended to be kept at 30psi on the rear and 25psi on the front tyres. Note: Regularly check and maintain these tyre pressures as low tyre pressure can reduce the range of your scooter. Product Life Expectancy Your scooter has been designed to provide the user with a long, reliable life provided it is correctly maintained and regularly serviced by an authorised dealer. However, due to inevitable wear and tear and technological improvements it is recommended that the average usable life of this scooter is five years.
Page 11

Continued….. Note: Should any parts need replacing during routine maintenance please consult your local Dealer for approved spare parts for your scooter. Failure to do so may damage the scooter and void your warranty. Troubleshooting Circuit Breaker Your scooter is fitted with the latest in electronic controls that are programmed to protect the electrical system from abnormal overloads. Fitted for extra protection is a circuit breaker. Should there be a situation where your scooter stops for no apparent reason please check that the circuit breaker has not tripped. The circuit breaker is located
is located through a hole in the shroud underneath the seat behind the seat post. Press this button to reset the circuit breaker. Note: Should the circuit breaker continue to trip turn off the scooter immediately and consult your dealer. Fuses Inline 50 amp blade type fuses from the batteries protect any overload, and a 15 amp fuse is located in the battery charger as extra protection. Note: Should the fuses need replacing please contact your dealer to ensure the correct sizes are fitted. Failure to do so could result in permanent damage to the scooter’s electronics and possibly cause a fire hazard. Failure to do this will void your warranty. Check List If you scooter fails to operate, please check the following:
• The unit is switched on. • All plugs and connectors are firmly fixed. • Battery level shows full charge. • Freewheeling device is in the drive position (lever down). • Circuit breaker has not tripped
If the freewheel device has been operated with the scooter left switched on, the scooter will bleep continually and not operate until the ignition key has been switched off then on again. Please consult your dealer if your scooter does not run after checking these points.
Circuit Breaker Reset
Page 12
Further Information Safety Information Regarding Electromagnetic Interference (EMI) Scooters and powerchairs are designed to operate under certain conditions. However, radio waves or electromagnetic fields may affect the operation of the scooter. The source of EMI could be radio or television transmitters or portable devices such as mobile phones, portable CB radios etc. Should any unintentional movement occur turn the scooter off as soon as safely possible. Solar Energy During periods of sunny weather, it is possible that surfaces of your scooter may reach high temperatures (as with motor vehicles). Please take precautions if leaving the scooter in direct sunlight for any period of time. Seek shade or cover the seat and hand controls to keep any temperature increases to a minimum. Health Factors Suitability for this product has been assessed on the user’s current state of health. It is essential that the user regularly monitor their ability to use the scooter safely. Please read and adhere to the guidelines set out in this manual and in the ‘Code of practice for Class 3/C vehicle users’ General Use Take heed of the information given in this manual regarding safety and the maintenance of your scooter. If adhered to, your scooter should give you years of reliable mobility. DO NOT use the scooter in electrical storms, high winds or prolonged downpours. Care must also be taken during cold weather due to icy surfaces. Storage and General Care We recommend that the scooter is always stored in a dry environment such as a garage or shed to protect the chassis and other components from corrosion or water damage. Do not leave the scooter outside during rainstorms. If the scooter is wet, wipe with a dry cloth to ensure there is no ingress of water into the internal components of the scooter (If the scooter needs to be cleaned, use a mild detergent and warm water with a damp sponge or cloth. DO NOT throw water over the scooter).
Page 13

Product Stability Scooters and powered wheelchairs are designed to allow the user flexibility of movement in restricted areas. Driving at maximum speed and attempting sharp turns can create a situation where the product becomes unstable. Therefore it is essential that the user pay attention the guidance set out in this manual. For maximum stability the speed setting should be set up to 50% of the maximum available (halfway between the tortoise and the hare or just entering the red sector on the speed indicator depending on the model. The main factors affecting stability are:
• Maximum speed setting • Seat height • User movement • User’s manoeuvres • Gradients or slopes
Please keep your speed to a level where you can safely stop without having to make any erratic turns. Do not load bags etc. on the back of the seat as this will affect the centre of gravity and could increase instability. Do not lean outside of the ‘footprint’ of the product, especially whilst moving. Avoid making turns on gradients or slopes. Notes
Page 14
WARRANTY TERMS AND CONDITIONS
Standard Terms This is to certify that your RMA/Shoprider® scooter is guaranteed for a period of one year from the date of purchase. The warranty is not transferable. If a defect or fault arises the dealer from where the scooter was purchased should be notified immediately. The manufacturer will not accept liability for damage caused by any misuse, unauthorised alterations or non-observance of the instructions set out in this user manual. The guarantee excludes parts, which have been subjected to natural wear and tear during this period (Tyres and plastic parts). Model No:…………………………… Serial No:……………………………. Purchase Date:……………………..
RMA Ltd, York Road,
Bridgend Industrial Estate, Bridgend. CF31 3TB
Tel: 01656 674488 Fax: 01656 674499 Email: [email protected]
www.romamedical.co.uk
RMA reserve the right to change specifications without prior notice
Dealer’s Stamp
KB&SXXXXX