mis setup guide - staplesdocuments.staples.com/asp1/documentation/en/pdf/digital storefront... ·...
TRANSCRIPT
MIS Setup Guide
Digital StoreFront v 8.2 April / 2015
2 EFI Digital StoreFront | MIS Setup Guide
Copyright © 2004 - 2015 by Electronics for Imaging, Inc. All Rights Reserved.
EFI Digital StoreFront | MIS Setup Guide
April 2015 Digital StoreFront version 8.2
This publication is protected by copyright, and all rights are reserved. No part of it may be reproduced or transmitted in any form or by any means for any purpose without express prior written consent from Electronics for Imaging, Inc. Information in this document is subject to change without notice and does not represent a commitment on the part of Electronics for Imaging, Inc.
Patents
This product may be covered by one or more of the following U.S. Patents: 4,716,978, 4,828,056, 4,917,488, 4,941,038, 5,109,241, 5,170,182, 5,212,546, 5,260,878, 5,276,490, 5,278,599, 5,335,040, 5,343,311, 5,398,107, 5,424,754, 5,442,429, 5,459,560, 5,467,446, 5,506,946, 5,517,334, 5,537,516, 5,543,940, 5,553,200, 5,563,689, 5,565,960, 5,583,623, 5,596,416, 5,615,314, 5,619,624, 5,625,712, 5,640,228, 5,666,436, 5,745,657, 5,760,913, 5,799,232, 5,818,645, 5,835,788, 5,859,711, 5,867,179, 5,940,186, 5,959,867, 5,970,174, 5,982,937, 5,995,724, 6,002,795, 6,025,922, 6,035,103, 6,041,200, 6,065,041, 6,112,665, 6,116,707, 6,122,407, 6,134,018, 6,141,120, 6,166,821, 6,173,286, 6,185,335, 6,201,614, 6,215,562, 6,219,155, 6,219,659, 6,222,641, 6,224,048, 6,225,974, 6,226,419, 6,238,105, 6,239,895, 6,256,108, 6,269,190, 6,271,937, 6,278,901, 6,279,009, 6,289,122, 6,292,270, 6,299,063, 6,310,697, 6,321,133, 6,327,047, 6,327,050, 6,327,052, 6,330,071, 6,330,363, 6,331,899, 6,340,975, 6,341,017, 6,341,018, 6,341,307, 6,347,256, 6,348,978, 6,356,359, 6,366,918, 6,369,895, 6,381,036, 6,400,443, 6,429,949, 6,449,393, 6,476,927, 6,490,696, 6,501,565, 6,519,053, 6,539,323, 6,543,871, 6,546,364, 6,549,294, 6,549,300, 6,550,991, 6,552,815, 6,559,958, 6,572,293, 6,590,676, 6,606,165, 6,633,396, 6,636,326, 6,643,317, 6,647,149, 6,657,741, 6,662,199, 6,678,068, 6,707,563, 6,741,262, 6,748,471, 6,753,845, 6,757,436, 6,757,440, 6,778,700, 6,781,596, 6,816,276, 6,825,943, 6,832,865, 6,836,342, RE33,973, RE36,947, D341,131, D406,117, D416,550, D417,864, D419,185, D426,206, D439,851, D444,793.
Trademarks
The APPS logo, AutoCal, Auto-Count, Balance, Best, the Best logo, BESTColor, BioVu, BioWare, ColorPASS, Colorproof, ColorWise, Command WorkStation, CopyNet, Cretachrom, Cretaprint, the Cretaprint logo, Cretaprinter, Cretaroller, DockNet, Digital StoreFront, DocBuilder, DocBuilder Pro, DocStream, DSFdesign Studio, Dynamic Wedge, EDOX, EFI, the EFI logo, Electronics For Imaging, Entrac, EPCount, EPPhoto, EPRegister, EPStatus, Estimate, ExpressPay, Fabrivu, Fast-4, Fiery, the Fiery logo, Fiery Driven, the Fiery Driven logo, Fiery JobFlow, Fiery JobMaster, Fiery Link, Fiery Prints, the Fiery Prints logo, Fiery Spark, FreeForm, Hagen, Inktensity, Inkware, Jetrion, the Jetrion logo, LapNet, Logic, MiniNet, Monarch, MicroPress, OneFlow, Pace, PhotoXposure, PressVu, Printcafe, PrinterSite, PrintFlow, PrintMe, the PrintMe logo, PrintSmith, PrintSmith Site, Printstream, Print to Win, Prograph, PSI, PSI Flexo, Radius, Rastek, the Rastek logo, Remoteproof, RIPChips, RIP-While-Print, Screenproof, SendMe, Sincrolor, Splash, Spot-On, TrackNet, UltraPress, UltraTex, UltraVu, UV Series 50, VisualCal, VUTEk, the VUTEk logo, and WebTools are trademarks of Electronics For Imaging, Inc. and/or its wholly owned subsidiaries in the U.S. and/or certain other countries.
All other terms and product names may be trademarks or registered trademarks of their respective owners, and are hereby acknowledged.
Contents 3
Contents
About This Document ............................................................................................................ 5
Contact Information .............................................................................................................. 5
Monarch, Pace, and PrintSmith Classic Integrations ............................................................... 5
Overview ........................................................................................................................................................ 6 Task 1: Make Sure Pre-Requisites Are Met ...................................................................................................... 6
License ............................................................................................................................................................. 6 PNI Installation ................................................................................................................................................ 6 Site Call Back URL ............................................................................................................................................ 6
Task 2: Establish Communication Channel ...................................................................................................... 8 Direct Communication Channel: Monarch v 13.1 or Higher ........................................................................... 8 Direct Communication Channel: Pace ............................................................................................................. 9 SuperHub Communication Channel (Cloud-Based): PrintSmith and pre-13.1 Monarch............................... 12 PNI as Communication Channel (Customer-Hosted): PrintSmith and pre-13.1 Monarch ............................ 12
Task 3: Configure and Register the MIS ......................................................................................................... 14 Monarch Setup .............................................................................................................................................. 14 Pace Setup ..................................................................................................................................................... 16 PrintSmith Classic Setup ................................................................................................................................ 19 Settings that Control the Exchange of Information ....................................................................................... 20
Task 4: Associate MIS with Print Shop and Test Basic MIS Connectivity ........................................................ 24 Associate the MIS with a print shop and define some print shop settings ................................................... 24 Run diagnostics ............................................................................................................................................. 25
Next Steps ..................................................................................................................................................... 26
MIS Integrations and Fulfillment in Digital StoreFront .......................................................... 26
Fulfillment (Non Printed) Products ............................................................................................................... 26 Pricing ........................................................................................................................................................... 26 Ordering ....................................................................................................................................................... 26
MIS Basic Integrations ......................................................................................................... 28
Configure the MIS ......................................................................................................................................... 28 Associate the MIS with a Print Shop and Define Some Print Shop Settings ................................................... 29
Reviewing Order Transactions Sent to the MIS ..................................................................... 31

4 EFI Digital StoreFront | MIS Setup Guide
Digital StoreFront MIS Setup Guide 5
About This Document This document describes the steps you must perform in Digital StoreFront® to integrate it with an EFI MIS such as Pace™, Monarch, or PrintSmith™.
This document assumes that both Digital StoreFront and the MIS are already installed.
Different levels of integration are possible. The first part of this guide covers the integration tasks for Monarch, Pace™, and PrintSmith™ Classic. The second part covers a basic MIS integration option for other EFI MIS such as PrintSmith Vision.
Contact Information Digital StoreFront Support
US Phone: 888.334.8650 (select option 4 then option 1)
Hours: 8 a.m.–8 p.m. EST
US E-mail: [email protected]
Europe Phone:
+31 20 658 8080 (NL) +49 2102 745 4500 (DE) +44 12462 98085 (UK)
Hours: 9 a.m. – 5 p.m. CET
EU E-Mail: [email protected] Outside these hours, you may leave a voice mail message, and an on-call support representative will be paged. Response time is based on the severity of the issue.
Note For problems involving infrastructure (i.e., computers, networks, operating systems, backup software, printers, third-party software, etc.), contact the appropriate vendor. EFI cannot support these types of issues.
EFI Professional Services
US Phone: 651.365.5321
US Fax: 651.365.5334
E-Mail: [email protected] EFI Professional Services can help you perform EFI software installations, upgrades, and updates. This group can also help you implement, customize, and optimize your EFI software, plus offers a range of training options.
Monarch, Pace, and PrintSmith Classic Integrations This section covers the integration tasks for Monarch, Pace, and PrintSmith Classic integrations.
Important The tasks described in this document are performed in Digital StoreFront, and are only part of what you must do to integrate Digital StoreFront with an MIS. For information about all the tasks you must perform for a successful integration, see the implementation/integration documentation for the MIS you plan to use with Digital StoreFront.
6 EFI Digital StoreFront | MIS Setup Guide
Overview The four main tasks you perform in Digital StoreFront to integrate it with an MIS are:
1. Make sure pre-requisites are met.
2. Establish the communication channel.
3. Configure and register the MIS.
4. Associate the MIS with a print shop and test communications.
In addition, this guide provides an overview of using Fulfillment in Digital StoreFront with an MIS. (Fulfillment is licensed separately.)
Task 1: Make Sure Pre-Requisites Are Met This document assumes that Digital StoreFront and the MIS are already installed. In addition, check the following before you try establishing communication with an MIS.
License Make sure that you are licensed for MIS integration:
• Log into Digital StoreFront as an administrator, click the Administration tab, and go to PLATFORM SETTINGS > License.
PNI Installation For PrintSmith Classic integrations and Monarch integrations (for Monarch versions pre-13.1), make sure the PNI (PrintNet Integrator) is installed and certified. (The PNI is not used with Pace or with Monarch v 13.1 or higher.)
Important An MIS may have additional requirements. Check the integration documentation for the MIS for any such requirements.
Site Call Back URL The site call back URL is used for communication between Digital StoreFront and an MIS. In customer-hosted installations, you should verify it is correct.
Note In Pace and Monarch integrations using a direct channel, the site call back URL is not established until the communication channel is established. You can then follow the steps below to verify the call back URL.
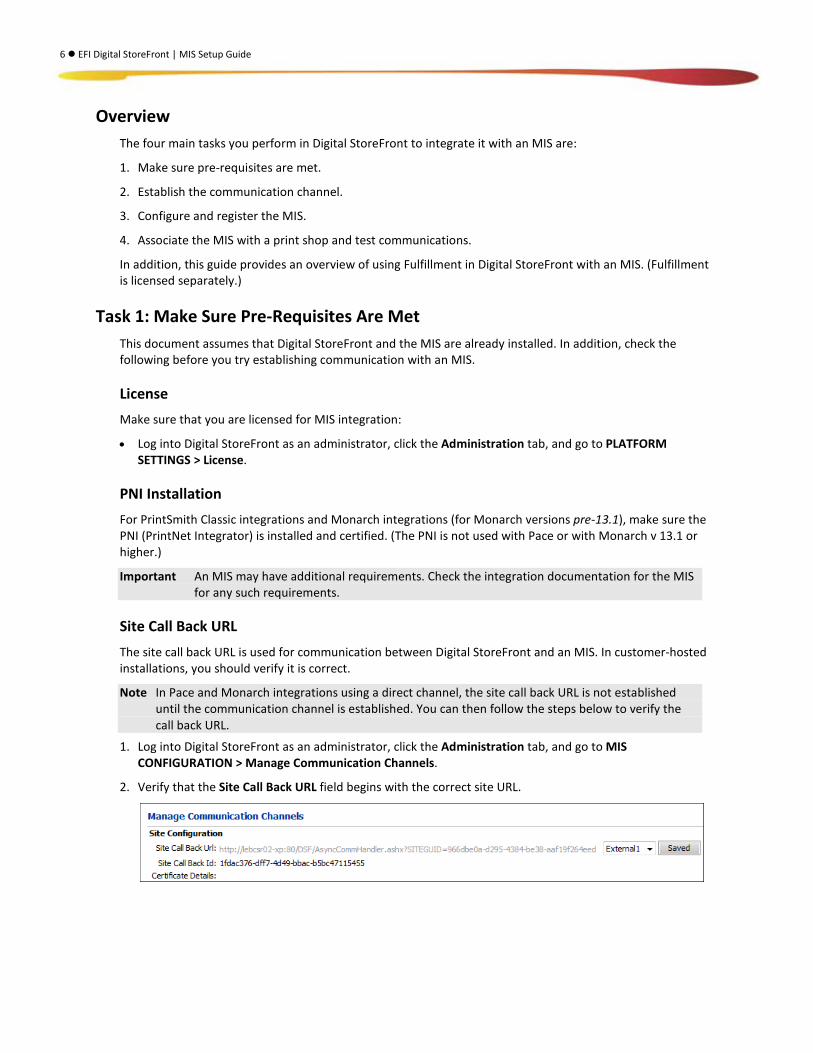
1. Log into Digital StoreFront as an administrator, click the Administration tab, and go to MIS CONFIGURATION > Manage Communication Channels.
2. Verify that the Site Call Back URL field begins with the correct site URL.
Digital StoreFront MIS Setup Guide 7
Note If the site call back URL includes localhost, the site is being accessed on the local server using http://localhost/DSF (which is sometimes done for testing purposes). The site URL is used as the base for the call back URL. When localhost is the base for a call back, however, some communication (asynchronous) between Digital StoreFront and the MIS will not work. In this case, you must provide access to the site from outside the domain by correcting the site URLs as described next.
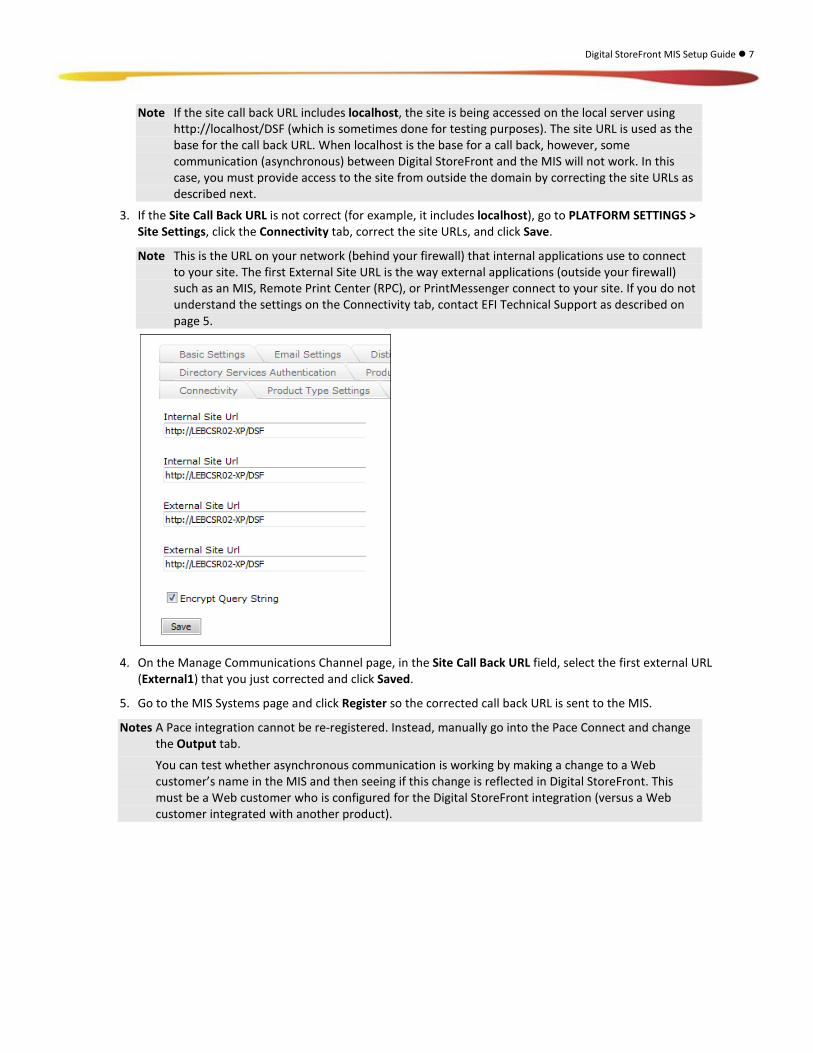
3. If the Site Call Back URL is not correct (for example, it includes localhost), go to PLATFORM SETTINGS > Site Settings, click the Connectivity tab, correct the site URLs, and click Save.
Note This is the URL on your network (behind your firewall) that internal applications use to connect to your site. The first External Site URL is the way external applications (outside your firewall) such as an MIS, Remote Print Center (RPC), or PrintMessenger connect to your site. If you do not understand the settings on the Connectivity tab, contact EFI Technical Support as described on page 5.
4. On the Manage Communications Channel page, in the Site Call Back URL field, select the first external URL
(External1) that you just corrected and click Saved.
5. Go to the MIS Systems page and click Register so the corrected call back URL is sent to the MIS.
Notes A Pace integration cannot be re-registered. Instead, manually go into the Pace Connect and change the Output tab.
You can test whether asynchronous communication is working by making a change to a Web customer’s name in the MIS and then seeing if this change is reflected in Digital StoreFront. This must be a Web customer who is configured for the Digital StoreFront integration (versus a Web customer integrated with another product).
8 EFI Digital StoreFront | MIS Setup Guide
Task 2: Establish Communication Channel This task involves establishing a communication channel between Digital StoreFront and the MIS. The type of communication channel that you select depends on the MIS with which you are integrating Digital StoreFront. In the case of Monarch, what you select also depends on the version of Monarch you have installed:
• Pace and Monarch (v. 13.1 or higher) always use a Direct Channel (whether Digital StoreFront is cloud-based or customer-hosted).
• PrintSmith Classic or Monarch (pre-13.1) can use one of two types of channel:
• SuperHub – if Digital StoreFront is cloud-based (meaning EFI hosts the software).
• EFI PrintNetIntegrator – if Digital StoreFront is customer-hosted.
The steps you must complete depend on the type of channel you are establishing.
Note A communication channel is never used for MIS basic integrations with Digital StoreFront. For information about basic integrations, see page 28.
Direct Communication Channel: Monarch v 13.1 or Higher When you are integrating Digital StoreFront with Monarch v 13.1 or higher, you must complete the steps described below to establish a direct communication channel using Monarch Gateway. The steps are the same whether Digital StoreFront is cloud-based or customer-hosted, but if it is customer-hosted, you must also edit the registry to grant full control to certificate entries.
Important This procedure assumes that Monarch Gateway is already installed and configured. See the EFI Monarch Gateway Installation Guide.
Editing the registry
When Digital StoreFront is customer-hosted you must edit the registry to grant full control to some certificate entries:
1. Start the Registry Editor (regedit).
2. Go to HKEY_LOCAL_MACHINE > Software > WOW6432Node > Electronics for Imaging > DSF > Certification.
3. Right-click Certification and choose Permissions.
4. Add the local computer accounts ASPNET and IIS_IUSRS, select the Allow check box for Full Control, and click Apply for each of these.
5. Repeat steps 3 and 4 for HKEY_LOCAL_MACHINE > SOFTWARE > WOW6432Node > Microsoft > SystemCertificates and all the subkeys (e.g., ROOT and MY).
6. Click OK and close regedit.
Defining and registering the communication channel for Monarch
1. If Digital StoreFront is customer-hosted, edit the registry as described in “Editing the registry” above.
2. Log into Digital StoreFront as an administrator, click the Administration tab, and go to MIS CONFIGURATION > Manage Communication Channels. The Manage Communication Channels page opens.
3. Click Add New Channel.
Digital StoreFront MIS Setup Guide 9
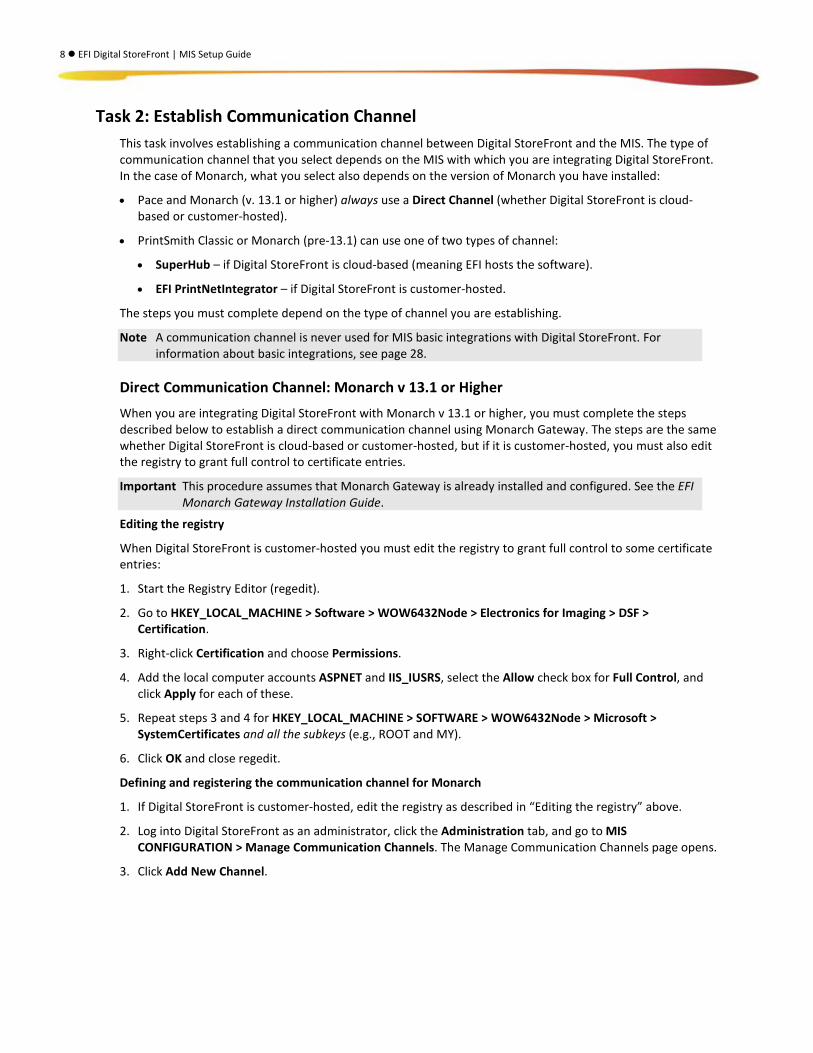
4. In the Type field, select Direct Channel.
5. Enter a Name and optional Description for the channel.
6. In the Configuration url field, enter the location of Monarch Gateway (the web service) in this format:
http:// name/MonarchIISGateway/EFIConfiguration.asmx
where name is the domain name of the Monarch machine.
Important This URL is case-sensitive.
Monarch Gateway must already be installed and configured as described in the EFI Monarch Gateway Installation Guide.
7. If you plan to use SSL (Secure Socket Layer) for communication:
a. Select the Use SSL check box.
b. Next to External Certificate, select the certificate you want to use from the drop-down list.
8. Click Register.
Direct Communication Channel: Pace When you are integrating Digital StoreFront with Pace, you must complete the steps described below to establish a direct communication channel. The steps are the same whether Digital StoreFront is cloud-based or customer-hosted, but if it is customer-hosted, you must also edit the registry to grant full control to certificate entries.
Establish a direct communication channel for Pace
1. If Digital StoreFront is customer-hosted, edit the registry as described in “Editing the registry” on page 8.
2. Log into Digital StoreFront as an administrator, click the Administration tab, and go to MIS CONFIGURATION > Manage Communication Channels. The Manage Communication Channels page opens.
3. Click Add New Channel.
This is URL of Monarch Gateway
If using SSL, you would select certificate here
10 EFI Digital StoreFront | MIS Setup Guide
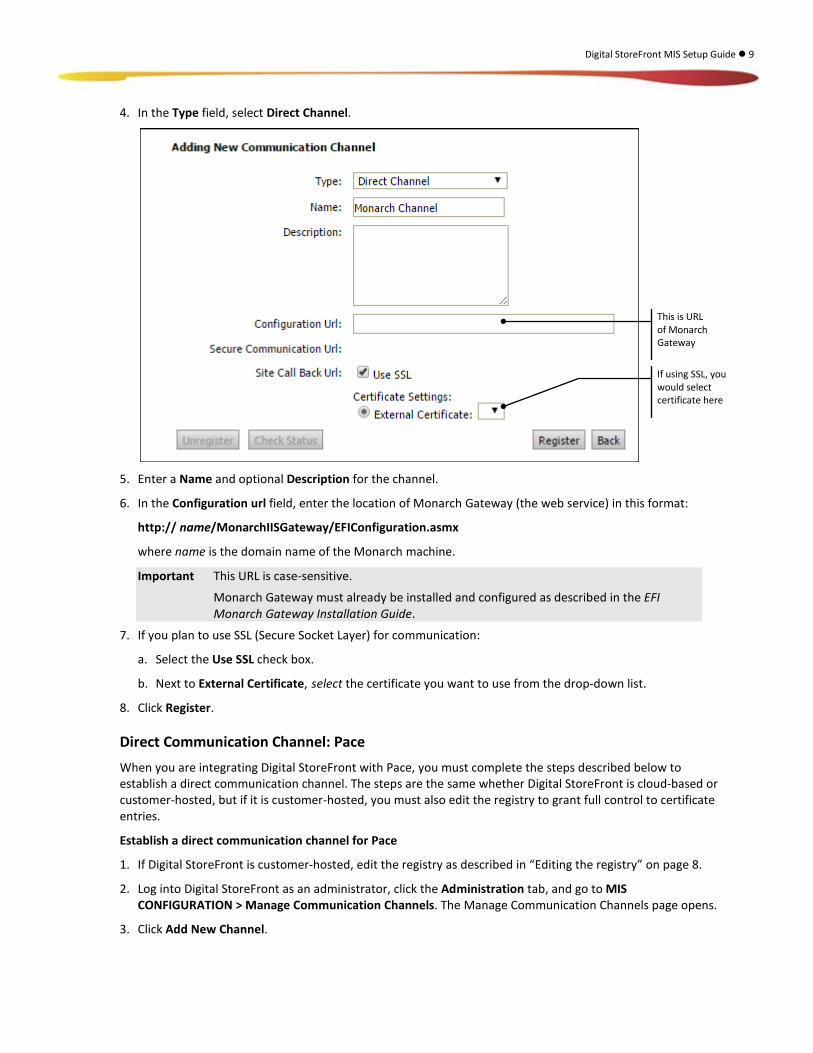
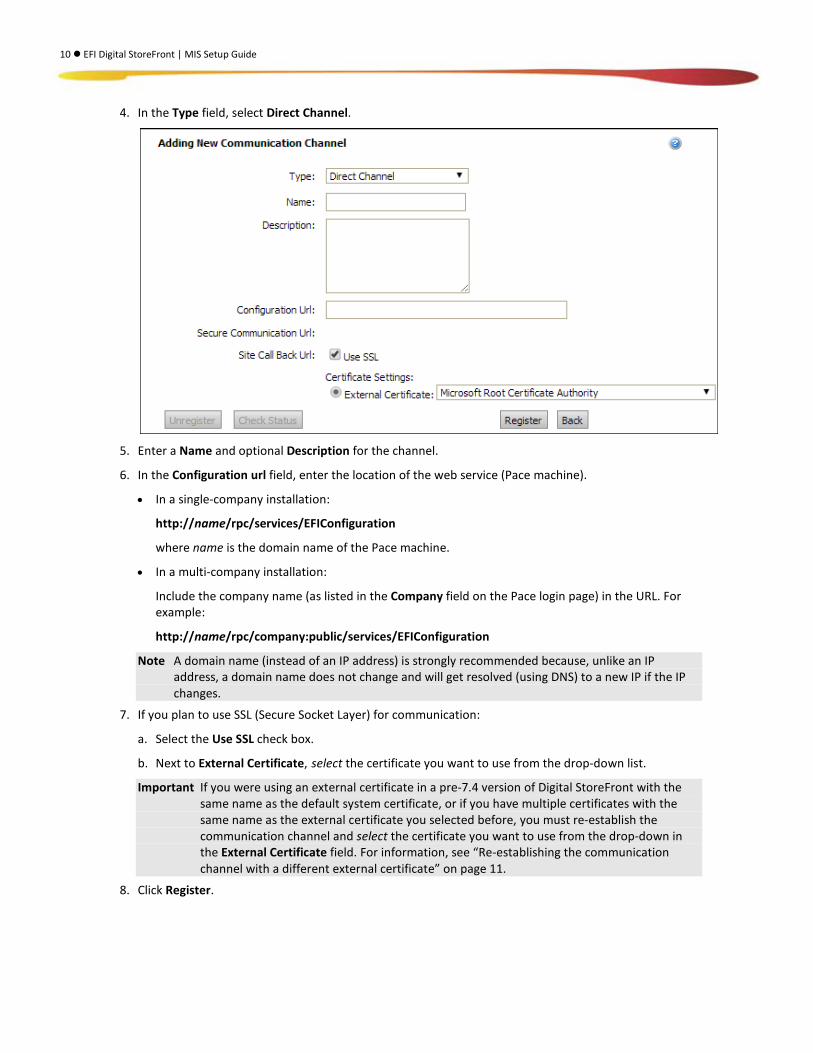
4. In the Type field, select Direct Channel.
5. Enter a Name and optional Description for the channel.
6. In the Configuration url field, enter the location of the web service (Pace machine).
• In a single-company installation:
http://name/rpc/services/EFIConfiguration
where name is the domain name of the Pace machine.
• In a multi-company installation:
Include the company name (as listed in the Company field on the Pace login page) in the URL. For example:
http://name/rpc/company:public/services/EFIConfiguration
Note A domain name (instead of an IP address) is strongly recommended because, unlike an IP address, a domain name does not change and will get resolved (using DNS) to a new IP if the IP changes.
7. If you plan to use SSL (Secure Socket Layer) for communication:
a. Select the Use SSL check box.
b. Next to External Certificate, select the certificate you want to use from the drop-down list.
Important If you were using an external certificate in a pre-7.4 version of Digital StoreFront with the same name as the default system certificate, or if you have multiple certificates with the same name as the external certificate you selected before, you must re-establish the communication channel and select the certificate you want to use from the drop-down in the External Certificate field. For information, see “Re-establishing the communication channel with a different external certificate” on page 11.
8. Click Register.

Digital StoreFront MIS Setup Guide 11
After you click Register, and registration succeeds,
• The Secure Communication Url will be set automatically, and should match what is in the Configuration url field, except for the file name which will be EFIIntegration instead of EFIConfiguration.
• An active Pace Connect for Digital StoreFront is automatically created in the EFI Pace system.
Re-establishing the communication channel with a different external certificate
If you need to re-establish a communication channel by selecting a different external certificate, follow these steps:
1. Log into Digital StoreFront as an administrator, click the Administration tab, and go to MIS CONFIGURATION > Manage Communication Channels. The Manage Communication Channels page opens.
2. Open the channel you need to remove and click Unregister.
3. Re-establish a communication channel by following the steps in “Establish a direct communication channel for Pace” on page 9 and selecting the certificate from the drop-down in the External Certificate field in step 7.
12 EFI Digital StoreFront | MIS Setup Guide
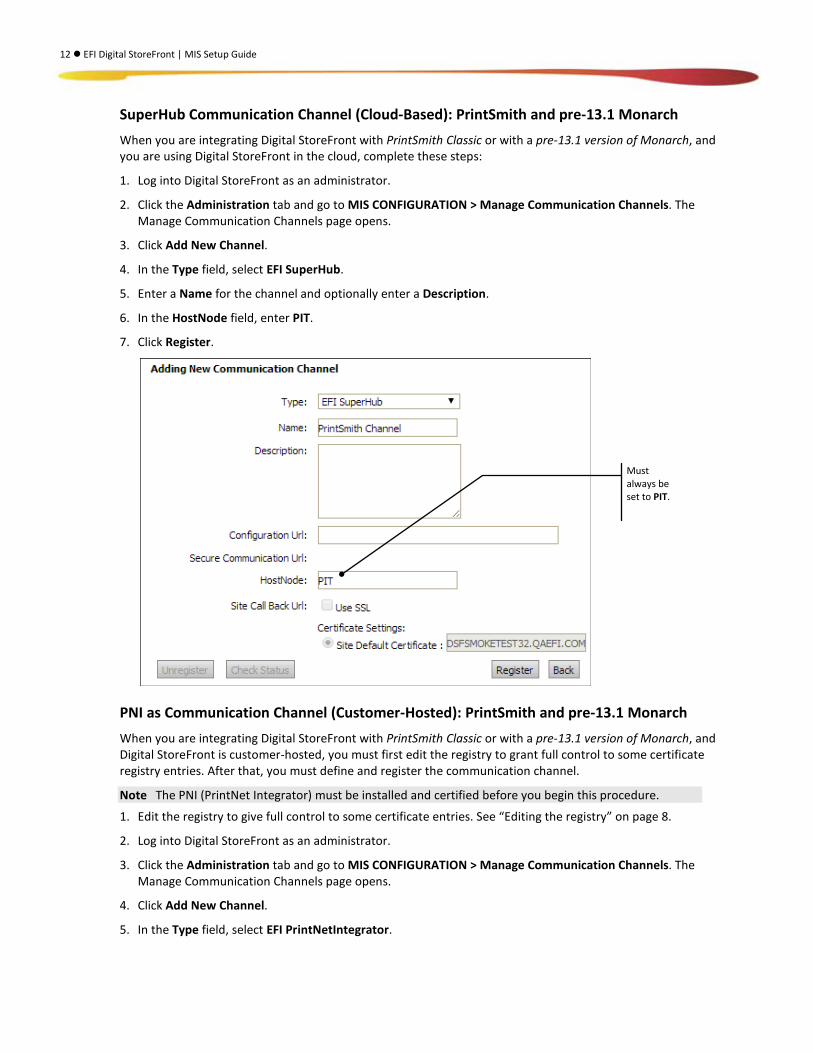
SuperHub Communication Channel (Cloud-Based): PrintSmith and pre-13.1 Monarch When you are integrating Digital StoreFront with PrintSmith Classic or with a pre-13.1 version of Monarch, and you are using Digital StoreFront in the cloud, complete these steps:
1. Log into Digital StoreFront as an administrator.
2. Click the Administration tab and go to MIS CONFIGURATION > Manage Communication Channels. The Manage Communication Channels page opens.
3. Click Add New Channel.
4. In the Type field, select EFI SuperHub.
5. Enter a Name for the channel and optionally enter a Description.
6. In the HostNode field, enter PIT.
7. Click Register.
PNI as Communication Channel (Customer-Hosted): PrintSmith and pre-13.1 Monarch When you are integrating Digital StoreFront with PrintSmith Classic or with a pre-13.1 version of Monarch, and Digital StoreFront is customer-hosted, you must first edit the registry to grant full control to some certificate registry entries. After that, you must define and register the communication channel.
Note The PNI (PrintNet Integrator) must be installed and certified before you begin this procedure.
1. Edit the registry to give full control to some certificate entries. See “Editing the registry” on page 8.
2. Log into Digital StoreFront as an administrator.
3. Click the Administration tab and go to MIS CONFIGURATION > Manage Communication Channels. The Manage Communication Channels page opens.
4. Click Add New Channel.
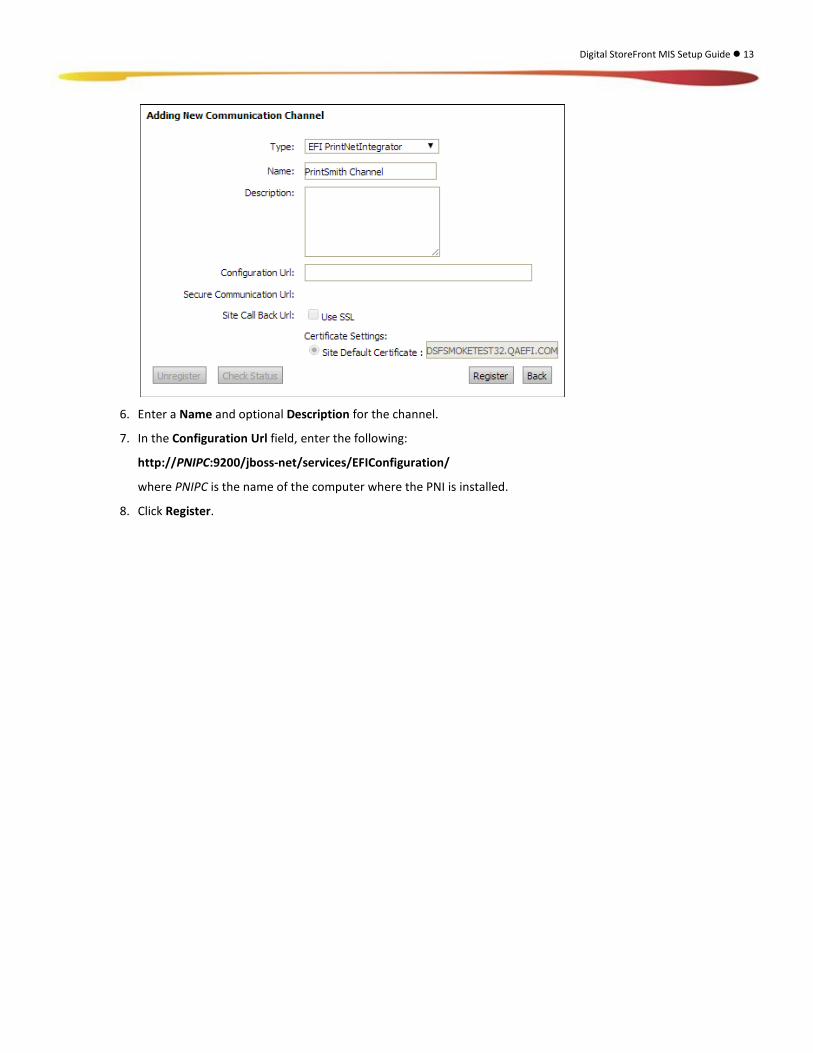
5. In the Type field, select EFI PrintNetIntegrator.
Must always be set to PIT.
Digital StoreFront MIS Setup Guide 13
6. Enter a Name and optional Description for the channel.
7. In the Configuration Url field, enter the following:
http://PNIPC:9200/jboss-net/services/EFIConfiguration/
where PNIPC is the name of the computer where the PNI is installed.
8. Click Register.
14 EFI Digital StoreFront | MIS Setup Guide
Task 3: Configure and Register the MIS The next step is to configure and register the MIS. The information that you provide varies by MIS, but the general procedure is the same.
• For Monarch, see below.
• For Pace, see page 16.
• For PrintSmith Classic, see page 19.
Monarch Setup If you are integrating Digital StoreFront with Monarch (any version), follow these steps to configure and register the MIS.
Set up and register the MIS
1. Log into Digital StoreFront as an administrator, click the Administration tab, and go to MIS CONFIGURATION > MIS Systems. The MIS Systems page opens.
2. Click Add New MIS.
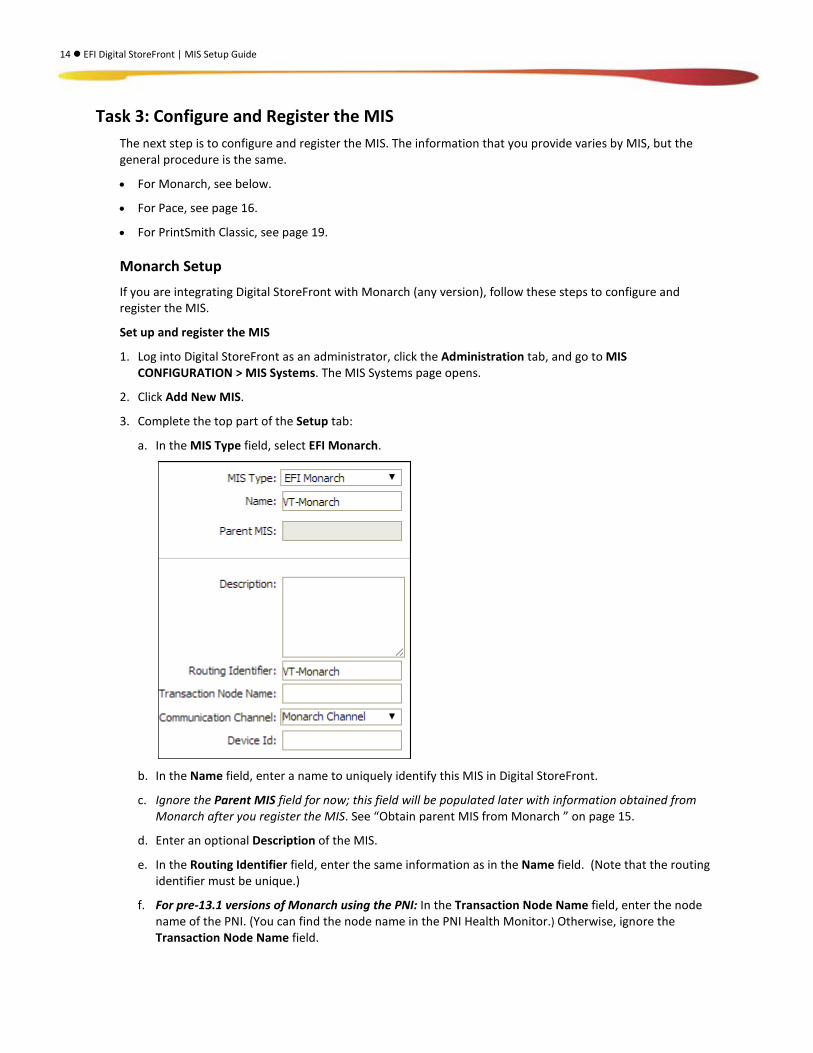
3. Complete the top part of the Setup tab:
a. In the MIS Type field, select EFI Monarch.
b. In the Name field, enter a name to uniquely identify this MIS in Digital StoreFront.
c. Ignore the Parent MIS field for now; this field will be populated later with information obtained from Monarch after you register the MIS. See “Obtain parent MIS from Monarch ” on page 15.
d. Enter an optional Description of the MIS.
e. In the Routing Identifier field, enter the same information as in the Name field. (Note that the routing identifier must be unique.)
f. For pre-13.1 versions of Monarch using the PNI: In the Transaction Node Name field, enter the node name of the PNI. (You can find the node name in the PNI Health Monitor.) Otherwise, ignore the Transaction Node Name field.
Digital StoreFront MIS Setup Guide 15
g. Select the Communication Channel you established earlier.
If Click here to add a Communication Channel is displayed next to the Communication Channel field, you must establish a communication channel before you can configure and register the MIS. For details, see “Direct Communication Channel: Monarch ” on page 8.
h. For pre-13.1 versions of Monarch using the PNI: Enter the Device Id if more than one MIS is being routed through the same PNI. Otherwise, ignore the Device Id field.
4. Set the Asynchronous Order Submission through Job Cancelled Statuses options as applicable. For information about these settings, see “Settings that Control the Exchange of Information” starting on page 20.
Note The Accepts Single Order check box will be set later automatically (after you register the MIS and click Request System Capabilities) – along with the Parent MIS field – with information obtained from the MIS. See “Obtain parent MIS from Monarch ” on page 15.
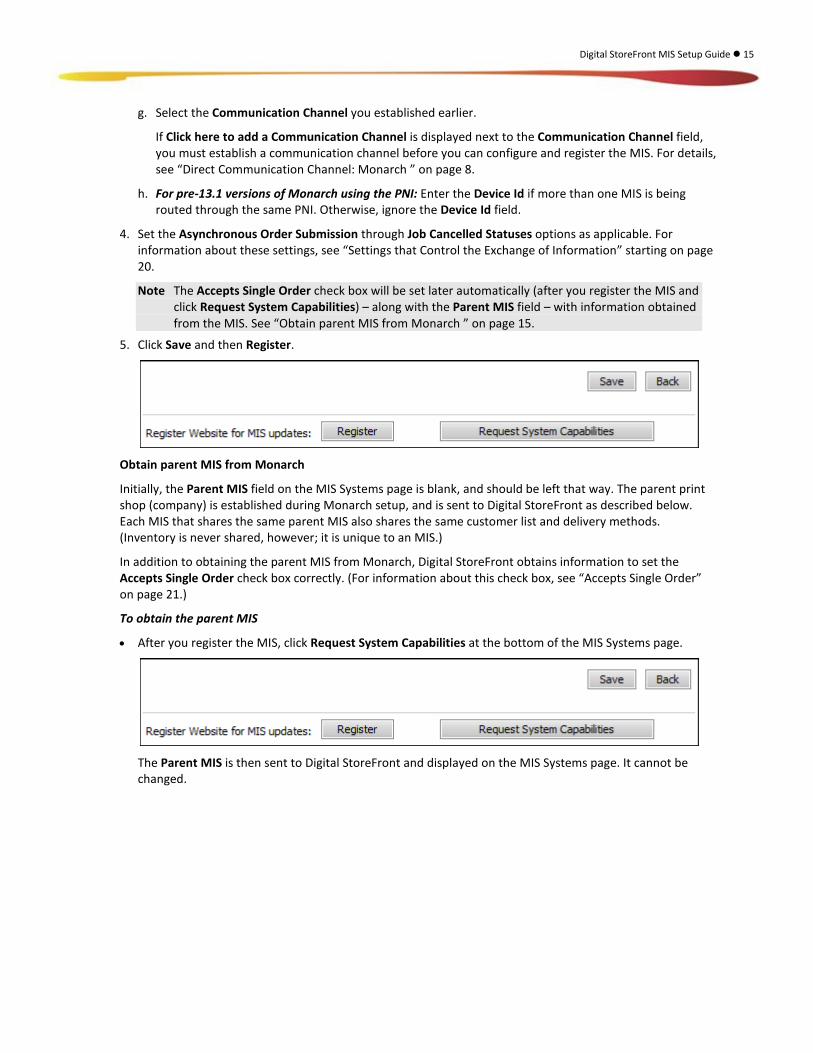
5. Click Save and then Register.
Obtain parent MIS from Monarch
Initially, the Parent MIS field on the MIS Systems page is blank, and should be left that way. The parent print shop (company) is established during Monarch setup, and is sent to Digital StoreFront as described below. Each MIS that shares the same parent MIS also shares the same customer list and delivery methods. (Inventory is never shared, however; it is unique to an MIS.)
In addition to obtaining the parent MIS from Monarch, Digital StoreFront obtains information to set the Accepts Single Order check box correctly. (For information about this check box, see “Accepts Single Order” on page 21.)
To obtain the parent MIS
• After you register the MIS, click Request System Capabilities at the bottom of the MIS Systems page.
The Parent MIS is then sent to Digital StoreFront and displayed on the MIS Systems page. It cannot be changed.
16 EFI Digital StoreFront | MIS Setup Guide
Pace Setup If you are integrating Digital StoreFront with Pace, follow these steps to configure and register the MIS.
Set up and register the MIS
1. Log into Digital StoreFront as an administrator, click the Administration tab, and go to MIS CONFIGURATION > MIS Systems. The MIS Systems page opens.
2. Click Add New MIS.
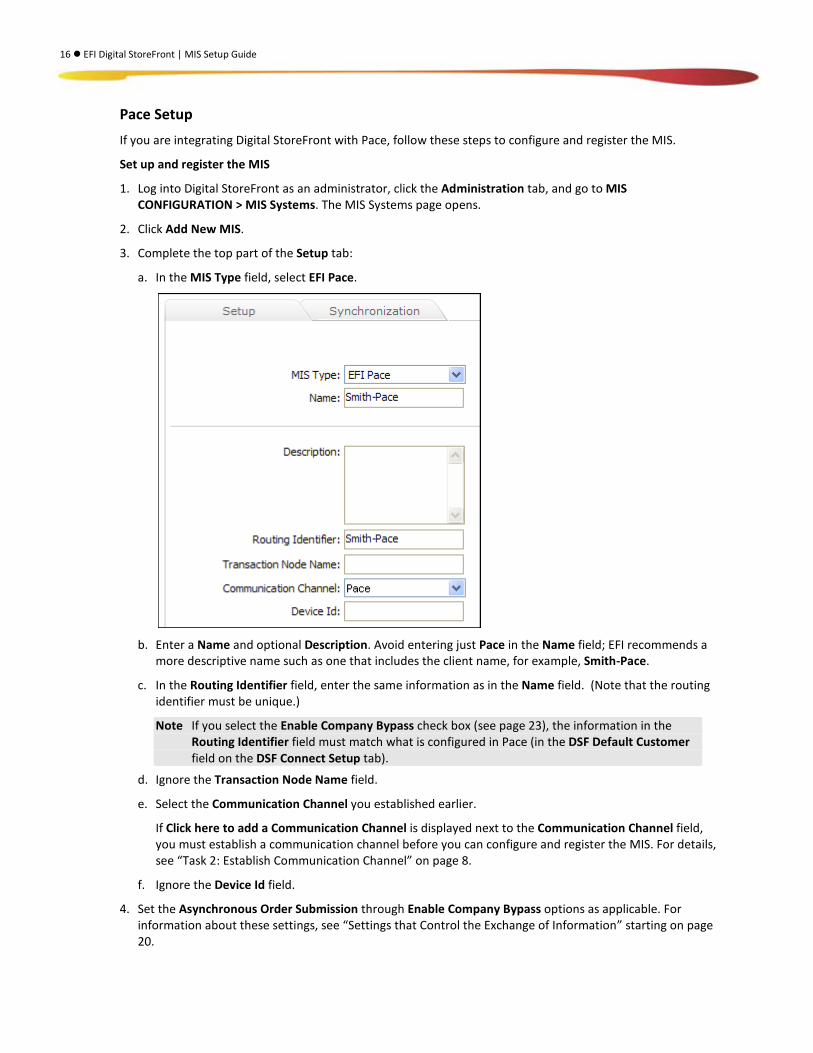
3. Complete the top part of the Setup tab:
a. In the MIS Type field, select EFI Pace.
b. Enter a Name and optional Description. Avoid entering just Pace in the Name field; EFI recommends a
more descriptive name such as one that includes the client name, for example, Smith-Pace.
c. In the Routing Identifier field, enter the same information as in the Name field. (Note that the routing identifier must be unique.)
Note If you select the Enable Company Bypass check box (see page 23), the information in the Routing Identifier field must match what is configured in Pace (in the DSF Default Customer field on the DSF Connect Setup tab).
d. Ignore the Transaction Node Name field.
e. Select the Communication Channel you established earlier.
If Click here to add a Communication Channel is displayed next to the Communication Channel field, you must establish a communication channel before you can configure and register the MIS. For details, see “Task 2: Establish Communication Channel” on page 8.
f. Ignore the Device Id field.
4. Set the Asynchronous Order Submission through Enable Company Bypass options as applicable. For information about these settings, see “Settings that Control the Exchange of Information” starting on page 20.
Digital StoreFront MIS Setup Guide 17
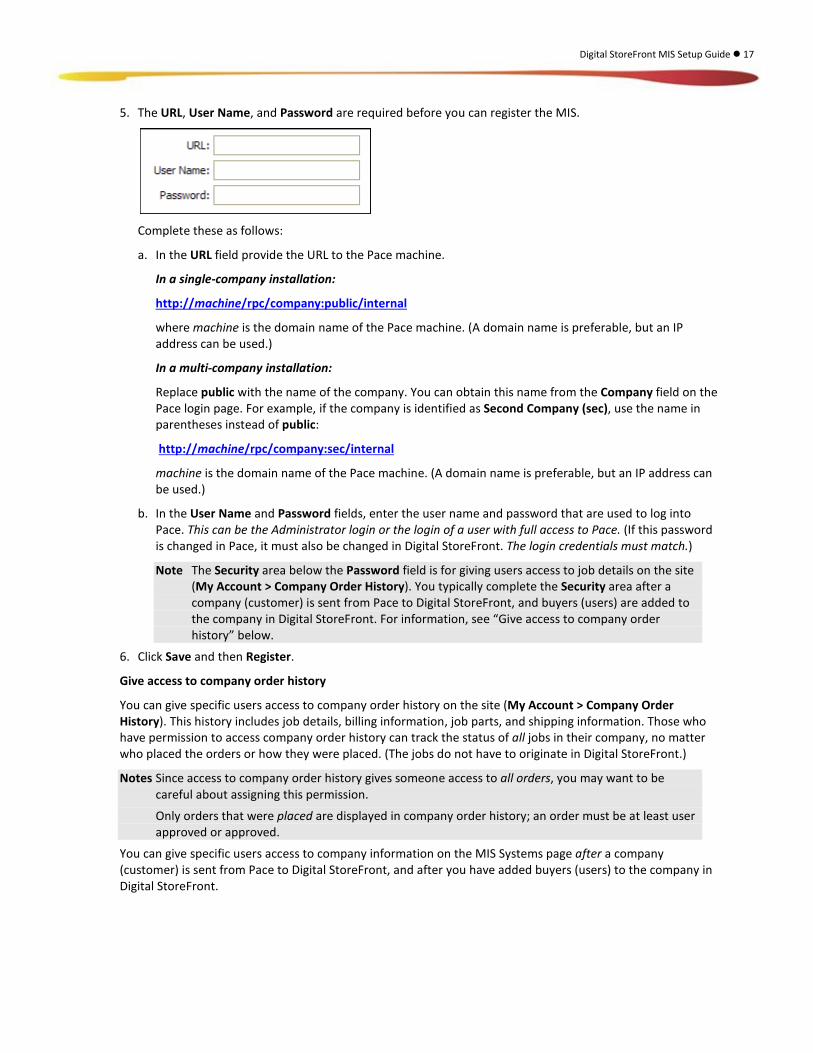
5. The URL, User Name, and Password are required before you can register the MIS.
Complete these as follows:
a. In the URL field provide the URL to the Pace machine.
In a single-company installation:
http://machine/rpc/company:public/internal
where machine is the domain name of the Pace machine. (A domain name is preferable, but an IP address can be used.)
In a multi-company installation:
Replace public with the name of the company. You can obtain this name from the Company field on the Pace login page. For example, if the company is identified as Second Company (sec), use the name in parentheses instead of public:
http://machine/rpc/company:sec/internal
machine is the domain name of the Pace machine. (A domain name is preferable, but an IP address can be used.)
b. In the User Name and Password fields, enter the user name and password that are used to log into Pace. This can be the Administrator login or the login of a user with full access to Pace. (If this password is changed in Pace, it must also be changed in Digital StoreFront. The login credentials must match.)
Note The Security area below the Password field is for giving users access to job details on the site (My Account > Company Order History). You typically complete the Security area after a company (customer) is sent from Pace to Digital StoreFront, and buyers (users) are added to the company in Digital StoreFront. For information, see “Give access to company order history” below.
6. Click Save and then Register.
Give access to company order history
You can give specific users access to company order history on the site (My Account > Company Order History). This history includes job details, billing information, job parts, and shipping information. Those who have permission to access company order history can track the status of all jobs in their company, no matter who placed the orders or how they were placed. (The jobs do not have to originate in Digital StoreFront.)
Notes Since access to company order history gives someone access to all orders, you may want to be careful about assigning this permission.
Only orders that were placed are displayed in company order history; an order must be at least user approved or approved.
You can give specific users access to company information on the MIS Systems page after a company (customer) is sent from Pace to Digital StoreFront, and after you have added buyers (users) to the company in Digital StoreFront.
18 EFI Digital StoreFront | MIS Setup Guide
To give access to company order history
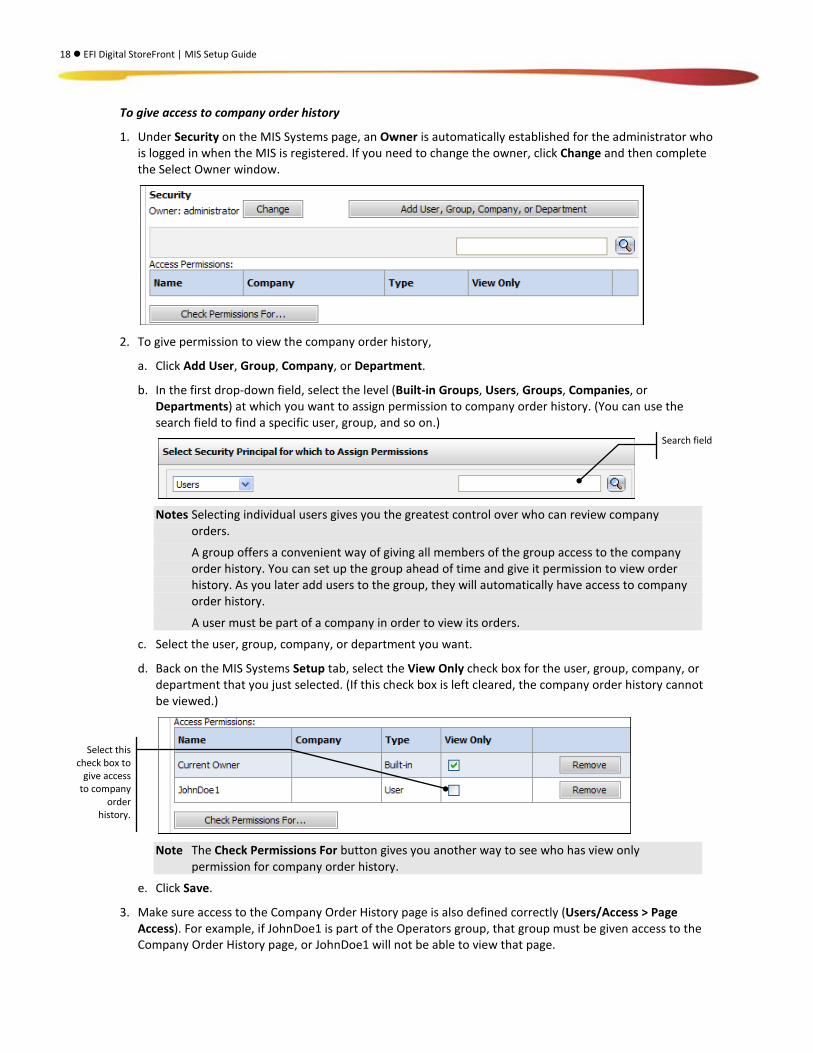
1. Under Security on the MIS Systems page, an Owner is automatically established for the administrator who is logged in when the MIS is registered. If you need to change the owner, click Change and then complete the Select Owner window.
2. To give permission to view the company order history,
a. Click Add User, Group, Company, or Department.
b. In the first drop-down field, select the level (Built-in Groups, Users, Groups, Companies, or Departments) at which you want to assign permission to company order history. (You can use the search field to find a specific user, group, and so on.)
Notes Selecting individual users gives you the greatest control over who can review company
orders.
A group offers a convenient way of giving all members of the group access to the company order history. You can set up the group ahead of time and give it permission to view order history. As you later add users to the group, they will automatically have access to company order history.
A user must be part of a company in order to view its orders.
c. Select the user, group, company, or department you want.
d. Back on the MIS Systems Setup tab, select the View Only check box for the user, group, company, or department that you just selected. (If this check box is left cleared, the company order history cannot be viewed.)
Note The Check Permissions For button gives you another way to see who has view only
permission for company order history.
e. Click Save.
3. Make sure access to the Company Order History page is also defined correctly (Users/Access > Page Access). For example, if JohnDoe1 is part of the Operators group, that group must be given access to the Company Order History page, or JohnDoe1 will not be able to view that page.
Select this check box to
give access to company
order history.
Search field
Digital StoreFront MIS Setup Guide 19
PrintSmith Classic Setup If you are integrating Digital StoreFront with PrintSmith Classic, follow these steps to configure and register the MIS.
1. Log into Digital StoreFront as an administrator, click the Administration tab, and go to MIS CONFIGURATION > MIS Systems. The MIS Systems page opens.
2. Click Add New MIS.
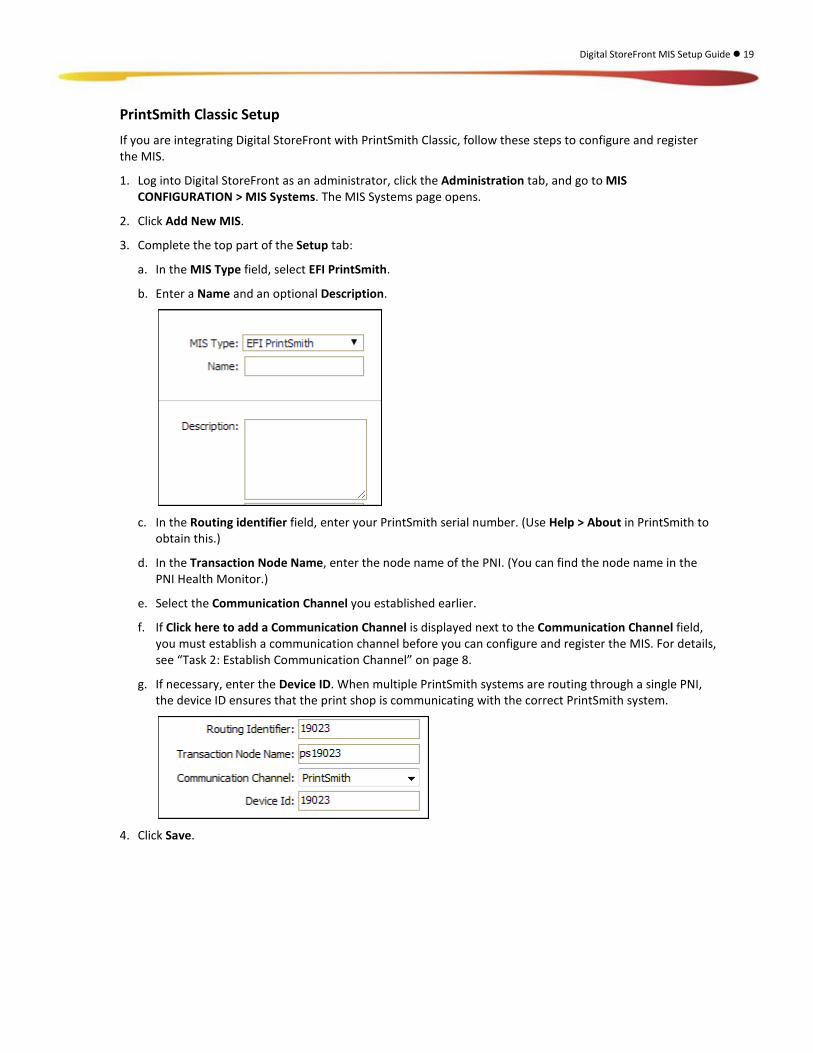
3. Complete the top part of the Setup tab:
a. In the MIS Type field, select EFI PrintSmith.
b. Enter a Name and an optional Description.
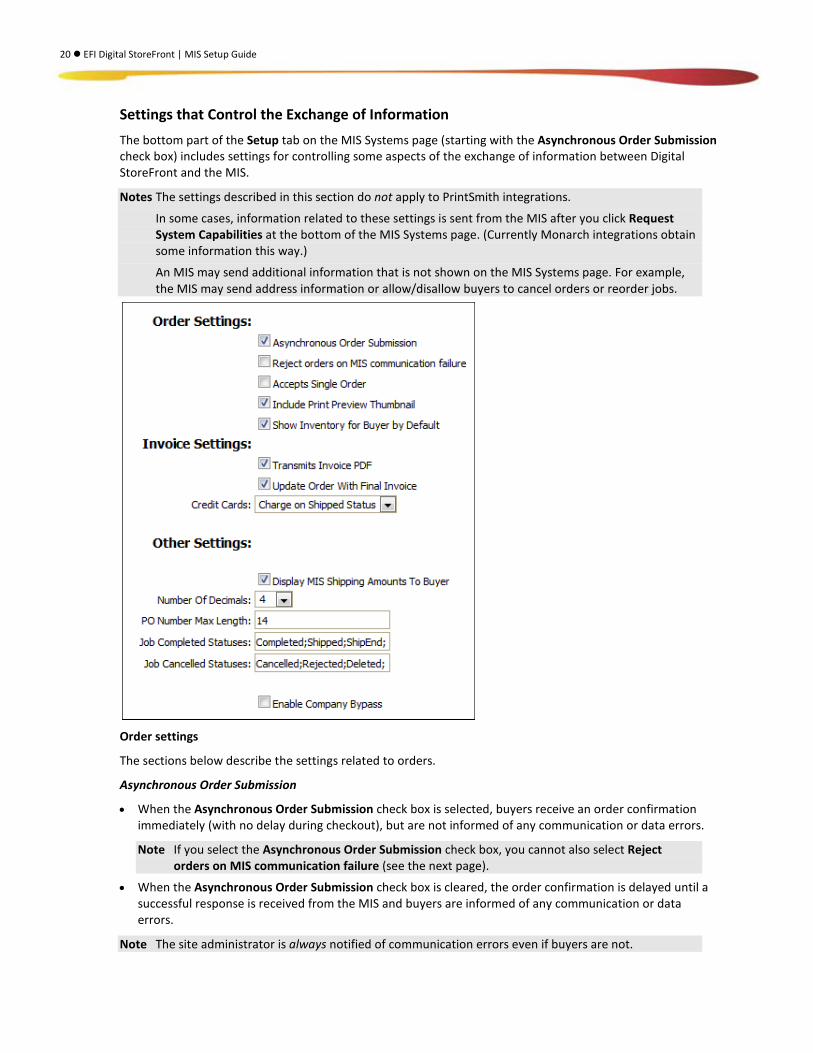
c. In the Routing identifier field, enter your PrintSmith serial number. (Use Help > About in PrintSmith to
obtain this.)
d. In the Transaction Node Name, enter the node name of the PNI. (You can find the node name in the PNI Health Monitor.)
e. Select the Communication Channel you established earlier.
f. If Click here to add a Communication Channel is displayed next to the Communication Channel field, you must establish a communication channel before you can configure and register the MIS. For details, see “Task 2: Establish Communication Channel” on page 8.
g. If necessary, enter the Device ID. When multiple PrintSmith systems are routing through a single PNI, the device ID ensures that the print shop is communicating with the correct PrintSmith system.
4. Click Save.
20 EFI Digital StoreFront | MIS Setup Guide
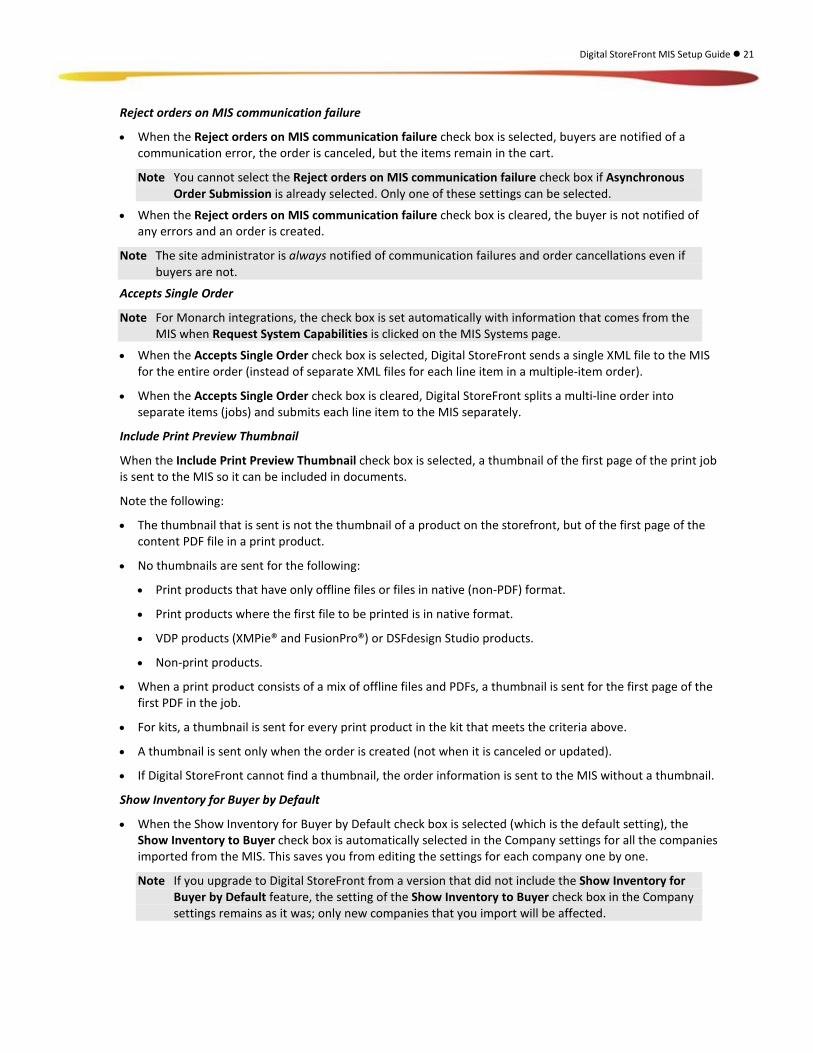
Settings that Control the Exchange of Information The bottom part of the Setup tab on the MIS Systems page (starting with the Asynchronous Order Submission check box) includes settings for controlling some aspects of the exchange of information between Digital StoreFront and the MIS.
Notes The settings described in this section do not apply to PrintSmith integrations.
In some cases, information related to these settings is sent from the MIS after you click Request System Capabilities at the bottom of the MIS Systems page. (Currently Monarch integrations obtain some information this way.)
An MIS may send additional information that is not shown on the MIS Systems page. For example, the MIS may send address information or allow/disallow buyers to cancel orders or reorder jobs.
Order settings
The sections below describe the settings related to orders.
Asynchronous Order Submission
• When the Asynchronous Order Submission check box is selected, buyers receive an order confirmation immediately (with no delay during checkout), but are not informed of any communication or data errors.
Note If you select the Asynchronous Order Submission check box, you cannot also select Reject orders on MIS communication failure (see the next page).
• When the Asynchronous Order Submission check box is cleared, the order confirmation is delayed until a successful response is received from the MIS and buyers are informed of any communication or data errors.
Note The site administrator is always notified of communication errors even if buyers are not.
Digital StoreFront MIS Setup Guide 21
Reject orders on MIS communication failure
• When the Reject orders on MIS communication failure check box is selected, buyers are notified of a communication error, the order is canceled, but the items remain in the cart.
Note You cannot select the Reject orders on MIS communication failure check box if Asynchronous Order Submission is already selected. Only one of these settings can be selected.
• When the Reject orders on MIS communication failure check box is cleared, the buyer is not notified of any errors and an order is created.
Note The site administrator is always notified of communication failures and order cancellations even if buyers are not.
Accepts Single Order
Note For Monarch integrations, the check box is set automatically with information that comes from the MIS when Request System Capabilities is clicked on the MIS Systems page.
• When the Accepts Single Order check box is selected, Digital StoreFront sends a single XML file to the MIS for the entire order (instead of separate XML files for each line item in a multiple-item order).
• When the Accepts Single Order check box is cleared, Digital StoreFront splits a multi-line order into separate items (jobs) and submits each line item to the MIS separately.
Include Print Preview Thumbnail
When the Include Print Preview Thumbnail check box is selected, a thumbnail of the first page of the print job is sent to the MIS so it can be included in documents.
Note the following:
• The thumbnail that is sent is not the thumbnail of a product on the storefront, but of the first page of the content PDF file in a print product.
• No thumbnails are sent for the following:
• Print products that have only offline files or files in native (non-PDF) format.
• Print products where the first file to be printed is in native format.
• VDP products (XMPie® and FusionPro®) or DSFdesign Studio products.
• Non-print products.
• When a print product consists of a mix of offline files and PDFs, a thumbnail is sent for the first page of the first PDF in the job.
• For kits, a thumbnail is sent for every print product in the kit that meets the criteria above.
• A thumbnail is sent only when the order is created (not when it is canceled or updated).
• If Digital StoreFront cannot find a thumbnail, the order information is sent to the MIS without a thumbnail.
Show Inventory for Buyer by Default
• When the Show Inventory for Buyer by Default check box is selected (which is the default setting), the Show Inventory to Buyer check box is automatically selected in the Company settings for all the companies imported from the MIS. This saves you from editing the settings for each company one by one.
Note If you upgrade to Digital StoreFront from a version that did not include the Show Inventory for Buyer by Default feature, the setting of the Show Inventory to Buyer check box in the Company settings remains as it was; only new companies that you import will be affected.

22 EFI Digital StoreFront | MIS Setup Guide
• When the Show Inventory for Buyer by Default check box is cleared, you must manually set the Show Inventory to Buyer check box in the Company settings for each company (the Show Inventory to Buyer check box is cleared by default).
Invoice settings
The sections that follow describe settings related to invoicing.
Transmits Invoice PDF
Transmits Invoice PDF is designed to work in conjunction with the Update Order with Final Invoice setting (see below).
• When the Transmits Invoice PDF check box is selected, Digital StoreFront stores summary invoice amounts and displays links to detailed PDFs of MIS invoices (if supplied by the MIS). Buyers can view the invoices as part of their order history. Until a “final” invoice is sent, the MIS can send the same invoice multiple times, and it will be updated in Digital StoreFront. After a final invoice is sent, no further updates to the order will be accepted by Digital StoreFront.
Note When the Transmits Invoice PDF and Update Order with Final Invoice check boxes are both selected, and the MIS sends a final invoice, the status of the order in Digital StoreFront changes to Completed and Invoiced.
• When the Transmits Invoice PDF check box is cleared, Digital StoreFront does not process or store MIS invoice information or PDFs. In this case, the Digital StoreFront shipping amount is updated when the order status is set to Shipped as long as the Update Order with Final Invoice check box is selected, the Perform Shipping Calculations check box in the Digital StoreFront Price Settings is selected, and the MIS supplies shipping information.
Update Order with Final Invoice
The Update Order with Final Invoice setting is designed to work in conjunction with the Transmits Invoice PDF setting above.
• When the Update Order with Final Invoice check box is selected, the order amounts are updated in Digital StoreFront (based either on the MIS invoice or shipment messages, depending on the setting of the Transmits Invoice PDF check box). If the Update Order with Final Invoice check box is selected, you can also use job synchronization to make a single adjustment to the order based on the MIS total invoice amount, as long as a final invoice was not already sent.
• When the Update Order with Final Invoice check box is cleared, the order amount is not updated in Digital StoreFront and job synchronization is unavailable.
Credit Cards
When a credit card is used for an order, Digital StoreFront goes to the payment gateway to obtain authorization for the payment. The gateway returns an authorization reference number, but the credit card is not charged at this time. There are three options for controlling when the credit card is charged:
• Charge on Shipped Status: Digital StoreFront charges the card, based on the web order amount when the order ships (its status is set to Shipped).
• Charge on MIS request: Credit cards are charged by Digital StoreFront when a request to do so is received from the MIS. The amount charged is the final invoice amount provided by the MIS.
Note After it receives the request from the MIS, Digital StoreFront attempts the delayed capture on the credit card and sends a message to the MIS to indicate whether the capture was successful or not.
• Charge in the MIS: The MIS charges the card, having received the authorization reference number from Digital StoreFront.
Digital StoreFront MIS Setup Guide 23
Other settings
The sections that follow describe miscellaneous settings.
Display MIS Shipping Amounts to Buyer
• When the Display MIS Shipping Amounts to Buyer check box is selected, if the MIS sends shipping and tracking information, the shipping charges are displayed next to the tracking number at the bottom of the buyer order summary.
• When the Display MIS Shipping Amounts to Buyer check box is cleared, and the MIS sends shipping and tracking information, the shipping charges are not displayed next to the tracking number in the buyer order summary.
Number of Decimals
This field specifies the number of decimal places allowed in numerical values sent to the MIS. When the MIS specifies the number of decimals in a transaction, this overrides the Digital StoreFront default number of decimals, thus avoiding the scenario where a value set in Digital StoreFront and communicated to the MIS could exceed the maximum value set in the MIS (and possibly result in overflow errors in the MIS, truncation of data, and so on).
Note Sometimes the unit price and price components may have more decimals to make everything add up. You would see this in the OrderInformation.xml.
PO Max Number Length
This field specifies the maximum number of characters (up to 50) that a purchase order number can include. When the MIS specifies the maximum length for PO numbers, this overrides the Digital StoreFront maximum length, thus avoiding the scenario where a value set in Digital StoreFront and communicated to the MIS could exceed the maximum value set in the MIS (and possibly result in overflow errors in the MIS, truncation of data, and so on).
Job Completed Statuses
This field specifies the statuses that indicate that a job is complete.
Job Canceled Statuses
This field specifies the statuses that indicate that a job is canceled.
Note These two job status settings are used for the job status update, not for the order status update, which is the update that transmits shipping information.
Enable Company Bypass
Note Currently only Pace integrations use this setting.
When the Enable Company Bypass check box is selected, buyers can belong to any company and place orders that are sent to this MIS. For companies to be bypassed, the Routing Identifier on the MIS Systems page is used instead of the buyer’s company to route orders to the correct print shop/manufacturing facility. This Routing Identifier must match what is configured in Pace (in the DSF Default Customer field on the DSF Connect Setup tab).
24 EFI Digital StoreFront | MIS Setup Guide
Task 4: Associate MIS with Print Shop and Test Basic MIS Connectivity The next step is to associate the MIS you just configured with a print shop, define some print shop settings, and then check connectivity between Digital StoreFront and the MIS by running some diagnostics.
Associate the MIS with a print shop and define some print shop settings In addition to associating the MIS with a print shop, if you plan to offer digital downloads of products or direct mail products on your site, you must configure some default shipping methods for the print shop. When buyers order a digital download or direct mail product, no shipping information is required in the cart. When the order is sent to the MIS, however, a delivery method is required (even if it does not apply to the type of product being ordered). To support this, you must map three default shipping methods to delivery methods. Depending on how your MIS handles delivery methods, these can either be delivery methods defined in the MIS (and transmitted to Digital StoreFront) or delivery methods that are available for this purpose in Digital StoreFront.
1. On the Administration tab in Digital StoreFront, click Print Shops.
2. Either edit the default print shop or add a new print shop.
Note For details of adding and configuring print shops, use the Help system on the site.
3. Next to MIS System, select the system you just configured as the MIS System for the print shop.
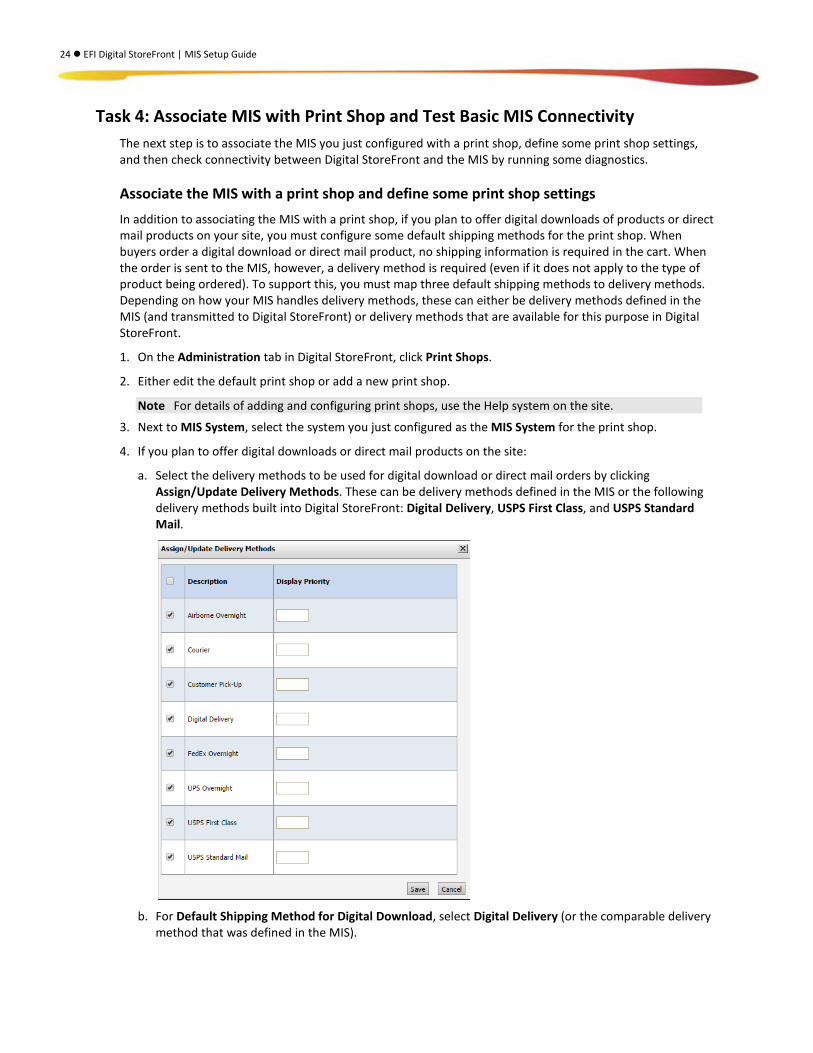
4. If you plan to offer digital downloads or direct mail products on the site:
a. Select the delivery methods to be used for digital download or direct mail orders by clicking Assign/Update Delivery Methods. These can be delivery methods defined in the MIS or the following delivery methods built into Digital StoreFront: Digital Delivery, USPS First Class, and USPS Standard Mail.
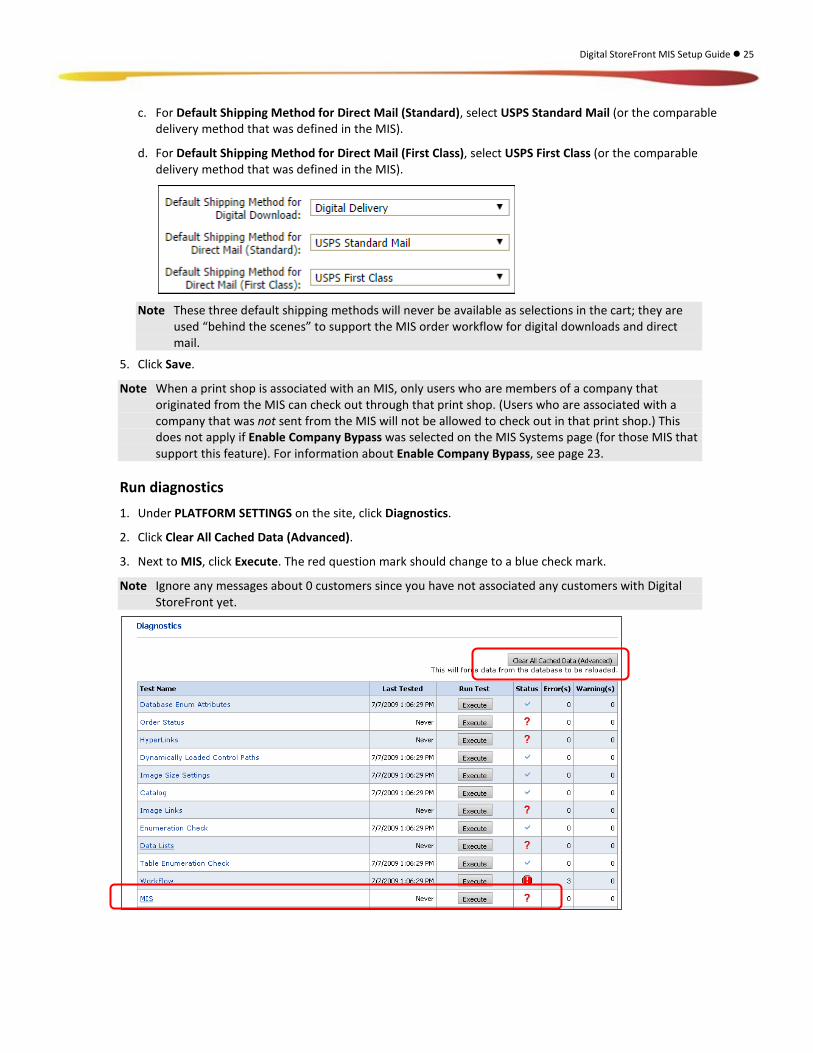
b. For Default Shipping Method for Digital Download, select Digital Delivery (or the comparable delivery
method that was defined in the MIS).
Digital StoreFront MIS Setup Guide 25
c. For Default Shipping Method for Direct Mail (Standard), select USPS Standard Mail (or the comparable delivery method that was defined in the MIS).
d. For Default Shipping Method for Direct Mail (First Class), select USPS First Class (or the comparable delivery method that was defined in the MIS).
Note These three default shipping methods will never be available as selections in the cart; they are
used “behind the scenes” to support the MIS order workflow for digital downloads and direct mail.
5. Click Save.
Note When a print shop is associated with an MIS, only users who are members of a company that originated from the MIS can check out through that print shop. (Users who are associated with a company that was not sent from the MIS will not be allowed to check out in that print shop.) This does not apply if Enable Company Bypass was selected on the MIS Systems page (for those MIS that support this feature). For information about Enable Company Bypass, see page 23.
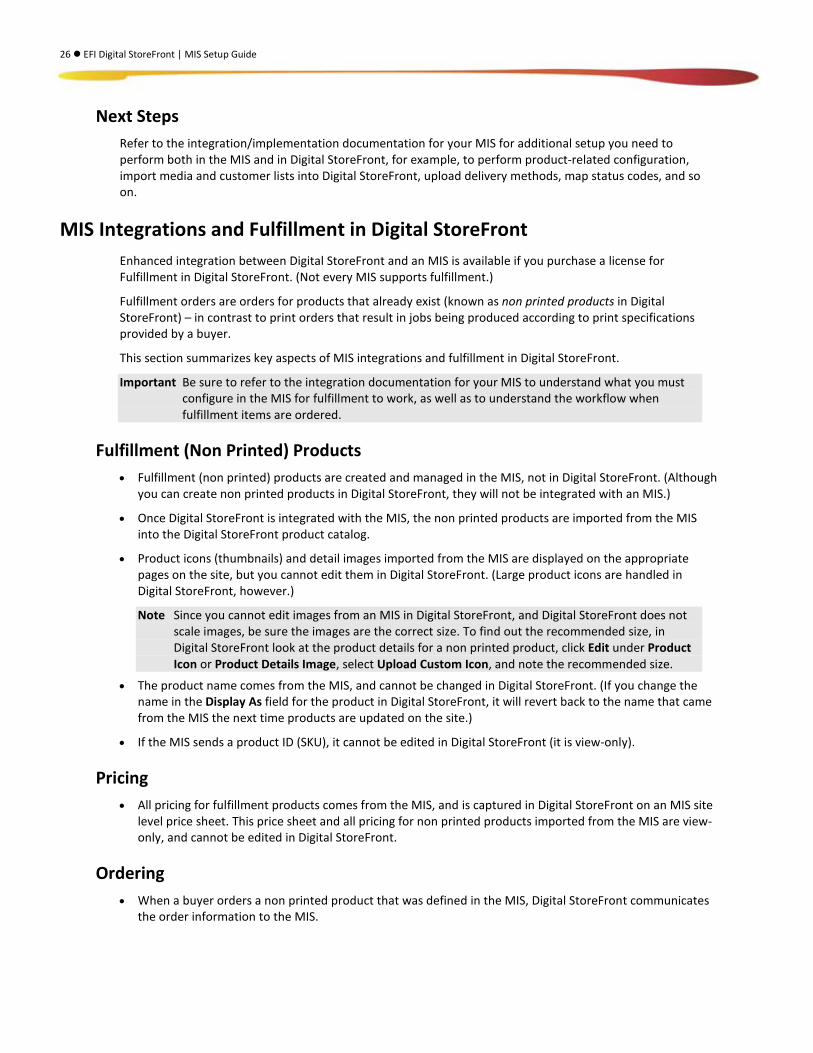
Run diagnostics 1. Under PLATFORM SETTINGS on the site, click Diagnostics.
2. Click Clear All Cached Data (Advanced).
3. Next to MIS, click Execute. The red question mark should change to a blue check mark.
Note Ignore any messages about 0 customers since you have not associated any customers with Digital StoreFront yet.
26 EFI Digital StoreFront | MIS Setup Guide
Next Steps Refer to the integration/implementation documentation for your MIS for additional setup you need to perform both in the MIS and in Digital StoreFront, for example, to perform product-related configuration, import media and customer lists into Digital StoreFront, upload delivery methods, map status codes, and so on.
MIS Integrations and Fulfillment in Digital StoreFront Enhanced integration between Digital StoreFront and an MIS is available if you purchase a license for Fulfillment in Digital StoreFront. (Not every MIS supports fulfillment.)
Fulfillment orders are orders for products that already exist (known as non printed products in Digital StoreFront) – in contrast to print orders that result in jobs being produced according to print specifications provided by a buyer.
This section summarizes key aspects of MIS integrations and fulfillment in Digital StoreFront.
Important Be sure to refer to the integration documentation for your MIS to understand what you must configure in the MIS for fulfillment to work, as well as to understand the workflow when fulfillment items are ordered.
Fulfillment (Non Printed) Products • Fulfillment (non printed) products are created and managed in the MIS, not in Digital StoreFront. (Although
you can create non printed products in Digital StoreFront, they will not be integrated with an MIS.)
• Once Digital StoreFront is integrated with the MIS, the non printed products are imported from the MIS into the Digital StoreFront product catalog.
• Product icons (thumbnails) and detail images imported from the MIS are displayed on the appropriate pages on the site, but you cannot edit them in Digital StoreFront. (Large product icons are handled in Digital StoreFront, however.)
Note Since you cannot edit images from an MIS in Digital StoreFront, and Digital StoreFront does not scale images, be sure the images are the correct size. To find out the recommended size, in Digital StoreFront look at the product details for a non printed product, click Edit under Product Icon or Product Details Image, select Upload Custom Icon, and note the recommended size.
• The product name comes from the MIS, and cannot be changed in Digital StoreFront. (If you change the name in the Display As field for the product in Digital StoreFront, it will revert back to the name that came from the MIS the next time products are updated on the site.)
• If the MIS sends a product ID (SKU), it cannot be edited in Digital StoreFront (it is view-only).
Pricing • All pricing for fulfillment products comes from the MIS, and is captured in Digital StoreFront on an MIS site
level price sheet. This price sheet and all pricing for non printed products imported from the MIS are view-only, and cannot be edited in Digital StoreFront.
Ordering • When a buyer orders a non printed product that was defined in the MIS, Digital StoreFront communicates
the order information to the MIS.

Digital StoreFront MIS Setup Guide 27
• When an MIS non printed product is ordered, the MIS updates Digital StoreFront with the quantity on hand.
• When the MIS tells Digital StoreFront that the status of a line item in a fulfillment order is “Shipped,” Digital StoreFront marks those line items as shipped. If the shipment is partial, the MIS sends a status of “Shipping” to indicate that more will be shipped later, and the line item is left open in Digital StoreFront. The order status is changed to Completed only after every item has a status of “Shipped.”
28 EFI Digital StoreFront | MIS Setup Guide
MIS Basic Integrations For some types of MIS, for example, PrintSmith Vision, a basic integration with Digital StoreFront is possible. This type of integration offers a one-way flow of order information from Digital StoreFront to the MIS. The MIS uses this information to create and process jobs. No information is sent back from the MIS to Digital StoreFront.
Two communication methods are available in a basic integration:
• URL (web service) or network location. In the case of a URL, Digital StoreFront delivers the order to the web service when the order is placed; in the case of a network location, Digital StoreFront stores orders in this location for the MIS to use. In both cases the orders are in the form of XML files.
• Requests by the MIS for orders to be sent from Digital StoreFront when they are placed. This method is useful if the MIS wants to avoid opening a firewall, port, and so on. (PrintSmith Vision uses this method.)
Important The task described here is performed in Digital StoreFront, and is only part of what you must do to integrate Digital StoreFront with an MIS. For complete details of what you must do in both Digital StoreFront and the MIS for a successful integration, see the implementation/integration guide for the MIS you are integrating with Digital StoreFront. For example, for PrintSmith Vision, be sure to follow the detailed instructions in the PrintSmith Vision and Digital StoreFront Integration Guide.
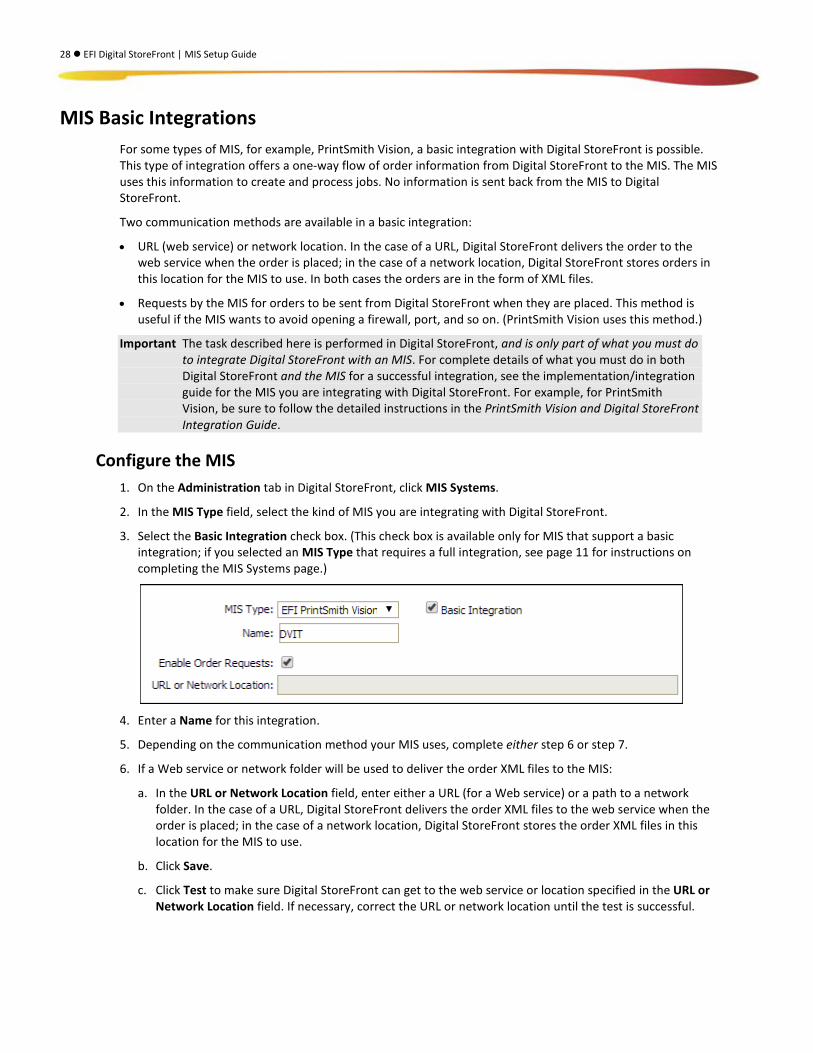
Configure the MIS 1. On the Administration tab in Digital StoreFront, click MIS Systems.
2. In the MIS Type field, select the kind of MIS you are integrating with Digital StoreFront.
3. Select the Basic Integration check box. (This check box is available only for MIS that support a basic integration; if you selected an MIS Type that requires a full integration, see page 11 for instructions on completing the MIS Systems page.)
4. Enter a Name for this integration.
5. Depending on the communication method your MIS uses, complete either step 6 or step 7.
6. If a Web service or network folder will be used to deliver the order XML files to the MIS:
a. In the URL or Network Location field, enter either a URL (for a Web service) or a path to a network folder. In the case of a URL, Digital StoreFront delivers the order XML files to the web service when the order is placed; in the case of a network location, Digital StoreFront stores the order XML files in this location for the MIS to use.
b. Click Save.
c. Click Test to make sure Digital StoreFront can get to the web service or location specified in the URL or Network Location field. If necessary, correct the URL or network location until the test is successful.
Digital StoreFront MIS Setup Guide 29
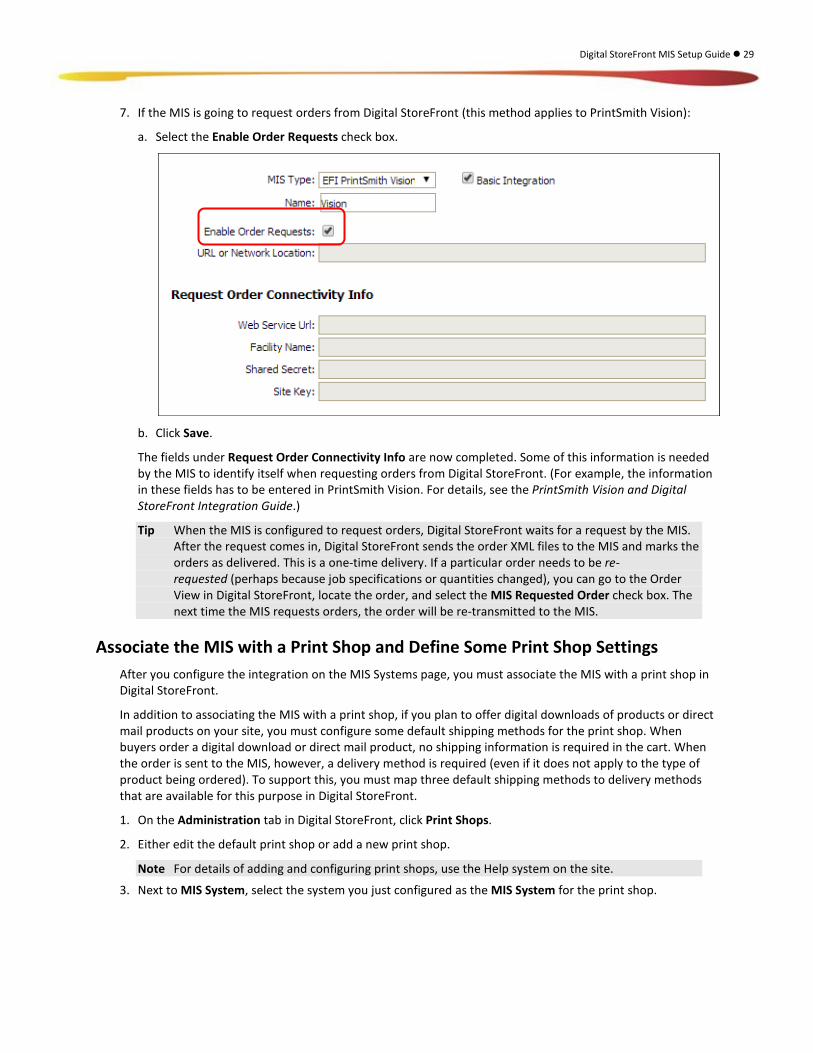
7. If the MIS is going to request orders from Digital StoreFront (this method applies to PrintSmith Vision):
a. Select the Enable Order Requests check box.
b. Click Save.
The fields under Request Order Connectivity Info are now completed. Some of this information is needed by the MIS to identify itself when requesting orders from Digital StoreFront. (For example, the information in these fields has to be entered in PrintSmith Vision. For details, see the PrintSmith Vision and Digital StoreFront Integration Guide.)
Tip When the MIS is configured to request orders, Digital StoreFront waits for a request by the MIS. After the request comes in, Digital StoreFront sends the order XML files to the MIS and marks the orders as delivered. This is a one-time delivery. If a particular order needs to be re-requested (perhaps because job specifications or quantities changed), you can go to the Order View in Digital StoreFront, locate the order, and select the MIS Requested Order check box. The next time the MIS requests orders, the order will be re-transmitted to the MIS.
Associate the MIS with a Print Shop and Define Some Print Shop Settings After you configure the integration on the MIS Systems page, you must associate the MIS with a print shop in Digital StoreFront.
In addition to associating the MIS with a print shop, if you plan to offer digital downloads of products or direct mail products on your site, you must configure some default shipping methods for the print shop. When buyers order a digital download or direct mail product, no shipping information is required in the cart. When the order is sent to the MIS, however, a delivery method is required (even if it does not apply to the type of product being ordered). To support this, you must map three default shipping methods to delivery methods that are available for this purpose in Digital StoreFront.
1. On the Administration tab in Digital StoreFront, click Print Shops.
2. Either edit the default print shop or add a new print shop.
Note For details of adding and configuring print shops, use the Help system on the site.
3. Next to MIS System, select the system you just configured as the MIS System for the print shop.
30 EFI Digital StoreFront | MIS Setup Guide
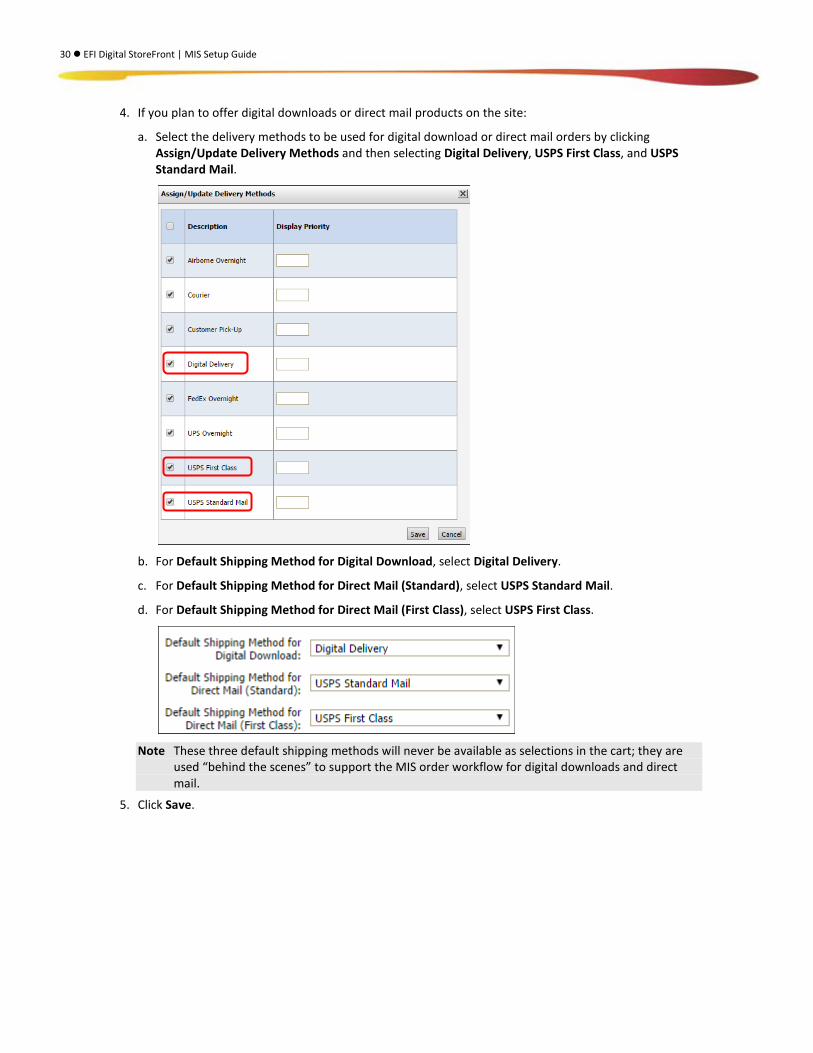
4. If you plan to offer digital downloads or direct mail products on the site:
a. Select the delivery methods to be used for digital download or direct mail orders by clicking Assign/Update Delivery Methods and then selecting Digital Delivery, USPS First Class, and USPS Standard Mail.
b. For Default Shipping Method for Digital Download, select Digital Delivery.
c. For Default Shipping Method for Direct Mail (Standard), select USPS Standard Mail.
d. For Default Shipping Method for Direct Mail (First Class), select USPS First Class.
Note These three default shipping methods will never be available as selections in the cart; they are
used “behind the scenes” to support the MIS order workflow for digital downloads and direct mail.
5. Click Save.
Digital StoreFront MIS Setup Guide 31
Reviewing Order Transactions Sent to the MIS You can use the MIS Transaction Viewer in Digital StoreFront to review all the orders that were sent to the EFI MIS (for example, Pace or Monarch) with which Digital StoreFront is integrated. In particular, you can review orders that failed to reach the MIS and re-submit those orders to the MIS. To see the relevant list of orders, you must know the name of the print shop that is associated with the MIS.
To review transactions sent to the MIS
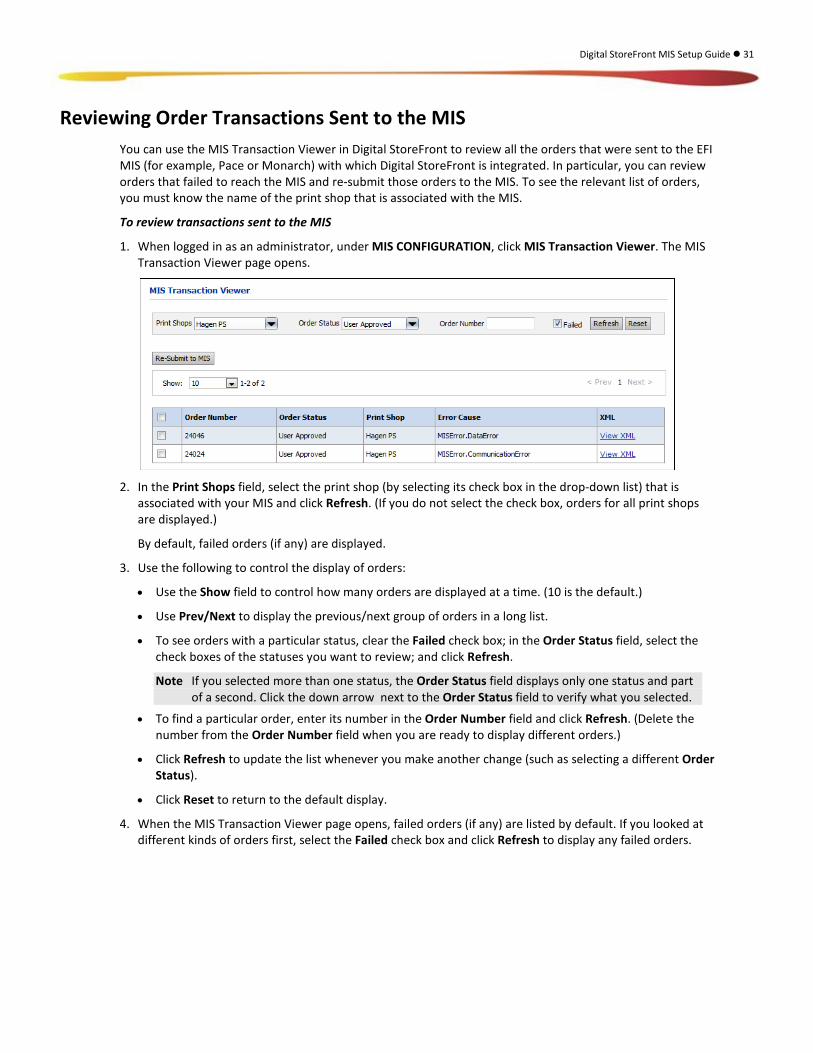
1. When logged in as an administrator, under MIS CONFIGURATION, click MIS Transaction Viewer. The MIS Transaction Viewer page opens.
2. In the Print Shops field, select the print shop (by selecting its check box in the drop-down list) that is
associated with your MIS and click Refresh. (If you do not select the check box, orders for all print shops are displayed.)
By default, failed orders (if any) are displayed.
3. Use the following to control the display of orders:
• Use the Show field to control how many orders are displayed at a time. (10 is the default.)
• Use Prev/Next to display the previous/next group of orders in a long list.
• To see orders with a particular status, clear the Failed check box; in the Order Status field, select the check boxes of the statuses you want to review; and click Refresh.
Note If you selected more than one status, the Order Status field displays only one status and part of a second. Click the down arrow next to the Order Status field to verify what you selected.
• To find a particular order, enter its number in the Order Number field and click Refresh. (Delete the number from the Order Number field when you are ready to display different orders.)
• Click Refresh to update the list whenever you make another change (such as selecting a different Order Status).
• Click Reset to return to the default display.
4. When the MIS Transaction Viewer page opens, failed orders (if any) are listed by default. If you looked at different kinds of orders first, select the Failed check box and click Refresh to display any failed orders.
32 EFI Digital StoreFront | MIS Setup Guide
5. If an order failed to reach the MIS:
a. Some information is displayed in the Error Cause column. Review this information. A communication problem may have prevented the order from going through, or the order may include invalid data.
b. To check for invalid data, click View XML. If you notice invalid data, correct it, for example, in the order.
c. After making any necessary corrections, re-send the order by selecting it and clicking Re-Submit to MIS. (You can select more than one order at a time and re-submit them together.)
Note Not all orders can be re-submitted to the MIS from MIS Transaction Viewer. When an MIS is configured for basic integration (see page 28) and requests orders from Digital StoreFront, you cannot re-submit the orders from the MIS Transaction Viewer. Instead, go to the Order View, locate the order you want to re-submit, and select the MIS Requested Order check box. The next time the MIS requests orders, the order will be re-transmitted to the MIS.
d. Click Refresh to make sure order did not fail again (it should not be listed).