meeting agenda template - western australian planning ... daps/metro north-west... · technical...
TRANSCRIPT


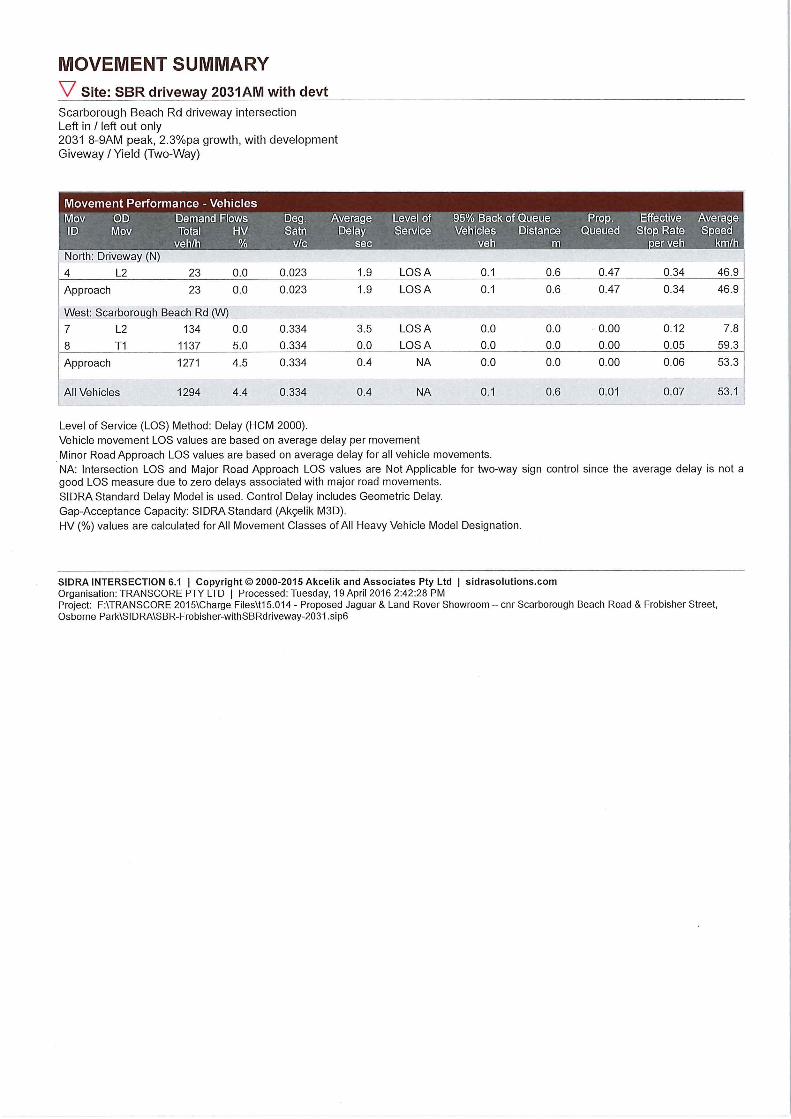


Technical Note 81113-187-FLYT-TEN-0001
PROJECT Proposed Jaguar/Land Rover Showroom – Paramics model review
Date Issued 27 May 2016
1. INTRODUCTION Flyt were engaged by the Department of Planning to undertake an independent review of the Paramics microsimulation modelling for the proposed Jaguar/Land Rover showroom to be located at the intersection of Scarborough Beach Road and Frobisher Street, Osborne Park. The purpose of the review was to understand the technical approach to the modelling process and determine the suitability of the reported outputs. The review is documented in this short report.
The review covers the following areas:
Model settings and coding (addressed in Section 2); Consistency between Scenario 1a and Scenario 3c model coding (addressed in Sections 2
and 3); and Translation of demands and distribution for use in Paramics (addressed in Section 3)
A summary of the review findings, avoiding the use of technical jargon, is presented in Section 4.
The following documents and model scenarios were considered during the review:
Transport Assessment (Filename t15014-rw-r01.docx) August 2015;
Technical Note 5 (Project No. t15.014) 8.04.2016;
Scenario 1a Paramics Model (Frobisher Street and Scarborough Beach Road crossover development access); and
Scenario 3c Paramics Model (Frobisher Street access with right turn pocket).
The following sections cover the review findings.
2. MODEL CODING Ordinarily, a base model (existing situation) would be created, calibrated and validated, and used as a basis for testing the project proposals. This model would contain all relevant calibration parameters (lane choice, headway time, reaction time, spatial tests, etc.) that would remain as a constant when testing the project proposals. This restricts the model performance and outputs to be based solely on the proposals ensuring an accurate comparison. In this situation, a base model has not been provided for review, but the consistency between modelled scenarios is still important.

2 | P a g e
2.1 Global parameter comparison This section compares the global parameters used in the models. These settings represent overarching values that are applied to the models that are specified through key Paramics files, i.e. Configuration, Categories, Profile, and Vehicles. Table 1 presents the findings.
Table 1 - Global parameter comparison
Parameter / Setting Scenario 1a Scenario 3c Time Steps 4 consistent Current Seed Value 6 consistent Speed Memory 6 consistent Mean Target Headway 1.0 consistent Mean Driver Reaction Time 1.0 consistent Driver Familiarity 95% consistent Vehicle composition 93.3% car, 6.7% Heavy consistent Modelled period (peak) 08:00 – 09:00 consistent Modelled warm up period 07:45 – 08:00 consistent Warm up period (% of peak) 20% consistent Release profile Flat consistentLink Categories Logical application consistent
The majority of these parameters have been referenced in the report documentation, and were cross checked against individual model files. The model parameters applied to the Scenario 1a model are logical and are consistent with Scenario 3c.
2.2 Restrictions Restrictions can be created to define which vehicles can use specified links in the modelled network. Both models contain the following restrictions that could be applied to the road network:
No Heavies; and No Dev Traffic.
The “No Dev Traffic” restriction is applied to two links in the Scenario 1a modelled network. The northbound “No Dev Traffic” restriction has been removed in Scenario 3c, and a “No Heavies” restriction has been applied to the median side lane of the Scarborough Beach Road westbound approach.

3 | P a g e
Scenario 1a Scenario 3c
The use of restrictions in these models is not unreasonable, and appears to be associated with lane discipline to achieve a more logical vehicle progression through the network, although it would be queried whether there was a reason for the different application of restrictions between the two models
2.3 Lane choice rules Lane choices allow a modeller to add specific rules to certain locations in the network to control lane changing movements. The rule also contains an activation area determining where the vehicle will become aware of the lane choice.
The use of lane choice rules in microsimulation models is logical, although there appear to be a large number for a network of this size. Scenario 1a contains 29 separate rules and Scenario 3c contains 26. There are numerous small differences between the two Scenario’s lanechoices.xml files; some are to be expected where the network, and therefore nodes numbers differ slightly, but there are also differences to the lane range groups and the activation area distances which do not appear to be documented. It is unclear why these changes have been modelled in Scenario 3c.
2.4 Individual link properties Individual links have been checked for Speed, Categories, Cost, Reaction and Headway factor values. A consistent set of values was observed between Scenario 1a and Scenario 3c models.
2.5 Signal coding Historic signal data was compared against the modelled data in Scenario 1a at the Scarborough Beach Road and Frobisher Street intersection. Figure 1 shows a screenshot from the Scenario 1a model displaying the signal arrangement. The corresponding SCATS image for this location is shown as Figure 2.

4 | P a g e
Figure 1 - Scenario 1a signal details
Figure 2 - SCATS image for Scarborough Beach Road and Frobisher Street
It was noted that Phase C (or Phase 3 in the modelled screenshot) differs where the left turn from Frobisher Street to Scarborough Beach Road eastbound has been omitted from the models. (both Scenario 1a and Scenario 3c).
Historic signal timing data (October 2014) from MRWA has been compared against the modelled data. Table 2 presents the comparison.

5 | P a g e
Table 2 - Signal timing comparison
Phase 2014 idm Green time
Scn 1a Green time
Scn 1a Amber time
Scn 1a Red time
Scn 3c Green time
Scn 1 3c Amber time
Scn 3c Red time
A 39 42 4 2 37 0 6 B 41 41 4 2 47 0 6 C 45 39 4 2 44 0 6 D 22 24 4 2 18 0 6
The historic green time details for the individual phases are quite consistent with the Scenario 1a modelled green time, and the overall cycle time of approximately 170 seconds is consistent showing an accurate translation of data.
Although the overall cycle time is consistent between the two modelled scenarios, differences have been observed between individual phase green times. Additionally, the amber time has been omitted from Scenario 3c with the 4 seconds for each phase added onto the red time. This would have the effect of providing less time where vehicles are still able to move through the intersection on an amber light. The adjustments to the Scenario 3c model have not been documented in Technical Note 5, and it is therefore unclear why the changes have been made.
2.6 Spatial tests Spatial tests refer to particular rules that can be applied to a defined modelled area. The area is defined and the spatial rule can be applied to particular movements through the area. This is commonly used to model “keep clear” box road markings, or to more accurately model vehicles waiting for the exit leg of an intersection to be clear before proceeding.
A transfer rule has been applied to the Frobisher Street crossover area which is logical and helps to ensure a correct level of priority is modelled.
Scenario 3c includes additional spatial tests in slightly different formats. Additional transfer rules have been included to restrict the movement of vehicles trying to access Frobisher Street northbound when there is unavailable space. This approach is logical given the blocking back from the Frobisher Street crossover, and applies realism to the vehicles queuing at the approach stop lines.
The keep clear box has also been modelled. The compliance with the keep clear rule is able to be set by the modeller as a percentage value. The spatialTests.xml file for Scenario 3c inputs compliance values for individual 15 minute periods through the simulation as:
07:45 – 08:00 = 50% 08:00 – 08:15 = 65% 08:15 – 08:30 = 68% 08:30 – 08:45 = 87% 08:45 – 09:00 = 78%

6 | P a g e
The range of compliance referred to in Technical Note 5 suggests values between 50% and 78% which differ slightly from the details reviewed in the spatialTests.xml file (shown above). Commentary on compliance with the keep clear box in the modelled simulation is documented in Technical Note 5 suggesting, “70% of southbound through traffic on Frobisher Street was compliant with the keep clear box.” Where the compliance values have been input at less than 100%, it would be expected that vehicles would not adhere to the keep clear box at all times, and the modelled compliance could be determined as a conservative set of values. Technical Note 5 correctly cites the non-compliance with the keep clear box as a key factor in the blocking back and queueing simulated in Scenario 3c.
3. DEMANDS AND DISTRIBUTION Technical Note 5 refers to the creation of Paramics demand matrices being based on the Transport Assessment report. An independent check for this translation was undertaken and the following sections report on the demand and distribution areas of the models.
3.1 Background traffic demands and distribution The total demand matrices (Matrices 1, 2 and 3 in Scenario 1a) were compared against Figure 7 from the Transport Assessment. The turning movements are presented in Figure 3.
Figure 3 - Background traffic comparison
35 386 111
49 49 36 387 113
531 528
329 329
330 330
549 549
225 272 194
225 272 196
SCARBOROUGH BEACH ROAD
FRO
BIS
HER
STR
EET

7 | P a g e
The translation from Transport Assessment to Scenario 1a is consistent and only very minor differences could exist due to the segregation of the Paramics matrices into Car, OGV1 and OGV2.
The background traffic matrices were also compared between Scenario 1a and Scenario 3c and consistency was observed.
The distribution of background traffic has been taken directly from the Transport Assessment.
The background total demands were compared between Scenario 1a and Scenario 3c for consistency. The zoning differs slightly between the two scenarios where a single access is modelled for Scenario 3c. The combined background traffic matrices are shown in Table 3 (Scenario 1a) and Table 4 (Scenario 3c). The zone correspondence for the matrices are:
Zone 1 – Scarborough Beach Road (West); Zone 2 – Frobisher Street; Zone 3 – Scarborough Beach Road (East); Zone 4 – Harborne Street; Zone 5 – Frobisher Street crossover; Zone 6 – Scarborough Beach Rd crossover in Scn 1a, and existing crossover in Scn 3c; Zone 7 – existing crossover in Scn 1a, not used in Scn 3c.
Table 3 - Background traffic demand Scenario 1a
1 2 3 4 5 6 7 Total 1 0 49 526 329 0 0 5 909 2 35 0 108 386 0 0 3 532 3 549 330 0 0 0 0 0 879 4 225 272 193 0 0 0 3 693 5 0 0 0 0 0 0 0 0 6 0 0 0 0 0 0 0 0 7 0 0 6 0 0 0 0 6
Total 809 651 833 715 0 0 11 3019
Table 4 - Background traffic demand Scenario 3c
1 2 3 4 5 6 7 Total 1 0 49 526 329 0 5 0 909 2 32 0 105 392 0 3 0 532 3 549 330 0 0 0 0 0 879 4 225 272 193 0 0 3 0 693 5 0 0 0 0 0 0 0 0 6 0 0 6 0 0 0 0 6 7 0 0 0 0 0 0 0 0
Total 806 651 830 721 0 11 0 3019

8 | P a g e
The matrix totals are consistent between modelled scenarios, although there are minor differences for individual cells – a small reduction from Frobisher Street (Zone 2) to Scarborough Beach Road (Zones 1 and 3) totalling 6 vehicles, and an increase to Harborne Street (Zone 4) of 6 vehicles. Although unclear why these changes are present, they are very small and unlikely to affect the operation of the model.
3.2 Development traffic demands and distribution Table 2 from the Transport Assessment outlines the calculated trip generation for the proposed car yard and office development. This information is summarised in Table 5.
Table 5 - Trip generation from Transport Assessment
AM Peak Hour PM Peak Hour Inbound Outbound Inbound Outbound Car Yard 39 21 17 34 Office 123 17 23 111 Total 162 38 40 145 Peak hour trips 200 185
The Transport Assessment outlines the trip generation calculation process as using RTA NSW and ITE guidelines. These details have not been checked through this review. It should also be noted that although the Transport Assessment details the PM peak hour trip generation, the Paramics models reviewed only represent the AM peak hour – the justification for this has been included in Technical Note 5 as the AM peak hour being, “considered to exhibit the greatest impact on the surrounding road network.” The PM turning movement volumes at the Scarborough Beach Road and Frobisher Street intersection presented in the Transport Assessment show a combined throughput volume of 3351 which is 11% greater than the AM peak of 3012. The trip generation summarised above is not dissimilar for the AM and PM. For a robust assessment, the PM peak hour should also have been modelled.
The volume of calculated trips (200) is consistent with the total volume of trips shown in Matrix 4 of Scenario 1a and Scenario 2a, demonstrating a successful translation.
The development traffic trip distribution referred to in the Transport Assessment has been checked against the modelled scenario matrices. Figure 4 and Figure 5 show the Scenario 1a and Scenario 3c inbound trips and distribution for the proposed development traffic.

9 | P a g e
Figure 4 – Scenario 1a inbound development trips
The percentage split of distribution in the Transport Assessment is suggested as, “40% north, 20% west, 20% south and 20% east of the site”. The distribution shown in Figure 4 shows 60% north, 19% west, 19% south and 2% east which differ from the Transport Assessment values. The Transport Assessment suggests that some drivers may adjust their routes to utilise the left in, left out access, and while this could address the change in distribution between assessment and model, has not been documented and is unable to be assessed. This adjustment would physically require substantial re-routing from the east towards Hutton Street in order to cross the Mitchell Freeway before travelling along Frobisher Street.
17 80
4
27
3
4 27
SCARBOROUGH BEACH ROAD
FRO
BIS
HER
STR
EET