installing management applications on vnx for file - …®vnx® series release 8.1 installing...
TRANSCRIPT
EMC®VNX® SeriesRelease 8.1
Installing Management Applications on VNX® for FileP/N 300-015-111 Rev 01
EMC CorporationCorporate Headquarters:
Hopkinton, MA 01748-91031-508-435-1000
www.EMC.com
Copyright © 2005 -2013 EMC Corporation. All rights reserved.
Published August 2013
EMC believes the information in this publication is accurate as of its publication date. Theinformation is subject to change without notice.
THE INFORMATION IN THIS PUBLICATION IS PROVIDED "AS IS." EMC CORPORATIONMAKES NO REPRESENTATIONS ORWARRANTIES OF ANY KINDWITH RESPECT TOTHE INFORMATION IN THIS PUBLICATION, AND SPECIFICALLY DISCLAIMS IMPLIEDWARRANTIES OF MERCHANTABILITY OR FITNESS FOR A PARTICULAR PURPOSE.
Use, copying, and distribution of any EMC software described in this publication requires anapplicable software license.
For the most up-to-date regulatory document for your product line, go to the TechnicalDocumentation and Advisories section on EMC Powerlink.
For the most up-to-date listing of EMC product names, see EMC Corporation Trademarks onEMC.com.
All other trademarks used herein are the property of their respective owners.
Corporate Headquarters: Hopkinton, MA 01748-9103
2 Installing Management Applications on VNX for File 8.1

Contents
Preface.....................................................................................................5
Chapter 1: Introduction...........................................................................7Before installing or upgrading..............................................................................8System requirements...............................................................................................8Related information................................................................................................9
Chapter 2: Concepts.............................................................................11Command line interface.......................................................................................12Unisphere...............................................................................................................12Celerra Monitor.....................................................................................................13CIFS management MMC snap-ins......................................................................13
Chapter 3: Installing VNX Management Applications.......................17Installing JRE for the Unisphere software.........................................................18
Configure Java Web Start for a proxy server...........................................18Installing digital certificates for the Unisphere software................................18
Regenerate the CA and Apache certificates............................................18Regenerate the Apache certificate only....................................................19
Launching Celerra Monitor.................................................................................20Before installing Celerra Monitor.............................................................20Launch Celerra Monitor.............................................................................20
Installing CIFS management MMC snap-ins....................................................20Install the UNIX Management snap-in....................................................21Open Unisphere...........................................................................................21General usage notes....................................................................................22
Installing Management Applications on VNX for File 8.1 3
Chapter 4: Managing............................................................................23Using the CLI.........................................................................................................24
Log in locally................................................................................................24Log in remotely............................................................................................24Log in through RS232.................................................................................25
Starting a Unisphere session................................................................................25Before starting a Unisphere session..........................................................25Start a Unisphere session............................................................................25Enable a license............................................................................................26Disable a licensed feature...........................................................................26View the list of licensed features...............................................................27
Chapter 5: Troubleshooting..................................................................29EMC E-Lab Interoperability Navigator..............................................................30VNX user customized documentation...............................................................30EMC Training and Professional Services...........................................................30
Glossary..................................................................................................31
Index.......................................................................................................33
4 Installing Management Applications on VNX for File 8.1
Contents

Preface
As part of an effort to improve and enhance the performance and capabilities of its product lines,EMC periodically releases revisions of its hardware and software. Therefore, some functions describedin this document may not be supported by all versions of the software or hardware currently in use.For the most up-to-date information on product features, refer to your product release notes.
If a product does not function properly or does not function as described in this document, pleasecontact your EMC representative.
Installing Management Applications on VNX for File 8.1 5
Special notice conventions
EMC uses the following conventions for special notices:
Note: Emphasizes content that is of exceptional importance or interest but does not relate to personalinjury or business/data loss.
Identifies content that warns of potential business or data loss.
Indicates a hazardous situation which, if not avoided, could result in minor ormoderate injury.
Indicates a hazardous situation which, if not avoided, could result in death orserious injury.
Indicates a hazardous situationwhich, if not avoided,will result in death or seriousinjury.
Where to get help
EMC support, product, and licensing information can be obtained as follows:
Product information—For documentation, release notes, software updates, or forinformation about EMC products, licensing, and service, go to EMC Online Support(registration required) at http://Support.EMC.com.
Troubleshooting—Go to EMC Online Support at http://Support.EMC.com. Afterlogging in, locate the applicable Support by Product page.
Technical support—For technical support and service requests, go to EMCCustomerService on EMC Online Support at http://Support.EMC.com. After logging in, locatethe applicable Support by Product page, and choose either Live Chat orCreate a servicerequest. To open a service request through EMC Online Support, you must have avalid support agreement. Contact your EMC sales representative for details aboutobtaining a valid support agreement or with questions about your account.
Note: Do not request a specific support representative unless one has already been assigned toyour particular system problem.
Your comments
Your suggestionswill help us continue to improve the accuracy, organization, and overallquality of the user publications.
Please send your opinion of this document to:
6 Installing Management Applications on VNX for File 8.1
Preface

1
Introduction
This document describes the installation and setup procedures for EMCVNX management applications. This document also describes how toaccess the command line interface (CLI) and the Unisphere software. Thisdocument neither gives a detailed description of the applications norrecommends which application is best suited for your purposes.
This document is part of the VNX documentation set and is intended foruse by users who must install or access the CLI, the Unisphere software,Celerra Monitor, or the CIFS management snap-ins for the MicrosoftManagement Console (MMC).
The online help system for each application contains information abouthow to use each management application.
Topics included are:◆ Before installing or upgrading on page 8◆ System requirements on page 8◆ Related information on page 9
Installing Management Applications on VNX for File 8.1 7
Before installing or upgrading
Before you install or upgrade EMC® VNX® software, ensure that all browser windows areclosed. Otherwise errors can occur.
System requirements
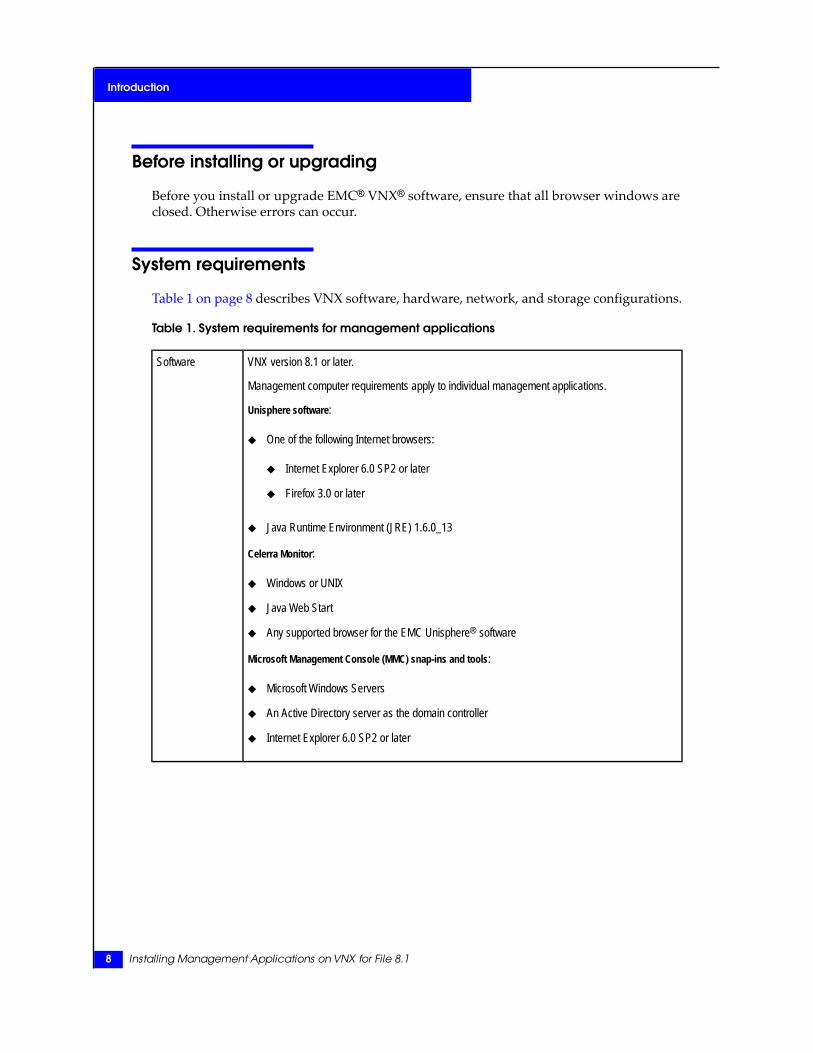
Table 1 on page 8 describes VNX software, hardware, network, and storage configurations.
Table 1. System requirements for management applications
VNX version 8.1 or later.Software
Management computer requirements apply to individual management applications.
Unisphere software:
◆ One of the following Internet browsers:
◆ Internet Explorer 6.0 SP2 or later
◆ Firefox 3.0 or later
◆ Java Runtime Environment (JRE) 1.6.0_13
Celerra Monitor:
◆ Windows or UNIX
◆ Java Web Start
◆ Any supported browser for the EMC Unisphere® software
Microsoft Management Console (MMC) snap-ins and tools:
◆ Microsoft Windows Servers
◆ An Active Directory server as the domain controller
◆ Internet Explorer 6.0 SP2 or later
8 Installing Management Applications on VNX for File 8.1
Introduction

The minimum hardware requirements apply according to platform.
For Windows NT 4.0 and other Windows Servers:
◆ 600 MHz processor
◆ 256 MB RAM
◆ 16 KB color graphics
◆ 20 MB disk space
For Linux:
◆ 600 MHz Intel processor
◆ 256 MB RAM
◆ 16 KB graphics
◆ 30 MB disk space
For Sun Solaris:
◆ Ultra 5 workstation
◆ 356 MB RAM
◆ 16 KB color graphics
◆ 30 MB disk space
Hardware
No specific network requirements.Network
No specific storage requirements.Storage
Related information
The following documents provide specific information related to the features andfunctionality described in this document:
◆ EMC VNX Command Line Interface Reference for File
◆ Security Configuration Guide for VNX
◆ VNX for File man pages
◆ Parameters Guide for VNX for File
◆ Using Unisphere in YourWeb Browsing Environment: Browser and Security Setting to ImproveYour Experiencewhite paper
Related information 9
Introduction

EMC VNX documentation on EMC Online Support
The complete set of EMC VNX series customer publications is available on EMCOnlineSupport. To search for technical documentation, go to http://Support.EMC.com. Afterlogging in to the website, click Support by Product and type VNX series in the Find aProduct text box. Then search for the specific feature required.
VNX wizards
Unisphere software provideswizards for performing setup and configuration tasks. TheUnisphere online help provides more details on the wizards.
10 Installing Management Applications on VNX for File 8.1
Introduction

2
Concepts
VNX provides several management applications:◆ Command line interface on page 12◆ Unisphere on page 12◆ Celerra Monitor on page 13◆ CIFS management MMC snap-ins on page 13
Installing Management Applications on VNX for File 8.1 11

Command line interface
VNX provides full management functionality through the CLI. The commands are typedthrough the Control Station. The commands follow Linux-like syntax for familiarity andusability.
The EMC VNX Command Line Interface Reference for File provides a full description of all CLIcommands.
Some management operations can be performed only through the CLI.
Unisphere
Unisphere® is a web-based graphical user interface (GUI) that enables you to manage VNXand the EMC VNX for block without the knowledge of command syntax. You can selectitems, such as file systems from the list instead of remembering and typing their names.Unisphere software also includes several wizards that guide you through the proceduresfor creating and setting up components of the server. For example, there are wizards forcreating file systems and CIFS servers. Unisphere also provides access to the CLI.
You can run the Unisphere software from any supported web browser. Table 1 on page 8lists the supported web browsers.
TheUnisphere software supports Secure Sockets Layer (SSL) encryption and authenticationto protect the connection between the user’s web browser and VNX's Apache web server.Digital certificates, whose authenticity is verified by a Certificate Authority (CA), are usedby SSL to identify and authenticate the server and, if required, the client. In the case ofUnisphere, the Control Station serves as a limited purpose CA by signing the certificateprovided by the Apache web server.
Interoperating with the CLI
If you use the CLI and the Unisphere software concurrently, you should refresh theUnisphere software display after making any related changes through the CLI. Thisensures that the Unisphere software display reflects the current state of the system.
You can use the VNX CLI to create items, such as event notifications, with propertiesthat prevent Unisphere from managing them. If you create such an item, you mustmanage it with the CLI. For example, Unisphere does not support event notificationsthat specify individual event identifiers. If you create such an event notification by usingthe CLI, you will be able to view, but not modify or delete it by using the Unispheresoftware.
EMC VNX Operating Environment for File Release Notes for your software version containadditional and more specific interoperability information.
12 Installing Management Applications on VNX for File 8.1
Concepts
Celerra Monitor
Celerra Monitor provides tools for monitoring activity on VNX and the attached storagedevices.
Most of the Celerra Monitor capabilities are also available in the Unisphere software. If themonitoring functions in the Unisphere software meet your business requirements, you donot need to launch Celerra Monitor.
Celerra Monitor runs on Microsoft Windows or UNIX platforms and is available throughthe Unisphere software. Its graphical user interface is Java-based, which enables it to runon various browsers. The Celerra Monitor online help contains detailed information.
CIFS management MMC snap-ins
VNX supports a set of MMC snap-ins and programs for managing users and Data Moversecurity settings from amachine that is running aWindows Server. These tools for the CIFSenvironment enable you to manage users and Data Movers. Table 2 on page 14 describesthe CIFS MMC snap-ins.
The user management tools enable you to migrate UNIX attributes to the Windows ActiveDirectorywhere you can then assign, remove, ormodifyUNIX attributes forWindowsusersor groups.
The Data Mover management tools consist of several MMC snap-ins to the Unisphere. Youcan use these snap-ins to manage virus checking, home directories, and security settings onData Movers from a machine that is running a Windows Server.
For more detailed information, view the online help for the following features:
◆ VNX AntiVirus Management◆ Data Mover Security Settings◆ Home Directory Management◆ UNIX Attributes Migration Tool◆ UNIX Property Page Extensions in Active Directory Users and Computers◆ UNIX User Management
You can install any of the CIFS management applications during the installation process.
Celerra Monitor 13
Concepts

Table 2. CIFS MMC snap-ins
DescriptionSnap-in/tool
UNIX User Management is installed as an MMC snap-into the Unisphere. Use it to assign, remove, or modify UNIXattributes for a single Windows user or group on the localdomain and on remote domains.You can also use it tomanage domain access to the Active Directory located onthe domain in which the attribute database is stored.
UNIX User Management
Celerra AntiVirus Management is an MMC snap-in to theUnisphere.You can use the Celerra AntiVirus Management
AntiVirus Management
snap-in with the Common AntiVirus Agent (CAVA), third-party AntiVirus engines that run on a Windows NT orWindows 2000 or later, and a Data Mover to view or mod-ify the VNX virus-checking parameters. The parametersare located in the viruschecker.conf file on each VNX inthe Windows domain.You can use this snap-in instead ofediting the viruschecker.conf file on the Control Station.
The CAVA and third-party antivirus software must be in-stalled on Windows Server 2003, Windows 2000, or later.Using VNX Event Enabler provides detailed information.
Home Directory Management is an MMC snap-in to theUnisphere, which you can install on a Windows Server.
Home Directory Management allows you to associate ausername with a directory that then acts as the user’s homedirectory. Home Directory Management simplifies the ad-ministration of personal shares and the process of connect-ing to them. The home directory is mapped in a user'sprofile so that upon login, the home directory is connectedto a network drive.
Home directory feature allows you to use a single sharename called HOME that all users connect to.You do nothave to create individual shares for each user.
Home Directory Management
14 Installing Management Applications on VNX for File 8.1
Concepts

Table 2. CIFS MMC snap-ins (continued)
DescriptionSnap-in/tool
Data Mover Security Settings consist of the Audit Policynode and the User Rights Assignment node.
Audit Policy is a component of the Data Mover SecuritySettings snap-in, which is installed as an MMC snap-in intothe Unisphere on a Windows Server.
You can use audit policies to determine which Data Moversecurity events are logged in the Security log.You canselect to log successful attempts, failed attempts, both, orneither. Audited events are viewed in the Security log ofthe Windows Event Viewer.
User Rights Assignment is a component of the Data MoverSecurity Settings snap-in, which is installed as an MMCsnap-in into the Unisphere on a Windows Server.
You can use user rights assignments to manage whichusers and groups can log in to or execute tasks on a DataMover. User rights assignments are local policies and applyonly to the selected Data Mover.
Security Management
CIFS management MMC snap-ins 15
Concepts

16 Installing Management Applications on VNX for File 8.1
Concepts

3
Installing VNX ManagementApplications
The tasks for installing and setting upVNXmanagement applications are:◆ Installing JRE for the Unisphere software on page 18◆ Installing digital certificates for the Unisphere software on page 18◆ Launching Celerra Monitor on page 20◆ Installing CIFS management MMC snap-ins on page 20
Installing Management Applications on VNX for File 8.1 17
Installing JRE for the Unisphere software
JRE is required to run the Unisphere software. EMC recommends JRE 1.6.0_13 or later. Youcan download the latest JRE from the downloads area at http://www.oracle.com.
After downloading JRE, install it on yourWindows, Linux, or Solarismanagement computer.
Configure Java Web Start for a proxy server
When using a proxy server, you must configure the proxy settings in Java Web Start forCelerra Monitor to launch correctly.
To type the proxy settings into Java Web Start:
1. Open the browser and type the proxy information.
The online help on the browser contains more information.
2. Start the Java Web Start application.
3. Select File ➤ Preferences.
4. On the General tab, select Use Browser.
The field is filled in with the proxy information from the browser.
Note: To manually configure proxy settings in Java Web Start, select Manual on the General tab, andthen type the proxy information.
Installing digital certificates for the Unisphere software
The VNX software automatically generates the CA certificate and a new Apache certificatesigned by that CA certificate at system installation or software upgrade if these certificatesdo not exist.
Note: The white paperUsing Unisphere in Your Web Browsing Environment: Browser and Security Settingsto Improve Your Experience, available on http://Support.EMC.com, contains more specific informationabout how and why to install the certificates.
Regenerate the CA and Apache certificates
If you change the VNX hostname, you have to regenerate the Control Station’s CA andApache certificates. When you generate a new CA certificate, a matching Apache certificate
18 Installing Management Applications on VNX for File 8.1
Installing VNX Management Applications
is also generated. After you regenerate the certificates, any browsers or systems that use theprevious certificates must install the new certificates.
To regenerate the CA and Apache certificates:
1. Log in to the Control Station CLI with your username and password. You must haveroot privileges to execute the required commands.
2. To generate updated CA and Apache keys and certificates, type:
/nas/sbin/nas_ca_certificate -generate
3. Import the Control Station CA certificate into your web browser for the certificateverification to succeed. After importing, youwill not receive any securitywarningswhenopening a new browser session to Unisphere.
In addition, when you start the Unisphere software after performing this setup, youmustinstall the new Apache certificate. For example, if you are using Internet Explorer 6,install the certificate when prompted by the Security Alert pop-up by clicking ViewCertificate and then Install Certificate.
Regenerate the Apache certificate only
If you change VNX domain name or IP address, you must regenerate the Apache webserver’s certificate.
To regenerate the Apache certificate:
1. Log in to the Control Station CLI with your username and password. You must haveroot privileges to execute the required commands.
2. To generate an updated Apache certificate, type:
/nas/sbin/nas_config -ssl
3. Restart the Apache web server when prompted:
Installing a new SSL certificate requires restarting the Apache webserver.
Do you want to proceed? [y|n]: y
New SSL certificate has been generated and installed successfully.
4. When you start the Unisphere software after performing this setup, you must install thenew Apache certificate. For example, if using Internet Explorer 6, install the certificatewhen prompted by the Security Alert pop-up by clicking View Certificate and then InstallCertificate.
Installing digital certificates for the Unisphere software 19
Installing VNX Management Applications
Launching Celerra Monitor
Celerra Monitor is available through the Unisphere software.
Before installing Celerra Monitor
Ensure that JRE and Java Web Start are properly installed on the management computer.
Launch Celerra Monitor
1. In a browser, open Unisphere.
2. Select System ➤ Monitoring and Alerts ➤ Statistics for File.
3. Under Tools, select Launch Celerra Monitor.
4. If you receive a message to download a file, perform the following:
a. Select Open using JNLP File.
b. Clear Always ask before opening this type of file.
c. Click OK.
In the Saving File dialog box, clear Keep this window open after download is complete.
If you are prompted to overwrite a file, click Yes to proceed with the installation.
5. After the Celerra Monitor files have been downloaded through the Java Web Startapplication, click Start on the Security Warning dialog box.
The Celerra Monitor Login dialog box appears.
Installing CIFS management MMC snap-ins
To install MMC snap-ins and tools for managing a CIFS environment:
1. Go to http://Support.EMC.com, select Support by Product ➤ VNX Series. Search for VNXfor File/Celerra CIFS Management MMC snap-ins under Downloads.
2. Download the executable file on your system and run it.
3. On the Welcome screen, click Next.
4. On the License Agreement screen, click Yes.
5. On the Select Installation Folder screen, verify the displayed folder name.
20 Installing Management Applications on VNX for File 8.1
Installing VNX Management Applications

To install the program files here, click Next.
To select a different folder, click Browse, locate the folder, and then click Next.
6. On the Features screen, select the features to install and clear the features that you donot want to install. Click Next.
7. On the Start Copying Files screen, click Next.
8. On the InstallShield Wizard Complete screen, click Finish.
Install the UNIX Management snap-in
After installing the UNIX User Management snap-in, you must set the cifs useADMapparameter. Set the cifs useADMap parameter to 1 if you are using UNIX User Managementsnap-in. Otherwise, set the parameter to 0.
Access problems can occur if you set the useADMap parameter to 1, but you have notextended the Active Directory schema.
To set the cifs useADMap parameter:
1. On the Control Station, use this command syntax:
server_param {<movername>|ALL} - facility cifs -modify useADMap -value 0
where:
<movername> = name of the Data Mover (or type ALL for all Data Movers)
2. Restart the Data Mover by using this command syntax:
server_cpu {<movername>|ALL} - reboot now
where:
<movername> = name of the Data Mover (or type ALL for all Data Movers)
Open Unisphere
To open the Unisphere:
1. From the Start menu, select Settings > Control Panel.
2. Double-click Administrative Tools.
3. Double-click Celerra Management.
Installing CIFS management MMC snap-ins 21
Installing VNX Management Applications

General usage notes
Before using the MMC snap-ins:
◆ You must be logged in as a user with Administrator rights.◆ The CIFS service must be configured and started on the Data Mover. Configuring and
Managing CIFS on VNX provides useful information.◆ When you try to open the Celerra Management MMC snap-ins, the following error
message may appear:
The RPC server is unavailable
This occurs if:
• The CIFS server does not exist.• The CIFS service is not running. The DNS entry for the CIFS server is not correct.
There are network or routing problems.
◆ The instructions in the online help describe the default installation of the Unisphere. Youcan select to install the snap-ins into a different MMC. If you do so, any references to theUnisphere in the online help will no longer apply.
22 Installing Management Applications on VNX for File 8.1
Installing VNX Management Applications
4
Managing
Topics included are:◆ Using the CLI on page 24◆ Starting a Unisphere session on page 25
Installing Management Applications on VNX for File 8.1 23

Using the CLI
To use the CLI, you must establish a connection with the Control Station. After logging in,you can typeCLI commands at the Control Station prompt. The commands that are availabledepend on the privileges assigned to your user account.
The EMC VNX Command Line Interface Reference for File provides detailed information aboutall CLI commands. The Security Configuration Guide for File provides information about theprivileges that can be associated with user accounts.
You can connect to the Control Station in several ways:
◆ Local — Log in to the Control Station directly.◆ Remote — Use a secure, encrypted, remote login application to connect to the Control
Station IP address, and log in remotely.◆ RS232 — Use the modem or terminal server to connect to the COM2 port of the Control
Station.
Log in locally
To log in to the Control Station directly:
Log in to the Control Station with your username and password.
Log in remotely
To log in to the Control Station remotely:
1. Type the name of a secure, encrypted, remote login application followed by the IP addressof the Control Station.
Use the following syntax:
<remote_app> <IPaddr>
where:
<remote_app> = a secure, encrypted, remote login application
<IPaddr> = IP address of the Control Station
2. When prompted, type your username and password.
24 Installing Management Applications on VNX for File 8.1
Managing
Log in through RS232
The documentation for your modem or terminal server contains instructions.
Starting a Unisphere session
Use this procedure to begin a Unisphere software session by connecting to VNX.
Before starting a Unisphere session
Ensure that the JRE is installed on the management computer, and that you are using asupported browser.
Ensure that the browser is configured to accept first-party and third-party cookies, and thatany password management feature is disabled.
Start a Unisphere session
To start a Unisphere session to manage VNX:
1. Start the browser and type the hostname or the IP address of the Control Station. Forexample, http://10.48.73.124.
2. Respond to any certificate security dialog boxes that appear.
Note: The white paper Using Unisphere in Your Web Browsing Environment: Browser and SecuritySettings to Improve Your Experience, available on http://Support.EMC.com, containsmore informationabout accepting security certificates.
Once you are logged in to Unisphere, the Unisphere online help provides additionalinformation about certificate management.
3. The Unisphere login dialog box is displayed. Type a username and password.
Select Use LDAP if you are using an LDAP-based directory server to authenticate usercredentials.
Select Scope,Global (domain) or Local, to specify the scope of the systems to bemanaged.
4. Click Login.
The Unisphere All Systems view is displayed.
5. Select a system from the system selector drop-down list or from All Systems > SystemList.
Using the CLI 25
Managing
For additional information, click the (?) icon. The (?) icon within a view displays the helptopic for that view. The (?) icon in the title bar opens the entire help system.
Enable a license
Some VNX licensed features and products can be managed with the Unisphere softwareonly after you purchase a license for them and enable them in Unisphere.
Enabling VNX licensed feature in the Unisphere software activates support for that feature.
To enable a licensed feature:
1. Select System.
2. From the task list, under System, select Manage Licenses.
3. Select the licensed feature to enable.
4. Click Apply.
5. Click OK to confirm that you have a license for this feature and you want to enable itsuse.
Disable a licensed feature
To disable a licensed feature:
1. Select System.
2. From the task list, under System, select Manage Licenses.
3. Clear the licensed feature to disable.
4. Click Apply.
5. Click OK to confirm that you want to disable use of this feature.
After the license is disabled, you have to restart the management application to see thischange take effect in the user interface.
26 Installing Management Applications on VNX for File 8.1
Managing
View the list of licensed features
To view the licensed features:
1. Select System.
2. From the task list, under System, select Manage Licenses.
If a feature is enabled, this feature can be managed in Unisphere.
Starting a Unisphere session 27
Managing

28 Installing Management Applications on VNX for File 8.1
Managing
5
Troubleshooting
Aspart of an effort to continuously improve and enhance the performanceand capabilities of its product lines, EMCperiodically releases newversionsof its hardware and software. Therefore, some functions described in thisdocument may not be supported by all versions of the software orhardware currently in use. For themost up-to-date information on productfeatures, refer to your product release notes.
If a product does not function properly or does not function as describedin this document, contact your EMC Customer Support Representative.
ProblemResolution Roadmap for VNX contains additional information aboutusing EMC Online Support and resolving problems.
Topics included in this chapter are:◆ EMC E-Lab Interoperability Navigator on page 30◆ VNX user customized documentation on page 30◆ EMC Training and Professional Services on page 30
Installing Management Applications on VNX for File 8.1 29
EMC E-Lab Interoperability Navigator
The EMC E-Lab™ Interoperability Navigator is a searchable, web-based application thatprovides access to EMC interoperability support matrices. It is available on EMC OnlineSupport at http://Support.EMC.com. After logging in, in the right pane under Product andSupport Tools, click E-Lab Navigator.
VNX user customized documentation
EMC provides the ability to create step-by-step planning, installation, and maintenanceinstructions tailored to your environment. To create VNX user customized documentation,go to: https://mydocs.emc.com/VNX.
EMC Training and Professional Services
EMCCustomer Education courses help you learn howEMCstorage productswork togetherwithin your environment tomaximize your entire infrastructure investment. EMCCustomerEducation features online and hands-on training in state-of-the-art labs conveniently locatedthroughout theworld. EMC customer training courses are developed and delivered by EMCexperts. Go to EMC Online Support at http://Support.EMC.com for course and registrationinformation.
EMC Professional Services can help you implement your system efficiently. Consultantsevaluate your business, IT processes, and technology, and recommend ways that you canleverage your information for the most benefit. From business plan to implementation, youget the experience and expertise that you need without straining your IT staff or hiring andtraining new personnel. Contact your EMC Customer Support Representative for moreinformation.
30 Installing Management Applications on VNX for File 8.1
Troubleshooting

Glossary
A
Active Directory (AD)Advanced directory service included with Windows operating systems. It stores informationabout objects on a network and makes this information available to users and networkadministrators through a protocol such as Lightweight Directory Access Protocol (LDAP).
B
browserProgram used to access information over the Internet or an intranet.
C
Celerra MonitorJava client/server application that lets an administrator observe the performance of a systemattached to VNX for file and the performance of any Data Movers mounted in VNX for filecabinet.
Certificate Authority (CA)Trusted third-party that creates and digitally signs public key certificates.
command line interface (CLI)Interface for typing commands through the Control Station to perform tasks that include themanagement and configuration of the database andDataMovers and themonitoring of statisticsfor VNX for file cabinet components.
Control StationHardware and software component of VNX for file that manages the system and provides theuser interface to all VNX for file components.
Installing Management Applications on VNX for File 8.1 31
D
Data MoverIn VNX for file, a cabinet component that is running its own operating system that retrievesdata from a storage device and makes it available to a network client. This is also referred to asa blade.
G
GUISee graphical user interface.
H
Hypertext Transfer Protocol (HTTP)Communications protocol used to connect to servers on the World Wide Web.
M
Microsoft Management Console (MMC)Extensible commonpresentation service formanagement applications included in theWindowsoperating system.
See alsoMMC snap-in.
MMC snap-inManagement tool an administrator can add to the interface of aMicrosoftManagement Console(MMC).
See alsoMicrosoft Management Console.
S
Secure Sockets Layer (SSL)Security protocol that provides encryption and authentication. It encrypts data and providesmessage and server authentication. It also supports client authentication if required by theserver.
32 Installing Management Applications on VNX for File 8.1
Glossary
Index
CCelerra Management
Data Mover management 13user management 13
Celerra Monitorlaunch 20
command line interfacelogging in remotely 24
EEMC E-Lab Navigator 30
Llaunch
Celerra Monitor 20logging in
logging in (continued)remotely 24
Ssoftware requirements
Celerra Monitor 8Microsoft Management Console (MMC)snap-ins and tools 8Unisphere 8
system requirementshardware 9network 9software 8storage 9
Ttroubleshooting 29
Installing Management Applications on VNX for File 8.1 33

34 Installing Management Applications on VNX for File 8.1
Index