celerra security configuration guide on vnx for file...security configuration guide on vnx for file...
TRANSCRIPT

EMC CorporationCorporate Headquarters:
Hopkinton, MA 01748-9103
1-508-435-1000www.EMC.com
EMC® VNX™
Release 7.0
Security Configuration Guide on VNX™ for FileP/N 300-011-803
REV A02

Security Configuration Guide on VNX™ for File2 of 94 Release 7.0

3 of 94Release 7.0Security Configuration Guide on VNX™ for File
Contents
Introduction . . . . . . . . . . . . . . . . . . . . . . . . . . . . . . . . . . . . . . . . . . . . . . . . . .5System requirements . . . . . . . . . . . . . . . . . . . . . . . . . . . . . . . . . . . . . . .5Cautions and warnings . . . . . . . . . . . . . . . . . . . . . . . . . . . . . . . . . . . . .5User interface choices . . . . . . . . . . . . . . . . . . . . . . . . . . . . . . . . . . . . . .5Terminology . . . . . . . . . . . . . . . . . . . . . . . . . . . . . . . . . . . . . . . . . . . . . .6Related information . . . . . . . . . . . . . . . . . . . . . . . . . . . . . . . . . . . . . . . .8
Concepts. . . . . . . . . . . . . . . . . . . . . . . . . . . . . . . . . . . . . . . . . . . . . . . . . . . . .9Planning considerations for using an external LDAP-based directory server for user identification and authentication . . . . . . .18Planning considerations for password security . . . . . . . . . . . . . . . .21Planning considerations for Public Key Infrastructure. . . . . . . . . . .22
Configuring the use of an external LDAP-based directory server for user identification and authentication . . . . . . . . . . . . . . . . . . . . . . . . .25Configuring password policy . . . . . . . . . . . . . . . . . . . . . . . . . . . . . . . . . . .28
Define password policy interactively . . . . . . . . . . . . . . . . . . . . . . . .28Define specific password policy definitions . . . . . . . . . . . . . . . . . . .29Set password expiration period . . . . . . . . . . . . . . . . . . . . . . . . . . . . .29
Configuring session timeout . . . . . . . . . . . . . . . . . . . . . . . . . . . . . . . . . . .30Prerequisites . . . . . . . . . . . . . . . . . . . . . . . . . . . . . . . . . . . . . . . . . . . . .30Change the session timeout value . . . . . . . . . . . . . . . . . . . . . . . . . . .30
Customizing a login banner . . . . . . . . . . . . . . . . . . . . . . . . . . . . . . . . . . . .32Creating a message of the day . . . . . . . . . . . . . . . . . . . . . . . . . . . . . . . . . .33Protecting session tokens . . . . . . . . . . . . . . . . . . . . . . . . . . . . . . . . . . . . .34Configuring network encryption and authentication using the SSL protocol. . . . . . . . . . . . . . . . . . . . . . . . . . . . . . . . . . . . . . . . . . . . . . . . .35
Using HTTPS . . . . . . . . . . . . . . . . . . . . . . . . . . . . . . . . . . . . . . . . . . . . .35Using SSL with LDAP. . . . . . . . . . . . . . . . . . . . . . . . . . . . . . . . . . . . . .35Change the default SSL protocol . . . . . . . . . . . . . . . . . . . . . . . . . . . .35Change the default SSL cipher suite . . . . . . . . . . . . . . . . . . . . . . . . .36Postrequisites . . . . . . . . . . . . . . . . . . . . . . . . . . . . . . . . . . . . . . . . . . . .37
Configuring PKI . . . . . . . . . . . . . . . . . . . . . . . . . . . . . . . . . . . . . . . . . . . . . .38Creating the certificate provided by the persona . . . . . . . . . . . . . . .38Obtaining CA certificates . . . . . . . . . . . . . . . . . . . . . . . . . . . . . . . . . . .38Using the Control Station as the CA. . . . . . . . . . . . . . . . . . . . . . . . . .38Generate a key set and certificate request. . . . . . . . . . . . . . . . . . . . .39Send the certificate request to the CA . . . . . . . . . . . . . . . . . . . . . . . .42Import a CA-signed certificate. . . . . . . . . . . . . . . . . . . . . . . . . . . . . . .43List the available CA certificates . . . . . . . . . . . . . . . . . . . . . . . . . . .45Acquire a CA certificate . . . . . . . . . . . . . . . . . . . . . . . . . . . . . . . . . . . .45Import a CA certificate . . . . . . . . . . . . . . . . . . . . . . . . . . . . . . . . . . . . .48Generate a new Control Station CA certificate . . . . . . . . . . . . . . . . .48Display the certificate. . . . . . . . . . . . . . . . . . . . . . . . . . . . . . . . . . . . . .49Distribute the Control Station CA certificate . . . . . . . . . . . . . . . . . . .51

Security Configuration Guide on VNX™ for FileRelease 7.0 4 of 94 Security Configuration Guide on VNX™ for FileRelease 7.0 4 of 94
Managing PKI . . . . . . . . . . . . . . . . . . . . . . . . . . . . . . . . . . . . . . . . . . . . . . . .52Display key set and certificate properties . . . . . . . . . . . . . . . . . . . .52Check for expired key sets . . . . . . . . . . . . . . . . . . . . . . . . . . . . . . . . .53Clear key sets . . . . . . . . . . . . . . . . . . . . . . . . . . . . . . . . . . . . . . . . . . . .53Display CA certificate properties . . . . . . . . . . . . . . . . . . . . . . . . . . .54Check for expired CA certificates . . . . . . . . . . . . . . . . . . . . . . . . . . . .54Delete CA certificates . . . . . . . . . . . . . . . . . . . . . . . . . . . . . . . . . . . . . .55
Troubleshooting. . . . . . . . . . . . . . . . . . . . . . . . . . . . . . . . . . . . . . . . . . . . . .56Where to get help . . . . . . . . . . . . . . . . . . . . . . . . . . . . . . . . . . . . . . . . .56EMC E-Lab Interoperability Navigator . . . . . . . . . . . . . . . . . . . . . . . .56Troubleshooting the Control Station connection to a LDAP-based directory server . . . . . . . . . . . . . . . . . . . . . . . . . . . . . . .56Troubleshooting local user accounts . . . . . . . . . . . . . . . . . . . . . . . . .57Troubleshooting domain-mapped user accounts . . . . . . . . . . . . . . .59Troubleshooting certificate imports . . . . . . . . . . . . . . . . . . . . . . . . . .60Error messages. . . . . . . . . . . . . . . . . . . . . . . . . . . . . . . . . . . . . . . . . . .61Training and Professional Services . . . . . . . . . . . . . . . . . . . . . . . . . .62
Appendix A: CLI role-based access setup . . . . . . . . . . . . . . . . . . . . . . . .63Appendix B: Supported SSL cipher suites . . . . . . . . . . . . . . . . . . . . . . . .73Appendix C: Understanding your LDAP-based directory server configuration . . . . . . . . . . . . . . . . . . . . . . . . . . . . . . . . . . . . . . . . . .75
Active Directory Users & Computers . . . . . . . . . . . . . . . . . . . . . . . . .75LDAP Admin . . . . . . . . . . . . . . . . . . . . . . . . . . . . . . . . . . . . . . . . . . . . .82
Index . . . . . . . . . . . . . . . . . . . . . . . . . . . . . . . . . . . . . . . . . . . . . . . . . . . . . . .91

5 of 94Release 7.0Security Configuration Guide on VNX™ for File
Introduction
EMC® VNX™ for File implements a variety of security features to control user and network access, monitor system access and use, and support the transmission of encrypted data. These security features are implemented on the Control Station and Data Movers. This document explains why, when, and how to use these security features. A basic understanding of these features is important to understanding VNX for File security. "Concepts" on page 9 provides more details.
This document is part of the VNX documentation set and is intended for administrators responsible for the overall configuration and operation of VNX.
System requirements
Table 1 on page 5 describes the VNX software, hardware, network, and storage configurations.
Cautions and warnings
If any of this information is unclear, contact your EMC Customer Support Representative for assistance.
If you do not change the default passwords during installation, you should change them as soon as possible.
User interface choices
VNX offers flexibility in managing networked storage that is based on your support environment and interface preferences. This document describes how to configure security features by using the command line interface (CLI). You can also perform many of these tasks by using the EMC Unisphere™ software.
The Unisphere online help contains additional information about managing your VNX.
The VNX Release Notes contain additional, late-breaking information about VNX management applications.
Table 1 Security system requirements
Software VNX version 7.0
Hardware No specific hardware requirements
Network No specific network requirements
Storage No specific storage requirements
Security Configuration Guide on VNX™ for File6 of 94 Release 7.0
Terminology
The VNX Glossary provides a complete list of VNX terminology.
access control entry (ACE): In a Microsoft Windows environment, an element of an access control list (ACL). This element defines access rights to a file for a user or group.
access control list (ACL): A list of access control entries (ACEs) that provide information about the users and groups allowed access to an object.
access policy: The policy that defines what access control methods (NFS permissions and/or Windows ACLs) are enforced when a user accesses a file on a system in an environment configured to provide multiprotocol access to some file systems. The access policy is set with the server_mount command and also determines what actions a user can perform against a file or directory.
authentication: The process for verifying the identity of a user trying to access a resource or object, such as a file or a directory.
Certificate Authority (CA): A trusted third party that digitally signs public key certificates.
Certificate Authority Certificate: A digitally signed association between an identity (a Certificate Authority) and a public key to be used by the host to verify digital signatures on Public Key Certificates.
command line interface (CLI): An interface for entering commands through the Control Station to perform tasks that include the management and configuration of the database and Data Movers and the monitoring of statistics for the VNX for File cabinet components.
Common Internet File System (CIFS): A file-sharing protocol based on the Microsoft Server Message Block (SMB). It allows users to share file systems over the Internet and intranets.
Control Station: A hardware and software component of VNX for File that manages the system and provides an administrative user interface to system components.
Data Mover: A VNX for File cabinet component running its own operating system that retrieves files from a storage device and makes them available to a network client.
digital certificate: An electronic ID issued by a certificate authority that establishes a user’s credentials. It contains the user’s identity (a hostname), a serial number, expiration dates, a copy of the certificate holder's public key (used for encrypting messages and digital signatures), and a digital signature from the certificate-issuing authority so that a recipient can verify that the certificate is valid.
directory server: A server that stores and organizes information about a computer network's users and network resources, and that allows network administrators to manage users' access to the resources. X.500 is the best-known open directory service. Proprietary directory services include Microsoft’s Active Directory.
Hypertext Transfer Protocol (HTTP): The communications protocol used to connect to servers on the World Wide Web.
Hypertext Transfer Protocol Secure (HTTPS): HTTP over SSL. All network traffic between the client and server system is encrypted. In addition, there is the option to

7 of 94Release 7.0Security Configuration Guide on VNX™ for File
verify server and client identities. Typically server identities are verified and client identities are not.
Kerberos: An authentication, data integrity, and data privacy encryption mechanism used to encode authentication information. Kerberos coexists with NTLM (Netlogon services) and, using secret-key cryptography, provides authentication for client/server applications.
LDAP-based directory: A directory server that provides access by LDAP. Examples of LDAP-based directory servers include OpenLDAP or iPlanet (also known as Sun Java System Directory Server and Sun ONE Directory Server).
Lightweight Directory Access Protocol (LDAP): An industry-standard information access protocol that runs directly over TCP/IP. It is the primary access protocol for Active Directory and LDAP-based directory servers. LDAP Version 3 is defined by a set of Proposed Standard documents in Internet Engineering Task Force (IETF) RFC 2251.
Network File System (NFS): A distributed file system providing transparent access to remote file systems. NFS allows all network systems to share a single copy of a directory.
OpenLDAP: The open source implementation of an LDAP-based directory service.
persona: A means of providing an identity for a Data Mover as either a server or a client through a private key and associated public key certificate. Each persona can maintain up to two sets of keys (current and next), to allow for the generation of new keys and certificates prior to the expiration of the current certificate.
Public Key Infrastructure (PKI): A means of managing private keys and associated public key certificates for use in Public Key Cryptography.
Simple Network Management Protocol (SNMP): Method used to communicate management information between the network management stations and the agents in the network elements.
Secure Socket Layer (SSL): A security protocol that provides encryption and authentication. It encrypts data and provides message and server authentication. It also supports client authentication if required by the server.
Transport Layer Security (TLS): The successor protocol to SSL for general communication authentication and encryption over TCP/IP networks. TLS version 1 is nearly identical with SSL version 3.
X.509: A widely used standard for defining digital certificates.
XML API: An interface for remotely managing and monitoring a VNX for File system. The interface uses XML formatted messages, and is programming language neutral.

Security Configuration Guide on VNX™ for File8 of 94 Release 7.0
Related information
Specific information related to the features and functionality described in this document is included in:
◆ EMC VNX Command Line Interface Reference for File
◆ Online Man Pages for File
◆ Parameters Guide for VNX
◆ VNX Glossary
◆ Installing Management Applications on VNX for File
◆ Configuring and Managing CIFS on VNX
◆ Configuring NFS on VNX
◆ Managing a Multiprotocol Environment on VNX
◆ Configuring VNX Naming Services
◆ Using VNX FileMover
◆ Configuring Events and Notifications on VNX for File
◆ Configuring and Managing Networking on VNX
◆ Auditing in the VNX Control Station Technical Note
◆ VNX for File on the Enterprise Network Technical Note
For general information on LDAP, refer to:
◆ RFC 2307, An Approach for Using LDAP as a Network Information Service
For specific information on Active Directory’s LDAP and SSL configuration, refer to:
◆ Microsoft Knowledge Base article How to enable LDAP over SSL with a third-party certification authority (ID 321051)
For specific information on OpenLDAP and SSL configuration, refer to the OpenLDAP website (www.openldap.org). If you are using a different non-Active Directory LDAP-based directory server, refer to that vendor’s documentation for information on LDAP and SSL configuration.
EMC VNX documentation on the EMC Online Support website
The complete set of EMC VNX customer publications is available on the EMC Online Support website. To search for technical documentation, go to http://Support.EMC.com. After logging in to the website, click the VNX Support by Product page to locate information for the specific feature required.
9 of 94Release 7.0Security Configuration Guide on VNX™ for File
Concepts
Strong system security features are increasingly necessary to comply with new regulations and ensure greater protection against system attacks. VNX for File implements a variety of features on both the Control Station and Data Movers to secure its infrastructure, control access, and protect data.
On the Control Station:
◆ To secure its infrastructure, VNX for File provides a variety of features that can be used to tighten the operation of the Control Station. Table 2 on page 10 describes these features.
◆ To protect system resources against unauthorized access, VNX for File supports strict user identification and authentication, role-based access, and customer-defined password policies. Table 3 on page 12 describes these features.
◆ To support the transmission of encrypted data, VNX for File supports the SSL security protocol. Table 4 on page 14 describes this feature.
On Data Movers:
◆ To secure its infrastructure, VNX for File provides a variety of features that can be used to tighten the operation of the Data Movers. Table 5 on page 15 describes these features.
◆ To protect the transmission of encrypted data, VNX for File supports the SSL security protocol and public key certificate management for certain protocols. Table 6 on page 18 describes these features.
Although many of these features require explicit configuration and management, others are included as basic components of software operation:
◆ Security between a user and the Unisphere software and between two Control Stations uses the checksum SHA1 to sign the session token (cookie). SHA1 produces a 160-bit hash value unlike MD5, which produces only a 128-bit hash value.
◆ Unnecessary services and dynamic ports have been removed from the Control Station's Linux operating system.
Note: Many of the VNX for File security features are described elsewhere in the documentation library, as noted in the overview tables. Therefore, this document includes detailed configuration procedures for only a subset of the available security features.

Security Configuration Guide on VNX™ for File10 of 94 Release 7.0
Table 2 Overview of Control Station features to secure infrastructure (page 1 of 2)
Feature What it does Restrictions More information
Session timeout VNX for File enforces a session timeout for administrative sessions accessed from both Control Station shells and Unisphere. Sessions time out after a specified period of inactivity.
Session timeout is enabled by default.
You must be root to modify Control Station properties.
Note: The VNX Release Notes describe how to log in to Unisphere as root.
To manage shell session timeout, use the command /nas/sbin/ nas_config -sessiontimeout. "Configuring session timeout" on page 30 describes how to configure this feature.
To manage Unisphere session timeout, select Settings (Security tasks) > Manage Idle Timeout. You can find a description of this feature in Unisphere online help.
Login banner and message of the day (MOTD)
A login banner and message of the day (MOTD) provide a way for an administrator to communicate with VNX for File users.
The same login banner is seen from the command line interface and Unisphere. The MOTD is seen only from the command line interface.
You must be root to modify Control Station properties.
Note: The VNX Release Notes describe how to log in to Unisphere as root.
To configure the banner through Unisphere, select System (System Management tasks) > Control Station Properties. You can find a description of this feature in Unisphere online help.
To configure the banner and MOTD through the CLI, use a text editor to edit the /etc/issue or /etc/motd files. "Customizing a login banner" on page 32 and "Creating a message of the day" on page 33 describe how to configure these features.
Network services management
In Unisphere, you can list the current state of some network services (and associated communications ports and protocols) on the Control Station. You can enable, disable, and monitor these services. To improve VNX for File security, you should restrict access to VNX for File by disabling network services that are not used in your environment.
You must be root to modify Control Station properties.
Note: The VNX Release Notes describe how to log in to Unisphere as root.
To manage network services through Unisphere, select Settings > Network > Settings for File > Network Services. You can find a description of this feature in Unisphere online help.

11 of 94Release 7.0Security Configuration Guide on VNX™ for File
Session tokens (cookies) VNX for File uses SHA1 to generate checksums to protect the session tokens (cookies) used to identify users after they log in. To enhance security, you can change the default SHA1 secret value used to generate the checksums.
When you change this value, existing session tokens (cookies) are no longer valid and current users of Unisphere will have to log in again.
You must be root to modify Control Station properties.
Note: The VNX Release Notes describe how to log in to Unisphere as root.
To manage session tokens (cookies), edit the file /nas/http/conf/secret.txt. "Protecting session tokens" on page 34 describes how to configure this feature.
Auditing VNX for File provides configuration files and commands to capture management activities initiated from the Control Station, specifically access to key system files and end-user data.
You must be root to modify Control Station properties.
Note: The VNX Release Notes describe how to log in to Unisphere as root.
The Technical Note Auditing in the VNX Control Station, available on the EMC Online Support website, provides specific information about how to implement auditing.
Table 2 Overview of Control Station features to secure infrastructure (page 2 of 2)
Feature What it does Restrictions More information

Security Configuration Guide on VNX™ for File12 of 94 Release 7.0
Table 3 Overview of Control Station features to control access (page 1 of 2)
Feature What it does Restrictions More information
User identification and authentication
Unique user accounts allow for more secure management of VNX. User accounts can be a local user account, a global user account, or a user account mapped from a LDAP user account.
LDAP domain-mapped user accounts require that VNX for File has access to a LDAP-based directory server. This may mean configuring access to an Active Directory or a non- Active Directory server such as OpenLDAP or iPlanet.
Note: Only global and LDAP user accounts are supported in VNX 7.0.
Users can be managed only through Unisphere.
The Linux commands available from the CLI (useradd, userdel, usermod, groupadd, groupmod, and groupdel) do not support VNX role-based user access and should no longer be used to manage user and group accounts.
To create a new file local user account, you must be root or a user who has Administrator or Security Administrator privileges.
To create a new global user account, you must be the global sysadmin user or a global user who has Administrator or Security Administrator privileges.
Note: The VNX Release Notes describe how to log in to Unisphere as root.
To create and manage users with Unisphere, select Settings > Security > User Management. You can find a description of this feature in Unisphere online help.
"Planning considerations for using an external LDAP-based directory server for user identification and authentication" on page 18 describes how VNX for File interacts with an LDAP-based directory server and "Configuring the use of an external LDAP-based directory server for user identification and authentication" on page 25 describes how to configure this feature.
Role-based user access This feature enables you to assign users privileges that are appropriate to their responsibilities. Consequently, it simplifies the Unisphere and CLI interfaces for users by limiting the operations they can perform while protecting the system and customer data from operations by those who should not perform them.
A role defines the privileges (read, modify, or full control) you can perform on a particular object. VNX offers both predefined and custom roles.
Note: Only global and LDAP user accounts are supported in VNX 7.0.
To assign roles to file local user accounts, you must be root or a user who has Administrator or Security Administrator privi-leges.
To assign roles to global user accounts, you must be the glo-bal sysadmin user or a global user who has Administrator or Security Administrator privi-leges.
Note: The VNX Release Notes describe how to log in to Unisphere as root.
To create and manage role-based user access with Unisphere, select Settings > Security > User Management. You can find a description of this feature in Unisphere online help.

13 of 94Release 7.0Security Configuration Guide on VNX™ for File
Password quality policy Strong passwords are an important element of a security strategy. VNX for File enforces several requirements to guarantee a password quality policy.
This feature defines password complexity requirements for all local users. This feature does not apply to domain-mapped users, whose passwords are governed by the policies within the domain.
You must be root to define the password quality policy.
Note: Only global and LDAP user accounts are supported in VNX 7.0. The VNX Release Notes describe how to log in to Unisphere as root.
"Planning considerations for password security" on page 21 describes the elements of a password quality policy.
To define password quality policy, use the command /nas/sbin/ nas_config -password. "Configuring password policy" on page 28 describes how to configure this feature.
Table 3 Overview of Control Station features to control access (page 2 of 2)
Feature What it does Restrictions More information
Security Configuration Guide on VNX™ for File14 of 94 Release 7.0
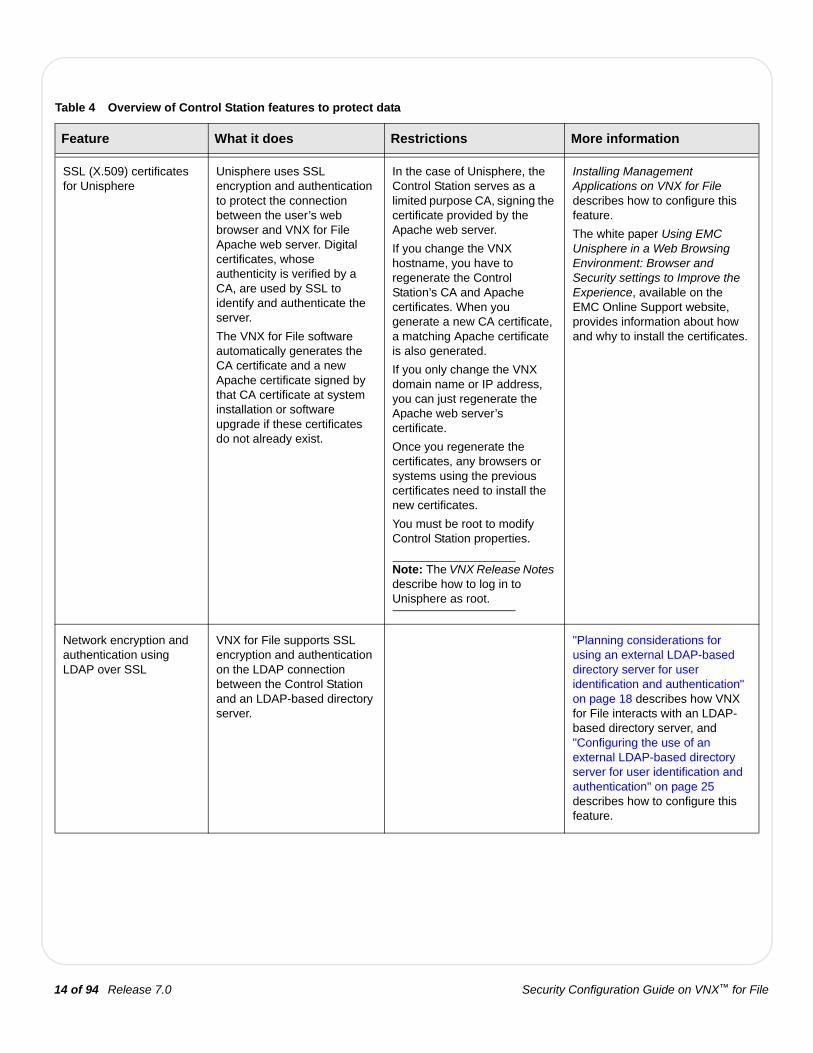
Table 4 Overview of Control Station features to protect data
Feature What it does Restrictions More information
SSL (X.509) certificates for Unisphere
Unisphere uses SSL encryption and authentication to protect the connection between the user’s web browser and VNX for File Apache web server. Digital certificates, whose authenticity is verified by a CA, are used by SSL to identify and authenticate the server.
The VNX for File software automatically generates the CA certificate and a new Apache certificate signed by that CA certificate at system installation or software upgrade if these certificates do not already exist.
In the case of Unisphere, the Control Station serves as a limited purpose CA, signing the certificate provided by the Apache web server.
If you change the VNX hostname, you have to regenerate the Control Station’s CA and Apache certificates. When you generate a new CA certificate, a matching Apache certificate is also generated.
If you only change the VNX domain name or IP address, you can just regenerate the Apache web server’s certificate.
Once you regenerate the certificates, any browsers or systems using the previous certificates need to install the new certificates.
You must be root to modify Control Station properties.
Note: The VNX Release Notes describe how to log in to Unisphere as root.
Installing Management Applications on VNX for File describes how to configure this feature.
The white paper Using EMC Unisphere in a Web Browsing Environment: Browser and Security settings to Improve the Experience, available on the EMC Online Support website, provides information about how and why to install the certificates.
Network encryption and authentication using LDAP over SSL
VNX for File supports SSL encryption and authentication on the LDAP connection between the Control Station and an LDAP-based directory server.
"Planning considerations for using an external LDAP-based directory server for user identification and authentication" on page 18 describes how VNX for File interacts with an LDAP-based directory server, and "Configuring the use of an external LDAP-based directory server for user identification and authentication" on page 25 describes how to configure this feature.

15 of 94Release 7.0Security Configuration Guide on VNX™ for File
Table 5 Overview of Data Mover features to secure infrastructure (page 1 of 3)
Feature What it does Restrictions More information
Network services management
In Unisphere, you can list the current state of some network services (and associated communications ports and protocols) on the Data Movers. You can enable, disable, and monitor these services. To improve VNX for File security, you should restrict access to the VNX for File by disabling network services that are not used in your environment, for example, FTP.
Some services that are running on the Data Movers require a reboot for changes to take effect.
To manage network services through Unisphere, select Settings > Network > Settings for File > Network Services. You can find a description of this feature in Unisphere online help.
CIFS Kerberos authentication
Since Kerberos is now the recommended authentication method in Windows environments, you may want to disable NTLM authentication. (By default, VNX for File allows both Kerberos and NTLM authentication.)
To set CIFS server authentication mode to Kerberos only, use the command server_cifs <movername> -add compname=<comp_name>, domain=<full_domain_name>, authentication=kerberos.
The server_cifs man page describes how to configure this setting. Configuring and Managing CIFS on VNX describes authentication.
NFS security settings Although generally regarded as a vulnerable file-sharing protocol, you can make NFS more secure by using the following configuration settings:
• Defining read-only access for some (or all) hosts
• Limiting root access to specific systems or subnets
• Hiding export and mount information if a client does not have mount permissions for the file system corresponding to that entry
In addition, if strong authentication is required, you can configure Secure NFS, which uses Kerberos.
All NFS exports are displayed by default. To hide NFS exports, you must change the value of the forceFullShowmount parameter.
Configuring NFS on VNX describes how to configure these settings.

Security Configuration Guide on VNX™ for File16 of 94 Release 7.0
Access policies The VNX for FIle set of customizable access modes allow you to choose the best possible interaction between NFS and CIFS access for your environment.
You can select how security attributes are maintained and the type of interaction between NFS and CIFS users including:
• Separate• CIFS dominant• NFS dominant• Equal • Mixed (used to achieve a
high level of synchronization between the two protocols)
The mixed access policy is required when using NFSv4.
Managing a Multiprotocol Environment on VNX describes how to configure this feature.
Windows-style (NT) credentials for UNIX users
VNX for File allows you to create a common Windows-style (NT) credential. Users therefore have the same credentials regardless of their file access protocol, providing more consistent access control.
Managing a Multiprotocol Environment on VNX describes how to configure this feature.
SNMP management The SNMP community string provides the basis for security in SNMP. The default community name is the well-known name public. This name should be changed to prevent unwanted access to VNX for File.
Use the server_snmp -community command to assign a new value to a server SNMP agent’s community for a Data Mover.
SNMP is used for communication between the Control Station and Data Mover, so disabling it can interfere with some functions. For example, the server_netstat command will not work.
Configuring Events and Notifications on VNX for File describes how to configure this feature.
Table 5 Overview of Data Mover features to secure infrastructure (page 2 of 3)
Feature What it does Restrictions More information

17 of 94Release 7.0Security Configuration Guide on VNX™ for File
IP packet reflect IP packet reflect provides your network with an additional security level. Because reply packets always go out the same interface as the request packets, request packets cannot be used to indirectly flood other LANs. In cases where two network devices exist, one connected to the Internet and the other connected to the intranet, replies to Internet requests do not appear on the intranet. Also, the internal networks used by VNX for File are not affected by any packet from external networks.
Configuring and Managing Networking on VNX describes how to configure this feature.
Table 5 Overview of Data Mover features to secure infrastructure (page 3 of 3)
Feature What it does Restrictions More information

Security Configuration Guide on VNX™ for File18 of 94 Release 7.0
Planning considerations for using an external LDAP-based directory server for user identification and authentication
A user account can be identified and authenticated by an external directory server when the user logs in to the VNX Control Station. The external directory server provides a centralized repository of user accounts, simplifying management.
The external directory server can be an LDAP-based Active Directory or non-Active Directory server:
◆ Active Directory is an LDAP-based directory service used in Windows that provides management of user and group accounts, security, and distributed resources.
◆ OpenLDAP and iPlanet (also known as Sun Java System Directory Server and Sun ONE Directory Server) are distributed LDAP-based directory servers that provide a central repository for storing and managing identity profiles, access privileges, and application and network resource information.
Understanding the directory server
An LDAP-based directory server organizes information in a hierarchical directory structure unique to a particular organization’s needs. Each object stored in the
Table 6 Overview of Data Mover features to protect data
Feature What it does Restrictions More information
Network encryption and authentication through SSL
VNX for File supports SSL encryption and authentication for both LDAP and HTTP connections between Data Movers and various external services.
SSL on Data Mover connec-tions can be configured and managed only through the CLI.
"Configuring network encryption and authentication using the SSL protocol" on page 35 describes how to configure parameters associated with this feature.
Configuring VNX Naming Ser-vices and Using VNX FileMover describe how to configure and manage SSL for these features.
Public key certificates The PKI framework provides the software management and database systems to support the use of digital certificates for Data Mover LDAP and HTTP connections on which SSL is enabled.
The VNX for File PKI framework supports only X.509 public key certificates.
"Planning considerations for Public Key Infrastructure" on page 22 describes the concepts behind this feature.
"Configuring PKI" on page 38 and "Managing PKI" on page 52 describe how to configure and manage this feature by using the CLI.
To configure and manage PKI through Unisphere, select Settings > Security > Server Certificates for File. You can find a description of this feature in Unisphere online help.

19 of 94Release 7.0Security Configuration Guide on VNX™ for File
directory is represented by a directory entry. An entry is formed by one or more attributes. Entries are stored in a hierarchical form in the directory tree. Each entry is uniquely defined by its distinguished name (DN) which enumerates the position of this entry in the tree. For example, the distinguished name for the admin group is "cn=admin,ou=group,dc=mycompany,dc=com". Using LDAP, one may query an entry and request all the entries and their attributes below the requested entry.
An example of an LDAP-based directory structure is as follows:
dc= indicates domain components and ou= indicates organizational units consisting of people, groups, hosts, and netgroups. Typically, the cn attribute is used to indicate the name by which a particular entry is commonly known. The directory structure can be changed. You inform the Data Mover about your organization’s directory structure by uploading a custom client configuration profile or configuration file. For example, your organization’s user information might be stored in a container called users rather than people, and hosts in a container called computers rather than hosts. You can also define several containers for the same object class.
Configuring access
To configure the Control Station’s LDAP-based client, you must have the following information:
◆ domain name — Indicates the root of the LDAP directory tree, that is, where in the LDAP directory tree to begin a search for information. Also known as the base distinguished name.
For example, the base distinguished name for the example LDAP-based directory structure is dc=mycompany,dc=com. Active Directory assumes that the attribute type is dc so the base distinguished name can be expressed as simply mycompany.com.
Note: VNX for File supports only a single LDAP domain. It does not support trees or forests. Consequently, references to other domains are not followed.
◆ bind distinguished name — Indicates the identity used to bind to the LDAP service, that is, the user or account permitted to search the LDAP directory within the defined search base.
Typically, Active Directory assumes a bind distinguished name format of cn=<acctname>,cn=users,dc=<domain component>,dc=<domain component>.
Note: The Active Directory administrator can create users in other locations within Active Directory, in which case the bind distinguished name path may be different.
dc=mycompany,dc=com
ou=hostsou=people ou=group ou=netgroup

Security Configuration Guide on VNX™ for File20 of 94 Release 7.0
An OpenLDAP directory server accepts different bind distinguished name formats such as cn=<acctname>,uid=<name>,ou=people,dc=<domain component>,dc=<domain component> or uid=<name>,dc=users,dc=<domain component>,dc=<domain component>.
◆ user search path and name attribute — Indicate the directory branch VNX for File will search for an instance of the name attribute whose value is the user’s account name.
Typically, Active Directory assumes a user search path and name attribute of cn=<acctname>,cn=users,dc=<domain component>,dc=<domain component>.
Note: The Active Directory administrator can create users in other locations within Active Directory, in which case the user search path may be different.
An OpenLDAP directory server accepts different bind distinguished name formats such as uid=<name>,ou=people,dc=<domain component>,dc=<domain component> or uid=<name>,dc=users,dc=<domain component>,dc=<domain component>.
◆ group search path, name attribute, group class and member — Indicate the directory branch VNX for File will search for an instance of the attribute whose value is the user’s group name. The group may be further specified by identifying the class in which the group is stored and the attribute of that class.
Active Directory assumes a group search path and name attribute of cn=<acctname>,cn=users,dc=<domain component>,dc=<domain component>. In Active Directory, groups and users are stored in the same hierarchy. The group class is called group and the default attribute value is member.
Note: The Active Directory administrator can create groups in other locations within Active Directory, in which case the group search path may be different.
In other directory servers, the class may be posixGroup, groupOfNames, or groupOfUniqueNames. If the group class value is groupOfUniqueNames, the default attribute value is uniqueMember. If the group class value is groupOfNames, the default attribute value is member. If the group class value is posixGroup, the default attribute value is memberUid.
Connecting to the directory server using SSL
To protect LDAP traffic and improve client and server application security, the LDAP-based directory server can support and, in some cases, require the use of SSL. SSL provides encryption and authentication capabilities. It encrypts data over the network and provides message and server authentication. It also supports client authentication if required by the server. SSL uses digital certificates, whose authenticity is verified by a CA.
The LDAP client, using the underlying SSL client, authenticates the certificate received from the LDAP-based directory server. The CA certificate (for the CA that signed the directory server's certificate) must have been imported into the Control Station for the certificate verification to succeed. In addition, the subject from the server's certificate must contain the hostname or IP address of the server, otherwise the certificate verification fails.

21 of 94Release 7.0Security Configuration Guide on VNX™ for File
Note: The Control Station LDAP-based client implementation does not support SSL-based client authentication.
"Configuring the use of an external LDAP-based directory server for user identification and authentication" on page 25 describes how to configure this feature.
Planning considerations for password security
Strong passwords are an important element of a security strategy.
Password quality policy
To ensure that sufficiently strong passwords are chosen by all VNX for File local users, you can define a password quality policy that enforces a certain complexity for user-defined passwords. This feature does not apply to domain-mapped users, whose passwords are governed by the policies within the domain.
The default password policy includes the following requirements:
◆ A minimum password length of 8 characters
◆ A maximum of 3 attempts to define a new password of acceptable value before the command fails
◆ A minimum of 3 characters that were not in the previous password
◆ A minimum of one numeral in the new password
Note: There is currently no requirement to use special characters (such as !, @, #, $, %, &, ^, and *) or lowercase and uppercase characters in the password.
VNX for File also supports a default password expiration period of 120 days.
"Configuring password policy" on page 28 describes how to configure this feature.
Note: Changes made to the password quality policy apply only to password defined after the policy is revised.
Changing default passwords
VNX for File provides two default local user accounts: root and nasadmin. Both accounts are assigned the password nasadmin by default. The software installation procedure allows you to enter a different password, but a new password is not required.
!CAUTION!If you do not change the default passwords during installation, you should change them as soon as possible.
You choose and change passwords through the User Properties dialog box in Unisphere. Unisphere online help provides a detailed explanation of this procedure.
Security Configuration Guide on VNX™ for File22 of 94 Release 7.0
Note: You can access the User Properties page from Settings > User Management > Users or from the User Name field on Control Station Properties.
Root and users with security operator privileges are not required to choose passwords that conform to password policy. Furthermore, when creating a new user account, root and users with security operator privileges can assign any password to that user.
However, if the user subsequently changes the password, this password is subject to the current password policy. Once the password policy is set, you will receive an error indicating the password is bad if you attempt to define a password that does not meet the specified requirements.
Planning considerations for Public Key Infrastructure
The VNX for File Public Key Infrastructure (PKI) provides the software management and database systems to support the use of digital certificates for Data Mover LDAP and HTTP connections on which SSL is enabled. Certificates, whose authenticity is verified by a Certificate Authority (CA), are used by SSL to identify one or both ends of a connection, providing stronger security between clients and servers.
Note: The VNX for File PKI framework supports the X.509 certificate standard. Certificates are encoded using Distinguished Encoding Rules (DER) and may be further encoded in Privacy Enhanced Mail (PEM) format for ease of distribution through email systems.
Personas
Personas are used to provide an identity for a Data Mover when it is acting as a server or a client. When negotiating a secure connection with a client (such as the external policy and migration software used with FileMover), the persona provides a private key and certificate to the Data Mover (which is acting as a server). This certificate provides the means by which the client can identify and authenticate the server. When negotiating a secure connection with a server that is configured to require client authentication, the persona provides the private key and certificate to the Data Mover (which is acting as a client). The certificate provides the means by which the server can identify and authenticate the client.
By default, each Data Mover is configured with a single persona named default. To create the certificate that the persona provides to the Data Mover, you first generate the persona’s public/private key set. You must then request a signed certificate from a CA. Certificate requests are generated in Privacy Enhanced Mail (PEM) format only.
Note: Currently, each Data Mover is allowed only one persona. VNX for File does not support a mechanism to create additional personas.
If you are using the Control Station as the CA, the Control Station automatically receives the certificate request, generates and signs the certificate, and returns the certificate to the Data Mover. The Control Station can sign certificates for all the Data Movers in the cabinet. It cannot be used to sign certificates for any external hosts. "Using the Control Station as the CA" on page 38 describes the tasks for using a Control Station CA.

23 of 94Release 7.0Security Configuration Guide on VNX™ for File
If you are using an external CA, you must send the certificate request manually. The request to sign the public key is generated with the public/private key set. Display the persona’s properties to verify its content. Obtain a copy of the certificate request and then send the request to the CA through that company’s website or email.
When the CA returns a signed certificate, you must import it to the Data Mover. To import the signed certificate, you can either provide a path and import a file, or cut and paste the associated text. A file can be in either Distinguished Encoding Rules (DER) or PEM format. You can cut and paste text only in PEM format.
Each persona can be associated with up to two sets of keys and certificates (current and next), to allow generating new keys and certificates before the expiration of the current certificate. When the next certificate (which is already valid) is imported, it and its associated key set immediately become the current key set and certificate.
Because the next certificate is typically generated when it is needed, you typically do not see a next certificate associated with a persona. However, a next certificate may be waiting if there is a time difference between the Data Mover and the CA (or the Control Station if it is serving as the CA). For example, a CA might prepare a certificate in advance by assigning it a future start date. Merging companies could set up such a certificate to have it in place for the official merge date.
The next certificate becomes the current certificate (and the current key and certificate are deleted) when the certificate becomes valid (per Data Mover time), and one of the following happens:
◆ The persona is queried (by either the CLI or Unisphere).
◆ The persona's key and certificate are requested by a Data Mover function (such as SSL).
After a certificate expires, any attempt to use the certificate results in a failure, typically a loss of connection or a failure to reconnect. When a new certificate is available, PKI deletes the old certificate and provides the new certificate when requested. However, if you did not obtain a new certificate before the current certificate expires, the certificate request will fail. PKI will not provide an expired certificate for a persona.
There is no automated way to check for expired public key certificates. You must check for expired certificates manually by listing the personas and examining the expiration dates of the associated certificates. You can then take action based on your organization’s business practices.
"Creating the certificate provided by the persona" on page 38 outlines the procedure for creating the key set and certificate that are provided by the persona to the Data Movers when VNX for File is configured as a server or client.
Certificate Authority (CA) certificates
When a VNX for File based client application requires a network connection with a server (such as FileMover’s connection with its secondary storage), the server provides a certificate as part of the negotiation for a secure connection. The client application confirms the server’s identity by validating the certificate. It does this by verifying the server certificate’s signature with the public key from the CA certificate.

Security Configuration Guide on VNX™ for File24 of 94 Release 7.0
Obtaining the required CA certificates is a manual task. Typically, before actual operation, you must identify the appropriate CA. Then you must check the list of CA certificates that are available. If a new CA certificate is required and an external CA is being used, you can obtain the CA certificate from the company’s website or from the person responsible for security. If the CA is local (enterprise-level or inhouse), obtain the CA certificate from the person who manages the CA.
To make the CA certificate known to system, you must import it. You can provide a path and import a file, or cut and paste the text. A file can be in either DER or PEM format. You can cut and paste text only in PEM format.
"Obtaining CA certificates" on page 38 outlines the procedure for obtaining the certificate that is used to confirm the identity of a server.
Using the Control Station as the CA
The system software automatically generates a key set and certificate for the Control Station when the system is installed or upgraded. The Control Station uses this key set and certificate to sign certificate requests from Data Movers. However, before the Control Station can successfully operate as a CA and be recognized by a Data Mover as such, you must complete several configuration tasks:
◆ Distribute the Control Station CA certificate to network clients. In order for a network client to validate a certificate sent by a Data Mover that has been signed by the Control Station, the client needs the public key from the CA certificate to verify the Data Mover certificate’s signature.
◆ Import the CA certificate (with the CA certificates from external CAs).
A copy of the Control Station certificate can be obtained only by using the CLI command nas_ca_certificate, as described in "Using the Control Station as the CA" on page 38.
If the Control Station key set and certificate are compromised, you can regenerate them. This task can be accomplished only through the CLI command nas_ca_certificate. After regenerating the Control Station key set and certificate, you have to regenerate a new key set and certificate request, and then import the signed certificate for any personas whose certificates are signed by the Control Station.
Note: The Control Station continues to generate a separate key set for the SSL-based connection between the Apache web server (on behalf of Unisphere) and a user’s web browser. However, the Control Station now uses the CA key set to sign the Apache web server’s certificate, meaning the certificate is no longer self-signed. Installing Management Applications on VNX for File describes how to manage certificates for Unisphere.
25 of 94Release 7.0Security Configuration Guide on VNX™ for File
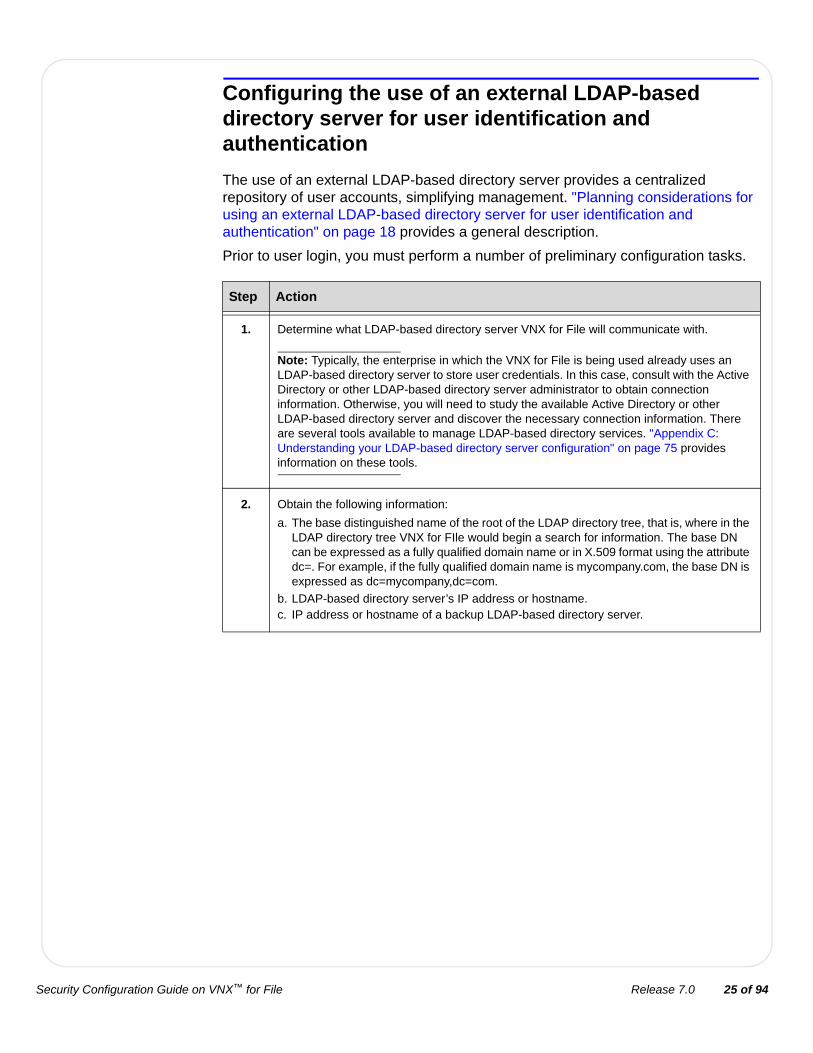
Configuring the use of an external LDAP-based directory server for user identification and authentication
The use of an external LDAP-based directory server provides a centralized repository of user accounts, simplifying management. "Planning considerations for using an external LDAP-based directory server for user identification and authentication" on page 18 provides a general description.
Prior to user login, you must perform a number of preliminary configuration tasks.
Step Action
1. Determine what LDAP-based directory server VNX for File will communicate with.
Note: Typically, the enterprise in which the VNX for File is being used already uses an LDAP-based directory server to store user credentials. In this case, consult with the Active Directory or other LDAP-based directory server administrator to obtain connection information. Otherwise, you will need to study the available Active Directory or other LDAP-based directory server and discover the necessary connection information. There are several tools available to manage LDAP-based directory services. "Appendix C: Understanding your LDAP-based directory server configuration" on page 75 provides information on these tools.
2. Obtain the following information:
a. The base distinguished name of the root of the LDAP directory tree, that is, where in the LDAP directory tree VNX for FIle would begin a search for information. The base DN can be expressed as a fully qualified domain name or in X.509 format using the attribute dc=. For example, if the fully qualified domain name is mycompany.com, the base DN is expressed as dc=mycompany,dc=com.
b. LDAP-based directory server’s IP address or hostname.c. IP address or hostname of a backup LDAP-based directory server.

Security Configuration Guide on VNX™ for File26 of 94 Release 7.0
3. Request that the directory server administrator add an user or account name identifying the VNX for File in the LDAP-based server’s directory structure. Or, if you have permission to create user and group accounts on the Active Directory or another LDAP-based directory server, add this user or account name yourself.
This account should be a restricted user account (such as a Domain Guest account) with read/search privileges for the directory.
Note: There are several tools available to manage LDAP-based directory services. "Appendix C: Understanding your LDAP-based directory server configuration" on page 75 provides information on these tools.
This entry identifies the VNX for File as the user or account that will bind to the directory service, that is, the user or account permitted to search the LDAP directory within the defined search base. This entry is also known as the bind distinguished name.
For example, when using an Active Directory, the bind distinguished name might be defined as cn=<acctname>,cn=users,dc=<domain component>,dc=<domain component> and, when using an OpenLDAP directory server, uid=<name>,dc=users,dc=<domain component>,dc=<domain component> or cn=<acctname>,uid=<name>,ou=people,dc=<domain component>,dc=<domain component>.
4. Verify that the administrative users (and their associated groups) that will be logging in to the Control Station are defined in the LDAP-based directory server and determine the paths VNX for File will search for an instance of the name attribute whose value is the user or group name.
If the user and group accounts do not already exist, request that the directory server administrator add them. Or, if you have permission to create user and group accounts on the Active Directory or another LDAP-based directory server, add these accounts yourself.
Note: There are several tools available to manage LDAP-based directory services. "Appendix C: Understanding your LDAP-based directory server configuration" on page 75 provides information on these tools.
For example, if users and groups are stored in an organizational unit with the common name users, the search path will be cn=users,dc=<domain component>,dc=<domain component>.
5. If the LDAP connection uses SSL, obtain the public certificate from the CA that signs the LDAP-based directory server's SSL server certificate. VNX for File uses this CA certificate to verify the certificate received from the LDAP server. The certificate must be in a Base64 encoded format.
If the LDAP-based directory server uses an external CA, obtain the CA certificate from the CA company’s website. If the LDAP-based directory server uses an inhouse CA or if certificates are self-signed, obtain the CA certificate from the LDAP-based directory server administrator.
If you are not enabling SSL, a CA certificate is not required.
Step Action

27 of 94Release 7.0Security Configuration Guide on VNX™ for File
6. With the information you have discovered, log in to Unisphere and use Settings > Security (Security tasks) > Manage LDAP Domain for File to configure the Control Station so it can access the LDAP-based directory server.
Note: VNX for File automatically creates a File local user account mapped from the LDAP domain user when you log in to the system with the domain username and password. Alternatively, you can create a user mapped to a domain user and associate it with a domain-mapped group.
Unisphere online help provides a description of these tasks.
Step Action

Security Configuration Guide on VNX™ for File28 of 94 Release 7.0
Configuring password policy
This feature enables the VNX for File root administrator to define password complexity requirements for all local users. "Planning considerations for password security" on page 21 provides a general description.
Note: This feature does not apply to domain-mapped users, whose passwords are governed by the policies within the domain.
Note: You must be root to execute the /nas/sbin/nas_config command.
Define password policy interactively
Action
To initiate a script that prompts for password policy definitions, use this command syntax: # /nas/sbin/nas_config -password
Output
Minimum length for a new password (Between 6 and 15): [8] Number of attempts to allow before failing: [3] Number of new characters (not in the old password): [3] Number of digits that must be in the new password: [1] Number of special characters that must be in a new password: [0] Number of lower case characters that must be in password: [0] Number of upper case characters that must be in password: [0]
Notes
The current value defined for each field is displayed in brackets. The original default values for each field are:
• Length: minimum 8 characters, range 6-15• Attempts: maximum of 3 attempts• New characters: minimum of 3 characters• Digits: minimum of 1 digit• Special, lowercase, and uppercase characters: 0
To change the value for each field, type a new value when prompted.
29 of 94Release 7.0Security Configuration Guide on VNX™ for File
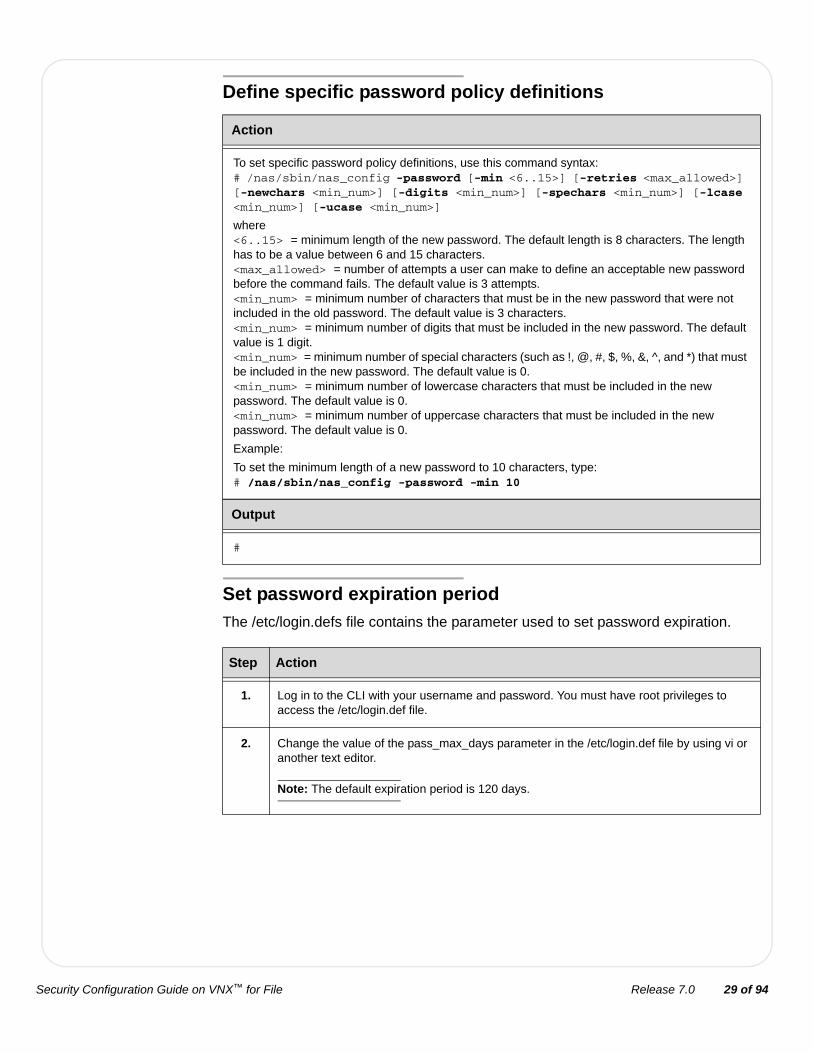
Define specific password policy definitions
Set password expiration period
The /etc/login.defs file contains the parameter used to set password expiration.
Action
To set specific password policy definitions, use this command syntax: # /nas/sbin/nas_config -password [-min <6..15>] [-retries <max_allowed>] [-newchars <min_num>] [-digits <min_num>] [-spechars <min_num>] [-lcase <min_num>] [-ucase <min_num>]
where<6..15> = minimum length of the new password. The default length is 8 characters. The length has to be a value between 6 and 15 characters. <max_allowed> = number of attempts a user can make to define an acceptable new password before the command fails. The default value is 3 attempts.<min_num> = minimum number of characters that must be in the new password that were not included in the old password. The default value is 3 characters.<min_num> = minimum number of digits that must be included in the new password. The default value is 1 digit.<min_num> = minimum number of special characters (such as !, @, #, $, %, &, ^, and *) that must be included in the new password. The default value is 0.<min_num> = minimum number of lowercase characters that must be included in the new password. The default value is 0.<min_num> = minimum number of uppercase characters that must be included in the new password. The default value is 0.
Example:
To set the minimum length of a new password to 10 characters, type:# /nas/sbin/nas_config -password -min 10
Output
#
Step Action
1. Log in to the CLI with your username and password. You must have root privileges to access the /etc/login.def file.
2. Change the value of the pass_max_days parameter in the /etc/login.def file by using vi or another text editor.
Note: The default expiration period is 120 days.
Security Configuration Guide on VNX™ for File30 of 94 Release 7.0
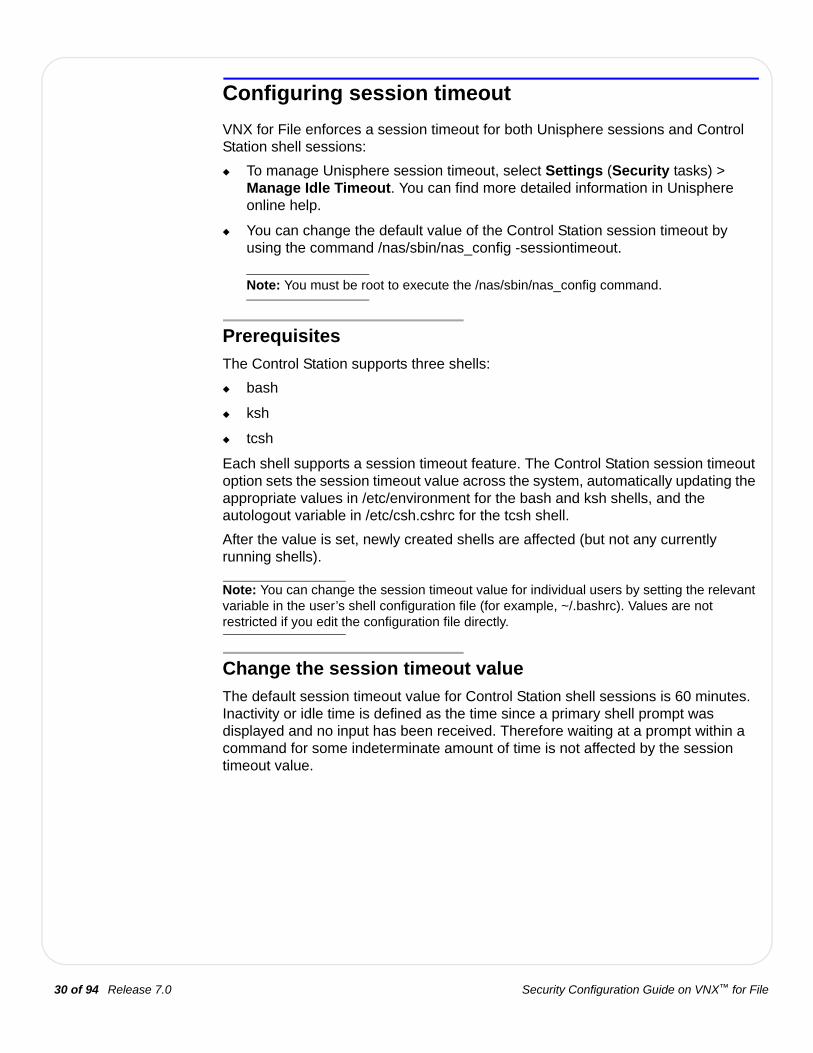
Configuring session timeout
VNX for File enforces a session timeout for both Unisphere sessions and Control Station shell sessions:
◆ To manage Unisphere session timeout, select Settings (Security tasks) > Manage Idle Timeout. You can find more detailed information in Unisphere online help.
◆ You can change the default value of the Control Station session timeout by using the command /nas/sbin/nas_config -sessiontimeout.
Note: You must be root to execute the /nas/sbin/nas_config command.
Prerequisites
The Control Station supports three shells:
◆ bash
◆ ksh
◆ tcsh
Each shell supports a session timeout feature. The Control Station session timeout option sets the session timeout value across the system, automatically updating the appropriate values in /etc/environment for the bash and ksh shells, and the autologout variable in /etc/csh.cshrc for the tcsh shell.
After the value is set, newly created shells are affected (but not any currently running shells).
Note: You can change the session timeout value for individual users by setting the relevant variable in the user’s shell configuration file (for example, ~/.bashrc). Values are not restricted if you edit the configuration file directly.
Change the session timeout value
The default session timeout value for Control Station shell sessions is 60 minutes. Inactivity or idle time is defined as the time since a primary shell prompt was displayed and no input has been received. Therefore waiting at a prompt within a command for some indeterminate amount of time is not affected by the session timeout value.

31 of 94Release 7.0Security Configuration Guide on VNX™ for File
Disable session timeout
Action
To change the session timeout value, use this command syntax:# /nas/sbin/nas_config -sessiontimeout <minutes>
where:<minutes> = number of minutes for session timeout (in the range 5 through 240)
Example:
To change the session timeout value to 200 minutes, type:# /nas/sbin/nas_config -sessiontimeout 200
Output
#
Action
To disable session timeout, use this command syntax: # /nas/sbin/nas_config -sessiontimeout 0
or# /nas/sbin/nas_config -sessiontimeout off
Output
#

Security Configuration Guide on VNX™ for File32 of 94 Release 7.0
Customizing a login banner
The /etc/issue file contains a login banner message or system identification, which appears before the login prompt. A login banner can be used for any informational purpose, but is most often used to warn users about unauthorized or improper use of the system.
Note: You can also customize the login banner by using System (System Management tasks) > Control Station Properties. You must have root privileges to access the Login Banner field. The VNX Release Notes describe how to log in to Unisphere as root.
Step Action
1. Log in to the CLI with your username and password. You must have root privileges to access the /etc/issue file.
2. Edit the /etc/issue file by using vi or another text editor.
EMC suggests you add an extra carriage return at the end of the banner message.
Use spaces, tabs, and carriage returns to format the message. In general, you should limit the size of the message to no more than a single screen.
Note: Because the login banner appears with the login prompt, do not include any sensitive information in the banner message.
3. Log in to the CLI or Unisphere to view the login banner and verify your changes.

33 of 94Release 7.0Security Configuration Guide on VNX™ for File
Creating a message of the day
The message of the day file, /etc/motd, is displayed after a user successfully logs in. It can be used for any informational purpose, but it is particularly useful for sending messages that affect all users. The message might contain information about a server upgrade or an alert about an impending system shutdown. By default, this file is empty.
Step Action
1. Log in to the CLI with your username and password. You must have root privileges to access the /etc/motd file.
2. Edit the /etc/motd file by using vi or another text editor.
EMC suggests you add an extra carriage return at the end of the banner message.
Use spaces, tabs, and carriage returns to format the message. In general, you should limit the size of the message to no more than a single screen.
3. Log in to the CLI to display the MOTD and verify your changes.
Security Configuration Guide on VNX™ for File34 of 94 Release 7.0
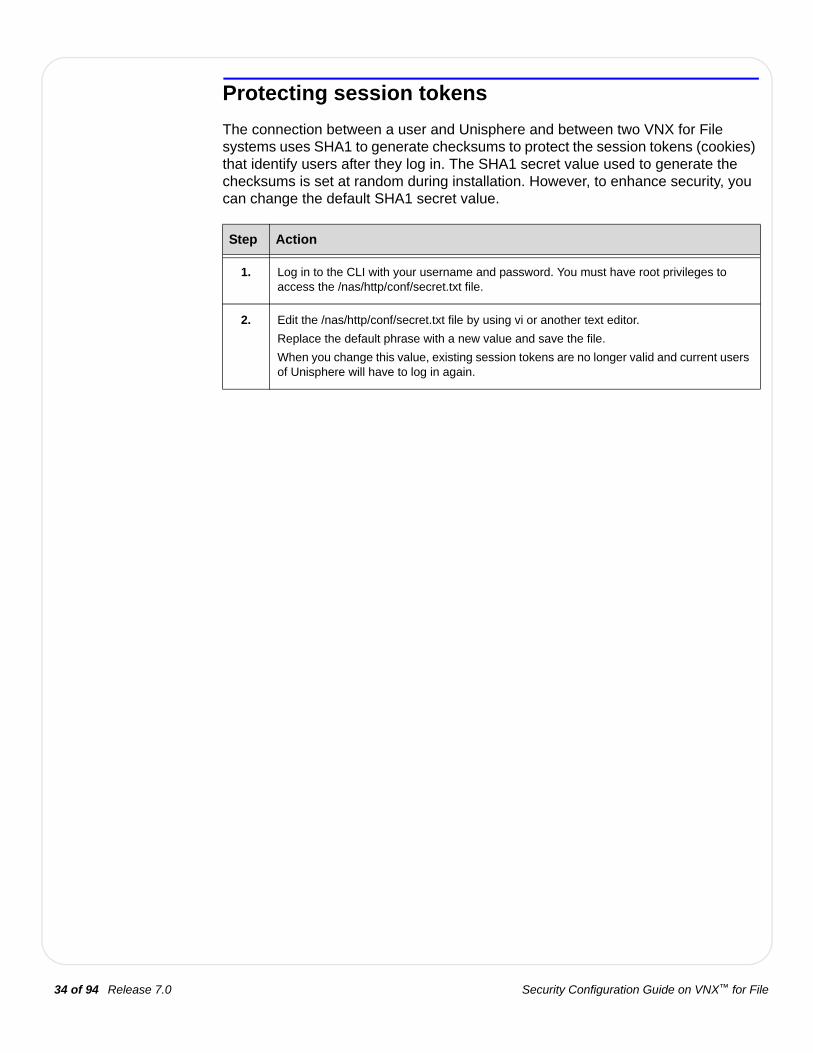
Protecting session tokens
The connection between a user and Unisphere and between two VNX for File systems uses SHA1 to generate checksums to protect the session tokens (cookies) that identify users after they log in. The SHA1 secret value used to generate the checksums is set at random during installation. However, to enhance security, you can change the default SHA1 secret value.
Step Action
1. Log in to the CLI with your username and password. You must have root privileges to access the /nas/http/conf/secret.txt file.
2. Edit the /nas/http/conf/secret.txt file by using vi or another text editor.
Replace the default phrase with a new value and save the file.
When you change this value, existing session tokens are no longer valid and current users of Unisphere will have to log in again.

35 of 94Release 7.0Security Configuration Guide on VNX™ for File
Configuring network encryption and authentication using the SSL protocol
Secure Socket Layer (SSL) is a session level protocol used to encrypt network transmissions on the Internet. It encrypts data and provides message and server authentication. It also supports client authentication if required by the server. SSL is independent of higher level protocols so it can encapsulate any of the application level protocols such as HTTP and LDAP:
◆ Hypertext Transfer Protocol (HTTP) is a fast, stateless, and object-oriented protocol used on the web. It enables web clients and servers to negotiate and interact. Unfortunately it has minimal security features. HTTPS (Secure) is a variant of HTTP used by a server that is SSL-enabled.
◆ Lightweight Directory Access Protocol (LDAP) is an industry-standard access protocol that runs directly over TCP/IP. It is the primary access protocol for Active Directory and other directory servers such as the Sun Java System Directory Server (iPlanet) and OpenLDAP.
VNX for File supports SSL for Data Mover HTTP and LDAP connections.
Using HTTPS
You enable SSL on Data Mover HTTP connections through the server_http command. Currently, the VNX for File FileMover feature uses HTTPS and SSL’s encryption and authentication features. Using VNX FileMover describes how to configure SSL with HTTP for use by FileMover. The keys and certificates used with SSL are managed by using PKI. PKI is available through the CLI and Unisphere. "Planning considerations for Public Key Infrastructure" on page 22 provides an overview of the PKI feature. "Configuring PKI" on page 38 and "Managing PKI" on page 52 describe how to configure and manage PKI through the CLI.
Using SSL with LDAP
You enable SSL on Data Mover LDAP connections through the server_ldap command. Currently, the VNX for File naming service support for OpenLDAP, iPlanet, and Active Directory uses LDAP and SSL’s encryption and authentication features. Configuring VNX Naming Services describes how to configure SSL with LDAP for use by the OpenLDAP and iPlanet LDAP-based directory servers. The keys and certificates used with SSL are managed through PKI. PKI is available through the CLI and Unisphere. "Planning considerations for Public Key Infrastructure" on page 22 provides an overview of the PKI feature. "Configuring PKI" on page 38 and "Managing PKI" on page 52 describe how to configure and manage PKI through the CLI.
Change the default SSL protocol
VNX for File supports the following SSL protocol versions:
◆ SSLv3
◆ TLSv1

Security Configuration Guide on VNX™ for File36 of 94 Release 7.0
Change the default SSL cipher suite
A cipher suite defines a set of technologies to secure your SSL communications:
◆ Key exchange algorithm (how the secret key used to encrypt the data is communicated from the client to the server). Examples: RSA key or Diffie-Hellman (DH)
◆ Authentication method (how hosts can authenticate the identity of remote hosts). Examples: RSA certificate, DSS certificate, or no authentication
◆ Encryption cipher (how to encrypt data). Examples: AES (256 or 128 bits), RC4 (128 bits or 56 bits), 3DES (168 bits), DES (56 or 40 bits), or null encryption
◆ Hash algorithm (ensuring data by providing a way to determine if data has been modified). Examples: SHA-1 or MD5
The supported cipher suites combine all these items. "Appendix B: Supported SSL cipher suites" on page 73 lists the SSL cipher suites supported by VNX for File.
Action
To change the default SSL protocol, use this command syntax:$ server_param <movername> -facility ssl -modify protocol -value <new_value>
where:<movername> = name of the Data Mover<new_value> = 0 (both SSLv3 and TLSv1), 1 (only SSLv3), or 2 (only TLSv1)
Note: The default value is 0.
Parameter and facility names are case-sensitive.
Examples:
To change the default SSL protocol to SSLv3 only, type:$ server_param server_2 -facility ssl -modify protocol -value 1
To change the default SSL protocol to TLSv1 only, type:$ server_param server_2 -facility ssl -modify protocol -value 2
Output
server_2 : done

37 of 94Release 7.0Security Configuration Guide on VNX™ for File
Postrequisites
After changing SSL parameter values, you must reboot the Data Mover for a SSL protocol and cipher suite change to take effect.
Action
To change the default SSL cipher suite, use this command syntax:$ server_param <movername> -facility ssl -modify cipher -value <new_value>
where:<movername> = name of the Data Mover.<new_value> = string that specifies the new cipher value. If the value includes any special characters (such as a semi-colon, space character, or exclamation), it must be enclosed in quotation marks.
Note: The default cipher suite value is ALL:!ADH:!SSLv2:@STRENGTH, which means that VNX for File supports all ciphers except the SSLv2, Anonymous Diffie-Hellman, and NULL ciphers, sorted by their “strength”, that is, the size of the encryption key.
Parameter and facility names are case-sensitive.
Example:
To change the default SSL cipher suite to a strong cipher (mainly AES128 and AES256) to be used by each new SSL connection, type:$ server_param server_2 -facility ssl -modify cipher -value ‘HIGH:@STRENGTH’
Output
server_2 : done

Security Configuration Guide on VNX™ for File38 of 94 Release 7.0
Configuring PKI
"Planning considerations for Public Key Infrastructure" on page 22 provides a general description of this feature.
Creating the certificate provided by the persona
The procedure for creating the certificate provided by the persona to the Data Mover varies slightly depending on whether the Certificate Authority (CA) that signs the certificate is an external CA or the Control Station:
1. "Generate a key set and certificate request" on page 39
2. "Send the certificate request to the CA" on page 42 (not required if using the Control Station)
3. "Import a CA-signed certificate" on page 43 (not required if using the Control Station)
Obtaining CA certificates
The procedure for obtaining the CA certificates used to confirm the identity of a server includes the following tasks:
1. "List the available CA certificates" on page 45
2. "Acquire a CA certificate" on page 45
3. "Import a CA certificate" on page 48
Using the Control Station as the CA
The procedure for using the Control Station as the CA includes the following tasks:
1. "Generate a new Control Station CA certificate" on page 48
2. "Display the certificate" on page 49
3. "Distribute the Control Station CA certificate" on page 51
Note: The Control Station continues to generate a separate key set for the SSL-based connection between the Apache web server (on behalf of Unisphere) and a user’s web browser. However, the Control Station now uses the CA key set to sign the Apache web server’s certificate, meaning the certificate is no longer self-signed. Installing Management Applications on VNX for File describes how to manage certificates for Unisphere.

39 of 94Release 7.0Security Configuration Guide on VNX™ for File
Generate a key set and certificate request
To create the certificate provided by the persona to the Data Mover, you first generate the persona’s public/private key set with a request for a CA to sign the certificate. The CA can be an external CA or the Control Station.
Create a certificate signed by an external CA
Action
To generate a key set and request for a certificate to be signed by an external CA, use this command syntax:$ server_certificate <movername> -persona -generate {<persona_name> | id=<persona_id>} -key_size <bits> {-cn | -common_name} <common_name>
where:<movername> = name of the physical Data Mover with which the persona is associated.
<persona_name> = name of the persona.
<persona_id> = ID of the persona. The ID is generated when the persona is created. You can determine the ID through the -persona -list command.
<bits> = key size, either 2048 or 4096 bits.
<common_name> = commonly used name, typically a hostname that describes the Data Mover with which the persona is associated. If the name includes any special characters (such as a semi-colon, space character, or exclamation), it must be enclosed in quotation marks.
Note: Certificate requests are generated in PEM format only.
Example:
To generate a key set and request for a certificate to be signed by an external CA, type:
$ server_certificate server_2 -persona -generate default -key_size 4096 -cn ‘name;1.2.3.4’
Output
server_2 : Starting key generation. This could take a long time ... done

Security Configuration Guide on VNX™ for File40 of 94 Release 7.0
Create a certificate signed by the Control Station
If you are using the Control Station to sign the certificate, you must specify the number of months the certificate is valid.
Create a certificate specifying detailed information about the persona
When you generate the persona’s public/private key set and certificate request, you can specify detailed information about the Data Mover. Typically this information includes details such as the organization that uses the Data Mover and where it is
Action
To generate a key set and request for a certificate to be signed by the Control Station, use this command syntax:$ server_certificate <movername> -persona -generate {<persona_name> | id=<persona_id>} -key_size <bits> -cs_sign_duration <# of months> {-cn | -common_name} <common_name>
where:<movername> = name of the physical Data Mover with which the persona is associated.
<persona_name> = name of the persona.
<persona_id> = ID of the persona. The ID is generated when the persona is created. You can determine the ID through the -persona -list command.
<bits> = key size, either 2048 or 4096 bits.
<# of months> = number of months the certificate is valid.
<common_name> = commonly used name, typically a hostname that describes the Data Mover with which the persona is associated. If the name includes any special characters (such as a semi-colon, space character, or exclamation), it must be enclosed in quotation marks.
Note: Certificate requests are generated in PEM format only.
Example:
To generate a key set and request for a certificate to be signed by the Control Station, type:
$ server_certificate server_2 -persona -generate default -key_size 4096 -cs_sign_duration 13 -cn ‘name;1.2.3.4’
Output
server_2 : Starting key generation. This could take a long time ... done

41 of 94Release 7.0Security Configuration Guide on VNX™ for File
located. In addition, you have the option of saving the certificate request to a specific file.
Action
To generate a key set and request for a certificate signed by an external CA, specifying detailed information about the Data Mover and saving the certificate request to a specific file, use this command syntax:$ server_certificate <movername> -persona -generate {<persona_name> | id=<persona_id>} -key_size <bits> {-cn | -common_name} <common_name> -ou <org_unit> -organization <organization> -location <location> -state <state> -country <country> -filename <output_path>
where:<movername> = name of the physical Data Mover with which the persona is associated.
<persona_name> = name of the persona.
<persona_id> = ID of the persona. The ID is generated when the persona is created. You can determine the ID through the -persona -list command.
<bits> = key size, either 2048 or 4096 bits.
<common_name> = commonly used name, typically a hostname that describes the Data Mover with which the persona is associated. If the name includes any special characters (such as a semi-colon, space character, or exclamation), it must be enclosed in quotation marks.
<org_unit> = name of the organizational unit. If the name includes any special characters (such as a semi-colon, space character, or exclamation), it must be enclosed in quotation marks.
<organization> = name of the organization.
<location> = physical location of the organization.
<state> = state where the organization is located.
<country> = country where the organization is located.
<output_path> = name and path where the generated request are written.
Note: The -ou, -organization, -location, -state, and -country arguments are optional.
Note: The -filename argument is only valid if the certificate will be signed by an external CA.
Note: Certificate requests are generated in PEM format only.
Example:
To generate a key set and request for a certificate signed by an external CA, specifying detailed information about the Data Mover and saving the certificate request to a specific file, type:
$ server_certificate server_2 -persona -generate default -key_size 4096 -cn ‘name;1.2.3.4’ -ou ‘my.org;my dept’ -organization EMC -location Hopkinton -state MA -country US -filename /tmp/server_2.1.request.pem
Output
server_2 : Starting key generation. This could take a long time ... done

Security Configuration Guide on VNX™ for File42 of 94 Release 7.0
Send the certificate request to the CA
Note: This task is not required if you are using the Control Station to sign the certificate. The Control Station automatically receives the certificate request.
If you are using an external CA to sign the certificate, a request to sign the public key is automatically generated along with the public/private key set. You must then send the certificate request to the CA.
Step Action
1. Display the persona’s properties to verify the content of the certificate request by using this command syntax:$ server_certificate <movername> -persona -info {-all | <persona_name> | id=<persona_id>}
where:<movername> = name of the physical Data Mover with which the persona is associated.
<persona_name> = name of the persona.
<persona_id> = ID of the persona. The ID is generated when the persona is created.
Example:
To display the properties for the default persona, including the certificate request, type:$ server_certificate server_2 -persona -info default
Output:
server_2 : id=1name=defaultnext state=Request Pending next certificate: request subject = CN=name;CN=1.2.3.4request: -----BEGIN CERTIFICATE REQUEST-----MIIB6TCCAVICAQYwDQYJKoZIhvcNAQEEBQAwWzELMAkGA1UEBhMCQVUxEzARBgNVBAgTClF1ZWVuc2xhbmQxGjAYBgNVBAoTEUNyeXB0U29mdCBQdHkgTHRkMRswGQYDVQQDExJUZXN0IENBICgxMDI0IGJpdCkwHhcNMDAxMDE2MjIzMTAzWhcNMDMwMTE0MjIzMTAzWjBjMQswCQYDVQQGEwJBVTETMBEGA1UECBMKUXVlZW5zbGFuZDEaMBgGA1UEChMRQ3J5cHRTb2Z0IFB0eSBMdGQxIzAhBgNVBAMTGlNlcnZlciB0ZXN0IGNlcnQgKDUxMiBiaXQpMFwwDQYJKoZIhvcNAQEBBQADSwAwSAJBAJ+zw4Qnlf8SMVIPFe9GEcStgOY2Ww/dgNdhjeD8ckUJNP5VZkVDTGiXav6ooKXfX3j/7tdkuD8Ey2//Kv7+ue0CAwEAATANBgkqhkiG9w0BAQQFAAOBgQCT0grFQeZaqYb5EYfk20XixZV4GmyAbXMftG1Eo7qGiMhYzRwGNWxEYojf5PZkYZXvSqZ/ZXHXa4g59jK/rJNnaVGMk+xIX8mxQvlV0n5O9PIha5BX5teZnkHKgL8aKKLKW1BK7YTngsfSzzaeame5iKfzitAE+OjGF+PFKbwX8Q==-----END CERTIFICATE REQUEST-----
2. If you have not already done so, save the certificate request to a file (for example, server_2.1.request.pem).
3. Send the .pem file to the CA using that company’s website or email.
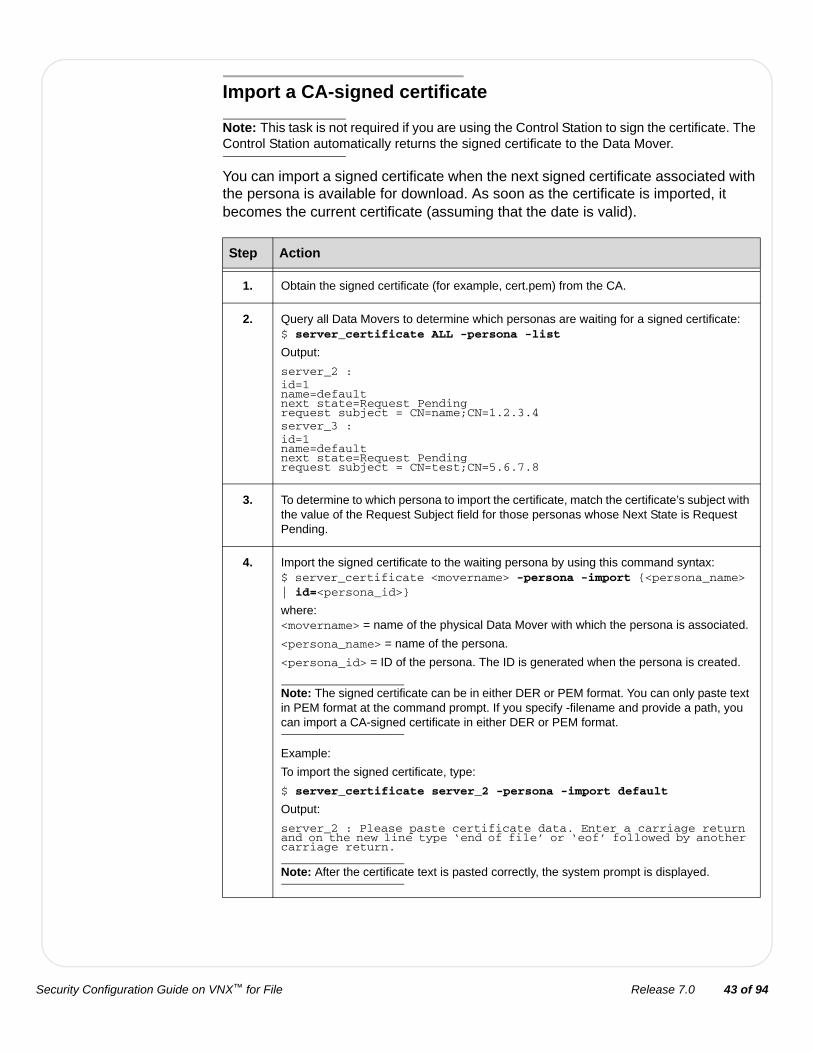
43 of 94Release 7.0Security Configuration Guide on VNX™ for File
Import a CA-signed certificate
Note: This task is not required if you are using the Control Station to sign the certificate. The Control Station automatically returns the signed certificate to the Data Mover.
You can import a signed certificate when the next signed certificate associated with the persona is available for download. As soon as the certificate is imported, it becomes the current certificate (assuming that the date is valid).
Step Action
1. Obtain the signed certificate (for example, cert.pem) from the CA.
2. Query all Data Movers to determine which personas are waiting for a signed certificate:$ server_certificate ALL -persona -list
Output:
server_2 : id=1name=defaultnext state=Request Pending request subject = CN=name;CN=1.2.3.4 server_3 : id=1name=defaultnext state=Request Pending request subject = CN=test;CN=5.6.7.8
3. To determine to which persona to import the certificate, match the certificate’s subject with the value of the Request Subject field for those personas whose Next State is Request Pending.
4. Import the signed certificate to the waiting persona by using this command syntax:$ server_certificate <movername> -persona -import {<persona_name> | id=<persona_id>}
where:<movername> = name of the physical Data Mover with which the persona is associated.
<persona_name> = name of the persona.
<persona_id> = ID of the persona. The ID is generated when the persona is created.
Note: The signed certificate can be in either DER or PEM format. You can only paste text in PEM format at the command prompt. If you specify -filename and provide a path, you can import a CA-signed certificate in either DER or PEM format.
Example:
To import the signed certificate, type:
$ server_certificate server_2 -persona -import default
Output:
server_2 : Please paste certificate data. Enter a carriage return and on the new line type ‘end of file’ or ‘eof’ followed by another carriage return.
Note: After the certificate text is pasted correctly, the system prompt is displayed.
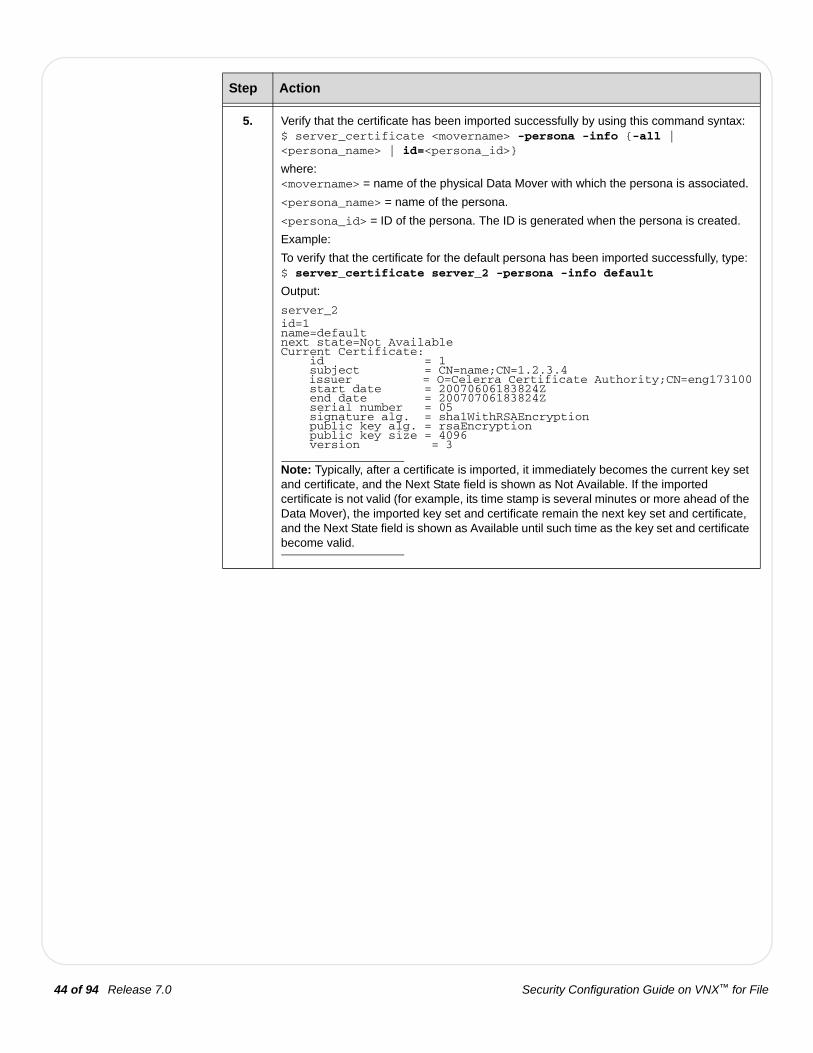
Security Configuration Guide on VNX™ for File44 of 94 Release 7.0
5. Verify that the certificate has been imported successfully by using this command syntax:$ server_certificate <movername> -persona -info {-all | <persona_name> | id=<persona_id>}
where:<movername> = name of the physical Data Mover with which the persona is associated.
<persona_name> = name of the persona.
<persona_id> = ID of the persona. The ID is generated when the persona is created.
Example:
To verify that the certificate for the default persona has been imported successfully, type:$ server_certificate server_2 -persona -info default
Output:
server_2id=1name=defaultnext state=Not Available Current Certificate: id = 1 subject = CN=name;CN=1.2.3.4 issuer = O=Celerra Certificate Authority;CN=eng173100 start date = 20070606183824Z end date = 20070706183824Z serial number = 05 signature alg. = sha1WithRSAEncryption public key alg. = rsaEncryption public key size = 4096 version = 3
Note: Typically, after a certificate is imported, it immediately becomes the current key set and certificate, and the Next State field is shown as Not Available. If the imported certificate is not valid (for example, its time stamp is several minutes or more ahead of the Data Mover), the imported key set and certificate remain the next key set and certificate, and the Next State field is shown as Available until such time as the key set and certificate become valid.
Step Action
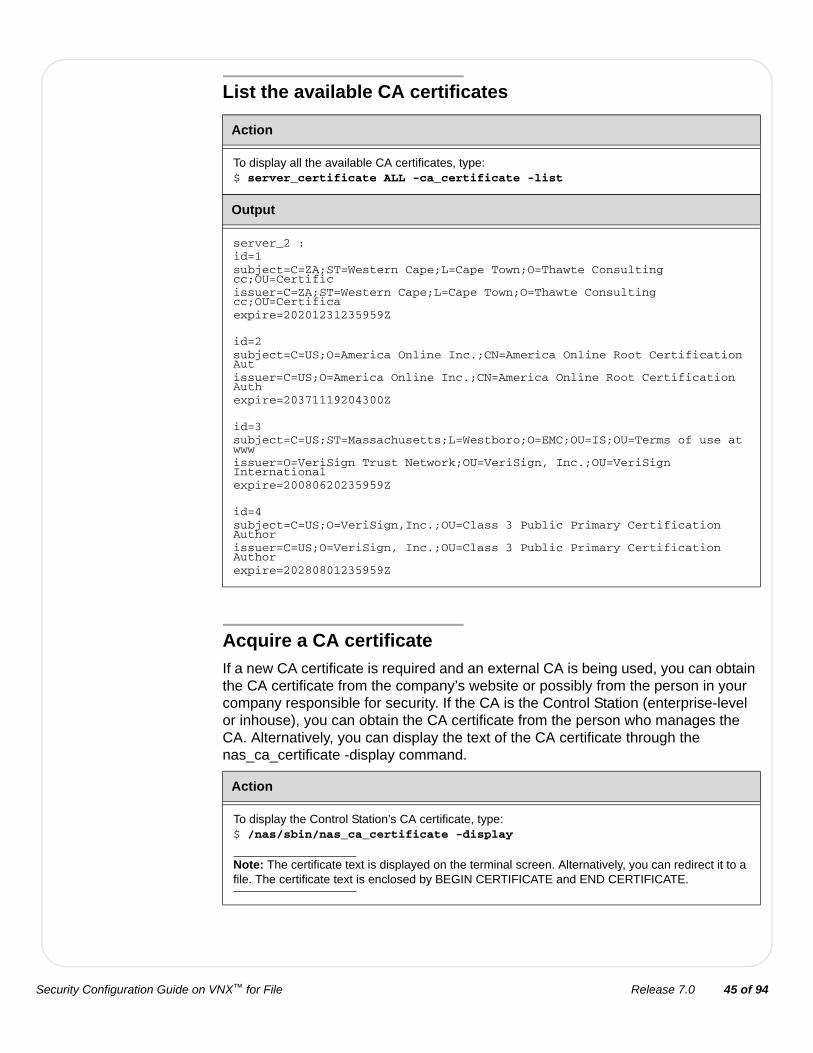
45 of 94Release 7.0Security Configuration Guide on VNX™ for File
List the available CA certificates
Acquire a CA certificate
If a new CA certificate is required and an external CA is being used, you can obtain the CA certificate from the company’s website or possibly from the person in your company responsible for security. If the CA is the Control Station (enterprise-level or inhouse), you can obtain the CA certificate from the person who manages the CA. Alternatively, you can display the text of the CA certificate through the nas_ca_certificate -display command.
Action
To display all the available CA certificates, type:$ server_certificate ALL -ca_certificate -list
Output
server_2 : id=1subject=C=ZA;ST=Western Cape;L=Cape Town;O=Thawte Consulting cc;OU=Certificissuer=C=ZA;ST=Western Cape;L=Cape Town;O=Thawte Consulting cc;OU=Certificaexpire=20201231235959Z
id=2subject=C=US;O=America Online Inc.;CN=America Online Root Certification Autissuer=C=US;O=America Online Inc.;CN=America Online Root Certification Authexpire=20371119204300Z
id=3subject=C=US;ST=Massachusetts;L=Westboro;O=EMC;OU=IS;OU=Terms of use at wwwissuer=O=VeriSign Trust Network;OU=VeriSign, Inc.;OU=VeriSign Internationalexpire=20080620235959Z
id=4subject=C=US;O=VeriSign,Inc.;OU=Class 3 Public Primary Certification Authorissuer=C=US;O=VeriSign, Inc.;OU=Class 3 Public Primary Certification Authorexpire=20280801235959Z
Action
To display the Control Station’s CA certificate, type:$ /nas/sbin/nas_ca_certificate -display
Note: The certificate text is displayed on the terminal screen. Alternatively, you can redirect it to a file. The certificate text is enclosed by BEGIN CERTIFICATE and END CERTIFICATE.

Security Configuration Guide on VNX™ for File46 of 94 Release 7.0
Output
Certificate: Data: Version: 3 (0x2) Serial Number: 3 (0x3) Signature Algorithm: sha1WithRSAEncryption Issuer: O=Celerra Certificate Authority, CN=eng173100 Validity Not Before: Mar 23 21:07:40 2007 GMT Not After : Mar 21 21:07:40 2012 GMT Subject: O=Celerra Certificate Authority, CN=eng173100 Subject Public Key Info: Public Key Algorithm: rsaEncryption RSA Public Key: (2048 bit) Modulus (2048 bit): 00:da:b2:37:86:05:a3:73:d5:9a:04:ba:db:05:97: d2:12:fe:1a:79:06:19:eb:c7:2c:c2:51:93:7f:7a: 93:59:37:63:1e:53:b3:8d:d2:7f:f0:e3:49:42:22: f4:26:9b:b4:e4:a6:40:6d:8d:e7:ea:07:8e:ca:b7: 7e:88:71:9d:11:27:5a:e3:57:16:03:a7:ee:19:25: 07:d9:42:17:b4:eb:e6:97:61:13:54:62:03:ec:93: b7:e6:f1:7f:21:f0:71:2d:c4:8a:8f:20:d1:ab:5a: 6a:6c:f1:f6:2f:26:8c:39:32:93:93:67:bb:03:a7: 22:29:00:11:e0:a1:12:4b:02:79:fb:0f:fc:54:90: 30:65:cd:ea:e6:84:cc:91:fe:21:9c:c1:91:f3:17: 1e:44:7b:6f:23:e9:17:63:88:92:ea:80:a5:ca:38: 9a:b3:f8:08:cb:32:16:56:8b:c4:f7:54:ef:75:db: 36:7e:cf:ef:75:44:11:69:bf:7c:06:97:d1:87:ff: 5f:22:b5:ad:c3:94:a5:f8:a7:69:21:60:5a:04:5e: 00:15:04:77:47:03:ec:c5:7a:a2:bf:32:0e:4d:d8: dc:44:fa:26:39:16:84:a7:1f:11:ef:a3:37:39:a6: 35:b1:e9:a8:aa:a8:4a:72:8a:b8:c4:bf:04:70:12: b3:31 Exponent: 65537 (0x10001)

47 of 94Release 7.0Security Configuration Guide on VNX™ for File
Output
X509v3 extensions: X509v3 Subject Key Identifier: 35:06:F2:FE:CC:21:4B:92:DA:74:C9:47:CE:BB:37:21:5E:04:E2:E6 X509v3 Authority Key Identifier: keyid:35:06:F2:FE:CC:21:4B:92:DA:74:C9:47:CE:BB:37:21:5E:04:E2:E6 DirName:/O=Celerra Certificate Authority/CN=eng173100 serial:00X509v3 Basic Constraints: CA:TRUE X509v3 Subject Alternative Name: DNS:eng173100 Signature Algorithm: sha1WithRSAEncryption 09:c3:13:26:16:be:44:56:82:5d:0e:63:07:19:28:f3:6a:c4: f3:bf:93:25:85:c3:55:48:4e:07:84:1d:ea:18:cf:8b:b8:2d: 54:13:25:2f:c9:75:c1:28:39:88:91:04:df:47:2c:c0:8f:a4: ba:a6:cd:aa:59:8a:33:7d:55:29:aa:23:59:ab:be:1d:57:f6: 20:e7:2b:68:98:f2:5d:ed:58:31:d5:62:85:5d:6a:3f:6d:2b: 2d:f3:41:be:97:3f:cf:05:8b:7e:f5:d7:e8:7c:66:b2:ea:ed: 58:d4:f0:1c:91:d8:80:af:3c:ff:14:b6:e7:51:73:bb:64:84: 26:95:67:c6:60:32:67:c1:f7:66:f4:79:b5:5d:32:33:3c:00: 8c:75:7d:02:06:d3:1a:4e:18:0b:86:78:24:37:18:20:31:61: 59:dd:78:1f:88:f8:38:a0:f4:25:2e:c8:85:4f:ce:8a:88:f4: 4f:12:7e:ee:84:52:b4:91:fe:ff:07:6c:32:ca:41:d0:a6:c0: 9d:8f:cc:e8:74:ee:ab:f3:a5:b9:ad:bb:d7:79:67:89:34:52: b4:6b:39:db:83:27:43:84:c3:c3:ca:cd:b2:0c:1d:f5:20:de: 7a:dc:f0:1f:fc:70:5b:71:bf:e3:14:31:4c:7e:eb:b5:11:9c: 96:bf:fe:6f-----BEGIN CERTIFICATE-----MIIDoDCCAoigAwIBAgIBAzANBgkqhkiG9w0BAQUFADA8MSYwJAYDVQQKEx1DZWxlcnJhIENlcnRpZmljYXRlIEF1dGhvcml0eTESMBAGA1UEAxMJZW5nMTczMTAwMB4XDTA3MDMyMzIxMDc0MFoXDTEyMDMyMTIxMDc0MFowPDEmMCQGA1UEChMdQ2VsZXJyYSBDZXJ0aWZpY2F0ZSBBdXRob3JpdHkxEjAQBgNVBAMTCWVuZzE3MzEwMDCCASIwDQYJKoZIhvcNAQEBBQADggEPADCCAQoCggEBANqyN4YFo3PVmgS62wWX0hL+GnkGGevHLMJRk396k1k3Yx5Ts43Sf/DjSUIi9CabtOSmQG2N5+oHjsq3fohxnREnWuNXFgOn7hklB9lCF7Tr5pdhE1RiA+yTt+bxfyHwcS3Eio8g0ataamzx9i8mjDkyk5NnuwOnIikAEeChEksCefsP/FSQMGXN6uaEzJH+IZzBkfMXHkR7byPpF2OIkuqApco4mrP4CMsyFlaLxPdU73XbNn7P73VEEWm/fAaX0Yf/XyK1rcOUpfinaSFgWgReABUEd0cD7MV6or8yDk3Y3ET6JjkWhKcfEe+jNzmmNbHpqKqoSnKKuMS/BHASszECAwEAAaOBrDCBqTAdBgNVHQ4EFgQUNQby/swhS5LadMlHzrs3IV4E4uYwZAYDVR0jBF0wW4AUNQby/swhS5LadMlHzrs3IV4E4uahQKQ+MDwxJjAkBgNVBAoTHUNlbGVycmEgQ2VydGlmaWNhdGUgQXV0aG9yaXR5MRIwEAYDVQQDEwllbmcxNzMxMDCCAQAwDAYDVR0TBAUwAwEB/zAUBgNVHREEDTALggllbmcxNzMxMDAwDQYJKoZIhvcNAQEFBQADggEBAAnDEyYWvkRWgl0OYwcZKPNqxPO/kyWFw1VITgeEHeoYz4u4LVQTJS/JdcEoOYiRBN9HLMCPpLqmzapZijN9VSmqI1mrvh1X9iDnK2iY8l3tWDHVYoVdaj9tKy3zQb6XP88Fi3711+h8ZrLq7VjU8ByR2ICvPP8UtudRc7tkhCaVZ8ZgMmfB92b0ebVdMjM8AIx1fQIG0xpOGAuGeCQ3GCAxYVndeB+I+Dig9CUuyIVPzoqI9E8Sfu6EUrSR/v8HbDLKQdCmwJ2PzOh07qvzpbmtu9d5Z4k0UrRrOduDJ0OEw8PKzbIMHfUg3nrc8B/8cFtxv+MUMUx+67URnJa//m8=-----END CERTIFICATE-----
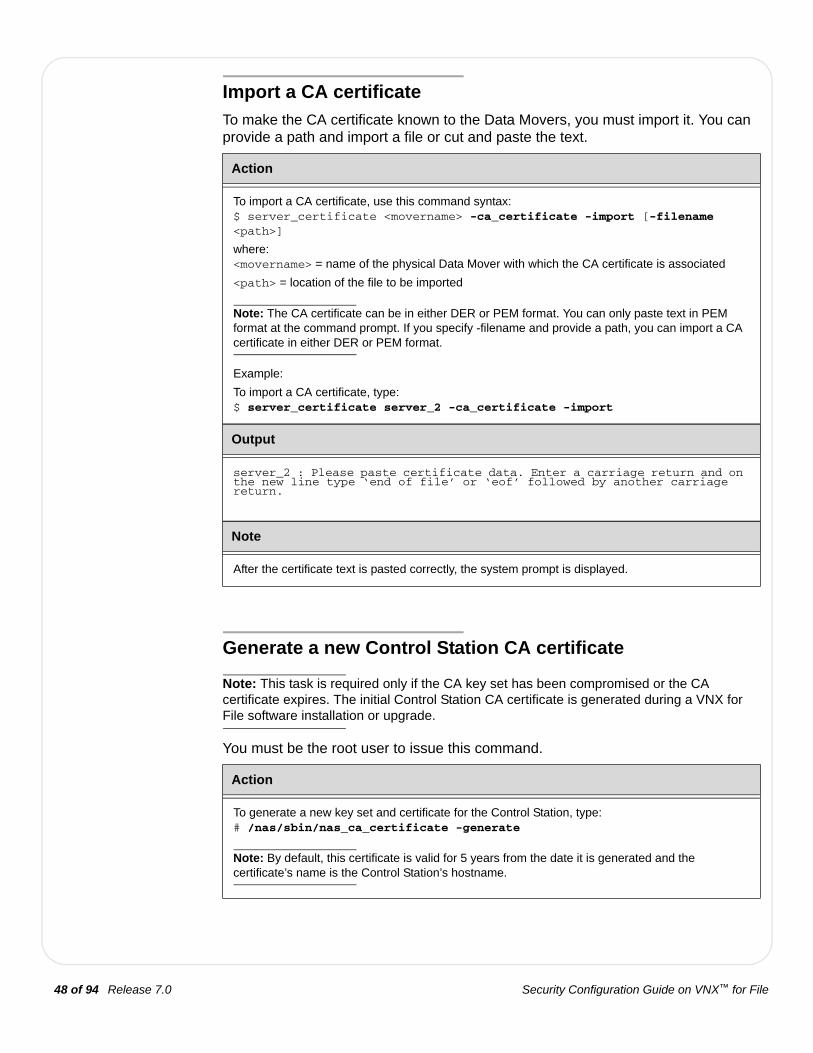
Security Configuration Guide on VNX™ for File48 of 94 Release 7.0
Import a CA certificate
To make the CA certificate known to the Data Movers, you must import it. You can provide a path and import a file or cut and paste the text.
Generate a new Control Station CA certificate
Note: This task is required only if the CA key set has been compromised or the CA certificate expires. The initial Control Station CA certificate is generated during a VNX for File software installation or upgrade.
You must be the root user to issue this command.
Action
To import a CA certificate, use this command syntax:$ server_certificate <movername> -ca_certificate -import [-filename <path>]
where:<movername> = name of the physical Data Mover with which the CA certificate is associated
<path> = location of the file to be imported
Note: The CA certificate can be in either DER or PEM format. You can only paste text in PEM format at the command prompt. If you specify -filename and provide a path, you can import a CA certificate in either DER or PEM format.
Example:
To import a CA certificate, type:$ server_certificate server_2 -ca_certificate -import
Output
server_2 : Please paste certificate data. Enter a carriage return and on the new line type ‘end of file’ or ‘eof’ followed by another carriage return.
Note
After the certificate text is pasted correctly, the system prompt is displayed.
Action
To generate a new key set and certificate for the Control Station, type:# /nas/sbin/nas_ca_certificate -generate
Note: By default, this certificate is valid for 5 years from the date it is generated and the certificate’s name is the Control Station’s hostname.

49 of 94Release 7.0Security Configuration Guide on VNX™ for File
Display the certificate
Display the text of the Control Station CA certificate so you can copy it for distribution to network clients.
Output
New keys and certificate were successfully generated.
Action
To display the Control Station’s CA certificate, type:$ /nas/sbin/nas_ca_certificate -display
Note: The certificate text is displayed on the terminal screen. Alternatively, you can redirect it to a file.
Output
Certificate: Data: Version: 3 (0x2) Serial Number: 3 (0x3) Signature Algorithm: sha1WithRSAEncryption Issuer: O=Celerra Certificate Authority, CN=eng173100 Validity Not Before: Mar 23 21:07:40 2007 GMT Not After : Mar 21 21:07:40 2012 GMT Subject: O=Celerra Certificate Authority, CN=eng173100 Subject Public Key Info: Public Key Algorithm: rsaEncryption RSA Public Key: (2048 bit) Modulus (2048 bit): 00:da:b2:37:86:05:a3:73:d5:9a:04:ba:db:05:97: d2:12:fe:1a:79:06:19:eb:c7:2c:c2:51:93:7f:7a: 93:59:37:63:1e:53:b3:8d:d2:7f:f0:e3:49:42:22: f4:26:9b:b4:e4:a6:40:6d:8d:e7:ea:07:8e:ca:b7: 7e:88:71:9d:11:27:5a:e3:57:16:03:a7:ee:19:25: 07:d9:42:17:b4:eb:e6:97:61:13:54:62:03:ec:93: b7:e6:f1:7f:21:f0:71:2d:c4:8a:8f:20:d1:ab:5a: 6a:6c:f1:f6:2f:26:8c:39:32:93:93:67:bb:03:a7: 22:29:00:11:e0:a1:12:4b:02:79:fb:0f:fc:54:90: 30:65:cd:ea:e6:84:cc:91:fe:21:9c:c1:91:f3:17: 1e:44:7b:6f:23:e9:17:63:88:92:ea:80:a5:ca:38: 9a:b3:f8:08:cb:32:16:56:8b:c4:f7:54:ef:75:db: 36:7e:cf:ef:75:44:11:69:bf:7c:06:97:d1:87:ff: 5f:22:b5:ad:c3:94:a5:f8:a7:69:21:60:5a:04:5e: 00:15:04:77:47:03:ec:c5:7a:a2:bf:32:0e:4d:d8: dc:44:fa:26:39:16:84:a7:1f:11:ef:a3:37:39:a6: 35:b1:e9:a8:aa:a8:4a:72:8a:b8:c4:bf:04:70:12: b3:31 Exponent: 65537 (0x10001)

Security Configuration Guide on VNX™ for File50 of 94 Release 7.0
Output
X509v3 extensions: X509v3 Subject Key Identifier: 35:06:F2:FE:CC:21:4B:92:DA:74:C9:47:CE:BB:37:21:5E:04:E2:E6 X509v3 Authority Key Identifier: keyid:35:06:F2:FE:CC:21:4B:92:DA:74:C9:47:CE:BB:37:21:5E:04:E2:E6 DirName:/O=Celerra Certificate Authority/CN=eng173100 serial:00X509v3 Basic Constraints: CA:TRUE X509v3 Subject Alternative Name: DNS:eng173100 Signature Algorithm: sha1WithRSAEncryption 09:c3:13:26:16:be:44:56:82:5d:0e:63:07:19:28:f3:6a:c4: f3:bf:93:25:85:c3:55:48:4e:07:84:1d:ea:18:cf:8b:b8:2d: 54:13:25:2f:c9:75:c1:28:39:88:91:04:df:47:2c:c0:8f:a4: ba:a6:cd:aa:59:8a:33:7d:55:29:aa:23:59:ab:be:1d:57:f6: 20:e7:2b:68:98:f2:5d:ed:58:31:d5:62:85:5d:6a:3f:6d:2b: 2d:f3:41:be:97:3f:cf:05:8b:7e:f5:d7:e8:7c:66:b2:ea:ed: 58:d4:f0:1c:91:d8:80:af:3c:ff:14:b6:e7:51:73:bb:64:84: 26:95:67:c6:60:32:67:c1:f7:66:f4:79:b5:5d:32:33:3c:00: 8c:75:7d:02:06:d3:1a:4e:18:0b:86:78:24:37:18:20:31:61: 59:dd:78:1f:88:f8:38:a0:f4:25:2e:c8:85:4f:ce:8a:88:f4: 4f:12:7e:ee:84:52:b4:91:fe:ff:07:6c:32:ca:41:d0:a6:c0: 9d:8f:cc:e8:74:ee:ab:f3:a5:b9:ad:bb:d7:79:67:89:34:52: b4:6b:39:db:83:27:43:84:c3:c3:ca:cd:b2:0c:1d:f5:20:de: 7a:dc:f0:1f:fc:70:5b:71:bf:e3:14:31:4c:7e:eb:b5:11:9c: 96:bf:fe:6f-----BEGIN CERTIFICATE-----MIIDoDCCAoigAwIBAgIBAzANBgkqhkiG9w0BAQUFADA8MSYwJAYDVQQKEx1DZWxlcnJhIENlcnRpZmljYXRlIEF1dGhvcml0eTESMBAGA1UEAxMJZW5nMTczMTAwMB4XDTA3MDMyMzIxMDc0MFoXDTEyMDMyMTIxMDc0MFowPDEmMCQGA1UEChMdQ2VsZXJyYSBDZXJ0aWZpY2F0ZSBBdXRob3JpdHkxEjAQBgNVBAMTCWVuZzE3MzEwMDCCASIwDQYJKoZIhvcNAQEBBQADggEPADCCAQoCggEBANqyN4YFo3PVmgS62wWX0hL+GnkGGevHLMJRk396k1k3Yx5Ts43Sf/DjSUIi9CabtOSmQG2N5+oHjsq3fohxnREnWuNXFgOn7hklB9lCF7Tr5pdhE1RiA+yTt+bxfyHwcS3Eio8g0ataamzx9i8mjDkyk5NnuwOnIikAEeChEksCefsP/FSQMGXN6uaEzJH+IZzBkfMXHkR7byPpF2OIkuqApco4mrP4CMsyFlaLxPdU73XbNn7P73VEEWm/fAaX0Yf/XyK1rcOUpfinaSFgWgReABUEd0cD7MV6or8yDk3Y3ET6JjkWhKcfEe+jNzmmNbHpqKqoSnKKuMS/BHASszECAwEAAaOBrDCBqTAdBgNVHQ4EFgQUNQby/swhS5LadMlHzrs3IV4E4uYwZAYDVR0jBF0wW4AUNQby/swhS5LadMlHzrs3IV4E4uahQKQ+MDwxJjAkBgNVBAoTHUNlbGVycmEgQ2VydGlmaWNhdGUgQXV0aG9yaXR5MRIwEAYDVQQDEwllbmcxNzMxMDCCAQAwDAYDVR0TBAUwAwEB/zAUBgNVHREEDTALggllbmcxNzMxMDAwDQYJKoZIhvcNAQEFBQADggEBAAnDEyYWvkRWgl0OYwcZKPNqxPO/kyWFw1VITgeEHeoYz4u4LVQTJS/JdcEoOYiRBN9HLMCPpLqmzapZijN9VSmqI1mrvh1X9iDnK2iY8l3tWDHVYoVdaj9tKy3zQb6XP88Fi3711+h8ZrLq7VjU8ByR2ICvPP8UtudRc7tkhCaVZ8ZgMmfB92b0ebVdMjM8AIx1fQIG0xpOGAuGeCQ3GCAxYVndeB+I+Dig9CUuyIVPzoqI9E8Sfu6EUrSR/v8HbDLKQdCmwJ2PzOh07qvzpbmtu9d5Z4k0UrRrOduDJ0OEw8PKzbIMHfUg3nrc8B/8cFtxv+MUMUx+67URnJa//m8=-----END CERTIFICATE-----

51 of 94Release 7.0Security Configuration Guide on VNX™ for File
Distribute the Control Station CA certificate
You must make the Control Station CA certificate available so it can be imported by network clients and used to recognize certificates sent by Data Movers signed by this Control Station.
Step Action
1. Save the Control Station CA certificate text to a file (for example, cs_ca_cert.crt).
2. Make this .crt file available to network clients through an appropriate mechanism (FTP or email).
3. Regenerate a new key set and certificate request and import a signed certificate for any personas whose certificates are signed by the Control Station. "Creating the certificate provided by the persona" on page 38 describes this procedure.
4. If a Data Mover is a client to another Data Mover, import the new CA certificate to the appropriate Data Mover. "Obtaining CA certificates" on page 38 describes this procedure.

Security Configuration Guide on VNX™ for File52 of 94 Release 7.0
Managing PKI
"Planning considerations for Public Key Infrastructure" on page 22 provides a general description of this feature.
The tasks to manage the persona key sets and certificates are:
◆ "Display key set and certificate properties" on page 52
◆ "Check for expired key sets" on page 53
◆ "Clear key sets" on page 53
The tasks to manage the CA certificate are:
◆ "Display CA certificate properties" on page 54
◆ "Check for expired CA certificates" on page 54
◆ "Delete CA certificates" on page 55
Display key set and certificate properties
Action
To display the properties of a key set and certificate, use this command syntax:$ server_certificate <movername> -persona -info {-all | <persona_name> | id=<persona_id>}
where:<movername> = name of the physical Data Mover with which the persona is associated.
<persona_name> = name of the persona.
<persona_id> = ID of the persona. The ID is generated when the persona is created.
Example:
To display the key set and certificate for the persona named default, type:$ server_certificate server_2 -persona -info default
Output
server_2 : id=1 name=default next state=Not Available CURRENT CERTIFICATE: id = 1 subject = CN=test;CN=1.2.3.4 issuer = O=Celerra Certificate Authority;CN=eng173100 start date = 20070606183824Z end date = 20070706183824Z serial number = 05 signature alg. = sha1WithRSAEncryption public key alg. = rsaEncryption public key size = 4096 version = 3

53 of 94Release 7.0Security Configuration Guide on VNX™ for File
Check for expired key sets
There is no automated way to check for expired key sets and certificates. Instead you must check for expired certificates by listing the personas and examining the expiration dates of the certificates associated with each persona.
Clear key sets
You should clear a key set when it has expired, the service is not longer needed, or the certificate request will not be fulfilled. You can clear a persona’s current key set and certificate, the next key set and certificate, or both.
Action
To list all the key sets and certificates that are currently available, type:$ server_certificate ALL -persona -list
Output
server_2 : id=1 name=default next state=Request Pending request subject=CN=name;CN=1.2.3.4server_3 : id=1 name=default next state=Not Available CURRENT CERTIFICATE: id=1 subject=CN=test;CN=1.2.3.4 expire=20070608183824Z issuer=O=Celerra Certificate Authority;CN=eng173100
Note
A current certificate’s expiration date is listed in the Expire field. 20070608183824Z translates to Fri June 08 18:38:24 GMT 2007.
Action
To clear a key set and the associated certificate, use this command syntax:$ server_certificate <movername> -persona -clear {<persona_name> | id=<persona_id>} {-next | -current | -both}
where:<movername> = name assigned to the physical Data Mover with which the persona is associated.
<persona_name> = name of the persona.
<persona_id> = ID of the persona. The ID is generated when the persona is created.
Example:
To clear both the current and next key set and certificate for the persona on server_2, type:$ server_certificate server_2 -persona -clear default -both

Security Configuration Guide on VNX™ for File54 of 94 Release 7.0
Display CA certificate properties
Check for expired CA certificates
There is no automated way to check for expired CA certificates. Instead you must check for expired certificates by listing the CA certificates and examining the expiration dates.
Output
server_2 : done
Action
To display the properties of a CA certificate, use this command syntax:$ server_certificate <movername> -ca_certificate -info {-all | <certificate_id>}
where:<movername> = name of the physical Data Mover with which the CA certificate is associated.
<certificate_id> = ID of the certificate.
Note: Use the -all option to display the properties of all the CA certificates available to the Data Mover.
Example:
To display the properties of the CA certificate identified by certificate ID 2, type:$ server_certificate server_2 -ca_certificate -info 2
Output
server_2 :id=2subject = C=US;O=VeriSign, Inc.;OU=Class 3 Public Primary Certification Authorityissuer = C=US;O=VeriSign, Inc.;OU=Class 3 Public Primary Certification Authoritystart = 19960129000000Zexpire = 20280801235959Zsignature alg. = md2WithRSAEncryptionpublic key alg. = rsaEncryptionpublic key size = 2048 bitsserial number = 70ba e41d 10d9 2934 b638 ca7b 03cc babfversion = 1
Action
To list all the CA certificates that are currently available, type:$ server_certificate ALL -ca_certificate -list

55 of 94Release 7.0Security Configuration Guide on VNX™ for File
Delete CA certificates
You should delete a CA certificate when it has expired, been compromised, or is no longer needed for authenticating a server.
Output
server_2 :id=1subject=O=Celerra Certificate Authority;CN=sorentoissuer=O=Celerra Certificate Authority;CN=sorentoexpire=20120318032639Zid=2subject=C=US;O=VeriSign, Inc.;OU=Class 3 Public Primary Certification Authorissuer=C=US;O=VeriSign, Inc.;OU=Class 3 Public Primary Certification Authorexpire=20280801235959Z
server_3 :id=1subject=O=Celerra Certificate Authority;CN=zeus-csissuer=O=Celerra Certificate Authority;CN=zeus-csexpire=20120606181215Z
Note
A certificate’s expiration date is listed in the Expire field. 20120318032639Z translates to March 18 03:26:39 GMT 2012.
Action
To delete a CA certificate, use this command syntax:$ server_certificate <movername> -ca_certificate -delete {-all | <certificate_id>}
where:<movername> = name of the physical Data Mover with which the CA certificate is associated.
<certificate_id> = ID of the certificate. You can determine the ID through the -ca_certificate -list command.
Note: Use the -all option to delete all the CA certificates available to the Data Mover.
Example:
To delete the CA certificate on server_2 identified by its ID number, type:$ server_certificate server_2 -ca_certificate -delete 1
Output
server_2 : done
Security Configuration Guide on VNX™ for File56 of 94 Release 7.0
Troubleshooting
As part of an effort to continuously improve and enhance the performance and capabilities of its product lines, EMC periodically releases new versions of its hardware and software. Therefore, some functions described in this document may not be supported by all revisions of the software or hardware currently in use. For the most up-to-date information on product features, refer to your product release notes.
If a product does not function properly or does not function as described in this document, please contact your EMC representative.
Where to get help
Product information – For documentation, release notes, software updates, or for information about EMC products, licensing, and service, go to the EMC Online Support website (registration required).
Troubleshooting – For troubleshooting information, go to the EMC Online Support website, search for Celerra Tools, and select Celerra Troubleshooting.
Technical support – For technical support, go to the EMC Online Support website. On the Support page, you can access Support Forums, request a product enhancement, talk directly to an EMC representative, or open a service request. To open a service request, you must have a valid support agreement. Please contact you EMC sales representative for details about obtaining a valid support agreement or to answer any questions about your account.
Note: Do not request a specific support representative unless one has already been assigned to your particular system problem.
Problem Resolution Roadmap for VNX contains additional information about using the EMC Online Support website and resolving problems.
EMC E-Lab Interoperability Navigator
The EMC E-LabTM Interoperability Navigator is a searchable, web-based application that provides access to EMC interoperability support matrices. It is available at the EMC Online Support website. After logging in, locate the applicable Support by Product page, find Tools, and click E-Lab Interoperability Navigator.
Troubleshooting the Control Station connection to a LDAP-based directory server
Testing the Control Station connection to a LDAP-based directory server
You can verify that the Control Station’s connection to an LDAP-based directory server is functioning by selecting Test on Settings > Security (Security tasks) > Manage LDAP Domain for File. If you have specified both a primary and backup directory server, both connections are tested together.

57 of 94Release 7.0Security Configuration Guide on VNX™ for File
Note: A backup directory server must support all the same domain settings as the primary directory server.
If one directory server cannot be accessed successfully, the Test function will report which connection attempt failed. Failure indicates that binding credentials, user or group attributes and search paths are incorrect.
Note: The user account (also known as the bind distinguished name) that VNX for File uses to bind to the LDAP service must exist on the directory server.
Creating the user account that binds to the LDAP-based directory service
EMC recommends that the user account used to bind to the LDAP-based directory service be as restricted as possible (such as an account whose primary group is Domain Guests). If the user account fails to bind to the directory service, check the following:
1. Verify that the GPO User Rights Assignment does not include guests in the list of users denied access to the domain controller from the network.
2. In those environments in which guests are blocked from connecting to domain controllers, the user account’s primary group may need to be Domain Users rather than Domain Guests.
3. If access problems persist, a more privileged user account must be used.
Ensure that the account chosen has read/search privileges for the directory.
Setting up the SSL session
For the SSL session to be created successfully, the following configuration tasks must have been performed correctly:
◆ The certificate uploaded to the Control Station must be the public certificate from the CA that signed the LDAP-based directory server’s SSL server certificate. The Control Station uses this CA certificate to verify the certificate received from the LDAP server.
◆ The hostname of the LDAP-based directory server (specified in the Primary and Backup fields on Settings > Security (Security tasks) > Manage LDAP Domain for File) and the common name provided in the directory server’s certificate must match. The value you specify depends on the format of the subject in the directory server’s certificate; typically the subject is indicated by its hostname although it may be the IP address.
Troubleshooting local user accounts
Note: Only global and LDAP user accounts are supported in VNX 7.0.
Enabling a disabled account by changing its password
Unisphere, like the Linux operating system, enables a previously disabled local user account if you change the password for that user account. Other changes to a disabled user account do not result in the account being enabled.
Security Configuration Guide on VNX™ for File58 of 94 Release 7.0
Disabling your user account
If you disable your own account while logged in (using Settings > Security > User Management > Users > Disable):
◆ If you are logged in to Unisphere and attempt to perform any additional operations, you will receive the error "User is not allowed to perform this operation".
◆ If you are logged in to the VNX CLI for File when you disable your account, you can continue to perform additional operations. However, once you log out, you will not be able to log in again.
Using local user accounts
VNX for File provides the ability to create strictly local user accounts and domain-mapped local user accounts.
You should use a local user account to log in directly to a specific VNX for File system. This type of local user account is relevant only to the VNX for File on which it was created and is used to manage that one VNX for File.
The local user accounts created for domain users provide the mechanism for verifying that a user authenticated by an external directory server is authorized to access the VNX for File and that it has the necessary local credentials, including a UID, to perform tasks. You should use a domain account to remotely access and manage multiple VNX for File systems, avoiding the need to configure individual user accounts on each system you manage.
Important: Do not use the local name of a domain-mapped account to log in to a VNX for File.
If you change an existing local user account to a domain-mapped user account, you must first create a domain-mapped group (if a domain-mapped group does not already exist) to which you can make the user a member. Otherwise, the user will be unable to log in to VNX for File.
Cleaning up out-of-date local user accounts
In certain circumstances, you may need to manually delete out-of-date local user accounts from the VNX for File. This problem only occurs when usernames are exactly alike. For example, a user Jennifer Smith has a domain-mapped local user account named JSmith. Subsequently Jennifer adopts her married name and her user account on the directory server is changed to JBrown, resulting in a new domain-mapped local user account. But when a new user Joshua Smith is created on the directory server with username JSmith and is mapped to the VNX for File, he is assigned the existing local user account JSmith and is given the privileges previously assigned to Jennifer.
EMC recommends that on the directory server you avoid the reuse of usernames for different physical users. If such reuse is unavoidable, then to prevent the potentially problematic situation described above, you must use Unisphere to do one of the following:
◆ In the case where a VNX for File administrator’s directory username is changed, manually change the local username and domain username in the domain-mapped local user account.

59 of 94Release 7.0Security Configuration Guide on VNX™ for File
◆ In the case where a VNX for File administrator’s account is removed from the directory server, manually delete the domain-mapped local user account and home directory.
Understanding how local user account names are created
When a local user account is automatically mapped from a domain user, VNX for File assigns it a name based on both the user's directory server name and the domain name. If the username contains spaces, these spaces are removed.
Understanding defunct storage domain user accounts
If you remove a VNX for File from a storage domain, the local user account mapped from the storage domain global user is marked defunct and can no longer be used to login. Even if the VNX for File rejoins the storage domain with the same user account, the original local user account cannot be reenabled. VNX for File maintains defunct accounts for auditing purposes. You can delete this account if you choose.
Troubleshooting domain-mapped user accounts
To login successfully as a LDAP user using Unisphere on a VNX consisting of both file and block, both the file and block LDAP user accounts must be configured with the same connection settings. In addition, both the file and block LDAP users must belong to the same group on the LDAP server. A file LDAP domain-mapped user account uses the username and password specified on the LDAP domain server. This type of user account is always authenticated on the LDAP domain server. If the LDAP domain server is not available, the user is not able to log in
When a domain-mapped user logs in to the Control Station CLI or XML API, the domain name provided must match the domain name or fully qualified domain name known to VNX for File. (In the case of a LDAP domain-mapped user, this is the domain name defined on Settings > Security (Security tasks) > Manage LDAP Domain for File.) Otherwise, the user will be unable to log in.
The supported domain-mapped user login formats for LDAP domain-mapped users are:
◆ <domain name>\<user> (for example, mycompany\anne)
◆ <user>@<domain name> (for example, anne@mycompany)
The domain name can be specified as the fully qualified domain name. For example:
◆ <fully qualified domain name>\<user> (for example, mycompany.com\anne)
◆ <user>@<fully qualified domain name> (for example, [email protected])
Note: Users can only log in under a single domain. Consequently, mycompany and mycompany.com are treated as the same domain.
When using CLI, the supported domain-mapped user login formats for storage domain-mapped users are:
◆ storageDomain\<user> (for example, storageDomain\anne)
◆ <user>@storageDomain (for example, anne@storageDomain)
Security Configuration Guide on VNX™ for File60 of 94 Release 7.0
Note: storageDomain is a case-sensitive keyword, not a variable, and you must type it exactly as shown.
When using XML API, the supported domain-mapped user login formats for storage domain-mapped users are:
◆ CLARIION_DOMAIN\<user> (for example, CLARIION_DOMAIN\anne)
◆ <user>@CLARIION_DOMAIN (for example, anne@CLARIION_DOMAIN)
Note: CLARIION_DOMAIN is a case-sensitive keyword, not a variable, and you must type it exactly as shown.
When using Unisphere, the supported domain-mapped user login format for storage domain-mapped users is <user>.
Troubleshooting certificate imports
Certificates are used by both the Data Mover and Control Station to identify one or both ends of a SSL-enabled connection. The Data Mover can import certificates encoded using Distinguished Encoding Rules (DER) format, also known as binary-encoded X.509, or Privacy Enhanced Mail (PEM) format, also known as Base64-encoded X.509. The Control Station can import certificates encoded using PEM format.
A certificate file in DER format is composed of binary data. PEM format uses Base64 encoding to transform binary text to ASCII text, translating each 6 bits to a specific ASCII character and enclosing the certificate text (up to 64 characters) in the lines BEGIN CERTIFICATE and END CERTIFICATE. Depending on the source of the certificate file, the PEM-encoded certificate may be preceded by other text that lists the contents of the certificate. The translation of binary text into text prevents data from being modified in transit between systems, such as through email.
Importing a certificate into the Data Mover
Attempting to import an expired certificate
If you receive an error when importing a certificate, verify that the certificate’s “valid to” date and time have not already passed. An expired certificate cannot be imported into the Data Mover.
Importing a DER-encoded certificate
If you receive an error when importing a DER-encoded certificate into a Data Mover, check the following:
◆ Verify that the certificate is valid by using a tool such as OpenSSL or Microsoft Certificate Server. To use these tools, the file must have a valid extension such as .der, .cer, or .crt.
◆ If the certificate is not valid, that is, the tool reports an error, the certificate file is probably corrupted and must be replaced with an uncorrupted copy.
◆ If the certificate is valid, use the tool to export the certificate in PEM format, verify that the PEM-encoded certificate is valid, and import the PEM version of the certificate.
61 of 94Release 7.0Security Configuration Guide on VNX™ for File
Importing a PEM-encoded certificate
If you receive an error when importing a PEM-encoded certificate into a Data Mover, check the following:
◆ Verify that the certificate file’s PEM format is correct.
◆ Verify that the certificate is valid by using a tool such as OpenSSL or Microsoft Certificate Server. If the certificate is not valid, that is, the tool reports an error, the certificate file is probably corrupted and must be replaced with an uncorrupted copy.
Importing a certificate into the Control Station
Checking for out-of-date certificates
The Control Station does not return an error if you upload an expired certificate. But the Control Station will not use an out-of-date certificate to verify the certificate received from the LDAP-based directory server.
You can determine the expiration date of the currently installed certificate by viewing the certificate’s properties in the SSL Certificate field.
Determining if certificate chaining is used
To increase security, some organizations use CA certificate chaining. Certificate chaining links two or more CA certificates together. The primary CA certificate is the root certificate at the end of the CA certificate chain. Since VNX for File needs the complete certificate chain to verify the authenticity of a certificate that is received, ask the directory server administrator if certificate chaining is used. If so, you must concatenate all the relevant certificates into a single file and upload that version. The certificate must be in PEM/Base64 encoded format and use the suffix .cer.
Error messages
All new event, alert, and status messages provide detailed information and recommended actions to help you troubleshoot the situation.
To view message details, use any of the following methods:
◆ Unisphere software:
• Right-click on an event, alert, or status message and select to view Event Details, Alert Details, or Status Details.
◆ CLI:
• Use the nas_message -info <message_id> command to retrieve the detailed information for a particular error.
◆ Celerra Network Server Error Messages Guide:
• Use this guide to locate information about messages that are in the earlier-release message format.
◆ EMC Online Support:
• Use the text from the error message's brief description or the message's ID to search the Knowledgebase on the EMC Online Support website. After logging in to EMC Online Support, locate the applicable Support by Product page, and search for the error message.

Security Configuration Guide on VNX™ for File62 of 94 Release 7.0
Training and Professional Services
EMC Customer Education courses help you learn how EMC storage products work together within your environment in order to maximize your entire infrastructure investment. EMC Customer Education features online and hands-on training in state-of-the-art labs conveniently located throughout the world. EMC customer training courses are developed and delivered by EMC experts. Go to the EMC Online Support website for course and registration information.
EMC Professional Services can help you implement your VNX efficiently. Consultants evaluate your business, IT processes, and technology and recommend ways you can leverage your information for the most benefit. From business plan to implementation, you get the experience and expertise you need, without straining your IT staff or hiring and training new personnel. Contact your EMC representative for more information.
63 of 94Release 7.0Security Configuration Guide on VNX™ for File
Appendix A: CLI role-based access setup
A user account is always associated with a primary group and each group is assigned a role. A role defines the privileges (that is, the operations) the user can perform on a particular VNX for File object.
Defining role-based access for commands. This appendix provides information about how to set up role-based access for CLI commands. The first four tables list the CLI commands for which you can specify the privileges needed to perform different command actions. The object on which privileges are defined and the specific command actions available when Modify or Full Control privileges are selected are listed for each command. Using this information you can create a custom role (also known as a user role) that gives a user associated with this role exactly the privileges necessary to perform the job. Or you can associate a user with the predefined role that already includes Full Control privileges for the command. Table 7 on page 64 lists the commands with the prefix cel. Table 8 on page 64 lists the commands with the prefix fs. Table 9 on page 65 lists the commands with the prefix nas. Table 10 on page 67 lists the commands with the prefix server.
You create and manage role-based user access with Settings > Security > User Management > User Customization for File > Roles. You can find a description of this feature in Unisphere online help. You must be root or a user who has root or security operator privileges to create a user account and to associate it with a group and role.
Note: The VNX Release Notes describe how to log in to Unisphere as root.
Read-only privileges. Regardless of the role with which the user is associated, a user always has read-only privileges for all commands and command options that display information. Some of the command actions available with read-only privileges include info, list, status, and verify. Table 11 on page 70 lists commands that users associated with any role can execute.
Commands not covered by the role-based access feature. Table 12 on page 70 lists the commands that are not covered by the role-based access feature. Some of these commands invoke scripts, others are based on legacy executables, and others are associated with VNX for File objects that are not exposed. If the VNX for File object associated with a command is not exposed in Settings > Security > User Management > User Customization for File > Roles > Create, you cannot create a custom (user) role that allows you to specify the privileges needed to perform different command actions. Consequently, these commands can only be performed by the default local user accounts root and nasadmin or, in some cases, by a user account associated with the local root and nasadmin roles.
The Unisphere online help describes the concepts behind this feature.
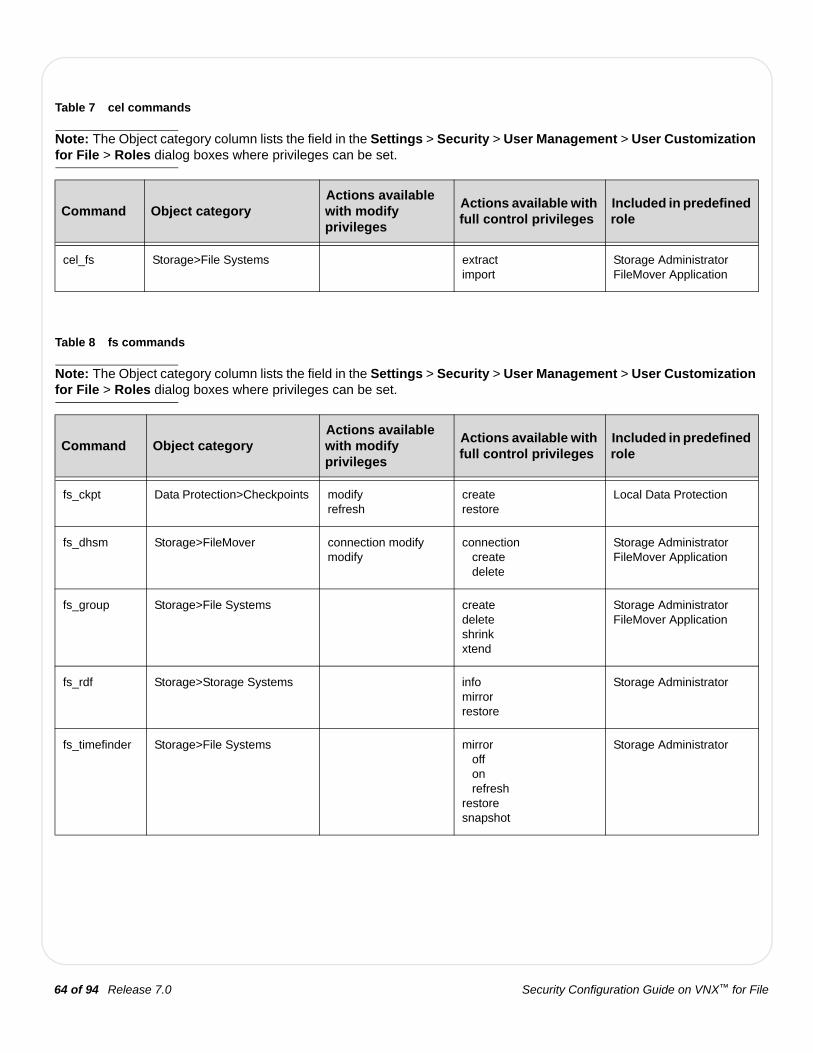
Security Configuration Guide on VNX™ for File64 of 94 Release 7.0
Table 7 cel commands
Note: The Object category column lists the field in the Settings > Security > User Management > User Customization for File > Roles dialog boxes where privileges can be set.
Command Object category Actions available with modify privileges
Actions available with full control privileges
Included in predefined role
cel_fs Storage>File Systems extractimport
Storage AdministratorFileMover Application
Table 8 fs commands
Note: The Object category column lists the field in the Settings > Security > User Management > User Customization for File > Roles dialog boxes where privileges can be set.
Command Object categoryActions available with modify privileges
Actions available with full control privileges
Included in predefined role
fs_ckpt Data Protection>Checkpoints modifyrefresh
createrestore
Local Data Protection
fs_dhsm Storage>FileMover connection modifymodify
connection create delete
Storage AdministratorFileMover Application
fs_group Storage>File Systems createdeleteshrinkxtend
Storage AdministratorFileMover Application
fs_rdf Storage>Storage Systems infomirrorrestore
Storage Administrator
fs_timefinder Storage>File Systems mirror off on refreshrestoresnapshot
Storage Administrator
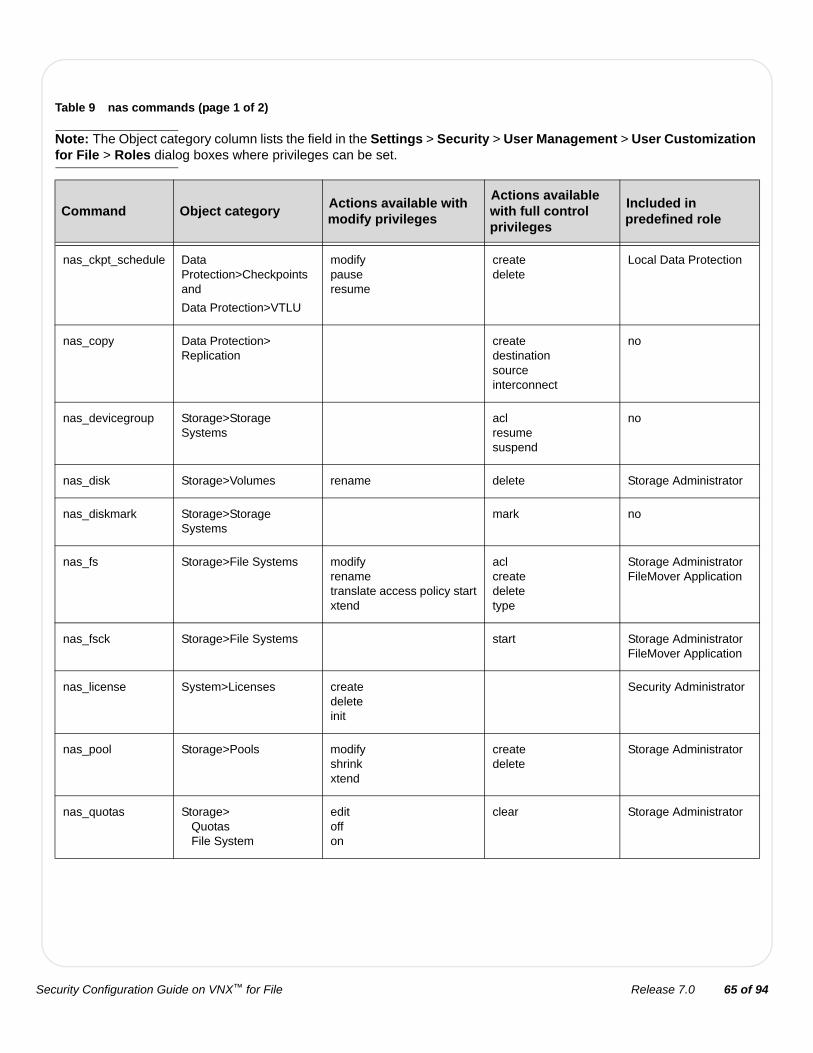
65 of 94Release 7.0Security Configuration Guide on VNX™ for File
Table 9 nas commands (page 1 of 2)
Note: The Object category column lists the field in the Settings > Security > User Management > User Customization for File > Roles dialog boxes where privileges can be set.
Command Object categoryActions available with modify privileges
Actions available with full control privileges
Included in predefined role
nas_ckpt_schedule Data Protection>Checkpointsand
Data Protection>VTLU
modifypauseresume
createdelete
Local Data Protection
nas_copy Data Protection> Replication
createdestinationsourceinterconnect
no
nas_devicegroup Storage>Storage Systems
aclresumesuspend
no
nas_disk Storage>Volumes rename delete Storage Administrator
nas_diskmark Storage>Storage Systems
mark no
nas_fs Storage>File Systems modifyrenametranslate access policy startxtend
aclcreatedeletetype
Storage AdministratorFileMover Application
nas_fsck Storage>File Systems start Storage AdministratorFileMover Application
nas_license System>Licenses createdeleteinit
Security Administrator
nas_pool Storage>Pools modifyshrinkxtend
createdelete
Storage Administrator
nas_quotas Storage> Quotas File System
edit off on
clear Storage Administrator
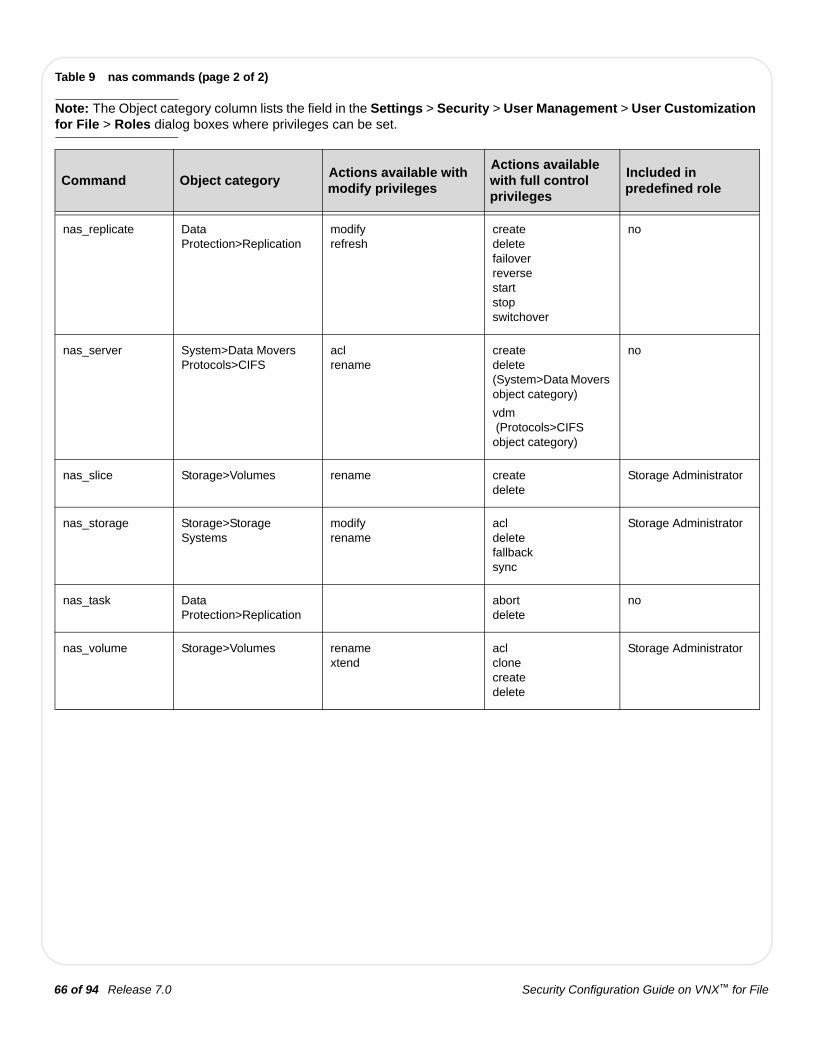
Security Configuration Guide on VNX™ for File66 of 94 Release 7.0
nas_replicate Data Protection>Replication
modifyrefresh
createdeletefailoverreversestartstopswitchover
no
nas_server System>Data MoversProtocols>CIFS
aclrename
createdelete(System>Data Movers object category)
vdm (Protocols>CIFS object category)
no
nas_slice Storage>Volumes rename createdelete
Storage Administrator
nas_storage Storage>Storage Systems
modifyrename
acldeletefallbacksync
Storage Administrator
nas_task Data Protection>Replication
abortdelete
no
nas_volume Storage>Volumes renamextend
aclclonecreatedelete
Storage Administrator
Table 9 nas commands (page 2 of 2)
Note: The Object category column lists the field in the Settings > Security > User Management > User Customization for File > Roles dialog boxes where privileges can be set.
Command Object categoryActions available with modify privileges
Actions available with full control privileges
Included in predefined role

67 of 94Release 7.0Security Configuration Guide on VNX™ for File
Table 10 server commands (page 1 of 4)
Note: The Object category column lists the field in the Settings > Security > User Management > User Customization for File > Roles dialog boxes where privileges can be set.
Command Object categoryActions available with modify privileges
Actions available with full control privileges
Included in predefined role
server_arp Networking>NIS deleteset
Network Administrator
server_cdms Storage>Migration converthaltstart
connectdisconnect
Storage Administrator
server_certificate Security>Public Key Certificates
cacertificate delete importpersona clear generate import
Security Administrator
server_cifs Protocols>CIFS disableenablejoinrenamereplaceunjoinupdate
adddeletemigrate
no
server_cifssupport Protocols>CIFS aclsecmap update
secmap create delete import migration
no
server_cpu System>Data Movers haltreboot
no
server_date System>Data Movers timesvc hosts start update
timesvc delete set stop
no
server_devconfig Storage>Storage System rename create Storage Administrator
server_dns Networking>DNS option deleteprotocol
Network Administrator

Security Configuration Guide on VNX™ for File68 of 94 Release 7.0
server_export Protocols>NFS or
Protocols>CIFS
unexport protocol (NFS) no
server_ftp Protocols>NFS modifyservice stat reset
service start stop
Network Administrator
server_http Storage>FileMover modifyappendremoveservice start stop
Storage AdministratorFileMover Application
server_ifconfig Networking>Interfaces updownipsecnoipsecmtuvlan
createdelete
Network Administrator
server_kerberos Protocols>CIFS keytabccachekadmin
adddelete
Security Administrator
server_ldap Networking>NIS set clearservice start stop
Network Administrator
server_mount Storage>File Systems allforceoptions
Local Data ProtectionStorage Administrator
server_mountpoint Storage>File Systems createdelete
Local Data ProtectionStorage Administrator
server_mpfsstat Storage>File Systems zZ
Storage AdministratorFileMover Application
server_name System>Data Movers <new_name> no
Table 10 server commands (page 2 of 4)
Note: The Object category column lists the field in the Settings > Security > User Management > User Customization for File > Roles dialog boxes where privileges can be set.
Command Object categoryActions available with modify privileges
Actions available with full control privileges
Included in predefined role

69 of 94Release 7.0Security Configuration Guide on VNX™ for File
server_nfs Protocols>NFS userv4 client stats zero
principalservicev4 service
nocommand options mapper set and mapping can only executed by root
server_nfsstat Protocols>NFS zero no
server_nis Networking>NIS delete Network Administrator
server_param System>Data Movers facility no
server_rip Networking>Routing ripinnoripin
Network Administrator
server_route Networking>Routing adddeleteflushdeleteAll
Network Administrator
server_security Protocols>CIFS modifyupdate
adddelete
Security Administrator
server_setup System>Data Movers loadprotocolload
no
server_snmp Networking>NIS communitylocationsyscontact
Network Administrator
server_standby System>Data Movers activaterestore
createdelete
no
server_sysconfig Networking>Devices pci virtual delete new
Network Administrator
server_umount Storage>File Systems temp allperm
Local Data ProtectionStorage Administrator
server_usermapper
Protocols>CIFS disableenableimportremove
no
Table 10 server commands (page 3 of 4)
Note: The Object category column lists the field in the Settings > Security > User Management > User Customization for File > Roles dialog boxes where privileges can be set.
Command Object categoryActions available with modify privileges
Actions available with full control privileges
Included in predefined role
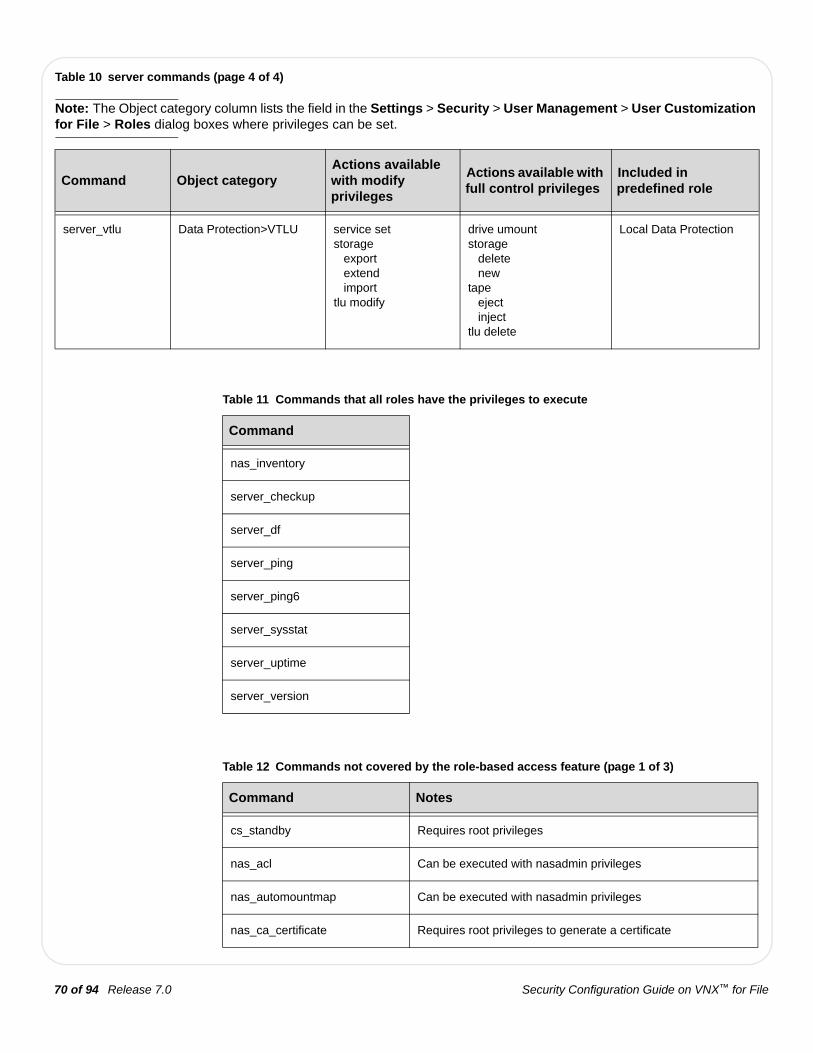
Security Configuration Guide on VNX™ for File70 of 94 Release 7.0
server_vtlu Data Protection>VTLU service setstorage export extend importtlu modify
drive umountstorage delete newtape eject injecttlu delete
Local Data Protection
Table 10 server commands (page 4 of 4)
Note: The Object category column lists the field in the Settings > Security > User Management > User Customization for File > Roles dialog boxes where privileges can be set.
Command Object categoryActions available with modify privileges
Actions available with full control privileges
Included in predefined role
Table 11 Commands that all roles have the privileges to execute
Command
nas_inventory
server_checkup
server_df
server_ping
server_ping6
server_sysstat
server_uptime
server_version
Table 12 Commands not covered by the role-based access feature (page 1 of 3)
Command Notes
cs_standby Requires root privileges
nas_acl Can be executed with nasadmin privileges
nas_automountmap Can be executed with nasadmin privileges
nas_ca_certificate Requires root privileges to generate a certificate

71 of 94Release 7.0Security Configuration Guide on VNX™ for File
nas_cel Can be executed with nasadmin privileges
nas_checkup Can be executed with nasadmin privileges
nas_connecthome Requires root privileges to modify and test
nas_config Requires root privileges
nas_emailuser Can be executed with nasadmin privileges
nas_event Can be executed with nasadmin privileges
nas_halt Requires root privileges
nas_logviewer Can be executed with nasadmin privileges
nas_message Can be executed with nasadmin privileges
nas_mview Requires root privileges
nas_rdf Requires root privileges
nas_version Can be executed with nasadmin privileges
server_archive Can be executed with nasadmin privileges
server_cepp Can be executed with nasadmin privileges
server_dbms Requires root privileges to delete, compact, repair, and restore the database
server_file Can be executed with nasadmin privileges
server_ipsec Can be executed with nasadmin privileges
server_iscsi Can be executed with nasadmin privileges
server_log Can be executed with nasadmin privileges
server_mpfs Can be executed with nasadmin privileges
server_mt Can be executed with nasadmin privileges
server_netstat Can be executed with nasadmin privileges
server_nfs Requires root privileges to configure secure NFS mapping
server_pax Requires root privileges to reset stats
Table 12 Commands not covered by the role-based access feature (page 2 of 3)
Command Notes

Security Configuration Guide on VNX™ for File72 of 94 Release 7.0
server_snmpd Can be executed with nasadmin privileges
server_stats Can be executed with nasadmin privileges
server_tftp Can be executed with nasadmin privileges
server_user Can be executed with nasadmin privileges
server_viruschk Can be executed with nasadmin privileges
Table 12 Commands not covered by the role-based access feature (page 3 of 3)
Command Notes

73 of 94Release 7.0Security Configuration Guide on VNX™ for File
Appendix B: Supported SSL cipher suites
Table 13 on page 73 lists the cipher suites supported by VNX for File. The following lists give the SSL or TLS cipher suites names from the relevant specification and their OpenSSL equivalents. It should be noted that several cipher suite names do not include the authentication used, for example, DES-CBC3-SHA. In these cases, RSA authentication is used.
The following restrictions apply:
◆ NULL ciphers and all ADH cipher suites (because they do not allow authentication) are disabled by default.
◆ Some cipher suites will not be accepted by VNX for File because of certificate size (if the certificate presented by the Data Mover has a 2048-bit key, ciphers with a smaller key will be rejected).
Table 13 Supported SSL cipher suites (page 1 of 2)
Protocol Specification name OpenSSL name
SSL v3.0 cipher suites SSL_RSA_WITH_NULL_MD5 NULL-MD5
SSL_RSA_WITH_NULL_SHA NULL-SHA
SSL_RSA_WITH_DES_CBC_SHA DES-CBC-SHA
SSL_RSA_WITH_3DES_EDE_CBC_SHA DES-CBC3-SHA
SSL_DHE_RSA_EXPORT_WITH_DES40_CBC_SHA EXP-EDH-RSA-DES-CBC-SHA
SSL_DHE_RSA_WITH_DES_CBC_SHA EDH-RSA-DES-CBC-SHA
SSL_DHE_RSA_WITH_3DES_EDE_CBC_SHA EDH-RSA-DES-CBC3-SHA
SSL_DH_anon_EXPORT_WITH_RC4_40_MD5 EXP-ADH-RC4-MD5
SSL_DH_anon_EXPORT_WITH_DES40_CBC_SHA EXP-ADH-DES-CBC-SHA
SSL_DH_anon_WITH_DES_CBC_SHA ADH-DES-CBC-SHA
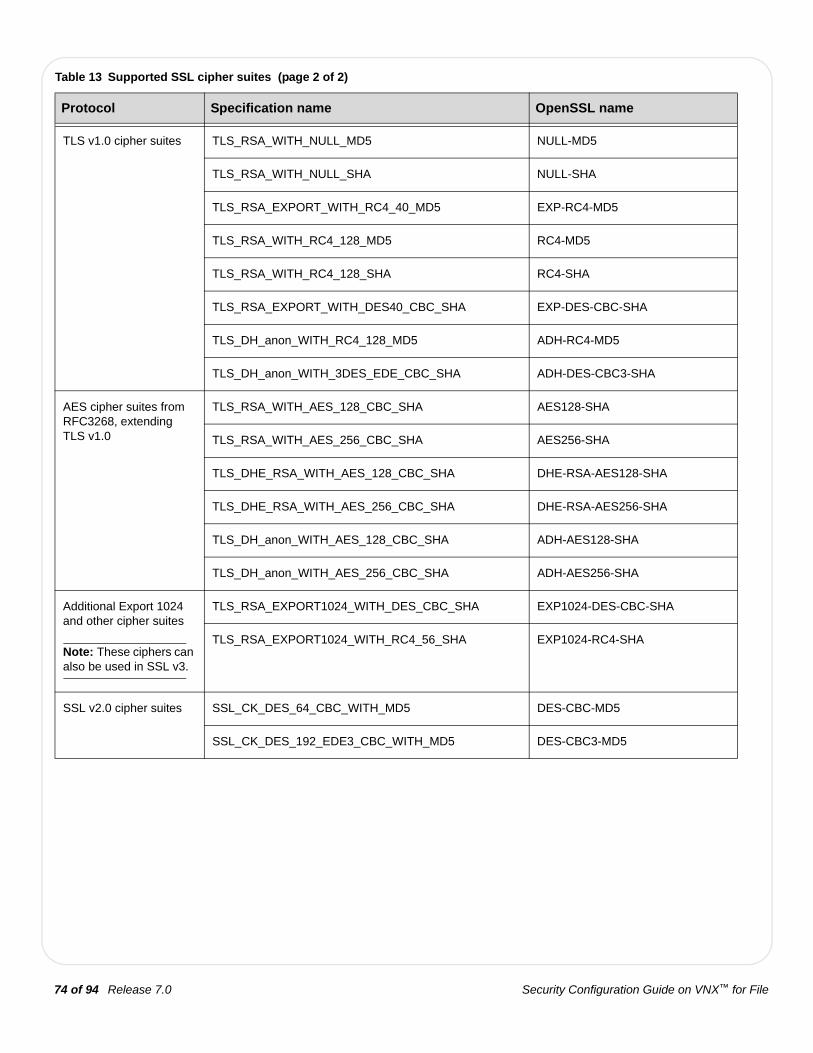
Security Configuration Guide on VNX™ for File74 of 94 Release 7.0
TLS v1.0 cipher suites TLS_RSA_WITH_NULL_MD5 NULL-MD5
TLS_RSA_WITH_NULL_SHA NULL-SHA
TLS_RSA_EXPORT_WITH_RC4_40_MD5 EXP-RC4-MD5
TLS_RSA_WITH_RC4_128_MD5 RC4-MD5
TLS_RSA_WITH_RC4_128_SHA RC4-SHA
TLS_RSA_EXPORT_WITH_DES40_CBC_SHA EXP-DES-CBC-SHA
TLS_DH_anon_WITH_RC4_128_MD5 ADH-RC4-MD5
TLS_DH_anon_WITH_3DES_EDE_CBC_SHA ADH-DES-CBC3-SHA
AES cipher suites from RFC3268, extending TLS v1.0
TLS_RSA_WITH_AES_128_CBC_SHA AES128-SHA
TLS_RSA_WITH_AES_256_CBC_SHA AES256-SHA
TLS_DHE_RSA_WITH_AES_128_CBC_SHA DHE-RSA-AES128-SHA
TLS_DHE_RSA_WITH_AES_256_CBC_SHA DHE-RSA-AES256-SHA
TLS_DH_anon_WITH_AES_128_CBC_SHA ADH-AES128-SHA
TLS_DH_anon_WITH_AES_256_CBC_SHA ADH-AES256-SHA
Additional Export 1024 and other cipher suites
Note: These ciphers can also be used in SSL v3.
TLS_RSA_EXPORT1024_WITH_DES_CBC_SHA EXP1024-DES-CBC-SHA
TLS_RSA_EXPORT1024_WITH_RC4_56_SHA EXP1024-RC4-SHA
SSL v2.0 cipher suites SSL_CK_DES_64_CBC_WITH_MD5 DES-CBC-MD5
SSL_CK_DES_192_EDE3_CBC_WITH_MD5 DES-CBC3-MD5
Table 13 Supported SSL cipher suites (page 2 of 2)
Protocol Specification name OpenSSL name

75 of 94Release 7.0Security Configuration Guide on VNX™ for File
Appendix C: Understanding your LDAP-based directory server configuration
This appendix provides information about tools you can use to better understand the structure of your organization’s information in the LDAP-based directory server and tips about how to interpret this information. You must understand where your users and groups are located. Use this information to set up the directory server, as outlined in "Configuring the use of an external LDAP-based directory server for user identification and authentication" on page 25, and to configure the connection between the Control Station’s LDAP-based client and the directory server, accomplished by using Unisphere Settings > Security (Security tasks) > Manage File LDAP Domain.
There are several tools available to manage LDAP-based directory services including:
◆ "Active Directory Users & Computers" on page 75
◆ "LDAP Admin" on page 82
Active Directory Users & Computers
Active Directory user and group accounts can be managed with the Active Directory Users & Computers (ADUC) MMC Snap-in. This snap-in is installed automatically on every Windows domain controller. You access this tool from Control Panel > Administrative Tools > Active Directory Users & Computers.
Table 14 on page 75 lists the information you need for a successful connection to Active Directory.
Table 14 Information required to connect to an Active Directory server
Required connection information
Your values
Fully qualified domain name(also known as the base distinguished name)
Primary domain controller/directory server IP address or hostname
Secondary domain controller/directory server IP address or hostname
Account name (also known as the bind distinguished name)
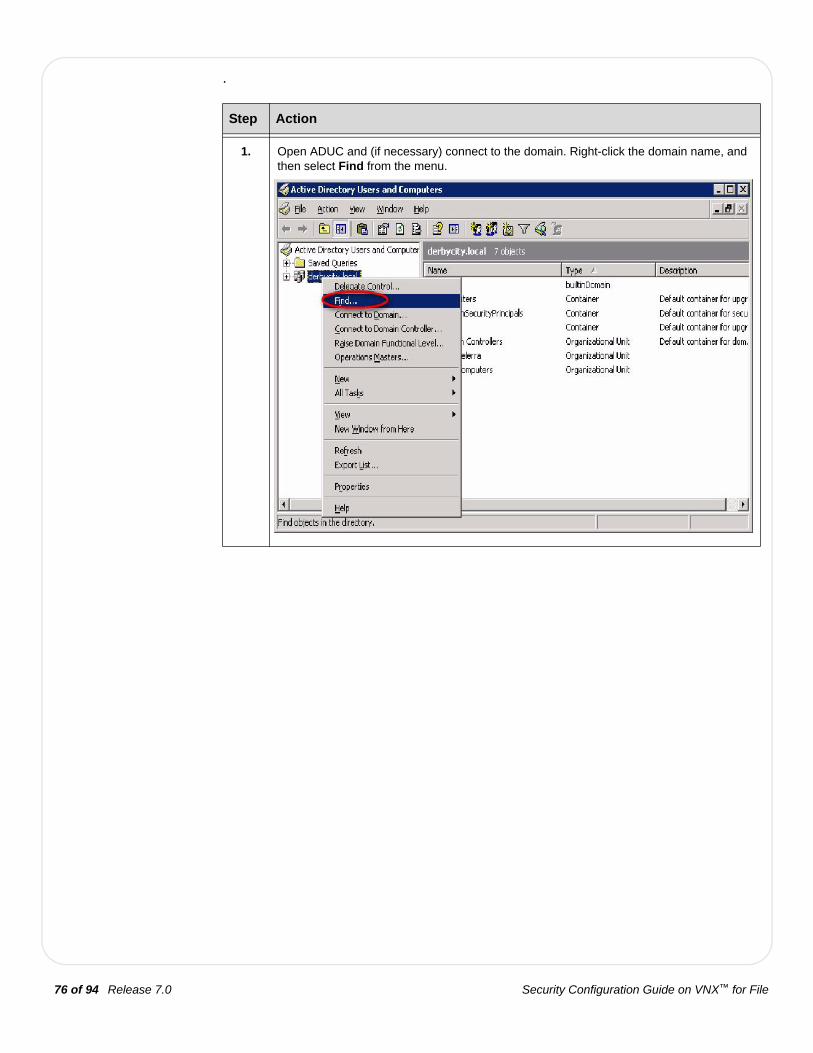
Security Configuration Guide on VNX™ for File76 of 94 Release 7.0
.
Step Action
1. Open ADUC and (if necessary) connect to the domain. Right-click the domain name, and then select Find from the menu.

77 of 94Release 7.0Security Configuration Guide on VNX™ for File
2. Identify a domain user who will be a VNX for File user. To locate the user profile, type the user's name in the Find field and click Find Now.
3. Add the X.500 path to the displayed user information by selecting View > Choose Columns.
Step Action
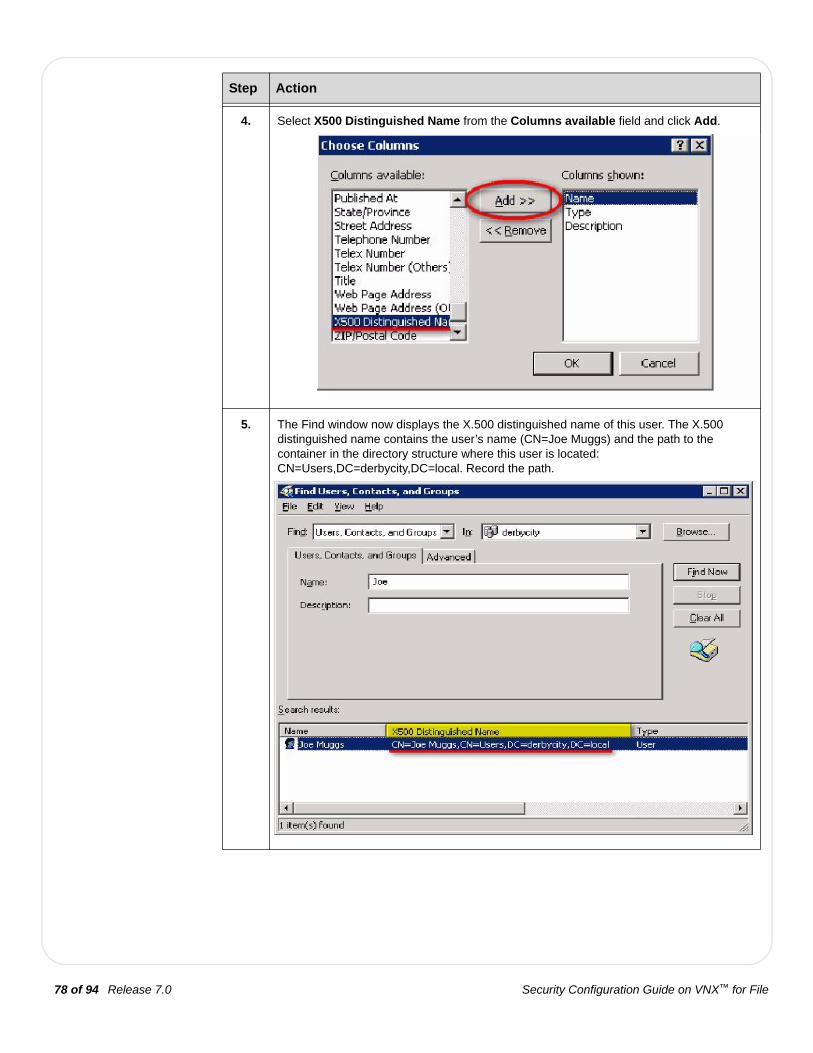
Security Configuration Guide on VNX™ for File78 of 94 Release 7.0
4. Select X500 Distinguished Name from the Columns available field and click Add.
5. The Find window now displays the X.500 distinguished name of this user. The X.500 distinguished name contains the user’s name (CN=Joe Muggs) and the path to the container in the directory structure where this user is located: CN=Users,DC=derbycity,DC=local. Record the path.
Step Action

79 of 94Release 7.0Security Configuration Guide on VNX™ for File
6. Verify that all other VNX for File users use the same path by:
• Repeating the Find for all VNX for File user accounts
or
• Navigating to that area of the directory in ADUC, and locating all VNX for File user accounts
7. Repeat steps 1 through 6 to find the path to the container in the directory structure where the groups are located.
If the user and group paths are both CN=Users,DC=<domain component>,DC=<domain component>[, DC=<domain component>…] (for example CN=Users,DC=derbycity,DC=local), you can use the Default Active Directory option in the Unisphere Manage LDAP Domain for File view. This option assumes that the users and groups are located in the default container (CN=Users), so you do not have to specify the user or group search path.
Step Action

Security Configuration Guide on VNX™ for File80 of 94 Release 7.0
8. Users might not be in the default container (CN=Users). They may instead be located in other containers or organizational units within the directory, for example Celerra Users. In this case, you need to use the Custom Active Directory option in the Unisphere Manage LDAP Domain for File view and manually enter the search paths.
9. Groups might not be in the default container (CN=Users), and they do not have to be located with the users. They may instead be located within other containers or organizational units within the directory.
Step Action
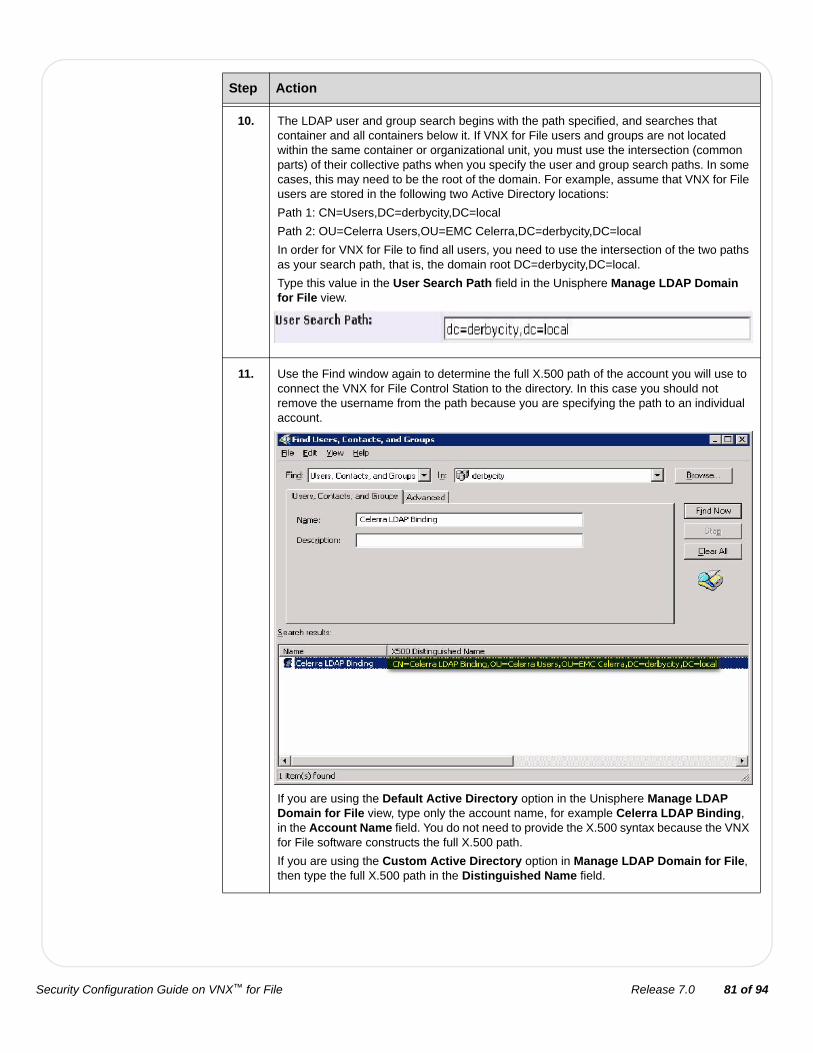
81 of 94Release 7.0Security Configuration Guide on VNX™ for File
10. The LDAP user and group search begins with the path specified, and searches that container and all containers below it. If VNX for File users and groups are not located within the same container or organizational unit, you must use the intersection (common parts) of their collective paths when you specify the user and group search paths. In some cases, this may need to be the root of the domain. For example, assume that VNX for File users are stored in the following two Active Directory locations:
Path 1: CN=Users,DC=derbycity,DC=local
Path 2: OU=Celerra Users,OU=EMC Celerra,DC=derbycity,DC=local
In order for VNX for File to find all users, you need to use the intersection of the two paths as your search path, that is, the domain root DC=derbycity,DC=local.
Type this value in the User Search Path field in the Unisphere Manage LDAP Domain for File view.
11. Use the Find window again to determine the full X.500 path of the account you will use to connect the VNX for File Control Station to the directory. In this case you should not remove the username from the path because you are specifying the path to an individual account.
If you are using the Default Active Directory option in the Unisphere Manage LDAP Domain for File view, type only the account name, for example Celerra LDAP Binding, in the Account Name field. You do not need to provide the X.500 syntax because the VNX for File software constructs the full X.500 path.
If you are using the Custom Active Directory option in Manage LDAP Domain for File, then type the full X.500 path in the Distinguished Name field.
Step Action

Security Configuration Guide on VNX™ for File82 of 94 Release 7.0
LDAP Admin
Unlike Active Directory, other LDAP-based directory servers do not typically ship with a GUI management interface. In this case you might use a tool like Ldap Admin to find the proper search paths on LDAP servers. The free Ldap Admin tool (a Windows LDAP manager available from ldapadmin.sourceforge.net) lets you browse, search, modify, create, and delete objects on a LDAP server. Ldap Admin’s copy-to-clipboard functionality is especially useful for easily transferring values into the Unisphere Settings > Security (Security tasks) > Manage LDAP Domain for File fields.
Table 15 on page 82 lists the information you need for a successful connection to a customized Active Directory or other LDAP-based directory server such as OpenLDAP.
Table 15 Information required to connect to a customized Active Directory or other directory LDAP-based directory server
Required connection information
Your values
Fully qualified domain name(also known as the base distinguished name)
Primary directory server IP address or hostname
Secondary directory server IP address or hostname
Distinguished name (also known as the bind distinguished name)
User search path
User name attribute
Group search path
Group name attribute
Group class
Group member

83 of 94Release 7.0Security Configuration Guide on VNX™ for File
.
Step Action
1. Start Ldap Admin and create a new connection. Click Test connection to verify the connection.

Security Configuration Guide on VNX™ for File84 of 94 Release 7.0
2. Open the connection to the LDAP server, right-click the domain name, and then select Search from the menu.
3. Identify an LDAP user who will be a VNX for File user. To locate the user profile, type the user’s name in the Name field and click Start.
Step Action

85 of 94Release 7.0Security Configuration Guide on VNX™ for File
4. Right-click the appropriate user from the results list, and then select Go to from the menu. You will use this user to determine the user and group search paths. Close the Search window.
Step Action

Security Configuration Guide on VNX™ for File86 of 94 Release 7.0
5. On the main Ldap Admin window, notice that the status bar contains the distinguished name (DN) of the folder in which the user is located. Many LDAP servers follow the convention outlined in RFC2307 and put users in a People container.
6. Right-click the folder, and then select Copy dn to clipboard from the menu.
Step Action

87 of 94Release 7.0Security Configuration Guide on VNX™ for File
7. In the Unisphere Manage LDAP Domain for File view, select the Other Directory Servers option. Paste the DN value in the User Search Path field.
8. Verify that all other VNX for File users use the same path by:
• Repeating the Search for all VNX for File user accounts
or
• Navigating to that area of the directory in Ldap Admin, and locating all VNX for File user accounts
Step Action

Security Configuration Guide on VNX™ for File88 of 94 Release 7.0
9. Repeat steps 2 through 8 to search on a group name to find the path to the container in the directory structure where the groups are located. When you search by group name, you have to use an advanced search and supply a search filter in the form cn=<group name>. Once the search is complete, right-click the appropriate group from the results list, and then select Go to from the menu.
10. The LDAP user and group search begins with the path specified, and searches that container and all containers below it. If VNX for File users and groups are not located within the same container or organizational unit, you must use the intersection (common parts) of their collective paths when you specify the user and group search paths. In some cases, this may need to be the root of the domain. For example, assume that VNX for File users are stored in the following two LDAP locations:
Path 1: OU=People,DC=openldap-eng,DC=local
Path 2: OU=Celerra Users,OU=EMC Celerra, DC=openldap-eng,DC=local
In order for VNX for File to find all VNX for File users, you need to use the intersection of the two paths as your search path, that is, the domain root DC=openldap-eng,DC=local.
Step Action

89 of 94Release 7.0Security Configuration Guide on VNX™ for File
11. Use the Search window to locate the user account you will use to connect the VNX for File Control Station to the directory. Right-click the account name, and then select Copy dn to clipboard. Paste the DN value in the Distinguished Name field in the Unisphere Manage LDAP Domain for File view, for example uid=celerra,ou=People.
Step Action

Security Configuration Guide on VNX™ for File90 of 94 Release 7.0
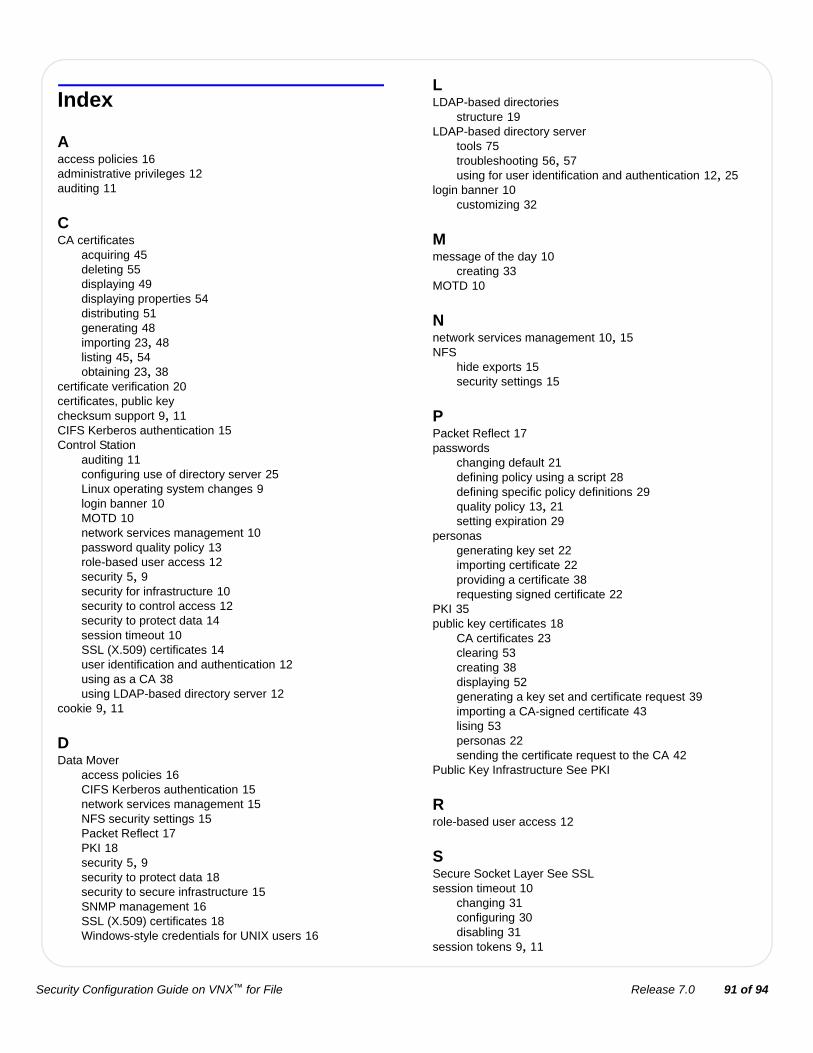
91 of 94Release 7.0Security Configuration Guide on VNX™ for File
Index
Aaccess policies 16administrative privileges 12auditing 11
CCA certificates
acquiring 45deleting 55displaying 49displaying properties 54distributing 51generating 48importing 23, 48listing 45, 54obtaining 23, 38
certificate verification 20certificates, public keychecksum support 9, 11CIFS Kerberos authentication 15Control Station
auditing 11configuring use of directory server 25Linux operating system changes 9login banner 10MOTD 10network services management 10password quality policy 13role-based user access 12security 5, 9security for infrastructure 10security to control access 12security to protect data 14session timeout 10SSL (X.509) certificates 14user identification and authentication 12using as a CA 38using LDAP-based directory server 12
cookie 9, 11
DData Mover
access policies 16CIFS Kerberos authentication 15network services management 15NFS security settings 15Packet Reflect 17PKI 18security 5, 9security to protect data 18security to secure infrastructure 15SNMP management 16SSL (X.509) certificates 18Windows-style credentials for UNIX users 16
LLDAP-based directories
structure 19LDAP-based directory server
tools 75troubleshooting 56, 57using for user identification and authentication 12, 25
login banner 10customizing 32
Mmessage of the day 10
creating 33MOTD 10
Nnetwork services management 10, 15NFS
hide exports 15security settings 15
PPacket Reflect 17passwords
changing default 21defining policy using a script 28defining specific policy definitions 29quality policy 13, 21setting expiration 29
personasgenerating key set 22importing certificate 22providing a certificate 38requesting signed certificate 22
PKI 35public key certificates 18
CA certificates 23clearing 53creating 38displaying 52generating a key set and certificate request 39importing a CA-signed certificate 43lising 53personas 22sending the certificate request to the CA 42
Public Key Infrastructure See PKI
Rrole-based user access 12
SSecure Socket Layer See SSLsession timeout 10
changing 31configuring 30disabling 31
session tokens 9, 11

92 of 94 Security Configuration Guide on VNX™ for FileRelease 7.0
changing the SHA1 secret value 34SHA1 9, 11SNMP management 16SSL 20
changing the cipher suite 36changing the protocol version 35supported cipher suites 73troubleshooting 57using certificates for Control Station and LDAP-based
directory server connection 14using certificates with Celerra Manager 14using certificates with HTTP 18, 35using certificates with LDAP 18, 35
Ttroubleshooting 56
Control Station connection to directory server 56creating binding account 57domain-mapped user accounts 59local user accounts 57setting up SSL session 57
Uuser identification and authentication 12user interface choices 5users
identifying and authenticating using a directory server 18troubleshooting 57, 59
WWindows-style credentials 16
93 of 94Release 7.0Security Configuration Guide on VNX™ for File
Notes

About this document
As part of its effort to continuously improve and enhance the performance and capabilities of the Celerra Network Server product line, EMC periodically releases new versions of Celerra hardware and software. Therefore, some functions described in this document may not be supported by all versions of Celerra software or hardware presently in use. For the most up-to-date information on product features, see your product release notes. If your Celerra system does not offer a function described in this document, contact your EMC Customer Support Representative for a hardware upgrade or software update.
Comments and suggestions about documentation
Your suggestions will help us improve the accuracy, organization, and overall quality of the user documentation. Send a message to [email protected] with your opinions of this document.
Copyright © 1998-2011 EMC Corporation. All rights reserved.
EMC believes the information in this publication is accurate as of its publication date. The information is subject to change without notice.
THE INFORMATION IN THIS PUBLICATION IS PROVIDED “AS IS.” EMC CORPORATION MAKES NO REPRESENTATIONS OR WARRANTIES OF ANY KIND WITH RESPECT TO THE INFORMATION IN THIS PUBLICATION, AND SPECIFICALLY DISCLAIMS IMPLIED WARRANTIES OF MERCHANTABILITY OR FITNESS FOR A PARTICULAR PURPOSE.
Use, copying, and distribution of any EMC software described in this publication requires an applicable software license.
For the most up-to-date regulatory document for your product line, go to the Technical Documentation and Advisories section on EMC Powerlink.
For the most up-to-date listing of EMC product names, see EMC Corporation Trademarks on EMC.com.
All other trademarks used herein are the property of their respective owners.
Release 7.0 94 of 94