installation runbook for cloudbase solutions – hyper-v compute... · · 2016-02-26installation...
TRANSCRIPT
Installation runbook for
Cloudbase Solutions – Hyper-V Compute
Partner Name: Cloudbase Solutions
Product Name: Hyper-V Compute Driver
Product Type: Hypervisor
Product Version: 12.0
MOS Version: 6.1
OpenStack version: Juno
Contents
Document History Introduction
1.1 Objective 1.2 Target Audience
Product Overview Joint reference architecture Networking
4.1 Physical & Logical network topology Installation and Configuration
5.1 Overview of MOS installation steps 5.2 MOS Installation in details 5.3 Creation of OpenStack environment 5.4 MOS Deployment 5.5 <Driver name> Installation steps
Testing 6.1 Test tools 6.2 Test cases
6.2.2 Deployment modes and configuration options 6.2.3 Functional testing 6.2.4 Performance testing 6.2.5 Negative testing
6.3 Test results (if FUEL HealthCheck is used)
Document History
Version Revision Date Description
0.1 21-10-2015 Initial Version

1. Introduction This document is to serve as a detailed Deployment Guide for the Hyper-V Compute driver provided by Cloudbase Solutions. It describes the reference architecture, installation steps for certified MOS+Hyper-V, limitations and testing procedures.
1.1 Objective This document contains information to help OpenStack operators understand and deploy MOS with Hyper-V compute nodes. The OpenStack deployment can have Hyper-V only compute nodes or a mix of multiple hypervisors, e.g. Hyper-V, KVM, ESXi hosts.
1.2 Target Audience Those who want to benefit from running Windows-native applications within OpenStack.
2. Product Overview
OpenStack supports multiple types of hypervisors on a single cloud, which means that you can run KVM and Hyper-V side by side with complete interoperability. One of the great advantages is that you can have Windows instances running on Hyper-V, taking advantage of Microsoft’s support for your Windows guests, while keeping Linux instances on KVM in a totally transparent way for your users.
Cloudbase OpenStack Compute Hyper-V installer offers a simple and fast way to deploy Nova Compute on Hyper-V, using a neat and tidy GUI for the occasional deployment or an automated and unattended mode for deployments on a massive number of servers.
Cloudbase OpenStack Hyper-V Compute driver is compatible with Juno, Kilo, Liberty version of OpenStack.
3. Joint reference architecture Cloudbase OpenStack Hyper-V Compute driver requires Neutron ML2 core plugin enabled. Mirantis OpenStack has it out-of-box so no additional work required to adjust Mirantis OpenStack.
Hyper-V Compute driver supports iSCSI and SMB3 OpenStack volumes while Mirantis OpenStack supports iSCSI and Ceph volumes out-of-box but SMB3 volumes may also be enabled as a part of Professional Services engagement.
Hyper-V Compute driver integrates with Ceilometer.
All above means that almost any Mirantis OpenStack cloud may be integrated with Hyper-V Compute driver. In this runbook we use the following configuration:
• Neutron ML2 based networking on top of OpenVSwitch • VLAN segmentation for tenant networks • iSCSI volumes provided by Cinder LVM driver • Ceilometer installed with MongoDB installed at one of the Controller nodes • Two Controller nodes • 1 KVM Compute nodes • One Cinder LVM node • One Hyper-V Compute node based on Microsoft Windows Hyper-V Server 2012 R2
4. Networking The Hyper-V Driver is based on Neutron ML2 plugin and supports VLAN, flat and VXLAN, NVGRE types of segmentation. All OpenStack underlying networks should be exposed to Hyper-
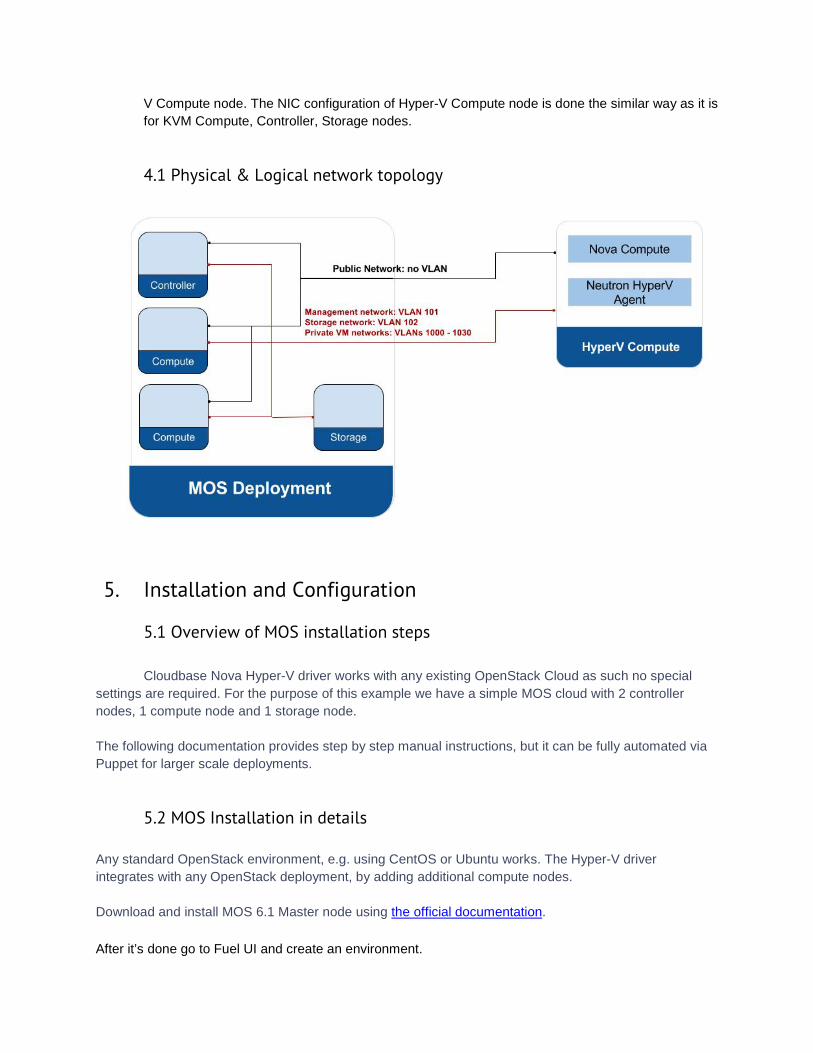
V Compute node. The NIC configuration of Hyper-V Compute node is done the similar way as it is for KVM Compute, Controller, Storage nodes.
4.1 Physical & Logical network topology
5. Installation and Configuration
5.1 Overview of MOS installation steps Cloudbase Nova Hyper-V driver works with any existing OpenStack Cloud as such no special settings are required. For the purpose of this example we have a simple MOS cloud with 2 controller nodes, 1 compute node and 1 storage node. The following documentation provides step by step manual instructions, but it can be fully automated via Puppet for larger scale deployments.
5.2 MOS Installation in details Any standard OpenStack environment, e.g. using CentOS or Ubuntu works. The Hyper-V driver integrates with any OpenStack deployment, by adding additional compute nodes. Download and install MOS 6.1 Master node using the official documentation. After it’s done go to Fuel UI and create an environment.
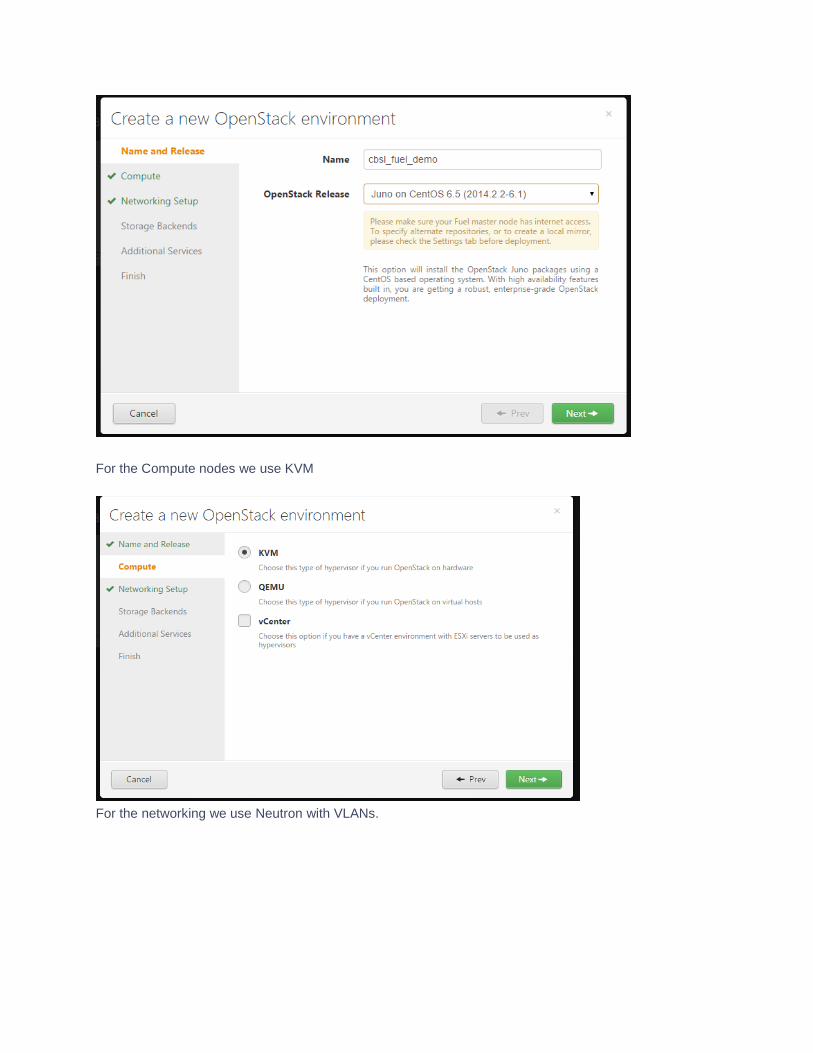
For the Compute nodes we use KVM
For the networking we use Neutron with VLANs.
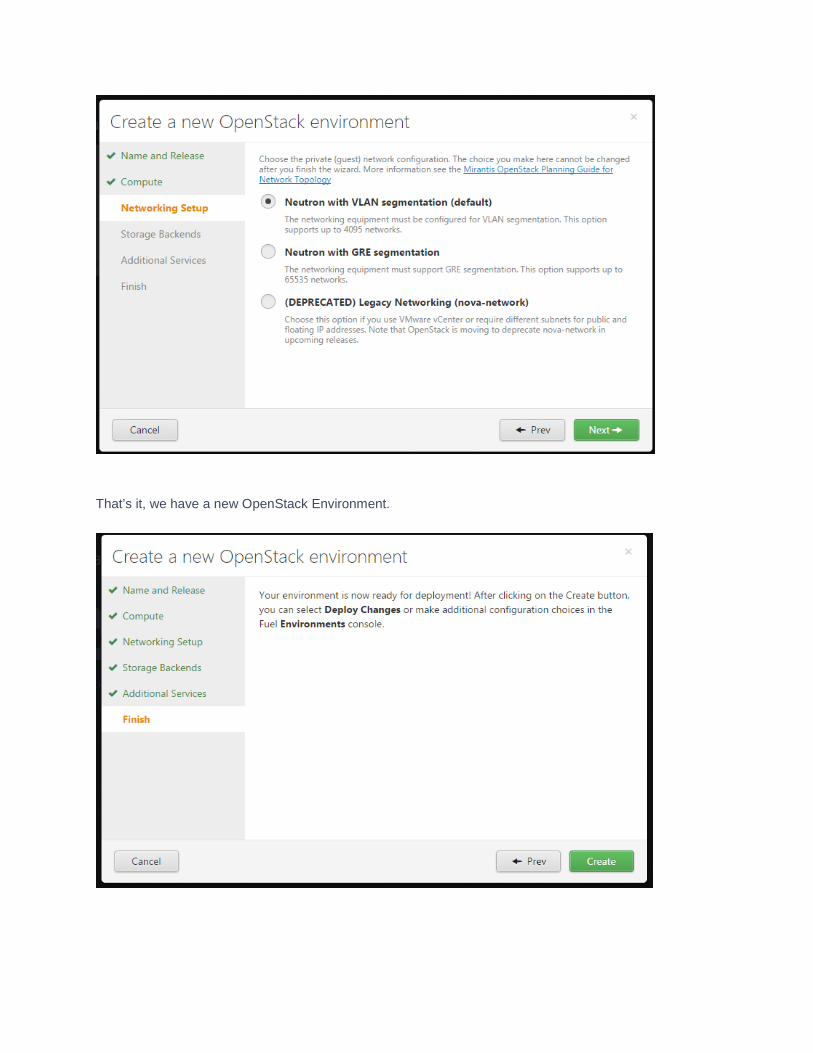
That’s it, we have a new OpenStack Environment.

5.3 MOS Deployment The 4 nodes added to the new environment:
o 1 Controller node o 1 Controller node with MongoDB for Ceilometer o 1 KVM Compute node o 1 Storage node
Each node has two physical NICs. One NIC will be used for the public network and the other will be used for the PXE network as well as the VLAN Tagged Storage, Management and Private networks.

5.4 Hyper-V Compute Driver Installation steps To begin with, all you need is a host running the freely available Microsoft Hyper-V Server 2012 R2 or alternatively Windows Server 2012 R2 with the Hyper-V Role enabled.
• Setting up networking The Windows Server 2012 R2/ Hyper-V Server 2012 R2 will work with only one network interface that would be used for management, storage and tenant networks. In other words, the networks should be mapped to the ones defined in MOS. For our example MOS deployment we have defined an untagged Public network, Management network tagged with VLAN 101, Storage network tagged with VLAN 102 and Private network with VLANs 1000-1030. In order to have the same on the Windows node we need to take advantage of a feature called Nic-Teaming in order to create tagged virtual NICs. First, let’s list all net adapters (PowerShell is used for Microsoft Windows configuration here and further):
PS > Get-NetAdapter
The output should be something similar: Name InterfaceDescription ifIndex Status MacAddress LinkSpeed ---- -------------------- ------- ------ ---------- --------- Ethernet1 Intel(R) 82574L Gigabit Network Co...#2 15 Up 00-0C-29-8B-73-83 1 Gbps Ethernet0 Intel(R) 82574L Gigabit Network Conn... 12 Up 00-0C-29-8B-73-79 1 Gbps
In this situation, Ethernet1 is the physical interface we will be using for creating vNICs for the Management and Storage Networks as well as the Private Network. Let’s go ahead and create a new NetLbfoTeam and add two vNICs to that team:
PS > New-NetLbfoTeam –Name Bond0 –TeamMembers Ethernet1 PS > Add-NetLbfoTeamNic –Team Bond0 –VlanID 101 –Name Management PS > Add-NetLbfoTeamNic –Team Bond0 –VlanID 102 –Name Storage
Now can see the two new vNICs we just created:
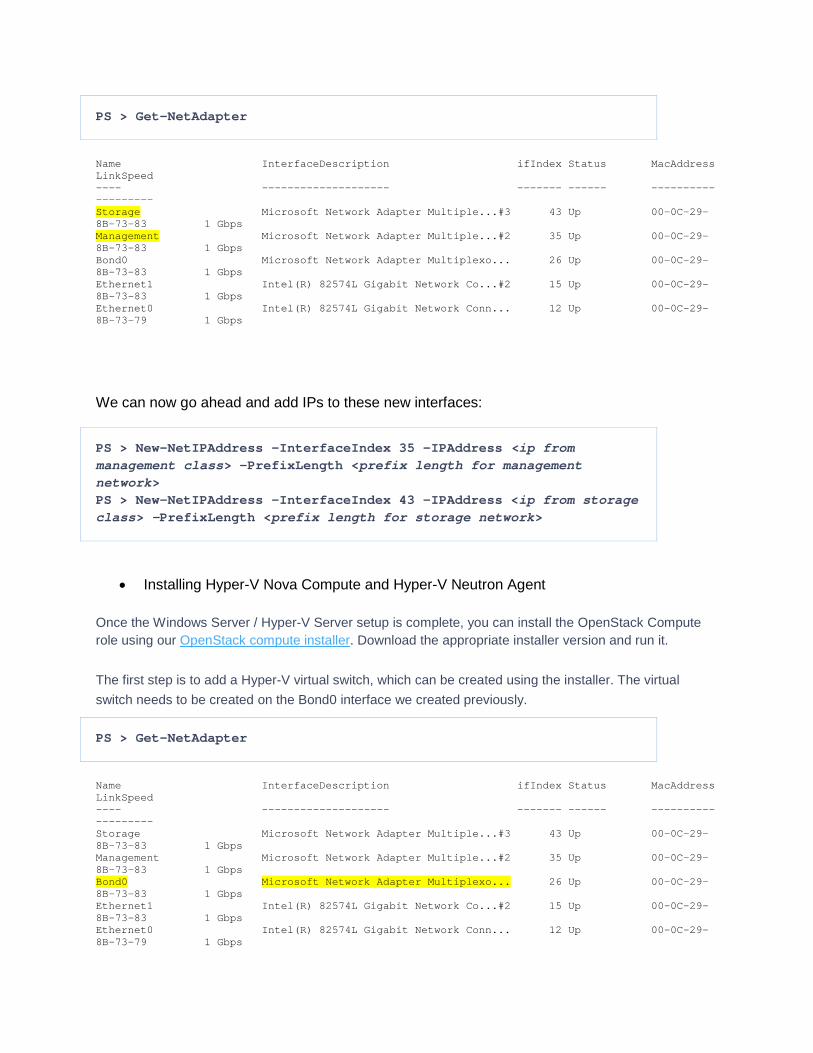
PS > Get-NetAdapter
Name InterfaceDescription ifIndex Status MacAddress LinkSpeed ---- -------------------- ------- ------ ---------- --------- Storage Microsoft Network Adapter Multiple...#3 43 Up 00-0C-29-8B-73-83 1 Gbps Management Microsoft Network Adapter Multiple...#2 35 Up 00-0C-29-8B-73-83 1 Gbps Bond0 Microsoft Network Adapter Multiplexo... 26 Up 00-0C-29-8B-73-83 1 Gbps Ethernet1 Intel(R) 82574L Gigabit Network Co...#2 15 Up 00-0C-29-8B-73-83 1 Gbps Ethernet0 Intel(R) 82574L Gigabit Network Conn... 12 Up 00-0C-29-8B-73-79 1 Gbps
We can now go ahead and add IPs to these new interfaces:
PS > New-NetIPAddress –InterfaceIndex 35 –IPAddress <ip from management class> -PrefixLength <prefix length for management network> PS > New-NetIPAddress –InterfaceIndex 43 –IPAddress <ip from storage class> -PrefixLength <prefix length for storage network>
• Installing Hyper-V Nova Compute and Hyper-V Neutron Agent Once the Windows Server / Hyper-V Server setup is complete, you can install the OpenStack Compute role using our OpenStack compute installer. Download the appropriate installer version and run it.
The first step is to add a Hyper-V virtual switch, which can be created using the installer. The virtual switch needs to be created on the Bond0 interface we created previously.
PS > Get-NetAdapter
Name InterfaceDescription ifIndex Status MacAddress LinkSpeed ---- -------------------- ------- ------ ---------- --------- Storage Microsoft Network Adapter Multiple...#3 43 Up 00-0C-29-8B-73-83 1 Gbps Management Microsoft Network Adapter Multiple...#2 35 Up 00-0C-29-8B-73-83 1 Gbps Bond0 Microsoft Network Adapter Multiplexo... 26 Up 00-0C-29-8B-73-83 1 Gbps Ethernet1 Intel(R) 82574L Gigabit Network Co...#2 15 Up 00-0C-29-8B-73-83 1 Gbps Ethernet0 Intel(R) 82574L Gigabit Network Conn... 12 Up 00-0C-29-8B-73-79 1 Gbps

Select the appropriate interface from the installer dropdown to create the virtual switch.
Next, you’ll need the host addresses URLs for the Glance API and AMQP server as well as credentials for AMQP.
An easy way to get the API endpoint URLs is by using Horizon. Login as an administrator and navigate to the projects Access & Security section, API Access tab and select the URL corresponding to the Image service.

You will need to provide a Neutron API endpoint as well. The Neutron API endpoint can be obtained in the same way as the Glance one, listed as Network under the API Access tab in Horizon.
You will also be prompted for credentials for neutron authentication. The simplest way to find those credentials is to look on the controller node in /etc/nova/nova.conf, in the [neutron] section. The values you are looking for are:
[neutron] admin_tenant_name admin_username admin_password
The AMQP RabbitMQ configuration can be retrieved from /etc/nova/nova.conf as well:
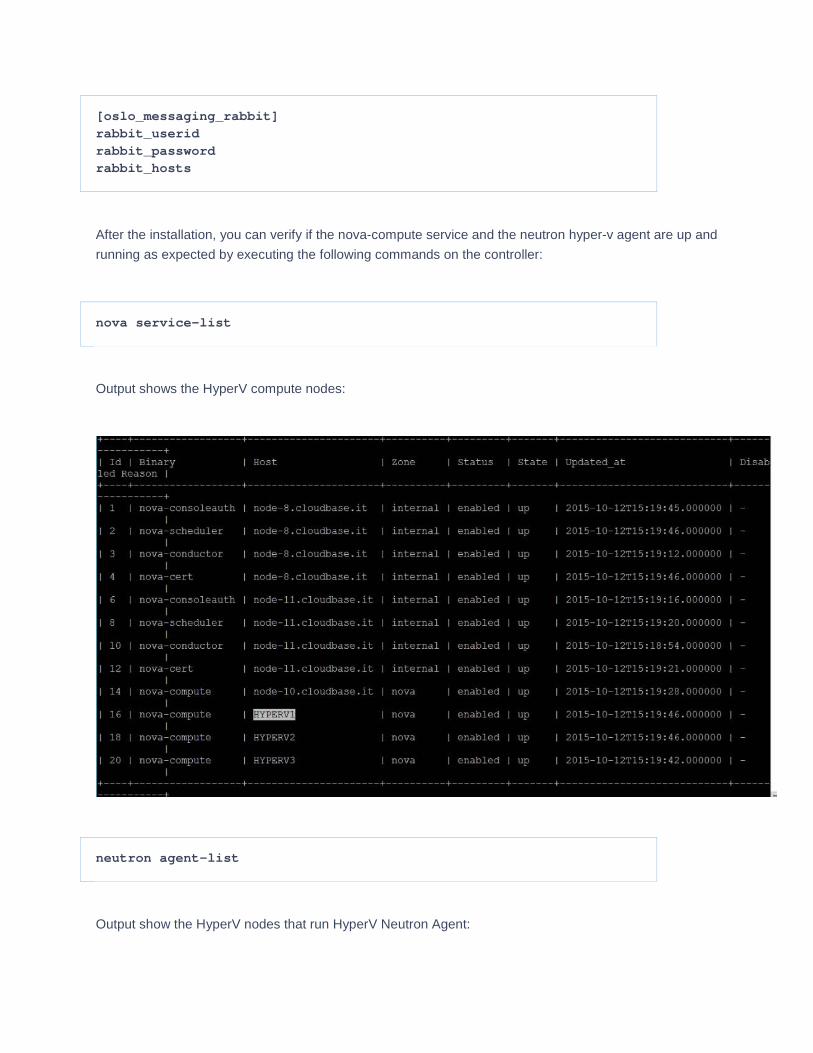
[oslo_messaging_rabbit] rabbit_userid rabbit_password rabbit_hosts
After the installation, you can verify if the nova-compute service and the neutron hyper-v agent are up and running as expected by executing the following commands on the controller:
nova service-list
Output shows the HyperV compute nodes:
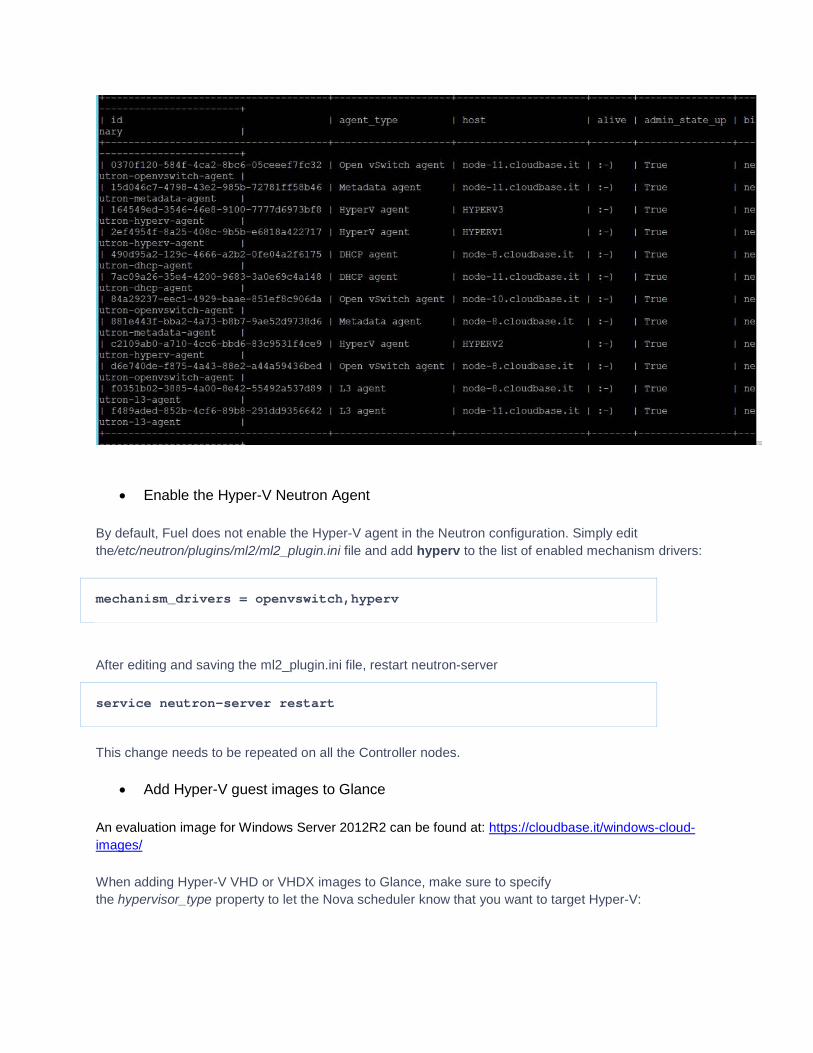
neutron agent-list
Output show the HyperV nodes that run HyperV Neutron Agent:
• Enable the Hyper-V Neutron Agent By default, Fuel does not enable the Hyper-V agent in the Neutron configuration. Simply edit the/etc/neutron/plugins/ml2/ml2_plugin.ini file and add hyperv to the list of enabled mechanism drivers:
mechanism_drivers = openvswitch,hyperv
After editing and saving the ml2_plugin.ini file, restart neutron-server
service neutron-server restart
This change needs to be repeated on all the Controller nodes.
• Add Hyper-V guest images to Glance An evaluation image for Windows Server 2012R2 can be found at: https://cloudbase.it/windows-cloud-images/ When adding Hyper-V VHD or VHDX images to Glance, make sure to specify the hypervisor_type property to let the Nova scheduler know that you want to target Hyper-V:
glance image-create --property hypervisor_type=hyperv --name "Windows Server 2012 R2 Std" \ --container-format bare --disk-format vhd --file windows2012r2.vhdx
6. Testing
6.1 Test tools • Tempest • Since the HyperV nodes are not managed by FUEL, HealthChecks are not available.
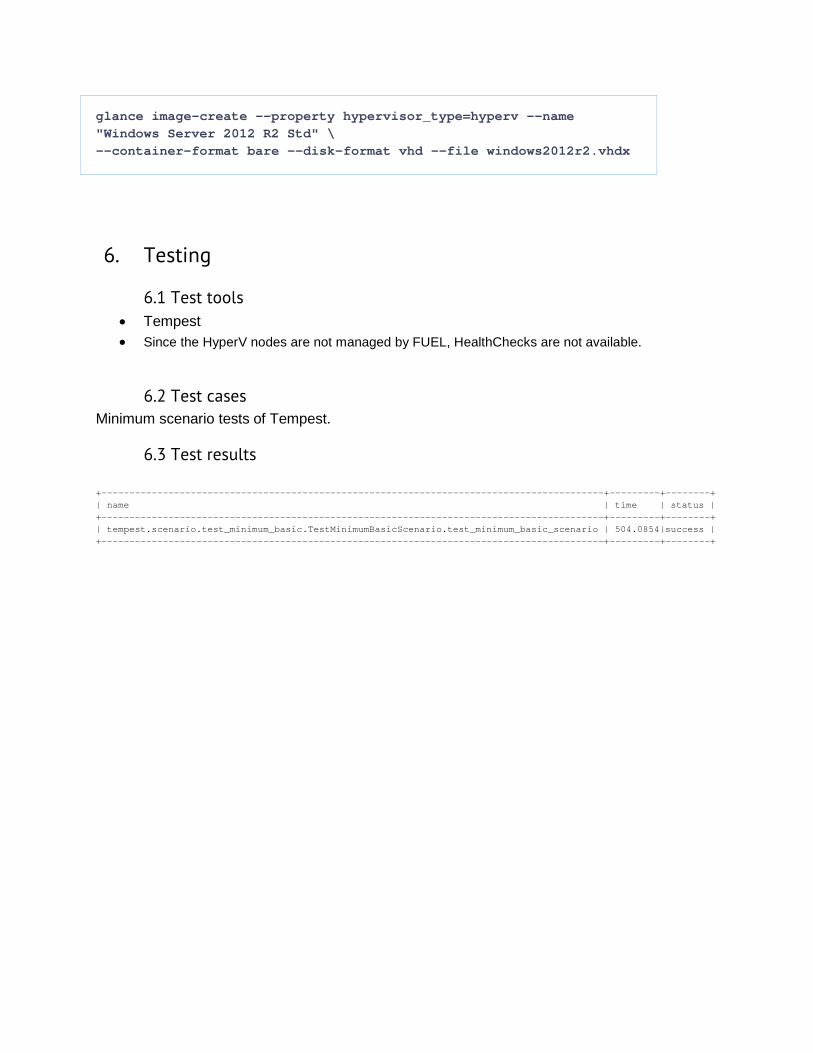
6.2 Test cases Minimum scenario tests of Tempest.
6.3 Test results +------------------------------------------------------------------------------------------+---------+--------+ | name | time | status | +------------------------------------------------------------------------------------------+---------+--------+ | tempest.scenario.test_minimum_basic.TestMinimumBasicScenario.test_minimum_basic_scenario | 504.0854|success | +------------------------------------------------------------------------------------------+---------+--------+