runbook automation systemwalker -...
TRANSCRIPT
B1X1-0119-03ENZ0(00)September 2012
Windows/Linux
Systemwalker Runbook Automation
Cluster Setup Guide
Preface
Purpose of This Document
This document provides an overview of the functions for increasing the reliability of Systemwalker Runbook Automation V15.1.1 usingcluster systems, as well as information on how to install and operate Systemwalker Runbook Automation on cluster systems.
Intended Readers
This document is intended for people who want to improve the reliability of administrative tasks by using the following clustering softwareto increase the reliability of Systemwalker Runbook Automation.
- Microsoft(R) Cluster Server or Microsoft(R) Cluster Service (hereafter referred to as "MSCS")
- Windows Server 2008 Failover Clustering (hereafter referred to as "Failover Clustering")
It is assumed that readers already have basic knowledge about the operating system and general GUI operations.
Abbreviations and Generic Terms Used
- The term "Windows(R) 7" refers to the following products:
- Microsoft(R) Windows(R) 7 Home Premium (x86)
- Microsoft(R) Windows(R) 7 Professional (x86)
- Microsoft(R) Windows(R) 7 Ultimate (x86)
- Windows(R) 7 Home Premium (x64)
- Windows(R) 7 Professional (x64)
- Windows(R) 7 Ultimate (x64)
- The term "Windows Server 2008" refers to the following products:
- Microsoft(R) Windows Server(R) 2008 R2 Standard (x64)
- Microsoft(R) Windows Server(R) 2008 R2 Enterprise (x64)
- Microsoft(R) Windows Server(R) 2008 R2 Datacenter (x64)
- Microsoft(R) Windows Server(R) 2008 Standard (x86)
- Microsoft(R) Windows Server(R) 2008 Enterprise (x86)
- Microsoft(R) Windows Server(R) 2008 Standard (x64)
- Microsoft(R) Windows Server(R) 2008 Enterprise (x64)
- Microsoft(R) Windows Server(R) 2008 Datacenter (x64)
- Microsoft(R) Windows Server(R) 2008 Standard without Hyper-V (x86)
- Microsoft(R) Windows Server(R) 2008 Enterprise without Hyper-V (x86)
- Microsoft(R) Windows Server(R) 2008 Datacenter without Hyper-V (x64)
- The term "Windows Vista(R)" refers to the following products:
- Microsoft(R) Windows Vista(R) Home Basic (x86)
- Microsoft(R) Windows Vista(R) Home Premium (x86)
- Microsoft(R) Windows Vista(R) Business (x86)
- Microsoft(R) Windows Vista(R) Ultimate (x86)
- Microsoft(R) Windows Vista(R) Enterprise (x86)
- i -
- Windows Vista(R) Business (x64)
- Windows Vista(R) Ultimate (x64)
- The term "Windows Server 2003" refers to the following products:
- Microsoft(R) Windows Server(R) 2003, Standard Edition
- Microsoft(R) Windows Server(R) 2003, Enterprise Edition
- Microsoft(R) Windows Server(R) 2003, Standard x64 Edition
- Microsoft(R) Windows Server(R) 2003, Enterprise x64 Edition
- Microsoft(R) Windows Server(R) 2003 R2, Standard Edition
- Microsoft(R) Windows Server(R) 2003 R2, Enterprise Edition
- Microsoft(R) Windows Server(R) 2003 R2, Standard x64 Edition
- Microsoft(R) Windows Server(R) 2003 R2, Enterprise x64 Edition
- The term "Windows(R) XP" refers to the following products:
- Microsoft(R) Windows(R) XP Professional x64 Edition
- Microsoft(R) Windows(R) XP Professional
- Microsoft(R) Windows(R) XP Home Edition
- The Oracle Solaris Operating System may be referred to as Solaris, Solaris Operating System or Solaris OS.
- Microsoft (R) Cluster Server and Microsoft (R) Cluster Service are referred to as MSCS.
- The versions of Systemwalker Runbook Automation that run on Windows systems are referred to as the Windows version.
- The versions of Systemwalker Runbook Automation that run on Linux systems are referred to as the Linux version.
Export Restriction
If this document is to be exported or provided overseas, it is necessary to check Foreign Exchange and Foreign Trade Law, and take thenecessary procedure according to these laws
Trademarks
ITIL(R) is a registered trademark, and a registered community trademark of the Office of Government Commerce, and is registered in theUS Patent and Trademark Office.
Linux is a registered trademark of Linus Torvalds.
Microsoft, Windows, Windows Server, and Microsoft Cluster Service are either registered trademarks or trademarks of MicrosoftCorporation in the United States and/or other countries.
Oracle is a registered trademark of Oracle Corporation and/or its affiliates.
Red Hat and all Red Hat-based trademarks and logos are trademarks or registered trademarks of Red Hat, Inc. in the United States andother countries.
Oracle and Java are registered trademarks of Oracle and/or its affiliates. Other names may be trademarks of their respective owners.
Systemwalker, Interstage, and Symfoware are registered trademarks of Fujitsu Limited.
UNIX is a registered trademark of The Open Group in the United States and other countries.
VMware, the VMware "boxes" logo and design, Virtual SMP and VMotion are trademarks or registered trademarks of VMware, Inc. inthe United States and other countries.
Other company names and product names are trademarks or registered trademarks of respective companies.
The company names, system names, product names and other proprietary names that appear in this document are not always accompaniedby trademark symbols (TM or (R)).
- ii -

This guide uses screenshots in accordance with Microsoft Corporation's guidelines.
September 2012
Revision history
March 2012: First edition
July 2012: Second edition
September 2012: Third edition
Copyright 2010-2012 FUJITSU LIMITED
- iii -

ContentsChapter 1 High-Reliability Operations......................................................................................................................................1
1.1 High-Reliability Operations Using Cluster Systems...........................................................................................................................11.2 Supported Cluster Systems..................................................................................................................................................................21.3 Configuration of Systemwalker Runbook Automation on Cluster Systems.......................................................................................4
Chapter 2 Installation................................................................................................................................................................62.1 Management Server Installation Procedure.........................................................................................................................................62.2 Preparation for Creating the Management Server Environment.........................................................................................................62.3 Installing the Management Server.......................................................................................................................................................7
2.3.1 Installing Systemwalker Runbook Automation............................................................................................................................82.3.2 Setting up a Cluster Environment for Interstage Application Server...........................................................................................82.3.3 LDAP Environment Build and Settings......................................................................................................................................12
2.3.3.1 Building the Interstage Directory Service Environment......................................................................................................122.3.3.2 Building the Active Directory or OpenLDAP Environment...............................................................................................13
2.3.4 Setting up Systemwalker Runbook Automation (Primary Node)..............................................................................................132.3.5 Setting up Systemwalker Runbook Automation (Secondary Node)..........................................................................................292.3.6 Disabling Service Automatic Startup Settings............................................................................................................................352.3.7 Setting up the Cluster Service.....................................................................................................................................................37
2.3.7.1 For MSCS or Failover Clustering........................................................................................................................................372.3.8 Starting the Cluster Service........................................................................................................................................................40
2.3.8.1 For MSCS or Failover Clustering........................................................................................................................................402.4 Uninstalling the Management Server................................................................................................................................................40
2.4.1 Stopping the Cluster Service.......................................................................................................................................................402.4.1.1 For MSCS or Failover Clustering........................................................................................................................................40
2.4.2 Canceling the Cluster Service.....................................................................................................................................................402.4.2.1 For MSCS or Failover Clustering........................................................................................................................................40
2.4.3 Setup Cancellation......................................................................................................................................................................412.4.3.1 Deleting the Environment for Systemwalker Runbook Automation (Secondary Node).....................................................412.4.3.2 Deleting the Environment for Systemwalker Runbook Automation (Primary Node).........................................................44
2.4.4 Uninstallation..............................................................................................................................................................................472.5 Linked Server Installation Procedure................................................................................................................................................47
2.5.1 Installing on the Linked Server...................................................................................................................................................482.5.2 Setting up Agents in Systemwalker Centric Manager Environments (Primary Node)..............................................................482.5.3 Setting up Agents in Systemwalker Centric Manager Environments (Secondary Node)..........................................................49
2.6 Uninstalling the Linked Server..........................................................................................................................................................502.6.1 Canceling the Agent Settings in a Systemwalker Centric Manager Environment (Primary Node)...........................................502.6.2 Canceling the Setup for Agents in Systemwalker Centric Manager Environments (Secondary Node).....................................512.6.3 Uninstalling from the Linked Server..........................................................................................................................................52
Chapter 3 Operation...............................................................................................................................................................533.1 Starting and Stopping.........................................................................................................................................................................53
3.1.1 Starting the Management Server [Windows]..............................................................................................................................533.1.2 Stopping the Management Servers [Windows]..........................................................................................................................53
3.2 Backup and Restoration.....................................................................................................................................................................533.2.1 Backup........................................................................................................................................................................................533.2.2 Restoration..................................................................................................................................................................................57
- iv -
Chapter 1 High-Reliability OperationsThis chapter presents an overview of using cluster systems to achieve high reliability operations for Systemwalker Runbook Automation.
1.1 High-Reliability Operations Using Cluster SystemsWith Systemwalker Runbook Automation, cluster systems can be used to achieve operation management in high-reliability environments.
This section explains the purpose and configurations of cluster systems
The purpose of cluster systems
A "cluster system" is a highly reliable system configuration that connects multiple servers in order to ensure high availability for the jobsrunning on those servers.
Redundant nodes are prepared in case faults occur during operations, so that these redundant nodes can re-execute jobs when faults occurwith active nodes. (This transition action is referred to as a "failover".) This means that even if a job has stopped (due to node failure, forexample), the failover allows the job to be rapidly re-executed.
In cluster systems, the node that is operating is referred to as the "active node", while the redundant nodes that are on standby in case afailure occurs are referred to as "standby nodes". Also, to distinguish the physical nodes, the node that is initially the active node is referredto as the "primary node", while the node that is initially the standby node is referred to as the "secondary node".
Operations that can be achieved with failovers
When a failover occurs, the processing progress of any automated operation processes that were executing on the active node can beinherited by the standby node.
Note
When failovers occur, the processing progress of automated operation processes is not inherited if operation components or activities wereexecuting these automated operation processes. In this case, recovery actions must be taken in order to re-execute the automated operationprocesses.
Refer to "Troubleshooting the Automatic Operation Processes" in the Systemwalker Runbook Automation Troubleshooting Guide forinformation on recovery actions.
The configuration of cluster systems
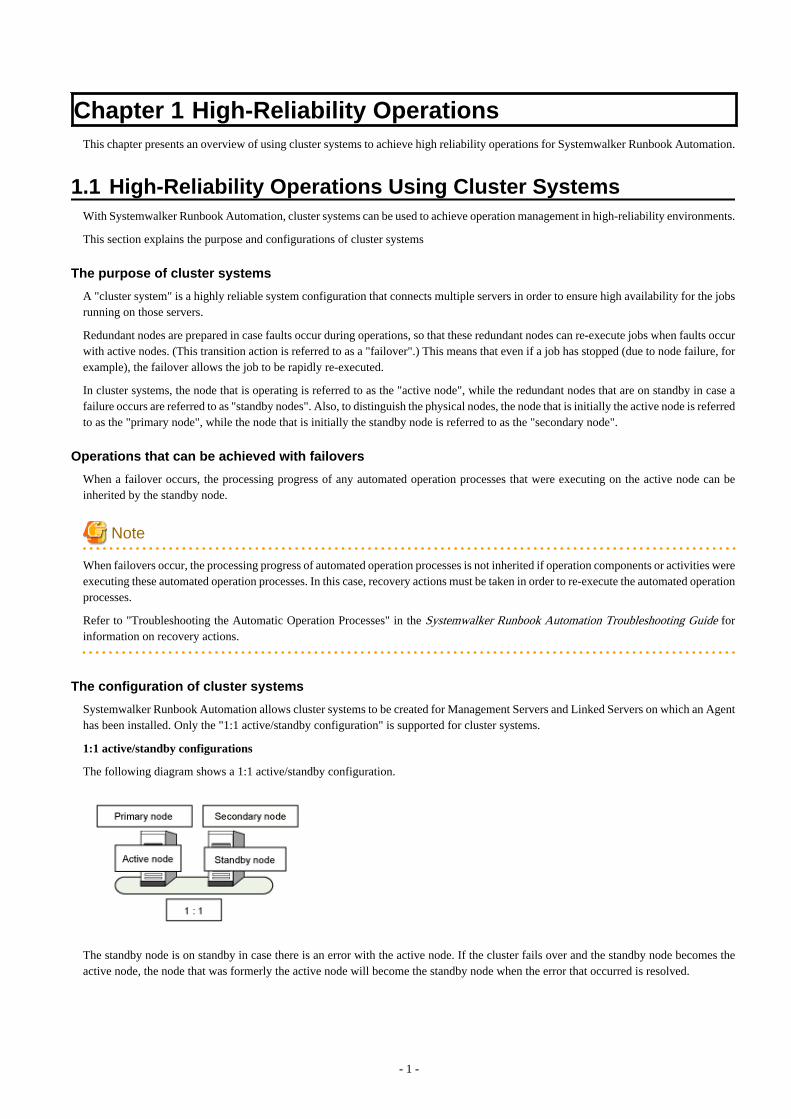
Systemwalker Runbook Automation allows cluster systems to be created for Management Servers and Linked Servers on which an Agenthas been installed. Only the "1:1 active/standby configuration" is supported for cluster systems.
1:1 active/standby configurations
The following diagram shows a 1:1 active/standby configuration.
The standby node is on standby in case there is an error with the active node. If the cluster fails over and the standby node becomes theactive node, the node that was formerly the active node will become the standby node when the error that occurred is resolved.
- 1 -
Note
Linked Servers where Systemwalker Runbook Automation Agents have been installed run on servers where cluster systems have beencreated, but the Systemwalker Runbook Automation Agents do not fail over even if they fail. Inheriting the processing for linked productstakes precedence.
1.2 Supported Cluster SystemsThe following cluster systems are supported by Systemwalker Runbook Automation.
Management Servers
[Windows]
When Microsoft(R) Cluster Service (MSCS) or Microsoft(R) Failover Clustering is contained in the following:
- Microsoft(R) Windows Server(R) 2003, Enterprise Edition
- Microsoft(R) Windows Server(R) 2008 Enterprise
[Linux]
Cluster operations are not supported.
Linked Servers
[Windows]
When Microsoft(R) Cluster Service(MSCS) or Microsoft(R) Failover Clustering is contained in the following:
- Microsoft(R) Windows Server(R) 2003, Enterprise Edition
- Microsoft(R) Windows Server(R) 2008 Enterprise
[Linux]
- Fujitsu PRIMECLUSTER Enterprise Edition 4.1A20 or later
- Fujitsu PRIMECLUSTER HA Server 4.1A20 or later
- Fujitsu PRIMECLUSTER Clustering Base 4.1A20 or later
Overview of server operations on cluster systems
The following diagram illustrates server operations on cluster systems.
- 2 -
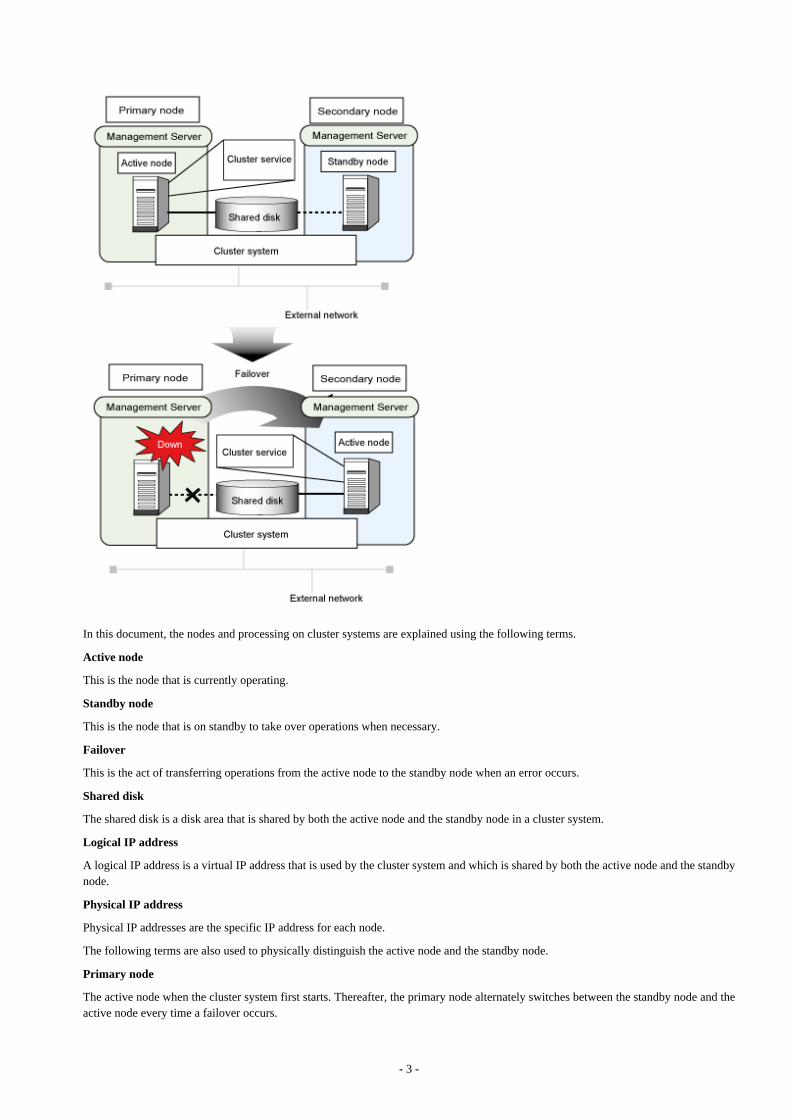
In this document, the nodes and processing on cluster systems are explained using the following terms.
Active node
This is the node that is currently operating.
Standby node
This is the node that is on standby to take over operations when necessary.
Failover
This is the act of transferring operations from the active node to the standby node when an error occurs.
Shared disk
The shared disk is a disk area that is shared by both the active node and the standby node in a cluster system.
Logical IP address
A logical IP address is a virtual IP address that is used by the cluster system and which is shared by both the active node and the standbynode.
Physical IP address
Physical IP addresses are the specific IP address for each node.
The following terms are also used to physically distinguish the active node and the standby node.
Primary node
The active node when the cluster system first starts. Thereafter, the primary node alternately switches between the standby node and theactive node every time a failover occurs.
- 3 -

Secondary node
The standby node when the cluster system first starts. Thereafter, the secondary node alternately switches between the active node andthe standby node every time a failover occurs.
Failover trigger
Failovers are triggered by errors with the resources that have been registered with the cluster system.
1.3 Configuration of Systemwalker Runbook Automation onCluster Systems
Systemwalker Runbook Automation can be operated in cluster systems using the following configurations.
Using cluster configurations for the Management Servers and Linked Servers
The following diagram shows an overview of cluster configurations for the Management Servers and Linked Servers.
Internal product configuration for the Management Server
The following diagram shows the internal product configuration for Systemwalker Runbook Automation for when a cluster configurationis used for the Management Server.
- 4 -

Internal product configuration for Linked Servers
The following diagram shows the internal product configuration for Systemwalker Runbook Automation for when a cluster configurationis used for Linked Servers.
Refer to the Systemwalker Centric Manager manual for details on cluster configurations for Systemwalker Centric Manager.
- 5 -
Chapter 2 InstallationThis chapter explains how to specify the settings for installing Systemwalker Runbook Automation on a cluster system.
2.1 Management Server Installation ProcedureThis section describes the procedure for installing a server on a cluster system.
Refer also to the following manuals in the course of the installation.
- Systemwalker Runbook Automation Technical Guide
- Systemwalker Runbook Automation Installation Guide
- The manuals for MSCS and Failover Clustering
Perform all installation steps as a user that belongs to the administrators group.
2.2 Preparation for Creating the Management Server EnvironmentThis section explains the preparation tasks before the server is installed on the cluster.
Determining the system configuration
The "1:1 active/standby configuration" is supported for Management Server cluster systems. Determine which servers will use a clusterconfiguration.
Preparing resources
Prepare the following resources.
- Shared disk
This is the disk for storing files that are shared by functions on the primary node and functions on the secondary node.
- Logical IP address
This is the unique IP address in the IPv4 format allocated to the network being used when operating Systemwalker RunbookAutomation in a cluster system.
- Logical host name
This is the host name that corresponds to the logical IP address.
Estimating the space required for the shared disk
The shared disk will store the following resources, which are shared by the primary node and the secondary node. This means that it isnecessary to estimate the required space.
- Database areas for Process Management
- Database areas for the CMDB Manager
- Directory for storing inherited files
Refer to the Systemwalker Runbook Automation Technical Guide for information on the required space.
Preparing the LDAP environment
The Systemwalker Runbook Automation cluster configuration is compatible with the LDAP environments shown below.
For this reason, prepare one of the following LDAP environments:
- Interstage Directory Service
- Active Directory
- 6 -
- OpenLDAP
Note that the cluster configuration is not compatible with the Interstage Single Sign-On and ServerView Operations Manager Single Sign-on environments.
Installing and setting up MSCS or Failover Clustering [Windows]
Before setting up Systemwalker Runbook Automation, install and set up MSCS or Failover Clustering. Refer to the MSCS or FailoverClustering manual for details.
2.3 Installing the Management ServerThis section explains how to install a Management Server on a cluster system.
If Systemwalker Runbook Automation is running, stop Systemwalker Runbook Automation on both nodes in the cluster configuration(both the primary node and the secondary node).
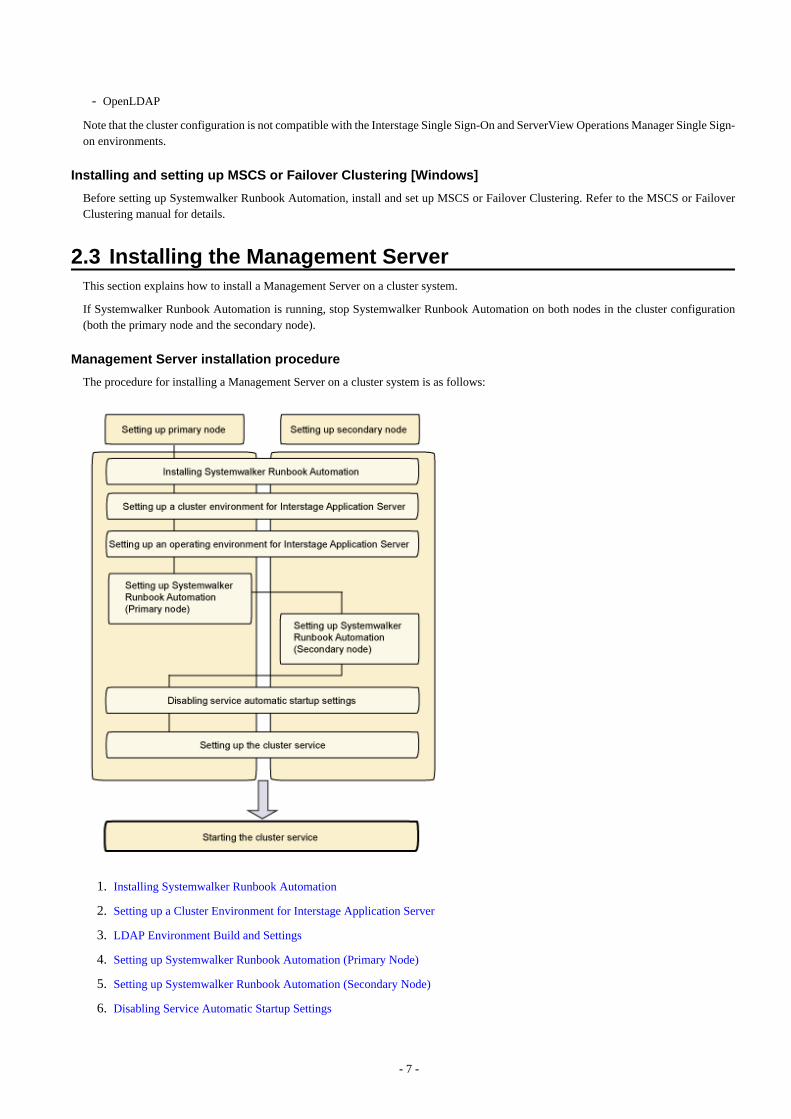
Management Server installation procedure
The procedure for installing a Management Server on a cluster system is as follows:
1. Installing Systemwalker Runbook Automation
2. Setting up a Cluster Environment for Interstage Application Server
3. LDAP Environment Build and Settings
4. Setting up Systemwalker Runbook Automation (Primary Node)
5. Setting up Systemwalker Runbook Automation (Secondary Node)
6. Disabling Service Automatic Startup Settings
- 7 -
7. Setting up the Cluster Service
8. Starting the Cluster Service
2.3.1 Installing Systemwalker Runbook Automation
Installing the Management Server
Install Systemwalker Runbook Automation on both nodes in the cluster system (both the primary node and the secondary node).
Use the following procedure to install Systemwalker Runbook Automation.
1. Place the shared disk online on the primary node.
2. Custom-install Systemwalker Runbook Automation on the primary node.
3. Place the shared disk offline on the primary node.
4. Place the shared disk online on the secondary node.
5. Custom-install Systemwalker Runbook Automation on the secondary node.
6. Place the shared disk offline on the secondary node.
7. Restart the primary node.
8. Restart the secondary node.
9. Place the shared disk online on the primary node.
Refer to "Installing on Management Servers", "Custom Installation" in the Systemwalker Runbook Automation Installation Guide forinformation on the installation procedure for Systemwalker Runbook Automation.
Note
- Use the Custom Installation procedure for installing the System Walker Runbook Automation. If Standard Installation is used, theshared disk on the CMDB Manager database storage destination will not be configured.
- Specify a directory on the shared disk as the database storage directory for the CMDB Manager.
- For all other installation directories other than the database storage directory for the CMDB Manager, specify directories on the localdisks rather than on the shared disk.
- Specify the same installation directories for both nodes.
- Specify the same port number for Systemwalker Runbook Automation on both nodes.
2.3.2 Setting up a Cluster Environment for Interstage Application ServerThis section explains the procedure for setting up a cluster environment for Interstage Application Server that is used by SystemwalkerRunbook Automation.
Refer to the Interstage Application Server/Interstage Web Server Reference Manual (Command Edition) for details on the commandsexplained in this section.
Note
The setup procedure in this section must be performed on both the primary node and the secondary node.
Specifying the IP address to take over
On both the primary node and the secondary node, specify the IP address to be embedded when object references are generated. For theIP address, specify the logical IP address that is taken over by the cluster service.
- 8 -
Execute the following command.
[Windows]
OD_set_env -n <Logical IP address>
Stopping Interstage
Stop Interstage on both the primary node and the secondary node.
Execute the following command.
[Windows]
isstop -f
Generating an Interstage system definition file
Generate an Interstage system definition file on both the primary node and the secondary node.
Execute the following command.
[Windows]
isgendef large
Registering the Interstage system definition file
Register the Interstage system definition file (that has been generated) on both the primary node and the secondary node.
Execute the following command.
[Windows]
Isregistdef
Initializing Interstage
Use the following procedure to initialize Interstage, first on the primary node and then on the secondary node.
1. Execute the following command on the primary node first.
[Windows]
isinit -f type1 ejb
2. When the initialization on the primary node has completed, fail the cluster over to the secondary node, and then execute the followingcommand on the secondary node.
[Windows]
isinit -f -w type1 ejb
Changing settings of Interstage HTTP Server
Modify Interstage HTTP Server setting file, first on the primary node and then on the secondary.
Edit ServerName directive of the following file, and then set the name (the common host name or the logical IP address that is taken overby the cluster service) which registered in DNS (Domain Name Server).
[Install directory of Interstage Application Server]\F3FMihs\servers\FJapache\conf\httpd.conf
Example:
- 9 -
(abbr)
ServerName SWRBA
(abbr)
Starting Interstage
Start Interstage on both the primary node and the secondary node.
Execute the following command.
[Windows]
isstart && net start "Fjapache"
Stopping the Java EE Service
Stop the Java EE Service.
Stop the Java EE Service on the primary and secondary nodes.
1. As a user who has administrator privileges, use the following command to stop the Interstage Java EE Node Agent Service.
[Windows]
Ijnastop
2. As a user who has administrator privileges, use the following command to stop the Interstage Java EE DAS Service.
[Windows]
Ijdasstop
Java EE Settings
Use the procedure shown below to set the transition IP address and host name for the Interstage Application Server Java EE feature.
Execute the following procedure on both the primary and secondary nodes.
1. Edit das.properties
Use a text editor to open the following file, then change the agent.das.host value to the transition host name:
[Windows]
[Interstage Application Server installation directory]\F3FMisjee\var\nodeagents\ijna\agent
\config\das.properties
Example:
To set the transition host name "SWRBA", edit the agent.das.host value as follows:
(Omitted)
agent.das.host=SWRBA
(Omitted)
2. Edit nodeagent.properties
Use a text editor to open the following file, then change the agent.client.host value to the transition host name:
[Windows]
[Interstage Application Server installation directory]\F3FMisjee\var\nodeagents\ijna\agent
\config\nodeagent.properties
Example:
To set the transition host name "SWRBA", edit the agent.client.host value as follows:
- 10 -
(Omitted)
agent.client.host=SWRBA
(Omitted)
3. Edit sun-acc.xml
Use a text editor to open sun-acc.xml, then change the values shown below to the transition IP address:
[Windows]
[Interstage Application Server installation directory]\F3FMisjee\var\domains\interstage\config
\sun-acc.xml
[Edited items]
The name and address attributes of the target-server tag.
Example:
To set the transition host name "SWRBA", edit sun-acc.xml as follows:
(Omitted)
<client-container>
<target-server name="SWRBA" address="SWRBA" port="23600"/>
<log-service level="WARNING"/>
</client-container>
(Omitted)
4. Start the Interstage Java EE DAS Service
Execute the following command to start the Interstage Java EE DAS Service:
[Windows]
ijdasstart
5. Change the host name of the various definition items
Execute the following command to set the transition host name:
asadmin set node-agent.ijna.jmx-connector.property.client-hostname=<transition host name>
asadmin set default-config.admin-service.jmx-connector.system.property.client-
hostname=<transition host name>
asadmin set server-config.admin-service.jmx-connector.system.property.client-
hostname=<transition host name>
asadmin set default-config.jms-service.jms-host.default_JMS_host.host=<transition host name>
asadmin set server.jms-service.jms-host.default_JMS_host.host=<transition host name>
asadmin set default-config.transaction-service.property.xa-servername=<transition host name>
asadmin set server.transaction-service.property.xa-servername=<transition host name>
Example:
When the transition host name is "SWRBA"
asadmin set node-agent.ijna.jmx-connector.property.client-hostname=SWRBA
asadmin set default-config.admin-service.jmx-connector.system.property.client-hostname=SWRBA
asadmin set server-config.admin-service.jmx-connector.system.property.client-hostname=SWRBA
asadmin set default-config.jms-service.jms-host.default_JMS_host.host=SWRBA
asadmin set server.jms-service.jms-host.default_JMS_host.host=SWRBA
asadmin set default-config.transaction-service.property.xa-servername=SWRBA
asadmin set server.transaction-service.property.xa-servername=SWRBA
Refer to the Interstage Application Server manuals for information on the asadmin command.
6. Change the IP address of the various definition items
Execute the following command to set the transition IP address:
- 11 -
asadmin set default-config.iiop-service.iiop-listener.orb-listener-1.address=<transition IP
address>
asadmin set server.iiop-service.iiop-listener.orb-listener-1.address=<transition IP address>
Example:
When the transition IP address is 192.0.2.10, execute the following command:
asadmin set default-config.iiop-service.iiop-listener.orb-listener-1.address=192.0.2.10
asadmin set server.iiop-service.iiop-listener.orb-listener-1.address=192.0.2.10
Refer to the Interstage Application Server manuals for information on the asadmin command.
7. As a user who has administrator privileges, use the following command to start the Interstage Java EE Node Agent Service.
[Windows]
ijnastart
2.3.3 LDAP Environment Build and SettingsThe procedure used to build the LDAP environment is explained in this section.
- 2.3.3.1 Building the Interstage Directory Service Environment
- 2.3.3.2 Building the Active Directory or OpenLDAP Environment
2.3.3.1 Building the Interstage Directory Service EnvironmentTo use the Interstage Directory Service provided with Systemwalker Runbook Automation via LDAP authentication, use the followingprocedure to build the Interstage Directory Service environment.
Additionally, if you are using another LDAP type, refer to the manual of the LDAP that is used before building the LDAP environment.
1. On the active node, change the shared disk to online status.
2. On the active node, build the Interstage Directory Service environment.
Refer to "Creating an Environment for the Interstage Directory Service" in the Systemwalker Runbook Automation InstallationGuide for information on how to build the environment.
Note that the following must be specified for the build.
- For Simple Settings >> Database storage directory: Specify the directory on the shared disk.
- For Access log settings >> Access log storage directory: Specify the directory on the shared disk.
3. On the active node, execute the irepbacksys command to back up the repository information.
Example:
irepbacksys -d X:\Backup\irep\rep001_back -R rep001 -confonly
4. Transfer the backup obtained to the standby node using ftp, for example.
5. On the active node, change the shared disk to offline status.
6. On the standby node, change the shared disk to online status.
7. On the standby node, execute the ireprestsys command to restore the repository information.
Example:
ireprestsys -d X:\Backup\irep\rep001_back -R rep001 -confonly
8. On the standby node, change the shared disk to offline status.
- 12 -

2.3.3.2 Building the Active Directory or OpenLDAP EnvironmentTo use Active Directory or OpenLDAP, refer to the respective manual before building the environment.
2.3.4 Setting up Systemwalker Runbook Automation (Primary Node)This section explains the procedure for setting up Systemwalker Runbook Automation.
Register the users required for the setup with LDAP before setting up Systemwalker Runbook Automation.
Refer to "Registering Users, Groups and Organizational Units with the LDAP Directory" in the Systemwalker Runbook AutomationInstallation Guide for details.
Additionally, before Systemwalker Runbook Automation can be set up, the shared disk must be placed online on the primary node andInterstage, the Interstage Java EE DAS Service, and the Interstage Java EE Node Agent Service must be started.
Moreover, if the Interstage Directory Service provided with Systemwalker Runbook Automation is used, it must be started first.
The procedures for starting Interstage, the Interstage JMX Service, the Java EE Service, and the Interstage Directory Service are coveredbelow.
Start Interstage [Windows]
Execute the isstart command as a user with administrator privileges.
isstartnet start "Fjapache"
Start Interstage JMX Service [Windows]
As a user with administrator privileges, use the Services feature of Windows to start the Interstage JMX Service.
1. Click Start >> Control Panel >> Administrative Tools, and then, double-click Services.
2. Select Interstage Operation Tool, and click the Start button.
Start Java EE Service [Windows]
1. As a user with administrator privileges, execute the following command to start the Interstage Java EE DAS Service.
ijdasstart
2. As a user with administrator privileges, execute the following command to start the Interstage Java EE Node Agent Service.
ijnastart
Start Interstage Directory Service
Execute the following command to start the Interstage Directory Service:
irepstart -R repository name
Example
If the repository name is rep001, execute the following command:
irepstart -R rep001
[Windows]
Note
- Execute by user as administrator authority on local computer.
- During setup, stop services that are common to Systemwalker Operation Manager, and start the services after setup is completed. Inaddition, Systemwalker Operation Manager must be stopped before the setup.
- 13 -

- If the setup fails for any reason, be sure to cancel the setup after restarting the system.
1. Log in as a user with administrator privileges for the server on the primary node.
2. Execute the following command to start the setup.
<Systemwalker Runbook Automation Management Server installation directory>\bin\swrba_setup-s
3. The Systemwalker Runbook Automation Setup Tool will start.
Check the settings that are displayed, and click the Next button.
- 14 -

4. Select the type of server to be created.
Enter each setting, and click the Next button.
Item name Input value
Select the build server type Select Standalone Server (Clusteroperations - primary node).
High-ReliabilityEnvironmentSettings
Inherit File StorageDirectory
Specify the directory that will store the filesfor inheriting information about theManagement Server when a failover occurs.
Specify the absolute path to a directory onthe shared disk that can be accessed by boththe primary node and the secondary node.
Value can be up to 100 characters long.
Primary Node HostName
The primary node host name is displayed.
- 15 -
Item name Input value
Secondary Node HostName
Enter the host name corresponding to thesecondary node physical IP address. (*1)
*1: Do not enter the logical host name (host name corresponding to the logical IP address).
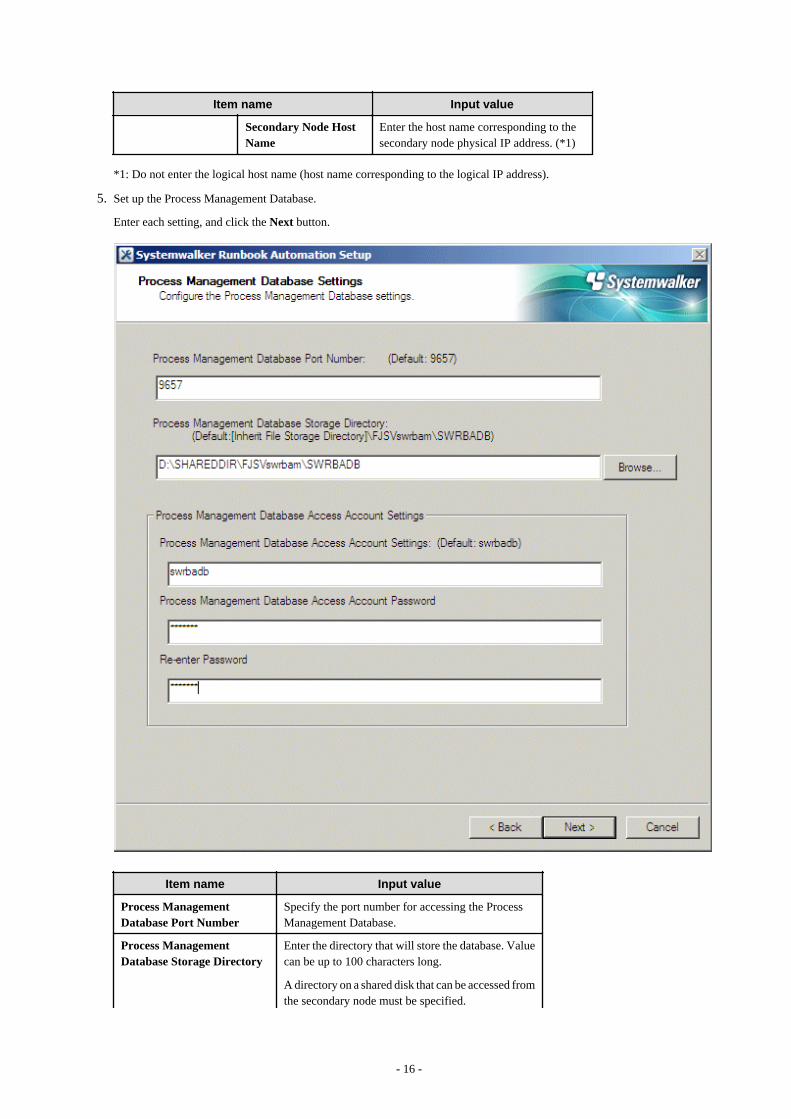
5. Set up the Process Management Database.
Enter each setting, and click the Next button.
Item name Input value
Process ManagementDatabase Port Number
Specify the port number for accessing the ProcessManagement Database.
Process ManagementDatabase Storage Directory
Enter the directory that will store the database. Valuecan be up to 100 characters long.
A directory on a shared disk that can be accessed fromthe secondary node must be specified.
- 16 -

Item name Input value
Also, for this directory, assign read/write privilegesto the "Users" group.
Process ManagementDatabase access accountpassword
Register a new account that will be required forSystemwalker Runbook Automation to access theProcess Management Database.
Specify this item using up to 18 alphanumericcharacters starting with a letter.
Note that the value specified for this item is requiredto directly manipulate the Process ManagementDatabase.
Process ManagementDatabase Access AccountPassword
Specify the password for the account for accessingthe Process Management Database.
Specify this item using up to 18 alphanumericcharacters and symbols (*1).
The value specified for this item is required to directlymanipulate the Process Management Database, sosave this value.
*1: The following symbols can be used:
! # % = ~ : ,_
Re-enter Password Re-enter the password for the account for accessingthe Process Management Database.
- 17 -
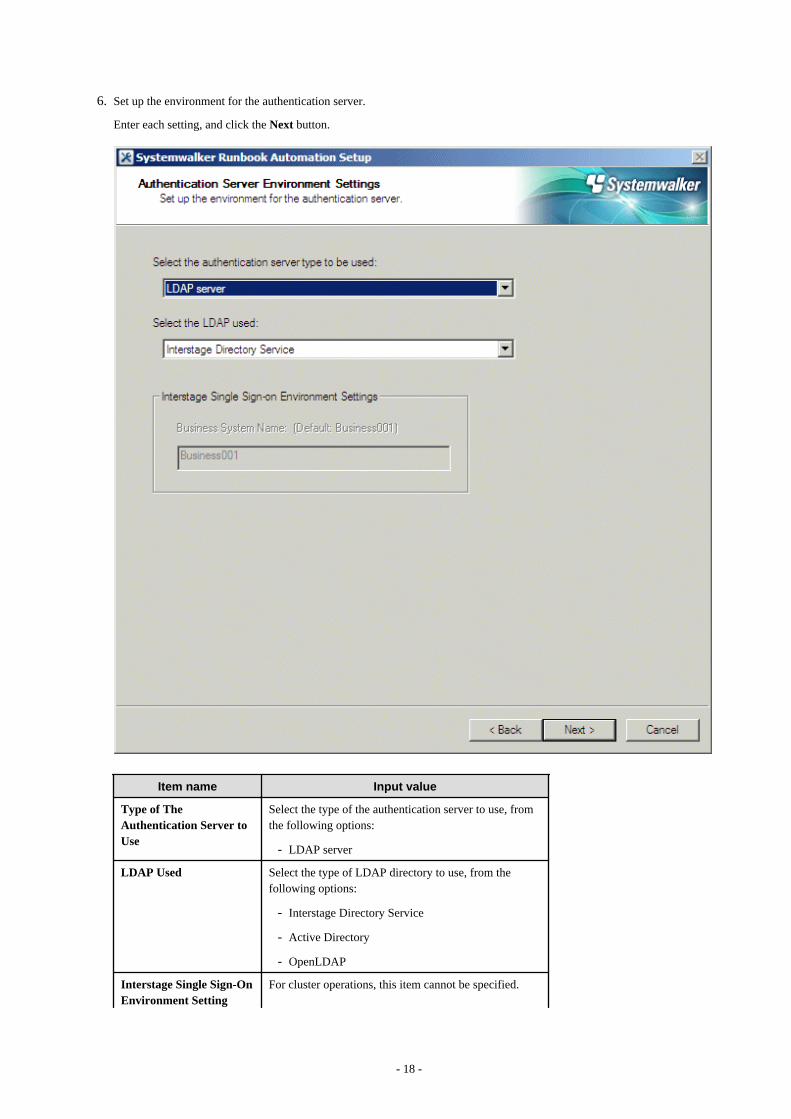
6. Set up the environment for the authentication server.
Enter each setting, and click the Next button.
Item name Input value
Type of TheAuthentication Server toUse
Select the type of the authentication server to use, fromthe following options:
- LDAP server
LDAP Used Select the type of LDAP directory to use, from thefollowing options:
- Interstage Directory Service
- Active Directory
- OpenLDAP
Interstage Single Sign-OnEnvironment Setting
For cluster operations, this item cannot be specified.
- 18 -
Item name Input value
Business System Name
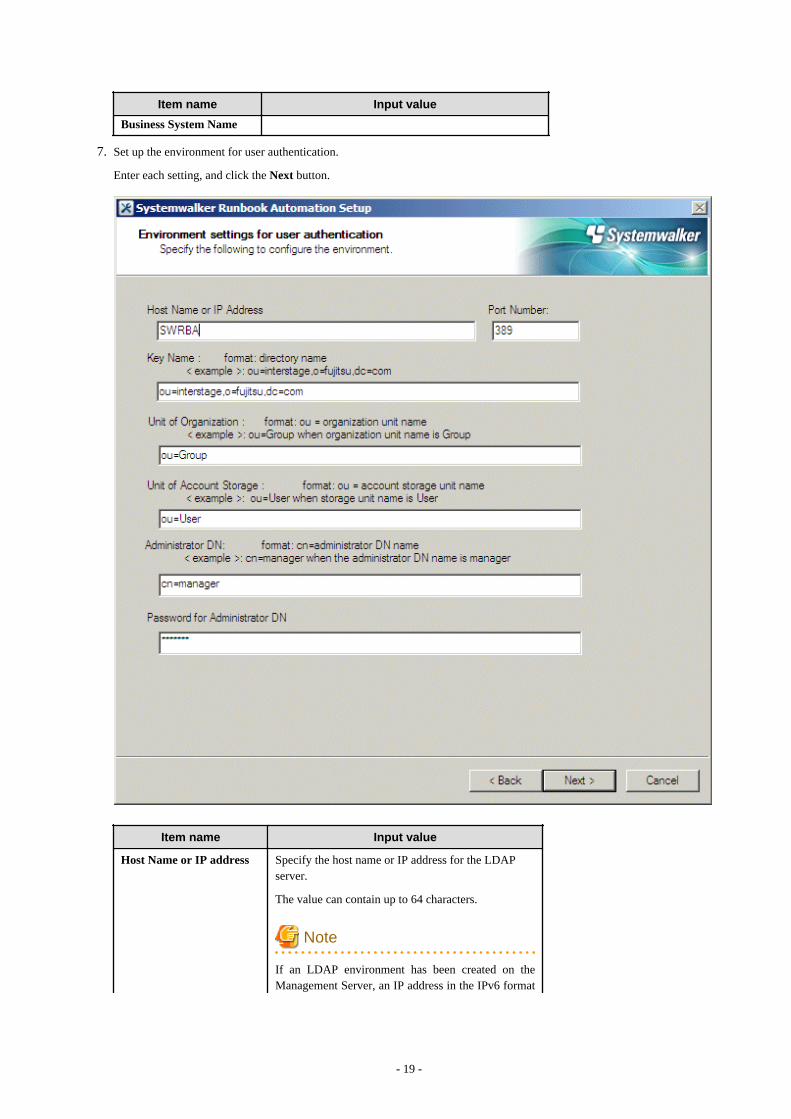
7. Set up the environment for user authentication.
Enter each setting, and click the Next button.
Item name Input value
Host Name or IP address Specify the host name or IP address for the LDAPserver.
The value can contain up to 64 characters.
Note
If an LDAP environment has been created on theManagement Server, an IP address in the IPv6 format
- 19 -
Item name Input value
cannot be specified for this item. In this case, specify ahost name or an IP address in the IPv4 format.
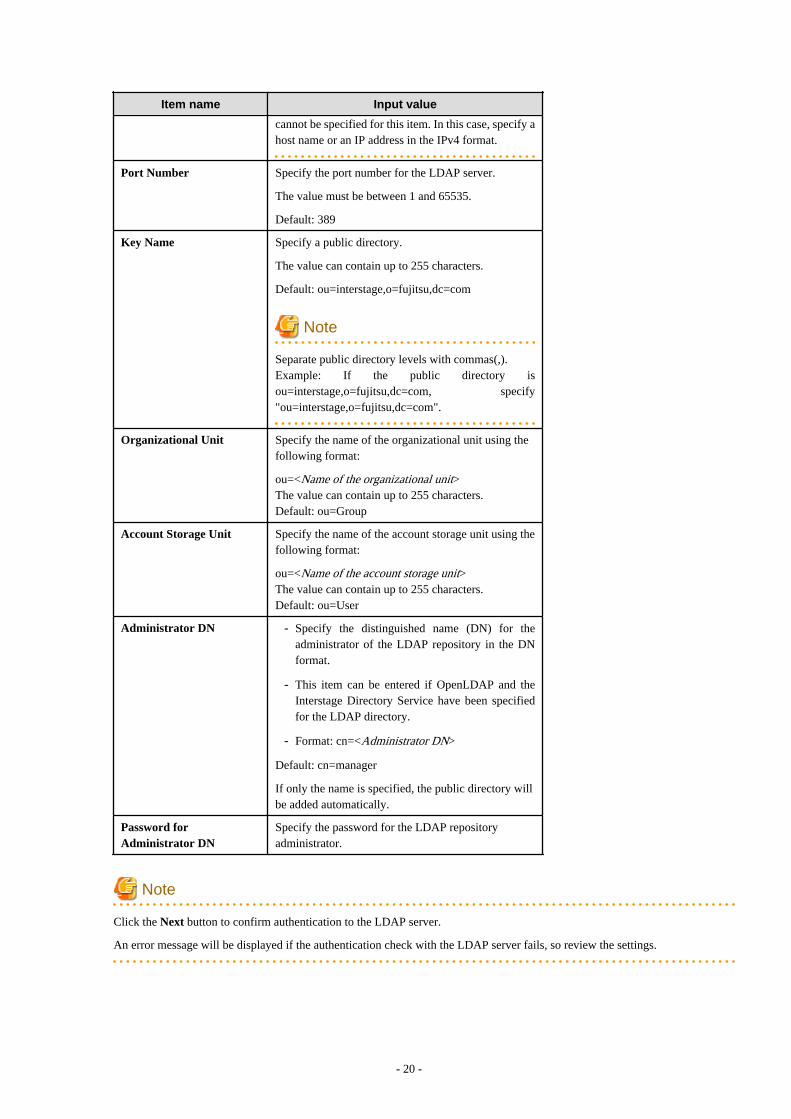
Port Number Specify the port number for the LDAP server.
The value must be between 1 and 65535.
Default: 389
Key Name Specify a public directory.
The value can contain up to 255 characters.
Default: ou=interstage,o=fujitsu,dc=com
Note
Separate public directory levels with commas(,).Example: If the public directory isou=interstage,o=fujitsu,dc=com, specify"ou=interstage,o=fujitsu,dc=com".
Organizational Unit Specify the name of the organizational unit using thefollowing format:
ou=<Name of the organizational unit>The value can contain up to 255 characters.Default: ou=Group
Account Storage Unit Specify the name of the account storage unit using thefollowing format:
ou=<Name of the account storage unit>The value can contain up to 255 characters.Default: ou=User
Administrator DN - Specify the distinguished name (DN) for theadministrator of the LDAP repository in the DNformat.
- This item can be entered if OpenLDAP and theInterstage Directory Service have been specifiedfor the LDAP directory.
- Format: cn=<Administrator DN>
Default: cn=manager
If only the name is specified, the public directory willbe added automatically.
Password forAdministrator DN
Specify the password for the LDAP repositoryadministrator.
Note
Click the Next button to confirm authentication to the LDAP server.
An error message will be displayed if the authentication check with the LDAP server fails, so review the settings.
- 20 -

8. Specify user information.
Enter each setting, and click the Next button.
Item name Input value
User for Process Control Specify the user required for Systemwalker RunbookAutomation to control processes. swrbaadmin is therecommended value, but any value can be specified.This user must have been registered in the LDAPdirectory.
Password for the User forProcess Control
Specify the password for the process control user.
User for Schedule Startup Specify the user who must start schedules in accordancewith Systemwalker Runbook Automation schedules.swrbasch is the recommended value, but any value canbe specified. This user must have been registered in theLDAP directory.
- 21 -

Item name Input value
Password of User forSchedule Startup
Specify the password for the user for schedule startup.
Note
Click the Next button to confirm authentication to the LDAP server. An error message will be displayed if the authentication checkwith the LDAP server fails, so review the settings. Also check the following.
- There may be an error with the LDAP server settings, so return to the previous window, and check whether the information hasbeen set up correctly.
- Check whether there are any errors with the user information or group information that has been registered on the LDAP server.
9. Execute the SMTP server environment settings.
To perform email notification when the task is assigned in the Automated Operation Process, the SMTP server information mustbe registered on the Management Server.
- 22 -

Enter the various settings items, and click the Next button.
Item name Input value
Host Name or IP Address Set the host name or IP address of the SMTP server thatwill be used to send mail.
- A maximum of 255 alphanumeric characters, periods('.'), and hyphens ('-') can be used.
- Default: localhost
Port Number Specify the port number of the SMTP server that will beused to send mail.
Default: 25
SMTP server user name Specify the user name that will be used in SMTP serverauthentication when the mail is sent.
- 23 -
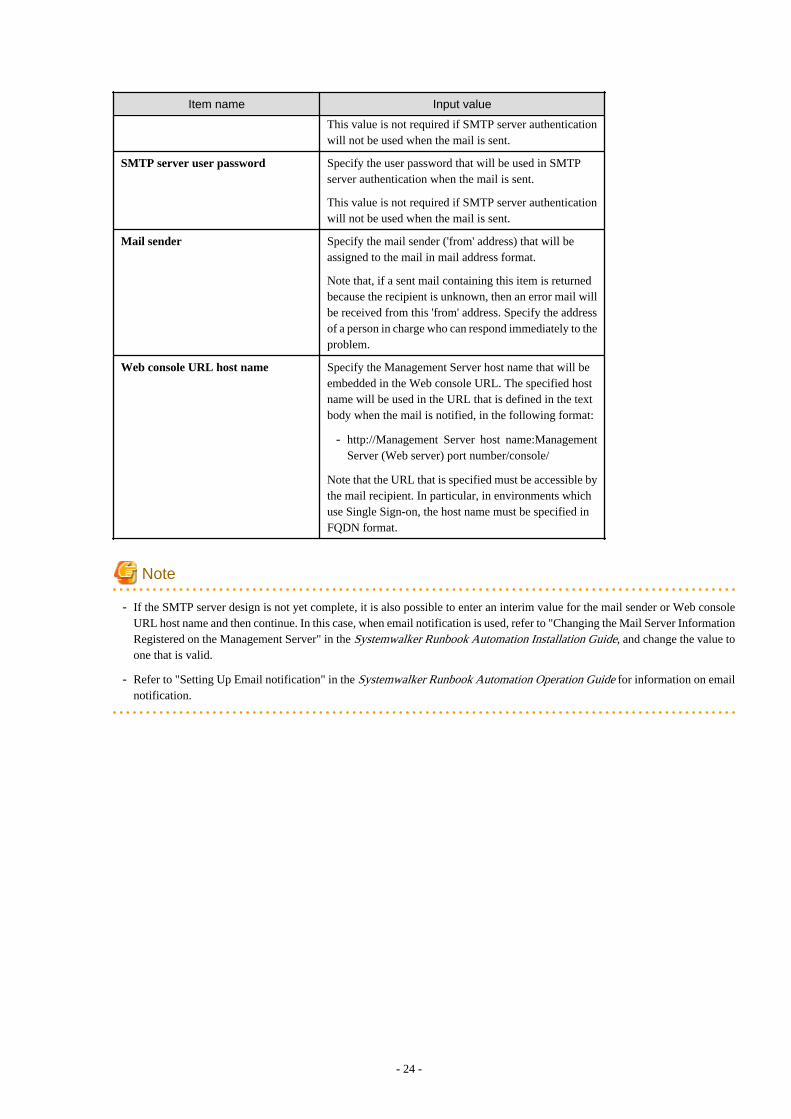
Item name Input value
This value is not required if SMTP server authenticationwill not be used when the mail is sent.
SMTP server user password Specify the user password that will be used in SMTPserver authentication when the mail is sent.
This value is not required if SMTP server authenticationwill not be used when the mail is sent.
Mail sender Specify the mail sender ('from' address) that will beassigned to the mail in mail address format.
Note that, if a sent mail containing this item is returnedbecause the recipient is unknown, then an error mail willbe received from this 'from' address. Specify the addressof a person in charge who can respond immediately to theproblem.
Web console URL host name Specify the Management Server host name that will beembedded in the Web console URL. The specified hostname will be used in the URL that is defined in the textbody when the mail is notified, in the following format:
- http://Management Server host name:ManagementServer (Web server) port number/console/
Note that the URL that is specified must be accessible bythe mail recipient. In particular, in environments whichuse Single Sign-on, the host name must be specified inFQDN format.
Note
- If the SMTP server design is not yet complete, it is also possible to enter an interim value for the mail sender or Web consoleURL host name and then continue. In this case, when email notification is used, refer to "Changing the Mail Server InformationRegistered on the Management Server" in the Systemwalker Runbook Automation Installation Guide, and change the value toone that is valid.
- Refer to "Setting Up Email notification" in the Systemwalker Runbook Automation Operation Guide for information on emailnotification.
- 24 -
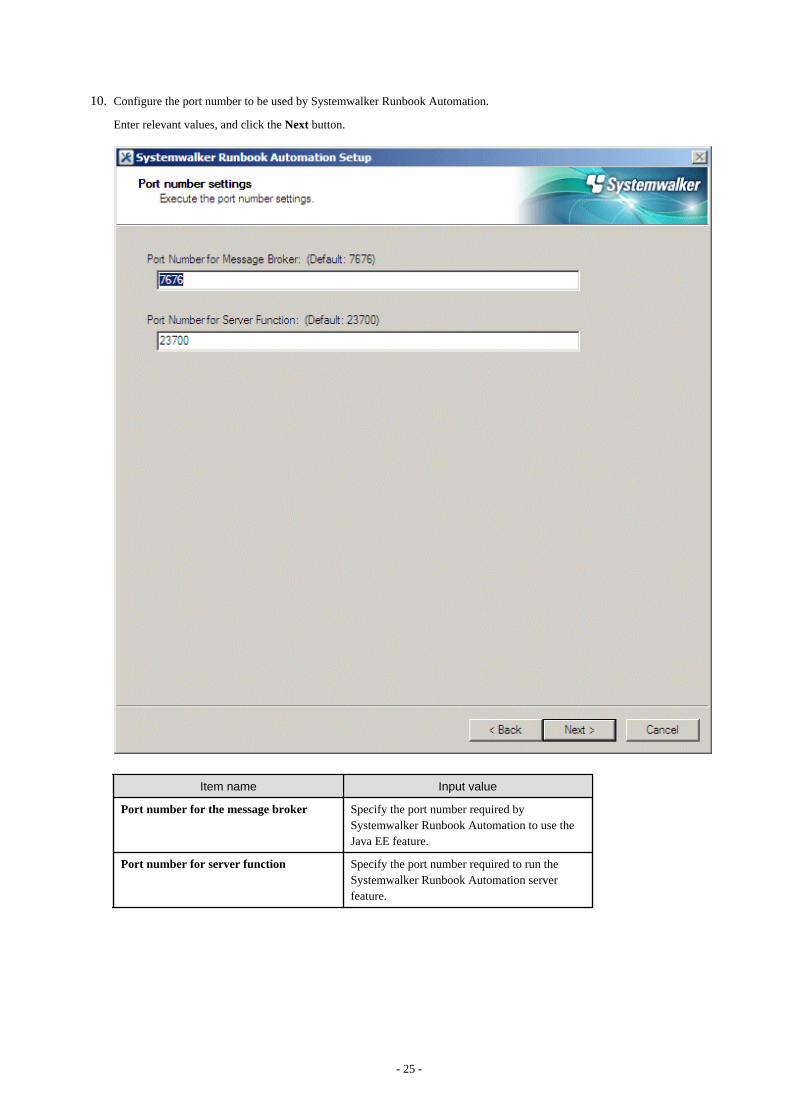
10. Configure the port number to be used by Systemwalker Runbook Automation.
Enter relevant values, and click the Next button.
Item name Input value
Port number for the message broker Specify the port number required bySystemwalker Runbook Automation to use theJava EE feature.
Port number for server function Specify the port number required to run theSystemwalker Runbook Automation serverfeature.
- 25 -
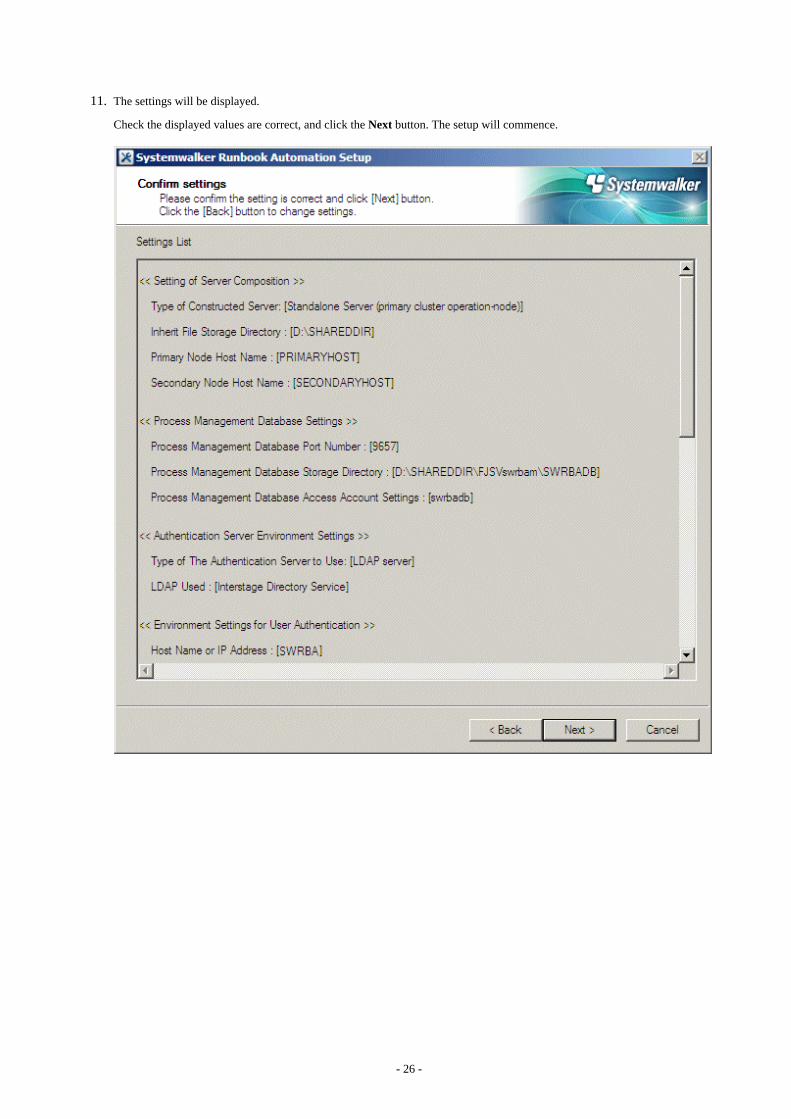
11. The settings will be displayed.
Check the displayed values are correct, and click the Next button. The setup will commence.
- 26 -

12. A window will be displayed indicating the setup progress.
- 27 -
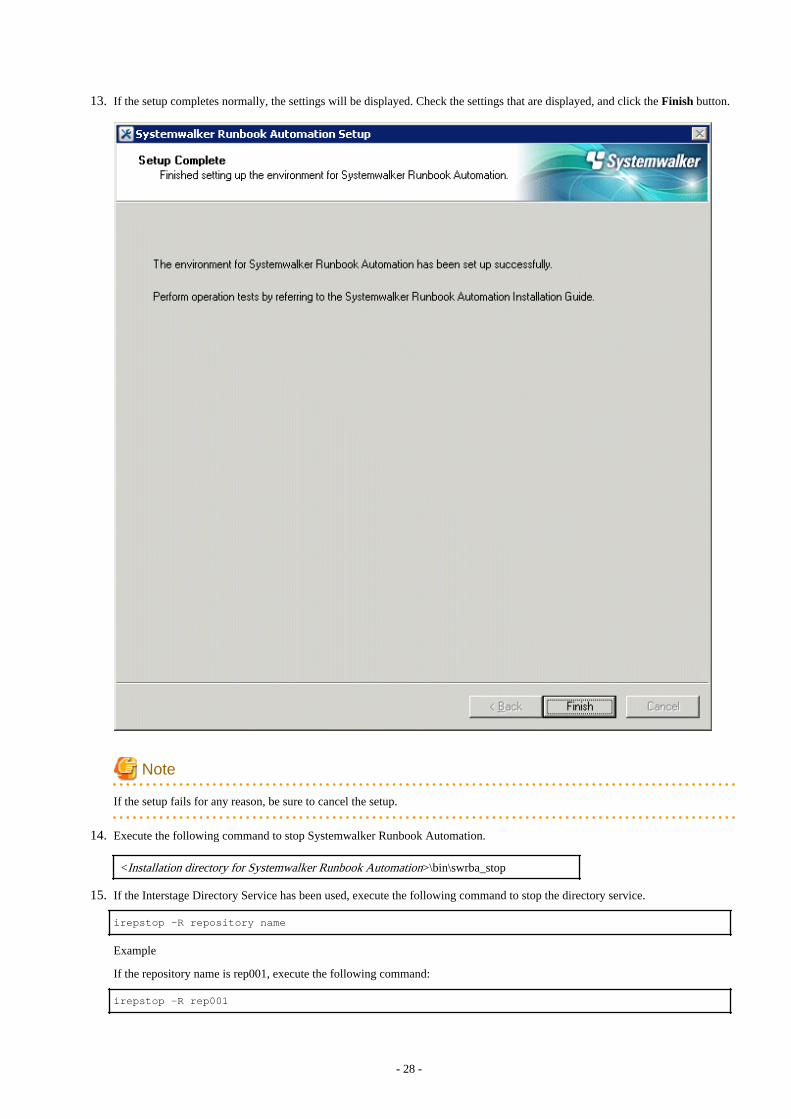
13. If the setup completes normally, the settings will be displayed. Check the settings that are displayed, and click the Finish button.
Note
If the setup fails for any reason, be sure to cancel the setup.
14. Execute the following command to stop Systemwalker Runbook Automation.
<Installation directory for Systemwalker Runbook Automation>\bin\swrba_stop
15. If the Interstage Directory Service has been used, execute the following command to stop the directory service.
irepstop -R repository name
Example
If the repository name is rep001, execute the following command:
irepstop -R rep001
- 28 -
2.3.5 Setting up Systemwalker Runbook Automation (Secondary Node)This section explains the procedure for setting up Systemwalker Runbook Automation.
Before Systemwalker Runbook Automation can be set up, the shared disk must be placed online on the primary node and Interstage, theInterstage Java EE DAS Service, and the Interstage Java EE Node Agent Service must be started.
Additionally, if the Interstage Directory Service provided with Systemwalker Runbook Automation is used, it must be started first.
Refer to "2.3.4 Setting up Systemwalker Runbook Automation (Primary Node)" - "Start Interstage [Windows]", "Start Interstage JMXService [Windows]", "Start Java EE Service [Windows]", and "Start Interstage Directory Service" for details about how to start Interstage,the Interstage JMX Service, the Java EE Service, and the Interstage Directory Service.
[Windows]
Note
- Execute by user as administrator authority on local computer.
- During setup, stop services that are common to Systemwalker Operation Manager, and start the services after setup is completed. Inaddition, Systemwalker Operation Manager must be stopped before cancelling the setup.
- If the setup fails for any reason, be sure to cancel the setup after restarting the system..
1. Log in as a user with administrator privileges for the server on the secondary node.
2. Execute the following command to start the setup.
<Installation directory for Systemwalker Runbook Automation Management Server> \bin\swrba_setup-s
- 29 -

3. The Systemwalker Runbook Automation Setup Tool will start.
Check the settings that are displayed, and click the Next button.
- 30 -

4. Select the type of server to be created.
Enter each setting, and click the Next button.
Item name Input value
Select the build server type Select Standalone Server (Cluster operations -secondary node).
High-ReliabilityEnvironmentSettings
Inherit FileStorageDirectory
Specify the inherited files storage directory forwhich the environment was created on theprimary node.
Be sure to specify a directory on the shared disk.
PrimaryNode HostName
Enter the host name corresponding to the primarynode physical IP address. (*1)
The primary node host name is displayed as thedefault.
- 31 -

Item name Input value
SecondaryNode HostName
Enter the host name corresponding to thesecondary node physical IP address. (*1)
The secondary node host name entered at theprimary node is displayed as the default.
*1: Do not enter the logical host name (host name corresponding to the logical IP address)
Note
The following warning is displayed if the primary node host name or the secondary node host name has been changed from thedefault value:
If this warning is displayed, edit the file below at the primary node so that it matches the primary node host name and the secondarynode host name entered at the secondary node:
<Systemwalker Operation Manager installation destination directory>\MPWALKER.JM\mpjmcal\etc
\calcphost.def
[Example of editing]
@V11L10
#Specify host names or IP addresses on the subsequent lines.
PRIMARYHOST
SECONDARYHOST
- 32 -
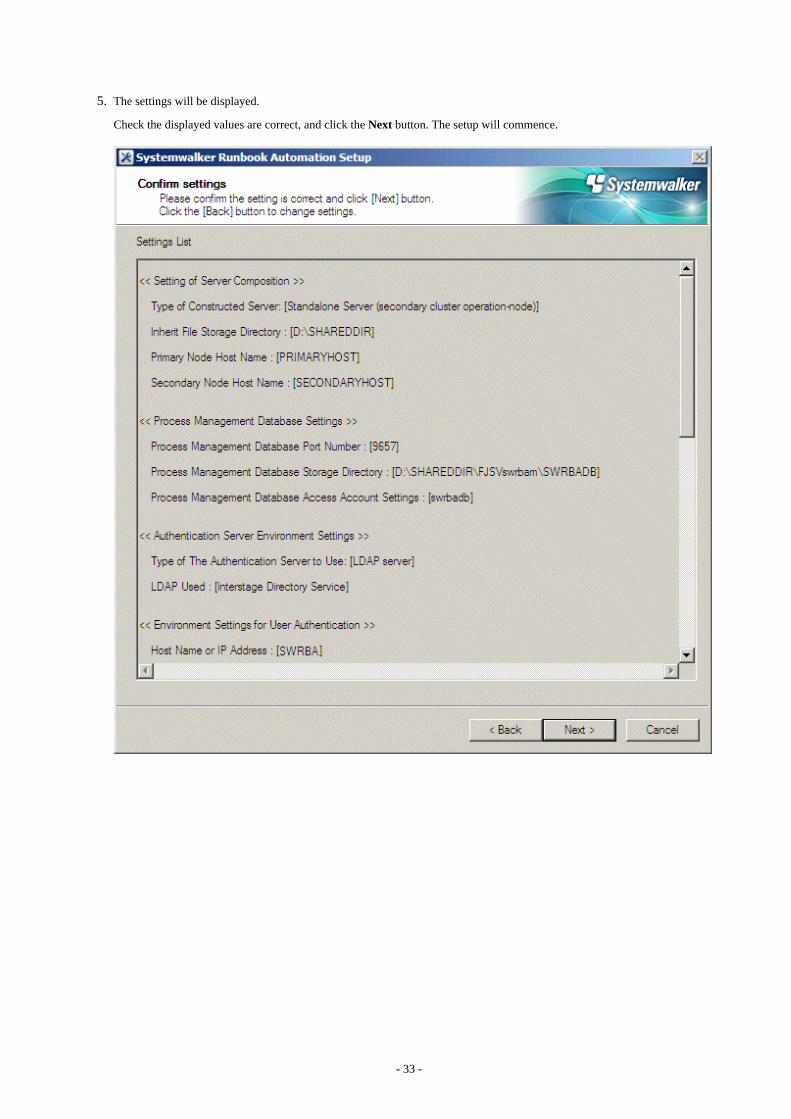
5. The settings will be displayed.
Check the displayed values are correct, and click the Next button. The setup will commence.
- 33 -

6. A window will be displayed indicating the setup progress.
- 34 -
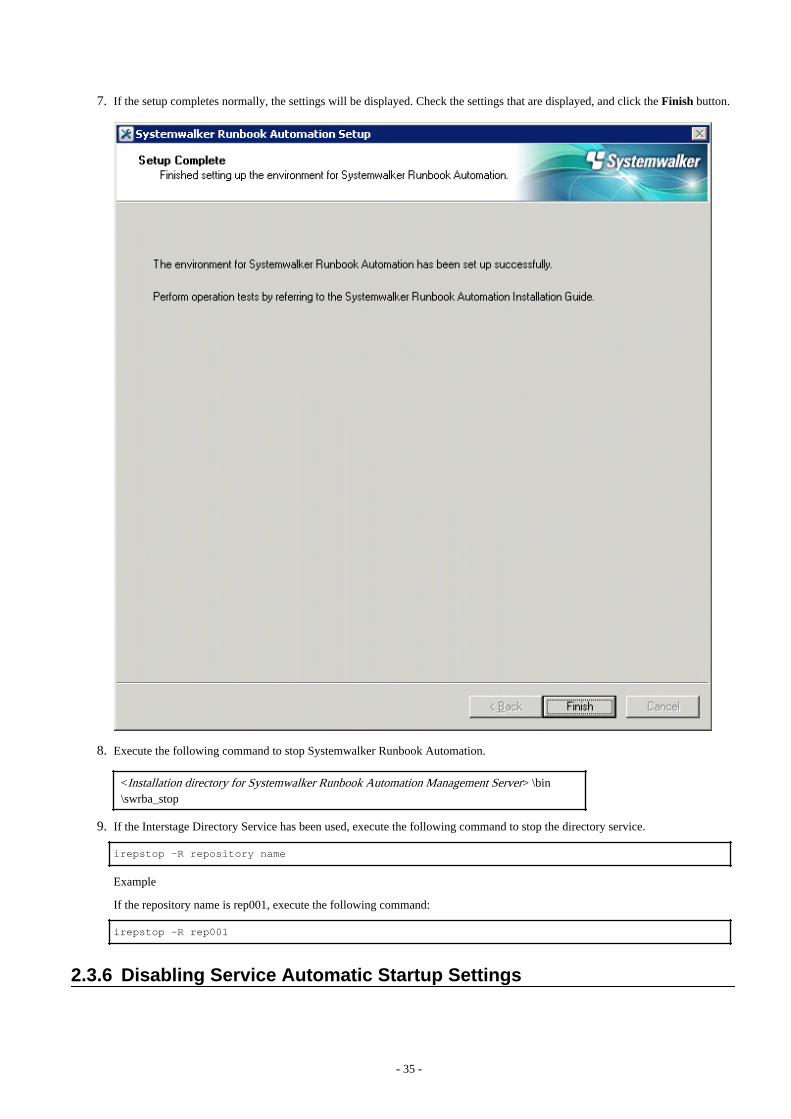
7. If the setup completes normally, the settings will be displayed. Check the settings that are displayed, and click the Finish button.
8. Execute the following command to stop Systemwalker Runbook Automation.
<Installation directory for Systemwalker Runbook Automation Management Server> \bin\swrba_stop
9. If the Interstage Directory Service has been used, execute the following command to stop the directory service.
irepstop -R repository name
Example
If the repository name is rep001, execute the following command:
irepstop -R rep001
2.3.6 Disabling Service Automatic Startup Settings
- 35 -
Note
The setup procedure in this section must be performed on both the primary node and the secondary node.
In cluster environments, the cluster product will start Systemwalker Runbook Automation when the machine starts up, so the automaticstartup settings for the following services must be disabled.
- Interstage Operation Tool
- OD_start
- Naming Service
- InterfaceRep_Cache Service
- InterfaceRep_Cache_e Service
- EventService
- TransactionDirector
- INTERSTAGE API
- FJapache
- Interstage Java EE DAS
- Interstage Java EE Node Agent
- Interstage Message Queue Broker
- Systemwalker CMDB Manager
- INTERSTAGE
- ObjectTransactionService
- Interstage Directory Service (repository name) (*1)
- Systemwalker MpMjes
- Systemwalker MpJobschn (*2)
- Systemwalker MpMjesn (*2)
- Symfoware JDBC NamingSystemwalker Runbook Automation DB Service
- Systemwalker Runbook Automation Manager
*1: If the Interstage Directory Service provided with Systemwalker Runbook Automation is used, it must be disabled.
*2: n is the subsystem number used by Systemwalker Runbook Automation (the default is 9).
Use the following procedure to disable these services. Perform this procedure on both the primary node and the secondary node.
1. Start the Services dialog box by selecting Control Panel, Administrative Tools, and then Services from the Start menu.
2. Select the name of the target service, and then open the Properties window.
3. If the Startup type is Automatic, change it to Manual.
4. Stop the service if it is running.
Note
If the environment is changed from a cluster environment to a non-cluster environment, the Startup type must be changed back toAutomatic, so take note of which services have been changed to Manual.
- 36 -

2.3.7 Setting up the Cluster ServiceThis section explains the setup procedure for the cluster product.
2.3.7.1 For MSCS or Failover ClusteringRegister the Systemwalker Runbook Automation service as an MSCS resource or a Failover Clustering resource.
Placing the shared disk online
Use Failover Cluster Management to obtain the ownership of the shared disk, and then place the shared disk online.
1. On the node, obtain the ownership of the group that contains the following resources. Refer to the clustering software manual fordetails on how to obtain ownership.
- Quorum disks
- Shared disk used by Systemwalker Runbook Automation
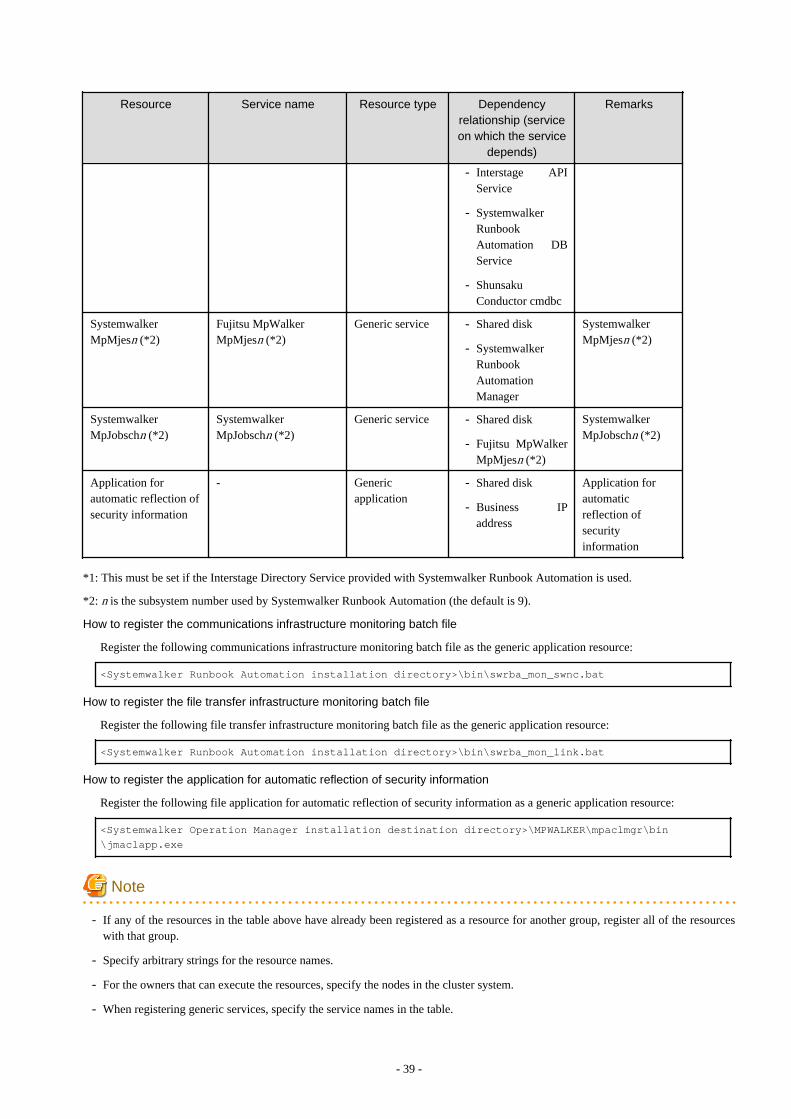
Registering resources
Use Cluster Administrator to register the resources for the services to be used, by referring to the list of resources in the following table.
Resource Service name Resource type Dependency
relationship (serviceon which the service
depends)
Remarks
Business IP address - IP address -
Business network name - Network name - Business IPaddress
Shared disk - Physical disk - Business networkname
Interstage JMX Interstage Operation Tool Generic service - Shared disk
OD_start ODloader Generic service - Shared disk
NamingService Naming Generic service - OD_start service
InterfaceRep_CacheService
InterfaceRep_Cache_s Generic service - NamingServiceservice
InterfaceRep_Cache_eService
InterfaceRep_e Generic service - NamingServiceservice
EventService esdmnmain Generic service - InterfaceRep_Cache Service service
TransactionDirector TransactionDirector Generic service - InterfaceRep_Cache Service service
- ShunsakuConductor cmdbc
Interstage API Interstage API Generic service - TransactionDirector service
Interstage HTTPServer
FJapache Generic service - Shared disk
Interstage DirectoryService (*1)
Interstage DirectoryService (repository name)
Generic service - Shared disk
Interstage Java EEDAS
Interstage Java EE DAS Generic service - Shared disk
- 37 -

Resource Service name Resource type Dependencyrelationship (serviceon which the service
depends)
Remarks
Interstage Java EENode Agent
Interstage Java EE NodeAgent
Generic service - Interstage Java EEDAS
Interstage MessageQueue Broker
Interstage MessageQueue Broker
Generic service - Interstage Java EENode Agent
Communicationsinfrastructuremonitoring batch file
- Genericapplication
- Shared disk
File transferinfrastructuremonitoring batch file
- Genericapplication
- Shared disk
SystemwalkerRunbook AutomationDB Service
Systemwalker RunbookAutomation DB Service
Generic service - Shared disk
Shunsaku Conductorcmdbc
Shunsaku Conductorcmdbc
Generic service - Shared disk
- Shunsaku Directorcontents
- Shunsaku Directormetadata
- Shunsaku Searchercmdbs01
- Shunsaku Searchercmdbs02
- Shunsaku Searchercmdbs03
- Shunsaku Sortercmdbo01
Shunsaku Directorcontents
Shunsaku Directorcontents
Generic service - Shared disk
Shunsaku Directormetadata
Shunsaku Directormetadata
Generic service - Shared disk
Shunsaku Searchercmdbs01
Shunsaku Searchercmdbs01
Generic service - Shared disk
Shunsaku Searchercmdbs02
Shunsaku Searchercmdbs02
Generic service - Shared disk
Shunsaku Searchercmdbs03
Shunsaku Searchercmdbs03
Generic service - Shared disk
Shunsaku Sortercmdbo01
Shunsaku Sortercmdbo01
Generic service - Shared disk
SystemwalkerRunbook AutomationManager
Systemwalker RunbookAutomation Manager
Generic service - InterstageDirectory Service(*1)
- Interstage MessageQueue Broker
- 38 -
Resource Service name Resource type Dependencyrelationship (serviceon which the service
depends)
Remarks
- Interstage APIService
- SystemwalkerRunbookAutomation DBService
- ShunsakuConductor cmdbc
SystemwalkerMpMjesn (*2)
Fujitsu MpWalkerMpMjesn (*2)
Generic service - Shared disk
- SystemwalkerRunbookAutomationManager
SystemwalkerMpMjesn (*2)
SystemwalkerMpJobschn (*2)
SystemwalkerMpJobschn (*2)
Generic service - Shared disk
- Fujitsu MpWalkerMpMjesn (*2)
SystemwalkerMpJobschn (*2)
Application forautomatic reflection ofsecurity information
- Genericapplication
- Shared disk
- Business IPaddress
Application forautomaticreflection ofsecurityinformation
*1: This must be set if the Interstage Directory Service provided with Systemwalker Runbook Automation is used.
*2: n is the subsystem number used by Systemwalker Runbook Automation (the default is 9).
How to register the communications infrastructure monitoring batch file
Register the following communications infrastructure monitoring batch file as the generic application resource:
<Systemwalker Runbook Automation installation directory>\bin\swrba_mon_swnc.bat
How to register the file transfer infrastructure monitoring batch file
Register the following file transfer infrastructure monitoring batch file as the generic application resource:
<Systemwalker Runbook Automation installation directory>\bin\swrba_mon_link.bat
How to register the application for automatic reflection of security information
Register the following file application for automatic reflection of security information as a generic application resource:
<Systemwalker Operation Manager installation destination directory>\MPWALKER\mpaclmgr\bin
\jmaclapp.exe
Note
- If any of the resources in the table above have already been registered as a resource for another group, register all of the resourceswith that group.
- Specify arbitrary strings for the resource names.
- For the owners that can execute the resources, specify the nodes in the cluster system.
- When registering generic services, specify the service names in the table.
- 39 -
- When registering a generic application, specify the full path including the command name in the "Command line" parameter, andspecify the full path not including the command name in the "Current directory" parameter.
- When the following services are registered, the start option may be set automatically by the Cluster Administrator or Failover ClusterManager. Delete all start options that have been set automatically.
- Systemwalker Runbook Automation DB Service
- FJapache
- The following services are not registered as Cluster Administrator or Failover Cluster Manager resources. Use the process monitoringfunction of Systemwalker Operation Manager to monitor these services for errors.
- Systemwalker ACL Manager
- Systemwalker MpJmCal
- Systemwalker MpJmSrv
- Systemwalker MpPmonO
2.3.8 Starting the Cluster ServiceThis section explains the procedure for starting the cluster service.
2.3.8.1 For MSCS or Failover ClusteringUse either Cluster Administrator or Failover Cluster Manager to start the cluster service.
2.4 Uninstalling the Management ServerThis section explains the procedure for cancelling cluster operations for a Management Server, and how to uninstall the ManagementServer. In this section, the node where the settings are first canceled and Systemwalker Runbook Automation is first uninstalled is referredto as the "secondary node".
2.4.1 Stopping the Cluster ServiceThis section explains the procedure for stopping the cluster service.
2.4.1.1 For MSCS or Failover ClusteringUse either Cluster Administrator or Failover Cluster Manager to stop the cluster service.
2.4.2 Canceling the Cluster ServiceThis section explains the procedure for canceling the cluster service.
2.4.2.1 For MSCS or Failover Clustering
Deleting resources
1. Use Cluster Administrator to place the Systemwalker Runbook Automation group offline.
2. Delete the following cluster resources, which have been registered with the Systemwalker Runbook Automation group.
- Interstage JMX
- OD_start
- NamingService
- InterfaceRep_Cache Service
- InterfaceRep_Cache_e Service
- 40 -
- TransactionDirector
- Interstage API
- Interstage HTTP Server
- Interstage Directory Service (repository name) (*1)
- Interstage Java EE DAS
- Interstage Java EE Node Agent
- Interstage Message Queue Broker
- Communications infrastructure monitoring batch file
- File transfer infrastructure monitoring batch file
- Shunsaku Conductor cmdbc
- Shunsaku Director contents
- Shunsaku Director metadata
- Shunsaku Searcher cmdbs01
- Shunsaku Searcher cmdbs02
- Shunsaku Searcher cmdbs03
- Shunsaku Sorter cmdbo01
- Systemwalker Runbook Automation DB Service
- Systemwalker Runbook Automation Manager
- Systemwalker MpJobschn (*2)
- Systemwalker MpMjesn (*2)
- Application for automatic reflection of security information
*1: If the Interstage Directory Service provided with Systemwalker Runbook Automation is used.
*2: n is the subsystem number used by Systemwalker Runbook Automation (the default is 9).
2.4.3 Setup CancellationThis section explains how to cancel the setup.
2.4.3.1 Deleting the Environment for Systemwalker Runbook Automation (SecondaryNode)
Cancel the setup for Systemwalker Runbook Automation on the secondary node.
Before canceling the setup, it is necessary to place the shared disk online on the secondary node and start Interstage, the Interstage JMXService, and the Java EE Service.
If the Interstage Directory Service provided with Systemwalker Runbook Automation is used, it must be started first.
Refer to "2.3.4 Setting up Systemwalker Runbook Automation (Primary Node)" - "Start Interstage [Windows]", "Start Interstage JMXService [Windows]", "Start Java EE Service [Windows]", and "Start Interstage Directory Service" for details about how to start Interstage,the Interstage JMX Service, the Java EE Service, and the Interstage Directory Service.
- During setup, stop services that are common to Systemwalker Operation Manager, and start the services after setup is completed. Inaddition, Systemwalker Operation Manager must be stopped before cancelling the setup.
For Windows
Use the following procedure to delete Systemwalker Runbook Automation.
- 41 -
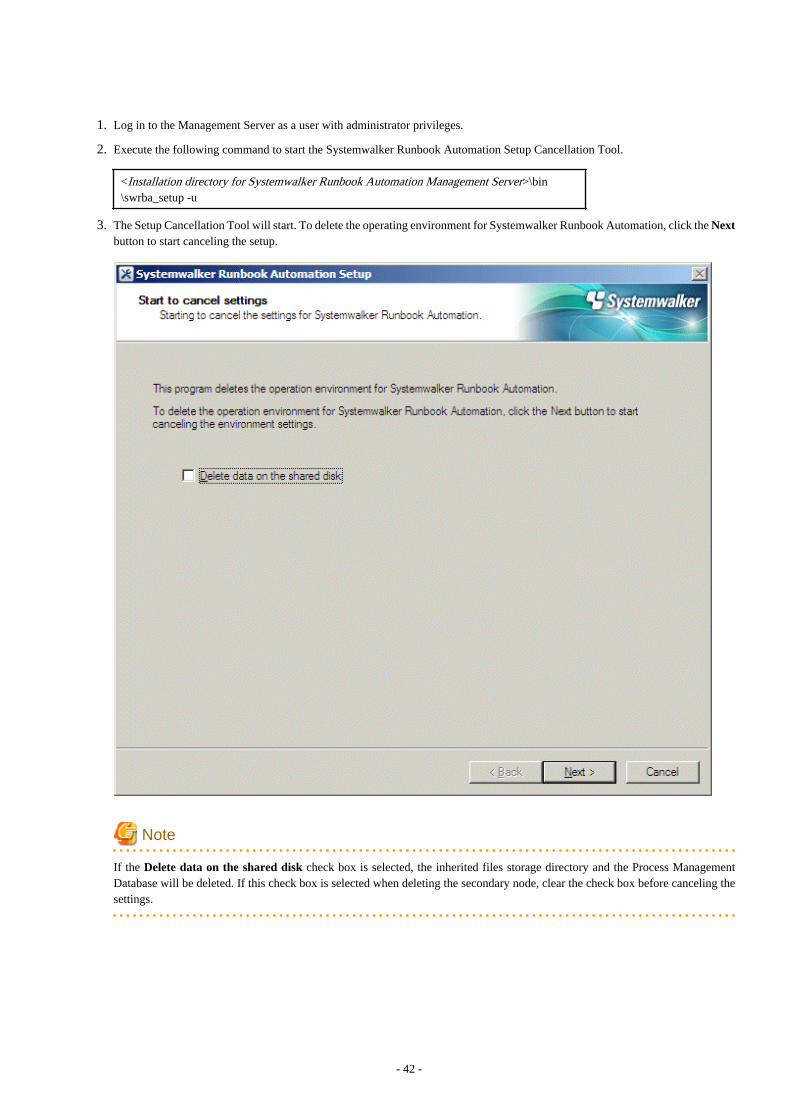
1. Log in to the Management Server as a user with administrator privileges.
2. Execute the following command to start the Systemwalker Runbook Automation Setup Cancellation Tool.
<Installation directory for Systemwalker Runbook Automation Management Server>\bin\swrba_setup -u
3. The Setup Cancellation Tool will start. To delete the operating environment for Systemwalker Runbook Automation, click the Nextbutton to start canceling the setup.
Note
If the Delete data on the shared disk check box is selected, the inherited files storage directory and the Process ManagementDatabase will be deleted. If this check box is selected when deleting the secondary node, clear the check box before canceling thesettings.
- 42 -

4. A confirmation window will be displayed. To delete the operating environment, click the Yes button to start the setup cancellationprocess. If No is clicked, the setup cancellation process will be canceled.
5. The setup cancellation process will be executed.
- 43 -
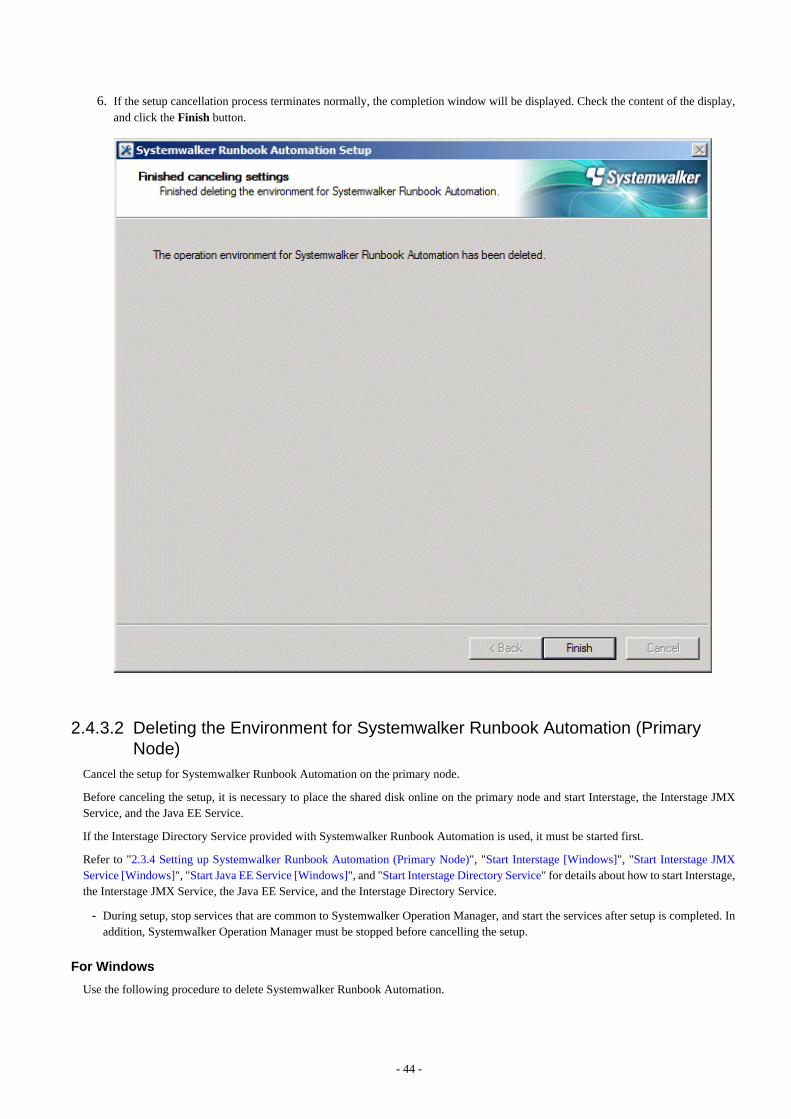
6. If the setup cancellation process terminates normally, the completion window will be displayed. Check the content of the display,and click the Finish button.
2.4.3.2 Deleting the Environment for Systemwalker Runbook Automation (PrimaryNode)
Cancel the setup for Systemwalker Runbook Automation on the primary node.
Before canceling the setup, it is necessary to place the shared disk online on the primary node and start Interstage, the Interstage JMXService, and the Java EE Service.
If the Interstage Directory Service provided with Systemwalker Runbook Automation is used, it must be started first.
Refer to "2.3.4 Setting up Systemwalker Runbook Automation (Primary Node)", "Start Interstage [Windows]", "Start Interstage JMXService [Windows]", "Start Java EE Service [Windows]", and "Start Interstage Directory Service" for details about how to start Interstage,the Interstage JMX Service, the Java EE Service, and the Interstage Directory Service.
- During setup, stop services that are common to Systemwalker Operation Manager, and start the services after setup is completed. Inaddition, Systemwalker Operation Manager must be stopped before cancelling the setup.
For Windows
Use the following procedure to delete Systemwalker Runbook Automation.
- 44 -
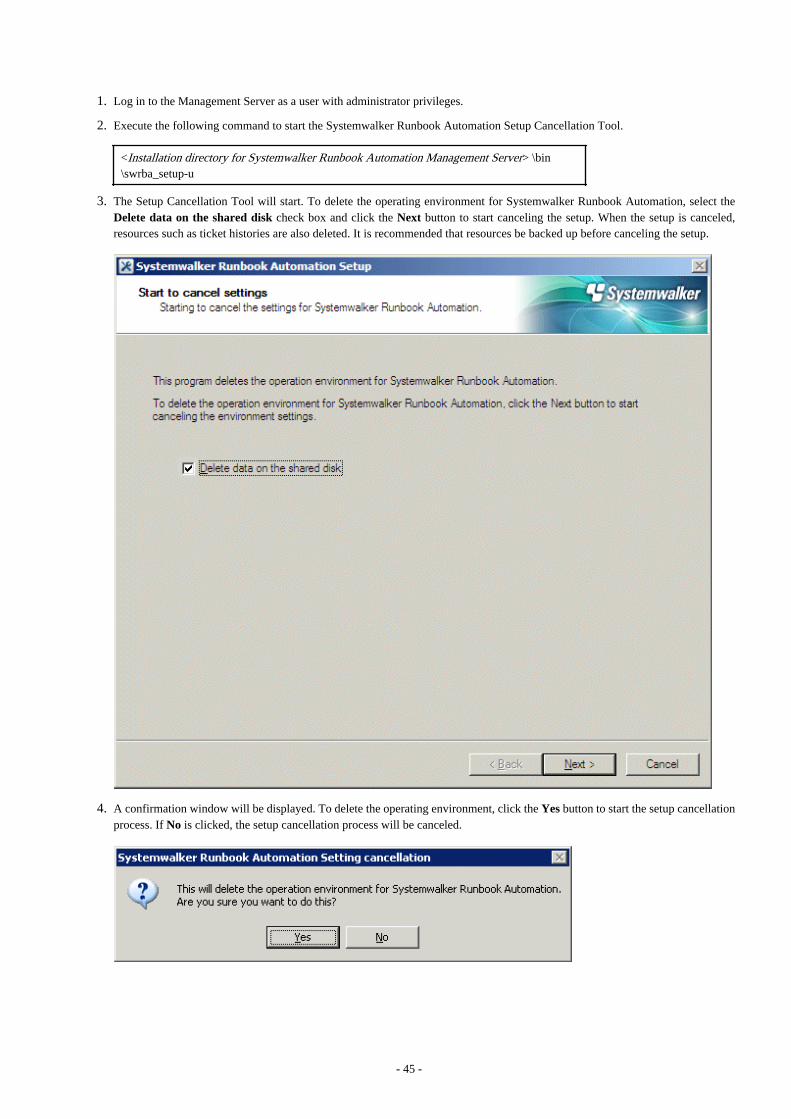
1. Log in to the Management Server as a user with administrator privileges.
2. Execute the following command to start the Systemwalker Runbook Automation Setup Cancellation Tool.
<Installation directory for Systemwalker Runbook Automation Management Server> \bin\swrba_setup-u
3. The Setup Cancellation Tool will start. To delete the operating environment for Systemwalker Runbook Automation, select theDelete data on the shared disk check box and click the Next button to start canceling the setup. When the setup is canceled,resources such as ticket histories are also deleted. It is recommended that resources be backed up before canceling the setup.
4. A confirmation window will be displayed. To delete the operating environment, click the Yes button to start the setup cancellationprocess. If No is clicked, the setup cancellation process will be canceled.
- 45 -

5. The setup cancellation process will be executed.
- 46 -

6. If the setup cancellation process terminates normally, the completion window will be displayed. Check the content of the display,and click the Finish button.
2.4.4 UninstallationUninstall the server that is operating as a cluster on both nodes.
Note
To uninstall the server on the secondary node, place the shared disk offline before uninstalling.
To uninstall the server on the primary node, place the shared disk online before uninstalling.
The uninstallation method is the same as for non-cluster environments. Refer to the Systemwalker Runbook Automation InstallationGuide for details.
2.5 Linked Server Installation ProcedureThis section explains the procedure for installing Agents for linking with Systemwalker Centric Manager servers that are operating ascluster systems.
Refer also to the following manuals in the course of the installation.
- 47 -
- Systemwalker Runbook Automation Technical Guide
- Systemwalker Runbook Automation Installation Guide
Perform all installation steps as a user that belongs to the administrators group for Windows or the superuser account for Linux.
2.5.1 Installing on the Linked Server
Installing Agents
Install the Systemwalker Runbook Automation Agent (hereafter referred to simply as the Agent) on both nodes in the cluster configuration(both the primary node and the secondary node).
The installation method is the same as for non-cluster environments.Refer to the Systemwalker Runbook Automation Installation Guide for details.
2.5.2 Setting up Agents in Systemwalker Centric Manager Environments(Primary Node)
Setup procedure for the primary node
1. Execute the following command to stop the Agent.
[Windows]
"%F4AN_INSTALL_PATH%\F4ANswnc\bin\swncctrl" stop
[Linux]
/opt/FJSVswnc/bin/swncctrl stop
2. Set up the Agent on the primary node by executing the following environment setup command.
[Windows]
<Agent installation directory>\CMDB\FJSVcmdba\bin\cmdbsetupenv.bat -k AGT_CENTINV
<Agent installation directory>\CMDB\FJSVcmdba\bin\cmdbsetupenv.bat -k AGT_CENTREP
[Linux]
/opt/FJSVcmdba/bin/cmdbsetupenv.sh -k AGT_CENTINV/opt/FJSVcmdba/bin/cmdbsetupenv.sh -k AGT_CENTREP
3. Execute the cluster setup command on the primary node.
The synopsis for the cluster setup command is shown below. For the primary node, specify "ACT" for the "-t" option. For the shareddisk or the mount point for the shared disk device, specify a disk that is being used by Systemwalker Centric Manager clusteroperations.
[Windows]
<Agent installation directory>\CMDB\FJSVcmdba\bin\cmdbagentclset.bat -t ACT -d <Shareddisk> -a <Logical IP address>
- Example of how to specify a shared disk: D:\
[Linux]
/opt/FJSVcmdba/bin/cmdbagentclset.sh -t ACT -d <Mount point for the shared disk device> -a<Logical IP address>
- 48 -
4. Check whether the setup has completed normally.
If the creation of the cluster environment has completed normally, the following message will be output. If this message has notbeen output, review the command options and execute the command again.
Command successful!
5. Execute the following command to start the Agent.
[Windows]
"%F4AN_INSTALL_PATH%\F4ANswnc\bin\swncctrl" start
[Linux]
/opt/FJSVswnc/bin/swncctrl start
6. Execute the following command to update the observed record in CMDB. This operation results the recognition of this Agent forManagement Server.
[Windows]
<Agent installation directory>\CMDB\FJSVcmdba\bin\cmdbrefresh.exe -q
type=AGT_CENTREP<Agent installation directory>\CMDB\FJSVcmdba\bin\cmdbrefresh.exe -qtype=AGT_CENTINV
[Linux]
/opt/FJSVcmdba/bin/cmdbrefresh.sh -q type=AGT_CENTREP/opt/FJSVcmdba/bin/cmdbrefresh.sh -q type=AGT_CENTINV
2.5.3 Setting up Agents in Systemwalker Centric Manager Environments(Secondary Node)
Setup procedure for the secondary node
1. Execute the following command to stop the Agent.
[Windows]
"%F4AN_INSTALL_PATH%\F4ANswnc\bin\swncctrl" stop
[Linux]
/opt/FJSVswnc/bin/swncctrl stop
2. Set up the Agent on the secondary node by executing the following environment setup command.
[Windows]
<Agent installation directory>\CMDB\FJSVcmdba\bin\cmdbsetupenv.bat -k AGT_CENTINV
<Agent installation directory>\CMDB\FJSVcmdba\bin\cmdbsetupenv.bat -k AGT_CENTREP
[Linux]
/opt/FJSVcmdba/bin/cmdbsetupenv.sh -k AGT_CENTINV/opt/FJSVcmdba/bin/cmdbsetupenv.sh -k AGT_CENTREP
- 49 -
3. Execute the cluster setup command on the secondary node.
The synopsis for the cluster setup command is shown below. For the secondary node, specify "STB" for the "-t" option. For theshared disk or the mount point for the shared disk device, specify a disk that is being used by Systemwalker Centric Manager clusteroperations.
[Windows]
<Agent installation directory>\CMDB\FJSVcmdba\bin\cmdbagentclset.bat -t STB -d <Shareddisk> -a <Logical IP address>
- Example of how to specify a shared disk: D:\
[Linux]
/opt/FJSVcmdba/bin/cmdbagentclset.sh -t STB -d <Mount point for the shared disk device> -a<Logical IP address>
4. Check whether the setup has completed normally.
If the creation of the cluster environment has completed normally, the following message will be output. If this message has notbeen output, review the command options and execute the command again.
Command successful!
5. Execute the following command to start the Agent.
[Windows]
"%F4AN_INSTALL_PATH%\F4ANswnc\bin\swncctrl" start
[Linux]
/opt/FJSVswnc/bin/swncctrl start
2.6 Uninstalling the Linked ServerThis section explains the procedure for uninstalling Systemwalker Runbook Automation from a Linked Server by canceling the linkageto Systemwalker Centric Manager with cluster configurations.
2.6.1 Canceling the Agent Settings in a Systemwalker Centric ManagerEnvironment (Primary Node)
Procedure for canceling the settings on the primary node
1. Execute the following command to stop the Agent.
[Windows]
"%F4AN_INSTALL_PATH%\F4ANswnc\bin\swncctrl" stop
[Linux]
/opt/FJSVswnc/bin/swncctrl stop
2. Execute the cluster setup command on the primary node.
The entry format for the cluster setup command is shown below. To cancel the settings, specify the "-r" option. Also, for the primarynode, specify "ACT" for the "-t" option.
[Windows]
- 50 -
<Agent installation directory>\CMDB\FJSVcmdba\bin\cmdbagentclset.bat -t ACT -r
[Linux]
/opt/FJSVcmdba/bin/cmdbagentclset.sh -t ACT -r
3. Check whether the canceling the settings has completed normally.
If the canceling the settings has completed normally, the following message will be output. If this message has not been output,review the command options and execute the command again.
Command successful!
4. Cancel the setup for the Agent on the primary node.
Execute the following environment setup cancellation command.
[Windows]
<Agent installation directory>\CMDB\FJSVcmdba\bin\cmdbunsetupenv.bat -k ALL
[Linux]
/opt/FJSVcmdba/bin/cmdbunsetupenv.sh -k ALL
2.6.2 Canceling the Setup for Agents in Systemwalker Centric ManagerEnvironments (Secondary Node)
Procedure for canceling the settings on the secondary node
1. Execute the following command to stop the Agent.
[Windows]
"%F4AN_INSTALL_PATH%\F4ANswnc\bin\swncctrl" stop
[Linux]
/opt/FJSVcmdbaFJSVswnc/bin/cmdbagentclset.sh -t ACT -rswncctrl stop
2. Execute the cluster setup command on the secondary node.
The entry format for the cluster setup command is shown below. To cancel the settings, specify the "-r" option. Also, for the secondarynode, specify "STB" for the "-t" option.
[Windows]
<Agent installation directory>\CMDB\FJSVcmdba\bin\cmdbagentclset.bat -t STB -r
[Linux]
/opt/FJSVcmdba/bin/cmdbagentclset.sh -t STB -r
3. Check whether the setup cancellation has completed normally.
If the setup cancellation has completed normally, the following message will be output. If this message has not been output, reviewthe command options and execute the command again.
Command successful!
4. Cancel the setup for the Agent on the secondary node.
Execute the following environment setup cancellation command.
- 51 -

[Windows]
<Agent installation directory>\CMDB\FJSVcmdba\bin\cmdbunsetupenv.bat -k ALL
[Linux]
/opt/FJSVcmdba/bin/cmdbunsetupenv.sh -k ALL
2.6.3 Uninstalling from the Linked ServerUninstall the Agents from both nodes.
The uninstallation method is the same as for non-cluster environments.Refer to the Systemwalker Runbook Automation Installation Guide for details.
- 52 -

Chapter 3 OperationThis chapter explains how to operate servers as cluster systems.
3.1 Starting and StoppingThis section explains how to start and stop the Management Server on cluster systems. Note that the procedures for starting and stoppingLinked Servers in cluster environments are the same as for non-cluster environments. Refer to the Systemwalker Runbook AutomationInstallation Guide.
3.1.1 Starting the Management Server [Windows]This section explains how to start the Management Server.
Starting the cluster service
Use the following procedure to start the services that have been registered with the cluster using Failover Cluster Management.
1. Obtain ownership of the shared disk.
On the node, obtain the ownership of the group that contains the following resources. Refer to the clustering software manual fordetails on how to obtain ownership.
- Quorum disks
- The shared disk used by Systemwalker Runbook Automation
2. Use Cluster Administrator to place the Systemwalker Runbook Automation group online.
Starting the cluster service also starts the Management Server.
3.1.2 Stopping the Management Servers [Windows]This section explains how to stop the Management Server.
Stopping the cluster service
Use the following procedure to stop the services that have been registered with the cluster using Failover Cluster Management.
1. Use Cluster Administrator to place the Systemwalker Runbook Automation group offline.
Stopping the cluster service also stops the Management Server.
3.2 Backup and RestorationThis section explains how to back up and restore Management Server resources on cluster systems.
Point
Systemwalker Runbook Automation operations must be stopped before staring a backup or restoration.
Refer to "Notes on Backup and Restoration" in the Systemwalker Runbook Automation Installation Guide for notes on backup andrestoration.
3.2.1 BackupThis section describes the procedure for backing up server resources on a cluster system.
- 53 -

Backing up Interstage Directory Service resources
If the Interstage Directory Service provided with Systemwalker Runbook Automation is used, execute the following procedure to backup the directory service on the primary node.
Note that if the Active Directory or OpenLDAP is used for LDAP, you need to refer to the LDAP manual before performing the backup.
The following backup procedure assumes that the Interstage Directory Service is used and a standard database is used for the repositorydatabase. In this example, a repository, "rep001", is backed up to the X:\Backup\rep001 directory.
1. Stop the cluster service.
Refer to "3.1.2 Stopping the Management Servers [Windows]" for details.
2. Place the shared disk online on the primary node.
3. Execute the backup command. If the rep001 repository exists at X:\Backup, delete it. If rep001 is not deleted, the command executionwill fail.
[Interstage Application Server installation directory]\bin\irepbacksys -d X:\Backup\rep001 -R
rep001
4. Place the shared disk offline on the primary node.
5. Start the cluster service.
Refer to "3.1.1 Starting the Management Server [Windows]" for details.
Backing up Systemwalker Runbook Automation runtime environment
Use the following procedure to back up the Systemwalker Runbook Automation runtime environment. The backup procedure is the sameas for a normal, non-cluster configuration.
1. Stop the cluster service.
Refer to "3.1.2 Stopping the Management Servers [Windows]" for details.
2. Place the shared disk online on the primary node.
3. To use the Interstage Directory Service provided with Systemwalker Runbook Automation, execute the following command to startthe directory service on the primary node.
irepstart -R repository name
Example:
If the repository name is rep001, execute the following command:
irepstart -R rep001
4. Start the Interstage Java EE DAS Service on the primary node.
# ijdasstart
5. Start the Interstage Java EE Node Agent Service on the primary node.
# ijnastart
6. Start the message broker on the primary node.
Use the Windows Services feature to start the message broker.
Click Start >> Control Panel >> Administrative Tools, and then, double-click Services. Next, select Interstage Message QueueBroker and click the Start button.
7. Start Interstage on the primary node.
# isstart
- 54 -

8. Stop the Systemwalker CMDB Manager service on the primary node.
[Systemwalker Runbook Automation Management Server install directory]\CMDB\FJSVcmdbm\bin
\cmdbstop.bat
9. Start the following service on the primary node.
Start with using Windows(R) service function. From [Control Panel]-[Management Tool]-[Service], select the following serviceand click the [Start] button.
- Shunsaku Director contents
- Shunsaku Director metadata
- Shunsaku Searcher cmdbs01
- Shunsaku Searcher cmdbs02
- Shunsaku Searcher cmdbs03
10. Back up server resources on the primary node.
Refer to the Systemwalker Runbook Automation Administration Guide for details.
11. Stop Systemwalker Runbook Automation on primary node.
[Systemwalker Runbook Automation Management Server install directory]\bin\swrba_stop
12. Stop the following service on the primary node.
Stop with using Windows(R) service function. From [Control Panel]-[Management Tool]-[Service], select the following serviceand click the [Stop] button.
- Shunsaku Director contents
- Shunsaku Director metadata
- Shunsaku Searcher cmdbs01
- Shunsaku Searcher cmdbs02
- Shunsaku Searcher cmdbs03
13. Stop Interstage on the primary node.
# isstop -f
14. Stop the message broker on the primary node.
Use the Windows Services feature to stop the message broker.
Click Start >> Control Panel >> Administrative Tools, and then, double-click Services. Next, select Interstage Message QueueBroker and click the Stop button.
15. Stop the Interstage Java EE Node Agent Service on the primary node.
# ijnastop
16. Stop the Interstage Java EE DAS Service on the primary node.
# ijdasstop
17. Stop the Interstage Directory Service on the primary node.
irepstop -R repository name
Example:
If the repository name is rep001, execute the following command:
irepstop -R rep001
- 55 -

18. Place the shared disk offline on the primary node.
19. Place the shared disk online on the secondary node.
20. Start the Interstage Directory Service on the secondary node. The procedure is the same as for the primary node.
21. Start the Interstage Java EE DAS Service on the secondary node.
# ijdasstart
22. Start the Interstage Java EE Node Agent Service on the secondary node.
# ijnastart
23. Start the message broker on the secondary node. The procedure is the same as for the primary node.
24. Start Interstage on the secondary node.
# isstart
25. Stop the Systemwalker CMDB Manager service on the secondary node.
[Systemwalker Runbook Automation Management Server install directory]\CMDB\FJSVcmdbm\bin
\cmdbstop.bat
26. . Start the following service on the secondary node.
Start with using Windows(R) service function. From [Control Panel]-[Management Tool]-[Service], select the following serviceand click the [Start] button.
- Shunsaku Director contents
- Shunsaku Director metadata
- Shunsaku Searcher cmdbs01
- Shunsaku Searcher cmdbs02
- Shunsaku Searcher cmdbs03
27. Back up server resources on the secondary node.
Refer to the Systemwalker Runbook Automation Installation Guide for details.
28. . Stop Systemwalker Runbook Automation on primary node.
[Systemwalker Runbook Automation Management Server install directory]\bin\swrba_stop
29. Stop the following service on the secondary node.
Stop with using Windows(R) service function. From [Control Panel]-[Management Tool]-[Service], select the following serviceand click the [Stop] button.
- Shunsaku Director contents
- Shunsaku Director metadata
- Shunsaku Searcher cmdbs01
- Shunsaku Searcher cmdbs02
- Shunsaku Searcher cmdbs03
30. Stop Interstage on the secondary node.
# isstop -f
31. Stop the message broker on the secondary node. The procedure is the same as for the primary node.
- 56 -
32. Stop the Interstage Java EE Node Agent Service on the secondary node.
# ijnastop
33. Stop the Interstage Java EE DAS Service on the secondary node.
# ijdasstop
34. Stop the Interstage Directory Service on the secondary node. The procedure is the same as for the primary node.
35. Place the shared disk offline on the secondary node.
36. Start the cluster service.
Refer to "3.1.1 Starting the Management Server [Windows]" for details.
3.2.2 RestorationThis section describes the procedure for restoring server resources that have been backed up.
Restoring Interstage Directory Service resources
If the Interstage Directory Service provided with Systemwalker Runbook Automation is used, execute the following procedure to restorethe directory service on the primary node.
Note that if the Active Directory or OpenLDAP is used for LDAP, you need to refer to the LDAP manual before performing the restoration.
The following restoration procedure assumes that the Interstage Directory Service is used and a standard database is used for the repositorydatabase. In this example, a repository, "rep001", is restored from the X:\Backup\rep001 backup directory.
1. Stop the cluster service.
Refer to "3.1.2 Stopping the Management Servers [Windows]" for details.
2. Place the shared disk online on the primary node.
3. Execute the restore command on the primary node to restore the repository data that was backed up.
[Interstage Application Server installation directory]\bin\ireprestsys -d X:\Backup\rep001 -R
rep001 -dataonly
4. Place the shared disk offline on the primary node.
5. Start the cluster service.
Refer to "3.1.1 Starting the Management Server [Windows]" for details.
Restoring Systemwalker Runbook Automation runtime environment
Use the following procedure to restore the Systemwalker Runbook Automation runtime environment. The restoration procedure is thesame as for a normal, non-cluster configuration.
1. Stop the cluster service.
Refer to "3.1.2 Stopping the Management Servers [Windows]" for details.
2. Place the shared disk online on the primary node.
3. Start JMX service on primary node.
Use the Windows(R) Services function to start it.
Select "Interstage Operation Tool" in the Services dialog box (opened from Administrative Tools under Control Panel), and clickthe Start button.
4. To use the Interstage Directory Service provided with Systemwalker Runbook Automation, execute the following command to startthe directory service on the primary node.
irepstart -R repository name
- 57 -
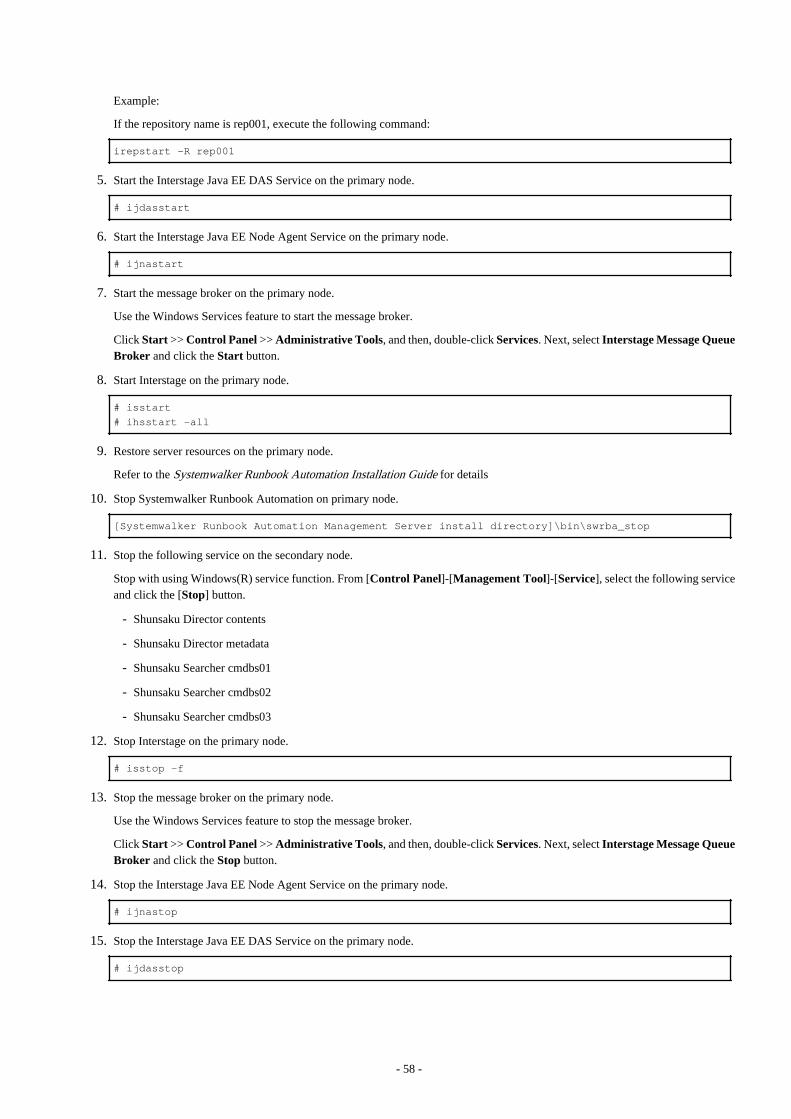
Example:
If the repository name is rep001, execute the following command:
irepstart -R rep001
5. Start the Interstage Java EE DAS Service on the primary node.
# ijdasstart
6. Start the Interstage Java EE Node Agent Service on the primary node.
# ijnastart
7. Start the message broker on the primary node.
Use the Windows Services feature to start the message broker.
Click Start >> Control Panel >> Administrative Tools, and then, double-click Services. Next, select Interstage Message QueueBroker and click the Start button.
8. Start Interstage on the primary node.
# isstart
# ihsstart -all
9. Restore server resources on the primary node.
Refer to the Systemwalker Runbook Automation Installation Guide for details
10. Stop Systemwalker Runbook Automation on primary node.
[Systemwalker Runbook Automation Management Server install directory]\bin\swrba_stop
11. Stop the following service on the secondary node.
Stop with using Windows(R) service function. From [Control Panel]-[Management Tool]-[Service], select the following serviceand click the [Stop] button.
- Shunsaku Director contents
- Shunsaku Director metadata
- Shunsaku Searcher cmdbs01
- Shunsaku Searcher cmdbs02
- Shunsaku Searcher cmdbs03
12. Stop Interstage on the primary node.
# isstop -f
13. Stop the message broker on the primary node.
Use the Windows Services feature to stop the message broker.
Click Start >> Control Panel >> Administrative Tools, and then, double-click Services. Next, select Interstage Message QueueBroker and click the Stop button.
14. Stop the Interstage Java EE Node Agent Service on the primary node.
# ijnastop
15. Stop the Interstage Java EE DAS Service on the primary node.
# ijdasstop
- 58 -

16. Stop the Interstage Directory Service on the primary node.
irepstop -R repository name
Example:
If the repository name is rep001, execute the following command:
irepstop -R rep001
17. Stop JMX service on primary node.
Use the Windows(R) Services function to stop it.
Select "Interstage Operation Tool" in the Services dialog box (opened from Administrative Tools under Control Panel), and clickthe Stop button.
18. Place the shared disk offline on the primary node.
19. Place the shared disk online on the secondary node.
20. Start JMX service on secondary node.
Use the Windows(R) Services function to start it.
Select "Interstage Operation Tool" in the Services dialog box (opened from Administrative Tools under Control Panel), and clickthe Start button.
21. To use the Interstage Directory Service, start the directory service on the secondary node. The procedure is the same as for theprimary node.
22. Start the Interstage Java EE DAS Service on the secondary node.
# ijdasstart
23. Start the Interstage Java EE Node Agent Service on the secondary node.
# ijnastart
24. Start the message broker on the secondary node. The procedure is the same as for the primary node.
25. Start Interstage on the secondary node.
# isstart
# ihsstart -all
26. Restore server resources on the secondary node.
Refer to the Systemwalker Runbook Automation Installation Guide for details
27. Stop Systemwalker Runbook Automation on secondary node.
[Systemwalker Runbook Automation Management Server install directory]\bin\swrba_stop
28. Stop the following service on the secondary node.
Stop with using Windows(R) service function. From [Control Panel]-[Management Tool]-[Service], select the following serviceand click the [Stop] button.
- Shunsaku Director contents
- Shunsaku Director metadata
- Shunsaku Searcher cmdbs01
- Shunsaku Searcher cmdbs02
- Shunsaku Searcher cmdbs03
- 59 -
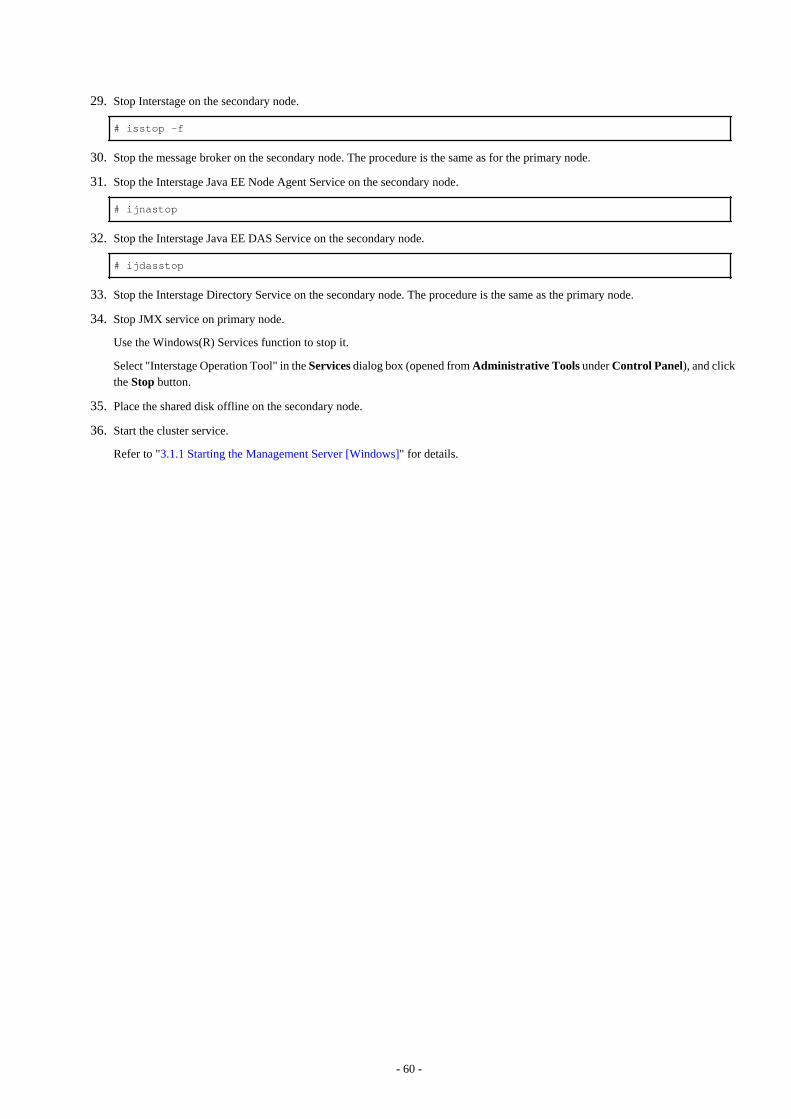
29. Stop Interstage on the secondary node.
# isstop -f
30. Stop the message broker on the secondary node. The procedure is the same as for the primary node.
31. Stop the Interstage Java EE Node Agent Service on the secondary node.
# ijnastop
32. Stop the Interstage Java EE DAS Service on the secondary node.
# ijdasstop
33. Stop the Interstage Directory Service on the secondary node. The procedure is the same as the primary node.
34. Stop JMX service on primary node.
Use the Windows(R) Services function to stop it.
Select "Interstage Operation Tool" in the Services dialog box (opened from Administrative Tools under Control Panel), and clickthe Stop button.
35. Place the shared disk offline on the secondary node.
36. Start the cluster service.
Refer to "3.1.1 Starting the Management Server [Windows]" for details.
- 60 -