installation runbook for... · installation runbook for ... mirantis openstack is the orchestration...
TRANSCRIPT
Installation Runbook forOpenStack® Deployment with SR-IOV ConfigurationQLogic® 3400, 8400, and 45000 Series AdaptersApplication Type Single Root-I/O VirtualizationApplication Version
Mirantis® OpenStack Version 7.0/8.0OpenStack Version Kilo and Liberty

Contents1 Introduction1.1 Audience2 Application Overview3 Joint Reference Architecture3.1 OpenStack Nodes3.1.1 Controller Node3.1.2 Compute Node3.2 Physical & Logical Network Topology4 Installation & Configuration4.1 Environment Preparation4.1.1 Nodes4.1.2 MOS installation4.1.3 Health Check Results4.2 SR-IOV Configuration Using the 3400/8400/45000 Series Adapters4.2.1 Enabling SR-IOV on the 3400/8400/45000 Series Adapters (Compute Node)4.2.2 Configuring SR-IOV in the Controller Node4.2.3 Configuring SR-IOV on the Compute Node4.3 Configuration Deployment with SR-IOV4.3.1 Creating an SR-IOV Network4.3.2 Creating the Subnet “subnet2” for the SR-IOV Network4.3.3 Creating the SR-IOV Port4.3.4 Creating a VM with the SR-IOV Network4.3.5 Quality of Service Policy Updates for MOS 8.04.4 Troubleshooting4.4.1 Compute Node—QLogic NIC Adapter Connection4.4.2 Compute Node—SR-IOV VFs4.4.3 Compute Node—Enable intel_iommu4.4.4 Server BIOS—Enable SR-IOV4.4.5 Controller Node—Neutron Server4.4.6 Controller Node—Nova Services4.4.7 Controller Node—Neutron Agents4.4.8 SR-IOV VF Connectivity4.4.8.1 Server Logs on the Compute Node4.4.8.2 Server Logs on the Controller Node5 Limitations6 Testing

Document HistoryVersion Revision Date Description
1.0 05-24-16 Initial Version

1 IntroductionThe OpenStack® project is an open source cloud computing platform that supports all types of cloud environments and works as infrastructure as a service (IAAS).The technology consists of a series of interrelated projects that control pools of processing, storage, and networking resources throughout a data center, which users manage through a web-based dashboard, command line tools, or representational state transfer (REST) APIs.OpenStack (starting with Juno) adds inbox support to request virtual machine (VM) access to the virtual network through single root input/output virtualization (SR-IOV) NIC. With the introduction of SR-IOV-based NICs, each SR-IOV port is associated with virtual functions (VFs). SR-IOV ports are provided by hardware-based virtual Ethernet bridging (HW VEB).1.1 AudienceThis guide is intended for OpenStack (Kilo and Liberty) users who want to configure SR-IOV with the QLogic 3400/8400/45000 Series Adapters. You will need the following knowledge and equipment:• One or more QLogic 3400/8400/45000 Series Adapters. For more information about these adapters, see the following links:3400/45000 Series Intelligent Ethernet Adaptershttp://www.qlogic.com/Products/adapters/Pages/IntelligentEthernetAdapters.aspx8400 Series Converged Network Adaptershttp://www.qlogic.com/Products/adapters/Pages/ConvergedNetworkAdapters.aspx• An understanding of OpenStack deployment and experience with OpenStack 3 node configuration using flat mode networking with virtual LAN (VLAN) with the ML2/OVS plug-in for public and private (that is, net1) networks.More information about OpenStack 3 node configuration can be found at the following locations:OpenStack (Kilo):http://docs.openstack.org/kilo/install-guide/install/yum/content/OpenStack (Liberty):http://docs.openstack.org/liberty/install-guide-rdo/• The compute node must have one or more QLogic 3400/8400/45000 Series Adapters present in system with SR-IOV support enabled.• For the VM instance, QLogic uses a Red Hat 7 KVM Guest image to test SR-IOV configurations that support the 3400/8400/45000 Series Adapters’ inbox driver or out-of-box driver, as described here:http://docs.openstack.org/image-guide/content/ch_obtaining_images.html• OpenStack 3 node configuration without SR-IOV support must work with flat networking/VLAN. You must be able to assign floating IP access and log in to the VM.

2 Application OverviewMirantis OpenStack is the orchestration solution that is commonly used in network data centers and has several components: compute, storage, dashboard, and networking. For networking connectivity under Neutron, 3400/8400/45000 Series Adapters support a comprehensive list of virtualization and multi-tenant services, including SR-IOV and virtual extensible LAN (VXLAN) offloads for the most sophisticated enterprise data centers, as well as private, public, and hybrid cloud deployments. With the Neutron networking component, QLogic offers several optimizations including VXLAN offloads and Open vSwitch (OVS) integration. The QLogic poll mode driver (PMD) allows the use of optimized networking for OpenStack using virtual network appliances running on the OpenStack Nova compute platform.

3 Joint Reference ArchitectureThis chapter describes the OpenStack 3 node architecture.
Figure 3-1. Mirantis OpenStack with SR-IOVPCI-SIG, the special interest group that owns and manages PCI specifications as open industry standards, introduced a suite of specifications for SR-IOV to allow multiple operating systems to share a physical interconnect. The SR-IOV standard allows multiple virtual machines (VMs) to share an I/O device, while allowing for close to bare-metal runtime performance.The SR-IOV specification details how a single PCI Express (PCIe) device can be shared between various guest operating systems—the VMs. Devices with SR-IOV support multiple virtual functions (VFs) on top of the physical function. VFs are enabled in hardware as a lightweight PCIe function that can be directly assigned to a VM without hypervisor mediation. These VFs operate in the context of a VM, and must be associated with a physical function (PF), a full-featured PCIe function that operates in the context of the hypervisor or parent partition.SR-IOV provides direct VM connectivity and isolation across VMs. It allows the data to bypass the software virtual switch (vSwitch) and provides near-native performance. The benefits to deploying hardware-based SRIOV- enabled NICs include reduction of CPU and memory usage compared to vSwitches. Moving the network virtualization into hardware (SR-IOV adapters) relieves the performance problems associated with vSwitches. By directing VM I/O directly to VFs and bypassing the hypervisor, the vSwitches are no longer part of the data path. In addition, it significantly increases the number of virtual networking functions for a single physical server.

3.1 OpenStack NodesThis guide is intended for use with OpenStack 3 node architecture, which consists of the following nodes:• Controller • ComputeThese nodes are described in the following sections.3.1.1 Controller NodeIn the example architecture used in this guide, the Controller node runs the following services and functions:• Identity service (Keystone)• Image service (Glance)• Management portions of the Compute service (Nova Management) and Networking service (Neutron Server/modular layer 2 (ML2) plug-in)• Networking plug-in• Dashboard (Horizon)• Networking plug-in (ML2)• Layer 3 agent• DHCP agentThe architecture also includes supporting services such as a database (mysql), message broker (Rabbitmq), network time protocol (NTP), and external (Internet) connectivity for tenant VMs for the Compute node. 3.1.2 Compute NodeThe Compute node runs the hypervisor portion of Compute, which operates tenant virtual machines. In this architecture, the Compute node uses a kernel-based virtual machine (KVM) as the hypervisor (KVM is the default hypervisor). The Compute node runs the Networking node plug-in (ML2), layer 2 agent open virtual search (OVS), and NIC switch agent (SR-IOV switch).

3.2 Physical & Logical Network Topology
Figure 3-2. Physical Topology
Figure 3-3. Logical Topology

4 Installation & Configuration4.1 Environment PreparationFor information about preparing the Fuel environment, refer to the respective guides:• For Fuel 7.0: https://docs.mirantis.com/openstack/fuel/fuel-7.0/user-guide.html#boot-the-fuel-master-node• For Fuel 8.0http://docs.openstack.org/developer/fuel-docs/userdocs/fuel-install-guide.htmlMOS 7.0/8.0 ISO are available at https://www.mirantis.com/products/mirantis-openstack-software/4.1.1 NodesNumber of nodes: 1 Controller/Compute/StorageHypervisor: KVMNetworking segmentation type: Neutron VLANTo configure MOS:1. Select Name and Release. Specify the OpenStack name (QL-E3)and release (Liberty on Ubuntu 14.04), and then click Next.

2. Select Compute. Select QEMU-KVM to use QEMU as the hypervisor with capability of KVM acceleration, and then click Next.
For MOS 8.0, under Hypervisor, select KVM and check Resume guests state on host boot. Click Next.

3. Select Networking Setup. Select ML2 Plugin with Neutron, and Neutron with VLAN segmentation, and then click Next.
4. Select Storage Backends. Under Block Storage, select LVM, and then click Next.

4.1.2 MOS installationFor information about installing MOS, refer to the respective Quick Start Guides:• For Fuel 7.0: https://docs.mirantis.com/openstack/fuel/fuel-7.0/#guides• For Fuel 8.0: https://docs.mirantis.com/openstack/fuel/fuel-8.0/4.1.3 Health Check ResultsFor information about performing health checks, refer to the respective user’s guides:• For Fuel 7.0, under Post-Deployment Check:https://docs.mirantis.com/openstack/fuel/fuel-7.0/user-guide.html#post-deployment-check• For Fuel 8.0, under Verify your OpenStack environment:https://docs.mirantis.com/openstack/fuel/fuel-8.0/pdf/Fuel-8.0-UserGuide.pdfThe deployment should pass for basic sanity test, functional test, and HA test if the controllers are configured in HA mode.4.2 SR-IOV Configuration Using the 3400/8400/45000 Series AdaptersThis section describes how to configure SR-IOV using the QLogic 3400/8400/45000 Series Adapters, as described in the following sections:• Enabling SR-IOV on the 3400/8400/45000 Series Adapters (Compute Node)• Configuring SR-IOV in the Controller Node• Configuring SR-IOV on the Compute Node4.2.1 Enabling SR-IOV on the 3400/8400/45000 Series Adapters (Compute Node)To enable SR-IOV on the 3400/8400/45000 Series Adapters in the Compute node:1. Ensure that one or more 3400/8400/45000 Series Adapters with SR-IOV support are present on the Compute node.2. Install the adapter driver on the Compute node. • For 3400/8400 Series Adapters install the bnx2x NIC driver.• For 45000 Series Adapters, install the qed/qede drivers.To download the most recent drivers, go to driverdownloads.qlogic.com.3. Load the NIC drivers by issuing the following commands for your adapter model.3400/8400 Series Adapters:modprobe bnx2x45000 Series Adapters:modprobe qedmodprobe qede4. Ensure that the port is up by issuing the following command:ifup ethx / ifconfig ethx up

5. To create eight VFs, issue the following command:echo 8 > /sys/bus/pci/devices/0000\:0x\:00.x/sriov_numvfs6. Verify that the virtual interfaces are visible to host operating system by issuing the following command:lspci |grep Qlogic7. Enable SR-IOV on the port where the tenant network has been defined.4.2.2 Configuring SR-IOV in the Controller NodeSince the Neutron server is running on the Controller node, the file configuration for the Neutron server must be changed to enable SR-IOV, as described in the following procedure.To configure SR-IOV in the Controller node:1. Modify the ML2 Neutron plug-in by editing the /etc/neutron/plugins/ml2/ml2_conf.ini file on Controller node as follows:[ml2]tenant_network_types = flat,vlantype_drivers = vlanmechanism_drivers = openvswitch,sriovnicswitch
[ml2_type_vlan]network_vlan_ranges = physnet2:1000:2000,physnet3:2001:21002. Add the supported PCI vendor VF devices defined by <device_id>:<vendor_id> according to the PCI ID Repository and make agent_require=False (MOS 7.0) or agent_require=True (MOS 8.0) by editing the /etc/neutron/plugins/ml2/ml2_conf_sriov.ini file as follows: [ml2_sriov]supported_pci_vendor_devs = <device_id>:<vendor_id>agent_require = False (MOS 7.0)oragent_require = True (MOS 8)3. Add scheduler_default_filters and scheduler_available_filters to the /etc/nova/nova.conf file as follows:scheduler_default_filters=RetryFilter,AvailabilityZoneFilter,RamFilter,CoreFilter,DiskFilter,ComputeFilter,ComputeCapabilitiesFilter,ImagePropertiesFilter, ServerGroupAntiAffinityFilter,ServerGroupAffinityFilter,PciPassthroughFilterscheduler_available_filters=nova.scheduler.filters.all_filters

4. Change the Neutron server configuration.The Neutron server must be run with the following configuration file:/etc/neutron/plugins/ml2/ml2_conf_sriov.inia. Navigate to the configuration files’ location by issuing the following command:# cd /etc/initb. Edit the neutron-server.conf file and add the ml2_conf_sriov.ini configuration file as follows:exec start-stop-daemon --start --chuid neutron:neutron --exec /usr/bin/neutron-server --\--config-file /etc/neutron/neutron.conf \--log-file /var/log/neutron/server.log $CONF_ARG --config-file /etc/neutron/plugins/ml2/ml2_conf_sriov.ini5. Restart the Neutron server by issuing the following commands:# service neutron-server restart4.2.3 Configuring SR-IOV on the Compute NodeTo configure SR-IOV on the Compute node, associate the available VF with the physical network as follows:1. Enable intel_iommu on the Compute node by adding the following line to the /etc/default/grub file:GRUB_CMDLINE_LINUX_DEFAULT="nomdmonddf nomdmonisw intel_iommu=on"Reboot the system and then examine the cat/proc/cmdline file to confirm that intel_iommu is enabled (intel_iommu=on).2. For MOS 8.0, the Neutron agent is running on the Compute node and agent_require=True in the Controller node. Therefore, add the following to the sriov_agent.ini file:[sriov_nic]physical_device_mappings = physnet3:p5p2
[securitygroup]firewall_driver = neutron.agent.firewall.NoopFirewallDriver

3. In MOS 8.0 there is an issue with the Libvirt/SRIOV configuration while creating a VM. Add the following entries to the /etc/apparmor.d/abstractions/libvirt-qemu file in the Compute node.# Those rules are required for SR-IOV to function properly/sys/devices/system/** r,/sys/bus/pci/devices/ r,/sys/bus/pci/devices/** r,/sys/devices/pci*/** rw,/{,var/}run/openvswitch/vhu* rw,4. Add pci_passthrough_whitelist to the /etc/nova/nova.conf file as follows:pci_passthrough_whitelist={"devname": "p5p2", "physical_network":"physnet3"}5. Restart the OpenStack Nova service by issuing the following command:# service nova-compute restart6. For MOS 8.0 only, install the SR-IOV Neutron agent on the Compute node by issuing the following command:# apt-get install neutron-plugin-sriov-agent7. Restart the Neutron Open vSwitch agent and SR-IOV NIC agent services by issuing the following commands:For MOS 7.0 and 8.0:# service neutron-plugin-openvswitch-agent restartFor MOS 8.0 only:# service neutron-plugin-sriov-agent restart4.3 Configuration Deployment with SR-IOVThis section describes how to deploy OpenStack with SR-IOV, as follows:• Creating an SR-IOV Network• Creating the Subnet “subnet2” for the SR-IOV Network• Creating the SR-IOV Port• Creating a VM with the SR-IOV Network• Quality of Service Policy Updates for MOS 8.0

4.3.1 Creating an SR-IOV NetworkTo create an SR-IOV network from the Controller node:1. Create an SR-IOV network with a VLAN network type by issuing the following command:# neutron net-create --provider:physical_network=physnet3 --provider:network_type=vlan sriov2. Issue the following command to view the configuration for OpenStack 3 nodes:# [root@network1 ~]# neutron net-listFollowing is a sample output.
The values in the name column are described in the following paragraphs.
net1 A private network that provides internal network access for instances of the Compute node.Public and private networks are configured in the prerequisite section.sriov An SR-IOV network for VM access to a virtual network using SR-IOV NIC.public An external network that provides Internet access for instances of the Compute node using a network address translation (NAT) /floating IP address and a qualified security group.

4.3.2 Creating the Subnet “subnet2” for the SR-IOV NetworkTo create the subnet2 subnet for the SR-IOV network:1. Create a subnet attached to the SR-IOV network by issuing the following command:# neutron subnet-create sriov 11.0.0.0/24 --name subnet2 --dns-nameserver 8.8.4.4 --gateway 11.0.0.12. Issue the following command to view the subnet network:# neutron subnet-list Following is a sample output.
The values in the name column are described in the following paragraphs.
4.3.3 Creating the SR-IOV PortTo create the SR-IOV port:1. Issue the following command to create an SR-IOV port:#neutron port-create <sriov net id> --name <port_name> --binding:vnic-type direct --device_owner network:dhcpFollowing is a sample output.
subnet1 A private subnet that uses DHCPPrivate subnets are configured in the prerequisite section.subnet2 An SRI-OV subnetpublic-subnet A subnet for external connectivity
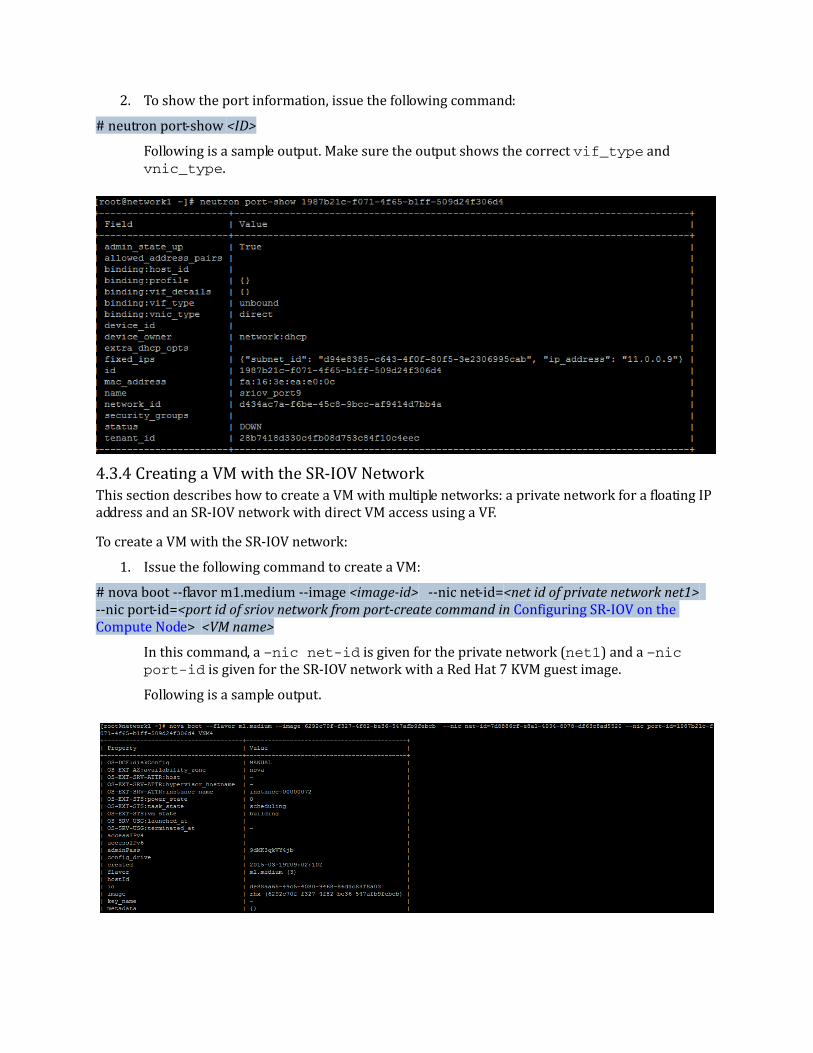
2. To show the port information, issue the following command:# neutron port-show <ID>Following is a sample output. Make sure the output shows the correct vif_type and vnic_type.
4.3.4 Creating a VM with the SR-IOV NetworkThis section describes how to create a VM with multiple networks: a private network for a floating IP address and an SR-IOV network with direct VM access using a VF.To create a VM with the SR-IOV network:1. Issue the following command to create a VM:# nova boot --flavor m1.medium --image <image-id> --nic net-id=<net id of private network net1> --nic port-id=<port id of sriov network from port-create command in Configuring SR-IOV on the Compute Node> <VM name>In this command, a –nic net-id is given for the private network (net1) and a –nic port-id is given for the SR-IOV network with a Red Hat 7 KVM guest image.Following is a sample output.

2. Issue the following command to ensure that the VM is up and running:#nova listFollowing is a sample output.
3. Assign a floating IP address to the private network to access using ssh.Following is a sample output.
4.3.5 Quality of Service Policy Updates for MOS 8.0To update quality of service (QoS) on the Controller node and the Compute node for MOS 8.0:1. Add QoS to the Controller node by editing the /etc/neutron/neutron.conf file and adding the following line:service_plugins =neutron.services.l3_router.l3_router_plugin.L3RouterPlugin,neutron.services. metering.metering_plugin.MeteringPlugin,qo2. n the [qos] section of the /etc/neutron/neutron.conf file, confirm that notification_drivers = message_queue.
[qos]
# Drivers list to use to send the update notification
# notification_drivers = message_queue
notification_drivers = message_queue3. In [ml2] section of the /etc/neutron/plugins/ml2/ml2_conf.ini, confirm that qos is included for the extension_drivers.extension_drivers =port_security,qos

4. Type the following command to complete the Controller node settings:service neutron-server restart5. In the /etc/neutron/plugins/ml2/sriov_agent.ini file, confirm the Compute node settings by ensuring that extensions = qos:[agent]
# (ListOpt) Extensions list to use
# Example: extensions = qos
# extensions = qos6. Type the following command to complete the Compute node settings:service neutron-plugin-sriov-agent restart7. Edit the /etc/neutron/policy.json file to include the following lines to allow regular users to change bandwidth on the Controller node:"get_policy": "rule:regular_user",
"create_policy": "rule:regular_user",
"update_policy": "rule:regular_user",
"delete_policy": "rule:regular_user",
"get_policy_bandwidth_limit_rule": "rule:regular_user",
"create_policy_bandwidth_limit_rule": "rule:regular_user",
"delete_policy_bandwidth_limit_rule": "rule:regular_user",
"update_policy_bandwidth_limit_rule": "rule:regular_user",
"get_rule_type": "rule:regular_user",8. You now want to confirm that QoS is working: type the following command to create a QoS policy:neutron qos-policy-create bw-limiter9. Type the following command to create a bandwidth setting rule:neutron qos-bandwidth-limit-rule-create bw-limiter --max-kbps 7000000 --max-burst-kbps 70000010. Type the following commands to associate the QoS bandwidth policy with existing Neutron ports:neutron port-update 5056e2f1-025d-46fc-9131-959ae708fe40 --qos-policy bw-limiterneutron port-update 98148013-d210-4922-a4ae-fa92c57c2cd3 --qos-policy bw-limiter11. Run traffic between two VMs over the SRIOV-VFS port. You should observe that the bandwidth is less than the specified limit (7,000,000kbps).To modify the bandwidth rule, use the following command format:neutron qos-bandwidth-limit-rule-update BANDWIDTH_LIMIT_RULE QOS_POLICY [--max-kbps MAX_KBPS] [--max-burst-kbps MAX_BURST_KBPS]For example:neutron qos-bandwidth-limit-rule-update 9914f100-9e0e-48dc-b964-b2afa47332d8 bw-limiter --max-kbps 3000000 --max-burst-kbps 3000000

4.4 TroubleshootingShould you encounter problems with your configuration, consider the following:• Compute Node—QLogic NIC Adapter Connection• Compute Node—SR-IOV VFs• Controller Node—Neutron Server• Server BIOS—Enable SR-IOV• Controller Node—Neutron Server• Controller Node—Nova Services• Controller Node—Neutron Agents• SR-IOV VF ConnectivityFor adapter related issues, see the troubleshooting chapters in the following user’s guides available at driverdownloads.qlogic.com:• QLogic FastLinQ 8400/3400 Series Converged Network Adapters and Intelligent Ethernet
Adapters User’s Guide
• QLogic 25Gb/40Gb/100Gb FastLinQ 45000 Series Intelligent Ethernet Adapters User’s Guide4.4.1 Compute Node—QLogic NIC Adapter ConnectionTo confirm that the Compute node QLogic adapter is connected to the switch network, use the ethtool ethx command, as shown:
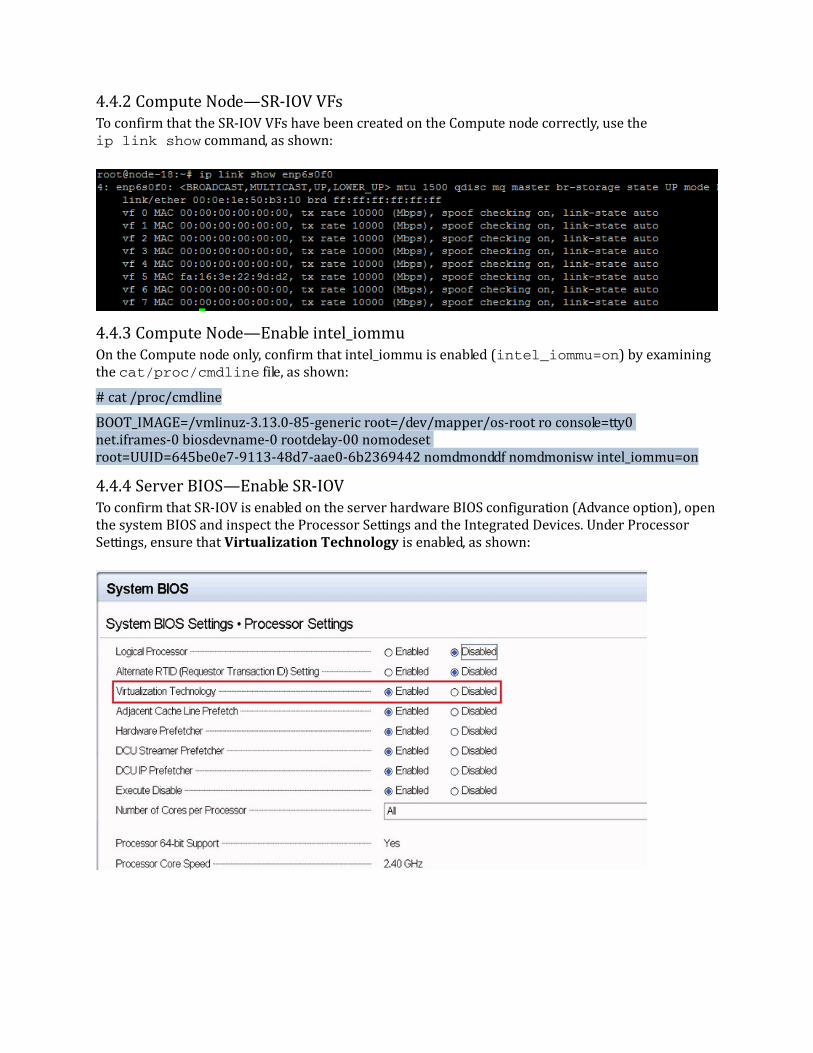
4.4.2 Compute Node—SR-IOV VFsTo confirm that the SR-IOV VFs have been created on the Compute node correctly, use the ip link show command, as shown:
4.4.3 Compute Node—Enable intel_iommuOn the Compute node only, confirm that intel_iommu is enabled (intel_iommu=on) by examining the cat/proc/cmdline file, as shown:# cat /proc/cmdlineBOOT_IMAGE=/vmlinuz-3.13.0-85-generic root=/dev/mapper/os-root ro console=tty0 net.iframes-0 biosdevname-0 rootdelay-00 nomodeset root=UUID=645be0e7-9113-48d7-aae0-6b2369442 nomdmonddf nomdmonisw intel_iommu=on4.4.4 Server BIOS—Enable SR-IOVTo confirm that SR-IOV is enabled on the server hardware BIOS configuration (Advance option), open the system BIOS and inspect the Processor Settings and the Integrated Devices. Under Processor Settings, ensure that Virtualization Technology is enabled, as shown:

Under Integrated Devices, ensure that SR-IOV Global Enable is enabled, as shown:
4.4.5 Controller Node—Neutron ServerTo confirm that the Neutron server is running properly on the Controller node, use the service neutron-server status command, as shown:# service neutron-server statusneutron-server start/running, process 76814.4.6 Controller Node—Nova ServicesTo confirm that all Nova services (consoleauth/conductor/scheduler/compute/cert) are running properly, use the nova service-list command, as shown:
4.4.7 Controller Node—Neutron AgentsTo confirm that the Neutron agents for MOS 8.0 (DHCP/metadata/openvswitch/sriov) are running properly on the Controller node, use the neutron agent-list command, as shown:
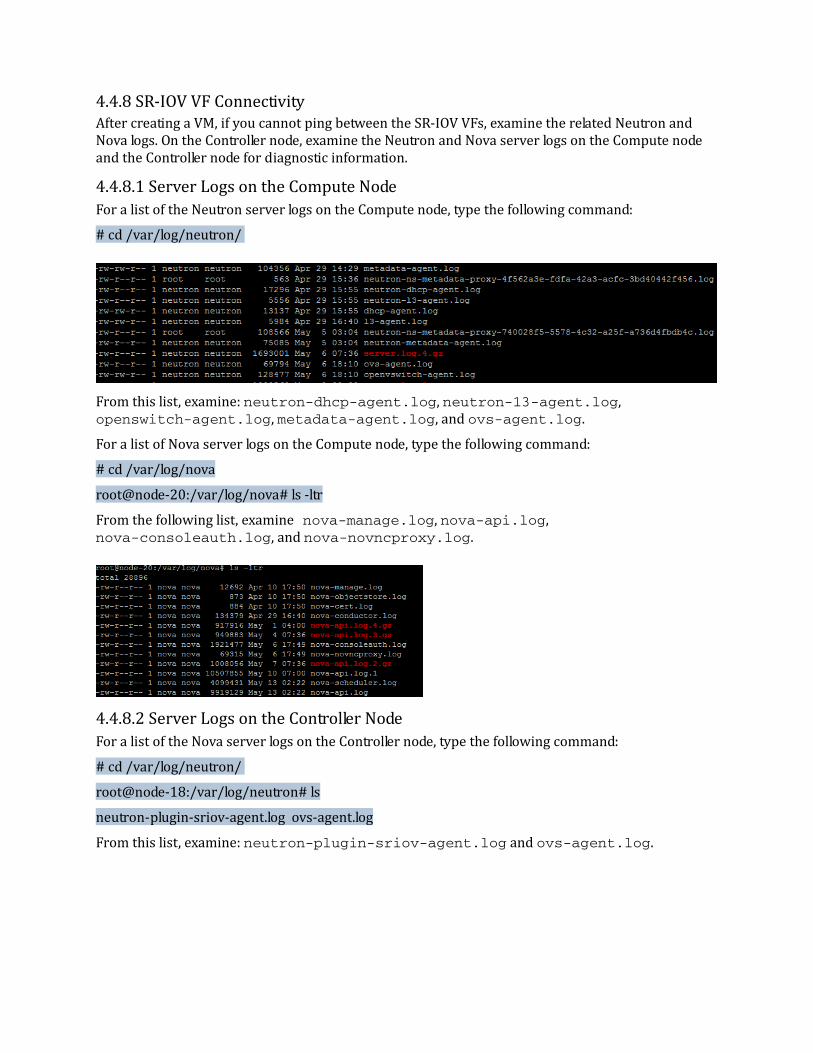
4.4.8 SR-IOV VF ConnectivityAfter creating a VM, if you cannot ping between the SR-IOV VFs, examine the related Neutron and Nova logs. On the Controller node, examine the Neutron and Nova server logs on the Compute node and the Controller node for diagnostic information.4.4.8.1 Server Logs on the Compute NodeFor a list of the Neutron server logs on the Compute node, type the following command:# cd /var/log/neutron/
From this list, examine: neutron-dhcp-agent.log, neutron-13-agent.log, openswitch-agent.log, metadata-agent.log, and ovs-agent.log.For a list of Nova server logs on the Compute node, type the following command:# cd /var/log/novaroot@node-20:/var/log/nova# ls -ltrFrom the following list, examine nova-manage.log, nova-api.log, nova-consoleauth.log, and nova-novncproxy.log.
4.4.8.2 Server Logs on the Controller NodeFor a list of the Nova server logs on the Controller node, type the following command:# cd /var/log/neutron/ root@node-18:/var/log/neutron# lsneutron-plugin-sriov-agent.log ovs-agent.logFrom this list, examine: neutron-plugin-sriov-agent.log and ovs-agent.log.

For a list of Nova server logs on the Controller node, type the following command:# cd /var/log/novaroot@node-18:/var/log/nova# lsnova-compute.log nova-compute.log.2.gz nova-compute.log.3.gz nova-manage.logFrom the following list, examine nova-compute.log and nova-manage.log.

5 LimitationsWhen planning the OpenStack environment, consider the following limitations• SR-IOV environments were tested with KVM only.• For 45000 Series Adapters, the adapter drivers are not Inbox. Therefore, you must needs to install the qed/qede driver on the Compute node and VM manually.• When NPAR is enabled on the adapter, do not configure the PF with SR-IOV and VLAN.• 3400/8400 Series Adapters are not able to set the quality of service (QoS) bandwidth limit on SR-IOV VFs.• The SR-IOV IP Network interface does not receive the DHCP IP address while creating the VM. Therefore, you must assign the IP address for the SR-IOV interface manually.

6 TestingThis chapter provides a sample testing procedure. To verify the SR-IOV configuration with OpenStack:1. Create two VMs with different ports using the procedures in Creating the SR-IOV Port and Creating a VM with the SR-IOV Network.This example creates VMs named VNM3 and VNM4.2. Log in to the VMs using the floating IP address, which has been assigned to the private network net1 port.3. Ideally, the SR-IOV port should get DHCP IP address 11.0.0.x in the VM, but in this case, it is not getting the IP address automatically.Assign an IP address to the SR-IOV port in the VMs using the ifconfig command, as follows:• VNM3—SR-IOV port IP address 11.0.0.8• VNM4—SR-IOV port IP address 11.0.0.9 Following is a sample output for VNM3.
Following is a sample output for VNM4.

© 2016 QLogic Corporation. Specifications are subject to change without notice. All rights reserved worldwide. QLogic and the QLogic logo are registered trademarks of QLogic Corporation. OpenStack is a registered trademark of the OpenStack Foundation. Mirantis is a registered trademark of Mirantis Inc. Red Hat is a registered trademark of Red Hat, Inc. in the US and other countries. All other brand and product names are trademarks or registered trademarks of their respective owners. Information supplied by QLogic Corporation is believed to be accurate and reliable. QLogic Corporation assumes no responsibility for any errors in this brochure. QLogic Corporation reserves the right, without notice, to make changes in product design or specifications.