installation runbook fordocument history ... mirantis openstack deployment guide for getting the...
TRANSCRIPT

INSTALLATION RUNBOOK FOR
Hitachi Block Storage Driver for OpenStack Product Name: Hitachi Block Storage Driver for
OpenStack
Driver Version: 1.4.10
MOS Version: 7.0
OpenStack Version: Kilo
Product Type: Storage Driver for Cinder

2
DOCUMENT HISTORY ...................................................................................................................................................... 3
1. INTRODUCTION ........................................................................................................................................................... 4
1.1 TARGET AUDIENCE .......................................................................................................................................................................... 4
2. PRODUCT OVERVIEW .................................................................................................................................................. 4
3. JOINT REFERENCE ARCHITECTURE ........................................................................................................................... 4
4. PHYSICAL AND LOGICAL NETWORK TOPOLOGY .................................................................................................... 6
5. INSTALLATION AND CONFIGURATION ..................................................................................................................... 6
5.1 ENVIRONMENT PREPARATION ........................................................................................................................................................ 7
5.2 MOS INSTALLATION .................................................................................................................................................................... 11
5.2.1 Health Check Results ................................................................................................................................................... 13
5.3 HBSD INSTALLATION PROCEDURE .......................................................................................................................................... 17
5.4 LIMITATIONS .............................................................................................................................................................................. 24
5.5 TESTING ..................................................................................................................................................................................... 24
5.5.1 TEST CASES .......................................................................................................................................................................... 24
5.5.2 TEST RESULTS ...................................................................................................................................................................... 25
6. TROUBLESHOOTING .................................................................................................................................................................. 26
7. CONVENTIONS: ABBREVIATIONS FOR PRODUCT NAMES ................................................................................................. 26

Document History
Version Revision Date Description
1.0 09-26-2016 Initial Version

4
1. Introduction This document serves as a runbook for deploying the Hitachi Block Storage Driver for OpenStack
within Mirantis OpenStack deployment. Integrating Hitachi Block Storage Driver for OpenStack into
Mirantis deployment allows high-performance and high-reliability features for Hitachi storage
managed by Cinder.
The objective of Mirantis OpenStack certification is to provide Mirantis program partners with a
Consistent and unified approach for acceptance of their solution into the Mirantis Technology
Partner Program.
Certification is designed within the context of Mirantis OpenStack infrastructure, including Mirantis
Fuel deployment tool and supported cloud reference architectures.
1.1 Target Audience
OpenStack administrators, Storage administrators, Network administrators who are familiar with
Mirantis OpenStack, Fuel and Hitachi Block Storage Driver for OpenStack.
2. Product Overview Hitachi Block Storage Driver for OpenStack (abbreviated as HBSD hereafter) is a driver for Cinder,
which is a block storage management component, in OpenStack environments. HBSD allows you to
use high-performance and high-reliability features for Hitachi storage managed by Cinder. Both
Mirantis OpenStack and HBSD can be configured to provide services in a variety of ways. To ensure
that the best possible end result is achieved, the guidelines and best practices for Mirantis
OpenStack should be followed to configure OpenStack.
For HBSD best practices it is suggested that the administrator follow the guidelines outlined in the
HBSD User Manual to configure a compute and controller node.
3. Joint Reference Architecture Overview:
This reference architecture describes how to integrate Mirantis OpenStack 7.0 (using OpenStack
Kilo) with HBSD 1.4.10, utilizing HBSD as a backend storage.
● Hitachi Block Storage Device - To use high-performance and high-reliability features.
● Controller nodes - Servers running OpenStack controller elements.
● Compute nodes - Servers running OpenStack compute elements.
● Cinder node - Server running OpenStack cinder elements.
● Fuel - Infrastructure running OpenStack deployment and management tool.

Node configuration:
When HBSD is used in an environment that is managed by Mirantis OpenStack 7.0, deployment of
all nodes and OS configuration must be performed through Mirantis Fuel. HBSD supports
deployment using Ubuntu 14.04 LTS when using OpenStack Kilo based releases.
Note: This document assumes Ubuntu is being used when referencing command-line utilities
and/or OS level configuration files and tools.
High Availability configurations for cinder-volume service:
HBSD supports both HA [Active / Standby] mode and ‘non-HA’ mode.

6
4. Physical and Logical Network Topology
Fuel operates with a set of logical networks. In this scheme, these logical networks are mapped
With such example as follows:
• Administrative (Fuel) network: untagged on this scheme.
• Public Network: network: untagged on this scheme
• Floating Network: network: untagged on this scheme
• Management Network: VLAN 101.
• FC/iSCSI Network [Physical LAN or FC] is created manually to connect the control and
compute nodes with Hitachi Storage.
Note: Fuel uses a separate network to connect Hitachi Storage directly.
• Private Network: VLANs 200-210
5. Installation and Configuration
Overview:
When HBSD is used as a backend storage solution for OpenStack, the guidelines and best practices
published for Mirantis apply.
The deployment of Mirantis OpenStack should be done through FUEL, and the deployment should
pass all automated health checks.

After installing an OpenStack environment using Mirantis Fuel a number of configuration changes
are required to use HBSD as backend storage for Cinder.
Prerequisites:
This guide assumes that the following base requirements are satisfied:
• HBSD 1.4.10 is installed and configured on supported hardware.
• Mirantis OpenStack 7.0 is used and Mirantis FUEL is used to deploy/manage servers.
• Technically, this document is specific to Mirantis OpenStack 7.0 and Kilo.
• The environment is running on Ubuntu 14.04 LTS.
5.1 Environment Preparation
Please follow the Mirantis OpenStack deployment guide for getting the Fuel master node up and
the controller, compute nodes discovered.
Details available in the link: https://docs.mirantis.com/openstack/fuel/fuel-7.0/pdf/Mirantis-
OpenStack-7.0-UserGuide.pdf
After completing Fuel setup, the Fuel UI screen shows all your Slave nodes as "Unallocated nodes".
You can now create, configure, and deploy your first OpenStack environment. One Fuel Master can
deploy and manage multiple OpenStack environments but you must create each environment
separately.
During the certification and functional verification of HBSD and Mirantis OpenStack 7.0 the
following configuration was used:
• One Mirantis Fuel Master Node.
• One server used for Controller node and Cinder node
• Two OpenStack Compute nodes.
Creation of OpenStack environment:
• Launch Wizard to Create New Environment.
• Click on the "New OpenStack environment" icon to launch the wizard that creates a new
OpenStack environment.
• Give the environment a name and select the Linux distribution from the drop-down list
As Kilo on Ubuntu 14.04 (2015 1.0-7.0) (default)
• The operating system Ubuntu 14.04 will be installed on the target nodes in the
environment.
• Note: HBSD does not support on Kilo on CentOS 6.5 (2015.1.0-7.0)
On the Fuel UI, click on “New OpenStack Environment”.
When the wizard opens, enter the name and the desired OpenStack Release.
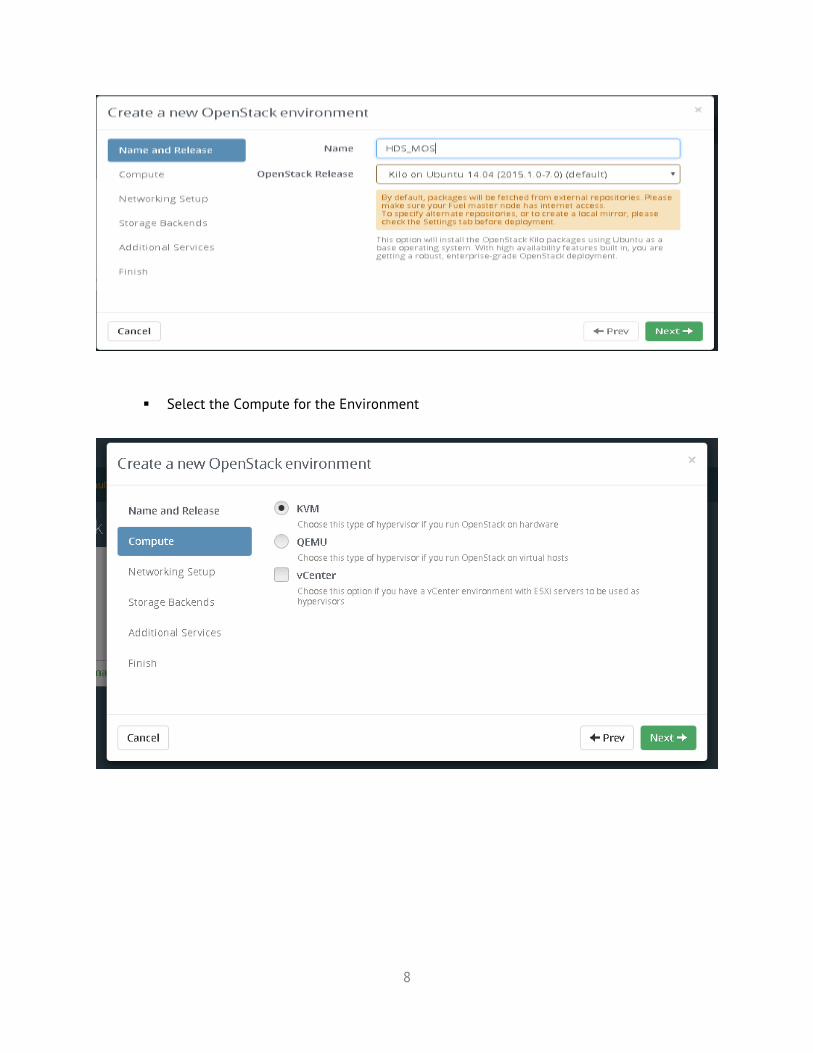
8
Select the Compute for the Environment

Select the network setup option ‘Neutron with VLAN segmentation’.
Under Storage Backend, select “No, use defaults providers”. Hitachi Volume driver can be
installed after the OpenStack is deployed.

10
Select the additional services and click on next.
Click Create to start deploy the OpenStack.

5.2 MOS Installation
The MOS deployment will consist of,
• One Fuel server.
• At least one MOS controller (preferred 3 MOS controllers in HA configuration).
• Neutron VLAN based configuration is recommended.
• Storage backend as default providers [Cinder LVM over iSCSI for volumes] is mandatory.
Please follow Mirantis documentation on bringing up a fuel node and discovering nodes on which
OpenStack controller/ compute services shall run.
• Add nodes to the environment.
• Assign a role or roles to each node server.
• Do the required Network settings.
• Mapping logical networks to physical interfaces on servers [if required].
• Verify Networks
• The network verification check should get succeeded in order to ensure that deployment
is not failed due to network settings.
• Deploy Changes.

12
Status after Deployment

5.2.1 Health Check Results
Validating the installation:
• After the configuration has been completed, it should be validated using the automated
health check capabilities of Mirantis Fuel.
• Doing this will catch most errors before trying to deploy production workloads.
• All Cinder related tests should pass with no errors.
• The Health Check is initiated from the Mirantis Fuel console (within the context of the
relevant OpenStack cloud).
• All of the Sanity Tests should pass, and it is important that the “Create Volume” related
Functional Tests also pass.
• If any of these basic tests fail, the cause should be determined and corrected before
proceeding to deploy a workload on these systems.
In Health Check - Functional test, we have skipped the step “Check network connectivity
from instance via floating IP ".
The reason for skipping this step in Health Check - Functional test are mentioned below,
• Target component: Neutron - This component testing is not required cinder
certification.
• Scenario used to “Check network connectivity from instance via floating IP”
includes,
1. Create a new security group (if it doesn`t exist yet).
2. Create router, Create network and Create subnet.
3. Uplink subnet to router.
4. Create an instance using the new security group with created subnet.
5. Create a new floating IP.
6. Assign the new floating IP to the instance.
7. Check connectivity to the floating IP using ping command.
8. Check that public IP 8.8.8.8 can be pinged from instance.
9. Disassociate server floating IP.
10. Delete floating IP.
11. Delete server.
12. Remove router, Remove subnet and Remove network.
In the above mentioned scenario, step #8 will check whether public IP 8.8.8.8 can be pinged or
not. As the environment built for this certification does not contain 8.8.8.8 in DNS list [Available
in "Mirantis OpenStack Environment - Settings tab - Host OS DNS Servers"], the pinging will not
happen. Hence this step has been skipped.
Note: Instead we have used a proxy server IP to establish connectivity between instance and
public connectivity. This is non-HA setup, so we have skipped the HA tests.

14


16

5.3 HBSD Installation Procedure
The information described in this section about storage resource setting, installation and
configuration of storage management software is all belong to Hitachi Storage Administrators.
And, they will be responsible for doing the necessary configuration in order to use Hitachi
storage as mentioned below.

18
Note: This is an example connection configuration for VSP G1000/VSP G200, G400, G600,
G800/VSP/HUS VM with FC and the same can be used in case of VSP G200, G400, G600, and G800
with iSCSI also.
For more detailed information on Storage resource setting, installation and configuration of
management software, kindly refer the support documents from
https://support.hds.com/en_us/documents.html

1. Setting contents for each node:
Table mentioned below shows the setting contents for each node.
"my_ip" is the public IP of each Node. The IPv4 address must be a unique value among other
nodes.
Execute the command "ifconfig br-ex" to find out "my_ip" of the each specific node.
Here is an example:
root@node-2:~# ifconfig br-ex
br-ex Link encap:Ethernet HWaddr 38:63:bb:43:57:19
inet addr:172.17.14.15 Bcast:172.17.15.255 Mask:255.255.254.0
inet6 addr: fe80::3a63:bbff:fe43:5719/64 Scope:Link
UP BROADCAST RUNNING MULTICAST MTU:1500 Metric:1
RX packets:272031416 errors:0 dropped:440885 overruns:0 frame:0
TX packets:30419755 errors:0 dropped:0 overruns:0 carrier:0
collisions:0 txqueuelen:0
RX bytes:75919765059 (75.9 GB) TX bytes:1750811584 (1.7 GB)
root@node-2:~#

20
2. Resource setting of the storage:
For the target storage device, set the following resources to allow HBSD to use each FC
connection.
FC Connection:
• Create a Resource-Group and an account for user groups [only for RAID storage].
• Create a DP pool.
• Enable Port Security for HBSD.
• Manually set the storage control path for the Controller node.
• Create a host group using I/O data path for Controller node and Compute node.
• Set FC zoning.
• Reboot the Controller and Compute nodes.
iSCSI Connection:
• Create a Resource-Group and an account for user groups [only for RAID storage].
• Create a DP pool.
• Enable Port Security for HBSD.
• Manually set the storage control path for the Controller node.
• Create an iSCSI target using I/O data path for Controller node and Compute node.
3. Install and Configure the storage management software:
Designated management software must be configured on the Controller node for each target
storage device.
• Setting of CCI for VSP G1000/ VSP G200, G400, G600, G800/VSP/HUS VM
o Install CCI to the Controller node.
o At the command device (In-Band),
§ Confirm that there is a connection to a command device.
§ Create the configuration file for horcm instance
• Setting of SNM2 CLI for HUS100.
o Install SNM2 CLI.
o Register Unit name or Controller for HUS100.
o If Account Authentication is enabled, login beforehand.
4. HBSD Installation:
Follow the procedure given below to install HBSD package.
• Use the dpkg command to install HBSD.
• You must log in as a super user (root) on the Controller node where you want to install
HBSD.
o Before installing HBSD, stop the cinder-volume service.

# /usr/sbin/service cinder-volume stop
o If you use the cinder-backup service, stop that service also.
# /usr/sbin/service cinder-backup stop
o Perform the installation.
dpkg -i hbsd_1.4.10-0-6.0_all.deb
Note: The HBSD package will be available from Hitachi Data Systems support
team. Kindly contact Hitachi Data Systems in order to get and use this package.
=============================================================================
=========== 5. Initial Settings:
Mirantis OpenStack needs HBSD configuration along with cinder, edit the configuration file
(/etc/cinder/cinder.conf) on the Cinder node by manually.
• Associating volume type and backend.
# /usr/bin/cinder type-create <volume type name>
# /usr/bin/cinder type-key <volume type name> set
volume_backend_name=<volume
backend name>
• Adding the configuration of HBSD.
According to the using of OpenStack configuration installer, add the configuration
of
HBSD to the editing target. After this, adding it to the configuration file
(/etc/cinder/cinder.conf) provided by the OpenStack-cinder package is explained.
In DEFAULT section:
o Enable backend list: VSPG200, HUS100(shown in the cinder.conf sample below)
o logging format: Thread information is add to default format to log analysis.
In VSPG200 section:
o Backend definition section: VSPG200 (any string)
o Backend name registered with the volume type using the cinder type-key
command: hbsd_backend
o Volume driver: cinder.volume.drivers.hitachi.hbsd.hbsd_fc.HBSDFCDriver
o Storage device serial number: 12345
o DP pool ID: 0
o TI pool ID for Thin Image: 1
o Login user name to the target storage: user
o Login password to the target storage: password
o Storage controller port names which Controller node uses: CL1-A, CL2-A
o Storage controller port names which Compute nodes use:CL1-B, CL2-B

22
In HUS100 section:
o Backend definition section: HUS100 (any string)
o Backend name registered with the volume type using the cinder type-key
command: hbsd_backend2
o Volume driver: cinder.volume.drivers.hitachi.hbsd.hbsd_iscsi.HBSDISCSIDriver
o Array Unit name: HUS100_unitname
o DP pool ID: 5
o DP pool ID for Copy-on-write snapshot: 6
o Storage controller port names which Controller node uses: 0E, 0F
o Storage controller port names which Compute nodes use:1E, 1F
#The following table provides a sample for cinder.conf file
######################
# cinder.conf sample #
######################
[DEFAULT]
:(Omitted)
enabled_backends=VSPG200
logging_context_format_string=%(asctime)s.%(msecs)03d %( process)d%(thread)s
%(levelname)s %(name)s [%(request_id)s %(user_identity)s]
%(instance)s%(message)s
:(Omitted)
[VSPG200]
volume_driver=cinder.volume.drivers.hitachi.hbsd.hbsd_fc.HBSDFCDriver
volume_backend_name=hbsd_backend1
hitachi_storage_cli=HORCM
hitachi_storage_id=12345
hitachi_pool=0
hitachi_thin_pool=1
hitachi_horcm_user=user
hitachi_horcm_password=password
hitachi_target_ports=CL1-A,CL-2A
hitachi_compute_target_ports=CL-1B,CL2-B
[HUS100]
volume_driver=cinder.volume.drivers.hitachi.hbsd.hbsd_iscsi.HBSDISCSIDriver
volume_backend_name=hbsd_backend2

hitachi_storage_cli=SNM2
hitachi_storage_id=HUS100_unitname
hitachi_pool=5
hitachi_thin_pool=6
hitachi_target_ports=0E,0F
hitachi_compute_target_ports=1E,1F
6. Syntax of Hitachi Block Storage Driver for OpenStack:
Specify "parameter=value" pair per line. The table shown below describes the HBSD specific
parameters that has to be defined in HBSD settings in the configuration file
(/etc/cinder/cinder.conf) provided by the OpenStack cinder package.
Note: The above mentioned details are specific to Hitachi Storage and will be available with
Hitachi Storage Administrator or User who has configured this Storage Device. Therefore,
HBSD user has to get this information from them.
7. Restart the Cinder service:
start the cinder-volume service
#/usr/sbin/service cinder-volume start
cinder-volume start/running, process <Process ID>
If you use the cinder-backup service, start that service also.
#/usr/sbin/service cinder-backup start

24
cinder-backup start/running, process <Process ID>
8. Operation check:
Pre-operation check by the storage operation software (ex. CCI or SNM2 CLI).
Confirm that HBSD is being used.
Confirm Create Volume
Confirm Attach Volume
Confirm Detach Volume
Confirm Create Snapshot
Confirm Create Volume from Snapshot
Confirm Delete Volume
Confirm Delete Snapshot
Confirm Delete Volume
5.4 Limitations
Note: Create a new OpenStack environment for MOS deployment with following limitations,
HBSD does not support Juno on CentOS 6.5 (2014.2.2-6.1).
HBSD administrator requires storage backend with default providers [Cinder LVM over
iSCSI for volumes] as this configuration setting is used to update Hitachi storage details
with cinder-volume service.
5.5 Testing
5.5.1 Test cases
In addition to functional tests that are a part of the Fuel Health Check:
Verify instances connected to Hitachi Storage via HBSD with below mentioned functional testing.
# Category Function Description
1 Provisioning Create volume Create new volume (DP-VOL)
2 Create cloned volume
Create new volume from existing volume using Shadow Image or Thin Image
3 Delete volume Delete a volume

4
Snapshot
Create snapshot
Create a snapshot from a volume using Shadow Image or Thin Image
5 Create volume from snapshot
Create new volume from a snapshot using Shadow Image or Thin Image
6 Delete snapshot Delete a snapshot
7
Attach / Detach
Initialize connection Map the specified volume to a host group or iSCSI target
8 Terminate connection
Un map the specified volume to a host group or iSCSI target
9
Image creation
Copy image to volume
Copy OS image to the specified volume using dd
10 Copy volume to image Copy the specified volume as OS image data using dd
11
Mange / Unmanage
Manage volumes
LDEV which Cinder of other OpenStack made is added under management of target Cinder.
12 Unmanage volume
The volume which Cinder made is removed from the Cinder management
5.5.2 Test results
# Category Function Test Results
1 Provisioning Create volume Success
2 Create cloned volume Success
3 Delete volume Success
4 Snapshot Create snapshot Success
5 Create volume from snapshot Success
6 Delete snapshot Success
7
Attach / Detach
Initialize connection Success
8 Terminate connection Success
9
Image creation
Copy image to volume Success
10 Copy volume to image Success

26
11
Mange / Unmanage
Manage volumes Success
12 Unmanage volume Success
6. Troubleshooting
This section explains how to perform troubleshooting for HBSD.
Service cinder-volume does not start:
An error message for HBSD is output to "/var/log/cinder/cinder-volume.log". Kindly check
and take necessary action to resolve the cause.
If no error message is logged for HBSD in var/log/cinder/cinder-volume.log", then check
"/var/log/hbsd/debug.log" file and takes necessary action to resolve the cause.
Similarly, do troubleshoot all issues related to HBSD functionalities. [Ex: Create Volume,
Create snapshot, etc.]
7. Conventions: Abbreviations for product names
HBSD: Hitachi Block Storage Driver for OpenStack
HUS 1xx: Hitachi Unified Storage Family
HUS VM: Hitachi Unified Storage VM
VSP: Hitachi Virtual Storage Platform
VSP G1000: Hitachi Virtual Storage Platform G1000
VSP G200: Hitachi Virtual Storage Platform G200
VSP G400: Hitachi Virtual Storage Platform G400
VSP G600: Hitachi Virtual Storage Platform G600
VSP G800: Hitachi Virtual Storage Platform G800
SNM2: Hitachi Storage Navigator Modular 2
CCI: Command Control Interface