gemini intellifresh satellite
TRANSCRIPT

Gemini®
IntelliFresh® Satellite
USER GUIDE
READ AND SAVE THESE INSTRUCTIONS NOTICE TO INSTALLER: Please leave this booklet with the machine.
See brewer user’s guide for brewing instructions
Style varies

CONTENTS CL72
Important Safeguards............................................................................................................................................... IS7
IntelliFresh® Features............................................................................................................................................... IF1
Cleaning Instructions................................................................................................................................................CI3
Rough-In Drawing................................................................................................................................................. RD75
Illustrated Parts/Recommended Parts.................................................................................................................. IP123
Electrical Schematic (GEM3IF) .............................................................................................................................ES29
Electrical Schematic (GEM3IF30) .........................................................................................................................ES30
Product Warranty....................................................................................................................................................PW1
Contact Information
Wilbur Curtis Co., Inc.6913 Acco Street | Montebello, CA 90640 US
Phone: 323-837-2300 | Toll Free: 800-421-6150Email: [email protected] | Web: www.wilburcurtis.com
A.M. - 4:00 P.M. PTEmail: [email protected]
081517A

IMPORTANT SAFEGUARDS IS7
Symbols
This is the safety alert symbol. It is used to alert you to potential physical injury hazards. Obey all safety messages that follow this symbol to avoid possible injury or death.
DANGER - Indicates a hazardous situation which, if not avoided, will result in death or serious injury.
WARNING - Indicates a hazardous situation which, if not avoided, could result in death or serious injury.
CAUTION - Indicates a hazardous situation which, if not avoided, could result in minor or moderate injury.
NOTICE - Indicates a situation which, if not avoided, could result in property damage.
IMPORTANT - Provides information and tips for proper operation.
SANITATION REQUIREMENTS
Important Safeguards/Conventions
WARNING:
• Keep hands, arms and other items away from hot surfaces.
• Clean the satellite completely
When cleaning satellites with a connector on the back, do not allow liquids to get into the connector
during cleaning.
•
•
• This satellite is not intended for use by persons (including children) with reduced physical, sensory or
mental capabilities or lack of experience and knowledge, unless they have been given supervision or
instruction concerning use of the satellite by a person responsible for their safety.
WARNING -

IMPORTANT SAFEGUARDS IS7
CE Requirements
• This appliance must be installed in locations where it can be overseen by trained personnel.
•
•
•
• This appliance must not be cleaned by water jet.
• instruction concerning use of the appliance in a safe way and if they understand the hazards involved.
•
• or lack of experience and knowledge if they have been given supervision or instruction concerning use of the appliance in a safe way and understand the hazards involved.
•
• If the power cord is ever damaged, it must be replaced by the manufacturer or authorized service personnel with a special cord available from the manufacturer or its authorized service personnel in order to avoid a hazard.
•
• supervised.
• This appliance is intended to be used in household and similar applications such as:
– bed and breakfast type environments.
• This appliance not intended to be used in applications such as:
– farm houses
•
•
INTELLIFRESH® FEATURES IF1
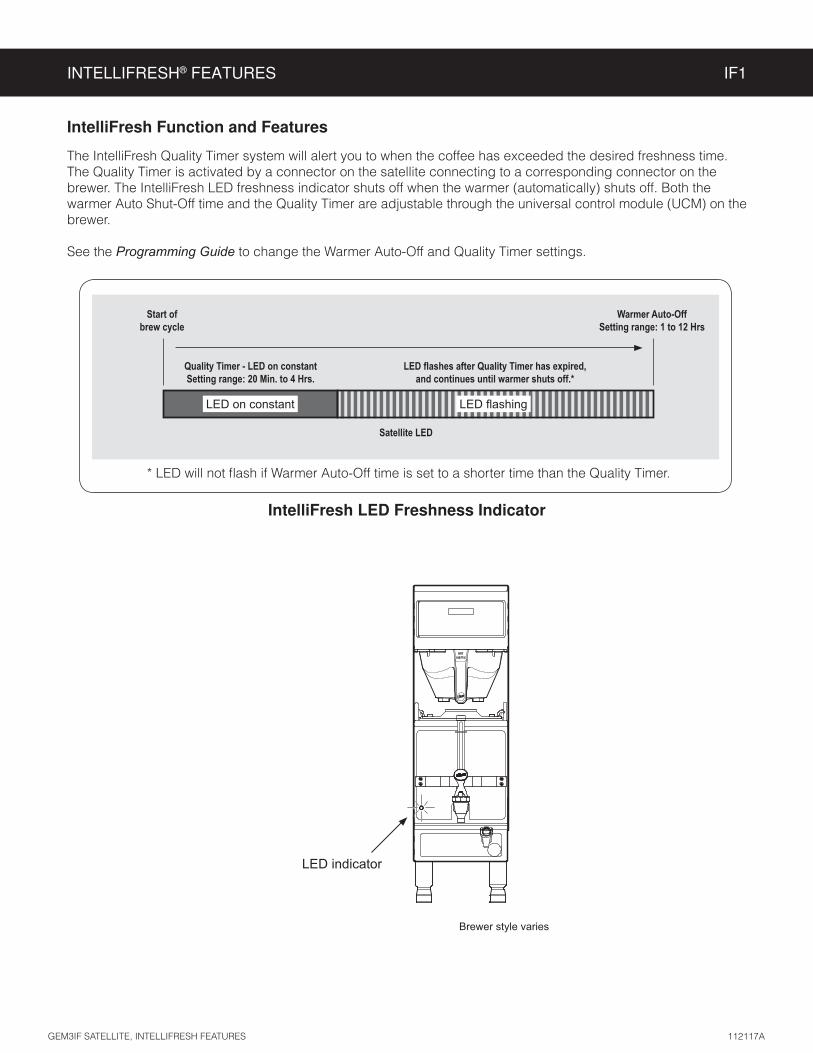
IntelliFresh Function and Features
The IntelliFresh Quality Timer system will alert you to when the coffee has exceeded the desired freshness time. The Quality Timer is activated by a connector on the satellite connecting to a corresponding connector on the brewer. The IntelliFresh LED freshness indicator shuts off when the warmer (automatically) shuts off. Both the warmer Auto Shut-Off time and the Quality Timer are adjustable through the universal control module (UCM) on the brewer.
See the Programming Guide to change the Warmer Auto-Off and Quality Timer settings.
LED on constant
IntelliFresh LED Freshness Indicator
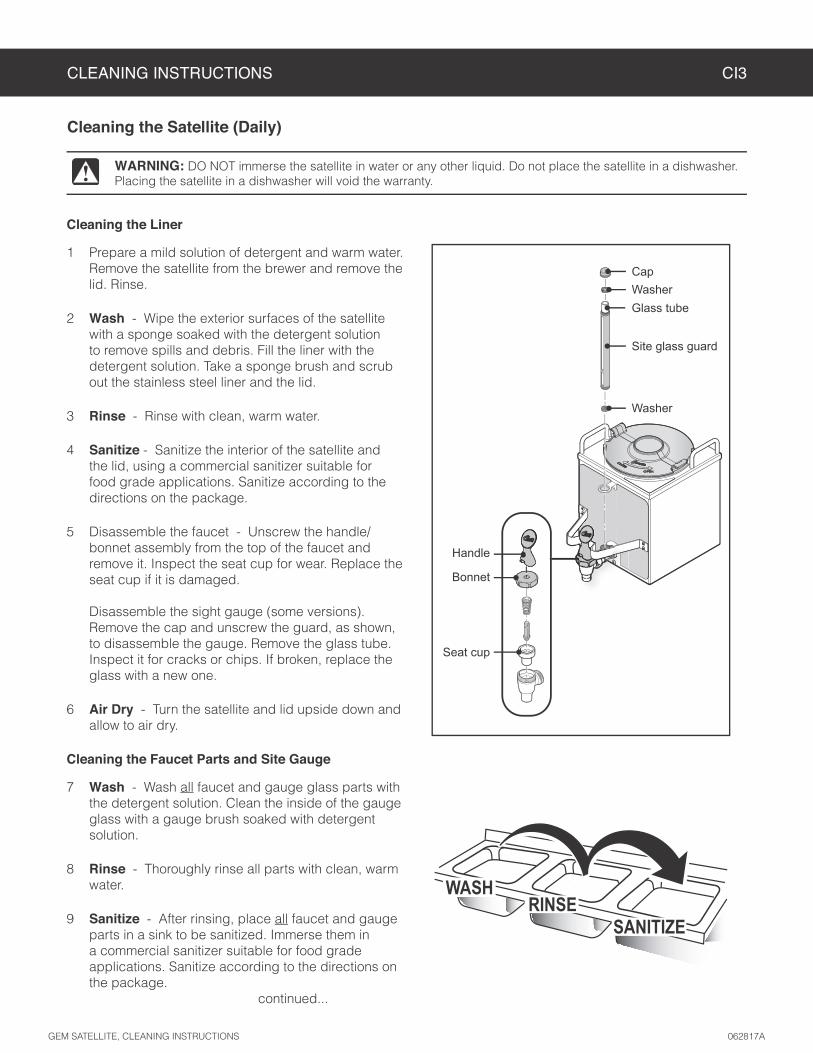
Cleaning the Satellite (Daily)
CLEANING INSTRUCTIONS CI3
GEM SATELLITE, CLEANING INSTRUCTIONS 062817A
WARNING: DO NOT immerse the satellite in water or any other liquid. Do not place the satellite in a dishwasher. Placing the satellite in a dishwasher will void the warranty.
Cleaning the Liner
1 Prepare a mild solution of detergent and warm water. Remove the satellite from the brewer and remove the lid. Rinse.
2 Wash - Wipe the exterior surfaces of the satellite with a sponge soaked with the detergent solution to remove spills and debris. Fill the liner with the detergent solution. Take a sponge brush and scrub out the stainless steel liner and the lid.
3 Rinse - Rinse with clean, warm water.
4 Sanitize - Sanitize the interior of the satellite and the lid, using a commercial sanitizer suitable for food grade applications. Sanitize according to the directions on the package.
5 Disassemble the faucet - Unscrew the handle/bonnet assembly from the top of the faucet and remove it. Inspect the seat cup for wear. Replace the seat cup if it is damaged. Disassemble the sight gauge (some versions). Remove the cap and unscrew the guard, as shown, to disassemble the gauge. Remove the glass tube. Inspect it for cracks or chips. If broken, replace the glass with a new one.
6 Air Dry - Turn the satellite and lid upside down and allow to air dry.
Cleaning the Faucet Parts and Site Gauge
7 Wash - Wash all faucet and gauge glass parts with the detergent solution. Clean the inside of the gauge glass with a gauge brush soaked with detergent solution.
8 Rinse - Thoroughly rinse all parts with clean, warm water.
9 Sanitize - After rinsing, place all faucet and gauge parts in a sink to be sanitized. Immerse them in a commercial sanitizer suitable for food grade applications. Sanitize according to the directions on the package. continued...
Seat cup
Handle
Bonnet
CapWasher
Washer
Glass tube
Site glass guard
WASH
SANITIZERINSE

CLEANING INSTRUCTIONS CI3
Cleaning the Faucet Parts and Site Gauge (cont.)
10 Air Dry - Allow all parts to thoroughly air dry.
11 Reassemble - When dry, reassemble the handle/bonnet. Hand tighten the handle/bonnet onto the top of the faucet assembly. Reinstall the site gauge (if applicable). If replacing a broken gauge glass, carefully remove any traces of glass from the silicone parts before inserting the new gauge glass tube. Reinstall the lid.

ROUGH-IN DRAWINGS RD75
GEM3IF - Satellite Server
GEM3IF, ROUGH-IN DRAWING 062317NC
13.48 in [34.2 cm]
10.28 in [26.1 cm]
9.98 in [25.3 cm]
11.72 in [29.8 cm]
11.48 in [29.2 cm]
0.27 in [0.7 cm]
8.94 in [22.7 cm]
8.94 in [22.7 cm]

ILLUSTRATED PARTS LIST IP123
GEM3IF, ILLUSTRATED PARTS/RECOMMENDED PARTS 040519C
1
2
4
5
6 19
20
10
12C
3
7
GEM3IF - Exploded View
A
8
1815
14
9
11A11B
17A17B
17C
21
12A12B
16A16B
13A13B13C
A
Orange, decaf handle
22

ILLUSTRATED PARTS LIST IP123
GEM3IF, ILLUSTRATED PARTS/RECOMMENDED PARTS 040519C
ITEM # PART # DESCRIPTION
1 WC-5622 LID, SATELLITE PLASTIC GEM-3
2 WC-2001 CAP, SHIELD W/VENT 77-4 GEN USE
3 WC-2005 WASHER, SHIELD CAP 1/8” GEM-3/TC’S W/SG
4 WC-2025 GLASS, GAUGE 8”
5 WC-2010C SHIELD, GAUGE GLASS 3/4”D.X 8”
6 WC-2006WASHER, .188 ID X .188 THK BOTTOM GAUGE GLASS GEN USE
7 WC-2102 GAUGE GLASS, ASSY 8”C
8 WC-39747 LABEL, SIDE GEM-3IF CURTIS LOG
9 WC-2007 BRACKET, GAUGE GLASS GEM-3
10 WC-6417 GUARD, FAUCET GEM-3
11A* WC-1901A-103SHANK ASSY, FAUCET W/SHIELD BASE O-RING STYLE
11B WC-1901A SHANK, FAUCET W/SHIELD BASE
12A WC-1800FAUCET,”S” SERIES BLK LOCKING 1-1/32-14 UNS CURTIS
12B WC-1800DFAUCET ASSY, ORANGE HANDLE 1-1 /32”-14 UNS CURTIS
12C WC-1800-CHFAUCET, “S” SERIES NONLOCKING 1-1/32-14 UNS CLASSIC
ITEM # PART # DESCRIPTION
1 WC-5622 LID, SATELLITE PLASTIC GEM-3
3 WC-2005 WASHER, SHIELD CAP 1/8” GEM-3/TC’S W/SG
4 WC-2025 GLASS, GAUGE 8”
6 WC-2006WASHER, .188 ID X .188 THK BOTTOM GAUGE GLASS GEN USE
12A WC-1800FAUCET,”S” SERIES BLK LOCKING 1-1/32-14 UNS CURTIS
GEM3IF - Recommended Parts to Stock
ITEM # PART # DESCRIPTION
13A* WC-981K KIT, INTELLIFRESH HEATR WC-981 GEM3IF
13B WC-982K KIT, INTELLIFRESH HEATR WC-982 GEM3IF30
13C WC-37543 KIT, INTELLIFRESH HEATER GEM3IF
14 WC-37544 KIT, LED SENSOR GEM3IF
15 WC-39746 LABEL, FRONT GEM3IF CURTIS LOGO
16A WC-736K KIT, CONTROL MODULE, UPM 120V GEM3IF
16B WC-739K KIT, CONTROL MODULE, UPM 220V GEM3IF30
17A WC-3705KIT, FAUCET S SERIES NONLOCK USE ON WC-1800
17B WC-3705DKIT, FAUCET S SERIES DECAF NON LOCK USE ON WC-1800D
17C WC-3705-101 KIT, FAUCET BONNET ASSY
18 WC-38151 LABEL, LOCK/UNLOCK GEM-3
19 WC-13426 WIRE ASSY, IF CONNECTOR GEM3IF
20 WC-61307 HOLDER, CONNECTOR FEMALE GEMTIF
21 WC-1805SEAT CUP, “S” FAUCET USE ON WC-1800/B/LB/D/DL/L/WC-1803
22 WC-32005ORG HANDLE, FAUCET STYLIZED ORG CURTIS
ITEM # PART # DESCRIPTION
14 WC-37544 KIT, LED SENSOR GEM3I
16A WC-736K KIT, CONTROL MODULE, UPM 120V GEM3IF
21 WC-1805SEAT CUP, “S” FAUCET USE ON WC-1800/B/LB/D/DL/L/WC-1803
GEM3IF - Main Chassis - Parts List
* For units built after 11/16/15

GEM3IF
ELECTRICAL SCHEMATICS ES29
1 120V HOT2 120V NEUTRAL
3 TANK TEMPERATURE SENSOR
4 TANK TEMPERATURE SENSOR5 HEATER/WARMER OUT
6 HEATER/WARMER OUT
7 LED (+)8 LED (-)
Pin Assignments
ModelVoltage
VAmps
AWa s
WHertz
Hz
# of Conductor
WiresPhase
110 0.55 60 50/60 2 1115 0.58 67 50/60 2 1120 0.60 71 50/60 2 1
GEM3IFx
ELECTRICAL RATING TABLE

GEM3IF-30
ELECTRICAL SCHEMATICS ES30

PRODUCT WARRANTY PW1
3 years, parts and labor, from original date of purchase on digital control boards21
CONDITIONS & EXCEPTIONS
• Adjustments and cleaning: The resetting of safety thermostats and circuit breakers, programming and temperature adjustments are the responsibility of the equipment owner. The owner is responsible for proper cleaning and regular maintenance of this equipment.
• Replacement of items subject to normal use and wear: This shall include, but is not limited to, spray heads, faucets, light bulbs, shear disks, “O” rings, gaskets, silicone tubing, silicone elbows, canister assemblies, whipper chambers and plates, mixing bowls, agitation assemblies and whipper propellers.
• Improper operation of equipment: The equipment must be used for its designed and intended purpose and function.• Improper installation of equipment: This equipment must be installed by a professional technician and must comply with all local elec-
trical, mechanical and plumbing codes.• Improper voltage: Equipment must be installed at the voltage stated on the serial plate supplied with this equipment.• Improper water supply: • Damaged in transit: Equipment damaged in transit is the responsibility of the freight company and a claim should be made with the carrier. • Abuse or neglect (including failure to periodically clean or remove lime accumulations): The manufacturer is not responsible for
variation in equipment operation due to excessive lime or local water conditions. The equipment must be maintained according to the manufacturer’s recommendations.
Repairs and/or Replacements
Return Merchandise Authorization (RMA):All returned equipment must be properly re-packaged in the
original carton and received by Curtis within 45 days following the issuance of a RMA.NO UNITS OR PARTS WILL BE ACCEPTED WITHOUT A RETURN MERCHANDISE AUTHORIZATION
(RMA). THE RMA NUMBER MUST BE MARKED ON THE CARTON OR SHIPPING LABEL. All warranty claims must be submitted within 60 days of service. Invoices will not be processed or accepted without a RMA number. Any defective parts must be returned in order for warranty invoices to be processed and approved.