electronic 4 spreadsheetncert.nic.in/ncerts/l/kect104.pdf · formulas in a sheet, ... a spreadsheet...
TRANSCRIPT

ELECTRONICSPREADSHEET
Introduction
After completing this Chapter, thestudent will be able to:
� create, save and open a sheet ina spreadsheet,
� enter data � text, numbers andformulas in a sheet,
� navigate within a sheet and alsobetween different sheets of aworkbook,
� insert and delete cells, rows andcolumns in a sheet,
� select, copy, paste and delete celldata within a worksheet,
� use various formulas and inbuiltfunctions provided in thespreadsheet,
� create error free sheets usingspecial tools like spell check andauto correct,
� setup the page and margins ofthe worksheets so as to print it ina paper of desired choice,
� format the data in the worksheetentirely or selectively,
� define and apply styles and
� enhance worksheets usingcharts.
4
In our daily life, we may have come across a list ofitems in tabular form several times. For example,the shopping bills, the school annual report card,or the cricket match scorecard. These tables withrows and columns are called spreadsheets. If wehave to tabulate and analyse the data for theIndian team�s performance in a cricket series andsubmit a project as part of our course evaluation,we will perhaps take a chart paper and design theproject, write a report and submit it. That�s theway we have done it all along. The project maycompletely cover all aspects of the series but weare not happy with it. This is because the projectreport is static � we cannot make dynamic analysisusing this paper report. How do we then getattention of our audience? Welcome to the worldof electronic spreadsheets, where we can do allthese, and much more. Let us see how.
Objectives �It�s a humongous time saver! I did [depreciationcalculations] with spreadsheets before, butbecause of tax laws changing so much, you haveto keep track of ACE (adjusted current earnings),AMT (alternative minimum tax) and four or fiveother methods of reporting. And updating wouldtake four or five hours. Now, with one button,the information just rolls over.�
Terry RogersConsultant, Datacentrik Solutions, Vancouver.
© NCERT
not to
be r
epubl
ished

4.1 A SPREADSHEET
A spreadsheet is defined as a large sheet which contains data andinformation arranged in rows and columns. There are different spreadsheetprograms available; some are proprietary, like Microsoft Excel, Lotus 123,etc., others are free/open source like, Gnome Office Spreadsheet Gnumeric,KOffice KSpread, OpenOffic.org Calc. Spreadsheets, also known asworksheets, allow us to perform detailed analysis on numerical data.Data is entered in a cell, which represents the intersection of a row and acolumn. The most powerful feature of a spreadsheet is that it automaticallyrecalculates the result of mathematical formulas if the source data changes.A spreadsheet can help us quickly record and manipulate a large amountof numerical information and share it with others in a wide variety offorms. Since MS-Excel, an integralcomponent of MS-Office, is one of theprograms which has all these featuresand many more we have taken it as aspreadsheet program.
4.2 STARTING ASPREADSHEETPROGRAM
To start follow the steps given below:
1. Click on button on the
Taskbar.2. Click on option in
the pop-up window.
3. Click on
A blank spreadsheet as shown in figure 4.1 is displayed.
4.3 BASIC SPREASDSHEET ELEMENTS
4.3.1 WORKBOOK AND WORKSHEET
Each speadsheet file is known as a workbook and is stored with a defaultextension of .xls. Each workbook can contain many sheets, so variouskinds of related information can be organised in a single file. Eachworkbook can contain up to 255 worksheets, but by default it displaysonly three. Worksheet is the area where the data is stored and work isperformed. Extra worksheets can be added as and when required.
4.3.2 ROWS, COLUMNS AND CELLS
The rows in a worksheet are numbered from top to bottom along theleft column of the worksheet. The columns are labeled from left toright with letters. The total number of rows in Excel are 65536 and the
Standard Toolbar Formatting
Active Cell
Active
Figure 4.1 : A blank spreadsheet
9797979797
Electronic Spreadsheet
Title bar
© NCERT
not to
be r
epubl
ished

9898989898
Computers and Communication Technology
9898989898
total number of columns are 256. Columns are named from A to IV.The rows are numbered from 1 to 65536.
A cell is the intersection of a row and a column. A cell is identifiedby an address that consists of the column name followed by the rownumber. For example, the first cell is referred to as A1, which indicatesthat it lies at the intersection of the column A and row 1. This is theactive cell. The active cell is ready for accepting any action or input. Asmall group of contiguous cells is defined as a range. The range isreferred to by writing the starting address of the cell in the range:Ending address of the cell in a range or vice versa. For example A1:A10(can also be referred as A10 : A1).
4.4 NAVIGATING IN A WORKSHEETThe cursor keys, mouse and the scroll bar can be used to navigatethrough the worksheet. However, navigating through the 65,536 rowsand 256 columns using these techniques is very inefficient. To move toany cell directly without scrolling through the entire worksheet, useany of the following shortcut methods:
Method 1 : Using key combinations
Movement Key Stroke
One cell up Up arrow key (!!!!!)
One cell down Down arrow key or ENTER (""""")
One cell left Left arrow key (#####)
One cell right Right arrow key or TAB ($$$$$)
Top of the worksheet CTRL + HOME(cell A1)
End of the worksheet CTRL + END(last cell containing data)
End of the row CTRL + right arrow key or END +right arrow key
End of the column CTRL + down arrow key or END +down arrow key
Method 2 : Using the name box
1. Type the cell address in the Name Box2. Press ENTER to reach the desired cell.
For example, to move to cell D6, enter D6 in the Name Box and pressENTER. The cursor is positioned on the cell in the D column and 6th row.
Method 3 : Using the go to dialog box
1. Press F5 or CTRL + G or choose Go To option from the Edit menu to
© NCERT
not to
be r
epubl
ished
9999999999
Electronic Spreadsheet
Icon Movement
%| To display the first worksheet
&| To display the last worksheet
% To display adjacent worksheets on the left
& To display adjacent worksheets on the right
invoke the Go To dialog box.2. Enter the cell coordinates in the Reference textbox.3. Click OK to move to the desired cell.
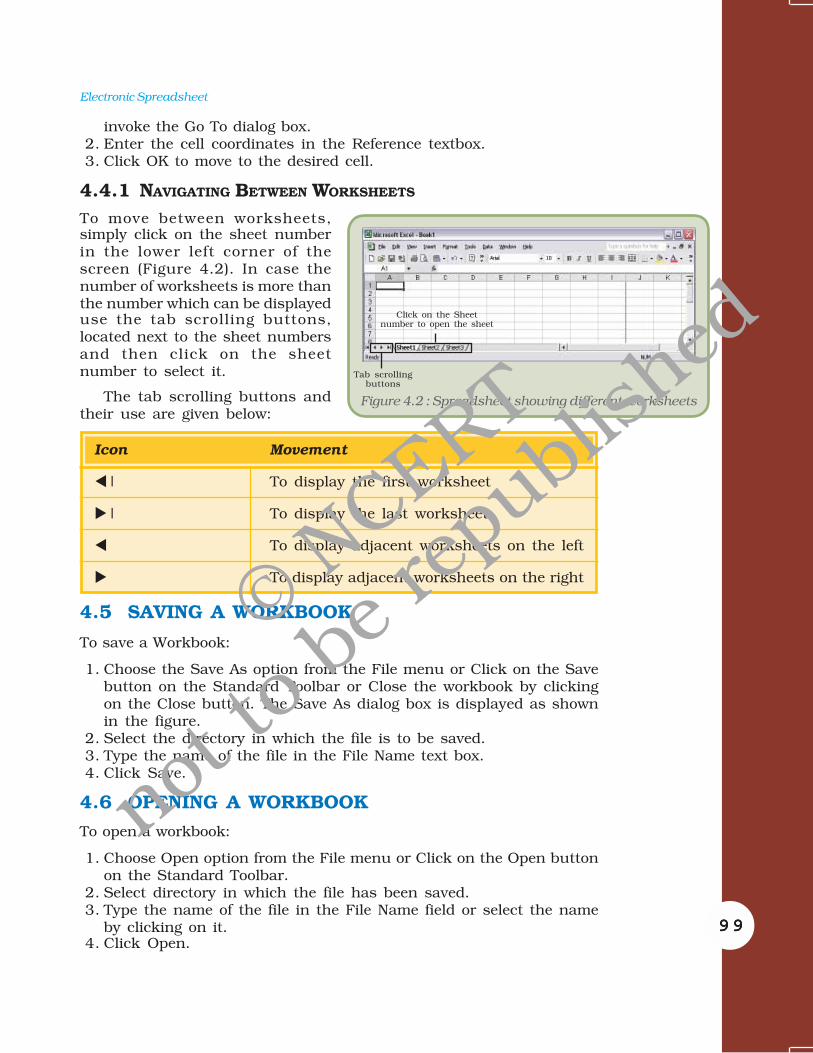
4.4.1 NAVIGATING BETWEEN WORKSHEETS
To move between worksheets,simply click on the sheet numberin the lower left corner of thescreen (Figure 4.2). In case thenumber of worksheets is more thanthe number which can be displayeduse the tab scrolling buttons,located next to the sheet numbersand then click on the sheetnumber to select it.
The tab scrolling buttons andtheir use are given below:
4.5 SAVING A WORKBOOK
To save a Workbook:
1. Choose the Save As option from the File menu or Click on the Savebutton on the Standard Toolbar or Close the workbook by clickingon the Close button. The Save As dialog box is displayed as shownin the figure.
2. Select the directory in which the file is to be saved.3. Type the name of the file in the File Name text box.4. Click Save.
4.6 OPENING A WORKBOOK
To open a workbook:
1. Choose Open option from the File menu or Click on the Open buttonon the Standard Toolbar.
2. Select directory in which the file has been saved.3. Type the name of the file in the File Name field or select the name
by clicking on it.4. Click Open.
Click on the Sheetnumber to open the sheet
Tab scrollingbuttons
Figure 4.2 : Spreadsheet showing different worksheets
© NCERT
not to
be r
epubl
ished

100100100100100
Computers and Communication Technology
100100100100100
Place the cursor in cell A3and look at the Formula bar.
Figure 4.4 : Working with Math Function
4.7 USING FORMULAS AND FUNCTIONS
Formulas are entries containing an equation that calculates the valueto be displayed. Please remember, when working with formulas, do nottype in the numbers but type in the equation. This equation will beautomatically updated upon the change or entry of any data that isreferenced in the equation.
4.7.1 ENTERING FORMULAS
Cells in a worksheet can also contain formulas that are helpful inperforming calculations. Formulas are mathematical equations. Theyare useful for establishing the relationship between two or more cells.
They contain the coordinates of thecells that are used in the formula,operators and functions. When aformula is entered, the celldisplays the result of the formula.Formulas must begin with an =sign, otherwise it is treated as atext entry (Figure 4.3).
Value displayed in the cell
Figure 4.3 : Using formula in a Spreadsheet
Whenever any cell value ischanged it automaticallyrecalculates the values of anyformula and displays it in therelevant cell.
mathematical functions built intothem. The most basic operationsused widely are addition,subtraction, multiplication anddivision. Follow the given steps toperform addition.
1. Move the cursor to cell A1.Type 1.
2. Press Enter to move to cell A2.Type 1 in cell A2.
3. Press Enter to move to cell A3.4. Type =A1+A2 in cell A3.
Note that the contents of cellA1 and A2 have been added andthe result is shown in cell A3(Figure 4.4).
Using Arithmetic Operators
When a number is entered into a cell, it is possible to performmathematical calculations using them. Spreadsheets have many© N
CERT
not to
be r
epubl
ished

101101101101101
Electronic Spreadsheet
The same steps can be followed to perform other mathematicaloperations by simply changing the formula typed into cell A3.
Using Auto Sum
The addition of numbers is one of the most frequently used actions.Thus, a toolbar button, AutoSum, has been provided to accomplishthis task. The AutoSum button on the Standard toolbar automaticallyadds the values above the destination cell or to the left of the destinationcell. The steps to illustrate this are as follows:
1. Click on the destination cell i.e. the cell in which the result is to bedisplayed.
2. Click on the AutoSum button, which is located on the Standardtoolbar. The cells containing the numbers to be added automaticallyshould now be highlighted.
3. Press Enter to see the result in the destination cell.
4.7.2 FUNCTIONS
This has a set of prewritten formulas called functions. Functions arespecial programs that accept data and return a value after processingthe data. Functions differ from regular formulas because they acceptvalues and not the operators, such as +, -, *, or /. For example, theSUM function can be used to add numbers in place of the �+� operator.When using a function, remember the following :
� Use an equal to sign (=) to begin a formula.� Specify the function name.� Enclose arguments (data accepted by a function) within parentheses.� Use a comma to separate arguments.
Some commonly used Functions are listed in Table representingsome commonly used Functions (Appendix 4.1)
4.7.3 COPYING AND PASTING FORMULAS AND FUNCTIONS
Sometimes when working with formulas, the need arises to repeat thesame formula for many different cells. The formulas can be copiedusing various methods.
Method 1 : Using the Edit menu
Steps are given below:
1. Click on the cell that contains the formula.2. Choose the Copy option from the Edit menu.3. Click on the cell where the formula is to be copied.4. Choose the Paste option from the Edit menu. Note the change in
the cell reference.5. Press Esc to exit the Copy mode.
© NCERT
not to
be r
epubl
ished

102102102102102
Computers and Communication Technology
102102102102102
Method 2 : Using the Formatting Toolbar / Keyboard Shortcuts
Steps are given below :
1. Click on the cell that contains the formula.
2. Click on the Copy icon located on the Formatting toolbar orpress Ctrl + C keys.
3. Click on the cell where the formula is to be copied.
4. Click on the Paste icon located on the Formatting toolbar or
press Ctrl + V keys.
5. Press Esc to exit the Copy mode.
If a formula needs to be copied to multiple cells, use the AutoFillfeature discussed later in the lesson.
4.7.4 CELL REFERENCING
Observe that when you copy and paste formulas, they are pasted relativeto the position they are copied from. This is because of the way theformula treats the cell references. The cell coordinates in the formulaare known as cell references. Two commonly used cell references are �Absolute and Relative.
Absolute Referencing
Absolute referencing implies that the coordinates of a cell are notchanged when a formula is copied from one cell to another. To make acell address an absolute cell address place a dollar sign in front ofboth the row and column identifiers. For example, $A$1 implies thatboth row and column have been fixed or made absolute. In simplewords this means that while copying this formula to another cell,neither the column name nor the row number will change.
Relative Referencing
With relative cell referencing, when we copy a formula from one areaof the worksheet to another, it records the position of the cell relativeto the cell that originally contained the formula. This is the defaultmode of referencing in a spreadsheet.
The F4 key is used to toggle between the absolute and relativemodes of referencing cells.
4.8 WORKING WITH WORKSHEET RANGES
Each cell is referred to by a cell address. A group of cells are referencedusing a reference operator. There are two types of reference operators,range and union.
© NCERT
not to
be r
epubl
ished

103103103103103
Electronic Spreadsheet
� A range reference refers to allthe cells between and includingthe reference (Figure 4.5). Arange reference consists of twocell addresses separated by acolon. The range referenceB1:B4 includes cells B1, B2, B3and B4. The range referenceA1:B3 includes A1, A2, A3, B1,B2 and B3.
� A union reference includes twoor more references. A unionreference consists of two ormore cell addresses separated by a comma. For example, thereference A1, B5, C7 refers to cells A1, B5, and C7. Similarly, thereference A1:A3,B4:B6 refers to cells A1, A2, A3, B4, B5 and B6.
4.8.1 USING RANGE NAMES IN FORMULAS
When working with large volumes of data in a worksheet, it is frequentlydesirable to refer to a range of cells repeatedly. For example, if a columnin the worksheet contains the price of products, it will be requiredagain and again for calculating the total price of all products orcalculating the average price and so on. In such a case, it is convenientand efficient to name this range meaningfully and use the name of therange instead of the cell coordinates. Naming a range of cells has thefollowing advantages:
� Names are easier to remember than cell coordinates.� Names make navigation in a worksheet easier.� Named ranges can be used throughout a workbook easily. This is
very helpful while linkingworksheets in a workbook.
4.8.2 CREATING RANGE
NAMES
Steps to create a named range are:
1. Select the cell or range of cellsto be named.
2. Choose the Name option fromthe Insert menu.
3. Choose the Define option fromthe Name sub-menu. The DefineName dialog box is displayed asin figure 4.6.
4. Type in the name of the range inthe Names in a workbook text box.
Figure 4.5 : Worksheet Range
Type the nameof the Range
The Rangereference
Figure 4.6 : To create Range Name from Name Optionof the Insert Menu
© NCERT
not to
be r
epubl
ished

104104104104104
Computers and Communication Technology
104104104104104
Figure 4.8 : Inserting a column
Blank
5. Click on the Add button to create the name. The name isimmediately added to the existing names in the box.
6. Click on the OK button to close the dialog box.
4.8.3 USING RANGE NAMES
Simply type the name in the formula in place of the cell coordinates.For example, to find the maximum of a range of marks named Maths,the formula will be =MAX(Maths).
4.9 WORKING WITH ROWS AND COLUMNS
Figure 4.7 : Inserting a row
To add extra information to aworksheet, it may sometimes bedesirable to insert new rows andcolumns. To insert a new row/column, execute the following steps:
4.9.1 INSERTING A ROW
1. Click on the Row Number (or anycell in that row) above whichthe new row is to be added.
2. Choose the Rows option fromthe Insert menu. A row isinserted above the selected row(Figure 4.7).
3. Click any where in thespreadsheet to remove theselection.
4.9.2 INSERTING A COLUMN
1. Click on the Column name (orany cell in that column).
2. Choose the Columns option fromthe Insert menu. A column isinserted to the left of theselected column (Figure 4.8).
3. Click anywhere in thespreadsheet to remove theselection.
4.9.3 DELETING ROWS AND
COLUMNS
When the contents of an entire row
or column are to be deleted, perform the following steps:
1. Click on the Row Number/Column Name to be deleted.
© NCERT
not to
be r
epubl
ished

105105105105105
Electronic Spreadsheet
2. Choose the Delete option from the Edit menu or right click andselect Delete option from the pop-up menus.
3. Click anywhere in the spreadsheet to remove the selection.
4.9.4 INSERTING AND DELETING CELLS
We can insert or delete individual cells also, rather than the entirerow or column.
Inserting a Cell
1. Click on the cell where new cell(s) is to be inserted.2. Choose the Cells option from the Insert menu.
The Insert dialog box is displayed (Figure 4.9).3. Choose the appropriate option. The result of
each option is explained as under:
(a) Shift cells right � adds a blank cell to theleft of the selected cell.
(b) Shift cells down � adds a blank cell abovethe selected cell.
(c) Entire row � adds a new row above theselected cell.
(d) Entire column � adds a new column to theleft of the selected cell.
4. Click on OK button.
Deleting a Cell
1. Click on the cell which is to be deleted.2. Choose the Delete option from the Edit menu.
The Delete dialog box is displayed as shownin figure 4.10.
3. Choose the appropriate option. The result ofeach option is explained as under:
(a) Shift cells left � the cells to the right ofthe deleted cell are moved left.
(b) Shift cells up � the cells below the deletedcell are moved up.
(c) Entire row � deletes the entire row andmoves the row below upwards.
(d) Entire column � deletes the entire columnand moves the row to the right leftwards.
4. Click on OK button.
Figure 4.9 : Insert dialog box
Fiugre 4.10 : Delete dialog box
Note: If there is any data at the extreme right or at the end of the worksheet, itdoes not allow us to insert cells or rows. This is because, it does not deleteexisting contents from the worksheet while inserting cells. For example, if thereis data in row number 16,384, then inserting a row will result in an error.
© NCERT
not to
be r
epubl
ished

106106106106106
Computers and Communication Technology
106106106106106
Figure 4.11 : Clear data using Edit Menu
4.9.5 CLEARING DATA
To delete an entry in a cell or a group of cells, place the cursor in thecell or highlight the group of cells and press the Delete key. Note that
this method only clears the cell contents andnot the cell formats or comments.
Alternatively, use the Edit menu that allowsan option of what to delete.
Steps for clearing data using Edit menu areas under:
1. Click on the cell or select the cell range whosecontents are to be deleted.
2. Choose the Clear option from the Edit menu.3. Choose the relevant option from the Clear
sub-menu.
The Clear sub-menu offers four choices(Figure 4.11) explained as below:
� All � to delete all formats, contents andcomments.
� Formats � to delete formats only.� Contents � to delete contents only.� Comments � to delete comments only.
4.10 SELECTING CELLS
To perform a function on any particular cell or a group of cells, the cellor cells need to be first selected. Selecting a single cell is as simple asclicking on it.
4.10.1 SELECT A ROW
To select an entire row, click on the row number to be selected on theleft hand side of the spreadsheet.
4.10.2 SELECT A COLUMN
To select an entire column, click on the column label at the top of thespreadsheet.
4.10.3 SELECT ALL CELLS IN A WORKSHEET
Click on the empty grey box in the left corner between A and 1. Thisarea is called the Select All button.
4.10.4 TO SELECT A CONTIGUOUS GROUP OF CELLS
To select adjacent cells, use any of the following methods.
© NCERT
not to
be r
epubl
ished
107107107107107
Electronic Spreadsheet
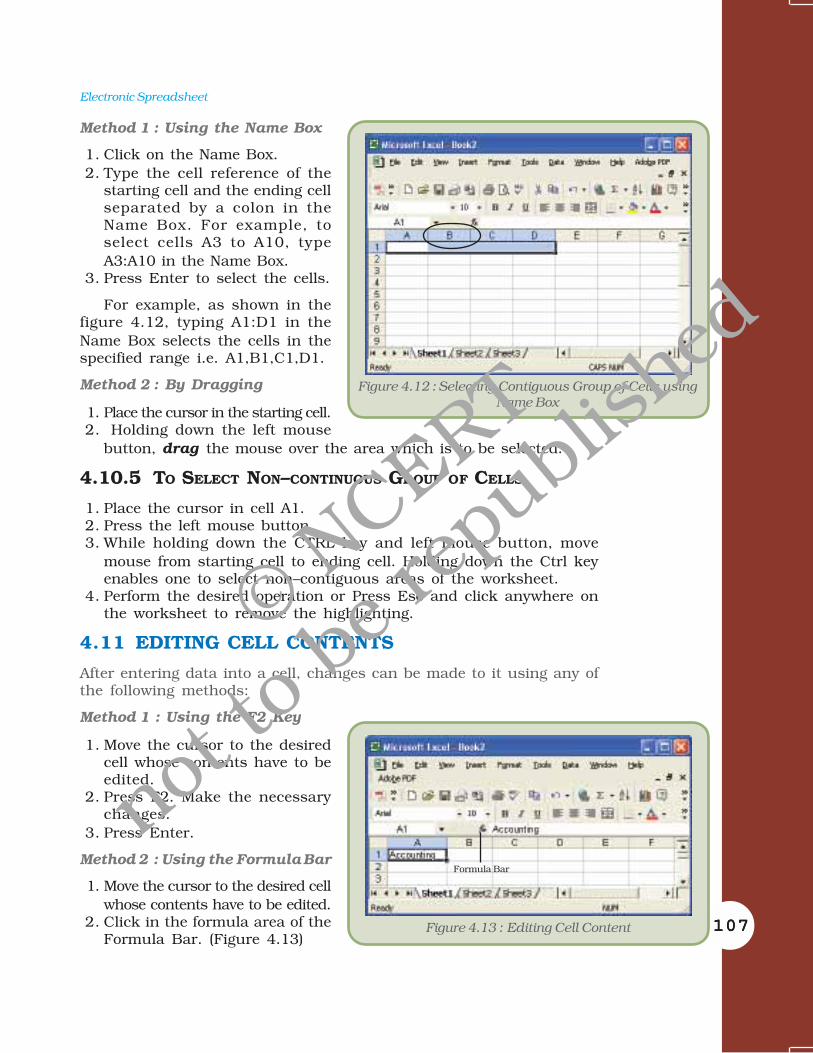
Figure 4.12 : Selecting Contiguous Group of Cells usingName Box
Method 1 : Using the Name Box
1. Click on the Name Box.2. Type the cell reference of the
starting cell and the ending cellseparated by a colon in theName Box. For example, toselect cells A3 to A10, typeA3:A10 in the Name Box.
3. Press Enter to select the cells.
For example, as shown in thefigure 4.12, typing A1:D1 in theName Box selects the cells in thespecified range i.e. A1,B1,C1,D1.
Method 2 : By Dragging
1. Place the cursor in the starting cell.2. Holding down the left mouse
button, drag the mouse over the area which is to be selected.
4.10.5 TO SELECT NON�CONTINUOUS GROUP OF CELLS
1. Place the cursor in cell A1.2. Press the left mouse button.3. While holding down the CTRL key and left mouse button, move
mouse from starting cell to ending cell. Holding down the Ctrl keyenables one to select non�contiguous areas of the worksheet.
4. Perform the desired operation or Press Esc and click anywhere onthe worksheet to remove the highlighting.
4.11 EDITING CELL CONTENTS
After entering data into a cell, changes can be made to it using any ofthe following methods:
Method 1 : Using the F2 Key
1. Move the cursor to the desiredcell whose contents have to beedited.
2. Press F2. Make the necessarychanges.
3. Press Enter.
Method 2 : Using the Formula Bar
1. Move the cursor to the desired cellwhose contents have to be edited.
2. Click in the formula area of theFormula Bar. (Figure 4.13)
Figure 4.13 : Editing Cell Content
Formula Bar
© NCERT
not to
be r
epubl
ished

108108108108108
Computers and Communication Technology
108108108108108
Icon Effect
Left aligns the selected text
Centers the selected text
Right aligns the selected text
3. Make the necessary changes.4. Press Enter.
Method 3 : Double-click in the Cell
1. Move the cursor to the desired cell whose contents have to be edited.2. Double-click in the cell.3. Make the necessary changes.4. Press Enter.
4.12 FORMATTING WORKSHEETS
4.12.1 ALIGNING CELL CONTENT
By default, text entries are left aligned and formulas and numbers arealso left aligned. These alignments can be changed. Apart from theLeft, Right and Center alignment options, the entries can be alignedvertically also. There are two methods for changing the horizontal cellalignment as explained below.
Method 1 : Using the Menu
1. Click on the cell to be aligned.2. Choose the Cell option from the Format menu. The Format cells
dialog box appears.3. Choose the alignment tab.4. Click to open the drop-down box associated with the horizontal
field. After the drop-down box is opened, select the desired alignmentas Right, Left or Center.
5. Click OK to close the dialog box.
Method 2 : Using the Format Toolbar
1. Click on the cell to be aligned.2. Click on the appropriate alignment button in the Format toolbar to
change the alignment.
To change the vertical alignment select the desired alignment asCenter or Bottom from the Vertical drop-down box in the Format Cellsdialog box displayed above.
Note : To make the line of data fit evenly within the height of a cell,choose the justify option.
© NCERT
not to
be r
epubl
ished

109109109109109
Electronic Spreadsheet
4.12.2 CHANGING COLUMN WIDTH
There are two methods to change the column width.
Method 1 : Using the Menu Bar
1. Place the cursor anywhere in the column whose width is to bechanged.
2. Choose the Column option from the Format menu. A dialog boxopens.
3. Type in the required Column width in the dialog box andclick on OK.
Method 2 : By Dragging
1. Place the cursor on the line between the B and C column headings.The cursor with two arrows appears.
2. Move the mouse to the right while holding down the left mousebutton. The width indicator appears on the screen.
3. Release the left mouse button when the width indicator shows thedesired width.
4.12.3 CHANGING ROW HEIGHT
There are two methods to change the row height.
Method 1 : Using the Menubar
1. Place the cursor anywhere in the row whose height is to be changed.2. Choose the Row option from the Format menu. A dialog box opens.3. Type in the required Row Height in the dialog box and click on OK.
Method 2 : By Dragging
1. Place the cursor on the line between the 1 and 2 row headings. Thecursor should look like the one displayed above, with two arrows.
2. Move the mouse downwards or upwards while holding down the leftmouse button. The height indicator appears on the screen.
3. Release the left mouse button when the height indicator shows thedesired height.
4.12.4 CHANGING FONT ATTRIBUTES
The Font style, size and colour can be easily changed in aspreadsheet to dress it up a little. To set the Font properties performthe following steps.
1. Click on the cell whose font properties are to be changed.2. Choose the Cell option from the Format menu. The Format cells
dialog box appears.3. Choose the Font tab.4. Change the Font type, style, size and colour using the appropriate options.5. Click on OK.
© NCERT
not to
be r
epubl
ished

110110110110110
Computers and Communication Technology
110110110110110
Alternatively use the formatting tools available on the Formattingtool bar for changing the type, size and colour of the text.
4.12.5 MAKING FORMAT CHANGES
Auto Formatting Worksheets
The Auto Format is a tool for creating pleasing worksheets with variousformats quickly and easily. To Auto format a worksheet, follow thegiven steps:
1. Choose the Auto Format option from the Format menu.2. Select the format to apply.3. Click on OK.
Figure 4.14 : Style option dialog box
Modifying Styles
The worksheet allows users tocreate, store and use individualformatting styles. A style can bedefined as a collection of formatssuch as font size, patterns, andalignment that can be defined andsaved as a group. To add or modifystyles perform the following steps :
1. Choose Style option from theFormat menu.
2. In the Style name box, type aname for a new style (Figure 4.14).
3. To change formats for an existing style, click the style you want to change.4. Click Modify.5. On any of the tabs in the dialog box, select the formats you want,
and then click OK.6. Clear the check box for any type of formats that are not to be included
in the style.7. To define and apply the style to the selected cells, click OK.8. To define the style without applying it, click Add, and then click Close.
Additional Formatting Options
Special Cell Borders
Another formatting feature, which can improve the readability of aspreadsheet, is to add borders around cells. This is especially useful ifspreadsheet needs to be printed, because, by default, the light greycell gridlines don�t appear when a spreadsheet document is printed.
To set borders, the steps are:
1. First select the cells on which you want to put borders.
© NCERT
not to
be r
epubl
ished

111111111111111
Electronic Spreadsheet
2. Then click the Borders button on the toolbar at thetop of the screen .
3. Select a border style from the options that aredisplayed in figure 4.15. In the example below, the AllBorders options is selected � this places a single linearound all sides of all of the selected cells.
It is also possible to give different borders on differentsides of a cell or have coloured borders around cells. Usethe Draw borders option for this purpose. For this, followthe given steps:
1. Click on the down arrow next to the borders
button on the formatting Toolbar.2. Select the Draw Borders option
from the drop-down menu. TheBorders toolbar is displayed asshown in figure 4.16.
3. Choose the colour of the borderand the type of the border anddraw borders or grids.
Special Cell Shades
Cells can be filled with variouscolours or shading effects. Forachieving this, use the Patterns tabof the Format cells menu. The stepsto be followed are given below:
1. Select the cells to which cellshading is to be applied.
2. Choose the Cells option fromthe Format menu.
3. Click on the Patterns tab.4. Choose the desired colour and/
or pattern from the available list.5. Click on OK.
Protecting Cells
It allows us to set Protection options to prevent editing (or even viewing)of all or parts of a workbook. This can be very useful while sharing aspreadsheet with others or even to prevent accidental altering of labelsand formulas once they are all completed.
It is necessary to set an option to unlock cells that may still requirechange after a worksheet is protected. By default every cell has itsLocked property set to true. For unlocking cells :
1. Select the block of cells to be unlocked.
Figure 4.15 : Choose BorderOptions
Figure 4.16 : Draw Border Options
Click to chooseborder type
Click to chooseborder colour
Click to togglebetween drawingborders and grids
Figure 4.17 : Format cell window for protecting cells
© NCERT
not to
be r
epubl
ished

112112112112112
Computers and Communication Technology
112112112112112 Figure 4.20 : Applying different colours to different sheets using Format Tab Color
2. Choose the Cells option from the Format menu.The Format Cells window appears as shown infigure 4.18.
3. Click on the Protection tab.4. Click in the box next to Locked to remove the check
mark.5. Click OK. The Locked property for these cells is
now disabled.
Conditional Formatting
This feature allows the user to apply formats to cellsthat satisfy a predefined criterion. To applyconditional formatting, perform the following steps:
1. Choose Conditional Formatting option from theFormat menu.
2. In the Conditional Formatting dialog box(Figure 4.19) specify criteria using the various options.
Figure 4.18: Protect sheetdialog box
Figure 4.19 : Conditional formatting dialog box
3. Click Format.4. Select the font styles, borders,
shading and other options to beapplied.
5. Click OK to apply the formatsto cells that meet the specifiedcriterion.
Tab Colours
To separate out worksheets fromone another, it is possible to givedifferent colours to the name of theworksheets at the bottom left
corner. The steps to be followed for achieving this are:
© NCERT
not to
be r
epubl
ished

113113113113113
Electronic Spreadsheet
1. Click on the Sheet name.2. Right click and in the pop up box choose the Tab Color option.3. Select the desired colour from the Format Tab Color Dialog Box as
shown in figure 4.20.4. Click on OK to see the effect.
4.12.6 USING CHARTS
Charts are an excellent tool to present data in a worksheet in a visuallyappealing format which aids in analysing and comparing data. TheChart Wizard button guides through the steps for creating anembedded chart. The steps are as follows:
1. Highlight all the cells that need to be included in the chartincluding headers.
2. Choose the Chart option from the Insert menu.3. Choose the suitable Chart type from any of the available types. We
will select Column. There are various types available like Pie Chart,Bar Chart, Line Chart, etc.
4. In the Chart Sub-type box, choose the Clustered Column icon toselect the chart sub-type.
5. Click Next.6. The next step displays the address of the cell range selected for
preparing the chart. If the need arises, this range can be changedby clicking on the collapse dialog box.
7. Click Next.8. To place the Subject data on the x-axis, select the Rows radio button.9. Click Next.
10. Type Class XI Performance in the Chart Title textbox.11. Type Subjects in the Category (X) Axis field. Subjects will appear
as the x-axis title.12. Type Marks in the Value (Y) Axis field. Marks will appear as the y-axis title.13. Choose the Data Table tab.14. Select Show Data Table if required.15. Click Next.16. Choose the As Object in Sheet1 option to make the chart an embedded
object and part of the current worksheet. In case we need it on a newsheet, then we may choose the option As New Sheet.
17.Click Finish.
Activity
Let us explore it by ourselves creating a worksheet and using different Chart Options.
4.12.7 USING SPECIAL TOOLS
Spell Checking
The Spell Check feature of spreadsheet is same as that for WordProcessing which we used in the previous chapter.
© NCERT
not to
be r
epubl
ished

114114114114114
Computers and Communication Technology
114114114114114
Figure 4.22 : Find and Replace Dialog Box
Click Here
1. Select the range of cells to be checked.
2. Click on Spelling button on the Standard Toolbar.3. On locating an error, make changes accordingly.
AutoCorrect Worksheets
The AutoCorrect feature cancorrect common typing errorsduring working. For example, it canchange �adn� to �and� and change�their is� to �there is.� Thecommonly misspelt words can beadded as an AutoCorrect entry(Figure 4.21). The commonmisspelling is then automaticallycorrected.
4.12.8 FINDING AND
REPLACING DATA
This feature is useful in findingand replacing multiple occurrencesof a value in the worksheet quicklyand efficiently. The steps involvedare as given below:
Specify thecommonlymisspelled words,Click on Add andthen OK
Figure 4.21: AutoCorrect Dialog Box
1. Click on the cell whose valueis to be found and replaced.
2. Choose the Replace option fromthe Edit menu. The Find &Replace menu box opens(Figure 4.22).
3. Enter the text to be found inthe Find What textbox.
4. Enter the text to be replacedwith in the Replace With textbox.
5. Click on the Replace All buttonand then Click on OK whenprompted.
6. Click on Close to come out ofthe dialog box.
4.12.9 USING AUTOFILL
Excel contains a feature called AutoFill, which copies a logical seriesof values, labels or formulas. The AutoFill handle, which is like the �+�mathematical operator, can be located at the bottom right corner ofthe active cell.
To fill series perform the following steps:
© NCERT
not to
be r
epubl
ished

115115115115115
Electronic Spreadsheet
Dragging the fill handle across five cells
Figure 4.23 : Using AutoFill option
Note : Advanced options on creating such auto-fill series areavailable with the menu command Edit > Fill > Series.
1. Click on the first cell and type in �01-May�.2. Click on the cell again and then position the mouse in the bottom
right of the cell so that the cursor turns to a small black plus sign,as shown below.
3. With the cursor, click, hold and drag the mouse down.4. It automatically copies the date and increments by one day for
each cell going down, giving the series 1-May, 2-May, ... , 10-May.It keeps showing exactly which day is being filled. Release the mousewhen the desired date is reached (Figure 4.23).
4.12.10 ADDING COMMENTS
Cell comments are additionalexplanatory notes which can beattached to a cell in a spreadsheet.
Cell comments are indicated bythe small red triangle in the upperright corner of the cell. To viewthe comment, rest the pointer over the cell. A text box will appear, asshown in the figure 4.24.
To add a comment to a cell follow the given steps:
1. Click on the cell to which the comment is to be added.2. Choose Comment from the Insert menu.3. In the box, type the comment text.4. Once the comment is typed, click outside the comment box. The
comment disappears but a small red triangle appears at the topright corner of the cell.
To edit an existing cell comment, follow the given steps:
1. Click on the cell with the comment we want to edit.2. On the Insert menu, click Edit Comment.3. Edit the comment and click outside the comment box.
Figure 4.24 : Adding Comments
© NCERT
not to
be r
epubl
ished

116116116116116
Computers and Communication Technology
116116116116116 Figure 4.26 : Setting Margins
4.13 PRINTING A WORKSHEET/WORKBOOK
The simplest way to print a workbook is to click the Print icon locatedon the Standard toolbar. Dotted lines will appear on the screen afterclicking on the print icon. These dotted lines indicate the right, left,top, and bottom edges of the printed pages. Before the printing can bedone, it offers a variety of options to customise the printing accordingto specific needs.
4.13.1 PRINT PREVIEW
There are many print options. AllOffice packages offer a facility ofpreviewing a worksheet before itis actually printed in order tocustomise the print according toone�s specific requirements. Printoptions can be selected using thePage Setup dialog box or in thePrint Preview. In Print Preview, itis possible to see the results ofselections onscreen.
Figure 4.25 : Preparing a worksheet for printing
4.13.2 PRINT A SPREADSHEET
To print a spreadsheet:
1. Choose Print Preview optionfrom the File menu or click onthe Print icon in the Standardtoolbar.
2. Click Setup.3. Choose the Page tab (Figure 4.25).4. Choose Portrait or Landscape.5. In the Adjust To field, type 100%
to set the size to 100%.6. Choose the Margin tab.7. Check the Horizontally box in
the Center On Page frame toc en t e r t h e spreadshee thorizontally.
8. Click OK.9. Click Print. The Print dialog box
opens.10. Click OK to print the file.
© NCERT
not to
be r
epubl
ished
117117117117117
Electronic Spreadsheet
Summary
� A spreadsheet, also known as a worksheet, is a row and column arrangement of dataand the formulas to manipulate the data.
� A spreadsheet can be used for a variety of applications like business forecasts, inventorycontrol and accounting.
� Every Excel file is a workbook that can contain more than one worksheet.
� Cell is defined as the space where a specified row and a column intersect.
� Worksheets can contain labels, numbers or formulas.
� Worksheet allows selecting both contiguous and non-contiguous cells.
� A range is a group of cells referenced with a name. The range reference consists of thefirst and last cell addresses separated by a colon.
� The AutoSum button on the Standard toolbar adds numbers automatically and alsosuggests the range of numbers to be added.
� Formulas and functions are automatically updated with a change in the source cell orposition of the formula.
� In Relative referencing, the reference is adjusted relative to the new location of the formula.
� In Absolute referencing, the cell reference does not change but remains fixed while pastingformulas.
� Functions are pre-written formulas which must begin with an �=� sign.
� Cell ranges can be named and used in place of cell references.
� The AutoFill handle is a very useful tool to fill in logical series.
� Cell comments are additional explanatory notes which can be attached to a cell in aspreadsheet.
� Charts are an excellent tool to present data graphically and also help in analysing andcomparing data.
� The most powerful feature of a spreadsheet package is the �What-if analysis�. Using thisfeature, we can change values and immediately see the effect as the entire worksheet isautomatically updated, based on the change in the values.
EXERCISE
SHORT ANSWER TYPE QUESTIONS
1. Define spreadsheet. Name any two spreadsheet software.
2. How many rows and columns are there in MS Excel?
3. How can you write a formula in Excel? Write a valid formula.
4. What is the shortcut to print current time in a cell?
© NCERT
not to
be r
epubl
ished

118118118118118
Computers and Communication Technology
118118118118118
5. Create a table to summarise the alignments of different types of datatype.
6. What is the use of auto correct option?
7. What is the use of print preview feature?
8. What is the use of auto sum feature?
9. How many function categories and functions are there in Excel? What do youunderstand by automatic recalculation feature of a spreadsheet?
10. Differentiate between relative and absolute cell referencing with the help ofsuitable examples.
11. Explain the uses of any two inbuilt mathematical functions in Excel.
12. Differentiate between the COUNT( ) and COUNTA( ) functions of Excel.
13. What is the function of the auto fill handle in Excel?
LONG ANSWER TYPE QUESTIONS
1. What do you mean by conditional formatting? Explain.
2. Explain any five types of charts in Excel.
MULTIPLE CHOICE QUESTIONS
1. A range refers to a of cells.(i) Row(ii) Column(iii) Group of contiguous cells(iv) Group of non-contiguous cells
2. In referencing, the cell reference does not change while copyingformulas.(i) Relative referencing(ii) Absolute referencing(iii) Mixed referencing(iv) None of the above
3. Which of the following function keys is used as a toggle key for changingreferencing modes?(i) F2(ii) F8(iii) F4(iv) F6
4. Which one of the following is the default folder for saving the files?(i) c:\(ii) d:\(iii) my documents(iv) new folder
5. A valid formula in Excel begins with:(i) +(ii) �(iii) #(iv) =
© NCERT
not to
be r
epubl
ished

119119119119119
Electronic Spreadsheet
6. How many sheets are there in a workbook by default:(i) 1(ii) 2(iii) 3(iv) 4
7. Which function key is used to edit cell contents:(i) F1(ii) F2(iii) F3(iv) F4
8. Height of a row in Excel is:(i) 12(ii) 12.25(iii) 12.50(iv) 12.75.
Activities
ACTIVITY 4.1Prepare an analytical result report of Second Monday Test Round Exam of your class in theformat given below.
A B C D E F G H
1 1ST QUARTERLY CYCLE TEST
2
3 Name English Maths Science S. Science Computer Lang TotalII Marks
4 Ankit 78 65 77 88 76 54
5 Achala 77 98 90 66 99 76
6 Himanshu 67 78 87 56 84 92
7 Paarth 81 91 98 77 100 78
8 TotalAppeared
10 Highest M.
11 Lowest M.
Instructions
� Calculate the total marks obtained by each student in column I.� Calculate the highest and lowest marks obtained in each subject in row 9 and 10
respectively.� Also calculate the aggregate/percentage marks obtained by each student in column J� Give the number of students appearing for each subject in row11.� Find the subject-wise average marks and display them in the row 8.
© NCERT
not to
be r
epubl
ished

120120120120120
Computers and Communication Technology
120120120120120
ACTIVITY 4.2Prepare a score sheet of an inter-house cricket match in your school:
A B C D E
India vs. Pakistan
Batsman Balls Faced Fours Sixes Singles Total
Gurman Singh 61 7 3 23
Harinder Singh 12 2 4 2
Sachin Gupta 132 21 10 64
Gaurav Sachdeva 17 4 5 7
Ishwaq Ahmed 23 3 3 6
Instructions
� Calculate the total runs obtained by each student in column E.( Total = No. of sixes x 6 + No. of fours x 4 + No. of Singles)
� Calculate the Strike Rate of each batsman in column F.� Draw the pie chart to compare the strike rate of each batsman.
ACTIVITY 4.3
Prepare a personal expenditure report of last financial year in the format as below.
A B C D E F G
1 Pocket -Money Expenditure Report 2008-09
2
3 Month Mobile Travel Hobby Dinner Dates Savings Total
4 April 1200 900 500 1000
5 May 1440 788 700 1500
6 June 1320 1110 700 1200
7
8
9
Instructions
� Assume that you are given a monthly pocket-money of Rs. 6000.� Calculate the savings made by you every month.� Calculate the total expenditure in each month.� Calculate the highest and lowest expenditure made.� Calculate the total savings after the three months� Draw the bar graph to compare the expenditure of various months.
© NCERT
not to
be r
epubl
ished

121121121121121
Electronic Spreadsheet
Our School Canteen
A B C D E
1 Weekly Purchase/Sale Report of Items
2 Weekly Investment Weekly Sale
3 Item Name Qty. Made Cost Price (Rs.) Qty. Sold Selling Price (Rs.)
4 Samosa 250 2 245 3
5 Sandwitch 150 4 139 5
6 Fried Rice 300 7 300 10
7 Tea 225 2 225 3
ACTIVITY 4.4
Prepare a report on purchase and sale of any 10 items of a shop over a week depicting theprofit/loss in the format specified below.
Instructions
� Calculate the total amount invested on each of the items. Total Amount Invested=Qty.Purchased * Cost price.
� Calculate the total selling price of each of the items. Total Selling Price=Qty. Sold *Selling Price.
� Calculate the Profit/Loss of each of the items. Profit/Loss =Total Selling Price-TotalAmount Invested.
� Calculate the overall Profit/Loss made by Our School Canteen.
© NCERT
not to
be r
epubl
ished

APPENDIX
APPENDIX 4.1 : ANNEXURE � TABLE REPRESENTING SOME COMMONLY
USED FUNCTIONS
Function Description
SUM() The SUM function is used to calculatethe sum of the numbers passed asarguments.
Average() The AVERAGE function is used tocalculate the average of the numberspassed as arguments.
MAX() The MAX function returns the largestvalue among the values passed asarguments.
MIN() The MIN function returns thesmallest value among the valuespassed as arguments.
COUNT() The COUNT function is used to countthe number of cells that containnumbers within the list ofarguments.
COUNTA() The COUNTA function is used tocount the number of cells thatcontain data within the list ofarguments.
COUNTIF() The COUNTIF function is used tocount the number of cells within arange that meet the given criteria.
Syntax
=SUM(number1, number2, ��.)
=AVERAGE(number1,number2��..)
= MAX(number1, number2, ��.)
= MIN(number1, number2, ��.)
= COUNT(value1,value2��..)
= COUNTA(value1,value2��..)
= COUNTIF(range, criteria)
122122122122122
Computers and Communication Technology
122122122122122
© NCERT
not to
be r
epubl
ished