dvb-t2 hd terrestrial receiver - nexus industries ltd · dvb-t2 hd terrestrial receiver user manual...
TRANSCRIPT
DVB-T2 HD Terrestrial ReceiverUser Manual
MODEL NUMBERHDT2-5101
Please read this Manual thoroughly before using your Receiver and then retain for future reference.
1. Important Instructions p1 1.1 Safety Instructions p1 1.2 General Information p2 2. In the Box p2 3. Controls and Functions p3 3.1 Front Panel p3 3.2 Rear Panel p3 3.3 Remote Control p4 3.4 Remote Control Functions p5 4. Getting Started p7 4.1 Installing Batteries in your Remote Control p7 4.2 Using your Remote Control p7 4.3 Connecting your Receiver p7 4.4 Operating your Receiver p9 4.5 EPG p9 4.6 Digital Interactive Text p10 4.7 Live Pausing your Programme p10 4.8 OTR Recording p10 4.9 Channel List and Favourite List p10 5. The Main Menu p11 5.1 Installation Menu p11 5.2 Channel Menu p13 5.3 Preference Menu p14 5.4 Setting Menu p16 5.5 AV (Audio/Video) p22 5.6 AV Games p24 6. Recording, Playback and Media Functions p25 6.1 Compatible Recording Media p25 6.2 Disk Space Requirements for Recording p25 6.3 Recording p26 6.4 Playback p26 6.5 Playback of Movie Files or Recording p26 6.6 Playback of Music Files p27 6.7 Playback of Photo Files p27 6.8 Native 32 Games p28 6.9 Record Manager p28 6.10 Disk Manager p30 6.11 E-Book Option p30 7. Trouble Shooting p31 8. Specification p32
Contents
1
1.0 Important Instructions
1.1 Safety Instructions• Please read these Instructions carefully and retain for future reference. If you sell, or give this receiver away be sure to pass on these Instructions.
• There are NO user serviceable parts inside this unit. DO NOT remove the cover, there are dangerous voltages inside. Electric shock hazard.
• Refer all repairs to your authorised Service Centre.
• This unit operates from a 220~240V 50Hz Supply. Consumption is 20W.
• During use, this device may become warm, this is normal, it is not a fault. DO NOT allow anything to block the ventilation slots as this may cause overheating. Risk of fire.
• DO NOT place naked flames (such as candles) on this equipment.
• DO NOT stand other equipment on this unit.
• DO NOT stand containers (such as vases) filled with water or other liquids on this unit.
• DO NOT stand on soft furnishings.
• DO NOT operate close to heaters or other heat sources.
• DO NOT allow anything to trap, pinch or otherwise damage the Power Cord. If the Power Cord should become damaged IMMEDIATELY switch if off at the wall socket and then unplug it. Contact your Service centre to carry out a repair.
• DO NOT unplug this unit by pulling the Power Cord. Grasp the plug firmly and pull from the wall socket. Electric shock hazard.
• DO NOT operate this unit in damp conditions or allow water or other fluids to enter the enclosure. Electric shock hazard.
• DO NOT touch the Mains Plug or Power Cord with wet hands. Electric shock hazard.
• DO NOT use this Receiver outside. It is for indoor use only. Electric shock hazard.
• DO NOT clean your receiver using solvent based products. Use only a soft dry cloth
• MAKE SURE you have easy access to the Mains Plug in case of emergency.
2
1.2 General Information• Thank you for purchasing a Ross DVB-T2 HD Terrestrial Receiver. Treated with care and used in accordance with the contents of this manual it will provide you with many years of reliable service.
• This Digital DVBT2 HD Receiver offers many useful and exciting features to enhance your enjoyment including an 8 Day EPG, full MHEG5 Interactive Text and the ability (with an externally connected USB Memory device) to both Record and Live Pause programmes. It is also able to playback Multimedia files.
• Please note that the Digital DVB-T service is not yet available in all parts of the country. When you purchased your Receiver your retailer should have already checked that you live in an area where Digital Broadcasts are available. However if you are experiencing difficulties then go to http://www.freeview.co.uk/availability where you can check to see if broadcasts are available in your area. This site will also indicate when HD Broadcasts can be received.
• If you are in an existing Digital area but cannot receive some or all of the available Programmes then ask your local Aerial Installers to check your Antenna as this may require upgrading.
• This symbol indicates that, at the end of its useful life, this product must not be disposed of with normal domestic waste. To prevent possible harm to the environment or human health from uncontrolled waste disposal, please recycle it responsibly. You can return your used device using the return and collection service or contact the retailer where the product was purchased.Batteries used in operating this product may contain toxic agents that are hazardous to the environment. Therefore, as with the unit itself, dispose of the batteries according to the prevailing statutory regulations. Never put the batteries in normal household waste.
• This environmentally friendly Product complies with the RoHS Directive (2002/95/EC) for the control of restricted substances (Pb, Hg, Cd, Cr6+, PBB and PBDE).
• This receiver conforms to all applicable EU Legislation for this type of product. Further information can be obtained from Ross if required.
2.0 In the Box: • Ross HDT2-5101 DVB-T2 HD Receiver • Remote Control (NOTE: 2 x AAA Batteries not included) • User Manual
3
3.0 Controls & Functions:
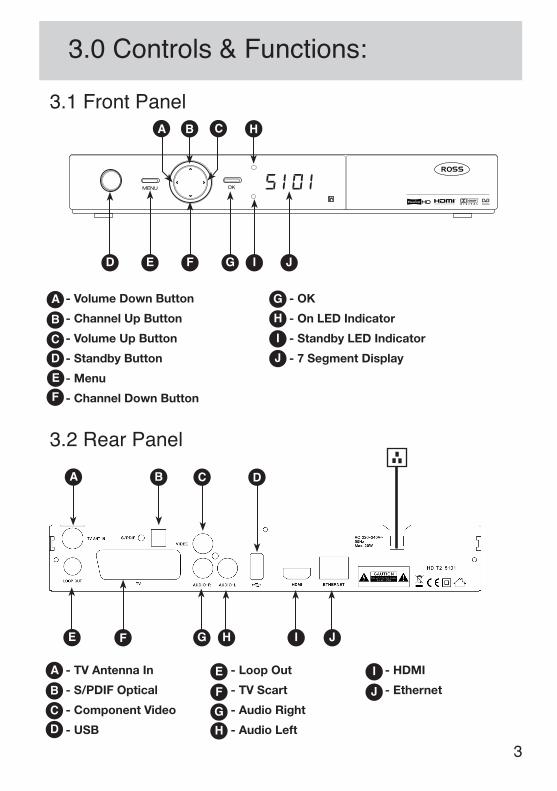
3.1 Front Panel
- Volume Down Button - OK
- Channel Up Button - On LED Indicator
- Volume Up Button - Standby LED Indicator
- Standby Button - 7 Segment Display
- Menu
- Channel Down Button
3.2 Rear Panel
- TV Antenna In - Loop Out - HDMI
- S/PDIF Optical - TV Scart - Ethernet
- Component Video - Audio Right
- USB - Audio Left
EF
G
IH
J
ABCD
A
E F G I J
ABCD
E IF JGH
E F H I JG
A B DC
CB H
D
4
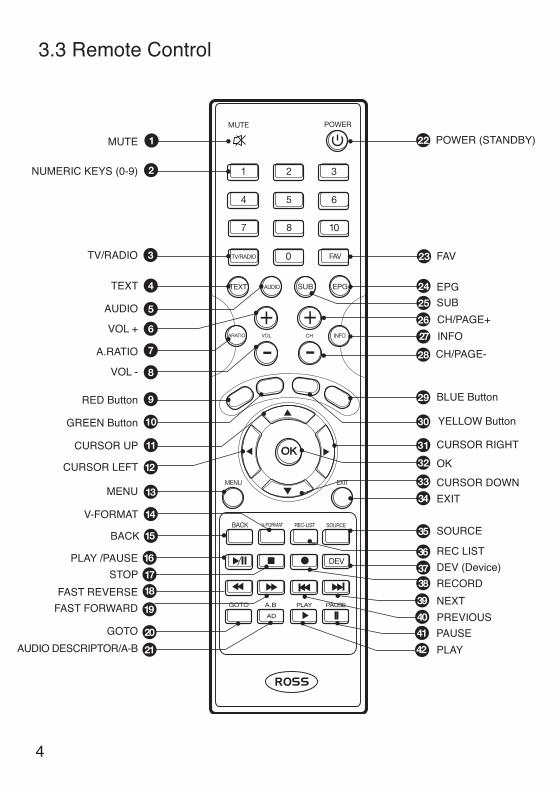
3.3 Remote Control
FAV
EPGSUBCH/PAGE+
BLUE Button
YELLOW Button
CURSOR RIGHTOK
CURSOR DOWNEXIT
SOURCE
REC LISTDEV (Device)RECORDNEXT
PLAY
23
24
25
26
29
28
30
31
33
34
35
36
3738
39
42
POWER (STANDBY)221MUTE
NUMERIC KEYS (0-9)
TEXT
AUDIO
VOL +
VOL -
RED Button
GREEN Button
CURSOR UP
CURSOR LEFT
MENU
V-FORMAT
PLAY /PAUSESTOP
FAST REVERSEFAST FORWARD
GOTOAUDIO DESCRIPTOR/A-B
2
4
5
6
8
9
10
11
12
13
14
16
18
17
19
20
21
TV/RADIO 3
A.RATIO 7INFO27
BACK 15
CH/PAGE-
PREVIOUS40
PAUSE41
OK32

3.4 Remote Control Functions
Button Function MUTE: Press to MUTE the sound, press again to cancel. You can also press the VOL + or VOL – to cancel the MUTE function. NUMERIC KEYS: For direct entry of CHANNEL NUMBERS as well as TIME and DATE information. TV/RADIO: Switch between TV and Radio Programmes TEXT: Accesses digital and interactive text services, Not all providers transmit text. AUDIO: Press to access Audio information on the current programme . Here you can select LEFT, RIGHT, STEREO or change language (content dependent) VOL +: Press to increase the Volume. A.RATIO: Adjusts the Aspect ratio of the Receiver to match your TV. VOL -: Press to decrease the Volume. RED Button: Content dependent when in TEXT or EPG etc. GREEN BUTTON: Content dependent when in TEXT or EPG etc. CURSOR UP: Moves the Cursor up when in MENU, EPG, CHANNEL LIST or CURSOR LEFT: Moves the Cursor left when in MENU, EPG, CHANNEL LIST or FAVOURITE modes. MENU: Accesses the MENU options V.FORMAT: Select the resolution you require from 480p through to 1080p at a variety of frame rates. BACK: Returns you to the previously viewed Programme or goes back one step when in MENU mode. PLAY /PAUSE: Used in MHEG5 only for video content etc. STOP: Stops Playback FAST REVERSE: Choose from X2, X4, X8 and X16 when playing back recordings etc. FAST FORWARD: Choose from X2, X4, X8 and X16 when playing back recordings etc. GOTO: Enables you to move to a particular time within a recording AUDIO DESCRIPTOR: Engages audio description function. A-B: Allows a loop of video to be continuously played. POWER: Switches on the Power or switches the Receiver to STANDBY mode. FAV: Brings up the FAVOURITE screen allowing FAVOURITE PROGRAMMES to be stored in one of four available lists. EPG: Accesses the Electronic Programme Guide. Here you can choose a Programme to watch or set a Reminder or a future Record event (Memory device required to record).
1
2
3
4
5
6
7
8
9
10
11
12
13
14
15
16
17
18
19
20
21
5
22
23
24
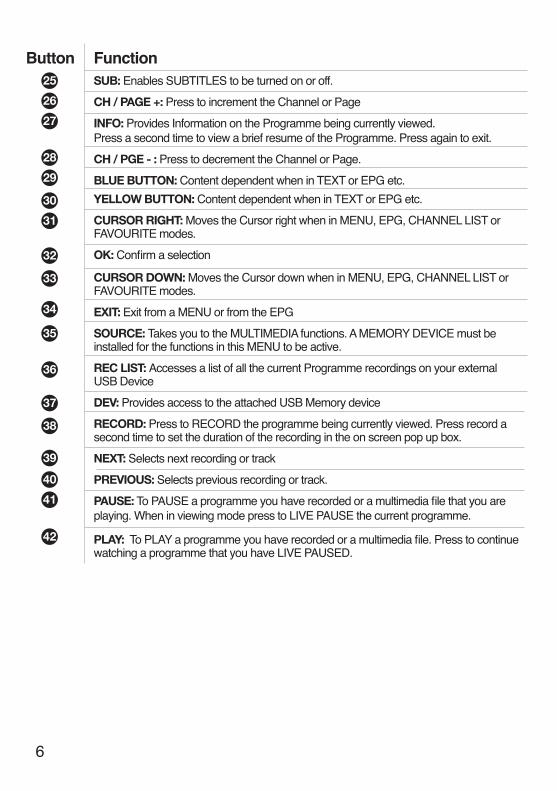
Button Function SUB: Enables SUBTITLES to be turned on or off. CH / PAGE +: Press to increment the Channel or Page INFO: Provides Information on the Programme being currently viewed. Press a second time to view a brief resume of the Programme. Press again to exit. CH / PGE - : Press to decrement the Channel or Page. BLUE BUTTON: Content dependent when in TEXT or EPG etc. YELLOW BUTTON: Content dependent when in TEXT or EPG etc. CURSOR RIGHT: Moves the Cursor right when in MENU, EPG, CHANNEL LIST or FAVOURITE modes. OK: Confirmaselection
CURSOR DOWN: Moves the Cursor down when in MENU, EPG, CHANNEL LIST or FAVOURITE modes. EXIT: Exit from a MENU or from the EPG SOURCE: Takes you to the MULTIMEDIA functions. A MEMORY DEVICE must be installed for the functions in this MENU to be active. REC LIST: Accesses a list of all the current Programme recordings on your external USB Device DEV: Provides access to the attached USB Memory device RECORD: Press to RECORD the programme being currently viewed. Press record a second time to set the duration of the recording in the on screen pop up box. NEXT: Selects next recording or track PREVIOUS: Selects previous recording or track. PAUSE: ToPAUSEaprogrammeyouhaverecordedoramultimediafilethatyouare playing. When in viewing mode press to LIVE PAUSE the current programme.
PLAY: ToPLAYaprogrammeyouhaverecordedoramultimediafile.Presstocontinue watching a programme that you have LIVE PAUSED.
25
26
27
28
29
30
31
32
33
34
35
36
37
38
39
40
41
42
6
7
4.0 Getting Started:
4.1 Installing Batteries in your Remote Control• Remove the Battery Compartment cover by sliding it downwards• Install two AAA batteries (not supplied) taking care to observe the correct polarity.• Replace the Battery Compartment cover by sliding it upwards.
NOTE: If you will not be using your Remote control for sometime then remove the batteries to prevent risk of leakage and subsequent damage.
• If your remote starts to operate erratically then the batteries are probably drained. Replace both batteries with new, do not mix new and old.
• Dispose of used batteries in an environmentally responsible way. They must not be disposed of in normal household waste. Many stores now have a recycling point for batteries.
4.2 Using your Remote Control • Always point the Remote Control at the Receiver. It will operate successfully over a range of around 6m and at an angle of +/- 30o.
• Remember, strong light or objects in the path of the Infra red beam will affect the performance of the Remote Control adversely.
4.3 Connecting your Receiver• Your QUICK START GUIDE shows the simplest and most effective way to connect your Receiver and get watching! The following information describes in more detail the use of your new Digital receiver.
• Connecting the TV Aerial: Your TV aerial needs to be connected to the “TV Antenna In” at the rear of your Receiver. Digital TV requires a good quality signal, for optimum reception use a loft or roof mounted High Gain Aerial. If in doubt contact your local Aerial Installer.
• Connecting to your Television: There are four methods to connect your Receiver to your Television. These will be described in descending order of Picture Quality with the best first, please also refer to the CONNECTION DIAGRAM at the end of this section for further guidance:
• HDMI: If your TV is equipped with an HDMI Input then this is both the easiest and the best method of connection. An HDMI connection delivers both picture and sound at high quality. Using the supplied HDMI cable connect the HDMI socket on the rear of your Receiver to an available HDMI Socket on your TV.
• Component (Y, Pb, Pr): Whilst this connection can deliver similar picture quality to HDMI the sound has to be separately connected. Using a 3 Way Cinch (RCA) type cable (not supplied) connect the Component Outputs on the rear of your receiver to the corresponding inputs on your TV, carefully observing the colour coding. You will then need to connect the Audio Left and Audio Right outputs to the corresponding inputs on your Television. These again use RCA type connectors.
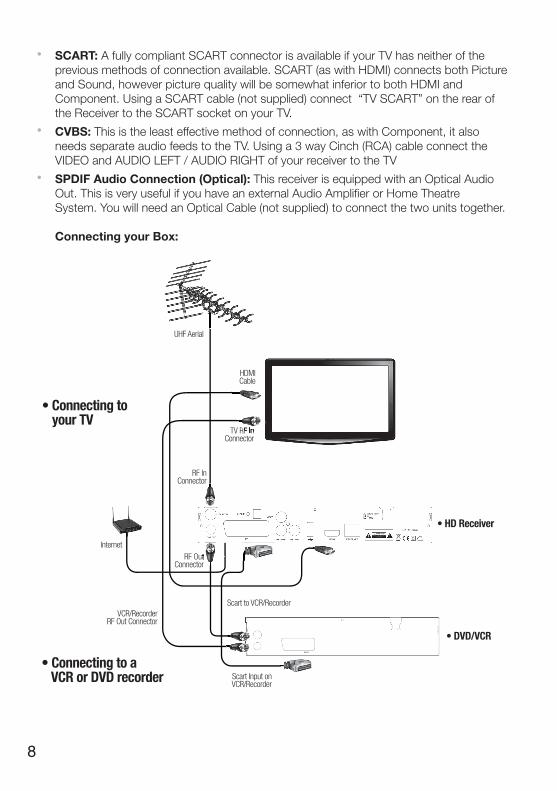
• SCART: A fully compliant SCART connector is available if your TV has neither of the previous methods of connection available. SCART (as with HDMI) connects both Picture and Sound, however picture quality will be somewhat inferior to both HDMI and Component. Using a SCART cable (not supplied) connect “TV SCART” on the rear of the Receiver to the SCART socket on your TV.
• CVBS: This is the least effective method of connection, as with Component, it also needs separate audio feeds to the TV. Using a 3 way Cinch (RCA) cable connect the VIDEO and AUDIO LEFT / AUDIO RIGHT of your receiver to the TV
• SPDIF Audio Connection (Optical): This receiver is equipped with an Optical Audio Out. This is very useful if you have an external Audio Amplifier or Home Theatre System. You will need an Optical Cable (not supplied) to connect the two units together.
Connecting your Box:
8

4.4 Operating your Receiver Now you have connected your Receiver you are ready to tune it in and complete the installation.
• Connect the Mains Plug of the Receiver to a convenient Wall Socket and switch on. The INITIAL INSTALL screen opposite will be displayed.
• Check the following, using the CURSOR KEYS and OK button as required:
• OSD Language - English • Country - UK • Time Zone - Auto • LCN (Logical Channel Numbering) On
• Using the CURSOR KEYS move down to START SEARCH and press OK. The receiver will automatically search and store all Digital Programmes available in your area, including where present any HD Channels being Broadcast.
• Your receiver is now ready to use. Use the NUMERIC or CH+- keys to change Programme and the VOL+- to control the volume. There are many more features and functions that you can explore and use (these will be covered in the remainder of this manual) but you will now be able to watch and enjoy your Digital Television programmes.
4.5 EPGThe EPG is an extremely useful tool that enables you to see for up to 7 days ahead(8 days including the current day) the Programmes that are available for youto view.
In this screen you can:
• Select a Programme to view• Set a Programme Reminder• Set a Record Request• Set a Series Link recording• Check what Programmes are on in the next week.
Press EPG and follow the ON SCREEN “COLOURED BUTTON” prompts to select the feature you require.
9
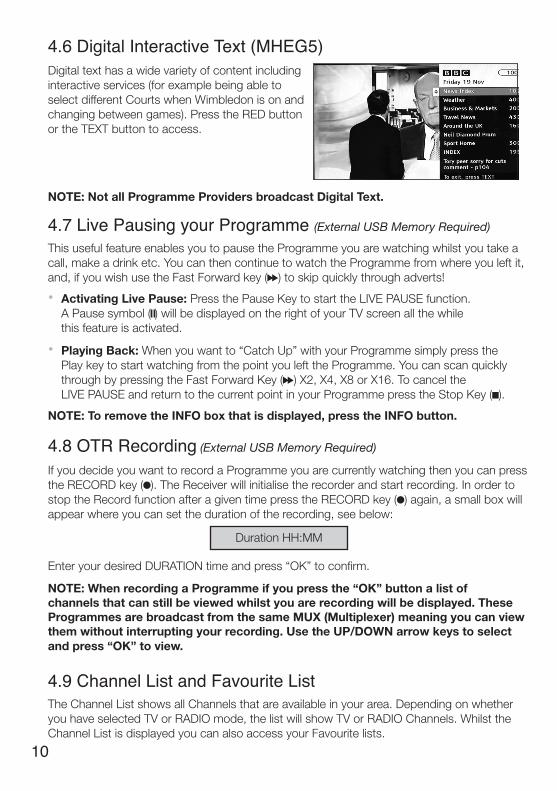
4.6 Digital Interactive Text (MHEG5) Digital text has a wide variety of content including interactive services (for example being able to select different Courts when Wimbledon is on and changing between games). Press the RED buttonor the TEXT button to access.
NOTE: Not all Programme Providers broadcast Digital Text.
4.7 Live Pausing your Programme (External USB Memory Required)
This useful feature enables you to pause the Programme you are watching whilst you take a call, make a drink etc. You can then continue to watch the Programme from where you left it, and, if you wish use the Fast Forward key ( ) to skip quickly through adverts!
• Activating Live Pause: Press the Pause Key to start the LIVE PAUSE function. A Pause symbol ( ) will be displayed on the right of your TV screen all the while this feature is activated.
• Playing Back: When you want to “Catch Up” with your Programme simply press the Play key to start watching from the point you left the Programme. You can scan quickly through by pressing the Fast Forward Key ( ) X2, X4, X8 or X16. To cancel the LIVE PAUSE and return to the current point in your Programme press the Stop Key ( ).
NOTE: To remove the INFO box that is displayed, press the INFO button.
4.8 OTR Recording (External USB Memory Required) If you decide you want to record a Programme you are currently watching then you can press the RECORD key ( ). The Receiver will initialise the recorder and start recording. In order to stop the Record function after a given time press the RECORD key ( ) again, a small box will appear where you can set the duration of the recording, see below:
Enter your desired DURATION time and press “OK” to confirm.
NOTE: When recording a Programme if you press the “OK” button a list of channels that can still be viewed whilst you are recording will be displayed. These Programmes are broadcast from the same MUX (Multiplexer) meaning you can view them without interrupting your recording. Use the UP/DOWN arrow keys to select and press “OK” to view.
4.9 Channel List and Favourite ListThe Channel List shows all Channels that are available in your area. Depending on whether you have selected TV or RADIO mode, the list will show TV or RADIO Channels. Whilst the Channel List is displayed you can also access your Favourite lists.
10
Duration HH:MM
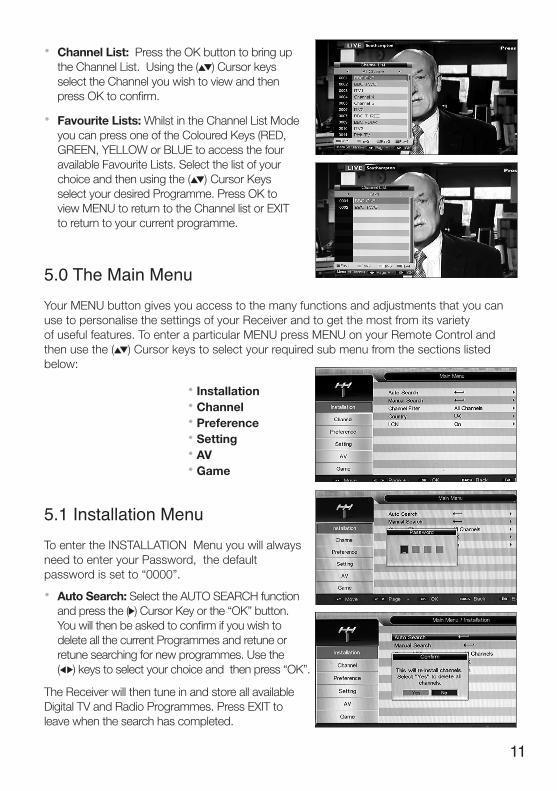
• Channel List: Press the OK button to bring up the Channel List. Using the ( ) Cursor keys select the Channel you wish to view and then press OK to confirm.
• Favourite Lists: Whilst in the Channel List Mode you can press one of the Coloured Keys (RED, GREEN, YELLOW or BLUE to access the four available Favourite Lists. Select the list of your choice and then using the ( ) Cursor Keys select your desired Programme. Press OK to view MENU to return to the Channel list or EXIT to return to your current programme.
5.0 The Main MenuYour MENU button gives you access to the many functions and adjustments that you canuse to personalise the settings of your Receiver and to get the most from its varietyof useful features. To enter a particular MENU press MENU on your Remote Control and then use the ( ) Cursor keys to select your required sub menu from the sections listed below:
• Installation • Channel • Preference • Setting • AV • Game
5.1 Installation Menu To enter the INSTALLATION Menu you will always need to enter your Password, the default password is set to “0000”.
• Auto Search: Select the AUTO SEARCH function and press the ( ) Cursor Key or the “OK” button. You will then be asked to confirm if you wish to delete all the current Programmes and retune or retune searching for new programmes. Use the ( ) keys to select your choice and then press “OK”.
The Receiver will then tune in and store all availableDigital TV and Radio Programmes. Press EXIT toleave when the search has completed.
11

12
• Manual Search: This can be useful if you know a new programme has been added to a particular CHANNEL. Using ( ) keys select the MANUAL SEARCH function and press the ( ) Cursor Key or the “OK” button. You will then be prompted to enter the number of the CHANNEL you wish to search for Digital Programmes or (if you know it) the FREQUENCY in kHz. It is recommended that you use the CHANNEL option as this is easier. Press the “OK” button and then use the ( ) keys to select your desired CHANNEL. Press “OK” to confirm. It is not necessary to change the BANDWIDTH setting. Scroll down to START SEARCH and press “OK”. Your chosen CHANNEL will now be searched for available Programmes and the results stored. PRESS “EXIT” to leave.
• Channel Filter: This feature enables you to remove encrypted (Pay TV) CHANNELS from your Programme List if you wish. Using the ( ) keys select CHANNEL FILTER and press “OK”. Then using the ( ) select FTA ONLY and press to confirm. You will need to retune your receiver to remove the “PAY TV” Programmes from your list. If you want to restore the “PAY TV” channels then repeat this procedure but select ALL CHANNELS instead of FTA ONLY. Press “EXIT” to leave.
• Country: This feature is used to set your Country of location. You will not normally need to change it from the default setting of UK.
• LCN: The LCN (Logical Channel Numbering) ensures that your Programmes are stored in the preferred order, such as BBC1 as Location 1, BBC2 as Location 2 etc…. It is not recommended that you change this setting.
13
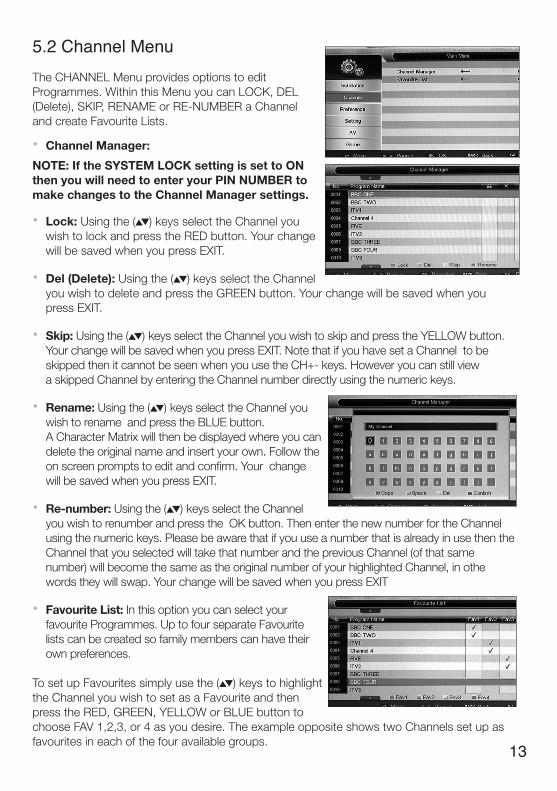
5.2 Channel Menu The CHANNEL Menu provides options to edit Programmes. Within this Menu you can LOCK, DEL (Delete), SKIP, RENAME or RE-NUMBER a Channeland create Favourite Lists.
• Channel Manager:
NOTE: If the SYSTEM LOCK setting is set to ON then you will need to enter your PIN NUMBER to make changes to the Channel Manager settings.
• Lock: Using the ( ) keys select the Channel you wish to lock and press the RED button. Your change will be saved when you press EXIT.
• Del (Delete): Using the ( ) keys select the Channel you wish to delete and press the GREEN button. Your change will be saved when you press EXIT.
• Skip: Using the ( ) keys select the Channel you wish to skip and press the YELLOW button. Your change will be saved when you press EXIT. Note that if you have set a Channel to be skipped then it cannot be seen when you use the CH+- keys. However you can still view a skipped Channel by entering the Channel number directly using the numeric keys.
• Rename: Using the ( ) keys select the Channel you wish to rename and press the BLUE button. A Character Matrix will then be displayed where you can delete the original name and insert your own. Follow the on screen prompts to edit and confirm. Your change will be saved when you press EXIT.
• Re-number: Using the ( ) keys select the Channel you wish to renumber and press the OK button. Then enter the new number for the Channel using the numeric keys. Please be aware that if you use a number that is already in use then the Channel that you selected will take that number and the previous Channel (of that same number) will become the same as the original number of your highlighted Channel, in othe words they will swap. Your change will be saved when you press EXIT
• Favourite List: In this option you can select your favourite Programmes. Up to four separate Favourite lists can be created so family members can have their own preferences.
To set up Favourites simply use the ( ) keys to highlight the Channel you wish to set as a Favourite and then press the RED, GREEN, YELLOW or BLUE button to choose FAV 1,2,3, or 4 as you desire. The example opposite shows two Channels set up as favourites in each of the four available groups.

14
5.3 Preference MenuThis Menu enables the User to set up manypersonal preferences associated with the OSD, Subtitles, Audio Descriptor and the PVR function.
• OSD Language: Select your preferred OSD Language. Using the ( ) keys select OSD LANGUAGE and then press “OK”. Use the ( ) keys again to select your preference and press “OK” to confirm.
• OSD Timeout: Select your preferred OSD Timeout (length of time the OSD is displayed for), you can select between 1-6 seconds. Using the ( ) keys select OSD TIMEOUT and then press “OK”. Use the ( ) keys again to select your preference and press “OK” to confirm.
• Time on OSD: Select whether you wish ON SCREEN TIME to be displayed. Using the ( ) keys select TIME ON OSD and then press “OK”. Use the ( ) keys again to select your preference and press “OK” to confirm.
• OSD Transparency: Select your preferred OSD Transparency. Using the ( ) keys select OSD TRANSPARENCY and then press “OK”. Use the ( ) keys again to select your preference and press “OK” to confirm. NOTE: “0%” is Opaque.
1st Preferred Subtitle Language. Using the ( ) keys select 1st PREFERRED SUB TITLE LANGUAGE and then press “OK”. Use the ( ) keys again to select your preference and press “OK” to confirm.
• 2nd. Preferred Subtitle - Select your 2nd. Preferred Subtitle Language. Using the ( ) keys select 2nd. PREFERRED SUBTITLE LANGUAGE and then press “OK”. Use the ( ) keys again to select your preference and press “OK” to confirm.
15
• Audio Descriptor: Turn ON or OFF the Audio Descriptor. This feature provides additional audio content to assist persons with impaired hearing. Using the ( ) keys select AUDIO DESCRIPTOR and then press “OK”. Use the ( ) keys again to select your preference and press “OK” to confirm. Please note not all Broadcasters transmit Audio Descriptor information.
• 1st. Preferred Audio: Select your 1st Preferred Audio Language. Using the ( ) keys select 1st PREFERRED AUDIO LANGUAGE (for Audio Descriptor) and then press “OK”. Use the ( ) keys again to select your preference and press “OK” to confirm.
• 2nd. Preferred Audio: 1st. Preferred Audio: Select your 1st Preferred Audio Language. Using the ( ) keys select 1st PREFERRED AUDIO LANGUAGE (for Audio Descriptor) and then press “OK”. Use the ( ) keys again to select your preference and press “OK” to confirm.
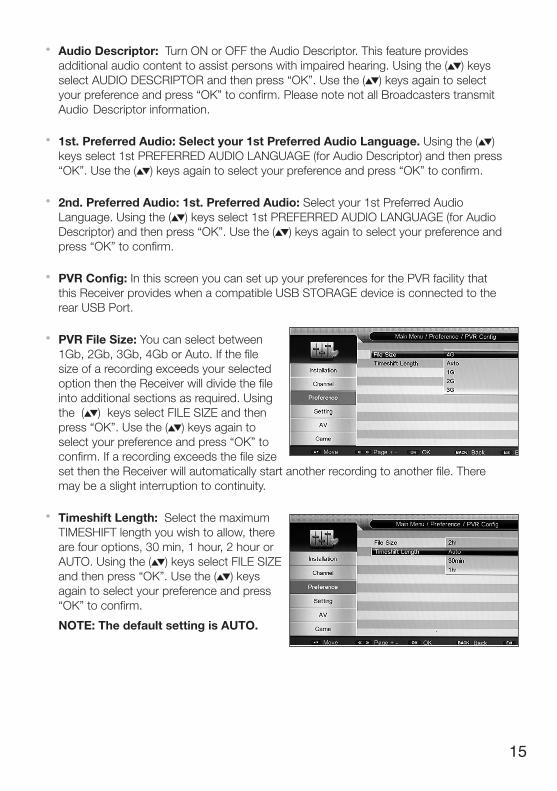
• PVR Config: In this screen you can set up your preferences for the PVR facility that this Receiver provides when a compatible USB STORAGE device is connected to the rear USB Port.
• PVR File Size: You can select between 1Gb, 2Gb, 3Gb, 4Gb or Auto. If the file size of a recording exceeds your selected option then the Receiver will divide the file into additional sections as required. Using the ( ) keys select FILE SIZE and then press “OK”. Use the ( ) keys again to select your preference and press “OK” to confirm. If a recording exceeds the file size set then the Receiver will automatically start another recording to another file. There may be a slight interruption to continuity.
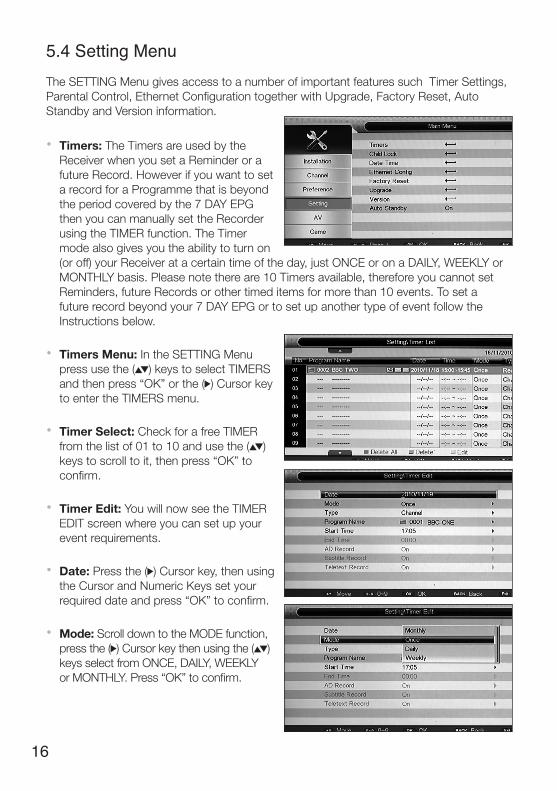
• Timeshift Length: Select the maximum TIMESHIFT length you wish to allow, there are four options, 30 min, 1 hour, 2 hour or AUTO. Using the ( ) keys select FILE SIZE and then press “OK”. Use the ( ) keys again to select your preference and press “OK” to confirm.
NOTE: The default setting is AUTO.
16
5.4 Setting Menu The SETTING Menu gives access to a number of important features such Timer Settings, Parental Control, Ethernet Configuration together with Upgrade, Factory Reset, Auto Standby and Version information.
• Timers: The Timers are used by the Receiver when you set a Reminder or a future Record. However if you want to set a record for a Programme that is beyond the period covered by the 7 DAY EPG then you can manually set the Recorder using the TIMER function. The Timer mode also gives you the ability to turn on (or off) your Receiver at a certain time of the day, just ONCE or on a DAILY, WEEKLY or MONTHLY basis. Please note there are 10 Timers available, therefore you cannot set Reminders, future Records or other timed items for more than 10 events. To set a future record beyond your 7 DAY EPG or to set up another type of event follow the Instructions below.
• Timers Menu: In the SETTING Menu press use the ( ) keys to select TIMERS and then press “OK” or the ( ) Cursor key to enter the TIMERS menu.
• Timer Select: Check for a free TIMER from the list of 01 to 10 and use the ( ) keys to scroll to it, then press “OK” to confirm.
• Timer Edit: You will now see the TIMER EDIT screen where you can set up your event requirements.
• Date: Press the ( ) Cursor key, then using the Cursor and Numeric Keys set your required date and press “OK” to confirm.
• Mode: Scroll down to the MODE function, press the ( ) Cursor key then using the ( ) keys select from ONCE, DAILY, WEEKLY or MONTHLY. Press “OK” to confirm.

17
• Type: Scroll down to the TYPE function, press the ( ) Cursor key then using the ( ) keys select from RECORDER, CHANNEL, STANDBY, ON or VCR. Press “OK” to confirm.
NOTE: Set to RECORDER to record Programmes to your external memory device.
• Programme Name: Scroll down to the PROGRAMME NAME function, press the ( ) Cursor key then using the ( ) keys select from your list of available PROGRAMMES. Press “OK” to confirm.
NOTE: You can record both TV and Radio Programmes.
• Start Time : Scroll down to the START TIME function, press the ( ) Cursor key then using the Cursor and Numeric Keys set the required time. Press “OK” to confirm.
• End Time: – Scroll down to the END TIME function, press the ( ) Cursor key then using the Cursor and Numeric Keys set the required time. Press “OK” to confirm.
• AD Record: – Here you can set the Receiver to Record the AUDIO DESCRIPTOR if the Programme you are recording is broadcasting this information. Press the ( ) Cursor key, then using the ( ) keys select ON or OFF as desired. Press “OK” to confirm.
• Subtitle: – Here you can set the Receiver to Record the SUBTITLES if the Programme you are recording is broadcasting this information. Press the ( ) Cursor key, then using the ( ) keys select ON or OFF as desired. Press “OK” to confirm.

18
• Teletext: – Here you can set the Receiver to Record the TELETEXT if the Programme you are recording is broadcasting this information. Press the ( ) Cursor key, then using the ( ) keys select ON or OFF as desired. Press “OK” to confirm.
• Saving your TIMER entry: When you have completed all the fields that you needed to change press “OK” once more. This will save your TIMER settings and take you back to your TIMER LIST where you can check your settings are correct. If you need to correct one of your settings, press the YELLOW button to go back to the TIMER EDIT screen and make your changes.
• TIMER Delete:
• Single Delete: When in the TIMER LIST screen you can delete a specific TIMER by highlighting it using the ( ) keys and then pressing the GREEN button. Highlight YES and then press “OK” to confirm.
• Delete All: You can also delete all TIMER entries by using the RED button. Take care when using this function as it will also delete all REMINDERS of future RECORD events that you may have set from within the EPG.
• Child Lock: This feature enables Parental Control to prevent Children accessing inappropriate content or tampering with the Installation.
• Using the ( ) keys select CHILD LOCK and press “OK”. You will now be prompted to enter the PASSWORD. The default PASSWORD is set to “0000”.
• System Lock: When this is set to ON then no changes can be made to the INSTALLATION Menu settings without entering the password. Using the ( ) keys scroll to SYSTEM LOCK and press “OK”. Select ON or OFF as desired and “OK” to confirm.
• Parental Rating: Here you can choose a RATING from 0 through to 18. Using the ( ) keys scroll to PARENTAL RATING and press “OK”. Select 0 to 18 as desired and press “OK” to confirm. Not all Broadcasters transmit age related Parental Control data.
19
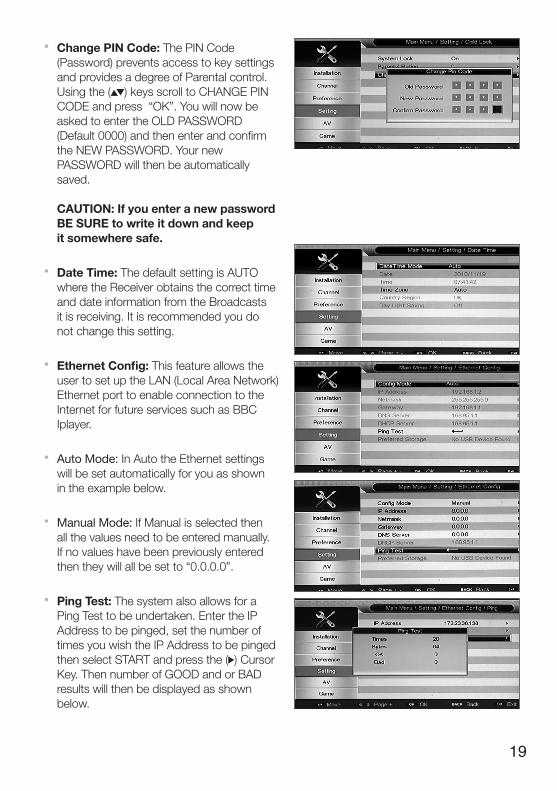
• Change PIN Code: The PIN Code (Password) prevents access to key settings and provides a degree of Parental control. Using the ( ) keys scroll to CHANGE PIN CODE and press “OK”. You will now be asked to enter the OLD PASSWORD (Default 0000) and then enter and confirm the NEW PASSWORD. Your new PASSWORD will then be automatically saved.
CAUTION: If you enter a new password BE SURE to write it down and keep it somewhere safe.
• Date Time: The default setting is AUTO where the Receiver obtains the correct time and date information from the Broadcasts it is receiving. It is recommended you do not change this setting.
• Ethernet Config: This feature allows the user to set up the LAN (Local Area Network) Ethernet port to enable connection to the Internet for future services such as BBC Iplayer.
• Auto Mode: In Auto the Ethernet settings will be set automatically for you as shown in the example below.
• Manual Mode: If Manual is selected then all the values need to be entered manually. If no values have been previously entered then they will all be set to “0.0.0.0”.
• Ping Test: The system also allows for a Ping Test to be undertaken. Enter the IP Address to be pinged, set the number of times you wish the IP Address to be pinged then select START and press the ( ) Cursor Key. Then number of GOOD and or BAD results will then be displayed as shown below.

20
• Factory Reset: This returns all settings to as they were when the Receiver left the factory. It deletes all stored Programmes and should be used with CAUTION. Using the( ) keys scroll to FACTORY RESET and press “OK”. You will then be asked to input your PASSWORD. On completion, the FACTORY RESET will be activated and you will be returned to the INITIAL INSTALL screen. Refer to SECTION 4.4 for guidance if necessary.
• Upgrade: As with all complex Electronics Products changes are sometimes required to the Operating Software (Firmware) either to make improvements or because of external influences. This Receiver is capable of upgrading using two options as below:-
• a) USB Upgrade: Periodically check the Ross Website www.ross.co.uk for firmware updates for this receiver. When one becomes available it is recommended you update your Receiver to take advantage of the benefits that the new version may offer. Proceed as follows.
• Download: Download the firmware update from the Ross Website to your PC.
• Extract and Copy: The file will be compressed so you will need to extract it prior to copying it to your Memory Stick. Make sure that you use an empty Memory Stick for this purpose and copy the file to the root directory.
• Upgrade Screen: Using the ( ) keys select UPGRADE and press “OK” to confirm. Again using the ( ) keys, select USB UPGRADE, press OK to confirm. You will now be taken to the USB UPGRADE SCREEN.
• Upgrading: The USB Memory Stick containing the UPGRADE file will be shown as “/udska1”.
• Press “OK” to confirm. You will now see the UPGRADE FILE ITSELF, the name of this will take the form “SPHE1510_…………. .bin”.
• Using the ( ) keys select the file and press “OK”. An on screen progress timer will then be displayed whilst the file is being loaded. On completion the Receiver will be automatically restarted.
21
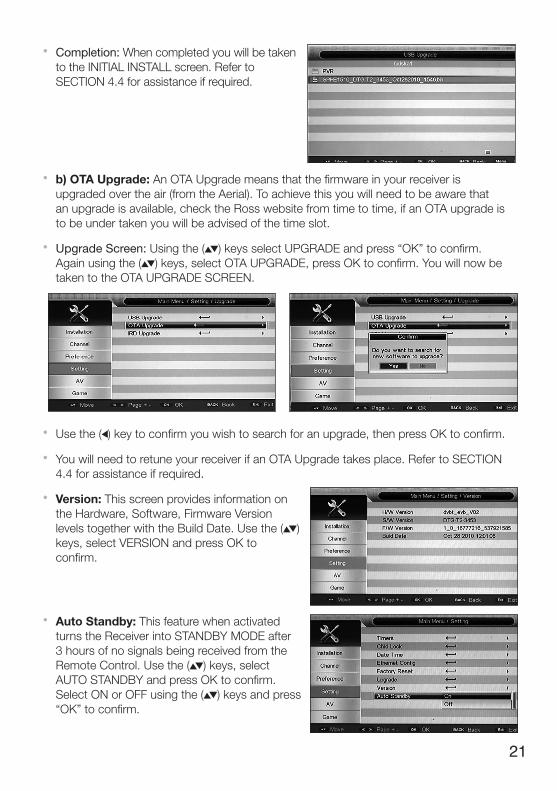
• Completion: When completed you will be taken to the INITIAL INSTALL screen. Refer to SECTION 4.4 for assistance if required.
• b) OTA Upgrade: An OTA Upgrade means that the firmware in your receiver is upgraded over the air (from the Aerial). To achieve this you will need to be aware that an upgrade is available, check the Ross website from time to time, if an OTA upgrade is to be under taken you will be advised of the time slot.
• Upgrade Screen: Using the ( ) keys select UPGRADE and press “OK” to confirm. Again using the ( ) keys, select OTA UPGRADE, press OK to confirm. You will now be taken to the OTA UPGRADE SCREEN.
• Use the ( ) key to confirm you wish to search for an upgrade, then press OK to confirm.
• You will need to retune your receiver if an OTA Upgrade takes place. Refer to SECTION 4.4 for assistance if required.
• Version: This screen provides information on the Hardware, Software, Firmware Version levels together with the Build Date. Use the ( ) keys, select VERSION and press OK to confirm.
• Auto Standby: This feature when activated turns the Receiver into STANDBY MODE after 3 hours of no signals being received from the Remote Control. Use the ( ) keys, select AUTO STANDBY and press OK to confirm. Select ON or OFF using the ( ) keys and press “OK” to confirm.
22
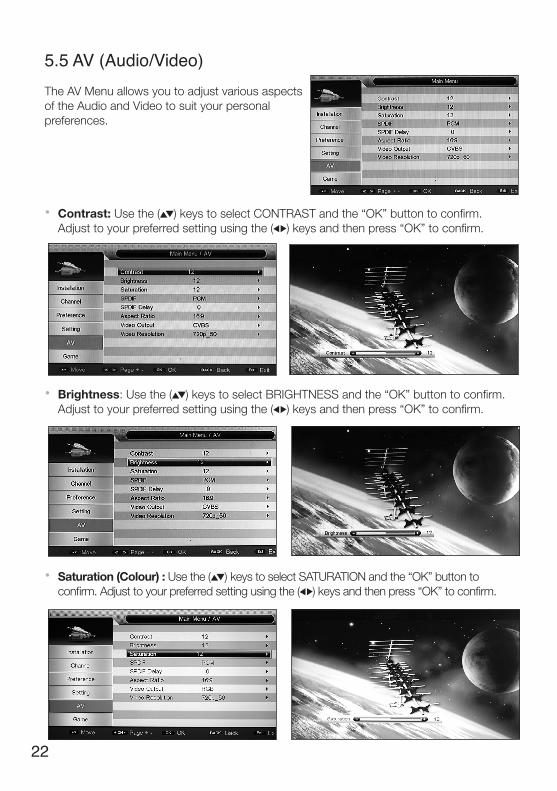
5.5 AV (Audio/Video) The AV Menu allows you to adjust various aspectsof the Audio and Video to suit your personalpreferences.
• Contrast: Use the ( ) keys to select CONTRAST and the “OK” button to confirm. Adjust to your preferred setting using the ( ) keys and then press “OK” to confirm.
• Brightness: Use the ( ) keys to select BRIGHTNESS and the “OK” button to confirm. Adjust to your preferred setting using the ( ) keys and then press “OK” to confirm.
• Saturation (Colour) : Use the ( ) keys to select SATURATION and the “OK” button to confirm. Adjust to your preferred setting using the ( ) keys and then press “OK” to confirm.

23
• SPDIF: The SPDIF (Sony Philips Digital Interface) provided on this Receiver is via an Optical Out socket. This option allows you to choose between PCM, Bitstream or Mute. Using the ( ) keys select SPDIF and press “OK” to confirm. Again, using the ( ) keys, select your preferred option and press “OK” to confirm. The default is PCM (Pulse Coded Modulation) this being the most common mode used.
• SPDIF Delay: This useful adjustment enables any delays in video processing to be compensated for by injecting a delay in the audio processing so that the two “match”. Using the ( ) keys select SPDIF DELAY and press “OK” to confirm. Use the ( ) keys to adjust the delay between 0-250mS depending on your equipment. Press “OK” to confirm.
• Aspect Ratio: This feature allows the User to adjust the screen format to match their TV. Please note however that in the higher resolutions, i.e., from 720p upwards the Aspect ratio is fixed at 16:9. If the Aspect Ratio is set to 576i then the user has a choice of 4:3 PS, 4:3 LB or 16:9.
•Using the ( ) keys select Aspect Ratio, press the OK key to bring up available options. Then using the ( ) keys select your preference (576i only) and press OK to confirm.
• Video Output: This enables the SCART Output to be set to output RGB, YUV or CVBS. Using the ( ) keys select VIDEO OUTPUT and press “OK” to confirm. Again, using the ( ) keys, select your preferred option and press “OK” to confirm. The default setting is RGB.

24
• Video Resolution: Set the resolution of your receiver to match your TV. If you have an HD Ready TV capable of displaying 1080p then set your Receiver to match this, any other received broadcasts will be automatically adjusted to display correctly. Available settings are as shown in the table below:
576i 25Hz 720p 50Hz 1080i 25Hz 1080p 50Hz
Using the ( ) keys select VIDEO RESOLUTION and press “OK” to confirm. Again, using the ( ) keys, select your preferred option and press “OK” to confirm. The default setting is 720p 50Hz.
5.6 AV Games This Receiver comes pre-loaded with five exciting games to challenge both your mind and your aptitude. Enjoy!
• Box Man: Follow the on screen prompts to play this game using the Cursor keys and the OK button.
• Tetris: Follow the on screen prompts to play this game using the Cursor keys and the OK button.
• Hit Rat : Follow the on screen prompts to play this game using the Cursor keys and the OK button.

25
• Go Bang: Follow the on screen prompts to play this game using the Cursor keys and the OK button.
• Sudoku: Follow the on screen prompts to play this game using the Cursor keys and the OK button.
6.0 How to get the Best from your Recording, Playback and Media Functions All Media files including Recordings that you make are stored on an external Memory Device. Access to all these DATA FILES is via the SOURCE button on the Remote Control.
6.1 Compatible Recording Media:
• USB Memory Sticks: The Receiver is compatible with most devices of this type but poor quality USB Memory sticks may have a speed issue resulting in record problems. Most Memory Sticks use a FAT32 file format.
• USB HDD (Hard Disk Drive) – Whilst a Memory Stick can give you a reasonable amount of capacity for recording if you want to take full advantage of the capabilities of this Receive then it is recommended you purchase a USB HDD. These come in many capacities, your Receiver will work with a drive of up to 1Tb capacity but for most purposes 500Gb should be adequate. Please be aware that whilst as much testing as possible has been undertaken during the development of this Receiver it is not possible to guarantee compatibility with all brands of HDD available in the market.
6.2 Disk Space Requirements for Recording:
• SD (Standard Definition) Recordings: Whilst it is not possible to be precise as to the amount of storage required because this varies with content an average SD Programme of 1hr duration will require up to 2Gb of memory
• HD (High Definition) Recordings: HD is much more demanding on storage capacity, a 1hr HD recording may need up to 4Gb.

26
6.3 Recording
NOTE: When recording a Programme if you press the “OK” button a list of channels that can still be viewed whilst you are recording will be displayed. These Programmes are broadcast from the same MUX (Multiplexer) meaning you can view them without interrupting your recording. Use the UP/DOWN arrow keys to select and press “OK” toview. There are three ways to make a recording on your Receiver as listed below:
• OTR Recording: If you decide you want to record the Programme you are currently watching then you can press the RECORD ( ) key. The Receiver will initialise the recorder and start recording. An information box also appears giving details of the recording being made. To close this press EXIT. To view again press INFO. In order to stop the Record function after a given time press the RECORD key ( ) again, a small box will appear where you can set the duration of the recording, see below:
Enter your desired DURATION time and press “OK” to confirm.
•EPG Recording: This is the most convenient way of recording. Simply press the EPG key then using the Cursor keys scroll to the Programme you wish to record, your choice will be highlighted. Then press the GREEN button (Reminder) and then press again to change the REMINDER to a RECORD. A GREEN ® symbol will appear to the left of your Programme Name. Remember though, to leave your Receiver in Standby and your USB HDD switched on (or your Memory Stick plugged in. If you change your mind, select the Programme again and pressing the GREEN button once more will cancel your RECORD request.
• Series Link: This feature enables the user to record multiple programmes such as a series and will do so beyond the duration of the 8 day EPG . Proceed as follows;
• Press EPG: Press EPG on the Remote Control. Look for the series of Programmes that you want to Record, for example “The One Show” on BBC1. Using the Cursor keys highlight the first episode that you wish to record.
• Series Link: You will see the SERIES LINK function which is activated by pressing the RED button. The Series List menu will be displayed showing all occurrences of the selected programme that appear within the current EPG window.
Duration HH:MM
27
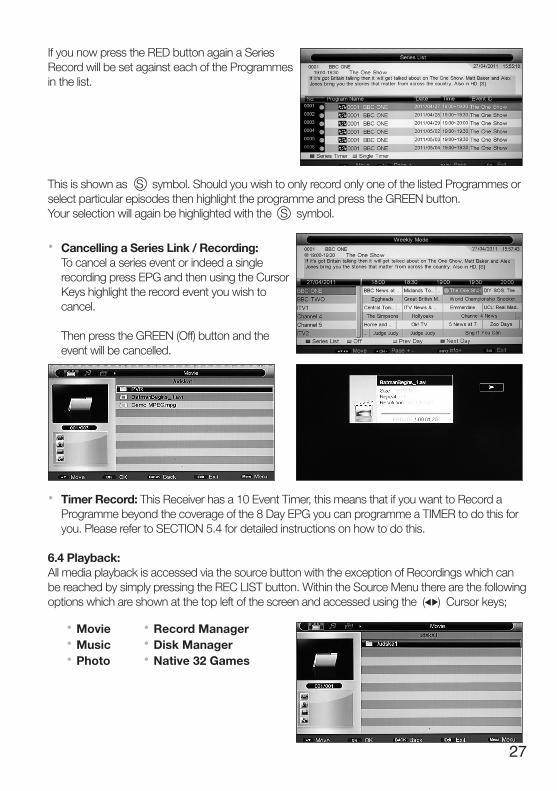
If you now press the RED button again a Series Record will be set against each of the Programmes in the list.
This is shown as S symbol. Should you wish to only record only one of the listed Programmes or select particular episodes then highlight the programme and press the GREEN button. Your selection will again be highlighted with the S symbol.
• Cancelling a Series Link / Recording: To cancel a series event or indeed a single recording press EPG and then using the Cursor Keys highlight the record event you wish to cancel.
Then press the GREEN (Off) button and the event will be cancelled.
• Timer Record: This Receiver has a 10 Event Timer, this means that if you want to Record a Programme beyond the coverage of the 8 Day EPG you can programme a TIMER to do this for you. Please refer to SECTION 5.4 for detailed instructions on how to do this.
6.4 Playback:All media playback is accessed via the source button with the exception of Recordings which can be reached by simply pressing the REC LIST button. Within the Source Menu there are the following options which are shown at the top left of the screen and accessed using the ( ) Cursor keys;
•Movie •Record Manager •Music •Disk Manager •Photo •Native 32 Games
28
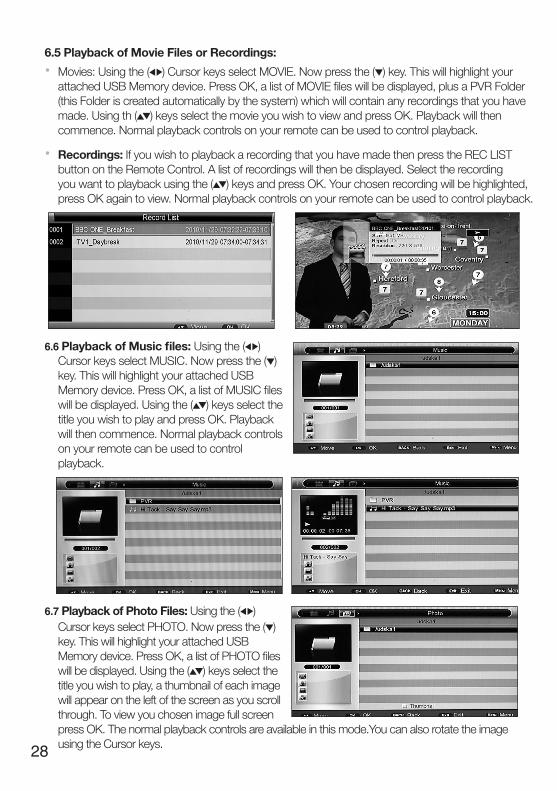
6.5 Playback of Movie Files or Recordings:
• Movies: Using the ( ) Cursor keys select MOVIE. Now press the ( ) key. This will highlight your attached USB Memory device. Press OK, a list of MOVIE files will be displayed, plus a PVR Folder (this Folder is created automatically by the system) which will contain any recordings that you have made. Using th ( ) keys select the movie you wish to view and press OK. Playback will then commence. Normal playback controls on your remote can be used to control playback.
• Recordings: If you wish to playback a recording that you have made then press the REC LIST button on the Remote Control. A list of recordings will then be displayed. Select the recording you want to playback using the ( ) keys and press OK. Your chosen recording will be highlighted, press OK again to view. Normal playback controls on your remote can be used to control playback.
6.6 Playback of Music files: Using the ( ) Cursor keys select MUSIC. Now press the ( ) key. This will highlight your attached USB Memory device. Press OK, a list of MUSIC files will be displayed. Using the ( ) keys select the title you wish to play and press OK. Playback will then commence. Normal playback controls on your remote can be used to control playback.
6.7 Playback of Photo Files: Using the ( ) Cursor keys select PHOTO. Now press the ( ) key. This will highlight your attached USB Memory device. Press OK, a list of PHOTO files will be displayed. Using the ( ) keys select the title you wish to play, a thumbnail of each image will appear on the left of the screen as you scroll through. To view you chosen image full screen press OK. The normal playback controls are available in this mode.You can also rotate the image using the Cursor keys.
29
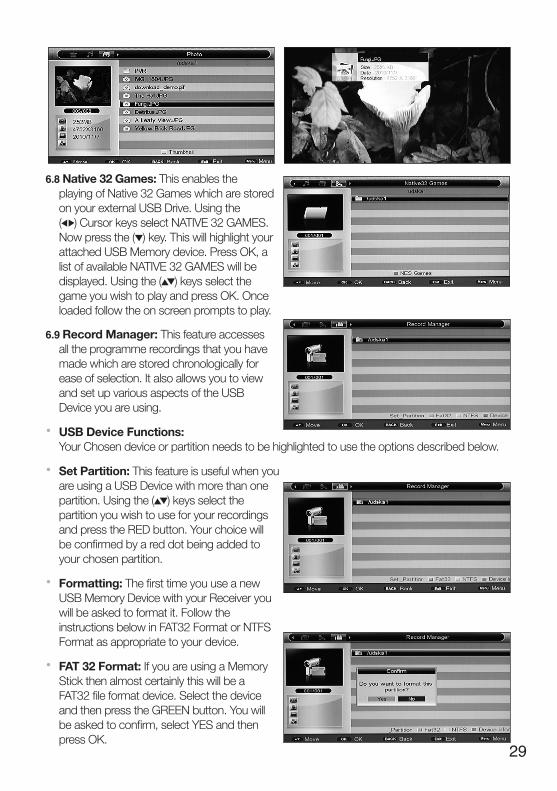
6.8 Native 32 Games: This enables the playing of Native 32 Games which are stored on your external USB Drive. Using the ( ) Cursor keys select NATIVE 32 GAMES. Now press the ( ) key. This will highlight your attached USB Memory device. Press OK, a list of available NATIVE 32 GAMES will be displayed. Using the ( ) keys select the game you wish to play and press OK. Once loaded follow the on screen prompts to play.
6.9 Record Manager: This feature accesses all the programme recordings that you have made which are stored chronologically for ease of selection. It also allows you to view and set up various aspects of the USB Device you are using.
• USB Device Functions: Your Chosen device or partition needs to be highlighted to use the options described below.
• Set Partition: This feature is useful when you are using a USB Device with more than one partition. Using the ( ) keys select the partition you wish to use for your recordings and press the RED button. Your choice will be confirmed by a red dot being added to your chosen partition.
• Formatting: The first time you use a new USB Memory Device with your Receiver you will be asked to format it. Follow the instructions below in FAT32 Format or NTFS Format as appropriate to your device.
• FAT 32 Format: If you are using a Memory Stick then almost certainly this will be a FAT32 file format device. Select the device and then press the GREEN button. You will be asked to confirm, select YES and then press OK.
30
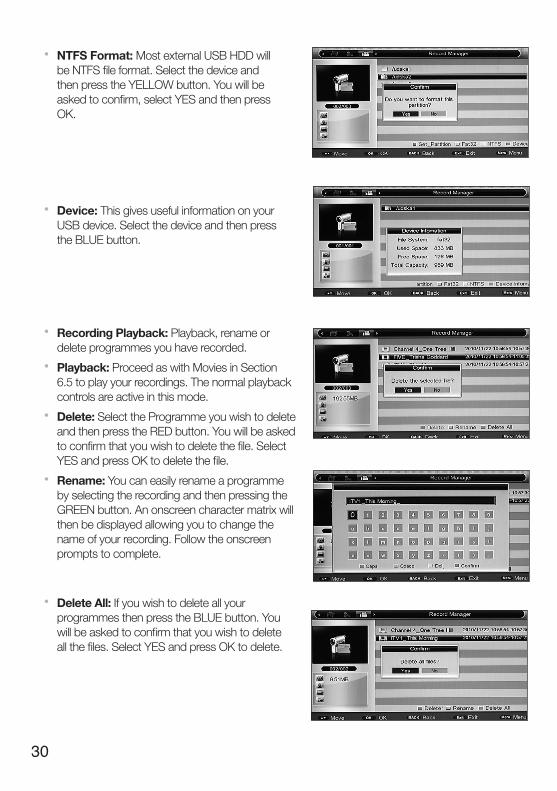
• NTFS Format: Most external USB HDD will be NTFS file format. Select the device and then press the YELLOW button. You will be asked to confirm, select YES and then press OK.
• Device: This gives useful information on your USB device. Select the device and then press the BLUE button.
• Recording Playback: Playback, rename or delete programmes you have recorded.
• Playback: Proceed as with Movies in Section 6.5 to play your recordings. The normal playback controls are active in this mode.
• Delete: Select the Programme you wish to delete and then press the RED button. You will be asked to confirm that you wish to delete the file. Select YES and press OK to delete the file.
• Rename: You can easily rename a programme by selecting the recording and then pressing the GREEN button. An onscreen character matrix will then be displayed allowing you to change the name of your recording. Follow the onscreen prompts to complete.
• Delete All: If you wish to delete all your programmes then press the BLUE button. You will be asked to confirm that you wish to delete all the files. Select YES and press OK to delete.
31
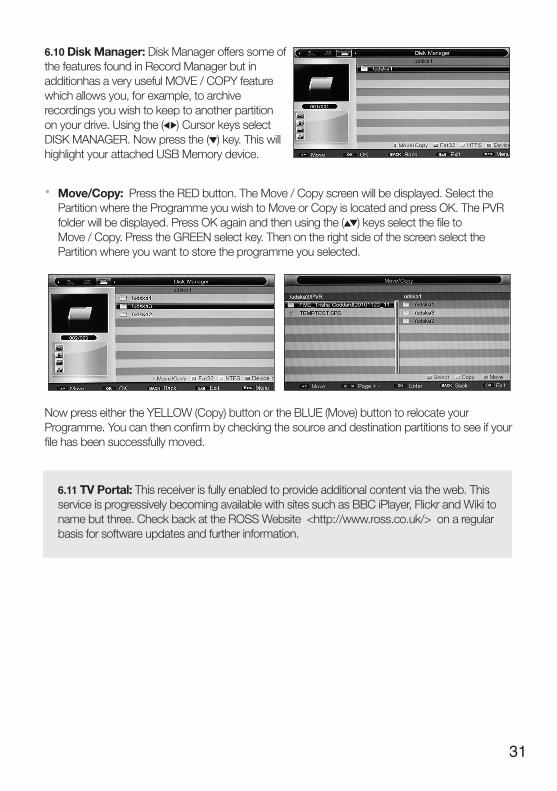
6.10 Disk Manager: Disk Manager offers some ofthe features found in Record Manager but in additionhas a very useful MOVE / COPY featurewhich allows you, for example, to archiverecordings you wish to keep to another partitionon your drive. Using the ( ) Cursor keys selectDISK MANAGER. Now press the ( ) key. This will highlight your attached USB Memory device.
• Move/Copy: Press the RED button. The Move / Copy screen will be displayed. Select the Partition where the Programme you wish to Move or Copy is located and press OK. The PVR folder will be displayed. Press OK again and then using the ( ) keys select the file to Move / Copy. Press the GREEN select key. Then on the right side of the screen select the Partition where you want to store the programme you selected.
Now press either the YELLOW (Copy) button or the BLUE (Move) button to relocate your Programme. You can then confirm by checking the source and destination partitions to see if your file has been successfully moved.
6.11 TV Portal: This receiver is fully enabled to provide additional content via the web. This service is progressively becoming available with sites such as BBC iPlayer, Flickr and Wiki to name but three. Check back at the ROSS Website <http://www.ross.co.uk/> on a regular basis for software updates and further information.
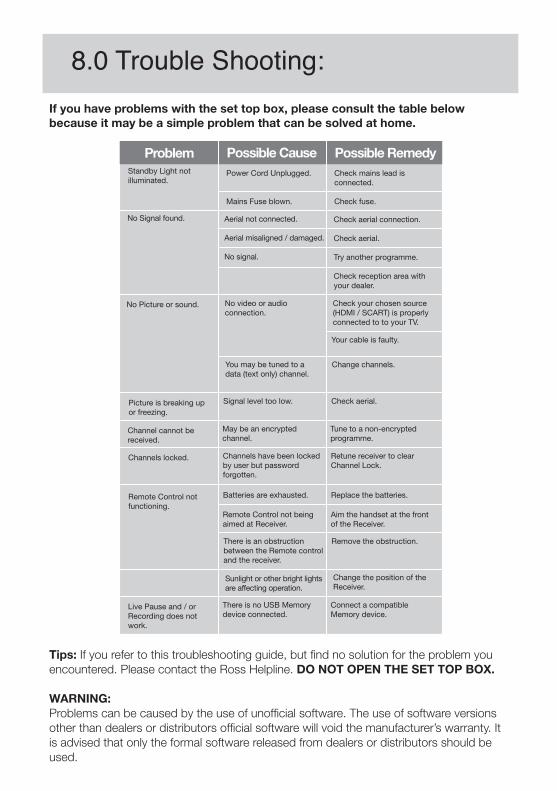
8.0 Trouble Shooting:If you have problems with the set top box, please consult the table below because it may be a simple problem that can be solved at home.
Tips: If you refer to this troubleshooting guide, but find no solution for the problem you encountered. Please contact the Ross Helpline. DO NOT OPEN THE SET TOP BOX.
WARNING:Problems can be caused by the use of unofficial software. The use of software versions other than dealers or distributors official software will void the manufacturer’s warranty. It is advised that only the formal software released from dealers or distributors should be used.
Standby Light not illuminated.
Power Cord Unplugged.
Mains Fuse blown.
Check mains lead is connected.
Check fuse.
Check aerial connection.
Check aerial.
Try another programme.
Check reception area withyour dealer.
No Picture or sound. No video or audio connection.
Check your chosen source (HDMI / SCART) is properly connected to to your TV.
Your cable is faulty.
Change channels.
Picture is breaking upor freezing.
Signal level too low. Check aerial.
No Signal found. Aerial not connected.
Aerial misaligned / damaged.
No signal.
You may be tuned to adata (text only) channel.
Channel cannot bereceived.
May be an encryptedchannel.
Tune to a non-encryptedprogramme.
Channels locked. Channels have been lockedby user but passwordforgotten.
Retune receiver to clear Channel Lock.
Remote Control notfunctioning.
Batteries are exhausted. Replace the batteries.
Remote Control not being aimed at Receiver.
Aim the handset at the front of the Receiver.
There is an obstruction between the Remote controland the receiver.
Remove the obstruction.
Live Pause and / or Recording does notwork.
There is no USB Memorydevice connected.
Connect a compatible Memory device.
Sunlight or other bright lightsare affecting operation.
Change the position of theReceiver.
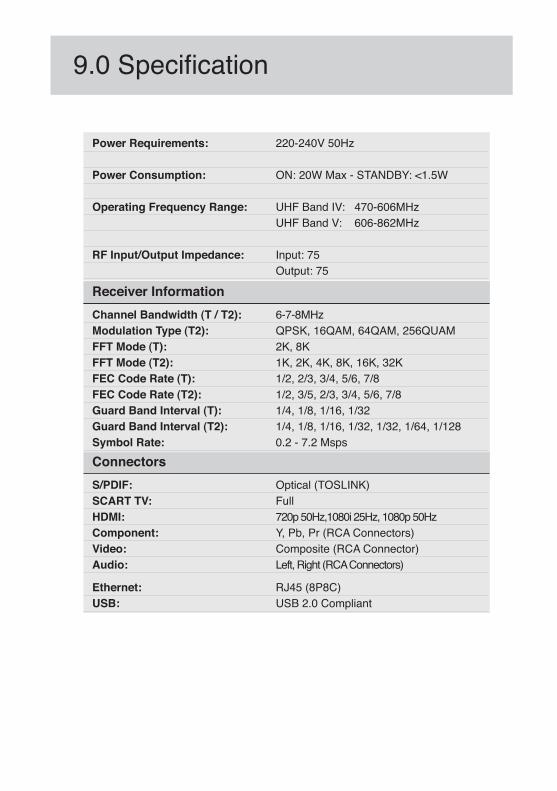
9.0Specification
Power Requirements: 220-240V 50Hz Power Consumption: ON: 20W Max - STANDBY: <1.5W Operating Frequency Range: UHF Band IV: 470-606MHz UHF Band V: 606-862MHz
RF Input/Output Impedance: Input: 75 Output: 75
Receiver Information Channel Bandwidth (T / T2): 6-7-8MHz Modulation Type (T2): QPSK, 16QAM, 64QAM, 256QUAM FFT Mode (T): 2K, 8K FFT Mode (T2): 1K, 2K, 4K, 8K, 16K, 32K FEC Code Rate (T): 1/2, 2/3, 3/4, 5/6, 7/8 FEC Code Rate (T2): 1/2, 3/5, 2/3, 3/4, 5/6, 7/8 Guard Band Interval (T): 1/4, 1/8, 1/16, 1/32 Guard Band Interval (T2): 1/4, 1/8, 1/16, 1/32, 1/32, 1/64, 1/128 Symbol Rate: 0.2 - 7.2 Msps Connectors S/PDIF: Optical (TOSLINK) SCART TV: Full HDMI: 720p 50Hz,1080i 25Hz, 1080p 50Hz Component: Y, Pb, Pr (RCA Connectors) Video: Composite (RCA Connector) Audio: Left, Right (RCA Connectors)
Ethernet: RJ45 (8P8C) USB: USB 2.0 Compliant

UK Office: Stafford Park 1, Telford, Shropshire, England, TF3 3BDTel: +44 (0) 1952 238 100 • Fax: +44 (0) 1952 238 180
Helpline: 0845 194 7584 (UK) For further product information please go to: www.ross.co.uk