tide of iron rules - fantasy flight games
TRANSCRIPT


Welcome
June 6th, 1944. D-Day was heralded as “the longest day” of the
war, yet it was but the opening salvo for the Allied offensive into
western Europe – an offensive that would last for almost a year
before the Allies could declare victory in the European theater.
The objective of the invasion: to dismantle Hitler’s
“Wehrmacht,” the once-mighty German armed forces; liberate
the occupied countries of western Europe; and ultimately to sub-
due the threat from Germany and the Nazi regime that ruled it.
Although bludgeoned by defeats in Russia and Africa and sys-
tematically weakened by Allied bombing of its supply and pro-
duction infrastructure, the German army remained a formidable
foe. The soldiers and officers of Hitler’s army were well trained,
battle hardened, and in possession of some of the finest and
most lethal equipment of the war.
Over the course of the Allied offensive, American forces would
undertake the brunt of the fighting in northern France and
Belgium, while their British allies would con-
centrate on the Netherlands and the
liberation of the Scandinavian
countries.
The American and British forces slowly but surely advanced
towards Germany, yet not without problems. In Arnhem, a dar-
ing joint offensive by the Allies was struck down by German
defenses, and Nazi forces nearly broke the American lines dur-
ing the last major German offensive in the Ardennes forest.
TIDE OF IRON is a game of World War II tactical conflict for
two to four players. The components in this base game allow
players to simulate the dramatic struggles that took place
between American and German forces in Northern Europe dur-
ing the years 1944 and 1945.
FFG hopes to provide you with expansions that will broaden the
scope of TIDE OF IRON, introducing more units and scenarios
covering other periods and theaters of the war, adding English,
Russian, and Japanese forces to the game.
Object of the game
TIDE OF IRON (“TOI”) is a scenario-based game, in which the
components and rules provide you with the tools to re-create a
vast number of different WWII battles and conflicts. Each spe-
cific scenario will dictate the setup, special rules, and victory
conditions for any one game session.
Before each game of TIDE OF IRON, players must first agree
upon and select a scenario to play. Such scenarios can be found
either in the included Scenario Guide, or online at:
WWW.FANTASYFLIGHTGAMES.COM
INtroduction

3INTRODUCTION
A TOI scenario is played over several rounds, with each round
consisting of a number of actions. What a player needs to
accomplish to win a game of TIDE OF IRON depends on the
scenario being played. Some scenarios require players to earn a
certain number of victory points, while other scenarios may
require players to control strategic positions on the battlefield,
such as bridges or pillboxes.
Feel free to invent your own scenarios with the components pro-
vided with the game.
Components
• This Rulebook
• 1 Scenario Guide
• 216 Plastic Figures, consisting of:
- 54 American Regular Infantry
- 12 American Elite Infantry
- 6 American Officers
- 6 American Mortar Crews
- 6 American Machine Gun Crews
- 12 M4A1 Sherman Tanks
- 6 M3A1 Half-Tracks
- 6 GMC CCKW 353 Transport Trucks
- 54 German Regular Infantry
- 12 German Elite Infantry
- 6 German Infantry Officers
- 6 German Mortar Crews
- 6 German Machine Gun Crews
- 6 Panzer IV Tanks
- 6 Tiger I Tanks
- 6 SdKfz 251 Half-Tracks
- 6 Opel Blitz Transport Trucks
• 48 Squad Bases
- 12 Light Grey German Bases
- 12 Dark Grey German Bases
- 12 Light Green American Bases
- 12 Dark Green American Bases
• 2 Player Reference Sheets
• 12 Map Boards
• 28 Map Overlay Pieces
• 14 Black Attack Dice
• 6 Red Defense Dice
• 1 Round Track
• 1 Round Marker
• 1 American Victory Point Marker
• 1 German Victory Point Marker
• 110 Cards, consisting of:
- 90 Strategy Cards
- 18 Operations Cards
- 1 American Initiative Card
- 1 German Initiative Card
• 1 Initiative Token
• 88 Activation Tokens
• 32 Damage Tokens
• 36 Condition Tokens
• 6 Anti-Tank Specialization Tokens
• 6 Engineer Specialization Tokens
• 6 Flamethrower Specialization Tokens
• 6 Medic Specialization Tokens
• 6 Victory Objective Markers
• 8 American Command Objective Markers (various values)
• 8 German Command Objective Markers (various values)
• 8 Neutral Command Objective Markers (various values)
• 8 American Control Markers
• 8 German Control Markers
• 51 Command Tokens (in 1s and 5s)
• 4 American Concealed Squad Markers
• 4 German Concealed Squad Markers
• 8 American Transport Markers
• 8 German Transport Markers
• 8 American Off-Board Indicator Tokens (numbered 1-8)
• 8 German Off-Board Indicator Tokens (numbered 1-8)
• 38 Fortification, Obstacle, and Cover Markers, consisting of:
- 12 Double-Sided Pillbox/Entrenchment Markers
- 14 Double-Sided Tank Trap/Razor Wire Markers
- 6 Smoke Markers
- 6 Minefield Markers
• 1 Target Token
• 1 North Directional Marker
Component Overview
Below you will find illustrations and brief descriptions of all the
components in the game.
Plastic Figures
These 216 detailed plastic figures represent the American and
German military personnel and vehicles that the players will be
commanding. Each player starts the game with the specific fig-
ures listed by the chosen scenario.

4 INTRODUCTION
Squad Bases
The squad bases come in four different shades representing the
players of a four-player game. All green bases belong to the
American players, while the grey bases belong to the German
players. Each base can hold up to four infantry figures. In a two-
player game, each player takes control of all bases of one color
(nation), ignoring the light and dark shades.
Player Reference Sheets
These sheets provide players with the
combat values and special abilities of
each figure, as well as summaries of
important rules and concepts.
Map Boards
The 12 double-sided map boards
are used to build the game board
for each scenario. They can be
arranged in a large number of
different variations, allowing for
a wide variety of scenarios.
Map Overlay Pieces
Map overlay pieces are placed on top of
the map boards to add additional terrain
features. Map overlay pieces feature
everything from additional buildings and
woods to streams and roads.
Dice
Black dice are attack dice and represent
the firepower and effectiveness of an
attack. Red dice are defense dice and rep-
resent both cover gained from terrain fea-
tures and the difficulty of penetrating a
vehicle’s armor.
Round Track, Round Marker, and Victory Markers
The round marker is placed on the round track to keep track of
the number of game rounds. Each nation also has a victory point
marker, which is placed on the round track to keep track of each
nation’s current victory point total. All of these markers have
“+10” on their reverse sides, for use if a nation exceeds 10 vic-
tory points or a game goes longer than 10 rounds.
Strategy Cards
During the game setup, as instructed
by each individual scenario, players
typically will receive one or more
Strategy card decks. During the
game players will be able to activate
cards from these decks for a variety
of benefits, including reinforcements
and artillery support.
Operations Cards
Some scenarios indicate that one or both
nations start with certain Operations cards,
which add additional game rules. These
rules can cover anything from weather con-
ditions and morale options to specialization
enhancements, such as those that give engi-
neer squads the ability to remove mine-
fields or lay smoke on the battlefield.
Initiative Cards and the Initiative Token
At the end of each Command Phase, the player with the most
cumulative command on his Initiative card gains the initiative
token. The player with the initiative token acts first during a
game round and breaks ties during timing conflicts.
ROUND
MARKER
ROUND TRACK
AMERICAN VP
MARKER
GERMAN VP
MARKER
AMERICAN SQUAD BASES GERMAN SQUAD BASES
AMERICAN
INITIATIVE CARD
GERMAN
INITIATIVE CARD
INITIATIV
ET
OK
EN

5INTRODUCTION
Activation Tokens
These tokens are used to keep track of which units have already
acted during a game round. The activation tokens have two
sides: a fatigued side and an opportunity fire side.
Damage Tokens
These tokens are used to indicate when a vehicle has been dam-
aged. The two sides of these tokens indicate whether the vehicle
is lightly damaged or heavily damaged.
Condition Tokens
These tokens are used to reflect the condition (i.e., morale) of
a squad that has been subject to suppressive fire. The two sides
of these markers indicate whether a squad has been pinned or
disrupted.
Squad Specialization Tokens
Specialization tokens are used to indicate that a squad has
special equipment or training, giving it additional abilities.
Victory Objective Markers
These markers act as reminders as to which
hexes are related to the victory conditions
specified by the scenario. Each scenario will
describe where to place these as well as their
purpose on the game board.
Command Objective Markers
These markers come in three colors and with various numeric
values. They are placed on the game board and represent areas
of tactical importance on the battlefield. Controlling these objec-
tives provides a player with command points. Each scenario will
indicate where to place these on the game board.
Control Markers
Each nation has eight control markers, which are used to indi-
cate which nation has control of which victory and command
objectives.
Command Tokens
Command tokens are used to keep
track of a nation’s total available com-
mand. Nations will spend command to
gain initiative as well as to activate
Strategy cards.
Transport Markers, Off-Board Indicator Tokens, and
Concealed Squad Markers
Each nation has 8 transport markers with corresponding off-
board indicator tokens, and four concealed squad markers. These
are used to mark which squads are being transported in vehicles
and to mark concealed squads.
Fatigued
Side
Opportunity
Fire Side
Lightly
Damaged
Heavily
Damaged
Pinned
Side
Disrupted
Side
ANTI-TANK MEDICFLAMETHROWERENGINEER
AMERICAN
CONTROL MARKER
GERMAN
CONTROL MARKER
AMERICAN
COMMAND
OBJECTIVE
MARKER
GERMAN
COMMAND
OBJECTIVE
MARKER
NEUTRAL
COMMAND
OBJECTIVE
MARKER
OFF-BOARD
INDICATOR TOKENS
TRANSPORT MARKERS CONCEALED SQUAD
MARKERS
COMMAND
TOKENS
6
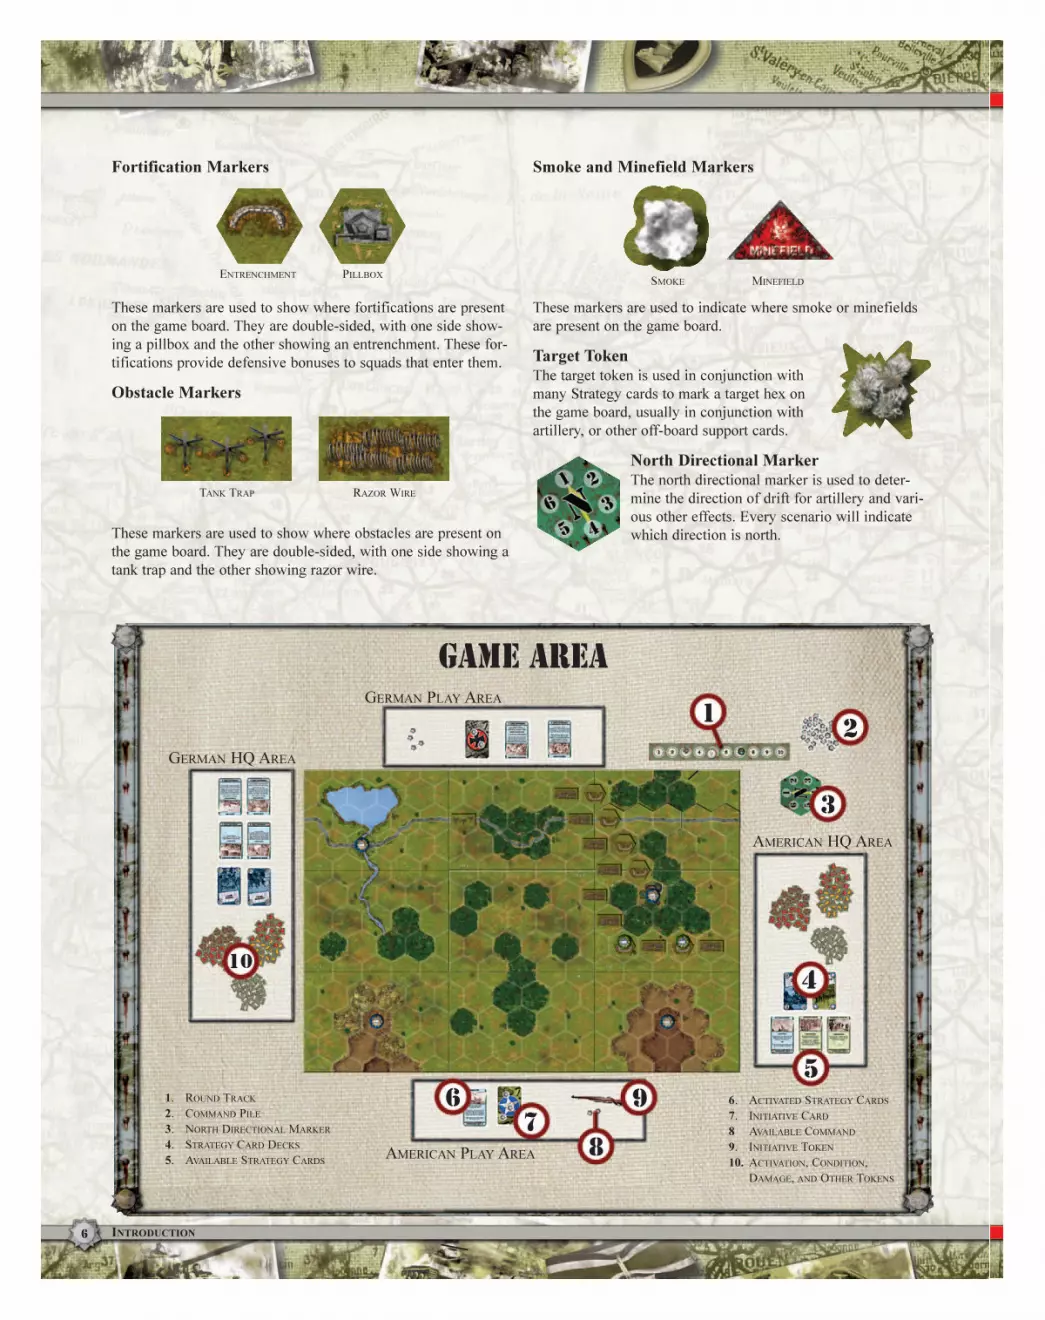
Fortification Markers
These markers are used to show where fortifications are present
on the game board. They are double-sided, with one side show-
ing a pillbox and the other showing an entrenchment. These for-
tifications provide defensive bonuses to squads that enter them.
Obstacle Markers
These markers are used to show where obstacles are present on
the game board. They are double-sided, with one side showing a
tank trap and the other showing razor wire.
Smoke and Minefield Markers
These markers are used to indicate where smoke or minefields
are present on the game board.
Target Token
The target token is used in conjunction with
many Strategy cards to mark a target hex on
the game board, usually in conjunction with
artillery, or other off-board support cards.
North Directional Marker
The north directional marker is used to deter-
mine the direction of drift for artillery and vari-
ous other effects. Every scenario will indicate
which direction is north.
ENTRENCHMENT PILLBOX
TANK TRAP RAZOR WIRE
SMOKE MINEFIELD
GERMAN PLAY AREA
AMERICAN HQ AREA
GERMAN HQ AREA
Game Area
AMERICAN PLAY AREA
1. ROUND TRACK
2. COMMAND PILE
3. NORTH DIRECTIONAL MARKER
4. STRATEGY CARD DECKS
5. AVAILABLE STRATEGY CARDS
6. ACTIVATED STRATEGY CARDS
7. INITIATIVE CARD
8 AVAILABLE COMMAND
9. INITIATIVE TOKEN
10. ACTIVATION, CONDITION,
DAMAGE, AND OTHER TOKENS
12
3
4
5
6
7
8
9
INTRODUCTION
10

7GAME SETUP
Starting the game
To prepare the gaming area, follow the instructions below. First-
time players should consult the “Game Area” diagram as a refer-
ence to where the various game elements should be placed.
1. Choose a Scenario and Nation
Players must first choose the game scenario for their session.
Scenarios can be found in the enclosed Scenario Guide, online at
www.fantasyflightgames.com, or in the planned expansion sets
for TIDE OF IRON. After a scenario is chosen, players must
decide which nation each player will be representing. In this
TOI base game, players have the choice of controlling either the
German or the American forces.
Important: Throughout this rulebook, we assume that you will
be playing the scenario “At the Breaking Point” with two play-
ers – one player taking the role of the Germans, and his oppo-
nent taking the role of the Americans. It is also possible to play
TOI with three or four players, as explained on pages 35-36.
2. Create the Game Board
Following the scenario instructions, players must find the rele-
vant map boards and arrange them together as instructed to form
the game board. Once assembled, many scenarios will require
additional map pieces and special tokens to be placed on the
game board. For more information on setting up the game board
for a scenario, please read the “Setting Up the Game Board”
section at the beginning of the enclosed Scenario Guide.
Play Area and HQ Area
As shown in the “Game Area” diagram, the area directly in front
of a player is his play area. This is where a player keeps his
Initiative card, his available command, and any relevant activat-
ed Strategy cards. The area to a player’s right is his HQ area,
where he keeps his Strategy card decks and available (but unac-
tivated) Strategy cards. It is important that players keep their
play areas and HQ areas separate.
3. Claim Game Cards
Each player now claims any specific
Strategy card decks that his nation is
granted (as indicated by the scenario),
shuffling each deck and placing each shuf-
fled deck facedown in his HQ area.
Then each player draws a number of start-
ing Strategy cards as indicated by the sce-
nario and places them faceup in his HQ area. These cards may
be drawn from any of the Strategy decks in a player’s HQ area,
in any combination the player wishes, including all from the
same deck. These will be the available Strategy cards that the
player may activate during the game round.
Example: In the “At the Breaking Point” scenario, the German
player is given the “Morale I” and the “Command I” Strategy
card decks. He shuffles the two decks separately and places
them facedown in his HQ area. The scenario gives the Germans
3 starting Strategy cards. The German player chooses to draw 2
cards from the Morale deck, and 1 card from the Command
deck, placing all 3 cards faceup in his HQ area.
Each player then takes any Operations
cards granted to him by the scenario (if
any), placing them in his play area. Note
that some Operations cards (such as
weather effects) affect the game play of
both players. Be sure to read any
Operations cards in your
own, as well as your opponent’s, play area.
(The “At the Breaking Point” scenario does
not use Operations cards.)
Each player should then locate the Initiative
card representing his nation, and place this
card in his play area.
4. Place Round Marker and Game Tokens
Most scenarios last a set number of rounds. To illustrate the pas-
sage of time, find the round track and the corresponding round
marker. Place the round track to one side of the game board,
and place the round marker on the “1” space on the round track.
Each player should now take a healthy supply of the activation
tokens, condition tokens, and damage tokens, placing a stack
of each of these in his HQ area.
Then take all the command tokens and place them in a central
command pile adjacent to the round track, within easy reach of
both players.
Each scenario indicates which nation begins the game with the
initiative token. That nation places the initiative token in its play
area, and is said to “have the initiative.”
GAME SETup
STRATEGY CARDS
OPERATIONS CARDS
INITIATIVE CARDS

8 GAME SETUP
5. Build Squads
Each scenario details the number of starting infantry, vehicles,
and squad bases available to each nation (divided into two divi-
sions). Before beginning the game, each player must locate these
plastic pieces from the game box, placing them in his play area.
Then, each player must proceed to build his squads by placing
his infantry figures into the squad bases. This is done by pushing
the peg, found below each infantry figure, into the holes located
in the squad bases. When a squad base has each of its four holes
occupied, that base is considered full. A squad base with a full
contingent of infantry (i.e., with all its holes occupied) is said to
form a “full squad.” A player must always build full squads dur-
ing setup.
Note that some infantry figures (such as the mortar and machine
gun crews), take up two holes in the base. Thus, for example, a
squad would be full if it included two mortar crews.
Unless the scenario designates otherwise, players are free to cus-
tomize their squad bases with the mix of scenario-provided
infantry types that they deem appropriate for their strategy.
Example: During setup of the “At the Breaking Point” scenario,
the American player must create his 11 squads from the figures
listed by the scenario. In his first squad, he decides to place 1
machine gun crew figure (which takes up 2 of the 4 available
slots in the base) and 2 regular infantry figures (each of which
takes 1 slot in the base). He places this full squad in his play
area, and starts assembling his next squad. This continues until
the American player has assembled all 11 of his squads.
All customization of squads and subsequent placement on the
game board are done in order of initiative. To speed up this part
Specialization
Token
Building Squads
At the start of a scenario, each player is allotted a
number of infantry figures, which he uses to cus-
tomize his squads. Each of the four holes in his
allotted squad bases must be filled. Figures are
inserted with their peg fitting into one of the holes
in the squad base. Note that some figures (the mor-
tar crew and the machine gun crew) are considered a
single figure but take up two holes on the base.
Certain scenarios grant players specialization
tokens. A squad may have a single specialization
token placed into the slot on the back of the base.
For more information about specialization tokens,
see page 44.
THE LANGUAGE OF
TIDE OF IRON
Throughout this rulebook and on the game cards, we
will use special terms to describe game components
and circumstances. These include:
Figure: An individual infantry figure (Regular
Infantry, Elite Infantry, Officer, Machine Gun Crew,
or Mortar Crew). On the game board, a figure will
always be part of a squad.
Squad: A single squad base and the figures assigned
to it.
Vehicle: A single vehicle miniature, such as a truck,
half-track, or tank.
Unit: An individual vehicle or squad.
Full Squad: A squad with all its slots filled by figures.
Weakened Squad: A squad with one or more avail-
able slots (typically because some of its figures have
been destroyed by an enemy attack).
Friendly: A term used for units or other game com-
ponents belonging to the same player.
Enemy: A term used for units belonging to an
opposing player.
Fatigued: A unit that has finished its activation and
has been assigned an activation token with the
“fatigued” side faceup.
Activated: A unit that is either fatigued or in Op Fire
mode.
Fresh: A unit that has been assigned no activation
token (i.e., is not fatigued or in Op Fire mode).
Typically, a unit that has not yet been activated dur-
ing the current game round will be fresh.
LOS: Acronym for “Line of Sight.”
Op Fire: Short term for “Opportunity Fire.”
Fire/Attack: The terms “fire” and “attack” are used
interchangeably in TOI.
9GAME SETUP
of the game setup, if players agree, they may customize their
squads simultaneously, even behind a screen (such as the game
box lid) for secrecy.
Divisions and Base Colors
In TOI, each nation is provided with 12 plastic squad bases in
each of two shades (for a total of 24 bases per nation). The
Germans have 12 squad bases of a light grey color and 12 bases
of a darker grey color, while the Americans have 12 squad bases
of a lighter green color and 12 bases of a darker green color.
These lighter or darker shades only have significance in a three-
or four-player game, in which each member of team controls
one division of his team’s forces. The differently shaded bases
are used to show which units belong to each division. See pages
35-36 for more information. .
Unless stated otherwise, in a two-player game these darker
and lighter shades have no game effect. Each player simply
takes control of all the figures and bases of both divisions from
the given nation.
Squad Specialization
Many scenarios will grant a nation a certain number of “special-
ization” tokens. Every squad base has a small protruding plastic
hook, which can hold one specialization token. While building
squads, the player may use these tokens to illustrate that a squad
has the specific specialization by clamping the specialization
token onto the squad’s plastic hook
A squad that contains any figure with the heavy infantry
weapon trait (such as the mortar crew and the machine gun
crew) may never be assigned a specialization token.
Specializations grant a unit special skills on the battlefield, as
explained on page 44.
6. Place Starting Units on the Game Board
Now, in order of initiative, players place their units on the board
in the areas indicated by the scenario. The player with initiative
places all of his units first, followed by his opponent. Make sure
that no hex exceeds the stacking limit (see sidebar).
Example: In the “At the Breaking Point” scenario, the American
player starts the game with initiative. He places his 11 squads
on the board as directed by the scenario instructions, then the
German player places all his units.
Each scenario will detail which sections of the game board play-
ers may place their starting units in. These sections are referred
to as deployment zones. Be sure to read pages 2-3 of the
Scenario Guide for more information on deployment zones and
placing starting units.
Once both players have placed their units on the game board,
setup continues.
7. Place Initial Opportunity Fire Tokens
In order of initiative, each player may place any of his units in
“opportunity fire” mode (also called “Op Fire”mode) before the
first game round. This represents the readiness of such a unit to
fire at enemy units (the rules for opportunity fire will be
explained later). This is done by placing an activation token with
the “opportunity fire” side up by a specific unit, indicating that
the unit is now in “Op Fire mode.”
As you will read later, a unit placed under Op Fire
is considered to be activated. An activated unit is
not able to move or fire normally during the
upcoming game round. We recommend that dur-
ing their first game, players refrain from starting any of their
units in Op Fire mode.
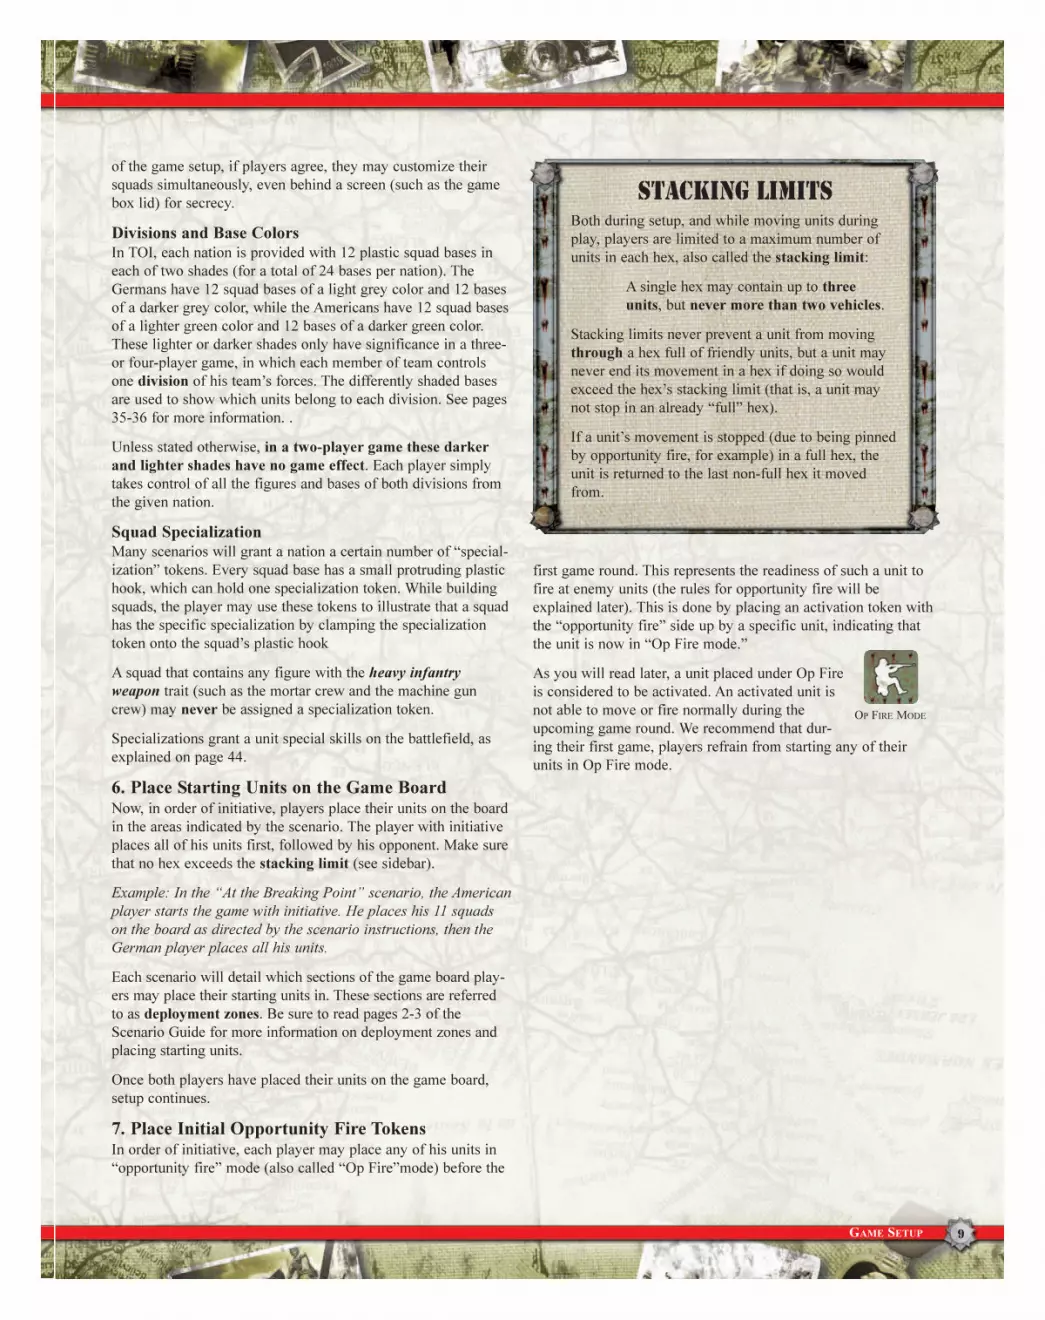
Stacking Limits
Both during setup, and while moving units during
play, players are limited to a maximum number of
units in each hex, also called the stacking limit:
A single hex may contain up to three
units, but never more than two vehicles.
Stacking limits never prevent a unit from moving
through a hex full of friendly units, but a unit may
never end its movement in a hex if doing so would
exceed the hex’s stacking limit (that is, a unit may
not stop in an already “full” hex).
If a unit’s movement is stopped (due to being pinned
by opportunity fire, for example) in a full hex, the
unit is returned to the last non-full hex it moved
from.
OP FIRE MODE
10 THE GAME ROUND
The following section will explain the structure of the game in
detail. It will explain how the game round is played, facilitating
an overall understanding of the game flow and how the various
elements of TOI tie together. In the section titled “The Rules of
Engagement” (page 18) we will describe the detailed rules for
moving your units on the board and engaging in combat against
the enemy.
Every TOI scenario is played over a series of game rounds. The
actual number of rounds, as well the game’s victory conditions,
are designated by the individual scenario. In the “At the
Breaking Point” scenario, for example, the game is played over
8 rounds.
Each round is divided into three phases, always taken in the fol-
lowing order:
1. The Action Phase
2. The Command Phase
3. The Status Phase
After the Status Phase of a round is completed, another round
begins. This continues until the last round of the game is fin-
ished, or until one player reaches a victory condition designated
by the scenario.
THE ACTION PHASE
The Action Phase constitutes the main portion of game play in
TOI. The Action Phase is broken down into a number of action
turns, during which a player must take the number of actions
indicated by the specific scenario. After a player has completed
all the actions of his action turn, his opponent must complete his
action turn, after which the first player again takes another
action turn, etc.
For example, in the “At the Breaking Point” scenario, each play-
er must take three actions during each of their action turns.
Thus, at the start of each Action Phase, the player with initiative
must take three actions, after which his opponent must take three
actions, etc.
After neither player has additional actions (which is typically
when every unit has been activated), the Action Phase is over,
and play proceeds to the Command Phase (the Command Phase
is described in detail on pages 14-15).
The Action Turn
The player with the initiative always takes the first action turn of
the phase. In the “At the Breaking Point” scenario, the American
player starts with the initiative.
Each action can be one of the following:
• Advance
• Concentrated Fire
• Prepare Op Fire
• Fire and Movement
• Activate Strategy Card
• Assault
• Fatigue Unit
• Special Action
Most of these actions involve activating a single unit on the
game board for some activity.
Only a fresh unit may be activated. As described in “Language
of Tide of Iron” sidebar, a fresh unit is one that has not previous-
ly been assigned an activation token. When a player activates a
squad, he activates the entire squad, not a specific individual fig-
ure within the squad.
Once a unit has been activated by an action, and until it com-
pletes its activation, we will refer to that unit as the active unit.
As all actions are taken one-at-a-time, there will only be a single
active unit at any given moment.
When the active unit has completed its activation, it is
fatigued (unless placed in Op Fire mode) and an acti-
vation token with the “fatigued” side faceup is placed
by the unit to indicate its fatigued status. A fatigued
unit, or a unit in Op Fire mode, may not be activated to
take an action.
Below, the eight possible actions are described in detail:
The current player activates a fresh friendly unit to move across
the board, its distance limited by its number of movement points
(determined by its movement value) and by the various terrain
types on the board. While moving, a unit may also be subject to
enemy Op Fire, which may halt its movement. Detailed move-
ment rules can be found on pages 18-21.
After the active unit has completed its movement, it is fatigued.
THE GAME ROUND
FATIGUED
Advance

11THE GAME ROUND
The current player activates a fresh friendly unit to immediately
make a concentrated attack against an enemy unit.
Detailed combat rules can be found beginning on page 22.
After resolving the attack, the active unit is fatigued.
The current player places an activation token, with the “Op Fire”
side faceup, by a fresh friendly unit.
A unit in Op Fire mode is prepared to attack an enemy unit at a
moment’s notice: If an enemy unit moves within the Op Fire
unit’s line of sight, the Op Fire unit will have an opportunity to
interrupt the enemy unit’s movement and attack it.
Detailed combat rules be found beginning on page 22.
The current player activates a fresh friendly unit to move on the
game board and optionally make an attack against an eligible
enemy unit. The active unit may a) move then attack or b) attack
and then move. A unit cannot break up its movement with an
attack. In other words, a unit cannot move, attack, and then
move again.
When a player chooses this type of action, the active unit
receives penalties to both its movement and its attack:
• A squad taking a Fire and Movement action receives
1 fewer movement point during the activation.
• A vehicle taking a Fire and Movement action receives
2 fewer movement points during the activation.
• A unit taking a Fire and Movement action must
halve its firepower value when making its attack.
• A unit taking a Fire and Movement action may not
make a long-range attack (see “Determining Range,”
page 22).
• Other friendly units may not support the active unit’s
attack (see “Combined Fire,” pages 29-31).
A squad containing any heavy infantry weapon figure (such as a
machine gun crew), may not be activated with a Fire and
Movement action.
A player who declares a Fire and Movement action may decide
not to have the active unit attack during the activation, but the
unit still receives the movement point penalty.
Detailed combat rules can be found beginning on page 22.
After the active unit has resolved its Fire and Movement, it is
fatigued.
The current player activates and resolves
the effects of an eligible faceup Strategy
card in his HQ area. For a Strategy card
to be eligible for activation during the
Action Phase, it must have the words
“Action Phase:” at the top of its text box.
Before activating a Strategy card, a player
must first pay the card’s command cost.
He simply takes the required command
from his play area and places the com-
mand tokens back in the central command
pile. Once the command cost has been
paid, the player immediately resolves the
effect of the card. Most Strategy cards are removed from the game
after being activated (place them back in the game box), but some
have lasting effects and indicate that they should be placed in a
player’s play area.
Example: The American player decides to use an action to acti-
vate the Strategy Card “All or Nothing” (pictured above). He
takes 2 command from his play area and places it back in the
command pile, then resolves the card’s effect, removing an acti-
vation token from one of his fatigued units. Finally, he places the
card back in the game box.
If a player has insufficient command in his play area to pay the
command cost of a Strategy Card, that card may not be activated.
Fire and movement
Concentrated fire
Prepare Op fire
ActivateStrategy card
AN ACTION PHASE
STRATEGY CARD

12 THE GAME ROUND
The current player activates a fresh friendly squad to move on
the game board. After moving, the active squad may make an
assault attack against an adjacent hex containing one or more
enemy units (see pages 33-34 for how to resolve an assault
attack).
A squad taking an Assault action receives 1 fewer movement
point during its activation.
A player who declares an Assault action may decide not to have
the active squad engage in an assault attack after its movement,
but the squad still receives the movement penalty.
A squad containing any heavy infantry weapon figure (such as a
machine gun crew), may not be activated with an Assault action.
Vehicles cannot be activated with an Assault action.
After an Assault action, the active squad is fatigued.
The current player may simply activate a fresh friendly unit to do
nothing. Typically, it is better to place such a unit into Op Fire
mode, but the scenario or other situations may dictate that simply
using an action to do nothing is more appropriate.
Simply fatigue the unit and proceed to the next action.
Many elements in the game allow for other actions than the
seven described above. Such actions are typically made avail-
able by Strategy cards, Operations cards, specialization tokens,
and sometimes even the scenario itself. Effects and special abili-
ties that require an action will always use the terminology “as an
action, do X.”
For example, a unit with the engineering specialization can be
fatigued as an action to build an entrenchment terrain enhance-
ment in its current hex.
Opportunity Fire and Combined Fire
Throughout a given game turn, most units on the board are acti-
vated as a result on an action taken during their nation’s action
turn. Typically a unit moves, fires, or resolves other effects by
its player spending an action to activate it, with it becoming the
active unit for the duration of that action.
In two circumstances, however, units can act in the game with-
out being the active unit. These circumstances are when a non-
active unit:
• Makes an Op Fire attack
• Supports an attack with combined fire.
Make an Op Fire Attack
A unit in Op Fire mode may attack an enemy unit that moves
within its range and line of sight. Such opportunity attacks occur
during the opponent’s action turn. Op Fire attacks are dis-
cussed in more detail on page 32.
After making an opportunity fire attack, the attacking unit is
fatigued (flip the Op Fire token over to its fatigued side).
Assigning a unit to Op Fire mode during the Action Phase takes
an action (as described on page 11), but actually executing an
Op Fire attack does not cost an action.
Support an Attack with Combined Fire
When the active unit makes a concentrated attack, other fresh
friendly units may support that attack with combined fire.
(Combined fire is explained in detail on pages 29-31.) Likewise,
when a unit engages in an Op Fire attack, other friendly units
also in Op Fire mode may support the attack with combined fire.
Participating in combined fire causes a unit to become fatigued
after the attack, but does not cost an action.
Example: On his action turn, the American player announces
that he will use his first action to have one of his tanks make a
concentrated attack. He also announces that two of his squads
will support the attack. All three units will be fatigued after the
attack, but the American player has only used one action.
End of the Action Phase
If a player can take no more actions during his action turn (usu-
ally because all of his units are either in Op Fire mode or are
fatigued), his Action Phase is over. Alternatively, a player may
declare that his Action Phase is over at any time, even if he still
has fresh units on the board. Once a player has declared that his
Action Phase is over, he may not take any more actions during
that round.
At that point, his opponent may now take an unlimited number
of actions, until he also has no more available actions, or he
declares that his Action Phase is over.
Once both players have no more actions, play continues to the
Command Phase.
ASSAULT
fatigue unit
Special action

13THE GAME ROUND
Action Turn Examples
American Action Turn
A) Advance: The American player uses his first action
to activate this squad to Advance. He moves the unit 4
hexes and then fatigues the unit.
B) Concentrated Attack: The American player uses
his second action to activate this unit to make a concen-
trated attack against a German squad. He resolves the
attack and then fatigues the unit.
C) Prepare Op Fire: The American player uses his
third and final action to activate this squad, placing it
into Op Fire mode. He sets an Op Fire token by the
squad to indicate this. This squad will be able to attack
an enemy squad that enters its range and line of sight.
German Action Turn
D) Activate Strategy Card: The German player uses
his first action to activate and resolve one of the
Strategy cards faceup in his HQ area.
E) Advance: The German player uses his second action
to activate this squad to Advance. The American player,
however, uses his squad in Op Fire mode to attack the
German squad as it moves into its first hex. As a result
of the Op Fire attack, the German squad becomes
pinned, is immediately fatigued, and must stop its
movement. The American player flips his Op Fire token
to its fatigued side.
F) Fire and Movement: The German player uses his
third and final action to activate this squad for a Fire and
Movement action. First he moves the squad adjacent to
an American unit and then attacks it. Because this is a
Fire and Movement action, the German squad has only 3
movement points, and attacks at half firepower. After the
attack is resolved, the German player fatigues his squad.
This diagram shows one American action turn, followed by one German action turn. In this
example, each nation receives 3 actions per action turn.

14 THE GAME ROUND
THE COMMAND PHASE
After both players have completed all their actions, ending the
Action Phase, play proceeds to the Command Phase. This phase
represents the strategic events surrounding the scenario, as well
as the lobbying for priority and prestige (which we jointly call
“command”) that this battlefield is receiving from the field
headquarters in the context of the wider war. These are the steps
of the Command Phase, always taken in this order:
1. Determine Control over Objectives
2. Receive Command and Victory Points
3. Spend Command
4. Determine Initiative
1. Determine Control over Objectives
First, players should look at every hex that is significant for con-
trol purposes. Such hexes are the ones containing a command
objective marker, a victory objective marker, or any other hex
whose control is deemed significant by the scenario (we will call
all such hexes “objectives”). If control over an objective hex has
changed, the new owner must now place his control marker on
that hex.
A player is said to “control” an objective if he has previously
placed one of his control markers on that hex, or if he is now
capturing the hex by having at least one friendly unit in it. A
player that captures an objective should place one of his control
makers on that hex, removing any enemy control marker that
may be present.
A player retains control of a hex as long as his control marker
remains on the hex. It is not necessary for the capturing units
to remain in the hex in order to retain control of the objective.
Command Objectives
Command objectives are either nation-specific or neutral.
Although a player can control any command objective, a player
may only gain command (see below) from controlling friendly
or neutral command objective hexes.
Objective Control at the Start of the Game
Unless specified otherwise by the scenario, objectives are con-
trolled by neither player at the beginning of a game. Even
nation-specific command objectives do not start controlled by
their nation.
For example: In the “Crossroads” scenario, there are three
American command objectives on the board. These do not start
under American control, so the American player must move
units to take control of them before he can collect any command
from them.
Note that if a command objective is located in a nation’s deploy-
ment zone, that nation can take control of the command objec-
tive during setup by simply placing one or more starting units in
that hex.
2. Receive Command and Victory Points
During this step of the Command Phase, each player collects
command for controlling command objectives, and victory
points for controlling victory point objectives.
Receive Command Points
For each friendly or neutral command
objective a player controls, he receives
the indicated amount of command from
the command pile, placing the command
tokens prominently in his play area
(along with any unused command from
prior rounds).
The amount of command in a player’s play area is called his
“available command.” Players are always entitled to see how
much command is available to an opponent at any time.
Note that while a player can control enemy command objectives,
he does not receive command for controlling them. The control-
ling player must simply take satisfaction that he is denying his
enemy from potentially collecting that command.
Example: During the prior Action Phase, the American player
fought to push several of his squads into a building containing a
“3” German command objective. The American player also con-
trols a “2” American command objective and a “2” neutral
command objective. During the “Receive Command and Victory
Points” step of the Command Phase, he receives 4 command
from the command pile for the “2” American objective plus the
“2” neutral objective. The American player does not receive
command for the “3” German command objective, even though
he controls it.
Available command can be used to activate Strategy cards,
towards gaining initiative, and/or for any special purposes speci-
fied by the scenario.
AMERICAN
COMMAND
OBJECTIVE
GERMAN
COMMAND
OBJECTIVE
NEUTRAL
COMMAND
OBJECTIVE
AMERICAN
CONTROL
MARKER
GERMAN
CONTROL
MARKER
COMMAND TOKENS

15THE GAME ROUND
Receive Victory Points
Now players must collect victory points as dictated by the sce-
nario (some scenarios may not depend on victory points, in
which case you simply skip this step). To keep track of the num-
ber of accumulated victory points, players should use their victo-
ry point markers on the round track, When a player reaches 11
victory points, he should record this by flipping his victory point
marker to its “+10” side and moving it back to the “1” space of
the round track.
3. Spend Command
In order of initiative, each player may now spend command
points. Once the player with initiative has fully completed his
spending, his opponent may then spend command points.
A player may spend command on the following two effects
(some scenarios may allow players to spend command for other
effects):
• Activate Strategy Cards
• Increase Initiative Pool
Important: A player is not required to spend all or any of his
available command on either Strategy cards or initiative. A play-
er may “save up” command in his play area to spend during a
later round.
Activate Strategy Cards
Many Strategy cards have the words “Command Phase” in bold
at the top of their text box, indicating that they can be activated
during this step of the Command Phase. As when activating a
Strategy card during the Action Phase, a player must first pay
the command cost of the Strategy card to the command pile.
Once the command cost has been paid, the player immediately
resolves the effect of the card. Most Strategy cards are removed
from the game once activated (place them back in the game box),
but some have lasting effects and indicate that they should be
placed in a player’s play area.
A player may activate as many of his available Strategy cards
(the faceup Strategy cards in his HQ area) as he can afford. If a
player has no additional faceup Strategy cards remaining in his
HQ area, he will not be able to activate any additional cards.
Increase Initiative Pool
In addition to spending command by
activating Strategy cards, a player may
place some or all of his available com-
mand onto his Initiative card. To
spend command on initiative, a player
simply places the desired amount of
available command from his play area
onto his Initiative card. Command that
has been placed on a player’s Initiative
card is considered spent and cannot be
retrieved later.
In this way, command can accumulate on a player’s Initiative
card round after round. During the next step, the player with the
highest total command on his Initiative card will claim the ini-
tiative for the next game round.
4. Determine Initiative
The player with the highest amount
of accumulated command on his
Initiative card now claims the initia-
tive token, indicating that he has the
initiative for the coming round. Also,
If there is ever a conflict about timing (such as two
abilities that both take effect at the same time), the player with
initiative decides the order in which to resolve the effects (see
“Timing Conflicts” on page 35).
If the cumulative amount of command assigned to initiative is
tied between the players, the initiative token goes to the player
who currently does not have initiative.
AMERICAN INITIATIVE CARD
WITH ACCUMULATED
COMMAND.
INITIATIV
ET
OK
EN
Tracking Victory Points
on the Round Track
It is third round of the game. During the Command
Phase, the American player acquires 2 victory
points, placing his total at 7. Although the German
player did not acquire any victory points this round,
notice that his marker is on the +10 side, indicating
that he has a total of 12 victory points.

16 THE GAME ROUND
The Status Phase
The Status Phase consists of several important steps, but at its
heart is a “clean up” phase that readies the game for the next
Action Phase. Each step of the Status Phase must be taken in the
following order:
1. Draw Strategy Cards
2. Remove Tokens
3. Place Units in Op Fire Mode
4. Squad Transfers
5. Scenario Reinforcements and Events
6. Advance the Round Marker
These steps are described in detail below.
1. Draw Strategy Cards
In order of initiative, each player draws one Strategy card from
any one of the Strategy card decks in his HQ area. The drawn
card is placed faceup in his HQ area, and depending on the card,
may be activated during the next Action or Command Phase.
If the first card drawn contains a “+” symbol, the player may
immediately draw one additional Strategy card from any one of
the decks in his HQ area. No additional cards are drawn this
round, even if the second card also contains a “+” symbol.
Note that the “+” symbol only has an effect when cards are
drawn during this step. (For example, a player does not draw an
additional card during game setup when a card with a “+” sym-
bol is drawn.)
If a player has no cards left in his Strategy decks, he skips this
step.
2. Remove Tokens
During this step, do the following in the order listed below:
1. Remove all activation tokens from the game board (including
activation tokens from squads being transported by vehicles and
located by off-board indicator tokens), placing the tokens back in
their respective HQ piles. All units are now considered “fresh.”
2. Remove all condition tokens from pinned squads, placing the
tokens back in their HQ pile.
3. All disrupted squads now become pinned (flip the condition
token). Exception: If there is an officer in the same hex as a dis-
rupted squad, the condition token is removed and placed back in
the HQ pile instead of being converted to pinned condition.
4. Remove any markers that expire (such as smoke).
3. Place Units in Op Fire Mode
In order of initiative, players may assign any number of their
units to Op Fire mode. This will prevent them from being acti-
vated during the upcoming Action Phase, but will allow them to
react to enemy movement from the very first action of the next
round. If desired, it is possible for a player to place all of his
units in Op Fire mode during this step.
4. Squad Transfers
In order of initiative, players may now move figures between
friendly squads occupying the same hex. There is no limit to the
number of figures that may be moved between squads in this
way. See the “Squad Transfer Example” diagram for how a play-
er may wish to transfer units.
The following restrictions govern squad transfers:
• A player may not transfer figures to or from a squad with a
specialization (such as a medic squad, or an anti-tank squad).
• A player may not transfer a specialization token to another
squad.
• Players may not transfer figures to or from pinned or disrupted
squads, or to or from squads being transported by a vehicle.
• Players may not transfer infantry to or from squads that are in
entrenchments or pillboxes.
If a transfer leaves a squad base empty, remove the squad base
from the game and place it back in the box.
5. Scenario Reinforcements and Events
In order of initiative, players now receive any reinforcements
provided by the scenario (if any), and resolve any special events
for this round, as indicated by the scenario.
Note that scenario reinforcements differ from reinforcements
provided by Strategy cards, which are placed on the board while
resolving that Strategy card, and not during this step.
Placing Reinforcements
Whether granted by a Strategy card or because of a scenario spe-
cial event, reinforcements may only be placed in a nation’s rein-
forcement zone. In the Scenario Guide maps, the hexes of a
nation’s reinforcement zone are marked with the letter “R.” The
American reinforcement zone consists of all the hexes with a
green “R,” and the German reinforcement zone consists of all
the hexes with a grey “R.”
• A player may not place reinforcements in a way that would
exceed a hex’s stacking limits.
• A player may not place reinforcements in a hex occupied by
enemy units. If all a nation’s reinforcement zone hexes are occu-
pied by enemy units, the player unable to receive the reinforce-
ments. Even if such hexes are later freed of enemy units, any
reinforcements missed in prior game rounds remain lost.
THE “+”
SYMBOL

17THE GAME ROUND
See pages 2-3 of the Scenario Guide for more details on sce-
nario reinforcements.
6. Advance the Round Marker
Now advance the round marker on the round track. If the sce-
nario has more than ten rounds, when the eleventh round is
reached, record this by flipping the round marker to its “+10”
side and placing it back on the “1” space of the round track.
If the round just completed was the last round of the scenario,
the game is now over, and a winner is determined. For example,
a scenario that is 8 rounds long would end immediately upon the
round marker advancing to the “9” position.
A New Round!
After advancing the round maker, this round is over, and another
round begins with a new Action Phase.
Winning the Game
Different scenarios have different victory conditions. Make sure
to read the scenario victory conditions carefully. In many scenar-
ios, the player with the highest victory point total is the winner
at the end of the game, but the scenario may specify more spe-
cialized victory conditions. For example, in the “At the Breaking
Point” scenario, the American player wins by having his units
occupy certain hexes specified by the scenario, and the German
player wins by preventing the Americans from occupying those
hexes for 8 rounds.
If, at the end of a victory point scenario, both players have the
same number of victory points; the player who has the initiative
at the end of the Status Phase is the winner of the game.
Squad Transfer Example
During the Status Phase, the German player wishes
to transfer figures between squads in the same hex.
He may not transfer any figures to or from the top
squad because it has a specialization token. He
instead decides to transfer one single figure into the
eligible squad, and then removes the empty base
from the game board.

18 RULES OF ENGAGEMENT
This section will provide you with the detailed rules for the core
elements of the game, such as movement, combat, line of sight,
and other critical elements involving interaction among the
game units.
The Player Reference
Sheets
TOI includes two player reference sheets that list the detailed
information and values for each unit type. Every figure in the
game has a few key values, and most figures also have certain
special abilities and/or traits. This section of the rules will fre-
quently reference the various values found on the player refer-
ence sheets. Please read the “The Player Reference Sheet” dia-
gram for a better understanding of how to locate and reference
these values.
Movement
A unit moves on the board by spending its movement points. A
unit can only use its movement points if it is activated with
an Advance, Fire and Movement, or Assault action.
A unit may not move into or through a hex containing an
enemy unit. (Exceptions include tanks’ “Overrun” special abili-
ty and assault attacks.)
The movement values of figures within a squad are not cumula-
tive. For example, a squad consisting of 4 regular infantry (each
with a movement value of 4) has only 4 movement points.
When moving the active unit, it is simply moved from hex to
hex until the active player is either satisfied with the movement,
or until all of its movement points are spent. The number of
movement points expended when entering any given hex is
dependent on the terrain of the hex.
Certain types of terrain cost more movement points to enter than
other types. See pages 45-47 for specific information on each
terrain type, their movement costs, and effects. Terrain move-
ment costs and effects are also summarized on the back of the
Scenario Guide.
Movement points may also be spent for purposes besides mov-
ing from hex to hex, such as entering or exiting a vehicle or for-
tification, as described later in these rules. A unit may only
spend movement points during Advance, Fire and
Movement, or Assault actions.
Half Hexes
Around the outside frame of the game board, every other hex
will be a “half hex.” These hexes are not part of the game, and
cannot be entered or counted for any reason.
The rules of engagement
the PLayer Reference Sheet
The player reference sheet contains the values and
ability summary for each unit in the game, repre-
sented as follows:
A) Figure Type: Each figure has an icon indicating
whether it is an infantry or a vehicle figure.
B) Movement Value: Each figure has a base move-
ment value, indicating how many movement points
it receives. Many abilities and cards can modify this
number.
C) Attack Table: The attack table lists the figure’s
range and firepower values for attacks against
infantry or vehicles. For example, in attacks against
enemy infantry, the elite infantry figure has range of
4 and firepower of 2. In attacks against vehicles, the
elite infantry has range of 1 and firepower of 1.
D) Name and special abilities: In this box, you can
find the name and special abilities of this figure.
19RULES OF ENGAGEMENT
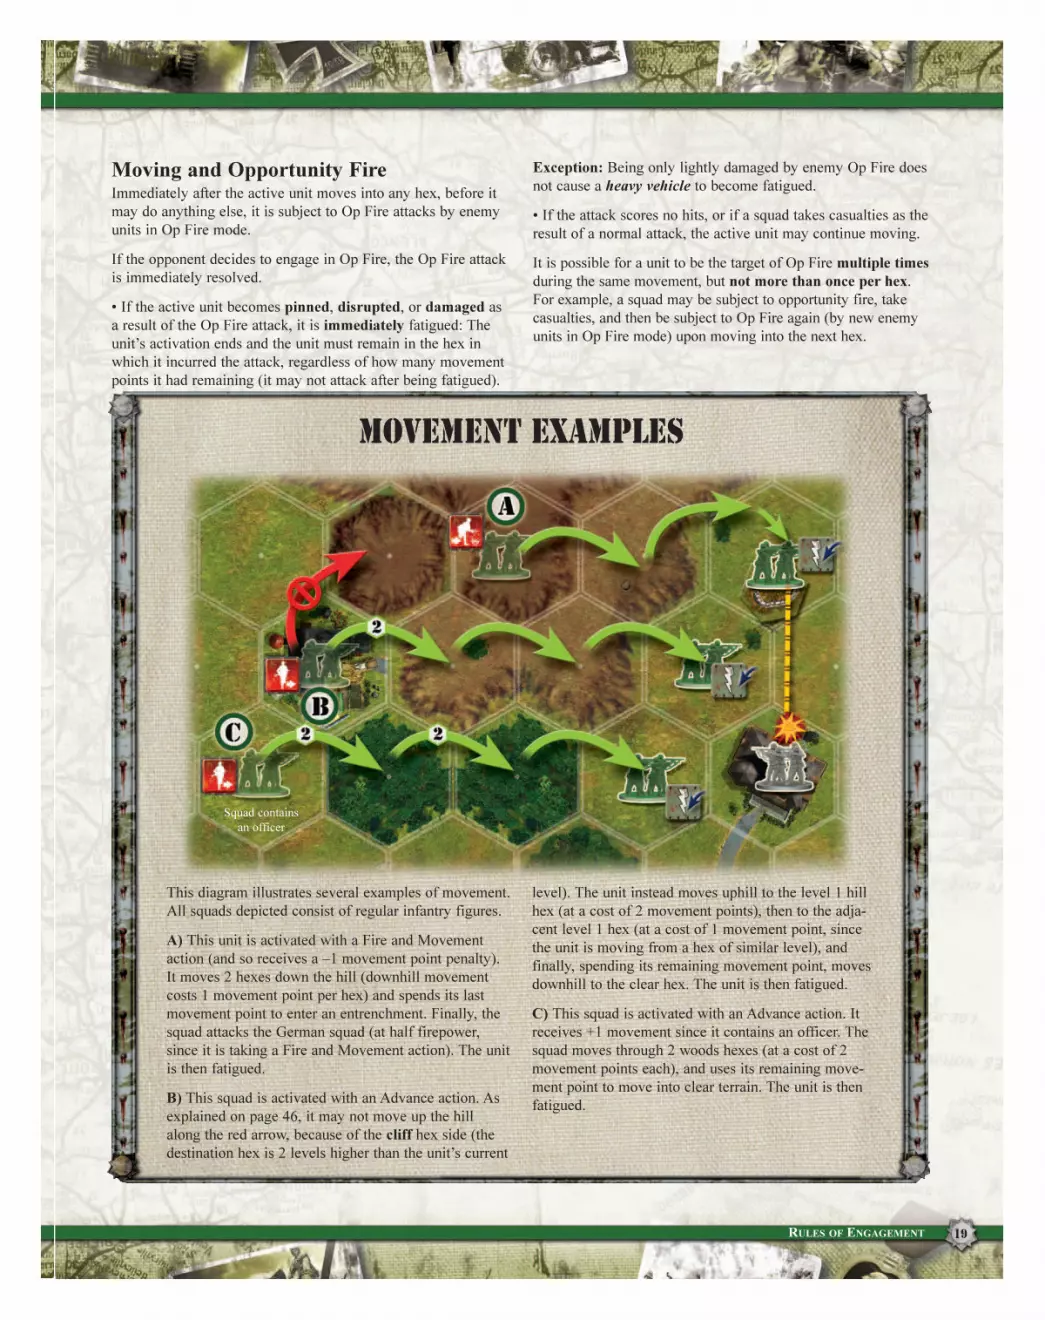
Moving and Opportunity Fire
Immediately after the active unit moves into any hex, before it
may do anything else, it is subject to Op Fire attacks by enemy
units in Op Fire mode.
If the opponent decides to engage in Op Fire, the Op Fire attack
is immediately resolved.
• If the active unit becomes pinned, disrupted, or damaged as
a result of the Op Fire attack, it is immediately fatigued: The
unit’s activation ends and the unit must remain in the hex in
which it incurred the attack, regardless of how many movement
points it had remaining (it may not attack after being fatigued).
Exception: Being only lightly damaged by enemy Op Fire does
not cause a heavy vehicle to become fatigued.
• If the attack scores no hits, or if a squad takes casualties as the
result of a normal attack, the active unit may continue moving.
It is possible for a unit to be the target of Op Fire multiple times
during the same movement, but not more than once per hex.
For example, a squad may be subject to opportunity fire, take
casualties, and then be subject to Op Fire again (by new enemy
units in Op Fire mode) upon moving into the next hex.
Movement EXAMPLES
This diagram illustrates several examples of movement.
All squads depicted consist of regular infantry figures.
A) This unit is activated with a Fire and Movement
action (and so receives a –1 movement point penalty).
It moves 2 hexes down the hill (downhill movement
costs 1 movement point per hex) and spends its last
movement point to enter an entrenchment. Finally, the
squad attacks the German squad (at half firepower,
since it is taking a Fire and Movement action). The unit
is then fatigued.
B) This squad is activated with an Advance action. As
explained on page 46, it may not move up the hill
along the red arrow, because of the cliff hex side (the
destination hex is 2 levels higher than the unit’s current
level). The unit instead moves uphill to the level 1 hill
hex (at a cost of 2 movement points), then to the adja-
cent level 1 hex (at a cost of 1 movement point, since
the unit is moving from a hex of similar level), and
finally, spending its remaining movement point, moves
downhill to the clear hex. The unit is then fatigued.
C) This squad is activated with an Advance action. It
receives +1 movement since it contains an officer. The
squad moves through 2 woods hexes (at a cost of 2
movement points each), and uses its remaining move-
ment point to move into clear terrain. The unit is then
fatigued.
Squad contains
an officer

20 RULES OF ENGAGEMENT
Immobile Units
A unit that is pinned, disrupted, or heavily damaged cannot be
moved on the board. Such a unit must remain in its current hex
until the condition or damage token is removed. (See the “Vehicle
Damage” and “Squad Conditions” sidebars on pages 28 and 29
for more information.)
Transporting Squads in Vehicles
Although squads will mostly be moving across the board by
using their own movement points, there are circumstances where
faster, or safer, movement of those squads may be desired.
Squads may be transported across the board on vehicles with
the Transport trait.
The number of squads an eligible vehicle can carry is deter-
mined by the number in parenthesis after the Transport trait in
that vehicle’s special ability area on the player reference sheet.
For example, the German Opel Blitz truck has Transport (2),
which indicates that it can transport two squads.
Entering and Exiting Transport Vehicles
To track which vehicles are carrying which squads, you will
need to use the transport markers and their corresponding off-
board indicator tokens.
A squad may enter a vehicle in its same hex by spending 2
movement points. When a squad enters a vehicle, place a trans-
port marker below the transport vehicle with its numbered side
faceup. Then find the corresponding off-board indicator token,
place it in your play area, and place the active squad by that
token. This indicates that the squad is now inside the vehicle
assigned that number. See the “Transporting Squads” diagram for
an illustrated example of this.
Immediately after a squad enters a vehicle, it is fatigued and its
action is complete.
To exit a vehicle, an active squad must spend 2 movement
points (regardless of the terrain that the vehicle and squad are
in). Place the squad on the board in the same hex as the vehicle.
If the exiting squad was the only/last squad inside the vehicle,
remove the transport marker from the board, as it is no longer
needed.
The following points summarize the rules that govern squads in
transport vehicles:
• It costs a squad 2 movement points to enter or exit a vehicle.
The vehicle must be located in the same hex as the entering
squad.
• As soon as a squad enters a transport vehicle (but not when it
exits), it becomes fatigued.
• Exiting a vehicle may trigger enemy Op Fire, as if the squad
just moved into the hex.
• Fresh squads inside a vehicle may be activated by any action
type, but cannot fire or resolve special abilities while inside the
transport.
• Squads inside a vehicle cannot be targeted for an attack
(including area attacks); only the vehicle itself can be targeted.
• If a vehicle is destroyed, all squads transported by that vehicle
are also destroyed. Squads inside a vehicle are not affected by
their vehicle being (or becoming) lightly or heavily damaged.
• Vehicles do not benefit from any movement bonuses, cover
bonuses, or special abilities of the squads inside them. For
example, a transport vehicle does not receive a +1 movement
bonus for transporting a squad containing an officer.
• A transport vehicle and all the squads it carries, count as only
one unit for the purpose of stacking limits. A squad may not exit
a vehicle if by doing so it would exceed the stacking limit of the
hex.
• During game setup, if a player is granted one or more transport
vehicles, he may deploy squads in these vehicles (at no action or
movement cost), by simply using the transport markers and off-
board indicator tokens as described above.
OFF-BOARD
INDICATOR
TOKENS
TRANSPORT MARKERS

21RULES OF ENGAGEMENT
Transporting Squads
A) Entering a Transport: The American player
takes an Advance action to move this squad into an
adjacent hex (costing 1 movement point), and then
into the truck marked with the “4” transport marker
(costing 2 movement points) joining another squad
already being transported by the truck. The
American player places the active unit by the “4”
off-board indicator in his play area. The squad is
then fatigued.
B) Moving a Transport: The American player now
activates the truck with an Advance action, and
moves it 12 hexes along the contiguous road (the
“Effective Road Movement” special ability of
trucks allows it to spend only 1/3 of a movement
point when entering a road hex contiguous to a
prior road hex). Note that the “4” transport marker
follows the truck as it moves. The truck is then
fatigued.
C) Moving a Transport: The half-track with the
“5” transport marker is transporting a squad of
infantry. The half-track is activated with an
Advance action, and moves 4 hexes before it
decides to stop moving by the nearby road. It is
then fatigued.
D) Exiting a Transport: Later, the squad within
the “5” half-track is activated with an Advance
action. The squad spends 2 movement points to exit
the vehicle. The player retrieves the squad from his
“5” off board indicator token and places the squad
in the half-track’s hex. The player also removes the
“5” transport marker from the board, as the half-
track is now empty. The squad then spends its
remaining 2 movement points to move north along
the road. It is then fatigued.
22 RULES OF ENGAGEMENT
Combat
TOI is a game of military conflict, the heart of which lies in the
projection of force against the enemy. Such force is exemplified
in “firing” or “attacking” with your units against enemy units.
This section of the rules will explain how to resolve attacks
between units. Note that these rules use the words “fire” and
“attack” interchangeably.
Targeting Infantry or Vehicles
As explained in the “The Player Reference Sheet” diagram, the
combat values (range and firepower) of any given unit are
dependent on whether the target of the attack is an infantry or a
vehicle unit. For example, an American machine gun crew has a
range of 5 and firepower value of 3 when firing against squads.
Against vehicles, that same machine gun crew has a range of 3
and a firepower of 2.
All squads, and the figures that are placed in the squad bases,
are considered infantry. All units with the light vehicle and
heavy vehicle traits are considered vehicles. On the player refer-
ence sheet, each figure has an icon indicating whether that figure
is considered a vehicle or infantry.
In TOI, an attack targets a single squad or vehicle. If a hex con-
tains multiple squads or vehicles, the firing player must indicate
which exact squad or vehicle within that hex is to be the target
of the attack. (Area attacks and assaults are exceptions to this
rule – see page 32 and pages 33-34.)
Example: The German player activates one of his tanks to make
a concentrated attack against an American occupied hex con-
taining 2 squads and 1 vehicle. Before firing, the German player
must designate which of the 3 units in that hex is the target of
his attack. He decides to target one of the squads, and then pro-
ceeds to check range and LOS to the target squad.
Eligible Attacking Units
A player’s main task in TOI will be to attack enemy units in bat-
tle as a means toward accomplishing victory objectives.
An attacking unit must always be eligible to attack the enemy
target, or the attack cannot proceed. An eligible attacking unit is
one that is both in range and has line of sight to the target unit.
Attacking with Mixed Squads
Often a squad will consist of a mixture of different figures with
different ranges and abilities. A squad is eligible to attack an
enemy unit if at least one figure in that squad is eligible to do
so. Any figures that cannot participate in the attack (usually
because they are out of range) simply do not contribute to the
attack strength, nor can they apply any of their abilities to the
attack. Since a squad can attack only once per activation, any
non-participating figures may not attack later in the round.
You may always choose to have some figures in a squad not par-
ticipate in an attack.
Remember that individual figures are never activated, only units.
Determining Range
When a player considers attacking an enemy unit, he should first
check whether the target enemy unit is within range. Simply
count the number of hexes from the firing unit to target unit’s
hex. This is the distance to the target. Compare this value to the
range value of the attacking unit:
• If the target unit is in adjacent hex, the attack is considered to
be at close range.
• If the distance to the target is less than or equal to the attack-
er’s range value, the attack is considered to be at normal range.
• If the distance to the target unit is less than or equal to double
the attacking unit’s range value, the attack is considered to be at
long range.
• If the distance to the target unit is greater than double the
attacking unit’s range value, the target unit is out of range, and
the attacking unit is not eligible to attack.
Remember that a unit taking a Fire and Movement action may
not make a long-range attack. Thus, a unit taking a Fire and
Movement action may only attack targets that are within close or
normal range.
If a squad contains figures with varying ranges, the squad’s range
is equal to that of the attacking figure with the lowest range. As
stated above, a player may decide not to fire with all figures in a
squad, which may increase the squad’s overall range.
Effects of Range
The type of range, close range, normal range, or long range;
affects how likely it is to hit the target. This is detailed under the
“Resolving an Attack” instructions on page 27.
Elevation and Range
An attacking unit located on higher ground will benefit from a
greater range when firing at targets at a lower elevation. TOI has
three elevation levels: level 0 (the majority of board hexes,
grasslands, etc.), level 1 (low hill), and level 2 (high hill).
If an attacking unit is on a hex of a higher elevation than
its target, the attacking unit receives +1 to its range value.
Example: An American squad composed of 4 regular infantry
figures is making a concentrated attack against a German squad
that is 5 hexes away. The American squad is on a level 2 eleva-
tion, while the German unit is at level 0 elevation. The printed
INFANTRY ICON VEHICLE ICON

23RULES OF ENGAGEMENT
range value for American regular infantry is 4 against infantry.
Since the American squad is on a higher elevation than the
German squad, its range value when attacking the German
squad is 5 – which means that attack against the German squad
would be considered at normal range. The American squad
could attack targets that are 6 to 10 hexes away at long range,
as long as those targets are at a lower elevation.
Line of Sight
Although a target unit may be within range of an attacking unit,
the attacking player must still confirm that the target unit is
within line of sight (“LOS”). That is, the attacker must confirm
that there is no blocking terrain between the two units. Units
do not block line of sight.
Determining Line of Sight Between Units on the
Same Level of Elevation
If there is no elevation difference between the attacking and the
target unit, simply trace the straight firing line (using a ruler or a
piece of paper) between the center of their two hexes (i.e., the
hex of the firing unit and the hex of the target unit). If there is no
blocking terrain between these two points, a clear line of sight
is established and the attack may proceed. If the firing line, at
any point, intersects a hex containing blocking terrain, no LOS
can be established and the attacking unit is not eligible to attack.
Blocking terrain includes woods hexes, building hexes, and any
hex of a higher elevation than that of the two units.
Note that the entire hex of a blocking terrain hex blocks LOS,
regardless of the actual artwork on the map board.
Other effects (such as smoke markers) may also cause a hex to
block LOS.
Blocking terrain does not block LOS to units in that hex. For
example, if a squad is in a woods hex, that woods hex does not
block LOS to itself. Only blocking terrain hexes between the
two units block LOS.
Before playing your first game, make sure to read about terrain
and its effects on pages 45 through 47 of this rulebook. Terrain
effects are also summarized on the back of the Scenario Guide.
Firing Along Hex Edges
If the firing line between the target unit and the attacking unit
is traced exactly along the edge of a series of hexes, the firing
player must shift the firing line either slightly to the left or
right, away from the hex edge, so that it does not trace the hex
line exactly. If shifting the line in both of these directions
causes the LOS to be blocked, then no LOS can be established
and the target unit is not eligible for attack. If the line can be
shifted so that a clear LOS can be established in one (or both)
of the two directions, then LOS can be established and the
attack may proceed. See the “Determining Line of Sight Along
a Hex Edge” diagram and examples C and E in the “Line of
Sight” diagram for more information.
Determining Range
An American squad attacking with all regular infantry
figures has a range of 4 when firing against enemy
infantry.
A) This target is adjacent to the attacking unit, so the
American squad will make a close-range attack
against it.
B) This target is 4 hexes away from the attacking unit.
As this distance is equal to the range of the attacking
unit, the attack is considered to be at normal range.
C) This enemy unit is 8 hexes away from the attacking
unit. The distance to the target is greater than the
attacker’s range, but equal to double the attacker’s
range value. Therefore, the American squad can attack
at long range. If the American squad were executing a
Fire and Movement action, it could not attack this tar-
get, since units may not make long-range attacks when
executing a Fire and Movement action.
D) This target is 9 hexes away from the attacking unit.
This is greater than double the attacking unit’s range
value. Thus, this target is out of range and the attack
cannot proceed.

24 RULES OF ENGAGEMENT
Determining Line of Sight Between Units
on Different Levels of Elevation
When the attacker and the proposed target are at different eleva-
tions, determining LOS is a bit trickier. In this situation, follow
the rules below.
When two units are of different elevations, the attacking unit
may be able to fire “over” some blocking terrain between the
units. To determine whether LOS exists between units at varying
elevations, rather than checking whether there is blocking terrain
between the two units, players must ensure that the lower unit is
not located in a blind hex. If the lower unit is indeed located in
a blind hex, LOS cannot be established and there can be no
attack.
To determine whether the lower unit is in a blind hex, do the
following:
• Select the unit on the lowest elevation, and trace a straight fir-
ing line between the two hexes. If there is no blocking terrain
between the two, LOS is clear and the attack may proceed.
• If there is blocking terrain between the two, determine which
blocking terrain hex is closest to the unit on the lowest eleva-
tion: This is the closest obstruction. (When firing along hex
lines, use the rules on page 22 to determine the closest
obstruction.)
• If the difference in elevation between the two units is 1, the two
hexes behind (from the unit on higher elevation’s perspective) the
closest obstruction are blind hexes. If the unit in the lower eleva-
tion is located in either of these two blind hexes, then there is no
LOS, and the attack may not proceed.
• If the difference in elevation between the two units is 2, the
one hex behind the closest obstruction is a blind hex. If the unit
in the lowest elevation is located in this blind hex, then there is
no LOS, and the attack may not proceed.
The closest obstruction may be a blocking terrain hex, as when
establishing LOS between units at the same elevation. Also, when
dealing with varying unit elevations, a hill the same level or lower
than the unit on the higher elevation is also considered blocking
terrain for the purpose of determining blind hexes.
Blocking Higher Elevation
As when two units are at the same elevation, if the firing line
between them is traced through an elevated hex higher than
either of the two units, LOS cannot be established and the
attack cannot proceed.
Determining Line of Sight Along a Hex Edge
Since there is blocking terrain on both sides of the
firing line, LOS is blocked.
Although the firing line runs along the hex edge of a
blocking terrain hex, LOS is clear because there is no
blocking terrain on the other side of the firing line.
When determining line of sight, it is possible that the
firing line will be drawn directly along the edge of one
or more hexes. When this happens, line of sight is not
blocked unless there is blocking terrain on both sides
of the line. When LOS runs along a hex edge, draw
two new lines parallel to the main line, shifted slightly
in either direction. If both of these new lines pass
through blocking terrain (the example on the upper
left), then LOS is blocked. If one or both of these lines
does not cross blocking terrain (the example on the
upper right), there is a clear line of sight between the
two units.

25RULES OF ENGAGEMENT
LOS Exceptions
The following two rules are exceptions to the LOS rules.
Adjacent Units
Regardless of elevation difference, two adjacent units always
have LOS to each other.
Firing Across a Plateau
If the unit on the higher elevation must fire (or be fired upon)
across an adjacent hex at its same level, it is considered to be
hidden by a plateau, and no LOS can be established. Thus, the
higher unit must be on the “edge” hex of a hill in order to estab-
lish LOS to a lower target, and vice versa.
Line of Sight (same elevation)
This diagram shows an American squad determining
LOS to several potential targets on the same elevation
as the attacking unit.
A) Blocking Terrain: The American squad does not
have line of sight to squad A because there is blocking
terrain (woods) in the firing line.
B) Clear Line of Sight: The American squad has clear
line of sight to squad B. There is no blocking terrain in
the firing line.
C) Firing Along Hex Lines: The American squad’s
firing line to the target follows the map’s hex lines, so
the American player must shift the line in either direc-
tion to determine LOS. The American squad has line
of sight to squad C, as there is blocking terrain on one
side of the firing line, but the other side is clear.
D) Blocking Higher Elevation: The American squad
does not have line of sight to squad D, since a hex of
higher elevation than both units is in the line of fire.
E) Firing Along Hex Lines: The American squad’s
LOS follows the map’s hex lines. The American squad
does not have a line of sight to squad E, since there is
blocking terrain on both sides of the line of fire, as
indicated by the red arrows.

26 RULES OF ENGAGEMENT
This diagram shows an American squad determining
LOS to several potential targets. The American squad
is on level 1 terrain, while the German squads are all
on level 0 terrain. Being on higher elevation allows
the American squad to see over blocking terrain,
although the terrain still has some “blind hexes”
immediately behind it.
A) Plateau Rule: Squad A is not within line of sight
because the line of fire to squad A is traced through
an adjacent hex hill of the same elevation (a plateau).
B) Firing Along Hex Lines: Squad B is within line
of sight because blocking terrain hexes are not locat-
ed on both sides of the line of fire.
C) Blind Hex: Squad C is not within line of sight
because it is in one of the blind hexes created by the
closest obstruction. Since the hill is the closest
obstruction to the lower unit, and the difference
between units is one level, any 2 hexes hidden
behind the hill are blind hexes. Had the American
unit been on a level 2 terrain, only 1 hex behind the
hill would have been blind, and Squad C would have
been in LOS.
D) Firing Past Blind Hexes: Squad D is within line
of sight because it is not in one of the blind hexes
created by the closest obstruction.
Line of Sight (different elevations)

27RULES OF ENGAGEMENT
ResoLVING AN ATTACK
All attacks (except for assault attacks, which are described on
pages 33-34) are resolved by performing the following steps,
known as the attack sequence:
1. Determine the total attack strength. This value is equal to
the appropriate firepower value of the unit making the attack,
plus half (round up) the firepower value of each unit supporting
the attack with combined fire (see page 29 for more information
about combined fire).
As explained on page 22, use a figure’s firepower against
infantry if the target unit is a squad, use the unit’s vehicle fire-
power value if the target unit is a vehicle.
A squad’s firepower value is equal to the cumulative firepower
value of every figure in the squad that is participating in the
attack. The attack strength of a squad containing four regular
infantry attacking an adjacent vehicle, for example, would be 4
(1 firepower for each of the four regular infantry).
Remember that a unit taking a Fire and Movement action has its
firepower value halved (round up).
Example: A squad containing 4 elite infantry figures has taken a
Fire and Movement action and is attacking an enemy squad. The
full firepower of the squad is 8 against infantry, but during a
Fire and Movement action, that value is halved. The squad
therefore rolls 4 attack dice when firing.
2. Determine the total defense strength of the target unit. This
is equal to the target unit’s armor value plus any cover for ter-
rain and fortifications. See the sidebar on this page for more
information on armor and cover values. Note that only vehicles
have armor values.
Example: A German SdKfz 251 half-track (which has an armor
value of 1) in rough terrain (which provides 1 cover) would
receive a total defense strength of 2.
3. Declare attack type. If the target of the attack is a squad, the
attacking player must now determine whether the attack is a
normal attack or a suppressive attack (see page 28).
If a player forgets to designate the type of attack, the attack is
always considered to be a normal attack.
4. Roll the attack. To resolve any attack in TOI, take a num-
ber of black dice equal to the total attack strength, and a num-
ber of red dice equal to the total defense strength, then roll all
these dice at once.
5. Determine hits. Determine the number of successes rolled on
the black dice. Whether an attack die result is a success depends
on the range type of the attack:
Range Successful Results
Long Range All “6” results
Normal Range All “5” and “6” results
Close Range All “4,” “5,” and “6” results
After determining the number of black dice successes, subtract
the number of successes showing on the red dice. Red dice
always score successes on “5” and “6” results, regardless of
range.
The final number is the amount of “hits” incurred by the target
unit. If this number is zero or negative (i.e., more red dice suc-
cesses than black dice successes), no hits are achieved and the
attack is over.
6. Resolve hits. Hits are resolved in different ways, depending
on whether the attack is a normal or suppressive fire attack,
and whether the target unit is a squad or a vehicle.
Cover and Armor
When resolving an attack, the attacking player must
roll a number of defense dice equal to the target
unit’s overall defense strength. Defense strength
comes from two sources: cover and armor.
Units may benefit from cover bonuses provided by
certain terrain types (such as woods), fortification
markers (such as pillboxes and entrenchments), and
other game effects.
Example: A squad in a woods hex (+2 cover) that
also has a smoke marker on it (+2 cover) would
have a total defense strength of 4.
When attacked, vehicles also add their armor value
to their defense strength. A vehicle’s armor value is
listed on the player reference sheets.
Example: An M3A1 half-track (armor value 1) in a
woods hex (+2 cover) would have a total defense
strength of 3.
Note that some game effects, such as a flamethrower
squad’s “Flaming Death” ability, reduce a target’s
cover value. Effects that modify cover do not
affect armor, and vice versa.

28 RULES OF ENGAGEMENT
Normal Attacks and Suppressive Attacks
As described above, when the target of an attack is a squad, the
attacking player must decide whether his attack will be a normal
attack or a suppressive attack before rolling the dice. Vehicles
are not affected by suppressive attacks.
Normal attacks inflict casualties, reducing the strength of
enemy squads. Suppressive attacks disrupt the effectiveness
and morale of an enemy squad, possibly completely routing the
squad. It is the attacker’s responsibility to determine which of
these attack types will benefit his tactical situation the most.
Depending on the attack (normal or suppressive) and the type of
target unit, hits will have different effects. In the rules below,
each iteration of attack and target type is outlined in detail.
Normal Attacks Against Squads
When a squad sustains hits from a normal attack, the owner of
the squad must take casualties, that is, destroy an equal number
of figures from the squad. A destroyed figure is removed from
the squad and placed back in the box. When the last figure is
removed from a squad, the squad base is likewise removed from
the game and placed back in the box. Note that even though the
mortar crew and the machine gun crew have two base pegs, they
are considered only one figure.
Example: An already weakened squad with 2 regular infantry
figures and 1 officer figure is the target of a normal attack and
receives 2 hits. The owner of the squad must now take 2 casual-
ties (remove 2 figures). The player chooses to destroy the 2 reg-
ular infantry, leaving the officer.
Note that if a pinned or disrupted squad (from a previous sup-
pressive attack) sustains hits from a normal attack, its pinned or
disrupted status is not affected, nor does the pinned or disrupted
status have an effect on the casualties the squad must take.
Normal Attacks Against Vehicles
The effect of hits against a vehicle depends on the state of the
vehicle before the attack. A vehicle that has not previously been
assigned a damage token is said to be undamaged.
When an Undamaged Vehicle Is Hit
• If an undamaged vehicle takes one or two hits, place a damage
token with the “lightly damaged” side faceup next to vehicle,
indicating that this vehicle is now lightly damaged.
• If an undamaged vehicle takes three hits, place a damage token
with the “heavily damaged” side up next to the vehicle.
• If an undamaged vehicle takes four or more hits, it is immedi-
ately destroyed, removed from the game, and placed back in the
box.
When a Lightly Damaged Vehicle Is Hit
• If a lightly damaged vehicle takes one or two hits, flip its dam-
age token to its “heavily damaged” side.
• If a lightly damaged vehicle takes three or more hits, it is
immediately destroyed, removed from the game, and placed
back in the box.
When a Heavily Damaged Vehicle Is Hit
• If a heavily damaged vehicle takes one or more hits in an
attack, it is immediately destroyed, removed from the game, and
placed back in the box.
Damage tokens must remain with a vehicle as it is moved on the
board. Read more about the damage tokens in the “Vehicle
Damage” sidebar.
Vehicle Damage
The damage tokens are used on vehicles, reflecting
two levels of damage to the vehicle: lightly damaged
and heavily damaged.
Besides moving the vehicles closer to destruction,
damage affects vehicles in the following ways:
Lightly Damaged: A vehicle that is lightly damaged
receives –1 to its movement value and –1 to its
armor value.
Heavily Damaged: A vehicle that is heavily dam-
aged may not move, it receives –1 to its armor value,
and its firepower value is halved (round up).
Example: If the M4A1 Sherman tank (movement 7,
armor 4, firepower 7 against infantry, and firepower
8 against vehicles) were to be heavily damaged, it
would have a movement value of 0, an armor value
of 3, firepower 4 against infantry, and firepower 4
against vehicles.
Opportunity Fire
If a vehicle becomes damaged during its activation
by enemy Op Fire, it is immediately fatigued: It may
not attack and must remain in the hex in which it
sustained the damage.
Exception: Being only lightly damaged by enemy
Op Fire does not cause a heavy vehicle to become
fatigued.
A damaged vehicle may be activated to enter Op Fire
mode as normal.
Lightly
Damaged
Heavily
Damaged

29RULES OF ENGAGEMENT
Suppressive Attacks Against a Squad
When a squad sustains hits from a suppressive attack, the result
depends on the condition of the squad prior to the attack. A
squad that is neither pinned nor disrupted is said to be in nor-
mal condition.
When a Squad in Normal Condition Is Hit By
Suppressive Fire
• If a squad in normal condition takes one or two suppressive
hits, place a condition token with the “pinned” side faceup next
to the squad, indicating that this squad is now pinned.
• If a squad in normal condition takes three suppressive hits,
place a condition token with the “disrupted” side up next to the
squad, indicating that this squad is now disrupted.
• If a squad in normal condition takes four or more suppressive
hits, the entire squad is routed. Routed squads, including all fig-
ures therein, are removed from the game and placed back in the
box.
When a Pinned Squad Is Hit By Suppressive Fire
• If a pinned squad takes one or two suppressive hits, flip the
condition token to its “disrupted” side, indicating that the squad
is now disrupted.
• If a pinned squad takes three or more suppressive hits, the
entire squad is routed: It is removed from the game and placed
back in the box.
When a Disrupted Squad Is Hit By Suppressive Fire
• If a disrupted squad takes one or more suppressive hits, the
entire squad is routed: It is removed from the game and placed
back in the box.
Condition tokens must remain with a squad until removed dur-
ing a future Status Phase. See more information about the effects
of the two conditions in the “Squad Conditions” sidebar.
Combined Fire
When a unit makes a concentrated attack or an opportunity fire
attack, the attacking player may declare that other friendly units
will support the attack with combined fire.
Units may never support an attack initiated by a unit taking a
Fire and Movement action.
In a combined fire attack, there is always a leading unit that
starts the attack. In concentrated attacks, the lead unit is the
active unit. In Op Fire attacks, the attacker must declare which
of the friendly units eligible for Op Fire will lead the attack.
To support an attack with combined fire, a unit must be eligible
to attack the target – that is, be within range and LOS of the tar-
get. Only fresh units may support a concentrated attack, and
only units in Op Fire mode may support an Op Fire attack.
When resolving an attack with combined fire, the leading unit
adds all of its firepower to the attack strength, while each unit
supporting with combined fire adds half its firepower (round
up) to the attack strength.
After a combined fire attack is resolved, both the lead and sup-
porting units are fatigued (in the case of an Op Fire attack, the
activation tokens are flipped to their fatigued side).
Squad Conditions
A condition token reflects the morale of a squad that
has been subject to suppressive fire.
Besides pressing a squad closer to routing (which
eliminates the entire squad), pinned and disrupted
conditions affect squads in the following ways:
Pinned: A squad that is pinned may not move, fire,
or take any special action. Exception: An officer’s
“Rally” ability allows any fresh, pinned squads in
the same hex as the officer to be activated with a
Concentrated Attack action, but the squad’s firepow-
er value is halved.
Disrupted: A squad that is disrupted may not move,
fire, or take any special action, regardless of the
presence of an officer. Having an officer in the same
hex, however, will cause the disrupted condition to
be removed during the next Status Phase, rather than
be downgraded to a pinned condition.
Opportunity Fire
If a squad becomes pinned or disrupted during its
activation (normally as a result of opportunity fire),
it is immediately fatigued: It may not attack and
must remain in the hex in which it was attacked.
A pinned or disrupted squad can never be placed into
Op Fire mode; a squad in Op Fire mode that is
pinned or disrupted is immediately fatigued.
Other Rules
A pinned or disrupted squad may never perform spe-
cial actions (such as laying smoke or clearing mines).
Pinned Disrupted

30 RULES OF ENGAGEMENT
Multiple Ranges in Combined Fire Attacks
When multiple units are participating in an attack with com-
bined fire, the attacking units are often firing at the target from
different ranges. If this is the case, the “success” number,
required to hit on the black attack dice, is equal to the least
favorable range type contributing to the attack.
For example: The American player activates a unit to make a
concentrated attack. The active unit is adjacent to the target
unit, and is therefore within close range of the target. However,
the American player decides to have two additional units sup-
port the attack with combined fire. These two other units are at
normal range to the target.
The American player must treat the combined attack as being at
normal, rather than close, range: Only “5” and “6” results will
score successes on the attack dice. Had the American player
decided to attack the target with only the active unit, the attack
would have been at close range, and scored successes on “4,”
“5,” and “6” results.
Attack Examples
The American squad, which consists of 4 regular
infantry, is activated to make a concentrated attack
against the German squad, which is within its nor-
mal range. The American player decides that it will
be a normal attack and rolls 4 black attack dice for
his squad as well as 2 red cover dice (for the cover
provided by the target’s woods terrain). He rolls 2
successes (“5” or “6” results) on his attack dice and
1 success on the defense dice. The defense success
cancels out one attack success, resulting in 1 total
hit applied to the German squad. The German play-
er removes 1 figure from his squad, and the
American squad is fatigued.
Concentrated Attack
Fire and Movement Attack
The American squad, which consists of 4 regular
infantry, takes a Fire and Movement action. It
moves 3 hexes and then attacks. The American
player decides that it will be a normal attack, and
rolls 2 black attack dice (half its total firepower)
and no defense dice (since the German squad is in
clear terrain, which provides no cover).
He rolls 1 success and deals 1 hit to the German
squad. The German player removes 1 figure from
his squad, and the American squad is fatigued.

31RULES OF ENGAGEMENT
This diagram shows examples of combined opportuni-
ty fire and combined concentrated fire.
A) Combined Opportunity Fire: The German player
decides to activate his tank with a Fire and Movement
action, and begins to move the tank towards the
American building. The two American squads on the
hill are both in Op Fire mode, and when the German
tank moves into a hex adjacent to one of the American
squads, the American player declares that he will make
an Op Fire attack against it.
The American player declares that the American squad
closest to the tank will be the lead Op Fire unit, adding
its full firepower to the attack. The other American
squad in Op Fire mode supports the attack, adding half
its firepower. Although the lead Op Fire unit is at close
range, the squad supporting the attack is at long range
(the base range of regular infantry unit against vehicles
is 1), so this will be a long-range attack (only “6”
results will score successes). The American player rolls
the attack and defense dice and luckily scores 3 hits
against the tank. The American squads flip their Op
Fire tokens to their fatigued sides, and a “heavily dam-
aged” token is placed by the tank. The tank is immedi-
ately fatigued, it must stop its movement, and may not
fire.
B) Combined Concentrated Fire: The German player
decides to activate his tank in the lower right corner to
make a concentrated attack. The German squad in the
same hex will participate in the attack with combined
fire.
The tank is the active unit, so it adds its full firepower
to the attack, while the squad adds half its firepower.
The target is within normal range of both the tank and
the squad, so the attack is a normal-range attack. The
German player declares that this will be a normal and
not a suppressive attack, and rolls the attack and
defense dice. Note that due to its “Concussive
Firepower” ability, the tank receives +3 firepower and
+3 range (since the target squad is in a building).
Once the attack is resolved, the German player places
a fatigued token by both the tank and the squad.
Combined Fire Examples
32 RULES OF ENGAGEMENT
Dice Shortages
Due to the potential size of combined attacks, it is possible that
players may run out of dice when resolving the attack. To com-
pensate for this, simply break down the attack into multiple dice
rolls, keeping track of results between rolls.
Opportunity Fire
Unlike the other types of attacks, Op Fire is announced and
resolved during the opponent’s action turn. A unit in Op Fire
mode may attack the active enemy unit immediately after the
active unit moves into a hex within range and LOS of the Op
Fire unit.
Note the following rules about Op Fire attacks:
• A unit may only engage in an Op Fire attack if the active
enemy unit has just moved into a hex within range and LOS. If
the active unit has not moved, it cannot be the target of an Op
Fire attack, even if it is within range and LOS.
• If an enemy unit spends movement points for a purpose other
than moving into a new hex (for example, using a special ability,
or entering or exiting an entrenchment), this does not trigger Op
Fire.
• The active unit can only be subject to one Op Fire attack for
each hex that it moves into. Thus, if the opponent wishes to
attack the active unit in a certain hex with more than one unit in
Op Fire mode, he must use combined fire.
• If a unit is capable of firing multiple Op Fire attacks during a
round (such as the machine gun crew, see page 37), it may only
make one attack against a single enemy unit during that
unit’s activation. Thus, it is not legal for a machine gun crew to
engage in Op Fire (or participate in combined Op Fire) against
the active unit in one hex, and then engage in Op Fire against
the same active unit as it moves into an adjacent hex.
• If the Op Fire attacker decides to make a suppressive attack
against an active unit, and manages to either pin or disrupt an
active squad or damage an active vehicle, the active unit is
immediately fatigued.
Exception: Being only lightly damaged by enemy Op Fire does
not cause a heavy vehicle to become fatigued.
After resolving an Op Fire attack, the lead Op Fire unit, as well
as any other Op Fire units that supported the attack with com-
bined fire, are fatigued. Simply flip the activation token from its
Op Fire side to the fatigued side. These units are no longer con-
sidered to be in Op Fire mode.
Area Attacks
Area Attacks are made by certain figures (such as the mortar
crew), as well as most attacks provided by Strategy cards. Area
attacks are destructive attacks that blanket an entire hex, rather
than targeting a single unit in the hex. The hits from an area
attack affect each unit in the hex equally.
Area attacks can be either normal attacks or suppressive attacks,
depending on the unit or the card creating the attack.
When executing an area attack against a target hex, a player
rolls the relevant attack strength (black dice) first, applying the
number of successes to every squad and vehicle in the area indi-
vidually. Unless stated otherwise, all area attacks succeed on
rolled results of “5” and “6.”
Then, in any order, each individual unit in the hex must roll its
defense strength (red dice) separately, subtracting successes
from the successes scored on the previously rolled attack dice,
and then resolving the total number of hits against it.
Remember that vehicles are immune to suppressive attacks. If a
suppressive area attack strikes a hex containing one or more
vehicles, only apply the hits to any squads in the hex; the vehi-
cles are ignored.
Example: A German mortar crew makes a strength-4 suppres-
sive area attack against a woods terrain hex containing 2
American squads and 1 American half-track vehicle containing
1 American squad.
First, the German player rolls 4 black attack dice, and scores
3 successes. The 2 American squads in the hex (but not the one
in the half-track) now must roll defense dice. The vehicle (and
the squad it carries) are ignored, as vehicles are immune to
suppressive fire. The first American squad receives 2 cover for
the woods terrain, and so rolls 2 red defense dice. Neither
result is a success, so the squad must sustain all 3 suppression
hits, causing the squad to become disrupted. The American
player places a disrupted token next to the American squad to
indicate its new condition. The remaining American squad is in
an entrenchment, and therefore receives 4 defense dice (2 for
the woods and 2 for its entrenchment). The American player
rolls 2 successes, reducing the attacking successes against it to
1. This single hit causes the squad to become pinned. The
American player places a pinned condition token next to the
squad to indicate its new condition.

33RULES OF ENGAGEMENT
Assault Attacks
After a squad activated by an Assault action has completed its
movement, it can execute an assault attack against an adjacent
enemy hex. Assault attacks represent brutal combat at close
quarters between soldiers, as the active squad, and any squads
supporting it with combined fire, seek to advance into the enemy
hex, forcing the enemy to retreat.
The following rules govern assaults:
• Only squads may execute Assault actions. The active squad (or
any supporting squad) may not contain a figure with the heavy
infantry weapon trait.
• After the active squad has moved, the active squad may select
an adjacent hex containing at least one enemy unit as the tar-
get of the assault.
• The active squad may not assault a hex that contains an enemy
heavy vehicle.
• If an assaulting squad enters a hex containing a minefield or
razor wire during its movement, it may not assault attack during
that activation.
Resolving an Assault Attack
All assaults attacks are resolved using the sequence below:
1. The active player declares which (if any) friendly squads are
supporting the assault with combined fire.
Up to two friendly squads in hexes adjacent to the target hex
may support the attack, even fatigued squads (but not pinned or
disrupted squads). As with normal combined fire, squads sup-
porting the attack only add half their firepower to the attack.
2. Determine the attack strength in the assault. This number is
equal to the firepower against infantry (even if the target hex
contains a light vehicle) of the active squad, plus half the fire-
power (against infantry) of any squads supporting the assault.
Flamethrower Assaults: For each attacking squad that has the
flamethrower specialization, the attack gains +2 firepower.
3. Determine the defender’s attack strength. This number is
equal to the total firepower (against infantry) of all defending
squads and light vehicles in the hex. A defending squad that is
disrupted does not contribute any firepower. A defending squad
that is pinned only contributes half its firepower.
Exception: If at least one defending officer is present in the target
hex, all pinned units contribute full firepower, rather than half.
4. The attacker now simultaneously rolls a number of black dice
equal to his attack strength, and a number of red dice equal to
the defender’s terrain cover plus any cover bonuses provided to
squads by entrenchments or pillboxes. Cover bonuses from forti-
fications are cumulative.
Assault attack
In the example above, the American player acti-
vates squad A with an Assault action.
1) The active squad A moves one hex north to
be adjacent to hex B, which contains a German
squad (in an entrenchment) and a German half-
track vehicle.
2) The American player declares an assault
against hex B, with the 2 American squads in
hex C supporting with combined fire (even the
fatigued unit is allowed to support an adjacent
assault attack). The active unit adds its full fire-
power, while the supporting units add half their
firepower.
3) The American player rolls his attack dice, as
well as two cover dice (representing the single
entrenchment), scoring a total of 5 hits. Then
the German player rolls his attack dice for the
defending squad and the half-track in hex B,
scoring 2 hits.
4) Applying the hits against him, the American
player removes 2 figures from the active squad,
after which the German player applies 4 hits to
the half-track (destroying it) and applies the
remaining hit to his squad, removing 1 figure.
5) Since the attacking players scored the most
hits, the defending player must retreat. The
German player retreats to hex D, with the
American player choosing to advance his active
unit into the now-vacant assaulted hex.

RULES OF ENGAGEMENT
Example: An assault attack is made against a wood hex contain-
ing 3 defending squads. Two of these defending units are in
entrenchments. The total defense dice rolled by the attacking
player is 6 (2 for the woods terrain cover, plus 2 for each
entrenchment).
Flamethrower Assaults: If there is at least one squad among the
attacking squads with the flamethrower specialization, the
defenders’ combined cover value is reduced by 5.
Important: Light vehicles do not contribute their armor to the
defense of an assaulted hex, but they do contribute their fire-
power to the defender’s attack strength.
First determine the number of successes on the black attack dice.
As with close-range attacks, every “4,” “5,” and “6” result is
considered a success. Then subtract the number of successes on
the red defense dice (for which “5” and “6” results are success-
es). The remainder is the attacker’s total number of hits.
Remember this number.
5. The defender now rolls a number of black attack dice equal to
his attack strength, scoring a success on every “4,” “5,” and “6”
result. This is the number of hits that the defender will inflict
upon the attacker. Remember this number.
6. Assault attacks are considered normal, rather than suppres-
sive, attacks. After damage has been determined on both sides,
the attacking player must remove a number of figures from the
active squad equal to the defender’s damage number. If the
active squad is eliminated, any remaining casualties must be
taken from the other participating attacking units (if any).
7. Then the defender must remove a number of figures from the
defending units equal to the number of hits inflicted by the
attacker. The defender may choose these casualties from any
combination of the defending units.
Light Vehicles and Assault Damage: The defender may assign
a number of hits against any defending light vehicle, but no
more hits may be assigned to a light vehicle than what is needed
to destroy that vehicle (see page 28 for how combat hits from a
normal attack are applied to vehicles, and how vehicles take
damage).
8. If the defender’s number of hits equals or exceeds that of the
attacker, the assault is unsuccessful. The active unit and any sup-
porting units are fatigued, and the Assault action is over.
9. If the attacker’s number of hits exceeds that of the defender,
the assault is successful, and the defender must now retreat from
the hex.
The defender must choose a single adjacent hex that all the sur-
viving defending units must retreat to. Defending units may not
retreat into a hex containing enemy units, or retreat off the game
board. If the defending units retreat into a hex containing friend-
ly units, so that the stacking limit is exceeded, the retreating
player must immediately destroy any excess units from the
retreating units, so that the number of units in the retreat hex
conforms to the legal stacking limit. If there are no eligible
hexes for retreat, then all the defending units are destroyed.
Disrupted units can never retreat, and are immediately destroyed
if forced to do so. A pinned unit that is forced to retreat immedi-
ately becomes disrupted after retreating. Any fresh unit or unit in
Op Fire mode that is forced to retreat becomes fatigued.
A retreat is not considered normal movement, and the defender
is not subject to opportunity fire when retreating.
10. After the defender has vacated the hex, the active unit and
any units that supported the attack may advance into the vacated
hex. However, supporting units that were fatigued at the start of
the attack may not advance into the hex. Neither the active unit
nor any of the supporting units are required to advance into the
assaulted hex.
The advance is not considered normal movement, and the
advancing units are not subject to opportunity fire when
advancing.
11. Both the active unit and any supporting units become
fatigued (regardless of whether they advanced or not).
Concealed Squads
Certain scenarios allow one or both players to field
concealed squads on the board. During setup, play-
ers designate which of their squads are “concealed”
by placing one of the concealed squad markers adja-
cent to the unit. A concealed squad marker follows
its squad on the board until the marker is removed
by the squad becoming “revealed.”
Vehicles cannot be assigned a concealed squad marker.
A concealed squad cannot be fired upon by enemy units, nor
can a concealed squad be affected by area attacks targeting
its hex.
Enemy units can move through, but not end their movement in,
a hex containing only concealed squads. Tank movement is
unaffected by moving through hexes containing only concealed
squads, and concealed squads are unaffected by the tank’s
“Overrun” ability.
A concealed squad is revealed, and the concealed squad marker
is removed, in the following circumstances:
• If a concealed squad fires or supports an attack, it is immedi-
ately revealed.
• If a concealed squad moves into an objective hex (one contain-
ing a command objective, victory point marker, or any other
specific hex mentioned in the scenario), it is immediately
revealed.
• If at any time a concealed squad is within LOS of an enemy unit
and is not located in cover-providing terrain, it is immediately
revealed. A smoke marker (which provides +2 cover) will not
34
CONCEALED
SQUAD MARKERS

35RULES OF ENGAGEMENT
keep a squad from being revealed; the hex’s main terrain type
must provide cover (woods, rough, bridge, or building terrain).
• If at the end of the Status Phase, a concealed squad is adjacent
to an enemy unit, it is revealed, even if it is on cover-providing
terrain.
Timing Conflicts
Situations may arise during the game in which both players
simultaneously announce that they wish to take a game action or
use a unit or card effect. Use the following rules to resolve such
timing disputes.
If a timing dispute occurs during any point in the game, unless
specified below, the player with initiative decides the order in
which to resolve the effects.
Movement and Order of Events
Most timing conflicts occur upon a unit moving into a new hex
during an Advance, Fire and Movement, or Assault action.
When moving a unit into a hex, the possible events and reac-
tions to them occur in this order:
1. The active unit moves into an adjacent hex.
2. Any LOS determination and effects take place (such as a con-
cealed squad being revealed).
3. The opponent may declare an opportunity attack. Note that
the active player must always give his opponent sufficient time
to declare opportunity fire after a movement.
4. The opponent resolves any Op Fire attack.
5. Resolve obstacle effects (such as mines, a tank trap ending a
vehicle’s movement, etc.). If a hex contains multiple obstacles,
these are resolved in the order of the active player’s choosing.
6. The active unit spends movement points on non-movement
effects, such as having a tank remove razor wire, etc.
7. If the active unit is taking an Assault or Fire and Movement
action, that unit may now attack.
8. After a tank unit leaves a hex, resolve any tank overrun
effects.
As the active unit moves into a new hex, the above timing
sequence is repeated, etc.
Note that cover bonuses, such as those provided by a smoke
marker, are always in effect.
Example: The American player activates a squad and moves it
into a hex containing a minefield marker. The German player
declares that he will make an Op Fire attack against the
American squad. Because Op Fire attacks are resolved before
obstacle effects in the timing sequence, the Op Fire attack is
resolved before the squad rolls for the minefield’s effects.
Calculating Modifiers
Whenever any value (firepower, movement, etc.) is affected by
more than one modifier, always perform any addition and sub-
traction before any division or multiplication.
Important: Any unit that has its firepower halved more than
once may not attack. (See the sidebar on page 40.)
Three- and
four-player Games
Conflicts in World War II were two-sided, and every scenario in
TOI consists of two nations in conflict. This does not mean,
however, that the game cannot be played with three or four play-
ers. The game can accommodate three or four players playing in
teams. In a four-player game, there will be two teams of two
players each. In a three-player game, there will be one team of
two players versus the third player.
The Four-Player Game
When playing with four players, each player will take control of
one of a nation’s two divisions. In this way, each nation is repre-
sented by two divisions, each controlled by a player. Players on
the same “team” will win or lose the game as a team. Scenario
objectives and victory points are resolved as normal.
Every TOI scenario divides a nation’s forces into two separate
divisions, represented by the lighter and darker colors of a
nation’s squad bases. The overall squad base color of the
Germans is grey, with one division represented by light grey
squad bases, and the other division by dark grey squad bases.
Similarly the overall squad base color of the Americans is green,
with one division being represented by dark green squad bases,
and the other division by light green squad bases.
At the beginning of a four-player game, players first divide
themselves into two teams of two players each (either by con-
sensus, or randomly). Each player then takes control of one of
the divisions of his team, and is responsible for the setup and
actions of these units.
Since vehicles are not marked by base color, players will need to
remember which team member controls which vehicles. In most
scenarios, vehicles are split across divisions by vehicle type, so
remembering who controls which vehicle is not necessary. In a
scenario with a large number of vehicles, team members may
wish to use some sort of token (such as a penny) to indicate
which team member controls which vehicles.
Turn Order
During the Action Phase, teams alternate in taking action turns,
with one member of a team taking all of his actions, followed by
the other team member, after which the members of the other
team take their action turns, etc.

36 RULES OF ENGAGEMENT
As with the normal game, this continues until both teams can
take no additional actions, or choose to end their Action Phase,
after which the game proceeds to the Status Phase.
Initiative applies to both players of a team (that is, they share the
same Initiative card). During the Action Phase, the members of
the team with initiative take their turns first, and must mutually
decide which member of the team will take his action turn
before the other. The first active player must resolve all of his
actions before his team member proceeds with his action turn.
After each team member on the team completes his action turn,
the other team decides which team member will take all of his
actions first, and so on.
The number of actions each member of a team may take is equal
to half the number of actions indicated by the scenario (round up).
Example: It is the Action Phase of the “At the Breaking Point”
scenario. Mark and Lisa are on the German team, while Phil and
Mary are on the American team. The Scenario Guide indicates
that each side receives 3 actions per action turn, so in a 4-player
game each player will take 2 actions on his action turn. The
Americans have initiative, so Phil and Mary take their action
turns before the American players. Phil takes his 2 actions first,
followed by Mary. The German team then decides which order
they will take their turns in. Lisa takes her 2 actions first, fol-
lowed by Mark. Now Phil and Mary must again decide which
one of them will take their action turn first, and so on.
If one team member declares that he has no more actions, or that
he is finished with his Action Phase, the remaining team mem-
ber may continue to take actions (still only half the scenario stat-
ed amount, rounded up) until he also is out of actions or decides
to end his Action Phase.
Decision-Making and Sharing Resources
Players receive command and victory points as a team. For
example, if the Germans control a 1-point command objective
marker, the German team receives 1 command, instead of both
German players receiving 1 command each.
Members of the team must work together, deciding how best to
coordinate their efforts and share resources such as command
points and Strategy cards. Each member may spend command
and activate his units during the Action and Status Phases how-
ever he pleases – even spending available command without the
other team member’s consent.
However, decisions made during the Command Phase (such as
whether to invest in initiative or activate Strategy cards) must be
made jointly between the two players. If the two players cannot
agree on a course of action in a reasonable amount of time, then
no action is taken, and the game proceeds to the next segment of
the Command Phase.
Strategy Cards
Each team draws only one Strategy card at the beginning of each
Status Phase (not one per player). Strategy cards that are placed
in a team’s HQ area may be used by either player. Although
players must agree on which cards they wish to activate during
the Command Phase, each individual Strategy card is only con-
sidered to have been activated by one member of team, as
agreed on by both teammates. Strategy cards’ effects, including
Strategy cards placed in the nation’s play area, only apply to the
player that activated the card (unless the card provide discounts
or other benefits to future Strategy cards, in which case the
effect is shared among both players).
Example: The “Hardened Veterans” Strategy card reads:
“Command Phase: Receive up to 2 regular infantry and place
them in any of your weakened squad(s).” The two players on a
team must agree on which of them will activate this card. The
player that activates this card may only place the infantry fig-
ures in his squads; he may not place any infantry in his team
member’s squads.
Squad Transfers
Players may transfer figures from their team member’s squads if
they receive their team member’s consent.
Team Restrictions
There are several restrictions on how the units in each of the two
divisions may interact. (Note that these restrictions are only for
team games; the differently shaded squad bases do not have any
game effect in two-player games.)
• Units belonging to one division may not establish LOS for the
other division’s units (for example, LOS for one player’s mortar
figure cannot be established by the other team member’s units).
This same restriction applies when establishing LOS for drift, etc.
• Units belonging to one division may not support a team mem-
ber’s attack with combined fire unless the nation chooses to pay
1 command to the command pile. This cost must be paid for
each such combined attack. However, units in the same hex as
an officer may support a team member’s attack at no command
cost. During any instance where the forces of two team members
join (such as during combined fire, assault, or defending against
an assault), the firepower/cover of these units are joined together
in one dice roll.
• When placing starting units on the game board, a player may
start with his squads loaded into his team member’s transports.
A player may have his squads enter or exit his team member’s
transports as normal, but only the player controlling the trans-
port may activate the transport.
The Three-Player Game
A three-player game of TOI is played much like a four-player
game, except that one nation will be controlled by a single play-
er. That player must play his Action Phase as if his nation’s
forces were controlled by two players, thus his units of different
divisions would be subject to the restrictions (and splitting of
actions) as outlined above.

37TOOLS OF WAR
From reading the previous sections, you will now have the fun-
damental understanding of how TOI is played. This section
will discuss the remaining elements of the game, such as the
special abilities of each game figure, understanding the
Strategy and Operations cards, squad specialization, terrain,
and other elements.
The Tide of Iron Figures
The core TIDE OF IRON game contains 17 different unique
sculptures of figures, 8 for the American nation and 9 for the
German nation. Below, each of these figure types and their
respective abilities are outlined and explained. A summary of
these abilities is also provided on the player reference sheets.
Regular Infantry
Traits: None
Regular infantry constitute the bulk of a player’s forces. Regular
infantry are not well equipped to handle attacks against vehicles,
and their firepower against enemy infantry is also somewhat
limited. However, regular infantry are an invaluable tool to hold
and capture crucial positions, as well as protect your more valu-
able forces.
Special Abilities: None.
Elite Infantry
Traits: None
Elite infantry represent battle-hardened units, better equipped
and with greater experience than regular infantry. These figures
provide an effective punch against enemy squads, and will often
be the spear tip of an infantry charge. Like normal infantry, elite
infantry are ill equipped to fight vehicles.
Battle-Hardened: Each elite infantry figure in a squad provides
+1 cover against suppressive fire attacks.
Machine Gun Crew
Traits: Heavy Infantry Weapon
Machine gun crew figures represent infantry equipped with
heavy repeating weapons. These figures pack heavy firepower
against enemy squads, and are eligible to contribute to multiple
rounds of Op Fire.
Limited Choice of Actions: A squad containing a heavy
infantry weapon, such as a machine gun crew figure, may not
take a Fire and Movement action or an Assault action.
Rapid Op Fire: If a squad with one or more machine gun crews
are in Op Fire mode, the squad may execute an Op Fire attack
without becoming fatigued – as long as only the machine gun
crew(s) participate in the Op Fire attack. This also applies to
supporting another Op Fire attack with combined fire.
When such a squad makes an Op Fire attack with other figure
types in the same squad contributing to the attack, the unit is
fatigued as normal after the attack.
This means that a machine gun crew can participate in multiple
Op Fire attacks during one round. Note that such attacks must
all be against different targets, as a squad may only make one
Op Fire attack against any one particular active unit during its
activation (see page 32).
Example: The German player has placed one of his squads, con-
sisting of 1 machine gun crew and 2 regular infantry figures, in
Op Fire mode. During his opponent’s turn, the German player
executes an Op Fire attack against a moving American squad.
He chooses to have only the machine gun crew participate in the
attack, so the squad is not fatigued and the Op Fire token
remains with the squad after the attack.
Later, the German player decides to make another Op Fire
attack against another moving American squad. Again, the
AMERICAN
MACHINE GUN CREW
GERMAN
MACHINE GUN CREW
AMERICAN
ELITE INFANTRY
GERMAN
ELITE INFANTRY
AMERICAN
REGULAR INFANTRY
GERMAN
REGULAR INFANTRY
The tools of war

38 TOOLS OF WAR
German player uses only his machine gun crew in the Op Fire
attack, and the squad remains in Op Fire mode after the attack.
Finally, hoping to stop a nearby moving American tank, the
German player makes an Op Fire attack against the tank. This
time the German player decides to have all the units in the
squad participate in the Op Fire attack. Since other figure types
in the squad are participating in the attack, not just the machine
gun crew, the German squad will be fatigued after the attack,
and its Op Fire token must be flipped over to the fatigued side.
Mortar Crew
Traits: Heavy Infantry Weapon
Mortar crews are equipped with small ballistic shell launchers,
making them a useful minor on-board artillery piece. These impor-
tant units are capable of reaching enemy units at long distance
from secure positions.
Limited Choice of Actions: A squad containing a heavy
infantry weapon, such as a mortar crew, may not take a Fire and
Movement action or an Assault action.
American
Mortar Crew
German
Mortar Crew
Mortar Crew attacks
2 mortar
crews
Mortar crews are special in that they can attack any unit
within line of sight of non-fatigued friendly units (as long
as the target unit is also within range of the mortar crew).
A) Adjacent Enemy: Squad A is not a legal target because
mortar crew figures may not attack adjacent hexes.
B) No Line of Sight: Although the American squad 1 is
within LOS of Squad B, the American squad is fatigued,
and can therefore not establish LOS for the mortar crew.
C) Line of Sight: Non-fatigued American squads 2 and 3
have LOS to squad C, so the mortar crew may attack it.
D) No Line of Sight: Squad D is not a legal target for the
mortar crew, because no friendly units have LOS to it.
E) Line of Sight: Squad E is a legal target because the mor-
tar crew itself has LOS to the target squad.

39TOOLS OF WAR
Area Attack: Unlike other figures, mortars do not fire upon a
target enemy unit, but rather they target an entire hex and all
units therein with an area attack. Unlike other figures, the
strength of mortar attacks is dependent on whether it is engaging
in normal or suppressive fire. On the player reference sheet, note
that the combat value table of the mortar figure is not divided in
the normal vehicle/infantry values, but instead whether the mor-
tar attack is engaging in a suppressive or a normal attack.
Suppressive mortar attacks are significantly more effective than
normal mortar attacks.
The attack dice rolled from a mortar crew’s area attack succeed
on results of “5” and “6.” If firing at long range, the area attack
succeeds on dice roll results of “6” only.
Ballistic Fire: A mortar crew does not need to trace its own
LOS directly to the target, as its ballistic attack can fire over
blocking terrain.
If a mortar crew does not have direct LOS to a target unit, it
may use the LOS of another non-fatigued friendly unit. See the
“Mortar and Machine Gun Crews” diagram for an illustrated
example of this. This simulates a coordinated attack by radio
communication between the mortar crew and the friendly unit
that is contributing the LOS to the enemy unit.
Mortar crews cannot fire if they are located in a building hex or
a pillbox, or if no LOS can be established.
Minimum Distance: A mortar crew cannot attack or support an
attack against enemy units in an adjacent hex, nor can a mortar
crew contribute firepower during an assault against its own hex.
No Opportunity Fire: A mortar figure cannot participate in
opportunity fire (even if other figures in its squad are doing so).
No Mixed Fire: Due to the nature of its area attack ability, a mor-
tar crew may not attack with other figure types, even other figure
types in its own squad. For example, if a mortar crew is in the
same squad as two regular infantry, and an enemy unit is within
LOS of the squad, the owner of the squad must decide whether to
attack with the two regular infantry, or the mortar crew.
If a squad consists of two mortar units (a common composition),
the squad could fire in a single activation with both its figures.
Also, a mortar crew may support the concentrated attack of
another mortar crew.
Officer
Traits: None
Infantry officers represent trained leaders who make a nation’s
units more coordinated and efficient. In addition to making his
assigned squad more efficient, an infantry officer can positively
affect the morale condition of all friendly squads in the hex he
occupies.
Fast Recovery: During the Status Phase, a disrupted squad in
the same hex as an officer may remove its condition token,
rather than reducing it to pinned.
Rally: A fresh, but pinned, squad in the same hex as an officer
may be activated with a Concentrated Attack action. The squad
will fire at half firepower.
Determination: A squad in the same hex as one or more officers
receives +1 cover against suppressive fire attacks.
Increased Mobility: A squad containing at least one officer
receives +1 to its movement value.
Trucks
Traits: Transport (2), Light Vehicle
Trucks were the fastest and most efficient way of moving troops
rapidly from HQ, port, and railway staging areas to the front
lines. Unless moving along proper and safe roads, however,
trucks were slow and cumbersome vehicles that provided their
cargo with little protection.
Transport: Trucks are transports and can be entered by friendly
squads.
Effective Road Movement: When moving from a hex contain-
ing a road to an adjacent hex contiguous to the same road, it
only costs a truck 1/3 movement points to enter that hex. Thus,
if a GMC CCKW 353 truck (4 movement points) moves along a
contiguous road for its whole movement, it can move up to 12
hexes.
Fragile: If a truck becomes heavily damaged, it is immediately
destroyed.
THE MORTAR CREW’S ATTACK TABLE
AMERICAN OFFICER GERMAN OFFICER
AMERICAN GMC CCKW 353
TRANSPORT TRUCK
GERMAN OPEL BLITZ
TRANSPORT TRUCK

40 TOOLS OF WAR
Half-Tracks
Traits: Transport (1), Light Vehicle
Half-tracks were a far more versatile vehicle than trucks when
moving in rough terrain, and provided their cargo with protec-
tion superior to that of trucks. In addition, half-tracks are
equipped with light weapons, making them effective in hotly
contested areas.
Transport: Half-tracks are transports and can be entered by
friendly squads.
Medium and Heavy Tanks
Traits: Tank, Heavy Vehicle
Tanks are powerful armored vehicles, packed with devastating
weaponry. Any serious offensive in WWII would consist of the
tank as the main projection of force.
Sturdy: Being lightly damaged by enemy Op Fire does not
cause a heavy vehicle to become fatigued (it does, however,
immediately lose 1 movement point, and its armor is reduced by
1 for the duration of the activation, as per the lightly damaged
effects).
Concussive Firepower: When a tank attacks a squad located in
a building hex or pillbox, the tank receives +3 firepower and
+3 range.
Example: A Tiger I tank is activated to make a concentrated
attack against a squad located in a building hex. The Tiger’s
range against such a target is 8, and its firepower is 9 (instead
of its normal range of 5, and firepower of 6).
Overrun: Unlike other units, a tank may move through (but
never remain in) a hex containing enemy units (even through a
hex that is at the stacking limit). The movement cost for an
overrun is the normal cost to enter the hex plus one movement
point for each enemy unit in the hex. Immediately after the
active tank leaves such an overrun hex, every enemy squad in
the hex immediately becomes pinned (vehicles are unaffected, as
are squads being transported in vehicles or located in entrench-
ments/pillboxes). Squads already pinned or disrupted are unaf-
fected. A tank may never end its movement in a hex containing
enemy units.
A tank performing an overrun is subject to Op Fire when it
enters the enemy hex. Units in Op Fire mode attacking an
enemy unit in their same hex are considered to be attacking at
close range. If an active tank is forced to end its movement in an
enemy-occupied hex due to being heavily damaged by Op Fire,
it must immediately retreat to its last enemy-free hex (at no
movement cost), immediately becoming fatigued, with no
enemy squads pinned as a result of the overrun.
Thick Armor: Some tanks (such as the German Tiger I) have
this ability, which makes their armor extra effective. When a
unit with Thick Armor is attacked, the owner of the unit may
automatically change any one of the defense dice into a “6”
result after the dice are rolled.
AMERICAN
M3A1 HALF-TRACK
GERMAN
SDKFZ 251 HALF-TRACK
GERMAN PANZER IV TANK GERMAN TIGER I TANK
AMERICAN M4A1 SHERMAN TANK Halving firepower
In many situations, you must halve a unit’s firepow-
er: If a unit is supporting an attack with combined
fire, if a unit has been activated with a Fire and
Movement action, if a vehicle is heavily damaged,
etc.
You may never halve a unit’s firepower more than
once. If two or more effects would force you to
halve a unit’s firepower, the unit may not attack.
For example, a heavily damaged vehicle cannot sup-
port an attack with combined fire.
Whenever the rules instruct you to halve firepower,
round up.

41TOOLS OF WAR
Strategy Cards
Most scenarios give each player access to one or more Strategy
card decks. These decks represent off-board events and forces
that players may bring to the battle by spending the designated
number of command points printed on each Strategy card.
At the beginning of the game, and during the Status Phase,
players will draw Strategy cards from their Strategy decks and
place them faceup in their HQ area. Many of these Strategy
cards have the words “Action Phase” topmost in their text box,
indicating that they can be activated
during the Action Phase as an
action. Other Strategy cards will
have the words “Command Phase”
topmost in their text box, indicating
that they may only be activated dur-
ing the Spend Command step of the
Command Phase.
When a player takes an action to activate an available Strategy
card, he must first pay the command cost of the Strategy card. If
a player cannot afford the command cost of a Strategy card, he
may not activate that card.
Although the effect of a Strategy card is typically explained on
the card itself, and its effects work within the context of the rules,
a few cards may contradict the rules. If a card contradicts the
rules of the game, the card always takes precedence.
“Place in Your Play Area”
Though most Strategy cards are removed from the game after
use (place them back in the game box), any Strategy cards which
state that they are “placed in your play area” are not immediate-
ly discarded, but are placed faceup in a player’s play area – and
will typically have a lasting effect on the game. The command
cost for such cards are only paid at the time the card is initially
activated. After such a Strategy card has been placed in a play-
er’s play area, the player may use its effects at no additional
command cost until the end of the game, or until the card is dis-
carded by its own effects.
After the last card of a Strategy card deck is drawn, the deck is
not replenished. That deck is simply no longer available to the
player.
Card Types
Some effects reference certain types of cards in bold italic (for
example, an “Air Support card”). This always refers to the title
of a Strategy card deck, and affects any card in a deck contain-
ing that name.
Example: “Increased Priority” reads: “When you activate
another Artillery card, its cost is reduced by 1 (to a minimum of
0).” This ability affects all of the other cards in the Artillery I
and the Artillery II deck.
Strategy Card Keywords
Some of the rules regarding Strategy cards’ effects are too
detailed to fit on the card. For example, many Strategy cards,
especially in the Artillery and Air Support decks, allow the
active player to make a destructive attack from an off-board
source. The rules for such off-board attacks make use of card
keywords that are described below.
Keyword: “Establish Contact (X)”
Many Strategy cards will require you to establish contact before
an attack can proceed. This simulates an attempt to contact the
battlefield headquarters by radio, and the difficulties in acquiring
sufficient battlefield priority for a support request. Establishing
contact works in the following way:
When a card requires a player to “establish contact,” the key-
word is always followed by a number in parenthesis – the target
number. The active player must now roll a single die. If the
result of the roll is equal to or higher than the target number,
then contact is established, and the player may continue to
resolve the other effects of the card.
If contact is not established, the remaining effects of the card are
not resolved now. In this case, the player keeps the Strategy card
and places it in his play area. Once during every subsequent
round, as an action, the player may again seek to establish con-
tact in order to resolve the card’s remaining effects.
Once contact has been established, and the remaining effects of
the cards are resolved, the card is discarded.
Remember that a player does not pay the command cost again
for a card already placed in his play area.
Keyword: “Target Hex”
Many Strategy cards will require a player to
establish a target hex on the board. A player
resolves this by simply placing the target
token on any board hex of his choice (or
within any restrictions indicated by the
Strategy card). After placing the target token, the player contin-
ues to resolve the remaining effects of the Strategy card.
Keyword: “Determine Drift”
Many Strategy cards require a player to resolve a variance in
final placement of a target token for an off-board attack, or other
similar function representing an entity entering the board from
off-board (such as paratroopers, air-dropped equipment, etc.).
This variance is called “drift.”
Any drift will always start from the target hex (indicated by a tar-
get token) established prior on the Strategy card. Drift has the
potential to move the target token to a different, final hex location.
TARGET TOKEN

42 TOOLS OF WAR
Example of an Off-Board Artillery Attack
When making an off-board attack (via an Artillery
Strategy card), specific keywords instruct players to
perform certain steps. This diagram details the steps
that an American player goes through after having
paid the command cost to activate the “Sustained
Blanket” Artillery Strategy card.
A) Establish Contact: To establish contact, the
player must roll a die. If the die roll is equal to or
higher than the target number (4 in this example),
then contact is established and the rest of the card’s
text is resolved. Otherwise, the card is placed in the
player’s play area and the player may use an action
to try to establish contact on a future game round.
B) Target Hex: After establishing contact, the play-
er selects a target hex and places the target token
there. While a player may target any hex, it is better
to target a hex within a friendly unit’s line of sight,
so that the attack has a lower drift number. In this
example, the player selects a target hex that his “E”
unit has normal LOS to, so the drift number is 4.
C) Determine Drift: After targeting a hex, the play-
er rolls 1 red die and 1 black die. The red die deter-
mines whether the target hex will drift and how
many hexes it will drift, while the black die deter-
mines which direction it will drift. The player rolls a
3 on the red die, which is lower than the drift num-
ber, so the attack will drift 3 hexes. The player rolls
a 3 on the black die; the north directional marker
shows that “3” means that the attack will drift
directly to the right. Fortunately for the American
player, 2 German squads are located in the attack’s
final target hex.
D) Suppressive Area Attack: The attacker then
rolls a number of attack dice equal to the strength
indicated on the card (4 in this example), scoring
successes on results of “5” and “6.” Each individual
unit affected by the area attack rolls its own defense
dice. In this example, the 2 squads in the final target
hex have no cover, so no defense dice are rolled.
E, F, and G) Wide Blast Radius: This attack has a
suppressive wide blast radius of strength 3. The
American player rolls 3 attack dice for each hex
adjacent to the final target hex that contains figures,
scoring successes on results of “5” and “6.” Each
individual unit affected by the attack must roll its
own defense dice. Squads E and G are subject to the
suppressive attack (even though squad E is a friend-
ly unit). Unit F is not subject to the suppressive
attack, as vehicles are unaffected by suppressive
attacks. The wide blast radius area attack rolls are
made separately for each hex.

43TOOLS OF WAR
Rolling for Drift
To resolve the drift of the target token, first you must establish
the drift number from the following information:
No LOS: If the target token is located in a hex not within LOS
of any non-fatigued friendly unit, the drift number is 6.
Normal LOS: If the target token is located in a hex within LOS
of a non-fatigued friendly unit, the drift number is 4.
Enhanced LOS: If the target token is located in a hex within
LOS of a non-fatigued squad containing an officer, or the target
token is located in a hex either containing, or adjacent to, any
friendly unit, the drift number is 3.
After determining the drift number, roll two dice – one red and
one black.
• First look at the black die: If the result is equal to or higher
than the drift number, the attack is accurate and strikes the tar-
get hex where planned. Ignore any results of the red die. The
player may continue to resolve the effects of the Strategy card.
• If the result is less than the drift number, the attack will drift
as many hexes as the rolled result of the black die. To determine
the direction of the drift, look at the result of the red die.
Reference the result of the red die with the north directional
marker to determine the direction in which the target hex drifts
from the original target hex. In this way, the black die tells you
how many hexes the target hex drifts (if any), and the red die
(together with the north directional marker) tells you the direc-
tion in which it drifts.
Example One: If the drift number is 6, and the rolled result on
the black die is a “5,” the attack has missed its target, and will
drift 5 hexes away from the intended target hex. Check the result
of the red die against the north directional marker to determine
the direction of the drift.
Example Two: If the drift number is 4, and the rolled result on
the black die is a “2,” the attack has missed its target, and will
drift 2 hexes away from the intended target hex. Check the result
of the red die against the north directional marker to determine
the direction of the drift.
Example Three: If the drift number is 4, and the rolled result on
the black die is a “5,” the attack is successful in striking the tar-
get hex (in this case, a result of “4” or “6” would also achieve
the same result).
Note that the lower the quality of friendly LOS to the original
target hex (i.e., the higher the drift number), the greater the
potential for deviation of the final target hex.
After determining which final target hex the attack drifted to,
continue to resolve the effects of the Strategy card.
If the final target hex drifted off the board (including one of the
half-hexes on the side of the game board), the Strategy card has
no additional effect, and is placed back in the game box.
Friendly Fire
The player activating the Strategy card cannot stop the resolu-
tion of a Strategy card, even if he does not like the final target
hex. Any off-board attack (such as artillery fire) does not recog-
nize friend from foe. If friendly units are in the affected area of
an off-board attack, they – like any enemy units – must take any
damage relevant to the Strategy card.
Keyword: “Area Attack (X)”
Make an area attack against the target hex using the attack
strength indicated in the parenthesis. See the rules for area
attacks on page 32. If an area attack is not designated as “sup-
pressive,” it is considered to be a normal attack. Off-board area
attacks (i.e., those from Strategy cards) score successes on
results of “5” and “6” unless stated otherwise on the card.
Keyword: “Wide Blast Radius (X)”
An attack with a wide blast radius affects all the hexes adjacent
to the target hex. These adjacent hexes are hit by an area attack
with the strength indicated by the number in parentheses follow-
ing the “Wide Blast Radius” keyword. (Note that the final target
hex itself is only affected by the strength indicated by the “Area
Attack” keyword; only hexes adjacent to the final target hex are
hit by the “Wide Blast Radius” attack.) Roll each wide blast
radius area attack separately for each adjacent hex. If a wide blast
radius attack is not designated as “suppressive,” it is considered
to be a normal attack. Wide blast radius attacks score successes
on results of “5” and “6” unless stated otherwise on the card.
Operations Cards
Many scenarios grant a player the use of specific Operations
cards. Each of these cards enhances the scenario with special
rules. These rules can affect anything
from weather conditions and tactical or
morale options to specialization
enhancements, such as the ability for
squads to place smoke and razor wire on
the battlefield.
Example: The Scenario Guide specifies
that in the “Liberation” scenario, the
German player receives the “Desperate
Defenders” Operations card. This card
states: “Your squads may attack at half
their firepower (round up) even if they
are pinned or disrupted. Squads containing friendly officers do
not gain any additional benefit.” The German player benefits
from this effect throughout the scenario.
When a scenario grants a player one or more Operations cards,
find those cards at the beginning of the game and place them in
the appropriate player’s play area.
Some Operations cards will affect both players, so be sure to
read and understand all Operations cards in play.

44 TOOLS OF WAR
Specialized Squads
Many scenarios grant nations various squad specializations.
These represent skills or special equipment carried by that
squad.
During setup, when a nation is awarded with specialization
tokens, its player must decide which squads will be specialized.
Each such squad then receives the corresponding specialization
token – place the token itself in the hook protruding from the
squad base. This serves as an easy indication to both players that
the squad has such a specialization. (A squad that contains any
figure with the heavy infantry weapon trait – such as the mortar
crew and the machine gun crew – may never be assigned a spe-
cialization token.)
Units with specializations are often referred to by their special-
ization. For example, squads with the engineer specialization are
referred to as “engineer squads,” squads with the medical spe-
cialization are referred to as “medic squads,” etc.
Unless stated otherwise, the normal abilities of figures within a
squad are completely unaffected by specialization. A specialized
squad can be activated, move, and attack like any similar squad
without specialization.
Scenario-Specific Specialization Effects
Every specialization has one or more basic abilities that can be
used in any scenario. Many scenarios, however, also provide
players with certain Operations cards that grant some specializa-
tions additional abilities. Some scenarios may also grant special-
ized squads with abilities unique to that scenario.
For example, an engineer squad is always allowed to create
entrenchments on the board, but the Operations Card “Lay
Smoke” also gives a player’s engineer squads the ability to use
smoke grenades to obscure enemy LOS (read more about smoke
effects on page 47).
Basic Specialization Abilities
Specialized squads in TOI have the following abilities, regard-
less of the scenario being played.
Engineer
A squad with the engineer specialization may do the
following:
Dig Entrenchment: During the Action Phase, as an action, an
engineer squad may be fatigued to create an entrenchment in its
current hex. Simply take an entrenchment marker from the box
and place it on the hex. Its player may then choose to have the
engineer squad enter the entrenchment as part of this action. More
information about entrenchments can be found on page 46.
A hex may not contain more than a total of three fortification
markers (entrenchments and pillboxes in the TOI base game). If a
hex already contains three such markers, no additional markers
may be built there. Entrenchments may not be built in hexes con-
taining stream, pond, or building terrain.
Anti-Tank
A squad with the anti-tank specialization has
enhanced effectiveness in attacks against vehicles.
Armor-Piercing Weaponry: In all attacks against a vehicle
(even when supporting an attack) a squad with anti-tank special-
ization has a base range value of 3 and +3 firepower.
Example: An anti-tank squad of 4 regular infantry attacks a
Panzer IV tank 5 hexes away. Since the squad’s range value
against vehicles is 3 (rather than the 1 for normal infantry), the
tank is at long range, and the squad will score successes on “6”
results. The squad has a total attack strength of 7 (4 from the
squad’s cumulative vehicle attack values, plus 3 from the
“armor-piercing weaponry” ability).
Flamethrower
A squad with the flamethrower specialization is very
effective in close combat.
Flaming Death: When a flamethrower squad attacks
an adjacent enemy unit, the attacking squad gains +2
firepower, and the target unit receives –5 cover (to a minimum
of 0). (Note that armor is not affected by this penalty.)
Remember that any attack against an adjacent unit is considered
a close-range attack, with the black attack dice scoring successes
on results of “4,” “5,” and “6.”
Medic
A medic squad can harden the resolve of units in the
hex, and is able to heal squads which have suffered
casualties during a normal attack.
Bandage: The medic squad, and any squad in the same hex as at
least one medic squad, gains +1 cover against normal attacks.
Heal: During the Action Phase, as an action, a medic squad may
be fatigued to heal a weakened squad in the same hex (including
the medic squad itself).
Healing a squad is done as follows:
1. First, the active player announces that, as an action, he will
fatigue the medic squad to heal a squad in the same hex, desig-
nating the squad to receive the healing. The medic squad is
allowed to heal itself, if desired.
2. Roll a single die: On a result of “4,” “5 “ or “6,” the player
may retrieve one regular infantry figure from the game box
and place this figure in the healed squad (regardless of what fig-
ure type was destroyed prior to the healing). If another result is
rolled, the healing attempt was unsuccessful, and the medic
squad has thus been fatigued to no effect.
A weakened squad may continue to be healed by medic squads
in this way, as long as available holes remain in the squad base.
Note that a medic can never heal an empty squad, as empty

45TOOLS OF WAR
squad bases are removed from the game as soon as the last fig-
ure in the squad is destroyed.
If there are no regular infantry figures available in the game box,
a medic squad may not attempt to heal.
Other Specialization Rules
The following additional rules govern squads with specializations:
• A squad may not have more than one specialization.
• A squad with a specialization may not receive or remove fig-
ures by transfer during the Status Phase.
• A squad retains its full specialization abilities, regardless of the
number of figures remaining in the squad. In other words, a
weakened squad is just as effective when executing specializa-
tion abilities as squad containing all its original figures.
• A squad with specialization may not use any of its special abil-
ities and/or actions if it is pinned or disrupted.
Terrain
The various types of terrain in TOI have significant impact on
game play. Each terrain type is described in detail below,
including terrain movement effects, whether the terrain blocks
LOS, etc. This list covers both the terrain printed on the map
board and the overlay terrain pieces that are placed on top of
the board at the beginning of the scenario, as well as the spe-
cial terrain features that may be implemented by Operations
cards such as wire, smoke, mines, etc.
A hex’s terrain type is considered to be covering the entire hex,
regardless of where the actual artwork on the board may end.
For example, if a LOS is drawn through an edge area of a woods
hex, where no artwork of woods is present, that hex is neverthe-
less still considered a woods terrain, and LOS would be blocked.
The information on each terrain type should be interpreted in the
following way:
Blocking Terrain: When a terrain is considered blocking ter-
rain, it will block LOS when units are on the same level, or will
act as the “closest obstruction” when determining LOS between
units on different elevations (see pages 24-25).
Movement Cost: This is the cost of moving into a hex featuring
such terrain. If a unit cannot afford to expend the movement
cost, it may not enter the terrain.
Cover: This is the number of red “cover” defense dice that this
terrain provides any units in the hex when attacked.
Special Rules: Any unique rules that govern hexes with this ter-
rain feature are detailed here.
Terrain Breakdown
Clear
Blocking Terrain: No
Movement Cost: 1
Cover: None
Rough
Blocking Terrain: No
Movement Cost: 2 for squads, 1 for
vehicles
Cover: 1
Woods
Blocking Terrain: Yes
Movement Cost: 2 for squads, 3 for
vehicles
Cover: 2
Road
Blocking Terrain: Depends on hex’s main
terrain type
Movement Cost: It only costs a unit 1
movement point to enter a road hex, regard-
less of the hex’s main terrain type, as long as
the active unit moved from another hex containing a road con-
tiguous to that of the hex entered. If a unit is not moving con-
tiguously along the road, the cost to enter a road hex depends on
the road hex’s main terrain type.
Cover: Is equal to that of the hex’s main terrain type
Special Rules: “Road” is a terrain type for movement purposes
only. Road hexes are blocking or cover-providing terrain if the
road hex’s main terrain type (e.g., clear, rough, or woods) is
blocking or cover-providing terrain.
Stream
Blocking Terrain: No
Movement Cost: Depending on water depth
(specified by each scenario), stream terrain
has the following movement costs:
• Shallow: 2 for squads, 4 for vehicles
• Deep: 3 for squads, vehicles may not enter
• Flooded: Treat as a pond hex (impassible)
Cover: None

46 TOOLS OF WAR
Pond
Blocking Terrain: No
Movement Cost: Impassible
Cover: None
Bridge
Blocking Terrain: No
Movement Cost: 1
Cover: 1
A bridge is contiguous to an adjoining road.
Hill
Blocking Terrain: A hill hex obstructs LOS
between two units if the hill’s level is higher
than both units. A hill hex does not obstruct
LOS between two units if both units are on
the same or higher elevations than the hill.
In the case where a hill is at a higher level
than one of the units, check to see if the hill
constitutes the closest obstruction to the
lowest unit (as per the rules on page 24).
Movement Cost: The cost of moving onto a
hill hex is 1, if the moving unit came from a
hex of the same or higher level than the hill
hex entered. When moving “uphill” onto a
hill hex that is one level higher than the
unit’s previous hex, the movement cost 2. Note that (as with all
other terrain movement costs) a unit moving by contiguous road
ignores the “uphill” movement penalty and pays a movement
cost of 1.
A hex side in which the terrain moves directly from level 0 to
level 2 is called a cliff. Cliff hex sides are impassable.
Cover: None
Special Rules: If an attacking unit is at a higher level than its
target, it receives +1 to its range value.
Building
Blocking Terrain: Yes
Movement Cost: 2 even if the hex also
contains a road; Vehicles may never enter
building hexes, even if the hex also contains
a road.
Cover: 3
Fortifications, Obstacles,
and cover
Many scenarios direct players to create the game board with a
variety of fortification and obstacle elements. In addition, some
fortification elements can be created during the game by certain
unit types (such as engineer squads digging entrenchments), and
some fortifications and obstacles can be created or removed by
players using Operations cards provided to them by the scenario.
Entrenchments
A squad in the same hex as an entrenchment
may spend 1 movement point to enter the
entrenchment. Likewise, a squad already in an
entrenchment must spend 1 movement point to
leave the entrenchment. When a squad enters an entrenchment,
simply place the squad on top of the entrenchment marker. An
entrenchment can only hold one squad. Vehicles may not enter
an entrenchment.
A squad in an entrenchment gains +2 cover in addition to any
cover provided by the terrain of the hex.
There may be a maximum of three entrenchment/pillbox mark-
ers in one hex.
Exiting an entrenchment may trigger enemy Op Fire.
Pillboxes
As with entrenchments, squads in the same hex
can enter or exit a pillbox by spending 1 move-
ment point. When a squad enters a pillbox, sim-
ply place the squad on the pillbox marker. A pill-
box can only hold one squad. Vehicles may not enter a pillbox.
A squad in a pillbox gains +6 cover in addition to any cover
provided by the terrain of the hex.
There may be a maximum of three entrenchment/pillbox mark-
ers in one hex.
Exiting a pillbox may trigger enemy Op Fire.
Razor Wire
Non-engineer squads and light vehicles
entering a hex with a razor wire marker
must immediately end their movement.
A squad located in a hex that contains a razor wire marker
attacks at half firepower. Units may leave a hex containing
razor wire without movement penalty.
There may be a maximum of one razor wire marker per hex.
Removing Razor Wire
• During an Advance, Fire and Movement, or Assault action, an
active tank or engineer squad may spend 2 movement points to
remove a razor wire marker in the same hex.
Level 1 Hill
Level 2 Hill

47TOOLS OF WAR
• If an area attack (normal or suppressive) causes three or more
successes against a hex with a razor wire, the razor wire marker
is removed.
Tank Traps
A vehicle may not enter a hex containing
a tank trap marker unless it started its
movement in an adjacent hex. As soon
as a vehicle enters a hex containing a tank trap marker, it must
end its movement. Vehicles on a tank trap may move off the
tank trap hex normally. Squads are unaffected by tank traps.
Tank traps give squads in the same hex +1 cover.
There may be a maximum of one tank trap marker per hex.
Minefields
If a unit enters a hex containing a minefield
marker, it must immediately end its move-
ment and check for casualties: Roll four
attack dice, with “4,” “5,” and “6” results inflicting normal
hits on the unit (no defense dice are rolled). Then fatigue the
unit. Squads with the engineer specialization do not check for
casualties, but are still fatigued. Units that attack when in a
minefield hex do so at half firepower. A unit moving from a
minefield hex may only move to an adjacent hex during its acti-
vation, regardless of its number of available movement points.
There may be a maximum of one minefield marker per hex.
Smoke
Any hex that contains a smoke marker is consid-
ered to be blocking terrain, and provides +2
cover for any units in the hex. Units in the same
hex as a smoke marker attack at half firepower.
• Smoke markers may not be placed on a building hex, and any
other hex may contain a maximum of one smoke marker.
• Smoke markers are removed during the next Status Phase.
• If a squad is executing an assault attack, or supporting an
assault attack, from a hex containing a smoke marker, the
smoke marker does not halve the squad’s firepower .
• A unit defending against an assault in a hex with a smoke marker
has its firepower halved and receives +2 cover. A unit assaulting
(or supporting an assault against) a hex containing a smoke marker
has its firepower halved but does not receive +2 cover. Note that
squads cannot support an assault against a hex containing a smoke
marker, since they would have to halve their firepower twice.
Component LimitsPlayers are not limited in the number of dice, activation tokens,
damage tokens, condition tokens, command counters, or control
markers they may use. If a player runs out of said component,
find a usable substitute (such as pennies, beads, etc.). All other
components are limited to the amounts provided with the game.
Card Errata
Before this rules booklet was sent to the printer, we caught
errors on three TOI cards. Their current text should be replaced
with the following:
Strategy Card “Go to Ground”: “Action Phase: Place up to
two concealed squad markers on two friendly squads located in
the same hex. You may not choose squads that are adjacent to
enemy units.”
Operations Card “Camouflage”: “Your concealed squads are
not revealed when firing, unless the attack inflicted 2 or more
hits on the enemy.”
Operations Card “Double Time”: “Whenever one of your
squads is activated with an Advance action, it receives +2 move-
ment points.”
More Tide of Iron
Please visit Fantasy Flight’s website for additional TOI content,
including examples of play, additional scenarios, rules clarifica-
tions, and FAQ, as well as news on upcoming TOI releases and
information on designing and publishing your own scenarios.
WWW.FANTASYFLIGHTGAMES.COM
Credits
Game Design: John Goodenough
Additional Design: Christian T. Petersen and Corey Konieczka
Rulebook: Christian T. Petersen
Editing: James D. Torr
Historical Text and Reference: John Grams
Graphic Design: Scott Nicely, Brian Schomburg, and Andrew Navaro
Reference Art: Rick Drennan
Miniature Designs: Rick Drennan
Board Art: Kurt Miller
Art Direction: John Goodenough
Production Managers: Richard Spicer and Darrell Hardy
Developers: John Goodenough and Christian T. Petersen
Executive Developers: Christian T. Petersen and Greg Benage
Publisher: Christian T. Petersen
Special Thanks: Mike Zebrowski and John Grams
Lead Playtester: Mike Zebrowski
Playtesters: Gary Averett, Paul Bachleda, Robert A. Barker, Jay Barry, Steve Bernhardt,
Carolina Blanken, Matt Boehland, Dan Bothell, Terrell Brace, Arthor Braune, Maarten
Bruinsma, Zach Bush, Wilco van de Camp, Nick Cottor, Boyd Davis, Arthur DeFilippo,
Tony DiPoce, Deron Dorna, Rick Drennan, Shane Dunkle, Tim Dunwoody, Alex Eguren,
Peter Fuesz, Jason Fulton, Jack Grubb, Thomas Hammerschmidt, Carl Hotchkiss, Alexis
Hunter, Paul Jacob, Ryan Jenkins, Kevin Johnson, Sheldon Johnson, Claudia Kelsey, Jerold
Korinek, Bob Lauria, Casey Lee, Christopher Lee, Morgan Leider, Emile de Maat, Matt
Madeira, William G. Matthews, Tom Meredith, Brad Metzler, Brian Murray, Gene Moyer,
James Noel, Christopher Oberst, Will Pattison, John Peters, Tyler Putman, Will Reaves,
Steve Reinartz, Chris Reppin, Jeff Reske, Wesley Robinson, Kurt Rompot, Scott Sarnecke,
Zach Sawyer, Brad Sayles, David Schuth, Kevin Seime, David Sellers, Rogier Sluimers,
Jason Smith, Richard Stevens, J.B. Sullivan, Brant Treon, Frank Vermeulen, Kris Vezner,
Martin Villemaire, Steve Vogel, Remco van der Waal, Scott Weber, Matthias Weeks, Jamie
White, Jason Woodburn, FFG Staff. Thank you all for your time and valuable input!
© 2006. TIDE OF IRON is a trademark of Fantasy Flight Publishing, Inc. All Rights
Reserved. No portion of this game may be copied or reproduced without written consent.

48 INDEX
index
Action Phase: 10-13
action turn: 10
Activate Strategy Card action: 11
active unit: 10
Advance action: 10
anti-tank specialization: 44
area attack: 32
armor value: 27
artillery: 41-43
Assault action: 12
assaults: resolving, 33-34
attack sequence: 27
attack strength: 27
blind hexes: 24
build squads: 8
cliffs: 46
calculating modifiers: 35
casualties: 28
closest obstruction: 24
combat: 22-34
combined fire: 29-31; does not cost an
action, 12
command: 14-15
Command Phase: 14-15
component limits: 47
concealed squads: 34-35
Concentrated Fire action: 11
cover: 27, 45-47
damage: 28
defense strength: 27
definitions of basic game terms: 8
deployment zone: 9
dice shortages: 32
disrupted: 29
divisions: 9, 35
drift: 41-43
elevation: effects on line of sight, 24-25;
effects on movement, 35; effects on
range, 22-23
elite infantry: 37
engineer specialization: 44
entrenchments: 46; engineers digging, 44
establish contact: 41
fatigued: 10
Fatigue Unit action: 12
figure abilities: 37-40
Fire and Movement action: 11
firepower: 22, 27
flamethrower specialization: 44; and
assaults, 33
fortifications: 46-47
four-player game: 35-36
game round: 10-17
half hexes: 18
half-tracks: 40
halving firepower: 40
heavily damaged: 28
heavy infantry weapon trait: and
specialization, 9, 44; and Fire and
Movement action, 11; and Assault
action, 12
heavy vehicle trait: 40
hits: 27
HQ area: 6, 7
initiative: 7; determining during
Command Phase, 15; increasing
initiative pool, 15
leading unit: 29
lightly damaged: 28
line of sight: 23-26
machine gun crew: 37
medic specialization: 44-45
minefields: 47
mortar crew: 38-39
movement: 18-21; terrain effects on,
45-46
normal fire: 28
north directional marker: 43
objectives, controlling: 14
obstacles: 46-47
off-board attacks: 41-43
officer: 39
Operations cards: 43; during setup, 7;
errata, 47
opportunity fire: 32; does not cost an
action, 12; entering Op Fire mode as
action, 11; entering Op Fire mode
during Status Phase, 16; interrupting
movement 19
pillboxes: 46
pinned: 29
plateau rule: 25
player reference sheet: 18
play area: 6, 7
Prepare Op Fire action: 11
range: determining, 22-23; effect on
attack roll, 27
razor wire: 46-47
regular infantry: 37
reinforcements: 16-17
setup: 7-9
smoke markers: 47
Special action: 12
specialization: 9, 44-45
squad bases: 9, 35
squad conditions: 29
squad transfers: 16-17
stacking limits: 9; and assaults, 34; and
reinforcements, 16; and tanks
“Overrun” ability, 40; and transports,
20
Status Phase: 16-17
Strategy cards: activating, 11, 15, 41;
drawing during setup, 7; drawing
during Status Phase, 16; errata, 47;
keywords, 41-43
successes: on attack roll, 27
suppressive fire: 28-29
tank traps: 47
tanks: 40
target hex: 41
terrain: 45-47
three-player game: 36
timing conflicts: 35
transporting squads: 20-21
trucks: 39
victory points: 15
wide blast radius: 43
winning the game: 17