final fantasy vii versus guide
TRANSCRIPT
WlMWlflHMWJ ®nly $9.99 • Free Giant Poster!
/•
Z\ Brief Note From the Editor:. • The truth is, I hate RPG guide books. I
y really do. It's all because of a terrible
y childhood trauma I suffered when I was* "i\ carelessly flipping through my Phantasy
Star II guide booh and saw, hours before I
was supposed to, a picture of Palmaexploding. One of the best plot twists of
RPG history... ruined! Sure, after so many. .
' years, the hurting has stopped, but the
scars have yet to fade away.
And that's not the least of their crimes.
Half the fun of RPG's is that whole feeling
of exploration, something that most guide
books crush in their tedious, point-by-
point, picture-by-picture series of instruc-
tions designed to get you through the
game as quicfely and with as little fun as
possible. What's the point of playing an RPG if a guide booh is going to
both ruin the storyline and destroy the feeling of exploration? You might
as well just pull out the ol' NES and pop in Lee Travino's Fighting Golf.
I've created this booh with these complaints in mind, and I'm proud of
the result. By giving each location in the game its own section, and high-
lighting the optional ones, the reader is free to open up the booh to what-
ever location they're at, and see all of that area's strategies, secrets, items
shop data and enemies without any heavy-handed instruction telling himor her in what order the areas must be done.
I've also discovered it's perfectly possible to include every single secret
and strategy without giving away any of the plot. I certainly don't want to
have to carry the guilt of ruining any of FFVII's masterful storyline twists
for anyone... Heck, I feel bad enough for
ruining that part of Phantasy Star II forxiihii^^^^mhii^^Ki
you (at least I didn't tell you about Nei A|]', Sfcf B|\ *M
dying! Er... um... never mind). So you can /JL, Hlfi\l ^8v*flip through this book secure in the knowl- £ :}
jam*' "* Wm ^lC
edge that you're probably not going to see ^™ g vJw"* —WW 5anything you'll come to regret.
As a result, this is a strategy guide that1
"MB^* ''wi^feven I approve of, and I'm not just saying 01 •#that because they paid me to. Although, as
you can imagine, that certainly doesn't JL
hurt. *E '
|f*Anyway, happy travels, and when the h i
quest is over, don't forget to drop me a line JL /
and let me know what you thought of the
guide! Sorry about ruining PSII. <M'
-Casey Loe
M
Copyright ©1997 Empire 21 Publishing, Inc. All rights reserved, inl-
cuding the right of reproduction in whole or in part in any form.
Final Fantasy VII © 1997 Square Co., Ltd. Final Fantasy™ andSquare® are trademarks of Square Co., Ltd.. PlayStation™ is a trade-
mark of Sony. Square and Sony do not sponsor, endorse, or grant
seal of approval to this unauthorized guide, and have no association
with Versus Books or Empire 21 Publishing, Inc. Empire 21
Publishing expressly disclaims any copyright in Final Fantasy VII or
in the characters and artwork found in Final Fantasy VII, and claims
no rights within. Empire 21 Publishing and Versus Books are not
associated with, nor sponsored or authorized by Square Co., Ltd. or
Sony. Empire 21 Publishing is not associated with any licensed
products or publishing licensees of Square Co., Ltd.
Characters © 1997 Square Co., Ltd.
This Pine Publication wasBrought to You By:
Design, Layout, Graphics &Text:
Gasey Loe
Cover, IPC, IBC, & Poster:
Tomotake Kinoshita
Map, Character Art, & All
Other Internal Art:
Lena Yoshikawa
Title Page:
Nick Des Barres
Extra Special Thanks:
Bubba
Special Thanks:Tsuyako Nakamura, Mr. Kuwabara &Mr. Kinoshita, Nick Des Barres, Ryan
Lockharl, David Sirlin, My Mom,Lena's Mom, Matt's Mom, and Moms in
general, Rachel, the many fine Final
Fantasy VII scholars who contributed to
and hosted the many Japanese websites that were a major resource in the
creation of this book, especially Tsuki,
The Three Wise Men or the East, and
Krtu, and thanks most of all to Paco
and whoever it was that was the night
manager that fateful night at Popeyes,
two refreshing examplars of
trustworthiness, responsibility, and
civic duty that are so rare in these
troubled times.
PUBLISHED BY:EMPIRE 2 1 PUBLISHING, INC.
Publisher:
Matt Taylor
National Distributor:
Eastern NewsDistributors
©ne Media Way, 12406 Rt. 250Milan, ©H 4481(3-9705
800/221-3148
Newsstand Consultant
PSCS 603/924-4407
Direct Market Consultant
PD&C 760/740-0779
MANUFACTURED IN CANADA
visit our web site:
www.VSb00kS.comail: [email protected]
snail mail: FF7 Guide,
370 Altair Way #333,
yvale, CA 94086 USA

Before you dive into the walkthrough that begins on page 12, why not tafee a few minutes to flip throughthis section and make sure you have a solid grasp of FFVII's fundamentals? Some of this may be covered in the man-ual, but most of it isn't, and if you want to know how the Materia System, Battle System, and Limit Break System, real-
ly work, this is the place to look. This information is not covered anywhere else in the guide, and I'm willing to betthat even the most experienced of Final Fantasy VII players have missed at least a few of these valuable tips...
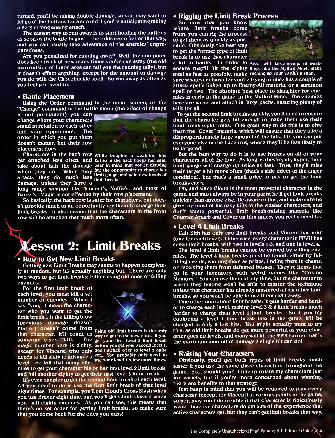
W ACCnn I • Rattlo *I*2lf»tfif»C their bacbs turned, you'll do^UVOOUII I • IXlllIC 1 C1V.I.IVZ5 T double damage! Make sure
. Determining Your Battle Order I , SS^oSSJI1 he ability to determine the order in >Jk ~~m um ': {• --, „ ... . . ,... ' „ „ . . # r r̂£^m t - the enemy will turn around to
which your characters act in battle situa- J^HH -\ c c , .. ,. , ..,...... . , . iiM "**T^^P1P *ace you after the tirst hit,tions is probably the most overlooked battle . i . u• » _ • c- . c . .... ... , — > making you lose your bonus.strategy in Final Fantasy VII. Most people, . . 1. ... c ^
. , . .' ,cr ? jS < ExDloit vour advantage here bv "S even more tun when youwhen they re hoping to use a specific char- - "
. :«»»e "J '
. . . . . J[ . , Kj A attaching fast and spreading the end up surrounding an enemy.acter, tend to lust hit the button to make ... 'V rfaman» ammBt t aii Ln,hi» »n» ., ... c * . .. ..
'-fv damage amongst all available ene- While this forces you to divide
everyone else attack (or block, or whatever) mies. Use regular attacks, don't your Dart (positive SDellsuntil they get to the character they're wait- ^ jEMM waste ma«ic '
that effect all of you will nOWing for. This is completely unnecessary and '
effect onIy one side or the other... But so wil[ enemy.castpotentially dangerous; As long as you have - w
„s) opponents - bacbs are always goino- to be turnedmore than one character whos ready to act ftowards someone, so if you choose your targets carefully,
(te, their toe bar ,s filled up), you can . *can mafee surg , double
* y
rapidly switch between them by simply tap-,
<V 0n the negative sjde you ,
n\,so occasionalIy & forcedping tne a outton. 3 . into me sgme situatjon_ either with your backs turned whileFor example, say you encounter a group
^ tfM&fm enemies pound you, or sur-_ _ _of enemies you simply do not want to deal* ^^fP rounded by foes on botnfBH^H^Hiwith, and you ve decided to obliterate them - sides when the former hap-
-
with a summon spell. Now lets say that the « „ . .,. . ... X. « • .,«.• I • pens, you can exploit a little »
character with the spell is third in line. , *,,St„h •
f . „ '. „ . , '-«*
Getting to him by having the first two char- ^, * S^SS ' "•
'
acters attack would not only waste their S s completely negate their " *turns 1 could also buy your enemies
advantage. lust tap L and R atenough time to launch attacks of their own. Go straight to me same „ ( fc same CQm .H^^^H^Hyour summoner, and have h.m of her fry the enemies first mand wi„ mabe fun bThen the first two characters will still be fully charged, and won -
t k , £no
u
_ready to finish off the survivors as soon as the spell is com-
for there tQ fae any c|ancesof^VH-B** 11 1 1
1
"
Pnte
, . ,. , j. that happening) and your *Remember that everyone s time bars (including your ene- characters wiIfturn to run> fmies ) are always filling up, so never waste a character s turn then turn tQ face £ne .
in an urgent situation. For example, if your healer is about to mjes wnen you re iease ; t dq Attached from behind? Tap L & R
with, and you've decided to obliterate them -~
' wwith a summon spell. Now let's say that the *
character with the spell is third in line.
Getting to him by having the first two char- {\
acters attack would not only waste their \nturns, it could also buy your enemiesenough time to launch attacks of their own. Go straight to
your summoner, and have him of her fry the enemies first.
Then the first two characters will still be fully charged, andready to finish off the survivors as soon as the spell is com-pleted.
Remember that everyone's time bars (including your ene-mies') are always filling up, so never waste a character's turnin an urgent situation. For example, if your healer is about to
get her turn, your should ignore any characters who arealready ready to act, and wait for her. Select her with the Abutton and have her cast the spell, then go back to the othercharacters' turns... In the time it would have taken the othercharacters to act, the member she was trying to heal couldhave gotten killed.
There are other good uses for this tactic, too. If you'refighting against weak enemies, you can use the A button to
ignore everyone else's turns and go straight to your weakestcharacter, allowing him to get the easy kill (The computerdoes keep track of who gets "kills," and uses it as one of thecriteria to get new Limit Breaks. See that section for details).
There are a ton of uses for this option, so keep an eye outfor them. Once you get used to determining your own battle
order, you'll wonder how you ever did without.
• Handling Different Battle TypesThere are four different kinds of battles that occur at ran-
dom. Usually, you'll merely be facing your foes, with themfacing you. But every now ' * "'M^ *
'
and then you'll get lucky and f, w,come upon enemies with their '^^^^backs turned. This "pre-emp-tive attack" formation allows " % \you to get the first shots in, ' * i»
and since your enemies have
4*X_The Completely Unauthorized Final Fantasy VII Ultimate Guide
this as soon as the battletogether to get your characters in
as wuii as 1.1c uamc motion . but ,et go as soon as pos .
starts, and you'll never take sible to ensure that you won't acci-
the double damage! Of dentally run away. Now you can
course, you'll still be stuck in face soar attacfeers head on.
the back row, which meansyour attacks will do less damage (see the section on Battle
Placement) until you "Change" to the forward row.When the latter happens, and you're surrounded, your
strategy should be to pick the weakest side, and then dowhatever it takes to kill everyone on that side. Then you cando the running trick outlined above to make sure everyone is
facing the remaining enemies. You may get beat around for
a few seconds, but you'll do much better than your foeswould in the same situation, since they don't seem to knowabout the little running away trick...
• Running AwayRunning away works the same on Final Fantasy VII as it did
in the Super Nintendo Final
Fantasy's. Just hold Ll and Rldown, and your characterswill turn away from your ene-mies and try to run. It maytake a while to work, so becareful- while your backs are
turned, you'll be taking double damage, so you may want to
let go of the buttons for a second if you're anticipating taking
a very strong enemy attack.
The easiest way to run away is to start holding the buttons
as soon as the battle begins— the odds seem better that way,
and you can usually take advantage of the enemies' unpre-
paredness.Are you penalized for running away? Well, the computer
does keep track of how many times you've run away (the old
man outside of Junon area can tell you the running tally), but
it doesn't effect anything, except for the amount of damageyou do with the Chocobuckle spell. So run away as often as
you feel you need to.
• Battle PlacementUsing the Order command in the menu screen, or the
"Change" command in the battle menu (the effect of changeis not permanent) you can ., —change where your characters S^-**—
stand in relation to each other
and your opponents. The ,
order in which you put themj,
doesn't matter, but their row |,
placement does.
Characters in the back row Whi ie beeping a weahling lifee
get attacked less often, and Yuffie in the back keeps her safe,
take about half the damage bear in mind that you're denying
when they do. When they her the opportunity to charge her
, , . , limit gauge, and gain new levels orattack, they do much less
Iimit^fes .
damage, unless they have a
long range weapon like Vincent's, Yuffie's, and most of
Barret's. Magic is not effected by their row placement.
So basically, the back row is safer for characters, but does-
n't provide much of an opportunity for them to charge their
limit breaks. It also means that the characters in the front
row will be attacked that much more often.
esson 2: Limit Breaks• How to Get New Limit BreaksGetting new Limit Breaks may seems to happen complete-
ly at random, but it's actually anything but. There are only
two ways to get limit breaks: Either using old ones or killing
enemies.For the first limit break of
each level, you must kill a set »A^number of enemies. When I \say "you," I mean the charac- \^,;
ter who you want to get the
limit break... If the killing blow .-^\(previous damage doesn't \matter) doesn't come from,,.
,,' . „, Using old limit breahs is the only
that character, it 11 count as way to get to the new ones. If yousomeone else's "kill." The get your first level 2 limit breah
magic number here is eighty, before you get your second level 1,
except for Vincent, who only don't switch over to level 2 quite
needs to kill sixty to advance a You,
probably only need to
i . c- fit „«. * use your level 1 a few more times,level. So kill that many ene-
mies to get your character his or her first level 2 limit break,
and kill another eighty to get their first level 3 limit break.
It's even simpler to get the second limit break of each level.
All you need to do is use the first limit break of that level
eight times. For example, you'll get Cloud's Cross Slash whenyou use Braver eight time, and you'll get Climb Hazard whenyou kill eighty enemies. As you can see, this means that
there's no set order for getting limit breaks, so make sure
that you come back for the ones you miss!
• Rigging the Limit Break ProcessSo now that you know BPBfW'***^
where limit breaks comefrom, you can rig the process ~" T
'
rto get them as quickly as pos-
'
sible. Obviously, the best way fjt
to get the former type of limit \,
break is to use that character
a lot in battle. In order to Areas with large groups of weafa-
ensure they'll hit the eighty lings, like the Mythril Mine, mabe
total as fast as possible, make racking up your 80 hills a snap,
sure whatever character you're trying to raise has a couple of
attack spells linked up to Enemy-All materia, or a summonspell or two. The absolute best place to slaughter for ene-
mies is early in the game, in the Mythril Mine. The enemieshere are weak, and attack in large packs, ensuring plenty of
kills for all.
To get the second limit breaks quickly, you'll need to ensure
that the character gets hit enough to make them use their
limit break eight times. One great way to do this is to give
them the "Cover" materia, which will ensure that they take a
disproportionately large amount of the hits. Or, you can put
everyone else in the back row, where they'll be less likely to
be targeted.
But the best way to do it is to use hypers on all of yourcharacters, all of the time. As long as they're, uh, hyper, their
limit gauge will charge up twice as fast. True, they'll miss
their target a bit more often (that's a side effect of the anger
condition), but that's a small price to pay to get the limit
breaks early.
Oh, and since Cloud is the most powerful character in the
game, and must always be in your party, he'll get limit breaks
quicker than anyone else. Be aware of this, and make sure he
gives up most of his easy kills to the weaker characters, anddon't waste powerful, limit break-raising materia like
Counter Attack and Cover on him unless you really need to.
• Level 4 Limit BreaksCait Sith has only two limit breaks, and Vincent has four
(one for each level). Otherwise, every character in FFVII has
seven limit breaks, with two in levels 1-3, and one in level 4.
The level 4 limit breaks cannot be earned by killing ene-
mies. The level 4 limit breaks must be found, either by ful-
filling events, winning them as prizes, finding them in chests,
or receiving them from defeated bosses. They're items that
go in your inventory, with weird names like "CosmoMemory." You can use them at any time, but the character to
whom they belong won't be able to master the technique
unless that character has already mastered all six other limit
breaks, so you won't be able to use them right away.
One other note about limit breaks: It gets harder and hard-
er to charge each level, making level 3 & 4 limit breaks muchharder to charge than level 1 limit breaks. So if you try
equipping a level 1 limit break late in the game, it'll be
charged in only a few hits. You might actually want to try
this, as old limit breaks do get more powerful as your char-
acter goes up levels, and many will hit the 9999 barrier that is
the maximum amount of damage a single hit can do!
• Raising Your CharactersObviously, you'll get both types of limit breaks much
faster if you use the same three characters throughout the
game. So... should you? I like to rotate my characters just
for variety, but if you're more concerned about winning,
there are benefits to that strategy.
lust keep in mind that you will be required to play every
character (except for Vincent) at various points in the game,
so you may run into trouble if that character is ridiculously
weak. Inactive characters do get 50% of the experience that
active characters get, but they can't get limit breaks that way.
The Completely Unauthorized Final Fantasy VII Ultimate Guide^5
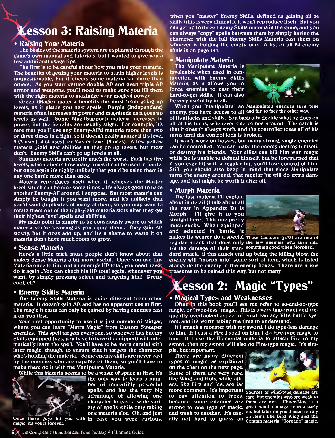
Lesson 3: Raising Materia• Raising Your MateriaThe basics of the materia system are explained through the
game's own manual and tutorials, but I wanted to give you a
few additional usage tips.
The first is to be careful about how you raise your materia.
The benefits of getting your materia to attain higher levels is
unquestionable, but it effects some materia far more thanothers. As you start getting double AP and even triple AParmor and weapons, you'll need to make sure you fill themwith the right materia to maximize your magical power.Green (Magic) materia benefits the most from going up
levels, as it yields you new spells. Purple (Independent)
materia often increases in power and magnitude as it goes uplevels as well. Some Blue (Support) materia increases in
power, but the benefits are usually slight. For example, it's
rare that you'll use any Enemy-AU'd materia more then twoor three times in a fight, so it doesn't really matter if it's level
3 (3 uses), 4 (4 uses), or Master level (5 uses). A few yellowmateria yield new abilities as they go up levels, but mostdon't. Enemy Skills can't go up levels at all.
Summon materia are pretty much the worst. Each has five
levels, which effects how many times it can be used in battle,
but once again it's highly unlikely that you'd be using them in
any one battle more than once.
Materia reproduces itself when it achieves the Masterlevel, which can be nice some times... It's always good to haveanother Enemy-All around, I suppose. But most materia cansimply be bought if you want more, and it's unlikely that
you'd want duplicates of many of them, so you may want to
rotate them out of the high-yield materia slots after they get
their highest level spells and abilities.
My main point is simply to be consciously aware of whichmateria you're favoring as you equip them... They gain APslowly, but it does add up, and it's a shame to waste it onmateria don't have much room to grow.
• Sense MateriaHere's a little trick most people don't know about that
makes Sense Materia a bit more useful. Once you use this
Materia once to find out an enemy's HP total, you need neverdo it again...You can check his HP total again, whenever youwant, by simply pressing select and targeting him! Pretty
cool, eh?
• Enemy Skills MateriaThe Enemy Skills Materia is quite different from other
materia. It doesn't gain AP, and has no apparent use at first.
The magic it casts can only be gained by having enemies cast
it on you first.
Your first opportunity to use it is just outside of Midgar,
where you can learn "Matra Magic" from Custom Sweeperenemies. This spell targets everyone, so whoever has EnemySkills equipped (yes, you have to have it equipped) will auto-
matically learn the spell. You'll have to be more careful withlater magic, though, to ensure that it targets the character
who's holding the materia. Some enemy skills are never cast
by the enemies who are capable of them, so you'll have to
make them do it with the Manipulate Materia.
While this Materia seems to be a waste of space at first, it's
>*w ^i^^Qm the only way to learn a num-
k\ ber of incredibly powerful
ifcjL*
• fl» spells, and has the very big
•C. r> advantage of allowing one
^fltv'' character to cast a wide vari-' ety of spells while only taking
i, ii^H^ ' one materia slot. Oh, and just
Once these guys hit you with in case you were curious,magic, it's yours forever.
6^l(The Completely Unauthorized Final Fantasy VII Ultimate Guide
when you "master" Enemy Skills, defined as gaining all 24
skills (this is very difficult), it won't reproduce itself. But youcan get up to three Enemy Skills materia in the game, and youcan always "copy" spells between them by simply having the
character with the full Enemy Skills Materia cast them onwhoever is holding the empty one. A list of all 24 enemyskills is on page 141.
• Manipulate MateriaThe Manipulate Materia is a""^^
invaluable when used in con-junction with Enemy Skills _^ «Materia, as it allows you to WMk^£_^^T Aforce enemies to cast their ^IBwB' <2gs
hard-to-get skills. It can also ^jjjlf^R*
When you "manipulate" an Manipulated enemies turn blue
enemy, you have access to all and H'P to face the otner wa?-
of its attacks and skills. You basically decide what he does onall of his turns, whenever one comes around. The catch is
that it doesn't always work, and the controller loses all of his
turns until the control lock is broken.It won't work on bosses, but many strong, single enemies
can be controlled. You can make the enemy destroy himself,
or destroy his friends. Your allies can kill him with magicwhile he is unable to defend himself, but be forewarned that
if you ever hit with a regular hit, you'll lose control of him.
Still, you should also keep in mind that since Manipulateturns the enemy around, that regular hit will do extra dam-age, and just might be worth it after all.
• Morph MateriaThe last materia I'll explain mi
about in detail (I talk about all Ithe rest in Appendix D) is
'
Morph. I'll give it to you f\r
straight here... This one pretty rmuch sucks. When equipped Land selected in battle, it
makes its wearer do a special These Cactuers (p.73) are" one of
regular attack that does only the few enemies who turn into
1/8 the damage of their Stan- something good when Morphed.
dard attack, if this attack end up being the killing blow, the
enemy will "morph into" some sort of item, which is listed
alongside the enemy in the enemy boxes. There are a fewtreasures to be gained this way, but not many.
Lesson 2: Magic "Types"• Magical Types and WeaknessesOften in this book you'll see me refer to so-and-so- type
magic, or "type-less" magic. This is a very important and fre-
quently overlooked aspect of Final Fantasy VII's battle sys-
tem, and it's worth taking the time to understand.
If I smack a monster with my sword, I do type-less damageto him. If I cast a Fire 1 spell on him, I do Fire-type magic to
him. If I use the Elemental materia to attach Fire to mysword, then my sword will also do Fire-type magic. It's sim-
ple, but important., „ ^^""'M
There are many different » flt
types of magic, as explained jt^ Mt^A^tt IBr1
!on the chart on the next page, ijp*Some of them are very rare, feMMBMrS^lflhriflllike Wind and Holy, while oth- 9 -' «» ^ers. like Fire and Ice. are far H § j
"
more common. It's important Sources of wind .tvpe damage^
to pay attention to types, rare, but enemies who are weak to
because some enemies are them are not. Choco/Mog is a
Strong to one type of magic, Sreat wind damage source early
and weak to another. It's usu- on'but Iater on ?ou
'
11 need to "*>lf . , , . on items like Bird Wing and the
ally not hard to guess an Comain materia ..Torna«0 „ magic _
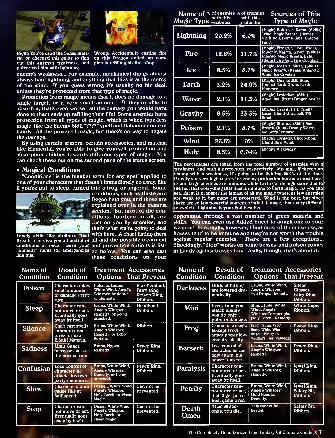
Right: You've used the Sense mate- Wrong: Accidentally casting fire
ria, or checked this guide to find on this Dragon ended up cora-
out this enemy's weakness, and pletely refilling his life. Oops,pulverized him with lightning.
enemy's weakness. .. For example, mechanical things almostalways hate lightning, and anything that flies is at the mercyof the wind. If you guess wrong, it's usually no big deal,
unless they're protected from that type of magic.
Protection from magic means that it does no damage to a
single target, or a very small amount. If they're able to
absorb it, that's even worse- all the damage you would havedone to them ends up refilling their life! Some enemies haveprotection from all types of magic, which is when type-less
magic, like the Enemy Skill "????" spell and Bahamut come in
handy. AH the power of magic, but there's no way to negate
the damage.By using certain armors, certain accessories, and materia
like Elemental, you're able to give yourself protection andabsorption abilities towards different types of magic. Youcan check these out on the second page of the status screen.
• Magical Conditions"Conditions" is the blanket term for any spell applied to
one of your characters that doesn't immediately go away, like
if you're put to sleep, turned into a frog, or angered. Somer conditions, such as Haste and
B^X ' flJI^^W^^ Regen help you, and those are
^ * explained over in the materiar^^iT ,» W*^' section. But most of the con-
J'V ditions, fourteen in all, are
^SRff~,r
cast on you by enemies, and&9&^j
;j^2^-.^<*: -f---m that's what we're going to deal
Lovely skills like Molbors "Bad with here. A chart listing themBreath" can give you a handful of all and the possible treatmentconditions at once. Save your and prevention options is list-
"Remedy" items for emergencies efj below. You can also castlike this. these conditions on your
Name Of * °* enemies % of enemies- . . with this with thisMaglC type weakness protection
Sources of ThisType of Magic
Lightning 20.2% 6.0%(Magic) Bolt 1.2.3. Ramu. (Skills)
Trine, Magic Breath, (Items)Swift Bolt. Bolt Plume. DragonFang.
Fire 12.8% 11.7%(Magic) Firel.2,3, Flare. Ifreet,
Phoenix. Kujata. Tupon, (Skills)
Inferno. Magic Breath. Beta.
(Items) Fire Veil. Fire Cocktail.
Ice 8.5% 8.7%(Magic) Ice 1.2.3. Shiva. (Skills)
Magic Breath. (Items) Antarctic
Wind. Ice Crystals.
Earth 3.2% 24.0%(Magic) Quakel.2,3, Titan,
(Items) Earth Drum. EarthHammer.
Water 2.1% 11.3%(Magic) Leviathan. (Skill)
Aqualung. (Item) Dragon Scales.
Gravity 8.5% 33.3%(Magic) Gravityl.2.3, (Skill)
Laser. (Item) Graviball, T/SBomb.
Poison 2.1% 8.7%(Magic) Biol.2.3. (Skill) BadBreath, (Item) Deadly Waste,Molbor's Tentacle.
Wind 26.6% 0%(Magic) Tornado. Choco/Mog,(Item) Bird Wing.
Holy 8.5% 0.04%(Magic) Alexander.
The percentages are taken from the total number of enemies with a
weakness, and with a protection, respectively. Meaning, if there's anenemy with a weakness, it's going to be lighting 20.2% of the time.
Gravity got very high scores for enemy protection because most boss-
es and large enemies are immune, while Earth got its high score due to
the fact that everything that flies is immune to Earth magic. As you cansee. Earth is probably the lamest of all the magic types, as few enemiesare weak to it, but many are protected. Wind is the best, but since
there are so few powerful sources of wind damage, that's very difficult
to exploit. Lightning is your 2nd best bet.
opponents, through a vast number of green materia andskills. You can even use Added Effect to attach one to yourweapon! Personally, however, I find most of them useless, as
bosses tend to be immune and they're not worth the trouble
against regular enemies. There are a few exceptions...
Shockingly, "Stop" works on some bosses, and poison comesin handy against bosses too. Really, though, that's about it.
Name of Result of Treatment AccessoriesCondition Condition Options That Prevent
Poison Characters takes
small amountsof damage everyturn.
Poisona, Esuna,
White Wind, Angel's
Whisper, Antidote
or Remedy.
Star Pendant,Fairy Ring,
Poison Ring,
Ribbon.
SleepCharacter can-
not move or act.
Eventually goesaway by itself.
Esuna, White Wind,Angel's Whisper,Remedy or beingattacked.
Headband,Ribbon.
SilenceCan't cast spells,
summon crea-
tures, or useE.Skill Materia.
Esuna, White Wind,Angel's Whisper,Remedy or EchoScreen.
Ribbon.
Sadness Limit Gaugeincreases at 1/4
the normal rate.
Esuna, Hyper,Remedy.
Peace Ring,
Ribbon.
Confusion Lose control of
character, heattacks his ownparty members.
Esuna, White Wind,Angel's Whisper,Remedy, or being
attacked.
Peace Ring,
Ribbon.
Slow Character's timegauge fills at
half speed.
Despell, White Wind.Angel's Whisper,Holy Torch, or HasteMagic.
Can not beprevented.
StopCharacter can-
not move or act.
Eventually goesaway by itself.
Dispel, White Wind,Angel's Whisper.Holy Torch, or
Haste Magic.
Can not beprevented.
Name of Result of Treatment AccessoriesCondition Condition Options That Prevent
Darkness Odds of hitting
are lowered dra-
matically.
Esuna, White Wind,Angels Whisper,Eye Drops. Remedy.
Silver
Glasses,
Fairy Ring,
Ribbon.
MiniEvery time youattack enemyyou do only 1
point of damage.
Mini, Esuna, WhiteWind, Angel's
Whisper.Cornucopia,Holy Torch. Remedy.
White Cape,Ribbon.
FrogCannot use magic(except Frog),
attack power low-
ered drastically.
Frog, Esuna, Frog
Song. White Wind,Angel's Whisper.
Maiden's Kiss, Remedy.
Peace Ring,
Ribbon.
BerserkLose control of
character, he canonly attack, butpower is up 50%.
Esuna, White Wind.Angel's Whisper,Remedy.
Peace Ring,
Ribbon.
ParalysisCharacter can-
not move or act.
Eventually goesaway by itself.
Esuna, White Wind,Angel's Whisper,Remedy.
Jewel Ring,
Ribbon.
PetrifyCharacter can-not move or act,
if all 3 get petri-
fied, game over.
Esuna. White Wind.Angel's Whisper,Gold Needle,
Remedy.
Jewel Ring,
Safety Bit,
Ribbon.
DeathOmen
After 60 sec-
onds, you die.
This cannot behealed.
Safety Bit,
Ribbon.
The Completely Unauthorized Final Fantasy VII Ultimate Guide \7
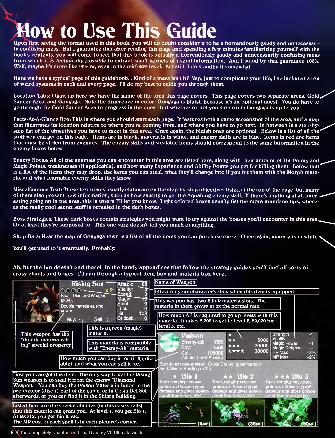
Stow to Use This GuideUpon first seeing the format used in this booh, you will no doubt consider it to be a horrendously gaudy and unnecessari-ly confusing mess. But I guarantee that after reading this page and spending a few minutes familiarizing yourself with thebook's contents, you will come to feel that this booh is actually a horrendously gaudy and unnecessarily confusing messfrom which it is technically possible to extract small kernels of useful information. And I stand by that guarantee 100%.
Well, maybe it's more like 90% or, even in the mid-80% level. But still, I do standby it somewhat.
Here we have a typical page of this guidebook... Kind of a mess isn't it? Yep, just to complicate your life, I've included a tonof weird systems in each and every page. I'll do my best to guide you through them.
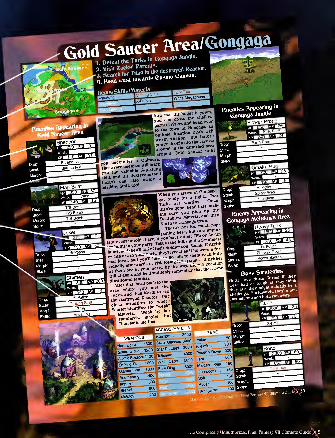
Location Tabs: Okay, up here we have the name of the area this page covers. This page covers two separate areas. Gold*Saucer Area, and Gongaga. Note the difference in color: Gongaga is bluish because it's an optional quest. You do have to
go through the Gold Saucer Area to progress in the quest, but whether or not you stop off in Gongaga is up to you.
Facts-At-A-GIance Box: This is where you should start each page. It features both a game screenshot of the area, and a mapthat illustrates its location relative to where you're coming from, and where you have to go next. In between is a step-by-
step list of the objectives you have to meet in this area. Once again, the bluish ones are optional. Below is a list of all the*stuff you can get on this page. Items are in black, materia is in white, and enemy skills are in blue. Items in red are itemsthat must be stolen from enemies. The enemy skills and stealable items should correspond to the same information in theenemy boxes below.
Enemy Boxes: All of the enemies you can encounter in this area are listed here, along with their amount of Hit Points andMagic Points, weaknesses (if applicable), and how many Experience and Ability Points you get for killing them. Below that
is a list of the items they may drop, the items you can steal, what they'll change into if you hit them with the Morph mate-ria, and what learnable enemy skills they know.
Miscellaneous Text: These text boxes usually elaborate on the step-by-step objectives listed at the top of the page, but manyof them also present new information, such as how exactly to get the Aqualung enemy skill. If there's anything at all inter-
esting going on in the area, this is where I'll let you know. Light colored boxes usually list the more mundane tips, where-as the really cool secret stuff is revealed in the dark boxes.
Boss Strategies: These dark boxes contain strategies you might want to try against the bosses you'll encounter in this area._Or at least they're supposed to. This one sure doesn't tell you much of anything.
Shop Data: Near the map of Gongaga town is a list of all the items you can purchase there. Once again, materia is in white.s
You'll get used to it eventually. Probably.
Ah, but the fun doesn't end there! In the handy appendices that follow the strategy guides you'll find all sorts of
crazy charts and boxes. I'll run through a typical item box and materia box here.
This weapon has the
"double materia-rais-
ing" special property.
tising Sun Attack: 68
X 2 Vitality: ~~T)
—
Diamond Weapon "Magic: hS—
•
materialisingSpirit 1 0
Hit: 108
i:- Sell: 1 Critical: 0
This is a green (magic)
materia.
This materia is compatiblewith "Enemy-AU" materia.
II. u<: 0
108cal: 0
jName of Weapon]
1 Effect on your character's stats when this item is equipped.
" This weapon has two 2-link materia slots. Themateria in them grows at 2x the normal rate.
How much AP is required to go up levels with this
materia. It takes 5.000 to get to level 2, 20,000 for
"| level 3, etc.
How much you can buy it for (if applic-
able), and what you can sell it for.
A /How you can get this item. The only way to get the Rising
Sun weapon is to steal it from the enemy "DiamondWeapon." You can buy the Poison Materia in Junon in the
pre-meteor (disc 1) part of the game, or in Costa Del Sol
afterwards, or you can find it in the Shinra Building.j
Listed here are the special abilities (in this case spells)
that this materia can grant you. At level 1, you get Bio I.
At level 2, you get Bio 2, etc.
The MP cost of each spell is in each picture's corner.
Strength|
l^Enemy-all: YES ** 5000 V™*^,,W Buy: 1500 *** 20000 Defense
Sell: 105000 **** 38000 HP Max""^
(Master-Level Resale) |MP Max
/: Junon (pre meteor), Costa Del Sol (post meteor),
d: Shinra Building (p.22)
Bio I Bio 2 * Bio .
es roughly 150-400 Docs roughly 600-1200 Does roughly 2000-3:
jits of Poison-typed points of Poison-typed points of Poison-typnage and gives poison damage and gives poison damage and gives pc
idition to target(s). condition to target(s). condition to target(s
v (36mp)
8 X The Completely Unauthorized Final Fantasy VII Ultimate Guide
lm the town of Gongaga. an
Jop^na! location that.-en
worth visiting. But before
lyoTrushofftodothat,cruse
vou the valuable Aqua ung
I Striking StaH. too!
Enemies J\ppearin9 in
Gonqaaa Jun9'e
iKimaira Bug
7QQ_ "
Then you arrive m bonga«a
Materia, and then
North to Gongaga town
I There's not too
m^. A~ vSB^pening
-r both) in your party, lam ifes lf Aentn
or Tifa are in yo«- party, tney (hem each ndi
me lover, and you'll haw «°^ poi„,s. If neither
CLlndthen^o^el
Scitet identifies the "weakbcariei i«
TO„ai, by herMateria. WeaR uy
,
standards, maybe, but
Titan suits me fine.
190,Hi-Potion
Snider Web
Hourglass
Enemy appearing in
fionaaga Meltdown Urea
Hi-Potion
phnanix Down
Power Source
1500
\GrandGtove 1200
Atomic Scissors 1400
[Striking StetT"l300
I'piamant Pin
iBoomerang
I Impaier
1 Shrivel
I Molotov
JftCCESS./MAIb!
RjA
headband 3000
Silver Glasses 3000
star Pendant 3000
Talisman
White Cape
J Fury Ring
ITEMS
Potion
Hi-Potion
50 1
300 1
4000
5000
Phoenix Down 300 I
Tent
5000 Maiden's Kiss
Cornucopia..-
Soft
Hyper
Tranquilizer
IRude" 2001)1
720_X-Potion
iReno
g|g ?uuu
660 _
Fairy Tale
inal Fantasy VMllimateGuide X.3S
The Completely Unauthorized Final Fantasy VII Ultimate Guide^V9
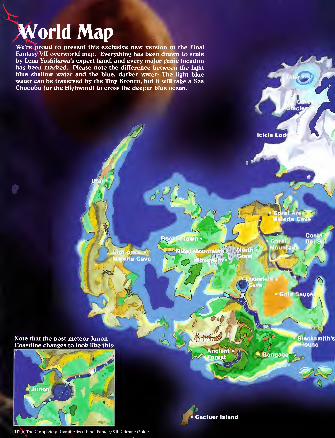
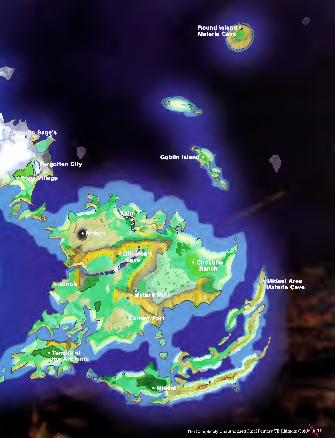
World MapWe're proud to present this exclusive new version of the Final
Fantasy VII overworld map. Everything has been drawn to scale
by Lena Yoshibawa's expert hand, and every major game location
has been marked. Please note the difference between the light
blue shallow water and the blue, darker water: The light bluewater can be traversed by the Tiny Bronco, but it will take a SeaChocobo (or the Highwind) to cross the deeper blue ocean.
10 X The Completely Unauthorized Final Fantasy VII Ultimate Guide
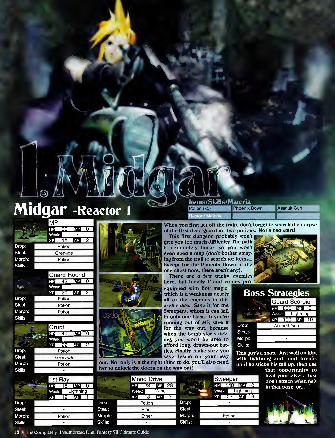
Mldgar -Reactor 1
IMP3Q ffla ^
Potion
Grenade
Potion
|Guard Hound
W3L42
20Potion
Potion
Potion
iGrunt40 10:22 ™ 2
Potion
Grenade
Potion
Items/Skills/Materia
1When you first get off the train, don't forget to search the corpse
of the first dead guard for two potions. Not a bad start!
This first dungeon probably won't I
give you too much difficulty. The path
is completely linear, so you won'tj
even need a map (don't bother stray-
ing from the trail to search for items...J
Except for the Phoenix Down in the
one chest here, there aren't any).
There are a few tricky enemies I
here, but luckily Cloud comes pre-
equipped with Bolt magic,
Not only- to unlock
is it
the
which is a weakness nearly
all of the enemies in this
area share. Save it for the
Sweepers, whom it can kill
in only one blast. If you're
running out of MP, save it
for the way out, becausewhen the bomb starts tick-
ing, you won't be able to
afford long, drawn-out bat-
tles. Finally, make sure yousave Jessie on your way
the right thing to do, you'll also needdoors on the way out!
Boss StrategiesIGuard Scorpion
800 qa_ o'
Lightning
oarAssault Gun
1 1st Ray iMono Drive |Sweeper
28
12
Lightning WindJ4Q raa o
Lightning
zoo27
Potion
Potion
Ether
Ether Potion
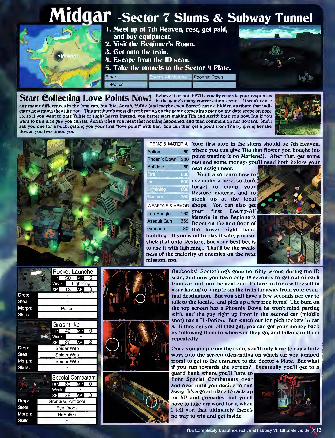
Midqar -Sector 7 Slums & Subway Tunnel1. Meet up at 7th Heaven, rest, get paid,
and buy equipment.
2. Visit the Beginner's Room.3. Get onto the train.
4. Escape from the ID scan.
5. Take the tunnels to the Sector 4 Plate.
Start PnllPCtina I ftve PnillK NOW' Relieve it or not, FFVII actually records your responseswJICIl I V^VIItVllliy LtWVC ' U1I113 in the games many conversation scenes. It won't causeany major differences in the long run, but Tifa, Aerith, Yuffie (and maybe even Barret) have a hidden attribute that indi-
cates how much they like you. This attribute's most direct bearing on the game comes into play on the date scene on page
55, so if you want to date Yuffie or (ugh) Barret instead, you better start making Tifa and Aerith hate you now. But if youwant to be a nice guy, you can tell Aerith when you meet that nothing happened, and then comment on her flowers. She'll
sell you one for a buck, getting you your first "love point" with her. You can then get a point from Tifa by giving her the
flower, you two-timer, you.
Your first stop in the slums should be 7th Heaven,
where you can give Tifa that flower you bought (no
point wasting it on Marlene!). After that, get somerest and some money- you'll need both before yournext assignment.
ITEMS & MATERIA
Potion 50
Phoenix Down 300
Antidote 80
|Fire 600
Restore 750
WEAPONS & ARMOR
Iron Bangle 160
Assault Gun 350
Grenade 80
You'll also learn how to
use materia here, so don't
forget to equip yourRestore materia, and to
stock up at the local |
shops. You can also get
your first Enemy-AllMateria in the Beginner's
Room on the 2nd floor of
the lower right handbuilding... If you want to play it safe, you canstick that onto Restore, but your best bet is
to use it with lightning... That'll be the weak-ness of the majority of enemies on the next
mission, too.
Gadzooks! Something's gone horribly wrong during the ID
scan, and now you have only 15 seconds to get out of each
train car and into the next one. Failure to do so will result in
your having to jump from the train far away from your even-
tual destination. But you still have a few seconds per car to
talk to the locals... and pick up a few free items! The bum onthe top screen has a Phoenix Down he won't mind parting
with, and the guy right up front in the second car (middle
shot) has a Hi-Potion. But watch out for pickpockets in car
3. If they rip you off (100 gil), you can get your money backby following them to wherever they go, and talking to themrepeatedly.
Once you jump from the train, you'll only have to run a little
ways into the screen (depending on which car you jumpedfrom) to get to the entrance to the Sector 4 Plate. But whatif you run towards the screen? Eventually you'll get to a
guard bank where you'll have to
fight Special Combatants overand over until you decide to runaway. It's a good place to rack upon XP and grenades, but you'll
have to take my word for it whenI tell you that ultimately there's
no way to win and get inside.
The Completely Unauthorized Final Fantasy VII Ultimate Guide X 13
te & Reactorr 4 Plate.
I
and escape!
IBIugu
Lightning
Potion
Eye Drops
Potion
Hi-Potion
Antidote
Eye Drops
Potion
|Proto Machinegun
IWH Lightning
m 16 Ea 2
Potion
|Special Combatant
WL60 ™ 0
Antidote, Grenade
Eye Drops
Hi-Potion
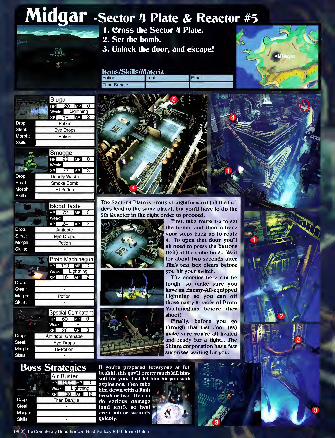
The Sector 4 Plate is pretty straightforward (all the lad-
ders lead to the same place), but you'll have to do the
5th Reactor in the right order to proceed.
First, take route 1-3 to set
the bomb, and then retrace
your steps back up to route
4. To open that door, you'll
all need to press the buttons
(left) at the same time... Wait
for about two seconds after
Tifa's text box clears before
you hit your switch.
The enemies here can betough, so make sure youhave an Enemy-AH-equippedLightning so you can off
those nasty 5-packs of Proto
Machineguns before they
shoot!
Finally, before you gothrough that last door (#5)
make sure you're all healed
and ready for a fight... TheShinra corporation has a fewsurprises waiting for you.
). J
I
fjitBAir Buster
*'tCI, ."XLiahtnina
Titan Bangle

Mldgar -Church & Sector 5 Slums1 . Help Aerith escape from Reno.
2. Escort her to the Sector 5 Slums.
3. Stay the night at Aerith's house.
4. Sneak out without being detected.
5. Head back towards the Sector 7 Slums.
Items/Skills/Materia
Reno and his pacfe of MP's,
and some materia.
Now, even Aerith can easily take the weeniesReno sends after her, so you don't really have to
do anything special to survive this event. But
why not take the opportunity to show Aerith just
how incredibly cool you are? Tell her to hold ona minute, and then bill the oncoming guards with
the barrels stacked in the rafters. Push the left
barrel, then the top barrel, then the right barrel,
and wham, it's over. Aerith will love you for it.
As Aerith s newly commissioned bodyguard, your firs
duty is to protect her fron.
.
First, equip Aerith with the Titan Bangle you just won.
aHHHedgehog Pie
"In 40 raa b2
& ;
Weak: |K9™3 ^ MJ 3
Drop: Potion
Steal: Ether
Morph: Ether
Skills:
sameyou'll
There are really only two interesting things in the Sector 5 slums, both in the
place. It's the 2nd floor of the residence on the east edge of town, and there
find the first ad for Utai's "Turtle's Paradise" |:
bar... You get a prize if you read all six. The sec-
ond is the hidden drawer in the dresser... Youcould rob the poor kid of his 5 measly bucks,
but it's better not too. If you wait
until the next time you visit this
town, the kid'll give you some-thing you might actually want: a „nice Turbo Ether! I^^^Bwh i
jffl -J
Newsflash to Aerith:
The church isn't the
only place flowers
can grow, there's a
billion of them in
your own backyard!
Clearly she's never
been there, which is
probably why shedidn't notice themMmm
Cover Materia (check out the basic training section for warnings
on using this in conjunction with limit breaks) and the bottle of
Ether.
Stay the night at Aerith's house,
and then do her mom a favor byditching her early in the morning...
You'll need to take it nice and easy
(no running!) and avoid all of the
creaky floorboards by travelling
in the route depicted on the right.
Don't worry, you'll meet again real
soon.
MATERIA
The Completely Unaul 'II Ultimate Guide X 15
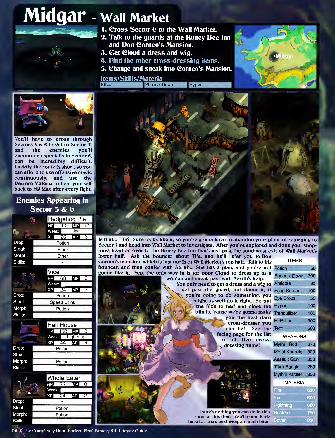
Mldgar - Wall Market1. Gross Sector 6 to the Wall Market.
2. Talk to the guards at the Honey Bee Inn
and Don Borneo's Mansion.
3. Get Cloud a dress and wig.
4. Find the other cross-dressing items.
5. Change and sneak into (Borneo's Mansion.
Items/Skills/Materia
-3-
1 -~ i
You'll have to cross throughSectors S & 6 to get to Sector 7,
and the enemies you'll
encounter, especially in Sector 6,
can be incredibly difficult.
Luckily, the route is short, so youcan afford to use offensive magiccontinuously, and use the
Restore Materia to heal yourself
back to HP Max after every fight.
Enemies Appearing in
Sector 5 & 6
ITEMS
Is that... Tifa? Sure looks like it, so you're gonna have to abandon your plans of returning to|
Sector 7 and head into Wall Market to investigate. After you've explored and done your shop-ping, head on over to the Honey Bee Inn that's just past the southwest exit of Wall Market's
|
lower half. Ask the bouncer about Tifa, and he'll refer you to DonCorneo's mansion, which is just north of Wall Market's top half. Talk to his
bouncer, and then confer with Aerith... She has a plan, and you're notgonna like it. Yep, the only way in is for poor Cloud to dress up as a
woman and sneak past with Aerith's help.
7 need to get a dress and a wig to
get past the guard, but damn it, if
you're going to do something, youmight as well do it right. So putthe kids to bed and close the
you the best darncross-dresser youcan be! See the
facing page for the list
of all five cross-
- dressing items!
< "ifThere's nothing you can do in this
room at this time. You'll come bachhere for Tifa's best weapon much later.
Potion 50
Phoenix Down 300
Antidote 80
Echo Screen 100
Eye Drops 50
Hyper 100
Tranquilizer 100
Hi-Potion 300
Tent 500
WEAPONS
Mythril Rod 370
Metal Knuckle 320
Assault Gun 350
Titan Bangle 280
Mythril Armlet 350
MATERIA
' The Completely Unauthorized Final Fantasy VII Ultimate Guide
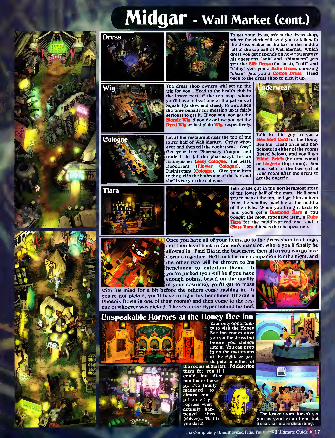
Mldgar - Wall Market (cont.)
To get your dress, ask at the dress shop,
where the clerk will send you to talk with
the dress-maker at the bar in the middleleft of the top half of Wall Market. Whichdress you get depends on how you answerhis questions: "soft" and "shimmers" gets
you the Silk Dress (the best), "soft" and"shiny" gets you a Satin Dress, choosing"clean" gets you a Cotton Dress. Headback to the dress shop to pick it up.
The dress shop owners will set up the
wig for you... Head to the health club in
the lower part of the top map, where
[you'll have to beat one of the patrons at
Squats (go slow and steady to win, since
the time penalty for messing up is fairly
serious) to get it. If you win, you get the
Blonde Wig, if you tie or lose you get the
Dyed Wig or just plain Wig, respectively.
Eat at the restaurant near the top of the
lower half of Wall Market. Order what-ever and then tell the cook it was "okay."
Get your free Pharmacy Coupon andtrade it in (at the pharmacy), for anExtinguisher (Sexy Cologne, the best).
Deodorant (Flower Cologne), orDisinfectant (Cologne). Give your itemto the girl in the bathroom of the bar, and
j she'll give you the cologne.
Talk to this guy to get a
Member's Card for the HoneyBee Inn. Head on in and par-
ticipate in either of the rooms(listed below), and you'll get
Bikini Briefs (bottom room)or Lingerie (top room). Youmust talk to the bee girl in
your room after the event to
get the lingerie.
Tiara
r-~t.it t T
Talk to the guy in the northernmost store
of the lower half of the map. He'll sendyou to stay at the inn, and get him an item
from the vending machine at the middleof the night. When you bring it back to
him, you'll get a Diamond Tiara if youbought the most expensive item, a RubyTiara for the middle-priced one, and a
Glass Tiara if it was the cheapest one.
I Once you have all of your items, go to the dress shop to change,
|and then head bach to Corneo's mansion, where you'll finally be
allowed in. Find Tifa in the basement, then all of you can go face
Corneo together. He'll pick his one companion for the night, andthe other two will be thrown to his I
henchmen to entertain them. If
you're picked (you will be if you haveenough points, based on the quality I
I of your costume), you'll get to mess I
with his mind for a bit before the others come rushing in. If
you're not piched, you'll have to fight his henchmen (there's a|
Phoenix Down in one of their rooms) and then come to the res-
cue of whoever was piched. There's a free Hyper behind his bed.
3SU
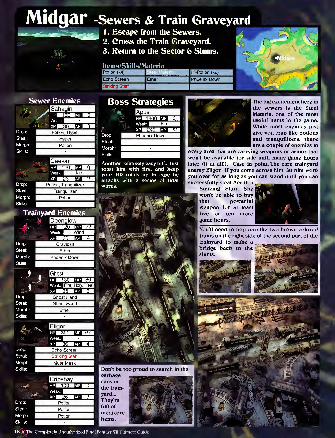
-Sewers & Train GraveyardI I . Escape from the Sewers.
2. Cross the Train Graveyard.
3. Return to the Sector 6 Slums.
wer Enemies
Weak: ^^^^H
[Caesarvm |gg i)
Ice
'23 m tPotion, Tranquilizer
Tranquilizer
Potion
Deenglowi2Q-ffl
35
Wind3UGraviball
Ether
Phoenix Down
130 M 80".
TFire, Holy, Heal I
30 eg &
Ghost Hand
Ghost Hand
Ether
jjjgEligorifeffa^jy 300 HIJ eT7~|
Echo Screenj
Striking Staffj
Mute Maskj
' HCripshayj
Potion
Boss Strategies
hpMMIJmpMMWeak: ^HU^^H
The big excitement here in
the sewers is the Steal
Materia, one of the mostuseful items in the game.While most enemies just
give you crap like potions
and tranquilizers, there
I are a couple of enemies in
every area that are carrying weapons or armor that
won't be available for sale until many game hourslater (if at all!). Case in point: The rare trainyard
enemy Eligor. If you come across him, let him workyou over for as long as you can stand until you cansuccessfully steal Aerith a
,
Striking Staff. Shewon't be able to buy
j
that powerful[
weapon for at least I
five or ten more [
game hours.
You'll need to hop into the two brown-coloredtrains on the right side of the second part of the
trainyard to make a
bridge back to the _slums.
Don't be too proud to search in the
garbage
cans in
the train-
yard...
They're
full of
mediocreitems.
SOTS
L . VI
18 X The Completely Unauthorized Final Fantasy VII Ultimate Guide
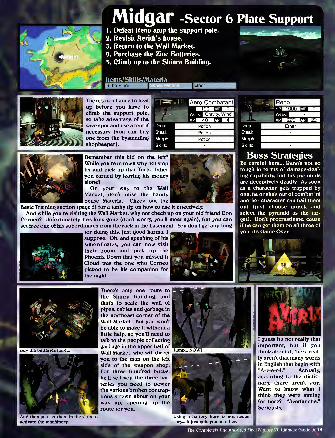
Midgar -Sector 6 Plate SupportI I . Defeat Reno atop the support pole
1 2. Revisit Aerith's house.
Return to the Wall Market.
Purchase the Zinc Batteries.
Climb up to the Shinra Building.
Items/Skills/Materia
M.
r
There's no chance to heal
up before you have to
climb the support pole,
so take advantage of the
save spot and use a tent if
necessary (you can buyone from the bystanding
shopkeeper).
Aero Combatantl
Gravity, Wind
33 40 EE! 4~Potion
Potion
Potion
I Reno11)1)1) laiair
290 sheEther
Remember this kid on the left?
While you're in town why not stop
by and pick up that Turbo Ether
you earned by leaving his moneyI alone?
On your way to the Wall
I Market, don't miss the handyI Sense Materia. Check out the
Basic Training section (page 5) for a fanky tip on how to use it effectively.
And while you're visiting the Wall Market, why not check up on your old friend DonCorneo? Unfortunately, he's long gone (don't worry, you'll meet again), but you can
set free one of his subordinates from the rack in the basement. You don't get anything
. for doing this, just good karma, I
suppose. Oh, and speaking of his
subordinates, you can now visit
their room and pick up the
Phoenix Down that you missed if
Cloud was the one who Corneopicked to be his companion for
the night.
Boss StrategiesBe careful here... Reno's not so
tough in terms of damage-deal-
ing capability, but his pyramidsare deceptively deadly. As soonas a character gets trapped byone, he or she's out of combat 'til
another character can bail themout (just choose attack andselect the pyramid as the tar-
get). Don't procrastinate, cause
if he can get them on all three of
you, it's Game Over.
#'5.',
SS* s Sm
There's only one route to
the Shinra Building, andthat's to scale the wall of
pipes, cables and garbage in
the northeast corner of the
Wall Market. But you won't
be able to make it without a
little help, so you'll need to
talk to the people collecting
garbage in the upper half of
Wall Market, who will direct
you to the man on the left
side of the weapon shop.
For three hundred bucks,
he'll sell you the three bat-
teries you need to powerthe various broken contrap-
tions strewn about on yourway up, opening up the
route for you.
And then just set them in the slots to
activate the machinery.
I guess it's not really that
important, but if youthink about it, there real-
ly aren't that many wordsin English that begin with
"A-v-e-r-I." Actually,
according to the dictio-
nary, there aren't any.
Want to know what I
think they were aiming
for here? "Averlanche."
Seriously.
Using a battery here is not neces-
sary... It just gets you an ether.
The Completely Unauthorized Final Fantasy VII Ultimate Guide X 19
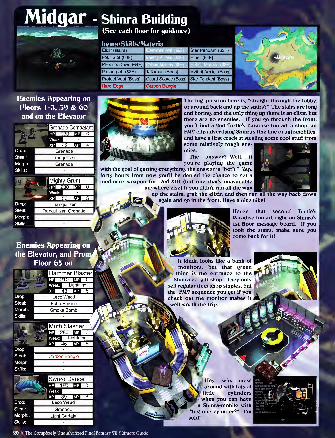
Midgar - Shinra Building I(See each floor for guidance)
Items/Skills/Materia
IHMffllllH'M
I Carbon Bangle
emies Appearing on
oors I -3, 59 & 60d on the Elevator
The big question here is, "straight through the ]
or around back and up the stairs?" The stairs are 1
and boring, and the only thing up there is an elixir, but
there are no enemies. If you go through the front,
you'll find a 2nd Turtle's Paradise Inn ad, a shop, anFMV clip advertising Shinra's fine line of automobiles,
and have a first crack at stealing some cool stuff fromsome relatively tough ene-
mies.
The answer? Well, if I
you're playing the gamewith the goal of getting everything, the answer is "both." Yep,
forty hours from now you'll be denied the chance to get a
mediocre weapon for Red-XIII (but one that's unavailable
anywhere else) if you didn't run all the wayup the stairs, grab the elixir, and then run all the way back down
again and go in the front. Have a nice hike!
Here's that second Turtle's
Paradise Inn ad, right on Shinra's
1st floor message board. If youtook the stairs, make sure youcome back for it!
It kinda looks like a bank of
monitors, but that greenthing is the entrance to the
Shinra co. gift shop. They only
sell regular item shop staples, but |the FMV sequence you get if youcheck out the monitor makes it
well worth the trip.
Hey, why mess/ around with lots of :
little cylinders I
when you can havej
a Shinra-mobile with
"big one cylinder?" I'm
sold!
20 * The Completely Unauthorized Final Fantasy VII Ultimate Guide
Midgar - Shinra Building (cont.)
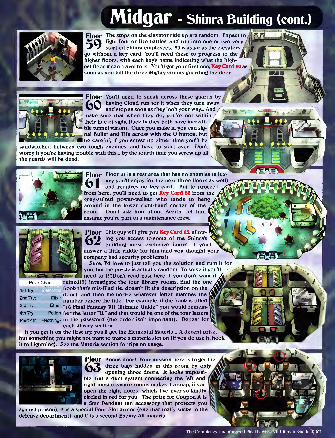
Floor The stops on the elevator ride up are random. Expect to Mfight four or five battles, and run into one or two very /'
~J s startled Shinra employees. 59 is as far as the elevators
go without a bey card: You'll need these to progress to the
higher floors, with each bey's name indicating what the high-
est floor it can travel to is. You'll get your first one. Key Card 60 as
soon as you bill the three Mighty Grunts guarding the door.
Floor
60You'll need to sneab across these guards byhaving Cloud run for it when they turn awayand stop as soon as they loob your way... And
mabe sure that when they do, you're not within '
their line of sight (lucbily they both have incredi-
ble tunnel vision). Once you mabe it, you can sig-
nal Bullet and Ufa across with the O button, but
I be careful, if you screw up either time you'll besandwitched between two tough enemies, and have to start over. Don't
worry if you're having trouble with this... by the fourth time you screw up all
the guards will be dead.
Floor
61Floor 61 is a rest area that has no enemies (a lux-
ury you'll enjoy for the next three floors as well)
and requires no bey card. But to proceed
from here, you'll need to get Key Card 62 from the
grey-suited power-walber who tends to hangaround in the lower right-hand corner of the
room. Don't asb him about Aerith, let himassume you're part of a maintenance crew.
Floor
62This guy will give you Key Card 65, allow-
ing you access to some of the Shinra's
building most exclusive floors, if you'll
I answer a little riddle for him (and you thought your
|
company had security problems!)
Sure, I'd love to just tell you the solution and ruin it for
I you, but the puzzle is actually random. To solve it you'll
I need to (!!!Don't read past here if you don't want it
ruined!!!) investigate the four library rooms, find the oneboob that's mis-filed (ie, doesn't fit the description on the
door), and then memorize whatever letter matches the
number before the title. For example, if the boob is titledEther »
16 pjnai Fantasy VII Ultimate Guide" you would remem-Potion ber the letter "U," and that would be one of the four letters IS"
lothing- in the password (the order isn't important). Repeat for IS
each library section.
If you get it on the first try, you'll get the Elemental Materia... A decent prize,
but something you might not want to waste a materia slot on (if you do use it, hoobit to Lightning). See the Materia section for tips on usage.
Prize Chart
1st Try:
2nd Try:
3rd Try:
4th Try:
Past 4th:
Elixir
Floor
63Bonus floor! Your mission here is to get the
three bags hidden in this room by only
opening three doors. It loobs impossi-
I ble, but a duct system connecting the left andright-most treasure rooms mabes it a snap, if youopen the right doors, which I've ever-so-bindly
circled in red for you. The prize for Coupon A is
I a Star Pendant (an accessory that protects youagainst poison), B is a special Four Slot armor (one that really sucbs in the
defense department), and C is a second Enemy-All materia.
Mldgar - Shinra Building (cont.)
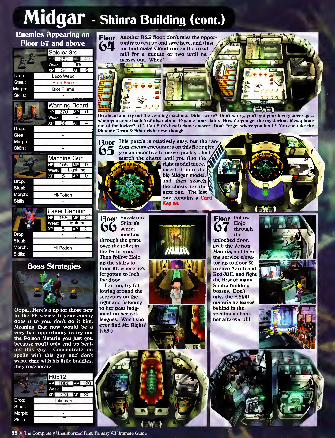
Enemies Appearing on
Floor 67 and aboveAnother R&R floor, don't miss the opportunity to rest up and save here, and (just
for fun) make Cloud run on the tread-
mill for a minute or two until hepasses out. Whee!
Go ahead and try out the vending machine. Didn't worh? Don't worry, you'll get your lovely beverage...
when you come back to Midgar about 40 game hours later. How do you get the mysterious Megaphoneout of the locker? (It's Cait Sith's best!) Same answer. Don't forget where you left it! You can take the
Phoenix Down & Ether right now, though.
Oops... Here's a tip for those newto the FF series: If your enemydoes it to you, don't do it him.
Meaning that now would be a
very bad opportunity to try out
the Poison Materia you just got,
because you'll only end up heal-
ing this guy. Concentrate onspells with this guy, and don't
waste time with his little buddies:
they regenerate.
Sneak into
Shinra's
secret
meetingthrough the grate
over the toilet in
the bathroom...
Then follow Hojoup the stairs to
floor 67, where he's
forgotten to loch
the door.
For fun, try fol-
lowing around the
secretary on the
right and listening
to her pass judg-
ment on her col-
leagues. Won't she
ever find Mr. Right?
(sigh)
This puzzle is relatively easy, but the ran
dom enemy encounters on this floor give
you an incentive to move quickly... lust
search the chests until you find the
]right model piece, (Svj
'insert it into thely^.big Midgar model, IS,
I and then search |»the chests for the IV
J
next one. The last Vone contains a Card
I Key 66.
Follow
Hojothroughthe
unlocked door,
grab the PoisonMateria, and take
the service eleva-
tor up to floor 68
to save Aerith andRed-XIII, and fight
the first of manyShinra building
bosses. Don't
miss the E.Skill
materia he leaves
behind in the
specimen cham-ber afterward!!!
J I
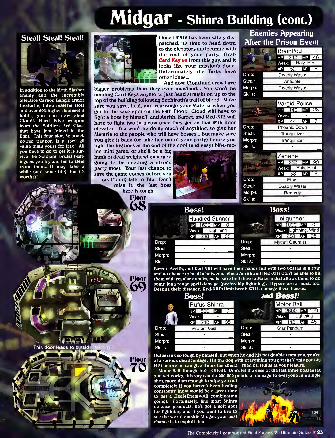
Midgar - Shinra Building (cont.)
Steal! Steal! Steal!
In addition to the Moth Slasher
enemy and the incredibly
effective Carbon Bangle armor(featuring three materia slots
and over 50% higher defense) it
holds, you can now steal
Cloud's Hard Edge weaponfrom the Soldiers 3rd Class
that have just joined in the
fight. This four slot, 32 attach
power weapon is a 1500 gil
value that's yours for free! All
you have to do to get it is sur-
vive the Soldiers' brutal beat-
ings as you try and fail to steal
from them... It may tafee a
while (and some life), but it's
worth it!
,\ Floorl__.69
Once H0512 has been safely dis
patched, it's time to head downto the elevators and reunite with
the rest of your party. GrabCard Key 68 from this guy, and it
looks like your mission's done.
Unfortunately, the Turks haveother ideas...
W-~ And now, Cloud and crew have
bigger problems than they ever imagined... You won't be
needing Card Keys anymore, just head straight on up to the
top of the building foflowing Sephiroth's trail of blood. Makesure you save, heal, and rearrange your Materia when youget to the save spot on the 69th Floor. Cloud will have to
fight a boss by himself, and Aerith, Barret, and Red-XIII will
have to fight two in a row once they get on that 69th floor
elevator. Tifa won't be doing much of anything, so give her
Materia to the people who will have bosses... But make sure
you give it back (or take her out of your party) before youfight the big boss at the end of the cool (and easy) bike-rac-
ing mini game, or she'll be a big
hunk of dead weight when you're
going to be needing a strong
party most. Your last chance to
save the game comes before you(as Cloud) talk to Tifa. Don't
miss it, the last bosshere is tough.
Floor
68
Enemies Appearing
After the Prison Event
Weak: iBlBliEgW
Deadly Waste
Weak: ^QlSni^H
Items/Skills/Materia
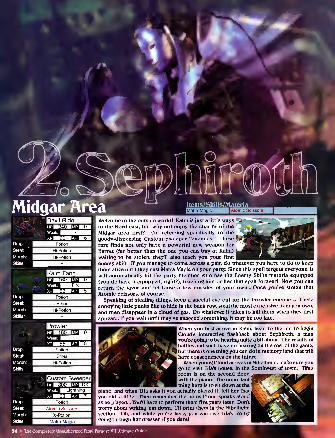
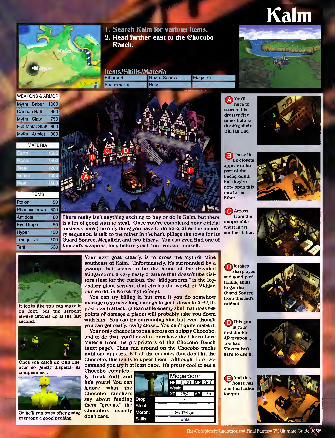
Welcome to the outside world! Kalm is just a little ways ^to the Northeast, but why not enjoy the charms of the
Midgar area first? I'm referring specifically to the
goody-dispensing Custom Sweeper "enemies." These I
rare finds not only have a powerful new weapon for
Barret (far better than the one you can buy at Kalm) I
waiting to be stolen, they'll also teach you your first|
enemy skill. If you manage to come across a pair, do whatever you have to do to beep
them alive until they cast Matra Magic on your party. Since this spell targets everyone, it
will automatically hit the party member who has the Enemy Skills materia equipped
(you do have it equipped, right?), teaching him or her that spell forever! Now you can
return the favor and let loose a few missiles of your own... Once you've stolen that
Atomic Scissors, of course.
Speaking of stealing things, keep a special eye out for the Prowler enemies... These
annoying little punks like to hide in the back row, steal the most expensive item you own,
and then disappear in a cloud of gas. Do whatever it takes to kill them when they first
appear... If you wait until they've snagged something, it may be too late.
When you first arrive in Kalm, head to the inn to begin
Cloud's interactive flashback about Sephiroth, a manyou're going to be hearing quite a bit about. The results of
battles and such have no bearing on the rest of the game,
but there is one thing you can do in memory land that will
have consequences on the future.
When young Cloud arrives in Nibelheim, make sure yougo to visit Tifa's house, in the Southwest of town. Tifa's
room is on the second floor,
with the piano. The important
thing here is to sit down at the|
piano, and when Tifa asks if you actually played it, tell her that
you did, a little. Then remember the notes Cloud speaks aloud
as he played... You'll have to perform them five years later. Don't
worry about writing 'em down, I'll print them in the Nibelheim
section. Oh, and while you're here, you can risk Tifa's ire by|
going through her dresser, if you dare!
e Completely Unauthorized Final Fantasy VII Ultimate Guide
IWEAPONS & ARMOR
*Mythril Saber 100CT
Cannon Ball 950
Mythril Claw 750|
Full Metal Staff 800)
,Mythril Armlet 300
1
MATERIA
ITEMS "
|
Potion 50
Phoenix Down 300
Antidote 80
Eye Drops 50
Hyper 100
Tranquilizer 100
Tent 500
There really isn't anything exciting to buy or do in Kalm, but there
is a lot of good stuff to steal. Once you've completed your official
business here (the only thing you have to do here, after the memo-ry sequence, is talk to the miner in the bar), pillage the town for its
Guard Source, Megalixir, and two Ethers. You can even find one of
Vincent's weapons, long before you'll find Vincent himself.
It looks like you can make it
on foot, but the serpentalways catches up at the last
second.
Once you catch up with one,
ever so gently dispatch its
companions...
Or he'll run away after giving
everyone a good pecking.
Your next goal, clearly, is to cross the Mythril Minesoutheast of Kalm. Unfortunately, it's surrounded by a
swamp that seems to be the home of the dreadedMidgarsorm, a very nasty creature that doesn't like visi-
tors (lust for the curious, the "Midgarsorm," is the leg-
endary giant serpent that circles the world of Midgar,
our world, in Norse mythology).
You can try killing it, but even if you do somehowmanage to survive long enough to get it down to 0 HP, its
post-death attack, (a learnable enemy skill that does 999
points of damage a piece) will probably take you downwith him. You can try outrunning him, but even thoughyou can get really, really close... You can't quite make it.
Your only chance is to run across on a zippy Chocobo,and to do that, you'll need to purchase the Choco LureMateria from the proprietors of the Chocobo Ranch(next page). Then run around on the Chocobo tracks
until one appears. Kill all the enemies (but don't hit the
Chocobo, this tends to upset them. Although, I do rec-
ommend you try it at least once. It's pretty cool to see a
Chocobo complete-
ly freak out) andhe's yours! You canignore what the
Chocobo rancherssay about feeding
them "greens," the
Chocobos usually
don't care.
These Ut-
^^le closets
appear to be
part of the
background,
but they're
not- open this
one for an
Ether.
Across
from the
unopenable
chest is yet
another Ether.
ff%lt takes
^^sharp eyes
and good posi-
tioning skills
to get the
Guard Source
from this kid's
cabinet.
IftThis gunis your
first double
AP weapon...
Too badVincent isn't
here to use it.
f^And this
house has
one final Ether
for you.
f'. £
ie Completely Unauthorized Final Fantasy VII Ultimate Guide*X25
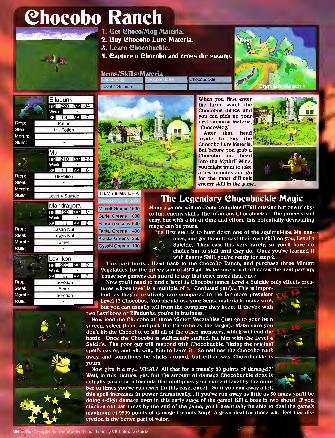
Chocobo Ranch1 . Get Ghoco/Mog Materia.
2. Buy Ghocobo Lure Materia.
3. Learn Ghocobuckle.
4. Capture a Chocobo and cross the swamp.
Items/Skills/MateriaChocobuckle
Weak.
ITEMS & MATERIA
When you first enter
the farm, watch the
Chocobos dance andyou can pick up yourfirst summon Materia,
"Choco/Mog."After that, head
inside to buy the
Chocobo Lure Materia. isSfSBt
But before you grab a
Chocobo and headinto the Mythril Mine,
you might want to take
a few minutes and gofor the most difficult
enemy skill in the game
Mandragora|J 1^11 JJ 0
323B Lasan Nutj
Lasan Nut
EtherJ
!'
*v
Levrikon|
hi 2oo m 0 1
if m i \
Hi-Potion 1
iMimett Greens 1500
Curiel Greens 1000
Pahsana Greens 800
iTantal Greens 400
Hi WiJi
i|rArj| |
^^ ;
Krakka Greens 250
1
Gysahl Greens 100
1
Ether
Hi-Potion
~irio-twBi'iyi(«)«iiiiinTii'i»iiuin iiiiJ.«ji]iunniT
ed Final Fantasy VII Ultimate Guide
: _r» "«it
Mind Source
I Elixir
Flame Thrower I Grand Glove
Tent
Hi- Potion
3 .-•
—[Castanets
|
IjjJino LfilJ o 1
ESuS Fire !
mT1bs m 7
Steal:
Morph:
Skills:
Hi-Potion
^. Y J
|Archdragon |l!IJ iwn lAlsl VA 1
Wskm Wind 1
xpMEHapDrop:
Steal:
Morph:
Skills:
Phoenix Down, Ether f
Ether|
Phoenix Down|]
Flame Thrower I
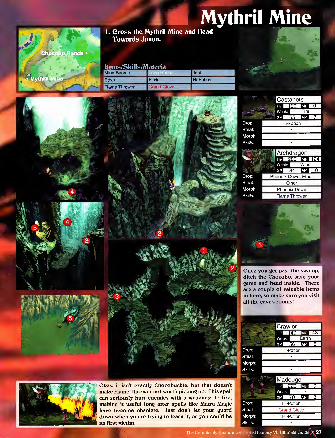
Once you get past the swamp,ditch the Chocobo, save your
game and head inside. There
are a couple of valuable items
in here, so make sure you visit
all the cave's rooms!
Okay, it isn't exactly Chocobuckle, but that doesn't
make Flame Thrower not worth picking up. This spell
can seriously hurt enemies with a weakness to fire,
making it useful long after spells like Matra Magic
have become obsolete. Just don't let your guard
down when you're trying to learn it, or you could be
its first victim.
The Completely UnauthoriZ'
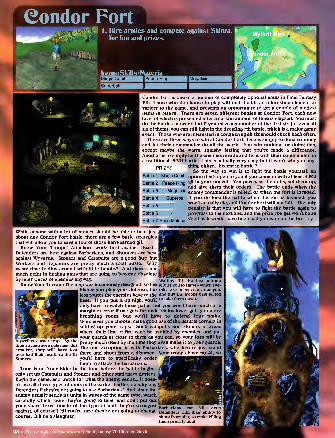
i Condor Port ^Hl1 . Hire armies and compete against Shinra
for fun and prizes.
Items/Skills/Materia
(\. \'( X
1 • i
| Magic Comb | Peace Ring jMegalixir
Isuperball
Condor Fort is one of a number of completely optional areas in Final Fantasy
VII. Those who do choose to play will find it adds an interesting element of
variety to the game, and presents an opportunity to get a couple of modestitems in return. There are seven different battles at Condor Fort, each newlevel of which is presented after a certain amount of time is elapsed. You mustdo the battles in order, but if you miss any number of the first six (or even all
six of them), you can still fight in the deciding 7th battle, which is a major gameevent. Those who are interested in conquering all six should check back often.
There are three ways to win at Condor Fort. One is simply to donate moneyand let their commander do all the work. You win nothing for doing this,
except maybe the warm, squishy feeling that you've made a difference.
Another is to simply let the enemies invade and fight with their commander, in
a traditional FFVII battle. This is actually very easy, but it won't win you any-
thing either... Except in battle 7.
So the way to win is to fight the battle yourself, an
and give them their orders. The battle ends when the
enemy commander is killed, or when the fort is invaded.
If you do lose the battle when the fort is invaded, youwon't actually die, and Condor Fort will not fall... The only
penalty is that you will have to fight the battle again to
progress to the next one, and the prize you get won't be as
PRIZES
Battle 1 Magic Comb
Battle 2 Peace Ring
Battle 3 Megalixir
Battle 4 Superball
Battle
Battle 6
Battle 7 Huge Materia
Waiting 'til the last minute
While anyone with a lot of money should be able to beat just
about any Condor Fort battle, there are a few basic strategies
that will allow you to save a few of those hard-earned gil.
Know Your Troops! Attackers work best against Beasts,
Defenders are best against Barbarians, and Shooters are best
against Wyverns. Stoners and Catapults are a good buy, but
Workers and Repairers are pretty much a total waste. Whywaste time fooling around with little bombs? And there's not
much point in healing units that are going to become obsolete
by later waves of enemies anyway.Know Your Terrain: The map was ingeniously designed, so the allows you to survey which ene-
higher you plan your defense, the mies are being sent after you,
less routes the enemies have to the and buy the troops best suited
base. If you put it up high, you'll to tabe them down -
only have to watch three paths, but you won't have much of a
margin of error if one gets through. Going lower gets you morebreathing room, but you'll have to defend four paths.
Whichever you choose, make good use of the natural corners in
setting up your traps. Stick catapults and stoners in areas
where their line of fire can't be avoided by enemies, and put
your guards as close to them as you can, so your foes will beA perfect corner trap. By the pretty much dead by the time they even make it to your guards.
a™er°r;e
wifh^T.os, ™* one exception is with Barbarians, who .ike to just stand
over half their health to the Tri there and shoot from a distance. Your troops have no AI, so
Stoners. you'll have to specifically orderthem to attack the Barbarians.
Time is on Your Side: In the time before the battle begins,
only set up Catapults and Stoners and other stationary devices.
Begin the game, and watch for what the enemy sends... It does-
n't use all three types of units in the earlier battles, so why buyDefenders if they're not going to use Barbarians? And since the
enemy usually sends its units in waves of the same type, watchcarefully which route they're going to take, and don't put out
your guard force (made of the type of unit they're strongest Barbarians can bjll cvenagainst, of course!) 'til you're sure they're not going to change Defenders with their ability tocourse. It'll be a slaughter! shoot from afar, so mahe hilling
them priority one!
(1
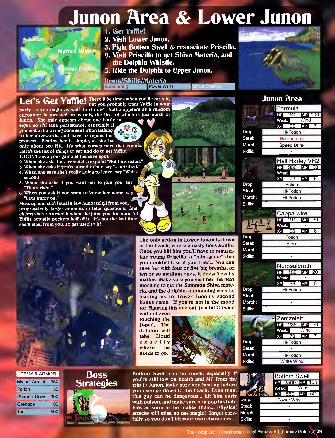
Junon Area & Lower Junon1. Get Yuffie!
2. Visit Lower Junon.
3. Fight Bottom Swell & resuscitate Priscilla
4. Visit Priscilla to get Shiva Materia, and
the Dolphin Whistle.
5. Ride the Dolphin to Upper Junon.
Items/Skills/Materia
The only action in Lower lunon is downat the beach, where a nasty boss awaits.
Once you bill him you'll have to resusci-
tate young Priscilla, a "mini-game" that
you couldn't lose if you tried... You can
save her with four or five big breaths, or
ten or so medium ones, it doesn't really
matter. Make sure you visit her the next
morning to get the Summon Shiva mate-
ria, and the dolphin-summoning whistle,
leading us to Lower Junon's secondbonus game. If you're not in the moodfor figuring this one out, just hit O twice
without eventouching the
D-pad... Thedolphin will
take Cloudexactlywhere he
|
needs to go.
Junon Area
RT3 240 lAlsl 1 uu
BPS' Wind
HT™65 ffil 7
Hi-Potion
Boomerang
Speed Drink
| Hell Harley VR2IjlJ IJJJ ho
SaV2 m 8
Potion
Hi-Potion
Hi-Potion
Capparwiregio &
ITEMS & ARMOR|
Mythril Armlet 350
Potion 50
Phoenix Down 300
Grenade 80
Tent 500
E33Potion
Ether
MPBeia
ES31
'/Hi »jiH
Hi-Potion 1
/,1 g
[Zemzelett91=1 ^Hh IAIJ 3ta
EMP ! Wind
IIS 70 m 7
Hi-Potion
Hi-Potion
White Wind
I Bottom Swell
25QQ rcaWind
TOO
"so M b?Power Wrist
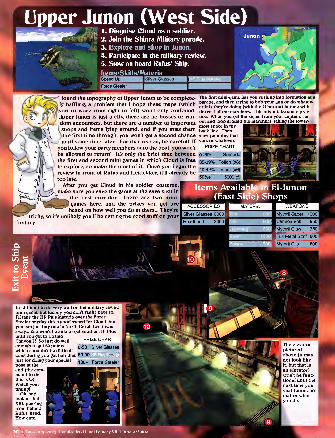
»er Junon (West Side)HHp^J||| 1 . Disguise Cloud as a soldier.
B^^PlPffJ 2. Join the Shinra Military parade.
3. Explore and shop in Junon.
4. Participate in the military review.
5. Stow on board Rufus' Ship.
Items/Skills/Materia[Speed Up I Silver Glasses
Force Stealer
tricky, so
first try!
I found the topography of Upper Junon to be complete-
ly baffling, a problem that I hope these maps (which
sort of work from right to left) won't only confound.
Upper Junon is just a city, there are no bosses or ran-
dom encounters, but there are a number of important
shops and items lying around, and if you miss themthe first time through, you won't get a second chance
until some time later. For that reason, be careful! If
you follow your party members onto the boat, you won't
be allowed to return! It's only the brief time betweenthe first and second mini games in which Cloud is free
to explore, so make the most of it. Once you begin the
review in front of Rufus and Heidekker, it'll already betoo late.
After you get Cloud in his soldier costume,
make sure you save the game at the save spot in
the first corridor. There are two mini-
games here, and the prizes you get are
based on how well you do at them... They're
it's unlikely you'll be getting the good stuff on your
The first mini-game has you rushing into formation at aparade, and then trying to bob your gun or do whatev-er it is they're doing (with the O button) in time with
the rest of the marchers. This might take some prac-
tice. When you get the signal from your captain, runout and loop around the marchers, taking the lower-
most space in the
back line. Thenstart pumping that
gun, or whatever.
PRIZE CHART
0-29%
30-39%
40-49%
50%+
Grenade
Potion (x6)
Ether (x6)
5000 gil
MATERIA WEAPONS
Silver Glasses 3000
1
IMythril Saber 10001
I Headband I Cannon Ball 950
1
IMythril Claw 750
'
Full Metal Staff 80o'<
\Mythril Clip 800
It's difficult to do very well on the military reviewmini game, but luckily, you don't really have to.
I'll take the HP Plus Materia over the ForceStealer anyday (it's a good sword for Cloud, butyou can just buy one in North Corel, two townsaway... You won't be able to get another HP Plus
until you get to CosmoCanyon!)! So just do well PHIZtOHAHlenough to get 60 points. 0.50 silver Glasseswhich shouldn't be difficult
considering you get half that 60-90
just for doing your special 1Q0+ Force stea |erpose at the
St
e Completely Unauthorized Final Fantasy VII Ultimate
The elevator
j
pictured
|above (it maynot look like
it, but that is
an elevator)
won't be func-
tional until the
next time youvisit Junon, nomatter whatyou do.
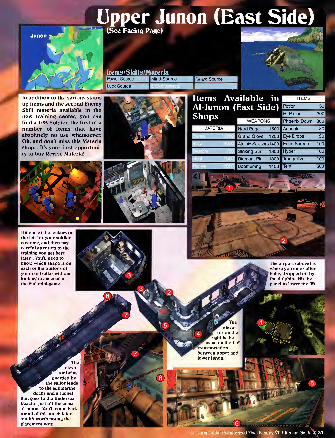
KM
Upper Junon (East Side) §(See Facing Page) ,-
ms/Skills/MateriaPower Source
Luck Source
I Mind Source Guard Source
In addition to the various status
up items and the second EnemySkill materia available in the
new training center, you can
find a 1/35 Soldier, the first of a
number of items that haveabsolutely no use whatsoever.
Oh, and don't miss this Materia
shop... It's your first opportuni-
ty to buy Revive Materia!
Items Available in
Al-Junon (East Side)Shops —i—h_
ITEMS
Potion 501
Hi-Potion 3001
Phoenix Down 300
1
|§r" MATERIA Hard Edge 1500 Antidote 80
Grand Glove 1200 Eye Drops 50
1
Atomic Scissors 1 400 Echo Screen 100
1
Striking Staff 1300 Hyper 100
1
Diamant Pin 1300 Tranquilizer ioo|
Boomerang 1400 Tent 500
Hit one of the lockers onthe left for your soldier
costume, and then paycareful attention to the
training you get here
later... You'll need to
know which shape is oneach of the buttons of
your controller withoutfooking to succeed at
the 2nd mini-game.
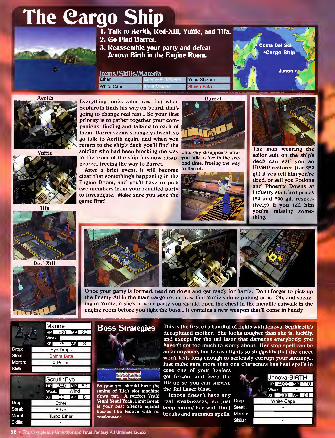
e, and Tifa.
AerithEverything looks calm now, but whenSephiroth finds his way on board, that's
going to change real fast... So your first
priority is to gather together your com-panions, finding and talking to each of
them. Barret seems strangely absent, so
go talk to Aerith again, and when youreturn to the ship's deck you'll find the
soldier who had been blocking the way This guy disappears after
to the front of the ship has now disap- you talfe to Aerith the sec-
peared, freeing the way to Barret.
After a brief event, it will becomeclear that something's happening in the
Engine Room, and you'll have to pick
two members from your reunited party
to investigate. Make sure you save the
game first!
Eye Drops|
Shinra Betaj
X-Potionj
mo \M gp~
Wind
80 H3 5
Ether
Ether
Turbo Ether
Boss Strategies
By now you should have the
timing of Tifa's slot machinedown pat. A perfect Yeah!
Yeah! Yeah! Yeah! Limit Breakis your best offense against
bosses like Jenova with noweaknesses.
Once your party is formed, head on down and get ready for battle. Don't forget to pick upthe Enemy-All in the main cargo room, now that Yuffie's done puking on it. Oh, and speak-
ing of Yuffie, if she's in your party you should open the chest in the metallic catwalk in the
engine room before you fight the boss... It contains a new weapon that'll come in handy.
This is the first of a handful of fights with lenova, Sephiroth'
decapitated mother. She looks tougher than she is, luckily,
and except for the tail laser that damages everybody, youhaven't got too much to worry about. Her stop spell can bean annoyance, but lenova fights so sluggishly that the effect
won't lasts long enough to seriously corrupt your strategy-
lust make sure more than one characters has heal spells in
case one of your healers
get frozen, and keep the pMHP up so you can survive
the Tail Laser blast.
Jenova doesn't have anyreal weaknesses, so just Dr°P :
keep hitting her with limit Steal:
breaks and summon spells. Morph
Weak: I^^^^^H
ompletely Unauthorized Final Fantasy VII Ultimate Guide
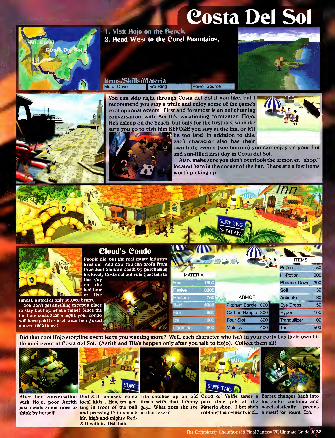
Costa Del Sol1 . Visit Mojo on the Beach.
2. Head West to the Corel Mountains.
Items/Skills/Materia
You can skip right through Costa del Sol if you like, but IW^fy**J^recommend you stay a while and enjoy some of the game's // 1
V
^B^^ ^HAl l,ecl '" Ul^HM^ V il^BHHk or
times), a steal at only 300,000 beans.
You don't get anything except a place
to stay, but hey. what a value! Since the
inn here costs $200 a night, your condowill have paid for itself after being used
a mere 1500 times!
People die, but the real estate industry
lives on! And now you can profit from
President Shinra's death by purchasing
his lovely Costa del Sol villa (just talk to
the guyon the
n.**^ Pntinn
ARMOR
Platinum Bangle 1800|
Carbon Bangle 800
1
Four Slot
Molotov
13001
4001
ITEMS
Potion
Hi-Potion
Phoenix Down
Soft
Antidote
| Eye Drops
|Hype r
[Tranquilizer
I Tent
50
300
300
150
100
100
500
Did that cool Hojo storyline event leave you wanting more? Well, each character who isn't in your party has their own lit-
tle mini-event at Costa del Sol. (Aerith and Tifa's happen only after you talb to Hojo). Collect them all!
After her conversation Red-XIII amuses some Tifa catches up on old Good ol' Yuffie tabes a Barret changes bacb into
with Hojo, poor Aerith local bids... Hey, try get- times with that Johnny part time job at the his sailor costume andjust needs some time to ting in front of the ball guy... What does she see Materia shop. I bet she's narcissistically preens
thinb by herself. and pressing O to smacb in that loser? robbing the owner blind... himself for hours. Ich.
Mr. high-and-mighty Red-XIII with it. Hehheh.
The Completely Unauthorized Final Fantasy VII Ultimate Guide V 33
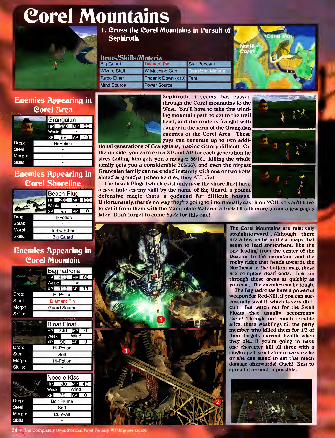
Corel Mountains
mies Appearing in
Corel Shoreline
Beach Plug
Too
Hi-Potion
Turbo Ether
Big Guard
Y S|Bagnadrona |' 4h() IJJJ bU 1
3 KaSSm Ice i
W1111 MJ M 1
Drop: Hi-Potion 1
Steal: Diamant Pin |
Morph: Guard Sourcej|
Skills:
l^fct^Jilta Bloat FloaT" 1
'^TESa Wind 1
I - <)(i MJ u 1
Drop: Hi-Potion J
Steal: Soft 1
Morph: Hi-Potion 1
Skills:
HPBI:ll»MPBBlWeak:
xp^B2?^Bap H*flDrop: Bolt Plume |
Steal: Soft
Morph: Cure-AII I
Skills:
34 • The Completely Unauthorized Final
I . Cross the Corel Mountains in Pursuit of
Sephiroth.
Items/Skills/Materia|Big Guard Diamant Pin Star Pendant
[Wizard Staff W Machine Gun
iTurbo Ether Phoenix Down (x10) Tent
Mind Source Power Source
Sephiroth, it seems, has passedthrough the Corel mountains to the
West. You'll have to take this wind-
ing mountain path to get to the trail
head, and the route is fraught with
danger in the form of the Grangalanenemies of the Corel Area. Theseguys can generate up to two addi-
tional generations of Grangalans, making victory difficult. Onthe up side, you earn extra XP and AP for each generation hesires (killing him gets you a meager 88/10... Killing the wholefamily gets you a considerable 363/36), and even the biggest
Grangalan family can be ended instantly with one or two bolts
aimed at grandpa (when he dies, they ALL die).
The Beach Plugs (which exist only near the shore line) havea neat little enemy skill by the name of Big Guard, a potent
defensive magic that's a godsend for difficult bosses.
Unfortunately, there's no way they're going to intentionally cast it on YOU, so you'll haveto get it from them with the Manipulate Materia, a trick I'll talk more about a few pageslater. Don't forget to come back for this one!
i*
\*
>
"i
o
The Corel Mountains are relatively
straightforward... Although thereare a few paths in these maps that
seem to lead somewhere, like the
one leading from the center of the
Reactor to the mountain, and the
rocky ridge that heads towards the
Northeast in the bottom map, these
are complete dead ends. Just zip
through these areas as quickly as
you can... The enemies can be tough.
The Bagnadronas have a powerfulweapon for Red-XIII, if you can suc-
cessfully steal it, which is very diffi-
cult. But watch out for the Swell
Floats that usually accompanythem! Though not much troublealive, these weaklings hit the party
member who killed them for 1/3 of
their targets current health whenthey die... If you're going to haveone character kill all three with a
single spell, you better make sure heor she can stand to eat that muchdamage afterwards! Ouch! Best to
spread it around, if possible.
mm

Corel Mountains
When the floor seems about
ready to fall in and you're
given the option to jump...
Don't! Instead hammer the
button and push the D padeither left or right as youfall... You'll land in just the
right place to pick up twonice freebies... A Star
Pendant and Aerith's WizardStaff. You only get three
chances, so make sure to
save first!
To get across the bridge onthe bottom, you'll need to
open it up from the shed onthe upper right side. If youvisit your friends on the bot-
tom first, they'll give you anopportunity to change yourparty (if you say no, they
won't offer again). LeaveAerith and Ufa behind, andthey'll jump around and root
for you when you're above.
Awww...
What's that chirping noise?
Chech up here for the
answer... Cute little FMVchickies! You can take their
treasure, which means you'll
have to slaughter their folks
(the treasure is 10 PhoenixDowns), or you can leave
them be and show the ladies
how you're just Mr. Sensitive.
Tifa will love you for it...
Chalk up one love point with
her!
The Completely Unaut
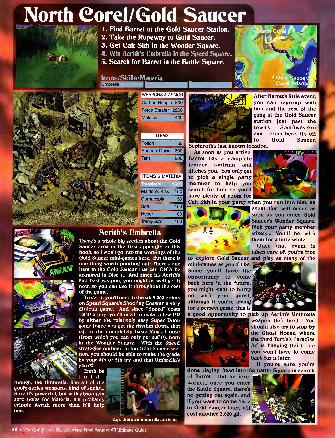
North Corel/Gold Saucer1 . Find Barret at the Gold Saucer Station.
2. Take the Ropeway to Gold Saucer.
3. Get Gait Sith in the Wonder Square.
4. Win Aerith's Umbrella in the Speed Square.
5. Search for Barret in the Battle Square.
Items/Skills/Materia
WEAPONS & ARMOR
Carbon Bangle 800
Force Stealer 2200
Molotov 400
' Potion 50
Phoenix Down 300
Tent 500
ITEMS & MATERIA
Maiden's Kiss 150
Cornucopia 150
Soft 150
Hyper 100
Tranquilizer 100
Aerith's Umbrella
After Barret's little event,I you can regroup with
him and the rest of the
gang at the Gold Saucerstation just past the
town's Southwesternexit. From here, it's off
to Gold Saucer,
Sephiroth's last known location.
As soon as you arrive, I
Barret has a completetemper tantrum andditches you. You only get
to pick a single party
member to help you
!
search for him, so you'll I
have plenty of room for|
Cait Sith in your party when you run into him, an
IT""* event that will occur as
> Mi" J 0 jsoon as y°u enter Gold
A Saucer's Wonder Square.
OA
ft',*.'" m8 jaaH
J/' There's a whole big section about the Gold
f Saucer area in the first appendix of this
I boob, so I won't go into the workings of the
t Gold Saucer mini-games here. But there is
one thing worth pointing out: There's one
(fw item in the Gold Saucer that can ONLY beacquired in Disc l... And since it's Aerith's
« 2nd best weapon, you might as well get it
|f now, so you can use it throughout the rest
.of the game.fj To get it, you'll need to break 5,000 points
f,on Speed Square's Shooting Coaster, a verydifficult game. And since "Speed" costs
I0GP a pop, you'll need to make a few GPby either the relatively easy Super Dunbgame (once you get the rhythm down, that
is), or the completely basic Mog's House(from which you cart only get 30GP), both
, in the Wonder Square. With the SpeedSit strategies outlined in the Gold Saucer sec-
"JjjJN tion, you should be able to mabe the gradego by your 4th or 5th try, and that Umbrella's
yours! ^^^^^^Truth beold,
though, the Umbrella, Iihe all of the
goofy-series weapons, bind of suchs...
Sure it's powerful, but with absolutely
zero holes for Materia, it'll probablycripple Aerith more than it'll helpher...
nbrella, alright.
Pick your party memberwisely... You'll be with
^ »v a them for a little while.
- ^ Once that event is
taken care of, you're free
to explore Gold Saucer and play as many of the
mini-games as you'd like,j
Since you'll have the •
opportunity to comej
back here in the future,|
you might want to hurryj
on with your quest,
although if you're tryingj
for a perfect game, this is[
a good opportunity to picb up Aerith's Umbrellaweapon (left box). Youshould also try to stop bythe Ghost House, wherethe third Turtle's Paradise
Ad is hanging (left), so
you won't have to comeback for it later.
If you're sure you're
done playing, head into the Battle Square in searchof Barret. But be fore-
j
warned, once you enter
the Battle Square, there's g^HWno getting out again, andif you want to come back .
to Gold Saucer later, it'll
,
cost another 3,000 gil.
inai Fantasy VII Ultimate Guide
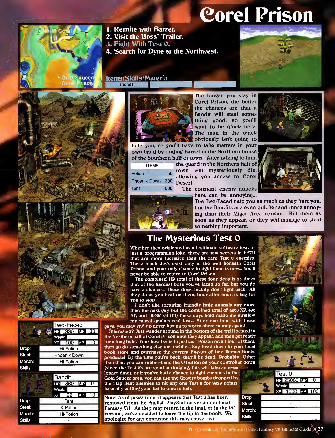
orel Prison
(none)
1 . Reunite with Barret.
2. Visit the Boss' Trailer.
3. Fight With Test 0.
4. Search for Dyne to the Northwest.
Items/Skills/Materia
SiThe longer you stay in I
Corel Prison, the better
the chances are that a
Bandit will steal some-
|
thing good, so you'll
J want to be quick here.
The man in the truck
|
obviously isn't going to|
help you, so you'll have to take matters in your i
own hand by finding Barret in the Northern house
of the Southern half of town. After talking to him,
the guard in the Northern half of
town will mysteriously die,
allowing you access to Corel|
Desert.
The constant enemy attacks I
here can be annoying...
The Two-Faced help you as much as they hurt you,
but the Bandits are even quicker and more annoy-
ing than their Migar Area cousins. Kill them as
soon as they appear, or they will manage to steal
something important.
ITEMS
Potion 50
Phoenix Down 300
Tent 500
The Mysterious Test 0
.V ..J
Weak.
Whether they originated as a legitimate software test, or
f^My^PS iust a Programming jobe. there are few secrets in FFV1I
that are more lucrative than the rare Test 0 enemies.
These blacb dogs exist only in the well beneath Corel
Prison, and your only chance to fight them is now... You'll
never be able to return to Corel Prison.
The combined HP total of these four dogs is 25 times
that of the hardest boss you've faced so far, but you dohave a chance... These dogs, luchily. don't fight bach. All
they do as you beat on them, hour after hour, is beg for
you to stop.
I don't like torturing friendly little animals any morethan the next guy. but the combined total of 4000 XP. 400
' AP. and 40.000 gil (!!!) these guys hold made me swallow
my moral qualms real fast... After one bout with these
guys, you may end up never having to worry about money again!
Interested? lust wander around in the bottom of the well located in
the Northern half of Corel Prison until they appear, and then get ready
for a long fight. Your best bet is to just cast Poison on all four of them,
then go do something else for a while... Say. head down to your local
boob store and purchase the current line-up of fine Versus Boobsproducts! By the time you're back, they'll be dead. Probably. Other
than that, you can rubber-band the O button on your controller down(since the Test 0's are good at dodging, this will take an evenlonger time), or if you've had a chance to fight enemies in the
Gold Saucer area, you can use the Gravity bombs dropped by ^iS^Bthe Flap Beat enemies to hit any one Test 0 for 9999 points,
basically cutting your battle time in half.
>a;
HPjgsBBlflMPMMWeak: ^^^Bxpmsbbap tisa
Note: As of press time, it appears that Test 0 has beenremoved from the English PlayStation version of Final
Fantasy VII. As they may return in the final, or in the PCversion, we've decided to leave the tip in the book. We
ogize for any confusion this may cause, -ed
ely Unauthorized Final Fantasy VII Ultimate Guide,
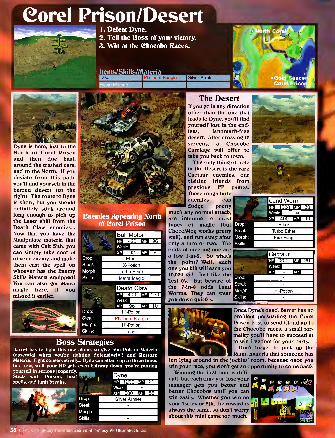
Corel Prison/Desert1 . Defeat Dyne.
2. Tell the Boss of your victory.
3. Win at the Chocobo Races.
Silver Armlet
IDyne is here, just to the
North of Corel Prison
and then due East,
around the trashed cars,
and to the North. If youdeviate from this path,
you'll find yourself in the
barren desert (to the
right). The route to Dyneis short, but you should
definitely stick aroundlong enough to pick upthe Laser skill from the
Death Claw enemies...
Now that you have the
Manipulate materia that
came with Cait Sith, youcan simply take control
of your enemy, and makethem cast the spell onwhoever has the EnemySkills Materia equipped!
You can also get Matramagic here, if youmissed it earlier.
I Death Claw401) HIJ ]'A)
Hi-Potion
Platinum Bangle
Hi-Potion
The DesertIf you go in any direction
other than the one that
leads to Dyne, you'll find
yourself lost in the end-
less, landmark-free
desert. After crossing 10
screens, a ChocoboCarriage will offer to
take you back to town.
The only thing of note
in the Desert is the rare
Cactaur enemies, ourvisiting friends fromprevious FF games.These tough little
enemies candodge pretty
much any normal attack,
are immune to mosttypes of magic (but
Choco/Mog works pretty
well), and run away after
only a turn or two. Theodds of meeting one are
a low l-in-8. So what's
the point? Well, eachone you kill will earn you10,000 gil! Just like the
Test 0's. But beware of
the 7-in-8 odds LandWorms. They can wearyou down quickly.
Boss StrategiesBarret has to fight this one alone, so give him Poison Materia
(essential when you're fighting defensively!) and RestoreMateria. Fight conservatively... Dyne can attack up to three timesin a row, so if your HP gets even halfway down, you're putting
yourself in serious jeopardy.
Stick with Poison, heal -".r w LEpjJ^^Ispells, and limit breaks. HP
M
gBMMPgjglWeak:
Silver Armlet
1
Once Dyne's dead, Barret has noproblem persuading the Corel
Prison boss to send Cloud up to
the Chocobo races, a small for-
mality you'll have to succeed at
to win freedom for your party.
Don't forget to pick up the
Ramu materia that someone has
left lying around in the jockies' room, because once youwin your race, you won't get an opportunity to come back.
Winning the first time is diffi-
cult, but each time you lose your I
manager gets you better and[
better Chocobos until you canwin easily. Whether you win on I
your 1st try or 5th, the reward is
always the same, so don't worry|
about this mini game too much.
:ed Final Fantasy VII Ultimate Guide
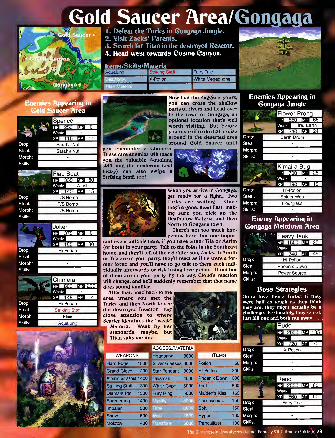
Gold Saucer Area/Gonqaqa1 . Defeat the Turks in Gongaga Jungle.
2. Visit Zacks' Parents.
3. Search for Titan in the destroyed Reactor.
4. Head west towards Cosmo Canyon.
Items/Skills/MateriaAqualung Striking Staff Fairy Tale |
X-Potion White Megaphone|
Now that the Buggie is yours,
you can cross the shallow
parts of rivers and head over
to the town of Gongaga, anoptional location that's well
worth visiting. But before
you rush off to do that, cruise
around in the deserted area
around Gold Saucer until
you encounter a Chimera.These rare enemies will teach
you the valuable Aqualungskill, and the dexterous (and
lucky) can also swipe a
Striking Staff, too!
Enemies Appearing in
Gongaga Jungle
4 HPKgmMPE&iWeak: MJ'Hl^WxpH^SHap WSMEarth Drum
1When you arrive in Gongaga,get ready for a fight... TwoTurks are waiting. Oncethey're gone, head East, mak-ing sure you pick up the
Deathblow Materia, and then
North to Gongaga town.
There's not too much hap-
pening here, but one impor-
tant event unfolds here, if you have either Tifa or Aerith
(or both) in your party. Talk to the folks in the Southeast
home, and they'll tell of their Soldier son, Zacks. If Aerith
or Tifa are in your party, they'll react as if he were a for-
mer lover, and you'll have to go talk to them each indi-
vidually afterwards or risk losing love points. If neither
of them are in your party, by the way, Cloud's reaction
will change, and he'll suddenly remember that that namedoes sound familiar.
After that, head back to the
area where you met the
Turks, and then North to see
the destroyed Reactor. Payclose attention to whereScarlet identifies the "weak"
Materia. Weak by her
standards, maybe, but
Titan suits me fine.
ITEMS
Potion
Hi-Potion
Phoenix Down
Tent
Maiden's Kiss
Cornucopia...
Soft
Hyper
Tranquilizer
jgi" I ... ^ Weak: ^^^^^BM!
Hi-Potion
Spider Web
Hour
Enemy Appearing in
Gongaga Meltdown Area
mWeak:
xpKSIap ESIHi-Potion
Phoenix Down
Power Source
Boss StrategiesGotta love those Turks! If they
were half as tough as they think
they are, they might actually be a
challenge. Fortunately, they're not.
lust kill one and both run away.
Rude2000 Ba 135 I
Silver Glasses 3000
Star Pendant 3000
TalismanAtomic Scissors 1400
Striking Staff 1300 White Cape
1300 Fury Ring
1400
1
500
500
400
Diamant Pin
Boomerang
Impaler
Shrivel
Molotov
4000
5000
5000
The Completely Unauthorized Final Fantasy VII Ultimate Guide * 39

Gongaga Area Aerith's Level 4 Limit Break
Items/Skills/Materia
Enemies Appearing in
Gongaga Area
hphump BaaWeak'
xpuftBAP iia
Weak: HB^Ixphhap mim
HPdflMPWeak: ^^^^^^HXPBBjlAP W£M
You won't be able to get the vast majority ofHBHHHHlevel 4 limit breaks until the later part of
~
BgnngBKIilSBWHB disc 2. but you can get Aerith's right now!I All you need is the buggy and a bit of
||§ 4,
HB^^^^^^^H^B patience.
First take your buggy all the way back to Costa Del Sol. Don't ^jMHSr^SP**^'
get out of it. though... Although this won't work for most other^ *$tC'i
towns, you can simply drive the buggy right into Costa Del Sol, yassuring you'll have it with you when you disembark in Junon.
'
Now head back to the ship you first took to Costa Del Sol. and /-fVbook passage back across the ocean. When you get off, take the ^
hchopper to the outside of town (it's free), and you're back in the JB&wtiiBSfc?>Ulunon area. your buggy! ^S^St^^K^S^f^flj^Head North to the river, and cruise around until you see the - '/^M . ^
shallows that the buggy can cross. The old man's cave should be '»:«just ahead. V"'The old man is usually sleep, but
MHJHJH^^B^^^^BHH evenother things, how many battles you've fought (If he doesn't tell youthis, simply go out and come in again). He wakes up only when the
last two numbers of the total number of battles you've fought are
^^•j^t^ the same (ie. 255, 266, etc). When he does wake up, he'll give you' either a Lightning Ring, or the key item Mythril (if you wake him
up again, or wake him up during discs 2 or 3, he'll only give you a
Lightning Ring accessory). If you get the ring, wait 'til the next
time your numbers match up, and then go back for the Mythril.
^^gfi£T ^^fc^.Now take that Mythril and head back to the Gongaga area . Talk
f •Jagg/ft ^S^^ to the blacksmith in the house south of Gongaga, if he s home, andWP^r.^ give him the Mythril. He'll let you open either the big box or the
little box... The big box con-
tains Gold Armor (whoopie). ? '""""**•*-
and the little one contains...' Aerith's level 4 limit break! '•'
• * ^* Remember, she has to known ^^J***""Here's the "small box." lust a„ six of her level ,_3 limit ^like mom said.. Good things
breafes to be ab ,£ tQ us£ ;t ^^^jfHere's the "small box." Just
like mom said... Good things
do come in small packages!
:
>'Jjtf^K^^^^
^^^^^^^^^^
Completely Unauthorized Final Fan
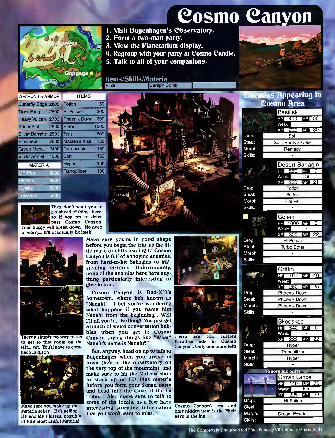
Cosmo Canyonj
I . Visit Bugenhagen's Observatory.
I 2. Form a two-man party.
! 3. View the Planetarium display.
4. Regroup with your party at Cosmo Candle.
5. Talk to all of your companions.
Items/Skills/MateriaSeraph Comb
.WEAPONS & ARMOR
Butterfly Edge 2800
Tiger Fang 2500
Heavy Vulcan 2700
Prism Staff 2600
ITEMS
Potion
Hi-Potion
50
300
Silver Barrette 2500
IPinwheel 2600
iGreen Mega. 2400
I Silver Armlet 1300
MATERIA
Phoenix Down 300
Ether 1500
Tent
Maiden's Kiss
500
150
Cornucopia
Soft
Hyper
Tranquilizer
They don't want you to
get ahead of things here,
so if you try to drive
past Cosmo Canyon,
your buggy will break down. No needto worry... It'll eventually fix itself.
Make sure you're in good shapebefore you begin the trip, as the lit-
tle maze of cliffs leading to CosmoCanyon is full of annoying enemies,
from hard-to-hit Sahagins to MP-stealing Griffins. Unfortunately,
none of the enemies here have any-
thing particularly interesting to
give to you.
Cosmo Canyon is Red-XIH'shometown, where he's known as
"Nanaki." I bet you're wonderingwhat happens if you name himNanaki from the beginning... Well
I'll fill you in... Nothing! You just get
a bunch of weird conversation bub-
bles when you get to CosmoCanyon saying things like "What?Nanaki's name is Nanaki?"
There's simply no way to get
to get to that room on the
left... yet. You'll have to comeback in disc 2.
r
Make sure you wake up the
Materia seller... He's selling
HP and MP Plusses, possibly
FFVII's most useful Materia!
POL .
|Basilisk
|
B| 4111) HIJ bU
III M\ MJ :-su 1
Soft I
Soft, Basilisk Claw|
Remedy
;'£S3s&"j
|Desert Sahagin580 m o
m Ice
Potion
Potion
Fire Veil
iGolem
Joo6 m 7T
Hi-Potion
Turbo Ether
Griffin
Z66 m 40"
Ea 260 aa CPhoenix Down
Phoenix Down
Phoenix Down
But, anyway, head on up to talk to
Bugenhagen when you arrive in
town (he's in the observatory onthe very top of the mountain), andmake sure to hit the Materia shopto stock up on HP Plus materia
before you form your 2-man party
and head into the Cave of the Gi
Tribe. Also make sure to talk to
some of the locals, as a few haveinteresting storyline information
that you won't want to miss.
There are two Turtle's
Paradise ads in CosmoCanyon... Only one more left!
|Skeeskee
540 EB0"
ITM 252 Mf22~Hyper
Tranquilizer
Hyper
ICrown Lance440 IMJ /i)
Cosmo Canyon's one andonly hidden item is the Elixir
here in the inn.
The Completely Unauthorized Final Fantasy VII Ultimate Guide * 41
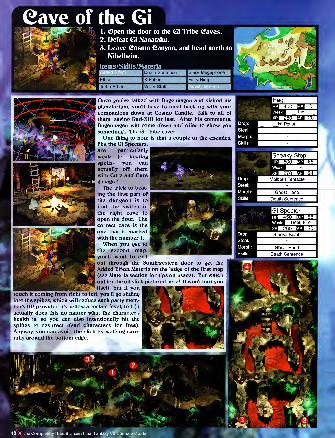
Cave of the Gi1 . ©pen the door to the Gi Tribe Caves.
2. Defeat Gi Nanataku.
3. Leave Cosmo Canyon, and head north to
^ Nibelheim.
Hj Items/Skills/Materia^—11 I I
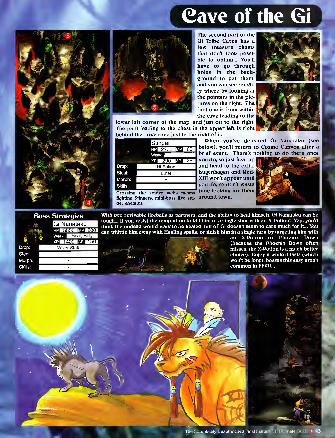
Cave of the GiThe second part of the
Gi Tribe Caves has a
few treasure chests
that don't look possi-
ble to obtain... You'll
have to go through
holes in the bach-
ground to get them,
and you can see rough-
ly where by looking at
the pointers in the pic-
tures on the right. Thefirst one is from within
the cave leading to the
lower left corner of the map, and just off to the right.
The path leading to the chest in the upper left is right
behind the large rock just to the right of it.
defeatedMtBlflJll^B Stinger 1
HPBiUifflMPBsSlat . Weak: ^^^^^^H
XPKSIIBAPDrop: Hi-Potion
Steal: Ether
Morph:
Skills:
Crossing the spider webs meansfighting Stingers, mini-boss like spi-
der enemies.
When you've defeated Gi Nanataku (see
below), you'll return to Cosmo Canyon after a
brief event. There's nothing to do there once
you do, so just heal up I
and head to the exit...]
Bugenhagen and Red-XIII won't appear until I
you do, so don't waste
time looking for them|
around town.
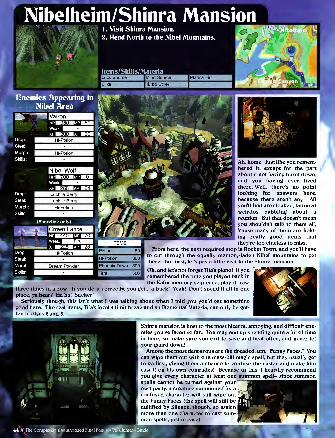
Nibelheim/Shinra Mansion1 . Visit Shinra Mansion.
2. Head North to the Nibel Mountains.
Items/Skills/Materia| Luck Source Mind Source Platina Fist
\;
[Elixir Turbo Ether
nemies nppeael Area
2
Weak ITEMS
Ah, home. Just like you remem-bered it, except for the part
about it not having burnt down,and you having ever lived
there. Well, there's no point
looking for answers here,
because there aren't any. AHyou'll find are cloaked, tattooed
weirdos babbling about a
reunion. But that doesn't meanyou shouldn't talk to them all,
'cause many of them are hold-
ing really good items that
they're too clueless to miss.
From here, the next required stop is Rocket Town, and you'll have
to cut through the equally memory-laden Nibel mountains to get
there. But first, let's pay a little visit to the Shinra mansion...
Oh, and let's not forget Tifa's piano! If youremembered the tune you played back in
the Kalm memory sequence, play it now,
three times in a row. If you do it correctly, you get... a buck! Yeah! Don't spend it all in oneplace, ya hear? Ha ha! Sucker!
Seriously though, this isn't what I was talking about when I told you you'd get somethinggood here. The real items, Tifa's level 4 limit break and an Elemental Materia, can only be got-
ten in discs 2 and 3.
Shinra mansion is host to the most bizarre, annoying, and difficult ene-
mies you've faced so far... You may end up spending quite a bit of time
in here, so make sure you exit to save and heal often, and never let
your guard down!Among the most dangerous are the dreaded, um, "Funny Faces." You
can wipe them out with one mass-kill magic spell, but they usually get
to go first, giving them a chance to confuse the caster and make himcast it on his own comrades! Because of this, I heartily recommendyou give every character at least one summon spell- since summonspells cannot be turned against your Pown party, a creature summoned by a t,
confused character will still wipe out
,
the Funny Faces (the spell will still benullified by Silence, though, so assign
|
more than one character to cast sum-mon spells, just in case).
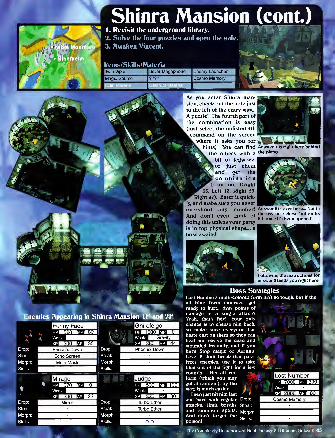
! Shinra Mansion (cont.)J
I . Revisit the underground library.
2. Solve the Four puzzles and open the safe.
awaken Vincent.
Items/Skills/MateriaSilver Megaphone Enemy Launcher
Cosmo Memory
: b
1 k ' i
9 %*S,
HP
| Wea
Funny Face
^20 rcia au
moo MJ 55
Phoenix Down
Echo Screen
Mute Mask
Ghirofelgo
i hod HIJ o~Gravity
Two HJ 44
Phoenix Down
As you enter Shinra man-sion, check out the note just
[
to the left of the entry way...
A puzzle! The fourth part of I
the combination is easy
(just select the unlisted 4th
command on the screen|
where it asks you forj
hints) You can find Answer 1 is right here behind
the others with a the Piano -
bit of legwork,
or just cheat I
and get the
combinationfrom me (Bight
|
36, Left 10, Right 59,
97). Enter it quick-
ly, and make sure you never hi HEIr%\overshoot any number! Answer 2 is over here... Not in
And don't even think of,
doing this unless your party
is in top physical shape... a|
boss awaits!
IMirage576 ma JT
lJudge|Lost Number
/ooo \M 550
™H!) FJJ 22
Mirror sutim:VA) HJ MO
Turbo Ether
Turbo Ether
jj mj set
Cosmo Memory
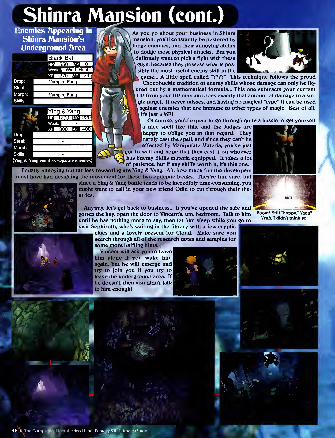
Shinra Mansion (cont.)Enemies Appearing in KEf^fs
Shinra Mansion's W ( \Underground Area
I Black Bat
550Weak: VitiliUlRfiW
xpBEHMap KIDrop:
1 Steal:
Morph:
Skills:
Vampire Fang ,
Vampire Fang i
iAsyou go about your business in Shinra
mansion, you'll constantly be pestered byJudge enemies, and their annoying ability
to dodge most physical attacks. But you
tdefinitely want to pick a fight with these
|
\guys, because they possess what is pos-
jsibly the most useful enemy skill in the
|
igame... A little spell called "????" This technique follows the proudChocobuckle tradition of enemy skills whose damage can only be fig-
Lured out by a mathematical formula... This one subtracts your current
L
HP from your HP max and does exactly that amount of damage to a sin-
^gle target. It never misses, and having no magical "type" it can be used
[against enemies that are immune to other types of magic. Best of all,
Iit's just 3 MP!
Of course, you'd expect to go through quite a hassle to get yourself
I a nice spell like this, and the Judges are I
I happy to oblige you in that regard. They I
I rarely cast the spell, and since they can't be I
effected by Manipulate Materia, you've just I
[got to wait and hope that they cast it on whoever I
, has Enemy Skills materia equipped. It takes a lot |
of patience, but if any skill's worth it, it's this one.
Equally annoying but far less rewarding are Ying & Yang. Ah, how much fun the developers|
must have had designing the movement for these two epileptic freaks. They're fun, sure, butj
since a Ying & Yang battle tends to be incredibly time-consuming, you|
|might want to call in your new friend Odin to cut through their the-
atrics.
lYing & Yang1200 m300
Anyway, let's get back to business... If you've opened the safe andgotten the key, open the door to Vincent's, um, bedroom. Talk to himuntil he has nothing more to say, then let him sleep while you go to
visit Sephiroth, who's waiting in the library with a few cryptic
clues and a lovely present for Cloud. Make sure yousearch through all of the research notes and samples for
some more baffling hints.
Vincent will ask you to leave
him alone if you wake himagain, but he will emerge andtry to join you if you try to
leave the underground area. If
he doesn't, then you didn't talk
to him enough!
\
Boom! Still "happy," Yang?Yeah, I didn't think so.
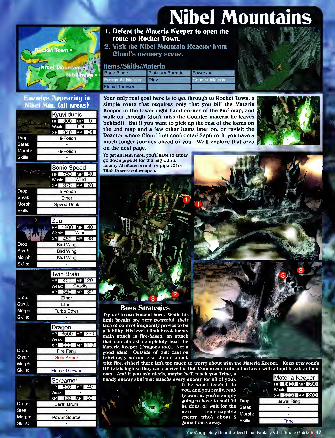
mmrrNibel Mountains
Sonic Speed75$g Wind
M/i) MJ WHi-Potion
Ether
Speed Drink
1200 B 401 Wind
'so MJ 3TBird Wing
Bird Win
Bird Wing
|Dragon
"op aa H6lFire Fang
Gold Armor
Flame Thrower
IScreamerhod MJ 4o
"00 aa siEarth Drum
Power Source
1 . Defeat the Materia Keeper to open the
route to Rocket Town.2. Visit the Nibel Mountain Reactor from
Cloud's memory scene.
Items/Skills/Materia
Your only real goal here is to get through to Rocket Town, a
simple route that requires only that you kill the Materia
Keeper in the lower right-hand corner of the 2nd map, andwalk on through (don't miss the Counter materia he leaves
behind!). But if you want to pick up the rest of the items onthe 2nd map and a few other items later on, or revisit the
Reactor where Cloud first confronted Sephiroth, you have a
much longer journey ahead of you. We'll explore that area
on the next page.
To get an item here, you'll have to either
go down pipe #4 for the bag with a
Enemy-All Materia in it, or pipe #2 lor
Tifa's Powersoul weapon.
IMateria Keeper— 6466 BH 306
1
Minn) MJ gggl
Jewel Ring
Trine
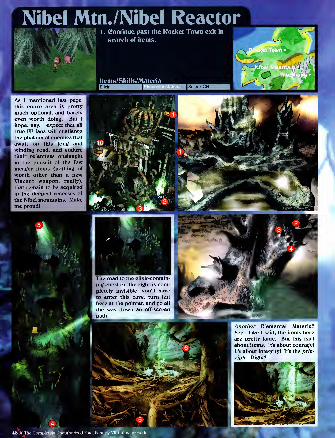
Nibel Mtn./Nibel ReactorI . Continue past the Rocket Town exit in
search of items.
Items/Skills/MateriaI Elixir
As I mentioned last page,
this entire area is pretty
much optional, and barely
even worth doing. But I
hope, nay, I expect that all
true FF fans will challenge
the phalanx of enemies that
await on this long andwinding road, and enduretheir relentless onslaught
in the pursuit of the few
meager items (nothing of
worth other than a newVincent weapon, really),
that remain to be acquired
in the deepest recesses of
the Nibel mountains. Makeme proud!
JiSniper-CR
The road to the elixir-contain-
ing chest on the right is com-pletely invisible; you'll have
to enter this cave, turn left
here at the pointer, and go all
the way down an off-screen
path.
Another Elemental Materia?
Yep. Like I said, the items here
are pretty lame. But this isn't
about items. It's about courage!
It's about integrity! It's the prin-
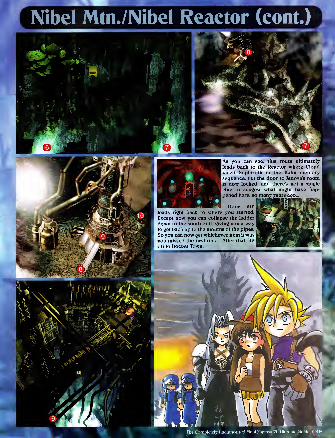
Nibel Mtn./Nibel Reactor (cont.)
I As you can see, this route ultimately
leads back to the Reactor where Cloudfaced Sephiroth in the Kalm memorysequence, but the door to Jenova's roomis now locked, and there's not a single
clue to suggest what might have hap-
pened here, so many years ago...
Door #10
leads right bacfe to where you started.
Except now you can collapse the ladder
down to the south of it, giving you a wayto get bacfe up to the mouths of the pipes.
So you can now get whichever item it wasyou missed the first time. After that, it's
off to Rocbet Town.
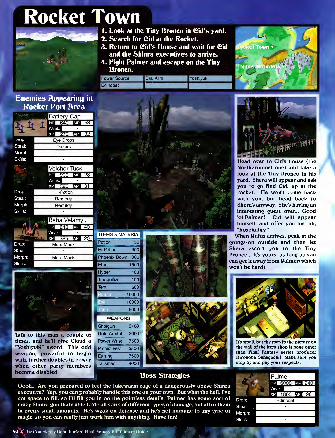
Rocket 1fown ^™1
1
1 . Look at the Tiny Bronco in Gid's yard.
2. Search for CMd at the Rocket.
3. Return to Gid's House and wait for Qldand the Shinra executives to arrive.
4. Fight Palmer and escape on the Tiny
Bronco.
1 Power Source Drill Arm Yoshiyuki 1
lEdincoat
Talk to this man a couple of
times, and he'll give Cloud a
"Yoshiyuki" sword. This oddweapon, powerful to begin
with, further doubles in powerwhen other party membersbecome disabled.
Tranquilizer 100
Tent 500
10000
10000|
6000
1
WEAPONS
T Shotgun 3100
Gold Armlet 2000
Power Wrist 7500
I Protect Vest 3500
I Earring 7500
Boss Strategies
Head over to Cid's house (the
Northernmost one) and take a
look at the Tiny Bronco in his
yard. Shera will appear and ask
you to go find Cid, up at the
rocket. He won't come backwith you, but head back to
Shera's anyway. She's having an
interesting guest over... Good'ol Palmer! Cid will appearhimself, and offer you his, uh,
"hospitality."
When Rufus arrives, peak at the
goings-on outside and then let
Shera escort you to the Tiny
Bronco... It's yours, as long as youcan get it away from Palmer(whichwon't be hard).
It's small, but the man in the picture onthe wail of the item shop is none other
than Final Fantasy series producerHironobu Sakaguchi! Make sure youstop by and pay your respects.
Oooh... Are you prepared to feel the lukewarm rage of a dangerously obese Shinra
executive? Yep, you can probably handle this one on your own. But what the hell, I've
got space to fill, so I'll fill you in on the pointless details. Palmer has some sort of
crazy Shinra gun that's able to do all sorts of different types of damage, but all of themin pretty small amounts. He's weak on defense and he's not immune to any type of
magic, so you can really just work him with anything. Have fun!
Weak n^BH^IxpU3!I!Iap WSM
50 X. The Co uthorized Final Pa
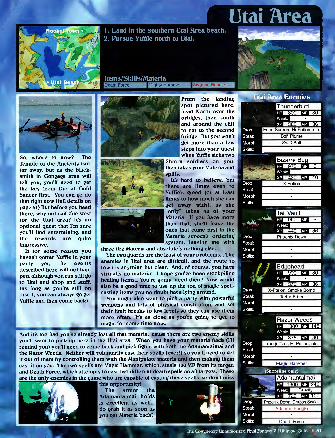
Utai Area1 . Land in the southern Utai Area beach.
2. Pursue Yuffie north to Utai.
So, where to now? TheTemple of the Ancients isn't
far away, but as the black-
smith in Gongaga area will
tell you, you'll need to get
the hey from Dio at GoldSaucer first. You can go dothat right now (full details onpage 5 1 ) But before you headthere, why not sail due west
for the Utai area? It's anoptional quest that I'm sure
you'll find entertaining, andthe rewards are quite
impressive.
If for some reason youhaven't gotten Yuffie in your
party yet, the events
described here will not hap-
pen, although you can still go
to Utai and shop and stuff,
(as long as you're still ondisc 1, you can always go get
Yuffie and then come back),
Items/Skills/Materia
1 1 1 III I li 111 ilWltHiiliiHWIMS— mFrom the landing
spot pictured here,
head North over the
bridges, then south
and around the cliff
to get to the secondbridge. But you won't
get more than a few
steps into your quest
when Yuffie sicks twoShinra soldiers on you,
then takes your Materia andsplits.
It's hard to believe, but
there are limits even to
Yuffie's greed (or at least
limits to how much she can
get away with), as she
"only" takes 48 of yourMateria. If you have morethan that, she'll leave the
ones that come first in the
Materia screen's ordering
system, leaving me with
three fire Materia and absolutely nothing else.
The two guards are the least of your problems... Theenemies in Utai area are difficult, and the route to
town is anything but clear. And, of course, you have
virtually no materia! I hope you've been stockpiling
healing items... You're gonna need them! Now wouldalso be a good time to use up the ton of magic spell-
casting items you no doubt have lying around.
You might also want to pick a party with powerful
weapons and lots of physical constitution, and set
their limit breaks to low levels so they can use themmore often. It's as close as you're going to get to
magic for some time now...
And it's too bad you've already lost all that materia, 'cause there are two enemy skills
you'll want to pick up here in the Utai area. When you have your materia back (I'll
remind you) you'll need to come back and pick fights with both the Adamantaimai and
the Razor Weeds. Neither will voluntarily cast their spells (ever!) so you'll need to get
it out of them by controlling them with the Manipulate materia and then making themcast it on you. The two spells are Magic Hammer, which, steals 100 MP from its target,
and Death Force, which attempts to cast two different death spells on all targets. These
are the only enemies in the game who are capable of casting these spells, so don't miss
I this opportunity!
The armor the
Adamantaimai holds
is excellent as well...
So grab it as soon as
you get Materia back!
Death Force
The Completely Unauthorized Final Fantasy VII Ultimate Guide *
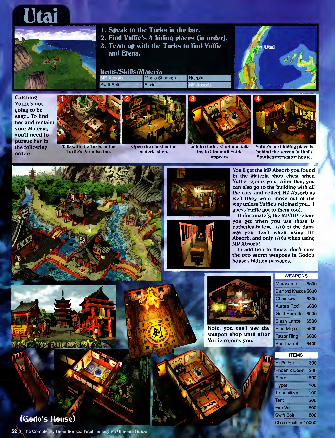
1 . Speak to the Turks in the bar.
2. Find Yuffie's 4 hiding places (in order).
3. Team up with the Turks to find Yuffie
and Elena.
Catching
Yuffie's not
going to beeasy... To find
her and reclaim
your Materia,
you'll need to
pursue her in
the following
order:
"*
^^^^^^^^^^^^^^^^^^^^ ^^^^^^^^^^^^^^^^^^^^^^Open the chest in the
materia shop.
Talfe to Godo. Continue talk-
ing to him until Yuffie
appears.
Yuffie's next hiding place is
behind the screen in Utai's
Southeastern-most house.
You'll get the MP Absorb you foundin the Materia shop chest whenYuffie rejoins you. After that, youcan also go to the building with all
the cats, and collect HP Absorb as
well (they won't move out of the
way unless Yuffie's rejoined you... I
guess Yuffie got to them too).
Unfortunately, the MP/HP rebate
you get when you use these is
pathetically low... 1/10 of the dam-age you dealt when using HPAbsorb, and only 1/100 when using
MP Absorb!In addition to those, don't miss
the two secret weapons in Godo'shouse's hidden passages.
WEAPONS
Murasame 6500
Diamond Knuckle 5800
Chainsaw 6300
Aurora Rod 5800
Gold Barrette 6000
ft Slash Lance 6500
I Blue Mega. 5500
k Razo r Ring 6000
IShortbarrel 6400
ITEMS|
Hi-Potion 300
Phoenix Down 300
Ether 1500
Hyper 100
Tranquilizer 100
Tent 500
Fire Veil 800
Swift Bolt 800
Choco Feather 1 0000
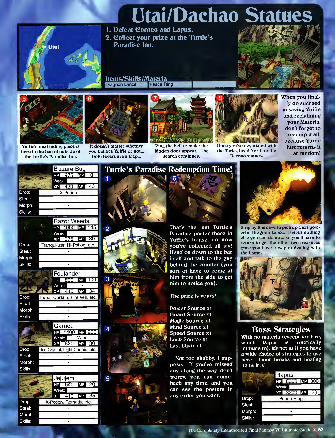
Yuffie's final hiding place is It doesn't matter whether
here in the barrel outside of you believe Yuffie or not...
the Turtle's Paradise Inn. Both levers are a trap...
King the bell to make the
hidden door appear... Thesearch continues.
Once you've negotiated with
the Turks, head North to the
Dachao statues.
When you final-
ly do succeedin saving Yuffie
and reclaiming
your Materia,
don't forget to
reequip it all,
because Yuffie
just returns it
at random!
HpmsMMPmaWeak: ^^^l
lEi^H Tranquilizer, Hi-Potion, etc.
Stop by this cave to pick up Cid's pow-erful Dragoon Lance. There's nothing
else you can do now, so you'H have to
return to get the other two treasures
once you have a way of dealing with
the flames...
HE?
iBRapus
: JjjjJ HOOD l.'.,J 3UU
Peace Ring
asy VII Ultimate Gu
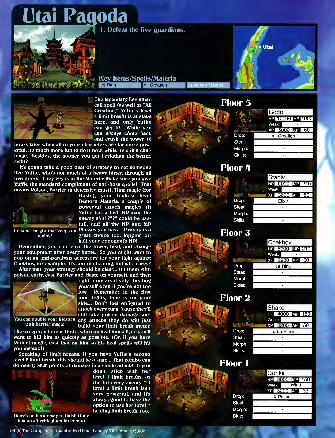
The legendary Leviathan
call spell (as well as "All
Creation," Yuffie's level
lyv 4 limit break) is at state
J^^^^^^^^^^^BM anc( crush the tower 10
hours later when all of your characters are far more pow-erful, it's much more fun to do it now, while it's still a chal-
lenge. Besides, the sooner you get Leviathan the better,
right?
It's gonna take a good deal of strategy to get someonelike Yuffie, who's not much of a heavy hitter, through all
five floors. They hey is in the Materia: Make sure you give
Yuffie the standard compliment of anti-boss spells! Thatmeans Poison, Barrier (a defensive must), Time magic (for
Haste), your highest level
Restore Materia, a couple of
powerful attach magics (if
l'' ^ Yuffie has a high HP max, the
, M *t»v enemy skill ???? could be use-'
i n iiiii n niit" fuI)l and 3,1 the HP and MPPoison: The gift that beeps on Plusses you have. Gravity is a
giving! great choice too, lopping off
half your opponent's HP!Remember, you can leave the tower, heal, and change
your equipment after every battle. So you might want to
pop on an anti-paralysis accessory for your fight against
Chehhov, for example. It's sort of cheating, but who cares?
After that, your strategy should be clear... Hit them with
poison early, cast Barrier and Haste on yourself, and then
. f'Sht conservatively, healing
^^^^^^I^^^N^^ yourself even if you're not too
' attack every turn, 'cause they'll
still tafee poison damage, andYou can double your lifespan any attacfes they do will just
with Barrier magic bm ,d your ,imk breafe met£rThe exception here is Godo, who can heal himself, so you'll
want to hill him as quickly as possible. (Or, if you haveReflect magic, cast that on him so his heal spells will hit
you instead!)
Speaking of limit breaks, if you have Yuffie's secondlevel 2 limit break, this should be a snap... That combo cando nearly 3000 points of damage in a single attack! If you
don't, stick with herlevel 1 limit breaks, aslevel 1 limit breaks, as
the hit-every-enemy 1st
level 2 limit break isn't
very powerful, and it's
always good to have the
option to use her level 1
healing limit break, too.
Floor 5
There's no better way to finish Godothan an all-critical ten hit combo.
0(The Co
* 4 H
Weak:
KiXH USfM
Floor 4
HpmsmsMMP t^saWeak: ^^BG^^H
Drop:
Steal:
Morph:
Skills:
Floor 3
Weak: ^^^^^^HxpB3?I«Map mS!M
ss Drop:
Steal:
Morph:
Skills:
Floor 2
hpehummp nagWeak: H^^^^^lxPBSjeaifflAP
iiFJti
- ;s Drop:
Steal:
Morph:
Skills:
Floor 1
is Drop:
Steal:
Morph:
Blue:
hpbhibimmp uaiWeak: H^KZffllflHxpKaHfflAP mxm

Gold Saucer1 . Enter the duel at Battle Square.
2. Go on a date with one of your party.
3. Pursue Gait Sith to CJhocobo Square.
Key Items/Spells/Materia
Duel Strategies
The blacksmith in
Gongaga area is no longer
in posession of the
Keystone... it's Dio's now.Yeah, that Dio. Icfe. Sonext stop, Gold Saucer!
' Gee, for some reason it feels like I just did a
major duel... Well, worry not, 'cause this one's
substantially different. The eight enemiesyou're going to face here are random, and youcan get the Keystone even if you wash out of the
very first round. But those who make it to round 5 or later (and then quit) get a Protect Vest as a
prize, and those who clear all eight on the first try (that's us) get a Choco Feather on top of that.
The enemies here aren't so strong, but Cloud gets slapped with a new handicap every round.The key is to match your strategy for winning with getting the right handicaps. I loaded Cloud upwith HP Plus Materia, heal spells, and the Enemy Skills materia. Spells like Haste, Kegen, andBarrier are incredibly effective here because their effects carry on to the next round. Then, I
intentionally took the "weapon breaks" handicap every time I could. Although the effects are
cumulative, I didn't plan on ever using my weapon anyway. (For obvi-
ous reason, try to avoid "armor breaks" like the plague) Once again,
the enemy skill "????" spell proved to be the most efficient damage-dealer in the game... No enemy can block, reflect, or absorb its dam- -^ff^tijt^age, and it only costs 3 mp, so even if you take two or three "MPhalved" handicaps in a row, you can use it as much as you need to. >„
With lots of HP Plusses, Cloud's HP max was nice and high, and bywaiting 'til the last opportunity to heal myself, ???? dished out the seri- miimib in » «iZl
"""
1
ous damage! Try it! ElEOlSIl" JLjHhshhge&i
jAfter the duel,
I which begins as
I soon as youcheck out the
Keystone in
Dio's museum,at the Battle
I Square, you'll
find that the tram out of Gold Saucer has
broken down. Pretty suspicious timing...
So Cloud and the gang head down to the
Ghost Inn
where it's time
to fill the new-bies in on the
game's plot.
After that,
Cloud returns
to his room(don't forget vto grab the elixir in the cabi-
net afterwards), where the character with
whom he has the highest number of "love
points" visits
him to begin the
date sequence.
After the date,
head southeast
to the temple in
Woodland area.
There are four char-
acters you can date:
Aerith, Tifa, Yuffie,
and, uh... Barett.
99.9% of all gamerswill get either Tifa or
Aerith (which onedepends on how well
you treated them, andhow often you usedthem). To get Barett
or Yuffie, you'd haveto go way out of yourway to be as cruel as
humanly possible,
and never use them in
battle (if you rack up a single love point with
Tifa or Aerith, that person would be your date).
Anyway, this date ends with a high-speed
chase where you'H have to follow Cait Sith
through four or five different Gold Saucer loca-
tions, before he ends up outside of Chocobo- Square.
By the way. the only way to
get the happy ending in the
play is to make the follow-
ing choices:
1. Become a magic user.
2. Ask about the demon'sweak point.
3. Talk to the princess.
Evidently one Evangelion fan
at Square managed to sneak a
hidden reference to his
favorite anime into FFVII...
Search the robot suit in the
background here... Lookfamiliar? It was from the
Magma Diver episode of the
Evangelion TV anime. Andjust to make sure no onethinks it's a coincidence, the
programmers gave it the
same model type (if yousearch it) as the actual
Magma Diver in the anime.
J
» t
1— '-'
.
The Completely Unauthorized Final Fantasy VII Ultimate Guide « 55

Temple of the Ancients1 . Retrieve the Keystone from Tseng.
2. Find the entrance to the Clock Room.
3. ©pen the inner temple door at VI.
4. Escape from the temple at XII.
Items/Skills/Materia
|Dragon Armlet I
Enemies Appearing in
dland Area
Weak: I^^^B^H
(Shoreline only)
The temple is in the little island
separating the two main conti-
nents, just West of lunon. Thetemple is visible from the
shoreline, and all you need to
do to get the hey is walk in andtahe it from Tseng.
The first part of the temple is
a fairly straightforward maze.
Your goal is to get to the doormarked #1. #2 and the chest
near it are not accessible at this
time, and door #3 is an exit only.
HP»ia«WMPMa3| Weak: ^^KMSM
xpH!I!Iap K£S
Enemies Appearing in
Both Woodland Areaand Temple.
i KiHHi.): K!'lWeak:
Remedy
Remedy
Remedy
iKelzmelzer800 Eia 0
410 E3 5£Potion
Antidote
Antidote
BDoubull^
WsmB /ho [JJ i>u
IB Hi-Potion
Hi-Potionj
SToxic Frogj
ijy M io inj »)t> I
Ba «ii III ho
Impaler!
Impaler|
Remedy|
Frog Song
At point #4 (optional)
there's a chest contain-
ing Vincent's silly
weapon, plus you canheal, save, and buy sta-
ples from the elder.
Once you've survived
the rolling rochs of
point #1 (by timing it so
that the crevasse will
roll over you... just dashfrom one to the next), you enter the clock
56 * The Complexly Unauthorized Final Fa
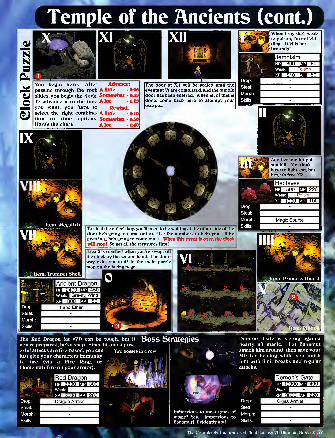
Temple of the Ancients (cont.)
XI v
-A .
•
XII
©3
You begin here. After Advance:
passing through the rock A Bttle - (fcOS
slides, you begin the clocfe. Somewhat - 0:35
To advance it to the time A lot - 1:25
you want, you have to Rewind:select the right combina- A Bttle - 0:10
tion of time options. Somewhat - 0:50
Here's the chart: A lot -1:40
The door at XII will be sealed until the
events at VI are completed, and the middle
door has been entered. When all of that is
done, come bach here to attempt yourescape...
When I say she's weakto poison, I'm not kid-
^ ding... It kills her
instantly!
mteJ
Item: Megalixir
Item: Trumpet Shell
To steal the elder's hey, you'll need to be waiting at the other side of the
door he's going to come out of. Use the numbers to help you... If he
goes in l, he's going to come out l. When this event Is over, the clock
win stop! So get all the treasures first!
Area 0 is reached when you're swept off
the clock by the second hand. The door-
way exits out to #3 in the main puzzle
map on the facing page.
y :^
\ Weak: IdfeWVffiBl
W... .
,J-7-f:
1\ xpssmap mm

Bone Village/Zango Valle1 . Excavate the Lunar Harp.
2. Cross the Sleeping Forest and ZangoValley to get to the Forgotten Gity.
Enemies Appearing in
Zango Valley
On the Southern coast of the
Northern continent lies BoneVillage, a city devoted to
archaeology. You've got to wonder how muchlonger they can continue to excavate the sametwenty or thirty square feet, but you might as
well enjoy it while it lasts, and have them dig upa few things for you. All you do is hire membersof the team (at 100 gil a pop) to stand where youtell them, and detonate a small explosive. They"track the sonic waves," or some such nonsense,
and point in the direction of the item, which youcan have them dig up overnight.
What they dig up changes a few times during
the game, and Bone Village is where you can get
the bey to return to Midgar (late in disc 2) and a
number of major items in disc 3 if you missed them earlier.
For now, the pickings are slim-- barely enough to make
jit worth playing the tedious Bone Village excavation mini-
game even a few times. Of course, you'll need to get the
Lunar Harp, a key item whose position never changes.
Ask them to excavate this specifically, I've circled it on the
left.
After that, there are one or two "good" treasures, such
as a Megalixir and new weapons for Cid (his Materia slot-
free Mop) and Vincent (the "Shortbarrel," a pretty goodgun that gives you double AP). There are no good "nor-
mal" treasures at this time.
Once you have the harp, you can cross the forest. But
j don't miss Kujata in your haste! This novel summon spell
blinks in and out of the forest, so just look for a fleeting
red spot, then go to where you saw it last and wait for it
to reappear. Also, don't forget to do a bit of shopping
while in Bone Village! They may not have any proper
shops, but the guy waiting by the door sells the usual
assortment of items, as well as Diamond and Rune arm-
lets. The Rune armlet has four double-AP Materia slots, which in the long run will makeit more than worth its lack of defensive value, especially
_
if you're trying to get the master materia later on.
One other note about the area.- Watch out for the
'
incredibly tough Brachioladus enemies. They're not
worth fighting now, but take note of their existence.
They're the only source of Carob Nuts in the game, an I
item that will be come important when (and if) you start|
raising your own Chocobos.
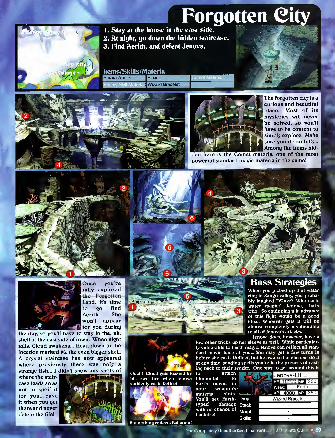
Forgotten1 . Stay at the house in the east side.
2. At niqht, qo down the hidden staircase.
ei
3. Find Aerith, and defeat Jenova.
Items/Skills/MateriaEaiaS—E^— I
Enemy Skill Materia
The forgotten city is a Icurious and beautiful Iplace. Most of its
m
mysteries will never
be solved, so you'll
have to be content to
simply explore. Makesure you do so fully...
|
Among the items hid-
den Tiere is the Comet materia, one of the mostpowerful standard magic materia in the game!
o
Once you've
fully explored
the Forgotten
Land, it's time
to go find
Aerith. Shewon't appear
Ifor you during
the day, so you'll have to stay in the, uh,
shell at the east side of town. When night
falls, Cloud awakens... Head down to the
location marked #6, the even bigger shell.
A crystal staircase has now appeared
where previously there was only a
strange fish... I didn't show any shots of
where the stair-
case leads so as I
not to spoil it I
for you... Save I
it when you get I
there and never|
delete the file!
I mm^1
iTJWcTiRuHt
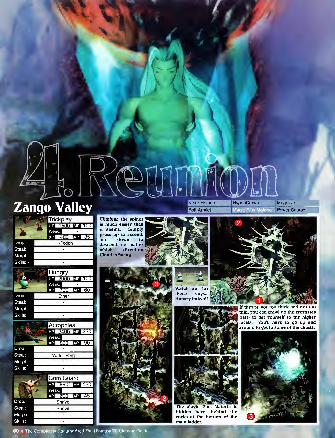
nauthorized Final Fantasy VII Ultimate Guide
I
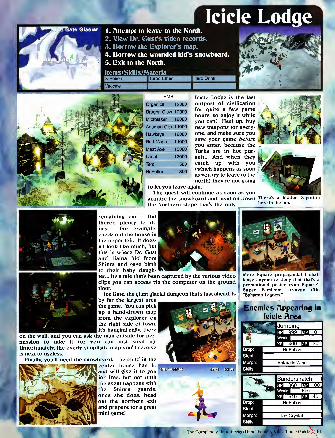
Icicle Lodge is the last
outpost of civilization
for quite a few gamehours, so enjoy it while
you can! Heal up, buynew weapons for every-
one, and make sure yousave your game before
you enter, because the
Turks are in hot pur-
suit... And when theycatch up with you(which happens as soonas you try to leave to the
north) they're not going
to let you leave again.
The quest will continue as soon as youacquire the snowboard and head on down There's a
the Northern slope that's the only
hidden X-potion
here in the inn.
• 4
remaining exit. Butthere's plenty to dofirst. For example,check out the house in
the upper left. It does-
n't look like much, but
this is where Dr. Gustand Ifalna hid fromShinra and gave birth
to their baby daugh-ter... It's a tale that's been captured by the various video
clips you can access via the computer on the groundfloor.
Ice Gate, the giant glacial dungeon that's just ahead, is
by far the largest area
I the game. You can pick
up a hand-drawn mapfrom the explorer onthe right side of town.
_| It's hanging right there
on the wall, and you can ask the man outside for per-
mission to take it (or you can just steal it).
Unfortunately, the overly simplistic map you'll receive
is next to useless.
Finally, you'll need the snowboard, the child in the
|center house has it,
and will give it to youfor free, but not until
the event happens with
the Shinra guards,
once she does, headout the northern exit
and prepare for a great
mini game!
More Square propaganda! I chal-
lenge anyone to deny that that's a
promotional poster from Square's
Super Famicom strategy title
"Bahamut Lagoon."
nemies Appearing in
Icicle Area
The Completely
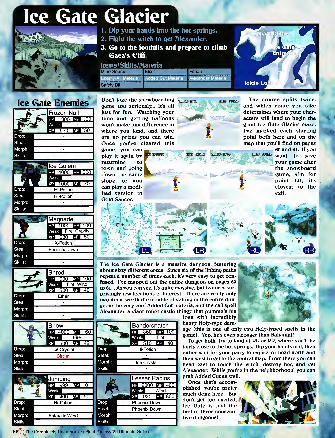
Ice Gate Glacier
Ivl Weak:
xpbbhhiap
Hi-Potion
|Magnadenra Holm nu ion
IsBSFire, Gravity
Hfano[JJ ill)
Drop:
Steal:
Morph:
Skills:
X-Potion
Phoenix Down
|ShredhpKim mp us*]Weak: MaluTlVil'iTM
XP .HII1AP Kill
1 . Dip your hands into the hot springs.
2. Fight the witch to get Alexander.
3. Go to the foothills and prepare to climb
Gaea's Cliff.
Items/Skills/MateriaMind Source
Safety Bit
Elixir Potion
Don't take the snowboarding ^game too seriously... It's all
just for fun. Watching your
time and getting balloons
won't make any difference in
where you land, and there
are no prizes you can win.
Once you've cleared this
game, you can
play it again byreturning to
town and going
down the sameslope, or youcan play a modi-fied version in
Gold Saucer.
The course splits twice,
and which route you take
determines where your char-
acters will land to begin the
giant Ice Gate Glacier maze.
I've marked each starting
point both here and on the
map that you'll find on pages
60 and 61. If youwant to save
your game after
the snowboardgame, aim for
point LR, it's
closest to the
exit.
The Ice Gate Glacier is a massive dungeon, featuring
about sixty different areas. Since six of the linking paths
repeat a number of times each, it's very easy to get con-
fused. I've mapped out the entire dungeon on pages 60
to 61... As you can see, it's quite massive, but features sur-
prisingly few locations of interest. There are really only
two items worth the trouble of getting in the entire dun-
geon: the very cool Added Cut materia, and the call spell
Alexander, a giant robot castle thingy that pummels his
^^^^^^^ foes with incredibly
|Bandersnatch heavy Holy-type dam-age (this is one of only two Holy-typed spells in the
game). Yep, he's even stronger than Bahamut!To get both, try to land at RL or RR, where you'll be
fairly close to the hot springs. Dip your hands in it, then
either wait for your party to expire, or head north andthen west to get to the central map. From there you can
head east to touch the witch, destroy her, and get
Alexander. While you're in the neighborhood, you cangrab Added Cut as well.
Once that's accom- IBSplished, you're pretty ' 9gmuch done here. But t»
don't get too excited, \ -
Ice Gate is just the IBk <iy
first of three consecu- MtTtive dungeons!
62 , .The Completely Unauthorized Final

. Ice Gate Glacier
.1
As Ice Gate explorers will soon discover, you can't wander for long before Cloud andcompany pass out from exposure. This occurs after a certain amount of distance trav-
Erf* elled, and can not be prevented (note that this has no connection to the amount of time
|
elapsed, so if you're thinking of taking a shortcut to get back to the central map by leav-
\
ing your party to freeze for a while, it's not going to work).When you expire, you'll find yourself in a cabin the
j
foothills of the menacing Gaea's Cliff, your next challenge.
If you're ready to move on, fine. Talk to the man whosaved you to heal yourself, then save at the save spot and
I
pick your party.
If you want to return to various Ice Gate locations youmissed, you're going to have to deal with the central map. This area seems like the game'soverhead map, but is not directly connected to it. Every screen of it looks the same, andit's basically just a giant square. If you make it to the top of the square, you'll be back at
the foothills. If you go South, West, or East, you'll find yourself at the various Ice Gatelocations depicted on the map on the next page. So all you do to get where you want to
|
go is pick a direction and walk that way for a couple of screens. Sounds easy, doesn't it?[
Well, unfortunately the central map is constantly being swept by blizzards that rotate
the screen around and destroy your sense of direction. Since there are absolutely no nat-
ural landmarks, you'll have to make your own with the stakes you can set with the O but-
ton. These are easy to use... As you walk, simply press the O button every few steps so I
that there are always at least two or three stakes visible on screen (three is the max youcan have before the old ones disappear). When the blizzard strikes, just stop in your
|
tracks and wait it out. When it's over, you can figure out which direction you were walk-ing in by simply drawing a line between Cloud's current position and the stakes that are
|
behind him. It's tricky to get going in the exact same direction, but since you can enter your target location by hitting anypart of that side of the square, this should be sufficient to insure you get where you want to be.
Actually, there is one other location within the central map. Smack dab in the middle of it is a small cave that contains...
(gasp!) another Enemy-All Materia! Yes, youshould have like twelve
of them by now, but if
you still feel you could
use another, here's youropportunity. Since the
cave is in the dead cen-
ter of the map, you'll
have to walk straight in
the opposite direction
(for example, if youleave from Gaea's Cliff,
head due South). Youdon't have much of a
margin for error, somake sure you use yourstakes! And memorizewhich direction youcame from in relation to
the cave's entrance...
When you leave, it won't
be facing the same wayand your stakes will
have disappeared.
thorized Final Farf Itimate Guide^ ' 63
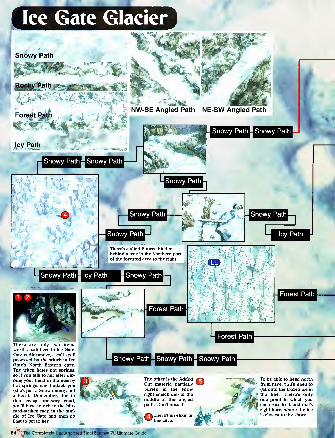
Ice Gate Glacier
Snowy Path
. a NW-SE Angled Path NE-SW Angled PathForest g£ i^il!
Icy Path
i
Snowy Path
Snowy Path
Snowy Path
Icy Path
There's a Mind Source hiddenbehind a tree in the Northern part
of the forested area to the right.
Snowy Path
There are only two items
worth a salt here in Ice Gate.
One is Alexander, a call spell
posessed by the which in Ice
Gate's North Eastern cave.
The witch hates hot springs,
so if you talk to her after dip-
ping your hand in the nearbyhot springs, she'll attack you(she's just a Snow enemy, not
a boss). Remember, due to
that crazy one-way road,
you'll have to exit to the bliz-
zard-striken map in the mid-dle of Ice Gate and then goEast to get to her.
64 , ^The Completely Unauthorized Final f.
Forest Path
_1
Forest Path
Forest Path
The other is the AddedCut materia partially
buried in the snowright smack dab in the
middle of this angledpath. Don't miss it!
There's an elixir in
this cave.
© To be able to head northfrom here, you'll need to
get onto the frozen ice in
the like. There's only
one point in which youcan cross to it, and that's
right here, where the ice
is closest to the shore.
Ik
jtasy VII Ultimate Guide
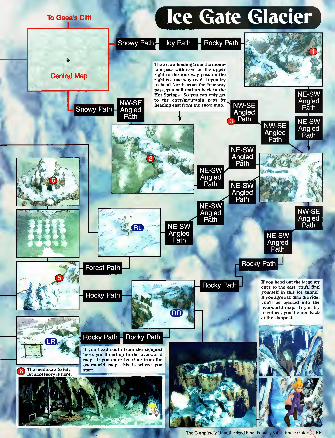
Ice Gate GlacierTo Gaea's Cliff
1
NW-SEAngledPath
Icy Path Rocky Path
The arrow leading from the moun-tain pass with cave on the upperright to the four-way pass on the
right is a one way road. If you try
to head North from the four-way
pass, you will end up back in the
Hot Springs. So you can only get
to the cave/mountain pass byheading east from the snow map.
*
j NW-1 Ang~o Pal
SEedh
I NW-SE 1
Angled 1
Path
NE-SWAngledPath
NE-SWAngledPath
NE-SWAngledPath
NE-SWAngledPath
NE-SWAngledPath
NE-SWAngledPath
NE-SWAngledPath
4 ttSGHPr
NE-SWAngledPath
NW-SEAngledPath
Rocky Path LT
If you head out the large icy
cave to the east, you'H find
yourself in this ice tunnel.
If you agree to take the ride,
you'll be ejected into the
overworld map. If you try
to return, you'll enter bachat the signpost.
The Completely Unauthorized Final Fantasy VII Ultimate Guide 65
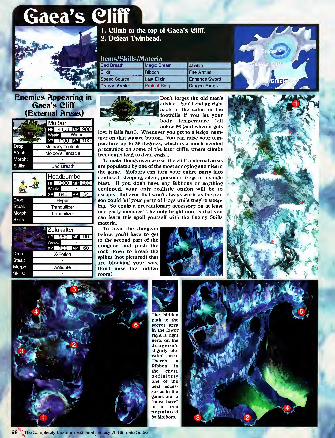
Gaea's Cliff1. eiimb to the top of Gaea's Cliff.
2. Defeat Twinhead.
Items/Skills/MateriaBad Breath
Elixir
Speed Source
Dragon Armlet
Magic Breath
Ribbon
Last Elixir
Protect Ring
Javelin
Fire Armlet
Enhance Sword
Dragon Fangs
Enemies Appearing in
Gaea's Cliff
(External Areas)
.
* *3i xp [•:•:• mi>:
Molbor's Tentacle
Molbor's Tentacle
Bad Breath
^ iHeadbomber' _J? |j|J 1 HI II i HIJ yoi
H4(l MJ HTHyper
Tranquilizer
Tranquilizer
Weak: ^^^KflHHxpHCHap Bill
Don't forget the old man'sadvice... You'll end up right
back in the cabin in the
foothills if you let yourbody temperature fall
below 26 (and when it gets
low, it falls fast!). Whenever you get to a ledge, ham-mer on that square button... You can raise your tem-
perature up to 38 degrees, which is a much neededprecaution on some of the later cliffs, where climbs
frequently lead to dead ends...
To make things even worse, the cliff's external areas
are populated by one of the most annoying enemies in
the game. Molbors can turn your entire party into
confused, sleeping, silent, poisoned frogs in a single
blast. If you don't have any Ribbons or anything
equipped, your only realistic option will be to
escape... But even that won't always work, as the poi-
son could kill your party of frogs while they're sleep-
ing. So equip a precautionary accessory on at least
one party member! The only bright note is that youcan learn this spell yourself with the Enemy Skills
materia.
To beat the dungeonI
below, you'll have to get
to the second part of the
dungeon and push the
rock down to break the I
spikes (not pictured) that[
are blocking your way.
Don't miss the hidden|
room!
The hiddenpath to the
secret area
in the lowerright is right
here, on the
dungeon'sslightly ele-
vated area.
There's a
Ribbon in
the chest,
definitelyone of the
best acces-
sories in the
game, and a
"must have"
in an area
populatedby Molbors.
4tM
, ft- S66 , CThe Completely Unauthorized Final Fi tasy VII Ultimate Guide

(Internal Areas)
You'll have to cross the[
frozen external area to
get to the room pictured
on the right. Only byknocking down all four
of these icicles (easily
accomplished since they
don't fight back) can youmake the bridge to let [
you progress (map version 2), and get the treasure
chest in the upper right hand corner. Ignore the
message that asks you if you want to jump downafter each icicle... If you jump early, you'll have to
climb all the way back up to get the chest on the left!
Just say "no" each time, get the chest, then leave the
room and return immediately. You'll be given the
option to jump again!
In addition to the
Molbor's Bad Breath
skill, you can get the
powerful but expensive
Magic Breath from this
enemy... He also knowsTrine, in case you didn't
learn that earlier.
The Completely Unauthorized Final Fan!
IBIue DragonHPB33iIMMPlsfflaWeak: I^^^HMxpBHHMap Efifl
qon Armlet
Ultimate Guide /
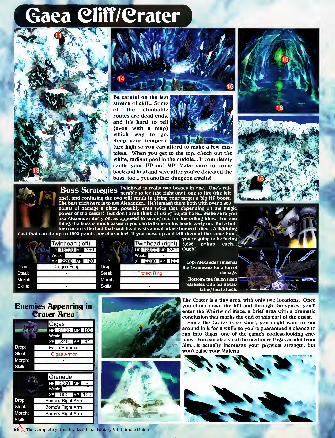
Gaea Cliff/Crater
M*^^ one), and confusing the two will result in giving your target a big HP boost.>i.^ i f
, , | The best trick here is to use Alexander... He'll smash them both with over 3.000
points of damage a piece, possibly even twice that, depending on the magicpower of the caster! But don't even think of using Kujata here... Make sure youuse Alexander early on, as opposed to saving him for the killing blow. For onething, the boss is much easier if you can kill one of his heads early on. But a bet-
ter reason is the fact that each head casts a final attack before it dies... A lightning
blast that can do up to 1500 points per character! If you mess up and kill them at the same time,
_ e^B^^^MwMMwm you're going to be facing"">/, IimamwSPHjM i twra 1 1fsfe'P nfflB*1 3,000 points each...
Be careful on the last
!
stretch of cliff... Someof the climbable
j
routes are dead ends, i
and it's hard to tell
(even with a map)which way to go.
Keep your tempera-
1
ture high so you can afford to make a few mis-
tabes. When you get to the top, check out the
white, radiant pool in the middle... It completely
refills your HP and MP! Make sure to comeback and heal and save after you've defeated the
boss, too... yet another dungeon awaits!
tKjg™ ^(Tatpnit** Twinhead is really two bosses in one. One's vul-EMJ99 oil ulcljlcs nerable to ice (the right one), one to fire (the left
0 hp MESSES mp K$fil
\ Weak' H^HIDrop:
Steal:
Morph:
Skills:
lOSiEtEIuHiDl 5
HPlEfiBSlMPlcHfl Ouch!
Weak:
XPBHISBAP 1HJ Too:
each...JJ<
Top: Alexander smashesthe Twinheads for a ton of
damage.
Bottom: the fallen headretaliates with his devas-
tating final attack.
Enemies Appearing in
Crater Area
The Crater is a tiny area, with only two locations. Onceyou climb down the hill and through the spires, you'll
enter the Whirlwind Maze, a brief area with a dramatic
conclusion that marks the end of this part of the quest.
Since the Crater is so short, you might want to run
around in it for a while so you're guaranteed a chance to
run into Gigas, one of the game's coolest-looking ene-
mies. You can also steal the mediocre Gigas armlet fromhim... It actually increases your physical strength, but
won't raise your Materia.
68 , 'The Completely Unauthorized Final Fantasy VII Ultimate Guide
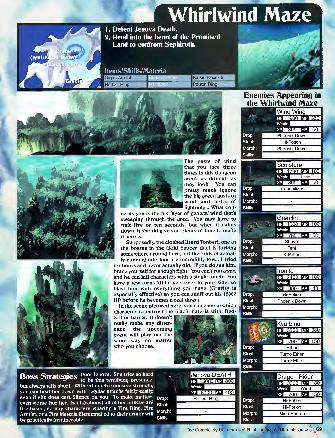
Whirlwind Maze1 . Defeat Jenova Death.
2. Head into the heart of the PromisedLand to confront Sephiroth.
Enemies Appearing in
the Whirlwind Maze
The gusts of windthat you face three
times in this dungeonaren't as difficult as
they look. You canpretty much ignore
the big green gusts of
wind and bolts of
lightning... What con-
cerns you is the big layer of general wind that's
sweeping through the area. You may have to
wait five or ten seconds, but when it calms
down, it should give you plenty of time to makeit across.
Supposedly, the cloaked lizard Tonberi, one of
the bosses in the Gold Saucer duel is lurking
somewhere around here, but the odds of actual-
ly running into him are incredibly low... I tried
for hours and never actually did. If you do see him,
brace yourself for a tough fight. You can't run away,
and he can kill characters with a single touch. Youhave a few turns 'til he gets over to your side, so
blast him with everything you have (Gravity is
especially effective) so you can snuff out his 15000
HP before he becomes a real threat.
In the scene pictured here, you can choose whichcharacter to entrust the black materia with, Red-
XIII or Barret. It doesn't
really make any differ-
ence, the upcomingevent will play out the
same way no matter
who you choose.
M'I'l j
Weak: VEi^^lxpBEHMap -.<
onee *Nri-Aff»nip<i Poor Jenova. She tries so hard£>U»» Oil OlCyiCS
tQ b£ this terrifying preSence,
but always falls short. Without much offensive strength,
you can beat her down with regular attacks fairly easily,
even if she does cast Silence on you. To make matters Drop:
even worse (for her, that is) almost all of her attacks aresteal-
fire-based, so any characters wearing a Fire Ring, Fire
Armlet, or a Fire Materia Elemental'ed to their armor willorp
be practically invulnerable.Skills.
M
Weak:
The Completely Unauthorized Final Fantasy VII Ultimate Guide
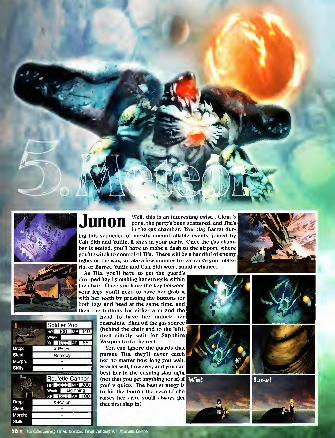
Junon
.3Drop:
Steal:
Morph:
Skills:
Well, this is an interesting twist... Cloud's
gone, the party's been scattered, and Tifa's
in the gas chamber. You play Barret dur-
ing this sequence of mostly uncontrollable events, joined byCait Sith and Yuffie, if she's in your party. Once the gas cham-ber is sealed, you'll have to make a dash to the airport, whereyou'll switch to control of Tifa. There will be a handful of enemyfights on the way, so take a few minutes to rearrange your mate-
ria, or Barret, Yuffie and Cait Sith won't stand a chance.
As Tifa, you'll have to get the guard's
dropped key by making her struggle within
the chair. Once you have the key betweenyour legs, you'll need to have her grab it
with her teeth by pressing the buttons for
both legs and head at the same time, andthen the buttons for either arm and the
y head to have her unlock her
restraints. Shut off the gas source
(behind the chair and to the left),
then simply wait for SapphireWeapon to do the rest.
You can ignore the guards that
pursue Tifa, they'll never catch
her no matter how long you wait.
Scarlet will, however, and you can
best her in the ensuing slap fight
(not that you get anything for it) if
you're quick. The best strategy is
to hit the button the second she
raises her arm, you'll always get
that first slap in!
yVIl Ultimate Guide
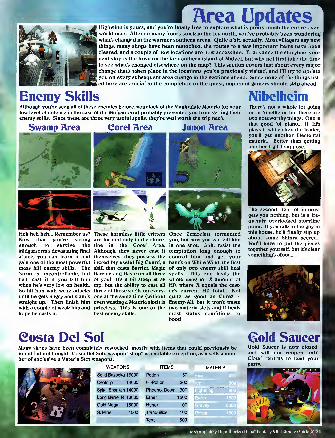
Area Updates
Enemy Skills
Swamp Area
Highwind is yours, and you're finally free to explore what is pretty much the entire over-
world map. After so many hours stuck in the icy north, you've probably been wonderingwhat's changed in the warmer southern areas. Quite a bit, actually. Most villagers say newthings, many shops have been restocked, the routes to a few important items have beencleared, and a couple of new locations are now accessible. To advance the storyline, yournext stop is the town on the far southern island of Mideel, but why not first take the time
to see what's changed elsewhere on the map? This section covers just about every majorchange that's taken place in the locations you've previously visited, and I'll try to updateyou on every subsequent area change in the sections ahead. Since none of the things list-
ed here are crucial to the completion of the quest, impatient gamers should skip ahead.
NibelheimThere's not a whole lot going
on in Nibelheim, but there are
two noteworthy things. One is
that good 'ol piano... If Tifa
plays it while she's the leader,
you'll get another Elementalmateria. Better than getting
another 1 gil, I suppose.
Although you've seen all of these enemies before, your lack of the Manipulate Materia (or yourlow level of defense in the case of the Midgarsorm) probably prevented you from getting their
enemy skills. Since these are three very useful spells, they're well worth the trip back.
Corel Area Junon Area
Heh heh heh... Remember us?
Now that you're strong
enough to survive the
Midgarsorm's devastating final
attack, you can learn it andgain one of the most powerfulmass kill enemy skills. The'sorm is uncontrollable, buthe'll cast it if you kill himwhen he's very low on health.
So hit him with weak attacks
until he gets angry and stands
straight up. Then finish himwith a couple of weak hits andhope he casts it.
These harmless little critters
are located only in the shore-
line in the Corel Area.
Although they never cast it
themselves, they possess the
incredibly useful Big Guard, a
skill that casts Barrier, MagicBarrier, and Haste on all three
of you! It's a bit steep at 56
mp, but the ability to cast all
three of those spells on every-
one at the same time (without
even wasting a Materia slot!) is
priceless. This is one of the
best enemy skills.
Once Zemzelett tormentedyou, but now you can kill himin one shot. Still, resist the
temptation long enough to
control him and get yourhands on White Wind, the first
of only two enemy skill heal
spells. This one heals the
whole gang for X amount of
HP, where X equals the cast-
er's current HP total. Notquite as good as Cure3 +Enemy-All, but it won't wastetwo materia slots and it heals
most status conditions to
boot!
The second item of interest
gets you nothing, but is a fre-
quently overlooked storyline
point. If you talk to the guy in
this house, he'll finally slip upabout some Shinra secret...
You'll have to put the pieces
together yourself, but it's clear
something's afoot...
eosta Del SolMany shops have been completely restocked, mostly with items that could previously befound but not bought. Costa Del Sol's weapon "shop" is a notable exception, as it sells a num-ber of exclusive 8 Materia Slot weapons.
WEAPONS ITEMS MATERIA
Solid Bazooka 16000 Potion 50 Fire
Centclip 14000 Hi-Potion 300 Ice 600 g|Spiral Shuriken 14000 Phoenix Down 300 Lightning
Long Barrel R 13000 Ether 1500 Earth 1500B
Gold Mega. 15000 Hyper 100 Gravity 8000
1
S. Mine 1000 Tranquilizer 100 Poison 1500[Tent 500
Gold SaucerGold Saucer is now closed,
and will not reopen until
Cloud returns to lead yourparty.
" Unauthorized Final Fantasy VII Ultimate Guide )( 71
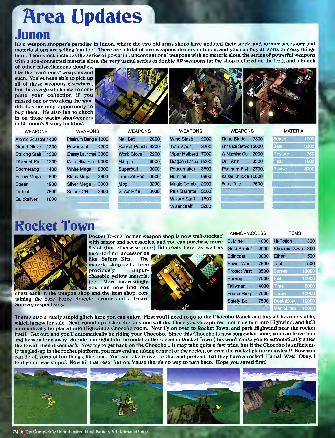
Area UpdatesJunonIt's a weapon shopper's paradise in Junon, where the two old arms shops have updated their stock, and former accessory andmateria shops are selling 'em too! There are a total of five weapons dealers in Junon, and you can buy all sorts of crazy things
here. Their stocb includes the series of powerful, unconventional weapons with no materia slots, the series of powerful weaponswith 8 non-connected materia slots, the very useful series of double AP weapons (at the shop pictured on the left), and a bunchof other miscellaneous goodies,
l
like the "can't miss" weapons andsuch. You've been able to pick upall of these weapons elsewhere,
but this is a great chance to com-plete your collection if youmissed one or two along the way-this is your only opportunity to
buy them. It's also fun to checkin on those wacky shopkeepersin El-Junon's 3-story building.
WEAPONS WEAPONS WEAPONS WEAPONS WEAPONS MATERIA
Atomic Scissors 1 400 Platinum Bangle 1800 Nail Bat 2800 Wind Slash 2000 Rune Blade 3800
Grand Glove 1200 Powersoul 4200 Rocket Punch 3200 Twin Viper 3200 Enhance Sword 12000 |Seal 30001
Striking Staff 1300 Enemy Launcher 3300 Work Glove 2200 Viper Halberd 7000 W Machine Gun 2000 (Restore 750
Diamant Pin 1300 Magic Shuriken 6000 Hairpin 6000 Dragoon Lance 6200 Drill Arm 3300 (Heal 150o|
Boomerang 1400 White Mega 2300 Superball 3000 Peacemaker 3500 Platinum Fist 2700 | Revive 3000
1
Yellow Mega 500 Black Mega 2800 Trumpet Shell 3000 Buntline 6800 Kaiser Knuckle 15000
Spear 1200 Silver Mega 3300 Mop 3200 Magic Comb 2000 Fairy Tale 2500
Trident 7500 Sniper-CR 3300 Silver Rifle 3000 Plus Barrette 3500
Quicksilver 1000 Wizard Staff 1800
Wiser Staff 3200 I
TownARMOR/ACCESS ITEMS
I Rocket Town's former weapon shop is now well-stocked
!with armor and accessories, and you can purchase more8-sIot (but otherwise poor) Edincoats here, as well as
hard-to-find accessories
like Safety Bits. Themateria shop sells three
' previously unpur-chasable yellow materia,
too. More interestingly,
|
you can now find onechest each in the weapon shop and the item shop, con-
taining the rare Force Bracelet armor and a GuardSource, respectively. K^m^f/Vy „-r "^^^^^^^m*£*-marMS * . ^^^^^^h
|yhiiiiw»i^||.i.i.i.|
There's also a really stupid glitch here you can enjoy. First you'll need to go to the Chocobo Ranch and buy a Chocobo stable,
which is now for sale. Next, round up a Chocobo, any one will do. Once you've captured him, ride him into Highwind, and he'll
automatically be placed into Highwind's Chocobo room. Now fly on over to Rocket Town, and park Highwind near the rocket
itself. Get out, and you'll automatically be riding your Chocobo. Since this Chocobo is now somewhat tame, you can leave himand he won't run away. So ride him right into the midst of the rocket in Rocket Town (this won't cause you to automatically enter
the town), then disembark. Now try to get back on the Chocobo... It may take quite a few tries, but if the Chocobo is sufficient-
ly tangled-up in the rocket platform, you may end up taking control of the rocket, or even the rocket platform instead! Now youcan do all sorts of fun things, like, urn... You can take it over to Utai and pretend that they have a rocket! Ha ha! Wee! Okay, I
told you it was stupid. Now hit that reset button, 'cause there's no way to turn back. Hope you saved first!
S. Mine 1000 Hi-Potion 300
Gold Armlet 2000 Phoenix Down 300
Edincoat 8000 Ether 1500
Power Wrist 7500 TGnt 500
Protect Vest 3500 Barrier 10000
Earring 7500 Exit 10000
Talisman 4000 Time 6000
Peace Ring 7500 Throw 10000
Safety Bit 7500 Deathblow 10000
72 * The Completely Unauthorized Final Fantasy VII Ultimate Guide
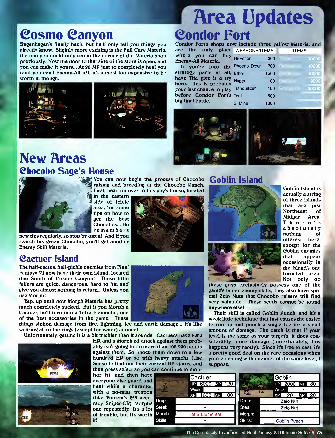
Cosmo CanyonArea Updates
Condor FortBugenhagen's finally back, but he'll only tell you things youalready know. Slightly more exciting is the Full Cure Materia,
the one you could only see in the corner of the Materia shoppreviously. Now the door to that side of the store is open, andyou can make it yours... At 99 MP just to completely heal you(and you can't Enemy-All it!), it's almost too expensive to beworth it, though.
« * si
y * • — —
^
Condor Fort's shops now include three yellow Materia, andare the only place WEAPONS/ITEMS ITEMSwhere you can buyEnemy-All Materia.
If you're into the Phoenix Down
strategy parts at all, Ether
have Tifa give it a try
here... this is probablyyour last chance to play Tranquilizer
before Condor Fort's Tent
big final battle.S Mjne
Hi-Potion
Hyper
New AreasChocobo Sage's House
'^JfSf' You can now begin the process of Chocobo {fjObtifl Islflfldraising and breeding at the Chocobo Ranch. _>
**§^HB^^^^i First, head on over to this guy's house, located
/j| in the eastern
i side of Icicle
I area, for sometips on how to
get the best
Chocobos... HeIremembers
new tips regularly, so stop by often! And if yousearch his green Chocobo, you'll get anotherEnemy Skill Materia.
Cactuer IslandThe half-cactus, half-pickle enemies from Final
Fantasy VI now have their own island, located
due South of Cosmo Canyon! These little
fellers are quick, dangerous, hard to hit, andgive you almost nothing in return... Unless youuse Morph!
Yep, up until now Morph Materia has pretty
much completely sucked. But if you Morph a
Cactuer, he'll turn into a Tetra Elemental, oneof the best accessories in the game. Thesethings siphon damage from fire, lightning, ice and earth damage... It's like
wearing all of the rings (except for water) at once! t/t
Unfortunately, getting it is a bit trickier than it sounds. Cactuers have 6000HP, and a Morph'ed attack against them prob-
I ably isn't going to do more than 100-200 points
against them. So knock them down to a fewhundred HP or so with heavy attacks (UseSense to find out their current HP status, andthen press select so you can continue to mon-itor it), and then have
I
everyone else guard andi heal while a characterI with a no-miss weapon(like Vincent's 255 accu-
racy Sniper-CR) Morphsone repeatedly. It's a lot
I of trouble, but it's worthit!
I Goblin Island is
I actually a string
of three islands
that are just
Northeast of
Midgar Area.
There'sabsolutelynothing of
interest here,
except for the
Goblin enemiesthat appearoccasionally in
the island's oneforested area.
Not only dothese guys exclusively possess one of thegame's lamer enemy skills, they also have spe-
cial Zeio Nuts that Chocobo raisers will find
very valuable. These seeds cannot be foundanywhere else!
Their skill is called Goblin Punch, and it's aweak little technique that just causes the caster
to run up and punch a single foe for a small
amount of damage. The catch is that if yourlevel is the same as your target's, it does con-
siderably more damage (unfortunately, this
happens very rarely). Since it's free to cast, it's
a pretty good deal on the rare occasions whenI
you're dealing with enemies of the same level, I
suppose.
Cactuer
Weak:
XPlGllAP MSlfl
HPKfififflMPKSB|Weak: H^B^^BIXPHllAP WSfM
Tetra Elemental
Zeio Nut
Goblin Punch
Unauthorized Final Fantasy VII Ultimate Guide )( 73
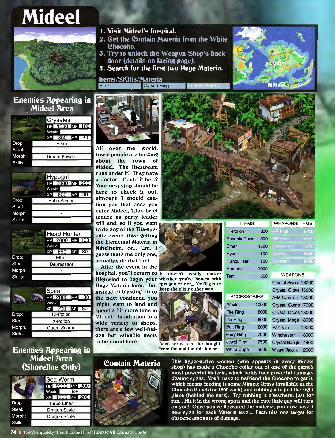
Mideel1 . Visit Mideel's hospital.
2. Get the Contain Materia from the WhiteChocobo.
3. Try to unlock the Weapon Shop's backdoor (details on facing page).
4. Search for the first two Huge Materia.
Items/SKIIIs/Materia[Elixir I Cursed Ring
Enemies Appearing in
ideel Area
nemies Anneai-ina in
AH over the world,
townspeople are buzzing
about the town of
Mideel. The lifestream
runs under it! They havea doctor! Could it be...?
Your next stop should behere to check it out,
although I should cau-
tion you that once youenter Mideel, Tifa's brief
tenure as party leader
will end, so if you wantto do any of the Tifa-spe-
cific events (like getting
the Elemental Materia in
Nibelheim, or... Um, I
guess that's the only one,
actually), do that first.
After the event in the
hospital, you'll return to It doesn't really matter
Highwind to begin your whether you're honest with
Huge Materia hunt. But !hisW °r not... You'll get to
instead of blasting off to
the next continent, youmight want to land and
'
spend a bit more time in
Mideel. In addition to a
wide variety of shops,
there are a few well-hid-
den but valuable items
to be found here. Accessories can be boughtfrom the maid in this house.
keep the elixir either way.
ACCESSORIES
Amulet 10000
Fire Ring 8000
Ice Ring 8000
Bolt Ring 8000
Fairy Ring 7000
Jewel Ring
White Cape
7500
5000
WEAPONS
Crystal Sword 18000
Crystal Glove 1 6000
A-M Cannon 18000
Crystal Comb 17000
Crystal Cross 18000
Crystal Mega 18000
Partisan 19000
Winchester 18000
Crystal Bangle 4800
Wizard Bracelet 12000
Mideel Area(Shoreline ©nly)
HPRHflfflMP f£SHWeak ^H^^mxpUcIUHap KHfl
Contain MateriaK*
This hyper-active women (who appears in every Mideelshop) has made a Chocobo collar out of one of the game'smost powerful Materia, which holds four powerful damage-dealing spells. You'll have to befriend the Chocobo to get it,
which means feeding it some Mimett Grass (available at the
Chocobo Ranch for 1500 each) and rubbing it in just the right
place (behind the ears). Try rubbing it elsewhere, just for
fun... Hit it in the wrong spots and the cute little guy will turn
on you! Once you've liberated the materia, you now have 1
new spell for each Materia level... Each hits one target for
obscene amounts of damage.
74 X The Completely Unauthorized Final Fantasy VII Ultimate Guide
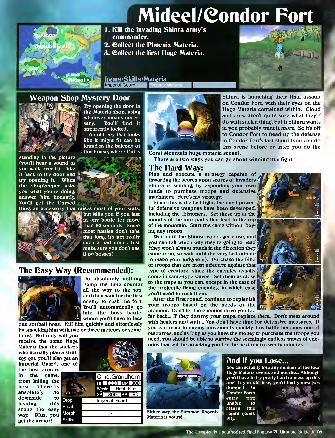
Mideel/Condor Fort1 . Kill the invading Shinra army'scommander.
2. Collect the Phoenix Materia.
3. Collect the first Huge Materia.
Items/SkiHs/Materia
Weapon Shop Mystery DoorTry opening the door in
the Materia shop, using
whatever means neces-
sary. You'll find it
apparently locked.
An old hey that looks
like it might fit can befound in the balcony of
this house, where Cid is
standing in the picture , t
(you'll hear a sound as ^'uEjS -Jkjje*'' ^fej^-iyou walk over it). Take .b^^^f**?*
1
i'v^Git back to the door and j"^S|^^p- ftry opening it. When P' » Wl^Isi*the shopkeeper asks \ _ Wv^KsSSsr^you what you're doing, i^Sf *"W|^j[j3jHS^-j
answer him honestly. SSw SYou'll get the CursedRing, an accessory that raises most of your stats,
\ *'/2§i T.^^L but kills you if you last
^F'^ Iff i Vt in any battle for more
HHK " +3m:- ^ than 60 seconds-Since
/ i v' •'Jjl ' most battles don't takey' that long, it's not really
gj^ss^"
•• V ' such a bad item... lust
^£ra«Ljjpg^ make sure you don't use
"\SL ,- it on bosses!
ccessory tnat ra
'IP• *
The Easy Way (Recommended):Do absolutely nothing.
Pump the time counterall the way to the top,
I and then wait for the first
ienemy to rush the fort.
You'll automatically gointo the boss battle,
| where you'll have to face
one Softball boss. Kill him quickly and effortlessly
by smacking him with two or three meteors or some-thing. Not only will youreceive the same HugeMateria that the suckerswho actually plan a strat-
egy get, you'll also get anImperial Guard, one of
the best armorsin the game,from killing the
boss. There is
absolutely nodownside to
beating this
scene the easyway. Plus, youget the armor!
HPKHHfflMPfiBIlIWeak: MIEEWaiTM
1^1 XPKHIHAP W3*MDrop:
Steal:
Morph:
Skills:
Imperial Guardj
Shinra is launching their final assault
on Condor Fort, with their eyes on the
Huge Materia contained within. Cloudand crew aren't quite sure what they'd
do with such a thing, but if Shinra wantsit, you probably want it more. So it's off
to Condor Fort to head up the defense
in Condor Fort's last stand (you can dothis scene before or after you do the
Corel Mountain huge materia scene).
There are two ways you can go about winning this fight.
The Hard Way:Plan and execute a strategy capable of .
thwarting the scores upon scores of invaders '*
Shinra is sending, by expending your ownfunds to purchase troops and defensive
|
machinery. Here's my strategy:
Since this is the last fight, the most power-ful defensive weapons have been developed, I
including the Tristoners. Set these up at the
mouths of the four paths that lead to the top|
of the mountain. Start the game without buy-ing any troops.
Wait until the Shinra troops get close, and I
you can tell which way they're going to head(they won't always attack in the direction they
came from, so wait until the very last minuteto make your judgment). Purchase the kind
of troops that are most effective against that
type of creature, since the enemies usually
come in same-type waves. Set them as close I
to the traps as you can, except in the case of
the projectile-firing enemies, in which case|
you'll need to rush them.After the first round, continue to replenish I
your troops based on the needs of the|
moment. Don't let the enemies drive you too
far back... If they destroy your traps, replace them. Don't mess aroundwith healers and stuff... You don't have time for defensive measures. If
you can react to enemy movements quickly, this battle becomes one of
resources, and as long as you have the money to purchase the troops youneed, you should be able to survive the seemingly endless waves of ene-
mies that will be attacking you for the next ten to twenty minutes.
Either way. the Summon Phoenix HWPSH^ffljMateria is yours!
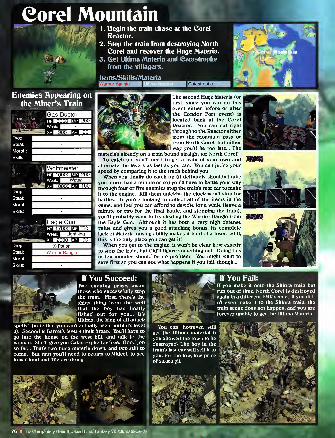
Corel Mountain
4
nemies Appearing on
the Miner's Train
i cI»HHB'.i : jjMjl! '•> '.
!
Weak ^^HI^^H
1 . Begin the train chase at the Corel
Reactor.
2. Stop the train from destroying North
Corel and recover the Huge Materia.
3. Get Ultima Materia and Catastrophe
from the villagers.
Items/Skills/MateriaWarrior Bangle Catastrophe
HPlEBBBI»Plgi- 'l
Weak: KiUH^H
weak: HEHiHniHi^B^s XPKHHIBAP Kl!l
The second Huge Materia (or
first, since you can do this
event either before or after
the Condor Fort event) is
located back at the CorelReactor. You can cut right
through to the Reactor either
from the mountain pass or
from North Corel, but either
If-j way you'll be too late... Themateria's already on a train bound straight for North Corel!
To catch up, you'll need to get a train of your own andalternate the levers as fast as you can. You can judge yourspeed by comparing it to the track behind you.
When you finally do catch up (it definitely shouldn't take
you more than a minute or so) you'll have to battle your waythrough four or five enemies atop the train's rear car to makeit to the engine. Kill them quickly- the clock won't stop for
battles. If you're looking to collect all of the items in the
game, and feel you can afford to dawdle for a while (leave a
minute or two for the final battle, and stopping the train),
you'll probably want to try stealing the Warrior Bangle fromthe Eagle Gun. Although it has both a very high defense
value and gives you a good attacking bonus, its completelack of Materia-raising ability makes it kind of a loser. Still,
this is the only place you can get it!
When you get to the engine, it won't be clear how exactly
to stop the train, but Cid'H figure something out. Doing this
in ten minutes should be no problem! You might want to
save first so you can see what happens if you fail, though...
If You Succeed:Two exciting prizes await
those who successfully stop
the train. First, there's the
shiny thing from the well
that the boy has finally
"fished out for you... It's
$if«Hw8ralr Ultima, the king of all attack
spells! (note that you can't actually use it until it's level
2). Second is Barret's level 4 limit break. You'll have to
go into the house on the west hill, and talk to the
woman. She'll give you Catastrophe for free. Good job
so far... That's two huge materia down, and two still to
come. But first you'll need to return to Mideel, to see
how Cloud and Tifa are doing.
If You Pail:If you make it onto the Shinra train but
* run out of time. North Corel is destroyed
iagain in a different FMV scene. If you did-
n't even make it to the Shinra train, the
train scene does not happen, and you are
forever unable to get the Ultima Materia.
You can, however, still
get the Ultima material if
you allowed the town to bedestroyed- The boy in the
train's last car will sell it to
you, for the low, low price
of 50,000 gil.
76 < The Completely Unauthorized Final Fantasy VII Ultimate Guide
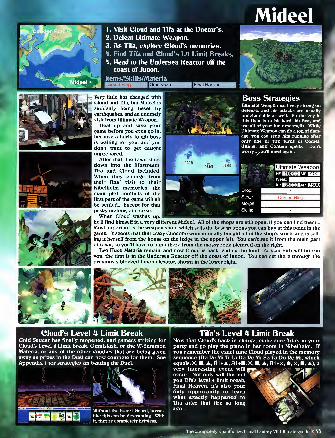
Mideel1. Visit eioud and Tifa at the Doctor's.
2. Defeat Ultimate Weapon.3. As Tifa, explore Cloud's memories.
4. Find Tifa and Cloud's L4 Limit Breaks.
5. Head to the Undersea Reactor off the
coast of Junon.
Items/Skills/MateriaCursed Rir lOmnislash I Final Heaven
Very little has changed with
Cloud and Tifa, but Mideel is
suddenly being beset byearthquakes, and an untimely
visit from Ultimate Weapon.Heal up and save your
|
game before you even go in,
because a fairly tough boss I
is waiting for you, and youdon't want to get caughtunprepared.
After that, the town sinks|
down into the lifestream,
Tifa and Cloud included.
When they emerge from I
their final visit to their
Nibelheim memories, the
main plot conflicts of the
first part of the game will all
be settled... Except for that
pesky meteor, of course.
Boss StrategiesUltimate Weapon isn't very strong ondefense, and his attacks are usually
undefendable as well. So the key in
this fight is to hit hard, hit fast, anduse all of your fun new spells. WhileUltimate Weapon can do a ton of dam-age, you can send him running after
only one or two turns of Comet,Ultima, and Contain spells. Don*t
worry... you'll meet again.
Weak:
XP BSBISMAP ESflfi
When Cloud washes up,
he'll find himself in a very different Mideel. All of the shops are still open, if you can find them...
Most important is the weapon shop, which sells the best weapons you can buy at this point in the
game. It seems that that crazy Chocobo woman finally bought all of the shop's stock, and is sell-
ing it herself from the house on the ledge in the upper left. You can't see it from the main part
of town, so you'll have to jump there from the mossy rock pictured on the right.
Two Huge Materia remain, and now Cloud is back leading the hunt. As Cait Sith will informyou, the first is in the Undersea Reactor off the coast of Junon. You can get there through the
previously blocked Junon elevator, shown in the lower right.
Cloud's Level 4 Limit BreakGold Saucer has finally reopened, and gamers striving for
Cloud's Level 4 Limit Break, Omnislash, or the W-SummonMateria, or any of the other goodies that are being givenaway as prizes in the Duel can now compete for them. SeeAppendix 1 for strategies on beating the Duel.
Without the Escort Guard, bosseslike this can be devastating. Withit, they're completely helpless.
Tifa's Level 4 Limit BreakNow that Cloud's back in charge, make sure Tifa's in yourparty and go play the piano in her room in Nibelheim. If
you remember the exact tune Cloud played in the memorysequence (Do Re Mi Ti La Do Re Mi So Fa Do Re Mi, whichequals: X, . , R1+A, R1 +, X, M , R1+X, •, X, . ). avery interesting event will wyiy *A!Moccur. Not only will this net ^jafF?' -^^^k^tT'you Tifa's level 4 limit break, - ->J^BBBwW jttFinal Heaven, it's also your vvHp^ «?only opportunity to learn ^$HH?!Sfcv>Vwhat exactly happened to ^HpRsSk. >kTifa after that fire so long -A vago- ttS .
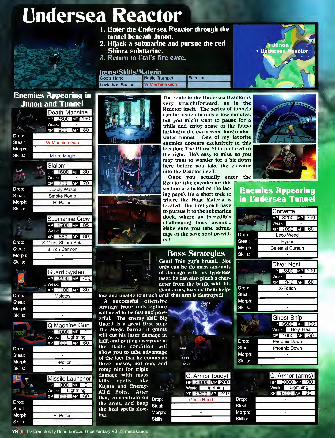
Undersea ReactorEnter the Undersea Reactor through the
tunnel beneath Junon.Hijack a submarine and pursue the red
Shinra submarine.Return to Ctai's fire cave.
Items/Skills/Materia
Junon and Tunnel
hpKsHMmp Hl'lWeak: ^^^^BH
Drop:
Steal:
Mornh:
Matra Magic
Weak: H^B^^IxpBBW ap H!lDeadly Waste
Smoke Bomb
Hi-Potion
Submarine Crew[
1500" \M SB1 -
~
"bo MJ »o
S Mine, Shinra Beta
Inch Cannon
ESSE—Weak: ^^H^^^BXPHMlAP
BHSBB8BIHPMjBMMPM
Weak: SQSijSi^HXPKfiHBAP •!•>
The route to the Undersea Reactor is
very straightforward, as is the
Reactor itself. The series of tunnels
can be beaten in only a few minutes,
but you might want to pause for a
while and enjoy some of the fauna
lurking in the two screen-long under-
water tunnel. One of my favorite
enemies appears exclusively in this
location: The Ghost Ship pictured to
the right. He's easy to miss, so youmay want to wander for a bit downhere before you take the elevator
into the Reactor itself.
Once you actually enter the
Reactor (the enemies for this
section are listed on the fac-
ing page), it's a short trek to
where the Huge Materia is
located. But first you'll haveto pursue it to the submarinedock, where an incredibly
challenging boss awaits...
Make sure you take advan-
tage of the save spot provid-
ed!
Boss StrategiesGeez! This guy's brutal... Not
only can he do mass amountsof damage with his type-less
w' laser, he can also pluck a char-
acter from the battle with his
giant arms, leaving them help-
less and unable to attack until that arm is destroyed!
A successful offensive »,
strategy (your only option)'^•aJ "C
will need to be fast and pow- ^^^JR,erful. The enemy skill Big x^'W i# .-"-s,*.
Guard is a great fir§t step: ^"^trThe Magic Barrier it grants Hwill cut his laser damage in
-^^fc
half, and putting everyone in
the Haste condition will5t6l;
allow you to take advantage ' ."
of the fact that he counts as 55n
three bosses, not one, and s«26
romp him for triple
damage with mass [HKHmBWUBBHIkills spells like HPKffififlMPKflflKujata and Enemy- Weak MKflJIJfflBMAll'd Bolts. After XP K2fifflAP KB1that, concentrate on rj r0 p.
the arms, and keepstea |.
the heal spells flow- ^^^^^^^^^^^^^Ming.
MorPh: BMBM—
Enemies Appearingea Tunne
HPKBaHMPKfiflWeak: £ll2iSj^Hxpbssiiimap f-ii'i
hpBHSHImpISsSIWeak: ^f^HxpHBSHap MSM
1 Drop: Leco Weed j
1 Steal:*
Hyper I
Celestial Curtain 1
1 Skills:
HPBmiMMP m*M
1 mr xpKMap MSm1 Drop:
1 Steal:
1 Morph:
1 Skills:
1 ,
1 sw
1 ....
Weak: IBIWIIETHMxp wniiiaap mm
1 Drop:
Steal:
1 Morph::
Skills:
HPiBBijiflMpmtiWeak: ^QSQigHxpMEBMIap jjgM
' The Completely Unauthorized Final Fantasy
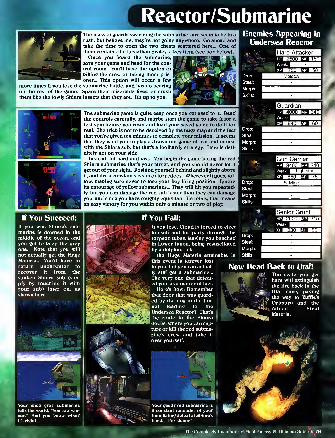
Reactor/SubmarineThe mass of guards swarming the submarine sure seem to berush, but believe me, they're not going anywhere. Go ahead andtake the time to open the two chests scattered here... One of
|them contains the Leviathan Scales, a hey item (see box below).
Once you board the submarine,I save your game and head for the con-
|trol room. You'll have the option of
killing the crew or taking them pris-1 oner... This option will occur a few
more times if you lose the submarine battle, and has no bearing
on the rest of the game. Spare their miserable lives, or crush
them like the lowly Shinra insects that they are. It's up to you.
Enemies Appearing in
Undersea Reactor
Hard Attacker
2500 m m'.si ) MJ hh'
The submarine game is quite easy, once you get used to it. Readthe controls carefully, and maybe start the game to take it for a
test spin before you reset and load your saved game to do it for
real. The trick is not to be deceived by the huge map and the fact
that you're given ten minutes to complete your mission. It seemsthat they want you to play a drawn-out game of cat and mousewith the Shinra sub, but that's a foolhardy strategy. Time is defi-
nitely not on your side.
Instead, hit hard and fast. You begin the game facing the redShinra submarine that's your target, and you should never let it
get out of your sight. Position yourself behind and slightly aboveit, and fire a constant stream of torpedoes. Wherever it goes, fol-
low, making sure never to lose your key firing position. Ignore
its entourage of yellow submarines... They will hit you repeated-
ly, but you can damage the red sub faster than they can damageyou, and since you have roughly equivilant life totals, that meansan easy victory for you within only a minute or two of play.
If You Succeed:If you win, Shinra's sub-
marine is downed in the
middle of the ocean, andyou get to keep the grey
one. Note that you will
not actually get the HugeMateria... You'll have to
return underwater to
recover it from the
sunken Shinra sub (sim-
ply by touching it with
your sub) later on, as
shown here.
0
Weak' ^^^^^^H2MB U7JM
|Gu n Carrier
Lightning
~60 EB 75
S. Mine
Bnior Grunt2600
j55 MJ no"
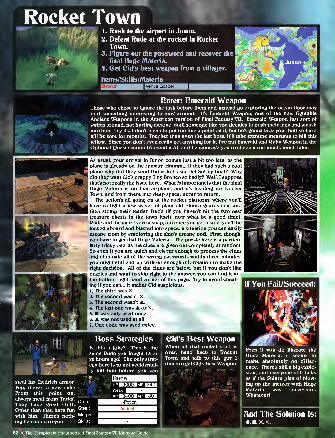
Rocket Town1 . Rush to the airport in Junon.
2. Defeat Rude at the rocket in RocketTown.
3. Figure out the password and recover the
final Huge Materia.
4. Get fid's best weapon from a villager.
Items/Skills/MateriaI Venus Gospel
Enter: Emerald WeaponThose who chose to ignore the task before them and instead go exploring the ocean floor mayfind something interesting lurking around. It's Emerald Weapon, one of the new fightable
Ancient Weapons in the American version of Final Fantasy VII. Emerald Weapon just sort of
swims around, not hurting anyone, until someone like you decides to push their luck and smashinto him. Try it... I don't mean to put too fine a point on it, but he's gonna kick your butt so hardit'll be sore for months. Tougher than even the last boss, it'll take extreme measures to kill this
fellow. Since you don't even really get anything for it, I've put Emerald and Ruby Weapon in the
Optional Quest section (Appendix A), and I encourage you to check it out much, much later.
As usual, your arrival in lunon comes just a bit too late, as the
plane is already on the runway. Hmmm... If they had such a cool
plane why did they send Rufus to Costa Del Sol by boat? Whydid they want Cid's crappy Tiny Bronco so badly? Well, I suppose
I that's not really the issue here. What is important is that the final
I Huge Materia is on that airplane, and it's heading for Rocket
| Town, and from there into deep space, never to return.
The action's all going on at the rocket platform, where you'll
have to fight a few waves of plain old Shinra guardsmen, andthen stomp their leader, Rude (if you haven't hit the two newtreasure chests in the town itself, now what be a good time).
Rude and the guards are a snap, but once you get inside, you'll belocked aboard and blasted into space, a situation you can easily
escape from by employing the ship's escape pod. First, though,
you have to get that Huge Materia... The puzzle here is a particu-
larly tricky one, as the clues are given out completely at random.So even if you are quick and clever enough to process the clues
and eliminate all of the wrong passwords within three minutes,
you might still end up without enough information to make the
right decision. AH of the clues are below, but if you don't like
puzzles and want to skip right to the answer, you can find it in
the bottom right hand corner of this page. Try to avoid cheat-
ing if you can... It makes Cid suspicious.
1. The third was X.
2. The second wasn't X.
3. The second wasn't .4. The last one was or X.
5. • was only used once.
6. was not used at all.
7. One code was used twice.
If You Fail/Succeed:
I
steal his Ziedrich armor.
Yep, there's a new rule:
From this point on,
always steal from Turks!
They have great stuff.
Other than that, have fun
with him. There's noth-
ing he can do to you.
Boss Strategies Cid's Best WeaponIs this a joke? This is the
same Rude you fought 15 or
20 hours ago! The only strat-
egy here is to not accidental-
ly kill him before you can
Drop:
Steal:
Morph:
Skills:
Weak: B^B^^HxpEHSap mS!M
When all that rocket stuff is
over, head back to RocketTown and talk to this guy 3
times to get Cid's Best Weapon.
Even if you do liberate the
Huge Materia, it seems to
make absolutely no differ-
ence. There's still a big explo-
sion, and everyone still talks
as if the Shinra plan of blow-
ing up the meteor with HugeMateria was successful.
Whatever!
And The Solution Is:
• , , X, X.
80 X The Comnletelv Unauthorized Final Fantasy VII Ultimate Guide
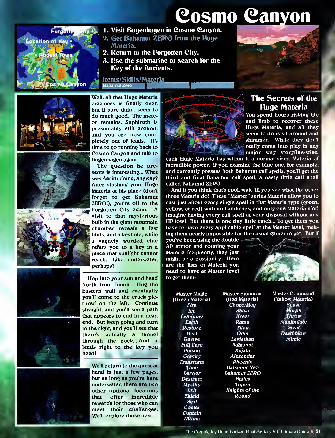
Cosmo Canyon1 . Visit Bugenhagen in Cosmo Canyon.
2. Get Bahamut ZERO from the HugeMateria.
2. Return to the Forgotten City.
3. Use the submarine to search for the
Key of the Ancients.
Items/Skills/Materia
Well, all that Huge Materia
craziness is finally over,
but it sure didn't seem to
do much good. The mete-
or remains, Sephiroth is
presumably still around,
and you are now com-pletely out of leads. It's
time to go running bach to
Cosmo Canyon and talh to
Bugenhagen again.
The question he pre-
sents is interesting... Whatwas Aerith doing, anyway?After stashing your HugeMateria at his place (don't
forget to get BahamutZERO!), you're off to the
Forgotten City again. Avisit to that mysterious
bulb in the giant mountainchamber reveals a fewhints, and a keyhole, while
a vaguely worded clue
refers you to a hey in a
place that sunlight cannot
reach. Lifce, underwater,
perhaps?
Hop into your sub and headNorth from Junon. Hug the
Eastern wall and eventually
you'll come to the crach pic-
tured on the left. Continue
straight, and you'll see a path
that appears to end in a deadend. But heep going and turn
to the right, and you'll see that
there's actually a tunnel
through the rocfe... And it
leads right to the hey youneed!
We'll return to the quest at
hand in just a few pages,
but as long as you're here
underwater, there are twoother optional locations
that offer incredible
rewards for those who can
meet their challenges.
We'll explore those next.
The Secrets of the
Huge MateriaIrjy~-Afrjy^ You spend hours risking lifei i and limb to recover these
^t^jKL.jrg^^^^z^y^KQ Huge Materia, and all they
"^^S'^I^^Sp^^^^R' '' seem to ^°
'
s s '1 aroun£l an<l'!WtMK^^"'' shimmer. While they don't
yt#H<tm-}ftm
'
' really come into play in any~ "nWfc " V major way storyline-wise,
each Huge Materia has within it a normal sized Materia of
incredible power. If you examine the blue one, for example,
and currently possess both Bahamut call spells, you'll get the
third and final Bahamut call spell, a nasty little call spell
called Bahamut ZERO.And if you think that's cool, wait 'til you see what the other
three Materia do! These "Master" series Materia allow you to
cast just about every single spell in that Materia type (green,
yellow, or red) with no handicaps, and only one Materia slot!
Imagine having every call spell at your disposal without any
HP loss! But there is one tiny little catch... To get them youhave to have every applicable spell at the Master level, mak-ing them nearly impossible for the casual gamer to get. But if
you've been using the double — ^ t—^a-^.•
AP armor and rotating your
Master Magic(Green Materia)
Fire
Ice
Lightning
Eajth
RestoreHeal
ReviveFull CarePoisonGravity
TransformTime
Barrier
DestructMystify
Bkit
Shield
SealCometContainUltima
Master Summon(Red Materia)
Chocd/MogShivaIfreet
RamuTitan
OdinLeviathan
BahamutKujata
AlexanderPhoenix
Bahamut NeoBahamut ZERO
HadesTupon
Knights of the
Round
Master Command(Yellow Materia)
SenseMorphThrow-
ManipulateSteal'
DeathblowMimic
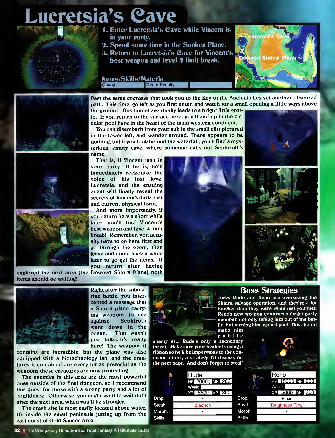
Lucretsia's Cave-± T '
y. I . Enter Lucretsia's Gave while Vincent is~
in your party.
2. Spend some time in the Sunken Plane.
3. Return to Lucretsia's Cave for Vincent's
best weapon and level 4 limit break.
Items/Skills/Materia
Past the same crevasse that took you to the Key of the Ancients lies yet another obscured
path. This time, go left as you first enter, and watch for a small opening a little ways above
the ground. This tunnel eventually leads to a bright little grot-
to. If you return to the surface here, you'll end up in the cir-
cular pool here in the heart of the main western continent.
You can disembark from your sub in the small cliff pictured I
in the lower left, and wander around. There appears to be|
nothing, but if you look behind the waterfall, you'll find a mys-
terious, empty cave, where someone calls out Sephiroth's|
name.That is, if Vincent isn't in
your party. If he is, he'll
immediately reckonize the
voice of his lost love,
Lucretsia, and the ensuing
event will finally reveal the
secrets of Vincent's dark past
]and current physical form.
And more importantly, if
you return here a short while
later, you'll find Vincent's
best weapon and level 4 limit
break! Remember, you actu-
ally have to go here first andgo through the event, then
leave and come back a while
later to go get the items. If
' you return after having
explored the next area (the Downed Shinra Plane) both
items should be waiting!
I Right after the subma-rine battle, you inter-
cepted a message that
a Shinra plane carry-
ing weapons to use
against Sephiroth
went down in the
ocean. That wasn't
just talk... It's really
here! The weapons it
contains are incredible, but the plane was also
equipped with a biotechnology lab, and the crea-
tures it contained are every bit as powerful as the
weapons those creatures are now protecting.
The enemies in this area are the most powerful
ones outside of the final dungeon, so I recommendthis quest for those with a strong party and a lot of
confidence. Otherwise, you might want to wait until
after the next area, when you'll be stronger.
The crash site is most easily located above water.
It's inside the small peninsula jutting up from the
east coast of Gold Saucer Area.
enemythreat,
ribbon s
fusion <
the nexl
82 « The Completely Unauthorized Final Fantasy VII Ultimate Guide

rf
—MHeaven's Cloud Escort Guard
Conformer Megalixer (x 2) Spirit Lance
Highwind Outsider
The enemies here are I
incredibly brutal, so you'll
need to be at your strategic
best. Luckily, you've picked
up a few items that can makej
this part significantly easier.
One is the Ribbon. This|
king of all accessories protects you from all enemy condi-
tions. Since this area's two strongest enemies both use con-
ditional magic (one uses confuse the other poison), your
Ribbons will allow you to make two of your characters (if
you have both Ribbons) immune to the worst of their
attacks. These characters should also be the ones holding
heal, treat, and revive magics, so they can save whoever's left
without one.
Equally valuable is the Gravity materia. It hasn't been too
useful up to this point, but now that you're facing enemieswith over 10,000 HP, a well timed blast from this materia is
your most powerful source of damage.Oh, and note the wide variety of armor you can steal from
these guys. It's difficult, but if you take the risk, you can get
some pretty nice stuff-
As you explore, take care not to miss the Hades materia
hidden near the helicopter in the cargo room, and the
Double Cut Materia (an incredibly useful tool!) hidden in the
corners of the lower level of the laboratory. It's possible to
miss the laboratory entirely if you don't recognize the doorin the main corridor... It's not very well marked. The items
here include Yuffie's best weapon, the best armor in the
game (in my opinion), and a new Cloud Weapon.
IEvil Rap
mini) p 12o~
Dazers
Ink
Luck Source
|PudoleaHill II I IfllJ WK)
"00 B3 7o"
X-Potion
Turbo Ether
Speed Source
|Serpentha 14000 Eg 555l||p| Wind
M 141 ii i HJ A)
Dragon Scales. Stardust
Water Ring
Mind Source
lUnknown 1
mil in \M Ho I
Celestial Curtain
Fire Armlet
Power Source
lUnknown 213000 rcami"inn MJ
|
Lunar Curtain
Aurora Armlet
Guard Source
lUnknown 3isoiii) MJ ihp I
%i ii i MJ yoTjl
Holy Torch
Bolt Armlet
gic Source
The Completely Unauthorized Pinal Fantasy VII Ultimate Guide » 83
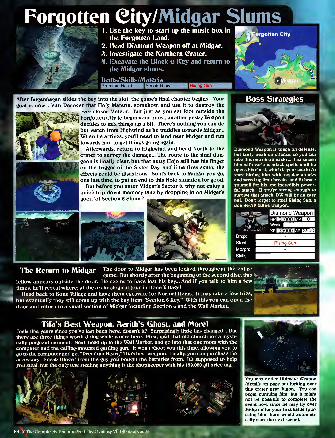
Forgotten City/Midgar Slums1 . Use the key to start up the music box in
the Forgotten Land.
2. Head Diamond Weapon off at Midgar.
3. Investigate the Northern Crater.
4. Excavate the Block 6 Key and return to
the Midgar slums.
Items/Skills/Materia
After Bugenhagen slides the bey into the slot, the game's final chapter begins. Your
goal is now clear: Recover that Holy Materia, somehow, and use it to destroy the
ever-closer Meteor. But just as you set foot outside the
jForgotten City to begin your quest, another pesky Weapondecides to mix things up a bit. There's nothing you can do
i but watch from Highwind as he waddles towards Midgar...
; When he arrives, you'll need to land near Midgar and run
jtowards him to get things going again.
Afterwards, return to Highwind and head North to the
crater to survey the damage... The route to the final dun-
geon is finally clear, but that nutty Hojo still has his finger
on the trigger of the Sister Ray, and if he fires again, the' effects could be disastrous. So it's back to Midgar you go,
i
one last time, to put an end to this Hojo situation for good.
But before you enter Midgar's Sector 8, why not enjoy a
I quick trip down memory lane by dropping in on Midgar's
good 'ol Section 6 Slums?
Boss Strategies
Diamond Weapon is tough on defense,
but fairly weak on offense, so you can
take this one nice and stow. Just smashhim with various attack spells until heopens his chest, which is your cue to A)
start hitting him with regular attacks
and saved up limit breaks, and B) brace
yourself for his one incredibly power-ful attack. If you're strong enough to
survive that attack, DW will be an easy
kill. Don't forget to steal Rising Sun, a
double-AP Yuffie weapon.
,3* GEBEBEEEpnTW^H HPKIBIflllMP«WTjU. *>^^ Weak: ^^^H
• xp BBSSIIap gang
1The RetUm tO MidQar The door to MidSar nas Deen !ocked throughout the entire
game. But shortly after the beginning of the second disc, this v
fellow appears outside the door. He seems to have lost his key... And if you talk to him a few ~g-*Ji
times, he'll reveal where: at the archeological tour in Bone Village! • _I lead back (d Bone Village and have them excavate for Normal Items. It may take a few tries, mJjgJNk
but eventually they will come up with the key item "Section 6 Key." With this you can open the
door and return to a small section of Midgar including Section 6 and the Wall Market.
You may notice Ultimate Weapon(details on page 90) lurking over
this crater near Junon. You canbegin pursuing him, but it might
not be possible to complete the
event now, since he may fly over
Midgar after your first battle (pur-
suing him there would automati-
cally start the next scene).
Tifa's Best Weapon, Aerith's Ghost, and More!Feels like years since you've last been here, doesn't it? Surprisingly little has changed... But
there are three things worth doing while you're here. First, visit that old church for a mysti-
cally poignant moment. Next, head up to the Wall Market, and go into that one room with the
computer and the ceiling-mounted gattling gun. It won't shoot you this time, allowing you to
go to the computer and get "Premium Heart," Tifa's best weapon. Finally, you can purchase the
accessory "Sneak Glove" from the guy you bought the batteries from. It's supposed to help
you steal, but the only one stealing anything is the shopkeeper with his 129,000 gil price tag.
1Msmi .* mi lily *
84 if The Completely Unauthorized Final Fantasy VII Ultimate Guide
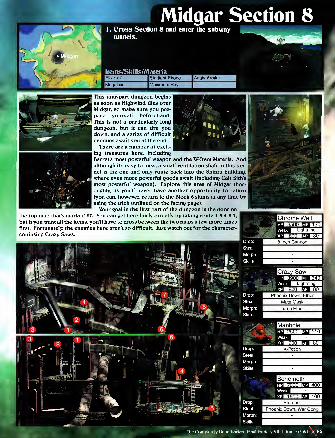
v.
4jt
m
Midgar Section 8I . Cross Section 8 and enter the subway
tunnels.
Items/Skills/Materia
This four-part dungeon begins I
as soon as Highwind flies over
Midgar, so make sure you pre-
1
pare yourself beforehand.
This is not a particularly long I
dungeon, but it can tire you I
down, and a series of difficult|
enemies await you at the end.
There are a number of excit-
ing treasures here, including
Barret's most powerful weapon and the W-Item Materia. Andalthough it's easy to miss, a small ventilation shaft in this tun-
nel is the one and only route bach into the Shinra building,
where even more powerful goods await (including Cait Sith's
most powerful weapon). Explore this area of Midgar thor-
oughly, as you'll never have another opportunity to return
(you can, however, return to the Block 6 slums at any time byusing the trick outlined on the facing page).
Your goal in the first part of the dungeon is the door onYou can get here fairly directly by taking route 1-3-4-6-7,the top map that's marked #7
but if you want all the items, you'll have to cross between the two maps a few more times
first. Fortunately, the enemies here aren't so difficult. Just watch out for the character-
confusing Crazy Saws.
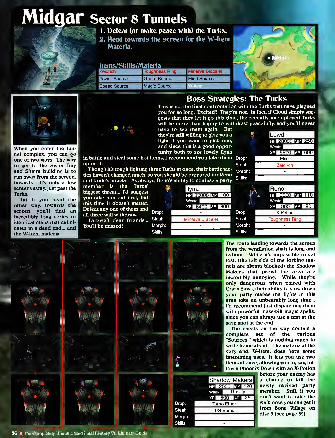
Mldaar Sector S Tunnels1 . Defeat (or make peace with) the Turks.
2. Head towards the screen for the W-ltemMateria.
Items/Skills/Materia
When you enter the tun-
nel complex, you can goone of two ways. The wayto get to the Sister Rayand Shinra building is to
run away from the screen,
inwards. It's only a fewscreens away, just past the
Turks.
But if you head the
other way, towards the
screen, you'll find anincredibly long series of
identical maps that culmi-
nates in a dead end... andthe W-Item materia.
Boss Strategies:This is it... the final confrontation with
you for so long. Excited? They're not.
gests that they let it go this time, the
will be more than happy to withdrawAA have to see them again. But
they're still willing to give you a
fight if you want to pick one,
and since this is a good oppor-tunity both to see lovely Ilyna
in battle and steal some hot items, I recommend you take them Drop:
"P on it. Steal:
Though it's tough fighting three Turks at once, their battle tac-Morpn
tics haven't changed much, so you should be prepared for Renoand Rude's attacks. As always, Reno's ability to confuse a party
member is the Turks'|j ffiTTVI
biggest threat... I'd suggest ^sKSSHSiyou take him out first, but HPKfiflfiaMPHflfl
this time it doesn't matter. _ J^^^^^^^Defeat any one ot them and _J^SiS nall three will withdraw.
Drop- ^M^^^W °p -
Farewell dear friends... steal: BBCjE^TH - .' ' 'MMI steal:
You'll be missed! Morph:| |
Morph
The Turksthe Turks that have plaguedIn fact, if Cloud simply sug-
recently unemployed Turks
peacefully, and you'll never
Weak:
xp Bannaap Ksifl
Weak: EHHHxpHHap
The route leading towards the screen
from the ventilation shaft is long andtedious. While it's impossible to get
lost, (the left side of the forking tun-
nels are always blocked) the ShadowMakers that prowl the area are
incredibly annoying. While they're
only dangerous when paired with
Crazy Saws, their ability to slow downyour party makes the fights in this
area take an unbearably long time...
I'd recommend just dispatching themwith powerful mass-kill magic spells,
since you can always use a tent at the
save spot at the end.
The chests on the way contain a
complete set of the various
"Sources," which is nothing much to
write home about. The materia at the
very end, W-Item, does have someinteresting uses. It lets you use twoitems at once, allowing you to, say, fol-
low a Phoenix Down with an X-Potion
before your enemy has
a chance to kill the
newly revived party
member. Still, if youdon't want to take the
walk now, you can get it
from Bone Village ondisc 3 (see page 89).
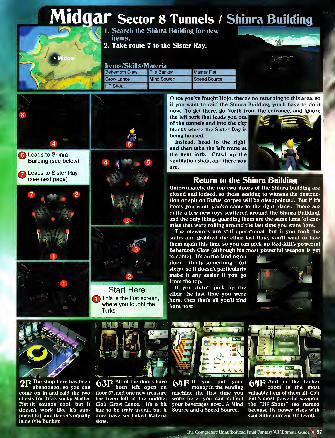
Midqar Sector 8 Tunnels / Shinra Building
@ Leads to Shinra
I Building (see below)
0% Leads to Sister Ray(see next page)
1 . Search the Shinra Building for newitems.
2. Take route 7 to the Sister Ray.
Items/Skills/Materia
Start Here^^This is the first screen,
where you fought the
Once you've fought Hojo, there's no returning to this area, so
if you want to raid the Shinra Building, you'll have to do it
now. To get there, go North from the entrance, and ignore
the left fork that leads you out I
of the tunnels and into the city
blocks where the Sister Ray is[
being housed.
Instead, head to the right,
and then take the left route at I
the next forfe. Crawl up the
ventilation shaft, and there you
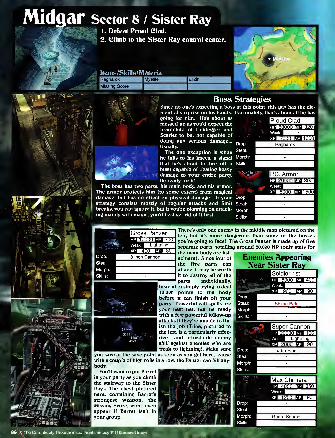
edhere). Since four of
the five parts canattack, it may be worthit to destroy all of the
parts individually,
instead of simply trying to deal
10,000 points to the bodybefore it can finish off yourparty. Powerful call spells are
your best bet, but be readywith a few powerful follow-up
attacks if they're unable to fin-
ish the job (Trine, pictured to
the left, is a particularly effec-
tive and affordable enemyskill against enemies who are
weak to lightning). Make sureyou save at the save point as soon as you get here, 'cause
with a couple of high rolls in a row, the Panzer can kill any-
body.
You'll want to put Barret
in your party as you climb
the stairway to the Sister
Ray... The chest pictured
here, containing Barret's
strongest weapon, the
Missing Score, won't evenappear if Barret isn't in
your group.
There's only one enemy in the middle map pictured on the
left, but it's more dangerous than some of the bossesyou're going to face! The Gross Panzer is made up of five
separate parts, totalling around 20,000 HP (only stats for
the main body are list- .
Enemies AppearingNear Sister Ray
3766 *
58263474
ISoldier 1st
Weak: m^^^lxpKMIap MSiM
1 Steal: Shinra Beta
1 Morph:
1 Skills:'
fflaWK^BSuperCannonHPKfifiHUMPlIflflWeak: SQQiSi^HKHOI
Drop: Turbo Ether
Steal:
Morph:
Skills:
-
HPKfiBHlMPieHfl
1Weak:^H
- xpbhsimap wirnDrop:
1 Steal:
Morph: Guard Source
r Skills:
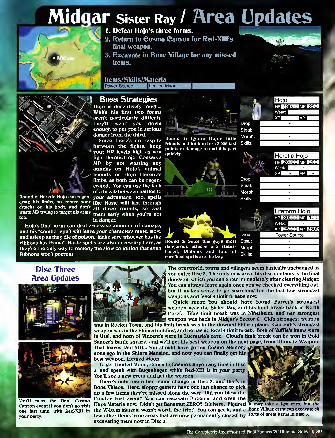
Midqar Sister Ray / Area Updates1 . Defeat Hojo's three forms.
2. Return to Cosmo Canyon for Red-XIII's
final weapon.
3. Excavate in Bone Village for any misseditems.
Items/Skills/Materia
xtm if
^--v ^xx)^ Nil Boss Strategies^PaJ'^S * ' Hojo is deceptively tough...
\ / N. V»x While his first two forms
NX 1^ •/ •.» v ^jm/ aren't particularly difficult,
"N, >, ^dffisSr 'S they'll wear you down*"
, \ \jC ^ /§2r enough to put you in serious
Y\v" '^V\/\ ^ danger from the third.
; 40?c:-\ Since there's no respite
S^/N. SN between the fights, keep»X> •. X *.V *r •
yDur up levels high as yousi fight Heretic Hojo. Conserve'ji MP by not wasting any
i jr , attacks on Hojo's animal
jpjL.^ friends or Hojo Heretic's
v limbs, as both can be regen-
t \ erated. Vou can use the lack
/ * Sttkl. of a break between battles to
Round 2: Heretic Hojo can regen- your advantage, too: spellserate his limbs, so center your Iibe Haste wifl |ast throughattacks on his body, and don't
alI three rounds, SO castwaste MP trying to target his arms
h , wh ,
too. . «in danger.
Hojo's final form can deal excessive amounts of damage,and his "combo" spell will leave your characters mute, slow,
and asleep as they die of poison. Make sure whoever has the
ribbons has Esuna! Haste spells are also necessary here, as
they're the only way to remedy the slow condition that evenRibbons won't prevent.
itj\j\- •
'
.
4" Drop*
^^Sjjf'^^^^mlii^ Steal:
Round 1: Ignore Hojo's littleMorPh
friends and hit him for 13.000 fast Skills:
points of damage to end this part
quickly. \V
L
HPici»i«aiMPK3gWeak:
Weak: ^^^^H
Round 3: Since this guy's most Steal:
dangerous attacks are status- Morph:based, Ribbons and lots of
gj^ug.cure/heal spells are the key.
Weak: ^^^^^^H.xpKSSSIap nwmi
Disc ThreeArea Updates
You'll miss the final CosmoCanyon event if you don't go visit
one last time, with Red-XIII in
your party.
The overworld, towns and villagers seem basically unchanged as
you enter Disc 3. The only new area this disc contains is the final
dungeon, which you can enter immediately after clearing Midgar.
You can always leave again once you've checked everything out,
but it makes sense to go searching for the last few strongest
weapons and level 4 limit breaks now.
Quick recap: You should have found Barret's strongest
weapon near the Sister Ray, and his limit break back in North
Corel. Tifa's limit break was in Nibelheim, and her strongest
weapon was back in Midgar's Sector 6. Cid's strongest weaponwas in Rocket Town, and his limit break was in the downed Shinra plane. Cait Sith's strongest
weapon was in the Shinra building, and he has no level 4 limit break. Both of YufHe's items werein Utai, and both of Vincent's were in Lucretsia's cave. Cloud's limit break can be won in GoldSaucer's battle square, and we'll get his best weapon on the next page, from Ultimate Weapon.That leaves Red-XIII... You should have gotten Cosmo Memory M^jfCSX\^^^^S9Bt^deons ago in the Shinra Mansion, and now you can finally get his fFWsS^tkS^^^^^rT 1
best weapon, Limited Moon. » * •»
To get Limited Moon, return to Cosmo Canyon any time in Disc1
3, and speak with Bugenhagen while Red-XIII is in your party.|
You'll see a new event and get the weapon.There's only one other major change in Disc 3, and that's in I
Bone Village. Here, sloppy gamers have one last chance to pick
up a few items they've missed along the way. Did you blow the
Condor Fort event? You can excavate Phoenix, and even the|
Huge Materia now. Didn't get Bahamut ZERO? It's here. Figured It may take a few tries, but the
the W-Item Materia wasn't worth the trip? You can get it, and a Bone Village crew can excavate all
few other items from areas that are now permanently closed, by sorts of great items in disc 3.
excavating them now in Disc 3.
Unauthorized Final Fantasy VII Ultimate Guide X 89
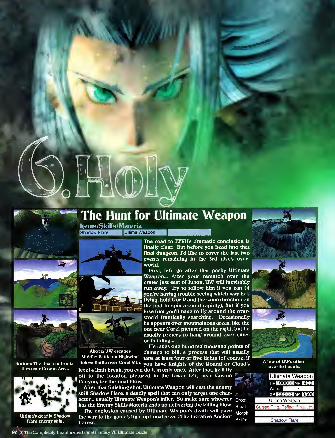
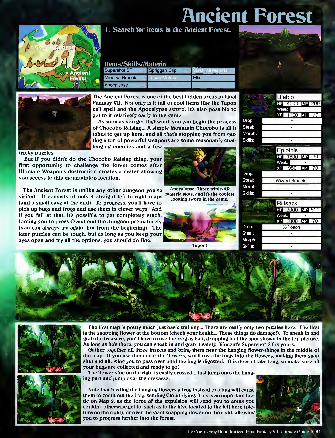
Ancient ForestI. Search for items in the Ancient Forest.
Items/Skills/MateriaSupershot ST
Minerva Bracelet
Apocalypse
Spriggan Clip
Elixir
I The Ancient Forest is one of the best hidden areas in Final
Fantasy VII. Not only is it full of cool items like the Tuponcall spell and the Apocalypse sword, it's also possible to
I
get to it relatively early in the game.As soon as you get Highrwind, you can begin the process
I of Chocobo Raising... A simple Mountain Chocobo is all it
tabes to get up here, and all that's stopping you from get-
ting a ton of powerful weapons are some reasonably chal-
j
lenging enemies and a fewtricby puzzles.
But if you didn't do the Chocobo Raising thing, yourfirst opportunity to challenge the forest comes after
Ultimate Weapon's destruction creates a crater allowing
you access to this mountaintop location.
The Ancient Forest is unlike any other dungeon you've
visited. It consists of only 4 straight left-to-right maps(and a small cave at the end). To progress, you'll have to
picb up bugs and frogs and use them in clever ways. Andif you fail at that, it's possible to get completely stucb,
forcing you to press O and end the dungeon prematurely
(you can always try again, but from the beginning). Thelater puzzles can be tough, but as long as you beep youreyes open and try all the options, you should do fine.
Apocalypse: Three triple-AP
materia slots, and it's the coolest
looking sword in the game.
Tupon!
E&RiH n i o h 1 n 1
1a^C
|J[34000 JTT3 ^oo 1
->.m 1 --
Drop:
Steal:
Morph:
Skills:
. ... f v ^HEpiolnis |
HMjldlHiin l!,lJ mi 1
PL. MJ /II EDrop:
Steal: Wizard Bracelet *
. Morph:
Skills:
SHI HRilfsack 1
' *jy_^ )|),, bo°1
I S, 3 10UU fJJ /u I
Drop: X-Potionj
Steal:
Morph:
Skills:
* MS
The first map is pretty much just basic training... There are really only two puzzles here. The first
is the snapping flower at the bottom (chech your health... These things do damage!). To sneab in andgrab the treasure, you'll have to use the frog as bait, dropping it at the spot shown in the top picture.
As long as he's there, you can sneab in and grab it safely. Vincent's Supershot ST is yours.
Gather together all three insects and bring them near the hanging flower-things in the middle of
the map. If you use them near the flowers, you'll toss the bugs into the flowers, mabing them snapshut and allowing you to pass over until the bug is digested. This doesn't tabe long, so mabe sure all
your bugs are collected and ready to go!
The flower vine on the right is easily crossed... lust jump onto the hang-
ing part and jump over the crevasse.
Note that feeding the hanging flowers a frog instead of a bug will causethem to vomit out the frog, sending Cloud flying. This is an important tac-
tic on Map 2, as the force of the expulsion will send you to areas youcouldn't otherwise get to, such as to the hive located to the left here (pic-
ture on the right), or over the giant snapping flower on the right, allowing
you to progress further into the forest.
The Completely Unauthorized Final Fantasy VII Ultimate Guide
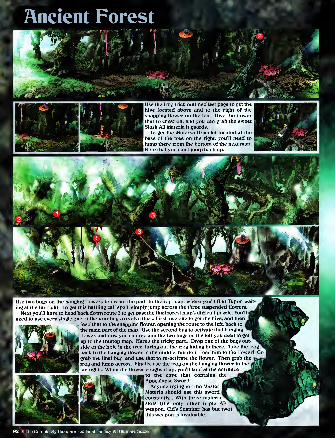
Ancient Forest/'2
Use the frog tricb outlined last page to get the
hive located above and to the right of the
snapping flower on the left. Give the flower
that to chew on, and you can grab the sweet
Slash All Materia it guards.
To get the Minerva Bracelet located at the
base of the tree on the right, you'll need to
jump there from the bottom of the next map.Note that you can't jump bacfe up.
4*
Use two bugs on the hanging flowers to create the path to the top map, where you'll find Tupon wait-
ing at the far right. To get this baffling call spell, simply jump across the three suspended flowers.
Next you'll have to head bach down route 3 to get past the final forest map's difficult puzzle. You'llj
need to use every single one of the four bugs to solve this... First, use one to get the hive, and theni
- feed that to the snapping flower, opening the route to the left, bacfe to
the main part of the map. Use the second bug to activate that hanging'
flower, and now you can reclaim the two bugs on the left you used to get 1
I up to the treetop map. Here's the tricfey part... Drop one of the bugs out-
I side of the hole in the tree, luring out the frog hiding in there. Tafee the frog"1
jback to the hanging flower in the middle, but don't feed him to the flower! Go
j
grab the final bug, and use that to re-activate the flower. Then grab the i
frog and jump across. Finally, use the frog on the hanging flower in the|
I
far right... When the flower coughs it up, you'll land at the entrance
to the cave that contains the
jApocalypse Sword.Anyone trying for the Master
I Materia should use this sword|
!constantly... With three materia
'
slots (the only other triple APweapon, Cid's Scimitar, has but two),
, ., . , J this weapon is invaluable.
. __ Ultimate Guide
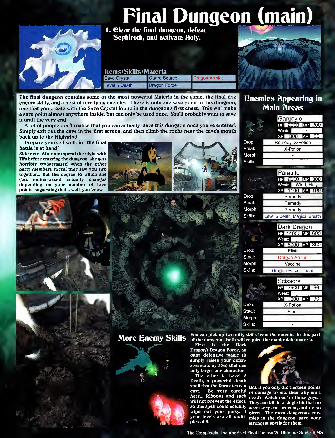
Pinal Dunaeon (main)1 . Clear the final dungeon, defeat
Sephiroth, and activate Holy.
Items/Skills/MateriaI Save Crystal
Level 5 Death
Guard Source
Dragon Force
Dragon Armlet
The final dungeon contains some of the most powerful Materia in the game, the final five
enemy skills, and a host of terrifying enemies. There is only one save point in this dungeon,
one that you create with the Save Crystal found in the dungeon's first chest. This will makea save point almost anywhere inside, but can only be used once. You'll probably want to save
it until the very end.
A lot of people don't realize that you can actually leave this dungeon once you've entered.
Simply exit out the cave in the first screen, and then climb the rocks near the cave's mouthback up to the Highwind.
Prepare yourself well, for the final
battle is at hand!Side note: After you spend the night with
Tifa before entering the dungeon, she gets
horribly embarrassed when the other
party members reveal they saw you twotogether... But the degree to which she
gets embarrassed actually changesdepending on your number of love
points, suggesting that... well, you know.
OM.,
Drop:
Steal:
1
HPMgBSMMPlfljlflWeak: mVBUi S BlPgHOI MI'I
,v. r
HPlEBSSlMPlSflflWeak: ^^H^^HxpH&IiBap KfiBI
Drop:
Steal:
Morph:
Skills:
hp^HMmpHsEIWeak:^^i•r BBMap BUI
Drop:
Steal:
Morph:
Skills:
« ... You can pick up two nifty skills from the enemies in this parti"OrC dlCmy oKIIIS of the dunoeon. Roth will reauire the maninulate materia.
2R
First is the DarkDragon's Dragon Force, anokay defensive magic (it
simply raises your defen-
sive stats by 50%) that canonly target one character.
The other is Level 5
Death, a powerful deathspell that the Parasites can
cast. Be very careful
here... Ribbons and such
will not prevent the effect,
so this spell could actually
wipe out your party, if
your levels are all multi-
ples of 5.
Um, if you only did thirteen points
of damage to me, then why am I
dead? Watch out for these guys...
They can kill in a single hit that noaccessory can prevent, and do so
often. The most dangerous ene-
mies in the dungeon, save yourstrongest spells for them.
The Completely Unauthorized Final Fantasy VII Ultimate Gi
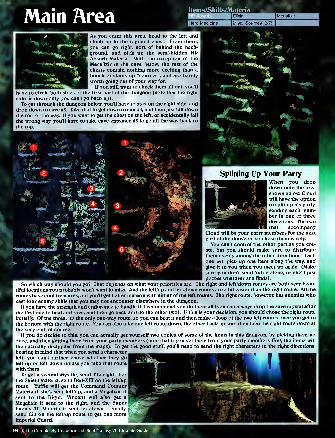
Main AreaItems/Skills/Materia
As you enter this area, head to the left andclimb up to the topmost chest. From there,
you can go right, sort of behind the back-
ground, and pick up the semi-hidden HPAbsorb Materia. With the exception of the
Megalixir in the cave below, the rest of the
chests contain nothing more exciting than a
bunch of status up "sources", and are barely
|
worth going out of your way for.
If you still want to check them all out, you'll[
have to circle both sides of the first part of the dungeon (note that the right|
side is down-only, you can't go back up).
To get through the dungeon below, you'll have to stay on the right side, anddrop down to cave #3. Take that to get down to exit #4, and then just fall down I
the rest of the way. If you want to get the chest on the left, or accidentally fall
the wrong way, you'll have to take cave entrance #5 to go all the way bach to[
the top.
Splitting Up Your PartyI When you dropI down onto the area
shown below, CloudI will have the option
| to split up his party,
£ sending each raera-
\ber in one of three
directions. The twoI that accompany
Cloud will be your party members for the next
part of the dungeon, so chose them wisely.
You can't control the other parties you cre-
ate, but you should make sure to distribute
them evenly among the other directions. Each
one will pick up one item along the way, andgive it to you when you meet up again (Makesure you don't send Yuffie alone, or she'll just
pocket whatever she finds).
i which way should you go? That depends on what your priorities are. The right and left/down routes are both very beau-
tiful locations you probably won't want to miss. And the left/up and left/down routes are a bit easier than the right route. All the
routes have cool treasures, but you'll get better materia with either of the left routes. The right route, however, has enemies whocast four enemy skills that you may not encounter elsewhere in the dungeon.
If you have the strength and endurance to handle it, I recommend you do them all (you can always drop the save crystal after
the first one to heal and save, and then go back and do the other two). If this is your decision, you should chose the right route
initially. Of the three, it's the only one-way route, so you can beat it and then make a loop of the two left routes once you get to
the bottom with the right route. You can also take one left route down, the other back up, and then take the right route down at
the very end, of course.
If you do decide to this, you can actually get yourself two copies of some of the items in this dungeon, by picking them uponce, and then getting them from your party members (note that if you get them from your party members first, the items will
then actually disappear from the maps). To get the good stuff, you'll need to send the right characters in the right directions,
bearing in mind that when you send a characterl
left, you can't further chose whether they goleft up or left down unless you take that route
with them.
To get a second Mystile, send Ufa right. Forthe Shield Materia, send Red-XIII on the left/up
route. Yuffie will get the Command CounterMateria if she's sent left/up, and a Megalixir if
sent to the Right. Vincent will also get a
Megalixir if sent to the right, and the SuperEnemy-All Materia if sent left/down. Finally,
send Cid on the left/up route to get one moreImperial Guard.
94 * The Completely Unauthorized Final Fantasy VII Ultimate Guide
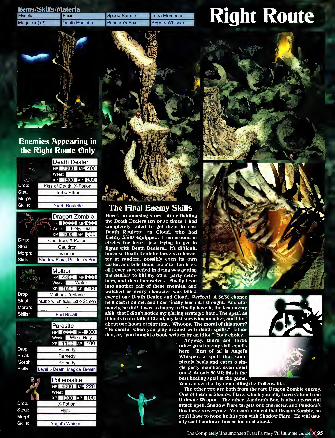
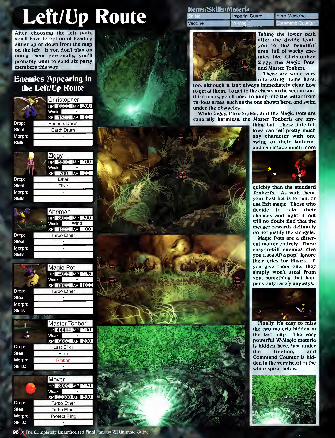
Items/Skills/Materia
After choosing the left path,
you'll have to option of headingeither up or down from the mapon the left. If you don't plan ondoing them personally, you'll
probably want to send six party
members this way.
Enemies Appearing in
the Left/Dp Route
I Taking the lower pathafter the divide leads
you to this beautiful
area, full of wacky ene-
mies like Christopher,
Ziggy, the Magic Pots,
Iand Master Tonberi.
There are some very
I interesting items here,
too, although it isn't always immediately clear howto get at them. To get to the chests in the second andthird maps, you'll need to jump into the water fromvarious areas, such as the one shown here, and swimunder the obstacles.
While Ziggy, Christopher, and the Magic Pots are
generally harmless, the Master Tonberis are any-
thing but. These little fel-
lows can fell pretty muchany character with oneswing of their lanterns,
and can attack much more
quickly than the standard
Tonberi's. As with them,
your best bet is to run, or
use Exit magic. Those whodecide to take their
chances and fight it out
will no doubt find that the
meager rewards definitely
do not justify the struggle.
Magic Pots are a differ-
ent matter entirely. Theseeasy-to-kill enemies give
you 1 ,000 AP a pop! Ignore
their cries for Elixirs... If
you give them one, they
simply won't steal fromyou, something that hap-
pens only rarely anyways.
Mover
Weak: I^^^HHxp KHHSSIap EBIfl
Turbo Ether
Turbo Ether
Protect Rin9.
Finally, it's easy to miss
the two materia hidden in
the last map. The very
powerful W-Magic materia
is hidden here, just underthe treeline, andCommand Counter is hid-
den in the very heart of the
white spiral below.
96 X The Completely Unauthorized
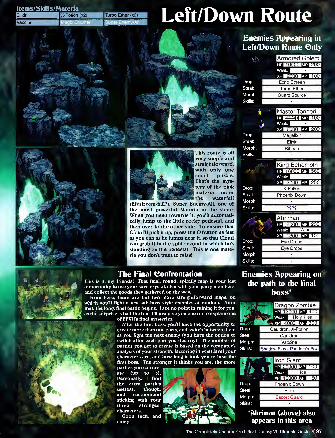
[Elixir |X-Potion (x2) | Turbo Ether (x2)j
|Vaccine 1 1 1
.
I This route is all
very simple and
I
straightforward,
with only onesmall puzzle.
That's the mys-' tery of the pink
j
materia underi the waterfall
(lifestream-fall?), Super Enemy-All, one of
the most powerful Materia in the game.When you head towards it, you'll automati-
cally jump to the little rocky pedestal, andthen over to the other side. To ensure that
Cloud'H pick it up, press the O button as fast
as you can as he jumps near it, so that Cloudcan grab it in the split-second in which he's
standing on the pedestal. This is one mate-
ria you don't want to miss!
|HHj
^Armored Golem 1
Drop: Echo Screenj
Steal: Turbo Ether i
Morph: Guard Source'
Skills:
i-#M Master Tonberi f
|P--.fS fi()l)(lfj||
'AH) 1
Drop: Megalixir[j
Steal: Elixir|
Morph: Ribbon J
Skills:
ByP^','--=yBKing Behemoth |HPBUBBIjlMPliHflWeak: ^^P^^H
Drop: X-Potion
Steal: Phoenix DownMorph:
Skills: ???? ;
(P^Ahriman
smKUM w mm) IVJ vim PwBKmSM Wind
V i£?MTT.Mm MB Hod 1
Drop: Eye Drops
Steal: Eye Drops j
Morph:
Skills:
ppeanng on
o the final
| Dragon Zombie
paiB Holy, Heal
Cauldron
Vaccine
I Shadow Flare, Pandora's Box
I Iron GiantI vihhiii L'|IJ tool
inonn MJ H kt )
|
Phoenix Down
Elixir
Escort Guard
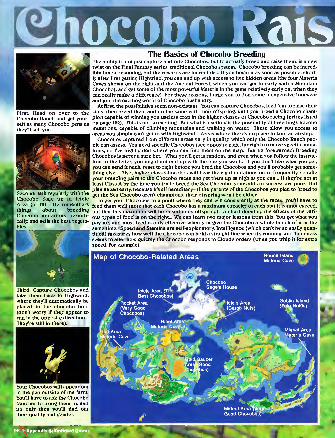
ocobo Rais
First: Head on over to the
Chocobo Ranch and get your-
self as many Chocobo pens as
they'll sell you.
Second: Talk regularly with the
Chocobo Sage up in Icicle
Area (p. 73). He remembersthings about breedingChocobo mutations periodi-
cally, and sells the best vegeta-
bles.
The Basics of Chocobo BreedingThe ability to not just capture and ride Chocobos, but to actually breed and raise them, is a newtwist on the Final Fantasy series' traditional Chocobo system. Chocobo breeding can be incred-
ibly time-consuming, but the rewards are incredible... If you begin it as soon as possible, short-
ly after first getting Highwind, you can end up with access to five hidden areas (the four Materia
Caves shown on the right and the Ancient Forest, which you can get to early with a MountainChocobo), and get some of the most powerful Materia in the game relatively early on, when they
can really make a difference! For these reasons, I urge you to don some inexpensive footwear
and join the exciting world of Chocobo husbandry.
At first, the possibilities seem non-existant. You can capture Chocobos, feed 'em to raise their
stats, then breed them and do the same with their offspring, until you breed a Chocobo cham-pion capable of winning you useless crap in the higher classes of Chocobo racing (prizes listed
on page 102). This is not so exciting. But what is exciting is the possibility of breeding Chocobomutations, capable of climbing mountains and walking on water. These allow you access to
areas you simply can't get to with Highwind... Areas where there's no place to land an airship.
Chocobos captured from different areas vary in quality, which only the Chocobo Ranch peo-
ple can assess. You need specific Chocobos (see opposite page, far right) to make specific muta-tions, so I've highlighted where you can find them on the map. But be forewarned: BreedingChocobos is never a sure bet. What you'll get is random, and even when you follow the instruc-
tion to the letter, you might not end up with the one you want... If you don't like what you get,
you can send it back: reset to right before you bred the Chocobos and you'll probably get some-thing else. Also, higher class Chocobos will bear the right mutations more frequently, so take
your breeding pairs to the Chocobo races and get them up as high as you can... If they're not at
least Class A by the time you try to breed the Sea Chocobo, your odds of success are poor. But
plan ahead early, because it's all hereditary- If the parents of the Chocobos you plan to breed to
get the Sea Chocobo aren't champions, their offspring won't be either.
To get your Chocobos to a point where they can win consistently at the races, you'll have to
feed them well (note that each Chocobo has a maximum capacity of each stat it cannot exceed,
but that this maximum will be raised in its offspring). A chart detailing the effects of the vari-
ous types of food is on the right... We can learn two major lessons from this: You get what youpay for, and most feed is only effective when you give the Chocobo a whole bunch of it at the
same time. Speed and Stamina are self-explanatory, Intelligence (which can't be so easily quan-
tified) measures how well the Chocobo can hold a straight-line when it's running, and Tamenessseems to alter how quickly the Chocobo responds to Cloud's orders (when you whip it for extra
speed, for example).
Map of Chocobo-Related Areas Round Island
Materia Cave
Third: Capture Chocobos andtake them back to Highwind,
where they'll automatically beplaced in the chocobo hold
(don't worry if they appear to
run in the opposite direction...
They're still in there).
Goblin Island
(Zeio NutOs)
Your Chocobos will appear outin the pen outside of the farm.
You'll have to ask the ChocoboRancher to bring them in, andit's only then you'll find out
their quality and gender.
98 • Appendix A: Optional Quests
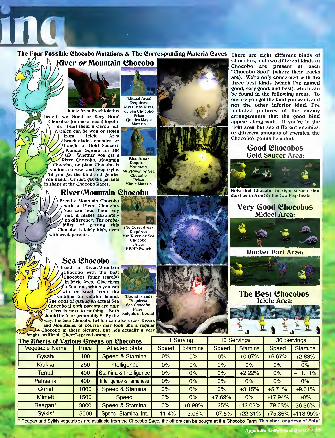
The Four Possible Chocobo Mutations & The Corresponding Materia Caves there are eight different binds of
fiver or Mountain Chocobo
Icicle Area Brachioladus.
Breed two Good or Very GoodChocobos (or one of each) togeth-
er. Feed them a Carob nut,
which can be won or stolen
from Icicle AreaBrachioladus enemies, or
bought at Gold Saucer's
Wonder Square for 500GP. Whether you get a
River Chocobo, MountainChocobo, or plain Chocobo is
random, so reset and keep trying
'til you get the bind and genderyou need... Or just, get the parentsin shape at the Chocobo Races.
(Mideel Area)
Requires:River, Mtn/River.
or Sea ChocoboPrize:
Quadra MagicMateria
(Utai Area)Requires:
Mountain,Mtn/River, or Sea
ChocoboPrize:
Mimic Materia
River/Mountain ChocoboiBreed a Mountain Chocobo
i with a River Chocobo.I You can feed them anynut, it makes absolutely
' no difference. The proba-bility of getting this
Chocobo is fairly high, even1 with weak parents.
(No.Corel Area)
Requires:Mtn/River, or Sea
ChocoboPrize:
MP/HP Switch
Sea £hocobo\ Breed a River/Mountain
aChocobo with the Best/Chocobos, found (rarely)
in Icicle Area. Give them1 a Zeio nut, which you can'win or steal from the
'Goblins on Goblin Island.
1 The odds of getting an actual Sea/ Chocobo if both parents are only
'C class is next to nothing... Bothr , >t
,
J should be A, or preferably S. By thenl*
s ° oun
^way, the Sea Chocobo (which can also cross Riversand Mountains, of course) may look like a regular
» Chocobo in these pictures, but he's actually a very'bright, artificial "Cheez"-spread orange.
The Effects of Various Greens on Chocobos
(Round Island)
Requires:
Sea ChocoboPrize:
Chocobos, and two different binds of
Chocobo are present at each"Chocobo Spot" (where their tracks
are). We're only concerned with the
three best kinds (which I've namedgood, very good, and best), which canbe found in the following areas. Toensure you get the hind you want, andnot the other inferior hind, I've
included pictures of the enemyarrangements that the good hindappear along with. If you're in the
right area but see different enemies,or different amounts of enemies, the
Chocobo's gonna be a dud.
Good ChocobosGold Saucer Area:
I Note that Chocobo in right screen shotmust be in front of the two Flap Beats.
Very Good ChocobosMideel Area:
w -. _ ._ : . ,
Rocket Port Area:
The Best ChocobosIcicle Area:
1 Serving 10 Servings 30 Servings
Vegetable Name Price Affected Stats Speed Stamina Speed Stamina Speed Stamina
Gysahl 100 Speed & Stamina 0% 0% 0% +0.07% +6.67% +2.83%
Krakka 250 Intelligence 0% 0% 0% 0% 0% 0%Tantal 400 Stamina & Intelligence 0% 0% 0% +2.22% 0% +11.11%
Pahsana 400 Intelligence STameness 0% 0% 0% 0% 0% 0%Curiel 1000 Speed & Stamina 0% 0% 0% +3.15% +5.71% +9.01%
Mimett 1500 Speed 0% 0% +7.69% 0% 1-17.94% +0%Reagan* 3000 Speed & Stamina 0% +0.98% +25% +12.02% +79.03% 36.36%
Sylkis* 5000 Speed, Stamina, Int. +1 1 .4% +3.06% +67.5% +22.31% +75.86% +118.95%* Reagan and Sylkis vegetables are available from the Chocobo Sage, the others can be bought at the Chocobo Farm. This chart courtesy of Entu!
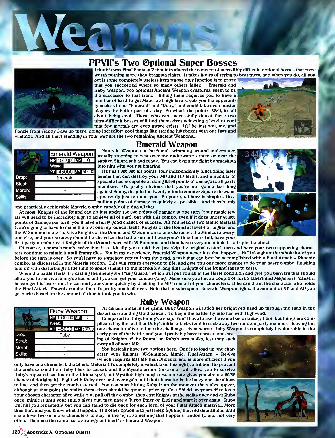
FFYIPs Two Optional Super Bosses[ think it was Final Fantasy V that introduced the concept of incredibly difficult, optional bosses that were
I worth nothing more than bragging rights. It takes hours of trying to beat them, and when you do, all youI get is some completely useless item whose only function is to prove1 that you succeeded where so many others failed. Emerald andRuby Weapon, two optional Ancient Weapon creatures, seem to be
the successor to that trend. Killing them requires you to have a
number of hard-to-get Materia at high levels, gets you the apparent-
ly useless items "Emerald" and "Ruby," and could take even master
players the better part of a day. So what's the point? Well, it's all
about being cool. Those who can successfully defeat these twoultra-difficult bosses will find themselves achieving a level of cool _
|that few mortals are even aware exists. It'll be just you, me, and
Fonzie from Happy Days up there, doing incredibly cool things like starting jukeboxes with our fists andwhatnot. And all that's standing in your way are the two remaining Ancient Weapons...
Emerald WeaponEmerald Weapon can be found swimming around underwater,
usually stopping to rest over the underwater crater, or near the
sunken Shinra sub and plane. You can begin the fight by smashinginto him with your submarine.
He has 1,000,000 hit points, four independently functioning laser
beams that can destroy your MP and HP levels, and a number of
special attacks capable of doing 9,999 points of damage to all party
members. It's pretty obvious that you're not gonna last long
against Emmy, despite the twenty minute counter Square threw in,
apparently just to taunt you. So your goal here is simple... Do a
million points of damage as quickly as possible. And there's only
one practically achievable Materia combo capable of doing all that...
At most. Knights of the Round can do just under 130,000 points of damage in one turn (your magic lev-
els will need to be incredibly high to achieve all of that), but with this combo, even if it does under 80,000
points of damage per turn, you'll have a fairly good chance of success. All you need is two Mimic Materia
(you're going to have to make the first one reproduce itself), Knights of the Round at level 4 or higher, andthe W-Summon materia. Give Knights of the Round and W-Summon to one character, the Mimics to every-
one else, and your strategy should be clear: Let the battle run until everyone's time bar is full, have your
first party member cast Knights of the Round twice with W-Summon, and then have everyone mimic it to triple the effect.
Of course, it sounds much easier than it is. Ideally, you could then just skip the original caster's turn and have your two supporting charac-
ters continue to mimic it until Emmy dies. But in my experience. Emerald Weapon never lets that happen... He'll slaughter the whole lot of youbefore the turn is over. So you'll have to somehow return from the dead, a task that can best be accomplished with a Final Attack + Phoenix
combo, as discussed in the Materia section. This will return everyone to life, and give you one more chance to do your nasty combo, finishing
him off with disturbingly little time to spare (thanks to the incredibly long time Knights of the Round takes to cast).
When the battle starts, try casting the enemy skill "Big Guard," which will put you all in the Haste condition and give you barriers that should
allow you to survive Emmy's attacks until you can get your combo going. Make sure you have a couple of Turbo Ethers and Megalixirs, 'cause if
he can get his lasers out, he can end your game quickly by draining the MP from all of your characters. If he can drain the character who holds
the Final Attack+Phoenix combo, then it's pretty much all over. Note that in subsequent Emerald Weapon fights, the amount of XP and AP youget varies based on the amount of time it took you to win.
Ruby WeaponAt certain times in the game. Ruby Weapon will stick her bright red head up through the sand in the
|desert surrounding Gold Saucer. To begin the battle, fly into her with Highwind.
Compared to Ruby, Emmy's a snap. You'll have to use the same basic strategy here, but things are com-I plicated by the fact that Ruby's initial attacks tend to suck away two random party members, leaving but
one character alive to face the challenge. Even worse, Ruby Weapon is completely invulnerable in the
early part of the battle, and you'll probably have to waste one cast-
ing of Knights of the Round on Ruby's arm stalks, lest they suckaway all of your MP.
You basically have two options here. One is to load up one char-
acter with Knights, W-Summon, Mimic, Final Attack + Revive
(which requires less MP than Phoenix, and is more efficient if youonly have one character), the Shield Materia (it's completely invaluable on this fight), a Ribbon (to preventthe confuse condition Ruby likes to cause), and the Mystile armor (no armor will allow you to survive
Ruby's repeated casting of the Ultima spell, but Mystile's high magic evasion rate gives you about a 50/50
chance of dodging it). Fight with Ruby over and over again until that character is the lucky one she allows
to live, and then get the combo started. You can start hitting Ruby from the moment the stalks appear,
although at that point the stalks themselves should be your #1 priority. Cast Shield on yourself to keepyour chosen character alive while you pull off the combo, then cast Knights at the stalks once and at Rubyonce, mimic it until your shield gives out, then have a Turbo Ether or Elixir and start it over again. Rubywill kill you repeatedly, but you can stand to die once for each level of your Final Attack materia... Morethan that, and you know what'll happen. The other option is to just keep fighting that red data animal until
she allows two or more characters to stay in the fight, something that happens randomly, and not very
often. Then use the same basic strategy outlined for Emerald Weapon.
1 00 Appendix A: Optional Quests
i
. *.f HPiBIIIIIimiIMP•Dim Weak: ^H^^^H
xPBHHSIflAP H!I!l!lfl
Drop: Ruby
Steal:
Morph:
Skills:
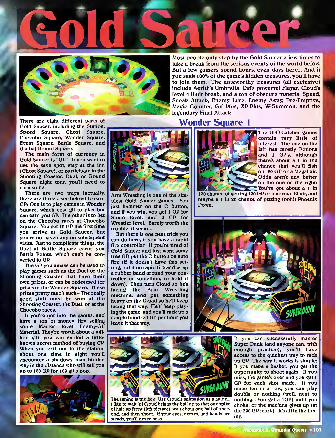
Most people only stop by the Gold Saucer a few times to
take a break from the serious events of the world below.
But a few gamers spend hours, even days here... And if
you seek 100% of the game's hidden treasures, you'll haveto join them. The noteworthy treasures (all exclusive)
include Aerith's Umbrella, Cid's powerful Flayer, Cloud's
level 4 limit break, and a ton of obscure materia: Speed,Sneak Attach, Enemy Lure, Enemy Away, Pre-Emptive,
Magic Counter, Gil Plus, XP Plus, W-Summon, and the
legendary Final Attach.
There are eight different parts of
Gold Saucer, including the Station,
Speed Square, Ghost Square,Chocobo Square, Wonder Square,
Event Square. Battle Square, and(ha ha) Round Square.
The main form of currency in
Gold Saucer is "GP." If you want to
use the save spot, stay at the inn
(Ghost Square), or participate in the
Shooting Coaster, Duel, or RoundSquare night tour, you'll need to
earn some.There are two ways (actually,
there are three... see below) to earn
GP: One is to play games in WonderSquare, which cost gil to play but
can earn you GP. The other is to bet
on the Chocobo races at ChocoboSquare. You get 10 GP the first time
you arrive at Gold Saucer, butyou're not given any on subsequentvisits. Just to complicate things, the
Duel at Battle Square earns youBattle Points, which can't be con-
verted to GP.
The GP you amass can be used to
play games such as the Duel or the
Shooting Coaster that have their
own prizes, or can be redeemed for
prizes in the Wonder Square. Theseprizes pretty much suck- The really
good stuff must be won at the
Shooting Coaster, the Duel, or at the
Chocobo races.
If you're not into the games, andhave a ton of money (try selling
some Master level Enemy-AllMaterial. They're worth about a mil-
lion gil), you can exploit a little-
fenown secret method of buying GP.
When you exit out to the station,
about one time in eight you'll
encounter a shadowy man hiddenway in the distance who will sell youup to 100 GP for 100 gil a pop.
Wonder Square 1
Arm Wrestling is one of the sim-
plest Gold Saucer games. Youjust hammer on the O button,
and if you win, you get 1 GP for
Sumo level, and 2 GP for
Wrestler level. Barely worth the
trouble, it seems.But there is one neat trick you
can do here, if you have a rapid
fire controller. If you're tired of
Gold Saucer and just want somefree GP, put the O button on auto
fire (if it doesn't have this set-
ting, put it on rapid fire and wrapa rubber band around your con-
troller or something to hold it
down). Then turn Cloud so he's
facing the Arm Wrestlingmachine, and put somethingheavy on the D-pad so he'll keepfacing that way. He'll keep play-
ing the game, and you'll rack up a
couple hundred GP per hour youleave it that way.
The UFO Catcher gamescontain very little of
interest. The one on the
left has mostly Potions
and 1 GP's, althoughthere's about a 1 in 100
chance that you'll fish
out 80 GP or a Megalixir.
Odds aren't any better
on the one on the right:
You've got about a l in
100 chance of getting 100 GP or a normal Elixir, andmaybe a 1 in 20 chance of getting (ooh!) PhoenixDown.
The timing is the bey. Use Cloud's animation as a guide...
I lihe to wait 'til Cloud brings the ball up to that one spike
of hair up front (left picture), wait about one half of a sec-
ond, and then shoot. If your eyes, nerves, and hands are
steady, you'll never miss.
If you can successfully masterSuper Dunk (and anyone can, with
enough practice), you'll haveaccess to the quickest way to rack
up GP. The way it works is simple:
If you make a basket, you get the
opportunity to shoot again. If youmiss, the game's over and you get 1
GP for each shot made. If youmake ten in a row, you can play
double or nothing (well, next to
nothing... You get a 1GP) until youchoke, or the machine gives up (at
the 300 GP mark). It's all in the tim-
ing.
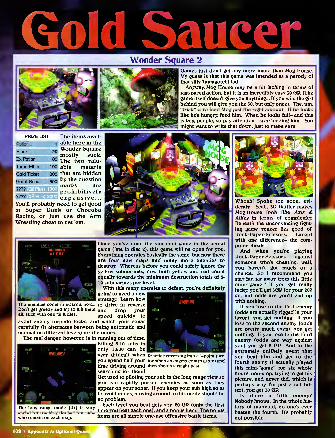
Gold SaucerWonder Square 2
Games just don't get any more inane than Mog House.My guess is that this game was intended as a parody of
that silly Tamagotchi fad.
Anyway, Mog House may be a bit lacking in terms of
fast-paced action, but it is an incredibly easy 30 GP. (Thegame itself doesn't give you anything... If you win, the girl
behind you will give you the 30, but only once). The, um,"trick" is to feed Mog just the right amount. If he looks
like he's hungry, feed him. When he looks full- and this
is key, people, so pay attention- stop feeding him. Youmight want to write that down, just to make sure.
1
20
80
The items avail-
able here in the
Wonder Squaremostly suck.
The two valu-100 able materia
300 that are hidden
500 by the questionmarks areprohibitivelyexpensive...
You'll probably need to get goodat Super Dunk or ChocoboRacing, or just use the ArmWrestling cheat to get 'em.
PRIZE LIST
Potion
Ether
Ex Potion
Turbo Ether
Gold Ticket
Garaf Seed
????
m XP Plus)
/•'
Once you've done the sub mini game in the actual
game (late in disc 2), this game will be open for you.
Everything operates basically the same, but now there
are four new maps and many more enemies to
destroy. Whereas before you could safely ignore the
yellow submarines, now both yellow and red countequally towards the minimum destruction totals of 8-
10 submarines per level.
With this many enemies to defeat, you're definitely
going to need a newstrategy. Learn how
The enemies come in swarms now... to drive in reverseDon't get greedy and try to kill them an(j drop yourall, stick with one til it dies. speed quicbiy to
avoid enemy torpedo locks, and watch your sonarcarefully (it alternates between being automatic andmanual on different levels) for the mines.
The real danger, however, is in running out of time.
Killing 8-10 subs in
only 10:00 can bevery difficult when Practice reversing into a 3-point turnyou spend half your for when an enemy comes at you andtime driving around then shoots straight past,
searching for them!Get used to piloting your sub in the long range view soyou can rapidly pursue enemies as soon as theyappear on your sonar. If you keep your sub high so as
to avoid mines, moving around in this mode should beno problem.
,Each level you beat gets you 20 GP (only the first
The long range mode (Rl) is very . . / . 7 J , . i; .
useful for tracking the last few subst,me y°u be*«
.
each ^ a bonus item The bonus
who remain on each map. items are all simple one-use offensive battle items.
Whoah! Spoke too soon, evi-
dently. Yeah, 3D Battler makesMog House look like Axis &Allies in terms of complexity.
Beneath the unconvincing fight-
ing game veneer lies good ol'
Rock-Paper-Scissors. Exceptwith one difference- the com-puter cheats.
And when you're playingRock-Paper-Scissors against
someone who's cheating, well,
you haven't got much of a
chance. So I recommend youstay far, far away from this little
mini-"game." If you get really
lucky, you'll get 3GP for your 200
gil, but odds are you'll end upwith nothing.
If you lose to the first enemy(odds are actually rigged in yourfavor), you get nothing. If youlose to the second enemy (oddsare pretty much even), you get
nothing. If you lose to the third
enemy (odds are way against
you) you get 3 GP. And in the
extremely unlikely event that
you beat him and get to thefourth enemy (I actually playedthis mini-"game" for six wholehours, non-stop, trying to get his
picture, and never did, which is
perhaps why I'm just a tad bit-
ter), you get 30 GP.
Is there a fifth enemy?Nobody knows. In the whole his-
tory of mankind, no one's everbeaten the fourth. It's probablynot possible.
102 Appendix A: Optional Que;
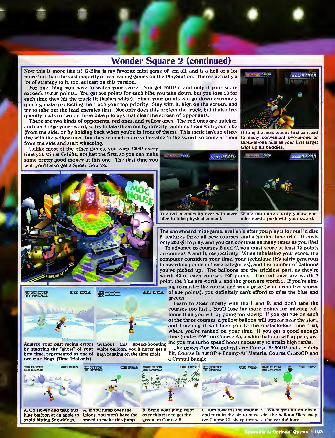
^1
Wonder Square 2 (continued)
Now this is more like it! G-Bike is my favorite mini game of 'em all, and is a hell of a lot
more fun than the vast majority of real racing games on the PlayStation. There's actually a
lot of strategy to it, too, at least on this version.
For one thing, you have to watch your score. You get 10GP if and only if your score
exceeds 10,000 points... You get 500 points for each bike you take down, but you lose 50 for
each time they hit the truck (it flashes white). Since your points can go down extremely
quickly, make protecting the truck your top priority. Stay with it, high on the screen, andtry to take out the lead enemies first. Not only does this protect the truck, but it also fre-
quently leads to two or three-bike pile ups that clear the screen of opponents.There are two kinds of opponents: red ones, and yellow ones. The red ones are quicker,
and can dodge your sword, so try to take them out by directly ramming them with your bike
(from the side, or by holding back when you're in front of them). This tactic isn't so effec-
tive with the yellow ones, but they're much more vulnerable to the sword, so come at themfrom the side and start whacking.
Unlike most of the other games, you earn 10GP everytime you win at G-Bike, not just the first, so you can makesome pretty good money at this one. The first time youwin, you'll also get a Speed Source.
Hitting the head enemy first can lead
to many convenient two-in-one or
three-in-one bills as your first target
trips up his buddies.
Ill scout rJnSnscore oWtill scoM.fiiinn
.4
t \The red enemies tip over with mere While the more sturdy yellow ene-
bike-to-bike physical contact. mies need a push with your sword.
msm-asram hoec-
Analyze your past racing errors Without this
by studying the "ghost" of your white balloon, you'll never get a
best time, represented as one of high ranking on the time trials,
two cute Mogs. (Time Trial only)
The snowboard mini-game, available after you play it for real in disc
2, features three all new courses, and a hidden time trial. It costs
only 200 gil to play, and you can continue as many times as you like!
To advance to courses B and C, you must score at least 70 points
on courses A and B, respectively. When tabulating your score, the
computer considers your time, your technique (it's fairly generousin awarding points in these categories), and the number of balloons
you've picked up. The balloons are the trickiest part, as they're
worth 40 of each course's 100 points. The red ones are worth 1
point, the blue are worth 3, and the green are worth 5. If you're aim-
ing to master the course and win a prize (which requires scores
of 90+ points), you definitely can't afford to miss the blue andgreens.
Learn to steer mostly with the L and R, and don't take the
courses too fast... You'll lose far more points for missing bal-
loons than you will by going too slowly. If you get 70+ on eachof the three courses, a yellow balloon will appear near the start,
and touching it will take you to the obstacle-less time trial,
where you're ranked on your time. If you get a good enoughtime (under 1'05" on Course A), a white balloon will appear, giv-
speed-boosting in2 y°u tne turDO speed boost necessary to attain high ranks.
The prizes (for 90+ points) are: Course A: 30GP and a Safety
Bit, Course B: 100GP + Enemy-All Materia, Course C: 300GP anda Crystal Bangle.
IffQafih umWWBBD *£, SUED) (DQH
A: Go slowly and tafee this A: If you jump over the
blue balloon at an angle to igloos, you won't have the
avoid hitting SnowMogs. speed to make this jump.
B: Begin your jump right
over this rise to get the
green on Course B.
C: Aim towards the middle C: When you hit an obsta-
and turn in the air to mas- cle, the balloon flies away,
ter Course C's sharp turns, so be careful here.
Iptional Quests • 103
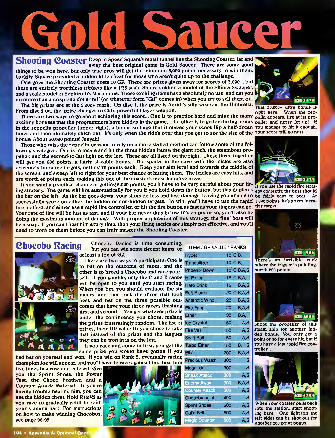
Gold SaucerShOOtiflQ 60dSt6r Deep in Speed Square's metal tunnel lies the Shooting Coaster, far and
" away the best original game in Gold Saucer. There are some good
things to be won here, but only true pros will get the minimum 5,000 points necessary to win them.
Luckily, Square provided a hidden little cheat for those who aren't quite up to the challenge.
One go at the Shooting Coaster costs 10 GP. There are prizes given away for scores of 3,000+, but
these are entirely worthless trinkets like a 1/35 scale Shinra soldier, a model of the Shinra Sweeper,
and a scale model of Sephiroth's Masamune. These exciting items have absolutely no use, and net you
no more than a crisp one dollar bill (or whatever form "Gil" comes in) when you try to sell them off.
The big prizes are at the 5,000+ mark. On disc 1, the prize is Aerith's silly weapon, the Umbrella.
From disc 2 on, the prize changes to Cid's powerful Flayer weapon.
There are two ways to go about achieving this score... One is to practice hard and mine the manyexciting bonuses that the programmers have hidden in the game. The other is to go for the big bonus
in the Zeppelin propeller (upper right), a bonus so huge that it makes your score flip a half-dozen
times and then ultimately glitch out. It's only when the ride's over that you get to see the size of the
bonus: About 30,000 points! leeyah!
Those who miss the zeppelin or want to rely on a more skilled method can follow some of the fol-
lowing strategies. One is to locate and hit the three hidden items: the giant rock, the steamboat pro-
peller, and the second-to-last light on the left. These are all listed on the right. These three together
will get you 600 points, a fairly sizeable bonus. The sparks in the cave with the icicles are also
extremely lucrative targets, netting 70 points each. Keep your aim level and towards the middle of
the screen, and sweep left to right for your best chance at hitting them. The icicles are easy hits, andare worth 40 points each, making this one of the coaster's most lucrative areas.
If you want a practical chance at getting 5,000 points, you'll have to be very careful about your fir-
ing strategy. The game will fire automatically for you if you hold down the button, but this depletes
the bar on the left. As the bar goes down, your shots do less and less damage, leaving you unable to
successfully score on either the hidden or non-hidden targets. To win, you'll have to use the rapid
fire method, and either use a rapid fire controller, or hit the fire button as fast as your fingers can go.
Your rate of fire will be just as fast, and if your bar never dips below 10% empty or so, you'll also be
doing the maximum amount of damage. With proper application of this strategy, the final boss will
be a snap. If you can't beat him every time, then your firing tactics are simply not effective, and you'll
need to work on them before you can truly master the Shooting Coaster.
That 30,000+ ultra bonus is
right here. When the zep-
pelin appears, fire at its pro-
peller and never let up! If
you manage to hit it enough,your score will go nuts.
ire strat-
egy correctly, the boss shouldbe fairly easy to beat. At
1,000 points, he's a very lucra-
tive target.
Ghocobo Racing Chocobo Racing is time consuming,
but you can win some decent items, or
iat least a ton of GP.
There are two ways to participate: One is
I to bet on the outcome of races, and the
Iother is to breed a Chocobo and race your-
(self. If you gamble, only the C and B ranks
I will be open to you until you start racing.
I When you bet, you should evaluate the six
[racers, and then pick the three that look
best, and bet on the three possible out-
I comes that have your three racers finishing
1 first and second. You get whatever prize is
I under the contingency you chose, makingI the prizes frustratingly random. The list of
I prizes, their GP value (if you chose to take
I that instead of the prize) and the leagues
|they can be won in is on the left.
If you race and come in first, you get the
'same prize you would have gotten if youhad bet on yourself and won. If you win on Rank S, eventually racing
champion loe will appear, and you'll have to race against him. Beat himfive times in a row, and Este will give
you the Sprint Shoes, the PowerVest, the Choco Feather, and a
Counter Attack Materia! If you're
having trouble beating him, you can
use the hidden cheat: Hold R1&R2 as
you race to gradually refill to refill
your stamina bar! For instructions
on how to make winning Chocobos,see page 98-99.
ITEM / GP VALUE / RANKS
fer trL. 1, „;- ,11. V=T ^ WJ
Ms*-*
{ft, ft, f^s,
Hyper 10 C,B,
Tranquilizer 10 C,B,
Phoenix Down 10 C,B,A,S
Hi-Potion 15 C,B,A,
Hero Drink 15 B,A,S
Bolt Plume 20 C,B,A,S
Antarctic Wind 20 B,A,S
Fire Fang 20 B,A,S
30 B,A,
Ice Crystal 50 A,S
Fire Veil 50 A,S
Swift Bolt 50 A,S
Turbo Ether 150 B, S
Elixir 200 B,A,S
Precious Watch 300HHMegalixir 300 S
icum A,S
|
Enemy Away B,A,S
|C!III1 A,S
Chocobracelet 400 S
Sprint Shoes 500 A.S
Cat's Bell 500 A,S
A,S
There's an invisible rockwhere the trigger is pointing,
worth 200 points.
Shoot the propeller of this
steam ship for another hid-
den bonus. You only get a
point or so for every hit, but if
you have a fast rapid fire con-
troller...
When your coaster pulls bachinto the station, start shoot-
ing here. One light (on the
left side) can be shot out for
another 200 point bonus.
104 • Appendix A: Optional Quest
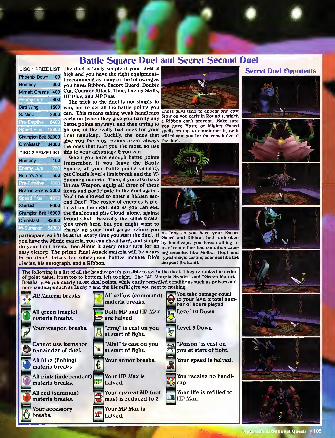
DISC 1 PRIZE LIST
Phoenix Down 1 00
Remedy 200
Mimett Greens 400
800
Battle Square Duel and Secret Second DuelSecret
raw
e-tmptive ES3
Champion Belt 32000
Omnislash 64000
DISC 2 PRIZE LIST
Remedy 1 00
The duel is fairly simple if your level is
high and you have the right equipment-I recommend as many of the following as
you have: Ribbon, Escort Guard, DoubleCut, Counter Attach, Time, Enemy Skills,
HP Plus, and MP Plus.
The trick to the duel is not simply to
Bird Wing 1600 win, but to get all the battle points you
S. Mine 3200 can - This means tahing weak handicaps
early on (when they give you hardly anybattle points anyway), and then trying to
hit one of the really bad ones for yourfinal handicap. Luchily, the ones that
give you the most points aren't always
the ones that hurt you the most, so use
this to your advantage if you can.
When you have enough battle points
(remember, if you leave the Battle
Square, all your battle points vanish!),
get Cloud's level 4 limit break and the W-Summon materia. Then, if you also haveUltima Weapon, equip all three of these
Reagan Greens 2000 items and participate in the duel again...
You'll be allowed to enter a hidden sec-
ond Duel! The roster of enemies is pic-
tured on the right, and as you can see,
the final round pits Cloud, alone, against
Proud Clod. Basically the same strate-
gies work here, but you might want to
charge up your limit gauge before youparticipate, so it'll be at full every time you start the duel. If
you have the Mimic materia, you can cheat hard, and simply
do your limit break, then Mimic it every other turn for aneasy victory. The prized Final Attack materia will be yours
in no time! Prizes for subsequent battles include Dio's
diaries, his autograph, and a Ribbon.
These guys tend to appear and cast
Slow on you early in Round 1, whicha Ribbon can't prevent. Make sure
you have Haste or Mighty Guardspells on tap to counteract it, or it
will plague you for the remainder of
Bomb's Arm 500
Stardust 8000
Champion Belt 16000
Omnislash 32000
'''//ilU'jJ*
I
S BR5. !:
As long as you have your Escort
Guard and Ribbon, both unbrokenby handicaps, you have nothing to
fear from either bad condition-caus-
ing enemies like Molbor (top) andtyped-magic casting enemies like the
Serpent (bottom).
I AH Materia breaks.
1AH green (magic)
V\ materia breaks.
Your weapon breaks.
The following is a list of all the handicaps it's possible to get in the duel. They're ranked in order
of point value, from top to bottom, left to right. The "All Materia Breaks" and "Green Materia
Breaks" give you nearly 10,000 duel points, while easily remedied conditions such as poison andnon-handicaps such as Lucky 7 and the life refill give you next to nothing.
You take damage equalto your level x total num-ber of hours played.
1 Level 10 Down
1 Level 5 Down
\ "Poison" is cast onI you at start of fight.
IYour speed is halved.
flYou receive no handi-
ly Cannot use items for
remainder of duel.
SAH blue (linking)
materia breaks.
AH pink (independent)
materia breaks.
RTAH red (summon)\'%} materia breaks.
Your accessory
^ breaks.
AH yellow (command)materia breaks.
Both MP and HP Maxl&P are halved
"Frog" is cast on youU I at start of fight.
"Mini" is cast on youat start of fight.
Your armor breaks.
Your HP Max is
halved.
r^Your current MP (not
W max) is reduced to 0.
Your MP Max is
EI? halved.
Your life is refilled to
JM HP Max.
1
jj
*j
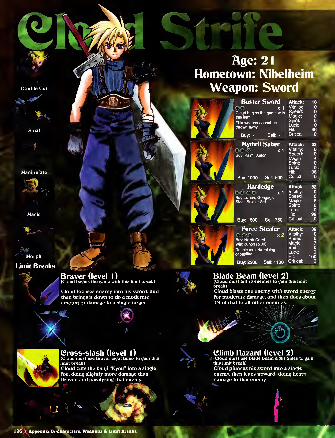
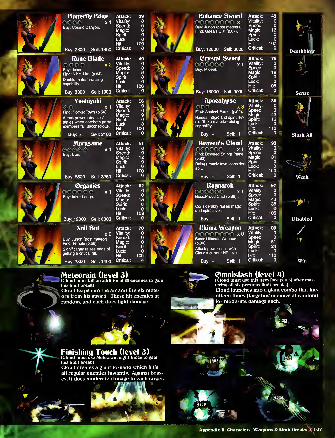
Butterfly EdgeOOCO x
1
Buy: Cosmo Canyon.
1 Buy: 2800 Sell: 1400
Rune BladeOCOO x2Buy: Junon.
Find: Nibel Mtn. (p.84)
Double materia-raising
capability.
Buy: 3800 Sell: 1900
YoshiyukiX 1
Find: Rocket Town (p.50)
Attack powers doubles/
triples when one/both party
members fall unconscious.
Enhance SwordOOOOOOOO x
1
Buy: Junon (post meteor).
Find: Gaea's Cliff (p.67).
Buy: 12000 Sell: 6000
Crystal SwordX 1
Buy: Mideel.
Buy: 18000 Sell: 9000
ApocalypseOOC x 3Find: Ancient Forest (p.92).
Raises magic and spirit lev-
els, Triple materia-raising
capability.
Attack: 43Vitality: 0Speed: 0Magic: 16
Attack: 76
Magic: 19
Attack: 88Vitality: 0Speed: 0Magic: 43
Deathbl.
JVturasame
tOOOOO x1Buy: Utai.
| Buy: 6500 Sell: 3250
©rganicsROCOC O C x 1
|Buy: Icicle Lodge.
Buy: 12000 Sell: 6000
Nail BatxO
Buy: Junon (post meteor).
Find: Temple (p.56).
Significantly raises odds of
getting a critical hit.
Buy: 2800 Sell: 1400
Heaven's CloudOOOOOO x
1
Find: Downed Shinra Plane
(p.83).
Raises magic level consider-
ably.
RagnarokAOOOOOOOOOOOO x 1
Boss:Proud Clad (p.88).
.
Considerably raises magicand spirit levels.
Ultima Weapon Attack:
OOOOOOOO' xO Vitality:
Boss: Ultimate Weapon Speed:
(p.90). Magic:
Attack power rises withi SI!'
Cloud's current HP level. t,"c*'
Meteorain (level 3)«^ Wmm (Cloud must bill an additional 80 enemies to gain
- '^""w^. this limit break)
'^ta^v Cloud leaps into the air and fire six mete-
ors from n 's sword. These hit enemies at
i? random, and each does light damage
#
Omnislash (level 4)(Cloud must use this item [see p. 105] after mas-tering all six previous limit breaks)
Cloud launches into a giant combo that hits
fifteen times (targeting enemies at random)for moderate damage each.
f - \
Finishing Touch (level 3)(Cloud must use Meteorain eight times to gain
this limit break)
Cloud creates a giant tornado which bills
all regular enemies instantly. Against boss-
es, it does moderate damage to each target.
ppendix B: Characters, Weapons & Limit
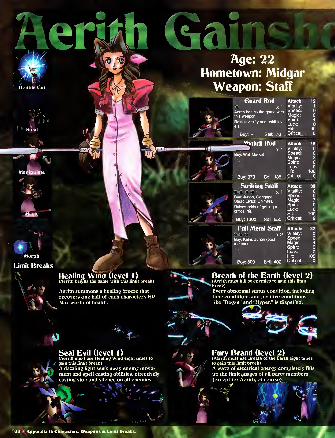
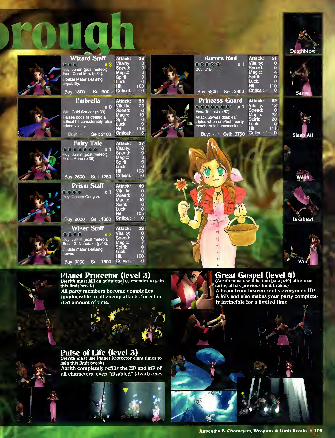
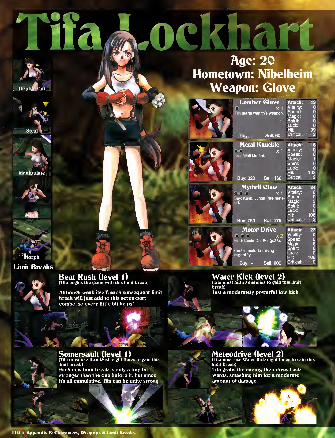
17Slorph
Limit Breaks
'Sim i
Beat Rush (level I)(Tifa begins the game with this limit break)
Although weak itself, each subsequent limit
break will just add to this seven-part
combo, so every little bit helps!
Somersault (level I
)
(Tifa must use Beat Rush eight times to gain this
limit break)
Each new limit break is only a tiny bit
stronger than the one before it, but since
it's all cumulative, Tifa can be quite strong.
i3tDouble materia-raising
capability.
Buy: Sell: 900
opim:Luck:
Hit:
Critical:
u0
1060 I
Water Kick (level 2)(Tifa must kill 80 enemies to gain this limit
break)
Just a moderately powerful low kick.
lie* T%Meteodrive (level 2)(Tifa must use Water Kick eight times to gain this
limit break)
Tifa grabs the enemy, then dives back-
wards, smashing him for a moderateamount of damage.
110 • Appendix B: racters. Weapons & Limit Breaks.
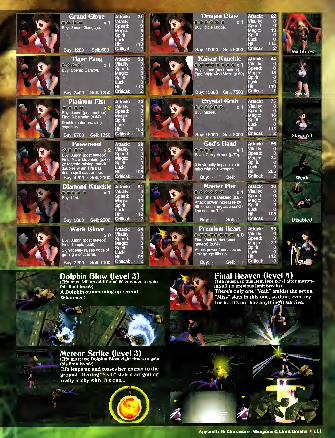
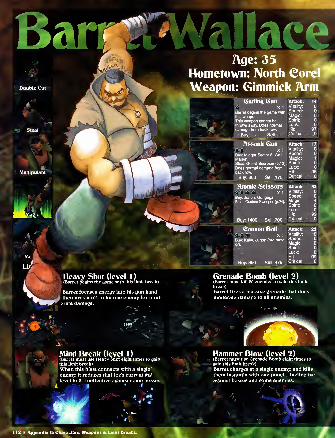
WallaceAge: 3
Hometown: North
Weapon: Gimmick Arm
Heavy Shot (level 1
)
(Barret begins the game with this limit break)
Barret focuses energy into his gun hand,
then fires it off to hit one enemy for mod-erate damage.
Gatling GunX 1
Barret begins the game with
this weapon.
Attack: 14Vitality: 0Speed: 0Magic: 0
Attack: 17Vitality: 0Speed: 0Magic: 1
Spirit: 0Luck: 0Hit: 98Critical: 0
Does normal damage from
back row.
Buy: 350 Sell: 175
| V
Atomic Scissors
Buy: Junon, Gongaga.Steal: Custom Sweeper (p.24).
Buy: 1400 Sell: 700
Attack: 32Vitality: 0Speed: 0Magic: 4Spirit: 0Luck: 0Hit: 99Critical: 0
%iglBBBOPmWrilBIEliiBnB
Attack: 23Vitality: 0Speed: 0Magic: 2Spirit: 0Luck: 0Hit: 99Critical: 0
1
Grenade Bomb (level 2)(Barret must kill 80 enemies to gain this limit
break)
Barret fires a massive grenade that doesmoderate damage to all enemies.
Mind Break (level I)(Barret must use Heavy Shot eight times to gain
this limit break)
When this blast connects with a single
enemy, it reduces that foe's current MPlevel to 0. Ineffective against some bosses.
k 1 * J ,
fiaracters, Weai
Hammer Blow (level 2)(Barret must use Grenade Bomb eight times to
gain this limit break)
Barret charges at a single enemy, and hills
them instantly with one punch. Ineffective
against bosses and some enemies.
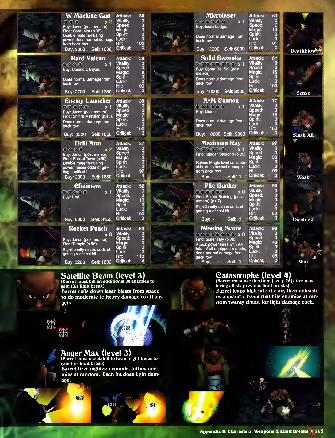
M ' ' W Machine C^unr g C x2Buy: Junon (post meteor).
o o o o o o
Attack: 63Vitality: 0Speed: 0
4Find: Corel Mtn (p.35).
Double materia-raising
power, does normal damagefrom back row.
Magic: 3Spirit: 0Luck: 0Hit: 100 I
Does normal damage from
back row.
Magic: 13Spirit: 0Luck: 0Hit: 101
jllLJJkJjIiTE Critical: 0 [Will Critical: 0
Hard Vulcan Attack: 39 Attack: 61
«. . . ' - OCOC x 1Vitality: 0 e o o a o.
Buy: Cosmo Canyon.
Does normal damage from
Speed: 0Magic: 8Spirit: 0
Buy: Costa Del Sol (post
meteor).
Does normal damage from> back row.
Buy: 2700 Sell: 1350
Luck: 0Hit: 100Critical: 0 J > back row.
Buy: 16000 Sell: 8000
Enemy LauncherOOCCC x1
Attack: 35Vitality: 0
A»M CannonOCOCOC x 1
Attack: 77Vitality: 0
opeea. u Buy: Mideel. OpccU. U
Magic: 7 Magic: 16
fa. WK * JfDoes normal damage from
back row.
Spirit: 0Luck: 0
Does normal damage from
back row.!
41Buy: 3300 Sell: 1650 L—i,jL_ Buy: 18000 Sell: 9000
" ~" "* m ate:
OOOO x2Buy: Junon (post meteor).
Vitality: 0Speed: 0
OOOO 0 0
Vfeat
Find; Rocket Town (p.50).Pin i rhlo rnflt^ria-raictnfi
Magic: 0Spirit: 0 Raises Magic level consideL/UUUIc 1 1 Idler la 1 ctlol My
power, raises odds of get-
ting a critical hit.
Buy: 3300 Sell: 1650
Luck: 0Hit: 97Critical: 3* M *
ably, does normal damagefrom back row.
Buy: - Sell: 1
Chainsawm n < immAttack: 52
I
' Pile Bunker Attack: 90
OCOCC x1 Vitality: 0Speed: 0
ocoooc xO Vitality: 0Speed: 0
Buy: Utai.Magic: 10Spirit: 0
Find: Shinra Building (post
meteor) (p.87). Magic: 0Spirit: 0
> Luck: 0Hit: 100 I
J>'> Significantly raises odds of
getting a critical hit.
Buy: 6300 Sell: 3150 Critical: 0 Buy: - Sell: 1
Rocket Punchx0
Buy: Junon (post meteor).
Find: Temple (p.56).
Attack: 62Vitality: 0Speed: 0Magic: 0
'•::•:'•;:•.•,•.:•)'•"••
Significantly raises odds of
getting a critical hit.
Spirit: 0Luck: 0Hit: 110P Vf.
.. ....Critical: 4
t
F f
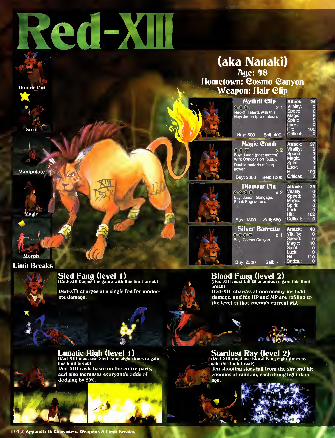
Red-XHIAge: 48
Hometown: Cosmo CanyonWeapon: Hair Clip
t
Mythril Clip Attack:
OOO x 1 Vitality:
Red-XIII starts with this. ?.pef
rd:
Buy: Junon (pre meteor). Magic:
Sled Pang (level I
)
(Red-XIII begins the game with this limit break)
Red-XIII charges at a single foe for moder-ate damage.
Blood Pang (level 2)(Red-XIII must kiu80 enemies to gain this limit
break)
Red-XIII charges at one enemy for light
damage, and his HP and MP are refilled to
the level of that enemy's current MP.
Lunatic High (level I
)
(Red-XIII must use Sled Fang eight times to gain
this limit break)
Red-XIII casts haste on the entire party,
and also increases everyone's odds of
dodging by 50%.
a;
Stardust Ray (level 2)(Red-XIII must use Blood Fang eight times to
gain this limit break)
Ten shooting stars fall from the shy and hit
nemies at random, each doing light dam
1 14 « Appendix B: Characters. Weapons & Limit Breaks.
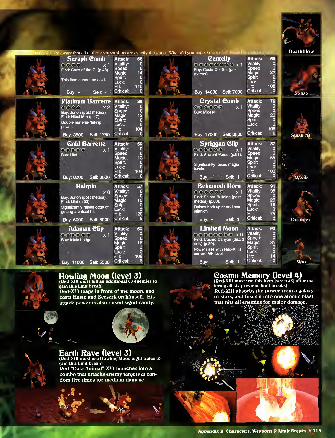
/ me to do?
entClip Attack: 58
C C 0 X 1 Vitality: 0
el Sol (post Speed: 0Magic: 22Spirit: 0Luck:
Hit:
Sell: 7000 Critical:
Slash All
Howling Moon (level 3)(Red-XIII must kill an additional 80 enemies to
gain this limit break)
Red-XIII leaps in front of the moon, andcasts Haste and Berserk on himself. His
attack power is also raised significantly.
Earth Rave (level 3)(Red-XIII must use Howling Moon eight times to
gain this limit break)
Red-"Data AnimaI"-XIII launches into a
combo that attacks enemy targets at ran-
dom five times for medium damage.
Cosmo Memory (level 4)(Red-XIII must use this item [see p.45] after mas-
* tering all six previous limit breaks)
Red-XIII absorbs the power from a galaxy
of stars, and fuses it into one atomic blast
that hits all enemies for major damage.
Vv~J 5-3/-
ppendix B: Characters, Weapons & Limit Breaks * 1
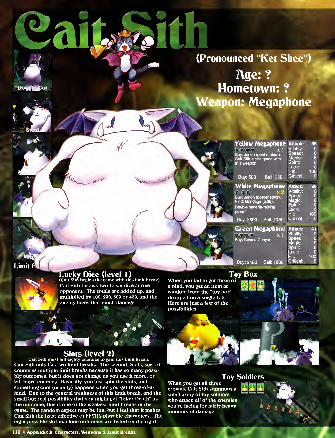
Mthif.
Dcujiflflput
(Pronounced "Ket Shee
Age: ?
Hometown: ?
^Weapon: Megaph
Slots (level 2)Cait Sith must kill eighty enemies to gain this limit break.
Cait Sith only has two limit breaks. The second. Slots, sort of
counts as multiple limit breaks because it has so many possi-
bly outcomes, but it does not change as you use it more, or
kill more enemies. Basically, you just spin the slots, andsomething cool (usually) happens when you get three-of-a-
kind. Due to the general weakness of this limit break, and the
small but real possibility that you might get "Joker Death" as
the outcome, this is one of the weakest limit breaks in the
game. The random aspect may be fun, but I feel that it makesCait Sith the least effective of FFVII's playable characters. Theeight possible slot machine outcomes are listed on the right.
Toy SoldiersWhen you get all three ,
.n »...u.i
crowns. Cait Sith summons a |3fl||W||Ml|
small army of toy soldiers
who attack all of the enemiesyou're facing for fairly heavy 4f
amounts of damage.
1 1 6 X Appendix B: Characters, Weap
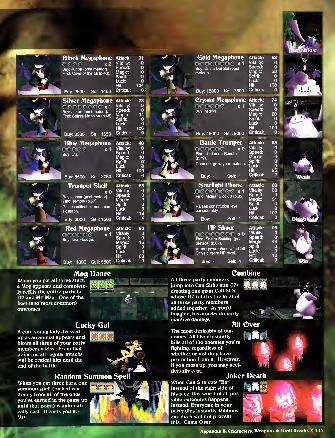
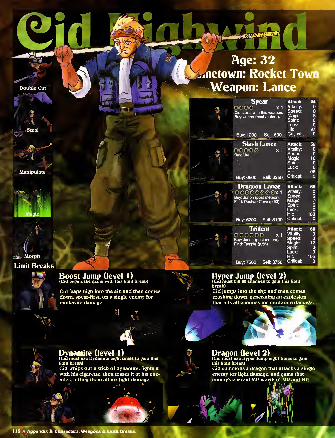
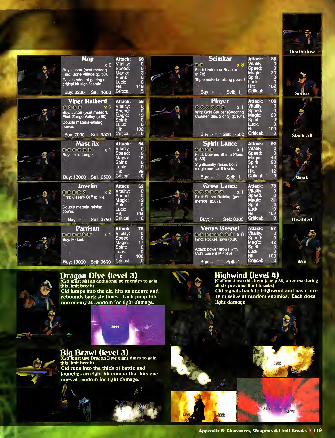
Dragon Dive (level 3)(Cid must kill an additional 80 enemies to gain
this limit break)
Cid jumps into the air, hits an enemy, andrebounds back six times. Each jump hits
one enemy at random for light damage.
Highwind (level 4)(Cidmust use this item [see p.83] after masteringall six previous limit breaks)
Cid signals back to Highwind and has it fire
18 missiles at random enemies. Each doeslight damage.
ft %
Big Brawl (level 3)(Cidmust use Dragon Dive eight times to gain
this limit break)
Cid runs into the thick of battle andlaunches an eight hit combo that hits ene-
mies at random for light damage. 6-
pendix B: Characters, Weapons & Limit Breaks • 1
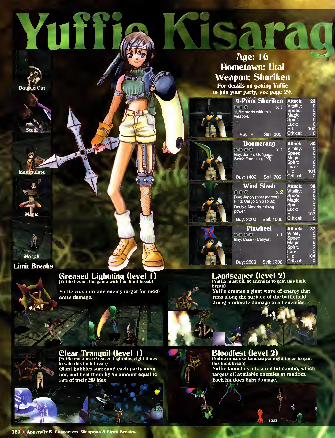
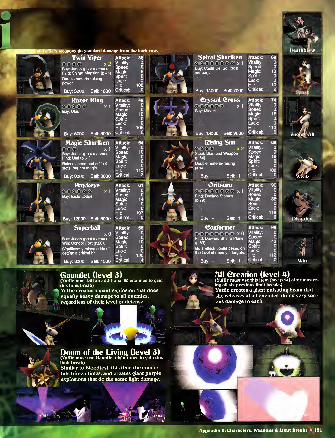
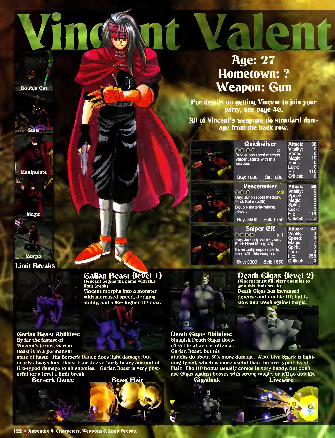
1 .
'
- - ' ••• -
Quicksilver
OCCC x 1
Buy: Junon (post meteor).
Vincent starts with this
Attack: 38Vitality: 0— .\
nr.*'
' V-5 Ik.
Speed: 0Magic: 10
weapon. Spirit: 0Luck: 0
Buy: 1000 Sell: 500
Hit: 110Critical: 0
W-M Ii:
PeacemakerOOO x2
Attack: 38Vitality: 0QnppH- 0Buy: Junon (post meteor).
Find: Kalm (p.25). Magic: 8
Double materia-raisingSpirit: 0Luck: 0
power.
Buy: 3500 Sell: 1750
Hit: 118Critical: 0
Sniper CROOOO x 1
Buy: Junon (post meteor).
Find: Nibel Mtn (p.49).
Attack: 42Vitality: 0Speed: 0Magic: 7
It's virtually impossible toSpirit: 0Luck: 0
miss with this weapon.
Buy: 3300 Sell: 1650
Hit: 255Critical: 0
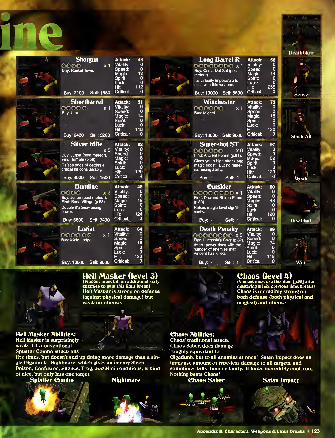

Normal Damage: BrOOZe BangleDefense: 8 -
Evade: 0 x u
Magic Damage: Cloud'
Barret-Tifa
<
and Aerith a "
M Defense' 0 begin the game with this armor.
M. Evade: 0
Other Stats:
Attack: 0Speed: 0Magic: 0Spirit: 0Luck: 0
Silver Armlet
OCCO x
1
Cait Sith and Vincent start with thisUagic Damage: olln arra vinceni
. Defense: 22 armor.
Evade- 0 Buv: Cosmo Canyon.
_ ." Boss: Dyne (p.38).Equip:
Male/Female
Normal Damage:
Defense: 10Evade: 0
Magic Damage:M. Defense: 2M. Evade: 0
Iron BangleG x 1
Buy: Midgar Sector 7 Slums.
Other Stats:
Attack: 0Speed: 0
Magic: 0Spirit: 0Luck: 0
Equip:Male/Female
Normal Damage:Defense: 14Evade: 2
Magic Damage:M. Defense: 4M. Evade: 0
Equip:Male/Female
ts: No
0 M De0 Ev0 U0 I M.0 . M.
irmal Damage:ense: 46ide: 4
Gold Armlet
ococ >
Cid starts with this armor.Magic Damage: l!" wl "'
11 " :
M. Defense: 28 Buy: Rocket Town
Equip:Male/Female
0 Steal: Dragon (p.47).
Find: Blacksmith's House (p.
Titan BangleGG x 1
Buy: Midgar Sector 5 Slums, Wall
Market.
Boss: Air Buster (p. 14).
ter Stats: Normal D
ck: 0 Defense:ed: 0 Evade:
Normal Damage: EdinCOflt
Evtd'T5o OOCCCCC x1
Magic Damage: guy: Rocket Town
M. Defense: 33 Boss: Palmer (p.50).
Normal Damage:Defense: 18Evade: 3
Magic Damage:M. Defense: 8M. Evade: 0
Equip:Male/Female
Normal Damage:Defense: 1
2
Evade: 0Magic Damage:
Mythril Armlet
GO x 1
Red-XIII starts with this armor.
Buy: Wall Market, Kalm, Junon.
Boss: Heligunner (p.23).
Buy: 280Sell: 140
Other Stats:
. Attack: 0' Speed: 0
Magic: 0 i
Buy: 350Sell: 175
Four Slot
GOOG x1Buy: Costa Del Sol (pre meteor).
M. Defense: 10 Win: Shinra Building (p.21).
M. Evade: 0
Shinra BetaOOGG x
1
Drop: Shinra Marine (p.32).
Male/Female
Normal Damage:Defense: 30Evade: 0
Magic Damage:M. Defense: 0
M. Evade: 0
Equip:Male/Female
Normal Damage:Defense: 27Evade: 3
Magic Damage:M. Defense: 14
M. Evade: 0
Equip:Male/Female
Equip:Male/Female
Defense: 93Evade: 0
Magic Damage:M. Defense: 23
M. Evade: 0
Equip:Male/Female
Other Stats:
Attack: 0
Buy: 1300Sell: 650
Normal Damage:Defense: 58Evade: 3
Magic Damage:M. Defense: 47
M. Evade: 2
Equip:Male/Female
Raises magic level slightly.
Adaman Bangl
OO )
Steal: Adamantai (p.51).
Dragon Armlet
COGOCO x 1
Drop: Red Dragon (p.57), BlueDragon (p.67).
Steal: Dark Dragon (p.93).
Damage from fire, ice, and lighti
sources is halved.
Carbon BangleGOO x 1
Yuffie starts with this armor.
Buy: Costa Del Sol (pre meteor)
North Corel.
Steal: Moth Slasher (p.20).
Normal Damage: GlQdSDefense: 59 r^r-r^rEvade: 0
Magic Damage: Boss,
: Demon's Gate (p.57).
M. Defense: 0 Steal: Gigas (p.68).
M. Evade: 0
Equip: Raises wearer's at
Male/Female cantly.
Raises wearer's
cantly.
Platinum BangleGG x2
Buy: Costa Del Sol (pre meteor)
Junon (post meteor)
Steal: Death Claw (p.38).
Double materia-raising power.
Defense: 20Evade: 0Magic Damage:
M. Defense: 12
M. Evade: 0
Equip:Male/Female
1 24X Appendix C: Armor, Items, & Accessories
Attack: 0Speed: 0Magic: 0Spirit: 0Luck: 0
Buy: 1800Sell: 900
Normal Damage:Defense: 57Evade: 6
Magic Damage:M. Defense: 37
M. Evade: 0
Equip:Male/Female
Normal Damage:Defense: 43Evade: 5
Magic Damage:M. Defense: 24
M. Evade: 0
Equip:Male/Female
DiamondGOOO O
Buy: Bone Village.
OGOOBuy: Bone Village.
Double materia-raisin
Magic: 0Spirit: 0Luck: 0
Buy: 1300Sell: 650
Other Stats:
Attack: 0Speed: 0Magic: 0Spirit: 0
Luck: 0
Buy: N/ASell: 1900
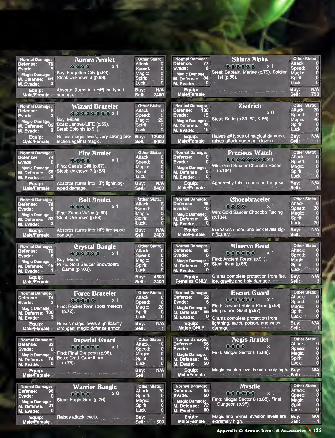
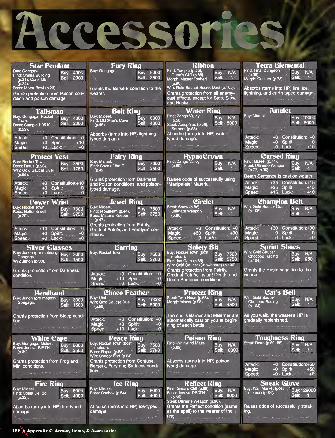
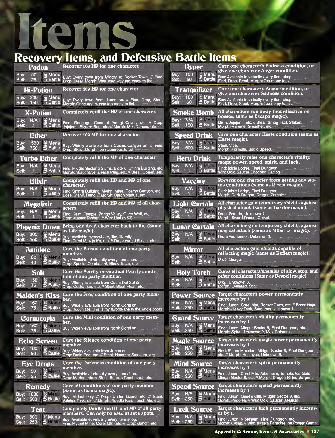

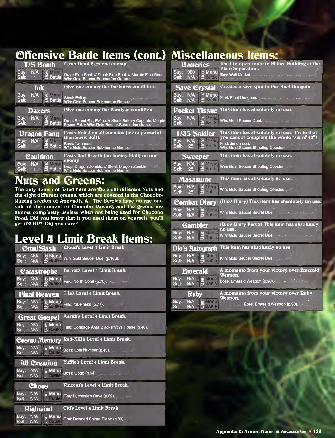
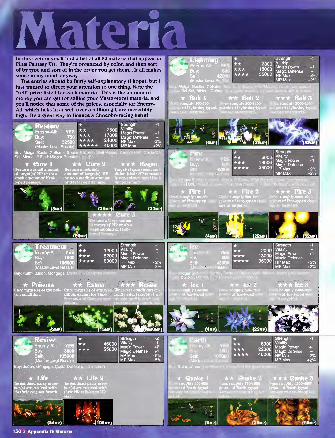
MateriaIn this section you'll find a list of all 82 materia that appear in
Final Fantasy VII. They're organized by color, and then sort
of by type and sort of in the order you get them... It all makessense in my mind, anyway.The entries should be fairly self-explanatory (I hope), but I
just wanted to direct your attention to one thing: Note the
"sell" price listed for each materia. This is the amount of
money you can get for selling your Master-level materia, andyou'll notice that some of the prices, especially for Enemy-All, which ticks in at well over a million gil, are incredibly
high. It's a great way to finance a Chocobo-racing habit!
Strength -1
2000 vitalitV
i nnnn Magic Power +1Magic Defense -
35000 HP Max -2%MP Max +2%
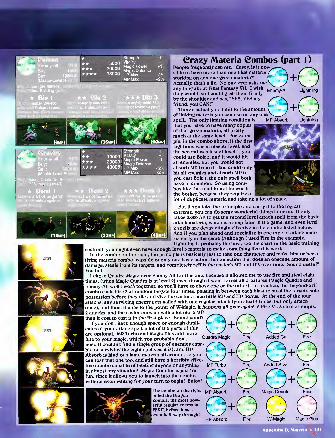
is MP Absorb Lightning
Strength -1
Vitality
onnnn MaSic Power +1
Magic Defense .
-
Grazy Materia Combos (part I
)
People frequently ask me, "Casey, is it pos- ^—>vsible to have more than one blue materia f \ f \working on any one green materia?" I
J-|- I
JActually, that's a lie. No one ever asks me N. J \^^Janything about Final Fantasy VII I wish E A|| Lj htningthey would, so I could grab them firmly
by the shoulder and say, "YES, YES myfriend, you CAN!"
There's actually no limit to the amountof linking materia you can use on any one\ / X '
spell... The only limiting condition is MP Absorb Lightning
that you have to have many copies
of that green materia, all pretty
much at the same level. For exam-ple, in the combo above, if the first
|
Lightning was at master level, andthe second was just at level l, youcould use Bolt 3, and it would hit W 4all enemies, but you would not
absorb MP from it. You could onlyj
hit all enemies and absorb MP if
you cast Bolt /, the only spell both
have in common. So using com-bos like this tend to not be worththe bother, because they require a
lot of duplicate materia and take up a lot of space.
But if you take the principle and carry it to the logical
extreme, you can do some wonderful things later on. It only
takes 2,000 AP to get the second level attack spell from the basic
attack materia, which is a snap later in the game, and even level
2 spells are devastatingly effective in the combo listed below.
And if you plan ahead and specialize in one type of attack mate-
_ ria early in the game (Although I used Fire in the example,
Lightning is probably the best, see the chart in the basic training
section), you might even have enough level 3 materia to make something like this work.
In the combo on the right, the principle is basically just to take one character and make him or her a
living materia combo, capable of only one basic action, but an action that does an obscene amount of
damage, steals from its targets, and completely refills the caster's MP and HP, over time. Sound useful?
You bet!
I chose Quadra Magic over Enemy-All for this one, because it allowed me to use fire and steal eight
times, (when Magic Quadra is at level 2) even though it won't target all creatures (Magic Quadra and
Enemy-All won't work together, so you'll have to chose one or the other). In practice, this beyond-evil
combo casts Fire 3 at random targets four times, pausing in between each blast to steal the target's sole
possession before they die and give the caster a nice little MP and HP bonus. At the end of the four
attacks, any surviving enemy gets nailed with one regular attack (you steal 4 times, but only attack
once), and then, thanks to the power of W-Magic, it happens all over again\ 8 Fire 3's, 8 steal attempts,
2 attacks, and the caster ends up with a lot more MPthan it cost to cast it in the first place. Sound good?
If you don't have enough space or enough dupli
cates of your attack spell, a lot of the parts of this x /are optional. MP Turbo and Magic Plus add morebite to your magic, which you probably don't Quadra Magic
need (I couldn't find a single group of enemies capa
ble of surviving the eight spells as it is), and HPAbsorb is kind of a lame materia all around, so youcan toss that one too, and still have a horribly effec-
tive combo capable of beating anyone or anything
in almost any situation! Magic Counter is just for
fun, since it allows you to launch into the combowithout even waiting for your turn to begin! Enjoy!
iod? / ~\
The combo on the right
killed the DragonZombie, the most pow-erful regular enemy in
FFVII. before it waseven half-way through!
G+MP Turbo
G+MP AbsorbOGHP Absorb Fire
Fire Added CutOQOFire Added Steal FireOQOFire Magic Counter Fire
Fire
W-Magic Magic Plus
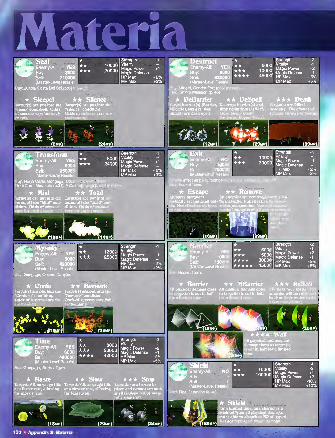
Materia
Strength -2
Vitality -1
Magic Power +2Magic Defense +1
HP Max - 5%MP Max +5%
18MP
132 « Appendix D: Materia
4-TtfiMP
|T71
Strength
10000 Vitali'y
100000Magic Defense +2HP Max -10%MP Max +10°/
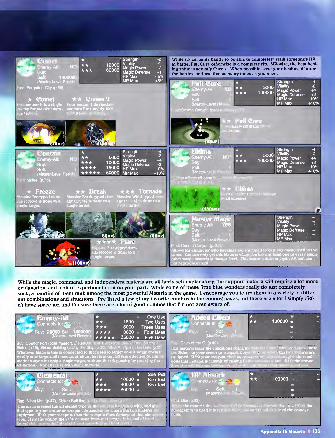
While the magic, command, and independent materia are all fairly self-explanatory, the support materia will require a lot moreexplanation, and a bit of experimentation on your part. While some of these little blue wonders really do just completely
suck, a handful of them rank among the most powerful Materia in the game. I encourage you to try them in a variety of differ-
ent combinations and situations. I've listed a few of my favorite combos in the coming pages, but there are a lot I simply did-
n't have space for, and I'm sure there are a lot of good combos that I'm not even aware of.
************
1500 =
6000 =18000 =35000 =
One UseTwo Uses
Three UsesFour UsesFive Uses
Elemental * = see Text
Connects to: O ** = SeeTeXt•UU *** 40000 = See Text
Buy: - Sell: 1 *** 80000 =(Master-Level Resale) _
Find: Nibel Mtn. (p.47), Shinra Building (p.21), Nibelheim (p.71).
This materia tabes the elemental type of the materia it's linfeed with, and gives
that type to your armor or weapon, depending on where the two materia are
equipped, if it's your weapon, then the weapon does damage of that elemental
type. If it's the armor, then the damage from that source is halved at level t.
completely prevented at level 2, and absorbed as HP at level 3.
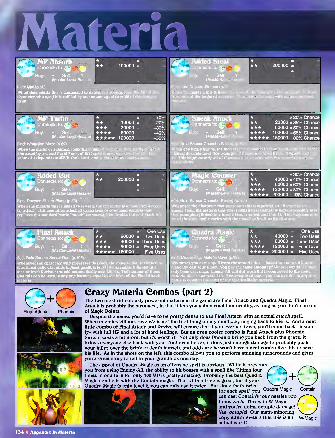
Materiaj**,. MP Absorb *^ Connects to:& ** 100000 =
^^Buy: Sell: 1
(Master-Level Resale) _
Find: Utai (p.52).
materia this is connected to damho used it is refilled by an
Crazy Materia Combos (part 2)The two most ridiculously powerful materia in the game are Final Attack and Quadra Magic. Final
Attach is probably the strongest, in that it lets you gain virtual immortality, as long as you don't run out
of Magic Points.
Despite the name, you'd have to be pretty dense to use Final Attach with an actual attack spell.
When enemies kill me, revenge is not the first thing on my mind... Springing back to life is. And a neat
little combo of Final Attack and Revive will ensure that if you ever go down, you'll come back- instant-
ly- with full HP and a lot of hard feelings. But an even cooler combo is Final Attack plus Phoenix.
Sure, it costs a bit more, but it's worth it! Not only does Phoenix bring you back from the grave, it
brings everyone else back with you. And even better, it does just enough damage to probably pushyour killer over the brink of death himself, and odds are he won't have a neat combo like this to save
his life. As in the shots on the left, this combo allows you to perform stunning turnarounds and gives
you a great story to tell to your grandkids one day.
The appeal of Quadra Magic as an offensive spell is obvious. While it prevents
you from using Enemy-All, the ability to hit bosses with a spell like Ultima four
times in one turn for only 100 MP is pretty amazing. Probably the best QuadraMagic combo is with the Contain magic. That Ultima trick is great, but if your
But since that's twice
9\ r
ofor each spell, you Quadra Ma3 ic
can cast Contain's four nasties twotimes each. Throw in W-Magicand you're doing octuple damage!Yes, octuple1
. Our math-minoringcopy editor swears that this is anactual word!
oContain
W-Magic
134 » Appendix D: Materia
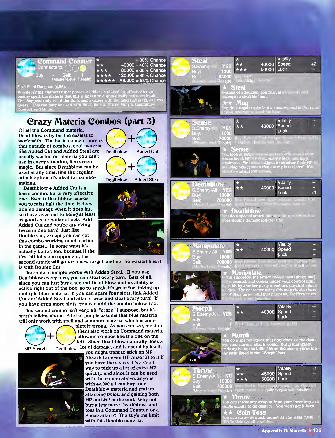
= 30% Chance40000 = 40% Chance80000 =60% Chance120000 = 80% Chance200000 =100% Chance
Find: Final Dungeon (p.96).
Whenever the character that possesses this is
enemy spell, the materia that this is linked to
This happens only x% of the time, and x varie
above. This can only be used with Steal, Sens
Control, and Mimic.
Crazy Materia Combos (part 3)
Deathblow Added Cut
OGDeathblow Added Steal
Of all the Command materia.
Deathblow is by far the easiest to
work with. The basic concept here is
that outside of combos, cool materia
like Added Cut and Added Steal are
usually wasted on materia you can't
use in every situation, lifee green
magic. But since Deathblow can beused at any time, lifee the regular
attacfe option, it's ideal for combo-making.Deathblow + Added Cut is a
basic combo, but a very effective
one. Even if Deathblow causes
you to miss half the time, it doesdouble damage when it does hit,
so it averages out to being at least
as good as a regular attacfe. AddAdded Cut and you're attacking
twice in one turn! Just like
Double Cut, except you can get
this combo working much earlier
in the game... In some ways it's
actually better, too, because if the
first hit kills one opponent, the
second attack will go for a new target, and not be wasted like it
is with Double Cut.
The same principle works with Added Steal... If you use
Deathblow every turn, you can steal every turn. Best of all,
since you can just buy a second Deathblow, and its ability is
active right out of the box, so to speak, it's great for linking upmultiple blue materia. If you can spare four slots, link AddedCut and Added Steal and attack twice and steal every turn! If
you have even more slots, you can add the combo below, too.
This second combo isn't very, uh, "crazy," I suppose, but it's
worth talking about. A lot of people assume that blue materia
will only work with spell and summon materia, which is com-—-\ * >. pletely wrong. As you can see, most of
f A f A them also work on Command materia,
PJ-|- I
Jallowing combos like the one on the
N / \^ y left. Since Deathblow naturally does a
MP Absorb Deathblow Iot of damage, and is useful by itself,
. you might want to stick an MPAbsorb (or even HP Absorb) to it if
you have the space. It's a goodway to pick up a Iot of extra MPquickly, and since it can be usedwith the combo above, anyonewith 40,000 gil can buy four
I
Deathblow materia and end upattacking twice, and gaining both
HP and MP at the end. Why not
buy a few more Deathblows andtoss in a Command Counter, or a
Sneak attacfe? The sfey's the limit
with this flexible materia.
M ')')') <!
•9 ^99.
* Manipul_._If this succeeds, the target enemy turns green andturns around, and comes under your control until
he is hit by another party member's physical a
or dies. The character using this materia als
all of their turns until that happens. Ineffec
irfTST
You do a special attack that only does 1/8 the damage your normal attach would. But if that attack
ends up being the killing blow, the enemy turns into
the item listed in the "Morph" box.
k Vita
45000 Spe60000 Luc
700000 Buy: Rocket Town (post met<
le) (post meteor). // Yuffie begin:
Throw
;teor), Condor Fort
ns with this item.
n throw any weapon from your inventory at
enemy to do damage. You won't get it
Coin Toss
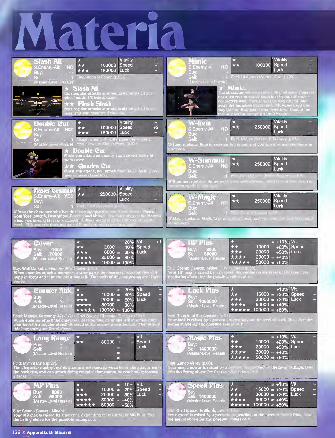
Materia
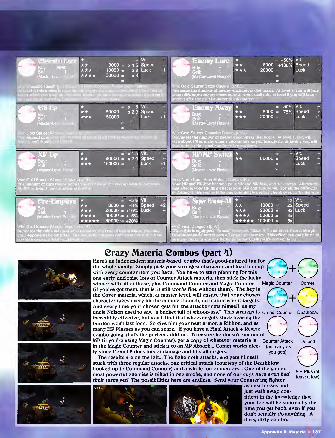
= +5% Vit.
** 8000 = +8% Speed +220000 = +10% Luck -
40000 = +15%80000 = +20%
HH = +50% Vit.* 8000 =+100% Speed20000 = Luck -1
uy:
ell: 1
Master-Level Resa
old Saucer Chocobo Raeases the number of enemy encounters that o
aster-Level Resa
Corel Area Materia
HP and HP Max become your
j I 20000
(Master-Level Resale) .
**** 50000100000
Dungeon (p.97).
is equipped, "Attack" becomes "Slash /maUS
Vit.
2x Speed3x Luck
4x!
5xj|
Crazy Materia Combos (part 4)j
Here's an independent materia-based combo that's good-natured fun for
the whole family. Simply pick your strongest character and load him upwith every counter item you have. You have to start planning for this
one early, and raise lots of Counter Attach materia, then stich the lucky
winner with all of those, plus Command Counter and Magic Counter Magic Counter
oComet
Deathblow
Defend
(if you've got them, that is, it still worhs fine without them). The hey is x v "N.
the Cover materia, which, at master level, will ensure that your chosen / A I \character takes every hit the enemies launch, no matter who it targets. V J "T" y JAnd every time your chosen gets hit, the attacfeer gets himself, as myuncle Nelson used to say, "a bucket full of whoop-ass." This strategy is Cmnd. Counter
incredibly effective, but you'll find that whoever gets stuck bearing the
burden won't last long. So give him your best armor, a Ribbon, and as
many HP Plusses as you can spare. If you have a Final Attack + Revive
combo going, that's the perfect addition. To ensure he doesn't run out of
MP (if you're using Magic Counter), get a copy of whatever materia is Counter Attack
in the Magic Counter and stick it to an MP Absorb... Comet works nice- (as many as
ly, since Comet 2 does lots of damage and hits all targets. you got!)
The results are on the left... The Behemoth attacks, and gets himself
stuck with three regular attacks, one critical attack (courtesy of the Deathblowhooked up to Command Counter) and a whole ton of meteors... One of the game's
most powerful enemies is killed in one stroke, and none of our guys have even hadtheir turns yet! The possibilities here are endless. Send your Counter'ing fighter
against bosses andjust walk away, con-
fident in the knowledge that
your foe will be smitten by the
time you get back, even if youdon't actually do anything. Adirty, dirty combo.
Appendix D: Materia • 137
HP Plus (at
least a few)

Materia** 16000** 32000
Magic Power +1
Magic Defense +1t-ID Mav £<V**** 65000
***** 80000nr Ivlax - 0 /o
MP Max +5% i
Swordmies. instantly billing them abo
Buy: - Sell: 1 (78mp)
al WaveHits all non-flying enemies for massive Water-typed dammore than double the damage of Titan.
Magic Power +1
Magic Defense +1
HP Max - 5%MP Max +5%
Magic Power +1
Magic DefenseHP Max - 2%MP Max +2%
Magic Power +1
Magic Defense +1
HP Max - 5%MP Max +5%
M102550
** 70
Magic Power +1
Magic Defense -
HP Max - 2%MP Max +2%
Titan 1 1**fq ***
y:-Sell:1 (46mp) *****
15000 Magic Power
30000 Magic Defense
60000 HP Max80000 MP Max
S 7\ll(J€rFmd: Gongaga Meltdown
moderate amount of Earth-typed damage to all enemir than Ramu.
2565
100** 150
agio Power +1
agic Defense +1
P Max - 5%P Max +5%
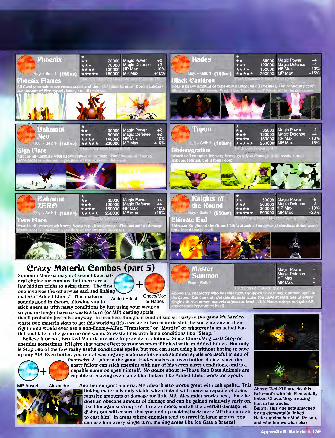
Allows the character who has this item equipped to
the game. You can only get this
single other summon materiaand can not reproduce itself.
Crazy Materia Combos (part 5)Summon Materia may not seem like a nat- /" "N.
ural choice for combos, but there are a L .
few hidden tricks to using them. The first T J I
one involves the otherwise sad, sad linking\^_^materia "Added Effect." This materia Added Effect
Cnoco/Mo9sounds good in theory, allowing you to or Hades
stick enemies with nasty conditions by just using your weapon,so you no longer have to waste a turn (or MP) casting spells
that'll probably just miss anyway. In practice, though, it kind of sucks. Early in the game it's hard to
waste two materia slots to get this working (it's a waste of two materia slots because no one in their
right mind would ever use a non-Enemy-AU'ed "Transform" or "Mystify" or whatever in an actual bat-
tle), and late in the game no one wants to waste time with lame conditions like "Sleep."
Believe it or not, two Red Materia are able to provide a solution... Since Choco/Mog casts Stop onenemies sometimes, it'll give that same effect to your weapon if linked with an Added Effect. Not only
is Stop one of the few really useful conditional spells, but you can start using it without having to save
up any AP! Even better, you're not wasting any materia slots since summon spells are useful in and of
.^w^. themselves! Later in the game, Hades makes an even better choice, since that
Inasty fellow can stick enemies with any of his seven nasty conditions, and is a
pf- j -L- Mr* capable summon spell himself. No doubt about it-These Red Data Animals are
V J V J capable of making even lame blue linkers like Added Effect work for >you!<
MP Absorb Alexander Another support materia, MP Absorb also works great with call spells... This
linking materia is only viable when linked with materia capable of doing
massive amounts of damage for little MP. Alexander works best, since hedoes an obscene amount of damage and can be gained relatively early on.
Use him against groups of three or more, and all the overkill damage hedishes out will ensure that you end up making back more MP than it took
to cast him! In areas where enemies tend to travel in large groups, youcan use him every single turn, making areas like Ice Gate a breeze!
Above: Red-XIII attacks this
Behemoth with his Elementally
linked Choco/Mog, freezing
him in his tracks.
Below: This one gets smackedby an elementally linked
Hades, giving her Mini, Poison,
and who knows what else.
Appendix D: Materia • 139
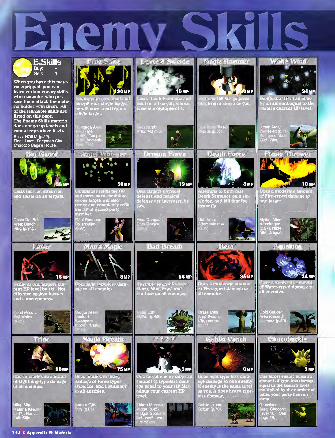
*1kills
iE.Skills
When you have this mate-ria equipped, you canlearn certain enemy skills
when enemies who pos-
sess them attack the mate-ria holder with them. Ail
of the learnable skills arelisted on this page.
The Enemy Skills materiadoes not go up levels andcannot reproduce itself.
Boss: H0512 (p.22).
Find: Junon, Forgotten City,
Chocobo Sage's House.
40 « Appendix D: Materia
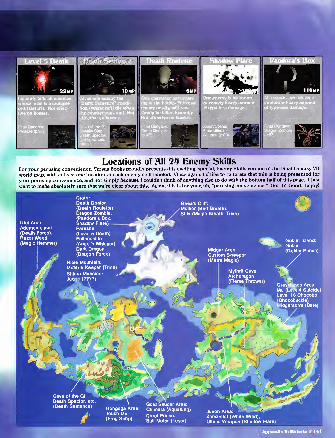
Locations of All 24 Enemy SkillsFor your perusing convenience, Versus Boobs proudly presents this exciting, special, Enemy Skills version of the Final Fantasy VII
world map, with at least one location of each enemy shill labeled. Once again, I'd like to reiterate that this is being presented for
your perusing convenience, and not simply because I couldn't think of anything else to do with the bottom half of this page. I just
want to make absolutely sure that we're clear about this. Again, this is for your, uh, "perusing convenience." Got it? Good. Enjoy!
Utai Area:
Adamantaimai(Death Force),
Razor Weed(Magic Hammer)
Crater:
Death Dealer(Death Roulette)
Dragon Zombie,(Pandora's Box,
Shadow Flare)
Parasite
(Level 5 Death)Pollensalita
(Angel's Whisper)Dark Dragon(Dragon Force)
Gaea's Cliff:
Molbor (Bad Breath),
Stilv (Magic Breath, Trine)
. Goblin Island:
- Goblin(Goblin Punch)
Cave of the Gi
Death Spector, etc.
(Death Sentence) Gongaga Area:
Touch Me(Frog Song)
Gold Saucer Area:
Chimera (Aqualung)
Corel Prison:
Bull Motor (Laser)
Junon Area:
Zemzellet (White Wind),
Ultima Weapon (Shadow Flare)
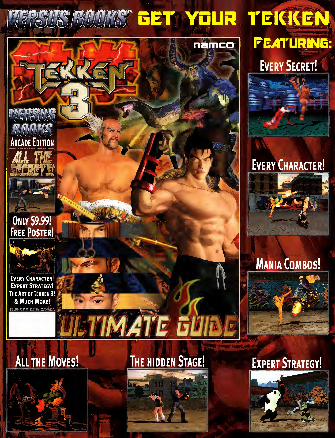
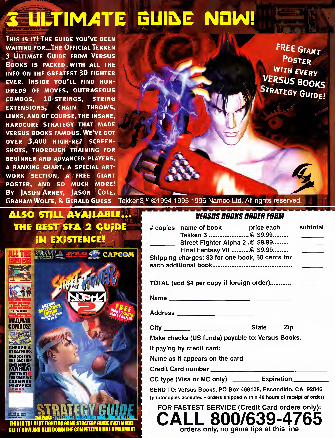
r4
ALSO STUL AVAILABLE...
THE BEST SFA 2 GUIDEIN EXISTENCE!
AILTHI
THIS IS THE BEST FIGHTING GAME STRATEGY GUIDE EVER MADE!
GET IT NOW AND DEAT DOWN THE COMPETITION LIKE A MADMAN!
J* 5VERSUSBOOKS ORDERFORM
# copies name of book price each
Tekken 3 @ $9.99
Street Fighter Alpha 2 .@ $9.99
Final Fantasy VII .@ $9.99
Shipping charges: $3 for one book, 50 cents for
each additional book
TOTAL (add $4 per copy if foreign order).
Name
subtotal
Address
City State Zip_
Make checks (US funds) payable to: Versus Books.
If paying by credit card:
Name as it appears on the card
Credit Card number
CC type (Visa or MC only) Expiration.
SEND TO: Versus Books, PO Box 469105, Escondido, CA 92046
(photocopies accepted • orders shipped within 48 hours of receipt of order)
FOR FASTEST SERVICE (Credit Card orders only):
CALL 800/639-4765orders only, no game tips at this line
IN-DEPTH STRATEGY
COMPREHENSIVE GUIDES
HARDCORE COMPETITIVE TACTICS
CREATED BY NORTH AMERICA'S BEST PLAYERS
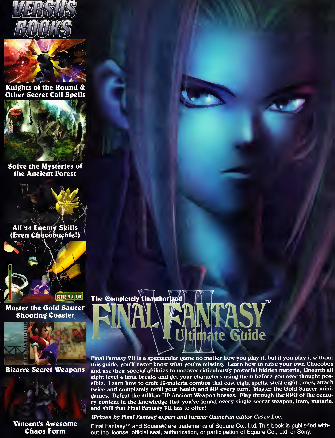
Knights of the Round &Other Secret Call Spells
Solve the Mysteries ofthe Ancient Forest
AH 24 Enemy Skills
(Even Chocobuckle!)
fj [MK3iiij The eompletely ilnauthon
Master the Gold Saucer W^%I|L T7l\Shooting Coaster 1^ 1 m\ LI SY
L Itim.ife Gjhide
Bizarre Secret Weapons
Vincent's AwesomeChaos Form
Final Fantasy VII is a spectacular game no matter how you play it, but if you play it without
this guide, you'll never know what you're missing. Learn how to raise your own Chocobosand use their special abilities to uncover ridiculously powerful hidden materia. Unearth all
eight level 4 limit breaks and get your characters using them before you ever thought pos-
sible. Learn how to craft 16-materia combos that cast eight spells, steal eight times, attack
twice and completely refill your health and MP every turn. Master the Gold Saucer mini-
games. Defeat the million-HP Ancient Weapon bosses. Play through the RPG of the centu-
ry content in the knowledge that you've found every single secret weapon, item, materia,
and skill that Final Fantasy VII has to offer!
Written by Final Fantasy expert and former GameFan editor Casey Loe.
Final Fantasy™ and Square® are trademarks of Square Co., Ltd. This book is published with
out the license, official seal, authorization, or participation of Square Co., Ltd. or Sony.

This magazine was scanned by Vanamo Media
This is a not-for-profit scan meant to preserve video gaming
history. Magazines run a serious risk of being lost to time,
so please share and host this scan.
B Visit retromags.com for classic gaming
magazine indexes, listings and downloads.
Visitarchive.org/details/gamemagazines
for classic game magazine downloads.
For a public domain archive of
gaming hardware photos, visit the
Vanamo Online Game Museum at:
commons.wikimedia.0rg/wiki/User:Evan-Amos/
archive.org Hyl