sap enhancement package 1 for sap crm 7.0 - sap help
TRANSCRIPT
Installation GuideSAP Enhancement Package 1 for SAP CRM 70Based on SAP NetWeaver 70 including Enhancement Package 2
Target Audience System Administrators Technical Consultants
CUSTOMERDocument version 10 ndash 2012-12-17
Document History
CAUTION
Before you start the implementation make sure you have the latest version of this document
You can find the latest version at the following location httpservicesapcom
instguides
The following table provides an overview of the most important document changes
Version Date Description
10 2012-12-17 Initial Version
250 CUSTOMER 2012-12-17
Table of Contents
Chapter 1 Introduction 5
Chapter 2 Planning and Preparation 7
21 Prerequisites for the Business Packages for SAP CRM 7
Chapter 3 Installation 7
Chapter 4 Post-Installation 11
41 Checking the Availability of Back-End Systems for SAP CRM Java
Components 11
411 Creating a Back-End User 11
412 Checking the Connection to the ABAP System 12
413 Configuring and Checking the TREX Service 14
414 Checking the Selling via eBay Processes 14
42 Post-Installation Steps for Workforce Deployment Application and
Calculation Services 15
421 Implementing WFMCORE 200 Using Transaction SAINT 15
422 Configuring the Extended Configuration Management (XCM) for WFD
Application and Calculation Services 16
423 Checking Workforce Deployment Calculation Services 18
424 Checking the Installation of WFD Application Services and WFD Calculation
Services 19
43 Post-Installation Steps for the Business Packages for SAP CRM 20
431 Creating Roles for the SAP CRM Business Packages 20
432 Installation of the Info Center for the SAP CRM Business Package 20
4321 Importing the SAP CRM Info Center Configurations and Directory
Structure 21
4322 Activating Manual Ordering of Folders for the sapcrm Repository 23
4323 Creating Indexes and Taxonomies for the sapcrmnews Repository 23
4324 Creating the Index for the sapcrm Repository 25
4325 Configuring the Personal Search 25
4326 Increasing the Number of JCo Connections 26
2012-12-17 CUSTOMER 350
44 Post-Installation Steps for MapBox 26
441 Assigning User Groups for MapBox Users 27
442 Configuring an RFC Destination for MapBox 28
443 Performing Initial Configuration for MapBox 28
444 Executing the MapBox 34
445 Performing the Smoke Test for MapBox 35
446 Ensuring Optimal Block Size settings 38
447 Adapting Memory Settings for the J2EE Engine 39
45 Activating the CRM Web Client 39
46 Installing and Configuring CRM Application Server Loyalty Add-On
Component 40
47 Starting XCM 40
48 Accessing Configuration Documentation in SAP Solution
Manager 41
Chapter 5 Additional Information 43
51 Installing the Business Packages for SAP CRM Using JSPM
(Optional) 43
52 Troubleshooting for the Business Package for SAP CRM 44
521 Activating BI Templates Manually 44
522 Dragging the Central Search onto the Portal Desktop 45
450 CUSTOMER 2012-12-17
1 Introduction
You need this document when you install SAP Enhancement Package 1 for CRM 70 (SAP CRM 70
EHP1) application server This document contains additional planning preparation and post-
installation steps that you have to perform in addition to the installation procedure described in the
documentation Installation Guide ndash SAP Systems Based on the Application Server ltABAP | Javagt of SAP NetWeaver
on ltOperating Systemgt ltDatabasegt mdash Valid for SAP Systems Based on SAP NetWeaver 70 including Enhancement
Package 2
SAP CRM 70 EHP1 is based on the technology of SAP NetWeaver 70 including Enhancement Package
2 For more information about the technology provided by SAP CRM and SAP NetWeaver see http
servicesapcomcrm and httpservicesapcomnetweaver
Make sure you have read the documentation Master Guide (Including Upgrade Information) SAP Customer
Relationship Management 70 Including SAP Enhancement Package 1 Using SAP CRM 70 SAP ERP 60 and SAP
NetWeaver 70 including SAP enhancement package 2 before you start with this installation guide The Master
Guide is available at httpservicesapcomcrm-inst SAP CRM SAP enhancement package 1 for
SAP CRM 70
1 Introduction
2012-12-17 CUSTOMER 550
This page is left blank for documents that are printed on both sides
2 Planning and Preparation
Only valid for ABAP+JavaJava |
21 Prerequisites for the Business Packages for SAP CRM
You can install the Business Packages for SAP CRM in one of the following ways
Automatically using SAPinst
Manually by downloading them from SAP Service Marketplace and installing them using Java Support
Package Manager (JSPM) [page 43]
Prerequisites
The Business Packages for CRM require at least the following SAP NetWeaver usage types and the
following CRM software units
SAP NetWeaver Application Server Java (AS Java)
SAP NetWeaver Enterprise Portal (EP)
SAP CRM Business Packages Foundation (BP-CRM-FND)
SAP NetWeaver Application Server ABAP (AS ABAP) and SAP CRM Application Set (CRM APP)
To use the CRM functionality of the Business Packages for SAP CRM you need an SAP CRM ABAP
back-end system consisting of AS ABAP and SAP CRM APP
SAP Retrieval and Classification Engine (TREX)
To use the search functions you need TREX
Integration
Check the support for these usage types and software components using the Product Availability Matrix
(PAM) at
httpservicesapcompam
More Information
For more information about how to size the Enterprise Portal (EP) see
httpservicesapcomsizing Hardware Sizing Sizing Guidelines Solutions amp PlatformEnd of ABAP+JavaJava |
2 Planning and Preparation
21 Prerequisites for the Business Packages for SAP CRM
2012-12-17 CUSTOMER 750
This page is left blank for documents that are printed on both sides
3 Installation
Proceed as described in the documentation Installation Guide ndash SAP Systems Based on the Application Server
ltABAP | Javagt of SAP NetWeaver on ltOperating Systemgt ltDatabasegt at httpservicesapcom
sltoolset Software Logistics Toolset 10 Software Provisioning Manager 10
3 Installation
2012-12-17 CUSTOMER 950
This page is left blank for documents that are printed on both sides
4 Post-Installation
Only valid for Java |
41 Checking the Availability of Back-End Systems for SAP CRM Java Components
Only valid for ABAP+JavaJava |
After the installation you have to check the availability of back-end systems as follows
1 To test the connection to the ABAP back-end system you create a back-end user [page 11]
2 Depending on various business processes you check the following back-end systems
ABAP system [page 12]
TREX Server [page 14]End of ABAP+JavaJava |
Only valid for ABAP+JavaJava |
411 Creating a Back-End User
You need service users to provide the anonymous remote function call (RFC) stateless connection
between your back-end system and your Web-based applications
Prerequisites
You have installed and configured CRM E-Commerce Web-based applications
Procedure
You create a service user in your back-end SAP CRM system and assign it to the Web-based application
as follows
1 In your ABAP back-end system on the SAP Easy Access screen choose Tools Administration User
Maintenance Users (transaction SU01)
2 Create a user of the type Service User and enter all required data
3 Assign the appropriate service user authorization role to the user on the Roles tab For a list of
service user roles for the various Web-based applications see the following table
Application Authorization Role for Service User
E-Selling B2B SAP_CRM_ECO_ISA_TU_B2B
E-Selling B2C SAP_CRM_ECO_ISA_TU_B2C
E-Selling EASYB2B SAP_CRM_ECO_ISA_TU_EASYB2B
4 Post-Installation
41 Checking the Availability of Back-End Systems for SAP CRM Java Components
2012-12-17 CUSTOMER 1150
Application Authorization Role for Service User
E-Selling CVIEWS SAP_CRM_ECO_ISA_TU_CVIEWS
E-Selling SHOPADMIN SAP_CRM_ECO_ISA_TU_SHOPADM
E-Selling USERADMIN SAP_CRM_ECO_ISA_TU_USERADM
E-Selling Auctioning via Web shop (AVW) SAP_CRM_ECO_TU_AVW
E-Selling via eBay (SVE) SAP_CRM_ECO_TU_SVE
E-Service Internet Customer Self Service (ICSS) SAP_CRM_ECO_ISE_TU_B2B (Authorizations for ICSS B2B)SAP_CRM_ECO_ISE_TU_B2C (Authorizations for ICSS B2C)
E-Service Complaints and Returns SAP_CRM_ECO_ISE_TU_CR
E-Service Remanufacturer inspection SAP_CRM_ECO_ISE_TU_INSP
Channel Management (CHM)Shared Catalog
SAP_CRM_ECO_CHM_TU_SHRDCAT
Channel Management (CHM) BOB SAP_CRM_ECO_ISA_TU_BOB
Channel Management (CHM) HOM SAP_CRM_ECO_ISA_TU_HOM
Channel Management (CHM) CSR SAP_CRM_ECO_ISA_TU_CSR
4 Save your entries
More Information
For more information about service users see the documentation ltyour projectgt Basic Settings for CRM
E-Commerce General Settings for CRM E-Commerce User Management in the SAP Solution Manager [page
41]End of ABAP+JavaJava |
Only valid for ABAP+JavaJava |
412 Checking the Connection to the ABAP System
This section tells you how to check the connection to the ABAP system
Prerequisites
To be able to test the connection to the ABAP system you need to create a user [page 11] on this system
Procedure
1 Start the Visual Administrator
1 On your central instance host change to the admin directory as follows
Only valid for IBM i5OSUNIX |
usrsapltSAPSIDgtltinstance_namegtj2eeadmin
End of IBM i5OSUNIX |
Only valid for Windows |
usrsapltSAPSIDgtltinstance_namegtj2eeadmin
End of Windows |
4 Post-Installation
41 Checking the Availability of Back-End Systems for SAP CRM Java Components
1250 CUSTOMER 2012-12-17
2 Only valid for IBM i5OSUNIX |
Run goshEnd of IBM i5OSUNIX |
3 Only valid for Windows |
Double-click gobatEnd of Windows |
For more information about the Visual Administrator see the SAP Library at
httphelpsapcomnw70 SAP NetWeaver 70 Library (including Enhancement Package 2) English
SAP NetWeaver Library SAP NetWeaver by Key Capability Application Platform by Key Capability Java
Technology Administration Manual J2EE Engine J2EE Engine Administration Tools
2 Only valid for IBM DB2 for i5OSIBM DB2 for i5OS (LinuxWindows)IBM DB2 for Linux and UNIX and WindowsIBM DB2 for zOSMaxDBMS SQL ServerOracle |
Log on to the Visual Administrator with administrator rights
NOTE
If you chose configuration Use ABAP in the User Management Engine (UME) and you selected
SAP CRM ABAP as your ABAP back end with UME during the installation a successful logon
to the Visual Administrator means that the SAP CRM ABAP back-end system is available
You have now finished this procedure
Otherwise continue with the next step
End of IBM DB2 for i5OSIBM DB2 for i5OS (LinuxWindows)IBM DB2 for Linux and UNIX and WindowsIBM DB2 for zOSMaxDBMS SQL ServerOracle |
3 Start an application that uses the SAP CRM ABAP system if it is stopped
1 In the left pane of the Visual Administrator open clusterserverservices and choose
Deploy service
2 Select the application
Application Context Root
crm~b2b b2b
crm~icss_b2b icss_b2b
crm~sve sve
3 To start the selected application choose Start
4 Open the user interface for the Extended Configuration Management (XCM) Administrator as
follows
1 Open a Web browser and enter the following URL
httpltJ2EE_hostgtltJ2EE_portgtltcontext rootgtadminxcminitdo
where ltcontext rootgt is the context root of the application started in the previous step
To find information about the components that can be configured choose help
2 Choose Start Component
You can find information about configuration of components on the right hand side of the
screen
4 Post-Installation
41 Checking the Availability of Back-End Systems for SAP CRM Java Components
2012-12-17 CUSTOMER 1350
3 To create a jco Component follow the instructions provided in the Example of component
configuration field
If the ldquorun testrdquo operation described in the component configuration section of a jco setting
was successful the ABAP system can be reached from the Java system
More InformationFor more information about using Extended Configuration Management (XCM) to configure your
application see Using Extended Configuration Management (XCM) [page 40] and the documentation in the
SAP Solution Manager [page 41]End of ABAP+JavaJava |
Only valid for Java |
413 Configuring and Checking the TREX Service
You need to configure and check the TREX service
Procedure
Configuring the TREX Service
1 Start the Visual Administrator
2 Connect to the AS Java
3 Choose Server node Open Services Node Select TREX Service
4 Maintain the values for nameserveraddress and nameserverbackupserverlist
For more information see Specifying the Address of the TREX Name Server in Installation Guide ndash SAP NetWeaver
70 Standalone Engine Search and Classification (TREX) Single Host at
httpservicesapcominstguidesNW70 Installation Installation - Standalone Engines SAP
NetWeaver Search and Classification TREX Installing TREX 70 Single Host
Checking the TREX Service
1 Start the application sapcomcrm~b2b as described in step 3 of Checking the Connection to the ABAP
System [page 12]
2 Open a Web browser and enter the following URL
httpltJ2EE_hostgtltJ2EE_portgtb2badmintrextrex_640jsp
ResultIf the connection was established successfully the message TREX Server is available appearsEnd of Java |
Only valid for Java |
414 Checking the Selling via eBay Processes
To use the selling via eBay (SVE) processes the Java system requires an http connection to
4 Post-Installation
41 Checking the Availability of Back-End Systems for SAP CRM Java Components
1450 CUSTOMER 2012-12-17
httpwwwebaycom
To test the connection you need to create an XCM component ebayCommunicator for the sapcom
crm~sve application
Procedure
To create the Extended Configuration Management (XCM) component ebayCommunicator using
application sapcomcrm~sve proceed as described in Checking the ABAP System [page 12]
NOTE
Make sure that you replace jco component with ebayCommunicator component when following
the procedure in Checking the ABAP System [page 12]
More Information
For more information about using Extended Configuration Management (XCM) to configure your
application see Using Extended Configuration Management (XCM) [page 40] and the documentation in the
SAP Solution Manager [page 41]End of Java |
End of Java |
Only valid for Java |
42 Post-Installation Steps for Workforce Deployment Application and Calculation Services
Only valid for ABAP+JavaJava | CRM Java Components (JCRM)Extended E-Selling Components (XECO) |
You have to perform the following steps to check and configure Workforce Deployment Application
and Calculation Services (WFD ASCS)
You implement WFMCORE 200 using transaction SAINT [page 15]
You configure the XCM administration tool for WFD ASCS [page 16]
You check WFD calculation services [page 18]
You check the installation of WFD ASCS [page 19]End of ABAP+JavaJava | CRM Java Components (JCRM)Extended E-Selling Components (XECO) |
Only valid for ABAP+JavaJava |
421 Implementing WFMCORE 200 Using Transaction SAINT
Before you can check and configure the Java part of Workforce Deployment Application and
Calculation Services (WFD ASCS) you need to implement WFMCORE 200
4 Post-Installation
42 Post-Installation Steps for Workforce Deployment Application and Calculation Services
2012-12-17 CUSTOMER 1550
Only valid for CRM Java Components (JCRM) |
The WFMCORE 200 component contains all necessary ABAP classes and libraries required for the
various Workforce Deployment scenarios and processes including Service Resource Planning in CRM and
Retail Multisite Workforce DeploymentEnd of CRM Java Components (JCRM) |
Procedure
1 Log on to your ABAP system
2 Install WFMCORE 200 using transaction SAINT as described in SAP Note 830595
3 Only valid for CRM Java Components (JCRM) |
If you are implementing the Service Resource Planning in CRM process variant run the report
WFDBP_UPDATE_BLUEPRINT to update tables that define the settings required to properly
display and maintain Service Arrangements in the People-Centric User InterfaceEnd of CRM Java Components (JCRM) |
End of ABAP+JavaJava |
Only valid for ABAP+JavaJava |
422 Configuring the Extended Configuration Management (XCM) for WFD Application and Calculation Services
Workforce Deployment Application Services (WFD AS) sends calculation and forecasting requests to
a CRM ABAP back-end system WFD Calculation Services (WFD CS) picks up the requests from this
CRM ABAP back-end system You define the connection to the CRM ABAP back-end system through
Extended Configuration Management (XCM) Admin
For more information about using Extended Configuration Management (XCM) to configure your
application see Using Extended Configuration Management (XCM) [page 40] and the documentation in the
SAP Solution Manager [page 41]
The csjcoxxxxx XCM parameters define the JCO connection to the SAP CRM ABAP system where
the WFD CS maintains forecast and calculation requests You can connect to the CRM ABAP system
using one of the following
A message or dispatching server by specifying csjcomshost csjcogroup and csjcor3name
An application server by specifying csjcoahost and csjcosysnr
In either case you must also specify csjcoclient csjcouser and csjcopassword
XCM Parameter Name Example Value Description
csjcoahost us0091wdfsapcorp Application server host name of the SAP CRM Calculation Service
csjcosysnr 91 System number of the R3 Calculation Service (for example 09)
csjcomshost us0091wdfsapcorp Message server host name of the SAP CRM Calculation Service
csjcogroup PUBLIC Group of the SAP CRM Calculation Service (case sensitive for example PUBLIC)
4 Post-Installation
42 Post-Installation Steps for Workforce Deployment Application and Calculation Services
1650 CUSTOMER 2012-12-17
XCM Parameter Name Example Value Description
csjcor3name Q5C System ID of the SAP CRM Calculation Service (for example IDES)
csjcoclient 505 Client of the SAP CRM Calculation Service
csjcouser Back end user for JCO connection to the SAP CRM Calculation Service
csjcopassword Password for the back-end user
You need to configure these csjcoxxxxx XCM parameter values in each instance of WFD AS and
WFD CS Make sure that the values are the same in all instances
Configuring the XCM for WFD Calculation Services
This business scenario is relevant for defining the WFD CS You must perform this XCM configuration
for the WFD CS to run
1 Start the XCM using the following URL
httpltJ2EE_hostgtltJ2EE_portgtwfdcsadminxcminitdo
2 Access the configuration using the following path General Application Settings Customer sisopt
sisoptconfig
Process Description Web ApplicationXCM Application Configurations
Calculations Service Workforce scheduling application
wfdcs sisoptconfig
3 In addition to the csjcoxxxx XCM parameters you need to define the http port of the J2EE
instance where WFD CS is running
XCM Parameter Name Example Value Description
cshttpport 51000 The http port of the web server where the WFD Calculation Services application is running (for example 50000)
4 Restart the application after saving the XCM configuration
Configuring the XCM for WFD Application Services
This business scenario is relevant for connecting the WFD AS to the WFD CS
1 Start the XCM using the following URL
httpltJ2EE_hostgtltJ2EE_portgtwfdadminxcminitdo
2 Access the configuration using the following path General Application Settings Customer sis
sisconfig
Process Description Web ApplicationXCM Application Configurations
Application Services Web-based scheduling application
wfd sisconfig
3 Restart the application after saving the XCM configurationEnd of ABAP+JavaJava |
4 Post-Installation
42 Post-Installation Steps for Workforce Deployment Application and Calculation Services
2012-12-17 CUSTOMER 1750
Only valid for ABAP+JavaJava |
423 Checking Workforce Deployment Calculation Services
After configuring Workforce Deployment Calculation Services (WFD CS) with Extended Configuration
Management (XCM) and restarting the application you need to go to the WFD CS configuration page
to check that it is running
Prerequisites
You have completed the installation of WFD Application Service (AS) and CS as described in this
documentation
Only valid for CRM Java Components (JCRM) |
You have downloaded the Business Package for Retail (Release 10) from sdnsapcom SAP NetWeaver
Capabilities User Productivity Portal and Collaboration Portal Content Portfolio
For more information about the portal content versions for your release see the documentation
Master Guide ndash SAP Customer Relationship Management 70 at httpservicesapcomcrm-instEnd of CRM Java Components (JCRM) |
Only valid for CRM Java Components (JCRM) |
You must have access to the Portal Admin role in SAP CRM through the Enterprise Portal to complete
this part of the WFD ASCS installation
For more information see Configuring the CRM Business Package on the SAP Service Marketplace at
httpservicesapcomcrm-inst SAP CRM 70 CRM Business Packages and PC UI Section
CRM Portal Administrator contains specific instructions on configuring the portal for access to WFD
AS and CS Apply the instructions to the Portal Admin roleEnd of CRM Java Components (JCRM) |
You have configured your portal users based on the required settings as described in the
configuration documentation for your IT scenario
For more information see Accessing Configuration Documentation in the SAP Solution Manager [page 41]
Procedure
1 Access the WFD CS configuration page through the Enterprise Portal using the role Portal
Administrator
2 Choose WFD Calculation Services Configuration
The Configuration tab looks as follows
Tab To Complete InstallationFor ongoing Configuration Management
Calculation Servers Required for at least one calculation server
Required for each additional calculation server
Logging Localization No Required to add or change logging once fully operational
End of ABAP+JavaJava |
4 Post-Installation
42 Post-Installation Steps for Workforce Deployment Application and Calculation Services
1850 CUSTOMER 2012-12-17
Only valid for ABAP+JavaJava |
424 Checking the Installation of WFD Application Services and WFD Calculation Services
This section tells you how to check that you have correctly installed the Java components for Workforce
Deployment Application Services (WFD AS) and WFD Calculation Services (WFD CS) This section
does not tell you how to check the connection between the WFD AS and the WFD CS
The procedure below shows you how to create a simple calculation request and verify that the
Calculation Server has received the request This helps you check that you have correctly installed all
WFD AS or CS components and that they are communicating with each other
Prerequisites
You have completed all the installation steps described in this documentation
You have connected WFD AS or CS components with the Enterprise Portal
You have installed the required business packages according to Checking Workforce Deployment
Calculation Services [page 18]
Procedure
1 To check that WFD AS is working and listening for HTTP requests enter the following URL
httpltJ2EE_hostgtltJ2EE_portgtwfdlogondo
The following error confirms that the application is working
Your session has expired Please renew your session by clicking a section link in
the Portal menu
2 Access the WFD CS from the Enterprise Portal through the Portal Admin role and check that the
WFD CS page comes up with no errors
If the page does not come up possible errors are
Error Message Cause
Missing value for XCM configuration
parameter cshttpport
The XCM parameter cshttpport was not filled
The request could not be completed
due to the following
errorsltfollowed by details of the
particular error usually related to
the JCO connectiongt
One of the XCM parameters csjcoxxxxx might be incorrect
EXAMPLE
The user or password are incorrect
3 Test the submission of a calculation request to see if the WFD CS can process the request
You can simulate a calculation request submission by executing the RFC
TEST_WFDCS_CALCREQ_SUBMIT from the CRM back-end system defined in the csjcoxxxxx XCM
parameters of WFD CS
4 Post-Installation
42 Post-Installation Steps for Workforce Deployment Application and Calculation Services
2012-12-17 CUSTOMER 1950
EXAMPLE
For example when you installed WFD CS you configured the csjcoxxxxx XCM
parameters to point to system ID Q5C client 505 You now need to log in to Q5C client 505
and execute TEST_WFDCS_CALCREQ_SUBMIT with transaction SE37 using the default import
parameters
4 Check the Requests tab of the WFD CS page to check the status of entries with the location name
SMOKETEST has the status FAILED
Status FAILED indicates a successful smoke test It means that the Request Manager successfully
sent the request to the Solver which successfully processed it
Status QUEUED probably means that the XCM parameter cshttpport was incorrectEnd of ABAP+JavaJava |
End of Java |
Only valid for ABAP+JavaJava |
43 Post-Installation Steps for the Business Packages for SAP CRM
The following sections provide information about the steps that you have to perform after importing
the Business Package for SAP CRM
Only valid for ABAP+JavaJava |
431 Creating Roles for the SAP CRM Business Packages
Procedure
If you create your own roles from the SAP CRM Business Packages also add the every user role
(eu_core_role) to your role The Every User Role contains the personalization functionality for the SAP
NetWeaver Portal
For more information about the Every User Role see the SAP Library at
httphelpsapcomnw70 SAP NetWeaver 70 Library (including Enhancement Package 2) English SAP
NetWeaver Library SAP NetWeaver by Key Capability People Integration by Key Capability Portal Portal
Administration Guide Super Administration Pre-configured Roles Every User Roles End of ABAP+JavaJava |
Only valid for ABAP+JavaJava |
432 Installation of the Info Center for the SAP CRM Business Package
This section describes how to install the Info Center
4 Post-Installation
43 Post-Installation Steps for the Business Packages for SAP CRM
2050 CUSTOMER 2012-12-17
Prerequisites
You have installed the Business Package for SAP CRM [page 43]
You have administrator rights
Process Flow
1 You import the SAP CRM info center configurations and directory structure [page 21]
2 You activate manual ordering of folders for the sapcrm Repository [page 23]
3 You create indexes and taxonomies for the sapcrmnews Repository [page 23]
4 You create the index for the sapcrm Repository [page 25]
5 You configure the personal search [page 25]
6 If required you increase the number of JCo connections [page 26]
Only valid for ABAP+JavaJava |
4321 Importing the SAP CRM Info Center Configurations and Directory Structure
The directory structure of the info center has been made available in one content package and you can
import it using the Information and Content Exchange (ICE) Repository
For more information about ICE see SAP Library at
httphelpsapcomnw70 SAP NetWeaver 70 Library (including Enhancement Package 2) English SAP
NetWeaver Library SAP NetWeaver by Key Capability Information Integration by Key Capability Knowledge
Management Content Managers Guide Additional Tasks for Content Managers Content Exchange Distributing
Content (Offline)
Procedure
Importing the Directory Structure
1 Log on to the Portal as content manager
2 Choose Content Management Content Exchange Upload
3 Only valid for Windows |
Select file fullupdate_infocenterzip from directory ltservlet_enginegtirjrootWEB-INF
portalportalappsepcrmchmkmexpice and confirm the uploadEnd of Windows |
Only valid for IBM i5OSUNIX |
Select file fullupdate_infocenterzip from directory ltservlet_enginegtirjrootWEB-INF
portalportalappsepcrmchmkmexpice and confirm the uploadEnd of IBM i5OSUNIX |
The zip file is now imported using the ICE protocol
If you cannot see the ICE repository this might be due to one of the following reasons
The ICE repository was hidden in the virtual root repository
4 Post-Installation
43 Post-Installation Steps for the Business Packages for SAP CRM
2012-12-17 CUSTOMER 2150
In this case do the following
1 Log on to the portal as system administrator
2 In the SAP NetWeaver Enterprise Portal choose System Administration System Configuration
Knowledge Management Content Management Repository Managers Virtual Root Repository
3 Check whether the ICE Repository has been entered under Repositories to exclude
4 Remove it from the list
5 Save your changes
6 Restart the Servlet Engine
The repository has been ldquoswitchedrdquo to invisible
1 Log on to the portal as system administrator
2 In the SAP NetWeaver Enterprise Portal choose System Administration System Configuration
Knowledge Management Content Management Repository Managers Content Exchange
Repository
3 If the property hide in root folder is active deselect it
4 Restart the Servlet Engine
NOTE
After the import check whether the directory structure was created by choosing Content
Administration KM Content in the SAP NetWeaver Enterprise Portal The list of folders should
contain the folders sapcrm and sapcrmnews
Checking Whether the Directory Structure Has Been Imported Successfully
You can only import the structure if there is a repository with the same name For example if a zip file
is exported from the repository sapcrm there must also be a repository with the name sapcrm in the
target system
The sapcrm and sapcrmnews repositories as well as the CRM-Namespace filter are created during the
import of the SAP CRM KM extension configuration archive To check whether this configuration
archive has been imported successfully proceed as follows
1 Log on to the portal as system administrator
2 In the SAP NetWeaver Enterprise Portal choose System Administration Monitoring Knowledge
Management Deployment Monitor Config Archives
3 Check whether the archive comsappctcrmappkmextprjconfig is installed in the system
If the archive comsappctcrmappkmextprjconfig is not installed in the system import it
manually as follows
1 Log on to the portal as system administrator
2 In the SAP NetWeaver Enterprise Portal choose System Administration Monitoring Knowledge
Management Deployment Monitor Config Archives Actions Import
4 Post-Installation
43 Post-Installation Steps for the Business Packages for SAP CRM
2250 CUSTOMER 2012-12-17
3 Only valid for Windows |
Select the archive comsappctcrmappkmextprjconfigconfigarchive from directory
ltSAPSIDgtJCltinstance_numbergtj2eeclusterappssapcomep~crm~chm
servlet_jspepcrmchmkmexprootWEB-INFconfig and confirm the importEnd of Windows |
4 Only valid for IBM i5OSUNIX |
Select the archive comsappctcrmappkmextprjconfigconfigarchive from
directory ltSAPSIDgtJCltinstance_numbergtj2eeclusterappssapcomep~crm~chm
servlet_jspepcrmchmkmexprootWEB-INFconfig and confirm the importEnd of IBM i5OSUNIX |
After the import the directory structure has no restrictions on rights Make sure that you modify the
rights of the various folders to meet your companyrsquos requirementsEnd of ABAP+JavaJava |
Only valid for ABAP+JavaJava |
4322 Activating Manual Ordering of Folders for the sapcrm Repository
The sapcrm Repository folders are ordered in a specific sequence
Procedure
To display this sequence activate manual ordering for each directory
For more information see the SAP Library at
httphelpsapcomnw70 SAP NetWeaver 70 Library (including Enhancement Package 2) English SAP
NetWeaver Library SAP NetWeaver by Key Capability Information Integration by Key Capability Knowledge
Management Content Managers Guide Providing Shared Access to Departmental Documents Sorting Documents in a
Folder ManuallyEnd of ABAP+JavaJava |
Only valid for ABAP+JavaJava |
4323 Creating Indexes and Taxonomies for the sapcrmnews Repository
To make news available for indexing and searching create two new indexes
Prerequisites
You have administrator rights for Knowledge Management on the server
For more information see the SAP Library at
httphelpsapcomnw70 SAP NetWeaver 70 Library (including Enhancement Package 2) English SAP
NetWeaver Library SAP NetWeaver by Key Capability Information Integration by Key Capability Knowledge
Management
4 Post-Installation
43 Post-Installation Steps for the Business Packages for SAP CRM
2012-12-17 CUSTOMER 2350
Procedure
Creating Indexes and Taxonomies for the sapcrmnews Repository
The Business Package contains an iView ndash epbp_crmchm-pmiviewsnews_flash ndash that combines all
news with the istopnews=yes attribute in a virtual folder To guarantee the function of this iView
create two indexes in KM
1 In the SAP NetWeaver Enterprise Portal choose System Administration System Configuration
Knowledge Management Index Administration
2 Create an index of the Search and Classification type with a suitably configured taxonomy
3 Choose sapcrmpartnernews as the index ID Otherwise the path to the folder specified in the iView
is incorrect
If you choose another index ID you must also modify accordingly the folder properties in the
iView for one of the following
Folders path to content and path to root
Folders Path to Initially Displayed Folder and Path to Root Folder for Navigation
If you want to link two portal servers with a TREX server you must modify the index name and
iView properties on one of the portal servers
4 Assign folder sapcrmpartnerPartnernews as a data source
This moves all news with the (virtual) Top flag from this folder to the Newsflash iView
5 Create a ldquoquery-basedrdquo taxonomy with the name PartnerNewsFlash choosing Automatic
Classification before you save the taxonomy
NOTE
The outbound delivery includes only the iView above for virtually combining news If you
also want to use this functionality for other news channels (for example internal news) use
your own index and taxonomy for each channel
For more information see the SAP Library at
httphelpsapcomnw70 SAP NetWeaver 70 Library (including Enhancement Package 2) English SAP
NetWeaver Library SAP NetWeaver by Key Capability Information Integration by Key Capability Knowledge
Management Administration Guide System Administration System Configuration lsquoIndex Administrationrsquo iView
Creating Queries for the Taxonomies of sapcrmnews Repositories
1 Log on to the portal as content manager
2 Choose Content Management Classification Taxonomy Query Builder
3 Add a search query to check the istopnews property for the value Yes
4 Enter PartnerNewsFlash as the name for the taxonomy
Here too a property of the iView links to a taxonomy with this name So if you want to choose
another name you must modify the path to the content folder property of the iView
For more information see the SAP Library at
4 Post-Installation
43 Post-Installation Steps for the Business Packages for SAP CRM
2450 CUSTOMER 2012-12-17
httphelpsapcomnw70 SAP NetWeaver 70 Library (including Enhancement Package 2) English SAP
NetWeaver Library SAP NetWeaver by Key Capability Information Integration by Key Capability Knowledge
Management Administration Guide System Administration System Configuration Taxonomies and ClassificationEnd of ABAP+JavaJava |
Only valid for ABAP+JavaJava |
4324 Creating the Index for the sapcrm Repository
To make Info center documents available for indexing and searching create a new index with sapcrm
as a data source
Prerequisites
You have administrator rights for Knowledge Management on the server
Procedure
Choose a name of your own Search as a service and standard as a crawler parameter
For more information see the SAP Library at
httphelpsapcomnw70 SAP NetWeaver 70 Library (including Enhancement Package 2) English SAP
NetWeaver Library SAP NetWeaver by Key Capability Information Integration by Key Capability Knowledge
ManagementEnd of ABAP+JavaJava |
Only valid for ABAP+JavaJava |
4325 Configuring the Personal Search
Prerequisites
You have administrator rights for Knowledge Management on the server
Procedure
1 Create an index for the userhome repository
To make personal folder documents available for the search create a new index with root
userhome as the data source
2 Create a search option set for personal search
To assign the search index and a start folder to the search for personal documents create a Search
Option Set with the name CRMPersonalFolderSearch As an index enter the index for the
userhome repository created above and ~alias~userhomeuseridPersonal Documents as the
root folder for the search
For more information see the SAPLibrary at
4 Post-Installation
43 Post-Installation Steps for the Business Packages for SAP CRM
2012-12-17 CUSTOMER 2550
httphelpsapcomnw70 SAP NetWeaver 70 Library (including Enhancement Package 2) English SAP
NetWeaver Library SAP NetWeaver by Key Capability Information Integration by Key Capability Knowledge
Management End of ABAP+JavaJava |
Only valid for ABAP+JavaJava |
4326 Increasing the Number of JCo Connections
This section tells you how to increase the number of concurrent Java Connector (JCo) connections
By default the maximum number of concurrent JCo connections is 100 The value depends on the
number and behavior of the users in the portal For more information see SAP Note 316877
You can specify this value when you plan the installation of your SAP NetWeaver Enterprise Portal
Make sure that you first analyze the number and behavior of the users
Procedure
To increase the maximum number of concurrent JCo connections increase the value of the
environment variable CPIC_MAX_CONV
EXAMPLE
Initial default value CPIC_MAX_CONV=100
Increased value CPIC_MAX_CONV=1000
End of ABAP+JavaJava |
End of ABAP+JavaJava |
End of ABAP+JavaJava |
Only valid for ABAP+JavaJava | MapBox (MBX) |
44 Post-Installation Steps for MapBoxOnly valid for Java | MapBox (MBX) |
You have to perform the following post-installation steps for MapBox
You assign user groups for MapBox users [page 27]
You configure an RFC destination for TCPIP connections [page 28]
You perform initial configuration for MapBox [page 28]
You execute the Map Box [page 34]
You perform the smoke test [page 35]
If required you perform additional settings for MapBox
Block size settings [page 38]
Memory settings for the J2EE Engine [page 39]End of Java | MapBox (MBX) |
4 Post-Installation
44 Post-Installation Steps for MapBox
2650 CUSTOMER 2012-12-17
Only valid for Java | MapBox (MBX) |
441 Assigning User Groups for MapBox Users
To access the MapBox URL you need to provide the correct security rights for individual user groups
Procedure
1 Log on to the Visual Administrator
1 On your central instance host change to the following directory
Only valid for IBM i5OSUNIX |
usrsapltSAPSIDgtltinstance_numbergtj2eeadmin
End of IBM i5OSUNIX |
Only valid for Windows |
usrsapltSAPSIDgtltinstance_numbergtj2eeadmin
End of Windows |
2 Only valid for IBM i5OSUNIX |
Run goshEnd of IBM i5OSUNIX |
3 Only valid for Windows |
Double-click gobatEnd of Windows |
For more information about the Visual Administrator see the SAP Library at
httpshelpsapcomnw70 SAP NetWeaver Library SAP NetWeaver by Key Capability
Application Platform by Key Capability Java Technology Administration Manual J2EE Engine J2EE Engine
Administration Tools
2 Choose the server node from the left-hand window
3 Choose Services Security Provider
A list of deployed components is displayed
4 Choose MapBoxLauncher from this list (sapcom
comsapsyncpointmapboxlaunchermapboxlauncher)
A list of tabs appears on the right
5 Choose Security Roles from the list
A list of security roles appears
6 If no display and modify roles are displayed add these roles as follows
1 Choose Switch to Edit Mode from the top task bar to switch to edit mode
2 Add display and modify roles by choosing Add
7 For both the display and modify roles perform the following
1 Choose Switch to Edit Mode from the top task bar to switch to edit mode
2 Choose the Groups tab from the list on the far right
3 Choose Search
4 Post-Installation
44 Post-Installation Steps for MapBox
2012-12-17 CUSTOMER 2750
A list of user groups appears
4 Select the user groups that you want to enable for the two roles
Add to the left of the user group display is now highlighted
5 Choose Add to add the user group for the selected roleEnd of Java | MapBox (MBX) |
Only valid for Java | MapBox (MBX) |
442 Configuring an RFC Destination for MapBox
After the installation you have to create an RFC destination for MapBox
Procedure1 Log on to the CRM server
2 Enter transaction SM59
The Display and Maintain RFC Destinations screen appears
3 Choose Technical Settings Activation Type and create a new destination with the type TCPIP
4 Choose Registered Server Program and enter a unique value for program ID
For example you might enter MAPBOX723 for SAP client 723
5 Enter the details of the gateway host and gateway service in Gateway Options
1 Gateway host
Enter the name of your message server You can also enter the IP address of your message
server
2 Gateway service
Enter your SAP CRM system number prefixed with the string sapgw
For example if your system number is 02 enter sapgw02
6 If the CRM system is a Unicode-enabled system choose Unicode in Special Options
7 Save the destination
8 Choose MapBox Configuration Page Connecting settings from the URL and enter the same RFC
destination name in the relevant fieldEnd of Java | MapBox (MBX) |
Only valid for Java | MapBox (MBX) |
443 Performing Initial Configuration for MapBox
Procedure1 Open a browser window and enter the following URL
httplthostnamegtltport_numbergtmapboxlauncher
NOTE
If you are logged on to the machine where the J2EE server is running you can also enter the
following URL
4 Post-Installation
44 Post-Installation Steps for MapBox
2850 CUSTOMER 2012-12-17
httplocalhostltport_numbergtmapboxlauncher
2 Choose Configuration
3 Edit the values according to your SAP system and choose Save
The application asks you to enter a user name and password
4 Enter the user name and password used for the SAP J2EE Engine Visual Administrator
A description of the properties and example values for the properties is given below
Result
You see the default connection settings for MapBox as shown in the graphic below A description
of the properties and example values are provided in the adjacent table
Figure 1 MapBox Default Connection Settings
Property Purpose Example
SAP System SAP System name ABC FAZ
Message Server Message server host name xyzmain
Group SAP System group PUBLIC SPACE
System Number SAP Gateway system number prefixed with sapgw
sapgw02
Unicode Used for setting the Unicode option for the CRM server Default value is no
yes
Maximum allowed wait time interval between ISP Processing and Commit call
Time-out period between an ISP_MAPBOX call and an ISP_COMMIT call
300
4 Post-Installation
44 Post-Installation Steps for MapBox
2012-12-17 CUSTOMER 2950
Property Purpose Example
Client SAP logon client 723
User Name SAP logon user John
Password SAP logon password
Language SAP logon language EN
Destination The RFC destination with which you need to register the MapBox This is the value you enter in step 3 of Configuring an RFC Destination for MapBox [page 28]
MAPBOX723
Number of server instances The number of JCO server execution instances used by the MapBox to process server requests This number indicates the number of CRM inbound queues that are running simultaneously
10
The above MapBox connection configuration is meant for one SAP client running with the CRM
Server If you want to run the MapBox with two or more SAP clients of the same CRM system
you can use Add Client on the configuration page and edit the values accordingly However make
sure that the RFC destinations that these multiple clients listen to are always unique You can
leave the default values for the other settings
If you need more control over logging and tracing you can go to Log Settings on the configuration
page edit the values and choose Save The Log Settings screen with default values is shown in the
graphic below A description of the properties and example values for the properties is provided
in the adjacent table
Figure 2 Default Values for the Log Settings Screen
4 Post-Installation
44 Post-Installation Steps for MapBox
3050 CUSTOMER 2012-12-17
Property Purpose Example
Log and dumps directory This value specifies where the MapBox logs and dumps are stored If this field is left blank the ltuser_homegt folder is used as default value
Only valid for Windows |
Ctemp
End of Windows |
Only valid for IBM i5OSUNIX |
tmp
End of IBM i5OSUNIX |
Input payload dump This value specifies whether the input document coming to MapBox for processing is written or not
No
MapBox launcher trace level This value specifies with what granularity the MapBoxLauncher execution trace is generated6 specifies that a full MapBoxLauncher execution trace is generated whereas 0 specifies that the MapBoxLauncher execution trace is not generated Recommended value for production use is 0
0
MapBox launcher trace size The maximum file size of the generated trace When the size reaches the maximum value another file is created so that the old file can be deleted (for example due to lack of space) You can use alphabetic suffixes to specify the sizes The supported values are k or K ndash kilobytes g or G ndash gigabytes m or M ndash megabytes t or T ndash terabytes
50 k
CoordServer log level This value specifies the detail of the coordination server logging We recommended you not to change the default value of 1
2
SAP Java connector trace level This value specifies the detail of the SAP Java Connector logging The recommended value for production use is 0
2
MapBox log level The log level required for the MapBox to generate an internal log file A higher trace level means that a more detailed log file is created We recommend you to use 4D for production systems where D meansldquoOn Demandrdquo
2
4 Post-Installation
44 Post-Installation Steps for MapBox
2012-12-17 CUSTOMER 3150
Property Purpose Example
MapBox message dumps This value stands for copying the incoming and outgoing messages to the local system For better performance we recommend that you do not enable the message dump option
no
MapBox statistics This value specifies whether a file that lists the performance measurements of the MapBox is created We recommend you to use the value no for production use
no
MapBox logs location This value specifies where the MapBox logs are stored Possible locations are the MapBox repository on the CRM Server or the local file system The recommended value for production use is local_fs which indicates that the MapBox logs are stored on the local file system
local_fs
MapLog format The format in which the MapBox log file must be created The internal log file is by default created in a particular format However you can change this format to display the file in the SAP log file format The two values that are available are default and sap_log
default
The MapBox uses additional properties for performance such as caching and reuse of the MapBox
atoms These values are already set to optimum values and you cannot change them
The description of the properties is shown in the table below
Property Purpose Example
General Settings
max_elements_document This is the limit for the internal cache of the MapBox to hold the count of generated XML documentsWe recommend you not to change this value
100
cache_threshold This is the maximum threshold ndash in kilobytes ndash for a document to be cached in the internal cache of the MapBox
500
4 Post-Installation
44 Post-Installation Steps for MapBox
3250 CUSTOMER 2012-12-17
Property Purpose ExampleWe recommend you not to change this value
max_elements_cache This is the limit for the internal cache of the MapBox to hold the count of MapScenariosWe recommend you not to change this value
100
parallel_instances You use this value on systems where more than one CPU is used This setting allows you to specify the number of CPU instances that MapBox must use for processing so that the remainder can be used by non-MapBox related applications By default MapBox uses all the available CPUs for processing Values can range between 0 to N-1 where N is the number of available CPUs
4
thread_priority Specifies the number of threads MapBox uses during processing We recommend you to set an optimum value for this property so that MapBox does not utilize all available resources 0 = min 1 = low 2 = normal 3 = high 4 = max
3
reuse_count Sets the count for the number of times an atom-instance must be reused before it is destroyed A value of 0 means that the atom is not destroyed and can be used continuously Recommended value is 50 This means that the atom instance is reused 50 times before it is destroyed
100
Lock Server Settings
Operation_Mode The internal mode of operation for the coordination server We recommend not to change the default value of OUTPROC_CLIENT
OUTPROC_CLIENT
Registry_Port The Remote Method Invocation (RMI) port used for connecting to the coordination serverRMI is a Java mechanism for distributed computing
1099
4 Post-Installation
44 Post-Installation Steps for MapBox
2012-12-17 CUSTOMER 3350
Property Purpose ExampleDo not change this value unless port 1099 is unavailable In this case change it to 59856
HostName The name of the host where the coordination server resides
localhost
LocalName The name of the host where the MapBoxLauncher is executed We recommend you not to change the default value of localhost
Server
PollingInterval Polling interval in seconds to ask for shutdown of the coordination server We recommend you not to change the default value of 30
60
CleanUpInterval Cleanup interval in seconds to check for invalid locks created by the MapBoxLauncher We recommend you not to change the default value of 60
180
NOTE
A file name MapLogxsl is also available with the smoke test [page 35] This file is the stylesheet
that is used to format the display of the MapBox log file During the installation and execution
of the MapBox the MapBox log file is created in the following directory
Only valid for Windows |
ltUser_homegtTempMapBoxDumpsltyour_system_namegt500 where ltuser_homegt is the
home directory of the logged-on user ltyour system namegt is the CRM server you have
connected to and 500 is the client you have connected toEnd of Windows |
Only valid for IBM i5OSUNIX |
ltUser_homegtTempMapBoxDumpsltyour_system_namegt500 where ltuser_homegt is the
home directory of the logged-on user ltyour system namegt is the CRM server you have
connected to and 500 is the client you have connected toEnd of IBM i5OSUNIX |
RECOMMENDATION
We recommend that you copy MapLogxsl from the
ltsmoke_test_installation_directorygt to the directory mentioned aboveEnd of Java | MapBox (MBX) |
Only valid for Java | MapBox (MBX) |
444 Executing the MapBox
This section tells you how to execute the MapBox The procedure that you use to execute the Map Box
depends on its current support package (SP) level
4 Post-Installation
44 Post-Installation Steps for MapBox
3450 CUSTOMER 2012-12-17
Procedure
If the SP level of the MapBox is less than SP11 proceed as follows
1 Enter the following URL in your browser
httplthostnamegtltport_numbergtmapboxlaunchermanage
2 Choose Start MapBox
3 The application prompts you for a user name and password
Enter the user name and password for the J2EE Engine Visual Administrator
NOTE
MapBox typically takes 30 to 60 seconds to initialize depending on the number of SAP clients
To see the status of messages processed by MapBox choose Status
If the SP level of the MapBox is equal to or higher than SP11 the MapBox starts automatically
1 For the first MapBox installation you need to restart the Java application server (AS Java) after all
the configuration settings have been completed This automatically starts the MapBox (Autostart)
2 To check the status go to the URL httplthostnamegtltport_numbergtmapboxlauncher
manage
NOTE
MapBox Autostart needs approximately 60 seconds to allow other services of As Java to start
To see the status of messages processed by MapBox choose Status
Result
When the MapBox is running the status is shown as Ready to processEnd of Java | MapBox (MBX) |
Only valid for Java | MapBox (MBX) |
445 Performing the Smoke Test for MapBox
The smoke test checks whether the MapBox installation is error-free
Only valid for Windows |
To execute the smoke test you have to run two batch filesEnd of Windows |
Only valid for IBM i5OSUNIX |
To execute the smoke test you have to run two shell scriptsEnd of IBM i5OSUNIX |
Prerequisites
Before you start the procedure you need to copy the smoketestjar file to a new
ltsmoke_test_installation_directorygt of your choice which has two further subdirectories
firstrun and secondrun
4 Post-Installation
44 Post-Installation Steps for MapBox
2012-12-17 CUSTOMER 3550
You can find the smoketestjar file here
Only valid for IBM i5OSUNIX |
usrsapltinstance_IDgtJCltinstance_numbergtj2eeclusterserver0binext
comsapsyncpointmapboxEnd of IBM i5OSUNIX |
Only valid for Windows |
usrsapltinstance_IDgtJCltinstance_numbergtj2eeclusterserver0binext
comsapsyncpointmapboxEnd of Windows |
NOTE
Each subdirectory of ltsmoke_test_installation_directorygt ndash that is firstrun and
secondrun ndash contains the following files
MBSMOKETEST_IN_000xml
MBSMOKETEST_IN_001xml
MBSMOKETEST_IN_002xml
MBSMOKETEST_IN_003xml
After executing the smoke test you must verify whether the contents of the files generated
by your test are similar to the contents of the above files That is the XML documents that
are created in the smoke test must match the documents located in the
ltsmoke_test_installation_directorygt mentioned above
To execute the smoke test you need to install the SAP Java Connector (SAP JCo version 2012)
You have to download SAP JCo 2012 from SAP Service Marketplace at https
servicesapcomswdc before executing the smoke test
CAUTION
Make sure that you install the SAP Java Connector correctly
The file mapcaseprop is available in the ltsmoke_test_installation_directorygt This file
contains the connection parameters to be tested You can modify the contents of this file
CAUTION
You must replace the connection parameters in this file with the connection parameters that
you entered in the MapBoxMetaxml file
Procedure
1 Run the first stage of the smoke test
1 Only valid for Windows |
Execute the file smoketest_1bat from the ltsmoke_test_installation_directorygtEnd of Windows |
Only valid for Windows |
This prompts you to enter the followingEnd of Windows |
4 Post-Installation
44 Post-Installation Steps for MapBox
3650 CUSTOMER 2012-12-17
Only valid for Windows |
1 ltDRIVEgtusrsapltinstance_IDgtJCltinstance_numbergtj2ee
2 ltsmoke_test_installation_directorygt
3 ltpath_to_sapjcojargt
End of Windows |
Only valid for IBM i5OSUNIX |
Execute the file smoketest_1sh from the ltsmoke_test_installation_directorygtEnd of IBM i5OSUNIX |
Only valid for IBM i5OSUNIX |
1 usrsapltinstance_IDgtJCltinstance_numbergtj2ee
2 ltsmoke_test_installation_directorygt
3 ltpath_to_sapjcojargt
End of IBM i5OSUNIX |
2 Enter the appropriate paths
The smoke test creates the following files
MBSMOKETEST_IN_000xml
MBSMOKETEST_IN_001xml
MBSMOKETEST_IN_002xml
MBSMOKETEST_IN_003xml
3 Only valid for Windows |
Check the contents of the generated files against the contents of the files located in
ltsmoke_test_installation_directorygtSMOKETESTfirstrunEnd of Windows |
Only valid for IBM i5OSUNIX |
Check the contents of the four files against the contents of the files located in
ltsmoke_test_installation_directorygtSMOKETESTfirstrunEnd of IBM i5OSUNIX |
2 Run the second stage of the smoke test
1 Only valid for Windows |
Execute the file smoketest_2bat which is located in the
ltsmoke_test_installation_directorygtEnd of Windows |
Only valid for IBM i5OSUNIX |
Execute the file smoketest_2sh which is located in the
ltsmoke_test_installation_directorygtEnd of IBM i5OSUNIX |
This prompts you to enter the following
Only valid for Windows |
1 ltDRIVEgtusrsapltinstance_IDgtJCltinstance_numbergtj2ee
2 ltsmoke_test_installation_directorygt
End of Windows |
4 Post-Installation
44 Post-Installation Steps for MapBox
2012-12-17 CUSTOMER 3750
Only valid for IBM i5OSUNIX |
1 usrsapltinstance_IDgtJCltinstance_numbergtj2ee
2 ltsmoke_test_installation_directorygt
End of IBM i5OSUNIX |
2 Enter the appropriate paths
The smoke test creates the following files
MBSMOKETEST_IN_000xml
MBSMOKETEST_IN_001xml
MBSMOKETEST_IN_002xml
MBSMOKETEST_IN_003xml
CAUTION
The files generated in the second stage of testing overwrite the contents of the files
generated in the first stage
3 Only valid for Windows |
Check the contents of the generated files against the contents of the files located in
ltsmoke_test_installation_directorygtSMOKETESTsecondrunEnd of Windows |
Only valid for IBM i5OSUNIX |
Check the contents of the four files against the contents of the files located in
ltsmoke_test_installation_directorygtSMOKETESTsecondrunEnd of IBM i5OSUNIX |
Result
If the smoke test has identified errors in the installation process the four XML files are not created in
either of the stages Instead an error log file is created
RECOMMENDATION
In the event of errors we recommend that you send the error log file to your administrator
End of Java | MapBox (MBX) |
Only valid for Java | MapBox (MBX) |
446 Ensuring Optimal Block Size settings
The block size of an object determines the number of messages that are processed at the same time by
the MapBox as a set You need to make sure that the block sizes are optimal to reduce load on the
MapBox XML processor
Procedure
1 Use transaction R3AC3 to set the block size of object GWA_COUNTRY to 10 and save the setting
2 Use transaction R3AC1 to set the block size of object BUPA_MAIN to 10 and save the settingEnd of Java | MapBox (MBX) |
4 Post-Installation
44 Post-Installation Steps for MapBox
3850 CUSTOMER 2012-12-17
Only valid for ABAP+JavaJava | MapBox (MBX) |
447 Adapting Memory Settings for the J2EE Engine
You need to adapt the memory settings for the J2EE Engine because MapBox relies heavily on memory-
intensive XML-processing such as schema-validation parsing transformation and so on
RECOMMENDATION
For rapid message processing by MapBox we recommend you to use 1024 MB of heap memory
for MapBox alone With a heap size of 512 MB MapBox can still process messages but with a slightly
higher processing time for each message
The MapBox memory requirements are directly proportional to the size of the input documents
that MapBox has to process The average size of such documents is in the range of 150 to 200 KB
For messages of this size it is sufficient to have a heap memory of 512 MB If the input documents
are in the range of 1 to 2 MB we recommend that you give MapBox a heap memory of 1024 MB
Procedure
To set the recommended memory settings for the MapBox you start the config tool of the J2EE Engine
Only valid for Windows |
Start the config tool by executing ltDrivegtusrsapltSAPSIDgtltinstance_numbergtj2ee
configtoolbatEnd of Windows |
Only valid for IBM i5OSUNIX |
Start the config tool by executing usrsapltSAPSIDgtltinstance_numbergtj2eeconfigtoolshEnd of IBM i5OSUNIX |
End of ABAP+JavaJava | MapBox (MBX) |
End of ABAP+JavaJava | MapBox (MBX) |
Only valid for ABAPABAP+Java |
45 Activating the CRM Web Client
The CRM Web Client is part of the ICF Services that is automatically installed as part of SAP NetWeaver
Application Server
Procedure
To activate the CRM Web Client after the installation see the SAP Library at
httphelpsapcomnw70 SAP NetWeaver 70 Library (including Enhancement Package 2) English SAP
NetWeaver Library SAP NetWeaver by Key Capability Application Platform by Key Capability Platform-Wide
Services Connectivity Components of SAP Communication Technology Communication Between ABAP and Non-
4 Post-Installation
45 Activating the CRM Web Client
2012-12-17 CUSTOMER 3950
ABAP Technology Internet Communication Framework Development Server-Side Development Creating and
Configuring an ICF Service Activating and Deactivating the ICF ServicesEnd of ABAPABAP+Java |
Only valid for ABAP |
46 Installing and Configuring CRM Application Server Loyalty Add-On Component
This section provides information about how to install and configure CRM Application Server Loyalty
as an add-on component to CRM Application Server ABAP
Prerequisites
You have already deployed the following software components
SAP NetWeaver Application Server ABAP (AS ABAP)
CRM Application Server ABAP
Procedure
Installing CRM Application Server Loyalty
Install CRM Application Server Loyalty on the same host where CRM Application Server ABAP is
deployed as described in SAP Note 1162144
Configuring CRM Application Server Loyalty
After you have installed CRM Application Server Loyalty you must complete the following
configuration steps
1 Call transaction nspro
2 Choose SAP Customising Implementation Guide Customer Relationship Management Marketing Loyalty
Management in BBPCRM Basic Settings Define Basic Settings
3 Enter value 1 for the INSTALL_TYPE parameter
NOTE
You do not have to enter destination name for the LOYALTY_SYSTEM parameterEnd of ABAP |
47 Starting XCM
This section describes how to start XCM
Procedure
1 You access the XCM tool at
httplthostgtltportgtltweb app namegtadminxcminitdo
4 Post-Installation
46 Installing and Configuring CRM Application Server Loyalty Add-On Component
4050 CUSTOMER 2012-12-17
NOTE
You can also start XCM in accessibility mode (according to Section 508 Rehabilitation Act)
at the following URL
httplthostgtltportgtltweb app namegtadminxcminitdosap-accessibility=x
2 Provide a user and password If you are logging on for the first time use the Administrator user
and the password you defined during the installation of the SAP system
RECOMMENDATION
We recommend you create new users with lesser rights than the Administrator for the
administration of Web applications
For more information see the SAP CRM Security Guide section E-Commerce
3 When the application opens a closed control tree is displayed on the left of the screen A screen
containing help information is displayed to the right
You can use edit (change settings) or display (see settings) mode in XCM You use the button in
the top right hand corner of the screen to change between modes When you switch to edit mode
a DB lock is set meaning that only this user can edit the settings at one time The lock is released
once the user switches back to display mode or after session timeout (default timeout is 30mins)
48 Accessing Configuration Documentation in SAP Solution Manager
To access configuration documentation in SAP Solution Manager you have to connect your newly
installed SAP system to SAP Solution Manager
NOTE
For SAP NetWeaver you can also find configuration documentation in the Technology Consultants
Guide at
httphelpsapcomnw70 SAP NetWeaver 70 Library (including Enhancement Package 2) English
SAP NetWeaver Library Technology Consultants Guide
Procedure
Create a configuration project with the related configuration guide as described in the following
documentation
httphelpsapcom SAP Solutions SAP Solution Manager Documentation for SAP Solution Manager
ltcurrent releasegt SAP Solution Manager Implementing and Upgrading SAP Solutions Projects
Configuration
More Information
httpservicesapcomsolutionmanager Media Library How-To Documents How to Create a
Configuration Guide using SAP Solution Manager
4 Post-Installation
48 Accessing Configuration Documentation in SAP Solution Manager
2012-12-17 CUSTOMER 4150
This page is left blank for documents that are printed on both sides
5 Additional Information
Only valid for ABAP+JavaJava |
51 Installing the Business Packages for SAP CRM Using JSPM (Optional)
You can also install the Business Packages for SAP CRM using the Java Support Package Manager (JSPM)
Prerequisites
Only valid for IBM i5OSUNIX |
You have checked hardware and software requirements [external document]End of IBM i5OSUNIX |
Only valid for Windows |
You have checked hardware and software requirements [external document]End of Windows |
You have ckecked the Prerequisites for the Business Packages for SAP CRM [page 7]
Procedure
1 Download version 701 of the files sapcom_BPCRMAPP sapcom_BPCRMFND sapcom_CRMAPP and
sapcom_CRMFND as follows
1 Go to httpservicesapcomswdc Download Support Packages and Patches Search for
Support Packages and Patches
2 Enter the following search terms
BP CRM Application Coding 701
BP CRM Application Content 701
BP CRM Foundation Coding 701
BP CRM Foundation Content 701
2 Add the deployment variable comsapcmshare as described in SAP Note 965948
For more information about how to use the Software Deployment Manager (SDM) see the
documentation Software Deployment Manager which is available at
httphelpsapcomnw70 SAP NetWeaver 70 Library (including Enhancement Package 2) English
SAP NetWeaver Library SAP NetWeaver Developerrsquos Guide Fundamentals Using Java Core Development
Tasks Deployment Putting It All Together Software Deployment Manager
3 Install the Business Packages for SAP CRM with JSPM as described in Installing Additional Usage Types
or Software Units in an Existing SAP System [external document]
5 Additional Information
51 Installing the Business Packages for SAP CRM Using JSPM (Optional)
2012-12-17 CUSTOMER 4350
4 Perform the required Post-Installation Steps for the Business Packages for SAP CRM [page 20]End of ABAP+JavaJava |
Only valid for ABAP+JavaJava |
52 Troubleshooting for the Business Package for SAP CRMOnly valid for ABAP+JavaJava |
The following sections describe the steps that you have to perform if you have problems after the
installation
Activating BI Templates Manually [page 44]
Dragging the Central Search onto the Portal Desktop [page 45]End of ABAP+JavaJava |
Only valid for ABAP+JavaJava |
521 Activating BI Templates Manually
If you have installed the Business Package you might see error messages when loading the BI templates
This procedure describes how you can activate the templates afterwards
Procedure
1 Note the technical name of all templates in your portal interface that are not working
2 Log on to your BI system
3 On the SAP Easy Access screen choose Modeling Administrator Workbench Modeling (transaction
RSA1 or RSOR)
4 Choose Business Content Object Types Web Template Name Select Objects
A new window containing a list of BW objects and templates opens
5 Find your missing templates for example 0TPL_0CRM_Cnn_Qnnn_Vnnn_M and select the entries
6 Choose Transfer Selection
The template now appears on the right-hand side of the screen The Transfer checkbox has been
selected and cannot be changed Nevertheless we recommend that you repeat the following
procedure so that your templates can be displayed
7 Select the template
8 Choose Transfer Transfer
Result
You have successfully activated your missing templates and no error messages appear in the portalEnd of ABAP+JavaJava |
5 Additional Information
52 Troubleshooting for the Business Package for SAP CRM
4450 CUSTOMER 2012-12-17
Only valid for ABAP+JavaJava |
522 Dragging the Central Search onto the Portal Desktop
Procedure
The Business Package for SAP CRM 70 including SAP enhancement package 1 contains an iView for
the central search in CRM This iView is in the package on the page Today in the workset Home of the
CRM User You can drag this iView onto the portal desktop under the tool areaEnd of ABAP+JavaJava |
End of ABAP+JavaJava |
5 Additional Information
52 Troubleshooting for the Business Package for SAP CRM
2012-12-17 CUSTOMER 4550
Typographic Conventions
Example Description
ltExamplegt Angle brackets indicate that you replace these words or characters with appropriate entries to make entries in the system for example ldquoEnter your ltUser Namegtrdquo
ExampleExample
Arrows separating the parts of a navigation path for example menu options
Example Emphasized words or expressions
Example Words or characters that you enter in the system exactly as they appear in the documentation
httpwwwsapcom Textual cross-references to an internet address
example Quicklinks added to the internet address of a homepage to enable quick access to specific content on the Web
123456 Hyperlink to an SAP Note for example SAP Note 123456
Example Words or characters quoted from the screen These include field labels screen titles pushbutton labels menu names and menu options
Cross-references to other documentation or published works
Example Output on the screen following a user action for example messages Source code or syntax quoted directly from a program File and directory names and their paths names of variables and parameters and
names of installation upgrade and database tools
EXAMPLE Technical names of system objects These include report names program names transaction codes database table names and key concepts of a programming language when they are surrounded by body text for example SELECT and INCLUDE
EXAMPLE Keys on the keyboard
4650 CUSTOMER 2012-12-17
SAP AGDietmar-Hopp-Allee 16
69190 WalldorfGermany
T +4918 0534 34 34F +4918 0534 34 20
wwwsapcom
copy Copyright 2012 SAP AG All rights reserved
No part of this publication may be reproduced or transmitted in any form or for any purpose without the express permission of SAP AG The information contained herein may be changed without prior noticeSome software products marketed by SAP AG and its distributors contain proprietary software components of other software vendors
Microsoft Windows Excel Outlook PowerPoint Silverlight and Visual Studio are registered trademarks of Microsoft CorporationIBM DB2 DB2 Universal Database System i System i5 System p System p5 System x System z System z10 z10 zVM zOS OS390 zEnterprise PowerVM Power Architecture Power Systems POWER7 POWER6+ POWER6 POWER PowerHA pureScale PowerPC BladeCenter System Storage Storwize XIV GPFS HACMP RETAIN DB2 Connect RACF Redbooks OS2 AIX Intelligent Miner WebSphere Tivoli Informix and Smarter Planet are trademarks or registered trademarks of IBM CorporationLinux is the registered trademark of Linus Torvalds in the United States and other countriesAdobe the Adobe logo Acrobat PostScript and Reader are trademarks or registered trademarks of Adobe Systems Incorporated in the United States and other countriesOracle and Java are registered trademarks of Oracle and its affiliatesUNIX XOpen OSF1 and Motif are registered trademarks of the Open GroupCitrix ICA Program Neighborhood MetaFrame WinFrame VideoFrame and MultiWin are trademarks or registered trademarks of Citrix Systems IncHTML XML XHTML and W3C are trademarks or registered trademarks of W3Creg World Wide Web Consortium Massachusetts Institute of TechnologyApple App Store iBooks iPad iPhone iPhoto iPod iTunes Multi-Touch Objective-C Retina Safari Siri and Xcode are trademarks or registered trademarks of Apple IncIOS is a registered trademark of Cisco Systems IncRIM BlackBerry BBM BlackBerry Curve BlackBerry Bold BlackBerry Pearl BlackBerry Torch BlackBerry Storm BlackBerry Storm2 BlackBerry PlayBook and BlackBerry App World are trademarks or registered trademarks of Research in Motion LimitedGoogle App Engine Google Apps Google Checkout Google Data API Google Maps Google Mobile Ads Google Mobile Updater Google Mobile Google Store Google Sync Google Updater Google Voice Google Mail Gmail YouTube Dalvik and Android are trademarks or registered trademarks of Google IncINTERMEC is a registered trademark of Intermec Technologies CorporationWi-Fi is a registered trademark of Wi-Fi AllianceBluetooth is a registered trademark of Bluetooth SIG IncMotorola is a registered trademark of Motorola Trademark Holdings LLCComputop is a registered trademark of Computop Wirtschaftsinformatik GmbHSAP R3 SAP NetWeaver Duet PartnerEdge ByDesign SAP BusinessObjects Explorer StreamWork SAP HANA and other SAP products and services mentioned herein as well as their respective logos are trademarks or registered trademarks of SAP AG in Germany and other countriesBusiness Objects and the Business Objects logo BusinessObjects Crystal Reports Crystal Decisions Web Intelligence Xcelsius and other Business Objects products and services mentioned herein as well as their respective logos are trademarks or registered trademarks of Business Objects Software Ltd Business Objects is an SAP companySybase and Adaptive Server iAnywhere Sybase 365 SQL Anywhere and other Sybase products and services mentioned herein as well as their respective logos are trademarks or registered trademarks of Sybase Inc Sybase is an SAP company
2012-12-17 CUSTOMER 4750
Crossgate mgic EDDY B2B 360deg and B2B 360deg Services are registered trademarks of Crossgate AG in Germany and other countries Crossgate is an SAP companyAll other product and service names mentioned are the trademarks of their respective companies Data contained in this document serves informational purposes only National product specifications may varyThese materials are subject to change without notice These materials are provided by SAP AG and its affiliated companies (ldquoSAP Grouprdquo) for informational purposes only without representation or warranty of any kind and SAP Group shall not be liable for errors or omissions with respect to the materials The only warranties for SAP Group products and services are those that are set forth in the express warranty statements accompanying such products and services if any Nothing herein should be construed as constituting an additional warranty
DisclaimerSome components of this product are based on Javatrade Any code change in these components may cause unpredictable and severe malfunctions and is therefore expressly prohibited as is any decompilation of these componentsAny Javatrade Source Code delivered with this product is only to be used by SAPrsquos Support Services and may not be modified or altered in any way
Documentation in the SAP Service MarketplaceYou can find this document at the following address httpservicesapcominstguides
4850 CUSTOMER 2012-12-17
SAP AGDietmar-Hopp-Allee 1669190 WalldorfGermanyT +4918 0534 34 34F +4918 0534 34 20wwwsapcom
copy Copyright 2012 SAP AG All rights reservedNo part of this publication may be reproduced or transmitted in any form or for any purpose without the express permission of SAP AG The information contained herein may be changed without prior notice
- SAP Enhancement Package 1 for SAP CRM 70
-
- Table of Contents
- 1 Introduction
- 2 Planning and Preparation
-
- 21 Prerequisites for the Business Packages for SAP CRM
-
- 3 Installation
- 4 Post-Installation
-
- 41 Checking the Availability of Back-End Systems for SAP CRM Java Components
-
- 411 Creating a Back-End User
- 412 Checking the Connection to the ABAP System
- 413 Configuring and Checking the TREX Service
- 414 Checking the Selling via eBay Processes
-
- 42 Post-Installation Steps for Workforce Deployment Application and Calculation Services
-
- 421 Implementing WFMCORE 200 Using Transaction SAINT
- 422 Configuring the Extended Configuration Management (XCM) for WFD Application and Calculation Services
- 423 Checking Workforce Deployment Calculation Services
- 424 Checking the Installation of WFD Application Services and WFD Calculation Services
-
- 43 Post-Installation Steps for the Business Packages for SAP CRM
-
- 431 Creating Roles for the SAP CRM Business Packages
- 432 Installation of the Info Center for the SAP CRM Business Package
-
- 4321 Importing the SAP CRM Info Center Configurations and Directory Structure
- 4322 Activating Manual Ordering of Folders for the sapcrm Repository
- 4323 Creating Indexes and Taxonomies for the sapcrmnews Repository
- 4324 Creating the Index for the sapcrm Repository
- 4325 Configuring the Personal Search
- 4326 Increasing the Number of JCo Connections
-
- 44 Post-Installation Steps for MapBox
-
- 441 Assigning User Groups for MapBox Users
- 442 Configuring an RFC Destination for MapBox
- 443 Performing Initial Configuration for MapBox
- 444 Executing the MapBox
- 445 Performing the Smoke Test for MapBox
- 446 Ensuring Optimal Block Size settings
- 447 Adapting Memory Settings for the J2EE Engine
-
- 45 Activating the CRM Web Client
- 46 Installing and Configuring CRM Application Server Loyalty Add-On Component
- 47 Starting XCM
- 48 Accessing Configuration Documentation in SAP Solution Manager
-
- 5 Additional Information
-
- 51 Installing the Business Packages for SAP CRM Using JSPM (Optional)
- 52 Troubleshooting for the Business Package for SAP CRM
-
- 521 Activating BI Templates Manually
- 522 Dragging the Central Search onto the Portal Desktop
-
- Copyright and trademarks
-
1 Introduction
You need this document when you install SAP Enhancement Package 1 for CRM 70 (SAP CRM 70
EHP1) application server This document contains additional planning preparation and post-
installation steps that you have to perform in addition to the installation procedure described in the
documentation Installation Guide ndash SAP Systems Based on the Application Server ltABAP | Javagt of SAP NetWeaver
on ltOperating Systemgt ltDatabasegt mdash Valid for SAP Systems Based on SAP NetWeaver 70 including Enhancement
Package 2
SAP CRM 70 EHP1 is based on the technology of SAP NetWeaver 70 including Enhancement Package
2 For more information about the technology provided by SAP CRM and SAP NetWeaver see http
servicesapcomcrm and httpservicesapcomnetweaver
Make sure you have read the documentation Master Guide (Including Upgrade Information) SAP Customer
Relationship Management 70 Including SAP Enhancement Package 1 Using SAP CRM 70 SAP ERP 60 and SAP
NetWeaver 70 including SAP enhancement package 2 before you start with this installation guide The Master
Guide is available at httpservicesapcomcrm-inst SAP CRM SAP enhancement package 1 for
SAP CRM 70
1 Introduction
2012-12-17 CUSTOMER 550
This page is left blank for documents that are printed on both sides
2 Planning and Preparation
Only valid for ABAP+JavaJava |
21 Prerequisites for the Business Packages for SAP CRM
You can install the Business Packages for SAP CRM in one of the following ways
Automatically using SAPinst
Manually by downloading them from SAP Service Marketplace and installing them using Java Support
Package Manager (JSPM) [page 43]
Prerequisites
The Business Packages for CRM require at least the following SAP NetWeaver usage types and the
following CRM software units
SAP NetWeaver Application Server Java (AS Java)
SAP NetWeaver Enterprise Portal (EP)
SAP CRM Business Packages Foundation (BP-CRM-FND)
SAP NetWeaver Application Server ABAP (AS ABAP) and SAP CRM Application Set (CRM APP)
To use the CRM functionality of the Business Packages for SAP CRM you need an SAP CRM ABAP
back-end system consisting of AS ABAP and SAP CRM APP
SAP Retrieval and Classification Engine (TREX)
To use the search functions you need TREX
Integration
Check the support for these usage types and software components using the Product Availability Matrix
(PAM) at
httpservicesapcompam
More Information
For more information about how to size the Enterprise Portal (EP) see
httpservicesapcomsizing Hardware Sizing Sizing Guidelines Solutions amp PlatformEnd of ABAP+JavaJava |
2 Planning and Preparation
21 Prerequisites for the Business Packages for SAP CRM
2012-12-17 CUSTOMER 750
This page is left blank for documents that are printed on both sides
3 Installation
Proceed as described in the documentation Installation Guide ndash SAP Systems Based on the Application Server
ltABAP | Javagt of SAP NetWeaver on ltOperating Systemgt ltDatabasegt at httpservicesapcom
sltoolset Software Logistics Toolset 10 Software Provisioning Manager 10
3 Installation
2012-12-17 CUSTOMER 950
This page is left blank for documents that are printed on both sides
4 Post-Installation
Only valid for Java |
41 Checking the Availability of Back-End Systems for SAP CRM Java Components
Only valid for ABAP+JavaJava |
After the installation you have to check the availability of back-end systems as follows
1 To test the connection to the ABAP back-end system you create a back-end user [page 11]
2 Depending on various business processes you check the following back-end systems
ABAP system [page 12]
TREX Server [page 14]End of ABAP+JavaJava |
Only valid for ABAP+JavaJava |
411 Creating a Back-End User
You need service users to provide the anonymous remote function call (RFC) stateless connection
between your back-end system and your Web-based applications
Prerequisites
You have installed and configured CRM E-Commerce Web-based applications
Procedure
You create a service user in your back-end SAP CRM system and assign it to the Web-based application
as follows
1 In your ABAP back-end system on the SAP Easy Access screen choose Tools Administration User
Maintenance Users (transaction SU01)
2 Create a user of the type Service User and enter all required data
3 Assign the appropriate service user authorization role to the user on the Roles tab For a list of
service user roles for the various Web-based applications see the following table
Application Authorization Role for Service User
E-Selling B2B SAP_CRM_ECO_ISA_TU_B2B
E-Selling B2C SAP_CRM_ECO_ISA_TU_B2C
E-Selling EASYB2B SAP_CRM_ECO_ISA_TU_EASYB2B
4 Post-Installation
41 Checking the Availability of Back-End Systems for SAP CRM Java Components
2012-12-17 CUSTOMER 1150
Application Authorization Role for Service User
E-Selling CVIEWS SAP_CRM_ECO_ISA_TU_CVIEWS
E-Selling SHOPADMIN SAP_CRM_ECO_ISA_TU_SHOPADM
E-Selling USERADMIN SAP_CRM_ECO_ISA_TU_USERADM
E-Selling Auctioning via Web shop (AVW) SAP_CRM_ECO_TU_AVW
E-Selling via eBay (SVE) SAP_CRM_ECO_TU_SVE
E-Service Internet Customer Self Service (ICSS) SAP_CRM_ECO_ISE_TU_B2B (Authorizations for ICSS B2B)SAP_CRM_ECO_ISE_TU_B2C (Authorizations for ICSS B2C)
E-Service Complaints and Returns SAP_CRM_ECO_ISE_TU_CR
E-Service Remanufacturer inspection SAP_CRM_ECO_ISE_TU_INSP
Channel Management (CHM)Shared Catalog
SAP_CRM_ECO_CHM_TU_SHRDCAT
Channel Management (CHM) BOB SAP_CRM_ECO_ISA_TU_BOB
Channel Management (CHM) HOM SAP_CRM_ECO_ISA_TU_HOM
Channel Management (CHM) CSR SAP_CRM_ECO_ISA_TU_CSR
4 Save your entries
More Information
For more information about service users see the documentation ltyour projectgt Basic Settings for CRM
E-Commerce General Settings for CRM E-Commerce User Management in the SAP Solution Manager [page
41]End of ABAP+JavaJava |
Only valid for ABAP+JavaJava |
412 Checking the Connection to the ABAP System
This section tells you how to check the connection to the ABAP system
Prerequisites
To be able to test the connection to the ABAP system you need to create a user [page 11] on this system
Procedure
1 Start the Visual Administrator
1 On your central instance host change to the admin directory as follows
Only valid for IBM i5OSUNIX |
usrsapltSAPSIDgtltinstance_namegtj2eeadmin
End of IBM i5OSUNIX |
Only valid for Windows |
usrsapltSAPSIDgtltinstance_namegtj2eeadmin
End of Windows |
4 Post-Installation
41 Checking the Availability of Back-End Systems for SAP CRM Java Components
1250 CUSTOMER 2012-12-17
2 Only valid for IBM i5OSUNIX |
Run goshEnd of IBM i5OSUNIX |
3 Only valid for Windows |
Double-click gobatEnd of Windows |
For more information about the Visual Administrator see the SAP Library at
httphelpsapcomnw70 SAP NetWeaver 70 Library (including Enhancement Package 2) English
SAP NetWeaver Library SAP NetWeaver by Key Capability Application Platform by Key Capability Java
Technology Administration Manual J2EE Engine J2EE Engine Administration Tools
2 Only valid for IBM DB2 for i5OSIBM DB2 for i5OS (LinuxWindows)IBM DB2 for Linux and UNIX and WindowsIBM DB2 for zOSMaxDBMS SQL ServerOracle |
Log on to the Visual Administrator with administrator rights
NOTE
If you chose configuration Use ABAP in the User Management Engine (UME) and you selected
SAP CRM ABAP as your ABAP back end with UME during the installation a successful logon
to the Visual Administrator means that the SAP CRM ABAP back-end system is available
You have now finished this procedure
Otherwise continue with the next step
End of IBM DB2 for i5OSIBM DB2 for i5OS (LinuxWindows)IBM DB2 for Linux and UNIX and WindowsIBM DB2 for zOSMaxDBMS SQL ServerOracle |
3 Start an application that uses the SAP CRM ABAP system if it is stopped
1 In the left pane of the Visual Administrator open clusterserverservices and choose
Deploy service
2 Select the application
Application Context Root
crm~b2b b2b
crm~icss_b2b icss_b2b
crm~sve sve
3 To start the selected application choose Start
4 Open the user interface for the Extended Configuration Management (XCM) Administrator as
follows
1 Open a Web browser and enter the following URL
httpltJ2EE_hostgtltJ2EE_portgtltcontext rootgtadminxcminitdo
where ltcontext rootgt is the context root of the application started in the previous step
To find information about the components that can be configured choose help
2 Choose Start Component
You can find information about configuration of components on the right hand side of the
screen
4 Post-Installation
41 Checking the Availability of Back-End Systems for SAP CRM Java Components
2012-12-17 CUSTOMER 1350
3 To create a jco Component follow the instructions provided in the Example of component
configuration field
If the ldquorun testrdquo operation described in the component configuration section of a jco setting
was successful the ABAP system can be reached from the Java system
More InformationFor more information about using Extended Configuration Management (XCM) to configure your
application see Using Extended Configuration Management (XCM) [page 40] and the documentation in the
SAP Solution Manager [page 41]End of ABAP+JavaJava |
Only valid for Java |
413 Configuring and Checking the TREX Service
You need to configure and check the TREX service
Procedure
Configuring the TREX Service
1 Start the Visual Administrator
2 Connect to the AS Java
3 Choose Server node Open Services Node Select TREX Service
4 Maintain the values for nameserveraddress and nameserverbackupserverlist
For more information see Specifying the Address of the TREX Name Server in Installation Guide ndash SAP NetWeaver
70 Standalone Engine Search and Classification (TREX) Single Host at
httpservicesapcominstguidesNW70 Installation Installation - Standalone Engines SAP
NetWeaver Search and Classification TREX Installing TREX 70 Single Host
Checking the TREX Service
1 Start the application sapcomcrm~b2b as described in step 3 of Checking the Connection to the ABAP
System [page 12]
2 Open a Web browser and enter the following URL
httpltJ2EE_hostgtltJ2EE_portgtb2badmintrextrex_640jsp
ResultIf the connection was established successfully the message TREX Server is available appearsEnd of Java |
Only valid for Java |
414 Checking the Selling via eBay Processes
To use the selling via eBay (SVE) processes the Java system requires an http connection to
4 Post-Installation
41 Checking the Availability of Back-End Systems for SAP CRM Java Components
1450 CUSTOMER 2012-12-17
httpwwwebaycom
To test the connection you need to create an XCM component ebayCommunicator for the sapcom
crm~sve application
Procedure
To create the Extended Configuration Management (XCM) component ebayCommunicator using
application sapcomcrm~sve proceed as described in Checking the ABAP System [page 12]
NOTE
Make sure that you replace jco component with ebayCommunicator component when following
the procedure in Checking the ABAP System [page 12]
More Information
For more information about using Extended Configuration Management (XCM) to configure your
application see Using Extended Configuration Management (XCM) [page 40] and the documentation in the
SAP Solution Manager [page 41]End of Java |
End of Java |
Only valid for Java |
42 Post-Installation Steps for Workforce Deployment Application and Calculation Services
Only valid for ABAP+JavaJava | CRM Java Components (JCRM)Extended E-Selling Components (XECO) |
You have to perform the following steps to check and configure Workforce Deployment Application
and Calculation Services (WFD ASCS)
You implement WFMCORE 200 using transaction SAINT [page 15]
You configure the XCM administration tool for WFD ASCS [page 16]
You check WFD calculation services [page 18]
You check the installation of WFD ASCS [page 19]End of ABAP+JavaJava | CRM Java Components (JCRM)Extended E-Selling Components (XECO) |
Only valid for ABAP+JavaJava |
421 Implementing WFMCORE 200 Using Transaction SAINT
Before you can check and configure the Java part of Workforce Deployment Application and
Calculation Services (WFD ASCS) you need to implement WFMCORE 200
4 Post-Installation
42 Post-Installation Steps for Workforce Deployment Application and Calculation Services
2012-12-17 CUSTOMER 1550
Only valid for CRM Java Components (JCRM) |
The WFMCORE 200 component contains all necessary ABAP classes and libraries required for the
various Workforce Deployment scenarios and processes including Service Resource Planning in CRM and
Retail Multisite Workforce DeploymentEnd of CRM Java Components (JCRM) |
Procedure
1 Log on to your ABAP system
2 Install WFMCORE 200 using transaction SAINT as described in SAP Note 830595
3 Only valid for CRM Java Components (JCRM) |
If you are implementing the Service Resource Planning in CRM process variant run the report
WFDBP_UPDATE_BLUEPRINT to update tables that define the settings required to properly
display and maintain Service Arrangements in the People-Centric User InterfaceEnd of CRM Java Components (JCRM) |
End of ABAP+JavaJava |
Only valid for ABAP+JavaJava |
422 Configuring the Extended Configuration Management (XCM) for WFD Application and Calculation Services
Workforce Deployment Application Services (WFD AS) sends calculation and forecasting requests to
a CRM ABAP back-end system WFD Calculation Services (WFD CS) picks up the requests from this
CRM ABAP back-end system You define the connection to the CRM ABAP back-end system through
Extended Configuration Management (XCM) Admin
For more information about using Extended Configuration Management (XCM) to configure your
application see Using Extended Configuration Management (XCM) [page 40] and the documentation in the
SAP Solution Manager [page 41]
The csjcoxxxxx XCM parameters define the JCO connection to the SAP CRM ABAP system where
the WFD CS maintains forecast and calculation requests You can connect to the CRM ABAP system
using one of the following
A message or dispatching server by specifying csjcomshost csjcogroup and csjcor3name
An application server by specifying csjcoahost and csjcosysnr
In either case you must also specify csjcoclient csjcouser and csjcopassword
XCM Parameter Name Example Value Description
csjcoahost us0091wdfsapcorp Application server host name of the SAP CRM Calculation Service
csjcosysnr 91 System number of the R3 Calculation Service (for example 09)
csjcomshost us0091wdfsapcorp Message server host name of the SAP CRM Calculation Service
csjcogroup PUBLIC Group of the SAP CRM Calculation Service (case sensitive for example PUBLIC)
4 Post-Installation
42 Post-Installation Steps for Workforce Deployment Application and Calculation Services
1650 CUSTOMER 2012-12-17
XCM Parameter Name Example Value Description
csjcor3name Q5C System ID of the SAP CRM Calculation Service (for example IDES)
csjcoclient 505 Client of the SAP CRM Calculation Service
csjcouser Back end user for JCO connection to the SAP CRM Calculation Service
csjcopassword Password for the back-end user
You need to configure these csjcoxxxxx XCM parameter values in each instance of WFD AS and
WFD CS Make sure that the values are the same in all instances
Configuring the XCM for WFD Calculation Services
This business scenario is relevant for defining the WFD CS You must perform this XCM configuration
for the WFD CS to run
1 Start the XCM using the following URL
httpltJ2EE_hostgtltJ2EE_portgtwfdcsadminxcminitdo
2 Access the configuration using the following path General Application Settings Customer sisopt
sisoptconfig
Process Description Web ApplicationXCM Application Configurations
Calculations Service Workforce scheduling application
wfdcs sisoptconfig
3 In addition to the csjcoxxxx XCM parameters you need to define the http port of the J2EE
instance where WFD CS is running
XCM Parameter Name Example Value Description
cshttpport 51000 The http port of the web server where the WFD Calculation Services application is running (for example 50000)
4 Restart the application after saving the XCM configuration
Configuring the XCM for WFD Application Services
This business scenario is relevant for connecting the WFD AS to the WFD CS
1 Start the XCM using the following URL
httpltJ2EE_hostgtltJ2EE_portgtwfdadminxcminitdo
2 Access the configuration using the following path General Application Settings Customer sis
sisconfig
Process Description Web ApplicationXCM Application Configurations
Application Services Web-based scheduling application
wfd sisconfig
3 Restart the application after saving the XCM configurationEnd of ABAP+JavaJava |
4 Post-Installation
42 Post-Installation Steps for Workforce Deployment Application and Calculation Services
2012-12-17 CUSTOMER 1750
Only valid for ABAP+JavaJava |
423 Checking Workforce Deployment Calculation Services
After configuring Workforce Deployment Calculation Services (WFD CS) with Extended Configuration
Management (XCM) and restarting the application you need to go to the WFD CS configuration page
to check that it is running
Prerequisites
You have completed the installation of WFD Application Service (AS) and CS as described in this
documentation
Only valid for CRM Java Components (JCRM) |
You have downloaded the Business Package for Retail (Release 10) from sdnsapcom SAP NetWeaver
Capabilities User Productivity Portal and Collaboration Portal Content Portfolio
For more information about the portal content versions for your release see the documentation
Master Guide ndash SAP Customer Relationship Management 70 at httpservicesapcomcrm-instEnd of CRM Java Components (JCRM) |
Only valid for CRM Java Components (JCRM) |
You must have access to the Portal Admin role in SAP CRM through the Enterprise Portal to complete
this part of the WFD ASCS installation
For more information see Configuring the CRM Business Package on the SAP Service Marketplace at
httpservicesapcomcrm-inst SAP CRM 70 CRM Business Packages and PC UI Section
CRM Portal Administrator contains specific instructions on configuring the portal for access to WFD
AS and CS Apply the instructions to the Portal Admin roleEnd of CRM Java Components (JCRM) |
You have configured your portal users based on the required settings as described in the
configuration documentation for your IT scenario
For more information see Accessing Configuration Documentation in the SAP Solution Manager [page 41]
Procedure
1 Access the WFD CS configuration page through the Enterprise Portal using the role Portal
Administrator
2 Choose WFD Calculation Services Configuration
The Configuration tab looks as follows
Tab To Complete InstallationFor ongoing Configuration Management
Calculation Servers Required for at least one calculation server
Required for each additional calculation server
Logging Localization No Required to add or change logging once fully operational
End of ABAP+JavaJava |
4 Post-Installation
42 Post-Installation Steps for Workforce Deployment Application and Calculation Services
1850 CUSTOMER 2012-12-17
Only valid for ABAP+JavaJava |
424 Checking the Installation of WFD Application Services and WFD Calculation Services
This section tells you how to check that you have correctly installed the Java components for Workforce
Deployment Application Services (WFD AS) and WFD Calculation Services (WFD CS) This section
does not tell you how to check the connection between the WFD AS and the WFD CS
The procedure below shows you how to create a simple calculation request and verify that the
Calculation Server has received the request This helps you check that you have correctly installed all
WFD AS or CS components and that they are communicating with each other
Prerequisites
You have completed all the installation steps described in this documentation
You have connected WFD AS or CS components with the Enterprise Portal
You have installed the required business packages according to Checking Workforce Deployment
Calculation Services [page 18]
Procedure
1 To check that WFD AS is working and listening for HTTP requests enter the following URL
httpltJ2EE_hostgtltJ2EE_portgtwfdlogondo
The following error confirms that the application is working
Your session has expired Please renew your session by clicking a section link in
the Portal menu
2 Access the WFD CS from the Enterprise Portal through the Portal Admin role and check that the
WFD CS page comes up with no errors
If the page does not come up possible errors are
Error Message Cause
Missing value for XCM configuration
parameter cshttpport
The XCM parameter cshttpport was not filled
The request could not be completed
due to the following
errorsltfollowed by details of the
particular error usually related to
the JCO connectiongt
One of the XCM parameters csjcoxxxxx might be incorrect
EXAMPLE
The user or password are incorrect
3 Test the submission of a calculation request to see if the WFD CS can process the request
You can simulate a calculation request submission by executing the RFC
TEST_WFDCS_CALCREQ_SUBMIT from the CRM back-end system defined in the csjcoxxxxx XCM
parameters of WFD CS
4 Post-Installation
42 Post-Installation Steps for Workforce Deployment Application and Calculation Services
2012-12-17 CUSTOMER 1950
EXAMPLE
For example when you installed WFD CS you configured the csjcoxxxxx XCM
parameters to point to system ID Q5C client 505 You now need to log in to Q5C client 505
and execute TEST_WFDCS_CALCREQ_SUBMIT with transaction SE37 using the default import
parameters
4 Check the Requests tab of the WFD CS page to check the status of entries with the location name
SMOKETEST has the status FAILED
Status FAILED indicates a successful smoke test It means that the Request Manager successfully
sent the request to the Solver which successfully processed it
Status QUEUED probably means that the XCM parameter cshttpport was incorrectEnd of ABAP+JavaJava |
End of Java |
Only valid for ABAP+JavaJava |
43 Post-Installation Steps for the Business Packages for SAP CRM
The following sections provide information about the steps that you have to perform after importing
the Business Package for SAP CRM
Only valid for ABAP+JavaJava |
431 Creating Roles for the SAP CRM Business Packages
Procedure
If you create your own roles from the SAP CRM Business Packages also add the every user role
(eu_core_role) to your role The Every User Role contains the personalization functionality for the SAP
NetWeaver Portal
For more information about the Every User Role see the SAP Library at
httphelpsapcomnw70 SAP NetWeaver 70 Library (including Enhancement Package 2) English SAP
NetWeaver Library SAP NetWeaver by Key Capability People Integration by Key Capability Portal Portal
Administration Guide Super Administration Pre-configured Roles Every User Roles End of ABAP+JavaJava |
Only valid for ABAP+JavaJava |
432 Installation of the Info Center for the SAP CRM Business Package
This section describes how to install the Info Center
4 Post-Installation
43 Post-Installation Steps for the Business Packages for SAP CRM
2050 CUSTOMER 2012-12-17
Prerequisites
You have installed the Business Package for SAP CRM [page 43]
You have administrator rights
Process Flow
1 You import the SAP CRM info center configurations and directory structure [page 21]
2 You activate manual ordering of folders for the sapcrm Repository [page 23]
3 You create indexes and taxonomies for the sapcrmnews Repository [page 23]
4 You create the index for the sapcrm Repository [page 25]
5 You configure the personal search [page 25]
6 If required you increase the number of JCo connections [page 26]
Only valid for ABAP+JavaJava |
4321 Importing the SAP CRM Info Center Configurations and Directory Structure
The directory structure of the info center has been made available in one content package and you can
import it using the Information and Content Exchange (ICE) Repository
For more information about ICE see SAP Library at
httphelpsapcomnw70 SAP NetWeaver 70 Library (including Enhancement Package 2) English SAP
NetWeaver Library SAP NetWeaver by Key Capability Information Integration by Key Capability Knowledge
Management Content Managers Guide Additional Tasks for Content Managers Content Exchange Distributing
Content (Offline)
Procedure
Importing the Directory Structure
1 Log on to the Portal as content manager
2 Choose Content Management Content Exchange Upload
3 Only valid for Windows |
Select file fullupdate_infocenterzip from directory ltservlet_enginegtirjrootWEB-INF
portalportalappsepcrmchmkmexpice and confirm the uploadEnd of Windows |
Only valid for IBM i5OSUNIX |
Select file fullupdate_infocenterzip from directory ltservlet_enginegtirjrootWEB-INF
portalportalappsepcrmchmkmexpice and confirm the uploadEnd of IBM i5OSUNIX |
The zip file is now imported using the ICE protocol
If you cannot see the ICE repository this might be due to one of the following reasons
The ICE repository was hidden in the virtual root repository
4 Post-Installation
43 Post-Installation Steps for the Business Packages for SAP CRM
2012-12-17 CUSTOMER 2150
In this case do the following
1 Log on to the portal as system administrator
2 In the SAP NetWeaver Enterprise Portal choose System Administration System Configuration
Knowledge Management Content Management Repository Managers Virtual Root Repository
3 Check whether the ICE Repository has been entered under Repositories to exclude
4 Remove it from the list
5 Save your changes
6 Restart the Servlet Engine
The repository has been ldquoswitchedrdquo to invisible
1 Log on to the portal as system administrator
2 In the SAP NetWeaver Enterprise Portal choose System Administration System Configuration
Knowledge Management Content Management Repository Managers Content Exchange
Repository
3 If the property hide in root folder is active deselect it
4 Restart the Servlet Engine
NOTE
After the import check whether the directory structure was created by choosing Content
Administration KM Content in the SAP NetWeaver Enterprise Portal The list of folders should
contain the folders sapcrm and sapcrmnews
Checking Whether the Directory Structure Has Been Imported Successfully
You can only import the structure if there is a repository with the same name For example if a zip file
is exported from the repository sapcrm there must also be a repository with the name sapcrm in the
target system
The sapcrm and sapcrmnews repositories as well as the CRM-Namespace filter are created during the
import of the SAP CRM KM extension configuration archive To check whether this configuration
archive has been imported successfully proceed as follows
1 Log on to the portal as system administrator
2 In the SAP NetWeaver Enterprise Portal choose System Administration Monitoring Knowledge
Management Deployment Monitor Config Archives
3 Check whether the archive comsappctcrmappkmextprjconfig is installed in the system
If the archive comsappctcrmappkmextprjconfig is not installed in the system import it
manually as follows
1 Log on to the portal as system administrator
2 In the SAP NetWeaver Enterprise Portal choose System Administration Monitoring Knowledge
Management Deployment Monitor Config Archives Actions Import
4 Post-Installation
43 Post-Installation Steps for the Business Packages for SAP CRM
2250 CUSTOMER 2012-12-17
3 Only valid for Windows |
Select the archive comsappctcrmappkmextprjconfigconfigarchive from directory
ltSAPSIDgtJCltinstance_numbergtj2eeclusterappssapcomep~crm~chm
servlet_jspepcrmchmkmexprootWEB-INFconfig and confirm the importEnd of Windows |
4 Only valid for IBM i5OSUNIX |
Select the archive comsappctcrmappkmextprjconfigconfigarchive from
directory ltSAPSIDgtJCltinstance_numbergtj2eeclusterappssapcomep~crm~chm
servlet_jspepcrmchmkmexprootWEB-INFconfig and confirm the importEnd of IBM i5OSUNIX |
After the import the directory structure has no restrictions on rights Make sure that you modify the
rights of the various folders to meet your companyrsquos requirementsEnd of ABAP+JavaJava |
Only valid for ABAP+JavaJava |
4322 Activating Manual Ordering of Folders for the sapcrm Repository
The sapcrm Repository folders are ordered in a specific sequence
Procedure
To display this sequence activate manual ordering for each directory
For more information see the SAP Library at
httphelpsapcomnw70 SAP NetWeaver 70 Library (including Enhancement Package 2) English SAP
NetWeaver Library SAP NetWeaver by Key Capability Information Integration by Key Capability Knowledge
Management Content Managers Guide Providing Shared Access to Departmental Documents Sorting Documents in a
Folder ManuallyEnd of ABAP+JavaJava |
Only valid for ABAP+JavaJava |
4323 Creating Indexes and Taxonomies for the sapcrmnews Repository
To make news available for indexing and searching create two new indexes
Prerequisites
You have administrator rights for Knowledge Management on the server
For more information see the SAP Library at
httphelpsapcomnw70 SAP NetWeaver 70 Library (including Enhancement Package 2) English SAP
NetWeaver Library SAP NetWeaver by Key Capability Information Integration by Key Capability Knowledge
Management
4 Post-Installation
43 Post-Installation Steps for the Business Packages for SAP CRM
2012-12-17 CUSTOMER 2350
Procedure
Creating Indexes and Taxonomies for the sapcrmnews Repository
The Business Package contains an iView ndash epbp_crmchm-pmiviewsnews_flash ndash that combines all
news with the istopnews=yes attribute in a virtual folder To guarantee the function of this iView
create two indexes in KM
1 In the SAP NetWeaver Enterprise Portal choose System Administration System Configuration
Knowledge Management Index Administration
2 Create an index of the Search and Classification type with a suitably configured taxonomy
3 Choose sapcrmpartnernews as the index ID Otherwise the path to the folder specified in the iView
is incorrect
If you choose another index ID you must also modify accordingly the folder properties in the
iView for one of the following
Folders path to content and path to root
Folders Path to Initially Displayed Folder and Path to Root Folder for Navigation
If you want to link two portal servers with a TREX server you must modify the index name and
iView properties on one of the portal servers
4 Assign folder sapcrmpartnerPartnernews as a data source
This moves all news with the (virtual) Top flag from this folder to the Newsflash iView
5 Create a ldquoquery-basedrdquo taxonomy with the name PartnerNewsFlash choosing Automatic
Classification before you save the taxonomy
NOTE
The outbound delivery includes only the iView above for virtually combining news If you
also want to use this functionality for other news channels (for example internal news) use
your own index and taxonomy for each channel
For more information see the SAP Library at
httphelpsapcomnw70 SAP NetWeaver 70 Library (including Enhancement Package 2) English SAP
NetWeaver Library SAP NetWeaver by Key Capability Information Integration by Key Capability Knowledge
Management Administration Guide System Administration System Configuration lsquoIndex Administrationrsquo iView
Creating Queries for the Taxonomies of sapcrmnews Repositories
1 Log on to the portal as content manager
2 Choose Content Management Classification Taxonomy Query Builder
3 Add a search query to check the istopnews property for the value Yes
4 Enter PartnerNewsFlash as the name for the taxonomy
Here too a property of the iView links to a taxonomy with this name So if you want to choose
another name you must modify the path to the content folder property of the iView
For more information see the SAP Library at
4 Post-Installation
43 Post-Installation Steps for the Business Packages for SAP CRM
2450 CUSTOMER 2012-12-17
httphelpsapcomnw70 SAP NetWeaver 70 Library (including Enhancement Package 2) English SAP
NetWeaver Library SAP NetWeaver by Key Capability Information Integration by Key Capability Knowledge
Management Administration Guide System Administration System Configuration Taxonomies and ClassificationEnd of ABAP+JavaJava |
Only valid for ABAP+JavaJava |
4324 Creating the Index for the sapcrm Repository
To make Info center documents available for indexing and searching create a new index with sapcrm
as a data source
Prerequisites
You have administrator rights for Knowledge Management on the server
Procedure
Choose a name of your own Search as a service and standard as a crawler parameter
For more information see the SAP Library at
httphelpsapcomnw70 SAP NetWeaver 70 Library (including Enhancement Package 2) English SAP
NetWeaver Library SAP NetWeaver by Key Capability Information Integration by Key Capability Knowledge
ManagementEnd of ABAP+JavaJava |
Only valid for ABAP+JavaJava |
4325 Configuring the Personal Search
Prerequisites
You have administrator rights for Knowledge Management on the server
Procedure
1 Create an index for the userhome repository
To make personal folder documents available for the search create a new index with root
userhome as the data source
2 Create a search option set for personal search
To assign the search index and a start folder to the search for personal documents create a Search
Option Set with the name CRMPersonalFolderSearch As an index enter the index for the
userhome repository created above and ~alias~userhomeuseridPersonal Documents as the
root folder for the search
For more information see the SAPLibrary at
4 Post-Installation
43 Post-Installation Steps for the Business Packages for SAP CRM
2012-12-17 CUSTOMER 2550
httphelpsapcomnw70 SAP NetWeaver 70 Library (including Enhancement Package 2) English SAP
NetWeaver Library SAP NetWeaver by Key Capability Information Integration by Key Capability Knowledge
Management End of ABAP+JavaJava |
Only valid for ABAP+JavaJava |
4326 Increasing the Number of JCo Connections
This section tells you how to increase the number of concurrent Java Connector (JCo) connections
By default the maximum number of concurrent JCo connections is 100 The value depends on the
number and behavior of the users in the portal For more information see SAP Note 316877
You can specify this value when you plan the installation of your SAP NetWeaver Enterprise Portal
Make sure that you first analyze the number and behavior of the users
Procedure
To increase the maximum number of concurrent JCo connections increase the value of the
environment variable CPIC_MAX_CONV
EXAMPLE
Initial default value CPIC_MAX_CONV=100
Increased value CPIC_MAX_CONV=1000
End of ABAP+JavaJava |
End of ABAP+JavaJava |
End of ABAP+JavaJava |
Only valid for ABAP+JavaJava | MapBox (MBX) |
44 Post-Installation Steps for MapBoxOnly valid for Java | MapBox (MBX) |
You have to perform the following post-installation steps for MapBox
You assign user groups for MapBox users [page 27]
You configure an RFC destination for TCPIP connections [page 28]
You perform initial configuration for MapBox [page 28]
You execute the Map Box [page 34]
You perform the smoke test [page 35]
If required you perform additional settings for MapBox
Block size settings [page 38]
Memory settings for the J2EE Engine [page 39]End of Java | MapBox (MBX) |
4 Post-Installation
44 Post-Installation Steps for MapBox
2650 CUSTOMER 2012-12-17
Only valid for Java | MapBox (MBX) |
441 Assigning User Groups for MapBox Users
To access the MapBox URL you need to provide the correct security rights for individual user groups
Procedure
1 Log on to the Visual Administrator
1 On your central instance host change to the following directory
Only valid for IBM i5OSUNIX |
usrsapltSAPSIDgtltinstance_numbergtj2eeadmin
End of IBM i5OSUNIX |
Only valid for Windows |
usrsapltSAPSIDgtltinstance_numbergtj2eeadmin
End of Windows |
2 Only valid for IBM i5OSUNIX |
Run goshEnd of IBM i5OSUNIX |
3 Only valid for Windows |
Double-click gobatEnd of Windows |
For more information about the Visual Administrator see the SAP Library at
httpshelpsapcomnw70 SAP NetWeaver Library SAP NetWeaver by Key Capability
Application Platform by Key Capability Java Technology Administration Manual J2EE Engine J2EE Engine
Administration Tools
2 Choose the server node from the left-hand window
3 Choose Services Security Provider
A list of deployed components is displayed
4 Choose MapBoxLauncher from this list (sapcom
comsapsyncpointmapboxlaunchermapboxlauncher)
A list of tabs appears on the right
5 Choose Security Roles from the list
A list of security roles appears
6 If no display and modify roles are displayed add these roles as follows
1 Choose Switch to Edit Mode from the top task bar to switch to edit mode
2 Add display and modify roles by choosing Add
7 For both the display and modify roles perform the following
1 Choose Switch to Edit Mode from the top task bar to switch to edit mode
2 Choose the Groups tab from the list on the far right
3 Choose Search
4 Post-Installation
44 Post-Installation Steps for MapBox
2012-12-17 CUSTOMER 2750
A list of user groups appears
4 Select the user groups that you want to enable for the two roles
Add to the left of the user group display is now highlighted
5 Choose Add to add the user group for the selected roleEnd of Java | MapBox (MBX) |
Only valid for Java | MapBox (MBX) |
442 Configuring an RFC Destination for MapBox
After the installation you have to create an RFC destination for MapBox
Procedure1 Log on to the CRM server
2 Enter transaction SM59
The Display and Maintain RFC Destinations screen appears
3 Choose Technical Settings Activation Type and create a new destination with the type TCPIP
4 Choose Registered Server Program and enter a unique value for program ID
For example you might enter MAPBOX723 for SAP client 723
5 Enter the details of the gateway host and gateway service in Gateway Options
1 Gateway host
Enter the name of your message server You can also enter the IP address of your message
server
2 Gateway service
Enter your SAP CRM system number prefixed with the string sapgw
For example if your system number is 02 enter sapgw02
6 If the CRM system is a Unicode-enabled system choose Unicode in Special Options
7 Save the destination
8 Choose MapBox Configuration Page Connecting settings from the URL and enter the same RFC
destination name in the relevant fieldEnd of Java | MapBox (MBX) |
Only valid for Java | MapBox (MBX) |
443 Performing Initial Configuration for MapBox
Procedure1 Open a browser window and enter the following URL
httplthostnamegtltport_numbergtmapboxlauncher
NOTE
If you are logged on to the machine where the J2EE server is running you can also enter the
following URL
4 Post-Installation
44 Post-Installation Steps for MapBox
2850 CUSTOMER 2012-12-17
httplocalhostltport_numbergtmapboxlauncher
2 Choose Configuration
3 Edit the values according to your SAP system and choose Save
The application asks you to enter a user name and password
4 Enter the user name and password used for the SAP J2EE Engine Visual Administrator
A description of the properties and example values for the properties is given below
Result
You see the default connection settings for MapBox as shown in the graphic below A description
of the properties and example values are provided in the adjacent table
Figure 1 MapBox Default Connection Settings
Property Purpose Example
SAP System SAP System name ABC FAZ
Message Server Message server host name xyzmain
Group SAP System group PUBLIC SPACE
System Number SAP Gateway system number prefixed with sapgw
sapgw02
Unicode Used for setting the Unicode option for the CRM server Default value is no
yes
Maximum allowed wait time interval between ISP Processing and Commit call
Time-out period between an ISP_MAPBOX call and an ISP_COMMIT call
300
4 Post-Installation
44 Post-Installation Steps for MapBox
2012-12-17 CUSTOMER 2950
Property Purpose Example
Client SAP logon client 723
User Name SAP logon user John
Password SAP logon password
Language SAP logon language EN
Destination The RFC destination with which you need to register the MapBox This is the value you enter in step 3 of Configuring an RFC Destination for MapBox [page 28]
MAPBOX723
Number of server instances The number of JCO server execution instances used by the MapBox to process server requests This number indicates the number of CRM inbound queues that are running simultaneously
10
The above MapBox connection configuration is meant for one SAP client running with the CRM
Server If you want to run the MapBox with two or more SAP clients of the same CRM system
you can use Add Client on the configuration page and edit the values accordingly However make
sure that the RFC destinations that these multiple clients listen to are always unique You can
leave the default values for the other settings
If you need more control over logging and tracing you can go to Log Settings on the configuration
page edit the values and choose Save The Log Settings screen with default values is shown in the
graphic below A description of the properties and example values for the properties is provided
in the adjacent table
Figure 2 Default Values for the Log Settings Screen
4 Post-Installation
44 Post-Installation Steps for MapBox
3050 CUSTOMER 2012-12-17
Property Purpose Example
Log and dumps directory This value specifies where the MapBox logs and dumps are stored If this field is left blank the ltuser_homegt folder is used as default value
Only valid for Windows |
Ctemp
End of Windows |
Only valid for IBM i5OSUNIX |
tmp
End of IBM i5OSUNIX |
Input payload dump This value specifies whether the input document coming to MapBox for processing is written or not
No
MapBox launcher trace level This value specifies with what granularity the MapBoxLauncher execution trace is generated6 specifies that a full MapBoxLauncher execution trace is generated whereas 0 specifies that the MapBoxLauncher execution trace is not generated Recommended value for production use is 0
0
MapBox launcher trace size The maximum file size of the generated trace When the size reaches the maximum value another file is created so that the old file can be deleted (for example due to lack of space) You can use alphabetic suffixes to specify the sizes The supported values are k or K ndash kilobytes g or G ndash gigabytes m or M ndash megabytes t or T ndash terabytes
50 k
CoordServer log level This value specifies the detail of the coordination server logging We recommended you not to change the default value of 1
2
SAP Java connector trace level This value specifies the detail of the SAP Java Connector logging The recommended value for production use is 0
2
MapBox log level The log level required for the MapBox to generate an internal log file A higher trace level means that a more detailed log file is created We recommend you to use 4D for production systems where D meansldquoOn Demandrdquo
2
4 Post-Installation
44 Post-Installation Steps for MapBox
2012-12-17 CUSTOMER 3150
Property Purpose Example
MapBox message dumps This value stands for copying the incoming and outgoing messages to the local system For better performance we recommend that you do not enable the message dump option
no
MapBox statistics This value specifies whether a file that lists the performance measurements of the MapBox is created We recommend you to use the value no for production use
no
MapBox logs location This value specifies where the MapBox logs are stored Possible locations are the MapBox repository on the CRM Server or the local file system The recommended value for production use is local_fs which indicates that the MapBox logs are stored on the local file system
local_fs
MapLog format The format in which the MapBox log file must be created The internal log file is by default created in a particular format However you can change this format to display the file in the SAP log file format The two values that are available are default and sap_log
default
The MapBox uses additional properties for performance such as caching and reuse of the MapBox
atoms These values are already set to optimum values and you cannot change them
The description of the properties is shown in the table below
Property Purpose Example
General Settings
max_elements_document This is the limit for the internal cache of the MapBox to hold the count of generated XML documentsWe recommend you not to change this value
100
cache_threshold This is the maximum threshold ndash in kilobytes ndash for a document to be cached in the internal cache of the MapBox
500
4 Post-Installation
44 Post-Installation Steps for MapBox
3250 CUSTOMER 2012-12-17
Property Purpose ExampleWe recommend you not to change this value
max_elements_cache This is the limit for the internal cache of the MapBox to hold the count of MapScenariosWe recommend you not to change this value
100
parallel_instances You use this value on systems where more than one CPU is used This setting allows you to specify the number of CPU instances that MapBox must use for processing so that the remainder can be used by non-MapBox related applications By default MapBox uses all the available CPUs for processing Values can range between 0 to N-1 where N is the number of available CPUs
4
thread_priority Specifies the number of threads MapBox uses during processing We recommend you to set an optimum value for this property so that MapBox does not utilize all available resources 0 = min 1 = low 2 = normal 3 = high 4 = max
3
reuse_count Sets the count for the number of times an atom-instance must be reused before it is destroyed A value of 0 means that the atom is not destroyed and can be used continuously Recommended value is 50 This means that the atom instance is reused 50 times before it is destroyed
100
Lock Server Settings
Operation_Mode The internal mode of operation for the coordination server We recommend not to change the default value of OUTPROC_CLIENT
OUTPROC_CLIENT
Registry_Port The Remote Method Invocation (RMI) port used for connecting to the coordination serverRMI is a Java mechanism for distributed computing
1099
4 Post-Installation
44 Post-Installation Steps for MapBox
2012-12-17 CUSTOMER 3350
Property Purpose ExampleDo not change this value unless port 1099 is unavailable In this case change it to 59856
HostName The name of the host where the coordination server resides
localhost
LocalName The name of the host where the MapBoxLauncher is executed We recommend you not to change the default value of localhost
Server
PollingInterval Polling interval in seconds to ask for shutdown of the coordination server We recommend you not to change the default value of 30
60
CleanUpInterval Cleanup interval in seconds to check for invalid locks created by the MapBoxLauncher We recommend you not to change the default value of 60
180
NOTE
A file name MapLogxsl is also available with the smoke test [page 35] This file is the stylesheet
that is used to format the display of the MapBox log file During the installation and execution
of the MapBox the MapBox log file is created in the following directory
Only valid for Windows |
ltUser_homegtTempMapBoxDumpsltyour_system_namegt500 where ltuser_homegt is the
home directory of the logged-on user ltyour system namegt is the CRM server you have
connected to and 500 is the client you have connected toEnd of Windows |
Only valid for IBM i5OSUNIX |
ltUser_homegtTempMapBoxDumpsltyour_system_namegt500 where ltuser_homegt is the
home directory of the logged-on user ltyour system namegt is the CRM server you have
connected to and 500 is the client you have connected toEnd of IBM i5OSUNIX |
RECOMMENDATION
We recommend that you copy MapLogxsl from the
ltsmoke_test_installation_directorygt to the directory mentioned aboveEnd of Java | MapBox (MBX) |
Only valid for Java | MapBox (MBX) |
444 Executing the MapBox
This section tells you how to execute the MapBox The procedure that you use to execute the Map Box
depends on its current support package (SP) level
4 Post-Installation
44 Post-Installation Steps for MapBox
3450 CUSTOMER 2012-12-17
Procedure
If the SP level of the MapBox is less than SP11 proceed as follows
1 Enter the following URL in your browser
httplthostnamegtltport_numbergtmapboxlaunchermanage
2 Choose Start MapBox
3 The application prompts you for a user name and password
Enter the user name and password for the J2EE Engine Visual Administrator
NOTE
MapBox typically takes 30 to 60 seconds to initialize depending on the number of SAP clients
To see the status of messages processed by MapBox choose Status
If the SP level of the MapBox is equal to or higher than SP11 the MapBox starts automatically
1 For the first MapBox installation you need to restart the Java application server (AS Java) after all
the configuration settings have been completed This automatically starts the MapBox (Autostart)
2 To check the status go to the URL httplthostnamegtltport_numbergtmapboxlauncher
manage
NOTE
MapBox Autostart needs approximately 60 seconds to allow other services of As Java to start
To see the status of messages processed by MapBox choose Status
Result
When the MapBox is running the status is shown as Ready to processEnd of Java | MapBox (MBX) |
Only valid for Java | MapBox (MBX) |
445 Performing the Smoke Test for MapBox
The smoke test checks whether the MapBox installation is error-free
Only valid for Windows |
To execute the smoke test you have to run two batch filesEnd of Windows |
Only valid for IBM i5OSUNIX |
To execute the smoke test you have to run two shell scriptsEnd of IBM i5OSUNIX |
Prerequisites
Before you start the procedure you need to copy the smoketestjar file to a new
ltsmoke_test_installation_directorygt of your choice which has two further subdirectories
firstrun and secondrun
4 Post-Installation
44 Post-Installation Steps for MapBox
2012-12-17 CUSTOMER 3550
You can find the smoketestjar file here
Only valid for IBM i5OSUNIX |
usrsapltinstance_IDgtJCltinstance_numbergtj2eeclusterserver0binext
comsapsyncpointmapboxEnd of IBM i5OSUNIX |
Only valid for Windows |
usrsapltinstance_IDgtJCltinstance_numbergtj2eeclusterserver0binext
comsapsyncpointmapboxEnd of Windows |
NOTE
Each subdirectory of ltsmoke_test_installation_directorygt ndash that is firstrun and
secondrun ndash contains the following files
MBSMOKETEST_IN_000xml
MBSMOKETEST_IN_001xml
MBSMOKETEST_IN_002xml
MBSMOKETEST_IN_003xml
After executing the smoke test you must verify whether the contents of the files generated
by your test are similar to the contents of the above files That is the XML documents that
are created in the smoke test must match the documents located in the
ltsmoke_test_installation_directorygt mentioned above
To execute the smoke test you need to install the SAP Java Connector (SAP JCo version 2012)
You have to download SAP JCo 2012 from SAP Service Marketplace at https
servicesapcomswdc before executing the smoke test
CAUTION
Make sure that you install the SAP Java Connector correctly
The file mapcaseprop is available in the ltsmoke_test_installation_directorygt This file
contains the connection parameters to be tested You can modify the contents of this file
CAUTION
You must replace the connection parameters in this file with the connection parameters that
you entered in the MapBoxMetaxml file
Procedure
1 Run the first stage of the smoke test
1 Only valid for Windows |
Execute the file smoketest_1bat from the ltsmoke_test_installation_directorygtEnd of Windows |
Only valid for Windows |
This prompts you to enter the followingEnd of Windows |
4 Post-Installation
44 Post-Installation Steps for MapBox
3650 CUSTOMER 2012-12-17
Only valid for Windows |
1 ltDRIVEgtusrsapltinstance_IDgtJCltinstance_numbergtj2ee
2 ltsmoke_test_installation_directorygt
3 ltpath_to_sapjcojargt
End of Windows |
Only valid for IBM i5OSUNIX |
Execute the file smoketest_1sh from the ltsmoke_test_installation_directorygtEnd of IBM i5OSUNIX |
Only valid for IBM i5OSUNIX |
1 usrsapltinstance_IDgtJCltinstance_numbergtj2ee
2 ltsmoke_test_installation_directorygt
3 ltpath_to_sapjcojargt
End of IBM i5OSUNIX |
2 Enter the appropriate paths
The smoke test creates the following files
MBSMOKETEST_IN_000xml
MBSMOKETEST_IN_001xml
MBSMOKETEST_IN_002xml
MBSMOKETEST_IN_003xml
3 Only valid for Windows |
Check the contents of the generated files against the contents of the files located in
ltsmoke_test_installation_directorygtSMOKETESTfirstrunEnd of Windows |
Only valid for IBM i5OSUNIX |
Check the contents of the four files against the contents of the files located in
ltsmoke_test_installation_directorygtSMOKETESTfirstrunEnd of IBM i5OSUNIX |
2 Run the second stage of the smoke test
1 Only valid for Windows |
Execute the file smoketest_2bat which is located in the
ltsmoke_test_installation_directorygtEnd of Windows |
Only valid for IBM i5OSUNIX |
Execute the file smoketest_2sh which is located in the
ltsmoke_test_installation_directorygtEnd of IBM i5OSUNIX |
This prompts you to enter the following
Only valid for Windows |
1 ltDRIVEgtusrsapltinstance_IDgtJCltinstance_numbergtj2ee
2 ltsmoke_test_installation_directorygt
End of Windows |
4 Post-Installation
44 Post-Installation Steps for MapBox
2012-12-17 CUSTOMER 3750
Only valid for IBM i5OSUNIX |
1 usrsapltinstance_IDgtJCltinstance_numbergtj2ee
2 ltsmoke_test_installation_directorygt
End of IBM i5OSUNIX |
2 Enter the appropriate paths
The smoke test creates the following files
MBSMOKETEST_IN_000xml
MBSMOKETEST_IN_001xml
MBSMOKETEST_IN_002xml
MBSMOKETEST_IN_003xml
CAUTION
The files generated in the second stage of testing overwrite the contents of the files
generated in the first stage
3 Only valid for Windows |
Check the contents of the generated files against the contents of the files located in
ltsmoke_test_installation_directorygtSMOKETESTsecondrunEnd of Windows |
Only valid for IBM i5OSUNIX |
Check the contents of the four files against the contents of the files located in
ltsmoke_test_installation_directorygtSMOKETESTsecondrunEnd of IBM i5OSUNIX |
Result
If the smoke test has identified errors in the installation process the four XML files are not created in
either of the stages Instead an error log file is created
RECOMMENDATION
In the event of errors we recommend that you send the error log file to your administrator
End of Java | MapBox (MBX) |
Only valid for Java | MapBox (MBX) |
446 Ensuring Optimal Block Size settings
The block size of an object determines the number of messages that are processed at the same time by
the MapBox as a set You need to make sure that the block sizes are optimal to reduce load on the
MapBox XML processor
Procedure
1 Use transaction R3AC3 to set the block size of object GWA_COUNTRY to 10 and save the setting
2 Use transaction R3AC1 to set the block size of object BUPA_MAIN to 10 and save the settingEnd of Java | MapBox (MBX) |
4 Post-Installation
44 Post-Installation Steps for MapBox
3850 CUSTOMER 2012-12-17
Only valid for ABAP+JavaJava | MapBox (MBX) |
447 Adapting Memory Settings for the J2EE Engine
You need to adapt the memory settings for the J2EE Engine because MapBox relies heavily on memory-
intensive XML-processing such as schema-validation parsing transformation and so on
RECOMMENDATION
For rapid message processing by MapBox we recommend you to use 1024 MB of heap memory
for MapBox alone With a heap size of 512 MB MapBox can still process messages but with a slightly
higher processing time for each message
The MapBox memory requirements are directly proportional to the size of the input documents
that MapBox has to process The average size of such documents is in the range of 150 to 200 KB
For messages of this size it is sufficient to have a heap memory of 512 MB If the input documents
are in the range of 1 to 2 MB we recommend that you give MapBox a heap memory of 1024 MB
Procedure
To set the recommended memory settings for the MapBox you start the config tool of the J2EE Engine
Only valid for Windows |
Start the config tool by executing ltDrivegtusrsapltSAPSIDgtltinstance_numbergtj2ee
configtoolbatEnd of Windows |
Only valid for IBM i5OSUNIX |
Start the config tool by executing usrsapltSAPSIDgtltinstance_numbergtj2eeconfigtoolshEnd of IBM i5OSUNIX |
End of ABAP+JavaJava | MapBox (MBX) |
End of ABAP+JavaJava | MapBox (MBX) |
Only valid for ABAPABAP+Java |
45 Activating the CRM Web Client
The CRM Web Client is part of the ICF Services that is automatically installed as part of SAP NetWeaver
Application Server
Procedure
To activate the CRM Web Client after the installation see the SAP Library at
httphelpsapcomnw70 SAP NetWeaver 70 Library (including Enhancement Package 2) English SAP
NetWeaver Library SAP NetWeaver by Key Capability Application Platform by Key Capability Platform-Wide
Services Connectivity Components of SAP Communication Technology Communication Between ABAP and Non-
4 Post-Installation
45 Activating the CRM Web Client
2012-12-17 CUSTOMER 3950
ABAP Technology Internet Communication Framework Development Server-Side Development Creating and
Configuring an ICF Service Activating and Deactivating the ICF ServicesEnd of ABAPABAP+Java |
Only valid for ABAP |
46 Installing and Configuring CRM Application Server Loyalty Add-On Component
This section provides information about how to install and configure CRM Application Server Loyalty
as an add-on component to CRM Application Server ABAP
Prerequisites
You have already deployed the following software components
SAP NetWeaver Application Server ABAP (AS ABAP)
CRM Application Server ABAP
Procedure
Installing CRM Application Server Loyalty
Install CRM Application Server Loyalty on the same host where CRM Application Server ABAP is
deployed as described in SAP Note 1162144
Configuring CRM Application Server Loyalty
After you have installed CRM Application Server Loyalty you must complete the following
configuration steps
1 Call transaction nspro
2 Choose SAP Customising Implementation Guide Customer Relationship Management Marketing Loyalty
Management in BBPCRM Basic Settings Define Basic Settings
3 Enter value 1 for the INSTALL_TYPE parameter
NOTE
You do not have to enter destination name for the LOYALTY_SYSTEM parameterEnd of ABAP |
47 Starting XCM
This section describes how to start XCM
Procedure
1 You access the XCM tool at
httplthostgtltportgtltweb app namegtadminxcminitdo
4 Post-Installation
46 Installing and Configuring CRM Application Server Loyalty Add-On Component
4050 CUSTOMER 2012-12-17
NOTE
You can also start XCM in accessibility mode (according to Section 508 Rehabilitation Act)
at the following URL
httplthostgtltportgtltweb app namegtadminxcminitdosap-accessibility=x
2 Provide a user and password If you are logging on for the first time use the Administrator user
and the password you defined during the installation of the SAP system
RECOMMENDATION
We recommend you create new users with lesser rights than the Administrator for the
administration of Web applications
For more information see the SAP CRM Security Guide section E-Commerce
3 When the application opens a closed control tree is displayed on the left of the screen A screen
containing help information is displayed to the right
You can use edit (change settings) or display (see settings) mode in XCM You use the button in
the top right hand corner of the screen to change between modes When you switch to edit mode
a DB lock is set meaning that only this user can edit the settings at one time The lock is released
once the user switches back to display mode or after session timeout (default timeout is 30mins)
48 Accessing Configuration Documentation in SAP Solution Manager
To access configuration documentation in SAP Solution Manager you have to connect your newly
installed SAP system to SAP Solution Manager
NOTE
For SAP NetWeaver you can also find configuration documentation in the Technology Consultants
Guide at
httphelpsapcomnw70 SAP NetWeaver 70 Library (including Enhancement Package 2) English
SAP NetWeaver Library Technology Consultants Guide
Procedure
Create a configuration project with the related configuration guide as described in the following
documentation
httphelpsapcom SAP Solutions SAP Solution Manager Documentation for SAP Solution Manager
ltcurrent releasegt SAP Solution Manager Implementing and Upgrading SAP Solutions Projects
Configuration
More Information
httpservicesapcomsolutionmanager Media Library How-To Documents How to Create a
Configuration Guide using SAP Solution Manager
4 Post-Installation
48 Accessing Configuration Documentation in SAP Solution Manager
2012-12-17 CUSTOMER 4150
This page is left blank for documents that are printed on both sides
5 Additional Information
Only valid for ABAP+JavaJava |
51 Installing the Business Packages for SAP CRM Using JSPM (Optional)
You can also install the Business Packages for SAP CRM using the Java Support Package Manager (JSPM)
Prerequisites
Only valid for IBM i5OSUNIX |
You have checked hardware and software requirements [external document]End of IBM i5OSUNIX |
Only valid for Windows |
You have checked hardware and software requirements [external document]End of Windows |
You have ckecked the Prerequisites for the Business Packages for SAP CRM [page 7]
Procedure
1 Download version 701 of the files sapcom_BPCRMAPP sapcom_BPCRMFND sapcom_CRMAPP and
sapcom_CRMFND as follows
1 Go to httpservicesapcomswdc Download Support Packages and Patches Search for
Support Packages and Patches
2 Enter the following search terms
BP CRM Application Coding 701
BP CRM Application Content 701
BP CRM Foundation Coding 701
BP CRM Foundation Content 701
2 Add the deployment variable comsapcmshare as described in SAP Note 965948
For more information about how to use the Software Deployment Manager (SDM) see the
documentation Software Deployment Manager which is available at
httphelpsapcomnw70 SAP NetWeaver 70 Library (including Enhancement Package 2) English
SAP NetWeaver Library SAP NetWeaver Developerrsquos Guide Fundamentals Using Java Core Development
Tasks Deployment Putting It All Together Software Deployment Manager
3 Install the Business Packages for SAP CRM with JSPM as described in Installing Additional Usage Types
or Software Units in an Existing SAP System [external document]
5 Additional Information
51 Installing the Business Packages for SAP CRM Using JSPM (Optional)
2012-12-17 CUSTOMER 4350
4 Perform the required Post-Installation Steps for the Business Packages for SAP CRM [page 20]End of ABAP+JavaJava |
Only valid for ABAP+JavaJava |
52 Troubleshooting for the Business Package for SAP CRMOnly valid for ABAP+JavaJava |
The following sections describe the steps that you have to perform if you have problems after the
installation
Activating BI Templates Manually [page 44]
Dragging the Central Search onto the Portal Desktop [page 45]End of ABAP+JavaJava |
Only valid for ABAP+JavaJava |
521 Activating BI Templates Manually
If you have installed the Business Package you might see error messages when loading the BI templates
This procedure describes how you can activate the templates afterwards
Procedure
1 Note the technical name of all templates in your portal interface that are not working
2 Log on to your BI system
3 On the SAP Easy Access screen choose Modeling Administrator Workbench Modeling (transaction
RSA1 or RSOR)
4 Choose Business Content Object Types Web Template Name Select Objects
A new window containing a list of BW objects and templates opens
5 Find your missing templates for example 0TPL_0CRM_Cnn_Qnnn_Vnnn_M and select the entries
6 Choose Transfer Selection
The template now appears on the right-hand side of the screen The Transfer checkbox has been
selected and cannot be changed Nevertheless we recommend that you repeat the following
procedure so that your templates can be displayed
7 Select the template
8 Choose Transfer Transfer
Result
You have successfully activated your missing templates and no error messages appear in the portalEnd of ABAP+JavaJava |
5 Additional Information
52 Troubleshooting for the Business Package for SAP CRM
4450 CUSTOMER 2012-12-17
Only valid for ABAP+JavaJava |
522 Dragging the Central Search onto the Portal Desktop
Procedure
The Business Package for SAP CRM 70 including SAP enhancement package 1 contains an iView for
the central search in CRM This iView is in the package on the page Today in the workset Home of the
CRM User You can drag this iView onto the portal desktop under the tool areaEnd of ABAP+JavaJava |
End of ABAP+JavaJava |
5 Additional Information
52 Troubleshooting for the Business Package for SAP CRM
2012-12-17 CUSTOMER 4550
Typographic Conventions
Example Description
ltExamplegt Angle brackets indicate that you replace these words or characters with appropriate entries to make entries in the system for example ldquoEnter your ltUser Namegtrdquo
ExampleExample
Arrows separating the parts of a navigation path for example menu options
Example Emphasized words or expressions
Example Words or characters that you enter in the system exactly as they appear in the documentation
httpwwwsapcom Textual cross-references to an internet address
example Quicklinks added to the internet address of a homepage to enable quick access to specific content on the Web
123456 Hyperlink to an SAP Note for example SAP Note 123456
Example Words or characters quoted from the screen These include field labels screen titles pushbutton labels menu names and menu options
Cross-references to other documentation or published works
Example Output on the screen following a user action for example messages Source code or syntax quoted directly from a program File and directory names and their paths names of variables and parameters and
names of installation upgrade and database tools
EXAMPLE Technical names of system objects These include report names program names transaction codes database table names and key concepts of a programming language when they are surrounded by body text for example SELECT and INCLUDE
EXAMPLE Keys on the keyboard
4650 CUSTOMER 2012-12-17
SAP AGDietmar-Hopp-Allee 16
69190 WalldorfGermany
T +4918 0534 34 34F +4918 0534 34 20
wwwsapcom
copy Copyright 2012 SAP AG All rights reserved
No part of this publication may be reproduced or transmitted in any form or for any purpose without the express permission of SAP AG The information contained herein may be changed without prior noticeSome software products marketed by SAP AG and its distributors contain proprietary software components of other software vendors
Microsoft Windows Excel Outlook PowerPoint Silverlight and Visual Studio are registered trademarks of Microsoft CorporationIBM DB2 DB2 Universal Database System i System i5 System p System p5 System x System z System z10 z10 zVM zOS OS390 zEnterprise PowerVM Power Architecture Power Systems POWER7 POWER6+ POWER6 POWER PowerHA pureScale PowerPC BladeCenter System Storage Storwize XIV GPFS HACMP RETAIN DB2 Connect RACF Redbooks OS2 AIX Intelligent Miner WebSphere Tivoli Informix and Smarter Planet are trademarks or registered trademarks of IBM CorporationLinux is the registered trademark of Linus Torvalds in the United States and other countriesAdobe the Adobe logo Acrobat PostScript and Reader are trademarks or registered trademarks of Adobe Systems Incorporated in the United States and other countriesOracle and Java are registered trademarks of Oracle and its affiliatesUNIX XOpen OSF1 and Motif are registered trademarks of the Open GroupCitrix ICA Program Neighborhood MetaFrame WinFrame VideoFrame and MultiWin are trademarks or registered trademarks of Citrix Systems IncHTML XML XHTML and W3C are trademarks or registered trademarks of W3Creg World Wide Web Consortium Massachusetts Institute of TechnologyApple App Store iBooks iPad iPhone iPhoto iPod iTunes Multi-Touch Objective-C Retina Safari Siri and Xcode are trademarks or registered trademarks of Apple IncIOS is a registered trademark of Cisco Systems IncRIM BlackBerry BBM BlackBerry Curve BlackBerry Bold BlackBerry Pearl BlackBerry Torch BlackBerry Storm BlackBerry Storm2 BlackBerry PlayBook and BlackBerry App World are trademarks or registered trademarks of Research in Motion LimitedGoogle App Engine Google Apps Google Checkout Google Data API Google Maps Google Mobile Ads Google Mobile Updater Google Mobile Google Store Google Sync Google Updater Google Voice Google Mail Gmail YouTube Dalvik and Android are trademarks or registered trademarks of Google IncINTERMEC is a registered trademark of Intermec Technologies CorporationWi-Fi is a registered trademark of Wi-Fi AllianceBluetooth is a registered trademark of Bluetooth SIG IncMotorola is a registered trademark of Motorola Trademark Holdings LLCComputop is a registered trademark of Computop Wirtschaftsinformatik GmbHSAP R3 SAP NetWeaver Duet PartnerEdge ByDesign SAP BusinessObjects Explorer StreamWork SAP HANA and other SAP products and services mentioned herein as well as their respective logos are trademarks or registered trademarks of SAP AG in Germany and other countriesBusiness Objects and the Business Objects logo BusinessObjects Crystal Reports Crystal Decisions Web Intelligence Xcelsius and other Business Objects products and services mentioned herein as well as their respective logos are trademarks or registered trademarks of Business Objects Software Ltd Business Objects is an SAP companySybase and Adaptive Server iAnywhere Sybase 365 SQL Anywhere and other Sybase products and services mentioned herein as well as their respective logos are trademarks or registered trademarks of Sybase Inc Sybase is an SAP company
2012-12-17 CUSTOMER 4750
Crossgate mgic EDDY B2B 360deg and B2B 360deg Services are registered trademarks of Crossgate AG in Germany and other countries Crossgate is an SAP companyAll other product and service names mentioned are the trademarks of their respective companies Data contained in this document serves informational purposes only National product specifications may varyThese materials are subject to change without notice These materials are provided by SAP AG and its affiliated companies (ldquoSAP Grouprdquo) for informational purposes only without representation or warranty of any kind and SAP Group shall not be liable for errors or omissions with respect to the materials The only warranties for SAP Group products and services are those that are set forth in the express warranty statements accompanying such products and services if any Nothing herein should be construed as constituting an additional warranty
DisclaimerSome components of this product are based on Javatrade Any code change in these components may cause unpredictable and severe malfunctions and is therefore expressly prohibited as is any decompilation of these componentsAny Javatrade Source Code delivered with this product is only to be used by SAPrsquos Support Services and may not be modified or altered in any way
Documentation in the SAP Service MarketplaceYou can find this document at the following address httpservicesapcominstguides
4850 CUSTOMER 2012-12-17
SAP AGDietmar-Hopp-Allee 1669190 WalldorfGermanyT +4918 0534 34 34F +4918 0534 34 20wwwsapcom
copy Copyright 2012 SAP AG All rights reservedNo part of this publication may be reproduced or transmitted in any form or for any purpose without the express permission of SAP AG The information contained herein may be changed without prior notice
- SAP Enhancement Package 1 for SAP CRM 70
-
- Table of Contents
- 1 Introduction
- 2 Planning and Preparation
-
- 21 Prerequisites for the Business Packages for SAP CRM
-
- 3 Installation
- 4 Post-Installation
-
- 41 Checking the Availability of Back-End Systems for SAP CRM Java Components
-
- 411 Creating a Back-End User
- 412 Checking the Connection to the ABAP System
- 413 Configuring and Checking the TREX Service
- 414 Checking the Selling via eBay Processes
-
- 42 Post-Installation Steps for Workforce Deployment Application and Calculation Services
-
- 421 Implementing WFMCORE 200 Using Transaction SAINT
- 422 Configuring the Extended Configuration Management (XCM) for WFD Application and Calculation Services
- 423 Checking Workforce Deployment Calculation Services
- 424 Checking the Installation of WFD Application Services and WFD Calculation Services
-
- 43 Post-Installation Steps for the Business Packages for SAP CRM
-
- 431 Creating Roles for the SAP CRM Business Packages
- 432 Installation of the Info Center for the SAP CRM Business Package
-
- 4321 Importing the SAP CRM Info Center Configurations and Directory Structure
- 4322 Activating Manual Ordering of Folders for the sapcrm Repository
- 4323 Creating Indexes and Taxonomies for the sapcrmnews Repository
- 4324 Creating the Index for the sapcrm Repository
- 4325 Configuring the Personal Search
- 4326 Increasing the Number of JCo Connections
-
- 44 Post-Installation Steps for MapBox
-
- 441 Assigning User Groups for MapBox Users
- 442 Configuring an RFC Destination for MapBox
- 443 Performing Initial Configuration for MapBox
- 444 Executing the MapBox
- 445 Performing the Smoke Test for MapBox
- 446 Ensuring Optimal Block Size settings
- 447 Adapting Memory Settings for the J2EE Engine
-
- 45 Activating the CRM Web Client
- 46 Installing and Configuring CRM Application Server Loyalty Add-On Component
- 47 Starting XCM
- 48 Accessing Configuration Documentation in SAP Solution Manager
-
- 5 Additional Information
-
- 51 Installing the Business Packages for SAP CRM Using JSPM (Optional)
- 52 Troubleshooting for the Business Package for SAP CRM
-
- 521 Activating BI Templates Manually
- 522 Dragging the Central Search onto the Portal Desktop
-
- Copyright and trademarks
-

This page is left blank for documents that are printed on both sides
2 Planning and Preparation
Only valid for ABAP+JavaJava |
21 Prerequisites for the Business Packages for SAP CRM
You can install the Business Packages for SAP CRM in one of the following ways
Automatically using SAPinst
Manually by downloading them from SAP Service Marketplace and installing them using Java Support
Package Manager (JSPM) [page 43]
Prerequisites
The Business Packages for CRM require at least the following SAP NetWeaver usage types and the
following CRM software units
SAP NetWeaver Application Server Java (AS Java)
SAP NetWeaver Enterprise Portal (EP)
SAP CRM Business Packages Foundation (BP-CRM-FND)
SAP NetWeaver Application Server ABAP (AS ABAP) and SAP CRM Application Set (CRM APP)
To use the CRM functionality of the Business Packages for SAP CRM you need an SAP CRM ABAP
back-end system consisting of AS ABAP and SAP CRM APP
SAP Retrieval and Classification Engine (TREX)
To use the search functions you need TREX
Integration
Check the support for these usage types and software components using the Product Availability Matrix
(PAM) at
httpservicesapcompam
More Information
For more information about how to size the Enterprise Portal (EP) see
httpservicesapcomsizing Hardware Sizing Sizing Guidelines Solutions amp PlatformEnd of ABAP+JavaJava |
2 Planning and Preparation
21 Prerequisites for the Business Packages for SAP CRM
2012-12-17 CUSTOMER 750
This page is left blank for documents that are printed on both sides
3 Installation
Proceed as described in the documentation Installation Guide ndash SAP Systems Based on the Application Server
ltABAP | Javagt of SAP NetWeaver on ltOperating Systemgt ltDatabasegt at httpservicesapcom
sltoolset Software Logistics Toolset 10 Software Provisioning Manager 10
3 Installation
2012-12-17 CUSTOMER 950
This page is left blank for documents that are printed on both sides
4 Post-Installation
Only valid for Java |
41 Checking the Availability of Back-End Systems for SAP CRM Java Components
Only valid for ABAP+JavaJava |
After the installation you have to check the availability of back-end systems as follows
1 To test the connection to the ABAP back-end system you create a back-end user [page 11]
2 Depending on various business processes you check the following back-end systems
ABAP system [page 12]
TREX Server [page 14]End of ABAP+JavaJava |
Only valid for ABAP+JavaJava |
411 Creating a Back-End User
You need service users to provide the anonymous remote function call (RFC) stateless connection
between your back-end system and your Web-based applications
Prerequisites
You have installed and configured CRM E-Commerce Web-based applications
Procedure
You create a service user in your back-end SAP CRM system and assign it to the Web-based application
as follows
1 In your ABAP back-end system on the SAP Easy Access screen choose Tools Administration User
Maintenance Users (transaction SU01)
2 Create a user of the type Service User and enter all required data
3 Assign the appropriate service user authorization role to the user on the Roles tab For a list of
service user roles for the various Web-based applications see the following table
Application Authorization Role for Service User
E-Selling B2B SAP_CRM_ECO_ISA_TU_B2B
E-Selling B2C SAP_CRM_ECO_ISA_TU_B2C
E-Selling EASYB2B SAP_CRM_ECO_ISA_TU_EASYB2B
4 Post-Installation
41 Checking the Availability of Back-End Systems for SAP CRM Java Components
2012-12-17 CUSTOMER 1150
Application Authorization Role for Service User
E-Selling CVIEWS SAP_CRM_ECO_ISA_TU_CVIEWS
E-Selling SHOPADMIN SAP_CRM_ECO_ISA_TU_SHOPADM
E-Selling USERADMIN SAP_CRM_ECO_ISA_TU_USERADM
E-Selling Auctioning via Web shop (AVW) SAP_CRM_ECO_TU_AVW
E-Selling via eBay (SVE) SAP_CRM_ECO_TU_SVE
E-Service Internet Customer Self Service (ICSS) SAP_CRM_ECO_ISE_TU_B2B (Authorizations for ICSS B2B)SAP_CRM_ECO_ISE_TU_B2C (Authorizations for ICSS B2C)
E-Service Complaints and Returns SAP_CRM_ECO_ISE_TU_CR
E-Service Remanufacturer inspection SAP_CRM_ECO_ISE_TU_INSP
Channel Management (CHM)Shared Catalog
SAP_CRM_ECO_CHM_TU_SHRDCAT
Channel Management (CHM) BOB SAP_CRM_ECO_ISA_TU_BOB
Channel Management (CHM) HOM SAP_CRM_ECO_ISA_TU_HOM
Channel Management (CHM) CSR SAP_CRM_ECO_ISA_TU_CSR
4 Save your entries
More Information
For more information about service users see the documentation ltyour projectgt Basic Settings for CRM
E-Commerce General Settings for CRM E-Commerce User Management in the SAP Solution Manager [page
41]End of ABAP+JavaJava |
Only valid for ABAP+JavaJava |
412 Checking the Connection to the ABAP System
This section tells you how to check the connection to the ABAP system
Prerequisites
To be able to test the connection to the ABAP system you need to create a user [page 11] on this system
Procedure
1 Start the Visual Administrator
1 On your central instance host change to the admin directory as follows
Only valid for IBM i5OSUNIX |
usrsapltSAPSIDgtltinstance_namegtj2eeadmin
End of IBM i5OSUNIX |
Only valid for Windows |
usrsapltSAPSIDgtltinstance_namegtj2eeadmin
End of Windows |
4 Post-Installation
41 Checking the Availability of Back-End Systems for SAP CRM Java Components
1250 CUSTOMER 2012-12-17
2 Only valid for IBM i5OSUNIX |
Run goshEnd of IBM i5OSUNIX |
3 Only valid for Windows |
Double-click gobatEnd of Windows |
For more information about the Visual Administrator see the SAP Library at
httphelpsapcomnw70 SAP NetWeaver 70 Library (including Enhancement Package 2) English
SAP NetWeaver Library SAP NetWeaver by Key Capability Application Platform by Key Capability Java
Technology Administration Manual J2EE Engine J2EE Engine Administration Tools
2 Only valid for IBM DB2 for i5OSIBM DB2 for i5OS (LinuxWindows)IBM DB2 for Linux and UNIX and WindowsIBM DB2 for zOSMaxDBMS SQL ServerOracle |
Log on to the Visual Administrator with administrator rights
NOTE
If you chose configuration Use ABAP in the User Management Engine (UME) and you selected
SAP CRM ABAP as your ABAP back end with UME during the installation a successful logon
to the Visual Administrator means that the SAP CRM ABAP back-end system is available
You have now finished this procedure
Otherwise continue with the next step
End of IBM DB2 for i5OSIBM DB2 for i5OS (LinuxWindows)IBM DB2 for Linux and UNIX and WindowsIBM DB2 for zOSMaxDBMS SQL ServerOracle |
3 Start an application that uses the SAP CRM ABAP system if it is stopped
1 In the left pane of the Visual Administrator open clusterserverservices and choose
Deploy service
2 Select the application
Application Context Root
crm~b2b b2b
crm~icss_b2b icss_b2b
crm~sve sve
3 To start the selected application choose Start
4 Open the user interface for the Extended Configuration Management (XCM) Administrator as
follows
1 Open a Web browser and enter the following URL
httpltJ2EE_hostgtltJ2EE_portgtltcontext rootgtadminxcminitdo
where ltcontext rootgt is the context root of the application started in the previous step
To find information about the components that can be configured choose help
2 Choose Start Component
You can find information about configuration of components on the right hand side of the
screen
4 Post-Installation
41 Checking the Availability of Back-End Systems for SAP CRM Java Components
2012-12-17 CUSTOMER 1350
3 To create a jco Component follow the instructions provided in the Example of component
configuration field
If the ldquorun testrdquo operation described in the component configuration section of a jco setting
was successful the ABAP system can be reached from the Java system
More InformationFor more information about using Extended Configuration Management (XCM) to configure your
application see Using Extended Configuration Management (XCM) [page 40] and the documentation in the
SAP Solution Manager [page 41]End of ABAP+JavaJava |
Only valid for Java |
413 Configuring and Checking the TREX Service
You need to configure and check the TREX service
Procedure
Configuring the TREX Service
1 Start the Visual Administrator
2 Connect to the AS Java
3 Choose Server node Open Services Node Select TREX Service
4 Maintain the values for nameserveraddress and nameserverbackupserverlist
For more information see Specifying the Address of the TREX Name Server in Installation Guide ndash SAP NetWeaver
70 Standalone Engine Search and Classification (TREX) Single Host at
httpservicesapcominstguidesNW70 Installation Installation - Standalone Engines SAP
NetWeaver Search and Classification TREX Installing TREX 70 Single Host
Checking the TREX Service
1 Start the application sapcomcrm~b2b as described in step 3 of Checking the Connection to the ABAP
System [page 12]
2 Open a Web browser and enter the following URL
httpltJ2EE_hostgtltJ2EE_portgtb2badmintrextrex_640jsp
ResultIf the connection was established successfully the message TREX Server is available appearsEnd of Java |
Only valid for Java |
414 Checking the Selling via eBay Processes
To use the selling via eBay (SVE) processes the Java system requires an http connection to
4 Post-Installation
41 Checking the Availability of Back-End Systems for SAP CRM Java Components
1450 CUSTOMER 2012-12-17
httpwwwebaycom
To test the connection you need to create an XCM component ebayCommunicator for the sapcom
crm~sve application
Procedure
To create the Extended Configuration Management (XCM) component ebayCommunicator using
application sapcomcrm~sve proceed as described in Checking the ABAP System [page 12]
NOTE
Make sure that you replace jco component with ebayCommunicator component when following
the procedure in Checking the ABAP System [page 12]
More Information
For more information about using Extended Configuration Management (XCM) to configure your
application see Using Extended Configuration Management (XCM) [page 40] and the documentation in the
SAP Solution Manager [page 41]End of Java |
End of Java |
Only valid for Java |
42 Post-Installation Steps for Workforce Deployment Application and Calculation Services
Only valid for ABAP+JavaJava | CRM Java Components (JCRM)Extended E-Selling Components (XECO) |
You have to perform the following steps to check and configure Workforce Deployment Application
and Calculation Services (WFD ASCS)
You implement WFMCORE 200 using transaction SAINT [page 15]
You configure the XCM administration tool for WFD ASCS [page 16]
You check WFD calculation services [page 18]
You check the installation of WFD ASCS [page 19]End of ABAP+JavaJava | CRM Java Components (JCRM)Extended E-Selling Components (XECO) |
Only valid for ABAP+JavaJava |
421 Implementing WFMCORE 200 Using Transaction SAINT
Before you can check and configure the Java part of Workforce Deployment Application and
Calculation Services (WFD ASCS) you need to implement WFMCORE 200
4 Post-Installation
42 Post-Installation Steps for Workforce Deployment Application and Calculation Services
2012-12-17 CUSTOMER 1550
Only valid for CRM Java Components (JCRM) |
The WFMCORE 200 component contains all necessary ABAP classes and libraries required for the
various Workforce Deployment scenarios and processes including Service Resource Planning in CRM and
Retail Multisite Workforce DeploymentEnd of CRM Java Components (JCRM) |
Procedure
1 Log on to your ABAP system
2 Install WFMCORE 200 using transaction SAINT as described in SAP Note 830595
3 Only valid for CRM Java Components (JCRM) |
If you are implementing the Service Resource Planning in CRM process variant run the report
WFDBP_UPDATE_BLUEPRINT to update tables that define the settings required to properly
display and maintain Service Arrangements in the People-Centric User InterfaceEnd of CRM Java Components (JCRM) |
End of ABAP+JavaJava |
Only valid for ABAP+JavaJava |
422 Configuring the Extended Configuration Management (XCM) for WFD Application and Calculation Services
Workforce Deployment Application Services (WFD AS) sends calculation and forecasting requests to
a CRM ABAP back-end system WFD Calculation Services (WFD CS) picks up the requests from this
CRM ABAP back-end system You define the connection to the CRM ABAP back-end system through
Extended Configuration Management (XCM) Admin
For more information about using Extended Configuration Management (XCM) to configure your
application see Using Extended Configuration Management (XCM) [page 40] and the documentation in the
SAP Solution Manager [page 41]
The csjcoxxxxx XCM parameters define the JCO connection to the SAP CRM ABAP system where
the WFD CS maintains forecast and calculation requests You can connect to the CRM ABAP system
using one of the following
A message or dispatching server by specifying csjcomshost csjcogroup and csjcor3name
An application server by specifying csjcoahost and csjcosysnr
In either case you must also specify csjcoclient csjcouser and csjcopassword
XCM Parameter Name Example Value Description
csjcoahost us0091wdfsapcorp Application server host name of the SAP CRM Calculation Service
csjcosysnr 91 System number of the R3 Calculation Service (for example 09)
csjcomshost us0091wdfsapcorp Message server host name of the SAP CRM Calculation Service
csjcogroup PUBLIC Group of the SAP CRM Calculation Service (case sensitive for example PUBLIC)
4 Post-Installation
42 Post-Installation Steps for Workforce Deployment Application and Calculation Services
1650 CUSTOMER 2012-12-17
XCM Parameter Name Example Value Description
csjcor3name Q5C System ID of the SAP CRM Calculation Service (for example IDES)
csjcoclient 505 Client of the SAP CRM Calculation Service
csjcouser Back end user for JCO connection to the SAP CRM Calculation Service
csjcopassword Password for the back-end user
You need to configure these csjcoxxxxx XCM parameter values in each instance of WFD AS and
WFD CS Make sure that the values are the same in all instances
Configuring the XCM for WFD Calculation Services
This business scenario is relevant for defining the WFD CS You must perform this XCM configuration
for the WFD CS to run
1 Start the XCM using the following URL
httpltJ2EE_hostgtltJ2EE_portgtwfdcsadminxcminitdo
2 Access the configuration using the following path General Application Settings Customer sisopt
sisoptconfig
Process Description Web ApplicationXCM Application Configurations
Calculations Service Workforce scheduling application
wfdcs sisoptconfig
3 In addition to the csjcoxxxx XCM parameters you need to define the http port of the J2EE
instance where WFD CS is running
XCM Parameter Name Example Value Description
cshttpport 51000 The http port of the web server where the WFD Calculation Services application is running (for example 50000)
4 Restart the application after saving the XCM configuration
Configuring the XCM for WFD Application Services
This business scenario is relevant for connecting the WFD AS to the WFD CS
1 Start the XCM using the following URL
httpltJ2EE_hostgtltJ2EE_portgtwfdadminxcminitdo
2 Access the configuration using the following path General Application Settings Customer sis
sisconfig
Process Description Web ApplicationXCM Application Configurations
Application Services Web-based scheduling application
wfd sisconfig
3 Restart the application after saving the XCM configurationEnd of ABAP+JavaJava |
4 Post-Installation
42 Post-Installation Steps for Workforce Deployment Application and Calculation Services
2012-12-17 CUSTOMER 1750
Only valid for ABAP+JavaJava |
423 Checking Workforce Deployment Calculation Services
After configuring Workforce Deployment Calculation Services (WFD CS) with Extended Configuration
Management (XCM) and restarting the application you need to go to the WFD CS configuration page
to check that it is running
Prerequisites
You have completed the installation of WFD Application Service (AS) and CS as described in this
documentation
Only valid for CRM Java Components (JCRM) |
You have downloaded the Business Package for Retail (Release 10) from sdnsapcom SAP NetWeaver
Capabilities User Productivity Portal and Collaboration Portal Content Portfolio
For more information about the portal content versions for your release see the documentation
Master Guide ndash SAP Customer Relationship Management 70 at httpservicesapcomcrm-instEnd of CRM Java Components (JCRM) |
Only valid for CRM Java Components (JCRM) |
You must have access to the Portal Admin role in SAP CRM through the Enterprise Portal to complete
this part of the WFD ASCS installation
For more information see Configuring the CRM Business Package on the SAP Service Marketplace at
httpservicesapcomcrm-inst SAP CRM 70 CRM Business Packages and PC UI Section
CRM Portal Administrator contains specific instructions on configuring the portal for access to WFD
AS and CS Apply the instructions to the Portal Admin roleEnd of CRM Java Components (JCRM) |
You have configured your portal users based on the required settings as described in the
configuration documentation for your IT scenario
For more information see Accessing Configuration Documentation in the SAP Solution Manager [page 41]
Procedure
1 Access the WFD CS configuration page through the Enterprise Portal using the role Portal
Administrator
2 Choose WFD Calculation Services Configuration
The Configuration tab looks as follows
Tab To Complete InstallationFor ongoing Configuration Management
Calculation Servers Required for at least one calculation server
Required for each additional calculation server
Logging Localization No Required to add or change logging once fully operational
End of ABAP+JavaJava |
4 Post-Installation
42 Post-Installation Steps for Workforce Deployment Application and Calculation Services
1850 CUSTOMER 2012-12-17
Only valid for ABAP+JavaJava |
424 Checking the Installation of WFD Application Services and WFD Calculation Services
This section tells you how to check that you have correctly installed the Java components for Workforce
Deployment Application Services (WFD AS) and WFD Calculation Services (WFD CS) This section
does not tell you how to check the connection between the WFD AS and the WFD CS
The procedure below shows you how to create a simple calculation request and verify that the
Calculation Server has received the request This helps you check that you have correctly installed all
WFD AS or CS components and that they are communicating with each other
Prerequisites
You have completed all the installation steps described in this documentation
You have connected WFD AS or CS components with the Enterprise Portal
You have installed the required business packages according to Checking Workforce Deployment
Calculation Services [page 18]
Procedure
1 To check that WFD AS is working and listening for HTTP requests enter the following URL
httpltJ2EE_hostgtltJ2EE_portgtwfdlogondo
The following error confirms that the application is working
Your session has expired Please renew your session by clicking a section link in
the Portal menu
2 Access the WFD CS from the Enterprise Portal through the Portal Admin role and check that the
WFD CS page comes up with no errors
If the page does not come up possible errors are
Error Message Cause
Missing value for XCM configuration
parameter cshttpport
The XCM parameter cshttpport was not filled
The request could not be completed
due to the following
errorsltfollowed by details of the
particular error usually related to
the JCO connectiongt
One of the XCM parameters csjcoxxxxx might be incorrect
EXAMPLE
The user or password are incorrect
3 Test the submission of a calculation request to see if the WFD CS can process the request
You can simulate a calculation request submission by executing the RFC
TEST_WFDCS_CALCREQ_SUBMIT from the CRM back-end system defined in the csjcoxxxxx XCM
parameters of WFD CS
4 Post-Installation
42 Post-Installation Steps for Workforce Deployment Application and Calculation Services
2012-12-17 CUSTOMER 1950
EXAMPLE
For example when you installed WFD CS you configured the csjcoxxxxx XCM
parameters to point to system ID Q5C client 505 You now need to log in to Q5C client 505
and execute TEST_WFDCS_CALCREQ_SUBMIT with transaction SE37 using the default import
parameters
4 Check the Requests tab of the WFD CS page to check the status of entries with the location name
SMOKETEST has the status FAILED
Status FAILED indicates a successful smoke test It means that the Request Manager successfully
sent the request to the Solver which successfully processed it
Status QUEUED probably means that the XCM parameter cshttpport was incorrectEnd of ABAP+JavaJava |
End of Java |
Only valid for ABAP+JavaJava |
43 Post-Installation Steps for the Business Packages for SAP CRM
The following sections provide information about the steps that you have to perform after importing
the Business Package for SAP CRM
Only valid for ABAP+JavaJava |
431 Creating Roles for the SAP CRM Business Packages
Procedure
If you create your own roles from the SAP CRM Business Packages also add the every user role
(eu_core_role) to your role The Every User Role contains the personalization functionality for the SAP
NetWeaver Portal
For more information about the Every User Role see the SAP Library at
httphelpsapcomnw70 SAP NetWeaver 70 Library (including Enhancement Package 2) English SAP
NetWeaver Library SAP NetWeaver by Key Capability People Integration by Key Capability Portal Portal
Administration Guide Super Administration Pre-configured Roles Every User Roles End of ABAP+JavaJava |
Only valid for ABAP+JavaJava |
432 Installation of the Info Center for the SAP CRM Business Package
This section describes how to install the Info Center
4 Post-Installation
43 Post-Installation Steps for the Business Packages for SAP CRM
2050 CUSTOMER 2012-12-17
Prerequisites
You have installed the Business Package for SAP CRM [page 43]
You have administrator rights
Process Flow
1 You import the SAP CRM info center configurations and directory structure [page 21]
2 You activate manual ordering of folders for the sapcrm Repository [page 23]
3 You create indexes and taxonomies for the sapcrmnews Repository [page 23]
4 You create the index for the sapcrm Repository [page 25]
5 You configure the personal search [page 25]
6 If required you increase the number of JCo connections [page 26]
Only valid for ABAP+JavaJava |
4321 Importing the SAP CRM Info Center Configurations and Directory Structure
The directory structure of the info center has been made available in one content package and you can
import it using the Information and Content Exchange (ICE) Repository
For more information about ICE see SAP Library at
httphelpsapcomnw70 SAP NetWeaver 70 Library (including Enhancement Package 2) English SAP
NetWeaver Library SAP NetWeaver by Key Capability Information Integration by Key Capability Knowledge
Management Content Managers Guide Additional Tasks for Content Managers Content Exchange Distributing
Content (Offline)
Procedure
Importing the Directory Structure
1 Log on to the Portal as content manager
2 Choose Content Management Content Exchange Upload
3 Only valid for Windows |
Select file fullupdate_infocenterzip from directory ltservlet_enginegtirjrootWEB-INF
portalportalappsepcrmchmkmexpice and confirm the uploadEnd of Windows |
Only valid for IBM i5OSUNIX |
Select file fullupdate_infocenterzip from directory ltservlet_enginegtirjrootWEB-INF
portalportalappsepcrmchmkmexpice and confirm the uploadEnd of IBM i5OSUNIX |
The zip file is now imported using the ICE protocol
If you cannot see the ICE repository this might be due to one of the following reasons
The ICE repository was hidden in the virtual root repository
4 Post-Installation
43 Post-Installation Steps for the Business Packages for SAP CRM
2012-12-17 CUSTOMER 2150
In this case do the following
1 Log on to the portal as system administrator
2 In the SAP NetWeaver Enterprise Portal choose System Administration System Configuration
Knowledge Management Content Management Repository Managers Virtual Root Repository
3 Check whether the ICE Repository has been entered under Repositories to exclude
4 Remove it from the list
5 Save your changes
6 Restart the Servlet Engine
The repository has been ldquoswitchedrdquo to invisible
1 Log on to the portal as system administrator
2 In the SAP NetWeaver Enterprise Portal choose System Administration System Configuration
Knowledge Management Content Management Repository Managers Content Exchange
Repository
3 If the property hide in root folder is active deselect it
4 Restart the Servlet Engine
NOTE
After the import check whether the directory structure was created by choosing Content
Administration KM Content in the SAP NetWeaver Enterprise Portal The list of folders should
contain the folders sapcrm and sapcrmnews
Checking Whether the Directory Structure Has Been Imported Successfully
You can only import the structure if there is a repository with the same name For example if a zip file
is exported from the repository sapcrm there must also be a repository with the name sapcrm in the
target system
The sapcrm and sapcrmnews repositories as well as the CRM-Namespace filter are created during the
import of the SAP CRM KM extension configuration archive To check whether this configuration
archive has been imported successfully proceed as follows
1 Log on to the portal as system administrator
2 In the SAP NetWeaver Enterprise Portal choose System Administration Monitoring Knowledge
Management Deployment Monitor Config Archives
3 Check whether the archive comsappctcrmappkmextprjconfig is installed in the system
If the archive comsappctcrmappkmextprjconfig is not installed in the system import it
manually as follows
1 Log on to the portal as system administrator
2 In the SAP NetWeaver Enterprise Portal choose System Administration Monitoring Knowledge
Management Deployment Monitor Config Archives Actions Import
4 Post-Installation
43 Post-Installation Steps for the Business Packages for SAP CRM
2250 CUSTOMER 2012-12-17
3 Only valid for Windows |
Select the archive comsappctcrmappkmextprjconfigconfigarchive from directory
ltSAPSIDgtJCltinstance_numbergtj2eeclusterappssapcomep~crm~chm
servlet_jspepcrmchmkmexprootWEB-INFconfig and confirm the importEnd of Windows |
4 Only valid for IBM i5OSUNIX |
Select the archive comsappctcrmappkmextprjconfigconfigarchive from
directory ltSAPSIDgtJCltinstance_numbergtj2eeclusterappssapcomep~crm~chm
servlet_jspepcrmchmkmexprootWEB-INFconfig and confirm the importEnd of IBM i5OSUNIX |
After the import the directory structure has no restrictions on rights Make sure that you modify the
rights of the various folders to meet your companyrsquos requirementsEnd of ABAP+JavaJava |
Only valid for ABAP+JavaJava |
4322 Activating Manual Ordering of Folders for the sapcrm Repository
The sapcrm Repository folders are ordered in a specific sequence
Procedure
To display this sequence activate manual ordering for each directory
For more information see the SAP Library at
httphelpsapcomnw70 SAP NetWeaver 70 Library (including Enhancement Package 2) English SAP
NetWeaver Library SAP NetWeaver by Key Capability Information Integration by Key Capability Knowledge
Management Content Managers Guide Providing Shared Access to Departmental Documents Sorting Documents in a
Folder ManuallyEnd of ABAP+JavaJava |
Only valid for ABAP+JavaJava |
4323 Creating Indexes and Taxonomies for the sapcrmnews Repository
To make news available for indexing and searching create two new indexes
Prerequisites
You have administrator rights for Knowledge Management on the server
For more information see the SAP Library at
httphelpsapcomnw70 SAP NetWeaver 70 Library (including Enhancement Package 2) English SAP
NetWeaver Library SAP NetWeaver by Key Capability Information Integration by Key Capability Knowledge
Management
4 Post-Installation
43 Post-Installation Steps for the Business Packages for SAP CRM
2012-12-17 CUSTOMER 2350
Procedure
Creating Indexes and Taxonomies for the sapcrmnews Repository
The Business Package contains an iView ndash epbp_crmchm-pmiviewsnews_flash ndash that combines all
news with the istopnews=yes attribute in a virtual folder To guarantee the function of this iView
create two indexes in KM
1 In the SAP NetWeaver Enterprise Portal choose System Administration System Configuration
Knowledge Management Index Administration
2 Create an index of the Search and Classification type with a suitably configured taxonomy
3 Choose sapcrmpartnernews as the index ID Otherwise the path to the folder specified in the iView
is incorrect
If you choose another index ID you must also modify accordingly the folder properties in the
iView for one of the following
Folders path to content and path to root
Folders Path to Initially Displayed Folder and Path to Root Folder for Navigation
If you want to link two portal servers with a TREX server you must modify the index name and
iView properties on one of the portal servers
4 Assign folder sapcrmpartnerPartnernews as a data source
This moves all news with the (virtual) Top flag from this folder to the Newsflash iView
5 Create a ldquoquery-basedrdquo taxonomy with the name PartnerNewsFlash choosing Automatic
Classification before you save the taxonomy
NOTE
The outbound delivery includes only the iView above for virtually combining news If you
also want to use this functionality for other news channels (for example internal news) use
your own index and taxonomy for each channel
For more information see the SAP Library at
httphelpsapcomnw70 SAP NetWeaver 70 Library (including Enhancement Package 2) English SAP
NetWeaver Library SAP NetWeaver by Key Capability Information Integration by Key Capability Knowledge
Management Administration Guide System Administration System Configuration lsquoIndex Administrationrsquo iView
Creating Queries for the Taxonomies of sapcrmnews Repositories
1 Log on to the portal as content manager
2 Choose Content Management Classification Taxonomy Query Builder
3 Add a search query to check the istopnews property for the value Yes
4 Enter PartnerNewsFlash as the name for the taxonomy
Here too a property of the iView links to a taxonomy with this name So if you want to choose
another name you must modify the path to the content folder property of the iView
For more information see the SAP Library at
4 Post-Installation
43 Post-Installation Steps for the Business Packages for SAP CRM
2450 CUSTOMER 2012-12-17
httphelpsapcomnw70 SAP NetWeaver 70 Library (including Enhancement Package 2) English SAP
NetWeaver Library SAP NetWeaver by Key Capability Information Integration by Key Capability Knowledge
Management Administration Guide System Administration System Configuration Taxonomies and ClassificationEnd of ABAP+JavaJava |
Only valid for ABAP+JavaJava |
4324 Creating the Index for the sapcrm Repository
To make Info center documents available for indexing and searching create a new index with sapcrm
as a data source
Prerequisites
You have administrator rights for Knowledge Management on the server
Procedure
Choose a name of your own Search as a service and standard as a crawler parameter
For more information see the SAP Library at
httphelpsapcomnw70 SAP NetWeaver 70 Library (including Enhancement Package 2) English SAP
NetWeaver Library SAP NetWeaver by Key Capability Information Integration by Key Capability Knowledge
ManagementEnd of ABAP+JavaJava |
Only valid for ABAP+JavaJava |
4325 Configuring the Personal Search
Prerequisites
You have administrator rights for Knowledge Management on the server
Procedure
1 Create an index for the userhome repository
To make personal folder documents available for the search create a new index with root
userhome as the data source
2 Create a search option set for personal search
To assign the search index and a start folder to the search for personal documents create a Search
Option Set with the name CRMPersonalFolderSearch As an index enter the index for the
userhome repository created above and ~alias~userhomeuseridPersonal Documents as the
root folder for the search
For more information see the SAPLibrary at
4 Post-Installation
43 Post-Installation Steps for the Business Packages for SAP CRM
2012-12-17 CUSTOMER 2550
httphelpsapcomnw70 SAP NetWeaver 70 Library (including Enhancement Package 2) English SAP
NetWeaver Library SAP NetWeaver by Key Capability Information Integration by Key Capability Knowledge
Management End of ABAP+JavaJava |
Only valid for ABAP+JavaJava |
4326 Increasing the Number of JCo Connections
This section tells you how to increase the number of concurrent Java Connector (JCo) connections
By default the maximum number of concurrent JCo connections is 100 The value depends on the
number and behavior of the users in the portal For more information see SAP Note 316877
You can specify this value when you plan the installation of your SAP NetWeaver Enterprise Portal
Make sure that you first analyze the number and behavior of the users
Procedure
To increase the maximum number of concurrent JCo connections increase the value of the
environment variable CPIC_MAX_CONV
EXAMPLE
Initial default value CPIC_MAX_CONV=100
Increased value CPIC_MAX_CONV=1000
End of ABAP+JavaJava |
End of ABAP+JavaJava |
End of ABAP+JavaJava |
Only valid for ABAP+JavaJava | MapBox (MBX) |
44 Post-Installation Steps for MapBoxOnly valid for Java | MapBox (MBX) |
You have to perform the following post-installation steps for MapBox
You assign user groups for MapBox users [page 27]
You configure an RFC destination for TCPIP connections [page 28]
You perform initial configuration for MapBox [page 28]
You execute the Map Box [page 34]
You perform the smoke test [page 35]
If required you perform additional settings for MapBox
Block size settings [page 38]
Memory settings for the J2EE Engine [page 39]End of Java | MapBox (MBX) |
4 Post-Installation
44 Post-Installation Steps for MapBox
2650 CUSTOMER 2012-12-17
Only valid for Java | MapBox (MBX) |
441 Assigning User Groups for MapBox Users
To access the MapBox URL you need to provide the correct security rights for individual user groups
Procedure
1 Log on to the Visual Administrator
1 On your central instance host change to the following directory
Only valid for IBM i5OSUNIX |
usrsapltSAPSIDgtltinstance_numbergtj2eeadmin
End of IBM i5OSUNIX |
Only valid for Windows |
usrsapltSAPSIDgtltinstance_numbergtj2eeadmin
End of Windows |
2 Only valid for IBM i5OSUNIX |
Run goshEnd of IBM i5OSUNIX |
3 Only valid for Windows |
Double-click gobatEnd of Windows |
For more information about the Visual Administrator see the SAP Library at
httpshelpsapcomnw70 SAP NetWeaver Library SAP NetWeaver by Key Capability
Application Platform by Key Capability Java Technology Administration Manual J2EE Engine J2EE Engine
Administration Tools
2 Choose the server node from the left-hand window
3 Choose Services Security Provider
A list of deployed components is displayed
4 Choose MapBoxLauncher from this list (sapcom
comsapsyncpointmapboxlaunchermapboxlauncher)
A list of tabs appears on the right
5 Choose Security Roles from the list
A list of security roles appears
6 If no display and modify roles are displayed add these roles as follows
1 Choose Switch to Edit Mode from the top task bar to switch to edit mode
2 Add display and modify roles by choosing Add
7 For both the display and modify roles perform the following
1 Choose Switch to Edit Mode from the top task bar to switch to edit mode
2 Choose the Groups tab from the list on the far right
3 Choose Search
4 Post-Installation
44 Post-Installation Steps for MapBox
2012-12-17 CUSTOMER 2750
A list of user groups appears
4 Select the user groups that you want to enable for the two roles
Add to the left of the user group display is now highlighted
5 Choose Add to add the user group for the selected roleEnd of Java | MapBox (MBX) |
Only valid for Java | MapBox (MBX) |
442 Configuring an RFC Destination for MapBox
After the installation you have to create an RFC destination for MapBox
Procedure1 Log on to the CRM server
2 Enter transaction SM59
The Display and Maintain RFC Destinations screen appears
3 Choose Technical Settings Activation Type and create a new destination with the type TCPIP
4 Choose Registered Server Program and enter a unique value for program ID
For example you might enter MAPBOX723 for SAP client 723
5 Enter the details of the gateway host and gateway service in Gateway Options
1 Gateway host
Enter the name of your message server You can also enter the IP address of your message
server
2 Gateway service
Enter your SAP CRM system number prefixed with the string sapgw
For example if your system number is 02 enter sapgw02
6 If the CRM system is a Unicode-enabled system choose Unicode in Special Options
7 Save the destination
8 Choose MapBox Configuration Page Connecting settings from the URL and enter the same RFC
destination name in the relevant fieldEnd of Java | MapBox (MBX) |
Only valid for Java | MapBox (MBX) |
443 Performing Initial Configuration for MapBox
Procedure1 Open a browser window and enter the following URL
httplthostnamegtltport_numbergtmapboxlauncher
NOTE
If you are logged on to the machine where the J2EE server is running you can also enter the
following URL
4 Post-Installation
44 Post-Installation Steps for MapBox
2850 CUSTOMER 2012-12-17
httplocalhostltport_numbergtmapboxlauncher
2 Choose Configuration
3 Edit the values according to your SAP system and choose Save
The application asks you to enter a user name and password
4 Enter the user name and password used for the SAP J2EE Engine Visual Administrator
A description of the properties and example values for the properties is given below
Result
You see the default connection settings for MapBox as shown in the graphic below A description
of the properties and example values are provided in the adjacent table
Figure 1 MapBox Default Connection Settings
Property Purpose Example
SAP System SAP System name ABC FAZ
Message Server Message server host name xyzmain
Group SAP System group PUBLIC SPACE
System Number SAP Gateway system number prefixed with sapgw
sapgw02
Unicode Used for setting the Unicode option for the CRM server Default value is no
yes
Maximum allowed wait time interval between ISP Processing and Commit call
Time-out period between an ISP_MAPBOX call and an ISP_COMMIT call
300
4 Post-Installation
44 Post-Installation Steps for MapBox
2012-12-17 CUSTOMER 2950
Property Purpose Example
Client SAP logon client 723
User Name SAP logon user John
Password SAP logon password
Language SAP logon language EN
Destination The RFC destination with which you need to register the MapBox This is the value you enter in step 3 of Configuring an RFC Destination for MapBox [page 28]
MAPBOX723
Number of server instances The number of JCO server execution instances used by the MapBox to process server requests This number indicates the number of CRM inbound queues that are running simultaneously
10
The above MapBox connection configuration is meant for one SAP client running with the CRM
Server If you want to run the MapBox with two or more SAP clients of the same CRM system
you can use Add Client on the configuration page and edit the values accordingly However make
sure that the RFC destinations that these multiple clients listen to are always unique You can
leave the default values for the other settings
If you need more control over logging and tracing you can go to Log Settings on the configuration
page edit the values and choose Save The Log Settings screen with default values is shown in the
graphic below A description of the properties and example values for the properties is provided
in the adjacent table
Figure 2 Default Values for the Log Settings Screen
4 Post-Installation
44 Post-Installation Steps for MapBox
3050 CUSTOMER 2012-12-17
Property Purpose Example
Log and dumps directory This value specifies where the MapBox logs and dumps are stored If this field is left blank the ltuser_homegt folder is used as default value
Only valid for Windows |
Ctemp
End of Windows |
Only valid for IBM i5OSUNIX |
tmp
End of IBM i5OSUNIX |
Input payload dump This value specifies whether the input document coming to MapBox for processing is written or not
No
MapBox launcher trace level This value specifies with what granularity the MapBoxLauncher execution trace is generated6 specifies that a full MapBoxLauncher execution trace is generated whereas 0 specifies that the MapBoxLauncher execution trace is not generated Recommended value for production use is 0
0
MapBox launcher trace size The maximum file size of the generated trace When the size reaches the maximum value another file is created so that the old file can be deleted (for example due to lack of space) You can use alphabetic suffixes to specify the sizes The supported values are k or K ndash kilobytes g or G ndash gigabytes m or M ndash megabytes t or T ndash terabytes
50 k
CoordServer log level This value specifies the detail of the coordination server logging We recommended you not to change the default value of 1
2
SAP Java connector trace level This value specifies the detail of the SAP Java Connector logging The recommended value for production use is 0
2
MapBox log level The log level required for the MapBox to generate an internal log file A higher trace level means that a more detailed log file is created We recommend you to use 4D for production systems where D meansldquoOn Demandrdquo
2
4 Post-Installation
44 Post-Installation Steps for MapBox
2012-12-17 CUSTOMER 3150
Property Purpose Example
MapBox message dumps This value stands for copying the incoming and outgoing messages to the local system For better performance we recommend that you do not enable the message dump option
no
MapBox statistics This value specifies whether a file that lists the performance measurements of the MapBox is created We recommend you to use the value no for production use
no
MapBox logs location This value specifies where the MapBox logs are stored Possible locations are the MapBox repository on the CRM Server or the local file system The recommended value for production use is local_fs which indicates that the MapBox logs are stored on the local file system
local_fs
MapLog format The format in which the MapBox log file must be created The internal log file is by default created in a particular format However you can change this format to display the file in the SAP log file format The two values that are available are default and sap_log
default
The MapBox uses additional properties for performance such as caching and reuse of the MapBox
atoms These values are already set to optimum values and you cannot change them
The description of the properties is shown in the table below
Property Purpose Example
General Settings
max_elements_document This is the limit for the internal cache of the MapBox to hold the count of generated XML documentsWe recommend you not to change this value
100
cache_threshold This is the maximum threshold ndash in kilobytes ndash for a document to be cached in the internal cache of the MapBox
500
4 Post-Installation
44 Post-Installation Steps for MapBox
3250 CUSTOMER 2012-12-17
Property Purpose ExampleWe recommend you not to change this value
max_elements_cache This is the limit for the internal cache of the MapBox to hold the count of MapScenariosWe recommend you not to change this value
100
parallel_instances You use this value on systems where more than one CPU is used This setting allows you to specify the number of CPU instances that MapBox must use for processing so that the remainder can be used by non-MapBox related applications By default MapBox uses all the available CPUs for processing Values can range between 0 to N-1 where N is the number of available CPUs
4
thread_priority Specifies the number of threads MapBox uses during processing We recommend you to set an optimum value for this property so that MapBox does not utilize all available resources 0 = min 1 = low 2 = normal 3 = high 4 = max
3
reuse_count Sets the count for the number of times an atom-instance must be reused before it is destroyed A value of 0 means that the atom is not destroyed and can be used continuously Recommended value is 50 This means that the atom instance is reused 50 times before it is destroyed
100
Lock Server Settings
Operation_Mode The internal mode of operation for the coordination server We recommend not to change the default value of OUTPROC_CLIENT
OUTPROC_CLIENT
Registry_Port The Remote Method Invocation (RMI) port used for connecting to the coordination serverRMI is a Java mechanism for distributed computing
1099
4 Post-Installation
44 Post-Installation Steps for MapBox
2012-12-17 CUSTOMER 3350
Property Purpose ExampleDo not change this value unless port 1099 is unavailable In this case change it to 59856
HostName The name of the host where the coordination server resides
localhost
LocalName The name of the host where the MapBoxLauncher is executed We recommend you not to change the default value of localhost
Server
PollingInterval Polling interval in seconds to ask for shutdown of the coordination server We recommend you not to change the default value of 30
60
CleanUpInterval Cleanup interval in seconds to check for invalid locks created by the MapBoxLauncher We recommend you not to change the default value of 60
180
NOTE
A file name MapLogxsl is also available with the smoke test [page 35] This file is the stylesheet
that is used to format the display of the MapBox log file During the installation and execution
of the MapBox the MapBox log file is created in the following directory
Only valid for Windows |
ltUser_homegtTempMapBoxDumpsltyour_system_namegt500 where ltuser_homegt is the
home directory of the logged-on user ltyour system namegt is the CRM server you have
connected to and 500 is the client you have connected toEnd of Windows |
Only valid for IBM i5OSUNIX |
ltUser_homegtTempMapBoxDumpsltyour_system_namegt500 where ltuser_homegt is the
home directory of the logged-on user ltyour system namegt is the CRM server you have
connected to and 500 is the client you have connected toEnd of IBM i5OSUNIX |
RECOMMENDATION
We recommend that you copy MapLogxsl from the
ltsmoke_test_installation_directorygt to the directory mentioned aboveEnd of Java | MapBox (MBX) |
Only valid for Java | MapBox (MBX) |
444 Executing the MapBox
This section tells you how to execute the MapBox The procedure that you use to execute the Map Box
depends on its current support package (SP) level
4 Post-Installation
44 Post-Installation Steps for MapBox
3450 CUSTOMER 2012-12-17
Procedure
If the SP level of the MapBox is less than SP11 proceed as follows
1 Enter the following URL in your browser
httplthostnamegtltport_numbergtmapboxlaunchermanage
2 Choose Start MapBox
3 The application prompts you for a user name and password
Enter the user name and password for the J2EE Engine Visual Administrator
NOTE
MapBox typically takes 30 to 60 seconds to initialize depending on the number of SAP clients
To see the status of messages processed by MapBox choose Status
If the SP level of the MapBox is equal to or higher than SP11 the MapBox starts automatically
1 For the first MapBox installation you need to restart the Java application server (AS Java) after all
the configuration settings have been completed This automatically starts the MapBox (Autostart)
2 To check the status go to the URL httplthostnamegtltport_numbergtmapboxlauncher
manage
NOTE
MapBox Autostart needs approximately 60 seconds to allow other services of As Java to start
To see the status of messages processed by MapBox choose Status
Result
When the MapBox is running the status is shown as Ready to processEnd of Java | MapBox (MBX) |
Only valid for Java | MapBox (MBX) |
445 Performing the Smoke Test for MapBox
The smoke test checks whether the MapBox installation is error-free
Only valid for Windows |
To execute the smoke test you have to run two batch filesEnd of Windows |
Only valid for IBM i5OSUNIX |
To execute the smoke test you have to run two shell scriptsEnd of IBM i5OSUNIX |
Prerequisites
Before you start the procedure you need to copy the smoketestjar file to a new
ltsmoke_test_installation_directorygt of your choice which has two further subdirectories
firstrun and secondrun
4 Post-Installation
44 Post-Installation Steps for MapBox
2012-12-17 CUSTOMER 3550
You can find the smoketestjar file here
Only valid for IBM i5OSUNIX |
usrsapltinstance_IDgtJCltinstance_numbergtj2eeclusterserver0binext
comsapsyncpointmapboxEnd of IBM i5OSUNIX |
Only valid for Windows |
usrsapltinstance_IDgtJCltinstance_numbergtj2eeclusterserver0binext
comsapsyncpointmapboxEnd of Windows |
NOTE
Each subdirectory of ltsmoke_test_installation_directorygt ndash that is firstrun and
secondrun ndash contains the following files
MBSMOKETEST_IN_000xml
MBSMOKETEST_IN_001xml
MBSMOKETEST_IN_002xml
MBSMOKETEST_IN_003xml
After executing the smoke test you must verify whether the contents of the files generated
by your test are similar to the contents of the above files That is the XML documents that
are created in the smoke test must match the documents located in the
ltsmoke_test_installation_directorygt mentioned above
To execute the smoke test you need to install the SAP Java Connector (SAP JCo version 2012)
You have to download SAP JCo 2012 from SAP Service Marketplace at https
servicesapcomswdc before executing the smoke test
CAUTION
Make sure that you install the SAP Java Connector correctly
The file mapcaseprop is available in the ltsmoke_test_installation_directorygt This file
contains the connection parameters to be tested You can modify the contents of this file
CAUTION
You must replace the connection parameters in this file with the connection parameters that
you entered in the MapBoxMetaxml file
Procedure
1 Run the first stage of the smoke test
1 Only valid for Windows |
Execute the file smoketest_1bat from the ltsmoke_test_installation_directorygtEnd of Windows |
Only valid for Windows |
This prompts you to enter the followingEnd of Windows |
4 Post-Installation
44 Post-Installation Steps for MapBox
3650 CUSTOMER 2012-12-17
Only valid for Windows |
1 ltDRIVEgtusrsapltinstance_IDgtJCltinstance_numbergtj2ee
2 ltsmoke_test_installation_directorygt
3 ltpath_to_sapjcojargt
End of Windows |
Only valid for IBM i5OSUNIX |
Execute the file smoketest_1sh from the ltsmoke_test_installation_directorygtEnd of IBM i5OSUNIX |
Only valid for IBM i5OSUNIX |
1 usrsapltinstance_IDgtJCltinstance_numbergtj2ee
2 ltsmoke_test_installation_directorygt
3 ltpath_to_sapjcojargt
End of IBM i5OSUNIX |
2 Enter the appropriate paths
The smoke test creates the following files
MBSMOKETEST_IN_000xml
MBSMOKETEST_IN_001xml
MBSMOKETEST_IN_002xml
MBSMOKETEST_IN_003xml
3 Only valid for Windows |
Check the contents of the generated files against the contents of the files located in
ltsmoke_test_installation_directorygtSMOKETESTfirstrunEnd of Windows |
Only valid for IBM i5OSUNIX |
Check the contents of the four files against the contents of the files located in
ltsmoke_test_installation_directorygtSMOKETESTfirstrunEnd of IBM i5OSUNIX |
2 Run the second stage of the smoke test
1 Only valid for Windows |
Execute the file smoketest_2bat which is located in the
ltsmoke_test_installation_directorygtEnd of Windows |
Only valid for IBM i5OSUNIX |
Execute the file smoketest_2sh which is located in the
ltsmoke_test_installation_directorygtEnd of IBM i5OSUNIX |
This prompts you to enter the following
Only valid for Windows |
1 ltDRIVEgtusrsapltinstance_IDgtJCltinstance_numbergtj2ee
2 ltsmoke_test_installation_directorygt
End of Windows |
4 Post-Installation
44 Post-Installation Steps for MapBox
2012-12-17 CUSTOMER 3750
Only valid for IBM i5OSUNIX |
1 usrsapltinstance_IDgtJCltinstance_numbergtj2ee
2 ltsmoke_test_installation_directorygt
End of IBM i5OSUNIX |
2 Enter the appropriate paths
The smoke test creates the following files
MBSMOKETEST_IN_000xml
MBSMOKETEST_IN_001xml
MBSMOKETEST_IN_002xml
MBSMOKETEST_IN_003xml
CAUTION
The files generated in the second stage of testing overwrite the contents of the files
generated in the first stage
3 Only valid for Windows |
Check the contents of the generated files against the contents of the files located in
ltsmoke_test_installation_directorygtSMOKETESTsecondrunEnd of Windows |
Only valid for IBM i5OSUNIX |
Check the contents of the four files against the contents of the files located in
ltsmoke_test_installation_directorygtSMOKETESTsecondrunEnd of IBM i5OSUNIX |
Result
If the smoke test has identified errors in the installation process the four XML files are not created in
either of the stages Instead an error log file is created
RECOMMENDATION
In the event of errors we recommend that you send the error log file to your administrator
End of Java | MapBox (MBX) |
Only valid for Java | MapBox (MBX) |
446 Ensuring Optimal Block Size settings
The block size of an object determines the number of messages that are processed at the same time by
the MapBox as a set You need to make sure that the block sizes are optimal to reduce load on the
MapBox XML processor
Procedure
1 Use transaction R3AC3 to set the block size of object GWA_COUNTRY to 10 and save the setting
2 Use transaction R3AC1 to set the block size of object BUPA_MAIN to 10 and save the settingEnd of Java | MapBox (MBX) |
4 Post-Installation
44 Post-Installation Steps for MapBox
3850 CUSTOMER 2012-12-17
Only valid for ABAP+JavaJava | MapBox (MBX) |
447 Adapting Memory Settings for the J2EE Engine
You need to adapt the memory settings for the J2EE Engine because MapBox relies heavily on memory-
intensive XML-processing such as schema-validation parsing transformation and so on
RECOMMENDATION
For rapid message processing by MapBox we recommend you to use 1024 MB of heap memory
for MapBox alone With a heap size of 512 MB MapBox can still process messages but with a slightly
higher processing time for each message
The MapBox memory requirements are directly proportional to the size of the input documents
that MapBox has to process The average size of such documents is in the range of 150 to 200 KB
For messages of this size it is sufficient to have a heap memory of 512 MB If the input documents
are in the range of 1 to 2 MB we recommend that you give MapBox a heap memory of 1024 MB
Procedure
To set the recommended memory settings for the MapBox you start the config tool of the J2EE Engine
Only valid for Windows |
Start the config tool by executing ltDrivegtusrsapltSAPSIDgtltinstance_numbergtj2ee
configtoolbatEnd of Windows |
Only valid for IBM i5OSUNIX |
Start the config tool by executing usrsapltSAPSIDgtltinstance_numbergtj2eeconfigtoolshEnd of IBM i5OSUNIX |
End of ABAP+JavaJava | MapBox (MBX) |
End of ABAP+JavaJava | MapBox (MBX) |
Only valid for ABAPABAP+Java |
45 Activating the CRM Web Client
The CRM Web Client is part of the ICF Services that is automatically installed as part of SAP NetWeaver
Application Server
Procedure
To activate the CRM Web Client after the installation see the SAP Library at
httphelpsapcomnw70 SAP NetWeaver 70 Library (including Enhancement Package 2) English SAP
NetWeaver Library SAP NetWeaver by Key Capability Application Platform by Key Capability Platform-Wide
Services Connectivity Components of SAP Communication Technology Communication Between ABAP and Non-
4 Post-Installation
45 Activating the CRM Web Client
2012-12-17 CUSTOMER 3950
ABAP Technology Internet Communication Framework Development Server-Side Development Creating and
Configuring an ICF Service Activating and Deactivating the ICF ServicesEnd of ABAPABAP+Java |
Only valid for ABAP |
46 Installing and Configuring CRM Application Server Loyalty Add-On Component
This section provides information about how to install and configure CRM Application Server Loyalty
as an add-on component to CRM Application Server ABAP
Prerequisites
You have already deployed the following software components
SAP NetWeaver Application Server ABAP (AS ABAP)
CRM Application Server ABAP
Procedure
Installing CRM Application Server Loyalty
Install CRM Application Server Loyalty on the same host where CRM Application Server ABAP is
deployed as described in SAP Note 1162144
Configuring CRM Application Server Loyalty
After you have installed CRM Application Server Loyalty you must complete the following
configuration steps
1 Call transaction nspro
2 Choose SAP Customising Implementation Guide Customer Relationship Management Marketing Loyalty
Management in BBPCRM Basic Settings Define Basic Settings
3 Enter value 1 for the INSTALL_TYPE parameter
NOTE
You do not have to enter destination name for the LOYALTY_SYSTEM parameterEnd of ABAP |
47 Starting XCM
This section describes how to start XCM
Procedure
1 You access the XCM tool at
httplthostgtltportgtltweb app namegtadminxcminitdo
4 Post-Installation
46 Installing and Configuring CRM Application Server Loyalty Add-On Component
4050 CUSTOMER 2012-12-17
NOTE
You can also start XCM in accessibility mode (according to Section 508 Rehabilitation Act)
at the following URL
httplthostgtltportgtltweb app namegtadminxcminitdosap-accessibility=x
2 Provide a user and password If you are logging on for the first time use the Administrator user
and the password you defined during the installation of the SAP system
RECOMMENDATION
We recommend you create new users with lesser rights than the Administrator for the
administration of Web applications
For more information see the SAP CRM Security Guide section E-Commerce
3 When the application opens a closed control tree is displayed on the left of the screen A screen
containing help information is displayed to the right
You can use edit (change settings) or display (see settings) mode in XCM You use the button in
the top right hand corner of the screen to change between modes When you switch to edit mode
a DB lock is set meaning that only this user can edit the settings at one time The lock is released
once the user switches back to display mode or after session timeout (default timeout is 30mins)
48 Accessing Configuration Documentation in SAP Solution Manager
To access configuration documentation in SAP Solution Manager you have to connect your newly
installed SAP system to SAP Solution Manager
NOTE
For SAP NetWeaver you can also find configuration documentation in the Technology Consultants
Guide at
httphelpsapcomnw70 SAP NetWeaver 70 Library (including Enhancement Package 2) English
SAP NetWeaver Library Technology Consultants Guide
Procedure
Create a configuration project with the related configuration guide as described in the following
documentation
httphelpsapcom SAP Solutions SAP Solution Manager Documentation for SAP Solution Manager
ltcurrent releasegt SAP Solution Manager Implementing and Upgrading SAP Solutions Projects
Configuration
More Information
httpservicesapcomsolutionmanager Media Library How-To Documents How to Create a
Configuration Guide using SAP Solution Manager
4 Post-Installation
48 Accessing Configuration Documentation in SAP Solution Manager
2012-12-17 CUSTOMER 4150
This page is left blank for documents that are printed on both sides
5 Additional Information
Only valid for ABAP+JavaJava |
51 Installing the Business Packages for SAP CRM Using JSPM (Optional)
You can also install the Business Packages for SAP CRM using the Java Support Package Manager (JSPM)
Prerequisites
Only valid for IBM i5OSUNIX |
You have checked hardware and software requirements [external document]End of IBM i5OSUNIX |
Only valid for Windows |
You have checked hardware and software requirements [external document]End of Windows |
You have ckecked the Prerequisites for the Business Packages for SAP CRM [page 7]
Procedure
1 Download version 701 of the files sapcom_BPCRMAPP sapcom_BPCRMFND sapcom_CRMAPP and
sapcom_CRMFND as follows
1 Go to httpservicesapcomswdc Download Support Packages and Patches Search for
Support Packages and Patches
2 Enter the following search terms
BP CRM Application Coding 701
BP CRM Application Content 701
BP CRM Foundation Coding 701
BP CRM Foundation Content 701
2 Add the deployment variable comsapcmshare as described in SAP Note 965948
For more information about how to use the Software Deployment Manager (SDM) see the
documentation Software Deployment Manager which is available at
httphelpsapcomnw70 SAP NetWeaver 70 Library (including Enhancement Package 2) English
SAP NetWeaver Library SAP NetWeaver Developerrsquos Guide Fundamentals Using Java Core Development
Tasks Deployment Putting It All Together Software Deployment Manager
3 Install the Business Packages for SAP CRM with JSPM as described in Installing Additional Usage Types
or Software Units in an Existing SAP System [external document]
5 Additional Information
51 Installing the Business Packages for SAP CRM Using JSPM (Optional)
2012-12-17 CUSTOMER 4350
4 Perform the required Post-Installation Steps for the Business Packages for SAP CRM [page 20]End of ABAP+JavaJava |
Only valid for ABAP+JavaJava |
52 Troubleshooting for the Business Package for SAP CRMOnly valid for ABAP+JavaJava |
The following sections describe the steps that you have to perform if you have problems after the
installation
Activating BI Templates Manually [page 44]
Dragging the Central Search onto the Portal Desktop [page 45]End of ABAP+JavaJava |
Only valid for ABAP+JavaJava |
521 Activating BI Templates Manually
If you have installed the Business Package you might see error messages when loading the BI templates
This procedure describes how you can activate the templates afterwards
Procedure
1 Note the technical name of all templates in your portal interface that are not working
2 Log on to your BI system
3 On the SAP Easy Access screen choose Modeling Administrator Workbench Modeling (transaction
RSA1 or RSOR)
4 Choose Business Content Object Types Web Template Name Select Objects
A new window containing a list of BW objects and templates opens
5 Find your missing templates for example 0TPL_0CRM_Cnn_Qnnn_Vnnn_M and select the entries
6 Choose Transfer Selection
The template now appears on the right-hand side of the screen The Transfer checkbox has been
selected and cannot be changed Nevertheless we recommend that you repeat the following
procedure so that your templates can be displayed
7 Select the template
8 Choose Transfer Transfer
Result
You have successfully activated your missing templates and no error messages appear in the portalEnd of ABAP+JavaJava |
5 Additional Information
52 Troubleshooting for the Business Package for SAP CRM
4450 CUSTOMER 2012-12-17
Only valid for ABAP+JavaJava |
522 Dragging the Central Search onto the Portal Desktop
Procedure
The Business Package for SAP CRM 70 including SAP enhancement package 1 contains an iView for
the central search in CRM This iView is in the package on the page Today in the workset Home of the
CRM User You can drag this iView onto the portal desktop under the tool areaEnd of ABAP+JavaJava |
End of ABAP+JavaJava |
5 Additional Information
52 Troubleshooting for the Business Package for SAP CRM
2012-12-17 CUSTOMER 4550
Typographic Conventions
Example Description
ltExamplegt Angle brackets indicate that you replace these words or characters with appropriate entries to make entries in the system for example ldquoEnter your ltUser Namegtrdquo
ExampleExample
Arrows separating the parts of a navigation path for example menu options
Example Emphasized words or expressions
Example Words or characters that you enter in the system exactly as they appear in the documentation
httpwwwsapcom Textual cross-references to an internet address
example Quicklinks added to the internet address of a homepage to enable quick access to specific content on the Web
123456 Hyperlink to an SAP Note for example SAP Note 123456
Example Words or characters quoted from the screen These include field labels screen titles pushbutton labels menu names and menu options
Cross-references to other documentation or published works
Example Output on the screen following a user action for example messages Source code or syntax quoted directly from a program File and directory names and their paths names of variables and parameters and
names of installation upgrade and database tools
EXAMPLE Technical names of system objects These include report names program names transaction codes database table names and key concepts of a programming language when they are surrounded by body text for example SELECT and INCLUDE
EXAMPLE Keys on the keyboard
4650 CUSTOMER 2012-12-17
SAP AGDietmar-Hopp-Allee 16
69190 WalldorfGermany
T +4918 0534 34 34F +4918 0534 34 20
wwwsapcom
copy Copyright 2012 SAP AG All rights reserved
No part of this publication may be reproduced or transmitted in any form or for any purpose without the express permission of SAP AG The information contained herein may be changed without prior noticeSome software products marketed by SAP AG and its distributors contain proprietary software components of other software vendors
Microsoft Windows Excel Outlook PowerPoint Silverlight and Visual Studio are registered trademarks of Microsoft CorporationIBM DB2 DB2 Universal Database System i System i5 System p System p5 System x System z System z10 z10 zVM zOS OS390 zEnterprise PowerVM Power Architecture Power Systems POWER7 POWER6+ POWER6 POWER PowerHA pureScale PowerPC BladeCenter System Storage Storwize XIV GPFS HACMP RETAIN DB2 Connect RACF Redbooks OS2 AIX Intelligent Miner WebSphere Tivoli Informix and Smarter Planet are trademarks or registered trademarks of IBM CorporationLinux is the registered trademark of Linus Torvalds in the United States and other countriesAdobe the Adobe logo Acrobat PostScript and Reader are trademarks or registered trademarks of Adobe Systems Incorporated in the United States and other countriesOracle and Java are registered trademarks of Oracle and its affiliatesUNIX XOpen OSF1 and Motif are registered trademarks of the Open GroupCitrix ICA Program Neighborhood MetaFrame WinFrame VideoFrame and MultiWin are trademarks or registered trademarks of Citrix Systems IncHTML XML XHTML and W3C are trademarks or registered trademarks of W3Creg World Wide Web Consortium Massachusetts Institute of TechnologyApple App Store iBooks iPad iPhone iPhoto iPod iTunes Multi-Touch Objective-C Retina Safari Siri and Xcode are trademarks or registered trademarks of Apple IncIOS is a registered trademark of Cisco Systems IncRIM BlackBerry BBM BlackBerry Curve BlackBerry Bold BlackBerry Pearl BlackBerry Torch BlackBerry Storm BlackBerry Storm2 BlackBerry PlayBook and BlackBerry App World are trademarks or registered trademarks of Research in Motion LimitedGoogle App Engine Google Apps Google Checkout Google Data API Google Maps Google Mobile Ads Google Mobile Updater Google Mobile Google Store Google Sync Google Updater Google Voice Google Mail Gmail YouTube Dalvik and Android are trademarks or registered trademarks of Google IncINTERMEC is a registered trademark of Intermec Technologies CorporationWi-Fi is a registered trademark of Wi-Fi AllianceBluetooth is a registered trademark of Bluetooth SIG IncMotorola is a registered trademark of Motorola Trademark Holdings LLCComputop is a registered trademark of Computop Wirtschaftsinformatik GmbHSAP R3 SAP NetWeaver Duet PartnerEdge ByDesign SAP BusinessObjects Explorer StreamWork SAP HANA and other SAP products and services mentioned herein as well as their respective logos are trademarks or registered trademarks of SAP AG in Germany and other countriesBusiness Objects and the Business Objects logo BusinessObjects Crystal Reports Crystal Decisions Web Intelligence Xcelsius and other Business Objects products and services mentioned herein as well as their respective logos are trademarks or registered trademarks of Business Objects Software Ltd Business Objects is an SAP companySybase and Adaptive Server iAnywhere Sybase 365 SQL Anywhere and other Sybase products and services mentioned herein as well as their respective logos are trademarks or registered trademarks of Sybase Inc Sybase is an SAP company
2012-12-17 CUSTOMER 4750
Crossgate mgic EDDY B2B 360deg and B2B 360deg Services are registered trademarks of Crossgate AG in Germany and other countries Crossgate is an SAP companyAll other product and service names mentioned are the trademarks of their respective companies Data contained in this document serves informational purposes only National product specifications may varyThese materials are subject to change without notice These materials are provided by SAP AG and its affiliated companies (ldquoSAP Grouprdquo) for informational purposes only without representation or warranty of any kind and SAP Group shall not be liable for errors or omissions with respect to the materials The only warranties for SAP Group products and services are those that are set forth in the express warranty statements accompanying such products and services if any Nothing herein should be construed as constituting an additional warranty
DisclaimerSome components of this product are based on Javatrade Any code change in these components may cause unpredictable and severe malfunctions and is therefore expressly prohibited as is any decompilation of these componentsAny Javatrade Source Code delivered with this product is only to be used by SAPrsquos Support Services and may not be modified or altered in any way
Documentation in the SAP Service MarketplaceYou can find this document at the following address httpservicesapcominstguides
4850 CUSTOMER 2012-12-17
SAP AGDietmar-Hopp-Allee 1669190 WalldorfGermanyT +4918 0534 34 34F +4918 0534 34 20wwwsapcom
copy Copyright 2012 SAP AG All rights reservedNo part of this publication may be reproduced or transmitted in any form or for any purpose without the express permission of SAP AG The information contained herein may be changed without prior notice
- SAP Enhancement Package 1 for SAP CRM 70
-
- Table of Contents
- 1 Introduction
- 2 Planning and Preparation
-
- 21 Prerequisites for the Business Packages for SAP CRM
-
- 3 Installation
- 4 Post-Installation
-
- 41 Checking the Availability of Back-End Systems for SAP CRM Java Components
-
- 411 Creating a Back-End User
- 412 Checking the Connection to the ABAP System
- 413 Configuring and Checking the TREX Service
- 414 Checking the Selling via eBay Processes
-
- 42 Post-Installation Steps for Workforce Deployment Application and Calculation Services
-
- 421 Implementing WFMCORE 200 Using Transaction SAINT
- 422 Configuring the Extended Configuration Management (XCM) for WFD Application and Calculation Services
- 423 Checking Workforce Deployment Calculation Services
- 424 Checking the Installation of WFD Application Services and WFD Calculation Services
-
- 43 Post-Installation Steps for the Business Packages for SAP CRM
-
- 431 Creating Roles for the SAP CRM Business Packages
- 432 Installation of the Info Center for the SAP CRM Business Package
-
- 4321 Importing the SAP CRM Info Center Configurations and Directory Structure
- 4322 Activating Manual Ordering of Folders for the sapcrm Repository
- 4323 Creating Indexes and Taxonomies for the sapcrmnews Repository
- 4324 Creating the Index for the sapcrm Repository
- 4325 Configuring the Personal Search
- 4326 Increasing the Number of JCo Connections
-
- 44 Post-Installation Steps for MapBox
-
- 441 Assigning User Groups for MapBox Users
- 442 Configuring an RFC Destination for MapBox
- 443 Performing Initial Configuration for MapBox
- 444 Executing the MapBox
- 445 Performing the Smoke Test for MapBox
- 446 Ensuring Optimal Block Size settings
- 447 Adapting Memory Settings for the J2EE Engine
-
- 45 Activating the CRM Web Client
- 46 Installing and Configuring CRM Application Server Loyalty Add-On Component
- 47 Starting XCM
- 48 Accessing Configuration Documentation in SAP Solution Manager
-
- 5 Additional Information
-
- 51 Installing the Business Packages for SAP CRM Using JSPM (Optional)
- 52 Troubleshooting for the Business Package for SAP CRM
-
- 521 Activating BI Templates Manually
- 522 Dragging the Central Search onto the Portal Desktop
-
- Copyright and trademarks
-
2 Planning and Preparation
Only valid for ABAP+JavaJava |
21 Prerequisites for the Business Packages for SAP CRM
You can install the Business Packages for SAP CRM in one of the following ways
Automatically using SAPinst
Manually by downloading them from SAP Service Marketplace and installing them using Java Support
Package Manager (JSPM) [page 43]
Prerequisites
The Business Packages for CRM require at least the following SAP NetWeaver usage types and the
following CRM software units
SAP NetWeaver Application Server Java (AS Java)
SAP NetWeaver Enterprise Portal (EP)
SAP CRM Business Packages Foundation (BP-CRM-FND)
SAP NetWeaver Application Server ABAP (AS ABAP) and SAP CRM Application Set (CRM APP)
To use the CRM functionality of the Business Packages for SAP CRM you need an SAP CRM ABAP
back-end system consisting of AS ABAP and SAP CRM APP
SAP Retrieval and Classification Engine (TREX)
To use the search functions you need TREX
Integration
Check the support for these usage types and software components using the Product Availability Matrix
(PAM) at
httpservicesapcompam
More Information
For more information about how to size the Enterprise Portal (EP) see
httpservicesapcomsizing Hardware Sizing Sizing Guidelines Solutions amp PlatformEnd of ABAP+JavaJava |
2 Planning and Preparation
21 Prerequisites for the Business Packages for SAP CRM
2012-12-17 CUSTOMER 750
This page is left blank for documents that are printed on both sides
3 Installation
Proceed as described in the documentation Installation Guide ndash SAP Systems Based on the Application Server
ltABAP | Javagt of SAP NetWeaver on ltOperating Systemgt ltDatabasegt at httpservicesapcom
sltoolset Software Logistics Toolset 10 Software Provisioning Manager 10
3 Installation
2012-12-17 CUSTOMER 950
This page is left blank for documents that are printed on both sides
4 Post-Installation
Only valid for Java |
41 Checking the Availability of Back-End Systems for SAP CRM Java Components
Only valid for ABAP+JavaJava |
After the installation you have to check the availability of back-end systems as follows
1 To test the connection to the ABAP back-end system you create a back-end user [page 11]
2 Depending on various business processes you check the following back-end systems
ABAP system [page 12]
TREX Server [page 14]End of ABAP+JavaJava |
Only valid for ABAP+JavaJava |
411 Creating a Back-End User
You need service users to provide the anonymous remote function call (RFC) stateless connection
between your back-end system and your Web-based applications
Prerequisites
You have installed and configured CRM E-Commerce Web-based applications
Procedure
You create a service user in your back-end SAP CRM system and assign it to the Web-based application
as follows
1 In your ABAP back-end system on the SAP Easy Access screen choose Tools Administration User
Maintenance Users (transaction SU01)
2 Create a user of the type Service User and enter all required data
3 Assign the appropriate service user authorization role to the user on the Roles tab For a list of
service user roles for the various Web-based applications see the following table
Application Authorization Role for Service User
E-Selling B2B SAP_CRM_ECO_ISA_TU_B2B
E-Selling B2C SAP_CRM_ECO_ISA_TU_B2C
E-Selling EASYB2B SAP_CRM_ECO_ISA_TU_EASYB2B
4 Post-Installation
41 Checking the Availability of Back-End Systems for SAP CRM Java Components
2012-12-17 CUSTOMER 1150
Application Authorization Role for Service User
E-Selling CVIEWS SAP_CRM_ECO_ISA_TU_CVIEWS
E-Selling SHOPADMIN SAP_CRM_ECO_ISA_TU_SHOPADM
E-Selling USERADMIN SAP_CRM_ECO_ISA_TU_USERADM
E-Selling Auctioning via Web shop (AVW) SAP_CRM_ECO_TU_AVW
E-Selling via eBay (SVE) SAP_CRM_ECO_TU_SVE
E-Service Internet Customer Self Service (ICSS) SAP_CRM_ECO_ISE_TU_B2B (Authorizations for ICSS B2B)SAP_CRM_ECO_ISE_TU_B2C (Authorizations for ICSS B2C)
E-Service Complaints and Returns SAP_CRM_ECO_ISE_TU_CR
E-Service Remanufacturer inspection SAP_CRM_ECO_ISE_TU_INSP
Channel Management (CHM)Shared Catalog
SAP_CRM_ECO_CHM_TU_SHRDCAT
Channel Management (CHM) BOB SAP_CRM_ECO_ISA_TU_BOB
Channel Management (CHM) HOM SAP_CRM_ECO_ISA_TU_HOM
Channel Management (CHM) CSR SAP_CRM_ECO_ISA_TU_CSR
4 Save your entries
More Information
For more information about service users see the documentation ltyour projectgt Basic Settings for CRM
E-Commerce General Settings for CRM E-Commerce User Management in the SAP Solution Manager [page
41]End of ABAP+JavaJava |
Only valid for ABAP+JavaJava |
412 Checking the Connection to the ABAP System
This section tells you how to check the connection to the ABAP system
Prerequisites
To be able to test the connection to the ABAP system you need to create a user [page 11] on this system
Procedure
1 Start the Visual Administrator
1 On your central instance host change to the admin directory as follows
Only valid for IBM i5OSUNIX |
usrsapltSAPSIDgtltinstance_namegtj2eeadmin
End of IBM i5OSUNIX |
Only valid for Windows |
usrsapltSAPSIDgtltinstance_namegtj2eeadmin
End of Windows |
4 Post-Installation
41 Checking the Availability of Back-End Systems for SAP CRM Java Components
1250 CUSTOMER 2012-12-17
2 Only valid for IBM i5OSUNIX |
Run goshEnd of IBM i5OSUNIX |
3 Only valid for Windows |
Double-click gobatEnd of Windows |
For more information about the Visual Administrator see the SAP Library at
httphelpsapcomnw70 SAP NetWeaver 70 Library (including Enhancement Package 2) English
SAP NetWeaver Library SAP NetWeaver by Key Capability Application Platform by Key Capability Java
Technology Administration Manual J2EE Engine J2EE Engine Administration Tools
2 Only valid for IBM DB2 for i5OSIBM DB2 for i5OS (LinuxWindows)IBM DB2 for Linux and UNIX and WindowsIBM DB2 for zOSMaxDBMS SQL ServerOracle |
Log on to the Visual Administrator with administrator rights
NOTE
If you chose configuration Use ABAP in the User Management Engine (UME) and you selected
SAP CRM ABAP as your ABAP back end with UME during the installation a successful logon
to the Visual Administrator means that the SAP CRM ABAP back-end system is available
You have now finished this procedure
Otherwise continue with the next step
End of IBM DB2 for i5OSIBM DB2 for i5OS (LinuxWindows)IBM DB2 for Linux and UNIX and WindowsIBM DB2 for zOSMaxDBMS SQL ServerOracle |
3 Start an application that uses the SAP CRM ABAP system if it is stopped
1 In the left pane of the Visual Administrator open clusterserverservices and choose
Deploy service
2 Select the application
Application Context Root
crm~b2b b2b
crm~icss_b2b icss_b2b
crm~sve sve
3 To start the selected application choose Start
4 Open the user interface for the Extended Configuration Management (XCM) Administrator as
follows
1 Open a Web browser and enter the following URL
httpltJ2EE_hostgtltJ2EE_portgtltcontext rootgtadminxcminitdo
where ltcontext rootgt is the context root of the application started in the previous step
To find information about the components that can be configured choose help
2 Choose Start Component
You can find information about configuration of components on the right hand side of the
screen
4 Post-Installation
41 Checking the Availability of Back-End Systems for SAP CRM Java Components
2012-12-17 CUSTOMER 1350
3 To create a jco Component follow the instructions provided in the Example of component
configuration field
If the ldquorun testrdquo operation described in the component configuration section of a jco setting
was successful the ABAP system can be reached from the Java system
More InformationFor more information about using Extended Configuration Management (XCM) to configure your
application see Using Extended Configuration Management (XCM) [page 40] and the documentation in the
SAP Solution Manager [page 41]End of ABAP+JavaJava |
Only valid for Java |
413 Configuring and Checking the TREX Service
You need to configure and check the TREX service
Procedure
Configuring the TREX Service
1 Start the Visual Administrator
2 Connect to the AS Java
3 Choose Server node Open Services Node Select TREX Service
4 Maintain the values for nameserveraddress and nameserverbackupserverlist
For more information see Specifying the Address of the TREX Name Server in Installation Guide ndash SAP NetWeaver
70 Standalone Engine Search and Classification (TREX) Single Host at
httpservicesapcominstguidesNW70 Installation Installation - Standalone Engines SAP
NetWeaver Search and Classification TREX Installing TREX 70 Single Host
Checking the TREX Service
1 Start the application sapcomcrm~b2b as described in step 3 of Checking the Connection to the ABAP
System [page 12]
2 Open a Web browser and enter the following URL
httpltJ2EE_hostgtltJ2EE_portgtb2badmintrextrex_640jsp
ResultIf the connection was established successfully the message TREX Server is available appearsEnd of Java |
Only valid for Java |
414 Checking the Selling via eBay Processes
To use the selling via eBay (SVE) processes the Java system requires an http connection to
4 Post-Installation
41 Checking the Availability of Back-End Systems for SAP CRM Java Components
1450 CUSTOMER 2012-12-17
httpwwwebaycom
To test the connection you need to create an XCM component ebayCommunicator for the sapcom
crm~sve application
Procedure
To create the Extended Configuration Management (XCM) component ebayCommunicator using
application sapcomcrm~sve proceed as described in Checking the ABAP System [page 12]
NOTE
Make sure that you replace jco component with ebayCommunicator component when following
the procedure in Checking the ABAP System [page 12]
More Information
For more information about using Extended Configuration Management (XCM) to configure your
application see Using Extended Configuration Management (XCM) [page 40] and the documentation in the
SAP Solution Manager [page 41]End of Java |
End of Java |
Only valid for Java |
42 Post-Installation Steps for Workforce Deployment Application and Calculation Services
Only valid for ABAP+JavaJava | CRM Java Components (JCRM)Extended E-Selling Components (XECO) |
You have to perform the following steps to check and configure Workforce Deployment Application
and Calculation Services (WFD ASCS)
You implement WFMCORE 200 using transaction SAINT [page 15]
You configure the XCM administration tool for WFD ASCS [page 16]
You check WFD calculation services [page 18]
You check the installation of WFD ASCS [page 19]End of ABAP+JavaJava | CRM Java Components (JCRM)Extended E-Selling Components (XECO) |
Only valid for ABAP+JavaJava |
421 Implementing WFMCORE 200 Using Transaction SAINT
Before you can check and configure the Java part of Workforce Deployment Application and
Calculation Services (WFD ASCS) you need to implement WFMCORE 200
4 Post-Installation
42 Post-Installation Steps for Workforce Deployment Application and Calculation Services
2012-12-17 CUSTOMER 1550
Only valid for CRM Java Components (JCRM) |
The WFMCORE 200 component contains all necessary ABAP classes and libraries required for the
various Workforce Deployment scenarios and processes including Service Resource Planning in CRM and
Retail Multisite Workforce DeploymentEnd of CRM Java Components (JCRM) |
Procedure
1 Log on to your ABAP system
2 Install WFMCORE 200 using transaction SAINT as described in SAP Note 830595
3 Only valid for CRM Java Components (JCRM) |
If you are implementing the Service Resource Planning in CRM process variant run the report
WFDBP_UPDATE_BLUEPRINT to update tables that define the settings required to properly
display and maintain Service Arrangements in the People-Centric User InterfaceEnd of CRM Java Components (JCRM) |
End of ABAP+JavaJava |
Only valid for ABAP+JavaJava |
422 Configuring the Extended Configuration Management (XCM) for WFD Application and Calculation Services
Workforce Deployment Application Services (WFD AS) sends calculation and forecasting requests to
a CRM ABAP back-end system WFD Calculation Services (WFD CS) picks up the requests from this
CRM ABAP back-end system You define the connection to the CRM ABAP back-end system through
Extended Configuration Management (XCM) Admin
For more information about using Extended Configuration Management (XCM) to configure your
application see Using Extended Configuration Management (XCM) [page 40] and the documentation in the
SAP Solution Manager [page 41]
The csjcoxxxxx XCM parameters define the JCO connection to the SAP CRM ABAP system where
the WFD CS maintains forecast and calculation requests You can connect to the CRM ABAP system
using one of the following
A message or dispatching server by specifying csjcomshost csjcogroup and csjcor3name
An application server by specifying csjcoahost and csjcosysnr
In either case you must also specify csjcoclient csjcouser and csjcopassword
XCM Parameter Name Example Value Description
csjcoahost us0091wdfsapcorp Application server host name of the SAP CRM Calculation Service
csjcosysnr 91 System number of the R3 Calculation Service (for example 09)
csjcomshost us0091wdfsapcorp Message server host name of the SAP CRM Calculation Service
csjcogroup PUBLIC Group of the SAP CRM Calculation Service (case sensitive for example PUBLIC)
4 Post-Installation
42 Post-Installation Steps for Workforce Deployment Application and Calculation Services
1650 CUSTOMER 2012-12-17
XCM Parameter Name Example Value Description
csjcor3name Q5C System ID of the SAP CRM Calculation Service (for example IDES)
csjcoclient 505 Client of the SAP CRM Calculation Service
csjcouser Back end user for JCO connection to the SAP CRM Calculation Service
csjcopassword Password for the back-end user
You need to configure these csjcoxxxxx XCM parameter values in each instance of WFD AS and
WFD CS Make sure that the values are the same in all instances
Configuring the XCM for WFD Calculation Services
This business scenario is relevant for defining the WFD CS You must perform this XCM configuration
for the WFD CS to run
1 Start the XCM using the following URL
httpltJ2EE_hostgtltJ2EE_portgtwfdcsadminxcminitdo
2 Access the configuration using the following path General Application Settings Customer sisopt
sisoptconfig
Process Description Web ApplicationXCM Application Configurations
Calculations Service Workforce scheduling application
wfdcs sisoptconfig
3 In addition to the csjcoxxxx XCM parameters you need to define the http port of the J2EE
instance where WFD CS is running
XCM Parameter Name Example Value Description
cshttpport 51000 The http port of the web server where the WFD Calculation Services application is running (for example 50000)
4 Restart the application after saving the XCM configuration
Configuring the XCM for WFD Application Services
This business scenario is relevant for connecting the WFD AS to the WFD CS
1 Start the XCM using the following URL
httpltJ2EE_hostgtltJ2EE_portgtwfdadminxcminitdo
2 Access the configuration using the following path General Application Settings Customer sis
sisconfig
Process Description Web ApplicationXCM Application Configurations
Application Services Web-based scheduling application
wfd sisconfig
3 Restart the application after saving the XCM configurationEnd of ABAP+JavaJava |
4 Post-Installation
42 Post-Installation Steps for Workforce Deployment Application and Calculation Services
2012-12-17 CUSTOMER 1750
Only valid for ABAP+JavaJava |
423 Checking Workforce Deployment Calculation Services
After configuring Workforce Deployment Calculation Services (WFD CS) with Extended Configuration
Management (XCM) and restarting the application you need to go to the WFD CS configuration page
to check that it is running
Prerequisites
You have completed the installation of WFD Application Service (AS) and CS as described in this
documentation
Only valid for CRM Java Components (JCRM) |
You have downloaded the Business Package for Retail (Release 10) from sdnsapcom SAP NetWeaver
Capabilities User Productivity Portal and Collaboration Portal Content Portfolio
For more information about the portal content versions for your release see the documentation
Master Guide ndash SAP Customer Relationship Management 70 at httpservicesapcomcrm-instEnd of CRM Java Components (JCRM) |
Only valid for CRM Java Components (JCRM) |
You must have access to the Portal Admin role in SAP CRM through the Enterprise Portal to complete
this part of the WFD ASCS installation
For more information see Configuring the CRM Business Package on the SAP Service Marketplace at
httpservicesapcomcrm-inst SAP CRM 70 CRM Business Packages and PC UI Section
CRM Portal Administrator contains specific instructions on configuring the portal for access to WFD
AS and CS Apply the instructions to the Portal Admin roleEnd of CRM Java Components (JCRM) |
You have configured your portal users based on the required settings as described in the
configuration documentation for your IT scenario
For more information see Accessing Configuration Documentation in the SAP Solution Manager [page 41]
Procedure
1 Access the WFD CS configuration page through the Enterprise Portal using the role Portal
Administrator
2 Choose WFD Calculation Services Configuration
The Configuration tab looks as follows
Tab To Complete InstallationFor ongoing Configuration Management
Calculation Servers Required for at least one calculation server
Required for each additional calculation server
Logging Localization No Required to add or change logging once fully operational
End of ABAP+JavaJava |
4 Post-Installation
42 Post-Installation Steps for Workforce Deployment Application and Calculation Services
1850 CUSTOMER 2012-12-17
Only valid for ABAP+JavaJava |
424 Checking the Installation of WFD Application Services and WFD Calculation Services
This section tells you how to check that you have correctly installed the Java components for Workforce
Deployment Application Services (WFD AS) and WFD Calculation Services (WFD CS) This section
does not tell you how to check the connection between the WFD AS and the WFD CS
The procedure below shows you how to create a simple calculation request and verify that the
Calculation Server has received the request This helps you check that you have correctly installed all
WFD AS or CS components and that they are communicating with each other
Prerequisites
You have completed all the installation steps described in this documentation
You have connected WFD AS or CS components with the Enterprise Portal
You have installed the required business packages according to Checking Workforce Deployment
Calculation Services [page 18]
Procedure
1 To check that WFD AS is working and listening for HTTP requests enter the following URL
httpltJ2EE_hostgtltJ2EE_portgtwfdlogondo
The following error confirms that the application is working
Your session has expired Please renew your session by clicking a section link in
the Portal menu
2 Access the WFD CS from the Enterprise Portal through the Portal Admin role and check that the
WFD CS page comes up with no errors
If the page does not come up possible errors are
Error Message Cause
Missing value for XCM configuration
parameter cshttpport
The XCM parameter cshttpport was not filled
The request could not be completed
due to the following
errorsltfollowed by details of the
particular error usually related to
the JCO connectiongt
One of the XCM parameters csjcoxxxxx might be incorrect
EXAMPLE
The user or password are incorrect
3 Test the submission of a calculation request to see if the WFD CS can process the request
You can simulate a calculation request submission by executing the RFC
TEST_WFDCS_CALCREQ_SUBMIT from the CRM back-end system defined in the csjcoxxxxx XCM
parameters of WFD CS
4 Post-Installation
42 Post-Installation Steps for Workforce Deployment Application and Calculation Services
2012-12-17 CUSTOMER 1950
EXAMPLE
For example when you installed WFD CS you configured the csjcoxxxxx XCM
parameters to point to system ID Q5C client 505 You now need to log in to Q5C client 505
and execute TEST_WFDCS_CALCREQ_SUBMIT with transaction SE37 using the default import
parameters
4 Check the Requests tab of the WFD CS page to check the status of entries with the location name
SMOKETEST has the status FAILED
Status FAILED indicates a successful smoke test It means that the Request Manager successfully
sent the request to the Solver which successfully processed it
Status QUEUED probably means that the XCM parameter cshttpport was incorrectEnd of ABAP+JavaJava |
End of Java |
Only valid for ABAP+JavaJava |
43 Post-Installation Steps for the Business Packages for SAP CRM
The following sections provide information about the steps that you have to perform after importing
the Business Package for SAP CRM
Only valid for ABAP+JavaJava |
431 Creating Roles for the SAP CRM Business Packages
Procedure
If you create your own roles from the SAP CRM Business Packages also add the every user role
(eu_core_role) to your role The Every User Role contains the personalization functionality for the SAP
NetWeaver Portal
For more information about the Every User Role see the SAP Library at
httphelpsapcomnw70 SAP NetWeaver 70 Library (including Enhancement Package 2) English SAP
NetWeaver Library SAP NetWeaver by Key Capability People Integration by Key Capability Portal Portal
Administration Guide Super Administration Pre-configured Roles Every User Roles End of ABAP+JavaJava |
Only valid for ABAP+JavaJava |
432 Installation of the Info Center for the SAP CRM Business Package
This section describes how to install the Info Center
4 Post-Installation
43 Post-Installation Steps for the Business Packages for SAP CRM
2050 CUSTOMER 2012-12-17
Prerequisites
You have installed the Business Package for SAP CRM [page 43]
You have administrator rights
Process Flow
1 You import the SAP CRM info center configurations and directory structure [page 21]
2 You activate manual ordering of folders for the sapcrm Repository [page 23]
3 You create indexes and taxonomies for the sapcrmnews Repository [page 23]
4 You create the index for the sapcrm Repository [page 25]
5 You configure the personal search [page 25]
6 If required you increase the number of JCo connections [page 26]
Only valid for ABAP+JavaJava |
4321 Importing the SAP CRM Info Center Configurations and Directory Structure
The directory structure of the info center has been made available in one content package and you can
import it using the Information and Content Exchange (ICE) Repository
For more information about ICE see SAP Library at
httphelpsapcomnw70 SAP NetWeaver 70 Library (including Enhancement Package 2) English SAP
NetWeaver Library SAP NetWeaver by Key Capability Information Integration by Key Capability Knowledge
Management Content Managers Guide Additional Tasks for Content Managers Content Exchange Distributing
Content (Offline)
Procedure
Importing the Directory Structure
1 Log on to the Portal as content manager
2 Choose Content Management Content Exchange Upload
3 Only valid for Windows |
Select file fullupdate_infocenterzip from directory ltservlet_enginegtirjrootWEB-INF
portalportalappsepcrmchmkmexpice and confirm the uploadEnd of Windows |
Only valid for IBM i5OSUNIX |
Select file fullupdate_infocenterzip from directory ltservlet_enginegtirjrootWEB-INF
portalportalappsepcrmchmkmexpice and confirm the uploadEnd of IBM i5OSUNIX |
The zip file is now imported using the ICE protocol
If you cannot see the ICE repository this might be due to one of the following reasons
The ICE repository was hidden in the virtual root repository
4 Post-Installation
43 Post-Installation Steps for the Business Packages for SAP CRM
2012-12-17 CUSTOMER 2150
In this case do the following
1 Log on to the portal as system administrator
2 In the SAP NetWeaver Enterprise Portal choose System Administration System Configuration
Knowledge Management Content Management Repository Managers Virtual Root Repository
3 Check whether the ICE Repository has been entered under Repositories to exclude
4 Remove it from the list
5 Save your changes
6 Restart the Servlet Engine
The repository has been ldquoswitchedrdquo to invisible
1 Log on to the portal as system administrator
2 In the SAP NetWeaver Enterprise Portal choose System Administration System Configuration
Knowledge Management Content Management Repository Managers Content Exchange
Repository
3 If the property hide in root folder is active deselect it
4 Restart the Servlet Engine
NOTE
After the import check whether the directory structure was created by choosing Content
Administration KM Content in the SAP NetWeaver Enterprise Portal The list of folders should
contain the folders sapcrm and sapcrmnews
Checking Whether the Directory Structure Has Been Imported Successfully
You can only import the structure if there is a repository with the same name For example if a zip file
is exported from the repository sapcrm there must also be a repository with the name sapcrm in the
target system
The sapcrm and sapcrmnews repositories as well as the CRM-Namespace filter are created during the
import of the SAP CRM KM extension configuration archive To check whether this configuration
archive has been imported successfully proceed as follows
1 Log on to the portal as system administrator
2 In the SAP NetWeaver Enterprise Portal choose System Administration Monitoring Knowledge
Management Deployment Monitor Config Archives
3 Check whether the archive comsappctcrmappkmextprjconfig is installed in the system
If the archive comsappctcrmappkmextprjconfig is not installed in the system import it
manually as follows
1 Log on to the portal as system administrator
2 In the SAP NetWeaver Enterprise Portal choose System Administration Monitoring Knowledge
Management Deployment Monitor Config Archives Actions Import
4 Post-Installation
43 Post-Installation Steps for the Business Packages for SAP CRM
2250 CUSTOMER 2012-12-17
3 Only valid for Windows |
Select the archive comsappctcrmappkmextprjconfigconfigarchive from directory
ltSAPSIDgtJCltinstance_numbergtj2eeclusterappssapcomep~crm~chm
servlet_jspepcrmchmkmexprootWEB-INFconfig and confirm the importEnd of Windows |
4 Only valid for IBM i5OSUNIX |
Select the archive comsappctcrmappkmextprjconfigconfigarchive from
directory ltSAPSIDgtJCltinstance_numbergtj2eeclusterappssapcomep~crm~chm
servlet_jspepcrmchmkmexprootWEB-INFconfig and confirm the importEnd of IBM i5OSUNIX |
After the import the directory structure has no restrictions on rights Make sure that you modify the
rights of the various folders to meet your companyrsquos requirementsEnd of ABAP+JavaJava |
Only valid for ABAP+JavaJava |
4322 Activating Manual Ordering of Folders for the sapcrm Repository
The sapcrm Repository folders are ordered in a specific sequence
Procedure
To display this sequence activate manual ordering for each directory
For more information see the SAP Library at
httphelpsapcomnw70 SAP NetWeaver 70 Library (including Enhancement Package 2) English SAP
NetWeaver Library SAP NetWeaver by Key Capability Information Integration by Key Capability Knowledge
Management Content Managers Guide Providing Shared Access to Departmental Documents Sorting Documents in a
Folder ManuallyEnd of ABAP+JavaJava |
Only valid for ABAP+JavaJava |
4323 Creating Indexes and Taxonomies for the sapcrmnews Repository
To make news available for indexing and searching create two new indexes
Prerequisites
You have administrator rights for Knowledge Management on the server
For more information see the SAP Library at
httphelpsapcomnw70 SAP NetWeaver 70 Library (including Enhancement Package 2) English SAP
NetWeaver Library SAP NetWeaver by Key Capability Information Integration by Key Capability Knowledge
Management
4 Post-Installation
43 Post-Installation Steps for the Business Packages for SAP CRM
2012-12-17 CUSTOMER 2350
Procedure
Creating Indexes and Taxonomies for the sapcrmnews Repository
The Business Package contains an iView ndash epbp_crmchm-pmiviewsnews_flash ndash that combines all
news with the istopnews=yes attribute in a virtual folder To guarantee the function of this iView
create two indexes in KM
1 In the SAP NetWeaver Enterprise Portal choose System Administration System Configuration
Knowledge Management Index Administration
2 Create an index of the Search and Classification type with a suitably configured taxonomy
3 Choose sapcrmpartnernews as the index ID Otherwise the path to the folder specified in the iView
is incorrect
If you choose another index ID you must also modify accordingly the folder properties in the
iView for one of the following
Folders path to content and path to root
Folders Path to Initially Displayed Folder and Path to Root Folder for Navigation
If you want to link two portal servers with a TREX server you must modify the index name and
iView properties on one of the portal servers
4 Assign folder sapcrmpartnerPartnernews as a data source
This moves all news with the (virtual) Top flag from this folder to the Newsflash iView
5 Create a ldquoquery-basedrdquo taxonomy with the name PartnerNewsFlash choosing Automatic
Classification before you save the taxonomy
NOTE
The outbound delivery includes only the iView above for virtually combining news If you
also want to use this functionality for other news channels (for example internal news) use
your own index and taxonomy for each channel
For more information see the SAP Library at
httphelpsapcomnw70 SAP NetWeaver 70 Library (including Enhancement Package 2) English SAP
NetWeaver Library SAP NetWeaver by Key Capability Information Integration by Key Capability Knowledge
Management Administration Guide System Administration System Configuration lsquoIndex Administrationrsquo iView
Creating Queries for the Taxonomies of sapcrmnews Repositories
1 Log on to the portal as content manager
2 Choose Content Management Classification Taxonomy Query Builder
3 Add a search query to check the istopnews property for the value Yes
4 Enter PartnerNewsFlash as the name for the taxonomy
Here too a property of the iView links to a taxonomy with this name So if you want to choose
another name you must modify the path to the content folder property of the iView
For more information see the SAP Library at
4 Post-Installation
43 Post-Installation Steps for the Business Packages for SAP CRM
2450 CUSTOMER 2012-12-17
httphelpsapcomnw70 SAP NetWeaver 70 Library (including Enhancement Package 2) English SAP
NetWeaver Library SAP NetWeaver by Key Capability Information Integration by Key Capability Knowledge
Management Administration Guide System Administration System Configuration Taxonomies and ClassificationEnd of ABAP+JavaJava |
Only valid for ABAP+JavaJava |
4324 Creating the Index for the sapcrm Repository
To make Info center documents available for indexing and searching create a new index with sapcrm
as a data source
Prerequisites
You have administrator rights for Knowledge Management on the server
Procedure
Choose a name of your own Search as a service and standard as a crawler parameter
For more information see the SAP Library at
httphelpsapcomnw70 SAP NetWeaver 70 Library (including Enhancement Package 2) English SAP
NetWeaver Library SAP NetWeaver by Key Capability Information Integration by Key Capability Knowledge
ManagementEnd of ABAP+JavaJava |
Only valid for ABAP+JavaJava |
4325 Configuring the Personal Search
Prerequisites
You have administrator rights for Knowledge Management on the server
Procedure
1 Create an index for the userhome repository
To make personal folder documents available for the search create a new index with root
userhome as the data source
2 Create a search option set for personal search
To assign the search index and a start folder to the search for personal documents create a Search
Option Set with the name CRMPersonalFolderSearch As an index enter the index for the
userhome repository created above and ~alias~userhomeuseridPersonal Documents as the
root folder for the search
For more information see the SAPLibrary at
4 Post-Installation
43 Post-Installation Steps for the Business Packages for SAP CRM
2012-12-17 CUSTOMER 2550
httphelpsapcomnw70 SAP NetWeaver 70 Library (including Enhancement Package 2) English SAP
NetWeaver Library SAP NetWeaver by Key Capability Information Integration by Key Capability Knowledge
Management End of ABAP+JavaJava |
Only valid for ABAP+JavaJava |
4326 Increasing the Number of JCo Connections
This section tells you how to increase the number of concurrent Java Connector (JCo) connections
By default the maximum number of concurrent JCo connections is 100 The value depends on the
number and behavior of the users in the portal For more information see SAP Note 316877
You can specify this value when you plan the installation of your SAP NetWeaver Enterprise Portal
Make sure that you first analyze the number and behavior of the users
Procedure
To increase the maximum number of concurrent JCo connections increase the value of the
environment variable CPIC_MAX_CONV
EXAMPLE
Initial default value CPIC_MAX_CONV=100
Increased value CPIC_MAX_CONV=1000
End of ABAP+JavaJava |
End of ABAP+JavaJava |
End of ABAP+JavaJava |
Only valid for ABAP+JavaJava | MapBox (MBX) |
44 Post-Installation Steps for MapBoxOnly valid for Java | MapBox (MBX) |
You have to perform the following post-installation steps for MapBox
You assign user groups for MapBox users [page 27]
You configure an RFC destination for TCPIP connections [page 28]
You perform initial configuration for MapBox [page 28]
You execute the Map Box [page 34]
You perform the smoke test [page 35]
If required you perform additional settings for MapBox
Block size settings [page 38]
Memory settings for the J2EE Engine [page 39]End of Java | MapBox (MBX) |
4 Post-Installation
44 Post-Installation Steps for MapBox
2650 CUSTOMER 2012-12-17
Only valid for Java | MapBox (MBX) |
441 Assigning User Groups for MapBox Users
To access the MapBox URL you need to provide the correct security rights for individual user groups
Procedure
1 Log on to the Visual Administrator
1 On your central instance host change to the following directory
Only valid for IBM i5OSUNIX |
usrsapltSAPSIDgtltinstance_numbergtj2eeadmin
End of IBM i5OSUNIX |
Only valid for Windows |
usrsapltSAPSIDgtltinstance_numbergtj2eeadmin
End of Windows |
2 Only valid for IBM i5OSUNIX |
Run goshEnd of IBM i5OSUNIX |
3 Only valid for Windows |
Double-click gobatEnd of Windows |
For more information about the Visual Administrator see the SAP Library at
httpshelpsapcomnw70 SAP NetWeaver Library SAP NetWeaver by Key Capability
Application Platform by Key Capability Java Technology Administration Manual J2EE Engine J2EE Engine
Administration Tools
2 Choose the server node from the left-hand window
3 Choose Services Security Provider
A list of deployed components is displayed
4 Choose MapBoxLauncher from this list (sapcom
comsapsyncpointmapboxlaunchermapboxlauncher)
A list of tabs appears on the right
5 Choose Security Roles from the list
A list of security roles appears
6 If no display and modify roles are displayed add these roles as follows
1 Choose Switch to Edit Mode from the top task bar to switch to edit mode
2 Add display and modify roles by choosing Add
7 For both the display and modify roles perform the following
1 Choose Switch to Edit Mode from the top task bar to switch to edit mode
2 Choose the Groups tab from the list on the far right
3 Choose Search
4 Post-Installation
44 Post-Installation Steps for MapBox
2012-12-17 CUSTOMER 2750
A list of user groups appears
4 Select the user groups that you want to enable for the two roles
Add to the left of the user group display is now highlighted
5 Choose Add to add the user group for the selected roleEnd of Java | MapBox (MBX) |
Only valid for Java | MapBox (MBX) |
442 Configuring an RFC Destination for MapBox
After the installation you have to create an RFC destination for MapBox
Procedure1 Log on to the CRM server
2 Enter transaction SM59
The Display and Maintain RFC Destinations screen appears
3 Choose Technical Settings Activation Type and create a new destination with the type TCPIP
4 Choose Registered Server Program and enter a unique value for program ID
For example you might enter MAPBOX723 for SAP client 723
5 Enter the details of the gateway host and gateway service in Gateway Options
1 Gateway host
Enter the name of your message server You can also enter the IP address of your message
server
2 Gateway service
Enter your SAP CRM system number prefixed with the string sapgw
For example if your system number is 02 enter sapgw02
6 If the CRM system is a Unicode-enabled system choose Unicode in Special Options
7 Save the destination
8 Choose MapBox Configuration Page Connecting settings from the URL and enter the same RFC
destination name in the relevant fieldEnd of Java | MapBox (MBX) |
Only valid for Java | MapBox (MBX) |
443 Performing Initial Configuration for MapBox
Procedure1 Open a browser window and enter the following URL
httplthostnamegtltport_numbergtmapboxlauncher
NOTE
If you are logged on to the machine where the J2EE server is running you can also enter the
following URL
4 Post-Installation
44 Post-Installation Steps for MapBox
2850 CUSTOMER 2012-12-17
httplocalhostltport_numbergtmapboxlauncher
2 Choose Configuration
3 Edit the values according to your SAP system and choose Save
The application asks you to enter a user name and password
4 Enter the user name and password used for the SAP J2EE Engine Visual Administrator
A description of the properties and example values for the properties is given below
Result
You see the default connection settings for MapBox as shown in the graphic below A description
of the properties and example values are provided in the adjacent table
Figure 1 MapBox Default Connection Settings
Property Purpose Example
SAP System SAP System name ABC FAZ
Message Server Message server host name xyzmain
Group SAP System group PUBLIC SPACE
System Number SAP Gateway system number prefixed with sapgw
sapgw02
Unicode Used for setting the Unicode option for the CRM server Default value is no
yes
Maximum allowed wait time interval between ISP Processing and Commit call
Time-out period between an ISP_MAPBOX call and an ISP_COMMIT call
300
4 Post-Installation
44 Post-Installation Steps for MapBox
2012-12-17 CUSTOMER 2950
Property Purpose Example
Client SAP logon client 723
User Name SAP logon user John
Password SAP logon password
Language SAP logon language EN
Destination The RFC destination with which you need to register the MapBox This is the value you enter in step 3 of Configuring an RFC Destination for MapBox [page 28]
MAPBOX723
Number of server instances The number of JCO server execution instances used by the MapBox to process server requests This number indicates the number of CRM inbound queues that are running simultaneously
10
The above MapBox connection configuration is meant for one SAP client running with the CRM
Server If you want to run the MapBox with two or more SAP clients of the same CRM system
you can use Add Client on the configuration page and edit the values accordingly However make
sure that the RFC destinations that these multiple clients listen to are always unique You can
leave the default values for the other settings
If you need more control over logging and tracing you can go to Log Settings on the configuration
page edit the values and choose Save The Log Settings screen with default values is shown in the
graphic below A description of the properties and example values for the properties is provided
in the adjacent table
Figure 2 Default Values for the Log Settings Screen
4 Post-Installation
44 Post-Installation Steps for MapBox
3050 CUSTOMER 2012-12-17
Property Purpose Example
Log and dumps directory This value specifies where the MapBox logs and dumps are stored If this field is left blank the ltuser_homegt folder is used as default value
Only valid for Windows |
Ctemp
End of Windows |
Only valid for IBM i5OSUNIX |
tmp
End of IBM i5OSUNIX |
Input payload dump This value specifies whether the input document coming to MapBox for processing is written or not
No
MapBox launcher trace level This value specifies with what granularity the MapBoxLauncher execution trace is generated6 specifies that a full MapBoxLauncher execution trace is generated whereas 0 specifies that the MapBoxLauncher execution trace is not generated Recommended value for production use is 0
0
MapBox launcher trace size The maximum file size of the generated trace When the size reaches the maximum value another file is created so that the old file can be deleted (for example due to lack of space) You can use alphabetic suffixes to specify the sizes The supported values are k or K ndash kilobytes g or G ndash gigabytes m or M ndash megabytes t or T ndash terabytes
50 k
CoordServer log level This value specifies the detail of the coordination server logging We recommended you not to change the default value of 1
2
SAP Java connector trace level This value specifies the detail of the SAP Java Connector logging The recommended value for production use is 0
2
MapBox log level The log level required for the MapBox to generate an internal log file A higher trace level means that a more detailed log file is created We recommend you to use 4D for production systems where D meansldquoOn Demandrdquo
2
4 Post-Installation
44 Post-Installation Steps for MapBox
2012-12-17 CUSTOMER 3150
Property Purpose Example
MapBox message dumps This value stands for copying the incoming and outgoing messages to the local system For better performance we recommend that you do not enable the message dump option
no
MapBox statistics This value specifies whether a file that lists the performance measurements of the MapBox is created We recommend you to use the value no for production use
no
MapBox logs location This value specifies where the MapBox logs are stored Possible locations are the MapBox repository on the CRM Server or the local file system The recommended value for production use is local_fs which indicates that the MapBox logs are stored on the local file system
local_fs
MapLog format The format in which the MapBox log file must be created The internal log file is by default created in a particular format However you can change this format to display the file in the SAP log file format The two values that are available are default and sap_log
default
The MapBox uses additional properties for performance such as caching and reuse of the MapBox
atoms These values are already set to optimum values and you cannot change them
The description of the properties is shown in the table below
Property Purpose Example
General Settings
max_elements_document This is the limit for the internal cache of the MapBox to hold the count of generated XML documentsWe recommend you not to change this value
100
cache_threshold This is the maximum threshold ndash in kilobytes ndash for a document to be cached in the internal cache of the MapBox
500
4 Post-Installation
44 Post-Installation Steps for MapBox
3250 CUSTOMER 2012-12-17
Property Purpose ExampleWe recommend you not to change this value
max_elements_cache This is the limit for the internal cache of the MapBox to hold the count of MapScenariosWe recommend you not to change this value
100
parallel_instances You use this value on systems where more than one CPU is used This setting allows you to specify the number of CPU instances that MapBox must use for processing so that the remainder can be used by non-MapBox related applications By default MapBox uses all the available CPUs for processing Values can range between 0 to N-1 where N is the number of available CPUs
4
thread_priority Specifies the number of threads MapBox uses during processing We recommend you to set an optimum value for this property so that MapBox does not utilize all available resources 0 = min 1 = low 2 = normal 3 = high 4 = max
3
reuse_count Sets the count for the number of times an atom-instance must be reused before it is destroyed A value of 0 means that the atom is not destroyed and can be used continuously Recommended value is 50 This means that the atom instance is reused 50 times before it is destroyed
100
Lock Server Settings
Operation_Mode The internal mode of operation for the coordination server We recommend not to change the default value of OUTPROC_CLIENT
OUTPROC_CLIENT
Registry_Port The Remote Method Invocation (RMI) port used for connecting to the coordination serverRMI is a Java mechanism for distributed computing
1099
4 Post-Installation
44 Post-Installation Steps for MapBox
2012-12-17 CUSTOMER 3350
Property Purpose ExampleDo not change this value unless port 1099 is unavailable In this case change it to 59856
HostName The name of the host where the coordination server resides
localhost
LocalName The name of the host where the MapBoxLauncher is executed We recommend you not to change the default value of localhost
Server
PollingInterval Polling interval in seconds to ask for shutdown of the coordination server We recommend you not to change the default value of 30
60
CleanUpInterval Cleanup interval in seconds to check for invalid locks created by the MapBoxLauncher We recommend you not to change the default value of 60
180
NOTE
A file name MapLogxsl is also available with the smoke test [page 35] This file is the stylesheet
that is used to format the display of the MapBox log file During the installation and execution
of the MapBox the MapBox log file is created in the following directory
Only valid for Windows |
ltUser_homegtTempMapBoxDumpsltyour_system_namegt500 where ltuser_homegt is the
home directory of the logged-on user ltyour system namegt is the CRM server you have
connected to and 500 is the client you have connected toEnd of Windows |
Only valid for IBM i5OSUNIX |
ltUser_homegtTempMapBoxDumpsltyour_system_namegt500 where ltuser_homegt is the
home directory of the logged-on user ltyour system namegt is the CRM server you have
connected to and 500 is the client you have connected toEnd of IBM i5OSUNIX |
RECOMMENDATION
We recommend that you copy MapLogxsl from the
ltsmoke_test_installation_directorygt to the directory mentioned aboveEnd of Java | MapBox (MBX) |
Only valid for Java | MapBox (MBX) |
444 Executing the MapBox
This section tells you how to execute the MapBox The procedure that you use to execute the Map Box
depends on its current support package (SP) level
4 Post-Installation
44 Post-Installation Steps for MapBox
3450 CUSTOMER 2012-12-17
Procedure
If the SP level of the MapBox is less than SP11 proceed as follows
1 Enter the following URL in your browser
httplthostnamegtltport_numbergtmapboxlaunchermanage
2 Choose Start MapBox
3 The application prompts you for a user name and password
Enter the user name and password for the J2EE Engine Visual Administrator
NOTE
MapBox typically takes 30 to 60 seconds to initialize depending on the number of SAP clients
To see the status of messages processed by MapBox choose Status
If the SP level of the MapBox is equal to or higher than SP11 the MapBox starts automatically
1 For the first MapBox installation you need to restart the Java application server (AS Java) after all
the configuration settings have been completed This automatically starts the MapBox (Autostart)
2 To check the status go to the URL httplthostnamegtltport_numbergtmapboxlauncher
manage
NOTE
MapBox Autostart needs approximately 60 seconds to allow other services of As Java to start
To see the status of messages processed by MapBox choose Status
Result
When the MapBox is running the status is shown as Ready to processEnd of Java | MapBox (MBX) |
Only valid for Java | MapBox (MBX) |
445 Performing the Smoke Test for MapBox
The smoke test checks whether the MapBox installation is error-free
Only valid for Windows |
To execute the smoke test you have to run two batch filesEnd of Windows |
Only valid for IBM i5OSUNIX |
To execute the smoke test you have to run two shell scriptsEnd of IBM i5OSUNIX |
Prerequisites
Before you start the procedure you need to copy the smoketestjar file to a new
ltsmoke_test_installation_directorygt of your choice which has two further subdirectories
firstrun and secondrun
4 Post-Installation
44 Post-Installation Steps for MapBox
2012-12-17 CUSTOMER 3550
You can find the smoketestjar file here
Only valid for IBM i5OSUNIX |
usrsapltinstance_IDgtJCltinstance_numbergtj2eeclusterserver0binext
comsapsyncpointmapboxEnd of IBM i5OSUNIX |
Only valid for Windows |
usrsapltinstance_IDgtJCltinstance_numbergtj2eeclusterserver0binext
comsapsyncpointmapboxEnd of Windows |
NOTE
Each subdirectory of ltsmoke_test_installation_directorygt ndash that is firstrun and
secondrun ndash contains the following files
MBSMOKETEST_IN_000xml
MBSMOKETEST_IN_001xml
MBSMOKETEST_IN_002xml
MBSMOKETEST_IN_003xml
After executing the smoke test you must verify whether the contents of the files generated
by your test are similar to the contents of the above files That is the XML documents that
are created in the smoke test must match the documents located in the
ltsmoke_test_installation_directorygt mentioned above
To execute the smoke test you need to install the SAP Java Connector (SAP JCo version 2012)
You have to download SAP JCo 2012 from SAP Service Marketplace at https
servicesapcomswdc before executing the smoke test
CAUTION
Make sure that you install the SAP Java Connector correctly
The file mapcaseprop is available in the ltsmoke_test_installation_directorygt This file
contains the connection parameters to be tested You can modify the contents of this file
CAUTION
You must replace the connection parameters in this file with the connection parameters that
you entered in the MapBoxMetaxml file
Procedure
1 Run the first stage of the smoke test
1 Only valid for Windows |
Execute the file smoketest_1bat from the ltsmoke_test_installation_directorygtEnd of Windows |
Only valid for Windows |
This prompts you to enter the followingEnd of Windows |
4 Post-Installation
44 Post-Installation Steps for MapBox
3650 CUSTOMER 2012-12-17
Only valid for Windows |
1 ltDRIVEgtusrsapltinstance_IDgtJCltinstance_numbergtj2ee
2 ltsmoke_test_installation_directorygt
3 ltpath_to_sapjcojargt
End of Windows |
Only valid for IBM i5OSUNIX |
Execute the file smoketest_1sh from the ltsmoke_test_installation_directorygtEnd of IBM i5OSUNIX |
Only valid for IBM i5OSUNIX |
1 usrsapltinstance_IDgtJCltinstance_numbergtj2ee
2 ltsmoke_test_installation_directorygt
3 ltpath_to_sapjcojargt
End of IBM i5OSUNIX |
2 Enter the appropriate paths
The smoke test creates the following files
MBSMOKETEST_IN_000xml
MBSMOKETEST_IN_001xml
MBSMOKETEST_IN_002xml
MBSMOKETEST_IN_003xml
3 Only valid for Windows |
Check the contents of the generated files against the contents of the files located in
ltsmoke_test_installation_directorygtSMOKETESTfirstrunEnd of Windows |
Only valid for IBM i5OSUNIX |
Check the contents of the four files against the contents of the files located in
ltsmoke_test_installation_directorygtSMOKETESTfirstrunEnd of IBM i5OSUNIX |
2 Run the second stage of the smoke test
1 Only valid for Windows |
Execute the file smoketest_2bat which is located in the
ltsmoke_test_installation_directorygtEnd of Windows |
Only valid for IBM i5OSUNIX |
Execute the file smoketest_2sh which is located in the
ltsmoke_test_installation_directorygtEnd of IBM i5OSUNIX |
This prompts you to enter the following
Only valid for Windows |
1 ltDRIVEgtusrsapltinstance_IDgtJCltinstance_numbergtj2ee
2 ltsmoke_test_installation_directorygt
End of Windows |
4 Post-Installation
44 Post-Installation Steps for MapBox
2012-12-17 CUSTOMER 3750
Only valid for IBM i5OSUNIX |
1 usrsapltinstance_IDgtJCltinstance_numbergtj2ee
2 ltsmoke_test_installation_directorygt
End of IBM i5OSUNIX |
2 Enter the appropriate paths
The smoke test creates the following files
MBSMOKETEST_IN_000xml
MBSMOKETEST_IN_001xml
MBSMOKETEST_IN_002xml
MBSMOKETEST_IN_003xml
CAUTION
The files generated in the second stage of testing overwrite the contents of the files
generated in the first stage
3 Only valid for Windows |
Check the contents of the generated files against the contents of the files located in
ltsmoke_test_installation_directorygtSMOKETESTsecondrunEnd of Windows |
Only valid for IBM i5OSUNIX |
Check the contents of the four files against the contents of the files located in
ltsmoke_test_installation_directorygtSMOKETESTsecondrunEnd of IBM i5OSUNIX |
Result
If the smoke test has identified errors in the installation process the four XML files are not created in
either of the stages Instead an error log file is created
RECOMMENDATION
In the event of errors we recommend that you send the error log file to your administrator
End of Java | MapBox (MBX) |
Only valid for Java | MapBox (MBX) |
446 Ensuring Optimal Block Size settings
The block size of an object determines the number of messages that are processed at the same time by
the MapBox as a set You need to make sure that the block sizes are optimal to reduce load on the
MapBox XML processor
Procedure
1 Use transaction R3AC3 to set the block size of object GWA_COUNTRY to 10 and save the setting
2 Use transaction R3AC1 to set the block size of object BUPA_MAIN to 10 and save the settingEnd of Java | MapBox (MBX) |
4 Post-Installation
44 Post-Installation Steps for MapBox
3850 CUSTOMER 2012-12-17
Only valid for ABAP+JavaJava | MapBox (MBX) |
447 Adapting Memory Settings for the J2EE Engine
You need to adapt the memory settings for the J2EE Engine because MapBox relies heavily on memory-
intensive XML-processing such as schema-validation parsing transformation and so on
RECOMMENDATION
For rapid message processing by MapBox we recommend you to use 1024 MB of heap memory
for MapBox alone With a heap size of 512 MB MapBox can still process messages but with a slightly
higher processing time for each message
The MapBox memory requirements are directly proportional to the size of the input documents
that MapBox has to process The average size of such documents is in the range of 150 to 200 KB
For messages of this size it is sufficient to have a heap memory of 512 MB If the input documents
are in the range of 1 to 2 MB we recommend that you give MapBox a heap memory of 1024 MB
Procedure
To set the recommended memory settings for the MapBox you start the config tool of the J2EE Engine
Only valid for Windows |
Start the config tool by executing ltDrivegtusrsapltSAPSIDgtltinstance_numbergtj2ee
configtoolbatEnd of Windows |
Only valid for IBM i5OSUNIX |
Start the config tool by executing usrsapltSAPSIDgtltinstance_numbergtj2eeconfigtoolshEnd of IBM i5OSUNIX |
End of ABAP+JavaJava | MapBox (MBX) |
End of ABAP+JavaJava | MapBox (MBX) |
Only valid for ABAPABAP+Java |
45 Activating the CRM Web Client
The CRM Web Client is part of the ICF Services that is automatically installed as part of SAP NetWeaver
Application Server
Procedure
To activate the CRM Web Client after the installation see the SAP Library at
httphelpsapcomnw70 SAP NetWeaver 70 Library (including Enhancement Package 2) English SAP
NetWeaver Library SAP NetWeaver by Key Capability Application Platform by Key Capability Platform-Wide
Services Connectivity Components of SAP Communication Technology Communication Between ABAP and Non-
4 Post-Installation
45 Activating the CRM Web Client
2012-12-17 CUSTOMER 3950
ABAP Technology Internet Communication Framework Development Server-Side Development Creating and
Configuring an ICF Service Activating and Deactivating the ICF ServicesEnd of ABAPABAP+Java |
Only valid for ABAP |
46 Installing and Configuring CRM Application Server Loyalty Add-On Component
This section provides information about how to install and configure CRM Application Server Loyalty
as an add-on component to CRM Application Server ABAP
Prerequisites
You have already deployed the following software components
SAP NetWeaver Application Server ABAP (AS ABAP)
CRM Application Server ABAP
Procedure
Installing CRM Application Server Loyalty
Install CRM Application Server Loyalty on the same host where CRM Application Server ABAP is
deployed as described in SAP Note 1162144
Configuring CRM Application Server Loyalty
After you have installed CRM Application Server Loyalty you must complete the following
configuration steps
1 Call transaction nspro
2 Choose SAP Customising Implementation Guide Customer Relationship Management Marketing Loyalty
Management in BBPCRM Basic Settings Define Basic Settings
3 Enter value 1 for the INSTALL_TYPE parameter
NOTE
You do not have to enter destination name for the LOYALTY_SYSTEM parameterEnd of ABAP |
47 Starting XCM
This section describes how to start XCM
Procedure
1 You access the XCM tool at
httplthostgtltportgtltweb app namegtadminxcminitdo
4 Post-Installation
46 Installing and Configuring CRM Application Server Loyalty Add-On Component
4050 CUSTOMER 2012-12-17
NOTE
You can also start XCM in accessibility mode (according to Section 508 Rehabilitation Act)
at the following URL
httplthostgtltportgtltweb app namegtadminxcminitdosap-accessibility=x
2 Provide a user and password If you are logging on for the first time use the Administrator user
and the password you defined during the installation of the SAP system
RECOMMENDATION
We recommend you create new users with lesser rights than the Administrator for the
administration of Web applications
For more information see the SAP CRM Security Guide section E-Commerce
3 When the application opens a closed control tree is displayed on the left of the screen A screen
containing help information is displayed to the right
You can use edit (change settings) or display (see settings) mode in XCM You use the button in
the top right hand corner of the screen to change between modes When you switch to edit mode
a DB lock is set meaning that only this user can edit the settings at one time The lock is released
once the user switches back to display mode or after session timeout (default timeout is 30mins)
48 Accessing Configuration Documentation in SAP Solution Manager
To access configuration documentation in SAP Solution Manager you have to connect your newly
installed SAP system to SAP Solution Manager
NOTE
For SAP NetWeaver you can also find configuration documentation in the Technology Consultants
Guide at
httphelpsapcomnw70 SAP NetWeaver 70 Library (including Enhancement Package 2) English
SAP NetWeaver Library Technology Consultants Guide
Procedure
Create a configuration project with the related configuration guide as described in the following
documentation
httphelpsapcom SAP Solutions SAP Solution Manager Documentation for SAP Solution Manager
ltcurrent releasegt SAP Solution Manager Implementing and Upgrading SAP Solutions Projects
Configuration
More Information
httpservicesapcomsolutionmanager Media Library How-To Documents How to Create a
Configuration Guide using SAP Solution Manager
4 Post-Installation
48 Accessing Configuration Documentation in SAP Solution Manager
2012-12-17 CUSTOMER 4150
This page is left blank for documents that are printed on both sides
5 Additional Information
Only valid for ABAP+JavaJava |
51 Installing the Business Packages for SAP CRM Using JSPM (Optional)
You can also install the Business Packages for SAP CRM using the Java Support Package Manager (JSPM)
Prerequisites
Only valid for IBM i5OSUNIX |
You have checked hardware and software requirements [external document]End of IBM i5OSUNIX |
Only valid for Windows |
You have checked hardware and software requirements [external document]End of Windows |
You have ckecked the Prerequisites for the Business Packages for SAP CRM [page 7]
Procedure
1 Download version 701 of the files sapcom_BPCRMAPP sapcom_BPCRMFND sapcom_CRMAPP and
sapcom_CRMFND as follows
1 Go to httpservicesapcomswdc Download Support Packages and Patches Search for
Support Packages and Patches
2 Enter the following search terms
BP CRM Application Coding 701
BP CRM Application Content 701
BP CRM Foundation Coding 701
BP CRM Foundation Content 701
2 Add the deployment variable comsapcmshare as described in SAP Note 965948
For more information about how to use the Software Deployment Manager (SDM) see the
documentation Software Deployment Manager which is available at
httphelpsapcomnw70 SAP NetWeaver 70 Library (including Enhancement Package 2) English
SAP NetWeaver Library SAP NetWeaver Developerrsquos Guide Fundamentals Using Java Core Development
Tasks Deployment Putting It All Together Software Deployment Manager
3 Install the Business Packages for SAP CRM with JSPM as described in Installing Additional Usage Types
or Software Units in an Existing SAP System [external document]
5 Additional Information
51 Installing the Business Packages for SAP CRM Using JSPM (Optional)
2012-12-17 CUSTOMER 4350
4 Perform the required Post-Installation Steps for the Business Packages for SAP CRM [page 20]End of ABAP+JavaJava |
Only valid for ABAP+JavaJava |
52 Troubleshooting for the Business Package for SAP CRMOnly valid for ABAP+JavaJava |
The following sections describe the steps that you have to perform if you have problems after the
installation
Activating BI Templates Manually [page 44]
Dragging the Central Search onto the Portal Desktop [page 45]End of ABAP+JavaJava |
Only valid for ABAP+JavaJava |
521 Activating BI Templates Manually
If you have installed the Business Package you might see error messages when loading the BI templates
This procedure describes how you can activate the templates afterwards
Procedure
1 Note the technical name of all templates in your portal interface that are not working
2 Log on to your BI system
3 On the SAP Easy Access screen choose Modeling Administrator Workbench Modeling (transaction
RSA1 or RSOR)
4 Choose Business Content Object Types Web Template Name Select Objects
A new window containing a list of BW objects and templates opens
5 Find your missing templates for example 0TPL_0CRM_Cnn_Qnnn_Vnnn_M and select the entries
6 Choose Transfer Selection
The template now appears on the right-hand side of the screen The Transfer checkbox has been
selected and cannot be changed Nevertheless we recommend that you repeat the following
procedure so that your templates can be displayed
7 Select the template
8 Choose Transfer Transfer
Result
You have successfully activated your missing templates and no error messages appear in the portalEnd of ABAP+JavaJava |
5 Additional Information
52 Troubleshooting for the Business Package for SAP CRM
4450 CUSTOMER 2012-12-17
Only valid for ABAP+JavaJava |
522 Dragging the Central Search onto the Portal Desktop
Procedure
The Business Package for SAP CRM 70 including SAP enhancement package 1 contains an iView for
the central search in CRM This iView is in the package on the page Today in the workset Home of the
CRM User You can drag this iView onto the portal desktop under the tool areaEnd of ABAP+JavaJava |
End of ABAP+JavaJava |
5 Additional Information
52 Troubleshooting for the Business Package for SAP CRM
2012-12-17 CUSTOMER 4550
Typographic Conventions
Example Description
ltExamplegt Angle brackets indicate that you replace these words or characters with appropriate entries to make entries in the system for example ldquoEnter your ltUser Namegtrdquo
ExampleExample
Arrows separating the parts of a navigation path for example menu options
Example Emphasized words or expressions
Example Words or characters that you enter in the system exactly as they appear in the documentation
httpwwwsapcom Textual cross-references to an internet address
example Quicklinks added to the internet address of a homepage to enable quick access to specific content on the Web
123456 Hyperlink to an SAP Note for example SAP Note 123456
Example Words or characters quoted from the screen These include field labels screen titles pushbutton labels menu names and menu options
Cross-references to other documentation or published works
Example Output on the screen following a user action for example messages Source code or syntax quoted directly from a program File and directory names and their paths names of variables and parameters and
names of installation upgrade and database tools
EXAMPLE Technical names of system objects These include report names program names transaction codes database table names and key concepts of a programming language when they are surrounded by body text for example SELECT and INCLUDE
EXAMPLE Keys on the keyboard
4650 CUSTOMER 2012-12-17
SAP AGDietmar-Hopp-Allee 16
69190 WalldorfGermany
T +4918 0534 34 34F +4918 0534 34 20
wwwsapcom
copy Copyright 2012 SAP AG All rights reserved
No part of this publication may be reproduced or transmitted in any form or for any purpose without the express permission of SAP AG The information contained herein may be changed without prior noticeSome software products marketed by SAP AG and its distributors contain proprietary software components of other software vendors
Microsoft Windows Excel Outlook PowerPoint Silverlight and Visual Studio are registered trademarks of Microsoft CorporationIBM DB2 DB2 Universal Database System i System i5 System p System p5 System x System z System z10 z10 zVM zOS OS390 zEnterprise PowerVM Power Architecture Power Systems POWER7 POWER6+ POWER6 POWER PowerHA pureScale PowerPC BladeCenter System Storage Storwize XIV GPFS HACMP RETAIN DB2 Connect RACF Redbooks OS2 AIX Intelligent Miner WebSphere Tivoli Informix and Smarter Planet are trademarks or registered trademarks of IBM CorporationLinux is the registered trademark of Linus Torvalds in the United States and other countriesAdobe the Adobe logo Acrobat PostScript and Reader are trademarks or registered trademarks of Adobe Systems Incorporated in the United States and other countriesOracle and Java are registered trademarks of Oracle and its affiliatesUNIX XOpen OSF1 and Motif are registered trademarks of the Open GroupCitrix ICA Program Neighborhood MetaFrame WinFrame VideoFrame and MultiWin are trademarks or registered trademarks of Citrix Systems IncHTML XML XHTML and W3C are trademarks or registered trademarks of W3Creg World Wide Web Consortium Massachusetts Institute of TechnologyApple App Store iBooks iPad iPhone iPhoto iPod iTunes Multi-Touch Objective-C Retina Safari Siri and Xcode are trademarks or registered trademarks of Apple IncIOS is a registered trademark of Cisco Systems IncRIM BlackBerry BBM BlackBerry Curve BlackBerry Bold BlackBerry Pearl BlackBerry Torch BlackBerry Storm BlackBerry Storm2 BlackBerry PlayBook and BlackBerry App World are trademarks or registered trademarks of Research in Motion LimitedGoogle App Engine Google Apps Google Checkout Google Data API Google Maps Google Mobile Ads Google Mobile Updater Google Mobile Google Store Google Sync Google Updater Google Voice Google Mail Gmail YouTube Dalvik and Android are trademarks or registered trademarks of Google IncINTERMEC is a registered trademark of Intermec Technologies CorporationWi-Fi is a registered trademark of Wi-Fi AllianceBluetooth is a registered trademark of Bluetooth SIG IncMotorola is a registered trademark of Motorola Trademark Holdings LLCComputop is a registered trademark of Computop Wirtschaftsinformatik GmbHSAP R3 SAP NetWeaver Duet PartnerEdge ByDesign SAP BusinessObjects Explorer StreamWork SAP HANA and other SAP products and services mentioned herein as well as their respective logos are trademarks or registered trademarks of SAP AG in Germany and other countriesBusiness Objects and the Business Objects logo BusinessObjects Crystal Reports Crystal Decisions Web Intelligence Xcelsius and other Business Objects products and services mentioned herein as well as their respective logos are trademarks or registered trademarks of Business Objects Software Ltd Business Objects is an SAP companySybase and Adaptive Server iAnywhere Sybase 365 SQL Anywhere and other Sybase products and services mentioned herein as well as their respective logos are trademarks or registered trademarks of Sybase Inc Sybase is an SAP company
2012-12-17 CUSTOMER 4750
Crossgate mgic EDDY B2B 360deg and B2B 360deg Services are registered trademarks of Crossgate AG in Germany and other countries Crossgate is an SAP companyAll other product and service names mentioned are the trademarks of their respective companies Data contained in this document serves informational purposes only National product specifications may varyThese materials are subject to change without notice These materials are provided by SAP AG and its affiliated companies (ldquoSAP Grouprdquo) for informational purposes only without representation or warranty of any kind and SAP Group shall not be liable for errors or omissions with respect to the materials The only warranties for SAP Group products and services are those that are set forth in the express warranty statements accompanying such products and services if any Nothing herein should be construed as constituting an additional warranty
DisclaimerSome components of this product are based on Javatrade Any code change in these components may cause unpredictable and severe malfunctions and is therefore expressly prohibited as is any decompilation of these componentsAny Javatrade Source Code delivered with this product is only to be used by SAPrsquos Support Services and may not be modified or altered in any way
Documentation in the SAP Service MarketplaceYou can find this document at the following address httpservicesapcominstguides
4850 CUSTOMER 2012-12-17
SAP AGDietmar-Hopp-Allee 1669190 WalldorfGermanyT +4918 0534 34 34F +4918 0534 34 20wwwsapcom
copy Copyright 2012 SAP AG All rights reservedNo part of this publication may be reproduced or transmitted in any form or for any purpose without the express permission of SAP AG The information contained herein may be changed without prior notice
- SAP Enhancement Package 1 for SAP CRM 70
-
- Table of Contents
- 1 Introduction
- 2 Planning and Preparation
-
- 21 Prerequisites for the Business Packages for SAP CRM
-
- 3 Installation
- 4 Post-Installation
-
- 41 Checking the Availability of Back-End Systems for SAP CRM Java Components
-
- 411 Creating a Back-End User
- 412 Checking the Connection to the ABAP System
- 413 Configuring and Checking the TREX Service
- 414 Checking the Selling via eBay Processes
-
- 42 Post-Installation Steps for Workforce Deployment Application and Calculation Services
-
- 421 Implementing WFMCORE 200 Using Transaction SAINT
- 422 Configuring the Extended Configuration Management (XCM) for WFD Application and Calculation Services
- 423 Checking Workforce Deployment Calculation Services
- 424 Checking the Installation of WFD Application Services and WFD Calculation Services
-
- 43 Post-Installation Steps for the Business Packages for SAP CRM
-
- 431 Creating Roles for the SAP CRM Business Packages
- 432 Installation of the Info Center for the SAP CRM Business Package
-
- 4321 Importing the SAP CRM Info Center Configurations and Directory Structure
- 4322 Activating Manual Ordering of Folders for the sapcrm Repository
- 4323 Creating Indexes and Taxonomies for the sapcrmnews Repository
- 4324 Creating the Index for the sapcrm Repository
- 4325 Configuring the Personal Search
- 4326 Increasing the Number of JCo Connections
-
- 44 Post-Installation Steps for MapBox
-
- 441 Assigning User Groups for MapBox Users
- 442 Configuring an RFC Destination for MapBox
- 443 Performing Initial Configuration for MapBox
- 444 Executing the MapBox
- 445 Performing the Smoke Test for MapBox
- 446 Ensuring Optimal Block Size settings
- 447 Adapting Memory Settings for the J2EE Engine
-
- 45 Activating the CRM Web Client
- 46 Installing and Configuring CRM Application Server Loyalty Add-On Component
- 47 Starting XCM
- 48 Accessing Configuration Documentation in SAP Solution Manager
-
- 5 Additional Information
-
- 51 Installing the Business Packages for SAP CRM Using JSPM (Optional)
- 52 Troubleshooting for the Business Package for SAP CRM
-
- 521 Activating BI Templates Manually
- 522 Dragging the Central Search onto the Portal Desktop
-
- Copyright and trademarks
-

This page is left blank for documents that are printed on both sides
3 Installation
Proceed as described in the documentation Installation Guide ndash SAP Systems Based on the Application Server
ltABAP | Javagt of SAP NetWeaver on ltOperating Systemgt ltDatabasegt at httpservicesapcom
sltoolset Software Logistics Toolset 10 Software Provisioning Manager 10
3 Installation
2012-12-17 CUSTOMER 950
This page is left blank for documents that are printed on both sides
4 Post-Installation
Only valid for Java |
41 Checking the Availability of Back-End Systems for SAP CRM Java Components
Only valid for ABAP+JavaJava |
After the installation you have to check the availability of back-end systems as follows
1 To test the connection to the ABAP back-end system you create a back-end user [page 11]
2 Depending on various business processes you check the following back-end systems
ABAP system [page 12]
TREX Server [page 14]End of ABAP+JavaJava |
Only valid for ABAP+JavaJava |
411 Creating a Back-End User
You need service users to provide the anonymous remote function call (RFC) stateless connection
between your back-end system and your Web-based applications
Prerequisites
You have installed and configured CRM E-Commerce Web-based applications
Procedure
You create a service user in your back-end SAP CRM system and assign it to the Web-based application
as follows
1 In your ABAP back-end system on the SAP Easy Access screen choose Tools Administration User
Maintenance Users (transaction SU01)
2 Create a user of the type Service User and enter all required data
3 Assign the appropriate service user authorization role to the user on the Roles tab For a list of
service user roles for the various Web-based applications see the following table
Application Authorization Role for Service User
E-Selling B2B SAP_CRM_ECO_ISA_TU_B2B
E-Selling B2C SAP_CRM_ECO_ISA_TU_B2C
E-Selling EASYB2B SAP_CRM_ECO_ISA_TU_EASYB2B
4 Post-Installation
41 Checking the Availability of Back-End Systems for SAP CRM Java Components
2012-12-17 CUSTOMER 1150
Application Authorization Role for Service User
E-Selling CVIEWS SAP_CRM_ECO_ISA_TU_CVIEWS
E-Selling SHOPADMIN SAP_CRM_ECO_ISA_TU_SHOPADM
E-Selling USERADMIN SAP_CRM_ECO_ISA_TU_USERADM
E-Selling Auctioning via Web shop (AVW) SAP_CRM_ECO_TU_AVW
E-Selling via eBay (SVE) SAP_CRM_ECO_TU_SVE
E-Service Internet Customer Self Service (ICSS) SAP_CRM_ECO_ISE_TU_B2B (Authorizations for ICSS B2B)SAP_CRM_ECO_ISE_TU_B2C (Authorizations for ICSS B2C)
E-Service Complaints and Returns SAP_CRM_ECO_ISE_TU_CR
E-Service Remanufacturer inspection SAP_CRM_ECO_ISE_TU_INSP
Channel Management (CHM)Shared Catalog
SAP_CRM_ECO_CHM_TU_SHRDCAT
Channel Management (CHM) BOB SAP_CRM_ECO_ISA_TU_BOB
Channel Management (CHM) HOM SAP_CRM_ECO_ISA_TU_HOM
Channel Management (CHM) CSR SAP_CRM_ECO_ISA_TU_CSR
4 Save your entries
More Information
For more information about service users see the documentation ltyour projectgt Basic Settings for CRM
E-Commerce General Settings for CRM E-Commerce User Management in the SAP Solution Manager [page
41]End of ABAP+JavaJava |
Only valid for ABAP+JavaJava |
412 Checking the Connection to the ABAP System
This section tells you how to check the connection to the ABAP system
Prerequisites
To be able to test the connection to the ABAP system you need to create a user [page 11] on this system
Procedure
1 Start the Visual Administrator
1 On your central instance host change to the admin directory as follows
Only valid for IBM i5OSUNIX |
usrsapltSAPSIDgtltinstance_namegtj2eeadmin
End of IBM i5OSUNIX |
Only valid for Windows |
usrsapltSAPSIDgtltinstance_namegtj2eeadmin
End of Windows |
4 Post-Installation
41 Checking the Availability of Back-End Systems for SAP CRM Java Components
1250 CUSTOMER 2012-12-17
2 Only valid for IBM i5OSUNIX |
Run goshEnd of IBM i5OSUNIX |
3 Only valid for Windows |
Double-click gobatEnd of Windows |
For more information about the Visual Administrator see the SAP Library at
httphelpsapcomnw70 SAP NetWeaver 70 Library (including Enhancement Package 2) English
SAP NetWeaver Library SAP NetWeaver by Key Capability Application Platform by Key Capability Java
Technology Administration Manual J2EE Engine J2EE Engine Administration Tools
2 Only valid for IBM DB2 for i5OSIBM DB2 for i5OS (LinuxWindows)IBM DB2 for Linux and UNIX and WindowsIBM DB2 for zOSMaxDBMS SQL ServerOracle |
Log on to the Visual Administrator with administrator rights
NOTE
If you chose configuration Use ABAP in the User Management Engine (UME) and you selected
SAP CRM ABAP as your ABAP back end with UME during the installation a successful logon
to the Visual Administrator means that the SAP CRM ABAP back-end system is available
You have now finished this procedure
Otherwise continue with the next step
End of IBM DB2 for i5OSIBM DB2 for i5OS (LinuxWindows)IBM DB2 for Linux and UNIX and WindowsIBM DB2 for zOSMaxDBMS SQL ServerOracle |
3 Start an application that uses the SAP CRM ABAP system if it is stopped
1 In the left pane of the Visual Administrator open clusterserverservices and choose
Deploy service
2 Select the application
Application Context Root
crm~b2b b2b
crm~icss_b2b icss_b2b
crm~sve sve
3 To start the selected application choose Start
4 Open the user interface for the Extended Configuration Management (XCM) Administrator as
follows
1 Open a Web browser and enter the following URL
httpltJ2EE_hostgtltJ2EE_portgtltcontext rootgtadminxcminitdo
where ltcontext rootgt is the context root of the application started in the previous step
To find information about the components that can be configured choose help
2 Choose Start Component
You can find information about configuration of components on the right hand side of the
screen
4 Post-Installation
41 Checking the Availability of Back-End Systems for SAP CRM Java Components
2012-12-17 CUSTOMER 1350
3 To create a jco Component follow the instructions provided in the Example of component
configuration field
If the ldquorun testrdquo operation described in the component configuration section of a jco setting
was successful the ABAP system can be reached from the Java system
More InformationFor more information about using Extended Configuration Management (XCM) to configure your
application see Using Extended Configuration Management (XCM) [page 40] and the documentation in the
SAP Solution Manager [page 41]End of ABAP+JavaJava |
Only valid for Java |
413 Configuring and Checking the TREX Service
You need to configure and check the TREX service
Procedure
Configuring the TREX Service
1 Start the Visual Administrator
2 Connect to the AS Java
3 Choose Server node Open Services Node Select TREX Service
4 Maintain the values for nameserveraddress and nameserverbackupserverlist
For more information see Specifying the Address of the TREX Name Server in Installation Guide ndash SAP NetWeaver
70 Standalone Engine Search and Classification (TREX) Single Host at
httpservicesapcominstguidesNW70 Installation Installation - Standalone Engines SAP
NetWeaver Search and Classification TREX Installing TREX 70 Single Host
Checking the TREX Service
1 Start the application sapcomcrm~b2b as described in step 3 of Checking the Connection to the ABAP
System [page 12]
2 Open a Web browser and enter the following URL
httpltJ2EE_hostgtltJ2EE_portgtb2badmintrextrex_640jsp
ResultIf the connection was established successfully the message TREX Server is available appearsEnd of Java |
Only valid for Java |
414 Checking the Selling via eBay Processes
To use the selling via eBay (SVE) processes the Java system requires an http connection to
4 Post-Installation
41 Checking the Availability of Back-End Systems for SAP CRM Java Components
1450 CUSTOMER 2012-12-17
httpwwwebaycom
To test the connection you need to create an XCM component ebayCommunicator for the sapcom
crm~sve application
Procedure
To create the Extended Configuration Management (XCM) component ebayCommunicator using
application sapcomcrm~sve proceed as described in Checking the ABAP System [page 12]
NOTE
Make sure that you replace jco component with ebayCommunicator component when following
the procedure in Checking the ABAP System [page 12]
More Information
For more information about using Extended Configuration Management (XCM) to configure your
application see Using Extended Configuration Management (XCM) [page 40] and the documentation in the
SAP Solution Manager [page 41]End of Java |
End of Java |
Only valid for Java |
42 Post-Installation Steps for Workforce Deployment Application and Calculation Services
Only valid for ABAP+JavaJava | CRM Java Components (JCRM)Extended E-Selling Components (XECO) |
You have to perform the following steps to check and configure Workforce Deployment Application
and Calculation Services (WFD ASCS)
You implement WFMCORE 200 using transaction SAINT [page 15]
You configure the XCM administration tool for WFD ASCS [page 16]
You check WFD calculation services [page 18]
You check the installation of WFD ASCS [page 19]End of ABAP+JavaJava | CRM Java Components (JCRM)Extended E-Selling Components (XECO) |
Only valid for ABAP+JavaJava |
421 Implementing WFMCORE 200 Using Transaction SAINT
Before you can check and configure the Java part of Workforce Deployment Application and
Calculation Services (WFD ASCS) you need to implement WFMCORE 200
4 Post-Installation
42 Post-Installation Steps for Workforce Deployment Application and Calculation Services
2012-12-17 CUSTOMER 1550
Only valid for CRM Java Components (JCRM) |
The WFMCORE 200 component contains all necessary ABAP classes and libraries required for the
various Workforce Deployment scenarios and processes including Service Resource Planning in CRM and
Retail Multisite Workforce DeploymentEnd of CRM Java Components (JCRM) |
Procedure
1 Log on to your ABAP system
2 Install WFMCORE 200 using transaction SAINT as described in SAP Note 830595
3 Only valid for CRM Java Components (JCRM) |
If you are implementing the Service Resource Planning in CRM process variant run the report
WFDBP_UPDATE_BLUEPRINT to update tables that define the settings required to properly
display and maintain Service Arrangements in the People-Centric User InterfaceEnd of CRM Java Components (JCRM) |
End of ABAP+JavaJava |
Only valid for ABAP+JavaJava |
422 Configuring the Extended Configuration Management (XCM) for WFD Application and Calculation Services
Workforce Deployment Application Services (WFD AS) sends calculation and forecasting requests to
a CRM ABAP back-end system WFD Calculation Services (WFD CS) picks up the requests from this
CRM ABAP back-end system You define the connection to the CRM ABAP back-end system through
Extended Configuration Management (XCM) Admin
For more information about using Extended Configuration Management (XCM) to configure your
application see Using Extended Configuration Management (XCM) [page 40] and the documentation in the
SAP Solution Manager [page 41]
The csjcoxxxxx XCM parameters define the JCO connection to the SAP CRM ABAP system where
the WFD CS maintains forecast and calculation requests You can connect to the CRM ABAP system
using one of the following
A message or dispatching server by specifying csjcomshost csjcogroup and csjcor3name
An application server by specifying csjcoahost and csjcosysnr
In either case you must also specify csjcoclient csjcouser and csjcopassword
XCM Parameter Name Example Value Description
csjcoahost us0091wdfsapcorp Application server host name of the SAP CRM Calculation Service
csjcosysnr 91 System number of the R3 Calculation Service (for example 09)
csjcomshost us0091wdfsapcorp Message server host name of the SAP CRM Calculation Service
csjcogroup PUBLIC Group of the SAP CRM Calculation Service (case sensitive for example PUBLIC)
4 Post-Installation
42 Post-Installation Steps for Workforce Deployment Application and Calculation Services
1650 CUSTOMER 2012-12-17
XCM Parameter Name Example Value Description
csjcor3name Q5C System ID of the SAP CRM Calculation Service (for example IDES)
csjcoclient 505 Client of the SAP CRM Calculation Service
csjcouser Back end user for JCO connection to the SAP CRM Calculation Service
csjcopassword Password for the back-end user
You need to configure these csjcoxxxxx XCM parameter values in each instance of WFD AS and
WFD CS Make sure that the values are the same in all instances
Configuring the XCM for WFD Calculation Services
This business scenario is relevant for defining the WFD CS You must perform this XCM configuration
for the WFD CS to run
1 Start the XCM using the following URL
httpltJ2EE_hostgtltJ2EE_portgtwfdcsadminxcminitdo
2 Access the configuration using the following path General Application Settings Customer sisopt
sisoptconfig
Process Description Web ApplicationXCM Application Configurations
Calculations Service Workforce scheduling application
wfdcs sisoptconfig
3 In addition to the csjcoxxxx XCM parameters you need to define the http port of the J2EE
instance where WFD CS is running
XCM Parameter Name Example Value Description
cshttpport 51000 The http port of the web server where the WFD Calculation Services application is running (for example 50000)
4 Restart the application after saving the XCM configuration
Configuring the XCM for WFD Application Services
This business scenario is relevant for connecting the WFD AS to the WFD CS
1 Start the XCM using the following URL
httpltJ2EE_hostgtltJ2EE_portgtwfdadminxcminitdo
2 Access the configuration using the following path General Application Settings Customer sis
sisconfig
Process Description Web ApplicationXCM Application Configurations
Application Services Web-based scheduling application
wfd sisconfig
3 Restart the application after saving the XCM configurationEnd of ABAP+JavaJava |
4 Post-Installation
42 Post-Installation Steps for Workforce Deployment Application and Calculation Services
2012-12-17 CUSTOMER 1750
Only valid for ABAP+JavaJava |
423 Checking Workforce Deployment Calculation Services
After configuring Workforce Deployment Calculation Services (WFD CS) with Extended Configuration
Management (XCM) and restarting the application you need to go to the WFD CS configuration page
to check that it is running
Prerequisites
You have completed the installation of WFD Application Service (AS) and CS as described in this
documentation
Only valid for CRM Java Components (JCRM) |
You have downloaded the Business Package for Retail (Release 10) from sdnsapcom SAP NetWeaver
Capabilities User Productivity Portal and Collaboration Portal Content Portfolio
For more information about the portal content versions for your release see the documentation
Master Guide ndash SAP Customer Relationship Management 70 at httpservicesapcomcrm-instEnd of CRM Java Components (JCRM) |
Only valid for CRM Java Components (JCRM) |
You must have access to the Portal Admin role in SAP CRM through the Enterprise Portal to complete
this part of the WFD ASCS installation
For more information see Configuring the CRM Business Package on the SAP Service Marketplace at
httpservicesapcomcrm-inst SAP CRM 70 CRM Business Packages and PC UI Section
CRM Portal Administrator contains specific instructions on configuring the portal for access to WFD
AS and CS Apply the instructions to the Portal Admin roleEnd of CRM Java Components (JCRM) |
You have configured your portal users based on the required settings as described in the
configuration documentation for your IT scenario
For more information see Accessing Configuration Documentation in the SAP Solution Manager [page 41]
Procedure
1 Access the WFD CS configuration page through the Enterprise Portal using the role Portal
Administrator
2 Choose WFD Calculation Services Configuration
The Configuration tab looks as follows
Tab To Complete InstallationFor ongoing Configuration Management
Calculation Servers Required for at least one calculation server
Required for each additional calculation server
Logging Localization No Required to add or change logging once fully operational
End of ABAP+JavaJava |
4 Post-Installation
42 Post-Installation Steps for Workforce Deployment Application and Calculation Services
1850 CUSTOMER 2012-12-17
Only valid for ABAP+JavaJava |
424 Checking the Installation of WFD Application Services and WFD Calculation Services
This section tells you how to check that you have correctly installed the Java components for Workforce
Deployment Application Services (WFD AS) and WFD Calculation Services (WFD CS) This section
does not tell you how to check the connection between the WFD AS and the WFD CS
The procedure below shows you how to create a simple calculation request and verify that the
Calculation Server has received the request This helps you check that you have correctly installed all
WFD AS or CS components and that they are communicating with each other
Prerequisites
You have completed all the installation steps described in this documentation
You have connected WFD AS or CS components with the Enterprise Portal
You have installed the required business packages according to Checking Workforce Deployment
Calculation Services [page 18]
Procedure
1 To check that WFD AS is working and listening for HTTP requests enter the following URL
httpltJ2EE_hostgtltJ2EE_portgtwfdlogondo
The following error confirms that the application is working
Your session has expired Please renew your session by clicking a section link in
the Portal menu
2 Access the WFD CS from the Enterprise Portal through the Portal Admin role and check that the
WFD CS page comes up with no errors
If the page does not come up possible errors are
Error Message Cause
Missing value for XCM configuration
parameter cshttpport
The XCM parameter cshttpport was not filled
The request could not be completed
due to the following
errorsltfollowed by details of the
particular error usually related to
the JCO connectiongt
One of the XCM parameters csjcoxxxxx might be incorrect
EXAMPLE
The user or password are incorrect
3 Test the submission of a calculation request to see if the WFD CS can process the request
You can simulate a calculation request submission by executing the RFC
TEST_WFDCS_CALCREQ_SUBMIT from the CRM back-end system defined in the csjcoxxxxx XCM
parameters of WFD CS
4 Post-Installation
42 Post-Installation Steps for Workforce Deployment Application and Calculation Services
2012-12-17 CUSTOMER 1950
EXAMPLE
For example when you installed WFD CS you configured the csjcoxxxxx XCM
parameters to point to system ID Q5C client 505 You now need to log in to Q5C client 505
and execute TEST_WFDCS_CALCREQ_SUBMIT with transaction SE37 using the default import
parameters
4 Check the Requests tab of the WFD CS page to check the status of entries with the location name
SMOKETEST has the status FAILED
Status FAILED indicates a successful smoke test It means that the Request Manager successfully
sent the request to the Solver which successfully processed it
Status QUEUED probably means that the XCM parameter cshttpport was incorrectEnd of ABAP+JavaJava |
End of Java |
Only valid for ABAP+JavaJava |
43 Post-Installation Steps for the Business Packages for SAP CRM
The following sections provide information about the steps that you have to perform after importing
the Business Package for SAP CRM
Only valid for ABAP+JavaJava |
431 Creating Roles for the SAP CRM Business Packages
Procedure
If you create your own roles from the SAP CRM Business Packages also add the every user role
(eu_core_role) to your role The Every User Role contains the personalization functionality for the SAP
NetWeaver Portal
For more information about the Every User Role see the SAP Library at
httphelpsapcomnw70 SAP NetWeaver 70 Library (including Enhancement Package 2) English SAP
NetWeaver Library SAP NetWeaver by Key Capability People Integration by Key Capability Portal Portal
Administration Guide Super Administration Pre-configured Roles Every User Roles End of ABAP+JavaJava |
Only valid for ABAP+JavaJava |
432 Installation of the Info Center for the SAP CRM Business Package
This section describes how to install the Info Center
4 Post-Installation
43 Post-Installation Steps for the Business Packages for SAP CRM
2050 CUSTOMER 2012-12-17
Prerequisites
You have installed the Business Package for SAP CRM [page 43]
You have administrator rights
Process Flow
1 You import the SAP CRM info center configurations and directory structure [page 21]
2 You activate manual ordering of folders for the sapcrm Repository [page 23]
3 You create indexes and taxonomies for the sapcrmnews Repository [page 23]
4 You create the index for the sapcrm Repository [page 25]
5 You configure the personal search [page 25]
6 If required you increase the number of JCo connections [page 26]
Only valid for ABAP+JavaJava |
4321 Importing the SAP CRM Info Center Configurations and Directory Structure
The directory structure of the info center has been made available in one content package and you can
import it using the Information and Content Exchange (ICE) Repository
For more information about ICE see SAP Library at
httphelpsapcomnw70 SAP NetWeaver 70 Library (including Enhancement Package 2) English SAP
NetWeaver Library SAP NetWeaver by Key Capability Information Integration by Key Capability Knowledge
Management Content Managers Guide Additional Tasks for Content Managers Content Exchange Distributing
Content (Offline)
Procedure
Importing the Directory Structure
1 Log on to the Portal as content manager
2 Choose Content Management Content Exchange Upload
3 Only valid for Windows |
Select file fullupdate_infocenterzip from directory ltservlet_enginegtirjrootWEB-INF
portalportalappsepcrmchmkmexpice and confirm the uploadEnd of Windows |
Only valid for IBM i5OSUNIX |
Select file fullupdate_infocenterzip from directory ltservlet_enginegtirjrootWEB-INF
portalportalappsepcrmchmkmexpice and confirm the uploadEnd of IBM i5OSUNIX |
The zip file is now imported using the ICE protocol
If you cannot see the ICE repository this might be due to one of the following reasons
The ICE repository was hidden in the virtual root repository
4 Post-Installation
43 Post-Installation Steps for the Business Packages for SAP CRM
2012-12-17 CUSTOMER 2150
In this case do the following
1 Log on to the portal as system administrator
2 In the SAP NetWeaver Enterprise Portal choose System Administration System Configuration
Knowledge Management Content Management Repository Managers Virtual Root Repository
3 Check whether the ICE Repository has been entered under Repositories to exclude
4 Remove it from the list
5 Save your changes
6 Restart the Servlet Engine
The repository has been ldquoswitchedrdquo to invisible
1 Log on to the portal as system administrator
2 In the SAP NetWeaver Enterprise Portal choose System Administration System Configuration
Knowledge Management Content Management Repository Managers Content Exchange
Repository
3 If the property hide in root folder is active deselect it
4 Restart the Servlet Engine
NOTE
After the import check whether the directory structure was created by choosing Content
Administration KM Content in the SAP NetWeaver Enterprise Portal The list of folders should
contain the folders sapcrm and sapcrmnews
Checking Whether the Directory Structure Has Been Imported Successfully
You can only import the structure if there is a repository with the same name For example if a zip file
is exported from the repository sapcrm there must also be a repository with the name sapcrm in the
target system
The sapcrm and sapcrmnews repositories as well as the CRM-Namespace filter are created during the
import of the SAP CRM KM extension configuration archive To check whether this configuration
archive has been imported successfully proceed as follows
1 Log on to the portal as system administrator
2 In the SAP NetWeaver Enterprise Portal choose System Administration Monitoring Knowledge
Management Deployment Monitor Config Archives
3 Check whether the archive comsappctcrmappkmextprjconfig is installed in the system
If the archive comsappctcrmappkmextprjconfig is not installed in the system import it
manually as follows
1 Log on to the portal as system administrator
2 In the SAP NetWeaver Enterprise Portal choose System Administration Monitoring Knowledge
Management Deployment Monitor Config Archives Actions Import
4 Post-Installation
43 Post-Installation Steps for the Business Packages for SAP CRM
2250 CUSTOMER 2012-12-17
3 Only valid for Windows |
Select the archive comsappctcrmappkmextprjconfigconfigarchive from directory
ltSAPSIDgtJCltinstance_numbergtj2eeclusterappssapcomep~crm~chm
servlet_jspepcrmchmkmexprootWEB-INFconfig and confirm the importEnd of Windows |
4 Only valid for IBM i5OSUNIX |
Select the archive comsappctcrmappkmextprjconfigconfigarchive from
directory ltSAPSIDgtJCltinstance_numbergtj2eeclusterappssapcomep~crm~chm
servlet_jspepcrmchmkmexprootWEB-INFconfig and confirm the importEnd of IBM i5OSUNIX |
After the import the directory structure has no restrictions on rights Make sure that you modify the
rights of the various folders to meet your companyrsquos requirementsEnd of ABAP+JavaJava |
Only valid for ABAP+JavaJava |
4322 Activating Manual Ordering of Folders for the sapcrm Repository
The sapcrm Repository folders are ordered in a specific sequence
Procedure
To display this sequence activate manual ordering for each directory
For more information see the SAP Library at
httphelpsapcomnw70 SAP NetWeaver 70 Library (including Enhancement Package 2) English SAP
NetWeaver Library SAP NetWeaver by Key Capability Information Integration by Key Capability Knowledge
Management Content Managers Guide Providing Shared Access to Departmental Documents Sorting Documents in a
Folder ManuallyEnd of ABAP+JavaJava |
Only valid for ABAP+JavaJava |
4323 Creating Indexes and Taxonomies for the sapcrmnews Repository
To make news available for indexing and searching create two new indexes
Prerequisites
You have administrator rights for Knowledge Management on the server
For more information see the SAP Library at
httphelpsapcomnw70 SAP NetWeaver 70 Library (including Enhancement Package 2) English SAP
NetWeaver Library SAP NetWeaver by Key Capability Information Integration by Key Capability Knowledge
Management
4 Post-Installation
43 Post-Installation Steps for the Business Packages for SAP CRM
2012-12-17 CUSTOMER 2350
Procedure
Creating Indexes and Taxonomies for the sapcrmnews Repository
The Business Package contains an iView ndash epbp_crmchm-pmiviewsnews_flash ndash that combines all
news with the istopnews=yes attribute in a virtual folder To guarantee the function of this iView
create two indexes in KM
1 In the SAP NetWeaver Enterprise Portal choose System Administration System Configuration
Knowledge Management Index Administration
2 Create an index of the Search and Classification type with a suitably configured taxonomy
3 Choose sapcrmpartnernews as the index ID Otherwise the path to the folder specified in the iView
is incorrect
If you choose another index ID you must also modify accordingly the folder properties in the
iView for one of the following
Folders path to content and path to root
Folders Path to Initially Displayed Folder and Path to Root Folder for Navigation
If you want to link two portal servers with a TREX server you must modify the index name and
iView properties on one of the portal servers
4 Assign folder sapcrmpartnerPartnernews as a data source
This moves all news with the (virtual) Top flag from this folder to the Newsflash iView
5 Create a ldquoquery-basedrdquo taxonomy with the name PartnerNewsFlash choosing Automatic
Classification before you save the taxonomy
NOTE
The outbound delivery includes only the iView above for virtually combining news If you
also want to use this functionality for other news channels (for example internal news) use
your own index and taxonomy for each channel
For more information see the SAP Library at
httphelpsapcomnw70 SAP NetWeaver 70 Library (including Enhancement Package 2) English SAP
NetWeaver Library SAP NetWeaver by Key Capability Information Integration by Key Capability Knowledge
Management Administration Guide System Administration System Configuration lsquoIndex Administrationrsquo iView
Creating Queries for the Taxonomies of sapcrmnews Repositories
1 Log on to the portal as content manager
2 Choose Content Management Classification Taxonomy Query Builder
3 Add a search query to check the istopnews property for the value Yes
4 Enter PartnerNewsFlash as the name for the taxonomy
Here too a property of the iView links to a taxonomy with this name So if you want to choose
another name you must modify the path to the content folder property of the iView
For more information see the SAP Library at
4 Post-Installation
43 Post-Installation Steps for the Business Packages for SAP CRM
2450 CUSTOMER 2012-12-17
httphelpsapcomnw70 SAP NetWeaver 70 Library (including Enhancement Package 2) English SAP
NetWeaver Library SAP NetWeaver by Key Capability Information Integration by Key Capability Knowledge
Management Administration Guide System Administration System Configuration Taxonomies and ClassificationEnd of ABAP+JavaJava |
Only valid for ABAP+JavaJava |
4324 Creating the Index for the sapcrm Repository
To make Info center documents available for indexing and searching create a new index with sapcrm
as a data source
Prerequisites
You have administrator rights for Knowledge Management on the server
Procedure
Choose a name of your own Search as a service and standard as a crawler parameter
For more information see the SAP Library at
httphelpsapcomnw70 SAP NetWeaver 70 Library (including Enhancement Package 2) English SAP
NetWeaver Library SAP NetWeaver by Key Capability Information Integration by Key Capability Knowledge
ManagementEnd of ABAP+JavaJava |
Only valid for ABAP+JavaJava |
4325 Configuring the Personal Search
Prerequisites
You have administrator rights for Knowledge Management on the server
Procedure
1 Create an index for the userhome repository
To make personal folder documents available for the search create a new index with root
userhome as the data source
2 Create a search option set for personal search
To assign the search index and a start folder to the search for personal documents create a Search
Option Set with the name CRMPersonalFolderSearch As an index enter the index for the
userhome repository created above and ~alias~userhomeuseridPersonal Documents as the
root folder for the search
For more information see the SAPLibrary at
4 Post-Installation
43 Post-Installation Steps for the Business Packages for SAP CRM
2012-12-17 CUSTOMER 2550
httphelpsapcomnw70 SAP NetWeaver 70 Library (including Enhancement Package 2) English SAP
NetWeaver Library SAP NetWeaver by Key Capability Information Integration by Key Capability Knowledge
Management End of ABAP+JavaJava |
Only valid for ABAP+JavaJava |
4326 Increasing the Number of JCo Connections
This section tells you how to increase the number of concurrent Java Connector (JCo) connections
By default the maximum number of concurrent JCo connections is 100 The value depends on the
number and behavior of the users in the portal For more information see SAP Note 316877
You can specify this value when you plan the installation of your SAP NetWeaver Enterprise Portal
Make sure that you first analyze the number and behavior of the users
Procedure
To increase the maximum number of concurrent JCo connections increase the value of the
environment variable CPIC_MAX_CONV
EXAMPLE
Initial default value CPIC_MAX_CONV=100
Increased value CPIC_MAX_CONV=1000
End of ABAP+JavaJava |
End of ABAP+JavaJava |
End of ABAP+JavaJava |
Only valid for ABAP+JavaJava | MapBox (MBX) |
44 Post-Installation Steps for MapBoxOnly valid for Java | MapBox (MBX) |
You have to perform the following post-installation steps for MapBox
You assign user groups for MapBox users [page 27]
You configure an RFC destination for TCPIP connections [page 28]
You perform initial configuration for MapBox [page 28]
You execute the Map Box [page 34]
You perform the smoke test [page 35]
If required you perform additional settings for MapBox
Block size settings [page 38]
Memory settings for the J2EE Engine [page 39]End of Java | MapBox (MBX) |
4 Post-Installation
44 Post-Installation Steps for MapBox
2650 CUSTOMER 2012-12-17
Only valid for Java | MapBox (MBX) |
441 Assigning User Groups for MapBox Users
To access the MapBox URL you need to provide the correct security rights for individual user groups
Procedure
1 Log on to the Visual Administrator
1 On your central instance host change to the following directory
Only valid for IBM i5OSUNIX |
usrsapltSAPSIDgtltinstance_numbergtj2eeadmin
End of IBM i5OSUNIX |
Only valid for Windows |
usrsapltSAPSIDgtltinstance_numbergtj2eeadmin
End of Windows |
2 Only valid for IBM i5OSUNIX |
Run goshEnd of IBM i5OSUNIX |
3 Only valid for Windows |
Double-click gobatEnd of Windows |
For more information about the Visual Administrator see the SAP Library at
httpshelpsapcomnw70 SAP NetWeaver Library SAP NetWeaver by Key Capability
Application Platform by Key Capability Java Technology Administration Manual J2EE Engine J2EE Engine
Administration Tools
2 Choose the server node from the left-hand window
3 Choose Services Security Provider
A list of deployed components is displayed
4 Choose MapBoxLauncher from this list (sapcom
comsapsyncpointmapboxlaunchermapboxlauncher)
A list of tabs appears on the right
5 Choose Security Roles from the list
A list of security roles appears
6 If no display and modify roles are displayed add these roles as follows
1 Choose Switch to Edit Mode from the top task bar to switch to edit mode
2 Add display and modify roles by choosing Add
7 For both the display and modify roles perform the following
1 Choose Switch to Edit Mode from the top task bar to switch to edit mode
2 Choose the Groups tab from the list on the far right
3 Choose Search
4 Post-Installation
44 Post-Installation Steps for MapBox
2012-12-17 CUSTOMER 2750
A list of user groups appears
4 Select the user groups that you want to enable for the two roles
Add to the left of the user group display is now highlighted
5 Choose Add to add the user group for the selected roleEnd of Java | MapBox (MBX) |
Only valid for Java | MapBox (MBX) |
442 Configuring an RFC Destination for MapBox
After the installation you have to create an RFC destination for MapBox
Procedure1 Log on to the CRM server
2 Enter transaction SM59
The Display and Maintain RFC Destinations screen appears
3 Choose Technical Settings Activation Type and create a new destination with the type TCPIP
4 Choose Registered Server Program and enter a unique value for program ID
For example you might enter MAPBOX723 for SAP client 723
5 Enter the details of the gateway host and gateway service in Gateway Options
1 Gateway host
Enter the name of your message server You can also enter the IP address of your message
server
2 Gateway service
Enter your SAP CRM system number prefixed with the string sapgw
For example if your system number is 02 enter sapgw02
6 If the CRM system is a Unicode-enabled system choose Unicode in Special Options
7 Save the destination
8 Choose MapBox Configuration Page Connecting settings from the URL and enter the same RFC
destination name in the relevant fieldEnd of Java | MapBox (MBX) |
Only valid for Java | MapBox (MBX) |
443 Performing Initial Configuration for MapBox
Procedure1 Open a browser window and enter the following URL
httplthostnamegtltport_numbergtmapboxlauncher
NOTE
If you are logged on to the machine where the J2EE server is running you can also enter the
following URL
4 Post-Installation
44 Post-Installation Steps for MapBox
2850 CUSTOMER 2012-12-17
httplocalhostltport_numbergtmapboxlauncher
2 Choose Configuration
3 Edit the values according to your SAP system and choose Save
The application asks you to enter a user name and password
4 Enter the user name and password used for the SAP J2EE Engine Visual Administrator
A description of the properties and example values for the properties is given below
Result
You see the default connection settings for MapBox as shown in the graphic below A description
of the properties and example values are provided in the adjacent table
Figure 1 MapBox Default Connection Settings
Property Purpose Example
SAP System SAP System name ABC FAZ
Message Server Message server host name xyzmain
Group SAP System group PUBLIC SPACE
System Number SAP Gateway system number prefixed with sapgw
sapgw02
Unicode Used for setting the Unicode option for the CRM server Default value is no
yes
Maximum allowed wait time interval between ISP Processing and Commit call
Time-out period between an ISP_MAPBOX call and an ISP_COMMIT call
300
4 Post-Installation
44 Post-Installation Steps for MapBox
2012-12-17 CUSTOMER 2950
Property Purpose Example
Client SAP logon client 723
User Name SAP logon user John
Password SAP logon password
Language SAP logon language EN
Destination The RFC destination with which you need to register the MapBox This is the value you enter in step 3 of Configuring an RFC Destination for MapBox [page 28]
MAPBOX723
Number of server instances The number of JCO server execution instances used by the MapBox to process server requests This number indicates the number of CRM inbound queues that are running simultaneously
10
The above MapBox connection configuration is meant for one SAP client running with the CRM
Server If you want to run the MapBox with two or more SAP clients of the same CRM system
you can use Add Client on the configuration page and edit the values accordingly However make
sure that the RFC destinations that these multiple clients listen to are always unique You can
leave the default values for the other settings
If you need more control over logging and tracing you can go to Log Settings on the configuration
page edit the values and choose Save The Log Settings screen with default values is shown in the
graphic below A description of the properties and example values for the properties is provided
in the adjacent table
Figure 2 Default Values for the Log Settings Screen
4 Post-Installation
44 Post-Installation Steps for MapBox
3050 CUSTOMER 2012-12-17
Property Purpose Example
Log and dumps directory This value specifies where the MapBox logs and dumps are stored If this field is left blank the ltuser_homegt folder is used as default value
Only valid for Windows |
Ctemp
End of Windows |
Only valid for IBM i5OSUNIX |
tmp
End of IBM i5OSUNIX |
Input payload dump This value specifies whether the input document coming to MapBox for processing is written or not
No
MapBox launcher trace level This value specifies with what granularity the MapBoxLauncher execution trace is generated6 specifies that a full MapBoxLauncher execution trace is generated whereas 0 specifies that the MapBoxLauncher execution trace is not generated Recommended value for production use is 0
0
MapBox launcher trace size The maximum file size of the generated trace When the size reaches the maximum value another file is created so that the old file can be deleted (for example due to lack of space) You can use alphabetic suffixes to specify the sizes The supported values are k or K ndash kilobytes g or G ndash gigabytes m or M ndash megabytes t or T ndash terabytes
50 k
CoordServer log level This value specifies the detail of the coordination server logging We recommended you not to change the default value of 1
2
SAP Java connector trace level This value specifies the detail of the SAP Java Connector logging The recommended value for production use is 0
2
MapBox log level The log level required for the MapBox to generate an internal log file A higher trace level means that a more detailed log file is created We recommend you to use 4D for production systems where D meansldquoOn Demandrdquo
2
4 Post-Installation
44 Post-Installation Steps for MapBox
2012-12-17 CUSTOMER 3150
Property Purpose Example
MapBox message dumps This value stands for copying the incoming and outgoing messages to the local system For better performance we recommend that you do not enable the message dump option
no
MapBox statistics This value specifies whether a file that lists the performance measurements of the MapBox is created We recommend you to use the value no for production use
no
MapBox logs location This value specifies where the MapBox logs are stored Possible locations are the MapBox repository on the CRM Server or the local file system The recommended value for production use is local_fs which indicates that the MapBox logs are stored on the local file system
local_fs
MapLog format The format in which the MapBox log file must be created The internal log file is by default created in a particular format However you can change this format to display the file in the SAP log file format The two values that are available are default and sap_log
default
The MapBox uses additional properties for performance such as caching and reuse of the MapBox
atoms These values are already set to optimum values and you cannot change them
The description of the properties is shown in the table below
Property Purpose Example
General Settings
max_elements_document This is the limit for the internal cache of the MapBox to hold the count of generated XML documentsWe recommend you not to change this value
100
cache_threshold This is the maximum threshold ndash in kilobytes ndash for a document to be cached in the internal cache of the MapBox
500
4 Post-Installation
44 Post-Installation Steps for MapBox
3250 CUSTOMER 2012-12-17
Property Purpose ExampleWe recommend you not to change this value
max_elements_cache This is the limit for the internal cache of the MapBox to hold the count of MapScenariosWe recommend you not to change this value
100
parallel_instances You use this value on systems where more than one CPU is used This setting allows you to specify the number of CPU instances that MapBox must use for processing so that the remainder can be used by non-MapBox related applications By default MapBox uses all the available CPUs for processing Values can range between 0 to N-1 where N is the number of available CPUs
4
thread_priority Specifies the number of threads MapBox uses during processing We recommend you to set an optimum value for this property so that MapBox does not utilize all available resources 0 = min 1 = low 2 = normal 3 = high 4 = max
3
reuse_count Sets the count for the number of times an atom-instance must be reused before it is destroyed A value of 0 means that the atom is not destroyed and can be used continuously Recommended value is 50 This means that the atom instance is reused 50 times before it is destroyed
100
Lock Server Settings
Operation_Mode The internal mode of operation for the coordination server We recommend not to change the default value of OUTPROC_CLIENT
OUTPROC_CLIENT
Registry_Port The Remote Method Invocation (RMI) port used for connecting to the coordination serverRMI is a Java mechanism for distributed computing
1099
4 Post-Installation
44 Post-Installation Steps for MapBox
2012-12-17 CUSTOMER 3350
Property Purpose ExampleDo not change this value unless port 1099 is unavailable In this case change it to 59856
HostName The name of the host where the coordination server resides
localhost
LocalName The name of the host where the MapBoxLauncher is executed We recommend you not to change the default value of localhost
Server
PollingInterval Polling interval in seconds to ask for shutdown of the coordination server We recommend you not to change the default value of 30
60
CleanUpInterval Cleanup interval in seconds to check for invalid locks created by the MapBoxLauncher We recommend you not to change the default value of 60
180
NOTE
A file name MapLogxsl is also available with the smoke test [page 35] This file is the stylesheet
that is used to format the display of the MapBox log file During the installation and execution
of the MapBox the MapBox log file is created in the following directory
Only valid for Windows |
ltUser_homegtTempMapBoxDumpsltyour_system_namegt500 where ltuser_homegt is the
home directory of the logged-on user ltyour system namegt is the CRM server you have
connected to and 500 is the client you have connected toEnd of Windows |
Only valid for IBM i5OSUNIX |
ltUser_homegtTempMapBoxDumpsltyour_system_namegt500 where ltuser_homegt is the
home directory of the logged-on user ltyour system namegt is the CRM server you have
connected to and 500 is the client you have connected toEnd of IBM i5OSUNIX |
RECOMMENDATION
We recommend that you copy MapLogxsl from the
ltsmoke_test_installation_directorygt to the directory mentioned aboveEnd of Java | MapBox (MBX) |
Only valid for Java | MapBox (MBX) |
444 Executing the MapBox
This section tells you how to execute the MapBox The procedure that you use to execute the Map Box
depends on its current support package (SP) level
4 Post-Installation
44 Post-Installation Steps for MapBox
3450 CUSTOMER 2012-12-17
Procedure
If the SP level of the MapBox is less than SP11 proceed as follows
1 Enter the following URL in your browser
httplthostnamegtltport_numbergtmapboxlaunchermanage
2 Choose Start MapBox
3 The application prompts you for a user name and password
Enter the user name and password for the J2EE Engine Visual Administrator
NOTE
MapBox typically takes 30 to 60 seconds to initialize depending on the number of SAP clients
To see the status of messages processed by MapBox choose Status
If the SP level of the MapBox is equal to or higher than SP11 the MapBox starts automatically
1 For the first MapBox installation you need to restart the Java application server (AS Java) after all
the configuration settings have been completed This automatically starts the MapBox (Autostart)
2 To check the status go to the URL httplthostnamegtltport_numbergtmapboxlauncher
manage
NOTE
MapBox Autostart needs approximately 60 seconds to allow other services of As Java to start
To see the status of messages processed by MapBox choose Status
Result
When the MapBox is running the status is shown as Ready to processEnd of Java | MapBox (MBX) |
Only valid for Java | MapBox (MBX) |
445 Performing the Smoke Test for MapBox
The smoke test checks whether the MapBox installation is error-free
Only valid for Windows |
To execute the smoke test you have to run two batch filesEnd of Windows |
Only valid for IBM i5OSUNIX |
To execute the smoke test you have to run two shell scriptsEnd of IBM i5OSUNIX |
Prerequisites
Before you start the procedure you need to copy the smoketestjar file to a new
ltsmoke_test_installation_directorygt of your choice which has two further subdirectories
firstrun and secondrun
4 Post-Installation
44 Post-Installation Steps for MapBox
2012-12-17 CUSTOMER 3550
You can find the smoketestjar file here
Only valid for IBM i5OSUNIX |
usrsapltinstance_IDgtJCltinstance_numbergtj2eeclusterserver0binext
comsapsyncpointmapboxEnd of IBM i5OSUNIX |
Only valid for Windows |
usrsapltinstance_IDgtJCltinstance_numbergtj2eeclusterserver0binext
comsapsyncpointmapboxEnd of Windows |
NOTE
Each subdirectory of ltsmoke_test_installation_directorygt ndash that is firstrun and
secondrun ndash contains the following files
MBSMOKETEST_IN_000xml
MBSMOKETEST_IN_001xml
MBSMOKETEST_IN_002xml
MBSMOKETEST_IN_003xml
After executing the smoke test you must verify whether the contents of the files generated
by your test are similar to the contents of the above files That is the XML documents that
are created in the smoke test must match the documents located in the
ltsmoke_test_installation_directorygt mentioned above
To execute the smoke test you need to install the SAP Java Connector (SAP JCo version 2012)
You have to download SAP JCo 2012 from SAP Service Marketplace at https
servicesapcomswdc before executing the smoke test
CAUTION
Make sure that you install the SAP Java Connector correctly
The file mapcaseprop is available in the ltsmoke_test_installation_directorygt This file
contains the connection parameters to be tested You can modify the contents of this file
CAUTION
You must replace the connection parameters in this file with the connection parameters that
you entered in the MapBoxMetaxml file
Procedure
1 Run the first stage of the smoke test
1 Only valid for Windows |
Execute the file smoketest_1bat from the ltsmoke_test_installation_directorygtEnd of Windows |
Only valid for Windows |
This prompts you to enter the followingEnd of Windows |
4 Post-Installation
44 Post-Installation Steps for MapBox
3650 CUSTOMER 2012-12-17
Only valid for Windows |
1 ltDRIVEgtusrsapltinstance_IDgtJCltinstance_numbergtj2ee
2 ltsmoke_test_installation_directorygt
3 ltpath_to_sapjcojargt
End of Windows |
Only valid for IBM i5OSUNIX |
Execute the file smoketest_1sh from the ltsmoke_test_installation_directorygtEnd of IBM i5OSUNIX |
Only valid for IBM i5OSUNIX |
1 usrsapltinstance_IDgtJCltinstance_numbergtj2ee
2 ltsmoke_test_installation_directorygt
3 ltpath_to_sapjcojargt
End of IBM i5OSUNIX |
2 Enter the appropriate paths
The smoke test creates the following files
MBSMOKETEST_IN_000xml
MBSMOKETEST_IN_001xml
MBSMOKETEST_IN_002xml
MBSMOKETEST_IN_003xml
3 Only valid for Windows |
Check the contents of the generated files against the contents of the files located in
ltsmoke_test_installation_directorygtSMOKETESTfirstrunEnd of Windows |
Only valid for IBM i5OSUNIX |
Check the contents of the four files against the contents of the files located in
ltsmoke_test_installation_directorygtSMOKETESTfirstrunEnd of IBM i5OSUNIX |
2 Run the second stage of the smoke test
1 Only valid for Windows |
Execute the file smoketest_2bat which is located in the
ltsmoke_test_installation_directorygtEnd of Windows |
Only valid for IBM i5OSUNIX |
Execute the file smoketest_2sh which is located in the
ltsmoke_test_installation_directorygtEnd of IBM i5OSUNIX |
This prompts you to enter the following
Only valid for Windows |
1 ltDRIVEgtusrsapltinstance_IDgtJCltinstance_numbergtj2ee
2 ltsmoke_test_installation_directorygt
End of Windows |
4 Post-Installation
44 Post-Installation Steps for MapBox
2012-12-17 CUSTOMER 3750
Only valid for IBM i5OSUNIX |
1 usrsapltinstance_IDgtJCltinstance_numbergtj2ee
2 ltsmoke_test_installation_directorygt
End of IBM i5OSUNIX |
2 Enter the appropriate paths
The smoke test creates the following files
MBSMOKETEST_IN_000xml
MBSMOKETEST_IN_001xml
MBSMOKETEST_IN_002xml
MBSMOKETEST_IN_003xml
CAUTION
The files generated in the second stage of testing overwrite the contents of the files
generated in the first stage
3 Only valid for Windows |
Check the contents of the generated files against the contents of the files located in
ltsmoke_test_installation_directorygtSMOKETESTsecondrunEnd of Windows |
Only valid for IBM i5OSUNIX |
Check the contents of the four files against the contents of the files located in
ltsmoke_test_installation_directorygtSMOKETESTsecondrunEnd of IBM i5OSUNIX |
Result
If the smoke test has identified errors in the installation process the four XML files are not created in
either of the stages Instead an error log file is created
RECOMMENDATION
In the event of errors we recommend that you send the error log file to your administrator
End of Java | MapBox (MBX) |
Only valid for Java | MapBox (MBX) |
446 Ensuring Optimal Block Size settings
The block size of an object determines the number of messages that are processed at the same time by
the MapBox as a set You need to make sure that the block sizes are optimal to reduce load on the
MapBox XML processor
Procedure
1 Use transaction R3AC3 to set the block size of object GWA_COUNTRY to 10 and save the setting
2 Use transaction R3AC1 to set the block size of object BUPA_MAIN to 10 and save the settingEnd of Java | MapBox (MBX) |
4 Post-Installation
44 Post-Installation Steps for MapBox
3850 CUSTOMER 2012-12-17
Only valid for ABAP+JavaJava | MapBox (MBX) |
447 Adapting Memory Settings for the J2EE Engine
You need to adapt the memory settings for the J2EE Engine because MapBox relies heavily on memory-
intensive XML-processing such as schema-validation parsing transformation and so on
RECOMMENDATION
For rapid message processing by MapBox we recommend you to use 1024 MB of heap memory
for MapBox alone With a heap size of 512 MB MapBox can still process messages but with a slightly
higher processing time for each message
The MapBox memory requirements are directly proportional to the size of the input documents
that MapBox has to process The average size of such documents is in the range of 150 to 200 KB
For messages of this size it is sufficient to have a heap memory of 512 MB If the input documents
are in the range of 1 to 2 MB we recommend that you give MapBox a heap memory of 1024 MB
Procedure
To set the recommended memory settings for the MapBox you start the config tool of the J2EE Engine
Only valid for Windows |
Start the config tool by executing ltDrivegtusrsapltSAPSIDgtltinstance_numbergtj2ee
configtoolbatEnd of Windows |
Only valid for IBM i5OSUNIX |
Start the config tool by executing usrsapltSAPSIDgtltinstance_numbergtj2eeconfigtoolshEnd of IBM i5OSUNIX |
End of ABAP+JavaJava | MapBox (MBX) |
End of ABAP+JavaJava | MapBox (MBX) |
Only valid for ABAPABAP+Java |
45 Activating the CRM Web Client
The CRM Web Client is part of the ICF Services that is automatically installed as part of SAP NetWeaver
Application Server
Procedure
To activate the CRM Web Client after the installation see the SAP Library at
httphelpsapcomnw70 SAP NetWeaver 70 Library (including Enhancement Package 2) English SAP
NetWeaver Library SAP NetWeaver by Key Capability Application Platform by Key Capability Platform-Wide
Services Connectivity Components of SAP Communication Technology Communication Between ABAP and Non-
4 Post-Installation
45 Activating the CRM Web Client
2012-12-17 CUSTOMER 3950
ABAP Technology Internet Communication Framework Development Server-Side Development Creating and
Configuring an ICF Service Activating and Deactivating the ICF ServicesEnd of ABAPABAP+Java |
Only valid for ABAP |
46 Installing and Configuring CRM Application Server Loyalty Add-On Component
This section provides information about how to install and configure CRM Application Server Loyalty
as an add-on component to CRM Application Server ABAP
Prerequisites
You have already deployed the following software components
SAP NetWeaver Application Server ABAP (AS ABAP)
CRM Application Server ABAP
Procedure
Installing CRM Application Server Loyalty
Install CRM Application Server Loyalty on the same host where CRM Application Server ABAP is
deployed as described in SAP Note 1162144
Configuring CRM Application Server Loyalty
After you have installed CRM Application Server Loyalty you must complete the following
configuration steps
1 Call transaction nspro
2 Choose SAP Customising Implementation Guide Customer Relationship Management Marketing Loyalty
Management in BBPCRM Basic Settings Define Basic Settings
3 Enter value 1 for the INSTALL_TYPE parameter
NOTE
You do not have to enter destination name for the LOYALTY_SYSTEM parameterEnd of ABAP |
47 Starting XCM
This section describes how to start XCM
Procedure
1 You access the XCM tool at
httplthostgtltportgtltweb app namegtadminxcminitdo
4 Post-Installation
46 Installing and Configuring CRM Application Server Loyalty Add-On Component
4050 CUSTOMER 2012-12-17
NOTE
You can also start XCM in accessibility mode (according to Section 508 Rehabilitation Act)
at the following URL
httplthostgtltportgtltweb app namegtadminxcminitdosap-accessibility=x
2 Provide a user and password If you are logging on for the first time use the Administrator user
and the password you defined during the installation of the SAP system
RECOMMENDATION
We recommend you create new users with lesser rights than the Administrator for the
administration of Web applications
For more information see the SAP CRM Security Guide section E-Commerce
3 When the application opens a closed control tree is displayed on the left of the screen A screen
containing help information is displayed to the right
You can use edit (change settings) or display (see settings) mode in XCM You use the button in
the top right hand corner of the screen to change between modes When you switch to edit mode
a DB lock is set meaning that only this user can edit the settings at one time The lock is released
once the user switches back to display mode or after session timeout (default timeout is 30mins)
48 Accessing Configuration Documentation in SAP Solution Manager
To access configuration documentation in SAP Solution Manager you have to connect your newly
installed SAP system to SAP Solution Manager
NOTE
For SAP NetWeaver you can also find configuration documentation in the Technology Consultants
Guide at
httphelpsapcomnw70 SAP NetWeaver 70 Library (including Enhancement Package 2) English
SAP NetWeaver Library Technology Consultants Guide
Procedure
Create a configuration project with the related configuration guide as described in the following
documentation
httphelpsapcom SAP Solutions SAP Solution Manager Documentation for SAP Solution Manager
ltcurrent releasegt SAP Solution Manager Implementing and Upgrading SAP Solutions Projects
Configuration
More Information
httpservicesapcomsolutionmanager Media Library How-To Documents How to Create a
Configuration Guide using SAP Solution Manager
4 Post-Installation
48 Accessing Configuration Documentation in SAP Solution Manager
2012-12-17 CUSTOMER 4150
This page is left blank for documents that are printed on both sides
5 Additional Information
Only valid for ABAP+JavaJava |
51 Installing the Business Packages for SAP CRM Using JSPM (Optional)
You can also install the Business Packages for SAP CRM using the Java Support Package Manager (JSPM)
Prerequisites
Only valid for IBM i5OSUNIX |
You have checked hardware and software requirements [external document]End of IBM i5OSUNIX |
Only valid for Windows |
You have checked hardware and software requirements [external document]End of Windows |
You have ckecked the Prerequisites for the Business Packages for SAP CRM [page 7]
Procedure
1 Download version 701 of the files sapcom_BPCRMAPP sapcom_BPCRMFND sapcom_CRMAPP and
sapcom_CRMFND as follows
1 Go to httpservicesapcomswdc Download Support Packages and Patches Search for
Support Packages and Patches
2 Enter the following search terms
BP CRM Application Coding 701
BP CRM Application Content 701
BP CRM Foundation Coding 701
BP CRM Foundation Content 701
2 Add the deployment variable comsapcmshare as described in SAP Note 965948
For more information about how to use the Software Deployment Manager (SDM) see the
documentation Software Deployment Manager which is available at
httphelpsapcomnw70 SAP NetWeaver 70 Library (including Enhancement Package 2) English
SAP NetWeaver Library SAP NetWeaver Developerrsquos Guide Fundamentals Using Java Core Development
Tasks Deployment Putting It All Together Software Deployment Manager
3 Install the Business Packages for SAP CRM with JSPM as described in Installing Additional Usage Types
or Software Units in an Existing SAP System [external document]
5 Additional Information
51 Installing the Business Packages for SAP CRM Using JSPM (Optional)
2012-12-17 CUSTOMER 4350
4 Perform the required Post-Installation Steps for the Business Packages for SAP CRM [page 20]End of ABAP+JavaJava |
Only valid for ABAP+JavaJava |
52 Troubleshooting for the Business Package for SAP CRMOnly valid for ABAP+JavaJava |
The following sections describe the steps that you have to perform if you have problems after the
installation
Activating BI Templates Manually [page 44]
Dragging the Central Search onto the Portal Desktop [page 45]End of ABAP+JavaJava |
Only valid for ABAP+JavaJava |
521 Activating BI Templates Manually
If you have installed the Business Package you might see error messages when loading the BI templates
This procedure describes how you can activate the templates afterwards
Procedure
1 Note the technical name of all templates in your portal interface that are not working
2 Log on to your BI system
3 On the SAP Easy Access screen choose Modeling Administrator Workbench Modeling (transaction
RSA1 or RSOR)
4 Choose Business Content Object Types Web Template Name Select Objects
A new window containing a list of BW objects and templates opens
5 Find your missing templates for example 0TPL_0CRM_Cnn_Qnnn_Vnnn_M and select the entries
6 Choose Transfer Selection
The template now appears on the right-hand side of the screen The Transfer checkbox has been
selected and cannot be changed Nevertheless we recommend that you repeat the following
procedure so that your templates can be displayed
7 Select the template
8 Choose Transfer Transfer
Result
You have successfully activated your missing templates and no error messages appear in the portalEnd of ABAP+JavaJava |
5 Additional Information
52 Troubleshooting for the Business Package for SAP CRM
4450 CUSTOMER 2012-12-17
Only valid for ABAP+JavaJava |
522 Dragging the Central Search onto the Portal Desktop
Procedure
The Business Package for SAP CRM 70 including SAP enhancement package 1 contains an iView for
the central search in CRM This iView is in the package on the page Today in the workset Home of the
CRM User You can drag this iView onto the portal desktop under the tool areaEnd of ABAP+JavaJava |
End of ABAP+JavaJava |
5 Additional Information
52 Troubleshooting for the Business Package for SAP CRM
2012-12-17 CUSTOMER 4550
Typographic Conventions
Example Description
ltExamplegt Angle brackets indicate that you replace these words or characters with appropriate entries to make entries in the system for example ldquoEnter your ltUser Namegtrdquo
ExampleExample
Arrows separating the parts of a navigation path for example menu options
Example Emphasized words or expressions
Example Words or characters that you enter in the system exactly as they appear in the documentation
httpwwwsapcom Textual cross-references to an internet address
example Quicklinks added to the internet address of a homepage to enable quick access to specific content on the Web
123456 Hyperlink to an SAP Note for example SAP Note 123456
Example Words or characters quoted from the screen These include field labels screen titles pushbutton labels menu names and menu options
Cross-references to other documentation or published works
Example Output on the screen following a user action for example messages Source code or syntax quoted directly from a program File and directory names and their paths names of variables and parameters and
names of installation upgrade and database tools
EXAMPLE Technical names of system objects These include report names program names transaction codes database table names and key concepts of a programming language when they are surrounded by body text for example SELECT and INCLUDE
EXAMPLE Keys on the keyboard
4650 CUSTOMER 2012-12-17
SAP AGDietmar-Hopp-Allee 16
69190 WalldorfGermany
T +4918 0534 34 34F +4918 0534 34 20
wwwsapcom
copy Copyright 2012 SAP AG All rights reserved
No part of this publication may be reproduced or transmitted in any form or for any purpose without the express permission of SAP AG The information contained herein may be changed without prior noticeSome software products marketed by SAP AG and its distributors contain proprietary software components of other software vendors
Microsoft Windows Excel Outlook PowerPoint Silverlight and Visual Studio are registered trademarks of Microsoft CorporationIBM DB2 DB2 Universal Database System i System i5 System p System p5 System x System z System z10 z10 zVM zOS OS390 zEnterprise PowerVM Power Architecture Power Systems POWER7 POWER6+ POWER6 POWER PowerHA pureScale PowerPC BladeCenter System Storage Storwize XIV GPFS HACMP RETAIN DB2 Connect RACF Redbooks OS2 AIX Intelligent Miner WebSphere Tivoli Informix and Smarter Planet are trademarks or registered trademarks of IBM CorporationLinux is the registered trademark of Linus Torvalds in the United States and other countriesAdobe the Adobe logo Acrobat PostScript and Reader are trademarks or registered trademarks of Adobe Systems Incorporated in the United States and other countriesOracle and Java are registered trademarks of Oracle and its affiliatesUNIX XOpen OSF1 and Motif are registered trademarks of the Open GroupCitrix ICA Program Neighborhood MetaFrame WinFrame VideoFrame and MultiWin are trademarks or registered trademarks of Citrix Systems IncHTML XML XHTML and W3C are trademarks or registered trademarks of W3Creg World Wide Web Consortium Massachusetts Institute of TechnologyApple App Store iBooks iPad iPhone iPhoto iPod iTunes Multi-Touch Objective-C Retina Safari Siri and Xcode are trademarks or registered trademarks of Apple IncIOS is a registered trademark of Cisco Systems IncRIM BlackBerry BBM BlackBerry Curve BlackBerry Bold BlackBerry Pearl BlackBerry Torch BlackBerry Storm BlackBerry Storm2 BlackBerry PlayBook and BlackBerry App World are trademarks or registered trademarks of Research in Motion LimitedGoogle App Engine Google Apps Google Checkout Google Data API Google Maps Google Mobile Ads Google Mobile Updater Google Mobile Google Store Google Sync Google Updater Google Voice Google Mail Gmail YouTube Dalvik and Android are trademarks or registered trademarks of Google IncINTERMEC is a registered trademark of Intermec Technologies CorporationWi-Fi is a registered trademark of Wi-Fi AllianceBluetooth is a registered trademark of Bluetooth SIG IncMotorola is a registered trademark of Motorola Trademark Holdings LLCComputop is a registered trademark of Computop Wirtschaftsinformatik GmbHSAP R3 SAP NetWeaver Duet PartnerEdge ByDesign SAP BusinessObjects Explorer StreamWork SAP HANA and other SAP products and services mentioned herein as well as their respective logos are trademarks or registered trademarks of SAP AG in Germany and other countriesBusiness Objects and the Business Objects logo BusinessObjects Crystal Reports Crystal Decisions Web Intelligence Xcelsius and other Business Objects products and services mentioned herein as well as their respective logos are trademarks or registered trademarks of Business Objects Software Ltd Business Objects is an SAP companySybase and Adaptive Server iAnywhere Sybase 365 SQL Anywhere and other Sybase products and services mentioned herein as well as their respective logos are trademarks or registered trademarks of Sybase Inc Sybase is an SAP company
2012-12-17 CUSTOMER 4750
Crossgate mgic EDDY B2B 360deg and B2B 360deg Services are registered trademarks of Crossgate AG in Germany and other countries Crossgate is an SAP companyAll other product and service names mentioned are the trademarks of their respective companies Data contained in this document serves informational purposes only National product specifications may varyThese materials are subject to change without notice These materials are provided by SAP AG and its affiliated companies (ldquoSAP Grouprdquo) for informational purposes only without representation or warranty of any kind and SAP Group shall not be liable for errors or omissions with respect to the materials The only warranties for SAP Group products and services are those that are set forth in the express warranty statements accompanying such products and services if any Nothing herein should be construed as constituting an additional warranty
DisclaimerSome components of this product are based on Javatrade Any code change in these components may cause unpredictable and severe malfunctions and is therefore expressly prohibited as is any decompilation of these componentsAny Javatrade Source Code delivered with this product is only to be used by SAPrsquos Support Services and may not be modified or altered in any way
Documentation in the SAP Service MarketplaceYou can find this document at the following address httpservicesapcominstguides
4850 CUSTOMER 2012-12-17
SAP AGDietmar-Hopp-Allee 1669190 WalldorfGermanyT +4918 0534 34 34F +4918 0534 34 20wwwsapcom
copy Copyright 2012 SAP AG All rights reservedNo part of this publication may be reproduced or transmitted in any form or for any purpose without the express permission of SAP AG The information contained herein may be changed without prior notice
- SAP Enhancement Package 1 for SAP CRM 70
-
- Table of Contents
- 1 Introduction
- 2 Planning and Preparation
-
- 21 Prerequisites for the Business Packages for SAP CRM
-
- 3 Installation
- 4 Post-Installation
-
- 41 Checking the Availability of Back-End Systems for SAP CRM Java Components
-
- 411 Creating a Back-End User
- 412 Checking the Connection to the ABAP System
- 413 Configuring and Checking the TREX Service
- 414 Checking the Selling via eBay Processes
-
- 42 Post-Installation Steps for Workforce Deployment Application and Calculation Services
-
- 421 Implementing WFMCORE 200 Using Transaction SAINT
- 422 Configuring the Extended Configuration Management (XCM) for WFD Application and Calculation Services
- 423 Checking Workforce Deployment Calculation Services
- 424 Checking the Installation of WFD Application Services and WFD Calculation Services
-
- 43 Post-Installation Steps for the Business Packages for SAP CRM
-
- 431 Creating Roles for the SAP CRM Business Packages
- 432 Installation of the Info Center for the SAP CRM Business Package
-
- 4321 Importing the SAP CRM Info Center Configurations and Directory Structure
- 4322 Activating Manual Ordering of Folders for the sapcrm Repository
- 4323 Creating Indexes and Taxonomies for the sapcrmnews Repository
- 4324 Creating the Index for the sapcrm Repository
- 4325 Configuring the Personal Search
- 4326 Increasing the Number of JCo Connections
-
- 44 Post-Installation Steps for MapBox
-
- 441 Assigning User Groups for MapBox Users
- 442 Configuring an RFC Destination for MapBox
- 443 Performing Initial Configuration for MapBox
- 444 Executing the MapBox
- 445 Performing the Smoke Test for MapBox
- 446 Ensuring Optimal Block Size settings
- 447 Adapting Memory Settings for the J2EE Engine
-
- 45 Activating the CRM Web Client
- 46 Installing and Configuring CRM Application Server Loyalty Add-On Component
- 47 Starting XCM
- 48 Accessing Configuration Documentation in SAP Solution Manager
-
- 5 Additional Information
-
- 51 Installing the Business Packages for SAP CRM Using JSPM (Optional)
- 52 Troubleshooting for the Business Package for SAP CRM
-
- 521 Activating BI Templates Manually
- 522 Dragging the Central Search onto the Portal Desktop
-
- Copyright and trademarks
-
3 Installation
Proceed as described in the documentation Installation Guide ndash SAP Systems Based on the Application Server
ltABAP | Javagt of SAP NetWeaver on ltOperating Systemgt ltDatabasegt at httpservicesapcom
sltoolset Software Logistics Toolset 10 Software Provisioning Manager 10
3 Installation
2012-12-17 CUSTOMER 950
This page is left blank for documents that are printed on both sides
4 Post-Installation
Only valid for Java |
41 Checking the Availability of Back-End Systems for SAP CRM Java Components
Only valid for ABAP+JavaJava |
After the installation you have to check the availability of back-end systems as follows
1 To test the connection to the ABAP back-end system you create a back-end user [page 11]
2 Depending on various business processes you check the following back-end systems
ABAP system [page 12]
TREX Server [page 14]End of ABAP+JavaJava |
Only valid for ABAP+JavaJava |
411 Creating a Back-End User
You need service users to provide the anonymous remote function call (RFC) stateless connection
between your back-end system and your Web-based applications
Prerequisites
You have installed and configured CRM E-Commerce Web-based applications
Procedure
You create a service user in your back-end SAP CRM system and assign it to the Web-based application
as follows
1 In your ABAP back-end system on the SAP Easy Access screen choose Tools Administration User
Maintenance Users (transaction SU01)
2 Create a user of the type Service User and enter all required data
3 Assign the appropriate service user authorization role to the user on the Roles tab For a list of
service user roles for the various Web-based applications see the following table
Application Authorization Role for Service User
E-Selling B2B SAP_CRM_ECO_ISA_TU_B2B
E-Selling B2C SAP_CRM_ECO_ISA_TU_B2C
E-Selling EASYB2B SAP_CRM_ECO_ISA_TU_EASYB2B
4 Post-Installation
41 Checking the Availability of Back-End Systems for SAP CRM Java Components
2012-12-17 CUSTOMER 1150
Application Authorization Role for Service User
E-Selling CVIEWS SAP_CRM_ECO_ISA_TU_CVIEWS
E-Selling SHOPADMIN SAP_CRM_ECO_ISA_TU_SHOPADM
E-Selling USERADMIN SAP_CRM_ECO_ISA_TU_USERADM
E-Selling Auctioning via Web shop (AVW) SAP_CRM_ECO_TU_AVW
E-Selling via eBay (SVE) SAP_CRM_ECO_TU_SVE
E-Service Internet Customer Self Service (ICSS) SAP_CRM_ECO_ISE_TU_B2B (Authorizations for ICSS B2B)SAP_CRM_ECO_ISE_TU_B2C (Authorizations for ICSS B2C)
E-Service Complaints and Returns SAP_CRM_ECO_ISE_TU_CR
E-Service Remanufacturer inspection SAP_CRM_ECO_ISE_TU_INSP
Channel Management (CHM)Shared Catalog
SAP_CRM_ECO_CHM_TU_SHRDCAT
Channel Management (CHM) BOB SAP_CRM_ECO_ISA_TU_BOB
Channel Management (CHM) HOM SAP_CRM_ECO_ISA_TU_HOM
Channel Management (CHM) CSR SAP_CRM_ECO_ISA_TU_CSR
4 Save your entries
More Information
For more information about service users see the documentation ltyour projectgt Basic Settings for CRM
E-Commerce General Settings for CRM E-Commerce User Management in the SAP Solution Manager [page
41]End of ABAP+JavaJava |
Only valid for ABAP+JavaJava |
412 Checking the Connection to the ABAP System
This section tells you how to check the connection to the ABAP system
Prerequisites
To be able to test the connection to the ABAP system you need to create a user [page 11] on this system
Procedure
1 Start the Visual Administrator
1 On your central instance host change to the admin directory as follows
Only valid for IBM i5OSUNIX |
usrsapltSAPSIDgtltinstance_namegtj2eeadmin
End of IBM i5OSUNIX |
Only valid for Windows |
usrsapltSAPSIDgtltinstance_namegtj2eeadmin
End of Windows |
4 Post-Installation
41 Checking the Availability of Back-End Systems for SAP CRM Java Components
1250 CUSTOMER 2012-12-17
2 Only valid for IBM i5OSUNIX |
Run goshEnd of IBM i5OSUNIX |
3 Only valid for Windows |
Double-click gobatEnd of Windows |
For more information about the Visual Administrator see the SAP Library at
httphelpsapcomnw70 SAP NetWeaver 70 Library (including Enhancement Package 2) English
SAP NetWeaver Library SAP NetWeaver by Key Capability Application Platform by Key Capability Java
Technology Administration Manual J2EE Engine J2EE Engine Administration Tools
2 Only valid for IBM DB2 for i5OSIBM DB2 for i5OS (LinuxWindows)IBM DB2 for Linux and UNIX and WindowsIBM DB2 for zOSMaxDBMS SQL ServerOracle |
Log on to the Visual Administrator with administrator rights
NOTE
If you chose configuration Use ABAP in the User Management Engine (UME) and you selected
SAP CRM ABAP as your ABAP back end with UME during the installation a successful logon
to the Visual Administrator means that the SAP CRM ABAP back-end system is available
You have now finished this procedure
Otherwise continue with the next step
End of IBM DB2 for i5OSIBM DB2 for i5OS (LinuxWindows)IBM DB2 for Linux and UNIX and WindowsIBM DB2 for zOSMaxDBMS SQL ServerOracle |
3 Start an application that uses the SAP CRM ABAP system if it is stopped
1 In the left pane of the Visual Administrator open clusterserverservices and choose
Deploy service
2 Select the application
Application Context Root
crm~b2b b2b
crm~icss_b2b icss_b2b
crm~sve sve
3 To start the selected application choose Start
4 Open the user interface for the Extended Configuration Management (XCM) Administrator as
follows
1 Open a Web browser and enter the following URL
httpltJ2EE_hostgtltJ2EE_portgtltcontext rootgtadminxcminitdo
where ltcontext rootgt is the context root of the application started in the previous step
To find information about the components that can be configured choose help
2 Choose Start Component
You can find information about configuration of components on the right hand side of the
screen
4 Post-Installation
41 Checking the Availability of Back-End Systems for SAP CRM Java Components
2012-12-17 CUSTOMER 1350
3 To create a jco Component follow the instructions provided in the Example of component
configuration field
If the ldquorun testrdquo operation described in the component configuration section of a jco setting
was successful the ABAP system can be reached from the Java system
More InformationFor more information about using Extended Configuration Management (XCM) to configure your
application see Using Extended Configuration Management (XCM) [page 40] and the documentation in the
SAP Solution Manager [page 41]End of ABAP+JavaJava |
Only valid for Java |
413 Configuring and Checking the TREX Service
You need to configure and check the TREX service
Procedure
Configuring the TREX Service
1 Start the Visual Administrator
2 Connect to the AS Java
3 Choose Server node Open Services Node Select TREX Service
4 Maintain the values for nameserveraddress and nameserverbackupserverlist
For more information see Specifying the Address of the TREX Name Server in Installation Guide ndash SAP NetWeaver
70 Standalone Engine Search and Classification (TREX) Single Host at
httpservicesapcominstguidesNW70 Installation Installation - Standalone Engines SAP
NetWeaver Search and Classification TREX Installing TREX 70 Single Host
Checking the TREX Service
1 Start the application sapcomcrm~b2b as described in step 3 of Checking the Connection to the ABAP
System [page 12]
2 Open a Web browser and enter the following URL
httpltJ2EE_hostgtltJ2EE_portgtb2badmintrextrex_640jsp
ResultIf the connection was established successfully the message TREX Server is available appearsEnd of Java |
Only valid for Java |
414 Checking the Selling via eBay Processes
To use the selling via eBay (SVE) processes the Java system requires an http connection to
4 Post-Installation
41 Checking the Availability of Back-End Systems for SAP CRM Java Components
1450 CUSTOMER 2012-12-17
httpwwwebaycom
To test the connection you need to create an XCM component ebayCommunicator for the sapcom
crm~sve application
Procedure
To create the Extended Configuration Management (XCM) component ebayCommunicator using
application sapcomcrm~sve proceed as described in Checking the ABAP System [page 12]
NOTE
Make sure that you replace jco component with ebayCommunicator component when following
the procedure in Checking the ABAP System [page 12]
More Information
For more information about using Extended Configuration Management (XCM) to configure your
application see Using Extended Configuration Management (XCM) [page 40] and the documentation in the
SAP Solution Manager [page 41]End of Java |
End of Java |
Only valid for Java |
42 Post-Installation Steps for Workforce Deployment Application and Calculation Services
Only valid for ABAP+JavaJava | CRM Java Components (JCRM)Extended E-Selling Components (XECO) |
You have to perform the following steps to check and configure Workforce Deployment Application
and Calculation Services (WFD ASCS)
You implement WFMCORE 200 using transaction SAINT [page 15]
You configure the XCM administration tool for WFD ASCS [page 16]
You check WFD calculation services [page 18]
You check the installation of WFD ASCS [page 19]End of ABAP+JavaJava | CRM Java Components (JCRM)Extended E-Selling Components (XECO) |
Only valid for ABAP+JavaJava |
421 Implementing WFMCORE 200 Using Transaction SAINT
Before you can check and configure the Java part of Workforce Deployment Application and
Calculation Services (WFD ASCS) you need to implement WFMCORE 200
4 Post-Installation
42 Post-Installation Steps for Workforce Deployment Application and Calculation Services
2012-12-17 CUSTOMER 1550
Only valid for CRM Java Components (JCRM) |
The WFMCORE 200 component contains all necessary ABAP classes and libraries required for the
various Workforce Deployment scenarios and processes including Service Resource Planning in CRM and
Retail Multisite Workforce DeploymentEnd of CRM Java Components (JCRM) |
Procedure
1 Log on to your ABAP system
2 Install WFMCORE 200 using transaction SAINT as described in SAP Note 830595
3 Only valid for CRM Java Components (JCRM) |
If you are implementing the Service Resource Planning in CRM process variant run the report
WFDBP_UPDATE_BLUEPRINT to update tables that define the settings required to properly
display and maintain Service Arrangements in the People-Centric User InterfaceEnd of CRM Java Components (JCRM) |
End of ABAP+JavaJava |
Only valid for ABAP+JavaJava |
422 Configuring the Extended Configuration Management (XCM) for WFD Application and Calculation Services
Workforce Deployment Application Services (WFD AS) sends calculation and forecasting requests to
a CRM ABAP back-end system WFD Calculation Services (WFD CS) picks up the requests from this
CRM ABAP back-end system You define the connection to the CRM ABAP back-end system through
Extended Configuration Management (XCM) Admin
For more information about using Extended Configuration Management (XCM) to configure your
application see Using Extended Configuration Management (XCM) [page 40] and the documentation in the
SAP Solution Manager [page 41]
The csjcoxxxxx XCM parameters define the JCO connection to the SAP CRM ABAP system where
the WFD CS maintains forecast and calculation requests You can connect to the CRM ABAP system
using one of the following
A message or dispatching server by specifying csjcomshost csjcogroup and csjcor3name
An application server by specifying csjcoahost and csjcosysnr
In either case you must also specify csjcoclient csjcouser and csjcopassword
XCM Parameter Name Example Value Description
csjcoahost us0091wdfsapcorp Application server host name of the SAP CRM Calculation Service
csjcosysnr 91 System number of the R3 Calculation Service (for example 09)
csjcomshost us0091wdfsapcorp Message server host name of the SAP CRM Calculation Service
csjcogroup PUBLIC Group of the SAP CRM Calculation Service (case sensitive for example PUBLIC)
4 Post-Installation
42 Post-Installation Steps for Workforce Deployment Application and Calculation Services
1650 CUSTOMER 2012-12-17
XCM Parameter Name Example Value Description
csjcor3name Q5C System ID of the SAP CRM Calculation Service (for example IDES)
csjcoclient 505 Client of the SAP CRM Calculation Service
csjcouser Back end user for JCO connection to the SAP CRM Calculation Service
csjcopassword Password for the back-end user
You need to configure these csjcoxxxxx XCM parameter values in each instance of WFD AS and
WFD CS Make sure that the values are the same in all instances
Configuring the XCM for WFD Calculation Services
This business scenario is relevant for defining the WFD CS You must perform this XCM configuration
for the WFD CS to run
1 Start the XCM using the following URL
httpltJ2EE_hostgtltJ2EE_portgtwfdcsadminxcminitdo
2 Access the configuration using the following path General Application Settings Customer sisopt
sisoptconfig
Process Description Web ApplicationXCM Application Configurations
Calculations Service Workforce scheduling application
wfdcs sisoptconfig
3 In addition to the csjcoxxxx XCM parameters you need to define the http port of the J2EE
instance where WFD CS is running
XCM Parameter Name Example Value Description
cshttpport 51000 The http port of the web server where the WFD Calculation Services application is running (for example 50000)
4 Restart the application after saving the XCM configuration
Configuring the XCM for WFD Application Services
This business scenario is relevant for connecting the WFD AS to the WFD CS
1 Start the XCM using the following URL
httpltJ2EE_hostgtltJ2EE_portgtwfdadminxcminitdo
2 Access the configuration using the following path General Application Settings Customer sis
sisconfig
Process Description Web ApplicationXCM Application Configurations
Application Services Web-based scheduling application
wfd sisconfig
3 Restart the application after saving the XCM configurationEnd of ABAP+JavaJava |
4 Post-Installation
42 Post-Installation Steps for Workforce Deployment Application and Calculation Services
2012-12-17 CUSTOMER 1750
Only valid for ABAP+JavaJava |
423 Checking Workforce Deployment Calculation Services
After configuring Workforce Deployment Calculation Services (WFD CS) with Extended Configuration
Management (XCM) and restarting the application you need to go to the WFD CS configuration page
to check that it is running
Prerequisites
You have completed the installation of WFD Application Service (AS) and CS as described in this
documentation
Only valid for CRM Java Components (JCRM) |
You have downloaded the Business Package for Retail (Release 10) from sdnsapcom SAP NetWeaver
Capabilities User Productivity Portal and Collaboration Portal Content Portfolio
For more information about the portal content versions for your release see the documentation
Master Guide ndash SAP Customer Relationship Management 70 at httpservicesapcomcrm-instEnd of CRM Java Components (JCRM) |
Only valid for CRM Java Components (JCRM) |
You must have access to the Portal Admin role in SAP CRM through the Enterprise Portal to complete
this part of the WFD ASCS installation
For more information see Configuring the CRM Business Package on the SAP Service Marketplace at
httpservicesapcomcrm-inst SAP CRM 70 CRM Business Packages and PC UI Section
CRM Portal Administrator contains specific instructions on configuring the portal for access to WFD
AS and CS Apply the instructions to the Portal Admin roleEnd of CRM Java Components (JCRM) |
You have configured your portal users based on the required settings as described in the
configuration documentation for your IT scenario
For more information see Accessing Configuration Documentation in the SAP Solution Manager [page 41]
Procedure
1 Access the WFD CS configuration page through the Enterprise Portal using the role Portal
Administrator
2 Choose WFD Calculation Services Configuration
The Configuration tab looks as follows
Tab To Complete InstallationFor ongoing Configuration Management
Calculation Servers Required for at least one calculation server
Required for each additional calculation server
Logging Localization No Required to add or change logging once fully operational
End of ABAP+JavaJava |
4 Post-Installation
42 Post-Installation Steps for Workforce Deployment Application and Calculation Services
1850 CUSTOMER 2012-12-17
Only valid for ABAP+JavaJava |
424 Checking the Installation of WFD Application Services and WFD Calculation Services
This section tells you how to check that you have correctly installed the Java components for Workforce
Deployment Application Services (WFD AS) and WFD Calculation Services (WFD CS) This section
does not tell you how to check the connection between the WFD AS and the WFD CS
The procedure below shows you how to create a simple calculation request and verify that the
Calculation Server has received the request This helps you check that you have correctly installed all
WFD AS or CS components and that they are communicating with each other
Prerequisites
You have completed all the installation steps described in this documentation
You have connected WFD AS or CS components with the Enterprise Portal
You have installed the required business packages according to Checking Workforce Deployment
Calculation Services [page 18]
Procedure
1 To check that WFD AS is working and listening for HTTP requests enter the following URL
httpltJ2EE_hostgtltJ2EE_portgtwfdlogondo
The following error confirms that the application is working
Your session has expired Please renew your session by clicking a section link in
the Portal menu
2 Access the WFD CS from the Enterprise Portal through the Portal Admin role and check that the
WFD CS page comes up with no errors
If the page does not come up possible errors are
Error Message Cause
Missing value for XCM configuration
parameter cshttpport
The XCM parameter cshttpport was not filled
The request could not be completed
due to the following
errorsltfollowed by details of the
particular error usually related to
the JCO connectiongt
One of the XCM parameters csjcoxxxxx might be incorrect
EXAMPLE
The user or password are incorrect
3 Test the submission of a calculation request to see if the WFD CS can process the request
You can simulate a calculation request submission by executing the RFC
TEST_WFDCS_CALCREQ_SUBMIT from the CRM back-end system defined in the csjcoxxxxx XCM
parameters of WFD CS
4 Post-Installation
42 Post-Installation Steps for Workforce Deployment Application and Calculation Services
2012-12-17 CUSTOMER 1950
EXAMPLE
For example when you installed WFD CS you configured the csjcoxxxxx XCM
parameters to point to system ID Q5C client 505 You now need to log in to Q5C client 505
and execute TEST_WFDCS_CALCREQ_SUBMIT with transaction SE37 using the default import
parameters
4 Check the Requests tab of the WFD CS page to check the status of entries with the location name
SMOKETEST has the status FAILED
Status FAILED indicates a successful smoke test It means that the Request Manager successfully
sent the request to the Solver which successfully processed it
Status QUEUED probably means that the XCM parameter cshttpport was incorrectEnd of ABAP+JavaJava |
End of Java |
Only valid for ABAP+JavaJava |
43 Post-Installation Steps for the Business Packages for SAP CRM
The following sections provide information about the steps that you have to perform after importing
the Business Package for SAP CRM
Only valid for ABAP+JavaJava |
431 Creating Roles for the SAP CRM Business Packages
Procedure
If you create your own roles from the SAP CRM Business Packages also add the every user role
(eu_core_role) to your role The Every User Role contains the personalization functionality for the SAP
NetWeaver Portal
For more information about the Every User Role see the SAP Library at
httphelpsapcomnw70 SAP NetWeaver 70 Library (including Enhancement Package 2) English SAP
NetWeaver Library SAP NetWeaver by Key Capability People Integration by Key Capability Portal Portal
Administration Guide Super Administration Pre-configured Roles Every User Roles End of ABAP+JavaJava |
Only valid for ABAP+JavaJava |
432 Installation of the Info Center for the SAP CRM Business Package
This section describes how to install the Info Center
4 Post-Installation
43 Post-Installation Steps for the Business Packages for SAP CRM
2050 CUSTOMER 2012-12-17
Prerequisites
You have installed the Business Package for SAP CRM [page 43]
You have administrator rights
Process Flow
1 You import the SAP CRM info center configurations and directory structure [page 21]
2 You activate manual ordering of folders for the sapcrm Repository [page 23]
3 You create indexes and taxonomies for the sapcrmnews Repository [page 23]
4 You create the index for the sapcrm Repository [page 25]
5 You configure the personal search [page 25]
6 If required you increase the number of JCo connections [page 26]
Only valid for ABAP+JavaJava |
4321 Importing the SAP CRM Info Center Configurations and Directory Structure
The directory structure of the info center has been made available in one content package and you can
import it using the Information and Content Exchange (ICE) Repository
For more information about ICE see SAP Library at
httphelpsapcomnw70 SAP NetWeaver 70 Library (including Enhancement Package 2) English SAP
NetWeaver Library SAP NetWeaver by Key Capability Information Integration by Key Capability Knowledge
Management Content Managers Guide Additional Tasks for Content Managers Content Exchange Distributing
Content (Offline)
Procedure
Importing the Directory Structure
1 Log on to the Portal as content manager
2 Choose Content Management Content Exchange Upload
3 Only valid for Windows |
Select file fullupdate_infocenterzip from directory ltservlet_enginegtirjrootWEB-INF
portalportalappsepcrmchmkmexpice and confirm the uploadEnd of Windows |
Only valid for IBM i5OSUNIX |
Select file fullupdate_infocenterzip from directory ltservlet_enginegtirjrootWEB-INF
portalportalappsepcrmchmkmexpice and confirm the uploadEnd of IBM i5OSUNIX |
The zip file is now imported using the ICE protocol
If you cannot see the ICE repository this might be due to one of the following reasons
The ICE repository was hidden in the virtual root repository
4 Post-Installation
43 Post-Installation Steps for the Business Packages for SAP CRM
2012-12-17 CUSTOMER 2150
In this case do the following
1 Log on to the portal as system administrator
2 In the SAP NetWeaver Enterprise Portal choose System Administration System Configuration
Knowledge Management Content Management Repository Managers Virtual Root Repository
3 Check whether the ICE Repository has been entered under Repositories to exclude
4 Remove it from the list
5 Save your changes
6 Restart the Servlet Engine
The repository has been ldquoswitchedrdquo to invisible
1 Log on to the portal as system administrator
2 In the SAP NetWeaver Enterprise Portal choose System Administration System Configuration
Knowledge Management Content Management Repository Managers Content Exchange
Repository
3 If the property hide in root folder is active deselect it
4 Restart the Servlet Engine
NOTE
After the import check whether the directory structure was created by choosing Content
Administration KM Content in the SAP NetWeaver Enterprise Portal The list of folders should
contain the folders sapcrm and sapcrmnews
Checking Whether the Directory Structure Has Been Imported Successfully
You can only import the structure if there is a repository with the same name For example if a zip file
is exported from the repository sapcrm there must also be a repository with the name sapcrm in the
target system
The sapcrm and sapcrmnews repositories as well as the CRM-Namespace filter are created during the
import of the SAP CRM KM extension configuration archive To check whether this configuration
archive has been imported successfully proceed as follows
1 Log on to the portal as system administrator
2 In the SAP NetWeaver Enterprise Portal choose System Administration Monitoring Knowledge
Management Deployment Monitor Config Archives
3 Check whether the archive comsappctcrmappkmextprjconfig is installed in the system
If the archive comsappctcrmappkmextprjconfig is not installed in the system import it
manually as follows
1 Log on to the portal as system administrator
2 In the SAP NetWeaver Enterprise Portal choose System Administration Monitoring Knowledge
Management Deployment Monitor Config Archives Actions Import
4 Post-Installation
43 Post-Installation Steps for the Business Packages for SAP CRM
2250 CUSTOMER 2012-12-17
3 Only valid for Windows |
Select the archive comsappctcrmappkmextprjconfigconfigarchive from directory
ltSAPSIDgtJCltinstance_numbergtj2eeclusterappssapcomep~crm~chm
servlet_jspepcrmchmkmexprootWEB-INFconfig and confirm the importEnd of Windows |
4 Only valid for IBM i5OSUNIX |
Select the archive comsappctcrmappkmextprjconfigconfigarchive from
directory ltSAPSIDgtJCltinstance_numbergtj2eeclusterappssapcomep~crm~chm
servlet_jspepcrmchmkmexprootWEB-INFconfig and confirm the importEnd of IBM i5OSUNIX |
After the import the directory structure has no restrictions on rights Make sure that you modify the
rights of the various folders to meet your companyrsquos requirementsEnd of ABAP+JavaJava |
Only valid for ABAP+JavaJava |
4322 Activating Manual Ordering of Folders for the sapcrm Repository
The sapcrm Repository folders are ordered in a specific sequence
Procedure
To display this sequence activate manual ordering for each directory
For more information see the SAP Library at
httphelpsapcomnw70 SAP NetWeaver 70 Library (including Enhancement Package 2) English SAP
NetWeaver Library SAP NetWeaver by Key Capability Information Integration by Key Capability Knowledge
Management Content Managers Guide Providing Shared Access to Departmental Documents Sorting Documents in a
Folder ManuallyEnd of ABAP+JavaJava |
Only valid for ABAP+JavaJava |
4323 Creating Indexes and Taxonomies for the sapcrmnews Repository
To make news available for indexing and searching create two new indexes
Prerequisites
You have administrator rights for Knowledge Management on the server
For more information see the SAP Library at
httphelpsapcomnw70 SAP NetWeaver 70 Library (including Enhancement Package 2) English SAP
NetWeaver Library SAP NetWeaver by Key Capability Information Integration by Key Capability Knowledge
Management
4 Post-Installation
43 Post-Installation Steps for the Business Packages for SAP CRM
2012-12-17 CUSTOMER 2350
Procedure
Creating Indexes and Taxonomies for the sapcrmnews Repository
The Business Package contains an iView ndash epbp_crmchm-pmiviewsnews_flash ndash that combines all
news with the istopnews=yes attribute in a virtual folder To guarantee the function of this iView
create two indexes in KM
1 In the SAP NetWeaver Enterprise Portal choose System Administration System Configuration
Knowledge Management Index Administration
2 Create an index of the Search and Classification type with a suitably configured taxonomy
3 Choose sapcrmpartnernews as the index ID Otherwise the path to the folder specified in the iView
is incorrect
If you choose another index ID you must also modify accordingly the folder properties in the
iView for one of the following
Folders path to content and path to root
Folders Path to Initially Displayed Folder and Path to Root Folder for Navigation
If you want to link two portal servers with a TREX server you must modify the index name and
iView properties on one of the portal servers
4 Assign folder sapcrmpartnerPartnernews as a data source
This moves all news with the (virtual) Top flag from this folder to the Newsflash iView
5 Create a ldquoquery-basedrdquo taxonomy with the name PartnerNewsFlash choosing Automatic
Classification before you save the taxonomy
NOTE
The outbound delivery includes only the iView above for virtually combining news If you
also want to use this functionality for other news channels (for example internal news) use
your own index and taxonomy for each channel
For more information see the SAP Library at
httphelpsapcomnw70 SAP NetWeaver 70 Library (including Enhancement Package 2) English SAP
NetWeaver Library SAP NetWeaver by Key Capability Information Integration by Key Capability Knowledge
Management Administration Guide System Administration System Configuration lsquoIndex Administrationrsquo iView
Creating Queries for the Taxonomies of sapcrmnews Repositories
1 Log on to the portal as content manager
2 Choose Content Management Classification Taxonomy Query Builder
3 Add a search query to check the istopnews property for the value Yes
4 Enter PartnerNewsFlash as the name for the taxonomy
Here too a property of the iView links to a taxonomy with this name So if you want to choose
another name you must modify the path to the content folder property of the iView
For more information see the SAP Library at
4 Post-Installation
43 Post-Installation Steps for the Business Packages for SAP CRM
2450 CUSTOMER 2012-12-17
httphelpsapcomnw70 SAP NetWeaver 70 Library (including Enhancement Package 2) English SAP
NetWeaver Library SAP NetWeaver by Key Capability Information Integration by Key Capability Knowledge
Management Administration Guide System Administration System Configuration Taxonomies and ClassificationEnd of ABAP+JavaJava |
Only valid for ABAP+JavaJava |
4324 Creating the Index for the sapcrm Repository
To make Info center documents available for indexing and searching create a new index with sapcrm
as a data source
Prerequisites
You have administrator rights for Knowledge Management on the server
Procedure
Choose a name of your own Search as a service and standard as a crawler parameter
For more information see the SAP Library at
httphelpsapcomnw70 SAP NetWeaver 70 Library (including Enhancement Package 2) English SAP
NetWeaver Library SAP NetWeaver by Key Capability Information Integration by Key Capability Knowledge
ManagementEnd of ABAP+JavaJava |
Only valid for ABAP+JavaJava |
4325 Configuring the Personal Search
Prerequisites
You have administrator rights for Knowledge Management on the server
Procedure
1 Create an index for the userhome repository
To make personal folder documents available for the search create a new index with root
userhome as the data source
2 Create a search option set for personal search
To assign the search index and a start folder to the search for personal documents create a Search
Option Set with the name CRMPersonalFolderSearch As an index enter the index for the
userhome repository created above and ~alias~userhomeuseridPersonal Documents as the
root folder for the search
For more information see the SAPLibrary at
4 Post-Installation
43 Post-Installation Steps for the Business Packages for SAP CRM
2012-12-17 CUSTOMER 2550
httphelpsapcomnw70 SAP NetWeaver 70 Library (including Enhancement Package 2) English SAP
NetWeaver Library SAP NetWeaver by Key Capability Information Integration by Key Capability Knowledge
Management End of ABAP+JavaJava |
Only valid for ABAP+JavaJava |
4326 Increasing the Number of JCo Connections
This section tells you how to increase the number of concurrent Java Connector (JCo) connections
By default the maximum number of concurrent JCo connections is 100 The value depends on the
number and behavior of the users in the portal For more information see SAP Note 316877
You can specify this value when you plan the installation of your SAP NetWeaver Enterprise Portal
Make sure that you first analyze the number and behavior of the users
Procedure
To increase the maximum number of concurrent JCo connections increase the value of the
environment variable CPIC_MAX_CONV
EXAMPLE
Initial default value CPIC_MAX_CONV=100
Increased value CPIC_MAX_CONV=1000
End of ABAP+JavaJava |
End of ABAP+JavaJava |
End of ABAP+JavaJava |
Only valid for ABAP+JavaJava | MapBox (MBX) |
44 Post-Installation Steps for MapBoxOnly valid for Java | MapBox (MBX) |
You have to perform the following post-installation steps for MapBox
You assign user groups for MapBox users [page 27]
You configure an RFC destination for TCPIP connections [page 28]
You perform initial configuration for MapBox [page 28]
You execute the Map Box [page 34]
You perform the smoke test [page 35]
If required you perform additional settings for MapBox
Block size settings [page 38]
Memory settings for the J2EE Engine [page 39]End of Java | MapBox (MBX) |
4 Post-Installation
44 Post-Installation Steps for MapBox
2650 CUSTOMER 2012-12-17
Only valid for Java | MapBox (MBX) |
441 Assigning User Groups for MapBox Users
To access the MapBox URL you need to provide the correct security rights for individual user groups
Procedure
1 Log on to the Visual Administrator
1 On your central instance host change to the following directory
Only valid for IBM i5OSUNIX |
usrsapltSAPSIDgtltinstance_numbergtj2eeadmin
End of IBM i5OSUNIX |
Only valid for Windows |
usrsapltSAPSIDgtltinstance_numbergtj2eeadmin
End of Windows |
2 Only valid for IBM i5OSUNIX |
Run goshEnd of IBM i5OSUNIX |
3 Only valid for Windows |
Double-click gobatEnd of Windows |
For more information about the Visual Administrator see the SAP Library at
httpshelpsapcomnw70 SAP NetWeaver Library SAP NetWeaver by Key Capability
Application Platform by Key Capability Java Technology Administration Manual J2EE Engine J2EE Engine
Administration Tools
2 Choose the server node from the left-hand window
3 Choose Services Security Provider
A list of deployed components is displayed
4 Choose MapBoxLauncher from this list (sapcom
comsapsyncpointmapboxlaunchermapboxlauncher)
A list of tabs appears on the right
5 Choose Security Roles from the list
A list of security roles appears
6 If no display and modify roles are displayed add these roles as follows
1 Choose Switch to Edit Mode from the top task bar to switch to edit mode
2 Add display and modify roles by choosing Add
7 For both the display and modify roles perform the following
1 Choose Switch to Edit Mode from the top task bar to switch to edit mode
2 Choose the Groups tab from the list on the far right
3 Choose Search
4 Post-Installation
44 Post-Installation Steps for MapBox
2012-12-17 CUSTOMER 2750
A list of user groups appears
4 Select the user groups that you want to enable for the two roles
Add to the left of the user group display is now highlighted
5 Choose Add to add the user group for the selected roleEnd of Java | MapBox (MBX) |
Only valid for Java | MapBox (MBX) |
442 Configuring an RFC Destination for MapBox
After the installation you have to create an RFC destination for MapBox
Procedure1 Log on to the CRM server
2 Enter transaction SM59
The Display and Maintain RFC Destinations screen appears
3 Choose Technical Settings Activation Type and create a new destination with the type TCPIP
4 Choose Registered Server Program and enter a unique value for program ID
For example you might enter MAPBOX723 for SAP client 723
5 Enter the details of the gateway host and gateway service in Gateway Options
1 Gateway host
Enter the name of your message server You can also enter the IP address of your message
server
2 Gateway service
Enter your SAP CRM system number prefixed with the string sapgw
For example if your system number is 02 enter sapgw02
6 If the CRM system is a Unicode-enabled system choose Unicode in Special Options
7 Save the destination
8 Choose MapBox Configuration Page Connecting settings from the URL and enter the same RFC
destination name in the relevant fieldEnd of Java | MapBox (MBX) |
Only valid for Java | MapBox (MBX) |
443 Performing Initial Configuration for MapBox
Procedure1 Open a browser window and enter the following URL
httplthostnamegtltport_numbergtmapboxlauncher
NOTE
If you are logged on to the machine where the J2EE server is running you can also enter the
following URL
4 Post-Installation
44 Post-Installation Steps for MapBox
2850 CUSTOMER 2012-12-17
httplocalhostltport_numbergtmapboxlauncher
2 Choose Configuration
3 Edit the values according to your SAP system and choose Save
The application asks you to enter a user name and password
4 Enter the user name and password used for the SAP J2EE Engine Visual Administrator
A description of the properties and example values for the properties is given below
Result
You see the default connection settings for MapBox as shown in the graphic below A description
of the properties and example values are provided in the adjacent table
Figure 1 MapBox Default Connection Settings
Property Purpose Example
SAP System SAP System name ABC FAZ
Message Server Message server host name xyzmain
Group SAP System group PUBLIC SPACE
System Number SAP Gateway system number prefixed with sapgw
sapgw02
Unicode Used for setting the Unicode option for the CRM server Default value is no
yes
Maximum allowed wait time interval between ISP Processing and Commit call
Time-out period between an ISP_MAPBOX call and an ISP_COMMIT call
300
4 Post-Installation
44 Post-Installation Steps for MapBox
2012-12-17 CUSTOMER 2950
Property Purpose Example
Client SAP logon client 723
User Name SAP logon user John
Password SAP logon password
Language SAP logon language EN
Destination The RFC destination with which you need to register the MapBox This is the value you enter in step 3 of Configuring an RFC Destination for MapBox [page 28]
MAPBOX723
Number of server instances The number of JCO server execution instances used by the MapBox to process server requests This number indicates the number of CRM inbound queues that are running simultaneously
10
The above MapBox connection configuration is meant for one SAP client running with the CRM
Server If you want to run the MapBox with two or more SAP clients of the same CRM system
you can use Add Client on the configuration page and edit the values accordingly However make
sure that the RFC destinations that these multiple clients listen to are always unique You can
leave the default values for the other settings
If you need more control over logging and tracing you can go to Log Settings on the configuration
page edit the values and choose Save The Log Settings screen with default values is shown in the
graphic below A description of the properties and example values for the properties is provided
in the adjacent table
Figure 2 Default Values for the Log Settings Screen
4 Post-Installation
44 Post-Installation Steps for MapBox
3050 CUSTOMER 2012-12-17
Property Purpose Example
Log and dumps directory This value specifies where the MapBox logs and dumps are stored If this field is left blank the ltuser_homegt folder is used as default value
Only valid for Windows |
Ctemp
End of Windows |
Only valid for IBM i5OSUNIX |
tmp
End of IBM i5OSUNIX |
Input payload dump This value specifies whether the input document coming to MapBox for processing is written or not
No
MapBox launcher trace level This value specifies with what granularity the MapBoxLauncher execution trace is generated6 specifies that a full MapBoxLauncher execution trace is generated whereas 0 specifies that the MapBoxLauncher execution trace is not generated Recommended value for production use is 0
0
MapBox launcher trace size The maximum file size of the generated trace When the size reaches the maximum value another file is created so that the old file can be deleted (for example due to lack of space) You can use alphabetic suffixes to specify the sizes The supported values are k or K ndash kilobytes g or G ndash gigabytes m or M ndash megabytes t or T ndash terabytes
50 k
CoordServer log level This value specifies the detail of the coordination server logging We recommended you not to change the default value of 1
2
SAP Java connector trace level This value specifies the detail of the SAP Java Connector logging The recommended value for production use is 0
2
MapBox log level The log level required for the MapBox to generate an internal log file A higher trace level means that a more detailed log file is created We recommend you to use 4D for production systems where D meansldquoOn Demandrdquo
2
4 Post-Installation
44 Post-Installation Steps for MapBox
2012-12-17 CUSTOMER 3150
Property Purpose Example
MapBox message dumps This value stands for copying the incoming and outgoing messages to the local system For better performance we recommend that you do not enable the message dump option
no
MapBox statistics This value specifies whether a file that lists the performance measurements of the MapBox is created We recommend you to use the value no for production use
no
MapBox logs location This value specifies where the MapBox logs are stored Possible locations are the MapBox repository on the CRM Server or the local file system The recommended value for production use is local_fs which indicates that the MapBox logs are stored on the local file system
local_fs
MapLog format The format in which the MapBox log file must be created The internal log file is by default created in a particular format However you can change this format to display the file in the SAP log file format The two values that are available are default and sap_log
default
The MapBox uses additional properties for performance such as caching and reuse of the MapBox
atoms These values are already set to optimum values and you cannot change them
The description of the properties is shown in the table below
Property Purpose Example
General Settings
max_elements_document This is the limit for the internal cache of the MapBox to hold the count of generated XML documentsWe recommend you not to change this value
100
cache_threshold This is the maximum threshold ndash in kilobytes ndash for a document to be cached in the internal cache of the MapBox
500
4 Post-Installation
44 Post-Installation Steps for MapBox
3250 CUSTOMER 2012-12-17
Property Purpose ExampleWe recommend you not to change this value
max_elements_cache This is the limit for the internal cache of the MapBox to hold the count of MapScenariosWe recommend you not to change this value
100
parallel_instances You use this value on systems where more than one CPU is used This setting allows you to specify the number of CPU instances that MapBox must use for processing so that the remainder can be used by non-MapBox related applications By default MapBox uses all the available CPUs for processing Values can range between 0 to N-1 where N is the number of available CPUs
4
thread_priority Specifies the number of threads MapBox uses during processing We recommend you to set an optimum value for this property so that MapBox does not utilize all available resources 0 = min 1 = low 2 = normal 3 = high 4 = max
3
reuse_count Sets the count for the number of times an atom-instance must be reused before it is destroyed A value of 0 means that the atom is not destroyed and can be used continuously Recommended value is 50 This means that the atom instance is reused 50 times before it is destroyed
100
Lock Server Settings
Operation_Mode The internal mode of operation for the coordination server We recommend not to change the default value of OUTPROC_CLIENT
OUTPROC_CLIENT
Registry_Port The Remote Method Invocation (RMI) port used for connecting to the coordination serverRMI is a Java mechanism for distributed computing
1099
4 Post-Installation
44 Post-Installation Steps for MapBox
2012-12-17 CUSTOMER 3350
Property Purpose ExampleDo not change this value unless port 1099 is unavailable In this case change it to 59856
HostName The name of the host where the coordination server resides
localhost
LocalName The name of the host where the MapBoxLauncher is executed We recommend you not to change the default value of localhost
Server
PollingInterval Polling interval in seconds to ask for shutdown of the coordination server We recommend you not to change the default value of 30
60
CleanUpInterval Cleanup interval in seconds to check for invalid locks created by the MapBoxLauncher We recommend you not to change the default value of 60
180
NOTE
A file name MapLogxsl is also available with the smoke test [page 35] This file is the stylesheet
that is used to format the display of the MapBox log file During the installation and execution
of the MapBox the MapBox log file is created in the following directory
Only valid for Windows |
ltUser_homegtTempMapBoxDumpsltyour_system_namegt500 where ltuser_homegt is the
home directory of the logged-on user ltyour system namegt is the CRM server you have
connected to and 500 is the client you have connected toEnd of Windows |
Only valid for IBM i5OSUNIX |
ltUser_homegtTempMapBoxDumpsltyour_system_namegt500 where ltuser_homegt is the
home directory of the logged-on user ltyour system namegt is the CRM server you have
connected to and 500 is the client you have connected toEnd of IBM i5OSUNIX |
RECOMMENDATION
We recommend that you copy MapLogxsl from the
ltsmoke_test_installation_directorygt to the directory mentioned aboveEnd of Java | MapBox (MBX) |
Only valid for Java | MapBox (MBX) |
444 Executing the MapBox
This section tells you how to execute the MapBox The procedure that you use to execute the Map Box
depends on its current support package (SP) level
4 Post-Installation
44 Post-Installation Steps for MapBox
3450 CUSTOMER 2012-12-17
Procedure
If the SP level of the MapBox is less than SP11 proceed as follows
1 Enter the following URL in your browser
httplthostnamegtltport_numbergtmapboxlaunchermanage
2 Choose Start MapBox
3 The application prompts you for a user name and password
Enter the user name and password for the J2EE Engine Visual Administrator
NOTE
MapBox typically takes 30 to 60 seconds to initialize depending on the number of SAP clients
To see the status of messages processed by MapBox choose Status
If the SP level of the MapBox is equal to or higher than SP11 the MapBox starts automatically
1 For the first MapBox installation you need to restart the Java application server (AS Java) after all
the configuration settings have been completed This automatically starts the MapBox (Autostart)
2 To check the status go to the URL httplthostnamegtltport_numbergtmapboxlauncher
manage
NOTE
MapBox Autostart needs approximately 60 seconds to allow other services of As Java to start
To see the status of messages processed by MapBox choose Status
Result
When the MapBox is running the status is shown as Ready to processEnd of Java | MapBox (MBX) |
Only valid for Java | MapBox (MBX) |
445 Performing the Smoke Test for MapBox
The smoke test checks whether the MapBox installation is error-free
Only valid for Windows |
To execute the smoke test you have to run two batch filesEnd of Windows |
Only valid for IBM i5OSUNIX |
To execute the smoke test you have to run two shell scriptsEnd of IBM i5OSUNIX |
Prerequisites
Before you start the procedure you need to copy the smoketestjar file to a new
ltsmoke_test_installation_directorygt of your choice which has two further subdirectories
firstrun and secondrun
4 Post-Installation
44 Post-Installation Steps for MapBox
2012-12-17 CUSTOMER 3550
You can find the smoketestjar file here
Only valid for IBM i5OSUNIX |
usrsapltinstance_IDgtJCltinstance_numbergtj2eeclusterserver0binext
comsapsyncpointmapboxEnd of IBM i5OSUNIX |
Only valid for Windows |
usrsapltinstance_IDgtJCltinstance_numbergtj2eeclusterserver0binext
comsapsyncpointmapboxEnd of Windows |
NOTE
Each subdirectory of ltsmoke_test_installation_directorygt ndash that is firstrun and
secondrun ndash contains the following files
MBSMOKETEST_IN_000xml
MBSMOKETEST_IN_001xml
MBSMOKETEST_IN_002xml
MBSMOKETEST_IN_003xml
After executing the smoke test you must verify whether the contents of the files generated
by your test are similar to the contents of the above files That is the XML documents that
are created in the smoke test must match the documents located in the
ltsmoke_test_installation_directorygt mentioned above
To execute the smoke test you need to install the SAP Java Connector (SAP JCo version 2012)
You have to download SAP JCo 2012 from SAP Service Marketplace at https
servicesapcomswdc before executing the smoke test
CAUTION
Make sure that you install the SAP Java Connector correctly
The file mapcaseprop is available in the ltsmoke_test_installation_directorygt This file
contains the connection parameters to be tested You can modify the contents of this file
CAUTION
You must replace the connection parameters in this file with the connection parameters that
you entered in the MapBoxMetaxml file
Procedure
1 Run the first stage of the smoke test
1 Only valid for Windows |
Execute the file smoketest_1bat from the ltsmoke_test_installation_directorygtEnd of Windows |
Only valid for Windows |
This prompts you to enter the followingEnd of Windows |
4 Post-Installation
44 Post-Installation Steps for MapBox
3650 CUSTOMER 2012-12-17
Only valid for Windows |
1 ltDRIVEgtusrsapltinstance_IDgtJCltinstance_numbergtj2ee
2 ltsmoke_test_installation_directorygt
3 ltpath_to_sapjcojargt
End of Windows |
Only valid for IBM i5OSUNIX |
Execute the file smoketest_1sh from the ltsmoke_test_installation_directorygtEnd of IBM i5OSUNIX |
Only valid for IBM i5OSUNIX |
1 usrsapltinstance_IDgtJCltinstance_numbergtj2ee
2 ltsmoke_test_installation_directorygt
3 ltpath_to_sapjcojargt
End of IBM i5OSUNIX |
2 Enter the appropriate paths
The smoke test creates the following files
MBSMOKETEST_IN_000xml
MBSMOKETEST_IN_001xml
MBSMOKETEST_IN_002xml
MBSMOKETEST_IN_003xml
3 Only valid for Windows |
Check the contents of the generated files against the contents of the files located in
ltsmoke_test_installation_directorygtSMOKETESTfirstrunEnd of Windows |
Only valid for IBM i5OSUNIX |
Check the contents of the four files against the contents of the files located in
ltsmoke_test_installation_directorygtSMOKETESTfirstrunEnd of IBM i5OSUNIX |
2 Run the second stage of the smoke test
1 Only valid for Windows |
Execute the file smoketest_2bat which is located in the
ltsmoke_test_installation_directorygtEnd of Windows |
Only valid for IBM i5OSUNIX |
Execute the file smoketest_2sh which is located in the
ltsmoke_test_installation_directorygtEnd of IBM i5OSUNIX |
This prompts you to enter the following
Only valid for Windows |
1 ltDRIVEgtusrsapltinstance_IDgtJCltinstance_numbergtj2ee
2 ltsmoke_test_installation_directorygt
End of Windows |
4 Post-Installation
44 Post-Installation Steps for MapBox
2012-12-17 CUSTOMER 3750
Only valid for IBM i5OSUNIX |
1 usrsapltinstance_IDgtJCltinstance_numbergtj2ee
2 ltsmoke_test_installation_directorygt
End of IBM i5OSUNIX |
2 Enter the appropriate paths
The smoke test creates the following files
MBSMOKETEST_IN_000xml
MBSMOKETEST_IN_001xml
MBSMOKETEST_IN_002xml
MBSMOKETEST_IN_003xml
CAUTION
The files generated in the second stage of testing overwrite the contents of the files
generated in the first stage
3 Only valid for Windows |
Check the contents of the generated files against the contents of the files located in
ltsmoke_test_installation_directorygtSMOKETESTsecondrunEnd of Windows |
Only valid for IBM i5OSUNIX |
Check the contents of the four files against the contents of the files located in
ltsmoke_test_installation_directorygtSMOKETESTsecondrunEnd of IBM i5OSUNIX |
Result
If the smoke test has identified errors in the installation process the four XML files are not created in
either of the stages Instead an error log file is created
RECOMMENDATION
In the event of errors we recommend that you send the error log file to your administrator
End of Java | MapBox (MBX) |
Only valid for Java | MapBox (MBX) |
446 Ensuring Optimal Block Size settings
The block size of an object determines the number of messages that are processed at the same time by
the MapBox as a set You need to make sure that the block sizes are optimal to reduce load on the
MapBox XML processor
Procedure
1 Use transaction R3AC3 to set the block size of object GWA_COUNTRY to 10 and save the setting
2 Use transaction R3AC1 to set the block size of object BUPA_MAIN to 10 and save the settingEnd of Java | MapBox (MBX) |
4 Post-Installation
44 Post-Installation Steps for MapBox
3850 CUSTOMER 2012-12-17
Only valid for ABAP+JavaJava | MapBox (MBX) |
447 Adapting Memory Settings for the J2EE Engine
You need to adapt the memory settings for the J2EE Engine because MapBox relies heavily on memory-
intensive XML-processing such as schema-validation parsing transformation and so on
RECOMMENDATION
For rapid message processing by MapBox we recommend you to use 1024 MB of heap memory
for MapBox alone With a heap size of 512 MB MapBox can still process messages but with a slightly
higher processing time for each message
The MapBox memory requirements are directly proportional to the size of the input documents
that MapBox has to process The average size of such documents is in the range of 150 to 200 KB
For messages of this size it is sufficient to have a heap memory of 512 MB If the input documents
are in the range of 1 to 2 MB we recommend that you give MapBox a heap memory of 1024 MB
Procedure
To set the recommended memory settings for the MapBox you start the config tool of the J2EE Engine
Only valid for Windows |
Start the config tool by executing ltDrivegtusrsapltSAPSIDgtltinstance_numbergtj2ee
configtoolbatEnd of Windows |
Only valid for IBM i5OSUNIX |
Start the config tool by executing usrsapltSAPSIDgtltinstance_numbergtj2eeconfigtoolshEnd of IBM i5OSUNIX |
End of ABAP+JavaJava | MapBox (MBX) |
End of ABAP+JavaJava | MapBox (MBX) |
Only valid for ABAPABAP+Java |
45 Activating the CRM Web Client
The CRM Web Client is part of the ICF Services that is automatically installed as part of SAP NetWeaver
Application Server
Procedure
To activate the CRM Web Client after the installation see the SAP Library at
httphelpsapcomnw70 SAP NetWeaver 70 Library (including Enhancement Package 2) English SAP
NetWeaver Library SAP NetWeaver by Key Capability Application Platform by Key Capability Platform-Wide
Services Connectivity Components of SAP Communication Technology Communication Between ABAP and Non-
4 Post-Installation
45 Activating the CRM Web Client
2012-12-17 CUSTOMER 3950
ABAP Technology Internet Communication Framework Development Server-Side Development Creating and
Configuring an ICF Service Activating and Deactivating the ICF ServicesEnd of ABAPABAP+Java |
Only valid for ABAP |
46 Installing and Configuring CRM Application Server Loyalty Add-On Component
This section provides information about how to install and configure CRM Application Server Loyalty
as an add-on component to CRM Application Server ABAP
Prerequisites
You have already deployed the following software components
SAP NetWeaver Application Server ABAP (AS ABAP)
CRM Application Server ABAP
Procedure
Installing CRM Application Server Loyalty
Install CRM Application Server Loyalty on the same host where CRM Application Server ABAP is
deployed as described in SAP Note 1162144
Configuring CRM Application Server Loyalty
After you have installed CRM Application Server Loyalty you must complete the following
configuration steps
1 Call transaction nspro
2 Choose SAP Customising Implementation Guide Customer Relationship Management Marketing Loyalty
Management in BBPCRM Basic Settings Define Basic Settings
3 Enter value 1 for the INSTALL_TYPE parameter
NOTE
You do not have to enter destination name for the LOYALTY_SYSTEM parameterEnd of ABAP |
47 Starting XCM
This section describes how to start XCM
Procedure
1 You access the XCM tool at
httplthostgtltportgtltweb app namegtadminxcminitdo
4 Post-Installation
46 Installing and Configuring CRM Application Server Loyalty Add-On Component
4050 CUSTOMER 2012-12-17
NOTE
You can also start XCM in accessibility mode (according to Section 508 Rehabilitation Act)
at the following URL
httplthostgtltportgtltweb app namegtadminxcminitdosap-accessibility=x
2 Provide a user and password If you are logging on for the first time use the Administrator user
and the password you defined during the installation of the SAP system
RECOMMENDATION
We recommend you create new users with lesser rights than the Administrator for the
administration of Web applications
For more information see the SAP CRM Security Guide section E-Commerce
3 When the application opens a closed control tree is displayed on the left of the screen A screen
containing help information is displayed to the right
You can use edit (change settings) or display (see settings) mode in XCM You use the button in
the top right hand corner of the screen to change between modes When you switch to edit mode
a DB lock is set meaning that only this user can edit the settings at one time The lock is released
once the user switches back to display mode or after session timeout (default timeout is 30mins)
48 Accessing Configuration Documentation in SAP Solution Manager
To access configuration documentation in SAP Solution Manager you have to connect your newly
installed SAP system to SAP Solution Manager
NOTE
For SAP NetWeaver you can also find configuration documentation in the Technology Consultants
Guide at
httphelpsapcomnw70 SAP NetWeaver 70 Library (including Enhancement Package 2) English
SAP NetWeaver Library Technology Consultants Guide
Procedure
Create a configuration project with the related configuration guide as described in the following
documentation
httphelpsapcom SAP Solutions SAP Solution Manager Documentation for SAP Solution Manager
ltcurrent releasegt SAP Solution Manager Implementing and Upgrading SAP Solutions Projects
Configuration
More Information
httpservicesapcomsolutionmanager Media Library How-To Documents How to Create a
Configuration Guide using SAP Solution Manager
4 Post-Installation
48 Accessing Configuration Documentation in SAP Solution Manager
2012-12-17 CUSTOMER 4150
This page is left blank for documents that are printed on both sides
5 Additional Information
Only valid for ABAP+JavaJava |
51 Installing the Business Packages for SAP CRM Using JSPM (Optional)
You can also install the Business Packages for SAP CRM using the Java Support Package Manager (JSPM)
Prerequisites
Only valid for IBM i5OSUNIX |
You have checked hardware and software requirements [external document]End of IBM i5OSUNIX |
Only valid for Windows |
You have checked hardware and software requirements [external document]End of Windows |
You have ckecked the Prerequisites for the Business Packages for SAP CRM [page 7]
Procedure
1 Download version 701 of the files sapcom_BPCRMAPP sapcom_BPCRMFND sapcom_CRMAPP and
sapcom_CRMFND as follows
1 Go to httpservicesapcomswdc Download Support Packages and Patches Search for
Support Packages and Patches
2 Enter the following search terms
BP CRM Application Coding 701
BP CRM Application Content 701
BP CRM Foundation Coding 701
BP CRM Foundation Content 701
2 Add the deployment variable comsapcmshare as described in SAP Note 965948
For more information about how to use the Software Deployment Manager (SDM) see the
documentation Software Deployment Manager which is available at
httphelpsapcomnw70 SAP NetWeaver 70 Library (including Enhancement Package 2) English
SAP NetWeaver Library SAP NetWeaver Developerrsquos Guide Fundamentals Using Java Core Development
Tasks Deployment Putting It All Together Software Deployment Manager
3 Install the Business Packages for SAP CRM with JSPM as described in Installing Additional Usage Types
or Software Units in an Existing SAP System [external document]
5 Additional Information
51 Installing the Business Packages for SAP CRM Using JSPM (Optional)
2012-12-17 CUSTOMER 4350
4 Perform the required Post-Installation Steps for the Business Packages for SAP CRM [page 20]End of ABAP+JavaJava |
Only valid for ABAP+JavaJava |
52 Troubleshooting for the Business Package for SAP CRMOnly valid for ABAP+JavaJava |
The following sections describe the steps that you have to perform if you have problems after the
installation
Activating BI Templates Manually [page 44]
Dragging the Central Search onto the Portal Desktop [page 45]End of ABAP+JavaJava |
Only valid for ABAP+JavaJava |
521 Activating BI Templates Manually
If you have installed the Business Package you might see error messages when loading the BI templates
This procedure describes how you can activate the templates afterwards
Procedure
1 Note the technical name of all templates in your portal interface that are not working
2 Log on to your BI system
3 On the SAP Easy Access screen choose Modeling Administrator Workbench Modeling (transaction
RSA1 or RSOR)
4 Choose Business Content Object Types Web Template Name Select Objects
A new window containing a list of BW objects and templates opens
5 Find your missing templates for example 0TPL_0CRM_Cnn_Qnnn_Vnnn_M and select the entries
6 Choose Transfer Selection
The template now appears on the right-hand side of the screen The Transfer checkbox has been
selected and cannot be changed Nevertheless we recommend that you repeat the following
procedure so that your templates can be displayed
7 Select the template
8 Choose Transfer Transfer
Result
You have successfully activated your missing templates and no error messages appear in the portalEnd of ABAP+JavaJava |
5 Additional Information
52 Troubleshooting for the Business Package for SAP CRM
4450 CUSTOMER 2012-12-17
Only valid for ABAP+JavaJava |
522 Dragging the Central Search onto the Portal Desktop
Procedure
The Business Package for SAP CRM 70 including SAP enhancement package 1 contains an iView for
the central search in CRM This iView is in the package on the page Today in the workset Home of the
CRM User You can drag this iView onto the portal desktop under the tool areaEnd of ABAP+JavaJava |
End of ABAP+JavaJava |
5 Additional Information
52 Troubleshooting for the Business Package for SAP CRM
2012-12-17 CUSTOMER 4550
Typographic Conventions
Example Description
ltExamplegt Angle brackets indicate that you replace these words or characters with appropriate entries to make entries in the system for example ldquoEnter your ltUser Namegtrdquo
ExampleExample
Arrows separating the parts of a navigation path for example menu options
Example Emphasized words or expressions
Example Words or characters that you enter in the system exactly as they appear in the documentation
httpwwwsapcom Textual cross-references to an internet address
example Quicklinks added to the internet address of a homepage to enable quick access to specific content on the Web
123456 Hyperlink to an SAP Note for example SAP Note 123456
Example Words or characters quoted from the screen These include field labels screen titles pushbutton labels menu names and menu options
Cross-references to other documentation or published works
Example Output on the screen following a user action for example messages Source code or syntax quoted directly from a program File and directory names and their paths names of variables and parameters and
names of installation upgrade and database tools
EXAMPLE Technical names of system objects These include report names program names transaction codes database table names and key concepts of a programming language when they are surrounded by body text for example SELECT and INCLUDE
EXAMPLE Keys on the keyboard
4650 CUSTOMER 2012-12-17
SAP AGDietmar-Hopp-Allee 16
69190 WalldorfGermany
T +4918 0534 34 34F +4918 0534 34 20
wwwsapcom
copy Copyright 2012 SAP AG All rights reserved
No part of this publication may be reproduced or transmitted in any form or for any purpose without the express permission of SAP AG The information contained herein may be changed without prior noticeSome software products marketed by SAP AG and its distributors contain proprietary software components of other software vendors
Microsoft Windows Excel Outlook PowerPoint Silverlight and Visual Studio are registered trademarks of Microsoft CorporationIBM DB2 DB2 Universal Database System i System i5 System p System p5 System x System z System z10 z10 zVM zOS OS390 zEnterprise PowerVM Power Architecture Power Systems POWER7 POWER6+ POWER6 POWER PowerHA pureScale PowerPC BladeCenter System Storage Storwize XIV GPFS HACMP RETAIN DB2 Connect RACF Redbooks OS2 AIX Intelligent Miner WebSphere Tivoli Informix and Smarter Planet are trademarks or registered trademarks of IBM CorporationLinux is the registered trademark of Linus Torvalds in the United States and other countriesAdobe the Adobe logo Acrobat PostScript and Reader are trademarks or registered trademarks of Adobe Systems Incorporated in the United States and other countriesOracle and Java are registered trademarks of Oracle and its affiliatesUNIX XOpen OSF1 and Motif are registered trademarks of the Open GroupCitrix ICA Program Neighborhood MetaFrame WinFrame VideoFrame and MultiWin are trademarks or registered trademarks of Citrix Systems IncHTML XML XHTML and W3C are trademarks or registered trademarks of W3Creg World Wide Web Consortium Massachusetts Institute of TechnologyApple App Store iBooks iPad iPhone iPhoto iPod iTunes Multi-Touch Objective-C Retina Safari Siri and Xcode are trademarks or registered trademarks of Apple IncIOS is a registered trademark of Cisco Systems IncRIM BlackBerry BBM BlackBerry Curve BlackBerry Bold BlackBerry Pearl BlackBerry Torch BlackBerry Storm BlackBerry Storm2 BlackBerry PlayBook and BlackBerry App World are trademarks or registered trademarks of Research in Motion LimitedGoogle App Engine Google Apps Google Checkout Google Data API Google Maps Google Mobile Ads Google Mobile Updater Google Mobile Google Store Google Sync Google Updater Google Voice Google Mail Gmail YouTube Dalvik and Android are trademarks or registered trademarks of Google IncINTERMEC is a registered trademark of Intermec Technologies CorporationWi-Fi is a registered trademark of Wi-Fi AllianceBluetooth is a registered trademark of Bluetooth SIG IncMotorola is a registered trademark of Motorola Trademark Holdings LLCComputop is a registered trademark of Computop Wirtschaftsinformatik GmbHSAP R3 SAP NetWeaver Duet PartnerEdge ByDesign SAP BusinessObjects Explorer StreamWork SAP HANA and other SAP products and services mentioned herein as well as their respective logos are trademarks or registered trademarks of SAP AG in Germany and other countriesBusiness Objects and the Business Objects logo BusinessObjects Crystal Reports Crystal Decisions Web Intelligence Xcelsius and other Business Objects products and services mentioned herein as well as their respective logos are trademarks or registered trademarks of Business Objects Software Ltd Business Objects is an SAP companySybase and Adaptive Server iAnywhere Sybase 365 SQL Anywhere and other Sybase products and services mentioned herein as well as their respective logos are trademarks or registered trademarks of Sybase Inc Sybase is an SAP company
2012-12-17 CUSTOMER 4750
Crossgate mgic EDDY B2B 360deg and B2B 360deg Services are registered trademarks of Crossgate AG in Germany and other countries Crossgate is an SAP companyAll other product and service names mentioned are the trademarks of their respective companies Data contained in this document serves informational purposes only National product specifications may varyThese materials are subject to change without notice These materials are provided by SAP AG and its affiliated companies (ldquoSAP Grouprdquo) for informational purposes only without representation or warranty of any kind and SAP Group shall not be liable for errors or omissions with respect to the materials The only warranties for SAP Group products and services are those that are set forth in the express warranty statements accompanying such products and services if any Nothing herein should be construed as constituting an additional warranty
DisclaimerSome components of this product are based on Javatrade Any code change in these components may cause unpredictable and severe malfunctions and is therefore expressly prohibited as is any decompilation of these componentsAny Javatrade Source Code delivered with this product is only to be used by SAPrsquos Support Services and may not be modified or altered in any way
Documentation in the SAP Service MarketplaceYou can find this document at the following address httpservicesapcominstguides
4850 CUSTOMER 2012-12-17
SAP AGDietmar-Hopp-Allee 1669190 WalldorfGermanyT +4918 0534 34 34F +4918 0534 34 20wwwsapcom
copy Copyright 2012 SAP AG All rights reservedNo part of this publication may be reproduced or transmitted in any form or for any purpose without the express permission of SAP AG The information contained herein may be changed without prior notice
- SAP Enhancement Package 1 for SAP CRM 70
-
- Table of Contents
- 1 Introduction
- 2 Planning and Preparation
-
- 21 Prerequisites for the Business Packages for SAP CRM
-
- 3 Installation
- 4 Post-Installation
-
- 41 Checking the Availability of Back-End Systems for SAP CRM Java Components
-
- 411 Creating a Back-End User
- 412 Checking the Connection to the ABAP System
- 413 Configuring and Checking the TREX Service
- 414 Checking the Selling via eBay Processes
-
- 42 Post-Installation Steps for Workforce Deployment Application and Calculation Services
-
- 421 Implementing WFMCORE 200 Using Transaction SAINT
- 422 Configuring the Extended Configuration Management (XCM) for WFD Application and Calculation Services
- 423 Checking Workforce Deployment Calculation Services
- 424 Checking the Installation of WFD Application Services and WFD Calculation Services
-
- 43 Post-Installation Steps for the Business Packages for SAP CRM
-
- 431 Creating Roles for the SAP CRM Business Packages
- 432 Installation of the Info Center for the SAP CRM Business Package
-
- 4321 Importing the SAP CRM Info Center Configurations and Directory Structure
- 4322 Activating Manual Ordering of Folders for the sapcrm Repository
- 4323 Creating Indexes and Taxonomies for the sapcrmnews Repository
- 4324 Creating the Index for the sapcrm Repository
- 4325 Configuring the Personal Search
- 4326 Increasing the Number of JCo Connections
-
- 44 Post-Installation Steps for MapBox
-
- 441 Assigning User Groups for MapBox Users
- 442 Configuring an RFC Destination for MapBox
- 443 Performing Initial Configuration for MapBox
- 444 Executing the MapBox
- 445 Performing the Smoke Test for MapBox
- 446 Ensuring Optimal Block Size settings
- 447 Adapting Memory Settings for the J2EE Engine
-
- 45 Activating the CRM Web Client
- 46 Installing and Configuring CRM Application Server Loyalty Add-On Component
- 47 Starting XCM
- 48 Accessing Configuration Documentation in SAP Solution Manager
-
- 5 Additional Information
-
- 51 Installing the Business Packages for SAP CRM Using JSPM (Optional)
- 52 Troubleshooting for the Business Package for SAP CRM
-
- 521 Activating BI Templates Manually
- 522 Dragging the Central Search onto the Portal Desktop
-
- Copyright and trademarks
-

This page is left blank for documents that are printed on both sides
4 Post-Installation
Only valid for Java |
41 Checking the Availability of Back-End Systems for SAP CRM Java Components
Only valid for ABAP+JavaJava |
After the installation you have to check the availability of back-end systems as follows
1 To test the connection to the ABAP back-end system you create a back-end user [page 11]
2 Depending on various business processes you check the following back-end systems
ABAP system [page 12]
TREX Server [page 14]End of ABAP+JavaJava |
Only valid for ABAP+JavaJava |
411 Creating a Back-End User
You need service users to provide the anonymous remote function call (RFC) stateless connection
between your back-end system and your Web-based applications
Prerequisites
You have installed and configured CRM E-Commerce Web-based applications
Procedure
You create a service user in your back-end SAP CRM system and assign it to the Web-based application
as follows
1 In your ABAP back-end system on the SAP Easy Access screen choose Tools Administration User
Maintenance Users (transaction SU01)
2 Create a user of the type Service User and enter all required data
3 Assign the appropriate service user authorization role to the user on the Roles tab For a list of
service user roles for the various Web-based applications see the following table
Application Authorization Role for Service User
E-Selling B2B SAP_CRM_ECO_ISA_TU_B2B
E-Selling B2C SAP_CRM_ECO_ISA_TU_B2C
E-Selling EASYB2B SAP_CRM_ECO_ISA_TU_EASYB2B
4 Post-Installation
41 Checking the Availability of Back-End Systems for SAP CRM Java Components
2012-12-17 CUSTOMER 1150
Application Authorization Role for Service User
E-Selling CVIEWS SAP_CRM_ECO_ISA_TU_CVIEWS
E-Selling SHOPADMIN SAP_CRM_ECO_ISA_TU_SHOPADM
E-Selling USERADMIN SAP_CRM_ECO_ISA_TU_USERADM
E-Selling Auctioning via Web shop (AVW) SAP_CRM_ECO_TU_AVW
E-Selling via eBay (SVE) SAP_CRM_ECO_TU_SVE
E-Service Internet Customer Self Service (ICSS) SAP_CRM_ECO_ISE_TU_B2B (Authorizations for ICSS B2B)SAP_CRM_ECO_ISE_TU_B2C (Authorizations for ICSS B2C)
E-Service Complaints and Returns SAP_CRM_ECO_ISE_TU_CR
E-Service Remanufacturer inspection SAP_CRM_ECO_ISE_TU_INSP
Channel Management (CHM)Shared Catalog
SAP_CRM_ECO_CHM_TU_SHRDCAT
Channel Management (CHM) BOB SAP_CRM_ECO_ISA_TU_BOB
Channel Management (CHM) HOM SAP_CRM_ECO_ISA_TU_HOM
Channel Management (CHM) CSR SAP_CRM_ECO_ISA_TU_CSR
4 Save your entries
More Information
For more information about service users see the documentation ltyour projectgt Basic Settings for CRM
E-Commerce General Settings for CRM E-Commerce User Management in the SAP Solution Manager [page
41]End of ABAP+JavaJava |
Only valid for ABAP+JavaJava |
412 Checking the Connection to the ABAP System
This section tells you how to check the connection to the ABAP system
Prerequisites
To be able to test the connection to the ABAP system you need to create a user [page 11] on this system
Procedure
1 Start the Visual Administrator
1 On your central instance host change to the admin directory as follows
Only valid for IBM i5OSUNIX |
usrsapltSAPSIDgtltinstance_namegtj2eeadmin
End of IBM i5OSUNIX |
Only valid for Windows |
usrsapltSAPSIDgtltinstance_namegtj2eeadmin
End of Windows |
4 Post-Installation
41 Checking the Availability of Back-End Systems for SAP CRM Java Components
1250 CUSTOMER 2012-12-17
2 Only valid for IBM i5OSUNIX |
Run goshEnd of IBM i5OSUNIX |
3 Only valid for Windows |
Double-click gobatEnd of Windows |
For more information about the Visual Administrator see the SAP Library at
httphelpsapcomnw70 SAP NetWeaver 70 Library (including Enhancement Package 2) English
SAP NetWeaver Library SAP NetWeaver by Key Capability Application Platform by Key Capability Java
Technology Administration Manual J2EE Engine J2EE Engine Administration Tools
2 Only valid for IBM DB2 for i5OSIBM DB2 for i5OS (LinuxWindows)IBM DB2 for Linux and UNIX and WindowsIBM DB2 for zOSMaxDBMS SQL ServerOracle |
Log on to the Visual Administrator with administrator rights
NOTE
If you chose configuration Use ABAP in the User Management Engine (UME) and you selected
SAP CRM ABAP as your ABAP back end with UME during the installation a successful logon
to the Visual Administrator means that the SAP CRM ABAP back-end system is available
You have now finished this procedure
Otherwise continue with the next step
End of IBM DB2 for i5OSIBM DB2 for i5OS (LinuxWindows)IBM DB2 for Linux and UNIX and WindowsIBM DB2 for zOSMaxDBMS SQL ServerOracle |
3 Start an application that uses the SAP CRM ABAP system if it is stopped
1 In the left pane of the Visual Administrator open clusterserverservices and choose
Deploy service
2 Select the application
Application Context Root
crm~b2b b2b
crm~icss_b2b icss_b2b
crm~sve sve
3 To start the selected application choose Start
4 Open the user interface for the Extended Configuration Management (XCM) Administrator as
follows
1 Open a Web browser and enter the following URL
httpltJ2EE_hostgtltJ2EE_portgtltcontext rootgtadminxcminitdo
where ltcontext rootgt is the context root of the application started in the previous step
To find information about the components that can be configured choose help
2 Choose Start Component
You can find information about configuration of components on the right hand side of the
screen
4 Post-Installation
41 Checking the Availability of Back-End Systems for SAP CRM Java Components
2012-12-17 CUSTOMER 1350
3 To create a jco Component follow the instructions provided in the Example of component
configuration field
If the ldquorun testrdquo operation described in the component configuration section of a jco setting
was successful the ABAP system can be reached from the Java system
More InformationFor more information about using Extended Configuration Management (XCM) to configure your
application see Using Extended Configuration Management (XCM) [page 40] and the documentation in the
SAP Solution Manager [page 41]End of ABAP+JavaJava |
Only valid for Java |
413 Configuring and Checking the TREX Service
You need to configure and check the TREX service
Procedure
Configuring the TREX Service
1 Start the Visual Administrator
2 Connect to the AS Java
3 Choose Server node Open Services Node Select TREX Service
4 Maintain the values for nameserveraddress and nameserverbackupserverlist
For more information see Specifying the Address of the TREX Name Server in Installation Guide ndash SAP NetWeaver
70 Standalone Engine Search and Classification (TREX) Single Host at
httpservicesapcominstguidesNW70 Installation Installation - Standalone Engines SAP
NetWeaver Search and Classification TREX Installing TREX 70 Single Host
Checking the TREX Service
1 Start the application sapcomcrm~b2b as described in step 3 of Checking the Connection to the ABAP
System [page 12]
2 Open a Web browser and enter the following URL
httpltJ2EE_hostgtltJ2EE_portgtb2badmintrextrex_640jsp
ResultIf the connection was established successfully the message TREX Server is available appearsEnd of Java |
Only valid for Java |
414 Checking the Selling via eBay Processes
To use the selling via eBay (SVE) processes the Java system requires an http connection to
4 Post-Installation
41 Checking the Availability of Back-End Systems for SAP CRM Java Components
1450 CUSTOMER 2012-12-17
httpwwwebaycom
To test the connection you need to create an XCM component ebayCommunicator for the sapcom
crm~sve application
Procedure
To create the Extended Configuration Management (XCM) component ebayCommunicator using
application sapcomcrm~sve proceed as described in Checking the ABAP System [page 12]
NOTE
Make sure that you replace jco component with ebayCommunicator component when following
the procedure in Checking the ABAP System [page 12]
More Information
For more information about using Extended Configuration Management (XCM) to configure your
application see Using Extended Configuration Management (XCM) [page 40] and the documentation in the
SAP Solution Manager [page 41]End of Java |
End of Java |
Only valid for Java |
42 Post-Installation Steps for Workforce Deployment Application and Calculation Services
Only valid for ABAP+JavaJava | CRM Java Components (JCRM)Extended E-Selling Components (XECO) |
You have to perform the following steps to check and configure Workforce Deployment Application
and Calculation Services (WFD ASCS)
You implement WFMCORE 200 using transaction SAINT [page 15]
You configure the XCM administration tool for WFD ASCS [page 16]
You check WFD calculation services [page 18]
You check the installation of WFD ASCS [page 19]End of ABAP+JavaJava | CRM Java Components (JCRM)Extended E-Selling Components (XECO) |
Only valid for ABAP+JavaJava |
421 Implementing WFMCORE 200 Using Transaction SAINT
Before you can check and configure the Java part of Workforce Deployment Application and
Calculation Services (WFD ASCS) you need to implement WFMCORE 200
4 Post-Installation
42 Post-Installation Steps for Workforce Deployment Application and Calculation Services
2012-12-17 CUSTOMER 1550
Only valid for CRM Java Components (JCRM) |
The WFMCORE 200 component contains all necessary ABAP classes and libraries required for the
various Workforce Deployment scenarios and processes including Service Resource Planning in CRM and
Retail Multisite Workforce DeploymentEnd of CRM Java Components (JCRM) |
Procedure
1 Log on to your ABAP system
2 Install WFMCORE 200 using transaction SAINT as described in SAP Note 830595
3 Only valid for CRM Java Components (JCRM) |
If you are implementing the Service Resource Planning in CRM process variant run the report
WFDBP_UPDATE_BLUEPRINT to update tables that define the settings required to properly
display and maintain Service Arrangements in the People-Centric User InterfaceEnd of CRM Java Components (JCRM) |
End of ABAP+JavaJava |
Only valid for ABAP+JavaJava |
422 Configuring the Extended Configuration Management (XCM) for WFD Application and Calculation Services
Workforce Deployment Application Services (WFD AS) sends calculation and forecasting requests to
a CRM ABAP back-end system WFD Calculation Services (WFD CS) picks up the requests from this
CRM ABAP back-end system You define the connection to the CRM ABAP back-end system through
Extended Configuration Management (XCM) Admin
For more information about using Extended Configuration Management (XCM) to configure your
application see Using Extended Configuration Management (XCM) [page 40] and the documentation in the
SAP Solution Manager [page 41]
The csjcoxxxxx XCM parameters define the JCO connection to the SAP CRM ABAP system where
the WFD CS maintains forecast and calculation requests You can connect to the CRM ABAP system
using one of the following
A message or dispatching server by specifying csjcomshost csjcogroup and csjcor3name
An application server by specifying csjcoahost and csjcosysnr
In either case you must also specify csjcoclient csjcouser and csjcopassword
XCM Parameter Name Example Value Description
csjcoahost us0091wdfsapcorp Application server host name of the SAP CRM Calculation Service
csjcosysnr 91 System number of the R3 Calculation Service (for example 09)
csjcomshost us0091wdfsapcorp Message server host name of the SAP CRM Calculation Service
csjcogroup PUBLIC Group of the SAP CRM Calculation Service (case sensitive for example PUBLIC)
4 Post-Installation
42 Post-Installation Steps for Workforce Deployment Application and Calculation Services
1650 CUSTOMER 2012-12-17
XCM Parameter Name Example Value Description
csjcor3name Q5C System ID of the SAP CRM Calculation Service (for example IDES)
csjcoclient 505 Client of the SAP CRM Calculation Service
csjcouser Back end user for JCO connection to the SAP CRM Calculation Service
csjcopassword Password for the back-end user
You need to configure these csjcoxxxxx XCM parameter values in each instance of WFD AS and
WFD CS Make sure that the values are the same in all instances
Configuring the XCM for WFD Calculation Services
This business scenario is relevant for defining the WFD CS You must perform this XCM configuration
for the WFD CS to run
1 Start the XCM using the following URL
httpltJ2EE_hostgtltJ2EE_portgtwfdcsadminxcminitdo
2 Access the configuration using the following path General Application Settings Customer sisopt
sisoptconfig
Process Description Web ApplicationXCM Application Configurations
Calculations Service Workforce scheduling application
wfdcs sisoptconfig
3 In addition to the csjcoxxxx XCM parameters you need to define the http port of the J2EE
instance where WFD CS is running
XCM Parameter Name Example Value Description
cshttpport 51000 The http port of the web server where the WFD Calculation Services application is running (for example 50000)
4 Restart the application after saving the XCM configuration
Configuring the XCM for WFD Application Services
This business scenario is relevant for connecting the WFD AS to the WFD CS
1 Start the XCM using the following URL
httpltJ2EE_hostgtltJ2EE_portgtwfdadminxcminitdo
2 Access the configuration using the following path General Application Settings Customer sis
sisconfig
Process Description Web ApplicationXCM Application Configurations
Application Services Web-based scheduling application
wfd sisconfig
3 Restart the application after saving the XCM configurationEnd of ABAP+JavaJava |
4 Post-Installation
42 Post-Installation Steps for Workforce Deployment Application and Calculation Services
2012-12-17 CUSTOMER 1750
Only valid for ABAP+JavaJava |
423 Checking Workforce Deployment Calculation Services
After configuring Workforce Deployment Calculation Services (WFD CS) with Extended Configuration
Management (XCM) and restarting the application you need to go to the WFD CS configuration page
to check that it is running
Prerequisites
You have completed the installation of WFD Application Service (AS) and CS as described in this
documentation
Only valid for CRM Java Components (JCRM) |
You have downloaded the Business Package for Retail (Release 10) from sdnsapcom SAP NetWeaver
Capabilities User Productivity Portal and Collaboration Portal Content Portfolio
For more information about the portal content versions for your release see the documentation
Master Guide ndash SAP Customer Relationship Management 70 at httpservicesapcomcrm-instEnd of CRM Java Components (JCRM) |
Only valid for CRM Java Components (JCRM) |
You must have access to the Portal Admin role in SAP CRM through the Enterprise Portal to complete
this part of the WFD ASCS installation
For more information see Configuring the CRM Business Package on the SAP Service Marketplace at
httpservicesapcomcrm-inst SAP CRM 70 CRM Business Packages and PC UI Section
CRM Portal Administrator contains specific instructions on configuring the portal for access to WFD
AS and CS Apply the instructions to the Portal Admin roleEnd of CRM Java Components (JCRM) |
You have configured your portal users based on the required settings as described in the
configuration documentation for your IT scenario
For more information see Accessing Configuration Documentation in the SAP Solution Manager [page 41]
Procedure
1 Access the WFD CS configuration page through the Enterprise Portal using the role Portal
Administrator
2 Choose WFD Calculation Services Configuration
The Configuration tab looks as follows
Tab To Complete InstallationFor ongoing Configuration Management
Calculation Servers Required for at least one calculation server
Required for each additional calculation server
Logging Localization No Required to add or change logging once fully operational
End of ABAP+JavaJava |
4 Post-Installation
42 Post-Installation Steps for Workforce Deployment Application and Calculation Services
1850 CUSTOMER 2012-12-17
Only valid for ABAP+JavaJava |
424 Checking the Installation of WFD Application Services and WFD Calculation Services
This section tells you how to check that you have correctly installed the Java components for Workforce
Deployment Application Services (WFD AS) and WFD Calculation Services (WFD CS) This section
does not tell you how to check the connection between the WFD AS and the WFD CS
The procedure below shows you how to create a simple calculation request and verify that the
Calculation Server has received the request This helps you check that you have correctly installed all
WFD AS or CS components and that they are communicating with each other
Prerequisites
You have completed all the installation steps described in this documentation
You have connected WFD AS or CS components with the Enterprise Portal
You have installed the required business packages according to Checking Workforce Deployment
Calculation Services [page 18]
Procedure
1 To check that WFD AS is working and listening for HTTP requests enter the following URL
httpltJ2EE_hostgtltJ2EE_portgtwfdlogondo
The following error confirms that the application is working
Your session has expired Please renew your session by clicking a section link in
the Portal menu
2 Access the WFD CS from the Enterprise Portal through the Portal Admin role and check that the
WFD CS page comes up with no errors
If the page does not come up possible errors are
Error Message Cause
Missing value for XCM configuration
parameter cshttpport
The XCM parameter cshttpport was not filled
The request could not be completed
due to the following
errorsltfollowed by details of the
particular error usually related to
the JCO connectiongt
One of the XCM parameters csjcoxxxxx might be incorrect
EXAMPLE
The user or password are incorrect
3 Test the submission of a calculation request to see if the WFD CS can process the request
You can simulate a calculation request submission by executing the RFC
TEST_WFDCS_CALCREQ_SUBMIT from the CRM back-end system defined in the csjcoxxxxx XCM
parameters of WFD CS
4 Post-Installation
42 Post-Installation Steps for Workforce Deployment Application and Calculation Services
2012-12-17 CUSTOMER 1950
EXAMPLE
For example when you installed WFD CS you configured the csjcoxxxxx XCM
parameters to point to system ID Q5C client 505 You now need to log in to Q5C client 505
and execute TEST_WFDCS_CALCREQ_SUBMIT with transaction SE37 using the default import
parameters
4 Check the Requests tab of the WFD CS page to check the status of entries with the location name
SMOKETEST has the status FAILED
Status FAILED indicates a successful smoke test It means that the Request Manager successfully
sent the request to the Solver which successfully processed it
Status QUEUED probably means that the XCM parameter cshttpport was incorrectEnd of ABAP+JavaJava |
End of Java |
Only valid for ABAP+JavaJava |
43 Post-Installation Steps for the Business Packages for SAP CRM
The following sections provide information about the steps that you have to perform after importing
the Business Package for SAP CRM
Only valid for ABAP+JavaJava |
431 Creating Roles for the SAP CRM Business Packages
Procedure
If you create your own roles from the SAP CRM Business Packages also add the every user role
(eu_core_role) to your role The Every User Role contains the personalization functionality for the SAP
NetWeaver Portal
For more information about the Every User Role see the SAP Library at
httphelpsapcomnw70 SAP NetWeaver 70 Library (including Enhancement Package 2) English SAP
NetWeaver Library SAP NetWeaver by Key Capability People Integration by Key Capability Portal Portal
Administration Guide Super Administration Pre-configured Roles Every User Roles End of ABAP+JavaJava |
Only valid for ABAP+JavaJava |
432 Installation of the Info Center for the SAP CRM Business Package
This section describes how to install the Info Center
4 Post-Installation
43 Post-Installation Steps for the Business Packages for SAP CRM
2050 CUSTOMER 2012-12-17
Prerequisites
You have installed the Business Package for SAP CRM [page 43]
You have administrator rights
Process Flow
1 You import the SAP CRM info center configurations and directory structure [page 21]
2 You activate manual ordering of folders for the sapcrm Repository [page 23]
3 You create indexes and taxonomies for the sapcrmnews Repository [page 23]
4 You create the index for the sapcrm Repository [page 25]
5 You configure the personal search [page 25]
6 If required you increase the number of JCo connections [page 26]
Only valid for ABAP+JavaJava |
4321 Importing the SAP CRM Info Center Configurations and Directory Structure
The directory structure of the info center has been made available in one content package and you can
import it using the Information and Content Exchange (ICE) Repository
For more information about ICE see SAP Library at
httphelpsapcomnw70 SAP NetWeaver 70 Library (including Enhancement Package 2) English SAP
NetWeaver Library SAP NetWeaver by Key Capability Information Integration by Key Capability Knowledge
Management Content Managers Guide Additional Tasks for Content Managers Content Exchange Distributing
Content (Offline)
Procedure
Importing the Directory Structure
1 Log on to the Portal as content manager
2 Choose Content Management Content Exchange Upload
3 Only valid for Windows |
Select file fullupdate_infocenterzip from directory ltservlet_enginegtirjrootWEB-INF
portalportalappsepcrmchmkmexpice and confirm the uploadEnd of Windows |
Only valid for IBM i5OSUNIX |
Select file fullupdate_infocenterzip from directory ltservlet_enginegtirjrootWEB-INF
portalportalappsepcrmchmkmexpice and confirm the uploadEnd of IBM i5OSUNIX |
The zip file is now imported using the ICE protocol
If you cannot see the ICE repository this might be due to one of the following reasons
The ICE repository was hidden in the virtual root repository
4 Post-Installation
43 Post-Installation Steps for the Business Packages for SAP CRM
2012-12-17 CUSTOMER 2150
In this case do the following
1 Log on to the portal as system administrator
2 In the SAP NetWeaver Enterprise Portal choose System Administration System Configuration
Knowledge Management Content Management Repository Managers Virtual Root Repository
3 Check whether the ICE Repository has been entered under Repositories to exclude
4 Remove it from the list
5 Save your changes
6 Restart the Servlet Engine
The repository has been ldquoswitchedrdquo to invisible
1 Log on to the portal as system administrator
2 In the SAP NetWeaver Enterprise Portal choose System Administration System Configuration
Knowledge Management Content Management Repository Managers Content Exchange
Repository
3 If the property hide in root folder is active deselect it
4 Restart the Servlet Engine
NOTE
After the import check whether the directory structure was created by choosing Content
Administration KM Content in the SAP NetWeaver Enterprise Portal The list of folders should
contain the folders sapcrm and sapcrmnews
Checking Whether the Directory Structure Has Been Imported Successfully
You can only import the structure if there is a repository with the same name For example if a zip file
is exported from the repository sapcrm there must also be a repository with the name sapcrm in the
target system
The sapcrm and sapcrmnews repositories as well as the CRM-Namespace filter are created during the
import of the SAP CRM KM extension configuration archive To check whether this configuration
archive has been imported successfully proceed as follows
1 Log on to the portal as system administrator
2 In the SAP NetWeaver Enterprise Portal choose System Administration Monitoring Knowledge
Management Deployment Monitor Config Archives
3 Check whether the archive comsappctcrmappkmextprjconfig is installed in the system
If the archive comsappctcrmappkmextprjconfig is not installed in the system import it
manually as follows
1 Log on to the portal as system administrator
2 In the SAP NetWeaver Enterprise Portal choose System Administration Monitoring Knowledge
Management Deployment Monitor Config Archives Actions Import
4 Post-Installation
43 Post-Installation Steps for the Business Packages for SAP CRM
2250 CUSTOMER 2012-12-17
3 Only valid for Windows |
Select the archive comsappctcrmappkmextprjconfigconfigarchive from directory
ltSAPSIDgtJCltinstance_numbergtj2eeclusterappssapcomep~crm~chm
servlet_jspepcrmchmkmexprootWEB-INFconfig and confirm the importEnd of Windows |
4 Only valid for IBM i5OSUNIX |
Select the archive comsappctcrmappkmextprjconfigconfigarchive from
directory ltSAPSIDgtJCltinstance_numbergtj2eeclusterappssapcomep~crm~chm
servlet_jspepcrmchmkmexprootWEB-INFconfig and confirm the importEnd of IBM i5OSUNIX |
After the import the directory structure has no restrictions on rights Make sure that you modify the
rights of the various folders to meet your companyrsquos requirementsEnd of ABAP+JavaJava |
Only valid for ABAP+JavaJava |
4322 Activating Manual Ordering of Folders for the sapcrm Repository
The sapcrm Repository folders are ordered in a specific sequence
Procedure
To display this sequence activate manual ordering for each directory
For more information see the SAP Library at
httphelpsapcomnw70 SAP NetWeaver 70 Library (including Enhancement Package 2) English SAP
NetWeaver Library SAP NetWeaver by Key Capability Information Integration by Key Capability Knowledge
Management Content Managers Guide Providing Shared Access to Departmental Documents Sorting Documents in a
Folder ManuallyEnd of ABAP+JavaJava |
Only valid for ABAP+JavaJava |
4323 Creating Indexes and Taxonomies for the sapcrmnews Repository
To make news available for indexing and searching create two new indexes
Prerequisites
You have administrator rights for Knowledge Management on the server
For more information see the SAP Library at
httphelpsapcomnw70 SAP NetWeaver 70 Library (including Enhancement Package 2) English SAP
NetWeaver Library SAP NetWeaver by Key Capability Information Integration by Key Capability Knowledge
Management
4 Post-Installation
43 Post-Installation Steps for the Business Packages for SAP CRM
2012-12-17 CUSTOMER 2350
Procedure
Creating Indexes and Taxonomies for the sapcrmnews Repository
The Business Package contains an iView ndash epbp_crmchm-pmiviewsnews_flash ndash that combines all
news with the istopnews=yes attribute in a virtual folder To guarantee the function of this iView
create two indexes in KM
1 In the SAP NetWeaver Enterprise Portal choose System Administration System Configuration
Knowledge Management Index Administration
2 Create an index of the Search and Classification type with a suitably configured taxonomy
3 Choose sapcrmpartnernews as the index ID Otherwise the path to the folder specified in the iView
is incorrect
If you choose another index ID you must also modify accordingly the folder properties in the
iView for one of the following
Folders path to content and path to root
Folders Path to Initially Displayed Folder and Path to Root Folder for Navigation
If you want to link two portal servers with a TREX server you must modify the index name and
iView properties on one of the portal servers
4 Assign folder sapcrmpartnerPartnernews as a data source
This moves all news with the (virtual) Top flag from this folder to the Newsflash iView
5 Create a ldquoquery-basedrdquo taxonomy with the name PartnerNewsFlash choosing Automatic
Classification before you save the taxonomy
NOTE
The outbound delivery includes only the iView above for virtually combining news If you
also want to use this functionality for other news channels (for example internal news) use
your own index and taxonomy for each channel
For more information see the SAP Library at
httphelpsapcomnw70 SAP NetWeaver 70 Library (including Enhancement Package 2) English SAP
NetWeaver Library SAP NetWeaver by Key Capability Information Integration by Key Capability Knowledge
Management Administration Guide System Administration System Configuration lsquoIndex Administrationrsquo iView
Creating Queries for the Taxonomies of sapcrmnews Repositories
1 Log on to the portal as content manager
2 Choose Content Management Classification Taxonomy Query Builder
3 Add a search query to check the istopnews property for the value Yes
4 Enter PartnerNewsFlash as the name for the taxonomy
Here too a property of the iView links to a taxonomy with this name So if you want to choose
another name you must modify the path to the content folder property of the iView
For more information see the SAP Library at
4 Post-Installation
43 Post-Installation Steps for the Business Packages for SAP CRM
2450 CUSTOMER 2012-12-17
httphelpsapcomnw70 SAP NetWeaver 70 Library (including Enhancement Package 2) English SAP
NetWeaver Library SAP NetWeaver by Key Capability Information Integration by Key Capability Knowledge
Management Administration Guide System Administration System Configuration Taxonomies and ClassificationEnd of ABAP+JavaJava |
Only valid for ABAP+JavaJava |
4324 Creating the Index for the sapcrm Repository
To make Info center documents available for indexing and searching create a new index with sapcrm
as a data source
Prerequisites
You have administrator rights for Knowledge Management on the server
Procedure
Choose a name of your own Search as a service and standard as a crawler parameter
For more information see the SAP Library at
httphelpsapcomnw70 SAP NetWeaver 70 Library (including Enhancement Package 2) English SAP
NetWeaver Library SAP NetWeaver by Key Capability Information Integration by Key Capability Knowledge
ManagementEnd of ABAP+JavaJava |
Only valid for ABAP+JavaJava |
4325 Configuring the Personal Search
Prerequisites
You have administrator rights for Knowledge Management on the server
Procedure
1 Create an index for the userhome repository
To make personal folder documents available for the search create a new index with root
userhome as the data source
2 Create a search option set for personal search
To assign the search index and a start folder to the search for personal documents create a Search
Option Set with the name CRMPersonalFolderSearch As an index enter the index for the
userhome repository created above and ~alias~userhomeuseridPersonal Documents as the
root folder for the search
For more information see the SAPLibrary at
4 Post-Installation
43 Post-Installation Steps for the Business Packages for SAP CRM
2012-12-17 CUSTOMER 2550
httphelpsapcomnw70 SAP NetWeaver 70 Library (including Enhancement Package 2) English SAP
NetWeaver Library SAP NetWeaver by Key Capability Information Integration by Key Capability Knowledge
Management End of ABAP+JavaJava |
Only valid for ABAP+JavaJava |
4326 Increasing the Number of JCo Connections
This section tells you how to increase the number of concurrent Java Connector (JCo) connections
By default the maximum number of concurrent JCo connections is 100 The value depends on the
number and behavior of the users in the portal For more information see SAP Note 316877
You can specify this value when you plan the installation of your SAP NetWeaver Enterprise Portal
Make sure that you first analyze the number and behavior of the users
Procedure
To increase the maximum number of concurrent JCo connections increase the value of the
environment variable CPIC_MAX_CONV
EXAMPLE
Initial default value CPIC_MAX_CONV=100
Increased value CPIC_MAX_CONV=1000
End of ABAP+JavaJava |
End of ABAP+JavaJava |
End of ABAP+JavaJava |
Only valid for ABAP+JavaJava | MapBox (MBX) |
44 Post-Installation Steps for MapBoxOnly valid for Java | MapBox (MBX) |
You have to perform the following post-installation steps for MapBox
You assign user groups for MapBox users [page 27]
You configure an RFC destination for TCPIP connections [page 28]
You perform initial configuration for MapBox [page 28]
You execute the Map Box [page 34]
You perform the smoke test [page 35]
If required you perform additional settings for MapBox
Block size settings [page 38]
Memory settings for the J2EE Engine [page 39]End of Java | MapBox (MBX) |
4 Post-Installation
44 Post-Installation Steps for MapBox
2650 CUSTOMER 2012-12-17
Only valid for Java | MapBox (MBX) |
441 Assigning User Groups for MapBox Users
To access the MapBox URL you need to provide the correct security rights for individual user groups
Procedure
1 Log on to the Visual Administrator
1 On your central instance host change to the following directory
Only valid for IBM i5OSUNIX |
usrsapltSAPSIDgtltinstance_numbergtj2eeadmin
End of IBM i5OSUNIX |
Only valid for Windows |
usrsapltSAPSIDgtltinstance_numbergtj2eeadmin
End of Windows |
2 Only valid for IBM i5OSUNIX |
Run goshEnd of IBM i5OSUNIX |
3 Only valid for Windows |
Double-click gobatEnd of Windows |
For more information about the Visual Administrator see the SAP Library at
httpshelpsapcomnw70 SAP NetWeaver Library SAP NetWeaver by Key Capability
Application Platform by Key Capability Java Technology Administration Manual J2EE Engine J2EE Engine
Administration Tools
2 Choose the server node from the left-hand window
3 Choose Services Security Provider
A list of deployed components is displayed
4 Choose MapBoxLauncher from this list (sapcom
comsapsyncpointmapboxlaunchermapboxlauncher)
A list of tabs appears on the right
5 Choose Security Roles from the list
A list of security roles appears
6 If no display and modify roles are displayed add these roles as follows
1 Choose Switch to Edit Mode from the top task bar to switch to edit mode
2 Add display and modify roles by choosing Add
7 For both the display and modify roles perform the following
1 Choose Switch to Edit Mode from the top task bar to switch to edit mode
2 Choose the Groups tab from the list on the far right
3 Choose Search
4 Post-Installation
44 Post-Installation Steps for MapBox
2012-12-17 CUSTOMER 2750
A list of user groups appears
4 Select the user groups that you want to enable for the two roles
Add to the left of the user group display is now highlighted
5 Choose Add to add the user group for the selected roleEnd of Java | MapBox (MBX) |
Only valid for Java | MapBox (MBX) |
442 Configuring an RFC Destination for MapBox
After the installation you have to create an RFC destination for MapBox
Procedure1 Log on to the CRM server
2 Enter transaction SM59
The Display and Maintain RFC Destinations screen appears
3 Choose Technical Settings Activation Type and create a new destination with the type TCPIP
4 Choose Registered Server Program and enter a unique value for program ID
For example you might enter MAPBOX723 for SAP client 723
5 Enter the details of the gateway host and gateway service in Gateway Options
1 Gateway host
Enter the name of your message server You can also enter the IP address of your message
server
2 Gateway service
Enter your SAP CRM system number prefixed with the string sapgw
For example if your system number is 02 enter sapgw02
6 If the CRM system is a Unicode-enabled system choose Unicode in Special Options
7 Save the destination
8 Choose MapBox Configuration Page Connecting settings from the URL and enter the same RFC
destination name in the relevant fieldEnd of Java | MapBox (MBX) |
Only valid for Java | MapBox (MBX) |
443 Performing Initial Configuration for MapBox
Procedure1 Open a browser window and enter the following URL
httplthostnamegtltport_numbergtmapboxlauncher
NOTE
If you are logged on to the machine where the J2EE server is running you can also enter the
following URL
4 Post-Installation
44 Post-Installation Steps for MapBox
2850 CUSTOMER 2012-12-17
httplocalhostltport_numbergtmapboxlauncher
2 Choose Configuration
3 Edit the values according to your SAP system and choose Save
The application asks you to enter a user name and password
4 Enter the user name and password used for the SAP J2EE Engine Visual Administrator
A description of the properties and example values for the properties is given below
Result
You see the default connection settings for MapBox as shown in the graphic below A description
of the properties and example values are provided in the adjacent table
Figure 1 MapBox Default Connection Settings
Property Purpose Example
SAP System SAP System name ABC FAZ
Message Server Message server host name xyzmain
Group SAP System group PUBLIC SPACE
System Number SAP Gateway system number prefixed with sapgw
sapgw02
Unicode Used for setting the Unicode option for the CRM server Default value is no
yes
Maximum allowed wait time interval between ISP Processing and Commit call
Time-out period between an ISP_MAPBOX call and an ISP_COMMIT call
300
4 Post-Installation
44 Post-Installation Steps for MapBox
2012-12-17 CUSTOMER 2950
Property Purpose Example
Client SAP logon client 723
User Name SAP logon user John
Password SAP logon password
Language SAP logon language EN
Destination The RFC destination with which you need to register the MapBox This is the value you enter in step 3 of Configuring an RFC Destination for MapBox [page 28]
MAPBOX723
Number of server instances The number of JCO server execution instances used by the MapBox to process server requests This number indicates the number of CRM inbound queues that are running simultaneously
10
The above MapBox connection configuration is meant for one SAP client running with the CRM
Server If you want to run the MapBox with two or more SAP clients of the same CRM system
you can use Add Client on the configuration page and edit the values accordingly However make
sure that the RFC destinations that these multiple clients listen to are always unique You can
leave the default values for the other settings
If you need more control over logging and tracing you can go to Log Settings on the configuration
page edit the values and choose Save The Log Settings screen with default values is shown in the
graphic below A description of the properties and example values for the properties is provided
in the adjacent table
Figure 2 Default Values for the Log Settings Screen
4 Post-Installation
44 Post-Installation Steps for MapBox
3050 CUSTOMER 2012-12-17
Property Purpose Example
Log and dumps directory This value specifies where the MapBox logs and dumps are stored If this field is left blank the ltuser_homegt folder is used as default value
Only valid for Windows |
Ctemp
End of Windows |
Only valid for IBM i5OSUNIX |
tmp
End of IBM i5OSUNIX |
Input payload dump This value specifies whether the input document coming to MapBox for processing is written or not
No
MapBox launcher trace level This value specifies with what granularity the MapBoxLauncher execution trace is generated6 specifies that a full MapBoxLauncher execution trace is generated whereas 0 specifies that the MapBoxLauncher execution trace is not generated Recommended value for production use is 0
0
MapBox launcher trace size The maximum file size of the generated trace When the size reaches the maximum value another file is created so that the old file can be deleted (for example due to lack of space) You can use alphabetic suffixes to specify the sizes The supported values are k or K ndash kilobytes g or G ndash gigabytes m or M ndash megabytes t or T ndash terabytes
50 k
CoordServer log level This value specifies the detail of the coordination server logging We recommended you not to change the default value of 1
2
SAP Java connector trace level This value specifies the detail of the SAP Java Connector logging The recommended value for production use is 0
2
MapBox log level The log level required for the MapBox to generate an internal log file A higher trace level means that a more detailed log file is created We recommend you to use 4D for production systems where D meansldquoOn Demandrdquo
2
4 Post-Installation
44 Post-Installation Steps for MapBox
2012-12-17 CUSTOMER 3150
Property Purpose Example
MapBox message dumps This value stands for copying the incoming and outgoing messages to the local system For better performance we recommend that you do not enable the message dump option
no
MapBox statistics This value specifies whether a file that lists the performance measurements of the MapBox is created We recommend you to use the value no for production use
no
MapBox logs location This value specifies where the MapBox logs are stored Possible locations are the MapBox repository on the CRM Server or the local file system The recommended value for production use is local_fs which indicates that the MapBox logs are stored on the local file system
local_fs
MapLog format The format in which the MapBox log file must be created The internal log file is by default created in a particular format However you can change this format to display the file in the SAP log file format The two values that are available are default and sap_log
default
The MapBox uses additional properties for performance such as caching and reuse of the MapBox
atoms These values are already set to optimum values and you cannot change them
The description of the properties is shown in the table below
Property Purpose Example
General Settings
max_elements_document This is the limit for the internal cache of the MapBox to hold the count of generated XML documentsWe recommend you not to change this value
100
cache_threshold This is the maximum threshold ndash in kilobytes ndash for a document to be cached in the internal cache of the MapBox
500
4 Post-Installation
44 Post-Installation Steps for MapBox
3250 CUSTOMER 2012-12-17
Property Purpose ExampleWe recommend you not to change this value
max_elements_cache This is the limit for the internal cache of the MapBox to hold the count of MapScenariosWe recommend you not to change this value
100
parallel_instances You use this value on systems where more than one CPU is used This setting allows you to specify the number of CPU instances that MapBox must use for processing so that the remainder can be used by non-MapBox related applications By default MapBox uses all the available CPUs for processing Values can range between 0 to N-1 where N is the number of available CPUs
4
thread_priority Specifies the number of threads MapBox uses during processing We recommend you to set an optimum value for this property so that MapBox does not utilize all available resources 0 = min 1 = low 2 = normal 3 = high 4 = max
3
reuse_count Sets the count for the number of times an atom-instance must be reused before it is destroyed A value of 0 means that the atom is not destroyed and can be used continuously Recommended value is 50 This means that the atom instance is reused 50 times before it is destroyed
100
Lock Server Settings
Operation_Mode The internal mode of operation for the coordination server We recommend not to change the default value of OUTPROC_CLIENT
OUTPROC_CLIENT
Registry_Port The Remote Method Invocation (RMI) port used for connecting to the coordination serverRMI is a Java mechanism for distributed computing
1099
4 Post-Installation
44 Post-Installation Steps for MapBox
2012-12-17 CUSTOMER 3350
Property Purpose ExampleDo not change this value unless port 1099 is unavailable In this case change it to 59856
HostName The name of the host where the coordination server resides
localhost
LocalName The name of the host where the MapBoxLauncher is executed We recommend you not to change the default value of localhost
Server
PollingInterval Polling interval in seconds to ask for shutdown of the coordination server We recommend you not to change the default value of 30
60
CleanUpInterval Cleanup interval in seconds to check for invalid locks created by the MapBoxLauncher We recommend you not to change the default value of 60
180
NOTE
A file name MapLogxsl is also available with the smoke test [page 35] This file is the stylesheet
that is used to format the display of the MapBox log file During the installation and execution
of the MapBox the MapBox log file is created in the following directory
Only valid for Windows |
ltUser_homegtTempMapBoxDumpsltyour_system_namegt500 where ltuser_homegt is the
home directory of the logged-on user ltyour system namegt is the CRM server you have
connected to and 500 is the client you have connected toEnd of Windows |
Only valid for IBM i5OSUNIX |
ltUser_homegtTempMapBoxDumpsltyour_system_namegt500 where ltuser_homegt is the
home directory of the logged-on user ltyour system namegt is the CRM server you have
connected to and 500 is the client you have connected toEnd of IBM i5OSUNIX |
RECOMMENDATION
We recommend that you copy MapLogxsl from the
ltsmoke_test_installation_directorygt to the directory mentioned aboveEnd of Java | MapBox (MBX) |
Only valid for Java | MapBox (MBX) |
444 Executing the MapBox
This section tells you how to execute the MapBox The procedure that you use to execute the Map Box
depends on its current support package (SP) level
4 Post-Installation
44 Post-Installation Steps for MapBox
3450 CUSTOMER 2012-12-17
Procedure
If the SP level of the MapBox is less than SP11 proceed as follows
1 Enter the following URL in your browser
httplthostnamegtltport_numbergtmapboxlaunchermanage
2 Choose Start MapBox
3 The application prompts you for a user name and password
Enter the user name and password for the J2EE Engine Visual Administrator
NOTE
MapBox typically takes 30 to 60 seconds to initialize depending on the number of SAP clients
To see the status of messages processed by MapBox choose Status
If the SP level of the MapBox is equal to or higher than SP11 the MapBox starts automatically
1 For the first MapBox installation you need to restart the Java application server (AS Java) after all
the configuration settings have been completed This automatically starts the MapBox (Autostart)
2 To check the status go to the URL httplthostnamegtltport_numbergtmapboxlauncher
manage
NOTE
MapBox Autostart needs approximately 60 seconds to allow other services of As Java to start
To see the status of messages processed by MapBox choose Status
Result
When the MapBox is running the status is shown as Ready to processEnd of Java | MapBox (MBX) |
Only valid for Java | MapBox (MBX) |
445 Performing the Smoke Test for MapBox
The smoke test checks whether the MapBox installation is error-free
Only valid for Windows |
To execute the smoke test you have to run two batch filesEnd of Windows |
Only valid for IBM i5OSUNIX |
To execute the smoke test you have to run two shell scriptsEnd of IBM i5OSUNIX |
Prerequisites
Before you start the procedure you need to copy the smoketestjar file to a new
ltsmoke_test_installation_directorygt of your choice which has two further subdirectories
firstrun and secondrun
4 Post-Installation
44 Post-Installation Steps for MapBox
2012-12-17 CUSTOMER 3550
You can find the smoketestjar file here
Only valid for IBM i5OSUNIX |
usrsapltinstance_IDgtJCltinstance_numbergtj2eeclusterserver0binext
comsapsyncpointmapboxEnd of IBM i5OSUNIX |
Only valid for Windows |
usrsapltinstance_IDgtJCltinstance_numbergtj2eeclusterserver0binext
comsapsyncpointmapboxEnd of Windows |
NOTE
Each subdirectory of ltsmoke_test_installation_directorygt ndash that is firstrun and
secondrun ndash contains the following files
MBSMOKETEST_IN_000xml
MBSMOKETEST_IN_001xml
MBSMOKETEST_IN_002xml
MBSMOKETEST_IN_003xml
After executing the smoke test you must verify whether the contents of the files generated
by your test are similar to the contents of the above files That is the XML documents that
are created in the smoke test must match the documents located in the
ltsmoke_test_installation_directorygt mentioned above
To execute the smoke test you need to install the SAP Java Connector (SAP JCo version 2012)
You have to download SAP JCo 2012 from SAP Service Marketplace at https
servicesapcomswdc before executing the smoke test
CAUTION
Make sure that you install the SAP Java Connector correctly
The file mapcaseprop is available in the ltsmoke_test_installation_directorygt This file
contains the connection parameters to be tested You can modify the contents of this file
CAUTION
You must replace the connection parameters in this file with the connection parameters that
you entered in the MapBoxMetaxml file
Procedure
1 Run the first stage of the smoke test
1 Only valid for Windows |
Execute the file smoketest_1bat from the ltsmoke_test_installation_directorygtEnd of Windows |
Only valid for Windows |
This prompts you to enter the followingEnd of Windows |
4 Post-Installation
44 Post-Installation Steps for MapBox
3650 CUSTOMER 2012-12-17
Only valid for Windows |
1 ltDRIVEgtusrsapltinstance_IDgtJCltinstance_numbergtj2ee
2 ltsmoke_test_installation_directorygt
3 ltpath_to_sapjcojargt
End of Windows |
Only valid for IBM i5OSUNIX |
Execute the file smoketest_1sh from the ltsmoke_test_installation_directorygtEnd of IBM i5OSUNIX |
Only valid for IBM i5OSUNIX |
1 usrsapltinstance_IDgtJCltinstance_numbergtj2ee
2 ltsmoke_test_installation_directorygt
3 ltpath_to_sapjcojargt
End of IBM i5OSUNIX |
2 Enter the appropriate paths
The smoke test creates the following files
MBSMOKETEST_IN_000xml
MBSMOKETEST_IN_001xml
MBSMOKETEST_IN_002xml
MBSMOKETEST_IN_003xml
3 Only valid for Windows |
Check the contents of the generated files against the contents of the files located in
ltsmoke_test_installation_directorygtSMOKETESTfirstrunEnd of Windows |
Only valid for IBM i5OSUNIX |
Check the contents of the four files against the contents of the files located in
ltsmoke_test_installation_directorygtSMOKETESTfirstrunEnd of IBM i5OSUNIX |
2 Run the second stage of the smoke test
1 Only valid for Windows |
Execute the file smoketest_2bat which is located in the
ltsmoke_test_installation_directorygtEnd of Windows |
Only valid for IBM i5OSUNIX |
Execute the file smoketest_2sh which is located in the
ltsmoke_test_installation_directorygtEnd of IBM i5OSUNIX |
This prompts you to enter the following
Only valid for Windows |
1 ltDRIVEgtusrsapltinstance_IDgtJCltinstance_numbergtj2ee
2 ltsmoke_test_installation_directorygt
End of Windows |
4 Post-Installation
44 Post-Installation Steps for MapBox
2012-12-17 CUSTOMER 3750
Only valid for IBM i5OSUNIX |
1 usrsapltinstance_IDgtJCltinstance_numbergtj2ee
2 ltsmoke_test_installation_directorygt
End of IBM i5OSUNIX |
2 Enter the appropriate paths
The smoke test creates the following files
MBSMOKETEST_IN_000xml
MBSMOKETEST_IN_001xml
MBSMOKETEST_IN_002xml
MBSMOKETEST_IN_003xml
CAUTION
The files generated in the second stage of testing overwrite the contents of the files
generated in the first stage
3 Only valid for Windows |
Check the contents of the generated files against the contents of the files located in
ltsmoke_test_installation_directorygtSMOKETESTsecondrunEnd of Windows |
Only valid for IBM i5OSUNIX |
Check the contents of the four files against the contents of the files located in
ltsmoke_test_installation_directorygtSMOKETESTsecondrunEnd of IBM i5OSUNIX |
Result
If the smoke test has identified errors in the installation process the four XML files are not created in
either of the stages Instead an error log file is created
RECOMMENDATION
In the event of errors we recommend that you send the error log file to your administrator
End of Java | MapBox (MBX) |
Only valid for Java | MapBox (MBX) |
446 Ensuring Optimal Block Size settings
The block size of an object determines the number of messages that are processed at the same time by
the MapBox as a set You need to make sure that the block sizes are optimal to reduce load on the
MapBox XML processor
Procedure
1 Use transaction R3AC3 to set the block size of object GWA_COUNTRY to 10 and save the setting
2 Use transaction R3AC1 to set the block size of object BUPA_MAIN to 10 and save the settingEnd of Java | MapBox (MBX) |
4 Post-Installation
44 Post-Installation Steps for MapBox
3850 CUSTOMER 2012-12-17
Only valid for ABAP+JavaJava | MapBox (MBX) |
447 Adapting Memory Settings for the J2EE Engine
You need to adapt the memory settings for the J2EE Engine because MapBox relies heavily on memory-
intensive XML-processing such as schema-validation parsing transformation and so on
RECOMMENDATION
For rapid message processing by MapBox we recommend you to use 1024 MB of heap memory
for MapBox alone With a heap size of 512 MB MapBox can still process messages but with a slightly
higher processing time for each message
The MapBox memory requirements are directly proportional to the size of the input documents
that MapBox has to process The average size of such documents is in the range of 150 to 200 KB
For messages of this size it is sufficient to have a heap memory of 512 MB If the input documents
are in the range of 1 to 2 MB we recommend that you give MapBox a heap memory of 1024 MB
Procedure
To set the recommended memory settings for the MapBox you start the config tool of the J2EE Engine
Only valid for Windows |
Start the config tool by executing ltDrivegtusrsapltSAPSIDgtltinstance_numbergtj2ee
configtoolbatEnd of Windows |
Only valid for IBM i5OSUNIX |
Start the config tool by executing usrsapltSAPSIDgtltinstance_numbergtj2eeconfigtoolshEnd of IBM i5OSUNIX |
End of ABAP+JavaJava | MapBox (MBX) |
End of ABAP+JavaJava | MapBox (MBX) |
Only valid for ABAPABAP+Java |
45 Activating the CRM Web Client
The CRM Web Client is part of the ICF Services that is automatically installed as part of SAP NetWeaver
Application Server
Procedure
To activate the CRM Web Client after the installation see the SAP Library at
httphelpsapcomnw70 SAP NetWeaver 70 Library (including Enhancement Package 2) English SAP
NetWeaver Library SAP NetWeaver by Key Capability Application Platform by Key Capability Platform-Wide
Services Connectivity Components of SAP Communication Technology Communication Between ABAP and Non-
4 Post-Installation
45 Activating the CRM Web Client
2012-12-17 CUSTOMER 3950
ABAP Technology Internet Communication Framework Development Server-Side Development Creating and
Configuring an ICF Service Activating and Deactivating the ICF ServicesEnd of ABAPABAP+Java |
Only valid for ABAP |
46 Installing and Configuring CRM Application Server Loyalty Add-On Component
This section provides information about how to install and configure CRM Application Server Loyalty
as an add-on component to CRM Application Server ABAP
Prerequisites
You have already deployed the following software components
SAP NetWeaver Application Server ABAP (AS ABAP)
CRM Application Server ABAP
Procedure
Installing CRM Application Server Loyalty
Install CRM Application Server Loyalty on the same host where CRM Application Server ABAP is
deployed as described in SAP Note 1162144
Configuring CRM Application Server Loyalty
After you have installed CRM Application Server Loyalty you must complete the following
configuration steps
1 Call transaction nspro
2 Choose SAP Customising Implementation Guide Customer Relationship Management Marketing Loyalty
Management in BBPCRM Basic Settings Define Basic Settings
3 Enter value 1 for the INSTALL_TYPE parameter
NOTE
You do not have to enter destination name for the LOYALTY_SYSTEM parameterEnd of ABAP |
47 Starting XCM
This section describes how to start XCM
Procedure
1 You access the XCM tool at
httplthostgtltportgtltweb app namegtadminxcminitdo
4 Post-Installation
46 Installing and Configuring CRM Application Server Loyalty Add-On Component
4050 CUSTOMER 2012-12-17
NOTE
You can also start XCM in accessibility mode (according to Section 508 Rehabilitation Act)
at the following URL
httplthostgtltportgtltweb app namegtadminxcminitdosap-accessibility=x
2 Provide a user and password If you are logging on for the first time use the Administrator user
and the password you defined during the installation of the SAP system
RECOMMENDATION
We recommend you create new users with lesser rights than the Administrator for the
administration of Web applications
For more information see the SAP CRM Security Guide section E-Commerce
3 When the application opens a closed control tree is displayed on the left of the screen A screen
containing help information is displayed to the right
You can use edit (change settings) or display (see settings) mode in XCM You use the button in
the top right hand corner of the screen to change between modes When you switch to edit mode
a DB lock is set meaning that only this user can edit the settings at one time The lock is released
once the user switches back to display mode or after session timeout (default timeout is 30mins)
48 Accessing Configuration Documentation in SAP Solution Manager
To access configuration documentation in SAP Solution Manager you have to connect your newly
installed SAP system to SAP Solution Manager
NOTE
For SAP NetWeaver you can also find configuration documentation in the Technology Consultants
Guide at
httphelpsapcomnw70 SAP NetWeaver 70 Library (including Enhancement Package 2) English
SAP NetWeaver Library Technology Consultants Guide
Procedure
Create a configuration project with the related configuration guide as described in the following
documentation
httphelpsapcom SAP Solutions SAP Solution Manager Documentation for SAP Solution Manager
ltcurrent releasegt SAP Solution Manager Implementing and Upgrading SAP Solutions Projects
Configuration
More Information
httpservicesapcomsolutionmanager Media Library How-To Documents How to Create a
Configuration Guide using SAP Solution Manager
4 Post-Installation
48 Accessing Configuration Documentation in SAP Solution Manager
2012-12-17 CUSTOMER 4150
This page is left blank for documents that are printed on both sides
5 Additional Information
Only valid for ABAP+JavaJava |
51 Installing the Business Packages for SAP CRM Using JSPM (Optional)
You can also install the Business Packages for SAP CRM using the Java Support Package Manager (JSPM)
Prerequisites
Only valid for IBM i5OSUNIX |
You have checked hardware and software requirements [external document]End of IBM i5OSUNIX |
Only valid for Windows |
You have checked hardware and software requirements [external document]End of Windows |
You have ckecked the Prerequisites for the Business Packages for SAP CRM [page 7]
Procedure
1 Download version 701 of the files sapcom_BPCRMAPP sapcom_BPCRMFND sapcom_CRMAPP and
sapcom_CRMFND as follows
1 Go to httpservicesapcomswdc Download Support Packages and Patches Search for
Support Packages and Patches
2 Enter the following search terms
BP CRM Application Coding 701
BP CRM Application Content 701
BP CRM Foundation Coding 701
BP CRM Foundation Content 701
2 Add the deployment variable comsapcmshare as described in SAP Note 965948
For more information about how to use the Software Deployment Manager (SDM) see the
documentation Software Deployment Manager which is available at
httphelpsapcomnw70 SAP NetWeaver 70 Library (including Enhancement Package 2) English
SAP NetWeaver Library SAP NetWeaver Developerrsquos Guide Fundamentals Using Java Core Development
Tasks Deployment Putting It All Together Software Deployment Manager
3 Install the Business Packages for SAP CRM with JSPM as described in Installing Additional Usage Types
or Software Units in an Existing SAP System [external document]
5 Additional Information
51 Installing the Business Packages for SAP CRM Using JSPM (Optional)
2012-12-17 CUSTOMER 4350
4 Perform the required Post-Installation Steps for the Business Packages for SAP CRM [page 20]End of ABAP+JavaJava |
Only valid for ABAP+JavaJava |
52 Troubleshooting for the Business Package for SAP CRMOnly valid for ABAP+JavaJava |
The following sections describe the steps that you have to perform if you have problems after the
installation
Activating BI Templates Manually [page 44]
Dragging the Central Search onto the Portal Desktop [page 45]End of ABAP+JavaJava |
Only valid for ABAP+JavaJava |
521 Activating BI Templates Manually
If you have installed the Business Package you might see error messages when loading the BI templates
This procedure describes how you can activate the templates afterwards
Procedure
1 Note the technical name of all templates in your portal interface that are not working
2 Log on to your BI system
3 On the SAP Easy Access screen choose Modeling Administrator Workbench Modeling (transaction
RSA1 or RSOR)
4 Choose Business Content Object Types Web Template Name Select Objects
A new window containing a list of BW objects and templates opens
5 Find your missing templates for example 0TPL_0CRM_Cnn_Qnnn_Vnnn_M and select the entries
6 Choose Transfer Selection
The template now appears on the right-hand side of the screen The Transfer checkbox has been
selected and cannot be changed Nevertheless we recommend that you repeat the following
procedure so that your templates can be displayed
7 Select the template
8 Choose Transfer Transfer
Result
You have successfully activated your missing templates and no error messages appear in the portalEnd of ABAP+JavaJava |
5 Additional Information
52 Troubleshooting for the Business Package for SAP CRM
4450 CUSTOMER 2012-12-17
Only valid for ABAP+JavaJava |
522 Dragging the Central Search onto the Portal Desktop
Procedure
The Business Package for SAP CRM 70 including SAP enhancement package 1 contains an iView for
the central search in CRM This iView is in the package on the page Today in the workset Home of the
CRM User You can drag this iView onto the portal desktop under the tool areaEnd of ABAP+JavaJava |
End of ABAP+JavaJava |
5 Additional Information
52 Troubleshooting for the Business Package for SAP CRM
2012-12-17 CUSTOMER 4550
Typographic Conventions
Example Description
ltExamplegt Angle brackets indicate that you replace these words or characters with appropriate entries to make entries in the system for example ldquoEnter your ltUser Namegtrdquo
ExampleExample
Arrows separating the parts of a navigation path for example menu options
Example Emphasized words or expressions
Example Words or characters that you enter in the system exactly as they appear in the documentation
httpwwwsapcom Textual cross-references to an internet address
example Quicklinks added to the internet address of a homepage to enable quick access to specific content on the Web
123456 Hyperlink to an SAP Note for example SAP Note 123456
Example Words or characters quoted from the screen These include field labels screen titles pushbutton labels menu names and menu options
Cross-references to other documentation or published works
Example Output on the screen following a user action for example messages Source code or syntax quoted directly from a program File and directory names and their paths names of variables and parameters and
names of installation upgrade and database tools
EXAMPLE Technical names of system objects These include report names program names transaction codes database table names and key concepts of a programming language when they are surrounded by body text for example SELECT and INCLUDE
EXAMPLE Keys on the keyboard
4650 CUSTOMER 2012-12-17
SAP AGDietmar-Hopp-Allee 16
69190 WalldorfGermany
T +4918 0534 34 34F +4918 0534 34 20
wwwsapcom
copy Copyright 2012 SAP AG All rights reserved
No part of this publication may be reproduced or transmitted in any form or for any purpose without the express permission of SAP AG The information contained herein may be changed without prior noticeSome software products marketed by SAP AG and its distributors contain proprietary software components of other software vendors
Microsoft Windows Excel Outlook PowerPoint Silverlight and Visual Studio are registered trademarks of Microsoft CorporationIBM DB2 DB2 Universal Database System i System i5 System p System p5 System x System z System z10 z10 zVM zOS OS390 zEnterprise PowerVM Power Architecture Power Systems POWER7 POWER6+ POWER6 POWER PowerHA pureScale PowerPC BladeCenter System Storage Storwize XIV GPFS HACMP RETAIN DB2 Connect RACF Redbooks OS2 AIX Intelligent Miner WebSphere Tivoli Informix and Smarter Planet are trademarks or registered trademarks of IBM CorporationLinux is the registered trademark of Linus Torvalds in the United States and other countriesAdobe the Adobe logo Acrobat PostScript and Reader are trademarks or registered trademarks of Adobe Systems Incorporated in the United States and other countriesOracle and Java are registered trademarks of Oracle and its affiliatesUNIX XOpen OSF1 and Motif are registered trademarks of the Open GroupCitrix ICA Program Neighborhood MetaFrame WinFrame VideoFrame and MultiWin are trademarks or registered trademarks of Citrix Systems IncHTML XML XHTML and W3C are trademarks or registered trademarks of W3Creg World Wide Web Consortium Massachusetts Institute of TechnologyApple App Store iBooks iPad iPhone iPhoto iPod iTunes Multi-Touch Objective-C Retina Safari Siri and Xcode are trademarks or registered trademarks of Apple IncIOS is a registered trademark of Cisco Systems IncRIM BlackBerry BBM BlackBerry Curve BlackBerry Bold BlackBerry Pearl BlackBerry Torch BlackBerry Storm BlackBerry Storm2 BlackBerry PlayBook and BlackBerry App World are trademarks or registered trademarks of Research in Motion LimitedGoogle App Engine Google Apps Google Checkout Google Data API Google Maps Google Mobile Ads Google Mobile Updater Google Mobile Google Store Google Sync Google Updater Google Voice Google Mail Gmail YouTube Dalvik and Android are trademarks or registered trademarks of Google IncINTERMEC is a registered trademark of Intermec Technologies CorporationWi-Fi is a registered trademark of Wi-Fi AllianceBluetooth is a registered trademark of Bluetooth SIG IncMotorola is a registered trademark of Motorola Trademark Holdings LLCComputop is a registered trademark of Computop Wirtschaftsinformatik GmbHSAP R3 SAP NetWeaver Duet PartnerEdge ByDesign SAP BusinessObjects Explorer StreamWork SAP HANA and other SAP products and services mentioned herein as well as their respective logos are trademarks or registered trademarks of SAP AG in Germany and other countriesBusiness Objects and the Business Objects logo BusinessObjects Crystal Reports Crystal Decisions Web Intelligence Xcelsius and other Business Objects products and services mentioned herein as well as their respective logos are trademarks or registered trademarks of Business Objects Software Ltd Business Objects is an SAP companySybase and Adaptive Server iAnywhere Sybase 365 SQL Anywhere and other Sybase products and services mentioned herein as well as their respective logos are trademarks or registered trademarks of Sybase Inc Sybase is an SAP company
2012-12-17 CUSTOMER 4750
Crossgate mgic EDDY B2B 360deg and B2B 360deg Services are registered trademarks of Crossgate AG in Germany and other countries Crossgate is an SAP companyAll other product and service names mentioned are the trademarks of their respective companies Data contained in this document serves informational purposes only National product specifications may varyThese materials are subject to change without notice These materials are provided by SAP AG and its affiliated companies (ldquoSAP Grouprdquo) for informational purposes only without representation or warranty of any kind and SAP Group shall not be liable for errors or omissions with respect to the materials The only warranties for SAP Group products and services are those that are set forth in the express warranty statements accompanying such products and services if any Nothing herein should be construed as constituting an additional warranty
DisclaimerSome components of this product are based on Javatrade Any code change in these components may cause unpredictable and severe malfunctions and is therefore expressly prohibited as is any decompilation of these componentsAny Javatrade Source Code delivered with this product is only to be used by SAPrsquos Support Services and may not be modified or altered in any way
Documentation in the SAP Service MarketplaceYou can find this document at the following address httpservicesapcominstguides
4850 CUSTOMER 2012-12-17
SAP AGDietmar-Hopp-Allee 1669190 WalldorfGermanyT +4918 0534 34 34F +4918 0534 34 20wwwsapcom
copy Copyright 2012 SAP AG All rights reservedNo part of this publication may be reproduced or transmitted in any form or for any purpose without the express permission of SAP AG The information contained herein may be changed without prior notice
- SAP Enhancement Package 1 for SAP CRM 70
-
- Table of Contents
- 1 Introduction
- 2 Planning and Preparation
-
- 21 Prerequisites for the Business Packages for SAP CRM
-
- 3 Installation
- 4 Post-Installation
-
- 41 Checking the Availability of Back-End Systems for SAP CRM Java Components
-
- 411 Creating a Back-End User
- 412 Checking the Connection to the ABAP System
- 413 Configuring and Checking the TREX Service
- 414 Checking the Selling via eBay Processes
-
- 42 Post-Installation Steps for Workforce Deployment Application and Calculation Services
-
- 421 Implementing WFMCORE 200 Using Transaction SAINT
- 422 Configuring the Extended Configuration Management (XCM) for WFD Application and Calculation Services
- 423 Checking Workforce Deployment Calculation Services
- 424 Checking the Installation of WFD Application Services and WFD Calculation Services
-
- 43 Post-Installation Steps for the Business Packages for SAP CRM
-
- 431 Creating Roles for the SAP CRM Business Packages
- 432 Installation of the Info Center for the SAP CRM Business Package
-
- 4321 Importing the SAP CRM Info Center Configurations and Directory Structure
- 4322 Activating Manual Ordering of Folders for the sapcrm Repository
- 4323 Creating Indexes and Taxonomies for the sapcrmnews Repository
- 4324 Creating the Index for the sapcrm Repository
- 4325 Configuring the Personal Search
- 4326 Increasing the Number of JCo Connections
-
- 44 Post-Installation Steps for MapBox
-
- 441 Assigning User Groups for MapBox Users
- 442 Configuring an RFC Destination for MapBox
- 443 Performing Initial Configuration for MapBox
- 444 Executing the MapBox
- 445 Performing the Smoke Test for MapBox
- 446 Ensuring Optimal Block Size settings
- 447 Adapting Memory Settings for the J2EE Engine
-
- 45 Activating the CRM Web Client
- 46 Installing and Configuring CRM Application Server Loyalty Add-On Component
- 47 Starting XCM
- 48 Accessing Configuration Documentation in SAP Solution Manager
-
- 5 Additional Information
-
- 51 Installing the Business Packages for SAP CRM Using JSPM (Optional)
- 52 Troubleshooting for the Business Package for SAP CRM
-
- 521 Activating BI Templates Manually
- 522 Dragging the Central Search onto the Portal Desktop
-
- Copyright and trademarks
-

4 Post-Installation
Only valid for Java |
41 Checking the Availability of Back-End Systems for SAP CRM Java Components
Only valid for ABAP+JavaJava |
After the installation you have to check the availability of back-end systems as follows
1 To test the connection to the ABAP back-end system you create a back-end user [page 11]
2 Depending on various business processes you check the following back-end systems
ABAP system [page 12]
TREX Server [page 14]End of ABAP+JavaJava |
Only valid for ABAP+JavaJava |
411 Creating a Back-End User
You need service users to provide the anonymous remote function call (RFC) stateless connection
between your back-end system and your Web-based applications
Prerequisites
You have installed and configured CRM E-Commerce Web-based applications
Procedure
You create a service user in your back-end SAP CRM system and assign it to the Web-based application
as follows
1 In your ABAP back-end system on the SAP Easy Access screen choose Tools Administration User
Maintenance Users (transaction SU01)
2 Create a user of the type Service User and enter all required data
3 Assign the appropriate service user authorization role to the user on the Roles tab For a list of
service user roles for the various Web-based applications see the following table
Application Authorization Role for Service User
E-Selling B2B SAP_CRM_ECO_ISA_TU_B2B
E-Selling B2C SAP_CRM_ECO_ISA_TU_B2C
E-Selling EASYB2B SAP_CRM_ECO_ISA_TU_EASYB2B
4 Post-Installation
41 Checking the Availability of Back-End Systems for SAP CRM Java Components
2012-12-17 CUSTOMER 1150
Application Authorization Role for Service User
E-Selling CVIEWS SAP_CRM_ECO_ISA_TU_CVIEWS
E-Selling SHOPADMIN SAP_CRM_ECO_ISA_TU_SHOPADM
E-Selling USERADMIN SAP_CRM_ECO_ISA_TU_USERADM
E-Selling Auctioning via Web shop (AVW) SAP_CRM_ECO_TU_AVW
E-Selling via eBay (SVE) SAP_CRM_ECO_TU_SVE
E-Service Internet Customer Self Service (ICSS) SAP_CRM_ECO_ISE_TU_B2B (Authorizations for ICSS B2B)SAP_CRM_ECO_ISE_TU_B2C (Authorizations for ICSS B2C)
E-Service Complaints and Returns SAP_CRM_ECO_ISE_TU_CR
E-Service Remanufacturer inspection SAP_CRM_ECO_ISE_TU_INSP
Channel Management (CHM)Shared Catalog
SAP_CRM_ECO_CHM_TU_SHRDCAT
Channel Management (CHM) BOB SAP_CRM_ECO_ISA_TU_BOB
Channel Management (CHM) HOM SAP_CRM_ECO_ISA_TU_HOM
Channel Management (CHM) CSR SAP_CRM_ECO_ISA_TU_CSR
4 Save your entries
More Information
For more information about service users see the documentation ltyour projectgt Basic Settings for CRM
E-Commerce General Settings for CRM E-Commerce User Management in the SAP Solution Manager [page
41]End of ABAP+JavaJava |
Only valid for ABAP+JavaJava |
412 Checking the Connection to the ABAP System
This section tells you how to check the connection to the ABAP system
Prerequisites
To be able to test the connection to the ABAP system you need to create a user [page 11] on this system
Procedure
1 Start the Visual Administrator
1 On your central instance host change to the admin directory as follows
Only valid for IBM i5OSUNIX |
usrsapltSAPSIDgtltinstance_namegtj2eeadmin
End of IBM i5OSUNIX |
Only valid for Windows |
usrsapltSAPSIDgtltinstance_namegtj2eeadmin
End of Windows |
4 Post-Installation
41 Checking the Availability of Back-End Systems for SAP CRM Java Components
1250 CUSTOMER 2012-12-17
2 Only valid for IBM i5OSUNIX |
Run goshEnd of IBM i5OSUNIX |
3 Only valid for Windows |
Double-click gobatEnd of Windows |
For more information about the Visual Administrator see the SAP Library at
httphelpsapcomnw70 SAP NetWeaver 70 Library (including Enhancement Package 2) English
SAP NetWeaver Library SAP NetWeaver by Key Capability Application Platform by Key Capability Java
Technology Administration Manual J2EE Engine J2EE Engine Administration Tools
2 Only valid for IBM DB2 for i5OSIBM DB2 for i5OS (LinuxWindows)IBM DB2 for Linux and UNIX and WindowsIBM DB2 for zOSMaxDBMS SQL ServerOracle |
Log on to the Visual Administrator with administrator rights
NOTE
If you chose configuration Use ABAP in the User Management Engine (UME) and you selected
SAP CRM ABAP as your ABAP back end with UME during the installation a successful logon
to the Visual Administrator means that the SAP CRM ABAP back-end system is available
You have now finished this procedure
Otherwise continue with the next step
End of IBM DB2 for i5OSIBM DB2 for i5OS (LinuxWindows)IBM DB2 for Linux and UNIX and WindowsIBM DB2 for zOSMaxDBMS SQL ServerOracle |
3 Start an application that uses the SAP CRM ABAP system if it is stopped
1 In the left pane of the Visual Administrator open clusterserverservices and choose
Deploy service
2 Select the application
Application Context Root
crm~b2b b2b
crm~icss_b2b icss_b2b
crm~sve sve
3 To start the selected application choose Start
4 Open the user interface for the Extended Configuration Management (XCM) Administrator as
follows
1 Open a Web browser and enter the following URL
httpltJ2EE_hostgtltJ2EE_portgtltcontext rootgtadminxcminitdo
where ltcontext rootgt is the context root of the application started in the previous step
To find information about the components that can be configured choose help
2 Choose Start Component
You can find information about configuration of components on the right hand side of the
screen
4 Post-Installation
41 Checking the Availability of Back-End Systems for SAP CRM Java Components
2012-12-17 CUSTOMER 1350
3 To create a jco Component follow the instructions provided in the Example of component
configuration field
If the ldquorun testrdquo operation described in the component configuration section of a jco setting
was successful the ABAP system can be reached from the Java system
More InformationFor more information about using Extended Configuration Management (XCM) to configure your
application see Using Extended Configuration Management (XCM) [page 40] and the documentation in the
SAP Solution Manager [page 41]End of ABAP+JavaJava |
Only valid for Java |
413 Configuring and Checking the TREX Service
You need to configure and check the TREX service
Procedure
Configuring the TREX Service
1 Start the Visual Administrator
2 Connect to the AS Java
3 Choose Server node Open Services Node Select TREX Service
4 Maintain the values for nameserveraddress and nameserverbackupserverlist
For more information see Specifying the Address of the TREX Name Server in Installation Guide ndash SAP NetWeaver
70 Standalone Engine Search and Classification (TREX) Single Host at
httpservicesapcominstguidesNW70 Installation Installation - Standalone Engines SAP
NetWeaver Search and Classification TREX Installing TREX 70 Single Host
Checking the TREX Service
1 Start the application sapcomcrm~b2b as described in step 3 of Checking the Connection to the ABAP
System [page 12]
2 Open a Web browser and enter the following URL
httpltJ2EE_hostgtltJ2EE_portgtb2badmintrextrex_640jsp
ResultIf the connection was established successfully the message TREX Server is available appearsEnd of Java |
Only valid for Java |
414 Checking the Selling via eBay Processes
To use the selling via eBay (SVE) processes the Java system requires an http connection to
4 Post-Installation
41 Checking the Availability of Back-End Systems for SAP CRM Java Components
1450 CUSTOMER 2012-12-17
httpwwwebaycom
To test the connection you need to create an XCM component ebayCommunicator for the sapcom
crm~sve application
Procedure
To create the Extended Configuration Management (XCM) component ebayCommunicator using
application sapcomcrm~sve proceed as described in Checking the ABAP System [page 12]
NOTE
Make sure that you replace jco component with ebayCommunicator component when following
the procedure in Checking the ABAP System [page 12]
More Information
For more information about using Extended Configuration Management (XCM) to configure your
application see Using Extended Configuration Management (XCM) [page 40] and the documentation in the
SAP Solution Manager [page 41]End of Java |
End of Java |
Only valid for Java |
42 Post-Installation Steps for Workforce Deployment Application and Calculation Services
Only valid for ABAP+JavaJava | CRM Java Components (JCRM)Extended E-Selling Components (XECO) |
You have to perform the following steps to check and configure Workforce Deployment Application
and Calculation Services (WFD ASCS)
You implement WFMCORE 200 using transaction SAINT [page 15]
You configure the XCM administration tool for WFD ASCS [page 16]
You check WFD calculation services [page 18]
You check the installation of WFD ASCS [page 19]End of ABAP+JavaJava | CRM Java Components (JCRM)Extended E-Selling Components (XECO) |
Only valid for ABAP+JavaJava |
421 Implementing WFMCORE 200 Using Transaction SAINT
Before you can check and configure the Java part of Workforce Deployment Application and
Calculation Services (WFD ASCS) you need to implement WFMCORE 200
4 Post-Installation
42 Post-Installation Steps for Workforce Deployment Application and Calculation Services
2012-12-17 CUSTOMER 1550
Only valid for CRM Java Components (JCRM) |
The WFMCORE 200 component contains all necessary ABAP classes and libraries required for the
various Workforce Deployment scenarios and processes including Service Resource Planning in CRM and
Retail Multisite Workforce DeploymentEnd of CRM Java Components (JCRM) |
Procedure
1 Log on to your ABAP system
2 Install WFMCORE 200 using transaction SAINT as described in SAP Note 830595
3 Only valid for CRM Java Components (JCRM) |
If you are implementing the Service Resource Planning in CRM process variant run the report
WFDBP_UPDATE_BLUEPRINT to update tables that define the settings required to properly
display and maintain Service Arrangements in the People-Centric User InterfaceEnd of CRM Java Components (JCRM) |
End of ABAP+JavaJava |
Only valid for ABAP+JavaJava |
422 Configuring the Extended Configuration Management (XCM) for WFD Application and Calculation Services
Workforce Deployment Application Services (WFD AS) sends calculation and forecasting requests to
a CRM ABAP back-end system WFD Calculation Services (WFD CS) picks up the requests from this
CRM ABAP back-end system You define the connection to the CRM ABAP back-end system through
Extended Configuration Management (XCM) Admin
For more information about using Extended Configuration Management (XCM) to configure your
application see Using Extended Configuration Management (XCM) [page 40] and the documentation in the
SAP Solution Manager [page 41]
The csjcoxxxxx XCM parameters define the JCO connection to the SAP CRM ABAP system where
the WFD CS maintains forecast and calculation requests You can connect to the CRM ABAP system
using one of the following
A message or dispatching server by specifying csjcomshost csjcogroup and csjcor3name
An application server by specifying csjcoahost and csjcosysnr
In either case you must also specify csjcoclient csjcouser and csjcopassword
XCM Parameter Name Example Value Description
csjcoahost us0091wdfsapcorp Application server host name of the SAP CRM Calculation Service
csjcosysnr 91 System number of the R3 Calculation Service (for example 09)
csjcomshost us0091wdfsapcorp Message server host name of the SAP CRM Calculation Service
csjcogroup PUBLIC Group of the SAP CRM Calculation Service (case sensitive for example PUBLIC)
4 Post-Installation
42 Post-Installation Steps for Workforce Deployment Application and Calculation Services
1650 CUSTOMER 2012-12-17
XCM Parameter Name Example Value Description
csjcor3name Q5C System ID of the SAP CRM Calculation Service (for example IDES)
csjcoclient 505 Client of the SAP CRM Calculation Service
csjcouser Back end user for JCO connection to the SAP CRM Calculation Service
csjcopassword Password for the back-end user
You need to configure these csjcoxxxxx XCM parameter values in each instance of WFD AS and
WFD CS Make sure that the values are the same in all instances
Configuring the XCM for WFD Calculation Services
This business scenario is relevant for defining the WFD CS You must perform this XCM configuration
for the WFD CS to run
1 Start the XCM using the following URL
httpltJ2EE_hostgtltJ2EE_portgtwfdcsadminxcminitdo
2 Access the configuration using the following path General Application Settings Customer sisopt
sisoptconfig
Process Description Web ApplicationXCM Application Configurations
Calculations Service Workforce scheduling application
wfdcs sisoptconfig
3 In addition to the csjcoxxxx XCM parameters you need to define the http port of the J2EE
instance where WFD CS is running
XCM Parameter Name Example Value Description
cshttpport 51000 The http port of the web server where the WFD Calculation Services application is running (for example 50000)
4 Restart the application after saving the XCM configuration
Configuring the XCM for WFD Application Services
This business scenario is relevant for connecting the WFD AS to the WFD CS
1 Start the XCM using the following URL
httpltJ2EE_hostgtltJ2EE_portgtwfdadminxcminitdo
2 Access the configuration using the following path General Application Settings Customer sis
sisconfig
Process Description Web ApplicationXCM Application Configurations
Application Services Web-based scheduling application
wfd sisconfig
3 Restart the application after saving the XCM configurationEnd of ABAP+JavaJava |
4 Post-Installation
42 Post-Installation Steps for Workforce Deployment Application and Calculation Services
2012-12-17 CUSTOMER 1750
Only valid for ABAP+JavaJava |
423 Checking Workforce Deployment Calculation Services
After configuring Workforce Deployment Calculation Services (WFD CS) with Extended Configuration
Management (XCM) and restarting the application you need to go to the WFD CS configuration page
to check that it is running
Prerequisites
You have completed the installation of WFD Application Service (AS) and CS as described in this
documentation
Only valid for CRM Java Components (JCRM) |
You have downloaded the Business Package for Retail (Release 10) from sdnsapcom SAP NetWeaver
Capabilities User Productivity Portal and Collaboration Portal Content Portfolio
For more information about the portal content versions for your release see the documentation
Master Guide ndash SAP Customer Relationship Management 70 at httpservicesapcomcrm-instEnd of CRM Java Components (JCRM) |
Only valid for CRM Java Components (JCRM) |
You must have access to the Portal Admin role in SAP CRM through the Enterprise Portal to complete
this part of the WFD ASCS installation
For more information see Configuring the CRM Business Package on the SAP Service Marketplace at
httpservicesapcomcrm-inst SAP CRM 70 CRM Business Packages and PC UI Section
CRM Portal Administrator contains specific instructions on configuring the portal for access to WFD
AS and CS Apply the instructions to the Portal Admin roleEnd of CRM Java Components (JCRM) |
You have configured your portal users based on the required settings as described in the
configuration documentation for your IT scenario
For more information see Accessing Configuration Documentation in the SAP Solution Manager [page 41]
Procedure
1 Access the WFD CS configuration page through the Enterprise Portal using the role Portal
Administrator
2 Choose WFD Calculation Services Configuration
The Configuration tab looks as follows
Tab To Complete InstallationFor ongoing Configuration Management
Calculation Servers Required for at least one calculation server
Required for each additional calculation server
Logging Localization No Required to add or change logging once fully operational
End of ABAP+JavaJava |
4 Post-Installation
42 Post-Installation Steps for Workforce Deployment Application and Calculation Services
1850 CUSTOMER 2012-12-17
Only valid for ABAP+JavaJava |
424 Checking the Installation of WFD Application Services and WFD Calculation Services
This section tells you how to check that you have correctly installed the Java components for Workforce
Deployment Application Services (WFD AS) and WFD Calculation Services (WFD CS) This section
does not tell you how to check the connection between the WFD AS and the WFD CS
The procedure below shows you how to create a simple calculation request and verify that the
Calculation Server has received the request This helps you check that you have correctly installed all
WFD AS or CS components and that they are communicating with each other
Prerequisites
You have completed all the installation steps described in this documentation
You have connected WFD AS or CS components with the Enterprise Portal
You have installed the required business packages according to Checking Workforce Deployment
Calculation Services [page 18]
Procedure
1 To check that WFD AS is working and listening for HTTP requests enter the following URL
httpltJ2EE_hostgtltJ2EE_portgtwfdlogondo
The following error confirms that the application is working
Your session has expired Please renew your session by clicking a section link in
the Portal menu
2 Access the WFD CS from the Enterprise Portal through the Portal Admin role and check that the
WFD CS page comes up with no errors
If the page does not come up possible errors are
Error Message Cause
Missing value for XCM configuration
parameter cshttpport
The XCM parameter cshttpport was not filled
The request could not be completed
due to the following
errorsltfollowed by details of the
particular error usually related to
the JCO connectiongt
One of the XCM parameters csjcoxxxxx might be incorrect
EXAMPLE
The user or password are incorrect
3 Test the submission of a calculation request to see if the WFD CS can process the request
You can simulate a calculation request submission by executing the RFC
TEST_WFDCS_CALCREQ_SUBMIT from the CRM back-end system defined in the csjcoxxxxx XCM
parameters of WFD CS
4 Post-Installation
42 Post-Installation Steps for Workforce Deployment Application and Calculation Services
2012-12-17 CUSTOMER 1950
EXAMPLE
For example when you installed WFD CS you configured the csjcoxxxxx XCM
parameters to point to system ID Q5C client 505 You now need to log in to Q5C client 505
and execute TEST_WFDCS_CALCREQ_SUBMIT with transaction SE37 using the default import
parameters
4 Check the Requests tab of the WFD CS page to check the status of entries with the location name
SMOKETEST has the status FAILED
Status FAILED indicates a successful smoke test It means that the Request Manager successfully
sent the request to the Solver which successfully processed it
Status QUEUED probably means that the XCM parameter cshttpport was incorrectEnd of ABAP+JavaJava |
End of Java |
Only valid for ABAP+JavaJava |
43 Post-Installation Steps for the Business Packages for SAP CRM
The following sections provide information about the steps that you have to perform after importing
the Business Package for SAP CRM
Only valid for ABAP+JavaJava |
431 Creating Roles for the SAP CRM Business Packages
Procedure
If you create your own roles from the SAP CRM Business Packages also add the every user role
(eu_core_role) to your role The Every User Role contains the personalization functionality for the SAP
NetWeaver Portal
For more information about the Every User Role see the SAP Library at
httphelpsapcomnw70 SAP NetWeaver 70 Library (including Enhancement Package 2) English SAP
NetWeaver Library SAP NetWeaver by Key Capability People Integration by Key Capability Portal Portal
Administration Guide Super Administration Pre-configured Roles Every User Roles End of ABAP+JavaJava |
Only valid for ABAP+JavaJava |
432 Installation of the Info Center for the SAP CRM Business Package
This section describes how to install the Info Center
4 Post-Installation
43 Post-Installation Steps for the Business Packages for SAP CRM
2050 CUSTOMER 2012-12-17
Prerequisites
You have installed the Business Package for SAP CRM [page 43]
You have administrator rights
Process Flow
1 You import the SAP CRM info center configurations and directory structure [page 21]
2 You activate manual ordering of folders for the sapcrm Repository [page 23]
3 You create indexes and taxonomies for the sapcrmnews Repository [page 23]
4 You create the index for the sapcrm Repository [page 25]
5 You configure the personal search [page 25]
6 If required you increase the number of JCo connections [page 26]
Only valid for ABAP+JavaJava |
4321 Importing the SAP CRM Info Center Configurations and Directory Structure
The directory structure of the info center has been made available in one content package and you can
import it using the Information and Content Exchange (ICE) Repository
For more information about ICE see SAP Library at
httphelpsapcomnw70 SAP NetWeaver 70 Library (including Enhancement Package 2) English SAP
NetWeaver Library SAP NetWeaver by Key Capability Information Integration by Key Capability Knowledge
Management Content Managers Guide Additional Tasks for Content Managers Content Exchange Distributing
Content (Offline)
Procedure
Importing the Directory Structure
1 Log on to the Portal as content manager
2 Choose Content Management Content Exchange Upload
3 Only valid for Windows |
Select file fullupdate_infocenterzip from directory ltservlet_enginegtirjrootWEB-INF
portalportalappsepcrmchmkmexpice and confirm the uploadEnd of Windows |
Only valid for IBM i5OSUNIX |
Select file fullupdate_infocenterzip from directory ltservlet_enginegtirjrootWEB-INF
portalportalappsepcrmchmkmexpice and confirm the uploadEnd of IBM i5OSUNIX |
The zip file is now imported using the ICE protocol
If you cannot see the ICE repository this might be due to one of the following reasons
The ICE repository was hidden in the virtual root repository
4 Post-Installation
43 Post-Installation Steps for the Business Packages for SAP CRM
2012-12-17 CUSTOMER 2150
In this case do the following
1 Log on to the portal as system administrator
2 In the SAP NetWeaver Enterprise Portal choose System Administration System Configuration
Knowledge Management Content Management Repository Managers Virtual Root Repository
3 Check whether the ICE Repository has been entered under Repositories to exclude
4 Remove it from the list
5 Save your changes
6 Restart the Servlet Engine
The repository has been ldquoswitchedrdquo to invisible
1 Log on to the portal as system administrator
2 In the SAP NetWeaver Enterprise Portal choose System Administration System Configuration
Knowledge Management Content Management Repository Managers Content Exchange
Repository
3 If the property hide in root folder is active deselect it
4 Restart the Servlet Engine
NOTE
After the import check whether the directory structure was created by choosing Content
Administration KM Content in the SAP NetWeaver Enterprise Portal The list of folders should
contain the folders sapcrm and sapcrmnews
Checking Whether the Directory Structure Has Been Imported Successfully
You can only import the structure if there is a repository with the same name For example if a zip file
is exported from the repository sapcrm there must also be a repository with the name sapcrm in the
target system
The sapcrm and sapcrmnews repositories as well as the CRM-Namespace filter are created during the
import of the SAP CRM KM extension configuration archive To check whether this configuration
archive has been imported successfully proceed as follows
1 Log on to the portal as system administrator
2 In the SAP NetWeaver Enterprise Portal choose System Administration Monitoring Knowledge
Management Deployment Monitor Config Archives
3 Check whether the archive comsappctcrmappkmextprjconfig is installed in the system
If the archive comsappctcrmappkmextprjconfig is not installed in the system import it
manually as follows
1 Log on to the portal as system administrator
2 In the SAP NetWeaver Enterprise Portal choose System Administration Monitoring Knowledge
Management Deployment Monitor Config Archives Actions Import
4 Post-Installation
43 Post-Installation Steps for the Business Packages for SAP CRM
2250 CUSTOMER 2012-12-17
3 Only valid for Windows |
Select the archive comsappctcrmappkmextprjconfigconfigarchive from directory
ltSAPSIDgtJCltinstance_numbergtj2eeclusterappssapcomep~crm~chm
servlet_jspepcrmchmkmexprootWEB-INFconfig and confirm the importEnd of Windows |
4 Only valid for IBM i5OSUNIX |
Select the archive comsappctcrmappkmextprjconfigconfigarchive from
directory ltSAPSIDgtJCltinstance_numbergtj2eeclusterappssapcomep~crm~chm
servlet_jspepcrmchmkmexprootWEB-INFconfig and confirm the importEnd of IBM i5OSUNIX |
After the import the directory structure has no restrictions on rights Make sure that you modify the
rights of the various folders to meet your companyrsquos requirementsEnd of ABAP+JavaJava |
Only valid for ABAP+JavaJava |
4322 Activating Manual Ordering of Folders for the sapcrm Repository
The sapcrm Repository folders are ordered in a specific sequence
Procedure
To display this sequence activate manual ordering for each directory
For more information see the SAP Library at
httphelpsapcomnw70 SAP NetWeaver 70 Library (including Enhancement Package 2) English SAP
NetWeaver Library SAP NetWeaver by Key Capability Information Integration by Key Capability Knowledge
Management Content Managers Guide Providing Shared Access to Departmental Documents Sorting Documents in a
Folder ManuallyEnd of ABAP+JavaJava |
Only valid for ABAP+JavaJava |
4323 Creating Indexes and Taxonomies for the sapcrmnews Repository
To make news available for indexing and searching create two new indexes
Prerequisites
You have administrator rights for Knowledge Management on the server
For more information see the SAP Library at
httphelpsapcomnw70 SAP NetWeaver 70 Library (including Enhancement Package 2) English SAP
NetWeaver Library SAP NetWeaver by Key Capability Information Integration by Key Capability Knowledge
Management
4 Post-Installation
43 Post-Installation Steps for the Business Packages for SAP CRM
2012-12-17 CUSTOMER 2350
Procedure
Creating Indexes and Taxonomies for the sapcrmnews Repository
The Business Package contains an iView ndash epbp_crmchm-pmiviewsnews_flash ndash that combines all
news with the istopnews=yes attribute in a virtual folder To guarantee the function of this iView
create two indexes in KM
1 In the SAP NetWeaver Enterprise Portal choose System Administration System Configuration
Knowledge Management Index Administration
2 Create an index of the Search and Classification type with a suitably configured taxonomy
3 Choose sapcrmpartnernews as the index ID Otherwise the path to the folder specified in the iView
is incorrect
If you choose another index ID you must also modify accordingly the folder properties in the
iView for one of the following
Folders path to content and path to root
Folders Path to Initially Displayed Folder and Path to Root Folder for Navigation
If you want to link two portal servers with a TREX server you must modify the index name and
iView properties on one of the portal servers
4 Assign folder sapcrmpartnerPartnernews as a data source
This moves all news with the (virtual) Top flag from this folder to the Newsflash iView
5 Create a ldquoquery-basedrdquo taxonomy with the name PartnerNewsFlash choosing Automatic
Classification before you save the taxonomy
NOTE
The outbound delivery includes only the iView above for virtually combining news If you
also want to use this functionality for other news channels (for example internal news) use
your own index and taxonomy for each channel
For more information see the SAP Library at
httphelpsapcomnw70 SAP NetWeaver 70 Library (including Enhancement Package 2) English SAP
NetWeaver Library SAP NetWeaver by Key Capability Information Integration by Key Capability Knowledge
Management Administration Guide System Administration System Configuration lsquoIndex Administrationrsquo iView
Creating Queries for the Taxonomies of sapcrmnews Repositories
1 Log on to the portal as content manager
2 Choose Content Management Classification Taxonomy Query Builder
3 Add a search query to check the istopnews property for the value Yes
4 Enter PartnerNewsFlash as the name for the taxonomy
Here too a property of the iView links to a taxonomy with this name So if you want to choose
another name you must modify the path to the content folder property of the iView
For more information see the SAP Library at
4 Post-Installation
43 Post-Installation Steps for the Business Packages for SAP CRM
2450 CUSTOMER 2012-12-17
httphelpsapcomnw70 SAP NetWeaver 70 Library (including Enhancement Package 2) English SAP
NetWeaver Library SAP NetWeaver by Key Capability Information Integration by Key Capability Knowledge
Management Administration Guide System Administration System Configuration Taxonomies and ClassificationEnd of ABAP+JavaJava |
Only valid for ABAP+JavaJava |
4324 Creating the Index for the sapcrm Repository
To make Info center documents available for indexing and searching create a new index with sapcrm
as a data source
Prerequisites
You have administrator rights for Knowledge Management on the server
Procedure
Choose a name of your own Search as a service and standard as a crawler parameter
For more information see the SAP Library at
httphelpsapcomnw70 SAP NetWeaver 70 Library (including Enhancement Package 2) English SAP
NetWeaver Library SAP NetWeaver by Key Capability Information Integration by Key Capability Knowledge
ManagementEnd of ABAP+JavaJava |
Only valid for ABAP+JavaJava |
4325 Configuring the Personal Search
Prerequisites
You have administrator rights for Knowledge Management on the server
Procedure
1 Create an index for the userhome repository
To make personal folder documents available for the search create a new index with root
userhome as the data source
2 Create a search option set for personal search
To assign the search index and a start folder to the search for personal documents create a Search
Option Set with the name CRMPersonalFolderSearch As an index enter the index for the
userhome repository created above and ~alias~userhomeuseridPersonal Documents as the
root folder for the search
For more information see the SAPLibrary at
4 Post-Installation
43 Post-Installation Steps for the Business Packages for SAP CRM
2012-12-17 CUSTOMER 2550
httphelpsapcomnw70 SAP NetWeaver 70 Library (including Enhancement Package 2) English SAP
NetWeaver Library SAP NetWeaver by Key Capability Information Integration by Key Capability Knowledge
Management End of ABAP+JavaJava |
Only valid for ABAP+JavaJava |
4326 Increasing the Number of JCo Connections
This section tells you how to increase the number of concurrent Java Connector (JCo) connections
By default the maximum number of concurrent JCo connections is 100 The value depends on the
number and behavior of the users in the portal For more information see SAP Note 316877
You can specify this value when you plan the installation of your SAP NetWeaver Enterprise Portal
Make sure that you first analyze the number and behavior of the users
Procedure
To increase the maximum number of concurrent JCo connections increase the value of the
environment variable CPIC_MAX_CONV
EXAMPLE
Initial default value CPIC_MAX_CONV=100
Increased value CPIC_MAX_CONV=1000
End of ABAP+JavaJava |
End of ABAP+JavaJava |
End of ABAP+JavaJava |
Only valid for ABAP+JavaJava | MapBox (MBX) |
44 Post-Installation Steps for MapBoxOnly valid for Java | MapBox (MBX) |
You have to perform the following post-installation steps for MapBox
You assign user groups for MapBox users [page 27]
You configure an RFC destination for TCPIP connections [page 28]
You perform initial configuration for MapBox [page 28]
You execute the Map Box [page 34]
You perform the smoke test [page 35]
If required you perform additional settings for MapBox
Block size settings [page 38]
Memory settings for the J2EE Engine [page 39]End of Java | MapBox (MBX) |
4 Post-Installation
44 Post-Installation Steps for MapBox
2650 CUSTOMER 2012-12-17
Only valid for Java | MapBox (MBX) |
441 Assigning User Groups for MapBox Users
To access the MapBox URL you need to provide the correct security rights for individual user groups
Procedure
1 Log on to the Visual Administrator
1 On your central instance host change to the following directory
Only valid for IBM i5OSUNIX |
usrsapltSAPSIDgtltinstance_numbergtj2eeadmin
End of IBM i5OSUNIX |
Only valid for Windows |
usrsapltSAPSIDgtltinstance_numbergtj2eeadmin
End of Windows |
2 Only valid for IBM i5OSUNIX |
Run goshEnd of IBM i5OSUNIX |
3 Only valid for Windows |
Double-click gobatEnd of Windows |
For more information about the Visual Administrator see the SAP Library at
httpshelpsapcomnw70 SAP NetWeaver Library SAP NetWeaver by Key Capability
Application Platform by Key Capability Java Technology Administration Manual J2EE Engine J2EE Engine
Administration Tools
2 Choose the server node from the left-hand window
3 Choose Services Security Provider
A list of deployed components is displayed
4 Choose MapBoxLauncher from this list (sapcom
comsapsyncpointmapboxlaunchermapboxlauncher)
A list of tabs appears on the right
5 Choose Security Roles from the list
A list of security roles appears
6 If no display and modify roles are displayed add these roles as follows
1 Choose Switch to Edit Mode from the top task bar to switch to edit mode
2 Add display and modify roles by choosing Add
7 For both the display and modify roles perform the following
1 Choose Switch to Edit Mode from the top task bar to switch to edit mode
2 Choose the Groups tab from the list on the far right
3 Choose Search
4 Post-Installation
44 Post-Installation Steps for MapBox
2012-12-17 CUSTOMER 2750
A list of user groups appears
4 Select the user groups that you want to enable for the two roles
Add to the left of the user group display is now highlighted
5 Choose Add to add the user group for the selected roleEnd of Java | MapBox (MBX) |
Only valid for Java | MapBox (MBX) |
442 Configuring an RFC Destination for MapBox
After the installation you have to create an RFC destination for MapBox
Procedure1 Log on to the CRM server
2 Enter transaction SM59
The Display and Maintain RFC Destinations screen appears
3 Choose Technical Settings Activation Type and create a new destination with the type TCPIP
4 Choose Registered Server Program and enter a unique value for program ID
For example you might enter MAPBOX723 for SAP client 723
5 Enter the details of the gateway host and gateway service in Gateway Options
1 Gateway host
Enter the name of your message server You can also enter the IP address of your message
server
2 Gateway service
Enter your SAP CRM system number prefixed with the string sapgw
For example if your system number is 02 enter sapgw02
6 If the CRM system is a Unicode-enabled system choose Unicode in Special Options
7 Save the destination
8 Choose MapBox Configuration Page Connecting settings from the URL and enter the same RFC
destination name in the relevant fieldEnd of Java | MapBox (MBX) |
Only valid for Java | MapBox (MBX) |
443 Performing Initial Configuration for MapBox
Procedure1 Open a browser window and enter the following URL
httplthostnamegtltport_numbergtmapboxlauncher
NOTE
If you are logged on to the machine where the J2EE server is running you can also enter the
following URL
4 Post-Installation
44 Post-Installation Steps for MapBox
2850 CUSTOMER 2012-12-17
httplocalhostltport_numbergtmapboxlauncher
2 Choose Configuration
3 Edit the values according to your SAP system and choose Save
The application asks you to enter a user name and password
4 Enter the user name and password used for the SAP J2EE Engine Visual Administrator
A description of the properties and example values for the properties is given below
Result
You see the default connection settings for MapBox as shown in the graphic below A description
of the properties and example values are provided in the adjacent table
Figure 1 MapBox Default Connection Settings
Property Purpose Example
SAP System SAP System name ABC FAZ
Message Server Message server host name xyzmain
Group SAP System group PUBLIC SPACE
System Number SAP Gateway system number prefixed with sapgw
sapgw02
Unicode Used for setting the Unicode option for the CRM server Default value is no
yes
Maximum allowed wait time interval between ISP Processing and Commit call
Time-out period between an ISP_MAPBOX call and an ISP_COMMIT call
300
4 Post-Installation
44 Post-Installation Steps for MapBox
2012-12-17 CUSTOMER 2950
Property Purpose Example
Client SAP logon client 723
User Name SAP logon user John
Password SAP logon password
Language SAP logon language EN
Destination The RFC destination with which you need to register the MapBox This is the value you enter in step 3 of Configuring an RFC Destination for MapBox [page 28]
MAPBOX723
Number of server instances The number of JCO server execution instances used by the MapBox to process server requests This number indicates the number of CRM inbound queues that are running simultaneously
10
The above MapBox connection configuration is meant for one SAP client running with the CRM
Server If you want to run the MapBox with two or more SAP clients of the same CRM system
you can use Add Client on the configuration page and edit the values accordingly However make
sure that the RFC destinations that these multiple clients listen to are always unique You can
leave the default values for the other settings
If you need more control over logging and tracing you can go to Log Settings on the configuration
page edit the values and choose Save The Log Settings screen with default values is shown in the
graphic below A description of the properties and example values for the properties is provided
in the adjacent table
Figure 2 Default Values for the Log Settings Screen
4 Post-Installation
44 Post-Installation Steps for MapBox
3050 CUSTOMER 2012-12-17
Property Purpose Example
Log and dumps directory This value specifies where the MapBox logs and dumps are stored If this field is left blank the ltuser_homegt folder is used as default value
Only valid for Windows |
Ctemp
End of Windows |
Only valid for IBM i5OSUNIX |
tmp
End of IBM i5OSUNIX |
Input payload dump This value specifies whether the input document coming to MapBox for processing is written or not
No
MapBox launcher trace level This value specifies with what granularity the MapBoxLauncher execution trace is generated6 specifies that a full MapBoxLauncher execution trace is generated whereas 0 specifies that the MapBoxLauncher execution trace is not generated Recommended value for production use is 0
0
MapBox launcher trace size The maximum file size of the generated trace When the size reaches the maximum value another file is created so that the old file can be deleted (for example due to lack of space) You can use alphabetic suffixes to specify the sizes The supported values are k or K ndash kilobytes g or G ndash gigabytes m or M ndash megabytes t or T ndash terabytes
50 k
CoordServer log level This value specifies the detail of the coordination server logging We recommended you not to change the default value of 1
2
SAP Java connector trace level This value specifies the detail of the SAP Java Connector logging The recommended value for production use is 0
2
MapBox log level The log level required for the MapBox to generate an internal log file A higher trace level means that a more detailed log file is created We recommend you to use 4D for production systems where D meansldquoOn Demandrdquo
2
4 Post-Installation
44 Post-Installation Steps for MapBox
2012-12-17 CUSTOMER 3150
Property Purpose Example
MapBox message dumps This value stands for copying the incoming and outgoing messages to the local system For better performance we recommend that you do not enable the message dump option
no
MapBox statistics This value specifies whether a file that lists the performance measurements of the MapBox is created We recommend you to use the value no for production use
no
MapBox logs location This value specifies where the MapBox logs are stored Possible locations are the MapBox repository on the CRM Server or the local file system The recommended value for production use is local_fs which indicates that the MapBox logs are stored on the local file system
local_fs
MapLog format The format in which the MapBox log file must be created The internal log file is by default created in a particular format However you can change this format to display the file in the SAP log file format The two values that are available are default and sap_log
default
The MapBox uses additional properties for performance such as caching and reuse of the MapBox
atoms These values are already set to optimum values and you cannot change them
The description of the properties is shown in the table below
Property Purpose Example
General Settings
max_elements_document This is the limit for the internal cache of the MapBox to hold the count of generated XML documentsWe recommend you not to change this value
100
cache_threshold This is the maximum threshold ndash in kilobytes ndash for a document to be cached in the internal cache of the MapBox
500
4 Post-Installation
44 Post-Installation Steps for MapBox
3250 CUSTOMER 2012-12-17
Property Purpose ExampleWe recommend you not to change this value
max_elements_cache This is the limit for the internal cache of the MapBox to hold the count of MapScenariosWe recommend you not to change this value
100
parallel_instances You use this value on systems where more than one CPU is used This setting allows you to specify the number of CPU instances that MapBox must use for processing so that the remainder can be used by non-MapBox related applications By default MapBox uses all the available CPUs for processing Values can range between 0 to N-1 where N is the number of available CPUs
4
thread_priority Specifies the number of threads MapBox uses during processing We recommend you to set an optimum value for this property so that MapBox does not utilize all available resources 0 = min 1 = low 2 = normal 3 = high 4 = max
3
reuse_count Sets the count for the number of times an atom-instance must be reused before it is destroyed A value of 0 means that the atom is not destroyed and can be used continuously Recommended value is 50 This means that the atom instance is reused 50 times before it is destroyed
100
Lock Server Settings
Operation_Mode The internal mode of operation for the coordination server We recommend not to change the default value of OUTPROC_CLIENT
OUTPROC_CLIENT
Registry_Port The Remote Method Invocation (RMI) port used for connecting to the coordination serverRMI is a Java mechanism for distributed computing
1099
4 Post-Installation
44 Post-Installation Steps for MapBox
2012-12-17 CUSTOMER 3350
Property Purpose ExampleDo not change this value unless port 1099 is unavailable In this case change it to 59856
HostName The name of the host where the coordination server resides
localhost
LocalName The name of the host where the MapBoxLauncher is executed We recommend you not to change the default value of localhost
Server
PollingInterval Polling interval in seconds to ask for shutdown of the coordination server We recommend you not to change the default value of 30
60
CleanUpInterval Cleanup interval in seconds to check for invalid locks created by the MapBoxLauncher We recommend you not to change the default value of 60
180
NOTE
A file name MapLogxsl is also available with the smoke test [page 35] This file is the stylesheet
that is used to format the display of the MapBox log file During the installation and execution
of the MapBox the MapBox log file is created in the following directory
Only valid for Windows |
ltUser_homegtTempMapBoxDumpsltyour_system_namegt500 where ltuser_homegt is the
home directory of the logged-on user ltyour system namegt is the CRM server you have
connected to and 500 is the client you have connected toEnd of Windows |
Only valid for IBM i5OSUNIX |
ltUser_homegtTempMapBoxDumpsltyour_system_namegt500 where ltuser_homegt is the
home directory of the logged-on user ltyour system namegt is the CRM server you have
connected to and 500 is the client you have connected toEnd of IBM i5OSUNIX |
RECOMMENDATION
We recommend that you copy MapLogxsl from the
ltsmoke_test_installation_directorygt to the directory mentioned aboveEnd of Java | MapBox (MBX) |
Only valid for Java | MapBox (MBX) |
444 Executing the MapBox
This section tells you how to execute the MapBox The procedure that you use to execute the Map Box
depends on its current support package (SP) level
4 Post-Installation
44 Post-Installation Steps for MapBox
3450 CUSTOMER 2012-12-17
Procedure
If the SP level of the MapBox is less than SP11 proceed as follows
1 Enter the following URL in your browser
httplthostnamegtltport_numbergtmapboxlaunchermanage
2 Choose Start MapBox
3 The application prompts you for a user name and password
Enter the user name and password for the J2EE Engine Visual Administrator
NOTE
MapBox typically takes 30 to 60 seconds to initialize depending on the number of SAP clients
To see the status of messages processed by MapBox choose Status
If the SP level of the MapBox is equal to or higher than SP11 the MapBox starts automatically
1 For the first MapBox installation you need to restart the Java application server (AS Java) after all
the configuration settings have been completed This automatically starts the MapBox (Autostart)
2 To check the status go to the URL httplthostnamegtltport_numbergtmapboxlauncher
manage
NOTE
MapBox Autostart needs approximately 60 seconds to allow other services of As Java to start
To see the status of messages processed by MapBox choose Status
Result
When the MapBox is running the status is shown as Ready to processEnd of Java | MapBox (MBX) |
Only valid for Java | MapBox (MBX) |
445 Performing the Smoke Test for MapBox
The smoke test checks whether the MapBox installation is error-free
Only valid for Windows |
To execute the smoke test you have to run two batch filesEnd of Windows |
Only valid for IBM i5OSUNIX |
To execute the smoke test you have to run two shell scriptsEnd of IBM i5OSUNIX |
Prerequisites
Before you start the procedure you need to copy the smoketestjar file to a new
ltsmoke_test_installation_directorygt of your choice which has two further subdirectories
firstrun and secondrun
4 Post-Installation
44 Post-Installation Steps for MapBox
2012-12-17 CUSTOMER 3550
You can find the smoketestjar file here
Only valid for IBM i5OSUNIX |
usrsapltinstance_IDgtJCltinstance_numbergtj2eeclusterserver0binext
comsapsyncpointmapboxEnd of IBM i5OSUNIX |
Only valid for Windows |
usrsapltinstance_IDgtJCltinstance_numbergtj2eeclusterserver0binext
comsapsyncpointmapboxEnd of Windows |
NOTE
Each subdirectory of ltsmoke_test_installation_directorygt ndash that is firstrun and
secondrun ndash contains the following files
MBSMOKETEST_IN_000xml
MBSMOKETEST_IN_001xml
MBSMOKETEST_IN_002xml
MBSMOKETEST_IN_003xml
After executing the smoke test you must verify whether the contents of the files generated
by your test are similar to the contents of the above files That is the XML documents that
are created in the smoke test must match the documents located in the
ltsmoke_test_installation_directorygt mentioned above
To execute the smoke test you need to install the SAP Java Connector (SAP JCo version 2012)
You have to download SAP JCo 2012 from SAP Service Marketplace at https
servicesapcomswdc before executing the smoke test
CAUTION
Make sure that you install the SAP Java Connector correctly
The file mapcaseprop is available in the ltsmoke_test_installation_directorygt This file
contains the connection parameters to be tested You can modify the contents of this file
CAUTION
You must replace the connection parameters in this file with the connection parameters that
you entered in the MapBoxMetaxml file
Procedure
1 Run the first stage of the smoke test
1 Only valid for Windows |
Execute the file smoketest_1bat from the ltsmoke_test_installation_directorygtEnd of Windows |
Only valid for Windows |
This prompts you to enter the followingEnd of Windows |
4 Post-Installation
44 Post-Installation Steps for MapBox
3650 CUSTOMER 2012-12-17
Only valid for Windows |
1 ltDRIVEgtusrsapltinstance_IDgtJCltinstance_numbergtj2ee
2 ltsmoke_test_installation_directorygt
3 ltpath_to_sapjcojargt
End of Windows |
Only valid for IBM i5OSUNIX |
Execute the file smoketest_1sh from the ltsmoke_test_installation_directorygtEnd of IBM i5OSUNIX |
Only valid for IBM i5OSUNIX |
1 usrsapltinstance_IDgtJCltinstance_numbergtj2ee
2 ltsmoke_test_installation_directorygt
3 ltpath_to_sapjcojargt
End of IBM i5OSUNIX |
2 Enter the appropriate paths
The smoke test creates the following files
MBSMOKETEST_IN_000xml
MBSMOKETEST_IN_001xml
MBSMOKETEST_IN_002xml
MBSMOKETEST_IN_003xml
3 Only valid for Windows |
Check the contents of the generated files against the contents of the files located in
ltsmoke_test_installation_directorygtSMOKETESTfirstrunEnd of Windows |
Only valid for IBM i5OSUNIX |
Check the contents of the four files against the contents of the files located in
ltsmoke_test_installation_directorygtSMOKETESTfirstrunEnd of IBM i5OSUNIX |
2 Run the second stage of the smoke test
1 Only valid for Windows |
Execute the file smoketest_2bat which is located in the
ltsmoke_test_installation_directorygtEnd of Windows |
Only valid for IBM i5OSUNIX |
Execute the file smoketest_2sh which is located in the
ltsmoke_test_installation_directorygtEnd of IBM i5OSUNIX |
This prompts you to enter the following
Only valid for Windows |
1 ltDRIVEgtusrsapltinstance_IDgtJCltinstance_numbergtj2ee
2 ltsmoke_test_installation_directorygt
End of Windows |
4 Post-Installation
44 Post-Installation Steps for MapBox
2012-12-17 CUSTOMER 3750
Only valid for IBM i5OSUNIX |
1 usrsapltinstance_IDgtJCltinstance_numbergtj2ee
2 ltsmoke_test_installation_directorygt
End of IBM i5OSUNIX |
2 Enter the appropriate paths
The smoke test creates the following files
MBSMOKETEST_IN_000xml
MBSMOKETEST_IN_001xml
MBSMOKETEST_IN_002xml
MBSMOKETEST_IN_003xml
CAUTION
The files generated in the second stage of testing overwrite the contents of the files
generated in the first stage
3 Only valid for Windows |
Check the contents of the generated files against the contents of the files located in
ltsmoke_test_installation_directorygtSMOKETESTsecondrunEnd of Windows |
Only valid for IBM i5OSUNIX |
Check the contents of the four files against the contents of the files located in
ltsmoke_test_installation_directorygtSMOKETESTsecondrunEnd of IBM i5OSUNIX |
Result
If the smoke test has identified errors in the installation process the four XML files are not created in
either of the stages Instead an error log file is created
RECOMMENDATION
In the event of errors we recommend that you send the error log file to your administrator
End of Java | MapBox (MBX) |
Only valid for Java | MapBox (MBX) |
446 Ensuring Optimal Block Size settings
The block size of an object determines the number of messages that are processed at the same time by
the MapBox as a set You need to make sure that the block sizes are optimal to reduce load on the
MapBox XML processor
Procedure
1 Use transaction R3AC3 to set the block size of object GWA_COUNTRY to 10 and save the setting
2 Use transaction R3AC1 to set the block size of object BUPA_MAIN to 10 and save the settingEnd of Java | MapBox (MBX) |
4 Post-Installation
44 Post-Installation Steps for MapBox
3850 CUSTOMER 2012-12-17
Only valid for ABAP+JavaJava | MapBox (MBX) |
447 Adapting Memory Settings for the J2EE Engine
You need to adapt the memory settings for the J2EE Engine because MapBox relies heavily on memory-
intensive XML-processing such as schema-validation parsing transformation and so on
RECOMMENDATION
For rapid message processing by MapBox we recommend you to use 1024 MB of heap memory
for MapBox alone With a heap size of 512 MB MapBox can still process messages but with a slightly
higher processing time for each message
The MapBox memory requirements are directly proportional to the size of the input documents
that MapBox has to process The average size of such documents is in the range of 150 to 200 KB
For messages of this size it is sufficient to have a heap memory of 512 MB If the input documents
are in the range of 1 to 2 MB we recommend that you give MapBox a heap memory of 1024 MB
Procedure
To set the recommended memory settings for the MapBox you start the config tool of the J2EE Engine
Only valid for Windows |
Start the config tool by executing ltDrivegtusrsapltSAPSIDgtltinstance_numbergtj2ee
configtoolbatEnd of Windows |
Only valid for IBM i5OSUNIX |
Start the config tool by executing usrsapltSAPSIDgtltinstance_numbergtj2eeconfigtoolshEnd of IBM i5OSUNIX |
End of ABAP+JavaJava | MapBox (MBX) |
End of ABAP+JavaJava | MapBox (MBX) |
Only valid for ABAPABAP+Java |
45 Activating the CRM Web Client
The CRM Web Client is part of the ICF Services that is automatically installed as part of SAP NetWeaver
Application Server
Procedure
To activate the CRM Web Client after the installation see the SAP Library at
httphelpsapcomnw70 SAP NetWeaver 70 Library (including Enhancement Package 2) English SAP
NetWeaver Library SAP NetWeaver by Key Capability Application Platform by Key Capability Platform-Wide
Services Connectivity Components of SAP Communication Technology Communication Between ABAP and Non-
4 Post-Installation
45 Activating the CRM Web Client
2012-12-17 CUSTOMER 3950
ABAP Technology Internet Communication Framework Development Server-Side Development Creating and
Configuring an ICF Service Activating and Deactivating the ICF ServicesEnd of ABAPABAP+Java |
Only valid for ABAP |
46 Installing and Configuring CRM Application Server Loyalty Add-On Component
This section provides information about how to install and configure CRM Application Server Loyalty
as an add-on component to CRM Application Server ABAP
Prerequisites
You have already deployed the following software components
SAP NetWeaver Application Server ABAP (AS ABAP)
CRM Application Server ABAP
Procedure
Installing CRM Application Server Loyalty
Install CRM Application Server Loyalty on the same host where CRM Application Server ABAP is
deployed as described in SAP Note 1162144
Configuring CRM Application Server Loyalty
After you have installed CRM Application Server Loyalty you must complete the following
configuration steps
1 Call transaction nspro
2 Choose SAP Customising Implementation Guide Customer Relationship Management Marketing Loyalty
Management in BBPCRM Basic Settings Define Basic Settings
3 Enter value 1 for the INSTALL_TYPE parameter
NOTE
You do not have to enter destination name for the LOYALTY_SYSTEM parameterEnd of ABAP |
47 Starting XCM
This section describes how to start XCM
Procedure
1 You access the XCM tool at
httplthostgtltportgtltweb app namegtadminxcminitdo
4 Post-Installation
46 Installing and Configuring CRM Application Server Loyalty Add-On Component
4050 CUSTOMER 2012-12-17
NOTE
You can also start XCM in accessibility mode (according to Section 508 Rehabilitation Act)
at the following URL
httplthostgtltportgtltweb app namegtadminxcminitdosap-accessibility=x
2 Provide a user and password If you are logging on for the first time use the Administrator user
and the password you defined during the installation of the SAP system
RECOMMENDATION
We recommend you create new users with lesser rights than the Administrator for the
administration of Web applications
For more information see the SAP CRM Security Guide section E-Commerce
3 When the application opens a closed control tree is displayed on the left of the screen A screen
containing help information is displayed to the right
You can use edit (change settings) or display (see settings) mode in XCM You use the button in
the top right hand corner of the screen to change between modes When you switch to edit mode
a DB lock is set meaning that only this user can edit the settings at one time The lock is released
once the user switches back to display mode or after session timeout (default timeout is 30mins)
48 Accessing Configuration Documentation in SAP Solution Manager
To access configuration documentation in SAP Solution Manager you have to connect your newly
installed SAP system to SAP Solution Manager
NOTE
For SAP NetWeaver you can also find configuration documentation in the Technology Consultants
Guide at
httphelpsapcomnw70 SAP NetWeaver 70 Library (including Enhancement Package 2) English
SAP NetWeaver Library Technology Consultants Guide
Procedure
Create a configuration project with the related configuration guide as described in the following
documentation
httphelpsapcom SAP Solutions SAP Solution Manager Documentation for SAP Solution Manager
ltcurrent releasegt SAP Solution Manager Implementing and Upgrading SAP Solutions Projects
Configuration
More Information
httpservicesapcomsolutionmanager Media Library How-To Documents How to Create a
Configuration Guide using SAP Solution Manager
4 Post-Installation
48 Accessing Configuration Documentation in SAP Solution Manager
2012-12-17 CUSTOMER 4150
This page is left blank for documents that are printed on both sides
5 Additional Information
Only valid for ABAP+JavaJava |
51 Installing the Business Packages for SAP CRM Using JSPM (Optional)
You can also install the Business Packages for SAP CRM using the Java Support Package Manager (JSPM)
Prerequisites
Only valid for IBM i5OSUNIX |
You have checked hardware and software requirements [external document]End of IBM i5OSUNIX |
Only valid for Windows |
You have checked hardware and software requirements [external document]End of Windows |
You have ckecked the Prerequisites for the Business Packages for SAP CRM [page 7]
Procedure
1 Download version 701 of the files sapcom_BPCRMAPP sapcom_BPCRMFND sapcom_CRMAPP and
sapcom_CRMFND as follows
1 Go to httpservicesapcomswdc Download Support Packages and Patches Search for
Support Packages and Patches
2 Enter the following search terms
BP CRM Application Coding 701
BP CRM Application Content 701
BP CRM Foundation Coding 701
BP CRM Foundation Content 701
2 Add the deployment variable comsapcmshare as described in SAP Note 965948
For more information about how to use the Software Deployment Manager (SDM) see the
documentation Software Deployment Manager which is available at
httphelpsapcomnw70 SAP NetWeaver 70 Library (including Enhancement Package 2) English
SAP NetWeaver Library SAP NetWeaver Developerrsquos Guide Fundamentals Using Java Core Development
Tasks Deployment Putting It All Together Software Deployment Manager
3 Install the Business Packages for SAP CRM with JSPM as described in Installing Additional Usage Types
or Software Units in an Existing SAP System [external document]
5 Additional Information
51 Installing the Business Packages for SAP CRM Using JSPM (Optional)
2012-12-17 CUSTOMER 4350
4 Perform the required Post-Installation Steps for the Business Packages for SAP CRM [page 20]End of ABAP+JavaJava |
Only valid for ABAP+JavaJava |
52 Troubleshooting for the Business Package for SAP CRMOnly valid for ABAP+JavaJava |
The following sections describe the steps that you have to perform if you have problems after the
installation
Activating BI Templates Manually [page 44]
Dragging the Central Search onto the Portal Desktop [page 45]End of ABAP+JavaJava |
Only valid for ABAP+JavaJava |
521 Activating BI Templates Manually
If you have installed the Business Package you might see error messages when loading the BI templates
This procedure describes how you can activate the templates afterwards
Procedure
1 Note the technical name of all templates in your portal interface that are not working
2 Log on to your BI system
3 On the SAP Easy Access screen choose Modeling Administrator Workbench Modeling (transaction
RSA1 or RSOR)
4 Choose Business Content Object Types Web Template Name Select Objects
A new window containing a list of BW objects and templates opens
5 Find your missing templates for example 0TPL_0CRM_Cnn_Qnnn_Vnnn_M and select the entries
6 Choose Transfer Selection
The template now appears on the right-hand side of the screen The Transfer checkbox has been
selected and cannot be changed Nevertheless we recommend that you repeat the following
procedure so that your templates can be displayed
7 Select the template
8 Choose Transfer Transfer
Result
You have successfully activated your missing templates and no error messages appear in the portalEnd of ABAP+JavaJava |
5 Additional Information
52 Troubleshooting for the Business Package for SAP CRM
4450 CUSTOMER 2012-12-17
Only valid for ABAP+JavaJava |
522 Dragging the Central Search onto the Portal Desktop
Procedure
The Business Package for SAP CRM 70 including SAP enhancement package 1 contains an iView for
the central search in CRM This iView is in the package on the page Today in the workset Home of the
CRM User You can drag this iView onto the portal desktop under the tool areaEnd of ABAP+JavaJava |
End of ABAP+JavaJava |
5 Additional Information
52 Troubleshooting for the Business Package for SAP CRM
2012-12-17 CUSTOMER 4550
Typographic Conventions
Example Description
ltExamplegt Angle brackets indicate that you replace these words or characters with appropriate entries to make entries in the system for example ldquoEnter your ltUser Namegtrdquo
ExampleExample
Arrows separating the parts of a navigation path for example menu options
Example Emphasized words or expressions
Example Words or characters that you enter in the system exactly as they appear in the documentation
httpwwwsapcom Textual cross-references to an internet address
example Quicklinks added to the internet address of a homepage to enable quick access to specific content on the Web
123456 Hyperlink to an SAP Note for example SAP Note 123456
Example Words or characters quoted from the screen These include field labels screen titles pushbutton labels menu names and menu options
Cross-references to other documentation or published works
Example Output on the screen following a user action for example messages Source code or syntax quoted directly from a program File and directory names and their paths names of variables and parameters and
names of installation upgrade and database tools
EXAMPLE Technical names of system objects These include report names program names transaction codes database table names and key concepts of a programming language when they are surrounded by body text for example SELECT and INCLUDE
EXAMPLE Keys on the keyboard
4650 CUSTOMER 2012-12-17
SAP AGDietmar-Hopp-Allee 16
69190 WalldorfGermany
T +4918 0534 34 34F +4918 0534 34 20
wwwsapcom
copy Copyright 2012 SAP AG All rights reserved
No part of this publication may be reproduced or transmitted in any form or for any purpose without the express permission of SAP AG The information contained herein may be changed without prior noticeSome software products marketed by SAP AG and its distributors contain proprietary software components of other software vendors
Microsoft Windows Excel Outlook PowerPoint Silverlight and Visual Studio are registered trademarks of Microsoft CorporationIBM DB2 DB2 Universal Database System i System i5 System p System p5 System x System z System z10 z10 zVM zOS OS390 zEnterprise PowerVM Power Architecture Power Systems POWER7 POWER6+ POWER6 POWER PowerHA pureScale PowerPC BladeCenter System Storage Storwize XIV GPFS HACMP RETAIN DB2 Connect RACF Redbooks OS2 AIX Intelligent Miner WebSphere Tivoli Informix and Smarter Planet are trademarks or registered trademarks of IBM CorporationLinux is the registered trademark of Linus Torvalds in the United States and other countriesAdobe the Adobe logo Acrobat PostScript and Reader are trademarks or registered trademarks of Adobe Systems Incorporated in the United States and other countriesOracle and Java are registered trademarks of Oracle and its affiliatesUNIX XOpen OSF1 and Motif are registered trademarks of the Open GroupCitrix ICA Program Neighborhood MetaFrame WinFrame VideoFrame and MultiWin are trademarks or registered trademarks of Citrix Systems IncHTML XML XHTML and W3C are trademarks or registered trademarks of W3Creg World Wide Web Consortium Massachusetts Institute of TechnologyApple App Store iBooks iPad iPhone iPhoto iPod iTunes Multi-Touch Objective-C Retina Safari Siri and Xcode are trademarks or registered trademarks of Apple IncIOS is a registered trademark of Cisco Systems IncRIM BlackBerry BBM BlackBerry Curve BlackBerry Bold BlackBerry Pearl BlackBerry Torch BlackBerry Storm BlackBerry Storm2 BlackBerry PlayBook and BlackBerry App World are trademarks or registered trademarks of Research in Motion LimitedGoogle App Engine Google Apps Google Checkout Google Data API Google Maps Google Mobile Ads Google Mobile Updater Google Mobile Google Store Google Sync Google Updater Google Voice Google Mail Gmail YouTube Dalvik and Android are trademarks or registered trademarks of Google IncINTERMEC is a registered trademark of Intermec Technologies CorporationWi-Fi is a registered trademark of Wi-Fi AllianceBluetooth is a registered trademark of Bluetooth SIG IncMotorola is a registered trademark of Motorola Trademark Holdings LLCComputop is a registered trademark of Computop Wirtschaftsinformatik GmbHSAP R3 SAP NetWeaver Duet PartnerEdge ByDesign SAP BusinessObjects Explorer StreamWork SAP HANA and other SAP products and services mentioned herein as well as their respective logos are trademarks or registered trademarks of SAP AG in Germany and other countriesBusiness Objects and the Business Objects logo BusinessObjects Crystal Reports Crystal Decisions Web Intelligence Xcelsius and other Business Objects products and services mentioned herein as well as their respective logos are trademarks or registered trademarks of Business Objects Software Ltd Business Objects is an SAP companySybase and Adaptive Server iAnywhere Sybase 365 SQL Anywhere and other Sybase products and services mentioned herein as well as their respective logos are trademarks or registered trademarks of Sybase Inc Sybase is an SAP company
2012-12-17 CUSTOMER 4750
Crossgate mgic EDDY B2B 360deg and B2B 360deg Services are registered trademarks of Crossgate AG in Germany and other countries Crossgate is an SAP companyAll other product and service names mentioned are the trademarks of their respective companies Data contained in this document serves informational purposes only National product specifications may varyThese materials are subject to change without notice These materials are provided by SAP AG and its affiliated companies (ldquoSAP Grouprdquo) for informational purposes only without representation or warranty of any kind and SAP Group shall not be liable for errors or omissions with respect to the materials The only warranties for SAP Group products and services are those that are set forth in the express warranty statements accompanying such products and services if any Nothing herein should be construed as constituting an additional warranty
DisclaimerSome components of this product are based on Javatrade Any code change in these components may cause unpredictable and severe malfunctions and is therefore expressly prohibited as is any decompilation of these componentsAny Javatrade Source Code delivered with this product is only to be used by SAPrsquos Support Services and may not be modified or altered in any way
Documentation in the SAP Service MarketplaceYou can find this document at the following address httpservicesapcominstguides
4850 CUSTOMER 2012-12-17
SAP AGDietmar-Hopp-Allee 1669190 WalldorfGermanyT +4918 0534 34 34F +4918 0534 34 20wwwsapcom
copy Copyright 2012 SAP AG All rights reservedNo part of this publication may be reproduced or transmitted in any form or for any purpose without the express permission of SAP AG The information contained herein may be changed without prior notice
- SAP Enhancement Package 1 for SAP CRM 70
-
- Table of Contents
- 1 Introduction
- 2 Planning and Preparation
-
- 21 Prerequisites for the Business Packages for SAP CRM
-
- 3 Installation
- 4 Post-Installation
-
- 41 Checking the Availability of Back-End Systems for SAP CRM Java Components
-
- 411 Creating a Back-End User
- 412 Checking the Connection to the ABAP System
- 413 Configuring and Checking the TREX Service
- 414 Checking the Selling via eBay Processes
-
- 42 Post-Installation Steps for Workforce Deployment Application and Calculation Services
-
- 421 Implementing WFMCORE 200 Using Transaction SAINT
- 422 Configuring the Extended Configuration Management (XCM) for WFD Application and Calculation Services
- 423 Checking Workforce Deployment Calculation Services
- 424 Checking the Installation of WFD Application Services and WFD Calculation Services
-
- 43 Post-Installation Steps for the Business Packages for SAP CRM
-
- 431 Creating Roles for the SAP CRM Business Packages
- 432 Installation of the Info Center for the SAP CRM Business Package
-
- 4321 Importing the SAP CRM Info Center Configurations and Directory Structure
- 4322 Activating Manual Ordering of Folders for the sapcrm Repository
- 4323 Creating Indexes and Taxonomies for the sapcrmnews Repository
- 4324 Creating the Index for the sapcrm Repository
- 4325 Configuring the Personal Search
- 4326 Increasing the Number of JCo Connections
-
- 44 Post-Installation Steps for MapBox
-
- 441 Assigning User Groups for MapBox Users
- 442 Configuring an RFC Destination for MapBox
- 443 Performing Initial Configuration for MapBox
- 444 Executing the MapBox
- 445 Performing the Smoke Test for MapBox
- 446 Ensuring Optimal Block Size settings
- 447 Adapting Memory Settings for the J2EE Engine
-
- 45 Activating the CRM Web Client
- 46 Installing and Configuring CRM Application Server Loyalty Add-On Component
- 47 Starting XCM
- 48 Accessing Configuration Documentation in SAP Solution Manager
-
- 5 Additional Information
-
- 51 Installing the Business Packages for SAP CRM Using JSPM (Optional)
- 52 Troubleshooting for the Business Package for SAP CRM
-
- 521 Activating BI Templates Manually
- 522 Dragging the Central Search onto the Portal Desktop
-
- Copyright and trademarks
-
2 Only valid for IBM i5OSUNIX |
Run goshEnd of IBM i5OSUNIX |
3 Only valid for Windows |
Double-click gobatEnd of Windows |
For more information about the Visual Administrator see the SAP Library at
httphelpsapcomnw70 SAP NetWeaver 70 Library (including Enhancement Package 2) English
SAP NetWeaver Library SAP NetWeaver by Key Capability Application Platform by Key Capability Java
Technology Administration Manual J2EE Engine J2EE Engine Administration Tools
2 Only valid for IBM DB2 for i5OSIBM DB2 for i5OS (LinuxWindows)IBM DB2 for Linux and UNIX and WindowsIBM DB2 for zOSMaxDBMS SQL ServerOracle |
Log on to the Visual Administrator with administrator rights
NOTE
If you chose configuration Use ABAP in the User Management Engine (UME) and you selected
SAP CRM ABAP as your ABAP back end with UME during the installation a successful logon
to the Visual Administrator means that the SAP CRM ABAP back-end system is available
You have now finished this procedure
Otherwise continue with the next step
End of IBM DB2 for i5OSIBM DB2 for i5OS (LinuxWindows)IBM DB2 for Linux and UNIX and WindowsIBM DB2 for zOSMaxDBMS SQL ServerOracle |
3 Start an application that uses the SAP CRM ABAP system if it is stopped
1 In the left pane of the Visual Administrator open clusterserverservices and choose
Deploy service
2 Select the application
Application Context Root
crm~b2b b2b
crm~icss_b2b icss_b2b
crm~sve sve
3 To start the selected application choose Start
4 Open the user interface for the Extended Configuration Management (XCM) Administrator as
follows
1 Open a Web browser and enter the following URL
httpltJ2EE_hostgtltJ2EE_portgtltcontext rootgtadminxcminitdo
where ltcontext rootgt is the context root of the application started in the previous step
To find information about the components that can be configured choose help
2 Choose Start Component
You can find information about configuration of components on the right hand side of the
screen
4 Post-Installation
41 Checking the Availability of Back-End Systems for SAP CRM Java Components
2012-12-17 CUSTOMER 1350
3 To create a jco Component follow the instructions provided in the Example of component
configuration field
If the ldquorun testrdquo operation described in the component configuration section of a jco setting
was successful the ABAP system can be reached from the Java system
More InformationFor more information about using Extended Configuration Management (XCM) to configure your
application see Using Extended Configuration Management (XCM) [page 40] and the documentation in the
SAP Solution Manager [page 41]End of ABAP+JavaJava |
Only valid for Java |
413 Configuring and Checking the TREX Service
You need to configure and check the TREX service
Procedure
Configuring the TREX Service
1 Start the Visual Administrator
2 Connect to the AS Java
3 Choose Server node Open Services Node Select TREX Service
4 Maintain the values for nameserveraddress and nameserverbackupserverlist
For more information see Specifying the Address of the TREX Name Server in Installation Guide ndash SAP NetWeaver
70 Standalone Engine Search and Classification (TREX) Single Host at
httpservicesapcominstguidesNW70 Installation Installation - Standalone Engines SAP
NetWeaver Search and Classification TREX Installing TREX 70 Single Host
Checking the TREX Service
1 Start the application sapcomcrm~b2b as described in step 3 of Checking the Connection to the ABAP
System [page 12]
2 Open a Web browser and enter the following URL
httpltJ2EE_hostgtltJ2EE_portgtb2badmintrextrex_640jsp
ResultIf the connection was established successfully the message TREX Server is available appearsEnd of Java |
Only valid for Java |
414 Checking the Selling via eBay Processes
To use the selling via eBay (SVE) processes the Java system requires an http connection to
4 Post-Installation
41 Checking the Availability of Back-End Systems for SAP CRM Java Components
1450 CUSTOMER 2012-12-17
httpwwwebaycom
To test the connection you need to create an XCM component ebayCommunicator for the sapcom
crm~sve application
Procedure
To create the Extended Configuration Management (XCM) component ebayCommunicator using
application sapcomcrm~sve proceed as described in Checking the ABAP System [page 12]
NOTE
Make sure that you replace jco component with ebayCommunicator component when following
the procedure in Checking the ABAP System [page 12]
More Information
For more information about using Extended Configuration Management (XCM) to configure your
application see Using Extended Configuration Management (XCM) [page 40] and the documentation in the
SAP Solution Manager [page 41]End of Java |
End of Java |
Only valid for Java |
42 Post-Installation Steps for Workforce Deployment Application and Calculation Services
Only valid for ABAP+JavaJava | CRM Java Components (JCRM)Extended E-Selling Components (XECO) |
You have to perform the following steps to check and configure Workforce Deployment Application
and Calculation Services (WFD ASCS)
You implement WFMCORE 200 using transaction SAINT [page 15]
You configure the XCM administration tool for WFD ASCS [page 16]
You check WFD calculation services [page 18]
You check the installation of WFD ASCS [page 19]End of ABAP+JavaJava | CRM Java Components (JCRM)Extended E-Selling Components (XECO) |
Only valid for ABAP+JavaJava |
421 Implementing WFMCORE 200 Using Transaction SAINT
Before you can check and configure the Java part of Workforce Deployment Application and
Calculation Services (WFD ASCS) you need to implement WFMCORE 200
4 Post-Installation
42 Post-Installation Steps for Workforce Deployment Application and Calculation Services
2012-12-17 CUSTOMER 1550
Only valid for CRM Java Components (JCRM) |
The WFMCORE 200 component contains all necessary ABAP classes and libraries required for the
various Workforce Deployment scenarios and processes including Service Resource Planning in CRM and
Retail Multisite Workforce DeploymentEnd of CRM Java Components (JCRM) |
Procedure
1 Log on to your ABAP system
2 Install WFMCORE 200 using transaction SAINT as described in SAP Note 830595
3 Only valid for CRM Java Components (JCRM) |
If you are implementing the Service Resource Planning in CRM process variant run the report
WFDBP_UPDATE_BLUEPRINT to update tables that define the settings required to properly
display and maintain Service Arrangements in the People-Centric User InterfaceEnd of CRM Java Components (JCRM) |
End of ABAP+JavaJava |
Only valid for ABAP+JavaJava |
422 Configuring the Extended Configuration Management (XCM) for WFD Application and Calculation Services
Workforce Deployment Application Services (WFD AS) sends calculation and forecasting requests to
a CRM ABAP back-end system WFD Calculation Services (WFD CS) picks up the requests from this
CRM ABAP back-end system You define the connection to the CRM ABAP back-end system through
Extended Configuration Management (XCM) Admin
For more information about using Extended Configuration Management (XCM) to configure your
application see Using Extended Configuration Management (XCM) [page 40] and the documentation in the
SAP Solution Manager [page 41]
The csjcoxxxxx XCM parameters define the JCO connection to the SAP CRM ABAP system where
the WFD CS maintains forecast and calculation requests You can connect to the CRM ABAP system
using one of the following
A message or dispatching server by specifying csjcomshost csjcogroup and csjcor3name
An application server by specifying csjcoahost and csjcosysnr
In either case you must also specify csjcoclient csjcouser and csjcopassword
XCM Parameter Name Example Value Description
csjcoahost us0091wdfsapcorp Application server host name of the SAP CRM Calculation Service
csjcosysnr 91 System number of the R3 Calculation Service (for example 09)
csjcomshost us0091wdfsapcorp Message server host name of the SAP CRM Calculation Service
csjcogroup PUBLIC Group of the SAP CRM Calculation Service (case sensitive for example PUBLIC)
4 Post-Installation
42 Post-Installation Steps for Workforce Deployment Application and Calculation Services
1650 CUSTOMER 2012-12-17
XCM Parameter Name Example Value Description
csjcor3name Q5C System ID of the SAP CRM Calculation Service (for example IDES)
csjcoclient 505 Client of the SAP CRM Calculation Service
csjcouser Back end user for JCO connection to the SAP CRM Calculation Service
csjcopassword Password for the back-end user
You need to configure these csjcoxxxxx XCM parameter values in each instance of WFD AS and
WFD CS Make sure that the values are the same in all instances
Configuring the XCM for WFD Calculation Services
This business scenario is relevant for defining the WFD CS You must perform this XCM configuration
for the WFD CS to run
1 Start the XCM using the following URL
httpltJ2EE_hostgtltJ2EE_portgtwfdcsadminxcminitdo
2 Access the configuration using the following path General Application Settings Customer sisopt
sisoptconfig
Process Description Web ApplicationXCM Application Configurations
Calculations Service Workforce scheduling application
wfdcs sisoptconfig
3 In addition to the csjcoxxxx XCM parameters you need to define the http port of the J2EE
instance where WFD CS is running
XCM Parameter Name Example Value Description
cshttpport 51000 The http port of the web server where the WFD Calculation Services application is running (for example 50000)
4 Restart the application after saving the XCM configuration
Configuring the XCM for WFD Application Services
This business scenario is relevant for connecting the WFD AS to the WFD CS
1 Start the XCM using the following URL
httpltJ2EE_hostgtltJ2EE_portgtwfdadminxcminitdo
2 Access the configuration using the following path General Application Settings Customer sis
sisconfig
Process Description Web ApplicationXCM Application Configurations
Application Services Web-based scheduling application
wfd sisconfig
3 Restart the application after saving the XCM configurationEnd of ABAP+JavaJava |
4 Post-Installation
42 Post-Installation Steps for Workforce Deployment Application and Calculation Services
2012-12-17 CUSTOMER 1750
Only valid for ABAP+JavaJava |
423 Checking Workforce Deployment Calculation Services
After configuring Workforce Deployment Calculation Services (WFD CS) with Extended Configuration
Management (XCM) and restarting the application you need to go to the WFD CS configuration page
to check that it is running
Prerequisites
You have completed the installation of WFD Application Service (AS) and CS as described in this
documentation
Only valid for CRM Java Components (JCRM) |
You have downloaded the Business Package for Retail (Release 10) from sdnsapcom SAP NetWeaver
Capabilities User Productivity Portal and Collaboration Portal Content Portfolio
For more information about the portal content versions for your release see the documentation
Master Guide ndash SAP Customer Relationship Management 70 at httpservicesapcomcrm-instEnd of CRM Java Components (JCRM) |
Only valid for CRM Java Components (JCRM) |
You must have access to the Portal Admin role in SAP CRM through the Enterprise Portal to complete
this part of the WFD ASCS installation
For more information see Configuring the CRM Business Package on the SAP Service Marketplace at
httpservicesapcomcrm-inst SAP CRM 70 CRM Business Packages and PC UI Section
CRM Portal Administrator contains specific instructions on configuring the portal for access to WFD
AS and CS Apply the instructions to the Portal Admin roleEnd of CRM Java Components (JCRM) |
You have configured your portal users based on the required settings as described in the
configuration documentation for your IT scenario
For more information see Accessing Configuration Documentation in the SAP Solution Manager [page 41]
Procedure
1 Access the WFD CS configuration page through the Enterprise Portal using the role Portal
Administrator
2 Choose WFD Calculation Services Configuration
The Configuration tab looks as follows
Tab To Complete InstallationFor ongoing Configuration Management
Calculation Servers Required for at least one calculation server
Required for each additional calculation server
Logging Localization No Required to add or change logging once fully operational
End of ABAP+JavaJava |
4 Post-Installation
42 Post-Installation Steps for Workforce Deployment Application and Calculation Services
1850 CUSTOMER 2012-12-17
Only valid for ABAP+JavaJava |
424 Checking the Installation of WFD Application Services and WFD Calculation Services
This section tells you how to check that you have correctly installed the Java components for Workforce
Deployment Application Services (WFD AS) and WFD Calculation Services (WFD CS) This section
does not tell you how to check the connection between the WFD AS and the WFD CS
The procedure below shows you how to create a simple calculation request and verify that the
Calculation Server has received the request This helps you check that you have correctly installed all
WFD AS or CS components and that they are communicating with each other
Prerequisites
You have completed all the installation steps described in this documentation
You have connected WFD AS or CS components with the Enterprise Portal
You have installed the required business packages according to Checking Workforce Deployment
Calculation Services [page 18]
Procedure
1 To check that WFD AS is working and listening for HTTP requests enter the following URL
httpltJ2EE_hostgtltJ2EE_portgtwfdlogondo
The following error confirms that the application is working
Your session has expired Please renew your session by clicking a section link in
the Portal menu
2 Access the WFD CS from the Enterprise Portal through the Portal Admin role and check that the
WFD CS page comes up with no errors
If the page does not come up possible errors are
Error Message Cause
Missing value for XCM configuration
parameter cshttpport
The XCM parameter cshttpport was not filled
The request could not be completed
due to the following
errorsltfollowed by details of the
particular error usually related to
the JCO connectiongt
One of the XCM parameters csjcoxxxxx might be incorrect
EXAMPLE
The user or password are incorrect
3 Test the submission of a calculation request to see if the WFD CS can process the request
You can simulate a calculation request submission by executing the RFC
TEST_WFDCS_CALCREQ_SUBMIT from the CRM back-end system defined in the csjcoxxxxx XCM
parameters of WFD CS
4 Post-Installation
42 Post-Installation Steps for Workforce Deployment Application and Calculation Services
2012-12-17 CUSTOMER 1950
EXAMPLE
For example when you installed WFD CS you configured the csjcoxxxxx XCM
parameters to point to system ID Q5C client 505 You now need to log in to Q5C client 505
and execute TEST_WFDCS_CALCREQ_SUBMIT with transaction SE37 using the default import
parameters
4 Check the Requests tab of the WFD CS page to check the status of entries with the location name
SMOKETEST has the status FAILED
Status FAILED indicates a successful smoke test It means that the Request Manager successfully
sent the request to the Solver which successfully processed it
Status QUEUED probably means that the XCM parameter cshttpport was incorrectEnd of ABAP+JavaJava |
End of Java |
Only valid for ABAP+JavaJava |
43 Post-Installation Steps for the Business Packages for SAP CRM
The following sections provide information about the steps that you have to perform after importing
the Business Package for SAP CRM
Only valid for ABAP+JavaJava |
431 Creating Roles for the SAP CRM Business Packages
Procedure
If you create your own roles from the SAP CRM Business Packages also add the every user role
(eu_core_role) to your role The Every User Role contains the personalization functionality for the SAP
NetWeaver Portal
For more information about the Every User Role see the SAP Library at
httphelpsapcomnw70 SAP NetWeaver 70 Library (including Enhancement Package 2) English SAP
NetWeaver Library SAP NetWeaver by Key Capability People Integration by Key Capability Portal Portal
Administration Guide Super Administration Pre-configured Roles Every User Roles End of ABAP+JavaJava |
Only valid for ABAP+JavaJava |
432 Installation of the Info Center for the SAP CRM Business Package
This section describes how to install the Info Center
4 Post-Installation
43 Post-Installation Steps for the Business Packages for SAP CRM
2050 CUSTOMER 2012-12-17
Prerequisites
You have installed the Business Package for SAP CRM [page 43]
You have administrator rights
Process Flow
1 You import the SAP CRM info center configurations and directory structure [page 21]
2 You activate manual ordering of folders for the sapcrm Repository [page 23]
3 You create indexes and taxonomies for the sapcrmnews Repository [page 23]
4 You create the index for the sapcrm Repository [page 25]
5 You configure the personal search [page 25]
6 If required you increase the number of JCo connections [page 26]
Only valid for ABAP+JavaJava |
4321 Importing the SAP CRM Info Center Configurations and Directory Structure
The directory structure of the info center has been made available in one content package and you can
import it using the Information and Content Exchange (ICE) Repository
For more information about ICE see SAP Library at
httphelpsapcomnw70 SAP NetWeaver 70 Library (including Enhancement Package 2) English SAP
NetWeaver Library SAP NetWeaver by Key Capability Information Integration by Key Capability Knowledge
Management Content Managers Guide Additional Tasks for Content Managers Content Exchange Distributing
Content (Offline)
Procedure
Importing the Directory Structure
1 Log on to the Portal as content manager
2 Choose Content Management Content Exchange Upload
3 Only valid for Windows |
Select file fullupdate_infocenterzip from directory ltservlet_enginegtirjrootWEB-INF
portalportalappsepcrmchmkmexpice and confirm the uploadEnd of Windows |
Only valid for IBM i5OSUNIX |
Select file fullupdate_infocenterzip from directory ltservlet_enginegtirjrootWEB-INF
portalportalappsepcrmchmkmexpice and confirm the uploadEnd of IBM i5OSUNIX |
The zip file is now imported using the ICE protocol
If you cannot see the ICE repository this might be due to one of the following reasons
The ICE repository was hidden in the virtual root repository
4 Post-Installation
43 Post-Installation Steps for the Business Packages for SAP CRM
2012-12-17 CUSTOMER 2150
In this case do the following
1 Log on to the portal as system administrator
2 In the SAP NetWeaver Enterprise Portal choose System Administration System Configuration
Knowledge Management Content Management Repository Managers Virtual Root Repository
3 Check whether the ICE Repository has been entered under Repositories to exclude
4 Remove it from the list
5 Save your changes
6 Restart the Servlet Engine
The repository has been ldquoswitchedrdquo to invisible
1 Log on to the portal as system administrator
2 In the SAP NetWeaver Enterprise Portal choose System Administration System Configuration
Knowledge Management Content Management Repository Managers Content Exchange
Repository
3 If the property hide in root folder is active deselect it
4 Restart the Servlet Engine
NOTE
After the import check whether the directory structure was created by choosing Content
Administration KM Content in the SAP NetWeaver Enterprise Portal The list of folders should
contain the folders sapcrm and sapcrmnews
Checking Whether the Directory Structure Has Been Imported Successfully
You can only import the structure if there is a repository with the same name For example if a zip file
is exported from the repository sapcrm there must also be a repository with the name sapcrm in the
target system
The sapcrm and sapcrmnews repositories as well as the CRM-Namespace filter are created during the
import of the SAP CRM KM extension configuration archive To check whether this configuration
archive has been imported successfully proceed as follows
1 Log on to the portal as system administrator
2 In the SAP NetWeaver Enterprise Portal choose System Administration Monitoring Knowledge
Management Deployment Monitor Config Archives
3 Check whether the archive comsappctcrmappkmextprjconfig is installed in the system
If the archive comsappctcrmappkmextprjconfig is not installed in the system import it
manually as follows
1 Log on to the portal as system administrator
2 In the SAP NetWeaver Enterprise Portal choose System Administration Monitoring Knowledge
Management Deployment Monitor Config Archives Actions Import
4 Post-Installation
43 Post-Installation Steps for the Business Packages for SAP CRM
2250 CUSTOMER 2012-12-17
3 Only valid for Windows |
Select the archive comsappctcrmappkmextprjconfigconfigarchive from directory
ltSAPSIDgtJCltinstance_numbergtj2eeclusterappssapcomep~crm~chm
servlet_jspepcrmchmkmexprootWEB-INFconfig and confirm the importEnd of Windows |
4 Only valid for IBM i5OSUNIX |
Select the archive comsappctcrmappkmextprjconfigconfigarchive from
directory ltSAPSIDgtJCltinstance_numbergtj2eeclusterappssapcomep~crm~chm
servlet_jspepcrmchmkmexprootWEB-INFconfig and confirm the importEnd of IBM i5OSUNIX |
After the import the directory structure has no restrictions on rights Make sure that you modify the
rights of the various folders to meet your companyrsquos requirementsEnd of ABAP+JavaJava |
Only valid for ABAP+JavaJava |
4322 Activating Manual Ordering of Folders for the sapcrm Repository
The sapcrm Repository folders are ordered in a specific sequence
Procedure
To display this sequence activate manual ordering for each directory
For more information see the SAP Library at
httphelpsapcomnw70 SAP NetWeaver 70 Library (including Enhancement Package 2) English SAP
NetWeaver Library SAP NetWeaver by Key Capability Information Integration by Key Capability Knowledge
Management Content Managers Guide Providing Shared Access to Departmental Documents Sorting Documents in a
Folder ManuallyEnd of ABAP+JavaJava |
Only valid for ABAP+JavaJava |
4323 Creating Indexes and Taxonomies for the sapcrmnews Repository
To make news available for indexing and searching create two new indexes
Prerequisites
You have administrator rights for Knowledge Management on the server
For more information see the SAP Library at
httphelpsapcomnw70 SAP NetWeaver 70 Library (including Enhancement Package 2) English SAP
NetWeaver Library SAP NetWeaver by Key Capability Information Integration by Key Capability Knowledge
Management
4 Post-Installation
43 Post-Installation Steps for the Business Packages for SAP CRM
2012-12-17 CUSTOMER 2350
Procedure
Creating Indexes and Taxonomies for the sapcrmnews Repository
The Business Package contains an iView ndash epbp_crmchm-pmiviewsnews_flash ndash that combines all
news with the istopnews=yes attribute in a virtual folder To guarantee the function of this iView
create two indexes in KM
1 In the SAP NetWeaver Enterprise Portal choose System Administration System Configuration
Knowledge Management Index Administration
2 Create an index of the Search and Classification type with a suitably configured taxonomy
3 Choose sapcrmpartnernews as the index ID Otherwise the path to the folder specified in the iView
is incorrect
If you choose another index ID you must also modify accordingly the folder properties in the
iView for one of the following
Folders path to content and path to root
Folders Path to Initially Displayed Folder and Path to Root Folder for Navigation
If you want to link two portal servers with a TREX server you must modify the index name and
iView properties on one of the portal servers
4 Assign folder sapcrmpartnerPartnernews as a data source
This moves all news with the (virtual) Top flag from this folder to the Newsflash iView
5 Create a ldquoquery-basedrdquo taxonomy with the name PartnerNewsFlash choosing Automatic
Classification before you save the taxonomy
NOTE
The outbound delivery includes only the iView above for virtually combining news If you
also want to use this functionality for other news channels (for example internal news) use
your own index and taxonomy for each channel
For more information see the SAP Library at
httphelpsapcomnw70 SAP NetWeaver 70 Library (including Enhancement Package 2) English SAP
NetWeaver Library SAP NetWeaver by Key Capability Information Integration by Key Capability Knowledge
Management Administration Guide System Administration System Configuration lsquoIndex Administrationrsquo iView
Creating Queries for the Taxonomies of sapcrmnews Repositories
1 Log on to the portal as content manager
2 Choose Content Management Classification Taxonomy Query Builder
3 Add a search query to check the istopnews property for the value Yes
4 Enter PartnerNewsFlash as the name for the taxonomy
Here too a property of the iView links to a taxonomy with this name So if you want to choose
another name you must modify the path to the content folder property of the iView
For more information see the SAP Library at
4 Post-Installation
43 Post-Installation Steps for the Business Packages for SAP CRM
2450 CUSTOMER 2012-12-17
httphelpsapcomnw70 SAP NetWeaver 70 Library (including Enhancement Package 2) English SAP
NetWeaver Library SAP NetWeaver by Key Capability Information Integration by Key Capability Knowledge
Management Administration Guide System Administration System Configuration Taxonomies and ClassificationEnd of ABAP+JavaJava |
Only valid for ABAP+JavaJava |
4324 Creating the Index for the sapcrm Repository
To make Info center documents available for indexing and searching create a new index with sapcrm
as a data source
Prerequisites
You have administrator rights for Knowledge Management on the server
Procedure
Choose a name of your own Search as a service and standard as a crawler parameter
For more information see the SAP Library at
httphelpsapcomnw70 SAP NetWeaver 70 Library (including Enhancement Package 2) English SAP
NetWeaver Library SAP NetWeaver by Key Capability Information Integration by Key Capability Knowledge
ManagementEnd of ABAP+JavaJava |
Only valid for ABAP+JavaJava |
4325 Configuring the Personal Search
Prerequisites
You have administrator rights for Knowledge Management on the server
Procedure
1 Create an index for the userhome repository
To make personal folder documents available for the search create a new index with root
userhome as the data source
2 Create a search option set for personal search
To assign the search index and a start folder to the search for personal documents create a Search
Option Set with the name CRMPersonalFolderSearch As an index enter the index for the
userhome repository created above and ~alias~userhomeuseridPersonal Documents as the
root folder for the search
For more information see the SAPLibrary at
4 Post-Installation
43 Post-Installation Steps for the Business Packages for SAP CRM
2012-12-17 CUSTOMER 2550
httphelpsapcomnw70 SAP NetWeaver 70 Library (including Enhancement Package 2) English SAP
NetWeaver Library SAP NetWeaver by Key Capability Information Integration by Key Capability Knowledge
Management End of ABAP+JavaJava |
Only valid for ABAP+JavaJava |
4326 Increasing the Number of JCo Connections
This section tells you how to increase the number of concurrent Java Connector (JCo) connections
By default the maximum number of concurrent JCo connections is 100 The value depends on the
number and behavior of the users in the portal For more information see SAP Note 316877
You can specify this value when you plan the installation of your SAP NetWeaver Enterprise Portal
Make sure that you first analyze the number and behavior of the users
Procedure
To increase the maximum number of concurrent JCo connections increase the value of the
environment variable CPIC_MAX_CONV
EXAMPLE
Initial default value CPIC_MAX_CONV=100
Increased value CPIC_MAX_CONV=1000
End of ABAP+JavaJava |
End of ABAP+JavaJava |
End of ABAP+JavaJava |
Only valid for ABAP+JavaJava | MapBox (MBX) |
44 Post-Installation Steps for MapBoxOnly valid for Java | MapBox (MBX) |
You have to perform the following post-installation steps for MapBox
You assign user groups for MapBox users [page 27]
You configure an RFC destination for TCPIP connections [page 28]
You perform initial configuration for MapBox [page 28]
You execute the Map Box [page 34]
You perform the smoke test [page 35]
If required you perform additional settings for MapBox
Block size settings [page 38]
Memory settings for the J2EE Engine [page 39]End of Java | MapBox (MBX) |
4 Post-Installation
44 Post-Installation Steps for MapBox
2650 CUSTOMER 2012-12-17
Only valid for Java | MapBox (MBX) |
441 Assigning User Groups for MapBox Users
To access the MapBox URL you need to provide the correct security rights for individual user groups
Procedure
1 Log on to the Visual Administrator
1 On your central instance host change to the following directory
Only valid for IBM i5OSUNIX |
usrsapltSAPSIDgtltinstance_numbergtj2eeadmin
End of IBM i5OSUNIX |
Only valid for Windows |
usrsapltSAPSIDgtltinstance_numbergtj2eeadmin
End of Windows |
2 Only valid for IBM i5OSUNIX |
Run goshEnd of IBM i5OSUNIX |
3 Only valid for Windows |
Double-click gobatEnd of Windows |
For more information about the Visual Administrator see the SAP Library at
httpshelpsapcomnw70 SAP NetWeaver Library SAP NetWeaver by Key Capability
Application Platform by Key Capability Java Technology Administration Manual J2EE Engine J2EE Engine
Administration Tools
2 Choose the server node from the left-hand window
3 Choose Services Security Provider
A list of deployed components is displayed
4 Choose MapBoxLauncher from this list (sapcom
comsapsyncpointmapboxlaunchermapboxlauncher)
A list of tabs appears on the right
5 Choose Security Roles from the list
A list of security roles appears
6 If no display and modify roles are displayed add these roles as follows
1 Choose Switch to Edit Mode from the top task bar to switch to edit mode
2 Add display and modify roles by choosing Add
7 For both the display and modify roles perform the following
1 Choose Switch to Edit Mode from the top task bar to switch to edit mode
2 Choose the Groups tab from the list on the far right
3 Choose Search
4 Post-Installation
44 Post-Installation Steps for MapBox
2012-12-17 CUSTOMER 2750
A list of user groups appears
4 Select the user groups that you want to enable for the two roles
Add to the left of the user group display is now highlighted
5 Choose Add to add the user group for the selected roleEnd of Java | MapBox (MBX) |
Only valid for Java | MapBox (MBX) |
442 Configuring an RFC Destination for MapBox
After the installation you have to create an RFC destination for MapBox
Procedure1 Log on to the CRM server
2 Enter transaction SM59
The Display and Maintain RFC Destinations screen appears
3 Choose Technical Settings Activation Type and create a new destination with the type TCPIP
4 Choose Registered Server Program and enter a unique value for program ID
For example you might enter MAPBOX723 for SAP client 723
5 Enter the details of the gateway host and gateway service in Gateway Options
1 Gateway host
Enter the name of your message server You can also enter the IP address of your message
server
2 Gateway service
Enter your SAP CRM system number prefixed with the string sapgw
For example if your system number is 02 enter sapgw02
6 If the CRM system is a Unicode-enabled system choose Unicode in Special Options
7 Save the destination
8 Choose MapBox Configuration Page Connecting settings from the URL and enter the same RFC
destination name in the relevant fieldEnd of Java | MapBox (MBX) |
Only valid for Java | MapBox (MBX) |
443 Performing Initial Configuration for MapBox
Procedure1 Open a browser window and enter the following URL
httplthostnamegtltport_numbergtmapboxlauncher
NOTE
If you are logged on to the machine where the J2EE server is running you can also enter the
following URL
4 Post-Installation
44 Post-Installation Steps for MapBox
2850 CUSTOMER 2012-12-17
httplocalhostltport_numbergtmapboxlauncher
2 Choose Configuration
3 Edit the values according to your SAP system and choose Save
The application asks you to enter a user name and password
4 Enter the user name and password used for the SAP J2EE Engine Visual Administrator
A description of the properties and example values for the properties is given below
Result
You see the default connection settings for MapBox as shown in the graphic below A description
of the properties and example values are provided in the adjacent table
Figure 1 MapBox Default Connection Settings
Property Purpose Example
SAP System SAP System name ABC FAZ
Message Server Message server host name xyzmain
Group SAP System group PUBLIC SPACE
System Number SAP Gateway system number prefixed with sapgw
sapgw02
Unicode Used for setting the Unicode option for the CRM server Default value is no
yes
Maximum allowed wait time interval between ISP Processing and Commit call
Time-out period between an ISP_MAPBOX call and an ISP_COMMIT call
300
4 Post-Installation
44 Post-Installation Steps for MapBox
2012-12-17 CUSTOMER 2950
Property Purpose Example
Client SAP logon client 723
User Name SAP logon user John
Password SAP logon password
Language SAP logon language EN
Destination The RFC destination with which you need to register the MapBox This is the value you enter in step 3 of Configuring an RFC Destination for MapBox [page 28]
MAPBOX723
Number of server instances The number of JCO server execution instances used by the MapBox to process server requests This number indicates the number of CRM inbound queues that are running simultaneously
10
The above MapBox connection configuration is meant for one SAP client running with the CRM
Server If you want to run the MapBox with two or more SAP clients of the same CRM system
you can use Add Client on the configuration page and edit the values accordingly However make
sure that the RFC destinations that these multiple clients listen to are always unique You can
leave the default values for the other settings
If you need more control over logging and tracing you can go to Log Settings on the configuration
page edit the values and choose Save The Log Settings screen with default values is shown in the
graphic below A description of the properties and example values for the properties is provided
in the adjacent table
Figure 2 Default Values for the Log Settings Screen
4 Post-Installation
44 Post-Installation Steps for MapBox
3050 CUSTOMER 2012-12-17
Property Purpose Example
Log and dumps directory This value specifies where the MapBox logs and dumps are stored If this field is left blank the ltuser_homegt folder is used as default value
Only valid for Windows |
Ctemp
End of Windows |
Only valid for IBM i5OSUNIX |
tmp
End of IBM i5OSUNIX |
Input payload dump This value specifies whether the input document coming to MapBox for processing is written or not
No
MapBox launcher trace level This value specifies with what granularity the MapBoxLauncher execution trace is generated6 specifies that a full MapBoxLauncher execution trace is generated whereas 0 specifies that the MapBoxLauncher execution trace is not generated Recommended value for production use is 0
0
MapBox launcher trace size The maximum file size of the generated trace When the size reaches the maximum value another file is created so that the old file can be deleted (for example due to lack of space) You can use alphabetic suffixes to specify the sizes The supported values are k or K ndash kilobytes g or G ndash gigabytes m or M ndash megabytes t or T ndash terabytes
50 k
CoordServer log level This value specifies the detail of the coordination server logging We recommended you not to change the default value of 1
2
SAP Java connector trace level This value specifies the detail of the SAP Java Connector logging The recommended value for production use is 0
2
MapBox log level The log level required for the MapBox to generate an internal log file A higher trace level means that a more detailed log file is created We recommend you to use 4D for production systems where D meansldquoOn Demandrdquo
2
4 Post-Installation
44 Post-Installation Steps for MapBox
2012-12-17 CUSTOMER 3150
Property Purpose Example
MapBox message dumps This value stands for copying the incoming and outgoing messages to the local system For better performance we recommend that you do not enable the message dump option
no
MapBox statistics This value specifies whether a file that lists the performance measurements of the MapBox is created We recommend you to use the value no for production use
no
MapBox logs location This value specifies where the MapBox logs are stored Possible locations are the MapBox repository on the CRM Server or the local file system The recommended value for production use is local_fs which indicates that the MapBox logs are stored on the local file system
local_fs
MapLog format The format in which the MapBox log file must be created The internal log file is by default created in a particular format However you can change this format to display the file in the SAP log file format The two values that are available are default and sap_log
default
The MapBox uses additional properties for performance such as caching and reuse of the MapBox
atoms These values are already set to optimum values and you cannot change them
The description of the properties is shown in the table below
Property Purpose Example
General Settings
max_elements_document This is the limit for the internal cache of the MapBox to hold the count of generated XML documentsWe recommend you not to change this value
100
cache_threshold This is the maximum threshold ndash in kilobytes ndash for a document to be cached in the internal cache of the MapBox
500
4 Post-Installation
44 Post-Installation Steps for MapBox
3250 CUSTOMER 2012-12-17
Property Purpose ExampleWe recommend you not to change this value
max_elements_cache This is the limit for the internal cache of the MapBox to hold the count of MapScenariosWe recommend you not to change this value
100
parallel_instances You use this value on systems where more than one CPU is used This setting allows you to specify the number of CPU instances that MapBox must use for processing so that the remainder can be used by non-MapBox related applications By default MapBox uses all the available CPUs for processing Values can range between 0 to N-1 where N is the number of available CPUs
4
thread_priority Specifies the number of threads MapBox uses during processing We recommend you to set an optimum value for this property so that MapBox does not utilize all available resources 0 = min 1 = low 2 = normal 3 = high 4 = max
3
reuse_count Sets the count for the number of times an atom-instance must be reused before it is destroyed A value of 0 means that the atom is not destroyed and can be used continuously Recommended value is 50 This means that the atom instance is reused 50 times before it is destroyed
100
Lock Server Settings
Operation_Mode The internal mode of operation for the coordination server We recommend not to change the default value of OUTPROC_CLIENT
OUTPROC_CLIENT
Registry_Port The Remote Method Invocation (RMI) port used for connecting to the coordination serverRMI is a Java mechanism for distributed computing
1099
4 Post-Installation
44 Post-Installation Steps for MapBox
2012-12-17 CUSTOMER 3350
Property Purpose ExampleDo not change this value unless port 1099 is unavailable In this case change it to 59856
HostName The name of the host where the coordination server resides
localhost
LocalName The name of the host where the MapBoxLauncher is executed We recommend you not to change the default value of localhost
Server
PollingInterval Polling interval in seconds to ask for shutdown of the coordination server We recommend you not to change the default value of 30
60
CleanUpInterval Cleanup interval in seconds to check for invalid locks created by the MapBoxLauncher We recommend you not to change the default value of 60
180
NOTE
A file name MapLogxsl is also available with the smoke test [page 35] This file is the stylesheet
that is used to format the display of the MapBox log file During the installation and execution
of the MapBox the MapBox log file is created in the following directory
Only valid for Windows |
ltUser_homegtTempMapBoxDumpsltyour_system_namegt500 where ltuser_homegt is the
home directory of the logged-on user ltyour system namegt is the CRM server you have
connected to and 500 is the client you have connected toEnd of Windows |
Only valid for IBM i5OSUNIX |
ltUser_homegtTempMapBoxDumpsltyour_system_namegt500 where ltuser_homegt is the
home directory of the logged-on user ltyour system namegt is the CRM server you have
connected to and 500 is the client you have connected toEnd of IBM i5OSUNIX |
RECOMMENDATION
We recommend that you copy MapLogxsl from the
ltsmoke_test_installation_directorygt to the directory mentioned aboveEnd of Java | MapBox (MBX) |
Only valid for Java | MapBox (MBX) |
444 Executing the MapBox
This section tells you how to execute the MapBox The procedure that you use to execute the Map Box
depends on its current support package (SP) level
4 Post-Installation
44 Post-Installation Steps for MapBox
3450 CUSTOMER 2012-12-17
Procedure
If the SP level of the MapBox is less than SP11 proceed as follows
1 Enter the following URL in your browser
httplthostnamegtltport_numbergtmapboxlaunchermanage
2 Choose Start MapBox
3 The application prompts you for a user name and password
Enter the user name and password for the J2EE Engine Visual Administrator
NOTE
MapBox typically takes 30 to 60 seconds to initialize depending on the number of SAP clients
To see the status of messages processed by MapBox choose Status
If the SP level of the MapBox is equal to or higher than SP11 the MapBox starts automatically
1 For the first MapBox installation you need to restart the Java application server (AS Java) after all
the configuration settings have been completed This automatically starts the MapBox (Autostart)
2 To check the status go to the URL httplthostnamegtltport_numbergtmapboxlauncher
manage
NOTE
MapBox Autostart needs approximately 60 seconds to allow other services of As Java to start
To see the status of messages processed by MapBox choose Status
Result
When the MapBox is running the status is shown as Ready to processEnd of Java | MapBox (MBX) |
Only valid for Java | MapBox (MBX) |
445 Performing the Smoke Test for MapBox
The smoke test checks whether the MapBox installation is error-free
Only valid for Windows |
To execute the smoke test you have to run two batch filesEnd of Windows |
Only valid for IBM i5OSUNIX |
To execute the smoke test you have to run two shell scriptsEnd of IBM i5OSUNIX |
Prerequisites
Before you start the procedure you need to copy the smoketestjar file to a new
ltsmoke_test_installation_directorygt of your choice which has two further subdirectories
firstrun and secondrun
4 Post-Installation
44 Post-Installation Steps for MapBox
2012-12-17 CUSTOMER 3550
You can find the smoketestjar file here
Only valid for IBM i5OSUNIX |
usrsapltinstance_IDgtJCltinstance_numbergtj2eeclusterserver0binext
comsapsyncpointmapboxEnd of IBM i5OSUNIX |
Only valid for Windows |
usrsapltinstance_IDgtJCltinstance_numbergtj2eeclusterserver0binext
comsapsyncpointmapboxEnd of Windows |
NOTE
Each subdirectory of ltsmoke_test_installation_directorygt ndash that is firstrun and
secondrun ndash contains the following files
MBSMOKETEST_IN_000xml
MBSMOKETEST_IN_001xml
MBSMOKETEST_IN_002xml
MBSMOKETEST_IN_003xml
After executing the smoke test you must verify whether the contents of the files generated
by your test are similar to the contents of the above files That is the XML documents that
are created in the smoke test must match the documents located in the
ltsmoke_test_installation_directorygt mentioned above
To execute the smoke test you need to install the SAP Java Connector (SAP JCo version 2012)
You have to download SAP JCo 2012 from SAP Service Marketplace at https
servicesapcomswdc before executing the smoke test
CAUTION
Make sure that you install the SAP Java Connector correctly
The file mapcaseprop is available in the ltsmoke_test_installation_directorygt This file
contains the connection parameters to be tested You can modify the contents of this file
CAUTION
You must replace the connection parameters in this file with the connection parameters that
you entered in the MapBoxMetaxml file
Procedure
1 Run the first stage of the smoke test
1 Only valid for Windows |
Execute the file smoketest_1bat from the ltsmoke_test_installation_directorygtEnd of Windows |
Only valid for Windows |
This prompts you to enter the followingEnd of Windows |
4 Post-Installation
44 Post-Installation Steps for MapBox
3650 CUSTOMER 2012-12-17
Only valid for Windows |
1 ltDRIVEgtusrsapltinstance_IDgtJCltinstance_numbergtj2ee
2 ltsmoke_test_installation_directorygt
3 ltpath_to_sapjcojargt
End of Windows |
Only valid for IBM i5OSUNIX |
Execute the file smoketest_1sh from the ltsmoke_test_installation_directorygtEnd of IBM i5OSUNIX |
Only valid for IBM i5OSUNIX |
1 usrsapltinstance_IDgtJCltinstance_numbergtj2ee
2 ltsmoke_test_installation_directorygt
3 ltpath_to_sapjcojargt
End of IBM i5OSUNIX |
2 Enter the appropriate paths
The smoke test creates the following files
MBSMOKETEST_IN_000xml
MBSMOKETEST_IN_001xml
MBSMOKETEST_IN_002xml
MBSMOKETEST_IN_003xml
3 Only valid for Windows |
Check the contents of the generated files against the contents of the files located in
ltsmoke_test_installation_directorygtSMOKETESTfirstrunEnd of Windows |
Only valid for IBM i5OSUNIX |
Check the contents of the four files against the contents of the files located in
ltsmoke_test_installation_directorygtSMOKETESTfirstrunEnd of IBM i5OSUNIX |
2 Run the second stage of the smoke test
1 Only valid for Windows |
Execute the file smoketest_2bat which is located in the
ltsmoke_test_installation_directorygtEnd of Windows |
Only valid for IBM i5OSUNIX |
Execute the file smoketest_2sh which is located in the
ltsmoke_test_installation_directorygtEnd of IBM i5OSUNIX |
This prompts you to enter the following
Only valid for Windows |
1 ltDRIVEgtusrsapltinstance_IDgtJCltinstance_numbergtj2ee
2 ltsmoke_test_installation_directorygt
End of Windows |
4 Post-Installation
44 Post-Installation Steps for MapBox
2012-12-17 CUSTOMER 3750
Only valid for IBM i5OSUNIX |
1 usrsapltinstance_IDgtJCltinstance_numbergtj2ee
2 ltsmoke_test_installation_directorygt
End of IBM i5OSUNIX |
2 Enter the appropriate paths
The smoke test creates the following files
MBSMOKETEST_IN_000xml
MBSMOKETEST_IN_001xml
MBSMOKETEST_IN_002xml
MBSMOKETEST_IN_003xml
CAUTION
The files generated in the second stage of testing overwrite the contents of the files
generated in the first stage
3 Only valid for Windows |
Check the contents of the generated files against the contents of the files located in
ltsmoke_test_installation_directorygtSMOKETESTsecondrunEnd of Windows |
Only valid for IBM i5OSUNIX |
Check the contents of the four files against the contents of the files located in
ltsmoke_test_installation_directorygtSMOKETESTsecondrunEnd of IBM i5OSUNIX |
Result
If the smoke test has identified errors in the installation process the four XML files are not created in
either of the stages Instead an error log file is created
RECOMMENDATION
In the event of errors we recommend that you send the error log file to your administrator
End of Java | MapBox (MBX) |
Only valid for Java | MapBox (MBX) |
446 Ensuring Optimal Block Size settings
The block size of an object determines the number of messages that are processed at the same time by
the MapBox as a set You need to make sure that the block sizes are optimal to reduce load on the
MapBox XML processor
Procedure
1 Use transaction R3AC3 to set the block size of object GWA_COUNTRY to 10 and save the setting
2 Use transaction R3AC1 to set the block size of object BUPA_MAIN to 10 and save the settingEnd of Java | MapBox (MBX) |
4 Post-Installation
44 Post-Installation Steps for MapBox
3850 CUSTOMER 2012-12-17
Only valid for ABAP+JavaJava | MapBox (MBX) |
447 Adapting Memory Settings for the J2EE Engine
You need to adapt the memory settings for the J2EE Engine because MapBox relies heavily on memory-
intensive XML-processing such as schema-validation parsing transformation and so on
RECOMMENDATION
For rapid message processing by MapBox we recommend you to use 1024 MB of heap memory
for MapBox alone With a heap size of 512 MB MapBox can still process messages but with a slightly
higher processing time for each message
The MapBox memory requirements are directly proportional to the size of the input documents
that MapBox has to process The average size of such documents is in the range of 150 to 200 KB
For messages of this size it is sufficient to have a heap memory of 512 MB If the input documents
are in the range of 1 to 2 MB we recommend that you give MapBox a heap memory of 1024 MB
Procedure
To set the recommended memory settings for the MapBox you start the config tool of the J2EE Engine
Only valid for Windows |
Start the config tool by executing ltDrivegtusrsapltSAPSIDgtltinstance_numbergtj2ee
configtoolbatEnd of Windows |
Only valid for IBM i5OSUNIX |
Start the config tool by executing usrsapltSAPSIDgtltinstance_numbergtj2eeconfigtoolshEnd of IBM i5OSUNIX |
End of ABAP+JavaJava | MapBox (MBX) |
End of ABAP+JavaJava | MapBox (MBX) |
Only valid for ABAPABAP+Java |
45 Activating the CRM Web Client
The CRM Web Client is part of the ICF Services that is automatically installed as part of SAP NetWeaver
Application Server
Procedure
To activate the CRM Web Client after the installation see the SAP Library at
httphelpsapcomnw70 SAP NetWeaver 70 Library (including Enhancement Package 2) English SAP
NetWeaver Library SAP NetWeaver by Key Capability Application Platform by Key Capability Platform-Wide
Services Connectivity Components of SAP Communication Technology Communication Between ABAP and Non-
4 Post-Installation
45 Activating the CRM Web Client
2012-12-17 CUSTOMER 3950
ABAP Technology Internet Communication Framework Development Server-Side Development Creating and
Configuring an ICF Service Activating and Deactivating the ICF ServicesEnd of ABAPABAP+Java |
Only valid for ABAP |
46 Installing and Configuring CRM Application Server Loyalty Add-On Component
This section provides information about how to install and configure CRM Application Server Loyalty
as an add-on component to CRM Application Server ABAP
Prerequisites
You have already deployed the following software components
SAP NetWeaver Application Server ABAP (AS ABAP)
CRM Application Server ABAP
Procedure
Installing CRM Application Server Loyalty
Install CRM Application Server Loyalty on the same host where CRM Application Server ABAP is
deployed as described in SAP Note 1162144
Configuring CRM Application Server Loyalty
After you have installed CRM Application Server Loyalty you must complete the following
configuration steps
1 Call transaction nspro
2 Choose SAP Customising Implementation Guide Customer Relationship Management Marketing Loyalty
Management in BBPCRM Basic Settings Define Basic Settings
3 Enter value 1 for the INSTALL_TYPE parameter
NOTE
You do not have to enter destination name for the LOYALTY_SYSTEM parameterEnd of ABAP |
47 Starting XCM
This section describes how to start XCM
Procedure
1 You access the XCM tool at
httplthostgtltportgtltweb app namegtadminxcminitdo
4 Post-Installation
46 Installing and Configuring CRM Application Server Loyalty Add-On Component
4050 CUSTOMER 2012-12-17
NOTE
You can also start XCM in accessibility mode (according to Section 508 Rehabilitation Act)
at the following URL
httplthostgtltportgtltweb app namegtadminxcminitdosap-accessibility=x
2 Provide a user and password If you are logging on for the first time use the Administrator user
and the password you defined during the installation of the SAP system
RECOMMENDATION
We recommend you create new users with lesser rights than the Administrator for the
administration of Web applications
For more information see the SAP CRM Security Guide section E-Commerce
3 When the application opens a closed control tree is displayed on the left of the screen A screen
containing help information is displayed to the right
You can use edit (change settings) or display (see settings) mode in XCM You use the button in
the top right hand corner of the screen to change between modes When you switch to edit mode
a DB lock is set meaning that only this user can edit the settings at one time The lock is released
once the user switches back to display mode or after session timeout (default timeout is 30mins)
48 Accessing Configuration Documentation in SAP Solution Manager
To access configuration documentation in SAP Solution Manager you have to connect your newly
installed SAP system to SAP Solution Manager
NOTE
For SAP NetWeaver you can also find configuration documentation in the Technology Consultants
Guide at
httphelpsapcomnw70 SAP NetWeaver 70 Library (including Enhancement Package 2) English
SAP NetWeaver Library Technology Consultants Guide
Procedure
Create a configuration project with the related configuration guide as described in the following
documentation
httphelpsapcom SAP Solutions SAP Solution Manager Documentation for SAP Solution Manager
ltcurrent releasegt SAP Solution Manager Implementing and Upgrading SAP Solutions Projects
Configuration
More Information
httpservicesapcomsolutionmanager Media Library How-To Documents How to Create a
Configuration Guide using SAP Solution Manager
4 Post-Installation
48 Accessing Configuration Documentation in SAP Solution Manager
2012-12-17 CUSTOMER 4150
This page is left blank for documents that are printed on both sides
5 Additional Information
Only valid for ABAP+JavaJava |
51 Installing the Business Packages for SAP CRM Using JSPM (Optional)
You can also install the Business Packages for SAP CRM using the Java Support Package Manager (JSPM)
Prerequisites
Only valid for IBM i5OSUNIX |
You have checked hardware and software requirements [external document]End of IBM i5OSUNIX |
Only valid for Windows |
You have checked hardware and software requirements [external document]End of Windows |
You have ckecked the Prerequisites for the Business Packages for SAP CRM [page 7]
Procedure
1 Download version 701 of the files sapcom_BPCRMAPP sapcom_BPCRMFND sapcom_CRMAPP and
sapcom_CRMFND as follows
1 Go to httpservicesapcomswdc Download Support Packages and Patches Search for
Support Packages and Patches
2 Enter the following search terms
BP CRM Application Coding 701
BP CRM Application Content 701
BP CRM Foundation Coding 701
BP CRM Foundation Content 701
2 Add the deployment variable comsapcmshare as described in SAP Note 965948
For more information about how to use the Software Deployment Manager (SDM) see the
documentation Software Deployment Manager which is available at
httphelpsapcomnw70 SAP NetWeaver 70 Library (including Enhancement Package 2) English
SAP NetWeaver Library SAP NetWeaver Developerrsquos Guide Fundamentals Using Java Core Development
Tasks Deployment Putting It All Together Software Deployment Manager
3 Install the Business Packages for SAP CRM with JSPM as described in Installing Additional Usage Types
or Software Units in an Existing SAP System [external document]
5 Additional Information
51 Installing the Business Packages for SAP CRM Using JSPM (Optional)
2012-12-17 CUSTOMER 4350
4 Perform the required Post-Installation Steps for the Business Packages for SAP CRM [page 20]End of ABAP+JavaJava |
Only valid for ABAP+JavaJava |
52 Troubleshooting for the Business Package for SAP CRMOnly valid for ABAP+JavaJava |
The following sections describe the steps that you have to perform if you have problems after the
installation
Activating BI Templates Manually [page 44]
Dragging the Central Search onto the Portal Desktop [page 45]End of ABAP+JavaJava |
Only valid for ABAP+JavaJava |
521 Activating BI Templates Manually
If you have installed the Business Package you might see error messages when loading the BI templates
This procedure describes how you can activate the templates afterwards
Procedure
1 Note the technical name of all templates in your portal interface that are not working
2 Log on to your BI system
3 On the SAP Easy Access screen choose Modeling Administrator Workbench Modeling (transaction
RSA1 or RSOR)
4 Choose Business Content Object Types Web Template Name Select Objects
A new window containing a list of BW objects and templates opens
5 Find your missing templates for example 0TPL_0CRM_Cnn_Qnnn_Vnnn_M and select the entries
6 Choose Transfer Selection
The template now appears on the right-hand side of the screen The Transfer checkbox has been
selected and cannot be changed Nevertheless we recommend that you repeat the following
procedure so that your templates can be displayed
7 Select the template
8 Choose Transfer Transfer
Result
You have successfully activated your missing templates and no error messages appear in the portalEnd of ABAP+JavaJava |
5 Additional Information
52 Troubleshooting for the Business Package for SAP CRM
4450 CUSTOMER 2012-12-17
Only valid for ABAP+JavaJava |
522 Dragging the Central Search onto the Portal Desktop
Procedure
The Business Package for SAP CRM 70 including SAP enhancement package 1 contains an iView for
the central search in CRM This iView is in the package on the page Today in the workset Home of the
CRM User You can drag this iView onto the portal desktop under the tool areaEnd of ABAP+JavaJava |
End of ABAP+JavaJava |
5 Additional Information
52 Troubleshooting for the Business Package for SAP CRM
2012-12-17 CUSTOMER 4550
Typographic Conventions
Example Description
ltExamplegt Angle brackets indicate that you replace these words or characters with appropriate entries to make entries in the system for example ldquoEnter your ltUser Namegtrdquo
ExampleExample
Arrows separating the parts of a navigation path for example menu options
Example Emphasized words or expressions
Example Words or characters that you enter in the system exactly as they appear in the documentation
httpwwwsapcom Textual cross-references to an internet address
example Quicklinks added to the internet address of a homepage to enable quick access to specific content on the Web
123456 Hyperlink to an SAP Note for example SAP Note 123456
Example Words or characters quoted from the screen These include field labels screen titles pushbutton labels menu names and menu options
Cross-references to other documentation or published works
Example Output on the screen following a user action for example messages Source code or syntax quoted directly from a program File and directory names and their paths names of variables and parameters and
names of installation upgrade and database tools
EXAMPLE Technical names of system objects These include report names program names transaction codes database table names and key concepts of a programming language when they are surrounded by body text for example SELECT and INCLUDE
EXAMPLE Keys on the keyboard
4650 CUSTOMER 2012-12-17
SAP AGDietmar-Hopp-Allee 16
69190 WalldorfGermany
T +4918 0534 34 34F +4918 0534 34 20
wwwsapcom
copy Copyright 2012 SAP AG All rights reserved
No part of this publication may be reproduced or transmitted in any form or for any purpose without the express permission of SAP AG The information contained herein may be changed without prior noticeSome software products marketed by SAP AG and its distributors contain proprietary software components of other software vendors
Microsoft Windows Excel Outlook PowerPoint Silverlight and Visual Studio are registered trademarks of Microsoft CorporationIBM DB2 DB2 Universal Database System i System i5 System p System p5 System x System z System z10 z10 zVM zOS OS390 zEnterprise PowerVM Power Architecture Power Systems POWER7 POWER6+ POWER6 POWER PowerHA pureScale PowerPC BladeCenter System Storage Storwize XIV GPFS HACMP RETAIN DB2 Connect RACF Redbooks OS2 AIX Intelligent Miner WebSphere Tivoli Informix and Smarter Planet are trademarks or registered trademarks of IBM CorporationLinux is the registered trademark of Linus Torvalds in the United States and other countriesAdobe the Adobe logo Acrobat PostScript and Reader are trademarks or registered trademarks of Adobe Systems Incorporated in the United States and other countriesOracle and Java are registered trademarks of Oracle and its affiliatesUNIX XOpen OSF1 and Motif are registered trademarks of the Open GroupCitrix ICA Program Neighborhood MetaFrame WinFrame VideoFrame and MultiWin are trademarks or registered trademarks of Citrix Systems IncHTML XML XHTML and W3C are trademarks or registered trademarks of W3Creg World Wide Web Consortium Massachusetts Institute of TechnologyApple App Store iBooks iPad iPhone iPhoto iPod iTunes Multi-Touch Objective-C Retina Safari Siri and Xcode are trademarks or registered trademarks of Apple IncIOS is a registered trademark of Cisco Systems IncRIM BlackBerry BBM BlackBerry Curve BlackBerry Bold BlackBerry Pearl BlackBerry Torch BlackBerry Storm BlackBerry Storm2 BlackBerry PlayBook and BlackBerry App World are trademarks or registered trademarks of Research in Motion LimitedGoogle App Engine Google Apps Google Checkout Google Data API Google Maps Google Mobile Ads Google Mobile Updater Google Mobile Google Store Google Sync Google Updater Google Voice Google Mail Gmail YouTube Dalvik and Android are trademarks or registered trademarks of Google IncINTERMEC is a registered trademark of Intermec Technologies CorporationWi-Fi is a registered trademark of Wi-Fi AllianceBluetooth is a registered trademark of Bluetooth SIG IncMotorola is a registered trademark of Motorola Trademark Holdings LLCComputop is a registered trademark of Computop Wirtschaftsinformatik GmbHSAP R3 SAP NetWeaver Duet PartnerEdge ByDesign SAP BusinessObjects Explorer StreamWork SAP HANA and other SAP products and services mentioned herein as well as their respective logos are trademarks or registered trademarks of SAP AG in Germany and other countriesBusiness Objects and the Business Objects logo BusinessObjects Crystal Reports Crystal Decisions Web Intelligence Xcelsius and other Business Objects products and services mentioned herein as well as their respective logos are trademarks or registered trademarks of Business Objects Software Ltd Business Objects is an SAP companySybase and Adaptive Server iAnywhere Sybase 365 SQL Anywhere and other Sybase products and services mentioned herein as well as their respective logos are trademarks or registered trademarks of Sybase Inc Sybase is an SAP company
2012-12-17 CUSTOMER 4750
Crossgate mgic EDDY B2B 360deg and B2B 360deg Services are registered trademarks of Crossgate AG in Germany and other countries Crossgate is an SAP companyAll other product and service names mentioned are the trademarks of their respective companies Data contained in this document serves informational purposes only National product specifications may varyThese materials are subject to change without notice These materials are provided by SAP AG and its affiliated companies (ldquoSAP Grouprdquo) for informational purposes only without representation or warranty of any kind and SAP Group shall not be liable for errors or omissions with respect to the materials The only warranties for SAP Group products and services are those that are set forth in the express warranty statements accompanying such products and services if any Nothing herein should be construed as constituting an additional warranty
DisclaimerSome components of this product are based on Javatrade Any code change in these components may cause unpredictable and severe malfunctions and is therefore expressly prohibited as is any decompilation of these componentsAny Javatrade Source Code delivered with this product is only to be used by SAPrsquos Support Services and may not be modified or altered in any way
Documentation in the SAP Service MarketplaceYou can find this document at the following address httpservicesapcominstguides
4850 CUSTOMER 2012-12-17
SAP AGDietmar-Hopp-Allee 1669190 WalldorfGermanyT +4918 0534 34 34F +4918 0534 34 20wwwsapcom
copy Copyright 2012 SAP AG All rights reservedNo part of this publication may be reproduced or transmitted in any form or for any purpose without the express permission of SAP AG The information contained herein may be changed without prior notice
- SAP Enhancement Package 1 for SAP CRM 70
-
- Table of Contents
- 1 Introduction
- 2 Planning and Preparation
-
- 21 Prerequisites for the Business Packages for SAP CRM
-
- 3 Installation
- 4 Post-Installation
-
- 41 Checking the Availability of Back-End Systems for SAP CRM Java Components
-
- 411 Creating a Back-End User
- 412 Checking the Connection to the ABAP System
- 413 Configuring and Checking the TREX Service
- 414 Checking the Selling via eBay Processes
-
- 42 Post-Installation Steps for Workforce Deployment Application and Calculation Services
-
- 421 Implementing WFMCORE 200 Using Transaction SAINT
- 422 Configuring the Extended Configuration Management (XCM) for WFD Application and Calculation Services
- 423 Checking Workforce Deployment Calculation Services
- 424 Checking the Installation of WFD Application Services and WFD Calculation Services
-
- 43 Post-Installation Steps for the Business Packages for SAP CRM
-
- 431 Creating Roles for the SAP CRM Business Packages
- 432 Installation of the Info Center for the SAP CRM Business Package
-
- 4321 Importing the SAP CRM Info Center Configurations and Directory Structure
- 4322 Activating Manual Ordering of Folders for the sapcrm Repository
- 4323 Creating Indexes and Taxonomies for the sapcrmnews Repository
- 4324 Creating the Index for the sapcrm Repository
- 4325 Configuring the Personal Search
- 4326 Increasing the Number of JCo Connections
-
- 44 Post-Installation Steps for MapBox
-
- 441 Assigning User Groups for MapBox Users
- 442 Configuring an RFC Destination for MapBox
- 443 Performing Initial Configuration for MapBox
- 444 Executing the MapBox
- 445 Performing the Smoke Test for MapBox
- 446 Ensuring Optimal Block Size settings
- 447 Adapting Memory Settings for the J2EE Engine
-
- 45 Activating the CRM Web Client
- 46 Installing and Configuring CRM Application Server Loyalty Add-On Component
- 47 Starting XCM
- 48 Accessing Configuration Documentation in SAP Solution Manager
-
- 5 Additional Information
-
- 51 Installing the Business Packages for SAP CRM Using JSPM (Optional)
- 52 Troubleshooting for the Business Package for SAP CRM
-
- 521 Activating BI Templates Manually
- 522 Dragging the Central Search onto the Portal Desktop
-
- Copyright and trademarks
-
Only valid for CRM Java Components (JCRM) |
The WFMCORE 200 component contains all necessary ABAP classes and libraries required for the
various Workforce Deployment scenarios and processes including Service Resource Planning in CRM and
Retail Multisite Workforce DeploymentEnd of CRM Java Components (JCRM) |
Procedure
1 Log on to your ABAP system
2 Install WFMCORE 200 using transaction SAINT as described in SAP Note 830595
3 Only valid for CRM Java Components (JCRM) |
If you are implementing the Service Resource Planning in CRM process variant run the report
WFDBP_UPDATE_BLUEPRINT to update tables that define the settings required to properly
display and maintain Service Arrangements in the People-Centric User InterfaceEnd of CRM Java Components (JCRM) |
End of ABAP+JavaJava |
Only valid for ABAP+JavaJava |
422 Configuring the Extended Configuration Management (XCM) for WFD Application and Calculation Services
Workforce Deployment Application Services (WFD AS) sends calculation and forecasting requests to
a CRM ABAP back-end system WFD Calculation Services (WFD CS) picks up the requests from this
CRM ABAP back-end system You define the connection to the CRM ABAP back-end system through
Extended Configuration Management (XCM) Admin
For more information about using Extended Configuration Management (XCM) to configure your
application see Using Extended Configuration Management (XCM) [page 40] and the documentation in the
SAP Solution Manager [page 41]
The csjcoxxxxx XCM parameters define the JCO connection to the SAP CRM ABAP system where
the WFD CS maintains forecast and calculation requests You can connect to the CRM ABAP system
using one of the following
A message or dispatching server by specifying csjcomshost csjcogroup and csjcor3name
An application server by specifying csjcoahost and csjcosysnr
In either case you must also specify csjcoclient csjcouser and csjcopassword
XCM Parameter Name Example Value Description
csjcoahost us0091wdfsapcorp Application server host name of the SAP CRM Calculation Service
csjcosysnr 91 System number of the R3 Calculation Service (for example 09)
csjcomshost us0091wdfsapcorp Message server host name of the SAP CRM Calculation Service
csjcogroup PUBLIC Group of the SAP CRM Calculation Service (case sensitive for example PUBLIC)
4 Post-Installation
42 Post-Installation Steps for Workforce Deployment Application and Calculation Services
1650 CUSTOMER 2012-12-17
XCM Parameter Name Example Value Description
csjcor3name Q5C System ID of the SAP CRM Calculation Service (for example IDES)
csjcoclient 505 Client of the SAP CRM Calculation Service
csjcouser Back end user for JCO connection to the SAP CRM Calculation Service
csjcopassword Password for the back-end user
You need to configure these csjcoxxxxx XCM parameter values in each instance of WFD AS and
WFD CS Make sure that the values are the same in all instances
Configuring the XCM for WFD Calculation Services
This business scenario is relevant for defining the WFD CS You must perform this XCM configuration
for the WFD CS to run
1 Start the XCM using the following URL
httpltJ2EE_hostgtltJ2EE_portgtwfdcsadminxcminitdo
2 Access the configuration using the following path General Application Settings Customer sisopt
sisoptconfig
Process Description Web ApplicationXCM Application Configurations
Calculations Service Workforce scheduling application
wfdcs sisoptconfig
3 In addition to the csjcoxxxx XCM parameters you need to define the http port of the J2EE
instance where WFD CS is running
XCM Parameter Name Example Value Description
cshttpport 51000 The http port of the web server where the WFD Calculation Services application is running (for example 50000)
4 Restart the application after saving the XCM configuration
Configuring the XCM for WFD Application Services
This business scenario is relevant for connecting the WFD AS to the WFD CS
1 Start the XCM using the following URL
httpltJ2EE_hostgtltJ2EE_portgtwfdadminxcminitdo
2 Access the configuration using the following path General Application Settings Customer sis
sisconfig
Process Description Web ApplicationXCM Application Configurations
Application Services Web-based scheduling application
wfd sisconfig
3 Restart the application after saving the XCM configurationEnd of ABAP+JavaJava |
4 Post-Installation
42 Post-Installation Steps for Workforce Deployment Application and Calculation Services
2012-12-17 CUSTOMER 1750
Only valid for ABAP+JavaJava |
423 Checking Workforce Deployment Calculation Services
After configuring Workforce Deployment Calculation Services (WFD CS) with Extended Configuration
Management (XCM) and restarting the application you need to go to the WFD CS configuration page
to check that it is running
Prerequisites
You have completed the installation of WFD Application Service (AS) and CS as described in this
documentation
Only valid for CRM Java Components (JCRM) |
You have downloaded the Business Package for Retail (Release 10) from sdnsapcom SAP NetWeaver
Capabilities User Productivity Portal and Collaboration Portal Content Portfolio
For more information about the portal content versions for your release see the documentation
Master Guide ndash SAP Customer Relationship Management 70 at httpservicesapcomcrm-instEnd of CRM Java Components (JCRM) |
Only valid for CRM Java Components (JCRM) |
You must have access to the Portal Admin role in SAP CRM through the Enterprise Portal to complete
this part of the WFD ASCS installation
For more information see Configuring the CRM Business Package on the SAP Service Marketplace at
httpservicesapcomcrm-inst SAP CRM 70 CRM Business Packages and PC UI Section
CRM Portal Administrator contains specific instructions on configuring the portal for access to WFD
AS and CS Apply the instructions to the Portal Admin roleEnd of CRM Java Components (JCRM) |
You have configured your portal users based on the required settings as described in the
configuration documentation for your IT scenario
For more information see Accessing Configuration Documentation in the SAP Solution Manager [page 41]
Procedure
1 Access the WFD CS configuration page through the Enterprise Portal using the role Portal
Administrator
2 Choose WFD Calculation Services Configuration
The Configuration tab looks as follows
Tab To Complete InstallationFor ongoing Configuration Management
Calculation Servers Required for at least one calculation server
Required for each additional calculation server
Logging Localization No Required to add or change logging once fully operational
End of ABAP+JavaJava |
4 Post-Installation
42 Post-Installation Steps for Workforce Deployment Application and Calculation Services
1850 CUSTOMER 2012-12-17
Only valid for ABAP+JavaJava |
424 Checking the Installation of WFD Application Services and WFD Calculation Services
This section tells you how to check that you have correctly installed the Java components for Workforce
Deployment Application Services (WFD AS) and WFD Calculation Services (WFD CS) This section
does not tell you how to check the connection between the WFD AS and the WFD CS
The procedure below shows you how to create a simple calculation request and verify that the
Calculation Server has received the request This helps you check that you have correctly installed all
WFD AS or CS components and that they are communicating with each other
Prerequisites
You have completed all the installation steps described in this documentation
You have connected WFD AS or CS components with the Enterprise Portal
You have installed the required business packages according to Checking Workforce Deployment
Calculation Services [page 18]
Procedure
1 To check that WFD AS is working and listening for HTTP requests enter the following URL
httpltJ2EE_hostgtltJ2EE_portgtwfdlogondo
The following error confirms that the application is working
Your session has expired Please renew your session by clicking a section link in
the Portal menu
2 Access the WFD CS from the Enterprise Portal through the Portal Admin role and check that the
WFD CS page comes up with no errors
If the page does not come up possible errors are
Error Message Cause
Missing value for XCM configuration
parameter cshttpport
The XCM parameter cshttpport was not filled
The request could not be completed
due to the following
errorsltfollowed by details of the
particular error usually related to
the JCO connectiongt
One of the XCM parameters csjcoxxxxx might be incorrect
EXAMPLE
The user or password are incorrect
3 Test the submission of a calculation request to see if the WFD CS can process the request
You can simulate a calculation request submission by executing the RFC
TEST_WFDCS_CALCREQ_SUBMIT from the CRM back-end system defined in the csjcoxxxxx XCM
parameters of WFD CS
4 Post-Installation
42 Post-Installation Steps for Workforce Deployment Application and Calculation Services
2012-12-17 CUSTOMER 1950
EXAMPLE
For example when you installed WFD CS you configured the csjcoxxxxx XCM
parameters to point to system ID Q5C client 505 You now need to log in to Q5C client 505
and execute TEST_WFDCS_CALCREQ_SUBMIT with transaction SE37 using the default import
parameters
4 Check the Requests tab of the WFD CS page to check the status of entries with the location name
SMOKETEST has the status FAILED
Status FAILED indicates a successful smoke test It means that the Request Manager successfully
sent the request to the Solver which successfully processed it
Status QUEUED probably means that the XCM parameter cshttpport was incorrectEnd of ABAP+JavaJava |
End of Java |
Only valid for ABAP+JavaJava |
43 Post-Installation Steps for the Business Packages for SAP CRM
The following sections provide information about the steps that you have to perform after importing
the Business Package for SAP CRM
Only valid for ABAP+JavaJava |
431 Creating Roles for the SAP CRM Business Packages
Procedure
If you create your own roles from the SAP CRM Business Packages also add the every user role
(eu_core_role) to your role The Every User Role contains the personalization functionality for the SAP
NetWeaver Portal
For more information about the Every User Role see the SAP Library at
httphelpsapcomnw70 SAP NetWeaver 70 Library (including Enhancement Package 2) English SAP
NetWeaver Library SAP NetWeaver by Key Capability People Integration by Key Capability Portal Portal
Administration Guide Super Administration Pre-configured Roles Every User Roles End of ABAP+JavaJava |
Only valid for ABAP+JavaJava |
432 Installation of the Info Center for the SAP CRM Business Package
This section describes how to install the Info Center
4 Post-Installation
43 Post-Installation Steps for the Business Packages for SAP CRM
2050 CUSTOMER 2012-12-17
Prerequisites
You have installed the Business Package for SAP CRM [page 43]
You have administrator rights
Process Flow
1 You import the SAP CRM info center configurations and directory structure [page 21]
2 You activate manual ordering of folders for the sapcrm Repository [page 23]
3 You create indexes and taxonomies for the sapcrmnews Repository [page 23]
4 You create the index for the sapcrm Repository [page 25]
5 You configure the personal search [page 25]
6 If required you increase the number of JCo connections [page 26]
Only valid for ABAP+JavaJava |
4321 Importing the SAP CRM Info Center Configurations and Directory Structure
The directory structure of the info center has been made available in one content package and you can
import it using the Information and Content Exchange (ICE) Repository
For more information about ICE see SAP Library at
httphelpsapcomnw70 SAP NetWeaver 70 Library (including Enhancement Package 2) English SAP
NetWeaver Library SAP NetWeaver by Key Capability Information Integration by Key Capability Knowledge
Management Content Managers Guide Additional Tasks for Content Managers Content Exchange Distributing
Content (Offline)
Procedure
Importing the Directory Structure
1 Log on to the Portal as content manager
2 Choose Content Management Content Exchange Upload
3 Only valid for Windows |
Select file fullupdate_infocenterzip from directory ltservlet_enginegtirjrootWEB-INF
portalportalappsepcrmchmkmexpice and confirm the uploadEnd of Windows |
Only valid for IBM i5OSUNIX |
Select file fullupdate_infocenterzip from directory ltservlet_enginegtirjrootWEB-INF
portalportalappsepcrmchmkmexpice and confirm the uploadEnd of IBM i5OSUNIX |
The zip file is now imported using the ICE protocol
If you cannot see the ICE repository this might be due to one of the following reasons
The ICE repository was hidden in the virtual root repository
4 Post-Installation
43 Post-Installation Steps for the Business Packages for SAP CRM
2012-12-17 CUSTOMER 2150
In this case do the following
1 Log on to the portal as system administrator
2 In the SAP NetWeaver Enterprise Portal choose System Administration System Configuration
Knowledge Management Content Management Repository Managers Virtual Root Repository
3 Check whether the ICE Repository has been entered under Repositories to exclude
4 Remove it from the list
5 Save your changes
6 Restart the Servlet Engine
The repository has been ldquoswitchedrdquo to invisible
1 Log on to the portal as system administrator
2 In the SAP NetWeaver Enterprise Portal choose System Administration System Configuration
Knowledge Management Content Management Repository Managers Content Exchange
Repository
3 If the property hide in root folder is active deselect it
4 Restart the Servlet Engine
NOTE
After the import check whether the directory structure was created by choosing Content
Administration KM Content in the SAP NetWeaver Enterprise Portal The list of folders should
contain the folders sapcrm and sapcrmnews
Checking Whether the Directory Structure Has Been Imported Successfully
You can only import the structure if there is a repository with the same name For example if a zip file
is exported from the repository sapcrm there must also be a repository with the name sapcrm in the
target system
The sapcrm and sapcrmnews repositories as well as the CRM-Namespace filter are created during the
import of the SAP CRM KM extension configuration archive To check whether this configuration
archive has been imported successfully proceed as follows
1 Log on to the portal as system administrator
2 In the SAP NetWeaver Enterprise Portal choose System Administration Monitoring Knowledge
Management Deployment Monitor Config Archives
3 Check whether the archive comsappctcrmappkmextprjconfig is installed in the system
If the archive comsappctcrmappkmextprjconfig is not installed in the system import it
manually as follows
1 Log on to the portal as system administrator
2 In the SAP NetWeaver Enterprise Portal choose System Administration Monitoring Knowledge
Management Deployment Monitor Config Archives Actions Import
4 Post-Installation
43 Post-Installation Steps for the Business Packages for SAP CRM
2250 CUSTOMER 2012-12-17
3 Only valid for Windows |
Select the archive comsappctcrmappkmextprjconfigconfigarchive from directory
ltSAPSIDgtJCltinstance_numbergtj2eeclusterappssapcomep~crm~chm
servlet_jspepcrmchmkmexprootWEB-INFconfig and confirm the importEnd of Windows |
4 Only valid for IBM i5OSUNIX |
Select the archive comsappctcrmappkmextprjconfigconfigarchive from
directory ltSAPSIDgtJCltinstance_numbergtj2eeclusterappssapcomep~crm~chm
servlet_jspepcrmchmkmexprootWEB-INFconfig and confirm the importEnd of IBM i5OSUNIX |
After the import the directory structure has no restrictions on rights Make sure that you modify the
rights of the various folders to meet your companyrsquos requirementsEnd of ABAP+JavaJava |
Only valid for ABAP+JavaJava |
4322 Activating Manual Ordering of Folders for the sapcrm Repository
The sapcrm Repository folders are ordered in a specific sequence
Procedure
To display this sequence activate manual ordering for each directory
For more information see the SAP Library at
httphelpsapcomnw70 SAP NetWeaver 70 Library (including Enhancement Package 2) English SAP
NetWeaver Library SAP NetWeaver by Key Capability Information Integration by Key Capability Knowledge
Management Content Managers Guide Providing Shared Access to Departmental Documents Sorting Documents in a
Folder ManuallyEnd of ABAP+JavaJava |
Only valid for ABAP+JavaJava |
4323 Creating Indexes and Taxonomies for the sapcrmnews Repository
To make news available for indexing and searching create two new indexes
Prerequisites
You have administrator rights for Knowledge Management on the server
For more information see the SAP Library at
httphelpsapcomnw70 SAP NetWeaver 70 Library (including Enhancement Package 2) English SAP
NetWeaver Library SAP NetWeaver by Key Capability Information Integration by Key Capability Knowledge
Management
4 Post-Installation
43 Post-Installation Steps for the Business Packages for SAP CRM
2012-12-17 CUSTOMER 2350
Procedure
Creating Indexes and Taxonomies for the sapcrmnews Repository
The Business Package contains an iView ndash epbp_crmchm-pmiviewsnews_flash ndash that combines all
news with the istopnews=yes attribute in a virtual folder To guarantee the function of this iView
create two indexes in KM
1 In the SAP NetWeaver Enterprise Portal choose System Administration System Configuration
Knowledge Management Index Administration
2 Create an index of the Search and Classification type with a suitably configured taxonomy
3 Choose sapcrmpartnernews as the index ID Otherwise the path to the folder specified in the iView
is incorrect
If you choose another index ID you must also modify accordingly the folder properties in the
iView for one of the following
Folders path to content and path to root
Folders Path to Initially Displayed Folder and Path to Root Folder for Navigation
If you want to link two portal servers with a TREX server you must modify the index name and
iView properties on one of the portal servers
4 Assign folder sapcrmpartnerPartnernews as a data source
This moves all news with the (virtual) Top flag from this folder to the Newsflash iView
5 Create a ldquoquery-basedrdquo taxonomy with the name PartnerNewsFlash choosing Automatic
Classification before you save the taxonomy
NOTE
The outbound delivery includes only the iView above for virtually combining news If you
also want to use this functionality for other news channels (for example internal news) use
your own index and taxonomy for each channel
For more information see the SAP Library at
httphelpsapcomnw70 SAP NetWeaver 70 Library (including Enhancement Package 2) English SAP
NetWeaver Library SAP NetWeaver by Key Capability Information Integration by Key Capability Knowledge
Management Administration Guide System Administration System Configuration lsquoIndex Administrationrsquo iView
Creating Queries for the Taxonomies of sapcrmnews Repositories
1 Log on to the portal as content manager
2 Choose Content Management Classification Taxonomy Query Builder
3 Add a search query to check the istopnews property for the value Yes
4 Enter PartnerNewsFlash as the name for the taxonomy
Here too a property of the iView links to a taxonomy with this name So if you want to choose
another name you must modify the path to the content folder property of the iView
For more information see the SAP Library at
4 Post-Installation
43 Post-Installation Steps for the Business Packages for SAP CRM
2450 CUSTOMER 2012-12-17
httphelpsapcomnw70 SAP NetWeaver 70 Library (including Enhancement Package 2) English SAP
NetWeaver Library SAP NetWeaver by Key Capability Information Integration by Key Capability Knowledge
Management Administration Guide System Administration System Configuration Taxonomies and ClassificationEnd of ABAP+JavaJava |
Only valid for ABAP+JavaJava |
4324 Creating the Index for the sapcrm Repository
To make Info center documents available for indexing and searching create a new index with sapcrm
as a data source
Prerequisites
You have administrator rights for Knowledge Management on the server
Procedure
Choose a name of your own Search as a service and standard as a crawler parameter
For more information see the SAP Library at
httphelpsapcomnw70 SAP NetWeaver 70 Library (including Enhancement Package 2) English SAP
NetWeaver Library SAP NetWeaver by Key Capability Information Integration by Key Capability Knowledge
ManagementEnd of ABAP+JavaJava |
Only valid for ABAP+JavaJava |
4325 Configuring the Personal Search
Prerequisites
You have administrator rights for Knowledge Management on the server
Procedure
1 Create an index for the userhome repository
To make personal folder documents available for the search create a new index with root
userhome as the data source
2 Create a search option set for personal search
To assign the search index and a start folder to the search for personal documents create a Search
Option Set with the name CRMPersonalFolderSearch As an index enter the index for the
userhome repository created above and ~alias~userhomeuseridPersonal Documents as the
root folder for the search
For more information see the SAPLibrary at
4 Post-Installation
43 Post-Installation Steps for the Business Packages for SAP CRM
2012-12-17 CUSTOMER 2550
httphelpsapcomnw70 SAP NetWeaver 70 Library (including Enhancement Package 2) English SAP
NetWeaver Library SAP NetWeaver by Key Capability Information Integration by Key Capability Knowledge
Management End of ABAP+JavaJava |
Only valid for ABAP+JavaJava |
4326 Increasing the Number of JCo Connections
This section tells you how to increase the number of concurrent Java Connector (JCo) connections
By default the maximum number of concurrent JCo connections is 100 The value depends on the
number and behavior of the users in the portal For more information see SAP Note 316877
You can specify this value when you plan the installation of your SAP NetWeaver Enterprise Portal
Make sure that you first analyze the number and behavior of the users
Procedure
To increase the maximum number of concurrent JCo connections increase the value of the
environment variable CPIC_MAX_CONV
EXAMPLE
Initial default value CPIC_MAX_CONV=100
Increased value CPIC_MAX_CONV=1000
End of ABAP+JavaJava |
End of ABAP+JavaJava |
End of ABAP+JavaJava |
Only valid for ABAP+JavaJava | MapBox (MBX) |
44 Post-Installation Steps for MapBoxOnly valid for Java | MapBox (MBX) |
You have to perform the following post-installation steps for MapBox
You assign user groups for MapBox users [page 27]
You configure an RFC destination for TCPIP connections [page 28]
You perform initial configuration for MapBox [page 28]
You execute the Map Box [page 34]
You perform the smoke test [page 35]
If required you perform additional settings for MapBox
Block size settings [page 38]
Memory settings for the J2EE Engine [page 39]End of Java | MapBox (MBX) |
4 Post-Installation
44 Post-Installation Steps for MapBox
2650 CUSTOMER 2012-12-17
Only valid for Java | MapBox (MBX) |
441 Assigning User Groups for MapBox Users
To access the MapBox URL you need to provide the correct security rights for individual user groups
Procedure
1 Log on to the Visual Administrator
1 On your central instance host change to the following directory
Only valid for IBM i5OSUNIX |
usrsapltSAPSIDgtltinstance_numbergtj2eeadmin
End of IBM i5OSUNIX |
Only valid for Windows |
usrsapltSAPSIDgtltinstance_numbergtj2eeadmin
End of Windows |
2 Only valid for IBM i5OSUNIX |
Run goshEnd of IBM i5OSUNIX |
3 Only valid for Windows |
Double-click gobatEnd of Windows |
For more information about the Visual Administrator see the SAP Library at
httpshelpsapcomnw70 SAP NetWeaver Library SAP NetWeaver by Key Capability
Application Platform by Key Capability Java Technology Administration Manual J2EE Engine J2EE Engine
Administration Tools
2 Choose the server node from the left-hand window
3 Choose Services Security Provider
A list of deployed components is displayed
4 Choose MapBoxLauncher from this list (sapcom
comsapsyncpointmapboxlaunchermapboxlauncher)
A list of tabs appears on the right
5 Choose Security Roles from the list
A list of security roles appears
6 If no display and modify roles are displayed add these roles as follows
1 Choose Switch to Edit Mode from the top task bar to switch to edit mode
2 Add display and modify roles by choosing Add
7 For both the display and modify roles perform the following
1 Choose Switch to Edit Mode from the top task bar to switch to edit mode
2 Choose the Groups tab from the list on the far right
3 Choose Search
4 Post-Installation
44 Post-Installation Steps for MapBox
2012-12-17 CUSTOMER 2750
A list of user groups appears
4 Select the user groups that you want to enable for the two roles
Add to the left of the user group display is now highlighted
5 Choose Add to add the user group for the selected roleEnd of Java | MapBox (MBX) |
Only valid for Java | MapBox (MBX) |
442 Configuring an RFC Destination for MapBox
After the installation you have to create an RFC destination for MapBox
Procedure1 Log on to the CRM server
2 Enter transaction SM59
The Display and Maintain RFC Destinations screen appears
3 Choose Technical Settings Activation Type and create a new destination with the type TCPIP
4 Choose Registered Server Program and enter a unique value for program ID
For example you might enter MAPBOX723 for SAP client 723
5 Enter the details of the gateway host and gateway service in Gateway Options
1 Gateway host
Enter the name of your message server You can also enter the IP address of your message
server
2 Gateway service
Enter your SAP CRM system number prefixed with the string sapgw
For example if your system number is 02 enter sapgw02
6 If the CRM system is a Unicode-enabled system choose Unicode in Special Options
7 Save the destination
8 Choose MapBox Configuration Page Connecting settings from the URL and enter the same RFC
destination name in the relevant fieldEnd of Java | MapBox (MBX) |
Only valid for Java | MapBox (MBX) |
443 Performing Initial Configuration for MapBox
Procedure1 Open a browser window and enter the following URL
httplthostnamegtltport_numbergtmapboxlauncher
NOTE
If you are logged on to the machine where the J2EE server is running you can also enter the
following URL
4 Post-Installation
44 Post-Installation Steps for MapBox
2850 CUSTOMER 2012-12-17
httplocalhostltport_numbergtmapboxlauncher
2 Choose Configuration
3 Edit the values according to your SAP system and choose Save
The application asks you to enter a user name and password
4 Enter the user name and password used for the SAP J2EE Engine Visual Administrator
A description of the properties and example values for the properties is given below
Result
You see the default connection settings for MapBox as shown in the graphic below A description
of the properties and example values are provided in the adjacent table
Figure 1 MapBox Default Connection Settings
Property Purpose Example
SAP System SAP System name ABC FAZ
Message Server Message server host name xyzmain
Group SAP System group PUBLIC SPACE
System Number SAP Gateway system number prefixed with sapgw
sapgw02
Unicode Used for setting the Unicode option for the CRM server Default value is no
yes
Maximum allowed wait time interval between ISP Processing and Commit call
Time-out period between an ISP_MAPBOX call and an ISP_COMMIT call
300
4 Post-Installation
44 Post-Installation Steps for MapBox
2012-12-17 CUSTOMER 2950
Property Purpose Example
Client SAP logon client 723
User Name SAP logon user John
Password SAP logon password
Language SAP logon language EN
Destination The RFC destination with which you need to register the MapBox This is the value you enter in step 3 of Configuring an RFC Destination for MapBox [page 28]
MAPBOX723
Number of server instances The number of JCO server execution instances used by the MapBox to process server requests This number indicates the number of CRM inbound queues that are running simultaneously
10
The above MapBox connection configuration is meant for one SAP client running with the CRM
Server If you want to run the MapBox with two or more SAP clients of the same CRM system
you can use Add Client on the configuration page and edit the values accordingly However make
sure that the RFC destinations that these multiple clients listen to are always unique You can
leave the default values for the other settings
If you need more control over logging and tracing you can go to Log Settings on the configuration
page edit the values and choose Save The Log Settings screen with default values is shown in the
graphic below A description of the properties and example values for the properties is provided
in the adjacent table
Figure 2 Default Values for the Log Settings Screen
4 Post-Installation
44 Post-Installation Steps for MapBox
3050 CUSTOMER 2012-12-17
Property Purpose Example
Log and dumps directory This value specifies where the MapBox logs and dumps are stored If this field is left blank the ltuser_homegt folder is used as default value
Only valid for Windows |
Ctemp
End of Windows |
Only valid for IBM i5OSUNIX |
tmp
End of IBM i5OSUNIX |
Input payload dump This value specifies whether the input document coming to MapBox for processing is written or not
No
MapBox launcher trace level This value specifies with what granularity the MapBoxLauncher execution trace is generated6 specifies that a full MapBoxLauncher execution trace is generated whereas 0 specifies that the MapBoxLauncher execution trace is not generated Recommended value for production use is 0
0
MapBox launcher trace size The maximum file size of the generated trace When the size reaches the maximum value another file is created so that the old file can be deleted (for example due to lack of space) You can use alphabetic suffixes to specify the sizes The supported values are k or K ndash kilobytes g or G ndash gigabytes m or M ndash megabytes t or T ndash terabytes
50 k
CoordServer log level This value specifies the detail of the coordination server logging We recommended you not to change the default value of 1
2
SAP Java connector trace level This value specifies the detail of the SAP Java Connector logging The recommended value for production use is 0
2
MapBox log level The log level required for the MapBox to generate an internal log file A higher trace level means that a more detailed log file is created We recommend you to use 4D for production systems where D meansldquoOn Demandrdquo
2
4 Post-Installation
44 Post-Installation Steps for MapBox
2012-12-17 CUSTOMER 3150
Property Purpose Example
MapBox message dumps This value stands for copying the incoming and outgoing messages to the local system For better performance we recommend that you do not enable the message dump option
no
MapBox statistics This value specifies whether a file that lists the performance measurements of the MapBox is created We recommend you to use the value no for production use
no
MapBox logs location This value specifies where the MapBox logs are stored Possible locations are the MapBox repository on the CRM Server or the local file system The recommended value for production use is local_fs which indicates that the MapBox logs are stored on the local file system
local_fs
MapLog format The format in which the MapBox log file must be created The internal log file is by default created in a particular format However you can change this format to display the file in the SAP log file format The two values that are available are default and sap_log
default
The MapBox uses additional properties for performance such as caching and reuse of the MapBox
atoms These values are already set to optimum values and you cannot change them
The description of the properties is shown in the table below
Property Purpose Example
General Settings
max_elements_document This is the limit for the internal cache of the MapBox to hold the count of generated XML documentsWe recommend you not to change this value
100
cache_threshold This is the maximum threshold ndash in kilobytes ndash for a document to be cached in the internal cache of the MapBox
500
4 Post-Installation
44 Post-Installation Steps for MapBox
3250 CUSTOMER 2012-12-17
Property Purpose ExampleWe recommend you not to change this value
max_elements_cache This is the limit for the internal cache of the MapBox to hold the count of MapScenariosWe recommend you not to change this value
100
parallel_instances You use this value on systems where more than one CPU is used This setting allows you to specify the number of CPU instances that MapBox must use for processing so that the remainder can be used by non-MapBox related applications By default MapBox uses all the available CPUs for processing Values can range between 0 to N-1 where N is the number of available CPUs
4
thread_priority Specifies the number of threads MapBox uses during processing We recommend you to set an optimum value for this property so that MapBox does not utilize all available resources 0 = min 1 = low 2 = normal 3 = high 4 = max
3
reuse_count Sets the count for the number of times an atom-instance must be reused before it is destroyed A value of 0 means that the atom is not destroyed and can be used continuously Recommended value is 50 This means that the atom instance is reused 50 times before it is destroyed
100
Lock Server Settings
Operation_Mode The internal mode of operation for the coordination server We recommend not to change the default value of OUTPROC_CLIENT
OUTPROC_CLIENT
Registry_Port The Remote Method Invocation (RMI) port used for connecting to the coordination serverRMI is a Java mechanism for distributed computing
1099
4 Post-Installation
44 Post-Installation Steps for MapBox
2012-12-17 CUSTOMER 3350
Property Purpose ExampleDo not change this value unless port 1099 is unavailable In this case change it to 59856
HostName The name of the host where the coordination server resides
localhost
LocalName The name of the host where the MapBoxLauncher is executed We recommend you not to change the default value of localhost
Server
PollingInterval Polling interval in seconds to ask for shutdown of the coordination server We recommend you not to change the default value of 30
60
CleanUpInterval Cleanup interval in seconds to check for invalid locks created by the MapBoxLauncher We recommend you not to change the default value of 60
180
NOTE
A file name MapLogxsl is also available with the smoke test [page 35] This file is the stylesheet
that is used to format the display of the MapBox log file During the installation and execution
of the MapBox the MapBox log file is created in the following directory
Only valid for Windows |
ltUser_homegtTempMapBoxDumpsltyour_system_namegt500 where ltuser_homegt is the
home directory of the logged-on user ltyour system namegt is the CRM server you have
connected to and 500 is the client you have connected toEnd of Windows |
Only valid for IBM i5OSUNIX |
ltUser_homegtTempMapBoxDumpsltyour_system_namegt500 where ltuser_homegt is the
home directory of the logged-on user ltyour system namegt is the CRM server you have
connected to and 500 is the client you have connected toEnd of IBM i5OSUNIX |
RECOMMENDATION
We recommend that you copy MapLogxsl from the
ltsmoke_test_installation_directorygt to the directory mentioned aboveEnd of Java | MapBox (MBX) |
Only valid for Java | MapBox (MBX) |
444 Executing the MapBox
This section tells you how to execute the MapBox The procedure that you use to execute the Map Box
depends on its current support package (SP) level
4 Post-Installation
44 Post-Installation Steps for MapBox
3450 CUSTOMER 2012-12-17
Procedure
If the SP level of the MapBox is less than SP11 proceed as follows
1 Enter the following URL in your browser
httplthostnamegtltport_numbergtmapboxlaunchermanage
2 Choose Start MapBox
3 The application prompts you for a user name and password
Enter the user name and password for the J2EE Engine Visual Administrator
NOTE
MapBox typically takes 30 to 60 seconds to initialize depending on the number of SAP clients
To see the status of messages processed by MapBox choose Status
If the SP level of the MapBox is equal to or higher than SP11 the MapBox starts automatically
1 For the first MapBox installation you need to restart the Java application server (AS Java) after all
the configuration settings have been completed This automatically starts the MapBox (Autostart)
2 To check the status go to the URL httplthostnamegtltport_numbergtmapboxlauncher
manage
NOTE
MapBox Autostart needs approximately 60 seconds to allow other services of As Java to start
To see the status of messages processed by MapBox choose Status
Result
When the MapBox is running the status is shown as Ready to processEnd of Java | MapBox (MBX) |
Only valid for Java | MapBox (MBX) |
445 Performing the Smoke Test for MapBox
The smoke test checks whether the MapBox installation is error-free
Only valid for Windows |
To execute the smoke test you have to run two batch filesEnd of Windows |
Only valid for IBM i5OSUNIX |
To execute the smoke test you have to run two shell scriptsEnd of IBM i5OSUNIX |
Prerequisites
Before you start the procedure you need to copy the smoketestjar file to a new
ltsmoke_test_installation_directorygt of your choice which has two further subdirectories
firstrun and secondrun
4 Post-Installation
44 Post-Installation Steps for MapBox
2012-12-17 CUSTOMER 3550
You can find the smoketestjar file here
Only valid for IBM i5OSUNIX |
usrsapltinstance_IDgtJCltinstance_numbergtj2eeclusterserver0binext
comsapsyncpointmapboxEnd of IBM i5OSUNIX |
Only valid for Windows |
usrsapltinstance_IDgtJCltinstance_numbergtj2eeclusterserver0binext
comsapsyncpointmapboxEnd of Windows |
NOTE
Each subdirectory of ltsmoke_test_installation_directorygt ndash that is firstrun and
secondrun ndash contains the following files
MBSMOKETEST_IN_000xml
MBSMOKETEST_IN_001xml
MBSMOKETEST_IN_002xml
MBSMOKETEST_IN_003xml
After executing the smoke test you must verify whether the contents of the files generated
by your test are similar to the contents of the above files That is the XML documents that
are created in the smoke test must match the documents located in the
ltsmoke_test_installation_directorygt mentioned above
To execute the smoke test you need to install the SAP Java Connector (SAP JCo version 2012)
You have to download SAP JCo 2012 from SAP Service Marketplace at https
servicesapcomswdc before executing the smoke test
CAUTION
Make sure that you install the SAP Java Connector correctly
The file mapcaseprop is available in the ltsmoke_test_installation_directorygt This file
contains the connection parameters to be tested You can modify the contents of this file
CAUTION
You must replace the connection parameters in this file with the connection parameters that
you entered in the MapBoxMetaxml file
Procedure
1 Run the first stage of the smoke test
1 Only valid for Windows |
Execute the file smoketest_1bat from the ltsmoke_test_installation_directorygtEnd of Windows |
Only valid for Windows |
This prompts you to enter the followingEnd of Windows |
4 Post-Installation
44 Post-Installation Steps for MapBox
3650 CUSTOMER 2012-12-17
Only valid for Windows |
1 ltDRIVEgtusrsapltinstance_IDgtJCltinstance_numbergtj2ee
2 ltsmoke_test_installation_directorygt
3 ltpath_to_sapjcojargt
End of Windows |
Only valid for IBM i5OSUNIX |
Execute the file smoketest_1sh from the ltsmoke_test_installation_directorygtEnd of IBM i5OSUNIX |
Only valid for IBM i5OSUNIX |
1 usrsapltinstance_IDgtJCltinstance_numbergtj2ee
2 ltsmoke_test_installation_directorygt
3 ltpath_to_sapjcojargt
End of IBM i5OSUNIX |
2 Enter the appropriate paths
The smoke test creates the following files
MBSMOKETEST_IN_000xml
MBSMOKETEST_IN_001xml
MBSMOKETEST_IN_002xml
MBSMOKETEST_IN_003xml
3 Only valid for Windows |
Check the contents of the generated files against the contents of the files located in
ltsmoke_test_installation_directorygtSMOKETESTfirstrunEnd of Windows |
Only valid for IBM i5OSUNIX |
Check the contents of the four files against the contents of the files located in
ltsmoke_test_installation_directorygtSMOKETESTfirstrunEnd of IBM i5OSUNIX |
2 Run the second stage of the smoke test
1 Only valid for Windows |
Execute the file smoketest_2bat which is located in the
ltsmoke_test_installation_directorygtEnd of Windows |
Only valid for IBM i5OSUNIX |
Execute the file smoketest_2sh which is located in the
ltsmoke_test_installation_directorygtEnd of IBM i5OSUNIX |
This prompts you to enter the following
Only valid for Windows |
1 ltDRIVEgtusrsapltinstance_IDgtJCltinstance_numbergtj2ee
2 ltsmoke_test_installation_directorygt
End of Windows |
4 Post-Installation
44 Post-Installation Steps for MapBox
2012-12-17 CUSTOMER 3750
Only valid for IBM i5OSUNIX |
1 usrsapltinstance_IDgtJCltinstance_numbergtj2ee
2 ltsmoke_test_installation_directorygt
End of IBM i5OSUNIX |
2 Enter the appropriate paths
The smoke test creates the following files
MBSMOKETEST_IN_000xml
MBSMOKETEST_IN_001xml
MBSMOKETEST_IN_002xml
MBSMOKETEST_IN_003xml
CAUTION
The files generated in the second stage of testing overwrite the contents of the files
generated in the first stage
3 Only valid for Windows |
Check the contents of the generated files against the contents of the files located in
ltsmoke_test_installation_directorygtSMOKETESTsecondrunEnd of Windows |
Only valid for IBM i5OSUNIX |
Check the contents of the four files against the contents of the files located in
ltsmoke_test_installation_directorygtSMOKETESTsecondrunEnd of IBM i5OSUNIX |
Result
If the smoke test has identified errors in the installation process the four XML files are not created in
either of the stages Instead an error log file is created
RECOMMENDATION
In the event of errors we recommend that you send the error log file to your administrator
End of Java | MapBox (MBX) |
Only valid for Java | MapBox (MBX) |
446 Ensuring Optimal Block Size settings
The block size of an object determines the number of messages that are processed at the same time by
the MapBox as a set You need to make sure that the block sizes are optimal to reduce load on the
MapBox XML processor
Procedure
1 Use transaction R3AC3 to set the block size of object GWA_COUNTRY to 10 and save the setting
2 Use transaction R3AC1 to set the block size of object BUPA_MAIN to 10 and save the settingEnd of Java | MapBox (MBX) |
4 Post-Installation
44 Post-Installation Steps for MapBox
3850 CUSTOMER 2012-12-17
Only valid for ABAP+JavaJava | MapBox (MBX) |
447 Adapting Memory Settings for the J2EE Engine
You need to adapt the memory settings for the J2EE Engine because MapBox relies heavily on memory-
intensive XML-processing such as schema-validation parsing transformation and so on
RECOMMENDATION
For rapid message processing by MapBox we recommend you to use 1024 MB of heap memory
for MapBox alone With a heap size of 512 MB MapBox can still process messages but with a slightly
higher processing time for each message
The MapBox memory requirements are directly proportional to the size of the input documents
that MapBox has to process The average size of such documents is in the range of 150 to 200 KB
For messages of this size it is sufficient to have a heap memory of 512 MB If the input documents
are in the range of 1 to 2 MB we recommend that you give MapBox a heap memory of 1024 MB
Procedure
To set the recommended memory settings for the MapBox you start the config tool of the J2EE Engine
Only valid for Windows |
Start the config tool by executing ltDrivegtusrsapltSAPSIDgtltinstance_numbergtj2ee
configtoolbatEnd of Windows |
Only valid for IBM i5OSUNIX |
Start the config tool by executing usrsapltSAPSIDgtltinstance_numbergtj2eeconfigtoolshEnd of IBM i5OSUNIX |
End of ABAP+JavaJava | MapBox (MBX) |
End of ABAP+JavaJava | MapBox (MBX) |
Only valid for ABAPABAP+Java |
45 Activating the CRM Web Client
The CRM Web Client is part of the ICF Services that is automatically installed as part of SAP NetWeaver
Application Server
Procedure
To activate the CRM Web Client after the installation see the SAP Library at
httphelpsapcomnw70 SAP NetWeaver 70 Library (including Enhancement Package 2) English SAP
NetWeaver Library SAP NetWeaver by Key Capability Application Platform by Key Capability Platform-Wide
Services Connectivity Components of SAP Communication Technology Communication Between ABAP and Non-
4 Post-Installation
45 Activating the CRM Web Client
2012-12-17 CUSTOMER 3950
ABAP Technology Internet Communication Framework Development Server-Side Development Creating and
Configuring an ICF Service Activating and Deactivating the ICF ServicesEnd of ABAPABAP+Java |
Only valid for ABAP |
46 Installing and Configuring CRM Application Server Loyalty Add-On Component
This section provides information about how to install and configure CRM Application Server Loyalty
as an add-on component to CRM Application Server ABAP
Prerequisites
You have already deployed the following software components
SAP NetWeaver Application Server ABAP (AS ABAP)
CRM Application Server ABAP
Procedure
Installing CRM Application Server Loyalty
Install CRM Application Server Loyalty on the same host where CRM Application Server ABAP is
deployed as described in SAP Note 1162144
Configuring CRM Application Server Loyalty
After you have installed CRM Application Server Loyalty you must complete the following
configuration steps
1 Call transaction nspro
2 Choose SAP Customising Implementation Guide Customer Relationship Management Marketing Loyalty
Management in BBPCRM Basic Settings Define Basic Settings
3 Enter value 1 for the INSTALL_TYPE parameter
NOTE
You do not have to enter destination name for the LOYALTY_SYSTEM parameterEnd of ABAP |
47 Starting XCM
This section describes how to start XCM
Procedure
1 You access the XCM tool at
httplthostgtltportgtltweb app namegtadminxcminitdo
4 Post-Installation
46 Installing and Configuring CRM Application Server Loyalty Add-On Component
4050 CUSTOMER 2012-12-17
NOTE
You can also start XCM in accessibility mode (according to Section 508 Rehabilitation Act)
at the following URL
httplthostgtltportgtltweb app namegtadminxcminitdosap-accessibility=x
2 Provide a user and password If you are logging on for the first time use the Administrator user
and the password you defined during the installation of the SAP system
RECOMMENDATION
We recommend you create new users with lesser rights than the Administrator for the
administration of Web applications
For more information see the SAP CRM Security Guide section E-Commerce
3 When the application opens a closed control tree is displayed on the left of the screen A screen
containing help information is displayed to the right
You can use edit (change settings) or display (see settings) mode in XCM You use the button in
the top right hand corner of the screen to change between modes When you switch to edit mode
a DB lock is set meaning that only this user can edit the settings at one time The lock is released
once the user switches back to display mode or after session timeout (default timeout is 30mins)
48 Accessing Configuration Documentation in SAP Solution Manager
To access configuration documentation in SAP Solution Manager you have to connect your newly
installed SAP system to SAP Solution Manager
NOTE
For SAP NetWeaver you can also find configuration documentation in the Technology Consultants
Guide at
httphelpsapcomnw70 SAP NetWeaver 70 Library (including Enhancement Package 2) English
SAP NetWeaver Library Technology Consultants Guide
Procedure
Create a configuration project with the related configuration guide as described in the following
documentation
httphelpsapcom SAP Solutions SAP Solution Manager Documentation for SAP Solution Manager
ltcurrent releasegt SAP Solution Manager Implementing and Upgrading SAP Solutions Projects
Configuration
More Information
httpservicesapcomsolutionmanager Media Library How-To Documents How to Create a
Configuration Guide using SAP Solution Manager
4 Post-Installation
48 Accessing Configuration Documentation in SAP Solution Manager
2012-12-17 CUSTOMER 4150
This page is left blank for documents that are printed on both sides
5 Additional Information
Only valid for ABAP+JavaJava |
51 Installing the Business Packages for SAP CRM Using JSPM (Optional)
You can also install the Business Packages for SAP CRM using the Java Support Package Manager (JSPM)
Prerequisites
Only valid for IBM i5OSUNIX |
You have checked hardware and software requirements [external document]End of IBM i5OSUNIX |
Only valid for Windows |
You have checked hardware and software requirements [external document]End of Windows |
You have ckecked the Prerequisites for the Business Packages for SAP CRM [page 7]
Procedure
1 Download version 701 of the files sapcom_BPCRMAPP sapcom_BPCRMFND sapcom_CRMAPP and
sapcom_CRMFND as follows
1 Go to httpservicesapcomswdc Download Support Packages and Patches Search for
Support Packages and Patches
2 Enter the following search terms
BP CRM Application Coding 701
BP CRM Application Content 701
BP CRM Foundation Coding 701
BP CRM Foundation Content 701
2 Add the deployment variable comsapcmshare as described in SAP Note 965948
For more information about how to use the Software Deployment Manager (SDM) see the
documentation Software Deployment Manager which is available at
httphelpsapcomnw70 SAP NetWeaver 70 Library (including Enhancement Package 2) English
SAP NetWeaver Library SAP NetWeaver Developerrsquos Guide Fundamentals Using Java Core Development
Tasks Deployment Putting It All Together Software Deployment Manager
3 Install the Business Packages for SAP CRM with JSPM as described in Installing Additional Usage Types
or Software Units in an Existing SAP System [external document]
5 Additional Information
51 Installing the Business Packages for SAP CRM Using JSPM (Optional)
2012-12-17 CUSTOMER 4350
4 Perform the required Post-Installation Steps for the Business Packages for SAP CRM [page 20]End of ABAP+JavaJava |
Only valid for ABAP+JavaJava |
52 Troubleshooting for the Business Package for SAP CRMOnly valid for ABAP+JavaJava |
The following sections describe the steps that you have to perform if you have problems after the
installation
Activating BI Templates Manually [page 44]
Dragging the Central Search onto the Portal Desktop [page 45]End of ABAP+JavaJava |
Only valid for ABAP+JavaJava |
521 Activating BI Templates Manually
If you have installed the Business Package you might see error messages when loading the BI templates
This procedure describes how you can activate the templates afterwards
Procedure
1 Note the technical name of all templates in your portal interface that are not working
2 Log on to your BI system
3 On the SAP Easy Access screen choose Modeling Administrator Workbench Modeling (transaction
RSA1 or RSOR)
4 Choose Business Content Object Types Web Template Name Select Objects
A new window containing a list of BW objects and templates opens
5 Find your missing templates for example 0TPL_0CRM_Cnn_Qnnn_Vnnn_M and select the entries
6 Choose Transfer Selection
The template now appears on the right-hand side of the screen The Transfer checkbox has been
selected and cannot be changed Nevertheless we recommend that you repeat the following
procedure so that your templates can be displayed
7 Select the template
8 Choose Transfer Transfer
Result
You have successfully activated your missing templates and no error messages appear in the portalEnd of ABAP+JavaJava |
5 Additional Information
52 Troubleshooting for the Business Package for SAP CRM
4450 CUSTOMER 2012-12-17
Only valid for ABAP+JavaJava |
522 Dragging the Central Search onto the Portal Desktop
Procedure
The Business Package for SAP CRM 70 including SAP enhancement package 1 contains an iView for
the central search in CRM This iView is in the package on the page Today in the workset Home of the
CRM User You can drag this iView onto the portal desktop under the tool areaEnd of ABAP+JavaJava |
End of ABAP+JavaJava |
5 Additional Information
52 Troubleshooting for the Business Package for SAP CRM
2012-12-17 CUSTOMER 4550
Typographic Conventions
Example Description
ltExamplegt Angle brackets indicate that you replace these words or characters with appropriate entries to make entries in the system for example ldquoEnter your ltUser Namegtrdquo
ExampleExample
Arrows separating the parts of a navigation path for example menu options
Example Emphasized words or expressions
Example Words or characters that you enter in the system exactly as they appear in the documentation
httpwwwsapcom Textual cross-references to an internet address
example Quicklinks added to the internet address of a homepage to enable quick access to specific content on the Web
123456 Hyperlink to an SAP Note for example SAP Note 123456
Example Words or characters quoted from the screen These include field labels screen titles pushbutton labels menu names and menu options
Cross-references to other documentation or published works
Example Output on the screen following a user action for example messages Source code or syntax quoted directly from a program File and directory names and their paths names of variables and parameters and
names of installation upgrade and database tools
EXAMPLE Technical names of system objects These include report names program names transaction codes database table names and key concepts of a programming language when they are surrounded by body text for example SELECT and INCLUDE
EXAMPLE Keys on the keyboard
4650 CUSTOMER 2012-12-17
SAP AGDietmar-Hopp-Allee 16
69190 WalldorfGermany
T +4918 0534 34 34F +4918 0534 34 20
wwwsapcom
copy Copyright 2012 SAP AG All rights reserved
No part of this publication may be reproduced or transmitted in any form or for any purpose without the express permission of SAP AG The information contained herein may be changed without prior noticeSome software products marketed by SAP AG and its distributors contain proprietary software components of other software vendors
Microsoft Windows Excel Outlook PowerPoint Silverlight and Visual Studio are registered trademarks of Microsoft CorporationIBM DB2 DB2 Universal Database System i System i5 System p System p5 System x System z System z10 z10 zVM zOS OS390 zEnterprise PowerVM Power Architecture Power Systems POWER7 POWER6+ POWER6 POWER PowerHA pureScale PowerPC BladeCenter System Storage Storwize XIV GPFS HACMP RETAIN DB2 Connect RACF Redbooks OS2 AIX Intelligent Miner WebSphere Tivoli Informix and Smarter Planet are trademarks or registered trademarks of IBM CorporationLinux is the registered trademark of Linus Torvalds in the United States and other countriesAdobe the Adobe logo Acrobat PostScript and Reader are trademarks or registered trademarks of Adobe Systems Incorporated in the United States and other countriesOracle and Java are registered trademarks of Oracle and its affiliatesUNIX XOpen OSF1 and Motif are registered trademarks of the Open GroupCitrix ICA Program Neighborhood MetaFrame WinFrame VideoFrame and MultiWin are trademarks or registered trademarks of Citrix Systems IncHTML XML XHTML and W3C are trademarks or registered trademarks of W3Creg World Wide Web Consortium Massachusetts Institute of TechnologyApple App Store iBooks iPad iPhone iPhoto iPod iTunes Multi-Touch Objective-C Retina Safari Siri and Xcode are trademarks or registered trademarks of Apple IncIOS is a registered trademark of Cisco Systems IncRIM BlackBerry BBM BlackBerry Curve BlackBerry Bold BlackBerry Pearl BlackBerry Torch BlackBerry Storm BlackBerry Storm2 BlackBerry PlayBook and BlackBerry App World are trademarks or registered trademarks of Research in Motion LimitedGoogle App Engine Google Apps Google Checkout Google Data API Google Maps Google Mobile Ads Google Mobile Updater Google Mobile Google Store Google Sync Google Updater Google Voice Google Mail Gmail YouTube Dalvik and Android are trademarks or registered trademarks of Google IncINTERMEC is a registered trademark of Intermec Technologies CorporationWi-Fi is a registered trademark of Wi-Fi AllianceBluetooth is a registered trademark of Bluetooth SIG IncMotorola is a registered trademark of Motorola Trademark Holdings LLCComputop is a registered trademark of Computop Wirtschaftsinformatik GmbHSAP R3 SAP NetWeaver Duet PartnerEdge ByDesign SAP BusinessObjects Explorer StreamWork SAP HANA and other SAP products and services mentioned herein as well as their respective logos are trademarks or registered trademarks of SAP AG in Germany and other countriesBusiness Objects and the Business Objects logo BusinessObjects Crystal Reports Crystal Decisions Web Intelligence Xcelsius and other Business Objects products and services mentioned herein as well as their respective logos are trademarks or registered trademarks of Business Objects Software Ltd Business Objects is an SAP companySybase and Adaptive Server iAnywhere Sybase 365 SQL Anywhere and other Sybase products and services mentioned herein as well as their respective logos are trademarks or registered trademarks of Sybase Inc Sybase is an SAP company
2012-12-17 CUSTOMER 4750
Crossgate mgic EDDY B2B 360deg and B2B 360deg Services are registered trademarks of Crossgate AG in Germany and other countries Crossgate is an SAP companyAll other product and service names mentioned are the trademarks of their respective companies Data contained in this document serves informational purposes only National product specifications may varyThese materials are subject to change without notice These materials are provided by SAP AG and its affiliated companies (ldquoSAP Grouprdquo) for informational purposes only without representation or warranty of any kind and SAP Group shall not be liable for errors or omissions with respect to the materials The only warranties for SAP Group products and services are those that are set forth in the express warranty statements accompanying such products and services if any Nothing herein should be construed as constituting an additional warranty
DisclaimerSome components of this product are based on Javatrade Any code change in these components may cause unpredictable and severe malfunctions and is therefore expressly prohibited as is any decompilation of these componentsAny Javatrade Source Code delivered with this product is only to be used by SAPrsquos Support Services and may not be modified or altered in any way
Documentation in the SAP Service MarketplaceYou can find this document at the following address httpservicesapcominstguides
4850 CUSTOMER 2012-12-17
SAP AGDietmar-Hopp-Allee 1669190 WalldorfGermanyT +4918 0534 34 34F +4918 0534 34 20wwwsapcom
copy Copyright 2012 SAP AG All rights reservedNo part of this publication may be reproduced or transmitted in any form or for any purpose without the express permission of SAP AG The information contained herein may be changed without prior notice
- SAP Enhancement Package 1 for SAP CRM 70
-
- Table of Contents
- 1 Introduction
- 2 Planning and Preparation
-
- 21 Prerequisites for the Business Packages for SAP CRM
-
- 3 Installation
- 4 Post-Installation
-
- 41 Checking the Availability of Back-End Systems for SAP CRM Java Components
-
- 411 Creating a Back-End User
- 412 Checking the Connection to the ABAP System
- 413 Configuring and Checking the TREX Service
- 414 Checking the Selling via eBay Processes
-
- 42 Post-Installation Steps for Workforce Deployment Application and Calculation Services
-
- 421 Implementing WFMCORE 200 Using Transaction SAINT
- 422 Configuring the Extended Configuration Management (XCM) for WFD Application and Calculation Services
- 423 Checking Workforce Deployment Calculation Services
- 424 Checking the Installation of WFD Application Services and WFD Calculation Services
-
- 43 Post-Installation Steps for the Business Packages for SAP CRM
-
- 431 Creating Roles for the SAP CRM Business Packages
- 432 Installation of the Info Center for the SAP CRM Business Package
-
- 4321 Importing the SAP CRM Info Center Configurations and Directory Structure
- 4322 Activating Manual Ordering of Folders for the sapcrm Repository
- 4323 Creating Indexes and Taxonomies for the sapcrmnews Repository
- 4324 Creating the Index for the sapcrm Repository
- 4325 Configuring the Personal Search
- 4326 Increasing the Number of JCo Connections
-
- 44 Post-Installation Steps for MapBox
-
- 441 Assigning User Groups for MapBox Users
- 442 Configuring an RFC Destination for MapBox
- 443 Performing Initial Configuration for MapBox
- 444 Executing the MapBox
- 445 Performing the Smoke Test for MapBox
- 446 Ensuring Optimal Block Size settings
- 447 Adapting Memory Settings for the J2EE Engine
-
- 45 Activating the CRM Web Client
- 46 Installing and Configuring CRM Application Server Loyalty Add-On Component
- 47 Starting XCM
- 48 Accessing Configuration Documentation in SAP Solution Manager
-
- 5 Additional Information
-
- 51 Installing the Business Packages for SAP CRM Using JSPM (Optional)
- 52 Troubleshooting for the Business Package for SAP CRM
-
- 521 Activating BI Templates Manually
- 522 Dragging the Central Search onto the Portal Desktop
-
- Copyright and trademarks
-

XCM Parameter Name Example Value Description
csjcor3name Q5C System ID of the SAP CRM Calculation Service (for example IDES)
csjcoclient 505 Client of the SAP CRM Calculation Service
csjcouser Back end user for JCO connection to the SAP CRM Calculation Service
csjcopassword Password for the back-end user
You need to configure these csjcoxxxxx XCM parameter values in each instance of WFD AS and
WFD CS Make sure that the values are the same in all instances
Configuring the XCM for WFD Calculation Services
This business scenario is relevant for defining the WFD CS You must perform this XCM configuration
for the WFD CS to run
1 Start the XCM using the following URL
httpltJ2EE_hostgtltJ2EE_portgtwfdcsadminxcminitdo
2 Access the configuration using the following path General Application Settings Customer sisopt
sisoptconfig
Process Description Web ApplicationXCM Application Configurations
Calculations Service Workforce scheduling application
wfdcs sisoptconfig
3 In addition to the csjcoxxxx XCM parameters you need to define the http port of the J2EE
instance where WFD CS is running
XCM Parameter Name Example Value Description
cshttpport 51000 The http port of the web server where the WFD Calculation Services application is running (for example 50000)
4 Restart the application after saving the XCM configuration
Configuring the XCM for WFD Application Services
This business scenario is relevant for connecting the WFD AS to the WFD CS
1 Start the XCM using the following URL
httpltJ2EE_hostgtltJ2EE_portgtwfdadminxcminitdo
2 Access the configuration using the following path General Application Settings Customer sis
sisconfig
Process Description Web ApplicationXCM Application Configurations
Application Services Web-based scheduling application
wfd sisconfig
3 Restart the application after saving the XCM configurationEnd of ABAP+JavaJava |
4 Post-Installation
42 Post-Installation Steps for Workforce Deployment Application and Calculation Services
2012-12-17 CUSTOMER 1750
Only valid for ABAP+JavaJava |
423 Checking Workforce Deployment Calculation Services
After configuring Workforce Deployment Calculation Services (WFD CS) with Extended Configuration
Management (XCM) and restarting the application you need to go to the WFD CS configuration page
to check that it is running
Prerequisites
You have completed the installation of WFD Application Service (AS) and CS as described in this
documentation
Only valid for CRM Java Components (JCRM) |
You have downloaded the Business Package for Retail (Release 10) from sdnsapcom SAP NetWeaver
Capabilities User Productivity Portal and Collaboration Portal Content Portfolio
For more information about the portal content versions for your release see the documentation
Master Guide ndash SAP Customer Relationship Management 70 at httpservicesapcomcrm-instEnd of CRM Java Components (JCRM) |
Only valid for CRM Java Components (JCRM) |
You must have access to the Portal Admin role in SAP CRM through the Enterprise Portal to complete
this part of the WFD ASCS installation
For more information see Configuring the CRM Business Package on the SAP Service Marketplace at
httpservicesapcomcrm-inst SAP CRM 70 CRM Business Packages and PC UI Section
CRM Portal Administrator contains specific instructions on configuring the portal for access to WFD
AS and CS Apply the instructions to the Portal Admin roleEnd of CRM Java Components (JCRM) |
You have configured your portal users based on the required settings as described in the
configuration documentation for your IT scenario
For more information see Accessing Configuration Documentation in the SAP Solution Manager [page 41]
Procedure
1 Access the WFD CS configuration page through the Enterprise Portal using the role Portal
Administrator
2 Choose WFD Calculation Services Configuration
The Configuration tab looks as follows
Tab To Complete InstallationFor ongoing Configuration Management
Calculation Servers Required for at least one calculation server
Required for each additional calculation server
Logging Localization No Required to add or change logging once fully operational
End of ABAP+JavaJava |
4 Post-Installation
42 Post-Installation Steps for Workforce Deployment Application and Calculation Services
1850 CUSTOMER 2012-12-17
Only valid for ABAP+JavaJava |
424 Checking the Installation of WFD Application Services and WFD Calculation Services
This section tells you how to check that you have correctly installed the Java components for Workforce
Deployment Application Services (WFD AS) and WFD Calculation Services (WFD CS) This section
does not tell you how to check the connection between the WFD AS and the WFD CS
The procedure below shows you how to create a simple calculation request and verify that the
Calculation Server has received the request This helps you check that you have correctly installed all
WFD AS or CS components and that they are communicating with each other
Prerequisites
You have completed all the installation steps described in this documentation
You have connected WFD AS or CS components with the Enterprise Portal
You have installed the required business packages according to Checking Workforce Deployment
Calculation Services [page 18]
Procedure
1 To check that WFD AS is working and listening for HTTP requests enter the following URL
httpltJ2EE_hostgtltJ2EE_portgtwfdlogondo
The following error confirms that the application is working
Your session has expired Please renew your session by clicking a section link in
the Portal menu
2 Access the WFD CS from the Enterprise Portal through the Portal Admin role and check that the
WFD CS page comes up with no errors
If the page does not come up possible errors are
Error Message Cause
Missing value for XCM configuration
parameter cshttpport
The XCM parameter cshttpport was not filled
The request could not be completed
due to the following
errorsltfollowed by details of the
particular error usually related to
the JCO connectiongt
One of the XCM parameters csjcoxxxxx might be incorrect
EXAMPLE
The user or password are incorrect
3 Test the submission of a calculation request to see if the WFD CS can process the request
You can simulate a calculation request submission by executing the RFC
TEST_WFDCS_CALCREQ_SUBMIT from the CRM back-end system defined in the csjcoxxxxx XCM
parameters of WFD CS
4 Post-Installation
42 Post-Installation Steps for Workforce Deployment Application and Calculation Services
2012-12-17 CUSTOMER 1950
EXAMPLE
For example when you installed WFD CS you configured the csjcoxxxxx XCM
parameters to point to system ID Q5C client 505 You now need to log in to Q5C client 505
and execute TEST_WFDCS_CALCREQ_SUBMIT with transaction SE37 using the default import
parameters
4 Check the Requests tab of the WFD CS page to check the status of entries with the location name
SMOKETEST has the status FAILED
Status FAILED indicates a successful smoke test It means that the Request Manager successfully
sent the request to the Solver which successfully processed it
Status QUEUED probably means that the XCM parameter cshttpport was incorrectEnd of ABAP+JavaJava |
End of Java |
Only valid for ABAP+JavaJava |
43 Post-Installation Steps for the Business Packages for SAP CRM
The following sections provide information about the steps that you have to perform after importing
the Business Package for SAP CRM
Only valid for ABAP+JavaJava |
431 Creating Roles for the SAP CRM Business Packages
Procedure
If you create your own roles from the SAP CRM Business Packages also add the every user role
(eu_core_role) to your role The Every User Role contains the personalization functionality for the SAP
NetWeaver Portal
For more information about the Every User Role see the SAP Library at
httphelpsapcomnw70 SAP NetWeaver 70 Library (including Enhancement Package 2) English SAP
NetWeaver Library SAP NetWeaver by Key Capability People Integration by Key Capability Portal Portal
Administration Guide Super Administration Pre-configured Roles Every User Roles End of ABAP+JavaJava |
Only valid for ABAP+JavaJava |
432 Installation of the Info Center for the SAP CRM Business Package
This section describes how to install the Info Center
4 Post-Installation
43 Post-Installation Steps for the Business Packages for SAP CRM
2050 CUSTOMER 2012-12-17
Prerequisites
You have installed the Business Package for SAP CRM [page 43]
You have administrator rights
Process Flow
1 You import the SAP CRM info center configurations and directory structure [page 21]
2 You activate manual ordering of folders for the sapcrm Repository [page 23]
3 You create indexes and taxonomies for the sapcrmnews Repository [page 23]
4 You create the index for the sapcrm Repository [page 25]
5 You configure the personal search [page 25]
6 If required you increase the number of JCo connections [page 26]
Only valid for ABAP+JavaJava |
4321 Importing the SAP CRM Info Center Configurations and Directory Structure
The directory structure of the info center has been made available in one content package and you can
import it using the Information and Content Exchange (ICE) Repository
For more information about ICE see SAP Library at
httphelpsapcomnw70 SAP NetWeaver 70 Library (including Enhancement Package 2) English SAP
NetWeaver Library SAP NetWeaver by Key Capability Information Integration by Key Capability Knowledge
Management Content Managers Guide Additional Tasks for Content Managers Content Exchange Distributing
Content (Offline)
Procedure
Importing the Directory Structure
1 Log on to the Portal as content manager
2 Choose Content Management Content Exchange Upload
3 Only valid for Windows |
Select file fullupdate_infocenterzip from directory ltservlet_enginegtirjrootWEB-INF
portalportalappsepcrmchmkmexpice and confirm the uploadEnd of Windows |
Only valid for IBM i5OSUNIX |
Select file fullupdate_infocenterzip from directory ltservlet_enginegtirjrootWEB-INF
portalportalappsepcrmchmkmexpice and confirm the uploadEnd of IBM i5OSUNIX |
The zip file is now imported using the ICE protocol
If you cannot see the ICE repository this might be due to one of the following reasons
The ICE repository was hidden in the virtual root repository
4 Post-Installation
43 Post-Installation Steps for the Business Packages for SAP CRM
2012-12-17 CUSTOMER 2150
In this case do the following
1 Log on to the portal as system administrator
2 In the SAP NetWeaver Enterprise Portal choose System Administration System Configuration
Knowledge Management Content Management Repository Managers Virtual Root Repository
3 Check whether the ICE Repository has been entered under Repositories to exclude
4 Remove it from the list
5 Save your changes
6 Restart the Servlet Engine
The repository has been ldquoswitchedrdquo to invisible
1 Log on to the portal as system administrator
2 In the SAP NetWeaver Enterprise Portal choose System Administration System Configuration
Knowledge Management Content Management Repository Managers Content Exchange
Repository
3 If the property hide in root folder is active deselect it
4 Restart the Servlet Engine
NOTE
After the import check whether the directory structure was created by choosing Content
Administration KM Content in the SAP NetWeaver Enterprise Portal The list of folders should
contain the folders sapcrm and sapcrmnews
Checking Whether the Directory Structure Has Been Imported Successfully
You can only import the structure if there is a repository with the same name For example if a zip file
is exported from the repository sapcrm there must also be a repository with the name sapcrm in the
target system
The sapcrm and sapcrmnews repositories as well as the CRM-Namespace filter are created during the
import of the SAP CRM KM extension configuration archive To check whether this configuration
archive has been imported successfully proceed as follows
1 Log on to the portal as system administrator
2 In the SAP NetWeaver Enterprise Portal choose System Administration Monitoring Knowledge
Management Deployment Monitor Config Archives
3 Check whether the archive comsappctcrmappkmextprjconfig is installed in the system
If the archive comsappctcrmappkmextprjconfig is not installed in the system import it
manually as follows
1 Log on to the portal as system administrator
2 In the SAP NetWeaver Enterprise Portal choose System Administration Monitoring Knowledge
Management Deployment Monitor Config Archives Actions Import
4 Post-Installation
43 Post-Installation Steps for the Business Packages for SAP CRM
2250 CUSTOMER 2012-12-17
3 Only valid for Windows |
Select the archive comsappctcrmappkmextprjconfigconfigarchive from directory
ltSAPSIDgtJCltinstance_numbergtj2eeclusterappssapcomep~crm~chm
servlet_jspepcrmchmkmexprootWEB-INFconfig and confirm the importEnd of Windows |
4 Only valid for IBM i5OSUNIX |
Select the archive comsappctcrmappkmextprjconfigconfigarchive from
directory ltSAPSIDgtJCltinstance_numbergtj2eeclusterappssapcomep~crm~chm
servlet_jspepcrmchmkmexprootWEB-INFconfig and confirm the importEnd of IBM i5OSUNIX |
After the import the directory structure has no restrictions on rights Make sure that you modify the
rights of the various folders to meet your companyrsquos requirementsEnd of ABAP+JavaJava |
Only valid for ABAP+JavaJava |
4322 Activating Manual Ordering of Folders for the sapcrm Repository
The sapcrm Repository folders are ordered in a specific sequence
Procedure
To display this sequence activate manual ordering for each directory
For more information see the SAP Library at
httphelpsapcomnw70 SAP NetWeaver 70 Library (including Enhancement Package 2) English SAP
NetWeaver Library SAP NetWeaver by Key Capability Information Integration by Key Capability Knowledge
Management Content Managers Guide Providing Shared Access to Departmental Documents Sorting Documents in a
Folder ManuallyEnd of ABAP+JavaJava |
Only valid for ABAP+JavaJava |
4323 Creating Indexes and Taxonomies for the sapcrmnews Repository
To make news available for indexing and searching create two new indexes
Prerequisites
You have administrator rights for Knowledge Management on the server
For more information see the SAP Library at
httphelpsapcomnw70 SAP NetWeaver 70 Library (including Enhancement Package 2) English SAP
NetWeaver Library SAP NetWeaver by Key Capability Information Integration by Key Capability Knowledge
Management
4 Post-Installation
43 Post-Installation Steps for the Business Packages for SAP CRM
2012-12-17 CUSTOMER 2350
Procedure
Creating Indexes and Taxonomies for the sapcrmnews Repository
The Business Package contains an iView ndash epbp_crmchm-pmiviewsnews_flash ndash that combines all
news with the istopnews=yes attribute in a virtual folder To guarantee the function of this iView
create two indexes in KM
1 In the SAP NetWeaver Enterprise Portal choose System Administration System Configuration
Knowledge Management Index Administration
2 Create an index of the Search and Classification type with a suitably configured taxonomy
3 Choose sapcrmpartnernews as the index ID Otherwise the path to the folder specified in the iView
is incorrect
If you choose another index ID you must also modify accordingly the folder properties in the
iView for one of the following
Folders path to content and path to root
Folders Path to Initially Displayed Folder and Path to Root Folder for Navigation
If you want to link two portal servers with a TREX server you must modify the index name and
iView properties on one of the portal servers
4 Assign folder sapcrmpartnerPartnernews as a data source
This moves all news with the (virtual) Top flag from this folder to the Newsflash iView
5 Create a ldquoquery-basedrdquo taxonomy with the name PartnerNewsFlash choosing Automatic
Classification before you save the taxonomy
NOTE
The outbound delivery includes only the iView above for virtually combining news If you
also want to use this functionality for other news channels (for example internal news) use
your own index and taxonomy for each channel
For more information see the SAP Library at
httphelpsapcomnw70 SAP NetWeaver 70 Library (including Enhancement Package 2) English SAP
NetWeaver Library SAP NetWeaver by Key Capability Information Integration by Key Capability Knowledge
Management Administration Guide System Administration System Configuration lsquoIndex Administrationrsquo iView
Creating Queries for the Taxonomies of sapcrmnews Repositories
1 Log on to the portal as content manager
2 Choose Content Management Classification Taxonomy Query Builder
3 Add a search query to check the istopnews property for the value Yes
4 Enter PartnerNewsFlash as the name for the taxonomy
Here too a property of the iView links to a taxonomy with this name So if you want to choose
another name you must modify the path to the content folder property of the iView
For more information see the SAP Library at
4 Post-Installation
43 Post-Installation Steps for the Business Packages for SAP CRM
2450 CUSTOMER 2012-12-17
httphelpsapcomnw70 SAP NetWeaver 70 Library (including Enhancement Package 2) English SAP
NetWeaver Library SAP NetWeaver by Key Capability Information Integration by Key Capability Knowledge
Management Administration Guide System Administration System Configuration Taxonomies and ClassificationEnd of ABAP+JavaJava |
Only valid for ABAP+JavaJava |
4324 Creating the Index for the sapcrm Repository
To make Info center documents available for indexing and searching create a new index with sapcrm
as a data source
Prerequisites
You have administrator rights for Knowledge Management on the server
Procedure
Choose a name of your own Search as a service and standard as a crawler parameter
For more information see the SAP Library at
httphelpsapcomnw70 SAP NetWeaver 70 Library (including Enhancement Package 2) English SAP
NetWeaver Library SAP NetWeaver by Key Capability Information Integration by Key Capability Knowledge
ManagementEnd of ABAP+JavaJava |
Only valid for ABAP+JavaJava |
4325 Configuring the Personal Search
Prerequisites
You have administrator rights for Knowledge Management on the server
Procedure
1 Create an index for the userhome repository
To make personal folder documents available for the search create a new index with root
userhome as the data source
2 Create a search option set for personal search
To assign the search index and a start folder to the search for personal documents create a Search
Option Set with the name CRMPersonalFolderSearch As an index enter the index for the
userhome repository created above and ~alias~userhomeuseridPersonal Documents as the
root folder for the search
For more information see the SAPLibrary at
4 Post-Installation
43 Post-Installation Steps for the Business Packages for SAP CRM
2012-12-17 CUSTOMER 2550
httphelpsapcomnw70 SAP NetWeaver 70 Library (including Enhancement Package 2) English SAP
NetWeaver Library SAP NetWeaver by Key Capability Information Integration by Key Capability Knowledge
Management End of ABAP+JavaJava |
Only valid for ABAP+JavaJava |
4326 Increasing the Number of JCo Connections
This section tells you how to increase the number of concurrent Java Connector (JCo) connections
By default the maximum number of concurrent JCo connections is 100 The value depends on the
number and behavior of the users in the portal For more information see SAP Note 316877
You can specify this value when you plan the installation of your SAP NetWeaver Enterprise Portal
Make sure that you first analyze the number and behavior of the users
Procedure
To increase the maximum number of concurrent JCo connections increase the value of the
environment variable CPIC_MAX_CONV
EXAMPLE
Initial default value CPIC_MAX_CONV=100
Increased value CPIC_MAX_CONV=1000
End of ABAP+JavaJava |
End of ABAP+JavaJava |
End of ABAP+JavaJava |
Only valid for ABAP+JavaJava | MapBox (MBX) |
44 Post-Installation Steps for MapBoxOnly valid for Java | MapBox (MBX) |
You have to perform the following post-installation steps for MapBox
You assign user groups for MapBox users [page 27]
You configure an RFC destination for TCPIP connections [page 28]
You perform initial configuration for MapBox [page 28]
You execute the Map Box [page 34]
You perform the smoke test [page 35]
If required you perform additional settings for MapBox
Block size settings [page 38]
Memory settings for the J2EE Engine [page 39]End of Java | MapBox (MBX) |
4 Post-Installation
44 Post-Installation Steps for MapBox
2650 CUSTOMER 2012-12-17
Only valid for Java | MapBox (MBX) |
441 Assigning User Groups for MapBox Users
To access the MapBox URL you need to provide the correct security rights for individual user groups
Procedure
1 Log on to the Visual Administrator
1 On your central instance host change to the following directory
Only valid for IBM i5OSUNIX |
usrsapltSAPSIDgtltinstance_numbergtj2eeadmin
End of IBM i5OSUNIX |
Only valid for Windows |
usrsapltSAPSIDgtltinstance_numbergtj2eeadmin
End of Windows |
2 Only valid for IBM i5OSUNIX |
Run goshEnd of IBM i5OSUNIX |
3 Only valid for Windows |
Double-click gobatEnd of Windows |
For more information about the Visual Administrator see the SAP Library at
httpshelpsapcomnw70 SAP NetWeaver Library SAP NetWeaver by Key Capability
Application Platform by Key Capability Java Technology Administration Manual J2EE Engine J2EE Engine
Administration Tools
2 Choose the server node from the left-hand window
3 Choose Services Security Provider
A list of deployed components is displayed
4 Choose MapBoxLauncher from this list (sapcom
comsapsyncpointmapboxlaunchermapboxlauncher)
A list of tabs appears on the right
5 Choose Security Roles from the list
A list of security roles appears
6 If no display and modify roles are displayed add these roles as follows
1 Choose Switch to Edit Mode from the top task bar to switch to edit mode
2 Add display and modify roles by choosing Add
7 For both the display and modify roles perform the following
1 Choose Switch to Edit Mode from the top task bar to switch to edit mode
2 Choose the Groups tab from the list on the far right
3 Choose Search
4 Post-Installation
44 Post-Installation Steps for MapBox
2012-12-17 CUSTOMER 2750
A list of user groups appears
4 Select the user groups that you want to enable for the two roles
Add to the left of the user group display is now highlighted
5 Choose Add to add the user group for the selected roleEnd of Java | MapBox (MBX) |
Only valid for Java | MapBox (MBX) |
442 Configuring an RFC Destination for MapBox
After the installation you have to create an RFC destination for MapBox
Procedure1 Log on to the CRM server
2 Enter transaction SM59
The Display and Maintain RFC Destinations screen appears
3 Choose Technical Settings Activation Type and create a new destination with the type TCPIP
4 Choose Registered Server Program and enter a unique value for program ID
For example you might enter MAPBOX723 for SAP client 723
5 Enter the details of the gateway host and gateway service in Gateway Options
1 Gateway host
Enter the name of your message server You can also enter the IP address of your message
server
2 Gateway service
Enter your SAP CRM system number prefixed with the string sapgw
For example if your system number is 02 enter sapgw02
6 If the CRM system is a Unicode-enabled system choose Unicode in Special Options
7 Save the destination
8 Choose MapBox Configuration Page Connecting settings from the URL and enter the same RFC
destination name in the relevant fieldEnd of Java | MapBox (MBX) |
Only valid for Java | MapBox (MBX) |
443 Performing Initial Configuration for MapBox
Procedure1 Open a browser window and enter the following URL
httplthostnamegtltport_numbergtmapboxlauncher
NOTE
If you are logged on to the machine where the J2EE server is running you can also enter the
following URL
4 Post-Installation
44 Post-Installation Steps for MapBox
2850 CUSTOMER 2012-12-17
httplocalhostltport_numbergtmapboxlauncher
2 Choose Configuration
3 Edit the values according to your SAP system and choose Save
The application asks you to enter a user name and password
4 Enter the user name and password used for the SAP J2EE Engine Visual Administrator
A description of the properties and example values for the properties is given below
Result
You see the default connection settings for MapBox as shown in the graphic below A description
of the properties and example values are provided in the adjacent table
Figure 1 MapBox Default Connection Settings
Property Purpose Example
SAP System SAP System name ABC FAZ
Message Server Message server host name xyzmain
Group SAP System group PUBLIC SPACE
System Number SAP Gateway system number prefixed with sapgw
sapgw02
Unicode Used for setting the Unicode option for the CRM server Default value is no
yes
Maximum allowed wait time interval between ISP Processing and Commit call
Time-out period between an ISP_MAPBOX call and an ISP_COMMIT call
300
4 Post-Installation
44 Post-Installation Steps for MapBox
2012-12-17 CUSTOMER 2950
Property Purpose Example
Client SAP logon client 723
User Name SAP logon user John
Password SAP logon password
Language SAP logon language EN
Destination The RFC destination with which you need to register the MapBox This is the value you enter in step 3 of Configuring an RFC Destination for MapBox [page 28]
MAPBOX723
Number of server instances The number of JCO server execution instances used by the MapBox to process server requests This number indicates the number of CRM inbound queues that are running simultaneously
10
The above MapBox connection configuration is meant for one SAP client running with the CRM
Server If you want to run the MapBox with two or more SAP clients of the same CRM system
you can use Add Client on the configuration page and edit the values accordingly However make
sure that the RFC destinations that these multiple clients listen to are always unique You can
leave the default values for the other settings
If you need more control over logging and tracing you can go to Log Settings on the configuration
page edit the values and choose Save The Log Settings screen with default values is shown in the
graphic below A description of the properties and example values for the properties is provided
in the adjacent table
Figure 2 Default Values for the Log Settings Screen
4 Post-Installation
44 Post-Installation Steps for MapBox
3050 CUSTOMER 2012-12-17
Property Purpose Example
Log and dumps directory This value specifies where the MapBox logs and dumps are stored If this field is left blank the ltuser_homegt folder is used as default value
Only valid for Windows |
Ctemp
End of Windows |
Only valid for IBM i5OSUNIX |
tmp
End of IBM i5OSUNIX |
Input payload dump This value specifies whether the input document coming to MapBox for processing is written or not
No
MapBox launcher trace level This value specifies with what granularity the MapBoxLauncher execution trace is generated6 specifies that a full MapBoxLauncher execution trace is generated whereas 0 specifies that the MapBoxLauncher execution trace is not generated Recommended value for production use is 0
0
MapBox launcher trace size The maximum file size of the generated trace When the size reaches the maximum value another file is created so that the old file can be deleted (for example due to lack of space) You can use alphabetic suffixes to specify the sizes The supported values are k or K ndash kilobytes g or G ndash gigabytes m or M ndash megabytes t or T ndash terabytes
50 k
CoordServer log level This value specifies the detail of the coordination server logging We recommended you not to change the default value of 1
2
SAP Java connector trace level This value specifies the detail of the SAP Java Connector logging The recommended value for production use is 0
2
MapBox log level The log level required for the MapBox to generate an internal log file A higher trace level means that a more detailed log file is created We recommend you to use 4D for production systems where D meansldquoOn Demandrdquo
2
4 Post-Installation
44 Post-Installation Steps for MapBox
2012-12-17 CUSTOMER 3150
Property Purpose Example
MapBox message dumps This value stands for copying the incoming and outgoing messages to the local system For better performance we recommend that you do not enable the message dump option
no
MapBox statistics This value specifies whether a file that lists the performance measurements of the MapBox is created We recommend you to use the value no for production use
no
MapBox logs location This value specifies where the MapBox logs are stored Possible locations are the MapBox repository on the CRM Server or the local file system The recommended value for production use is local_fs which indicates that the MapBox logs are stored on the local file system
local_fs
MapLog format The format in which the MapBox log file must be created The internal log file is by default created in a particular format However you can change this format to display the file in the SAP log file format The two values that are available are default and sap_log
default
The MapBox uses additional properties for performance such as caching and reuse of the MapBox
atoms These values are already set to optimum values and you cannot change them
The description of the properties is shown in the table below
Property Purpose Example
General Settings
max_elements_document This is the limit for the internal cache of the MapBox to hold the count of generated XML documentsWe recommend you not to change this value
100
cache_threshold This is the maximum threshold ndash in kilobytes ndash for a document to be cached in the internal cache of the MapBox
500
4 Post-Installation
44 Post-Installation Steps for MapBox
3250 CUSTOMER 2012-12-17
Property Purpose ExampleWe recommend you not to change this value
max_elements_cache This is the limit for the internal cache of the MapBox to hold the count of MapScenariosWe recommend you not to change this value
100
parallel_instances You use this value on systems where more than one CPU is used This setting allows you to specify the number of CPU instances that MapBox must use for processing so that the remainder can be used by non-MapBox related applications By default MapBox uses all the available CPUs for processing Values can range between 0 to N-1 where N is the number of available CPUs
4
thread_priority Specifies the number of threads MapBox uses during processing We recommend you to set an optimum value for this property so that MapBox does not utilize all available resources 0 = min 1 = low 2 = normal 3 = high 4 = max
3
reuse_count Sets the count for the number of times an atom-instance must be reused before it is destroyed A value of 0 means that the atom is not destroyed and can be used continuously Recommended value is 50 This means that the atom instance is reused 50 times before it is destroyed
100
Lock Server Settings
Operation_Mode The internal mode of operation for the coordination server We recommend not to change the default value of OUTPROC_CLIENT
OUTPROC_CLIENT
Registry_Port The Remote Method Invocation (RMI) port used for connecting to the coordination serverRMI is a Java mechanism for distributed computing
1099
4 Post-Installation
44 Post-Installation Steps for MapBox
2012-12-17 CUSTOMER 3350
Property Purpose ExampleDo not change this value unless port 1099 is unavailable In this case change it to 59856
HostName The name of the host where the coordination server resides
localhost
LocalName The name of the host where the MapBoxLauncher is executed We recommend you not to change the default value of localhost
Server
PollingInterval Polling interval in seconds to ask for shutdown of the coordination server We recommend you not to change the default value of 30
60
CleanUpInterval Cleanup interval in seconds to check for invalid locks created by the MapBoxLauncher We recommend you not to change the default value of 60
180
NOTE
A file name MapLogxsl is also available with the smoke test [page 35] This file is the stylesheet
that is used to format the display of the MapBox log file During the installation and execution
of the MapBox the MapBox log file is created in the following directory
Only valid for Windows |
ltUser_homegtTempMapBoxDumpsltyour_system_namegt500 where ltuser_homegt is the
home directory of the logged-on user ltyour system namegt is the CRM server you have
connected to and 500 is the client you have connected toEnd of Windows |
Only valid for IBM i5OSUNIX |
ltUser_homegtTempMapBoxDumpsltyour_system_namegt500 where ltuser_homegt is the
home directory of the logged-on user ltyour system namegt is the CRM server you have
connected to and 500 is the client you have connected toEnd of IBM i5OSUNIX |
RECOMMENDATION
We recommend that you copy MapLogxsl from the
ltsmoke_test_installation_directorygt to the directory mentioned aboveEnd of Java | MapBox (MBX) |
Only valid for Java | MapBox (MBX) |
444 Executing the MapBox
This section tells you how to execute the MapBox The procedure that you use to execute the Map Box
depends on its current support package (SP) level
4 Post-Installation
44 Post-Installation Steps for MapBox
3450 CUSTOMER 2012-12-17
Procedure
If the SP level of the MapBox is less than SP11 proceed as follows
1 Enter the following URL in your browser
httplthostnamegtltport_numbergtmapboxlaunchermanage
2 Choose Start MapBox
3 The application prompts you for a user name and password
Enter the user name and password for the J2EE Engine Visual Administrator
NOTE
MapBox typically takes 30 to 60 seconds to initialize depending on the number of SAP clients
To see the status of messages processed by MapBox choose Status
If the SP level of the MapBox is equal to or higher than SP11 the MapBox starts automatically
1 For the first MapBox installation you need to restart the Java application server (AS Java) after all
the configuration settings have been completed This automatically starts the MapBox (Autostart)
2 To check the status go to the URL httplthostnamegtltport_numbergtmapboxlauncher
manage
NOTE
MapBox Autostart needs approximately 60 seconds to allow other services of As Java to start
To see the status of messages processed by MapBox choose Status
Result
When the MapBox is running the status is shown as Ready to processEnd of Java | MapBox (MBX) |
Only valid for Java | MapBox (MBX) |
445 Performing the Smoke Test for MapBox
The smoke test checks whether the MapBox installation is error-free
Only valid for Windows |
To execute the smoke test you have to run two batch filesEnd of Windows |
Only valid for IBM i5OSUNIX |
To execute the smoke test you have to run two shell scriptsEnd of IBM i5OSUNIX |
Prerequisites
Before you start the procedure you need to copy the smoketestjar file to a new
ltsmoke_test_installation_directorygt of your choice which has two further subdirectories
firstrun and secondrun
4 Post-Installation
44 Post-Installation Steps for MapBox
2012-12-17 CUSTOMER 3550
You can find the smoketestjar file here
Only valid for IBM i5OSUNIX |
usrsapltinstance_IDgtJCltinstance_numbergtj2eeclusterserver0binext
comsapsyncpointmapboxEnd of IBM i5OSUNIX |
Only valid for Windows |
usrsapltinstance_IDgtJCltinstance_numbergtj2eeclusterserver0binext
comsapsyncpointmapboxEnd of Windows |
NOTE
Each subdirectory of ltsmoke_test_installation_directorygt ndash that is firstrun and
secondrun ndash contains the following files
MBSMOKETEST_IN_000xml
MBSMOKETEST_IN_001xml
MBSMOKETEST_IN_002xml
MBSMOKETEST_IN_003xml
After executing the smoke test you must verify whether the contents of the files generated
by your test are similar to the contents of the above files That is the XML documents that
are created in the smoke test must match the documents located in the
ltsmoke_test_installation_directorygt mentioned above
To execute the smoke test you need to install the SAP Java Connector (SAP JCo version 2012)
You have to download SAP JCo 2012 from SAP Service Marketplace at https
servicesapcomswdc before executing the smoke test
CAUTION
Make sure that you install the SAP Java Connector correctly
The file mapcaseprop is available in the ltsmoke_test_installation_directorygt This file
contains the connection parameters to be tested You can modify the contents of this file
CAUTION
You must replace the connection parameters in this file with the connection parameters that
you entered in the MapBoxMetaxml file
Procedure
1 Run the first stage of the smoke test
1 Only valid for Windows |
Execute the file smoketest_1bat from the ltsmoke_test_installation_directorygtEnd of Windows |
Only valid for Windows |
This prompts you to enter the followingEnd of Windows |
4 Post-Installation
44 Post-Installation Steps for MapBox
3650 CUSTOMER 2012-12-17
Only valid for Windows |
1 ltDRIVEgtusrsapltinstance_IDgtJCltinstance_numbergtj2ee
2 ltsmoke_test_installation_directorygt
3 ltpath_to_sapjcojargt
End of Windows |
Only valid for IBM i5OSUNIX |
Execute the file smoketest_1sh from the ltsmoke_test_installation_directorygtEnd of IBM i5OSUNIX |
Only valid for IBM i5OSUNIX |
1 usrsapltinstance_IDgtJCltinstance_numbergtj2ee
2 ltsmoke_test_installation_directorygt
3 ltpath_to_sapjcojargt
End of IBM i5OSUNIX |
2 Enter the appropriate paths
The smoke test creates the following files
MBSMOKETEST_IN_000xml
MBSMOKETEST_IN_001xml
MBSMOKETEST_IN_002xml
MBSMOKETEST_IN_003xml
3 Only valid for Windows |
Check the contents of the generated files against the contents of the files located in
ltsmoke_test_installation_directorygtSMOKETESTfirstrunEnd of Windows |
Only valid for IBM i5OSUNIX |
Check the contents of the four files against the contents of the files located in
ltsmoke_test_installation_directorygtSMOKETESTfirstrunEnd of IBM i5OSUNIX |
2 Run the second stage of the smoke test
1 Only valid for Windows |
Execute the file smoketest_2bat which is located in the
ltsmoke_test_installation_directorygtEnd of Windows |
Only valid for IBM i5OSUNIX |
Execute the file smoketest_2sh which is located in the
ltsmoke_test_installation_directorygtEnd of IBM i5OSUNIX |
This prompts you to enter the following
Only valid for Windows |
1 ltDRIVEgtusrsapltinstance_IDgtJCltinstance_numbergtj2ee
2 ltsmoke_test_installation_directorygt
End of Windows |
4 Post-Installation
44 Post-Installation Steps for MapBox
2012-12-17 CUSTOMER 3750
Only valid for IBM i5OSUNIX |
1 usrsapltinstance_IDgtJCltinstance_numbergtj2ee
2 ltsmoke_test_installation_directorygt
End of IBM i5OSUNIX |
2 Enter the appropriate paths
The smoke test creates the following files
MBSMOKETEST_IN_000xml
MBSMOKETEST_IN_001xml
MBSMOKETEST_IN_002xml
MBSMOKETEST_IN_003xml
CAUTION
The files generated in the second stage of testing overwrite the contents of the files
generated in the first stage
3 Only valid for Windows |
Check the contents of the generated files against the contents of the files located in
ltsmoke_test_installation_directorygtSMOKETESTsecondrunEnd of Windows |
Only valid for IBM i5OSUNIX |
Check the contents of the four files against the contents of the files located in
ltsmoke_test_installation_directorygtSMOKETESTsecondrunEnd of IBM i5OSUNIX |
Result
If the smoke test has identified errors in the installation process the four XML files are not created in
either of the stages Instead an error log file is created
RECOMMENDATION
In the event of errors we recommend that you send the error log file to your administrator
End of Java | MapBox (MBX) |
Only valid for Java | MapBox (MBX) |
446 Ensuring Optimal Block Size settings
The block size of an object determines the number of messages that are processed at the same time by
the MapBox as a set You need to make sure that the block sizes are optimal to reduce load on the
MapBox XML processor
Procedure
1 Use transaction R3AC3 to set the block size of object GWA_COUNTRY to 10 and save the setting
2 Use transaction R3AC1 to set the block size of object BUPA_MAIN to 10 and save the settingEnd of Java | MapBox (MBX) |
4 Post-Installation
44 Post-Installation Steps for MapBox
3850 CUSTOMER 2012-12-17
Only valid for ABAP+JavaJava | MapBox (MBX) |
447 Adapting Memory Settings for the J2EE Engine
You need to adapt the memory settings for the J2EE Engine because MapBox relies heavily on memory-
intensive XML-processing such as schema-validation parsing transformation and so on
RECOMMENDATION
For rapid message processing by MapBox we recommend you to use 1024 MB of heap memory
for MapBox alone With a heap size of 512 MB MapBox can still process messages but with a slightly
higher processing time for each message
The MapBox memory requirements are directly proportional to the size of the input documents
that MapBox has to process The average size of such documents is in the range of 150 to 200 KB
For messages of this size it is sufficient to have a heap memory of 512 MB If the input documents
are in the range of 1 to 2 MB we recommend that you give MapBox a heap memory of 1024 MB
Procedure
To set the recommended memory settings for the MapBox you start the config tool of the J2EE Engine
Only valid for Windows |
Start the config tool by executing ltDrivegtusrsapltSAPSIDgtltinstance_numbergtj2ee
configtoolbatEnd of Windows |
Only valid for IBM i5OSUNIX |
Start the config tool by executing usrsapltSAPSIDgtltinstance_numbergtj2eeconfigtoolshEnd of IBM i5OSUNIX |
End of ABAP+JavaJava | MapBox (MBX) |
End of ABAP+JavaJava | MapBox (MBX) |
Only valid for ABAPABAP+Java |
45 Activating the CRM Web Client
The CRM Web Client is part of the ICF Services that is automatically installed as part of SAP NetWeaver
Application Server
Procedure
To activate the CRM Web Client after the installation see the SAP Library at
httphelpsapcomnw70 SAP NetWeaver 70 Library (including Enhancement Package 2) English SAP
NetWeaver Library SAP NetWeaver by Key Capability Application Platform by Key Capability Platform-Wide
Services Connectivity Components of SAP Communication Technology Communication Between ABAP and Non-
4 Post-Installation
45 Activating the CRM Web Client
2012-12-17 CUSTOMER 3950
ABAP Technology Internet Communication Framework Development Server-Side Development Creating and
Configuring an ICF Service Activating and Deactivating the ICF ServicesEnd of ABAPABAP+Java |
Only valid for ABAP |
46 Installing and Configuring CRM Application Server Loyalty Add-On Component
This section provides information about how to install and configure CRM Application Server Loyalty
as an add-on component to CRM Application Server ABAP
Prerequisites
You have already deployed the following software components
SAP NetWeaver Application Server ABAP (AS ABAP)
CRM Application Server ABAP
Procedure
Installing CRM Application Server Loyalty
Install CRM Application Server Loyalty on the same host where CRM Application Server ABAP is
deployed as described in SAP Note 1162144
Configuring CRM Application Server Loyalty
After you have installed CRM Application Server Loyalty you must complete the following
configuration steps
1 Call transaction nspro
2 Choose SAP Customising Implementation Guide Customer Relationship Management Marketing Loyalty
Management in BBPCRM Basic Settings Define Basic Settings
3 Enter value 1 for the INSTALL_TYPE parameter
NOTE
You do not have to enter destination name for the LOYALTY_SYSTEM parameterEnd of ABAP |
47 Starting XCM
This section describes how to start XCM
Procedure
1 You access the XCM tool at
httplthostgtltportgtltweb app namegtadminxcminitdo
4 Post-Installation
46 Installing and Configuring CRM Application Server Loyalty Add-On Component
4050 CUSTOMER 2012-12-17
NOTE
You can also start XCM in accessibility mode (according to Section 508 Rehabilitation Act)
at the following URL
httplthostgtltportgtltweb app namegtadminxcminitdosap-accessibility=x
2 Provide a user and password If you are logging on for the first time use the Administrator user
and the password you defined during the installation of the SAP system
RECOMMENDATION
We recommend you create new users with lesser rights than the Administrator for the
administration of Web applications
For more information see the SAP CRM Security Guide section E-Commerce
3 When the application opens a closed control tree is displayed on the left of the screen A screen
containing help information is displayed to the right
You can use edit (change settings) or display (see settings) mode in XCM You use the button in
the top right hand corner of the screen to change between modes When you switch to edit mode
a DB lock is set meaning that only this user can edit the settings at one time The lock is released
once the user switches back to display mode or after session timeout (default timeout is 30mins)
48 Accessing Configuration Documentation in SAP Solution Manager
To access configuration documentation in SAP Solution Manager you have to connect your newly
installed SAP system to SAP Solution Manager
NOTE
For SAP NetWeaver you can also find configuration documentation in the Technology Consultants
Guide at
httphelpsapcomnw70 SAP NetWeaver 70 Library (including Enhancement Package 2) English
SAP NetWeaver Library Technology Consultants Guide
Procedure
Create a configuration project with the related configuration guide as described in the following
documentation
httphelpsapcom SAP Solutions SAP Solution Manager Documentation for SAP Solution Manager
ltcurrent releasegt SAP Solution Manager Implementing and Upgrading SAP Solutions Projects
Configuration
More Information
httpservicesapcomsolutionmanager Media Library How-To Documents How to Create a
Configuration Guide using SAP Solution Manager
4 Post-Installation
48 Accessing Configuration Documentation in SAP Solution Manager
2012-12-17 CUSTOMER 4150
This page is left blank for documents that are printed on both sides
5 Additional Information
Only valid for ABAP+JavaJava |
51 Installing the Business Packages for SAP CRM Using JSPM (Optional)
You can also install the Business Packages for SAP CRM using the Java Support Package Manager (JSPM)
Prerequisites
Only valid for IBM i5OSUNIX |
You have checked hardware and software requirements [external document]End of IBM i5OSUNIX |
Only valid for Windows |
You have checked hardware and software requirements [external document]End of Windows |
You have ckecked the Prerequisites for the Business Packages for SAP CRM [page 7]
Procedure
1 Download version 701 of the files sapcom_BPCRMAPP sapcom_BPCRMFND sapcom_CRMAPP and
sapcom_CRMFND as follows
1 Go to httpservicesapcomswdc Download Support Packages and Patches Search for
Support Packages and Patches
2 Enter the following search terms
BP CRM Application Coding 701
BP CRM Application Content 701
BP CRM Foundation Coding 701
BP CRM Foundation Content 701
2 Add the deployment variable comsapcmshare as described in SAP Note 965948
For more information about how to use the Software Deployment Manager (SDM) see the
documentation Software Deployment Manager which is available at
httphelpsapcomnw70 SAP NetWeaver 70 Library (including Enhancement Package 2) English
SAP NetWeaver Library SAP NetWeaver Developerrsquos Guide Fundamentals Using Java Core Development
Tasks Deployment Putting It All Together Software Deployment Manager
3 Install the Business Packages for SAP CRM with JSPM as described in Installing Additional Usage Types
or Software Units in an Existing SAP System [external document]
5 Additional Information
51 Installing the Business Packages for SAP CRM Using JSPM (Optional)
2012-12-17 CUSTOMER 4350
4 Perform the required Post-Installation Steps for the Business Packages for SAP CRM [page 20]End of ABAP+JavaJava |
Only valid for ABAP+JavaJava |
52 Troubleshooting for the Business Package for SAP CRMOnly valid for ABAP+JavaJava |
The following sections describe the steps that you have to perform if you have problems after the
installation
Activating BI Templates Manually [page 44]
Dragging the Central Search onto the Portal Desktop [page 45]End of ABAP+JavaJava |
Only valid for ABAP+JavaJava |
521 Activating BI Templates Manually
If you have installed the Business Package you might see error messages when loading the BI templates
This procedure describes how you can activate the templates afterwards
Procedure
1 Note the technical name of all templates in your portal interface that are not working
2 Log on to your BI system
3 On the SAP Easy Access screen choose Modeling Administrator Workbench Modeling (transaction
RSA1 or RSOR)
4 Choose Business Content Object Types Web Template Name Select Objects
A new window containing a list of BW objects and templates opens
5 Find your missing templates for example 0TPL_0CRM_Cnn_Qnnn_Vnnn_M and select the entries
6 Choose Transfer Selection
The template now appears on the right-hand side of the screen The Transfer checkbox has been
selected and cannot be changed Nevertheless we recommend that you repeat the following
procedure so that your templates can be displayed
7 Select the template
8 Choose Transfer Transfer
Result
You have successfully activated your missing templates and no error messages appear in the portalEnd of ABAP+JavaJava |
5 Additional Information
52 Troubleshooting for the Business Package for SAP CRM
4450 CUSTOMER 2012-12-17
Only valid for ABAP+JavaJava |
522 Dragging the Central Search onto the Portal Desktop
Procedure
The Business Package for SAP CRM 70 including SAP enhancement package 1 contains an iView for
the central search in CRM This iView is in the package on the page Today in the workset Home of the
CRM User You can drag this iView onto the portal desktop under the tool areaEnd of ABAP+JavaJava |
End of ABAP+JavaJava |
5 Additional Information
52 Troubleshooting for the Business Package for SAP CRM
2012-12-17 CUSTOMER 4550
Typographic Conventions
Example Description
ltExamplegt Angle brackets indicate that you replace these words or characters with appropriate entries to make entries in the system for example ldquoEnter your ltUser Namegtrdquo
ExampleExample
Arrows separating the parts of a navigation path for example menu options
Example Emphasized words or expressions
Example Words or characters that you enter in the system exactly as they appear in the documentation
httpwwwsapcom Textual cross-references to an internet address
example Quicklinks added to the internet address of a homepage to enable quick access to specific content on the Web
123456 Hyperlink to an SAP Note for example SAP Note 123456
Example Words or characters quoted from the screen These include field labels screen titles pushbutton labels menu names and menu options
Cross-references to other documentation or published works
Example Output on the screen following a user action for example messages Source code or syntax quoted directly from a program File and directory names and their paths names of variables and parameters and
names of installation upgrade and database tools
EXAMPLE Technical names of system objects These include report names program names transaction codes database table names and key concepts of a programming language when they are surrounded by body text for example SELECT and INCLUDE
EXAMPLE Keys on the keyboard
4650 CUSTOMER 2012-12-17
SAP AGDietmar-Hopp-Allee 16
69190 WalldorfGermany
T +4918 0534 34 34F +4918 0534 34 20
wwwsapcom
copy Copyright 2012 SAP AG All rights reserved
No part of this publication may be reproduced or transmitted in any form or for any purpose without the express permission of SAP AG The information contained herein may be changed without prior noticeSome software products marketed by SAP AG and its distributors contain proprietary software components of other software vendors
Microsoft Windows Excel Outlook PowerPoint Silverlight and Visual Studio are registered trademarks of Microsoft CorporationIBM DB2 DB2 Universal Database System i System i5 System p System p5 System x System z System z10 z10 zVM zOS OS390 zEnterprise PowerVM Power Architecture Power Systems POWER7 POWER6+ POWER6 POWER PowerHA pureScale PowerPC BladeCenter System Storage Storwize XIV GPFS HACMP RETAIN DB2 Connect RACF Redbooks OS2 AIX Intelligent Miner WebSphere Tivoli Informix and Smarter Planet are trademarks or registered trademarks of IBM CorporationLinux is the registered trademark of Linus Torvalds in the United States and other countriesAdobe the Adobe logo Acrobat PostScript and Reader are trademarks or registered trademarks of Adobe Systems Incorporated in the United States and other countriesOracle and Java are registered trademarks of Oracle and its affiliatesUNIX XOpen OSF1 and Motif are registered trademarks of the Open GroupCitrix ICA Program Neighborhood MetaFrame WinFrame VideoFrame and MultiWin are trademarks or registered trademarks of Citrix Systems IncHTML XML XHTML and W3C are trademarks or registered trademarks of W3Creg World Wide Web Consortium Massachusetts Institute of TechnologyApple App Store iBooks iPad iPhone iPhoto iPod iTunes Multi-Touch Objective-C Retina Safari Siri and Xcode are trademarks or registered trademarks of Apple IncIOS is a registered trademark of Cisco Systems IncRIM BlackBerry BBM BlackBerry Curve BlackBerry Bold BlackBerry Pearl BlackBerry Torch BlackBerry Storm BlackBerry Storm2 BlackBerry PlayBook and BlackBerry App World are trademarks or registered trademarks of Research in Motion LimitedGoogle App Engine Google Apps Google Checkout Google Data API Google Maps Google Mobile Ads Google Mobile Updater Google Mobile Google Store Google Sync Google Updater Google Voice Google Mail Gmail YouTube Dalvik and Android are trademarks or registered trademarks of Google IncINTERMEC is a registered trademark of Intermec Technologies CorporationWi-Fi is a registered trademark of Wi-Fi AllianceBluetooth is a registered trademark of Bluetooth SIG IncMotorola is a registered trademark of Motorola Trademark Holdings LLCComputop is a registered trademark of Computop Wirtschaftsinformatik GmbHSAP R3 SAP NetWeaver Duet PartnerEdge ByDesign SAP BusinessObjects Explorer StreamWork SAP HANA and other SAP products and services mentioned herein as well as their respective logos are trademarks or registered trademarks of SAP AG in Germany and other countriesBusiness Objects and the Business Objects logo BusinessObjects Crystal Reports Crystal Decisions Web Intelligence Xcelsius and other Business Objects products and services mentioned herein as well as their respective logos are trademarks or registered trademarks of Business Objects Software Ltd Business Objects is an SAP companySybase and Adaptive Server iAnywhere Sybase 365 SQL Anywhere and other Sybase products and services mentioned herein as well as their respective logos are trademarks or registered trademarks of Sybase Inc Sybase is an SAP company
2012-12-17 CUSTOMER 4750
Crossgate mgic EDDY B2B 360deg and B2B 360deg Services are registered trademarks of Crossgate AG in Germany and other countries Crossgate is an SAP companyAll other product and service names mentioned are the trademarks of their respective companies Data contained in this document serves informational purposes only National product specifications may varyThese materials are subject to change without notice These materials are provided by SAP AG and its affiliated companies (ldquoSAP Grouprdquo) for informational purposes only without representation or warranty of any kind and SAP Group shall not be liable for errors or omissions with respect to the materials The only warranties for SAP Group products and services are those that are set forth in the express warranty statements accompanying such products and services if any Nothing herein should be construed as constituting an additional warranty
DisclaimerSome components of this product are based on Javatrade Any code change in these components may cause unpredictable and severe malfunctions and is therefore expressly prohibited as is any decompilation of these componentsAny Javatrade Source Code delivered with this product is only to be used by SAPrsquos Support Services and may not be modified or altered in any way
Documentation in the SAP Service MarketplaceYou can find this document at the following address httpservicesapcominstguides
4850 CUSTOMER 2012-12-17
SAP AGDietmar-Hopp-Allee 1669190 WalldorfGermanyT +4918 0534 34 34F +4918 0534 34 20wwwsapcom
copy Copyright 2012 SAP AG All rights reservedNo part of this publication may be reproduced or transmitted in any form or for any purpose without the express permission of SAP AG The information contained herein may be changed without prior notice
- SAP Enhancement Package 1 for SAP CRM 70
-
- Table of Contents
- 1 Introduction
- 2 Planning and Preparation
-
- 21 Prerequisites for the Business Packages for SAP CRM
-
- 3 Installation
- 4 Post-Installation
-
- 41 Checking the Availability of Back-End Systems for SAP CRM Java Components
-
- 411 Creating a Back-End User
- 412 Checking the Connection to the ABAP System
- 413 Configuring and Checking the TREX Service
- 414 Checking the Selling via eBay Processes
-
- 42 Post-Installation Steps for Workforce Deployment Application and Calculation Services
-
- 421 Implementing WFMCORE 200 Using Transaction SAINT
- 422 Configuring the Extended Configuration Management (XCM) for WFD Application and Calculation Services
- 423 Checking Workforce Deployment Calculation Services
- 424 Checking the Installation of WFD Application Services and WFD Calculation Services
-
- 43 Post-Installation Steps for the Business Packages for SAP CRM
-
- 431 Creating Roles for the SAP CRM Business Packages
- 432 Installation of the Info Center for the SAP CRM Business Package
-
- 4321 Importing the SAP CRM Info Center Configurations and Directory Structure
- 4322 Activating Manual Ordering of Folders for the sapcrm Repository
- 4323 Creating Indexes and Taxonomies for the sapcrmnews Repository
- 4324 Creating the Index for the sapcrm Repository
- 4325 Configuring the Personal Search
- 4326 Increasing the Number of JCo Connections
-
- 44 Post-Installation Steps for MapBox
-
- 441 Assigning User Groups for MapBox Users
- 442 Configuring an RFC Destination for MapBox
- 443 Performing Initial Configuration for MapBox
- 444 Executing the MapBox
- 445 Performing the Smoke Test for MapBox
- 446 Ensuring Optimal Block Size settings
- 447 Adapting Memory Settings for the J2EE Engine
-
- 45 Activating the CRM Web Client
- 46 Installing and Configuring CRM Application Server Loyalty Add-On Component
- 47 Starting XCM
- 48 Accessing Configuration Documentation in SAP Solution Manager
-
- 5 Additional Information
-
- 51 Installing the Business Packages for SAP CRM Using JSPM (Optional)
- 52 Troubleshooting for the Business Package for SAP CRM
-
- 521 Activating BI Templates Manually
- 522 Dragging the Central Search onto the Portal Desktop
-
- Copyright and trademarks
-
Only valid for ABAP+JavaJava |
424 Checking the Installation of WFD Application Services and WFD Calculation Services
This section tells you how to check that you have correctly installed the Java components for Workforce
Deployment Application Services (WFD AS) and WFD Calculation Services (WFD CS) This section
does not tell you how to check the connection between the WFD AS and the WFD CS
The procedure below shows you how to create a simple calculation request and verify that the
Calculation Server has received the request This helps you check that you have correctly installed all
WFD AS or CS components and that they are communicating with each other
Prerequisites
You have completed all the installation steps described in this documentation
You have connected WFD AS or CS components with the Enterprise Portal
You have installed the required business packages according to Checking Workforce Deployment
Calculation Services [page 18]
Procedure
1 To check that WFD AS is working and listening for HTTP requests enter the following URL
httpltJ2EE_hostgtltJ2EE_portgtwfdlogondo
The following error confirms that the application is working
Your session has expired Please renew your session by clicking a section link in
the Portal menu
2 Access the WFD CS from the Enterprise Portal through the Portal Admin role and check that the
WFD CS page comes up with no errors
If the page does not come up possible errors are
Error Message Cause
Missing value for XCM configuration
parameter cshttpport
The XCM parameter cshttpport was not filled
The request could not be completed
due to the following
errorsltfollowed by details of the
particular error usually related to
the JCO connectiongt
One of the XCM parameters csjcoxxxxx might be incorrect
EXAMPLE
The user or password are incorrect
3 Test the submission of a calculation request to see if the WFD CS can process the request
You can simulate a calculation request submission by executing the RFC
TEST_WFDCS_CALCREQ_SUBMIT from the CRM back-end system defined in the csjcoxxxxx XCM
parameters of WFD CS
4 Post-Installation
42 Post-Installation Steps for Workforce Deployment Application and Calculation Services
2012-12-17 CUSTOMER 1950
EXAMPLE
For example when you installed WFD CS you configured the csjcoxxxxx XCM
parameters to point to system ID Q5C client 505 You now need to log in to Q5C client 505
and execute TEST_WFDCS_CALCREQ_SUBMIT with transaction SE37 using the default import
parameters
4 Check the Requests tab of the WFD CS page to check the status of entries with the location name
SMOKETEST has the status FAILED
Status FAILED indicates a successful smoke test It means that the Request Manager successfully
sent the request to the Solver which successfully processed it
Status QUEUED probably means that the XCM parameter cshttpport was incorrectEnd of ABAP+JavaJava |
End of Java |
Only valid for ABAP+JavaJava |
43 Post-Installation Steps for the Business Packages for SAP CRM
The following sections provide information about the steps that you have to perform after importing
the Business Package for SAP CRM
Only valid for ABAP+JavaJava |
431 Creating Roles for the SAP CRM Business Packages
Procedure
If you create your own roles from the SAP CRM Business Packages also add the every user role
(eu_core_role) to your role The Every User Role contains the personalization functionality for the SAP
NetWeaver Portal
For more information about the Every User Role see the SAP Library at
httphelpsapcomnw70 SAP NetWeaver 70 Library (including Enhancement Package 2) English SAP
NetWeaver Library SAP NetWeaver by Key Capability People Integration by Key Capability Portal Portal
Administration Guide Super Administration Pre-configured Roles Every User Roles End of ABAP+JavaJava |
Only valid for ABAP+JavaJava |
432 Installation of the Info Center for the SAP CRM Business Package
This section describes how to install the Info Center
4 Post-Installation
43 Post-Installation Steps for the Business Packages for SAP CRM
2050 CUSTOMER 2012-12-17
Prerequisites
You have installed the Business Package for SAP CRM [page 43]
You have administrator rights
Process Flow
1 You import the SAP CRM info center configurations and directory structure [page 21]
2 You activate manual ordering of folders for the sapcrm Repository [page 23]
3 You create indexes and taxonomies for the sapcrmnews Repository [page 23]
4 You create the index for the sapcrm Repository [page 25]
5 You configure the personal search [page 25]
6 If required you increase the number of JCo connections [page 26]
Only valid for ABAP+JavaJava |
4321 Importing the SAP CRM Info Center Configurations and Directory Structure
The directory structure of the info center has been made available in one content package and you can
import it using the Information and Content Exchange (ICE) Repository
For more information about ICE see SAP Library at
httphelpsapcomnw70 SAP NetWeaver 70 Library (including Enhancement Package 2) English SAP
NetWeaver Library SAP NetWeaver by Key Capability Information Integration by Key Capability Knowledge
Management Content Managers Guide Additional Tasks for Content Managers Content Exchange Distributing
Content (Offline)
Procedure
Importing the Directory Structure
1 Log on to the Portal as content manager
2 Choose Content Management Content Exchange Upload
3 Only valid for Windows |
Select file fullupdate_infocenterzip from directory ltservlet_enginegtirjrootWEB-INF
portalportalappsepcrmchmkmexpice and confirm the uploadEnd of Windows |
Only valid for IBM i5OSUNIX |
Select file fullupdate_infocenterzip from directory ltservlet_enginegtirjrootWEB-INF
portalportalappsepcrmchmkmexpice and confirm the uploadEnd of IBM i5OSUNIX |
The zip file is now imported using the ICE protocol
If you cannot see the ICE repository this might be due to one of the following reasons
The ICE repository was hidden in the virtual root repository
4 Post-Installation
43 Post-Installation Steps for the Business Packages for SAP CRM
2012-12-17 CUSTOMER 2150
In this case do the following
1 Log on to the portal as system administrator
2 In the SAP NetWeaver Enterprise Portal choose System Administration System Configuration
Knowledge Management Content Management Repository Managers Virtual Root Repository
3 Check whether the ICE Repository has been entered under Repositories to exclude
4 Remove it from the list
5 Save your changes
6 Restart the Servlet Engine
The repository has been ldquoswitchedrdquo to invisible
1 Log on to the portal as system administrator
2 In the SAP NetWeaver Enterprise Portal choose System Administration System Configuration
Knowledge Management Content Management Repository Managers Content Exchange
Repository
3 If the property hide in root folder is active deselect it
4 Restart the Servlet Engine
NOTE
After the import check whether the directory structure was created by choosing Content
Administration KM Content in the SAP NetWeaver Enterprise Portal The list of folders should
contain the folders sapcrm and sapcrmnews
Checking Whether the Directory Structure Has Been Imported Successfully
You can only import the structure if there is a repository with the same name For example if a zip file
is exported from the repository sapcrm there must also be a repository with the name sapcrm in the
target system
The sapcrm and sapcrmnews repositories as well as the CRM-Namespace filter are created during the
import of the SAP CRM KM extension configuration archive To check whether this configuration
archive has been imported successfully proceed as follows
1 Log on to the portal as system administrator
2 In the SAP NetWeaver Enterprise Portal choose System Administration Monitoring Knowledge
Management Deployment Monitor Config Archives
3 Check whether the archive comsappctcrmappkmextprjconfig is installed in the system
If the archive comsappctcrmappkmextprjconfig is not installed in the system import it
manually as follows
1 Log on to the portal as system administrator
2 In the SAP NetWeaver Enterprise Portal choose System Administration Monitoring Knowledge
Management Deployment Monitor Config Archives Actions Import
4 Post-Installation
43 Post-Installation Steps for the Business Packages for SAP CRM
2250 CUSTOMER 2012-12-17
3 Only valid for Windows |
Select the archive comsappctcrmappkmextprjconfigconfigarchive from directory
ltSAPSIDgtJCltinstance_numbergtj2eeclusterappssapcomep~crm~chm
servlet_jspepcrmchmkmexprootWEB-INFconfig and confirm the importEnd of Windows |
4 Only valid for IBM i5OSUNIX |
Select the archive comsappctcrmappkmextprjconfigconfigarchive from
directory ltSAPSIDgtJCltinstance_numbergtj2eeclusterappssapcomep~crm~chm
servlet_jspepcrmchmkmexprootWEB-INFconfig and confirm the importEnd of IBM i5OSUNIX |
After the import the directory structure has no restrictions on rights Make sure that you modify the
rights of the various folders to meet your companyrsquos requirementsEnd of ABAP+JavaJava |
Only valid for ABAP+JavaJava |
4322 Activating Manual Ordering of Folders for the sapcrm Repository
The sapcrm Repository folders are ordered in a specific sequence
Procedure
To display this sequence activate manual ordering for each directory
For more information see the SAP Library at
httphelpsapcomnw70 SAP NetWeaver 70 Library (including Enhancement Package 2) English SAP
NetWeaver Library SAP NetWeaver by Key Capability Information Integration by Key Capability Knowledge
Management Content Managers Guide Providing Shared Access to Departmental Documents Sorting Documents in a
Folder ManuallyEnd of ABAP+JavaJava |
Only valid for ABAP+JavaJava |
4323 Creating Indexes and Taxonomies for the sapcrmnews Repository
To make news available for indexing and searching create two new indexes
Prerequisites
You have administrator rights for Knowledge Management on the server
For more information see the SAP Library at
httphelpsapcomnw70 SAP NetWeaver 70 Library (including Enhancement Package 2) English SAP
NetWeaver Library SAP NetWeaver by Key Capability Information Integration by Key Capability Knowledge
Management
4 Post-Installation
43 Post-Installation Steps for the Business Packages for SAP CRM
2012-12-17 CUSTOMER 2350
Procedure
Creating Indexes and Taxonomies for the sapcrmnews Repository
The Business Package contains an iView ndash epbp_crmchm-pmiviewsnews_flash ndash that combines all
news with the istopnews=yes attribute in a virtual folder To guarantee the function of this iView
create two indexes in KM
1 In the SAP NetWeaver Enterprise Portal choose System Administration System Configuration
Knowledge Management Index Administration
2 Create an index of the Search and Classification type with a suitably configured taxonomy
3 Choose sapcrmpartnernews as the index ID Otherwise the path to the folder specified in the iView
is incorrect
If you choose another index ID you must also modify accordingly the folder properties in the
iView for one of the following
Folders path to content and path to root
Folders Path to Initially Displayed Folder and Path to Root Folder for Navigation
If you want to link two portal servers with a TREX server you must modify the index name and
iView properties on one of the portal servers
4 Assign folder sapcrmpartnerPartnernews as a data source
This moves all news with the (virtual) Top flag from this folder to the Newsflash iView
5 Create a ldquoquery-basedrdquo taxonomy with the name PartnerNewsFlash choosing Automatic
Classification before you save the taxonomy
NOTE
The outbound delivery includes only the iView above for virtually combining news If you
also want to use this functionality for other news channels (for example internal news) use
your own index and taxonomy for each channel
For more information see the SAP Library at
httphelpsapcomnw70 SAP NetWeaver 70 Library (including Enhancement Package 2) English SAP
NetWeaver Library SAP NetWeaver by Key Capability Information Integration by Key Capability Knowledge
Management Administration Guide System Administration System Configuration lsquoIndex Administrationrsquo iView
Creating Queries for the Taxonomies of sapcrmnews Repositories
1 Log on to the portal as content manager
2 Choose Content Management Classification Taxonomy Query Builder
3 Add a search query to check the istopnews property for the value Yes
4 Enter PartnerNewsFlash as the name for the taxonomy
Here too a property of the iView links to a taxonomy with this name So if you want to choose
another name you must modify the path to the content folder property of the iView
For more information see the SAP Library at
4 Post-Installation
43 Post-Installation Steps for the Business Packages for SAP CRM
2450 CUSTOMER 2012-12-17
httphelpsapcomnw70 SAP NetWeaver 70 Library (including Enhancement Package 2) English SAP
NetWeaver Library SAP NetWeaver by Key Capability Information Integration by Key Capability Knowledge
Management Administration Guide System Administration System Configuration Taxonomies and ClassificationEnd of ABAP+JavaJava |
Only valid for ABAP+JavaJava |
4324 Creating the Index for the sapcrm Repository
To make Info center documents available for indexing and searching create a new index with sapcrm
as a data source
Prerequisites
You have administrator rights for Knowledge Management on the server
Procedure
Choose a name of your own Search as a service and standard as a crawler parameter
For more information see the SAP Library at
httphelpsapcomnw70 SAP NetWeaver 70 Library (including Enhancement Package 2) English SAP
NetWeaver Library SAP NetWeaver by Key Capability Information Integration by Key Capability Knowledge
ManagementEnd of ABAP+JavaJava |
Only valid for ABAP+JavaJava |
4325 Configuring the Personal Search
Prerequisites
You have administrator rights for Knowledge Management on the server
Procedure
1 Create an index for the userhome repository
To make personal folder documents available for the search create a new index with root
userhome as the data source
2 Create a search option set for personal search
To assign the search index and a start folder to the search for personal documents create a Search
Option Set with the name CRMPersonalFolderSearch As an index enter the index for the
userhome repository created above and ~alias~userhomeuseridPersonal Documents as the
root folder for the search
For more information see the SAPLibrary at
4 Post-Installation
43 Post-Installation Steps for the Business Packages for SAP CRM
2012-12-17 CUSTOMER 2550
httphelpsapcomnw70 SAP NetWeaver 70 Library (including Enhancement Package 2) English SAP
NetWeaver Library SAP NetWeaver by Key Capability Information Integration by Key Capability Knowledge
Management End of ABAP+JavaJava |
Only valid for ABAP+JavaJava |
4326 Increasing the Number of JCo Connections
This section tells you how to increase the number of concurrent Java Connector (JCo) connections
By default the maximum number of concurrent JCo connections is 100 The value depends on the
number and behavior of the users in the portal For more information see SAP Note 316877
You can specify this value when you plan the installation of your SAP NetWeaver Enterprise Portal
Make sure that you first analyze the number and behavior of the users
Procedure
To increase the maximum number of concurrent JCo connections increase the value of the
environment variable CPIC_MAX_CONV
EXAMPLE
Initial default value CPIC_MAX_CONV=100
Increased value CPIC_MAX_CONV=1000
End of ABAP+JavaJava |
End of ABAP+JavaJava |
End of ABAP+JavaJava |
Only valid for ABAP+JavaJava | MapBox (MBX) |
44 Post-Installation Steps for MapBoxOnly valid for Java | MapBox (MBX) |
You have to perform the following post-installation steps for MapBox
You assign user groups for MapBox users [page 27]
You configure an RFC destination for TCPIP connections [page 28]
You perform initial configuration for MapBox [page 28]
You execute the Map Box [page 34]
You perform the smoke test [page 35]
If required you perform additional settings for MapBox
Block size settings [page 38]
Memory settings for the J2EE Engine [page 39]End of Java | MapBox (MBX) |
4 Post-Installation
44 Post-Installation Steps for MapBox
2650 CUSTOMER 2012-12-17
Only valid for Java | MapBox (MBX) |
441 Assigning User Groups for MapBox Users
To access the MapBox URL you need to provide the correct security rights for individual user groups
Procedure
1 Log on to the Visual Administrator
1 On your central instance host change to the following directory
Only valid for IBM i5OSUNIX |
usrsapltSAPSIDgtltinstance_numbergtj2eeadmin
End of IBM i5OSUNIX |
Only valid for Windows |
usrsapltSAPSIDgtltinstance_numbergtj2eeadmin
End of Windows |
2 Only valid for IBM i5OSUNIX |
Run goshEnd of IBM i5OSUNIX |
3 Only valid for Windows |
Double-click gobatEnd of Windows |
For more information about the Visual Administrator see the SAP Library at
httpshelpsapcomnw70 SAP NetWeaver Library SAP NetWeaver by Key Capability
Application Platform by Key Capability Java Technology Administration Manual J2EE Engine J2EE Engine
Administration Tools
2 Choose the server node from the left-hand window
3 Choose Services Security Provider
A list of deployed components is displayed
4 Choose MapBoxLauncher from this list (sapcom
comsapsyncpointmapboxlaunchermapboxlauncher)
A list of tabs appears on the right
5 Choose Security Roles from the list
A list of security roles appears
6 If no display and modify roles are displayed add these roles as follows
1 Choose Switch to Edit Mode from the top task bar to switch to edit mode
2 Add display and modify roles by choosing Add
7 For both the display and modify roles perform the following
1 Choose Switch to Edit Mode from the top task bar to switch to edit mode
2 Choose the Groups tab from the list on the far right
3 Choose Search
4 Post-Installation
44 Post-Installation Steps for MapBox
2012-12-17 CUSTOMER 2750
A list of user groups appears
4 Select the user groups that you want to enable for the two roles
Add to the left of the user group display is now highlighted
5 Choose Add to add the user group for the selected roleEnd of Java | MapBox (MBX) |
Only valid for Java | MapBox (MBX) |
442 Configuring an RFC Destination for MapBox
After the installation you have to create an RFC destination for MapBox
Procedure1 Log on to the CRM server
2 Enter transaction SM59
The Display and Maintain RFC Destinations screen appears
3 Choose Technical Settings Activation Type and create a new destination with the type TCPIP
4 Choose Registered Server Program and enter a unique value for program ID
For example you might enter MAPBOX723 for SAP client 723
5 Enter the details of the gateway host and gateway service in Gateway Options
1 Gateway host
Enter the name of your message server You can also enter the IP address of your message
server
2 Gateway service
Enter your SAP CRM system number prefixed with the string sapgw
For example if your system number is 02 enter sapgw02
6 If the CRM system is a Unicode-enabled system choose Unicode in Special Options
7 Save the destination
8 Choose MapBox Configuration Page Connecting settings from the URL and enter the same RFC
destination name in the relevant fieldEnd of Java | MapBox (MBX) |
Only valid for Java | MapBox (MBX) |
443 Performing Initial Configuration for MapBox
Procedure1 Open a browser window and enter the following URL
httplthostnamegtltport_numbergtmapboxlauncher
NOTE
If you are logged on to the machine where the J2EE server is running you can also enter the
following URL
4 Post-Installation
44 Post-Installation Steps for MapBox
2850 CUSTOMER 2012-12-17
httplocalhostltport_numbergtmapboxlauncher
2 Choose Configuration
3 Edit the values according to your SAP system and choose Save
The application asks you to enter a user name and password
4 Enter the user name and password used for the SAP J2EE Engine Visual Administrator
A description of the properties and example values for the properties is given below
Result
You see the default connection settings for MapBox as shown in the graphic below A description
of the properties and example values are provided in the adjacent table
Figure 1 MapBox Default Connection Settings
Property Purpose Example
SAP System SAP System name ABC FAZ
Message Server Message server host name xyzmain
Group SAP System group PUBLIC SPACE
System Number SAP Gateway system number prefixed with sapgw
sapgw02
Unicode Used for setting the Unicode option for the CRM server Default value is no
yes
Maximum allowed wait time interval between ISP Processing and Commit call
Time-out period between an ISP_MAPBOX call and an ISP_COMMIT call
300
4 Post-Installation
44 Post-Installation Steps for MapBox
2012-12-17 CUSTOMER 2950
Property Purpose Example
Client SAP logon client 723
User Name SAP logon user John
Password SAP logon password
Language SAP logon language EN
Destination The RFC destination with which you need to register the MapBox This is the value you enter in step 3 of Configuring an RFC Destination for MapBox [page 28]
MAPBOX723
Number of server instances The number of JCO server execution instances used by the MapBox to process server requests This number indicates the number of CRM inbound queues that are running simultaneously
10
The above MapBox connection configuration is meant for one SAP client running with the CRM
Server If you want to run the MapBox with two or more SAP clients of the same CRM system
you can use Add Client on the configuration page and edit the values accordingly However make
sure that the RFC destinations that these multiple clients listen to are always unique You can
leave the default values for the other settings
If you need more control over logging and tracing you can go to Log Settings on the configuration
page edit the values and choose Save The Log Settings screen with default values is shown in the
graphic below A description of the properties and example values for the properties is provided
in the adjacent table
Figure 2 Default Values for the Log Settings Screen
4 Post-Installation
44 Post-Installation Steps for MapBox
3050 CUSTOMER 2012-12-17
Property Purpose Example
Log and dumps directory This value specifies where the MapBox logs and dumps are stored If this field is left blank the ltuser_homegt folder is used as default value
Only valid for Windows |
Ctemp
End of Windows |
Only valid for IBM i5OSUNIX |
tmp
End of IBM i5OSUNIX |
Input payload dump This value specifies whether the input document coming to MapBox for processing is written or not
No
MapBox launcher trace level This value specifies with what granularity the MapBoxLauncher execution trace is generated6 specifies that a full MapBoxLauncher execution trace is generated whereas 0 specifies that the MapBoxLauncher execution trace is not generated Recommended value for production use is 0
0
MapBox launcher trace size The maximum file size of the generated trace When the size reaches the maximum value another file is created so that the old file can be deleted (for example due to lack of space) You can use alphabetic suffixes to specify the sizes The supported values are k or K ndash kilobytes g or G ndash gigabytes m or M ndash megabytes t or T ndash terabytes
50 k
CoordServer log level This value specifies the detail of the coordination server logging We recommended you not to change the default value of 1
2
SAP Java connector trace level This value specifies the detail of the SAP Java Connector logging The recommended value for production use is 0
2
MapBox log level The log level required for the MapBox to generate an internal log file A higher trace level means that a more detailed log file is created We recommend you to use 4D for production systems where D meansldquoOn Demandrdquo
2
4 Post-Installation
44 Post-Installation Steps for MapBox
2012-12-17 CUSTOMER 3150
Property Purpose Example
MapBox message dumps This value stands for copying the incoming and outgoing messages to the local system For better performance we recommend that you do not enable the message dump option
no
MapBox statistics This value specifies whether a file that lists the performance measurements of the MapBox is created We recommend you to use the value no for production use
no
MapBox logs location This value specifies where the MapBox logs are stored Possible locations are the MapBox repository on the CRM Server or the local file system The recommended value for production use is local_fs which indicates that the MapBox logs are stored on the local file system
local_fs
MapLog format The format in which the MapBox log file must be created The internal log file is by default created in a particular format However you can change this format to display the file in the SAP log file format The two values that are available are default and sap_log
default
The MapBox uses additional properties for performance such as caching and reuse of the MapBox
atoms These values are already set to optimum values and you cannot change them
The description of the properties is shown in the table below
Property Purpose Example
General Settings
max_elements_document This is the limit for the internal cache of the MapBox to hold the count of generated XML documentsWe recommend you not to change this value
100
cache_threshold This is the maximum threshold ndash in kilobytes ndash for a document to be cached in the internal cache of the MapBox
500
4 Post-Installation
44 Post-Installation Steps for MapBox
3250 CUSTOMER 2012-12-17
Property Purpose ExampleWe recommend you not to change this value
max_elements_cache This is the limit for the internal cache of the MapBox to hold the count of MapScenariosWe recommend you not to change this value
100
parallel_instances You use this value on systems where more than one CPU is used This setting allows you to specify the number of CPU instances that MapBox must use for processing so that the remainder can be used by non-MapBox related applications By default MapBox uses all the available CPUs for processing Values can range between 0 to N-1 where N is the number of available CPUs
4
thread_priority Specifies the number of threads MapBox uses during processing We recommend you to set an optimum value for this property so that MapBox does not utilize all available resources 0 = min 1 = low 2 = normal 3 = high 4 = max
3
reuse_count Sets the count for the number of times an atom-instance must be reused before it is destroyed A value of 0 means that the atom is not destroyed and can be used continuously Recommended value is 50 This means that the atom instance is reused 50 times before it is destroyed
100
Lock Server Settings
Operation_Mode The internal mode of operation for the coordination server We recommend not to change the default value of OUTPROC_CLIENT
OUTPROC_CLIENT
Registry_Port The Remote Method Invocation (RMI) port used for connecting to the coordination serverRMI is a Java mechanism for distributed computing
1099
4 Post-Installation
44 Post-Installation Steps for MapBox
2012-12-17 CUSTOMER 3350
Property Purpose ExampleDo not change this value unless port 1099 is unavailable In this case change it to 59856
HostName The name of the host where the coordination server resides
localhost
LocalName The name of the host where the MapBoxLauncher is executed We recommend you not to change the default value of localhost
Server
PollingInterval Polling interval in seconds to ask for shutdown of the coordination server We recommend you not to change the default value of 30
60
CleanUpInterval Cleanup interval in seconds to check for invalid locks created by the MapBoxLauncher We recommend you not to change the default value of 60
180
NOTE
A file name MapLogxsl is also available with the smoke test [page 35] This file is the stylesheet
that is used to format the display of the MapBox log file During the installation and execution
of the MapBox the MapBox log file is created in the following directory
Only valid for Windows |
ltUser_homegtTempMapBoxDumpsltyour_system_namegt500 where ltuser_homegt is the
home directory of the logged-on user ltyour system namegt is the CRM server you have
connected to and 500 is the client you have connected toEnd of Windows |
Only valid for IBM i5OSUNIX |
ltUser_homegtTempMapBoxDumpsltyour_system_namegt500 where ltuser_homegt is the
home directory of the logged-on user ltyour system namegt is the CRM server you have
connected to and 500 is the client you have connected toEnd of IBM i5OSUNIX |
RECOMMENDATION
We recommend that you copy MapLogxsl from the
ltsmoke_test_installation_directorygt to the directory mentioned aboveEnd of Java | MapBox (MBX) |
Only valid for Java | MapBox (MBX) |
444 Executing the MapBox
This section tells you how to execute the MapBox The procedure that you use to execute the Map Box
depends on its current support package (SP) level
4 Post-Installation
44 Post-Installation Steps for MapBox
3450 CUSTOMER 2012-12-17
Procedure
If the SP level of the MapBox is less than SP11 proceed as follows
1 Enter the following URL in your browser
httplthostnamegtltport_numbergtmapboxlaunchermanage
2 Choose Start MapBox
3 The application prompts you for a user name and password
Enter the user name and password for the J2EE Engine Visual Administrator
NOTE
MapBox typically takes 30 to 60 seconds to initialize depending on the number of SAP clients
To see the status of messages processed by MapBox choose Status
If the SP level of the MapBox is equal to or higher than SP11 the MapBox starts automatically
1 For the first MapBox installation you need to restart the Java application server (AS Java) after all
the configuration settings have been completed This automatically starts the MapBox (Autostart)
2 To check the status go to the URL httplthostnamegtltport_numbergtmapboxlauncher
manage
NOTE
MapBox Autostart needs approximately 60 seconds to allow other services of As Java to start
To see the status of messages processed by MapBox choose Status
Result
When the MapBox is running the status is shown as Ready to processEnd of Java | MapBox (MBX) |
Only valid for Java | MapBox (MBX) |
445 Performing the Smoke Test for MapBox
The smoke test checks whether the MapBox installation is error-free
Only valid for Windows |
To execute the smoke test you have to run two batch filesEnd of Windows |
Only valid for IBM i5OSUNIX |
To execute the smoke test you have to run two shell scriptsEnd of IBM i5OSUNIX |
Prerequisites
Before you start the procedure you need to copy the smoketestjar file to a new
ltsmoke_test_installation_directorygt of your choice which has two further subdirectories
firstrun and secondrun
4 Post-Installation
44 Post-Installation Steps for MapBox
2012-12-17 CUSTOMER 3550
You can find the smoketestjar file here
Only valid for IBM i5OSUNIX |
usrsapltinstance_IDgtJCltinstance_numbergtj2eeclusterserver0binext
comsapsyncpointmapboxEnd of IBM i5OSUNIX |
Only valid for Windows |
usrsapltinstance_IDgtJCltinstance_numbergtj2eeclusterserver0binext
comsapsyncpointmapboxEnd of Windows |
NOTE
Each subdirectory of ltsmoke_test_installation_directorygt ndash that is firstrun and
secondrun ndash contains the following files
MBSMOKETEST_IN_000xml
MBSMOKETEST_IN_001xml
MBSMOKETEST_IN_002xml
MBSMOKETEST_IN_003xml
After executing the smoke test you must verify whether the contents of the files generated
by your test are similar to the contents of the above files That is the XML documents that
are created in the smoke test must match the documents located in the
ltsmoke_test_installation_directorygt mentioned above
To execute the smoke test you need to install the SAP Java Connector (SAP JCo version 2012)
You have to download SAP JCo 2012 from SAP Service Marketplace at https
servicesapcomswdc before executing the smoke test
CAUTION
Make sure that you install the SAP Java Connector correctly
The file mapcaseprop is available in the ltsmoke_test_installation_directorygt This file
contains the connection parameters to be tested You can modify the contents of this file
CAUTION
You must replace the connection parameters in this file with the connection parameters that
you entered in the MapBoxMetaxml file
Procedure
1 Run the first stage of the smoke test
1 Only valid for Windows |
Execute the file smoketest_1bat from the ltsmoke_test_installation_directorygtEnd of Windows |
Only valid for Windows |
This prompts you to enter the followingEnd of Windows |
4 Post-Installation
44 Post-Installation Steps for MapBox
3650 CUSTOMER 2012-12-17
Only valid for Windows |
1 ltDRIVEgtusrsapltinstance_IDgtJCltinstance_numbergtj2ee
2 ltsmoke_test_installation_directorygt
3 ltpath_to_sapjcojargt
End of Windows |
Only valid for IBM i5OSUNIX |
Execute the file smoketest_1sh from the ltsmoke_test_installation_directorygtEnd of IBM i5OSUNIX |
Only valid for IBM i5OSUNIX |
1 usrsapltinstance_IDgtJCltinstance_numbergtj2ee
2 ltsmoke_test_installation_directorygt
3 ltpath_to_sapjcojargt
End of IBM i5OSUNIX |
2 Enter the appropriate paths
The smoke test creates the following files
MBSMOKETEST_IN_000xml
MBSMOKETEST_IN_001xml
MBSMOKETEST_IN_002xml
MBSMOKETEST_IN_003xml
3 Only valid for Windows |
Check the contents of the generated files against the contents of the files located in
ltsmoke_test_installation_directorygtSMOKETESTfirstrunEnd of Windows |
Only valid for IBM i5OSUNIX |
Check the contents of the four files against the contents of the files located in
ltsmoke_test_installation_directorygtSMOKETESTfirstrunEnd of IBM i5OSUNIX |
2 Run the second stage of the smoke test
1 Only valid for Windows |
Execute the file smoketest_2bat which is located in the
ltsmoke_test_installation_directorygtEnd of Windows |
Only valid for IBM i5OSUNIX |
Execute the file smoketest_2sh which is located in the
ltsmoke_test_installation_directorygtEnd of IBM i5OSUNIX |
This prompts you to enter the following
Only valid for Windows |
1 ltDRIVEgtusrsapltinstance_IDgtJCltinstance_numbergtj2ee
2 ltsmoke_test_installation_directorygt
End of Windows |
4 Post-Installation
44 Post-Installation Steps for MapBox
2012-12-17 CUSTOMER 3750
Only valid for IBM i5OSUNIX |
1 usrsapltinstance_IDgtJCltinstance_numbergtj2ee
2 ltsmoke_test_installation_directorygt
End of IBM i5OSUNIX |
2 Enter the appropriate paths
The smoke test creates the following files
MBSMOKETEST_IN_000xml
MBSMOKETEST_IN_001xml
MBSMOKETEST_IN_002xml
MBSMOKETEST_IN_003xml
CAUTION
The files generated in the second stage of testing overwrite the contents of the files
generated in the first stage
3 Only valid for Windows |
Check the contents of the generated files against the contents of the files located in
ltsmoke_test_installation_directorygtSMOKETESTsecondrunEnd of Windows |
Only valid for IBM i5OSUNIX |
Check the contents of the four files against the contents of the files located in
ltsmoke_test_installation_directorygtSMOKETESTsecondrunEnd of IBM i5OSUNIX |
Result
If the smoke test has identified errors in the installation process the four XML files are not created in
either of the stages Instead an error log file is created
RECOMMENDATION
In the event of errors we recommend that you send the error log file to your administrator
End of Java | MapBox (MBX) |
Only valid for Java | MapBox (MBX) |
446 Ensuring Optimal Block Size settings
The block size of an object determines the number of messages that are processed at the same time by
the MapBox as a set You need to make sure that the block sizes are optimal to reduce load on the
MapBox XML processor
Procedure
1 Use transaction R3AC3 to set the block size of object GWA_COUNTRY to 10 and save the setting
2 Use transaction R3AC1 to set the block size of object BUPA_MAIN to 10 and save the settingEnd of Java | MapBox (MBX) |
4 Post-Installation
44 Post-Installation Steps for MapBox
3850 CUSTOMER 2012-12-17
Only valid for ABAP+JavaJava | MapBox (MBX) |
447 Adapting Memory Settings for the J2EE Engine
You need to adapt the memory settings for the J2EE Engine because MapBox relies heavily on memory-
intensive XML-processing such as schema-validation parsing transformation and so on
RECOMMENDATION
For rapid message processing by MapBox we recommend you to use 1024 MB of heap memory
for MapBox alone With a heap size of 512 MB MapBox can still process messages but with a slightly
higher processing time for each message
The MapBox memory requirements are directly proportional to the size of the input documents
that MapBox has to process The average size of such documents is in the range of 150 to 200 KB
For messages of this size it is sufficient to have a heap memory of 512 MB If the input documents
are in the range of 1 to 2 MB we recommend that you give MapBox a heap memory of 1024 MB
Procedure
To set the recommended memory settings for the MapBox you start the config tool of the J2EE Engine
Only valid for Windows |
Start the config tool by executing ltDrivegtusrsapltSAPSIDgtltinstance_numbergtj2ee
configtoolbatEnd of Windows |
Only valid for IBM i5OSUNIX |
Start the config tool by executing usrsapltSAPSIDgtltinstance_numbergtj2eeconfigtoolshEnd of IBM i5OSUNIX |
End of ABAP+JavaJava | MapBox (MBX) |
End of ABAP+JavaJava | MapBox (MBX) |
Only valid for ABAPABAP+Java |
45 Activating the CRM Web Client
The CRM Web Client is part of the ICF Services that is automatically installed as part of SAP NetWeaver
Application Server
Procedure
To activate the CRM Web Client after the installation see the SAP Library at
httphelpsapcomnw70 SAP NetWeaver 70 Library (including Enhancement Package 2) English SAP
NetWeaver Library SAP NetWeaver by Key Capability Application Platform by Key Capability Platform-Wide
Services Connectivity Components of SAP Communication Technology Communication Between ABAP and Non-
4 Post-Installation
45 Activating the CRM Web Client
2012-12-17 CUSTOMER 3950
ABAP Technology Internet Communication Framework Development Server-Side Development Creating and
Configuring an ICF Service Activating and Deactivating the ICF ServicesEnd of ABAPABAP+Java |
Only valid for ABAP |
46 Installing and Configuring CRM Application Server Loyalty Add-On Component
This section provides information about how to install and configure CRM Application Server Loyalty
as an add-on component to CRM Application Server ABAP
Prerequisites
You have already deployed the following software components
SAP NetWeaver Application Server ABAP (AS ABAP)
CRM Application Server ABAP
Procedure
Installing CRM Application Server Loyalty
Install CRM Application Server Loyalty on the same host where CRM Application Server ABAP is
deployed as described in SAP Note 1162144
Configuring CRM Application Server Loyalty
After you have installed CRM Application Server Loyalty you must complete the following
configuration steps
1 Call transaction nspro
2 Choose SAP Customising Implementation Guide Customer Relationship Management Marketing Loyalty
Management in BBPCRM Basic Settings Define Basic Settings
3 Enter value 1 for the INSTALL_TYPE parameter
NOTE
You do not have to enter destination name for the LOYALTY_SYSTEM parameterEnd of ABAP |
47 Starting XCM
This section describes how to start XCM
Procedure
1 You access the XCM tool at
httplthostgtltportgtltweb app namegtadminxcminitdo
4 Post-Installation
46 Installing and Configuring CRM Application Server Loyalty Add-On Component
4050 CUSTOMER 2012-12-17
NOTE
You can also start XCM in accessibility mode (according to Section 508 Rehabilitation Act)
at the following URL
httplthostgtltportgtltweb app namegtadminxcminitdosap-accessibility=x
2 Provide a user and password If you are logging on for the first time use the Administrator user
and the password you defined during the installation of the SAP system
RECOMMENDATION
We recommend you create new users with lesser rights than the Administrator for the
administration of Web applications
For more information see the SAP CRM Security Guide section E-Commerce
3 When the application opens a closed control tree is displayed on the left of the screen A screen
containing help information is displayed to the right
You can use edit (change settings) or display (see settings) mode in XCM You use the button in
the top right hand corner of the screen to change between modes When you switch to edit mode
a DB lock is set meaning that only this user can edit the settings at one time The lock is released
once the user switches back to display mode or after session timeout (default timeout is 30mins)
48 Accessing Configuration Documentation in SAP Solution Manager
To access configuration documentation in SAP Solution Manager you have to connect your newly
installed SAP system to SAP Solution Manager
NOTE
For SAP NetWeaver you can also find configuration documentation in the Technology Consultants
Guide at
httphelpsapcomnw70 SAP NetWeaver 70 Library (including Enhancement Package 2) English
SAP NetWeaver Library Technology Consultants Guide
Procedure
Create a configuration project with the related configuration guide as described in the following
documentation
httphelpsapcom SAP Solutions SAP Solution Manager Documentation for SAP Solution Manager
ltcurrent releasegt SAP Solution Manager Implementing and Upgrading SAP Solutions Projects
Configuration
More Information
httpservicesapcomsolutionmanager Media Library How-To Documents How to Create a
Configuration Guide using SAP Solution Manager
4 Post-Installation
48 Accessing Configuration Documentation in SAP Solution Manager
2012-12-17 CUSTOMER 4150
This page is left blank for documents that are printed on both sides
5 Additional Information
Only valid for ABAP+JavaJava |
51 Installing the Business Packages for SAP CRM Using JSPM (Optional)
You can also install the Business Packages for SAP CRM using the Java Support Package Manager (JSPM)
Prerequisites
Only valid for IBM i5OSUNIX |
You have checked hardware and software requirements [external document]End of IBM i5OSUNIX |
Only valid for Windows |
You have checked hardware and software requirements [external document]End of Windows |
You have ckecked the Prerequisites for the Business Packages for SAP CRM [page 7]
Procedure
1 Download version 701 of the files sapcom_BPCRMAPP sapcom_BPCRMFND sapcom_CRMAPP and
sapcom_CRMFND as follows
1 Go to httpservicesapcomswdc Download Support Packages and Patches Search for
Support Packages and Patches
2 Enter the following search terms
BP CRM Application Coding 701
BP CRM Application Content 701
BP CRM Foundation Coding 701
BP CRM Foundation Content 701
2 Add the deployment variable comsapcmshare as described in SAP Note 965948
For more information about how to use the Software Deployment Manager (SDM) see the
documentation Software Deployment Manager which is available at
httphelpsapcomnw70 SAP NetWeaver 70 Library (including Enhancement Package 2) English
SAP NetWeaver Library SAP NetWeaver Developerrsquos Guide Fundamentals Using Java Core Development
Tasks Deployment Putting It All Together Software Deployment Manager
3 Install the Business Packages for SAP CRM with JSPM as described in Installing Additional Usage Types
or Software Units in an Existing SAP System [external document]
5 Additional Information
51 Installing the Business Packages for SAP CRM Using JSPM (Optional)
2012-12-17 CUSTOMER 4350
4 Perform the required Post-Installation Steps for the Business Packages for SAP CRM [page 20]End of ABAP+JavaJava |
Only valid for ABAP+JavaJava |
52 Troubleshooting for the Business Package for SAP CRMOnly valid for ABAP+JavaJava |
The following sections describe the steps that you have to perform if you have problems after the
installation
Activating BI Templates Manually [page 44]
Dragging the Central Search onto the Portal Desktop [page 45]End of ABAP+JavaJava |
Only valid for ABAP+JavaJava |
521 Activating BI Templates Manually
If you have installed the Business Package you might see error messages when loading the BI templates
This procedure describes how you can activate the templates afterwards
Procedure
1 Note the technical name of all templates in your portal interface that are not working
2 Log on to your BI system
3 On the SAP Easy Access screen choose Modeling Administrator Workbench Modeling (transaction
RSA1 or RSOR)
4 Choose Business Content Object Types Web Template Name Select Objects
A new window containing a list of BW objects and templates opens
5 Find your missing templates for example 0TPL_0CRM_Cnn_Qnnn_Vnnn_M and select the entries
6 Choose Transfer Selection
The template now appears on the right-hand side of the screen The Transfer checkbox has been
selected and cannot be changed Nevertheless we recommend that you repeat the following
procedure so that your templates can be displayed
7 Select the template
8 Choose Transfer Transfer
Result
You have successfully activated your missing templates and no error messages appear in the portalEnd of ABAP+JavaJava |
5 Additional Information
52 Troubleshooting for the Business Package for SAP CRM
4450 CUSTOMER 2012-12-17
Only valid for ABAP+JavaJava |
522 Dragging the Central Search onto the Portal Desktop
Procedure
The Business Package for SAP CRM 70 including SAP enhancement package 1 contains an iView for
the central search in CRM This iView is in the package on the page Today in the workset Home of the
CRM User You can drag this iView onto the portal desktop under the tool areaEnd of ABAP+JavaJava |
End of ABAP+JavaJava |
5 Additional Information
52 Troubleshooting for the Business Package for SAP CRM
2012-12-17 CUSTOMER 4550
Typographic Conventions
Example Description
ltExamplegt Angle brackets indicate that you replace these words or characters with appropriate entries to make entries in the system for example ldquoEnter your ltUser Namegtrdquo
ExampleExample
Arrows separating the parts of a navigation path for example menu options
Example Emphasized words or expressions
Example Words or characters that you enter in the system exactly as they appear in the documentation
httpwwwsapcom Textual cross-references to an internet address
example Quicklinks added to the internet address of a homepage to enable quick access to specific content on the Web
123456 Hyperlink to an SAP Note for example SAP Note 123456
Example Words or characters quoted from the screen These include field labels screen titles pushbutton labels menu names and menu options
Cross-references to other documentation or published works
Example Output on the screen following a user action for example messages Source code or syntax quoted directly from a program File and directory names and their paths names of variables and parameters and
names of installation upgrade and database tools
EXAMPLE Technical names of system objects These include report names program names transaction codes database table names and key concepts of a programming language when they are surrounded by body text for example SELECT and INCLUDE
EXAMPLE Keys on the keyboard
4650 CUSTOMER 2012-12-17
SAP AGDietmar-Hopp-Allee 16
69190 WalldorfGermany
T +4918 0534 34 34F +4918 0534 34 20
wwwsapcom
copy Copyright 2012 SAP AG All rights reserved
No part of this publication may be reproduced or transmitted in any form or for any purpose without the express permission of SAP AG The information contained herein may be changed without prior noticeSome software products marketed by SAP AG and its distributors contain proprietary software components of other software vendors
Microsoft Windows Excel Outlook PowerPoint Silverlight and Visual Studio are registered trademarks of Microsoft CorporationIBM DB2 DB2 Universal Database System i System i5 System p System p5 System x System z System z10 z10 zVM zOS OS390 zEnterprise PowerVM Power Architecture Power Systems POWER7 POWER6+ POWER6 POWER PowerHA pureScale PowerPC BladeCenter System Storage Storwize XIV GPFS HACMP RETAIN DB2 Connect RACF Redbooks OS2 AIX Intelligent Miner WebSphere Tivoli Informix and Smarter Planet are trademarks or registered trademarks of IBM CorporationLinux is the registered trademark of Linus Torvalds in the United States and other countriesAdobe the Adobe logo Acrobat PostScript and Reader are trademarks or registered trademarks of Adobe Systems Incorporated in the United States and other countriesOracle and Java are registered trademarks of Oracle and its affiliatesUNIX XOpen OSF1 and Motif are registered trademarks of the Open GroupCitrix ICA Program Neighborhood MetaFrame WinFrame VideoFrame and MultiWin are trademarks or registered trademarks of Citrix Systems IncHTML XML XHTML and W3C are trademarks or registered trademarks of W3Creg World Wide Web Consortium Massachusetts Institute of TechnologyApple App Store iBooks iPad iPhone iPhoto iPod iTunes Multi-Touch Objective-C Retina Safari Siri and Xcode are trademarks or registered trademarks of Apple IncIOS is a registered trademark of Cisco Systems IncRIM BlackBerry BBM BlackBerry Curve BlackBerry Bold BlackBerry Pearl BlackBerry Torch BlackBerry Storm BlackBerry Storm2 BlackBerry PlayBook and BlackBerry App World are trademarks or registered trademarks of Research in Motion LimitedGoogle App Engine Google Apps Google Checkout Google Data API Google Maps Google Mobile Ads Google Mobile Updater Google Mobile Google Store Google Sync Google Updater Google Voice Google Mail Gmail YouTube Dalvik and Android are trademarks or registered trademarks of Google IncINTERMEC is a registered trademark of Intermec Technologies CorporationWi-Fi is a registered trademark of Wi-Fi AllianceBluetooth is a registered trademark of Bluetooth SIG IncMotorola is a registered trademark of Motorola Trademark Holdings LLCComputop is a registered trademark of Computop Wirtschaftsinformatik GmbHSAP R3 SAP NetWeaver Duet PartnerEdge ByDesign SAP BusinessObjects Explorer StreamWork SAP HANA and other SAP products and services mentioned herein as well as their respective logos are trademarks or registered trademarks of SAP AG in Germany and other countriesBusiness Objects and the Business Objects logo BusinessObjects Crystal Reports Crystal Decisions Web Intelligence Xcelsius and other Business Objects products and services mentioned herein as well as their respective logos are trademarks or registered trademarks of Business Objects Software Ltd Business Objects is an SAP companySybase and Adaptive Server iAnywhere Sybase 365 SQL Anywhere and other Sybase products and services mentioned herein as well as their respective logos are trademarks or registered trademarks of Sybase Inc Sybase is an SAP company
2012-12-17 CUSTOMER 4750
Crossgate mgic EDDY B2B 360deg and B2B 360deg Services are registered trademarks of Crossgate AG in Germany and other countries Crossgate is an SAP companyAll other product and service names mentioned are the trademarks of their respective companies Data contained in this document serves informational purposes only National product specifications may varyThese materials are subject to change without notice These materials are provided by SAP AG and its affiliated companies (ldquoSAP Grouprdquo) for informational purposes only without representation or warranty of any kind and SAP Group shall not be liable for errors or omissions with respect to the materials The only warranties for SAP Group products and services are those that are set forth in the express warranty statements accompanying such products and services if any Nothing herein should be construed as constituting an additional warranty
DisclaimerSome components of this product are based on Javatrade Any code change in these components may cause unpredictable and severe malfunctions and is therefore expressly prohibited as is any decompilation of these componentsAny Javatrade Source Code delivered with this product is only to be used by SAPrsquos Support Services and may not be modified or altered in any way
Documentation in the SAP Service MarketplaceYou can find this document at the following address httpservicesapcominstguides
4850 CUSTOMER 2012-12-17
SAP AGDietmar-Hopp-Allee 1669190 WalldorfGermanyT +4918 0534 34 34F +4918 0534 34 20wwwsapcom
copy Copyright 2012 SAP AG All rights reservedNo part of this publication may be reproduced or transmitted in any form or for any purpose without the express permission of SAP AG The information contained herein may be changed without prior notice
- SAP Enhancement Package 1 for SAP CRM 70
-
- Table of Contents
- 1 Introduction
- 2 Planning and Preparation
-
- 21 Prerequisites for the Business Packages for SAP CRM
-
- 3 Installation
- 4 Post-Installation
-
- 41 Checking the Availability of Back-End Systems for SAP CRM Java Components
-
- 411 Creating a Back-End User
- 412 Checking the Connection to the ABAP System
- 413 Configuring and Checking the TREX Service
- 414 Checking the Selling via eBay Processes
-
- 42 Post-Installation Steps for Workforce Deployment Application and Calculation Services
-
- 421 Implementing WFMCORE 200 Using Transaction SAINT
- 422 Configuring the Extended Configuration Management (XCM) for WFD Application and Calculation Services
- 423 Checking Workforce Deployment Calculation Services
- 424 Checking the Installation of WFD Application Services and WFD Calculation Services
-
- 43 Post-Installation Steps for the Business Packages for SAP CRM
-
- 431 Creating Roles for the SAP CRM Business Packages
- 432 Installation of the Info Center for the SAP CRM Business Package
-
- 4321 Importing the SAP CRM Info Center Configurations and Directory Structure
- 4322 Activating Manual Ordering of Folders for the sapcrm Repository
- 4323 Creating Indexes and Taxonomies for the sapcrmnews Repository
- 4324 Creating the Index for the sapcrm Repository
- 4325 Configuring the Personal Search
- 4326 Increasing the Number of JCo Connections
-
- 44 Post-Installation Steps for MapBox
-
- 441 Assigning User Groups for MapBox Users
- 442 Configuring an RFC Destination for MapBox
- 443 Performing Initial Configuration for MapBox
- 444 Executing the MapBox
- 445 Performing the Smoke Test for MapBox
- 446 Ensuring Optimal Block Size settings
- 447 Adapting Memory Settings for the J2EE Engine
-
- 45 Activating the CRM Web Client
- 46 Installing and Configuring CRM Application Server Loyalty Add-On Component
- 47 Starting XCM
- 48 Accessing Configuration Documentation in SAP Solution Manager
-
- 5 Additional Information
-
- 51 Installing the Business Packages for SAP CRM Using JSPM (Optional)
- 52 Troubleshooting for the Business Package for SAP CRM
-
- 521 Activating BI Templates Manually
- 522 Dragging the Central Search onto the Portal Desktop
-
- Copyright and trademarks
-
EXAMPLE
For example when you installed WFD CS you configured the csjcoxxxxx XCM
parameters to point to system ID Q5C client 505 You now need to log in to Q5C client 505
and execute TEST_WFDCS_CALCREQ_SUBMIT with transaction SE37 using the default import
parameters
4 Check the Requests tab of the WFD CS page to check the status of entries with the location name
SMOKETEST has the status FAILED
Status FAILED indicates a successful smoke test It means that the Request Manager successfully
sent the request to the Solver which successfully processed it
Status QUEUED probably means that the XCM parameter cshttpport was incorrectEnd of ABAP+JavaJava |
End of Java |
Only valid for ABAP+JavaJava |
43 Post-Installation Steps for the Business Packages for SAP CRM
The following sections provide information about the steps that you have to perform after importing
the Business Package for SAP CRM
Only valid for ABAP+JavaJava |
431 Creating Roles for the SAP CRM Business Packages
Procedure
If you create your own roles from the SAP CRM Business Packages also add the every user role
(eu_core_role) to your role The Every User Role contains the personalization functionality for the SAP
NetWeaver Portal
For more information about the Every User Role see the SAP Library at
httphelpsapcomnw70 SAP NetWeaver 70 Library (including Enhancement Package 2) English SAP
NetWeaver Library SAP NetWeaver by Key Capability People Integration by Key Capability Portal Portal
Administration Guide Super Administration Pre-configured Roles Every User Roles End of ABAP+JavaJava |
Only valid for ABAP+JavaJava |
432 Installation of the Info Center for the SAP CRM Business Package
This section describes how to install the Info Center
4 Post-Installation
43 Post-Installation Steps for the Business Packages for SAP CRM
2050 CUSTOMER 2012-12-17
Prerequisites
You have installed the Business Package for SAP CRM [page 43]
You have administrator rights
Process Flow
1 You import the SAP CRM info center configurations and directory structure [page 21]
2 You activate manual ordering of folders for the sapcrm Repository [page 23]
3 You create indexes and taxonomies for the sapcrmnews Repository [page 23]
4 You create the index for the sapcrm Repository [page 25]
5 You configure the personal search [page 25]
6 If required you increase the number of JCo connections [page 26]
Only valid for ABAP+JavaJava |
4321 Importing the SAP CRM Info Center Configurations and Directory Structure
The directory structure of the info center has been made available in one content package and you can
import it using the Information and Content Exchange (ICE) Repository
For more information about ICE see SAP Library at
httphelpsapcomnw70 SAP NetWeaver 70 Library (including Enhancement Package 2) English SAP
NetWeaver Library SAP NetWeaver by Key Capability Information Integration by Key Capability Knowledge
Management Content Managers Guide Additional Tasks for Content Managers Content Exchange Distributing
Content (Offline)
Procedure
Importing the Directory Structure
1 Log on to the Portal as content manager
2 Choose Content Management Content Exchange Upload
3 Only valid for Windows |
Select file fullupdate_infocenterzip from directory ltservlet_enginegtirjrootWEB-INF
portalportalappsepcrmchmkmexpice and confirm the uploadEnd of Windows |
Only valid for IBM i5OSUNIX |
Select file fullupdate_infocenterzip from directory ltservlet_enginegtirjrootWEB-INF
portalportalappsepcrmchmkmexpice and confirm the uploadEnd of IBM i5OSUNIX |
The zip file is now imported using the ICE protocol
If you cannot see the ICE repository this might be due to one of the following reasons
The ICE repository was hidden in the virtual root repository
4 Post-Installation
43 Post-Installation Steps for the Business Packages for SAP CRM
2012-12-17 CUSTOMER 2150
In this case do the following
1 Log on to the portal as system administrator
2 In the SAP NetWeaver Enterprise Portal choose System Administration System Configuration
Knowledge Management Content Management Repository Managers Virtual Root Repository
3 Check whether the ICE Repository has been entered under Repositories to exclude
4 Remove it from the list
5 Save your changes
6 Restart the Servlet Engine
The repository has been ldquoswitchedrdquo to invisible
1 Log on to the portal as system administrator
2 In the SAP NetWeaver Enterprise Portal choose System Administration System Configuration
Knowledge Management Content Management Repository Managers Content Exchange
Repository
3 If the property hide in root folder is active deselect it
4 Restart the Servlet Engine
NOTE
After the import check whether the directory structure was created by choosing Content
Administration KM Content in the SAP NetWeaver Enterprise Portal The list of folders should
contain the folders sapcrm and sapcrmnews
Checking Whether the Directory Structure Has Been Imported Successfully
You can only import the structure if there is a repository with the same name For example if a zip file
is exported from the repository sapcrm there must also be a repository with the name sapcrm in the
target system
The sapcrm and sapcrmnews repositories as well as the CRM-Namespace filter are created during the
import of the SAP CRM KM extension configuration archive To check whether this configuration
archive has been imported successfully proceed as follows
1 Log on to the portal as system administrator
2 In the SAP NetWeaver Enterprise Portal choose System Administration Monitoring Knowledge
Management Deployment Monitor Config Archives
3 Check whether the archive comsappctcrmappkmextprjconfig is installed in the system
If the archive comsappctcrmappkmextprjconfig is not installed in the system import it
manually as follows
1 Log on to the portal as system administrator
2 In the SAP NetWeaver Enterprise Portal choose System Administration Monitoring Knowledge
Management Deployment Monitor Config Archives Actions Import
4 Post-Installation
43 Post-Installation Steps for the Business Packages for SAP CRM
2250 CUSTOMER 2012-12-17
3 Only valid for Windows |
Select the archive comsappctcrmappkmextprjconfigconfigarchive from directory
ltSAPSIDgtJCltinstance_numbergtj2eeclusterappssapcomep~crm~chm
servlet_jspepcrmchmkmexprootWEB-INFconfig and confirm the importEnd of Windows |
4 Only valid for IBM i5OSUNIX |
Select the archive comsappctcrmappkmextprjconfigconfigarchive from
directory ltSAPSIDgtJCltinstance_numbergtj2eeclusterappssapcomep~crm~chm
servlet_jspepcrmchmkmexprootWEB-INFconfig and confirm the importEnd of IBM i5OSUNIX |
After the import the directory structure has no restrictions on rights Make sure that you modify the
rights of the various folders to meet your companyrsquos requirementsEnd of ABAP+JavaJava |
Only valid for ABAP+JavaJava |
4322 Activating Manual Ordering of Folders for the sapcrm Repository
The sapcrm Repository folders are ordered in a specific sequence
Procedure
To display this sequence activate manual ordering for each directory
For more information see the SAP Library at
httphelpsapcomnw70 SAP NetWeaver 70 Library (including Enhancement Package 2) English SAP
NetWeaver Library SAP NetWeaver by Key Capability Information Integration by Key Capability Knowledge
Management Content Managers Guide Providing Shared Access to Departmental Documents Sorting Documents in a
Folder ManuallyEnd of ABAP+JavaJava |
Only valid for ABAP+JavaJava |
4323 Creating Indexes and Taxonomies for the sapcrmnews Repository
To make news available for indexing and searching create two new indexes
Prerequisites
You have administrator rights for Knowledge Management on the server
For more information see the SAP Library at
httphelpsapcomnw70 SAP NetWeaver 70 Library (including Enhancement Package 2) English SAP
NetWeaver Library SAP NetWeaver by Key Capability Information Integration by Key Capability Knowledge
Management
4 Post-Installation
43 Post-Installation Steps for the Business Packages for SAP CRM
2012-12-17 CUSTOMER 2350
Procedure
Creating Indexes and Taxonomies for the sapcrmnews Repository
The Business Package contains an iView ndash epbp_crmchm-pmiviewsnews_flash ndash that combines all
news with the istopnews=yes attribute in a virtual folder To guarantee the function of this iView
create two indexes in KM
1 In the SAP NetWeaver Enterprise Portal choose System Administration System Configuration
Knowledge Management Index Administration
2 Create an index of the Search and Classification type with a suitably configured taxonomy
3 Choose sapcrmpartnernews as the index ID Otherwise the path to the folder specified in the iView
is incorrect
If you choose another index ID you must also modify accordingly the folder properties in the
iView for one of the following
Folders path to content and path to root
Folders Path to Initially Displayed Folder and Path to Root Folder for Navigation
If you want to link two portal servers with a TREX server you must modify the index name and
iView properties on one of the portal servers
4 Assign folder sapcrmpartnerPartnernews as a data source
This moves all news with the (virtual) Top flag from this folder to the Newsflash iView
5 Create a ldquoquery-basedrdquo taxonomy with the name PartnerNewsFlash choosing Automatic
Classification before you save the taxonomy
NOTE
The outbound delivery includes only the iView above for virtually combining news If you
also want to use this functionality for other news channels (for example internal news) use
your own index and taxonomy for each channel
For more information see the SAP Library at
httphelpsapcomnw70 SAP NetWeaver 70 Library (including Enhancement Package 2) English SAP
NetWeaver Library SAP NetWeaver by Key Capability Information Integration by Key Capability Knowledge
Management Administration Guide System Administration System Configuration lsquoIndex Administrationrsquo iView
Creating Queries for the Taxonomies of sapcrmnews Repositories
1 Log on to the portal as content manager
2 Choose Content Management Classification Taxonomy Query Builder
3 Add a search query to check the istopnews property for the value Yes
4 Enter PartnerNewsFlash as the name for the taxonomy
Here too a property of the iView links to a taxonomy with this name So if you want to choose
another name you must modify the path to the content folder property of the iView
For more information see the SAP Library at
4 Post-Installation
43 Post-Installation Steps for the Business Packages for SAP CRM
2450 CUSTOMER 2012-12-17
httphelpsapcomnw70 SAP NetWeaver 70 Library (including Enhancement Package 2) English SAP
NetWeaver Library SAP NetWeaver by Key Capability Information Integration by Key Capability Knowledge
Management Administration Guide System Administration System Configuration Taxonomies and ClassificationEnd of ABAP+JavaJava |
Only valid for ABAP+JavaJava |
4324 Creating the Index for the sapcrm Repository
To make Info center documents available for indexing and searching create a new index with sapcrm
as a data source
Prerequisites
You have administrator rights for Knowledge Management on the server
Procedure
Choose a name of your own Search as a service and standard as a crawler parameter
For more information see the SAP Library at
httphelpsapcomnw70 SAP NetWeaver 70 Library (including Enhancement Package 2) English SAP
NetWeaver Library SAP NetWeaver by Key Capability Information Integration by Key Capability Knowledge
ManagementEnd of ABAP+JavaJava |
Only valid for ABAP+JavaJava |
4325 Configuring the Personal Search
Prerequisites
You have administrator rights for Knowledge Management on the server
Procedure
1 Create an index for the userhome repository
To make personal folder documents available for the search create a new index with root
userhome as the data source
2 Create a search option set for personal search
To assign the search index and a start folder to the search for personal documents create a Search
Option Set with the name CRMPersonalFolderSearch As an index enter the index for the
userhome repository created above and ~alias~userhomeuseridPersonal Documents as the
root folder for the search
For more information see the SAPLibrary at
4 Post-Installation
43 Post-Installation Steps for the Business Packages for SAP CRM
2012-12-17 CUSTOMER 2550
httphelpsapcomnw70 SAP NetWeaver 70 Library (including Enhancement Package 2) English SAP
NetWeaver Library SAP NetWeaver by Key Capability Information Integration by Key Capability Knowledge
Management End of ABAP+JavaJava |
Only valid for ABAP+JavaJava |
4326 Increasing the Number of JCo Connections
This section tells you how to increase the number of concurrent Java Connector (JCo) connections
By default the maximum number of concurrent JCo connections is 100 The value depends on the
number and behavior of the users in the portal For more information see SAP Note 316877
You can specify this value when you plan the installation of your SAP NetWeaver Enterprise Portal
Make sure that you first analyze the number and behavior of the users
Procedure
To increase the maximum number of concurrent JCo connections increase the value of the
environment variable CPIC_MAX_CONV
EXAMPLE
Initial default value CPIC_MAX_CONV=100
Increased value CPIC_MAX_CONV=1000
End of ABAP+JavaJava |
End of ABAP+JavaJava |
End of ABAP+JavaJava |
Only valid for ABAP+JavaJava | MapBox (MBX) |
44 Post-Installation Steps for MapBoxOnly valid for Java | MapBox (MBX) |
You have to perform the following post-installation steps for MapBox
You assign user groups for MapBox users [page 27]
You configure an RFC destination for TCPIP connections [page 28]
You perform initial configuration for MapBox [page 28]
You execute the Map Box [page 34]
You perform the smoke test [page 35]
If required you perform additional settings for MapBox
Block size settings [page 38]
Memory settings for the J2EE Engine [page 39]End of Java | MapBox (MBX) |
4 Post-Installation
44 Post-Installation Steps for MapBox
2650 CUSTOMER 2012-12-17
Only valid for Java | MapBox (MBX) |
441 Assigning User Groups for MapBox Users
To access the MapBox URL you need to provide the correct security rights for individual user groups
Procedure
1 Log on to the Visual Administrator
1 On your central instance host change to the following directory
Only valid for IBM i5OSUNIX |
usrsapltSAPSIDgtltinstance_numbergtj2eeadmin
End of IBM i5OSUNIX |
Only valid for Windows |
usrsapltSAPSIDgtltinstance_numbergtj2eeadmin
End of Windows |
2 Only valid for IBM i5OSUNIX |
Run goshEnd of IBM i5OSUNIX |
3 Only valid for Windows |
Double-click gobatEnd of Windows |
For more information about the Visual Administrator see the SAP Library at
httpshelpsapcomnw70 SAP NetWeaver Library SAP NetWeaver by Key Capability
Application Platform by Key Capability Java Technology Administration Manual J2EE Engine J2EE Engine
Administration Tools
2 Choose the server node from the left-hand window
3 Choose Services Security Provider
A list of deployed components is displayed
4 Choose MapBoxLauncher from this list (sapcom
comsapsyncpointmapboxlaunchermapboxlauncher)
A list of tabs appears on the right
5 Choose Security Roles from the list
A list of security roles appears
6 If no display and modify roles are displayed add these roles as follows
1 Choose Switch to Edit Mode from the top task bar to switch to edit mode
2 Add display and modify roles by choosing Add
7 For both the display and modify roles perform the following
1 Choose Switch to Edit Mode from the top task bar to switch to edit mode
2 Choose the Groups tab from the list on the far right
3 Choose Search
4 Post-Installation
44 Post-Installation Steps for MapBox
2012-12-17 CUSTOMER 2750
A list of user groups appears
4 Select the user groups that you want to enable for the two roles
Add to the left of the user group display is now highlighted
5 Choose Add to add the user group for the selected roleEnd of Java | MapBox (MBX) |
Only valid for Java | MapBox (MBX) |
442 Configuring an RFC Destination for MapBox
After the installation you have to create an RFC destination for MapBox
Procedure1 Log on to the CRM server
2 Enter transaction SM59
The Display and Maintain RFC Destinations screen appears
3 Choose Technical Settings Activation Type and create a new destination with the type TCPIP
4 Choose Registered Server Program and enter a unique value for program ID
For example you might enter MAPBOX723 for SAP client 723
5 Enter the details of the gateway host and gateway service in Gateway Options
1 Gateway host
Enter the name of your message server You can also enter the IP address of your message
server
2 Gateway service
Enter your SAP CRM system number prefixed with the string sapgw
For example if your system number is 02 enter sapgw02
6 If the CRM system is a Unicode-enabled system choose Unicode in Special Options
7 Save the destination
8 Choose MapBox Configuration Page Connecting settings from the URL and enter the same RFC
destination name in the relevant fieldEnd of Java | MapBox (MBX) |
Only valid for Java | MapBox (MBX) |
443 Performing Initial Configuration for MapBox
Procedure1 Open a browser window and enter the following URL
httplthostnamegtltport_numbergtmapboxlauncher
NOTE
If you are logged on to the machine where the J2EE server is running you can also enter the
following URL
4 Post-Installation
44 Post-Installation Steps for MapBox
2850 CUSTOMER 2012-12-17
httplocalhostltport_numbergtmapboxlauncher
2 Choose Configuration
3 Edit the values according to your SAP system and choose Save
The application asks you to enter a user name and password
4 Enter the user name and password used for the SAP J2EE Engine Visual Administrator
A description of the properties and example values for the properties is given below
Result
You see the default connection settings for MapBox as shown in the graphic below A description
of the properties and example values are provided in the adjacent table
Figure 1 MapBox Default Connection Settings
Property Purpose Example
SAP System SAP System name ABC FAZ
Message Server Message server host name xyzmain
Group SAP System group PUBLIC SPACE
System Number SAP Gateway system number prefixed with sapgw
sapgw02
Unicode Used for setting the Unicode option for the CRM server Default value is no
yes
Maximum allowed wait time interval between ISP Processing and Commit call
Time-out period between an ISP_MAPBOX call and an ISP_COMMIT call
300
4 Post-Installation
44 Post-Installation Steps for MapBox
2012-12-17 CUSTOMER 2950
Property Purpose Example
Client SAP logon client 723
User Name SAP logon user John
Password SAP logon password
Language SAP logon language EN
Destination The RFC destination with which you need to register the MapBox This is the value you enter in step 3 of Configuring an RFC Destination for MapBox [page 28]
MAPBOX723
Number of server instances The number of JCO server execution instances used by the MapBox to process server requests This number indicates the number of CRM inbound queues that are running simultaneously
10
The above MapBox connection configuration is meant for one SAP client running with the CRM
Server If you want to run the MapBox with two or more SAP clients of the same CRM system
you can use Add Client on the configuration page and edit the values accordingly However make
sure that the RFC destinations that these multiple clients listen to are always unique You can
leave the default values for the other settings
If you need more control over logging and tracing you can go to Log Settings on the configuration
page edit the values and choose Save The Log Settings screen with default values is shown in the
graphic below A description of the properties and example values for the properties is provided
in the adjacent table
Figure 2 Default Values for the Log Settings Screen
4 Post-Installation
44 Post-Installation Steps for MapBox
3050 CUSTOMER 2012-12-17
Property Purpose Example
Log and dumps directory This value specifies where the MapBox logs and dumps are stored If this field is left blank the ltuser_homegt folder is used as default value
Only valid for Windows |
Ctemp
End of Windows |
Only valid for IBM i5OSUNIX |
tmp
End of IBM i5OSUNIX |
Input payload dump This value specifies whether the input document coming to MapBox for processing is written or not
No
MapBox launcher trace level This value specifies with what granularity the MapBoxLauncher execution trace is generated6 specifies that a full MapBoxLauncher execution trace is generated whereas 0 specifies that the MapBoxLauncher execution trace is not generated Recommended value for production use is 0
0
MapBox launcher trace size The maximum file size of the generated trace When the size reaches the maximum value another file is created so that the old file can be deleted (for example due to lack of space) You can use alphabetic suffixes to specify the sizes The supported values are k or K ndash kilobytes g or G ndash gigabytes m or M ndash megabytes t or T ndash terabytes
50 k
CoordServer log level This value specifies the detail of the coordination server logging We recommended you not to change the default value of 1
2
SAP Java connector trace level This value specifies the detail of the SAP Java Connector logging The recommended value for production use is 0
2
MapBox log level The log level required for the MapBox to generate an internal log file A higher trace level means that a more detailed log file is created We recommend you to use 4D for production systems where D meansldquoOn Demandrdquo
2
4 Post-Installation
44 Post-Installation Steps for MapBox
2012-12-17 CUSTOMER 3150
Property Purpose Example
MapBox message dumps This value stands for copying the incoming and outgoing messages to the local system For better performance we recommend that you do not enable the message dump option
no
MapBox statistics This value specifies whether a file that lists the performance measurements of the MapBox is created We recommend you to use the value no for production use
no
MapBox logs location This value specifies where the MapBox logs are stored Possible locations are the MapBox repository on the CRM Server or the local file system The recommended value for production use is local_fs which indicates that the MapBox logs are stored on the local file system
local_fs
MapLog format The format in which the MapBox log file must be created The internal log file is by default created in a particular format However you can change this format to display the file in the SAP log file format The two values that are available are default and sap_log
default
The MapBox uses additional properties for performance such as caching and reuse of the MapBox
atoms These values are already set to optimum values and you cannot change them
The description of the properties is shown in the table below
Property Purpose Example
General Settings
max_elements_document This is the limit for the internal cache of the MapBox to hold the count of generated XML documentsWe recommend you not to change this value
100
cache_threshold This is the maximum threshold ndash in kilobytes ndash for a document to be cached in the internal cache of the MapBox
500
4 Post-Installation
44 Post-Installation Steps for MapBox
3250 CUSTOMER 2012-12-17
Property Purpose ExampleWe recommend you not to change this value
max_elements_cache This is the limit for the internal cache of the MapBox to hold the count of MapScenariosWe recommend you not to change this value
100
parallel_instances You use this value on systems where more than one CPU is used This setting allows you to specify the number of CPU instances that MapBox must use for processing so that the remainder can be used by non-MapBox related applications By default MapBox uses all the available CPUs for processing Values can range between 0 to N-1 where N is the number of available CPUs
4
thread_priority Specifies the number of threads MapBox uses during processing We recommend you to set an optimum value for this property so that MapBox does not utilize all available resources 0 = min 1 = low 2 = normal 3 = high 4 = max
3
reuse_count Sets the count for the number of times an atom-instance must be reused before it is destroyed A value of 0 means that the atom is not destroyed and can be used continuously Recommended value is 50 This means that the atom instance is reused 50 times before it is destroyed
100
Lock Server Settings
Operation_Mode The internal mode of operation for the coordination server We recommend not to change the default value of OUTPROC_CLIENT
OUTPROC_CLIENT
Registry_Port The Remote Method Invocation (RMI) port used for connecting to the coordination serverRMI is a Java mechanism for distributed computing
1099
4 Post-Installation
44 Post-Installation Steps for MapBox
2012-12-17 CUSTOMER 3350
Property Purpose ExampleDo not change this value unless port 1099 is unavailable In this case change it to 59856
HostName The name of the host where the coordination server resides
localhost
LocalName The name of the host where the MapBoxLauncher is executed We recommend you not to change the default value of localhost
Server
PollingInterval Polling interval in seconds to ask for shutdown of the coordination server We recommend you not to change the default value of 30
60
CleanUpInterval Cleanup interval in seconds to check for invalid locks created by the MapBoxLauncher We recommend you not to change the default value of 60
180
NOTE
A file name MapLogxsl is also available with the smoke test [page 35] This file is the stylesheet
that is used to format the display of the MapBox log file During the installation and execution
of the MapBox the MapBox log file is created in the following directory
Only valid for Windows |
ltUser_homegtTempMapBoxDumpsltyour_system_namegt500 where ltuser_homegt is the
home directory of the logged-on user ltyour system namegt is the CRM server you have
connected to and 500 is the client you have connected toEnd of Windows |
Only valid for IBM i5OSUNIX |
ltUser_homegtTempMapBoxDumpsltyour_system_namegt500 where ltuser_homegt is the
home directory of the logged-on user ltyour system namegt is the CRM server you have
connected to and 500 is the client you have connected toEnd of IBM i5OSUNIX |
RECOMMENDATION
We recommend that you copy MapLogxsl from the
ltsmoke_test_installation_directorygt to the directory mentioned aboveEnd of Java | MapBox (MBX) |
Only valid for Java | MapBox (MBX) |
444 Executing the MapBox
This section tells you how to execute the MapBox The procedure that you use to execute the Map Box
depends on its current support package (SP) level
4 Post-Installation
44 Post-Installation Steps for MapBox
3450 CUSTOMER 2012-12-17
Procedure
If the SP level of the MapBox is less than SP11 proceed as follows
1 Enter the following URL in your browser
httplthostnamegtltport_numbergtmapboxlaunchermanage
2 Choose Start MapBox
3 The application prompts you for a user name and password
Enter the user name and password for the J2EE Engine Visual Administrator
NOTE
MapBox typically takes 30 to 60 seconds to initialize depending on the number of SAP clients
To see the status of messages processed by MapBox choose Status
If the SP level of the MapBox is equal to or higher than SP11 the MapBox starts automatically
1 For the first MapBox installation you need to restart the Java application server (AS Java) after all
the configuration settings have been completed This automatically starts the MapBox (Autostart)
2 To check the status go to the URL httplthostnamegtltport_numbergtmapboxlauncher
manage
NOTE
MapBox Autostart needs approximately 60 seconds to allow other services of As Java to start
To see the status of messages processed by MapBox choose Status
Result
When the MapBox is running the status is shown as Ready to processEnd of Java | MapBox (MBX) |
Only valid for Java | MapBox (MBX) |
445 Performing the Smoke Test for MapBox
The smoke test checks whether the MapBox installation is error-free
Only valid for Windows |
To execute the smoke test you have to run two batch filesEnd of Windows |
Only valid for IBM i5OSUNIX |
To execute the smoke test you have to run two shell scriptsEnd of IBM i5OSUNIX |
Prerequisites
Before you start the procedure you need to copy the smoketestjar file to a new
ltsmoke_test_installation_directorygt of your choice which has two further subdirectories
firstrun and secondrun
4 Post-Installation
44 Post-Installation Steps for MapBox
2012-12-17 CUSTOMER 3550
You can find the smoketestjar file here
Only valid for IBM i5OSUNIX |
usrsapltinstance_IDgtJCltinstance_numbergtj2eeclusterserver0binext
comsapsyncpointmapboxEnd of IBM i5OSUNIX |
Only valid for Windows |
usrsapltinstance_IDgtJCltinstance_numbergtj2eeclusterserver0binext
comsapsyncpointmapboxEnd of Windows |
NOTE
Each subdirectory of ltsmoke_test_installation_directorygt ndash that is firstrun and
secondrun ndash contains the following files
MBSMOKETEST_IN_000xml
MBSMOKETEST_IN_001xml
MBSMOKETEST_IN_002xml
MBSMOKETEST_IN_003xml
After executing the smoke test you must verify whether the contents of the files generated
by your test are similar to the contents of the above files That is the XML documents that
are created in the smoke test must match the documents located in the
ltsmoke_test_installation_directorygt mentioned above
To execute the smoke test you need to install the SAP Java Connector (SAP JCo version 2012)
You have to download SAP JCo 2012 from SAP Service Marketplace at https
servicesapcomswdc before executing the smoke test
CAUTION
Make sure that you install the SAP Java Connector correctly
The file mapcaseprop is available in the ltsmoke_test_installation_directorygt This file
contains the connection parameters to be tested You can modify the contents of this file
CAUTION
You must replace the connection parameters in this file with the connection parameters that
you entered in the MapBoxMetaxml file
Procedure
1 Run the first stage of the smoke test
1 Only valid for Windows |
Execute the file smoketest_1bat from the ltsmoke_test_installation_directorygtEnd of Windows |
Only valid for Windows |
This prompts you to enter the followingEnd of Windows |
4 Post-Installation
44 Post-Installation Steps for MapBox
3650 CUSTOMER 2012-12-17
Only valid for Windows |
1 ltDRIVEgtusrsapltinstance_IDgtJCltinstance_numbergtj2ee
2 ltsmoke_test_installation_directorygt
3 ltpath_to_sapjcojargt
End of Windows |
Only valid for IBM i5OSUNIX |
Execute the file smoketest_1sh from the ltsmoke_test_installation_directorygtEnd of IBM i5OSUNIX |
Only valid for IBM i5OSUNIX |
1 usrsapltinstance_IDgtJCltinstance_numbergtj2ee
2 ltsmoke_test_installation_directorygt
3 ltpath_to_sapjcojargt
End of IBM i5OSUNIX |
2 Enter the appropriate paths
The smoke test creates the following files
MBSMOKETEST_IN_000xml
MBSMOKETEST_IN_001xml
MBSMOKETEST_IN_002xml
MBSMOKETEST_IN_003xml
3 Only valid for Windows |
Check the contents of the generated files against the contents of the files located in
ltsmoke_test_installation_directorygtSMOKETESTfirstrunEnd of Windows |
Only valid for IBM i5OSUNIX |
Check the contents of the four files against the contents of the files located in
ltsmoke_test_installation_directorygtSMOKETESTfirstrunEnd of IBM i5OSUNIX |
2 Run the second stage of the smoke test
1 Only valid for Windows |
Execute the file smoketest_2bat which is located in the
ltsmoke_test_installation_directorygtEnd of Windows |
Only valid for IBM i5OSUNIX |
Execute the file smoketest_2sh which is located in the
ltsmoke_test_installation_directorygtEnd of IBM i5OSUNIX |
This prompts you to enter the following
Only valid for Windows |
1 ltDRIVEgtusrsapltinstance_IDgtJCltinstance_numbergtj2ee
2 ltsmoke_test_installation_directorygt
End of Windows |
4 Post-Installation
44 Post-Installation Steps for MapBox
2012-12-17 CUSTOMER 3750
Only valid for IBM i5OSUNIX |
1 usrsapltinstance_IDgtJCltinstance_numbergtj2ee
2 ltsmoke_test_installation_directorygt
End of IBM i5OSUNIX |
2 Enter the appropriate paths
The smoke test creates the following files
MBSMOKETEST_IN_000xml
MBSMOKETEST_IN_001xml
MBSMOKETEST_IN_002xml
MBSMOKETEST_IN_003xml
CAUTION
The files generated in the second stage of testing overwrite the contents of the files
generated in the first stage
3 Only valid for Windows |
Check the contents of the generated files against the contents of the files located in
ltsmoke_test_installation_directorygtSMOKETESTsecondrunEnd of Windows |
Only valid for IBM i5OSUNIX |
Check the contents of the four files against the contents of the files located in
ltsmoke_test_installation_directorygtSMOKETESTsecondrunEnd of IBM i5OSUNIX |
Result
If the smoke test has identified errors in the installation process the four XML files are not created in
either of the stages Instead an error log file is created
RECOMMENDATION
In the event of errors we recommend that you send the error log file to your administrator
End of Java | MapBox (MBX) |
Only valid for Java | MapBox (MBX) |
446 Ensuring Optimal Block Size settings
The block size of an object determines the number of messages that are processed at the same time by
the MapBox as a set You need to make sure that the block sizes are optimal to reduce load on the
MapBox XML processor
Procedure
1 Use transaction R3AC3 to set the block size of object GWA_COUNTRY to 10 and save the setting
2 Use transaction R3AC1 to set the block size of object BUPA_MAIN to 10 and save the settingEnd of Java | MapBox (MBX) |
4 Post-Installation
44 Post-Installation Steps for MapBox
3850 CUSTOMER 2012-12-17
Only valid for ABAP+JavaJava | MapBox (MBX) |
447 Adapting Memory Settings for the J2EE Engine
You need to adapt the memory settings for the J2EE Engine because MapBox relies heavily on memory-
intensive XML-processing such as schema-validation parsing transformation and so on
RECOMMENDATION
For rapid message processing by MapBox we recommend you to use 1024 MB of heap memory
for MapBox alone With a heap size of 512 MB MapBox can still process messages but with a slightly
higher processing time for each message
The MapBox memory requirements are directly proportional to the size of the input documents
that MapBox has to process The average size of such documents is in the range of 150 to 200 KB
For messages of this size it is sufficient to have a heap memory of 512 MB If the input documents
are in the range of 1 to 2 MB we recommend that you give MapBox a heap memory of 1024 MB
Procedure
To set the recommended memory settings for the MapBox you start the config tool of the J2EE Engine
Only valid for Windows |
Start the config tool by executing ltDrivegtusrsapltSAPSIDgtltinstance_numbergtj2ee
configtoolbatEnd of Windows |
Only valid for IBM i5OSUNIX |
Start the config tool by executing usrsapltSAPSIDgtltinstance_numbergtj2eeconfigtoolshEnd of IBM i5OSUNIX |
End of ABAP+JavaJava | MapBox (MBX) |
End of ABAP+JavaJava | MapBox (MBX) |
Only valid for ABAPABAP+Java |
45 Activating the CRM Web Client
The CRM Web Client is part of the ICF Services that is automatically installed as part of SAP NetWeaver
Application Server
Procedure
To activate the CRM Web Client after the installation see the SAP Library at
httphelpsapcomnw70 SAP NetWeaver 70 Library (including Enhancement Package 2) English SAP
NetWeaver Library SAP NetWeaver by Key Capability Application Platform by Key Capability Platform-Wide
Services Connectivity Components of SAP Communication Technology Communication Between ABAP and Non-
4 Post-Installation
45 Activating the CRM Web Client
2012-12-17 CUSTOMER 3950
ABAP Technology Internet Communication Framework Development Server-Side Development Creating and
Configuring an ICF Service Activating and Deactivating the ICF ServicesEnd of ABAPABAP+Java |
Only valid for ABAP |
46 Installing and Configuring CRM Application Server Loyalty Add-On Component
This section provides information about how to install and configure CRM Application Server Loyalty
as an add-on component to CRM Application Server ABAP
Prerequisites
You have already deployed the following software components
SAP NetWeaver Application Server ABAP (AS ABAP)
CRM Application Server ABAP
Procedure
Installing CRM Application Server Loyalty
Install CRM Application Server Loyalty on the same host where CRM Application Server ABAP is
deployed as described in SAP Note 1162144
Configuring CRM Application Server Loyalty
After you have installed CRM Application Server Loyalty you must complete the following
configuration steps
1 Call transaction nspro
2 Choose SAP Customising Implementation Guide Customer Relationship Management Marketing Loyalty
Management in BBPCRM Basic Settings Define Basic Settings
3 Enter value 1 for the INSTALL_TYPE parameter
NOTE
You do not have to enter destination name for the LOYALTY_SYSTEM parameterEnd of ABAP |
47 Starting XCM
This section describes how to start XCM
Procedure
1 You access the XCM tool at
httplthostgtltportgtltweb app namegtadminxcminitdo
4 Post-Installation
46 Installing and Configuring CRM Application Server Loyalty Add-On Component
4050 CUSTOMER 2012-12-17
NOTE
You can also start XCM in accessibility mode (according to Section 508 Rehabilitation Act)
at the following URL
httplthostgtltportgtltweb app namegtadminxcminitdosap-accessibility=x
2 Provide a user and password If you are logging on for the first time use the Administrator user
and the password you defined during the installation of the SAP system
RECOMMENDATION
We recommend you create new users with lesser rights than the Administrator for the
administration of Web applications
For more information see the SAP CRM Security Guide section E-Commerce
3 When the application opens a closed control tree is displayed on the left of the screen A screen
containing help information is displayed to the right
You can use edit (change settings) or display (see settings) mode in XCM You use the button in
the top right hand corner of the screen to change between modes When you switch to edit mode
a DB lock is set meaning that only this user can edit the settings at one time The lock is released
once the user switches back to display mode or after session timeout (default timeout is 30mins)
48 Accessing Configuration Documentation in SAP Solution Manager
To access configuration documentation in SAP Solution Manager you have to connect your newly
installed SAP system to SAP Solution Manager
NOTE
For SAP NetWeaver you can also find configuration documentation in the Technology Consultants
Guide at
httphelpsapcomnw70 SAP NetWeaver 70 Library (including Enhancement Package 2) English
SAP NetWeaver Library Technology Consultants Guide
Procedure
Create a configuration project with the related configuration guide as described in the following
documentation
httphelpsapcom SAP Solutions SAP Solution Manager Documentation for SAP Solution Manager
ltcurrent releasegt SAP Solution Manager Implementing and Upgrading SAP Solutions Projects
Configuration
More Information
httpservicesapcomsolutionmanager Media Library How-To Documents How to Create a
Configuration Guide using SAP Solution Manager
4 Post-Installation
48 Accessing Configuration Documentation in SAP Solution Manager
2012-12-17 CUSTOMER 4150
This page is left blank for documents that are printed on both sides
5 Additional Information
Only valid for ABAP+JavaJava |
51 Installing the Business Packages for SAP CRM Using JSPM (Optional)
You can also install the Business Packages for SAP CRM using the Java Support Package Manager (JSPM)
Prerequisites
Only valid for IBM i5OSUNIX |
You have checked hardware and software requirements [external document]End of IBM i5OSUNIX |
Only valid for Windows |
You have checked hardware and software requirements [external document]End of Windows |
You have ckecked the Prerequisites for the Business Packages for SAP CRM [page 7]
Procedure
1 Download version 701 of the files sapcom_BPCRMAPP sapcom_BPCRMFND sapcom_CRMAPP and
sapcom_CRMFND as follows
1 Go to httpservicesapcomswdc Download Support Packages and Patches Search for
Support Packages and Patches
2 Enter the following search terms
BP CRM Application Coding 701
BP CRM Application Content 701
BP CRM Foundation Coding 701
BP CRM Foundation Content 701
2 Add the deployment variable comsapcmshare as described in SAP Note 965948
For more information about how to use the Software Deployment Manager (SDM) see the
documentation Software Deployment Manager which is available at
httphelpsapcomnw70 SAP NetWeaver 70 Library (including Enhancement Package 2) English
SAP NetWeaver Library SAP NetWeaver Developerrsquos Guide Fundamentals Using Java Core Development
Tasks Deployment Putting It All Together Software Deployment Manager
3 Install the Business Packages for SAP CRM with JSPM as described in Installing Additional Usage Types
or Software Units in an Existing SAP System [external document]
5 Additional Information
51 Installing the Business Packages for SAP CRM Using JSPM (Optional)
2012-12-17 CUSTOMER 4350
4 Perform the required Post-Installation Steps for the Business Packages for SAP CRM [page 20]End of ABAP+JavaJava |
Only valid for ABAP+JavaJava |
52 Troubleshooting for the Business Package for SAP CRMOnly valid for ABAP+JavaJava |
The following sections describe the steps that you have to perform if you have problems after the
installation
Activating BI Templates Manually [page 44]
Dragging the Central Search onto the Portal Desktop [page 45]End of ABAP+JavaJava |
Only valid for ABAP+JavaJava |
521 Activating BI Templates Manually
If you have installed the Business Package you might see error messages when loading the BI templates
This procedure describes how you can activate the templates afterwards
Procedure
1 Note the technical name of all templates in your portal interface that are not working
2 Log on to your BI system
3 On the SAP Easy Access screen choose Modeling Administrator Workbench Modeling (transaction
RSA1 or RSOR)
4 Choose Business Content Object Types Web Template Name Select Objects
A new window containing a list of BW objects and templates opens
5 Find your missing templates for example 0TPL_0CRM_Cnn_Qnnn_Vnnn_M and select the entries
6 Choose Transfer Selection
The template now appears on the right-hand side of the screen The Transfer checkbox has been
selected and cannot be changed Nevertheless we recommend that you repeat the following
procedure so that your templates can be displayed
7 Select the template
8 Choose Transfer Transfer
Result
You have successfully activated your missing templates and no error messages appear in the portalEnd of ABAP+JavaJava |
5 Additional Information
52 Troubleshooting for the Business Package for SAP CRM
4450 CUSTOMER 2012-12-17
Only valid for ABAP+JavaJava |
522 Dragging the Central Search onto the Portal Desktop
Procedure
The Business Package for SAP CRM 70 including SAP enhancement package 1 contains an iView for
the central search in CRM This iView is in the package on the page Today in the workset Home of the
CRM User You can drag this iView onto the portal desktop under the tool areaEnd of ABAP+JavaJava |
End of ABAP+JavaJava |
5 Additional Information
52 Troubleshooting for the Business Package for SAP CRM
2012-12-17 CUSTOMER 4550
Typographic Conventions
Example Description
ltExamplegt Angle brackets indicate that you replace these words or characters with appropriate entries to make entries in the system for example ldquoEnter your ltUser Namegtrdquo
ExampleExample
Arrows separating the parts of a navigation path for example menu options
Example Emphasized words or expressions
Example Words or characters that you enter in the system exactly as they appear in the documentation
httpwwwsapcom Textual cross-references to an internet address
example Quicklinks added to the internet address of a homepage to enable quick access to specific content on the Web
123456 Hyperlink to an SAP Note for example SAP Note 123456
Example Words or characters quoted from the screen These include field labels screen titles pushbutton labels menu names and menu options
Cross-references to other documentation or published works
Example Output on the screen following a user action for example messages Source code or syntax quoted directly from a program File and directory names and their paths names of variables and parameters and
names of installation upgrade and database tools
EXAMPLE Technical names of system objects These include report names program names transaction codes database table names and key concepts of a programming language when they are surrounded by body text for example SELECT and INCLUDE
EXAMPLE Keys on the keyboard
4650 CUSTOMER 2012-12-17
SAP AGDietmar-Hopp-Allee 16
69190 WalldorfGermany
T +4918 0534 34 34F +4918 0534 34 20
wwwsapcom
copy Copyright 2012 SAP AG All rights reserved
No part of this publication may be reproduced or transmitted in any form or for any purpose without the express permission of SAP AG The information contained herein may be changed without prior noticeSome software products marketed by SAP AG and its distributors contain proprietary software components of other software vendors
Microsoft Windows Excel Outlook PowerPoint Silverlight and Visual Studio are registered trademarks of Microsoft CorporationIBM DB2 DB2 Universal Database System i System i5 System p System p5 System x System z System z10 z10 zVM zOS OS390 zEnterprise PowerVM Power Architecture Power Systems POWER7 POWER6+ POWER6 POWER PowerHA pureScale PowerPC BladeCenter System Storage Storwize XIV GPFS HACMP RETAIN DB2 Connect RACF Redbooks OS2 AIX Intelligent Miner WebSphere Tivoli Informix and Smarter Planet are trademarks or registered trademarks of IBM CorporationLinux is the registered trademark of Linus Torvalds in the United States and other countriesAdobe the Adobe logo Acrobat PostScript and Reader are trademarks or registered trademarks of Adobe Systems Incorporated in the United States and other countriesOracle and Java are registered trademarks of Oracle and its affiliatesUNIX XOpen OSF1 and Motif are registered trademarks of the Open GroupCitrix ICA Program Neighborhood MetaFrame WinFrame VideoFrame and MultiWin are trademarks or registered trademarks of Citrix Systems IncHTML XML XHTML and W3C are trademarks or registered trademarks of W3Creg World Wide Web Consortium Massachusetts Institute of TechnologyApple App Store iBooks iPad iPhone iPhoto iPod iTunes Multi-Touch Objective-C Retina Safari Siri and Xcode are trademarks or registered trademarks of Apple IncIOS is a registered trademark of Cisco Systems IncRIM BlackBerry BBM BlackBerry Curve BlackBerry Bold BlackBerry Pearl BlackBerry Torch BlackBerry Storm BlackBerry Storm2 BlackBerry PlayBook and BlackBerry App World are trademarks or registered trademarks of Research in Motion LimitedGoogle App Engine Google Apps Google Checkout Google Data API Google Maps Google Mobile Ads Google Mobile Updater Google Mobile Google Store Google Sync Google Updater Google Voice Google Mail Gmail YouTube Dalvik and Android are trademarks or registered trademarks of Google IncINTERMEC is a registered trademark of Intermec Technologies CorporationWi-Fi is a registered trademark of Wi-Fi AllianceBluetooth is a registered trademark of Bluetooth SIG IncMotorola is a registered trademark of Motorola Trademark Holdings LLCComputop is a registered trademark of Computop Wirtschaftsinformatik GmbHSAP R3 SAP NetWeaver Duet PartnerEdge ByDesign SAP BusinessObjects Explorer StreamWork SAP HANA and other SAP products and services mentioned herein as well as their respective logos are trademarks or registered trademarks of SAP AG in Germany and other countriesBusiness Objects and the Business Objects logo BusinessObjects Crystal Reports Crystal Decisions Web Intelligence Xcelsius and other Business Objects products and services mentioned herein as well as their respective logos are trademarks or registered trademarks of Business Objects Software Ltd Business Objects is an SAP companySybase and Adaptive Server iAnywhere Sybase 365 SQL Anywhere and other Sybase products and services mentioned herein as well as their respective logos are trademarks or registered trademarks of Sybase Inc Sybase is an SAP company
2012-12-17 CUSTOMER 4750
Crossgate mgic EDDY B2B 360deg and B2B 360deg Services are registered trademarks of Crossgate AG in Germany and other countries Crossgate is an SAP companyAll other product and service names mentioned are the trademarks of their respective companies Data contained in this document serves informational purposes only National product specifications may varyThese materials are subject to change without notice These materials are provided by SAP AG and its affiliated companies (ldquoSAP Grouprdquo) for informational purposes only without representation or warranty of any kind and SAP Group shall not be liable for errors or omissions with respect to the materials The only warranties for SAP Group products and services are those that are set forth in the express warranty statements accompanying such products and services if any Nothing herein should be construed as constituting an additional warranty
DisclaimerSome components of this product are based on Javatrade Any code change in these components may cause unpredictable and severe malfunctions and is therefore expressly prohibited as is any decompilation of these componentsAny Javatrade Source Code delivered with this product is only to be used by SAPrsquos Support Services and may not be modified or altered in any way
Documentation in the SAP Service MarketplaceYou can find this document at the following address httpservicesapcominstguides
4850 CUSTOMER 2012-12-17
SAP AGDietmar-Hopp-Allee 1669190 WalldorfGermanyT +4918 0534 34 34F +4918 0534 34 20wwwsapcom
copy Copyright 2012 SAP AG All rights reservedNo part of this publication may be reproduced or transmitted in any form or for any purpose without the express permission of SAP AG The information contained herein may be changed without prior notice
- SAP Enhancement Package 1 for SAP CRM 70
-
- Table of Contents
- 1 Introduction
- 2 Planning and Preparation
-
- 21 Prerequisites for the Business Packages for SAP CRM
-
- 3 Installation
- 4 Post-Installation
-
- 41 Checking the Availability of Back-End Systems for SAP CRM Java Components
-
- 411 Creating a Back-End User
- 412 Checking the Connection to the ABAP System
- 413 Configuring and Checking the TREX Service
- 414 Checking the Selling via eBay Processes
-
- 42 Post-Installation Steps for Workforce Deployment Application and Calculation Services
-
- 421 Implementing WFMCORE 200 Using Transaction SAINT
- 422 Configuring the Extended Configuration Management (XCM) for WFD Application and Calculation Services
- 423 Checking Workforce Deployment Calculation Services
- 424 Checking the Installation of WFD Application Services and WFD Calculation Services
-
- 43 Post-Installation Steps for the Business Packages for SAP CRM
-
- 431 Creating Roles for the SAP CRM Business Packages
- 432 Installation of the Info Center for the SAP CRM Business Package
-
- 4321 Importing the SAP CRM Info Center Configurations and Directory Structure
- 4322 Activating Manual Ordering of Folders for the sapcrm Repository
- 4323 Creating Indexes and Taxonomies for the sapcrmnews Repository
- 4324 Creating the Index for the sapcrm Repository
- 4325 Configuring the Personal Search
- 4326 Increasing the Number of JCo Connections
-
- 44 Post-Installation Steps for MapBox
-
- 441 Assigning User Groups for MapBox Users
- 442 Configuring an RFC Destination for MapBox
- 443 Performing Initial Configuration for MapBox
- 444 Executing the MapBox
- 445 Performing the Smoke Test for MapBox
- 446 Ensuring Optimal Block Size settings
- 447 Adapting Memory Settings for the J2EE Engine
-
- 45 Activating the CRM Web Client
- 46 Installing and Configuring CRM Application Server Loyalty Add-On Component
- 47 Starting XCM
- 48 Accessing Configuration Documentation in SAP Solution Manager
-
- 5 Additional Information
-
- 51 Installing the Business Packages for SAP CRM Using JSPM (Optional)
- 52 Troubleshooting for the Business Package for SAP CRM
-
- 521 Activating BI Templates Manually
- 522 Dragging the Central Search onto the Portal Desktop
-
- Copyright and trademarks
-
Prerequisites
You have installed the Business Package for SAP CRM [page 43]
You have administrator rights
Process Flow
1 You import the SAP CRM info center configurations and directory structure [page 21]
2 You activate manual ordering of folders for the sapcrm Repository [page 23]
3 You create indexes and taxonomies for the sapcrmnews Repository [page 23]
4 You create the index for the sapcrm Repository [page 25]
5 You configure the personal search [page 25]
6 If required you increase the number of JCo connections [page 26]
Only valid for ABAP+JavaJava |
4321 Importing the SAP CRM Info Center Configurations and Directory Structure
The directory structure of the info center has been made available in one content package and you can
import it using the Information and Content Exchange (ICE) Repository
For more information about ICE see SAP Library at
httphelpsapcomnw70 SAP NetWeaver 70 Library (including Enhancement Package 2) English SAP
NetWeaver Library SAP NetWeaver by Key Capability Information Integration by Key Capability Knowledge
Management Content Managers Guide Additional Tasks for Content Managers Content Exchange Distributing
Content (Offline)
Procedure
Importing the Directory Structure
1 Log on to the Portal as content manager
2 Choose Content Management Content Exchange Upload
3 Only valid for Windows |
Select file fullupdate_infocenterzip from directory ltservlet_enginegtirjrootWEB-INF
portalportalappsepcrmchmkmexpice and confirm the uploadEnd of Windows |
Only valid for IBM i5OSUNIX |
Select file fullupdate_infocenterzip from directory ltservlet_enginegtirjrootWEB-INF
portalportalappsepcrmchmkmexpice and confirm the uploadEnd of IBM i5OSUNIX |
The zip file is now imported using the ICE protocol
If you cannot see the ICE repository this might be due to one of the following reasons
The ICE repository was hidden in the virtual root repository
4 Post-Installation
43 Post-Installation Steps for the Business Packages for SAP CRM
2012-12-17 CUSTOMER 2150
In this case do the following
1 Log on to the portal as system administrator
2 In the SAP NetWeaver Enterprise Portal choose System Administration System Configuration
Knowledge Management Content Management Repository Managers Virtual Root Repository
3 Check whether the ICE Repository has been entered under Repositories to exclude
4 Remove it from the list
5 Save your changes
6 Restart the Servlet Engine
The repository has been ldquoswitchedrdquo to invisible
1 Log on to the portal as system administrator
2 In the SAP NetWeaver Enterprise Portal choose System Administration System Configuration
Knowledge Management Content Management Repository Managers Content Exchange
Repository
3 If the property hide in root folder is active deselect it
4 Restart the Servlet Engine
NOTE
After the import check whether the directory structure was created by choosing Content
Administration KM Content in the SAP NetWeaver Enterprise Portal The list of folders should
contain the folders sapcrm and sapcrmnews
Checking Whether the Directory Structure Has Been Imported Successfully
You can only import the structure if there is a repository with the same name For example if a zip file
is exported from the repository sapcrm there must also be a repository with the name sapcrm in the
target system
The sapcrm and sapcrmnews repositories as well as the CRM-Namespace filter are created during the
import of the SAP CRM KM extension configuration archive To check whether this configuration
archive has been imported successfully proceed as follows
1 Log on to the portal as system administrator
2 In the SAP NetWeaver Enterprise Portal choose System Administration Monitoring Knowledge
Management Deployment Monitor Config Archives
3 Check whether the archive comsappctcrmappkmextprjconfig is installed in the system
If the archive comsappctcrmappkmextprjconfig is not installed in the system import it
manually as follows
1 Log on to the portal as system administrator
2 In the SAP NetWeaver Enterprise Portal choose System Administration Monitoring Knowledge
Management Deployment Monitor Config Archives Actions Import
4 Post-Installation
43 Post-Installation Steps for the Business Packages for SAP CRM
2250 CUSTOMER 2012-12-17
3 Only valid for Windows |
Select the archive comsappctcrmappkmextprjconfigconfigarchive from directory
ltSAPSIDgtJCltinstance_numbergtj2eeclusterappssapcomep~crm~chm
servlet_jspepcrmchmkmexprootWEB-INFconfig and confirm the importEnd of Windows |
4 Only valid for IBM i5OSUNIX |
Select the archive comsappctcrmappkmextprjconfigconfigarchive from
directory ltSAPSIDgtJCltinstance_numbergtj2eeclusterappssapcomep~crm~chm
servlet_jspepcrmchmkmexprootWEB-INFconfig and confirm the importEnd of IBM i5OSUNIX |
After the import the directory structure has no restrictions on rights Make sure that you modify the
rights of the various folders to meet your companyrsquos requirementsEnd of ABAP+JavaJava |
Only valid for ABAP+JavaJava |
4322 Activating Manual Ordering of Folders for the sapcrm Repository
The sapcrm Repository folders are ordered in a specific sequence
Procedure
To display this sequence activate manual ordering for each directory
For more information see the SAP Library at
httphelpsapcomnw70 SAP NetWeaver 70 Library (including Enhancement Package 2) English SAP
NetWeaver Library SAP NetWeaver by Key Capability Information Integration by Key Capability Knowledge
Management Content Managers Guide Providing Shared Access to Departmental Documents Sorting Documents in a
Folder ManuallyEnd of ABAP+JavaJava |
Only valid for ABAP+JavaJava |
4323 Creating Indexes and Taxonomies for the sapcrmnews Repository
To make news available for indexing and searching create two new indexes
Prerequisites
You have administrator rights for Knowledge Management on the server
For more information see the SAP Library at
httphelpsapcomnw70 SAP NetWeaver 70 Library (including Enhancement Package 2) English SAP
NetWeaver Library SAP NetWeaver by Key Capability Information Integration by Key Capability Knowledge
Management
4 Post-Installation
43 Post-Installation Steps for the Business Packages for SAP CRM
2012-12-17 CUSTOMER 2350
Procedure
Creating Indexes and Taxonomies for the sapcrmnews Repository
The Business Package contains an iView ndash epbp_crmchm-pmiviewsnews_flash ndash that combines all
news with the istopnews=yes attribute in a virtual folder To guarantee the function of this iView
create two indexes in KM
1 In the SAP NetWeaver Enterprise Portal choose System Administration System Configuration
Knowledge Management Index Administration
2 Create an index of the Search and Classification type with a suitably configured taxonomy
3 Choose sapcrmpartnernews as the index ID Otherwise the path to the folder specified in the iView
is incorrect
If you choose another index ID you must also modify accordingly the folder properties in the
iView for one of the following
Folders path to content and path to root
Folders Path to Initially Displayed Folder and Path to Root Folder for Navigation
If you want to link two portal servers with a TREX server you must modify the index name and
iView properties on one of the portal servers
4 Assign folder sapcrmpartnerPartnernews as a data source
This moves all news with the (virtual) Top flag from this folder to the Newsflash iView
5 Create a ldquoquery-basedrdquo taxonomy with the name PartnerNewsFlash choosing Automatic
Classification before you save the taxonomy
NOTE
The outbound delivery includes only the iView above for virtually combining news If you
also want to use this functionality for other news channels (for example internal news) use
your own index and taxonomy for each channel
For more information see the SAP Library at
httphelpsapcomnw70 SAP NetWeaver 70 Library (including Enhancement Package 2) English SAP
NetWeaver Library SAP NetWeaver by Key Capability Information Integration by Key Capability Knowledge
Management Administration Guide System Administration System Configuration lsquoIndex Administrationrsquo iView
Creating Queries for the Taxonomies of sapcrmnews Repositories
1 Log on to the portal as content manager
2 Choose Content Management Classification Taxonomy Query Builder
3 Add a search query to check the istopnews property for the value Yes
4 Enter PartnerNewsFlash as the name for the taxonomy
Here too a property of the iView links to a taxonomy with this name So if you want to choose
another name you must modify the path to the content folder property of the iView
For more information see the SAP Library at
4 Post-Installation
43 Post-Installation Steps for the Business Packages for SAP CRM
2450 CUSTOMER 2012-12-17
httphelpsapcomnw70 SAP NetWeaver 70 Library (including Enhancement Package 2) English SAP
NetWeaver Library SAP NetWeaver by Key Capability Information Integration by Key Capability Knowledge
Management Administration Guide System Administration System Configuration Taxonomies and ClassificationEnd of ABAP+JavaJava |
Only valid for ABAP+JavaJava |
4324 Creating the Index for the sapcrm Repository
To make Info center documents available for indexing and searching create a new index with sapcrm
as a data source
Prerequisites
You have administrator rights for Knowledge Management on the server
Procedure
Choose a name of your own Search as a service and standard as a crawler parameter
For more information see the SAP Library at
httphelpsapcomnw70 SAP NetWeaver 70 Library (including Enhancement Package 2) English SAP
NetWeaver Library SAP NetWeaver by Key Capability Information Integration by Key Capability Knowledge
ManagementEnd of ABAP+JavaJava |
Only valid for ABAP+JavaJava |
4325 Configuring the Personal Search
Prerequisites
You have administrator rights for Knowledge Management on the server
Procedure
1 Create an index for the userhome repository
To make personal folder documents available for the search create a new index with root
userhome as the data source
2 Create a search option set for personal search
To assign the search index and a start folder to the search for personal documents create a Search
Option Set with the name CRMPersonalFolderSearch As an index enter the index for the
userhome repository created above and ~alias~userhomeuseridPersonal Documents as the
root folder for the search
For more information see the SAPLibrary at
4 Post-Installation
43 Post-Installation Steps for the Business Packages for SAP CRM
2012-12-17 CUSTOMER 2550
httphelpsapcomnw70 SAP NetWeaver 70 Library (including Enhancement Package 2) English SAP
NetWeaver Library SAP NetWeaver by Key Capability Information Integration by Key Capability Knowledge
Management End of ABAP+JavaJava |
Only valid for ABAP+JavaJava |
4326 Increasing the Number of JCo Connections
This section tells you how to increase the number of concurrent Java Connector (JCo) connections
By default the maximum number of concurrent JCo connections is 100 The value depends on the
number and behavior of the users in the portal For more information see SAP Note 316877
You can specify this value when you plan the installation of your SAP NetWeaver Enterprise Portal
Make sure that you first analyze the number and behavior of the users
Procedure
To increase the maximum number of concurrent JCo connections increase the value of the
environment variable CPIC_MAX_CONV
EXAMPLE
Initial default value CPIC_MAX_CONV=100
Increased value CPIC_MAX_CONV=1000
End of ABAP+JavaJava |
End of ABAP+JavaJava |
End of ABAP+JavaJava |
Only valid for ABAP+JavaJava | MapBox (MBX) |
44 Post-Installation Steps for MapBoxOnly valid for Java | MapBox (MBX) |
You have to perform the following post-installation steps for MapBox
You assign user groups for MapBox users [page 27]
You configure an RFC destination for TCPIP connections [page 28]
You perform initial configuration for MapBox [page 28]
You execute the Map Box [page 34]
You perform the smoke test [page 35]
If required you perform additional settings for MapBox
Block size settings [page 38]
Memory settings for the J2EE Engine [page 39]End of Java | MapBox (MBX) |
4 Post-Installation
44 Post-Installation Steps for MapBox
2650 CUSTOMER 2012-12-17
Only valid for Java | MapBox (MBX) |
441 Assigning User Groups for MapBox Users
To access the MapBox URL you need to provide the correct security rights for individual user groups
Procedure
1 Log on to the Visual Administrator
1 On your central instance host change to the following directory
Only valid for IBM i5OSUNIX |
usrsapltSAPSIDgtltinstance_numbergtj2eeadmin
End of IBM i5OSUNIX |
Only valid for Windows |
usrsapltSAPSIDgtltinstance_numbergtj2eeadmin
End of Windows |
2 Only valid for IBM i5OSUNIX |
Run goshEnd of IBM i5OSUNIX |
3 Only valid for Windows |
Double-click gobatEnd of Windows |
For more information about the Visual Administrator see the SAP Library at
httpshelpsapcomnw70 SAP NetWeaver Library SAP NetWeaver by Key Capability
Application Platform by Key Capability Java Technology Administration Manual J2EE Engine J2EE Engine
Administration Tools
2 Choose the server node from the left-hand window
3 Choose Services Security Provider
A list of deployed components is displayed
4 Choose MapBoxLauncher from this list (sapcom
comsapsyncpointmapboxlaunchermapboxlauncher)
A list of tabs appears on the right
5 Choose Security Roles from the list
A list of security roles appears
6 If no display and modify roles are displayed add these roles as follows
1 Choose Switch to Edit Mode from the top task bar to switch to edit mode
2 Add display and modify roles by choosing Add
7 For both the display and modify roles perform the following
1 Choose Switch to Edit Mode from the top task bar to switch to edit mode
2 Choose the Groups tab from the list on the far right
3 Choose Search
4 Post-Installation
44 Post-Installation Steps for MapBox
2012-12-17 CUSTOMER 2750
A list of user groups appears
4 Select the user groups that you want to enable for the two roles
Add to the left of the user group display is now highlighted
5 Choose Add to add the user group for the selected roleEnd of Java | MapBox (MBX) |
Only valid for Java | MapBox (MBX) |
442 Configuring an RFC Destination for MapBox
After the installation you have to create an RFC destination for MapBox
Procedure1 Log on to the CRM server
2 Enter transaction SM59
The Display and Maintain RFC Destinations screen appears
3 Choose Technical Settings Activation Type and create a new destination with the type TCPIP
4 Choose Registered Server Program and enter a unique value for program ID
For example you might enter MAPBOX723 for SAP client 723
5 Enter the details of the gateway host and gateway service in Gateway Options
1 Gateway host
Enter the name of your message server You can also enter the IP address of your message
server
2 Gateway service
Enter your SAP CRM system number prefixed with the string sapgw
For example if your system number is 02 enter sapgw02
6 If the CRM system is a Unicode-enabled system choose Unicode in Special Options
7 Save the destination
8 Choose MapBox Configuration Page Connecting settings from the URL and enter the same RFC
destination name in the relevant fieldEnd of Java | MapBox (MBX) |
Only valid for Java | MapBox (MBX) |
443 Performing Initial Configuration for MapBox
Procedure1 Open a browser window and enter the following URL
httplthostnamegtltport_numbergtmapboxlauncher
NOTE
If you are logged on to the machine where the J2EE server is running you can also enter the
following URL
4 Post-Installation
44 Post-Installation Steps for MapBox
2850 CUSTOMER 2012-12-17
httplocalhostltport_numbergtmapboxlauncher
2 Choose Configuration
3 Edit the values according to your SAP system and choose Save
The application asks you to enter a user name and password
4 Enter the user name and password used for the SAP J2EE Engine Visual Administrator
A description of the properties and example values for the properties is given below
Result
You see the default connection settings for MapBox as shown in the graphic below A description
of the properties and example values are provided in the adjacent table
Figure 1 MapBox Default Connection Settings
Property Purpose Example
SAP System SAP System name ABC FAZ
Message Server Message server host name xyzmain
Group SAP System group PUBLIC SPACE
System Number SAP Gateway system number prefixed with sapgw
sapgw02
Unicode Used for setting the Unicode option for the CRM server Default value is no
yes
Maximum allowed wait time interval between ISP Processing and Commit call
Time-out period between an ISP_MAPBOX call and an ISP_COMMIT call
300
4 Post-Installation
44 Post-Installation Steps for MapBox
2012-12-17 CUSTOMER 2950
Property Purpose Example
Client SAP logon client 723
User Name SAP logon user John
Password SAP logon password
Language SAP logon language EN
Destination The RFC destination with which you need to register the MapBox This is the value you enter in step 3 of Configuring an RFC Destination for MapBox [page 28]
MAPBOX723
Number of server instances The number of JCO server execution instances used by the MapBox to process server requests This number indicates the number of CRM inbound queues that are running simultaneously
10
The above MapBox connection configuration is meant for one SAP client running with the CRM
Server If you want to run the MapBox with two or more SAP clients of the same CRM system
you can use Add Client on the configuration page and edit the values accordingly However make
sure that the RFC destinations that these multiple clients listen to are always unique You can
leave the default values for the other settings
If you need more control over logging and tracing you can go to Log Settings on the configuration
page edit the values and choose Save The Log Settings screen with default values is shown in the
graphic below A description of the properties and example values for the properties is provided
in the adjacent table
Figure 2 Default Values for the Log Settings Screen
4 Post-Installation
44 Post-Installation Steps for MapBox
3050 CUSTOMER 2012-12-17
Property Purpose Example
Log and dumps directory This value specifies where the MapBox logs and dumps are stored If this field is left blank the ltuser_homegt folder is used as default value
Only valid for Windows |
Ctemp
End of Windows |
Only valid for IBM i5OSUNIX |
tmp
End of IBM i5OSUNIX |
Input payload dump This value specifies whether the input document coming to MapBox for processing is written or not
No
MapBox launcher trace level This value specifies with what granularity the MapBoxLauncher execution trace is generated6 specifies that a full MapBoxLauncher execution trace is generated whereas 0 specifies that the MapBoxLauncher execution trace is not generated Recommended value for production use is 0
0
MapBox launcher trace size The maximum file size of the generated trace When the size reaches the maximum value another file is created so that the old file can be deleted (for example due to lack of space) You can use alphabetic suffixes to specify the sizes The supported values are k or K ndash kilobytes g or G ndash gigabytes m or M ndash megabytes t or T ndash terabytes
50 k
CoordServer log level This value specifies the detail of the coordination server logging We recommended you not to change the default value of 1
2
SAP Java connector trace level This value specifies the detail of the SAP Java Connector logging The recommended value for production use is 0
2
MapBox log level The log level required for the MapBox to generate an internal log file A higher trace level means that a more detailed log file is created We recommend you to use 4D for production systems where D meansldquoOn Demandrdquo
2
4 Post-Installation
44 Post-Installation Steps for MapBox
2012-12-17 CUSTOMER 3150
Property Purpose Example
MapBox message dumps This value stands for copying the incoming and outgoing messages to the local system For better performance we recommend that you do not enable the message dump option
no
MapBox statistics This value specifies whether a file that lists the performance measurements of the MapBox is created We recommend you to use the value no for production use
no
MapBox logs location This value specifies where the MapBox logs are stored Possible locations are the MapBox repository on the CRM Server or the local file system The recommended value for production use is local_fs which indicates that the MapBox logs are stored on the local file system
local_fs
MapLog format The format in which the MapBox log file must be created The internal log file is by default created in a particular format However you can change this format to display the file in the SAP log file format The two values that are available are default and sap_log
default
The MapBox uses additional properties for performance such as caching and reuse of the MapBox
atoms These values are already set to optimum values and you cannot change them
The description of the properties is shown in the table below
Property Purpose Example
General Settings
max_elements_document This is the limit for the internal cache of the MapBox to hold the count of generated XML documentsWe recommend you not to change this value
100
cache_threshold This is the maximum threshold ndash in kilobytes ndash for a document to be cached in the internal cache of the MapBox
500
4 Post-Installation
44 Post-Installation Steps for MapBox
3250 CUSTOMER 2012-12-17
Property Purpose ExampleWe recommend you not to change this value
max_elements_cache This is the limit for the internal cache of the MapBox to hold the count of MapScenariosWe recommend you not to change this value
100
parallel_instances You use this value on systems where more than one CPU is used This setting allows you to specify the number of CPU instances that MapBox must use for processing so that the remainder can be used by non-MapBox related applications By default MapBox uses all the available CPUs for processing Values can range between 0 to N-1 where N is the number of available CPUs
4
thread_priority Specifies the number of threads MapBox uses during processing We recommend you to set an optimum value for this property so that MapBox does not utilize all available resources 0 = min 1 = low 2 = normal 3 = high 4 = max
3
reuse_count Sets the count for the number of times an atom-instance must be reused before it is destroyed A value of 0 means that the atom is not destroyed and can be used continuously Recommended value is 50 This means that the atom instance is reused 50 times before it is destroyed
100
Lock Server Settings
Operation_Mode The internal mode of operation for the coordination server We recommend not to change the default value of OUTPROC_CLIENT
OUTPROC_CLIENT
Registry_Port The Remote Method Invocation (RMI) port used for connecting to the coordination serverRMI is a Java mechanism for distributed computing
1099
4 Post-Installation
44 Post-Installation Steps for MapBox
2012-12-17 CUSTOMER 3350
Property Purpose ExampleDo not change this value unless port 1099 is unavailable In this case change it to 59856
HostName The name of the host where the coordination server resides
localhost
LocalName The name of the host where the MapBoxLauncher is executed We recommend you not to change the default value of localhost
Server
PollingInterval Polling interval in seconds to ask for shutdown of the coordination server We recommend you not to change the default value of 30
60
CleanUpInterval Cleanup interval in seconds to check for invalid locks created by the MapBoxLauncher We recommend you not to change the default value of 60
180
NOTE
A file name MapLogxsl is also available with the smoke test [page 35] This file is the stylesheet
that is used to format the display of the MapBox log file During the installation and execution
of the MapBox the MapBox log file is created in the following directory
Only valid for Windows |
ltUser_homegtTempMapBoxDumpsltyour_system_namegt500 where ltuser_homegt is the
home directory of the logged-on user ltyour system namegt is the CRM server you have
connected to and 500 is the client you have connected toEnd of Windows |
Only valid for IBM i5OSUNIX |
ltUser_homegtTempMapBoxDumpsltyour_system_namegt500 where ltuser_homegt is the
home directory of the logged-on user ltyour system namegt is the CRM server you have
connected to and 500 is the client you have connected toEnd of IBM i5OSUNIX |
RECOMMENDATION
We recommend that you copy MapLogxsl from the
ltsmoke_test_installation_directorygt to the directory mentioned aboveEnd of Java | MapBox (MBX) |
Only valid for Java | MapBox (MBX) |
444 Executing the MapBox
This section tells you how to execute the MapBox The procedure that you use to execute the Map Box
depends on its current support package (SP) level
4 Post-Installation
44 Post-Installation Steps for MapBox
3450 CUSTOMER 2012-12-17
Procedure
If the SP level of the MapBox is less than SP11 proceed as follows
1 Enter the following URL in your browser
httplthostnamegtltport_numbergtmapboxlaunchermanage
2 Choose Start MapBox
3 The application prompts you for a user name and password
Enter the user name and password for the J2EE Engine Visual Administrator
NOTE
MapBox typically takes 30 to 60 seconds to initialize depending on the number of SAP clients
To see the status of messages processed by MapBox choose Status
If the SP level of the MapBox is equal to or higher than SP11 the MapBox starts automatically
1 For the first MapBox installation you need to restart the Java application server (AS Java) after all
the configuration settings have been completed This automatically starts the MapBox (Autostart)
2 To check the status go to the URL httplthostnamegtltport_numbergtmapboxlauncher
manage
NOTE
MapBox Autostart needs approximately 60 seconds to allow other services of As Java to start
To see the status of messages processed by MapBox choose Status
Result
When the MapBox is running the status is shown as Ready to processEnd of Java | MapBox (MBX) |
Only valid for Java | MapBox (MBX) |
445 Performing the Smoke Test for MapBox
The smoke test checks whether the MapBox installation is error-free
Only valid for Windows |
To execute the smoke test you have to run two batch filesEnd of Windows |
Only valid for IBM i5OSUNIX |
To execute the smoke test you have to run two shell scriptsEnd of IBM i5OSUNIX |
Prerequisites
Before you start the procedure you need to copy the smoketestjar file to a new
ltsmoke_test_installation_directorygt of your choice which has two further subdirectories
firstrun and secondrun
4 Post-Installation
44 Post-Installation Steps for MapBox
2012-12-17 CUSTOMER 3550
You can find the smoketestjar file here
Only valid for IBM i5OSUNIX |
usrsapltinstance_IDgtJCltinstance_numbergtj2eeclusterserver0binext
comsapsyncpointmapboxEnd of IBM i5OSUNIX |
Only valid for Windows |
usrsapltinstance_IDgtJCltinstance_numbergtj2eeclusterserver0binext
comsapsyncpointmapboxEnd of Windows |
NOTE
Each subdirectory of ltsmoke_test_installation_directorygt ndash that is firstrun and
secondrun ndash contains the following files
MBSMOKETEST_IN_000xml
MBSMOKETEST_IN_001xml
MBSMOKETEST_IN_002xml
MBSMOKETEST_IN_003xml
After executing the smoke test you must verify whether the contents of the files generated
by your test are similar to the contents of the above files That is the XML documents that
are created in the smoke test must match the documents located in the
ltsmoke_test_installation_directorygt mentioned above
To execute the smoke test you need to install the SAP Java Connector (SAP JCo version 2012)
You have to download SAP JCo 2012 from SAP Service Marketplace at https
servicesapcomswdc before executing the smoke test
CAUTION
Make sure that you install the SAP Java Connector correctly
The file mapcaseprop is available in the ltsmoke_test_installation_directorygt This file
contains the connection parameters to be tested You can modify the contents of this file
CAUTION
You must replace the connection parameters in this file with the connection parameters that
you entered in the MapBoxMetaxml file
Procedure
1 Run the first stage of the smoke test
1 Only valid for Windows |
Execute the file smoketest_1bat from the ltsmoke_test_installation_directorygtEnd of Windows |
Only valid for Windows |
This prompts you to enter the followingEnd of Windows |
4 Post-Installation
44 Post-Installation Steps for MapBox
3650 CUSTOMER 2012-12-17
Only valid for Windows |
1 ltDRIVEgtusrsapltinstance_IDgtJCltinstance_numbergtj2ee
2 ltsmoke_test_installation_directorygt
3 ltpath_to_sapjcojargt
End of Windows |
Only valid for IBM i5OSUNIX |
Execute the file smoketest_1sh from the ltsmoke_test_installation_directorygtEnd of IBM i5OSUNIX |
Only valid for IBM i5OSUNIX |
1 usrsapltinstance_IDgtJCltinstance_numbergtj2ee
2 ltsmoke_test_installation_directorygt
3 ltpath_to_sapjcojargt
End of IBM i5OSUNIX |
2 Enter the appropriate paths
The smoke test creates the following files
MBSMOKETEST_IN_000xml
MBSMOKETEST_IN_001xml
MBSMOKETEST_IN_002xml
MBSMOKETEST_IN_003xml
3 Only valid for Windows |
Check the contents of the generated files against the contents of the files located in
ltsmoke_test_installation_directorygtSMOKETESTfirstrunEnd of Windows |
Only valid for IBM i5OSUNIX |
Check the contents of the four files against the contents of the files located in
ltsmoke_test_installation_directorygtSMOKETESTfirstrunEnd of IBM i5OSUNIX |
2 Run the second stage of the smoke test
1 Only valid for Windows |
Execute the file smoketest_2bat which is located in the
ltsmoke_test_installation_directorygtEnd of Windows |
Only valid for IBM i5OSUNIX |
Execute the file smoketest_2sh which is located in the
ltsmoke_test_installation_directorygtEnd of IBM i5OSUNIX |
This prompts you to enter the following
Only valid for Windows |
1 ltDRIVEgtusrsapltinstance_IDgtJCltinstance_numbergtj2ee
2 ltsmoke_test_installation_directorygt
End of Windows |
4 Post-Installation
44 Post-Installation Steps for MapBox
2012-12-17 CUSTOMER 3750
Only valid for IBM i5OSUNIX |
1 usrsapltinstance_IDgtJCltinstance_numbergtj2ee
2 ltsmoke_test_installation_directorygt
End of IBM i5OSUNIX |
2 Enter the appropriate paths
The smoke test creates the following files
MBSMOKETEST_IN_000xml
MBSMOKETEST_IN_001xml
MBSMOKETEST_IN_002xml
MBSMOKETEST_IN_003xml
CAUTION
The files generated in the second stage of testing overwrite the contents of the files
generated in the first stage
3 Only valid for Windows |
Check the contents of the generated files against the contents of the files located in
ltsmoke_test_installation_directorygtSMOKETESTsecondrunEnd of Windows |
Only valid for IBM i5OSUNIX |
Check the contents of the four files against the contents of the files located in
ltsmoke_test_installation_directorygtSMOKETESTsecondrunEnd of IBM i5OSUNIX |
Result
If the smoke test has identified errors in the installation process the four XML files are not created in
either of the stages Instead an error log file is created
RECOMMENDATION
In the event of errors we recommend that you send the error log file to your administrator
End of Java | MapBox (MBX) |
Only valid for Java | MapBox (MBX) |
446 Ensuring Optimal Block Size settings
The block size of an object determines the number of messages that are processed at the same time by
the MapBox as a set You need to make sure that the block sizes are optimal to reduce load on the
MapBox XML processor
Procedure
1 Use transaction R3AC3 to set the block size of object GWA_COUNTRY to 10 and save the setting
2 Use transaction R3AC1 to set the block size of object BUPA_MAIN to 10 and save the settingEnd of Java | MapBox (MBX) |
4 Post-Installation
44 Post-Installation Steps for MapBox
3850 CUSTOMER 2012-12-17
Only valid for ABAP+JavaJava | MapBox (MBX) |
447 Adapting Memory Settings for the J2EE Engine
You need to adapt the memory settings for the J2EE Engine because MapBox relies heavily on memory-
intensive XML-processing such as schema-validation parsing transformation and so on
RECOMMENDATION
For rapid message processing by MapBox we recommend you to use 1024 MB of heap memory
for MapBox alone With a heap size of 512 MB MapBox can still process messages but with a slightly
higher processing time for each message
The MapBox memory requirements are directly proportional to the size of the input documents
that MapBox has to process The average size of such documents is in the range of 150 to 200 KB
For messages of this size it is sufficient to have a heap memory of 512 MB If the input documents
are in the range of 1 to 2 MB we recommend that you give MapBox a heap memory of 1024 MB
Procedure
To set the recommended memory settings for the MapBox you start the config tool of the J2EE Engine
Only valid for Windows |
Start the config tool by executing ltDrivegtusrsapltSAPSIDgtltinstance_numbergtj2ee
configtoolbatEnd of Windows |
Only valid for IBM i5OSUNIX |
Start the config tool by executing usrsapltSAPSIDgtltinstance_numbergtj2eeconfigtoolshEnd of IBM i5OSUNIX |
End of ABAP+JavaJava | MapBox (MBX) |
End of ABAP+JavaJava | MapBox (MBX) |
Only valid for ABAPABAP+Java |
45 Activating the CRM Web Client
The CRM Web Client is part of the ICF Services that is automatically installed as part of SAP NetWeaver
Application Server
Procedure
To activate the CRM Web Client after the installation see the SAP Library at
httphelpsapcomnw70 SAP NetWeaver 70 Library (including Enhancement Package 2) English SAP
NetWeaver Library SAP NetWeaver by Key Capability Application Platform by Key Capability Platform-Wide
Services Connectivity Components of SAP Communication Technology Communication Between ABAP and Non-
4 Post-Installation
45 Activating the CRM Web Client
2012-12-17 CUSTOMER 3950
ABAP Technology Internet Communication Framework Development Server-Side Development Creating and
Configuring an ICF Service Activating and Deactivating the ICF ServicesEnd of ABAPABAP+Java |
Only valid for ABAP |
46 Installing and Configuring CRM Application Server Loyalty Add-On Component
This section provides information about how to install and configure CRM Application Server Loyalty
as an add-on component to CRM Application Server ABAP
Prerequisites
You have already deployed the following software components
SAP NetWeaver Application Server ABAP (AS ABAP)
CRM Application Server ABAP
Procedure
Installing CRM Application Server Loyalty
Install CRM Application Server Loyalty on the same host where CRM Application Server ABAP is
deployed as described in SAP Note 1162144
Configuring CRM Application Server Loyalty
After you have installed CRM Application Server Loyalty you must complete the following
configuration steps
1 Call transaction nspro
2 Choose SAP Customising Implementation Guide Customer Relationship Management Marketing Loyalty
Management in BBPCRM Basic Settings Define Basic Settings
3 Enter value 1 for the INSTALL_TYPE parameter
NOTE
You do not have to enter destination name for the LOYALTY_SYSTEM parameterEnd of ABAP |
47 Starting XCM
This section describes how to start XCM
Procedure
1 You access the XCM tool at
httplthostgtltportgtltweb app namegtadminxcminitdo
4 Post-Installation
46 Installing and Configuring CRM Application Server Loyalty Add-On Component
4050 CUSTOMER 2012-12-17
NOTE
You can also start XCM in accessibility mode (according to Section 508 Rehabilitation Act)
at the following URL
httplthostgtltportgtltweb app namegtadminxcminitdosap-accessibility=x
2 Provide a user and password If you are logging on for the first time use the Administrator user
and the password you defined during the installation of the SAP system
RECOMMENDATION
We recommend you create new users with lesser rights than the Administrator for the
administration of Web applications
For more information see the SAP CRM Security Guide section E-Commerce
3 When the application opens a closed control tree is displayed on the left of the screen A screen
containing help information is displayed to the right
You can use edit (change settings) or display (see settings) mode in XCM You use the button in
the top right hand corner of the screen to change between modes When you switch to edit mode
a DB lock is set meaning that only this user can edit the settings at one time The lock is released
once the user switches back to display mode or after session timeout (default timeout is 30mins)
48 Accessing Configuration Documentation in SAP Solution Manager
To access configuration documentation in SAP Solution Manager you have to connect your newly
installed SAP system to SAP Solution Manager
NOTE
For SAP NetWeaver you can also find configuration documentation in the Technology Consultants
Guide at
httphelpsapcomnw70 SAP NetWeaver 70 Library (including Enhancement Package 2) English
SAP NetWeaver Library Technology Consultants Guide
Procedure
Create a configuration project with the related configuration guide as described in the following
documentation
httphelpsapcom SAP Solutions SAP Solution Manager Documentation for SAP Solution Manager
ltcurrent releasegt SAP Solution Manager Implementing and Upgrading SAP Solutions Projects
Configuration
More Information
httpservicesapcomsolutionmanager Media Library How-To Documents How to Create a
Configuration Guide using SAP Solution Manager
4 Post-Installation
48 Accessing Configuration Documentation in SAP Solution Manager
2012-12-17 CUSTOMER 4150
This page is left blank for documents that are printed on both sides
5 Additional Information
Only valid for ABAP+JavaJava |
51 Installing the Business Packages for SAP CRM Using JSPM (Optional)
You can also install the Business Packages for SAP CRM using the Java Support Package Manager (JSPM)
Prerequisites
Only valid for IBM i5OSUNIX |
You have checked hardware and software requirements [external document]End of IBM i5OSUNIX |
Only valid for Windows |
You have checked hardware and software requirements [external document]End of Windows |
You have ckecked the Prerequisites for the Business Packages for SAP CRM [page 7]
Procedure
1 Download version 701 of the files sapcom_BPCRMAPP sapcom_BPCRMFND sapcom_CRMAPP and
sapcom_CRMFND as follows
1 Go to httpservicesapcomswdc Download Support Packages and Patches Search for
Support Packages and Patches
2 Enter the following search terms
BP CRM Application Coding 701
BP CRM Application Content 701
BP CRM Foundation Coding 701
BP CRM Foundation Content 701
2 Add the deployment variable comsapcmshare as described in SAP Note 965948
For more information about how to use the Software Deployment Manager (SDM) see the
documentation Software Deployment Manager which is available at
httphelpsapcomnw70 SAP NetWeaver 70 Library (including Enhancement Package 2) English
SAP NetWeaver Library SAP NetWeaver Developerrsquos Guide Fundamentals Using Java Core Development
Tasks Deployment Putting It All Together Software Deployment Manager
3 Install the Business Packages for SAP CRM with JSPM as described in Installing Additional Usage Types
or Software Units in an Existing SAP System [external document]
5 Additional Information
51 Installing the Business Packages for SAP CRM Using JSPM (Optional)
2012-12-17 CUSTOMER 4350
4 Perform the required Post-Installation Steps for the Business Packages for SAP CRM [page 20]End of ABAP+JavaJava |
Only valid for ABAP+JavaJava |
52 Troubleshooting for the Business Package for SAP CRMOnly valid for ABAP+JavaJava |
The following sections describe the steps that you have to perform if you have problems after the
installation
Activating BI Templates Manually [page 44]
Dragging the Central Search onto the Portal Desktop [page 45]End of ABAP+JavaJava |
Only valid for ABAP+JavaJava |
521 Activating BI Templates Manually
If you have installed the Business Package you might see error messages when loading the BI templates
This procedure describes how you can activate the templates afterwards
Procedure
1 Note the technical name of all templates in your portal interface that are not working
2 Log on to your BI system
3 On the SAP Easy Access screen choose Modeling Administrator Workbench Modeling (transaction
RSA1 or RSOR)
4 Choose Business Content Object Types Web Template Name Select Objects
A new window containing a list of BW objects and templates opens
5 Find your missing templates for example 0TPL_0CRM_Cnn_Qnnn_Vnnn_M and select the entries
6 Choose Transfer Selection
The template now appears on the right-hand side of the screen The Transfer checkbox has been
selected and cannot be changed Nevertheless we recommend that you repeat the following
procedure so that your templates can be displayed
7 Select the template
8 Choose Transfer Transfer
Result
You have successfully activated your missing templates and no error messages appear in the portalEnd of ABAP+JavaJava |
5 Additional Information
52 Troubleshooting for the Business Package for SAP CRM
4450 CUSTOMER 2012-12-17
Only valid for ABAP+JavaJava |
522 Dragging the Central Search onto the Portal Desktop
Procedure
The Business Package for SAP CRM 70 including SAP enhancement package 1 contains an iView for
the central search in CRM This iView is in the package on the page Today in the workset Home of the
CRM User You can drag this iView onto the portal desktop under the tool areaEnd of ABAP+JavaJava |
End of ABAP+JavaJava |
5 Additional Information
52 Troubleshooting for the Business Package for SAP CRM
2012-12-17 CUSTOMER 4550
Typographic Conventions
Example Description
ltExamplegt Angle brackets indicate that you replace these words or characters with appropriate entries to make entries in the system for example ldquoEnter your ltUser Namegtrdquo
ExampleExample
Arrows separating the parts of a navigation path for example menu options
Example Emphasized words or expressions
Example Words or characters that you enter in the system exactly as they appear in the documentation
httpwwwsapcom Textual cross-references to an internet address
example Quicklinks added to the internet address of a homepage to enable quick access to specific content on the Web
123456 Hyperlink to an SAP Note for example SAP Note 123456
Example Words or characters quoted from the screen These include field labels screen titles pushbutton labels menu names and menu options
Cross-references to other documentation or published works
Example Output on the screen following a user action for example messages Source code or syntax quoted directly from a program File and directory names and their paths names of variables and parameters and
names of installation upgrade and database tools
EXAMPLE Technical names of system objects These include report names program names transaction codes database table names and key concepts of a programming language when they are surrounded by body text for example SELECT and INCLUDE
EXAMPLE Keys on the keyboard
4650 CUSTOMER 2012-12-17
SAP AGDietmar-Hopp-Allee 16
69190 WalldorfGermany
T +4918 0534 34 34F +4918 0534 34 20
wwwsapcom
copy Copyright 2012 SAP AG All rights reserved
No part of this publication may be reproduced or transmitted in any form or for any purpose without the express permission of SAP AG The information contained herein may be changed without prior noticeSome software products marketed by SAP AG and its distributors contain proprietary software components of other software vendors
Microsoft Windows Excel Outlook PowerPoint Silverlight and Visual Studio are registered trademarks of Microsoft CorporationIBM DB2 DB2 Universal Database System i System i5 System p System p5 System x System z System z10 z10 zVM zOS OS390 zEnterprise PowerVM Power Architecture Power Systems POWER7 POWER6+ POWER6 POWER PowerHA pureScale PowerPC BladeCenter System Storage Storwize XIV GPFS HACMP RETAIN DB2 Connect RACF Redbooks OS2 AIX Intelligent Miner WebSphere Tivoli Informix and Smarter Planet are trademarks or registered trademarks of IBM CorporationLinux is the registered trademark of Linus Torvalds in the United States and other countriesAdobe the Adobe logo Acrobat PostScript and Reader are trademarks or registered trademarks of Adobe Systems Incorporated in the United States and other countriesOracle and Java are registered trademarks of Oracle and its affiliatesUNIX XOpen OSF1 and Motif are registered trademarks of the Open GroupCitrix ICA Program Neighborhood MetaFrame WinFrame VideoFrame and MultiWin are trademarks or registered trademarks of Citrix Systems IncHTML XML XHTML and W3C are trademarks or registered trademarks of W3Creg World Wide Web Consortium Massachusetts Institute of TechnologyApple App Store iBooks iPad iPhone iPhoto iPod iTunes Multi-Touch Objective-C Retina Safari Siri and Xcode are trademarks or registered trademarks of Apple IncIOS is a registered trademark of Cisco Systems IncRIM BlackBerry BBM BlackBerry Curve BlackBerry Bold BlackBerry Pearl BlackBerry Torch BlackBerry Storm BlackBerry Storm2 BlackBerry PlayBook and BlackBerry App World are trademarks or registered trademarks of Research in Motion LimitedGoogle App Engine Google Apps Google Checkout Google Data API Google Maps Google Mobile Ads Google Mobile Updater Google Mobile Google Store Google Sync Google Updater Google Voice Google Mail Gmail YouTube Dalvik and Android are trademarks or registered trademarks of Google IncINTERMEC is a registered trademark of Intermec Technologies CorporationWi-Fi is a registered trademark of Wi-Fi AllianceBluetooth is a registered trademark of Bluetooth SIG IncMotorola is a registered trademark of Motorola Trademark Holdings LLCComputop is a registered trademark of Computop Wirtschaftsinformatik GmbHSAP R3 SAP NetWeaver Duet PartnerEdge ByDesign SAP BusinessObjects Explorer StreamWork SAP HANA and other SAP products and services mentioned herein as well as their respective logos are trademarks or registered trademarks of SAP AG in Germany and other countriesBusiness Objects and the Business Objects logo BusinessObjects Crystal Reports Crystal Decisions Web Intelligence Xcelsius and other Business Objects products and services mentioned herein as well as their respective logos are trademarks or registered trademarks of Business Objects Software Ltd Business Objects is an SAP companySybase and Adaptive Server iAnywhere Sybase 365 SQL Anywhere and other Sybase products and services mentioned herein as well as their respective logos are trademarks or registered trademarks of Sybase Inc Sybase is an SAP company
2012-12-17 CUSTOMER 4750
Crossgate mgic EDDY B2B 360deg and B2B 360deg Services are registered trademarks of Crossgate AG in Germany and other countries Crossgate is an SAP companyAll other product and service names mentioned are the trademarks of their respective companies Data contained in this document serves informational purposes only National product specifications may varyThese materials are subject to change without notice These materials are provided by SAP AG and its affiliated companies (ldquoSAP Grouprdquo) for informational purposes only without representation or warranty of any kind and SAP Group shall not be liable for errors or omissions with respect to the materials The only warranties for SAP Group products and services are those that are set forth in the express warranty statements accompanying such products and services if any Nothing herein should be construed as constituting an additional warranty
DisclaimerSome components of this product are based on Javatrade Any code change in these components may cause unpredictable and severe malfunctions and is therefore expressly prohibited as is any decompilation of these componentsAny Javatrade Source Code delivered with this product is only to be used by SAPrsquos Support Services and may not be modified or altered in any way
Documentation in the SAP Service MarketplaceYou can find this document at the following address httpservicesapcominstguides
4850 CUSTOMER 2012-12-17
SAP AGDietmar-Hopp-Allee 1669190 WalldorfGermanyT +4918 0534 34 34F +4918 0534 34 20wwwsapcom
copy Copyright 2012 SAP AG All rights reservedNo part of this publication may be reproduced or transmitted in any form or for any purpose without the express permission of SAP AG The information contained herein may be changed without prior notice
- SAP Enhancement Package 1 for SAP CRM 70
-
- Table of Contents
- 1 Introduction
- 2 Planning and Preparation
-
- 21 Prerequisites for the Business Packages for SAP CRM
-
- 3 Installation
- 4 Post-Installation
-
- 41 Checking the Availability of Back-End Systems for SAP CRM Java Components
-
- 411 Creating a Back-End User
- 412 Checking the Connection to the ABAP System
- 413 Configuring and Checking the TREX Service
- 414 Checking the Selling via eBay Processes
-
- 42 Post-Installation Steps for Workforce Deployment Application and Calculation Services
-
- 421 Implementing WFMCORE 200 Using Transaction SAINT
- 422 Configuring the Extended Configuration Management (XCM) for WFD Application and Calculation Services
- 423 Checking Workforce Deployment Calculation Services
- 424 Checking the Installation of WFD Application Services and WFD Calculation Services
-
- 43 Post-Installation Steps for the Business Packages for SAP CRM
-
- 431 Creating Roles for the SAP CRM Business Packages
- 432 Installation of the Info Center for the SAP CRM Business Package
-
- 4321 Importing the SAP CRM Info Center Configurations and Directory Structure
- 4322 Activating Manual Ordering of Folders for the sapcrm Repository
- 4323 Creating Indexes and Taxonomies for the sapcrmnews Repository
- 4324 Creating the Index for the sapcrm Repository
- 4325 Configuring the Personal Search
- 4326 Increasing the Number of JCo Connections
-
- 44 Post-Installation Steps for MapBox
-
- 441 Assigning User Groups for MapBox Users
- 442 Configuring an RFC Destination for MapBox
- 443 Performing Initial Configuration for MapBox
- 444 Executing the MapBox
- 445 Performing the Smoke Test for MapBox
- 446 Ensuring Optimal Block Size settings
- 447 Adapting Memory Settings for the J2EE Engine
-
- 45 Activating the CRM Web Client
- 46 Installing and Configuring CRM Application Server Loyalty Add-On Component
- 47 Starting XCM
- 48 Accessing Configuration Documentation in SAP Solution Manager
-
- 5 Additional Information
-
- 51 Installing the Business Packages for SAP CRM Using JSPM (Optional)
- 52 Troubleshooting for the Business Package for SAP CRM
-
- 521 Activating BI Templates Manually
- 522 Dragging the Central Search onto the Portal Desktop
-
- Copyright and trademarks
-
3 Only valid for Windows |
Select the archive comsappctcrmappkmextprjconfigconfigarchive from directory
ltSAPSIDgtJCltinstance_numbergtj2eeclusterappssapcomep~crm~chm
servlet_jspepcrmchmkmexprootWEB-INFconfig and confirm the importEnd of Windows |
4 Only valid for IBM i5OSUNIX |
Select the archive comsappctcrmappkmextprjconfigconfigarchive from
directory ltSAPSIDgtJCltinstance_numbergtj2eeclusterappssapcomep~crm~chm
servlet_jspepcrmchmkmexprootWEB-INFconfig and confirm the importEnd of IBM i5OSUNIX |
After the import the directory structure has no restrictions on rights Make sure that you modify the
rights of the various folders to meet your companyrsquos requirementsEnd of ABAP+JavaJava |
Only valid for ABAP+JavaJava |
4322 Activating Manual Ordering of Folders for the sapcrm Repository
The sapcrm Repository folders are ordered in a specific sequence
Procedure
To display this sequence activate manual ordering for each directory
For more information see the SAP Library at
httphelpsapcomnw70 SAP NetWeaver 70 Library (including Enhancement Package 2) English SAP
NetWeaver Library SAP NetWeaver by Key Capability Information Integration by Key Capability Knowledge
Management Content Managers Guide Providing Shared Access to Departmental Documents Sorting Documents in a
Folder ManuallyEnd of ABAP+JavaJava |
Only valid for ABAP+JavaJava |
4323 Creating Indexes and Taxonomies for the sapcrmnews Repository
To make news available for indexing and searching create two new indexes
Prerequisites
You have administrator rights for Knowledge Management on the server
For more information see the SAP Library at
httphelpsapcomnw70 SAP NetWeaver 70 Library (including Enhancement Package 2) English SAP
NetWeaver Library SAP NetWeaver by Key Capability Information Integration by Key Capability Knowledge
Management
4 Post-Installation
43 Post-Installation Steps for the Business Packages for SAP CRM
2012-12-17 CUSTOMER 2350
Procedure
Creating Indexes and Taxonomies for the sapcrmnews Repository
The Business Package contains an iView ndash epbp_crmchm-pmiviewsnews_flash ndash that combines all
news with the istopnews=yes attribute in a virtual folder To guarantee the function of this iView
create two indexes in KM
1 In the SAP NetWeaver Enterprise Portal choose System Administration System Configuration
Knowledge Management Index Administration
2 Create an index of the Search and Classification type with a suitably configured taxonomy
3 Choose sapcrmpartnernews as the index ID Otherwise the path to the folder specified in the iView
is incorrect
If you choose another index ID you must also modify accordingly the folder properties in the
iView for one of the following
Folders path to content and path to root
Folders Path to Initially Displayed Folder and Path to Root Folder for Navigation
If you want to link two portal servers with a TREX server you must modify the index name and
iView properties on one of the portal servers
4 Assign folder sapcrmpartnerPartnernews as a data source
This moves all news with the (virtual) Top flag from this folder to the Newsflash iView
5 Create a ldquoquery-basedrdquo taxonomy with the name PartnerNewsFlash choosing Automatic
Classification before you save the taxonomy
NOTE
The outbound delivery includes only the iView above for virtually combining news If you
also want to use this functionality for other news channels (for example internal news) use
your own index and taxonomy for each channel
For more information see the SAP Library at
httphelpsapcomnw70 SAP NetWeaver 70 Library (including Enhancement Package 2) English SAP
NetWeaver Library SAP NetWeaver by Key Capability Information Integration by Key Capability Knowledge
Management Administration Guide System Administration System Configuration lsquoIndex Administrationrsquo iView
Creating Queries for the Taxonomies of sapcrmnews Repositories
1 Log on to the portal as content manager
2 Choose Content Management Classification Taxonomy Query Builder
3 Add a search query to check the istopnews property for the value Yes
4 Enter PartnerNewsFlash as the name for the taxonomy
Here too a property of the iView links to a taxonomy with this name So if you want to choose
another name you must modify the path to the content folder property of the iView
For more information see the SAP Library at
4 Post-Installation
43 Post-Installation Steps for the Business Packages for SAP CRM
2450 CUSTOMER 2012-12-17
httphelpsapcomnw70 SAP NetWeaver 70 Library (including Enhancement Package 2) English SAP
NetWeaver Library SAP NetWeaver by Key Capability Information Integration by Key Capability Knowledge
Management Administration Guide System Administration System Configuration Taxonomies and ClassificationEnd of ABAP+JavaJava |
Only valid for ABAP+JavaJava |
4324 Creating the Index for the sapcrm Repository
To make Info center documents available for indexing and searching create a new index with sapcrm
as a data source
Prerequisites
You have administrator rights for Knowledge Management on the server
Procedure
Choose a name of your own Search as a service and standard as a crawler parameter
For more information see the SAP Library at
httphelpsapcomnw70 SAP NetWeaver 70 Library (including Enhancement Package 2) English SAP
NetWeaver Library SAP NetWeaver by Key Capability Information Integration by Key Capability Knowledge
ManagementEnd of ABAP+JavaJava |
Only valid for ABAP+JavaJava |
4325 Configuring the Personal Search
Prerequisites
You have administrator rights for Knowledge Management on the server
Procedure
1 Create an index for the userhome repository
To make personal folder documents available for the search create a new index with root
userhome as the data source
2 Create a search option set for personal search
To assign the search index and a start folder to the search for personal documents create a Search
Option Set with the name CRMPersonalFolderSearch As an index enter the index for the
userhome repository created above and ~alias~userhomeuseridPersonal Documents as the
root folder for the search
For more information see the SAPLibrary at
4 Post-Installation
43 Post-Installation Steps for the Business Packages for SAP CRM
2012-12-17 CUSTOMER 2550
httphelpsapcomnw70 SAP NetWeaver 70 Library (including Enhancement Package 2) English SAP
NetWeaver Library SAP NetWeaver by Key Capability Information Integration by Key Capability Knowledge
Management End of ABAP+JavaJava |
Only valid for ABAP+JavaJava |
4326 Increasing the Number of JCo Connections
This section tells you how to increase the number of concurrent Java Connector (JCo) connections
By default the maximum number of concurrent JCo connections is 100 The value depends on the
number and behavior of the users in the portal For more information see SAP Note 316877
You can specify this value when you plan the installation of your SAP NetWeaver Enterprise Portal
Make sure that you first analyze the number and behavior of the users
Procedure
To increase the maximum number of concurrent JCo connections increase the value of the
environment variable CPIC_MAX_CONV
EXAMPLE
Initial default value CPIC_MAX_CONV=100
Increased value CPIC_MAX_CONV=1000
End of ABAP+JavaJava |
End of ABAP+JavaJava |
End of ABAP+JavaJava |
Only valid for ABAP+JavaJava | MapBox (MBX) |
44 Post-Installation Steps for MapBoxOnly valid for Java | MapBox (MBX) |
You have to perform the following post-installation steps for MapBox
You assign user groups for MapBox users [page 27]
You configure an RFC destination for TCPIP connections [page 28]
You perform initial configuration for MapBox [page 28]
You execute the Map Box [page 34]
You perform the smoke test [page 35]
If required you perform additional settings for MapBox
Block size settings [page 38]
Memory settings for the J2EE Engine [page 39]End of Java | MapBox (MBX) |
4 Post-Installation
44 Post-Installation Steps for MapBox
2650 CUSTOMER 2012-12-17
Only valid for Java | MapBox (MBX) |
441 Assigning User Groups for MapBox Users
To access the MapBox URL you need to provide the correct security rights for individual user groups
Procedure
1 Log on to the Visual Administrator
1 On your central instance host change to the following directory
Only valid for IBM i5OSUNIX |
usrsapltSAPSIDgtltinstance_numbergtj2eeadmin
End of IBM i5OSUNIX |
Only valid for Windows |
usrsapltSAPSIDgtltinstance_numbergtj2eeadmin
End of Windows |
2 Only valid for IBM i5OSUNIX |
Run goshEnd of IBM i5OSUNIX |
3 Only valid for Windows |
Double-click gobatEnd of Windows |
For more information about the Visual Administrator see the SAP Library at
httpshelpsapcomnw70 SAP NetWeaver Library SAP NetWeaver by Key Capability
Application Platform by Key Capability Java Technology Administration Manual J2EE Engine J2EE Engine
Administration Tools
2 Choose the server node from the left-hand window
3 Choose Services Security Provider
A list of deployed components is displayed
4 Choose MapBoxLauncher from this list (sapcom
comsapsyncpointmapboxlaunchermapboxlauncher)
A list of tabs appears on the right
5 Choose Security Roles from the list
A list of security roles appears
6 If no display and modify roles are displayed add these roles as follows
1 Choose Switch to Edit Mode from the top task bar to switch to edit mode
2 Add display and modify roles by choosing Add
7 For both the display and modify roles perform the following
1 Choose Switch to Edit Mode from the top task bar to switch to edit mode
2 Choose the Groups tab from the list on the far right
3 Choose Search
4 Post-Installation
44 Post-Installation Steps for MapBox
2012-12-17 CUSTOMER 2750
A list of user groups appears
4 Select the user groups that you want to enable for the two roles
Add to the left of the user group display is now highlighted
5 Choose Add to add the user group for the selected roleEnd of Java | MapBox (MBX) |
Only valid for Java | MapBox (MBX) |
442 Configuring an RFC Destination for MapBox
After the installation you have to create an RFC destination for MapBox
Procedure1 Log on to the CRM server
2 Enter transaction SM59
The Display and Maintain RFC Destinations screen appears
3 Choose Technical Settings Activation Type and create a new destination with the type TCPIP
4 Choose Registered Server Program and enter a unique value for program ID
For example you might enter MAPBOX723 for SAP client 723
5 Enter the details of the gateway host and gateway service in Gateway Options
1 Gateway host
Enter the name of your message server You can also enter the IP address of your message
server
2 Gateway service
Enter your SAP CRM system number prefixed with the string sapgw
For example if your system number is 02 enter sapgw02
6 If the CRM system is a Unicode-enabled system choose Unicode in Special Options
7 Save the destination
8 Choose MapBox Configuration Page Connecting settings from the URL and enter the same RFC
destination name in the relevant fieldEnd of Java | MapBox (MBX) |
Only valid for Java | MapBox (MBX) |
443 Performing Initial Configuration for MapBox
Procedure1 Open a browser window and enter the following URL
httplthostnamegtltport_numbergtmapboxlauncher
NOTE
If you are logged on to the machine where the J2EE server is running you can also enter the
following URL
4 Post-Installation
44 Post-Installation Steps for MapBox
2850 CUSTOMER 2012-12-17
httplocalhostltport_numbergtmapboxlauncher
2 Choose Configuration
3 Edit the values according to your SAP system and choose Save
The application asks you to enter a user name and password
4 Enter the user name and password used for the SAP J2EE Engine Visual Administrator
A description of the properties and example values for the properties is given below
Result
You see the default connection settings for MapBox as shown in the graphic below A description
of the properties and example values are provided in the adjacent table
Figure 1 MapBox Default Connection Settings
Property Purpose Example
SAP System SAP System name ABC FAZ
Message Server Message server host name xyzmain
Group SAP System group PUBLIC SPACE
System Number SAP Gateway system number prefixed with sapgw
sapgw02
Unicode Used for setting the Unicode option for the CRM server Default value is no
yes
Maximum allowed wait time interval between ISP Processing and Commit call
Time-out period between an ISP_MAPBOX call and an ISP_COMMIT call
300
4 Post-Installation
44 Post-Installation Steps for MapBox
2012-12-17 CUSTOMER 2950
Property Purpose Example
Client SAP logon client 723
User Name SAP logon user John
Password SAP logon password
Language SAP logon language EN
Destination The RFC destination with which you need to register the MapBox This is the value you enter in step 3 of Configuring an RFC Destination for MapBox [page 28]
MAPBOX723
Number of server instances The number of JCO server execution instances used by the MapBox to process server requests This number indicates the number of CRM inbound queues that are running simultaneously
10
The above MapBox connection configuration is meant for one SAP client running with the CRM
Server If you want to run the MapBox with two or more SAP clients of the same CRM system
you can use Add Client on the configuration page and edit the values accordingly However make
sure that the RFC destinations that these multiple clients listen to are always unique You can
leave the default values for the other settings
If you need more control over logging and tracing you can go to Log Settings on the configuration
page edit the values and choose Save The Log Settings screen with default values is shown in the
graphic below A description of the properties and example values for the properties is provided
in the adjacent table
Figure 2 Default Values for the Log Settings Screen
4 Post-Installation
44 Post-Installation Steps for MapBox
3050 CUSTOMER 2012-12-17
Property Purpose Example
Log and dumps directory This value specifies where the MapBox logs and dumps are stored If this field is left blank the ltuser_homegt folder is used as default value
Only valid for Windows |
Ctemp
End of Windows |
Only valid for IBM i5OSUNIX |
tmp
End of IBM i5OSUNIX |
Input payload dump This value specifies whether the input document coming to MapBox for processing is written or not
No
MapBox launcher trace level This value specifies with what granularity the MapBoxLauncher execution trace is generated6 specifies that a full MapBoxLauncher execution trace is generated whereas 0 specifies that the MapBoxLauncher execution trace is not generated Recommended value for production use is 0
0
MapBox launcher trace size The maximum file size of the generated trace When the size reaches the maximum value another file is created so that the old file can be deleted (for example due to lack of space) You can use alphabetic suffixes to specify the sizes The supported values are k or K ndash kilobytes g or G ndash gigabytes m or M ndash megabytes t or T ndash terabytes
50 k
CoordServer log level This value specifies the detail of the coordination server logging We recommended you not to change the default value of 1
2
SAP Java connector trace level This value specifies the detail of the SAP Java Connector logging The recommended value for production use is 0
2
MapBox log level The log level required for the MapBox to generate an internal log file A higher trace level means that a more detailed log file is created We recommend you to use 4D for production systems where D meansldquoOn Demandrdquo
2
4 Post-Installation
44 Post-Installation Steps for MapBox
2012-12-17 CUSTOMER 3150
Property Purpose Example
MapBox message dumps This value stands for copying the incoming and outgoing messages to the local system For better performance we recommend that you do not enable the message dump option
no
MapBox statistics This value specifies whether a file that lists the performance measurements of the MapBox is created We recommend you to use the value no for production use
no
MapBox logs location This value specifies where the MapBox logs are stored Possible locations are the MapBox repository on the CRM Server or the local file system The recommended value for production use is local_fs which indicates that the MapBox logs are stored on the local file system
local_fs
MapLog format The format in which the MapBox log file must be created The internal log file is by default created in a particular format However you can change this format to display the file in the SAP log file format The two values that are available are default and sap_log
default
The MapBox uses additional properties for performance such as caching and reuse of the MapBox
atoms These values are already set to optimum values and you cannot change them
The description of the properties is shown in the table below
Property Purpose Example
General Settings
max_elements_document This is the limit for the internal cache of the MapBox to hold the count of generated XML documentsWe recommend you not to change this value
100
cache_threshold This is the maximum threshold ndash in kilobytes ndash for a document to be cached in the internal cache of the MapBox
500
4 Post-Installation
44 Post-Installation Steps for MapBox
3250 CUSTOMER 2012-12-17
Property Purpose ExampleWe recommend you not to change this value
max_elements_cache This is the limit for the internal cache of the MapBox to hold the count of MapScenariosWe recommend you not to change this value
100
parallel_instances You use this value on systems where more than one CPU is used This setting allows you to specify the number of CPU instances that MapBox must use for processing so that the remainder can be used by non-MapBox related applications By default MapBox uses all the available CPUs for processing Values can range between 0 to N-1 where N is the number of available CPUs
4
thread_priority Specifies the number of threads MapBox uses during processing We recommend you to set an optimum value for this property so that MapBox does not utilize all available resources 0 = min 1 = low 2 = normal 3 = high 4 = max
3
reuse_count Sets the count for the number of times an atom-instance must be reused before it is destroyed A value of 0 means that the atom is not destroyed and can be used continuously Recommended value is 50 This means that the atom instance is reused 50 times before it is destroyed
100
Lock Server Settings
Operation_Mode The internal mode of operation for the coordination server We recommend not to change the default value of OUTPROC_CLIENT
OUTPROC_CLIENT
Registry_Port The Remote Method Invocation (RMI) port used for connecting to the coordination serverRMI is a Java mechanism for distributed computing
1099
4 Post-Installation
44 Post-Installation Steps for MapBox
2012-12-17 CUSTOMER 3350
Property Purpose ExampleDo not change this value unless port 1099 is unavailable In this case change it to 59856
HostName The name of the host where the coordination server resides
localhost
LocalName The name of the host where the MapBoxLauncher is executed We recommend you not to change the default value of localhost
Server
PollingInterval Polling interval in seconds to ask for shutdown of the coordination server We recommend you not to change the default value of 30
60
CleanUpInterval Cleanup interval in seconds to check for invalid locks created by the MapBoxLauncher We recommend you not to change the default value of 60
180
NOTE
A file name MapLogxsl is also available with the smoke test [page 35] This file is the stylesheet
that is used to format the display of the MapBox log file During the installation and execution
of the MapBox the MapBox log file is created in the following directory
Only valid for Windows |
ltUser_homegtTempMapBoxDumpsltyour_system_namegt500 where ltuser_homegt is the
home directory of the logged-on user ltyour system namegt is the CRM server you have
connected to and 500 is the client you have connected toEnd of Windows |
Only valid for IBM i5OSUNIX |
ltUser_homegtTempMapBoxDumpsltyour_system_namegt500 where ltuser_homegt is the
home directory of the logged-on user ltyour system namegt is the CRM server you have
connected to and 500 is the client you have connected toEnd of IBM i5OSUNIX |
RECOMMENDATION
We recommend that you copy MapLogxsl from the
ltsmoke_test_installation_directorygt to the directory mentioned aboveEnd of Java | MapBox (MBX) |
Only valid for Java | MapBox (MBX) |
444 Executing the MapBox
This section tells you how to execute the MapBox The procedure that you use to execute the Map Box
depends on its current support package (SP) level
4 Post-Installation
44 Post-Installation Steps for MapBox
3450 CUSTOMER 2012-12-17
Procedure
If the SP level of the MapBox is less than SP11 proceed as follows
1 Enter the following URL in your browser
httplthostnamegtltport_numbergtmapboxlaunchermanage
2 Choose Start MapBox
3 The application prompts you for a user name and password
Enter the user name and password for the J2EE Engine Visual Administrator
NOTE
MapBox typically takes 30 to 60 seconds to initialize depending on the number of SAP clients
To see the status of messages processed by MapBox choose Status
If the SP level of the MapBox is equal to or higher than SP11 the MapBox starts automatically
1 For the first MapBox installation you need to restart the Java application server (AS Java) after all
the configuration settings have been completed This automatically starts the MapBox (Autostart)
2 To check the status go to the URL httplthostnamegtltport_numbergtmapboxlauncher
manage
NOTE
MapBox Autostart needs approximately 60 seconds to allow other services of As Java to start
To see the status of messages processed by MapBox choose Status
Result
When the MapBox is running the status is shown as Ready to processEnd of Java | MapBox (MBX) |
Only valid for Java | MapBox (MBX) |
445 Performing the Smoke Test for MapBox
The smoke test checks whether the MapBox installation is error-free
Only valid for Windows |
To execute the smoke test you have to run two batch filesEnd of Windows |
Only valid for IBM i5OSUNIX |
To execute the smoke test you have to run two shell scriptsEnd of IBM i5OSUNIX |
Prerequisites
Before you start the procedure you need to copy the smoketestjar file to a new
ltsmoke_test_installation_directorygt of your choice which has two further subdirectories
firstrun and secondrun
4 Post-Installation
44 Post-Installation Steps for MapBox
2012-12-17 CUSTOMER 3550
You can find the smoketestjar file here
Only valid for IBM i5OSUNIX |
usrsapltinstance_IDgtJCltinstance_numbergtj2eeclusterserver0binext
comsapsyncpointmapboxEnd of IBM i5OSUNIX |
Only valid for Windows |
usrsapltinstance_IDgtJCltinstance_numbergtj2eeclusterserver0binext
comsapsyncpointmapboxEnd of Windows |
NOTE
Each subdirectory of ltsmoke_test_installation_directorygt ndash that is firstrun and
secondrun ndash contains the following files
MBSMOKETEST_IN_000xml
MBSMOKETEST_IN_001xml
MBSMOKETEST_IN_002xml
MBSMOKETEST_IN_003xml
After executing the smoke test you must verify whether the contents of the files generated
by your test are similar to the contents of the above files That is the XML documents that
are created in the smoke test must match the documents located in the
ltsmoke_test_installation_directorygt mentioned above
To execute the smoke test you need to install the SAP Java Connector (SAP JCo version 2012)
You have to download SAP JCo 2012 from SAP Service Marketplace at https
servicesapcomswdc before executing the smoke test
CAUTION
Make sure that you install the SAP Java Connector correctly
The file mapcaseprop is available in the ltsmoke_test_installation_directorygt This file
contains the connection parameters to be tested You can modify the contents of this file
CAUTION
You must replace the connection parameters in this file with the connection parameters that
you entered in the MapBoxMetaxml file
Procedure
1 Run the first stage of the smoke test
1 Only valid for Windows |
Execute the file smoketest_1bat from the ltsmoke_test_installation_directorygtEnd of Windows |
Only valid for Windows |
This prompts you to enter the followingEnd of Windows |
4 Post-Installation
44 Post-Installation Steps for MapBox
3650 CUSTOMER 2012-12-17
Only valid for Windows |
1 ltDRIVEgtusrsapltinstance_IDgtJCltinstance_numbergtj2ee
2 ltsmoke_test_installation_directorygt
3 ltpath_to_sapjcojargt
End of Windows |
Only valid for IBM i5OSUNIX |
Execute the file smoketest_1sh from the ltsmoke_test_installation_directorygtEnd of IBM i5OSUNIX |
Only valid for IBM i5OSUNIX |
1 usrsapltinstance_IDgtJCltinstance_numbergtj2ee
2 ltsmoke_test_installation_directorygt
3 ltpath_to_sapjcojargt
End of IBM i5OSUNIX |
2 Enter the appropriate paths
The smoke test creates the following files
MBSMOKETEST_IN_000xml
MBSMOKETEST_IN_001xml
MBSMOKETEST_IN_002xml
MBSMOKETEST_IN_003xml
3 Only valid for Windows |
Check the contents of the generated files against the contents of the files located in
ltsmoke_test_installation_directorygtSMOKETESTfirstrunEnd of Windows |
Only valid for IBM i5OSUNIX |
Check the contents of the four files against the contents of the files located in
ltsmoke_test_installation_directorygtSMOKETESTfirstrunEnd of IBM i5OSUNIX |
2 Run the second stage of the smoke test
1 Only valid for Windows |
Execute the file smoketest_2bat which is located in the
ltsmoke_test_installation_directorygtEnd of Windows |
Only valid for IBM i5OSUNIX |
Execute the file smoketest_2sh which is located in the
ltsmoke_test_installation_directorygtEnd of IBM i5OSUNIX |
This prompts you to enter the following
Only valid for Windows |
1 ltDRIVEgtusrsapltinstance_IDgtJCltinstance_numbergtj2ee
2 ltsmoke_test_installation_directorygt
End of Windows |
4 Post-Installation
44 Post-Installation Steps for MapBox
2012-12-17 CUSTOMER 3750
Only valid for IBM i5OSUNIX |
1 usrsapltinstance_IDgtJCltinstance_numbergtj2ee
2 ltsmoke_test_installation_directorygt
End of IBM i5OSUNIX |
2 Enter the appropriate paths
The smoke test creates the following files
MBSMOKETEST_IN_000xml
MBSMOKETEST_IN_001xml
MBSMOKETEST_IN_002xml
MBSMOKETEST_IN_003xml
CAUTION
The files generated in the second stage of testing overwrite the contents of the files
generated in the first stage
3 Only valid for Windows |
Check the contents of the generated files against the contents of the files located in
ltsmoke_test_installation_directorygtSMOKETESTsecondrunEnd of Windows |
Only valid for IBM i5OSUNIX |
Check the contents of the four files against the contents of the files located in
ltsmoke_test_installation_directorygtSMOKETESTsecondrunEnd of IBM i5OSUNIX |
Result
If the smoke test has identified errors in the installation process the four XML files are not created in
either of the stages Instead an error log file is created
RECOMMENDATION
In the event of errors we recommend that you send the error log file to your administrator
End of Java | MapBox (MBX) |
Only valid for Java | MapBox (MBX) |
446 Ensuring Optimal Block Size settings
The block size of an object determines the number of messages that are processed at the same time by
the MapBox as a set You need to make sure that the block sizes are optimal to reduce load on the
MapBox XML processor
Procedure
1 Use transaction R3AC3 to set the block size of object GWA_COUNTRY to 10 and save the setting
2 Use transaction R3AC1 to set the block size of object BUPA_MAIN to 10 and save the settingEnd of Java | MapBox (MBX) |
4 Post-Installation
44 Post-Installation Steps for MapBox
3850 CUSTOMER 2012-12-17
Only valid for ABAP+JavaJava | MapBox (MBX) |
447 Adapting Memory Settings for the J2EE Engine
You need to adapt the memory settings for the J2EE Engine because MapBox relies heavily on memory-
intensive XML-processing such as schema-validation parsing transformation and so on
RECOMMENDATION
For rapid message processing by MapBox we recommend you to use 1024 MB of heap memory
for MapBox alone With a heap size of 512 MB MapBox can still process messages but with a slightly
higher processing time for each message
The MapBox memory requirements are directly proportional to the size of the input documents
that MapBox has to process The average size of such documents is in the range of 150 to 200 KB
For messages of this size it is sufficient to have a heap memory of 512 MB If the input documents
are in the range of 1 to 2 MB we recommend that you give MapBox a heap memory of 1024 MB
Procedure
To set the recommended memory settings for the MapBox you start the config tool of the J2EE Engine
Only valid for Windows |
Start the config tool by executing ltDrivegtusrsapltSAPSIDgtltinstance_numbergtj2ee
configtoolbatEnd of Windows |
Only valid for IBM i5OSUNIX |
Start the config tool by executing usrsapltSAPSIDgtltinstance_numbergtj2eeconfigtoolshEnd of IBM i5OSUNIX |
End of ABAP+JavaJava | MapBox (MBX) |
End of ABAP+JavaJava | MapBox (MBX) |
Only valid for ABAPABAP+Java |
45 Activating the CRM Web Client
The CRM Web Client is part of the ICF Services that is automatically installed as part of SAP NetWeaver
Application Server
Procedure
To activate the CRM Web Client after the installation see the SAP Library at
httphelpsapcomnw70 SAP NetWeaver 70 Library (including Enhancement Package 2) English SAP
NetWeaver Library SAP NetWeaver by Key Capability Application Platform by Key Capability Platform-Wide
Services Connectivity Components of SAP Communication Technology Communication Between ABAP and Non-
4 Post-Installation
45 Activating the CRM Web Client
2012-12-17 CUSTOMER 3950
ABAP Technology Internet Communication Framework Development Server-Side Development Creating and
Configuring an ICF Service Activating and Deactivating the ICF ServicesEnd of ABAPABAP+Java |
Only valid for ABAP |
46 Installing and Configuring CRM Application Server Loyalty Add-On Component
This section provides information about how to install and configure CRM Application Server Loyalty
as an add-on component to CRM Application Server ABAP
Prerequisites
You have already deployed the following software components
SAP NetWeaver Application Server ABAP (AS ABAP)
CRM Application Server ABAP
Procedure
Installing CRM Application Server Loyalty
Install CRM Application Server Loyalty on the same host where CRM Application Server ABAP is
deployed as described in SAP Note 1162144
Configuring CRM Application Server Loyalty
After you have installed CRM Application Server Loyalty you must complete the following
configuration steps
1 Call transaction nspro
2 Choose SAP Customising Implementation Guide Customer Relationship Management Marketing Loyalty
Management in BBPCRM Basic Settings Define Basic Settings
3 Enter value 1 for the INSTALL_TYPE parameter
NOTE
You do not have to enter destination name for the LOYALTY_SYSTEM parameterEnd of ABAP |
47 Starting XCM
This section describes how to start XCM
Procedure
1 You access the XCM tool at
httplthostgtltportgtltweb app namegtadminxcminitdo
4 Post-Installation
46 Installing and Configuring CRM Application Server Loyalty Add-On Component
4050 CUSTOMER 2012-12-17
NOTE
You can also start XCM in accessibility mode (according to Section 508 Rehabilitation Act)
at the following URL
httplthostgtltportgtltweb app namegtadminxcminitdosap-accessibility=x
2 Provide a user and password If you are logging on for the first time use the Administrator user
and the password you defined during the installation of the SAP system
RECOMMENDATION
We recommend you create new users with lesser rights than the Administrator for the
administration of Web applications
For more information see the SAP CRM Security Guide section E-Commerce
3 When the application opens a closed control tree is displayed on the left of the screen A screen
containing help information is displayed to the right
You can use edit (change settings) or display (see settings) mode in XCM You use the button in
the top right hand corner of the screen to change between modes When you switch to edit mode
a DB lock is set meaning that only this user can edit the settings at one time The lock is released
once the user switches back to display mode or after session timeout (default timeout is 30mins)
48 Accessing Configuration Documentation in SAP Solution Manager
To access configuration documentation in SAP Solution Manager you have to connect your newly
installed SAP system to SAP Solution Manager
NOTE
For SAP NetWeaver you can also find configuration documentation in the Technology Consultants
Guide at
httphelpsapcomnw70 SAP NetWeaver 70 Library (including Enhancement Package 2) English
SAP NetWeaver Library Technology Consultants Guide
Procedure
Create a configuration project with the related configuration guide as described in the following
documentation
httphelpsapcom SAP Solutions SAP Solution Manager Documentation for SAP Solution Manager
ltcurrent releasegt SAP Solution Manager Implementing and Upgrading SAP Solutions Projects
Configuration
More Information
httpservicesapcomsolutionmanager Media Library How-To Documents How to Create a
Configuration Guide using SAP Solution Manager
4 Post-Installation
48 Accessing Configuration Documentation in SAP Solution Manager
2012-12-17 CUSTOMER 4150
This page is left blank for documents that are printed on both sides
5 Additional Information
Only valid for ABAP+JavaJava |
51 Installing the Business Packages for SAP CRM Using JSPM (Optional)
You can also install the Business Packages for SAP CRM using the Java Support Package Manager (JSPM)
Prerequisites
Only valid for IBM i5OSUNIX |
You have checked hardware and software requirements [external document]End of IBM i5OSUNIX |
Only valid for Windows |
You have checked hardware and software requirements [external document]End of Windows |
You have ckecked the Prerequisites for the Business Packages for SAP CRM [page 7]
Procedure
1 Download version 701 of the files sapcom_BPCRMAPP sapcom_BPCRMFND sapcom_CRMAPP and
sapcom_CRMFND as follows
1 Go to httpservicesapcomswdc Download Support Packages and Patches Search for
Support Packages and Patches
2 Enter the following search terms
BP CRM Application Coding 701
BP CRM Application Content 701
BP CRM Foundation Coding 701
BP CRM Foundation Content 701
2 Add the deployment variable comsapcmshare as described in SAP Note 965948
For more information about how to use the Software Deployment Manager (SDM) see the
documentation Software Deployment Manager which is available at
httphelpsapcomnw70 SAP NetWeaver 70 Library (including Enhancement Package 2) English
SAP NetWeaver Library SAP NetWeaver Developerrsquos Guide Fundamentals Using Java Core Development
Tasks Deployment Putting It All Together Software Deployment Manager
3 Install the Business Packages for SAP CRM with JSPM as described in Installing Additional Usage Types
or Software Units in an Existing SAP System [external document]
5 Additional Information
51 Installing the Business Packages for SAP CRM Using JSPM (Optional)
2012-12-17 CUSTOMER 4350
4 Perform the required Post-Installation Steps for the Business Packages for SAP CRM [page 20]End of ABAP+JavaJava |
Only valid for ABAP+JavaJava |
52 Troubleshooting for the Business Package for SAP CRMOnly valid for ABAP+JavaJava |
The following sections describe the steps that you have to perform if you have problems after the
installation
Activating BI Templates Manually [page 44]
Dragging the Central Search onto the Portal Desktop [page 45]End of ABAP+JavaJava |
Only valid for ABAP+JavaJava |
521 Activating BI Templates Manually
If you have installed the Business Package you might see error messages when loading the BI templates
This procedure describes how you can activate the templates afterwards
Procedure
1 Note the technical name of all templates in your portal interface that are not working
2 Log on to your BI system
3 On the SAP Easy Access screen choose Modeling Administrator Workbench Modeling (transaction
RSA1 or RSOR)
4 Choose Business Content Object Types Web Template Name Select Objects
A new window containing a list of BW objects and templates opens
5 Find your missing templates for example 0TPL_0CRM_Cnn_Qnnn_Vnnn_M and select the entries
6 Choose Transfer Selection
The template now appears on the right-hand side of the screen The Transfer checkbox has been
selected and cannot be changed Nevertheless we recommend that you repeat the following
procedure so that your templates can be displayed
7 Select the template
8 Choose Transfer Transfer
Result
You have successfully activated your missing templates and no error messages appear in the portalEnd of ABAP+JavaJava |
5 Additional Information
52 Troubleshooting for the Business Package for SAP CRM
4450 CUSTOMER 2012-12-17
Only valid for ABAP+JavaJava |
522 Dragging the Central Search onto the Portal Desktop
Procedure
The Business Package for SAP CRM 70 including SAP enhancement package 1 contains an iView for
the central search in CRM This iView is in the package on the page Today in the workset Home of the
CRM User You can drag this iView onto the portal desktop under the tool areaEnd of ABAP+JavaJava |
End of ABAP+JavaJava |
5 Additional Information
52 Troubleshooting for the Business Package for SAP CRM
2012-12-17 CUSTOMER 4550
Typographic Conventions
Example Description
ltExamplegt Angle brackets indicate that you replace these words or characters with appropriate entries to make entries in the system for example ldquoEnter your ltUser Namegtrdquo
ExampleExample
Arrows separating the parts of a navigation path for example menu options
Example Emphasized words or expressions
Example Words or characters that you enter in the system exactly as they appear in the documentation
httpwwwsapcom Textual cross-references to an internet address
example Quicklinks added to the internet address of a homepage to enable quick access to specific content on the Web
123456 Hyperlink to an SAP Note for example SAP Note 123456
Example Words or characters quoted from the screen These include field labels screen titles pushbutton labels menu names and menu options
Cross-references to other documentation or published works
Example Output on the screen following a user action for example messages Source code or syntax quoted directly from a program File and directory names and their paths names of variables and parameters and
names of installation upgrade and database tools
EXAMPLE Technical names of system objects These include report names program names transaction codes database table names and key concepts of a programming language when they are surrounded by body text for example SELECT and INCLUDE
EXAMPLE Keys on the keyboard
4650 CUSTOMER 2012-12-17
SAP AGDietmar-Hopp-Allee 16
69190 WalldorfGermany
T +4918 0534 34 34F +4918 0534 34 20
wwwsapcom
copy Copyright 2012 SAP AG All rights reserved
No part of this publication may be reproduced or transmitted in any form or for any purpose without the express permission of SAP AG The information contained herein may be changed without prior noticeSome software products marketed by SAP AG and its distributors contain proprietary software components of other software vendors
Microsoft Windows Excel Outlook PowerPoint Silverlight and Visual Studio are registered trademarks of Microsoft CorporationIBM DB2 DB2 Universal Database System i System i5 System p System p5 System x System z System z10 z10 zVM zOS OS390 zEnterprise PowerVM Power Architecture Power Systems POWER7 POWER6+ POWER6 POWER PowerHA pureScale PowerPC BladeCenter System Storage Storwize XIV GPFS HACMP RETAIN DB2 Connect RACF Redbooks OS2 AIX Intelligent Miner WebSphere Tivoli Informix and Smarter Planet are trademarks or registered trademarks of IBM CorporationLinux is the registered trademark of Linus Torvalds in the United States and other countriesAdobe the Adobe logo Acrobat PostScript and Reader are trademarks or registered trademarks of Adobe Systems Incorporated in the United States and other countriesOracle and Java are registered trademarks of Oracle and its affiliatesUNIX XOpen OSF1 and Motif are registered trademarks of the Open GroupCitrix ICA Program Neighborhood MetaFrame WinFrame VideoFrame and MultiWin are trademarks or registered trademarks of Citrix Systems IncHTML XML XHTML and W3C are trademarks or registered trademarks of W3Creg World Wide Web Consortium Massachusetts Institute of TechnologyApple App Store iBooks iPad iPhone iPhoto iPod iTunes Multi-Touch Objective-C Retina Safari Siri and Xcode are trademarks or registered trademarks of Apple IncIOS is a registered trademark of Cisco Systems IncRIM BlackBerry BBM BlackBerry Curve BlackBerry Bold BlackBerry Pearl BlackBerry Torch BlackBerry Storm BlackBerry Storm2 BlackBerry PlayBook and BlackBerry App World are trademarks or registered trademarks of Research in Motion LimitedGoogle App Engine Google Apps Google Checkout Google Data API Google Maps Google Mobile Ads Google Mobile Updater Google Mobile Google Store Google Sync Google Updater Google Voice Google Mail Gmail YouTube Dalvik and Android are trademarks or registered trademarks of Google IncINTERMEC is a registered trademark of Intermec Technologies CorporationWi-Fi is a registered trademark of Wi-Fi AllianceBluetooth is a registered trademark of Bluetooth SIG IncMotorola is a registered trademark of Motorola Trademark Holdings LLCComputop is a registered trademark of Computop Wirtschaftsinformatik GmbHSAP R3 SAP NetWeaver Duet PartnerEdge ByDesign SAP BusinessObjects Explorer StreamWork SAP HANA and other SAP products and services mentioned herein as well as their respective logos are trademarks or registered trademarks of SAP AG in Germany and other countriesBusiness Objects and the Business Objects logo BusinessObjects Crystal Reports Crystal Decisions Web Intelligence Xcelsius and other Business Objects products and services mentioned herein as well as their respective logos are trademarks or registered trademarks of Business Objects Software Ltd Business Objects is an SAP companySybase and Adaptive Server iAnywhere Sybase 365 SQL Anywhere and other Sybase products and services mentioned herein as well as their respective logos are trademarks or registered trademarks of Sybase Inc Sybase is an SAP company
2012-12-17 CUSTOMER 4750
Crossgate mgic EDDY B2B 360deg and B2B 360deg Services are registered trademarks of Crossgate AG in Germany and other countries Crossgate is an SAP companyAll other product and service names mentioned are the trademarks of their respective companies Data contained in this document serves informational purposes only National product specifications may varyThese materials are subject to change without notice These materials are provided by SAP AG and its affiliated companies (ldquoSAP Grouprdquo) for informational purposes only without representation or warranty of any kind and SAP Group shall not be liable for errors or omissions with respect to the materials The only warranties for SAP Group products and services are those that are set forth in the express warranty statements accompanying such products and services if any Nothing herein should be construed as constituting an additional warranty
DisclaimerSome components of this product are based on Javatrade Any code change in these components may cause unpredictable and severe malfunctions and is therefore expressly prohibited as is any decompilation of these componentsAny Javatrade Source Code delivered with this product is only to be used by SAPrsquos Support Services and may not be modified or altered in any way
Documentation in the SAP Service MarketplaceYou can find this document at the following address httpservicesapcominstguides
4850 CUSTOMER 2012-12-17
SAP AGDietmar-Hopp-Allee 1669190 WalldorfGermanyT +4918 0534 34 34F +4918 0534 34 20wwwsapcom
copy Copyright 2012 SAP AG All rights reservedNo part of this publication may be reproduced or transmitted in any form or for any purpose without the express permission of SAP AG The information contained herein may be changed without prior notice
- SAP Enhancement Package 1 for SAP CRM 70
-
- Table of Contents
- 1 Introduction
- 2 Planning and Preparation
-
- 21 Prerequisites for the Business Packages for SAP CRM
-
- 3 Installation
- 4 Post-Installation
-
- 41 Checking the Availability of Back-End Systems for SAP CRM Java Components
-
- 411 Creating a Back-End User
- 412 Checking the Connection to the ABAP System
- 413 Configuring and Checking the TREX Service
- 414 Checking the Selling via eBay Processes
-
- 42 Post-Installation Steps for Workforce Deployment Application and Calculation Services
-
- 421 Implementing WFMCORE 200 Using Transaction SAINT
- 422 Configuring the Extended Configuration Management (XCM) for WFD Application and Calculation Services
- 423 Checking Workforce Deployment Calculation Services
- 424 Checking the Installation of WFD Application Services and WFD Calculation Services
-
- 43 Post-Installation Steps for the Business Packages for SAP CRM
-
- 431 Creating Roles for the SAP CRM Business Packages
- 432 Installation of the Info Center for the SAP CRM Business Package
-
- 4321 Importing the SAP CRM Info Center Configurations and Directory Structure
- 4322 Activating Manual Ordering of Folders for the sapcrm Repository
- 4323 Creating Indexes and Taxonomies for the sapcrmnews Repository
- 4324 Creating the Index for the sapcrm Repository
- 4325 Configuring the Personal Search
- 4326 Increasing the Number of JCo Connections
-
- 44 Post-Installation Steps for MapBox
-
- 441 Assigning User Groups for MapBox Users
- 442 Configuring an RFC Destination for MapBox
- 443 Performing Initial Configuration for MapBox
- 444 Executing the MapBox
- 445 Performing the Smoke Test for MapBox
- 446 Ensuring Optimal Block Size settings
- 447 Adapting Memory Settings for the J2EE Engine
-
- 45 Activating the CRM Web Client
- 46 Installing and Configuring CRM Application Server Loyalty Add-On Component
- 47 Starting XCM
- 48 Accessing Configuration Documentation in SAP Solution Manager
-
- 5 Additional Information
-
- 51 Installing the Business Packages for SAP CRM Using JSPM (Optional)
- 52 Troubleshooting for the Business Package for SAP CRM
-
- 521 Activating BI Templates Manually
- 522 Dragging the Central Search onto the Portal Desktop
-
- Copyright and trademarks
-
Procedure
Creating Indexes and Taxonomies for the sapcrmnews Repository
The Business Package contains an iView ndash epbp_crmchm-pmiviewsnews_flash ndash that combines all
news with the istopnews=yes attribute in a virtual folder To guarantee the function of this iView
create two indexes in KM
1 In the SAP NetWeaver Enterprise Portal choose System Administration System Configuration
Knowledge Management Index Administration
2 Create an index of the Search and Classification type with a suitably configured taxonomy
3 Choose sapcrmpartnernews as the index ID Otherwise the path to the folder specified in the iView
is incorrect
If you choose another index ID you must also modify accordingly the folder properties in the
iView for one of the following
Folders path to content and path to root
Folders Path to Initially Displayed Folder and Path to Root Folder for Navigation
If you want to link two portal servers with a TREX server you must modify the index name and
iView properties on one of the portal servers
4 Assign folder sapcrmpartnerPartnernews as a data source
This moves all news with the (virtual) Top flag from this folder to the Newsflash iView
5 Create a ldquoquery-basedrdquo taxonomy with the name PartnerNewsFlash choosing Automatic
Classification before you save the taxonomy
NOTE
The outbound delivery includes only the iView above for virtually combining news If you
also want to use this functionality for other news channels (for example internal news) use
your own index and taxonomy for each channel
For more information see the SAP Library at
httphelpsapcomnw70 SAP NetWeaver 70 Library (including Enhancement Package 2) English SAP
NetWeaver Library SAP NetWeaver by Key Capability Information Integration by Key Capability Knowledge
Management Administration Guide System Administration System Configuration lsquoIndex Administrationrsquo iView
Creating Queries for the Taxonomies of sapcrmnews Repositories
1 Log on to the portal as content manager
2 Choose Content Management Classification Taxonomy Query Builder
3 Add a search query to check the istopnews property for the value Yes
4 Enter PartnerNewsFlash as the name for the taxonomy
Here too a property of the iView links to a taxonomy with this name So if you want to choose
another name you must modify the path to the content folder property of the iView
For more information see the SAP Library at
4 Post-Installation
43 Post-Installation Steps for the Business Packages for SAP CRM
2450 CUSTOMER 2012-12-17
httphelpsapcomnw70 SAP NetWeaver 70 Library (including Enhancement Package 2) English SAP
NetWeaver Library SAP NetWeaver by Key Capability Information Integration by Key Capability Knowledge
Management Administration Guide System Administration System Configuration Taxonomies and ClassificationEnd of ABAP+JavaJava |
Only valid for ABAP+JavaJava |
4324 Creating the Index for the sapcrm Repository
To make Info center documents available for indexing and searching create a new index with sapcrm
as a data source
Prerequisites
You have administrator rights for Knowledge Management on the server
Procedure
Choose a name of your own Search as a service and standard as a crawler parameter
For more information see the SAP Library at
httphelpsapcomnw70 SAP NetWeaver 70 Library (including Enhancement Package 2) English SAP
NetWeaver Library SAP NetWeaver by Key Capability Information Integration by Key Capability Knowledge
ManagementEnd of ABAP+JavaJava |
Only valid for ABAP+JavaJava |
4325 Configuring the Personal Search
Prerequisites
You have administrator rights for Knowledge Management on the server
Procedure
1 Create an index for the userhome repository
To make personal folder documents available for the search create a new index with root
userhome as the data source
2 Create a search option set for personal search
To assign the search index and a start folder to the search for personal documents create a Search
Option Set with the name CRMPersonalFolderSearch As an index enter the index for the
userhome repository created above and ~alias~userhomeuseridPersonal Documents as the
root folder for the search
For more information see the SAPLibrary at
4 Post-Installation
43 Post-Installation Steps for the Business Packages for SAP CRM
2012-12-17 CUSTOMER 2550
httphelpsapcomnw70 SAP NetWeaver 70 Library (including Enhancement Package 2) English SAP
NetWeaver Library SAP NetWeaver by Key Capability Information Integration by Key Capability Knowledge
Management End of ABAP+JavaJava |
Only valid for ABAP+JavaJava |
4326 Increasing the Number of JCo Connections
This section tells you how to increase the number of concurrent Java Connector (JCo) connections
By default the maximum number of concurrent JCo connections is 100 The value depends on the
number and behavior of the users in the portal For more information see SAP Note 316877
You can specify this value when you plan the installation of your SAP NetWeaver Enterprise Portal
Make sure that you first analyze the number and behavior of the users
Procedure
To increase the maximum number of concurrent JCo connections increase the value of the
environment variable CPIC_MAX_CONV
EXAMPLE
Initial default value CPIC_MAX_CONV=100
Increased value CPIC_MAX_CONV=1000
End of ABAP+JavaJava |
End of ABAP+JavaJava |
End of ABAP+JavaJava |
Only valid for ABAP+JavaJava | MapBox (MBX) |
44 Post-Installation Steps for MapBoxOnly valid for Java | MapBox (MBX) |
You have to perform the following post-installation steps for MapBox
You assign user groups for MapBox users [page 27]
You configure an RFC destination for TCPIP connections [page 28]
You perform initial configuration for MapBox [page 28]
You execute the Map Box [page 34]
You perform the smoke test [page 35]
If required you perform additional settings for MapBox
Block size settings [page 38]
Memory settings for the J2EE Engine [page 39]End of Java | MapBox (MBX) |
4 Post-Installation
44 Post-Installation Steps for MapBox
2650 CUSTOMER 2012-12-17
Only valid for Java | MapBox (MBX) |
441 Assigning User Groups for MapBox Users
To access the MapBox URL you need to provide the correct security rights for individual user groups
Procedure
1 Log on to the Visual Administrator
1 On your central instance host change to the following directory
Only valid for IBM i5OSUNIX |
usrsapltSAPSIDgtltinstance_numbergtj2eeadmin
End of IBM i5OSUNIX |
Only valid for Windows |
usrsapltSAPSIDgtltinstance_numbergtj2eeadmin
End of Windows |
2 Only valid for IBM i5OSUNIX |
Run goshEnd of IBM i5OSUNIX |
3 Only valid for Windows |
Double-click gobatEnd of Windows |
For more information about the Visual Administrator see the SAP Library at
httpshelpsapcomnw70 SAP NetWeaver Library SAP NetWeaver by Key Capability
Application Platform by Key Capability Java Technology Administration Manual J2EE Engine J2EE Engine
Administration Tools
2 Choose the server node from the left-hand window
3 Choose Services Security Provider
A list of deployed components is displayed
4 Choose MapBoxLauncher from this list (sapcom
comsapsyncpointmapboxlaunchermapboxlauncher)
A list of tabs appears on the right
5 Choose Security Roles from the list
A list of security roles appears
6 If no display and modify roles are displayed add these roles as follows
1 Choose Switch to Edit Mode from the top task bar to switch to edit mode
2 Add display and modify roles by choosing Add
7 For both the display and modify roles perform the following
1 Choose Switch to Edit Mode from the top task bar to switch to edit mode
2 Choose the Groups tab from the list on the far right
3 Choose Search
4 Post-Installation
44 Post-Installation Steps for MapBox
2012-12-17 CUSTOMER 2750
A list of user groups appears
4 Select the user groups that you want to enable for the two roles
Add to the left of the user group display is now highlighted
5 Choose Add to add the user group for the selected roleEnd of Java | MapBox (MBX) |
Only valid for Java | MapBox (MBX) |
442 Configuring an RFC Destination for MapBox
After the installation you have to create an RFC destination for MapBox
Procedure1 Log on to the CRM server
2 Enter transaction SM59
The Display and Maintain RFC Destinations screen appears
3 Choose Technical Settings Activation Type and create a new destination with the type TCPIP
4 Choose Registered Server Program and enter a unique value for program ID
For example you might enter MAPBOX723 for SAP client 723
5 Enter the details of the gateway host and gateway service in Gateway Options
1 Gateway host
Enter the name of your message server You can also enter the IP address of your message
server
2 Gateway service
Enter your SAP CRM system number prefixed with the string sapgw
For example if your system number is 02 enter sapgw02
6 If the CRM system is a Unicode-enabled system choose Unicode in Special Options
7 Save the destination
8 Choose MapBox Configuration Page Connecting settings from the URL and enter the same RFC
destination name in the relevant fieldEnd of Java | MapBox (MBX) |
Only valid for Java | MapBox (MBX) |
443 Performing Initial Configuration for MapBox
Procedure1 Open a browser window and enter the following URL
httplthostnamegtltport_numbergtmapboxlauncher
NOTE
If you are logged on to the machine where the J2EE server is running you can also enter the
following URL
4 Post-Installation
44 Post-Installation Steps for MapBox
2850 CUSTOMER 2012-12-17
httplocalhostltport_numbergtmapboxlauncher
2 Choose Configuration
3 Edit the values according to your SAP system and choose Save
The application asks you to enter a user name and password
4 Enter the user name and password used for the SAP J2EE Engine Visual Administrator
A description of the properties and example values for the properties is given below
Result
You see the default connection settings for MapBox as shown in the graphic below A description
of the properties and example values are provided in the adjacent table
Figure 1 MapBox Default Connection Settings
Property Purpose Example
SAP System SAP System name ABC FAZ
Message Server Message server host name xyzmain
Group SAP System group PUBLIC SPACE
System Number SAP Gateway system number prefixed with sapgw
sapgw02
Unicode Used for setting the Unicode option for the CRM server Default value is no
yes
Maximum allowed wait time interval between ISP Processing and Commit call
Time-out period between an ISP_MAPBOX call and an ISP_COMMIT call
300
4 Post-Installation
44 Post-Installation Steps for MapBox
2012-12-17 CUSTOMER 2950
Property Purpose Example
Client SAP logon client 723
User Name SAP logon user John
Password SAP logon password
Language SAP logon language EN
Destination The RFC destination with which you need to register the MapBox This is the value you enter in step 3 of Configuring an RFC Destination for MapBox [page 28]
MAPBOX723
Number of server instances The number of JCO server execution instances used by the MapBox to process server requests This number indicates the number of CRM inbound queues that are running simultaneously
10
The above MapBox connection configuration is meant for one SAP client running with the CRM
Server If you want to run the MapBox with two or more SAP clients of the same CRM system
you can use Add Client on the configuration page and edit the values accordingly However make
sure that the RFC destinations that these multiple clients listen to are always unique You can
leave the default values for the other settings
If you need more control over logging and tracing you can go to Log Settings on the configuration
page edit the values and choose Save The Log Settings screen with default values is shown in the
graphic below A description of the properties and example values for the properties is provided
in the adjacent table
Figure 2 Default Values for the Log Settings Screen
4 Post-Installation
44 Post-Installation Steps for MapBox
3050 CUSTOMER 2012-12-17
Property Purpose Example
Log and dumps directory This value specifies where the MapBox logs and dumps are stored If this field is left blank the ltuser_homegt folder is used as default value
Only valid for Windows |
Ctemp
End of Windows |
Only valid for IBM i5OSUNIX |
tmp
End of IBM i5OSUNIX |
Input payload dump This value specifies whether the input document coming to MapBox for processing is written or not
No
MapBox launcher trace level This value specifies with what granularity the MapBoxLauncher execution trace is generated6 specifies that a full MapBoxLauncher execution trace is generated whereas 0 specifies that the MapBoxLauncher execution trace is not generated Recommended value for production use is 0
0
MapBox launcher trace size The maximum file size of the generated trace When the size reaches the maximum value another file is created so that the old file can be deleted (for example due to lack of space) You can use alphabetic suffixes to specify the sizes The supported values are k or K ndash kilobytes g or G ndash gigabytes m or M ndash megabytes t or T ndash terabytes
50 k
CoordServer log level This value specifies the detail of the coordination server logging We recommended you not to change the default value of 1
2
SAP Java connector trace level This value specifies the detail of the SAP Java Connector logging The recommended value for production use is 0
2
MapBox log level The log level required for the MapBox to generate an internal log file A higher trace level means that a more detailed log file is created We recommend you to use 4D for production systems where D meansldquoOn Demandrdquo
2
4 Post-Installation
44 Post-Installation Steps for MapBox
2012-12-17 CUSTOMER 3150
Property Purpose Example
MapBox message dumps This value stands for copying the incoming and outgoing messages to the local system For better performance we recommend that you do not enable the message dump option
no
MapBox statistics This value specifies whether a file that lists the performance measurements of the MapBox is created We recommend you to use the value no for production use
no
MapBox logs location This value specifies where the MapBox logs are stored Possible locations are the MapBox repository on the CRM Server or the local file system The recommended value for production use is local_fs which indicates that the MapBox logs are stored on the local file system
local_fs
MapLog format The format in which the MapBox log file must be created The internal log file is by default created in a particular format However you can change this format to display the file in the SAP log file format The two values that are available are default and sap_log
default
The MapBox uses additional properties for performance such as caching and reuse of the MapBox
atoms These values are already set to optimum values and you cannot change them
The description of the properties is shown in the table below
Property Purpose Example
General Settings
max_elements_document This is the limit for the internal cache of the MapBox to hold the count of generated XML documentsWe recommend you not to change this value
100
cache_threshold This is the maximum threshold ndash in kilobytes ndash for a document to be cached in the internal cache of the MapBox
500
4 Post-Installation
44 Post-Installation Steps for MapBox
3250 CUSTOMER 2012-12-17
Property Purpose ExampleWe recommend you not to change this value
max_elements_cache This is the limit for the internal cache of the MapBox to hold the count of MapScenariosWe recommend you not to change this value
100
parallel_instances You use this value on systems where more than one CPU is used This setting allows you to specify the number of CPU instances that MapBox must use for processing so that the remainder can be used by non-MapBox related applications By default MapBox uses all the available CPUs for processing Values can range between 0 to N-1 where N is the number of available CPUs
4
thread_priority Specifies the number of threads MapBox uses during processing We recommend you to set an optimum value for this property so that MapBox does not utilize all available resources 0 = min 1 = low 2 = normal 3 = high 4 = max
3
reuse_count Sets the count for the number of times an atom-instance must be reused before it is destroyed A value of 0 means that the atom is not destroyed and can be used continuously Recommended value is 50 This means that the atom instance is reused 50 times before it is destroyed
100
Lock Server Settings
Operation_Mode The internal mode of operation for the coordination server We recommend not to change the default value of OUTPROC_CLIENT
OUTPROC_CLIENT
Registry_Port The Remote Method Invocation (RMI) port used for connecting to the coordination serverRMI is a Java mechanism for distributed computing
1099
4 Post-Installation
44 Post-Installation Steps for MapBox
2012-12-17 CUSTOMER 3350
Property Purpose ExampleDo not change this value unless port 1099 is unavailable In this case change it to 59856
HostName The name of the host where the coordination server resides
localhost
LocalName The name of the host where the MapBoxLauncher is executed We recommend you not to change the default value of localhost
Server
PollingInterval Polling interval in seconds to ask for shutdown of the coordination server We recommend you not to change the default value of 30
60
CleanUpInterval Cleanup interval in seconds to check for invalid locks created by the MapBoxLauncher We recommend you not to change the default value of 60
180
NOTE
A file name MapLogxsl is also available with the smoke test [page 35] This file is the stylesheet
that is used to format the display of the MapBox log file During the installation and execution
of the MapBox the MapBox log file is created in the following directory
Only valid for Windows |
ltUser_homegtTempMapBoxDumpsltyour_system_namegt500 where ltuser_homegt is the
home directory of the logged-on user ltyour system namegt is the CRM server you have
connected to and 500 is the client you have connected toEnd of Windows |
Only valid for IBM i5OSUNIX |
ltUser_homegtTempMapBoxDumpsltyour_system_namegt500 where ltuser_homegt is the
home directory of the logged-on user ltyour system namegt is the CRM server you have
connected to and 500 is the client you have connected toEnd of IBM i5OSUNIX |
RECOMMENDATION
We recommend that you copy MapLogxsl from the
ltsmoke_test_installation_directorygt to the directory mentioned aboveEnd of Java | MapBox (MBX) |
Only valid for Java | MapBox (MBX) |
444 Executing the MapBox
This section tells you how to execute the MapBox The procedure that you use to execute the Map Box
depends on its current support package (SP) level
4 Post-Installation
44 Post-Installation Steps for MapBox
3450 CUSTOMER 2012-12-17
Procedure
If the SP level of the MapBox is less than SP11 proceed as follows
1 Enter the following URL in your browser
httplthostnamegtltport_numbergtmapboxlaunchermanage
2 Choose Start MapBox
3 The application prompts you for a user name and password
Enter the user name and password for the J2EE Engine Visual Administrator
NOTE
MapBox typically takes 30 to 60 seconds to initialize depending on the number of SAP clients
To see the status of messages processed by MapBox choose Status
If the SP level of the MapBox is equal to or higher than SP11 the MapBox starts automatically
1 For the first MapBox installation you need to restart the Java application server (AS Java) after all
the configuration settings have been completed This automatically starts the MapBox (Autostart)
2 To check the status go to the URL httplthostnamegtltport_numbergtmapboxlauncher
manage
NOTE
MapBox Autostart needs approximately 60 seconds to allow other services of As Java to start
To see the status of messages processed by MapBox choose Status
Result
When the MapBox is running the status is shown as Ready to processEnd of Java | MapBox (MBX) |
Only valid for Java | MapBox (MBX) |
445 Performing the Smoke Test for MapBox
The smoke test checks whether the MapBox installation is error-free
Only valid for Windows |
To execute the smoke test you have to run two batch filesEnd of Windows |
Only valid for IBM i5OSUNIX |
To execute the smoke test you have to run two shell scriptsEnd of IBM i5OSUNIX |
Prerequisites
Before you start the procedure you need to copy the smoketestjar file to a new
ltsmoke_test_installation_directorygt of your choice which has two further subdirectories
firstrun and secondrun
4 Post-Installation
44 Post-Installation Steps for MapBox
2012-12-17 CUSTOMER 3550
You can find the smoketestjar file here
Only valid for IBM i5OSUNIX |
usrsapltinstance_IDgtJCltinstance_numbergtj2eeclusterserver0binext
comsapsyncpointmapboxEnd of IBM i5OSUNIX |
Only valid for Windows |
usrsapltinstance_IDgtJCltinstance_numbergtj2eeclusterserver0binext
comsapsyncpointmapboxEnd of Windows |
NOTE
Each subdirectory of ltsmoke_test_installation_directorygt ndash that is firstrun and
secondrun ndash contains the following files
MBSMOKETEST_IN_000xml
MBSMOKETEST_IN_001xml
MBSMOKETEST_IN_002xml
MBSMOKETEST_IN_003xml
After executing the smoke test you must verify whether the contents of the files generated
by your test are similar to the contents of the above files That is the XML documents that
are created in the smoke test must match the documents located in the
ltsmoke_test_installation_directorygt mentioned above
To execute the smoke test you need to install the SAP Java Connector (SAP JCo version 2012)
You have to download SAP JCo 2012 from SAP Service Marketplace at https
servicesapcomswdc before executing the smoke test
CAUTION
Make sure that you install the SAP Java Connector correctly
The file mapcaseprop is available in the ltsmoke_test_installation_directorygt This file
contains the connection parameters to be tested You can modify the contents of this file
CAUTION
You must replace the connection parameters in this file with the connection parameters that
you entered in the MapBoxMetaxml file
Procedure
1 Run the first stage of the smoke test
1 Only valid for Windows |
Execute the file smoketest_1bat from the ltsmoke_test_installation_directorygtEnd of Windows |
Only valid for Windows |
This prompts you to enter the followingEnd of Windows |
4 Post-Installation
44 Post-Installation Steps for MapBox
3650 CUSTOMER 2012-12-17
Only valid for Windows |
1 ltDRIVEgtusrsapltinstance_IDgtJCltinstance_numbergtj2ee
2 ltsmoke_test_installation_directorygt
3 ltpath_to_sapjcojargt
End of Windows |
Only valid for IBM i5OSUNIX |
Execute the file smoketest_1sh from the ltsmoke_test_installation_directorygtEnd of IBM i5OSUNIX |
Only valid for IBM i5OSUNIX |
1 usrsapltinstance_IDgtJCltinstance_numbergtj2ee
2 ltsmoke_test_installation_directorygt
3 ltpath_to_sapjcojargt
End of IBM i5OSUNIX |
2 Enter the appropriate paths
The smoke test creates the following files
MBSMOKETEST_IN_000xml
MBSMOKETEST_IN_001xml
MBSMOKETEST_IN_002xml
MBSMOKETEST_IN_003xml
3 Only valid for Windows |
Check the contents of the generated files against the contents of the files located in
ltsmoke_test_installation_directorygtSMOKETESTfirstrunEnd of Windows |
Only valid for IBM i5OSUNIX |
Check the contents of the four files against the contents of the files located in
ltsmoke_test_installation_directorygtSMOKETESTfirstrunEnd of IBM i5OSUNIX |
2 Run the second stage of the smoke test
1 Only valid for Windows |
Execute the file smoketest_2bat which is located in the
ltsmoke_test_installation_directorygtEnd of Windows |
Only valid for IBM i5OSUNIX |
Execute the file smoketest_2sh which is located in the
ltsmoke_test_installation_directorygtEnd of IBM i5OSUNIX |
This prompts you to enter the following
Only valid for Windows |
1 ltDRIVEgtusrsapltinstance_IDgtJCltinstance_numbergtj2ee
2 ltsmoke_test_installation_directorygt
End of Windows |
4 Post-Installation
44 Post-Installation Steps for MapBox
2012-12-17 CUSTOMER 3750
Only valid for IBM i5OSUNIX |
1 usrsapltinstance_IDgtJCltinstance_numbergtj2ee
2 ltsmoke_test_installation_directorygt
End of IBM i5OSUNIX |
2 Enter the appropriate paths
The smoke test creates the following files
MBSMOKETEST_IN_000xml
MBSMOKETEST_IN_001xml
MBSMOKETEST_IN_002xml
MBSMOKETEST_IN_003xml
CAUTION
The files generated in the second stage of testing overwrite the contents of the files
generated in the first stage
3 Only valid for Windows |
Check the contents of the generated files against the contents of the files located in
ltsmoke_test_installation_directorygtSMOKETESTsecondrunEnd of Windows |
Only valid for IBM i5OSUNIX |
Check the contents of the four files against the contents of the files located in
ltsmoke_test_installation_directorygtSMOKETESTsecondrunEnd of IBM i5OSUNIX |
Result
If the smoke test has identified errors in the installation process the four XML files are not created in
either of the stages Instead an error log file is created
RECOMMENDATION
In the event of errors we recommend that you send the error log file to your administrator
End of Java | MapBox (MBX) |
Only valid for Java | MapBox (MBX) |
446 Ensuring Optimal Block Size settings
The block size of an object determines the number of messages that are processed at the same time by
the MapBox as a set You need to make sure that the block sizes are optimal to reduce load on the
MapBox XML processor
Procedure
1 Use transaction R3AC3 to set the block size of object GWA_COUNTRY to 10 and save the setting
2 Use transaction R3AC1 to set the block size of object BUPA_MAIN to 10 and save the settingEnd of Java | MapBox (MBX) |
4 Post-Installation
44 Post-Installation Steps for MapBox
3850 CUSTOMER 2012-12-17
Only valid for ABAP+JavaJava | MapBox (MBX) |
447 Adapting Memory Settings for the J2EE Engine
You need to adapt the memory settings for the J2EE Engine because MapBox relies heavily on memory-
intensive XML-processing such as schema-validation parsing transformation and so on
RECOMMENDATION
For rapid message processing by MapBox we recommend you to use 1024 MB of heap memory
for MapBox alone With a heap size of 512 MB MapBox can still process messages but with a slightly
higher processing time for each message
The MapBox memory requirements are directly proportional to the size of the input documents
that MapBox has to process The average size of such documents is in the range of 150 to 200 KB
For messages of this size it is sufficient to have a heap memory of 512 MB If the input documents
are in the range of 1 to 2 MB we recommend that you give MapBox a heap memory of 1024 MB
Procedure
To set the recommended memory settings for the MapBox you start the config tool of the J2EE Engine
Only valid for Windows |
Start the config tool by executing ltDrivegtusrsapltSAPSIDgtltinstance_numbergtj2ee
configtoolbatEnd of Windows |
Only valid for IBM i5OSUNIX |
Start the config tool by executing usrsapltSAPSIDgtltinstance_numbergtj2eeconfigtoolshEnd of IBM i5OSUNIX |
End of ABAP+JavaJava | MapBox (MBX) |
End of ABAP+JavaJava | MapBox (MBX) |
Only valid for ABAPABAP+Java |
45 Activating the CRM Web Client
The CRM Web Client is part of the ICF Services that is automatically installed as part of SAP NetWeaver
Application Server
Procedure
To activate the CRM Web Client after the installation see the SAP Library at
httphelpsapcomnw70 SAP NetWeaver 70 Library (including Enhancement Package 2) English SAP
NetWeaver Library SAP NetWeaver by Key Capability Application Platform by Key Capability Platform-Wide
Services Connectivity Components of SAP Communication Technology Communication Between ABAP and Non-
4 Post-Installation
45 Activating the CRM Web Client
2012-12-17 CUSTOMER 3950
ABAP Technology Internet Communication Framework Development Server-Side Development Creating and
Configuring an ICF Service Activating and Deactivating the ICF ServicesEnd of ABAPABAP+Java |
Only valid for ABAP |
46 Installing and Configuring CRM Application Server Loyalty Add-On Component
This section provides information about how to install and configure CRM Application Server Loyalty
as an add-on component to CRM Application Server ABAP
Prerequisites
You have already deployed the following software components
SAP NetWeaver Application Server ABAP (AS ABAP)
CRM Application Server ABAP
Procedure
Installing CRM Application Server Loyalty
Install CRM Application Server Loyalty on the same host where CRM Application Server ABAP is
deployed as described in SAP Note 1162144
Configuring CRM Application Server Loyalty
After you have installed CRM Application Server Loyalty you must complete the following
configuration steps
1 Call transaction nspro
2 Choose SAP Customising Implementation Guide Customer Relationship Management Marketing Loyalty
Management in BBPCRM Basic Settings Define Basic Settings
3 Enter value 1 for the INSTALL_TYPE parameter
NOTE
You do not have to enter destination name for the LOYALTY_SYSTEM parameterEnd of ABAP |
47 Starting XCM
This section describes how to start XCM
Procedure
1 You access the XCM tool at
httplthostgtltportgtltweb app namegtadminxcminitdo
4 Post-Installation
46 Installing and Configuring CRM Application Server Loyalty Add-On Component
4050 CUSTOMER 2012-12-17
NOTE
You can also start XCM in accessibility mode (according to Section 508 Rehabilitation Act)
at the following URL
httplthostgtltportgtltweb app namegtadminxcminitdosap-accessibility=x
2 Provide a user and password If you are logging on for the first time use the Administrator user
and the password you defined during the installation of the SAP system
RECOMMENDATION
We recommend you create new users with lesser rights than the Administrator for the
administration of Web applications
For more information see the SAP CRM Security Guide section E-Commerce
3 When the application opens a closed control tree is displayed on the left of the screen A screen
containing help information is displayed to the right
You can use edit (change settings) or display (see settings) mode in XCM You use the button in
the top right hand corner of the screen to change between modes When you switch to edit mode
a DB lock is set meaning that only this user can edit the settings at one time The lock is released
once the user switches back to display mode or after session timeout (default timeout is 30mins)
48 Accessing Configuration Documentation in SAP Solution Manager
To access configuration documentation in SAP Solution Manager you have to connect your newly
installed SAP system to SAP Solution Manager
NOTE
For SAP NetWeaver you can also find configuration documentation in the Technology Consultants
Guide at
httphelpsapcomnw70 SAP NetWeaver 70 Library (including Enhancement Package 2) English
SAP NetWeaver Library Technology Consultants Guide
Procedure
Create a configuration project with the related configuration guide as described in the following
documentation
httphelpsapcom SAP Solutions SAP Solution Manager Documentation for SAP Solution Manager
ltcurrent releasegt SAP Solution Manager Implementing and Upgrading SAP Solutions Projects
Configuration
More Information
httpservicesapcomsolutionmanager Media Library How-To Documents How to Create a
Configuration Guide using SAP Solution Manager
4 Post-Installation
48 Accessing Configuration Documentation in SAP Solution Manager
2012-12-17 CUSTOMER 4150
This page is left blank for documents that are printed on both sides
5 Additional Information
Only valid for ABAP+JavaJava |
51 Installing the Business Packages for SAP CRM Using JSPM (Optional)
You can also install the Business Packages for SAP CRM using the Java Support Package Manager (JSPM)
Prerequisites
Only valid for IBM i5OSUNIX |
You have checked hardware and software requirements [external document]End of IBM i5OSUNIX |
Only valid for Windows |
You have checked hardware and software requirements [external document]End of Windows |
You have ckecked the Prerequisites for the Business Packages for SAP CRM [page 7]
Procedure
1 Download version 701 of the files sapcom_BPCRMAPP sapcom_BPCRMFND sapcom_CRMAPP and
sapcom_CRMFND as follows
1 Go to httpservicesapcomswdc Download Support Packages and Patches Search for
Support Packages and Patches
2 Enter the following search terms
BP CRM Application Coding 701
BP CRM Application Content 701
BP CRM Foundation Coding 701
BP CRM Foundation Content 701
2 Add the deployment variable comsapcmshare as described in SAP Note 965948
For more information about how to use the Software Deployment Manager (SDM) see the
documentation Software Deployment Manager which is available at
httphelpsapcomnw70 SAP NetWeaver 70 Library (including Enhancement Package 2) English
SAP NetWeaver Library SAP NetWeaver Developerrsquos Guide Fundamentals Using Java Core Development
Tasks Deployment Putting It All Together Software Deployment Manager
3 Install the Business Packages for SAP CRM with JSPM as described in Installing Additional Usage Types
or Software Units in an Existing SAP System [external document]
5 Additional Information
51 Installing the Business Packages for SAP CRM Using JSPM (Optional)
2012-12-17 CUSTOMER 4350
4 Perform the required Post-Installation Steps for the Business Packages for SAP CRM [page 20]End of ABAP+JavaJava |
Only valid for ABAP+JavaJava |
52 Troubleshooting for the Business Package for SAP CRMOnly valid for ABAP+JavaJava |
The following sections describe the steps that you have to perform if you have problems after the
installation
Activating BI Templates Manually [page 44]
Dragging the Central Search onto the Portal Desktop [page 45]End of ABAP+JavaJava |
Only valid for ABAP+JavaJava |
521 Activating BI Templates Manually
If you have installed the Business Package you might see error messages when loading the BI templates
This procedure describes how you can activate the templates afterwards
Procedure
1 Note the technical name of all templates in your portal interface that are not working
2 Log on to your BI system
3 On the SAP Easy Access screen choose Modeling Administrator Workbench Modeling (transaction
RSA1 or RSOR)
4 Choose Business Content Object Types Web Template Name Select Objects
A new window containing a list of BW objects and templates opens
5 Find your missing templates for example 0TPL_0CRM_Cnn_Qnnn_Vnnn_M and select the entries
6 Choose Transfer Selection
The template now appears on the right-hand side of the screen The Transfer checkbox has been
selected and cannot be changed Nevertheless we recommend that you repeat the following
procedure so that your templates can be displayed
7 Select the template
8 Choose Transfer Transfer
Result
You have successfully activated your missing templates and no error messages appear in the portalEnd of ABAP+JavaJava |
5 Additional Information
52 Troubleshooting for the Business Package for SAP CRM
4450 CUSTOMER 2012-12-17
Only valid for ABAP+JavaJava |
522 Dragging the Central Search onto the Portal Desktop
Procedure
The Business Package for SAP CRM 70 including SAP enhancement package 1 contains an iView for
the central search in CRM This iView is in the package on the page Today in the workset Home of the
CRM User You can drag this iView onto the portal desktop under the tool areaEnd of ABAP+JavaJava |
End of ABAP+JavaJava |
5 Additional Information
52 Troubleshooting for the Business Package for SAP CRM
2012-12-17 CUSTOMER 4550
Typographic Conventions
Example Description
ltExamplegt Angle brackets indicate that you replace these words or characters with appropriate entries to make entries in the system for example ldquoEnter your ltUser Namegtrdquo
ExampleExample
Arrows separating the parts of a navigation path for example menu options
Example Emphasized words or expressions
Example Words or characters that you enter in the system exactly as they appear in the documentation
httpwwwsapcom Textual cross-references to an internet address
example Quicklinks added to the internet address of a homepage to enable quick access to specific content on the Web
123456 Hyperlink to an SAP Note for example SAP Note 123456
Example Words or characters quoted from the screen These include field labels screen titles pushbutton labels menu names and menu options
Cross-references to other documentation or published works
Example Output on the screen following a user action for example messages Source code or syntax quoted directly from a program File and directory names and their paths names of variables and parameters and
names of installation upgrade and database tools
EXAMPLE Technical names of system objects These include report names program names transaction codes database table names and key concepts of a programming language when they are surrounded by body text for example SELECT and INCLUDE
EXAMPLE Keys on the keyboard
4650 CUSTOMER 2012-12-17
SAP AGDietmar-Hopp-Allee 16
69190 WalldorfGermany
T +4918 0534 34 34F +4918 0534 34 20
wwwsapcom
copy Copyright 2012 SAP AG All rights reserved
No part of this publication may be reproduced or transmitted in any form or for any purpose without the express permission of SAP AG The information contained herein may be changed without prior noticeSome software products marketed by SAP AG and its distributors contain proprietary software components of other software vendors
Microsoft Windows Excel Outlook PowerPoint Silverlight and Visual Studio are registered trademarks of Microsoft CorporationIBM DB2 DB2 Universal Database System i System i5 System p System p5 System x System z System z10 z10 zVM zOS OS390 zEnterprise PowerVM Power Architecture Power Systems POWER7 POWER6+ POWER6 POWER PowerHA pureScale PowerPC BladeCenter System Storage Storwize XIV GPFS HACMP RETAIN DB2 Connect RACF Redbooks OS2 AIX Intelligent Miner WebSphere Tivoli Informix and Smarter Planet are trademarks or registered trademarks of IBM CorporationLinux is the registered trademark of Linus Torvalds in the United States and other countriesAdobe the Adobe logo Acrobat PostScript and Reader are trademarks or registered trademarks of Adobe Systems Incorporated in the United States and other countriesOracle and Java are registered trademarks of Oracle and its affiliatesUNIX XOpen OSF1 and Motif are registered trademarks of the Open GroupCitrix ICA Program Neighborhood MetaFrame WinFrame VideoFrame and MultiWin are trademarks or registered trademarks of Citrix Systems IncHTML XML XHTML and W3C are trademarks or registered trademarks of W3Creg World Wide Web Consortium Massachusetts Institute of TechnologyApple App Store iBooks iPad iPhone iPhoto iPod iTunes Multi-Touch Objective-C Retina Safari Siri and Xcode are trademarks or registered trademarks of Apple IncIOS is a registered trademark of Cisco Systems IncRIM BlackBerry BBM BlackBerry Curve BlackBerry Bold BlackBerry Pearl BlackBerry Torch BlackBerry Storm BlackBerry Storm2 BlackBerry PlayBook and BlackBerry App World are trademarks or registered trademarks of Research in Motion LimitedGoogle App Engine Google Apps Google Checkout Google Data API Google Maps Google Mobile Ads Google Mobile Updater Google Mobile Google Store Google Sync Google Updater Google Voice Google Mail Gmail YouTube Dalvik and Android are trademarks or registered trademarks of Google IncINTERMEC is a registered trademark of Intermec Technologies CorporationWi-Fi is a registered trademark of Wi-Fi AllianceBluetooth is a registered trademark of Bluetooth SIG IncMotorola is a registered trademark of Motorola Trademark Holdings LLCComputop is a registered trademark of Computop Wirtschaftsinformatik GmbHSAP R3 SAP NetWeaver Duet PartnerEdge ByDesign SAP BusinessObjects Explorer StreamWork SAP HANA and other SAP products and services mentioned herein as well as their respective logos are trademarks or registered trademarks of SAP AG in Germany and other countriesBusiness Objects and the Business Objects logo BusinessObjects Crystal Reports Crystal Decisions Web Intelligence Xcelsius and other Business Objects products and services mentioned herein as well as their respective logos are trademarks or registered trademarks of Business Objects Software Ltd Business Objects is an SAP companySybase and Adaptive Server iAnywhere Sybase 365 SQL Anywhere and other Sybase products and services mentioned herein as well as their respective logos are trademarks or registered trademarks of Sybase Inc Sybase is an SAP company
2012-12-17 CUSTOMER 4750
Crossgate mgic EDDY B2B 360deg and B2B 360deg Services are registered trademarks of Crossgate AG in Germany and other countries Crossgate is an SAP companyAll other product and service names mentioned are the trademarks of their respective companies Data contained in this document serves informational purposes only National product specifications may varyThese materials are subject to change without notice These materials are provided by SAP AG and its affiliated companies (ldquoSAP Grouprdquo) for informational purposes only without representation or warranty of any kind and SAP Group shall not be liable for errors or omissions with respect to the materials The only warranties for SAP Group products and services are those that are set forth in the express warranty statements accompanying such products and services if any Nothing herein should be construed as constituting an additional warranty
DisclaimerSome components of this product are based on Javatrade Any code change in these components may cause unpredictable and severe malfunctions and is therefore expressly prohibited as is any decompilation of these componentsAny Javatrade Source Code delivered with this product is only to be used by SAPrsquos Support Services and may not be modified or altered in any way
Documentation in the SAP Service MarketplaceYou can find this document at the following address httpservicesapcominstguides
4850 CUSTOMER 2012-12-17
SAP AGDietmar-Hopp-Allee 1669190 WalldorfGermanyT +4918 0534 34 34F +4918 0534 34 20wwwsapcom
copy Copyright 2012 SAP AG All rights reservedNo part of this publication may be reproduced or transmitted in any form or for any purpose without the express permission of SAP AG The information contained herein may be changed without prior notice
- SAP Enhancement Package 1 for SAP CRM 70
-
- Table of Contents
- 1 Introduction
- 2 Planning and Preparation
-
- 21 Prerequisites for the Business Packages for SAP CRM
-
- 3 Installation
- 4 Post-Installation
-
- 41 Checking the Availability of Back-End Systems for SAP CRM Java Components
-
- 411 Creating a Back-End User
- 412 Checking the Connection to the ABAP System
- 413 Configuring and Checking the TREX Service
- 414 Checking the Selling via eBay Processes
-
- 42 Post-Installation Steps for Workforce Deployment Application and Calculation Services
-
- 421 Implementing WFMCORE 200 Using Transaction SAINT
- 422 Configuring the Extended Configuration Management (XCM) for WFD Application and Calculation Services
- 423 Checking Workforce Deployment Calculation Services
- 424 Checking the Installation of WFD Application Services and WFD Calculation Services
-
- 43 Post-Installation Steps for the Business Packages for SAP CRM
-
- 431 Creating Roles for the SAP CRM Business Packages
- 432 Installation of the Info Center for the SAP CRM Business Package
-
- 4321 Importing the SAP CRM Info Center Configurations and Directory Structure
- 4322 Activating Manual Ordering of Folders for the sapcrm Repository
- 4323 Creating Indexes and Taxonomies for the sapcrmnews Repository
- 4324 Creating the Index for the sapcrm Repository
- 4325 Configuring the Personal Search
- 4326 Increasing the Number of JCo Connections
-
- 44 Post-Installation Steps for MapBox
-
- 441 Assigning User Groups for MapBox Users
- 442 Configuring an RFC Destination for MapBox
- 443 Performing Initial Configuration for MapBox
- 444 Executing the MapBox
- 445 Performing the Smoke Test for MapBox
- 446 Ensuring Optimal Block Size settings
- 447 Adapting Memory Settings for the J2EE Engine
-
- 45 Activating the CRM Web Client
- 46 Installing and Configuring CRM Application Server Loyalty Add-On Component
- 47 Starting XCM
- 48 Accessing Configuration Documentation in SAP Solution Manager
-
- 5 Additional Information
-
- 51 Installing the Business Packages for SAP CRM Using JSPM (Optional)
- 52 Troubleshooting for the Business Package for SAP CRM
-
- 521 Activating BI Templates Manually
- 522 Dragging the Central Search onto the Portal Desktop
-
- Copyright and trademarks
-
httphelpsapcomnw70 SAP NetWeaver 70 Library (including Enhancement Package 2) English SAP
NetWeaver Library SAP NetWeaver by Key Capability Information Integration by Key Capability Knowledge
Management Administration Guide System Administration System Configuration Taxonomies and ClassificationEnd of ABAP+JavaJava |
Only valid for ABAP+JavaJava |
4324 Creating the Index for the sapcrm Repository
To make Info center documents available for indexing and searching create a new index with sapcrm
as a data source
Prerequisites
You have administrator rights for Knowledge Management on the server
Procedure
Choose a name of your own Search as a service and standard as a crawler parameter
For more information see the SAP Library at
httphelpsapcomnw70 SAP NetWeaver 70 Library (including Enhancement Package 2) English SAP
NetWeaver Library SAP NetWeaver by Key Capability Information Integration by Key Capability Knowledge
ManagementEnd of ABAP+JavaJava |
Only valid for ABAP+JavaJava |
4325 Configuring the Personal Search
Prerequisites
You have administrator rights for Knowledge Management on the server
Procedure
1 Create an index for the userhome repository
To make personal folder documents available for the search create a new index with root
userhome as the data source
2 Create a search option set for personal search
To assign the search index and a start folder to the search for personal documents create a Search
Option Set with the name CRMPersonalFolderSearch As an index enter the index for the
userhome repository created above and ~alias~userhomeuseridPersonal Documents as the
root folder for the search
For more information see the SAPLibrary at
4 Post-Installation
43 Post-Installation Steps for the Business Packages for SAP CRM
2012-12-17 CUSTOMER 2550
httphelpsapcomnw70 SAP NetWeaver 70 Library (including Enhancement Package 2) English SAP
NetWeaver Library SAP NetWeaver by Key Capability Information Integration by Key Capability Knowledge
Management End of ABAP+JavaJava |
Only valid for ABAP+JavaJava |
4326 Increasing the Number of JCo Connections
This section tells you how to increase the number of concurrent Java Connector (JCo) connections
By default the maximum number of concurrent JCo connections is 100 The value depends on the
number and behavior of the users in the portal For more information see SAP Note 316877
You can specify this value when you plan the installation of your SAP NetWeaver Enterprise Portal
Make sure that you first analyze the number and behavior of the users
Procedure
To increase the maximum number of concurrent JCo connections increase the value of the
environment variable CPIC_MAX_CONV
EXAMPLE
Initial default value CPIC_MAX_CONV=100
Increased value CPIC_MAX_CONV=1000
End of ABAP+JavaJava |
End of ABAP+JavaJava |
End of ABAP+JavaJava |
Only valid for ABAP+JavaJava | MapBox (MBX) |
44 Post-Installation Steps for MapBoxOnly valid for Java | MapBox (MBX) |
You have to perform the following post-installation steps for MapBox
You assign user groups for MapBox users [page 27]
You configure an RFC destination for TCPIP connections [page 28]
You perform initial configuration for MapBox [page 28]
You execute the Map Box [page 34]
You perform the smoke test [page 35]
If required you perform additional settings for MapBox
Block size settings [page 38]
Memory settings for the J2EE Engine [page 39]End of Java | MapBox (MBX) |
4 Post-Installation
44 Post-Installation Steps for MapBox
2650 CUSTOMER 2012-12-17
Only valid for Java | MapBox (MBX) |
441 Assigning User Groups for MapBox Users
To access the MapBox URL you need to provide the correct security rights for individual user groups
Procedure
1 Log on to the Visual Administrator
1 On your central instance host change to the following directory
Only valid for IBM i5OSUNIX |
usrsapltSAPSIDgtltinstance_numbergtj2eeadmin
End of IBM i5OSUNIX |
Only valid for Windows |
usrsapltSAPSIDgtltinstance_numbergtj2eeadmin
End of Windows |
2 Only valid for IBM i5OSUNIX |
Run goshEnd of IBM i5OSUNIX |
3 Only valid for Windows |
Double-click gobatEnd of Windows |
For more information about the Visual Administrator see the SAP Library at
httpshelpsapcomnw70 SAP NetWeaver Library SAP NetWeaver by Key Capability
Application Platform by Key Capability Java Technology Administration Manual J2EE Engine J2EE Engine
Administration Tools
2 Choose the server node from the left-hand window
3 Choose Services Security Provider
A list of deployed components is displayed
4 Choose MapBoxLauncher from this list (sapcom
comsapsyncpointmapboxlaunchermapboxlauncher)
A list of tabs appears on the right
5 Choose Security Roles from the list
A list of security roles appears
6 If no display and modify roles are displayed add these roles as follows
1 Choose Switch to Edit Mode from the top task bar to switch to edit mode
2 Add display and modify roles by choosing Add
7 For both the display and modify roles perform the following
1 Choose Switch to Edit Mode from the top task bar to switch to edit mode
2 Choose the Groups tab from the list on the far right
3 Choose Search
4 Post-Installation
44 Post-Installation Steps for MapBox
2012-12-17 CUSTOMER 2750
A list of user groups appears
4 Select the user groups that you want to enable for the two roles
Add to the left of the user group display is now highlighted
5 Choose Add to add the user group for the selected roleEnd of Java | MapBox (MBX) |
Only valid for Java | MapBox (MBX) |
442 Configuring an RFC Destination for MapBox
After the installation you have to create an RFC destination for MapBox
Procedure1 Log on to the CRM server
2 Enter transaction SM59
The Display and Maintain RFC Destinations screen appears
3 Choose Technical Settings Activation Type and create a new destination with the type TCPIP
4 Choose Registered Server Program and enter a unique value for program ID
For example you might enter MAPBOX723 for SAP client 723
5 Enter the details of the gateway host and gateway service in Gateway Options
1 Gateway host
Enter the name of your message server You can also enter the IP address of your message
server
2 Gateway service
Enter your SAP CRM system number prefixed with the string sapgw
For example if your system number is 02 enter sapgw02
6 If the CRM system is a Unicode-enabled system choose Unicode in Special Options
7 Save the destination
8 Choose MapBox Configuration Page Connecting settings from the URL and enter the same RFC
destination name in the relevant fieldEnd of Java | MapBox (MBX) |
Only valid for Java | MapBox (MBX) |
443 Performing Initial Configuration for MapBox
Procedure1 Open a browser window and enter the following URL
httplthostnamegtltport_numbergtmapboxlauncher
NOTE
If you are logged on to the machine where the J2EE server is running you can also enter the
following URL
4 Post-Installation
44 Post-Installation Steps for MapBox
2850 CUSTOMER 2012-12-17
httplocalhostltport_numbergtmapboxlauncher
2 Choose Configuration
3 Edit the values according to your SAP system and choose Save
The application asks you to enter a user name and password
4 Enter the user name and password used for the SAP J2EE Engine Visual Administrator
A description of the properties and example values for the properties is given below
Result
You see the default connection settings for MapBox as shown in the graphic below A description
of the properties and example values are provided in the adjacent table
Figure 1 MapBox Default Connection Settings
Property Purpose Example
SAP System SAP System name ABC FAZ
Message Server Message server host name xyzmain
Group SAP System group PUBLIC SPACE
System Number SAP Gateway system number prefixed with sapgw
sapgw02
Unicode Used for setting the Unicode option for the CRM server Default value is no
yes
Maximum allowed wait time interval between ISP Processing and Commit call
Time-out period between an ISP_MAPBOX call and an ISP_COMMIT call
300
4 Post-Installation
44 Post-Installation Steps for MapBox
2012-12-17 CUSTOMER 2950
Property Purpose Example
Client SAP logon client 723
User Name SAP logon user John
Password SAP logon password
Language SAP logon language EN
Destination The RFC destination with which you need to register the MapBox This is the value you enter in step 3 of Configuring an RFC Destination for MapBox [page 28]
MAPBOX723
Number of server instances The number of JCO server execution instances used by the MapBox to process server requests This number indicates the number of CRM inbound queues that are running simultaneously
10
The above MapBox connection configuration is meant for one SAP client running with the CRM
Server If you want to run the MapBox with two or more SAP clients of the same CRM system
you can use Add Client on the configuration page and edit the values accordingly However make
sure that the RFC destinations that these multiple clients listen to are always unique You can
leave the default values for the other settings
If you need more control over logging and tracing you can go to Log Settings on the configuration
page edit the values and choose Save The Log Settings screen with default values is shown in the
graphic below A description of the properties and example values for the properties is provided
in the adjacent table
Figure 2 Default Values for the Log Settings Screen
4 Post-Installation
44 Post-Installation Steps for MapBox
3050 CUSTOMER 2012-12-17
Property Purpose Example
Log and dumps directory This value specifies where the MapBox logs and dumps are stored If this field is left blank the ltuser_homegt folder is used as default value
Only valid for Windows |
Ctemp
End of Windows |
Only valid for IBM i5OSUNIX |
tmp
End of IBM i5OSUNIX |
Input payload dump This value specifies whether the input document coming to MapBox for processing is written or not
No
MapBox launcher trace level This value specifies with what granularity the MapBoxLauncher execution trace is generated6 specifies that a full MapBoxLauncher execution trace is generated whereas 0 specifies that the MapBoxLauncher execution trace is not generated Recommended value for production use is 0
0
MapBox launcher trace size The maximum file size of the generated trace When the size reaches the maximum value another file is created so that the old file can be deleted (for example due to lack of space) You can use alphabetic suffixes to specify the sizes The supported values are k or K ndash kilobytes g or G ndash gigabytes m or M ndash megabytes t or T ndash terabytes
50 k
CoordServer log level This value specifies the detail of the coordination server logging We recommended you not to change the default value of 1
2
SAP Java connector trace level This value specifies the detail of the SAP Java Connector logging The recommended value for production use is 0
2
MapBox log level The log level required for the MapBox to generate an internal log file A higher trace level means that a more detailed log file is created We recommend you to use 4D for production systems where D meansldquoOn Demandrdquo
2
4 Post-Installation
44 Post-Installation Steps for MapBox
2012-12-17 CUSTOMER 3150
Property Purpose Example
MapBox message dumps This value stands for copying the incoming and outgoing messages to the local system For better performance we recommend that you do not enable the message dump option
no
MapBox statistics This value specifies whether a file that lists the performance measurements of the MapBox is created We recommend you to use the value no for production use
no
MapBox logs location This value specifies where the MapBox logs are stored Possible locations are the MapBox repository on the CRM Server or the local file system The recommended value for production use is local_fs which indicates that the MapBox logs are stored on the local file system
local_fs
MapLog format The format in which the MapBox log file must be created The internal log file is by default created in a particular format However you can change this format to display the file in the SAP log file format The two values that are available are default and sap_log
default
The MapBox uses additional properties for performance such as caching and reuse of the MapBox
atoms These values are already set to optimum values and you cannot change them
The description of the properties is shown in the table below
Property Purpose Example
General Settings
max_elements_document This is the limit for the internal cache of the MapBox to hold the count of generated XML documentsWe recommend you not to change this value
100
cache_threshold This is the maximum threshold ndash in kilobytes ndash for a document to be cached in the internal cache of the MapBox
500
4 Post-Installation
44 Post-Installation Steps for MapBox
3250 CUSTOMER 2012-12-17
Property Purpose ExampleWe recommend you not to change this value
max_elements_cache This is the limit for the internal cache of the MapBox to hold the count of MapScenariosWe recommend you not to change this value
100
parallel_instances You use this value on systems where more than one CPU is used This setting allows you to specify the number of CPU instances that MapBox must use for processing so that the remainder can be used by non-MapBox related applications By default MapBox uses all the available CPUs for processing Values can range between 0 to N-1 where N is the number of available CPUs
4
thread_priority Specifies the number of threads MapBox uses during processing We recommend you to set an optimum value for this property so that MapBox does not utilize all available resources 0 = min 1 = low 2 = normal 3 = high 4 = max
3
reuse_count Sets the count for the number of times an atom-instance must be reused before it is destroyed A value of 0 means that the atom is not destroyed and can be used continuously Recommended value is 50 This means that the atom instance is reused 50 times before it is destroyed
100
Lock Server Settings
Operation_Mode The internal mode of operation for the coordination server We recommend not to change the default value of OUTPROC_CLIENT
OUTPROC_CLIENT
Registry_Port The Remote Method Invocation (RMI) port used for connecting to the coordination serverRMI is a Java mechanism for distributed computing
1099
4 Post-Installation
44 Post-Installation Steps for MapBox
2012-12-17 CUSTOMER 3350
Property Purpose ExampleDo not change this value unless port 1099 is unavailable In this case change it to 59856
HostName The name of the host where the coordination server resides
localhost
LocalName The name of the host where the MapBoxLauncher is executed We recommend you not to change the default value of localhost
Server
PollingInterval Polling interval in seconds to ask for shutdown of the coordination server We recommend you not to change the default value of 30
60
CleanUpInterval Cleanup interval in seconds to check for invalid locks created by the MapBoxLauncher We recommend you not to change the default value of 60
180
NOTE
A file name MapLogxsl is also available with the smoke test [page 35] This file is the stylesheet
that is used to format the display of the MapBox log file During the installation and execution
of the MapBox the MapBox log file is created in the following directory
Only valid for Windows |
ltUser_homegtTempMapBoxDumpsltyour_system_namegt500 where ltuser_homegt is the
home directory of the logged-on user ltyour system namegt is the CRM server you have
connected to and 500 is the client you have connected toEnd of Windows |
Only valid for IBM i5OSUNIX |
ltUser_homegtTempMapBoxDumpsltyour_system_namegt500 where ltuser_homegt is the
home directory of the logged-on user ltyour system namegt is the CRM server you have
connected to and 500 is the client you have connected toEnd of IBM i5OSUNIX |
RECOMMENDATION
We recommend that you copy MapLogxsl from the
ltsmoke_test_installation_directorygt to the directory mentioned aboveEnd of Java | MapBox (MBX) |
Only valid for Java | MapBox (MBX) |
444 Executing the MapBox
This section tells you how to execute the MapBox The procedure that you use to execute the Map Box
depends on its current support package (SP) level
4 Post-Installation
44 Post-Installation Steps for MapBox
3450 CUSTOMER 2012-12-17
Procedure
If the SP level of the MapBox is less than SP11 proceed as follows
1 Enter the following URL in your browser
httplthostnamegtltport_numbergtmapboxlaunchermanage
2 Choose Start MapBox
3 The application prompts you for a user name and password
Enter the user name and password for the J2EE Engine Visual Administrator
NOTE
MapBox typically takes 30 to 60 seconds to initialize depending on the number of SAP clients
To see the status of messages processed by MapBox choose Status
If the SP level of the MapBox is equal to or higher than SP11 the MapBox starts automatically
1 For the first MapBox installation you need to restart the Java application server (AS Java) after all
the configuration settings have been completed This automatically starts the MapBox (Autostart)
2 To check the status go to the URL httplthostnamegtltport_numbergtmapboxlauncher
manage
NOTE
MapBox Autostart needs approximately 60 seconds to allow other services of As Java to start
To see the status of messages processed by MapBox choose Status
Result
When the MapBox is running the status is shown as Ready to processEnd of Java | MapBox (MBX) |
Only valid for Java | MapBox (MBX) |
445 Performing the Smoke Test for MapBox
The smoke test checks whether the MapBox installation is error-free
Only valid for Windows |
To execute the smoke test you have to run two batch filesEnd of Windows |
Only valid for IBM i5OSUNIX |
To execute the smoke test you have to run two shell scriptsEnd of IBM i5OSUNIX |
Prerequisites
Before you start the procedure you need to copy the smoketestjar file to a new
ltsmoke_test_installation_directorygt of your choice which has two further subdirectories
firstrun and secondrun
4 Post-Installation
44 Post-Installation Steps for MapBox
2012-12-17 CUSTOMER 3550
You can find the smoketestjar file here
Only valid for IBM i5OSUNIX |
usrsapltinstance_IDgtJCltinstance_numbergtj2eeclusterserver0binext
comsapsyncpointmapboxEnd of IBM i5OSUNIX |
Only valid for Windows |
usrsapltinstance_IDgtJCltinstance_numbergtj2eeclusterserver0binext
comsapsyncpointmapboxEnd of Windows |
NOTE
Each subdirectory of ltsmoke_test_installation_directorygt ndash that is firstrun and
secondrun ndash contains the following files
MBSMOKETEST_IN_000xml
MBSMOKETEST_IN_001xml
MBSMOKETEST_IN_002xml
MBSMOKETEST_IN_003xml
After executing the smoke test you must verify whether the contents of the files generated
by your test are similar to the contents of the above files That is the XML documents that
are created in the smoke test must match the documents located in the
ltsmoke_test_installation_directorygt mentioned above
To execute the smoke test you need to install the SAP Java Connector (SAP JCo version 2012)
You have to download SAP JCo 2012 from SAP Service Marketplace at https
servicesapcomswdc before executing the smoke test
CAUTION
Make sure that you install the SAP Java Connector correctly
The file mapcaseprop is available in the ltsmoke_test_installation_directorygt This file
contains the connection parameters to be tested You can modify the contents of this file
CAUTION
You must replace the connection parameters in this file with the connection parameters that
you entered in the MapBoxMetaxml file
Procedure
1 Run the first stage of the smoke test
1 Only valid for Windows |
Execute the file smoketest_1bat from the ltsmoke_test_installation_directorygtEnd of Windows |
Only valid for Windows |
This prompts you to enter the followingEnd of Windows |
4 Post-Installation
44 Post-Installation Steps for MapBox
3650 CUSTOMER 2012-12-17
Only valid for Windows |
1 ltDRIVEgtusrsapltinstance_IDgtJCltinstance_numbergtj2ee
2 ltsmoke_test_installation_directorygt
3 ltpath_to_sapjcojargt
End of Windows |
Only valid for IBM i5OSUNIX |
Execute the file smoketest_1sh from the ltsmoke_test_installation_directorygtEnd of IBM i5OSUNIX |
Only valid for IBM i5OSUNIX |
1 usrsapltinstance_IDgtJCltinstance_numbergtj2ee
2 ltsmoke_test_installation_directorygt
3 ltpath_to_sapjcojargt
End of IBM i5OSUNIX |
2 Enter the appropriate paths
The smoke test creates the following files
MBSMOKETEST_IN_000xml
MBSMOKETEST_IN_001xml
MBSMOKETEST_IN_002xml
MBSMOKETEST_IN_003xml
3 Only valid for Windows |
Check the contents of the generated files against the contents of the files located in
ltsmoke_test_installation_directorygtSMOKETESTfirstrunEnd of Windows |
Only valid for IBM i5OSUNIX |
Check the contents of the four files against the contents of the files located in
ltsmoke_test_installation_directorygtSMOKETESTfirstrunEnd of IBM i5OSUNIX |
2 Run the second stage of the smoke test
1 Only valid for Windows |
Execute the file smoketest_2bat which is located in the
ltsmoke_test_installation_directorygtEnd of Windows |
Only valid for IBM i5OSUNIX |
Execute the file smoketest_2sh which is located in the
ltsmoke_test_installation_directorygtEnd of IBM i5OSUNIX |
This prompts you to enter the following
Only valid for Windows |
1 ltDRIVEgtusrsapltinstance_IDgtJCltinstance_numbergtj2ee
2 ltsmoke_test_installation_directorygt
End of Windows |
4 Post-Installation
44 Post-Installation Steps for MapBox
2012-12-17 CUSTOMER 3750
Only valid for IBM i5OSUNIX |
1 usrsapltinstance_IDgtJCltinstance_numbergtj2ee
2 ltsmoke_test_installation_directorygt
End of IBM i5OSUNIX |
2 Enter the appropriate paths
The smoke test creates the following files
MBSMOKETEST_IN_000xml
MBSMOKETEST_IN_001xml
MBSMOKETEST_IN_002xml
MBSMOKETEST_IN_003xml
CAUTION
The files generated in the second stage of testing overwrite the contents of the files
generated in the first stage
3 Only valid for Windows |
Check the contents of the generated files against the contents of the files located in
ltsmoke_test_installation_directorygtSMOKETESTsecondrunEnd of Windows |
Only valid for IBM i5OSUNIX |
Check the contents of the four files against the contents of the files located in
ltsmoke_test_installation_directorygtSMOKETESTsecondrunEnd of IBM i5OSUNIX |
Result
If the smoke test has identified errors in the installation process the four XML files are not created in
either of the stages Instead an error log file is created
RECOMMENDATION
In the event of errors we recommend that you send the error log file to your administrator
End of Java | MapBox (MBX) |
Only valid for Java | MapBox (MBX) |
446 Ensuring Optimal Block Size settings
The block size of an object determines the number of messages that are processed at the same time by
the MapBox as a set You need to make sure that the block sizes are optimal to reduce load on the
MapBox XML processor
Procedure
1 Use transaction R3AC3 to set the block size of object GWA_COUNTRY to 10 and save the setting
2 Use transaction R3AC1 to set the block size of object BUPA_MAIN to 10 and save the settingEnd of Java | MapBox (MBX) |
4 Post-Installation
44 Post-Installation Steps for MapBox
3850 CUSTOMER 2012-12-17
Only valid for ABAP+JavaJava | MapBox (MBX) |
447 Adapting Memory Settings for the J2EE Engine
You need to adapt the memory settings for the J2EE Engine because MapBox relies heavily on memory-
intensive XML-processing such as schema-validation parsing transformation and so on
RECOMMENDATION
For rapid message processing by MapBox we recommend you to use 1024 MB of heap memory
for MapBox alone With a heap size of 512 MB MapBox can still process messages but with a slightly
higher processing time for each message
The MapBox memory requirements are directly proportional to the size of the input documents
that MapBox has to process The average size of such documents is in the range of 150 to 200 KB
For messages of this size it is sufficient to have a heap memory of 512 MB If the input documents
are in the range of 1 to 2 MB we recommend that you give MapBox a heap memory of 1024 MB
Procedure
To set the recommended memory settings for the MapBox you start the config tool of the J2EE Engine
Only valid for Windows |
Start the config tool by executing ltDrivegtusrsapltSAPSIDgtltinstance_numbergtj2ee
configtoolbatEnd of Windows |
Only valid for IBM i5OSUNIX |
Start the config tool by executing usrsapltSAPSIDgtltinstance_numbergtj2eeconfigtoolshEnd of IBM i5OSUNIX |
End of ABAP+JavaJava | MapBox (MBX) |
End of ABAP+JavaJava | MapBox (MBX) |
Only valid for ABAPABAP+Java |
45 Activating the CRM Web Client
The CRM Web Client is part of the ICF Services that is automatically installed as part of SAP NetWeaver
Application Server
Procedure
To activate the CRM Web Client after the installation see the SAP Library at
httphelpsapcomnw70 SAP NetWeaver 70 Library (including Enhancement Package 2) English SAP
NetWeaver Library SAP NetWeaver by Key Capability Application Platform by Key Capability Platform-Wide
Services Connectivity Components of SAP Communication Technology Communication Between ABAP and Non-
4 Post-Installation
45 Activating the CRM Web Client
2012-12-17 CUSTOMER 3950
ABAP Technology Internet Communication Framework Development Server-Side Development Creating and
Configuring an ICF Service Activating and Deactivating the ICF ServicesEnd of ABAPABAP+Java |
Only valid for ABAP |
46 Installing and Configuring CRM Application Server Loyalty Add-On Component
This section provides information about how to install and configure CRM Application Server Loyalty
as an add-on component to CRM Application Server ABAP
Prerequisites
You have already deployed the following software components
SAP NetWeaver Application Server ABAP (AS ABAP)
CRM Application Server ABAP
Procedure
Installing CRM Application Server Loyalty
Install CRM Application Server Loyalty on the same host where CRM Application Server ABAP is
deployed as described in SAP Note 1162144
Configuring CRM Application Server Loyalty
After you have installed CRM Application Server Loyalty you must complete the following
configuration steps
1 Call transaction nspro
2 Choose SAP Customising Implementation Guide Customer Relationship Management Marketing Loyalty
Management in BBPCRM Basic Settings Define Basic Settings
3 Enter value 1 for the INSTALL_TYPE parameter
NOTE
You do not have to enter destination name for the LOYALTY_SYSTEM parameterEnd of ABAP |
47 Starting XCM
This section describes how to start XCM
Procedure
1 You access the XCM tool at
httplthostgtltportgtltweb app namegtadminxcminitdo
4 Post-Installation
46 Installing and Configuring CRM Application Server Loyalty Add-On Component
4050 CUSTOMER 2012-12-17
NOTE
You can also start XCM in accessibility mode (according to Section 508 Rehabilitation Act)
at the following URL
httplthostgtltportgtltweb app namegtadminxcminitdosap-accessibility=x
2 Provide a user and password If you are logging on for the first time use the Administrator user
and the password you defined during the installation of the SAP system
RECOMMENDATION
We recommend you create new users with lesser rights than the Administrator for the
administration of Web applications
For more information see the SAP CRM Security Guide section E-Commerce
3 When the application opens a closed control tree is displayed on the left of the screen A screen
containing help information is displayed to the right
You can use edit (change settings) or display (see settings) mode in XCM You use the button in
the top right hand corner of the screen to change between modes When you switch to edit mode
a DB lock is set meaning that only this user can edit the settings at one time The lock is released
once the user switches back to display mode or after session timeout (default timeout is 30mins)
48 Accessing Configuration Documentation in SAP Solution Manager
To access configuration documentation in SAP Solution Manager you have to connect your newly
installed SAP system to SAP Solution Manager
NOTE
For SAP NetWeaver you can also find configuration documentation in the Technology Consultants
Guide at
httphelpsapcomnw70 SAP NetWeaver 70 Library (including Enhancement Package 2) English
SAP NetWeaver Library Technology Consultants Guide
Procedure
Create a configuration project with the related configuration guide as described in the following
documentation
httphelpsapcom SAP Solutions SAP Solution Manager Documentation for SAP Solution Manager
ltcurrent releasegt SAP Solution Manager Implementing and Upgrading SAP Solutions Projects
Configuration
More Information
httpservicesapcomsolutionmanager Media Library How-To Documents How to Create a
Configuration Guide using SAP Solution Manager
4 Post-Installation
48 Accessing Configuration Documentation in SAP Solution Manager
2012-12-17 CUSTOMER 4150
This page is left blank for documents that are printed on both sides
5 Additional Information
Only valid for ABAP+JavaJava |
51 Installing the Business Packages for SAP CRM Using JSPM (Optional)
You can also install the Business Packages for SAP CRM using the Java Support Package Manager (JSPM)
Prerequisites
Only valid for IBM i5OSUNIX |
You have checked hardware and software requirements [external document]End of IBM i5OSUNIX |
Only valid for Windows |
You have checked hardware and software requirements [external document]End of Windows |
You have ckecked the Prerequisites for the Business Packages for SAP CRM [page 7]
Procedure
1 Download version 701 of the files sapcom_BPCRMAPP sapcom_BPCRMFND sapcom_CRMAPP and
sapcom_CRMFND as follows
1 Go to httpservicesapcomswdc Download Support Packages and Patches Search for
Support Packages and Patches
2 Enter the following search terms
BP CRM Application Coding 701
BP CRM Application Content 701
BP CRM Foundation Coding 701
BP CRM Foundation Content 701
2 Add the deployment variable comsapcmshare as described in SAP Note 965948
For more information about how to use the Software Deployment Manager (SDM) see the
documentation Software Deployment Manager which is available at
httphelpsapcomnw70 SAP NetWeaver 70 Library (including Enhancement Package 2) English
SAP NetWeaver Library SAP NetWeaver Developerrsquos Guide Fundamentals Using Java Core Development
Tasks Deployment Putting It All Together Software Deployment Manager
3 Install the Business Packages for SAP CRM with JSPM as described in Installing Additional Usage Types
or Software Units in an Existing SAP System [external document]
5 Additional Information
51 Installing the Business Packages for SAP CRM Using JSPM (Optional)
2012-12-17 CUSTOMER 4350
4 Perform the required Post-Installation Steps for the Business Packages for SAP CRM [page 20]End of ABAP+JavaJava |
Only valid for ABAP+JavaJava |
52 Troubleshooting for the Business Package for SAP CRMOnly valid for ABAP+JavaJava |
The following sections describe the steps that you have to perform if you have problems after the
installation
Activating BI Templates Manually [page 44]
Dragging the Central Search onto the Portal Desktop [page 45]End of ABAP+JavaJava |
Only valid for ABAP+JavaJava |
521 Activating BI Templates Manually
If you have installed the Business Package you might see error messages when loading the BI templates
This procedure describes how you can activate the templates afterwards
Procedure
1 Note the technical name of all templates in your portal interface that are not working
2 Log on to your BI system
3 On the SAP Easy Access screen choose Modeling Administrator Workbench Modeling (transaction
RSA1 or RSOR)
4 Choose Business Content Object Types Web Template Name Select Objects
A new window containing a list of BW objects and templates opens
5 Find your missing templates for example 0TPL_0CRM_Cnn_Qnnn_Vnnn_M and select the entries
6 Choose Transfer Selection
The template now appears on the right-hand side of the screen The Transfer checkbox has been
selected and cannot be changed Nevertheless we recommend that you repeat the following
procedure so that your templates can be displayed
7 Select the template
8 Choose Transfer Transfer
Result
You have successfully activated your missing templates and no error messages appear in the portalEnd of ABAP+JavaJava |
5 Additional Information
52 Troubleshooting for the Business Package for SAP CRM
4450 CUSTOMER 2012-12-17
Only valid for ABAP+JavaJava |
522 Dragging the Central Search onto the Portal Desktop
Procedure
The Business Package for SAP CRM 70 including SAP enhancement package 1 contains an iView for
the central search in CRM This iView is in the package on the page Today in the workset Home of the
CRM User You can drag this iView onto the portal desktop under the tool areaEnd of ABAP+JavaJava |
End of ABAP+JavaJava |
5 Additional Information
52 Troubleshooting for the Business Package for SAP CRM
2012-12-17 CUSTOMER 4550
Typographic Conventions
Example Description
ltExamplegt Angle brackets indicate that you replace these words or characters with appropriate entries to make entries in the system for example ldquoEnter your ltUser Namegtrdquo
ExampleExample
Arrows separating the parts of a navigation path for example menu options
Example Emphasized words or expressions
Example Words or characters that you enter in the system exactly as they appear in the documentation
httpwwwsapcom Textual cross-references to an internet address
example Quicklinks added to the internet address of a homepage to enable quick access to specific content on the Web
123456 Hyperlink to an SAP Note for example SAP Note 123456
Example Words or characters quoted from the screen These include field labels screen titles pushbutton labels menu names and menu options
Cross-references to other documentation or published works
Example Output on the screen following a user action for example messages Source code or syntax quoted directly from a program File and directory names and their paths names of variables and parameters and
names of installation upgrade and database tools
EXAMPLE Technical names of system objects These include report names program names transaction codes database table names and key concepts of a programming language when they are surrounded by body text for example SELECT and INCLUDE
EXAMPLE Keys on the keyboard
4650 CUSTOMER 2012-12-17
SAP AGDietmar-Hopp-Allee 16
69190 WalldorfGermany
T +4918 0534 34 34F +4918 0534 34 20
wwwsapcom
copy Copyright 2012 SAP AG All rights reserved
No part of this publication may be reproduced or transmitted in any form or for any purpose without the express permission of SAP AG The information contained herein may be changed without prior noticeSome software products marketed by SAP AG and its distributors contain proprietary software components of other software vendors
Microsoft Windows Excel Outlook PowerPoint Silverlight and Visual Studio are registered trademarks of Microsoft CorporationIBM DB2 DB2 Universal Database System i System i5 System p System p5 System x System z System z10 z10 zVM zOS OS390 zEnterprise PowerVM Power Architecture Power Systems POWER7 POWER6+ POWER6 POWER PowerHA pureScale PowerPC BladeCenter System Storage Storwize XIV GPFS HACMP RETAIN DB2 Connect RACF Redbooks OS2 AIX Intelligent Miner WebSphere Tivoli Informix and Smarter Planet are trademarks or registered trademarks of IBM CorporationLinux is the registered trademark of Linus Torvalds in the United States and other countriesAdobe the Adobe logo Acrobat PostScript and Reader are trademarks or registered trademarks of Adobe Systems Incorporated in the United States and other countriesOracle and Java are registered trademarks of Oracle and its affiliatesUNIX XOpen OSF1 and Motif are registered trademarks of the Open GroupCitrix ICA Program Neighborhood MetaFrame WinFrame VideoFrame and MultiWin are trademarks or registered trademarks of Citrix Systems IncHTML XML XHTML and W3C are trademarks or registered trademarks of W3Creg World Wide Web Consortium Massachusetts Institute of TechnologyApple App Store iBooks iPad iPhone iPhoto iPod iTunes Multi-Touch Objective-C Retina Safari Siri and Xcode are trademarks or registered trademarks of Apple IncIOS is a registered trademark of Cisco Systems IncRIM BlackBerry BBM BlackBerry Curve BlackBerry Bold BlackBerry Pearl BlackBerry Torch BlackBerry Storm BlackBerry Storm2 BlackBerry PlayBook and BlackBerry App World are trademarks or registered trademarks of Research in Motion LimitedGoogle App Engine Google Apps Google Checkout Google Data API Google Maps Google Mobile Ads Google Mobile Updater Google Mobile Google Store Google Sync Google Updater Google Voice Google Mail Gmail YouTube Dalvik and Android are trademarks or registered trademarks of Google IncINTERMEC is a registered trademark of Intermec Technologies CorporationWi-Fi is a registered trademark of Wi-Fi AllianceBluetooth is a registered trademark of Bluetooth SIG IncMotorola is a registered trademark of Motorola Trademark Holdings LLCComputop is a registered trademark of Computop Wirtschaftsinformatik GmbHSAP R3 SAP NetWeaver Duet PartnerEdge ByDesign SAP BusinessObjects Explorer StreamWork SAP HANA and other SAP products and services mentioned herein as well as their respective logos are trademarks or registered trademarks of SAP AG in Germany and other countriesBusiness Objects and the Business Objects logo BusinessObjects Crystal Reports Crystal Decisions Web Intelligence Xcelsius and other Business Objects products and services mentioned herein as well as their respective logos are trademarks or registered trademarks of Business Objects Software Ltd Business Objects is an SAP companySybase and Adaptive Server iAnywhere Sybase 365 SQL Anywhere and other Sybase products and services mentioned herein as well as their respective logos are trademarks or registered trademarks of Sybase Inc Sybase is an SAP company
2012-12-17 CUSTOMER 4750
Crossgate mgic EDDY B2B 360deg and B2B 360deg Services are registered trademarks of Crossgate AG in Germany and other countries Crossgate is an SAP companyAll other product and service names mentioned are the trademarks of their respective companies Data contained in this document serves informational purposes only National product specifications may varyThese materials are subject to change without notice These materials are provided by SAP AG and its affiliated companies (ldquoSAP Grouprdquo) for informational purposes only without representation or warranty of any kind and SAP Group shall not be liable for errors or omissions with respect to the materials The only warranties for SAP Group products and services are those that are set forth in the express warranty statements accompanying such products and services if any Nothing herein should be construed as constituting an additional warranty
DisclaimerSome components of this product are based on Javatrade Any code change in these components may cause unpredictable and severe malfunctions and is therefore expressly prohibited as is any decompilation of these componentsAny Javatrade Source Code delivered with this product is only to be used by SAPrsquos Support Services and may not be modified or altered in any way
Documentation in the SAP Service MarketplaceYou can find this document at the following address httpservicesapcominstguides
4850 CUSTOMER 2012-12-17
SAP AGDietmar-Hopp-Allee 1669190 WalldorfGermanyT +4918 0534 34 34F +4918 0534 34 20wwwsapcom
copy Copyright 2012 SAP AG All rights reservedNo part of this publication may be reproduced or transmitted in any form or for any purpose without the express permission of SAP AG The information contained herein may be changed without prior notice
- SAP Enhancement Package 1 for SAP CRM 70
-
- Table of Contents
- 1 Introduction
- 2 Planning and Preparation
-
- 21 Prerequisites for the Business Packages for SAP CRM
-
- 3 Installation
- 4 Post-Installation
-
- 41 Checking the Availability of Back-End Systems for SAP CRM Java Components
-
- 411 Creating a Back-End User
- 412 Checking the Connection to the ABAP System
- 413 Configuring and Checking the TREX Service
- 414 Checking the Selling via eBay Processes
-
- 42 Post-Installation Steps for Workforce Deployment Application and Calculation Services
-
- 421 Implementing WFMCORE 200 Using Transaction SAINT
- 422 Configuring the Extended Configuration Management (XCM) for WFD Application and Calculation Services
- 423 Checking Workforce Deployment Calculation Services
- 424 Checking the Installation of WFD Application Services and WFD Calculation Services
-
- 43 Post-Installation Steps for the Business Packages for SAP CRM
-
- 431 Creating Roles for the SAP CRM Business Packages
- 432 Installation of the Info Center for the SAP CRM Business Package
-
- 4321 Importing the SAP CRM Info Center Configurations and Directory Structure
- 4322 Activating Manual Ordering of Folders for the sapcrm Repository
- 4323 Creating Indexes and Taxonomies for the sapcrmnews Repository
- 4324 Creating the Index for the sapcrm Repository
- 4325 Configuring the Personal Search
- 4326 Increasing the Number of JCo Connections
-
- 44 Post-Installation Steps for MapBox
-
- 441 Assigning User Groups for MapBox Users
- 442 Configuring an RFC Destination for MapBox
- 443 Performing Initial Configuration for MapBox
- 444 Executing the MapBox
- 445 Performing the Smoke Test for MapBox
- 446 Ensuring Optimal Block Size settings
- 447 Adapting Memory Settings for the J2EE Engine
-
- 45 Activating the CRM Web Client
- 46 Installing and Configuring CRM Application Server Loyalty Add-On Component
- 47 Starting XCM
- 48 Accessing Configuration Documentation in SAP Solution Manager
-
- 5 Additional Information
-
- 51 Installing the Business Packages for SAP CRM Using JSPM (Optional)
- 52 Troubleshooting for the Business Package for SAP CRM
-
- 521 Activating BI Templates Manually
- 522 Dragging the Central Search onto the Portal Desktop
-
- Copyright and trademarks
-

httphelpsapcomnw70 SAP NetWeaver 70 Library (including Enhancement Package 2) English SAP
NetWeaver Library SAP NetWeaver by Key Capability Information Integration by Key Capability Knowledge
Management End of ABAP+JavaJava |
Only valid for ABAP+JavaJava |
4326 Increasing the Number of JCo Connections
This section tells you how to increase the number of concurrent Java Connector (JCo) connections
By default the maximum number of concurrent JCo connections is 100 The value depends on the
number and behavior of the users in the portal For more information see SAP Note 316877
You can specify this value when you plan the installation of your SAP NetWeaver Enterprise Portal
Make sure that you first analyze the number and behavior of the users
Procedure
To increase the maximum number of concurrent JCo connections increase the value of the
environment variable CPIC_MAX_CONV
EXAMPLE
Initial default value CPIC_MAX_CONV=100
Increased value CPIC_MAX_CONV=1000
End of ABAP+JavaJava |
End of ABAP+JavaJava |
End of ABAP+JavaJava |
Only valid for ABAP+JavaJava | MapBox (MBX) |
44 Post-Installation Steps for MapBoxOnly valid for Java | MapBox (MBX) |
You have to perform the following post-installation steps for MapBox
You assign user groups for MapBox users [page 27]
You configure an RFC destination for TCPIP connections [page 28]
You perform initial configuration for MapBox [page 28]
You execute the Map Box [page 34]
You perform the smoke test [page 35]
If required you perform additional settings for MapBox
Block size settings [page 38]
Memory settings for the J2EE Engine [page 39]End of Java | MapBox (MBX) |
4 Post-Installation
44 Post-Installation Steps for MapBox
2650 CUSTOMER 2012-12-17
Only valid for Java | MapBox (MBX) |
441 Assigning User Groups for MapBox Users
To access the MapBox URL you need to provide the correct security rights for individual user groups
Procedure
1 Log on to the Visual Administrator
1 On your central instance host change to the following directory
Only valid for IBM i5OSUNIX |
usrsapltSAPSIDgtltinstance_numbergtj2eeadmin
End of IBM i5OSUNIX |
Only valid for Windows |
usrsapltSAPSIDgtltinstance_numbergtj2eeadmin
End of Windows |
2 Only valid for IBM i5OSUNIX |
Run goshEnd of IBM i5OSUNIX |
3 Only valid for Windows |
Double-click gobatEnd of Windows |
For more information about the Visual Administrator see the SAP Library at
httpshelpsapcomnw70 SAP NetWeaver Library SAP NetWeaver by Key Capability
Application Platform by Key Capability Java Technology Administration Manual J2EE Engine J2EE Engine
Administration Tools
2 Choose the server node from the left-hand window
3 Choose Services Security Provider
A list of deployed components is displayed
4 Choose MapBoxLauncher from this list (sapcom
comsapsyncpointmapboxlaunchermapboxlauncher)
A list of tabs appears on the right
5 Choose Security Roles from the list
A list of security roles appears
6 If no display and modify roles are displayed add these roles as follows
1 Choose Switch to Edit Mode from the top task bar to switch to edit mode
2 Add display and modify roles by choosing Add
7 For both the display and modify roles perform the following
1 Choose Switch to Edit Mode from the top task bar to switch to edit mode
2 Choose the Groups tab from the list on the far right
3 Choose Search
4 Post-Installation
44 Post-Installation Steps for MapBox
2012-12-17 CUSTOMER 2750
A list of user groups appears
4 Select the user groups that you want to enable for the two roles
Add to the left of the user group display is now highlighted
5 Choose Add to add the user group for the selected roleEnd of Java | MapBox (MBX) |
Only valid for Java | MapBox (MBX) |
442 Configuring an RFC Destination for MapBox
After the installation you have to create an RFC destination for MapBox
Procedure1 Log on to the CRM server
2 Enter transaction SM59
The Display and Maintain RFC Destinations screen appears
3 Choose Technical Settings Activation Type and create a new destination with the type TCPIP
4 Choose Registered Server Program and enter a unique value for program ID
For example you might enter MAPBOX723 for SAP client 723
5 Enter the details of the gateway host and gateway service in Gateway Options
1 Gateway host
Enter the name of your message server You can also enter the IP address of your message
server
2 Gateway service
Enter your SAP CRM system number prefixed with the string sapgw
For example if your system number is 02 enter sapgw02
6 If the CRM system is a Unicode-enabled system choose Unicode in Special Options
7 Save the destination
8 Choose MapBox Configuration Page Connecting settings from the URL and enter the same RFC
destination name in the relevant fieldEnd of Java | MapBox (MBX) |
Only valid for Java | MapBox (MBX) |
443 Performing Initial Configuration for MapBox
Procedure1 Open a browser window and enter the following URL
httplthostnamegtltport_numbergtmapboxlauncher
NOTE
If you are logged on to the machine where the J2EE server is running you can also enter the
following URL
4 Post-Installation
44 Post-Installation Steps for MapBox
2850 CUSTOMER 2012-12-17
httplocalhostltport_numbergtmapboxlauncher
2 Choose Configuration
3 Edit the values according to your SAP system and choose Save
The application asks you to enter a user name and password
4 Enter the user name and password used for the SAP J2EE Engine Visual Administrator
A description of the properties and example values for the properties is given below
Result
You see the default connection settings for MapBox as shown in the graphic below A description
of the properties and example values are provided in the adjacent table
Figure 1 MapBox Default Connection Settings
Property Purpose Example
SAP System SAP System name ABC FAZ
Message Server Message server host name xyzmain
Group SAP System group PUBLIC SPACE
System Number SAP Gateway system number prefixed with sapgw
sapgw02
Unicode Used for setting the Unicode option for the CRM server Default value is no
yes
Maximum allowed wait time interval between ISP Processing and Commit call
Time-out period between an ISP_MAPBOX call and an ISP_COMMIT call
300
4 Post-Installation
44 Post-Installation Steps for MapBox
2012-12-17 CUSTOMER 2950
Property Purpose Example
Client SAP logon client 723
User Name SAP logon user John
Password SAP logon password
Language SAP logon language EN
Destination The RFC destination with which you need to register the MapBox This is the value you enter in step 3 of Configuring an RFC Destination for MapBox [page 28]
MAPBOX723
Number of server instances The number of JCO server execution instances used by the MapBox to process server requests This number indicates the number of CRM inbound queues that are running simultaneously
10
The above MapBox connection configuration is meant for one SAP client running with the CRM
Server If you want to run the MapBox with two or more SAP clients of the same CRM system
you can use Add Client on the configuration page and edit the values accordingly However make
sure that the RFC destinations that these multiple clients listen to are always unique You can
leave the default values for the other settings
If you need more control over logging and tracing you can go to Log Settings on the configuration
page edit the values and choose Save The Log Settings screen with default values is shown in the
graphic below A description of the properties and example values for the properties is provided
in the adjacent table
Figure 2 Default Values for the Log Settings Screen
4 Post-Installation
44 Post-Installation Steps for MapBox
3050 CUSTOMER 2012-12-17
Property Purpose Example
Log and dumps directory This value specifies where the MapBox logs and dumps are stored If this field is left blank the ltuser_homegt folder is used as default value
Only valid for Windows |
Ctemp
End of Windows |
Only valid for IBM i5OSUNIX |
tmp
End of IBM i5OSUNIX |
Input payload dump This value specifies whether the input document coming to MapBox for processing is written or not
No
MapBox launcher trace level This value specifies with what granularity the MapBoxLauncher execution trace is generated6 specifies that a full MapBoxLauncher execution trace is generated whereas 0 specifies that the MapBoxLauncher execution trace is not generated Recommended value for production use is 0
0
MapBox launcher trace size The maximum file size of the generated trace When the size reaches the maximum value another file is created so that the old file can be deleted (for example due to lack of space) You can use alphabetic suffixes to specify the sizes The supported values are k or K ndash kilobytes g or G ndash gigabytes m or M ndash megabytes t or T ndash terabytes
50 k
CoordServer log level This value specifies the detail of the coordination server logging We recommended you not to change the default value of 1
2
SAP Java connector trace level This value specifies the detail of the SAP Java Connector logging The recommended value for production use is 0
2
MapBox log level The log level required for the MapBox to generate an internal log file A higher trace level means that a more detailed log file is created We recommend you to use 4D for production systems where D meansldquoOn Demandrdquo
2
4 Post-Installation
44 Post-Installation Steps for MapBox
2012-12-17 CUSTOMER 3150
Property Purpose Example
MapBox message dumps This value stands for copying the incoming and outgoing messages to the local system For better performance we recommend that you do not enable the message dump option
no
MapBox statistics This value specifies whether a file that lists the performance measurements of the MapBox is created We recommend you to use the value no for production use
no
MapBox logs location This value specifies where the MapBox logs are stored Possible locations are the MapBox repository on the CRM Server or the local file system The recommended value for production use is local_fs which indicates that the MapBox logs are stored on the local file system
local_fs
MapLog format The format in which the MapBox log file must be created The internal log file is by default created in a particular format However you can change this format to display the file in the SAP log file format The two values that are available are default and sap_log
default
The MapBox uses additional properties for performance such as caching and reuse of the MapBox
atoms These values are already set to optimum values and you cannot change them
The description of the properties is shown in the table below
Property Purpose Example
General Settings
max_elements_document This is the limit for the internal cache of the MapBox to hold the count of generated XML documentsWe recommend you not to change this value
100
cache_threshold This is the maximum threshold ndash in kilobytes ndash for a document to be cached in the internal cache of the MapBox
500
4 Post-Installation
44 Post-Installation Steps for MapBox
3250 CUSTOMER 2012-12-17
Property Purpose ExampleWe recommend you not to change this value
max_elements_cache This is the limit for the internal cache of the MapBox to hold the count of MapScenariosWe recommend you not to change this value
100
parallel_instances You use this value on systems where more than one CPU is used This setting allows you to specify the number of CPU instances that MapBox must use for processing so that the remainder can be used by non-MapBox related applications By default MapBox uses all the available CPUs for processing Values can range between 0 to N-1 where N is the number of available CPUs
4
thread_priority Specifies the number of threads MapBox uses during processing We recommend you to set an optimum value for this property so that MapBox does not utilize all available resources 0 = min 1 = low 2 = normal 3 = high 4 = max
3
reuse_count Sets the count for the number of times an atom-instance must be reused before it is destroyed A value of 0 means that the atom is not destroyed and can be used continuously Recommended value is 50 This means that the atom instance is reused 50 times before it is destroyed
100
Lock Server Settings
Operation_Mode The internal mode of operation for the coordination server We recommend not to change the default value of OUTPROC_CLIENT
OUTPROC_CLIENT
Registry_Port The Remote Method Invocation (RMI) port used for connecting to the coordination serverRMI is a Java mechanism for distributed computing
1099
4 Post-Installation
44 Post-Installation Steps for MapBox
2012-12-17 CUSTOMER 3350
Property Purpose ExampleDo not change this value unless port 1099 is unavailable In this case change it to 59856
HostName The name of the host where the coordination server resides
localhost
LocalName The name of the host where the MapBoxLauncher is executed We recommend you not to change the default value of localhost
Server
PollingInterval Polling interval in seconds to ask for shutdown of the coordination server We recommend you not to change the default value of 30
60
CleanUpInterval Cleanup interval in seconds to check for invalid locks created by the MapBoxLauncher We recommend you not to change the default value of 60
180
NOTE
A file name MapLogxsl is also available with the smoke test [page 35] This file is the stylesheet
that is used to format the display of the MapBox log file During the installation and execution
of the MapBox the MapBox log file is created in the following directory
Only valid for Windows |
ltUser_homegtTempMapBoxDumpsltyour_system_namegt500 where ltuser_homegt is the
home directory of the logged-on user ltyour system namegt is the CRM server you have
connected to and 500 is the client you have connected toEnd of Windows |
Only valid for IBM i5OSUNIX |
ltUser_homegtTempMapBoxDumpsltyour_system_namegt500 where ltuser_homegt is the
home directory of the logged-on user ltyour system namegt is the CRM server you have
connected to and 500 is the client you have connected toEnd of IBM i5OSUNIX |
RECOMMENDATION
We recommend that you copy MapLogxsl from the
ltsmoke_test_installation_directorygt to the directory mentioned aboveEnd of Java | MapBox (MBX) |
Only valid for Java | MapBox (MBX) |
444 Executing the MapBox
This section tells you how to execute the MapBox The procedure that you use to execute the Map Box
depends on its current support package (SP) level
4 Post-Installation
44 Post-Installation Steps for MapBox
3450 CUSTOMER 2012-12-17
Procedure
If the SP level of the MapBox is less than SP11 proceed as follows
1 Enter the following URL in your browser
httplthostnamegtltport_numbergtmapboxlaunchermanage
2 Choose Start MapBox
3 The application prompts you for a user name and password
Enter the user name and password for the J2EE Engine Visual Administrator
NOTE
MapBox typically takes 30 to 60 seconds to initialize depending on the number of SAP clients
To see the status of messages processed by MapBox choose Status
If the SP level of the MapBox is equal to or higher than SP11 the MapBox starts automatically
1 For the first MapBox installation you need to restart the Java application server (AS Java) after all
the configuration settings have been completed This automatically starts the MapBox (Autostart)
2 To check the status go to the URL httplthostnamegtltport_numbergtmapboxlauncher
manage
NOTE
MapBox Autostart needs approximately 60 seconds to allow other services of As Java to start
To see the status of messages processed by MapBox choose Status
Result
When the MapBox is running the status is shown as Ready to processEnd of Java | MapBox (MBX) |
Only valid for Java | MapBox (MBX) |
445 Performing the Smoke Test for MapBox
The smoke test checks whether the MapBox installation is error-free
Only valid for Windows |
To execute the smoke test you have to run two batch filesEnd of Windows |
Only valid for IBM i5OSUNIX |
To execute the smoke test you have to run two shell scriptsEnd of IBM i5OSUNIX |
Prerequisites
Before you start the procedure you need to copy the smoketestjar file to a new
ltsmoke_test_installation_directorygt of your choice which has two further subdirectories
firstrun and secondrun
4 Post-Installation
44 Post-Installation Steps for MapBox
2012-12-17 CUSTOMER 3550
You can find the smoketestjar file here
Only valid for IBM i5OSUNIX |
usrsapltinstance_IDgtJCltinstance_numbergtj2eeclusterserver0binext
comsapsyncpointmapboxEnd of IBM i5OSUNIX |
Only valid for Windows |
usrsapltinstance_IDgtJCltinstance_numbergtj2eeclusterserver0binext
comsapsyncpointmapboxEnd of Windows |
NOTE
Each subdirectory of ltsmoke_test_installation_directorygt ndash that is firstrun and
secondrun ndash contains the following files
MBSMOKETEST_IN_000xml
MBSMOKETEST_IN_001xml
MBSMOKETEST_IN_002xml
MBSMOKETEST_IN_003xml
After executing the smoke test you must verify whether the contents of the files generated
by your test are similar to the contents of the above files That is the XML documents that
are created in the smoke test must match the documents located in the
ltsmoke_test_installation_directorygt mentioned above
To execute the smoke test you need to install the SAP Java Connector (SAP JCo version 2012)
You have to download SAP JCo 2012 from SAP Service Marketplace at https
servicesapcomswdc before executing the smoke test
CAUTION
Make sure that you install the SAP Java Connector correctly
The file mapcaseprop is available in the ltsmoke_test_installation_directorygt This file
contains the connection parameters to be tested You can modify the contents of this file
CAUTION
You must replace the connection parameters in this file with the connection parameters that
you entered in the MapBoxMetaxml file
Procedure
1 Run the first stage of the smoke test
1 Only valid for Windows |
Execute the file smoketest_1bat from the ltsmoke_test_installation_directorygtEnd of Windows |
Only valid for Windows |
This prompts you to enter the followingEnd of Windows |
4 Post-Installation
44 Post-Installation Steps for MapBox
3650 CUSTOMER 2012-12-17
Only valid for Windows |
1 ltDRIVEgtusrsapltinstance_IDgtJCltinstance_numbergtj2ee
2 ltsmoke_test_installation_directorygt
3 ltpath_to_sapjcojargt
End of Windows |
Only valid for IBM i5OSUNIX |
Execute the file smoketest_1sh from the ltsmoke_test_installation_directorygtEnd of IBM i5OSUNIX |
Only valid for IBM i5OSUNIX |
1 usrsapltinstance_IDgtJCltinstance_numbergtj2ee
2 ltsmoke_test_installation_directorygt
3 ltpath_to_sapjcojargt
End of IBM i5OSUNIX |
2 Enter the appropriate paths
The smoke test creates the following files
MBSMOKETEST_IN_000xml
MBSMOKETEST_IN_001xml
MBSMOKETEST_IN_002xml
MBSMOKETEST_IN_003xml
3 Only valid for Windows |
Check the contents of the generated files against the contents of the files located in
ltsmoke_test_installation_directorygtSMOKETESTfirstrunEnd of Windows |
Only valid for IBM i5OSUNIX |
Check the contents of the four files against the contents of the files located in
ltsmoke_test_installation_directorygtSMOKETESTfirstrunEnd of IBM i5OSUNIX |
2 Run the second stage of the smoke test
1 Only valid for Windows |
Execute the file smoketest_2bat which is located in the
ltsmoke_test_installation_directorygtEnd of Windows |
Only valid for IBM i5OSUNIX |
Execute the file smoketest_2sh which is located in the
ltsmoke_test_installation_directorygtEnd of IBM i5OSUNIX |
This prompts you to enter the following
Only valid for Windows |
1 ltDRIVEgtusrsapltinstance_IDgtJCltinstance_numbergtj2ee
2 ltsmoke_test_installation_directorygt
End of Windows |
4 Post-Installation
44 Post-Installation Steps for MapBox
2012-12-17 CUSTOMER 3750
Only valid for IBM i5OSUNIX |
1 usrsapltinstance_IDgtJCltinstance_numbergtj2ee
2 ltsmoke_test_installation_directorygt
End of IBM i5OSUNIX |
2 Enter the appropriate paths
The smoke test creates the following files
MBSMOKETEST_IN_000xml
MBSMOKETEST_IN_001xml
MBSMOKETEST_IN_002xml
MBSMOKETEST_IN_003xml
CAUTION
The files generated in the second stage of testing overwrite the contents of the files
generated in the first stage
3 Only valid for Windows |
Check the contents of the generated files against the contents of the files located in
ltsmoke_test_installation_directorygtSMOKETESTsecondrunEnd of Windows |
Only valid for IBM i5OSUNIX |
Check the contents of the four files against the contents of the files located in
ltsmoke_test_installation_directorygtSMOKETESTsecondrunEnd of IBM i5OSUNIX |
Result
If the smoke test has identified errors in the installation process the four XML files are not created in
either of the stages Instead an error log file is created
RECOMMENDATION
In the event of errors we recommend that you send the error log file to your administrator
End of Java | MapBox (MBX) |
Only valid for Java | MapBox (MBX) |
446 Ensuring Optimal Block Size settings
The block size of an object determines the number of messages that are processed at the same time by
the MapBox as a set You need to make sure that the block sizes are optimal to reduce load on the
MapBox XML processor
Procedure
1 Use transaction R3AC3 to set the block size of object GWA_COUNTRY to 10 and save the setting
2 Use transaction R3AC1 to set the block size of object BUPA_MAIN to 10 and save the settingEnd of Java | MapBox (MBX) |
4 Post-Installation
44 Post-Installation Steps for MapBox
3850 CUSTOMER 2012-12-17
Only valid for ABAP+JavaJava | MapBox (MBX) |
447 Adapting Memory Settings for the J2EE Engine
You need to adapt the memory settings for the J2EE Engine because MapBox relies heavily on memory-
intensive XML-processing such as schema-validation parsing transformation and so on
RECOMMENDATION
For rapid message processing by MapBox we recommend you to use 1024 MB of heap memory
for MapBox alone With a heap size of 512 MB MapBox can still process messages but with a slightly
higher processing time for each message
The MapBox memory requirements are directly proportional to the size of the input documents
that MapBox has to process The average size of such documents is in the range of 150 to 200 KB
For messages of this size it is sufficient to have a heap memory of 512 MB If the input documents
are in the range of 1 to 2 MB we recommend that you give MapBox a heap memory of 1024 MB
Procedure
To set the recommended memory settings for the MapBox you start the config tool of the J2EE Engine
Only valid for Windows |
Start the config tool by executing ltDrivegtusrsapltSAPSIDgtltinstance_numbergtj2ee
configtoolbatEnd of Windows |
Only valid for IBM i5OSUNIX |
Start the config tool by executing usrsapltSAPSIDgtltinstance_numbergtj2eeconfigtoolshEnd of IBM i5OSUNIX |
End of ABAP+JavaJava | MapBox (MBX) |
End of ABAP+JavaJava | MapBox (MBX) |
Only valid for ABAPABAP+Java |
45 Activating the CRM Web Client
The CRM Web Client is part of the ICF Services that is automatically installed as part of SAP NetWeaver
Application Server
Procedure
To activate the CRM Web Client after the installation see the SAP Library at
httphelpsapcomnw70 SAP NetWeaver 70 Library (including Enhancement Package 2) English SAP
NetWeaver Library SAP NetWeaver by Key Capability Application Platform by Key Capability Platform-Wide
Services Connectivity Components of SAP Communication Technology Communication Between ABAP and Non-
4 Post-Installation
45 Activating the CRM Web Client
2012-12-17 CUSTOMER 3950
ABAP Technology Internet Communication Framework Development Server-Side Development Creating and
Configuring an ICF Service Activating and Deactivating the ICF ServicesEnd of ABAPABAP+Java |
Only valid for ABAP |
46 Installing and Configuring CRM Application Server Loyalty Add-On Component
This section provides information about how to install and configure CRM Application Server Loyalty
as an add-on component to CRM Application Server ABAP
Prerequisites
You have already deployed the following software components
SAP NetWeaver Application Server ABAP (AS ABAP)
CRM Application Server ABAP
Procedure
Installing CRM Application Server Loyalty
Install CRM Application Server Loyalty on the same host where CRM Application Server ABAP is
deployed as described in SAP Note 1162144
Configuring CRM Application Server Loyalty
After you have installed CRM Application Server Loyalty you must complete the following
configuration steps
1 Call transaction nspro
2 Choose SAP Customising Implementation Guide Customer Relationship Management Marketing Loyalty
Management in BBPCRM Basic Settings Define Basic Settings
3 Enter value 1 for the INSTALL_TYPE parameter
NOTE
You do not have to enter destination name for the LOYALTY_SYSTEM parameterEnd of ABAP |
47 Starting XCM
This section describes how to start XCM
Procedure
1 You access the XCM tool at
httplthostgtltportgtltweb app namegtadminxcminitdo
4 Post-Installation
46 Installing and Configuring CRM Application Server Loyalty Add-On Component
4050 CUSTOMER 2012-12-17
NOTE
You can also start XCM in accessibility mode (according to Section 508 Rehabilitation Act)
at the following URL
httplthostgtltportgtltweb app namegtadminxcminitdosap-accessibility=x
2 Provide a user and password If you are logging on for the first time use the Administrator user
and the password you defined during the installation of the SAP system
RECOMMENDATION
We recommend you create new users with lesser rights than the Administrator for the
administration of Web applications
For more information see the SAP CRM Security Guide section E-Commerce
3 When the application opens a closed control tree is displayed on the left of the screen A screen
containing help information is displayed to the right
You can use edit (change settings) or display (see settings) mode in XCM You use the button in
the top right hand corner of the screen to change between modes When you switch to edit mode
a DB lock is set meaning that only this user can edit the settings at one time The lock is released
once the user switches back to display mode or after session timeout (default timeout is 30mins)
48 Accessing Configuration Documentation in SAP Solution Manager
To access configuration documentation in SAP Solution Manager you have to connect your newly
installed SAP system to SAP Solution Manager
NOTE
For SAP NetWeaver you can also find configuration documentation in the Technology Consultants
Guide at
httphelpsapcomnw70 SAP NetWeaver 70 Library (including Enhancement Package 2) English
SAP NetWeaver Library Technology Consultants Guide
Procedure
Create a configuration project with the related configuration guide as described in the following
documentation
httphelpsapcom SAP Solutions SAP Solution Manager Documentation for SAP Solution Manager
ltcurrent releasegt SAP Solution Manager Implementing and Upgrading SAP Solutions Projects
Configuration
More Information
httpservicesapcomsolutionmanager Media Library How-To Documents How to Create a
Configuration Guide using SAP Solution Manager
4 Post-Installation
48 Accessing Configuration Documentation in SAP Solution Manager
2012-12-17 CUSTOMER 4150
This page is left blank for documents that are printed on both sides
5 Additional Information
Only valid for ABAP+JavaJava |
51 Installing the Business Packages for SAP CRM Using JSPM (Optional)
You can also install the Business Packages for SAP CRM using the Java Support Package Manager (JSPM)
Prerequisites
Only valid for IBM i5OSUNIX |
You have checked hardware and software requirements [external document]End of IBM i5OSUNIX |
Only valid for Windows |
You have checked hardware and software requirements [external document]End of Windows |
You have ckecked the Prerequisites for the Business Packages for SAP CRM [page 7]
Procedure
1 Download version 701 of the files sapcom_BPCRMAPP sapcom_BPCRMFND sapcom_CRMAPP and
sapcom_CRMFND as follows
1 Go to httpservicesapcomswdc Download Support Packages and Patches Search for
Support Packages and Patches
2 Enter the following search terms
BP CRM Application Coding 701
BP CRM Application Content 701
BP CRM Foundation Coding 701
BP CRM Foundation Content 701
2 Add the deployment variable comsapcmshare as described in SAP Note 965948
For more information about how to use the Software Deployment Manager (SDM) see the
documentation Software Deployment Manager which is available at
httphelpsapcomnw70 SAP NetWeaver 70 Library (including Enhancement Package 2) English
SAP NetWeaver Library SAP NetWeaver Developerrsquos Guide Fundamentals Using Java Core Development
Tasks Deployment Putting It All Together Software Deployment Manager
3 Install the Business Packages for SAP CRM with JSPM as described in Installing Additional Usage Types
or Software Units in an Existing SAP System [external document]
5 Additional Information
51 Installing the Business Packages for SAP CRM Using JSPM (Optional)
2012-12-17 CUSTOMER 4350
4 Perform the required Post-Installation Steps for the Business Packages for SAP CRM [page 20]End of ABAP+JavaJava |
Only valid for ABAP+JavaJava |
52 Troubleshooting for the Business Package for SAP CRMOnly valid for ABAP+JavaJava |
The following sections describe the steps that you have to perform if you have problems after the
installation
Activating BI Templates Manually [page 44]
Dragging the Central Search onto the Portal Desktop [page 45]End of ABAP+JavaJava |
Only valid for ABAP+JavaJava |
521 Activating BI Templates Manually
If you have installed the Business Package you might see error messages when loading the BI templates
This procedure describes how you can activate the templates afterwards
Procedure
1 Note the technical name of all templates in your portal interface that are not working
2 Log on to your BI system
3 On the SAP Easy Access screen choose Modeling Administrator Workbench Modeling (transaction
RSA1 or RSOR)
4 Choose Business Content Object Types Web Template Name Select Objects
A new window containing a list of BW objects and templates opens
5 Find your missing templates for example 0TPL_0CRM_Cnn_Qnnn_Vnnn_M and select the entries
6 Choose Transfer Selection
The template now appears on the right-hand side of the screen The Transfer checkbox has been
selected and cannot be changed Nevertheless we recommend that you repeat the following
procedure so that your templates can be displayed
7 Select the template
8 Choose Transfer Transfer
Result
You have successfully activated your missing templates and no error messages appear in the portalEnd of ABAP+JavaJava |
5 Additional Information
52 Troubleshooting for the Business Package for SAP CRM
4450 CUSTOMER 2012-12-17
Only valid for ABAP+JavaJava |
522 Dragging the Central Search onto the Portal Desktop
Procedure
The Business Package for SAP CRM 70 including SAP enhancement package 1 contains an iView for
the central search in CRM This iView is in the package on the page Today in the workset Home of the
CRM User You can drag this iView onto the portal desktop under the tool areaEnd of ABAP+JavaJava |
End of ABAP+JavaJava |
5 Additional Information
52 Troubleshooting for the Business Package for SAP CRM
2012-12-17 CUSTOMER 4550
Typographic Conventions
Example Description
ltExamplegt Angle brackets indicate that you replace these words or characters with appropriate entries to make entries in the system for example ldquoEnter your ltUser Namegtrdquo
ExampleExample
Arrows separating the parts of a navigation path for example menu options
Example Emphasized words or expressions
Example Words or characters that you enter in the system exactly as they appear in the documentation
httpwwwsapcom Textual cross-references to an internet address
example Quicklinks added to the internet address of a homepage to enable quick access to specific content on the Web
123456 Hyperlink to an SAP Note for example SAP Note 123456
Example Words or characters quoted from the screen These include field labels screen titles pushbutton labels menu names and menu options
Cross-references to other documentation or published works
Example Output on the screen following a user action for example messages Source code or syntax quoted directly from a program File and directory names and their paths names of variables and parameters and
names of installation upgrade and database tools
EXAMPLE Technical names of system objects These include report names program names transaction codes database table names and key concepts of a programming language when they are surrounded by body text for example SELECT and INCLUDE
EXAMPLE Keys on the keyboard
4650 CUSTOMER 2012-12-17
SAP AGDietmar-Hopp-Allee 16
69190 WalldorfGermany
T +4918 0534 34 34F +4918 0534 34 20
wwwsapcom
copy Copyright 2012 SAP AG All rights reserved
No part of this publication may be reproduced or transmitted in any form or for any purpose without the express permission of SAP AG The information contained herein may be changed without prior noticeSome software products marketed by SAP AG and its distributors contain proprietary software components of other software vendors
Microsoft Windows Excel Outlook PowerPoint Silverlight and Visual Studio are registered trademarks of Microsoft CorporationIBM DB2 DB2 Universal Database System i System i5 System p System p5 System x System z System z10 z10 zVM zOS OS390 zEnterprise PowerVM Power Architecture Power Systems POWER7 POWER6+ POWER6 POWER PowerHA pureScale PowerPC BladeCenter System Storage Storwize XIV GPFS HACMP RETAIN DB2 Connect RACF Redbooks OS2 AIX Intelligent Miner WebSphere Tivoli Informix and Smarter Planet are trademarks or registered trademarks of IBM CorporationLinux is the registered trademark of Linus Torvalds in the United States and other countriesAdobe the Adobe logo Acrobat PostScript and Reader are trademarks or registered trademarks of Adobe Systems Incorporated in the United States and other countriesOracle and Java are registered trademarks of Oracle and its affiliatesUNIX XOpen OSF1 and Motif are registered trademarks of the Open GroupCitrix ICA Program Neighborhood MetaFrame WinFrame VideoFrame and MultiWin are trademarks or registered trademarks of Citrix Systems IncHTML XML XHTML and W3C are trademarks or registered trademarks of W3Creg World Wide Web Consortium Massachusetts Institute of TechnologyApple App Store iBooks iPad iPhone iPhoto iPod iTunes Multi-Touch Objective-C Retina Safari Siri and Xcode are trademarks or registered trademarks of Apple IncIOS is a registered trademark of Cisco Systems IncRIM BlackBerry BBM BlackBerry Curve BlackBerry Bold BlackBerry Pearl BlackBerry Torch BlackBerry Storm BlackBerry Storm2 BlackBerry PlayBook and BlackBerry App World are trademarks or registered trademarks of Research in Motion LimitedGoogle App Engine Google Apps Google Checkout Google Data API Google Maps Google Mobile Ads Google Mobile Updater Google Mobile Google Store Google Sync Google Updater Google Voice Google Mail Gmail YouTube Dalvik and Android are trademarks or registered trademarks of Google IncINTERMEC is a registered trademark of Intermec Technologies CorporationWi-Fi is a registered trademark of Wi-Fi AllianceBluetooth is a registered trademark of Bluetooth SIG IncMotorola is a registered trademark of Motorola Trademark Holdings LLCComputop is a registered trademark of Computop Wirtschaftsinformatik GmbHSAP R3 SAP NetWeaver Duet PartnerEdge ByDesign SAP BusinessObjects Explorer StreamWork SAP HANA and other SAP products and services mentioned herein as well as their respective logos are trademarks or registered trademarks of SAP AG in Germany and other countriesBusiness Objects and the Business Objects logo BusinessObjects Crystal Reports Crystal Decisions Web Intelligence Xcelsius and other Business Objects products and services mentioned herein as well as their respective logos are trademarks or registered trademarks of Business Objects Software Ltd Business Objects is an SAP companySybase and Adaptive Server iAnywhere Sybase 365 SQL Anywhere and other Sybase products and services mentioned herein as well as their respective logos are trademarks or registered trademarks of Sybase Inc Sybase is an SAP company
2012-12-17 CUSTOMER 4750
Crossgate mgic EDDY B2B 360deg and B2B 360deg Services are registered trademarks of Crossgate AG in Germany and other countries Crossgate is an SAP companyAll other product and service names mentioned are the trademarks of their respective companies Data contained in this document serves informational purposes only National product specifications may varyThese materials are subject to change without notice These materials are provided by SAP AG and its affiliated companies (ldquoSAP Grouprdquo) for informational purposes only without representation or warranty of any kind and SAP Group shall not be liable for errors or omissions with respect to the materials The only warranties for SAP Group products and services are those that are set forth in the express warranty statements accompanying such products and services if any Nothing herein should be construed as constituting an additional warranty
DisclaimerSome components of this product are based on Javatrade Any code change in these components may cause unpredictable and severe malfunctions and is therefore expressly prohibited as is any decompilation of these componentsAny Javatrade Source Code delivered with this product is only to be used by SAPrsquos Support Services and may not be modified or altered in any way
Documentation in the SAP Service MarketplaceYou can find this document at the following address httpservicesapcominstguides
4850 CUSTOMER 2012-12-17
SAP AGDietmar-Hopp-Allee 1669190 WalldorfGermanyT +4918 0534 34 34F +4918 0534 34 20wwwsapcom
copy Copyright 2012 SAP AG All rights reservedNo part of this publication may be reproduced or transmitted in any form or for any purpose without the express permission of SAP AG The information contained herein may be changed without prior notice
- SAP Enhancement Package 1 for SAP CRM 70
-
- Table of Contents
- 1 Introduction
- 2 Planning and Preparation
-
- 21 Prerequisites for the Business Packages for SAP CRM
-
- 3 Installation
- 4 Post-Installation
-
- 41 Checking the Availability of Back-End Systems for SAP CRM Java Components
-
- 411 Creating a Back-End User
- 412 Checking the Connection to the ABAP System
- 413 Configuring and Checking the TREX Service
- 414 Checking the Selling via eBay Processes
-
- 42 Post-Installation Steps for Workforce Deployment Application and Calculation Services
-
- 421 Implementing WFMCORE 200 Using Transaction SAINT
- 422 Configuring the Extended Configuration Management (XCM) for WFD Application and Calculation Services
- 423 Checking Workforce Deployment Calculation Services
- 424 Checking the Installation of WFD Application Services and WFD Calculation Services
-
- 43 Post-Installation Steps for the Business Packages for SAP CRM
-
- 431 Creating Roles for the SAP CRM Business Packages
- 432 Installation of the Info Center for the SAP CRM Business Package
-
- 4321 Importing the SAP CRM Info Center Configurations and Directory Structure
- 4322 Activating Manual Ordering of Folders for the sapcrm Repository
- 4323 Creating Indexes and Taxonomies for the sapcrmnews Repository
- 4324 Creating the Index for the sapcrm Repository
- 4325 Configuring the Personal Search
- 4326 Increasing the Number of JCo Connections
-
- 44 Post-Installation Steps for MapBox
-
- 441 Assigning User Groups for MapBox Users
- 442 Configuring an RFC Destination for MapBox
- 443 Performing Initial Configuration for MapBox
- 444 Executing the MapBox
- 445 Performing the Smoke Test for MapBox
- 446 Ensuring Optimal Block Size settings
- 447 Adapting Memory Settings for the J2EE Engine
-
- 45 Activating the CRM Web Client
- 46 Installing and Configuring CRM Application Server Loyalty Add-On Component
- 47 Starting XCM
- 48 Accessing Configuration Documentation in SAP Solution Manager
-
- 5 Additional Information
-
- 51 Installing the Business Packages for SAP CRM Using JSPM (Optional)
- 52 Troubleshooting for the Business Package for SAP CRM
-
- 521 Activating BI Templates Manually
- 522 Dragging the Central Search onto the Portal Desktop
-
- Copyright and trademarks
-
Only valid for Java | MapBox (MBX) |
441 Assigning User Groups for MapBox Users
To access the MapBox URL you need to provide the correct security rights for individual user groups
Procedure
1 Log on to the Visual Administrator
1 On your central instance host change to the following directory
Only valid for IBM i5OSUNIX |
usrsapltSAPSIDgtltinstance_numbergtj2eeadmin
End of IBM i5OSUNIX |
Only valid for Windows |
usrsapltSAPSIDgtltinstance_numbergtj2eeadmin
End of Windows |
2 Only valid for IBM i5OSUNIX |
Run goshEnd of IBM i5OSUNIX |
3 Only valid for Windows |
Double-click gobatEnd of Windows |
For more information about the Visual Administrator see the SAP Library at
httpshelpsapcomnw70 SAP NetWeaver Library SAP NetWeaver by Key Capability
Application Platform by Key Capability Java Technology Administration Manual J2EE Engine J2EE Engine
Administration Tools
2 Choose the server node from the left-hand window
3 Choose Services Security Provider
A list of deployed components is displayed
4 Choose MapBoxLauncher from this list (sapcom
comsapsyncpointmapboxlaunchermapboxlauncher)
A list of tabs appears on the right
5 Choose Security Roles from the list
A list of security roles appears
6 If no display and modify roles are displayed add these roles as follows
1 Choose Switch to Edit Mode from the top task bar to switch to edit mode
2 Add display and modify roles by choosing Add
7 For both the display and modify roles perform the following
1 Choose Switch to Edit Mode from the top task bar to switch to edit mode
2 Choose the Groups tab from the list on the far right
3 Choose Search
4 Post-Installation
44 Post-Installation Steps for MapBox
2012-12-17 CUSTOMER 2750
A list of user groups appears
4 Select the user groups that you want to enable for the two roles
Add to the left of the user group display is now highlighted
5 Choose Add to add the user group for the selected roleEnd of Java | MapBox (MBX) |
Only valid for Java | MapBox (MBX) |
442 Configuring an RFC Destination for MapBox
After the installation you have to create an RFC destination for MapBox
Procedure1 Log on to the CRM server
2 Enter transaction SM59
The Display and Maintain RFC Destinations screen appears
3 Choose Technical Settings Activation Type and create a new destination with the type TCPIP
4 Choose Registered Server Program and enter a unique value for program ID
For example you might enter MAPBOX723 for SAP client 723
5 Enter the details of the gateway host and gateway service in Gateway Options
1 Gateway host
Enter the name of your message server You can also enter the IP address of your message
server
2 Gateway service
Enter your SAP CRM system number prefixed with the string sapgw
For example if your system number is 02 enter sapgw02
6 If the CRM system is a Unicode-enabled system choose Unicode in Special Options
7 Save the destination
8 Choose MapBox Configuration Page Connecting settings from the URL and enter the same RFC
destination name in the relevant fieldEnd of Java | MapBox (MBX) |
Only valid for Java | MapBox (MBX) |
443 Performing Initial Configuration for MapBox
Procedure1 Open a browser window and enter the following URL
httplthostnamegtltport_numbergtmapboxlauncher
NOTE
If you are logged on to the machine where the J2EE server is running you can also enter the
following URL
4 Post-Installation
44 Post-Installation Steps for MapBox
2850 CUSTOMER 2012-12-17
httplocalhostltport_numbergtmapboxlauncher
2 Choose Configuration
3 Edit the values according to your SAP system and choose Save
The application asks you to enter a user name and password
4 Enter the user name and password used for the SAP J2EE Engine Visual Administrator
A description of the properties and example values for the properties is given below
Result
You see the default connection settings for MapBox as shown in the graphic below A description
of the properties and example values are provided in the adjacent table
Figure 1 MapBox Default Connection Settings
Property Purpose Example
SAP System SAP System name ABC FAZ
Message Server Message server host name xyzmain
Group SAP System group PUBLIC SPACE
System Number SAP Gateway system number prefixed with sapgw
sapgw02
Unicode Used for setting the Unicode option for the CRM server Default value is no
yes
Maximum allowed wait time interval between ISP Processing and Commit call
Time-out period between an ISP_MAPBOX call and an ISP_COMMIT call
300
4 Post-Installation
44 Post-Installation Steps for MapBox
2012-12-17 CUSTOMER 2950
Property Purpose Example
Client SAP logon client 723
User Name SAP logon user John
Password SAP logon password
Language SAP logon language EN
Destination The RFC destination with which you need to register the MapBox This is the value you enter in step 3 of Configuring an RFC Destination for MapBox [page 28]
MAPBOX723
Number of server instances The number of JCO server execution instances used by the MapBox to process server requests This number indicates the number of CRM inbound queues that are running simultaneously
10
The above MapBox connection configuration is meant for one SAP client running with the CRM
Server If you want to run the MapBox with two or more SAP clients of the same CRM system
you can use Add Client on the configuration page and edit the values accordingly However make
sure that the RFC destinations that these multiple clients listen to are always unique You can
leave the default values for the other settings
If you need more control over logging and tracing you can go to Log Settings on the configuration
page edit the values and choose Save The Log Settings screen with default values is shown in the
graphic below A description of the properties and example values for the properties is provided
in the adjacent table
Figure 2 Default Values for the Log Settings Screen
4 Post-Installation
44 Post-Installation Steps for MapBox
3050 CUSTOMER 2012-12-17
Property Purpose Example
Log and dumps directory This value specifies where the MapBox logs and dumps are stored If this field is left blank the ltuser_homegt folder is used as default value
Only valid for Windows |
Ctemp
End of Windows |
Only valid for IBM i5OSUNIX |
tmp
End of IBM i5OSUNIX |
Input payload dump This value specifies whether the input document coming to MapBox for processing is written or not
No
MapBox launcher trace level This value specifies with what granularity the MapBoxLauncher execution trace is generated6 specifies that a full MapBoxLauncher execution trace is generated whereas 0 specifies that the MapBoxLauncher execution trace is not generated Recommended value for production use is 0
0
MapBox launcher trace size The maximum file size of the generated trace When the size reaches the maximum value another file is created so that the old file can be deleted (for example due to lack of space) You can use alphabetic suffixes to specify the sizes The supported values are k or K ndash kilobytes g or G ndash gigabytes m or M ndash megabytes t or T ndash terabytes
50 k
CoordServer log level This value specifies the detail of the coordination server logging We recommended you not to change the default value of 1
2
SAP Java connector trace level This value specifies the detail of the SAP Java Connector logging The recommended value for production use is 0
2
MapBox log level The log level required for the MapBox to generate an internal log file A higher trace level means that a more detailed log file is created We recommend you to use 4D for production systems where D meansldquoOn Demandrdquo
2
4 Post-Installation
44 Post-Installation Steps for MapBox
2012-12-17 CUSTOMER 3150
Property Purpose Example
MapBox message dumps This value stands for copying the incoming and outgoing messages to the local system For better performance we recommend that you do not enable the message dump option
no
MapBox statistics This value specifies whether a file that lists the performance measurements of the MapBox is created We recommend you to use the value no for production use
no
MapBox logs location This value specifies where the MapBox logs are stored Possible locations are the MapBox repository on the CRM Server or the local file system The recommended value for production use is local_fs which indicates that the MapBox logs are stored on the local file system
local_fs
MapLog format The format in which the MapBox log file must be created The internal log file is by default created in a particular format However you can change this format to display the file in the SAP log file format The two values that are available are default and sap_log
default
The MapBox uses additional properties for performance such as caching and reuse of the MapBox
atoms These values are already set to optimum values and you cannot change them
The description of the properties is shown in the table below
Property Purpose Example
General Settings
max_elements_document This is the limit for the internal cache of the MapBox to hold the count of generated XML documentsWe recommend you not to change this value
100
cache_threshold This is the maximum threshold ndash in kilobytes ndash for a document to be cached in the internal cache of the MapBox
500
4 Post-Installation
44 Post-Installation Steps for MapBox
3250 CUSTOMER 2012-12-17
Property Purpose ExampleWe recommend you not to change this value
max_elements_cache This is the limit for the internal cache of the MapBox to hold the count of MapScenariosWe recommend you not to change this value
100
parallel_instances You use this value on systems where more than one CPU is used This setting allows you to specify the number of CPU instances that MapBox must use for processing so that the remainder can be used by non-MapBox related applications By default MapBox uses all the available CPUs for processing Values can range between 0 to N-1 where N is the number of available CPUs
4
thread_priority Specifies the number of threads MapBox uses during processing We recommend you to set an optimum value for this property so that MapBox does not utilize all available resources 0 = min 1 = low 2 = normal 3 = high 4 = max
3
reuse_count Sets the count for the number of times an atom-instance must be reused before it is destroyed A value of 0 means that the atom is not destroyed and can be used continuously Recommended value is 50 This means that the atom instance is reused 50 times before it is destroyed
100
Lock Server Settings
Operation_Mode The internal mode of operation for the coordination server We recommend not to change the default value of OUTPROC_CLIENT
OUTPROC_CLIENT
Registry_Port The Remote Method Invocation (RMI) port used for connecting to the coordination serverRMI is a Java mechanism for distributed computing
1099
4 Post-Installation
44 Post-Installation Steps for MapBox
2012-12-17 CUSTOMER 3350
Property Purpose ExampleDo not change this value unless port 1099 is unavailable In this case change it to 59856
HostName The name of the host where the coordination server resides
localhost
LocalName The name of the host where the MapBoxLauncher is executed We recommend you not to change the default value of localhost
Server
PollingInterval Polling interval in seconds to ask for shutdown of the coordination server We recommend you not to change the default value of 30
60
CleanUpInterval Cleanup interval in seconds to check for invalid locks created by the MapBoxLauncher We recommend you not to change the default value of 60
180
NOTE
A file name MapLogxsl is also available with the smoke test [page 35] This file is the stylesheet
that is used to format the display of the MapBox log file During the installation and execution
of the MapBox the MapBox log file is created in the following directory
Only valid for Windows |
ltUser_homegtTempMapBoxDumpsltyour_system_namegt500 where ltuser_homegt is the
home directory of the logged-on user ltyour system namegt is the CRM server you have
connected to and 500 is the client you have connected toEnd of Windows |
Only valid for IBM i5OSUNIX |
ltUser_homegtTempMapBoxDumpsltyour_system_namegt500 where ltuser_homegt is the
home directory of the logged-on user ltyour system namegt is the CRM server you have
connected to and 500 is the client you have connected toEnd of IBM i5OSUNIX |
RECOMMENDATION
We recommend that you copy MapLogxsl from the
ltsmoke_test_installation_directorygt to the directory mentioned aboveEnd of Java | MapBox (MBX) |
Only valid for Java | MapBox (MBX) |
444 Executing the MapBox
This section tells you how to execute the MapBox The procedure that you use to execute the Map Box
depends on its current support package (SP) level
4 Post-Installation
44 Post-Installation Steps for MapBox
3450 CUSTOMER 2012-12-17
Procedure
If the SP level of the MapBox is less than SP11 proceed as follows
1 Enter the following URL in your browser
httplthostnamegtltport_numbergtmapboxlaunchermanage
2 Choose Start MapBox
3 The application prompts you for a user name and password
Enter the user name and password for the J2EE Engine Visual Administrator
NOTE
MapBox typically takes 30 to 60 seconds to initialize depending on the number of SAP clients
To see the status of messages processed by MapBox choose Status
If the SP level of the MapBox is equal to or higher than SP11 the MapBox starts automatically
1 For the first MapBox installation you need to restart the Java application server (AS Java) after all
the configuration settings have been completed This automatically starts the MapBox (Autostart)
2 To check the status go to the URL httplthostnamegtltport_numbergtmapboxlauncher
manage
NOTE
MapBox Autostart needs approximately 60 seconds to allow other services of As Java to start
To see the status of messages processed by MapBox choose Status
Result
When the MapBox is running the status is shown as Ready to processEnd of Java | MapBox (MBX) |
Only valid for Java | MapBox (MBX) |
445 Performing the Smoke Test for MapBox
The smoke test checks whether the MapBox installation is error-free
Only valid for Windows |
To execute the smoke test you have to run two batch filesEnd of Windows |
Only valid for IBM i5OSUNIX |
To execute the smoke test you have to run two shell scriptsEnd of IBM i5OSUNIX |
Prerequisites
Before you start the procedure you need to copy the smoketestjar file to a new
ltsmoke_test_installation_directorygt of your choice which has two further subdirectories
firstrun and secondrun
4 Post-Installation
44 Post-Installation Steps for MapBox
2012-12-17 CUSTOMER 3550
You can find the smoketestjar file here
Only valid for IBM i5OSUNIX |
usrsapltinstance_IDgtJCltinstance_numbergtj2eeclusterserver0binext
comsapsyncpointmapboxEnd of IBM i5OSUNIX |
Only valid for Windows |
usrsapltinstance_IDgtJCltinstance_numbergtj2eeclusterserver0binext
comsapsyncpointmapboxEnd of Windows |
NOTE
Each subdirectory of ltsmoke_test_installation_directorygt ndash that is firstrun and
secondrun ndash contains the following files
MBSMOKETEST_IN_000xml
MBSMOKETEST_IN_001xml
MBSMOKETEST_IN_002xml
MBSMOKETEST_IN_003xml
After executing the smoke test you must verify whether the contents of the files generated
by your test are similar to the contents of the above files That is the XML documents that
are created in the smoke test must match the documents located in the
ltsmoke_test_installation_directorygt mentioned above
To execute the smoke test you need to install the SAP Java Connector (SAP JCo version 2012)
You have to download SAP JCo 2012 from SAP Service Marketplace at https
servicesapcomswdc before executing the smoke test
CAUTION
Make sure that you install the SAP Java Connector correctly
The file mapcaseprop is available in the ltsmoke_test_installation_directorygt This file
contains the connection parameters to be tested You can modify the contents of this file
CAUTION
You must replace the connection parameters in this file with the connection parameters that
you entered in the MapBoxMetaxml file
Procedure
1 Run the first stage of the smoke test
1 Only valid for Windows |
Execute the file smoketest_1bat from the ltsmoke_test_installation_directorygtEnd of Windows |
Only valid for Windows |
This prompts you to enter the followingEnd of Windows |
4 Post-Installation
44 Post-Installation Steps for MapBox
3650 CUSTOMER 2012-12-17
Only valid for Windows |
1 ltDRIVEgtusrsapltinstance_IDgtJCltinstance_numbergtj2ee
2 ltsmoke_test_installation_directorygt
3 ltpath_to_sapjcojargt
End of Windows |
Only valid for IBM i5OSUNIX |
Execute the file smoketest_1sh from the ltsmoke_test_installation_directorygtEnd of IBM i5OSUNIX |
Only valid for IBM i5OSUNIX |
1 usrsapltinstance_IDgtJCltinstance_numbergtj2ee
2 ltsmoke_test_installation_directorygt
3 ltpath_to_sapjcojargt
End of IBM i5OSUNIX |
2 Enter the appropriate paths
The smoke test creates the following files
MBSMOKETEST_IN_000xml
MBSMOKETEST_IN_001xml
MBSMOKETEST_IN_002xml
MBSMOKETEST_IN_003xml
3 Only valid for Windows |
Check the contents of the generated files against the contents of the files located in
ltsmoke_test_installation_directorygtSMOKETESTfirstrunEnd of Windows |
Only valid for IBM i5OSUNIX |
Check the contents of the four files against the contents of the files located in
ltsmoke_test_installation_directorygtSMOKETESTfirstrunEnd of IBM i5OSUNIX |
2 Run the second stage of the smoke test
1 Only valid for Windows |
Execute the file smoketest_2bat which is located in the
ltsmoke_test_installation_directorygtEnd of Windows |
Only valid for IBM i5OSUNIX |
Execute the file smoketest_2sh which is located in the
ltsmoke_test_installation_directorygtEnd of IBM i5OSUNIX |
This prompts you to enter the following
Only valid for Windows |
1 ltDRIVEgtusrsapltinstance_IDgtJCltinstance_numbergtj2ee
2 ltsmoke_test_installation_directorygt
End of Windows |
4 Post-Installation
44 Post-Installation Steps for MapBox
2012-12-17 CUSTOMER 3750
Only valid for IBM i5OSUNIX |
1 usrsapltinstance_IDgtJCltinstance_numbergtj2ee
2 ltsmoke_test_installation_directorygt
End of IBM i5OSUNIX |
2 Enter the appropriate paths
The smoke test creates the following files
MBSMOKETEST_IN_000xml
MBSMOKETEST_IN_001xml
MBSMOKETEST_IN_002xml
MBSMOKETEST_IN_003xml
CAUTION
The files generated in the second stage of testing overwrite the contents of the files
generated in the first stage
3 Only valid for Windows |
Check the contents of the generated files against the contents of the files located in
ltsmoke_test_installation_directorygtSMOKETESTsecondrunEnd of Windows |
Only valid for IBM i5OSUNIX |
Check the contents of the four files against the contents of the files located in
ltsmoke_test_installation_directorygtSMOKETESTsecondrunEnd of IBM i5OSUNIX |
Result
If the smoke test has identified errors in the installation process the four XML files are not created in
either of the stages Instead an error log file is created
RECOMMENDATION
In the event of errors we recommend that you send the error log file to your administrator
End of Java | MapBox (MBX) |
Only valid for Java | MapBox (MBX) |
446 Ensuring Optimal Block Size settings
The block size of an object determines the number of messages that are processed at the same time by
the MapBox as a set You need to make sure that the block sizes are optimal to reduce load on the
MapBox XML processor
Procedure
1 Use transaction R3AC3 to set the block size of object GWA_COUNTRY to 10 and save the setting
2 Use transaction R3AC1 to set the block size of object BUPA_MAIN to 10 and save the settingEnd of Java | MapBox (MBX) |
4 Post-Installation
44 Post-Installation Steps for MapBox
3850 CUSTOMER 2012-12-17
Only valid for ABAP+JavaJava | MapBox (MBX) |
447 Adapting Memory Settings for the J2EE Engine
You need to adapt the memory settings for the J2EE Engine because MapBox relies heavily on memory-
intensive XML-processing such as schema-validation parsing transformation and so on
RECOMMENDATION
For rapid message processing by MapBox we recommend you to use 1024 MB of heap memory
for MapBox alone With a heap size of 512 MB MapBox can still process messages but with a slightly
higher processing time for each message
The MapBox memory requirements are directly proportional to the size of the input documents
that MapBox has to process The average size of such documents is in the range of 150 to 200 KB
For messages of this size it is sufficient to have a heap memory of 512 MB If the input documents
are in the range of 1 to 2 MB we recommend that you give MapBox a heap memory of 1024 MB
Procedure
To set the recommended memory settings for the MapBox you start the config tool of the J2EE Engine
Only valid for Windows |
Start the config tool by executing ltDrivegtusrsapltSAPSIDgtltinstance_numbergtj2ee
configtoolbatEnd of Windows |
Only valid for IBM i5OSUNIX |
Start the config tool by executing usrsapltSAPSIDgtltinstance_numbergtj2eeconfigtoolshEnd of IBM i5OSUNIX |
End of ABAP+JavaJava | MapBox (MBX) |
End of ABAP+JavaJava | MapBox (MBX) |
Only valid for ABAPABAP+Java |
45 Activating the CRM Web Client
The CRM Web Client is part of the ICF Services that is automatically installed as part of SAP NetWeaver
Application Server
Procedure
To activate the CRM Web Client after the installation see the SAP Library at
httphelpsapcomnw70 SAP NetWeaver 70 Library (including Enhancement Package 2) English SAP
NetWeaver Library SAP NetWeaver by Key Capability Application Platform by Key Capability Platform-Wide
Services Connectivity Components of SAP Communication Technology Communication Between ABAP and Non-
4 Post-Installation
45 Activating the CRM Web Client
2012-12-17 CUSTOMER 3950
ABAP Technology Internet Communication Framework Development Server-Side Development Creating and
Configuring an ICF Service Activating and Deactivating the ICF ServicesEnd of ABAPABAP+Java |
Only valid for ABAP |
46 Installing and Configuring CRM Application Server Loyalty Add-On Component
This section provides information about how to install and configure CRM Application Server Loyalty
as an add-on component to CRM Application Server ABAP
Prerequisites
You have already deployed the following software components
SAP NetWeaver Application Server ABAP (AS ABAP)
CRM Application Server ABAP
Procedure
Installing CRM Application Server Loyalty
Install CRM Application Server Loyalty on the same host where CRM Application Server ABAP is
deployed as described in SAP Note 1162144
Configuring CRM Application Server Loyalty
After you have installed CRM Application Server Loyalty you must complete the following
configuration steps
1 Call transaction nspro
2 Choose SAP Customising Implementation Guide Customer Relationship Management Marketing Loyalty
Management in BBPCRM Basic Settings Define Basic Settings
3 Enter value 1 for the INSTALL_TYPE parameter
NOTE
You do not have to enter destination name for the LOYALTY_SYSTEM parameterEnd of ABAP |
47 Starting XCM
This section describes how to start XCM
Procedure
1 You access the XCM tool at
httplthostgtltportgtltweb app namegtadminxcminitdo
4 Post-Installation
46 Installing and Configuring CRM Application Server Loyalty Add-On Component
4050 CUSTOMER 2012-12-17
NOTE
You can also start XCM in accessibility mode (according to Section 508 Rehabilitation Act)
at the following URL
httplthostgtltportgtltweb app namegtadminxcminitdosap-accessibility=x
2 Provide a user and password If you are logging on for the first time use the Administrator user
and the password you defined during the installation of the SAP system
RECOMMENDATION
We recommend you create new users with lesser rights than the Administrator for the
administration of Web applications
For more information see the SAP CRM Security Guide section E-Commerce
3 When the application opens a closed control tree is displayed on the left of the screen A screen
containing help information is displayed to the right
You can use edit (change settings) or display (see settings) mode in XCM You use the button in
the top right hand corner of the screen to change between modes When you switch to edit mode
a DB lock is set meaning that only this user can edit the settings at one time The lock is released
once the user switches back to display mode or after session timeout (default timeout is 30mins)
48 Accessing Configuration Documentation in SAP Solution Manager
To access configuration documentation in SAP Solution Manager you have to connect your newly
installed SAP system to SAP Solution Manager
NOTE
For SAP NetWeaver you can also find configuration documentation in the Technology Consultants
Guide at
httphelpsapcomnw70 SAP NetWeaver 70 Library (including Enhancement Package 2) English
SAP NetWeaver Library Technology Consultants Guide
Procedure
Create a configuration project with the related configuration guide as described in the following
documentation
httphelpsapcom SAP Solutions SAP Solution Manager Documentation for SAP Solution Manager
ltcurrent releasegt SAP Solution Manager Implementing and Upgrading SAP Solutions Projects
Configuration
More Information
httpservicesapcomsolutionmanager Media Library How-To Documents How to Create a
Configuration Guide using SAP Solution Manager
4 Post-Installation
48 Accessing Configuration Documentation in SAP Solution Manager
2012-12-17 CUSTOMER 4150
This page is left blank for documents that are printed on both sides
5 Additional Information
Only valid for ABAP+JavaJava |
51 Installing the Business Packages for SAP CRM Using JSPM (Optional)
You can also install the Business Packages for SAP CRM using the Java Support Package Manager (JSPM)
Prerequisites
Only valid for IBM i5OSUNIX |
You have checked hardware and software requirements [external document]End of IBM i5OSUNIX |
Only valid for Windows |
You have checked hardware and software requirements [external document]End of Windows |
You have ckecked the Prerequisites for the Business Packages for SAP CRM [page 7]
Procedure
1 Download version 701 of the files sapcom_BPCRMAPP sapcom_BPCRMFND sapcom_CRMAPP and
sapcom_CRMFND as follows
1 Go to httpservicesapcomswdc Download Support Packages and Patches Search for
Support Packages and Patches
2 Enter the following search terms
BP CRM Application Coding 701
BP CRM Application Content 701
BP CRM Foundation Coding 701
BP CRM Foundation Content 701
2 Add the deployment variable comsapcmshare as described in SAP Note 965948
For more information about how to use the Software Deployment Manager (SDM) see the
documentation Software Deployment Manager which is available at
httphelpsapcomnw70 SAP NetWeaver 70 Library (including Enhancement Package 2) English
SAP NetWeaver Library SAP NetWeaver Developerrsquos Guide Fundamentals Using Java Core Development
Tasks Deployment Putting It All Together Software Deployment Manager
3 Install the Business Packages for SAP CRM with JSPM as described in Installing Additional Usage Types
or Software Units in an Existing SAP System [external document]
5 Additional Information
51 Installing the Business Packages for SAP CRM Using JSPM (Optional)
2012-12-17 CUSTOMER 4350
4 Perform the required Post-Installation Steps for the Business Packages for SAP CRM [page 20]End of ABAP+JavaJava |
Only valid for ABAP+JavaJava |
52 Troubleshooting for the Business Package for SAP CRMOnly valid for ABAP+JavaJava |
The following sections describe the steps that you have to perform if you have problems after the
installation
Activating BI Templates Manually [page 44]
Dragging the Central Search onto the Portal Desktop [page 45]End of ABAP+JavaJava |
Only valid for ABAP+JavaJava |
521 Activating BI Templates Manually
If you have installed the Business Package you might see error messages when loading the BI templates
This procedure describes how you can activate the templates afterwards
Procedure
1 Note the technical name of all templates in your portal interface that are not working
2 Log on to your BI system
3 On the SAP Easy Access screen choose Modeling Administrator Workbench Modeling (transaction
RSA1 or RSOR)
4 Choose Business Content Object Types Web Template Name Select Objects
A new window containing a list of BW objects and templates opens
5 Find your missing templates for example 0TPL_0CRM_Cnn_Qnnn_Vnnn_M and select the entries
6 Choose Transfer Selection
The template now appears on the right-hand side of the screen The Transfer checkbox has been
selected and cannot be changed Nevertheless we recommend that you repeat the following
procedure so that your templates can be displayed
7 Select the template
8 Choose Transfer Transfer
Result
You have successfully activated your missing templates and no error messages appear in the portalEnd of ABAP+JavaJava |
5 Additional Information
52 Troubleshooting for the Business Package for SAP CRM
4450 CUSTOMER 2012-12-17
Only valid for ABAP+JavaJava |
522 Dragging the Central Search onto the Portal Desktop
Procedure
The Business Package for SAP CRM 70 including SAP enhancement package 1 contains an iView for
the central search in CRM This iView is in the package on the page Today in the workset Home of the
CRM User You can drag this iView onto the portal desktop under the tool areaEnd of ABAP+JavaJava |
End of ABAP+JavaJava |
5 Additional Information
52 Troubleshooting for the Business Package for SAP CRM
2012-12-17 CUSTOMER 4550
Typographic Conventions
Example Description
ltExamplegt Angle brackets indicate that you replace these words or characters with appropriate entries to make entries in the system for example ldquoEnter your ltUser Namegtrdquo
ExampleExample
Arrows separating the parts of a navigation path for example menu options
Example Emphasized words or expressions
Example Words or characters that you enter in the system exactly as they appear in the documentation
httpwwwsapcom Textual cross-references to an internet address
example Quicklinks added to the internet address of a homepage to enable quick access to specific content on the Web
123456 Hyperlink to an SAP Note for example SAP Note 123456
Example Words or characters quoted from the screen These include field labels screen titles pushbutton labels menu names and menu options
Cross-references to other documentation or published works
Example Output on the screen following a user action for example messages Source code or syntax quoted directly from a program File and directory names and their paths names of variables and parameters and
names of installation upgrade and database tools
EXAMPLE Technical names of system objects These include report names program names transaction codes database table names and key concepts of a programming language when they are surrounded by body text for example SELECT and INCLUDE
EXAMPLE Keys on the keyboard
4650 CUSTOMER 2012-12-17
SAP AGDietmar-Hopp-Allee 16
69190 WalldorfGermany
T +4918 0534 34 34F +4918 0534 34 20
wwwsapcom
copy Copyright 2012 SAP AG All rights reserved
No part of this publication may be reproduced or transmitted in any form or for any purpose without the express permission of SAP AG The information contained herein may be changed without prior noticeSome software products marketed by SAP AG and its distributors contain proprietary software components of other software vendors
Microsoft Windows Excel Outlook PowerPoint Silverlight and Visual Studio are registered trademarks of Microsoft CorporationIBM DB2 DB2 Universal Database System i System i5 System p System p5 System x System z System z10 z10 zVM zOS OS390 zEnterprise PowerVM Power Architecture Power Systems POWER7 POWER6+ POWER6 POWER PowerHA pureScale PowerPC BladeCenter System Storage Storwize XIV GPFS HACMP RETAIN DB2 Connect RACF Redbooks OS2 AIX Intelligent Miner WebSphere Tivoli Informix and Smarter Planet are trademarks or registered trademarks of IBM CorporationLinux is the registered trademark of Linus Torvalds in the United States and other countriesAdobe the Adobe logo Acrobat PostScript and Reader are trademarks or registered trademarks of Adobe Systems Incorporated in the United States and other countriesOracle and Java are registered trademarks of Oracle and its affiliatesUNIX XOpen OSF1 and Motif are registered trademarks of the Open GroupCitrix ICA Program Neighborhood MetaFrame WinFrame VideoFrame and MultiWin are trademarks or registered trademarks of Citrix Systems IncHTML XML XHTML and W3C are trademarks or registered trademarks of W3Creg World Wide Web Consortium Massachusetts Institute of TechnologyApple App Store iBooks iPad iPhone iPhoto iPod iTunes Multi-Touch Objective-C Retina Safari Siri and Xcode are trademarks or registered trademarks of Apple IncIOS is a registered trademark of Cisco Systems IncRIM BlackBerry BBM BlackBerry Curve BlackBerry Bold BlackBerry Pearl BlackBerry Torch BlackBerry Storm BlackBerry Storm2 BlackBerry PlayBook and BlackBerry App World are trademarks or registered trademarks of Research in Motion LimitedGoogle App Engine Google Apps Google Checkout Google Data API Google Maps Google Mobile Ads Google Mobile Updater Google Mobile Google Store Google Sync Google Updater Google Voice Google Mail Gmail YouTube Dalvik and Android are trademarks or registered trademarks of Google IncINTERMEC is a registered trademark of Intermec Technologies CorporationWi-Fi is a registered trademark of Wi-Fi AllianceBluetooth is a registered trademark of Bluetooth SIG IncMotorola is a registered trademark of Motorola Trademark Holdings LLCComputop is a registered trademark of Computop Wirtschaftsinformatik GmbHSAP R3 SAP NetWeaver Duet PartnerEdge ByDesign SAP BusinessObjects Explorer StreamWork SAP HANA and other SAP products and services mentioned herein as well as their respective logos are trademarks or registered trademarks of SAP AG in Germany and other countriesBusiness Objects and the Business Objects logo BusinessObjects Crystal Reports Crystal Decisions Web Intelligence Xcelsius and other Business Objects products and services mentioned herein as well as their respective logos are trademarks or registered trademarks of Business Objects Software Ltd Business Objects is an SAP companySybase and Adaptive Server iAnywhere Sybase 365 SQL Anywhere and other Sybase products and services mentioned herein as well as their respective logos are trademarks or registered trademarks of Sybase Inc Sybase is an SAP company
2012-12-17 CUSTOMER 4750
Crossgate mgic EDDY B2B 360deg and B2B 360deg Services are registered trademarks of Crossgate AG in Germany and other countries Crossgate is an SAP companyAll other product and service names mentioned are the trademarks of their respective companies Data contained in this document serves informational purposes only National product specifications may varyThese materials are subject to change without notice These materials are provided by SAP AG and its affiliated companies (ldquoSAP Grouprdquo) for informational purposes only without representation or warranty of any kind and SAP Group shall not be liable for errors or omissions with respect to the materials The only warranties for SAP Group products and services are those that are set forth in the express warranty statements accompanying such products and services if any Nothing herein should be construed as constituting an additional warranty
DisclaimerSome components of this product are based on Javatrade Any code change in these components may cause unpredictable and severe malfunctions and is therefore expressly prohibited as is any decompilation of these componentsAny Javatrade Source Code delivered with this product is only to be used by SAPrsquos Support Services and may not be modified or altered in any way
Documentation in the SAP Service MarketplaceYou can find this document at the following address httpservicesapcominstguides
4850 CUSTOMER 2012-12-17
SAP AGDietmar-Hopp-Allee 1669190 WalldorfGermanyT +4918 0534 34 34F +4918 0534 34 20wwwsapcom
copy Copyright 2012 SAP AG All rights reservedNo part of this publication may be reproduced or transmitted in any form or for any purpose without the express permission of SAP AG The information contained herein may be changed without prior notice
- SAP Enhancement Package 1 for SAP CRM 70
-
- Table of Contents
- 1 Introduction
- 2 Planning and Preparation
-
- 21 Prerequisites for the Business Packages for SAP CRM
-
- 3 Installation
- 4 Post-Installation
-
- 41 Checking the Availability of Back-End Systems for SAP CRM Java Components
-
- 411 Creating a Back-End User
- 412 Checking the Connection to the ABAP System
- 413 Configuring and Checking the TREX Service
- 414 Checking the Selling via eBay Processes
-
- 42 Post-Installation Steps for Workforce Deployment Application and Calculation Services
-
- 421 Implementing WFMCORE 200 Using Transaction SAINT
- 422 Configuring the Extended Configuration Management (XCM) for WFD Application and Calculation Services
- 423 Checking Workforce Deployment Calculation Services
- 424 Checking the Installation of WFD Application Services and WFD Calculation Services
-
- 43 Post-Installation Steps for the Business Packages for SAP CRM
-
- 431 Creating Roles for the SAP CRM Business Packages
- 432 Installation of the Info Center for the SAP CRM Business Package
-
- 4321 Importing the SAP CRM Info Center Configurations and Directory Structure
- 4322 Activating Manual Ordering of Folders for the sapcrm Repository
- 4323 Creating Indexes and Taxonomies for the sapcrmnews Repository
- 4324 Creating the Index for the sapcrm Repository
- 4325 Configuring the Personal Search
- 4326 Increasing the Number of JCo Connections
-
- 44 Post-Installation Steps for MapBox
-
- 441 Assigning User Groups for MapBox Users
- 442 Configuring an RFC Destination for MapBox
- 443 Performing Initial Configuration for MapBox
- 444 Executing the MapBox
- 445 Performing the Smoke Test for MapBox
- 446 Ensuring Optimal Block Size settings
- 447 Adapting Memory Settings for the J2EE Engine
-
- 45 Activating the CRM Web Client
- 46 Installing and Configuring CRM Application Server Loyalty Add-On Component
- 47 Starting XCM
- 48 Accessing Configuration Documentation in SAP Solution Manager
-
- 5 Additional Information
-
- 51 Installing the Business Packages for SAP CRM Using JSPM (Optional)
- 52 Troubleshooting for the Business Package for SAP CRM
-
- 521 Activating BI Templates Manually
- 522 Dragging the Central Search onto the Portal Desktop
-
- Copyright and trademarks
-
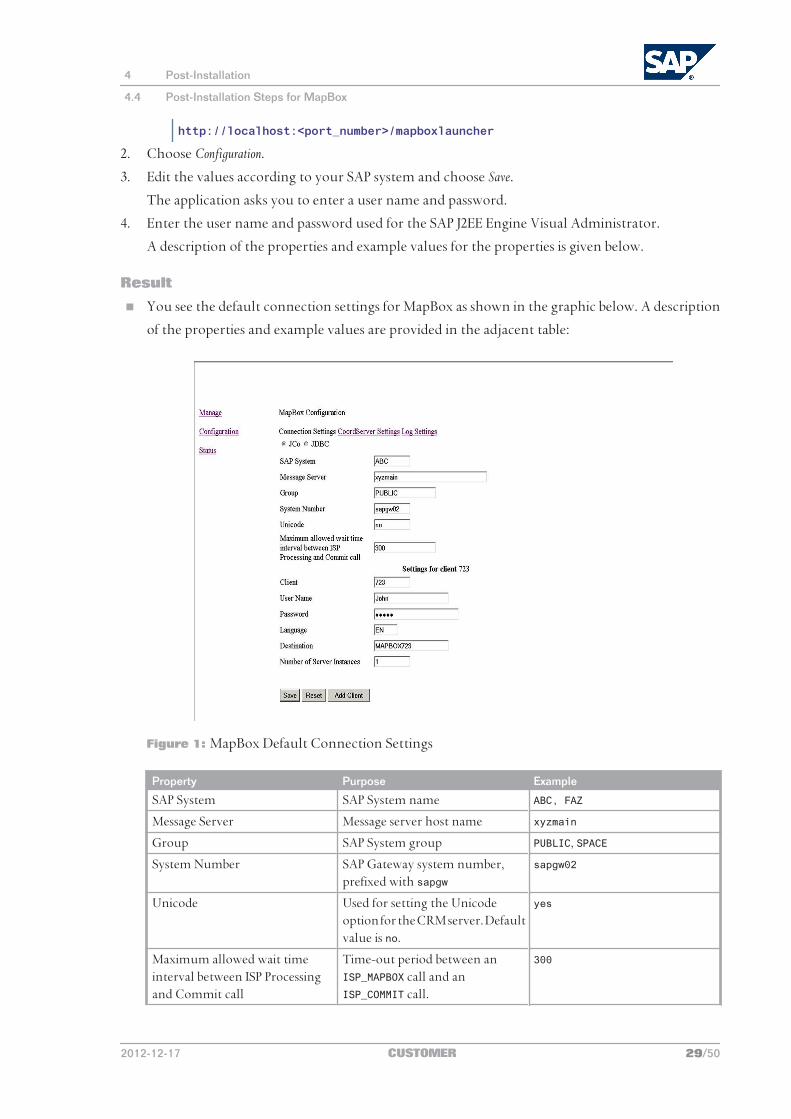
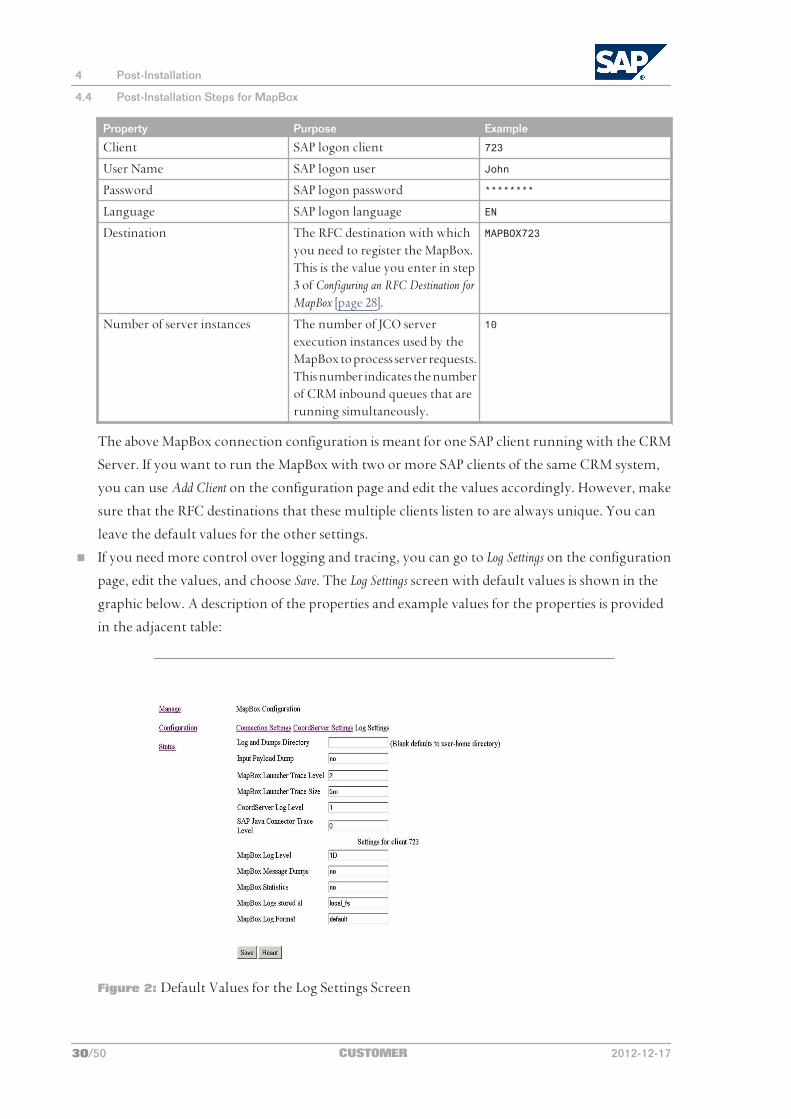
Property Purpose Example
Log and dumps directory This value specifies where the MapBox logs and dumps are stored If this field is left blank the ltuser_homegt folder is used as default value
Only valid for Windows |
Ctemp
End of Windows |
Only valid for IBM i5OSUNIX |
tmp
End of IBM i5OSUNIX |
Input payload dump This value specifies whether the input document coming to MapBox for processing is written or not
No
MapBox launcher trace level This value specifies with what granularity the MapBoxLauncher execution trace is generated6 specifies that a full MapBoxLauncher execution trace is generated whereas 0 specifies that the MapBoxLauncher execution trace is not generated Recommended value for production use is 0
0
MapBox launcher trace size The maximum file size of the generated trace When the size reaches the maximum value another file is created so that the old file can be deleted (for example due to lack of space) You can use alphabetic suffixes to specify the sizes The supported values are k or K ndash kilobytes g or G ndash gigabytes m or M ndash megabytes t or T ndash terabytes
50 k
CoordServer log level This value specifies the detail of the coordination server logging We recommended you not to change the default value of 1
2
SAP Java connector trace level This value specifies the detail of the SAP Java Connector logging The recommended value for production use is 0
2
MapBox log level The log level required for the MapBox to generate an internal log file A higher trace level means that a more detailed log file is created We recommend you to use 4D for production systems where D meansldquoOn Demandrdquo
2
4 Post-Installation
44 Post-Installation Steps for MapBox
2012-12-17 CUSTOMER 3150
Property Purpose Example
MapBox message dumps This value stands for copying the incoming and outgoing messages to the local system For better performance we recommend that you do not enable the message dump option
no
MapBox statistics This value specifies whether a file that lists the performance measurements of the MapBox is created We recommend you to use the value no for production use
no
MapBox logs location This value specifies where the MapBox logs are stored Possible locations are the MapBox repository on the CRM Server or the local file system The recommended value for production use is local_fs which indicates that the MapBox logs are stored on the local file system
local_fs
MapLog format The format in which the MapBox log file must be created The internal log file is by default created in a particular format However you can change this format to display the file in the SAP log file format The two values that are available are default and sap_log
default
The MapBox uses additional properties for performance such as caching and reuse of the MapBox
atoms These values are already set to optimum values and you cannot change them
The description of the properties is shown in the table below
Property Purpose Example
General Settings
max_elements_document This is the limit for the internal cache of the MapBox to hold the count of generated XML documentsWe recommend you not to change this value
100
cache_threshold This is the maximum threshold ndash in kilobytes ndash for a document to be cached in the internal cache of the MapBox
500
4 Post-Installation
44 Post-Installation Steps for MapBox
3250 CUSTOMER 2012-12-17
Property Purpose ExampleWe recommend you not to change this value
max_elements_cache This is the limit for the internal cache of the MapBox to hold the count of MapScenariosWe recommend you not to change this value
100
parallel_instances You use this value on systems where more than one CPU is used This setting allows you to specify the number of CPU instances that MapBox must use for processing so that the remainder can be used by non-MapBox related applications By default MapBox uses all the available CPUs for processing Values can range between 0 to N-1 where N is the number of available CPUs
4
thread_priority Specifies the number of threads MapBox uses during processing We recommend you to set an optimum value for this property so that MapBox does not utilize all available resources 0 = min 1 = low 2 = normal 3 = high 4 = max
3
reuse_count Sets the count for the number of times an atom-instance must be reused before it is destroyed A value of 0 means that the atom is not destroyed and can be used continuously Recommended value is 50 This means that the atom instance is reused 50 times before it is destroyed
100
Lock Server Settings
Operation_Mode The internal mode of operation for the coordination server We recommend not to change the default value of OUTPROC_CLIENT
OUTPROC_CLIENT
Registry_Port The Remote Method Invocation (RMI) port used for connecting to the coordination serverRMI is a Java mechanism for distributed computing
1099
4 Post-Installation
44 Post-Installation Steps for MapBox
2012-12-17 CUSTOMER 3350
Property Purpose ExampleDo not change this value unless port 1099 is unavailable In this case change it to 59856
HostName The name of the host where the coordination server resides
localhost
LocalName The name of the host where the MapBoxLauncher is executed We recommend you not to change the default value of localhost
Server
PollingInterval Polling interval in seconds to ask for shutdown of the coordination server We recommend you not to change the default value of 30
60
CleanUpInterval Cleanup interval in seconds to check for invalid locks created by the MapBoxLauncher We recommend you not to change the default value of 60
180
NOTE
A file name MapLogxsl is also available with the smoke test [page 35] This file is the stylesheet
that is used to format the display of the MapBox log file During the installation and execution
of the MapBox the MapBox log file is created in the following directory
Only valid for Windows |
ltUser_homegtTempMapBoxDumpsltyour_system_namegt500 where ltuser_homegt is the
home directory of the logged-on user ltyour system namegt is the CRM server you have
connected to and 500 is the client you have connected toEnd of Windows |
Only valid for IBM i5OSUNIX |
ltUser_homegtTempMapBoxDumpsltyour_system_namegt500 where ltuser_homegt is the
home directory of the logged-on user ltyour system namegt is the CRM server you have
connected to and 500 is the client you have connected toEnd of IBM i5OSUNIX |
RECOMMENDATION
We recommend that you copy MapLogxsl from the
ltsmoke_test_installation_directorygt to the directory mentioned aboveEnd of Java | MapBox (MBX) |
Only valid for Java | MapBox (MBX) |
444 Executing the MapBox
This section tells you how to execute the MapBox The procedure that you use to execute the Map Box
depends on its current support package (SP) level
4 Post-Installation
44 Post-Installation Steps for MapBox
3450 CUSTOMER 2012-12-17
Procedure
If the SP level of the MapBox is less than SP11 proceed as follows
1 Enter the following URL in your browser
httplthostnamegtltport_numbergtmapboxlaunchermanage
2 Choose Start MapBox
3 The application prompts you for a user name and password
Enter the user name and password for the J2EE Engine Visual Administrator
NOTE
MapBox typically takes 30 to 60 seconds to initialize depending on the number of SAP clients
To see the status of messages processed by MapBox choose Status
If the SP level of the MapBox is equal to or higher than SP11 the MapBox starts automatically
1 For the first MapBox installation you need to restart the Java application server (AS Java) after all
the configuration settings have been completed This automatically starts the MapBox (Autostart)
2 To check the status go to the URL httplthostnamegtltport_numbergtmapboxlauncher
manage
NOTE
MapBox Autostart needs approximately 60 seconds to allow other services of As Java to start
To see the status of messages processed by MapBox choose Status
Result
When the MapBox is running the status is shown as Ready to processEnd of Java | MapBox (MBX) |
Only valid for Java | MapBox (MBX) |
445 Performing the Smoke Test for MapBox
The smoke test checks whether the MapBox installation is error-free
Only valid for Windows |
To execute the smoke test you have to run two batch filesEnd of Windows |
Only valid for IBM i5OSUNIX |
To execute the smoke test you have to run two shell scriptsEnd of IBM i5OSUNIX |
Prerequisites
Before you start the procedure you need to copy the smoketestjar file to a new
ltsmoke_test_installation_directorygt of your choice which has two further subdirectories
firstrun and secondrun
4 Post-Installation
44 Post-Installation Steps for MapBox
2012-12-17 CUSTOMER 3550
You can find the smoketestjar file here
Only valid for IBM i5OSUNIX |
usrsapltinstance_IDgtJCltinstance_numbergtj2eeclusterserver0binext
comsapsyncpointmapboxEnd of IBM i5OSUNIX |
Only valid for Windows |
usrsapltinstance_IDgtJCltinstance_numbergtj2eeclusterserver0binext
comsapsyncpointmapboxEnd of Windows |
NOTE
Each subdirectory of ltsmoke_test_installation_directorygt ndash that is firstrun and
secondrun ndash contains the following files
MBSMOKETEST_IN_000xml
MBSMOKETEST_IN_001xml
MBSMOKETEST_IN_002xml
MBSMOKETEST_IN_003xml
After executing the smoke test you must verify whether the contents of the files generated
by your test are similar to the contents of the above files That is the XML documents that
are created in the smoke test must match the documents located in the
ltsmoke_test_installation_directorygt mentioned above
To execute the smoke test you need to install the SAP Java Connector (SAP JCo version 2012)
You have to download SAP JCo 2012 from SAP Service Marketplace at https
servicesapcomswdc before executing the smoke test
CAUTION
Make sure that you install the SAP Java Connector correctly
The file mapcaseprop is available in the ltsmoke_test_installation_directorygt This file
contains the connection parameters to be tested You can modify the contents of this file
CAUTION
You must replace the connection parameters in this file with the connection parameters that
you entered in the MapBoxMetaxml file
Procedure
1 Run the first stage of the smoke test
1 Only valid for Windows |
Execute the file smoketest_1bat from the ltsmoke_test_installation_directorygtEnd of Windows |
Only valid for Windows |
This prompts you to enter the followingEnd of Windows |
4 Post-Installation
44 Post-Installation Steps for MapBox
3650 CUSTOMER 2012-12-17
Only valid for Windows |
1 ltDRIVEgtusrsapltinstance_IDgtJCltinstance_numbergtj2ee
2 ltsmoke_test_installation_directorygt
3 ltpath_to_sapjcojargt
End of Windows |
Only valid for IBM i5OSUNIX |
Execute the file smoketest_1sh from the ltsmoke_test_installation_directorygtEnd of IBM i5OSUNIX |
Only valid for IBM i5OSUNIX |
1 usrsapltinstance_IDgtJCltinstance_numbergtj2ee
2 ltsmoke_test_installation_directorygt
3 ltpath_to_sapjcojargt
End of IBM i5OSUNIX |
2 Enter the appropriate paths
The smoke test creates the following files
MBSMOKETEST_IN_000xml
MBSMOKETEST_IN_001xml
MBSMOKETEST_IN_002xml
MBSMOKETEST_IN_003xml
3 Only valid for Windows |
Check the contents of the generated files against the contents of the files located in
ltsmoke_test_installation_directorygtSMOKETESTfirstrunEnd of Windows |
Only valid for IBM i5OSUNIX |
Check the contents of the four files against the contents of the files located in
ltsmoke_test_installation_directorygtSMOKETESTfirstrunEnd of IBM i5OSUNIX |
2 Run the second stage of the smoke test
1 Only valid for Windows |
Execute the file smoketest_2bat which is located in the
ltsmoke_test_installation_directorygtEnd of Windows |
Only valid for IBM i5OSUNIX |
Execute the file smoketest_2sh which is located in the
ltsmoke_test_installation_directorygtEnd of IBM i5OSUNIX |
This prompts you to enter the following
Only valid for Windows |
1 ltDRIVEgtusrsapltinstance_IDgtJCltinstance_numbergtj2ee
2 ltsmoke_test_installation_directorygt
End of Windows |
4 Post-Installation
44 Post-Installation Steps for MapBox
2012-12-17 CUSTOMER 3750
Only valid for IBM i5OSUNIX |
1 usrsapltinstance_IDgtJCltinstance_numbergtj2ee
2 ltsmoke_test_installation_directorygt
End of IBM i5OSUNIX |
2 Enter the appropriate paths
The smoke test creates the following files
MBSMOKETEST_IN_000xml
MBSMOKETEST_IN_001xml
MBSMOKETEST_IN_002xml
MBSMOKETEST_IN_003xml
CAUTION
The files generated in the second stage of testing overwrite the contents of the files
generated in the first stage
3 Only valid for Windows |
Check the contents of the generated files against the contents of the files located in
ltsmoke_test_installation_directorygtSMOKETESTsecondrunEnd of Windows |
Only valid for IBM i5OSUNIX |
Check the contents of the four files against the contents of the files located in
ltsmoke_test_installation_directorygtSMOKETESTsecondrunEnd of IBM i5OSUNIX |
Result
If the smoke test has identified errors in the installation process the four XML files are not created in
either of the stages Instead an error log file is created
RECOMMENDATION
In the event of errors we recommend that you send the error log file to your administrator
End of Java | MapBox (MBX) |
Only valid for Java | MapBox (MBX) |
446 Ensuring Optimal Block Size settings
The block size of an object determines the number of messages that are processed at the same time by
the MapBox as a set You need to make sure that the block sizes are optimal to reduce load on the
MapBox XML processor
Procedure
1 Use transaction R3AC3 to set the block size of object GWA_COUNTRY to 10 and save the setting
2 Use transaction R3AC1 to set the block size of object BUPA_MAIN to 10 and save the settingEnd of Java | MapBox (MBX) |
4 Post-Installation
44 Post-Installation Steps for MapBox
3850 CUSTOMER 2012-12-17
Only valid for ABAP+JavaJava | MapBox (MBX) |
447 Adapting Memory Settings for the J2EE Engine
You need to adapt the memory settings for the J2EE Engine because MapBox relies heavily on memory-
intensive XML-processing such as schema-validation parsing transformation and so on
RECOMMENDATION
For rapid message processing by MapBox we recommend you to use 1024 MB of heap memory
for MapBox alone With a heap size of 512 MB MapBox can still process messages but with a slightly
higher processing time for each message
The MapBox memory requirements are directly proportional to the size of the input documents
that MapBox has to process The average size of such documents is in the range of 150 to 200 KB
For messages of this size it is sufficient to have a heap memory of 512 MB If the input documents
are in the range of 1 to 2 MB we recommend that you give MapBox a heap memory of 1024 MB
Procedure
To set the recommended memory settings for the MapBox you start the config tool of the J2EE Engine
Only valid for Windows |
Start the config tool by executing ltDrivegtusrsapltSAPSIDgtltinstance_numbergtj2ee
configtoolbatEnd of Windows |
Only valid for IBM i5OSUNIX |
Start the config tool by executing usrsapltSAPSIDgtltinstance_numbergtj2eeconfigtoolshEnd of IBM i5OSUNIX |
End of ABAP+JavaJava | MapBox (MBX) |
End of ABAP+JavaJava | MapBox (MBX) |
Only valid for ABAPABAP+Java |
45 Activating the CRM Web Client
The CRM Web Client is part of the ICF Services that is automatically installed as part of SAP NetWeaver
Application Server
Procedure
To activate the CRM Web Client after the installation see the SAP Library at
httphelpsapcomnw70 SAP NetWeaver 70 Library (including Enhancement Package 2) English SAP
NetWeaver Library SAP NetWeaver by Key Capability Application Platform by Key Capability Platform-Wide
Services Connectivity Components of SAP Communication Technology Communication Between ABAP and Non-
4 Post-Installation
45 Activating the CRM Web Client
2012-12-17 CUSTOMER 3950
ABAP Technology Internet Communication Framework Development Server-Side Development Creating and
Configuring an ICF Service Activating and Deactivating the ICF ServicesEnd of ABAPABAP+Java |
Only valid for ABAP |
46 Installing and Configuring CRM Application Server Loyalty Add-On Component
This section provides information about how to install and configure CRM Application Server Loyalty
as an add-on component to CRM Application Server ABAP
Prerequisites
You have already deployed the following software components
SAP NetWeaver Application Server ABAP (AS ABAP)
CRM Application Server ABAP
Procedure
Installing CRM Application Server Loyalty
Install CRM Application Server Loyalty on the same host where CRM Application Server ABAP is
deployed as described in SAP Note 1162144
Configuring CRM Application Server Loyalty
After you have installed CRM Application Server Loyalty you must complete the following
configuration steps
1 Call transaction nspro
2 Choose SAP Customising Implementation Guide Customer Relationship Management Marketing Loyalty
Management in BBPCRM Basic Settings Define Basic Settings
3 Enter value 1 for the INSTALL_TYPE parameter
NOTE
You do not have to enter destination name for the LOYALTY_SYSTEM parameterEnd of ABAP |
47 Starting XCM
This section describes how to start XCM
Procedure
1 You access the XCM tool at
httplthostgtltportgtltweb app namegtadminxcminitdo
4 Post-Installation
46 Installing and Configuring CRM Application Server Loyalty Add-On Component
4050 CUSTOMER 2012-12-17
NOTE
You can also start XCM in accessibility mode (according to Section 508 Rehabilitation Act)
at the following URL
httplthostgtltportgtltweb app namegtadminxcminitdosap-accessibility=x
2 Provide a user and password If you are logging on for the first time use the Administrator user
and the password you defined during the installation of the SAP system
RECOMMENDATION
We recommend you create new users with lesser rights than the Administrator for the
administration of Web applications
For more information see the SAP CRM Security Guide section E-Commerce
3 When the application opens a closed control tree is displayed on the left of the screen A screen
containing help information is displayed to the right
You can use edit (change settings) or display (see settings) mode in XCM You use the button in
the top right hand corner of the screen to change between modes When you switch to edit mode
a DB lock is set meaning that only this user can edit the settings at one time The lock is released
once the user switches back to display mode or after session timeout (default timeout is 30mins)
48 Accessing Configuration Documentation in SAP Solution Manager
To access configuration documentation in SAP Solution Manager you have to connect your newly
installed SAP system to SAP Solution Manager
NOTE
For SAP NetWeaver you can also find configuration documentation in the Technology Consultants
Guide at
httphelpsapcomnw70 SAP NetWeaver 70 Library (including Enhancement Package 2) English
SAP NetWeaver Library Technology Consultants Guide
Procedure
Create a configuration project with the related configuration guide as described in the following
documentation
httphelpsapcom SAP Solutions SAP Solution Manager Documentation for SAP Solution Manager
ltcurrent releasegt SAP Solution Manager Implementing and Upgrading SAP Solutions Projects
Configuration
More Information
httpservicesapcomsolutionmanager Media Library How-To Documents How to Create a
Configuration Guide using SAP Solution Manager
4 Post-Installation
48 Accessing Configuration Documentation in SAP Solution Manager
2012-12-17 CUSTOMER 4150
This page is left blank for documents that are printed on both sides
5 Additional Information
Only valid for ABAP+JavaJava |
51 Installing the Business Packages for SAP CRM Using JSPM (Optional)
You can also install the Business Packages for SAP CRM using the Java Support Package Manager (JSPM)
Prerequisites
Only valid for IBM i5OSUNIX |
You have checked hardware and software requirements [external document]End of IBM i5OSUNIX |
Only valid for Windows |
You have checked hardware and software requirements [external document]End of Windows |
You have ckecked the Prerequisites for the Business Packages for SAP CRM [page 7]
Procedure
1 Download version 701 of the files sapcom_BPCRMAPP sapcom_BPCRMFND sapcom_CRMAPP and
sapcom_CRMFND as follows
1 Go to httpservicesapcomswdc Download Support Packages and Patches Search for
Support Packages and Patches
2 Enter the following search terms
BP CRM Application Coding 701
BP CRM Application Content 701
BP CRM Foundation Coding 701
BP CRM Foundation Content 701
2 Add the deployment variable comsapcmshare as described in SAP Note 965948
For more information about how to use the Software Deployment Manager (SDM) see the
documentation Software Deployment Manager which is available at
httphelpsapcomnw70 SAP NetWeaver 70 Library (including Enhancement Package 2) English
SAP NetWeaver Library SAP NetWeaver Developerrsquos Guide Fundamentals Using Java Core Development
Tasks Deployment Putting It All Together Software Deployment Manager
3 Install the Business Packages for SAP CRM with JSPM as described in Installing Additional Usage Types
or Software Units in an Existing SAP System [external document]
5 Additional Information
51 Installing the Business Packages for SAP CRM Using JSPM (Optional)
2012-12-17 CUSTOMER 4350
4 Perform the required Post-Installation Steps for the Business Packages for SAP CRM [page 20]End of ABAP+JavaJava |
Only valid for ABAP+JavaJava |
52 Troubleshooting for the Business Package for SAP CRMOnly valid for ABAP+JavaJava |
The following sections describe the steps that you have to perform if you have problems after the
installation
Activating BI Templates Manually [page 44]
Dragging the Central Search onto the Portal Desktop [page 45]End of ABAP+JavaJava |
Only valid for ABAP+JavaJava |
521 Activating BI Templates Manually
If you have installed the Business Package you might see error messages when loading the BI templates
This procedure describes how you can activate the templates afterwards
Procedure
1 Note the technical name of all templates in your portal interface that are not working
2 Log on to your BI system
3 On the SAP Easy Access screen choose Modeling Administrator Workbench Modeling (transaction
RSA1 or RSOR)
4 Choose Business Content Object Types Web Template Name Select Objects
A new window containing a list of BW objects and templates opens
5 Find your missing templates for example 0TPL_0CRM_Cnn_Qnnn_Vnnn_M and select the entries
6 Choose Transfer Selection
The template now appears on the right-hand side of the screen The Transfer checkbox has been
selected and cannot be changed Nevertheless we recommend that you repeat the following
procedure so that your templates can be displayed
7 Select the template
8 Choose Transfer Transfer
Result
You have successfully activated your missing templates and no error messages appear in the portalEnd of ABAP+JavaJava |
5 Additional Information
52 Troubleshooting for the Business Package for SAP CRM
4450 CUSTOMER 2012-12-17
Only valid for ABAP+JavaJava |
522 Dragging the Central Search onto the Portal Desktop
Procedure
The Business Package for SAP CRM 70 including SAP enhancement package 1 contains an iView for
the central search in CRM This iView is in the package on the page Today in the workset Home of the
CRM User You can drag this iView onto the portal desktop under the tool areaEnd of ABAP+JavaJava |
End of ABAP+JavaJava |
5 Additional Information
52 Troubleshooting for the Business Package for SAP CRM
2012-12-17 CUSTOMER 4550
Typographic Conventions
Example Description
ltExamplegt Angle brackets indicate that you replace these words or characters with appropriate entries to make entries in the system for example ldquoEnter your ltUser Namegtrdquo
ExampleExample
Arrows separating the parts of a navigation path for example menu options
Example Emphasized words or expressions
Example Words or characters that you enter in the system exactly as they appear in the documentation
httpwwwsapcom Textual cross-references to an internet address
example Quicklinks added to the internet address of a homepage to enable quick access to specific content on the Web
123456 Hyperlink to an SAP Note for example SAP Note 123456
Example Words or characters quoted from the screen These include field labels screen titles pushbutton labels menu names and menu options
Cross-references to other documentation or published works
Example Output on the screen following a user action for example messages Source code or syntax quoted directly from a program File and directory names and their paths names of variables and parameters and
names of installation upgrade and database tools
EXAMPLE Technical names of system objects These include report names program names transaction codes database table names and key concepts of a programming language when they are surrounded by body text for example SELECT and INCLUDE
EXAMPLE Keys on the keyboard
4650 CUSTOMER 2012-12-17
SAP AGDietmar-Hopp-Allee 16
69190 WalldorfGermany
T +4918 0534 34 34F +4918 0534 34 20
wwwsapcom
copy Copyright 2012 SAP AG All rights reserved
No part of this publication may be reproduced or transmitted in any form or for any purpose without the express permission of SAP AG The information contained herein may be changed without prior noticeSome software products marketed by SAP AG and its distributors contain proprietary software components of other software vendors
Microsoft Windows Excel Outlook PowerPoint Silverlight and Visual Studio are registered trademarks of Microsoft CorporationIBM DB2 DB2 Universal Database System i System i5 System p System p5 System x System z System z10 z10 zVM zOS OS390 zEnterprise PowerVM Power Architecture Power Systems POWER7 POWER6+ POWER6 POWER PowerHA pureScale PowerPC BladeCenter System Storage Storwize XIV GPFS HACMP RETAIN DB2 Connect RACF Redbooks OS2 AIX Intelligent Miner WebSphere Tivoli Informix and Smarter Planet are trademarks or registered trademarks of IBM CorporationLinux is the registered trademark of Linus Torvalds in the United States and other countriesAdobe the Adobe logo Acrobat PostScript and Reader are trademarks or registered trademarks of Adobe Systems Incorporated in the United States and other countriesOracle and Java are registered trademarks of Oracle and its affiliatesUNIX XOpen OSF1 and Motif are registered trademarks of the Open GroupCitrix ICA Program Neighborhood MetaFrame WinFrame VideoFrame and MultiWin are trademarks or registered trademarks of Citrix Systems IncHTML XML XHTML and W3C are trademarks or registered trademarks of W3Creg World Wide Web Consortium Massachusetts Institute of TechnologyApple App Store iBooks iPad iPhone iPhoto iPod iTunes Multi-Touch Objective-C Retina Safari Siri and Xcode are trademarks or registered trademarks of Apple IncIOS is a registered trademark of Cisco Systems IncRIM BlackBerry BBM BlackBerry Curve BlackBerry Bold BlackBerry Pearl BlackBerry Torch BlackBerry Storm BlackBerry Storm2 BlackBerry PlayBook and BlackBerry App World are trademarks or registered trademarks of Research in Motion LimitedGoogle App Engine Google Apps Google Checkout Google Data API Google Maps Google Mobile Ads Google Mobile Updater Google Mobile Google Store Google Sync Google Updater Google Voice Google Mail Gmail YouTube Dalvik and Android are trademarks or registered trademarks of Google IncINTERMEC is a registered trademark of Intermec Technologies CorporationWi-Fi is a registered trademark of Wi-Fi AllianceBluetooth is a registered trademark of Bluetooth SIG IncMotorola is a registered trademark of Motorola Trademark Holdings LLCComputop is a registered trademark of Computop Wirtschaftsinformatik GmbHSAP R3 SAP NetWeaver Duet PartnerEdge ByDesign SAP BusinessObjects Explorer StreamWork SAP HANA and other SAP products and services mentioned herein as well as their respective logos are trademarks or registered trademarks of SAP AG in Germany and other countriesBusiness Objects and the Business Objects logo BusinessObjects Crystal Reports Crystal Decisions Web Intelligence Xcelsius and other Business Objects products and services mentioned herein as well as their respective logos are trademarks or registered trademarks of Business Objects Software Ltd Business Objects is an SAP companySybase and Adaptive Server iAnywhere Sybase 365 SQL Anywhere and other Sybase products and services mentioned herein as well as their respective logos are trademarks or registered trademarks of Sybase Inc Sybase is an SAP company
2012-12-17 CUSTOMER 4750
Crossgate mgic EDDY B2B 360deg and B2B 360deg Services are registered trademarks of Crossgate AG in Germany and other countries Crossgate is an SAP companyAll other product and service names mentioned are the trademarks of their respective companies Data contained in this document serves informational purposes only National product specifications may varyThese materials are subject to change without notice These materials are provided by SAP AG and its affiliated companies (ldquoSAP Grouprdquo) for informational purposes only without representation or warranty of any kind and SAP Group shall not be liable for errors or omissions with respect to the materials The only warranties for SAP Group products and services are those that are set forth in the express warranty statements accompanying such products and services if any Nothing herein should be construed as constituting an additional warranty
DisclaimerSome components of this product are based on Javatrade Any code change in these components may cause unpredictable and severe malfunctions and is therefore expressly prohibited as is any decompilation of these componentsAny Javatrade Source Code delivered with this product is only to be used by SAPrsquos Support Services and may not be modified or altered in any way
Documentation in the SAP Service MarketplaceYou can find this document at the following address httpservicesapcominstguides
4850 CUSTOMER 2012-12-17
SAP AGDietmar-Hopp-Allee 1669190 WalldorfGermanyT +4918 0534 34 34F +4918 0534 34 20wwwsapcom
copy Copyright 2012 SAP AG All rights reservedNo part of this publication may be reproduced or transmitted in any form or for any purpose without the express permission of SAP AG The information contained herein may be changed without prior notice
- SAP Enhancement Package 1 for SAP CRM 70
-
- Table of Contents
- 1 Introduction
- 2 Planning and Preparation
-
- 21 Prerequisites for the Business Packages for SAP CRM
-
- 3 Installation
- 4 Post-Installation
-
- 41 Checking the Availability of Back-End Systems for SAP CRM Java Components
-
- 411 Creating a Back-End User
- 412 Checking the Connection to the ABAP System
- 413 Configuring and Checking the TREX Service
- 414 Checking the Selling via eBay Processes
-
- 42 Post-Installation Steps for Workforce Deployment Application and Calculation Services
-
- 421 Implementing WFMCORE 200 Using Transaction SAINT
- 422 Configuring the Extended Configuration Management (XCM) for WFD Application and Calculation Services
- 423 Checking Workforce Deployment Calculation Services
- 424 Checking the Installation of WFD Application Services and WFD Calculation Services
-
- 43 Post-Installation Steps for the Business Packages for SAP CRM
-
- 431 Creating Roles for the SAP CRM Business Packages
- 432 Installation of the Info Center for the SAP CRM Business Package
-
- 4321 Importing the SAP CRM Info Center Configurations and Directory Structure
- 4322 Activating Manual Ordering of Folders for the sapcrm Repository
- 4323 Creating Indexes and Taxonomies for the sapcrmnews Repository
- 4324 Creating the Index for the sapcrm Repository
- 4325 Configuring the Personal Search
- 4326 Increasing the Number of JCo Connections
-
- 44 Post-Installation Steps for MapBox
-
- 441 Assigning User Groups for MapBox Users
- 442 Configuring an RFC Destination for MapBox
- 443 Performing Initial Configuration for MapBox
- 444 Executing the MapBox
- 445 Performing the Smoke Test for MapBox
- 446 Ensuring Optimal Block Size settings
- 447 Adapting Memory Settings for the J2EE Engine
-
- 45 Activating the CRM Web Client
- 46 Installing and Configuring CRM Application Server Loyalty Add-On Component
- 47 Starting XCM
- 48 Accessing Configuration Documentation in SAP Solution Manager
-
- 5 Additional Information
-
- 51 Installing the Business Packages for SAP CRM Using JSPM (Optional)
- 52 Troubleshooting for the Business Package for SAP CRM
-
- 521 Activating BI Templates Manually
- 522 Dragging the Central Search onto the Portal Desktop
-
- Copyright and trademarks
-
Property Purpose Example
MapBox message dumps This value stands for copying the incoming and outgoing messages to the local system For better performance we recommend that you do not enable the message dump option
no
MapBox statistics This value specifies whether a file that lists the performance measurements of the MapBox is created We recommend you to use the value no for production use
no
MapBox logs location This value specifies where the MapBox logs are stored Possible locations are the MapBox repository on the CRM Server or the local file system The recommended value for production use is local_fs which indicates that the MapBox logs are stored on the local file system
local_fs
MapLog format The format in which the MapBox log file must be created The internal log file is by default created in a particular format However you can change this format to display the file in the SAP log file format The two values that are available are default and sap_log
default
The MapBox uses additional properties for performance such as caching and reuse of the MapBox
atoms These values are already set to optimum values and you cannot change them
The description of the properties is shown in the table below
Property Purpose Example
General Settings
max_elements_document This is the limit for the internal cache of the MapBox to hold the count of generated XML documentsWe recommend you not to change this value
100
cache_threshold This is the maximum threshold ndash in kilobytes ndash for a document to be cached in the internal cache of the MapBox
500
4 Post-Installation
44 Post-Installation Steps for MapBox
3250 CUSTOMER 2012-12-17
Property Purpose ExampleWe recommend you not to change this value
max_elements_cache This is the limit for the internal cache of the MapBox to hold the count of MapScenariosWe recommend you not to change this value
100
parallel_instances You use this value on systems where more than one CPU is used This setting allows you to specify the number of CPU instances that MapBox must use for processing so that the remainder can be used by non-MapBox related applications By default MapBox uses all the available CPUs for processing Values can range between 0 to N-1 where N is the number of available CPUs
4
thread_priority Specifies the number of threads MapBox uses during processing We recommend you to set an optimum value for this property so that MapBox does not utilize all available resources 0 = min 1 = low 2 = normal 3 = high 4 = max
3
reuse_count Sets the count for the number of times an atom-instance must be reused before it is destroyed A value of 0 means that the atom is not destroyed and can be used continuously Recommended value is 50 This means that the atom instance is reused 50 times before it is destroyed
100
Lock Server Settings
Operation_Mode The internal mode of operation for the coordination server We recommend not to change the default value of OUTPROC_CLIENT
OUTPROC_CLIENT
Registry_Port The Remote Method Invocation (RMI) port used for connecting to the coordination serverRMI is a Java mechanism for distributed computing
1099
4 Post-Installation
44 Post-Installation Steps for MapBox
2012-12-17 CUSTOMER 3350
Property Purpose ExampleDo not change this value unless port 1099 is unavailable In this case change it to 59856
HostName The name of the host where the coordination server resides
localhost
LocalName The name of the host where the MapBoxLauncher is executed We recommend you not to change the default value of localhost
Server
PollingInterval Polling interval in seconds to ask for shutdown of the coordination server We recommend you not to change the default value of 30
60
CleanUpInterval Cleanup interval in seconds to check for invalid locks created by the MapBoxLauncher We recommend you not to change the default value of 60
180
NOTE
A file name MapLogxsl is also available with the smoke test [page 35] This file is the stylesheet
that is used to format the display of the MapBox log file During the installation and execution
of the MapBox the MapBox log file is created in the following directory
Only valid for Windows |
ltUser_homegtTempMapBoxDumpsltyour_system_namegt500 where ltuser_homegt is the
home directory of the logged-on user ltyour system namegt is the CRM server you have
connected to and 500 is the client you have connected toEnd of Windows |
Only valid for IBM i5OSUNIX |
ltUser_homegtTempMapBoxDumpsltyour_system_namegt500 where ltuser_homegt is the
home directory of the logged-on user ltyour system namegt is the CRM server you have
connected to and 500 is the client you have connected toEnd of IBM i5OSUNIX |
RECOMMENDATION
We recommend that you copy MapLogxsl from the
ltsmoke_test_installation_directorygt to the directory mentioned aboveEnd of Java | MapBox (MBX) |
Only valid for Java | MapBox (MBX) |
444 Executing the MapBox
This section tells you how to execute the MapBox The procedure that you use to execute the Map Box
depends on its current support package (SP) level
4 Post-Installation
44 Post-Installation Steps for MapBox
3450 CUSTOMER 2012-12-17
Procedure
If the SP level of the MapBox is less than SP11 proceed as follows
1 Enter the following URL in your browser
httplthostnamegtltport_numbergtmapboxlaunchermanage
2 Choose Start MapBox
3 The application prompts you for a user name and password
Enter the user name and password for the J2EE Engine Visual Administrator
NOTE
MapBox typically takes 30 to 60 seconds to initialize depending on the number of SAP clients
To see the status of messages processed by MapBox choose Status
If the SP level of the MapBox is equal to or higher than SP11 the MapBox starts automatically
1 For the first MapBox installation you need to restart the Java application server (AS Java) after all
the configuration settings have been completed This automatically starts the MapBox (Autostart)
2 To check the status go to the URL httplthostnamegtltport_numbergtmapboxlauncher
manage
NOTE
MapBox Autostart needs approximately 60 seconds to allow other services of As Java to start
To see the status of messages processed by MapBox choose Status
Result
When the MapBox is running the status is shown as Ready to processEnd of Java | MapBox (MBX) |
Only valid for Java | MapBox (MBX) |
445 Performing the Smoke Test for MapBox
The smoke test checks whether the MapBox installation is error-free
Only valid for Windows |
To execute the smoke test you have to run two batch filesEnd of Windows |
Only valid for IBM i5OSUNIX |
To execute the smoke test you have to run two shell scriptsEnd of IBM i5OSUNIX |
Prerequisites
Before you start the procedure you need to copy the smoketestjar file to a new
ltsmoke_test_installation_directorygt of your choice which has two further subdirectories
firstrun and secondrun
4 Post-Installation
44 Post-Installation Steps for MapBox
2012-12-17 CUSTOMER 3550
You can find the smoketestjar file here
Only valid for IBM i5OSUNIX |
usrsapltinstance_IDgtJCltinstance_numbergtj2eeclusterserver0binext
comsapsyncpointmapboxEnd of IBM i5OSUNIX |
Only valid for Windows |
usrsapltinstance_IDgtJCltinstance_numbergtj2eeclusterserver0binext
comsapsyncpointmapboxEnd of Windows |
NOTE
Each subdirectory of ltsmoke_test_installation_directorygt ndash that is firstrun and
secondrun ndash contains the following files
MBSMOKETEST_IN_000xml
MBSMOKETEST_IN_001xml
MBSMOKETEST_IN_002xml
MBSMOKETEST_IN_003xml
After executing the smoke test you must verify whether the contents of the files generated
by your test are similar to the contents of the above files That is the XML documents that
are created in the smoke test must match the documents located in the
ltsmoke_test_installation_directorygt mentioned above
To execute the smoke test you need to install the SAP Java Connector (SAP JCo version 2012)
You have to download SAP JCo 2012 from SAP Service Marketplace at https
servicesapcomswdc before executing the smoke test
CAUTION
Make sure that you install the SAP Java Connector correctly
The file mapcaseprop is available in the ltsmoke_test_installation_directorygt This file
contains the connection parameters to be tested You can modify the contents of this file
CAUTION
You must replace the connection parameters in this file with the connection parameters that
you entered in the MapBoxMetaxml file
Procedure
1 Run the first stage of the smoke test
1 Only valid for Windows |
Execute the file smoketest_1bat from the ltsmoke_test_installation_directorygtEnd of Windows |
Only valid for Windows |
This prompts you to enter the followingEnd of Windows |
4 Post-Installation
44 Post-Installation Steps for MapBox
3650 CUSTOMER 2012-12-17
Only valid for Windows |
1 ltDRIVEgtusrsapltinstance_IDgtJCltinstance_numbergtj2ee
2 ltsmoke_test_installation_directorygt
3 ltpath_to_sapjcojargt
End of Windows |
Only valid for IBM i5OSUNIX |
Execute the file smoketest_1sh from the ltsmoke_test_installation_directorygtEnd of IBM i5OSUNIX |
Only valid for IBM i5OSUNIX |
1 usrsapltinstance_IDgtJCltinstance_numbergtj2ee
2 ltsmoke_test_installation_directorygt
3 ltpath_to_sapjcojargt
End of IBM i5OSUNIX |
2 Enter the appropriate paths
The smoke test creates the following files
MBSMOKETEST_IN_000xml
MBSMOKETEST_IN_001xml
MBSMOKETEST_IN_002xml
MBSMOKETEST_IN_003xml
3 Only valid for Windows |
Check the contents of the generated files against the contents of the files located in
ltsmoke_test_installation_directorygtSMOKETESTfirstrunEnd of Windows |
Only valid for IBM i5OSUNIX |
Check the contents of the four files against the contents of the files located in
ltsmoke_test_installation_directorygtSMOKETESTfirstrunEnd of IBM i5OSUNIX |
2 Run the second stage of the smoke test
1 Only valid for Windows |
Execute the file smoketest_2bat which is located in the
ltsmoke_test_installation_directorygtEnd of Windows |
Only valid for IBM i5OSUNIX |
Execute the file smoketest_2sh which is located in the
ltsmoke_test_installation_directorygtEnd of IBM i5OSUNIX |
This prompts you to enter the following
Only valid for Windows |
1 ltDRIVEgtusrsapltinstance_IDgtJCltinstance_numbergtj2ee
2 ltsmoke_test_installation_directorygt
End of Windows |
4 Post-Installation
44 Post-Installation Steps for MapBox
2012-12-17 CUSTOMER 3750
Only valid for IBM i5OSUNIX |
1 usrsapltinstance_IDgtJCltinstance_numbergtj2ee
2 ltsmoke_test_installation_directorygt
End of IBM i5OSUNIX |
2 Enter the appropriate paths
The smoke test creates the following files
MBSMOKETEST_IN_000xml
MBSMOKETEST_IN_001xml
MBSMOKETEST_IN_002xml
MBSMOKETEST_IN_003xml
CAUTION
The files generated in the second stage of testing overwrite the contents of the files
generated in the first stage
3 Only valid for Windows |
Check the contents of the generated files against the contents of the files located in
ltsmoke_test_installation_directorygtSMOKETESTsecondrunEnd of Windows |
Only valid for IBM i5OSUNIX |
Check the contents of the four files against the contents of the files located in
ltsmoke_test_installation_directorygtSMOKETESTsecondrunEnd of IBM i5OSUNIX |
Result
If the smoke test has identified errors in the installation process the four XML files are not created in
either of the stages Instead an error log file is created
RECOMMENDATION
In the event of errors we recommend that you send the error log file to your administrator
End of Java | MapBox (MBX) |
Only valid for Java | MapBox (MBX) |
446 Ensuring Optimal Block Size settings
The block size of an object determines the number of messages that are processed at the same time by
the MapBox as a set You need to make sure that the block sizes are optimal to reduce load on the
MapBox XML processor
Procedure
1 Use transaction R3AC3 to set the block size of object GWA_COUNTRY to 10 and save the setting
2 Use transaction R3AC1 to set the block size of object BUPA_MAIN to 10 and save the settingEnd of Java | MapBox (MBX) |
4 Post-Installation
44 Post-Installation Steps for MapBox
3850 CUSTOMER 2012-12-17
Only valid for ABAP+JavaJava | MapBox (MBX) |
447 Adapting Memory Settings for the J2EE Engine
You need to adapt the memory settings for the J2EE Engine because MapBox relies heavily on memory-
intensive XML-processing such as schema-validation parsing transformation and so on
RECOMMENDATION
For rapid message processing by MapBox we recommend you to use 1024 MB of heap memory
for MapBox alone With a heap size of 512 MB MapBox can still process messages but with a slightly
higher processing time for each message
The MapBox memory requirements are directly proportional to the size of the input documents
that MapBox has to process The average size of such documents is in the range of 150 to 200 KB
For messages of this size it is sufficient to have a heap memory of 512 MB If the input documents
are in the range of 1 to 2 MB we recommend that you give MapBox a heap memory of 1024 MB
Procedure
To set the recommended memory settings for the MapBox you start the config tool of the J2EE Engine
Only valid for Windows |
Start the config tool by executing ltDrivegtusrsapltSAPSIDgtltinstance_numbergtj2ee
configtoolbatEnd of Windows |
Only valid for IBM i5OSUNIX |
Start the config tool by executing usrsapltSAPSIDgtltinstance_numbergtj2eeconfigtoolshEnd of IBM i5OSUNIX |
End of ABAP+JavaJava | MapBox (MBX) |
End of ABAP+JavaJava | MapBox (MBX) |
Only valid for ABAPABAP+Java |
45 Activating the CRM Web Client
The CRM Web Client is part of the ICF Services that is automatically installed as part of SAP NetWeaver
Application Server
Procedure
To activate the CRM Web Client after the installation see the SAP Library at
httphelpsapcomnw70 SAP NetWeaver 70 Library (including Enhancement Package 2) English SAP
NetWeaver Library SAP NetWeaver by Key Capability Application Platform by Key Capability Platform-Wide
Services Connectivity Components of SAP Communication Technology Communication Between ABAP and Non-
4 Post-Installation
45 Activating the CRM Web Client
2012-12-17 CUSTOMER 3950
ABAP Technology Internet Communication Framework Development Server-Side Development Creating and
Configuring an ICF Service Activating and Deactivating the ICF ServicesEnd of ABAPABAP+Java |
Only valid for ABAP |
46 Installing and Configuring CRM Application Server Loyalty Add-On Component
This section provides information about how to install and configure CRM Application Server Loyalty
as an add-on component to CRM Application Server ABAP
Prerequisites
You have already deployed the following software components
SAP NetWeaver Application Server ABAP (AS ABAP)
CRM Application Server ABAP
Procedure
Installing CRM Application Server Loyalty
Install CRM Application Server Loyalty on the same host where CRM Application Server ABAP is
deployed as described in SAP Note 1162144
Configuring CRM Application Server Loyalty
After you have installed CRM Application Server Loyalty you must complete the following
configuration steps
1 Call transaction nspro
2 Choose SAP Customising Implementation Guide Customer Relationship Management Marketing Loyalty
Management in BBPCRM Basic Settings Define Basic Settings
3 Enter value 1 for the INSTALL_TYPE parameter
NOTE
You do not have to enter destination name for the LOYALTY_SYSTEM parameterEnd of ABAP |
47 Starting XCM
This section describes how to start XCM
Procedure
1 You access the XCM tool at
httplthostgtltportgtltweb app namegtadminxcminitdo
4 Post-Installation
46 Installing and Configuring CRM Application Server Loyalty Add-On Component
4050 CUSTOMER 2012-12-17
NOTE
You can also start XCM in accessibility mode (according to Section 508 Rehabilitation Act)
at the following URL
httplthostgtltportgtltweb app namegtadminxcminitdosap-accessibility=x
2 Provide a user and password If you are logging on for the first time use the Administrator user
and the password you defined during the installation of the SAP system
RECOMMENDATION
We recommend you create new users with lesser rights than the Administrator for the
administration of Web applications
For more information see the SAP CRM Security Guide section E-Commerce
3 When the application opens a closed control tree is displayed on the left of the screen A screen
containing help information is displayed to the right
You can use edit (change settings) or display (see settings) mode in XCM You use the button in
the top right hand corner of the screen to change between modes When you switch to edit mode
a DB lock is set meaning that only this user can edit the settings at one time The lock is released
once the user switches back to display mode or after session timeout (default timeout is 30mins)
48 Accessing Configuration Documentation in SAP Solution Manager
To access configuration documentation in SAP Solution Manager you have to connect your newly
installed SAP system to SAP Solution Manager
NOTE
For SAP NetWeaver you can also find configuration documentation in the Technology Consultants
Guide at
httphelpsapcomnw70 SAP NetWeaver 70 Library (including Enhancement Package 2) English
SAP NetWeaver Library Technology Consultants Guide
Procedure
Create a configuration project with the related configuration guide as described in the following
documentation
httphelpsapcom SAP Solutions SAP Solution Manager Documentation for SAP Solution Manager
ltcurrent releasegt SAP Solution Manager Implementing and Upgrading SAP Solutions Projects
Configuration
More Information
httpservicesapcomsolutionmanager Media Library How-To Documents How to Create a
Configuration Guide using SAP Solution Manager
4 Post-Installation
48 Accessing Configuration Documentation in SAP Solution Manager
2012-12-17 CUSTOMER 4150
This page is left blank for documents that are printed on both sides
5 Additional Information
Only valid for ABAP+JavaJava |
51 Installing the Business Packages for SAP CRM Using JSPM (Optional)
You can also install the Business Packages for SAP CRM using the Java Support Package Manager (JSPM)
Prerequisites
Only valid for IBM i5OSUNIX |
You have checked hardware and software requirements [external document]End of IBM i5OSUNIX |
Only valid for Windows |
You have checked hardware and software requirements [external document]End of Windows |
You have ckecked the Prerequisites for the Business Packages for SAP CRM [page 7]
Procedure
1 Download version 701 of the files sapcom_BPCRMAPP sapcom_BPCRMFND sapcom_CRMAPP and
sapcom_CRMFND as follows
1 Go to httpservicesapcomswdc Download Support Packages and Patches Search for
Support Packages and Patches
2 Enter the following search terms
BP CRM Application Coding 701
BP CRM Application Content 701
BP CRM Foundation Coding 701
BP CRM Foundation Content 701
2 Add the deployment variable comsapcmshare as described in SAP Note 965948
For more information about how to use the Software Deployment Manager (SDM) see the
documentation Software Deployment Manager which is available at
httphelpsapcomnw70 SAP NetWeaver 70 Library (including Enhancement Package 2) English
SAP NetWeaver Library SAP NetWeaver Developerrsquos Guide Fundamentals Using Java Core Development
Tasks Deployment Putting It All Together Software Deployment Manager
3 Install the Business Packages for SAP CRM with JSPM as described in Installing Additional Usage Types
or Software Units in an Existing SAP System [external document]
5 Additional Information
51 Installing the Business Packages for SAP CRM Using JSPM (Optional)
2012-12-17 CUSTOMER 4350
4 Perform the required Post-Installation Steps for the Business Packages for SAP CRM [page 20]End of ABAP+JavaJava |
Only valid for ABAP+JavaJava |
52 Troubleshooting for the Business Package for SAP CRMOnly valid for ABAP+JavaJava |
The following sections describe the steps that you have to perform if you have problems after the
installation
Activating BI Templates Manually [page 44]
Dragging the Central Search onto the Portal Desktop [page 45]End of ABAP+JavaJava |
Only valid for ABAP+JavaJava |
521 Activating BI Templates Manually
If you have installed the Business Package you might see error messages when loading the BI templates
This procedure describes how you can activate the templates afterwards
Procedure
1 Note the technical name of all templates in your portal interface that are not working
2 Log on to your BI system
3 On the SAP Easy Access screen choose Modeling Administrator Workbench Modeling (transaction
RSA1 or RSOR)
4 Choose Business Content Object Types Web Template Name Select Objects
A new window containing a list of BW objects and templates opens
5 Find your missing templates for example 0TPL_0CRM_Cnn_Qnnn_Vnnn_M and select the entries
6 Choose Transfer Selection
The template now appears on the right-hand side of the screen The Transfer checkbox has been
selected and cannot be changed Nevertheless we recommend that you repeat the following
procedure so that your templates can be displayed
7 Select the template
8 Choose Transfer Transfer
Result
You have successfully activated your missing templates and no error messages appear in the portalEnd of ABAP+JavaJava |
5 Additional Information
52 Troubleshooting for the Business Package for SAP CRM
4450 CUSTOMER 2012-12-17
Only valid for ABAP+JavaJava |
522 Dragging the Central Search onto the Portal Desktop
Procedure
The Business Package for SAP CRM 70 including SAP enhancement package 1 contains an iView for
the central search in CRM This iView is in the package on the page Today in the workset Home of the
CRM User You can drag this iView onto the portal desktop under the tool areaEnd of ABAP+JavaJava |
End of ABAP+JavaJava |
5 Additional Information
52 Troubleshooting for the Business Package for SAP CRM
2012-12-17 CUSTOMER 4550
Typographic Conventions
Example Description
ltExamplegt Angle brackets indicate that you replace these words or characters with appropriate entries to make entries in the system for example ldquoEnter your ltUser Namegtrdquo
ExampleExample
Arrows separating the parts of a navigation path for example menu options
Example Emphasized words or expressions
Example Words or characters that you enter in the system exactly as they appear in the documentation
httpwwwsapcom Textual cross-references to an internet address
example Quicklinks added to the internet address of a homepage to enable quick access to specific content on the Web
123456 Hyperlink to an SAP Note for example SAP Note 123456
Example Words or characters quoted from the screen These include field labels screen titles pushbutton labels menu names and menu options
Cross-references to other documentation or published works
Example Output on the screen following a user action for example messages Source code or syntax quoted directly from a program File and directory names and their paths names of variables and parameters and
names of installation upgrade and database tools
EXAMPLE Technical names of system objects These include report names program names transaction codes database table names and key concepts of a programming language when they are surrounded by body text for example SELECT and INCLUDE
EXAMPLE Keys on the keyboard
4650 CUSTOMER 2012-12-17
SAP AGDietmar-Hopp-Allee 16
69190 WalldorfGermany
T +4918 0534 34 34F +4918 0534 34 20
wwwsapcom
copy Copyright 2012 SAP AG All rights reserved
No part of this publication may be reproduced or transmitted in any form or for any purpose without the express permission of SAP AG The information contained herein may be changed without prior noticeSome software products marketed by SAP AG and its distributors contain proprietary software components of other software vendors
Microsoft Windows Excel Outlook PowerPoint Silverlight and Visual Studio are registered trademarks of Microsoft CorporationIBM DB2 DB2 Universal Database System i System i5 System p System p5 System x System z System z10 z10 zVM zOS OS390 zEnterprise PowerVM Power Architecture Power Systems POWER7 POWER6+ POWER6 POWER PowerHA pureScale PowerPC BladeCenter System Storage Storwize XIV GPFS HACMP RETAIN DB2 Connect RACF Redbooks OS2 AIX Intelligent Miner WebSphere Tivoli Informix and Smarter Planet are trademarks or registered trademarks of IBM CorporationLinux is the registered trademark of Linus Torvalds in the United States and other countriesAdobe the Adobe logo Acrobat PostScript and Reader are trademarks or registered trademarks of Adobe Systems Incorporated in the United States and other countriesOracle and Java are registered trademarks of Oracle and its affiliatesUNIX XOpen OSF1 and Motif are registered trademarks of the Open GroupCitrix ICA Program Neighborhood MetaFrame WinFrame VideoFrame and MultiWin are trademarks or registered trademarks of Citrix Systems IncHTML XML XHTML and W3C are trademarks or registered trademarks of W3Creg World Wide Web Consortium Massachusetts Institute of TechnologyApple App Store iBooks iPad iPhone iPhoto iPod iTunes Multi-Touch Objective-C Retina Safari Siri and Xcode are trademarks or registered trademarks of Apple IncIOS is a registered trademark of Cisco Systems IncRIM BlackBerry BBM BlackBerry Curve BlackBerry Bold BlackBerry Pearl BlackBerry Torch BlackBerry Storm BlackBerry Storm2 BlackBerry PlayBook and BlackBerry App World are trademarks or registered trademarks of Research in Motion LimitedGoogle App Engine Google Apps Google Checkout Google Data API Google Maps Google Mobile Ads Google Mobile Updater Google Mobile Google Store Google Sync Google Updater Google Voice Google Mail Gmail YouTube Dalvik and Android are trademarks or registered trademarks of Google IncINTERMEC is a registered trademark of Intermec Technologies CorporationWi-Fi is a registered trademark of Wi-Fi AllianceBluetooth is a registered trademark of Bluetooth SIG IncMotorola is a registered trademark of Motorola Trademark Holdings LLCComputop is a registered trademark of Computop Wirtschaftsinformatik GmbHSAP R3 SAP NetWeaver Duet PartnerEdge ByDesign SAP BusinessObjects Explorer StreamWork SAP HANA and other SAP products and services mentioned herein as well as their respective logos are trademarks or registered trademarks of SAP AG in Germany and other countriesBusiness Objects and the Business Objects logo BusinessObjects Crystal Reports Crystal Decisions Web Intelligence Xcelsius and other Business Objects products and services mentioned herein as well as their respective logos are trademarks or registered trademarks of Business Objects Software Ltd Business Objects is an SAP companySybase and Adaptive Server iAnywhere Sybase 365 SQL Anywhere and other Sybase products and services mentioned herein as well as their respective logos are trademarks or registered trademarks of Sybase Inc Sybase is an SAP company
2012-12-17 CUSTOMER 4750
Crossgate mgic EDDY B2B 360deg and B2B 360deg Services are registered trademarks of Crossgate AG in Germany and other countries Crossgate is an SAP companyAll other product and service names mentioned are the trademarks of their respective companies Data contained in this document serves informational purposes only National product specifications may varyThese materials are subject to change without notice These materials are provided by SAP AG and its affiliated companies (ldquoSAP Grouprdquo) for informational purposes only without representation or warranty of any kind and SAP Group shall not be liable for errors or omissions with respect to the materials The only warranties for SAP Group products and services are those that are set forth in the express warranty statements accompanying such products and services if any Nothing herein should be construed as constituting an additional warranty
DisclaimerSome components of this product are based on Javatrade Any code change in these components may cause unpredictable and severe malfunctions and is therefore expressly prohibited as is any decompilation of these componentsAny Javatrade Source Code delivered with this product is only to be used by SAPrsquos Support Services and may not be modified or altered in any way
Documentation in the SAP Service MarketplaceYou can find this document at the following address httpservicesapcominstguides
4850 CUSTOMER 2012-12-17
SAP AGDietmar-Hopp-Allee 1669190 WalldorfGermanyT +4918 0534 34 34F +4918 0534 34 20wwwsapcom
copy Copyright 2012 SAP AG All rights reservedNo part of this publication may be reproduced or transmitted in any form or for any purpose without the express permission of SAP AG The information contained herein may be changed without prior notice
- SAP Enhancement Package 1 for SAP CRM 70
-
- Table of Contents
- 1 Introduction
- 2 Planning and Preparation
-
- 21 Prerequisites for the Business Packages for SAP CRM
-
- 3 Installation
- 4 Post-Installation
-
- 41 Checking the Availability of Back-End Systems for SAP CRM Java Components
-
- 411 Creating a Back-End User
- 412 Checking the Connection to the ABAP System
- 413 Configuring and Checking the TREX Service
- 414 Checking the Selling via eBay Processes
-
- 42 Post-Installation Steps for Workforce Deployment Application and Calculation Services
-
- 421 Implementing WFMCORE 200 Using Transaction SAINT
- 422 Configuring the Extended Configuration Management (XCM) for WFD Application and Calculation Services
- 423 Checking Workforce Deployment Calculation Services
- 424 Checking the Installation of WFD Application Services and WFD Calculation Services
-
- 43 Post-Installation Steps for the Business Packages for SAP CRM
-
- 431 Creating Roles for the SAP CRM Business Packages
- 432 Installation of the Info Center for the SAP CRM Business Package
-
- 4321 Importing the SAP CRM Info Center Configurations and Directory Structure
- 4322 Activating Manual Ordering of Folders for the sapcrm Repository
- 4323 Creating Indexes and Taxonomies for the sapcrmnews Repository
- 4324 Creating the Index for the sapcrm Repository
- 4325 Configuring the Personal Search
- 4326 Increasing the Number of JCo Connections
-
- 44 Post-Installation Steps for MapBox
-
- 441 Assigning User Groups for MapBox Users
- 442 Configuring an RFC Destination for MapBox
- 443 Performing Initial Configuration for MapBox
- 444 Executing the MapBox
- 445 Performing the Smoke Test for MapBox
- 446 Ensuring Optimal Block Size settings
- 447 Adapting Memory Settings for the J2EE Engine
-
- 45 Activating the CRM Web Client
- 46 Installing and Configuring CRM Application Server Loyalty Add-On Component
- 47 Starting XCM
- 48 Accessing Configuration Documentation in SAP Solution Manager
-
- 5 Additional Information
-
- 51 Installing the Business Packages for SAP CRM Using JSPM (Optional)
- 52 Troubleshooting for the Business Package for SAP CRM
-
- 521 Activating BI Templates Manually
- 522 Dragging the Central Search onto the Portal Desktop
-
- Copyright and trademarks
-
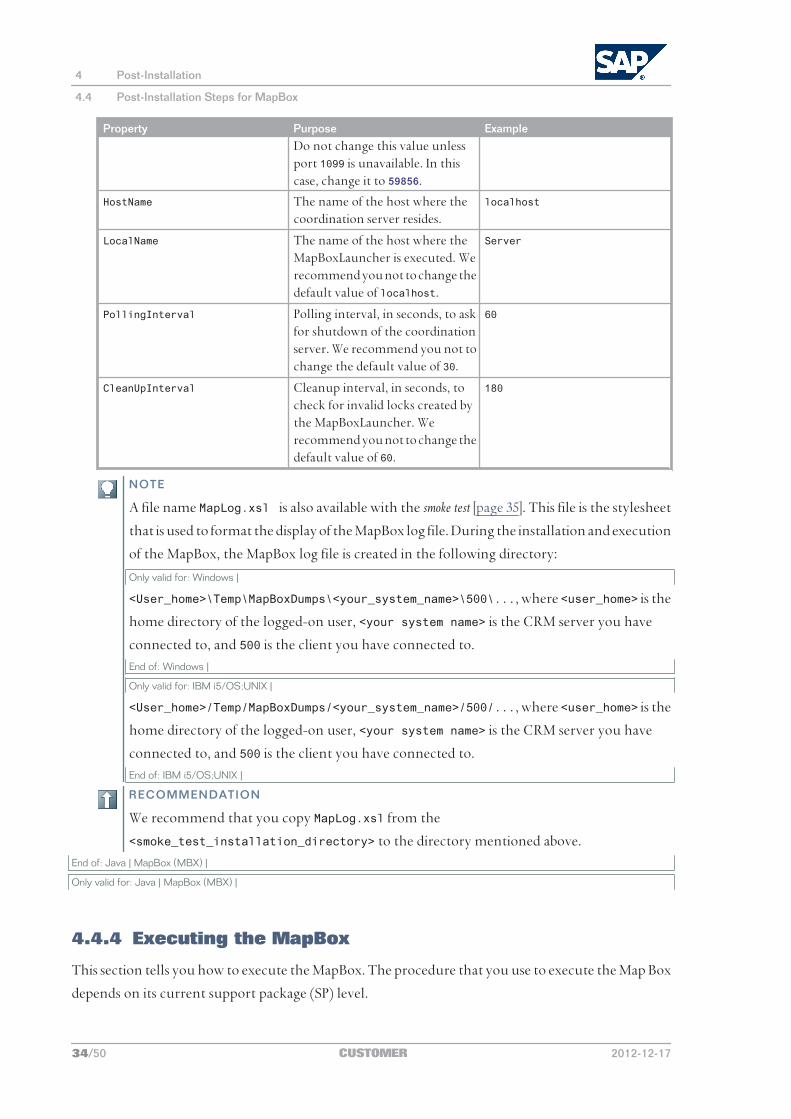

Procedure
If the SP level of the MapBox is less than SP11 proceed as follows
1 Enter the following URL in your browser
httplthostnamegtltport_numbergtmapboxlaunchermanage
2 Choose Start MapBox
3 The application prompts you for a user name and password
Enter the user name and password for the J2EE Engine Visual Administrator
NOTE
MapBox typically takes 30 to 60 seconds to initialize depending on the number of SAP clients
To see the status of messages processed by MapBox choose Status
If the SP level of the MapBox is equal to or higher than SP11 the MapBox starts automatically
1 For the first MapBox installation you need to restart the Java application server (AS Java) after all
the configuration settings have been completed This automatically starts the MapBox (Autostart)
2 To check the status go to the URL httplthostnamegtltport_numbergtmapboxlauncher
manage
NOTE
MapBox Autostart needs approximately 60 seconds to allow other services of As Java to start
To see the status of messages processed by MapBox choose Status
Result
When the MapBox is running the status is shown as Ready to processEnd of Java | MapBox (MBX) |
Only valid for Java | MapBox (MBX) |
445 Performing the Smoke Test for MapBox
The smoke test checks whether the MapBox installation is error-free
Only valid for Windows |
To execute the smoke test you have to run two batch filesEnd of Windows |
Only valid for IBM i5OSUNIX |
To execute the smoke test you have to run two shell scriptsEnd of IBM i5OSUNIX |
Prerequisites
Before you start the procedure you need to copy the smoketestjar file to a new
ltsmoke_test_installation_directorygt of your choice which has two further subdirectories
firstrun and secondrun
4 Post-Installation
44 Post-Installation Steps for MapBox
2012-12-17 CUSTOMER 3550
You can find the smoketestjar file here
Only valid for IBM i5OSUNIX |
usrsapltinstance_IDgtJCltinstance_numbergtj2eeclusterserver0binext
comsapsyncpointmapboxEnd of IBM i5OSUNIX |
Only valid for Windows |
usrsapltinstance_IDgtJCltinstance_numbergtj2eeclusterserver0binext
comsapsyncpointmapboxEnd of Windows |
NOTE
Each subdirectory of ltsmoke_test_installation_directorygt ndash that is firstrun and
secondrun ndash contains the following files
MBSMOKETEST_IN_000xml
MBSMOKETEST_IN_001xml
MBSMOKETEST_IN_002xml
MBSMOKETEST_IN_003xml
After executing the smoke test you must verify whether the contents of the files generated
by your test are similar to the contents of the above files That is the XML documents that
are created in the smoke test must match the documents located in the
ltsmoke_test_installation_directorygt mentioned above
To execute the smoke test you need to install the SAP Java Connector (SAP JCo version 2012)
You have to download SAP JCo 2012 from SAP Service Marketplace at https
servicesapcomswdc before executing the smoke test
CAUTION
Make sure that you install the SAP Java Connector correctly
The file mapcaseprop is available in the ltsmoke_test_installation_directorygt This file
contains the connection parameters to be tested You can modify the contents of this file
CAUTION
You must replace the connection parameters in this file with the connection parameters that
you entered in the MapBoxMetaxml file
Procedure
1 Run the first stage of the smoke test
1 Only valid for Windows |
Execute the file smoketest_1bat from the ltsmoke_test_installation_directorygtEnd of Windows |
Only valid for Windows |
This prompts you to enter the followingEnd of Windows |
4 Post-Installation
44 Post-Installation Steps for MapBox
3650 CUSTOMER 2012-12-17
Only valid for Windows |
1 ltDRIVEgtusrsapltinstance_IDgtJCltinstance_numbergtj2ee
2 ltsmoke_test_installation_directorygt
3 ltpath_to_sapjcojargt
End of Windows |
Only valid for IBM i5OSUNIX |
Execute the file smoketest_1sh from the ltsmoke_test_installation_directorygtEnd of IBM i5OSUNIX |
Only valid for IBM i5OSUNIX |
1 usrsapltinstance_IDgtJCltinstance_numbergtj2ee
2 ltsmoke_test_installation_directorygt
3 ltpath_to_sapjcojargt
End of IBM i5OSUNIX |
2 Enter the appropriate paths
The smoke test creates the following files
MBSMOKETEST_IN_000xml
MBSMOKETEST_IN_001xml
MBSMOKETEST_IN_002xml
MBSMOKETEST_IN_003xml
3 Only valid for Windows |
Check the contents of the generated files against the contents of the files located in
ltsmoke_test_installation_directorygtSMOKETESTfirstrunEnd of Windows |
Only valid for IBM i5OSUNIX |
Check the contents of the four files against the contents of the files located in
ltsmoke_test_installation_directorygtSMOKETESTfirstrunEnd of IBM i5OSUNIX |
2 Run the second stage of the smoke test
1 Only valid for Windows |
Execute the file smoketest_2bat which is located in the
ltsmoke_test_installation_directorygtEnd of Windows |
Only valid for IBM i5OSUNIX |
Execute the file smoketest_2sh which is located in the
ltsmoke_test_installation_directorygtEnd of IBM i5OSUNIX |
This prompts you to enter the following
Only valid for Windows |
1 ltDRIVEgtusrsapltinstance_IDgtJCltinstance_numbergtj2ee
2 ltsmoke_test_installation_directorygt
End of Windows |
4 Post-Installation
44 Post-Installation Steps for MapBox
2012-12-17 CUSTOMER 3750
Only valid for IBM i5OSUNIX |
1 usrsapltinstance_IDgtJCltinstance_numbergtj2ee
2 ltsmoke_test_installation_directorygt
End of IBM i5OSUNIX |
2 Enter the appropriate paths
The smoke test creates the following files
MBSMOKETEST_IN_000xml
MBSMOKETEST_IN_001xml
MBSMOKETEST_IN_002xml
MBSMOKETEST_IN_003xml
CAUTION
The files generated in the second stage of testing overwrite the contents of the files
generated in the first stage
3 Only valid for Windows |
Check the contents of the generated files against the contents of the files located in
ltsmoke_test_installation_directorygtSMOKETESTsecondrunEnd of Windows |
Only valid for IBM i5OSUNIX |
Check the contents of the four files against the contents of the files located in
ltsmoke_test_installation_directorygtSMOKETESTsecondrunEnd of IBM i5OSUNIX |
Result
If the smoke test has identified errors in the installation process the four XML files are not created in
either of the stages Instead an error log file is created
RECOMMENDATION
In the event of errors we recommend that you send the error log file to your administrator
End of Java | MapBox (MBX) |
Only valid for Java | MapBox (MBX) |
446 Ensuring Optimal Block Size settings
The block size of an object determines the number of messages that are processed at the same time by
the MapBox as a set You need to make sure that the block sizes are optimal to reduce load on the
MapBox XML processor
Procedure
1 Use transaction R3AC3 to set the block size of object GWA_COUNTRY to 10 and save the setting
2 Use transaction R3AC1 to set the block size of object BUPA_MAIN to 10 and save the settingEnd of Java | MapBox (MBX) |
4 Post-Installation
44 Post-Installation Steps for MapBox
3850 CUSTOMER 2012-12-17
Only valid for ABAP+JavaJava | MapBox (MBX) |
447 Adapting Memory Settings for the J2EE Engine
You need to adapt the memory settings for the J2EE Engine because MapBox relies heavily on memory-
intensive XML-processing such as schema-validation parsing transformation and so on
RECOMMENDATION
For rapid message processing by MapBox we recommend you to use 1024 MB of heap memory
for MapBox alone With a heap size of 512 MB MapBox can still process messages but with a slightly
higher processing time for each message
The MapBox memory requirements are directly proportional to the size of the input documents
that MapBox has to process The average size of such documents is in the range of 150 to 200 KB
For messages of this size it is sufficient to have a heap memory of 512 MB If the input documents
are in the range of 1 to 2 MB we recommend that you give MapBox a heap memory of 1024 MB
Procedure
To set the recommended memory settings for the MapBox you start the config tool of the J2EE Engine
Only valid for Windows |
Start the config tool by executing ltDrivegtusrsapltSAPSIDgtltinstance_numbergtj2ee
configtoolbatEnd of Windows |
Only valid for IBM i5OSUNIX |
Start the config tool by executing usrsapltSAPSIDgtltinstance_numbergtj2eeconfigtoolshEnd of IBM i5OSUNIX |
End of ABAP+JavaJava | MapBox (MBX) |
End of ABAP+JavaJava | MapBox (MBX) |
Only valid for ABAPABAP+Java |
45 Activating the CRM Web Client
The CRM Web Client is part of the ICF Services that is automatically installed as part of SAP NetWeaver
Application Server
Procedure
To activate the CRM Web Client after the installation see the SAP Library at
httphelpsapcomnw70 SAP NetWeaver 70 Library (including Enhancement Package 2) English SAP
NetWeaver Library SAP NetWeaver by Key Capability Application Platform by Key Capability Platform-Wide
Services Connectivity Components of SAP Communication Technology Communication Between ABAP and Non-
4 Post-Installation
45 Activating the CRM Web Client
2012-12-17 CUSTOMER 3950
ABAP Technology Internet Communication Framework Development Server-Side Development Creating and
Configuring an ICF Service Activating and Deactivating the ICF ServicesEnd of ABAPABAP+Java |
Only valid for ABAP |
46 Installing and Configuring CRM Application Server Loyalty Add-On Component
This section provides information about how to install and configure CRM Application Server Loyalty
as an add-on component to CRM Application Server ABAP
Prerequisites
You have already deployed the following software components
SAP NetWeaver Application Server ABAP (AS ABAP)
CRM Application Server ABAP
Procedure
Installing CRM Application Server Loyalty
Install CRM Application Server Loyalty on the same host where CRM Application Server ABAP is
deployed as described in SAP Note 1162144
Configuring CRM Application Server Loyalty
After you have installed CRM Application Server Loyalty you must complete the following
configuration steps
1 Call transaction nspro
2 Choose SAP Customising Implementation Guide Customer Relationship Management Marketing Loyalty
Management in BBPCRM Basic Settings Define Basic Settings
3 Enter value 1 for the INSTALL_TYPE parameter
NOTE
You do not have to enter destination name for the LOYALTY_SYSTEM parameterEnd of ABAP |
47 Starting XCM
This section describes how to start XCM
Procedure
1 You access the XCM tool at
httplthostgtltportgtltweb app namegtadminxcminitdo
4 Post-Installation
46 Installing and Configuring CRM Application Server Loyalty Add-On Component
4050 CUSTOMER 2012-12-17
NOTE
You can also start XCM in accessibility mode (according to Section 508 Rehabilitation Act)
at the following URL
httplthostgtltportgtltweb app namegtadminxcminitdosap-accessibility=x
2 Provide a user and password If you are logging on for the first time use the Administrator user
and the password you defined during the installation of the SAP system
RECOMMENDATION
We recommend you create new users with lesser rights than the Administrator for the
administration of Web applications
For more information see the SAP CRM Security Guide section E-Commerce
3 When the application opens a closed control tree is displayed on the left of the screen A screen
containing help information is displayed to the right
You can use edit (change settings) or display (see settings) mode in XCM You use the button in
the top right hand corner of the screen to change between modes When you switch to edit mode
a DB lock is set meaning that only this user can edit the settings at one time The lock is released
once the user switches back to display mode or after session timeout (default timeout is 30mins)
48 Accessing Configuration Documentation in SAP Solution Manager
To access configuration documentation in SAP Solution Manager you have to connect your newly
installed SAP system to SAP Solution Manager
NOTE
For SAP NetWeaver you can also find configuration documentation in the Technology Consultants
Guide at
httphelpsapcomnw70 SAP NetWeaver 70 Library (including Enhancement Package 2) English
SAP NetWeaver Library Technology Consultants Guide
Procedure
Create a configuration project with the related configuration guide as described in the following
documentation
httphelpsapcom SAP Solutions SAP Solution Manager Documentation for SAP Solution Manager
ltcurrent releasegt SAP Solution Manager Implementing and Upgrading SAP Solutions Projects
Configuration
More Information
httpservicesapcomsolutionmanager Media Library How-To Documents How to Create a
Configuration Guide using SAP Solution Manager
4 Post-Installation
48 Accessing Configuration Documentation in SAP Solution Manager
2012-12-17 CUSTOMER 4150
This page is left blank for documents that are printed on both sides
5 Additional Information
Only valid for ABAP+JavaJava |
51 Installing the Business Packages for SAP CRM Using JSPM (Optional)
You can also install the Business Packages for SAP CRM using the Java Support Package Manager (JSPM)
Prerequisites
Only valid for IBM i5OSUNIX |
You have checked hardware and software requirements [external document]End of IBM i5OSUNIX |
Only valid for Windows |
You have checked hardware and software requirements [external document]End of Windows |
You have ckecked the Prerequisites for the Business Packages for SAP CRM [page 7]
Procedure
1 Download version 701 of the files sapcom_BPCRMAPP sapcom_BPCRMFND sapcom_CRMAPP and
sapcom_CRMFND as follows
1 Go to httpservicesapcomswdc Download Support Packages and Patches Search for
Support Packages and Patches
2 Enter the following search terms
BP CRM Application Coding 701
BP CRM Application Content 701
BP CRM Foundation Coding 701
BP CRM Foundation Content 701
2 Add the deployment variable comsapcmshare as described in SAP Note 965948
For more information about how to use the Software Deployment Manager (SDM) see the
documentation Software Deployment Manager which is available at
httphelpsapcomnw70 SAP NetWeaver 70 Library (including Enhancement Package 2) English
SAP NetWeaver Library SAP NetWeaver Developerrsquos Guide Fundamentals Using Java Core Development
Tasks Deployment Putting It All Together Software Deployment Manager
3 Install the Business Packages for SAP CRM with JSPM as described in Installing Additional Usage Types
or Software Units in an Existing SAP System [external document]
5 Additional Information
51 Installing the Business Packages for SAP CRM Using JSPM (Optional)
2012-12-17 CUSTOMER 4350
4 Perform the required Post-Installation Steps for the Business Packages for SAP CRM [page 20]End of ABAP+JavaJava |
Only valid for ABAP+JavaJava |
52 Troubleshooting for the Business Package for SAP CRMOnly valid for ABAP+JavaJava |
The following sections describe the steps that you have to perform if you have problems after the
installation
Activating BI Templates Manually [page 44]
Dragging the Central Search onto the Portal Desktop [page 45]End of ABAP+JavaJava |
Only valid for ABAP+JavaJava |
521 Activating BI Templates Manually
If you have installed the Business Package you might see error messages when loading the BI templates
This procedure describes how you can activate the templates afterwards
Procedure
1 Note the technical name of all templates in your portal interface that are not working
2 Log on to your BI system
3 On the SAP Easy Access screen choose Modeling Administrator Workbench Modeling (transaction
RSA1 or RSOR)
4 Choose Business Content Object Types Web Template Name Select Objects
A new window containing a list of BW objects and templates opens
5 Find your missing templates for example 0TPL_0CRM_Cnn_Qnnn_Vnnn_M and select the entries
6 Choose Transfer Selection
The template now appears on the right-hand side of the screen The Transfer checkbox has been
selected and cannot be changed Nevertheless we recommend that you repeat the following
procedure so that your templates can be displayed
7 Select the template
8 Choose Transfer Transfer
Result
You have successfully activated your missing templates and no error messages appear in the portalEnd of ABAP+JavaJava |
5 Additional Information
52 Troubleshooting for the Business Package for SAP CRM
4450 CUSTOMER 2012-12-17
Only valid for ABAP+JavaJava |
522 Dragging the Central Search onto the Portal Desktop
Procedure
The Business Package for SAP CRM 70 including SAP enhancement package 1 contains an iView for
the central search in CRM This iView is in the package on the page Today in the workset Home of the
CRM User You can drag this iView onto the portal desktop under the tool areaEnd of ABAP+JavaJava |
End of ABAP+JavaJava |
5 Additional Information
52 Troubleshooting for the Business Package for SAP CRM
2012-12-17 CUSTOMER 4550
Typographic Conventions
Example Description
ltExamplegt Angle brackets indicate that you replace these words or characters with appropriate entries to make entries in the system for example ldquoEnter your ltUser Namegtrdquo
ExampleExample
Arrows separating the parts of a navigation path for example menu options
Example Emphasized words or expressions
Example Words or characters that you enter in the system exactly as they appear in the documentation
httpwwwsapcom Textual cross-references to an internet address
example Quicklinks added to the internet address of a homepage to enable quick access to specific content on the Web
123456 Hyperlink to an SAP Note for example SAP Note 123456
Example Words or characters quoted from the screen These include field labels screen titles pushbutton labels menu names and menu options
Cross-references to other documentation or published works
Example Output on the screen following a user action for example messages Source code or syntax quoted directly from a program File and directory names and their paths names of variables and parameters and
names of installation upgrade and database tools
EXAMPLE Technical names of system objects These include report names program names transaction codes database table names and key concepts of a programming language when they are surrounded by body text for example SELECT and INCLUDE
EXAMPLE Keys on the keyboard
4650 CUSTOMER 2012-12-17
SAP AGDietmar-Hopp-Allee 16
69190 WalldorfGermany
T +4918 0534 34 34F +4918 0534 34 20
wwwsapcom
copy Copyright 2012 SAP AG All rights reserved
No part of this publication may be reproduced or transmitted in any form or for any purpose without the express permission of SAP AG The information contained herein may be changed without prior noticeSome software products marketed by SAP AG and its distributors contain proprietary software components of other software vendors
Microsoft Windows Excel Outlook PowerPoint Silverlight and Visual Studio are registered trademarks of Microsoft CorporationIBM DB2 DB2 Universal Database System i System i5 System p System p5 System x System z System z10 z10 zVM zOS OS390 zEnterprise PowerVM Power Architecture Power Systems POWER7 POWER6+ POWER6 POWER PowerHA pureScale PowerPC BladeCenter System Storage Storwize XIV GPFS HACMP RETAIN DB2 Connect RACF Redbooks OS2 AIX Intelligent Miner WebSphere Tivoli Informix and Smarter Planet are trademarks or registered trademarks of IBM CorporationLinux is the registered trademark of Linus Torvalds in the United States and other countriesAdobe the Adobe logo Acrobat PostScript and Reader are trademarks or registered trademarks of Adobe Systems Incorporated in the United States and other countriesOracle and Java are registered trademarks of Oracle and its affiliatesUNIX XOpen OSF1 and Motif are registered trademarks of the Open GroupCitrix ICA Program Neighborhood MetaFrame WinFrame VideoFrame and MultiWin are trademarks or registered trademarks of Citrix Systems IncHTML XML XHTML and W3C are trademarks or registered trademarks of W3Creg World Wide Web Consortium Massachusetts Institute of TechnologyApple App Store iBooks iPad iPhone iPhoto iPod iTunes Multi-Touch Objective-C Retina Safari Siri and Xcode are trademarks or registered trademarks of Apple IncIOS is a registered trademark of Cisco Systems IncRIM BlackBerry BBM BlackBerry Curve BlackBerry Bold BlackBerry Pearl BlackBerry Torch BlackBerry Storm BlackBerry Storm2 BlackBerry PlayBook and BlackBerry App World are trademarks or registered trademarks of Research in Motion LimitedGoogle App Engine Google Apps Google Checkout Google Data API Google Maps Google Mobile Ads Google Mobile Updater Google Mobile Google Store Google Sync Google Updater Google Voice Google Mail Gmail YouTube Dalvik and Android are trademarks or registered trademarks of Google IncINTERMEC is a registered trademark of Intermec Technologies CorporationWi-Fi is a registered trademark of Wi-Fi AllianceBluetooth is a registered trademark of Bluetooth SIG IncMotorola is a registered trademark of Motorola Trademark Holdings LLCComputop is a registered trademark of Computop Wirtschaftsinformatik GmbHSAP R3 SAP NetWeaver Duet PartnerEdge ByDesign SAP BusinessObjects Explorer StreamWork SAP HANA and other SAP products and services mentioned herein as well as their respective logos are trademarks or registered trademarks of SAP AG in Germany and other countriesBusiness Objects and the Business Objects logo BusinessObjects Crystal Reports Crystal Decisions Web Intelligence Xcelsius and other Business Objects products and services mentioned herein as well as their respective logos are trademarks or registered trademarks of Business Objects Software Ltd Business Objects is an SAP companySybase and Adaptive Server iAnywhere Sybase 365 SQL Anywhere and other Sybase products and services mentioned herein as well as their respective logos are trademarks or registered trademarks of Sybase Inc Sybase is an SAP company
2012-12-17 CUSTOMER 4750
Crossgate mgic EDDY B2B 360deg and B2B 360deg Services are registered trademarks of Crossgate AG in Germany and other countries Crossgate is an SAP companyAll other product and service names mentioned are the trademarks of their respective companies Data contained in this document serves informational purposes only National product specifications may varyThese materials are subject to change without notice These materials are provided by SAP AG and its affiliated companies (ldquoSAP Grouprdquo) for informational purposes only without representation or warranty of any kind and SAP Group shall not be liable for errors or omissions with respect to the materials The only warranties for SAP Group products and services are those that are set forth in the express warranty statements accompanying such products and services if any Nothing herein should be construed as constituting an additional warranty
DisclaimerSome components of this product are based on Javatrade Any code change in these components may cause unpredictable and severe malfunctions and is therefore expressly prohibited as is any decompilation of these componentsAny Javatrade Source Code delivered with this product is only to be used by SAPrsquos Support Services and may not be modified or altered in any way
Documentation in the SAP Service MarketplaceYou can find this document at the following address httpservicesapcominstguides
4850 CUSTOMER 2012-12-17
SAP AGDietmar-Hopp-Allee 1669190 WalldorfGermanyT +4918 0534 34 34F +4918 0534 34 20wwwsapcom
copy Copyright 2012 SAP AG All rights reservedNo part of this publication may be reproduced or transmitted in any form or for any purpose without the express permission of SAP AG The information contained herein may be changed without prior notice
- SAP Enhancement Package 1 for SAP CRM 70
-
- Table of Contents
- 1 Introduction
- 2 Planning and Preparation
-
- 21 Prerequisites for the Business Packages for SAP CRM
-
- 3 Installation
- 4 Post-Installation
-
- 41 Checking the Availability of Back-End Systems for SAP CRM Java Components
-
- 411 Creating a Back-End User
- 412 Checking the Connection to the ABAP System
- 413 Configuring and Checking the TREX Service
- 414 Checking the Selling via eBay Processes
-
- 42 Post-Installation Steps for Workforce Deployment Application and Calculation Services
-
- 421 Implementing WFMCORE 200 Using Transaction SAINT
- 422 Configuring the Extended Configuration Management (XCM) for WFD Application and Calculation Services
- 423 Checking Workforce Deployment Calculation Services
- 424 Checking the Installation of WFD Application Services and WFD Calculation Services
-
- 43 Post-Installation Steps for the Business Packages for SAP CRM
-
- 431 Creating Roles for the SAP CRM Business Packages
- 432 Installation of the Info Center for the SAP CRM Business Package
-
- 4321 Importing the SAP CRM Info Center Configurations and Directory Structure
- 4322 Activating Manual Ordering of Folders for the sapcrm Repository
- 4323 Creating Indexes and Taxonomies for the sapcrmnews Repository
- 4324 Creating the Index for the sapcrm Repository
- 4325 Configuring the Personal Search
- 4326 Increasing the Number of JCo Connections
-
- 44 Post-Installation Steps for MapBox
-
- 441 Assigning User Groups for MapBox Users
- 442 Configuring an RFC Destination for MapBox
- 443 Performing Initial Configuration for MapBox
- 444 Executing the MapBox
- 445 Performing the Smoke Test for MapBox
- 446 Ensuring Optimal Block Size settings
- 447 Adapting Memory Settings for the J2EE Engine
-
- 45 Activating the CRM Web Client
- 46 Installing and Configuring CRM Application Server Loyalty Add-On Component
- 47 Starting XCM
- 48 Accessing Configuration Documentation in SAP Solution Manager
-
- 5 Additional Information
-
- 51 Installing the Business Packages for SAP CRM Using JSPM (Optional)
- 52 Troubleshooting for the Business Package for SAP CRM
-
- 521 Activating BI Templates Manually
- 522 Dragging the Central Search onto the Portal Desktop
-
- Copyright and trademarks
-

Only valid for Windows |
1 ltDRIVEgtusrsapltinstance_IDgtJCltinstance_numbergtj2ee
2 ltsmoke_test_installation_directorygt
3 ltpath_to_sapjcojargt
End of Windows |
Only valid for IBM i5OSUNIX |
Execute the file smoketest_1sh from the ltsmoke_test_installation_directorygtEnd of IBM i5OSUNIX |
Only valid for IBM i5OSUNIX |
1 usrsapltinstance_IDgtJCltinstance_numbergtj2ee
2 ltsmoke_test_installation_directorygt
3 ltpath_to_sapjcojargt
End of IBM i5OSUNIX |
2 Enter the appropriate paths
The smoke test creates the following files
MBSMOKETEST_IN_000xml
MBSMOKETEST_IN_001xml
MBSMOKETEST_IN_002xml
MBSMOKETEST_IN_003xml
3 Only valid for Windows |
Check the contents of the generated files against the contents of the files located in
ltsmoke_test_installation_directorygtSMOKETESTfirstrunEnd of Windows |
Only valid for IBM i5OSUNIX |
Check the contents of the four files against the contents of the files located in
ltsmoke_test_installation_directorygtSMOKETESTfirstrunEnd of IBM i5OSUNIX |
2 Run the second stage of the smoke test
1 Only valid for Windows |
Execute the file smoketest_2bat which is located in the
ltsmoke_test_installation_directorygtEnd of Windows |
Only valid for IBM i5OSUNIX |
Execute the file smoketest_2sh which is located in the
ltsmoke_test_installation_directorygtEnd of IBM i5OSUNIX |
This prompts you to enter the following
Only valid for Windows |
1 ltDRIVEgtusrsapltinstance_IDgtJCltinstance_numbergtj2ee
2 ltsmoke_test_installation_directorygt
End of Windows |
4 Post-Installation
44 Post-Installation Steps for MapBox
2012-12-17 CUSTOMER 3750
Only valid for IBM i5OSUNIX |
1 usrsapltinstance_IDgtJCltinstance_numbergtj2ee
2 ltsmoke_test_installation_directorygt
End of IBM i5OSUNIX |
2 Enter the appropriate paths
The smoke test creates the following files
MBSMOKETEST_IN_000xml
MBSMOKETEST_IN_001xml
MBSMOKETEST_IN_002xml
MBSMOKETEST_IN_003xml
CAUTION
The files generated in the second stage of testing overwrite the contents of the files
generated in the first stage
3 Only valid for Windows |
Check the contents of the generated files against the contents of the files located in
ltsmoke_test_installation_directorygtSMOKETESTsecondrunEnd of Windows |
Only valid for IBM i5OSUNIX |
Check the contents of the four files against the contents of the files located in
ltsmoke_test_installation_directorygtSMOKETESTsecondrunEnd of IBM i5OSUNIX |
Result
If the smoke test has identified errors in the installation process the four XML files are not created in
either of the stages Instead an error log file is created
RECOMMENDATION
In the event of errors we recommend that you send the error log file to your administrator
End of Java | MapBox (MBX) |
Only valid for Java | MapBox (MBX) |
446 Ensuring Optimal Block Size settings
The block size of an object determines the number of messages that are processed at the same time by
the MapBox as a set You need to make sure that the block sizes are optimal to reduce load on the
MapBox XML processor
Procedure
1 Use transaction R3AC3 to set the block size of object GWA_COUNTRY to 10 and save the setting
2 Use transaction R3AC1 to set the block size of object BUPA_MAIN to 10 and save the settingEnd of Java | MapBox (MBX) |
4 Post-Installation
44 Post-Installation Steps for MapBox
3850 CUSTOMER 2012-12-17
Only valid for ABAP+JavaJava | MapBox (MBX) |
447 Adapting Memory Settings for the J2EE Engine
You need to adapt the memory settings for the J2EE Engine because MapBox relies heavily on memory-
intensive XML-processing such as schema-validation parsing transformation and so on
RECOMMENDATION
For rapid message processing by MapBox we recommend you to use 1024 MB of heap memory
for MapBox alone With a heap size of 512 MB MapBox can still process messages but with a slightly
higher processing time for each message
The MapBox memory requirements are directly proportional to the size of the input documents
that MapBox has to process The average size of such documents is in the range of 150 to 200 KB
For messages of this size it is sufficient to have a heap memory of 512 MB If the input documents
are in the range of 1 to 2 MB we recommend that you give MapBox a heap memory of 1024 MB
Procedure
To set the recommended memory settings for the MapBox you start the config tool of the J2EE Engine
Only valid for Windows |
Start the config tool by executing ltDrivegtusrsapltSAPSIDgtltinstance_numbergtj2ee
configtoolbatEnd of Windows |
Only valid for IBM i5OSUNIX |
Start the config tool by executing usrsapltSAPSIDgtltinstance_numbergtj2eeconfigtoolshEnd of IBM i5OSUNIX |
End of ABAP+JavaJava | MapBox (MBX) |
End of ABAP+JavaJava | MapBox (MBX) |
Only valid for ABAPABAP+Java |
45 Activating the CRM Web Client
The CRM Web Client is part of the ICF Services that is automatically installed as part of SAP NetWeaver
Application Server
Procedure
To activate the CRM Web Client after the installation see the SAP Library at
httphelpsapcomnw70 SAP NetWeaver 70 Library (including Enhancement Package 2) English SAP
NetWeaver Library SAP NetWeaver by Key Capability Application Platform by Key Capability Platform-Wide
Services Connectivity Components of SAP Communication Technology Communication Between ABAP and Non-
4 Post-Installation
45 Activating the CRM Web Client
2012-12-17 CUSTOMER 3950
ABAP Technology Internet Communication Framework Development Server-Side Development Creating and
Configuring an ICF Service Activating and Deactivating the ICF ServicesEnd of ABAPABAP+Java |
Only valid for ABAP |
46 Installing and Configuring CRM Application Server Loyalty Add-On Component
This section provides information about how to install and configure CRM Application Server Loyalty
as an add-on component to CRM Application Server ABAP
Prerequisites
You have already deployed the following software components
SAP NetWeaver Application Server ABAP (AS ABAP)
CRM Application Server ABAP
Procedure
Installing CRM Application Server Loyalty
Install CRM Application Server Loyalty on the same host where CRM Application Server ABAP is
deployed as described in SAP Note 1162144
Configuring CRM Application Server Loyalty
After you have installed CRM Application Server Loyalty you must complete the following
configuration steps
1 Call transaction nspro
2 Choose SAP Customising Implementation Guide Customer Relationship Management Marketing Loyalty
Management in BBPCRM Basic Settings Define Basic Settings
3 Enter value 1 for the INSTALL_TYPE parameter
NOTE
You do not have to enter destination name for the LOYALTY_SYSTEM parameterEnd of ABAP |
47 Starting XCM
This section describes how to start XCM
Procedure
1 You access the XCM tool at
httplthostgtltportgtltweb app namegtadminxcminitdo
4 Post-Installation
46 Installing and Configuring CRM Application Server Loyalty Add-On Component
4050 CUSTOMER 2012-12-17
NOTE
You can also start XCM in accessibility mode (according to Section 508 Rehabilitation Act)
at the following URL
httplthostgtltportgtltweb app namegtadminxcminitdosap-accessibility=x
2 Provide a user and password If you are logging on for the first time use the Administrator user
and the password you defined during the installation of the SAP system
RECOMMENDATION
We recommend you create new users with lesser rights than the Administrator for the
administration of Web applications
For more information see the SAP CRM Security Guide section E-Commerce
3 When the application opens a closed control tree is displayed on the left of the screen A screen
containing help information is displayed to the right
You can use edit (change settings) or display (see settings) mode in XCM You use the button in
the top right hand corner of the screen to change between modes When you switch to edit mode
a DB lock is set meaning that only this user can edit the settings at one time The lock is released
once the user switches back to display mode or after session timeout (default timeout is 30mins)
48 Accessing Configuration Documentation in SAP Solution Manager
To access configuration documentation in SAP Solution Manager you have to connect your newly
installed SAP system to SAP Solution Manager
NOTE
For SAP NetWeaver you can also find configuration documentation in the Technology Consultants
Guide at
httphelpsapcomnw70 SAP NetWeaver 70 Library (including Enhancement Package 2) English
SAP NetWeaver Library Technology Consultants Guide
Procedure
Create a configuration project with the related configuration guide as described in the following
documentation
httphelpsapcom SAP Solutions SAP Solution Manager Documentation for SAP Solution Manager
ltcurrent releasegt SAP Solution Manager Implementing and Upgrading SAP Solutions Projects
Configuration
More Information
httpservicesapcomsolutionmanager Media Library How-To Documents How to Create a
Configuration Guide using SAP Solution Manager
4 Post-Installation
48 Accessing Configuration Documentation in SAP Solution Manager
2012-12-17 CUSTOMER 4150
This page is left blank for documents that are printed on both sides
5 Additional Information
Only valid for ABAP+JavaJava |
51 Installing the Business Packages for SAP CRM Using JSPM (Optional)
You can also install the Business Packages for SAP CRM using the Java Support Package Manager (JSPM)
Prerequisites
Only valid for IBM i5OSUNIX |
You have checked hardware and software requirements [external document]End of IBM i5OSUNIX |
Only valid for Windows |
You have checked hardware and software requirements [external document]End of Windows |
You have ckecked the Prerequisites for the Business Packages for SAP CRM [page 7]
Procedure
1 Download version 701 of the files sapcom_BPCRMAPP sapcom_BPCRMFND sapcom_CRMAPP and
sapcom_CRMFND as follows
1 Go to httpservicesapcomswdc Download Support Packages and Patches Search for
Support Packages and Patches
2 Enter the following search terms
BP CRM Application Coding 701
BP CRM Application Content 701
BP CRM Foundation Coding 701
BP CRM Foundation Content 701
2 Add the deployment variable comsapcmshare as described in SAP Note 965948
For more information about how to use the Software Deployment Manager (SDM) see the
documentation Software Deployment Manager which is available at
httphelpsapcomnw70 SAP NetWeaver 70 Library (including Enhancement Package 2) English
SAP NetWeaver Library SAP NetWeaver Developerrsquos Guide Fundamentals Using Java Core Development
Tasks Deployment Putting It All Together Software Deployment Manager
3 Install the Business Packages for SAP CRM with JSPM as described in Installing Additional Usage Types
or Software Units in an Existing SAP System [external document]
5 Additional Information
51 Installing the Business Packages for SAP CRM Using JSPM (Optional)
2012-12-17 CUSTOMER 4350
4 Perform the required Post-Installation Steps for the Business Packages for SAP CRM [page 20]End of ABAP+JavaJava |
Only valid for ABAP+JavaJava |
52 Troubleshooting for the Business Package for SAP CRMOnly valid for ABAP+JavaJava |
The following sections describe the steps that you have to perform if you have problems after the
installation
Activating BI Templates Manually [page 44]
Dragging the Central Search onto the Portal Desktop [page 45]End of ABAP+JavaJava |
Only valid for ABAP+JavaJava |
521 Activating BI Templates Manually
If you have installed the Business Package you might see error messages when loading the BI templates
This procedure describes how you can activate the templates afterwards
Procedure
1 Note the technical name of all templates in your portal interface that are not working
2 Log on to your BI system
3 On the SAP Easy Access screen choose Modeling Administrator Workbench Modeling (transaction
RSA1 or RSOR)
4 Choose Business Content Object Types Web Template Name Select Objects
A new window containing a list of BW objects and templates opens
5 Find your missing templates for example 0TPL_0CRM_Cnn_Qnnn_Vnnn_M and select the entries
6 Choose Transfer Selection
The template now appears on the right-hand side of the screen The Transfer checkbox has been
selected and cannot be changed Nevertheless we recommend that you repeat the following
procedure so that your templates can be displayed
7 Select the template
8 Choose Transfer Transfer
Result
You have successfully activated your missing templates and no error messages appear in the portalEnd of ABAP+JavaJava |
5 Additional Information
52 Troubleshooting for the Business Package for SAP CRM
4450 CUSTOMER 2012-12-17
Only valid for ABAP+JavaJava |
522 Dragging the Central Search onto the Portal Desktop
Procedure
The Business Package for SAP CRM 70 including SAP enhancement package 1 contains an iView for
the central search in CRM This iView is in the package on the page Today in the workset Home of the
CRM User You can drag this iView onto the portal desktop under the tool areaEnd of ABAP+JavaJava |
End of ABAP+JavaJava |
5 Additional Information
52 Troubleshooting for the Business Package for SAP CRM
2012-12-17 CUSTOMER 4550
Typographic Conventions
Example Description
ltExamplegt Angle brackets indicate that you replace these words or characters with appropriate entries to make entries in the system for example ldquoEnter your ltUser Namegtrdquo
ExampleExample
Arrows separating the parts of a navigation path for example menu options
Example Emphasized words or expressions
Example Words or characters that you enter in the system exactly as they appear in the documentation
httpwwwsapcom Textual cross-references to an internet address
example Quicklinks added to the internet address of a homepage to enable quick access to specific content on the Web
123456 Hyperlink to an SAP Note for example SAP Note 123456
Example Words or characters quoted from the screen These include field labels screen titles pushbutton labels menu names and menu options
Cross-references to other documentation or published works
Example Output on the screen following a user action for example messages Source code or syntax quoted directly from a program File and directory names and their paths names of variables and parameters and
names of installation upgrade and database tools
EXAMPLE Technical names of system objects These include report names program names transaction codes database table names and key concepts of a programming language when they are surrounded by body text for example SELECT and INCLUDE
EXAMPLE Keys on the keyboard
4650 CUSTOMER 2012-12-17
SAP AGDietmar-Hopp-Allee 16
69190 WalldorfGermany
T +4918 0534 34 34F +4918 0534 34 20
wwwsapcom
copy Copyright 2012 SAP AG All rights reserved
No part of this publication may be reproduced or transmitted in any form or for any purpose without the express permission of SAP AG The information contained herein may be changed without prior noticeSome software products marketed by SAP AG and its distributors contain proprietary software components of other software vendors
Microsoft Windows Excel Outlook PowerPoint Silverlight and Visual Studio are registered trademarks of Microsoft CorporationIBM DB2 DB2 Universal Database System i System i5 System p System p5 System x System z System z10 z10 zVM zOS OS390 zEnterprise PowerVM Power Architecture Power Systems POWER7 POWER6+ POWER6 POWER PowerHA pureScale PowerPC BladeCenter System Storage Storwize XIV GPFS HACMP RETAIN DB2 Connect RACF Redbooks OS2 AIX Intelligent Miner WebSphere Tivoli Informix and Smarter Planet are trademarks or registered trademarks of IBM CorporationLinux is the registered trademark of Linus Torvalds in the United States and other countriesAdobe the Adobe logo Acrobat PostScript and Reader are trademarks or registered trademarks of Adobe Systems Incorporated in the United States and other countriesOracle and Java are registered trademarks of Oracle and its affiliatesUNIX XOpen OSF1 and Motif are registered trademarks of the Open GroupCitrix ICA Program Neighborhood MetaFrame WinFrame VideoFrame and MultiWin are trademarks or registered trademarks of Citrix Systems IncHTML XML XHTML and W3C are trademarks or registered trademarks of W3Creg World Wide Web Consortium Massachusetts Institute of TechnologyApple App Store iBooks iPad iPhone iPhoto iPod iTunes Multi-Touch Objective-C Retina Safari Siri and Xcode are trademarks or registered trademarks of Apple IncIOS is a registered trademark of Cisco Systems IncRIM BlackBerry BBM BlackBerry Curve BlackBerry Bold BlackBerry Pearl BlackBerry Torch BlackBerry Storm BlackBerry Storm2 BlackBerry PlayBook and BlackBerry App World are trademarks or registered trademarks of Research in Motion LimitedGoogle App Engine Google Apps Google Checkout Google Data API Google Maps Google Mobile Ads Google Mobile Updater Google Mobile Google Store Google Sync Google Updater Google Voice Google Mail Gmail YouTube Dalvik and Android are trademarks or registered trademarks of Google IncINTERMEC is a registered trademark of Intermec Technologies CorporationWi-Fi is a registered trademark of Wi-Fi AllianceBluetooth is a registered trademark of Bluetooth SIG IncMotorola is a registered trademark of Motorola Trademark Holdings LLCComputop is a registered trademark of Computop Wirtschaftsinformatik GmbHSAP R3 SAP NetWeaver Duet PartnerEdge ByDesign SAP BusinessObjects Explorer StreamWork SAP HANA and other SAP products and services mentioned herein as well as their respective logos are trademarks or registered trademarks of SAP AG in Germany and other countriesBusiness Objects and the Business Objects logo BusinessObjects Crystal Reports Crystal Decisions Web Intelligence Xcelsius and other Business Objects products and services mentioned herein as well as their respective logos are trademarks or registered trademarks of Business Objects Software Ltd Business Objects is an SAP companySybase and Adaptive Server iAnywhere Sybase 365 SQL Anywhere and other Sybase products and services mentioned herein as well as their respective logos are trademarks or registered trademarks of Sybase Inc Sybase is an SAP company
2012-12-17 CUSTOMER 4750
Crossgate mgic EDDY B2B 360deg and B2B 360deg Services are registered trademarks of Crossgate AG in Germany and other countries Crossgate is an SAP companyAll other product and service names mentioned are the trademarks of their respective companies Data contained in this document serves informational purposes only National product specifications may varyThese materials are subject to change without notice These materials are provided by SAP AG and its affiliated companies (ldquoSAP Grouprdquo) for informational purposes only without representation or warranty of any kind and SAP Group shall not be liable for errors or omissions with respect to the materials The only warranties for SAP Group products and services are those that are set forth in the express warranty statements accompanying such products and services if any Nothing herein should be construed as constituting an additional warranty
DisclaimerSome components of this product are based on Javatrade Any code change in these components may cause unpredictable and severe malfunctions and is therefore expressly prohibited as is any decompilation of these componentsAny Javatrade Source Code delivered with this product is only to be used by SAPrsquos Support Services and may not be modified or altered in any way
Documentation in the SAP Service MarketplaceYou can find this document at the following address httpservicesapcominstguides
4850 CUSTOMER 2012-12-17
SAP AGDietmar-Hopp-Allee 1669190 WalldorfGermanyT +4918 0534 34 34F +4918 0534 34 20wwwsapcom
copy Copyright 2012 SAP AG All rights reservedNo part of this publication may be reproduced or transmitted in any form or for any purpose without the express permission of SAP AG The information contained herein may be changed without prior notice
- SAP Enhancement Package 1 for SAP CRM 70
-
- Table of Contents
- 1 Introduction
- 2 Planning and Preparation
-
- 21 Prerequisites for the Business Packages for SAP CRM
-
- 3 Installation
- 4 Post-Installation
-
- 41 Checking the Availability of Back-End Systems for SAP CRM Java Components
-
- 411 Creating a Back-End User
- 412 Checking the Connection to the ABAP System
- 413 Configuring and Checking the TREX Service
- 414 Checking the Selling via eBay Processes
-
- 42 Post-Installation Steps for Workforce Deployment Application and Calculation Services
-
- 421 Implementing WFMCORE 200 Using Transaction SAINT
- 422 Configuring the Extended Configuration Management (XCM) for WFD Application and Calculation Services
- 423 Checking Workforce Deployment Calculation Services
- 424 Checking the Installation of WFD Application Services and WFD Calculation Services
-
- 43 Post-Installation Steps for the Business Packages for SAP CRM
-
- 431 Creating Roles for the SAP CRM Business Packages
- 432 Installation of the Info Center for the SAP CRM Business Package
-
- 4321 Importing the SAP CRM Info Center Configurations and Directory Structure
- 4322 Activating Manual Ordering of Folders for the sapcrm Repository
- 4323 Creating Indexes and Taxonomies for the sapcrmnews Repository
- 4324 Creating the Index for the sapcrm Repository
- 4325 Configuring the Personal Search
- 4326 Increasing the Number of JCo Connections
-
- 44 Post-Installation Steps for MapBox
-
- 441 Assigning User Groups for MapBox Users
- 442 Configuring an RFC Destination for MapBox
- 443 Performing Initial Configuration for MapBox
- 444 Executing the MapBox
- 445 Performing the Smoke Test for MapBox
- 446 Ensuring Optimal Block Size settings
- 447 Adapting Memory Settings for the J2EE Engine
-
- 45 Activating the CRM Web Client
- 46 Installing and Configuring CRM Application Server Loyalty Add-On Component
- 47 Starting XCM
- 48 Accessing Configuration Documentation in SAP Solution Manager
-
- 5 Additional Information
-
- 51 Installing the Business Packages for SAP CRM Using JSPM (Optional)
- 52 Troubleshooting for the Business Package for SAP CRM
-
- 521 Activating BI Templates Manually
- 522 Dragging the Central Search onto the Portal Desktop
-
- Copyright and trademarks
-
Only valid for IBM i5OSUNIX |
1 usrsapltinstance_IDgtJCltinstance_numbergtj2ee
2 ltsmoke_test_installation_directorygt
End of IBM i5OSUNIX |
2 Enter the appropriate paths
The smoke test creates the following files
MBSMOKETEST_IN_000xml
MBSMOKETEST_IN_001xml
MBSMOKETEST_IN_002xml
MBSMOKETEST_IN_003xml
CAUTION
The files generated in the second stage of testing overwrite the contents of the files
generated in the first stage
3 Only valid for Windows |
Check the contents of the generated files against the contents of the files located in
ltsmoke_test_installation_directorygtSMOKETESTsecondrunEnd of Windows |
Only valid for IBM i5OSUNIX |
Check the contents of the four files against the contents of the files located in
ltsmoke_test_installation_directorygtSMOKETESTsecondrunEnd of IBM i5OSUNIX |
Result
If the smoke test has identified errors in the installation process the four XML files are not created in
either of the stages Instead an error log file is created
RECOMMENDATION
In the event of errors we recommend that you send the error log file to your administrator
End of Java | MapBox (MBX) |
Only valid for Java | MapBox (MBX) |
446 Ensuring Optimal Block Size settings
The block size of an object determines the number of messages that are processed at the same time by
the MapBox as a set You need to make sure that the block sizes are optimal to reduce load on the
MapBox XML processor
Procedure
1 Use transaction R3AC3 to set the block size of object GWA_COUNTRY to 10 and save the setting
2 Use transaction R3AC1 to set the block size of object BUPA_MAIN to 10 and save the settingEnd of Java | MapBox (MBX) |
4 Post-Installation
44 Post-Installation Steps for MapBox
3850 CUSTOMER 2012-12-17
Only valid for ABAP+JavaJava | MapBox (MBX) |
447 Adapting Memory Settings for the J2EE Engine
You need to adapt the memory settings for the J2EE Engine because MapBox relies heavily on memory-
intensive XML-processing such as schema-validation parsing transformation and so on
RECOMMENDATION
For rapid message processing by MapBox we recommend you to use 1024 MB of heap memory
for MapBox alone With a heap size of 512 MB MapBox can still process messages but with a slightly
higher processing time for each message
The MapBox memory requirements are directly proportional to the size of the input documents
that MapBox has to process The average size of such documents is in the range of 150 to 200 KB
For messages of this size it is sufficient to have a heap memory of 512 MB If the input documents
are in the range of 1 to 2 MB we recommend that you give MapBox a heap memory of 1024 MB
Procedure
To set the recommended memory settings for the MapBox you start the config tool of the J2EE Engine
Only valid for Windows |
Start the config tool by executing ltDrivegtusrsapltSAPSIDgtltinstance_numbergtj2ee
configtoolbatEnd of Windows |
Only valid for IBM i5OSUNIX |
Start the config tool by executing usrsapltSAPSIDgtltinstance_numbergtj2eeconfigtoolshEnd of IBM i5OSUNIX |
End of ABAP+JavaJava | MapBox (MBX) |
End of ABAP+JavaJava | MapBox (MBX) |
Only valid for ABAPABAP+Java |
45 Activating the CRM Web Client
The CRM Web Client is part of the ICF Services that is automatically installed as part of SAP NetWeaver
Application Server
Procedure
To activate the CRM Web Client after the installation see the SAP Library at
httphelpsapcomnw70 SAP NetWeaver 70 Library (including Enhancement Package 2) English SAP
NetWeaver Library SAP NetWeaver by Key Capability Application Platform by Key Capability Platform-Wide
Services Connectivity Components of SAP Communication Technology Communication Between ABAP and Non-
4 Post-Installation
45 Activating the CRM Web Client
2012-12-17 CUSTOMER 3950
ABAP Technology Internet Communication Framework Development Server-Side Development Creating and
Configuring an ICF Service Activating and Deactivating the ICF ServicesEnd of ABAPABAP+Java |
Only valid for ABAP |
46 Installing and Configuring CRM Application Server Loyalty Add-On Component
This section provides information about how to install and configure CRM Application Server Loyalty
as an add-on component to CRM Application Server ABAP
Prerequisites
You have already deployed the following software components
SAP NetWeaver Application Server ABAP (AS ABAP)
CRM Application Server ABAP
Procedure
Installing CRM Application Server Loyalty
Install CRM Application Server Loyalty on the same host where CRM Application Server ABAP is
deployed as described in SAP Note 1162144
Configuring CRM Application Server Loyalty
After you have installed CRM Application Server Loyalty you must complete the following
configuration steps
1 Call transaction nspro
2 Choose SAP Customising Implementation Guide Customer Relationship Management Marketing Loyalty
Management in BBPCRM Basic Settings Define Basic Settings
3 Enter value 1 for the INSTALL_TYPE parameter
NOTE
You do not have to enter destination name for the LOYALTY_SYSTEM parameterEnd of ABAP |
47 Starting XCM
This section describes how to start XCM
Procedure
1 You access the XCM tool at
httplthostgtltportgtltweb app namegtadminxcminitdo
4 Post-Installation
46 Installing and Configuring CRM Application Server Loyalty Add-On Component
4050 CUSTOMER 2012-12-17
NOTE
You can also start XCM in accessibility mode (according to Section 508 Rehabilitation Act)
at the following URL
httplthostgtltportgtltweb app namegtadminxcminitdosap-accessibility=x
2 Provide a user and password If you are logging on for the first time use the Administrator user
and the password you defined during the installation of the SAP system
RECOMMENDATION
We recommend you create new users with lesser rights than the Administrator for the
administration of Web applications
For more information see the SAP CRM Security Guide section E-Commerce
3 When the application opens a closed control tree is displayed on the left of the screen A screen
containing help information is displayed to the right
You can use edit (change settings) or display (see settings) mode in XCM You use the button in
the top right hand corner of the screen to change between modes When you switch to edit mode
a DB lock is set meaning that only this user can edit the settings at one time The lock is released
once the user switches back to display mode or after session timeout (default timeout is 30mins)
48 Accessing Configuration Documentation in SAP Solution Manager
To access configuration documentation in SAP Solution Manager you have to connect your newly
installed SAP system to SAP Solution Manager
NOTE
For SAP NetWeaver you can also find configuration documentation in the Technology Consultants
Guide at
httphelpsapcomnw70 SAP NetWeaver 70 Library (including Enhancement Package 2) English
SAP NetWeaver Library Technology Consultants Guide
Procedure
Create a configuration project with the related configuration guide as described in the following
documentation
httphelpsapcom SAP Solutions SAP Solution Manager Documentation for SAP Solution Manager
ltcurrent releasegt SAP Solution Manager Implementing and Upgrading SAP Solutions Projects
Configuration
More Information
httpservicesapcomsolutionmanager Media Library How-To Documents How to Create a
Configuration Guide using SAP Solution Manager
4 Post-Installation
48 Accessing Configuration Documentation in SAP Solution Manager
2012-12-17 CUSTOMER 4150
This page is left blank for documents that are printed on both sides
5 Additional Information
Only valid for ABAP+JavaJava |
51 Installing the Business Packages for SAP CRM Using JSPM (Optional)
You can also install the Business Packages for SAP CRM using the Java Support Package Manager (JSPM)
Prerequisites
Only valid for IBM i5OSUNIX |
You have checked hardware and software requirements [external document]End of IBM i5OSUNIX |
Only valid for Windows |
You have checked hardware and software requirements [external document]End of Windows |
You have ckecked the Prerequisites for the Business Packages for SAP CRM [page 7]
Procedure
1 Download version 701 of the files sapcom_BPCRMAPP sapcom_BPCRMFND sapcom_CRMAPP and
sapcom_CRMFND as follows
1 Go to httpservicesapcomswdc Download Support Packages and Patches Search for
Support Packages and Patches
2 Enter the following search terms
BP CRM Application Coding 701
BP CRM Application Content 701
BP CRM Foundation Coding 701
BP CRM Foundation Content 701
2 Add the deployment variable comsapcmshare as described in SAP Note 965948
For more information about how to use the Software Deployment Manager (SDM) see the
documentation Software Deployment Manager which is available at
httphelpsapcomnw70 SAP NetWeaver 70 Library (including Enhancement Package 2) English
SAP NetWeaver Library SAP NetWeaver Developerrsquos Guide Fundamentals Using Java Core Development
Tasks Deployment Putting It All Together Software Deployment Manager
3 Install the Business Packages for SAP CRM with JSPM as described in Installing Additional Usage Types
or Software Units in an Existing SAP System [external document]
5 Additional Information
51 Installing the Business Packages for SAP CRM Using JSPM (Optional)
2012-12-17 CUSTOMER 4350
4 Perform the required Post-Installation Steps for the Business Packages for SAP CRM [page 20]End of ABAP+JavaJava |
Only valid for ABAP+JavaJava |
52 Troubleshooting for the Business Package for SAP CRMOnly valid for ABAP+JavaJava |
The following sections describe the steps that you have to perform if you have problems after the
installation
Activating BI Templates Manually [page 44]
Dragging the Central Search onto the Portal Desktop [page 45]End of ABAP+JavaJava |
Only valid for ABAP+JavaJava |
521 Activating BI Templates Manually
If you have installed the Business Package you might see error messages when loading the BI templates
This procedure describes how you can activate the templates afterwards
Procedure
1 Note the technical name of all templates in your portal interface that are not working
2 Log on to your BI system
3 On the SAP Easy Access screen choose Modeling Administrator Workbench Modeling (transaction
RSA1 or RSOR)
4 Choose Business Content Object Types Web Template Name Select Objects
A new window containing a list of BW objects and templates opens
5 Find your missing templates for example 0TPL_0CRM_Cnn_Qnnn_Vnnn_M and select the entries
6 Choose Transfer Selection
The template now appears on the right-hand side of the screen The Transfer checkbox has been
selected and cannot be changed Nevertheless we recommend that you repeat the following
procedure so that your templates can be displayed
7 Select the template
8 Choose Transfer Transfer
Result
You have successfully activated your missing templates and no error messages appear in the portalEnd of ABAP+JavaJava |
5 Additional Information
52 Troubleshooting for the Business Package for SAP CRM
4450 CUSTOMER 2012-12-17
Only valid for ABAP+JavaJava |
522 Dragging the Central Search onto the Portal Desktop
Procedure
The Business Package for SAP CRM 70 including SAP enhancement package 1 contains an iView for
the central search in CRM This iView is in the package on the page Today in the workset Home of the
CRM User You can drag this iView onto the portal desktop under the tool areaEnd of ABAP+JavaJava |
End of ABAP+JavaJava |
5 Additional Information
52 Troubleshooting for the Business Package for SAP CRM
2012-12-17 CUSTOMER 4550
Typographic Conventions
Example Description
ltExamplegt Angle brackets indicate that you replace these words or characters with appropriate entries to make entries in the system for example ldquoEnter your ltUser Namegtrdquo
ExampleExample
Arrows separating the parts of a navigation path for example menu options
Example Emphasized words or expressions
Example Words or characters that you enter in the system exactly as they appear in the documentation
httpwwwsapcom Textual cross-references to an internet address
example Quicklinks added to the internet address of a homepage to enable quick access to specific content on the Web
123456 Hyperlink to an SAP Note for example SAP Note 123456
Example Words or characters quoted from the screen These include field labels screen titles pushbutton labels menu names and menu options
Cross-references to other documentation or published works
Example Output on the screen following a user action for example messages Source code or syntax quoted directly from a program File and directory names and their paths names of variables and parameters and
names of installation upgrade and database tools
EXAMPLE Technical names of system objects These include report names program names transaction codes database table names and key concepts of a programming language when they are surrounded by body text for example SELECT and INCLUDE
EXAMPLE Keys on the keyboard
4650 CUSTOMER 2012-12-17
SAP AGDietmar-Hopp-Allee 16
69190 WalldorfGermany
T +4918 0534 34 34F +4918 0534 34 20
wwwsapcom
copy Copyright 2012 SAP AG All rights reserved
No part of this publication may be reproduced or transmitted in any form or for any purpose without the express permission of SAP AG The information contained herein may be changed without prior noticeSome software products marketed by SAP AG and its distributors contain proprietary software components of other software vendors
Microsoft Windows Excel Outlook PowerPoint Silverlight and Visual Studio are registered trademarks of Microsoft CorporationIBM DB2 DB2 Universal Database System i System i5 System p System p5 System x System z System z10 z10 zVM zOS OS390 zEnterprise PowerVM Power Architecture Power Systems POWER7 POWER6+ POWER6 POWER PowerHA pureScale PowerPC BladeCenter System Storage Storwize XIV GPFS HACMP RETAIN DB2 Connect RACF Redbooks OS2 AIX Intelligent Miner WebSphere Tivoli Informix and Smarter Planet are trademarks or registered trademarks of IBM CorporationLinux is the registered trademark of Linus Torvalds in the United States and other countriesAdobe the Adobe logo Acrobat PostScript and Reader are trademarks or registered trademarks of Adobe Systems Incorporated in the United States and other countriesOracle and Java are registered trademarks of Oracle and its affiliatesUNIX XOpen OSF1 and Motif are registered trademarks of the Open GroupCitrix ICA Program Neighborhood MetaFrame WinFrame VideoFrame and MultiWin are trademarks or registered trademarks of Citrix Systems IncHTML XML XHTML and W3C are trademarks or registered trademarks of W3Creg World Wide Web Consortium Massachusetts Institute of TechnologyApple App Store iBooks iPad iPhone iPhoto iPod iTunes Multi-Touch Objective-C Retina Safari Siri and Xcode are trademarks or registered trademarks of Apple IncIOS is a registered trademark of Cisco Systems IncRIM BlackBerry BBM BlackBerry Curve BlackBerry Bold BlackBerry Pearl BlackBerry Torch BlackBerry Storm BlackBerry Storm2 BlackBerry PlayBook and BlackBerry App World are trademarks or registered trademarks of Research in Motion LimitedGoogle App Engine Google Apps Google Checkout Google Data API Google Maps Google Mobile Ads Google Mobile Updater Google Mobile Google Store Google Sync Google Updater Google Voice Google Mail Gmail YouTube Dalvik and Android are trademarks or registered trademarks of Google IncINTERMEC is a registered trademark of Intermec Technologies CorporationWi-Fi is a registered trademark of Wi-Fi AllianceBluetooth is a registered trademark of Bluetooth SIG IncMotorola is a registered trademark of Motorola Trademark Holdings LLCComputop is a registered trademark of Computop Wirtschaftsinformatik GmbHSAP R3 SAP NetWeaver Duet PartnerEdge ByDesign SAP BusinessObjects Explorer StreamWork SAP HANA and other SAP products and services mentioned herein as well as their respective logos are trademarks or registered trademarks of SAP AG in Germany and other countriesBusiness Objects and the Business Objects logo BusinessObjects Crystal Reports Crystal Decisions Web Intelligence Xcelsius and other Business Objects products and services mentioned herein as well as their respective logos are trademarks or registered trademarks of Business Objects Software Ltd Business Objects is an SAP companySybase and Adaptive Server iAnywhere Sybase 365 SQL Anywhere and other Sybase products and services mentioned herein as well as their respective logos are trademarks or registered trademarks of Sybase Inc Sybase is an SAP company
2012-12-17 CUSTOMER 4750
Crossgate mgic EDDY B2B 360deg and B2B 360deg Services are registered trademarks of Crossgate AG in Germany and other countries Crossgate is an SAP companyAll other product and service names mentioned are the trademarks of their respective companies Data contained in this document serves informational purposes only National product specifications may varyThese materials are subject to change without notice These materials are provided by SAP AG and its affiliated companies (ldquoSAP Grouprdquo) for informational purposes only without representation or warranty of any kind and SAP Group shall not be liable for errors or omissions with respect to the materials The only warranties for SAP Group products and services are those that are set forth in the express warranty statements accompanying such products and services if any Nothing herein should be construed as constituting an additional warranty
DisclaimerSome components of this product are based on Javatrade Any code change in these components may cause unpredictable and severe malfunctions and is therefore expressly prohibited as is any decompilation of these componentsAny Javatrade Source Code delivered with this product is only to be used by SAPrsquos Support Services and may not be modified or altered in any way
Documentation in the SAP Service MarketplaceYou can find this document at the following address httpservicesapcominstguides
4850 CUSTOMER 2012-12-17
SAP AGDietmar-Hopp-Allee 1669190 WalldorfGermanyT +4918 0534 34 34F +4918 0534 34 20wwwsapcom
copy Copyright 2012 SAP AG All rights reservedNo part of this publication may be reproduced or transmitted in any form or for any purpose without the express permission of SAP AG The information contained herein may be changed without prior notice
- SAP Enhancement Package 1 for SAP CRM 70
-
- Table of Contents
- 1 Introduction
- 2 Planning and Preparation
-
- 21 Prerequisites for the Business Packages for SAP CRM
-
- 3 Installation
- 4 Post-Installation
-
- 41 Checking the Availability of Back-End Systems for SAP CRM Java Components
-
- 411 Creating a Back-End User
- 412 Checking the Connection to the ABAP System
- 413 Configuring and Checking the TREX Service
- 414 Checking the Selling via eBay Processes
-
- 42 Post-Installation Steps for Workforce Deployment Application and Calculation Services
-
- 421 Implementing WFMCORE 200 Using Transaction SAINT
- 422 Configuring the Extended Configuration Management (XCM) for WFD Application and Calculation Services
- 423 Checking Workforce Deployment Calculation Services
- 424 Checking the Installation of WFD Application Services and WFD Calculation Services
-
- 43 Post-Installation Steps for the Business Packages for SAP CRM
-
- 431 Creating Roles for the SAP CRM Business Packages
- 432 Installation of the Info Center for the SAP CRM Business Package
-
- 4321 Importing the SAP CRM Info Center Configurations and Directory Structure
- 4322 Activating Manual Ordering of Folders for the sapcrm Repository
- 4323 Creating Indexes and Taxonomies for the sapcrmnews Repository
- 4324 Creating the Index for the sapcrm Repository
- 4325 Configuring the Personal Search
- 4326 Increasing the Number of JCo Connections
-
- 44 Post-Installation Steps for MapBox
-
- 441 Assigning User Groups for MapBox Users
- 442 Configuring an RFC Destination for MapBox
- 443 Performing Initial Configuration for MapBox
- 444 Executing the MapBox
- 445 Performing the Smoke Test for MapBox
- 446 Ensuring Optimal Block Size settings
- 447 Adapting Memory Settings for the J2EE Engine
-
- 45 Activating the CRM Web Client
- 46 Installing and Configuring CRM Application Server Loyalty Add-On Component
- 47 Starting XCM
- 48 Accessing Configuration Documentation in SAP Solution Manager
-
- 5 Additional Information
-
- 51 Installing the Business Packages for SAP CRM Using JSPM (Optional)
- 52 Troubleshooting for the Business Package for SAP CRM
-
- 521 Activating BI Templates Manually
- 522 Dragging the Central Search onto the Portal Desktop
-
- Copyright and trademarks
-
NOTE
You can also start XCM in accessibility mode (according to Section 508 Rehabilitation Act)
at the following URL
httplthostgtltportgtltweb app namegtadminxcminitdosap-accessibility=x
2 Provide a user and password If you are logging on for the first time use the Administrator user
and the password you defined during the installation of the SAP system
RECOMMENDATION
We recommend you create new users with lesser rights than the Administrator for the
administration of Web applications
For more information see the SAP CRM Security Guide section E-Commerce
3 When the application opens a closed control tree is displayed on the left of the screen A screen
containing help information is displayed to the right
You can use edit (change settings) or display (see settings) mode in XCM You use the button in
the top right hand corner of the screen to change between modes When you switch to edit mode
a DB lock is set meaning that only this user can edit the settings at one time The lock is released
once the user switches back to display mode or after session timeout (default timeout is 30mins)
48 Accessing Configuration Documentation in SAP Solution Manager
To access configuration documentation in SAP Solution Manager you have to connect your newly
installed SAP system to SAP Solution Manager
NOTE
For SAP NetWeaver you can also find configuration documentation in the Technology Consultants
Guide at
httphelpsapcomnw70 SAP NetWeaver 70 Library (including Enhancement Package 2) English
SAP NetWeaver Library Technology Consultants Guide
Procedure
Create a configuration project with the related configuration guide as described in the following
documentation
httphelpsapcom SAP Solutions SAP Solution Manager Documentation for SAP Solution Manager
ltcurrent releasegt SAP Solution Manager Implementing and Upgrading SAP Solutions Projects
Configuration
More Information
httpservicesapcomsolutionmanager Media Library How-To Documents How to Create a
Configuration Guide using SAP Solution Manager
4 Post-Installation
48 Accessing Configuration Documentation in SAP Solution Manager
2012-12-17 CUSTOMER 4150
This page is left blank for documents that are printed on both sides
5 Additional Information
Only valid for ABAP+JavaJava |
51 Installing the Business Packages for SAP CRM Using JSPM (Optional)
You can also install the Business Packages for SAP CRM using the Java Support Package Manager (JSPM)
Prerequisites
Only valid for IBM i5OSUNIX |
You have checked hardware and software requirements [external document]End of IBM i5OSUNIX |
Only valid for Windows |
You have checked hardware and software requirements [external document]End of Windows |
You have ckecked the Prerequisites for the Business Packages for SAP CRM [page 7]
Procedure
1 Download version 701 of the files sapcom_BPCRMAPP sapcom_BPCRMFND sapcom_CRMAPP and
sapcom_CRMFND as follows
1 Go to httpservicesapcomswdc Download Support Packages and Patches Search for
Support Packages and Patches
2 Enter the following search terms
BP CRM Application Coding 701
BP CRM Application Content 701
BP CRM Foundation Coding 701
BP CRM Foundation Content 701
2 Add the deployment variable comsapcmshare as described in SAP Note 965948
For more information about how to use the Software Deployment Manager (SDM) see the
documentation Software Deployment Manager which is available at
httphelpsapcomnw70 SAP NetWeaver 70 Library (including Enhancement Package 2) English
SAP NetWeaver Library SAP NetWeaver Developerrsquos Guide Fundamentals Using Java Core Development
Tasks Deployment Putting It All Together Software Deployment Manager
3 Install the Business Packages for SAP CRM with JSPM as described in Installing Additional Usage Types
or Software Units in an Existing SAP System [external document]
5 Additional Information
51 Installing the Business Packages for SAP CRM Using JSPM (Optional)
2012-12-17 CUSTOMER 4350
4 Perform the required Post-Installation Steps for the Business Packages for SAP CRM [page 20]End of ABAP+JavaJava |
Only valid for ABAP+JavaJava |
52 Troubleshooting for the Business Package for SAP CRMOnly valid for ABAP+JavaJava |
The following sections describe the steps that you have to perform if you have problems after the
installation
Activating BI Templates Manually [page 44]
Dragging the Central Search onto the Portal Desktop [page 45]End of ABAP+JavaJava |
Only valid for ABAP+JavaJava |
521 Activating BI Templates Manually
If you have installed the Business Package you might see error messages when loading the BI templates
This procedure describes how you can activate the templates afterwards
Procedure
1 Note the technical name of all templates in your portal interface that are not working
2 Log on to your BI system
3 On the SAP Easy Access screen choose Modeling Administrator Workbench Modeling (transaction
RSA1 or RSOR)
4 Choose Business Content Object Types Web Template Name Select Objects
A new window containing a list of BW objects and templates opens
5 Find your missing templates for example 0TPL_0CRM_Cnn_Qnnn_Vnnn_M and select the entries
6 Choose Transfer Selection
The template now appears on the right-hand side of the screen The Transfer checkbox has been
selected and cannot be changed Nevertheless we recommend that you repeat the following
procedure so that your templates can be displayed
7 Select the template
8 Choose Transfer Transfer
Result
You have successfully activated your missing templates and no error messages appear in the portalEnd of ABAP+JavaJava |
5 Additional Information
52 Troubleshooting for the Business Package for SAP CRM
4450 CUSTOMER 2012-12-17
Only valid for ABAP+JavaJava |
522 Dragging the Central Search onto the Portal Desktop
Procedure
The Business Package for SAP CRM 70 including SAP enhancement package 1 contains an iView for
the central search in CRM This iView is in the package on the page Today in the workset Home of the
CRM User You can drag this iView onto the portal desktop under the tool areaEnd of ABAP+JavaJava |
End of ABAP+JavaJava |
5 Additional Information
52 Troubleshooting for the Business Package for SAP CRM
2012-12-17 CUSTOMER 4550
Typographic Conventions
Example Description
ltExamplegt Angle brackets indicate that you replace these words or characters with appropriate entries to make entries in the system for example ldquoEnter your ltUser Namegtrdquo
ExampleExample
Arrows separating the parts of a navigation path for example menu options
Example Emphasized words or expressions
Example Words or characters that you enter in the system exactly as they appear in the documentation
httpwwwsapcom Textual cross-references to an internet address
example Quicklinks added to the internet address of a homepage to enable quick access to specific content on the Web
123456 Hyperlink to an SAP Note for example SAP Note 123456
Example Words or characters quoted from the screen These include field labels screen titles pushbutton labels menu names and menu options
Cross-references to other documentation or published works
Example Output on the screen following a user action for example messages Source code or syntax quoted directly from a program File and directory names and their paths names of variables and parameters and
names of installation upgrade and database tools
EXAMPLE Technical names of system objects These include report names program names transaction codes database table names and key concepts of a programming language when they are surrounded by body text for example SELECT and INCLUDE
EXAMPLE Keys on the keyboard
4650 CUSTOMER 2012-12-17
SAP AGDietmar-Hopp-Allee 16
69190 WalldorfGermany
T +4918 0534 34 34F +4918 0534 34 20
wwwsapcom
copy Copyright 2012 SAP AG All rights reserved
No part of this publication may be reproduced or transmitted in any form or for any purpose without the express permission of SAP AG The information contained herein may be changed without prior noticeSome software products marketed by SAP AG and its distributors contain proprietary software components of other software vendors
Microsoft Windows Excel Outlook PowerPoint Silverlight and Visual Studio are registered trademarks of Microsoft CorporationIBM DB2 DB2 Universal Database System i System i5 System p System p5 System x System z System z10 z10 zVM zOS OS390 zEnterprise PowerVM Power Architecture Power Systems POWER7 POWER6+ POWER6 POWER PowerHA pureScale PowerPC BladeCenter System Storage Storwize XIV GPFS HACMP RETAIN DB2 Connect RACF Redbooks OS2 AIX Intelligent Miner WebSphere Tivoli Informix and Smarter Planet are trademarks or registered trademarks of IBM CorporationLinux is the registered trademark of Linus Torvalds in the United States and other countriesAdobe the Adobe logo Acrobat PostScript and Reader are trademarks or registered trademarks of Adobe Systems Incorporated in the United States and other countriesOracle and Java are registered trademarks of Oracle and its affiliatesUNIX XOpen OSF1 and Motif are registered trademarks of the Open GroupCitrix ICA Program Neighborhood MetaFrame WinFrame VideoFrame and MultiWin are trademarks or registered trademarks of Citrix Systems IncHTML XML XHTML and W3C are trademarks or registered trademarks of W3Creg World Wide Web Consortium Massachusetts Institute of TechnologyApple App Store iBooks iPad iPhone iPhoto iPod iTunes Multi-Touch Objective-C Retina Safari Siri and Xcode are trademarks or registered trademarks of Apple IncIOS is a registered trademark of Cisco Systems IncRIM BlackBerry BBM BlackBerry Curve BlackBerry Bold BlackBerry Pearl BlackBerry Torch BlackBerry Storm BlackBerry Storm2 BlackBerry PlayBook and BlackBerry App World are trademarks or registered trademarks of Research in Motion LimitedGoogle App Engine Google Apps Google Checkout Google Data API Google Maps Google Mobile Ads Google Mobile Updater Google Mobile Google Store Google Sync Google Updater Google Voice Google Mail Gmail YouTube Dalvik and Android are trademarks or registered trademarks of Google IncINTERMEC is a registered trademark of Intermec Technologies CorporationWi-Fi is a registered trademark of Wi-Fi AllianceBluetooth is a registered trademark of Bluetooth SIG IncMotorola is a registered trademark of Motorola Trademark Holdings LLCComputop is a registered trademark of Computop Wirtschaftsinformatik GmbHSAP R3 SAP NetWeaver Duet PartnerEdge ByDesign SAP BusinessObjects Explorer StreamWork SAP HANA and other SAP products and services mentioned herein as well as their respective logos are trademarks or registered trademarks of SAP AG in Germany and other countriesBusiness Objects and the Business Objects logo BusinessObjects Crystal Reports Crystal Decisions Web Intelligence Xcelsius and other Business Objects products and services mentioned herein as well as their respective logos are trademarks or registered trademarks of Business Objects Software Ltd Business Objects is an SAP companySybase and Adaptive Server iAnywhere Sybase 365 SQL Anywhere and other Sybase products and services mentioned herein as well as their respective logos are trademarks or registered trademarks of Sybase Inc Sybase is an SAP company
2012-12-17 CUSTOMER 4750
Crossgate mgic EDDY B2B 360deg and B2B 360deg Services are registered trademarks of Crossgate AG in Germany and other countries Crossgate is an SAP companyAll other product and service names mentioned are the trademarks of their respective companies Data contained in this document serves informational purposes only National product specifications may varyThese materials are subject to change without notice These materials are provided by SAP AG and its affiliated companies (ldquoSAP Grouprdquo) for informational purposes only without representation or warranty of any kind and SAP Group shall not be liable for errors or omissions with respect to the materials The only warranties for SAP Group products and services are those that are set forth in the express warranty statements accompanying such products and services if any Nothing herein should be construed as constituting an additional warranty
DisclaimerSome components of this product are based on Javatrade Any code change in these components may cause unpredictable and severe malfunctions and is therefore expressly prohibited as is any decompilation of these componentsAny Javatrade Source Code delivered with this product is only to be used by SAPrsquos Support Services and may not be modified or altered in any way
Documentation in the SAP Service MarketplaceYou can find this document at the following address httpservicesapcominstguides
4850 CUSTOMER 2012-12-17
SAP AGDietmar-Hopp-Allee 1669190 WalldorfGermanyT +4918 0534 34 34F +4918 0534 34 20wwwsapcom
copy Copyright 2012 SAP AG All rights reservedNo part of this publication may be reproduced or transmitted in any form or for any purpose without the express permission of SAP AG The information contained herein may be changed without prior notice
- SAP Enhancement Package 1 for SAP CRM 70
-
- Table of Contents
- 1 Introduction
- 2 Planning and Preparation
-
- 21 Prerequisites for the Business Packages for SAP CRM
-
- 3 Installation
- 4 Post-Installation
-
- 41 Checking the Availability of Back-End Systems for SAP CRM Java Components
-
- 411 Creating a Back-End User
- 412 Checking the Connection to the ABAP System
- 413 Configuring and Checking the TREX Service
- 414 Checking the Selling via eBay Processes
-
- 42 Post-Installation Steps for Workforce Deployment Application and Calculation Services
-
- 421 Implementing WFMCORE 200 Using Transaction SAINT
- 422 Configuring the Extended Configuration Management (XCM) for WFD Application and Calculation Services
- 423 Checking Workforce Deployment Calculation Services
- 424 Checking the Installation of WFD Application Services and WFD Calculation Services
-
- 43 Post-Installation Steps for the Business Packages for SAP CRM
-
- 431 Creating Roles for the SAP CRM Business Packages
- 432 Installation of the Info Center for the SAP CRM Business Package
-
- 4321 Importing the SAP CRM Info Center Configurations and Directory Structure
- 4322 Activating Manual Ordering of Folders for the sapcrm Repository
- 4323 Creating Indexes and Taxonomies for the sapcrmnews Repository
- 4324 Creating the Index for the sapcrm Repository
- 4325 Configuring the Personal Search
- 4326 Increasing the Number of JCo Connections
-
- 44 Post-Installation Steps for MapBox
-
- 441 Assigning User Groups for MapBox Users
- 442 Configuring an RFC Destination for MapBox
- 443 Performing Initial Configuration for MapBox
- 444 Executing the MapBox
- 445 Performing the Smoke Test for MapBox
- 446 Ensuring Optimal Block Size settings
- 447 Adapting Memory Settings for the J2EE Engine
-
- 45 Activating the CRM Web Client
- 46 Installing and Configuring CRM Application Server Loyalty Add-On Component
- 47 Starting XCM
- 48 Accessing Configuration Documentation in SAP Solution Manager
-
- 5 Additional Information
-
- 51 Installing the Business Packages for SAP CRM Using JSPM (Optional)
- 52 Troubleshooting for the Business Package for SAP CRM
-
- 521 Activating BI Templates Manually
- 522 Dragging the Central Search onto the Portal Desktop
-
- Copyright and trademarks
-
5 Additional Information
Only valid for ABAP+JavaJava |
51 Installing the Business Packages for SAP CRM Using JSPM (Optional)
You can also install the Business Packages for SAP CRM using the Java Support Package Manager (JSPM)
Prerequisites
Only valid for IBM i5OSUNIX |
You have checked hardware and software requirements [external document]End of IBM i5OSUNIX |
Only valid for Windows |
You have checked hardware and software requirements [external document]End of Windows |
You have ckecked the Prerequisites for the Business Packages for SAP CRM [page 7]
Procedure
1 Download version 701 of the files sapcom_BPCRMAPP sapcom_BPCRMFND sapcom_CRMAPP and
sapcom_CRMFND as follows
1 Go to httpservicesapcomswdc Download Support Packages and Patches Search for
Support Packages and Patches
2 Enter the following search terms
BP CRM Application Coding 701
BP CRM Application Content 701
BP CRM Foundation Coding 701
BP CRM Foundation Content 701
2 Add the deployment variable comsapcmshare as described in SAP Note 965948
For more information about how to use the Software Deployment Manager (SDM) see the
documentation Software Deployment Manager which is available at
httphelpsapcomnw70 SAP NetWeaver 70 Library (including Enhancement Package 2) English
SAP NetWeaver Library SAP NetWeaver Developerrsquos Guide Fundamentals Using Java Core Development
Tasks Deployment Putting It All Together Software Deployment Manager
3 Install the Business Packages for SAP CRM with JSPM as described in Installing Additional Usage Types
or Software Units in an Existing SAP System [external document]
5 Additional Information
51 Installing the Business Packages for SAP CRM Using JSPM (Optional)
2012-12-17 CUSTOMER 4350
4 Perform the required Post-Installation Steps for the Business Packages for SAP CRM [page 20]End of ABAP+JavaJava |
Only valid for ABAP+JavaJava |
52 Troubleshooting for the Business Package for SAP CRMOnly valid for ABAP+JavaJava |
The following sections describe the steps that you have to perform if you have problems after the
installation
Activating BI Templates Manually [page 44]
Dragging the Central Search onto the Portal Desktop [page 45]End of ABAP+JavaJava |
Only valid for ABAP+JavaJava |
521 Activating BI Templates Manually
If you have installed the Business Package you might see error messages when loading the BI templates
This procedure describes how you can activate the templates afterwards
Procedure
1 Note the technical name of all templates in your portal interface that are not working
2 Log on to your BI system
3 On the SAP Easy Access screen choose Modeling Administrator Workbench Modeling (transaction
RSA1 or RSOR)
4 Choose Business Content Object Types Web Template Name Select Objects
A new window containing a list of BW objects and templates opens
5 Find your missing templates for example 0TPL_0CRM_Cnn_Qnnn_Vnnn_M and select the entries
6 Choose Transfer Selection
The template now appears on the right-hand side of the screen The Transfer checkbox has been
selected and cannot be changed Nevertheless we recommend that you repeat the following
procedure so that your templates can be displayed
7 Select the template
8 Choose Transfer Transfer
Result
You have successfully activated your missing templates and no error messages appear in the portalEnd of ABAP+JavaJava |
5 Additional Information
52 Troubleshooting for the Business Package for SAP CRM
4450 CUSTOMER 2012-12-17
Only valid for ABAP+JavaJava |
522 Dragging the Central Search onto the Portal Desktop
Procedure
The Business Package for SAP CRM 70 including SAP enhancement package 1 contains an iView for
the central search in CRM This iView is in the package on the page Today in the workset Home of the
CRM User You can drag this iView onto the portal desktop under the tool areaEnd of ABAP+JavaJava |
End of ABAP+JavaJava |
5 Additional Information
52 Troubleshooting for the Business Package for SAP CRM
2012-12-17 CUSTOMER 4550
Typographic Conventions
Example Description
ltExamplegt Angle brackets indicate that you replace these words or characters with appropriate entries to make entries in the system for example ldquoEnter your ltUser Namegtrdquo
ExampleExample
Arrows separating the parts of a navigation path for example menu options
Example Emphasized words or expressions
Example Words or characters that you enter in the system exactly as they appear in the documentation
httpwwwsapcom Textual cross-references to an internet address
example Quicklinks added to the internet address of a homepage to enable quick access to specific content on the Web
123456 Hyperlink to an SAP Note for example SAP Note 123456
Example Words or characters quoted from the screen These include field labels screen titles pushbutton labels menu names and menu options
Cross-references to other documentation or published works
Example Output on the screen following a user action for example messages Source code or syntax quoted directly from a program File and directory names and their paths names of variables and parameters and
names of installation upgrade and database tools
EXAMPLE Technical names of system objects These include report names program names transaction codes database table names and key concepts of a programming language when they are surrounded by body text for example SELECT and INCLUDE
EXAMPLE Keys on the keyboard
4650 CUSTOMER 2012-12-17
SAP AGDietmar-Hopp-Allee 16
69190 WalldorfGermany
T +4918 0534 34 34F +4918 0534 34 20
wwwsapcom
copy Copyright 2012 SAP AG All rights reserved
No part of this publication may be reproduced or transmitted in any form or for any purpose without the express permission of SAP AG The information contained herein may be changed without prior noticeSome software products marketed by SAP AG and its distributors contain proprietary software components of other software vendors
Microsoft Windows Excel Outlook PowerPoint Silverlight and Visual Studio are registered trademarks of Microsoft CorporationIBM DB2 DB2 Universal Database System i System i5 System p System p5 System x System z System z10 z10 zVM zOS OS390 zEnterprise PowerVM Power Architecture Power Systems POWER7 POWER6+ POWER6 POWER PowerHA pureScale PowerPC BladeCenter System Storage Storwize XIV GPFS HACMP RETAIN DB2 Connect RACF Redbooks OS2 AIX Intelligent Miner WebSphere Tivoli Informix and Smarter Planet are trademarks or registered trademarks of IBM CorporationLinux is the registered trademark of Linus Torvalds in the United States and other countriesAdobe the Adobe logo Acrobat PostScript and Reader are trademarks or registered trademarks of Adobe Systems Incorporated in the United States and other countriesOracle and Java are registered trademarks of Oracle and its affiliatesUNIX XOpen OSF1 and Motif are registered trademarks of the Open GroupCitrix ICA Program Neighborhood MetaFrame WinFrame VideoFrame and MultiWin are trademarks or registered trademarks of Citrix Systems IncHTML XML XHTML and W3C are trademarks or registered trademarks of W3Creg World Wide Web Consortium Massachusetts Institute of TechnologyApple App Store iBooks iPad iPhone iPhoto iPod iTunes Multi-Touch Objective-C Retina Safari Siri and Xcode are trademarks or registered trademarks of Apple IncIOS is a registered trademark of Cisco Systems IncRIM BlackBerry BBM BlackBerry Curve BlackBerry Bold BlackBerry Pearl BlackBerry Torch BlackBerry Storm BlackBerry Storm2 BlackBerry PlayBook and BlackBerry App World are trademarks or registered trademarks of Research in Motion LimitedGoogle App Engine Google Apps Google Checkout Google Data API Google Maps Google Mobile Ads Google Mobile Updater Google Mobile Google Store Google Sync Google Updater Google Voice Google Mail Gmail YouTube Dalvik and Android are trademarks or registered trademarks of Google IncINTERMEC is a registered trademark of Intermec Technologies CorporationWi-Fi is a registered trademark of Wi-Fi AllianceBluetooth is a registered trademark of Bluetooth SIG IncMotorola is a registered trademark of Motorola Trademark Holdings LLCComputop is a registered trademark of Computop Wirtschaftsinformatik GmbHSAP R3 SAP NetWeaver Duet PartnerEdge ByDesign SAP BusinessObjects Explorer StreamWork SAP HANA and other SAP products and services mentioned herein as well as their respective logos are trademarks or registered trademarks of SAP AG in Germany and other countriesBusiness Objects and the Business Objects logo BusinessObjects Crystal Reports Crystal Decisions Web Intelligence Xcelsius and other Business Objects products and services mentioned herein as well as their respective logos are trademarks or registered trademarks of Business Objects Software Ltd Business Objects is an SAP companySybase and Adaptive Server iAnywhere Sybase 365 SQL Anywhere and other Sybase products and services mentioned herein as well as their respective logos are trademarks or registered trademarks of Sybase Inc Sybase is an SAP company
2012-12-17 CUSTOMER 4750
Crossgate mgic EDDY B2B 360deg and B2B 360deg Services are registered trademarks of Crossgate AG in Germany and other countries Crossgate is an SAP companyAll other product and service names mentioned are the trademarks of their respective companies Data contained in this document serves informational purposes only National product specifications may varyThese materials are subject to change without notice These materials are provided by SAP AG and its affiliated companies (ldquoSAP Grouprdquo) for informational purposes only without representation or warranty of any kind and SAP Group shall not be liable for errors or omissions with respect to the materials The only warranties for SAP Group products and services are those that are set forth in the express warranty statements accompanying such products and services if any Nothing herein should be construed as constituting an additional warranty
DisclaimerSome components of this product are based on Javatrade Any code change in these components may cause unpredictable and severe malfunctions and is therefore expressly prohibited as is any decompilation of these componentsAny Javatrade Source Code delivered with this product is only to be used by SAPrsquos Support Services and may not be modified or altered in any way
Documentation in the SAP Service MarketplaceYou can find this document at the following address httpservicesapcominstguides
4850 CUSTOMER 2012-12-17
SAP AGDietmar-Hopp-Allee 1669190 WalldorfGermanyT +4918 0534 34 34F +4918 0534 34 20wwwsapcom
copy Copyright 2012 SAP AG All rights reservedNo part of this publication may be reproduced or transmitted in any form or for any purpose without the express permission of SAP AG The information contained herein may be changed without prior notice
- SAP Enhancement Package 1 for SAP CRM 70
-
- Table of Contents
- 1 Introduction
- 2 Planning and Preparation
-
- 21 Prerequisites for the Business Packages for SAP CRM
-
- 3 Installation
- 4 Post-Installation
-
- 41 Checking the Availability of Back-End Systems for SAP CRM Java Components
-
- 411 Creating a Back-End User
- 412 Checking the Connection to the ABAP System
- 413 Configuring and Checking the TREX Service
- 414 Checking the Selling via eBay Processes
-
- 42 Post-Installation Steps for Workforce Deployment Application and Calculation Services
-
- 421 Implementing WFMCORE 200 Using Transaction SAINT
- 422 Configuring the Extended Configuration Management (XCM) for WFD Application and Calculation Services
- 423 Checking Workforce Deployment Calculation Services
- 424 Checking the Installation of WFD Application Services and WFD Calculation Services
-
- 43 Post-Installation Steps for the Business Packages for SAP CRM
-
- 431 Creating Roles for the SAP CRM Business Packages
- 432 Installation of the Info Center for the SAP CRM Business Package
-
- 4321 Importing the SAP CRM Info Center Configurations and Directory Structure
- 4322 Activating Manual Ordering of Folders for the sapcrm Repository
- 4323 Creating Indexes and Taxonomies for the sapcrmnews Repository
- 4324 Creating the Index for the sapcrm Repository
- 4325 Configuring the Personal Search
- 4326 Increasing the Number of JCo Connections
-
- 44 Post-Installation Steps for MapBox
-
- 441 Assigning User Groups for MapBox Users
- 442 Configuring an RFC Destination for MapBox
- 443 Performing Initial Configuration for MapBox
- 444 Executing the MapBox
- 445 Performing the Smoke Test for MapBox
- 446 Ensuring Optimal Block Size settings
- 447 Adapting Memory Settings for the J2EE Engine
-
- 45 Activating the CRM Web Client
- 46 Installing and Configuring CRM Application Server Loyalty Add-On Component
- 47 Starting XCM
- 48 Accessing Configuration Documentation in SAP Solution Manager
-
- 5 Additional Information
-
- 51 Installing the Business Packages for SAP CRM Using JSPM (Optional)
- 52 Troubleshooting for the Business Package for SAP CRM
-
- 521 Activating BI Templates Manually
- 522 Dragging the Central Search onto the Portal Desktop
-
- Copyright and trademarks
-