product data - scheer nederland
TRANSCRIPT
Product Documentation PUBLICSAP Business ByDesign February 2017
Product Data

Table Of Contents
1 Business Background . . . . . . . . . . . . . . . . . . . . . . . . . . . . . . . . . . . . . . . . . . . . . . . . . . . . 51.1 Tax Determination . . . . . . . . . . . . . . . . . . . . . . . . . . . . . . . . . . . . . . . . . . . . . . . . . . . . . . . . . . 5
Tax Determination . . . . . . . . . . . . . . . . . . . . . . . . . . . . . . . . . . . . . . . . . . . . . . . . . . . . . . . . 5Tax Determination Details . . . . . . . . . . . . . . . . . . . . . . . . . . . . . . . . . . . . . . . . . . . . . . . . . . . 10Tax Determination — US . . . . . . . . . . . . . . . . . . . . . . . . . . . . . . . . . . . . . . . . . . . . . . . . . . . . 24
1.2 Pricing in Customer Relationship Management . . . . . . . . . . . . . . . . . . . . . . . . . . . . . . . . . . . . . . 251.3 Working With Serial Numbers . . . . . . . . . . . . . . . . . . . . . . . . . . . . . . . . . . . . . . . . . . . . . . . . . . 321.4 Kits Process Flow . . . . . . . . . . . . . . . . . . . . . . . . . . . . . . . . . . . . . . . . . . . . . . . . . . . . . . . . . . . 35
2 Materials View . . . . . . . . . . . . . . . . . . . . . . . . . . . . . . . . . . . . . . . . . . . . . . . . . . . . . . . . . . 392.1 Materials Quick Guide . . . . . . . . . . . . . . . . . . . . . . . . . . . . . . . . . . . . . . . . . . . . . . . . . . . . . . . . 392.2 Business Background . . . . . . . . . . . . . . . . . . . . . . . . . . . . . . . . . . . . . . . . . . . . . . . . . . . . . . . . 44
Assigning Statuses to a Material . . . . . . . . . . . . . . . . . . . . . . . . . . . . . . . . . . . . . . . . . . . . . . 44Changing Identified Stock Types . . . . . . . . . . . . . . . . . . . . . . . . . . . . . . . . . . . . . . . . . . . . . . 45Availability Checks . . . . . . . . . . . . . . . . . . . . . . . . . . . . . . . . . . . . . . . . . . . . . . . . . . . . . . . . 51Batch Specific Quantity Conversion . . . . . . . . . . . . . . . . . . . . . . . . . . . . . . . . . . . . . . . . . . . . 54
2.3 Tasks . . . . . . . . . . . . . . . . . . . . . . . . . . . . . . . . . . . . . . . . . . . . . . . . . . . . . . . . . . . . . . . . . . . 59Create a Material Template and Create a Material from a Template . . . . . . . . . . . . . . . . . . . . . . 59Assign Purchasing Details to a Material . . . . . . . . . . . . . . . . . . . . . . . . . . . . . . . . . . . . . . . . . . 60Assign Logistics Details to a Material . . . . . . . . . . . . . . . . . . . . . . . . . . . . . . . . . . . . . . . . . . . 61Assign Supply Planning Details to a Material . . . . . . . . . . . . . . . . . . . . . . . . . . . . . . . . . . . . . . 62Assign Availability Confirmation Details to a Material . . . . . . . . . . . . . . . . . . . . . . . . . . . . . . . . 63Assign Sales Details to a Material . . . . . . . . . . . . . . . . . . . . . . . . . . . . . . . . . . . . . . . . . . . . . . 64Assign Valuation Details to a Material . . . . . . . . . . . . . . . . . . . . . . . . . . . . . . . . . . . . . . . . . . . 66Add Quantity Conversions to a Material . . . . . . . . . . . . . . . . . . . . . . . . . . . . . . . . . . . . . . . . . 67Mass Change of Materials . . . . . . . . . . . . . . . . . . . . . . . . . . . . . . . . . . . . . . . . . . . . . . . . . . . 68Create Materials Using Microsoft Excel® . . . . . . . . . . . . . . . . . . . . . . . . . . . . . . . . . . . . . . . . . 69Export Business Data Using Microsoft Excel® . . . . . . . . . . . . . . . . . . . . . . . . . . . . . . . . . . . . . 71
3 Services View . . . . . . . . . . . . . . . . . . . . . . . . . . . . . . . . . . . . . . . . . . . . . . . . . . . . . . . . . . . 733.1 Quick Guide for Services (in Product Data) . . . . . . . . . . . . . . . . . . . . . . . . . . . . . . . . . . . . . . . . . 733.2 Business Background . . . . . . . . . . . . . . . . . . . . . . . . . . . . . . . . . . . . . . . . . . . . . . . . . . . . . . . . 76
Assigning Statuses to a Service . . . . . . . . . . . . . . . . . . . . . . . . . . . . . . . . . . . . . . . . . . . . . . . 76Cost Center Management Accounting . . . . . . . . . . . . . . . . . . . . . . . . . . . . . . . . . . . . . . . . . . 77Service Cost Allocation to Cost Objects . . . . . . . . . . . . . . . . . . . . . . . . . . . . . . . . . . . . . . . . . 79
3.3 Tasks . . . . . . . . . . . . . . . . . . . . . . . . . . . . . . . . . . . . . . . . . . . . . . . . . . . . . . . . . . . . . . . . . . . 80Create a Service Template and Create a Service from a Template . . . . . . . . . . . . . . . . . . . . . . . 80Assign Purchasing Details to a Service . . . . . . . . . . . . . . . . . . . . . . . . . . . . . . . . . . . . . . . . . . 81Assign Sales Details to a Service . . . . . . . . . . . . . . . . . . . . . . . . . . . . . . . . . . . . . . . . . . . . . . 82
SAP Business ByDesign February 2017Table Of Contents P U B L I C • © 2017 SAP SE or an SAP affiliate company. All rights reserved. 3
Assign Valuation Details to a Service . . . . . . . . . . . . . . . . . . . . . . . . . . . . . . . . . . . . . . . . . . . 83Add Quantity Conversions to a Service . . . . . . . . . . . . . . . . . . . . . . . . . . . . . . . . . . . . . . . . . . 84Mass Change of Services . . . . . . . . . . . . . . . . . . . . . . . . . . . . . . . . . . . . . . . . . . . . . . . . . . . . 85Create Services Using Microsoft Excel® . . . . . . . . . . . . . . . . . . . . . . . . . . . . . . . . . . . . . . . . . 86Export Business Data Using Microsoft Excel® . . . . . . . . . . . . . . . . . . . . . . . . . . . . . . . . . . . . . 88
4 Product Categories View . . . . . . . . . . . . . . . . . . . . . . . . . . . . . . . . . . . . . . . . . . . . . . . . . 904.1 Product Categories Quick Guide . . . . . . . . . . . . . . . . . . . . . . . . . . . . . . . . . . . . . . . . . . . . . . . . 904.2 Tasks . . . . . . . . . . . . . . . . . . . . . . . . . . . . . . . . . . . . . . . . . . . . . . . . . . . . . . . . . . . . . . . . . . . 92
Export Business Data Using Microsoft Excel® . . . . . . . . . . . . . . . . . . . . . . . . . . . . . . . . . . . . . 92
5 Entitlements View . . . . . . . . . . . . . . . . . . . . . . . . . . . . . . . . . . . . . . . . . . . . . . . . . . . . . . . 945.1 Entitlements Quick Guide . . . . . . . . . . . . . . . . . . . . . . . . . . . . . . . . . . . . . . . . . . . . . . . . . . . . . 945.2 Business Background . . . . . . . . . . . . . . . . . . . . . . . . . . . . . . . . . . . . . . . . . . . . . . . . . . . . . . . . 95
Entitlements . . . . . . . . . . . . . . . . . . . . . . . . . . . . . . . . . . . . . . . . . . . . . . . . . . . . . . . . . . . . 955.3 Tasks . . . . . . . . . . . . . . . . . . . . . . . . . . . . . . . . . . . . . . . . . . . . . . . . . . . . . . . . . . . . . . . . . . . 96
Create Entitlements . . . . . . . . . . . . . . . . . . . . . . . . . . . . . . . . . . . . . . . . . . . . . . . . . . . . . . . 96Assign Sales Details to an Entitlement . . . . . . . . . . . . . . . . . . . . . . . . . . . . . . . . . . . . . . . . . . 96Add Quantity Conversions to an Entitlement . . . . . . . . . . . . . . . . . . . . . . . . . . . . . . . . . . . . . . 98Assign Valuation Details to an Entitlement . . . . . . . . . . . . . . . . . . . . . . . . . . . . . . . . . . . . . . . 98Assigning Statuses to an Entitlement . . . . . . . . . . . . . . . . . . . . . . . . . . . . . . . . . . . . . . . . . . . 99Add Entitlement Descriptions in Other Languages . . . . . . . . . . . . . . . . . . . . . . . . . . . . . . . . . . 100
6 Products View . . . . . . . . . . . . . . . . . . . . . . . . . . . . . . . . . . . . . . . . . . . . . . . . . . . . . . . . . . 1026.1 Kits Quick Guide . . . . . . . . . . . . . . . . . . . . . . . . . . . . . . . . . . . . . . . . . . . . . . . . . . . . . . . . . . . . 1026.2 Business Background . . . . . . . . . . . . . . . . . . . . . . . . . . . . . . . . . . . . . . . . . . . . . . . . . . . . . . . . 104
Kits Process Flow . . . . . . . . . . . . . . . . . . . . . . . . . . . . . . . . . . . . . . . . . . . . . . . . . . . . . . . . . 1046.3 Tasks . . . . . . . . . . . . . . . . . . . . . . . . . . . . . . . . . . . . . . . . . . . . . . . . . . . . . . . . . . . . . . . . . . . 107
Create a Kit . . . . . . . . . . . . . . . . . . . . . . . . . . . . . . . . . . . . . . . . . . . . . . . . . . . . . . . . . . . . . 107Assign Sales Details to a Kit . . . . . . . . . . . . . . . . . . . . . . . . . . . . . . . . . . . . . . . . . . . . . . . . . 108Assign Valuation Details to a Kit . . . . . . . . . . . . . . . . . . . . . . . . . . . . . . . . . . . . . . . . . . . . . . . 109
7 Reports View . . . . . . . . . . . . . . . . . . . . . . . . . . . . . . . . . . . . . . . . . . . . . . . . . . . . . . . . . . . 1117.1 New Materials . . . . . . . . . . . . . . . . . . . . . . . . . . . . . . . . . . . . . . . . . . . . . . . . . . . . . . . . . . . . . 1117.2 Changed Materials . . . . . . . . . . . . . . . . . . . . . . . . . . . . . . . . . . . . . . . . . . . . . . . . . . . . . . . . . . 1127.3 New Services . . . . . . . . . . . . . . . . . . . . . . . . . . . . . . . . . . . . . . . . . . . . . . . . . . . . . . . . . . . . . . 1137.4 Changed Services . . . . . . . . . . . . . . . . . . . . . . . . . . . . . . . . . . . . . . . . . . . . . . . . . . . . . . . . . . . 114
4 © 2017 SAP SE or an SAP affiliate company. All rights reserved. • P U B L I CSAP Business ByDesign February 2017
Table Of Contents
1 Business Background
1.1 Tax Determination
1.1.1 Tax Determination
Overview
Business ByDesign provides a tax event and uses the resulting figures to generate tax reports. Thisautomatically-created report does not replace the customer or user’s own tax appraisal. SAP does notassume liability for the accuracy of the automatically-created report or the tax report that is generated.
As a rule, companies are legally required to calculate taxes on products that they buy or sell or services used, andto levy these taxes on their customers. After the products or services have been provided, the taxes must be declaredand paid to the relevant tax authorities.The taxes are calculated for business documents such as orders, invoices, credit memos or down payments.Since taxation laws differ in each country, your company is faced with the challenge of calculating the correct taxfor a particular business transaction. The system supports you by automatically calculating the tax for the followingtax types:
● Value-Added Tax (VAT)This tax is levied in many countries, especially countries in the European Union. Many regional differencesexist. For example, in some countries such as Canada and Australia, value-added tax is levied as "Goods andServices Tax".
● Sales and Use TaxThis tax is levied, for example, in the United States, and in a similar form in Canada (Provincial Sales Tax).
● Withholding TaxThis tax is levied in different forms in different countries. The system is able to calculate withholding tax forthe United States.
The system also offers a reporting tool that gives you effective control over your mandatory declaration of thesetaxes.
Prerequisites ● You have created the Master Data for Tax Determination [page 10]. ● Defining the Solution Scope for Taxation
The following activities are necessary to define the solution scope for taxation: ○ The solution scope for taxation is specified in the system in Business Configuration under Built-In Services
and Support. The Tax Calculation business topic is located in the Business Environment businesspackage.
○ If you are also required to have taxes calculated in your quotes, activate the relevant option inScoping. In the Questions step, navigate to the Sales business area, and choose New Business > Quoteswith Tax Calculation.
SAP Business ByDesign February 2017Business Background P U B L I C • © 2017 SAP SE or an SAP affiliate company. All rights reserved. 5
ElementsThe system collects the relevant data from the available business documents to correctly calculate the taxesapplicable. As the user, you have to configure your system with the information that is required for your businesscases. A lot of standard business cases are pre-configured by SAP, but in some cases you have to enhance yoursystem.For more detailed information about tax determination and how the system merges and classifies data, see Elementsfor Tax Determination [page 13].
Tax Number DeterminationIn the following cases the tax number is determined again:
● Tax date has been changed ● Buyer, seller or tax reporting group has been changed ● Tax number is wrong ● Tax country has been changed
Value-Added Tax (VAT) NumbersFor Export DeliveriesTo obtain tax exemption for intra-community deliveries, you need to record, among other things, the servicerecipient’s VAT number to be used for the receipt of goods.If several VAT numbers are assigned to a customer master record, the system selects the VAT number accordingto the following criteria:
● The VAT number of the country in which the ship-to party is located. ● If the VAT number of the ship-to country is not entered in the master data, the system searches for other
numbers entered in the master data and selects a number that is different from the number of the countryfrom which the goods are sent.
● If there is only one VAT number for the country where the transport of goods starts, or if there is no numberat all, the prerequisites for an intra-community delivery have not been fulfilled, and the delivery must be taxedat the relevant tax rate.
If a VAT number is entered in the master data, it will be automatically displayed on the invoice. You canoverwrite it on the Taxes tab in the document. However, you can only overwrite using those numbers thathave been previously entered in the account master record.
For Other Services, Performed AbroadAccording to the EU directive 2008/8/EG and country-specific tax legislation, there is a new regulation, particularlyfor B2B commissions relating to the place in which services are performed.Generally, the place in which services are provided serves as the 'service recipient’ address. If the country where the'Ship-To' address is located differs from the address of the account, then the 'Ship-To' location is understood to bethe location where the service is performed. This directly influences how taxes are determined, in that the “Ship-To'address is used to determine where the services will be taxed. For example, § 3a (2) UStG in Germany can beconsulted. If this is not correct for each and every case, then applicable tax data must be manually adapted, mainlythe tax country and the tax code.
6 © 2017 SAP SE or an SAP affiliate company. All rights reserved. • P U B L I CSAP Business ByDesign February 2017
Business Background
In order to distinguish between companies and individuals as the service recipient, the system (tax decision tree)checks whether a VAT number has been entered in the account master data. If the VAT number is missing, thebusiness case is regarded as a service that was performed for an individual.
Therefore, it is important to remember to include the VAT number when entering the account master data.
Reverse Charge MechanismReverse charge mechanism means that, in certain cases, the customer is required by law to be liable for VAT, andto pay it to the relevant tax authority. In this case, the entrepreneur issues an invoice without VAT, but with anotification indicating that the tax debt is being transferred to the customer. The customer must calculate and paythe VAT to the tax authority, and can claim input tax deduction at the same time as usual. The transfer of tax debtto the service recipient is called reverse charge mechanism.For more information, see Tax Determination with Reverse Charge Mechanism [page 19].
Third-Party Order Processing TaxationIn typical sales scenarios, transactions take place directly between a company and an account, both businesspartners are located in the same country, and the company produces and delivers a good or service directly to theaccount. In such scenarios, there is no need for special tax regulations. However, in the event that one or moreparameters of this business scenario differ from the typical situation and, for example, account address and ship-to addresses are not the same, special regulations apply, depending on how complex the scenarios are.For more information, see Third-Party Order Processing and Chain Transaction Taxation [page 21].
Relevant Date for the VAT Tax ReturnThe date used for the VAT tax return depends on the business document. For example, in the supplier invoice theReceipt Date is used, and in the customer invoice the Posting Date is used. But if you want, you can also enter a TaxDue Date.For more information on the tax due date, see Tax Due Date of Tax Items.
Entering or Changing Tax Codes in Journal Entry VouchersYou can enter or change tax codes in journal entry vouchers as follows:
● Sales OrdersGo to the Sales Orders work center and choose New Sales Order or an existing sales order for editing. ChooseView All. Go to the Items tab page and from there to the Taxes tab page. Choose an appropriate entry for theorder item selected under Tax Code.
● Invoices or Credit MemosGo to the Customer Invoicing work center and choose New Manual Invoice or an existing invoice or creditmemo for editing. Go to the Items tab page and from there to the Taxes tab page. Choose an appropriateentry for the invoice item selected under Tax Code.
● Purchase OrderGo to the Purchase Requests and Orders work center and choose New Purchase Order or an existing purchaseorder for editing. Choose View All Items . In the Basic Data tab page, select under Taxes the appropriatetax code for the selected purchase order item.
SAP Business ByDesign February 2017Business Background P U B L I C • © 2017 SAP SE or an SAP affiliate company. All rights reserved. 7
● Supplier InvoiceGo to the Supplier Invoice work center and choose New Invoice Without Purchase Order or an existing invoicefor editing. In the Overview tab page, select the appropriate tax code for the selected invoice item.
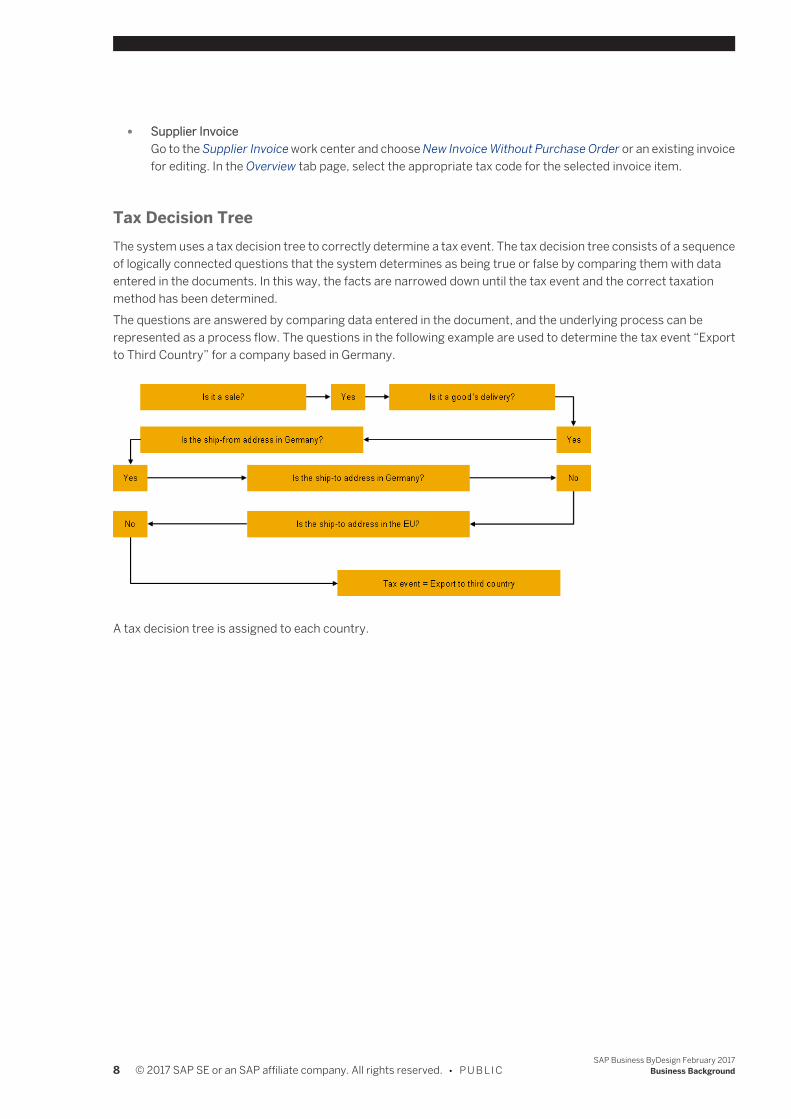
Tax Decision TreeThe system uses a tax decision tree to correctly determine a tax event. The tax decision tree consists of a sequenceof logically connected questions that the system determines as being true or false by comparing them with dataentered in the documents. In this way, the facts are narrowed down until the tax event and the correct taxationmethod has been determined.The questions are answered by comparing data entered in the document, and the underlying process can berepresented as a process flow. The questions in the following example are used to determine the tax event “Exportto Third Country” for a company based in Germany.
A tax decision tree is assigned to each country.
8 © 2017 SAP SE or an SAP affiliate company. All rights reserved. • P U B L I CSAP Business ByDesign February 2017
Business Background
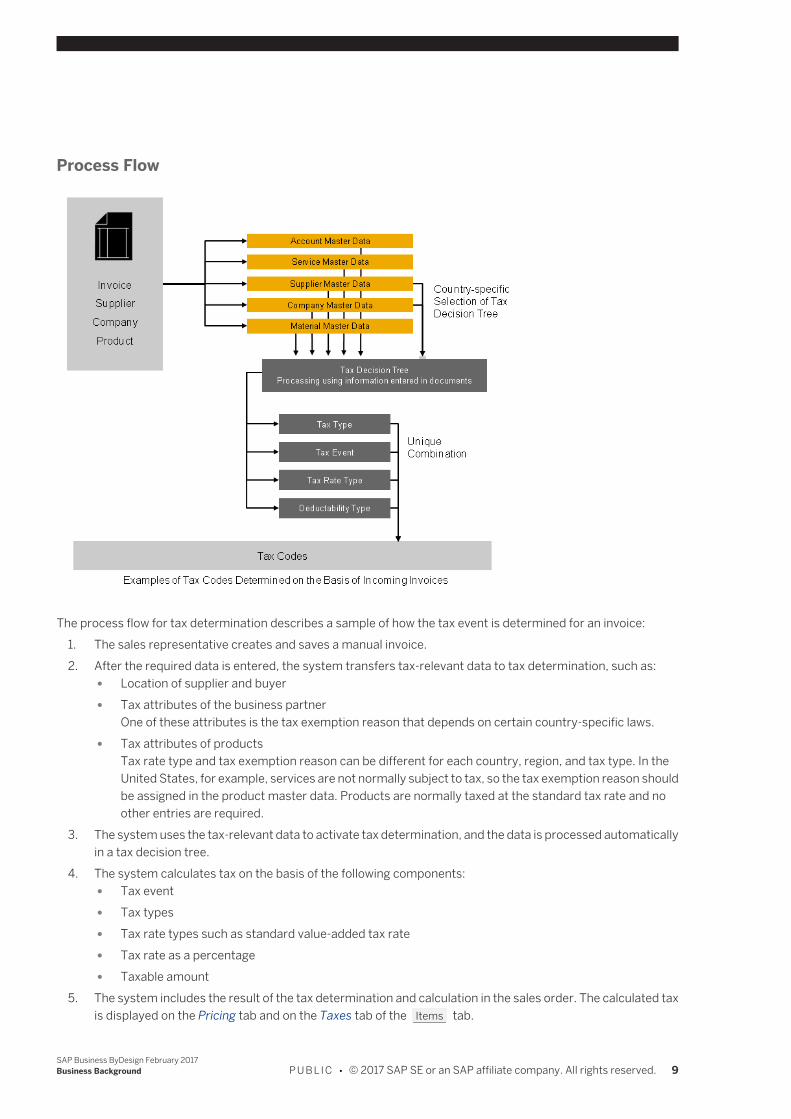
Process Flow
The process flow for tax determination describes a sample of how the tax event is determined for an invoice:1. The sales representative creates and saves a manual invoice.2. After the required data is entered, the system transfers tax-relevant data to tax determination, such as:
● Location of supplier and buyer ● Tax attributes of the business partner
One of these attributes is the tax exemption reason that depends on certain country-specific laws. ● Tax attributes of products
Tax rate type and tax exemption reason can be different for each country, region, and tax type. In theUnited States, for example, services are not normally subject to tax, so the tax exemption reason shouldbe assigned in the product master data. Products are normally taxed at the standard tax rate and noother entries are required.
3. The system uses the tax-relevant data to activate tax determination, and the data is processed automaticallyin a tax decision tree.
4. The system calculates tax on the basis of the following components: ● Tax event ● Tax types ● Tax rate types such as standard value-added tax rate ● Tax rate as a percentage ● Taxable amount
5. The system includes the result of the tax determination and calculation in the sales order. The calculated taxis displayed on the Pricing tab and on the Taxes tab of the Items tab.
SAP Business ByDesign February 2017Business Background P U B L I C • © 2017 SAP SE or an SAP affiliate company. All rights reserved. 9
All tax details determined by the system are displayed on the Tax tab. Examples are: ● Tax country ● Tax code ● Tax jurisdiction code in case the tax country is United States ● Tax region in case the tax country is Canada ● Tax date ● A table with one row for each tax type that lists the following:
○ Tax base ○ Tax rate type ○ Tax rate ○ Tax exemption reason, if necessary ○ Tax amount ○ Deductibility type (only for purchasing documents) ○ Country-specific parameters (if necessary), such as indicators for deferred tax (in France or India),
tax jurisdiction code (United States), or region (Canada).
However, not all tax-relevant transactions can be recognized automatically and correctly by thesystem.Therefore, we recommend that you overwrite the data manually in the document, in case the systemdoes not determine the correct tax country or the correct tax code for the transaction. If you have tochange the tax country in the document manually, the input help displays only the countries for whicha tax authority is created and tax arrangements are maintained for your company. However, you canalso enter another tax country in which sales need to be reported for tax purposes. The system thendisplays the specific tax codes for this country. Remember that you need to create the tax authorityfor this country. You then need to trigger tax determination again in the document so that the correcttax number of your company is found for the transaction. For countries that have multiple tax rates,you can enter the tax criteria manually.Note that if tax-relevant data such as the country of the service location or of the goods recipient hasbeen changed in a follow-up document of a business transaction, the Tax Country and Tax Code is notredetermined. This affects, for example, changes in the address data in a service confirmation that iscreated for a service order, or in a project invoice that is created for a sales order.
See AlsoParty ProcessingTax Determination — US [page 24] (This document covers topics specific for the United States, such as deliverytaxation in Texas and California, Nexus.)
1.1.2 Tax Determination Details
1.1.2.1 Master Data for Tax Determination
To ensure that the determination within your sales processes is running properly, you have created the followingmaster data:
10 © 2017 SAP SE or an SAP affiliate company. All rights reserved. • P U B L I CSAP Business ByDesign February 2017
Business Background
Tax AuthorityIn the Tax Management work center, you have created a master data record for each tax authority that is responsiblefor your company.
Company Tax ArrangementsYou have assigned a company tax arrangement in the master data record for the tax authority. You enter your taxnumber for the tax type to confirm that your company is registered and that you have declared tax to the relevanttax authority.
Tax Exemption Certificate in Account Master DataIn countries such as the United States, France, and Italy, accounts such as non-profit organizations can be exemptfrom tax payments for a certain period of time. For these accounts, you define the appropriate exemption certificatenumber and the validity date in the account master data. The Tax Exemption Certificates are taken into account insales transactions and are required to determine both the correct customer payment, and the proper payment tothe appropriate tax authority. If the tax exemption certificate is valid on the tax date, no tax is calculated. Theexemption certificate number is automatically entered in the payment document. You should enter a reason for thetax exemption in the account master data.
Tax Jurisdiction Code in Account Master Data for the United StatesYou have created a tax jurisdiction in the account master data.
CompanyCompany data, such as the company, address, and the tax jurisdiction code is entered in organizationalmanagement.
ProductsIf you do not enter any other information in a product master record, the product is taxed at a standard tax rate. Ifyou want to change the standard tax rate for certain countries, you must assign the tax rate type and, if necessary,a tax exemption reason to the relevant product in the master data.
ServicesFor taxes, you must specify which types of services you offer, and how these are to be taxed, or who is liable for taxfor a particular business transaction, so that the system determines the relevant tax code. Enter your services in theServices view of the Product and Service Portfolio work center under the Service Description tab, and if necessary,assign them to the relevant tax exemption reason on the Taxes tab, or specify whether the service is taxable at thelocation where the service is to be provided:
SAP Business ByDesign February 2017Business Background P U B L I C • © 2017 SAP SE or an SAP affiliate company. All rights reserved. 11

If a repair part is either implemented or installed, then the tax implication can either be a work delivery or workperformance. The system can't automatically determine these cases. In each individual instance, verify theapplicable tax code on the Taxes tab for the service and part item.
Specifics for European Union ● Certain services are always taxed at the head office of the company that provides the services, even if these
services are provided for an account located outside the borders where the head office is located. In themaster data records of such services, ensure that nothing has been entered in the Tax Exemption Reasonfield on the Taxes tab, and that the Taxable at Destination indicator has not been set. According to Directive2008/8/EC and its implementation under the Annual Tax Act 2009 from January 1, 2010 onwards, this is thebasic rule for services that are provided for a private end consumer located outside the borders where thehead office is located.
● Certain services must always be taxed at the location where the service is provided, such as constructionworks on buildings. For such services, set the Taxable at Destination indicator on the Taxes tab. Here, thesystem checks where the service is provided. The transaction is not taxable domestically if the location atwhich the service is provided is abroad. If this indicator is selected, then the address of the service locationis used to determine where the services will be taxed. In such a case, the company providing the goods orservices must tax the business transaction in the receiving country and also be registered there. Accordingto Directive 2008/8/EC and its implementation under the Annual Tax Act 2009 from January 1, 2010onwards. An example of this is work performed on movable tangible property for a private end consumerabroad.
● To ensure that automatic tax determination works correctly, you must set the indicators and enter the taxexemption reasons for all relevant countries. It is especially necessary to maintain the Taxable at Destinationindicator for both the issuing and receiving countries. In comparison, if goods or services are taxable atdestination, it is the seller's responsibility to calculate and pay the tax in the receiving country. Therefore, itis not enough to maintain the tax details just for the issuing country; you also need to maintain them for thereceiving countries.However, certain circumstances may lead to non-taxation or double taxation. Non-taxation occurs if a serviceis indicated as Taxable at Destination in the issuing country but not in the receiving country. Double taxationoccurs if a service is indicated as Taxable at Destination in the receiving country but not in the issuing country.These legislative inaccuracies also exist in reality. However, the system does not support double taxation. Forservices that are not taxable in the issuing country (namely those indicated Taxable at Destination), thesettings for the receiving countries should be checked carefully to avoid accidentally leading to non-taxation.
The Taxable at Destination indicator is only utilized in CRM-related transactions, and not in SRM-relatedtransactions.
● Other services such as those provided by a company located abroad or specific work deliveries are taxedaccording to the reverse charge mechanism. For more information, see Reverse Charge Mechanism[page 19].From the seller's perspective, the transaction must be reported, but the tax debt transfers to the account. Ifthis tax exemption reason is entered in the services master record, the system applies the reverse chargerule for a corresponding sales transaction. The note referring to the reversal of tax debt (reverse chargemechanism) is printed on the invoice. The relevant tax exemption reason must be entered for the service onthe Taxes tab. According to Directive 2008/8/EC and its implementation under the Annual Tax Act 2009from January 1, 2010 onwards, this is the basic rule for services that are provided for a company abroad. Thisbasic rule is determined automatically, if the head office of the company providing the goods or services is inany EU member state. In the case of domestic accounts, however, the system does not automaticallyrecognize the reverse charge rule. Where applicable, the user must manually overwrite the tax code in thesales document (§13b (1) No. 2 - 5). For this you can create your own tax code and legal phrase in business
12 © 2017 SAP SE or an SAP affiliate company. All rights reserved. • P U B L I CSAP Business ByDesign February 2017
Business Background
configuration. For more information, see Tax on Goods and Services — Configuration Guide [page 22]. Thecorresponding tax event and tax exemption reason code are already available in the system.
Specifics for the United States of America ● The service location is always used for tax determination for services in the USA. The Taxable at Destination
indicator is not relevant for the USA.
See AlsoTax on Goods and Services — Configuration Guide [page 22]Tax Determination [page 5]
1.1.2.2 Elements of Tax Determination
OverviewThe following sections provide you with an overview of the tax determination elements and their relations:
Tax Type and Tax Rate TypeEvery tax type in a tax event has a tax rate type and a tax rate that is applied to the tax base (in most cases the netamount) to calculate the tax amount for the relevant tax type.Tax rates are represented in the system by tax rate types – in the example of Germany, the tax rate of 19% for value-added tax corresponds to the Standard tax rate type. This makes it easy to represent time-dependencies. If the taxrate for this tax type changes because of a new law, you can define a new tax rate in the system for a specific validitydate without having to create a new tax code.Country Specifics
● India and CanadaFor tax jurisdictions such as India and Canada, where more than one tax type exists, the following fields canbe used: Tax Rate Type and Tax Exemption Reason, as well as Deductibility Type for purchasing documents.
● GermanyThe Standard tax rate type is calculated for the Value-Added Tax tax type on the basis of the net amount. Thismeans that if the tax rate is 19%, a tax amount of EUR 19 is calculated for a net amount of EUR 100.
Tax RateCountry Specifics
● Canada and United StatesFor Canada, tax rates are preconfigured for each province and territory in Canada, and for each state in theUnited States. However, before using the system, you must check whether these tax rates are still validaccording to any recent legislative amendments.
Tax EventIn the tax event, the system determines the method of taxation to be used for the business transaction accordingto:
SAP Business ByDesign February 2017Business Background P U B L I C • © 2017 SAP SE or an SAP affiliate company. All rights reserved. 13
● Which tax types are applicable ● Whether the business transaction is taxable or not ● Whether the business transaction is subject to tax or not ● Which tax rate is applicable
For transnational business transactions, the system uses a tax decision tree for both the ship-from country and theship-to country to determine the taxation method used in the tax event for each country. The relevant decision treesare determined by the tax countries entered in the document, in particular by the countries of the supplier and thegoods recipient. Other tax jurisdictions can be the:
● Location of the business residence of the seller who provides a service ● Location of the business residence of the buyer for whom a service is provided ● Location where the service is to be provided
Implications of the tax event for other areas: ● To calculate tax, the tax event takes the following into account:
○ Due tax type ○ Procedure for tax calculation ○ Tax exemption reasons, if required
● To determine tax, the tax event specifies the following: ○ Allocation criteria for the tax reports ○ The field in which the tax is displayed on the tax return:
You can assign tax events to the fields of the tax return form for the relevant country. For moreinformation see, Tax Returns for Goods and Services.
● In accounting, the tax event controls account determination.
There are, of course, more tax events in the system for other common business transactions. However, you cannotcreate your own tax events.Country Specifics
● GermanyExamples of tax events ○ 10: Domestic Acquisition (§15 I 1 Nr. 1) ○ 100: Intra-Community Acquisition ○ 310: Domestic Supply Of Goods And Services ○ 400: Intra-Community Supply (§4 Nr. 1b UStG)
In accordance with Directive 2008/8/EC and its implementation under the Annual Tax Act 2009, intra-community service provision must also be declared in VAT tax returns as of January 1, 2010. For this purpose,new fields have been introduced in the VAT tax return: fields 21, 46, and 47. To use these fields for servicesprovided in a foreign member state of the European Union, there are two new tax events for Germany and allother EU member valid as of January 1, 2010. ○ Sale 455 "EU Sale of Services, Reverse Charge" ○ 155 "EU Purchase of Services, Reverse Charge"
Errors may occur, if you use these tax events with an earlier tax date.
Deductibility TypeIn addition to the tax rate, the percentage rate at which input tax is deductible plays a part. Depending on the typeof company or the type of outgoing sales volume in which a certain incoming sales volume is incorporated, input taxcan be deducted at a rate of 100%, 0% or a rate determined specifically for the company. For this purpose, you
14 © 2017 SAP SE or an SAP affiliate company. All rights reserved. • P U B L I CSAP Business ByDesign February 2017
Business Background
define deductibility types that represent the percentage rate. The two most frequently used deductibility types areFully Deductible (100%) and Not Deductible (0%).
Tax CodeThe appropriate method for calculating tax is determined by a combination of tax type, tax event, and tax rate type,and by the deductibility type for the input tax of the sales volume. You can define tax codes in the system to avoiderrors when these parameters are entered manually.Each tax code represents a unique combination of the following parameters:
● In sales ○ Tax event ○ Tax types ○ Related tax rate types
● In purchasing ○ Tax event ○ Tax types ○ Related tax rate types ○ Deductibility types
This makes it possible to define all parameters represented by a tax code in the document by selecting a tax code,without having to enter each parameter individually.Taxes can be calculated automatically only for those products in the product master. This is why you may sometimeshave to enter the tax code manually, especially in purchasing. Alternatively, you may enter a product category sothat the tax rate type for this category can be used, thus enabling automatic tax calculation.The system uses one unique tax code for a tax event only for those countries that have one tax type.Country Specifics
● Canada and IndiaIn both countries several tax types can be taken into consideration for a tax event. India, for example, usesmultiple tax types, and each tax type has multiple tax rate types and deductibility types. The number ofpossible combinations resulting from this makes it impossible to work efficiently with tax codes. In thesecountries, the tax code corresponds to the tax event.
● GermanyIn accordance to Directive 2008/8/EC and its implementation under the Annual Tax Act 2009, intra-community service provision must also be declared in VAT tax returns as of January 1, 2010. For this purpose,new fields have been introduced in the VAT tax return: fields 21, 46, and 47.To use these fields for services provided in a foreign member state of the European Union, there are two newtax codes for Germany and all other EU member valid as of January 1, 2010: ○ Purchasing: 430 "EU Purchase of Services, Reverse Charge, standard rate, fully deductible ○ Sale: 530 "EU Sale of Services, Reverse Charge" ○ Exception for Italy: There the tax code for sales is: 540 "EU Sale of Services, Reverse Charge"
Exempted RegionIn many countries there are regions and areas that have special status under tax law. For example, Büsingen andHelgoland are exempt from German value-added tax. In business configuration you can define the regions that areexempt from national tax regulations, or have a special status. Such regions can correspond to political regions,communities, or tax-free zones and are derived directly from the postal code.
SAP Business ByDesign February 2017Business Background P U B L I C • © 2017 SAP SE or an SAP affiliate company. All rights reserved. 15
Tax Jurisdiction CodeTax jurisdiction levels are taken into account in tax calculation when taxes are in states, counties, and cities, but noton national levels of government. The different levels in a tax jurisdiction code represent different administrativelevels. Fine-tuning this activity ensures that the system uses all administrative levels to determine the tax rate foreach authority.In some countries, however, other government levels have tax jurisdiction. In these cases, you can adapt them.Define tax rates after you have maintained jurisdiction code.Country Specifics
● United StatesIn the United States, taxes are collected not only by states, but also by counties and cities; for domestic sales,taxation therefore depends on the state, county, and city in which your company and the goods recipient arelocated. For this purpose, you can enter a tax jurisdiction code in the master data of the company and thecustomer.The tax jurisdiction code represents the location of your company, your customer, or your supplier in ahierarchical structure, so that one country can have multiple states that, in turn, can have multiple cities andmunicipalities.The tax jurisdiction code is structured as follows: ○ 2 alphanumeric characters for the first level; this is the standard state code ○ 6 alphanumeric characters for the second level; for example, the county ○ 6 alphanumeric characters for the third level; for example, the city ○ 1 alphanumeric character for the fourth level, for example, the location or the area
It is not necessary to use all four levels. The number of levels used depends on the state.This function is currently used only in the United States.For the United States, tax jurisdiction codes have been preconfigured in the system on U.S. state level. Youmust enter further levels as required. If a tax jurisdiction code has not been assigned to a customer, the systemuses the U.S. state in the address as a tax jurisdiction code.Example
Tax Jurisdiction Code - Description Tax Jurisdiction Code Taxation in %
New York State NY 4%
Albany County NYAL0181 4%
Allegany County NYAL0221 4,5%
In the NYAL0181 tax jurisdiction code, NY stands for New York State, AL0181 stands for Albany County in NewYork State. For Albany County, two levels of the tax jurisdiction code are taken into consideration, and 8%(4% + 4%) of tax is levied. For Allegany County, 8.5% (4% + 4.5%) tax is levied.
● CanadaOther countries such as Canada have tax rates that depend on regions. This is because Canada is divided intoprovinces and territories. In these cases, use the Region field.
Tax ExemptionTax exemption is an exemption from all or certain taxes that are levied in a country. In most cases, the basis for taxexemption is determined by legal requirements. In some cases, these may apply without having to account for them.
16 © 2017 SAP SE or an SAP affiliate company. All rights reserved. • P U B L I CSAP Business ByDesign February 2017
Business Background
To ensure transparency, many legislators require that the reason for tax exemption be specified on relevantdocuments such as invoices. Tax exemption reasons are provided in the system, cannot be changed, and areassigned to a tax type.A customer's direct payment and exempt organization certificates are applicable until they are revoked.The tax exemption certificates are determined automatically in a sales document.You can assign relevant tax exemption reasons to product and customer master data by selecting the relevant entryin the Tax Exemption Reason fields.For more information, see Tax Exemption Certificate Processing [page 17].Country Specifics
● United StatesFor the United States, several tax exemption certificate types are available: ○ Direct Payment Certificate - continuous ○ Exempt Organization Certificate - continuous ○ Exempt Use Certificate - continuous ○ Exempt Use Certificate - single ○ Resale Certificate - continuous ○ Resale Certificate - single
The state must be added also.Only the following tax exemption certificate types can be found automatically, since only in these cases is itcertain that the exemption certificates always apply: ○ Direct Payment Certificate – continuous ○ Exempt Organization Certificate – continuous
For all the other certificate types, you need the information from the customer whether the certificate can beused for the current transaction.You must then assign the types manually in a sales transaction.
Legal Text InformationLegal text information is a textual explanation of the exemption reasons printed on invoices. These texts explain whycertain transactions are exempt from tax, thus allowing you to meet legal requirements.The legal text information is printed on a customer invoice, if, for example, a tax exemption is applicable. However,if the texts are not available in the required language, the system uses the English text for the invoice.
1.1.2.3 Tax Exemption Certificate Processing
OverviewA tax exemption is an exemption from all or certain taxes of a state or nation in which part of the taxes that wouldnormally be collected from an individual or an organization are instead foregone.A tax exemption certificate is a certificate sent by a customer to a company claiming exemption from tax on sales.In this system, the tax exemption certificate:
● Indicates the period of time during which the tax exemptions can apply ● Indicates if the tax exemptions apply to a single sales transaction or multiple sales transactions
SAP Business ByDesign February 2017Business Background P U B L I C • © 2017 SAP SE or an SAP affiliate company. All rights reserved. 17
● Indicates if the exempted (cumulated) amount exceeds a maximum amount when the exemptions apply inmultiple sales transactions
This applies to the Tax Exemption Certificates for France only.
● Indicates the reason for tax exemption
In France, a customer can apply to the authorities for exemption from VAT. If the exemption is granted,the customer receives a letter of confirmation including a license number and the period for which he isexempt from VAT. The customer sends this letter to a vendor, who must then take the tax exemption intoaccount when invoicing the customer. The vendor may not include any tax in customer invoices for thevalidity period of the tax exemption license.
PrerequisitesYour customer has registered with the tax authority for tax exemption and received a tax exemption certificate fromthem. This certificate has been assigned to the account.
Process FlowThe following steps explain the typical process flow for the Customer Tax Exemption Certificate in customerinvoicing.
1. When you create a sales/service order or customer invoice, the system searches for existing tax exemptioncertificates and automatically assigns a valid certificate. You have an option of rejecting the proposal andprevent the exemption to apply at header/line item level.You can manually assign an existing certificate and the relevant exemption reason at header/line item level.
You can see a set of elements (fields, links, push button, check box) related to tax exemption certificateswhen you create or view a sales/service order or a customer invoice. These elements are only visibleif the seller company is located in the US or France.
2. You can also create a new certificate if it does not exist and assign it immediately to the sales/invoicingdocument. The system allows you to enter the relevant tax exemption information sent by the customerdirectly in the business document.For more information, see, Create Tax Exemption Certificates
3. The certificate records and shows the sum of the amounts which were exempted. The amount exempted byeach certificate during the invoicing process is cumulated on the corresponding certificate.
In France, you can set a maximum tax amount that cannot be exceeded. The system prevents thecumulated amount to exceed the limit during the invoice creation process if a certificate only allows alimited amount to be exempted. The cancellation of invoices including certificates reverts theaccumulation performed previously.
In the Account Management work center, under the Reports view, you can monitor in real time the tax exemptioncertificates created in the system and sent to the company.
18 © 2017 SAP SE or an SAP affiliate company. All rights reserved. • P U B L I CSAP Business ByDesign February 2017
Business Background
1.1.2.4 Tax Determination with Reverse Charge Mechanism
OverviewValue-added tax (VAT) is charged revenue from the sale of goods and services. This means that an entrepreneurissues a customer (as the service recipient) with an invoice that includes VAT, and pays the VAT to the responsibletax authority. As a result of this, the entrepreneur is the tax payer who is liable for VAT.In certain cases, however, the customer is required by law to be liable for VAT, and to pay it to the relevant taxauthority. In this case, the entrepreneur issues an invoice without VAT, but with a notification indicating that the taxdebt has been transferred to the customer. The customer must calculate and pay the VAT to the tax authority, andcan claim input tax deduction at the same time as usual. The transfer of tax debt to the service recipient is calledReverse Charge Mechanism and reverses the tax liability.
Automatic Tax Determination with Reverse Charge MechanismCountry Specifics for GermanySome services, such as those provided by a company located abroad, or services that are provided for a servicerecipient located abroad are taxed according to the reverse charge mechanism. From the perspective of the seller,the transaction must be reported, but the tax debt transfers to the account. According to Directive 2008/8/EC andits implementation under the Annual Tax Act 2009 as of January 1, 2010, this is the basic rule for services that areprovided for a company abroad. This basic rule is determined automatically, if the head office of the companyproviding the goods or services is in any EU member state. No tax exemption reason code must be entered in theservice master.For Germany, the system currently only covers the transfer of tax debt for other services provided by an entrepreneurlocated abroad if these services are provided domestically (§ 13b Abs. 1 Nr. 1 UStG), or if a German company providesother such services for a service recipient located abroad.The process flow for tax determination describes the determination of tax event 240 – Reverse Charge Acquisition§13b II 1 Nr. 1 UStG, tax event 312 – Export of Service, Reverse Charge, and the anomalies to be taken into account:
1. Create a sales order, a purchase order, or an invoice.2. While the document is being processed, the system transfers the tax relevant data to tax determination.
Examples of tax relevant data for reverse charge mechanism are: ● Location of supplier and buyer
○ Sale of a service ○ The seller company must be located in Germany.
The address of the seller is used, and the system normally uses the standard address of yourcompany unless you have overwritten the address in the sales order on the Involved Parties tab.
○ The service recipient must be located abroad.The location where the service provision takes place is used and must not be in Germany. Ifthe recipient is a private individual, the service can only be subject to reverse chargemechanism if it is provided in the European Union (EU). If items in an invoice contain servicesthat have been provided at different locations (according to the address of the service or goodsrecipient on the Involved Parties tab), these addresses are used first.
○ Purchasing a Service
SAP Business ByDesign February 2017Business Background P U B L I C • © 2017 SAP SE or an SAP affiliate company. All rights reserved. 19
○ The supplier must be located abroad.The address of the supplier is used as a basis, and the system uses the standard address.
○ The service recipient must be located in Germany.The location where the service is provided is decisive. It is also possible that individual invoiceitems contain different locations where the services have been provided (according to theaddress of the goods recipient). In this case, this is used as a priority.
● Tax attributes of productsTax rate type and tax exemption reason can be different for each country, region, and tax type. In theUnited States, for example, services are not normally subject to tax, so the tax exemption reason shouldbe assigned in the product master data.Enter the following settings for reverse charge mechanism in the master data for services on the Sales > Taxes and Purchasing > Taxes tabs as required: ○ Tax Exemption Reason: Buyer liable for VAT
○ The Taxable at destination checkbox must not be selected.3. The system processes all tax-relevant data in tax determination.4. The system calculates tax using the following components:
● Tax event, for example 240 – Reverse Charge Acquisition §13b II 1 Nr 1 UStG for purchasing or 312 –Export of Service, Reverse Charge for sales
● Tax codes ● Tax type ● Tax rate type such as the complete value-added tax rate with which the tax rate is determined as a
percentage, for example 19% ● Taxable amount
5. The system enters the result of the tax determination and the tax calculation in the document currently beingprocessed. The calculated tax is displayed on the Pricing tab. All tax details determined by the system aredisplayed on the Tax Details tab, such as the Tax Country and the Tax Code of the tax country.
If reverse charge is determined for a sales order or a manual invoice, a note is displayed on the printedinvoice that the customer must pay tax.
For more information on the general process of tax determination, see Tax Determination [page 5].The system cannot process other reverse charge mechanism scenarios in the automatic tax determination, so thesemust be checked manually.
Manual Control for Reverse Charge MechanismFor some countries there are also other sales or purchasing processes that are subject to reverse charge but cannotbe determined automatically by the system, as for example, in Germany sales according to §13b (5) UStG orpurchases according to §13b (2).Country Specifics for Germany
● For mobile radio units and integrated circuits with a tax date as of July 1, 2011 and an invoice amount of atleast 5000 Euros, reverse charge applies according to § 13b (2) Nr.10 UStG.In this case you have to change the tax code manually to one of the following: ○ 15 – Reverse Charge Acquisition §13b II 1 Nr. 10 UStG ○ 515 – Reverse Charge Supply §13b II 1 Nr. 10 UStG
● For these processes, the system provides the tax events 313 – Reverse Charge Supply §13b V UStG and 50– Reverse Charge Acquisition §13b II 1 Nr 4, 6 - 9 UStG, 11 – Reverse Charge Acquisition §13b II 1 Nr 2 UStG,
20 © 2017 SAP SE or an SAP affiliate company. All rights reserved. • P U B L I CSAP Business ByDesign February 2017
Business Background
12 – Reverse Charge Acquisition §13b II 1 Nr 3 UStG, 13 – Reverse Charge Acquisition §13b II 1 Nr 5 UStG and240 – Reverse Charge Acquisition §13b II 1 Nr 1 UStG. But you need to create your own tax code in your system.
● If you obtain your sales revenue according to §13b (5) UStG, you must enter the tax code manually.
Tax Events Stored in the SystemCountry Specifics for GermanyThe following tax events are currently stored in the system and can be used to create tax codes for Germany:
● Purchase: ○ 11 – Reverse Charge Acquisition §13b II 1 Nr. 2 UStG ○ 12 – Reverse Charge Acquisition §13b II 1 Nr. 3 UStG ○ 13 – Reverse Charge Acquisition §13b II 1 Nr. 5 UStG ○ 50 – Reverse Charge Acquisition §13b II 1 Nr. 4, 6 – 9 UStG ○ 240 – Reverse Charge Acquisition §13b II 1 Nr.1 UStG ○ 15 – Reverse Charge Acquisition §13b II 1 Nr. 10 UStG
● Sales: ○ 312 – Export of Service, Reverse Charge ○ 313 – Reverse Charge Supply § 13b V UStG ○ 315 – Reverse Charge Supply §13b II 1 Nr. 10 UStG
The following tax code and tax events combinations are provided by the system and determined automatically: ● Tax code 504 – Not taxable (reverse charge mechanism) is linked to tax event 312 – Export of Service, Reverse
Charge ● Tax code 530 – EU Sales of Service, Reverse Charge is linked to tax event 455 – EU Sale of Service, Reverse
Charge
For purchasing, tax code 430 – EU Purchase of Services, Reverse Charge, Standard Rate, Fully Deductible with taxevent 155 is available.If you need further tax codes, you can create them under Define Tax Codes of the Tax on Goods and Services activityin Business Configuration Implementation Projects Activity List Fine-Tune .
When you create a tax code, ensure that you provide the tax type under Details.
1.1.2.5 Third-Party Order Processing Taxation
OverviewThird-party order processing scenarios involve at least three parties: Seller, account, and supplier.A Third-Party Order Processing is a sales transaction that is conducted by several parties for one item, where theitem is shipped directly from the supplier to the account or ship-to party.For more information concerning the general processing in the system, see Third-Party Order Processing.Chain transaction means consecutive supplies of goods between three or more legal entities, where the contractualobligations of all parties in the chain are discharged by a single movement of goods from the first supplier in thechain to the final customer.
SAP Business ByDesign February 2017Business Background P U B L I C • © 2017 SAP SE or an SAP affiliate company. All rights reserved. 21
From a taxation point of view, the scenarios where the sales transaction crosses borders and the subject to tax hasto be determined, are of interest.This also has an impact onto the country where the taxes have to be paid. In the following processes, the systemsupports the user by displaying warning messages and triggering a check of the tax codes:
● You are a supplier in a chain transaction and you enter a ship-to party that is different from the account. Thesystem displays the message if the head offices of the ship-to party and your company are in differentcountries.
● In a third-party deal, you are the company that creates a sales order to which an external supplier is assigned.The external supplier delivers the goods directly to the customer. These transactions are generally notinvoiced automatically during an invoice run.
Country Specifics in case the seller and supplier are different: ● Germany: These transactions are not invoiced automatically during an invoice run if the head office of your
company is in Germany.
Value-added tax for chain transactions is treated differently, especially if the item is transported across a stateborder. It is necessary to decide on a case-by-case basis, which of the companies involved is allowed to issue a tax-exempt invoice. If the tax has not automatically been calculated correctly in this transaction, or if tax has beencalculated even though the transaction is tax-exempt, change the tax code and, if necessary, the tax country, on theTaxes tab accordingly.
Intra-Community Triangular TradeAn Intra-Community Triangular Trade is a special kind of third-party order processing, where all three participantsare located in different EU member states. Under certain circumstances, a simplification can be applied to intra-community triangular trades. The prerequisites for the application of this process are:
● The three companies transact business for the same item. ● All participating companies are registered in different EU member states for value-added tax purposes. ● The item goes straight from the first supplier to the final account. ● The item goes from one EU member state to another. ● The first supplier or the first company is responsible for the transport of the item.
Country Specifics ● Germany: If the simplification can be applied to the triangular transaction, then the 512 - Triangular
Transaction tax code can be entered manually in the invoice.
1.1.2.6 Tax on Goods and Services - Configuration Guide
In this configuration activity, you can create and change parameters required for the tax determination in sales,purchasing, and service processes such as tax jurisdictions, currency conversions, exempted regions, legal textinformation, and tax codes. These parameters are required for the system to determine the tax due for a businessdocument.To comply with country specific legal requirements, currency conversion types are required. This includes theexchange rate type and conversion types that must be used to convert tax amounts from the document currencyto the reporting currency.To find the Tax on Goods and Services activity, go to the Business Configuration work center and choose theImplementation Projects view. Select your implementation project and click Open Activity List . Select the Fine-Tune phase, then select the Tax on Goods and Services activity from the activity list.
22 © 2017 SAP SE or an SAP affiliate company. All rights reserved. • P U B L I CSAP Business ByDesign February 2017
Business Background
PrerequisitesYou have completed the Tax Settings for Purchasing activity for purchasing processes.To find this activity, go to the Business Configuration work center and choose the Implementations Projects view.Select your implementation project and click Open Activity List . Select the Fine-Tune phase, then select the TaxSettings for Purchasing activity from the activity list.
Business Background
Tax DeterminationAs a rule, companies are legally required to calculate taxes on products that they buy or sell, and to levy these taxesfrom their customers. After the products have been provided, the taxes must be declared and levied to the respectivetax authorities. The system supports you by providing a substantially automated tax calculation for the following taxtypes: Value-Added Tax (VAT), Sales and Use Tax, Withholding Tax. The system also provides a reporting tool thatgives you effective control over your obligatory declaration of these taxes.For more information, see Tax Determination [page 5].
Master Data for Tax DeterminationFor more information, see Master Data for Tax Determination [page 10].
Tasks
Define Currency Conversion Type1. To create a new currency conversion, click Add Row .2. Select the country for which the exchange rate is valid.3. Enter the date for the end of the validity period for the exchange rate type and
conversion type.4. Enter the type of exchange rate used such as Historical Currency Rate or EMU
Regulation Fixed Exchange Rate.5. If necessary, change the conversion type which is defaulted to Mid Value to either Bid
Value or Ask Value.6. Save your entries.
Define Exempted Regions1. To define an exempted region, click Add Row .2. Select the country of the exempted region.3. Enter a code for the exempted region.4. Enter a description for the region.5. Select the status of the exempted region.6. Optional: Under Details, enter the Postal Code.7. Save your entries.
SAP Business ByDesign February 2017Business Background P U B L I C • © 2017 SAP SE or an SAP affiliate company. All rights reserved. 23
Define Tax Rate Schedules1. To define tax rates and validity dates, click Add Row .2. Select a country for which you want to create a tax rate schedule.3. Select the applicable tax type of the taxes that must be declared and paid to the
respective tax authorities such as value-added tax, sales and use tax, and withholdingtax.
4. Select the tax rate type, for example, Standard, Reduced, or Exempt Rate.5. Enter the date from which the tax rate is valid.6. Enter the rate as a percentage.7. Save your entries.
Define Standard Phrases for Legal Text Information
We recommend that you create a standard phrase specifically for each country sinceexemption reasons can differ for each country. If a standard phrase is not available forthe required language, the English text is printed in the invoices. All languages aredisplayed in this view.To enter the legal texts for a specific language, you must be logged on to the system inthat language.
1. To define standard phrases for legal text information, click Add Row .2. Select the country for which the legal text information is valid.3. Select the applicable tax type for which legal texts are required such as value-added
tax, sales and use tax, and withholding tax.4. Select the number of the Tax Exemption Reason.5. Check the selection of the Language field. It is preset according to the language in which
you are logged on and must correspond to the language of your legal text.6. Enter the legal text explaining the legal basis of the exemption.
This text is then included on the invoices where required.7. Save your entries.
Define Tax CodesFor more information, see here.
Follow-On ActivitiesAfter you have completed the tasks here, we recommend that you check the tasks of the country-specific activitiesthat are required for countries that you have scoped.
1.1.3 Tax Determination — US
Here you can find tax information specifically for the United States.
24 © 2017 SAP SE or an SAP affiliate company. All rights reserved. • P U B L I CSAP Business ByDesign February 2017
Business Background
Delivery TaxationTaxes on materials deliveries within the United States are levied according to the law of the destination state (Ship-to). Only in California and Texas are the deliveries taxed according to the state of origin (Ship-from). Taxes on servicedeliveries are levied according to the law of the state of destination.You can add your own combinations in business configuration and decide which combination is origin-based ordestination-based for an intrastate transaction, which means that ship-to and ship-from are the same US state. Tofind the activity, go to the Business Configuration work center and choose the Implementation Projects view. Selectyour implementation project and click Open Activity List . Select the Fine-tune phase, then select the Tax on Goodsand Services — US activity from the activity list.
NexusNexus is a connection between a taxpayer and a state where the taxpayer has to pay taxes. The rules to establishthe connection between the two differs from state to state. However, with this nexus a state is required to collectsales tax for sales.Therefore a sale within a particular state is only taxable in the system if the seller company has nexus in the state.If the seller does not have a nexus, no sales tax will be determined and the system assigns tax code 507 – Non TaxableSale Under Nexus Rules to the sales document.This means the seller company issues an invoice without tax for nexus reasons. The transaction is recordedstatistically in the tax register.If your company has nexus in a state, you must have the following settings prepared:
● You created a tax authority for this state in the Tax Management work center. For more information, see QuickGuide for Tax Authorities (Tax Management).
● You created entries in the system for every tax authority to which tax returns have to be submitted. ● You created a company tax arrangement for every tax authority that is relevant. ● You entered a tax registration number for the company tax arrangement. This documents that the company
is registered in the state where the tax authority is located, and provides the basis for nexus determinationin the tax determination.
If a company tax arrangement has been created properly for a state, and a sale takes place in this state, the taxdetermination works as described in Tax Determination [page 5].
1.2 Pricing in Customer Relationship Management
OverviewPricing is based on price master data such as price lists and discount lists, which are used to automatically calculatepricing within all business documents for sales and service processes. A predefined pricing procedure is used todetermine the gross value the customer has to pay for certain products or services to be received on a certain dayat a certain place. The pricing procedure consists of price components, such as list price, discounts, surcharges,freights, taxes, and costs. The order of these price components is essential for the calculation of the total value.
SAP Business ByDesign February 2017Business Background P U B L I C • © 2017 SAP SE or an SAP affiliate company. All rights reserved. 25
Price ComponentsSAP Business ByDesign contains a predefined set of price components, most of which you can activate through thebusiness configuration. Price components can be:
● Automatically determined by the system and non-editable, for example, tax ● Automatically determined by the system and able to be overwritten by the user, for example, list price or
automatically-determined product discounts ● Manually entered by the user, for example, a restocking fee or a manually-entered product discount
The manual behavior is influenced by the Manual flag in the business configuration for pricing. If the Manual flag isset, the system does not find the price component automatically and it must be added manually by the user.The following sections show the set of price components that may display depending on your configuration.
List PriceThis price component is naturally the first step of a pricing procedure, because many price components such asdiscounts or surcharges depend on it. To determine the net list price, the system checks all price lists that fit theparameters passed from the sales or service document. These parameters are customer, customer group,distribution chain, and date.Price lists can be customer specific, distribution chain specific, and base price lists. The price lists are maintainedas price master data, have a validity period, and need to be released before they are active.Because the customer may have special prices, the system checks first for a customer-specific price list. If there isno customer-specific price found, then it checks for a distribution chain specific price list. Finally, if there is nodistribution-chain-specific price, it checks for the base price list. You have to ensure that the system can find a pricefor all products or services you sell in the base price list at the very least. Prices can be manually revised within asales or service document, allowing you to flexibly adjust your net prices.
An approval procedure can be activated for price lists and discount lists which is done in the businessconfiguration in the scoping (under General Business Data Product and Service Pricing ). If this settingis active, the line manager automatically receives an approval task should his or her employee try to releasea price or a discount list. The price list or discount list cannot be released and included in all businessdocuments for sales and service processes until the line manager (or representative) approves the price listor discount list. If a manager is authorized to approve price and discount lists, he can directly release the priceor discount list in the price master data view. This automatic approval is done without creating a business taskif the manager himself releases the prices.For more general information on Business Task Management, see Business Task Management.
Product Discount (%)To determine the discount, the system checks all discount lists that fit the parameters passed from the sales orservice document. The parameters are customer, distribution chain, customer group, product, and date. All founddiscounts are considered in the price calculation.Discount lists can be Customer Specific Discount Product, General Customer Discount, Overall Customer GroupDiscount, and Customer Specific Discount Product Category discount lists.Because the customer may have a special discount for a certain product, the system checks for a discount list withcustomer product discounts.Discounts can always be revised manually within a sales or service document, allowing you to flexibly adjustdiscounts.
26 © 2017 SAP SE or an SAP affiliate company. All rights reserved. • P U B L I CSAP Business ByDesign February 2017
Business Background
An approval procedure can be activated for price lists and discount lists which is done in the businessconfiguration in the scoping (under General Business Data Product and Service Pricing ).If this settingis active, the line manager automatically receives an approval task should his or her employee try to releasea price or a discount list. The price list or discount list cannot be released and included in all businessdocuments for sales and service processes until the line manager (or representative) approves the price listor discount list. If a manager is authorized to approve price and discount lists, he can directly release the priceor discount list in the price master data view. This automatic approval is done without creating a business taskif the manager himself releases the prices.For more general information on Business Task Management, see Business Task Management.
Working Condition (%)This price component is important for service scenarios. If service performers work at nights or on weekends orpublic holidays, a surcharge can be invoiced to the customer.
SurchargeTwo different price components are available for surcharges. You can define surcharges as percentages or fixedamounts according to your needs. All surcharges can be used side by side.
Warranty/GoodwillThese price components are important within service scenarios. For example, in a service document, services orspare parts may be covered by a warranty. The warranty or goodwill discount will be calculated based on the Coveragefield in the service document.
Quality Loss FeeThis price component is used for return scenarios. This element displays only if the Returns business topic is includedin your business configuration. If your customer returns goods which are damaged or opened, you can manuallydefine a deduction on item level.
Restocking FeeThis price componentis used for return scenarios. This element displays only if the Returns business topic is includedin your business configuration. If your customer returns goods, you can manually define a restocking fee for eachindividual return document.
Migration PriceThe migration price is needed for open sales and service documents that are migrated from a legacy system intoSAP Business ByDesign. To ensure that prices are the same in both systems, there will not be any additionalcalculation of this price.
Total Item Net ValueThis is calculated by adding all the item net values. This value cannot be edited.
FreightThis price component covers the freight amount determined automatically or entered manually. Depending on thebusiness configuration settings it is possible to determine a fixed freight amount or to make the freight dependenton the net weight of the goods you sell.
SAP Business ByDesign February 2017Business Background P U B L I C • © 2017 SAP SE or an SAP affiliate company. All rights reserved. 27
Cost and Profit MarginCost displays only if profit margin is included in your business configuration. Cost is basically derived from financialsand makes the calculation of the profit margin possible.
Overall Discount (%)The overall discount (%) is an additional general discount applied to the total item net value. This can only be appliedmanually.
Total Net ValueThis is calculated by adding all the item net values plus freight, without considering taxes. This value cannot be edited.
Total Given DiscountsThis is calculated by adding all the relevant product discounts given. This value cannot be edited directly by the user.It can be influenced by editing the product discounts at item level.
Rounding DifferenceThis is a value that has been lost or gained through rounding. This value is used only for currencies that do not havelow denomination coins such as 1c or 2c – for example, Swiss francs or Australian dollars. For these currencies, theprice must be rounded to the nearest available value, such as 0c or 5c.
TaxThis price component covers all requirements in regards to taxation. All taxes are calculated according to legalrequirements and the results of this calculation are put into this price component.
TotalThis is calculated by adding the total net value plus tax.
Price CalculationPricing is centrally implemented in SAP Business ByDesign and linked to all relevant business processes. Theprocedure is predefined and you cannot modify the procedure or create a new one.The pricing procedure controls which price components are automatically calculated for the relevant businessdocuments, such as sales quotes, sales orders, and service orders. It contains the most commonly-used pricecomponents, including product prices, discounts, surcharges, and tax. These various kinds of price components canbe combined and control the price calculation process.The pricing procedure also contains the sequence in which the system takes these price components into accountduring pricing. It calculates the gross and net prices and taxes. The pricing procedure also determines:
● Which subtotals will be considered during pricing ● To what extent pricing can be processed manually ● Which method the system uses to calculate percentage discounts and surcharges ● Which requirements for a particular price component must be fulfilled before the system takes the element
into account. For example, freights are not considered for service items.
28 © 2017 SAP SE or an SAP affiliate company. All rights reserved. • P U B L I CSAP Business ByDesign February 2017
Business Background
Currency and Quantity ConversionDuring the price calculation, currency conversion occurs if the currency of the price master data differs from thedocument currency, depending on the exchange rates maintained as master data. The document currency isdefaulted from the account master sales data.In addition, during the price calculation, quantity conversion occurs if the unit of measure requested in the documentdiffers from the price unit maintained in the price list. A prerequisite is that the quantity conversions are maintainedin the product or service master data. For example, product master data maintains a quantity conversion “1 pallet= 20 each”, the price list specifies a price unit of “$50/1 each”, and the sales order requests 5 pallets - in this case,the 5 pallets are converted to 100 units and price is calculated at $5000.
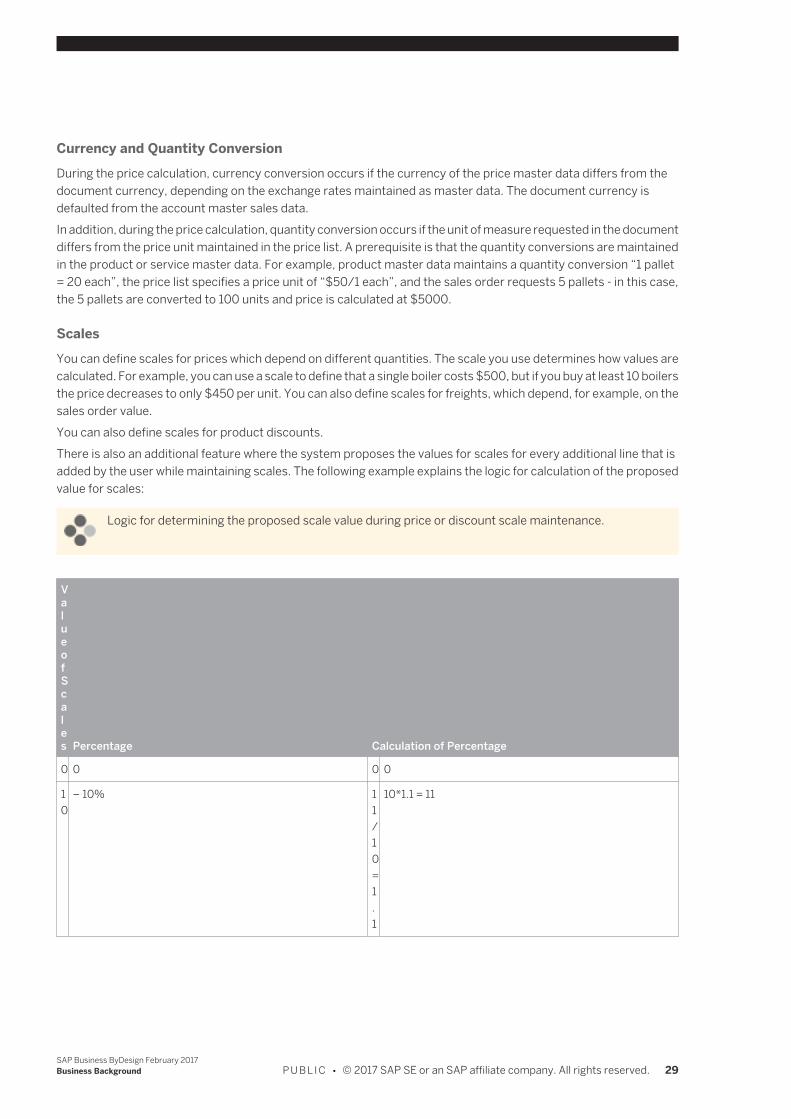
ScalesYou can define scales for prices which depend on different quantities. The scale you use determines how values arecalculated. For example, you can use a scale to define that a single boiler costs $500, but if you buy at least 10 boilersthe price decreases to only $450 per unit. You can also define scales for freights, which depend, for example, on thesales order value.You can also define scales for product discounts.There is also an additional feature where the system proposes the values for scales for every additional line that isadded by the user while maintaining scales. The following example explains the logic for calculation of the proposedvalue for scales:
Logic for determining the proposed scale value during price or discount scale maintenance.
ValueofScales Percentage Calculation of Percentage
0 0 0 0
10
– 10% 11/10=1.1
10*1.1 = 11
SAP Business ByDesign February 2017Business Background P U B L I C • © 2017 SAP SE or an SAP affiliate company. All rights reserved. 29
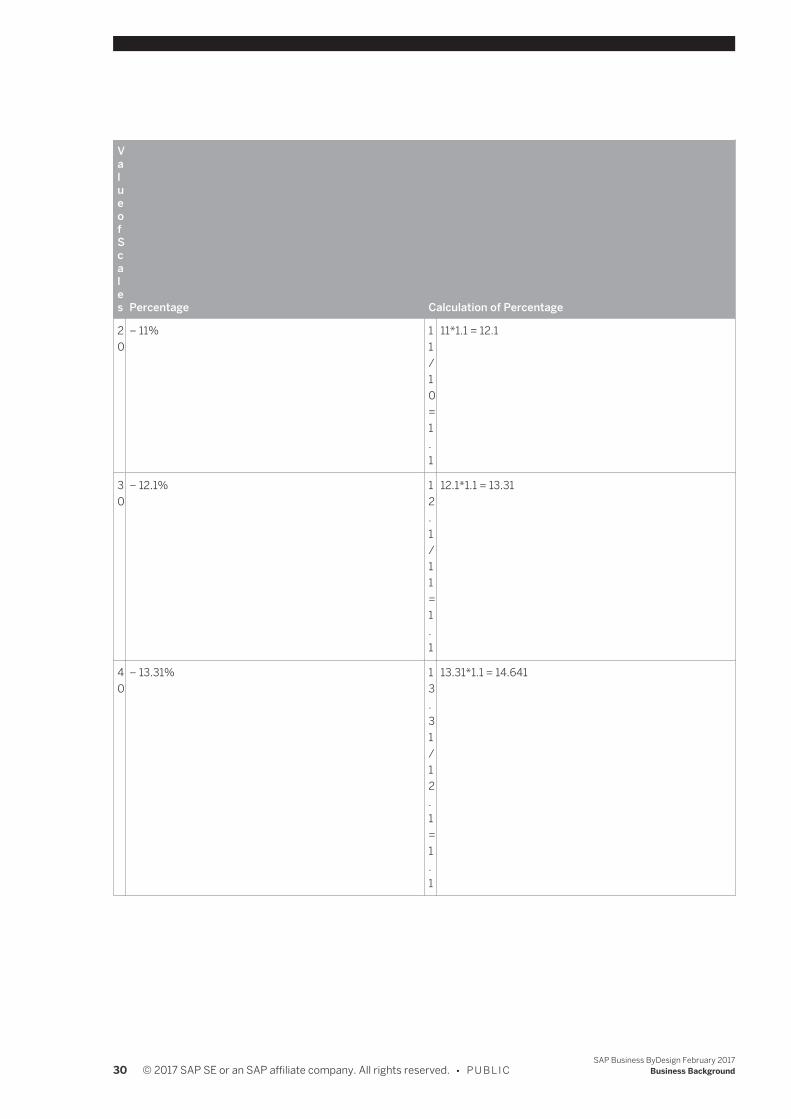
ValueofScales Percentage Calculation of Percentage
20
– 11% 11/10=1.1
11*1.1 = 12.1
30
– 12.1% 12.1/11=1.1
12.1*1.1 = 13.31
40
– 13.31% 13.31/12.1=1.1
13.31*1.1 = 14.641
30 © 2017 SAP SE or an SAP affiliate company. All rights reserved. • P U B L I CSAP Business ByDesign February 2017
Business Background
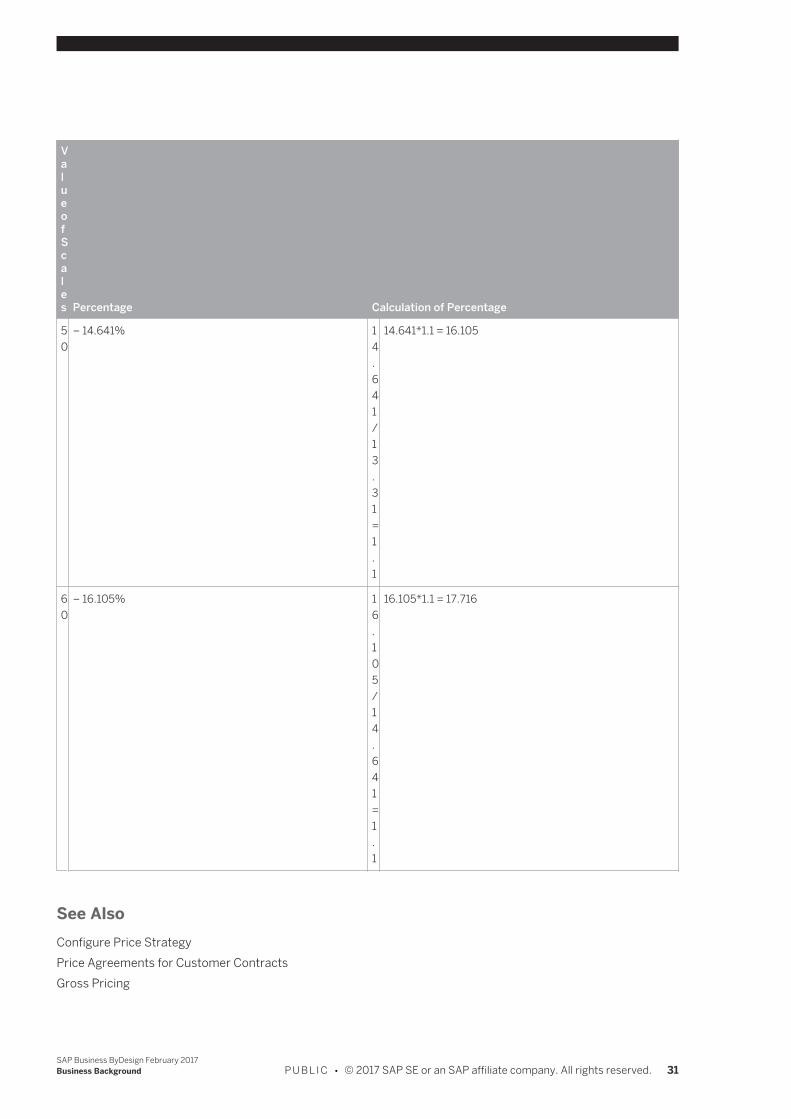
ValueofScales Percentage Calculation of Percentage
50
– 14.641% 14.641/13.31=1.1
14.641*1.1 = 16.105
60
– 16.105% 16.105/14.641=1.1
16.105*1.1 = 17.716
See AlsoConfigure Price StrategyPrice Agreements for Customer ContractsGross Pricing
SAP Business ByDesign February 2017Business Background P U B L I C • © 2017 SAP SE or an SAP affiliate company. All rights reserved. 31
1.3 Working With Serial Numbers
OverviewSerial numbers are unique identifiers that you can assign to a single item of a tangible product. They are used todifferentiate that item from other items of the same product. A serial number identifies a particular item that enablesyou to distinguish between individual pieces. Since serial numbers are only unique per reference material, twodifferent reference materials could have the same serial number. Serial numbers in SAP Business ByDesign arerepresented by registered products. These are integrated into subsequent service scenarios, for example, warrantyhandling.Some of the main benefits provided by the use of serial numbers are as follows:
● You can track serial numbers through the SAP Business ByDesign system. This allows you, for example, tosee which supplier delivered a specific product to your company. The registered product screens provide acomplete tracking history showing all processes in which this product has been handled. You can see thefollowing detailed information in the tracking screen: Movement history (such as deliveries or returns), servicerequests, service orders, and related labels.
● It ensures data consistency by introducing checks for complete serial number input. ● It enables automatic creation of the registered products from transactional processes, for example, goods
receipt posting from supplier delivery. ● It allows automatic updates of registered products, for example with account information, from transactional
processes such as goods issue to customer. This depends on your settings for the business option AutomaticProduct Registration found in the Business Configuration work center, under Questions Services Entitlement Management Registered Products .
You can record serial numbers in inbound logistics, outbound logistics, third-party logistics, third-party orderprocessing, over-the-counter sales, and repairs in the following business scenarios:
● Supplier delivery ● Return to supplier ● Customer delivery ● Third-party delivery ● Customer return ● Over-the-counter sales ● Service confirmation (for spare parts only) ● Third-party repair (for spare parts only) ● Customer return of repaired materials ● Intracompany stock transfer
Serial Number Profiles in Material Master DataUsing serial number profiles in the material master, you can define the processes for which the entry of serial numbersis mandatory, optional, or forbidden. The profile determines the conditions for serial number recording in differentbusiness documents. The following serial number profiles are available:
● No Serial Number Assignment— Serial number recording is forbidden. ● Optional Number Assignment— Serial number recording is allowed, but not mandatory.
32 © 2017 SAP SE or an SAP affiliate company. All rights reserved. • P U B L I CSAP Business ByDesign February 2017
Business Background
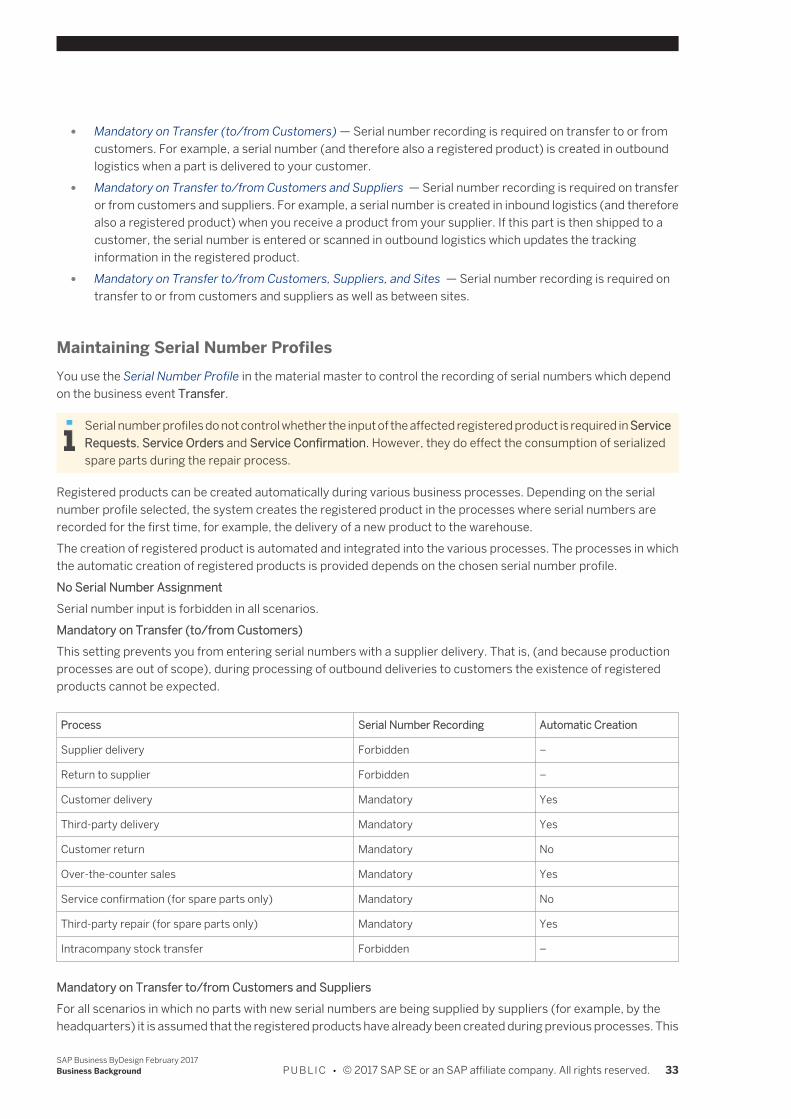
● Mandatory on Transfer (to/from Customers) — Serial number recording is required on transfer to or fromcustomers. For example, a serial number (and therefore also a registered product) is created in outboundlogistics when a part is delivered to your customer.
● Mandatory on Transfer to/from Customers and Suppliers — Serial number recording is required on transferor from customers and suppliers. For example, a serial number is created in inbound logistics (and thereforealso a registered product) when you receive a product from your supplier. If this part is then shipped to acustomer, the serial number is entered or scanned in outbound logistics which updates the trackinginformation in the registered product.
● Mandatory on Transfer to/from Customers, Suppliers, and Sites — Serial number recording is required ontransfer to or from customers and suppliers as well as between sites.
Maintaining Serial Number ProfilesYou use the Serial Number Profile in the material master to control the recording of serial numbers which dependon the business event Transfer.
Serial number profiles do not control whether the input of the affected registered product is required in ServiceRequests, Service Orders and Service Confirmation. However, they do effect the consumption of serializedspare parts during the repair process.
Registered products can be created automatically during various business processes. Depending on the serialnumber profile selected, the system creates the registered product in the processes where serial numbers arerecorded for the first time, for example, the delivery of a new product to the warehouse.The creation of registered product is automated and integrated into the various processes. The processes in whichthe automatic creation of registered products is provided depends on the chosen serial number profile.No Serial Number AssignmentSerial number input is forbidden in all scenarios.Mandatory on Transfer (to/from Customers)This setting prevents you from entering serial numbers with a supplier delivery. That is, (and because productionprocesses are out of scope), during processing of outbound deliveries to customers the existence of registeredproducts cannot be expected.
Process Serial Number Recording Automatic Creation
Supplier delivery Forbidden –
Return to supplier Forbidden –
Customer delivery Mandatory Yes
Third-party delivery Mandatory Yes
Customer return Mandatory No
Over-the-counter sales Mandatory Yes
Service confirmation (for spare parts only) Mandatory No
Third-party repair (for spare parts only) Mandatory Yes
Intracompany stock transfer Forbidden –
Mandatory on Transfer to/from Customers and SuppliersFor all scenarios in which no parts with new serial numbers are being supplied by suppliers (for example, by theheadquarters) it is assumed that the registered products have already been created during previous processes. This
SAP Business ByDesign February 2017Business Background P U B L I C • © 2017 SAP SE or an SAP affiliate company. All rights reserved. 33
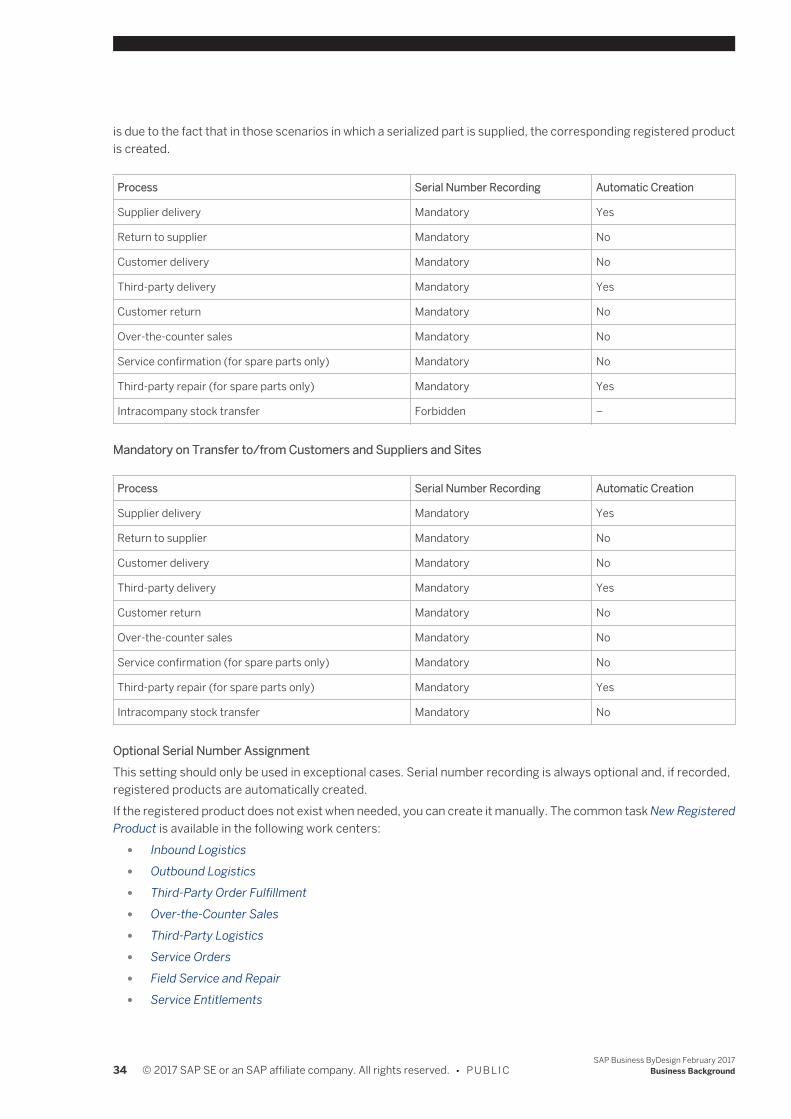
is due to the fact that in those scenarios in which a serialized part is supplied, the corresponding registered productis created.
Process Serial Number Recording Automatic Creation
Supplier delivery Mandatory Yes
Return to supplier Mandatory No
Customer delivery Mandatory No
Third-party delivery Mandatory Yes
Customer return Mandatory No
Over-the-counter sales Mandatory No
Service confirmation (for spare parts only) Mandatory No
Third-party repair (for spare parts only) Mandatory Yes
Intracompany stock transfer Forbidden –
Mandatory on Transfer to/from Customers and Suppliers and Sites
Process Serial Number Recording Automatic Creation
Supplier delivery Mandatory Yes
Return to supplier Mandatory No
Customer delivery Mandatory No
Third-party delivery Mandatory Yes
Customer return Mandatory No
Over-the-counter sales Mandatory No
Service confirmation (for spare parts only) Mandatory No
Third-party repair (for spare parts only) Mandatory Yes
Intracompany stock transfer Mandatory No
Optional Serial Number AssignmentThis setting should only be used in exceptional cases. Serial number recording is always optional and, if recorded,registered products are automatically created.If the registered product does not exist when needed, you can create it manually. The common task New RegisteredProduct is available in the following work centers:
● Inbound Logistics ● Outbound Logistics ● Third-Party Order Fulfillment ● Over-the-Counter Sales ● Third-Party Logistics ● Service Orders ● Field Service and Repair ● Service Entitlements
34 © 2017 SAP SE or an SAP affiliate company. All rights reserved. • P U B L I CSAP Business ByDesign February 2017
Business Background
Recording Serial NumbersOn some of the screens, you can enter serial numbers using the Next Serial Number entry field. This adds a line tothe serial numbers table. You can enter the serial numbers in this field either manually by typing in the entry andchoosing Enter , or by scanning (in the inbound and outbound logistics processes). The entry of serial numberscan be mandatory or optional depending on the Serial Number Profile defined for the product in the material master.If the profile defines that no serial numbers are required for a product, the Serial Numbers tab is not available forthat particular product.
See AlsoRegistered Products Quick GuideInbound Delivery ProcessingOutbound Delivery Processing
1.4 Kits Process Flow
OverviewA kit is defined as a logical group of items that can be sold or purchased together as one unit. Wholesale andcomponent manufacturing industries like to offer product bundles as single selling units. In the Business ByDesignsystem a single selling or purchasable unit comprising of various components is called a kit .For example, a laptop and an adaptor are two different products that can be grouped together to be sold or purchasedas a single unit. This combination of the laptop and adaptor is available on paper as a unit and has a price associatedwith it. However, the kit itself does not exist as a physical entity.The various components of a kit are listed in the kit item list. In the case of the laptop and adaptor, both the individualproducts exist as physical entities. They are stored and transported, and so have inventory value. However, sincethey are a part of a kit, their individual prices are not relevant and only the price of the kit as a whole is considered.
Create a Kit1. Create a Kit
To create a kit, go to Products view under Product and Service Portfolio work center. Click New , and selectKit.You can also create a kit from the New Kit common task in the Product and Service Portfolio work center andthe Product Data work center.The kit you create represents a group of items that is sold or purchased together as one unit.For more information, see Create a Kit [page 107].
2. Add purchasing information to the KitIf you want to create a purchasing kit, you can add purchasing information for this kit. To do so, in the Purchasing tab under General Information , select the status In Preparation. This activates the Purchasingindicator under Relevant Processes.
3. Add sales information to the KitIf you want to create a sales kit, you can add sales details for the sales kit in the Sales tab under General Information . This includes information such as the sales organization, distribution channel, and so
SAP Business ByDesign February 2017Business Background P U B L I C • © 2017 SAP SE or an SAP affiliate company. All rights reserved. 35
on. You can also assign advanced sales details to each distribution chain, for example, a specific sales unit ofmeasure, warranties, internal comments, sales notes, customer part numbers, tax information and so on.However, you must enter a sales organization and distribution channel for the sales kit.This activates the Sales indicator under Relevant Processes.For more information, see Assign Sales Details to the Kit [page 108].
4. Add valuation information to the KitYou can add valuation details for the kit which includes information such as basic valuation details, and astatus to each company and business residence that provide financial data for a kit. You can also assignadvanced valuation details such as a specific inventory valuation unit of measure, and cost information foreach relevant set of books.You can do so, in the Valuation tab under General Information . This activates the Valuation indicator underRelevant Processes.For more information, see Assign Valuation Details to the Kit [page 109].
5. Add tax information to the KitIf you create a purchasing kit, by default the highest value added tax (VAT) is applied as the standard tax rate.You can maintain separate tax rates for the kit in the Taxation tab under General Information .
6. Create a Kit Item ListUsing the kit ID created during the process of creating a kit, you can create a kit item list, which consists ofall the items that are included in that particular kit. Each of these items has an inventory process associatedwith it, but is not price relevant within the kit.For more information, see Create a Kit Item List in the Tasks section of the Kits Quick Guide [page 102].
Kits in Sales1. Create and Release a Sales Order
You can create a sales order with a sales kit as a line item and release it.For more information, see Sales Orders Quick Guide.
2. Release a Customer InvoiceYou can create and release a customer invoice document.For more information, see Quick Guide for Invoice Requests.
3. Determine Ship-From Information and Check AvailabilityOnce the sales order containing a sales kit has been released, the system displays a customer demand persales kit in the Customer Demand view of the Outbound Logistics Control work center. You can determine theshipment scheduling, ship-from information, and the availability for sales orders that contain sales kits. Youcan also use this view to release confirmed sales kits to logistics execution.For more information, see Customer Demand Quick Guide.
4. Release a Sales KitApart from the Customer Demand view, you can also release sales kits in the Delivery Due List view of theOutbound Logistics Control work center, where the sales orders are listed based on confirmed schedule lines.In this delivery due list, the supply planner can release the sales kits to hand them over to logistics execution.Once the sales kit has been released, you cannot change data such as product, date, quantity, ship-to partyin the corresponding sales order.For more information about delivery due lists, see Delivery Due List Quick Guide.
5. Process an Outbound DeliveryThe system displays the released sales kits as delivery proposals in the Delivery Proposals sub-view and asdelivery requests in the Delivery Requests sub-view of the Delivery Control view in the Outbound Logisticswork center. In this view, you can process an outbound delivery for the sales kit with tasks by creating awarehouse request or without tasks by posting a goods issue.For more information about delivery proposals and delivery requests, see Delivery Control Quick Guide.
36 © 2017 SAP SE or an SAP affiliate company. All rights reserved. • P U B L I CSAP Business ByDesign February 2017
Business Background
If you process the outbound delivery with tasks, you can create a warehouse task in the Warehouse Requestsview and confirm the task in the Task Control view.For more information about warehouse requests, see Warehouse Requests Quick Guide.For more information about task control, see Task Control Quick Guide.Whether you post the goods issue in one step directly or use the task support, the outbound delivery isprocessed and inventory changes are communicated to invoicing, accounting, and supply control.
6. Post Costs/RevenuesThe delivery of a sales kit and its components triggers the creation of a journal entry in the system which poststhe costs of components delivered. The valuation and the account determination are based on the componentproducts delivered as part of the sales kit. The invoicing of the sales kit triggers the creation of a journal entrywhich posts the revenues. You can view the entry in the Journal Entries view of the General Ledger work center.For more information, see Journal Entries Quick GuideThere is no change in the account determination logic for the sales kit items and the component items.Revenue recognition is not allowed for sales order items with sales kit products. For more information see,Sales Document Items Quick Guide
Kits in Purchasing1. Create and Release a Purchase Order
You can create a purchase order with a kit as a line item and release it.For more information, see Purchase Orders Quick Guide.
2. Create a Purchase Order AcknowledgementFor more information, see Purchase Order Acknowledgement.
3. Process an Inbound DeliveryWhen you receive a kit, you can use inbound processing to coordinate the inbound logistic activities.
Kits are only supported for inbound supplier deliveries.
For more information, , see Supplier Delivery Processing.4. Post Goods Receipt
On delivery of a kit, you can create a goods receipt to track it. The goods and services receipt can be createdwith reference to purchase orders with same or different suppliers.For more information, see, Directly Post a Goods Receipt with Label Creation.The valuation and the account determination are based on the component products delivered as part of thepurchase kit.The system sends the goods and services receipt to Supplier Invoicing for invoice verification, exceptionhandling, and payment processes. It also forwards the data to Financials, posts the goods return receipt there,and updates individual materials and fixed asset assignments if applicable. You can view the entry in theJournal Entries view of the General Ledger work center. For more information, see Journal Entries Quick Guide
5. Release a Supplier InvoiceYou can create and release a supplier invoice document.For more information, see Supplier Invoice Processing with Reference.
LimitationsKits are not supported in the following scenarios:
● Subsequent debit and subsequent credit memo items, customs duty, down payments, recurring invoices,invoice templates, and invoices without reference to purchase orders scenarios in supplier invoicing.
SAP Business ByDesign February 2017Business Background P U B L I C • © 2017 SAP SE or an SAP affiliate company. All rights reserved. 37
● Materials in Progress ● Intracompany stock transfer ● Supplier or customer returns ● Service and repair scenarios ● Strategic sourcing (contracts, quotes, shopping cart) ● Self- service procurement (non-stock materials) ● Invoices
38 © 2017 SAP SE or an SAP affiliate company. All rights reserved. • P U B L I CSAP Business ByDesign February 2017
Business Background
2 Materials View
2.1 Materials Quick Guide
The Materials view in the Product Data work center has two subviews: Materials and Material Templates.The Materials view provides a central entry point for viewing all the materials in your system, creating new materials,and maintaining materials throughout the product life cycle ensuring you have complete and accurate informationon all the materials your company offers.The Material Templates subview allows you to create material templates for different product categories and tocreate and change multiple materials based on these templates.
You can access the Materials view from the following locations: ● Product Data work center ● Product Development work center
You can also access certain functions of the Materials view via the Products view of the Product and ServicePortfolio work center.
Business Background
Assigning Statuses to a MaterialA material can be involved in various business processes. For example, a nail could be a component used inmanufacturing another product, or the nail could be sold as the end product itself. For this reason, a material isdivided into sections for purchasing, logistics, supply planning, availability confirmation, sales, and valuation. Eachsection includes details specific to the business process as well as one or more statuses indicating the completenessor readiness of the material for that process. Therefore, when creating a new material, it is important to apply thecorrect statuses to ensure that the relevant processes are assigned and that data in these areas is kept up-to-date.For more information, see Assigning Statuses to a Material [page 44]
Changing Identified Stock TypesYou can change the identified stock type of a product regardless of the process in which you use the product. Youcan specify a new identified stock type where previously there was none, you can remove the type completely, oryou can change the type from one type to another. You can change the identified stock type for a product even afterthe product is activated for logistics.The system allows you this flexibility in case that you need to change an identified stock type after you begin usinga product in your process. However, changing the identified stock type can have consequences and follow-up actions,depending on the status of the process in which you use the effected product. You should be aware of theseconsequences before you perform the identified stock type change. We recommend that you finish specifying yourproduct with the correct identified stock type before you start any process for a product.You can change the identified stock type in the General tab of the Material editor in the Product Data work center.You must access the General tab by clicking View All. You can also check if the product is activated in the Logisticstab.For more information, see Changing Identified Stock Types [page 45].
SAP Business ByDesign February 2017Materials View P U B L I C • © 2017 SAP SE or an SAP affiliate company. All rights reserved. 39
Pricing in Customer Relationship ManagementPricing is based on price master data such as price lists and discount lists, which are used to automatically calculatepricing within all business documents for sales and service processes. A predefined pricing procedure is used todetermine the gross value the customer has to pay for certain products or services to be received on a certain dayat a certain place. The pricing procedure consists of price components, such as list price, discounts, surcharges,freights, taxes, and costs. The order of these price components is essential for the calculation of the total value.For more information, see Pricing in Customer Relationship Management [page 25].
Tax DeterminationAs a rule, companies are legally required to calculate taxes on products that they buy or sell, and to levy these taxesfrom their customers. After the products have been provided, the taxes must be declared and levied to the respectivetax authorities. The system supports you by providing a substantially automated tax calculation for the following taxtypes: Value-Added Tax (VAT), Sales and Use Tax, Withholding Tax. The system also provides a reporting tool thatgives you effective control over your obligatory declaration of these taxes.For more information, see Tax Determination [page 5].
Availability ChecksAvailability checks enable you, as a supply planner, to answer the question of whether or not a requested quantityof a product is available at a certain place at a certain point in time. Confirmations as a result of these checks notonly give a reliable answer to this question, they are also required for the follow-on processes in logistics execution.Providing a reliable delivery date at the very time when a quote or order is entered in the system, helps you to improvecustomer satisfaction.The system allows you to check the availability for sales orders, service orders, stock transfer orders, project stockorders, and sales quotes.For more information, see Availability Checks [page 51].
Serial Number ProfilesSerial numbers are unique identifiers that are assigned to a single item of a tangible product. Serial numbers in SAPBusiness ByDesign are represented by registered products. These are integrated into subsequent service scenarios,for example, warranty handling. You can use serial number profiles to define in which processes it is mandatory oroptional to enter serial numbers. The profile determines the conditions for serial number recording in differentbusiness documents. For more information, see Working with Serial Numbers [page 32].
Tasks
Create a Material1. Choose the Materials subview in the Materials view of the Product Data work center.2. Click New and then Material to open the New Material quick activity.3. Enter the Material ID.
If internal number ranges have been configured for materials, you cannot enter a material ID manually;when you save the material, the system assigns the next available ID automatically.For more information, see Configuration: Number Ranges.
4. Enter the Material Description.For information about descriptions in other languages, see Add Material Descriptions in Other Languagesbelow.
40 © 2017 SAP SE or an SAP affiliate company. All rights reserved. • P U B L I CSAP Business ByDesign February 2017
Materials View
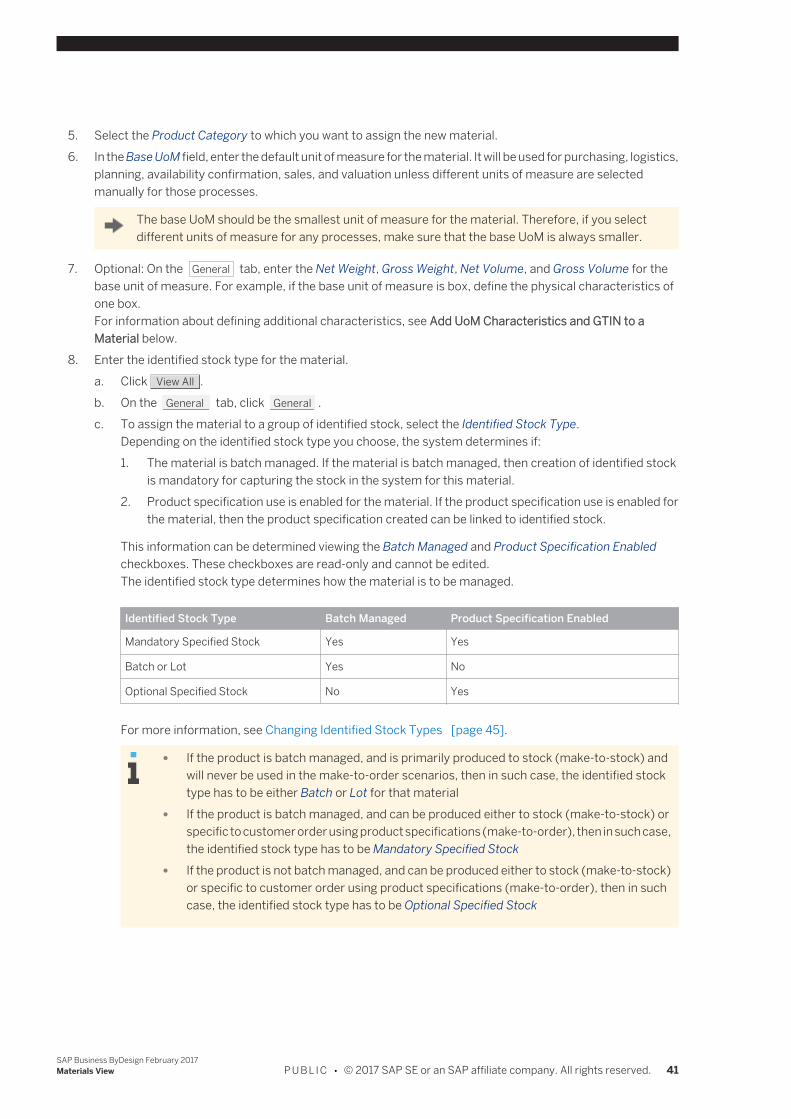
5. Select the Product Category to which you want to assign the new material.6. In the Base UoM field, enter the default unit of measure for the material. It will be used for purchasing, logistics,
planning, availability confirmation, sales, and valuation unless different units of measure are selectedmanually for those processes.
The base UoM should be the smallest unit of measure for the material. Therefore, if you selectdifferent units of measure for any processes, make sure that the base UoM is always smaller.
7. Optional: On the General tab, enter the Net Weight, Gross Weight, Net Volume, and Gross Volume for thebase unit of measure. For example, if the base unit of measure is box, define the physical characteristics ofone box.For information about defining additional characteristics, see Add UoM Characteristics and GTIN to aMaterial below.
8. Enter the identified stock type for the material.a. Click View All .b. On the General tab, click General .c. To assign the material to a group of identified stock, select the Identified Stock Type.
Depending on the identified stock type you choose, the system determines if:1. The material is batch managed. If the material is batch managed, then creation of identified stock
is mandatory for capturing the stock in the system for this material.2. Product specification use is enabled for the material. If the product specification use is enabled for
the material, then the product specification created can be linked to identified stock.
This information can be determined viewing the Batch Managed and Product Specification Enabledcheckboxes. These checkboxes are read-only and cannot be edited.The identified stock type determines how the material is to be managed.
Identified Stock Type Batch Managed Product Specification Enabled
Mandatory Specified Stock Yes Yes
Batch or Lot Yes No
Optional Specified Stock No Yes
For more information, see Changing Identified Stock Types [page 45].
● If the product is batch managed, and is primarily produced to stock (make-to-stock) andwill never be used in the make-to-order scenarios, then in such case, the identified stocktype has to be either Batch or Lot for that material
● If the product is batch managed, and can be produced either to stock (make-to-stock) orspecific to customer order using product specifications (make-to-order), then in such case,the identified stock type has to be Mandatory Specified Stock
● If the product is not batch managed, and can be produced either to stock (make-to-stock)or specific to customer order using product specifications (make-to-order), then in suchcase, the identified stock type has to be Optional Specified Stock
SAP Business ByDesign February 2017Materials View P U B L I C • © 2017 SAP SE or an SAP affiliate company. All rights reserved. 41
If you change the identified stock type once the material has already been created and is beingused, the associated logistic processes is lost. For example if you create a material and define theidentified stock type as Mandatory Specified Stock, it will be both batch managed and productspecification enabled. However, after the material is in use, if you then change the identified stocktype to Optional Specified Stock, then the batch management function for the material will be lost.
9. Optional: Enter the advanced general details for the materiala. Click View All .b. To choose a profile for serial number assignment, select a Serial Number Profile.c. To add, delete, or replace a product image for the material, click Image and select the appropriate
option.d. To specify the validity of the stock, enter the relevant number of days in the Minimum Required Shelf
Life field on the Planning tab. Stock will be unavailable for planning and execution after the completionof the number of days entered.
10. Click Save .
This document contains text that is relevant for India only. To ensure that the system displays thecorrect text, select Personalize → My Settings. Select Onscreen Help and, under Country, chooseIndia. Save your settings and logout to ensure these changes are made.
Create a Material Template and Create a Material from a TemplateFor more information about this task, see here [page 59].
Assign Purchasing Details to a MaterialFor information about this task, see here [page 60].
Assign Logistics Details to a MaterialFor information about this tasks, see here [page 61].
Assign Supply Planning Details to a MaterialFor information about this task, see here [page 62].
Assign Availability Confirmation Details to a MaterialFor information about this tasks, see here [page 63].
Assign Sales Details to a MaterialFor information about this task, see here [page 64].
Assign Valuation Details to a MaterialFor information about this task, see here [page 66].
Add Quantity Conversions to a MaterialFor information about this task, see here [page 67].
Add UoM Characteristics and GTIN to a Material1. Choose the Materials subview in the Materials view of the Product Data work center.
42 © 2017 SAP SE or an SAP affiliate company. All rights reserved. • P U B L I CSAP Business ByDesign February 2017
Materials View
2. Select the material and click Edit to open the Material quick activity.3. On the General tab, enter the Net Weight, Gross Weight, Net Volume, and Gross Volume for the base unit of
measure. For example, if the base unit of measure is box, define the characteristics of one box.4. Optional: Define additional characteristics and a GTIN (Global Trade Item Number) for the base unit of
measure and for other units of measure.a. Click View All .b. At the top of the General tab, click UoM Characteristics.
The first row of the table displays the physical characteristics you already entered for the base unit ofmeasure.
c. Enter the Length, Width, Height, and GTIN (Global Trade Item Number) for the base unit of measure.
A GTIN is an 8, 12, 13, or 14 digit number used to uniquely identify products worldwide. Each GTINmust conform to international standards and must be unique.
d. To define characteristics and a GTIN for another unit of measure, click Add Row.e. In the new row, select the UoM and enter the relevant characteristics and GTIN.f. Click Save to save your changes.
Add Material Descriptions in Other Languages1. Choose the Materials subview in the Materials view of the Product Data work center.2. Select the material and click Edit to open the Material quick activity.
The Material Description field displays the description of the material in your logon language.3. Click View All .4. At the top of the General tab, click Other Languages .5. To add a description of the material in another language, click Add Row .
If you do not maintain a material description for a language, a description will not appear on businessdocuments in that language.
6. In the new row, select a Language and enter the Material Description.7. In the Details section, enter additional information about the material and click Save .
Mass Change of MaterialsYou can quickly update the general and business area details of multiple materials at once. For information aboutthis task, see here [page 68].
Create Materials Using Microsoft Excel®You can create materials using a predefined Microsoft Excel template. For information about this task, see here[page 69].
Export Materials to Microsoft ExcelYou can export materials to Microsoft Excel. For more information about this task, see here [page 71].
See AlsoCommodity Catalogs Quick Guide
SAP Business ByDesign February 2017Materials View P U B L I C • © 2017 SAP SE or an SAP affiliate company. All rights reserved. 43
2.2 Business Background
2.2.1 Assigning Statuses to a Material
OverviewA material can be involved in various business processes. For example, a nail could be a component used inmanufacturing another product, or the nail could be sold as the end product itself. For this reason, a material isdivided into sections for purchasing, logistics, supply planning, availability confirmation, sales, and valuation. Eachsection includes details specific to the business process as well as one or more statuses indicating the completenessor readiness of the material for that process. Therefore, when creating a new material, it is important to apply thecorrect statuses to ensure that the relevant processes are assigned and that data in these areas is kept up-to-date.
Features
Changes to StatusesThe first status of a process is always Initial. You can then make the following changes in statuses before the materialis saved:
● Initial to In Preparation or In Preparation to Initial ● In Preparation to Active ● Active to Blocked or Blocked to Active ● Active to Initial
After a material is saved, you can make the following changes in status: ● Initial to In Preparation or In Preparation to Initial ● In Preparation to Active ● Active to Blocked or Blocked to Active
Changing from Active to Blocked is only possible for purchasing and sales.
Overall StatusIn cases where a process has multiple statuses, the status with the highest priority is always given as the overallstatus for a process. The hierarchy for status priority is as follows: Active, Blocked, In Preparation, and Initial. Forexample, if there is one status marked as Active, and there are multiple statuses marked as In Preparation, the overallstatus is given as Active. The logistics and purchasing processes each have only a single status, but all otherprocesses can have multiple statuses. Purchasing and sales are the only two processes with the Blocked status.The statuses for processes are as follows:
Statuses of Processes Overall Status Status Icon Status Combination Valid For
Initial Initial Grey Purchasing, Logistics, Planning, AvailabilityConfirmation, Sales, and Valuation
In Preparation In Preparation Yellow Purchasing, Logistics, Planning, AvailabilityConfirmation, Sales, and Valuation
44 © 2017 SAP SE or an SAP affiliate company. All rights reserved. • P U B L I CSAP Business ByDesign February 2017
Materials View
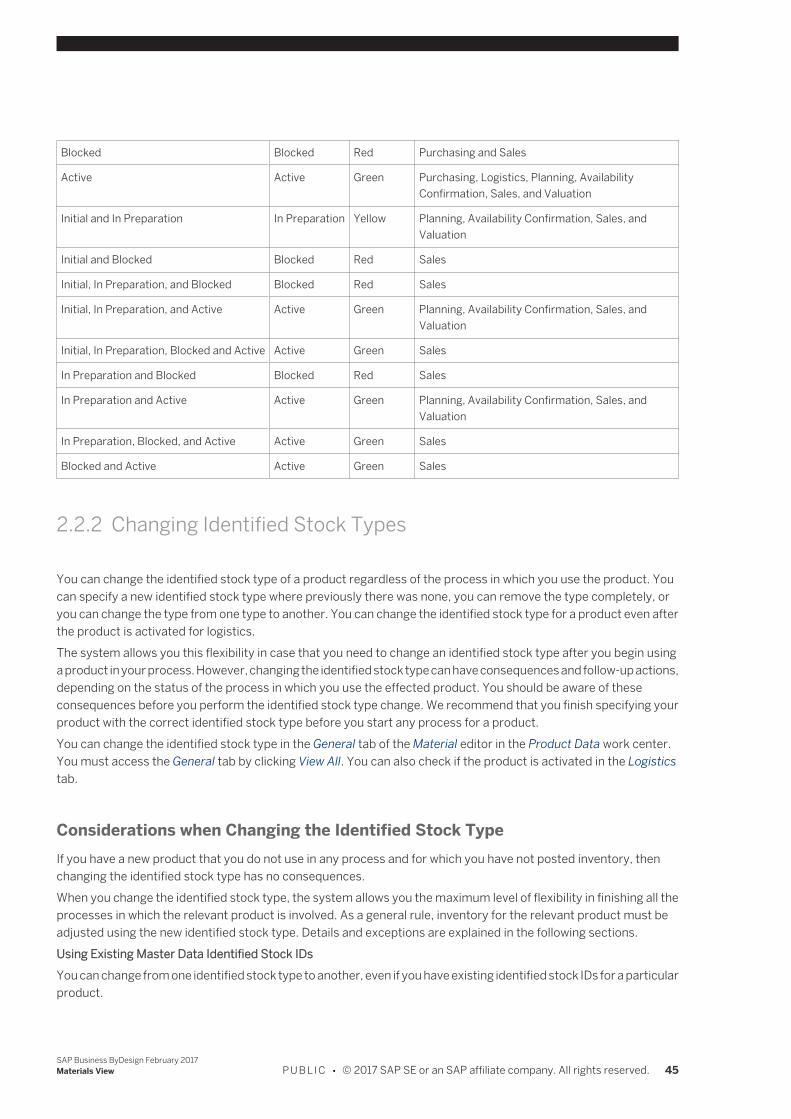
Blocked Blocked Red Purchasing and Sales
Active Active Green Purchasing, Logistics, Planning, AvailabilityConfirmation, Sales, and Valuation
Initial and In Preparation In Preparation Yellow Planning, Availability Confirmation, Sales, andValuation
Initial and Blocked Blocked Red Sales
Initial, In Preparation, and Blocked Blocked Red Sales
Initial, In Preparation, and Active Active Green Planning, Availability Confirmation, Sales, andValuation
Initial, In Preparation, Blocked and Active Active Green Sales
In Preparation and Blocked Blocked Red Sales
In Preparation and Active Active Green Planning, Availability Confirmation, Sales, andValuation
In Preparation, Blocked, and Active Active Green Sales
Blocked and Active Active Green Sales
2.2.2 Changing Identified Stock Types
You can change the identified stock type of a product regardless of the process in which you use the product. Youcan specify a new identified stock type where previously there was none, you can remove the type completely, oryou can change the type from one type to another. You can change the identified stock type for a product even afterthe product is activated for logistics.The system allows you this flexibility in case that you need to change an identified stock type after you begin usinga product in your process. However, changing the identified stock type can have consequences and follow-up actions,depending on the status of the process in which you use the effected product. You should be aware of theseconsequences before you perform the identified stock type change. We recommend that you finish specifying yourproduct with the correct identified stock type before you start any process for a product.You can change the identified stock type in the General tab of the Material editor in the Product Data work center.You must access the General tab by clicking View All. You can also check if the product is activated in the Logisticstab.
Considerations when Changing the Identified Stock TypeIf you have a new product that you do not use in any process and for which you have not posted inventory, thenchanging the identified stock type has no consequences.When you change the identified stock type, the system allows you the maximum level of flexibility in finishing all theprocesses in which the relevant product is involved. As a general rule, inventory for the relevant product must beadjusted using the new identified stock type. Details and exceptions are explained in the following sections.Using Existing Master Data Identified Stock IDsYou can change from one identified stock type to another, even if you have existing identified stock IDs for a particularproduct.
SAP Business ByDesign February 2017Materials View P U B L I C • © 2017 SAP SE or an SAP affiliate company. All rights reserved. 45
You can use new identified stock IDs that contain the new identified stock type for the product. You can still use theIDs from the old type, even though they contain the old identified stock type. You cannot change the identified stocktype of the old IDs. If you want to prevent the old IDs from being used, you must post inventory from the old identifiedstock ID to the new ID using the Change of Stock common task in the Internal Logistics work center. You can alsochange the status of the old IDs to Blocked or Obsolete.For example, you have a product PRO_1 that is specified with an identified stock type of batch. You create an identifiedstock ID B001 for the product in the Identified Stock view of the Planning and Production Master Data or Warehousingand Logistics Master Data work centers. You then change the identified stock type to lot. The next identified stockID you create for the product is L001. However, you can still use the ID B001 in the system, even though the productis now a lot. The ID B001 still shows the original identified stock type.In this case the system just checks that the product is specified as an identified stock. If it is, you must enter anidentified stock ID when you post inventory changes.Existing Inventory Not Used in a ProcessIf you change the identified stock type of a product for which you have inventory stored in a logistics area, you cannotuse the inventory until you post it using the new type. You can do this in the Change of Stock common task in theInternal Logistics work center. When you change the identified stock type, the following conditions apply:
● If you remove the identified stock type completely from a product in the Material editor, you must post achange of stock where you leave the Change Identified Stock ID field empty.
● If you specify an identified stock type for the first time for a product (where previously no identified stock wasspecified), you must first create the appropriate identified stock ID in the Identified Stock view in the Planningand Production Master Data or Warehousing and Logistics Master Data work centers. Then you change thestock details using the Change of Stock common task in the Internal Logistics work center. You must enterthe identified stock ID in the Change Identified Stock ID field for the new identified stock type. This is optionalif the new identified stock type is optional specified stock and mandatory for all other identified stock types.
● If you have already specified an identified stock type, but now want to change to another identified stock type,you only need to post a change of stock if you don’t want to use the old identified stock IDs with the product.
Changes to Identified Stock Type in a Make-to-Order ProcessIntroductionYou can use a product specification ID to record the special requirements your customer needs when they order aproduct in a make-to-order process. The system uses these properties and descriptions in addition to the standardproduct ID to supply your customer with the exact specification that they need.For example, a window is a standard product in your system. However, your customer may need a window madefrom wood, that has dimensions of 100cm by 50cm, and that is made from special glass. When you enter this in thesystem, you can enter the standard product in the sales order (window) and create a product specification thatprovides the detailed properties of the window that your customer needs.The product specification ID and properties follow the product through the process of external procurement orinternal production. This enables you to order, manufacture, pick, and ship products with specific requirements toyour customer.For example, when you post goods receipts from production or a supplier (inbound process), the system uses aproduct specification ID in combination with an identified stock ID to separate products in line with customer specificrequirements. You must use this approach in order to separate products.Mandatory and Optional Specified StockYou must use either the optional specified stock or mandatory specified stock type when you work with productspecifications. You should use optional specified stock if you want the choice of using a product in your process bothwith and without a product specification. For example, you have a standard window, window_1. You should useoptional specified stock if you want to manufacture standard windows (standard window_1), and also manufacturemake-to-order windows (window_1 with a product specification).
46 © 2017 SAP SE or an SAP affiliate company. All rights reserved. • P U B L I CSAP Business ByDesign February 2017
Materials View
You should use the mandatory specified stock type if you always want to make a product to order. For example, younever make standard windows; you always make windows to order.Changing the identified stock type from optional or mandatory specified stock to batch or lot, or removing theoptional or mandatory specified stock type completely has consequences if you have a running make-to-orderprocess. You need to take different courses of action, depending on where the product is in your process. Thesedifferent courses of action are outlined here.Change Before You Start Production and Place Orders on SuppliersIf you change the identified stock type from optional or mandatory specified stock to batch or lot, or completelyremove the optional or mandatory specified stock type, after you assign a product specification ID to a product inthe sales order but before you start production or place orders on suppliers:
● You cannot complete the make-to-order process for the product because the product must have either anoptional or mandatory specified stock type ID in order to be used with a product specification.
● You cannot start production and you cannot place an order on your suppliers with a product specification. ● You must cancel the line item in the sales order that contains the product.
Change Before You Finish ProductionYou have two possible courses of action if you change the identified stock type after you start but before you finishproduction:
1. If you have an existing identified stock ID for the optional or mandatory specified stock with the correct productspecification:a. You can post the goods receipt from production with an existing identified stock ID that contains the
correct product specification.b. You can pick and ship the product with an existing identified stock ID that contains the correct production
specification
If you decide not to finish manufacturing, you must process any open quantities. To do this, you must confirmthe production lot and production request. You must confirm the pick operation with a quantity of zero toforce the completion of the picking operation. Then you must cancel the sales order line item that containsthe make-to-order product.
2. If you do not have an existing identified stock ID with the correct product specification:a. You cannot perform a goods receipt with a product specification at the end of production.b. If you go ahead and manufacture the product, you must post the goods receipt without a product
specification as an unplanned item.c. You cannot pick and ship the goods using a product specification because you do not have the
appropriate inventory. You must reject the outbound request if it is not released. You must confirm thepick operation with a quantity of zero to force the completion of the picking operation. Then you mustcancel the sales order line item that contains the make-to-order product.
Change After Production CompletedIf you change the identified stock type after you finish production and after you start outbound processing, you canstill perform goods movements in your outbound process. If you use a product specification ID, the system allowsthe transactions to take place, even though the identified stock type has changed for the make-to-order product.Change Before Return to SupplierIf you change the identified stock type of a product that was ordered using a product specification ID, you cannotreturn the product to the supplier. You can use the following work around:
● Change back the identified stock type of the relevant product temporarily to the old setting. ● Create a return to supplier request, using the New Return to Supplier Request common task in the Outbound
Logistics work center.
SAP Business ByDesign February 2017Materials View P U B L I C • © 2017 SAP SE or an SAP affiliate company. All rights reserved. 47
● Change the identified stock type of the relevant product back to the new setting.
Change Before Return From CustomerIf you change the identified stock type of a product that was manufactured and shipped using a product specificationID, you cannot create a new customer return notification with reference to the delivery items. You must use the NewCustomer Return Notification common task in the Inbound Logistics work center to create a new customer returnnotification, and enter the delivery line items manually.
Execution Processes for Standard Inbound, Internal, Outbound, and ProductionChange Before You Confirm Tasks in Production, and in One-Step Inbound, Internal, and Outbound ExecutionProcessesIf you change the identified stock type before you confirm a production task for input products, or a pick or replenishtask, inventory for the relevant product must be adjusted using the new identified stock type. Refer to the sectionon Existing Inventory Not Used in a Process above for further details. For production tasks for output products andput-away tasks, you take no action because the incoming goods are not yet reported in inventory. When you finishproduction or receive the goods, you can post them using the new type.Change Between the First and Second Step in Two-Step Inbound, Internal, and Outbound ProcessesIf you change the identified stock type before you confirm the execution task of the first step (for example, pick),inventory for the relevant product must be adjusted using the new identified stock type. Refer to the section onExisting Inventory Not Used in a Process above for further details.For unload tasks, you take no action because the incoming goods are not yet reported in inventory. When the goodsarrive, you can post them using the new type.If you change the identified stock type after you confirm the execution task of the first step (for example, pick orunload) and before you confirm the execution task of the second step (for example, unload or put-away), you canconfirm the second step using the old identified stock type.For example, the first step is pick and move the goods to a staging area. The second step is move the goods fromthe staging area to a truck. The system allows you to load the products onto the truck even if you change the identifiedstock type before the second step begins.
Change After You Begin Confirming but Before You Finish a Task in ExecutionProcesses for Inbound, Internal, Outbound, and ProductionIf you change the identified stock type for a product after you begin a confirmation but before you finish a task, youhave the following options:
● You can finish a task for the remaining quantity using the old identified stock type. You must have sufficientinventory of product with the old identified stock type available for the confirmation. This is possible if youhave not yet updated the inventory using the new identified stock type in the Change of Stock common taskin the Internal Logistics work center
● You can use the Split Quantities feature to begin confirming using the new identified stock type.
Remove the Identified Stock Type After You Release a Production Order WhileUsing ReplenishmentThere are considerations you must take into account if a production order requests a particular identified stock IDand you use manual or integrated replenishment.
48 © 2017 SAP SE or an SAP affiliate company. All rights reserved. • P U B L I CSAP Business ByDesign February 2017
Materials View

If, after you release a production order for a product, you remove the identified stock type completely from theproduct, the system tries to satisfy the replenishment demand by using an identified stock ID. It creates areplenishment task that requires an identified stock ID. In this case you must:
● Confirm the replenishment task without the identified stock IDAs a consequence, you now have inventory of the product without an identified stock ID. Production demandstays open as long as you do not confirm the production task, because the demand for the product is notfulfilled by inventory with an identified stock ID. For example, your production order requests 10 pieces ofproduct PRO_1 with identified stock IS99. However, in your inventory, you have 10 pieces of PRO_1 but withoutIS99.
● Reject any new manual or integrated replenishment tasks with an identified stock ID.This is only necessary if another replenishment task is created between the confirmation of the replenishmenttask and the confirmation of the production task. The replenishment task could be created as a consequenceof the first replenishment not fulfilling the production demand.
● Confirm the production task for the relevant product without the identified stock ID.
Stock TransferThe stock transfer scenario combines an outbound logistics process on the sending side and an inbound logisticsprocess on the receiving side. See the sections above on the steps you should take for inbound and outboundprocesses.For stock transfers within your company (intra-company stock transfers), you have the additional consideration ofan identified stock type change after posting goods issue on the sending side and before posting the goods receipton the receiving side. After the goods receipt posting, you need to adjust the in-transit stock by using the Adjust InTransit Stock common task in the Physical Inventory work center.For example, you ship 3 pieces of product PRO_1 without an identified stock ID from Site 1 to Site 2. You now havein-transit stock of 3 pieces of PRO_1 without an identified stock ID. You then specify an identified stock type of batchwhere previously no type was specified for PRO_1. You must post goods receipt for 3 pieces of PRO_1 with anidentified stock ID (for example IS99). You then have the following in transit stock:
Product Identified Stock ID Inventory
PRO_1 None 3 pieces
PRO_1 IS99 -3 pieces
With the adjust in-transit stock transaction, the system posts both inventory lines to zero.
Pre-Delivery of Spare Parts on Service Order ConfirmationsThe pre-delivery of spare parts is an outbound delivery process with the added feature that you deliver the inventoryto the customer while it is still reported in the system (pre-delivered stock).If you change the identified stock type after you ship but before you submit a service confirmation, you need to adjustthe pre-delivered stock using the Change of Pre-Delivered Stock common task in the Physical Inventory work center.For example, you ship 3 pieces of spare part PRO_1 with no identified stock ID to the customer. You now have pre-delivered stock of 3 pieces of PRO_1 without an identified stock ID. You then specify an identified stock type of batchwhere previously no type was specified for the product PRO_1. Now you must adjust the pre-delivered stock of 3pieces of PRO_1 with an identified stock ID (for example IS99). You now have the following in transit stock:
Product Identified Stock Inventory Before Adjustment Posting Inventory After Adjustment Posting
SAP Business ByDesign February 2017Materials View P U B L I C • © 2017 SAP SE or an SAP affiliate company. All rights reserved. 49
PRO_1 None 3 Pieces Zero
PRO_1 IS99 Zero 3 Pieces
Physical InventoryIf you have inventory which does not fit to the new identified stock type, you can count as follows
● Inventory reported in the system (expected inventory) can be counted as reported in the system using theold identified stock type. For example, you completely remove the identified stock type and you have inventoryfor identified stock IS99, you can count the actual quantity for identified stock ID IS99
● Inventory not reported in the system can only be counted using the new identified stock type. For example,you completely remove the identified stock type and you have inventory for identified stock ID IS99, youcannot count the actual quantity for identified stock ID IS99. You can only count the actual quantity for theproduct.
If you want to ensure that inventory is counted using the new or changed identified stock type, you must adjustinventory for the relevant product using the new identified stock type before your physical inventory count.Refer to the section on Existing Inventory Not Used in a Process above for further details.
Change Before Cancellations in Production and WarehousingIf you cancel a confirmation in production or warehouse processes, you roll the original posting back completely.This means the posting is done with the identified stock related information from the original confirmation, regardlessof the identified stock type.For example, you confirm a pick task for a product with identified stock ID IS99 (batch), from logistics area Bin_1 for2 pieces. When you cancel this confirmation, the system increases the inventory in Bin_1 by 2 pieces of IS99 (batch)even if the identified stock type has changed to a new identified stock type, or has been removed completely. Afterthe cancellation, you must adjust the inventory by posting a change of stock using the new identified stock type. Formore information, see the section on Existing Inventory Not Used in a Process above.
●
Change Before Adjustment Postings in Production and WarehousingYou can use an adjustment posting to correct an error in an original posting in the Production Control, InboundLogistics, Internal Logistics, and Outbound Logistics work centers. In the original line item in the adjustment screen,you can only enter an adjusted quantity. This means you post the correction with the identified stock relatedinformation from the original line item, regardless of the identified stock type.If you need to change the logistics area or identified stock ID, you need to use the split quantity feature and add anew line. Here the system checks against the actual identified stock type.For example, you confirm a put-away task (one step inbound) for a product with no identified stock ID for logisticsarea Bin_1 with 2 pieces. You then specify an identified stock type of batch where previously no type was specifiedfor the product. You now need to adjust the put-away quantity to 3 pieces. You have the following options:
● You can change the original line item by entering one piece in the adjusted quantity. This means you havenow put-away 3 pieces without an identified stock ID (two put-away originally, plus one on the adjustment).To adjust the inventory using the new identified stock type, you must post a change of stock. For moreinformation, see the section on Existing Inventory Not Used in a Process above.
50 © 2017 SAP SE or an SAP affiliate company. All rights reserved. • P U B L I CSAP Business ByDesign February 2017
Materials View
● You can change the original line item by entering minus 2 pieces in the adjusted quantity. The system nowshows that you did not put-away any products. Now you can add a new line item (using the Split Quantitiesfeature) for three pieces. For this, you must enter an identified stock ID, for example IS99, using the newidentified stock type. Now the system shows you put-away three pieces of the relevant product with identifiedstock ID IS99.
See AlsoIdentified Stock Management
2.2.3 Availability Checks
OverviewAvailability checks enable you, as a supply planner, to answer the question of whether or not a requested quantityof a product is available at a certain place at a certain point in time. Confirmations as a result of these checks notonly give a reliable answer to this question, they are also required for the follow-on processes in logistics execution.Providing a reliable delivery date at the very time when a quote or order is entered in the system, helps you to improvecustomer satisfaction.The system allows you to check the availability for sales orders, service orders, stock transfer orders, project stockorders, and sales quotes.You can access the availability check function from the following locations:
● Sales Quote view of the New Business work center ● Sales Orders view of the Sales Orders work center ● Service Order Processing view of the Service Orders work center ● Customer Demand view of the Outbound Logistics Control work center or the Supply Planning work center ● Confirmation Update Runs view of the Outbound Logistics Control work center or the Supply Planning work
center
Availability Check MethodsOn the Availability Confirmation tab of the Materials view in the Product Development work center, you specify howyou want the system to check the availability for a product, that is, you decide which availability check method youwant to use. You can enter the following:
● A goods issue processing timeThis time is the lead time required for preparing the shipment of goods in the warehouse. It is taken intoaccount during scheduling. Note that the working day calendar and the operating hours of the ship-fromlocation are also considered for the goods issue processing time. If you do not enter anything here, the systemuses a goods issue processing time of zero for scheduling.
● An availability check scope with or without an availability check horizonThese settings specify which types of supply the system considers when trying to match a demand.
● A replenishment lead time with or without an availability check scope and availability check horizonThis time specifies the maximum length of time required to produce or procure a product.
If you do not enter anything on the Availability Confirmation tab, you specify that you are only interested in scheduleddates and do not want to match supply and demand.Note that you must make the settings in the product master for each planning area.
SAP Business ByDesign February 2017Materials View P U B L I C • © 2017 SAP SE or an SAP affiliate company. All rights reserved. 51
The following methods for checking the availability and determining a confirmation are available in the system: ● Availability checks based on scheduling
This check method results in the confirmation of the requested quantity on the date determined byscheduling. For more information, see Availability Checking Based on Scheduling.
● Availability checks with replenishment lead timeThis check method results in the confirmation of the requested quantity at the end of the replenishment leadtime. For more information, see Availability Checking with Replenishment Lead Time.
● Product availability checksThis check method results in the confirmation of the requested quantity or partial quantities by checking thecustomer demand against the supply. The following options are available: ○ Availability checks with availability check scope
The system matches the demand against the types of supply specified in the availability check scope.Examples for the types of supply would be stock, or stock and all receipts. For more information, seeAvailability Checking with Availability Check Scope.
○ Availability checks with availability check scope and horizonThe system matches the demand against the types of supply specified in the availability check scopewithin an availability check horizon. Examples for the types of supply would be stock, or stock and allreceipts. For more information, see Availability Checking with Availability Check Scope and AvailabilityCheck Horizon.
○ Availability checks with availability check scope, horizon, and replenishment lead timeThe system matches the demand with the types of supply specified in the availability check scope withinan availability check horizon you specified. Examples for the types of supply would be stock, or stockand all receipts. Beyond the check horizon, the system creates or updates the confirmation based onthe replenishment lead time you specified. For more information, see Availability Checking withAvailability Check Scope, Availability Check Horizon, and Replenishment Lead Time.
○ Confirmation update runsUsually, you check the availability at the very moment when a quote or order is created in the system.As an alternative, you can schedule confirmation update runs to check the availability for a large numberof different demand categories, such as sales orders for a specific product category or any demand froma specific customer. For more information, see Confirmation Update Run.
● Availability checks in third-party order processing scenariosThis check method results in the confirmation of the requested quantity based on the supplier lead time. Formore information, see Availability Checking in Third-Party Order Processing Scenarios.
● Availability checks for complete delivery ordersThe system checks and aligns the availability of all items of a delivery group in a complete delivery order. Formore information, see Availability Checks for Complete Delivery Orders.
Irrespective of the availability check method you choose, the system always carries out ship-from determination fora customer demand to determine possible sources of supply and schedules the demand to determine the dates thatare required to plan the goods delivery. Starting from the requested delivery date, the system takes into accountthe shipping duration to determine the requested shipment date and uses the goods issue processing time todetermine the requested execution start date. For more information, see Ship-From Determination and ShipmentScheduling for Customer Demand.
Sales/Service Order SettingsThe delivery rule settings made in the sales order or service order screen for each order item affect the result of theavailability check as they restrict whether one or more confirmations may be created. The following options areavailable:
52 © 2017 SAP SE or an SAP affiliate company. All rights reserved. • P U B L I CSAP Business ByDesign February 2017
Materials View
● Multiple DeliveriesThis is the system’s default setting for sales orders. More than one delivery may be sent to the customer, thismeans that the number of confirmations is not restricted. The requested delivery date does not have to bemet, and the delivery may comprise the requested quantity or only part of the requested quantity.
● Single DeliveryOnly one delivery may be sent to the customer, this means that only one confirmation is created. Therequested delivery date does not have to be met and the delivery may comprise the requested quantity oronly part of the requested quantity.
● Single Delivery – Full QuantityThis is the system’s default setting for service orders. Only one delivery may be sent to the customer, thismeans that only one confirmation is created. The requested delivery date does not have to be met but thedelivery must include the requested quantity. If this is not possible, the system issues a confirmation withzero quantity.
● Single On-Time DeliveryOnly one delivery may be sent to the customer, this means that only one confirmation is created. Therequested delivery date has to be met, but the delivery may comprise less than the requested quantity.
● Single On-Time Delivery - Full QuantityOnly one delivery may be sent to the customer, this means that only one confirmation is created. Therequested quantity has to be delivered at the requested delivery date. If this is not possible, the system issuesa confirmation with zero quantity.
Note that you can display the Simulated Confirmation Schedule hidden column for any of the “single” delivery rules.It simulates the earliest delivery date and quantity for each item to show earlier possible delivery dates.In addition, a delivery priority (Immediate, Urgent, Normal, or Low) may be assigned to a sales order. The confirmationupdate run considers the delivery priority when sorting the customer demand to be checked.If a sales order has delivery priority Immediate, everything that the system confirmed up to today may be releasedto outbound logistics right away.
Project Stock Order SettingsThe delivery rule settings made in the project stock order screen for each order item affect the result of the availabilitycheck as they restrict whether one or more confirmations may be created. The following options are available:
● Multiple DeliveriesThis is the system’s default setting for project stock orders. More than one delivery may be sent to thecustomer, this means that the number of confirmations is not restricted. The requested delivery date doesnot have to be met, and the delivery may comprise the requested quantity or only part of the requestedquantity.
Working with Availability ChecksStarting from the requested delivery date given by the customer, the system determines the confirmed deliverydate. Depending on the availability check method you use, the system takes into account different criteria to calculatethis date.A traffic-light system helps you to find out easily if the requested quantity of the product your customer ordered isavailable on the requested date. The colors displayed for the availability status of each customer demand itemprovide the following information:
● Green: The required quantity is fully confirmed on time. ● Yellow: The required quantity is partially confirmed or confirmed on a later date than requested.
SAP Business ByDesign February 2017Materials View P U B L I C • © 2017 SAP SE or an SAP affiliate company. All rights reserved. 53
● Red: The required quantity cannot be confirmed at all (confirmation with zero quantity) or an error occurred,for example, missing transport lane.
● Gray: Availability check was not performed, for example, if the sales order data is inconsistent.
If the requested delivery date is not entered in the sales order, service order, stock transfer order, project stockorder, or sales quote, the availability status is determined based on whether or not the requested quantity is available.When the order is saved, the system creates a customer demand that you can see in the Customer Demand view ofthe Outbound Logistics Control work center or Supply Planning work center. Schedule lines for the individual orderitems provide more detailed information about the dates and quantities that are requested, confirmed, released, notconfirmed, or fulfilled. At the same time, you can monitor the confirmed schedule lines as due deliveries in the DeliveryDue List view of the Outbound Logistics Control work center. When you release the customer demand or due delivery,a delivery proposal is created, which you can see in the Delivery Proposals view of the Outbound Logistics work center.The warehouse manager can then create a warehouse request for the delivery proposal or post a goods issue.
Changing the Result of Availability ChecksIf you want to change the result of the availability checks manually, you can use the following functions:
● Select source of supplyIf you do not want to use the ship-from site or supplier that the system found in ship-from determination fora customer demand, you can select any of the alternative sources of supply displayed in the Order LogisticsDetails screen. A simulative availability check, that is, without confirming quantities was performed for thealternative sources listed here. If you select one of them, the system carries out a binding availability checkwith confirmed quantities. Note that the system keeps the source that you selected manually even if theavailability for this customer demand is checked again manually. If the availability is checked again in aconfirmation update run, the source you selected manually is also kept unless you select the Update Sourceof Supply checkbox on the Confirmation Update Run screen. For more information, see Confirmation UpdateRun.
● Force confirmationIn a forced confirmation, you confirm the requested quantity on the requested date for a specific customerdemand. If the requested date is in the past, the system confirms on the current date. Note that you shouldonly use this option if you are entirely sure that a demand can be confirmed as requested.You can reset a forced confirmation by canceling the confirmation or by checking the availability for thecustomer demand again. Note that forced confirmations are not included in confirmation update runs.
● Cancel confirmationThe system checks availability according to the “first come, first served” principle, which means that theavailable quantity is allocated to the customer demand that is checked first. If you want to give priority to amore recent sales order from a valuable customer, for example, you can cancel a confirmation for a lessimportant sales order. The system then creates a confirmation with a zero quantity for this sales order on therequested date. The quantity that becomes available in this way can now be allocated to the more recent salesorder when you check the availability again.
2.2.4 Batch Specific Quantity Conversion
OverviewA batch is a quantity of the material produced during a given production run. For many products, different batchesof the same product could have slightly different specifications due to changes in variables like temperature,component quality, variation in the production process, different production facilities, or different formulation forproducing the same product. A batch represents a homogeneous unit with unique specifications.
54 © 2017 SAP SE or an SAP affiliate company. All rights reserved. • P U B L I CSAP Business ByDesign February 2017
Materials View
Whether the business is a manufacturing facility producing a material that has different specifications for differentbatches or procures such a material, batch-specific quantity conversion helps to take these variations into accountin the business processes
Oil and lubricants are bulk products in liquid form that are processed and shipped in large quantities bythe oil industry. The quantity conversion between mass and volume varies considerably due to variationsin temperature, formulations, component quality, and production processes.Variation in density due to temperatureConversion between mass and volume depends on the temperature, resulting in the same mass ofproduct leading to a higher volume at a higher temperature.To take this variation into account, units of measurement for volume need to refer to the respectivetemperature and quantity conversions consider the respective conversion factor at that specifictemperature.Different trading unit of measures like L15, L20, L25, L30 are generally used to denote the volume of theoil. Eg:- L15 represents the volume of oil in liters at 15°C. L20 represents the volume of oil in liters at 20°C.Variation in density due to other factorsDifferent batches of the same product could have a slightly different density at the same temperature,In production processes for lubricants the density for an output product could vary for differentproduction batches, because of
● changing component quality ● variation in the production process, e.g. external conditions, different production facilities ● different formulation for producing the same product
To take variation in density due to all these factors into account, quantity conversion between mass andvolumes at dedicated temperatures has to be done taking into account batch-specific densities.
Batch based variation in the product is especially relevant for these industries: ● Oil and lubricants ● Chemicals ● Pharmaceuticals ● Food products ● Mill products ● Mining
PrerequisitesYou have
● Flagged the material as Batch Managed.The solution allows you to upload and maintain multiple quantity conversions on product level.
● Maintained a conversion factor for the identified stock.
Features
Create customer specific trading units of measurementYou can create customer specific trading units of measurement, and assign them to products as base unit/ planningunit/ purchasing unit/ inventory unit or sales unit.
SAP Business ByDesign February 2017Materials View P U B L I C • © 2017 SAP SE or an SAP affiliate company. All rights reserved. 55
You can maintain the quantity conversion between the new trading units of measurement and other valid units ofmeasurement in product master data on product ID level. You can also use the new units of measurement duringtasks confirming delivery, production, and internal logistic movement.
Quantity conversion at identified stock levelYou can mark your materials as batch dependent in the product master data.
Only the materials with the identified stock types as Batch, Lot, and Mandatory Specified Stock can be markedbatch dependent.
If the product is marked as batch managed, Batch Dependent column is available in the product details. If you havemaintained a conversion between a pair of units of measurement, you can use it for batch specific quantityconversions.For all products marked as Batch Managed, you can maintain conversion factors while creating or changing anidentified stock.
● The flag Batch Dependent is only enabled for the material that is batch managed. ● In product master, quantity conversions can be changed. But, batch dependent quantity conversions
cannot be deleted at the product level, if conversions are maintained at identified stock level. ● Cyclic quantity conversions are not supported ● If Batch Dependent flag is set for conversions in product master after identified stocks are already
created, then you have to enter quantity conversion at identified stock level whenever those identifiedstocks are used after the flag is turned on.
Production Bill of Material and Production Model setupYou can create production bill of material and production model in any unit of measurement that is supported in theproduct master, and for which a valid quantity conversion is maintained.
Production processDuring the production process, the solution allows you to capture the actual specifications of the goods produced.This ensures that the production tasks and the inventory are updated correctly. In the production process, theproduction proposal and production request are created in the planning unit of measurement of the product. Theproduction order also represents quantities in the units of measurement, as defined in the production model.
While creating production request from production proposal, if there is a change of units between the planningand production model, then the system uses the conversions in product master, even if the conversions ismarked ‘batch dependent’. This happens because at this point of time, the system does not know the actualbatch details.
When you save the task during confirmation, the unit of measurement used in production bill of material is used. Thesystem calculates the task open quantities based on batch dependent quantity conversion factors.
● For input product, if the quantity conversion is not maintained for the selected identified stock of the product,the system raises an error.
● For an output product, you have to enter a quantity conversion while creating a new identified stock.
56 © 2017 SAP SE or an SAP affiliate company. All rights reserved. • P U B L I CSAP Business ByDesign February 2017
Materials View
While creating identified stock during production receipt, the quantity conversion is not defaulted from theproduct master. You have to enter a quantity conversion manually.At the time of creating an identified stock, you can only enter one conversion. This identified stock can laterbe modified and new conversions can be put in as required by business.
Sell from stock processDuring “Sell from Stock” process, the ATP check and the requirement planning happens based on the default quantityconversion for the product because the system does not know which batch will be issued against the sales order.When issuing the product, actual quantity conversion is used.The resulting customer demand, outbound delivery proposal, and the warehouse request also mention the quantitiesin the units of measurement used for planning.In the warehouse tasks, when you enter the actual identified stock details, the planned quantity in the inventory unitof measurement is recalculated based on the actual quantity conversions maintained at the identified stock level.As the customers might receive a different quantity than what has been ordered due to the differences arising outof batch level fluctuations, the system helps you in invoicing the customers for the quantities that have been actuallydelivered.
Procure to pay processProcure to pay process involves the creation of purchase order and the subsequent receipt of goods against theorder. As the system does not know the batch specific details at the time of creating the purchase order, these detailsare taken into account while performing goods receipt. The system creates an invoicing for the quantity that hasactually been received based on the batch conversions.
Stock transfer processStock Transfer process involves the transfer of goods between the sites of the same company. This is generallyperformed to make sure that goods are available at every location of a company, and can be consumed by thebusiness as required. Stock transfer involves outbound from the sending side, and inbound to the receiving side.The system creates an outbound delivery at the sending side, and an inbound delivery notification at the receivingside. These documents include the batch specific information.In case the stock transfer is triggered from MRP planning, the corresponding stock transfer order specifies quantitiesin the planning unit of measurement. This unit might not refer to a volume at a certain temperature and thus thewarehouse execution team might not know the quantity that has to be shipped. In such a case, the system firstchanges the quantity in the stock transfer order to a quantity known in warehouse, e.g. L15.
Return to supplier processReturn to Supplier process involves the scenario where the business is not content with the goods received from thesupplier and wish to send the goods back to the supplier.For returning a batch managed material, the system makes it mandatory to enter batch level information. The goodscan belong to the same batch or to different batches. If you want to return goods from two different batches, thenthe system requires you to create two separate line items while returning.
Customer return processCustomer return process involves the scenario where the business receives the goods back from customer, sincethe latter is not satisfied with goods delivered by business.While creating a customer return notification against an outbound delivery, the system shows the batch originallyissued in the outbound delivery.
SAP Business ByDesign February 2017Materials View P U B L I C • © 2017 SAP SE or an SAP affiliate company. All rights reserved. 57
In case the goods were initially issued in two different batches referring to same outbound delivery item, then, whilecreating customer return notification, you have to create two different line items, if you are receiving both the batchesfrom customer.
Physical inventory managementPhysical inventory management, refers to the business process, where inventory adjustments shall be performedbased on the inventory count either at a product level or at a particular location.While filling the count details against the product in count document, you can enter any unit of measurement thatis supported at product master level. If the product is batch managed and conversion between the counting unit andthe inventory unit is batch dependent, then you have to maintain related conversions at batch level.
Internal logistics handlingInternal logistics handling refers to all ad-hoc inventory movements happening within the warehouse.You have to enter the identified stock, and maintain the quantity conversion at batch level if
● The product is batch managed ● Conversion between unit of measurement in which the transaction is happening and the inventory unit of
measurement is batch dependent ● There is a change of stock
Inventory overviewIn the stock overview, you can see the on-hand inventory in the inventory unit of measurement for all the batches.The system uses batch conversion to display quantities in alternative unit of measurement.If the inventory is displayed across all the batches, the system uses the product conversion to display the quantitiesin the alternative unit of measurement.
Limitations ● Batch valuation is not covered for batch specific quantity conversion. ● Batch specific quantity conversion is not available for the following scenarios:
○ Demand and Supply Planning ○ Third Party Order (TPOP) Process ○ Third Party Logistics (3PL) Process ○ ATP Check ○ Quality Management ○ Point of Sales Process ○ OTC Process ○ Materials in Projects Process
58 © 2017 SAP SE or an SAP affiliate company. All rights reserved. • P U B L I CSAP Business ByDesign February 2017
Materials View
2.3 Tasks
2.3.1 Create a Material Template and Create a Material from aTemplate
OverviewYou can create a material template for each product category. You can use these templates to create individualmaterials with the same basic data. You can also create multiple materials at once from the same material template.You can create a material template from one of the following:
● Product Data work center, Materials view, Material Templates subview. ● Product Data work center, Materials view, Materials subview.
You can also create a new material template by starting the New Material Template common task thatbelongs to the Product Data work center.
Procedure1. To create a material template, from the Material Templates subview in the Materials view of the Product
Data work center do the following:a. Click New and follow the instructions for creating a material.
For more information, see Create a Material in the Tasks section of the Materials Quick Guide[page 39].
If you create a new material template for a product category for which a material templatealready exists, the new material template overwrites the original template.
b. Click Save to save the new material template.2. Alternatively, to create a material template, from the Materials subview in the Materials view of the Product
Data work center do the following:a. Select the material from which you want to create a template for a product category.b. Click Edit , and in the Material screen that opens, click Set as Template .c. Click Save to save the new material template.
Procedure1. To create a material from a template, choose the Material Templates subview in the Materials view of the
Product Data work center.2. Select the material template you want to use as the basis for the new material or materials.3. Click Create from Template .4. In the dialog box enter the number of new materials you want to create.
SAP Business ByDesign February 2017Materials View P U B L I C • © 2017 SAP SE or an SAP affiliate company. All rights reserved. 59
5. For the new material or materials, if you want the processes such as purchasing, logistics, planning, availabilityconfirmation, sales, and valuation to be created with the status In Preparation, select the Create with InPreparation Status option.
6. For the new material or materials, if you want the processes such as purchasing such as purchasing, logistics,planning, availability confirmation, sales, and valuation to be created with the same status as the sourcematerial select the Create with Source Status option.
7. Click OK .8. You can now use the mass change function to enter or change information for all or some of the new materials.
For more information about the mass change function, see Mass Change of Materials [page 68].9. Click Save to save the new materials.
2.3.2 Assign Purchasing Details to a Material
OverviewYou can assign purchasing processes to a material by applying the appropriate status. You can also assign advancedpurchasing details such as a specific purchasing unit of measure, internal comments, purchasing notes, supplierinformation, and tax information.You can assign purchasing details to a material in one of the following views:
● Product Data work center, Materials view ● Product Development work center, Materials view ● Product and Service Portfolio work center, Products view
Procedure1. Choose the Materials subview in the Materials view of the Product Data work center.2. Select the material and click Edit to open the Material quick activity.3. Go to the Purchasing tab.4. Set the Status to In Preparation.
The material is available for purchasing processes only once the status is Active. For more informationabout statuses, see Assigning Statuses to a Material [page 44].
5. Optional: Maintain deviations from the standard tax rate.a. Click Maintain Non-Standard Tax Rates.b. Click Add Row .c. Enter the Country, Region, Tax Type, Tax Type Rate, and Tax Exemption Reason as required.
6. Optional: Enter advanced purchasing details for the material.a. Click View All and go to the Purchasing tab.b. By default, the base unit of measure is applied as the purchasing unit of measure. If necessary, select
a different Purchasing UoM.
60 © 2017 SAP SE or an SAP affiliate company. All rights reserved. • P U B L I CSAP Business ByDesign February 2017
Materials View
If the purchasing UoM is different than the base UoM, you must maintain a quantity conversionbetween them. For more information, see Add Quantity Conversions to a Material[page 67].
c. Enter any Internal Comments.d. Enter the Purchasing Notes that should display on purchase orders created for the material.e. If you buy the material from one or more suppliers, enter the Supplier Part Number and/or the Supplier
Lead Time for each supplier. A supplier part number is the number that the supplier uses to identifythe material, and the supplier lead time is the amount of time required to receive the material from thesupplier.
The supplier lead time grants the production planner the ability to easily determine when thematerial will be available again.
f. Enter any relevant non-standard Taxes.g. Enter any relevant Withholding Tax details.
7. To activate the material for purchasing processes, set the Status to Active.8. Click Save to save your changes.
2.3.3 Assign Logistics Details to a Material
OverviewYou can assign basic logistic details to a material to track and control its internal movement and delivery. You canalso assign advanced logistics details such as a specific inventory valuation unit of measure and additional productionand storage sites.You can assign logistics details to a material in one of the following views:
● Product Data work center, Materials view ● Product Development work center, Materials view ● Product and Service Portfolio work center, Products view
Procedure1. Choose the Materials subview in the Materials view of the Product Data work center.2. Select the material and click Edit to open the Material quick activity.3. Go to the Logistics tab and click Add Row .4. Select a Site and maintain a status for the material for this site. The initial status is In Preparation.
The material is available for logistics processes at each site only once the status is Active. For moreinformation about statuses, see Assigning Statuses to a Material [page 44].
5. Enter a Production Group and Storage Group for each site.6. Optional: Enter advanced logistics details for the material.
a. Click View All and go to the Logistics tab.
SAP Business ByDesign February 2017Materials View P U B L I C • © 2017 SAP SE or an SAP affiliate company. All rights reserved. 61
b. By default, the base unit of measure is applied as the inventory valuation unit of measure. If necessary,select a different Inventory Valuation UoM.
If the inventory valuation UoM is different than the base UoM, you must maintain a quantityconversion between them. For more information, see Add Quantity Conversions to a Material
[page 67].The inventory valuation UoM cannot be changed after the material has been activated forlogistics or valuation.
c. Optional: Enter an interval for cycle counting.7. To activate the material for logistics processes, set the Status to Active.8. Click Save to save your changes.
2.3.4 Assign Supply Planning Details to a Material
OverviewYou can assign basic supply planning details and a status to each planning area that is associated with a material.You can also assign advanced supply planning details such as a specific planning unit of measure and forecastinggroup as well as lot-sizing details, safety stock levels, reorder methods, and days of supply for each planning area.You can assign supply planning details to a material in one of the following views:
● Product Data work center, Materials view ● Product Development work center, Materials view ● Product and Service Portfolio work center, Products view
Procedure1. Choose the Materials subview in the Materials view of the Product Data work center.2. Select the material and click Edit to open the Material quick activity.3. Go to the Planning tab.4. Optional: Select the Forecasting Group for the material.5. Enter the basic details for each planning area.
a. In the Planning Areas table, click Add Row and select a Planning Area.Supply planning areas are defined in the Locations view of the Supply Chain Design Master Data workcenter. To define a location as a supply planning area, go to the General tab for the location and selectthe Logistics Relevance checkbox in the Roles area. For more information, see Create and Edit aLocation.
b. The initial status of the each planning area you add is In Preparation. Update the status as necessary.
The material is available for planning at the selected planning area only once the status isActive. For more information about statuses, see Assigning Statuses to a Material [page 44].
Select a Procurement Type and, if necessary, a Planned Delivery Lead Time.c. Select a Planning Procedure.
For some planning procedures, you must enter a Lot-Sizing Method. Likewise, for some lot-sizing methods, you must enter additional mandatory information.
62 © 2017 SAP SE or an SAP affiliate company. All rights reserved. • P U B L I CSAP Business ByDesign February 2017
Materials View
6. Optional: Enter advanced planning details for the material and its planning areas.a. Click View All and go to the Planning tab.b. By default, the base unit of measure is applied as the planning unit of measure. If necessary, select a
different Planning UoM.
If the planning UoM is different than the base UoM, you must maintain a quantity conversionbetween them. For more information, see Add Quantity Conversions to a Material[page 67].
c. Select the Forecasting Group for the material.d. In the Planning Areas table, select a planning area and edit its Group, Procurement, Planning, and
Monitoring details as required.7. To activate the material for planning at a planning area, set the Status to Active.8. Click Save to save your changes.
2.3.5 Assign Availability Confirmation Details to a Material
OverviewYou can assign basic availability confirmation details and a status to each planning area that is involved in checkingthe availability of a material. You can also assign advanced availability confirmation details such as a specific planningunit of measure as well as ship-from site determination and scheduling details.You can assign availability confirmation details to a material in one of the following views:
● Product Data work center, Materials view ● Product Development work center, Materials view ● Product and Service Portfolio work center, Products view
Procedure1. Choose the Materials subview in the Materials view of the Product Data work center.2. Select the material and click Edit to open the Material quick activity.3. Go to the Availability Confirmation tab.4. Enter the basic details for each planning area.
a. In the Planning Areas table, select a planning area.b. In the Status column, the status of the planning area is initially set to In Preparation. Update the status
as appropriate.
The material is available for availability confirmation at the selected planning area only once thestatus is Active. For more information about statuses, see Assigning Statuses to a Material[page 44].
c. Optional: Select the Availability Check Scope for the planning area.
For some availability check scopes, you must also enter an Availability Check Horizon.
d. Optional: Enter the Replenishment Lead Time for the planning area.
SAP Business ByDesign February 2017Materials View P U B L I C • © 2017 SAP SE or an SAP affiliate company. All rights reserved. 63
e. Optional: Select the Goods Issue Processing Time for the planning area.5. Optional: Enter advanced availability confirmation details for the material and its planning areas.
a. Click View All and go to the Valuation tab.b. By default, the base unit of measure is applied as the planning unit of measure. If necessary, select a
different Planning UoM.
If the planning UoM is different than the base UoM, you must maintain a quantity conversionbetween them. For more information, see Add Quantity Conversions to a Material[page 67].
c. In the Planning Areas table, select a planning area.d. Select the Availability Check Scope for the planning area.
For some availability check scopes, you must also enter an Availability Check Horizon.
e. Enter the Replenishment Lead Time for the planning area.f. If you do not want the planning area to be used as the default source of supply during sales order
creation, select the Disable Automatic Ship-From Determination check box.g. Select the Goods Issue Processing Time for the planning area.
6. To activate the material for availability confirmation at a planning area, set the Status to Active.7. Click Save to save your changes.
2.3.6 Assign Sales Details to a Material
OverviewYou can assign basic sales details and a status to each distribution chain that is involved in selling a material. Youcan also assign advanced sales details to each distribution chain, for example, a specific sales unit of measure,warranties, internal comments, sales notes, customer part numbers, and tax information.You can assign sales details to a material in one of the following views:
● Product Data work center, Materials view ● Product Development work center, Materials view ● Product and Service Portfolio work center, Products view
Procedure1. Choose the Materials subview in the Materials view of the Product Data work center.2. Select the material and click Edit to open the Material quick activity.3. Go to the Sales tab.4. Enter the basic details for each distribution chain.
a. In the Distribution Chains table, click Add Row .b. Define a distribution chain by entering a sales organization and a distribution channel.c. Select an Item Group. The item group is required for creating and processing sales and service
documents. The following product-related item groups are available:
64 © 2017 SAP SE or an SAP affiliate company. All rights reserved. • P U B L I CSAP Business ByDesign February 2017
Materials View
● CONS for spare parts with costs charged to a cost center ● NORM for standard products ● PICK for spare parts that are picked up by the service performer ● SHIP for spare parts that are pre-delivered to the customer
For more information on these item groups, see Services.d. In the Status column, the initial status is In Preparation. Update the status as appropriate.
The material is available for the selected distribution chain only once the status is Active. Formore information about statuses, see Assigning Statuses to a Material [page 44].
5. Optional: Maintain deviations from the standard tax rate.a. Click Maintain Non-Standard Tax Rates.b. Click Add Row .c. Enter the Country, Region, Tax Type, Tax Type Rate, and Tax Exemption Reason as required.
6. Optional: Enter advanced sales details for the material.a. Click View All and go to the Sales tab.b. In the Distribution Chains table, select a distribution chain.c. By default, the base unit of measure is applied as the sales unit of measure for the distribution chain.
If necessary, select a different Sales UoM.
If the sales UoM is different than the base UoM, you must maintain a quantity conversionbetween them. For more information, see Add Quantity Conversions to a Material[page 67].
d. Choose the Item Group for the distribution chain.e. Enter Warranty details.f. Enter any Internal Comments. You can enter multiple internal comments for each combination of
material and distribution chain.g. Enter any Sales Notes. You can enter one sales note for each combination of material and distribution
chain.
Sales notes are visible in the following follow-on documents: ● Sales order ● Pick list ● Delivery note
h. Enter any Customer Part Number details.i. Enter any relevant non-standard Taxes.
7. To activate the material for a distribution chain, set the Status to Active.
To ensure that financial postings run smoothly, you should activate the valuation process for theassociated company as well. For more information, see Assign Valuation Details to a Material[page 66].
8. Click Save to save your changes.
SAP Business ByDesign February 2017Materials View P U B L I C • © 2017 SAP SE or an SAP affiliate company. All rights reserved. 65

2.3.7 Assign Valuation Details to a Material
OverviewYou can assign basic valuation details and a status to each company and business residence that provides financialdata for a material. You can also assign advanced valuation details such as a specific inventory valuation unit ofmeasure and cost information for each relevant set of books.You can assign valuation details to a material in one of the following views:
● Product Data work center, Materials view ● Product Development work center, Materials view ● Product and Service Portfolio work center, Products view
Procedure1. Choose the Materials subview in the Materials view of the Product Data work center.2. Select the material and click Edit to open the Material quick activity.3. Go to the Valuation tab.4. In the Companies/Business Residences table, click Add Row to enter a company and business residence.
a. In the Details fields, you can edit the cost information of the default set of books assigned to thecompany and business residence.
b. Select the Account Determination Group for the material. The account determination group definesthe rules that determine which accounts are used for automatic postings. For more information, seeAutomatic Account Determination.
c. Select the Perpetual Cost Method. A perpetual cost method is required in order for the material to beposted in financial accounting. For more information, see Perpetual Cost Methods.
d. In the Status column, the initial status is In Preparation. Update the status as appropriate.
The material is available for the selected company/business residence only once the status isActive. For more information about statuses, see Assigning Statuses to a Material [page 44].
5. Optional: Enter advanced valuation details for the material and its companies/business residences.a. Click View All and go to the Valuation tab.b. By default, the base unit of measure is applied as the inventory valuation unit of measure. If necessary,
select a different Inventory Valuation UoM.
If the inventory valuation UoM is different than the base UoM, you must maintain a quantityconversion between them. For more information, see Add Quantity Conversions to a Material
[page 67].The inventory valuation UoM cannot be changed after the material has been activated for oneof the companies/business residences or after the material has been activated for logistics.
c. In the Companies/Business Residences table, select a company/business residence.d. Select the Account Determination Group for the material. The account determination group defines
the rules that determine which accounts are used for automatic postings. For more information, seeAutomatic Account Determination.
66 © 2017 SAP SE or an SAP affiliate company. All rights reserved. • P U B L I CSAP Business ByDesign February 2017
Materials View

e. Select the Perpetual Cost Method. A perpetual cost method is required in order for the material to beposted in financial accounting. For more information, see Perpetual Cost Methods.
f. You can update the cost information for each set of books assigned to the selected company/businessresidence. To do so, select the set of books and click Edit Cost . A set of books forms a complete andconsistent set of accounting data that is required for statutory reporting and creating financialstatements. For more information, see Set of Books.
When you edit the material later, if a new set of books has been assigned to the company/business residence, it automatically displays on the Valuation tab. However, you must thensave the material to ensure that the new set of books is applied to the material.
Cost changes are not recorded directly in the material. To view the complete history of costchanges, go to the Material Unit Costs view of the Inventory Valuation work center, select thematerial, and then click View Cost History . Note that this function is not available for the costtype Planned Cost.
6. To activate the material for a company/business residence, set the Status to Active.7. Click Save to save your changes.
2.3.8 Add Quantity Conversions to a Material
OverviewBy default, the base UoM (unit of measure) is also the unit of measure for the purchasing, logistics, planning,availability confirmation, sales, and valuation processes. If you select a different UoM for any process, you mustspecify the equivalent measurements between the base UoM and the different process UoM. For example, if thebase UoM is box and the sales UoM is crate, you might specify how many boxes there are for every crate.
To ensure proper calculations, the base UoM should be the smallest unit of measure for the material.If you change the base UoM after the material has been activated for any processes, you must specify theequivalent measurements between the old base UoM and the new base UoM.
You can add quantity conversions to a material in one of the following views: ● Product Data work center, Materials view ● Product Development work center, Materials view ● Product and Service Portfolio work center, Products view
Procedure1. Choose the Materials subview in the Materials view of the Product Data work center.2. Select the material and click Edit to open the Material quick activity.3. Click View All .4. In the Quantity Conversions table, click Add Row .5. Enter the equivalent quantities between two different units of measure.
a. In the Quantity column of the new row, enter one unit of measure and quantity.b. In the Corresponding Quantity column of the new row, enter the other unit of measure and quantity.
6. For each additional conversion, add another row and repeat the step above.
SAP Business ByDesign February 2017Materials View P U B L I C • © 2017 SAP SE or an SAP affiliate company. All rights reserved. 67
7. Click Save to save your changes.
2.3.9 Mass Change of Materials
OverviewYou can quickly update the general and business area details of multiple materials at once.You can carry out a mass change of materials in one of the following views:
● Product Data work center, Materials view and Material Templates view ● Product Development work center, Materials view ● Product and Service Portfolio work center, Products view
If you want to update the details of multiple materials that are based on the same material template, youcan easily identify and change these materials by going to the Material Templates subview, selecting therelevant material template, choosing Mass Change and following the procedure described below.
Procedure1. Choose the Materials subview in the Materials view of the Product Data work center.
The Mass Change quick activity is opened automatically when you use the Create from Templatefunction to create materials. For more information, see the section Create a Material Template andCreate a Material from a Template above.
2. Select the materials that you want to update and click Mass Change to open the Mass Change quick activity.3. In the Show list, select the type of information that you want to update.
When you select to show general information, each material is listed on a single row. However, whenyou select to show business area details, only the materials with those details are listed, and eachmaterial may be listed on multiple rows. For example, when showing planning details, a material thatis not assigned to any planning areas would not be listed, whereas a material that is assigned to twoplanning areas would be listed on two rows, one row for each planning area.
4. In the first row of the table, enter the information that you want to apply to some or all of the materials.5. To apply the information to only some of the materials, select the relevant materials, click
Apply Mass Change , and then choose Selected Items.To apply the information to all of the materials, click Apply Mass Change , and then choose All Items.
Using the Mass Change quick activity, you can also update the information of each material manually.You can make these changes directly in the row of a material.
6. You can also use Add Organization Data to add one or more organizations to one or more materials.a. Select the material or materials to which you want to add organization data.b. Click Add Organization Data and select the type of organization that you want to add to the material.c. In the dialog box, select one or more organizations and choose OK . A list is displayed with one line
for each combination of material and organization. You can now select the items to which you want to
68 © 2017 SAP SE or an SAP affiliate company. All rights reserved. • P U B L I CSAP Business ByDesign February 2017
Materials View
apply the change. To apply the information to only some of the materials, select the relevant materials,click Apply Mass Change , and then choose Selected Items. To apply the information to all of thematerials, click Apply Mass Change , and then choose All Items.
7. To save your changes and return to the Materials view, click Save and Close .
2.3.10 Create Materials Using Microsoft Excel®
OverviewYou can create materials by entering them in a predefined Microsoft Excel template and uploading them to the SAPBusiness ByDesign system.
PrerequisitesYou have installed the latest Add-In for Microsoft Excel. Depending on your solution set-up, you can do this from theSelf Services Overview in the Home work center, from the Download Center in the Application and UserManagement work center, or from the Download link that is available directly on the user interface.Also, the settings for your browser must be set correctly. You can check this by clicking Check My ComputerSettings on the logon screen.
StepsIn the SAP Business ByDesign system, in the Materials subview in the Materials view of the Product Data or ProductDevelopment work center, click New , then Material from Microsoft Excel.Get the Template
1. Select the template.Choose the template in the required language and click Download.
You can choose any language that you have selected during scoping. If you have selected only onelanguage during scoping, you will not get a selection of language versions to choose from.
2. Decide what you want to do with the template. Choose one of the following options: ● If you want to use the template only once, you can open the template without saving it. Click Open. ● If you want to save the template so that you can use it again, choose a location to save the file to, enter
an appropriate file name, and click Save. Then click Open.
If you have previously downloaded and saved this template on your computer, navigate to the location whereyou have saved the template, and open it.
Log on to the solution from Microsoft Excel1. In the SAP Add-In ribbon in Microsoft Excel, click Logon.
If the SAP Add-In ribbon is not displayed, check to make sure that the Add-In for Microsoft Excel hasbeen installed correctly (see Prerequisites in this document).
A dialog box opens where you can enter the logon details. The system URL is proposed automatically. Thesystem URL is the URL of the system that you are working with.
SAP Business ByDesign February 2017Materials View P U B L I C • © 2017 SAP SE or an SAP affiliate company. All rights reserved. 69

2. Enter your user ID and your password, and click Logon.
After initial logon to the system, the ribbon text is changed from SAP Add-In to the name of yoursolution.
Enter Details in the Microsoft Excel Template
Note the following: ● The Microsoft Excel template is presented with a number of rows where you can enter or copy your
data. If you need more, add the number of rows you need before you start entering or copying yourdata.
● Ensure that mandatory fields (those marked with an asterisk) are filled. ● To help you fill in the details:
○ Some fields have dropdown lists. ○ In some fields you can search the system for data, for example, countries. Place the cursor on the
field, and click Lookup in your solution's tool bar or ribbon to search the system. A search field isavailable in the Lookup dialog box that appears. When you start to type text in the search field, therelevant entries are filtered in the ID and Description columns, meaning that you do not have toscroll through the whole list. If the Lookup button is not active in the ribbon or toolbar, then it isnot possible to perform a search.
Enter the general and business area details for the materials that you want to create. Enter each material in a singlerow.
If internal number ranges have been configured for materials, you do not have to enter material IDs manually;when you save the materials to the system, material IDs will be entered automatically.For more information, see Configuration: Number Ranges.
Save Your Data1. After you have finished entering all the data, save the Microsoft Excel file.2. Click Save Data to .
A dialog box opens, informing you that the data is being saved to the solution.After the upload, a message informs you that your data has been saved in the solution.
If you do not provide all the required information, or if you provide incorrect information, somerecords will not be saved. Error messages will highlight the problems so that you can correct themand save the data again.
3. You can then log off by clicking Logoff .
ResultThe new materials are saved in the SAP Business ByDesign system and added to the list in the Materials view.If you need to make changes to these materials, you can change them in the Microsoft Excel template and uploadthem again to the SAP Business ByDesign system, or you can change them directly in the system.
After a material is changed directly in the SAP Business ByDesign system, you can no longer use the MicrosoftExcel template to update that material.
70 © 2017 SAP SE or an SAP affiliate company. All rights reserved. • P U B L I CSAP Business ByDesign February 2017
Materials View
You should not use the Microsoft Excel template to remove or change the following information: ● Logistics: Production group sites and storage group sites ● Planning: Planning areas ● Availability Confirmation: Planning areas ● Sales: Sales organizations and distribution channels ● Valuation: Companies and business residences
If you remove such information from this Microsoft Excel template and then upload the material, theinformation will nonetheless remain assigned to the material. If you change such information in thisMicrosoft Excel template and then upload the material, the changed information will be assigned to thematerial, but the previous information will remain assigned as well. Therefore, to make such changes, youshould rather access the material directly in the system.
2.3.11 Export Business Data Using Microsoft Excel®
OverviewYou can export reports and worklists to Microsoft Excel® documents. You can use these documents for furtheranalysis, and in some cases, edit and upload them to the solution.You can export data from a report or from a worklist.
Prerequisites ● You have installed the latest Add-In for Microsoft Excel®. Depending on your solution set-up, you can do this
from the: ○ Self Services Overview in the Home work center ○ Download Center in the Application and User Management work center ○ Download link that is available directly on the user interface
● The settings for your browser must be set correctly. You can review the information about computer settingsby clicking Check My Computer Settings on the logon screen.
● You must be authorized to perform an export to Microsoft Excel®.
Procedure1. Go to the screen with the data you want to export.2. Depending on the type of data, choose one of these options:
● For a report, you can either export a chart or a table. To do so, select the report, and click Switch toChart or Switch to Table.
● For a worklist, select the worklist and click Go.3. Click Export , then choose To Microsoft Excel.4. Optional: Personalizing your excel export
1. To select the columns in your exported excel, do the following:a. In the title bar, click Personalize This screen
SAP Business ByDesign February 2017Materials View P U B L I C • © 2017 SAP SE or an SAP affiliate company. All rights reserved. 71
b. In the side panel, select Display Settings.c. In the Display Settings dialog box, you can export all the columns in the view by selecting All in
the Export Columns field
The default value for this field is Visible, which exports only the currently displayed columns.
2. To select the language for your excel export, do the followinga. In the Display Settings dialog box, set the Language Selection field to Show and click OK
b. Click Save .c. Click Export , then choose To Microsoft Excel®d. Select a language in the dialog box that opens.
The column selection preference in this dialog box allows you to override the personalizedsetting. This selection is valid for the current export only.
5. Select the template in the dialog box that is displayed.
● If there is only one template that has the logged in language variant, then the export will beperformed in the logged in language, and no user interaction is required.
● If there is only one template in the system for this export scenario, but the logged in languagevariant is not available, then export will be performed in the English language.
● If there is more than one template in the system for this export scenario, the Template List dialogbox is displayed. In this dialog, you can select the Microsoft Excel template that you want to usefor the export. The template will dictate how your exported data will be formatted. The MicrosoftExcel version that is relevant for each template is displayed.
6. Click Download.7. A message shows that you can open or save the file which contains the data that you have just exported from
the solution. Click Open or Save depending on what you want to do with the exported data.Depending on whether you click Open or Save, there are two possible results:
● If you click Open, a worksheet opens with the data in Microsoft Excel. The file has a temporary name,but it is not saved. You can use all the functions of Microsoft Excel to organize the data and to savethat worksheet.
● If you click Save, a Save As dialog box opens. You can specify an appropriate file name and a locationto save the exported Microsoft Excel file to. A message will inform you when the download hascompleted successfully.You can later navigate to the location where you have saved the template and open it .
72 © 2017 SAP SE or an SAP affiliate company. All rights reserved. • P U B L I CSAP Business ByDesign February 2017
Materials View
3 Services View
3.1 Quick Guide for Services (in Product Data)
It is important for you to have a deep understanding of all the services your company offers. Thus, the Services viewprovides a central entry point for viewing all the services in your system, creating new services, and maintainingimportant service-related information.You can access this view from the Product Data work center.
Business Background
Assigning Statuses to a ServiceA service can be involved in various business processes. For this reason, a service is divided into sections forpurchasing, sales, and valuation. Each section includes details specific to the business process as well as one ormore statuses indicating the completeness or readiness of the service for that process. Therefore, when creating anew service, it is important to apply the correct statuses to ensure that the relevant processes are assigned and thatdata in these areas is kept up-to-date.For more information, see Assigning Statuses to a Service [page 76]
Cost Center Management AccountingCost Center Management Accounting provides functions for managing and allocating overhead costs. Examples ofcosts that are generally classified as overhead include operating supplies, wages and salaries, social securitycontributions, and depreciation.In contrast to direct costs, overhead costs cannot be traced directly to a cost object but must first be accumulatedon the cost centers that requested the services. At the end of each period, you use the overhead distribution andoverhead absorption functions to credit the cost centers for the accumulated overhead and allocate it to the costobjects.For more information, see Cost Center Management Accounting [page 77].
Service Cost Allocation to Cost ObjectsWhen products are manufactured and delivered to customers, costs are incurred by the cost centers for the servicesand resources required to perform the work. A resource is a production factor such as labor, equipment, or vehicles,while a service is the activity performed by a resource.Production workers enter the consumption quantities of the services and resources into the system by means ofactivity confirmations. The confirmations result in the allocation of direct costs from the cost centers to the salesorders, service orders, projects, or production lots that requested the work.Service cost allocation is based on the resource and service cost rates defined in the Cost and Revenue work center,Resource Cost Rates and Service Cost Rates views.For more information, see Service Cost Allocation to Cost Objects [page 79].
SAP Business ByDesign February 2017Services View P U B L I C • © 2017 SAP SE or an SAP affiliate company. All rights reserved. 73
Pricing in Customer Relationship ManagementPricing is based on price master data such as price lists and discount lists, which are used to automatically calculatepricing within all business documents for sales and service processes. A predefined pricing procedure is used todetermine the gross value the customer has to pay for certain products or services to be received on a certain dayat a certain place. The pricing procedure consists of price components, such as list price, discounts, surcharges,freights, taxes, and costs. The order of these price components is essential for the calculation of the total value.For more information, see Pricing in Customer Relationship Management [page 25].
Tax DeterminationAs a rule, companies are legally required to calculate taxes on products that they buy or sell, and to levy these taxesfrom their customers. After the products have been provided, the taxes must be declared and levied to the respectivetax authorities. The system supports you by providing a substantially automated tax calculation for the following taxtypes: Value-Added Tax (VAT), Sales and Use Tax, Withholding Tax. The system also provides a reporting tool thatgives you effective control over your obligatory declaration of these taxes.For more information, see Tax Determination [page 5].
Tasks
Create a Service1. Choose the Services subview in the Services view of the Product Data work center.2. Click New and then Service to open the New Service quick activity.3. Enter the Service ID.
If internal number ranges have been configured for services, you cannot enter a service ID manually;when you save the service, the system assigns the next available ID automatically.For more information, see Configuration: Number Ranges.
4. Enter the Service Description.For information about descriptions in other languages, see Add Service Descriptions in Other Languagesbelow.
5. Select the Product Category to which you want to assign the new service.6. In the Base UoM field, enter the default unit of measure for the service. It will be used for purchasing, sales,
and valuation unless different units of measure are selected manually for those processes.
The base UoM should be the smallest unit of measure for the service. Therefore, if you select differentunits of measure for any processes, make sure that the base UoM is always smaller.
7. Optional: Enter advanced general details for the service.a. Click View All .b. To indicate that the service should be treated as an expense for financial purposes, select the Expense
Indicator check box.
The check box is grayed out as soon as you save the service.
c. To add, delete, or replace a product image for the service, click Image and select the appropriateoption.
8. Click Save to save your changes.
74 © 2017 SAP SE or an SAP affiliate company. All rights reserved. • P U B L I CSAP Business ByDesign February 2017
Services View
Create a Service Template and Create a Service from a TemplateFor more information about this task, see here [page 80].
Assign Purchasing Details to a ServiceFor information about this task, see here [page 81].
Assign Sales Details to a ServiceFor information about this task, see here [page 82].
Assign Valuation Details to a ServiceFor information about this task, see here [page 83].
Add Quantity Conversions to a ServiceFor information about this task, see here [page 84].
Add Service Descriptions in Other Languages1. Choose the Services subview in the Services view of the Product Data work center.2. Select the service and click Edit to open the Service quick activity.
The Service Description field displays the description of the service in your logon language.3. Click View All .4. At the top of the General tab, click Other Languages .5. To add a description of the service in another language, click Add Row .
If you do not maintain a service description for a language, a description will not appear on businessdocuments in that language.
6. In the new row, select a Language and enter the Service Description.7. In the Details section, enter additional information about the service and click Save .
Mass Change of ServicesYou can quickly update the general and business area details of multiple services at once. For information about thistask, see here [page 85].
Create Services Using Microsoft Excel®You can create services using a predefined Microsoft Excel template. For information about this task, see here[page 86].
Export Services to Microsoft ExcelYou can export services to Microsoft Excel. For more information about this task, see here [page 71].
SAP Business ByDesign February 2017Services View P U B L I C • © 2017 SAP SE or an SAP affiliate company. All rights reserved. 75
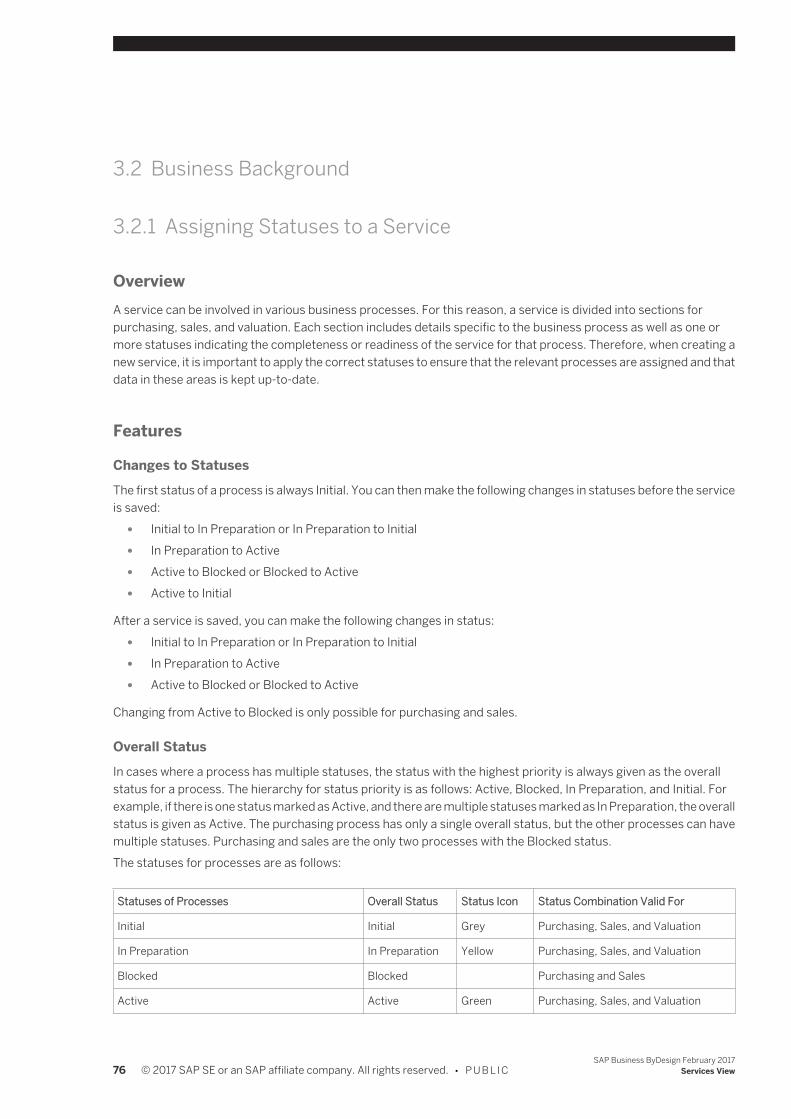
3.2 Business Background
3.2.1 Assigning Statuses to a Service
OverviewA service can be involved in various business processes. For this reason, a service is divided into sections forpurchasing, sales, and valuation. Each section includes details specific to the business process as well as one ormore statuses indicating the completeness or readiness of the service for that process. Therefore, when creating anew service, it is important to apply the correct statuses to ensure that the relevant processes are assigned and thatdata in these areas is kept up-to-date.
Features
Changes to StatusesThe first status of a process is always Initial. You can then make the following changes in statuses before the serviceis saved:
● Initial to In Preparation or In Preparation to Initial ● In Preparation to Active ● Active to Blocked or Blocked to Active ● Active to Initial
After a service is saved, you can make the following changes in status: ● Initial to In Preparation or In Preparation to Initial ● In Preparation to Active ● Active to Blocked or Blocked to Active
Changing from Active to Blocked is only possible for purchasing and sales.
Overall StatusIn cases where a process has multiple statuses, the status with the highest priority is always given as the overallstatus for a process. The hierarchy for status priority is as follows: Active, Blocked, In Preparation, and Initial. Forexample, if there is one status marked as Active, and there are multiple statuses marked as In Preparation, the overallstatus is given as Active. The purchasing process has only a single overall status, but the other processes can havemultiple statuses. Purchasing and sales are the only two processes with the Blocked status.The statuses for processes are as follows:
Statuses of Processes Overall Status Status Icon Status Combination Valid For
Initial Initial Grey Purchasing, Sales, and Valuation
In Preparation In Preparation Yellow Purchasing, Sales, and Valuation
Blocked Blocked Purchasing and Sales
Active Active Green Purchasing, Sales, and Valuation
76 © 2017 SAP SE or an SAP affiliate company. All rights reserved. • P U B L I CSAP Business ByDesign February 2017
Services View
Initial and In Preparation In Preparation Yellow Sales and Valuation
Initial and Blocked Blocked Red Sales
Initial, In Preparation, and Blocked Blocked Red Sales
Initial, In Preparation, and Active Active Green Sales and Valuation
Initial, In Preparation, Blocked and Active Active Green Sales
In Preparation and Blocked Blocked Red Sales
In Preparation and Active Active Green Sales and Valuation
In Preparation, Blocked, and Active Active Green Sales
Blocked and Active Active Green Sales
3.2.2 Cost Center Management Accounting
OverviewCost Center Management Accounting provides functions for managing and allocating overhead costs. Examples ofcosts that are generally classified as overhead include operating supplies, wages and salaries, social securitycontributions, and depreciation.In contrast to direct costs, overhead costs cannot be traced directly to a cost object but must first be accumulatedon the cost centers that requested the services. At the end of each period, you use the overhead distribution andoverhead absorption functions to credit the cost centers for the accumulated overhead and allocate it to the costobjects.Cost Center Management Accounting enables you to:
● Accumulate overhead on the responsible cost centers ● Distribute the overhead from support cost centers to primary cost centers based on cause-and-effect criteria ● Credit the cost centers for the services performed and debit the cost objects ● Credit the cost centers by applying overhead rates to the cost objects ● Use reports to monitor the efficiency of your cost centers
PrerequisitesManagement Accounting is activated in your solution configuration. To find this option, go to the BusinessConfiguration work center and choose the Implementation Projects view. Select your implementation project andclick Edit Project Scope . In the Scoping step of the project, ensure that the Management Accounting businesspackage is selected within the Financial and Management Accounting business area.
Cost CentersYou create organizational units and set up organizational structures in the Organizational Management work center,Org Structures view. Each organizational unit has attributes that define its legal, managerial, and reportingsignificance.
SAP Business ByDesign February 2017Services View P U B L I C • © 2017 SAP SE or an SAP affiliate company. All rights reserved. 77

For the purposes of management accounting, you need to have at least one organizational unit with the CostCenter attribute. Normally, however, you define most of your departments as cost centers to be able to monitor theirefficiency.Conceptually, you can divide your cost centers into primary cost centers and support cost centers:
● Primary cost centersA primary cost center belongs to one of the functional cost pools of your organization, such as materialsmanagement, production, administration, sales, or research and development.
● Support cost centersSupport cost centers provide services for other cost centers or serve as overhead cost collectors.
A distinction between primary cost centers and support cost centers cannot be defined as such in the system.
Functions in Cost Center Management Accounting ● Accumulation of overhead
You accumulate overhead on support cost centers or primary cost centers in the following ways: ○ By assigning the overhead to cost centers when entering invoices ○ By assigning the overhead to the master cost center of the employee in payroll ○ By assigning the overhead to the master cost center of the asset when posting depreciation
If overhead is assigned to the wrong cost center, you either need to correct the business transactionor create an adjusting entry in the General Ledger work center.
● Distribution of overhead between cost centersSupport cost centers distribute their overhead costs to primary cost centers based on allocation bases. Thedistribution function credits the support cost centers and debits the primary cost centers.Distribution can be based on either the original account (primary cost distribution) or special clearingaccounts (secondary cost allocation).For more information, see Overhead Distribution Between Cost Centers.
● Allocation of service costs to cost objectsThe resources assigned to cost centers provide services for the production of cost objects. The available costobjects are: ○ Sales orders ○ Service orders ○ Direct cost projects ○ Production lots
Service allocation debits the receivers of the services and credits the cost centers providing the services. Youcan define the cost rates for services in the resource and service master data.Since these costs can be traced directly to individual cost objects, they are direct costs of the cost object. Forexample, the costs incurred by a particular production lot or the costs for external or internal services incurredfor a direct cost project are direct costs.For more information, see Service Cost Allocation to Cost Objects [page 79]
● Absorption of overhead by cost objectsYou can define overhead rates based on the direct costs incurred by the cost objects and the overheadincurred by the cost centers. When the overhead rates are applied, the cost objects are debited with theirshare of the overhead and the cost centers are credited.For more information, see Overhead Absorption by Cost Objects.
● Reports
78 © 2017 SAP SE or an SAP affiliate company. All rights reserved. • P U B L I CSAP Business ByDesign February 2017
Services View
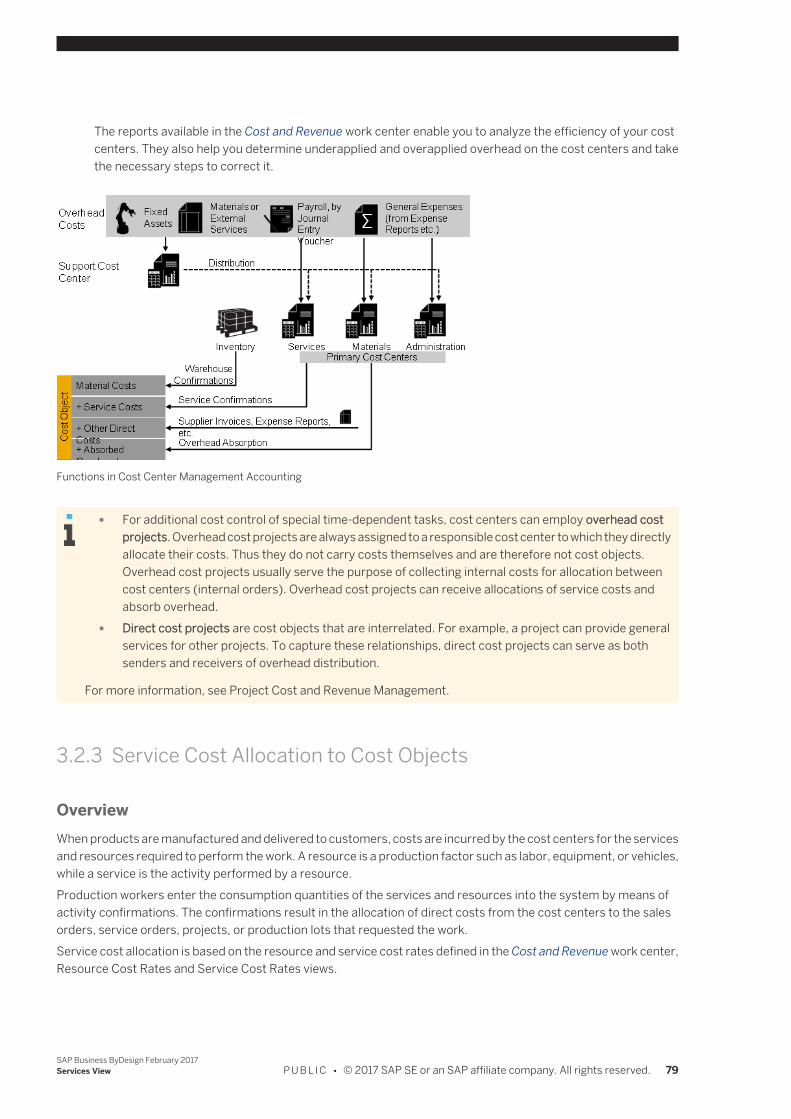
The reports available in the Cost and Revenue work center enable you to analyze the efficiency of your costcenters. They also help you determine underapplied and overapplied overhead on the cost centers and takethe necessary steps to correct it.
Functions in Cost Center Management Accounting
● For additional cost control of special time-dependent tasks, cost centers can employ overhead costprojects. Overhead cost projects are always assigned to a responsible cost center to which they directlyallocate their costs. Thus they do not carry costs themselves and are therefore not cost objects.Overhead cost projects usually serve the purpose of collecting internal costs for allocation betweencost centers (internal orders). Overhead cost projects can receive allocations of service costs andabsorb overhead.
● Direct cost projects are cost objects that are interrelated. For example, a project can provide generalservices for other projects. To capture these relationships, direct cost projects can serve as bothsenders and receivers of overhead distribution.
For more information, see Project Cost and Revenue Management.
3.2.3 Service Cost Allocation to Cost Objects
OverviewWhen products are manufactured and delivered to customers, costs are incurred by the cost centers for the servicesand resources required to perform the work. A resource is a production factor such as labor, equipment, or vehicles,while a service is the activity performed by a resource.Production workers enter the consumption quantities of the services and resources into the system by means ofactivity confirmations. The confirmations result in the allocation of direct costs from the cost centers to the salesorders, service orders, projects, or production lots that requested the work.Service cost allocation is based on the resource and service cost rates defined in the Cost and Revenue work center,Resource Cost Rates and Service Cost Rates views.
SAP Business ByDesign February 2017Services View P U B L I C • © 2017 SAP SE or an SAP affiliate company. All rights reserved. 79
Valuation of ConsumptionConsumption is valued based on the cost rates for the resources or services consumed. To enable the system tofind the appropriate cost rates, activity confirmations must always specify a resource. A service can optionally bespecified in addition.Whenever activity confirmations are entered into the system, the consumptions are valued automatically by applyingthe cost rate to the quantities entered. If cost rates have been maintained for the resources, the system uses theserates to value the consumptions. If no cost rate for a resource exists, the service cost rates are used instead.
Allocation of Costs to Requesting EntitiesResources are always associated with a cost center. The cost center provides services for cost objects that requestthem. The following cost objects can request services:
● Sales orders ● Service orders ● Projects ● Production lots
In each case, the cost object requesting the work is charged with the costs incurred, and the cost center where thework was performed is credited.
Account DeterminationThe accounts to which the relevant costs are posted are always selected based on the account determination groupfor the service. If no service was specified, the default account determination defined in business configuration isused.
See AlsoService Cost Allocation to Sales and Service OrdersService Cost Allocation to ProjectsService Cost Allocation to Production Lots
3.3 Tasks
3.3.1 Create a Service Template and Create a Service from a Template
OverviewYou can create a service template for each product category. You can use these templates to create individualservices with the same basic data. You can also create multiple services at once from the same service template.
Procedure1. To create a service template, choose the Service Templates subview in the Services view of the Product
Data work center.2. Click New and follow the instructions above for creating a service.
80 © 2017 SAP SE or an SAP affiliate company. All rights reserved. • P U B L I CSAP Business ByDesign February 2017
Services View
If you create a new service template for a product category for which a service template alreadyexists, the new service template overwrites the original template.
3. Click Save to save the new service template.
Procedure1. To create a service from a template, choose the Service Templates subview in the Services view of the Product
Data work center.2. Select the service template you want to use as the basis for the new service or services.3. Click Create from Template .4. In the dialog box enter the number of new services you want to create and click OK .5. You can now use the mass change function to enter or change information for all or some of the new services.
For more information about the mass change function, see Mass Change of Services [page 85].6. Click Save to save the new Services.
3.3.2 Assign Purchasing Details to a Service
OverviewYou can assign purchasing processes to a service by applying the appropriate status. You can also assign advancedpurchasing details such as a specific purchasing unit of measure, internal comments, purchasing notes, supplierservice numbers, and tax information.You can assign purchasing details to a service in the Product Data work center under Services.
Procedure1. Choose the Services subview in the Services view of the Product Data work center.2. Select the service and click Edit to open the Service quick activity.3. Go to the Purchasing tab.4. Set the Status to In Preparation.
The service is available for purchasing processes only once the status is Active. For more informationabout statuses, see Assigning Statuses to a Service [page 76].
5. Optional: Maintain deviations from the standard tax rate.a. Click Maintain Non-Standard Tax Rates.b. Click Add Row .c. Enter the Country, Region, Tax Type, Tax Type Rate, and Tax Exemption Reason as required.
6. Optional: Enter advanced purchasing details for the service.a. Click View All and go to the Purchasing tab.b. By default, the base unit of measure is applied as the purchasing unit of measure. If necessary, select
a different Purchasing UoM.
SAP Business ByDesign February 2017Services View P U B L I C • © 2017 SAP SE or an SAP affiliate company. All rights reserved. 81
If the purchasing UoM is different than the base UoM, you must maintain a quantity conversionbetween them. For more information, see Add Quantity Conversions to a Service[page 84].
c. Enter any Internal Comments.d. Enter the Purchasing Notes that should display on purchase orders created for the service.e. If you buy the service from one or more suppliers, enter the Supplier Service Number details.f. Enter any relevant non-standard Taxes.g. Enter any relevant Withholding Tax details.
7. To activate the service for purchasing processes, set the Status to Active.8. Click Save to save your changes.
3.3.3 Assign Sales Details to a Service
OverviewYou can assign basic sales details and a status to each distribution chain that is involved in selling a service. You canalso assign advanced sales details to each distribution chain, for example, a specific sales unit of measure, internalcomments, sales notes, customer service numbers, and tax information.You can assign sales details to a service in the Product Data work center under Services.
Procedure1. Choose the Services subview in the Services view of the Product Data work center.2. Select the service and click Edit to open the Service quick activity.3. Go to the Sales tab.4. Enter the basic details for each distribution chain:
a. In the Distribution Chains table, select a distribution chain.b. Select the Item Group for the distribution chain. The item group is required for creating and processing
service orders. Select one from the following service-related item groups: ● PBFP for fixed price services (project-based) ● PBTM for services sold on a time and material basis (project-based) ● PXAT for expenses invoiced on a time and material basis (project-based) ● PXFX for fixed price expenses (project-based) ● SECO for services sold on a time and material basis ● SEFL for fixed price services without tracking time and cost ● SERV for fixed price services with tracking time and cost ● XACT for expenses invoiced on a time and material basis ● XFIX for fixed price expenses
For more information on these item groups, see Services.5. In the Status column, the initial status is In Preparation. Update the status as appropriate.
82 © 2017 SAP SE or an SAP affiliate company. All rights reserved. • P U B L I CSAP Business ByDesign February 2017
Services View
The service is available for the selected distribution chain only once the status is Active. For moreinformation about statuses, see Assigning Statuses to a Service [page 76].
6. Optional: Maintain deviations from the standard tax rate.a. Click Maintain Non-Standard Tax Rates.b. Click Add Row .c. Enter the Country, Region, Tax Type, Tax Type Rate, and Tax Exemption Reason as required.
7. Optional: Enter advanced sales details for the service.a. Click View All and go to the Sales tab.b. In the Distribution Chains table, select a distribution chain.c. By default, the base unit of measure is applied as the sales unit of measure for the distribution chain.
If necessary, select a different Sales UoM.
If the sales UoM is different than the base UoM, you must maintain a quantity conversionbetween them. For more information, see Add Quantity Conversions to a Service[page 84].
d. Select the Item Group for the distribution chain.e. Enter any Internal Comments.f. Enter the Sales Notes that should display on any sales orders and other sales-relevant documents.g. Enter any Customer Service Number details.h. Enter any relevant non-standard Taxes.
8. To activate the service for a distribution chain, set the Status to Active.
To ensure that financial postings run smoothly, you should activate the valuation process for theassociated company as well. For more information, see Assign Valuation Details to a Service[page 83].
9. Click Save to save your changes.
3.3.4 Assign Valuation Details to a Service
OverviewYou can assign basic valuation details and a status to each company that provides financial data for a service. Youcan also assign advanced valuation details such as a specific inventory valuation unit of measure and the costinformation for each relevant set of books.You can assign valuation details to a service in the Product Data work center under Services.
Procedure1. Choose the Services subview in the Services view of the Product Data work center.2. Select the service and click Edit to open the Service quick activity.3. Go to the Valuation tab.4. Enter basic details for a company:
SAP Business ByDesign February 2017Services View P U B L I C • © 2017 SAP SE or an SAP affiliate company. All rights reserved. 83
a. In the Companies table, select a company.b. In the Status column, select In Preparation.
The service is available for the selected company only once the status is Active. For moreinformation about statuses, see Assigning Statuses to a Service [page 76].
c. In the Cost Rate field, enter the cost rate for default set of books assigned to the company.
You can edit cost information for each additional set of books assigned to the company. Formore information about editing advanced valuation details, see the next step.
d. Select the Account Determination Group for the service.5. Optional: Enter advanced valuation details for the service and its companies.
a. Click View All and go to the Valuation tab.b. By default, the base unit of measure is applied as the valuation unit of measure. If necessary, select a
different Valuation UoM.
If the valuation UoM is different than the base UoM, you must maintain a quantity conversionbetween them. For more information, see Add Quantity Conversions to a Service[page 84].The valuation UoM cannot be changed after the service has been activated for one of thecompanies.
c. In the Companies table, select a company.d. Select the Account Determination Group for the service. The account determination group defines the
rules that determine which accounts are used for automatic postings. For more information, seeAutomatic Account Determination.
e. You can update the cost information for each set of books assigned to the selected company. To doso, select the set of books and click Edit Cost Rate . A set of books forms a complete and consistentset of accounting data that is required for statutory reporting and creating financial statements. Formore information, see Set of Books.
When you edit the service later, if a new set of books has been assigned to the company, itautomatically displays on the Valuation tab. However, you must then save the service to ensurethat the new set of books is applied to the service.
6. To activate the service for a company, set the Status to Active.7. Click Save to save your changes.
3.3.5 Add Quantity Conversions to a Service
OverviewBy default, the base UoM (unit of measure) is also the unit of measure for the purchasing, sales, and valuationprocesses. If you select a different UoM for any process, you must specify the equivalent measurements betweenthe base UoM and the different process UoM. For example, if the base UoM is activity and the sales UoM is hour, youmight specify the typical duration of the activity.
84 © 2017 SAP SE or an SAP affiliate company. All rights reserved. • P U B L I CSAP Business ByDesign February 2017
Services View
To ensure proper calculations, the base UoM should be the smallest unit of measure for the service.If you change the base UoM after the service has been activated for any processes, you must specify theequivalent measurements between the old base UoM and the new base UoM.
You can add quantity conversions to a service in the Product Data work center under Services.
Procedure1. Choose the Services subview in the Services view of the Product Data work center.2. Select the service and click Edit to open the Service quick activity.3. Click View All .4. In the Quantity Conversions table, click Add Row .5. Enter the equivalent quantities between two different units of measure.
a. In the Quantity column of the new row, enter one unit of measure and quantity.b. In the Corresponding Quantity column of the new row, enter the other unit of measure and quantity.
6. For each additional conversion, add another row and repeat the step above.7. Click Save to save your changes.
3.3.6 Mass Change of Services
OverviewYou can quickly update the general, sales, and valuation details of multiple services at once.You can carry out a mass change of services in one of the following views:
● Product Data work center, Services view and Service Templates view ● Product and Service Portfolio work center, Services view
If you want to update the details of multiple services that are based on the same service template, you caneasily identify and change these services by going to the Service Templates subview, selecting the relevantservice template, choosing Mass Change and following the procedure described below.
Procedure1. Choose the Services subview in the Services view of the Product Data work center.2. Select the services that you want to update and click Mass Change to open the Mass Change quick activity.3. In the Show list, select the type of information that you want to update.
When you select to show general information, each service is listed on a single row. However, whenyou select to show sales or valuation details, only the services with those details are listed, and eachservice may be listed on multiple rows. For example, when you select sales details, a service that is notassigned to any sales organization is not listed, whereas a service that is assigned to two salesorganizations is listed on two rows, one row for each sales organization.
4. In the first row of the table, enter the information that you want to apply to some or all of the services.
SAP Business ByDesign February 2017Services View P U B L I C • © 2017 SAP SE or an SAP affiliate company. All rights reserved. 85
5. To apply the information to only some of the services, select the relevant services, clickApply Mass Change , and then choose Selected Items.
To apply the information to all of the services, click Apply Mass Change , and then choose All Items.
Using the Mass Change quick activity, you can also update the information of each service manually.You can make these changes directly in the row of a service.
6. You can also use Add Organization Data to add one or more organizations to one or more services.a. Select the service or services to which you want to add organization data.b. Click Add Organization Data and select the type of organization that you want to add to the service.c. In the dialog box, select one or more organizations and choose OK . A list is displayed with one line
for each combination of service and organization. You can now select the items to which you want toapply the change. To apply the information to only some of the services, select the relevant services,click Apply Mass Change , and then choose Selected Items. To apply the information to all of theservices, click Apply Mass Change , and then choose All Items.
7. To save your changes and return to the Services view, click Save and Close .
3.3.7 Create Services Using Microsoft Excel®
OverviewYou can create services by entering them in a predefined Microsoft Excel template and uploading them to the SAPBusiness ByDesign system.
PrerequisitesYou have installed the latest Add-In for Microsoft Excel. Depending on your solution set-up, you can do this from theSelf Services Overview in the Home work center, from the Download Center in the Application and UserManagement work center, or from the Download link that is available directly on the user interface.Also, the settings for your browser must be set correctly. You can check this by clicking Check My ComputerSettings on the logon screen.
StepsIn the SAP Business ByDesign system, in the Services subview of the Services view of the Product Data work center,click New , then Service from Microsoft Excel.Get the Template
1. Select the template.Choose the template in the required language and click Download.
You can choose any language that you have selected during scoping. If you have selected only onelanguage during scoping, you will not get a selection of language versions to choose from.
2. Decide what you want to do with the template. Choose one of the following options: ● If you want to use the template only once, you can open the template without saving it. Click Open. ● If you want to save the template so that you can use it again, choose a location to save the file to, enter
an appropriate file name, and click Save. Then click Open.
86 © 2017 SAP SE or an SAP affiliate company. All rights reserved. • P U B L I CSAP Business ByDesign February 2017
Services View
If you have previously downloaded and saved this template on your computer, navigate to the location whereyou have saved the template, and open it.
Log on to the solution from Microsoft Excel1. In the SAP Add-In ribbon in Microsoft Excel, click Logon.
If the SAP Add-In ribbon is not displayed, check to make sure that the Add-In for Microsoft Excel hasbeen installed correctly (see Prerequisites in this document).
A dialog box opens where you can enter the logon details. The system URL is proposed automatically. Thesystem URL is the URL of the system that you are working with.
2. Enter your user ID and your password, and click Logon.
After initial logon to the system, the ribbon text is changed from SAP Add-In to the name of yoursolution.
Enter Details in the Microsoft Excel Template
Note the following: ● The Microsoft Excel template is presented with a number of rows where you can enter or copy your
data. If you need more, add the number of rows you need before you start entering or copying yourdata.
● Ensure that mandatory fields (those marked with an asterisk) are filled. ● To help you fill in the details:
○ Some fields have dropdown lists. ○ In some fields you can search the system for data, for example, countries. Place the cursor on the
field, and click Lookup in your solution's tool bar or ribbon to search the system. A search field isavailable in the Lookup dialog box that appears. When you start to type text in the search field, therelevant entries are filtered in the ID and Description columns, meaning that you do not have toscroll through the whole list. If the Lookup button is not active in the ribbon or toolbar, then it isnot possible to perform a search.
Enter the general and business area details for the services that you want to create. Enter each service in a singlerow.
If internal number ranges have been configured for services, you do not have to enter service IDs manually;when you save the services to the system, service IDs will be entered automatically.For more information, see Configuration: Number Ranges.
Save Your Data1. After you have finished entering all the data, save the Microsoft Excel file.2. Click Save Data to .
A dialog box opens, informing you that the data is being saved to the solution.After the upload, a message informs you that your data has been saved in the solution.
If you do not provide all the required information, or if you provide incorrect information, somerecords will not be saved. Error messages will highlight the problems so that you can correct themand save the data again.
3. You can then log off by clicking Logoff .
SAP Business ByDesign February 2017Services View P U B L I C • © 2017 SAP SE or an SAP affiliate company. All rights reserved. 87
ResultThe new services are saved in the SAP Business ByDesign system and added to the list in the Services view.If you need to make changes to these services, you can change them in the Microsoft Excel template and uploadthem again to the SAP Business ByDesign system, or you can change them directly in the system.
After a service is changed directly in the SAP Business ByDesign system, you can no longer use the MicrosoftExcel template to update that service.
You should not use the Microsoft Excel template to remove or change the following information: ● Sales: Sales organizations and distribution channels ● Valuation: Companies
If you remove such information from this Microsoft Excel template and then upload the service, theinformation will nonetheless remain assigned to the service. If you change such information in thisMicrosoft Excel template and then upload the service, the changed information will be assigned to theservice, but the previous information will remain assigned as well. Therefore, to make such changes, youshould rather access the service directly in the system.
3.3.8 Export Business Data Using Microsoft Excel®
OverviewYou can export reports and worklists to Microsoft Excel® documents. You can use these documents for furtheranalysis, and in some cases, edit and upload them to the solution.You can export data from a report or from a worklist.
Prerequisites ● You have installed the latest Add-In for Microsoft Excel®. Depending on your solution set-up, you can do this
from the: ○ Self Services Overview in the Home work center ○ Download Center in the Application and User Management work center ○ Download link that is available directly on the user interface
● The settings for your browser must be set correctly. You can review the information about computer settingsby clicking Check My Computer Settings on the logon screen.
● You must be authorized to perform an export to Microsoft Excel®.
Procedure1. Go to the screen with the data you want to export.2. Depending on the type of data, choose one of these options:
● For a report, you can either export a chart or a table. To do so, select the report, and click Switch toChart or Switch to Table.
88 © 2017 SAP SE or an SAP affiliate company. All rights reserved. • P U B L I CSAP Business ByDesign February 2017
Services View
● For a worklist, select the worklist and click Go.3. Click Export , then choose To Microsoft Excel.4. Optional: Personalizing your excel export
1. To select the columns in your exported excel, do the following:a. In the title bar, click Personalize This screen b. In the side panel, select Display Settings.c. In the Display Settings dialog box, you can export all the columns in the view by selecting All in
the Export Columns field
The default value for this field is Visible, which exports only the currently displayed columns.
2. To select the language for your excel export, do the followinga. In the Display Settings dialog box, set the Language Selection field to Show and click OK
b. Click Save .c. Click Export , then choose To Microsoft Excel®d. Select a language in the dialog box that opens.
The column selection preference in this dialog box allows you to override the personalizedsetting. This selection is valid for the current export only.
5. Select the template in the dialog box that is displayed.
● If there is only one template that has the logged in language variant, then the export will beperformed in the logged in language, and no user interaction is required.
● If there is only one template in the system for this export scenario, but the logged in languagevariant is not available, then export will be performed in the English language.
● If there is more than one template in the system for this export scenario, the Template List dialogbox is displayed. In this dialog, you can select the Microsoft Excel template that you want to usefor the export. The template will dictate how your exported data will be formatted. The MicrosoftExcel version that is relevant for each template is displayed.
6. Click Download.7. A message shows that you can open or save the file which contains the data that you have just exported from
the solution. Click Open or Save depending on what you want to do with the exported data.Depending on whether you click Open or Save, there are two possible results:
● If you click Open, a worksheet opens with the data in Microsoft Excel. The file has a temporary name,but it is not saved. You can use all the functions of Microsoft Excel to organize the data and to savethat worksheet.
● If you click Save, a Save As dialog box opens. You can specify an appropriate file name and a locationto save the exported Microsoft Excel file to. A message will inform you when the download hascompleted successfully.You can later navigate to the location where you have saved the template and open it .
SAP Business ByDesign February 2017Services View P U B L I C • © 2017 SAP SE or an SAP affiliate company. All rights reserved. 89
4 Product Categories View
4.1 Product Categories Quick Guide
The Product Categories view provides a central entry point for creating and editing your product categories andorganizing them into a multi-level hierarchy. This structure is used in many areas such as analytics, planning, productcatalogs, contract management, and pricing.You can access this view from the Product Data work center.
Tasks
Create the Root Product Category1. Click New Hierarchy .2. In the first row of the table, enter the Product Category ID.3. In the Details section, specify the additional details for the root product category:
● In the Product Category field, enter the product category description. ● Choose the Language for the new product category.
It is not best practice to allow users to assign products to the root product category. It is thereforerecommended that you clear the Product Assignment Allowed check box of the root productcategory.
4. Click Save .You can now add subcategories and organize them into a multi-level hierarchy.
Create a Product Category1. Click Maintain Product Categories to open the Product Categories editor.
The Table view of the Product Categories editor is displayed by default.2. Select the product category to which you want to add a subcategory.3. Click Actions and then Add Subcategory.
The new category is added as a blank row.4. Enter the Product Category ID in the new row.5. In the Details section, specify the additional details for the product category:
● In the Product Category field, enter the product category description. ● Choose the Language for the new product category. ● To allow products to be assigned to the product category, select the Product Assignment Allowed check
box.6. Click Save .
Organize Product Categories Using the Table View1. Click Maintain Product Categories to open the Product Categories editor.
90 © 2017 SAP SE or an SAP affiliate company. All rights reserved. • P U B L I CSAP Business ByDesign February 2017
Product Categories View
The Table view of the Product Categories editor is displayed by default.2. You can expand and collapse the various levels of the product category hierarchy.
● To show all the product categories in the hierarchy, click Actions and then Expand All. ● To show only the root product category, click Actions and then Collapse All. ● To expand or collapse a particular product category, click the arrow icon next to the product category
ID.3. You can reorganize product categories by moving them up or down the product category hierarchy.
a. Select the product category you want to move.b. Click Actions and then Move Product Category.c. Enter the product category ID of the destination product category.
The product category is now a subcategory of the destination product category.4. Click Save .
Organize Product Categories Using the Chart View1. Click Maintain Product Categories to open the Product Categories editor.
The Table view of the Product Categories editor is displayed by default.2. Click Chart to display the Chart view of the Product Categories editor.3. You can expand and collapse the various levels of the product category hierarchy.
● To show all the product categories in the hierarchy, click Actions and then Expand All. ● To show only the root product category, click Actions and then Collapse All. ● To expand a particular product category, click the plus sign in the lower left corner of the category. ● To collapse a particular product category, click the minus sign in the lower left corner of the category.
4. You can adjust your view of the product category hierarchy by zooming in or out. ● To focus on a particular category, select the category and click Actions and then Zoom In. Alternately,
you can click the arrow in the lower right corner of the category and select Zoom In. ● To zoom out after focusing on a particular category, select the category and click Actions and then
Zoom Out. Alternately, you can click the arrow in the lower right corner of the category and select ZoomOut.
5. You can reorganize product categories by moving them up or down the product category hierarchy.a. Select the product category you want to move.b. Click Actions and then Move Product Category. Alternately, you can click the arrow in the lower right
corner of the category and select Move Product Category.c. Enter the product category ID of the destination product category.
The product category is now a subcategory of the destination product category.6. Click Save .
Delete a Product Category1. Click Maintain Product Categories to open the Product Categories editor.
The Table view of the Product Categories editor is displayed by default. To display the Chart view, clickChart .
2. Select the product category that you want to delete.3. Click Actions and then Delete.
You can delete a product category only if no products are assigned to it or any of its subordinatecategories.
SAP Business ByDesign February 2017Product Categories View P U B L I C • © 2017 SAP SE or an SAP affiliate company. All rights reserved. 91
4. Click Save .
Create a Template for a Product CategoryFor each product category you can create one template per product type. This means that for each product categoryyou can create one material template, one service template, and one entitlement template. You can use thesetemplates to create other products with the same or similar data and to create multiple products from one templatesimultaneously.For more information about this task, see:
● Materials Quick Guide [page 39] ● Quick Guide for Services (in Product Data) [page 73] ● Entitlements Quick Guide [page 94]
Export Product Categories to Microsoft ExcelYou can export product categories to Microsoft Excel. For more information about this task, see here [page 71].
4.2 Tasks
4.2.1 Export Business Data Using Microsoft Excel®
OverviewYou can export reports and worklists to Microsoft Excel® documents. You can use these documents for furtheranalysis, and in some cases, edit and upload them to the solution.You can export data from a report or from a worklist.
Prerequisites ● You have installed the latest Add-In for Microsoft Excel®. Depending on your solution set-up, you can do this
from the: ○ Self Services Overview in the Home work center ○ Download Center in the Application and User Management work center ○ Download link that is available directly on the user interface
● The settings for your browser must be set correctly. You can review the information about computer settingsby clicking Check My Computer Settings on the logon screen.
● You must be authorized to perform an export to Microsoft Excel®.
Procedure1. Go to the screen with the data you want to export.2. Depending on the type of data, choose one of these options:
● For a report, you can either export a chart or a table. To do so, select the report, and click Switch toChart or Switch to Table.
● For a worklist, select the worklist and click Go.
92 © 2017 SAP SE or an SAP affiliate company. All rights reserved. • P U B L I CSAP Business ByDesign February 2017
Product Categories View
3. Click Export , then choose To Microsoft Excel.4. Optional: Personalizing your excel export
1. To select the columns in your exported excel, do the following:a. In the title bar, click Personalize This screen b. In the side panel, select Display Settings.c. In the Display Settings dialog box, you can export all the columns in the view by selecting All in
the Export Columns field
The default value for this field is Visible, which exports only the currently displayed columns.
2. To select the language for your excel export, do the followinga. In the Display Settings dialog box, set the Language Selection field to Show and click OK
b. Click Save .c. Click Export , then choose To Microsoft Excel®d. Select a language in the dialog box that opens.
The column selection preference in this dialog box allows you to override the personalizedsetting. This selection is valid for the current export only.
5. Select the template in the dialog box that is displayed.
● If there is only one template that has the logged in language variant, then the export will beperformed in the logged in language, and no user interaction is required.
● If there is only one template in the system for this export scenario, but the logged in languagevariant is not available, then export will be performed in the English language.
● If there is more than one template in the system for this export scenario, the Template List dialogbox is displayed. In this dialog, you can select the Microsoft Excel template that you want to usefor the export. The template will dictate how your exported data will be formatted. The MicrosoftExcel version that is relevant for each template is displayed.
6. Click Download.7. A message shows that you can open or save the file which contains the data that you have just exported from
the solution. Click Open or Save depending on what you want to do with the exported data.Depending on whether you click Open or Save, there are two possible results:
● If you click Open, a worksheet opens with the data in Microsoft Excel. The file has a temporary name,but it is not saved. You can use all the functions of Microsoft Excel to organize the data and to savethat worksheet.
● If you click Save, a Save As dialog box opens. You can specify an appropriate file name and a locationto save the exported Microsoft Excel file to. A message will inform you when the download hascompleted successfully.You can later navigate to the location where you have saved the template and open it .
SAP Business ByDesign February 2017Product Categories View P U B L I C • © 2017 SAP SE or an SAP affiliate company. All rights reserved. 93

5 Entitlements View
5.1 Entitlements Quick Guide
The Entitlements view provides a central entry point for entering information relating to entitlements that yourcompany sells.You can access the Entitlements view from the following locations:
● Product Data work center ● Product and Service Portfolio work center
Business Background
EntitlementsEntitlements are intangible products that represent the right to use a service or receive a product at a later date.Entitlements are used to describe your company's portfolio of such products. Examples of entitlements includesupport entitlements with a certain service level and entitlements to call off certain services for a specific price.For more information, see Entitlements [page 95].
Pricing in Customer Relationship ManagementPricing is based on price master data such as price lists and discount lists, which are used to automatically calculatepricing within all business documents for sales and service processes. A predefined pricing procedure is used todetermine the gross value the customer has to pay for certain products or services to be received on a certain dayat a certain place. The pricing procedure consists of price components, such as list price, discounts, surcharges,freights, taxes, and costs. The order of these price components is essential for the calculation of the total value.For more information, see Pricing in Customer Relationship Management [page 25].
Tax DeterminationAs a rule, companies are legally required to calculate taxes on products that they buy or sell, and to levy these taxesfrom their customers. After the products have been provided, the taxes must be declared and levied to the respectivetax authorities. The system supports you by providing a substantially automated tax calculation for the following taxtypes: Value-Added Tax (VAT), Sales and Use Tax, Withholding Tax. The system also provides a reporting tool thatgives you effective control over your obligatory declaration of these taxes.For more information, see Tax Determination [page 5].
Tasks
Create EntitlementsFor more information about this task, see here [page 96].
Assign Sales Details to an EntitlementFor more information about this task, see here [page 96].
94 © 2017 SAP SE or an SAP affiliate company. All rights reserved. • P U B L I CSAP Business ByDesign February 2017
Entitlements View
Assign Valuation Details to an EntitlementFor more information about this task, see here [page 98].
Add Entitlement Descriptions in Other LanguagesFor more information about this task, see here [page 100].
Add Quantity Conversions to an EntitlementFor more information about this task, see here [page 98].
Assigning Statuses to an EntitlementFor more information about this task, see here [page 99].
Export Business Data Using Microsoft Excel®For more information about this task, see here [page 71].
5.2 Business Background
5.2.1 Entitlements
OverviewEntitlements are intangible products that represent the right to use a service or receive a product at a later date.Entitlements are used to describe your company's portfolio of such products. Examples of entitlements includesupport entitlements with a certain service level and entitlements to call off certain services for a specific price.
Entitlements typically represent rights to products that are redeemed by the customer on an ad-hoc basis.Products that are provided on a traditional basis are represented in the Product Data work center as servicesor materials.For more information, see Quick Guide for Services (in Product Data) [page 73] and Materials Quick Guide
[page 39].
UseYou create entitlements in order to represent a product offered by your company in your master data. An entitlementincludes information that defines how it is handled within the sales and invoicing processes. Once all the necessaryinformation has been entered and the entitlement has been activated, it can be used in Customer RelationshipManagement, for creating contracts.For example, when an IT support provider sells a service contract it is not possible to predict how often and exactlywhen customers will require support. However, using entitlements to represent these services, enables simplermonitoring of the uptake of these services. Other examples of products and services offered on an ad-hoc basis areteleconferencing services, payment services, licenses for software or music, and extended product warranties.
SAP Business ByDesign February 2017Entitlements View P U B L I C • © 2017 SAP SE or an SAP affiliate company. All rights reserved. 95
See AlsoEntitlements Quick Guide [page 94]Services
5.3 Tasks
5.3.1 Create Entitlements
OverviewThis document describes how to enter the basic data which is necessary in order to create a new entitlement.You can create entitlements in the Product Data work center under Entitlements.
Procedure1. Click New and then Entitlement to open the New Entitlement quick activity.2. Enter the Entitlement ID.
If internal number ranges have been configured for entitlements, you cannot enter an entitlement IDmanually; when you save the entitlement, the system assigns the next available ID automatically.For more information, see Configuration: Number Ranges.
3. Enter the Entitlement Description.
For information about descriptions in other languages, see Add Entitlement Descriptions in OtherLanguages [page 100]
4. Select the Product Category ID to which you want to assign the new entitlement.5. In the Base UoM field, enter the unit of measure for the entitlement. This is the default unit of measure for
sales and valuation processes and is used unless different units of measure are selected manually for thoseprocesses.
The base UoM should be the smallest unit of measure for the entitlement. Therefore, if you selectdifferent units of measure for other processes, make sure that the base UoM is smaller.
5.3.2 Assign Sales Details to an Entitlement
OverviewYou can assign basic sales details and a status to each distribution chain that is involved in selling an entitlement.You can also assign advanced sales details to each distribution chain, for example, a specific sales unit of measure,internal comments, sales notes, customer entitlement numbers, tax information, and sales prices.
96 © 2017 SAP SE or an SAP affiliate company. All rights reserved. • P U B L I CSAP Business ByDesign February 2017
Entitlements View
You can assign sales details to an entitlement in the Product Data work center under Entitlements.
Procedure1. Select the entitlement and click Edit to open the Entitlements screen.2. In the Distribution Chains table, change the status of the distribution channel/sales organization combination
to In Preparation.3. Select an Item Group for this combination. The item group is required for creating and processing entitlement
orders. Select one from the following entitlement-related item groups: ● ETFC for Fixed Price Entitlements with Confirmation
● ETFX for Fixed Price Entitlements
● ETTM for Entitlements Invoiced on Time and Material Basis
For more information on these item groups, see Services.4. Optional: Maintain deviations from the standard tax rate.
a. Click Maintain Non-Standard Tax Rates.b. Click Add Row.c. Enter the Country, Region, Tax Type, Tax Type Rate, and Tax Exemption Reason as required.
5. Optional: On the Sales tab, specify whether a cash discount is allowed for this entitlement. If a cash discountis allowed, select the Cash Discount Allowed check box.
The entitlement is available for the selected distribution chain only once the status is Active. For moreinformation about statuses, see Assigning Statuses to an Entitlement [page 99].
6. Optional: Enter advanced sales details for the entitlement.a. Click View All and go to the Sales tab.b. In the Distribution Chains table, select a distribution chain.c. By default, the base unit of measure is applied as the sales unit of measure for the distribution chain.
If necessary, select a different sales unit of measure.
If the sales UoM is different than the base UoM, you must maintain a quantity conversionbetween them. For more information, see Add Quantity Conversions to an Entitlement[page 98].
d. Select the Item Group for the distribution chain.e. Optional: Enter a Minimum Order Quantity, specify whether a Cash Discount is allowed, and enter a
Reference Price Entitlement.f. Enter any Internal Comments.g. Enter the Sales Notes that should display on any sales orders and other sales-relevant documents.h. Enter any Customer Entitlement Number details.i. Enter any relevant non-standard Taxes.j. You can view sales prices on the Sales Prices tab.
7. To activate the entitlement for a distribution chain, set the status to Active.
To ensure that financial postings run smoothly, you should activate the valuation process for theassociated company as well. For more information, see Assign Valuation Details to an Entitlement
[page 98].
SAP Business ByDesign February 2017Entitlements View P U B L I C • © 2017 SAP SE or an SAP affiliate company. All rights reserved. 97
8. Click Save to save your changes.
5.3.3 Add Quantity Conversions to an Entitlement
OverviewBy default, the base UoM (unit of measure) is also the unit of measure for the sales and valuation processes. If youselect a different UoM for either of these processes, you must specify the equivalent measurements between thebase UoM and the different process UoM. For example, if the base UoM is hour and the sales UoM is activity, youmight specify how many activities correspond to one hour.You can add quantity conversions to an entitlements in the Product Data work center under Entitlements.
To ensure proper calculations, the base UoM should be the smallest unit of measure for the entitlement.If you change the base UoM after the entitlement has been activated for any processes, you must specify theequivalent measurements between the old base UoM and the new base UoM.
Procedure1. Select the entitlement and click Edit to open the Entitlement quick activity.2. Click View All .3. In the Quantity Conversions table, click Add Row .4. Enter the equivalent quantities between two different units of measure.
a. In the Quantity column of the new row, enter one unit of measure and quantity.b. In the Corresponding Quantity column of the new row, enter the other unit of measure and quantity.
5. For each additional conversion, add another row and repeat the step above.6. Click Save to save your changes.
5.3.4 Assign Valuation Details to an Entitlement
OverviewYou can assign a valuation unit of measure (UoM) to an entitlement and a status to each company that providesfinancial data for an entitlement.You can assign valuation details to an entitlement in the Product Data work center under Entitlements.
Procedure1. Select the entitlement and click Edit to open the Entitlement screen.2. Click View All .3. Go to the Valuation tab.4. By default, the base unit of measure is applied as the valuation unit of measure. If necessary, select a different
Valuation UoM.
98 © 2017 SAP SE or an SAP affiliate company. All rights reserved. • P U B L I CSAP Business ByDesign February 2017
Entitlements View
If the valuation UoM is different than the base UoM, you must maintain a quantity conversion betweenthem. For more information, see Add Quantity Conversions to an Entitlement [page 98]. The valuationUoM cannot be changed after the entitlement has been activated for one of the companies.
5. In the Companies table, click Add Row .6. Select a Company and change the Status from Initial to In Preparation.7. Select the Account Determination Group for the entitlement. The account determination group defines the
rules that determine which accounts are used for automatic postings. For more information, see AutomaticAccount Determination.
8. To activate the entitlement for a company, set the Status to Active.
The entitlement is available for the selected company only once the status is Active. For moreinformation about statuses, see Assigning Statuses to an Entitlement [page 99].
9. Click Save to save your changes.
5.3.5 Assigning Statuses to an Entitlement
OverviewAn entitlement is divided into sections for sales and valuation. Each section includes details specific to that businessprocess and one or more statuses indicating the completeness or readiness of the entitlement for that process.Therefore, when creating a new entitlement, it is important to apply the correct statuses to ensure that the relevantprocesses are assigned and that data in these areas is kept up-to-date.You can assign statuses to an entitlement in the Product Data work center under Entitlements.
Features
Changes to StatusesThe first status of a process is always Initial. You can then make the following changes in statuses before theentitlement is saved:
● Initial to In Preparation or In Preparation to Initial ● In Preparation to Active ● Active to Blocked or Blocked to Active ● Active to Initial or Blocked to Initial
After the entitlement has been saved, you can make the following changes in status: ● Initial to In Preparation or In Preparation to Initial ● In Preparation to Active ● Active to Blocked or Blocked to Active
Changing from Active to Blocked is only possible for sales.
Overall StatusIn cases where a process has multiple statuses, the status with the highest priority is always given as the overallstatus for a process. The hierarchy for status priority is as follows: Active, Blocked, In Preparation, and Initial. For
SAP Business ByDesign February 2017Entitlements View P U B L I C • © 2017 SAP SE or an SAP affiliate company. All rights reserved. 99
example, if there is one status marked as Active, and there are multiple statuses marked as In Preparation, the overallstatus is given as Active. The Blocked status is only available for the Sales process.The statuses for processes are as follows:
Statuses of Processes Overall Status Status Icon Status Combination Valid For
Initial Initial Grey Sales and Valuation
In Preparation In Preparation Yellow Sales and Valuation
Blocked Blocked Red Sales
Active Active Green Sales and Valuation
Initial and In Preparation In Preparation Yellow Sales and Valuation
Initial and Blocked Blocked Red Sales
Initial, In Preparation, and Blocked Blocked Red Sales
Initial, In Preparation, and Active Active Green Sales and Valuation
Initial, In Preparation, Blocked and Active Active Green Sales
In Preparation and Blocked Blocked Red Sales
In Preparation and Active Active Green Sales and Valuation
In Preparation, Blocked, and Active Active Green Sales
Blocked and Active Active Green Sales
See AlsoCreate Entitlements [page 96]
5.3.6 Add Entitlement Descriptions in Other Languages
OverviewThis document describes how to add descriptions of entitlements in languages other than your logon language.You can add entitlement descriptions in other languages in the Product Data work center under Entitlements.
Procedure1. Select the entitlement and click Edit to open the Entitlement quick activity.
The Entitlement Description field displays the description of the entitlement in your logon language.2. Click View All .3. At the top of the General tab, click Other Languages .4. To add a description of the entitlement in another language, click Add Row .
If you do not maintain an entitlement description for a language, a description will not appear onbusiness documents in that language.
100 © 2017 SAP SE or an SAP affiliate company. All rights reserved. • P U B L I CSAP Business ByDesign February 2017
Entitlements View
5. In the new row, select a Language and enter the Entitlement Description.6. In the Details section, enter additional information about the entitlement and click Save .
SAP Business ByDesign February 2017Entitlements View P U B L I C • © 2017 SAP SE or an SAP affiliate company. All rights reserved. 101
6 Products View
6.1 Kits Quick Guide
A kit is a logical grouping of items to be sold or purchased together as a single unit.You can create a new kit in the Products view in the Product and Service Portfolio work center. The kit can also becreated by using the New Kit common task in the same work center.Purchasing, sales and valuation details can be added to the kit.You can create a new kit item list in the Kit Item List view in the Product and Service Portfolio work center.You can also create a new kit item list while creating a kit.
Business Background
Kits Process FlowWholesale and component manufacturing industries like to offer product bundles as single selling units. A singleselling or purchasing unit comprising of various components is called a kit in the Business ByDesign system. The kitdoes not exist as a physical entity and has an inventory value of zero. There are purchasing, sales and valuationprocesses associated with the kit and it is price relevant.For more information, seeKits Process Flow [page 35].
Tasks
Create a KitFor more information, see here [page 107].
Assign Purchasing Details to a KitIf you want to create a purchasing kit, you can add purchasing information to the kit. To do so, in the Purchasing tab under General Information , select the status In Preparation. This activates the Purchasing indicator underRelevant Processes.
Assign Sales Details to a KitIf you want to create a sales kit, you can add relevant information to the kit, in the Sales tab under General Information . For more information, see here [page 108].This activates the Purchasing indicator under Relevant Processes.
Assign Valuation Details to a Sales KitYou can add valuation details for the kit which includes information such as basic valuation details, and a status toeach company and business residence that provide financial data for a kit. You can also assign advanced valuationdetails such as a specific inventory valuation unit of measure, and cost information for each relevant set of books.For more information, see here [page 109].
102 © 2017 SAP SE or an SAP affiliate company. All rights reserved. • P U B L I CSAP Business ByDesign February 2017
Products View
Add Sales Kit Descriptions in Other Languages1. In the Product and Service Portfolio work center navigate to the Products view.2. Click Advanced, and select the Sales Kit checkbox, and click Go . All the kits available in the system created
are displayed.3. Select the sales kit and click Edit to open the sales kit screen. The Product Description field displays the
description of the sales kit in your logon language.4. Click View All . Under the General tab, select Other Languages .5. To add a description of the kit in another language, click Add Row .
Unless you maintain a kit description for a language, a description does not appear on businessdocuments in that language.
6. In the new row, select a Language and enter the Product Description.7. In the Details section, enter additional information about the kit and click Save .
Create a Sales Kit Item List1. In the Product and Service Portfolio work center navigate to the Kit Item List view.2. Click New and select Kit Item List.
You can also create a kit item list while creating the kit. For more information, see Create a Kit[page 107].
3. In the New Kit Item List screen that opens, enter the ID of the kit previously created by you.4. Enter a description of the kit item list.5. Under the Items tables, click Add Row to add information about the various items of the kit.6. For each item, enter the Product ID, Quantity/ UoM, and Distribution Percentage.
If the Kit is enabled for Purchasing then its mandatory to maintain distribution percentages. The costdistribution percentage for all the kit items should add up to 100%. This percentage is used bypurchasing and invoicing documents to distribute the kit header price & tax across the kit components.If the distribution percentage is not maintained, the price and tax is distributed equally among the kitcomponent
7. Click Save .8. Only one active kit item list can exist for a single kit.9. In case you feel that the kit item list created by you for a kit is not suitable, you can click Change Status and
choose Obsolete. You can now create a new kit item list for the same kit. If you want to use a kit item list thathas been rendered obsolete, click Change Status and choose Active.
SAP Business ByDesign February 2017Products View P U B L I C • © 2017 SAP SE or an SAP affiliate company. All rights reserved. 103
6.2 Business Background
6.2.1 Kits Process Flow
OverviewA kit is defined as a logical group of items that can be sold or purchased together as one unit. Wholesale andcomponent manufacturing industries like to offer product bundles as single selling units. In the Business ByDesignsystem a single selling or purchasable unit comprising of various components is called a kit .For example, a laptop and an adaptor are two different products that can be grouped together to be sold or purchasedas a single unit. This combination of the laptop and adaptor is available on paper as a unit and has a price associatedwith it. However, the kit itself does not exist as a physical entity.The various components of a kit are listed in the kit item list. In the case of the laptop and adaptor, both the individualproducts exist as physical entities. They are stored and transported, and so have inventory value. However, sincethey are a part of a kit, their individual prices are not relevant and only the price of the kit as a whole is considered.
Create a Kit1. Create a Kit
To create a kit, go to Products view under Product and Service Portfolio work center. Click New , and selectKit.You can also create a kit from the New Kit common task in the Product and Service Portfolio work center andthe Product Data work center.The kit you create represents a group of items that is sold or purchased together as one unit.For more information, see Create a Kit [page 107].
2. Add purchasing information to the KitIf you want to create a purchasing kit, you can add purchasing information for this kit. To do so, in the Purchasing tab under General Information , select the status In Preparation. This activates the Purchasingindicator under Relevant Processes.
3. Add sales information to the KitIf you want to create a sales kit, you can add sales details for the sales kit in the Sales tab under General Information . This includes information such as the sales organization, distribution channel, and soon. You can also assign advanced sales details to each distribution chain, for example, a specific sales unit ofmeasure, warranties, internal comments, sales notes, customer part numbers, tax information and so on.However, you must enter a sales organization and distribution channel for the sales kit.This activates the Sales indicator under Relevant Processes.For more information, see Assign Sales Details to the Kit [page 108].
4. Add valuation information to the KitYou can add valuation details for the kit which includes information such as basic valuation details, and astatus to each company and business residence that provide financial data for a kit. You can also assignadvanced valuation details such as a specific inventory valuation unit of measure, and cost information foreach relevant set of books.You can do so, in the Valuation tab under General Information . This activates the Valuation indicator underRelevant Processes.For more information, see Assign Valuation Details to the Kit [page 109].
104 © 2017 SAP SE or an SAP affiliate company. All rights reserved. • P U B L I CSAP Business ByDesign February 2017
Products View
5. Add tax information to the KitIf you create a purchasing kit, by default the highest value added tax (VAT) is applied as the standard tax rate.You can maintain separate tax rates for the kit in the Taxation tab under General Information .
6. Create a Kit Item ListUsing the kit ID created during the process of creating a kit, you can create a kit item list, which consists ofall the items that are included in that particular kit. Each of these items has an inventory process associatedwith it, but is not price relevant within the kit.For more information, see Create a Kit Item List in the Tasks section of the Kits Quick Guide [page 102].
Kits in Sales1. Create and Release a Sales Order
You can create a sales order with a sales kit as a line item and release it.For more information, see Sales Orders Quick Guide.
2. Release a Customer InvoiceYou can create and release a customer invoice document.For more information, see Quick Guide for Invoice Requests.
3. Determine Ship-From Information and Check AvailabilityOnce the sales order containing a sales kit has been released, the system displays a customer demand persales kit in the Customer Demand view of the Outbound Logistics Control work center. You can determine theshipment scheduling, ship-from information, and the availability for sales orders that contain sales kits. Youcan also use this view to release confirmed sales kits to logistics execution.For more information, see Customer Demand Quick Guide.
4. Release a Sales KitApart from the Customer Demand view, you can also release sales kits in the Delivery Due List view of theOutbound Logistics Control work center, where the sales orders are listed based on confirmed schedule lines.In this delivery due list, the supply planner can release the sales kits to hand them over to logistics execution.Once the sales kit has been released, you cannot change data such as product, date, quantity, ship-to partyin the corresponding sales order.For more information about delivery due lists, see Delivery Due List Quick Guide.
5. Process an Outbound DeliveryThe system displays the released sales kits as delivery proposals in the Delivery Proposals sub-view and asdelivery requests in the Delivery Requests sub-view of the Delivery Control view in the Outbound Logisticswork center. In this view, you can process an outbound delivery for the sales kit with tasks by creating awarehouse request or without tasks by posting a goods issue.For more information about delivery proposals and delivery requests, see Delivery Control Quick Guide.If you process the outbound delivery with tasks, you can create a warehouse task in the Warehouse Requestsview and confirm the task in the Task Control view.For more information about warehouse requests, see Warehouse Requests Quick Guide.For more information about task control, see Task Control Quick Guide.Whether you post the goods issue in one step directly or use the task support, the outbound delivery isprocessed and inventory changes are communicated to invoicing, accounting, and supply control.
6. Post Costs/RevenuesThe delivery of a sales kit and its components triggers the creation of a journal entry in the system which poststhe costs of components delivered. The valuation and the account determination are based on the componentproducts delivered as part of the sales kit. The invoicing of the sales kit triggers the creation of a journal entrywhich posts the revenues. You can view the entry in the Journal Entries view of the General Ledger work center.For more information, see Journal Entries Quick Guide
SAP Business ByDesign February 2017Products View P U B L I C • © 2017 SAP SE or an SAP affiliate company. All rights reserved. 105
There is no change in the account determination logic for the sales kit items and the component items.Revenue recognition is not allowed for sales order items with sales kit products. For more information see,Sales Document Items Quick Guide
Kits in Purchasing1. Create and Release a Purchase Order
You can create a purchase order with a kit as a line item and release it.For more information, see Purchase Orders Quick Guide.
2. Create a Purchase Order AcknowledgementFor more information, see Purchase Order Acknowledgement.
3. Process an Inbound DeliveryWhen you receive a kit, you can use inbound processing to coordinate the inbound logistic activities.
Kits are only supported for inbound supplier deliveries.
For more information, , see Supplier Delivery Processing.4. Post Goods Receipt
On delivery of a kit, you can create a goods receipt to track it. The goods and services receipt can be createdwith reference to purchase orders with same or different suppliers.For more information, see, Directly Post a Goods Receipt with Label Creation.The valuation and the account determination are based on the component products delivered as part of thepurchase kit.The system sends the goods and services receipt to Supplier Invoicing for invoice verification, exceptionhandling, and payment processes. It also forwards the data to Financials, posts the goods return receipt there,and updates individual materials and fixed asset assignments if applicable. You can view the entry in theJournal Entries view of the General Ledger work center. For more information, see Journal Entries Quick Guide
5. Release a Supplier InvoiceYou can create and release a supplier invoice document.For more information, see Supplier Invoice Processing with Reference.
LimitationsKits are not supported in the following scenarios:
● Subsequent debit and subsequent credit memo items, customs duty, down payments, recurring invoices,invoice templates, and invoices without reference to purchase orders scenarios in supplier invoicing.
● Materials in Progress ● Intracompany stock transfer ● Supplier or customer returns ● Service and repair scenarios ● Strategic sourcing (contracts, quotes, shopping cart) ● Self- service procurement (non-stock materials) ● Invoices
106 © 2017 SAP SE or an SAP affiliate company. All rights reserved. • P U B L I CSAP Business ByDesign February 2017
Products View

6.3 Tasks
6.3.1 Create a Kit
OverviewThis document describes how to create a sales or purchasing kit. A kit is a logical grouping of items to be sold orpurchased together as a single unit. You can create a new kit under the Product and Service Portfolio work center.Kits can be viewed and edited in the Products view of the Product and Service Portfolio work center.
Procedure1. In the Product and Service Portfolio work center, navigate to the Products view.2. Click New , and select Kit. You can also create a kit by starting the New Kit common task in the Product and
Service Portfolio work center and Product Data work center.3. In the New Kit screen, enter the Kit ID.
If internal number ranges have been configured for the kits, you cannot enter an ID manually; when yousave the kit, the system assigns the next available ID automatically. For more information, seeConfiguration: Number Ranges.
4. Enter the Kit Description.For information about descriptions in other languages, see Add Kit Descriptions in Other Languages in theTasks section of the Kits Quick Guide [page 102].
5. Select the Product Category to which you want to assign the new kit.6. The value for the Base UoM field is defaulted to ea-Each. It is used for purchasing, sales, and valuation.7. If you want to create a purchasing kit, under the Purchasing tab, set the status to In Preparation.8. If you want to create a sales kit, under the Sales tab, add the sales organization and distribution channel for
the kit. For more information, see Adding Sales details to a Kit [page 108].
You have an option of enabling a kit for only sales, for only purchasing, or for both (for example, in caseof third party order processing).
9. You can create or view the kit item lists for this kit as follows:a. Click View or Create Item List .b. On the new screen, screen click New .c. To create the kit item list follow the steps listed in Create Kit Item List in the Tasks section of the Kits
Quick Guide [page 102].d. You can create more than one kit item list using this process, however there is only one active kit item
list, the rest are obsolete.e. You can edit both the active and obsolete kit item lists by selecting the item list and clicking Edit .
10. You can check the consistency of the kit items and sales organizations selected for the sales kit by clickingCheck Kit Consistency. In case of a mismatch in the sales organizations for the sales kit and the sales kit items,a warning message is displayed.
SAP Business ByDesign February 2017Products View P U B L I C • © 2017 SAP SE or an SAP affiliate company. All rights reserved. 107
11. Optional: Enter advanced general details for the kit:a. Click View All .b. You can enter further details about the kit in the Details section.c. To add, delete, or replace a product image for the kit, click Image, and select the appropriate option.
12. Click Save .13. To view or edit the newly created kit, in the Product and Service Portfolio work center, navigate to the
Products view.14. Click Advanced, select the Kit checkbox, and click Go. All the kits available in the system are displayed. Select
the one created by you and click Edit to edit the kit.15. Click the kit ID to view it.
6.3.2 Assign Sales Details to a Kit
OverviewYou can assign basic sales details and a status to each distribution chain that is involved in selling a kit. You can alsoassign advanced sales details to each distribution chain, for example, a specific sales unit of measure, warranties,internal comments, sales notes, customer part numbers, and tax information.You can assign sales details to a kit in the Product and Service Portfolio work center, Products view
Procedure1. In the Product and Service Portfolio work center navigate to the Products view.2. Click Advanced, select the Kit checkbox, and click Go . All the kits available in the system are displayed.3. Select the kit and click Edit to open the kit screen.4. Go to the Sales tab.5. Enter the basic details for each distribution chain:
a. In the Distribution Chains table, click Add Row .b. Define a distribution chain by entering a sales organization and a distribution channel.c. The Item Group is defaulted to KIT- Sales Kit.d. In the Status column, the initial status is In Preparation. Update the status as appropriate.
The material is available for the selected distribution chain only once the status is Active.
6. Optional: Enter advanced sales details for the kit.a. Click View All and go to the Sales tab.b. In the Distribution Chains table, select a distribution chain.c. By default, the base unit of measure is applied as the sales unit of measure for the distribution chain.d. Enter any Internal Comments. You can enter multiple internal comments for each combination of a kit
and distribution chain.e. Enter any Sales Notes. You can enter one sales note for each combination of a kit and distribution
chain.
108 © 2017 SAP SE or an SAP affiliate company. All rights reserved. • P U B L I CSAP Business ByDesign February 2017
Products View
Sales notes are visible in the following follow-on documents: ● Sales order ● Pick list ● Delivery note
f. Enter any Customer Part Number details.7. To activate the kit for a distribution chain, set the Status to Active.
To ensure that financial postings run smoothly, also activate the valuation process for the associatedcompany.For more information, see Assign Valuation Details to a Kit [page 109].
8. Click Save .
6.3.3 Assign Valuation Details to a Kit
OverviewYou can assign basic valuation details and a status to each company and business residence that provides financialdata for a kit. You can also assign advanced valuation details such as a specific inventory valuation unit of measureand cost information for each relevant set of books.You can assign valuation details to a kit in the Product and Service Portfolio work center, Products view
Procedure1. In the Product and Service Portfolio work center navigate to the Products view.2. Click Advanced, select the Kit checkbox, and click Go . All the kits available in the system are displayed.3. Select the kit and click Edit to open the kit screen.4. Go to the Valuation tab.5. In the Companies/Business Residences table, click Add Row to enter a company and business residence.
a. Select the Account Determination Group for the kit. The account determination group defines the rulesthat determine which accounts are used for automatic postings. For more information, see AutomaticAccount Determination.
b. Select the Perpetual Cost Method. A perpetual cost method is required in order for the sales kit to beposted in financial accounting. For more information, see Perpetual Cost Methods.
c. In the Status column, the initial status is In Preparation. Update the status as appropriate.
The kit is available for the selected company/business residence only once the status isActive.
6. Optional: Enter advanced valuation details for the kit and its companies/business residences.a. Click View All and go to the Valuation tab.b. By default, the base unit of measure is applied as the inventory valuation unit of measure.c. In the Companies/Business Residences table, select a company/business residence.
SAP Business ByDesign February 2017Products View P U B L I C • © 2017 SAP SE or an SAP affiliate company. All rights reserved. 109
d. Select the Account Determination Group for the kit. The account determination group defines the rulesthat determine which accounts are used for automatic postings.
e. Select the Perpetual Cost Method. A perpetual cost method is required in order for the kit to be postedin financial accounting.
f. You can update the cost information for each set of books assigned to the selected company/businessresidence. To do so, select the set of books and click Edit Cost . A set of books forms a complete andconsistent set of accounting data that is required for statutory reporting and creating financialstatements.For more information, see Set of Books
If a new set of books has been assigned to the company/business residence, when you edit thekit later, it automatically gets displayed on the Valuation tab. However, you must then save thekit to ensure that the new set of books is applied to the kit.
7. To activate the kit for a company/business residence, set the Status to Active.8. Click Save .
110 © 2017 SAP SE or an SAP affiliate company. All rights reserved. • P U B L I CSAP Business ByDesign February 2017
Products View
7 Reports View
7.1 New Materials
OverviewThe New Materials report provides an overview of all materials that have not been changed since they were created.You can view all new materials or just those that were created within the last 30, 60, or 90 days.
ViewsThe following views are available with this report:
● New MaterialsShows all materials that have not been changed since they were created.
● New Materials Last 30 DaysShows all materials that were created and not changed in the last 30 days.
● New Materials Last 60 DaysShows all materials that were created and not changed in the last 60 days.
● New Materials Last 90 DaysShows all materials that were created and not changed in the last 90 days.
Features
Report ContentThe default view of this report shows all new materials that have not been changed. Alternatively, you can select toshow only the new materials that were created but not yet changed in the last 30, 60, or 90 days. The report includesthe material ID and description, base unit of measure (UoM), product category ID and description, date of creation,and date of last change of each material.The data in this report is initially displayed in table format. You can also display the report as a chart.
Analyzing the ReportTo further analyze data in this report, you can drag characteristics to rows and columns.
● Material ID ● Base UoM ● Product Category ● Created On ● Changed On
From this report, you can navigate to overview details for materials. To open a material overview, select View MaterialOverview from the context menu of the material ID or description.
SAP Business ByDesign February 2017Reports View P U B L I C • © 2017 SAP SE or an SAP affiliate company. All rights reserved. 111
See AlsoReports ViewOverview of Reports in General Business DataOverview of Data Sources in General Business Data
7.2 Changed Materials
OverviewThe Changed Materials report provides an overview of all materials that have been changed since they were created.You can view all changed materials or just those that were changed within the last 30, 60, or 90 days.
ViewsThe following views are available with this report:
● Changed MaterialsShows all materials that have been changed since they were created.
● Changed Materials Last 30 DaysShows all materials that were changed in the last 30 days.
● Changed Materials Last 60 DaysShows all materials that were changed in the last 60 days.
● Changed Materials Last 90 DaysShows all materials that were changed in the last 90 days.
Features
Report ContentThe default view of this report shows all changed materials. Alternatively, you can select to show only the materialsthat were changed within the last 30, 60, or 90 days. The report includes the material ID and description, base unitof measure (UoM), product category ID and description, date of creation, and date of last change of each material.The data in this report is initially displayed in table format. You can also display the report as a chart.
Analyzing the ReportTo further analyze data in this report, you can drag characteristics to rows and columns.
● Material ID ● Base UoM ● Product Category ● Created On ● Changed On
From this report, you can navigate to overview details for materials. To open a material overview, select View MaterialOverview from the context menu of the material ID or description.
112 © 2017 SAP SE or an SAP affiliate company. All rights reserved. • P U B L I CSAP Business ByDesign February 2017
Reports View
See AlsoReports ViewOverview of Reports in General Business DataOverview of Data Sources in General Business Data
7.3 New Services
OverviewThe New Services report provides an overview of all services that have not been changed since they were created.You can view all new services or just those that were created within the last 30, 60, or 90 days.
Views ● New Services
Shows all services that have not been changed since they were created. ● New Services Last 30 Days
Shows all services that were created and not changed in the last 30 days. ● New Services Last 60 Days
Shows all services that were created and not changed in the last 60 days. ● New Services Last 90 Days
Shows all services that were created and not changed in the last 90 days.
Features
Report ContentThe default view of this report shows all new services that have not been changed. Alternatively, you can select toshow only the new services that were were created but not yet changed within the last 30, 60, or 90 days. The reportincludes the service ID and description, base unit of measure (UoM), product category ID and description, date ofcreation, and date of last change of each service.The data in this report is initially displayed in table format. You can also display the report as a chart.
Analyzing the ReportTo further analyze data in this report, you can drag characteristics to rows and columns.
● Service ID ● Base UoM ● Product Category ● Created On ● Changed On
From this report, you can navigate to overview details for services. To open a service overview, select View ServiceOverview from the context menu of the service ID or description.
SAP Business ByDesign February 2017Reports View P U B L I C • © 2017 SAP SE or an SAP affiliate company. All rights reserved. 113
See AlsoReports ViewOverview of Reports in General Business DataOverview of Data Sources in General Business Data
7.4 Changed Services
OverviewThe Changed Services report provides an overview of all services that have been changed since they were created.You can view all changed services or just those that were changed within the last 30, 60, or 90 days.
Views ● Changed Services
Shows all services that have been changed since they were created. ● Changed Services Last 30 Days
Shows all services that were changed in the last 30 days. ● Changed Services Last 60 Days
Shows all services that were changed in the last 60 days. ● Changed Services Last 90 Days
Shows all services that were changed in the last 90 days.
Features
Report ContentThe default view of this report shows all changed services. Alternatively, you can select to show only the servicesthat were changed within the last 30, 60, or 90 days. The report includes the service ID and description, base unitof measure (UoM), product category ID and description, date of creation, and date of last change of each service.The data in this report is initially displayed in table format. You can also display the report as a chart.
Analyzing the ReportTo further analyze data in this report, you can drag characteristics to rows and columns.
● Service ID ● Base UoM ● Product Category ● Created On ● Changed On
From this report, you can navigate to overview details for services. To open a service overview, select View ServiceOverview from the context menu of the service ID or description.
114 © 2017 SAP SE or an SAP affiliate company. All rights reserved. • P U B L I CSAP Business ByDesign February 2017
Reports View
See AlsoReports ViewOverview of Reports in General Business DataOverview of Data Sources in General Business Data
SAP Business ByDesign February 2017Reports View P U B L I C • © 2017 SAP SE or an SAP affiliate company. All rights reserved. 115
www.sap.com/contactsap
© 2017 SAP SE or an SAP affiliate company. All rightsreserved.No part of this publication may be reproduced ortransmitted in any form or for any purpose without theexpress permission of SAP SE or an SAP affiliatecompany.The information contained herein may be changedwithout prior notice. Some software productsmarketed by SAP SE and its distributors containproprietary software components of other softwarevendors. National product specifications may vary.These materials are provided by SAP SE or an SAPaffiliate company for informational purposes only,without representation or warranty of any kind, andSAP or its affiliated companies shall not be liable forerrors or omissions with respect to the materials. Theonly warranties for SAP or SAP affiliate companyproducts and services are those that are set forth inthe express warranty statements accompanying suchproducts and services, if any. Nothing herein should beconstrued as constituting an additional warranty.SAP and other SAP products and services mentionedherein as well as their respective logos are trademarksor registered trademarks of SAP SE (or an SAP affiliatecompany) in Germany and other countries. All otherproduct and service names mentioned are thetrademarks of their respective companies. Please seehttp://www.sap.com/corporate-en/legal/copyright/index.epx for additional trademark information andnotices.
icon courtesy of W3C, see http://creativecommons.org/licenses/by/3.0/ .