pb 520 - precisa gravimetrics
TRANSCRIPT

Operating Instructions
PB 520
350-8185-000 --

Declaration of conformity
Declaration of conformity for apparatus with CE mark
Konformitätserklärung für Geräte mit CE-Zeichen
Déclaration de conformité pour appareils portant la marque CE
Declaración de conformidad para aparatos con disitintivo CE
Dichiarazione di cofnromitá per apparecchi contrassegnati con la marcatura CE
English We hereby declare that the product to which this declaration refers conforms with the following standards.
Deutsch Wir erklären hiermit, dass das Produkt, auf das sich diese Erklärung bezieht, mit den nachstehenden Normen übereinstimmt.
Français Nous déclarons avec cela responsabilité que le produit, auquel se rapporte la présente déclaration, est conforme aux normes citées ci-après.
Español Manifestamos en la presente que el producto al que se refiere esta declaración est´´a de acuerdo con las normas siguientes
Italiano Dichiariamo con ciò che il prodotto al quale la presente dichiarazione si riferisce è conforme alle norme di seguito citate.
Electronic Balance: Precisa Series 520 PT
Precisa Series 520 PB
Mark applied EU Directive Standards
2014/30/EU 2014/35/EU
EN61326 EN61010
Date: 12.06.2020 Signature: R. Grolimund R & D Manager
Precisa Gravimetrics AG , Moosmattstrasse 32 , Postfach 352 , CH-8953 Dietikon

Identification ■
1
Identification
Customer servicePrecisa Gravimetrics AGMoosmattstrasse 32CH-8953 DietikonTel. +41-44-744 28 28Fax. +41-44-744 28 38email [email protected]
http://www.precisa.comRefer to our website for information about local customer service centers and details of their addresses.
CopyrightThese operating instructions are protected by copyright. All rights reserved. No part of the operating instructions may be reproduced, processed, duplicated or published in any form by photocopying, microfilming, reprinting or other process, in particular electronic means, without the written agreement of Precisa Gravimetrics AG.
© Precisa Gravimetrics AG, 8953 Dietikon, Switzerland

■ 1 Overview
2
1 Overview
No. Description No. Description
1 Draft shield 11 USB device connector for connection to PC2 Weighing pan 12 Symbol display3 Levelling bubble 13 Measurement display4 5-key control panel 14 Info display5 Display 15 ON / OFF key6 Adjustable feet 16 MODE key7 Ethernet connector, optional 17 0 / T key8 Connecting socket for power adaptor 18 REF key
9USB host connector for connection of keyboard, bar-code reader, ...
19 PRINT key
10 Serial interface connector, DB9 female
1
2
4
65
3
8 111097
12 14
15 16 17 18 19
13

2 Inspection and assembly ■
3
2 Inspection and assemblyInspect delivery for complete supply immediately on unpacking all components.
The balance is delivered in partly dismantled condition. Assemble the individual components in the following sequence:• Install the draft shield as described in the separate manual• Place the weighing pan in position• Insert the power adaptor cable plug into the socket at the rear of the balance.
Components supplied, depending on balance type• Balance• Pan holder• Weighing pan• Protective ring for A• Centring ring for M balances• Protection and shield plate for C, D, G balances• Draft shield for A or M balances• Power adaptor• Protection cover for the balance• Short instructions
NOTEAll parts must fit together easily. Do not apply force. Customer Service will be pleased to help you withany problems.
A
M
C, D, G
■ 3 Firmware and serial number
4
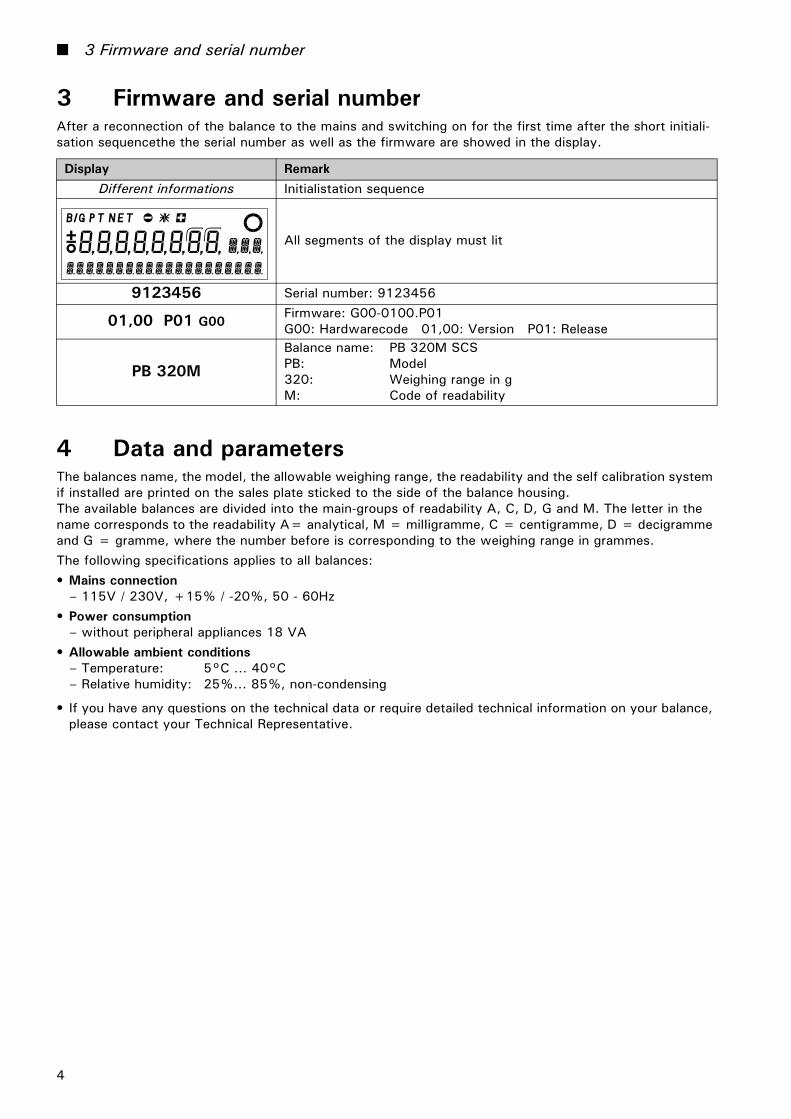
3 Firmware and serial numberAfter a reconnection of the balance to the mains and switching on for the first time after the short initiali-sation sequencethe the serial number as well as the firmware are showed in the display.
4 Data and parametersThe balances name, the model, the allowable weighing range, the readability and the self calibration system if installed are printed on the sales plate sticked to the side of the balance housing.The available balances are divided into the main-groups of readability A, C, D, G and M. The letter in the name corresponds to the readability A= analytical, M = milIigramme, C = centigramme, D = decigramme and G = gramme, where the number before is corresponding to the weighing range in grammes.The following specifications applies to all balances:• Mains connection
– 115V / 230V, +15% / -20%, 50 - 60Hz• Power consumption
– without peripheral appliances 18 VA• Allowable ambient conditions
– Temperature: 5°C … 40°C– Relative humidity: 25%... 85%, non-condensing
• If you have any questions on the technical data or require detailed technical information on your balance, please contact your Technical Representative.
Display RemarkDifferent informations Initialistation sequence
All segments of the display must lit
9123456 Serial number: 9123456
01,00 P01 G00Firmware: G00-0100.P01G00: Hardwarecode 01,00: Version P01: Release
PB 320MBalance name: PB 320M SCSPB: Model320: Weighing range in gM: Code of readability

5 Below-balance weighing ■
5
5 Below-balance weighingObjects which, because of their size or shape, cannot be put on the scale, can be weighed by means of be-low-balance weighing.Proceed as follows:• Turn off the balance.• Remove the weighing pan and the pan holder than turn the balance up side down.• Remove the screw (1) on the underside of the balance.• Hang the hook for weighing below (available as an accessory, see chapter 6 "Accessories") into the ap-
erture (2) of the now visible metal casting (3).• Place the balance over an opening.• Replace the pan holder and the weighing pan.• Level the balance (see chapter 9.6 "Levelling")• Switch on the balance.• Hang the object to be weighed on the hook and carry out the weighing.
WARNINGTake care that the hooks used for the below-balance weighing are stable enough to hold the goodswhich you wish to weigh.
NOTETake care that no dirt or moisture can get into the balance with the weighing pan removed.After completing the below-balance weighing, the opening in the floor of the balance must be closed again(dust protection).
kg
3
2
1

■ 6 Accessories
6
6 Accessories
Check our website for more accessories and options on demand.
Accessory Article number
APP: BEST Buoyancy Error Suppression Technology 350-8739-001
Printer LP4024, 230V / 115V 350-8391Paper roll for Printer LP4024, set of 4 pieces 350-8392Ribbon for Printer LP4024 PN 3953-013
Draft shield PB short 350-8742Draft shield PB short + Weighing pan M* for M balances 350-8742-001
Remote display free-standing, incl. 1.5 m cable 350-8401-001Remote display with wall bracket, incl. 1.5 m cable 350-8401-002
Signal Lamp, indicator with 3 lamps, green / red / yellow 350-8734Horn for signal lamp 350-8533
Single foot switch USB for one function: tare, print, … 350-8747-001Double foot switch USB for two functions: tare and print, tare and … 350-8747-002
Interface box, LAN Ethernet connection 350-8940-001Interface box, WiFi connection 350-8940-002Data cable DB9m-DB9f, 1.5m, (PC/Printer LP 4024, 1:1) 350-8672USB cable A-B, 1.5m, (PC) PN 3950-125
Hook for weighing below the balance 350-8744Animal weighing bowl complete for 0.01g, 0.1g and 1g balances 350-8743Carat bowl (for diamond weighing) 350-8322Anti-theft device, mechanical 350-8555
Density kit for 0.1mg balancesContainer size Ø= 75mm, h= 100mm
350-8719
Density kit solids only (w/o Glass body and Hook) for 0.1mg balancesContainer size Ø= 75mm, h= 100mm
350-8720
Glass body 10ccm for density determination of liquids 350-7054Downholder for samples with density < 1 g/cm3 350-7194
Protective cover 520 for the whole balance (0.1mg, 1mg), set of 5 pieces 350-8745-001Protective cover 520 for the whole balance (0.01g, 0.1g, 1g), set of 5 pieces 350-8745-002

6 Accessories ■
7

■ Contents
8
1 Overview................................ 2
2 Inspection and assembly........... 3
3 Firmware and serial number ...... 4
4 Data and parameters ................ 4
5 Below-balance weighing ........... 5
6 Accessories ............................ 6
7 Your balance ......................... 107.1 Introduction .................................... 107.2 Correct use of the balance................ 107.3 Conformity ..................................... 107.4 Technical data................................. 107.5 Useful tips on the Operating Instructions10
8 Safety .................................. 128.1 Representations and symbols ............ 128.2 Safety recommendations .................. 12
9 Set up .................................. 139.1 Unpacking the balance ..................... 139.2 Transport and shipping..................... 139.3 Storage .......................................... 139.4 Choosing a suitable location.............. 139.5 Connecting the balance to the mains.. 149.6 Levelling......................................... 149.7 Calibration of the balance ................. 159.8 Dual Range and Floating Range balances159.9 Standardized balance ....................... 15
10 Modes of operation and operating16
10.1 Switching on the balance ................. 1610.2 Auto-Standby Mode......................... 1610.3 Setting and storing the configuration.. 1610.4 Significance of the two main menus .. 1610.5 Activating the two main menus ......... 1610.5.1 Activating the configuration menu ..... 1610.5.2 Activating the application menu......... 1610.6 How the menu control operates......... 1610.6.1 Operating in the weighing mode ........ 1710.6.2 Operation in the programming mode .. 1810.6.3 Display........................................... 1810.6.4 Stability indicator............................. 18
11 Working with the configuration menu ................ 19
11.1 Structure of the configuration menu... 1911.2 Language-function ........................... 1911.3 Selecting the weight unit .................. 20
11.4 Print functions................................. 2011.5 Calibration functions ........................ 2111.6 Weighing mode ............................... 2211.7 RS232 interface .............................. 2311.8 USB Device interface ....................... 2411.9 USB Host interface .......................... 2411.10 Date and time ................................. 2511.11 Password protection ........................ 2611.12 Anti-theft encoding.......................... 2611.12.1 Key tone ........................................ 2711.12.2 Key tone ........................................ 2711.12.3 Backlight ........................................ 2711.13 Set Configuration ............................ 27
12 Working with the application menu28
12.1 Structure of the application menu ...... 2812.2 Selecting a working program............. 2812.3 Changing application / weighing mode 2912.4 Application “UNITS” ........................ 2912.5 Application “COUNT“....................... 2912.5.1 „REF. OPTIMIZATION“ ..................... 3012.5.2 „REF. ACCURACY“.......................... 3012.6 Application “PERCENT”.................... 3112.7 Application “CALCULATOR“ ............. 3112.8 Application “NET-TOTAL“................. 3212.9 Application “SUM“ .......................... 3212.10 Application “ANIMAL“ ..................... 3312.11 Application “DYN.-WEIGHT“ ............. 3312.12 Application “DENSITY” .................... 3412.12.1 Density determination “Solid on bottom
mode”............................................ 3412.12.2 Density determination “Solid in air mode”
3412.12.3 Density determination “Liquid mode” . 3512.12.4 Density determination “Solid porous mode”
3512.13 Application “DIAGNOSTICS“............. 35
13 Statistics...............................36
14 Check-Weighing .....................3814.1 Resolution reduction ........................ 39
15 Special operating keys ............4015.1 The Tare key «0/T» ......................... 4015.2 The Print key «PRINT» ..................... 4015.3 The Mode key «MODE».................... 41
16 Data transfer..........................4216.1 Connection scheme ......................... 4216.2 Remote control-commands ............... 4316.2.1 Examples for the remote control ........ 43

Contents ■
9
17 Practical examples.................. 4417.1 Changing the configuration menu .......4417.1.1 Setting the choice of language ...........4417.1.2 Setting the Weight unit .....................4417.1.3 Setting the Print functions.................4417.1.4 Activation of password protection ......4517.2 Selection of an application program ....4517.2.1 Setting for Counting by weighing .......45
18 Maintenance and servicing ...... 4718.1 Calibration.......................................4718.1.1 External calibration by means of ICM ..4718.1.2 External calibration with freely selectable
weight ............................................4718.1.3 Internal calibration............................4818.1.4 Automatic calibration........................4818.2 Firmware update ..............................4818.3 Cleaning..........................................4818.4 Error messages ................................4918.4.1 Notes on correcting faults .................49
19 Menu trees ............................ 5019.1 Configuration menu tree....................5019.2 Application menu tree .......................53

■ 7 Your balance
10
7 Your balance
7.1 IntroductionThe balances are high-quality electronic precision balances and developed to operate simple and functional.The versatile weighing programs allow you to use these balances not only for simple weighing procedures but also in a simple manner for carrying out various weighing applications such as, for example, percentage- or component counting weighings and document the measurements obtained accurately and unequivocally.Virtually all models can be delivered in weights and measures approved.The most important basic production features of the Precisa balances include:• Simple-to-use multifunction control panel• Large and bright display with multi-lines• Anti-theft encoding with four-figure numerical code• Storable user-configuration (UMM User Menu Memorized)• ICM-Autocalibration (intelligent calibration mode)• RS232/V24 serial interface for data transfer to PC or printers• USB device interface for data transfer to PC• USB host interface to attach a keyboard or bar code reader• ISO- and GLP-compliant reporting of results of measurements• Capacity and residual tare display• Various application programs:
Piece counting, Percentage weighing, Animal weighing, Dynamic weighing, Calculator, Check and refer-ence weighings and lot others
• Statistics program• Appliance for below-balance weighing
7.2 Correct use of the balanceThe balance may only be used for the weighing of solid-materials and of liquids filled into secure containers.The maximum allowable load of the balance must never be exceeded, otherwise the balance may be dama-ged.In using the balance in combination with other appliances as well as with appliances produced by other ma-nufacturers, the current regulations for the safe use of the relevant attachments and their application in ac-cordance with instructions must be observed.
7.3 ConformityThe balance has been manufactured and tested in accordance with the standards and recommendations set out in the certificate of conformity in the delivered brief instructions manual.The power adaptor produced for the operation of the balance and intended exclusively for this application, complies with the electrical protection class II.
7.4 Technical dataThe most important technical data of the balance are mentioned in the delivered brief instructions manual. If you have any questions on the technical data or require detailed technical information on your balance, please contact your Technical Representative.
7.5 Useful tips on the Operating InstructionsPrecisa balances are simple and functional to operate.Nevertheless, you should read through these operating instructions in their entirety, so that you can make optimal use of the full potential and the diverse possibilities of the balance in your daily work.

7 Your balance ■
11
These operating instructions contain guidance in the form of pictograms and keyboard diagrams, which should help you in finding the required information:• Key names are presented in quotation marks and are accentuated by printing in semi-bold script: «ON/
OFF».• In the explanation of the operating steps, the appropriate display for the current operating step is shown
for clarity at the left alongside the list of operating steps:
Display shows List of the Operating steps
LANGUAGE ENGLISH • Switch off balance. • Switch on balance and depress «MODE» until the currently activated
language is shown.• Press «E» to start to change the language (the display will flash).• Press «C» or «D» repeatedly, until the desired language is flashing.
• Press «E» to confirm the selected language.• Press «esc» in order to exit the menu.
Sprache Deutsch
langue francaise

■ 8 Safety
12
8 Safety
8.1 Representations and symbolsImportant instructions, which involve safety, are highlighted with the appropriate action:
8.2 Safety recommendations• When using the balance in surroundings with increased safety requirements the corresponding regulations
must be observed.• The balance may only be used with the power adaptor supplied exclusively for use with this balance.• Before plugging in the power adaptor, make sure that the operating voltage stated on the power adaptor
agrees with the mains voltage. If not, please refer to the Customer Service.• If the power adaptor or its cable is damaged, the balance must immediately be disconnected from the elec-
tricity supply (pull out the power adaptor). The balance may only be operated with a power adaptor in per-fect condition.
• If there is any reason to believe that it is no longer possible to operate the balance without danger, the bal-ance must immediately be unplugged from the electricity supply (pull out power adaptor) and secured against inadvertent operation.
• In carrying out maintenance work, it is essential to heed the recommendations in chapter 18.3 "Cleaning".• The balance must not be operated in an area subject to explosion risks.• Take care when weighing liquids that no liquid is spilt into the inside of the balance or into connections on
the rear of the equipment or the power adaptor.If liquid is spilt on the balance, the latter must immediately be unplugged from the mains electricity supply (pull out power adaptor). The balance may only be operated after it has first been re-checked by a Service technician.
• The operating instructions must be read by each operator of the balance and must be available at the work-place at all times.The balance may only be used for the weighing of solid-materials and of liquids filled into secure containers and for animal weighing and density determinations. The maximum allowable load of the balance must never be exceeded, otherwise the balance may be damaged.
• When using the balance in combination with other appliances, the current regulations for the safe use of the relevant attachments and their application in accordance with instructions must always be observed.
DANGERWarning of a possible danger, which can lead to death or to serious injuries.
WARNINGWarning of a possibly dangerous situation, which can lead to less severe injuries or damage.
NOTETips and important rules on the correct operation of the balance.

9 Set up ■
13
9 Set up
9.1 Unpacking the balanceThe balances are delivered in an environmentally-friendly package, specifically developed for this precision instrument, which provides optimum protection for the balance during transportation.
In order to avoid damage, attention must be given to the following points when unpacking the balance:• Unpack the balance carefully. It is a precision instrument.• When outside temperatures are very low, the balance should first be stored for some hours in the un-
opened transport package in a dry room at normal temperature, so that no condensation settles on the bal-ance when unpacking.
• Check the balance immediately after unpacking for externally visible damage. If you should find transport damage, please inform your Services representative immediately.
• If the balance is not to be used immediately after purchase but only at a later time, it should be stored in a dry place where fluctuations in temperature are as low as possible (see chapter 9.3 "Storage").
• Read through these operating instructions, even if you already have experience with balances, before you work with the balance and pay attention to the safety recommendations (see chapter 8 "Safety").
9.2 Transport and shippingYour balance is a precision instrument. Treat it with care.Avoid shaking, severe impacts and vibration during the transportation.Take care that there are no signification temperature fluctuations during the transportation and that the bal-ance does not become damp (condensation).
9.3 StorageIf you would like to take the balance out of service for an extended period, disconnect it from the electricity supply, clean it thoroughly (see chapter 18.3 "Cleaning") and store it in a place which meets the following conditions:• No violent shaking, no vibrations• No significant temperature fluctuations• No direct solar radiation• No moisture
9.4 Choosing a suitable locationThe balance location must be chosen in such a way as to guarantee perfect operation of your balance, so that the allowable ambient conditions and prerequisites are met and maintained:• Protect the balance from direct solar radiation
NOTERetain the original packaging in order to avoid transportation damages when shipping or transporting thebalance and to allow the balance to be stored in the best conditions if it is out of operation for an extendedperiod.
NOTEThe balance should preferably be dispatched and transported in the original packaging to avoid transpor-tation damage.
NOTEThe balance should preferably be stored in the original packaging, since this provides optimum protectionfor the balance.

■ 9 Set up
14
• Avoid temperature fluctuations• Put the balance on a solid, firm and preferably vibration-proof, horizontal base and the balance cannot be
shaken or knocked over,• Protect the balance from drafts
9.5 Connecting the balance to the mainsThe following safety recommendations must be observed when connecting the balance to the mains:
9.6 LevellingTo function properly, the balance must be precisely horizontal.The balance is fitted with one spirit level and two adjustable feet for level-control, with the aid of which it is possible to compensate for small height differences and/or unevennesses in the surface on which the bal-ance is standing.The two screw feet must be adjusted so that the air bubble is precisely in the centre of the sight glass of the bubble level.
NOTEWith difficult conditions (where the balance may be easily shaken or subject to vibration) the balance cannevertheless provide accurate results through suitable adjustment of the stability control (see chapter11.6 "Weighing mode").
DANGERThe balance may only be operated with the power adaptor supplied.Check before connecting the power adaptor to the mains supply that the operating voltage stated on thebalance or on the power adaptor agrees with the local mains voltage. If the operating voltage is not the same as the mains voltage, the balance or the power adaptor must onno account be connected to the mains supply. Contact the Customer Service.
Incorrect Correct
NOTEIn order to get exact measurements, the balance must again be carefully levelled after each relocation.

9 Set up ■
15
9.7 Calibration of the balance
Since the Earth's gravity is not the same everywhere, each balance must – in accordance with the underlying physical weighing principle – be adjusted to compensate for the gravity at each location. This adjustment process, known as “calibration”, must be carried out on initial installation and after each subsequent reloca-tion. In order to get exact measurements, it is recommended moreover, that the balance should also be cal-ibrated periodically.
Calibration is effected in the configuration menu. Depending on the balance model, this may be done exter-nally, internally or automatically (see chapter 11.5 "Calibration functions").With the aid of the “Intelligent Calibration Mode” the balance can itself determine the size of the calibration weight, which enables an exact calibration with different size weights (in 10 g, 50 g, 100 g and 500 g steps, depending on implementation).
9.8 Dual Range and Floating Range balancesWith the Dual Range balances, weighing is always first carried out in the fine range, which is 10 times more precise. When the fine range is exceeded the balance switches automatically into the coarse range.The Floating Range balances have a fine range (10 times more precise), which moves over the entire weight range. By pressing the tare key «0/T» the fine range can be called up as often as required over the entire weight range.
9.9 Standardized balanceThe standardized balances are provided with the EC/OIML certification or meet the local standardization reg-ulations.The balance range and certain functions of the weighing output differ from the standard program in the case of the standardized balances – in accordance with the EC/OIML provisions.
NOTEMake sure the balance has been connected to mains at least for one hour for class II balances or for 3hours for class I balances before the first weighing or any calibration.
NOTEThe balance must be calibrated on initial installation and after every relocation.If you work in accordance with “Good Laboratory Practice GLP” observe the prescribed intervals betweencalibrations (adjustments).
NOTEIf a circle appears in the main-display of a standardized balance, the indicated value is unstandardized.In balances of class (1) the circle also stands for the warm-up phase. Your Customer Service will be happy to assist you at any time if you have any questions on the stand-ardization of the balance or on working with standardized balances.

■ 10 Modes of operation and operating
16
10 Modes of operation and operating
10.1 Switching on the balance• Press «ON/OFF» to switch on the balance.The balance carries out a self-diagnosis in order to check the most important functions. After completion of the start-up process (approximately ten seconds) “Zero” appears in the display.The balance is ready for operation and is in the weighing mode.
10.2 Auto-Standby ModeThe balance is equipped with an Auto-Standby mode, which can be activated or deactivated in the configu-ration menu. If the Auto-Standby mode is activated, the balance automatically switches to Standby some time after the last weighing or key operation (current-saving function).The delay before switching to Standby is defined in the configuration menu (see Chapter 11.6 “Weighing mode”).• Press any button or put on a weight in order to switch the balance from the Standby mode back to the
weighing mode again.
10.3 Setting and storing the configurationTo learn how to store the current balance configuration, set the factory configuration or load a previews stored user configuration, see Chapter 11.13 “Set Configuration”.
10.4 Significance of the two main menusThe balance has two main menus available: the configuration menu and the application menu.The basic-program of the balance is defined in the configuration menu. With this, you can either work with the basic-configuration programmed ex-works, or define and store a user-configuration adapted to your spe-cific needs.In the application menu, you define a working program, which is suited to the specific weighing problem.
10.5 Activating the two main menus
10.5.1 Activating the configuration menu• Press «ON/OFF» to switch on the balance.• Continue to hold down the «MODE» button during the start-up process (approximately 10 seconds), until
the currently set language appears, than release the key.• Now you are in the configuration menu.
10.5.2 Activating the application menu• After the start-up process has finished, press «MODE» until “MENU” appears on the display, than release
the key.• Now you are in the application menu.
10.6 How the menu control operatesThe configuration menu and the application menu each have a main path and sub-paths in which the para-meters for the different functions and programs of the balance are defined.
Moving in the menu path:• «B»: In path to the right• «D»: In path downwards• «E»: In path to the right or or start input• «esc»: In path to the left or exit the menu from the main path

10 Modes of operation and operating ■
17
Input:• «C»,«D»: Change value of the current position• «B»: Change one position to the right or rollover to the first position• «esc»: Terminate input without changes• «E»: Terminate input and save new value
10.6.1 Operating in the weighing mode
For an illustration of the method of operation see Chapter 17 “Practical examples”.
Name Function during weighing
«ON/OFF» • Switching the balance on and off
«MODE» • Calling up the configuration menu and the application menu • Switches between the Basic program and the chosen application
«0/T» • Initiate Tare Function and/or Calibration Function
«REF» • Run application (see Chapter 12 “Working with the application menu”)
«PRINT» • Start print function
NOTEFor the operation of the «0/T» and «PRINT» see Chapter 15 “Special operating keys”.
SETDATA PRINT
Main path Sub-path 1 Sub-path 2
AB
AB
«esc»
«>»
D«˅»
«esc»
«>»
AB
AB
«esc»
«>»
«esc»
«>»
D
«˄»C D«˅» «˄»
C D«˅» «˄»
C D«˅» «˄»
C D«˅» «˄»
D«˅»
D
«˄»

■ 10 Modes of operation and operating
18
10.6.2 Operation in the programming mode
For an illustration of the method of operation see chapter 17 "Practical examples".
10.6.3 DisplayThe display has three sections.
The upper section contains various symbols about the current conditions, the check weigher symbols „+“, „–“ and „II“ and the big circel of the stability indicator.The middle display section includes the 3 symbols „+“,“-“ and „o“, the 8-digit measurement display, the two symbols to mark the auxiliary displayed decicmals and the 3 characters to display the measuring unit and other information.The lower line serves as a 20-character info-line in connection with the cursor keys for controlling the wor-king programs.
10.6.4 Stability indicatorThe stability indicator appears after each weight change as a black annulus, which decreases with increasing stability. Basically, a weight value is considered to be stable and thus valid if the indicator (black ring) is no longer visible. In case the inidator decreases only very slow or not at all, this means the weighing is disturbed e.g. by drafts, vibrations of the location or other influences.
Keys Designation Function in programming mode
«esc»• In the main menu path: leaves the menu• In a sub menu paths: left movement within the menu• During intput: Interrupts the input
«B» • In a menu paths: Right movement within the menu• During intput: Right movemnt
«C»
«D»• In a menu paths: Up/Down movement within the menu• During intput: Change selected parameter
«E»• In a menu paths: Selects a paramater• During intput: Stores selected parameter
NOTEFor the operation of the «0/T» and «PRINT» see Chapter 15 “Special operating keys”.

11 Working with the configuration menu ■
19
11 Working with the configuration menuThis chapter describes the configuration menu and its functions.To activate the menu, see Chapter 10.5 “Activating the two main menus” and Chapter 10.6 “How the menu control operates”.
11.1 Structure of the configuration menuThe basic adjustment of the balance is defined in the configuration menu:
Printing conventions used in this document:• The settings in the sub-paths pre-programmed in the works are printed in bold in these operating instruc-
tions.• For greater clarity, only that part of the menu tree which corresponds to the function is shown with each
description of the function.• You will find the entire menu tree for the configuration menu in Chapter 19 “Menu trees”.• Explanations of the menu functions are printed in italics.
11.2 Language-functionTo activate the menu see Chapter 10.5 “Activating the two main menus” and Chapter 10.6 “How the menu control operates”.
In order to alter the language, proceed as follows:• Switch off balance. • Switch on balance and depress «MODE» until the currently activated language is shown.• Press «E» to start to change the language (the display will flash).• Press «C» or «D» repeatedly, until the desired language is flashing.
Menu Definable functionsLANGUAGE Display language (E, G, F)UNIT-1 Unit in which the weighing results are displayed
SET DATA PRINT Print formats; Type of values to be printed (individual values, continuous print-out, time or load change dependent values, date, time, user, etc.)
SET CALIBRATION Calibration methodSETWEIGHING MODE
Stability mode (Quality of the balance location), Auto-Standby mode, zero cor-rection, tare method (rapid or standard tare)
SET RS 232 Set the parameters for the RS 232 interface like baud rate, parity and hand-shake.
SET USB DEVICE Set the operation mode of the USB device connection.SET USB HOST Set the operation mode of the USB host connection.SET DATE AND TIME Date and time (standard format or American format p.m. and a.m.)
PASSWORD Password protection for defining the menusTHEFTCODE Activating/deactivating and changing the anti-theft codeKEY TONE Tone of feedback when pressing a keyADVICE TONE Tone to announce advices or info from balanceBACKLIGHT Display backlightSET KONFIGURATION Store or recall a configuration
• LANGUAGELANGUAGE ENGLISHSPRACHE DEUTSCHLANGUE FRANCAISEDIL TURKCEIDIOMA ESPANOL
Selecting a language

■ 11 Working with the configuration menu
20
• Press «E» to confirm the selected language.• Press «esc» to exit the menu.
11.3 Selecting the weight unitTo activate the menu see Chapter 10.5 “Activating the two main menus” and Chapter 10.6 “How the menu control operates”.
The balance can show results in different units, although with some balances display is not possible in mil-ligrammes or kilogrammes because of the corresponding weight range.
11.4 Print functionsTo activate the menu see Chapter 10.5 “Activating the two main menus” and Chapter 10.6 “How the menu control operates”.
• UNIT-1UNIT-1 g
kg-----Bht
GramKilogram-----Baht
Display Weight unit Conversion to grammesg Gram(mg) Milligram 0.001 g(kg) Kilogram 1000 gGN Grain 0.06479891 gdwt Pennyweight 1.555174 gozt Troy ounce 31.10347 goz Ounce 28.34952 gLb Pound 453.59237 gct Carat 0.2 gC.M. Carat Metric 0.2 gtLH Tael Hong Kong 37.4290 gtLM Tael Malaysia 37.799366256 gtLT Tael Taiwan 37.5 gmo Momme 3.75 gt Tola 11.6638038 gBht Baht 15.2 g
• SET DATA PRINTAUTO-START ON/OFF Start print automatically on switching on/offMODE UNSTABLE
STABLELOADCHANGECONTINUOUS
TIMEBASE
Individual print, each valueIndividual print, stable valuePrint after load changesContinuous print after every integration timeContinuous print with time basis
TIMEBASE 2.0 Time basis (in seconds) freely selectableSET PRINTFORMAT DATE AND TIME ON/OFF
BALANCE-ID ON/OFFPRODUCT-ID ON/OFFGROSS AND TARE ON/OFFUNITS ON/OFFOPERATOR-ID ON/OFFLINEFEED OFF/1/2/../9/FROMFEEDPRODUCT ttt...

11 Working with the configuration menu ■
21
„SETR PRINTFORMAT“– „UNITS”: All momentarily active units are printed out– „LINEFEED”: The specified numbers of lines are printed out or a formfeed is performed at the end of
each printout
„PRODUCT ttt...“A product name can set alphanumerically.„PRODUCTMODE“
– „HOLD”: The product name keeps unchanged– „DELETE”: The product name is deleted after each printout– „COUNT”: The product name keeps unchanged and add by a counter, which is incremented by 1 af-
ter each printout
„OERATOR ttt...“A name for the operator can setalphanumerically.
11.5 Calibration functionsTo activate the menu see Chapter 10.5 “Activating the two main menus” and Chapter 10.6 “How the menu control operates”.
For the calibration of the balance see Chapter 9.7 “Calibration of the balance” and Chapter 18.1 “Calibrati-on”.
PRODUCTMODE HOLDDELETECOUNT
OPERATOR ttt...
NOTEWhen a peripheral device (for example a printer) is connected, the balance interface must be configuredaccordingly, see Chapter 11.7 “RS232 interface”, chapter 11.8 "USB Device interface" and chapter 11.9"USB Host interface".
• SET CALIBRATIONMODE OFF Closed
EXTERNAL External EXT.-DEF. External with user-defined weight („DEF. n.nnn
g“)INTERNAL with internal weight
AUTO Automatic (AUTOCAL)DEF. 0.000 g Calibration weight for EXT.-DEF. modeAUTOCAL. TIME/TEMP.
TEMPERATURETIME
Auto-calibration on time and temperatureAuto-calibration on temperatureAuto-calibration on time
AUTOCAL.-TIME 6 h Time for auto-calibrationAUTO-WARNING ON/OFF Shows a message if the balance recognizes a
significant temperature change and therefore a calibration is recommended
REPORT ON/OFF Printout calibration report
NOTEThe works setting depends on the model of balance. The internal calibration modes are only available ifthe self calibration system (SCS) is installed.

■ 11 Working with the configuration menu
22
11.6 Weighing modeTo activate the menu see Chapter 10.5 “Activating the two main menus” and Chapter 10.6 “How the menu control operates”.
„FLOATINGDISPLAY“The value set for „FLOATINGDISPLAY“ defines the period after which each new measurement is displayed.For the definition of this period, the quality of the balance location is crucial. The stability control must also set appropriately. Choose:
– For an optimum balance location:„0.08“– For a good balance location:„0.16“– Fro a critical balance location:„0.32“
„STABILITY“The value set for the stability control depends on the quality of the balance location and must be correctly chosen in order to obtain optimum, reproducible results. Take advantage of the stability indicator to find the best settings and location, see chapter 10.6.4 "Stability indicator". Choose:
– For an optimum balance location:„LOW“– For a good balance location:„MEDIUM“– For a critical balance location: „HIGH“
„FILTERPROFILE“In order to adapt the balance most effective for your particular application, various filter profiles are available. Choose:
– „STD.“: Suitable for most applications and ideal for single weighings. It is an adaptive filter type.– „DOSING“: Works with a short delay and optimzed timing behaviour, particularly when dosing pow-
der and liquid samples. It is an adaptive filter type.
• SET WEIGHING MODEFLOATINGDISPLAY 0.08
0.160.32
Input integration time (in seconds)
STABILITY LOWMEDIUM
HIGH
Setting the stability control (instability of the balance location)
FILTERPROFILE STD. DOSING
CONST.
Adapting the balacnce to your application
VALUE RELEASE V. FASTFASTSTD.
SLOWV. SLOW
Adapting the balacnce to your application
AUTO-STANDBY OFF 0.5 MIN.
1 MIN. 5 MIN. 10 MIN.
Auto-Standby not active or active after nn min-utes
AUTO-ZERO ON/OFF Automatic zero correction on/offQUICK-TARE ON/OFF Quick-Tare on/offZERO-RANGE 0.320 g Maximum weight to performe a zero functionLOAD CHG. 5.000 g This minimum load change must have taken
place in order to recognize an action what is triggered by a load change
NOTEThe value of the Floating Display is a function of the stability control and the balance location. For balancelocation, see chapter 9.4 "Choosing a suitable location".

11 Working with the configuration menu ■
23
– „CONST.“: Some applications, as evaporation processes, demand a filter behaviour which is linear in time. A therewith associated longer settling time is irrelevant.
„VALUE RELEASE“The speed of the measuring value release determines how rapidly the balance considers the measurement to be stable and releases its value. The slower you allow the balance to do this, the more you benefit of a high repeatability of the measuring.
„AUTO-STANDBY“The Auto-Standby mode turns off the balance automatically, if:• the balance is tared and has shown “Zero” for at least 5 minutes• the balance has received no remote control command via the interface for at least 5 minutes,• the automatic zero correction „AUTO-ZERO” is activated.It is possible to re-start the balance after it has been switched off by an automatic Auto-Standby:• Briefly press any key• Put a weight on the balance• Make a remote control command via the interface
„AUTO-ZERO“If the automatic zero correction „AUTO-ZERO” is activated, the balance always gives a stable zero (e.g. even with fluctuations in room temperature).
„QUICK-TARE“Tares the balance immediately when «0/T» is pressed or when the remote control command for taring is re-ceived, regardless of whether a stable weight value is reached or present.
„ZERO-RANGE“Defines the maximum weight value at which the balance performs a zero function instead of normal taring when the «0/T» key is pressed or the remote control command for taring is received. This value can be ad-justed to ensure that a small load is stored as tare and appears accordingly on a printout.
11.7 RS232 interface
Ensure the settings for baudrate, parity and handshake match with the peripheral device connected (see chapter 16 "Data transfer").
• SET RS 232BAUDRATE 300
6001200240048009600
192003840057600
Select baud rate
PARITY 7-EVEN-1STOP7-ODD-1STOP
7-NO-2STOP8-NO-1STOP
8-EVEN-1STOP8-ODD-1STOP
Select parity
HANDSHAKE NOXON-XOFF
HARDWARE
Select handshake function

■ 11 Working with the configuration menu
24
11.8 USB Device interface
„MODE“– „COMPORT“: The USB connetion acts like a standard RS232 interface and appears on the PC in the
COM interfaces.Ensure the settings for baudrate, parity and handshake match with the settings in the PC.
– „HID-PORT“: Direct connection to a PC. The values transfered from the balance looks like for the PC as they are input via a computer keyboard.
11.9 USB Host interface
• SET USB DEVICEMODE COM-PORT
HID-PORTSelect standard COMPORT (RS232) oder HID-PORT function
BAUDRATE 300600
1200240048009600
192003840057600
In mode COM-PORT: Select baud rate
PARITY 7-EVEN-1STOP7-ODD-1STOP
7-NO-2STOP8-NO-1STOP
8-EVEN-1STOP8-ODD-1STOP
In mode COM-PORT: Select parity
HANDSHAKE NOXON-XOFF
In mode COM-PORT: Select handshake func-tion
KEYBOARD LANGUAG. ENGGERFRATURSPA
In mode HID-PORT: Select character set for the PC according the English, German, French, Turkish or Spain keyboard of the PC
FORMAT LINESTABLE
In mode HID-PORT: Select output format in lines mode or in table mode with a tab stop for each column
COLUMN FOR o OFF ON/OFF In mode HID-PORT: Select output of a separate column for the identification
COLUMN FOR<> OFF ON/OFF In mode HID-PORT: Select output of a separate column for the „<“ and „>“ indication of the check weigher
UNIT ON/OFF In mode HID-PORT: Disable output of the weight unit
• SET USB HOSTMODE KEYBOARD
SCANNERFOOT SWITCHFLASH DRIVE
Select function depending on waht is connec-ted
KEYBOARD LANGUAG. ENGGERFRATURSPA
In mode KEYBOARD:Select character set for the PC according the English, German, French, Turkish or Spain key-board of the PC

11 Working with the configuration menu ■
25
„MODE“– „KEYBOARD“: In case a computer keyboard is connected.
If Product-ID is ON, entries over the keyboard and the scanner will be assigned to the product-id and will be shown in the info line of the balance display, see Chapter 11.4 “Print functions”.
– „SCANNER“: In case a bar code scanner is connected. If Product-ID is ON, entries over the keyboard and the scanner will be assigned to the product-id and will be shown in the info line of the balance display, see Chapter 11.4 “Print functions”.
– „FOOT SWITCH“: In case a single or double foot switch is connected–– „FLASH DRIVE“: In case a flash drive (memory stick) is connected, the protokoll as set in „SET DATA
PRINT“ is saved as a text file „sssssss.TXT“, where „ssssss“ is the serial number of the balance, e.g. „1234567.TXT“.
11.10 Date and timeTo activate the menu see Chapter 10.5 “Activating the two main menus” and Chapter 10.6 “How the menu control operates”.
SCANNER LANGUAGE ENGGERFRATURSPA
In mode SCANNER:Select character set for the PC according the English, German, French, Turkish or Spain key-board of the PC
DEVICE TYPE SINGLEDOUBLE
In mode FOOT SWITCH:Select the type of the foot switch
FUNCTION PRINTTARE
OFF
In mode FOOT SWITCH - SINGLE type:Select the function of the foot switch
FUNCTION L. PRINTTARE
OFF
In mode FOOT SWITCH - DOUBLE type:Select the function of the left foot switch
FUNCTION R. PRINTTARE
OFF
In mode FOOT SWITCH - DOUBLE type:Select the function of the right foot switch
GUARD ON/OFF In mode FLASH DRIVE:With ON an error message appears if the flash drive is not installed while data printing is initi-ated
• SET DATE AND TIMEDATE [DD.MM.YY]TIME [HH.MM.SS]FORMAT STANDARD/US
Set date and time
NOTEThe date and time display continues in the event of a power failure. If this is not the case, the balance bak-kup battery is exhausted and must be replaced by the customer service.

■ 11 Working with the configuration menu
26
11.11 Password protectionTo activate the menu see Chapter 10.5 “Activating the two main menus” and Chapter 10.6 “How the menu control operates”.
The password protection permits you to protect the application menu and/or the configuration menu against unintentional changes. If a protection is activated, only after entering the correct, four-figure password chan-ges can be made.
„DATA-PROTECTION“– „OFF.“: Any operator can change the balance configuration and application menus.– „MED“: Only the configuration menu is protected against unintentional changes.– „HIGH“: Both the configuration menu and the application menu are protected against unintentio-
nal changes.
11.12 Anti-theft encodingTo activate the menu see Chapter 10.5 “Activating the two main menus” and Chapter 10.6 “How the menu control operates”.
The balance can be protected against theft by using a freely selectable, four-digit numerical code.
„THEFT-PROTECTION“– „OFF.“: The balance can be switched on again and operated after interruption of the power
supply without entering a code.– „ON“: The balance requires the entry of the four-figure code after each interruption to the
power supply.
If the theft protection is „ON“:• If the four-digit code is input incorrectly, the balance is blocked.• If the balance is blocked, it must first be turned off and turned on again and unblocked by entering the
correct four-figure code.• After eight consecutive incorrect entries the display will read “NO ACCESS, CALL SERVICE”. In this case,
only service can unblock the balance again.
• PASSWORDPASSWORD – – – – DATA-PROTECTION OFF
MEDHIGH
No protectionThe configuration menu is protectedThe configuration menu and the application menu are protected
NEW PASSWORD –––– Enter new password
NOTEThe password protection is deactivated in the factory settings.The factory programmed password can be found on our website at the dealer loggin. It is always valid,at the same time with your new selected password. Keep a record of your own password.
• THEFTCODETHEFTCODE –––– THEFT-PROTECTION ON/OFF Switch encoding on/off
NEW CODE –––– Enter a new code
NOTEThe anti-theft-encoding is deactivated in the factory settings.The pre-programmed code set at the factory is: 8 9 3 7This code is the same for all balances. For reasons of security you should therefore always select yourown code.Keep your personal code in a safe place.

11 Working with the configuration menu ■
27
11.12.1Key tone
If the key tone is set, a short audio signal sounds each time a key is pressed.
11.12.2Key tone
If the advice tone is set, a short audio signal sounds to highlight an info or advice from the balance.
11.12.3Backlight
11.13 Set ConfigurationTo activate the menu see Chapter 10.5 “Activating the two main menus” and Chapter 10.6 “How the menu control operates”.
• KEY TONEKEY TONE 6 Select key tone
• ADVICE TONEADVICE TOINE 6 Select advice tone
• BACKLIGHTBACKLIGHT 6 Set display backlight
• SET CONFIGURATIONLOAD FACTORY CONFIG. Load factory configurationLOAD USER CONFIG. Load user configurationSTORE USER CONFIG. Store the current configuration as user config-
uration
NOTELoad factory configuration overwrites the current settings but does not delete any stored user configu-ration.

■ 12 Working with the application menu
28
12 Working with the application menuThis chapter explains which working programs the balance has and how these are operated (see also Chapter 10.5 “Activating the two main menus” and Chapter 10.6 “How the menu control operates”).If «PRINT» is operated in an application, a report corresponding to the application is printed out.
12.1 Structure of the application menuTo activate the menu see Chapter 10.5 “Activating the two main menus” and Chapter 10.6 “How the menu control operates”.The working programs of the balance are called up using the application menu and adapted to the user's needs:
Printing conventions:• The settings for the sub-menus programmed in works are printed in bold in these operating instructions• For a greater clarity, only that part of the menu tree which corresponds to this application is shown with
each application description.• You will find the complete menu tree for the application menu in Chapter 19.2 “Application menu tree”.• Explanations of the menu functions are printed in italics.
12.2 Selecting a working programSee Chapter 10.5 “Activating the two main menus” and Chapter 10.6 “How the menu control operates” for the activation of the application menu.
In this function-field, select the desired working program.If a working-program is selected in the “SET APP.” menu, then only those sub-menus, which contain functions and parameters necessary to define the chosen working program are shown in the “SETUP APPLI-CATION” menu.To activate the menu see Chapter 10.5 “Activating the two main menus” and Chapter 10.6 “How the menu control operates”.
Menu Definable functionsSET APP. Select application programSETUP APPLICATION Specify parameters for the application program selected
AUTO-START ON/OFF The selected application program can, if required, be loaded automatically every time the balance is switched on
SET STATISTICS Statistics and storage functionsSET CHECK +/- Define nominal weight and limits for comparison weighingRESOLU. REDUCT. Enables a reduction of the resolution/visible decimal places
• SELECT APPLICATIONSET APP. OFF
UNITSCOUNT
PERCENTCALCULATOR
NET-TOTALSUM
ANIMALDYN.-WEIGHT
DENSITYDIAGNOSTICS
Normal weighingDifferent weight unitsPiece countingPercent weighingConversionsAdd weighing results with intermediate tareAdd weighing results without intermediate tareAnimal weighingDynamique weighing at unstable locations (e.g. on a boat)Density determinationDiagnostics functions

12 Working with the application menu ■
29
12.3 Changing application / weighing modeTo activate an application, it must first be selected in the application menu (see Chapter 12.2 “Selecting a working program”).
• Press the «MODE» button.If “MENU” appears immediately, no application has yet been selected. Otherwise the display will show the names of the other activated applications you can switch to as e.g. “UNITS”, “COUNT”, ...,“CHECK“ or “WEIGHING” for switching back to weighing mode.Other information can displayed as e.g. when the reduction of the resolution is activated.
• Release the «MODE» button as soon as the required application is displayed.• The balance has now switched over to the application and mostly the «REF» button has a defined function.
NOTE, in the weighing mode the «REF» button has no function.
12.4 Application “UNITS”See Chapter 10.5 “Activating the two main menus” and Chapter 10.6 “How the menu control operates” for the activation of the application menu.
Operation:Start the application (see Chapter 12.3 “Changing application / weighing mode”).• Press the «REF» button until the desired unit appears on the display.• Release the «REF» button.
12.5 Application “COUNT“
With the aid of the „COUNT” program you can count items of uniform weight (screws, bearings, coins, etc.)..
• SETUP APPLICATIONUNITS UNIT-2 mg
-----OFF
Milligram-----not active
UNIT-3 GN-----OFF
Grain-----not active
UNIT-4 ct-----OFF
Carat----not active
NOTEFor basic operation, Unit 1 is defined in the configuration menu (standard unit for all weighings, if the wor-king-program “UNITS” is not called up, see Chapter 11.3 “Selecting the weight unit”).
• SETUP APPLICATIONCOUNT REFERENCE 5 Reference-number of pieces = 5
REF. OPTIMIZATION MODE PARTS-TOL.<5%PARTS-TOL.>5%
OFFINFO ON/OFF
REF.ACCURACY 0.01d0.1d
1d
Round the value of the reference piece weight according the readability of the balance (1d= digit displayed at place most right)
NOTEDepending on the weight and tolerances of the objects to be counted, you should count a representativenumber of items for the regulation of the reference-weight.

■ 12 Working with the application menu
30
Operation:Start the application (see Chapter 12.3 “Changing application / weighing mode”).• Tare the balance.• Place e.g. 5 objects on the weighing pan.• Press the «REF»-button until the reference quantity, e.g. „5 PCS“ appears on the display.• If the reference quantity is correct release the «REF»-button.
If the reference quantity does not match keep the «REF»-button pressed until further pre-defined reference quantity values appears like 1, 10, 25, 50, ... To adjust to any other value briefly release and press the «REF»-button to increase the current displayed value by 1 each time.As soon as the displayed value matches release the «REF»-button.
12.5.1 „REF. OPTIMIZATION“
The reference optimization gradually improves the average value of the reference-piece weight and thus the counting. If an optimization is performed, briefly a little circle appears to the left in the weighing indicator.When optimizing the overlying number is taken as the new reference piece number and with this new basis, the reference piece weight is recalculated.While recording a piece counting measurement series (statistic) no optimization is performed.Basically no optimized will performed when the fix value of the reference piece weight was entered via the keyboard or a remote control command or received from a reference scale.
„REF. OTIMIZATION - MODE OFF“No optimized is performed
„REF. OTIMIZATION - MODE PARTS-TOL.<5%“The individual parts weights should vary less than 5% of each other.Condition for carrying out the reference optimization:
– The balance is stable– The current number of pieces is min. 3 PCS larger than the last reference sample quantity.– The current quantity is a maximum 10x as big as the last reference sample quantity.– The current internally calculated piece count (e.g. 23:27 PCS) does not deviate more than /-0.3 PCS
from the nearest whole number (here 23 PCS).Advantage: Because for every optimization level up to 10 times the amount of the previous piece may be placed, a few intermediate stages (e.g.: 5 PCS, PCS 50, 500 PCS) to reach up the total amount required piece. This enables a fast and yet accurate counting.
„REF. OTIMIZATION - MODE PARTS-TOL. >5%“The individual parts Weights vary widely.Condition for carrying out the reference optimization:
– The balance is stable– The current number of pieces is min. 1 PCS (PCS to 20), respectively. 3 PCS (from 21 PCS) larger than
the last reference sample quantity.– The current quantity is a maximum 2x as big as of the last reference sample quantity.– The current internally calculated piece count (eg 23:27 PCS) does not differ by more than +/- 0.3 PCS
from the nearest whole number (here 23 PCS).
„REF. OPTIMIZATION - INFO ON/OFF“This menu does not appear when the reference optimization is off. Otherwise additional info are displayed on the display.
12.5.2 „REF. ACCURACY“
The "Ref. Accuracy "defines the accuracy with which the weight is taken on the scale. Since the scale can measure internally more accurate than it indicates, it makes sense to take the weight with a higher resolution than that of the scales display. Choose:
„REF. ACCURACY - 0.01d“Recommended for very small parts weights.The weight is taken with 100 times the resolution of the weighing indicator (= 0.01Digit).E.g.: 5 PCS on the scale, the display value 15:12 g, internally measured value 15.1234 gWeight for calculating is 15.1234 g, this gives a reference piece weight of 3.02468 g / PCS

12 Working with the application menu ■
31
„REF. ACCURACY - 0.1d“Recommended for small parts weights.The weight is taken with 10 times the resolution of the weighing indicator (= 0.1Digit).E.g.: 5 PCS on the scale, the display value 15:12 g, internally measured value 15.1234 gWeight for calculating is 15.123 g, this gives a reference piece weight of 3.02460 g / PCS
„REF. ACCURACY - 1d“The weight is taken with the resolution of the weighing indicator (= 1Digit).E.g.: 5 PCS on the scale, the display value 15:12 g, internally measured value 15.1234 gWeight for calculating is 15.12 g, this gives a reference piece weight of 3.02400 g / PCS
12.6 Application “PERCENT”See Chapter 10.5 “Activating the two main menus” and Chapter 10.6 “How the menu control operates” for the activation of the application menu.
With the aid of the “PERCENT” program you can display and print out the weight of different measurements as a percentage of a previously defined reference weight.
Operation:Start the application (see Chapter 12.3 “Changing application / weighing mode”).• Place the reference weight on the weighing pan.• Press the «REF»-button until “REFERENCE 100%” appears on the display.• Release the «REF»-button.
12.7 Application “CALCULATOR“See Chapter 10.5 “Activating the two main menus” and Chapter 10.6 “How the menu control operates” for the activation of the application menu.
With the aid of the „CALCULATOR“ application the current measurement is converted in accordance with the factor assigned and the result shown or printed out after pressing the Print key. Thus, for example, you can convert and display the weights of sample materials of known size directly into “gram per cubic metre”.
Operation:Start the application (see Chapter 12.3 “Changing application / weighing mode”).• Press the «REF» button until „CALCULATION name“ appears on the display.• Release the «REF» button.
• SETUP APPLICATION PERCENT DECIMALS AUTO
012
etc.
Enter number of decimal places.The number of places that can be selected after the decimal point depends on the balance model.
• SETUP APPLICATION CALCULATOR NAME nnnnn Calculation name, max. 5 characters
FACTOR 1.0000000E+0 Conversions factorMODE F * WEIGHT
F / WEIGHTMultiplication of the factor by the weight or di-vision of the factor by the weight
DECIMALS 0 Definition of number of decimal places are to be shown in the result.
DISPLAY-TEXT nnn Unit shown in the display, max. 3 characters.PRINTER-TEXT nnnnnnnn Unit being printed, max. 8 characters.

■ 12 Working with the application menu
32
12.8 Application “NET-TOTAL“There is no Setup menu for this application.
With the aid of the „NET-TOTAL“ application you can add individual weighings, where the balance is tared to zero again before each individual weighing.
Functions of the application:
Note:By pressing the «MODE»-button you can switch to display the total load, e.g. to fill-up to a specific weight. Press the «MODE»-button again to go back to the „NET-TOTAL“ application and its display.
Operation:Start the application (see Chapter 12.3 “Changing application / weighing mode”) and see Chapter 13 “Sta-tistics” for a detialed example how to operat the application.• Place something on the weighing pan.• Press the «REF»-button until the desired function flashes on the display.• Release the «REF»-button.
12.9 Application “SUM“See Chapter 10.5 “Activating the two main menus” and Chapter 10.6 “How the menu control operates” for the activation of the application menu.
There is no Setup menu for this application.
With the aid of the „SUM” application, you can add individual weighings, without the balance being tared to zero before each individual weighing.
Functions of the application:
Operation:Start the application (see Chapter 12.3 “Changing application / weighing mode”) and see Chapter 13 “Sta-tistics” for a detialed example how to operat the application.• Place something on the weighing pan.• Press the «REF»-button until the desired function flashes on the display.• Release the «REF»-button.
«STO n»: - Take stable value and add to the sum of the components.- Tare balance.- Short acustic confirmation
«WAIT i»: Value not stabilized yet«RES»: - Reset«INF»: - Display of:
- Total weight- Residual capacity- Individual components
- Exit info with «MODE»-button.
«STO n»: - Take stable value and add to the sum of the components.- Short acustic confirmation
«WAIT i»: Value not stabilized yet«RES»: - Reset«INF»: - Display of:
- Total weight- Residual capacity- Individual components
- Exit info with «MODE»-button.

12 Working with the application menu ■
33
12.10 Application “ANIMAL“See Chapter 10.5 “Activating the two main menus” and Chapter 10.6 “How the menu control operates” for the activation of the Application menu.
With the aid of the „ANIMAL” program you can weigh living animals accurately, even if they move on the scale-pan.The balance measures continuously throughout the period defined by the user in the Setup menu, averages the stored values at the end of the measuring period and displays average-measurement thus obtained.
Functions of the application:
Operation:Start the application (see Chapter 12.3 “Changing application / weighing mode”).• Place the animal on the weighing pan.• Press the «REF»-button until the desired function flashes on the display.• Release the «REF»-button.
12.11 Application “DYN.-WEIGHT“See Chapter 10.5 “Activating the two main menus” and Chapter 10.6 “How the menu control operates” for the activation of the Application menu.
With the aid of the „DYN.-WEIGHT” program you can use the balance on locations or in circumstances where a normal weighing normaly is not possible becasue the balance can not stabilize, e.g. on a boat.The balance measures continuously throughout the period defined by the user in the Setup menu, averages the stored values at the end of the measuring period and uses this value as the current weight.
Functions of the application:
Operation:Start the application (see Chapter 12.3 “Changing application / weighing mode”).• Press «0/T» to tare the balance. The average value is calculated and taken as the current tare.• Place the weight on the weighing pan.• Press the «REF»-button until the desired function flashes on the display.• Release the «REF»-button.
• SETUP APPLICATIONANIMAL MEASURETIME 4 Enter time in seconds
«MANUAL»: - Manual release of the measurement.«AUTO»: - Start automatic release of the measurement with a second delay after each load-change.«STOP»: - Stop automatic measurement.
• SETUP APPLICATIONDYN.-WEIGHT MEASURETIME 4 Enter time in seconds
«MANUAL»: - Manual release of the measurement.«AUTO»: - Start automatic release of the measurement with a second delay after each load-change.«STOP»: - Stop automatic measurement.

■ 12 Working with the application menu
34
12.12 Application “DENSITY”See Chapter 10.5 “Activating the two main menus” and Chapter 10.6 “How the menu control operates” for the activation of the Application menu.
You can carry out density determinations with the aid of the “DENSITY” program. For this, different modes of density determinations can be selected.
• Functions of the application on initialization:
• Functions of the application on measurement:
Operation:Start the application (see Chapter 12.3 “Changing application / weighing mode”).• Press the «REF»-button until the desired function flashes on the display.• Release the «REF»-button.The program leads the operator through the individual operating steps.
12.12.1Density determination “Solid on bottom mode”A temperature-controlled reference-liquid (water) is poured into a bowl, placed on the scale pan and tared. The solid is then placed into the liquid and weighed. Subsequently, the solid is suspended so that it is still completely immersed in the water, but no longer touches the base. It is weighed again.From the weights, the balance determines the density of the solid.
12.12.2Density determination “Solid in air mode”With this weighing method, the solid is weighed with the aid of under-floor weighing (see Chapter 5 “Below-balance weighing”).The solid is then placed in the temperature-controlled reference liquid (water) so that it does not touch the
• SETUP APPLICATIONDENSITY MODE SOLID ON bOTTOM
MODE SOLID IN AIRMODE LIQUIDMODE SOLID POROUS
Solid bodySolid (under-floor)Measure liquidsSolid porous bodies
INDEX ON/OFF Index on/offREFERENCE 8.000 Reference for indexTIMEBASE 0.0 Time base for repeat in secondsREF. DENSITY 0.998205 Density of the liquid used for the measurement
(set at works for water at 20°C)TEMPERATUR 20.0 C Temperature of the water used for the meas-
urementDECIMALS 3 Decimal places for density calculation
NOTEA Density Measurement Set (see Chapter 6 “Accessories”) is available as an optional extra. But you canalso determine the density of solids without this accessory.
«OK»: - Accept current reference density«CAL»: - Calculate reference density of the measuring liquid«T-H2o»: - Set reference density to water at nn.n °C«20.0C»: - Set reference density to water at nn.n °C
«AIR», etc - Invitation to measure the corresponding value«<–>»: -“Switch” from index to density«SET»: - Executes corresponding step«STO»: - Stores corresponding value (statistics)

12 Working with the application menu ■
35
base of the bowl, but is nevertheless fully immersed in the water. Weighing is again carried out. From the weights, the balance determines the density of the solid.
12.12.3Density determination “Liquid mode”The density of a liquid is determined using this method of weighing.The procedure is exactly the same as with the density determination by the “Solid in air” method. A glass object with a volume of 10 cm3 or 100 cm3 is used as the solid (available as accessories, see Chapter 6 “Ac-cessories”).
12.12.4Density determination “Solid porous mode”The density of a porous solid is determined with this method of weighing.In order to carry out such measurements, you will require the Density Determination Kit (see Chapter 6 “Ac-cessories”). The instruction manual supplied with this kit describes the procedure for the density-measure-ment.
12.13 Application “DIAGNOSTICS“There is no Setup menu for this application.
The diagnostics contains an automatic repeatability test, where the internal weight is measured 10 times, and the standard deviation is calculated from this and logged.
Operation:Start the application (see Chapter 12.3 “Changing application / weighing mode”).
Display Step
+0,0000 9 Press «REF», „REPEATABILITY TEST“ appears in the display, than release the «REF» button. Repeatability test
- - 0000 The balance carries out a Zero measurement (-- 0.000 g is shown flashing).esc Measurement 1
- - inT The internal weight, if available, is applied and measured (-- Int is shown flashing).esc Measurement 1
- - LLLL In case no internal weight (SCS) is available place an weight onto the ba-lance (-- LLLL is shown flashing).esc Measurement 1
- - 0000 The balance carries out a Zero measurement again.
esc Measurement 2
- - iNT / LLLL The internal weight is applied and measured again or place the same weight as before again.esc Measurement 2
The balance repeates this measurements for 10 cycles.
+0,00008 9 The standard deviation of the measurement is calculated and displayed and a report is printed.esc STANDARD-DEV.
Press «esc»to exit the repeatability test at anytime.
■ 13 Statistics
36
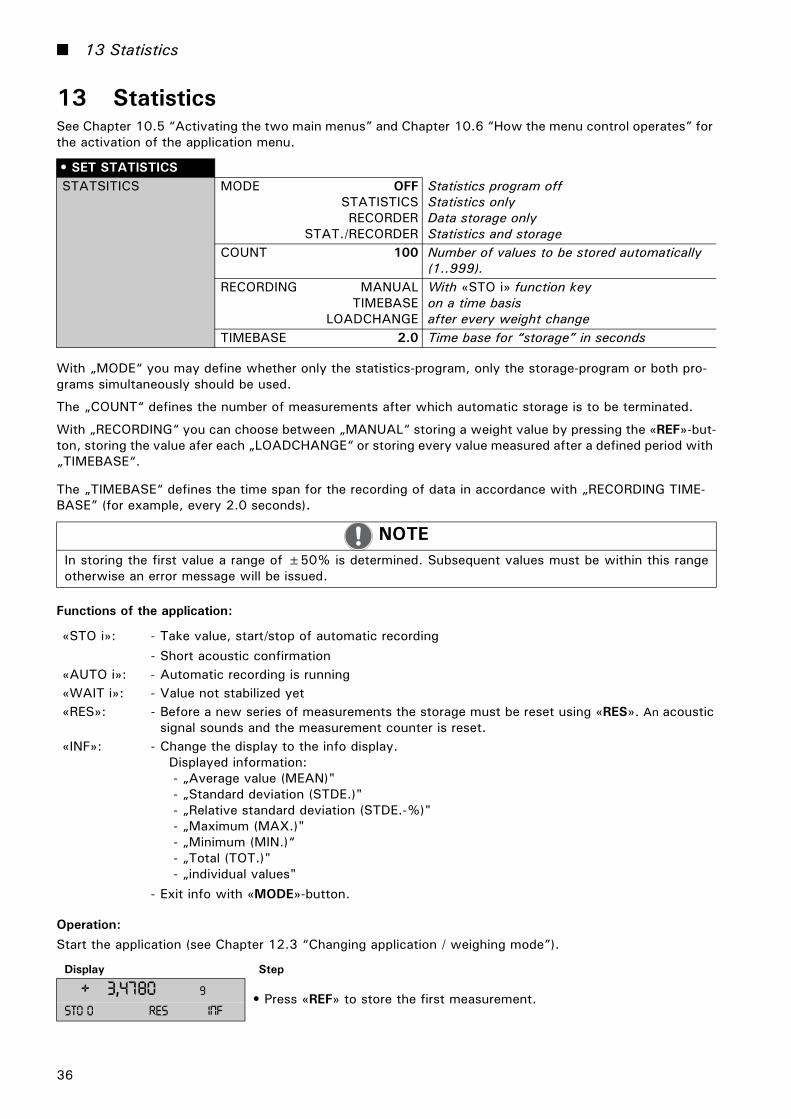
13 StatisticsSee Chapter 10.5 “Activating the two main menus” and Chapter 10.6 “How the menu control operates” for the activation of the application menu.
With „MODE“ you may define whether only the statistics-program, only the storage-program or both pro-grams simultaneously should be used.
The „COUNT“ defines the number of measurements after which automatic storage is to be terminated.
With „RECORDING“ you can choose between „MANUAL“ storing a weight value by pressing the «REF»-but-ton, storing the value afer each „LOADCHANGE“ or storing every value measured after a defined period with „TIMEBASE“.
The „TIMEBASE“ defines the time span for the recording of data in accordance with „RECORDING TIME-BASE” (for example, every 2.0 seconds).
Functions of the application:
Operation:Start the application (see Chapter 12.3 “Changing application / weighing mode”).
• SET STATISTICSSTATSITICS MODE OFF
STATISTICS RECORDER
STAT./RECORDER
Statistics program offStatistics onlyData storage onlyStatistics and storage
COUNT 100 Number of values to be stored automatically (1..999).
RECORDING MANUALTIMEBASE
LOADCHANGE
With «STO i» function keyon a time basisafter every weight change
TIMEBASE 2.0 Time base for “storage” in seconds
NOTEIn storing the first value a range of ±50% is determined. Subsequent values must be within this rangeotherwise an error message will be issued.
«STO i»: - Take value, start/stop of automatic recording- Short acoustic confirmation
«AUTO i»: - Automatic recording is running«WAIT i»: - Value not stabilized yet«RES»: - Before a new series of measurements the storage must be reset using «RES». An acoustic
signal sounds and the measurement counter is reset.«INF»: - Change the display to the info display.
Displayed information: - „Average value (MEAN)" - „Standard deviation (STDE.)" - „Relative standard deviation (STDE.-%)" - „Maximum (MAX.)" - „Minimum (MIN.)“ - „Total (TOT.)" - „individual values"
- Exit info with «MODE»-button.
Display Step
+ 3,4780 9• Press «REF» to store the first measurement.
sto 0 res inf

13 Statistics ■
37
+ 3,4785 9 • For „MANUAL“ recoding press «REF» shortly to store a second measure-ment.For „LOADCHANGE“ recoding just place a new load.For „TIMEBASE“ recodingwait until the time period set is over.
sto 1 res inf
+ 3,4775 9 • Store a third measurement in the same manner as for the second meas-urement.sto 2 res inf
Retrieve the parameters:
+ 3,4775 9 • Press «REF» until „INF“ flashes to show the info display with:Average measurement, Standard deviation, ...
• (Press «C» or «D» to change to next information or «esc» to exit the info display.
mean 3.4780 9
+ 3,4775 9Standard deviation
STDe. 0.0005 9
+ 3,4775 9Relative standard deviation
stde.-% 0.01 %
+ 3,4775 9Maximum
max 3.4785 9
+ 3,4775 9Minimum
min 3.4770 9
+ 3,4775 9Minimum
TOT. 10.4340 9
+ 3,4775 9Measurement 1
1= 3.4780 9
+ 3,4775 9Measurement 2, etc.
2= 3.4785 9
+ 3,4775 9• Press «esc» to exit the info display.
sto 3 res inf
Clear measurements:
+ 3,4775 9 • Press «REF» until „RES“ flashes. An acoustic signal sounds and the measurement counter is reset.sto 3 res inf
+ 3,4775 9Measurement cleared, balance ready for new statistics.
sto 0 res inf
A statistics log is printed by pressing the «PRINT» key.
Display Step

■ 14 Check-Weighing
38
14 Check-WeighingSee Chapter 10.5 “Activating the two main menus” and Chapter 10.6 “How the menu control operates” for the activation of the Application menu.
With the aid of the „CHECK +/-“ program you can check each measurement for its agreement with a defined reference-value plus/minus allowable deviations. The weiging range is divided into three ranges, the „-“ range from zero to TU, the „OK“ range from TU to TO and the „+“ range from TO to the maximum weighing capacity. In the display the symbols „+“, „–“ and „II“ are displayed according the settings for „SET IN-DICATION“. II“ lights up when the measurement is in the „ok“ range within the specified tolerances TU and TO. „+“ lights up when the measurement is in the „+“ range from TO to the maximum weighing ca-pacity . „–“ lights up when the measurement is in the „-“ range from zero or 50% of the nominal value to TU.
SET INDICATION - RANGE -“– „RANGE 50% .. TU“: Defines the „-“ range for the indication of symbol and tone is in the range from
50% of the nominal value to TU.– „RANGE 0% .. TU“: Defines the „-“ range for the indication of symbol and tone is in the range from
zero (0% of the nominal value) to TU.
„SET INDICATION - SYMBOLS“– „PERMANENT“: Indication of symbols independent the measured weight value is stabilized or not– „STABLE“: Indication of symbols only when the measured weight value is stabilized
„SET INDICATION - TONE“– „OFF“: No sound– „FILLING AID“: Sound to support fillingin in to a nominal weight– „STABLE -“: Sound when the weigh is stable and the measurement in the „-“ range– „STABLE OK“: Sound when the weigh is stable and the measurementin the „OK“ range– „STABLE +“: Sound when the weigh is stable and the measurement in the „+“ range– „STABLE - / +: Sound when the weigh is stable and the measurement in the „-“ or „+“ range.
• SET CHECK +/-CHECK +/- MODE OFF
gPCS
Check weighing offCheck weighing for weights in gramsCheck weighing in pieces
NOM. 100.000 g100 PCS
Enter nominal weight in grams orenter nominal number for pieces
TOLERANCE gPCS
%
Choose to set limits as weight, in pieces orin percent of nominal
TO 10000.0 gTO 100 PCSTOL.+ 1.0000 %
Upper limit in gramsUpper limit in piecesUpper limits in percent of nominal
TO 10000.0 gTO 100 PCSTOL.- 1.0000 %
Lower limit in gramsLower limit in piecesLower limits in percent of nominal
SET INDICATION RANGE - 50% .. TU0% .. TU
SYMBOLS PERMANENTSTABLE
TONE OFFFILLING AID
STABLE -STABLE OKSTABLE +
STABLE - / +
NOTEAs an accessory, a signal light is available for this type of display (see accessories).
14 Check-Weighing ■
39
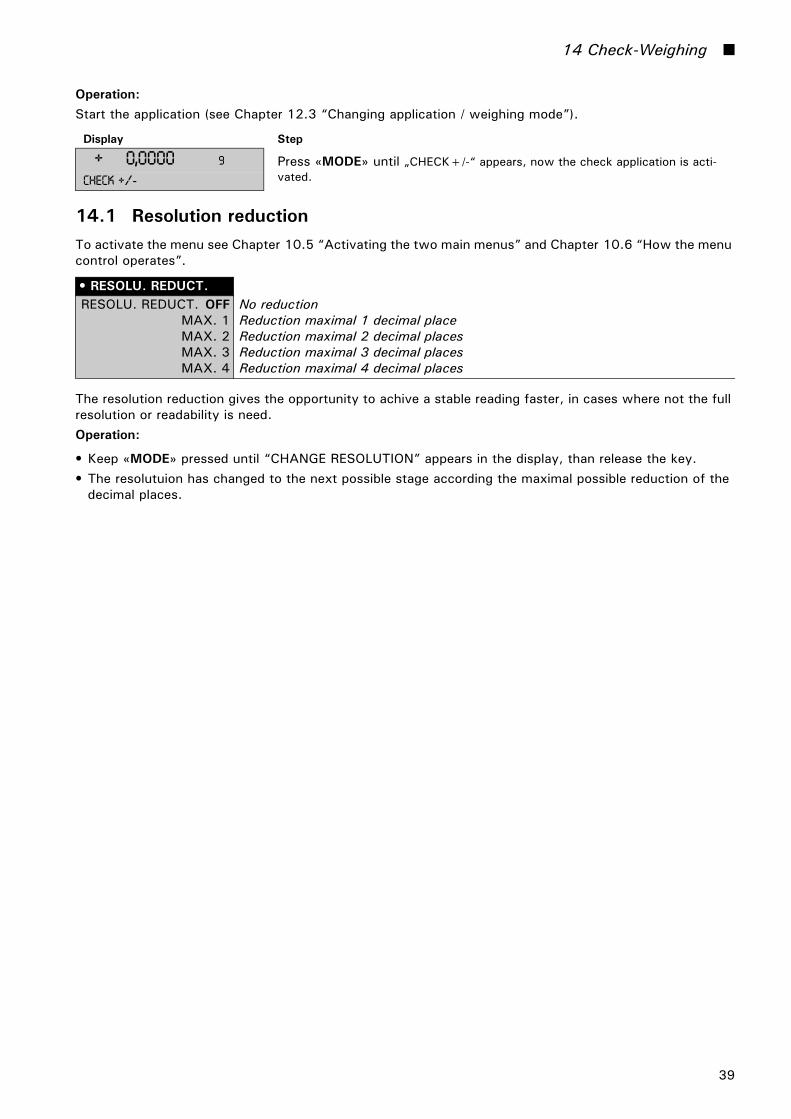
Operation:Start the application (see Chapter 12.3 “Changing application / weighing mode”).
14.1 Resolution reductionTo activate the menu see Chapter 10.5 “Activating the two main menus” and Chapter 10.6 “How the menu control operates”.
The resolution reduction gives the opportunity to achive a stable reading faster, in cases where not the full resolution or readability is need.Operation:
• Keep «MODE» pressed until “CHANGE RESOLUTION” appears in the display, than release the key.• The resolutuion has changed to the next possible stage according the maximal possible reduction of the
decimal places.
Display Step
+ 0,0000 9 Press «MODE» until „CHECK+/-“ appears, now the check application is acti-vated.CHeck +/-
• RESOLU. REDUCT.RESOLU. REDUCT. OFF
MAX. 1MAX. 2MAX. 3MAX. 4
No reductionReduction maximal 1 decimal placeReduction maximal 2 decimal placesReduction maximal 3 decimal placesReduction maximal 4 decimal places

■ 15 Special operating keys
40
15 Special operating keys
15.1 The Tare key «0/T»• Effects taring
– Ensure that the balance is in the weighing mode– Briefly press «0/T»– The balance performs a tare operation.
• Effects a calibration– Ensure that the balance is in the weighing mode– Keep «0/T» pressed until “CALIBRATION” is displayed– Release «0/T»– The balance carries out a calibration in accordance with the settings in the configuration menu (see
Chapter 11.5 “Calibration functions”) and reports these by means of a printout.
15.2 The Print key «PRINT»• Print out an individual value or a report
– Ensure that the balance is in the weighing mode– Briefly press «PRINT»– The individual value or report will be printed out.
• Reset product counter to 1– Ensure that the balance is in the weighing mode– Keep «PRINT» pressed until “RESET PROD.-COUNTER” is displayed– Release «PRINT»– The product counter will be reset to 1.
• Print out a balance status– Ensure that the balance is in the weighing mode– Keep «PRINT» pressed until “PRINT STATUS” is displayed– Release «PRINT»– The balance status will be printed out.
• Print out the application-setup– Ensure that the balance is in the weighing mode– Keep «PRINT» pressed until “PRINT APPLICATIONS” is displayed– Release «PRINT»– The application-setup will be printed out.
• Print out the calibrations information– Ensure that the balance is in the weighing mode– Keep «PRINT» pressed until “PRINT CALIBRATIONS” is displayed– Release «PRINT»– Information on the last 50 calibrations is printed. The time and date, as well as the temperature in the
balance at the time of calibration in degrees Celsius. If more than 50 calibrations have been performed, the oldest are deleted.
• Print out the firmware update history– Ensure that the balance is in the weighing mode– Keep «PRINT» pressed until “PRINT FIRMWARE HIST” is displayed– Release «PRINT»– Information on the firmware which has been loaded together with the time and date is printed.
NOTEA calibration can be cancelled with «ON/OFF».
15 Special operating keys ■
41
15.3 The Mode key «MODE»• Enter the application menu
– Keep «MODE» pressed until “MENU” appears in the display, than release the key.– Now you are in the application menu.
• Change the resolution– Ensure the resolution deduction is activated– Ensure that the balance is in the weighing mode– Keep «MODE» pressed until “CHANGE RESOLUTION” appears in the display, than release the key.– The resolutuion has changed to the next possible stage according the maximal possible reduction of the
decimal places.
• Switch to an other application / program– Ensure at least one application is activated– Ensure that the balance is in the weighing mode– Press «MODE» to show all other active applications:
If you are in normal weighing and for example the count application, the statistics program and the check weighing program and are activated “COUNT“, “STATISTIC“, “CHECK“ and “MENU“ appears in the in-fo-line one after the other.If you start from the count application,“WEIGHING“ is displayed instead of “COUNT“ to switch to the normal weighing mode.Other information can displayed as e.g. when the reduction of the resolution is activated.
– Release the «MODE» button as soon as the required application is displayed.

■ 16 Data transfer
42
16 Data transferFor data-transfers to peripheral devices, the balance is equipped with an RS232/V24-interface and an USB interface.Before the data-transfer, the peripheral device interface must match with the RS232 or USB interface in the balance configuration menu (see chapter 11.7 "RS232 interface" and chapter 11.8 "USB Device interface").
• HandshakeThe handshake is set to „NO“ (none) at the factory. It can be set to software handshake „XON-XOFF“, or to hardware handshake „HARDWARE“.
• Baud ratePossible baud rates: 300, 600, 1200, 2400, 4800, 9600, 19200, 38400, 57600 baud.
• ParityPossible parity: 7 even 1 stop, 7 odd 1 stop, 7 no 2 stop, 8 no 1 stop, 8 even 1 stop, 8 odd 1 stop.
• Display
The data-transfer takes place in ASCII code:
16.1 Connection scheme• Standard, duplex connection including lines for optional hardware handshake with the peripheral device
Pos. 0 1 2 3 4 5 6 7 8 9 107-even-1 SB 1.DA 2.DA 3.DA 4.DA 5.DA 6.DA 7.DA PB SP -7-odd-1 SB 1.DA 2.DA 3.DA 4.DA 5.DA 6.DA 7.DA PB SP -7-no-2 SB 1.DA 2.DA 3.DA 4.DA 5.DA 6.DA 7.DA 1.SP 2.SP -8-no-1 SB 1.DA 2.DA 3.DA 4.DA 5.DA 6.DA 7.DA 8.DA SP -8-even-1 SB 1.DA 2.DA 3.DA 4.DA 5.DA 6.DA 7.DA 8.DA PB SP8-odd-1 SB 1.DA 2.DA 3.DA 4.DA 5.DA 6.DA 7.DA 8.DA PB SP
SB: Start bit PB: Parity bitDA: Data bit SP: Stop bit
S D7 D6 D5 D4 D3 D2 D1 D0 U U U
1 2 3 4 5 6 7 8 9 10 11 12 13 14 15 ... ... ...B B B S D7 D6 D5 D4 D3 D2 D1 DP D0 B U ... CR LF
B Blank (space)S Sign (+, –, space)DP Decimal pointD0...D7 DigitsU ... Unit (only if the weight is stable, otherwise no unit is sent)CR Carriage returnLF Line feed
NOTEUnused positions are filled with spaces. The decimal point DP can be between D0 and D7.If the value format is user defined, the format is not as mentioned above!
Balance DB 9 female D25 / D9 Peripheral deviceRS 232 out 2 3 / 2 RS 232 inRS 232 in 3 2 / 3 RS 232 outGND 5 7 / 5 GNDCTS 4 20 / 4 DTR (only needed for hardware handshake)DTR 8 5 / 8 CTS (only needed for hardware handshake)

16 Data transfer ■
43
16.2 Remote control-commands
16.2.1 Examples for the remote control
Command FunctionACKn Acknowledge n=0 off; n = 1 onCAL Start calibrationD.......... Describe weight display (right-aligned)DN Reset weight display@......... Describe Info display@N Reset Info displayIn Set FLOATINGDISPLAY time n n=0 t=0.08 s
n=1 t=0.16 sn=2 t=0.32 s
N Reset balanceOFF Switch off balanceON Switch on balancePCxxxx Enter anti-theft codePDT Print out date and timePRT Print function, like pressing the «PRINT» keyPST Print status reportPn (ttt.t) Set print mode: n=0 individually print each value (unstable)
n=1 Individually print each value (stable)n=2 Print after change of loadn=3 Print after each integration periodn=4 Print on time basis in s (ttt.t)
R%k Set current weight=100%with k=0...7 decimal places (k=A: use automatic positioning of decimal point)
REF%k rrr Set reference weight rrr for 100%with k=0...7 decimal places (k=A: use automatic positioning of decimal point)
Rnnn Set current weight=nnn itemsREFrrr Set reference weight rrr for 1 itemSn Set stability n n=0 low
n=1 mediumn=2 high
SDTttmmjjhhmmss Set date and time (German) (Tag, Monat, Jahr, Stunde, Minute, Sekunde)SDTmmddyyhhmmss Set date and time (English) (Month, Day, Year, Hour, Minutes, Seconds)T (ttt) Tare or set tare to a specific valueUxnn Set unit x (1...4) of the balance with nn (0=g, 1=mg, 2=kg, ...)UxS Switch balance to unit x (1...4)ZERO Zero balance (provided weight is stable and within the zero position range)
NOTEEach remote control-command must terminate with «CR» «LF». The commands are acknowledged if re-quired.
Input Description of the function executedD – – – – – Five dashes are displayedDTEST123 tESt123 is displayedD The display is darkT100 -100.000 g (Tare set to 100 g)T1 -1.000 g (Tare set to 1g)T Balance is tared

■ 17 Practical examples
44
17 Practical examples
17.1 Changing the configuration menuSee Chapter 10.5.1 “Activating the configuration menu”, for the activation of the configuration menu.
17.1.1 Setting the choice of language• In order to alter the display language, proceed as follows:
• Press «C» or «D» again until the next setting appears. Change the setting in the same way.• Press «esc» to exit the menu.
17.1.2 Setting the Weight unitIn order to alter the weight unit, proceed as follows:
• Press «C» or «D» again until the next setting appears. Change the setting in the same way.• Press «esc» to exit the menu.
17.1.3 Setting the Print functionsIn order to alter the print parameters proceed as follows:
• Press «C» or «D» again until the next print function appears. Change the setting in the same way.• Press «esc» to exit to „SET DATA PRINT“.• Press «C» or «D» again until the next setting appears. Change the setting in the same way.
SPRACHE DEUTSCH • Press «C» or «D» repeatedly, until the curretn set language is displayed.
orLANGUE FRANCAISE
orLANGUAGE ENGLISH
LANGUAGE ENGLISH • Press «E» to start to change the language (the display will flash).
• Press «C» or «D» repeatedly, until the desired language is flashing.• Press «E» to confirm the selected language.
unit-1 9 • Press «C» or «D» repeatedly, until the curretn set unit is displayed.
unit-1 oz • Press «E» to start to change the unit (the unit e.g. „g“ will flash).
• Press «C» or «D» repeatedly, until the desired unit is flashing.• Press «E» to confirm the selected unit.
SET DATA PRINT • Press «C» or «D» repeatedly, until “SET DATA PRINT“ is displayd.
AUTO-START OFF • Press «B», “AUTO-START ...” will appear.
... ... • Press «C» or «D» repeatedly, until the desired setting is displayed.
mODE STABLE • Press «E» to start to change the setting (the setting e.g. „STABLE“ will flash).
• Press «C» or «D» repeatedly, until the desired mode e.g. „TIMEBASE“ is flashing.
MODE TIMEBASE • Press «E» to confirm the selected setting.

17 Practical examples ■
45
• Press «esc» to exit the menu.
17.1.4 Activation of password protectionThe possibilities for setting the password protection are described in Chapter 11.11 “Password protection”.In order to activate password protection, proceed as follows:
• Press «C» or «D» again until the next setting appears. Change the setting in the same way.• Press «esc» to exit the menu.
17.2 Selection of an application programSee Chapter 10.5.2 “Activating the application menu” for the activation of the application menu.
17.2.1 Setting for Counting by weighingFor Setup, see Chapter 12.5 “Application “COUNT“”To count uniformly heavy objects such as coins, screws or similar things, proceed as follows:
PASSWORd –––– • Press «C» or «D» repeatedly, until “PASSWORD ––––” appears.
PASSWORd 1000 • Press «E» to enter the password. The first digit of the password will flash.
• Enter the first digit with «C» or «D».
PASSWORd 1200 • Press «B», the second digit flashes. Enter the second digit with «C» or
«D».
PASSWORd 1234 • In the same way enter the third and fourth digit of the password.• Press «E» to confirm the password.
DATA-PROTECTION off • Press «B», “DATA-PROTECTION ...” will appear.
DATA-PROTECTION OFF • Press «E» to start to change the setting (the setting e.g. „OFF“ will flash).
• Press «C» or «D» repeatedly, until the desired setting e.g. „ON“ is flashing.
• Press «E» to confirm the setting
new PASSWORd 1234 • Press «C» or «D» until “NEW PASSWORD 1234” appears.
new PASSWORd 4321 • Press «E» to start to change the password• Your own new password can now be entered in a similar manner to the
foregoing.
new PASSWORd 4321 • Press «E» to confirm the new password.
PASSWORd –––– • Press «esc» to exit „DATA-PROTECTION“.
SET APP. OFF • Press «C» or «D» repeatedly, until the currently set application appear
SET APP. OFF • Press «E» to start to change the setting (the currently set application e.g. „OFF“ will flash).
• Press «C» or «D» repeatedly, until the desired application „COUNT“ is flashing.
SET APP. count • Press «E» to confirm the application.

■ 17 Practical examples
46
• The balance has switched direct into the counting application.• Place the set number of objects on the weighing pan. The reference weight for the count will be defined
by briefly pressing the «REF»-button.
SETup APPlication • Press «C» or «D» repeatedly, until “SETUP APPLICATION” appears.• Press «B» to go into the menu to setup for the count application.
Reference 5 pcs
Reference 0005 pcs • Press «E» to enter the reference number. The first digit of the number will flash.
• Enter the first digit with «C» or «D». Press «B», the second digit flas-
hes. Enter the second digit with «C» or «D».
Reference 0020 pcs • In the same way enter the remaining digits of the number.• Press «E» to confirm the number.
Reference 0020 pcs • Press «esc» to exit „SETUP APPLICATION.
• Press «esc» to exit menu.
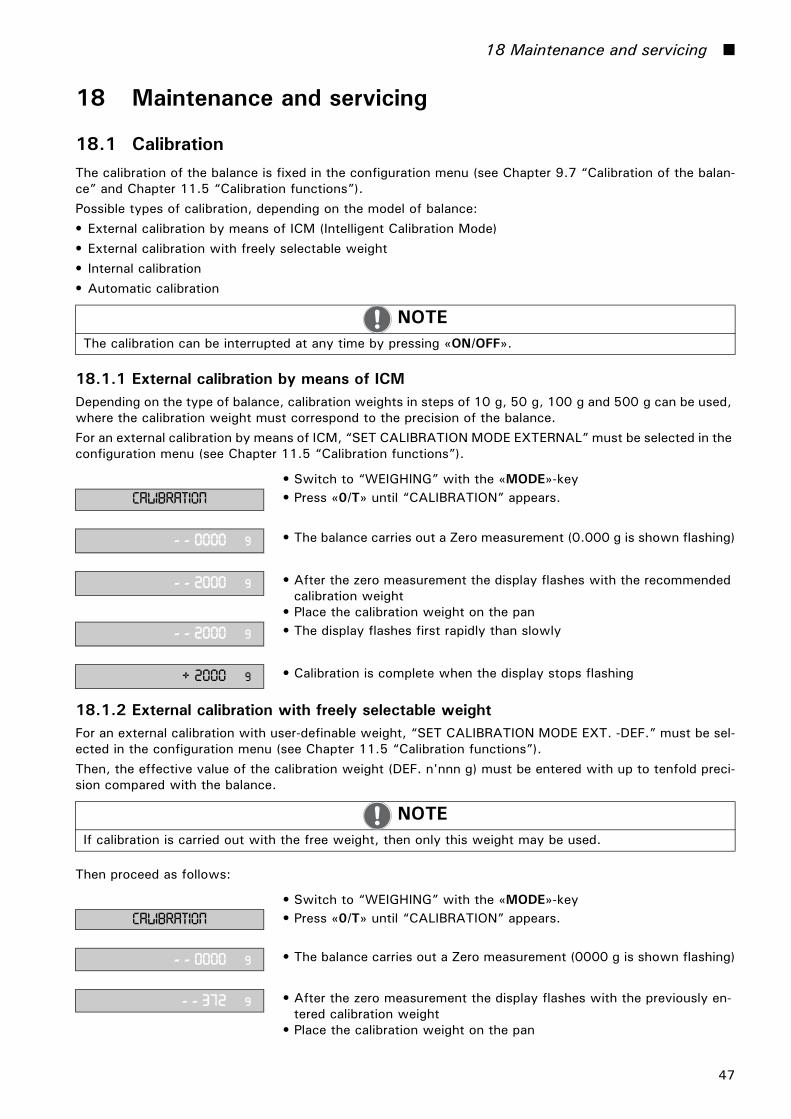
18 Maintenance and servicing ■
47
18 Maintenance and servicing
18.1 CalibrationThe calibration of the balance is fixed in the configuration menu (see Chapter 9.7 “Calibration of the balan-ce” and Chapter 11.5 “Calibration functions”).Possible types of calibration, depending on the model of balance:• External calibration by means of ICM (Intelligent Calibration Mode)• External calibration with freely selectable weight• Internal calibration• Automatic calibration
18.1.1 External calibration by means of ICMDepending on the type of balance, calibration weights in steps of 10 g, 50 g, 100 g and 500 g can be used, where the calibration weight must correspond to the precision of the balance.For an external calibration by means of ICM, “SET CALIBRATION MODE EXTERNAL” must be selected in the configuration menu (see Chapter 11.5 “Calibration functions”).
18.1.2 External calibration with freely selectable weightFor an external calibration with user-definable weight, “SET CALIBRATION MODE EXT. -DEF.” must be sel-ected in the configuration menu (see Chapter 11.5 “Calibration functions”).Then, the effective value of the calibration weight (DEF. n'nnn g) must be entered with up to tenfold preci-sion compared with the balance.
Then proceed as follows:
NOTEThe calibration can be interrupted at any time by pressing «ON/OFF».
• Switch to “WEIGHING” with the «MODE»-keycALIBRation • Press «0/T» until “CALIBRATION” appears.
- - 0000 9 • The balance carries out a Zero measurement (0.000 g is shown flashing)
- - 2000 9 • After the zero measurement the display flashes with the recommended calibration weight
• Place the calibration weight on the pan
- - 2000 9 • The display flashes first rapidly than slowly
+ 2000 9 • Calibration is complete when the display stops flashing
NOTEIf calibration is carried out with the free weight, then only this weight may be used.
• Switch to “WEIGHING” with the «MODE»-keycALIBRation • Press «0/T» until “CALIBRATION” appears.
- - 0000 9 • The balance carries out a Zero measurement (0000 g is shown flashing)
- - 372 9 • After the zero measurement the display flashes with the previously en-tered calibration weight
• Place the calibration weight on the pan
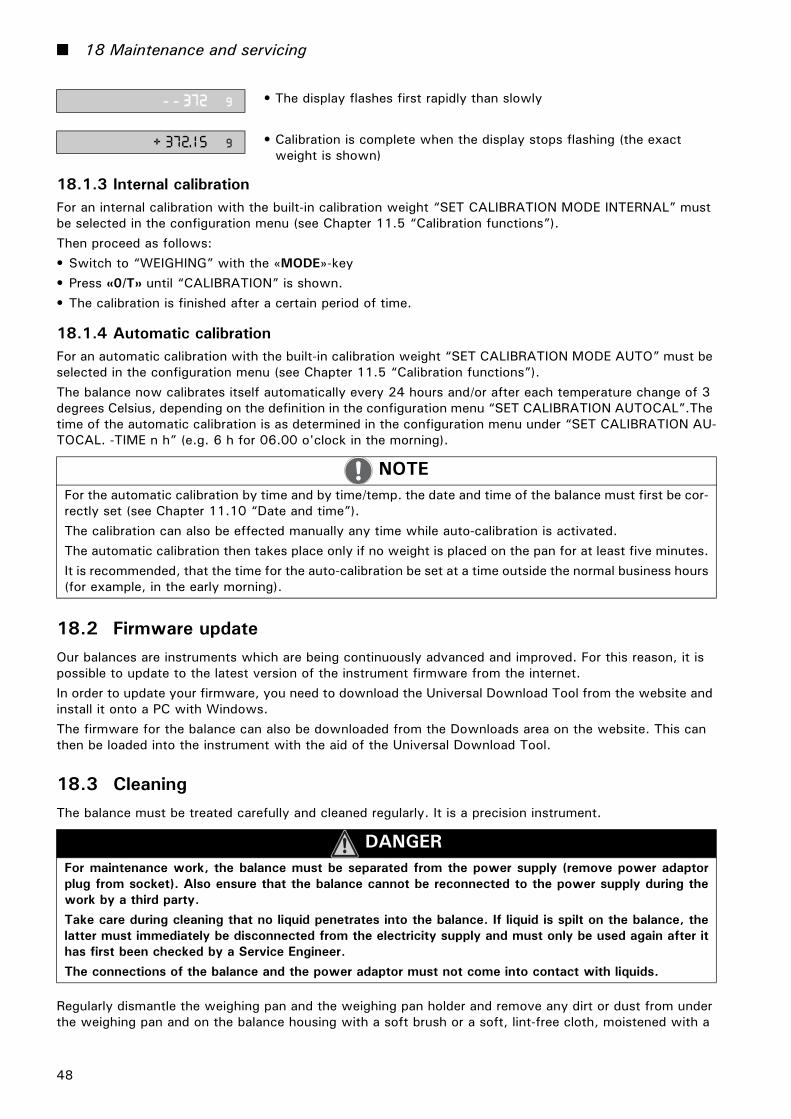
■ 18 Maintenance and servicing
48
18.1.3 Internal calibrationFor an internal calibration with the built-in calibration weight “SET CALIBRATION MODE INTERNAL” must be selected in the configuration menu (see Chapter 11.5 “Calibration functions”).Then proceed as follows:• Switch to “WEIGHING” with the «MODE»-key• Press «0/T» until “CALIBRATION” is shown.• The calibration is finished after a certain period of time.
18.1.4 Automatic calibrationFor an automatic calibration with the built-in calibration weight “SET CALIBRATION MODE AUTO” must be selected in the configuration menu (see Chapter 11.5 “Calibration functions”).The balance now calibrates itself automatically every 24 hours and/or after each temperature change of 3 degrees Celsius, depending on the definition in the configuration menu “SET CALIBRATION AUTOCAL”.The time of the automatic calibration is as determined in the configuration menu under “SET CALIBRATION AU-TOCAL. -TIME n h” (e.g. 6 h for 06.00 o'clock in the morning).
18.2 Firmware updateOur balances are instruments which are being continuously advanced and improved. For this reason, it is possible to update to the latest version of the instrument firmware from the internet. In order to update your firmware, you need to download the Universal Download Tool from the website and install it onto a PC with Windows.The firmware for the balance can also be downloaded from the Downloads area on the website. This can then be loaded into the instrument with the aid of the Universal Download Tool.
18.3 CleaningThe balance must be treated carefully and cleaned regularly. It is a precision instrument.
Regularly dismantle the weighing pan and the weighing pan holder and remove any dirt or dust from under the weighing pan and on the balance housing with a soft brush or a soft, lint-free cloth, moistened with a
- - 372 9 • The display flashes first rapidly than slowly
+ 372.15 9 • Calibration is complete when the display stops flashing (the exact weight is shown)
NOTEFor the automatic calibration by time and by time/temp. the date and time of the balance must first be cor-rectly set (see Chapter 11.10 “Date and time”).The calibration can also be effected manually any time while auto-calibration is activated.The automatic calibration then takes place only if no weight is placed on the pan for at least five minutes.It is recommended, that the time for the auto-calibration be set at a time outside the normal business hours(for example, in the early morning).
DANGERFor maintenance work, the balance must be separated from the power supply (remove power adaptorplug from socket). Also ensure that the balance cannot be reconnected to the power supply during thework by a third party.Take care during cleaning that no liquid penetrates into the balance. If liquid is spilt on the balance, thelatter must immediately be disconnected from the electricity supply and must only be used again after ithas first been checked by a Service Engineer.The connections of the balance and the power adaptor must not come into contact with liquids.

18 Maintenance and servicing ■
49
mild soap solution.The weighing pan and the holder can be cleaned under running water. Take care that both parts are com-pletely dry before they are re-installed on the balance.
The regular maintenance of the balance by your Service Representative will guarantee unlimited function and reliability over many years and will extend the lifespan of the balance.
18.4 Error messagesThe balance shows a description of the fault in the info-line.
18.4.1 Notes on correcting faultsThe following table shows faults and their possible causes. If you cannot clear the fault using the table, please contact the Customer Service..
WARNINGNever use solvents, acids, alkalis, paint thinners, scouring powders or other aggressive or corrosivechemicals for cleaning, since these substances attack the surfaces of the balance housing and can causedamage.
NOTEIf an error occurs without a description of the error in the info-line, the Customer Service must be called.
Fault Possible causeWeight dis-play does not light
• Balance not switched on• Connection to power adaptor is interrupted• Power supply has failed (interruption to current)• The power adaptor is defective
“OL” is shown in display
• The weight range has been exceeded (Observe information on the maximum weight range)
“UL” is shown in display
• The weight range is below the range of the balance (Scale pan or scale pan holder missing)
The weight display fluctuates continuously
• The draft is too strong at the balance location• The balance support is vibrating or varying• The scale pan is touching a foreign body• The time chosen for FLOATINGDISPLAY is too short• The material being weighed is absorbing moisture• The material being weighed is being blown away or is evaporating• Strong temperature variations in the material being weighed
Results of weighing are clearly incor-rect
• The balance was not correctly tared• The balance is not correctly levelled• The calibration is no longer correct• There are strong temperature variations
There is no display or only dashes
• The stability control (Balance functions) is set too sensitively• The time selected for „FLOATINGDISPLAY“ is unsatisfactory
Configuration menu cannot be changed
• The password lock is activated in the configuration menu
The display flashes contin-uously during calibration
• The balance location is not stable enough (Interrupt calibration with «ON/OFF» and re-locate the balance in a better position)
• Use of an inprecise calibration weight (only applies to external calibration)
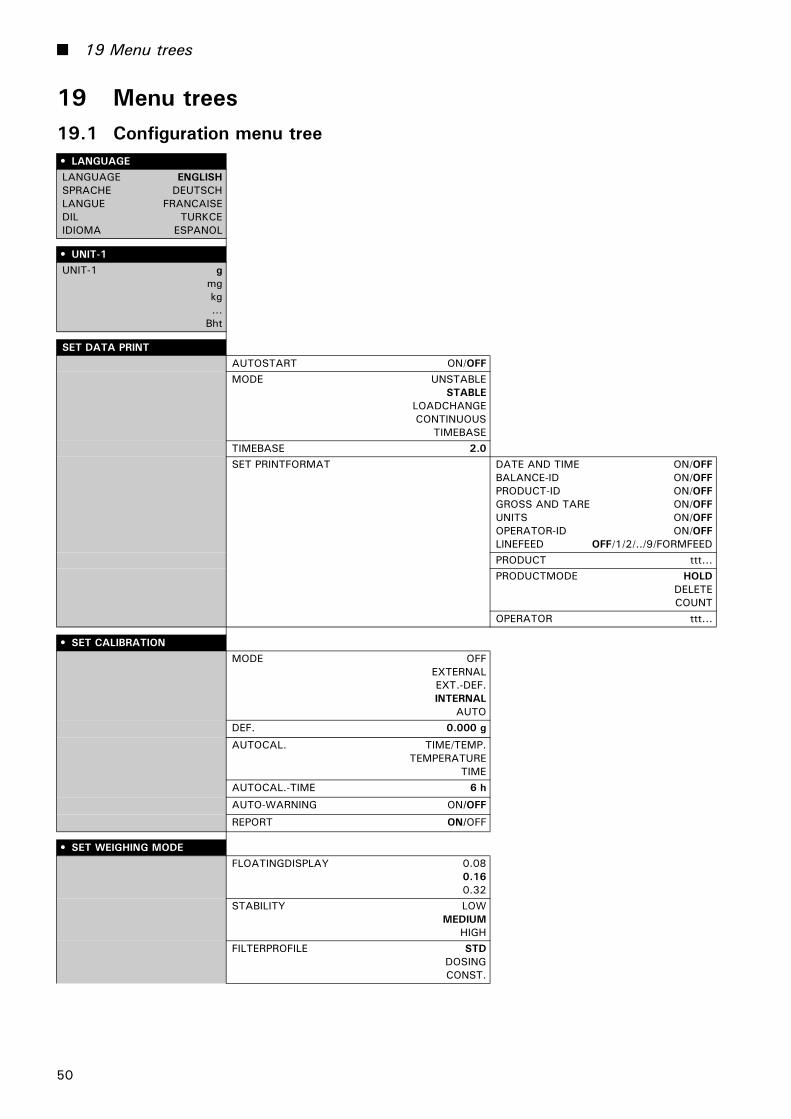
■ 19 Menu trees
50
19 Menu trees19.1 Configuration menu tree• LANGUAGELANGUAGE ENGLISHSPRACHE DEUTSCHLANGUE FRANCAISEDIL TURKCEIDIOMA ESPANOL
• UNIT-1UNIT-1 g
mgkg...
Bht
SET DATA PRINTAUTOSTART ON/OFFMODE UNSTABLE
STABLELOADCHANGECONTINUOUS
TIMEBASETIMEBASE 2.0SET PRINTFORMAT DATE AND TIME ON/OFF
BALANCE-ID ON/OFFPRODUCT-ID ON/OFFGROSS AND TARE ON/OFFUNITS ON/OFFOPERATOR-ID ON/OFFLINEFEED OFF/1/2/../9/FORMFEEDPRODUCT ttt...PRODUCTMODE HOLD
DELETECOUNT
OPERATOR ttt...
• SET CALIBRATIONMODE OFF
EXTERNALEXT.-DEF.INTERNAL
AUTODEF. 0.000 g
AUTOCAL. TIME/TEMP.TEMPERATURE
TIMEAUTOCAL.-TIME 6 h
AUTO-WARNING ON/OFF
REPORT ON/OFF
• SET WEIGHING MODEFLOATINGDISPLAY 0.08
0.160.32
STABILITY LOWMEDIUM
HIGHFILTERPROFILE STD
DOSINGCONST.

19 Menu trees ■
51
VALUE RELEASE V. FASTFASTSTD
SLOWV. SLOW
AUTO-STANDBY OFF0.5 MIN
1 MIN 5 MIN10 MIN
AUTO-ZERO ON/OFF
QUICK-TARE ON/OFF
ZERO-RANGE 0.320 g
LOAD-CHG. 5.000 g
• SET RS232BAUDRATE 300
6001200240048009600
192003840057600
PARITY 7-EVEN-1STOP7-ODD-1STOP
7-NO-2STOP8-NO-1STOP
8-EVEN-1STOP8-ODD-1STOP
HANDSHAKE NOXON-XOFF
HARDWARE
• SET USB DEVICEMODE COM-PORT
HID-PORTBAUDRATE 300
6001200240048009600
192003840057600
In mode COM-PORT
PARITY 7-EVEN-1STOP7-ODD-1STOP
7-NO-2STOP8-NO-1STOP
8-EVEN-1STOP8-ODD-1STOP
In mode COM-PORT
HANDSHAKE NOXON-XOFF
In mode COM-PORT
KEYBOARD LANGUAG. ENGGERFRATURSPA
In mode HID-PORT
FORMAT LINESTABLES
In mode HID-PORT
COLUMN FOR o ON/OFF In mode HID-PORT
COLUMN FOR <> ON/OFF In mode HID-PORT
UNIT ON/OFF In mode HID-PORT

■ 19 Menu trees
52
• SET USB HOSTMODE KEYBOARD
SCANNERFOOT SWITCHFLASH DRIVE
KEYBOARD LANGUAG. ENGGERFRATURSPA
In mode KEYBOARD
SCANNER LANGUAGE ENGGERFRATURSPA
In mode SCANNER
DEVICE TYPE SINGLEDOUBLE
In mode FOOT SWITCH
FUNCTION PRINTTARE
OFF
In mode FOOT SWITCH SINGLE type
FUNCTION L. PRINTTARE
OFF
In mode FOOT SWITCH DOUBLE type
FUNCTION R. PRINTTARE
OFF
In mode FOOT SWITCH DOUBLE type
GUARD ON/OFF In mode FLASH DRIVE
• SET DATE AND TIMETIME [HH.MM.SS]
DATE [DD.MM.YY]
FORMAT STANDARD/US
• PASSWORDPASSWORD –––– DATA-PROTECTION OFF
MEDHIGH
NEW PASSWORD – – – –
• THEFTCODETHEFTCODE –––– THEFT-PROTECTION ON/OFF
NEW CODE – – – –
• KEY TONEKEY TONE 6
• ADVICE TONEADVICE TONE 6
• BACKLIGHTBACKLIGHT 6
• SET CONFIGURATIONLOAD FACTORY CONFIG.
LOAD USER CONFIG.
STORE USER CONFIG.

19 Menu trees ■
53
19.2 Application menu tree• SET APP.
OFFUNITS
COUNTPERCENT
CALCULATORNET-TOTAL
SUMANIMAL
DYN.-WEIGHTDENSITY
DIAGNOSTICS
• AUTO-STARTAUTO-START ON/OFF
• SETUP APPLICATIONMenu depends on the current application, see Chapter 12 “Working with the application menu”
• SET STATISTICSMODE OFF
STATISTICSRECORDER
STAT./RECORDERCOUNT 100RECORDING MANUAL
TIMEBASELOADCHANGE
TMEBASE 2.0
• SET CHECK +/-MODE OFF
gPCS
NOM. 100.000 g100 PCS
TOLERANCE gPCS
%TO 120.000 gTO 120 PCSTOL.+ 1.0000%TU 80.000 gTU 80 PCSTUL.- 1.0000%SET INDICATION RANGE - 50% .. TU
0% .. TUSYMBOLS PERMANENT
STABLETONE OFF
FILLING AIDSTABLE -
STABLE OKSTABLE +
STABLE - / +
• RESOLU. REDUCT.RESOLU. REDUCT. OFF
MAX.1MAX.2MAX.3MAX.4