oracle® database express edition 2 day dba 10g release 2 (10.2
TRANSCRIPT
Oracle® Database Express Edition2 Day DBA
10g Release 2 (10.2)
B25107-01
February 2006
Oracle Database Express Edition 2 Day DBA, 10g Release 2 (10.2)
B25107-01
Copyright © 2005, 2006, Oracle. All rights reserved.
Primary Author: Steve Fogel
Contributing Author: Kathy Rich, Antonio Romero, Marcie Young, Colin McGregor, Terri Winters
Contributor: Mark Townsend, Bjørn Engsig, Santanu Datta, Michael Hichwa, Christina Cho, Matt McKerley, Graham Wood, Kant Patel, Ramanujam Srinivasan, Tammy Bednar, Beldalker Anand, Ed Miner, Paul Lo, Roy Swonger, Rae Burns,Valarie Moore, Tirthankar Lahiri, Satish Panchumarthy, Srinivas Poovala, Aneesh Khandelwal, Kevin Reardon, Thomas Baby, Roy Crow, Randy Urbano
The Programs (which include both the software and documentation) contain proprietary information; they are provided under a license agreement containing restrictions on use and disclosure and are also protected by copyright, patent, and other intellectual and industrial property laws. Reverse engineering, disassembly, or decompilation of the Programs, except to the extent required to obtain interoperability with other independently created software or as specified by law, is prohibited.
The information contained in this document is subject to change without notice. If you find any problems in the documentation, please report them to us in writing. This document is not warranted to be error-free. Except as may be expressly permitted in your license agreement for these Programs, no part of these Programs may be reproduced or transmitted in any form or by any means, electronic or mechanical, for any purpose.
If the Programs are delivered to the United States Government or anyone licensing or using the Programs on behalf of the United States Government, the following notice is applicable:
U.S. GOVERNMENT RIGHTS Programs, software, databases, and related documentation and technical data delivered to U.S. Government customers are "commercial computer software" or "commercial technical data" pursuant to the applicable Federal Acquisition Regulation and agency-specific supplemental regulations. As such, use, duplication, disclosure, modification, and adaptation of the Programs, including documentation and technical data, shall be subject to the licensing restrictions set forth in the applicable Oracle license agreement, and, to the extent applicable, the additional rights set forth in FAR 52.227-19, Commercial Computer Software—Restricted Rights (June 1987). Oracle USA, Inc., 500 Oracle Parkway, Redwood City, CA 94065
The Programs are not intended for use in any nuclear, aviation, mass transit, medical, or other inherently dangerous applications. It shall be the licensee's responsibility to take all appropriate fail-safe, backup, redundancy and other measures to ensure the safe use of such applications if the Programs are used for such purposes, and we disclaim liability for any damages caused by such use of the Programs.
Oracle, JD Edwards, PeopleSoft, and Retek are registered trademarks of Oracle Corporation and/or its affiliates. Other names may be trademarks of their respective owners.
The Programs may provide links to Web sites and access to content, products, and services from third parties. Oracle is not responsible for the availability of, or any content provided on, third-party Web sites. You bear all risks associated with the use of such content. If you choose to purchase any products or services from a third party, the relationship is directly between you and the third party. Oracle is not responsible for: (a) the quality of third-party products or services; or (b) fulfilling any of the terms of the agreement with the third party, including delivery of products or services and warranty obligations related to purchased products or services. Oracle is not responsible for any loss or damage of any sort that you may incur from dealing with any third party.
iii
Contents
Preface ................................................................................................................................................................. ix
Documentation Topics................................................................................................................................ ixAudience....................................................................................................................................................... xDocumentation Accessibility ..................................................................................................................... xRelated Documentation.............................................................................................................................. xConventions ................................................................................................................................................. xi
1 Introducing Oracle Database XE
Accessing the Database Home Page ..................................................................................................... 1-1Accessing the Database Home Page from the Desktop................................................................ 1-3Accessing the Database Home Page with Your Web Browser—Local User ............................. 1-3Accessing the Database Home Page with Your Web Browser—Remote User ......................... 1-4
Getting Help.............................................................................................................................................. 1-4Navigating the Graphical User Interface............................................................................................. 1-5
Navigating Using Icons or Menus................................................................................................... 1-5Navigating Using Breadcrumbs....................................................................................................... 1-6
2 Starting Up and Shutting Down
Starting Up the Database ........................................................................................................................ 2-1Starting Up the Database from the Desktop .................................................................................. 2-1Starting Up the Database Using SQL Command Line ................................................................. 2-2
Shutting Down the Database ................................................................................................................. 2-3Shutting Down the Database from the Desktop............................................................................ 2-3Shutting Down the Database Using SQL Command Line........................................................... 2-4
3 Connecting to the Database
About Local and Remote Connections................................................................................................. 3-2About Local Connections.................................................................................................................. 3-2About Remote Connections.............................................................................................................. 3-3
Setting Environment Variables.............................................................................................................. 3-5Setting Environment Variables on the Windows Platform.......................................................... 3-5Setting Environment Variables on the Linux Platform ................................................................ 3-5
Connecting Locally with SQL Command Line .................................................................................. 3-6Connecting Remotely with SQL Command Line .............................................................................. 3-7Environment Variables Reference for Linux....................................................................................... 3-7
iv
4 Managing Network Connections
About Network Connections and the Oracle Net Listener .............................................................. 4-1Viewing Listener Status .......................................................................................................................... 4-3Stopping and Starting the Listener....................................................................................................... 4-4Changing Listener Port Numbers ......................................................................................................... 4-5
Changing the Listener Port Number for Database Connection Requests ................................. 4-6Changing the Listener Port Number for HTTP Connection Requests ....................................... 4-7
Enabling Remote HTTP Connection to the Database....................................................................... 4-8
5 Managing Database Memory
About Memory Management ................................................................................................................. 5-1Memory Allocation Overview.......................................................................................................... 5-1SGA Components............................................................................................................................... 5-2SGA and PGA Sizes ........................................................................................................................... 5-3
Viewing Current Memory Allocation .................................................................................................. 5-4Example: Changing SGA and PGA Aggregate Sizes ........................................................................ 5-4
6 Managing Database Storage
About the Database Storage Structures ............................................................................................... 6-1Database .............................................................................................................................................. 6-2Tablespaces ......................................................................................................................................... 6-3Datafiles and Tempfiles..................................................................................................................... 6-4Control File.......................................................................................................................................... 6-4Server Parameter File ........................................................................................................................ 6-4Password File...................................................................................................................................... 6-5Recovery-Related Structures in the Flash Recovery Area............................................................ 6-5
Monitoring Storage Space Usage .......................................................................................................... 6-8Compacting Storage ................................................................................................................................. 6-9Viewing Tablespaces............................................................................................................................. 6-11Viewing Redo Log Files ....................................................................................................................... 6-12Managing the Flash Recovery Area .................................................................................................. 6-13
Monitoring Space in the Flash Recovery Area............................................................................ 6-13Setting Flash Recovery Area Location and Size ......................................................................... 6-14
7 Managing Users and Security
About User Accounts ............................................................................................................................... 7-1User Privileges and Roles ................................................................................................................. 7-2Internal User Accounts...................................................................................................................... 7-3
About Administrative Accounts and Privileges................................................................................. 7-3The SYS and SYSTEM Users............................................................................................................. 7-3The SYSDBA System Privilege......................................................................................................... 7-4Operating System Authentication ................................................................................................... 7-4
Logging In as an Administrator............................................................................................................. 7-5Logging In as User SYSTEM............................................................................................................. 7-6Logging In as a User with the DBA Role ........................................................................................ 7-7Logging In and Connecting to the Database as SYSDBA............................................................. 7-7
v
Changing Administrative User Passwords ......................................................................................... 7-9Managing Database Users ...................................................................................................................... 7-9
Viewing Users..................................................................................................................................... 7-9Creating Users ................................................................................................................................. 7-12Altering Users.................................................................................................................................. 7-14Locking and Unlocking User Accounts ....................................................................................... 7-15Expiring a User Password.............................................................................................................. 7-16Dropping Users ............................................................................................................................... 7-17
User Accounts Reference ..................................................................................................................... 7-19Predefined User Accounts ............................................................................................................. 7-19User Account Icons ......................................................................................................................... 7-20
8 Monitoring the Database
Monitoring Sessions ................................................................................................................................ 8-1Viewing Sessions................................................................................................................................ 8-1Killing (Terminating) a Session........................................................................................................ 8-3
Monitoring System Statistics ................................................................................................................. 8-3Viewing System Statistics ................................................................................................................. 8-3Viewing the Delta in System Statistics............................................................................................ 8-4
Monitoring the Top SQL Statements.................................................................................................... 8-4Monitoring Long Operations ................................................................................................................. 8-5
9 Viewing Database Version and Settings
Viewing Database Version ..................................................................................................................... 9-1Viewing Database Settings..................................................................................................................... 9-1
10 Importing, Exporting, Loading, and Unloading Data
About Importing, Exporting, Loading, and Unloading Data ....................................................... 10-1Choosing the Right Import/Export/Load/Unload Option ............................................................. 10-1Unloading and Loading Data.............................................................................................................. 10-3
Unloading and Loading Data with Wizards............................................................................... 10-3Loading Data with SQL*Loader.................................................................................................... 10-8
Exporting and Importing Data.......................................................................................................... 10-12Exporting and Importing with Data Pump Export and Data Pump Import........................ 10-12Exporting and Importing Data with the Export and Import Utilities ................................... 10-16
11 Backing Up and Recovering
Backing Up and Restoring the Database .......................................................................................... 11-1About Backing Up and Restoring the Database ......................................................................... 11-1Enabling ARCHIVELOG Mode for Media Failure Protection ................................................. 11-2Backing Up the Database ............................................................................................................... 11-4Scheduling Automatic Backups .................................................................................................... 11-6Restoring and Recovering the Database ...................................................................................... 11-6
Viewing and Restoring Historical Data with Flashback Query................................................... 11-8About Flashback Query.................................................................................................................. 11-8

vi
Example: Recovering Data with Flashback Query..................................................................... 11-8Tips for Using Flashback Query ................................................................................................... 11-8
Recovering Dropped Tables ................................................................................................................ 11-9About the Recycle Bin..................................................................................................................... 11-9Viewing Recycle Bin Contents ...................................................................................................... 11-9Example: Restoring a Table from the Recycle Bin.................................................................... 11-10Purging the Recycle Bin ............................................................................................................... 11-12
Index

vii
List of Figures
3–1 Local Connection......................................................................................................................... 3-23–2 Remote Connection..................................................................................................................... 3-45–1 Memory Allocation in Oracle Database XE ............................................................................ 5-26–1 Database Storage Structure........................................................................................................ 6-2
viii
List of Tables
3–1 Oracle Database XE Command-Line Utilities........................................................................ 3-13–2 Required Linux Environment Variables for Connecting with Oracle Utilities................. 3-73–3 Environment Variable Descriptions and Values for Linux.................................................. 3-84–1 Types of Connection Requests Handled by the Listener ..................................................... 4-14–2 Connections That Require the Listener................................................................................... 4-24–3 Location of the listener.ora File................................................................................................ 4-66–1 Tablespaces and Descriptions .................................................................................................. 6-46–2 Flash Recovery Area Default Locations.................................................................................. 6-66–3 Datafile Locations ...................................................................................................................... 6-77–1 Oracle Database Express Edition Predefined Roles.............................................................. 7-27–2 Operating System User Groups for OS Authentication ....................................................... 7-57–3 Database Administrator Login Methods................................................................................ 7-67–4 Oracle Database Express Edition Predefined User Accounts .......................................... 7-197–5 User Account Icons................................................................................................................. 7-2010–1 Summary of Oracle Database XE Import/Export Options............................................... 10-210–2 Import/Export Scenarios and Recommended Options .................................................... 10-211–1 Backup Script Output Log Locations ................................................................................... 11-511–2 Name and Path of the Backup Script for Each Platform ................................................... 11-6
ix
Preface
Welcome to Oracle Database Express Edition 2 Day DBA. This documentation provides background and how-to information for administering Oracle Database Express Edition. The preface contains the following sections:
■ Documentation Topics
■ Audience
■ Documentation Accessibility
■ Related Documentation
■ Conventions
Documentation Topics
Title Description
Introducing Oracle Database XE Introduces Oracle Database Express Edition (Oracle Database XE). Explains how to access the Database Home Page and how to use the Oracle Database XE graphical user interface.
Starting Up and Shutting Down Describes how to start up and shut down the database both from the desktop and from SQL Command Line (SQL*Plus).
Connecting to the Database Explains how to connect to the database locally and remotely with SQL Command Line (SQL*Plus) and other Oracle utilities.
Managing Network Connections Explains how to enable and disable remote connection requests, and how to configure the TCP port numbers that listen for these requests.
Managing Database Memory Provides background information on how Oracle Database XE uses memory, and explains how to adjust the amount of memory used.
Managing Database Storage Provides background information on storage structures, and describes how to monitor used and remaining storage space.
Managing Users and Security Explains user accounts and administrative accounts, explains how to log in as an administrator, and describes how to create, alter, drop, and otherwise manage database users accounts.
Monitoring the Database Describes how to monitor database operations, how to obtain information to help with performance tuning, and how to kill (terminate) a database session.
Viewing Database Version and Settings Describes how to view database version number and database settings.
Importing, Exporting, Loading, and Unloading Data
Compares the various ways to import and export data, and explains how to import and export data both with easy-to-use graphical wizards and with powerful command-line utilities. Provides examples.
x
AudienceOracle Database Express Edition 2 Day DBA is for anyone who wants to perform common, day-to-day administrative tasks with Oracle Database Express Edition. Prior knowledge or experience with managing databases is not required. The only requirement is a basic knowledge of computers.
Documentation AccessibilityOur goal is to make Oracle products, services, and supporting documentation accessible, with good usability, to the disabled community. To that end, our documentation includes features that make information available to users of assistive technology. This documentation is available in HTML format, and contains markup to facilitate access by the disabled community. Accessibility standards will continue to evolve over time, and Oracle is actively engaged with other market-leading technology vendors to address technical obstacles so that our documentation can be accessible to all of our customers. For more information, visit the Oracle Accessibility Program Web site at
http://www.oracle.com/accessibility/
Accessibility of Code Examples in DocumentationScreen readers may not always correctly read the code examples in this document. The conventions for writing code require that closing braces should appear on an otherwise empty line; however, some screen readers may not always read a line of text that consists solely of a bracket or brace.
Accessibility of Links to External Web Sites in DocumentationThis documentation may contain links to Web sites of other companies or organizations that Oracle does not own or control. Oracle neither evaluates nor makes any representations regarding the accessibility of these Web sites.
Related DocumentationFor more information, see these Oracle resources:
■ Oracle Database Express Edition Application Express User’s Guide
■ Oracle Database Express Edition 2 Day Developer Guide
■ Oracle Database Express Edition Installation Guide for your platform
■ Oracle Database Administrator's Guide
■ Oracle Database SQL Reference
■ Oracle Database Reference
For the most recent version of the Oracle Database Express Edition documentation, see the Oracle Database XE online library:
http://www.oracle.com/technology/xe/documentation
Backing Up and Recovering Describes how to back up and restore the database, how to recover dropped tables, and how to recover data that was accidentally deleted or changed.
Title Description
xi
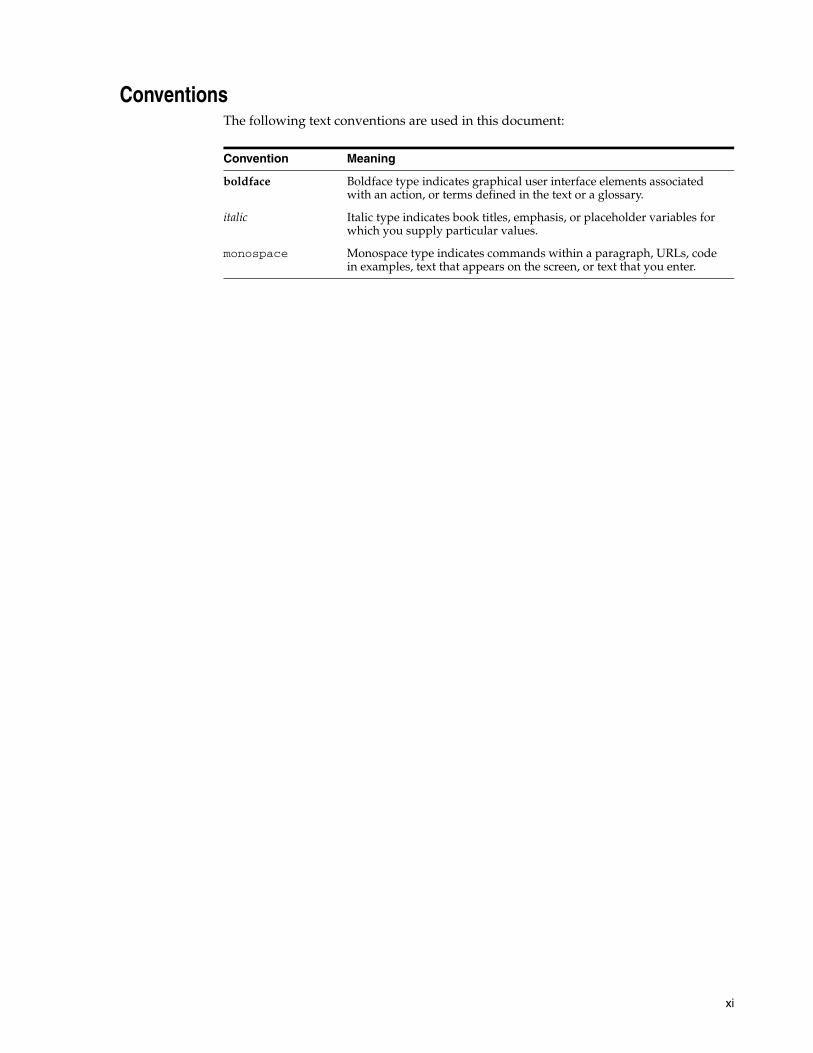
ConventionsThe following text conventions are used in this document:
Convention Meaning
boldface Boldface type indicates graphical user interface elements associated with an action, or terms defined in the text or a glossary.
italic Italic type indicates book titles, emphasis, or placeholder variables for which you supply particular values.
monospace Monospace type indicates commands within a paragraph, URLs, code in examples, text that appears on the screen, or text that you enter.

xii
Introducing Oracle Database XE 1-1
1Introducing Oracle Database XE
Oracle Database Express Edition (Oracle Database XE) is a free, smaller-footprint edition of Oracle Database. Oracle Database XE is easy to install and easy to manage.
With Oracle Database XE, you use an intuitive browser-based interface to:
■ Administer the database
■ Create tables, views, and other database objects
■ Import, export, and view table data
■ Run queries and SQL scripts
■ Generate reports
Oracle Database XE also includes Oracle Application Express release 2.1, a declarative, graphical development environment for creating database-centric Web applications. In addition to Oracle Application Express release 2.1, you can use all the popular Oracle and third-party languages and tools to develop your Oracle Database XE applications.
Oracle Database XE also includes the following command-line utilities:
■ SQL Command Line (SQL*Plus), for entering SQL and PL/SQL commands and running scripts
■ SQL*Loader, for loading data into the database
■ Data Pump and the Import and Export utilities for data import and export
This section contains the following topics:
■ Accessing the Database Home Page on page 1-1
■ Getting Help on page 1-4
■ Navigating the Graphical User Interface on page 1-5
Accessing the Database Home PageOracle Database Express Edition (Oracle Database XE) has a browser-based user interface for administering the database, running scripts and queries, building Web-based applications, and more. The starting point for this interface is the Database Home Page.
Accessing the Database Home Page
1-2 Oracle Database Express Edition 2 Day DBA
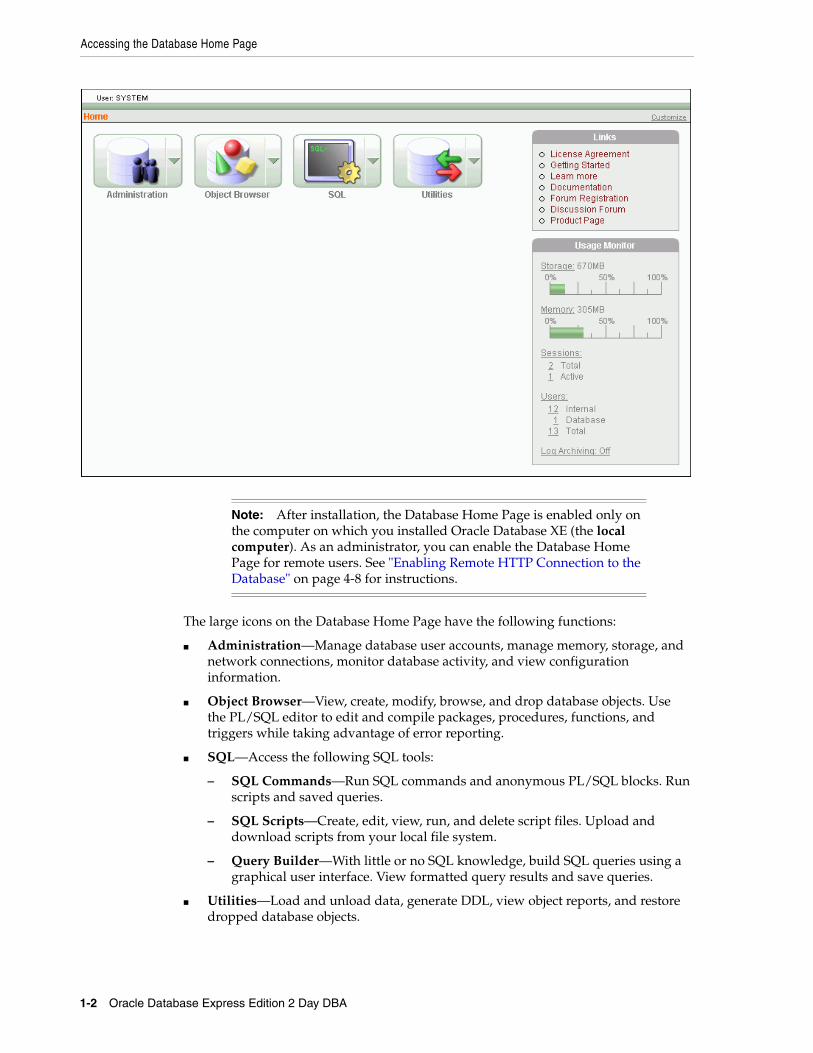
The large icons on the Database Home Page have the following functions:
■ Administration—Manage database user accounts, manage memory, storage, and network connections, monitor database activity, and view configuration information.
■ Object Browser—View, create, modify, browse, and drop database objects. Use the PL/SQL editor to edit and compile packages, procedures, functions, and triggers while taking advantage of error reporting.
■ SQL—Access the following SQL tools:
– SQL Commands—Run SQL commands and anonymous PL/SQL blocks. Run scripts and saved queries.
– SQL Scripts—Create, edit, view, run, and delete script files. Upload and download scripts from your local file system.
– Query Builder—With little or no SQL knowledge, build SQL queries using a graphical user interface. View formatted query results and save queries.
■ Utilities—Load and unload data, generate DDL, view object reports, and restore dropped database objects.
Note: After installation, the Database Home Page is enabled only on the computer on which you installed Oracle Database XE (the local computer). As an administrator, you can enable the Database Home Page for remote users. See "Enabling Remote HTTP Connection to the Database" on page 4-8 for instructions.
Accessing the Database Home Page
Introducing Oracle Database XE 1-3
You can access the Database Home Page from your desktop or by pointing your Web browser to a specific URL. The following sections provide details:
■ Accessing the Database Home Page from the Desktop on page 1-3
■ Accessing the Database Home Page with Your Web Browser—Local User on page 1-3
■ Accessing the Database Home Page with Your Web Browser—Remote User on page 1-4
Accessing the Database Home Page from the DesktopTo access the Database Home Page from the desktop:
1. Do one of the following:
■ On Windows: Click Start, point to Programs (or All Programs), point to Oracle Database 10g Express Edition, and then select Go to Database Home Page.
■ On Linux with Gnome: In the Applications menu, point to Oracle Database 10g Express Edition, and then select Go to Database Home Page.
■ On Linux with KDE: Click the icon for the K Menu, point to Oracle Database 10g Express Edition, and then select Go to Database Home Page.
2. When the login page appears, log in to the database using a valid database user name and password.
To log in as an administrator, log in with user name SYSTEM, and supply the password that you specified during installation (Windows platform) or configuration (Linux platform).
Upon successful login, the Database Home Page appears.
Accessing the Database Home Page with Your Web Browser—Local UserTo access the Database Home Page with your Web browser from the same computer on which you installed Oracle Database XE:
1. Point your browser to the following URL:
http://127.0.0.1:port/apex
where port is the TCP port number for HTTP connection requests. The default value is 8080. You may have changed this value during installation (Windows platform) or configuration (Linux platform).
For example, if you installed Oracle Database XE with the default port number, you would access the Database Home Page at this URL:
http://127.0.0.1:8080/apex
Note: When you log in to the Database Home Page as a user other than SYSTEM, another icon named Application Builder becomes available. You use Application Builder to develop Oracle Application Express applications.
See Also:
■ "Accessing the Database Home Page" on page 1-1
Getting Help
1-4 Oracle Database Express Edition 2 Day DBA
2. When the login page appears, log in to the database using a valid database user name and password.
To log in as an administrator, log in with user name SYSTEM, and supply the password that you specified during installation (Windows platform) or configuration (Linux platform).
Upon successful login, the Database Home Page appears.
Accessing the Database Home Page with Your Web Browser—Remote User
To access the Database Home Page with your Web browser on a remote computer:
1. Point your browser to the following URL:
http://host:port/apex
where:
■ host is the host name or IP address of the computer where Oracle Database XE is installed.
■ port is the TCP port number for HTTP connection requests. The default value is 8080. You may have changed this value during installation (Windows platform) or configuration (Linux platform).
For example, if you installed Oracle Database XE on a computer with the host name myhost.mydomain.com, and you installed with the default port number, you would access the Database Home Page at this URL:
http://myhost.mydomain.com:8080/apex
2. When the login page appears, log in to the database using a valid database user name and password.
To log in as an administrator, log in with user name SYSTEM, and supply the password that you specified during installation (Windows platform) or configuration (Linux platform).
Upon successful login, the Database Home Page appears.
Getting HelpYou can access context-sensitive online Help in the following ways:
■ For help with the current page in the Oracle Database XE graphical user interface, click the Help icon at the upper right-hand corner of the page.
See Also:
■ "Accessing the Database Home Page" on page 1-1
Note: Before you can access the Database Home Page from a remote computer, you must enable remote access to the Oracle Database XE graphical user interface. See "Enabling Remote HTTP Connection to the Database" on page 4-8 for instructions.
See Also:
■ "Accessing the Database Home Page" on page 1-1
Navigating the Graphical User Interface
Introducing Oracle Database XE 1-5
This opens the Help window. In addition to viewing the Help information specific to the page, you can browse through Help topics by expanding and collapsing the table of contents in the left pane.
A search facility in the Help window enables you to search all online Help topics. To search, click the Find link at the top of the Help window.
■ For help with an individual data field on the page, position the cursor over the field label. If the field label turns red and the cursor changes to an arrow with a question mark, help is available for that field. Click the field label to view the help in a separate window.
■ To open the Help window when not using the Oracle Database XE graphical user interface, do one of the following:
– On Windows: Click Start, point to Programs (or All Programs), point to Oracle Database 10g Express Edition, point to Get Help, and then select Read Online Help.
– On Linux with Gnome: In the Applications menu, point to Oracle Database 10g Express Edition, point to Get Help, and then select Read Online Help.
– On Linux with KDE: Click the icon for the K Menu, point to Oracle Database 10g Express Edition, point to Get Help, and then select Read Online Help.
Navigating the Graphical User InterfaceThis section describes alternative methods for navigating between pages in the Oracle Database XE graphical user interface. It contains the following topics:
■ Navigating Using Icons or Menus on page 1-5
■ Navigating Using Breadcrumbs on page 1-6
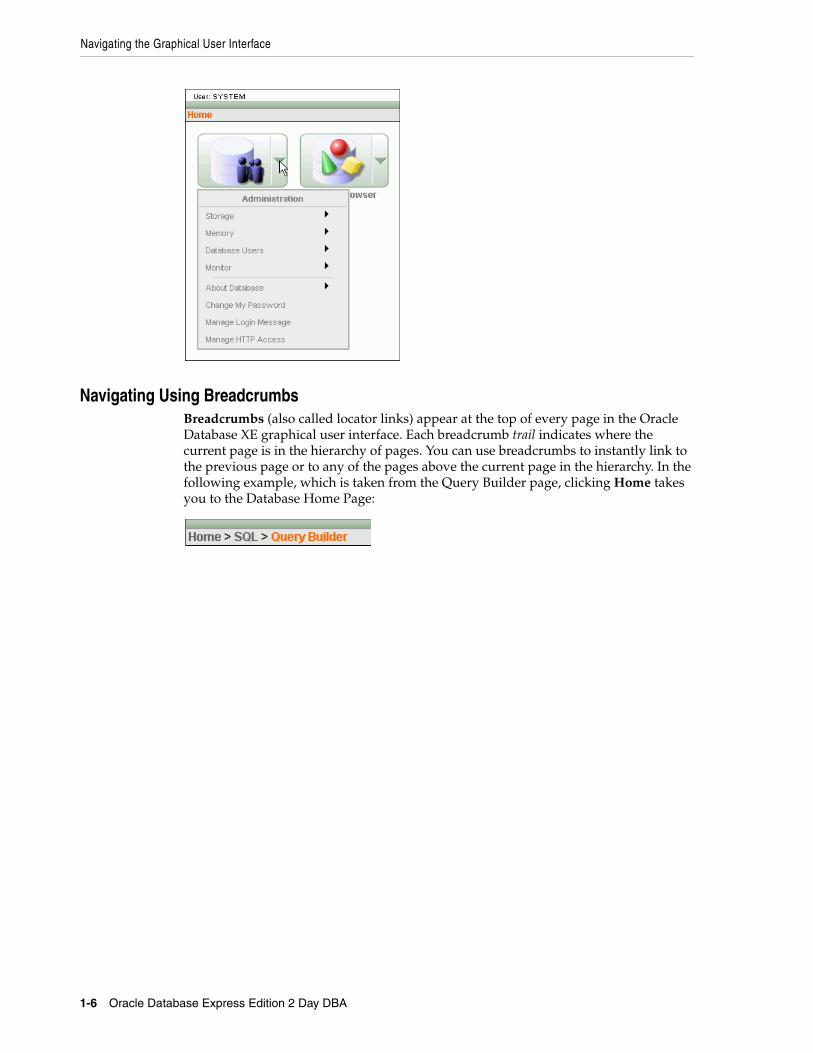
Navigating Using Icons or MenusYou can navigate the Oracle Database XE graphical user interface by clicking the large icons on the Database Home Page and on other navigation pages. When using these icons, you have two options:
■ Clicking the icon—Click the icon to go to the page indicated by the icon name.
You may have to click a number of these icons, descending one page at a time in the page hierarchy, before you reach your destination page.
■ Selecting from the icon’s menu—Click the down arrow on the right-hand side of the icon to view a menu, and then select an option from the menu or from any of its submenus.
This is a more direct method of reaching some pages.
See Also: "Accessing the Database Home Page" on page 1-1
Navigating the Graphical User Interface
1-6 Oracle Database Express Edition 2 Day DBA
Navigating Using BreadcrumbsBreadcrumbs (also called locator links) appear at the top of every page in the Oracle Database XE graphical user interface. Each breadcrumb trail indicates where the current page is in the hierarchy of pages. You can use breadcrumbs to instantly link to the previous page or to any of the pages above the current page in the hierarchy. In the following example, which is taken from the Query Builder page, clicking Home takes you to the Database Home Page:
Starting Up and Shutting Down 2-1
2Starting Up and Shutting Down
This section describes how to start up and shut down Oracle Database Express Edition. It contains the following topics:
■ Starting Up the Database on page 2-1
■ Shutting Down the Database on page 2-3
Starting Up the DatabaseOracle Database Express Edition (Oracle Database XE) starts up automatically immediately after installation and after each system restart. Thus, there is no need to start up the database unless you previously shut it down.
You can start up the database from the desktop or with SQL Command Line (SQL*Plus). Each of these methods is described in the following sections:
■ Starting Up the Database from the Desktop on page 2-1
■ Starting Up the Database Using SQL Command Line on page 2-2
Starting Up the Database from the DesktopThis section explains how to start up the database from the desktop in Windows and in the following two Linux windowing managers: KDE and Gnome. If your Linux computer is not running a windowing manager, or is running a windowing manager other than KDE or Gnome, you must start the database with SQL Command Line. See "Starting Up the Database Using SQL Command Line" on page 2-2 for instructions.
To start up the database using the desktop:
1. Do one of the following:
■ On Windows: Log in to the Oracle Database XE host computer as a Windows administrator—that is, as a user who is a member of the Administrator group.
■ On Linux: Log in to the Oracle Database XE host computer as a user who is a member of the dba user group. This is typically the user oracle. See "Operating System Authentication" on page 7-4 for more information.
2. Do one of the following:
■ On Windows: Click Start, point to Programs (or All Programs), point to Oracle Database 10g Express Edition, and then select Start Database.
■ On Linux with Gnome: In the Applications menu, point to Oracle Database 10g Express Edition, and then select Start Database.
Starting Up the Database
2-2 Oracle Database Express Edition 2 Day DBA
■ On Linux with KDE: Click the icon for the K Menu, point to Oracle Database 10g Express Edition, and then select Start Database.
Starting Up the Database Using SQL Command LineWhen you start up the database with SQL Command Line, you must run SQL Command Line on the same computer where you installed Oracle Database XE (the "Oracle Database XE host computer").
To start up the database using SQL Command Line:
1. Do one of the following:
■ On Windows: Log in to the Oracle Database XE host computer as a user who is a member of the ORA_DBA user group. This is typically the user that installed Oracle Database XE.
■ On Linux: Log in to the Oracle Database XE host computer as a user who is a member of the dba user group. This is typically the oracle user.
See "Operating System Authentication" on page 7-4 for more information.
2. If not already opened, open a terminal session or command window.
3. Linux platform only: Ensure that environment variables are set properly.
See "Setting Environment Variables on the Linux Platform" on page 3-5 for details.
4. At the operating system prompt, enter the following command to start SQL Command Line and connect to the database:
SQLPLUS / AS SYSDBA
The slash (/) indicates that the database should authenticate you with operating system authentication.
5. At the SQL Command Line prompt, enter the following command:
STARTUP
If the command is successful, it displays the following output. (System global area sizes will vary depending on the amount of physical memory in your Oracle Database XE host computer.)
ORACLE instance started. Total System Global Area 599785472 bytesFixed Size 1220804 bytesVariable Size 180358972 bytesDatabase Buffers 415236096 bytesRedo Buffers 2969600 bytesDatabase mounted.Database opened.
6. (Optional) Enter the following SQL query to verify that the database started up properly:
select count(*) from hr.employees;
The query results should look similar to the following:
COUNT(*)---------- 107

Shutting Down the Database
Starting Up and Shutting Down 2-3
7. Enter the following command to exit SQL Command Line:
EXIT
Shutting Down the DatabaseOracle Database Express Edition (Oracle Database XE) shuts down automatically when you shut down the computer that hosts it.
Before shutting down Oracle Database XE, it is best to ensure that all users and applications have completed their work and logged out. See "Monitoring Sessions" on page 8-1 for information on how to view current database sessions.
If users or applications are still logged in when you begin a shutdown operation, the shutdown proceeds under the following conditions:
■ No new connections are permitted, and no new transactions are allowed to be started.
■ Any uncommitted transactions are rolled back.
■ All users and applications are immediately disconnected.
You can shut down the database with the desktop or with SQL Command Line (SQL*Plus). Each of these methods is described in the following sections:
■ Shutting Down the Database from the Desktop on page 2-3
■ Shutting Down the Database Using SQL Command Line on page 2-4
Shutting Down the Database from the DesktopThis section explains how to shut down the database from the desktop in Windows and in the following two Linux windowing managers: KDE and Gnome. If your Linux computer is not running a windowing manager, or is running a windowing manager other than KDE or Gnome, you must shut down the database with SQL Command Line.
To shut down the database using the desktop:
1. Do one of the following:
■ On Windows: Log in to the Oracle Database XE host computer as a Windows administrator—that is, as a user who is a member of the Administrator group.
■ On Linux: Log in to the Oracle Database XE host computer as a user who is a member of the dba user group. This is typically the user oracle. See "Operating System Authentication" on page 7-4 for more information.
2. Do one of the following:
■ On Windows: Click Start, point to Programs (or All Programs), point to Oracle Database 10g Express Edition, and then select Stop Database.
■ On Linux with Gnome: In the Applications menu, point to Oracle Database 10g Express Edition, and then select Stop Database.
■ On Linux with KDE: Click the icon for the K Menu, point to Oracle Database 10g Express Edition, and then select Stop Database.
Shutting Down the Database
2-4 Oracle Database Express Edition 2 Day DBA
Shutting Down the Database Using SQL Command LineWhen you shut down the database with SQL Command Line, you must run SQL Command Line on the same computer where you installed Oracle Database XE (the "Oracle Database XE host computer").
To shut down the database using SQL Command Line:
1. Do one of the following:
■ On Windows: Log in to the Oracle Database XE host computer as a user who is a member of the ORA_DBA user group. This is typically the user that installed Oracle Database XE.
■ On Linux: Log in to the Oracle Database XE host computer as a user who is a member of the dba user group. This is typically the oracle user.
See "Operating System Authentication" on page 7-4 for more information.
2. If not already opened, open a terminal session or command window.
3. Linux platform only: Ensure that environment variables are set properly.
See "Setting Environment Variables on the Linux Platform" on page 3-5 for details.
4. At the operating system prompt, enter the following command to start SQL Command Line and connect to the database:
SQLPLUS / AS SYSDBA
The slash (/) indicates that the database should authenticate you with operating system authentication.
5. At the SQL Command Line prompt, enter the following command:
SHUTDOWN IMMEDIATE
Note that this command may take a short while to complete. If the command is successful, it displays the following output:
Database closed.Database dismounted.ORACLE instance shut down.
If the command displays no output after a number of minutes, indicating that the shutdown operation is not proceeding, you can press CTRL-C to interrupt the command, and then enter the following command:
SHUTDOWN ABORT
The database must go through a recovery process when it starts up after a SHUTDOWN ABORT command. It is recommended that you enable the recovery process to take place immediately, after which you can shut down the database normally. To do this, enter the following commands when the SHUTDOWN ABORT completes:
STARTUPSHUTDOWN IMMEDIATE
See Oracle Database Administrator's Guide for information on the SHUTDOWN ABORT command.
6. Enter the following command to exit SQL Command Line:
EXIT
Connecting to the Database 3-1
3Connecting to the Database
In addition to using the Oracle Database XE graphical user interface to work with the database, you can use the set of command-line utilities that come with Oracle Database XE. Table 3–1 lists these utilities. To use these utilities, you must understand how to connect to the database with them.
Although connection concepts apply to all utilities, this section focuses on SQL Command Line (SQL*Plus), because you use it for database administration. The following topics are covered:
■ About Local and Remote Connections on page 3-2
■ Setting Environment Variables on page 3-5
■ Connecting Locally with SQL Command Line on page 3-6
■ Connecting Remotely with SQL Command Line on page 3-7
■ Environment Variables Reference for Linux on page 3-7
Table 3–1 Oracle Database XE Command-Line Utilities
Utility Purpose See Also
SQL Command Line (SQL*Plus)
Administer the database; create, alter and drop database objects; run SQL queries; and run SQL and PL/SQL scripts.
"Using SQL Command Line" in Oracle Database Express Edition 2 Day Developer Guide
Data Pump Export and import data from one Oracle database to another.
"Importing, Exporting, Loading, and Unloading Data" on page 10-1
Import and Export Export and import data from one Oracle database to another.
"Importing, Exporting, Loading, and Unloading Data" on page 10-1
SQL*Loader Bulk-load data into the database from external files.
"Importing, Exporting, Loading, and Unloading Data" on page 10-1
See Also: The following documents, for information on how to connect to the database from your application:
■ Oracle Database Express Edition Java 2 Day Developer Guide
■ Oracle Database Express Edition 2 Day Plus .NET Developer Guide
■ Oracle Database Express Edition 2 Day Plus PHP Developer Guide
About Local and Remote Connections
3-2 Oracle Database Express Edition 2 Day DBA
About Local and Remote ConnectionsOracle Database XE supports connections between SQL Command Line (SQL*Plus) and the database either locally, or remotely over a TCP/IP network. The method that you use to connect to Oracle Database XE with SQL Command Line depends on whether you are initiating a local connection or a remote connection. Local and remote connections are explained in the following sections:
■ About Local Connections on page 3-2
■ About Remote Connections on page 3-3
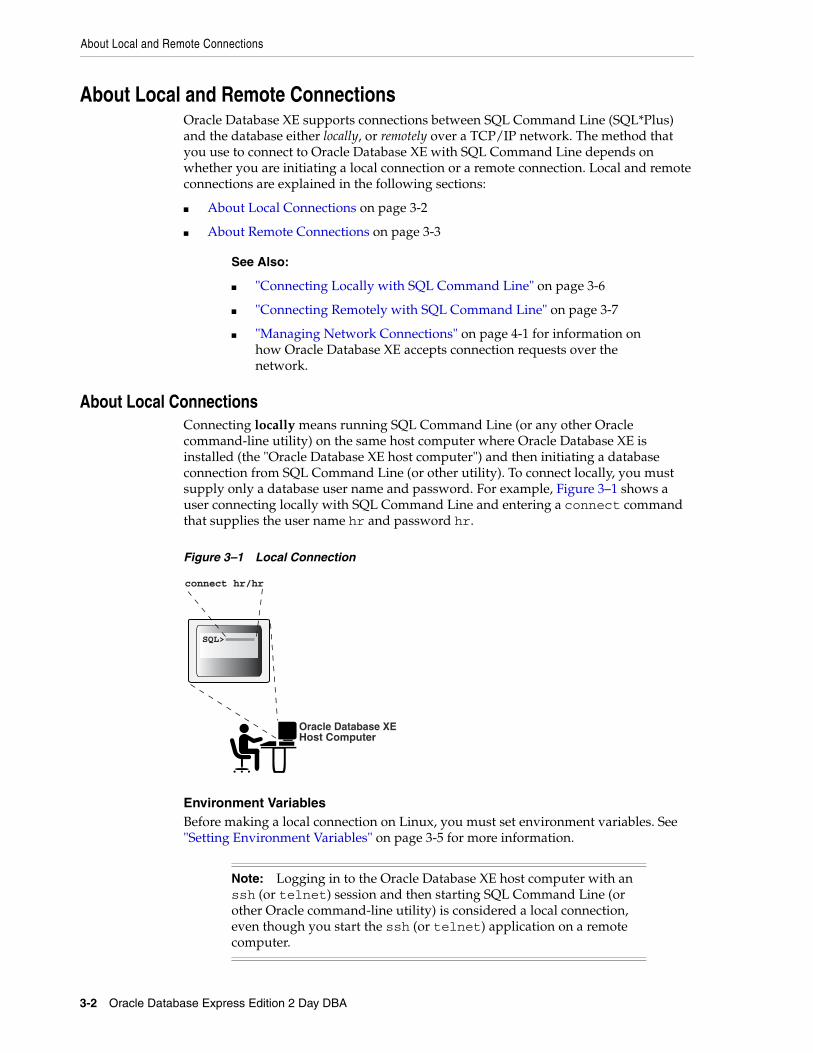
About Local ConnectionsConnecting locally means running SQL Command Line (or any other Oracle command-line utility) on the same host computer where Oracle Database XE is installed (the "Oracle Database XE host computer") and then initiating a database connection from SQL Command Line (or other utility). To connect locally, you must supply only a database user name and password. For example, Figure 3–1 shows a user connecting locally with SQL Command Line and entering a connect command that supplies the user name hr and password hr.
Figure 3–1 Local Connection
Environment VariablesBefore making a local connection on Linux, you must set environment variables. See "Setting Environment Variables" on page 3-5 for more information.
See Also:
■ "Connecting Locally with SQL Command Line" on page 3-6
■ "Connecting Remotely with SQL Command Line" on page 3-7
■ "Managing Network Connections" on page 4-1 for information on how Oracle Database XE accepts connection requests over the network.
Note: Logging in to the Oracle Database XE host computer with an ssh (or telnet) session and then starting SQL Command Line (or other Oracle command-line utility) is considered a local connection, even though you start the ssh (or telnet) application on a remote computer.
Oracle Database XE Host Computer
SQL>
connect hr/hr

About Local and Remote Connections
Connecting to the Database 3-3
About Remote ConnectionsConnecting remotely means running SQL Command Line (or any other Oracle command-line utility) on a computer other than the Oracle Database XE host computer, and then initiating a database connection from SQL Command Line (or other utility) over the network.
Oracle Client SoftwareThe remote computer must have Oracle client software installed. It is through Oracle client software that Oracle command-line utilities (and your applications) connect to the database. Oracle Database XE accepts connections from all of the following types of Oracle client software:
■ Oracle Database Express Edition Client (Oracle Database XE Client)
When you install Oracle Database XE, Oracle Database XE Client is also installed on the same computer. You can install Oracle Database XE Client separately on remote computers. It is available at
http://www.oracle.com/technology/xe
■ Instant Client
Instant Client is available at
http://www.oracle.com/technology/tech/oci/instantclient/instantclient.html
■ Oracle client software for Oracle Database Enterprise Edition or Standard Edition (all supported releases of Oracle Database 8, 8i, 9i, and 10g)
All Oracle client software includes Oracle Net, which is the Oracle network software that enables client applications on one computer to connect to databases on another computer over a network.
Connect StringsTo connect remotely, you must supply not just a user name and password, but a complete Oracle Net connect string. In addition to the database user name and password, a connect string includes a host name or host IP address, an optional TCP port number, and an optional database service name. These additional parameters are required to help Oracle Net find the right host computer and connect to Oracle Database XE. An Oracle Net connect string has the following format:
username/password@[//]host[:port][/service_name]
where:
■ // is optional
■ host is the host name or IP address of the computer that is running Oracle Database XE
■ port (optional) is the TCP port number on which the Oracle Net listener is listening. If not specified, the default port number 1521 is assumed.
■ service_name (optional) is the name of the database service to which to connect. For Oracle Database XE, the service name is XE. If service_name is omitted, Oracle Database XE Client appends a request for the default database service, which is configured during installation as XE.
About Local and Remote Connections
3-4 Oracle Database Express Edition 2 Day DBA
For example, Figure 3–2 shows a user connecting remotely with SQL Command Line and entering a connect command that includes a connect string that supplies: the user name hr, the password hr, and the host name dbhost.xyz.com. This connect string connects to the default database service (XE) on the default port (1521).
Figure 3–2 Remote Connection
Environment VariablesBefore making a remote connection from Linux, you must set environment variables. See "Setting Environment Variables" on page 3-5 for more information.
Remote Connection ExamplesIn the following examples of SQL Command Line connect commands, Oracle Database XE is running on the host computer mydbserver.mydomain.com.
Example 1 This example initiates a remote connection from Oracle Database XE Client, using the default port number.
CONNECT system/[email protected]
Example 2 This example initiates a remote connection from Oracle Database XE Client, using a nondefault port number (1522):
CONNECT system/[email protected]:1522
Example 3 This example initiates a remote connection using the default port number, and includes the optional service name.
CONNECT system/[email protected]/XE
Note: Only Oracle Database XE Client supports the notion of a default database service. If you connect remotely from any Oracle client software other than Oracle Database XE Client, you must include the XE service name.
Remote computerwith OracleDatabase XE Client
TCP / IP Network
SQL>
Oracle Database XE Host Computerdbhost.xyz.com
connect hr/[email protected]
Setting Environment Variables
Connecting to the Database 3-5
Setting Environment VariablesSQL Command Line (SQL*Plus) and other Oracle utilities retrieve configuration information from operating system environment variables. This section explains how to set these environment variables, and contains the following topics:
■ Setting Environment Variables on the Windows Platform on page 3-5
■ Setting Environment Variables on the Linux Platform on page 3-5
Setting Environment Variables on the Windows PlatformOn the Windows platform, environment variables are stored in the Windows registry, and are automatically set for you. You need not take any action involving environment variables before initiating a database connection.
Setting Environment Variables on the Linux PlatformOn the Linux platform, before running SQL Command Line or other Oracle utilities from a terminal session, you must set some environment variables for that session. The procedure for setting environment variables depends on whether you are connecting locally, or connecting remotely from Oracle Database XE Client.
Setting Environment Variables for a Local ConnectionTo set environment variables when connecting locally, enter one of the following commands in a terminal session.
For Bourne, Korn, or Bash shell:
source /usr/lib/oracle/xe/app/oracle/product/10.2.0/server/bin/oracle_env.sh
For C shell:
source /usr/lib/oracle/xe/app/oracle/product/10.2.0/server/bin/oracle_env.csh
See "Environment Variables Reference for Linux" on page 3-7 for more information.
Setting Environment Variables for a Remote ConnectionTo set environment variables when connecting remotely from Oracle Database XE Client, enter one of the following commands in a terminal session at the remote computer:
For Bourne, Korn, or Bash shell:
source /usr/lib/oracle/xe/app/oracle/product/10.2.0/client/bin/oracle_env.sh
For C shell:
source /usr/lib/oracle/xe/app/oracle/product/10.2.0/client/bin/oracle_env.csh
See "Environment Variables Reference for Linux" on page 3-7 for more information.
Note: There is no need to set environment variables before running SQL Command Line from the K menu (KDE) or Applications menu (Gnome).
See Also:
■ "About Local and Remote Connections" on page 3-2
Connecting Locally with SQL Command Line
3-6 Oracle Database Express Edition 2 Day DBA
Connecting Locally with SQL Command LineConnecting locally means running SQL Command Line (SQL*Plus) and Oracle Database XE on the same computer. There are two ways to start a local connection with SQL Command Line:
■ From the desktop
■ From a terminal session (Linux) or command window (Windows)
Starting SQL Command Line from the DesktopTo start SQL Command Line from the desktop and connect locally:
1. Do one of the following:
■ On Windows: Click Start, point to Programs (or All Programs), point to Oracle Database 10g Express Edition, and then select Run SQL Command Line.
■ On Linux with Gnome: In the Applications menu, point to Oracle Database 10g Express Edition, and then select Run SQL Command Line.
■ On Linux with KDE: Click the icon for the K Menu, point to Oracle Database 10g Express Edition, and then select Run SQL Command Line.
A SQL Command Line command window opens.
2. At the SQL Command Line prompt, enter the following command:
CONNECT username/password
For example, to connect as user HR with the password PEOPLE, enter the following command:
CONNECT HR/PEOPLE
Starting SQL Command Line from a Terminal Session or Command WindowTo start SQL Command Line from a terminal session or command window and connect locally:
1. If not already open, open a terminal session (Linux) or a command window (Windows).
2. (Linux only) If the required environment variables are not already set for your session, set them as described in "Setting Environment Variables on the Linux Platform" on page 3-5.
3. Enter the following command at the operating system prompt:
SQLPLUS /NOLOG
4. At the SQL Command Line prompt, enter the following command:
CONNECT username/password
For example, to connect as user HR with the password PEOPLE, enter the following command:
CONNECT HR/PEOPLE
See Also:
■ "About Local and Remote Connections" on page 3-2
Environment Variables Reference for Linux
Connecting to the Database 3-7
Connecting Remotely with SQL Command LineConnecting remotely means running SQL Command Line (SQL*Plus) on one computer (the remote computer), and then initiating a connection to Oracle Database XE on a different computer.
To initiate a remote connection from SQL Command Line using the Oracle Database XE Client:
1. On the remote computer, start a terminal session (Linux) or open a command window (Windows.)
If prompted for host credentials, log in to the remote computer.
2. (Linux only) If the required environment variables are not already set for your session, set them as described in "Setting Environment Variables on the Linux Platform" on page 3-5.
3. Enter the following command at the operating system prompt:
SQLPLUS /NOLOG
4. Enter a CONNECT command at the SQL Command Line prompt, supplying a connect string.
CONNECT username/password@[//]host[:port][/service_name]
See "About Remote Connections" on page 3-3 for a description and examples of connect strings.
Environment Variables Reference for LinuxThis section provides reference information for setting environment variables on Linux for the following two scenarios:
■ Connecting locally
■ Connecting remotely from Oracle Database XE Client.
Table 3–2 on page 3-7 lists the environment variables that you must set for each of these scenarios. Table 3–3 on page 3-8 provides environment variable descriptions and required values.
See Also: "About Local and Remote Connections" on page 3-2
Table 3–2 Required Linux Environment Variables for Connecting with Oracle Utilities
Connection Type Required Environment Variables
Local ORACLE_SIDORACLE_HOMEPATHNLS_LANGLD_LIBRARY_PATH
Remote, using Oracle Database XE Client ORACLE_HOMEPATHNLS_LANGLD_LIBRARY_PATHSQLPATH
Environment Variables Reference for Linux
3-8 Oracle Database Express Edition 2 Day DBA
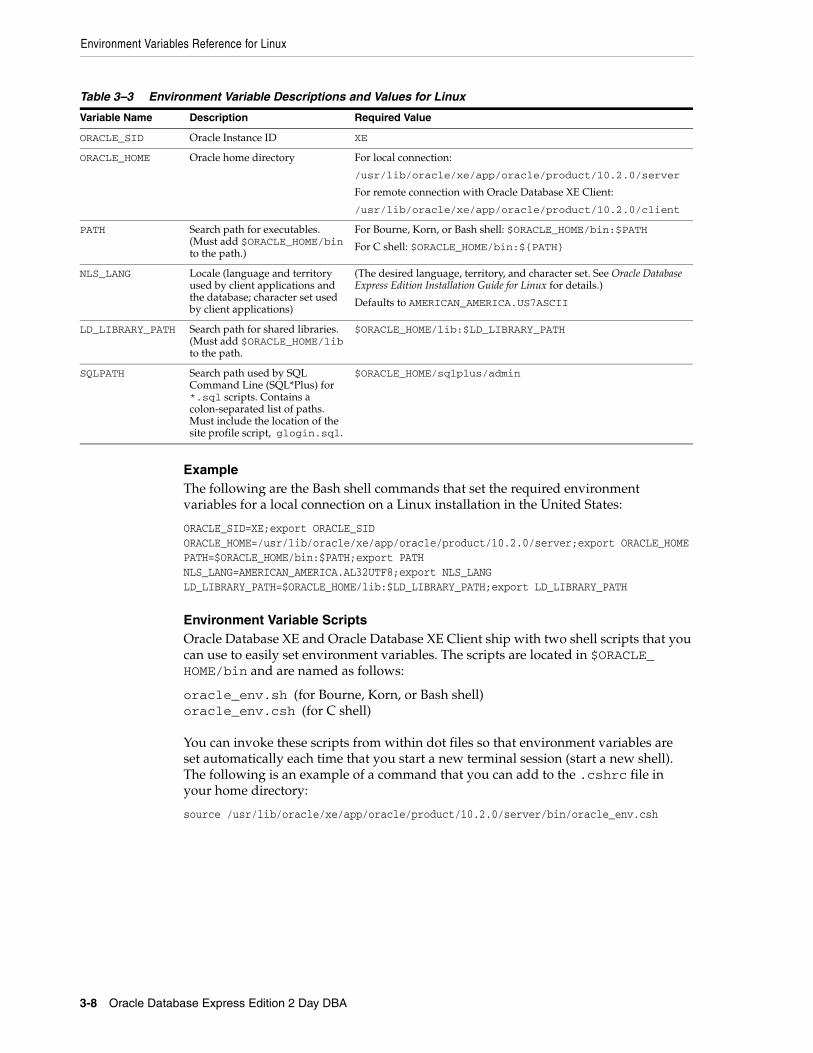
ExampleThe following are the Bash shell commands that set the required environment variables for a local connection on a Linux installation in the United States:
ORACLE_SID=XE;export ORACLE_SIDORACLE_HOME=/usr/lib/oracle/xe/app/oracle/product/10.2.0/server;export ORACLE_HOMEPATH=$ORACLE_HOME/bin:$PATH;export PATHNLS_LANG=AMERICAN_AMERICA.AL32UTF8;export NLS_LANGLD_LIBRARY_PATH=$ORACLE_HOME/lib:$LD_LIBRARY_PATH;export LD_LIBRARY_PATH
Environment Variable ScriptsOracle Database XE and Oracle Database XE Client ship with two shell scripts that you can use to easily set environment variables. The scripts are located in $ORACLE_HOME/bin and are named as follows:
oracle_env.sh (for Bourne, Korn, or Bash shell)oracle_env.csh (for C shell)
You can invoke these scripts from within dot files so that environment variables are set automatically each time that you start a new terminal session (start a new shell). The following is an example of a command that you can add to the .cshrc file in your home directory:
source /usr/lib/oracle/xe/app/oracle/product/10.2.0/server/bin/oracle_env.csh
Table 3–3 Environment Variable Descriptions and Values for Linux
Variable Name Description Required Value
ORACLE_SID Oracle Instance ID XE
ORACLE_HOME Oracle home directory For local connection:
/usr/lib/oracle/xe/app/oracle/product/10.2.0/server
For remote connection with Oracle Database XE Client:
/usr/lib/oracle/xe/app/oracle/product/10.2.0/client
PATH Search path for executables. (Must add $ORACLE_HOME/bin to the path.)
For Bourne, Korn, or Bash shell: $ORACLE_HOME/bin:$PATH
For C shell: $ORACLE_HOME/bin:${PATH}
NLS_LANG Locale (language and territory used by client applications and the database; character set used by client applications)
(The desired language, territory, and character set. See Oracle Database Express Edition Installation Guide for Linux for details.)
Defaults to AMERICAN_AMERICA.US7ASCII
LD_LIBRARY_PATH Search path for shared libraries. (Must add $ORACLE_HOME/lib to the path.
$ORACLE_HOME/lib:$LD_LIBRARY_PATH
SQLPATH Search path used by SQL Command Line (SQL*Plus) for *.sql scripts. Contains a colon-separated list of paths. Must include the location of the site profile script, glogin.sql.
$ORACLE_HOME/sqlplus/admin
Managing Network Connections 4-1
4Managing Network Connections
This section explains how to manage network connections to the database. It includes the following topics:
■ About Network Connections and the Oracle Net Listener on page 4-1
■ Viewing Listener Status on page 4-3
■ Stopping and Starting the Listener on page 4-4
■ Changing Listener Port Numbers on page 4-5
■ Enabling Remote HTTP Connection to the Database on page 4-8
About Network Connections and the Oracle Net ListenerOracle Database Express Edition (Oracle Database XE) supports connections from client applications both remotely over the network and locally. Remote client applications and the database communicate through Oracle Net, which is a software layer that resides both on the remote computer and on the Oracle Database XE host computer. Oracle Net establishes the connection between the client application and the database, and exchanges messages between them using TCP/IP. Oracle Net is automatically installed when you install Oracle Database XE and Oracle Database Express Edition Client.
Included with Oracle Net in an Oracle Database XE installation is the Oracle Net listener, commonly known as the listener. It is the host process that listens on specific TCP/IP ports for connection requests. When the listener receives a valid connection request from a client application, it routes the connection request to the database. The client application and the database then communicate directly.
Table 4–1 lists the types of connection requests that the listener handles.
See Also: "Connecting to the Database" on page 3-1
Table 4–1 Types of Connection Requests Handled by the Listener
Connection Request Type
Default TCP Port Number Used For
Database 1521 Database connections using Oracle Net over TCP/IP. Examples include:
■ Remote connection from SQL Command Line.
■ Remote connection from a Java application that connects with JDBC.
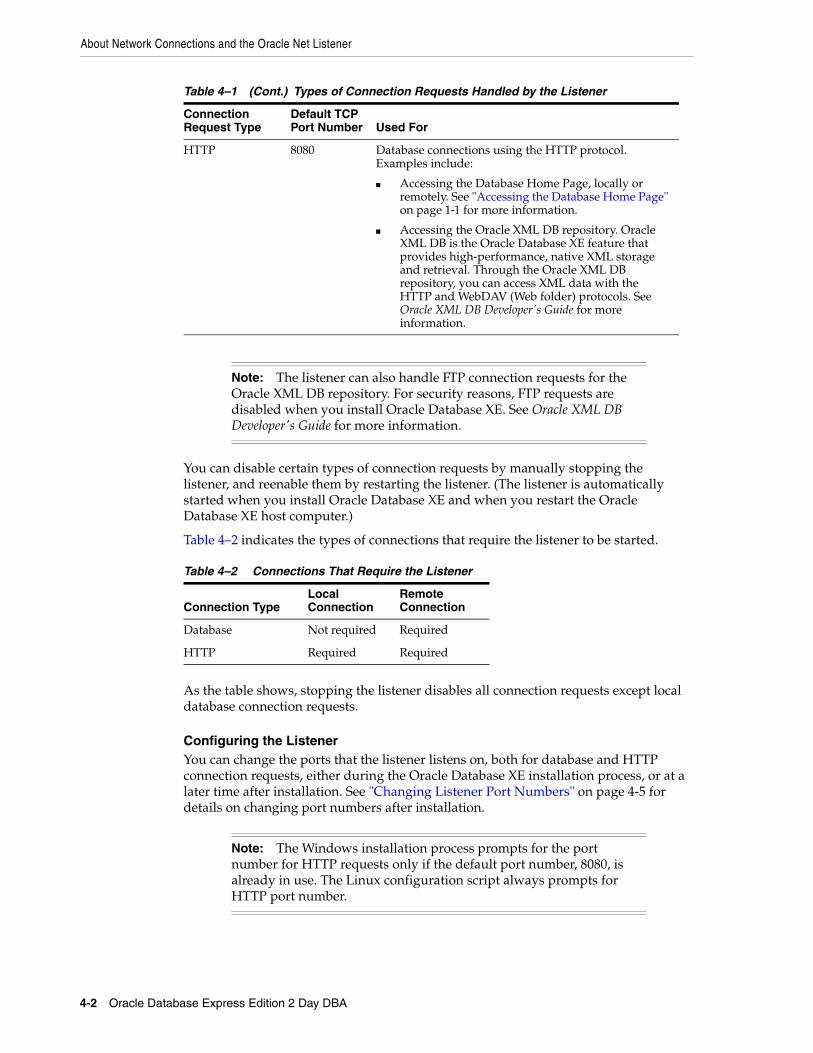
About Network Connections and the Oracle Net Listener
4-2 Oracle Database Express Edition 2 Day DBA
You can disable certain types of connection requests by manually stopping the listener, and reenable them by restarting the listener. (The listener is automatically started when you install Oracle Database XE and when you restart the Oracle Database XE host computer.)
Table 4–2 indicates the types of connections that require the listener to be started.
As the table shows, stopping the listener disables all connection requests except local database connection requests.
Configuring the ListenerYou can change the ports that the listener listens on, both for database and HTTP connection requests, either during the Oracle Database XE installation process, or at a later time after installation. See "Changing Listener Port Numbers" on page 4-5 for details on changing port numbers after installation.
HTTP 8080 Database connections using the HTTP protocol. Examples include:
■ Accessing the Database Home Page, locally or remotely. See "Accessing the Database Home Page" on page 1-1 for more information.
■ Accessing the Oracle XML DB repository. Oracle XML DB is the Oracle Database XE feature that provides high-performance, native XML storage and retrieval. Through the Oracle XML DB repository, you can access XML data with the HTTP and WebDAV (Web folder) protocols. See Oracle XML DB Developer's Guide for more information.
Note: The listener can also handle FTP connection requests for the Oracle XML DB repository. For security reasons, FTP requests are disabled when you install Oracle Database XE. See Oracle XML DB Developer's Guide for more information.
Table 4–2 Connections That Require the Listener
Connection TypeLocal Connection
Remote Connection
Database Not required Required
HTTP Required Required
Note: The Windows installation process prompts for the port number for HTTP requests only if the default port number, 8080, is already in use. The Linux configuration script always prompts for HTTP port number.
Table 4–1 (Cont.) Types of Connection Requests Handled by the Listener
Connection Request Type
Default TCP Port Number Used For
Viewing Listener Status
Managing Network Connections 4-3
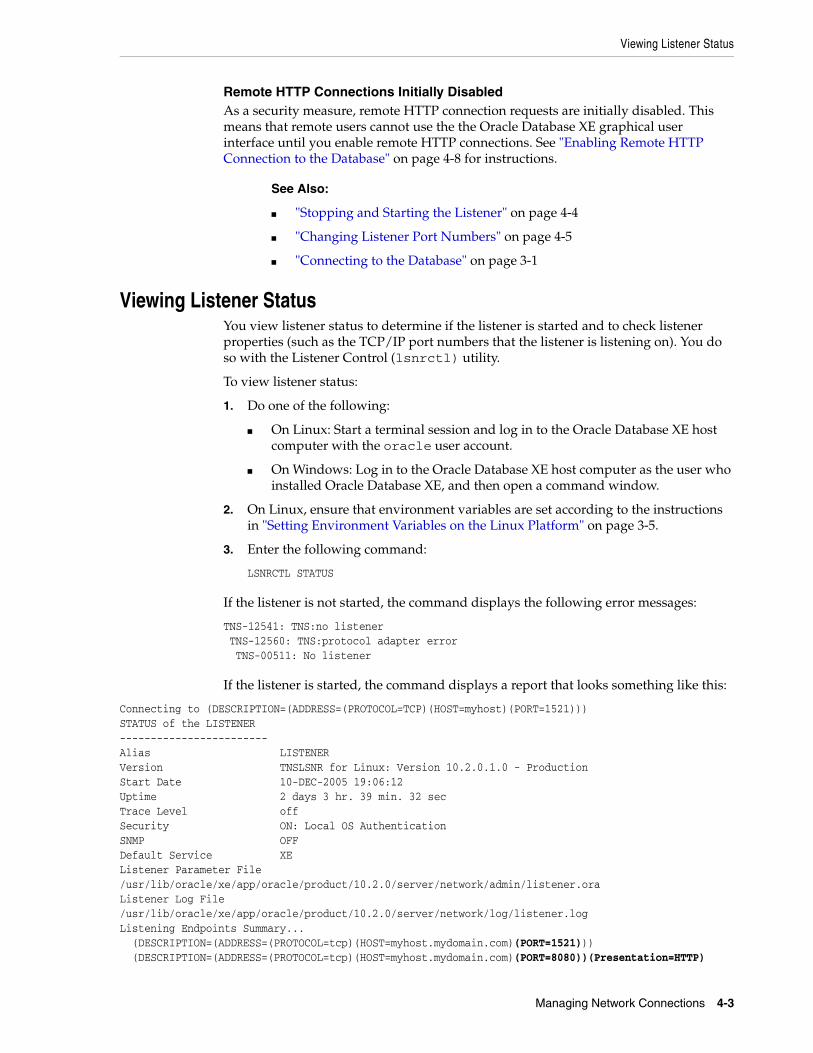
Remote HTTP Connections Initially DisabledAs a security measure, remote HTTP connection requests are initially disabled. This means that remote users cannot use the the Oracle Database XE graphical user interface until you enable remote HTTP connections. See "Enabling Remote HTTP Connection to the Database" on page 4-8 for instructions.
Viewing Listener StatusYou view listener status to determine if the listener is started and to check listener properties (such as the TCP/IP port numbers that the listener is listening on). You do so with the Listener Control (lsnrctl) utility.
To view listener status:
1. Do one of the following:
■ On Linux: Start a terminal session and log in to the Oracle Database XE host computer with the oracle user account.
■ On Windows: Log in to the Oracle Database XE host computer as the user who installed Oracle Database XE, and then open a command window.
2. On Linux, ensure that environment variables are set according to the instructions in "Setting Environment Variables on the Linux Platform" on page 3-5.
3. Enter the following command:
LSNRCTL STATUS
If the listener is not started, the command displays the following error messages:
TNS-12541: TNS:no listener TNS-12560: TNS:protocol adapter error TNS-00511: No listener
If the listener is started, the command displays a report that looks something like this:
Connecting to (DESCRIPTION=(ADDRESS=(PROTOCOL=TCP)(HOST=myhost)(PORT=1521)))STATUS of the LISTENER------------------------Alias LISTENERVersion TNSLSNR for Linux: Version 10.2.0.1.0 - ProductionStart Date 10-DEC-2005 19:06:12Uptime 2 days 3 hr. 39 min. 32 secTrace Level offSecurity ON: Local OS AuthenticationSNMP OFFDefault Service XEListener Parameter File /usr/lib/oracle/xe/app/oracle/product/10.2.0/server/network/admin/listener.oraListener Log File /usr/lib/oracle/xe/app/oracle/product/10.2.0/server/network/log/listener.logListening Endpoints Summary... (DESCRIPTION=(ADDRESS=(PROTOCOL=tcp)(HOST=myhost.mydomain.com)(PORT=1521))) (DESCRIPTION=(ADDRESS=(PROTOCOL=tcp)(HOST=myhost.mydomain.com)(PORT=8080))(Presentation=HTTP)
See Also:
■ "Stopping and Starting the Listener" on page 4-4
■ "Changing Listener Port Numbers" on page 4-5
■ "Connecting to the Database" on page 3-1
Stopping and Starting the Listener
4-4 Oracle Database Express Edition 2 Day DBA
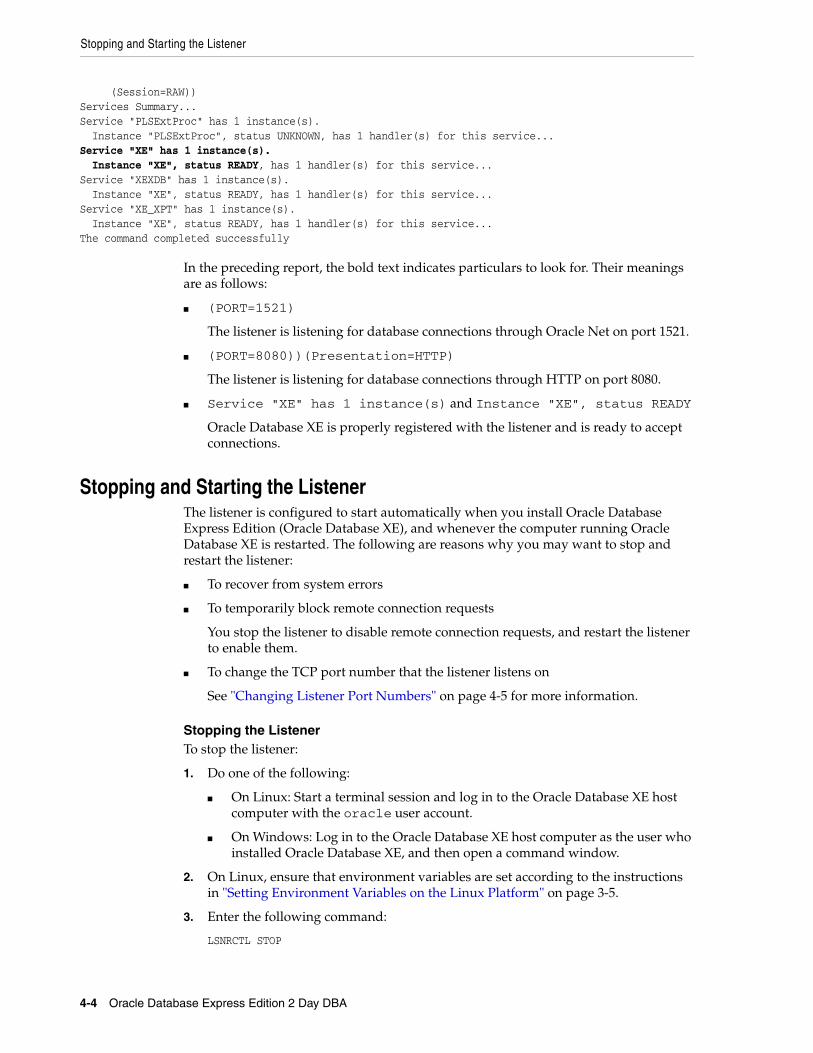
(Session=RAW))Services Summary...Service "PLSExtProc" has 1 instance(s). Instance "PLSExtProc", status UNKNOWN, has 1 handler(s) for this service...Service "XE" has 1 instance(s). Instance "XE", status READY, has 1 handler(s) for this service...Service "XEXDB" has 1 instance(s). Instance "XE", status READY, has 1 handler(s) for this service...Service "XE_XPT" has 1 instance(s). Instance "XE", status READY, has 1 handler(s) for this service...The command completed successfully
In the preceding report, the bold text indicates particulars to look for. Their meanings are as follows:
■ (PORT=1521)
The listener is listening for database connections through Oracle Net on port 1521.
■ (PORT=8080))(Presentation=HTTP)
The listener is listening for database connections through HTTP on port 8080.
■ Service "XE" has 1 instance(s) and Instance "XE", status READY
Oracle Database XE is properly registered with the listener and is ready to accept connections.
Stopping and Starting the ListenerThe listener is configured to start automatically when you install Oracle Database Express Edition (Oracle Database XE), and whenever the computer running Oracle Database XE is restarted. The following are reasons why you may want to stop and restart the listener:
■ To recover from system errors
■ To temporarily block remote connection requests
You stop the listener to disable remote connection requests, and restart the listener to enable them.
■ To change the TCP port number that the listener listens on
See "Changing Listener Port Numbers" on page 4-5 for more information.
Stopping the ListenerTo stop the listener:
1. Do one of the following:
■ On Linux: Start a terminal session and log in to the Oracle Database XE host computer with the oracle user account.
■ On Windows: Log in to the Oracle Database XE host computer as the user who installed Oracle Database XE, and then open a command window.
2. On Linux, ensure that environment variables are set according to the instructions in "Setting Environment Variables on the Linux Platform" on page 3-5.
3. Enter the following command:
LSNRCTL STOP
Changing Listener Port Numbers
Managing Network Connections 4-5
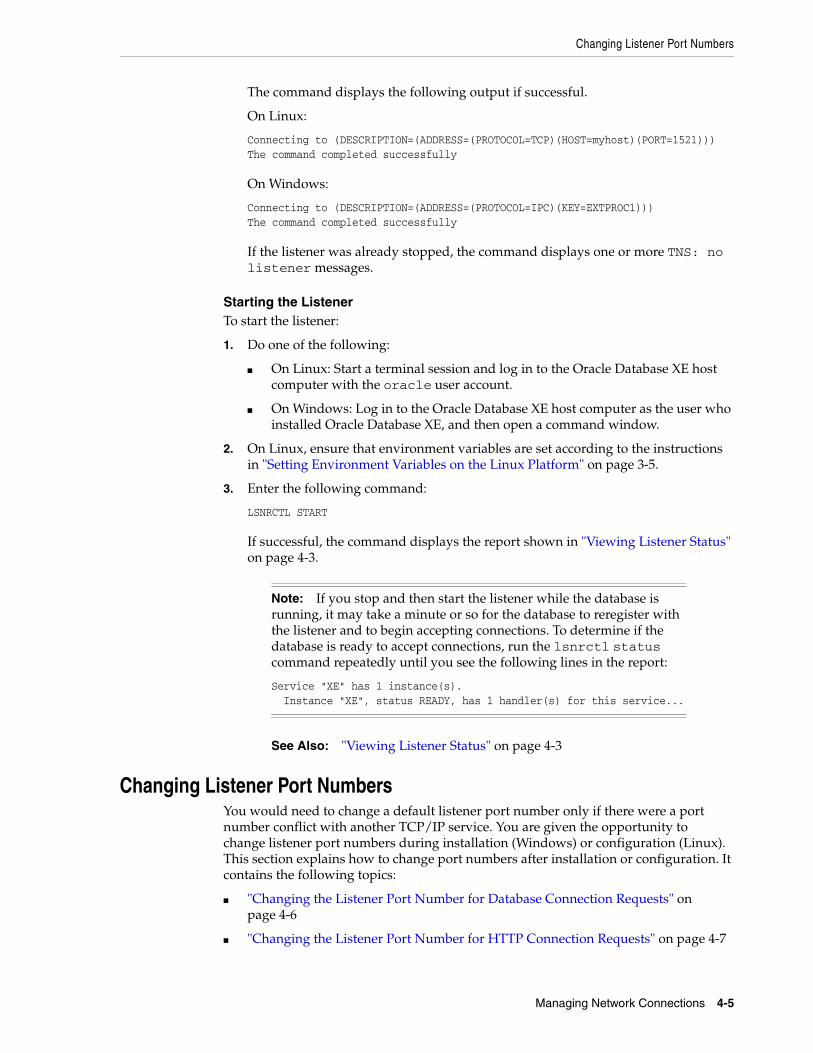
The command displays the following output if successful.
On Linux:
Connecting to (DESCRIPTION=(ADDRESS=(PROTOCOL=TCP)(HOST=myhost)(PORT=1521)))The command completed successfully
On Windows:
Connecting to (DESCRIPTION=(ADDRESS=(PROTOCOL=IPC)(KEY=EXTPROC1)))The command completed successfully
If the listener was already stopped, the command displays one or more TNS: no listener messages.
Starting the ListenerTo start the listener:
1. Do one of the following:
■ On Linux: Start a terminal session and log in to the Oracle Database XE host computer with the oracle user account.
■ On Windows: Log in to the Oracle Database XE host computer as the user who installed Oracle Database XE, and then open a command window.
2. On Linux, ensure that environment variables are set according to the instructions in "Setting Environment Variables on the Linux Platform" on page 3-5.
3. Enter the following command:
LSNRCTL START
If successful, the command displays the report shown in "Viewing Listener Status" on page 4-3.
Changing Listener Port NumbersYou would need to change a default listener port number only if there were a port number conflict with another TCP/IP service. You are given the opportunity to change listener port numbers during installation (Windows) or configuration (Linux). This section explains how to change port numbers after installation or configuration. It contains the following topics:
■ "Changing the Listener Port Number for Database Connection Requests" on page 4-6
■ "Changing the Listener Port Number for HTTP Connection Requests" on page 4-7
Note: If you stop and then start the listener while the database is running, it may take a minute or so for the database to reregister with the listener and to begin accepting connections. To determine if the database is ready to accept connections, run the lsnrctl status command repeatedly until you see the following lines in the report:
Service "XE" has 1 instance(s). Instance "XE", status READY, has 1 handler(s) for this service...
See Also: "Viewing Listener Status" on page 4-3
Changing Listener Port Numbers
4-6 Oracle Database Express Edition 2 Day DBA
Changing the Listener Port Number for Database Connection RequestsIf you change the listener port number for database connection requests, you must ensure that all future database connection requests use the new port number. This means that connection requests such as those discussed in "Connecting Remotely with SQL Command Line" on page 3-7 must explicitly include the port number.
For example, if you change the port number for database connection requests to 1522, subsequent SQL Command Line (SQL*Plus) connect statements must be similar to the following (assuming a connection from Oracle Database Express Edition Client):
connect system/[email protected]:1522
Example: Changing Listener Port Number for Database Connection RequestsAssume that your Oracle Database XE host computer is named myhost.mydomain.com and that you want to install a new software package on this computer that requires TCP port number 1521. Assume also that the port number for that software package cannot be configured, and that you must therefore resolve the port number conflict by reconfiguring Oracle Database XE. You decide to change the listener port number for database connection requests to 1522.
To change the listener port number for database connection requests to 1522:
1. Stop the listener.
See "Stopping and Starting the Listener" on page 4-4 for instructions.
2. Open the file listener.ora with a text editor.
Table 4–3 shows the location of this file on each platform.
3. Locate the following section of the file:
LISTENER = (DESCRIPTION_LIST = (DESCRIPTION = (ADDRESS = (PROTOCOL = IPC)(KEY = EXTPROC1)) (ADDRESS = (PROTOCOL = TCP)(HOST = myhost)(PORT = 1521)) ) )
Note that the line indicated in bold may or may not be present in the file.
4. Change the text (PORT = 1521) to (PORT = 1522).
5. Save the modified listener.ora file.
6. Start the listener.
See "Stopping and Starting the Listener" on page 4-4 for instructions.
7. Start SQL Command Line and connect to the database as user SYSTEM.
See Also: "About Network Connections and the Oracle Net Listener" on page 4-1
Table 4–3 Location of the listener.ora File
Platform Location
Linux /usr/lib/oracle/xe/app/oracle/product/10.2.0/server/network/admin/
Windows c:\oraclexe\app\oracle\product\10.2.0\server\NETWORK\ADMIN\
Changing Listener Port Numbers
Managing Network Connections 4-7
See "Connecting Locally with SQL Command Line" on page 3-6 for instructions. You must supply the SYSTEM password. You set this password upon installation (Windows) or configuration (Linux) of Oracle Database XE.
8. Enter the following two commands:
ALTER SYSTEM SET LOCAL_LISTENER = "(ADDRESS=(PROTOCOL=TCP)(HOST=myhost.mydomain.com)(PORT=1522))";
ALTER SYSTEM REGISTER;
9. Exit SQL Command Line and run the lsnrctl status command to verify the port number change.
The new port number should be displayed in the Listening Endpoints Summary section of the status report, and the report should include the following lines:
Service "XE" has 1 instance(s). Instance "XE", status READY, has 1 handler(s) for this service...
Changing the Listener Port Number for HTTP Connection RequestsIf you change the listener port number for HTTP connection requests, you must ensure that all future HTTP connection requests use the new port number.
For example, if you change the listener port number for HTTP requests to 8087, you must use the following URL to access the Database Home Page locally:
http://127.0.0.1:8087/apex
To change the listener port number for HTTP connection requests:
1. Do one of the following:
■ On Linux: Start a terminal session and log in to the Oracle Database XE host computer with the oracle user account.
■ On Windows: Log in to the Oracle Database XE host computer as the user who installed Oracle Database XE, and then open a command window.
2. On Linux, ensure that environment variables are set according to the instructions in "Setting Environment Variables on the Linux Platform" on page 3-5.
3. Ensure that the listener is started.
See "Viewing Listener Status" on page 4-3 and "Stopping and Starting the Listener" on page 4-4 for instructions.
4. Enter the following command at the operating system prompt to start SQL Command Line:
SQLPLUS /NOLOG
5. At the SQL Command Line prompt, enter the following command:
CONNECT SYSTEM/password
Note: When you change the listener port number for HTTP, the Go To Database Home Page menu item on the desktop can no longer open the Database Home Page. The following procedure contains an optional step that explains how to modify this menu item to function with the new port number.
Enabling Remote HTTP Connection to the Database
4-8 Oracle Database Express Edition 2 Day DBA
where password is the SYSTEM password that you set upon installation (Windows) or configuration (Linux) of Oracle Database XE.
6. At the SQL Command Line prompt, enter the following command:
EXEC DBMS_XDB.SETHTTPPORT(nnnn);
where nnnn represents the new port number to use for HTTP connection requests. Be certain that you select a port number that is not already in use.
For example, to use port number 8087 for HTTP connection requests, enter this command:
EXEC DBMS_XDB.SETHTTPPORT(8087);
If the command is successful, the following message is displayed:
PL/SQL procedure successfully completed.
7. Exit SQL Command Line (by entering the exit command) and view listener status to verify the port number change.
See "Viewing Listener Status" on page 4-3 for instructions. The new port number is displayed in the Listening Endpoints Summary section of the status report.
8. (Optional) To enable the Go To Database Home Page command on the desktop to work with the new port number, change the port number in the script that this command runs. The following table shows the scripts that you must change on each platform.
Enabling Remote HTTP Connection to the DatabaseAfter installation, database connection requests with the HTTP protocol are enabled only on the computer on which you installed Oracle Database XE. This means that remote users cannot access the Oracle Database XE graphical user interface (including the Database Home Page). As an administrator, you can enable HTTP access for remote users, thereby enabling them to access the Oracle Database XE graphical user interface.
There are two ways to enable remote HTTP database connection requests:
■ From the Manage HTTP Access page in the Oracle Database XE graphical user interface
Platform Script to Change When Changing the Listener Port for HTTP Connection Requests
Linux /usr/lib/oracle/xe/app/oracle/product/10.2.0/server/config/scripts/DatabaseHomePage.sh
Windows C:\oraclexe\app\oracle\product\10.2.0\server\Database_homepage.url
See Also: "Accessing the Database Home Page" on page 1-1
Security Note: With remote HTTP access to Oracle Database XE, all information exchanged between the browser and the database is in clear text—that is, unencrypted—including database user names and passwords. If this is cause for concern, do not enable remote HTTP connection to the database.
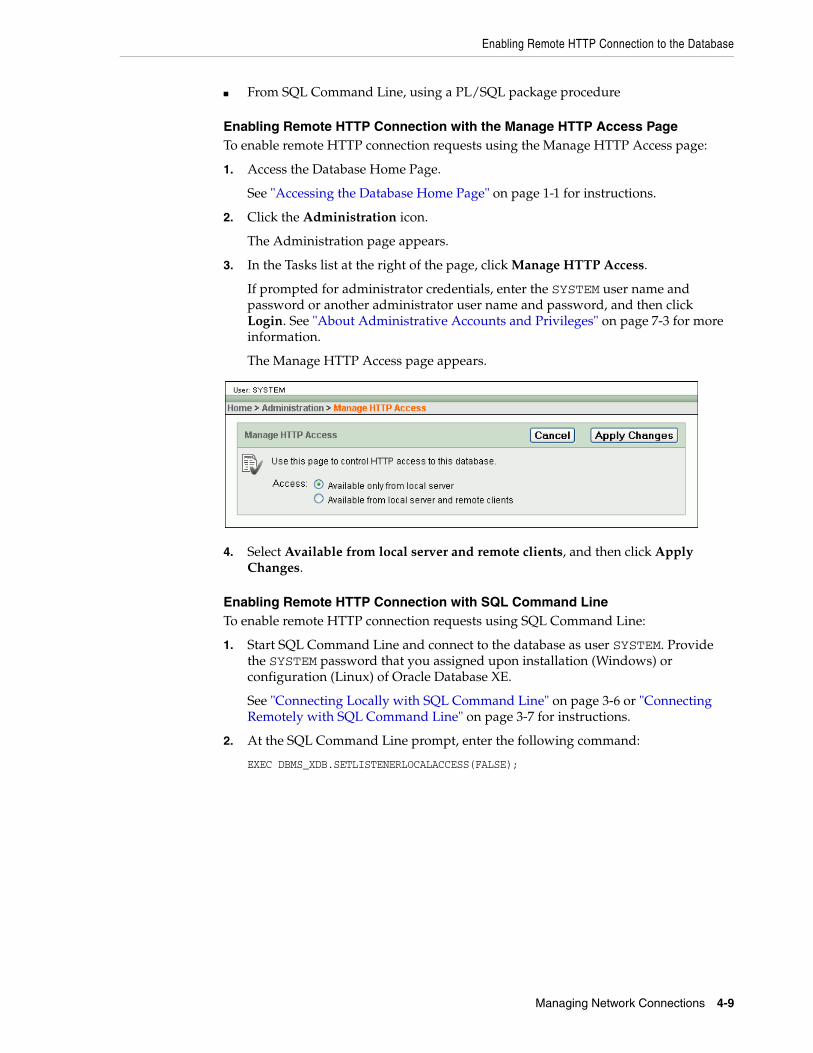
Enabling Remote HTTP Connection to the Database
Managing Network Connections 4-9
■ From SQL Command Line, using a PL/SQL package procedure
Enabling Remote HTTP Connection with the Manage HTTP Access PageTo enable remote HTTP connection requests using the Manage HTTP Access page:
1. Access the Database Home Page.
See "Accessing the Database Home Page" on page 1-1 for instructions.
2. Click the Administration icon.
The Administration page appears.
3. In the Tasks list at the right of the page, click Manage HTTP Access.
If prompted for administrator credentials, enter the SYSTEM user name and password or another administrator user name and password, and then click Login. See "About Administrative Accounts and Privileges" on page 7-3 for more information.
The Manage HTTP Access page appears.
4. Select Available from local server and remote clients, and then click Apply Changes.
Enabling Remote HTTP Connection with SQL Command LineTo enable remote HTTP connection requests using SQL Command Line:
1. Start SQL Command Line and connect to the database as user SYSTEM. Provide the SYSTEM password that you assigned upon installation (Windows) or configuration (Linux) of Oracle Database XE.
See "Connecting Locally with SQL Command Line" on page 3-6 or "Connecting Remotely with SQL Command Line" on page 3-7 for instructions.
2. At the SQL Command Line prompt, enter the following command:
EXEC DBMS_XDB.SETLISTENERLOCALACCESS(FALSE);

Enabling Remote HTTP Connection to the Database
4-10 Oracle Database Express Edition 2 Day DBA
Managing Database Memory 5-1
5Managing Database Memory
This section provides background information on memory management in Oracle Database Express Edition and describes how to adjust memory allocation.
The following topics are covered:
■ About Memory Management on page 5-1
■ Viewing Current Memory Allocation on page 5-4
■ Example: Changing SGA and PGA Aggregate Sizes on page 5-4
About Memory ManagementThis section provides background information on memory management in Oracle Database Express Edition (Oracle Database XE). It includes the following topics:
■ Memory Allocation Overview on page 5-1
■ SGA Components on page 5-2
■ SGA and PGA Sizes on page 5-3
Memory Allocation OverviewTo support database operation, Oracle Database XE needs to start a set of processes, called background processes, and needs to allocate some memory in the host computer. The background processes and allocated memory together make up an Oracle instance.
There are two types of memory that the Oracle instance allocates:
■ System global area (SGA)—A shared memory area that contains data buffers and control information for the instance. The SGA is divided into separate buffer areas and data pools. These are described in "SGA Components" on page 5-2.
■ Program global area (PGA)—A memory area used by a single Oracle server process. An Oracle server process is a process that services a client’s requests. Oracle Database XE creates a new server process whenever it receives a new database connection request. Each new server process then allocates its own private PGA area. The PGA is used to process SQL statements and to hold logon and other session information.
Figure 5–1 illustrates memory allocation in Oracle Database XE.
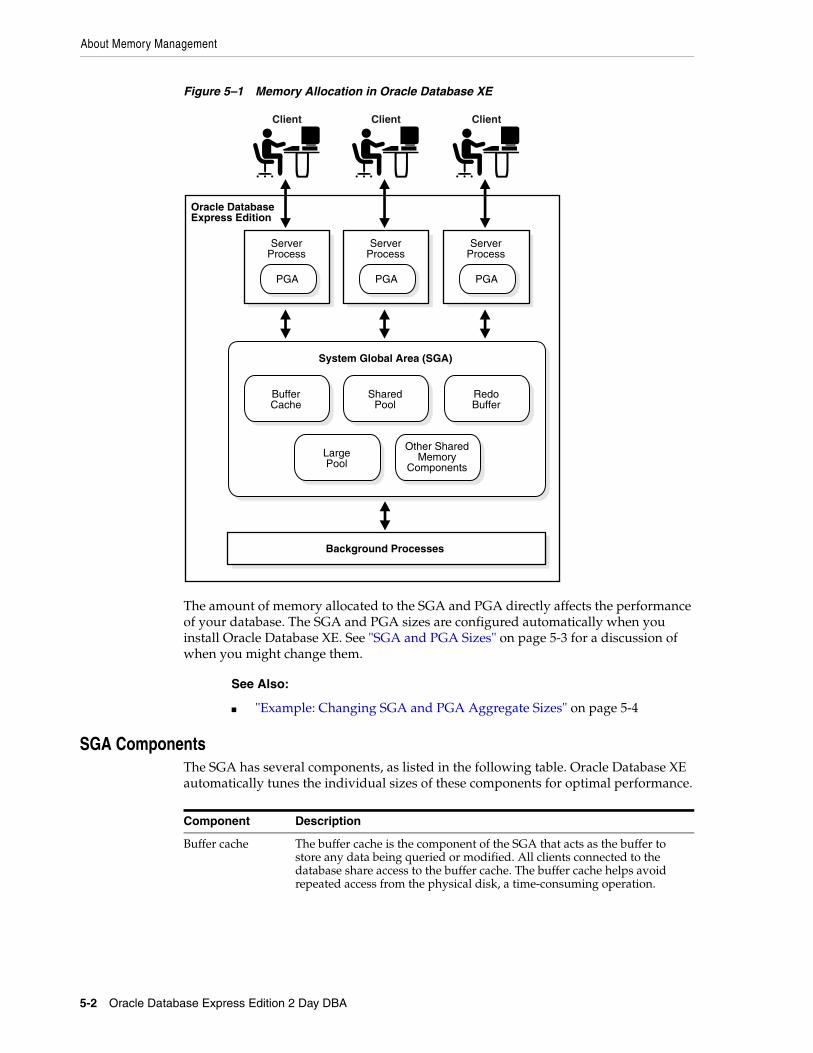
About Memory Management
5-2 Oracle Database Express Edition 2 Day DBA
Figure 5–1 Memory Allocation in Oracle Database XE
The amount of memory allocated to the SGA and PGA directly affects the performance of your database. The SGA and PGA sizes are configured automatically when you install Oracle Database XE. See "SGA and PGA Sizes" on page 5-3 for a discussion of when you might change them.
SGA ComponentsThe SGA has several components, as listed in the following table. Oracle Database XE automatically tunes the individual sizes of these components for optimal performance.
See Also:
■ "Example: Changing SGA and PGA Aggregate Sizes" on page 5-4
Component Description
Buffer cache The buffer cache is the component of the SGA that acts as the buffer to store any data being queried or modified. All clients connected to the database share access to the buffer cache. The buffer cache helps avoid repeated access from the physical disk, a time-consuming operation.
Client
ServerProcess
Client Client
BufferCache
SharedPool
RedoBuffer
Other SharedMemory
ComponentsLargePool
System Global Area (SGA)
Background Processes
Oracle DatabaseExpress Edition
PGA
ServerProcess
PGA
ServerProcess
PGA
About Memory Management
Managing Database Memory 5-3
SGA and PGA SizesThe default sizes for the SGA and PGA are set upon installation, based on the total amount of physical memory in your system. Rather than changing the sizes of individual SGA components, you can change the overall size of the SGA by setting a parameter called SGA Target, and Oracle Database XE automatically adjusts the sizes of the individual SGA components, continuously tuning these sizes to optimize performance. Similarly, rather than changing the size of individual PGAs, you can change the total amount of memory allocated for the collection of PGAs, and Oracle Database XE adjusts individual PGA sizes as needed. The collection of PGAs is known as the PGA Aggregate. You change the PGA Aggregate maximum size by setting a parameter called PGA Aggregate Target.
The maximum amount of memory that Oracle Database XE allows for the SGA and PGA Aggregate is 1 gigabyte (GB). If you attempt to change memory allocation so that the sum of the SGA size and PGA Aggregate size exceeds 1 GB, Oracle Database XE issues an error message. (For SGA changes, the error message does not appear until you restart the database.)
The only circumstances under which you should need to change SGA and PGA Aggregate sizes are the following:
■ You add physical memory to the computer running Oracle Database XE and want to allocate more to the database.
In this case, increase both the SGA and PGA Aggregate sizes, maintaining roughly the original ratio of SGA size to PGA Aggregate size.
■ You receive an error due to insufficient memory.
Shared pool The shared pool caches operational information and code that can be shared among users. For example:
■ SQL statements are cached so that they can be reused.
■ Information from the data dictionary, such as user account data, table and index descriptions, and privileges, is cached for quick access and reusability.
■ Stored procedures are cached for faster access.
Redo log buffer The redo log buffer improves performance by caching redo information (used for instance recovery) until it can be written at once and at a more opportune time to the physical redo log files that are stored on disk. Redo information and redo log files are discussed in "Online Redo Log Files" on page 6-6.
Large pool The large pool is an optional area that is used for buffering large I/O requests for various server processes.
Note: Oracle Database XE always allocates the full amount of memory specified by the SGA Target parameter. That is, the current SGA size is always equal to SGA Target. In contrast, the current size of the PGA Aggregate may be less than the amount specified by the PGA Aggregate Target parameter. The database allocates more memory for the PGA Aggregate as needed, up to the maximum indicated by PGA Aggregate Target.
Component Description
Viewing Current Memory Allocation
5-4 Oracle Database Express Edition 2 Day DBA
If the error message indicates insufficient memory for an SGA component, increase the SGA size. Examples of such errors include the following:
ORA-04031: unable to allocate n bytes of shared memoryORA-00379: no free buffers available in buffer pool...
If the error message indicates insufficient memory for a process, increase the PGA Aggregate size. An example of such an error is the following:
ORA-04030: out of process memory when trying to allocate n bytes
If you are not sure whether the insufficient memory error involves the SGA or PGA, increase both SGA and PGA Aggregate sizes, maintaining roughly the original ratio of SGA size to PGA Aggregate size.
For SGA size changes, you must shut down and restart the database for the changes to take effect. For PGA Aggregate size changes, there is no need to restart the database.
Viewing Current Memory AllocationTo view current memory allocation:
1. Access the Database Home Page.
See "Accessing the Database Home Page" on page 1-1 for instructions.
2. In the Usage Monitor at the right-hand side of the page, examine the Memory bar graph.
Example: Changing SGA and PGA Aggregate SizesSuppose you just upgraded the computer running Oracle Database Express Edition (Oracle Database XE) from 1 gigabyte (GB) to 1.5 GB of system memory, and you want
Note: If the Usage Monitor does not appear on the Database Home Page, click the Customize link near the upper right-hand corner of the page, and then enable the Usage Monitor.
See Also:
■ "About Memory Management" on page 5-1
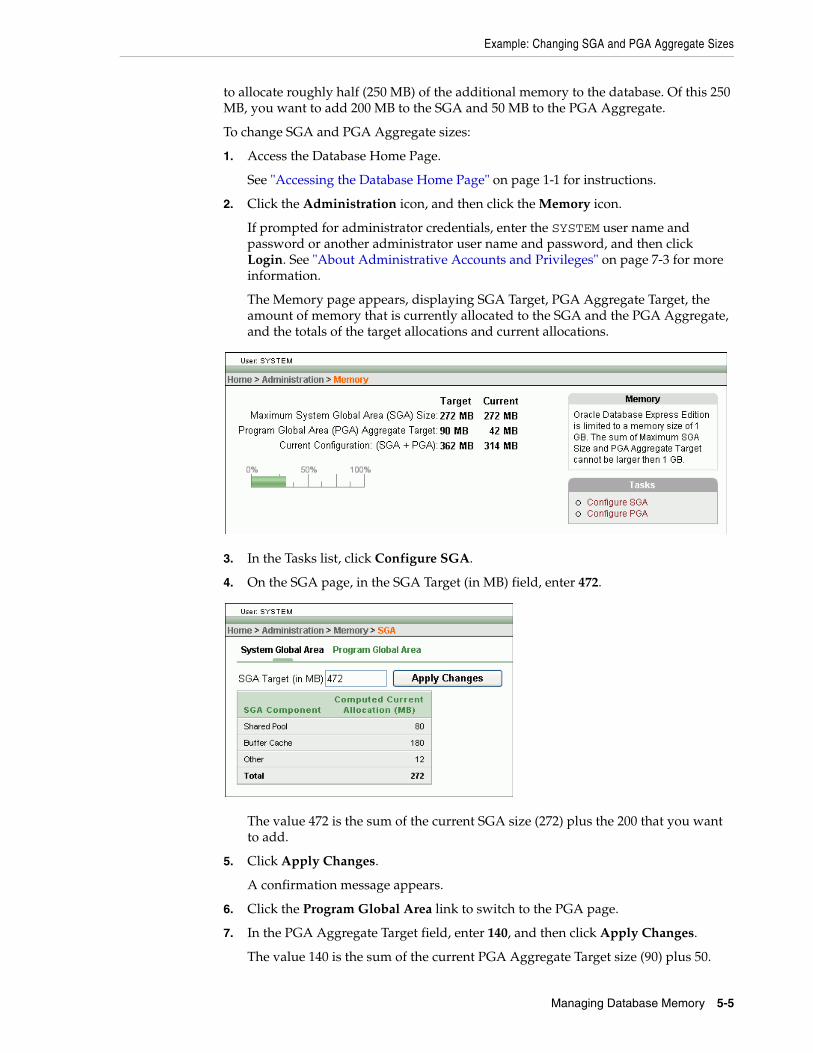
Example: Changing SGA and PGA Aggregate Sizes
Managing Database Memory 5-5
to allocate roughly half (250 MB) of the additional memory to the database. Of this 250 MB, you want to add 200 MB to the SGA and 50 MB to the PGA Aggregate.
To change SGA and PGA Aggregate sizes:
1. Access the Database Home Page.
See "Accessing the Database Home Page" on page 1-1 for instructions.
2. Click the Administration icon, and then click the Memory icon.
If prompted for administrator credentials, enter the SYSTEM user name and password or another administrator user name and password, and then click Login. See "About Administrative Accounts and Privileges" on page 7-3 for more information.
The Memory page appears, displaying SGA Target, PGA Aggregate Target, the amount of memory that is currently allocated to the SGA and the PGA Aggregate, and the totals of the target allocations and current allocations.
3. In the Tasks list, click Configure SGA.
4. On the SGA page, in the SGA Target (in MB) field, enter 472.
The value 472 is the sum of the current SGA size (272) plus the 200 that you want to add.
5. Click Apply Changes.
A confirmation message appears.
6. Click the Program Global Area link to switch to the PGA page.
7. In the PGA Aggregate Target field, enter 140, and then click Apply Changes.
The value 140 is the sum of the current PGA Aggregate Target size (90) plus 50.
Example: Changing SGA and PGA Aggregate Sizes
5-6 Oracle Database Express Edition 2 Day DBA
8. At the next convenient time, shut down and restart the database to enable the SGA size changes to take effect.
See "Starting Up and Shutting Down" on page 2-1 for instructions.
See Also: "About Memory Management" on page 5-1
Managing Database Storage 6-1
6Managing Database Storage
This section describes the storage structures of your database, and explains how to monitor and manage the amount of storage that is in use and available for the database and its backups. It contains the following topics:
■ About the Database Storage Structures on page 6-1
■ Monitoring Storage Space Usage on page 6-8
■ Compacting Storage on page 6-9
■ Viewing Tablespaces on page 6-11
■ Viewing Redo Log Files on page 6-12
■ Managing the Flash Recovery Area on page 6-11
About the Database Storage StructuresOracle Database Express Edition (Oracle Database XE) is composed of the following storage structures:
■ Logical structures such as tablespaces are created and recognized by the database only, and are not known to the operating system.
■ Physical structures are those that can be seen and operated on from the operating system, such as the physical files that store data on disk.
■ Recovery-related structures such as redo logs and database backups are used to recover the database after an operating system failure, Oracle instance failure, or media (disk) failure. Recovery-related structures are stored in an automatically managed disk storage area called the flash recovery area.
Oracle Database XE completely automates the management of its logical and physical structures and flash recovery area storage. You use the Oracle Database XE graphical user interface to monitor these structures, mostly to understand how much storage your applications have used so far, how much free storage remains, and whether more space is needed for backups.
The following sections provide a closer look at the database and its storage structures. Refer to Figure 6–1 as you review these sections.
■ Database on page 6-2
■ Tablespaces on page 6-3
■ Datafiles and Tempfiles on page 6-4
■ Control File on page 6-4
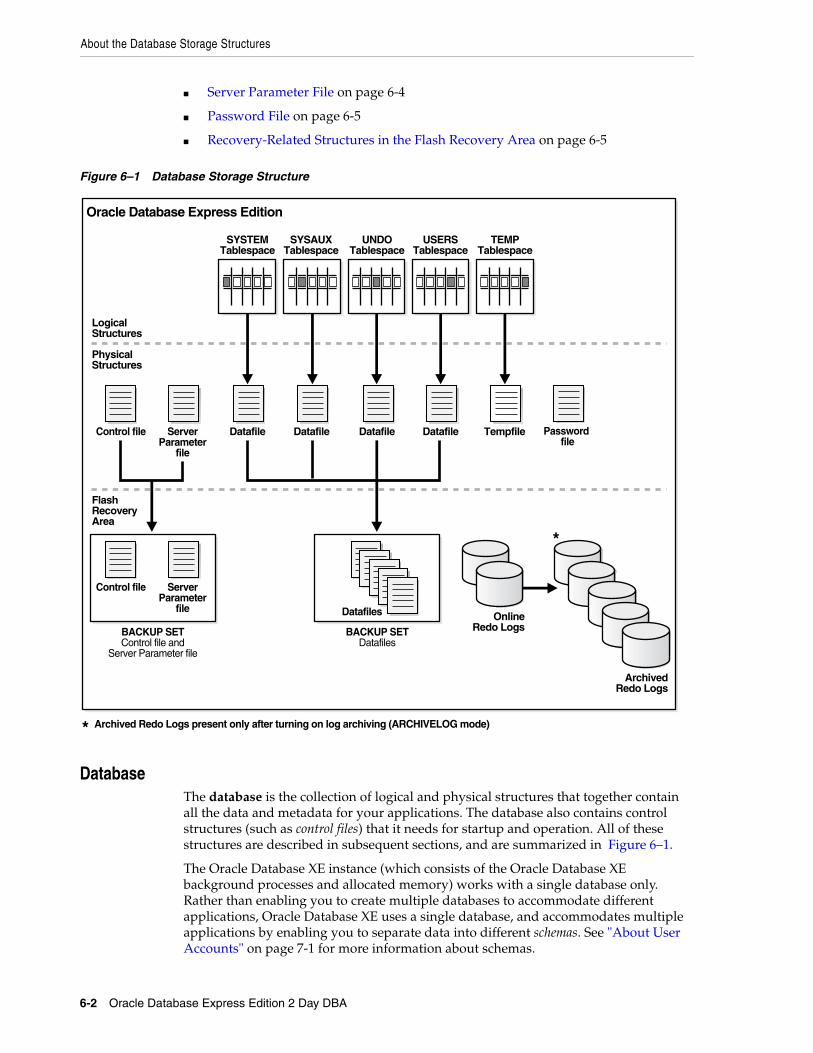
About the Database Storage Structures
6-2 Oracle Database Express Edition 2 Day DBA
■ Server Parameter File on page 6-4
■ Password File on page 6-5
■ Recovery-Related Structures in the Flash Recovery Area on page 6-5
Figure 6–1 Database Storage Structure
DatabaseThe database is the collection of logical and physical structures that together contain all the data and metadata for your applications. The database also contains control structures (such as control files) that it needs for startup and operation. All of these structures are described in subsequent sections, and are summarized in Figure 6–1.
The Oracle Database XE instance (which consists of the Oracle Database XE background processes and allocated memory) works with a single database only. Rather than enabling you to create multiple databases to accommodate different applications, Oracle Database XE uses a single database, and accommodates multiple applications by enabling you to separate data into different schemas. See "About User Accounts" on page 7-1 for more information about schemas.
SYSTEMTablespace
SYSAUXTablespace
UNDOTablespace
USERSTablespace
TEMPTablespace
Datafile Datafile Datafile DatafileServerParameter
file
Tempfile
ArchivedRedo Logs
Control file
ServerParameter
file
Control file
BACKUP SETControl file and
Server Parameter file
BACKUP SETDatafiles
Oracle Database Express Edition
Password file
Logical Structures
Physical Structures
FlashRecoveryArea
OnlineRedo Logs
Datafiles
*
* Archived Redo Logs present only after turning on log archiving (ARCHIVELOG mode)
About the Database Storage Structures
Managing Database Storage 6-3
The maximum database size in Oracle Database XE is 5 gigabytes (GB). This includes between 0.5 and 0.9 GB for the data dictionary, internal schemas, and temporary space, which leaves just over 4.0 GB for user data.
TablespacesA database consists of one or more tablespaces. A tablespace is a logical grouping of one or more physical datafiles or tempfiles, and is the primary structure by which the database manages storage.
There are various types of tablespaces, including the following:
■ Permanent tablespaces
These tablespaces are used to store system and user data. Permanent tablespaces consist of one or more datafiles. In Oracle Database XE, all your application data is by default stored in the tablespace named USERS. This tablespace consists of a single datafile that automatically grows (autoextends) as your applications store more data.
■ Temporary tablespaces
Temporary tablespaces improve the concurrency of multiple sort operations, and reduce their overhead. Temporary tablespaces are the most efficient tablespaces for disk sorts. Temporary tablespaces consist of one or more tempfiles. Oracle Database XE automatically manages storage for temporary tablespaces.
■ Undo tablespace
Oracle Database XE transparently creates and automatically manages undo data in this tablespace.
When a transaction modifies the database, Oracle Database XE makes a copy of the original data before modifying it. The original copy of the modified data is called undo data. This information is necessary for the following reasons:
– To undo any uncommitted changes made to the database in the event that a rollback operation is necessary. A rollback operation can be the result of a user specifically issuing a ROLLBACK statement to undo the changes of a misguided or unintentional transaction, or it can be part of a recovery operation.
– To provide read consistency, which means that each user can get a consistent view of data, even while other uncommitted changes may be occurring against the data. For example, if a user issues a query at 10:00 a.m. and the query runs for 15 minutes, then the query results should reflect the entire state of the data at 10:00 a.m., regardless of updates or inserts by other users during the query.
See Oracle Database Concepts for a discussion of read consistency.
– To support the Flashback Query feature, which enables you to view or recover older versions of data. See "Viewing and Restoring Historical Data with Flashback Query" on page 11-8 for more information.
Table 6–1 describes the tablespaces included in Oracle Database XE.
See Also: See "Internal User Accounts" on page 7-3 for information about internal schemas, and "Tablespaces" on page 6-3 for information about temporary space.
About the Database Storage Structures
6-4 Oracle Database Express Edition 2 Day DBA
Datafiles and TempfilesDatafiles are the operating system files that hold database data. The data is written to these files in an Oracle-proprietary format that cannot be read by programs other than an Oracle database. Tempfiles are a special class of datafiles that are associated only with temporary tablespaces. Temporary tablespaces provide workspaces to help process queries.
Control FileThe control file is a binary file that tracks the names and locations of the physical components of the database, and that maintains other control information, including records of all database backup-related files. It is essential to the functioning of the database.
Server Parameter File The server parameter file (SPFILE) contains initialization parameters that Oracle Database XE uses at startup to determine the settings and run-time resources for the database. Do not attempt to edit this file with a text editor, as it is a binary file. You can change initialization parameter values by submitting ALTER SYSTEM commands with SQL Command Line. See Oracle Database SQL Reference for more information.
Table 6–1 Tablespaces and Descriptions
Tablespace Description
SYSTEM This tablespace is automatically created when Oracle Database XE is installed. It contains the data dictionary, which is the central set of tables and views used as a read-only reference for the database. It also contains various tables and views that contain administrative information about the database. These are all contained in the SYS schema, and can be accessed only by user SYS or other administrative users with the required privilege.
SYSAUX This is an auxiliary tablespace to the SYSTEM tablespace, and is also automatically created upon installation. Some database components and products use this tablespace. The HR sample schema is also stored in the SYSAUX tablespace.
TEMP This tablespace stores temporary data generated when processing SQL statements. For example, this tablespace is used for sort work space. The TEMP tablespace is specified as the default temporary tablespace for every user.
UNDO This is the tablespace used by the database to store undo information.
USERS This tablespace is used to store permanent user objects and data. In Oracle Database XE, USERS is the assigned default tablespace for all users except the SYS user, which has the default permanent tablespace of SYSTEM.
Note: You can create additional permanent tablespaces in Oracle Database XE, although typically there is no need to do so. One situation where you may have to create new permanent tablespaces is if you are importing objects from another Oracle database and the import file specifies tablespace names. See the CREATE TABLESPACE command in Oracle Database SQL Reference, and "Exporting and Importing Data" on page 10-12 for more information.
About the Database Storage Structures
Managing Database Storage 6-5
You can view current initialization parameter settings with the Oracle Database XE graphical user interface. See "Viewing Database Settings" on page 9-1 for more information.
Password FileOracle Database XE uses a password file to authenticate a user who is logging in remotely as user SYS. The SYS user can then perform administrative functions from a remote workstation. The password file contains the SYS password (encrypted). Whenever you change the password for SYS, the password file is automatically updated.
The password file is automatically created when you install Oracle Database XE. Unlike the other physical structures of the database, the password file is not backed up to the flash recovery area.
Recovery-Related Structures in the Flash Recovery AreaThe flash recovery area is essential for data protection in Oracle Database XE. It is a directory, separate from the database itself, where recovery-related structures are stored. These recovery-related structures include:
■ Backups of the physical files that make up the database (datafiles, the control file, and the server parameter file (SPFILE))
Backups are stored in collections called backup sets. A backup set consists of one or more backup pieces, which are files in a proprietary archival format that can be accessed only by an Oracle database. See "About Backing Up and Restoring the Database" on page 11-1 for more information.
■ Online redo logs
The online redo log files record all changes made to the database. They can be used to reconstruct data in the event of a failure. See "Online Redo Log Files" on page 6-6 for more information.
■ Archived redo logs
If you enable log archiving, filled redo log files are archived (copied) in the flash recovery area before being reused. The online and archived logs together constitute a record of all changes committed to the database since the last backup was taken. See "Archived Redo Log Files" on page 6-7 for more information.
The database automatically manages all contents of the flash recovery area. You must not directly manipulate files within the flash recovery area using operating system commands.
Table 6–2 lists the default location for the flash recovery area on each platform.
Note: Under typical circumstances, you should never log in to Oracle Database XE as user SYS.
Note: Oracle database backup and recovery is based on protecting the physical files of the database, rather than individual database objects such as tables.
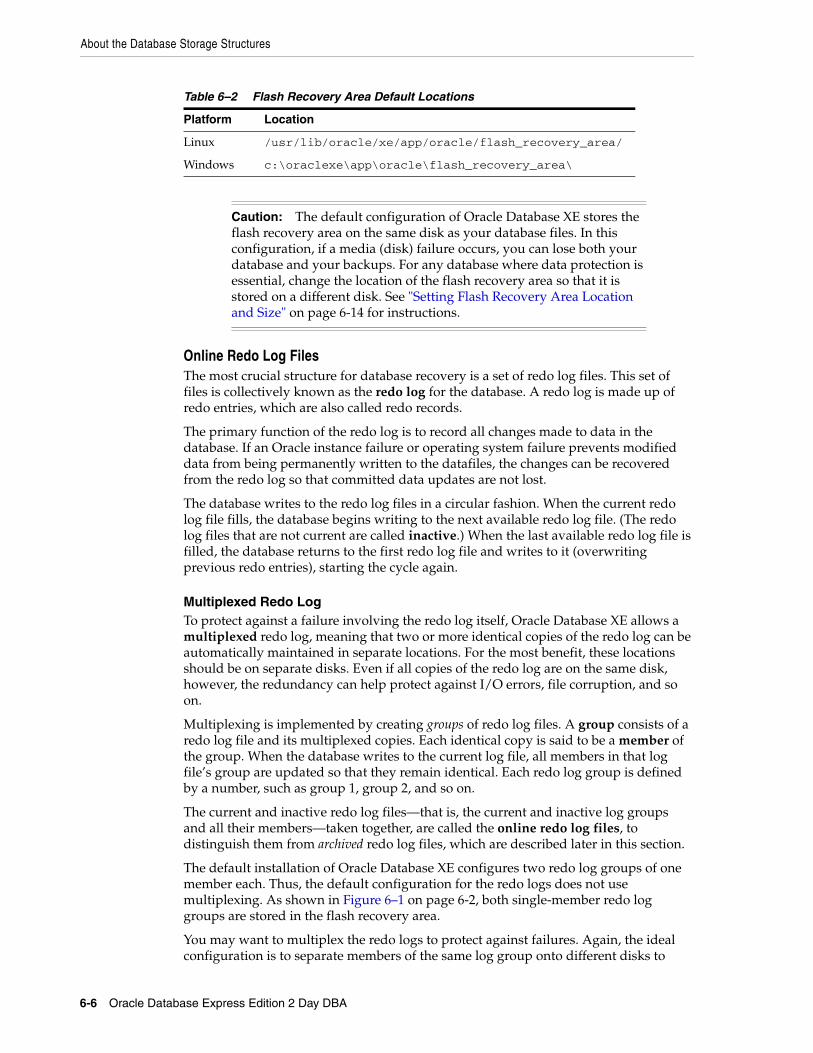
About the Database Storage Structures
6-6 Oracle Database Express Edition 2 Day DBA
Online Redo Log FilesThe most crucial structure for database recovery is a set of redo log files. This set of files is collectively known as the redo log for the database. A redo log is made up of redo entries, which are also called redo records.
The primary function of the redo log is to record all changes made to data in the database. If an Oracle instance failure or operating system failure prevents modified data from being permanently written to the datafiles, the changes can be recovered from the redo log so that committed data updates are not lost.
The database writes to the redo log files in a circular fashion. When the current redo log file fills, the database begins writing to the next available redo log file. (The redo log files that are not current are called inactive.) When the last available redo log file is filled, the database returns to the first redo log file and writes to it (overwriting previous redo entries), starting the cycle again.
Multiplexed Redo LogTo protect against a failure involving the redo log itself, Oracle Database XE allows a multiplexed redo log, meaning that two or more identical copies of the redo log can be automatically maintained in separate locations. For the most benefit, these locations should be on separate disks. Even if all copies of the redo log are on the same disk, however, the redundancy can help protect against I/O errors, file corruption, and so on.
Multiplexing is implemented by creating groups of redo log files. A group consists of a redo log file and its multiplexed copies. Each identical copy is said to be a member of the group. When the database writes to the current log file, all members in that log file’s group are updated so that they remain identical. Each redo log group is defined by a number, such as group 1, group 2, and so on.
The current and inactive redo log files—that is, the current and inactive log groups and all their members—taken together, are called the online redo log files, to distinguish them from archived redo log files, which are described later in this section.
The default installation of Oracle Database XE configures two redo log groups of one member each. Thus, the default configuration for the redo logs does not use multiplexing. As shown in Figure 6–1 on page 6-2, both single-member redo log groups are stored in the flash recovery area.
You may want to multiplex the redo logs to protect against failures. Again, the ideal configuration is to separate members of the same log group onto different disks to
Table 6–2 Flash Recovery Area Default Locations
Platform Location
Linux /usr/lib/oracle/xe/app/oracle/flash_recovery_area/
Windows c:\oraclexe\app\oracle\flash_recovery_area\
Caution: The default configuration of Oracle Database XE stores the flash recovery area on the same disk as your database files. In this configuration, if a media (disk) failure occurs, you can lose both your database and your backups. For any database where data protection is essential, change the location of the flash recovery area so that it is stored on a different disk. See "Setting Flash Recovery Area Location and Size" on page 6-14 for instructions.
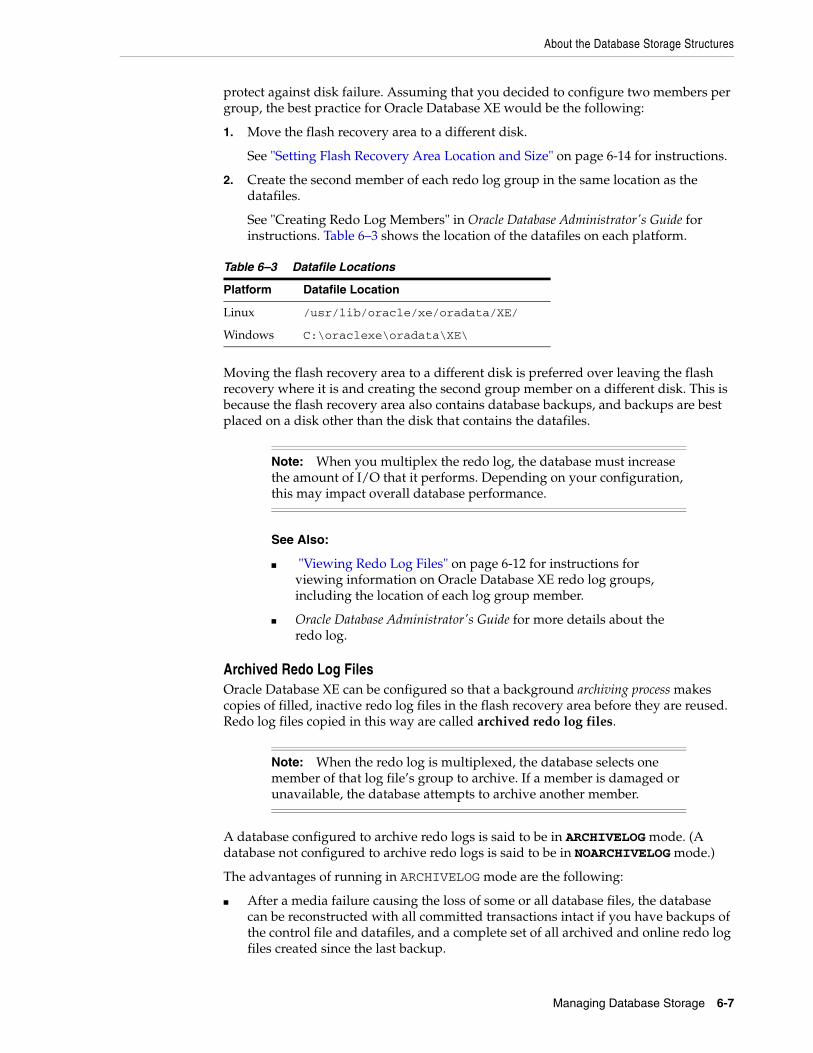
About the Database Storage Structures
Managing Database Storage 6-7
protect against disk failure. Assuming that you decided to configure two members per group, the best practice for Oracle Database XE would be the following:
1. Move the flash recovery area to a different disk.
See "Setting Flash Recovery Area Location and Size" on page 6-14 for instructions.
2. Create the second member of each redo log group in the same location as the datafiles.
See "Creating Redo Log Members" in Oracle Database Administrator's Guide for instructions. Table 6–3 shows the location of the datafiles on each platform.
Moving the flash recovery area to a different disk is preferred over leaving the flash recovery where it is and creating the second group member on a different disk. This is because the flash recovery area also contains database backups, and backups are best placed on a disk other than the disk that contains the datafiles.
Archived Redo Log FilesOracle Database XE can be configured so that a background archiving process makes copies of filled, inactive redo log files in the flash recovery area before they are reused. Redo log files copied in this way are called archived redo log files.
A database configured to archive redo logs is said to be in ARCHIVELOG mode. (A database not configured to archive redo logs is said to be in NOARCHIVELOG mode.)
The advantages of running in ARCHIVELOG mode are the following:
■ After a media failure causing the loss of some or all database files, the database can be reconstructed with all committed transactions intact if you have backups of the control file and datafiles, and a complete set of all archived and online redo log files created since the last backup.
Table 6–3 Datafile Locations
Platform Datafile Location
Linux /usr/lib/oracle/xe/oradata/XE/
Windows C:\oraclexe\oradata\XE\
Note: When you multiplex the redo log, the database must increase the amount of I/O that it performs. Depending on your configuration, this may impact overall database performance.
See Also:
■ "Viewing Redo Log Files" on page 6-12 for instructions for viewing information on Oracle Database XE redo log groups, including the location of each log group member.
■ Oracle Database Administrator's Guide for more details about the redo log.
Note: When the redo log is multiplexed, the database selects one member of that log file’s group to archive. If a member is damaged or unavailable, the database attempts to archive another member.
Monitoring Storage Space Usage
6-8 Oracle Database Express Edition 2 Day DBA
The online and archived redo log files contain a complete record of all database changes since the last backup. This reconstruction process is called media recovery.
■ A database in ARCHIVELOG mode can be backed up while it is online.
A NOARCHIVELOG mode database can be backed up only while it is in the mounted (but not open) state after a successful SHUTDOWN or SHUTDOWN IMMEDIATE operation. Your applications are unavailable during the backup of a NOARCHIVELOG database.
In ARCHIVELOG mode, the archived redo log files require disk space in the flash recovery area, and the flash recovery area requires monitoring to ensure that it does not fill completely.
Log archiving is disabled by default, to simplify the management of your database. Thus, the default configuration of Oracle Database XE protects your database from instance failure or operating system failure, but does not protect your database from media failure. Oracle therefore recommends that you do the following for complete data protection:
■ Enable ARCHIVELOG mode.
■ Back up the database frequently.
Monitoring Storage Space UsageBecause Oracle Database Express Edition (Oracle Database XE) is limited to just over four gigabytes (GB) of user data, your most important storage management task is monitoring the amount of storage space remaining.
To monitor storage space usage:
1. Access the Database Home Page.
See "Accessing the Database Home Page" on page 1-1 for instructions.
2. In the Usage Monitor at the right-hand side of the page, examine the Storage bar graph.
Note: If you enable ARCHIVELOG mode, you must perform regular backups of the database to avoid completely filling the flash recovery area. A completely filled flash recovery area can lead to database failure.
See Also:
■ "Enabling ARCHIVELOG Mode for Media Failure Protection" on page 11-2
■ "Monitoring Space in the Flash Recovery Area" on page 6-13
■ "Viewing Redo Log Files" on page 6-12 for instructions for viewing information on Oracle Database XE redo log groups, including the location of each log group member.
■ "Backing Up and Restoring the Database" on page 11-1 for details on database backup and recovery
■ Oracle Database Administrator's Guide for more details about redo logs and log archiving
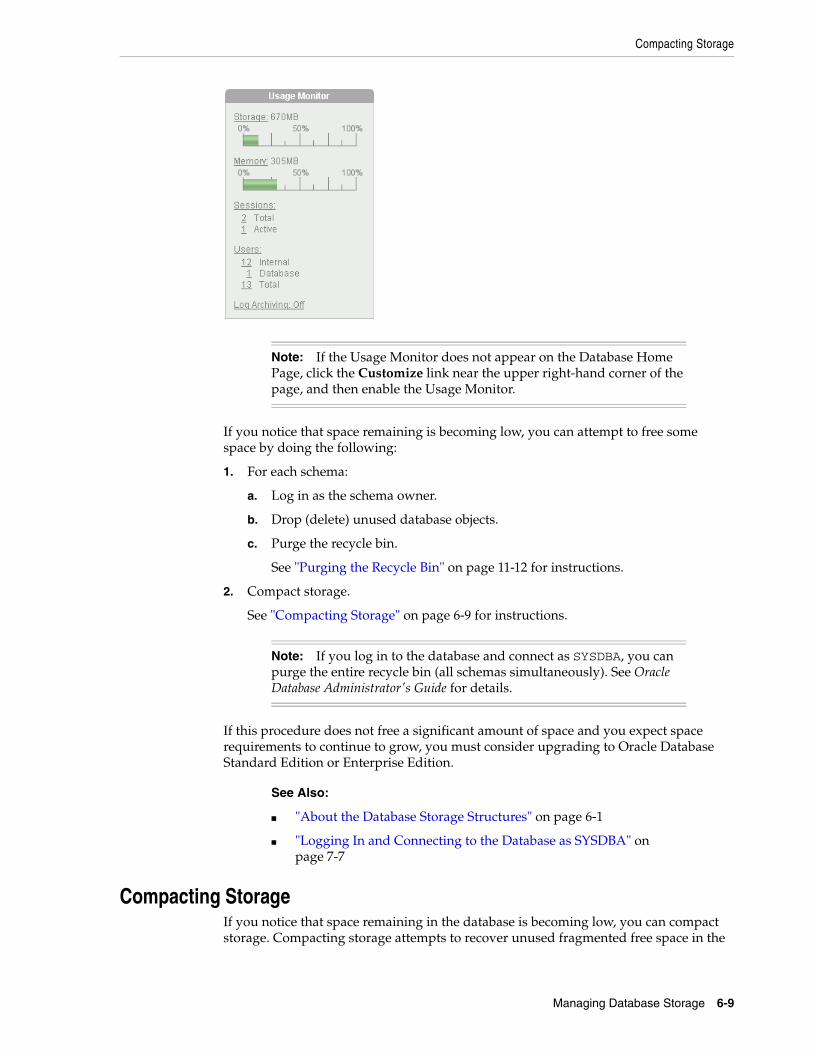
Compacting Storage
Managing Database Storage 6-9
If you notice that space remaining is becoming low, you can attempt to free some space by doing the following:
1. For each schema:
a. Log in as the schema owner.
b. Drop (delete) unused database objects.
c. Purge the recycle bin.
See "Purging the Recycle Bin" on page 11-12 for instructions.
2. Compact storage.
See "Compacting Storage" on page 6-9 for instructions.
If this procedure does not free a significant amount of space and you expect space requirements to continue to grow, you must consider upgrading to Oracle Database Standard Edition or Enterprise Edition.
Compacting StorageIf you notice that space remaining in the database is becoming low, you can compact storage. Compacting storage attempts to recover unused fragmented free space in the
Note: If the Usage Monitor does not appear on the Database Home Page, click the Customize link near the upper right-hand corner of the page, and then enable the Usage Monitor.
Note: If you log in to the database and connect as SYSDBA, you can purge the entire recycle bin (all schemas simultaneously). See Oracle Database Administrator's Guide for details.
See Also:
■ "About the Database Storage Structures" on page 6-1
■ "Logging In and Connecting to the Database as SYSDBA" on page 7-7
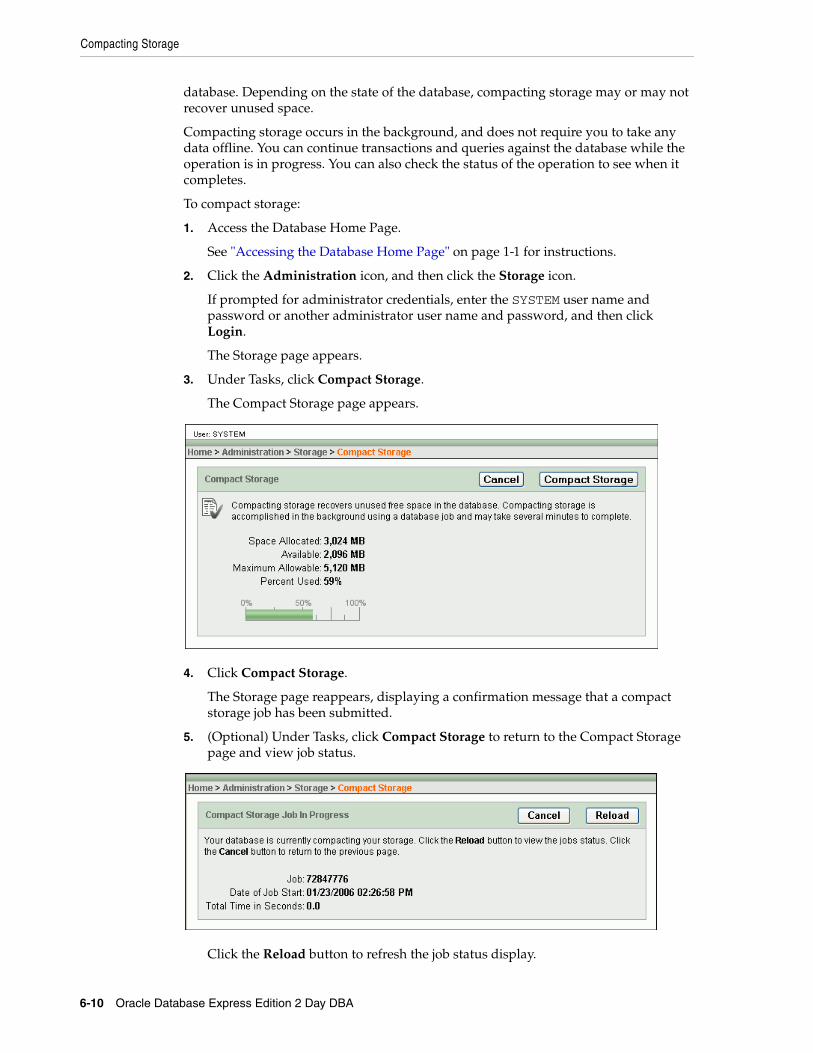
Compacting Storage
6-10 Oracle Database Express Edition 2 Day DBA
database. Depending on the state of the database, compacting storage may or may not recover unused space.
Compacting storage occurs in the background, and does not require you to take any data offline. You can continue transactions and queries against the database while the operation is in progress. You can also check the status of the operation to see when it completes.
To compact storage:
1. Access the Database Home Page.
See "Accessing the Database Home Page" on page 1-1 for instructions.
2. Click the Administration icon, and then click the Storage icon.
If prompted for administrator credentials, enter the SYSTEM user name and password or another administrator user name and password, and then click Login.
The Storage page appears.
3. Under Tasks, click Compact Storage.
The Compact Storage page appears.
4. Click Compact Storage.
The Storage page reappears, displaying a confirmation message that a compact storage job has been submitted.
5. (Optional) Under Tasks, click Compact Storage to return to the Compact Storage page and view job status.
Click the Reload button to refresh the job status display.
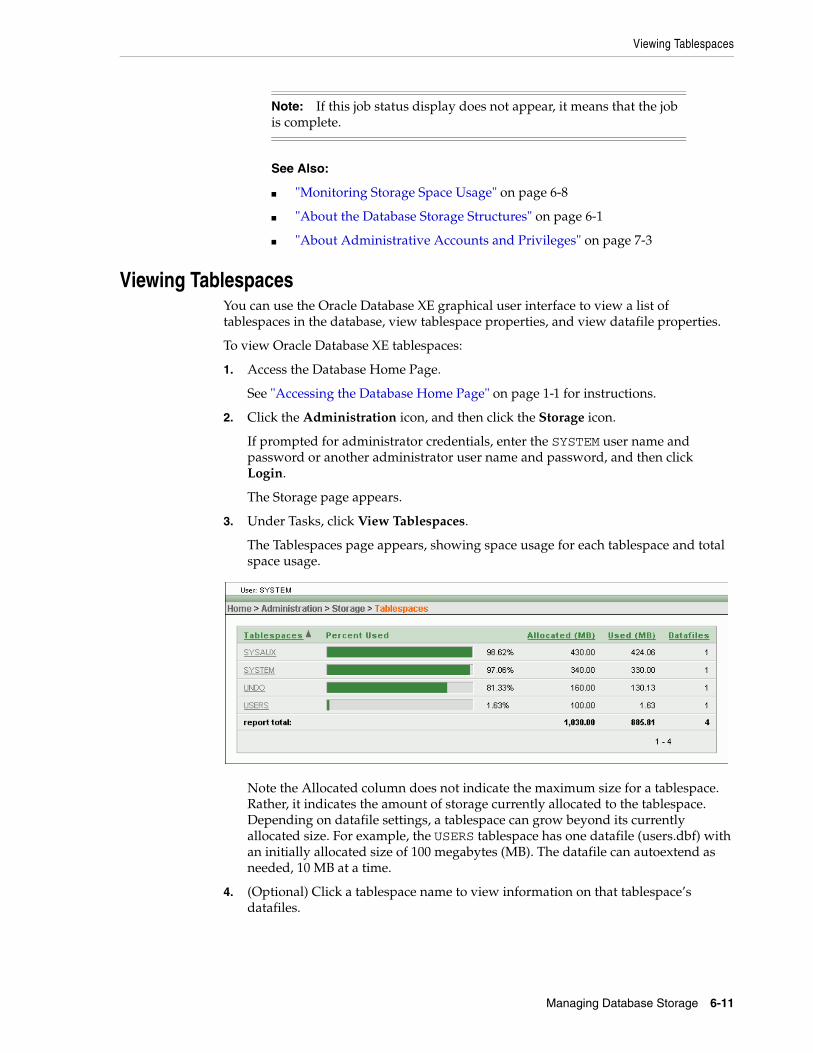
Viewing Tablespaces
Managing Database Storage 6-11
Viewing TablespacesYou can use the Oracle Database XE graphical user interface to view a list of tablespaces in the database, view tablespace properties, and view datafile properties.
To view Oracle Database XE tablespaces:
1. Access the Database Home Page.
See "Accessing the Database Home Page" on page 1-1 for instructions.
2. Click the Administration icon, and then click the Storage icon.
If prompted for administrator credentials, enter the SYSTEM user name and password or another administrator user name and password, and then click Login.
The Storage page appears.
3. Under Tasks, click View Tablespaces.
The Tablespaces page appears, showing space usage for each tablespace and total space usage.
Note the Allocated column does not indicate the maximum size for a tablespace. Rather, it indicates the amount of storage currently allocated to the tablespace. Depending on datafile settings, a tablespace can grow beyond its currently allocated size. For example, the USERS tablespace has one datafile (users.dbf) with an initially allocated size of 100 megabytes (MB). The datafile can autoextend as needed, 10 MB at a time.
4. (Optional) Click a tablespace name to view information on that tablespace’s datafiles.
Note: If this job status display does not appear, it means that the job is complete.
See Also:
■ "Monitoring Storage Space Usage" on page 6-8
■ "About the Database Storage Structures" on page 6-1
■ "About Administrative Accounts and Privileges" on page 7-3
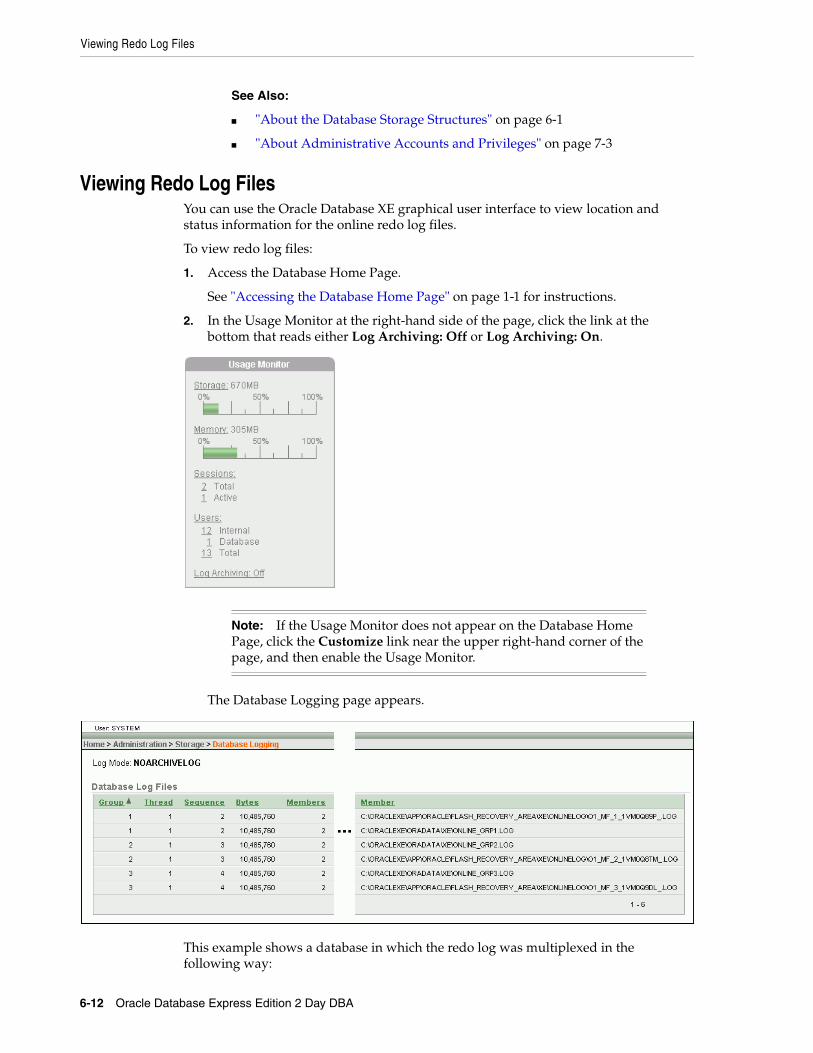
Viewing Redo Log Files
6-12 Oracle Database Express Edition 2 Day DBA
Viewing Redo Log FilesYou can use the Oracle Database XE graphical user interface to view location and status information for the online redo log files.
To view redo log files:
1. Access the Database Home Page.
See "Accessing the Database Home Page" on page 1-1 for instructions.
2. In the Usage Monitor at the right-hand side of the page, click the link at the bottom that reads either Log Archiving: Off or Log Archiving: On.
The Database Logging page appears.
This example shows a database in which the redo log was multiplexed in the following way:
See Also:
■ "About the Database Storage Structures" on page 6-1
■ "About Administrative Accounts and Privileges" on page 7-3
Note: If the Usage Monitor does not appear on the Database Home Page, click the Customize link near the upper right-hand corner of the page, and then enable the Usage Monitor.
Managing the Flash Recovery Area
Managing Database Storage 6-13
■ There were three log groups created, each with two members.
■ In each log group, one member was located with the datafiles, and the other left in the flash recovery area.
See "Online Redo Log Files" on page 6-6 for more information on redo log groups and log group members.
Managing the Flash Recovery Area Oracle Database Express Edition (Oracle Database XE) stores database backups, online redo log files, and archived redo log files in the flash recovery area. The primary management tasks related to the flash recovery area are the following:
■ Monitoring flash recovery area available space
■ Changing the flash recovery area location and size
The flash recovery area is a fixed-size storage area. The default size is 10 gigabytes (GB). Because Oracle Database XE storage is limited to 5 GB, two backups of the database are expected to fit in the flash recovery area. However, when running in ARCHIVELOG mode, you may need to allocate extra space for archived redo log files, and you must monitor flash recovery area available space more closely. (See "Archived Redo Log Files" on page 6-7 for information about ARCHIVELOG mode.)
This section contains the following topics:
■ Monitoring Space in the Flash Recovery Area on page 6-13
■ Setting Flash Recovery Area Location and Size on page 6-14
Monitoring Space in the Flash Recovery AreaYou must run a SQL query to determine the current available space in the flash recovery area.
To view current available space in the flash recovery area:
1. Access the Database Home page, and log in as user SYSTEM, providing the password that you set upon installation (Windows) or configuration (Linux).
See "Accessing the Database Home Page" on page 1-1 for instructions.
2. Click the SQL icon, and then click the SQL Commands icon.
The SQL Commands page appears.
3. Enter the following query into the query text field:
Note: The Database Logging page does not display information on archived redo log files. In addition, the default configuration of Oracle Database XE does not include redo log multiplexing.
See Also: "Recovery-Related Structures in the Flash Recovery Area" on page 6-5
See Also:
■ "Recovery-Related Structures in the Flash Recovery Area" on page 6-5
■ "About Backing Up and Restoring the Database" on page 11-1
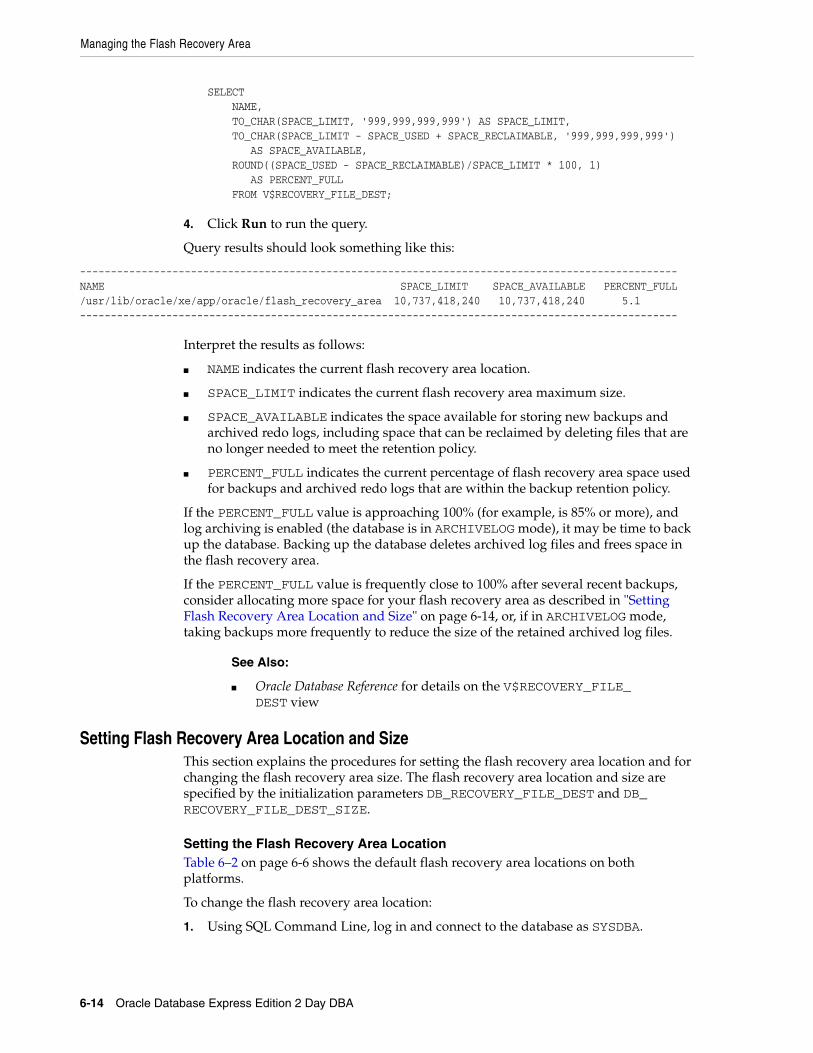
Managing the Flash Recovery Area
6-14 Oracle Database Express Edition 2 Day DBA
SELECT NAME, TO_CHAR(SPACE_LIMIT, '999,999,999,999') AS SPACE_LIMIT, TO_CHAR(SPACE_LIMIT - SPACE_USED + SPACE_RECLAIMABLE, '999,999,999,999') AS SPACE_AVAILABLE, ROUND((SPACE_USED - SPACE_RECLAIMABLE)/SPACE_LIMIT * 100, 1) AS PERCENT_FULL FROM V$RECOVERY_FILE_DEST;
4. Click Run to run the query.
Query results should look something like this:
-------------------------------------------------------------------------------------------------NAME SPACE_LIMIT SPACE_AVAILABLE PERCENT_FULL/usr/lib/oracle/xe/app/oracle/flash_recovery_area 10,737,418,240 10,737,418,240 5.1-------------------------------------------------------------------------------------------------
Interpret the results as follows:
■ NAME indicates the current flash recovery area location.
■ SPACE_LIMIT indicates the current flash recovery area maximum size.
■ SPACE_AVAILABLE indicates the space available for storing new backups and archived redo logs, including space that can be reclaimed by deleting files that are no longer needed to meet the retention policy.
■ PERCENT_FULL indicates the current percentage of flash recovery area space used for backups and archived redo logs that are within the backup retention policy.
If the PERCENT_FULL value is approaching 100% (for example, is 85% or more), and log archiving is enabled (the database is in ARCHIVELOG mode), it may be time to back up the database. Backing up the database deletes archived log files and frees space in the flash recovery area.
If the PERCENT_FULL value is frequently close to 100% after several recent backups, consider allocating more space for your flash recovery area as described in "Setting Flash Recovery Area Location and Size" on page 6-14, or, if in ARCHIVELOG mode, taking backups more frequently to reduce the size of the retained archived log files.
Setting Flash Recovery Area Location and SizeThis section explains the procedures for setting the flash recovery area location and for changing the flash recovery area size. The flash recovery area location and size are specified by the initialization parameters DB_RECOVERY_FILE_DEST and DB_RECOVERY_FILE_DEST_SIZE.
Setting the Flash Recovery Area LocationTable 6–2 on page 6-6 shows the default flash recovery area locations on both platforms.
To change the flash recovery area location:
1. Using SQL Command Line, log in and connect to the database as SYSDBA.
See Also:
■ Oracle Database Reference for details on the V$RECOVERY_FILE_DEST view

Managing the Flash Recovery Area
Managing Database Storage 6-15
See "Logging In and Connecting to the Database as SYSDBA" on page 7-7 for instructions.
2. At the SQL Command Line prompt, enter the following command:
ALTER SYSTEM SET DB_RECOVERY_FILE_DEST = 'new_path';
where new_path is an absolute path to the new directory for the flash recovery area. The path must exist. (The ALTER SYSTEM command cannot create directories.)
For example, in Windows, to set the flash recovery location to the FRA directory on the E: drive, enter the following command:
ALTER SYSTEM SET DB_RECOVERY_FILE_DEST = 'E:\FRA';
3. Enter the following command, which runs a PL/SQL script that moves the online redo log files to the new flash recovery area location and drops the log files from the old location:
@?/sqlplus/admin/movelogs
Note that the command must be entered in lower case. The '@' symbol is an abbreviation for the START command, which runs the named SQL script. The '?' symbol, when used in a SQL Command Line command, is an abbreviation for the Oracle home directory. This command therefore runs the script named movelogs.sql, which is located in the path Oracle_home/sqlplus/admin.
If the script is successful, SQL Command Line displays the following message:
PL/SQL procedure successfully completed.
A listing of the movelogs.sql script appears later in this section.
4. Enter the following command to exit SQL Command Line:
EXIT
Note: After you change the location of the flash recovery area, Recovery Manager (RMAN) can still use the backups and archived logs in the old location until they become obsolete. The old backups cannot be moved to the new flash recovery area location.
Do not manually delete the contents of the old flash recovery area using operating system utilities. Instead, make the backups in the old flash recovery area location obsolete by backing up your database twice after you change the location of the flash recovery area.
Each time that you back up the database as described in "Backing Up the Database" on page 11-4, obsolete backups and archived logs are deleted so that only the two most recent backups and accompanying archived redo logs are retained. Thus, after the new flash recovery area contains two recent backups, all files are deleted from the old location.
Managing the Flash Recovery Area
6-16 Oracle Database Express Edition 2 Day DBA
Changing the Flash Recovery Area SizeTo change the flash recovery area size:
1. Using SQL Command Line, log in and connect to the database as SYSDBA.
See "Logging In and Connecting to the Database as SYSDBA" on page 7-7 for instructions.
2. Enter the following command at the SQL Command Line prompt:
ALTER SYSTEM SET DB_RECOVERY_FILE_DEST_SIZE = new_size;
where new_size can be of the format nK (kilobytes), nM (megabytes) or nG (gigabytes).
For example, to set the flash recovery area size to 20 gigabytes, enter the following command:
ALTER SYSTEM SET DB_RECOVERY_FILE_DEST_SIZE = 20G;
3. Enter the following command to exit SQL Command Line:
EXIT
movelogs.sql ScriptThe following is a listing of the movelogs.sql script, which you must run after changing the location of the flash recovery area. The script moves the online redo log files to the new flash recovery area location and drops the log files from the old location.
declare cursor rlc is select group# grp, thread# thr, bytes/1024 bytes_k from v$log order by 1; stmt varchar2(2048); swtstmt varchar2(1024) := 'alter system switch logfile'; ckpstmt varchar2(1024) := 'alter system checkpoint global';begin for rlcRec in rlc loop stmt := 'alter database add logfile thread ' || rlcRec.thr || ' size ' || rlcRec.bytes_k || 'K'; execute immediate stmt;
See Also:
■ Oracle Database Administrator's Guide for details on setting and changing database initialization parameters
■ "Viewing Redo Log Files" on page 6-12 for information on how to view the online redo log files in their new location.
■ "Recovery-Related Structures in the Flash Recovery Area" on page 6-5
See Also:
■ Oracle Database Administrator's Guide for details on setting and changing database initialization parameters
■ "Recovery-Related Structures in the Flash Recovery Area" on page 6-5

Managing the Flash Recovery Area
Managing Database Storage 6-17
begin stmt := 'alter database drop logfile group ' || rlcRec.grp; execute immediate stmt; exception when others then execute immediate swtstmt; execute immediate ckpstmt; execute immediate stmt; end; execute immediate swtstmt; end loop;end;/

Managing the Flash Recovery Area
6-18 Oracle Database Express Edition 2 Day DBA
Managing Users and Security 7-1
7Managing Users and Security
Users access Oracle Database Express Edition through database user accounts. Some of these accounts are automatically created administrative accounts—accounts with database administration privileges. You log in to these administrative accounts to create and manage other user accounts, maintain database security, and perform other database administration tasks.
This section contains the following topics:
■ About User Accounts on page 7-1
■ About Administrative Accounts and Privileges on page 7-3
■ Logging In as an Administrator on page 7-5
■ Changing Administrative User Passwords on page 7-9
■ Managing Database Users on page 7-9
■ User Accounts Reference on page 7-19
About User AccountsA user account is identified by a user name and defines the user’s attributes, including the following:
■ Password for database authentication
■ Privileges and roles
■ Default tablespace for database objects
■ Default temporary tablespace for query processing work space
When you create a user, you are also implicitly creating a schema for that user. A schema is a logical container for the database objects (such as tables, views, triggers, and so on) that the user creates. The schema name is the same as the user name, and can be used to unambiguously refer to objects owned by the user. For example, HR.EMPLOYEES refers to the table named EMPLOYEES in the HR schema. (The EMPLOYEES table is owned by HR.) The terms database object and schema object are used interchangeably.
When you drop (delete) a user, you must either first drop all the user’s schema objects, or use the cascade feature of the drop operation, which simultaneously drops a user and all of his schema objects.
This section contains these topics:
■ User Privileges and Roles on page 7-2
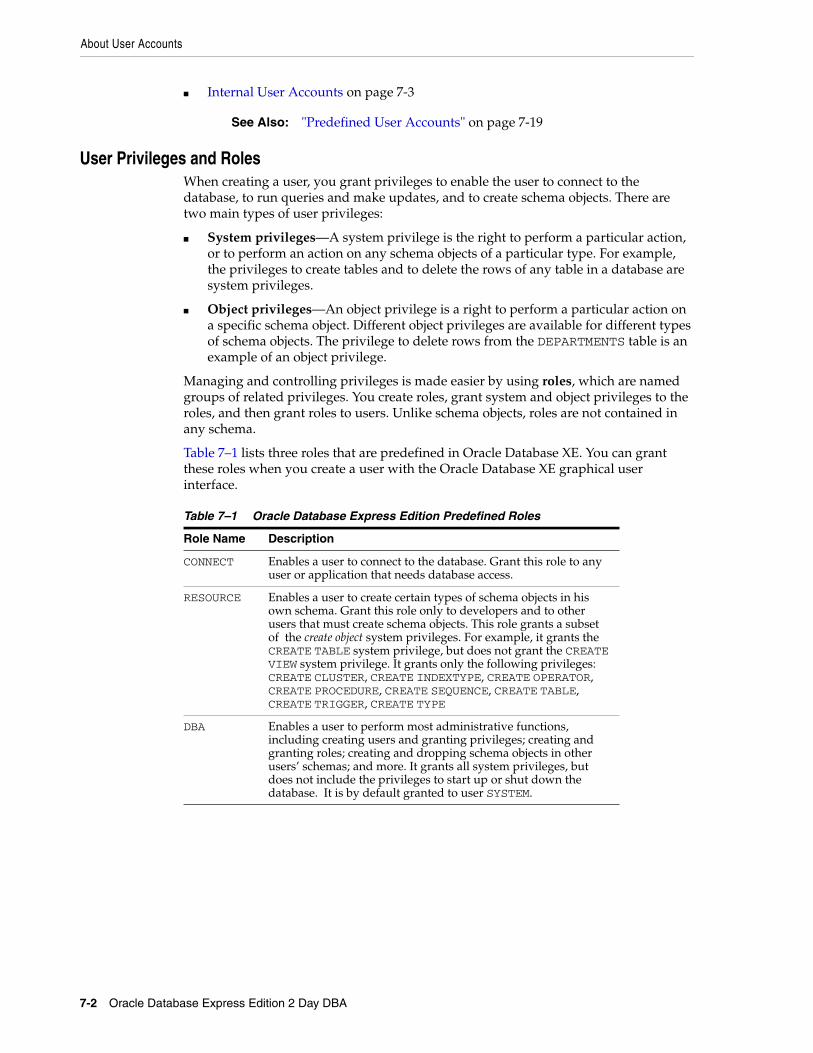
About User Accounts
7-2 Oracle Database Express Edition 2 Day DBA
■ Internal User Accounts on page 7-3
User Privileges and RolesWhen creating a user, you grant privileges to enable the user to connect to the database, to run queries and make updates, and to create schema objects. There are two main types of user privileges:
■ System privileges—A system privilege is the right to perform a particular action, or to perform an action on any schema objects of a particular type. For example, the privileges to create tables and to delete the rows of any table in a database are system privileges.
■ Object privileges—An object privilege is a right to perform a particular action on a specific schema object. Different object privileges are available for different types of schema objects. The privilege to delete rows from the DEPARTMENTS table is an example of an object privilege.
Managing and controlling privileges is made easier by using roles, which are named groups of related privileges. You create roles, grant system and object privileges to the roles, and then grant roles to users. Unlike schema objects, roles are not contained in any schema.
Table 7–1 lists three roles that are predefined in Oracle Database XE. You can grant these roles when you create a user with the Oracle Database XE graphical user interface.
See Also: "Predefined User Accounts" on page 7-19
Table 7–1 Oracle Database Express Edition Predefined Roles
Role Name Description
CONNECT Enables a user to connect to the database. Grant this role to any user or application that needs database access.
RESOURCE Enables a user to create certain types of schema objects in his own schema. Grant this role only to developers and to other users that must create schema objects. This role grants a subset of the create object system privileges. For example, it grants the CREATE TABLE system privilege, but does not grant the CREATE VIEW system privilege. It grants only the following privileges: CREATE CLUSTER, CREATE INDEXTYPE, CREATE OPERATOR, CREATE PROCEDURE, CREATE SEQUENCE, CREATE TABLE, CREATE TRIGGER, CREATE TYPE
DBA Enables a user to perform most administrative functions, including creating users and granting privileges; creating and granting roles; creating and dropping schema objects in other users’ schemas; and more. It grants all system privileges, but does not include the privileges to start up or shut down the database. It is by default granted to user SYSTEM.
About Administrative Accounts and Privileges
Managing Users and Security 7-3
Internal User AccountsCertain user accounts are created automatically for database administration. Examples are SYS and SYSTEM. Other accounts are automatically created just so that individual Oracle Database XE features or products can have their own schemas. An example is the CTXSYS account, which is used by the Oracle Text product. Oracle Text is used to index the Oracle Database XE online Help. The Help index is stored in the CTXSYS schema in the database.
These automatically created accounts are called internal user accounts, and their schemas are called internal schemas.
The only internal accounts that you may log in with are the SYS and SYSTEM accounts, although it is recommended that you avoid logging in with the SYS account. Do not attempt to log in with other internal accounts. See "The SYS and SYSTEM Users" on page 7-3 for more information.
About Administrative Accounts and PrivilegesAdministrative accounts and privileges enable you to perform administrative functions like managing users, managing database memory, and starting up and shutting down the database.
This section contains the following topics:
■ The SYS and SYSTEM Users on page 7-3
■ The SYSDBA System Privilege on page 7-4
■ Operating System Authentication on page 7-4
The SYS and SYSTEM UsersThe following administrative user accounts are automatically created when you install Oracle Database Express Edition (Oracle Database XE). They are both created with the password that you supplied upon installation (Windows operating systems) or configuration (Linux operating systems).
■ SYSTEM
This is the user account that you log in with to perform all administrative functions other than starting up and shutting down the database.
See Also:
■ "Administering User Privileges, Roles, and Profiles" in Oracle Database Security Guide for more information on privileges and roles
■ Oracle Database SQL Reference for tables of system privileges, object privileges, and predefined roles.
■ "Creating Users" on page 7-12
■ "Predefined User Accounts" on page 7-19
■ "About Administrative Accounts and Privileges" on page 7-3
See Also:
■ About User Accounts on page 7-1
■ Logging In as an Administrator on page 7-5
About Administrative Accounts and Privileges
7-4 Oracle Database Express Edition 2 Day DBA
■ SYS
All base tables and views for the database data dictionary are stored in the SYS schema. These base tables and views are critical for the operation of Oracle Database XE. To maintain the integrity of the data dictionary, tables in the SYS schema are manipulated only by the database. They should never be modified by any user or database administrator. You must not create any tables in the SYS schema.
There is typically no reason to log in as user SYS. User SYSTEM is preferred for all administrative tasks except starting up and shutting down. See "Starting Up and Shutting Down" on page 2-1 for more information.
The SYSDBA System PrivilegeSYSDBA is a system privilege that is assigned only to user SYS. It enables SYS to perform high-level administrative tasks such as starting up and shutting down the database.
Although under typical circumstances it is not necessary to log in to the database as user SYS, if you want to log in as SYS with SQL Command Line (SQL*Plus), you must connect to the database "AS SYSDBA." Connecting AS SYSDBA invokes the SYSDBA privilege. If you omit the AS SYSDBA clause when logging in as user SYS, SQL Command Line rejects the login attempt.
The following example illustrates how to connect to the database with the SYSDBA privilege from SQL Command Line:
SQL > connect sys/password as sysdba
password is the password for the SYS user account.
Operating System AuthenticationOperating system authentication (OS authentication) is a way of using operating system login credentials to authenticate database users. One aspect of OS authentication can be used to authenticate database administrators. If you log in to the Oracle Database XE host computer with a user name that is in a special operating system user group, you are then permitted to connect to the database with the SYSDBA privilege. An administrator who is authenticated through OS authentication does not need to know the SYS or SYSTEM account password.
OS authentication is needed because there must be a way to identify administrative users even if the database is shut down. A user authenticated in this way can then start
See Also:
■ "Logging In as an Administrator" on page 7-5
■ "Changing Administrative User Passwords" on page 7-9
Caution: When you connect as user SYS, you have unlimited privileges on data dictionary tables. Be certain that you do not modify any data dictionary tables.
See Also:
■ "Changing Administrative User Passwords" on page 7-9
■ Chapter 2, "Starting Up and Shutting Down" on page 2-1
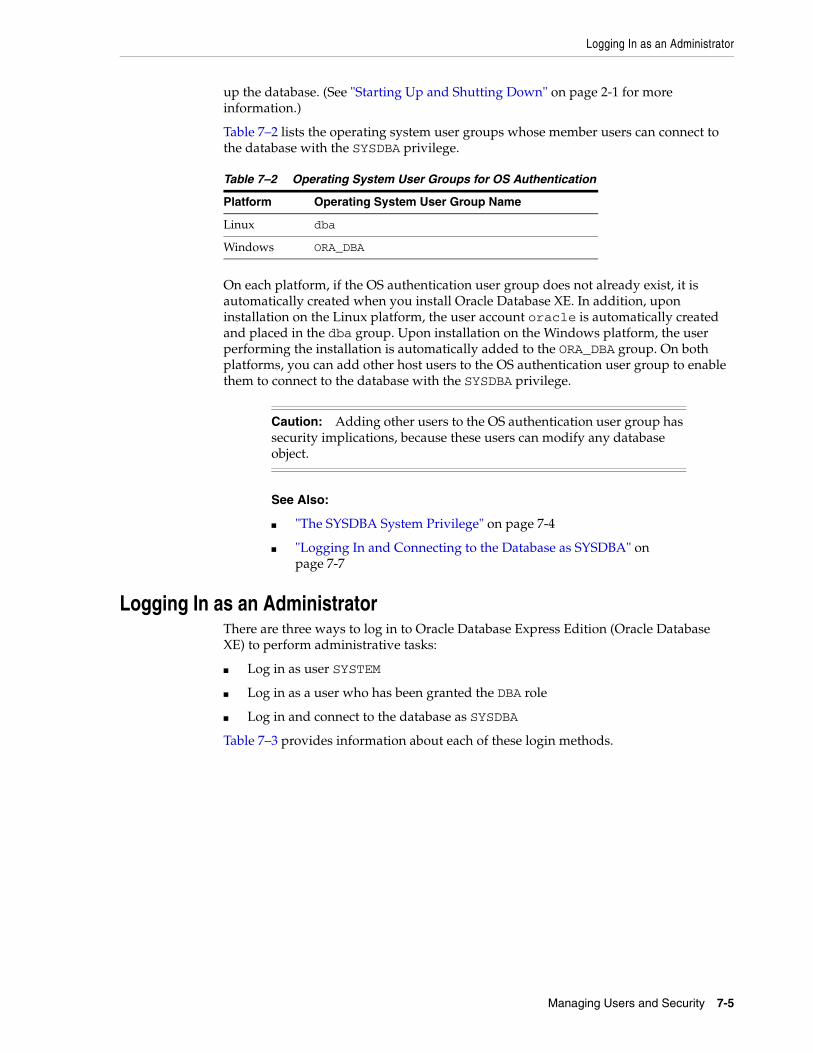
Logging In as an Administrator
Managing Users and Security 7-5
up the database. (See "Starting Up and Shutting Down" on page 2-1 for more information.)
Table 7–2 lists the operating system user groups whose member users can connect to the database with the SYSDBA privilege.
On each platform, if the OS authentication user group does not already exist, it is automatically created when you install Oracle Database XE. In addition, upon installation on the Linux platform, the user account oracle is automatically created and placed in the dba group. Upon installation on the Windows platform, the user performing the installation is automatically added to the ORA_DBA group. On both platforms, you can add other host users to the OS authentication user group to enable them to connect to the database with the SYSDBA privilege.
Logging In as an AdministratorThere are three ways to log in to Oracle Database Express Edition (Oracle Database XE) to perform administrative tasks:
■ Log in as user SYSTEM
■ Log in as a user who has been granted the DBA role
■ Log in and connect to the database as SYSDBA
Table 7–3 provides information about each of these login methods.
Table 7–2 Operating System User Groups for OS Authentication
Platform Operating System User Group Name
Linux dba
Windows ORA_DBA
Caution: Adding other users to the OS authentication user group has security implications, because these users can modify any database object.
See Also:
■ "The SYSDBA System Privilege" on page 7-4
■ "Logging In and Connecting to the Database as SYSDBA" on page 7-7
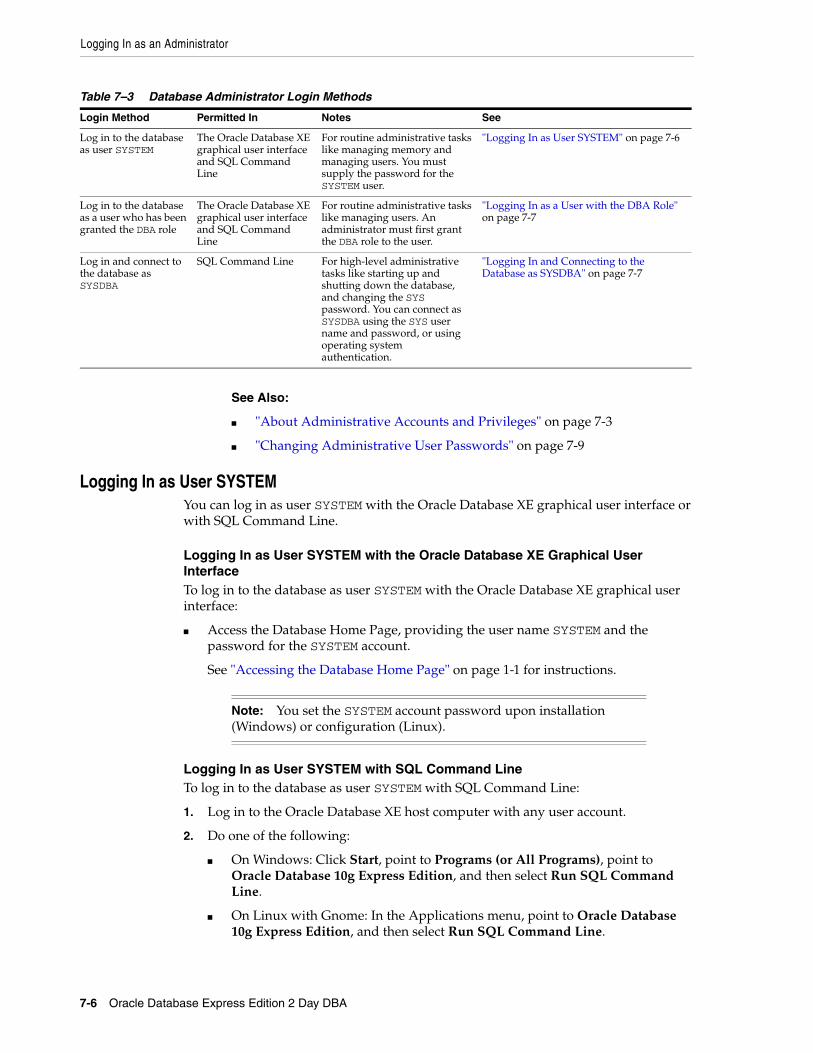
Logging In as an Administrator
7-6 Oracle Database Express Edition 2 Day DBA
Logging In as User SYSTEMYou can log in as user SYSTEM with the Oracle Database XE graphical user interface or with SQL Command Line.
Logging In as User SYSTEM with the Oracle Database XE Graphical User InterfaceTo log in to the database as user SYSTEM with the Oracle Database XE graphical user interface:
■ Access the Database Home Page, providing the user name SYSTEM and the password for the SYSTEM account.
See "Accessing the Database Home Page" on page 1-1 for instructions.
Logging In as User SYSTEM with SQL Command LineTo log in to the database as user SYSTEM with SQL Command Line:
1. Log in to the Oracle Database XE host computer with any user account.
2. Do one of the following:
■ On Windows: Click Start, point to Programs (or All Programs), point to Oracle Database 10g Express Edition, and then select Run SQL Command Line.
■ On Linux with Gnome: In the Applications menu, point to Oracle Database 10g Express Edition, and then select Run SQL Command Line.
Table 7–3 Database Administrator Login Methods
Login Method Permitted In Notes See
Log in to the database as user SYSTEM
The Oracle Database XE graphical user interface and SQL Command Line
For routine administrative tasks like managing memory and managing users. You must supply the password for the SYSTEM user.
"Logging In as User SYSTEM" on page 7-6
Log in to the database as a user who has been granted the DBA role
The Oracle Database XE graphical user interface and SQL Command Line
For routine administrative tasks like managing users. An administrator must first grant the DBA role to the user.
"Logging In as a User with the DBA Role" on page 7-7
Log in and connect to the database as SYSDBA
SQL Command Line For high-level administrative tasks like starting up and shutting down the database, and changing the SYS password. You can connect as SYSDBA using the SYS user name and password, or using operating system authentication.
"Logging In and Connecting to the Database as SYSDBA" on page 7-7
See Also:
■ "About Administrative Accounts and Privileges" on page 7-3
■ "Changing Administrative User Passwords" on page 7-9
Note: You set the SYSTEM account password upon installation (Windows) or configuration (Linux).
Logging In as an Administrator
Managing Users and Security 7-7
■ On Linux with KDE: Click the icon for the K Menu, point to Oracle Database 10g Express Edition, and then select Run SQL Command Line.
A SQL Command Line command window opens.
3. At the SQL Command Line prompt, enter the following command:
CONNECT SYSTEM/password
where password is the SYSTEM account password that you set during installation (Windows) or configuration (Linux)
Logging In as a User with the DBA RoleThe procedures for logging in as a user who has been granted the DBA role are the same as those for logging in as user SYSTEM, with the following exceptions:
■ When logging in, you must supply the user name and password for this user account.
■ An administrator must have previously logged in and granted the DBA role to this user.
See "User Privileges and Roles" on page 7-2 for more information.
Logging In and Connecting to the Database as SYSDBAYou can log in and connect as SYSDBA only with SQL Command Line (SQL*Plus). You can do so either by supplying the SYS user name and password, or by using operating system (OS) authentication.
Connecting as SYSDBA with the SYS User Name and PasswordTo connect as SYSDBA supplying the SYS user name and password:
Note: You can also start SQL Command Line from a terminal session (Linux) or command window (Windows). See "Connecting Locally with SQL Command Line" on page 3-6 for instructions.
Note: These instructions establish a local connection to the database. See "Connecting Remotely with SQL Command Line" on page 3-7 for information on connecting to the database remotely.
See Also:
■ "Logging In as an Administrator" on page 7-5
See Also:
■ "Logging In as User SYSTEM" on page 7-6
■ "Logging In as an Administrator" on page 7-5
Note: The following instructions establish a local connection to the database. Do not attempt to connect AS SYSDBA remotely. See "About Local and Remote Connections" on page 3-2 for more information.
Logging In as an Administrator
7-8 Oracle Database Express Edition 2 Day DBA
1. Log in to the Oracle Database XE host computer with any user account.
2. Do one of the following:
■ On Windows: Click Start, point to Programs (or All Programs), point to Oracle Database 10g Express Edition, and then select Run SQL Command Line.
■ On Linux with Gnome: In the Applications menu, point to Oracle Database 10g Express Edition, and then select Run SQL Command Line.
■ On Linux with KDE: Click the icon for the K Menu, point to Oracle Database 10g Express Edition, and then select Run SQL Command Line.
A SQL Command Line command window opens.
3. At the SQL Command Line prompt, enter the following command:
CONNECT SYS/password AS SYSDBA
where password is the password for the SYS user account. You set the SYS account password upon installation (Windows) or configuration (Linux).
Connecting as SYSDBA with OS AuthenticationTo connect as SYSDBA using OS authentication:
1. Do one of the following:
■ On Windows: Log in to the Oracle Database XE host computer as a user who is a member of the ORA_DBA user group. This is typically the user that installed Oracle Database XE.
■ On Linux: Log in to the Oracle Database XE host computer as a user who is a member of the dba user group. This is typically the oracle user.
2. Do one of the following:
■ On Windows: Click Start, point to Programs (or All Programs), point to Oracle Database 10g Express Edition, and then select Run SQL Command Line.
■ On Linux with Gnome: In the Applications menu, point to Oracle Database 10g Express Edition, and then select Run SQL Command Line.
■ On Linux with KDE: Click the icon for the K Menu, point to Oracle Database 10g Express Edition, and then select Run SQL Command Line.
A SQL Command Line command window opens.
3. At the SQL Command Line prompt, enter the following command:
CONNECT / AS SYSDBA
Note: You can also start SQL Command Line from a terminal session (Linux) or command window (Windows). See "Connecting Locally with SQL Command Line" on page 3-6 for instructions.
Note: You can also start SQL Command Line from a terminal session (Linux) or command window (Windows). See "Connecting Locally with SQL Command Line" on page 3-6 for instructions.
Managing Database Users
Managing Users and Security 7-9
The slash (/) indicates that the database should authenticate you with operating system (OS) authentication. Remember that when you connect with OS authentication, you are effectively logging in to the database as user SYS.
Changing Administrative User PasswordsTo change the password for user SYS or SYSTEM:
1. Using SQL Command Line, connect to the database as SYSDBA.
See "Logging In and Connecting to the Database as SYSDBA" on page 7-7 for instructions.
2. Enter one of the following commands:
ALTER USER SYS IDENTIFIED BY newpassword;ALTER USER SYSTEM IDENTIFIED BY newpassword;
where newpassword is the desired new password.
Managing Database UsersYou can use the Oracle Database XE graphical user interface or SQL Command Line (SQL*Plus) to manage database users. This section discusses using the Oracle Database XE graphical user interface, and contains the following topics:
■ Viewing Users on page 7-9
■ Creating Users on page 7-12
■ Altering Users on page 7-14
■ Locking and Unlocking User Accounts on page 7-15
■ Expiring a User Password on page 7-16
■ Dropping Users on page 7-17
Viewing UsersYou can view database users with the Oracle Database XE graphical user interface. After viewing a list of users, you can then select an individual user to alter or drop (delete).
To view database users:
1. Access the Database Home Page.
See Also:
■ "Logging In as an Administrator" on page 7-5
■ "The SYSDBA System Privilege" on page 7-4
■ "Operating System Authentication" on page 7-4
See Also: "About Administrative Accounts and Privileges" on page 7-3
See Also: Oracle Database SQL Reference and Oracle Database Security Guide for information on managing users with SQL Command Line (SQL*Plus).
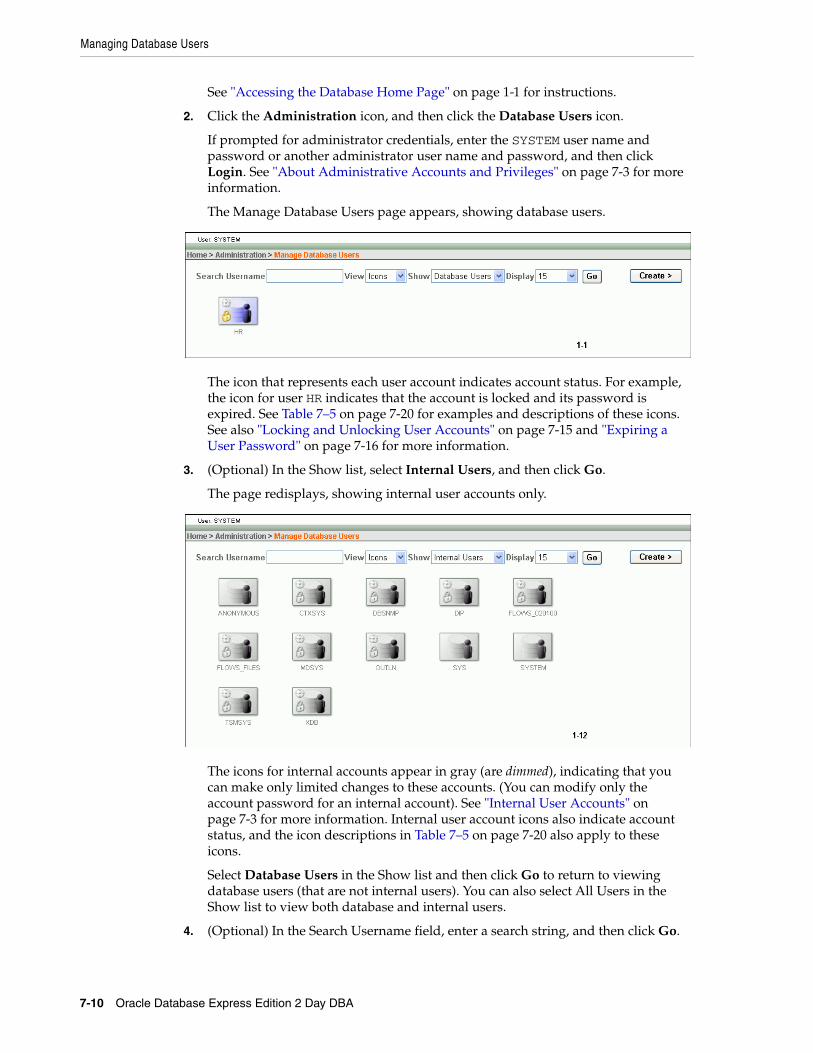
Managing Database Users
7-10 Oracle Database Express Edition 2 Day DBA
See "Accessing the Database Home Page" on page 1-1 for instructions.
2. Click the Administration icon, and then click the Database Users icon.
If prompted for administrator credentials, enter the SYSTEM user name and password or another administrator user name and password, and then click Login. See "About Administrative Accounts and Privileges" on page 7-3 for more information.
The Manage Database Users page appears, showing database users.
The icon that represents each user account indicates account status. For example, the icon for user HR indicates that the account is locked and its password is expired. See Table 7–5 on page 7-20 for examples and descriptions of these icons. See also "Locking and Unlocking User Accounts" on page 7-15 and "Expiring a User Password" on page 7-16 for more information.
3. (Optional) In the Show list, select Internal Users, and then click Go.
The page redisplays, showing internal user accounts only.
The icons for internal accounts appear in gray (are dimmed), indicating that you can make only limited changes to these accounts. (You can modify only the account password for an internal account). See "Internal User Accounts" on page 7-3 for more information. Internal user account icons also indicate account status, and the icon descriptions in Table 7–5 on page 7-20 also apply to these icons.
Select Database Users in the Show list and then click Go to return to viewing database users (that are not internal users). You can also select All Users in the Show list to view both database and internal users.
4. (Optional) In the Search Username field, enter a search string, and then click Go.
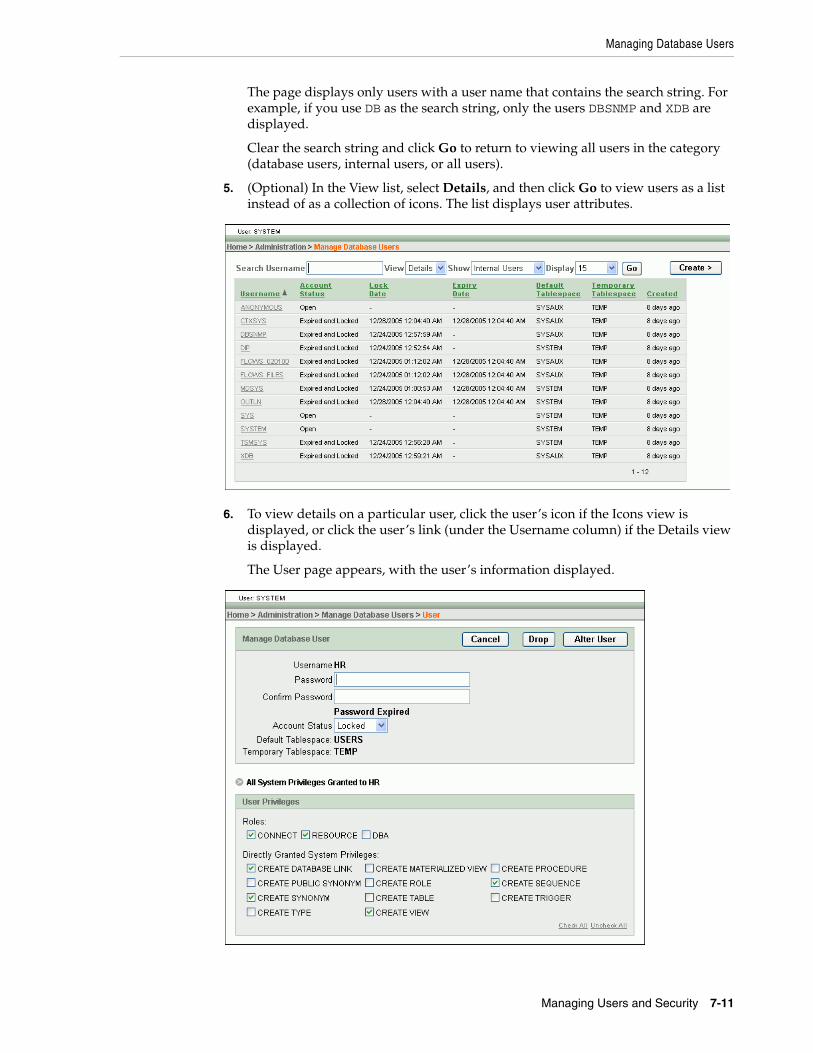
Managing Database Users
Managing Users and Security 7-11
The page displays only users with a user name that contains the search string. For example, if you use DB as the search string, only the users DBSNMP and XDB are displayed.
Clear the search string and click Go to return to viewing all users in the category (database users, internal users, or all users).
5. (Optional) In the View list, select Details, and then click Go to view users as a list instead of as a collection of icons. The list displays user attributes.
6. To view details on a particular user, click the user’s icon if the Icons view is displayed, or click the user’s link (under the Username column) if the Details view is displayed.
The User page appears, with the user’s information displayed.
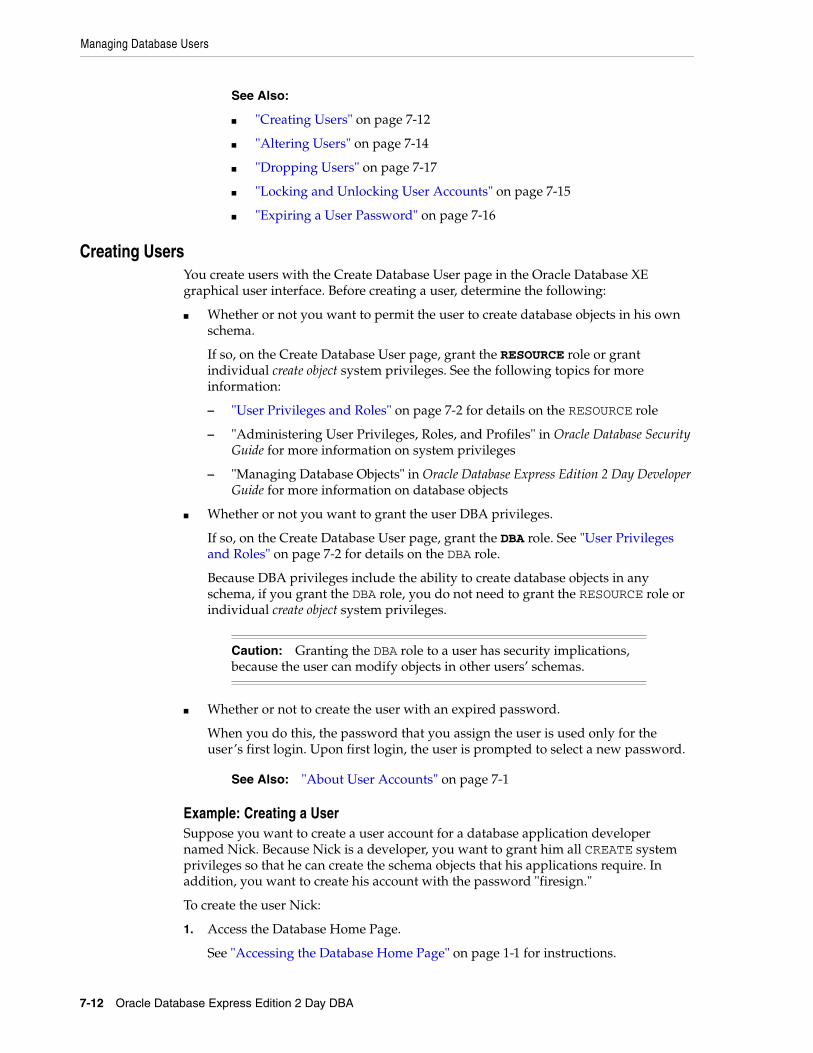
Managing Database Users
7-12 Oracle Database Express Edition 2 Day DBA
Creating UsersYou create users with the Create Database User page in the Oracle Database XE graphical user interface. Before creating a user, determine the following:
■ Whether or not you want to permit the user to create database objects in his own schema.
If so, on the Create Database User page, grant the RESOURCE role or grant individual create object system privileges. See the following topics for more information:
– "User Privileges and Roles" on page 7-2 for details on the RESOURCE role
– "Administering User Privileges, Roles, and Profiles" in Oracle Database Security Guide for more information on system privileges
– "Managing Database Objects" in Oracle Database Express Edition 2 Day Developer Guide for more information on database objects
■ Whether or not you want to grant the user DBA privileges.
If so, on the Create Database User page, grant the DBA role. See "User Privileges and Roles" on page 7-2 for details on the DBA role.
Because DBA privileges include the ability to create database objects in any schema, if you grant the DBA role, you do not need to grant the RESOURCE role or individual create object system privileges.
■ Whether or not to create the user with an expired password.
When you do this, the password that you assign the user is used only for the user’s first login. Upon first login, the user is prompted to select a new password.
Example: Creating a UserSuppose you want to create a user account for a database application developer named Nick. Because Nick is a developer, you want to grant him all CREATE system privileges so that he can create the schema objects that his applications require. In addition, you want to create his account with the password "firesign."
To create the user Nick:
1. Access the Database Home Page.
See "Accessing the Database Home Page" on page 1-1 for instructions.
See Also:
■ "Creating Users" on page 7-12
■ "Altering Users" on page 7-14
■ "Dropping Users" on page 7-17
■ "Locking and Unlocking User Accounts" on page 7-15
■ "Expiring a User Password" on page 7-16
Caution: Granting the DBA role to a user has security implications, because the user can modify objects in other users’ schemas.
See Also: "About User Accounts" on page 7-1
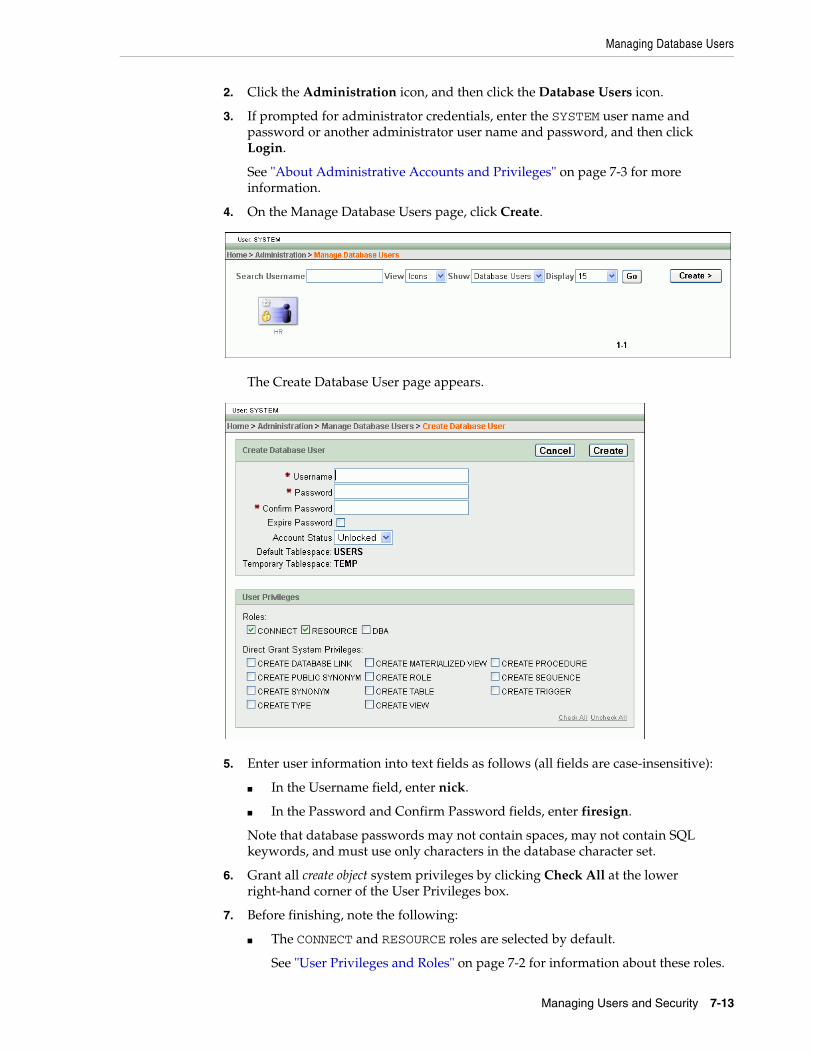
Managing Database Users
Managing Users and Security 7-13
2. Click the Administration icon, and then click the Database Users icon.
3. If prompted for administrator credentials, enter the SYSTEM user name and password or another administrator user name and password, and then click Login.
See "About Administrative Accounts and Privileges" on page 7-3 for more information.
4. On the Manage Database Users page, click Create.
The Create Database User page appears.
5. Enter user information into text fields as follows (all fields are case-insensitive):
■ In the Username field, enter nick.
■ In the Password and Confirm Password fields, enter firesign.
Note that database passwords may not contain spaces, may not contain SQL keywords, and must use only characters in the database character set.
6. Grant all create object system privileges by clicking Check All at the lower right-hand corner of the User Privileges box.
7. Before finishing, note the following:
■ The CONNECT and RESOURCE roles are selected by default.
See "User Privileges and Roles" on page 7-2 for information about these roles.
Managing Database Users
7-14 Oracle Database Express Edition 2 Day DBA
■ The DBA role is by default not selected. This is correct for Nick, because you do not want to give him DBA privileges, which include the ability to create schema objects in other users’ schemas, and to create other users.
■ The Account Status list defaults to Unlocked. This means that the user can log in with this account. Because you want Nick to be able to log in, you accept this default.
See "Locking and Unlocking User Accounts" on page 7-15 for more information.
8. Click Create.
The Manage Database Users page reappears and displays a confirmation that the user was created.
Altering UsersYou can use the Manage Database Users page to alter a user. Altering a user means changing some of his user attributes. You can change all user attributes except the user name, default tablespace, and temporary tablespace. If you want to change the user name, you must drop the user and re-create him with a different name. (Before you drop the user, ensure that the user’s schema objects are either no longer needed or are backed up (for example, by exporting them). See "Dropping Users" on page 7-17 for more information.)
One of the attributes that you can alter is the user password. If you do this, you must either communicate the new password to the user, or request the new password from the user and then enter it. An easier and more secure way to cause a password change is to expire the password. When you expire a password, the user is prompted to change his password the next time that he logs in. See "Expiring a User Password" on page 7-16 for more information.
Example: Altering a UserSuppose user Nick is promoted to senior developer, and he has shown an interest in helping with routine database administration tasks. You decide to grant the DBA role to Nick.
To alter Nick’s user account:
1. View the Manage Database Users page that contains the icon or link for user NICK.
See "Viewing Users" on page 7-9 for instructions.
2. Click the NICK icon or link.
The User page appears, with account information for user NICK displayed.
See Also:
■ "Locking and Unlocking User Accounts" on page 7-15
■ "Importing, Exporting, Loading, and Unloading Data" on page 10-1 for information on how to export and import a schema.
Managing Database Users
Managing Users and Security 7-15
3. Select the DBA check box to grant the DBA role to Nick.
4. Click Alter User to save your changes.
The Manage Database Users page reappears and displays a confirmation message that the user was altered.
Locking and Unlocking User AccountsTo temporarily deny access to the database for a particular user, you can lock the user account. If the user then attempts to connect, the database displays an error message and disallows the connection. You can unlock the user account when you want to allow database access again for that user.
To lock or unlock a user account:
1. View the Manage Database Users page that contains the icon or link for the user.
See "Viewing Users" on page 7-9 for instructions.
2. Click the icon or link for the user.
The User page appears, with the user account information displayed.
Note: Many internal user accounts are locked (or both expired and locked). You should not attempt to log in with these locked user accounts. See "Internal User Accounts" on page 7-3 for more information.
The HR user account, which contains a sample schema, is initially expired and locked. You must log in as SYSTEM, unlock the account, and assign a password before you can log in as HR.
Managing Database Users
7-16 Oracle Database Express Edition 2 Day DBA
3. Do one of the following:
■ To lock the account, select Locked from the Account Status list.
■ To unlock the account, select Unlocked from the Account Status list.
4. Click Alter User.
The Manage Database Users page reappears and displays a confirmation message. The large icon for the user now indicates whether the account is locked or unlocked by the presence or absence of a small lock. See "User Account Icons" on page 7-20 for examples of these large icons.
Expiring a User PasswordWhen you expire a user password, the user is prompted to change his password the next time that he logs in. Reasons to expire a password include the following:
■ A user password becomes compromised.
■ You have a security policy in place that requires users to change their passwords on a regular basis.
■ A user has forgotten his password.
In this case, you alter the user account, assign a new temporary password, and expire the password. The user then logs in with the temporary password and is prompted to choose a new password.
See "Altering Users" on page 7-14 for more information.
Example: Expiring a PasswordSuppose user Nick’s password becomes compromised, and you want to assign him a new one. The easiest way to do this is to expire his current password. The next time that Nick logs in with the compromised password, he is prompted to choose a new password.
To expire Nick’s password:
Managing Database Users
Managing Users and Security 7-17
1. View the Manage Database Users page that contains the icon or link for user NICK.
See "Viewing Users" on page 7-9 for instructions.
2. Click the NICK icon or link.
The User page appears, with account information for user NICK displayed.
3. Select the Expire Password check box, and then click Alter User.
The Manage Database Users page reappears and displays a confirmation message. The large icon for user NICK now contains a small clock. See "User Account Icons" on page 7-20 for examples of these large icons.
Dropping UsersDropping a user removes the user from the database. Before you can drop a user, you must first drop all the user’s schema objects. Or, you can use the cascade feature of the drop operation, which simultaneously drops a user and all his schema objects. The following are two alternatives to dropping a user and losing all the user’s schema objects:
■ To temporarily deny access to the database for a particular user while preserving the user’s schema objects, you can lock the user account. See "Locking and Unlocking User Accounts" on page 7-15 for more information.
■ To drop a user but retain the data from the user’s tables, export the tables first. See "Importing, Exporting, Loading, and Unloading Data" on page 10-1 for instructions.
Note: When you view the User page for a user whose password is expired, the Expire Password check box is replaced by the message Password Expired.

Managing Database Users
7-18 Oracle Database Express Edition 2 Day DBA
Example: Dropping a UserSuppose Nick’s project is canceled and Nick takes a position in another department. You want to drop the user NICK and all associated schema objects.
To drop user NICK and all his owned schema objects:
1. View the Manage Database Users page that contains the icon or link for NICK.
See "Viewing Users" on page 7-9 for instructions.
2. Click the NICK icon or link.
The User page appears, with account information for user NICK displayed.
3. Click Drop.
The Confirm Drop User page appears.
4. Select the Cascade check box.
This indicates that you want to drop the user’s schema objects also. If the user has schema objects and you do not select this option, you receive an error message if you attempt to complete the drop operation.
Caution: Under no circumstances should you attempt to drop the SYS or SYSTEM users, or any other internal user accounts. Doing so could cause Oracle Database XE to malfunction.

User Accounts Reference
Managing Users and Security 7-19
5. Click Drop User.
A confirmation message is displayed.
User Accounts ReferenceThis section provides reference information for managing user accounts. It covers the following topics:
■ Predefined User Accounts on page 7-19
■ User Account Icons on page 7-20
Predefined User AccountsTable 7–4 lists the Oracle Database XE predefined user accounts. Many of these accounts are internal accounts. You must not drop internal accounts, and with the exception of the accounts SYS and SYSTEM, you must not attempt to log in with an internal account.
Table 7–4 Oracle Database Express Edition Predefined User Accounts
User Account Name Purpose
ANONYMOUS Internal. Used for anonymous HTTP access to the database. Required by the Oracle Database XE graphical user interface. This account must remain unlocked. The account password is set upon installation (Windows) or configuration (Linux). For optimal security, avoid changing the password for this account.
CTXSYS Internal.
DBSNMP Internal.
DIP Internal.
FLOWS_version Internal.
FLOWS_FILES Internal.
HR For the HR sample schema. This account is initially expired and locked.
MDSYS Internal.
OUTLN Internal.
SYS Owns the data dictionary base tables and views. The account password is set upon installation (Windows) or configuration (Linux).
SYSTEM Log in with this account to perform routine database administration. The account password is set upon installation (Windows) or configuration (Linux).
TSMSYS Internal.
XDB Internal.
See Also:
■ "About User Accounts" on page 7-1
■ "About Administrative Accounts and Privileges" on page 7-3
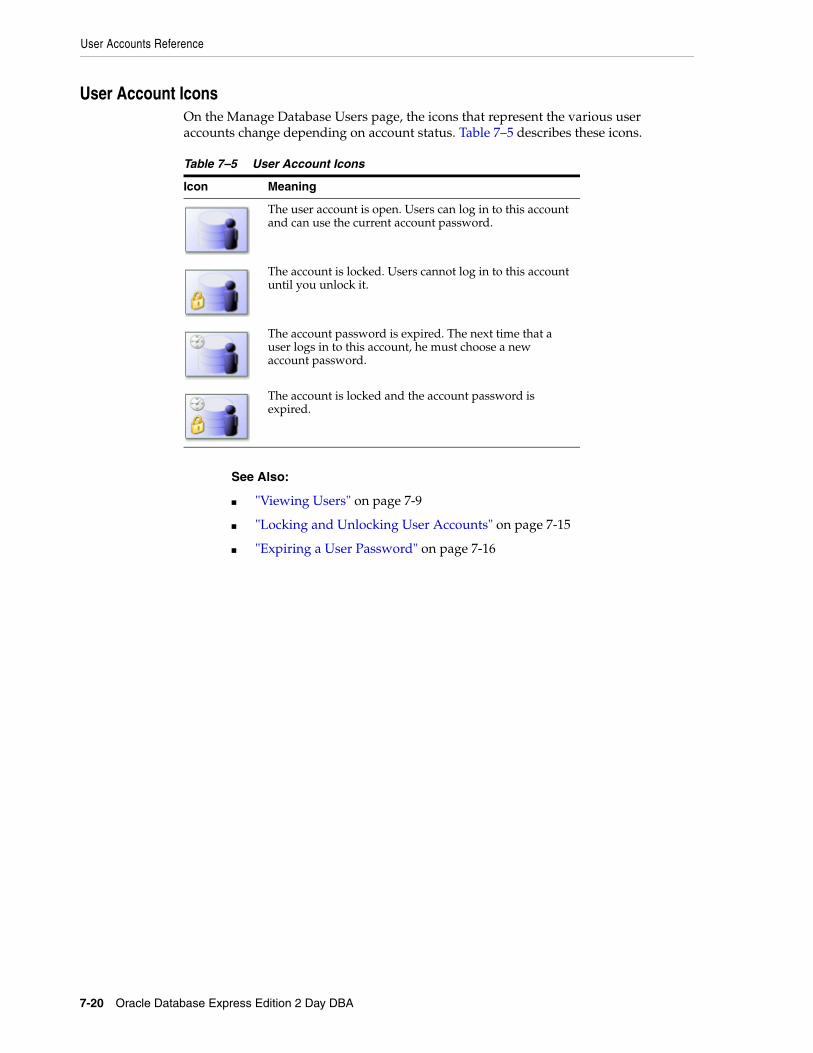
User Accounts Reference
7-20 Oracle Database Express Edition 2 Day DBA
User Account IconsOn the Manage Database Users page, the icons that represent the various user accounts change depending on account status. Table 7–5 describes these icons.
Table 7–5 User Account Icons
Icon Meaning
The user account is open. Users can log in to this account and can use the current account password.
The account is locked. Users cannot log in to this account until you unlock it.
The account password is expired. The next time that a user logs in to this account, he must choose a new account password.
The account is locked and the account password is expired.
See Also:
■ "Viewing Users" on page 7-9
■ "Locking and Unlocking User Accounts" on page 7-15
■ "Expiring a User Password" on page 7-16
Monitoring the Database 8-1
8Monitoring the Database
As an administrator, you can monitor the activities of the database and its users. You can use this information for tuning, troubleshooting, and more.
This section contains the following topics:
■ Monitoring Sessions on page 8-1
■ Monitoring System Statistics on page 8-3
■ Monitoring the Top SQL Statements on page 8-4
■ Monitoring Long Operations on page 8-5
Monitoring SessionsYou can use the Oracle Database XE graphical user interface to monitor the current database sessions. This enables you to determine the users who are currently logged in to the database and what applications they are running.
You can also use the Oracle Database XE graphical user interface to kill a session—to cause it to be disconnected and its resources to be relinquished.
This section contains the following topics:
■ Viewing Sessions on page 8-1
■ Killing (Terminating) a Session on page 8-3
Viewing SessionsWhen you view sessions, you can view:
■ All sessions
■ Active sessions only
■ Sessions that match a search string
The default session view shows active sessions only.
To view sessions:
1. Access the Database Home Page and log in as user SYSTEM.
See "Accessing the Database Home Page" on page 1-1 for instructions.
2. On the Database Home Page, click Administration, and then click Monitor.
3. On the Database Monitor page, click Sessions.
The Sessions page appears and displays the current active sessions.
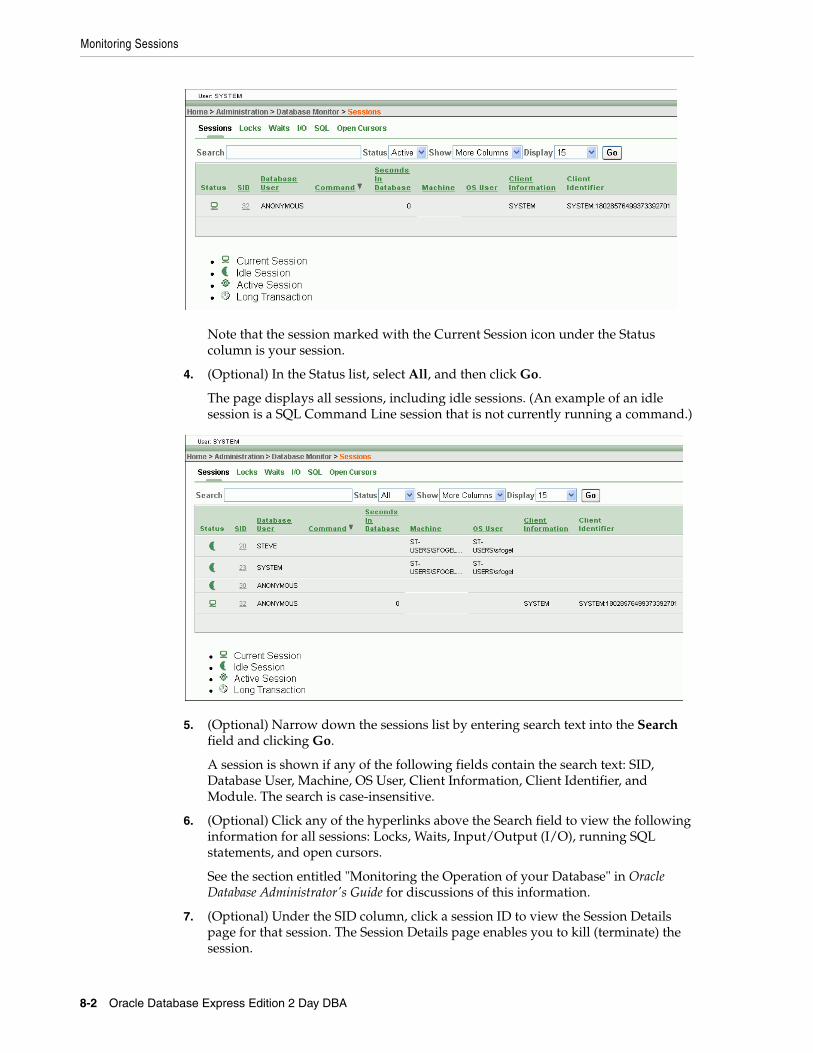
Monitoring Sessions
8-2 Oracle Database Express Edition 2 Day DBA
Note that the session marked with the Current Session icon under the Status column is your session.
4. (Optional) In the Status list, select All, and then click Go.
The page displays all sessions, including idle sessions. (An example of an idle session is a SQL Command Line session that is not currently running a command.)
5. (Optional) Narrow down the sessions list by entering search text into the Search field and clicking Go.
A session is shown if any of the following fields contain the search text: SID, Database User, Machine, OS User, Client Information, Client Identifier, and Module. The search is case-insensitive.
6. (Optional) Click any of the hyperlinks above the Search field to view the following information for all sessions: Locks, Waits, Input/Output (I/O), running SQL statements, and open cursors.
See the section entitled "Monitoring the Operation of your Database" in Oracle Database Administrator's Guide for discussions of this information.
7. (Optional) Under the SID column, click a session ID to view the Session Details page for that session. The Session Details page enables you to kill (terminate) the session.
Monitoring System Statistics
Monitoring the Database 8-3
Killing (Terminating) a SessionYou can use the Oracle Database XE graphical user interface to kill (terminate) a database session. This logs off and disconnects the user running the session. If the user is processing a transaction when you kill the session, the transaction is rolled back.
Reasons to kill a session include the following:
■ The session is not responding.
■ You want to perform an administrative function that requires all users to log off first, but the user is not available to end his session.
To kill a session:
1. View all sessions.
See "Viewing Sessions" on page 8-1 for instructions.
2. Under the SID column, click the session that you want to kill.
The Session Details page appears.
3. Click Kill Session.
A page appears, prompting you to verify the action.
4. Click Kill Session again.
Monitoring System StatisticsWith the System Statistics page of the Oracle Database XE graphical user interface, you can monitor the following types of database statistics:
■ Physical Input/Output (I/O)
■ Logical I/O
■ Memory usage
■ CPU time and wait events
■ SQL cursors
■ Transactions committed
This section contains the following topics:
■ Viewing System Statistics on page 8-3
■ Viewing the Delta in System Statistics on page 8-4
Viewing System StatisticsTo view system statistics:
1. Access the Database Home Page and log in as user SYSTEM.
See "Accessing the Database Home Page" on page 1-1 for instructions.
2. On the Database Home Page, click Administration, and then click Monitor.
3. On the Database Monitor page, click System Statistics.
The System Statistics page appears.
See Also: Oracle Database Performance Tuning Guide for definitions and discussions of the various system statistics.
Monitoring the Top SQL Statements
8-4 Oracle Database Express Edition 2 Day DBA
Viewing the Delta in System StatisticsYou can view the delta (relative change) in values between a saved set of statistics and the current set of statistics.
To view the delta in system statistics:
1. View the System Statistics page.
See "Viewing System Statistics" on page 8-3 for instructions.
2. (Optional) Click Refresh Report until you see the set of statistics that you want to use a your "base" set for comparison.
3. Click Save Statistics.
The Show delta between current and saved values check box is automatically selected.
4. Do one of the following:
■ Wait for some period of time, and then click Refresh Report.
■ Navigate elsewhere in the Oracle Database XE graphical user interface, and then return to the System Statistics page.
For each individual statistic, the delta between the saved statistic and the current statistic is displayed.
Monitoring the Top SQL StatementsThe "top" SQL statements represent the SQL statements that are executed most often, that use more system resources than other SQL statements, or that use system resources more frequently than other SQL statements. Viewing the top SQL statements report that is available in the Oracle Database XE graphical user interface enables you to focus your SQL tuning efforts on the statements that can have the most impact on database performance.
See Oracle Database Performance Tuning Guide for a discussion of tuning SQL statements.
To monitor the top SQL statements:
1. Access the Database Home Page and log in as user SYSTEM.
See "Accessing the Database Home Page" on page 1-1 for instructions.
2. On the Database Home Page, click Administration, and then click Monitor.
3. On the Database Monitor page, click Top SQL.
The Top SQL page appears.
4. (Optional) Select from the Top By list and click Go to change the statistic used to determine the statements that are the top SQL statements.
5. (Optional) Select from the Display Top list and click Go to change the number of SQL statements displayed in the report.
Note: Some of the statements that appear in the top SQL statements report may be from automatically scheduled internal database jobs (such as statistics gathering jobs) or from the Oracle Database XE graphical user interface itself.
Monitoring Long Operations
Monitoring the Database 8-5
6. (Optional) Do one or more of the following to narrow down the contents of the report:
■ Enter search text into the SQL Text field, and then click Go.
Only statements that contain the search text anywhere within them are displayed. The search is case-insensitive.
■ Enter a number into the Minimum Executions field, and then click Go.
Only statements with executions greater than or equal to the Minimum Executions value are displayed.
■ Enter a module name into the Module field by clicking the up-arrow icon to the right of the field, clicking a module name in the pop-up Search window, and then clicking Go.
Only statements run by the designated module are displayed.
7. (Optional) Click the magnifying glass icon to the left of the SQL statement to view the following information:
■ The complete statement text
■ The statement query plan
■ Descriptions of the tables involved in the statement
Monitoring Long OperationsThe Long Operations page of the Oracle Database XE graphical user interface displays statistics on various operations that run for longer than 6 seconds (in absolute time). These operations currently include many backup and recovery functions, statistics gathering operations, and query execution.
To monitor long operations:
1. Access the Database Home Page and log in as user SYSTEM.
See "Accessing the Database Home Page" on page 1-1 for instructions.
2. On the Database Home Page, click Administration, and then click Monitor.
3. On the Database Monitor page, click Long Operations.
The Long Operations page appears.
4. (Optional) Under the SID column, click a session ID to view the Session Details page for that session. The Session Details page enables you to kill the session.
See Also: "Killing (Terminating) a Session" on page 8-3

Monitoring Long Operations
8-6 Oracle Database Express Edition 2 Day DBA
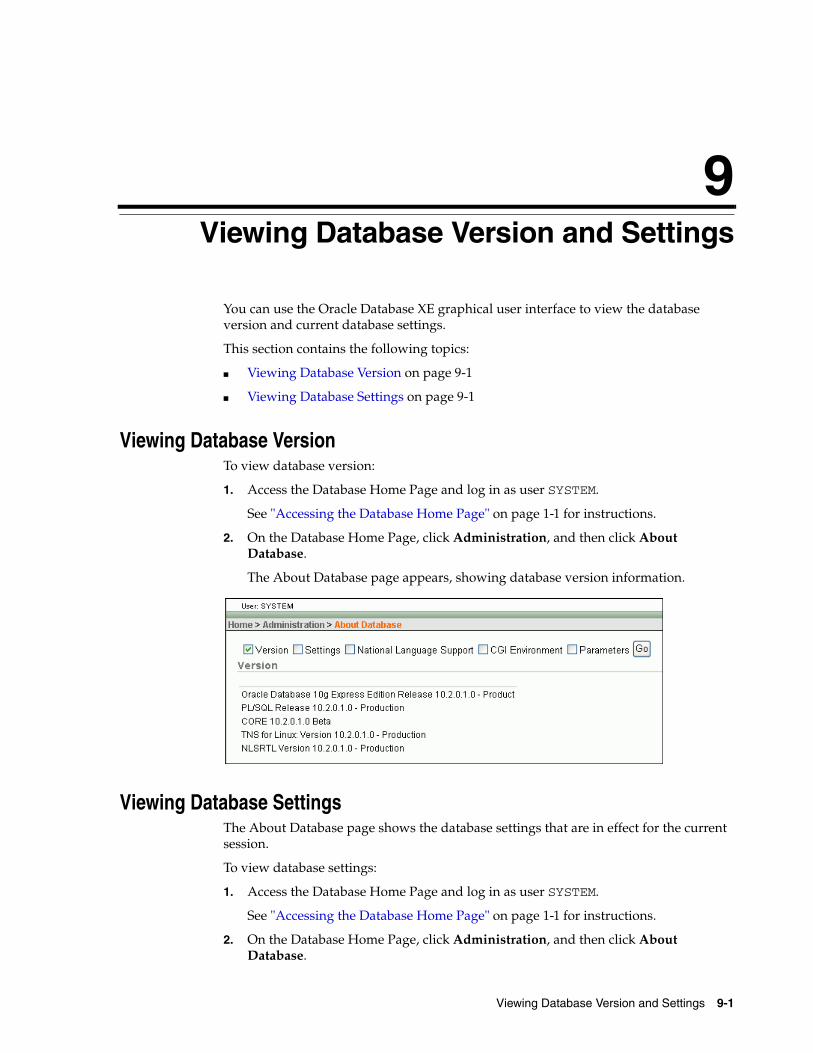
Viewing Database Version and Settings 9-1
9Viewing Database Version and Settings
You can use the Oracle Database XE graphical user interface to view the database version and current database settings.
This section contains the following topics:
■ Viewing Database Version on page 9-1
■ Viewing Database Settings on page 9-1
Viewing Database VersionTo view database version:
1. Access the Database Home Page and log in as user SYSTEM.
See "Accessing the Database Home Page" on page 1-1 for instructions.
2. On the Database Home Page, click Administration, and then click About Database.
The About Database page appears, showing database version information.
Viewing Database SettingsThe About Database page shows the database settings that are in effect for the current session.
To view database settings:
1. Access the Database Home Page and log in as user SYSTEM.
See "Accessing the Database Home Page" on page 1-1 for instructions.
2. On the Database Home Page, click Administration, and then click About Database.
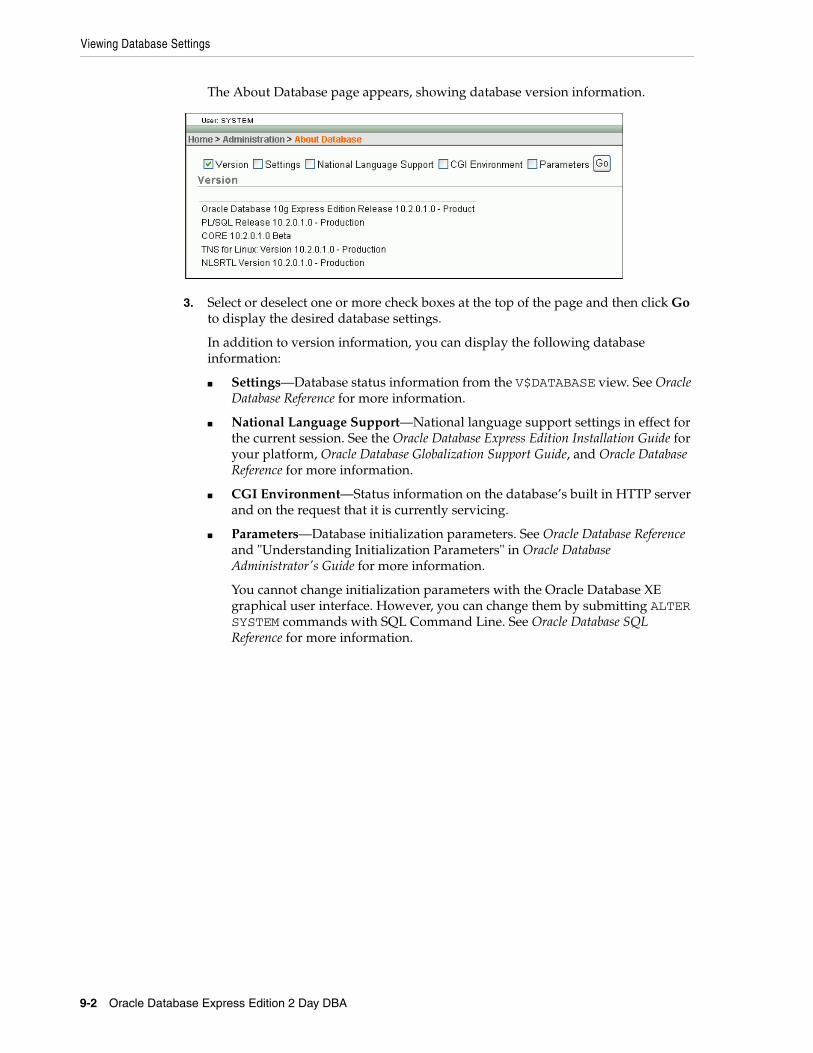
Viewing Database Settings
9-2 Oracle Database Express Edition 2 Day DBA
The About Database page appears, showing database version information.
3. Select or deselect one or more check boxes at the top of the page and then click Go to display the desired database settings.
In addition to version information, you can display the following database information:
■ Settings—Database status information from the V$DATABASE view. See Oracle Database Reference for more information.
■ National Language Support—National language support settings in effect for the current session. See the Oracle Database Express Edition Installation Guide for your platform, Oracle Database Globalization Support Guide, and Oracle Database Reference for more information.
■ CGI Environment—Status information on the database’s built in HTTP server and on the request that it is currently servicing.
■ Parameters—Database initialization parameters. See Oracle Database Reference and "Understanding Initialization Parameters" in Oracle Database Administrator's Guide for more information.
You cannot change initialization parameters with the Oracle Database XE graphical user interface. However, you can change them by submitting ALTER SYSTEM commands with SQL Command Line. See Oracle Database SQL Reference for more information.
Importing, Exporting, Loading, and Unloading Data 10-1
10Importing, Exporting, Loading, and
Unloading Data
This section describes how to import and export data and load and unload data with Oracle Database Express Edition (Oracle Database XE). It contains the following topics:
■ About Importing, Exporting, Loading, and Unloading Data on page 10-1
■ Choosing the Right Import/Export/Load/Unload Option on page 10-1
■ Unloading and Loading Data on page 10-3
■ Exporting and Importing Data on page 10-12
About Importing, Exporting, Loading, and Unloading DataOracle Database XE can copy data between itself and other Oracle databases, and between itself and external files. Data copying is accomplished by exporting and importing data, and by unloading and loading data. The following table defines these terms.
Data exported from any Oracle Database edition (Express Edition, Standard Edition, and Enterprise Edition), can be imported into any other edition.
Choosing the Right Import/Export/Load/Unload OptionOracle Database Express Edition (Oracle Database XE) provides a number of powerful options for importing, exporting, loading, and unloading data. Table 10–1 provides a summary of these options.
Term Definition
Exporting Copying database data to external files for import into another Oracle database only. The files are in a proprietary binary format.
Importing Copying data into the database from external files that were created by exporting from another Oracle database.
Unloading Copying database data to external text files for consumption by another Oracle database or another application (such as a spreadsheet application). The text files are in an industry-standard format such as tab-delimited or comma-delimited (CSV).
Loading Copying data into the database from external text files that are in either a standard delimited format or in any of the formats that are supported by the Oracle SQL*Loader utility.
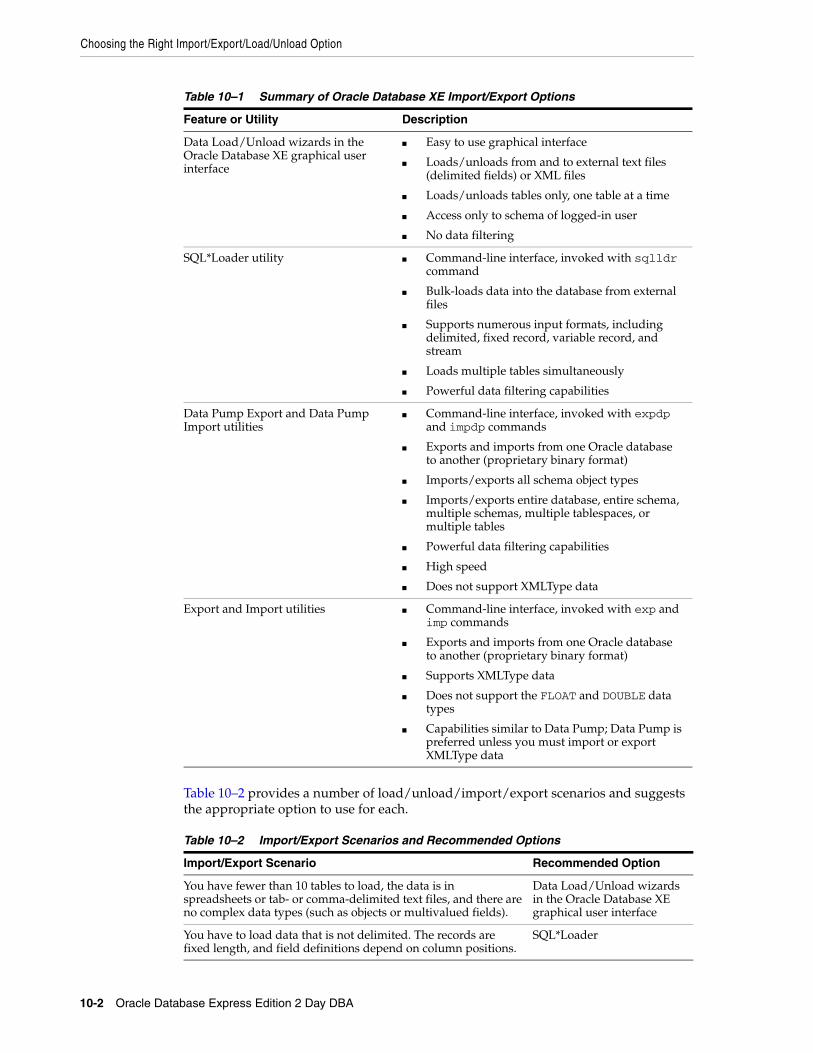
Choosing the Right Import/Export/Load/Unload Option
10-2 Oracle Database Express Edition 2 Day DBA
Table 10–2 provides a number of load/unload/import/export scenarios and suggests the appropriate option to use for each.
Table 10–1 Summary of Oracle Database XE Import/Export Options
Feature or Utility Description
Data Load/Unload wizards in the Oracle Database XE graphical user interface
■ Easy to use graphical interface
■ Loads/unloads from and to external text files (delimited fields) or XML files
■ Loads/unloads tables only, one table at a time
■ Access only to schema of logged-in user
■ No data filtering
SQL*Loader utility ■ Command-line interface, invoked with sqlldr command
■ Bulk-loads data into the database from external files
■ Supports numerous input formats, including delimited, fixed record, variable record, and stream
■ Loads multiple tables simultaneously
■ Powerful data filtering capabilities
Data Pump Export and Data Pump Import utilities
■ Command-line interface, invoked with expdp and impdp commands
■ Exports and imports from one Oracle database to another (proprietary binary format)
■ Imports/exports all schema object types
■ Imports/exports entire database, entire schema, multiple schemas, multiple tablespaces, or multiple tables
■ Powerful data filtering capabilities
■ High speed
■ Does not support XMLType data
Export and Import utilities ■ Command-line interface, invoked with exp and imp commands
■ Exports and imports from one Oracle database to another (proprietary binary format)
■ Supports XMLType data
■ Does not support the FLOAT and DOUBLE data types
■ Capabilities similar to Data Pump; Data Pump is preferred unless you must import or export XMLType data
Table 10–2 Import/Export Scenarios and Recommended Options
Import/Export Scenario Recommended Option
You have fewer than 10 tables to load, the data is in spreadsheets or tab- or comma-delimited text files, and there are no complex data types (such as objects or multivalued fields).
Data Load/Unload wizards in the Oracle Database XE graphical user interface
You have to load data that is not delimited. The records are fixed length, and field definitions depend on column positions.
SQL*Loader
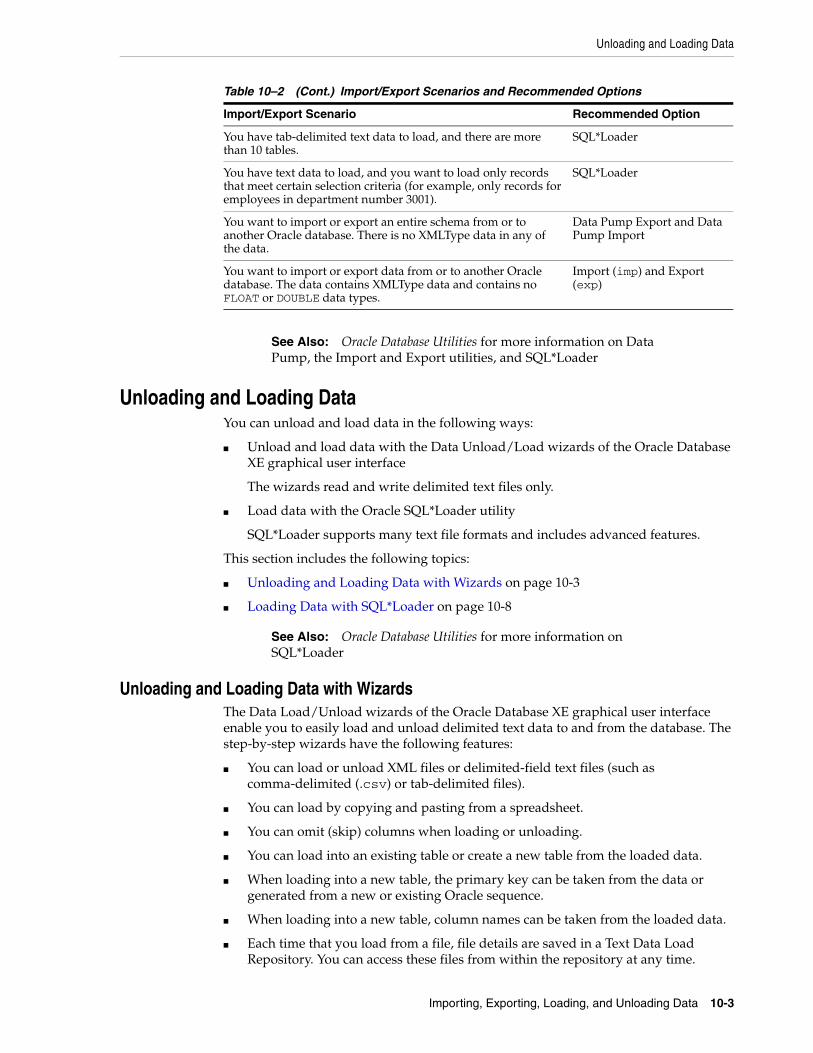
Unloading and Loading Data
Importing, Exporting, Loading, and Unloading Data 10-3
Unloading and Loading DataYou can unload and load data in the following ways:
■ Unload and load data with the Data Unload/Load wizards of the Oracle Database XE graphical user interface
The wizards read and write delimited text files only.
■ Load data with the Oracle SQL*Loader utility
SQL*Loader supports many text file formats and includes advanced features.
This section includes the following topics:
■ Unloading and Loading Data with Wizards on page 10-3
■ Loading Data with SQL*Loader on page 10-8
Unloading and Loading Data with WizardsThe Data Load/Unload wizards of the Oracle Database XE graphical user interface enable you to easily load and unload delimited text data to and from the database. The step-by-step wizards have the following features:
■ You can load or unload XML files or delimited-field text files (such as comma-delimited (.csv) or tab-delimited files).
■ You can load by copying and pasting from a spreadsheet.
■ You can omit (skip) columns when loading or unloading.
■ You can load into an existing table or create a new table from the loaded data.
■ When loading into a new table, the primary key can be taken from the data or generated from a new or existing Oracle sequence.
■ When loading into a new table, column names can be taken from the loaded data.
■ Each time that you load from a file, file details are saved in a Text Data Load Repository. You can access these files from within the repository at any time.
You have tab-delimited text data to load, and there are more than 10 tables.
SQL*Loader
You have text data to load, and you want to load only records that meet certain selection criteria (for example, only records for employees in department number 3001).
SQL*Loader
You want to import or export an entire schema from or to another Oracle database. There is no XMLType data in any of the data.
Data Pump Export and Data Pump Import
You want to import or export data from or to another Oracle database. The data contains XMLType data and contains no FLOAT or DOUBLE data types.
Import (imp) and Export (exp)
See Also: Oracle Database Utilities for more information on Data Pump, the Import and Export utilities, and SQL*Loader
See Also: Oracle Database Utilities for more information on SQL*Loader
Table 10–2 (Cont.) Import/Export Scenarios and Recommended Options
Import/Export Scenario Recommended Option
Unloading and Loading Data
10-4 Oracle Database Express Edition 2 Day DBA
Limitations include the following:
■ The wizards load and unload table data only. They do not load or unload other kinds of schema objects.
■ You can load and unload to and from your own schema only. This is also true for users with administrator privileges.
■ You can load or unload only a single table at a time.
■ There are no data type limitations for unloading to text or XML files, or for loading from XML files. However, when loading from spreadsheets (through copy and paste) or from text files, only the following data types are supported: NUMBER, DATE, VARCHAR2, CLOB, BINARY_FLOAT, and BINARY_DOUBLE.
This section contains the following examples of unloading and loading data with wizards:
■ Example: Unloading Data with the Unload Wizard
■ Example: Loading Data with the Load Wizard
Example: Unloading Data with the Unload WizardSuppose you want to unload the REGIONS table, which is part of the HR sample schema, so that it can be used in another application. Suppose also that you want to create a tab-delimited text file, and you want to save the data in a file called regions.txt.
To unload the REGIONS table:
1. Log in to the Oracle Database XE graphical user interface as the HR user.
See "Accessing the Database Home Page" on page 1-1 for information on getting logged in.
2. On the Database Home Page, click the Utilities icon, and then click the Data Load/Unload icon.
3. On the Data Load/Unload page, click the Unload icon, and then click the Unload to Text icon.
The Unload to Text page appears, showing the Schema wizard step. This wizard step displays a Schema list, in which HR is selected. Because you can unload from your own schema only, you cannot change this selection.
4. Click Next.
The Table Name wizard step appears.
5. From the Table list, select REGIONS, and then click Next.
The Columns wizard step appears.
Note: An administrator must first unlock the HR account and assign a password. See "Logging In as an Administrator" on page 7-5 and "Locking and Unlocking User Accounts" on page 7-15 for instructions.
Unloading and Loading Data
Importing, Exporting, Loading, and Unloading Data 10-5
6. Select all columns by clicking and dragging or by clicking and shift-clicking, and then click Next. (You can also select a subset of columns. Deselected columns are excluded from the unload operation.)
The Options wizard step appears.
7. Complete the following steps:
a. In the Separator field, remove the comma if present, and enter a backslash and a lowercase T (\t) to indicate that you want the tab character to be the field delimiter. (You can use any character as the delimiter.)
b. Select the Include Column Names check box.
This causes the first row unloaded to be the column names, rather than the first row of data. You can use this first row to set column names when you load.
c. In the File Character Set list, select Unicode UTF-8.
8. Click Unload Data.
A Save As window appears, with the file name regions.txt filled in. Depending on your browser, another window may precede the Save As window, asking you if you want to save or open the file. If so, take the option to save the file to disk.
9. Save the file regions.txt to the Desktop or to a directory of your choice.
10. (Optional) Open the regions.txt file with a text editor or spreadsheet application to verify that the REGIONS table was unloaded properly.
Example: Loading Data with the Load WizardSuppose your application calls for a REGIONS table, where each row contains a region number and a region name. Suppose also that you previously unloaded region data from a desktop database system into a tab-delimited text file named regions.txt.
You want to use the region number field in each record as a business key but not as the primary key, and you therefore decide to have the Load wizard generate a numeric primary key for each loaded record.
Note: You can complete the following steps with the regions.txt file that you create in "Example: Unloading Data with the Unload Wizard" on page 10-4.
Unloading and Loading Data
10-6 Oracle Database Express Edition 2 Day DBA
To load the REGIONS table:
1. Log in to the Oracle Database XE graphical user interface as any user other than SYSTEM or HR.
To log out first, click the Logout button at the upper right-hand corner of the page. See "Accessing the Database Home Page" on page 1-1 for information on getting logged in. If no database user other than SYSTEM or HR exists, create one. See "Creating Users" on page 7-12 for instructions.
2. On the Database Home Page, click the Utilities icon, and then click the Data Load/Unload icon.
3. On the Data Load/Unload page, click the Load icon, and then click the Load Text Data icon.
The Load Data page appears, showing the Target and Method wizard step.
4. Under the Load To heading, select New table, and under the Load From heading, select Upload file (comma separated or tab delimited).
5. Click Next.
The File Details wizard step appears.
6. Complete the following steps:
a. Click Browse, select the regions.txt file, and then click Open.
b. In the Separator field, replace the comma with a backslash and a lowercase T (\t) to indicate that the field delimiter is a tab character.
c. In the File Character Set list, select Unicode UTF-8.
d. Click Next.
The Table Properties wizard step appears.
7. Complete the following steps:
a. In the Table Name field, enter REGIONS.
Unloading and Loading Data
Importing, Exporting, Loading, and Unloading Data 10-7
b. Accept the default (Yes) in all Upload lists.
Setting Upload to No excludes the column from the load operation.
c. Click Next.
The Primary Key wizard step appears.
8. Complete the following steps:
a. Next to the Primary Key From label, select Create new column.
b. Next to the Primary Key Population label, select Generated from a new sequence.
These selections cause Oracle Database XE to:
■ Create an additional table column called ID, which is used as the primary key for REGIONS.
■ Create a new sequence called REGIONS_SEQ.
■ Use the values from the sequence to populate the ID field as each new row is added.
If you did not want to create a new primary key, and wanted to instead use the existing REGION_ID field as the primary key, you would do the following:
■ Select Use an existing column.
■ In the Primary Key list, select REGION_ID(NUMBER).
■ Select Not generated.
Unloading and Loading Data
10-8 Oracle Database Express Edition 2 Day DBA
9. Click the Load Data button.
The load proceeds, and when it is complete, the Text Data Load Repository page appears, showing the regions.txt file at the top of the list of loaded files.
10. Check the load status by looking under the Succeeded and Failed columns for the regions.txt file.
The numbers in these columns indicate the number of rows that were successfully loaded or that caused an error.
Loading Data with SQL*LoaderSQL*Loader loads data from external datafiles into tables of an Oracle database. A particular datafile can be in fixed record format, variable record format, or stream record format (the default).
The input for a typical SQL*Loader session is a control file, which controls the behavior of SQL*Loader, and some data, located either at the end of the control file itself, or in a separate datafile.
The output of a SQL*Loader session is an Oracle database (where the data is loaded), a log file, a "bad" file, and potentially, a discard file. The log file contains a detailed summary of the load, including a description of any errors that occurred during the load. The bad file contains records that were rejected, either by SQL*Loader or by the Oracle database. The discard file contains records that were filtered out of the load because they did not match any record-selection criteria specified in the control file.
Methods SQL*Loader Uses to Load DataSQL*Loader uses three different methods to load data, depending on the situation: conventional path, direct path, and external tables.
Conventional PathA conventional path load is the default loading method. It executes SQL INSERT statements to populate tables in an Oracle database. This method can sometimes be slower than other methods because extra overhead is added as SQL statements are generated, passed to Oracle, and executed. It can also be slower because when SQL*Loader performs a conventional path load, it competes equally with all other processes for buffer resources.
Direct PathA direct path load does not compete with other users for database resources. It eliminates much of the Oracle database overhead by formatting Oracle data blocks and writing them directly to the database files, bypassing much of the data processing that normally takes place. Therefore, a direct path load can usually load data faster than conventional path.
Unloading and Loading Data
Importing, Exporting, Loading, and Unloading Data 10-9
However, there are several restrictions on direct path loads that may require you to use a conventional path load. For example, direct path load cannot be used on clustered tables or on tables for which there are transactions pending.
See Oracle Database Utilities for a complete discussion of situations in which direct path load should and should not be used.
External TablesAn external table load creates an external table for data that is contained in a datafile. The load executes INSERT statements to insert the data from the datafile into the target table. An external table load allows modification of the data being loaded by using SQL functions and PL/SQL functions as part of the INSERT statement that is used to create the external table.
See Oracle Database Administrator's Guide for more information on external tables.
SQL*Loader FeaturesYou can use SQL*Loader to do the following:
■ Load data across a network. This means that you can run the SQL*Loader client on a different system from the one that is running the SQL*Loader server.
■ Load data from multiple data files during the same load session.
■ Load data into multiple tables during the same load session.
■ Specify the character set of the data.
■ Selectively load data (you can load records based on the records' values).
■ Manipulate the data before loading it, using SQL functions.
■ Generate unique sequential key values in specified columns.
■ Use the operating system's file system to access the datafiles.
■ Load data from disk, tape, or named pipe.
■ Generate sophisticated error reports, which greatly aid troubleshooting.
■ Load arbitrarily complex object-relational data.
■ Use secondary datafiles for loading LOBs and collections.
Example: Using SQL*LoaderIn the following example, a new table named dependents will be created in the HR sample schema. It will contain information about dependents of employees listed in the employees table of the HR schema. After the table is created, SQL*Loader will be used to load data about the dependents from a flat data file into the dependents table.
This example requires a data file and a SQL*Loader control file, which you will create in the first two steps.
1. Create the data file, dependents.dat, in your current working directory. You can create this file using a variety of methods, such as a spreadsheet application or by simply typing it into a text editor. It should have the following content:
100,"Susan, Susie",Kochhar,17-JUN-1997,daughter,101,NULL,102,David,Kochhar,02-APR-1999,son,101,NULL,104,Jill,Colmenares,10-FEB-1992,daughter,119,NULL,106,"Victoria, Vicki",Chen,17-JUN-1997,daughter,110,NULL,108,"Donald, Donnie",Weiss,24-OCT-1989,son,120,NULL,
Unloading and Loading Data
10-10 Oracle Database Express Edition 2 Day DBA
This file is a CSV (comma-separated values) file in which the commas act as delimiters between the fields. The field containing the first name is enclosed in double quotation marks in cases where a variant of the official name is also provided—that is, where the first name field contains a comma.
2. Create the SQL*Loader control file, dependents.ctl, in your current working directory. You can create this file with any text editor. It should have the following content:
LOAD DATAINFILE dependents.datINTO TABLE dependentsREPLACEFIELDS TERMINATED BY ',' OPTIONALLY ENCLOSED BY '"'(dep_id,first_name,last_name,birthdate,relation,relative_id,benefits)
3. Do one of the following:
■ On Linux: Start a terminal session and log in to the Oracle Database XE host computer with the oracle user account.
■ On Windows: Log in to the Oracle Database XE host computer as the user who installed Oracle Database XE, and then open a command window.
4. On Linux, ensure that environment variables are set according to the instructions in "Setting Environment Variables on the Linux Platform" on page 3-5.
5. Start SQL Command Line (SQL*Plus) and connect as user hr by entering the following at the command prompt:
sqlplus hr/hr
6. At the SQL prompt, create the dependents table, as follows:
CREATE TABLE dependents ( dep_id NUMBER(6), first_name VARCHAR2(20), last_name VARCHAR2(25) CONSTRAINT dep_last_name_nn NOT NULL, birthdate DATE, relation VARCHAR2(25), relative_id NUMBER(6) CONSTRAINT emp_dep_rel_id_fk REFERENCES employees (employee_id), benefits CLOB)/
The constraint on the last_name column indicates that a value must be provided. The constraint on the relative_id column indicates that it must match a value in the employee_id column of the employees table. The benefits column has a datatype of CLOB so that it can hold large blocks of character data. (In this example, there is not yet any benefits information available so the column is shown as NULL in the data file, dependents.dat.)

Unloading and Loading Data
Importing, Exporting, Loading, and Unloading Data 10-11
After you receive the Table created message, enter exit to exit SQL Command Line.
7. From within your current working directory (where you created the control and data files), issue the following SQL*Loader command at the system prompt:
sqlldr hr/hr DATA=dependents.dat CONTROL=dependents.ctl LOG=dependents.log
The data in the dependents.dat file is loaded into the dependents table and the following message is displayed:
Commit point reached - logical record count 5
Information about the load is written to the log file, dependents.log. The content of the log file looks similar to the following:
Copyright (c) 1982, 2005, Oracle. All rights reserved. Control File: dependents.ctlData File: dependents.dat Bad File: dependents.bad Discard File: none specified (Allow all discards) Number to load: ALLNumber to skip: 0Errors allowed: 50Bind array: 64 rows, maximum of 256000 bytesContinuation: none specifiedPath used: Conventional Table DEPENDENTS, loaded from every logical record.Insert option in effect for this table: REPLACE Column Name Position Len Term Encl Datatype------------------------------ ---------- ----- ---- ---- ---------------------DEP_ID FIRST * , O(") CHARACTER FIRST_NAME NEXT * , O(") CHARACTER LAST_NAME NEXT * , O(") CHARACTER BIRTHDATE NEXT * , O(") CHARACTER RELATION NEXT * , O(") CHARACTER RELATIVE_ID NEXT * , O(") CHARACTER BENEFITS NEXT * , O(") CHARACTER Table DEPENDENTS: 5 Rows successfully loaded. 0 Rows not loaded due to data errors. 0 Rows not loaded because all WHEN clauses were failed. 0 Rows not loaded because all fields were null. Space allocated for bind array: 115584 bytes(64 rows)Read buffer bytes: 1048576 Total logical records skipped: 0Total logical records read: 5Total logical records rejected: 0Total logical records discarded: 0
Exporting and Importing Data
10-12 Oracle Database Express Edition 2 Day DBA
Run began on Mon Dec 05 16:16:29 2005Run ended on Mon Dec 05 16:16:42 2005 Elapsed time was: 00:00:12.22CPU time was: 00:00:00.09
You can now work with the dependents table, as you would any other table.
Exporting and Importing DataOracle Database XE provides the following command-line utilities for exporting and importing data:
■ Data Pump Export and Data Pump Import
■ Export and Import
The following sections provide an overview of each utility. For a summary of when you might want to use each utility, see Table 10–2 on page 10-2.
■ Exporting and Importing with Data Pump Export and Data Pump Import on page 10-12
■ Exporting and Importing Data with the Export and Import Utilities on page 10-16
Exporting and Importing with Data Pump Export and Data Pump ImportThe Data Pump Export utility exports data and metadata into a set of operating system files called a dump file set. The Data Pump Import utility imports an export dump file set into a target Oracle database.
A dump file set is made up of one or more disk files that contain table data, database object metadata, and control information. The files are written in a proprietary, binary format, which means that the dump file set can be imported only by the Data Pump Import utility. The dump file set can be imported to the same database or it can be moved to another system and loaded into the Oracle database there.
Because the dump files are written by the database, rather than by the Data Pump client application, you must create directory objects for the directories to which files will be written. A directory object is a database object that is an alias for a directory in the host operating system’s file system.
Data Pump Export and Import enable you to move a subset of the data and metadata. This is done by using Data Pump parameters to specify export and import modes, as well as various filtering criteria.
You can also perform exports and imports over a network. In a network export, the data from the source database instance is written to a dump file set on the connected database instance. In a network import, a target database is loaded directly from a source database with no intervening dump files. This allows export and import operations to run concurrently, minimizing total elapsed time.
Data Pump Export and Import also provide a set of interactive commands so that you can monitor and modify ongoing export and import jobs.
See Also: Oracle Database Utilities for detail information on these utilities, including command line parameter descriptions and additional examples.
Exporting and Importing Data
Importing, Exporting, Loading, and Unloading Data 10-13
Example: Using Data Pump Export and Data Pump ImportIn this example, suppose that you want to make some changes to the HR sample schema and then test those changes without affecting the current HR schema. You could export the HR schema and then import it into a new HRDEV schema, where you could perform development work and conduct testing. To do this, take the following steps:
1. Do one of the following:
■ On Windows: Log in to the Oracle Database XE host computer as the user who installed Oracle Database XE, and then open a command window.
■ On Linux: Start a terminal session and log in to the Oracle Database XE host computer with the oracle user account.
2. On Linux, ensure that environment variables are set according to the instructions in "Setting Environment Variables on the Linux Platform" on page 3-5.
3. At the command prompt, issue the command appropriate to your operating system, to create the directory where the exported files will be placed:
On Windows:
MKDIR c:\oraclexe\app\tmp
On Linux:
mkdir /usr/lib/oracle/xe/tmp
4. Start SQL Command Line (SQL*Plus) and connect as user SYSTEM by entering the following at the command prompt:
sqlplus SYSTEM/password
where password is the password that you specified for the SYS and SYSTEM user accounts upon installation (Windows) or configuration (Linux) of Oracle Database XE.
5. At the SQL prompt, enter the following commands to create a directory object named dmpdir for the tmp directory that you just created, and to grant read and write access to it for user HR.
On Windows:
CREATE OR REPLACE DIRECTORY dmpdir AS ’c:\oraclexe\app\tmp’;GRANT READ,WRITE ON DIRECTORY dmpdir TO hr;
On Linux:
CREATE OR REPLACE DIRECTORY dmpdir AS ’/usr/lib/oracle/xe/tmp’;GRANT READ,WRITE ON DIRECTORY dmpdir TO hr;
6. Export the HR schema to a dump file named schema.dmp by issuing the following command at the system command prompt:
expdp SYSTEM/password SCHEMAS=hr DIRECTORY=dmpdir DUMPFILE=schema.dmp
Note: Data Pump Export and Data Pump Import do not support XMLType data. If you need to export and import XMLType data, use the Export and Import options described in "Exporting and Importing Data with the Export and Import Utilities" on page 10-16.
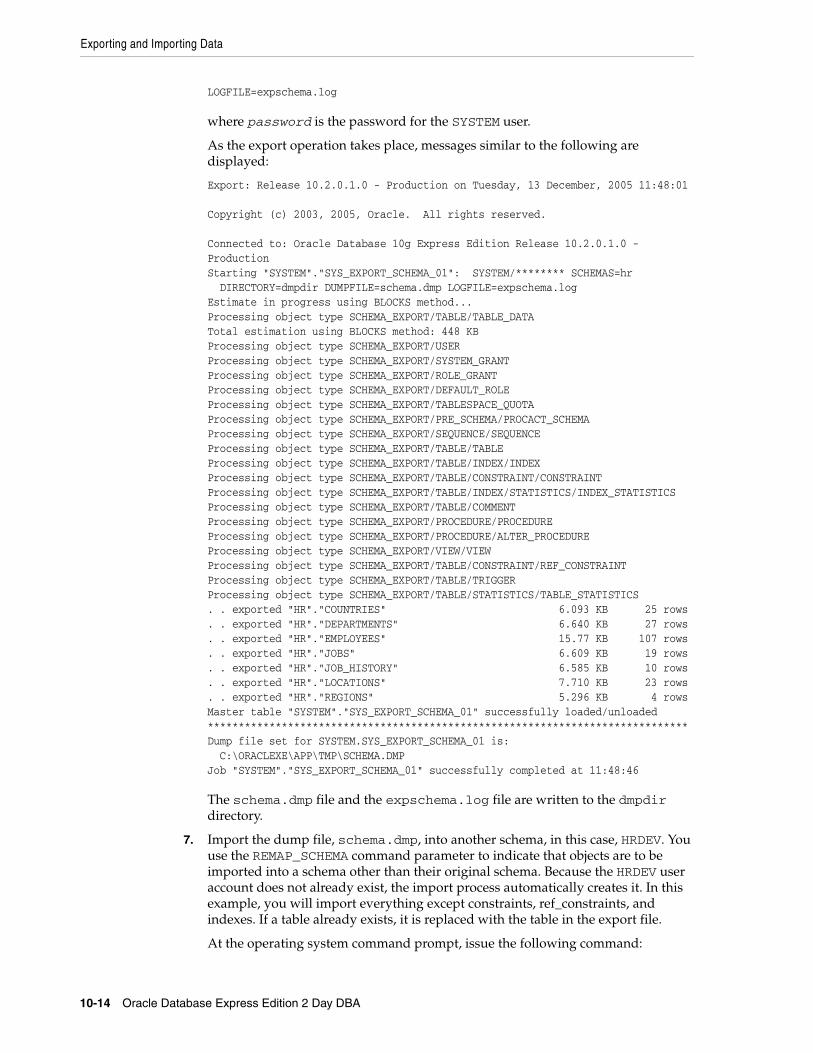
Exporting and Importing Data
10-14 Oracle Database Express Edition 2 Day DBA
LOGFILE=expschema.log
where password is the password for the SYSTEM user.
As the export operation takes place, messages similar to the following are displayed:
Export: Release 10.2.0.1.0 - Production on Tuesday, 13 December, 2005 11:48:01 Copyright (c) 2003, 2005, Oracle. All rights reserved. Connected to: Oracle Database 10g Express Edition Release 10.2.0.1.0 - ProductionStarting "SYSTEM"."SYS_EXPORT_SCHEMA_01": SYSTEM/******** SCHEMAS=hr DIRECTORY=dmpdir DUMPFILE=schema.dmp LOGFILE=expschema.log Estimate in progress using BLOCKS method...Processing object type SCHEMA_EXPORT/TABLE/TABLE_DATATotal estimation using BLOCKS method: 448 KBProcessing object type SCHEMA_EXPORT/USERProcessing object type SCHEMA_EXPORT/SYSTEM_GRANTProcessing object type SCHEMA_EXPORT/ROLE_GRANTProcessing object type SCHEMA_EXPORT/DEFAULT_ROLEProcessing object type SCHEMA_EXPORT/TABLESPACE_QUOTAProcessing object type SCHEMA_EXPORT/PRE_SCHEMA/PROCACT_SCHEMAProcessing object type SCHEMA_EXPORT/SEQUENCE/SEQUENCEProcessing object type SCHEMA_EXPORT/TABLE/TABLEProcessing object type SCHEMA_EXPORT/TABLE/INDEX/INDEXProcessing object type SCHEMA_EXPORT/TABLE/CONSTRAINT/CONSTRAINTProcessing object type SCHEMA_EXPORT/TABLE/INDEX/STATISTICS/INDEX_STATISTICSProcessing object type SCHEMA_EXPORT/TABLE/COMMENTProcessing object type SCHEMA_EXPORT/PROCEDURE/PROCEDUREProcessing object type SCHEMA_EXPORT/PROCEDURE/ALTER_PROCEDUREProcessing object type SCHEMA_EXPORT/VIEW/VIEWProcessing object type SCHEMA_EXPORT/TABLE/CONSTRAINT/REF_CONSTRAINTProcessing object type SCHEMA_EXPORT/TABLE/TRIGGERProcessing object type SCHEMA_EXPORT/TABLE/STATISTICS/TABLE_STATISTICS. . exported "HR"."COUNTRIES" 6.093 KB 25 rows. . exported "HR"."DEPARTMENTS" 6.640 KB 27 rows. . exported "HR"."EMPLOYEES" 15.77 KB 107 rows. . exported "HR"."JOBS" 6.609 KB 19 rows. . exported "HR"."JOB_HISTORY" 6.585 KB 10 rows. . exported "HR"."LOCATIONS" 7.710 KB 23 rows. . exported "HR"."REGIONS" 5.296 KB 4 rowsMaster table "SYSTEM"."SYS_EXPORT_SCHEMA_01" successfully loaded/unloaded******************************************************************************Dump file set for SYSTEM.SYS_EXPORT_SCHEMA_01 is: C:\ORACLEXE\APP\TMP\SCHEMA.DMPJob "SYSTEM"."SYS_EXPORT_SCHEMA_01" successfully completed at 11:48:46
The schema.dmp file and the expschema.log file are written to the dmpdir directory.
7. Import the dump file, schema.dmp, into another schema, in this case, HRDEV. You use the REMAP_SCHEMA command parameter to indicate that objects are to be imported into a schema other than their original schema. Because the HRDEV user account does not already exist, the import process automatically creates it. In this example, you will import everything except constraints, ref_constraints, and indexes. If a table already exists, it is replaced with the table in the export file.
At the operating system command prompt, issue the following command:
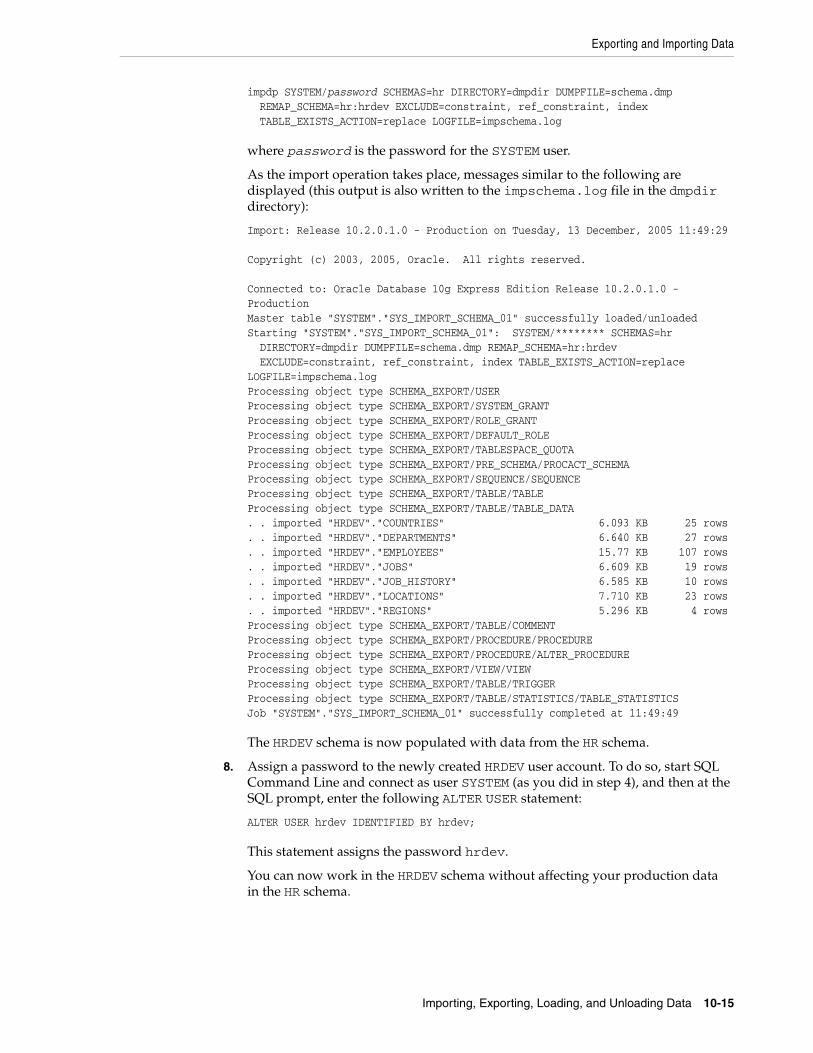
Exporting and Importing Data
Importing, Exporting, Loading, and Unloading Data 10-15
impdp SYSTEM/password SCHEMAS=hr DIRECTORY=dmpdir DUMPFILE=schema.dmp REMAP_SCHEMA=hr:hrdev EXCLUDE=constraint, ref_constraint, index TABLE_EXISTS_ACTION=replace LOGFILE=impschema.log
where password is the password for the SYSTEM user.
As the import operation takes place, messages similar to the following are displayed (this output is also written to the impschema.log file in the dmpdir directory):
Import: Release 10.2.0.1.0 - Production on Tuesday, 13 December, 2005 11:49:29 Copyright (c) 2003, 2005, Oracle. All rights reserved. Connected to: Oracle Database 10g Express Edition Release 10.2.0.1.0 - ProductionMaster table "SYSTEM"."SYS_IMPORT_SCHEMA_01" successfully loaded/unloadedStarting "SYSTEM"."SYS_IMPORT_SCHEMA_01": SYSTEM/******** SCHEMAS=hr DIRECTORY=dmpdir DUMPFILE=schema.dmp REMAP_SCHEMA=hr:hrdev EXCLUDE=constraint, ref_constraint, index TABLE_EXISTS_ACTION=replace LOGFILE=impschema.log Processing object type SCHEMA_EXPORT/USERProcessing object type SCHEMA_EXPORT/SYSTEM_GRANTProcessing object type SCHEMA_EXPORT/ROLE_GRANTProcessing object type SCHEMA_EXPORT/DEFAULT_ROLEProcessing object type SCHEMA_EXPORT/TABLESPACE_QUOTAProcessing object type SCHEMA_EXPORT/PRE_SCHEMA/PROCACT_SCHEMAProcessing object type SCHEMA_EXPORT/SEQUENCE/SEQUENCEProcessing object type SCHEMA_EXPORT/TABLE/TABLEProcessing object type SCHEMA_EXPORT/TABLE/TABLE_DATA. . imported "HRDEV"."COUNTRIES" 6.093 KB 25 rows. . imported "HRDEV"."DEPARTMENTS" 6.640 KB 27 rows. . imported "HRDEV"."EMPLOYEES" 15.77 KB 107 rows. . imported "HRDEV"."JOBS" 6.609 KB 19 rows. . imported "HRDEV"."JOB_HISTORY" 6.585 KB 10 rows. . imported "HRDEV"."LOCATIONS" 7.710 KB 23 rows. . imported "HRDEV"."REGIONS" 5.296 KB 4 rowsProcessing object type SCHEMA_EXPORT/TABLE/COMMENTProcessing object type SCHEMA_EXPORT/PROCEDURE/PROCEDUREProcessing object type SCHEMA_EXPORT/PROCEDURE/ALTER_PROCEDUREProcessing object type SCHEMA_EXPORT/VIEW/VIEWProcessing object type SCHEMA_EXPORT/TABLE/TRIGGERProcessing object type SCHEMA_EXPORT/TABLE/STATISTICS/TABLE_STATISTICSJob "SYSTEM"."SYS_IMPORT_SCHEMA_01" successfully completed at 11:49:49
The HRDEV schema is now populated with data from the HR schema.
8. Assign a password to the newly created HRDEV user account. To do so, start SQL Command Line and connect as user SYSTEM (as you did in step 4), and then at the SQL prompt, enter the following ALTER USER statement:
ALTER USER hrdev IDENTIFIED BY hrdev;
This statement assigns the password hrdev.
You can now work in the HRDEV schema without affecting your production data in the HR schema.
Exporting and Importing Data
10-16 Oracle Database Express Edition 2 Day DBA
Exporting and Importing Data with the Export and Import UtilitiesThe Export and Import utilities provide a simple way for you to transfer data objects between Oracle databases. They are invoked with the exp and imp commands, respectively. These utilities provide support for XMLType data, whereas the Data Pump Export and Import utilities do not.
When you run the Export utility against an Oracle database, objects (such as tables) are extracted, followed by their related objects (such as indexes, comments, and grants), if any. The extracted data is written to an export dump file. The dump file is an Oracle binary-format dump file that can be read only by the Import utility. The version of the Import utility cannot be earlier than the version of the Export utility used to create the dump file.
Like Data Pump Import and Export, data exported with the Export utility can be imported with the Import utility into the same or a different Oracle database.
See Oracle Database Utilities for further information about the Export and Import utilities and for examples of how to use them.
Note: The Export and Import utilities do not support the FLOAT and DOUBLE data types. If your data contains these types and does not contain XMLType data, you must use Data Pump Export and Import, described in "Exporting and Importing with Data Pump Export and Data Pump Import" on page 10-12.
Note: Dump files generated by the Export (exp) utility can only be imported by the Import (imp) utility; they cannot be imported with the Data Pump Import (impdp) utility.
Backing Up and Recovering 11-1
11Backing Up and Recovering
This section discusses backing up and restoring the entire database and recovering data from individual schema objects. It includes the following topics:
■ Backing Up and Restoring the Database on page 11-1
■ Viewing and Restoring Historical Data with Flashback Query on page 11-8
■ Recovering Dropped Tables on page 11-9
Backing Up and Restoring the DatabaseThis section includes the following topics:
■ About Backing Up and Restoring the Database on page 11-1
■ Enabling ARCHIVELOG Mode for Media Failure Protection on page 11-2
■ Backing Up the Database on page 11-4
■ Scheduling Automatic Backups on page 11-6
■ Restoring and Recovering the Database on page 11-6
About Backing Up and Restoring the DatabaseBacking up and restoring Oracle Database XE is based on protecting the physical files that make up the database: the datafiles, the control file, the server parameter file (SPFILE), and, if in ARCHIVELOG mode, the redo log files.
In Oracle Database XE, the database backup and recovery facility is based upon the Recovery Manager (RMAN) utility that is integrated into the database. Although there is an RMAN command line client similar to SQL Command Line, you do not need to interact with it directly to back up or restore your database. Oracle Database XE includes backup and restore scripts that you access using menu choices on your desktop. These scripts perform a full backup and restore of the entire database, and store backup files in the flash recovery area.
Automatic Management of Backup StorageOracle Database XE implements a backup retention policy that dictates that two complete backups of the database must be retained, to provide a level of redundant protection for the database. In ARCHIVELOG mode, all archived logs required for media recovery from either backup are also retained. The database automatically manages backups and archived logs in the flash recovery area, deleting any that are
See Also: "Recovery-Related Structures in the Flash Recovery Area" on page 6-5
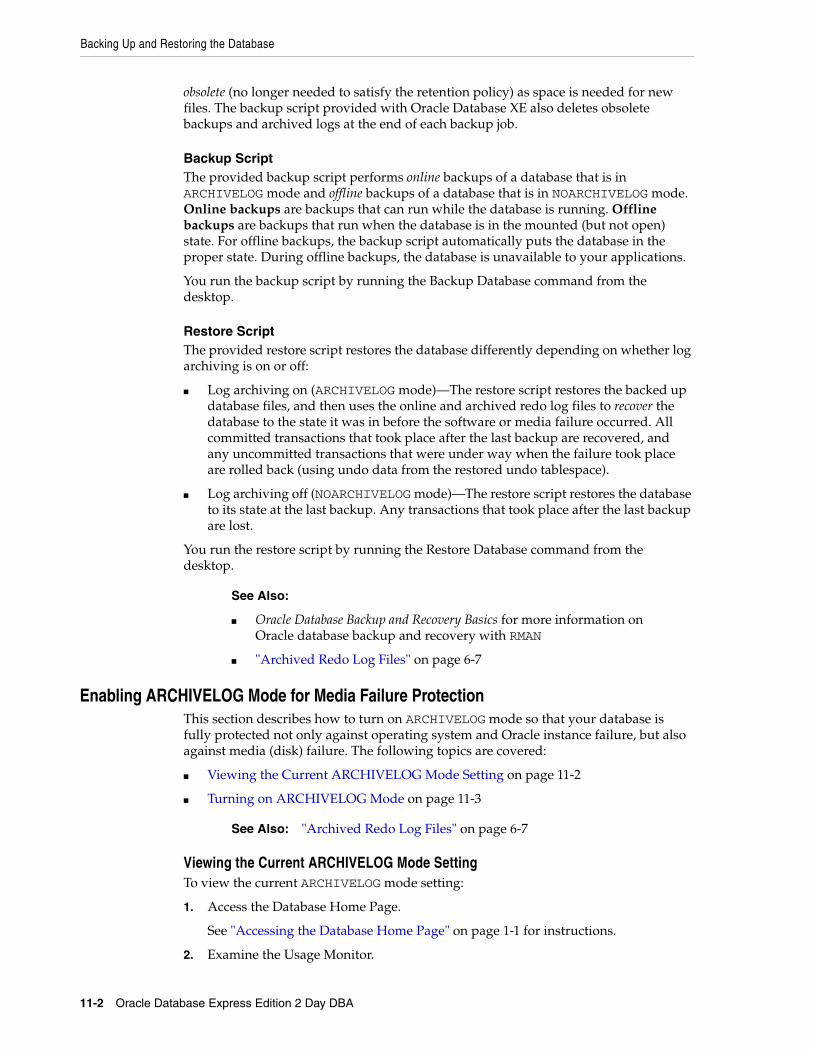
Backing Up and Restoring the Database
11-2 Oracle Database Express Edition 2 Day DBA
obsolete (no longer needed to satisfy the retention policy) as space is needed for new files. The backup script provided with Oracle Database XE also deletes obsolete backups and archived logs at the end of each backup job.
Backup ScriptThe provided backup script performs online backups of a database that is in ARCHIVELOG mode and offline backups of a database that is in NOARCHIVELOG mode. Online backups are backups that can run while the database is running. Offline backups are backups that run when the database is in the mounted (but not open) state. For offline backups, the backup script automatically puts the database in the proper state. During offline backups, the database is unavailable to your applications.
You run the backup script by running the Backup Database command from the desktop.
Restore ScriptThe provided restore script restores the database differently depending on whether log archiving is on or off:
■ Log archiving on (ARCHIVELOG mode)—The restore script restores the backed up database files, and then uses the online and archived redo log files to recover the database to the state it was in before the software or media failure occurred. All committed transactions that took place after the last backup are recovered, and any uncommitted transactions that were under way when the failure took place are rolled back (using undo data from the restored undo tablespace).
■ Log archiving off (NOARCHIVELOG mode)—The restore script restores the database to its state at the last backup. Any transactions that took place after the last backup are lost.
You run the restore script by running the Restore Database command from the desktop.
Enabling ARCHIVELOG Mode for Media Failure ProtectionThis section describes how to turn on ARCHIVELOG mode so that your database is fully protected not only against operating system and Oracle instance failure, but also against media (disk) failure. The following topics are covered:
■ Viewing the Current ARCHIVELOG Mode Setting on page 11-2
■ Turning on ARCHIVELOG Mode on page 11-3
Viewing the Current ARCHIVELOG Mode SettingTo view the current ARCHIVELOG mode setting:
1. Access the Database Home Page.
See "Accessing the Database Home Page" on page 1-1 for instructions.
2. Examine the Usage Monitor.
See Also:
■ Oracle Database Backup and Recovery Basics for more information on Oracle database backup and recovery with RMAN
■ "Archived Redo Log Files" on page 6-7
See Also: "Archived Redo Log Files" on page 6-7
Backing Up and Restoring the Database
Backing Up and Recovering 11-3
The Log Archiving mode is displayed in the last line of the Usage Monitor. In this example, the text "Log Archiving: Off" indicates that ARCHIVELOG mode is turned off.
Turning on ARCHIVELOG ModeTurning on ARCHIVELOG mode is a one-time operation. After it is turned on, it remains on until you turn it off. (You turn off ARCHIVELOG mode by setting NOARCHIVELOG mode.) Restarting the database does not change the ARCHIVELOG mode setting.
To turn on ARCHIVELOG mode:
1. Using SQL Command Line, log in to the database and connect as SYSDBA, as described in "Logging In and Connecting to the Database as SYSDBA" on page 7-7.
2. At the SQL Command Line prompt, enter the following command:
SHUTDOWN IMMEDIATE
If the command is successful, it displays the following output.
Database closed.Database dismounted.ORACLE instance shut down.
3. At the SQL Command Line prompt, enter the following command:
Note: If the Usage Monitor does not appear on the Database Home Page, click the Customize link near the upper right-hand corner of the page, and then enable the Usage Monitor.
Note: Click the Log Archiving: {On|Off} link to view a page that provides details on the online redo logs.
Note: If you turn on ARCHIVELOG mode, you must perform regular backups of the database to avoid completely filling the flash recovery area. A completely filled flash recovery area can lead to database failure.
Backing Up and Restoring the Database
11-4 Oracle Database Express Edition 2 Day DBA
STARTUP MOUNT
If the command is successful, it displays the following output. (System global area sizes will vary depending on the amount of physical memory in your Oracle Database XE host computer.)
ORACLE instance started. Total System Global Area 599785472 bytesFixed Size 1220804 bytesVariable Size 180358972 bytesDatabase Buffers 415236096 bytesRedo Buffers 2969600 bytesDatabase mounted.
4. Enter the following command:
ALTER DATABASE ARCHIVELOG;
If the command is successful, it displays the following output:
Database altered.
5. Enter the following command:
ALTER DATABASE OPEN;
If the command is successful, it displays the following output:
Database altered.
The database is now running with the new ARCHIVELOG mode setting.
6. Change the size of the flash recovery area to at least 15 gigabytes to allow for the extra space required for archived log files.
See "Changing the Flash Recovery Area Size" on page 6-16 for instructions.
Backing Up the DatabaseTo back up the database:
1. Do one of the following:
Note: To turn off ARCHIVELOG mode (that is, to set NOARCHIVELOG mode), follow the previous steps 1 through 5, but enter the following command in Step 4:
ALTER DATABASE NOARCHIVELOG;
Caution: When you change the ARCHIVELOG mode setting for your database, all of your existing backups become unusable. You must immediately perform a backup after changing the ARCHIVELOG mode, as described in "Backing Up the Database" on page 11-4.
See Also: "Shutting Down the Database Using SQL Command Line" on page 2-4 for information on how to handle a failed SHUTDOWN IMMEDIATE command.
Backing Up and Restoring the Database
Backing Up and Recovering 11-5
■ On Windows: Log in to the Oracle Database XE host computer as a user who is a member of the ORA_DBA user group. This is typically the user that installed Oracle Database XE.
■ On Linux: Log in to the Oracle Database XE host computer as a user who is a member of the dba user group. This is typically the oracle user.
See "Operating System Authentication" on page 7-4 for more information.
2. Do one of the following:
■ On Windows: Click Start, point to Programs (or All Programs), point to Oracle Database 10g Express Edition, and then select Backup Database.
■ On Linux with Gnome: In the Applications menu, point to Oracle Database 10g Express Edition, and then select Backup Database.
■ On Linux with KDE: Click the icon for the K Menu, point to Oracle Database 10g Express Edition, and then select Backup Database.
A console window opens so that you can interact with the backup script.
If running in ARCHIVELOG mode, the script displays the following output:
Doing online backup of the database.
If running in NOARCHIVELOG mode, the script displays the following output:
Warning: Log archiving (ARCHIVELOG mode) is currently disabled. Ifyou restore the database from this backup, any transactions that takeplace between this backup and the next backup will be lost. It isrecommended that you enable ARCHIVELOG mode before proceeding sothat all transactions can be recovered upon restore. See the section'Enabling ARCHIVELOG Mode...' in the online help for instructions.Backup with log archiving disabled will shut down and restart thedatabase. Are you sure [Y/N]?
3. If prompted, enter y and press Enter to confirm the database shutdown and begin the backup.
After the backup is complete, the script displays the following output:
Backup of the database succeeded.Log file is at locationPress ENTER key to exit
where location is the location of the log file.
4. Press Enter to close the Backup Database window.
Logs containing the output from the last two backups are stored in the locations listed in Table 11–1.
You can review the output of the two most recent backup attempts in the files OXE_BACKUP_CURRENT.LOG and OXE_BACKUP_PREVIOUS.LOG.
Table 11–1 Backup Script Output Log Locations
Platform Location
Linux $HOME/oxe_backup_current.log
$HOME/oxe_backup_previous.log
Windows C:\ORACLEXE\APP\ORACLE\PRODUCT\10.2.0\SERVER\DATABASE\OXE_BACKUP_CURRENT.LOG.
C:\ORACLEXE\APP\ORACLE\PRODUCT\10.2.0\SERVER\DATABASE\OXE_BACKUP_PREVIOUS.LOG.
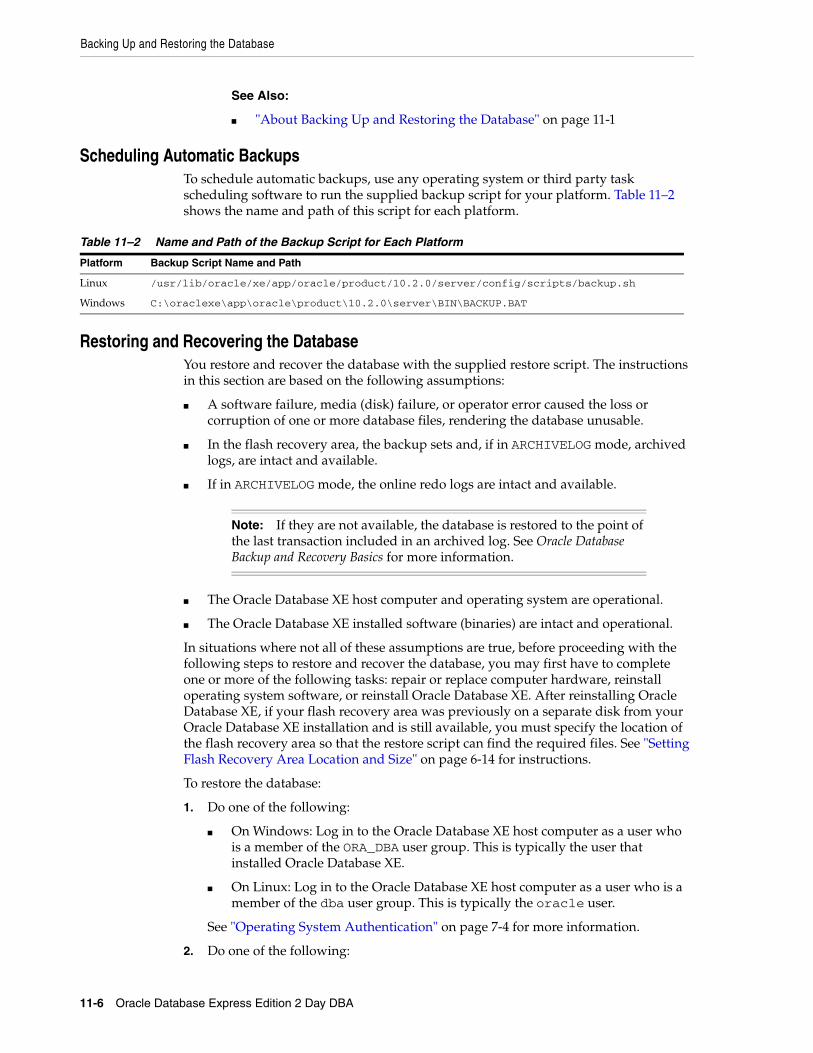
Backing Up and Restoring the Database
11-6 Oracle Database Express Edition 2 Day DBA
Scheduling Automatic BackupsTo schedule automatic backups, use any operating system or third party task scheduling software to run the supplied backup script for your platform. Table 11–2 shows the name and path of this script for each platform.
Restoring and Recovering the DatabaseYou restore and recover the database with the supplied restore script. The instructions in this section are based on the following assumptions:
■ A software failure, media (disk) failure, or operator error caused the loss or corruption of one or more database files, rendering the database unusable.
■ In the flash recovery area, the backup sets and, if in ARCHIVELOG mode, archived logs, are intact and available.
■ If in ARCHIVELOG mode, the online redo logs are intact and available.
■ The Oracle Database XE host computer and operating system are operational.
■ The Oracle Database XE installed software (binaries) are intact and operational.
In situations where not all of these assumptions are true, before proceeding with the following steps to restore and recover the database, you may first have to complete one or more of the following tasks: repair or replace computer hardware, reinstall operating system software, or reinstall Oracle Database XE. After reinstalling Oracle Database XE, if your flash recovery area was previously on a separate disk from your Oracle Database XE installation and is still available, you must specify the location of the flash recovery area so that the restore script can find the required files. See "Setting Flash Recovery Area Location and Size" on page 6-14 for instructions.
To restore the database:
1. Do one of the following:
■ On Windows: Log in to the Oracle Database XE host computer as a user who is a member of the ORA_DBA user group. This is typically the user that installed Oracle Database XE.
■ On Linux: Log in to the Oracle Database XE host computer as a user who is a member of the dba user group. This is typically the oracle user.
See "Operating System Authentication" on page 7-4 for more information.
2. Do one of the following:
See Also:
■ "About Backing Up and Restoring the Database" on page 11-1
Table 11–2 Name and Path of the Backup Script for Each Platform
Platform Backup Script Name and Path
Linux /usr/lib/oracle/xe/app/oracle/product/10.2.0/server/config/scripts/backup.sh
Windows C:\oraclexe\app\oracle\product\10.2.0\server\BIN\BACKUP.BAT
Note: If they are not available, the database is restored to the point of the last transaction included in an archived log. See Oracle Database Backup and Recovery Basics for more information.
Backing Up and Restoring the Database
Backing Up and Recovering 11-7
■ On Windows: Click Start, point to Programs (or All Programs), point to Oracle Database 10g Express Edition, and then select Restore Database.
■ On Linux with Gnome: In the Applications menu, point to Oracle Database 10g Express Edition, and then select Restore Database.
■ On Linux with KDE: Click the icon for the K Menu, point to Oracle Database 10g Express Edition, and then select Restore Database.
A console window opens so that you can interact with the restore script. The script displays the following output:
This operation will shut down and restore the database. Are you sure [Y/N]?
3. Enter y and press Enter to confirm the database restore.
The database is shut down, and the script runs RMAN to restore the database and, if running in ARCHIVELOG mode, recover all changes since the last backup.
If the restore and recovery process is completed successfully, the database is opened again. The script then displays the following output:
Restore of the database succeeded.Log file is at locationPress ENTER key to exit
where location is the location of the log file.
If the restore and recovery process fails, messages describing the error are displayed.
==================== ERROR ============================= Restore of the database Failed. RMAN Error - See log for details Log file is at location ==================== ERROR =============================
Refer to the log file for details on the cause of the error.
4. Press Enter to close the Restore Database window.
Note: In some situations, such as when you run the Restore Database command in a new Oracle Database XE installation before having backed up, the restore script may prompt you for the location of the flash recovery area:
Enter the flash recovery area location:
If so prompted, enter the complete path to the location of the flash recovery area. (The default location for each platform is listed in Table 6–2 on page 6-6.) The restore script then restores the database from the backup files in this location.
See Also:
■ "About Backing Up and Restoring the Database" on page 11-1
■ "Online Redo Log Files" on page 6-6
■ "Recovery-Related Structures in the Flash Recovery Area" on page 6-5

Viewing and Restoring Historical Data with Flashback Query
11-8 Oracle Database Express Edition 2 Day DBA
Viewing and Restoring Historical Data with Flashback QueryThe Flashback Query feature of Oracle Database Express Edition (Oracle Database XE) enables you to view data at a point in time in the past. You can then reconstruct lost data that was deleted or changed by accident.
This section contains the following topics:
■ About Flashback Query on page 11-8
■ Example: Recovering Data with Flashback Query on page 11-8
■ Tips for Using Flashback Query on page 11-8
About Flashback QueryWhen you write a Flashback Query, you add a clause to the SELECT statement that specifies either a time or a system change number (SCN). The query then uses the committed data from the corresponding time. The Flashback Query feature does not change any data; it queries only. It is up to you to analyze the historical data and then construct and issue data manipulation language (DML) statements to restore data.
The Flashback Query feature retrieves historical data by applying undo data as needed. The length of time that you can flash back therefore depends on the amount of undo data that is available. For more information on the Flashback Query feature, see the discussion of the AS OF clause for the SELECT statement in Oracle Database SQL Reference.
Example: Recovering Data with Flashback QueryThis example uses a Flashback Query to examine the state of a table at a previous time. Suppose that you discover at 12:30 p.m. that the row for employee Chung was deleted from the employees table. You also know that at 9:30 a.m. the data for Chung was correctly stored in the database. You can use a Flashback Query to examine the contents of the table at 9:30 a.m. to find out what data was lost. If appropriate, you can then reinsert the lost data.
Example 11–1 retrieves the state of the record for Chung at 9:30 a.m., April 4, 2005.
Example 11–1 Retrieving a Row with Flashback Query
SELECT * FROM employees AS OF TIMESTAMP TO_TIMESTAMP('2005-04-04 09:30:00', 'YYYY-MM-DD HH:MI:SS') WHERE last_name = 'Chung';
The update in Example 11–2 restores Chung's information to the employees table.
Example 11–2 Reinserting a Row After a Flashback Query
INSERT INTO employees (SELECT * FROM employees AS OF TIMESTAMP TO_TIMESTAMP('2005-04-04 09:30:00', 'YYYY-MM-DD HH:MI:SS') WHERE last_name = 'Chung');
Tips for Using Flashback QueryKeep the following in mind when using a Flashback Query (SELECT ... AS OF):
See Also:
■ "About Flashback Query" on page 11-8
Recovering Dropped Tables
Backing Up and Recovering 11-9
■ You can specify or omit the AS OF clause for each table in the query and specify different times for different tables. Use an AS OF clause in a query to perform data definition language (DDL) operations (such as creating and truncating tables) or DML operations (such as inserting and deleting) in the same session as the query.
■ To use the results of a Flashback Query in a DDL or DML statement that affects the current state of the database, use an AS OF clause inside an INSERT or CREATE TABLE AS SELECT statement.
Recovering Dropped TablesWhen you drop (delete) a table, the database does not immediately remove the space associated with the table. Instead, the database renames the table and places it and any dependent objects in a recycle bin, where, in case the table was dropped in error, it can be recovered at a later time.
This section contains the following topics:
■ About the Recycle Bin on page 11-9
■ Viewing Recycle Bin Contents on page 11-9
■ Example: Restoring a Table from the Recycle Bin on page 11-10
■ Purging the Recycle Bin on page 11-12
About the Recycle BinThe recycle bin is a data dictionary table containing information about dropped objects. Dropped objects and any dependent objects (such as indexes, constraints, nested tables, and so on) are not removed and still occupy space until you purge them from the recycle bin or until they are automatically purged by the database when available space becomes low.
You can restore objects from the recycle bin, which is equivalent to "undropping" them. When you restore an object, it is returned to the state that it was in before the drop operation. When you restore a table, all of the table’s dependent objects are also automatically restored.
You can use the Oracle Database XE graphical user interface to view the contents of the recycle bin, restore dropped objects, and purge objects from the recycle bin. To view, purge, or restore objects owned by a particular user, you must log in as that user.
Viewing Recycle Bin ContentsTo view recycle bin contents:
1. Access the Database Home Page, and log in as the owner of the schema of interest.
See "Accessing the Database Home Page" on page 1-1 for instructions.
Note: If you log in and connect as SYSDBA with SQL Command Line (SQL*Plus), you can view, restore, and purge objects owned by other users. See Oracle Database Administrator's Guide for details.
See Also:
■ "Logging In and Connecting to the Database as SYSDBA" on page 7-7
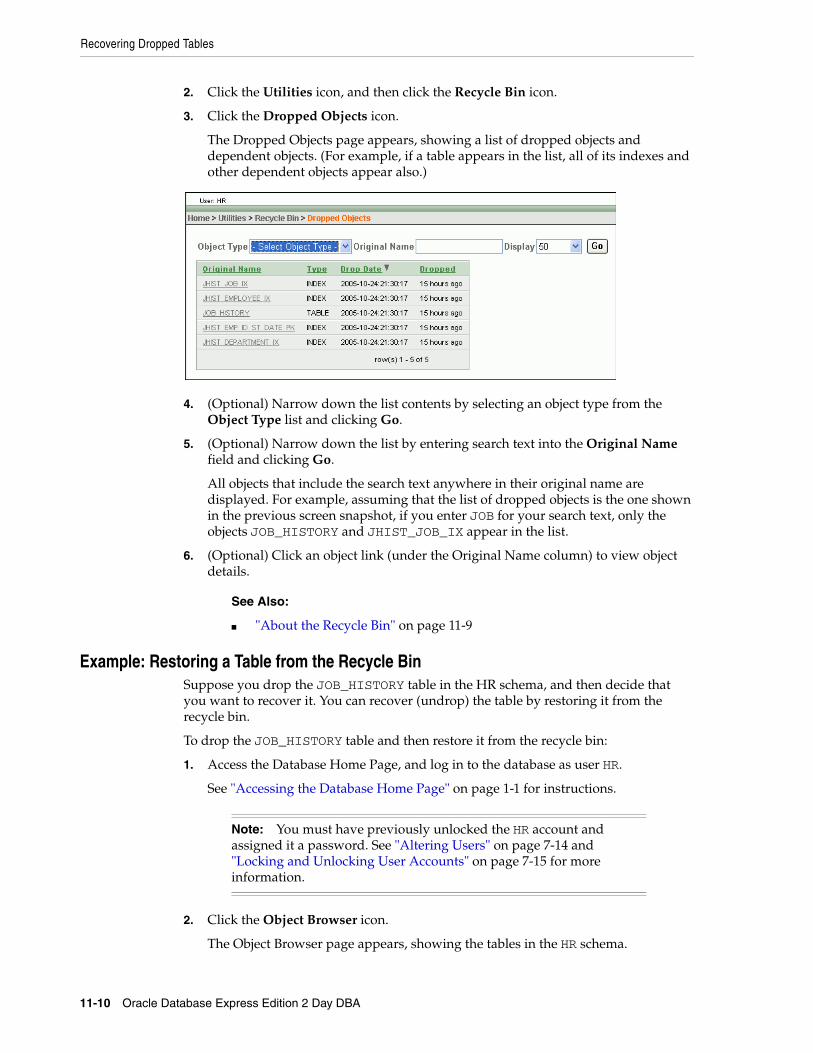
Recovering Dropped Tables
11-10 Oracle Database Express Edition 2 Day DBA
2. Click the Utilities icon, and then click the Recycle Bin icon.
3. Click the Dropped Objects icon.
The Dropped Objects page appears, showing a list of dropped objects and dependent objects. (For example, if a table appears in the list, all of its indexes and other dependent objects appear also.)
4. (Optional) Narrow down the list contents by selecting an object type from the Object Type list and clicking Go.
5. (Optional) Narrow down the list by entering search text into the Original Name field and clicking Go.
All objects that include the search text anywhere in their original name are displayed. For example, assuming that the list of dropped objects is the one shown in the previous screen snapshot, if you enter JOB for your search text, only the objects JOB_HISTORY and JHIST_JOB_IX appear in the list.
6. (Optional) Click an object link (under the Original Name column) to view object details.
Example: Restoring a Table from the Recycle BinSuppose you drop the JOB_HISTORY table in the HR schema, and then decide that you want to recover it. You can recover (undrop) the table by restoring it from the recycle bin.
To drop the JOB_HISTORY table and then restore it from the recycle bin:
1. Access the Database Home Page, and log in to the database as user HR.
See "Accessing the Database Home Page" on page 1-1 for instructions.
2. Click the Object Browser icon.
The Object Browser page appears, showing the tables in the HR schema.
See Also:
■ "About the Recycle Bin" on page 11-9
Note: You must have previously unlocked the HR account and assigned it a password. See "Altering Users" on page 7-14 and "Locking and Unlocking User Accounts" on page 7-15 for more information.
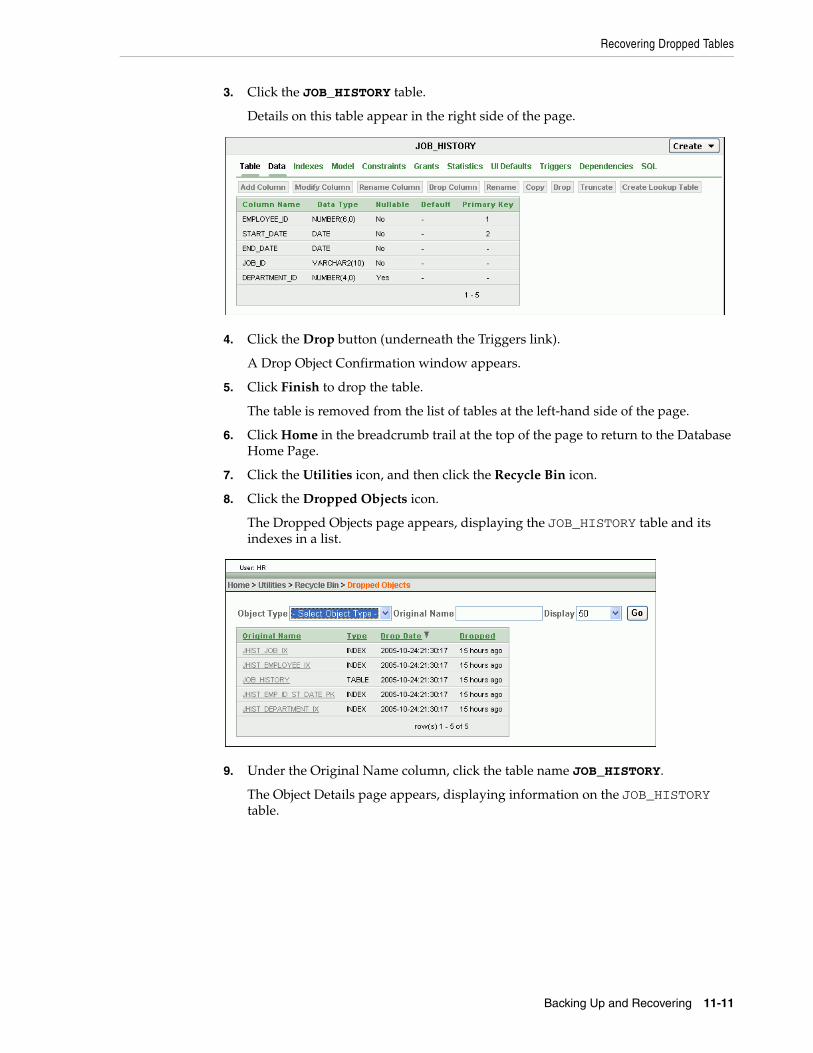
Recovering Dropped Tables
Backing Up and Recovering 11-11
3. Click the JOB_HISTORY table.
Details on this table appear in the right side of the page.
4. Click the Drop button (underneath the Triggers link).
A Drop Object Confirmation window appears.
5. Click Finish to drop the table.
The table is removed from the list of tables at the left-hand side of the page.
6. Click Home in the breadcrumb trail at the top of the page to return to the Database Home Page.
7. Click the Utilities icon, and then click the Recycle Bin icon.
8. Click the Dropped Objects icon.
The Dropped Objects page appears, displaying the JOB_HISTORY table and its indexes in a list.
9. Under the Original Name column, click the table name JOB_HISTORY.
The Object Details page appears, displaying information on the JOB_HISTORY table.
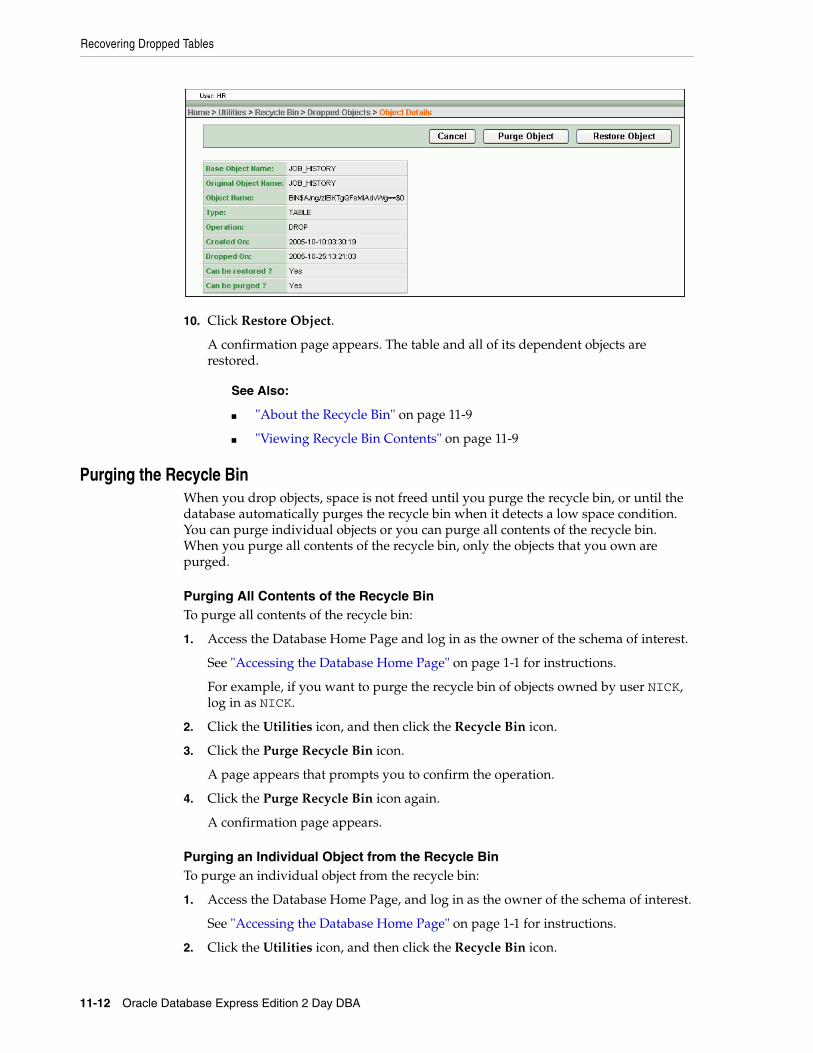
Recovering Dropped Tables
11-12 Oracle Database Express Edition 2 Day DBA
10. Click Restore Object.
A confirmation page appears. The table and all of its dependent objects are restored.
Purging the Recycle BinWhen you drop objects, space is not freed until you purge the recycle bin, or until the database automatically purges the recycle bin when it detects a low space condition. You can purge individual objects or you can purge all contents of the recycle bin. When you purge all contents of the recycle bin, only the objects that you own are purged.
Purging All Contents of the Recycle BinTo purge all contents of the recycle bin:
1. Access the Database Home Page and log in as the owner of the schema of interest.
See "Accessing the Database Home Page" on page 1-1 for instructions.
For example, if you want to purge the recycle bin of objects owned by user NICK, log in as NICK.
2. Click the Utilities icon, and then click the Recycle Bin icon.
3. Click the Purge Recycle Bin icon.
A page appears that prompts you to confirm the operation.
4. Click the Purge Recycle Bin icon again.
A confirmation page appears.
Purging an Individual Object from the Recycle BinTo purge an individual object from the recycle bin:
1. Access the Database Home Page, and log in as the owner of the schema of interest.
See "Accessing the Database Home Page" on page 1-1 for instructions.
2. Click the Utilities icon, and then click the Recycle Bin icon.
See Also:
■ "About the Recycle Bin" on page 11-9
■ "Viewing Recycle Bin Contents" on page 11-9
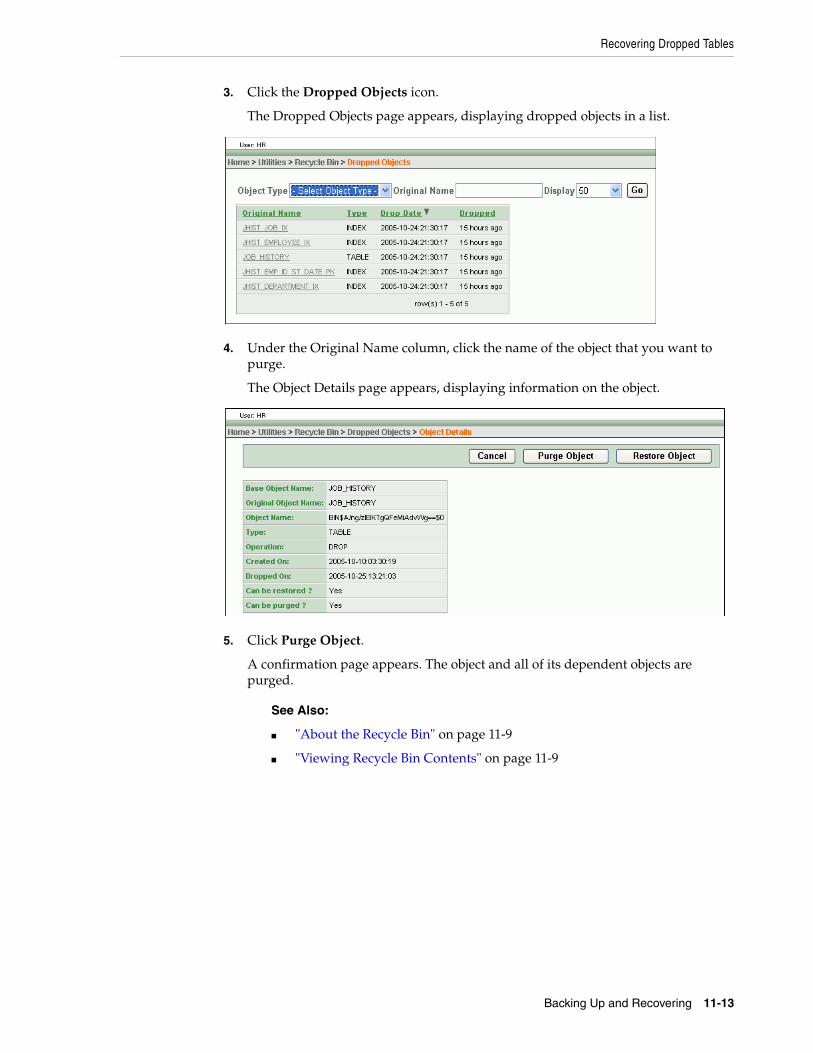
Recovering Dropped Tables
Backing Up and Recovering 11-13
3. Click the Dropped Objects icon.
The Dropped Objects page appears, displaying dropped objects in a list.
4. Under the Original Name column, click the name of the object that you want to purge.
The Object Details page appears, displaying information on the object.
5. Click Purge Object.
A confirmation page appears. The object and all of its dependent objects are purged.
See Also:
■ "About the Recycle Bin" on page 11-9
■ "Viewing Recycle Bin Contents" on page 11-9

Recovering Dropped Tables
11-14 Oracle Database Express Edition 2 Day DBA
Index-1
Index
Aadministrative user accounts, 7-3
logging in to, 7-5SYS, 7-4SYSTEM, 7-3
allocated spacein tablespaces, 6-11
altering user account attributes, 7-14passwords, 7-14user names, 7-14
Application Express, 1-1ARCHIVELOG mode, 6-7
setting, 11-2, 11-3viewing current setting, 11-2
archiving redo log files, 6-7attributes, user accounts
altering, 7-14authentication
operating system, 7-4
Bbacking up the database
about, 11-1how to, 11-4scheduling, 11-6script, 11-4
backupretention policy, 11-1script, 11-2storage
automatic management of, 11-1base, 9-1breadcrumbs
using to navigate the graphical user interface, 1-6
Cchanging
administrative user passwords, 7-9user account attributes, 7-14
passwords, 7-14user names, 7-14
client softwareInstant Client, 3-3
Oracle Database Express Edition Client, 3-3compacting storage space, 6-9CONNECT role, 7-2connect strings
elements of, 3-3connecting to Oracle Database XE
from your application, 3-1using SQL Command Line
locally, 3-2, 3-6remotely, 3-3, 3-7
with the SYSDBA privilege, 7-4control file
defined, 6-4control files
SQL*Loader, 10-8conventional path loads
SQL*Loader utility, 10-8CREATE TABLESPACE command, 6-4creating
tablespaces, 6-4users, 7-12
Ddata dictionary tables
access to as user SYS, 7-4Data Pump
purpose, 3-1Data Pump Export utility, 10-12
dump file set, 10-12Data Pump Import utility, 10-12database
defined, 6-2initialization parameters, 6-4, 9-2settings
viewing, 9-1version
viewing, 9-1database administration
privileges required, 7-3Database Home Page
accessing, 1-1from the desktop, 1-3with Web browser from a remote
computer, 1-4with Web browser from the local
Index-2
computer, 1-3enabling for remote users, 4-8navigating using breadcrumbs, 1-6
database storage structureslogical, 6-1physical, 6-1
datafiledefined, 6-4
DBA role, 7-2security implications, 7-12
direct path loadsSQL*Loader utility, 10-8
directory object, 10-12dropped tables
and the recycle bin, 11-9recovering, 11-9
dropping user accounts, 7-1, 7-17
Eenabling
Oracle Database XE graphical user interface for remote computers, 4-8
environment variablesand the listener on Linux, 4-3required for connecting with Oracle utilities, 3-7scripts, 3-8
invoking, 3-8setting
on Linux, 3-5on Windows, 3-5
using scripts to set, 3-8expiring passwords
how to, 7-16reasons for, 7-16
Export utility, 10-16purpose, 3-1
exporting data, 10-1summary of available methods, 10-1with Data Pump Export, 10-12with the Export utility, 10-16
external table loadSQL*Loader utility, 10-9
Ffiltering data
using Data Pump Export utility, 10-12flash recovery area
defined, 6-5location of, 6-5managing, 6-13monitoring space in, 6-13setting location, 6-14setting size, 6-14structures in, 6-5
Flashback Querytips for using, 11-8using to retrieve historical data, 11-8
ftp connection requests for XML DB repository
and the listener, 4-2
Ggraphical user interface
enabling for remote users, 4-8
HHelp, online
Oracle Database XE, 1-4historical data
retrieving with Flashback Query, 11-8home page
See Database Home Page, 1-1HR sample schema, 7-15HR user account, 7-15HTTP
connection requests, 4-2enabling remote, 4-8
IImport utility, 10-16
purpose, 3-1importing data, 10-1
summary of available methods, 10-1with Data Pump Import, 10-12with the Import utility, 10-16
initialization parameters, databasechanging, 6-4, 9-2viewing, 6-4, 9-2
Instant Clientaccessing, 3-3
internal schemas, 7-3internal user accounts, 7-3
SYSTEM, 7-3
LLD_LIBRARY_PATH environment variable, 3-8listener
and environment variables on Linux, 4-3and ftp connection requests, 4-2configuration of, 4-1port numbers
changing, 4-5starting, 4-4stopping, 4-4types of requests handled by, 4-1viewing status of, 4-3
Listener Control utility (lsnrctl), 4-3listener.ora file
changing port numbers in, 4-6location of, 4-6
Load wizardusing to load data, 10-5
loading data, 10-1with SQL*Loader utility, 10-8with the Load wizard, 10-5
local connections
Index-3
required environment variables, 3-7locator links
using to navigate the graphical user interface, 1-6locking user accounts, 7-15log writer process (LGWR)
writing to online redo log files, 6-6logging in to Oracle Database XE, 1-3, 1-4
as an administrator, 1-3, 1-4, 7-5logical storage, 6-1
MManage HTTP Access page, 4-8managing
database users, 7-9memory, 5-1network connections, 4-1storage, 6-1
memoryallocation in Oracle Database XE, 5-1, 5-5insufficient, 5-3managing, 5-1types of
program global area (PGA), 5-1system global area (SGA), 5-1
monitoringspace in flash recovery area, 6-13storage space usage, 6-8
monitoring the databasecurrent sessions, 8-1long operations, 8-5most-used SQL statements, 8-4system statistics, 8-3
Nnavigating the Oracle Database XE graphical user
interfaceusing breadcrumbs, 1-6using icons or menus, 1-5
network connectionsand the Oracle Net Listener, 4-1managing, 4-1
NLS_LANG environment variable, 3-8NOARCHIVELOG mode, 6-7
Oobject privileges, 7-2online redo log files
defined, 6-6operating system authentication
See OS authenticationOracle Application Express, 1-1Oracle Database Express Edition Client
accessing, 3-3Oracle Database XE
online Help, 1-4Oracle Net
used in remote connections, 4-1Oracle Net listener
See listenerOracle utilities, 3-1ORACLE_HOME environment variable, 3-8ORACLE_SID environment variable, 3-8OS authentication, 7-4
user groups, 7-5security of adding new members, 7-5
Ppassword file, 6-5passwords
altering for user accounts, 7-14expiring, 7-16restrictions, 7-13
PATH environment variable, 3-8PGA
See program global areaPGA Aggregate, 5-3PGA Aggregate Target parameter, 5-3physical storage, 6-1port numbers
changingfor database connection requests, 4-6for HTTP connection requests, 4-7
changing in listener.ora file, 4-6on Linux, 4-2on Windows
default for HTTP requests, 4-2predefined roles, 7-2predefined user accounts, 7-19privileges
administrative, 7-3object, 7-2required for database administration, 7-3system, 7-2
SYSDBA, 7-4user, 7-2
using roles to manage, 7-2program global area (PGA), 5-1
default size, 5-3when to change size of, 5-3
purging the recycle bin, 11-12
Rrecovering dropped tables, 11-9recycle bin
and dropped tables, 11-9purging, 11-12viewing contents of, 11-9
redo logand data protection, 6-7ARCHIVELOG mode, 6-7archiving, 6-7NOARCHIVELOG mode, 6-7
redo log filescircular use of, 6-6defined, 6-6in the flash recovery area, 6-5

Index-4
LGWR and the, 6-6moving, 6-15online
defined, 6-6viewing, 6-12
remote connectionsabout, 3-3required environment variables, 3-7
removing user accounts, 7-17RESOURCE role, 7-2restore
script, 11-2restoring the database
about, 11-1retention policy, backup, 11-1roles, 7-2
predefined, 7-2using to manage user privileges, 7-2
Ssample schema, HR, 7-15schemas, 7-1
internal, 7-3scripts
backup of the database, 11-4scheduling, 11-6
using to set environment variables, 3-8security
implications of DBA role, 7-12maintaining, 7-1
server parameter file, 6-4sessions
monitoring, 8-1setting environment variables
on Linux, 3-5on Windows, 3-5
SGASee system global area
SGA Target parameter, 5-3SHUTDOWN ABORT command, 2-4SHUTDOWN IMMEDIATE command, 2-4shutting down
the databasefrom the desktop, 2-3using SQL Command Line, 2-4
spacecompacting, 6-9monitoring, 6-8
SQL Command Lineconnecting using
locally, 3-2remotely, 3-3
purpose, 3-1using to shut down the database, 2-4using to start up the database, 2-2
SQL statementsviewing the most used, 8-4
SQL*Loader utilitycontrol files, 10-8
conventional path method, 10-8direct path method, 10-8discarded records, 10-8external tables method, 10-9features of, 10-9purpose, 3-1rejected records, 10-8using to load data, 10-8
SQL*PlusSee SQL Command Line
SQLPATH environment variable, 3-8starting
the databasefrom the desktop, 2-1using SQL Command Line, 2-2
the listener, 4-5stopping
the databasefrom the desktop, 2-3using SQL Command Line, 2-4
the listener, 4-4storage
compacting, 6-9logical, 6-1managing, 6-1monitoring space usage, 6-8physical, 6-1
SYS user, 7-3SYSAUX tablespace, 6-4SYSDBA system privilege, 7-4system global area (SGA), 5-1
components, 5-2default size, 5-3when to change size of, 5-3
system privileges, 7-2SYSDBA, 7-4
SYSTEM tablespace, 6-4SYSTEM user, 7-3
Ttablespaces
creating new, 6-4defined, 6-3SYSAUX, 6-4SYSTEM, 6-4TEMP, 6-4types of, 6-3UNDO, 6-4USERS, 6-4viewing, 6-11
TEMP tablespace, 6-4
Uundo data, 6-3UNDO tablespace, 6-4Unload wizard
using to unload data, 10-4unloading data, 10-1
Index-5
with the Unload wizard, 10-4unlocking user accounts, 7-15user account attributes
alteringpasswords, 7-14user names, 7-14
user accountsadministrative, 7-3altering attributes of, 7-14defining user attributes, 7-1dropping, 7-1, 7-17HR, 7-15internal, 7-3locking, 7-15predefined in Oracle Database XE, 7-19unlocking, 7-15
user namesaltering, 7-14See also user accounts
user privileges, 7-2users
authenticating, 7-4creating, 7-12expiring passwords for, 7-16See also user accountsviewing, 7-9
USERS tablespace, 6-4users.dbf datafile, 6-11utilities
Oracle, 3-1
Vversion, database
viewing, 9-1viewing
database settings, 9-1database version, 9-1listener status, 4-3recycle bin contents, 11-9redo log files, 6-12tablespaces, 6-11users, 7-9
WWeb applications
creating, 1-1

Index-6