secure mobile access 10.2 - sonicwall
TRANSCRIPT

Secure Mobile Access 10.2
Deployment Guide
for SMA 100

Contents
Deployment Scenarios Overview 3Selecting a Deployment Scenario 3SMA 210/410 and 500v Deployment Scenarios 4
Overview of Scenario A: SMA on a New DMZ 4Overview of Scenario B: SMA on an Existing DMZ 5Overview of Scenario C: SMA on the LAN 5
Connecting the SMA on a New DMZ 6Connecting the SMA to the Gateway 6Allowing a WAN to SMA Connection 6Allowing an SMA to LAN Connection 8
Connecting the SMA on an Existing DMZ 11Connecting the SMA to the Gateway 11Allowing WAN to DMZ Connection 11Allowing DMZ to LAN Connection 12
Deploying SMA on the LAN 15Connecting the SMA to the Gateway 15Configuring SMA to LAN Connectivity 15
Additional Configuration 18Configuring the X0 IP Address 18Configuring a Default Route 19Adding a NetExtender Client Route 19Setting Your NetExtender Address Range 21Adding a New SMA Custom Zone 22
Testing and Troubleshooting Your Remote Connection 24Verifying a User Connection from the Internet 24Policy > Access Rules Matrix View 25
SonicWall Support 26About This Document 27
SMA 10.2 Deployment Guide for SMA 100Contents
2

Deployment Scenarios OverviewWelcome to the SonicWall SMA Deployment Guide. SonicWall® Secure Mobile Access 210/410 and 500vprovides a unified secure gateway to access all network and cloud resources. This guide contains configurationguidelines for deployment scenarios involving new DMZ, existing DMZ, and LAN deployments, along with basicconfiguration settings for those scenarios.
Topics:
l Selecting a Deployment Scenariol SMA 210/410 and 500v Deployment Scenarios
Selecting a Deployment ScenarioThe deployment scenarios described in this guide are based on actual customer deployments and are SonicWall-recommended deployment best practices for SMA appliances.
An SMA appliance is commonly deployed in one-arm mode over the DMZ interface on an accompanying gatewayappliance, such as a SonicWall NSa 3600. This method of deployment offers additional layers of security control,plus the ability to use SonicWall’s security services, including Gateway Anti-Virus, Anti-Spyware, ContentFiltering, Intrusion Prevention Service, and Comprehensive Anti-Spam Service, to scan all incoming andoutgoing traffic.
The primary interface (X0) on the SonicWall SMA connects to an available segment on the gateway device. Theencrypted user session is passed through the gateway to the SMA appliance. The SonicWall SMA appliancedecrypts the session and determines the requested resource.
The session traffic then traverses the gateway appliance to reach the internal network resources. The gatewayappliance applies security services as data traverses the gateway. The internal network resource then returns therequested content to the SonicWall SMA appliance through the gateway, where it is encrypted and sent to theclient.
SMA 10.2 Deployment Guide for SMA 100Deployment Scenarios Overview
1
3

SMA 210/410 and 500v Deployment ScenariosGateway Appliance Deployment Scenario Requirements on Gateway Appliance
SonicOS/X 7 or higher:
l TZ Series
l NSa Series
l NSsp Series
l NSv Series
SMA on new DMZ l An unused interface
l NEWDMZ configured for NAT orTransparent Mode
SMA on existing DMZ l One dedicated interface in use as anexisting DMZ
SMA on LAN l None
For a full list of the supported SonicWall firewall and firmware versions, seehttps://www.sonicwall.com/support/product-lifecycle-tables/
The following illustrations provide an overview of each deployment scenario:
l Overview of Scenario A: SMA on a New DMZ
l Overview of Scenario B: SMA on an Existing DMZ
l Overview of Scenario C: SMA on the LAN
Overview of Scenario A: SMA on a New DMZ
SMA 10.2 Deployment Guide for SMA 100Deployment Scenarios Overview
4

Overview of Scenario B: SMA on an Existing DMZ
Overview of Scenario C: SMA on the LAN
SMA 10.2 Deployment Guide for SMA 100Deployment Scenarios Overview
5

Connecting the SMA on a New DMZThe following procedures explain how to configure your gateway appliance on a new DMZ:
l Connecting the SMA to the Gateway
l Allowing a WAN to SMA Connection
l Allowing an SMA to LAN Connection
Connecting the SMA to the GatewayTo connect the SMA 210/410 and 500v using Scenario A:
1. Connect one end of an Ethernet cable to an unused port on your SonicWall gateway appliance.
2. Connect the other end of the Ethernet cable to the X0 port on the front of your SonicWall Secure MobileAccess 210/410 and 500v. The X0 Port LED lights up indicating an active connection.
3. Configure the SMA X0 IP address. Refer to Configuring the X0 IP Address.
Allowing a WAN to SMA ConnectionNOTE: Before continuing, you must add a new SMA custom zone. Refer to Adding a New SMA CustomZone for more information.
To allow a WAN to SMA connection:
1. Using SonicOS, click theWizards icon in the top right corner of the gateway appliance managementinterface.
2. On the Configuration Guide page, select the Public Server Guide, and then click Next.
SMA 10.2 Deployment Guide for SMA 100Connecting the SMA on a New DMZ
2
6
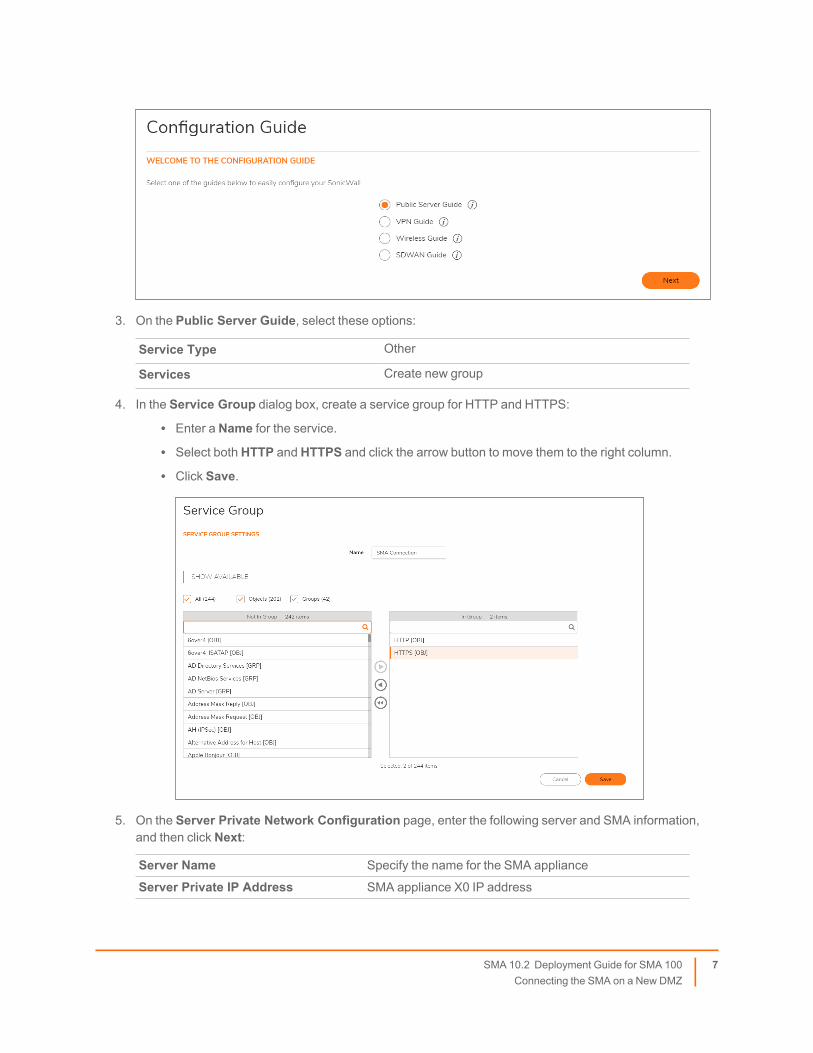
3. On the Public Server Guide, select these options:
Service Type Other
Services Create new group
4. In the Service Group dialog box, create a service group for HTTP and HTTPS:
l Enter a Name for the service.l Select both HTTP and HTTPS and click the arrow button to move them to the right column.
l Click Save.
5. On the Server Private Network Configuration page, enter the following server and SMA information,and then click Next:
Server Name Specify the name for the SMA appliance
Server Private IP Address SMA appliance X0 IP address
SMA 10.2 Deployment Guide for SMA 100Connecting the SMA on a New DMZ
7

Server Comment Brief description of the server
6. On the Server Public Information page, accept the default IP address, or enter an IP address in yourallowed public IP range. Click Next.
NOTE: The default IP address is the WAN IP address of your SonicWall security appliance. If youaccept this default, all HTTP and HTTPS traffic to this IP address will be routed to your SMAappliance.
7. The Public Server Configuration Summary page displays all the configuration actions that areperformed. Click Apply to create the configuration and allow access from the WAN to the SMA on theDMZ.
Allowing an SMA to LAN ConnectionWhen users have connected to the SMA, they need to be able to connect to resources on the LAN.
To allow an SMA to LAN connection:
1. Using SonicOS, navigate to theOBJECT | Match Objects > Addresses page on the gatewayappliance.
2. In the Address Objects tab, click +Add.
3. In the Address Object Settings dialog box, create an address object for the X0 interface IP address ofyour SMA appliance:
Name Name of the SMA appliance
Zone Assignment SMA
Type Host
IP Address SMA appliance X0 IP address (default 192.168.200.1)
4. Click Save to create the object. Once done, click Close.
SMA 10.2 Deployment Guide for SMA 100Connecting the SMA on a New DMZ
8

5. Click Add again to create an address object for the NetExtender range.
6. In the Add Address Object dialog box, create an address object for the NetExtender range:
Name Name for NetExtender range
Zone Assignment SMA
Type Range
Starting IP Address Start of the NetExtender IP address range (default 192.168.200.100)
Ending IP Address End of the NetExtender IP address range (default 192.168.200.200)
7. Click Save to create the object. Once added, click Close.
8. On theOBJECT | Match Objects > Addresses page, click the Address Groups tab.
9. Click +Add.
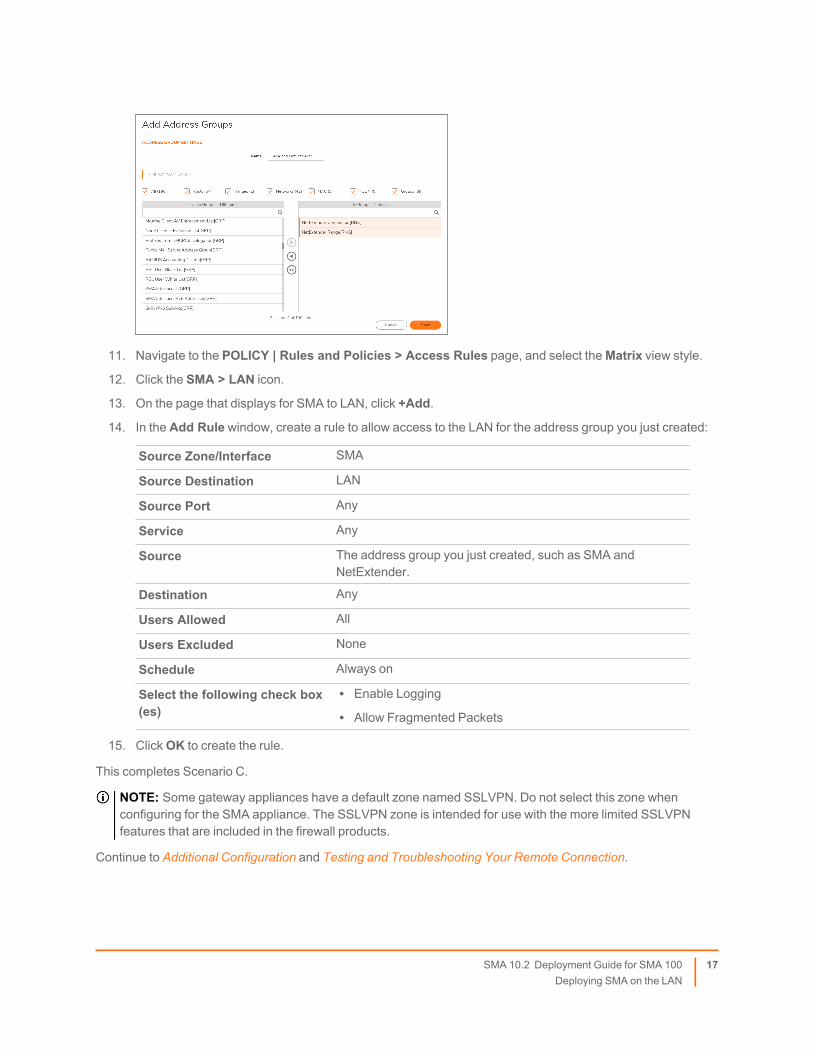
10. In the Add Address Groups dialog box, create a group for the X0 interface IP address of your SMAappliance and the NetExtender IP range:
l Enter a name for the group.
l In the left column, select the address objects you created and click the right arrow button.
l Click Save to create the group when both objects are in the right column.
11. Navigate to the POLICY | Rules and Policies > Access Rules page, and select theMatrix view style.
12. Click the SMA > LAN icon.
13. On the page that displays for SMA to LAN, click +Add.
SMA 10.2 Deployment Guide for SMA 100Connecting the SMA on a New DMZ
9

14. In the Add Rule window, create a rule to allow access to the LAN for the address group you just created:
Source Zone/Interface SMA
Source Destination LAN
Source Port Any
Service Any
Source The address group you just created, such as SMA andNetExtender.
Destination Any
Users Allowed All
Users Excluded None
Schedule Always on
Select the following check box(es)
l Enable Logging
l Allow Fragmented Packets
15. ClickOK to create the rule.
This completes Scenario A.
NOTE: Some gateway appliances have a default zone named SSLVPN. Do not select this zone whenconfiguring for the SMA appliance. The SSLVPN zone is intended for use with the more limited SSLVPNfeatures that are included in the firewall products.
Continue to Additional Configuration and Testing and Troubleshooting Your Remote Connection.
SMA 10.2 Deployment Guide for SMA 100Connecting the SMA on a New DMZ
10

Connecting the SMA on an Existing DMZThe following procedures explain how to configure your gateway on an existing DMZ:
l Connecting the SMA to the Gateway
l Allowing WAN to DMZ Connection
l Allowing DMZ to LAN Connection
Connecting the SMA to the GatewayTo connect the SMA using Scenario B:
1. Connect one end of an Ethernet cable to your DMZ, either directly to the corresponding port on yourexisting SonicWall gateway appliance, to a hub, or to a switch on your DMZ.
2. Connect the other end of the Ethernet cable to the X0 port on your SonicWall SMA 210/410 and 500v. TheX0 Port LED lights up indicating an active connection.
3. Configure the SMA X0 with an IP address in the DMZ subnet. Refer to Configuring the X0 IP Address formore information.
Allowing WAN to DMZ ConnectionIf you are already forwarding HTTP or HTTPS to an internal server and you only have a single public IP address,you need to select different (unique) ports of operation for either the existing servers or for the SMA appliance,because both cannot concurrently use the same IP address and port combinations.
To allow a WAN to DMZ connection:
1. Using SonicOS, log into your gateway appliance as an administrator and click theWizards icon at the topright of the interface.
2. On the Configuration Guide page, select the Public Server Guide, and then click Next.
3. On the Public Server Guide page of theWizard, select:
SMA 10.2 Deployment Guide for SMA 100Connecting the SMA on an Existing DMZ
3
11

Server Type Other
Service Create new group
The Service Group dialog box is displayed.
4. In the Service Group dialog box, create a service group for HTTP and HTTPS:
l Enter a Name for the service group.l Select both HTTP and HTTPS and click the arrow button to move to the right column.
l ClickOK.
5. On the Server Private Network Configuration page, enter the following server information and clickNext:
Server Name Name for the SMA appliance
Server Private IPAddress
The X0 IP address of the SMA appliance within your DMZ range, such as10.1.1.10/24.
Server Comment Brief description of the server
6. On the Server Public Information page, accept the default IP address or enter a new IP address in yourallowed public IP range. Click Next.
NOTE: The default IP address is the WAN IP address of your SonicWall firewall. If you accept thisdefault, all HTTP and HTTPS traffic to this IP address is routed to your SMA appliance.
7. The Public Server Configuration Summary page displays all configuration actions that are performed.Click Apply to create the configuration and allow access from the WAN to the SMA appliance on the DMZ.
Allowing DMZ to LAN ConnectionWhen users have connected to the SMA, they need to be able to connect to resources on the LAN.
To allow a DMZ to LAN connection:
1. Using SonicOS, navigate to theOBJECT | Match Objects > Addresses page on the gatewayappliance.
2. In the Address Objects tab, click +Add.
3. In the Address Object Settings dialog box, create an address object for the X0 interface IP address ofyour SMA appliance:
Name Name of the SMA appliance
Zone Assignment DMZ
Type Host
IP Address X0 IP address of the SMA appliance within your DMZ range, such as 10.1.1.10.
4. ClickOK to create the object. Once added, click Close.
SMA 10.2 Deployment Guide for SMA 100Connecting the SMA on an Existing DMZ
12

5. Click +Add again to create an address object for the NetExtender range.
6. In the Add Object dialog box, create an address object for the NetExtender range using the followingoptions, then click Add:
Name Name for NetExtender
ZoneAssignment
DMZ
Type Range
Starting IPaddress
Start of the NetExtender IP address range within your DMZ range, such as10.1.1.220.
Ending IPaddress
End of the NetExtender IP address range within your DMZ range, for example10.1.1.249.
7. On theOBJECT | Match Objects > Addresses page, click the Address Groups tab.
8. Click +Add.
9. In the Add Address Groups dialog box, create a group for the X0 interface IP address of your SMAappliance and the NetExtender IP range:
l Enter a name for the group.
l In the left column, select the address objects you created and click the right arrow button.
l Click Save to create the group when both objects are in the right column.
10. Navigate to the POLICY | Rules and Policies > Access Rules page, and select theMatrix view style.
11. Click the DMZ > LAN icon.
SMA 10.2 Deployment Guide for SMA 100Connecting the SMA on an Existing DMZ
13

12. On the page that displays for SMA to LAN, click +Add.
13. In the Add Rule window, create a rule to allow access to the LAN for the address group you just created:
Source Zone/Interface SMA
Source Destination LAN
Source Port Any
Service Any
Source The address group you just created, such as SMA andNetExtender.
Destination Any
Users Allowed All
Users Excluded None
Schedule Always on
Select the following check box(es)
l Enable Logging
l Allow Fragmented Packets
14. ClickOK to create the rule.
This completes Scenario B.
NOTE: Some gateway appliances have a default zone named SSLVPN. Do not select this zone whenconfiguring for the SMA appliance. The SSLVPN zone is intended for use with the more limited SSLVPNfeatures that are included in the firewall products.
Continue to Additional Configuration and Testing and Troubleshooting Your Remote Connection.
SMA 10.2 Deployment Guide for SMA 100Connecting the SMA on an Existing DMZ
14

Deploying SMA on the LANThe following procedures explain how to configure your gateway appliance on the LAN:
l Connecting the SMA to the Gateway
l Configuring SMA to LAN Connectivity
Connecting the SMA to the GatewayTo connect the SMA on the LAN:
1. Connect one end of an Ethernet cable to an unused port on your LAN hub or switch.
2. Connect the other end of the Ethernet cable to the X0 port on the front of your SonicWall SMA 210/410and 500v.The X0 Port LED lights up indicating an active connection.
3. Configure the SMA X0 IP address. Refer to Configuring the X0 IP Address for more information.
Configuring SMA to LAN ConnectivityNOTE: Before continuing, you must add a new SMA custom zone. Refer to Adding a New SMA CustomZone for more information.
For users to access local resources through the SMA appliance, you must configure your gateway device to allowan outside connection through the SMA into your LAN.
To allow an SMA to LAN connection:
1. Using SonicOS, navigate to theOBJECT | Match Objects > Addresses page on the gatewayappliance.
2. In the Address Objects tab, click +Add.
3. In the Address Object Settings dialog box, create an address object for the X0 interface IP address ofyour SMA appliance:
SMA 10.2 Deployment Guide for SMA 100Deploying SMA on the LAN
4
15

Name Name for the SMA appliance
Zone Assignment SMA
Type Host
IP Address SMA appliance X0 IP address (default 192.168.200.1)
4. Click +Add to create the object. After adding, click Close.
5. Click +Add again to create an address object for the NetExtender range.
6. In the Add Address Object dialog box, create an address object for the NetExtender range, using thefollowing options:
Name Name for NetExtender range
Zone Assignment SMA
Type Range
Starting IP Address Start of the NetExtender IP address range (default 192.168.200.100)
Ending IP Address End of the NetExtender IP address range (default 192.168.200.200)
7. Click Save to create the object. Once added, click Close.
8. On theOBJECT | Match Objects > Addresses page, click the Address Groups tab.
9. Click +Add.
10. In the Add Address Groups dialog box, create a group for the X0 interface IP address of your SMAappliance and the NetExtender IP range:
l Enter a name for the group.
l In the left column, select the address objects you created and click the right arrow button.
l Click Save to create the group when both objects are in the right column.
SMA 10.2 Deployment Guide for SMA 100Deploying SMA on the LAN
16
11. Navigate to the POLICY | Rules and Policies > Access Rules page, and select theMatrix view style.
12. Click the SMA > LAN icon.
13. On the page that displays for SMA to LAN, click +Add.
14. In the Add Rule window, create a rule to allow access to the LAN for the address group you just created:
Source Zone/Interface SMA
Source Destination LAN
Source Port Any
Service Any
Source The address group you just created, such as SMA andNetExtender.
Destination Any
Users Allowed All
Users Excluded None
Schedule Always on
Select the following check box(es)
l Enable Logging
l Allow Fragmented Packets
15. ClickOK to create the rule.
This completes Scenario C.
NOTE: Some gateway appliances have a default zone named SSLVPN. Do not select this zone whenconfiguring for the SMA appliance. The SSLVPN zone is intended for use with the more limited SSLVPNfeatures that are included in the firewall products.
Continue to Additional Configuration and Testing and Troubleshooting Your Remote Connection.
SMA 10.2 Deployment Guide for SMA 100Deploying SMA on the LAN
17

Additional ConfigurationThis section describes some additional configuration settings for your SMA 210/410 and 500v, depending on thedeployment scenario you selected.
Topics:
l Configuring the X0 IP Addressl Configuring a Default Routel Adding a NetExtender Client Routel Setting Your NetExtender Address Rangel Adding a New SMA Custom Zone
Configuring the X0 IP AddressWhen deploying the SMA in any of the scenarios mentioned in Selecting a Deployment Scenario, you need toreset the IP address of the X0 interface on the SMA to an address within the range of the new or existing DMZ orthe existing LAN subnet.
To configure the X0 IP address:
1. Connect your computer to X0 and log into the SMA appliance by navigating to https://192.168.200.1on your Web browser.
TIP: For additional information, see the SMA 210/410 Quick Start Guide.
2. Using SonicOS, navigate to the NETWORK | System > Interfaces page.
3. In the Interface Settings table, click the Configure icon for the X0 interface.
4. In the Edit Interface dialog box, set the IP Address to an unused address within your DMZ or LAN subnet.
5. For the Subnet Mask, enter the value that matches your DMZ or LAN subnet mask, such as255.255.255.0.
6. ClickOK. A warning displays that you are changing the X0 IP Address. ClickOK to acknowledge.
7. Reset the management computer to have a static IP address in the range you just set for the X0 interface.For example, if you set X0 to 10.1.1.10, you could set your computer to 10.1.1.20.
SMA 10.2 Deployment Guide for SMA 100Additional Configuration
5
18

8. Log into the SMAmanagement interface again, using the IP address you just configured for the X0interface. For example, point your browser to https://10.1.1.10.
Configuring a Default RouteRefer to the following table to correctly configure your default route for the scenario you selected.
If you are using scenario: Your upstream gateway IP address will be:
A - SMA on a New DMZ The IP address of the DMZ interface you create
B - SMA on an Existing DMZ The existing DMZ interface IP address
C - SMA on the LAN The LAN interface IP address
To configure a default route:
1. Using Secure Mobile Access, navigate to the Network > Routes page.
2. Enter the upstream gateway device’s IPv4 address in the Default IPv4 Gateway field or the IPv6 addressin the Default IPv6 Gateway field.
3. Select X0 as the interface and click Accept.
Adding a NetExtender Client RouteNetExtender allows remote clients to have seamless access to resources on your local network.
SMA 10.2 Deployment Guide for SMA 100Additional Configuration
19

To configure a NetExtender client route:
1. Using Secure Mobile Access, navigate to the Clients > Routes page.
2. To force all SMA client traffic to pass through the NetExtender tunnel, select Enabled in the Tunnel AllMode drop-down menu.
3. Click Add Client Route.
4. Enter the network address of the trusted network to which you would like to provide access withNetExtender in the Destination Network field. For example, if you are connecting to an existing DMZ on
SMA 10.2 Deployment Guide for SMA 100Additional Configuration
20

the 10.1.1.0/24 subnet and you want to provide access to your LAN network on the 192.168.168.0/24
subnet, you would enter 192.168.168.0.
5. Enter the subnet mask of the destination network in the Subnet Mask field. Continuing the example, enter255.255.255.0.
6. Click Submit to finish adding this client route.
Setting Your NetExtender Address RangeThe NetExtender address range defines the IP address pool from which addresses will be assigned to remoteusers during NetExtender sessions. The range needs to be large enough to accommodate the maximum numberof concurrent NetExtender users you wish to support.
The range should fall within the same subnet as the interface to which the SMA appliance is connected, and itmust not overlap or collide with any assigned addresses if other hosts are on the same segment as the SMAappliance.
Determine the correct subnet based on your network scenario selection:
ScenarioA
192.168.200.100 to 192.168.200.200 (default range)
ScenarioB
Select a range that falls within your existing DMZ subnet. For example, if your DMZ uses the10.1.1.0/24 subnet, and you want to support up to 30 concurrent NetExtender sessions, youcould use 10.1.1.220 to 10.1.1.249.
ScenarioC
Select a range that falls within your existing LAN subnet. For example, if your LAN uses the192.168.168.0/24 subnet, and you want to support up to 10 concurrent NetExtender sessions,you could use 192.168.168.240 to 192.168.168.249.
NOTE: DHCP/DHCPv6 is supported and can manage the IPv4 and IPv6 addresses in the LAN and theNetExtender client address ranges.
To set your NetExtender address range:
1. Using Secure Mobile Access, navigate to the Clients > Settings page.
2. Enter an address range in the Client Address Range Begin and Client Address Range End fields.
3. Click Accept to add the Client Address Range.
Scenario A 192.168.200.100 to 192.168.200.200 (default range)
Scenario B An unused range within your DMZ subnet.
Scenario C An unused range within your LAN subnet.
If you do not have enough available addresses to support your desired number of concurrent NetExtender users,you may use a new subnet for NetExtender. This condition may occur if your existing DMZ or LAN is configured inNAT mode with a small subnet space, such as 255.255.255.224, or more commonly if your DMZ or LAN isconfigured in Transparent mode and you have a limited number of public addresses from your ISP. In either case,
SMA 10.2 Deployment Guide for SMA 100Additional Configuration
21

you may assign a new, unallocated IP range to NetExtender (such as 192.168.10.100 to 192.168.10.200) andconfigure a route to this range on your gateway appliance.
For example, if your current Transparent range is 67.115.118.75 through 67.115.118.80, and you wish tosupport 50 concurrent NetExtender clients, configure your SMA X0 interface with an available IP address in theTransparent range, such as 67.115.118.80, and configure your NetExtender range as 192.168.10.100 to192.168.10.200. Then, on your gateway device, configure a static route to 192.168.10.0, using67.115.118.80.
Adding a New SMA Custom ZoneAdding a new SMA custom zone on your gateway appliance is a necessary step in deploying your SMAappliance using Scenarios A and C. For more information, see the following sections:
l Connecting the SMA on a New DMZ
l Deploying SMA on the LAN
To add a new SMA custom zone on the gateway appliance:
1. Using SonicOS, log into your gateway appliance as an administrator and navigate to the NETWORK |System > Interfaces page.
2. Click the Configure icon for the interface connected to your SMA, such as X2.
3. Select Create new zone in the Zone field.
The Add Zone window opens.
4. Enter SMA in the Name field.
5. Select Public from the Security Type drop-down menu.
6. Clear the Allow Interface Trust toggle.
SMA 10.2 Deployment Guide for SMA 100Additional Configuration
22

7. Select the following check boxes:• Enable Gateway Anti-Virus Service• Enable IPS• Enable Anti-Spyware Service
8. Click Save.
9. In the Edit Interface window again, enter the IP address for this interface in the IP Address field.
For example:
Scenario A Use an IP address in the default SMA X0 subnet (default 192.168.200.x)
Scenario C Use an IP address in the gateway LAN subnet (default 192.168.168.x)
10. Enter your Subnet Mask.
11. Optionally enter the Default Gateway, which is the WAN address of the gateway appliance.
12. If you want to allow management of the gateway appliance over this interface, select the desiredmanagement options.
13. If you want to allow users to log in to the gateway appliance using this interface, select the desired userlogin options.
14. ClickOK to apply changes.
SMA 10.2 Deployment Guide for SMA 100Additional Configuration
23

Testing and Troubleshooting YourRemote Connection
You have now configured your SonicWall gateway appliance and SMA appliance for secure remote access. Thissection provides information on the following topics:
l Verifying a User Connection from the Internet
l Policy > Access Rules Matrix View
Verifying a User Connection from the InternetYou can verify your connection using a remote client on the WAN.
To verify a User Connection from the Internet:
1. From aWAN connection outside of your corporate network, launch aWeb browser and enter thefollowing:https://<WAN_IP_address_of_gateway_device>
2. When prompted, enter the User Name and Password.
3. Select LocalDomain from the drop-down menu and click Login. The SonicWall Virtual Office screendisplays in your Web browser.
SMA 10.2 Deployment Guide for SMA 100Testing and Troubleshooting Your Remote Connection
6
24

4. Click NetExtender to start the NetExtender client installation.
5. If prompted, click Install to complete the client installation.
6. Ping a host on your corporate LAN to verify your remote connection.
You have now successfully set up your SMA appliance.
NOTE: It is easier for remote users to access the SMA appliance using a fully qualified domain name (FQDN)rather than an IP address. It is recommended that you create a DNS record to allow for FQDN access to yourSMA appliance. If you do not manage your own public DNS servers, contact your ISP for assistance.
Policy > Access Rules Matrix ViewIf the SMA zone does not appear in the POLICY | Rules and Policies > Access Rulesmatrix view, verify that itis selected as the zone for the gateway interface connected to the SMA appliance.
To ensure the SMA zone displays in the matrix view:
1. Using SonicOS, navigate to the NETWORK | System > Interfaces page.
2. Click the Configure icon for X2 or the port you assigned as the SMA zone.
3. Select SMA as the Zone from the drop-down menu.
4. ClickOK.
SMA 10.2 Deployment Guide for SMA 100Testing and Troubleshooting Your Remote Connection
25

SonicWall SupportTechnical support is available to customers who have purchased SonicWall products with a valid maintenancecontract.
The Support Portal provides self-help tools you can use to solve problems quickly and independently, 24 hours aday, 365 days a year. To access the Support Portal, go to https://www.sonicwall.com/support.
The Support Portal enables you to:
l View knowledge base articles and technical documentation
l View and participate in the Community forum discussions athttps://community.sonicwall.com/technology-and-support.
l View video tutorials
l Access https://mysonicwall.com
l Learn about SonicWall professional services
l Review SonicWall Support services and warranty information
l Register for training and certification
l Request technical support or customer service
To contact SonicWall Support, visit https://www.sonicwall.com/support/contact-support.
SMA 10.2 Deployment Guide for SMA 100SonicWall Support
7
26

About This DocumentNOTE: A NOTE icon indicates supporting information.
IMPORTANT: An IMPORTANT icon indicates supporting information.
TIP: A TIP icon indicates helpful information.
CAUTION: A CAUTION icon indicates potential damage to hardware or loss of data if instructionsare not followed.
WARNING: A WARNING icon indicates a potential for property damage, personal injury, or death.
Secure Mobile Access Deployment Guide for the SMA 100 SeriesUpdated - January 2022Software Version - 10.2232-005680-00 Rev B
Copyright © 2022 SonicWall Inc. All rights reserved.
The information in this document is provided in connection with SonicWall and/or its affiliates’ products. No license, express or implied,by estoppel or otherwise, to any intellectual property right is granted by this document or in connection with the sale of products.EXCEPT AS SET FORTH IN THE TERMS AND CONDITIONS AS SPECIFIED IN THE LICENSE AGREEMENT FOR THISPRODUCT, SONICWALL AND/OR ITS AFFILIATES ASSUME NO LIABILITYWHATSOEVER AND DISCLAIMS ANY EXPRESS,IMPLIED OR STATUTORYWARRANTY RELATING TO ITS PRODUCTS INCLUDING, BUT NOT LIMITED TO, THE IMPLIEDWARRANTY OFMERCHANTABILITY, FITNESS FOR A PARTICULAR PURPOSE, OR NON-INFRINGEMENT. IN NO EVENTSHALL SONICWALL AND/OR ITS AFFILIATES BE LIABLE FOR ANY DIRECT, INDIRECT, CONSEQUENTIAL, PUNITIVE,SPECIAL OR INCIDENTAL DAMAGES (INCLUDING, WITHOUT LIMITATION, DAMAGES FOR LOSS OF PROFITS, BUSINESSINTERRUPTION OR LOSS OF INFORMATION) ARISING OUT OF THE USE OR INABILITY TO USE THIS DOCUMENT, EVEN IFSONICWALL AND/OR ITS AFFILIATES HAVE BEEN ADVISED OF THE POSSIBILITY OF SUCH DAMAGES. SonicWall and/or itsaffiliates make no representations or warranties with respect to the accuracy or completeness of the contents of this document andreserves the right to make changes to specifications and product descriptions at any time without notice. and/or its affiliates do notmake any commitment to update the information contained in this document.
For more information, visit https://www.sonicwall.com/legal.
End User Product AgreementTo view the SonicWall End User Product Agreement, go to: https://www.sonicwall.com/legal/end-user-product-agreements/.
Open Source CodeSonicWall Inc. is able to provide a machine-readable copy of open source code with restrictive licenses such as GPL, LGPL, AGPLwhen applicable per license requirements. To obtain a complete machine-readable copy, send your written requests, along withcertified check or money order in the amount of USD 25.00 payable to “SonicWall Inc.”, to:
General Public License Source Code RequestAttn: Jennifer Anderson1033 McCarthy BlvdMilpitas, CA 95035
SMA 10.2 Deployment Guide for SMA 100SonicWall Support
27