oracle® application express - app builder user's guide
TRANSCRIPT
Oracle® Application ExpressApp Builder User's Guide
Release 18.1E86877-02May 2018

Oracle Application Express App Builder User's Guide, Release 18.1
E86877-02
Copyright © 2003, 2018, Oracle and/or its affiliates. All rights reserved.
Primary Author: Terri Jennings
Contributors: Christina Cho, Hilary Farrell, Michael Hichwa, Joel Kallman, Sharon Kennedy, HarishKonakondla, David Peake, Anthony Rayner, Marc Sewtz, John Synders, Jason Straub, Patrick Wolf
This software and related documentation are provided under a license agreement containing restrictions onuse and disclosure and are protected by intellectual property laws. Except as expressly permitted in yourlicense agreement or allowed by law, you may not use, copy, reproduce, translate, broadcast, modify,license, transmit, distribute, exhibit, perform, publish, or display any part, in any form, or by any means.Reverse engineering, disassembly, or decompilation of this software, unless required by law forinteroperability, is prohibited.
The information contained herein is subject to change without notice and is not warranted to be error-free. Ifyou find any errors, please report them to us in writing.
If this is software or related documentation that is delivered to the U.S. Government or anyone licensing it onbehalf of the U.S. Government, then the following notice is applicable:
U.S. GOVERNMENT END USERS: Oracle programs, including any operating system, integrated software,any programs installed on the hardware, and/or documentation, delivered to U.S. Government end users are"commercial computer software" pursuant to the applicable Federal Acquisition Regulation and agency-specific supplemental regulations. As such, use, duplication, disclosure, modification, and adaptation of theprograms, including any operating system, integrated software, any programs installed on the hardware,and/or documentation, shall be subject to license terms and license restrictions applicable to the programs.No other rights are granted to the U.S. Government.
This software or hardware is developed for general use in a variety of information management applications.It is not developed or intended for use in any inherently dangerous applications, including applications thatmay create a risk of personal injury. If you use this software or hardware in dangerous applications, then youshall be responsible to take all appropriate fail-safe, backup, redundancy, and other measures to ensure itssafe use. Oracle Corporation and its affiliates disclaim any liability for any damages caused by use of thissoftware or hardware in dangerous applications.
Oracle and Java are registered trademarks of Oracle and/or its affiliates. Other names may be trademarks oftheir respective owners.
Intel and Intel Xeon are trademarks or registered trademarks of Intel Corporation. All SPARC trademarks areused under license and are trademarks or registered trademarks of SPARC International, Inc. AMD, Opteron,the AMD logo, and the AMD Opteron logo are trademarks or registered trademarks of Advanced MicroDevices. UNIX is a registered trademark of The Open Group.
This software or hardware and documentation may provide access to or information about content, products,and services from third parties. Oracle Corporation and its affiliates are not responsible for and expresslydisclaim all warranties of any kind with respect to third-party content, products, and services unless otherwiseset forth in an applicable agreement between you and Oracle. Oracle Corporation and its affiliates will not beresponsible for any loss, costs, or damages incurred due to your access to or use of third-party content,products, or services, except as set forth in an applicable agreement between you and Oracle.
Contents
Preface
Audience xl
Documentation Accessibility xl
Related Documents xl
Conventions xli
Changes in This Release
Changes in Oracle Application Express Release 18.1 xlii
1 Quick Start
1.1 About Accessing Your Development Environment 1-2
1.2 Understanding Oracle Application Express 1-2
1.2.1 What is Oracle Application Express? 1-2
1.2.2 How Oracle Application Express Works 1-3
1.2.3 About the Differences Between Runtime and Full DevelopmentEnvironments 1-3
1.3 Understanding the Workspace Home Page 1-4
1.3.1 Workspace Home Page 1-4
1.3.2 Top Apps and Top Users Dashboards 1-6
1.3.3 News and Messages Region 1-6
1.3.4 Developer Navigation Tools 1-6
1.3.4.1 Global Search 1-7
1.3.4.2 Administration Menu 1-9
1.3.4.3 Help Menu 1-10
1.3.4.4 Account Menu 1-11
1.3.5 Available Updates Region 1-12
1.4 Understanding App Builder 1-12
1.4.1 Accessing App Builder 1-13
1.4.2 Understanding the App Builder Home Page 1-13
1.4.2.1 App Builder Home Page Icons and Navigation Bar 1-14
1.4.2.2 Reset and Create Buttons 1-16
iii
1.4.2.3 Recent List, Tasks List, and Migrations Link 1-17
1.4.2.4 Workspace Utilities 1-18
1.4.2.5 Viewing Cross Application Reports 1-19
1.4.3 Accessing the Application Home Page 1-20
1.4.4 Understanding the Application Home Page 1-20
1.4.4.1 Edit Application Properties Button 1-21
1.4.4.2 Application Home Page Icons 1-22
1.4.4.3 Create Page Button 1-23
1.4.4.4 Application Home Page Navigation Bar 1-23
1.4.4.5 Application Home Page Tasks List 1-24
1.4.4.6 Recently Edited Pages 1-24
1.5 Changing Your Profile or Password 1-24
1.6 Editing User Preferences 1-25
1.7 Using Oracle Application Express Documentation 1-26
1.7.1 Accessing Oracle Help Center 1-27
1.7.2 Searching the Oracle Help Center 1-28
1.7.3 Downloading the Documentation Library 1-28
1.7.4 Viewing Field-Level Help 1-29
1.7.4.1 Viewing Field-level Help in Oracle Application Express 1-29
1.7.4.2 Viewing Help in Page Designer 1-30
2 App Builder Concepts
2.1 Understanding Oracle Application Express Applications 2-2
2.1.1 What is an Oracle Application Express Application? 2-2
2.1.2 What is the Difference Between a Database and Websheet Application?2-2
2.2 Running an Application or Page 2-3
2.2.1 Run Application and Run Page Buttons 2-3
2.2.2 How Your Browser Impacts the Way Applications Run 2-4
2.2.3 Running an Application from the App Builder Home Page 2-4
2.2.4 Running an Application from the Application Home Page 2-5
2.2.5 Running a Page on the Application Home Page 2-5
2.3 How Does Page Processing and Page Rendering Work? 2-5
2.3.1 How the Application Express Engine Renders and Processes Pages 2-6
2.3.2 About Implicit Commit Points 2-6
2.3.3 Understanding Conditional Rendering and Processing 2-6
2.3.3.1 What is a Condition? 2-6
2.3.3.2 Selecting a Condition 2-7
2.3.3.3 Condition Example: Current Page in Expression 1 2-7
2.3.3.4 Condition Example: Exists 2-7
2.3.3.5 Condition Example: PL/SQL Expression 2-7
iv
2.3.4 About Verifying User Identity 2-7
2.3.5 About Controlling Access to Controls and Components 2-8
2.4 About Enabling Support for Bookmarks 2-8
2.5 Understanding Session State Management 2-8
2.5.1 What is Session State? 2-8
2.5.2 About Session IDs 2-9
2.5.3 What Is a Session? 2-9
2.6 Viewing Session State 2-10
2.7 Understanding URL Syntax 2-11
2.7.1 About the Application Page URL 2-11
2.7.2 About Using f?p Syntax to Link Pages 2-12
2.7.3 Calling a Page Using an Application Alias or Page Alias 2-14
2.7.4 Calling a Page from a Button URL 2-14
2.8 Managing Session State Values 2-14
2.8.1 About Referencing Session State 2-15
2.8.2 About Setting Session State 2-16
2.8.3 Clearing Session State 2-16
2.8.3.1 About Clearing Cache for an Item 2-16
2.8.3.2 About Clearing Cache for All Page Items 2-17
2.8.3.3 Clearing Cache for an Entire Application 2-18
2.8.3.4 About Resetting an Application Completely 2-18
2.8.3.5 About Clearing Cache for the Current User Session 2-18
2.8.4 Referencing Session State Using Bind Variable Syntax 2-18
2.8.4.1 About Using Bind Variable Syntax 2-18
2.8.4.2 About Using Bind Variables in Regions Based on a SQL Query orLOV 2-19
2.8.4.3 About Using Bind Variables in Regions Based on PL/SQL 2-19
2.8.5 About Session Cloning 2-19
2.9 Using Substitution Strings 2-20
2.9.1 About Using Substitution Strings 2-20
2.9.2 Controlling Output Escaping in Substitution Strings 2-22
2.9.3 About Determining Substitution String Usage within Templates 2-23
2.9.4 Using Built-in Substitution Strings 2-23
2.9.4.1 APEX$ROW_NUM 2-25
2.9.4.2 APEX$ROW_SELECTOR 2-25
2.9.4.3 APEX$ROW_STATUS 2-26
2.9.4.4 APP_ID 2-26
2.9.4.5 APP_ALIAS 2-26
2.9.4.6 APP_AJAX_X01, ... APP_AJAX_X10 2-27
2.9.4.7 APP_BUILDER_SESSION 2-27
2.9.4.8 APP_DATE_TIME_FORMAT 2-28
v
2.9.4.9 APP_IMAGES 2-28
2.9.4.10 APP_NLS_DATE_FORMAT 2-28
2.9.4.11 APP_NLS_TIMESTAMP_FORMAT 2-29
2.9.4.12 APP_NLS_TIMESTAMP_TZ_FORMAT 2-29
2.9.4.13 APP_PAGE_ALIAS 2-29
2.9.4.14 APP_PAGE_ID 2-30
2.9.4.15 APP_REQUEST_DATA_HASH 2-30
2.9.4.16 APP_SESSION 2-31
2.9.4.17 APP_SESSION_VISIBLE 2-31
2.9.4.18 APP_TITLE 2-32
2.9.4.19 APP_UNIQUE_PAGE_ID 2-32
2.9.4.20 APP_USER 2-33
2.9.4.21 AUTHENTICATED_URL_PREFIX 2-34
2.9.4.22 BROWSER_LANGUAGE 2-34
2.9.4.23 CURRENT_PARENT_TAB_TEXT 2-34
2.9.4.24 DEBUG 2-35
2.9.4.25 HOME_LINK 2-35
2.9.4.26 IMAGE_PREFIX 2-35
2.9.4.27 JET_BASE_DIRECTORY 2-36
2.9.4.28 JET_CSS_DIRECTORY 2-36
2.9.4.29 JET_JS_DIRECTORY 2-36
2.9.4.30 LOGIN_URL 2-36
2.9.4.31 LOGOUT_URL 2-37
2.9.4.32 APP_TEXT$Message_Name,APP_TEXT$Message_Name$Lang 2-37
2.9.4.33 PRINTER_FRIENDLY 2-38
2.9.4.34 PROXY_SERVER 2-38
2.9.4.35 PUBLIC_URL_PREFIX 2-38
2.9.4.36 REQUEST 2-38
2.9.4.37 Using REQUEST 2-39
2.9.4.38 SCHEMA OWNER 2-40
2.9.4.39 SQLERRM 2-41
2.9.4.40 SYSDATE_YYYYMMDD 2-41
2.9.4.41 THEME_DB_IMAGES 2-41
2.9.4.42 THEME_IMAGES 2-41
2.9.4.43 WORKSPACE_IMAGES 2-41
2.9.4.44 WORKSPACE_ID 2-42
3 Utilizing Packaged Applications
3.1 About Packaged Applications 3-1
3.2 Managing Packaged Applications in a Full Development Environment 3-2
vi

3.2.1 Accessing the Packaged Apps Page 3-3
3.2.2 Installing a Packaged Application 3-4
3.2.3 Running an Installed Packaged Application 3-5
3.2.4 Removing an Installed Packaged Application 3-5
3.2.5 Changing Authentication for an Installed Packaged Application 3-6
3.2.6 Unlocking an Installed Productivity Application 3-6
3.2.7 Updating a Packaged Application 3-7
3.3 Understanding Sample Database Application 3-7
3.3.1 Installing and Running Sample Database Application 3-7
3.3.2 Reviewing Sample Database Application 3-8
3.3.2.1 Home Page 3-9
3.3.2.2 About the Navigation Menu 3-10
3.3.2.3 Customers Page 3-10
3.3.2.4 Using the Customers Page 3-11
3.3.2.5 Products Page 3-13
3.3.2.6 Using the Products Page 3-13
3.3.2.7 Orders Page 3-14
3.3.2.8 Using the Orders Page 3-14
3.3.2.9 Reports Page 3-15
3.3.2.10 Administration Page 3-16
3.3.3 Modifying Sample Database Application 3-17
3.3.3.1 Why Modify a Sample Database Application? 3-17
3.3.3.2 Editing Sample Database Application 3-18
3.4 Understanding AnyCo IT Department Websheet 3-19
3.4.1 Installing and Running AnyCo IT Department 3-20
3.4.2 Understanding Websheet Navigation 3-21
3.4.3 Understanding AnyCo IT Department 3-22
3.4.3.1 Navigating Between Pages and Viewing Page Sections 3-22
3.4.3.2 Home Page 3-23
3.4.3.3 Projects Page 3-26
3.4.3.4 Project Review Page 3-27
3.4.3.5 Systems Page 3-27
3.4.3.6 Planned Purchase Review 3-28
3.4.3.7 Systems Budget Review 3-30
3.4.4 Modifying Websheet Content 3-32
3.4.4.1 Why Modify Sample Websheet Application? 3-32
3.4.4.2 Updating a Websheet Section 3-32
3.5 Utilizing Packaged App Administration 3-34
3.5.1 Making a Service Request 3-35
3.5.2 Setting Workspace Preferences 3-36
3.5.3 Managing Users 3-36
vii
3.5.4 Managing Saved Interactive Reports 3-37
3.5.5 Managing Interactive Report Subscriptions 3-37
3.5.6 Viewing Activity Reports 3-37
3.5.7 Viewing Page Views 3-38
3.5.8 Viewing Top Users 3-38
3.6 Using a Packaged Apps Only Workspace 3-38
3.6.1 What Is a Packaged Apps Only Workspace? 3-39
3.6.2 Requesting a Packaged Apps Only Workspace 3-39
3.6.3 Signing In To a Packaged Apps Only Workspace 3-39
3.6.4 Using the Packaged App Page 3-40
4 Managing the Application Life Cycle with Team Development
4.1 Accessing Team Development 4-2
4.2 Team Development Home Page 4-2
4.3 Tracking Features 4-3
4.3.1 Viewing the Features Report 4-4
4.3.2 Creating a Feature 4-4
4.3.3 About Feature Email Notifications 4-5
4.3.4 Updating or Deleting a Feature 4-6
4.3.5 About Creating Parent Features 4-6
4.3.6 How to Attach Files to a Feature 4-6
4.3.6.1 Attaching a File to a Feature 4-7
4.3.6.2 Viewing, Editing, and Removing Attached Files 4-7
4.3.7 Viewing Other Feature Reports 4-8
4.3.7.1 Viewing the Features Tree 4-8
4.3.7.2 Viewing the Features Calendar 4-9
4.3.7.3 Viewing The Feature History Report 4-9
4.3.7.4 Viewing the Feature Progress Log 4-10
4.3.7.5 Viewing the Feature Focus Areas Chart 4-10
4.3.7.6 Viewing the Approval Statuses 4-11
4.3.7.7 Viewing the Feature Owners Chart 4-11
4.3.8 Assigning or Updating Milestones Associated with Features 4-11
4.4 Tracking Milestones 4-11
4.4.1 Viewing the Milestones Report 4-12
4.4.2 Creating a Milestone 4-12
4.4.3 Updating or Deleting a Milestone 4-12
4.4.4 Viewing Other Milestone Reports 4-13
4.4.4.1 Viewing the Milestone Calendar 4-13
4.4.4.2 Viewing the Milestones By Owner Report 4-13
4.4.4.3 Viewing the Features by Milestone Report 4-14
viii
4.5 Tracking To Dos 4-14
4.5.1 Viewing To Dos 4-14
4.5.2 Creating a To Do 4-15
4.5.3 Updating a To Do 4-15
4.5.4 Managing Files Attached to a To Do 4-15
4.5.4.1 Attaching a File to a To Do 4-16
4.5.4.2 Viewing, Editing, and Removing Attached Files 4-16
4.5.5 Viewing Other To Do Reports 4-17
4.5.5.1 Viewing the To Dos Calendar 4-17
4.5.5.2 Viewing the To Do Progress Log 4-17
4.6 Managing Bugs 4-18
4.6.1 Viewing Bugs 4-18
4.6.2 Creating a Bug 4-18
4.6.3 Editing a Bug 4-19
4.6.4 Managing Files Attached to a Bug 4-19
4.6.4.1 Attaching a File to a Bug 4-19
4.6.4.2 Viewing, Editing, and Removing Attached Files 4-20
4.6.5 Viewing Other Bug Reports 4-20
4.6.5.1 Viewing the Bug Calendar 4-20
4.6.5.2 Viewing the Bugs By Developer 4-21
4.6.5.3 Viewing the Bugs By Day 4-21
4.7 Managing Feedback 4-22
4.7.1 About Feedback 4-22
4.7.2 Adding Feedback Using the Create Application Wizard 4-23
4.7.3 Adding Feedback Using the Create Page Wizard 4-24
4.7.4 Submitting Feedback Within a Running Application 4-25
4.7.5 Reviewing Feedback Within an Application 4-25
4.7.6 Configuring Feedback Within an Application 4-26
4.7.7 Tracking Feedback Team in Development 4-26
4.7.7.1 Accessing the Feedback Report in Team Development 4-26
4.7.7.2 Viewing Feedback by Filing User 4-27
4.7.7.3 Viewing the Feedback Calendar 4-28
4.8 Managing Team Development Utilities 4-28
4.8.1 Accessing Team Development Utilities 4-29
4.8.2 Configuring Team Development Settings 4-30
4.8.3 Viewing a Release Summary 4-31
4.8.4 Managing Feature Utilities 4-31
4.8.5 Renaming Focus Areas 4-31
4.8.6 Downloading File Attachments 4-32
4.8.7 Purging Data 4-32
4.8.8 Managing News Entries 4-33
ix

4.8.9 Managing Links with Workspace Members 4-33
5 Creating Websheet Applications
5.1 Creating a Websheet Application 5-2
5.1.1 Creating a Websheet from App Builder 5-2
5.1.2 Creating a Websheet Application from a Running Websheet 5-3
5.2 Copying an Existing Websheet Page 5-4
5.3 Running a Websheet 5-4
5.3.1 Running a Websheet from the App Builder Home Page 5-5
5.3.2 Running a Websheet from the Application Home Page 5-5
5.3.3 Determining a Websheet URL 5-6
5.4 Editing Page Details 5-6
5.5 Understanding Websheet Properties 5-6
5.5.1 Editing Websheet Properties 5-7
5.5.2 Websheet Properties 5-7
5.5.2.1 Websheet 5-7
5.5.2.2 Details 5-8
5.5.2.3 Logo 5-8
5.5.2.4 Style 5-9
5.5.2.5 Authentication 5-9
5.5.2.6 Authorization 5-10
5.5.2.7 SQL 5-10
5.6 Deleting a Websheet Application 5-11
5.7 Viewing the Websheet Dashboard 5-11
5.8 Monitoring Websheet Activity 5-11
5.9 Controlling Websheet Access 5-12
5.9.1 How Websheet Access Works 5-12
5.9.2 Specifying the Access Control List Type 5-13
5.9.3 Creating Access Control List Entries 5-13
6 Creating Database Applications
6.1 About the Create Application Wizard 6-2
6.2 Understanding Page Types, Features, and Settings 6-4
6.2.1 About Creating a New Database Application 6-4
6.2.2 Available Page Types in the Create Application Wizard 6-5
6.2.3 Available Features in the Create Application Wizard 6-6
6.2.4 Available Settings in the Create Application Wizard 6-8
6.2.5 About Removing Features Created with the Create Application Wizard 6-8
6.3 Creating a Database Application Based on a Table or Query 6-9
x
6.4 Creating a Database Application from a Spreadsheet 6-10
6.4.1 About Creating an Application from a Spreadsheet 6-11
6.4.2 Loading Spreadsheet Data from a File 6-11
6.4.3 Loading Spreadsheet Data by Copying and Pasting 6-14
6.5 Using Application Blueprints 6-16
6.5.1 What Is an Application Blueprint? 6-16
6.5.2 Viewing an Application Blueprint 6-16
6.5.3 Loading an Application Blueprint 6-17
6.6 Copying a Database Application 6-17
6.6.1 Copying a Database Application Using the Create Application Wizard 6-18
6.6.2 Copying an Application from the Application Home Page 6-19
6.7 Creating Applications for Mobile Devices 6-19
6.7.1 About Mobile Application Design 6-19
6.7.2 About Mobile Support 6-20
6.7.3 Creating Mobile Applications 6-21
6.8 Deleting an Application 6-21
6.8.1 Deleting an Application from the Application Home Page 6-22
6.8.2 Deleting an Application from the Edit Application Definition Page 6-22
6.9 Managing Application Attributes 6-22
6.9.1 Editing Application Attributes 6-23
6.9.1.1 Accessing the Edit Application Definition Page 6-23
6.9.1.2 Edit Application Definition Page 6-24
6.9.2 Configuring Security Attributes 6-32
6.9.2.1 Accessing the Edit Security Attributes Page 6-32
6.9.2.2 Security Attributes Page 6-33
6.9.3 Configuring Globalization Attributes 6-40
6.9.3.1 Accessing the Globalization Attributes Page 6-41
6.9.3.2 Edit Globalization Attributes Page 6-41
6.9.4 Managing the Application User Interface 6-45
6.9.4.1 Accessing User Interface Attributes 6-45
6.9.4.2 User Interface Page 6-45
6.9.4.3 Defining an Application Logo 6-48
6.9.4.4 Adding Desktop UI to a Mobile UI Only Application 6-49
6.9.4.5 Editing User Interface Details 6-50
6.9.4.6 User Interface Details Page 6-51
6.10 Adding Developer Comments 6-55
6.10.1 Developer Comment, Bug, or To Do Button 6-55
6.10.2 Adding Developer Comments to an Application 6-56
6.10.3 Viewing and Editing Developer Comments 6-56
6.10.4 Deleting Developer Comments 6-57
6.10.4.1 Deleting a Specific Developer Comment 6-57
xi
6.10.4.2 Deleting Multiple Developer Comments 6-57
6.10.5 Accessing the Developer Comments from Shared Components 6-57
6.10.6 Viewing the Developer Comments Calendar 6-58
6.11 Using the Find Icon 6-58
6.11.1 Accessing the Find Icon 6-58
6.11.2 Searching for Items 6-59
6.11.3 Searching for Pages 6-60
6.11.4 Searching for Queries 6-61
6.11.5 Searching for Tables 6-61
6.11.6 Using the PL/SQL Finder 6-62
6.11.7 Searching for Images 6-62
6.12 Adding Database Application Comments 6-63
6.13 Managing Application Groups 6-63
6.13.1 Viewing Database Application Groups 6-63
6.13.2 Creating a Database Application Group 6-64
6.13.3 Assigning a Database Application to an Application Group 6-64
6.13.4 Removing a Database Application from an Application Group 6-64
6.13.5 Deleting an Database Application Group 6-65
6.14 Using Application Utilities 6-65
6.14.1 Application Utilities 6-66
6.14.2 Accessing the Utilities Page 6-67
6.14.3 Viewing the Application Dashboard 6-68
6.14.4 Upgrading an Application to Include New Components 6-69
6.14.4.1 About Upgrading to Include New Components 6-69
6.14.4.2 Running Upgrade Application 6-69
6.14.5 Viewing the Recently Updated Pages Report 6-69
6.14.6 Viewing the Change History Report 6-70
6.14.7 Using the Database Object Dependencies Report 6-70
6.14.8 Accessing Application Express Views 6-71
6.14.9 Accessing Page Specific Utilities 6-71
6.14.10 Accessing Cross Page Utilities 6-72
6.14.11 Using Interactive Report Utilities 6-72
6.14.11.1 Deleting Saved Interactive Reports 6-73
6.14.11.2 Viewing Subscriptions 6-73
7 Managing Pages in a Database Application
7.1 About Creating New Pages 7-1
7.2 Adding a New Page to an Application 7-2
7.3 Understanding Page Types in the Create Page Wizard 7-4
7.3.1 Available Component Page Types 7-4
xii
7.3.2 Available Features Page Types 7-6
7.3.3 Available Components for Mobile User Interface Applications 7-7
7.3.4 About Removing Features Created with the Create Page Wizard 7-9
7.4 Creating Dialog Pages 7-9
7.4.1 About Supported Dialogs 7-10
7.4.2 Using a Dialog Page Template 7-10
7.4.2.1 Creating a Dialog Page Template 7-10
7.4.2.2 About Defining Dialog Page Template Attributes 7-11
7.4.3 Defining a Dialog Page as a in Page Designer 7-11
7.4.4 Generating a Cancel Dialog Dynamic Action on the Dialog Page 7-12
7.4.5 Generating a Close Dialog Page Process on the Dialog Page 7-12
7.4.6 About Branching with Dialog Pages 7-13
7.4.7 Handling Refresh Actions on Parent Page 7-13
7.5 About Copying Database Application Pages 7-13
7.6 About Deleting Database Application Pages 7-14
7.7 Creating Page Groups 7-14
7.7.1 Viewing Page Groups 7-15
7.7.2 Creating a Page Group 7-15
7.7.3 Editing a Page Group Definition 7-15
7.7.4 Assigning a Page to a Page Group 7-16
7.7.5 Viewing Pages by Page Group 7-16
7.7.6 Deleting a Page Group 7-16
7.8 Locking and Unlocking a Page 7-17
7.8.1 Determining If a Page Is Locked 7-17
7.8.2 Locking a Page 7-18
7.8.2.1 Locking a Page from the Application Home Page 7-18
7.8.2.2 Locking a Page from the Page Locks Page 7-18
7.8.2.3 Locking a Page in Page Designer 7-18
7.8.3 Unlocking a Page 7-19
7.8.3.1 Unlocking Pages from Utilities 7-19
7.8.3.2 Unlocking Pages from the Application Home Page 7-19
7.8.3.3 Unlocking a Page in Page Designer 7-19
7.8.3.4 Unlocking Pages As a Workspace Administrator 7-20
8 Editing Pages in Page Designer
8.1 About Page Designer 8-2
8.2 Understanding Page Designer UI Elements 8-3
8.2.1 Page Designer Toolbar 8-4
8.2.2 Left Pane of Page Designer 8-7
8.2.3 Central Pane of Page Designer 8-10
xiii
8.2.3.1 Layout Tab 8-11
8.2.3.2 Gallery 8-12
8.2.3.3 Component View Tab 8-14
8.2.3.4 Messages Tab 8-14
8.2.3.5 Page Search Tab 8-15
8.2.3.6 Help Tab 8-16
8.2.4 Right Pane of Page Designer (Property Editor) 8-17
8.2.5 Code Editor 8-18
8.3 Using Page Designer 8-20
8.3.1 Viewing a Page in Page Designer 8-20
8.3.2 Searching for Pages 8-21
8.3.3 Dragging and Dropping Tabs Between Panes 8-21
8.3.4 Switching Between Three Pane and Two Pane Mode 8-22
8.3.5 Accessing Property Editor 8-23
8.3.6 Adding a Region, Item, or Button by Dragging and Dropping 8-24
8.3.7 About Adding Components Using Gallery Context Menus 8-26
8.3.8 Adding a Region, Item, or Button from the Rendering Tab 8-26
8.3.9 Adding a Region, Item, or Button from the Component View Tab 8-27
8.3.10 Copying a Region, Item, or Button 8-27
8.3.11 Creating Pre-Rendering Branches, Computations, and Processes 8-28
8.3.12 Creating Page Submission Branches, Validations, Computations, andProcesses 8-29
8.4 Managing Page Attributes 8-30
8.4.1 Editing Page Attributes 8-30
8.4.2 Incorporating JavaScript Using Page Designer 8-31
8.4.3 Configuring Rejoin Sessions 8-32
8.4.4 Configuring Dialog Attributes 8-33
8.4.5 Configuring Page Attributes to Warn Users of Unsaved Changes 8-34
8.5 Running a Page from Page Designer 8-35
8.6 Runtime Developer Toolbar 8-35
8.7 Copying a Database Application Page 8-37
8.8 Deleting Pages 8-38
8.8.1 Deleting a Page 8-38
8.8.2 Deleting Multiple Pages 8-39
8.8.3 Deleting a Range of Pages 8-39
9 Developing Reports
9.1 Understanding Report Types 9-2
9.1.1 Interactive Grid 9-2
9.1.2 Interactive Report 9-3
9.1.3 Classic Report 9-4
xiv
9.1.4 Report and Form 9-5
9.2 Creating a Report Using the Create Application Wizard 9-6
9.2.1 Creating an Interactive or Classic Report Using the Create ApplicationWizard 9-6
9.2.2 Creating an Interactive Grid Using the Create Application Wizard 9-8
9.2.3 Report Options When Running the Create Application Wizard 9-9
9.3 Creating a Report Using the Create Page Wizard 9-10
9.3.1 Creating a Report on a New Page 9-10
9.3.2 Creating a Classic or Interactive Report on New Page Using RemoteDatabase References 9-12
9.3.3 Report Options When Running the Create Page Wizard 9-13
9.4 Creating a Report by Dragging and Dropping from the Gallery 9-16
9.5 Managing Interactive Grids 9-18
9.5.1 Managing Interactive Grid Region Attributes 9-19
9.5.1.1 Editing Interactive Grid Region Attributes 9-19
9.5.1.2 Creating Master Detail from an Existing Interactive Grid 9-20
9.5.1.3 Displaying Interactive Grids Conditionally 9-24
9.5.2 Managing Interactive Grid Attributes 9-25
9.5.2.1 Editing Interactive Grid Attributes 9-25
9.5.2.2 Making an Existing Interactive Grid Editable 9-26
9.5.2.3 Controlling Interactive Grid Pagination 9-27
9.5.2.4 Customizing the Interactive Grid Toolbar 9-28
9.5.2.5 Enabling Users to Save Public Reports in Interactive Grids 9-30
9.5.2.6 Restricting Who Can Save Public Reports 9-30
9.5.2.7 Enabling Icon View in an Interactive Grid 9-31
9.5.2.8 Enabling Detail View in an Interactive Grid 9-34
9.5.3 Managing Interactive Grid Column Attributes 9-36
9.5.3.1 Editing Common Grid Column Attributes 9-36
9.5.3.2 Defining a Column as a List of Values for Filtering 9-38
9.5.3.3 Creating a Column Link in an Interactive Grid 9-39
9.5.4 About Customizing Interactive Grids in a Running Application 9-40
9.5.5 Saving Interactive Grids 9-40
9.5.5.1 How the User Type Effects Available Save Options 9-41
9.5.5.2 About Configuration Dependencies When Saving Interactive Grids9-41
9.5.5.3 Saving a Private Interactive Grid 9-42
9.5.5.4 Saving a Public Interactive Grid 9-42
9.5.5.5 Saving or Renaming a Primary Interactive Grid 9-43
9.5.5.6 Saving an Alternative Interactive Grid 9-43
9.5.5.7 Renaming a Saved Interactive Grid Report 9-44
9.5.5.8 Deleting a Saved Interactive Grid Report 9-44
9.5.5.9 Resetting a Saved Interactive Grid Report 9-44
xv
9.6 Managing Interactive Reports 9-45
9.6.1 Managing Interactive Report Region Attributes 9-45
9.6.1.1 Editing Interactive Report Region Attributes 9-46
9.6.1.2 Displaying Interactive Reports Conditionally 9-47
9.6.2 Managing Interactive Report Attributes 9-47
9.6.2.1 Editing Interactive Report Attributes 9-48
9.6.2.2 Managing Link Columns 9-49
9.6.2.3 Customizing the Interactive Report Search Bar 9-53
9.6.2.4 Customizing the Actions Menu 9-55
9.6.2.5 Configuring Actions Menu Download Options 9-56
9.6.2.6 Controlling Interactive Report Pagination 9-61
9.6.2.7 Enabling Icon View 9-61
9.6.2.8 Enabling Detail View 9-64
9.6.2.9 Configuring Advanced Attributes for Interactive Reports 9-65
9.6.3 Managing Interactive Report Column Attributes 9-66
9.6.3.1 Editing Interactive Report Column Attributes 9-67
9.6.3.2 Creating a Column Link in an Interactive Report 9-68
9.6.3.3 Defining a Column as a List of Values in an Interactive Report 9-69
9.6.3.4 Formatting Columns in an Interactive Report 9-70
9.6.3.5 About Filtering on Conditional Links in Interactive Report Columns 9-71
9.6.4 Customizing Interactive Reports in a Running Application 9-72
9.6.4.1 About the Search Bar 9-72
9.6.4.2 About the Actions Menu 9-73
9.6.4.3 Using Interactive Report Filters 9-73
9.6.4.4 Saving Interactive Reports 9-74
9.6.5 Linking to Interactive Reports 9-80
9.6.5.1 Request Syntax 9-81
9.6.5.2 Name and Value Syntax 9-81
9.6.5.3 ClearCache Syntax 9-82
9.6.5.4 Restrictions When Linking to Interactive Reports 9-82
9.6.5.5 Valid Linking Examples 9-83
9.6.5.6 Invalid Linking Examples 9-83
9.6.5.7 Linking to Shared Interactive Reports 9-84
9.7 Managing Classic Reports 9-85
9.7.1 Managing Classic Report Region Attributes 9-86
9.7.1.1 Editing Classic Report Region Attributes 9-86
9.7.2 Managing Classic Report Attributes 9-87
9.7.2.1 Editing Classic Report Attributes 9-87
9.7.2.2 Editing Classic Report Pagination 9-88
9.7.2.3 Adding Support for XML File or a CSV File Export 9-89
9.7.2.4 Enabling Classic Report CSV Output Option 9-90
xvi
9.7.2.5 Controlling Classic Report Column Breaks 9-91
9.7.3 Managing Classic Report Column Attributes 9-92
9.7.3.1 Altering Classic Report Column Layout 9-92
9.7.3.2 Enabling Column Sorting in a Classic Report 9-93
9.7.3.3 Creating a Column Link in a Classic Report 9-94
9.7.3.4 Defining an Updatable Column in a Classic Report 9-95
9.7.3.5 Defining a Column as a List of Values in a Classic Report 9-96
9.7.3.6 Controlling When Classic Report Columns Display 9-97
9.7.3.7 Adding a Download Link to a Classic Report 9-98
9.8 Printing Report Regions 9-98
9.8.1 About Printing Reports to PDF 9-99
9.8.2 About Report Printing Configuration Options 9-99
9.8.3 About Classic Report Printing Methods 9-100
9.8.4 Configuring Classic Report Region Print Attributes 9-100
9.8.4.1 Configuring a Classic Report Print Attributes 9-101
9.8.5 Configuring Interactive Report Region Print Attributes 9-101
9.8.5.1 Configuring Interactive Report Regions for Printing 9-102
9.8.6 About Report Queries 9-102
9.8.7 About Report Layouts 9-103
9.9 Understanding BLOB Support in Forms and Reports 9-103
9.9.1 About BLOB Support in Reports 9-103
9.9.2 About Providing a Download Link 9-103
9.9.3 About Displaying the BLOB 9-104
9.9.4 About Working With BLOBs Procedurally 9-105
10
Developing Forms
10.1 Understanding Form Types 10-1
10.1.1 Editable Interactive Grid 10-2
10.1.2 Form on a Table 10-2
10.1.3 Master Detail Forms 10-3
10.2 Creating a Form 10-5
10.2.1 Creating a Form Using the Create Page Wizard 10-6
10.2.2 Form Options When Running the Create Page Wizard 10-7
10.2.3 Creating a Form Using the Create Application Wizard 10-9
10.2.4 Creating a Form Region 10-10
10.3 About Making an Interactive Grid Editable 10-11
10.4 Managing Master Detail Forms 10-11
10.4.1 About Master Detail Forms 10-12
10.4.2 Creating a Single Page Master Detail Using the Create ApplicationWizard 10-15
10.4.3 Creating a Single Page Master Detail Using the Create Page Wizard 10-17
xvii
10.4.4 Creating a Two Page Master Detail Using the Create Page Wizard 10-18
10.5 Validating User Input in Forms 10-20
10.5.1 About Creating Validations and Error Messages 10-20
10.5.2 Associating a Validation with a Specific Item 10-20
10.5.3 About the Error Message Display Location 10-21
10.6 Understanding BLOB Support in Forms 10-21
10.6.1 About BLOB Support in Forms 10-21
10.6.2 About Uploading and Downloading Files into a BLOB 10-22
10.6.3 About Displaying the BLOB 10-23
10.6.4 About Removing the Image Reference 10-23
11
Managing Database Application Components
11.1 Understanding Oracle JET Integration with Oracle Application Express 11-2
11.1.1 About Oracle JET 11-2
11.1.2 How Oracle JET is integrated with Oracle Application Express 11-2
11.2 Switching from AnyChart to JET Chart 11-4
11.2.1 Upgrading to JET Chart Using Application Upgrade Utility 11-4
11.2.2 Searching a Workspace for AnyChart Using SQL Commands 11-4
11.3 Creating Calendars 11-5
11.3.1 About Supported Calendars 11-6
11.3.2 Sample Calendar 11-7
11.3.3 Adding a Calendar to a New Page Using a Local Database 11-8
11.3.4 Adding a Calendar on a New Page Using Remote DatabaseReferences 11-10
11.3.5 Creating a Calendar in Page Designer 11-12
11.3.6 Managing Calendar Attributes 11-13
11.3.6.1 Editing Calendar Attributes in the Property Editor 11-13
11.3.6.2 Editing an Existing Calendar to Include Add and EditFunctionality 11-14
11.3.6.3 Adding Calendar Initialization JavaScript Code 11-16
11.3.6.4 Enabling the Dragging and Dropping of Data In an ExistingCalendar 11-17
11.3.7 About Dynamic Action Support for Calendar 11-18
11.4 Creating Maps 11-20
11.4.1 About Map Chart Support 11-20
11.4.2 About Creating SQL Queries for Maps 11-20
11.4.3 Adding a Map Chart to a New Page 11-23
11.4.4 Adding a Map Chart in Page Designer 11-24
11.4.5 Managing Map Charts 11-25
11.4.5.1 Editing Map Chart Attributes 11-25
11.4.5.2 Using Custom XML with Map Charts 11-26
xviii
11.4.5.3 Enabling Automatic Updates 11-27
11.5 Creating Charts 11-27
11.5.1 About Supported Charts 11-28
11.5.2 Sample Charts 11-29
11.5.3 Adding a Chart by Running the Create Page Wizard 11-29
11.5.4 Adding a Chart on a New Page Using Remote Database References 11-31
11.5.5 Adding a Chart in Page Designer 11-33
11.5.6 Managing Charts 11-35
11.5.6.1 Editing Chart Attributes 11-35
11.5.6.2 Switching Chart Type 11-35
11.5.6.3 Enabling Automatic Refresh 11-36
11.5.7 Using Custom JavaScript with Charts 11-38
11.6 Creating Help for Your Application 11-39
11.6.1 Creating Help 11-39
11.6.1.1 About Creating Help 11-40
11.6.1.2 Creating a Help Page and Region 11-40
11.6.1.3 Defining Page Help 11-41
11.6.1.4 Defining Item Help 11-42
11.6.2 Using the Bulk Edit Item Help Report 11-42
11.6.3 Seeding Item Help Topics 11-43
11.6.4 Creating a Help Navigation Bar Entry 11-43
12
Using Themes and Theme Styles
12.1 Using Themes 12-1
12.1.1 About Themes 12-2
12.1.2 About Responsive Design and the Universal Theme 12-2
12.1.3 Using Theme Styles and Theme Roller 12-3
12.1.3.1 About Theme Styles 12-4
12.1.3.2 Creating a Theme Style 12-4
12.1.3.3 Editing a Theme Style from the Themes Page 12-5
12.1.3.4 Editing a Theme Style from the User Interface Page 12-5
12.1.3.5 Enabling Users to Select a Theme Style 12-6
12.1.3.6 Using Theme Roller 12-6
12.1.4 Understanding Template Options 12-8
12.1.4.1 About Template Options 12-9
12.1.4.2 About Default Template Options 12-9
12.1.4.3 About Template Option Groups and Presets 12-9
12.1.5 Accessing the Themes Page 12-10
12.1.6 Editing Themes 12-10
12.1.6.1 Editing a Theme 12-10
xix
12.1.6.2 Theme Attributes 12-11
12.2 Managing Themes and Subscriptions 12-16
12.2.1 Understanding Theme Subscriptions 12-17
12.2.1.1 About Theme Subscriptions 12-17
12.2.1.2 About Modifying a Theme Subscription 12-17
12.2.1.3 Verifying if a Theme Refresh Is Needed 12-18
12.2.1.4 Refreshing a Subscribed Theme 12-18
12.2.1.5 Unsubscribing to a Theme 12-19
12.2.1.6 Re-subscribing to a Built-in Theme 12-19
12.2.2 Creating a Theme 12-20
12.2.3 Switching Themes 12-21
12.2.3.1 About Switching the Active Theme 12-21
12.2.3.2 Switching an Active Theme 12-21
12.2.4 Changing a Theme Identification Number 12-22
12.2.5 Copying a Theme 12-23
12.2.6 Deleting a Theme 12-23
12.2.7 Creating a Master Theme Application 12-24
12.2.7.1 Creating a Master Theme Application by Creating a NewApplication 12-24
12.2.7.2 Creating a Master Theme Application from an ExistingApplication 12-24
12.2.8 Managing Workspace Themes 12-24
12.2.8.1 Adding a Workspace Theme to the Theme Repository 12-25
12.2.8.2 Viewing an Existing Workspace Theme 12-25
12.2.8.3 Deleting a Workspace Theme 12-26
12.2.8.4 Modifying a Workspace Theme 12-26
12.2.8.5 Exporting a Workspace Theme 12-27
12.2.9 Managing Instance Themes 12-27
12.2.10 About Exporting and Importing Themes 12-27
12.2.11 Viewing Theme Reports 12-27
12.2.11.1 Viewing All Templates in a Theme 12-27
12.2.11.2 Viewing Theme Template Counts 12-28
12.2.11.3 Viewing File References 12-28
12.2.11.4 Viewing Class References 12-29
12.2.11.5 Viewing Template Substitution Strings 12-30
12.3 Creating Custom Themes 12-30
12.3.1 About Cascading Style Sheets 12-31
12.3.2 About Calling the JavaScript File from the Page Template 12-31
12.3.3 About Using Escaping Syntax in Substitution Strings 12-32
12.3.4 Selecting a Default Page Template 12-32
12.3.4.1 Selecting a Page-level Template Within a Theme 12-32
12.3.4.2 Selecting a Page-level Template for a Specific Page 12-32
xx
12.3.5 Creating a New Template 12-33
12.3.6 Using Template Options 12-33
12.3.6.1 Managing Global Template Option Groups 12-34
12.3.6.2 Managing Global Template Options 12-35
12.3.6.3 Managing Template Options 12-37
12.3.7 Viewing Template Reports 12-39
12.3.8 Managing Templates 12-40
12.3.8.1 Viewing Templates on the Templates Page 12-40
12.3.8.2 Viewing Templates Associated with a Specific Page 12-41
12.3.8.3 Replacing Templates 12-41
12.3.8.4 Replacing All Templates within an Application 12-42
12.3.8.5 Viewing Region Position Utilization by Page Template 12-42
12.3.8.6 Unsubscribing to Templates 12-42
12.3.8.7 Publishing Templates 12-43
12.3.9 Breadcrumb Templates 12-43
12.3.9.1 About Breadcrumb Style Navigation 12-43
12.3.9.2 Breadcrumb Template Attributes 12-44
12.3.10 Button Templates 12-46
12.3.10.1 Button Template Attributes 12-46
12.3.11 Legacy Calendar Templates 12-48
12.3.11.1 Supported Legacy Calendar Template Substitution Strings 12-48
12.3.11.2 Legacy Calendar Template Attributes 12-48
12.3.12 Label Templates 12-49
12.3.12.1 Label Template Attributes 12-50
12.3.12.2 About Using #CURRENT_ITEM_HELP_TEXT# to Create ItemHelp 12-52
12.3.13 List Templates 12-52
12.3.13.1 About Hierarchical Lists 12-53
12.3.13.2 List Template Attributes 12-53
12.3.14 Page Templates 12-55
12.3.14.1 Page Template Attributes 12-56
12.3.14.2 Required Dialog Page Template Attributes 12-63
12.3.15 Popup LOV Templates 12-64
12.3.15.1 Popup List of Values Template Attributes 12-64
12.3.16 Region Templates 12-65
12.3.16.1 Region Template Attributes 12-66
12.3.17 Report Templates 12-67
12.3.17.1 Generic Column Templates and Named Column Templates 12-68
12.3.17.2 Report Column Template Attributes for Generic ColumnTemplates 12-69
12.3.17.3 Report Column Template Attributes for Named ColumnTemplates 12-73
xxi
12.3.17.4 About Using JavaScript in Column Templates 12-76
12.4 Using Custom Cascading Style Sheets 12-76
12.4.1 About Uploading Cascading Style Sheets 12-77
12.4.2 Referencing an Uploaded Cascading Style Sheet in the PageTemplate 12-77
13
Controlling Page Layout
13.1 About Page Layout in Oracle Application Express 13-1
13.2 Optimizing a Page for Printing 13-2
13.2.1 Selecting a Printer Friendly Template for an Application 13-2
13.2.2 Using f?p Syntax to Toggle to Printer Friendly Mode 13-3
13.3 Creating a Global Page to Display Components on Every Page 13-3
13.3.1 Creating a Global Page 13-3
13.3.2 Navigating to the Global Page 13-4
13.4 Managing Regions 13-4
13.4.1 About Regions 13-4
13.4.2 Creating a Region 13-5
13.4.3 Editing Regions 13-6
13.4.3.1 Editing Region Attributes 13-6
13.4.3.2 Controlling Region Positioning 13-7
13.4.3.3 Specifying a Region Header and Footer 13-7
13.4.3.4 Enabling Users to Customize a Page 13-7
13.4.3.5 Utilizing Region Caching in Page Designer 13-8
13.4.3.6 Specifying a Static Region ID 13-9
13.4.3.7 Adding a Region Image 13-10
13.4.3.8 Creating a Region Display Selector 13-11
13.4.4 Copying a Region 13-12
13.4.5 Deleting Regions 13-12
13.5 About Incorporating Content from Other Web Sites 13-13
13.6 About Managing Images 13-14
13.7 Rendering HTML Using Custom PL/SQL 13-14
14
Managing Database Application Controls
14.1 Managing Page-Level Items 14-1
14.1.2 Viewing Page-Level Items 14-2
14.1.3 Creating Page-Level Items 14-3
14.1.3.1 Creating a Page-Level Item from the Rendering Tab 14-3
14.1.3.2 Adding a Page-Level Item from the Gallery 14-3
14.1.3.3 Creating a Static List of Values 14-4
14.1.3.4 Creating a Cascading List of Values 14-6
xxii
14.1.3.5 Creating a Shuttle Item 14-7
14.1.4 Editing Page-Level Items 14-8
14.1.4.1 Editing Page Item Attributes in the Property Editor 14-9
14.1.4.2 Defining Default Values for Page Items 14-9
14.1.4.3 Configuring Page Item Security 14-10
14.1.4.4 Creating a Quick Pick Selection 14-12
14.1.4.5 Displaying Conditional Page Items 14-13
14.1.4.6 Displaying Read Only Page Items 14-13
14.1.4.7 Applying a Format Mask to an Item 14-14
14.1.4.8 Configuring Item Attributes to Warn Users of Unsaved Changes 14-15
14.1.4.9 Viewing Item Utilities 14-16
14.1.1 Understanding Page-Level Items 14-16
14.1.1.1 About the Differences Between Page Items and ApplicationItems 14-17
14.1.1.2 About Item Naming Conventions 14-17
14.1.1.3 Referencing Item Values 14-17
14.1.1.4 About Referencing Items Using JavaScript 14-18
14.1.1.5 Working with Multiple Select List Item 14-19
14.2 Managing Dynamic Actions 14-20
14.2.1 About Dynamic Actions 14-21
14.2.2 About Dynamic Action Events 14-21
14.2.3 Creating a Dynamic Action 14-24
14.2.4 Editing Dynamic Actions 14-26
14.2.5 Defining Dynamic Action Event Scope 14-27
14.2.6 Deleting a Dynamic Action 14-27
14.2.7 About Calling JavaScript Using a Dynamic Action 14-28
14.2.8 Debugging Dynamic Actions 14-28
14.2.8.1 About Debugging Dynamic Actions 14-28
14.2.8.2 Debugging Dynamic Actions 14-28
14.3 Managing Buttons 14-29
14.3.1 What Actions Can a Button Perform? 14-29
14.3.2 Creating a Button 14-30
14.3.3 Editing a Button 14-31
14.3.4 Displaying a Button Conditionally 14-31
14.3.5 Configuring Button Attributes to Warn Users of Unsaved Changes 14-32
14.3.6 About Calling JavaScript from a Button 14-33
14.3.7 About the Relationship Between Button Names and REQUEST 14-34
14.3.8 About Branching with Buttons 14-34
14.4 Managing Trees 14-34
14.4.1 About Trees 14-35
14.4.2 Creating a Tree on New Page 14-35
xxiii
14.4.3 Creating a Tree in Page Designer 14-37
14.4.4 Editing Tree Attributes 14-40
14.5 About Incorporating JavaScript into an Application 14-40
15
Adding Navigation
15.1 About Using Lists as Navigation 15-1
15.2 Creating Tabs 15-2
15.2.1 About Tabs 15-2
15.2.2 About the Tabs Page 15-3
15.2.3 Checking for Tab Template Support 15-4
15.2.4 Creating a Tab 15-5
15.2.5 Editing Tabs 15-6
15.2.5.1 Editing Multiple Tabs Simultaneously 15-6
15.2.5.2 Managing Standard Tabs 15-7
15.2.6 Accessing Tab Reports 15-7
15.3 Creating Breadcrumbs 15-8
15.3.1 What Are Breadcrumbs? 15-8
15.3.2 Creating a Breadcrumb While Creating a Page 15-9
15.3.3 Creating a Breadcrumb Manually 15-9
15.3.3.1 About Creating a Breadcrumb Manually 15-9
15.3.3.2 Creating Breadcrumbs as Shared Components 15-9
15.3.3.3 Creating a Breadcrumb Region Using the Create BreadcrumbWizard 15-10
15.3.3.4 Adding a Breadcrumb Region to a Page 15-10
15.3.3.5 Adding Entries to a Breadcrumb 15-12
15.3.3.6 About Creating Dynamic Breadcrumbs 15-13
15.3.4 Editing Breadcrumbs 15-13
15.3.5 Reparenting Breadcrumb Entries 15-14
15.3.6 Deleting Unused Breadcrumb Entries 15-15
15.3.7 Accessing Breadcrumb Reports 15-15
15.4 Creating Classic Navigation Bar 15-16
15.4.1 About Classic Navigation Bar Entries 15-16
15.4.2 Creating a Classic Navigation Bar Entry 15-17
15.4.2.1 Creating a Classic Navigation Bar Entry from Scratch 15-17
15.4.2.2 Creating a Classic Navigation Bar Entry for Feedback 15-18
15.4.3 Copying a Classic Navigation Bar Entry 15-19
15.4.4 Editing a Classic Navigation Bar Entry 15-20
15.4.5 Editing Multiple Classic Navigation Bar Entries Simultaneously 15-20
15.4.6 Accessing Classic Navigation Bar Entry Reports 15-20
15.5 Controlling Navigation Using Branches 15-21
15.5.1 Creating a Branch 15-21
xxiv
15.5.2 About Branching Conditionally 15-23
16
Managing Computations, Validations, and Processes
16.1 Understanding Page Computations 16-1
16.1.1 About Page Computations 16-2
16.1.2 Creating a Page Computation 16-2
16.1.3 Editing Page Computation Attributes 16-3
16.1.4 Editing the Computation Point and Source 16-3
16.1.5 Computation Points and Computation Syntax Example 16-4
16.2 Understanding Validations 16-5
16.2.1 About Validations 16-6
16.2.2 Creating a Validation 16-6
16.2.3 Editing a Validation 16-7
16.2.4 About Determining When Validations Execute 16-8
16.2.5 About Defining How Validation Error Messages Display 16-8
16.2.6 Processing Validations Conditionally 16-9
16.2.7 About Altering the Go to Error Link 16-10
16.2.8 What Happens When a Validation Fails? 16-10
16.3 Understanding Page Processes 16-10
16.3.1 About Page Processes 16-11
16.3.2 Creating Page Processes 16-11
16.3.3 Editing Page Process Attributes 16-12
16.3.4 Controlling When a Page Process Executes 16-13
16.3.5 Creating Page Process Success and Error Messages 16-13
16.3.6 Making a Page Process Conditional 16-14
16.4 About Branches 16-14
16.5 Understanding Application Processes 16-14
16.5.1 On Demand Application Processes 16-15
16.5.2 About Application Processes that Execute On New Instance 16-15
16.5.3 About Running an On Demand Process from a Page Request 16-15
16.5.4 Application Process Example 16-16
16.5.5 Creating an Application Process 16-16
16.5.6 Editing Application Process Attributes 16-17
16.5.7 Creating Application Process Error Messages 16-17
16.5.8 Viewing the Application Processes History Report 16-18
16.6 Understanding Application Computations 16-19
16.6.1 About Application Computations 16-19
16.6.2 About Application Computations that Execute On New Instance 16-19
16.6.3 Creating an Application Computation 16-20
16.6.4 Accessing the Application Computation History Report 16-20
xxv
16.7 Using the Attribute Dictionary 16-21
16.7.1 About the Attribute Dictionary 16-21
16.7.2 Accessing the Manage Attribute Dictionary 16-21
17
Managing Shared Components
17.1 Accessing the Shared Components Page 17-2
17.2 Shared Components Page 17-2
17.2.1 Application Logic 17-3
17.2.2 Security 17-4
17.2.3 Other Components 17-4
17.2.4 Navigation 17-5
17.2.5 User Interface 17-6
17.2.6 Files 17-6
17.2.7 Data Sources 17-7
17.2.8 Reports 17-7
17.2.9 Globalization 17-8
17.2.10 Tasks Region 17-8
17.2.11 Workspace Objects Region 17-9
17.3 Managing Application Settings 17-9
17.3.1 Creating an Application Setting 17-10
17.3.2 Editing or Deleting Application Setting 17-10
17.4 Creating Lists of Values at the Application Level 17-11
17.4.1 What is a List of Values? 17-11
17.4.2 Creating a Named LOV at the Application Level 17-12
17.4.3 About Static LOVs 17-12
17.4.4 Editing an Existing LOV 17-12
17.4.4.1 Editing a LOV 17-12
17.4.4.2 Editing LOVs in Bulk 17-13
17.4.5 About Referencing Session State Within an LOV 17-13
17.4.6 Accessing LOV Reports 17-13
17.5 Managing Component Settings 17-14
17.5.1 Configuring Component Settings 17-15
17.5.2 Integrating with Google Calendar 17-15
17.5.3 Configuring Color Picker Display 17-16
17.5.4 Configuring Interactive Report Action Menu Structure 17-16
17.5.5 Dynamically Adding Sliders to Regions 17-17
17.5.6 Configuring Switch Defaults 17-17
17.5.7 Configuring Rich Text Editor Responsiveness 17-18
17.5.8 Viewing the Component Settings History Report 17-18
17.6 Using Shortcuts 17-19
xxvi

17.6.1 What is a Shortcut? 17-19
17.6.2 Supported Shortcut Types 17-20
17.6.3 Defining a Shortcut from Scratch 17-20
17.6.4 Copying an Existing Shortcuts 17-21
17.6.5 Editing Existing Shortcuts 17-22
17.6.6 Accessing Shortcut Reports 17-22
17.7 Managing Email Templates 17-23
17.7.1 Defining an Email Template 17-23
17.7.2 Viewing Sample Email Templates 17-25
17.7.3 About Including Dynamic Text 17-26
17.7.4 Editing Email Templates 17-27
17.8 Managing Static Application Files 17-27
17.8.1 Specifying the Location of Static Application Files 17-28
17.8.2 Uploading Static Application Files 17-28
17.8.3 Viewing the Static Application File Report 17-29
17.8.4 Referencing Static Application Files 17-29
17.8.5 Downloading Static Application Files 17-29
17.8.5.1 Downloading a Static Application File 17-29
17.8.5.2 Downloading All Static Application Files in a Zip 17-30
17.8.6 Deleting Static Application Files 17-30
17.8.6.1 Deleting a Static Application File 17-30
17.8.6.2 Deleting All Static Application Files 17-31
17.9 Managing Static Workspace Files 17-31
17.9.1 Uploading Static Workspace Files 17-31
17.9.2 Viewing Static Workspace File Report 17-32
17.9.3 About Referencing Static Workspace Files 17-32
17.9.4 Downloading Static Workspace Files 17-32
17.9.4.1 Downloading a Static Workspace File 17-33
17.9.4.2 Downloading All Static Workspace Files in a Zip 17-33
17.9.5 Deleting Static Workspace Files 17-33
17.9.5.1 Deleting a Static Workspace File 17-33
17.9.5.2 Deleting All Static Workspace Files 17-34
17.10 Managing Application-Level Items 17-34
17.10.1 Creating an Application-Level Item 17-35
17.10.2 Viewing Application Item Usage 17-36
17.10.3 Editing Application-Level Item Attributes 17-37
17.10.4 About Creating an Application-Level Item that Functions as a GlobalVariable 17-37
17.11 Creating Lists 17-38
17.11.1 About Static and Dynamic Lists 17-38
17.11.2 Creating Static Lists 17-39
xxvii
17.11.2.1 About the Process of Creating a Static List 17-39
17.11.2.2 Creating a Static List from Scratch 17-39
17.11.2.3 About Adding Entries and Sublists to a Static List 17-40
17.11.2.4 Adding Entries or Sublists from Scratch 17-41
17.11.2.5 Copying Static List Entries Between Lists 17-43
17.11.2.6 Reparenting Static List Entries 17-43
17.11.2.7 Managing Orphaned Static List Entries 17-44
17.11.2.8 Resequencing Static List Entries 17-44
17.11.3 Creating Dynamic Lists 17-44
17.11.3.1 About the Process of Creating a Dynamic List 17-45
17.11.3.2 Understanding Dynamic List Syntax 17-45
17.11.3.3 Creating a Dynamic List from Scratch 17-46
17.11.4 Copying a List 17-47
17.11.4.1 Copying a List from the Current Application 17-47
17.11.4.2 Copying a List Between Applications 17-48
17.11.5 Adding a List to a Page 17-48
17.11.6 Editing List Attributes 17-49
17.11.7 Accessing List Reports 17-50
17.11.8 Managing Navigation Menus 17-51
17.11.8.1 About Navigation Menus 17-51
17.11.8.2 Editing Navigation Menu Lists 17-52
17.11.8.3 Changing Where and How Navigation Menus Display 17-52
17.11.8.4 About Switching from Tabs to Navigation Menus 17-53
17.11.9 Managing Navigation Bar Lists 17-53
17.11.9.1 About Navigation Bars 17-53
17.11.9.2 Editing Navigation Bar Lists 17-54
17.11.9.3 Editing Navigation Bar User Interface Details 17-54
17.12 Managing Report Output 17-55
17.12.1 Printing a Report Region by Defining a Report Query 17-55
17.12.1.1 About Report Queries 17-55
17.12.1.2 Creating a Report Query 17-55
17.12.1.3 Editing a Report Query 17-58
17.12.1.4 Copying a Report Query 17-58
17.12.2 Formatting a Report Region or Report Query Using Report Layouts 17-58
17.12.2.1 About Report Layouts 17-58
17.12.2.2 About Report Layout Options 17-59
17.12.2.3 Creating a Report Layout 17-59
17.12.2.4 Editing a Report Layout 17-60
17.12.2.5 Copying a Report Layout 17-61
xxviii
18
Managing Application Data
18.1 Creating Applications with Data Loading Capability 18-1
18.1.1 About Creating a Data Load Wizard 18-2
18.1.2 Creating a Data Load Wizard 18-3
18.1.3 Re-creating Data Load Pages 18-6
18.1.4 Editing the Data Load Definition 18-6
18.2 About Using Collections 18-8
18.3 Managing REST Enabled SQL References 18-8
18.3.1 About REST Enabled SQL Service 18-9
18.3.2 Before You Begin: REST Enabled SQL Service Requirements 18-10
18.3.3 Creating a REST Enabled SQL Service Reference 18-11
18.3.4 Example: Creating a REST Enabled SQL Service Reference 18-13
18.3.5 Editing a REST Enabled SQL Service Reference 18-15
18.3.6 Deleting a REST Enabled SQL Service Reference 18-16
18.3.7 Creating or Updating Components to Use a REST Enabled SQL 18-17
18.3.7.1 Creating an Interactive or Classic Report Using a REST EnabledSQL Reference 18-17
18.3.7.2 Creating a Chart Using a REST Enabled SQL Reference 18-19
18.3.7.3 Creating a Calendar Using a REST Enabled SQL Reference 18-22
18.3.7.4 Specifying a REST Enabled SQL Reference in an ExistingComponent 18-24
18.4 Managing Web Source Modules 18-26
18.4.1 About Web Source Modules 18-26
18.4.2 Creating a Web Source Module 18-27
18.4.3 Editing or Deleting a Web Source Module 18-29
18.4.4 Copying a Web Source Module 18-31
18.4.5 Viewing Credential Utilization 18-31
18.4.6 Viewing Web Service Module History 18-32
18.5 Managing Remote Servers 18-32
18.5.1 About Remote Servers 18-32
18.5.2 Creating a Remote Server 18-33
18.5.3 Editing or Deleting a Remote Server 18-33
18.5.4 Viewing Remote Server Utilization 18-34
18.5.5 Viewing Remote Server History 18-35
18.6 Managing Web Credentials 18-35
18.6.1 About Credentials 18-36
18.6.2 Creating Web Credentials 18-36
18.6.3 Editing or Deleting Credentials 18-37
18.6.4 Viewing Credential Utilization 18-38
18.6.5 Viewing Credential History 18-38
18.7 Managing Legacy Web Services 18-39
xxix
18.7.1 About Web Services 18-39
18.7.2 Creating Web Service References 18-40
18.7.2.1 Accessing the Web Service References Page 18-40
18.7.2.2 Specifying an Application Proxy Server Address 18-41
18.7.3 About Working with SSL Enabled Web Services 18-41
18.7.4 Creating Web Service References Based on a WSDL 18-41
18.7.4.1 About Creating Web Service References Based on a WSDL 18-42
18.7.4.2 Creating a Web Service Reference by Specifying a WSDLDocument 18-42
18.7.4.3 Testing a Web Service Reference Created from a WSDL 18-43
18.7.5 Creating Web Service References Manually 18-43
18.7.5.1 About Creating Web Service References Manually 18-43
18.7.5.2 Creating a Web Service Reference Manually 18-44
18.7.5.3 Testing a Web Service Reference Created Manually 18-44
18.7.6 Creating RESTful Web Service References 18-45
18.7.6.1 About Creating RESTful Web Service References 18-45
18.7.6.2 Creating a RESTful Web Service Reference 18-45
18.7.6.3 Testing a REST Web Service Reference 18-47
18.7.7 Using the Web Service Reference Repository 18-48
18.7.8 Creating an Input Form and Report on a Web Service 18-48
18.7.8.1 About the Create Form and Report on Web Service Wizard 18-48
18.7.8.2 Creating a Form and Report by Adding a New Page 18-49
18.7.9 Creating a Form on a Web Service 18-50
18.7.9.1 About the Create Form on Web Service Wizard 18-50
18.7.9.2 Creating a Form by Adding a New Page 18-50
18.7.10 Creating a Report on a Web Service 18-51
18.7.11 How to Invoke a Web Service as a Process 18-53
18.7.11.1 Invoking a Web Service as a Process 18-53
18.7.11.2 Editing a Web Service Process 18-55
18.7.12 Viewing a Web Service Reference History 18-56
18.8 Accessing Data with Database Links 18-56
18.8.1 About Database Links 18-57
18.8.2 Creating a Database Link 18-57
18.8.3 Viewing an Existing Database Link 18-57
18.9 About DML Locking 18-57
18.9.1 About DML Locking 18-58
18.9.2 APEX_DML_LOCK_WAIT_TIME 18-58
18.9.3 FSP_DML_LOCK_ROW 18-58
xxx
19
Extending Application Capabilities
19.1 Sending Email from an Application 19-1
19.1.1 About Configuring Email 19-2
19.1.1.1 About Enabling Network Services 19-2
19.1.1.2 About Configuring Email in a Full Development Environment 19-2
19.1.2 About Email Provisioning 19-2
19.1.3 About the Mail Queue 19-2
19.1.4 About the APEX_MAIL Package 19-3
19.2 Implementing Plug-ins 19-3
19.2.1 About Plug-ins 19-3
19.2.2 Accessing the Plug-ins Page 19-4
19.2.3 Creating a Plug-in 19-4
19.2.4 Editing a Plug-in 19-6
19.2.5 Adding Custom Attributes to a Plug-in 19-6
19.2.6 Uploading Files Associated with a Plug-in 19-7
19.2.6.1 Uploading a File to Associate with a Plug-in 19-7
19.2.6.2 Automatically Loading CSS and JavaScript Files 19-8
19.2.7 Adding Events to a Plug-in 19-9
19.2.8 Deleting a Plug-in 19-9
19.2.9 Viewing the Plug-in Repository 19-10
19.2.10 Importing a Plug-in from the Plug-in Page 19-10
19.2.11 Exporting a Plug-in from the Plug-in Page 19-11
19.2.12 Resetting the Plug-in Interactive Report 19-11
19.2.13 Viewing Plug-in Utilization Page 19-11
19.2.14 Viewing Plug-in History 19-12
19.3 Understanding jQuery and jQuery UI Support 19-12
19.3.1 About Upgrading to jQuery 3.1.1 19-12
19.3.2 About Upgrading to jQuery UI 1.12.x 19-13
19.4 Manually Refreshing Oracle Application Express Components 19-13
20
Managing Application Security
20.1 Understanding Administrator Security Best Practices 20-1
20.1.1 About Oracle Application Express Administrator Roles 20-3
20.1.2 About Configuring Oracle REST Data Services with Oracle ApplicationExpress 20-3
20.1.3 About Configuring Oracle HTTP Server with mod_plsql with OracleApplication Express 20-4
20.1.4 About Security Considerations When Using the Embedded PL/SQLGateway 20-4
20.1.5 Managing Instance Security 20-4
xxxi
20.1.5.1 About Creating Login Controls 20-6
20.1.5.2 About Enabling Public File Upload 20-6
20.1.5.3 About Restricting User Access by IP Address 20-6
20.1.5.4 About Specifying an Instance Proxy 20-6
20.1.5.5 About Utilizing Secure Sockets Layer 20-6
20.1.5.6 About Enabling RESTful Access 20-7
20.1.5.7 About Rejoin Sessions 20-7
20.1.5.8 About Isolating Workspaces 20-8
20.1.5.9 About Utilizing Session Timeout 20-8
20.1.5.10 Restricting Password Reuse 20-8
20.1.5.11 About Using SQL in Websheets 20-9
20.1.5.12 About Enabling RESTful Services 20-9
20.1.6 Configuring Instance Settings 20-10
20.1.6.1 About Enabling Automation When Creating Workspaces 20-10
20.1.6.2 About Enabling and Configuring Email 20-11
20.1.6.3 About Configuring Storage Options 20-11
20.1.6.4 About Creating Wallets 20-11
20.1.7 About Configuring Workspace Purge Settings 20-11
20.1.8 Understanding Workspace Management 20-11
20.1.8.1 About Managing Workspace to Schema Assignments 20-12
20.1.8.2 About Managing Developers and Users 20-12
20.1.8.3 About Managing Component Availability 20-12
20.1.9 About Integrating with Oracle BI Publisher 20-12
20.1.10 About the Advantages of the Application Express RuntimeEnvironment 20-13
20.1.11 Enabling Network Services in Oracle Database 11g or Later 20-13
20.1.11.1 When and Why Network Services Must be Enabled 20-13
20.1.11.2 Granting Connect Privileges Prior to Oracle Database 12c 20-14
20.1.11.3 Granting Connect Privileges in Oracle Database 12c or Later 20-15
20.1.11.4 Troubleshooting an Invalid ACL Error 20-15
20.2 Understanding Developer Security Best Practices 20-16
20.2.1 About Items of Type Password 20-17
20.2.2 Identifying At Risk Password Items 20-18
20.2.2.1 Viewing the Security Profiles Report 20-18
20.2.2.2 Viewing the Password Items Report 20-19
20.2.3 Understanding Cross-Site Scripting Protection 20-19
20.2.3.1 What Is Cross Site-scripting Security Breach? 20-19
20.2.3.2 Protecting HTML Regions and Other Static Areas 20-20
20.2.3.3 About Protecting Dynamic Output 20-21
20.2.3.4 About Protecting Report Regions 20-21
20.2.3.5 About Protecting Form Items 20-22
xxxii
20.2.3.6 About Restricting Characters Entered on an Item 20-23
20.2.4 About Session State and Security 20-23
20.2.5 Preventing URL Tampering 20-24
20.2.5.1 How Session State Protection Works 20-24
20.2.5.2 Enabling Session State Protection 20-24
20.2.5.3 Configuring Session State Protection 20-26
20.2.6 About Securing File Uploads 20-36
20.3 Controlling Access to Applications, Pages, and Page Components 20-36
20.3.1 Understanding Access Control 20-37
20.3.1.1 About Adding Access Control 20-37
20.3.1.2 About Access Control Authorization Schemes 20-38
20.3.1.3 About Configuring Access Control 20-38
20.3.1.4 About Exporting an Application with Access Control 20-40
20.3.2 Creating an Access Control Using the Create Application Wizard 20-40
20.3.3 Creating an Access Control Using the Create Page Wizard 20-41
20.3.4 Managing User Access 20-42
20.3.5 Configuring Access Control 20-43
20.3.6 About Controlling Access for Pages and Page Components 20-43
20.3.7 About Removing an Access Control Created with a Wizard 20-44
20.3.8 Managing Roles and User Assignments 20-44
20.3.8.1 About Application Access Control 20-45
20.3.8.2 Creating Access Control Roles 20-46
20.3.8.3 Editing or Deleting Access Control Roles 20-46
20.3.8.4 Adding User Role Assignments 20-47
20.3.8.5 Editing User Role Assignments 20-47
20.4 Establishing User Identity Through Authentication 20-48
20.4.1 Understanding Authentication 20-49
20.4.1.1 How Authentication Works 20-49
20.4.1.2 About Support for Deep Linking 20-50
20.4.1.3 About Determining Whether to Include Authentication 20-50
20.4.2 Creating an Authentication Scheme 20-50
20.4.3 Understanding Preconfigured Authentication Schemes 20-51
20.4.3.1 Application Express Accounts 20-52
20.4.3.2 Custom Authentication 20-52
20.4.3.3 Database Accounts 20-54
20.4.3.4 HTTP Header Variable 20-55
20.4.3.5 LDAP Directory Verification 20-55
20.4.3.6 No Authentication (using DAD) 20-57
20.4.3.7 Open Door Credentials 20-58
20.4.3.8 Oracle Application Server Single Sign-On Server 20-59
20.4.3.9 Social Sign-In 20-60
xxxiii
20.4.4 Managing Existing Authentication Schemes 20-61
20.4.5 Viewing the Authentication Scheme Associated with an Application 20-61
20.4.6 Changing the Authentication Scheme Associated with an Application 20-62
20.4.7 Creating a Login Page 20-62
20.4.8 Viewing Authentication Scheme Reports 20-63
20.5 Providing Security Through Authorization 20-63
20.5.1 How Authorization Schemes Work 20-63
20.5.2 Creating and Editing an Authorization Scheme 20-64
20.5.2.1 About Authorization Scheme Types 20-64
20.5.2.2 Creating an Authorization Scheme 20-65
20.5.2.3 Editing Attributes of an Existing Authorization Scheme 20-66
20.5.2.4 Changing the Evaluation Point Attribute 20-66
20.5.2.5 About Resetting Authorization Scheme State 20-67
20.5.3 Attaching an Authorization Scheme to an Application, Page, orComponents 20-67
20.5.3.1 Attaching an Authorization Scheme to an Application 20-67
20.5.3.2 Attaching an Authorization Scheme to a Page 20-68
20.5.3.3 Attaching an Authorization Scheme to a Control or Component 20-68
20.5.4 Viewing Authorization Reports 20-69
21
Managing Application Globalization
21.3 About Apply Format Masks to Items 21-2
21.1 Understanding Application Translation and Globalization Support 21-2
21.1.1 About the Translation Process 21-2
21.1.2 About Language Identification 21-3
21.1.3 About the Rules for Translating Database Applications 21-3
21.1.4 How Translated Applications Are Rendered 21-3
21.1.5 Making Application Attributes Translatable 21-4
21.1.5.1 About Shortcuts that Support Translatable Messages 21-4
21.1.5.2 About Messages 21-4
21.1.5.3 About Dynamic Translation Text Strings 21-4
21.1.5.4 About Translating Region Titles 21-4
21.1.5.5 About Translating Templates 21-5
21.2 Specifying the Primary Language for an Application 21-6
21.4 About Translating Applications for Multibyte Languages 21-7
21.5 Understanding the Translation Process 21-7
21.5.1 Step 1: Define Application Language 21-8
21.5.2 Step 2: Seed and Download to a Translation File 21-8
21.5.2.1 Seeding Translatable Text 21-8
21.5.2.2 Downloading an XLIFF File 21-9
21.5.3 Step 3: Translate the XLIFF File 21-11
xxxiv
21.5.4 Step 4: Upload and Apply a Translated XLIFF Document 21-11
21.5.4.1 Uploading a Translated XLIFF Document 21-11
21.5.4.2 Applying an Uploaded XLIFF Document 21-12
21.5.4.3 Deleting an Uploaded XLIFF Document 21-12
21.5.5 Step 5: Publish the Application 21-13
21.5.6 Manually Editing a Translation 21-13
21.6 Translating Messages 21-14
21.6.1 About Translating Messages 21-14
21.6.2 Translating Messages Used in PL/SQL Procedures 21-15
21.6.2.1 About Translating Messages Used in PL/SQL Procedures 21-15
21.6.2.2 Defining a Translation Message 21-15
21.6.3 Interactive Grid Messages Requiring Translation 21-16
21.6.4 Translating Messages Used Internally by Oracle Application Express 21-34
21.6.4.1 Creating Text Messages 21-35
21.6.4.2 Editing Text Messages 21-35
21.6.4.3 Internal Messages Requiring Translation 21-36
21.6.4.4 Interactive Report Messages Requiring Translation 21-40
21.7 Translating Data That Supports List of Values 21-57
21.7.1 Defining a Dynamic Translation 21-57
21.8 Understanding Supported Globalization Codes 21-58
21.8.1 Oracle Application Express Globalization Codes 21-58
22
Managing Application Performance
22.1 About Best Practices to Improve Performance 22-1
22.2 Identifying Performance Issues 22-2
22.2.1 About Troubleshooting Slow Running Applications 22-2
22.2.2 Diagnosing Performance Issues 22-2
22.2.3 About Debugging Problematic SQL Queries 22-3
22.2.4 About Addressing Slow Queries 22-3
22.3 Utilizing Logs and Reports 22-3
22.3.1 How to Manage Log Files 22-4
22.3.2 Viewing the Application Dashboard Report 22-4
22.3.3 Workspace Activity Reports 22-5
22.3.4 Instance Activity Reports 22-5
22.4 About Utilizing Database Reporting 22-6
22.5 About Database Parameters that Impact Performance 22-6
22.6 About Limiting Resources 22-7
22.7 About Uploading Static Files to Your Web Server 22-7
22.8 Creating Custom Activity Reports Using APEX_ACTIVITY_LOG 22-7
22.8.1 Enabling Logging for an Application 22-8
xxxv
22.8.2 APEX_ACTIVITY_LOG 22-8
22.8.3 APEX_ACTIVITY_LOG Sample Query 22-9
23
Debugging an Application
23.1 Running Advisor to Check Application Integrity 23-1
23.1.1 About Oracle Application Express Advisor 23-2
23.1.2 Running Advisor on an Entire Application 23-2
23.1.3 Running Advisor on a Single Page 23-3
23.2 Reviewing Session State 23-3
23.3 About Monitoring Application and Page Resource Use 23-3
23.4 Enabling SQL Tracing and Using TKPROF 23-3
23.5 Utilizing Debug Mode 23-4
23.5.1 About Debug Mode 23-4
23.5.2 Enabling and Disabling Debug Mode for an Application 23-5
23.5.3 Running an Application in Debug Mode 23-5
23.5.4 Viewing Debug Reports in Development Mode 23-6
23.5.5 About Using f?p Syntax to Access Debug Mode 23-6
23.5.6 Viewing Debug Reports from a Running Application 23-6
23.5.7 Viewing Debug Reports 23-7
23.6 About Removing Controls and Components to Isolate a Problem 23-8
24
Deploying an Application
24.1 About Suggested Environments 24-2
24.2 System Development Life Cycle Methodologies to Consider 24-2
24.2.1 About Iterative Vs Planned Development 24-3
24.2.2 About the Advantages of Creating Prototypes 24-3
24.2.3 Waterfall 24-3
24.2.4 Spiral 24-4
24.2.5 Rapid Application Development 24-4
24.3 Understanding the Deployment Process 24-4
24.3.1 About Moving an Application to Another Instance 24-4
24.3.2 Deployment Options to Consider 24-4
24.3.3 How to Move an Application to Another Instance 24-5
24.3.3.1 About Managing Database Objects 24-6
24.4 How to Create a Custom Packaged Application 24-6
24.4.1 How Creating a Custom Packaged Application Simplifies Deployment 24-7
24.4.2 Creating a Custom Packaged Application 24-8
24.4.2.1 Accessing the Supporting Objects Page 24-8
24.4.2.2 Supporting Objects Page 24-8
xxxvi
24.4.3 Adding an Access Control List to a Custom Packaged Application 24-11
24.4.4 Installing Supporting Objects 24-11
24.4.5 Deleting Supporting Objects Scripts, Messages, and InstallationOptions 24-12
24.4.6 Upgrading a Custom Packaged Application 24-12
24.4.6.1 Defining an Upgrade Script 24-12
24.4.6.2 Upgrading a Custom Packaged Application 24-13
24.4.7 Deinstalling Supporting Objects 24-13
24.4.8 Viewing an Install Summary 24-14
24.5 Using Build Options to Control Configuration 24-14
24.5.1 About Build Options 24-15
24.5.2 Creating Build Options 24-16
24.5.3 Including or Excluding Build Options 24-17
24.5.4 Selecting a Build Option 24-17
24.5.5 Deleting Build Options and Associated Components 24-17
24.5.5.1 Removing Components Associated with a Build Options 24-18
24.5.5.2 Deleting Build Options Permanently 24-18
24.5.6 Viewing Build Option Reports 24-19
24.5.6.1 Viewing Build Option Utilization 24-19
24.5.6.2 Viewing Build Option History 24-19
24.5.7 Exporting Build Options or Build Option Status 24-20
24.6 About Publishing the Database Application URL 24-21
24.7 About Publishing the Websheet Application URL 24-22
24.8 Exporting an Application and Application Components 24-22
24.8.1 About the Export Process 24-23
24.8.2 About The Export Page 24-23
24.8.3 Exporting an Application 24-25
24.8.4 Exporting Application Components 24-27
24.8.5 Exporting a Workspace 24-28
24.8.6 Exporting a Page in an Application 24-29
24.8.6.1 Exporting a Websheet 24-30
24.8.7 About Exporting Static Files 24-31
24.8.8 Exporting Themes 24-31
24.8.9 Exporting Plug-ins 24-31
24.8.10 Exporting User Interface Defaults 24-32
24.8.10.1 About Exporting User Interface Defaults 24-32
24.8.10.2 Exporting User Interface Defaults from the Export Page 24-32
24.8.10.3 Exporting User Interface Defaults from the User InterfaceDefaults Page 24-33
24.8.11 Exporting Team Development Feedback 24-34
24.8.12 Exporting Script Files from the Script Repository 24-34
24.9 Importing Export Files 24-34
xxxvii
24.9.1 Importing an Application, Page or Component Export 24-35
24.9.2 About Importing Application Groups 24-36
24.9.3 Importing a Websheet 24-36
24.9.4 Importing Plug-ins 24-37
24.9.5 Importing Themes 24-38
24.9.6 Importing User Interface Defaults 24-38
24.9.7 Importing Team Development Feedback 24-39
24.10 Installing Export Files 24-39
24.10.1 About Installing Export Files 24-39
24.10.2 Accessing the Export Repository 24-40
24.10.3 Installing an Application Export from the Export Repository 24-40
24.10.4 Installing Other Files from the Export Repository 24-41
24.10.5 Deleting Files from the Export Repository 24-41
24.10.6 Installing Export Files from SQL*Plus 24-41
24.10.7 Using SQL*Plus to Install Export Files 24-41
25
Managing Application Legacy Components
25.1 Managing Legacy Charts 25-1
25.1.1 About Chart Legacy Types 25-2
25.1.1.1 About Legacy HTML5 Charts 25-2
25.1.1.2 About Legacy Flash Charts 25-2
25.1.2 Creating SQL Queries for Legacy Charts 25-2
25.1.2.1 Legacy Chart Syntax 25-3
25.1.2.2 Dial Chart Syntax (Flash and HTML5) 25-3
25.1.2.3 Legacy Multiple Series Syntax (Flash and HTML5) 25-3
25.1.2.4 Legacy Range Chart Syntax (Flash and HTML5) 25-4
25.1.2.5 Legacy Scatter Chart Syntax (Flash and HTML5) 25-4
25.1.2.6 Legacy Candlestick Chart Syntax (Flash and HTML5) 25-4
25.1.2.7 Legacy Gantt Chart Syntax (Flash Only) 25-4
25.1.3 Adding a Legacy Chart to a New Page 25-5
25.1.4 Adding a Legacy Chart in Page Designer 25-6
25.1.5 Editing Legacy Charts 25-8
25.1.5.1 Editing Chart Attributes 25-8
25.1.5.2 Switching an HTML5 Chart to a Flash Chart 25-9
25.1.5.3 Enabling Asynchronous Updates 25-9
25.1.6 About Saving Flash Charts 25-11
25.1.7 Using Custom XML with Flash and HTML5 Charts 25-11
25.2 Creating a Legacy Master Detail Form 25-12
25.3 Managing Legacy Tabular Forms 25-15
25.3.1 About Creating Tabular Forms 25-15
xxxviii
25.3.2 About Running a Tabular Form 25-16
25.3.3 How Tabular Forms Work 25-17
25.3.4 Creating a Legacy Tabular Form 25-18
25.4 Managing Legacy Calendars 25-19
25.4.1 Editing Calendar Attributes in the Property Editor 25-19
25.4.2 About Supported Calendar Substitution Strings in Legacy Calendars 25-20
25.5 Viewing Legacy Components in Gallery 25-20
A About Item Types
A.1 Available Item Types A-1
B Oracle Application Express Limits
B.1 Component Limits B-1
C Available Conditions
C.1 What Are Conditions? C-1
C.2 Conditions Available in App Builder C-1
D About Granted Privileges
D.1 About Granting Privileges to Database Users D-1
D.2 Understanding Privileges Granted to PUBLIC D-1
D.2.1 Packages D-2
D.2.2 Procedures D-4
D.2.3 Functions D-4
D.2.4 Tables D-5
D.2.5 Views D-5
D.2.6 Sequences D-10
D.2.7 Types D-10
Index
xxxix
Preface
Oracle Application Express App Builder User’s Guide describes how to use the OracleApplication Express development environment to build and deploy database-centricweb applications. Oracle Application Express turns a single Oracle database into ashared service by enabling multiple workgroups to build and access applications as ifthey were running in separate databases.
• Audience (page xl)
• Documentation Accessibility (page xl)
• Related Documents (page xl)
• Conventions (page xli)
AudienceOracle Application Express App Builder User’s Guide is intended for applicationdevelopers who are building database-centric web applications using OracleApplication Express. The guide describes how to use the Oracle Application Expressdevelopment environment to build, debug, manage, and deploy applications.
To use this guide, you must have a general understanding of relational databaseconcepts and an understanding of the operating system environment under which yourun Oracle Application Express.
Documentation AccessibilityFor information about Oracle's commitment to accessibility, visit the OracleAccessibility Program website at http://www.oracle.com/pls/topic/lookup?ctx=acc&id=docacc.
Access to Oracle Support
Oracle customers that have purchased support have access to electronic supportthrough My Oracle Support. For information, visit http://www.oracle.com/pls/topic/lookup?ctx=acc&id=info or visit http://www.oracle.com/pls/topic/lookup?ctx=acc&id=trsif you are hearing impaired.
Related DocumentsFor more information, see these Oracle resources:
• Oracle Application Express Release Notes
• Oracle Application Express Installation Guide
Preface
xl

• Oracle Application Express End User’s Guide
• Oracle Application Express Administration Guide
• Oracle Application Express SQL Workshop Guide
• Oracle Application Express API Reference
• Oracle Application Express Application Migration Guide
• Oracle Database Concepts
• Oracle Database Administrator’s Guide
• Oracle Database SQL Language Reference
• SQL*Plus User's Guide and Reference
ConventionsThe following text conventions are used in this document:
Convention Meaning
boldface Boldface type indicates graphical user interface elements associatedwith an action, or terms defined in text or the glossary.
italic Italic type indicates book titles, emphasis, or placeholder variables forwhich you supply particular values.
monospace Monospace type indicates commands within a paragraph, URLs, codein examples, text that appears on the screen, or text that you enter.
Preface
xli
Changes in This Release
This preface contains:
• Changes in Oracle Application Express Release 18.1 (page xlii)
Changes in Oracle Application Express Release 18.1The following are changes in Oracle Application Express App Builder User’s Guide forOracle Application Express release 18.1.
• New Features (page xlii)
• Deprecated and Desupported Features (page xliv)
• Other Changes (page xliv)
New FeaturesThe following features are new in this release:
• REST Enabled SQL Support
Use REST Enabled SQL references to execute SQL queries or PL/SQL defined atthe component-level on a remote database. Create or update classic reports,interactive reports, CSS calendars, or charts to point to data on a remote databaseusing a REST Enabled SQL reference.
See "Managing REST Enabled SQL References (page 18-8)."
• Web Source Modules
Create and maintain Web Source Modules within Shared Components thatfunction as references to REST services.
See "Managing Web Source Modules (page 18-26)."
• New Create App Wizard
– Add application-level features to your application. Available features include:About Page, Access Control, Activity Reporting, Configuration Options,Feedback, and Theme Selection.
– Customize user interface options such as Theme Style, application icon, andpage icons.
– Select lookup display values for foreign-key based columns.
– Select drill down report columns to declaratively link data in one report withanother.
– Application blueprints: View an application blueprint and directly edit theapplication definition in JSON format.
Changes in This Release
xlii
– Modify application attribute defaults: Control labels and form controls bypointing and clicking or using JSON application defaults.
See "Creating Database Applications (page 6-1)"
• Enhanced Create Page Wizard
– Add application-level features to your application. Available features include:About Page, Access Control, Activity Reporting, Configuration Options,Feedback, Job Reporting, Login Page, and Theme Selection.
See "Managing Pages in a Database Application (page 7-1)."
• Global Search
– Provides quick navigation and a unified search experience across OracleApplication Express.
– Activate by clicking Search from header or by using the keyboard shortcut Ctrl+ Quote (‘) (US Keyboards only)
– Navigate to most screens within App Builder and quickly jump acrossapplications and pages.
– Search in Page Designer by focussing on page components.
See "Global Search (page 1-7)."
• Page Designer Improvements
– Updated user interface to improve usability.
– When an attribute has focus, the group becomes highlighted.
– Quickly access a group, by clicking Go to Group and selecting the group. Toreturn the default display, click Go to Group again and select Expand All.
– Click Pin Filter on the right side of the search field to have search terms youenter remain persistent (or “sticky”) as you click around Page Designer. ClickPin Filter again to disable it.
See "Right Pane of Page Designer (Property Editor) (page 8-17)."
• Developer Toolbar Enhancements
– If a page has one or more JavaScript errors, a red error button displays on theleft side of the Runtime Developer toolbar. If you have enabled Auto Hide, theRuntime Developer toolbar displays indicating the error.
– New Page Info option includes two options:
* Show Layout Columns toggles between Show Layout Columns andHide Layout Columns.
* Show Page Timing displays the Page Performance Timing dialog. ClickCopy to copy the data in table form and then paste it into anotherapplication. Click Clear to remove the current timing events.
See "Runtime Developer Toolbar (page 8-35)."
• Universal Theme and User Interface Enhancements
– Includes Font APEX 2 which features two sets of icons: Small and Large.
– UI Optimizations:
Changes in This Release
xliii
* New Top Navigation Tabs template that can be used when the navigationposition is set to top. Provides a simplified tabs-like UI and on smallscreens is automatically positioned near the bottom of the screen.
* Standard Region and Carousel Region templates now support placing anicon in the region header.
– General Enhancements
* Tweaked and polished several templates, template options, and styles.
* Required asterisk for form items is now consistent across label templates.
* Carousel regions now support touch swipes.
* Cards have a new "Block" template option with more color.
• General Mobile Improvements
– Universal Theme has been optimized for mobile devices. Desktop UI nowsupports all mobile friendly components such as List View region, ColumnToggle Report region, and Reflow Report.
– Support touch for jQuery UI mouse interactions including draggable,droppable, and sortable. This can be seen in various places such as in PageDesigner drag and drop and adjusting splitter positions.
– Expose touch events through Dynamic Actions for all apps.
• Advisor Improvements
– New Accessibility checks to check your apps for common accessibility issues.
– New Performance check for inclusion of compatibility JavaScript.
See "Running Advisor to Check Application Integrity (page 23-1)" and "TestingApps for Accessibility" in Oracle Application Express Accessibility Guide.
• Social Sign-In
– Social Sign-In preconfigured authentication scheme supports authenticationwith Google, Facebook, and other social network that supports OpenIDConnect or OAuth2 standards.
– New authentication scheme attribute "Switch in Session" for schemes that canbe set in the current session.
See "Establishing User Identity Through Authentication (page 20-48)."
Deprecated and Desupported FeaturesSee "Deprecated Features" and "Desupported Features" in Oracle Application ExpressRelease Notes.
Other ChangesThe following are additional changes in the release:
• All content has been updated to reflect new functionality. Desupported functionalityhas been removed.
• Screen captures and graphics have been added and updated to reflect currentrelease user interface enhancement.
Changes in This Release
xliv
• In this publication legacy application components are grouped together. Legacyapplication components are components Oracle still supports but does notrecommend using.
See "Managing Application Legacy Components (page 25-1)."
Changes in This Release
xlv
1Quick Start
"Quick Start" offers a quick introduction to Oracle Application Express. This sectionexplains how to access your development environment, describes the Workspacehome page, the App Builder home page, and the Application home page, explains howto edit your account profile and user preferences, and how to access productdocumentation.
Tip:
If you are accessing an on-premises installation, complete the installationprocess before continuing. See Oracle Application Express InstallationGuide.
• About Accessing Your Development Environment (page 1-2)How you sign in and access Oracle Application Express depends upon your userrole and where Oracle Application Express resides. Oracle Application Expressmay reside in a local on-premises Oracle Database or in a hosted environment,such as a Oracle Cloud service. The login credentials you use to sign in differdepending upon the installation type.
• Understanding Oracle Application Express (page 1-2)Oracle Application Express is a hosted declarative development environment fordeveloping and deploying database-centric web applications.
• Understanding the Workspace Home Page (page 1-4)When you sign in to Oracle Application Express, the Workspace home pageappears. Use the Workspace home page to access key development componentsincluding App Builder, SQL Workshop, Team Development, and PackagedApplications.
• Understanding App Builder (page 1-12)Developers use App Builder to create and manage applications and applicationpages.
• Changing Your Profile or Password (page 1-24)Edit your account profile to update your email address, edit your first or last name,upload a profile photo, or change your password.
• Editing User Preferences (page 1-25)Edit your user preferences to update the default workspace schema, specify adefault date format, and control how Oracle Application Express manageswindows and tabs when running applications.
• Using Oracle Application Express Documentation (page 1-26)Oracle Application Express provides a hosted online documentation library andfield-level Help. You access, search, or download the online documentation libraryby going to the Oracle Help Center.
1-1
1.1 About Accessing Your Development EnvironmentHow you sign in and access Oracle Application Express depends upon your user roleand where Oracle Application Express resides. Oracle Application Express may residein a local on-premises Oracle Database or in a hosted environment, such as a OracleCloud service. The login credentials you use to sign in differ depending upon theinstallation type.
Oracle Application Express On-premises
If you are running Oracle Application Express on-premises, sign in to your OracleApplication Express workspace.
See Also:
"About Accessing Oracle Application Express" and "Signing In WhenWorkspace Requests Is Enabled" in Oracle Application Express InstallationGuide.
Oracle Database Cloud
Oracle Application Express is installed and enabled in Oracle Database Cloudservices such as Oracle Database Exadata Express Cloud Service and OracleDatabase Cloud - Database Schema Service.
Oracle Application Express is available in Exadata Cloud Service and Database CloudService. However, you need to manually customize your databases to install andenable Oracle Application Express.
1.2 Understanding Oracle Application ExpressOracle Application Express is a hosted declarative development environment fordeveloping and deploying database-centric web applications.
When you install Oracle Application Express, you can install either a runtimeenvironment or a full development environment.
• What is Oracle Application Express? (page 1-2)
• How Oracle Application Express Works (page 1-3)
• About the Differences Between Runtime and Full Development Environments(page 1-3)
1.2.1 What is Oracle Application Express?Oracle Application Express is a hosted declarative development environment fordeveloping and deploying database-centric web applications. Thanks to built-infeatures such as user interface themes, navigational controls, form handlers, andflexible reports, Oracle Application Express accelerates the application developmentprocess.
Chapter 1About Accessing Your Development Environment
1-2
The Application Express engine renders applications in real time from data stored indatabase tables. When you create or extend an application, Oracle ApplicationExpress creates or modifies metadata stored in database tables. When the applicationis run, the Application Express engine then reads the metadata and displays theapplication.
To provide stateful behavior within an application, Oracle Application Expresstransparently manages session state in the database. Application developers can getand set session state using simple substitutions and standard SQL bind variablesyntax.
1.2.2 How Oracle Application Express WorksOracle Application Express installs with your Oracle database and consists of data intables and PL/SQL code. Whether you run the Oracle Application Expressdevelopment environment or run an application built using Oracle Application Express,the process is the same. Your browser sends a URL request that is translated into theappropriate Oracle Application Express PL/SQL call. After the database processes thePL/SQL, the results are relayed back to your browser as HTML. This cycle happenseach time you either request or submit a page.
Oracle Application Express does not use a dedicated database connection. Instead,each request is made through a new database session, consuming minimal CPUresources. Application session state is managed in the database tables by theApplication Express engine.
Behind the scenes, the Application Express engine renders and processes pages. TheApplication Express engine also performs these tasks:
• Session state management
• Authentication services
• Authorization services
• Page flow control
• Validation processing
1.2.3 About the Differences Between Runtime and Full DevelopmentEnvironments
When you install Oracle Application Express, you can install two differentenvironments:
• Runtime environment. In a runtime environment users can run applications butcannot modify them. Select this option for production implementations.
• Full development environment. In a full development environment, users candevelop, modify, run, and delete Application Express applications. This optionprovides complete access to the Oracle Application Express environmentdescribed in this document.
Chapter 1Understanding Oracle Application Express
1-3
1.3 Understanding the Workspace Home PageWhen you sign in to Oracle Application Express, the Workspace home page appears.Use the Workspace home page to access key development components including AppBuilder, SQL Workshop, Team Development, and Packaged Applications.
Each Oracle Application Express development instance can contain multipleworkspaces. A workspace is a virtual private database which enables multiple usersto work within the same Oracle Application Express installation while keeping theirobjects, data and applications private. This section describes the sections that makeup the Workspace home page.
• Workspace Home Page (page 1-4)
• Top Apps and Top Users Dashboards (page 1-6)
• News and Messages Region (page 1-6)
• Developer Navigation Tools (page 1-6)
• Available Updates Region (page 1-12)
1.3.1 Workspace Home PageThe center of the Workspace home page features the following large icons:
• App Builder - Use App Builder to create an application, composed of a set ofHTML pages, based on database objects.
• SQL Workshop - Use the SQL Workshop to access tools for viewing andmanaging database objects.
• Team Development - Use Team Development to track new features, non-featurerelated tasks (or To Do tasks), bugs, and milestones. Users can also provide real-time feedback which then can be categorized into features, general tasks, or bugs.
• Packaged Apps - Links to the Packaged Apps page. Install and run packagedapplications to learn more about the types of applications you can build and how toconstruct specific types of pages.
Chapter 1Understanding the Workspace Home Page
1-4
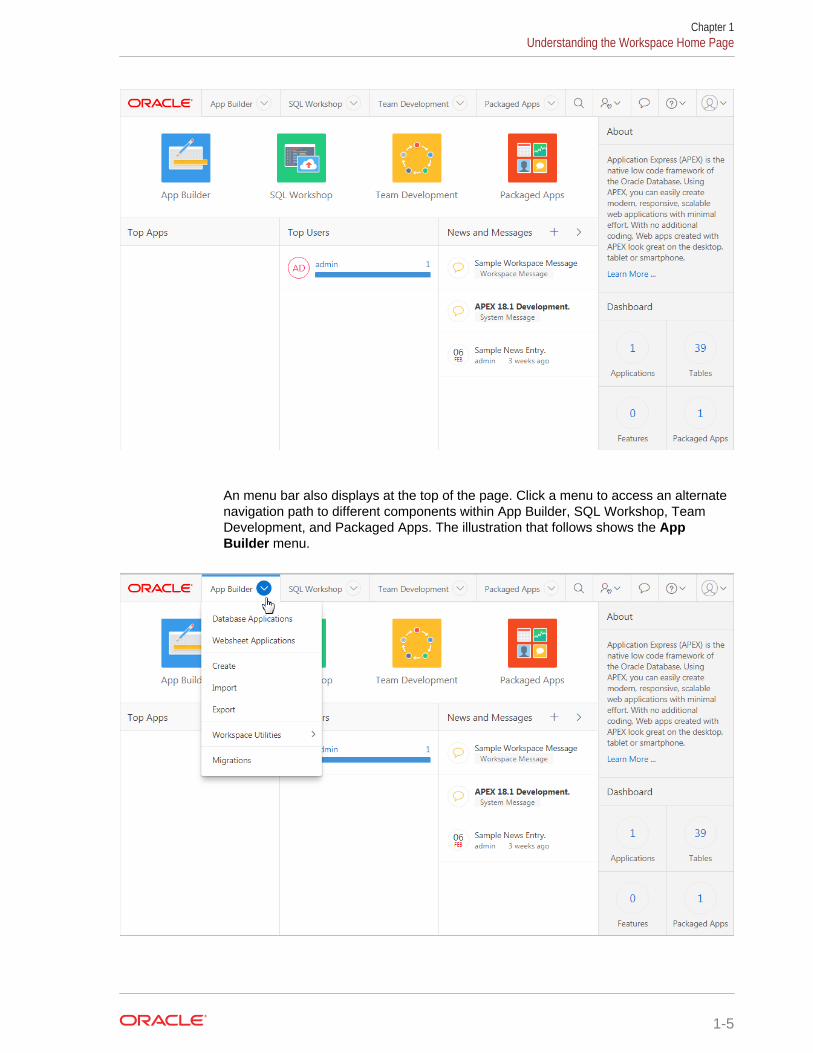
An menu bar also displays at the top of the page. Click a menu to access an alternatenavigation path to different components within App Builder, SQL Workshop, TeamDevelopment, and Packaged Apps. The illustration that follows shows the AppBuilder menu.
Chapter 1Understanding the Workspace Home Page
1-5
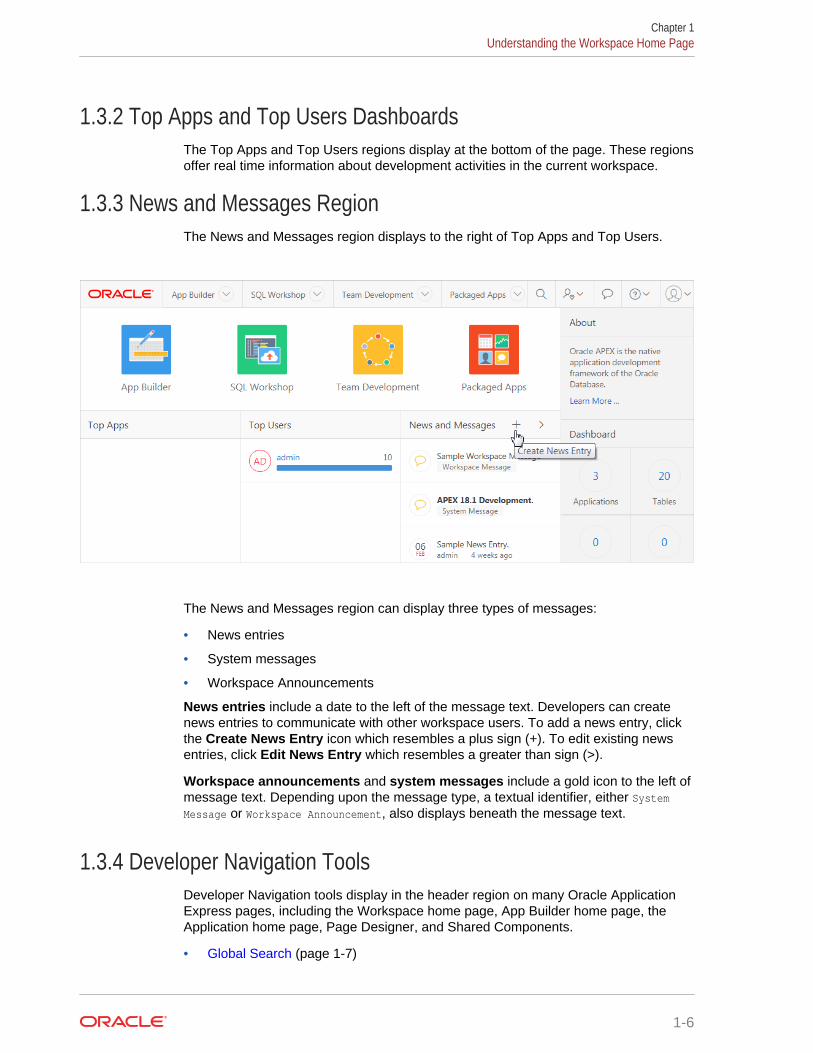
1.3.2 Top Apps and Top Users DashboardsThe Top Apps and Top Users regions display at the bottom of the page. These regionsoffer real time information about development activities in the current workspace.
1.3.3 News and Messages RegionThe News and Messages region displays to the right of Top Apps and Top Users.
The News and Messages region can display three types of messages:
• News entries
• System messages
• Workspace Announcements
News entries include a date to the left of the message text. Developers can createnews entries to communicate with other workspace users. To add a news entry, clickthe Create News Entry icon which resembles a plus sign (+). To edit existing newsentries, click Edit News Entry which resembles a greater than sign (>).
Workspace announcements and system messages include a gold icon to the left ofmessage text. Depending upon the message type, a textual identifier, either SystemMessage or Workspace Announcement, also displays beneath the message text.
1.3.4 Developer Navigation ToolsDeveloper Navigation tools display in the header region on many Oracle ApplicationExpress pages, including the Workspace home page, App Builder home page, theApplication home page, Page Designer, and Shared Components.
• Global Search (page 1-7)
Chapter 1Understanding the Workspace Home Page
1-6
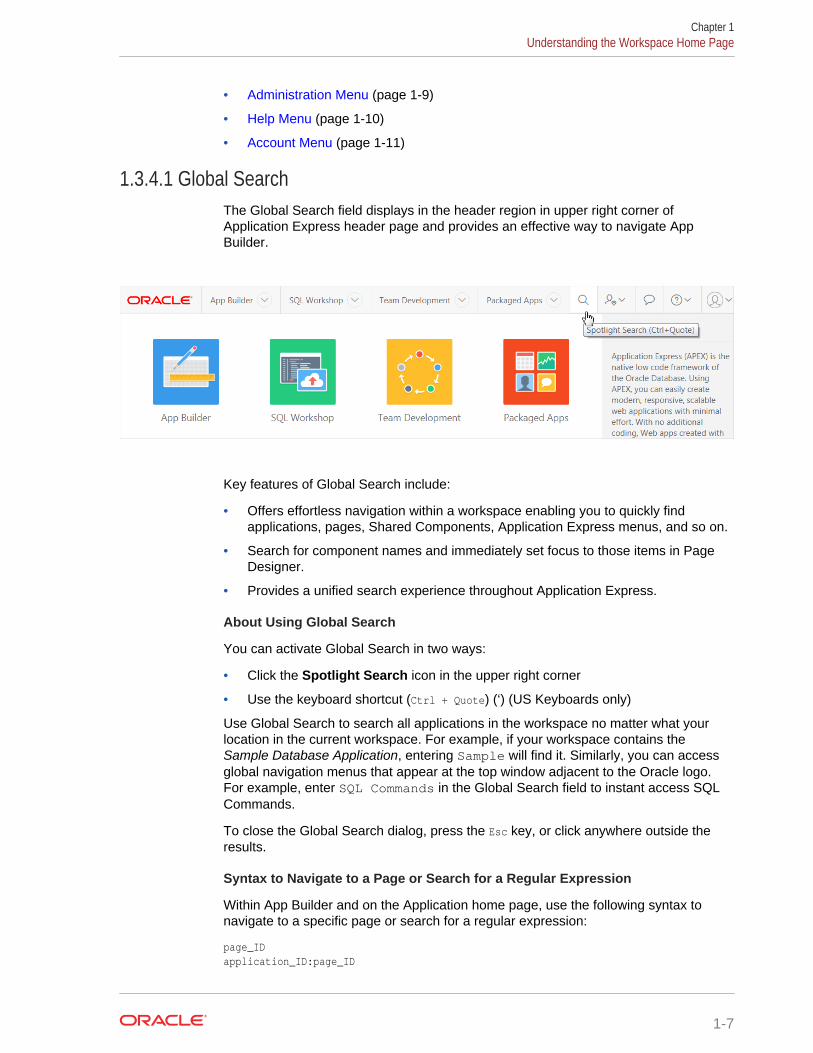
• Administration Menu (page 1-9)
• Help Menu (page 1-10)
• Account Menu (page 1-11)
1.3.4.1 Global SearchThe Global Search field displays in the header region in upper right corner ofApplication Express header page and provides an effective way to navigate AppBuilder.
Key features of Global Search include:
• Offers effortless navigation within a workspace enabling you to quickly findapplications, pages, Shared Components, Application Express menus, and so on.
• Search for component names and immediately set focus to those items in PageDesigner.
• Provides a unified search experience throughout Application Express.
About Using Global Search
You can activate Global Search in two ways:
• Click the Spotlight Search icon in the upper right corner
• Use the keyboard shortcut (Ctrl + Quote) (‘) (US Keyboards only)
Use Global Search to search all applications in the workspace no matter what yourlocation in the current workspace. For example, if your workspace contains theSample Database Application, entering Sample will find it. Similarly, you can accessglobal navigation menus that appear at the top window adjacent to the Oracle logo.For example, enter SQL Commands in the Global Search field to instant access SQLCommands.
To close the Global Search dialog, press the Esc key, or click anywhere outside theresults.
Syntax to Navigate to a Page or Search for a Regular Expression
Within App Builder and on the Application home page, use the following syntax tonavigate to a specific page or search for a regular expression:
page_IDapplication_ID:page_ID
Chapter 1Understanding the Workspace Home Page
1-7
application_ID-page_IDregexp:expression
Where:
• application_ID is the numeric identification number (or ID) that identifies anapplication.
• page_ID is the numeric identification number that identifies a specific page.
• regexp: is literal text.
• expression is a regular expression to search for.
The following example navigates you to page 10 of application 570:
10570-10570:10
You can also use this syntax to navigate to the Shared Components page of a givenapplication:
application_ID:sapplication_ID-s
Where:
• application_ID is the numeric identification number (or ID) that identifies anapplication.
The following example demonstrates how to navigate to the Shared Components pageof application 570:
570:s570-s
About Navigating Search Results
Global Search results display in a dialog. Use the Up and Down arrows keys tonavigate the results and press Enter to make a selection. Since the the GlobalSearch icon displays on nearly every page in Application Express, you can continue tonarrow your search until you find the app, page, or component (such as the item,button, or region) which contains the keyword.
Other available shortcuts change depending on where you are in App Builder, forexample:
• In Page Designer - To search for a page, press Ctrl + 4.
• In App - To search for as app, press Ctrl + 3.
• All Apps- To search all applications, press Ctrl + 2.
• Current Workspace- To search a workspace, press Ctrl + 1.
Example 1-1 Search Example
Suppose you need to find an application called Employees which has a report pagebuilt on the EMP table.
1. Find the application.
a. On the Workspace home page, enter EMP in the Global Search field.
Chapter 1Understanding the Workspace Home Page
1-8
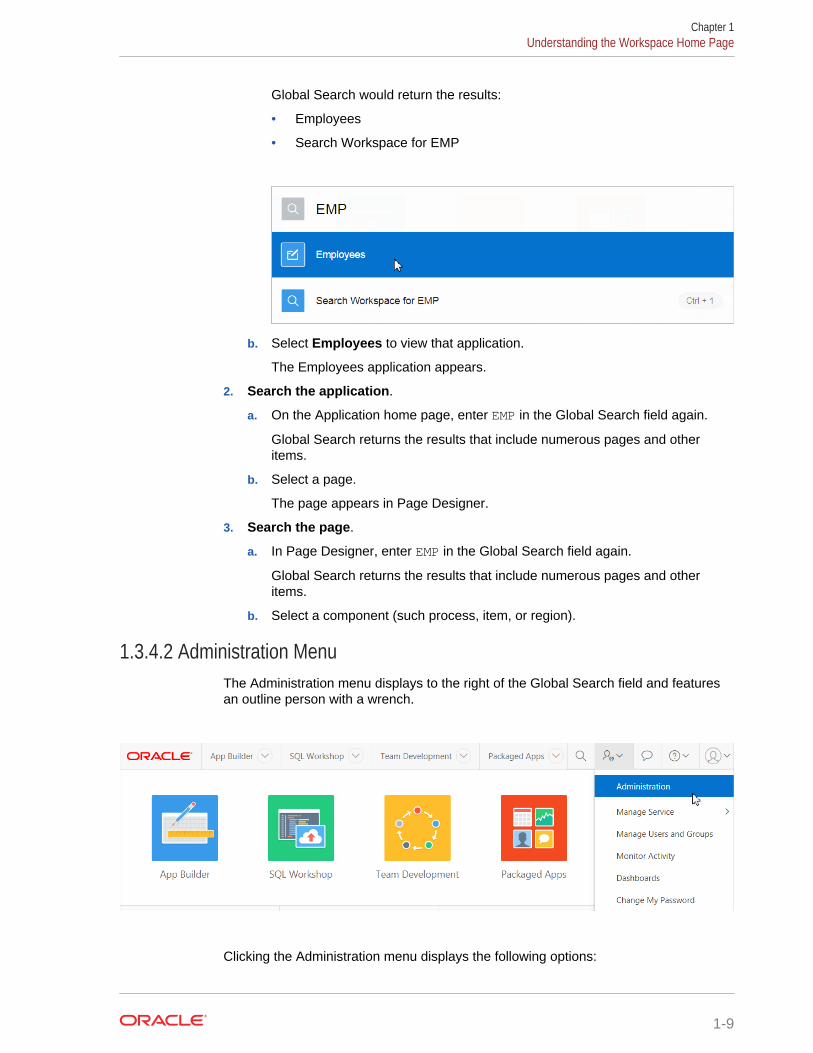
Global Search would return the results:
• Employees
• Search Workspace for EMP
b. Select Employees to view that application.
The Employees application appears.
2. Search the application.
a. On the Application home page, enter EMP in the Global Search field again.
Global Search returns the results that include numerous pages and otheritems.
b. Select a page.
The page appears in Page Designer.
3. Search the page.
a. In Page Designer, enter EMP in the Global Search field again.
Global Search returns the results that include numerous pages and otheritems.
b. Select a component (such process, item, or region).
1.3.4.2 Administration MenuThe Administration menu displays to the right of the Global Search field and featuresan outline person with a wrench.
Clicking the Administration menu displays the following options:
Chapter 1Understanding the Workspace Home Page
1-9
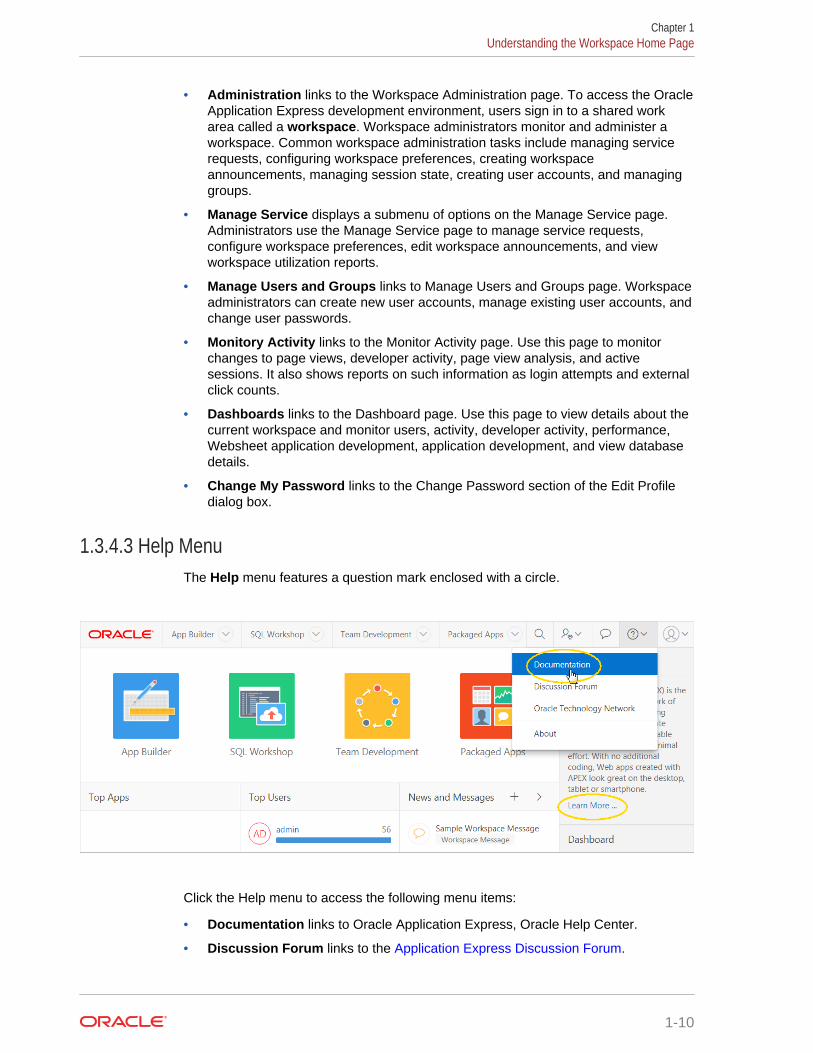
• Administration links to the Workspace Administration page. To access the OracleApplication Express development environment, users sign in to a shared workarea called a workspace. Workspace administrators monitor and administer aworkspace. Common workspace administration tasks include managing servicerequests, configuring workspace preferences, creating workspaceannouncements, managing session state, creating user accounts, and managinggroups.
• Manage Service displays a submenu of options on the Manage Service page.Administrators use the Manage Service page to manage service requests,configure workspace preferences, edit workspace announcements, and viewworkspace utilization reports.
• Manage Users and Groups links to Manage Users and Groups page. Workspaceadministrators can create new user accounts, manage existing user accounts, andchange user passwords.
• Monitory Activity links to the Monitor Activity page. Use this page to monitorchanges to page views, developer activity, page view analysis, and activesessions. It also shows reports on such information as login attempts and externalclick counts.
• Dashboards links to the Dashboard page. Use this page to view details about thecurrent workspace and monitor users, activity, developer activity, performance,Websheet application development, application development, and view databasedetails.
• Change My Password links to the Change Password section of the Edit Profiledialog box.
1.3.4.3 Help MenuThe Help menu features a question mark enclosed with a circle.
Click the Help menu to access the following menu items:
• Documentation links to Oracle Application Express, Oracle Help Center.
• Discussion Forum links to the Application Express Discussion Forum.
Chapter 1Understanding the Workspace Home Page
1-10
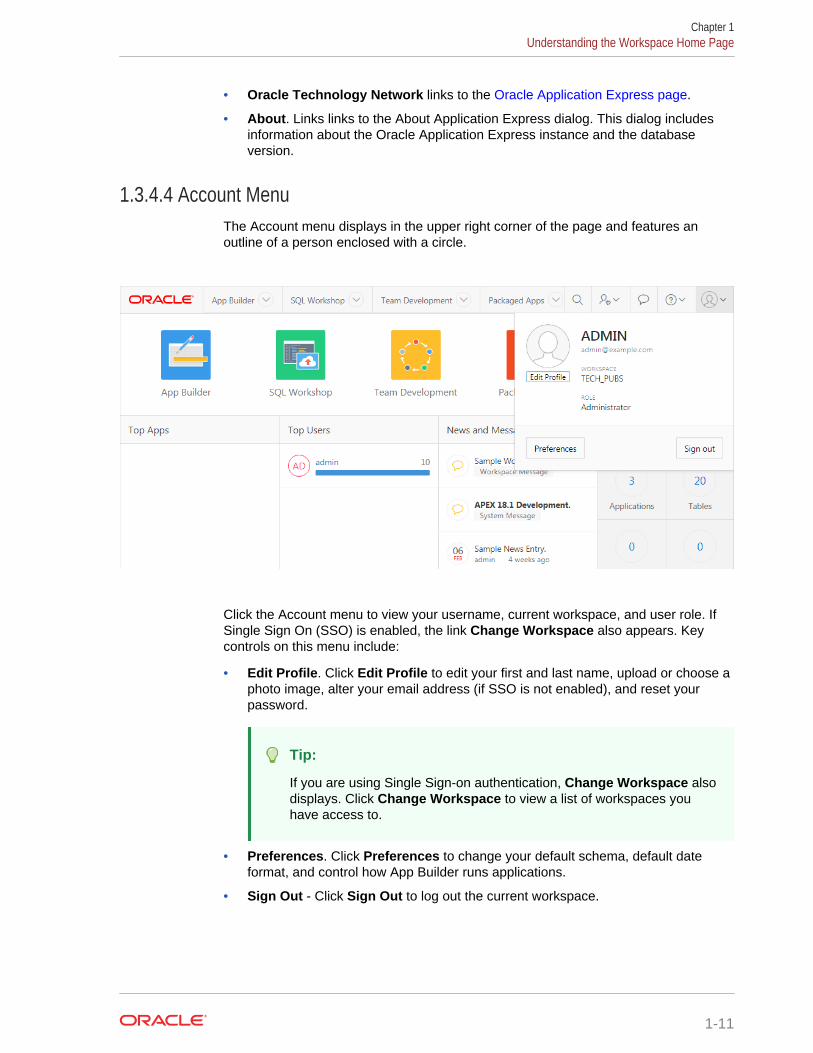
• Oracle Technology Network links to the Oracle Application Express page.
• About. Links links to the About Application Express dialog. This dialog includesinformation about the Oracle Application Express instance and the databaseversion.
1.3.4.4 Account MenuThe Account menu displays in the upper right corner of the page and features anoutline of a person enclosed with a circle.
Click the Account menu to view your username, current workspace, and user role. IfSingle Sign On (SSO) is enabled, the link Change Workspace also appears. Keycontrols on this menu include:
• Edit Profile. Click Edit Profile to edit your first and last name, upload or choose aphoto image, alter your email address (if SSO is not enabled), and reset yourpassword.
Tip:
If you are using Single Sign-on authentication, Change Workspace alsodisplays. Click Change Workspace to view a list of workspaces youhave access to.
• Preferences. Click Preferences to change your default schema, default dateformat, and control how App Builder runs applications.
• Sign Out - Click Sign Out to log out the current workspace.
Chapter 1Understanding the Workspace Home Page
1-11
1.3.5 Available Updates RegionThe Available Updates region indicates if updates are available for Oracle ApplicationExpress and the Oracle REST Data Services. If your installation is current thefollowing message displays:
System is up-to-date
To configure updates, click Set Preferences for Available Updates. You can enableor disable updates by selecting Yes or No from Check for Available Updates.
Tip:
To perform this check Application Express transmits the version number ofOracle Application Express and other system components to OracleCorporation. In order to continuously improve our products, Oracle isinterested in learning about product usage. To that end, statistics canoccasionally be sent to Oracle describing the product features in use. Nopersonally identifiable information is sent. To review Oracle's privacy policysee http://www.oracle.com/us/legal/privacy/overview/index.html
1.4 Understanding App BuilderDevelopers use App Builder to create and manage applications and application pages.
The App Builder home page displays all installed applications in the current OracleApplication Express instance. When a developer selects an application to edit, theApplication home page appears. Use the Application home page to run, edit, import,export, copy, or delete applications.
• Accessing App Builder (page 1-13)Access App Builder by clicking the App Builder icon on the Workspace homepage.
• Understanding the App Builder Home Page (page 1-13)Use App Builder to create new applications, select an application to edit, importpreviously exported applications, view the Dashboard, or access workspaceutilities.
• Accessing the Application Home Page (page 1-20)Access the Application home page by clicking the App Builder icon on theWorkspace home page and then selecting an application.
• Understanding the Application Home Page (page 1-20)Use the Application home page to run, edit, import, export, copy, or deleteapplications.
See Also:
"Quick Start (page 1-1)" and " App Builder Concepts (page 2-1)"
Chapter 1Understanding App Builder
1-12
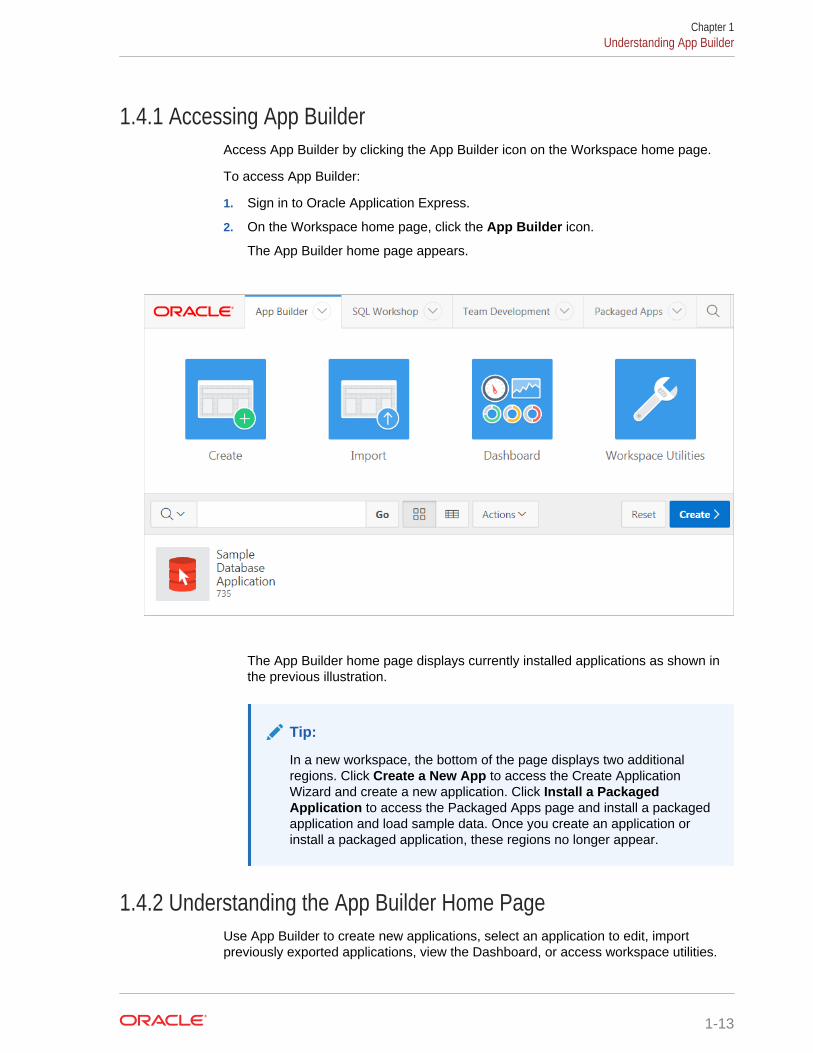
1.4.1 Accessing App BuilderAccess App Builder by clicking the App Builder icon on the Workspace home page.
To access App Builder:
1. Sign in to Oracle Application Express.
2. On the Workspace home page, click the App Builder icon.
The App Builder home page appears.
The App Builder home page displays currently installed applications as shown inthe previous illustration.
Tip:
In a new workspace, the bottom of the page displays two additionalregions. Click Create a New App to access the Create ApplicationWizard and create a new application. Click Install a PackagedApplication to access the Packaged Apps page and install a packagedapplication and load sample data. Once you create an application orinstall a packaged application, these regions no longer appear.
1.4.2 Understanding the App Builder Home PageUse App Builder to create new applications, select an application to edit, importpreviously exported applications, view the Dashboard, or access workspace utilities.
Chapter 1Understanding App Builder
1-13
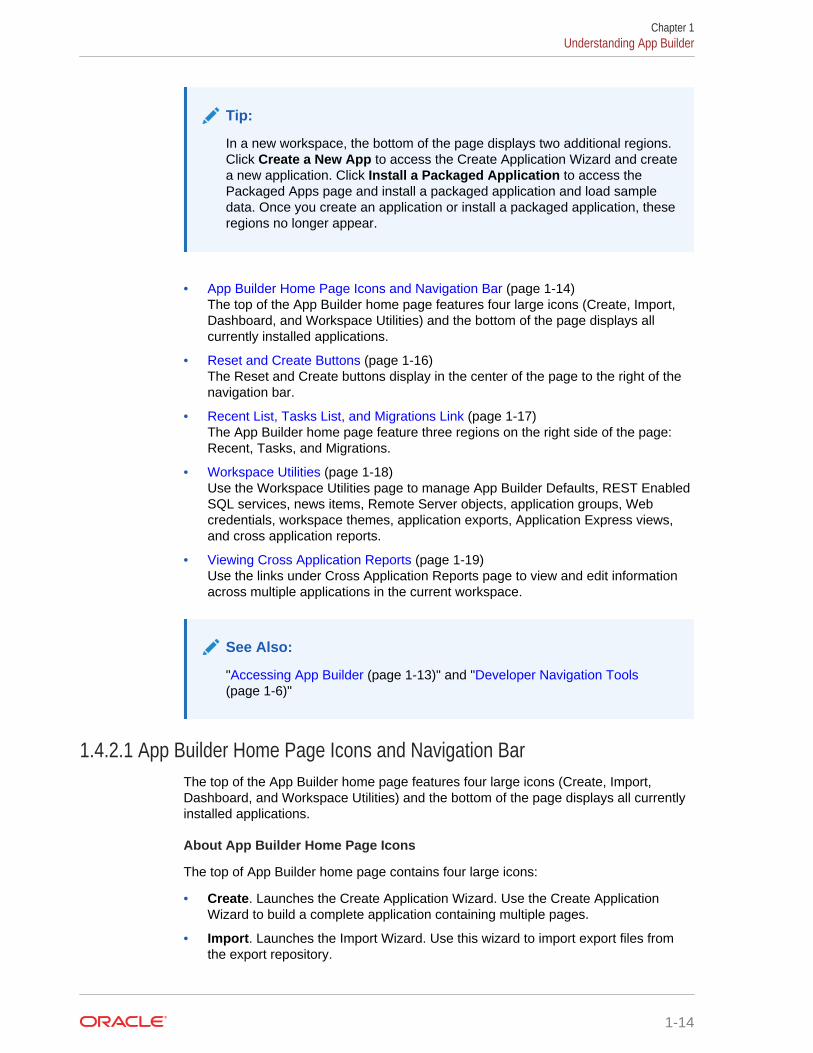
Tip:
In a new workspace, the bottom of the page displays two additional regions.Click Create a New App to access the Create Application Wizard and createa new application. Click Install a Packaged Application to access thePackaged Apps page and install a packaged application and load sampledata. Once you create an application or install a packaged application, theseregions no longer appear.
• App Builder Home Page Icons and Navigation Bar (page 1-14)The top of the App Builder home page features four large icons (Create, Import,Dashboard, and Workspace Utilities) and the bottom of the page displays allcurrently installed applications.
• Reset and Create Buttons (page 1-16)The Reset and Create buttons display in the center of the page to the right of thenavigation bar.
• Recent List, Tasks List, and Migrations Link (page 1-17)The App Builder home page feature three regions on the right side of the page:Recent, Tasks, and Migrations.
• Workspace Utilities (page 1-18)Use the Workspace Utilities page to manage App Builder Defaults, REST EnabledSQL services, news items, Remote Server objects, application groups, Webcredentials, workspace themes, application exports, Application Express views,and cross application reports.
• Viewing Cross Application Reports (page 1-19)Use the links under Cross Application Reports page to view and edit informationacross multiple applications in the current workspace.
See Also:
"Accessing App Builder (page 1-13)" and "Developer Navigation Tools(page 1-6)"
1.4.2.1 App Builder Home Page Icons and Navigation BarThe top of the App Builder home page features four large icons (Create, Import,Dashboard, and Workspace Utilities) and the bottom of the page displays all currentlyinstalled applications.
About App Builder Home Page Icons
The top of App Builder home page contains four large icons:
• Create. Launches the Create Application Wizard. Use the Create ApplicationWizard to build a complete application containing multiple pages.
• Import. Launches the Import Wizard. Use this wizard to import export files fromthe export repository.
Chapter 1Understanding App Builder
1-14
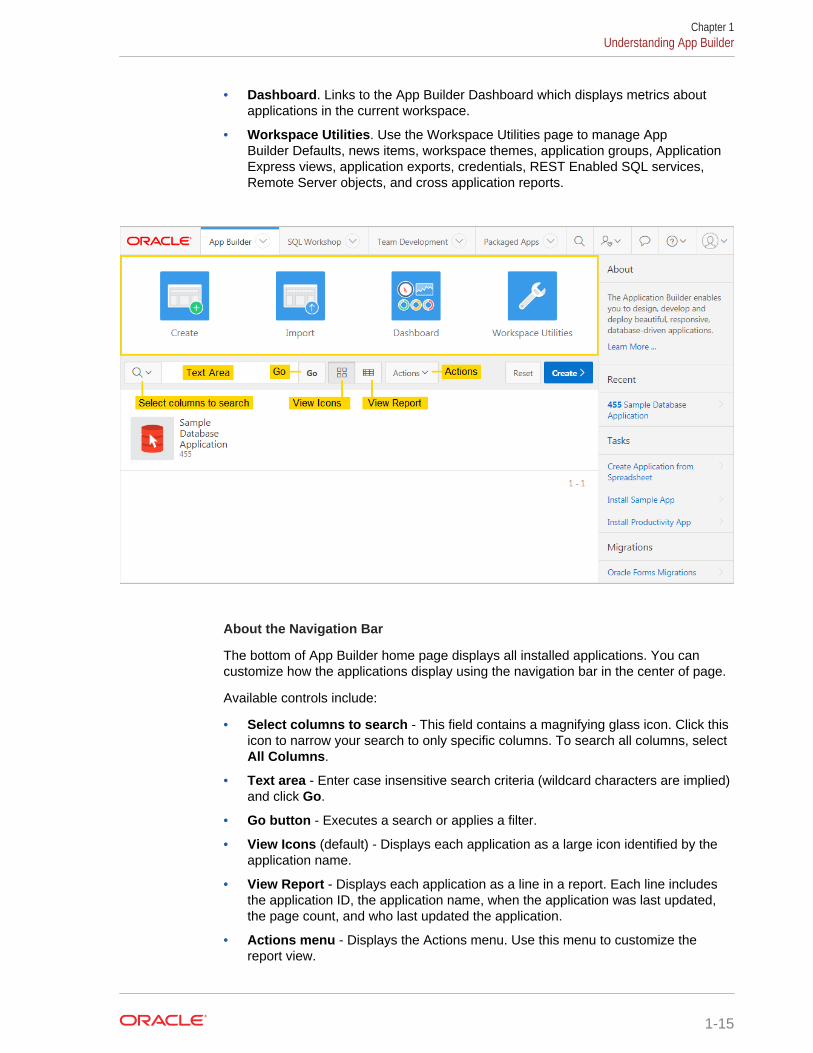
• Dashboard. Links to the App Builder Dashboard which displays metrics aboutapplications in the current workspace.
• Workspace Utilities. Use the Workspace Utilities page to manage AppBuilder Defaults, news items, workspace themes, application groups, ApplicationExpress views, application exports, credentials, REST Enabled SQL services,Remote Server objects, and cross application reports.
About the Navigation Bar
The bottom of App Builder home page displays all installed applications. You cancustomize how the applications display using the navigation bar in the center of page.
Available controls include:
• Select columns to search - This field contains a magnifying glass icon. Click thisicon to narrow your search to only specific columns. To search all columns, selectAll Columns.
• Text area - Enter case insensitive search criteria (wildcard characters are implied)and click Go.
• Go button - Executes a search or applies a filter.
• View Icons (default) - Displays each application as a large icon identified by theapplication name.
• View Report - Displays each application as a line in a report. Each line includesthe application ID, the application name, when the application was last updated,the page count, and who last updated the application.
• Actions menu - Displays the Actions menu. Use this menu to customize thereport view.
Chapter 1Understanding App Builder
1-15
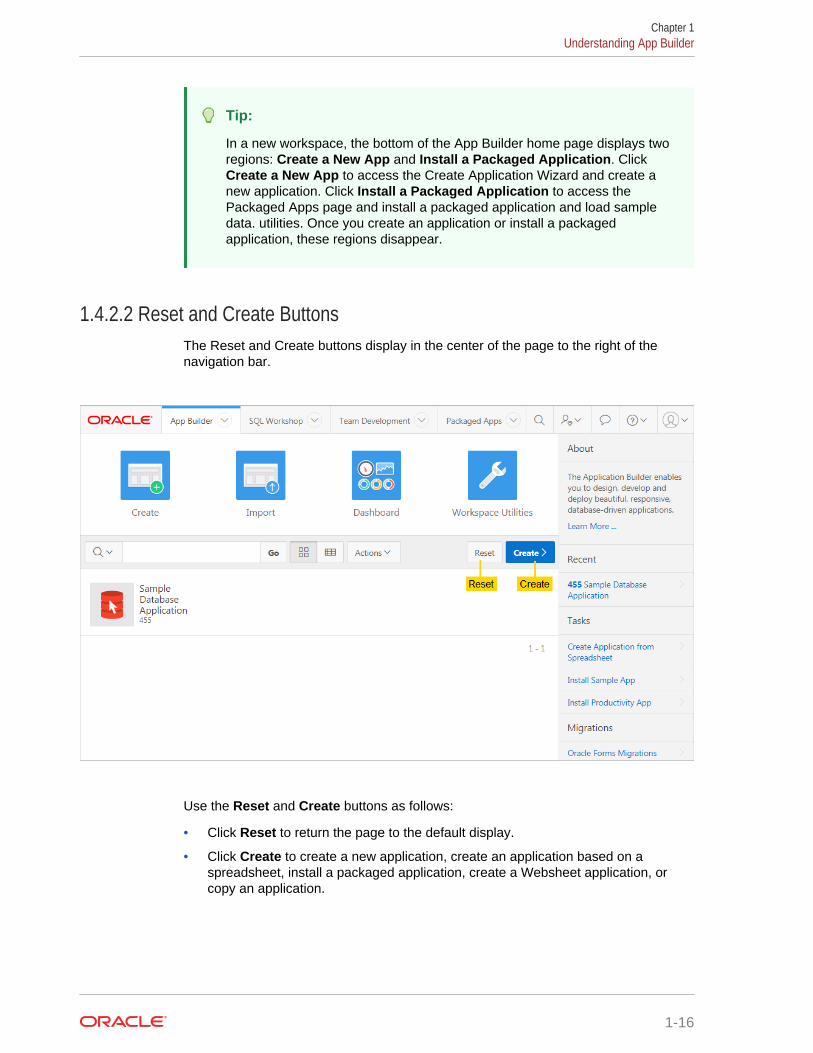
Tip:
In a new workspace, the bottom of the App Builder home page displays tworegions: Create a New App and Install a Packaged Application. ClickCreate a New App to access the Create Application Wizard and create anew application. Click Install a Packaged Application to access thePackaged Apps page and install a packaged application and load sampledata. utilities. Once you create an application or install a packagedapplication, these regions disappear.
1.4.2.2 Reset and Create ButtonsThe Reset and Create buttons display in the center of the page to the right of thenavigation bar.
Use the Reset and Create buttons as follows:
• Click Reset to return the page to the default display.
• Click Create to create a new application, create an application based on aspreadsheet, install a packaged application, create a Websheet application, orcopy an application.
Chapter 1Understanding App Builder
1-16
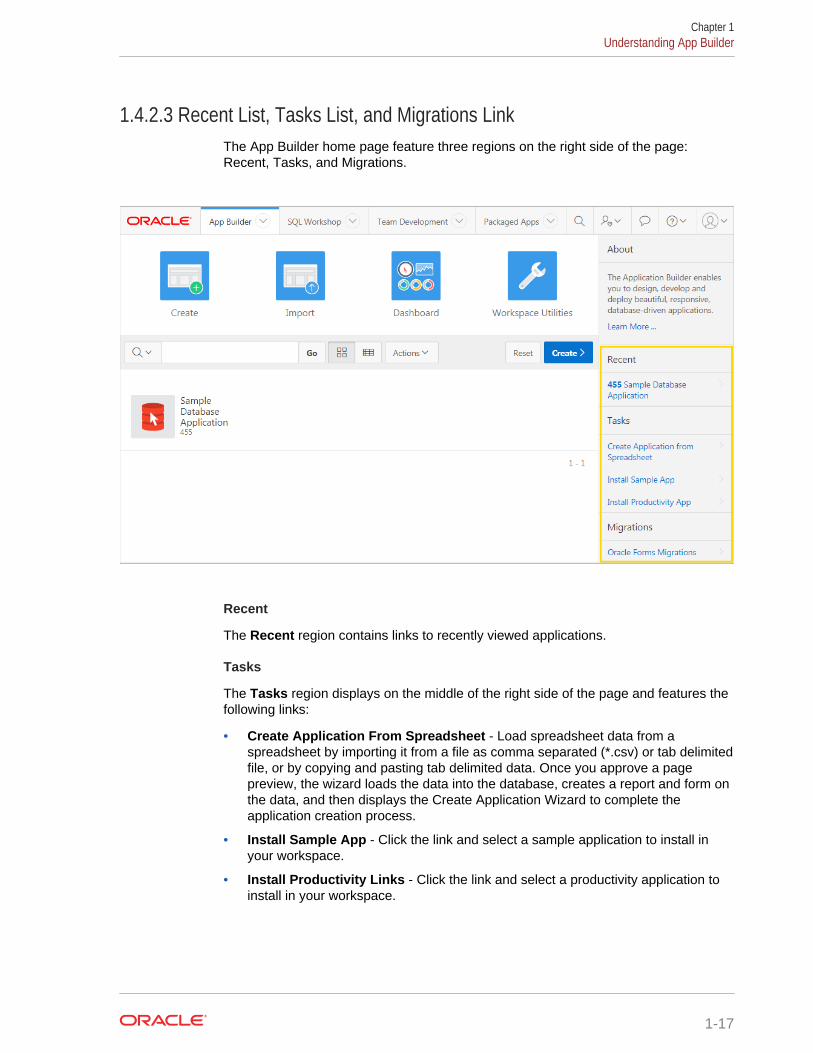
1.4.2.3 Recent List, Tasks List, and Migrations LinkThe App Builder home page feature three regions on the right side of the page:Recent, Tasks, and Migrations.
Recent
The Recent region contains links to recently viewed applications.
Tasks
The Tasks region displays on the middle of the right side of the page and features thefollowing links:
• Create Application From Spreadsheet - Load spreadsheet data from aspreadsheet by importing it from a file as comma separated (*.csv) or tab delimitedfile, or by copying and pasting tab delimited data. Once you approve a pagepreview, the wizard loads the data into the database, creates a report and form onthe data, and then displays the Create Application Wizard to complete theapplication creation process.
• Install Sample App - Click the link and select a sample application to install inyour workspace.
• Install Productivity Links - Click the link and select a productivity application toinstall in your workspace.
Chapter 1Understanding App Builder
1-17
See Also:
• "Creating a Database Application from a Spreadsheet (page 6-10)"
• "About Packaged Applications (page 3-1)"
• "Installing a Packaged Application (page 3-4)"
Migrations
The Migrations region displays on the bottom of the right side of the page. Click theMigrations link to access the Oracle Application Express Application MigrationWorkshop. Use Migration Workshop to migrate a Microsoft Access application orconvert an Oracle Forms application to an Oracle Application Express application.
1.4.2.4 Workspace UtilitiesUse the Workspace Utilities page to manage App Builder Defaults, REST EnabledSQL services, news items, Remote Server objects, application groups, Webcredentials, workspace themes, application exports, Application Express views, andcross application reports.
To access Workspace Utilities, click the Workspace Utilities icon in the center of theApp Builder home page.
The following table describes the links on the Workspace Utilities page.
Table 1-1 Links on the Workspace Utilities Page
Link Description To Learn More
App BuilderDefaults
Define application settings, themes,and globalization attributes.
See Leveraging App Builder Defaultsin Oracle Application ExpressAdministration Guide
REST EnabledSQL Services
Manage references to external RESTEnabled SQL services.
See: "Managing REST Enabled SQLReferences (page 18-8)"
Manage News Manage news displayed on theApplication Express home page andTeam Development.
See: "Managing News Entries(page 4-33)"
RemoteServers
Manage Remote Server objects usedin Web Source Modules andAuthentications.
See:"Managing Remote Servers(page 18-32)"
ApplicationGroups
Organize applications by assigningthem to application groups. To useapplication groups, first create agroup and then assign applications toit.
See: "Managing Application Groups(page 6-63)"
WebCredentials
Manage secure credentials to connectto REST Enabled SQL or other RESTservices.
See: "Managing Web Credentials(page 18-35)"
Chapter 1Understanding App Builder
1-18
Table 1-1 (Cont.) Links on the Workspace Utilities Page
Link Description To Learn More
WorkspaceThemes
Manage workspace themes that canbe utilized by any application withinthe workspace.
See: "Managing Workspace Themes(page 12-24)"
ApplicationExpress Views
Query the various views againstApplication Express meta data.
See: "Accessing Application ExpressViews (page 6-71)"
Export Export workspace components. See: "Exporting an Application andApplication Components(page 24-22)"
CrossApplicationReports
View and edit information acrossmultiple applications in the currentworkspace.
See: "Viewing Cross ApplicationReports (page 1-19)"
1.4.2.5 Viewing Cross Application ReportsUse the links under Cross Application Reports page to view and edit informationacross multiple applications in the current workspace.
To access cross application reports:
1. Sign in to Oracle Application Express.
The Workspace home page appears.
2. Click the App Builder icon.
The App Builder home page appears.
3. Click the Workspace Utilities icon.
4. Locate the Cross Application Reports region on the right side of the window.Available reports include:
• All Reports
• Application Attributes
• Build Options
• Developer Comments
• Comments Calendar
• Application Comparison
• Component Comparison
• Security Profiles
• Authentication Schemes
• Password Items
• Theme Summary
5. To view all reports:
a. Click All Reports.
Chapter 1Understanding App Builder
1-19
b. On the Cross Application Reports page, select a report to review.
1.4.3 Accessing the Application Home PageAccess the Application home page by clicking the App Builder icon on the Workspacehome page and then selecting an application.
Use the Application home page to run, edit, import, export, copy, or deleteapplications.
To access the Application home page:
1. Sign in to Oracle Application Express.
The Workspace home page appears.
2. Click the App Builder icon.
The App Builder home page appears.
3. Select an application on the Application home page.
The Application home page appears.
1.4.4 Understanding the Application Home PageUse the Application home page to run, edit, import, export, copy, or deleteapplications.
When a developer selects an application on the App Builder home page, theApplication home page appears.
• Edit Application Properties Button (page 1-21)
• Application Home Page Icons (page 1-22)
• Create Page Button (page 1-23)
• Application Home Page Navigation Bar (page 1-23)
• Application Home Page Tasks List (page 1-24)
• Recently Edited Pages (page 1-24)
See Also:
"Accessing App Builder (page 1-13)" and "Developer Navigation Tools(page 1-6)"
Chapter 1Understanding App Builder
1-20
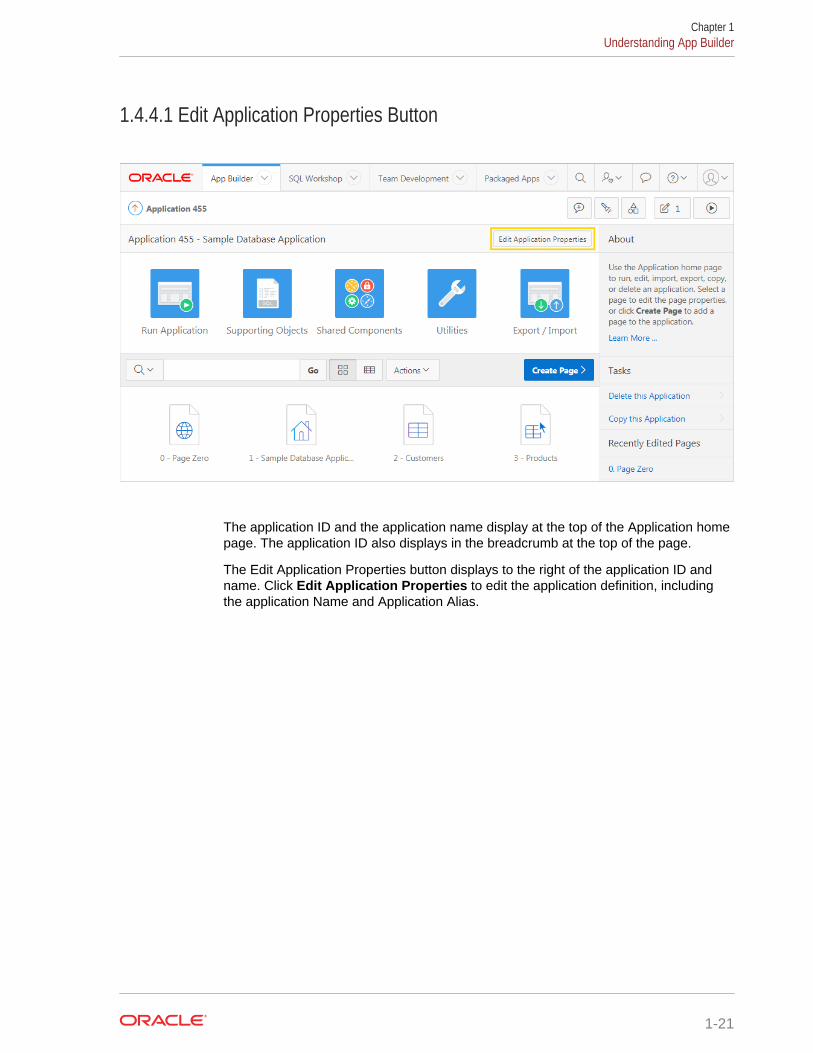
1.4.4.1 Edit Application Properties Button
The application ID and the application name display at the top of the Application homepage. The application ID also displays in the breadcrumb at the top of the page.
The Edit Application Properties button displays to the right of the application ID andname. Click Edit Application Properties to edit the application definition, includingthe application Name and Application Alias.
Chapter 1Understanding App Builder
1-21

1.4.4.2 Application Home Page Icons
The following large icons appear beneath the application ID and application name:
• Run Application submits the home page in the current application to theApplication Express engine to render viewable HTML.
• Supporting Objects links to the Supporting Objects page. Use SupportingObjects to define database object installation scripts that are invoked whenimporting an application. You can also define deinstallation scripts to drop objectswhen deleting an application.
• Shared Components links to the Shared Components page. Shared componentscan display or be applied on any page within the application.
• Utilities links to the Utilities page. Use this page to monitor developer activity,view dashboards, run Advisor, and view numerous other reports.
• Export/Import links you to the Export/Import Wizard. Use this wizard to importand export an entire application and related files such as cascading style sheets,images, static files, script files, themes, user interface defaults, and workspaceusers.
Chapter 1Understanding App Builder
1-22

1.4.4.3 Create Page Button
Clicking the Create Page button launches a wizard that walks you through creating apage in an application.
1.4.4.4 Application Home Page Navigation BarA navigation bar displays in the center of the Application home page. You can use thenavigation to search for pages or customize the appearance of the page.
Chapter 1Understanding App Builder
1-23

The Application home page navigation bar contains the following controls:
• Select columns to search - This field contains a magnifying glass icon. Click thisicon to narrow your search to only specific columns. To search all columns, selectAll Columns.
• Text area - Enter case insensitive search criteria (wildcard characters are implied)and click Go.
• Go button - Executes a search or applies a filter.
• View icons. Use these icons to toggle between three views:
– View Icons (default) - Displays each page as a large icon identified by thepage name.
To view a page, click the page icon.
– View Report - Displays each page as a line in a report. Each line includes thepage number (ID), the page name, when the page was last updated and bywhom, the page type, any associated group, the user interface, and lockstatus.
To view a page, click the page name. Click the Lock icon to prevent conflictsduring application development. Click the Run icon to run the associated pageand render viewable HTML.
• Actions menu - Displays the Actions menu. Use this menu to customize thereport view.
1.4.4.5 Application Home Page Tasks ListA Tasks list displays on the right side of the Application home page.
The Tasks list contains the following links:
• Delete this Application deletes the current application.
• Copy this Application creates a copy of the current application.
1.4.4.6 Recently Edited PagesRecently Edited Pages region contains links to recently edited pages within the currentapplication. To link to specific page, click the page ID and name.
1.5 Changing Your Profile or PasswordEdit your account profile to update your email address, edit your first or last name,upload a profile photo, or change your password.
To edit your account profile:
1. Click the Account menu in the header region.
2. Click Edit Profile.
Chapter 1Changing Your Profile or Password
1-24
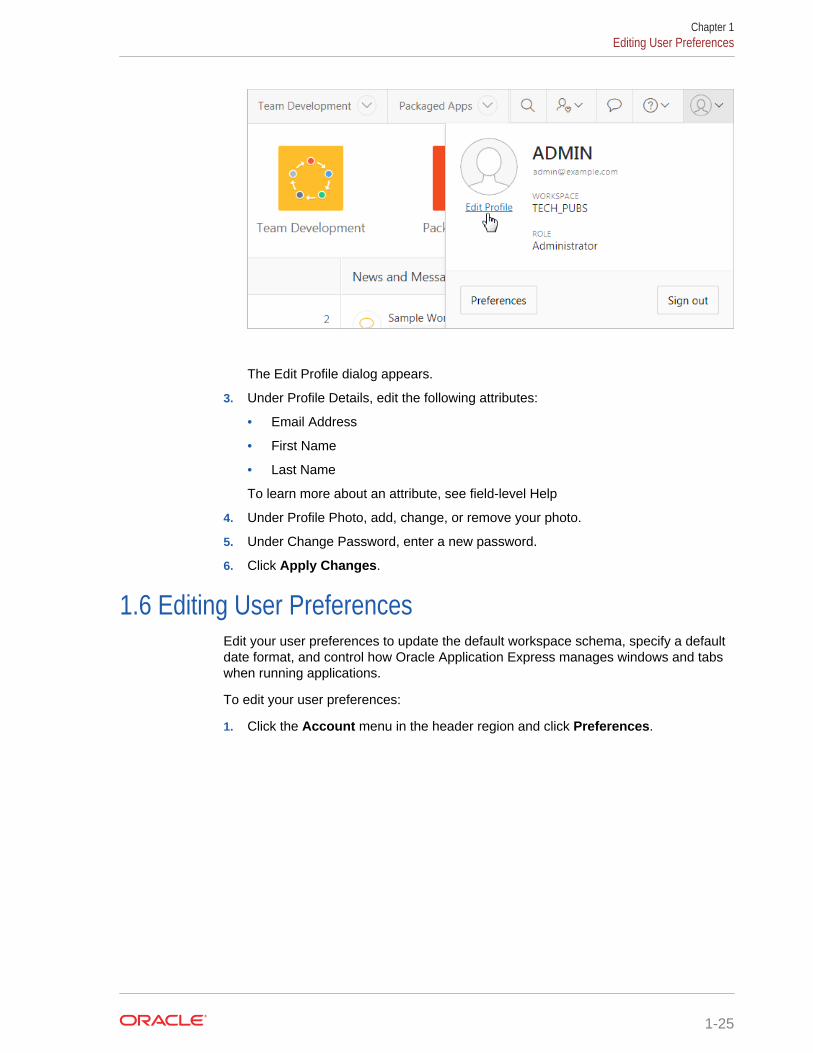
The Edit Profile dialog appears.
3. Under Profile Details, edit the following attributes:
• Email Address
• First Name
• Last Name
To learn more about an attribute, see field-level Help
4. Under Profile Photo, add, change, or remove your photo.
5. Under Change Password, enter a new password.
6. Click Apply Changes.
1.6 Editing User PreferencesEdit your user preferences to update the default workspace schema, specify a defaultdate format, and control how Oracle Application Express manages windows and tabswhen running applications.
To edit your user preferences:
1. Click the Account menu in the header region and click Preferences.
Chapter 1Editing User Preferences
1-25
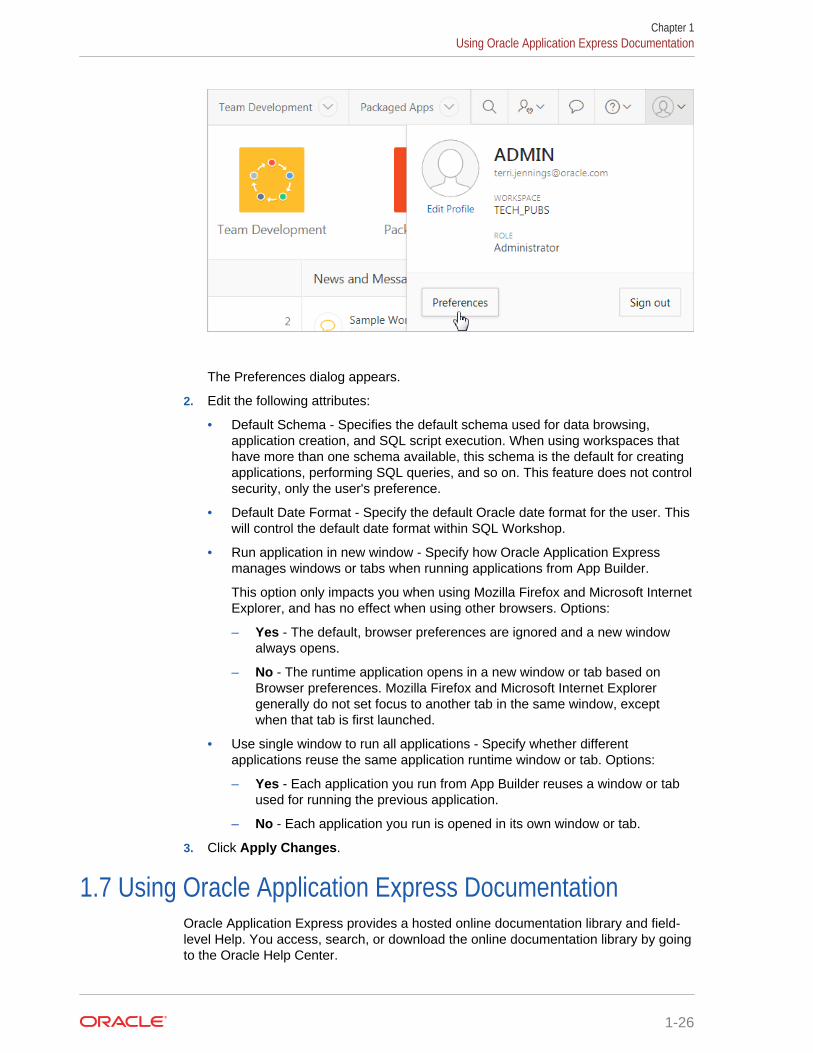
The Preferences dialog appears.
2. Edit the following attributes:
• Default Schema - Specifies the default schema used for data browsing,application creation, and SQL script execution. When using workspaces thathave more than one schema available, this schema is the default for creatingapplications, performing SQL queries, and so on. This feature does not controlsecurity, only the user's preference.
• Default Date Format - Specify the default Oracle date format for the user. Thiswill control the default date format within SQL Workshop.
• Run application in new window - Specify how Oracle Application Expressmanages windows or tabs when running applications from App Builder.
This option only impacts you when using Mozilla Firefox and Microsoft InternetExplorer, and has no effect when using other browsers. Options:
– Yes - The default, browser preferences are ignored and a new windowalways opens.
– No - The runtime application opens in a new window or tab based onBrowser preferences. Mozilla Firefox and Microsoft Internet Explorergenerally do not set focus to another tab in the same window, exceptwhen that tab is first launched.
• Use single window to run all applications - Specify whether differentapplications reuse the same application runtime window or tab. Options:
– Yes - Each application you run from App Builder reuses a window or tabused for running the previous application.
– No - Each application you run is opened in its own window or tab.
3. Click Apply Changes.
1.7 Using Oracle Application Express DocumentationOracle Application Express provides a hosted online documentation library and field-level Help. You access, search, or download the online documentation library by goingto the Oracle Help Center.
Chapter 1Using Oracle Application Express Documentation
1-26
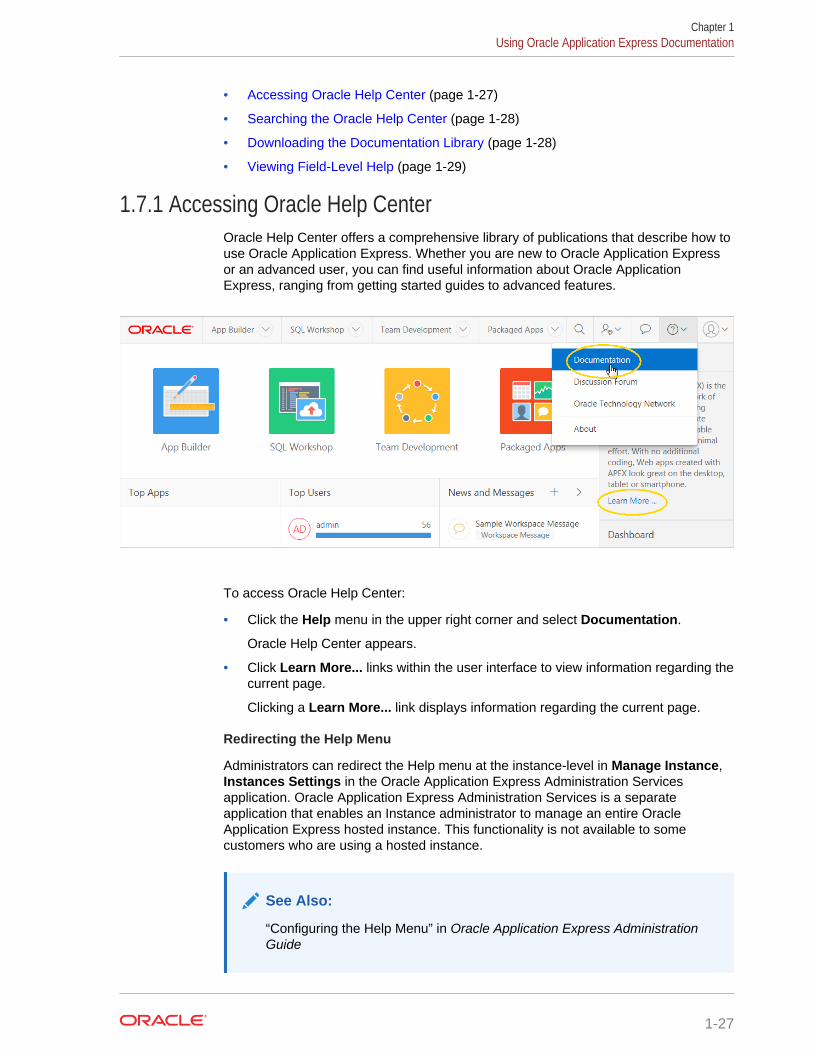
• Accessing Oracle Help Center (page 1-27)
• Searching the Oracle Help Center (page 1-28)
• Downloading the Documentation Library (page 1-28)
• Viewing Field-Level Help (page 1-29)
1.7.1 Accessing Oracle Help CenterOracle Help Center offers a comprehensive library of publications that describe how touse Oracle Application Express. Whether you are new to Oracle Application Expressor an advanced user, you can find useful information about Oracle ApplicationExpress, ranging from getting started guides to advanced features.
To access Oracle Help Center:
• Click the Help menu in the upper right corner and select Documentation.
Oracle Help Center appears.
• Click Learn More... links within the user interface to view information regarding thecurrent page.
Clicking a Learn More... link displays information regarding the current page.
Redirecting the Help Menu
Administrators can redirect the Help menu at the instance-level in Manage Instance,Instances Settings in the Oracle Application Express Administration Servicesapplication. Oracle Application Express Administration Services is a separateapplication that enables an Instance administrator to manage an entire OracleApplication Express hosted instance. This functionality is not available to somecustomers who are using a hosted instance.
See Also:
“Configuring the Help Menu” in Oracle Application Express AdministrationGuide
Chapter 1Using Oracle Application Express Documentation
1-27
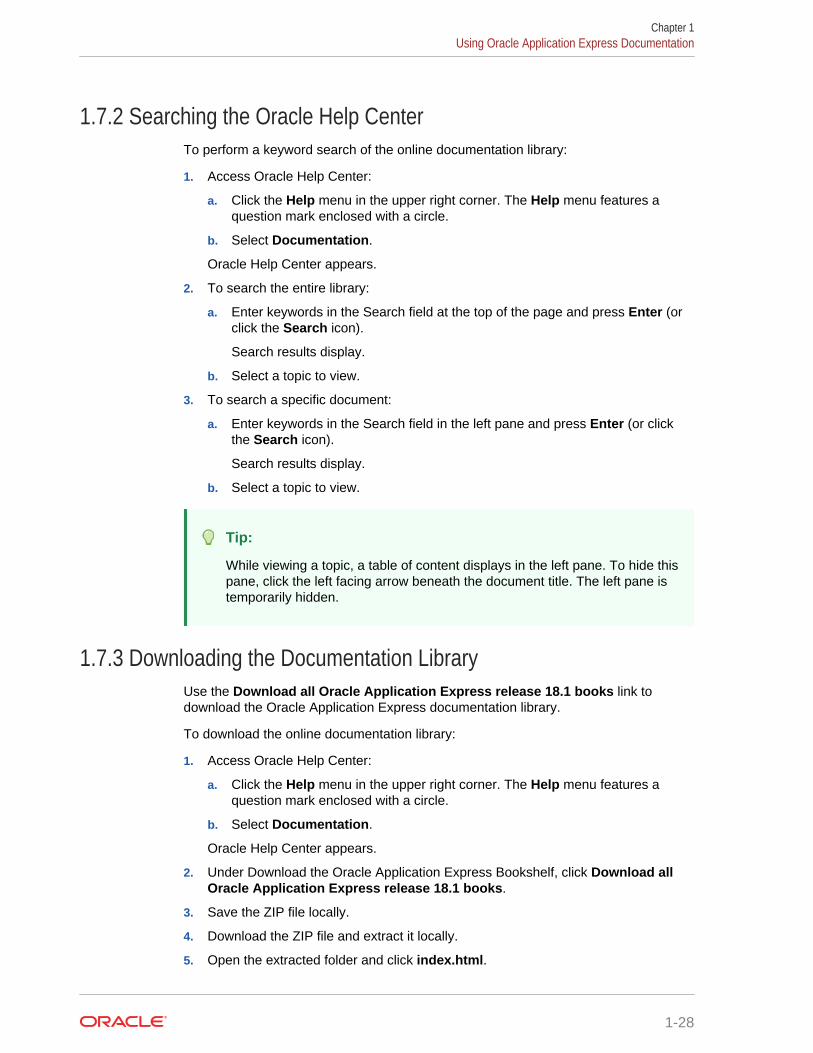
1.7.2 Searching the Oracle Help CenterTo perform a keyword search of the online documentation library:
1. Access Oracle Help Center:
a. Click the Help menu in the upper right corner. The Help menu features aquestion mark enclosed with a circle.
b. Select Documentation.
Oracle Help Center appears.
2. To search the entire library:
a. Enter keywords in the Search field at the top of the page and press Enter (orclick the Search icon).
Search results display.
b. Select a topic to view.
3. To search a specific document:
a. Enter keywords in the Search field in the left pane and press Enter (or clickthe Search icon).
Search results display.
b. Select a topic to view.
Tip:
While viewing a topic, a table of content displays in the left pane. To hide thispane, click the left facing arrow beneath the document title. The left pane istemporarily hidden.
1.7.3 Downloading the Documentation LibraryUse the Download all Oracle Application Express release 18.1 books link todownload the Oracle Application Express documentation library.
To download the online documentation library:
1. Access Oracle Help Center:
a. Click the Help menu in the upper right corner. The Help menu features aquestion mark enclosed with a circle.
b. Select Documentation.
Oracle Help Center appears.
2. Under Download the Oracle Application Express Bookshelf, click Download allOracle Application Express release 18.1 books.
3. Save the ZIP file locally.
4. Download the ZIP file and extract it locally.
5. Open the extracted folder and click index.html.
Chapter 1Using Oracle Application Express Documentation
1-28
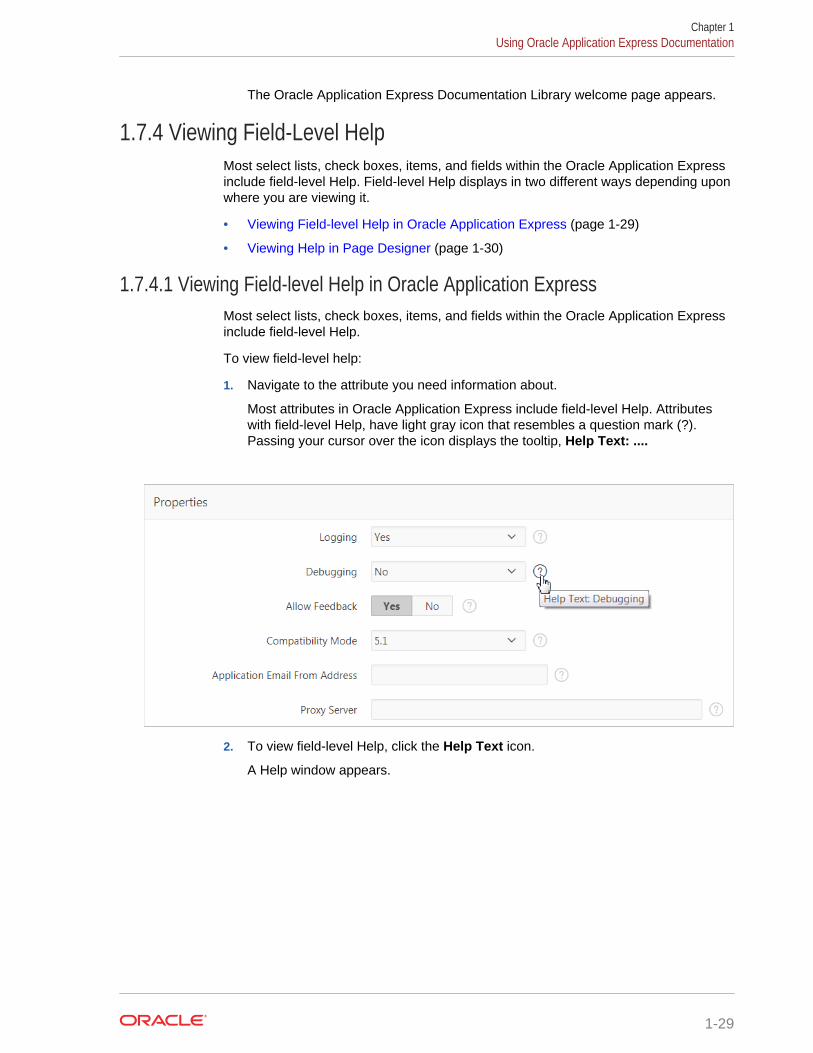
The Oracle Application Express Documentation Library welcome page appears.
1.7.4 Viewing Field-Level HelpMost select lists, check boxes, items, and fields within the Oracle Application Expressinclude field-level Help. Field-level Help displays in two different ways depending uponwhere you are viewing it.
• Viewing Field-level Help in Oracle Application Express (page 1-29)
• Viewing Help in Page Designer (page 1-30)
1.7.4.1 Viewing Field-level Help in Oracle Application ExpressMost select lists, check boxes, items, and fields within the Oracle Application Expressinclude field-level Help.
To view field-level help:
1. Navigate to the attribute you need information about.
Most attributes in Oracle Application Express include field-level Help. Attributeswith field-level Help, have light gray icon that resembles a question mark (?).Passing your cursor over the icon displays the tooltip, Help Text: ....
2. To view field-level Help, click the Help Text icon.
A Help window appears.
Chapter 1Using Oracle Application Express Documentation
1-29
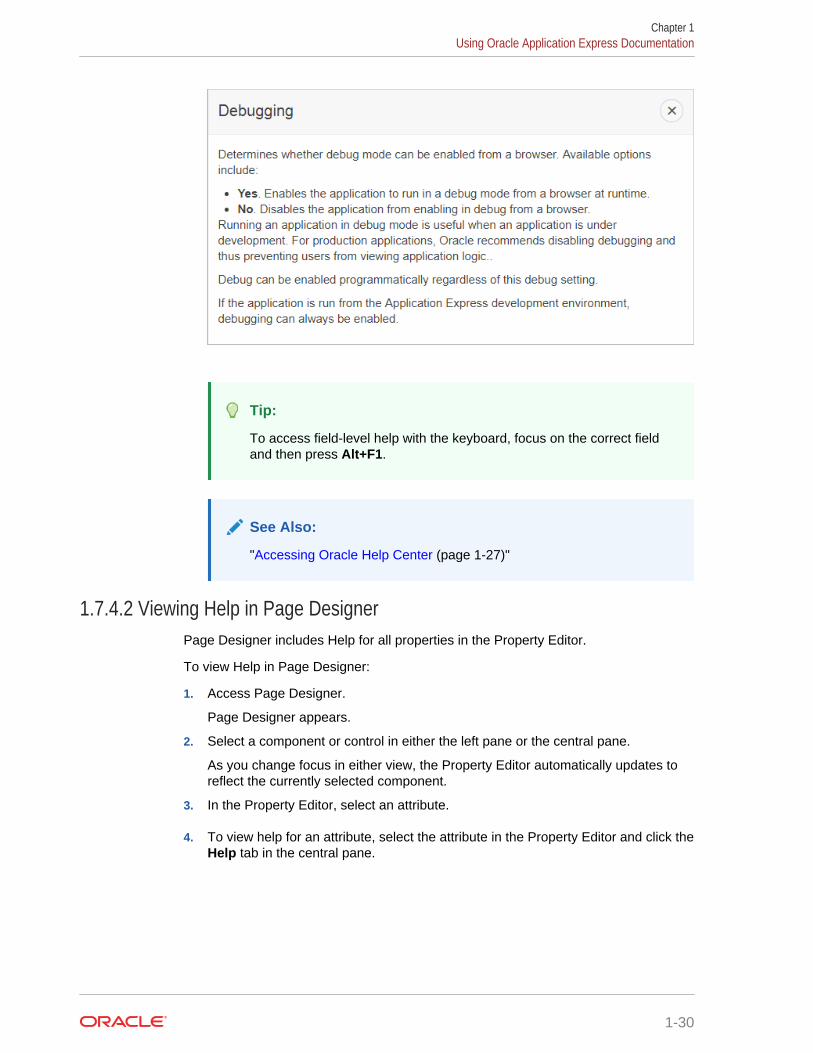
Tip:
To access field-level help with the keyboard, focus on the correct fieldand then press Alt+F1.
See Also:
"Accessing Oracle Help Center (page 1-27)"
1.7.4.2 Viewing Help in Page DesignerPage Designer includes Help for all properties in the Property Editor.
To view Help in Page Designer:
1. Access Page Designer.
Page Designer appears.
2. Select a component or control in either the left pane or the central pane.
As you change focus in either view, the Property Editor automatically updates toreflect the currently selected component.
3. In the Property Editor, select an attribute.
4. To view help for an attribute, select the attribute in the Property Editor and click theHelp tab in the central pane.
Chapter 1Using Oracle Application Express Documentation
1-30
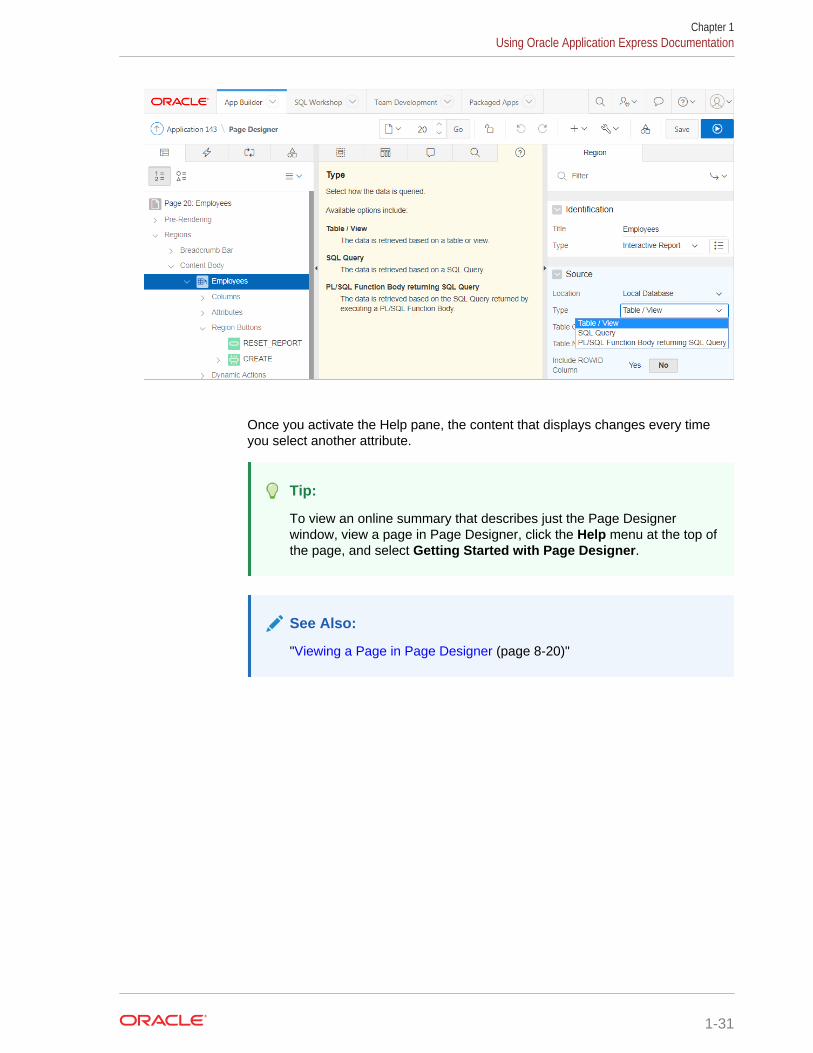
Once you activate the Help pane, the content that displays changes every timeyou select another attribute.
Tip:
To view an online summary that describes just the Page Designerwindow, view a page in Page Designer, click the Help menu at the top ofthe page, and select Getting Started with Page Designer.
See Also:
"Viewing a Page in Page Designer (page 8-20)"
Chapter 1Using Oracle Application Express Documentation
1-31
2App Builder Concepts
To efficiently use App Builder, developers must understand some key conceptsincluding managing user interface design, viewing rendered application page,understanding page processing and rendering, managing session state, understandingURL syntax, managing session state values, and using built-in substitution strings.
• Understanding Oracle Application Express Applications (page 2-2)Learn more about Oracle Application Express applications, the differencesbetween database and Websheet applications, and the advantages of using theCreate Application Wizard.
• Running an Application or Page (page 2-3)To view a rendered version of your application, you run or submit it to theApplication Express engine. The Application Express engine dynamically rendersand processes pages based on data stored in database tables.
• How Does Page Processing and Page Rendering Work? (page 2-5)Learn how the Application Express engine renders and processes pages, whenOracle Application Express issues implicit commits, how conditional rendering andprocessing works, and how to verify user identify or control access to controls andcomponents.
• About Enabling Support for Bookmarks (page 2-8)Developers can assist users who bookmark application pages by either using zeroas the session ID, or enabling Rejoin Sessions.
• Understanding Session State Management (page 2-8)Oracle Application Express transparently maintains session state and providesdevelopers with the ability to get and set session state values from any page in theapplication.
• Viewing Session State (page 2-10)View the Session page by clicking Session on the Developer toolbar.
• Understanding URL Syntax (page 2-11)Use f?p syntax to link pages or call pages using a page alias or button URL.
• Managing Session State Values (page 2-14)Manage session state to store and retrieve values for a user as the user navigatesbetween different application pages.
• Using Substitution Strings (page 2-20)Use substitution strings within a page template or region source to passinformation and replace a character string with another value.
See Also:
" Understanding App Builder (page 1-12)"
2-1

2.1 Understanding Oracle Application Express ApplicationsLearn more about Oracle Application Express applications, the differences betweendatabase and Websheet applications, and the advantages of using the CreateApplication Wizard.
• What is an Oracle Application Express Application? (page 2-2)
• What is the Difference Between a Database and Websheet Application?(page 2-2)
See Also:
" Understanding App Builder (page 1-12)"
2.1.1 What is an Oracle Application Express Application?An Oracle Application Express application is an HTML interface that exists on top ofdatabase objects such as tables or procedures. You create both database applicationsand Websheet applications using the Create Application Wizard. The main differencebetween these two types of applications is the intended audience. While databaseapplications are primarily developed by application developers, Websheet applicationsare often created by end users with no development experience.
What Is an Application Page?
A page is the basic building block of an application. Every application consists of oneor multiple pages. Each page can have buttons and fields (called items) which aregrouped into containers called regions. Pages can include application logic (orprocesses). You can branch from one page to the next using conditional navigation;perform calculations (called computations); perform validations (such as edit checks);and display reports, calendars, and charts. You view and edit a page in PageDesigner.
2.1.2 What is the Difference Between a Database and WebsheetApplication?
An Oracle Application Express application enables developers to manage and displaydata stored in an Oracle database. You build an application using App Builder. UsingApp Builder you can create two different types of applications: Database applicationsand Websheet applications.
About Database Applications
A database application is a collection of pages linked together using navigationmenus, tabs, buttons, or hypertext links. Application pages share a common sessionstate and authentication.
Chapter 2Understanding Oracle Application Express Applications
2-2
To create a database application, an application developer runs wizards todeclaratively assemble pages and navigation. Individual pages are organized usingcontainers called regions. Regions can contain text, custom PL/SQL, reports, charts,maps, calendars, web service content, or forms. Forms are made up of fields (calleditems) which can be selected from the multitude of built-in types (such as text fields,text areas, radio groups, select lists, check boxes, date pickers, and popup list ofvalues).
Developers can also create their own custom item types using plug-ins. Session state(or application context) is transparently managed and the user interface presentation isseparated from the application logic enabling developers to manage the look and feelof an application by simply selecting a different theme.
About Websheet Applications
Websheet applications enable end users to manage structured and unstructured datawithout developer assistance. Page sections contain unstructured data which can beedited using a WYSIWYG editor. Data Grids enable users to manage structured datawithout the need for writing SQL. Using runtime dialog boxes, users can add columns,rename columns, and validations. Each page and row of data grid data can beannotated with files, tags, notes, and links. Pages can contain sections, reports, anddata grids and everything can be linked together using navigation. All information issearchable and completely controlled by the end-user.
2.2 Running an Application or PageTo view a rendered version of your application, you run or submit it to the ApplicationExpress engine. The Application Express engine dynamically renders and processespages based on data stored in database tables.
• Run Application and Run Page Buttons (page 2-3)
• How Your Browser Impacts the Way Applications Run (page 2-4)
• Running an Application from the App Builder Home Page (page 2-4)
• Running an Application from the Application Home Page (page 2-5)
• Running a Page on the Application Home Page (page 2-5)
See Also:
"Running a Page from Page Designer (page 8-35)"
2.2.1 Run Application and Run Page ButtonsAs you create new pages, you can run them individually, or run an entire application.The Run Application button displays on the Application home page and resembles anapplication window with a green run (or play) button. To run the application from theapplication home page, click Run Application.
Chapter 2Running an Application or Page
2-3
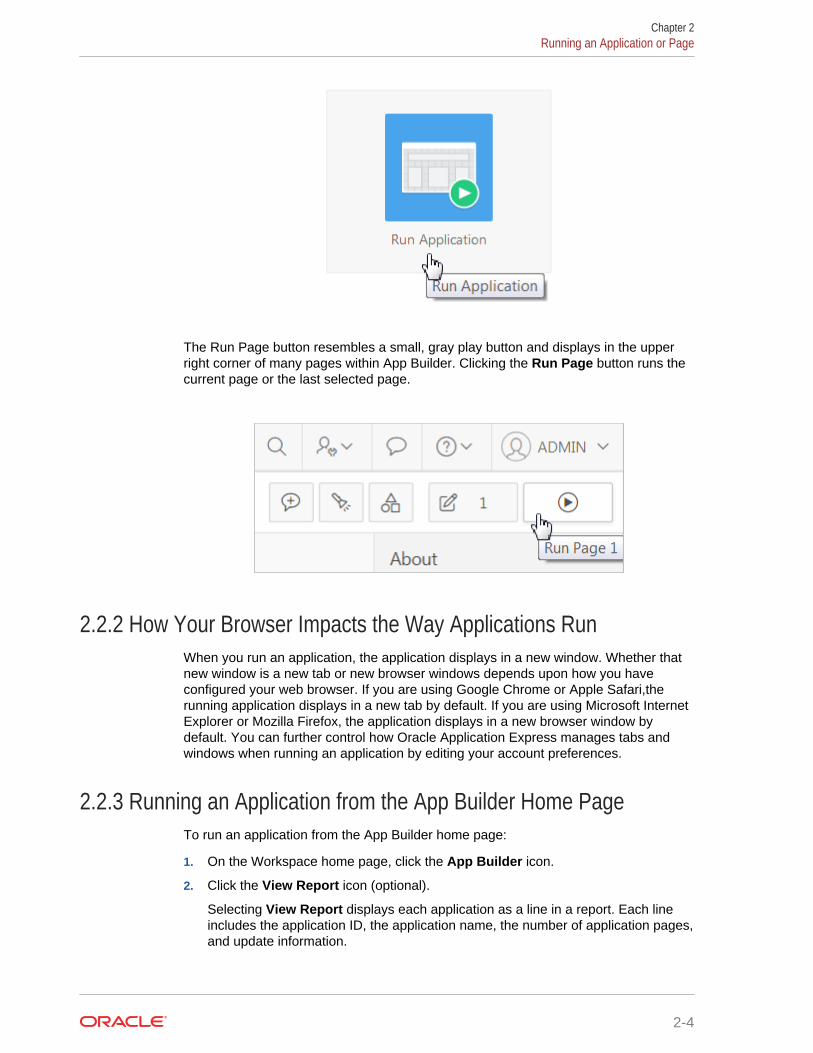
The Run Page button resembles a small, gray play button and displays in the upperright corner of many pages within App Builder. Clicking the Run Page button runs thecurrent page or the last selected page.
2.2.2 How Your Browser Impacts the Way Applications RunWhen you run an application, the application displays in a new window. Whether thatnew window is a new tab or new browser windows depends upon how you haveconfigured your web browser. If you are using Google Chrome or Apple Safari,therunning application displays in a new tab by default. If you are using Microsoft InternetExplorer or Mozilla Firefox, the application displays in a new browser window bydefault. You can further control how Oracle Application Express manages tabs andwindows when running an application by editing your account preferences.
2.2.3 Running an Application from the App Builder Home PageTo run an application from the App Builder home page:
1. On the Workspace home page, click the App Builder icon.
2. Click the View Report icon (optional).
Selecting View Report displays each application as a line in a report. Each lineincludes the application ID, the application name, the number of application pages,and update information.
Chapter 2Running an Application or Page
2-4
3. Locate the application to be run.
4. To run the application:
• In Report view - Click Run Page icon in the far right column.
• In Icon view - Click the Run Application icon at the top of the page.
The application displays in a new window.
2.2.4 Running an Application from the Application Home PageTo run an application from the Application home page:
1. On the Workspace home page, click the App Builder icon.
The App Builder home page appears.
2. Select an application.
3. Click the Run Application icon in the middle of page.
The application displays in a new window.
2.2.5 Running a Page on the Application Home PageTo run a page from the Pages list:
1. On the Workspace home page, click the App Builder icon.
2. Select an application.
3. Click the View Report icon.
Selecting View Report displays each page as a line in a report. Each line includesthe page number, the page name, when the page was last updated, who lastupdated the page, the page type, the selected user interface, a lock icon, and aRun button.
4. Locate the page you want to run.
5. Click Run Page in the far right column.
The application displays in a new window.
2.3 How Does Page Processing and Page Rendering Work?Learn how the Application Express engine renders and processes pages, when OracleApplication Express issues implicit commits, how conditional rendering and processingworks, and how to verify user identify or control access to controls and components.
• How the Application Express Engine Renders and Processes Pages (page 2-6)
• About Implicit Commit Points (page 2-6)
• Understanding Conditional Rendering and Processing (page 2-6)
• About Verifying User Identity (page 2-7)
• About Controlling Access to Controls and Components (page 2-8)
Chapter 2How Does Page Processing and Page Rendering Work?
2-5

2.3.1 How the Application Express Engine Renders and ProcessesPages
The Application Express engine dynamically renders and processes pages based ondata stored in Oracle database tables. To view a rendered version of your application,you request it from the Application Express engine with a URL. When you run anapplication, the Application Express engine relies on two processes:
• Show Page - Show Page is a page rendering process that assembles all the pageattributes (including regions, items, and buttons) into a viewable HTML page.When you request a page using a URL, the engine is running Show Page.
• Accept Page - Accept Page performs forms page processing, includingcomputations, validations, processes, and branching. When you submit a page,the Application Express engine is running Accept Page or performing pageprocessing during which it saves the submitted values in the session cache andthen performs any computations, validations, or processes.
2.3.2 About Implicit Commit PointsOracle Application Express issues implicit commits at the following points:
• On load, after a page finishes rendering
• On submit, before branching to another page
• On submit, if one or more validations fail, before re-rendering the page
• After a computation
• After changing the value of an item, for example after a PL/SQL processthat modifies a bind variable value or when APEX_UTIL.SET_SESSION_STATE is called.
• When APEX_MAIL.PUSH_QUEUE is called
2.3.3 Understanding Conditional Rendering and ProcessingDevelopers can use conditions in an application to control how pages and pagecomponents display and when processes, computations, and validations execute.
• What is a Condition? (page 2-6)
• Selecting a Condition (page 2-7)
• Condition Example: Current Page in Expression 1 (page 2-7)
• Condition Example: Exists (page 2-7)
• Condition Example: PL/SQL Expression (page 2-7)
2.3.3.1 What is a Condition?A condition is a small unit of logic that helps you control the display of regions, items,buttons, and tabs and the execution of processes, computations, and validations. Forexample, when you apply a condition to a button, the rendering engine evaluates thecondition during the rendering (or Show Page) process. Whether the condition passesor fails determines if the button displays.
Chapter 2How Does Page Processing and Page Rendering Work?
2-6
2.3.3.2 Selecting a ConditionYou specify a condition by selecting a condition type. You can select a condition typewhen you first create the control or component, or later when editing the control orcomponent.
Depending upon the type of condition you select, you enter the appropriate values inthe fields provided. The condition evaluates to true or false based on the values youenter. Click the select list to view a complete list of all available conditions for a givencomponent or control.
2.3.3.3 Condition Example: Current Page in Expression 1Current page in Expression 1 evaluates to true if the current page number iscontained within the comma-delimited list of pages provided. For example:
3,100,203
If the current page is 100, then this condition evaluates to true and the conditionpasses.
2.3.3.4 Condition Example: ExistsExists (SQL query returns at least one row) is expressed as a SQL query. If thequery returns at least one row, then the condition evaluates as true. For example:
SELECT 1 FROM employees WHERE department_id = :P101_DEPTNO
This example references item P101_DEPTNO as a bind variable. You can use bindvariables within application processes and SQL query regions to reference items fromsession state. If one or more employees are in the department identified by the valueof P101_DEPTNO, then the condition evaluates as true.
2.3.3.5 Condition Example: PL/SQL ExpressionUse PL/SQL Expression to specify an expression in valid PL/SQL syntax thatevaluates to true or false. For example:
NVL(:MY_ITEM,'NO') = 'YES'
If the value of :MY_ITEM is YES, as in the previous example, then the conditionevaluates as true. If the value of :MY_ITEM is anything other than YES, then thecondition evaluates as false.
2.3.4 About Verifying User IdentityAuthentication is the process of establishing users' identities before they can accessan application. Authentication may require a user to enter a user name and password,or may involve the use of a digital certificate or a secure key.
Oracle Application Express supports modular authentication, making it easy to switchauthentication methods when needed. You can establish a user's identity by selectingfrom several built-in authentication methods, or by using a wizard to create your owncustom authentication approach.
Chapter 2How Does Page Processing and Page Rendering Work?
2-7

2.3.5 About Controlling Access to Controls and ComponentsWhile conditions control the rendering and processing of specific controls orcomponents on a page, authorization schemes control user access. Authorization is abroad term for controlling access to resources based on user privileges.
Authorization schemes use the identities established by authentication to grantprivileges on applications and objects within them. You can specify an authorizationscheme for an entire application, a page, or a specific page control such as a region,item, or button. For example, you could use an authorization scheme to selectivelydetermine which tabs, regions, or navigation bar entries a user sees.
2.4 About Enabling Support for BookmarksDevelopers can assist users who bookmark application pages by either using zero asthe session ID, or enabling Rejoin Sessions.
In previous releases, if the pages within an application were public and did not requireauthentication, you could assist users in bookmarking pages by using zero as thesession ID. Although this approach is still supported, Oracle Application Express nowincludes a new feature called Rejoin Sessions that enables developers to control thistype of support at the page, application, or instance-level.
2.5 Understanding Session State ManagementOracle Application Express transparently maintains session state and providesdevelopers with the ability to get and set session state values from any page in theapplication.
• What is Session State? (page 2-8)Session state enables developers to store and retrieve values for a user as theuser navigates between different application pages.
• About Session IDs (page 2-9)A session ID is a unique number assigned a specific user for the duration of thatuser's visit (session)
• What Is a Session? (page 2-9)A session is a logical construct that establishes persistence (or stateful behavior)across page views. Each session is assigned a unique identifier. The ApplicationExpress engine uses this identifier (or session ID) to store and retrieve anapplication's working set of data (or session state) before and after each pageview.
2.5.1 What is Session State?Session state enables developers to store and retrieve values for a user as the usernavigates between different application pages.
Hypertext Transfer Protocol (HTTP), the protocol over which HTML pages are mostoften delivered, is a stateless protocol. A web browser is only connected to the serverfor as long as it takes to download a complete page. Each page request is treated bythe server as an independent event, unrelated to any page requests that happened
Chapter 2About Enabling Support for Bookmarks
2-8
previously or that may occur in the future. To access form values entered on one pageon a subsequent page, the values must be stored as session state. Oracle ApplicationExpress transparently maintains session state and provides developers with the abilityto get and set session state values from any page in the application.
2.5.2 About Session IDsA session ID is a unique number assigned a specific user for the duration of thatuser's visit (session)
The Application Express engine establishes the identity of the user for each pagerequest and the session ID to fetch session state from the database. The most visiblelocation of the session ID is in the URL for a page request. The session ID displays asthe third parameter in the URL, for example:
http://apex.somewhere.com/pls/apex/f?p=4350:1:220883407765693447
In this example, the session ID is 220883407765693447.
Another visible location is in the page's HTML POST data and indirectly in the contentsof a session cookie. This cookie is sent by the Application Express engine duringauthentication and is maintained for the life of the application (or browser) session.
Oracle Application Express assigns new session IDs during authentication processing,records the authenticated user's identity with the session ID, and continually checksthe session ID in each page request's URL or POST data with the session cookie andthe session record in the database. These checks provide users with flexibility andsecurity.
While the session ID is the key to session state, the session cookie and the sessionrecord safeguard the integrity of the session ID and the authentication status of theuser.
2.5.3 What Is a Session?A session is a logical construct that establishes persistence (or stateful behavior)across page views. Each session is assigned a unique identifier. The ApplicationExpress engine uses this identifier (or session ID) to store and retrieve an application'sworking set of data (or session state) before and after each page view.
Because sessions are entirely independent of one another, any number of sessionscan exist in the database at the same time. A user can also run multiple instances ofan application simultaneously in different browser programs.
Sessions are logically and physically distinct from Oracle database sessions used toservice page requests. A user runs an application in a single Oracle ApplicationExpress session from sign in to sign out with a typical duration measured in minutes orhours. Each page requested during that session results in the Application Expressengine creating or reusing an Oracle database session to access database resources.Often these database sessions last just a fraction of a second.
Chapter 2Understanding Session State Management
2-9
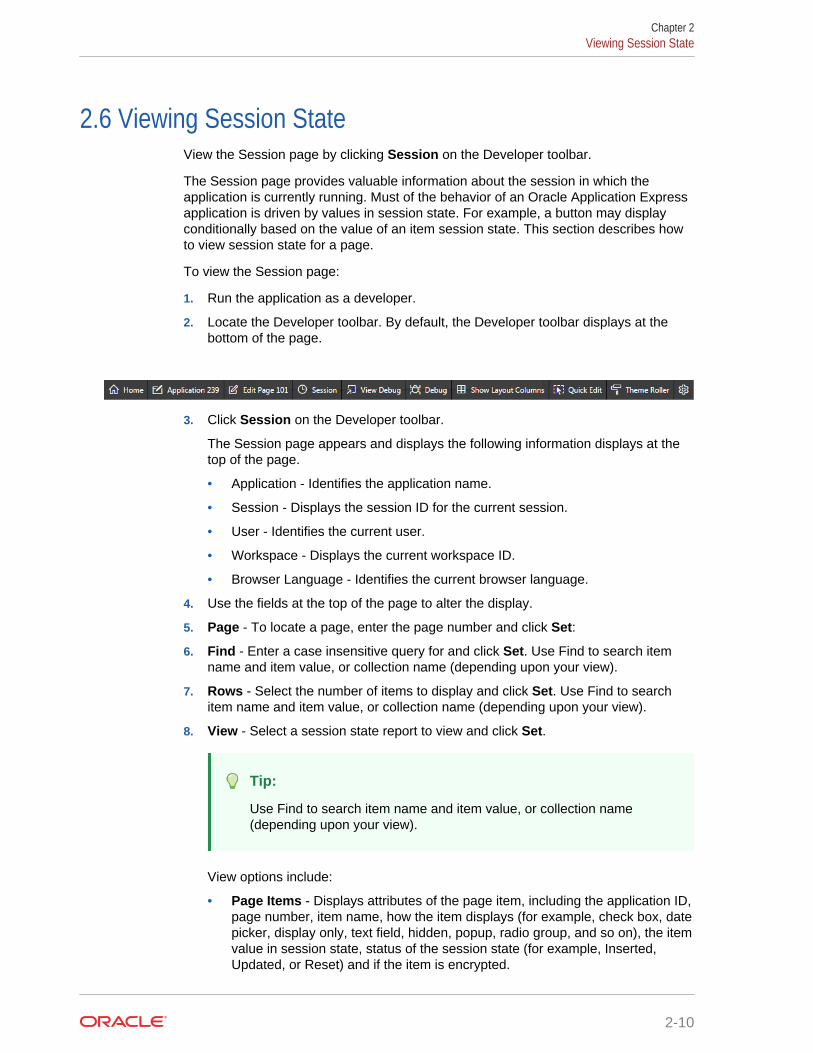
2.6 Viewing Session StateView the Session page by clicking Session on the Developer toolbar.
The Session page provides valuable information about the session in which theapplication is currently running. Must of the behavior of an Oracle Application Expressapplication is driven by values in session state. For example, a button may displayconditionally based on the value of an item session state. This section describes howto view session state for a page.
To view the Session page:
1. Run the application as a developer.
2. Locate the Developer toolbar. By default, the Developer toolbar displays at thebottom of the page.
3. Click Session on the Developer toolbar.
The Session page appears and displays the following information displays at thetop of the page.
• Application - Identifies the application name.
• Session - Displays the session ID for the current session.
• User - Identifies the current user.
• Workspace - Displays the current workspace ID.
• Browser Language - Identifies the current browser language.
4. Use the fields at the top of the page to alter the display.
5. Page - To locate a page, enter the page number and click Set:
6. Find - Enter a case insensitive query for and click Set. Use Find to search itemname and item value, or collection name (depending upon your view).
7. Rows - Select the number of items to display and click Set. Use Find to searchitem name and item value, or collection name (depending upon your view).
8. View - Select a session state report to view and click Set.
Tip:
Use Find to search item name and item value, or collection name(depending upon your view).
View options include:
• Page Items - Displays attributes of the page item, including the application ID,page number, item name, how the item displays (for example, check box, datepicker, display only, text field, hidden, popup, radio group, and so on), the itemvalue in session state, status of the session state (for example, Inserted,Updated, or Reset) and if the item is encrypted.
Chapter 2Viewing Session State
2-10
• Application Items - Displays application items. Application items are itemsthat do not reside on a page. Application items are session state variableswithout the associated user interface properties.
• Session State - Displays session state details, including the application ID,page number, item name, the item value in session state, how the itemdisplays (for example, check box, date picker, display only, text field, hidden,popup, radio group, and so on), label, encryption status, and data item ID.
• Collections - Displays currently defined collections.
• All - Displays page items, application items, session state, and collections.
2.7 Understanding URL SyntaxUse f?p syntax to link pages or call pages using a page alias or button URL.
• About the Application Page URL (page 2-11)The URL for each application page indicates the location of Oracle ApplicationExpress and identifies the address of Oracle Application Express, the applicationID, page number, and session ID.
• About Using f?p Syntax to Link Pages (page 2-12)Create links between application page using f?p syntax.
• Calling a Page Using an Application Alias or Page Alias (page 2-14)Use URL syntax to call a page using an application alias and/or page alias.
• Calling a Page from a Button URL (page 2-14)Use URL syntax to call a page from a button URL.
2.7.1 About the Application Page URLThe URL for each application page indicates the location of Oracle ApplicationExpress and identifies the address of Oracle Application Express, the application ID,page number, and session ID.
Consider the following example:
http://apex.somewhere.com/pls/apex/f?p=4350:1:220883407765693447
This example indicates:
• http: is the scheme.
• apex.somewhere.com is the domain name of the server. It can also include a portnumber or an IP address.
• pls is the indicator to use the mod_plsql cartridge (if applicable)
• apex is the Database Access Descriptor (DAD) name. The DAD describes howHTTP Server connects to the database server so that it can fulfill an HTTPrequest. The default value is apex.
• f?p= is a prefix used by Oracle Application Express to route the request to thecorrect engine process.
• 4350 is the ID of the application being called. The application ID is a uniquenumber that identifies each application.
• 1 is the number of the page within the application.
Chapter 2Understanding URL Syntax
2-11
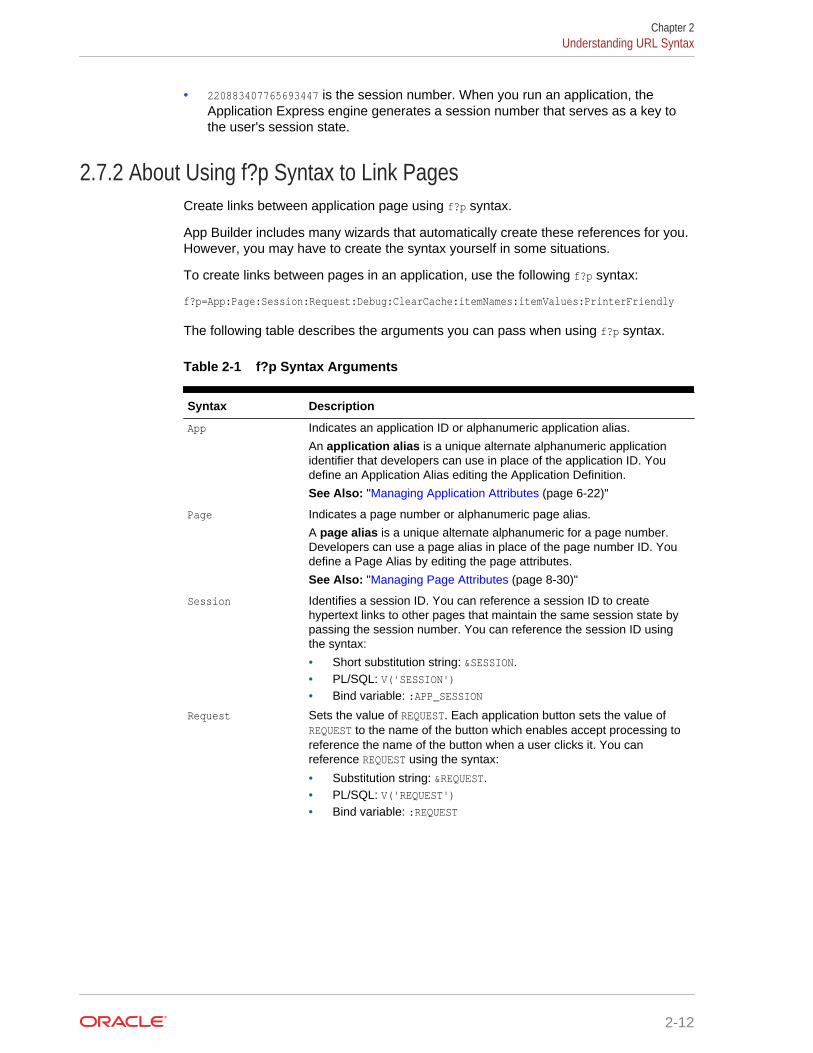
• 220883407765693447 is the session number. When you run an application, theApplication Express engine generates a session number that serves as a key tothe user's session state.
2.7.2 About Using f?p Syntax to Link PagesCreate links between application page using f?p syntax.
App Builder includes many wizards that automatically create these references for you.However, you may have to create the syntax yourself in some situations.
To create links between pages in an application, use the following f?p syntax:
f?p=App:Page:Session:Request:Debug:ClearCache:itemNames:itemValues:PrinterFriendly
The following table describes the arguments you can pass when using f?p syntax.
Table 2-1 f?p Syntax Arguments
Syntax Description
App Indicates an application ID or alphanumeric application alias.
An application alias is a unique alternate alphanumeric applicationidentifier that developers can use in place of the application ID. Youdefine an Application Alias editing the Application Definition.
See Also: "Managing Application Attributes (page 6-22)"
Page Indicates a page number or alphanumeric page alias.
A page alias is a unique alternate alphanumeric for a page number.Developers can use a page alias in place of the page number ID. Youdefine a Page Alias by editing the page attributes.
See Also: "Managing Page Attributes (page 8-30)"
Session Identifies a session ID. You can reference a session ID to createhypertext links to other pages that maintain the same session state bypassing the session number. You can reference the session ID usingthe syntax:
• Short substitution string: &SESSION.• PL/SQL: V('SESSION')• Bind variable: :APP_SESSION
Request Sets the value of REQUEST. Each application button sets the value ofREQUEST to the name of the button which enables accept processing toreference the name of the button when a user clicks it. You canreference REQUEST using the syntax:
• Substitution string: &REQUEST.• PL/SQL: V('REQUEST')• Bind variable: :REQUEST
Chapter 2Understanding URL Syntax
2-12
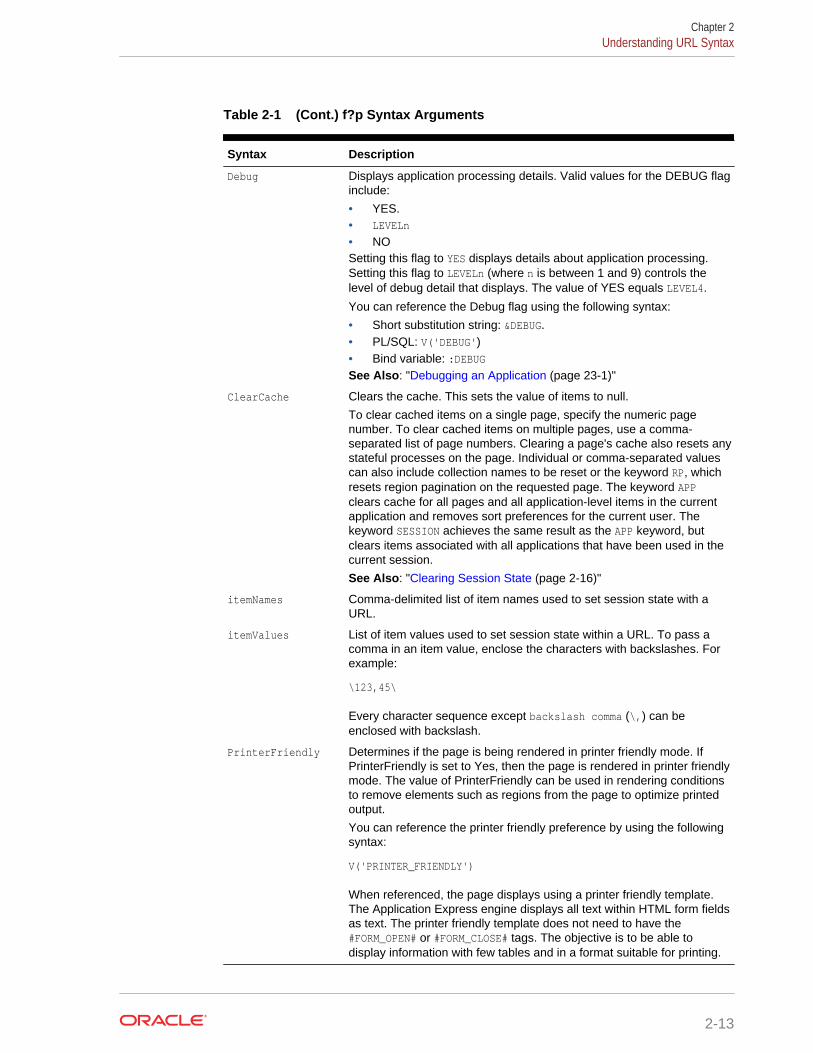
Table 2-1 (Cont.) f?p Syntax Arguments
Syntax Description
Debug Displays application processing details. Valid values for the DEBUG flaginclude:
• YES.• LEVELn
• NOSetting this flag to YES displays details about application processing.Setting this flag to LEVELn (where n is between 1 and 9) controls thelevel of debug detail that displays. The value of YES equals LEVEL4.
You can reference the Debug flag using the following syntax:
• Short substitution string: &DEBUG.• PL/SQL: V('DEBUG')• Bind variable: :DEBUGSee Also: "Debugging an Application (page 23-1)"
ClearCache Clears the cache. This sets the value of items to null.
To clear cached items on a single page, specify the numeric pagenumber. To clear cached items on multiple pages, use a comma-separated list of page numbers. Clearing a page's cache also resets anystateful processes on the page. Individual or comma-separated valuescan also include collection names to be reset or the keyword RP, whichresets region pagination on the requested page. The keyword APPclears cache for all pages and all application-level items in the currentapplication and removes sort preferences for the current user. Thekeyword SESSION achieves the same result as the APP keyword, butclears items associated with all applications that have been used in thecurrent session.
See Also: "Clearing Session State (page 2-16)"
itemNames Comma-delimited list of item names used to set session state with aURL.
itemValues List of item values used to set session state within a URL. To pass acomma in an item value, enclose the characters with backslashes. Forexample:
\123,45\
Every character sequence except backslash comma (\,) can beenclosed with backslash.
PrinterFriendly Determines if the page is being rendered in printer friendly mode. IfPrinterFriendly is set to Yes, then the page is rendered in printer friendlymode. The value of PrinterFriendly can be used in rendering conditionsto remove elements such as regions from the page to optimize printedoutput.
You can reference the printer friendly preference by using the followingsyntax:
V('PRINTER_FRIENDLY')
When referenced, the page displays using a printer friendly template.The Application Express engine displays all text within HTML form fieldsas text. The printer friendly template does not need to have the#FORM_OPEN# or #FORM_CLOSE# tags. The objective is to be able todisplay information with few tables and in a format suitable for printing.
Chapter 2Understanding URL Syntax
2-13
2.7.3 Calling a Page Using an Application Alias or Page AliasUse URL syntax to call a page using an application alias and/or page alias.
Application and page aliases must consist of valid Oracle identifiers, cannot containany whitespace, and cannot be case-sensitive. The following example calls a pagefrom within an application using an application alias and a page alias. This exampleruns the page home of the application myapp and uses the current session ID.
f?p=myapp:home:&APP_SESSION.
Application aliases must be unique within a workspace. If an application in a differentworkspace has the same application alias, use the &c argument to specify theworkspace name. For example:
f?p=common_alias:home:&APP_SESSION.&c=WORKSPACE_A
2.7.4 Calling a Page from a Button URLUse URL syntax to call a page from a button URL.
When you create a button, you can specify a URL to redirect to when the user clicksthe button. This example runs page 6001 of application 6000 and uses the currentsession ID.
f?p=6000:6001:&APP_SESSION.
Note that this is only one approach to using a button. This method bypasses pagesubmission and acts as a hyperlink on the page. You can also have a button clicksubmit a page. In that approach, clicking the button submits the page for processing,allowing forms to be submitted and session state to be saved.
2.8 Managing Session State ValuesManage session state to store and retrieve values for a user as the user navigatesbetween different application pages.
When building interactive, data-driven web applications, the ability to access andmanage session state values is critical. In Oracle Application Express, session state isautomatically managed for every page and easily referenced in static HTML or logiccontrols such as processes or validations.
• About Referencing Session State (page 2-15)Reference item values stored in session state in regions, computations,processes, validations, and branches. An item can be a field, a text area, apassword, a select list, or a check box.
• About Setting Session State (page 2-16)Set session state using form submissions, bind variables, computations, or f?psyntax.
• Clearing Session State (page 2-16)Clearing a cached value resets the value to null. You can clear the cached valuefor specific items, all items on a page, all pages in an application, or the currentuser session.
Chapter 2Managing Session State Values
2-14
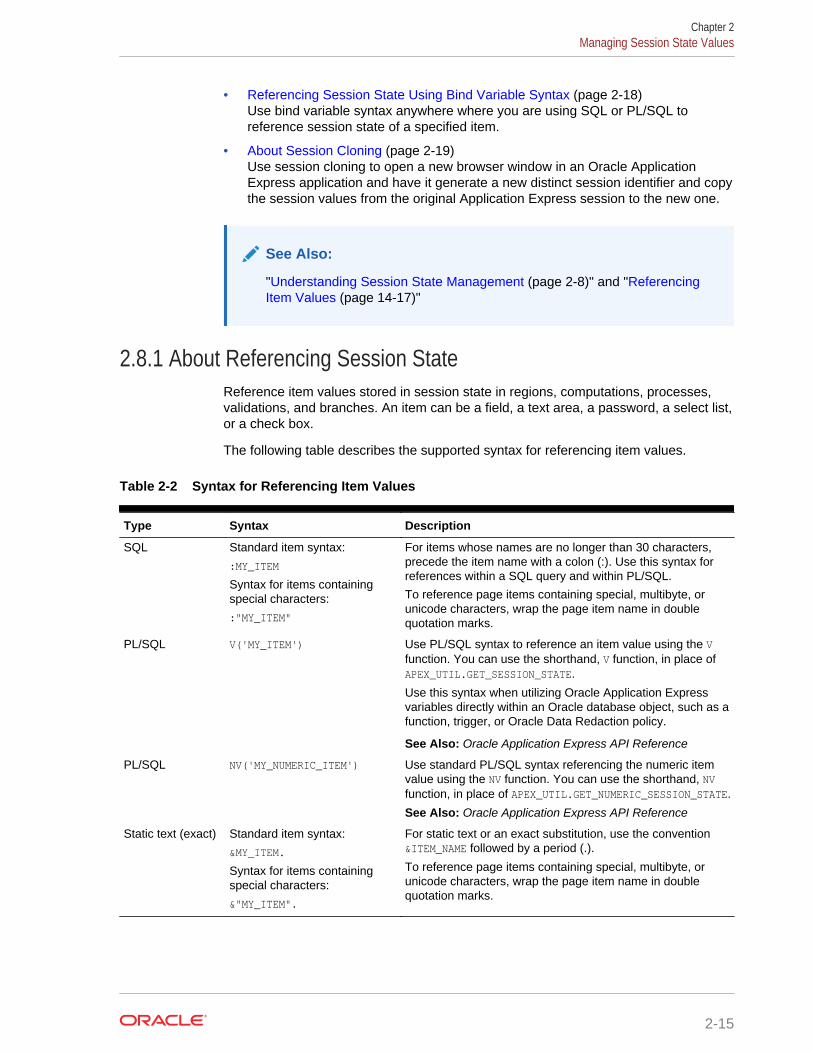
• Referencing Session State Using Bind Variable Syntax (page 2-18)Use bind variable syntax anywhere where you are using SQL or PL/SQL toreference session state of a specified item.
• About Session Cloning (page 2-19)Use session cloning to open a new browser window in an Oracle ApplicationExpress application and have it generate a new distinct session identifier and copythe session values from the original Application Express session to the new one.
See Also:
"Understanding Session State Management (page 2-8)" and "ReferencingItem Values (page 14-17)"
2.8.1 About Referencing Session StateReference item values stored in session state in regions, computations, processes,validations, and branches. An item can be a field, a text area, a password, a select list,or a check box.
The following table describes the supported syntax for referencing item values.
Table 2-2 Syntax for Referencing Item Values
Type Syntax Description
SQL Standard item syntax:
:MY_ITEM
Syntax for items containingspecial characters:
:"MY_ITEM"
For items whose names are no longer than 30 characters,precede the item name with a colon (:). Use this syntax forreferences within a SQL query and within PL/SQL.
To reference page items containing special, multibyte, orunicode characters, wrap the page item name in doublequotation marks.
PL/SQL V('MY_ITEM') Use PL/SQL syntax to reference an item value using the Vfunction. You can use the shorthand, V function, in place ofAPEX_UTIL.GET_SESSION_STATE.
Use this syntax when utilizing Oracle Application Expressvariables directly within an Oracle database object, such as afunction, trigger, or Oracle Data Redaction policy.
See Also: Oracle Application Express API Reference
PL/SQL NV('MY_NUMERIC_ITEM') Use standard PL/SQL syntax referencing the numeric itemvalue using the NV function. You can use the shorthand, NVfunction, in place of APEX_UTIL.GET_NUMERIC_SESSION_STATE.
See Also: Oracle Application Express API Reference
Static text (exact) Standard item syntax:
&MY_ITEM.
Syntax for items containingspecial characters:
&"MY_ITEM".
For static text or an exact substitution, use the convention&ITEM_NAME followed by a period (.).
To reference page items containing special, multibyte, orunicode characters, wrap the page item name in doublequotation marks.
Chapter 2Managing Session State Values
2-15
2.8.2 About Setting Session StateSet session state using form submissions, bind variables, computations, or f?p syntax.
You can set the value of an item in your application and therefore set session stateusing the following methods:
• Form submission. See the next section.
• Bind variable. See "Referencing Session State Using Bind Variable Syntax(page 2-18)."
• Computation. See "Understanding Application Computations (page 16-19)."
• f?p syntax. See "About Using f?p Syntax to Link Pages (page 2-12)."
About Setting Session State with a Form Submission
When a user submits a page, the Application Express engine automatically storesvalues typed into fields (items) in session state. For example, suppose you have anapplication containing two pages. The first page of the application contains a form inwhich a user can enter a phone number. You defined this form by creating an itemnamed P1_PHONENO. On the second page, you want to display the information the userenters in the form.
When the page is submitted, Oracle Application Express captures the value entered inthe phone number field and stores the value for future use. On the second page, thephone number entered by the user can then be retrieved from session state using thename P1_PHONE_NO with the appropriate syntax from Table 2-2 (page 2-15).
2.8.3 Clearing Session StateClearing a cached value resets the value to null. You can clear the cached value forspecific items, all items on a page, all pages in an application, or the current usersession.
• About Clearing Cache for an Item (page 2-16)
• About Clearing Cache for All Page Items (page 2-17)
• Clearing Cache for an Entire Application (page 2-18)
• About Resetting an Application Completely (page 2-18)
• About Clearing Cache for the Current User Session (page 2-18)
2.8.3.1 About Clearing Cache for an ItemClearing cache for a single item resets the value of the item to null. For example, youmight use this approach to make sure a specific item's value is null when a page isprepared for rendering.
Example 2-1 Example: Clearing Cache for an Item
The following example uses standard f?p syntax to clear the cache for an item. Thisexample calls page 5 of application 100. Placing MY_ITEM in the ClearCache position ofthe f?p syntax resets the value of MY_ITEM to NULL.
f?p=100:5:&APP_SESSION.::NO:MY_ITEM
Chapter 2Managing Session State Values
2-16
The following example resets the value of the items THE_EMPNO and THE_DEPTNO:
f?p=100:5:&APP_SESSION.::NO:THE_EMPNO,THE_DEPTNO
2.8.3.2 About Clearing Cache for All Page ItemsCaching application items is an effective way to maintain session state. However,there are occasions when you may want to clear the cache for all items on a page. Forexample, suppose you needed to clear all fields on a page when a user clicks a linkthat creates a new order. By clearing the cache for an entire page, you set the value ofall items on the page to null.
Example 2-2 Example: Clearing Cache for Two Pages and Resetting Pagination
This example clears the session cache for two pages and resets pagination.
f?p=6000:6003:&APP_SESSION.::NO:RP,6004,6014
This example:
• Runs page 6003 of application 6000 and uses the current session ID.
• Indicates to not show debug information (NO).
• Clears all values maintained by the current session's cache for items of pages6004 and 6014.
• Resets region pagination (RP) on page 6003 (the requested page).
Example 2-3 Example: Clearing Cache on a Page and Passing an Item Value
This example shows how to implement an update form. It clears existing informationand sets the item's value (typically a primary key).
f?p=6000:6003:&APP_SESSION.::NO:6003:MY_ITEM:1234
This example:
• Runs page 6003 of application 6000 and uses the current session ID
• Indicates to not show debug information (NO)
• Clears all values maintained by the current session's cache for items on page6003
• Sets the session state of an item called MY_ITEM to the value 1234
Example 2-4 Example: Clearing Session Cache on a Page and Passing Valuesto Multiple Items
This example demonstrates how to implement an update form. It clears existinginformation, sets the item's value (typically a primary key), and passes values tomultiple items.
f?p=6000:6004:&APP_SESSION.::NO:6003:MY_ITEM1,MY_ITEM2,MY_ITEM3:1234,,5678
This example:
• Runs page 6004 of application 6000 and uses the current session ID
• Clears the current session's cache for items on page 6003
• Indicates to not show debug information (NO)
Chapter 2Managing Session State Values
2-17
• Sets the value of MY_ITEM1 to 1234, sets the value of MY_ITEM2 to null (indicated bythe comma used as placeholder), and sets the value of MY_ITEM3 to 5678
2.8.3.3 Clearing Cache for an Entire ApplicationThis example clears the application's cache by using f?p syntax and creating a ClearCache argument using the keyword APP.
f?p=App:Page:Session::NO:APP
2.8.3.4 About Resetting an Application CompletelyResetting the cache for an entire application does not restore the application to acompletely reset state. For example, if an application includes on-new instancecomputations or on-new instance processes, the Application Express engine runsthese computations and processes when the application session is created. Then, itprocesses the clear cache request and displays the requested page.
To reset an application completely without a session ID (if no cookie is used to trackthe session ID), you must request it using a URL without a session ID, or by callingAPEX_UTIL.CLEAR_APP_CACHE from another application. If the session ID is tracked using acookie, you must logout to reset the state.
2.8.3.5 About Clearing Cache for the Current User SessionAnother approach to clearing an application's cache is to create a Clear Cacheargument using the keyword SESSION. For example:
f?p=6000:6004:12507785108488427528::NO:SESSION
2.8.4 Referencing Session State Using Bind Variable SyntaxUse bind variable syntax anywhere where you are using SQL or PL/SQL to referencesession state of a specified item.
• About Using Bind Variable Syntax (page 2-18)
• About Using Bind Variables in Regions Based on a SQL Query or LOV(page 2-19)
• About Using Bind Variables in Regions Based on PL/SQL (page 2-19)
2.8.4.1 About Using Bind Variable SyntaxIn the following example, the search string is a page item.
SELECT * FROM employees WHERE last_name like '%' || :SEARCH_STRING || '%'
If the region type is defined as SQL Query, you can reference the value using standardSQL bind variable syntax. Using bind variables ensures that parsed representations ofSQL queries are reused by the database, optimizing memory usage by the server.
When using bind variable syntax, remember the following rules:
• Bind variable names must correspond to an item name.
• Bind variable names are not case-sensitive.
Chapter 2Managing Session State Values
2-18
• Bind variable names cannot be longer than 30 characters (that is, they must be avalid Oracle identifier).
Although page item and application item names can be up to 255 characters, ifyou intend to use an application item within SQL using bind variable syntax, theitem name must be 30 characters or less.
2.8.4.2 About Using Bind Variables in Regions Based on a SQL Query or LOVIf your region type is defined as a SQL Query, SQL Query (plsql function bodyreturning SQL query), or list of values (LOV), you can reference session state usingthe following syntax:
:MY_ITEM
One common way to do this is to incorporate a session state variable in a WHEREclause. The following example shows how to bind the value of the item THE_DEPTNO intoa region defined from a SQL Query.
SELECT last_name, job_id, salaryFROM employeesWHERE department_id = :THE_DEPTNO
2.8.4.3 About Using Bind Variables in Regions Based on PL/SQLFor region types, processes, computations, validations, conditions, and so on that aredefined as PL/SQL dynamic content, regions are constructed using PL/SQLanonymous block syntax. In other words, the beginning and ending keywords are usedto enclose the PL/SQL block. For example:
IF :P1_JOB IS NOT NULL THEN INSERT INTO employees (employee_id, first_name, job_id) VALUES (:P1_EMP_ID, :P1_NAME, :P1_JOB)end if;
In this example, the values of the employee_id, first_name, and job_id are populated bythe values of P1_EMP_ID, P1_NAME, and P1_JOB.
2.8.5 About Session CloningUse session cloning to open a new browser window in an Oracle Application Expressapplication and have it generate a new distinct session identifier and copy the sessionvalues from the original Application Express session to the new one.
In previous releases, opening multiple windows (or browser tabs) in the same OracleApplication Express application resulted in a number of issues. Typically, all thebrowser tabs shared the same session and session state which resulted inunpredictable and undesirable results.
To use session cloning, the developer must provide a method for end user to open anew browser tab and specify the REQUEST value of APEX_CLONE_SESSION. The following isan example URL:
f?p=&APP_ID.:&APP_PAGE_ID.:&APP_SESSION.:APEX_CLONE_SESSION
Chapter 2Managing Session State Values
2-19
Best Practices When Using Session Cloning
When using this session cloning, developers should remember:
• The idle time associated with the Application Express session would be affectedby any of the Application Express sessions, original or cloned ones.
• When a user logs out of one session (original or cloned), all other associatedsessions will be logged out.
• The maximum session duration would be a function of the original ApplicationExpress session and when it was created.
• An administrative user can enable or disable this feature using the procedure:
apex_instance_admin.set_parameter( p_parameter => 'CLONE_SESSION_ENABLED', p_value => 'Y');
2.9 Using Substitution StringsUse substitution strings within a page template or region source to pass informationand replace a character string with another value.
• About Using Substitution Strings (page 2-20)
• Controlling Output Escaping in Substitution Strings (page 2-22)
• About Determining Substitution String Usage within Templates (page 2-23)
• Using Built-in Substitution Strings (page 2-23)
2.9.1 About Using Substitution StringsYou can use substitution strings in App Builder in the following ways:
• Include a substitution string within a template to reference component values
• Reference page or application items using &ITEM. syntax
• Use built-in substitution strings
Substitution Strings within Templates
Special substitution strings available within a template are denoted by the numbersymbol (#). For example:
#ABC#
Tip:
You can also use JavaScript API apex.util.applyTemplate to evaluatetemplates on the client side. See Oracle Application Express JavaScript APIReference.
Chapter 2Using Substitution Strings
2-20
Substitution Strings for Page or Application Items
To reference page or application items using substitution variables:
1. Reference the page or application item in all capital letters.
2. Precede the item name with an ampersand (&).
3. Append a period (.) to the item name.
For example, you would refer to an application item named F101_X in a region, a regiontitle, an item label, or in any of numerous other contexts in which static text is used, forexample:
&F101_X.
Tip:
Notice the required trailing period. When the page is rendered, ApplicationExpress engine replaces the value the substitution string with the value ofthe item F101_X .
Substitution Strings for Interactive Grid Columns
To reference columns in an interactive grid using substitution variables:
1. Reference the column name in all capital letters.
2. Precede the column name with an ampersand (&).
3. Append a period (.) to the item name.
For example, to reference the interactive grid column ENAME:
&ENAME.
Substitution Strings for Other Report Columns
To reference columns in other reports using substitution variables:
1. Reference the column name in all capital letters.
2. Precede the column name with a pound sign (#).
3. Append a pound sign (#) to the item name.
For example, to reference the interactive or classic report column ENAME:
#ENAME#
Using Double Quotation Marks for Special Characters or Case Sensitivity
Enclose items or columns with double quotation marks if the name contains specialcharacters or is case sensitive. For example:
&"ITEM-OR-COLUMN-NAME".
Use the following syntax:
&"<name>"[!<format>].
Chapter 2Using Substitution Strings
2-21

Where:
• "<name>" is an application item or page item or column name. If not quoted, then itmust be in set A-Z–0-9_$#
• "<name>" is APP_TEXT$<message-name>
Where <message-name> is an Application Express text message name.
• <format> is a predefined filter name: HTML, ATTR, JS, RAW, STRIPHTML as described in"Controlling Output Escaping in Substitution Strings (page 2-22)."
2.9.2 Controlling Output Escaping in Substitution StringsYou can escape special characters in the substitution value by appending anexclamation mark (!) followed by a predefined filter name to a page or application itemname, report column, or other substitution string. Output escaping is an importantsecurity technique to avoid Cross Site Scripting (XSS) attacks in the browser. OracleApplication Express already makes a best effort to automatically escape characters ina HTML or JavaScript context. With this extended syntax, developers have finegrained control over the output.
Available Escape Filters
Available escape filters include:
• HTML escapes reserved HTML characters, for example:
– Item:
&P1_DEPTNO!HTML.
– Interactive grid column:
&ENAME!HTML.
– Columns in other reports:
#ENAME!HTML#
See Also:
"APEX_ESCAPE.HTML" in Oracle Application Express API Reference
• ATTR escapes reserved characters in a HTML attribute context, for example:
– Interactive grid column:
&ENAME!ATTR.
– Columns in other reports:
#ENAME!ATTR#
See Also:
"APEX_ESCAPE.HTML_ATTRIBUTE" in Oracle Application Express APIReference
Chapter 2Using Substitution Strings
2-22
• JS escapes reserved characters in a JavaScript context, for example:
– Item:
&P1_DEPTNO!JS.
– Interactive grid column:
&ENAME!JS.
– Columns in other reports:
#ENAME!JS#
See Also:
"APEX_ESCAPE.JS_LITERAL" in Oracle Application Express APIReference
• RAW preserves the original item value and does not escape characters, forexample:
– Item:
&P1_DEPTNO!RAW.
– Interactive grid column:
&ENAME!RAW.
– Columns in other reports:
#ENAME!RAW#
• STRIPHTML removes HTML tags from the output and escapes reserved HTMLcharacters, for example:
– Item:
&P1_DEPTNO!STRIPHTML.
– Interactive grid column:
&ENAME!STRIPHTML.
– Columns in other reports:
#ENAME!STRIPHTML#
2.9.3 About Determining Substitution String Usage within TemplatesYou can determine what template-specific substitution strings are supported in whichtemplates by viewing the template definition. See "Creating Custom Themes(page 12-30)."
2.9.4 Using Built-in Substitution StringsApp Builder supports many built-in substitution strings. You can reference thesesubstitution strings to achieve specific types of functionality.
Chapter 2Using Substitution Strings
2-23
Tip:
Note that bind variable :USER has special meaning within the database. Also,the term Direct PL/SQL refers to PL/SQL that can be used in storeddatabase objects such as procedures and functions.
• APEX$ROW_NUM (page 2-25)
• APEX$ROW_SELECTOR (page 2-25)
• APEX$ROW_STATUS (page 2-26)
• APP_ID (page 2-26)
• APP_ALIAS (page 2-26)
• APP_AJAX_X01, ... APP_AJAX_X10 (page 2-27)
• APP_BUILDER_SESSION (page 2-27)
• APP_DATE_TIME_FORMAT (page 2-28)
• APP_IMAGES (page 2-28)
• APP_NLS_DATE_FORMAT (page 2-28)
• APP_NLS_TIMESTAMP_FORMAT (page 2-29)
• APP_NLS_TIMESTAMP_TZ_FORMAT (page 2-29)
• APP_PAGE_ALIAS (page 2-29)
• APP_PAGE_ID (page 2-30)
• APP_REQUEST_DATA_HASH (page 2-30)
• APP_SESSION (page 2-31)
• APP_SESSION_VISIBLE (page 2-31)
• APP_TITLE (page 2-32)
• APP_UNIQUE_PAGE_ID (page 2-32)
• APP_USER (page 2-33)
• AUTHENTICATED_URL_PREFIX (page 2-34)
• BROWSER_LANGUAGE (page 2-34)
• CURRENT_PARENT_TAB_TEXT (page 2-34)
• DEBUG (page 2-35)
• HOME_LINK (page 2-35)
• IMAGE_PREFIX (page 2-35)
• JET_BASE_DIRECTORY (page 2-36)
• JET_CSS_DIRECTORY (page 2-36)
• JET_JS_DIRECTORY (page 2-36)
• LOGIN_URL (page 2-36)
• LOGOUT_URL (page 2-37)
Chapter 2Using Substitution Strings
2-24
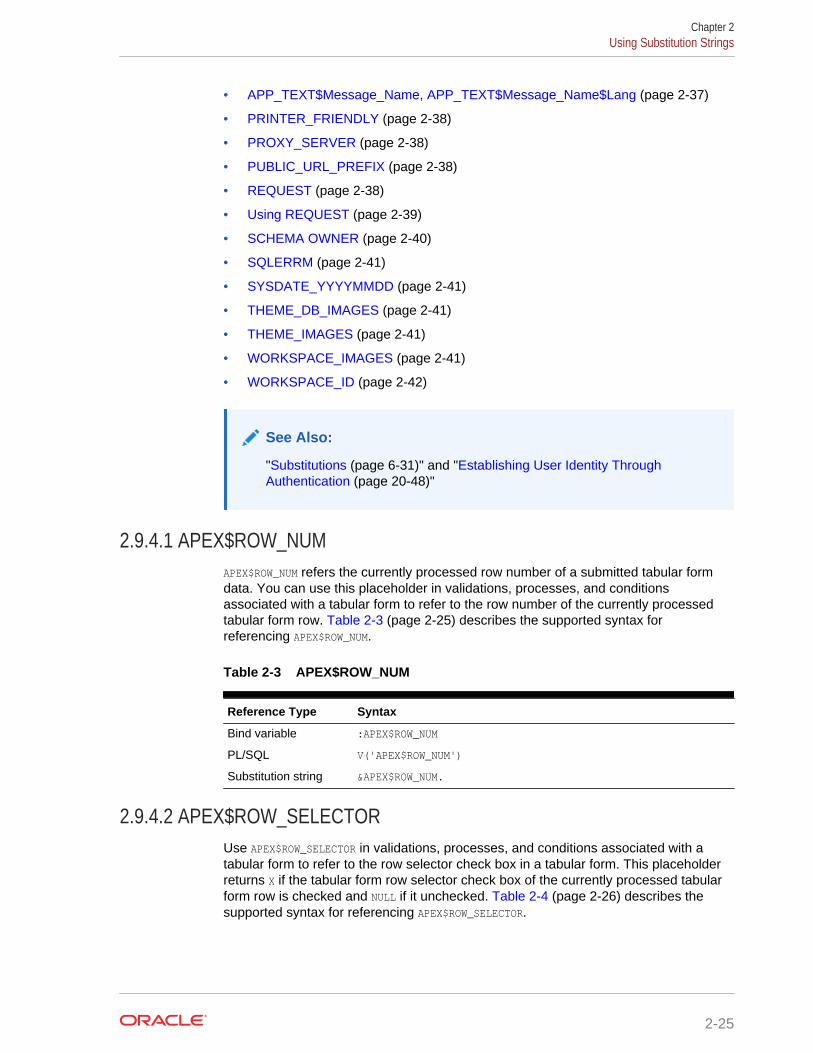
• APP_TEXT$Message_Name, APP_TEXT$Message_Name$Lang (page 2-37)
• PRINTER_FRIENDLY (page 2-38)
• PROXY_SERVER (page 2-38)
• PUBLIC_URL_PREFIX (page 2-38)
• REQUEST (page 2-38)
• Using REQUEST (page 2-39)
• SCHEMA OWNER (page 2-40)
• SQLERRM (page 2-41)
• SYSDATE_YYYYMMDD (page 2-41)
• THEME_DB_IMAGES (page 2-41)
• THEME_IMAGES (page 2-41)
• WORKSPACE_IMAGES (page 2-41)
• WORKSPACE_ID (page 2-42)
See Also:
"Substitutions (page 6-31)" and "Establishing User Identity ThroughAuthentication (page 20-48)"
2.9.4.1 APEX$ROW_NUMAPEX$ROW_NUM refers the currently processed row number of a submitted tabular formdata. You can use this placeholder in validations, processes, and conditionsassociated with a tabular form to refer to the row number of the currently processedtabular form row. Table 2-3 (page 2-25) describes the supported syntax forreferencing APEX$ROW_NUM.
Table 2-3 APEX$ROW_NUM
Reference Type Syntax
Bind variable :APEX$ROW_NUM
PL/SQL V('APEX$ROW_NUM')
Substitution string &APEX$ROW_NUM.
2.9.4.2 APEX$ROW_SELECTORUse APEX$ROW_SELECTOR in validations, processes, and conditions associated with atabular form to refer to the row selector check box in a tabular form. This placeholderreturns X if the tabular form row selector check box of the currently processed tabularform row is checked and NULL if it unchecked. Table 2-4 (page 2-26) describes thesupported syntax for referencing APEX$ROW_SELECTOR.
Chapter 2Using Substitution Strings
2-25
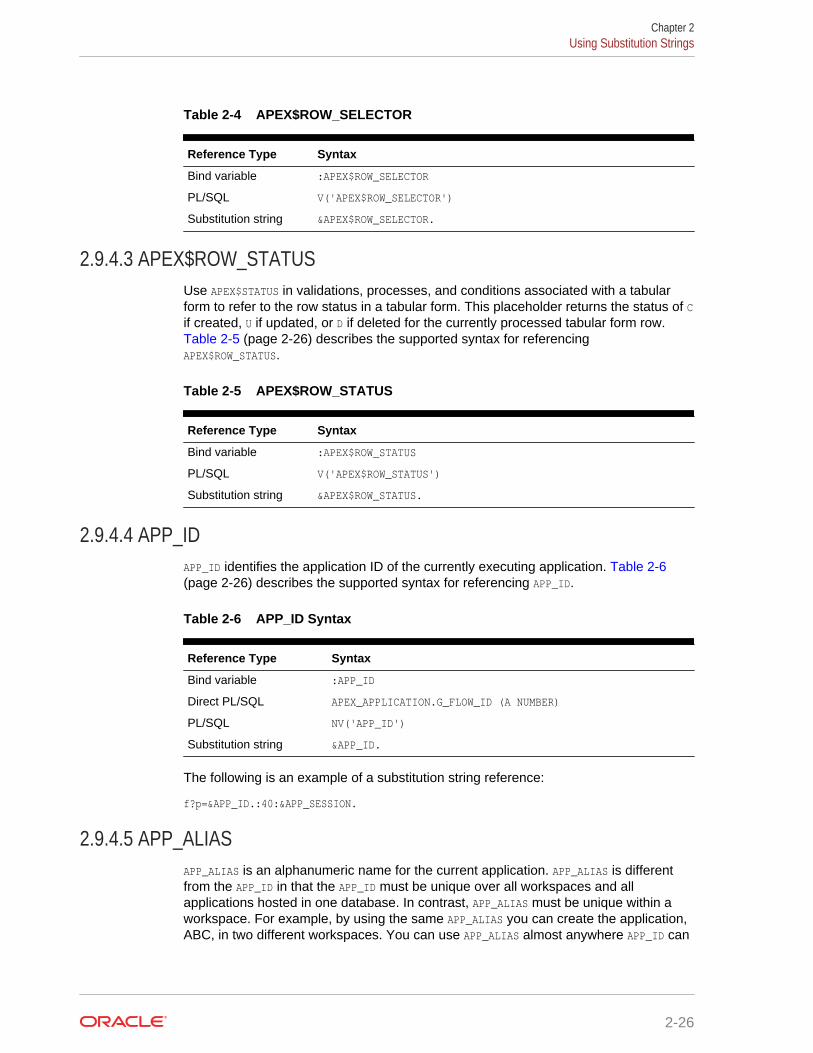
Table 2-4 APEX$ROW_SELECTOR
Reference Type Syntax
Bind variable :APEX$ROW_SELECTOR
PL/SQL V('APEX$ROW_SELECTOR')
Substitution string &APEX$ROW_SELECTOR.
2.9.4.3 APEX$ROW_STATUSUse APEX$STATUS in validations, processes, and conditions associated with a tabularform to refer to the row status in a tabular form. This placeholder returns the status of Cif created, U if updated, or D if deleted for the currently processed tabular form row. Table 2-5 (page 2-26) describes the supported syntax for referencingAPEX$ROW_STATUS.
Table 2-5 APEX$ROW_STATUS
Reference Type Syntax
Bind variable :APEX$ROW_STATUS
PL/SQL V('APEX$ROW_STATUS')
Substitution string &APEX$ROW_STATUS.
2.9.4.4 APP_IDAPP_ID identifies the application ID of the currently executing application. Table 2-6(page 2-26) describes the supported syntax for referencing APP_ID.
Table 2-6 APP_ID Syntax
Reference Type Syntax
Bind variable :APP_ID
Direct PL/SQL APEX_APPLICATION.G_FLOW_ID (A NUMBER)
PL/SQL NV('APP_ID')
Substitution string &APP_ID.
The following is an example of a substitution string reference:
f?p=&APP_ID.:40:&APP_SESSION.
2.9.4.5 APP_ALIASAPP_ALIAS is an alphanumeric name for the current application. APP_ALIAS is differentfrom the APP_ID in that the APP_ID must be unique over all workspaces and allapplications hosted in one database. In contrast, APP_ALIAS must be unique within aworkspace. For example, by using the same APP_ALIAS you can create the application,ABC, in two different workspaces. You can use APP_ALIAS almost anywhere APP_ID can
Chapter 2Using Substitution Strings
2-26
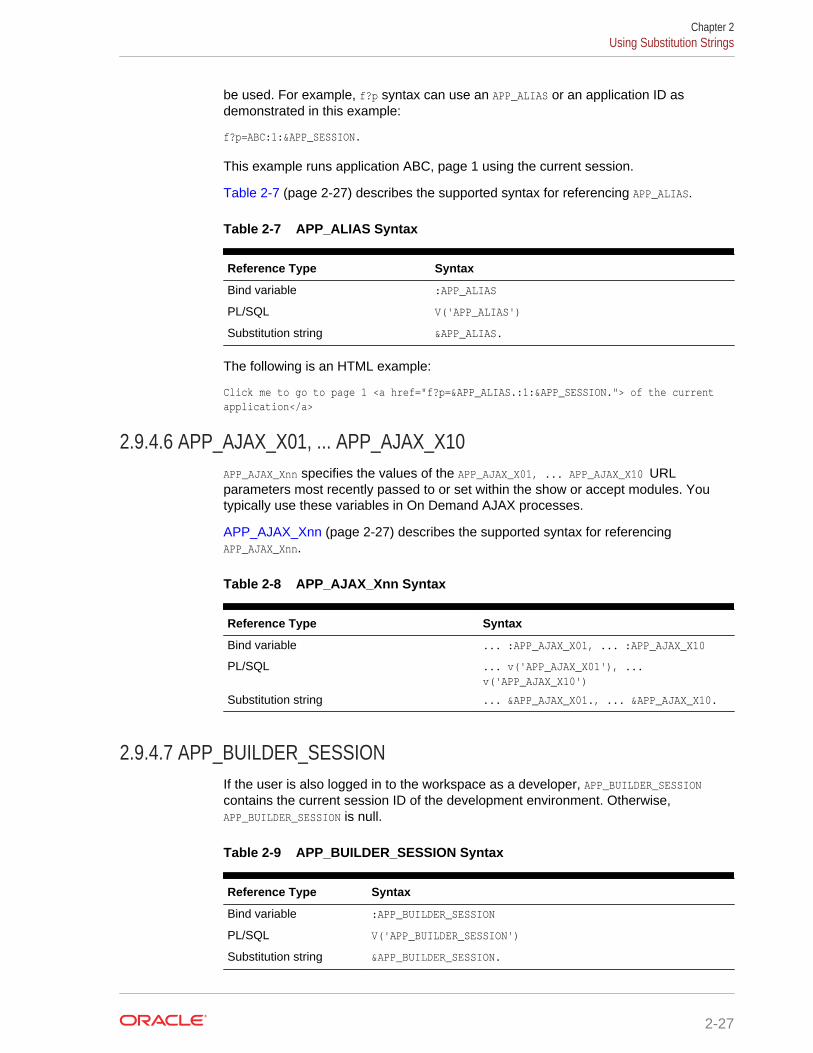
be used. For example, f?p syntax can use an APP_ALIAS or an application ID asdemonstrated in this example:
f?p=ABC:1:&APP_SESSION.
This example runs application ABC, page 1 using the current session.
Table 2-7 (page 2-27) describes the supported syntax for referencing APP_ALIAS.
Table 2-7 APP_ALIAS Syntax
Reference Type Syntax
Bind variable :APP_ALIAS
PL/SQL V('APP_ALIAS')
Substitution string &APP_ALIAS.
The following is an HTML example:
Click me to go to page 1 <a href="f?p=&APP_ALIAS.:1:&APP_SESSION."> of the current application</a>
2.9.4.6 APP_AJAX_X01, ... APP_AJAX_X10APP_AJAX_Xnn specifies the values of the APP_AJAX_X01, ... APP_AJAX_X10 URLparameters most recently passed to or set within the show or accept modules. Youtypically use these variables in On Demand AJAX processes.
APP_AJAX_Xnn (page 2-27) describes the supported syntax for referencingAPP_AJAX_Xnn.
Table 2-8 APP_AJAX_Xnn Syntax
Reference Type Syntax
Bind variable ... :APP_AJAX_X01, ... :APP_AJAX_X10
PL/SQL ... v('APP_AJAX_X01'), ...v('APP_AJAX_X10')
Substitution string ... &APP_AJAX_X01., ... &APP_AJAX_X10.
2.9.4.7 APP_BUILDER_SESSIONIf the user is also logged in to the workspace as a developer, APP_BUILDER_SESSIONcontains the current session ID of the development environment. Otherwise,APP_BUILDER_SESSION is null.
Table 2-9 APP_BUILDER_SESSION Syntax
Reference Type Syntax
Bind variable :APP_BUILDER_SESSION
PL/SQL V('APP_BUILDER_SESSION')
Substitution string &APP_BUILDER_SESSION.
Chapter 2Using Substitution Strings
2-27
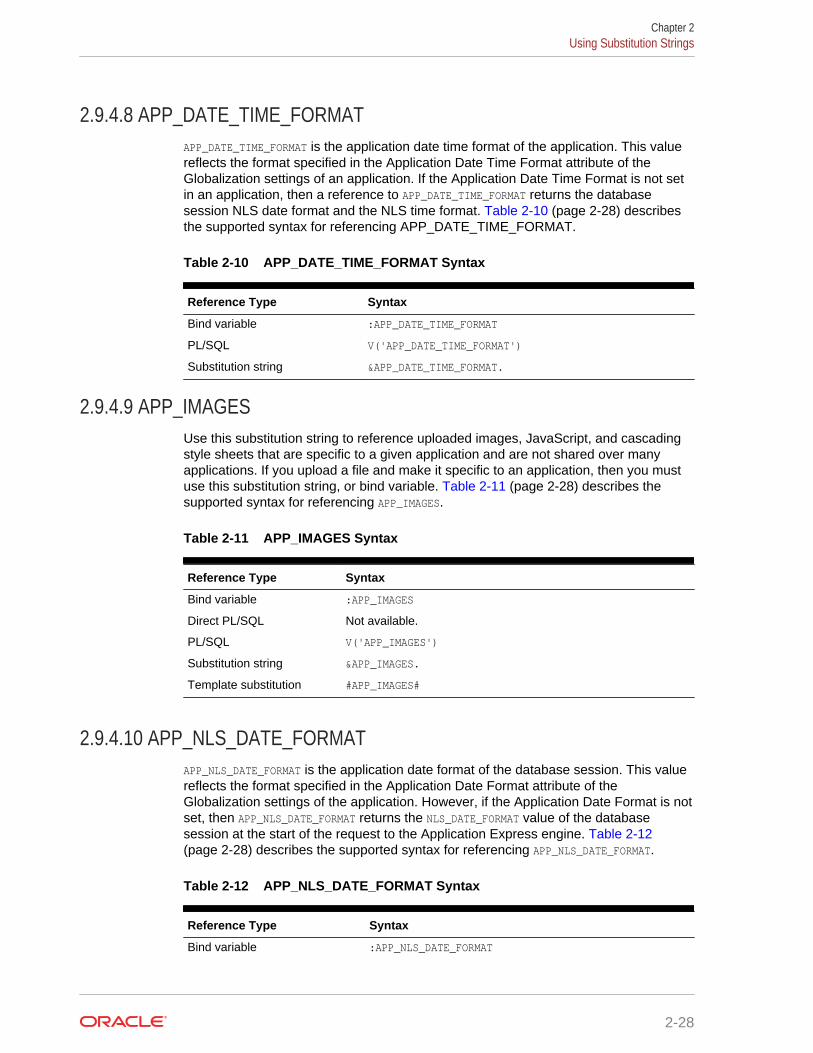
2.9.4.8 APP_DATE_TIME_FORMATAPP_DATE_TIME_FORMAT is the application date time format of the application. This valuereflects the format specified in the Application Date Time Format attribute of theGlobalization settings of an application. If the Application Date Time Format is not setin an application, then a reference to APP_DATE_TIME_FORMAT returns the databasesession NLS date format and the NLS time format. Table 2-10 (page 2-28) describesthe supported syntax for referencing APP_DATE_TIME_FORMAT.
Table 2-10 APP_DATE_TIME_FORMAT Syntax
Reference Type Syntax
Bind variable :APP_DATE_TIME_FORMAT
PL/SQL V('APP_DATE_TIME_FORMAT')
Substitution string &APP_DATE_TIME_FORMAT.
2.9.4.9 APP_IMAGESUse this substitution string to reference uploaded images, JavaScript, and cascadingstyle sheets that are specific to a given application and are not shared over manyapplications. If you upload a file and make it specific to an application, then you mustuse this substitution string, or bind variable. Table 2-11 (page 2-28) describes thesupported syntax for referencing APP_IMAGES.
Table 2-11 APP_IMAGES Syntax
Reference Type Syntax
Bind variable :APP_IMAGES
Direct PL/SQL Not available.
PL/SQL V('APP_IMAGES')
Substitution string &APP_IMAGES.
Template substitution #APP_IMAGES#
2.9.4.10 APP_NLS_DATE_FORMATAPP_NLS_DATE_FORMAT is the application date format of the database session. This valuereflects the format specified in the Application Date Format attribute of theGlobalization settings of the application. However, if the Application Date Format is notset, then APP_NLS_DATE_FORMAT returns the NLS_DATE_FORMAT value of the databasesession at the start of the request to the Application Express engine. Table 2-12(page 2-28) describes the supported syntax for referencing APP_NLS_DATE_FORMAT.
Table 2-12 APP_NLS_DATE_FORMAT Syntax
Reference Type Syntax
Bind variable :APP_NLS_DATE_FORMAT
Chapter 2Using Substitution Strings
2-28
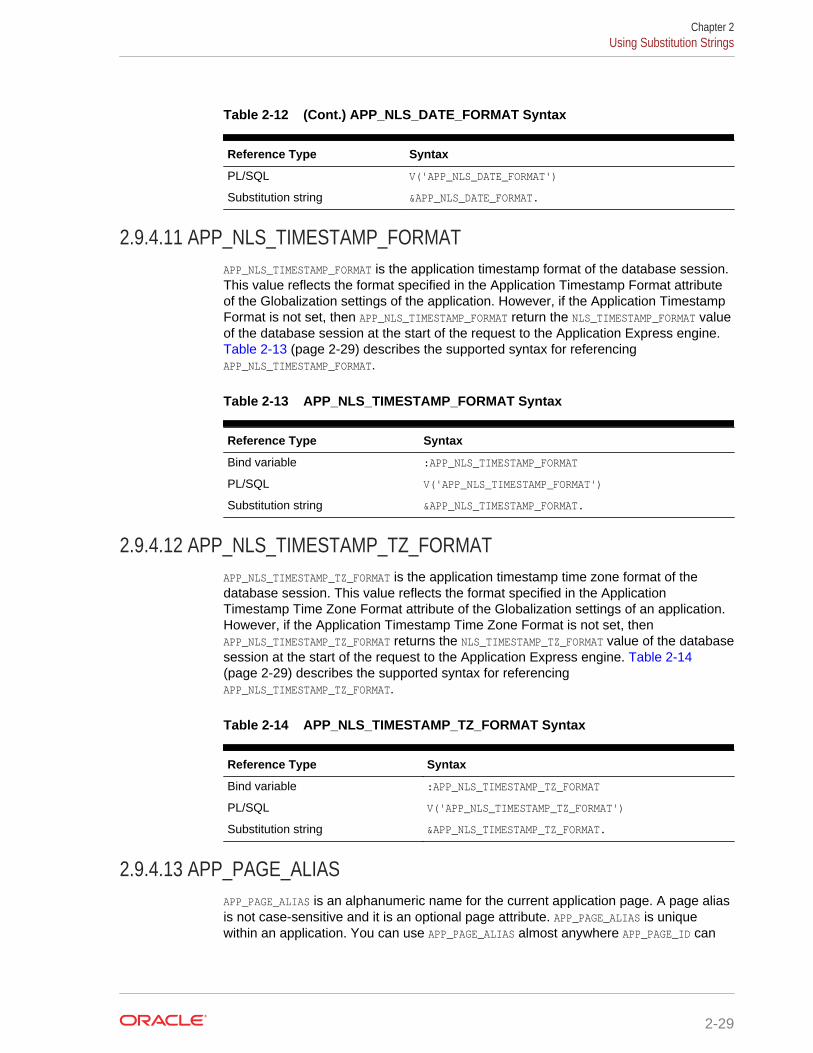
Table 2-12 (Cont.) APP_NLS_DATE_FORMAT Syntax
Reference Type Syntax
PL/SQL V('APP_NLS_DATE_FORMAT')
Substitution string &APP_NLS_DATE_FORMAT.
2.9.4.11 APP_NLS_TIMESTAMP_FORMATAPP_NLS_TIMESTAMP_FORMAT is the application timestamp format of the database session.This value reflects the format specified in the Application Timestamp Format attributeof the Globalization settings of the application. However, if the Application TimestampFormat is not set, then APP_NLS_TIMESTAMP_FORMAT return the NLS_TIMESTAMP_FORMAT valueof the database session at the start of the request to the Application Express engine. Table 2-13 (page 2-29) describes the supported syntax for referencingAPP_NLS_TIMESTAMP_FORMAT.
Table 2-13 APP_NLS_TIMESTAMP_FORMAT Syntax
Reference Type Syntax
Bind variable :APP_NLS_TIMESTAMP_FORMAT
PL/SQL V('APP_NLS_TIMESTAMP_FORMAT')
Substitution string &APP_NLS_TIMESTAMP_FORMAT.
2.9.4.12 APP_NLS_TIMESTAMP_TZ_FORMATAPP_NLS_TIMESTAMP_TZ_FORMAT is the application timestamp time zone format of thedatabase session. This value reflects the format specified in the ApplicationTimestamp Time Zone Format attribute of the Globalization settings of an application.However, if the Application Timestamp Time Zone Format is not set, thenAPP_NLS_TIMESTAMP_TZ_FORMAT returns the NLS_TIMESTAMP_TZ_FORMAT value of the databasesession at the start of the request to the Application Express engine. Table 2-14(page 2-29) describes the supported syntax for referencingAPP_NLS_TIMESTAMP_TZ_FORMAT.
Table 2-14 APP_NLS_TIMESTAMP_TZ_FORMAT Syntax
Reference Type Syntax
Bind variable :APP_NLS_TIMESTAMP_TZ_FORMAT
PL/SQL V('APP_NLS_TIMESTAMP_TZ_FORMAT')
Substitution string &APP_NLS_TIMESTAMP_TZ_FORMAT.
2.9.4.13 APP_PAGE_ALIASAPP_PAGE_ALIAS is an alphanumeric name for the current application page. A page aliasis not case-sensitive and it is an optional page attribute. APP_PAGE_ALIAS is uniquewithin an application. You can use APP_PAGE_ALIAS almost anywhere APP_PAGE_ID can
Chapter 2Using Substitution Strings
2-29
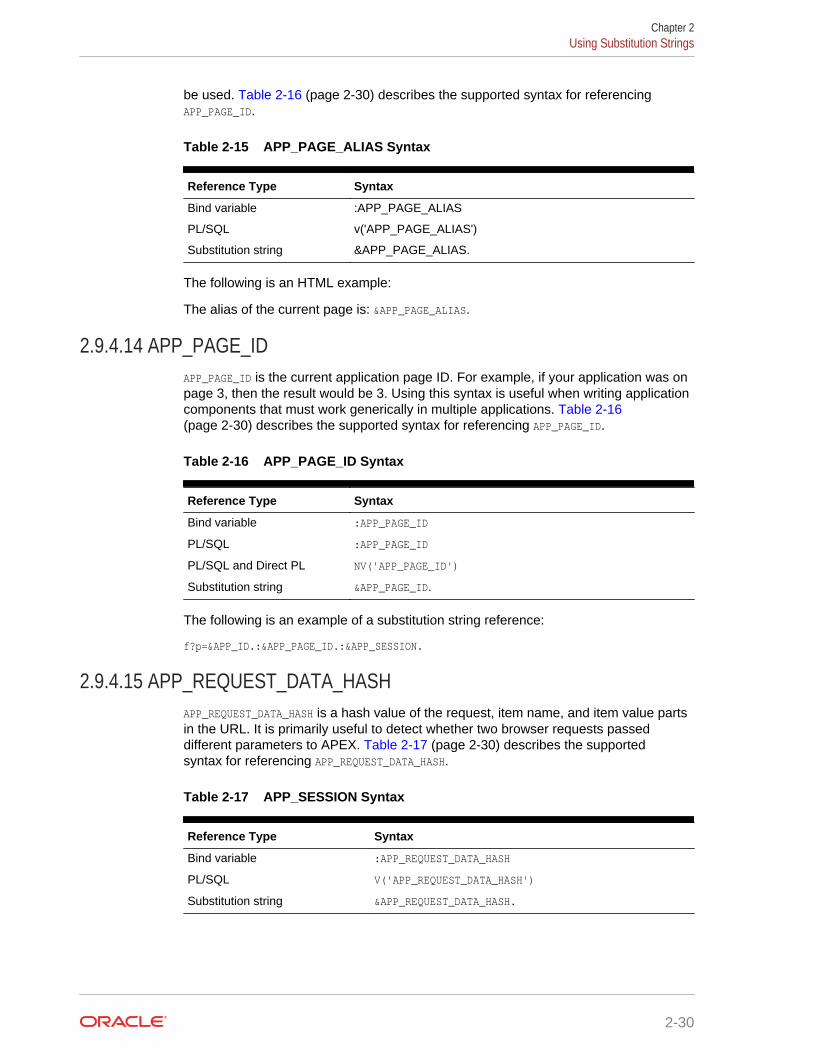
be used. Table 2-16 (page 2-30) describes the supported syntax for referencingAPP_PAGE_ID.
Table 2-15 APP_PAGE_ALIAS Syntax
Reference Type Syntax
Bind variable :APP_PAGE_ALIAS
PL/SQL v('APP_PAGE_ALIAS')
Substitution string &APP_PAGE_ALIAS.
The following is an HTML example:
The alias of the current page is: &APP_PAGE_ALIAS.
2.9.4.14 APP_PAGE_IDAPP_PAGE_ID is the current application page ID. For example, if your application was onpage 3, then the result would be 3. Using this syntax is useful when writing applicationcomponents that must work generically in multiple applications. Table 2-16(page 2-30) describes the supported syntax for referencing APP_PAGE_ID.
Table 2-16 APP_PAGE_ID Syntax
Reference Type Syntax
Bind variable :APP_PAGE_ID
PL/SQL :APP_PAGE_ID
PL/SQL and Direct PL NV('APP_PAGE_ID')
Substitution string &APP_PAGE_ID.
The following is an example of a substitution string reference:
f?p=&APP_ID.:&APP_PAGE_ID.:&APP_SESSION.
2.9.4.15 APP_REQUEST_DATA_HASHAPP_REQUEST_DATA_HASH is a hash value of the request, item name, and item value partsin the URL. It is primarily useful to detect whether two browser requests passeddifferent parameters to APEX. Table 2-17 (page 2-30) describes the supportedsyntax for referencing APP_REQUEST_DATA_HASH.
Table 2-17 APP_SESSION Syntax
Reference Type Syntax
Bind variable :APP_REQUEST_DATA_HASH
PL/SQL V('APP_REQUEST_DATA_HASH')
Substitution string &APP_REQUEST_DATA_HASH.
Chapter 2Using Substitution Strings
2-30
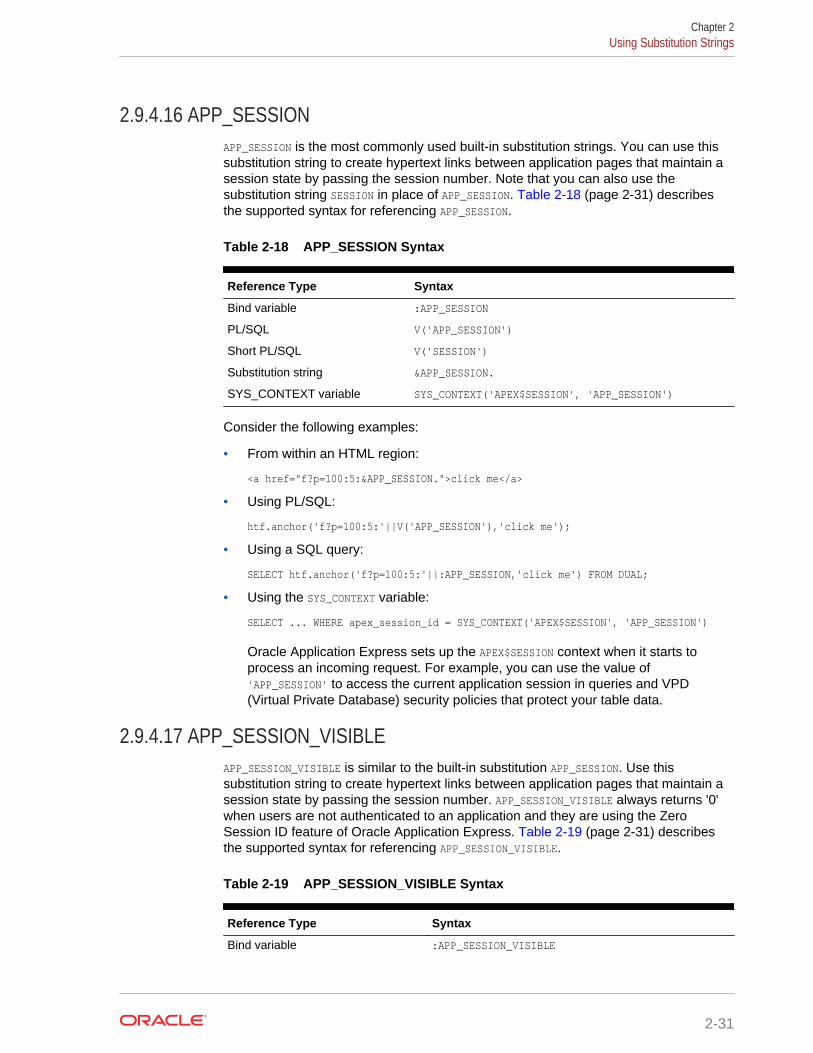
2.9.4.16 APP_SESSIONAPP_SESSION is the most commonly used built-in substitution strings. You can use thissubstitution string to create hypertext links between application pages that maintain asession state by passing the session number. Note that you can also use thesubstitution string SESSION in place of APP_SESSION. Table 2-18 (page 2-31) describesthe supported syntax for referencing APP_SESSION.
Table 2-18 APP_SESSION Syntax
Reference Type Syntax
Bind variable :APP_SESSION
PL/SQL V('APP_SESSION')
Short PL/SQL V('SESSION')
Substitution string &APP_SESSION.
SYS_CONTEXT variable SYS_CONTEXT('APEX$SESSION', 'APP_SESSION')
Consider the following examples:
• From within an HTML region:
<a href="f?p=100:5:&APP_SESSION.">click me</a>
• Using PL/SQL:
htf.anchor('f?p=100:5:'||V('APP_SESSION'),'click me');
• Using a SQL query:
SELECT htf.anchor('f?p=100:5:'||:APP_SESSION,'click me') FROM DUAL;
• Using the SYS_CONTEXT variable:
SELECT ... WHERE apex_session_id = SYS_CONTEXT('APEX$SESSION', 'APP_SESSION')
Oracle Application Express sets up the APEX$SESSION context when it starts toprocess an incoming request. For example, you can use the value of'APP_SESSION' to access the current application session in queries and VPD(Virtual Private Database) security policies that protect your table data.
2.9.4.17 APP_SESSION_VISIBLEAPP_SESSION_VISIBLE is similar to the built-in substitution APP_SESSION. Use thissubstitution string to create hypertext links between application pages that maintain asession state by passing the session number. APP_SESSION_VISIBLE always returns '0'when users are not authenticated to an application and they are using the ZeroSession ID feature of Oracle Application Express. Table 2-19 (page 2-31) describesthe supported syntax for referencing APP_SESSION_VISIBLE.
Table 2-19 APP_SESSION_VISIBLE Syntax
Reference Type Syntax
Bind variable :APP_SESSION_VISIBLE
Chapter 2Using Substitution Strings
2-31
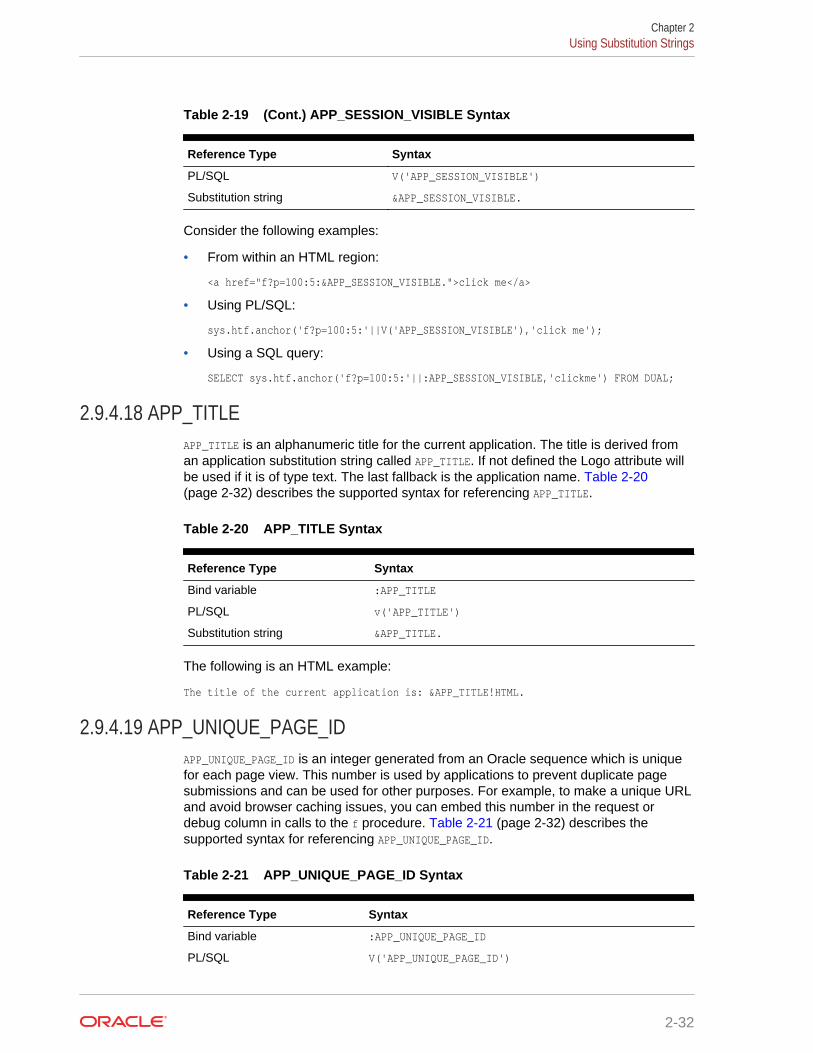
Table 2-19 (Cont.) APP_SESSION_VISIBLE Syntax
Reference Type Syntax
PL/SQL V('APP_SESSION_VISIBLE')
Substitution string &APP_SESSION_VISIBLE.
Consider the following examples:
• From within an HTML region:
<a href="f?p=100:5:&APP_SESSION_VISIBLE.">click me</a>
• Using PL/SQL:
sys.htf.anchor('f?p=100:5:'||V('APP_SESSION_VISIBLE'),'click me');
• Using a SQL query:
SELECT sys.htf.anchor('f?p=100:5:'||:APP_SESSION_VISIBLE,'clickme') FROM DUAL;
2.9.4.18 APP_TITLEAPP_TITLE is an alphanumeric title for the current application. The title is derived froman application substitution string called APP_TITLE. If not defined the Logo attribute willbe used if it is of type text. The last fallback is the application name. Table 2-20(page 2-32) describes the supported syntax for referencing APP_TITLE.
Table 2-20 APP_TITLE Syntax
Reference Type Syntax
Bind variable :APP_TITLE
PL/SQL v('APP_TITLE')
Substitution string &APP_TITLE.
The following is an HTML example:
The title of the current application is: &APP_TITLE!HTML.
2.9.4.19 APP_UNIQUE_PAGE_IDAPP_UNIQUE_PAGE_ID is an integer generated from an Oracle sequence which is uniquefor each page view. This number is used by applications to prevent duplicate pagesubmissions and can be used for other purposes. For example, to make a unique URLand avoid browser caching issues, you can embed this number in the request ordebug column in calls to the f procedure. Table 2-21 (page 2-32) describes thesupported syntax for referencing APP_UNIQUE_PAGE_ID.
Table 2-21 APP_UNIQUE_PAGE_ID Syntax
Reference Type Syntax
Bind variable :APP_UNIQUE_PAGE_ID
PL/SQL V('APP_UNIQUE_PAGE_ID')
Chapter 2Using Substitution Strings
2-32
Table 2-21 (Cont.) APP_UNIQUE_PAGE_ID Syntax
Reference Type Syntax
Substitution string &APP_UNIQUE_PAGE_ID.
The following is an HTML example:
SELECT 'f?p=100:1:'||:APP_SESSION||':'||:APP_UNIQUE_PAGE_ID|| ':::P1_EMPNO:'||employee_id, first_name, job_idFROM employees
Note the use of the APP_UNIQUE_PAGE_ID in the request column. This makes this URLunique and may avoid excessive browser caching problems.
2.9.4.20 APP_USERAPP_USER is the current user running the application. Depending upon yourauthentication model, the value of the user is set differently. If the application isrunning using database authentication, then the value of the user is the same as thedatabase pseudo column USER. If the application uses an authentication scheme thatrequires the user to authenticate, the value of APP_USER is set by the authenticationscheme, usually to the user name used during authentication. Table 2-22 (page 2-33)describes the supported syntax for referencing APP_USER.
Table 2-22 APP_USER Syntax
Reference Type Syntax
Bind variable :APP_USER
PL/SQL V('APP_USER')
Substitution string &APP_USER.
SYS_CONTEXT variable SYS_CONTEXT('APEX$SESSION', 'APP_USER')
Consider the following examples:
• From within an HTML region:
Hello you are logged in as &APP_USER.
• Using PL/SQL:
htp.p('Hello you are logged in as'||V('APP_USER'));
• As a bind variable:
SELECT * FROM some_table WHERE user_id = :APP_USER
• Using the SYS_CONTEXT variable:
SELECT ... WHERE username = SYS_CONTEXT('APEX$SESSION', 'APP_USER')
Oracle Application Express sets up the APEX$SESSION context when it starts toprocess an incoming request. For example, you can use the value of 'APP_USER' to
Chapter 2Using Substitution Strings
2-33
access the current application user in queries and VPD (Virtual Private Database)security policies that protect your table data.
See Also:
"Authentication (page 6-33)" for information about the Public Userattribute
2.9.4.21 AUTHENTICATED_URL_PREFIXThis application-level attribute identifies a valid authenticated prefix (that is, a logged inURL prefix). You can use a relative path or a full path beginning with http. This item isuseful if your application can be run in both authenticated (logged in) and public (notlogged in) modes. You can use AUTHENTICATED_URL_PREFIX to construct a link to anauthenticated page. This item is most useful when using basic database authenticationbecause changes to the URL can require authentication. Table 2-23 (page 2-34)describes the supported syntax for referencing AUTHENTICATED_URL_PREFIX.
Table 2-23 AUTHENTICATED_URL_PREFIX Syntax
Reference Type Syntax
Bind variable :AUTHENTICATED_URL_PREFIX
PL/SQL V('AUTHENTICATED_URL_PREFIX')
Substitution string &AUTHENTICATED_URL_PREFIX.
2.9.4.22 BROWSER_LANGUAGEBROWSER_LANGUAGE refers to the web browser's current language preference. Table 2-24(page 2-34) describes the supported syntax for referencing BROWSER_LANGUAGE.
Table 2-24 BROWSER_LANGUAGE Syntax
Reference Type Syntax
Bind variable :BROWSER_LANGUAGE
Direct PL/SQL APEX_APPLICATION.G_BROWSER_LANGUAGE
PL/SQL V('BROWSER_LANGUAGE')
Substitution string &BROWSER_LANGUAGE.
2.9.4.23 CURRENT_PARENT_TAB_TEXTCURRENT_PARENT_TAB_TEXT is most useful in page templates, but is only relevant forapplications that use two-level tabs (that is, parent and standard tabs). Use this stringto reference the parent tab label. This substitution string enables you to repeat thecurrently selected parent tab within the page template. Table 2-25 (page 2-35)describes the supported syntax for referencing CURRENT_PARENT_TAB_TEXT.
Chapter 2Using Substitution Strings
2-34
Table 2-25 CURRENT_PARENT_TAB_TEXT Syntax
Reference Type Syntax
Bind variable Not Available.
Substitution string &CURRENT_PARENT_TAB_TEXT.
2.9.4.24 DEBUGValid values for the DEBUG flag are Yes or No. Turning debug on shows details aboutapplication processing. If you write your own custom code, you may want to generatedebug information only if the debug mode is set to Yes. Table 2-26 (page 2-35)describes the supported syntax for referencing DEBUG.
Table 2-26 DEBUG Syntax
Reference Type Syntax
Bind variable :DEBUG
Direct PL/SQL APEX_APPLICATION.G_DEBUG
PL/SQL V('DEBUG')
Substitution string &DEBUG.
The following is an example of a substitution string reference that preserves thecurrent value of DEBUG:
f?p=100:1:&APP_SESSION.::&DEBUG
2.9.4.25 HOME_LINKHOME_LINK is the home page of an application. The Application Express engineredirects to this location if no page is given and if no alternative page is dictated by theauthentication scheme's logic. You define the Home URL on the User Interface Detailspage.
Table 2-27 (page 2-35) describes the supported syntax for referencing HOME_LINK.
Table 2-27 HOME_LINK Syntax
Reference Type Syntax
Direct PL/SQL APEX_APPLICATION.G_HOME_LINK
PL/SQL V('HOME_LINK')
Template Reference #HOME_LINK#
Substitution String &HOME_LINK.
2.9.4.26 IMAGE_PREFIXThe value of IMAGE_PREFIX determines the virtual path the web server uses to point tothe images directory distributed with Oracle Application Express. To reference
Chapter 2Using Substitution Strings
2-35
uploaded images, use WORKSPACE_IMAGES and APP_IMAGES. Table 2-28 (page 2-36)describes the supported syntax for referencing IMAGE_PREFIX.
Table 2-28 IMAGE_PREFIX Syntax
Reference Type Syntax
Bind variable :IMAGE_PREFIX
Direct PL/SQL APEX_APPLICATION.G_IMAGE_PREFIX
PL/SQL V('IMAGE_PREFIX')
Substitution string &IMAGE_PREFIX.
Template Substitution #IMAGE_PREFIX#
2.9.4.27 JET_BASE_DIRECTORYUse the JET_BASE_DIRECTORY substitution string to reference the base directory of theOracle JavaScript Extension Toolkit (JET) which ships with Oracle ApplicationExpress. Supported syntax for referencing JET_BASE_DIRECTORY :
#JET_BASE_DIRECTORY#
2.9.4.28 JET_CSS_DIRECTORYUse the JET_CSS_DIRECTORY substitution string to reference the base directory of theOracle JavaScript Extension Toolkit (JET) which ships with Oracle ApplicationExpress. Supported syntax for referencing JET_CSS_DIRECTORY:
#JET_CSS_DIRECTORY#
2.9.4.29 JET_JS_DIRECTORYUse the JET_JS_DIRECTORY substitution string to reference the JavaScript directory of theOracle JavaScript Extension Toolkit (JET) components which ships with OracleApplication Express. Supported syntax for referencing JET_JS_DIRECTORY:
#JET_JS_DIRECTORY#
2.9.4.30 LOGIN_URLUse LOGIN_URL to display a link to a login page for users that are not currently loggedin. Table 2-29 (page 2-37) describes the supported syntax for LOGIN_URL.
See Also:
"Authentication (page 6-33)" and "Security Attributes Page (page 6-33)"
Chapter 2Using Substitution Strings
2-36
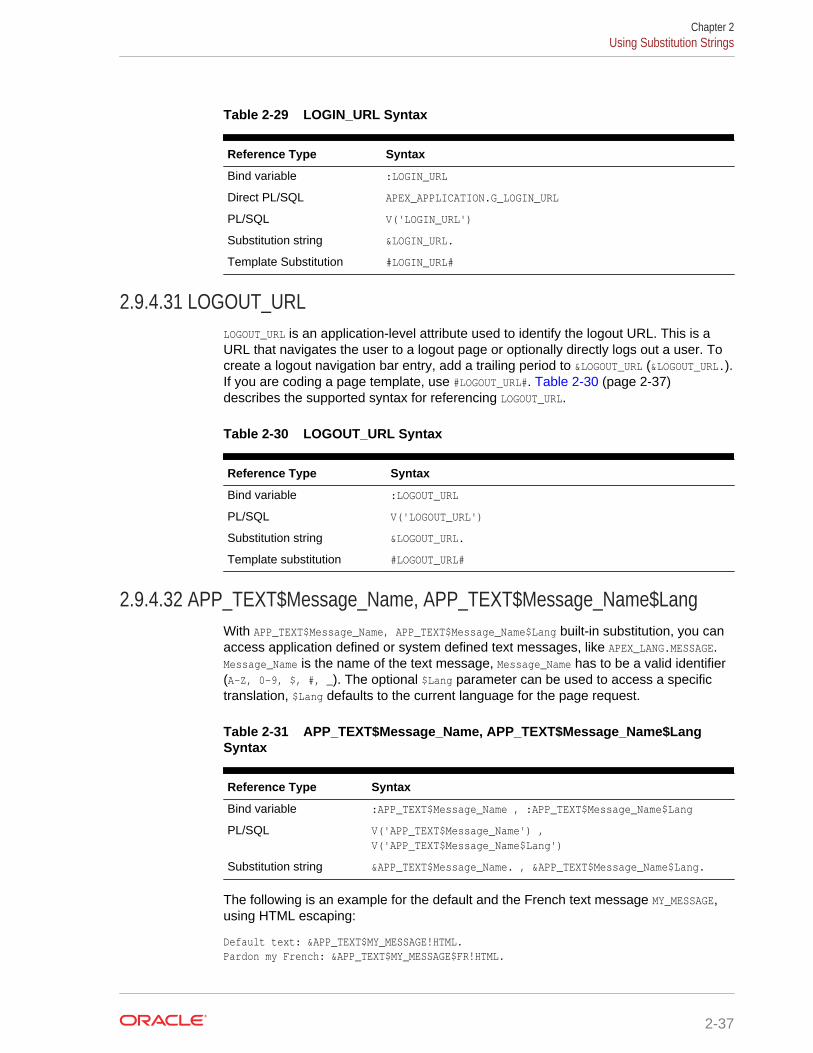
Table 2-29 LOGIN_URL Syntax
Reference Type Syntax
Bind variable :LOGIN_URL
Direct PL/SQL APEX_APPLICATION.G_LOGIN_URL
PL/SQL V('LOGIN_URL')
Substitution string &LOGIN_URL.
Template Substitution #LOGIN_URL#
2.9.4.31 LOGOUT_URLLOGOUT_URL is an application-level attribute used to identify the logout URL. This is aURL that navigates the user to a logout page or optionally directly logs out a user. Tocreate a logout navigation bar entry, add a trailing period to &LOGOUT_URL (&LOGOUT_URL.).If you are coding a page template, use #LOGOUT_URL#. Table 2-30 (page 2-37)describes the supported syntax for referencing LOGOUT_URL.
Table 2-30 LOGOUT_URL Syntax
Reference Type Syntax
Bind variable :LOGOUT_URL
PL/SQL V('LOGOUT_URL')
Substitution string &LOGOUT_URL.
Template substitution #LOGOUT_URL#
2.9.4.32 APP_TEXT$Message_Name, APP_TEXT$Message_Name$LangWith APP_TEXT$Message_Name, APP_TEXT$Message_Name$Lang built-in substitution, you canaccess application defined or system defined text messages, like APEX_LANG.MESSAGE.Message_Name is the name of the text message, Message_Name has to be a valid identifier(A-Z, 0-9, $, #, _). The optional $Lang parameter can be used to access a specifictranslation, $Lang defaults to the current language for the page request.
Table 2-31 APP_TEXT$Message_Name, APP_TEXT$Message_Name$LangSyntax
Reference Type Syntax
Bind variable :APP_TEXT$Message_Name , :APP_TEXT$Message_Name$Lang
PL/SQL V('APP_TEXT$Message_Name') ,V('APP_TEXT$Message_Name$Lang')
Substitution string &APP_TEXT$Message_Name. , &APP_TEXT$Message_Name$Lang.
The following is an example for the default and the French text message MY_MESSAGE,using HTML escaping:
Default text: &APP_TEXT$MY_MESSAGE!HTML.Pardon my French: &APP_TEXT$MY_MESSAGE$FR!HTML.
Chapter 2Using Substitution Strings
2-37
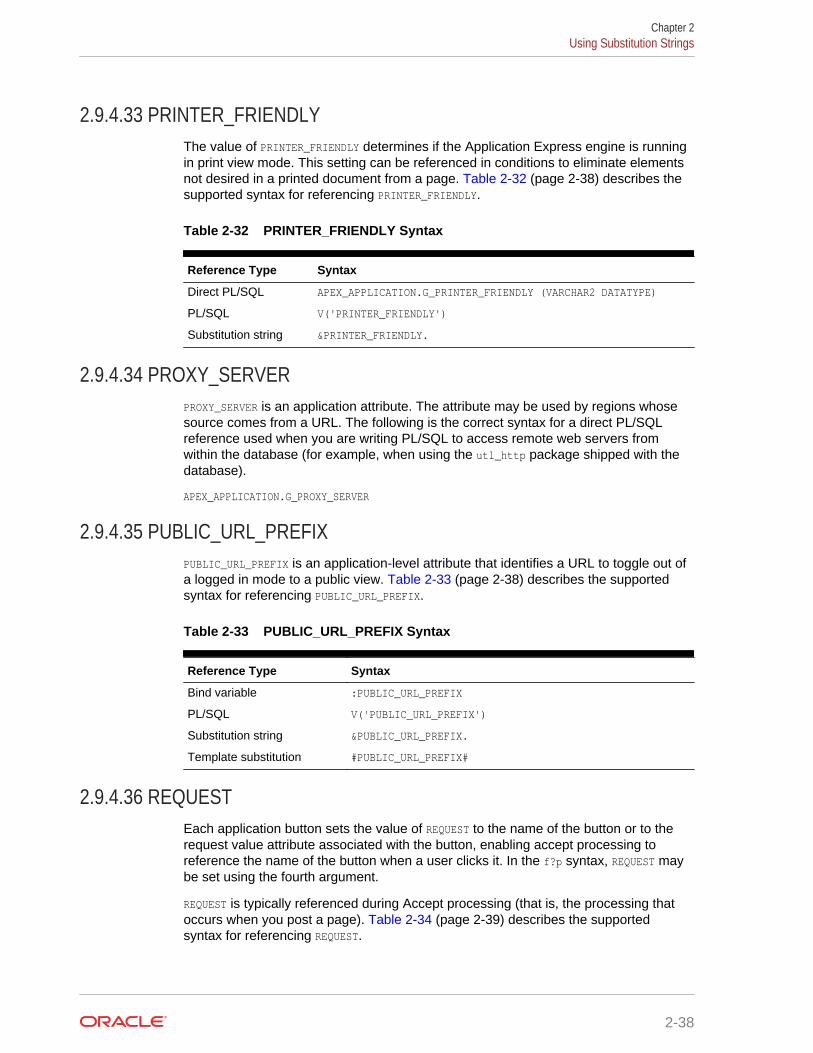
2.9.4.33 PRINTER_FRIENDLYThe value of PRINTER_FRIENDLY determines if the Application Express engine is runningin print view mode. This setting can be referenced in conditions to eliminate elementsnot desired in a printed document from a page. Table 2-32 (page 2-38) describes thesupported syntax for referencing PRINTER_FRIENDLY.
Table 2-32 PRINTER_FRIENDLY Syntax
Reference Type Syntax
Direct PL/SQL APEX_APPLICATION.G_PRINTER_FRIENDLY (VARCHAR2 DATATYPE)
PL/SQL V('PRINTER_FRIENDLY')
Substitution string &PRINTER_FRIENDLY.
2.9.4.34 PROXY_SERVERPROXY_SERVER is an application attribute. The attribute may be used by regions whosesource comes from a URL. The following is the correct syntax for a direct PL/SQLreference used when you are writing PL/SQL to access remote web servers fromwithin the database (for example, when using the utl_http package shipped with thedatabase).
APEX_APPLICATION.G_PROXY_SERVER
2.9.4.35 PUBLIC_URL_PREFIXPUBLIC_URL_PREFIX is an application-level attribute that identifies a URL to toggle out ofa logged in mode to a public view. Table 2-33 (page 2-38) describes the supportedsyntax for referencing PUBLIC_URL_PREFIX.
Table 2-33 PUBLIC_URL_PREFIX Syntax
Reference Type Syntax
Bind variable :PUBLIC_URL_PREFIX
PL/SQL V('PUBLIC_URL_PREFIX')
Substitution string &PUBLIC_URL_PREFIX.
Template substitution #PUBLIC_URL_PREFIX#
2.9.4.36 REQUESTEach application button sets the value of REQUEST to the name of the button or to therequest value attribute associated with the button, enabling accept processing toreference the name of the button when a user clicks it. In the f?p syntax, REQUEST maybe set using the fourth argument.
REQUEST is typically referenced during Accept processing (that is, the processing thatoccurs when you post a page). Table 2-34 (page 2-39) describes the supportedsyntax for referencing REQUEST.
Chapter 2Using Substitution Strings
2-38
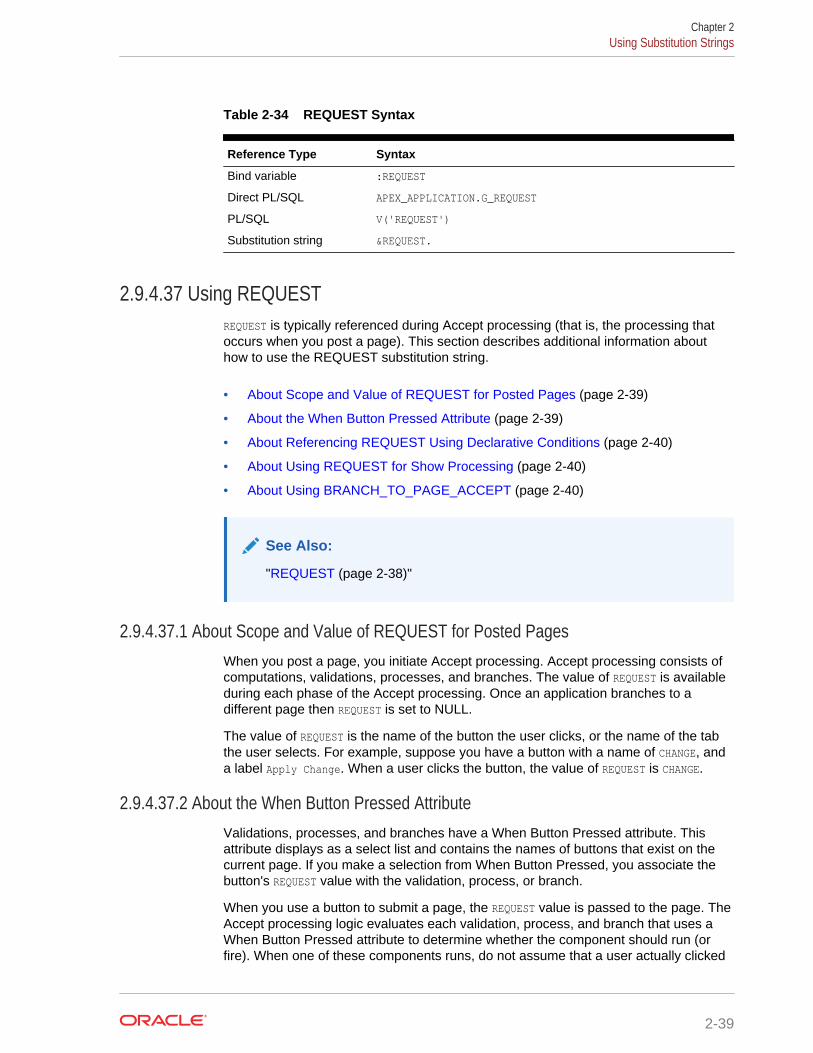
Table 2-34 REQUEST Syntax
Reference Type Syntax
Bind variable :REQUEST
Direct PL/SQL APEX_APPLICATION.G_REQUEST
PL/SQL V('REQUEST')
Substitution string &REQUEST.
2.9.4.37 Using REQUESTREQUEST is typically referenced during Accept processing (that is, the processing thatoccurs when you post a page). This section describes additional information abouthow to use the REQUEST substitution string.
• About Scope and Value of REQUEST for Posted Pages (page 2-39)
• About the When Button Pressed Attribute (page 2-39)
• About Referencing REQUEST Using Declarative Conditions (page 2-40)
• About Using REQUEST for Show Processing (page 2-40)
• About Using BRANCH_TO_PAGE_ACCEPT (page 2-40)
See Also:
"REQUEST (page 2-38)"
2.9.4.37.1 About Scope and Value of REQUEST for Posted PagesWhen you post a page, you initiate Accept processing. Accept processing consists ofcomputations, validations, processes, and branches. The value of REQUEST is availableduring each phase of the Accept processing. Once an application branches to adifferent page then REQUEST is set to NULL.
The value of REQUEST is the name of the button the user clicks, or the name of the tabthe user selects. For example, suppose you have a button with a name of CHANGE, anda label Apply Change. When a user clicks the button, the value of REQUEST is CHANGE.
2.9.4.37.2 About the When Button Pressed AttributeValidations, processes, and branches have a When Button Pressed attribute. Thisattribute displays as a select list and contains the names of buttons that exist on thecurrent page. If you make a selection from When Button Pressed, you associate thebutton's REQUEST value with the validation, process, or branch.
When you use a button to submit a page, the REQUEST value is passed to the page. TheAccept processing logic evaluates each validation, process, and branch that uses aWhen Button Pressed attribute to determine whether the component should run (orfire). When one of these components runs, do not assume that a user actually clicked
Chapter 2Using Substitution Strings
2-39
the associated button and caused the page to be submitted. Keep in mind, thatanother button using the same request value may have submitted the page. Similarly,JavaScript on the page can also submit the page and pass in a request value.
2.9.4.37.3 About Referencing REQUEST Using Declarative ConditionsMany developers reference REQUEST using conditions. For example, you may want toreset pagination when a user clicks Go on a report page. You can reset pagination bycreating an on-submit page process. The page process can be made conditional usingthe condition Request = Expression 1.
To conditionalize an on-submit page process:
1. Under Condition, select the condition type Request = Expression 1.
2. In Expression 1, enter GO.
2.9.4.37.4 About Using REQUEST for Show ProcessingYou can also use REQUEST for Show processing when navigating to a page using f?psyntax. For example:
f?p=100:1:&APP_SESSION.:GO
Remember that the fourth argument in the f?p syntax is REQUEST. This example goes toapplication 100, page 1 for the current session, and sets the value of REQUEST to GO.Any process or region can reference the value of REQUEST using Show processing.
The following is a similar example using PL/SQL:
IF V ('REQUEST') = 'GO' THEN htp.p('hello');END IF;
Note that htp.p('hello') is a call to a PL/SQL Web Toolkit package to print thespecified text string.
2.9.4.37.5 About Using BRANCH_TO_PAGE_ACCEPTYou can use a special request BRANCH_TO_PAGE_ACCEPT for Show processing toautomatically submit the page. For example:
f?p=100:1:&APP_SESSION.:BRANCH_TO_PAGE_ACCEPT|SAVE:::P1_DATA:value
Using BRANCH_TO_PAGE_ACCEPT is the same as navigating to page 1, entering a value intothe item P1_DATA, and clicking a button that submits the page with a SAVE request.
2.9.4.38 SCHEMA OWNERIf you are generating calls to applications from within your PL/SQL code, you mustreference the owner of the Oracle Application Express schema. The followingdescribes the correct syntax for a direct PL/SQL reference:
APEX_APPLICATION.G_FLOW_SCHEMA_OWNER
You may also use #FLOW_OWNER# to reference this value in SQL queries and PL/SQL (forexample, in a region or a process).
Chapter 2Using Substitution Strings
2-40

2.9.4.39 SQLERRMSQLERRM is a template substitution only available in the Applications Region ErrorMessage. Supported syntax for a region template substitution reference:
#SQLERRM#
2.9.4.40 SYSDATE_YYYYMMDDSYSDATE_YYYYMMDD represents the current date on the database server, with the YYYYMMDDformat mask applied. You may use this value instead of repeated calls to the SYSDATE()function. The following list describes the supported syntax for referencingSYSDATE_YYYYMMDD.
• Bind variable
:SYSDATE_YYYYMMDD
• PL/SQL
V('SYSDATE_YYYYMMDD')
• Direct PL/SQL
APEX_APPLICATION.G_SYSDATE (DATE DATATYPE)
Table 2-35 SYSDATE_YYYYMMDD Syntax
Reference Type Syntax
Bind variable :SYSDATE_YYYYMMDD
Direct PL/SQL APEX_APPLICATION.G_SYSDATE (DATE DATATYPE)
PL/SQL V('SYSDATE_YYYYMMDD')
2.9.4.41 THEME_DB_IMAGESUse the THEME_DB_IMAGES substitution string to always reference files which are storedwith your theme definition in the database, regardless of the File Prefix" setting of yourtheme. Supported syntax for a template substitution:
#THEME_DB_IMAGES#
2.9.4.42 THEME_IMAGESUse the THEME_IMAGES substitution string to reference files which are stored with yourtheme definition. Supported syntax for a template substitution:
#THEME_IMAGES#
2.9.4.43 WORKSPACE_IMAGESUse this substitution string to reference uploaded images, JavaScript, and cascadingstyle sheets that are shared over many applications within a workspace. Table 2-36(page 2-42) describes the supported syntax for referencing WORKSPACE_IMAGES.
Chapter 2Using Substitution Strings
2-41
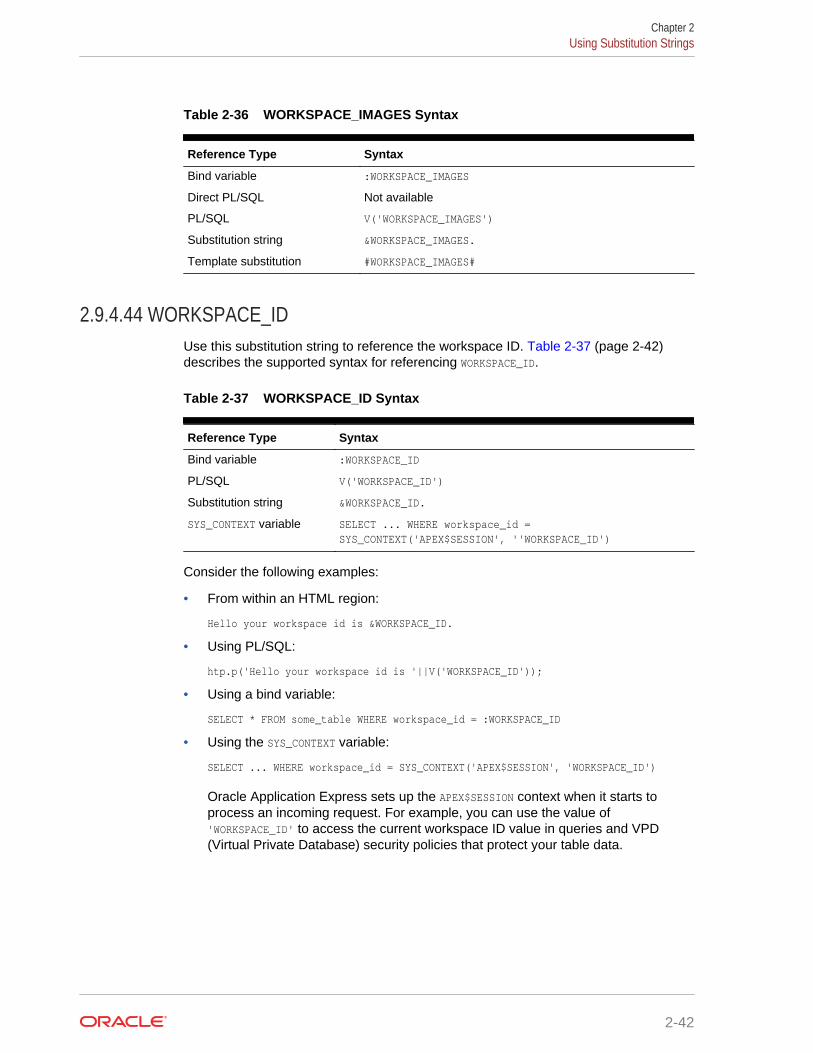
Table 2-36 WORKSPACE_IMAGES Syntax
Reference Type Syntax
Bind variable :WORKSPACE_IMAGES
Direct PL/SQL Not available
PL/SQL V('WORKSPACE_IMAGES')
Substitution string &WORKSPACE_IMAGES.
Template substitution #WORKSPACE_IMAGES#
2.9.4.44 WORKSPACE_IDUse this substitution string to reference the workspace ID. Table 2-37 (page 2-42)describes the supported syntax for referencing WORKSPACE_ID.
Table 2-37 WORKSPACE_ID Syntax
Reference Type Syntax
Bind variable :WORKSPACE_ID
PL/SQL V('WORKSPACE_ID')
Substitution string &WORKSPACE_ID.
SYS_CONTEXT variable SELECT ... WHERE workspace_id =SYS_CONTEXT('APEX$SESSION', ''WORKSPACE_ID')
Consider the following examples:
• From within an HTML region:
Hello your workspace id is &WORKSPACE_ID.
• Using PL/SQL:
htp.p('Hello your workspace id is '||V('WORKSPACE_ID'));
• Using a bind variable:
SELECT * FROM some_table WHERE workspace_id = :WORKSPACE_ID
• Using the SYS_CONTEXT variable:
SELECT ... WHERE workspace_id = SYS_CONTEXT('APEX$SESSION', 'WORKSPACE_ID')
Oracle Application Express sets up the APEX$SESSION context when it starts toprocess an incoming request. For example, you can use the value of'WORKSPACE_ID' to access the current workspace ID value in queries and VPD(Virtual Private Database) security policies that protect your table data.
Chapter 2Using Substitution Strings
2-42
3Utilizing Packaged Applications
Oracle Application Express includes a variety of packaged applications. Developerscan install and run packaged applications to learn more about the types of applicationsthey can build and how to construct specific types of pages.
Tip:
Demonstration applications and demonstration database objects are notcreated by default when creating a new workspace. To change this behavior,an instance administrator must change Feature Configuration settings in theAdministration Services application. See "Enabling the Creation ofDemonstration Objects in New Workspaces" and "Enabling the Creation ofWebsheet Objects in New Workspaces" in Oracle Application ExpressAdministration Guide
• About Packaged Applications (page 3-1)The Packaged Application gallery includes three types of applications: sampleapplications, productivity applications, and custom applications.
• Managing Packaged Applications in a Full Development Environment(page 3-2)In a full development environment, developers can view, install, run, remove,unlock, export, change authentication, and update packaged applications.
• Understanding Sample Database Application (page 3-7)Sample Database Application is a sample application that highlights commondesign concepts and demonstrates the use of reports, charts, calendars, maps,and trees.
• Understanding AnyCo IT Department Websheet (page 3-19)AnyCo IT Department is a sample application that highlights many Websheetfeatures and capabilities, contains several data grids, and demonstrates how toinclude data in embedded reports and charts.
• Utilizing Packaged App Administration (page 3-34)Administrators use Packaged App Administration to manage and monitorpackaged apps in their workspace.
• Using a Packaged Apps Only Workspace (page 3-38)A Packaged Apps Only workspace enables developers to share packagedapplications with other developers and administrators.
3.1 About Packaged ApplicationsThe Packaged Application gallery includes three types of applications: sampleapplications, productivity applications, and custom applications.
3-1
The main difference between a sample and productivity application is the level ofsupport. By default, sample applications are fully editable. In contrast, you must unlockpackaged applications before you can edit them. Unlocking an application makes itineligible for future upgrades or support by Oracle Support.
Sample Applications
As the group name implies, an Oracle-supplied sample application is not a completeapplication but instead contains code snippets or sample code. Sample applicationsare available for installation in a workspace and are editable by default.
Productivity Applications
Productivity applications are fully functional applications that have been designed toaddress a specific business need. You can install, run, and use aproductivity application as is, or analyze it to better understand how to build a specifictype of functionality. Productivity applications are available for installation in aworkspace, but are not be editable by default.
Custom Applications
Custom applications are applications you create and that are managed by yourinstance administrator. Like Oracle-supplied packaged applications, custom packagedapplications typically include both the application pages and supporting databaseobjects. A developer creates a custom application using an application export. Onceexported, your instance administrator imports it to make it available. Customapplications are available for installation in a workspace, but are not be editable bydefault.
3.2 Managing Packaged Applications in a Full DevelopmentEnvironment
In a full development environment, developers can view, install, run, remove, unlock,export, change authentication, and update packaged applications.
• Accessing the Packaged Apps Page (page 3-3)
• Installing a Packaged Application (page 3-4)
• Running an Installed Packaged Application (page 3-5)
• Removing an Installed Packaged Application (page 3-5)
• Changing Authentication for an Installed Packaged Application (page 3-6)
• Unlocking an Installed Productivity Application (page 3-6)
• Updating a Packaged Application (page 3-7)
See Also:
"Managing Custom Applications" in Oracle Application ExpressAdministration Guide and "Using a Packaged Apps Only Workspace(page 3-38)"
Chapter 3Managing Packaged Applications in a Full Development Environment
3-2
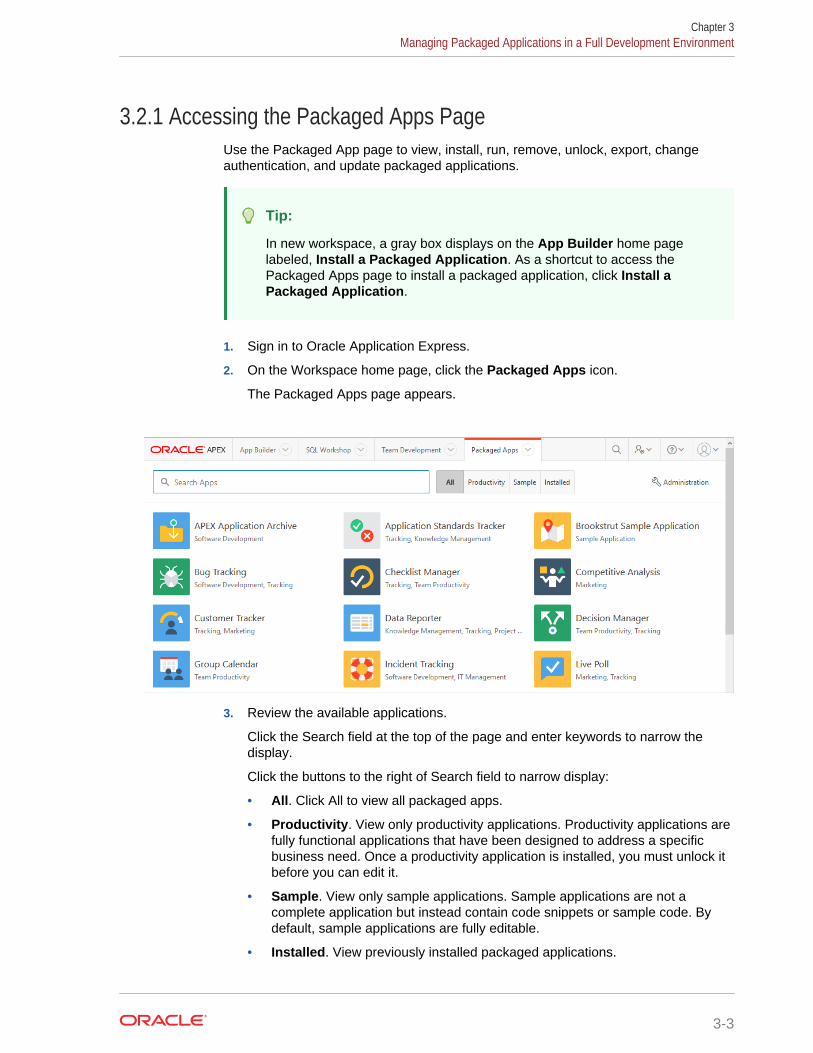
3.2.1 Accessing the Packaged Apps PageUse the Packaged App page to view, install, run, remove, unlock, export, changeauthentication, and update packaged applications.
Tip:
In new workspace, a gray box displays on the App Builder home pagelabeled, Install a Packaged Application. As a shortcut to access thePackaged Apps page to install a packaged application, click Install aPackaged Application.
1. Sign in to Oracle Application Express.
2. On the Workspace home page, click the Packaged Apps icon.
The Packaged Apps page appears.
3. Review the available applications.
Click the Search field at the top of the page and enter keywords to narrow thedisplay.
Click the buttons to the right of Search field to narrow display:
• All. Click All to view all packaged apps.
• Productivity. View only productivity applications. Productivity applications arefully functional applications that have been designed to address a specificbusiness need. Once a productivity application is installed, you must unlock itbefore you can edit it.
• Sample. View only sample applications. Sample applications are not acomplete application but instead contain code snippets or sample code. Bydefault, sample applications are fully editable.
• Installed. View previously installed packaged applications.
Chapter 3Managing Packaged Applications in a Full Development Environment
3-3
4. Select an application.
The Packaged Application Details page appears, displaying summary informationabout the application.
On Packaged Application Details page, you can:
• Install Packaged App. If not installed, click Install Packaged App to install it.
• Manage. If installed, click Manage to change the application authentication,unlock, or remove the application.
• Run. If installed, click Run to run the application.
Tip:
The actual options that display on the Packaged Application Details pagedepend upon whether the application is installed.
3.2.2 Installing a Packaged Application
Tip:
In a new workspace, a gray box displays on the App Builder home pagelabeled, Install a Packaged Application. Click Install a PackagedApplication as a shortcut to access the Packaged Apps page.
To install a packaged application:
1. Sign in to Oracle Application Express.
The Workspace home page appears.
2. Click the Packaged Apps icon.
The Packaged Apps page appears.
3. Locate an application to install. Use the Search field at the top of the page tonarrow the display results.
4. Click an application to install.
The Packaged App Details page appears.
5. Click Install Packaged App.
6. Select an Authentication scheme and click Next.
7. Click Install Packaged App again.
The Packaged Application Details page appears. The success message,Application installed, displays at the top of the page.
8. Click Manage.
The Manage dialog displays three buttons:
• Change Authentication
Chapter 3Managing Packaged Applications in a Full Development Environment
3-4
• Unlock Remove
• Remove
Tip:
Unlock is NOT available in a Packaged Apps Only Workspace.
9. To run the application, click the Run icon.
3.2.3 Running an Installed Packaged ApplicationTo run an installed packaged application:
1. On the Workspace home page, click the Packaged Apps icon.
The Packaged Apps page appears.
2. Click the Installed tab, select the application, and then click the Run icon.
3. Enter the appropriate credentials:
a. Username - Enter your workspace username.
b. Password - Enter your workspace password.
c. Click Sign In.
The application displays in a new window.
See Also:
"How Your Browser Impacts the Way Applications Run (page 2-4)"
3.2.4 Removing an Installed Packaged ApplicationTo remove an installed packaged application:
1. On the Workspace home page, click the Packaged Apps icon.
The Packaged Apps page appears.
2. Click the Installed tab and select the application to be removed.
3. Click Manage.
4. Click Remove.
5. When prompted, click Remove Application.
Tip:
You can also perform this task on the Application Details page. See"Accessing the Packaged Apps Page (page 3-3)."
Chapter 3Managing Packaged Applications in a Full Development Environment
3-5
3.2.5 Changing Authentication for an Installed Packaged ApplicationTo change the authentication for an installed packaged application:
1. On the Workspace home page, click the Packaged Apps icon.
The Packaged Apps page appears.
2. Click the Installed tab and select the application.
3. Click Manage.
4. Click Change Authentication.
The Change Authentication page appears.
5. From Authentication, select an authentication scheme and click Apply Changes.
Tip:
You can also perform this task on the Application Details page. See"Accessing the Packaged Apps Page (page 3-3)."
3.2.6 Unlocking an Installed Productivity ApplicationThe main difference between an Oracle-supplied sample and productivity applicationis the level of support. Once a productivity application is installed, you must unlock itbefore you can edit it. By default, sample applications are fully editable.
Note:
Unlocking a productivity application makes it ineligible for future upgrades orsupport by Oracle Support.
To unlock an installed productivity application:
1. On the Workspace home page, click the Packaged Apps icon.
The Packaged Apps page appears.
2. Click the Installed tab and select the application.
3. Click Manage.
4. Click Unlock.
Tip:
Unlock is NOT available in a Packaged Apps Only Workspace.
The Unlock Packaged Application page appears.
Chapter 3Managing Packaged Applications in a Full Development Environment
3-6

5. Click Unlock Application.
3.2.7 Updating a Packaged ApplicationYou can update a packaged application if an Update button displays on the PackagedApplication Details page.
To update a packaged application:
1. On the Workspace home page, click the Packaged Apps icon.
The Packaged Apps page appears.
2. Click the Installed tab and select the application to be removed.
3. Click Update Application.
The Update Packaged Application page appears.
Note:
Because sample applications are unlocked by default, they cannot beupdated. To access the latest sample applications, Oracle recommendsdeleting the sample application from your workspace and reinstalling fromthe Packaged Apps gallery.
3.3 Understanding Sample Database ApplicationSample Database Application is a sample application that highlights common designconcepts and demonstrates the use of reports, charts, calendars, maps, and trees.
• Installing and Running Sample Database Application (page 3-7)Install sample applications such as Sample Database Application on the PackagedApps page.
• Reviewing Sample Database Application (page 3-8)Sample Database Application demonstrates how to display summary information,use reports and forms for viewing, updating, and adding information, includecharts and maps, and create dedicated mobile pages that replicate mostfunctionality available in the desktop version.
• Modifying Sample Database Application (page 3-17)Learn how to build applications by studying sample applications such as SampleDatabase Application.
3.3.1 Installing and Running Sample Database ApplicationInstall sample applications such as Sample Database Application on the PackagedApps page.
To install Sample Database Application:
1. Sign in to Oracle Application Express.
Chapter 3Understanding Sample Database Application
3-7
The Workspace home page appears.
2. Click the Packaged Apps icon.
The Packaged Apps page appears.
3. Locate and select Sample Database Application.
Tip:
Use the Search field at the top of the page to narrow the display.
The Packaged App Details page appears.
4. Click Install Packaged App.
5. Select an Authentication scheme and click Next.
6. Click Install Packaged App again.
The Packaged Application Details page appears. The success message,Application installed, displays at the top of the page.
7. To run the application, click Run. Enter the appropriate login credentials:
a. Username - Enter your workspace username.
b. Password - Enter your workspace password.
c. Click Sign In.
Tip:
Once you install a packaged application, it displays under InstalledPackaged Apps on the Packaged Apps page.
3.3.2 Reviewing Sample Database ApplicationSample Database Application demonstrates how to display summary information, usereports and forms for viewing, updating, and adding information, include charts andmaps, and create dedicated mobile pages that replicate most functionality available inthe desktop version.
• Home Page (page 3-9)
• About the Navigation Menu (page 3-10)
• Customers Page (page 3-10)
• Using the Customers Page (page 3-11)
• Products Page (page 3-13)
• Using the Products Page (page 3-13)
• Orders Page (page 3-14)
• Using the Orders Page (page 3-14)
• Reports Page (page 3-15)
Chapter 3Understanding Sample Database Application
3-8
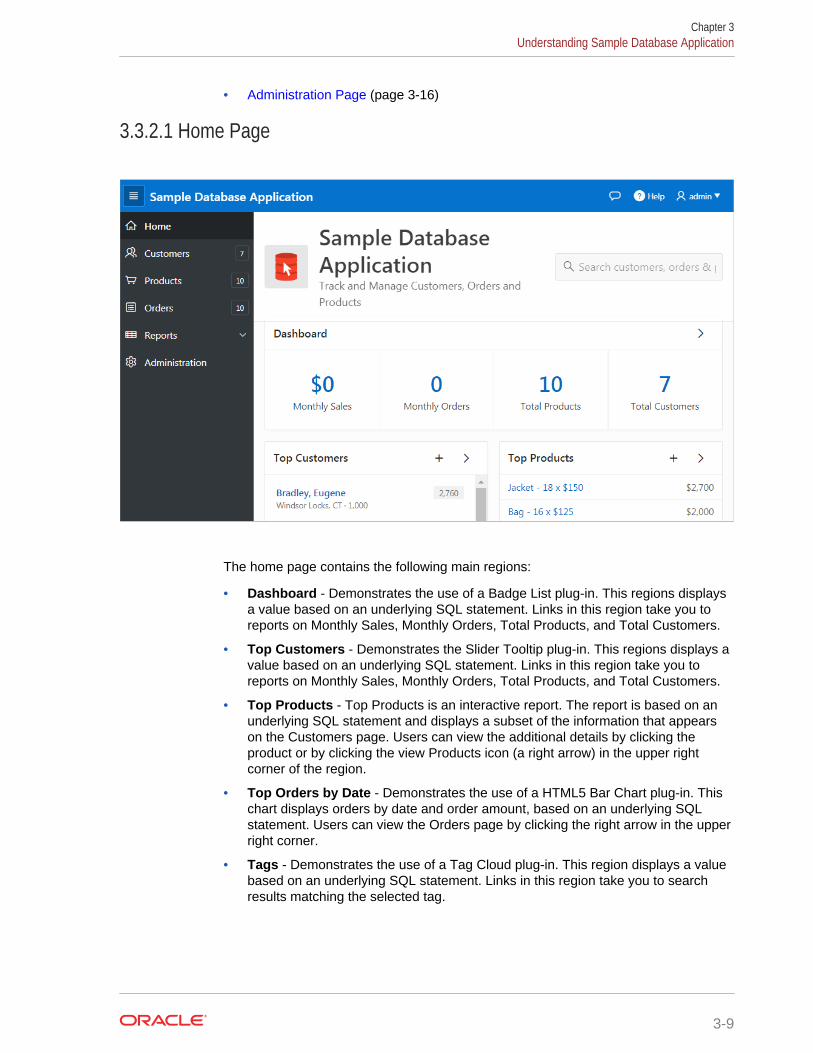
• Administration Page (page 3-16)
3.3.2.1 Home Page
The home page contains the following main regions:
• Dashboard - Demonstrates the use of a Badge List plug-in. This regions displaysa value based on an underlying SQL statement. Links in this region take you toreports on Monthly Sales, Monthly Orders, Total Products, and Total Customers.
• Top Customers - Demonstrates the Slider Tooltip plug-in. This regions displays avalue based on an underlying SQL statement. Links in this region take you toreports on Monthly Sales, Monthly Orders, Total Products, and Total Customers.
• Top Products - Top Products is an interactive report. The report is based on anunderlying SQL statement and displays a subset of the information that appearson the Customers page. Users can view the additional details by clicking theproduct or by clicking the view Products icon (a right arrow) in the upper rightcorner of the region.
• Top Orders by Date - Demonstrates the use of a HTML5 Bar Chart plug-in. Thischart displays orders by date and order amount, based on an underlying SQLstatement. Users can view the Orders page by clicking the right arrow in the upperright corner.
• Tags - Demonstrates the use of a Tag Cloud plug-in. This region displays a valuebased on an underlying SQL statement. Links in this region take you to searchresults matching the selected tag.
Chapter 3Understanding Sample Database Application
3-9
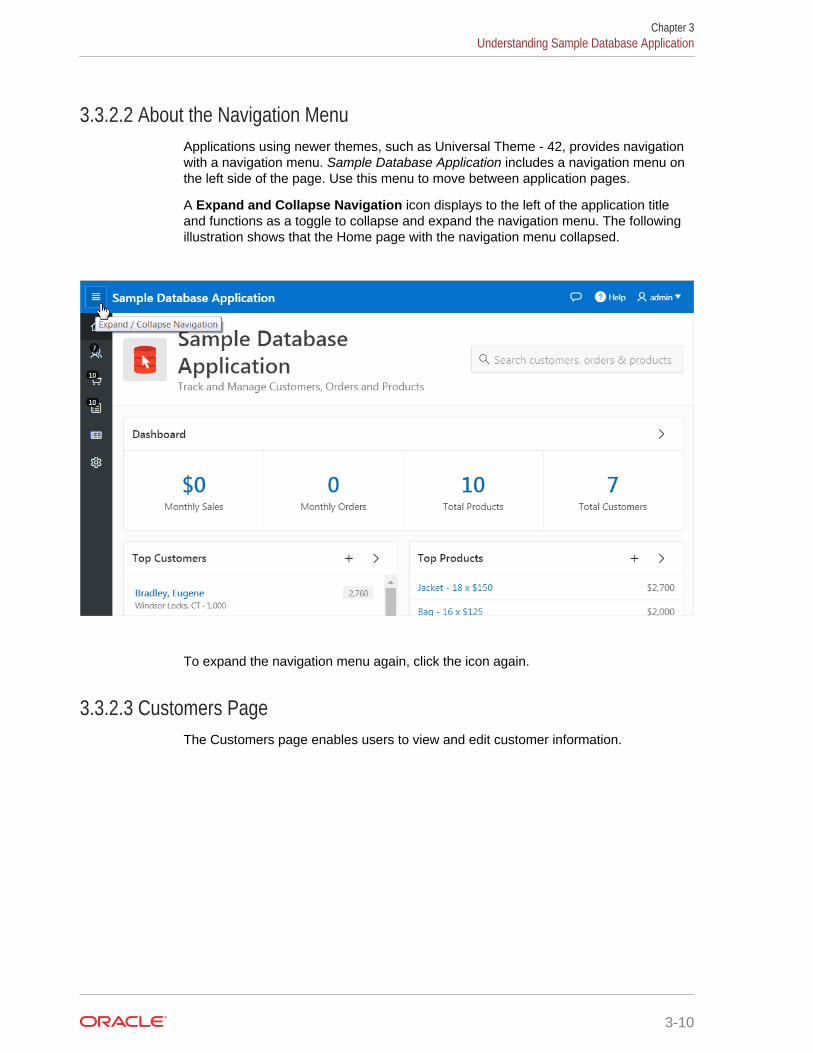
3.3.2.2 About the Navigation MenuApplications using newer themes, such as Universal Theme - 42, provides navigationwith a navigation menu. Sample Database Application includes a navigation menu onthe left side of the page. Use this menu to move between application pages.
A Expand and Collapse Navigation icon displays to the left of the application titleand functions as a toggle to collapse and expand the navigation menu. The followingillustration shows that the Home page with the navigation menu collapsed.
To expand the navigation menu again, click the icon again.
3.3.2.3 Customers PageThe Customers page enables users to view and edit customer information.
Chapter 3Understanding Sample Database Application
3-10
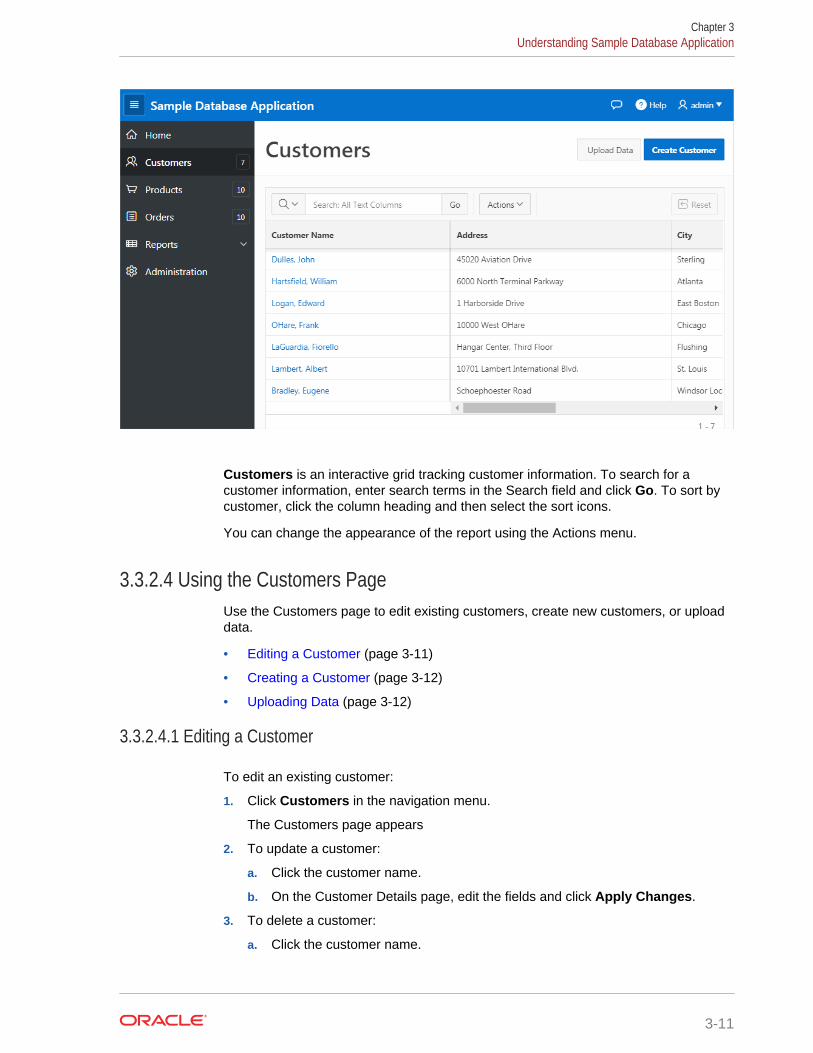
Customers is an interactive grid tracking customer information. To search for acustomer information, enter search terms in the Search field and click Go. To sort bycustomer, click the column heading and then select the sort icons.
You can change the appearance of the report using the Actions menu.
3.3.2.4 Using the Customers PageUse the Customers page to edit existing customers, create new customers, or uploaddata.
• Editing a Customer (page 3-11)
• Creating a Customer (page 3-12)
• Uploading Data (page 3-12)
3.3.2.4.1 Editing a Customer
To edit an existing customer:
1. Click Customers in the navigation menu.
The Customers page appears
2. To update a customer:
a. Click the customer name.
b. On the Customer Details page, edit the fields and click Apply Changes.
3. To delete a customer:
a. Click the customer name.
Chapter 3Understanding Sample Database Application
3-11
b. On the Customer Details page, click Delete.
3.3.2.4.2 Creating a CustomerTo add a new customer:
1. Click Customers in the navigation menu.
The Customers page appears
2. Click the Create Customer button.
The Customer Details page appears.
3. Add the appropriate details and click Add Customer.
3.3.2.4.3 Uploading DataTo upload data:
1. Click Customers in the navigation menu.
The Customers page appears
2. Click Upload Data.
3. For Import From, select either:
• Upload file, comma separated (*.csv) or tab delimited.
• Copy and Paste.
The UI changes based on the import option you select.
4. If you select Upload file, comma separated (*.csv) or tab delimited:
a. File Name - Click and locate the file to upload.
b. Separator - Identify a column separator character. Use \t for tab separators.
c. Optionally Enclosed By - Enter a delimiter character. See field-level Help formore details.
d. First Row has Column Names - Select or deselect Yes.
e. Use Advanced Settings - Select Yes to view the additional settings.
f. Click Next.
5. If you select Copy and Paste:
a. Copy and Paste Delimited Data- Copy and paste into the field provided.
b. Separator - Identify a column separator character. Use \t for tab separators.
c. Optionally Enclosed By - Enter a delimiter character. See field-level Help formore details.
d. First Row has Column Names - Select or deselect Yes.
e. Use Advanced Settings - Select Yes to view the additional settings.
f. Click Next.
6. On Data/Table Mapping, review the mappings and click Next.
7. On Data Validation, review the data and click Load Data.
8. Review the results.
Chapter 3Understanding Sample Database Application
3-12
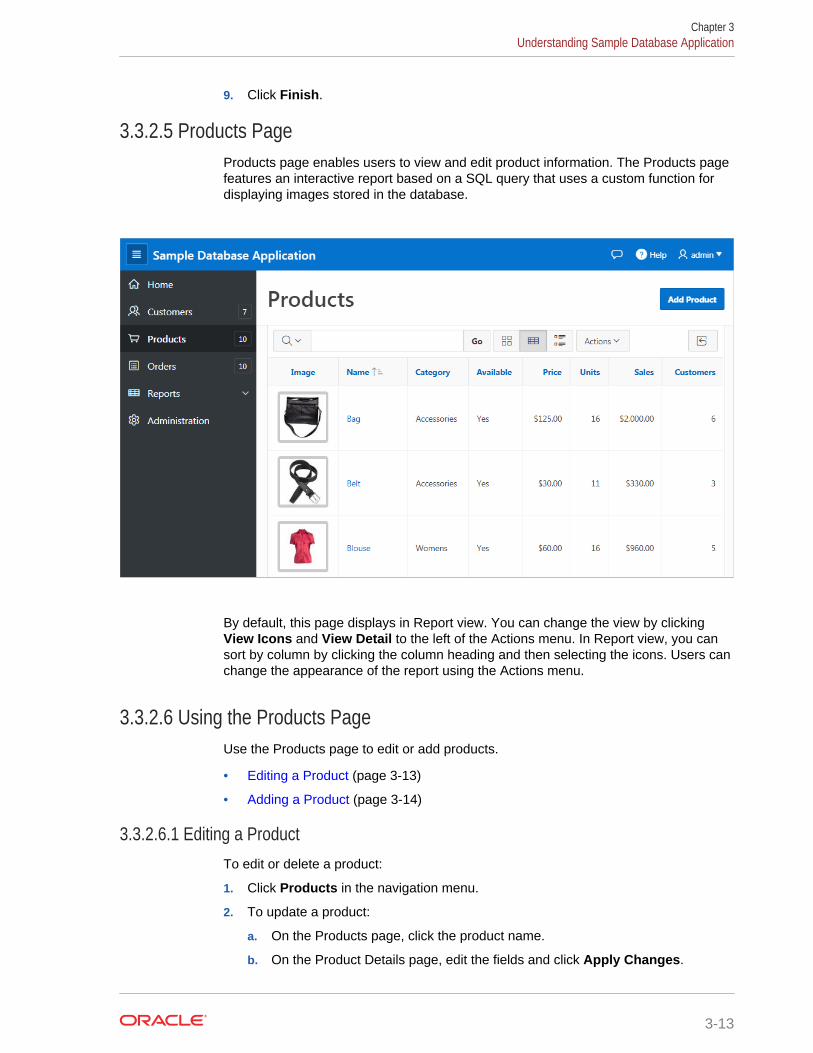
9. Click Finish.
3.3.2.5 Products PageProducts page enables users to view and edit product information. The Products pagefeatures an interactive report based on a SQL query that uses a custom function fordisplaying images stored in the database.
By default, this page displays in Report view. You can change the view by clickingView Icons and View Detail to the left of the Actions menu. In Report view, you cansort by column by clicking the column heading and then selecting the icons. Users canchange the appearance of the report using the Actions menu.
3.3.2.6 Using the Products PageUse the Products page to edit or add products.
• Editing a Product (page 3-13)
• Adding a Product (page 3-14)
3.3.2.6.1 Editing a ProductTo edit or delete a product:
1. Click Products in the navigation menu.
2. To update a product:
a. On the Products page, click the product name.
b. On the Product Details page, edit the fields and click Apply Changes.
Chapter 3Understanding Sample Database Application
3-13
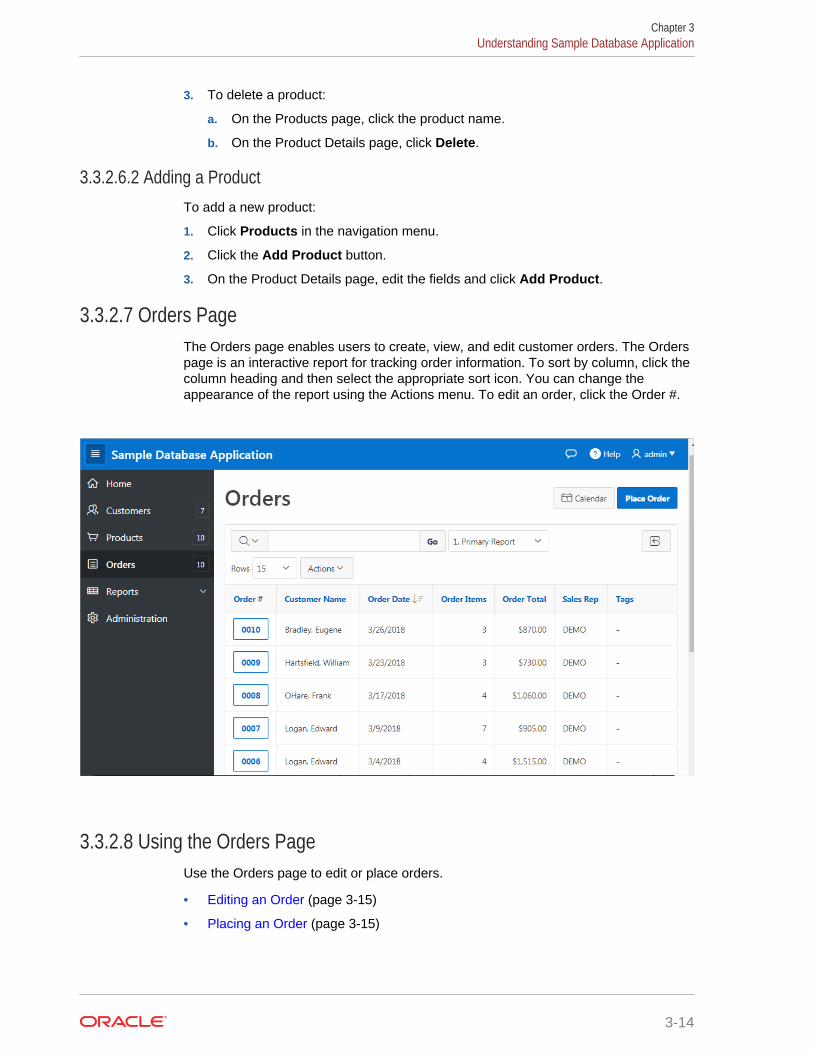
3. To delete a product:
a. On the Products page, click the product name.
b. On the Product Details page, click Delete.
3.3.2.6.2 Adding a ProductTo add a new product:
1. Click Products in the navigation menu.
2. Click the Add Product button.
3. On the Product Details page, edit the fields and click Add Product.
3.3.2.7 Orders PageThe Orders page enables users to create, view, and edit customer orders. The Orderspage is an interactive report for tracking order information. To sort by column, click thecolumn heading and then select the appropriate sort icon. You can change theappearance of the report using the Actions menu. To edit an order, click the Order #.
3.3.2.8 Using the Orders PageUse the Orders page to edit or place orders.
• Editing an Order (page 3-15)
• Placing an Order (page 3-15)
Chapter 3Understanding Sample Database Application
3-14

3.3.2.8.1 Editing an OrderTo edit or delete an order:
1. Click Orders in the navigation menu.
2. To update an order:
a. Click the Order number.
The Order Details page appears.
b. Edit the cells and click Apply Changes.
3. To delete an order:
a. Click the Order number.
The Order Details page appears.
b. Click the check box next to product to be deleted and click Delete.
3.3.2.8.2 Placing an OrderTo create an order:
1. Click Orders in the navigation menu.
2. Click the Place order button.
The Identify Customer wizard appears.
3. Follow the on-screen instructions to enter order information.
4. Click Complete Order.
The order confirmation page appears.
5. Click Close.
3.3.2.9 Reports PageAccess the Reports page to view information in various formats, including bar chart,pie chart, map, tree, and tags. To view a report or chart, select it.
Chapter 3Understanding Sample Database Application
3-15
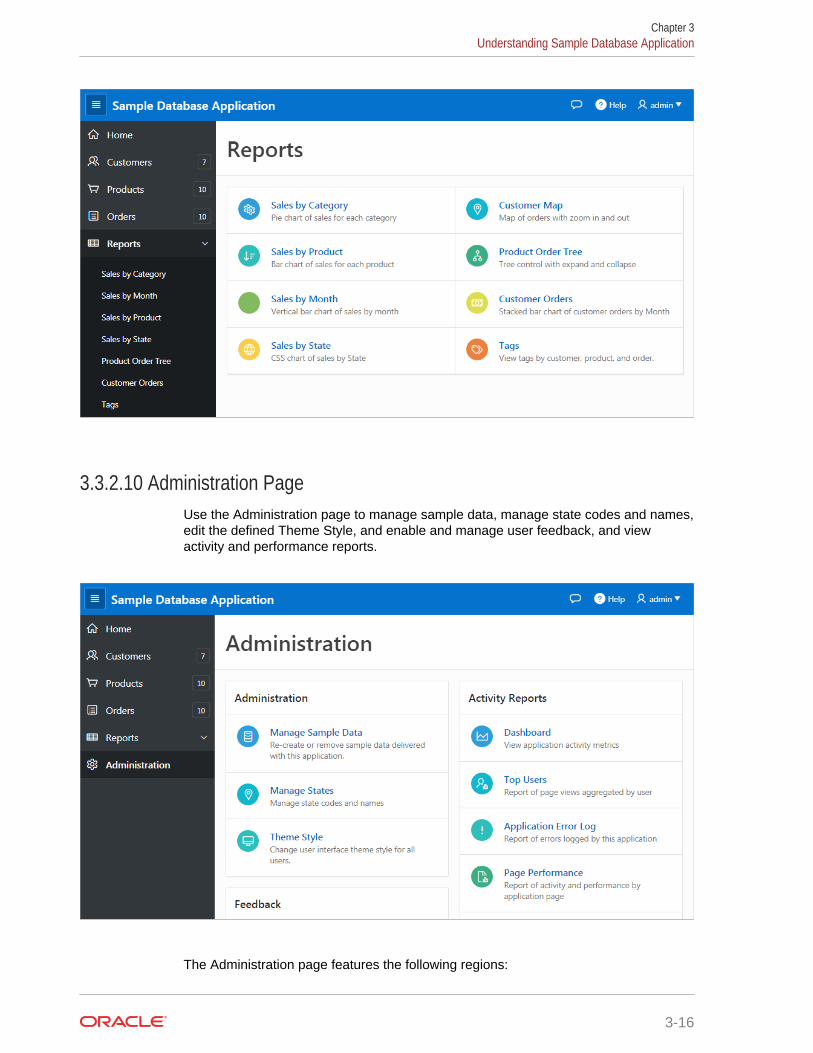
3.3.2.10 Administration PageUse the Administration page to manage sample data, manage state codes and names,edit the defined Theme Style, and enable and manage user feedback, and viewactivity and performance reports.
The Administration page features the following regions:
Chapter 3Understanding Sample Database Application
3-16
• Manage Sample Data - Re-create or remove sample data delivered with thisapplication.
• Manage States - Manage state codes and names.
• Theme Styles - Change user interface theme styles for all users.
• Feedback Settings - Manage if attachment should be allowed.
• User Feedback - View a report of all submitted feedback.
• Top Users - Displays top views aggregated by user.
• Application Error Log - Report of errors logged by this application.
• Page Performance - Reports of activity and performance by application page.
• Page Views - Report of each page view by user inclusing date of access andelapsed time.
3.3.3 Modifying Sample Database ApplicationLearn how to build applications by studying sample applications such as SampleDatabase Application.
• Why Modify a Sample Database Application? (page 3-17)
• Editing Sample Database Application (page 3-18)
See Also:
"Managing Packaged Applications in a Full Development Environment(page 3-2)"
3.3.3.1 Why Modify a Sample Database Application?Once you understand the type of functionality available in a packaged application,such as the Sample Database Application, the next step is to learn more about theconstruction of each page. An efficient way to speed up the learning process is toanalyze and deconstruct the pages in the packaged applications. If you happen tobreak something, you can quickly delete the packaged application and install it again.
Tip:
Oracle Application Express includes two types of packaged applications:sample and productivity applications. By default, sample applications arefully editable. In contrast, you must unlock a productivity application beforeyou can edit it. Unlocking a productivity packaged application makes itineligible for future upgrades or support by Oracle Support.
Chapter 3Understanding Sample Database Application
3-17
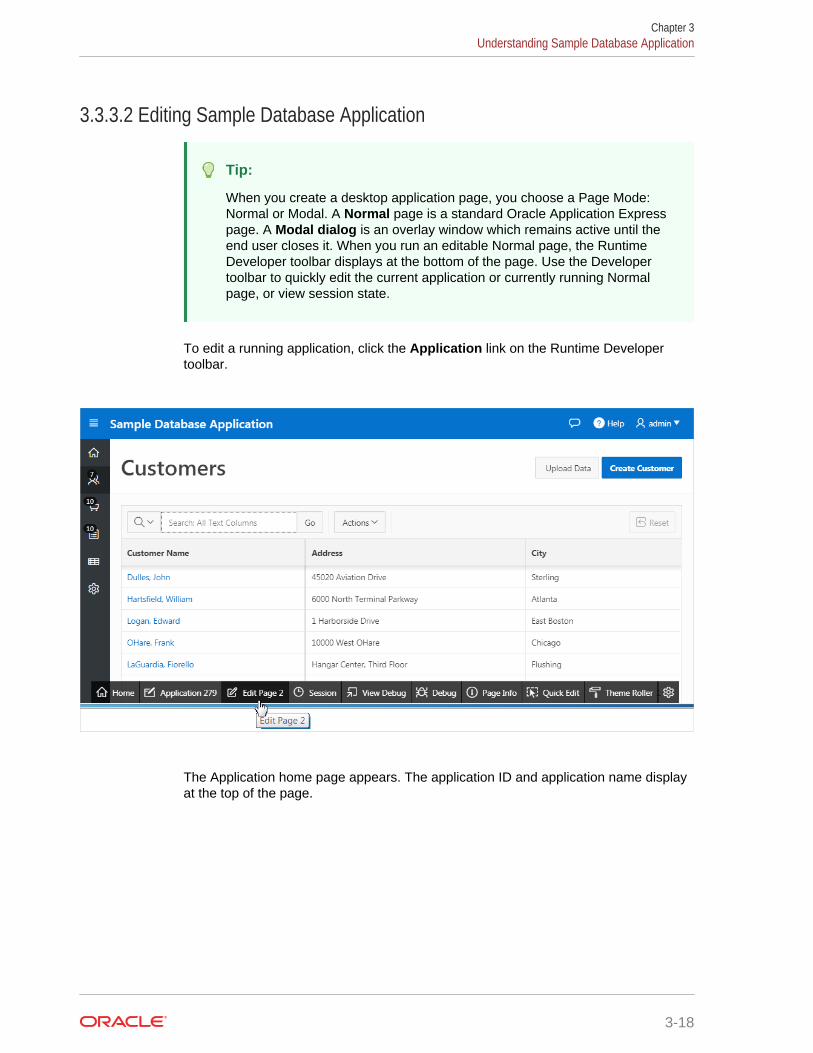
3.3.3.2 Editing Sample Database Application
Tip:
When you create a desktop application page, you choose a Page Mode:Normal or Modal. A Normal page is a standard Oracle Application Expresspage. A Modal dialog is an overlay window which remains active until theend user closes it. When you run an editable Normal page, the RuntimeDeveloper toolbar displays at the bottom of the page. Use the Developertoolbar to quickly edit the current application or currently running Normalpage, or view session state.
To edit a running application, click the Application link on the Runtime Developertoolbar.
The Application home page appears. The application ID and application name displayat the top of the page.
Chapter 3Understanding Sample Database Application
3-18
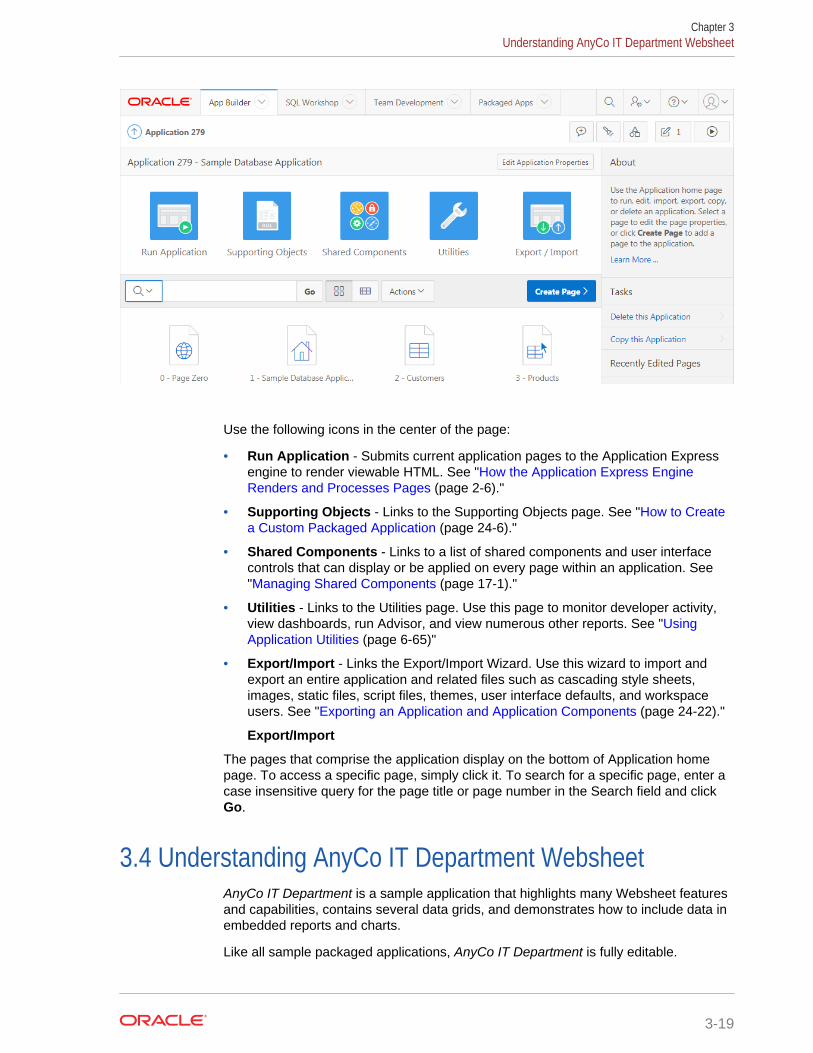
Use the following icons in the center of the page:
• Run Application - Submits current application pages to the Application Expressengine to render viewable HTML. See "How the Application Express EngineRenders and Processes Pages (page 2-6)."
• Supporting Objects - Links to the Supporting Objects page. See "How to Createa Custom Packaged Application (page 24-6)."
• Shared Components - Links to a list of shared components and user interfacecontrols that can display or be applied on every page within an application. See"Managing Shared Components (page 17-1)."
• Utilities - Links to the Utilities page. Use this page to monitor developer activity,view dashboards, run Advisor, and view numerous other reports. See "UsingApplication Utilities (page 6-65)"
• Export/Import - Links the Export/Import Wizard. Use this wizard to import andexport an entire application and related files such as cascading style sheets,images, static files, script files, themes, user interface defaults, and workspaceusers. See "Exporting an Application and Application Components (page 24-22)."
Export/Import
The pages that comprise the application display on the bottom of Application homepage. To access a specific page, simply click it. To search for a specific page, enter acase insensitive query for the page title or page number in the Search field and clickGo.
3.4 Understanding AnyCo IT Department WebsheetAnyCo IT Department is a sample application that highlights many Websheet featuresand capabilities, contains several data grids, and demonstrates how to include data inembedded reports and charts.
Like all sample packaged applications, AnyCo IT Department is fully editable.
Chapter 3Understanding AnyCo IT Department Websheet
3-19
• Installing and Running AnyCo IT Department (page 3-20)Install sample Websheets such as Sample Websheet - AnyCo IT Department onthe Packaged Apps page.
• Understanding Websheet Navigation (page 3-21)Navigate through Websheet pages by expanding and collapsing sections andclicking breadcrumbs.
• Understanding AnyCo IT Department (page 3-22)Sample Websheet - AnyCo IT Department demonstrates how users can sharetext, data, and images using Websheet pages.
• Modifying Websheet Content (page 3-32)Learn how to build a Websheet applications by studying a sample Websheet suchas AnyCo IT Department.
See Also:
"Creating Websheet Applications (page 5-1)" and "Using Websheets" in Oracle Application Express End User Guide
3.4.1 Installing and Running AnyCo IT DepartmentInstall sample Websheets such as Sample Websheet - AnyCo IT Department on thePackaged Apps page.
To install and run Sample Websheet - AnyCo IT Department:
1. Sign in to Oracle Application Express.
The Workspace home page appears.
2. Click the Packaged Apps icon.
The Packaged Apps page appears.
3. Locate and select the Sample Websheet - AnyCo IT Department application.
Tip:
Use the Search field at the top of the page to narrow the display.
The Packaged App Details page appears.
4. Click Install Packaged App.
5. Select an Authentication scheme and click Next.
6. Click Install Packaged App.
A success message appears.
7. To run the application, click the Run icon.
8. Enter the appropriate login credentials:
• Username - Enter your workspace username.
Chapter 3Understanding AnyCo IT Department Websheet
3-20
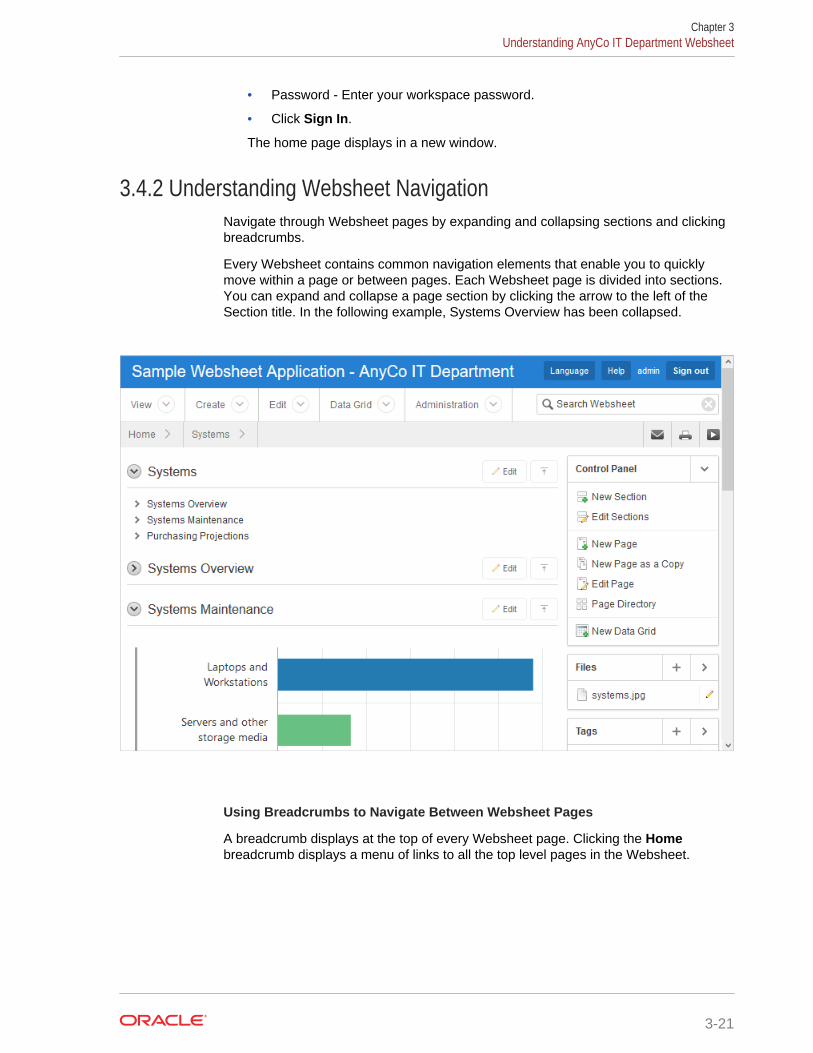
• Password - Enter your workspace password.
• Click Sign In.
The home page displays in a new window.
3.4.2 Understanding Websheet NavigationNavigate through Websheet pages by expanding and collapsing sections and clickingbreadcrumbs.
Every Websheet contains common navigation elements that enable you to quicklymove within a page or between pages. Each Websheet page is divided into sections.You can expand and collapse a page section by clicking the arrow to the left of theSection title. In the following example, Systems Overview has been collapsed.
Using Breadcrumbs to Navigate Between Websheet Pages
A breadcrumb displays at the top of every Websheet page. Clicking the Homebreadcrumb displays a menu of links to all the top level pages in the Websheet.
Chapter 3Understanding AnyCo IT Department Websheet
3-21
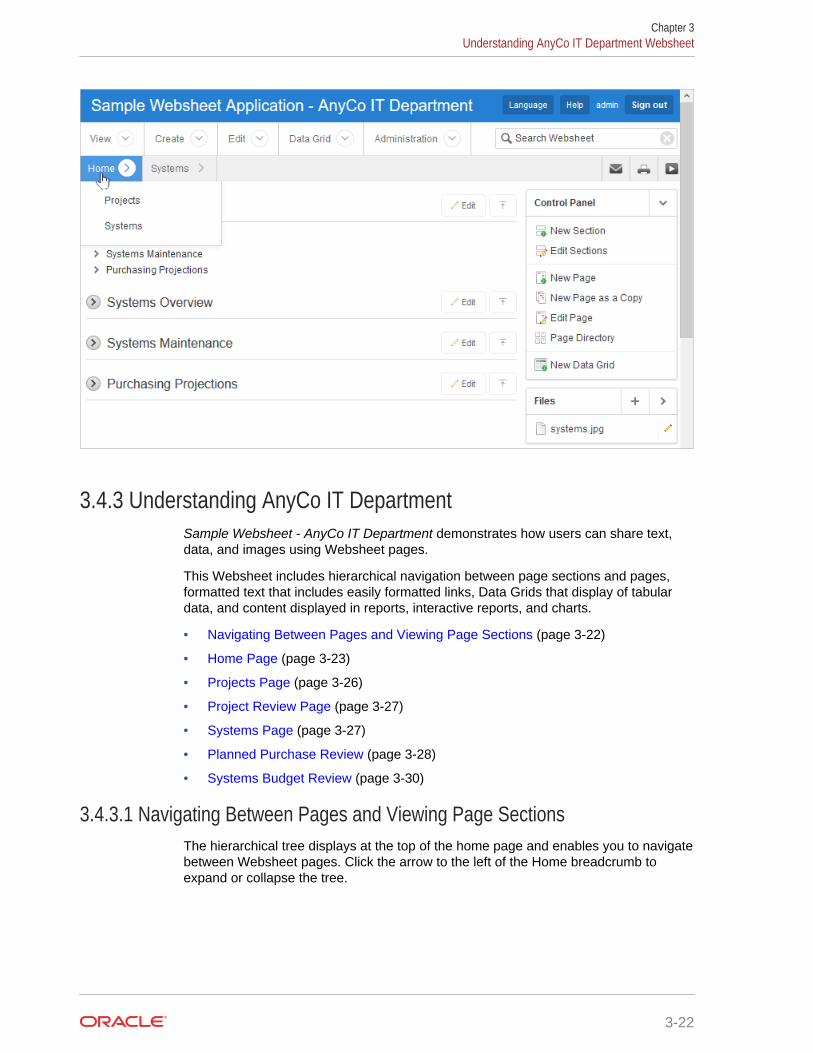
3.4.3 Understanding AnyCo IT DepartmentSample Websheet - AnyCo IT Department demonstrates how users can share text,data, and images using Websheet pages.
This Websheet includes hierarchical navigation between page sections and pages,formatted text that includes easily formatted links, Data Grids that display of tabulardata, and content displayed in reports, interactive reports, and charts.
• Navigating Between Pages and Viewing Page Sections (page 3-22)
• Home Page (page 3-23)
• Projects Page (page 3-26)
• Project Review Page (page 3-27)
• Systems Page (page 3-27)
• Planned Purchase Review (page 3-28)
• Systems Budget Review (page 3-30)
3.4.3.1 Navigating Between Pages and Viewing Page SectionsThe hierarchical tree displays at the top of the home page and enables you to navigatebetween Websheet pages. Click the arrow to the left of the Home breadcrumb toexpand or collapse the tree.
Chapter 3Understanding AnyCo IT Department Websheet
3-22
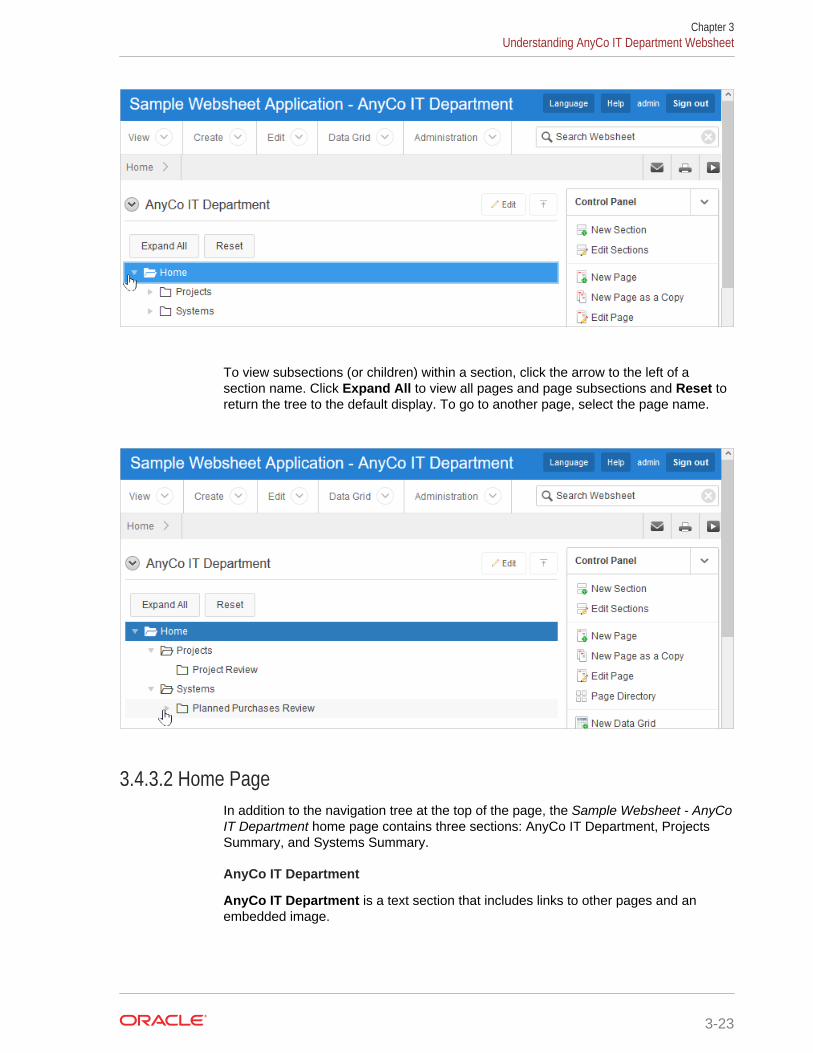
To view subsections (or children) within a section, click the arrow to the left of asection name. Click Expand All to view all pages and page subsections and Reset toreturn the tree to the default display. To go to another page, select the page name.
3.4.3.2 Home PageIn addition to the navigation tree at the top of the page, the Sample Websheet - AnyCoIT Department home page contains three sections: AnyCo IT Department, ProjectsSummary, and Systems Summary.
AnyCo IT Department
AnyCo IT Department is a text section that includes links to other pages and anembedded image.
Chapter 3Understanding AnyCo IT Department Websheet
3-23
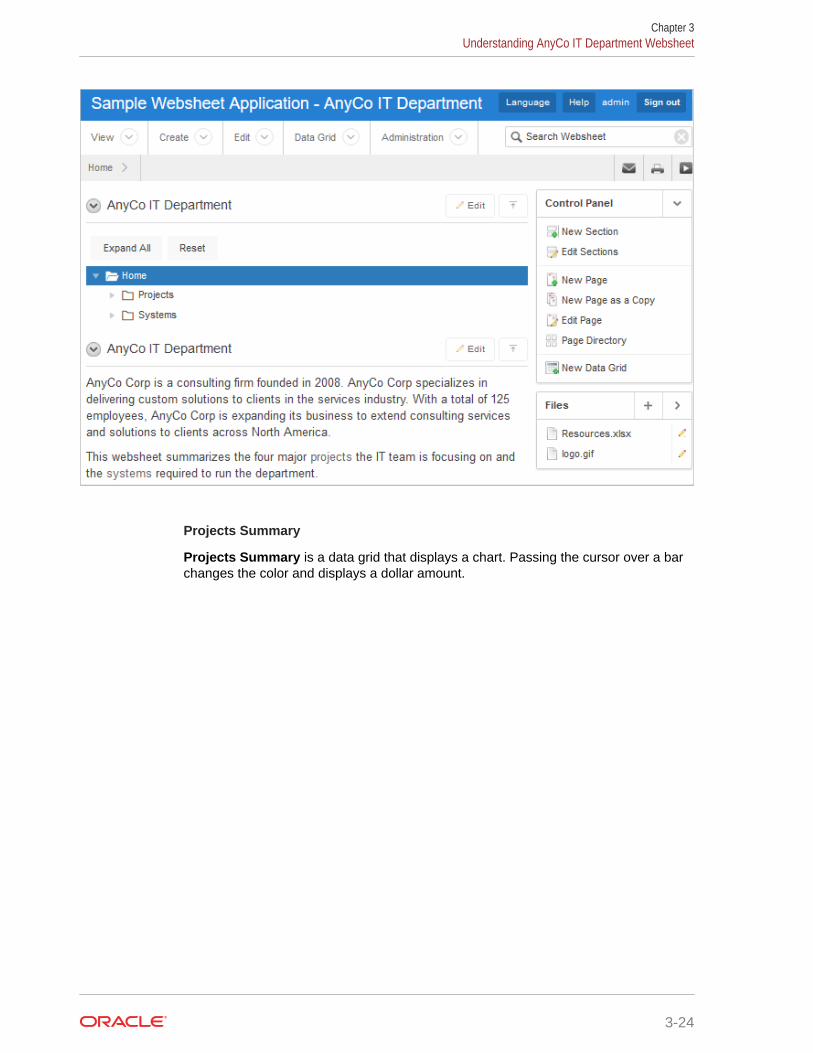
Projects Summary
Projects Summary is a data grid that displays a chart. Passing the cursor over a barchanges the color and displays a dollar amount.
Chapter 3Understanding AnyCo IT Department Websheet
3-24
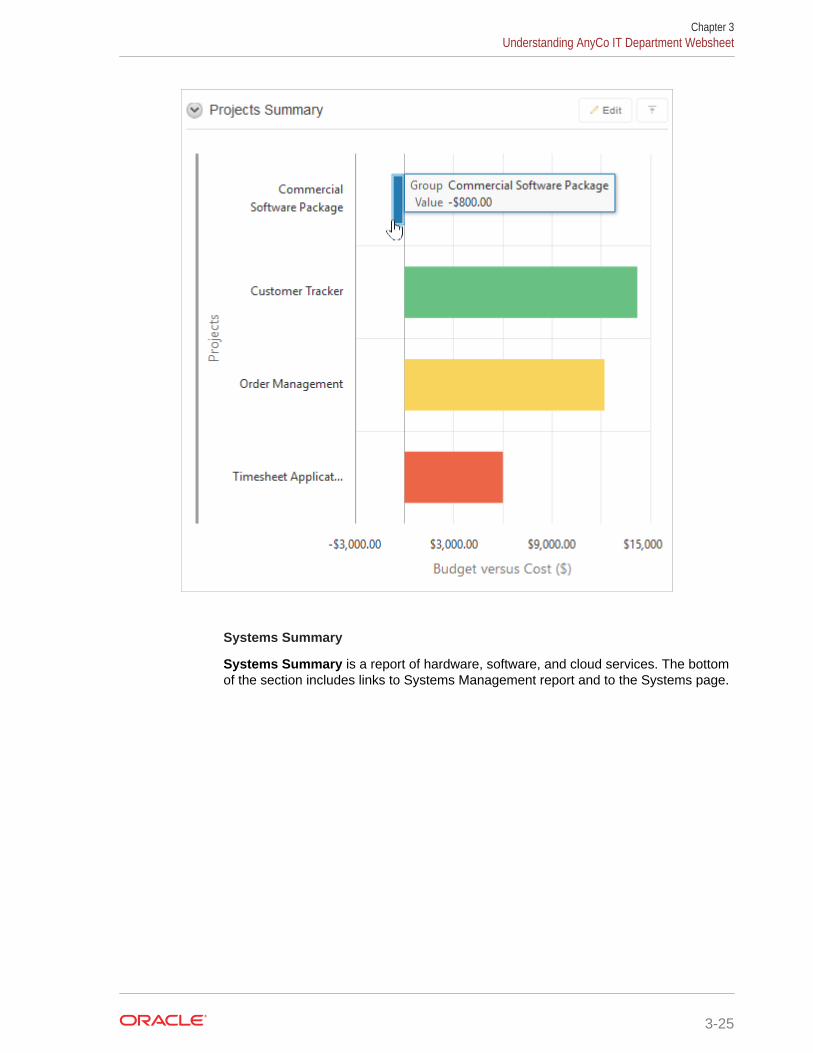
Systems Summary
Systems Summary is a report of hardware, software, and cloud services. The bottomof the section includes links to Systems Management report and to the Systems page.
Chapter 3Understanding AnyCo IT Department Websheet
3-25
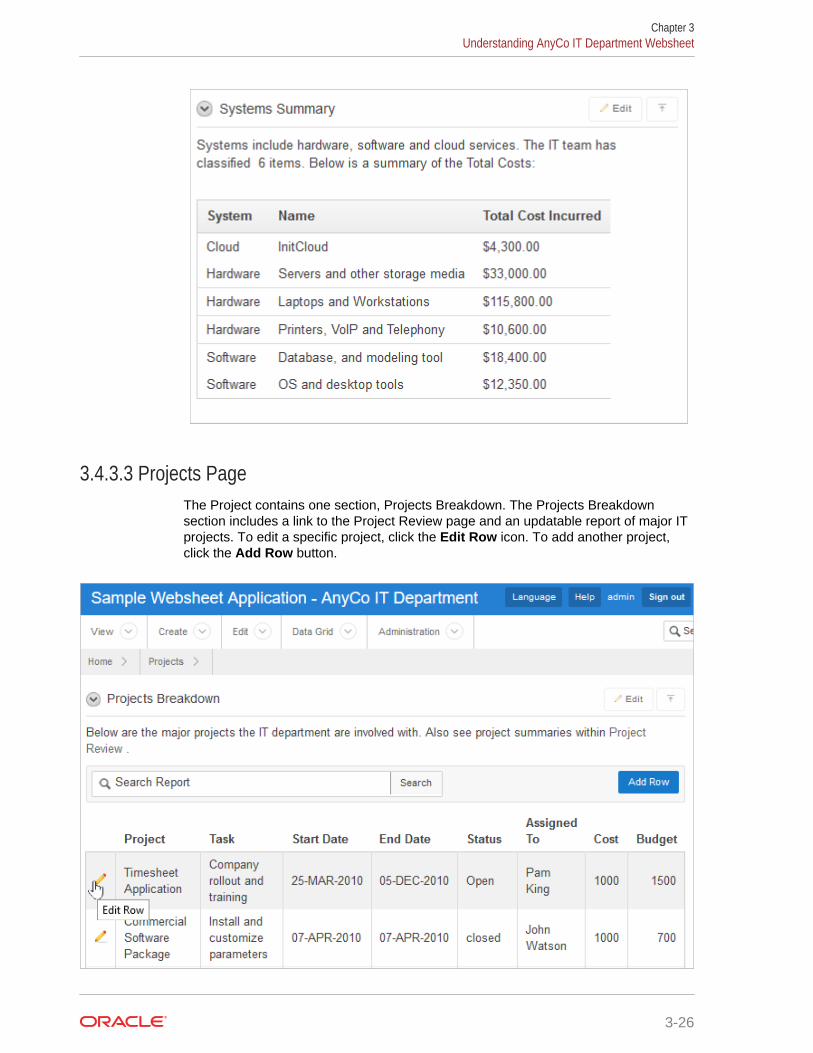
3.4.3.3 Projects PageThe Project contains one section, Projects Breakdown. The Projects Breakdownsection includes a link to the Project Review page and an updatable report of major ITprojects. To edit a specific project, click the Edit Row icon. To add another project,click the Add Row button.
Chapter 3Understanding AnyCo IT Department Websheet
3-26
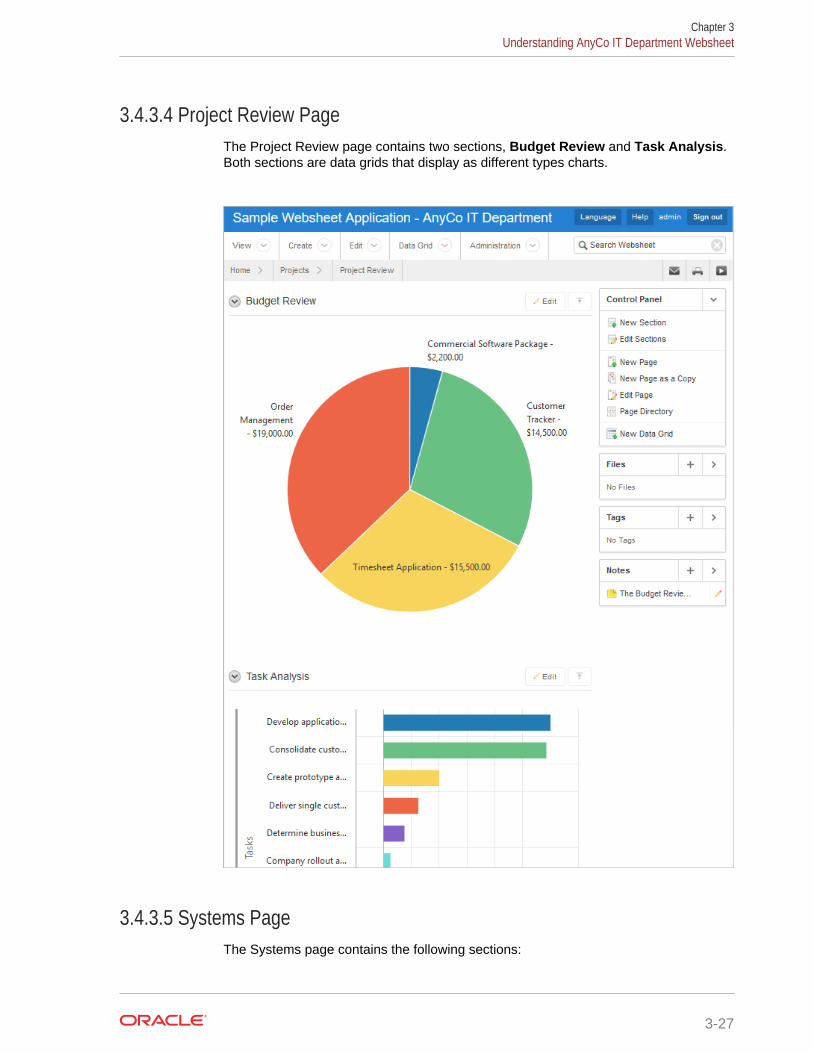
3.4.3.4 Project Review PageThe Project Review page contains two sections, Budget Review and Task Analysis.Both sections are data grids that display as different types charts.
3.4.3.5 Systems PageThe Systems page contains the following sections:
Chapter 3Understanding AnyCo IT Department Websheet
3-27

• Systems is a navigation section that includes links to the sections, SystemsOverview, Systems Maintenance, and Purchasing Projections.
• Systems Overview is a text section that includes an embedded image.
• Systems Maintenance is a data grid that displays a chart. Passing the cursorover a bar changes the color and displays a dollar amount.
• Purchasing Projections features a table that summarizes planned purchases. Toadd a new entry, click Add Row.
3.4.3.6 Planned Purchase ReviewThe Planned Purchase Review page contains two sections:
• Vendor Analysis is report of vendors.
• Total Planned Purchases is a data grid that displays a chart. Passing the cursorover a bar changes the color and displays a dollar amount.
Chapter 3Understanding AnyCo IT Department Websheet
3-28

Chapter 3Understanding AnyCo IT Department Websheet
3-29
3.4.3.7 Systems Budget ReviewThe Systems Budget Review page contains two sections:
• Annual Budget Allocation is a report budget categories. To update report item,click the Edit Row icon.
• Remaining Budget for the Year is a data grid that displays a pie chart. Passingthe cursor over a pie section displays the dollar amount.
Chapter 3Understanding AnyCo IT Department Websheet
3-30
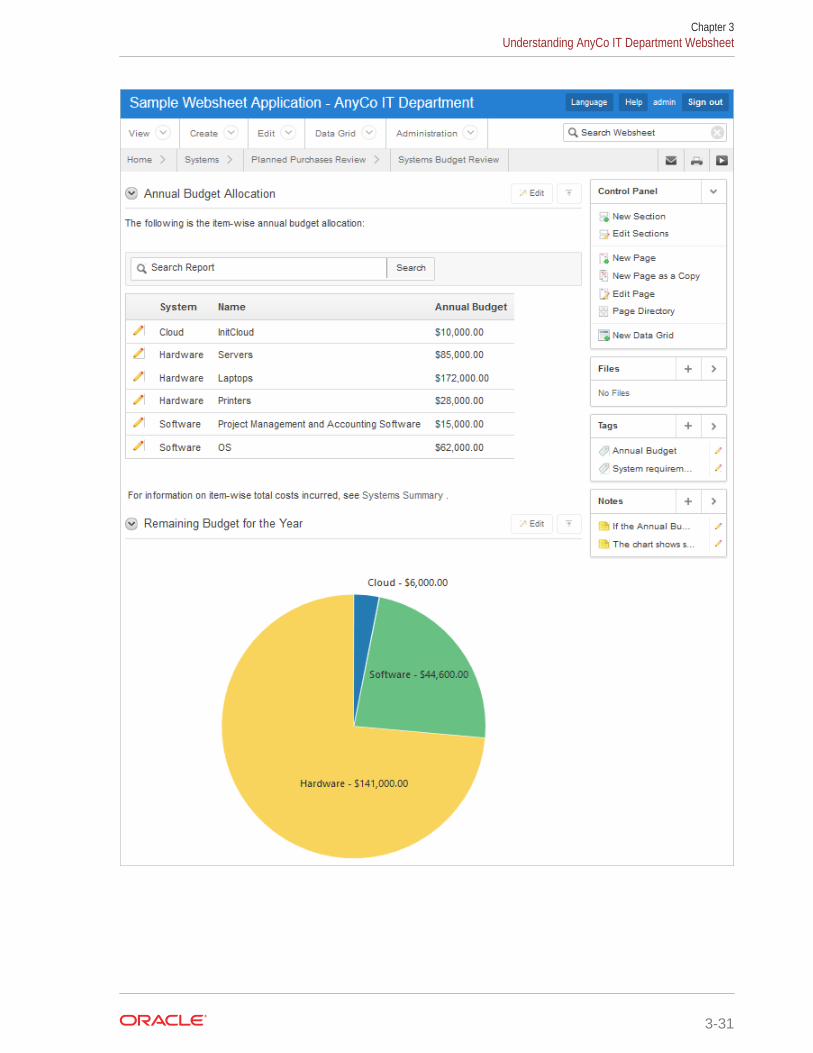
Chapter 3Understanding AnyCo IT Department Websheet
3-31
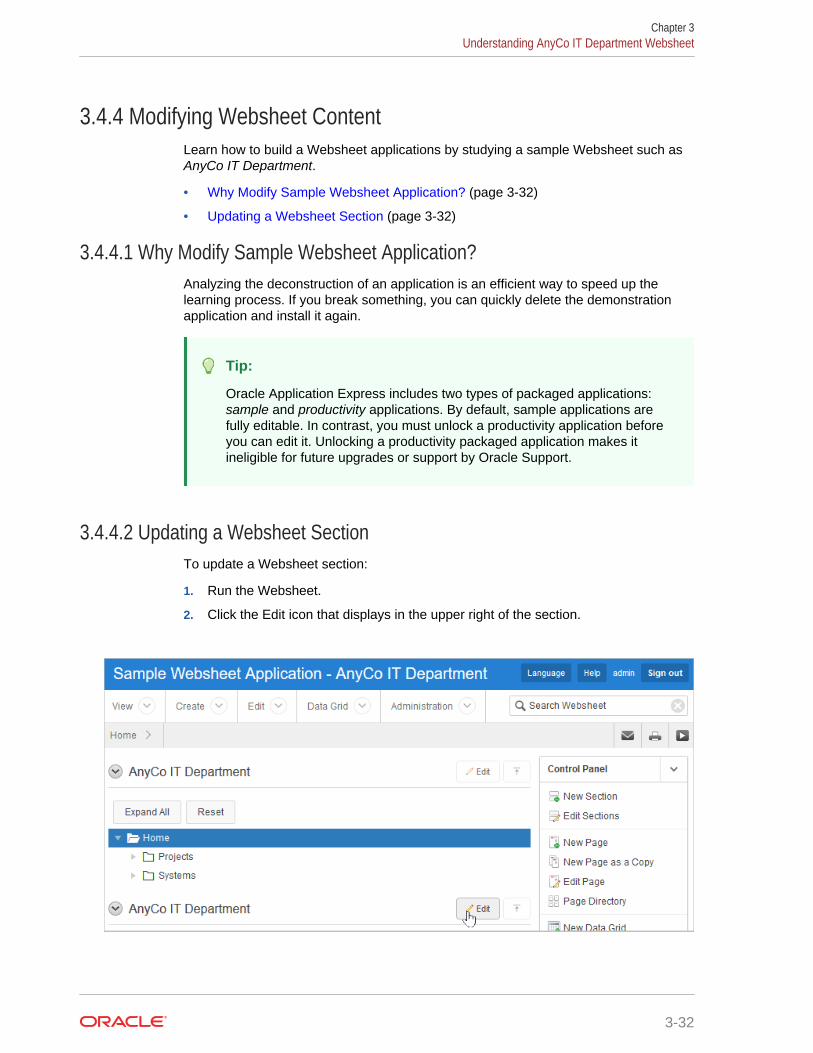
3.4.4 Modifying Websheet ContentLearn how to build a Websheet applications by studying a sample Websheet such asAnyCo IT Department.
• Why Modify Sample Websheet Application? (page 3-32)
• Updating a Websheet Section (page 3-32)
3.4.4.1 Why Modify Sample Websheet Application?Analyzing the deconstruction of an application is an efficient way to speed up thelearning process. If you break something, you can quickly delete the demonstrationapplication and install it again.
Tip:
Oracle Application Express includes two types of packaged applications:sample and productivity applications. By default, sample applications arefully editable. In contrast, you must unlock a productivity application beforeyou can edit it. Unlocking a productivity packaged application makes itineligible for future upgrades or support by Oracle Support.
3.4.4.2 Updating a Websheet SectionTo update a Websheet section:
1. Run the Websheet.
2. Click the Edit icon that displays in the upper right of the section.
Chapter 3Understanding AnyCo IT Department Websheet
3-32
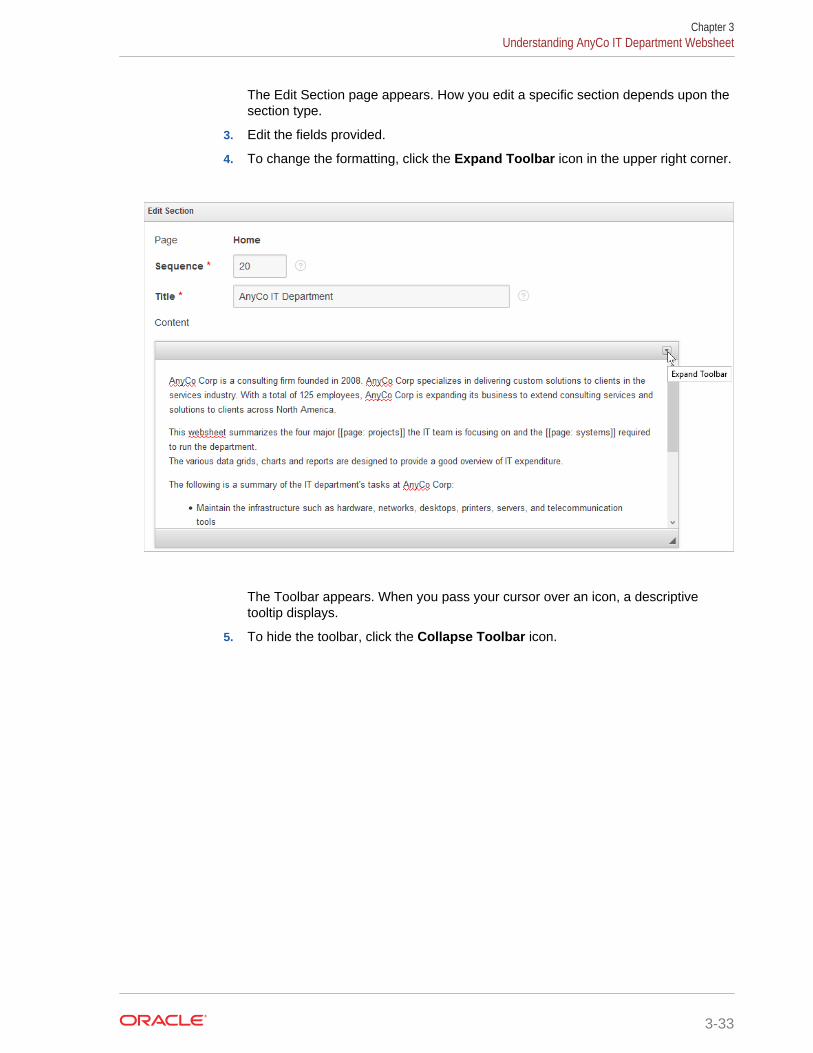
The Edit Section page appears. How you edit a specific section depends upon thesection type.
3. Edit the fields provided.
4. To change the formatting, click the Expand Toolbar icon in the upper right corner.
The Toolbar appears. When you pass your cursor over an icon, a descriptivetooltip displays.
5. To hide the toolbar, click the Collapse Toolbar icon.
Chapter 3Understanding AnyCo IT Department Websheet
3-33
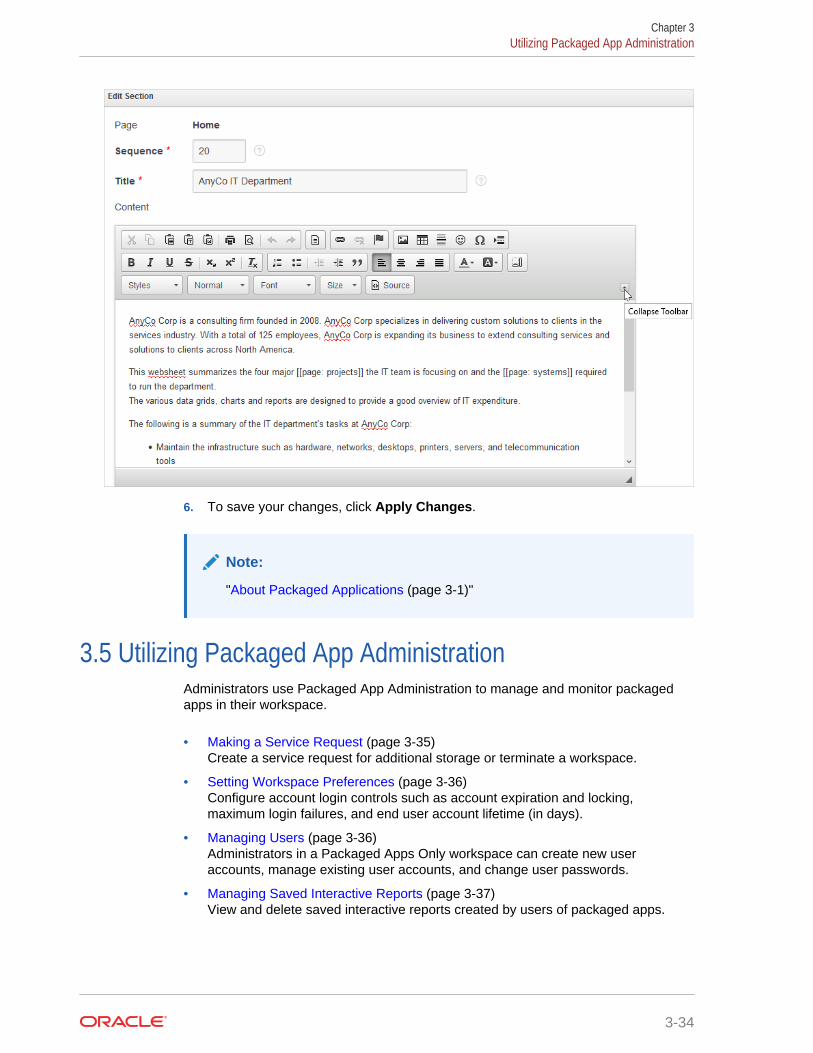
6. To save your changes, click Apply Changes.
Note:
"About Packaged Applications (page 3-1)"
3.5 Utilizing Packaged App AdministrationAdministrators use Packaged App Administration to manage and monitor packagedapps in their workspace.
• Making a Service Request (page 3-35)Create a service request for additional storage or terminate a workspace.
• Setting Workspace Preferences (page 3-36)Configure account login controls such as account expiration and locking,maximum login failures, and end user account lifetime (in days).
• Managing Users (page 3-36)Administrators in a Packaged Apps Only workspace can create new useraccounts, manage existing user accounts, and change user passwords.
• Managing Saved Interactive Reports (page 3-37)View and delete saved interactive reports created by users of packaged apps.
Chapter 3Utilizing Packaged App Administration
3-34
• Managing Interactive Report Subscriptions (page 3-37)View and manage interactive report subscriptions created by users of packagedapps.
• Viewing Activity Reports (page 3-37)View a monthly calendar of packaged app activity that details users and total pageviews by day.
• Viewing Page Views (page 3-38)View a report of packaged app page views detailing the app, page, user, andelapsed time.
• Viewing Top Users (page 3-38)View a report of packaged app page views aggregated by user.
See Also:
"Workspace and Application Administration" in Oracle Application ExpressAdministration Guide
3.5.1 Making a Service RequestCreate a service request for additional storage or terminate a workspace.
Tip:
Only users with administrator rights can access this functionality.
To make a service request for more storage or to terminate service:
1. Sign in to Oracle Application Express.
2. Click Packaged Apps.
3. Click Administration.
4. Click Make a Service Request.
5. To identify the type of service you would like to request, select one of thefollowing:
• Request Storage
• Request Termination
Tip:
To see the amount of free space available in a workspace, expandTablespace Utilization and select Detailed Tablespace UtilizationReport (may take several seconds).
6. Follow the on-screen instructions.
Chapter 3Utilizing Packaged App Administration
3-35
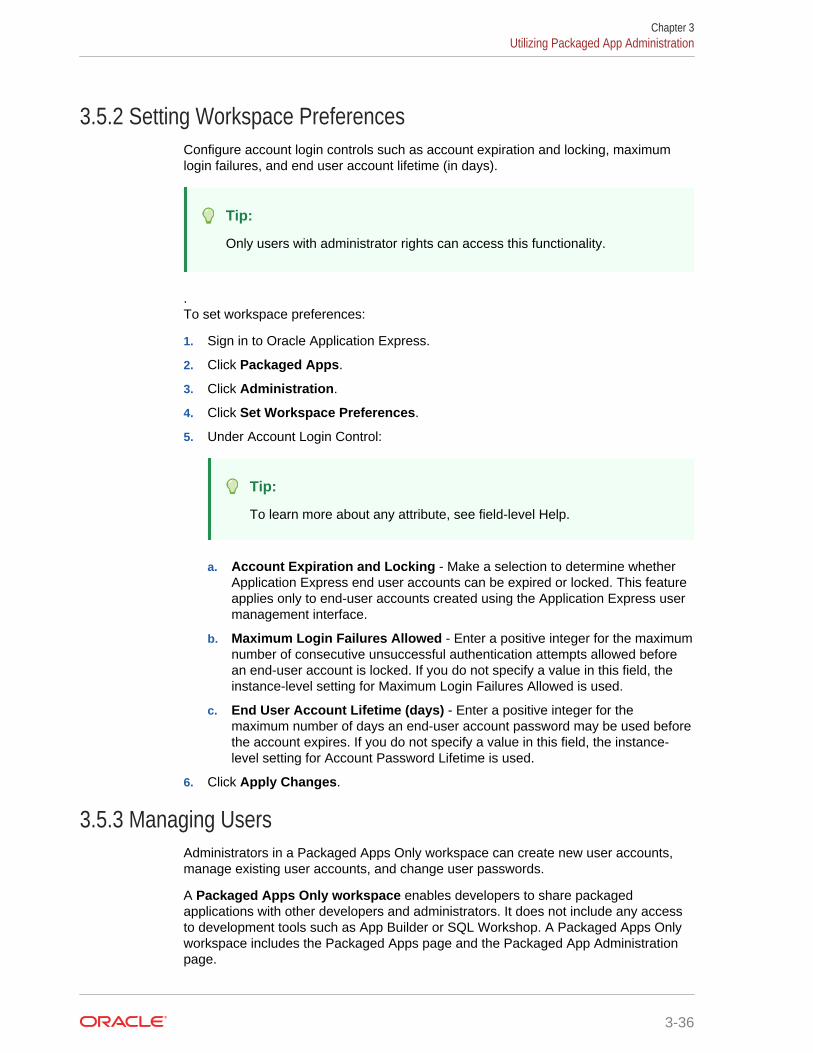
3.5.2 Setting Workspace PreferencesConfigure account login controls such as account expiration and locking, maximumlogin failures, and end user account lifetime (in days).
Tip:
Only users with administrator rights can access this functionality.
.To set workspace preferences:
1. Sign in to Oracle Application Express.
2. Click Packaged Apps.
3. Click Administration.
4. Click Set Workspace Preferences.
5. Under Account Login Control:
Tip:
To learn more about any attribute, see field-level Help.
a. Account Expiration and Locking - Make a selection to determine whetherApplication Express end user accounts can be expired or locked. This featureapplies only to end-user accounts created using the Application Express usermanagement interface.
b. Maximum Login Failures Allowed - Enter a positive integer for the maximumnumber of consecutive unsuccessful authentication attempts allowed beforean end-user account is locked. If you do not specify a value in this field, theinstance-level setting for Maximum Login Failures Allowed is used.
c. End User Account Lifetime (days) - Enter a positive integer for themaximum number of days an end-user account password may be used beforethe account expires. If you do not specify a value in this field, the instance-level setting for Account Password Lifetime is used.
6. Click Apply Changes.
3.5.3 Managing UsersAdministrators in a Packaged Apps Only workspace can create new user accounts,manage existing user accounts, and change user passwords.
A Packaged Apps Only workspace enables developers to share packagedapplications with other developers and administrators. It does not include any accessto development tools such as App Builder or SQL Workshop. A Packaged Apps Onlyworkspace includes the Packaged Apps page and the Packaged App Administrationpage.
Chapter 3Utilizing Packaged App Administration
3-36
Tip:
Only users with administrator rights can access this functionality. This optionis only available in a Packaged Apps Only workspace, but not in fullworkspace.
To manage users in a Packaged Apps Only workspace:
1. Sign in to the Packaged Apps Only workspace.
2. Click Packaged App Administration.
3. Click Manage Users.
Managing users works the same in a Packaged Apps Only workspace as it doesat the workspace-level.
3.5.4 Managing Saved Interactive ReportsView and delete saved interactive reports created by users of packaged apps.
To manage saved interactive reports:
1. Sign in to Oracle Application Express.
2. Click Packaged Apps.
3. Click Administration.
4. Click Saved Reports.
Managing saved interactive reports works the same in a Packaged Apps Onlyworkspace as it does at the workspace-level.
3.5.5 Managing Interactive Report SubscriptionsView and manage interactive report subscriptions created by users of packaged apps.
To manage interactive report subscriptions:
1. Sign in to Oracle Application Express.
2. Click Packaged Apps.
3. Click Administration.
4. Click Subscriptions.
Managing interactive report subscriptions works the same in a Packaged AppsOnly workspace as it does at the workspace-level.
3.5.6 Viewing Activity ReportsView a monthly calendar of packaged app activity that details users and total pageviews by day.
To view Packaged App Activity report:
Chapter 3Utilizing Packaged App Administration
3-37
1. Sign in to Oracle Application Express.
2. Click Packaged Apps.
3. Click Administration.
4. Click Packaged App Activity.
A monthly calendar of application activity appears.
3.5.7 Viewing Page ViewsView a report of packaged app page views detailing the app, page, user, and elapsedtime.
To view the Page View report:
1. Sign in to Oracle Application Express.
2. Click Packaged Apps.
3. Click Administration.
4. Click Page Views.
3.5.8 Viewing Top UsersView a report of packaged app page views aggregated by user.
To view the Top Users report:
1. Sign in to Oracle Application Express.
2. Click Packaged Apps.
3. Click Administration.
4. Click Top Users.
3.6 Using a Packaged Apps Only WorkspaceA Packaged Apps Only workspace enables developers to share packaged applicationswith other developers and administrators.
Note:
This information does not apply to Oracle Database Cloud Service(Database Schema).
• What Is a Packaged Apps Only Workspace? (page 3-39)
• Requesting a Packaged Apps Only Workspace (page 3-39)
• Signing In To a Packaged Apps Only Workspace (page 3-39)
• Using the Packaged App Page (page 3-40)
Chapter 3Using a Packaged Apps Only Workspace
3-38
3.6.1 What Is a Packaged Apps Only Workspace?A Packaged Apps Only workspace includes the Packaged Apps page and thePackaged App Administration page. It does not include any access to developmenttools such as App Builder or SQL Workshop. A Packaged Apps Only workspaceincludes the Packaged Apps page and the Packaged App Administration page. Youcan create a Packaged Apps Only workspace so that developers and administratorscan share packaged applications.
Tip:
End users cannot access a Packaged Apps Only workspace. End users canonly run existing database or Websheet applications.
3.6.2 Requesting a Packaged Apps Only WorkspaceTo request a Packaged Apps Only workspace:
1. In a web browser, navigate to the Oracle Application Express Sign In page.
The Sign In page appears.
2. Under Workspace, click Request a Workspace.
The Request Service Wizard appears.
3. Select Packaged Apps Only and click Next.
4. Follow the on-screen instructions.
To learn more, see field-level Help.
Tip:
You can manually control whether a workspace includes development tools,such as App Builder, by disabling access to development components. See "Configuring Workspace Preferences" and "Managing ComponentAvailability for an Instance" in Oracle Application Express AdministrationGuide.
3.6.3 Signing In To a Packaged Apps Only Workspace
Tip:
Sample applications are not available in a Packaged App Only workspace.Otherwise, the Packaged Apps page in a Packaged Apps Only workspaceworks the same as in a full development environment. See "ManagingPackaged Applications in a Full Development Environment (page 3-2)."
Chapter 3Using a Packaged Apps Only Workspace
3-39
To sign in to a Packaged Apps Only workspace:
1. Sign in to the Packaged Apps Only workspace.
2. Click the Packaged Apps icon.
The Packaged Apps page appears.
3. Click Packaged App Administration to access the Packaged ApplicationAdministration page.
See Also:
"Utilizing Packaged App Administration (page 3-34)."
3.6.4 Using the Packaged App Page
Tip:
Sample applications are not available in a Packaged App Only workspace.Otherwise, the Packaged Apps page in a Packaged Apps Only workspaceworks the same as in a full development environment. See "ManagingPackaged Applications in a Full Development Environment (page 3-2)."
To access the Packaged App page:
1. Sign in to the Packaged Apps Only workspace.
2. Click the Packaged Apps icon.
The Packaged Apps page appears.
3. To search for an application, enter search terms in Search field.
4. Select an application to view.
The Packaged Application Details page appears. Use this page to viewinformation about a packaged application, install an application, remove anapplication, or change the authentication of a previously installed packagedapplication.
Chapter 3Using a Packaged Apps Only Workspace
3-40
4Managing the Application Life Cycle withTeam Development
Team Development enables you to manage the development process by tracking newfeatures, non-feature related tasks (or To Dos), bugs, and milestones. Users can alsoprovide real-time feedback which then can be categorized into To Dos, bugs, orfeatures.
• Accessing Team Development (page 4-2)Access Team Development by clicking the Team Development icon on theWorkspace home page.
• Team Development Home Page (page 4-2)The Team Development home page is the starting point for tracking new features,non-feature related tasks (also known as To Dos), bugs, and milestones.
• Tracking Features (page 4-3)Track features from initial concept through implementation. You can organizefeatures by release, assignee, tags, or associated milestones.
• Tracking Milestones (page 4-11)Track and manage important milestones associated with features, bugs, and ToDos.
• Tracking To Dos (page 4-14)Track To Dos (or assignments) associated with features and milestones.
• Managing Bugs (page 4-18)Track bugs (or software defects) associated with your application. You can assignbugs to developers, associate bugs with milestones, or track bugs by due date,status, and other attributes.
• Managing Feedback (page 4-22)Feedback provides a mechanism for end users to post general comments forapplication administrators and developers.
• Managing Team Development Utilities (page 4-28)Use Team Development Utilities to configure Team Development settings, viewrelease summary information, enable support for file upload, access featureutilities, manage focus areas, update assignees, view uploaded files, purge data,manage news, and update links.
See Also:
"Managing Team Development" in Oracle Application Express AdministrationGuide
4-1
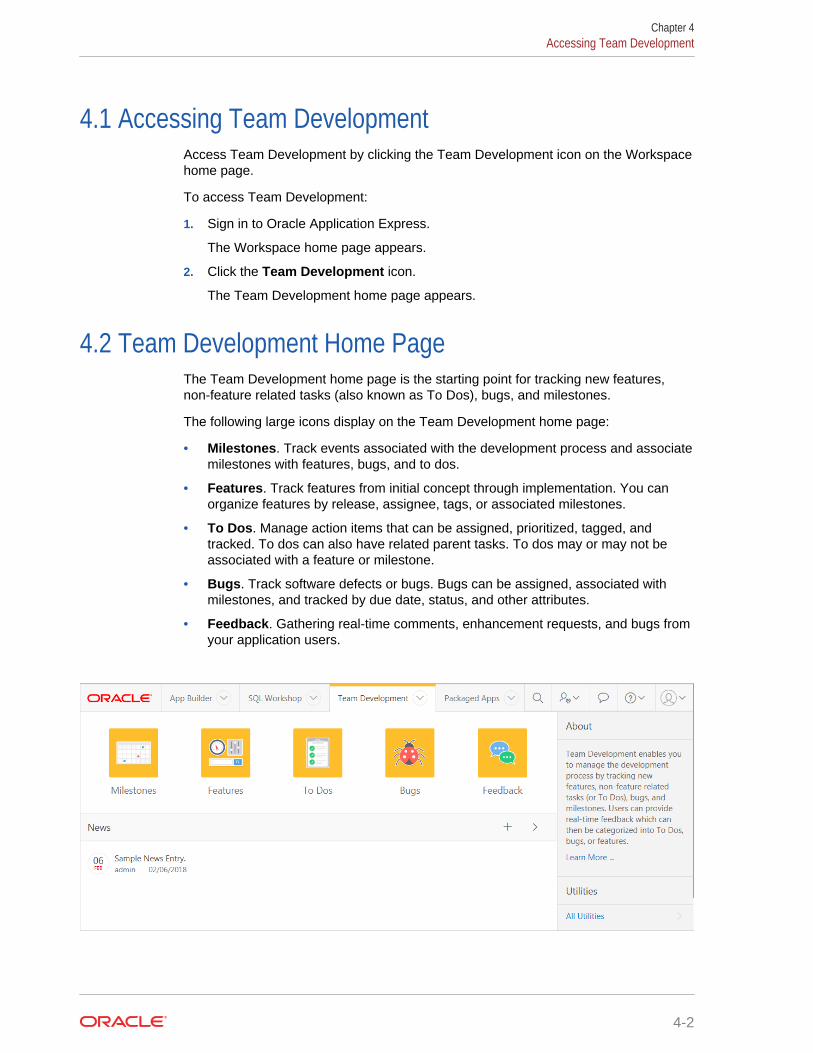
4.1 Accessing Team DevelopmentAccess Team Development by clicking the Team Development icon on the Workspacehome page.
To access Team Development:
1. Sign in to Oracle Application Express.
The Workspace home page appears.
2. Click the Team Development icon.
The Team Development home page appears.
4.2 Team Development Home PageThe Team Development home page is the starting point for tracking new features,non-feature related tasks (also known as To Dos), bugs, and milestones.
The following large icons display on the Team Development home page:
• Milestones. Track events associated with the development process and associatemilestones with features, bugs, and to dos.
• Features. Track features from initial concept through implementation. You canorganize features by release, assignee, tags, or associated milestones.
• To Dos. Manage action items that can be assigned, prioritized, tagged, andtracked. To dos can also have related parent tasks. To dos may or may not beassociated with a feature or milestone.
• Bugs. Track software defects or bugs. Bugs can be assigned, associated withmilestones, and tracked by due date, status, and other attributes.
• Feedback. Gathering real-time comments, enhancement requests, and bugs fromyour application users.
Chapter 4Accessing Team Development
4-2
News Region
Use the News region to communicate with other developers. You can add new or viewnews entries posted by other workspace users. News displays on the ApplicationExpress home page, the Team Development home page, and the News page.
Utilities Region
The Utilities region displays on the right side of the page and offers quick access toTeam Development Utilities page. To access the Utilities page, click All Utilities orclick a specific link.
Summary Regions
The bottom of the Team Development home page features the following summaryregions:
• Milestones. Provides a summary of the number of days to the final releasemilestone.
• Bugs. Provides a summary of closed bugs.
• Features. Lists a percentage of features that are functionally complete.
• To Dos. Lists a percentage of completed To Dos.
• Feedback. Displays recent feedback entries.
• Team Development Summary. Lists the total number of features, to dos,milestones, bugs, and feedback entries.
• Tags. Displays a weighted list of all the tags associated with all TeamDevelopment components. Click the hyperlinks to link to a search page displayingall components with the selected tag. You can use the Tags summary to bettermanage Team Development components. To populate this summary, edit theTeam Development component (that is, feature, To Do task, bug, and feedbackentry and update the Tags field.
Tip:
Most summary regions display a plus (+) sign and greater than sign (>) in theupper right corner. Click the plus (+) sign to add a component and click thegreater than sign (>) to link to the component dashboard page.
4.3 Tracking FeaturesTrack features from initial concept through implementation. You can organize featuresby release, assignee, tags, or associated milestones.
• Viewing the Features Report (page 4-4)
• Creating a Feature (page 4-4)
• About Feature Email Notifications (page 4-5)
Chapter 4Tracking Features
4-3
• Updating or Deleting a Feature (page 4-6)
• About Creating Parent Features (page 4-6)
• How to Attach Files to a Feature (page 4-6)
• Viewing Other Feature Reports (page 4-8)
• Assigning or Updating Milestones Associated with Features (page 4-11)
4.3.1 Viewing the Features ReportUse the Features report to view and edit existing features, create new features, ordelete features.
To view features:
1. On the Workspace home page, click the Team Development icon.
2. Click the Features icon.
The Features Dashboard displays an overview of features defined within theworkspace.
3. You can customize the display by making selections from the Release, ApprovalStatus, Assignee, or Application lists and clicking Set.
4. Click the Report tab.
The Features Report page appears.
5. Customize the Features Report as you would any other interactive grid.
6. To view a feature, click the feature name.
4.3.2 Creating a FeatureTo create a feature:
1. On the Workspace home page, click the Team Development icon.
2. Click the Features icon.
The Features Dashboard displays an overview of features defined within theworkspace.
3. Click Create Feature.
The Features dialog appears. Edit the appropriate fields.
4. Under Features:
Mandatory fields are marked with a red asterisk (*).
• Feature - Descriptive name of this feature.
• Tags - Tags are keywords that further describe this feature. Separate multipletags with commas. Tags display in a separate column in Report view.
• Owner - Person responsible for this feature. To add values to this list, enter aname in the New Owner field.
• Contributor - Another person who contributes to this feature. To add values tothis list, enter a name in the New Contributor field.
Chapter 4Tracking Features
4-4
• Focus Area - Associates the feature to a specific focus area (or category). Toadd values to this list, enter a name in the New Focus Area field.
• Committed Feature - Indicates whether the feature is a committed feature forthe current release
• Approval Status - Approval status of the feature. Indicates if the feature is tobe implemented and the current progress. Approval Status options are presetand cannot be configured.Approval Status only displays if enabled in Team Development Settings.
• Estimated Effort (in hours) - Estimated time need to complete this feature.
• Progress Status - Status of the feature. Indicates if the feature is to beimplemented and the current progress. Status codes are preset and notconfigurable.
• Desirability - The importance of the feature.
• Priority - Priority or importance of the feature. Priorities are preset and notconfigurable.
• Parent - Parent of this feature. Only features from the currently selectedrelease will be display.
5. Under Dates:
• Milestone - Important events during this development cycle.
• Start Date - Date feature implementation begins.
• Due Date / Date Completed - Date feature implementation ends. If notprovided, this date default to the Milestone date.
6. Under Summary:
• Publish this Feature - Select Yes to make this feature viewable to a broaderaudience.
• Summary (displayed if Published) - High level feature description designedto be published to a broad audience.
7. Click Create Feature.
4.3.3 About Feature Email NotificationsWhen you create a new features or update an existing feature, an email notification issent to the feature owner and contributor and any assignees listed under UserInterface, Testing, and Documentation.
About Subscribing and Unsubscribing to Features
Users who are not associated with a feature, can also receive email notifications bysubscribing to the feature.
To subscribe or unsubscribe to a feature, go to the Features report, select the featurename, and click Subscribe or Unsubscribe as appropriate..
Chapter 4Tracking Features
4-5
4.3.4 Updating or Deleting a FeatureWhen you update an existing feature, an email notification is sent to the feature ownerand contributor and any assignees listed under User Interface, Testing, andDocumentation. Users who are not associated with a feature, can also receive emailnotifications by subscribing to the feature.
To update or delete a feature:
1. On the Workspace home page, click the Team Development icon.
2. Click the Features icon.
The Features Dashboard appears.
3. Click the Report tab.
The Report page appears.
4. To update a feature:
a. Click the feature name.
b. Edit the appropriate fields.
To learn more about an attribute, see field-level Help.
c. Some select lists are editable. To add new values to editable select lists, entera value in the field with the title New.
d. Click Apply Changes.
5. To delete a feature:
a. Click the feature name.
b. Click Delete.
4.3.5 About Creating Parent FeaturesYou can group features hierarchically using the Parent Feature attribute. Selecting aParent Feature creates a parent/child relationship. When viewing features in Treeview, features are grouped first by release and then by parent.
4.3.6 How to Attach Files to a FeatureIf enabled at the workspace-level, you can attach files to features.
• Attaching a File to a Feature (page 4-7)
• Viewing, Editing, and Removing Attached Files (page 4-7)
Chapter 4Tracking Features
4-6
See Also:
" Downloading File Attachments (page 4-32)" and "Enabling Support for FileUpload in Team Development" in Oracle Application Express AdministrationGuide.
4.3.6.1 Attaching a File to a FeatureTo use this feature, you must set the Enable File Repository attribute to Yes inAdministration, Manage Service, Set Workspace Preferences.
To attach a file to a feature:
1. On the Workspace home page, click the Team Development icon.
2. Click the Features icon.
The Features Dashboard appears.
3. Click the Report tab.
The Report page appears.
4. Click the feature name.
5. Click the Files tab.
6. Click Add File.
The Add File dialog appears.
7. Locate the file to be attached and click Add File.
4.3.6.2 Viewing, Editing, and Removing Attached FilesTo view, edit, or remove attached files:
1. On the Workspace home page, click the Team Development icon.
2. Click the Features icon.
The Features Dashboard appears.
3. Click the Report tab.
The Report page appears.
4. Click the feature name.
5. Click the Files tab.
6. Click View and Manage Files.
The Files page appears.
7. To download the file, click the name.
8. To edit the file description:
a. Click the Edit icon.
b. Update the description and click Apply Changes.
9. To delete an attached file:
Chapter 4Tracking Features
4-7
a. Click the Edit icon.
b. Click Delete. When prompted, confirm your selection.
4.3.7 Viewing Other Feature ReportsClick the tabs at the top of the Features page to view other reports including Tree,Calendar, History Progress Log, Focus Areas, and Owners.
• Viewing the Features Tree (page 4-8)
• Viewing the Features Calendar (page 4-9)
• Viewing The Feature History Report (page 4-9)
• Viewing the Feature Progress Log (page 4-10)
• Viewing the Feature Focus Areas Chart (page 4-10)
• Viewing the Approval Statuses (page 4-11)
• Viewing the Feature Owners Chart (page 4-11)
See Also:
• "Viewing the Features Report (page 4-4)"
• "Assigning or Updating Milestones Associated with Features(page 4-11)"
• "Accessing Team Development Utilities (page 4-29)"
4.3.7.1 Viewing the Features TreeTo view the Features tree:
1. On the Workspace home page, click the Team Development icon.
2. Click the Features icon.
The Features Dashboard appears.
3. Click the Tree tab.
The Tree page displays features in a hierarchical tree by release.
Features are grouped first by release and then by parent. To expand a grouping,click the small triangle to the left of the feature name.
Tip:
When displaying features by a given release, features with parent orchildren features in different releases do not display.
4. Controls at the top of the page include:
Chapter 4Tracking Features
4-8
• Release - To select a new release, make a selection from the Release list andclick Set.
• Include Percent Complete? - The feature number and percent completedisplay to the right of the feature name. To hide or display the percentcomplete, select Yes or No from Include Percent Complete and click Set.
• Reset - Resets the report to the default view.
• Collapse All - Collapses the tree.
• Expand All - Expands the tree.
• Create Feature - Displays the Feature dialog enabling you to create a newfeature.
5. To edit a feature, select it. When the Feature dialog appears, edit the appropriatefields and click Apply Changes.
6. To delete a feature, select it. When the Feature dialog appears, click Delete.
4.3.7.2 Viewing the Features CalendarTo view the Features Calendar:
1. On the Workspace home page, click the Team Development icon.
2. Click the Features icon.
The Features Dashboard appears.
3. Click the Calendar tab.
The Calendar page displays features by due date or date completed in a calendarformat.
If a parent features have been defined, the due date or date completed displays ina calendar format.
4. Controls at the top of the page include:
• Release - To select a new release, make a selection from the Release list andclick Set.
• Assignee - Select an assignee and click Set.
• Reset - Resets the Calendar to the default view.
• Create Feature - Displays the Feature dialog enabling you to create a newfeature.
• Previous/Next - View to the previous month or the next month.
• Month - View the calendar by month.
• List - View the calendar entries in a list format by day.
5. To edit a feature, select it. When the Feature dialog appears, edit the appropriatefields and click Apply Changes.
6. To delete a feature, select it. When the Feature dialog appears, click Delete.
4.3.7.3 Viewing The Feature History ReportTo view the Feature History report:
Chapter 4Tracking Features
4-9
1. On the Workspace home page, click the Team Development icon.
2. Click the Features icon.
The Features Dashboard appears.
3. Click the History tab.
The Feature History report displays an interactive report of recently changedfeatures, including the old value and new value and who made the update.
4. To customize the report, use the Actions menu in Search bar at the top of thepage. Click Reset return the report to the default view.
5. To view a specific feature, click the feature name.
4.3.7.4 Viewing the Feature Progress LogDevelopers can track completed tasks associated with a feature under Progress.
To view the Feature Progress Log:
1. On the Workspace home page, click the Team Development icon.
2. Click the Features icon.
The Features Dashboard appears.
3. Click the Progress Log tab.
The Progress Log page displays as an interactive report of progress log entries.
4. To customize the report, use the Actions menu in Search bar at the top of thepage. ClickReset return the report to the default view.
5. To edit a log entry, click the Edit icon to the left of the Progress Note.
4.3.7.5 Viewing the Feature Focus Areas ChartThe Focus Areas page displays a chart of the number of features per defined focusarea by release.
To view the Feature Focus Areas chart:
1. On the Workspace home page, click the Team Development icon.
2. Click the Features icon.
The Features Dashboard appears.
3. Click the Focus Areas tab.
The Focus Areas page displays a chart of the number of features per definedfocus area by release.
4. To customize the report, use the Actions menu in Search bar at the top of thepage. ClickReset return the report to the default view.
5. To rename a Focus Area:
a. Click Manage Focus Areas.
b. Locate the Focus Area and click the Edit icon.
c. In Rename To, enter your edits and click Apply Changes.
Chapter 4Tracking Features
4-10
4.3.7.6 Viewing the Approval StatusesTo view Features Approval Statuses:
1. On the Workspace home page, click the Team Development icon.
2. Click the Features icon.
The Features Dashboard appears.
3. Click the Approval Statuses tab.
The Approval Statuses page displays the status and description . To create a newstatus, click Create.
4.3.7.7 Viewing the Feature Owners ChartTo view the Features Owner chart:
1. On the Workspace home page, click the Team Development icon.
2. Click the Features icon.
The Features Dashboard appears.
3. Click the Feature Owners tab.
The Feature Owners page displays a chart of the number of features by owner.
4. To alter the chart, select another Release, Minimum Status, or Maximum Status,and click Set. To return to the default chart, click Reset.
4.3.8 Assigning or Updating Milestones Associated with Features
Use Select a Utility to assign milestones to features, set feature due dates to milestonedates, change milestones for overdue features, or push due dates of open features.
To access Select a Utility:
1. On the Workspace home page, click the Team Development icon.
2. Click the Features icon.
The Features Dashboard appears.
3. Click the Utilities tab.
4. Select one of the following and click Next.
• Assign milestones to features (only those with no milestone currentlyassigned).
• Set feature due date to milestone date (only affects features).
• Push due date of open features.
5. Follow the on-screen instructions.
4.4 Tracking MilestonesTrack and manage important milestones associated with features, bugs, and To Dos.
Chapter 4Tracking Milestones
4-11
• Viewing the Milestones Report (page 4-12)
• Creating a Milestone (page 4-12)
• Updating or Deleting a Milestone (page 4-12)
• Viewing Other Milestone Reports (page 4-13)
4.4.1 Viewing the Milestones ReportTo view milestones:
1. On the Workspace home page, click the Team Development icon.
2. Click the Milestones icon.
The Milestones Dashboard appears.
The Milestones Dashboard displays an overview of milestones within theworkspace. You can filter by release or link to a specific milestone or milestonesby owner.
3. Click the Report tab.
The Milestones Report page displays as an interactive report. You can customizethe appearance of page using the Search bar at the top of the page.
4.4.2 Creating a MilestoneTo create a milestone:
1. On the Workspace home page, click the Team Development icon.
2. Click the Milestones icon.
The Milestones Dashboard page appears.
3. Click Create Milestone.
4. Fill in the appropriate fields. Mandatory fields are marked with a red asterisk (*).
To learn more about an attribute, see field-level Help.
5. To add new values to editable select lists, enter a value in the field with the titleNew. For example, to add name to the Owner list, enter a value in New Owner.
The value you enter is added.
6. Click Create Milestone.
4.4.3 Updating or Deleting a MilestoneTo update a milestone:
1. On the Workspace home page, click the Team Development icon.
2. Click the Milestones icon.
The Milestones Dashboard page appears and displays the following regions:
3. Click the Report tab.
The Milestones Report page appears.
4. Select the milestone.
Chapter 4Tracking Milestones
4-12
5. Click Edit Milestone.
6. Edit the appropriate fields.
To learn more about an attribute, see field-level Help.
7. Click Apply Changes.
4.4.4 Viewing Other Milestone ReportsClick the tabs at the top of the Milestones page to view other reports includingCalendar, By Owner, or Features by Milestone.
• Viewing the Milestone Calendar (page 4-13)
• Viewing the Milestones By Owner Report (page 4-13)
• Viewing the Features by Milestone Report (page 4-14)
See Also:
"Accessing Team Development Utilities (page 4-29)"
4.4.4.1 Viewing the Milestone CalendarTo view the Milestone Calendar:
1. On the Workspace home page, click the Team Development icon.
2. Click the Milestones icon.
The Milestones Dashboard appears.
3. Click the Calendar tab.
The Calendar page displays milestones by date in a calendar format.
4. Controls at the top of the page include:
• Release - Restrict report to a given release, or display all releases and clickSet.
• Create Milestone - Displays the Milestone dialog enabling you to create anew milestone.
• Previous/Next - View to the previous month or the next month.
• Month - View the calendar by month.
• List - View the calendar entries in a list format by day.
4.4.4.2 Viewing the Milestones By Owner ReportTo view the Milestones By Owner report:
1. On the Workspace home page, click the Team Development icon.
2. Click the Milestones icon.
The Milestones Dashboard appears.
Chapter 4Tracking Milestones
4-13
3. Click the By Owner tab.
To alter the report, select another release or milestone and click Set. To return tothe default chart, click Reset.
4. To alter the report, select another release or milestone and click Set.
5. To return to the default chart, click Reset.
6. To edit a milestone, click Edit Milestone.
4.4.4.3 Viewing the Features by Milestone ReportTo view the Features by Milestone report:
1. On the Workspace home page, click the Team Development icon.
2. Click the Milestones icon.
The Milestones Dashboard appears.
3. Click the Features by Milestone tab.
The Feature by Milestone report displays as an interactive report and displaysfeatures associated with each milestone.
4. To customize the report, use the Actions menu in Search bar at the top of thepage. Click Reset return the report to the default view.
5. To view a specific feature, click the feature name.
4.5 Tracking To DosTrack To Dos (or assignments) associated with features and milestones.
To Dos are work assignments associated with features but not directly related tosoftware functionality. You can assign ToDos to developers and organize them bystatus, release, assignee, or application.
• Viewing To Dos (page 4-14)
• Creating a To Do (page 4-15)
• Updating a To Do (page 4-15)
• Managing Files Attached to a To Do (page 4-15)
• Viewing Other To Do Reports (page 4-17)
4.5.1 Viewing To DosTo view To Dos:
1. On the Workspace home page, click the Team Development icon.
2. Click the To Dos icon.
The To Dos Dashboard appears. The To Dos Dashboard displays an overview ofTo Dos within the workspace. You can filter by release, assignee, or application.
3. Click the Report tab.
The To Dos Report page appears.
Chapter 4Tracking To Dos
4-14
4. Customize the report as you would any other interactive grid.
5. To create a new To Do, click Create To Do in the upper right corner.
4.5.2 Creating a To DoTo create a To Do:
1. On the Workspace home page, click the Team Development icon.
2. Click the To Dos icon.
The To Dos dashboard appears.
3. Click Create To Do.
4. Fill in the appropriate fields. Mandatory fields are marked with a red asterisk (*).
To learn more about an attribute, see field-level Help.
5. To add new values to editable select lists, enter a value in the field with the titleNew. For example, to add name to the Assigned To list, enter a value in NewAssignee.
The value you enter is added.
6. Click Create To Do.
4.5.3 Updating a To DoTo update a To Do:
1. On the Workspace home page, click the Team Development icon.
2. Click the To Dos icon.
The To Dos Dashboard appears.
3. Click the Report tab.
The To Dos Report page appears.
4. Customize the report as you would any other interactive grid.
5. Select a To Do.
6. Edit the appropriate fields.
7. Click Apply Changes.
4.5.4 Managing Files Attached to a To DoIf enabled at the workspace-level, you can attach files to a To Do.
• Attaching a File to a To Do (page 4-16)
• Viewing, Editing, and Removing Attached Files (page 4-16)
Chapter 4Tracking To Dos
4-15
See Also:
" Downloading File Attachments (page 4-32)" and "Enabling Support for FileUpload in Team Development" in Oracle Application Express AdministrationGuide.
4.5.4.1 Attaching a File to a To DoTo use this feature, you must set the Enable File Repository attribute to Yes inAdministration, Manage Service, Set Workspace Preferences.
To attach a file to a To Do:
1. Navigate to the To Do:
a. On the Workspace home page, click the Team Development icon.
b. Click the To Dos icon.
The To Dos Dashboard appears.
c. Click the Report tab.
d. Select a To Do.
2. From Actions, click Add File.
3. On Add File:
a. File - Locate the file to be uploaded.
b. Description - Enter a description of the file.
c. Click Add File.
A new region, called Files, displays at the bottom of the page.
4.5.4.2 Viewing, Editing, and Removing Attached FilesTo manage attached files:
1. Navigate to the To Do:
a. On the Workspace home page, click the Team Development icon.
b. Click the To Dos icon.
The To Dos Dashboard appears.
c. Click the Report tab.
d. Select a To Do.
2. Under Files, click View and Manage Files.
The Files page appears.
3. To download the file, click the name.
4. To edit the file description:
a. Click the Edit icon.
b. Update the description and click Apply Changes.
Chapter 4Tracking To Dos
4-16
5. To delete an attached file:
a. Click the Edit icon.
b. Click Delete. When prompted, confirm your selection.
4.5.5 Viewing Other To Do ReportsClick the tabs at the top of the To Dos page to view other reports including Calendarand Progress Log.
• Viewing the To Dos Calendar (page 4-17)
• Viewing the To Do Progress Log (page 4-17)
4.5.5.1 Viewing the To Dos CalendarTo view the To Dos Calendar:
1. On the Workspace home page, click the Team Development icon.
2. Click the To Dos icon.
The To Dos Dashboard appears.
3. Click the Calendar tab.
The To Dos page displays features by due date or date completed in a calendarformat.
The To Dos Calendar appears.
4. Controls at the top of the page include:
• Release - To select a new release, make a selection from the Release list andclick Set.
• Reset - Resets the Calendar to the default view.
• Create To Do - Displays the To Do page enabling you to create a new feature.
• Previous/Next - View to the previous month or the next month.
• Month - View the calendar by month.
• List - View the calendar entries in a list format by day.
5. To edit a To Do, select it. When the To Do appears, edit the appropriate fields andclick Apply Changes.
6. To edit a To Do, select it. When the To Do appears, click Delete.
4.5.5.2 Viewing the To Do Progress LogTo view the To Do Calendar:
1. On the Workspace home page, click the Team Development icon.
2. Click the To Dos icon.
The To Dos Dashboard appears.
3. Click the Progress Log tab.
The Progress Log page displays an interactive report of progress log entries. Tocustomize the report, use the Search bar at the top of the page.
Chapter 4Tracking To Dos
4-17

4. To edit an entry, click the Progress Entry name.
4.6 Managing BugsTrack bugs (or software defects) associated with your application. You can assignbugs to developers, associate bugs with milestones, or track bugs by due date, status,and other attributes.
• Viewing Bugs (page 4-18)
• Creating a Bug (page 4-18)
• Editing a Bug (page 4-19)
• Managing Files Attached to a Bug (page 4-19)
• Viewing Other Bug Reports (page 4-20)
4.6.1 Viewing BugsTo view bugs:
1. On the Workspace home page, click the Team Development icon.
2. Click the Bugs icon.
The Bugs Dashboard appears and displays an overview of known softwaredefects.
3. Click the Report tab.
The Bugs Report page appears. Customize the appearance of the page using theSearch bar at the top of the page.
4. To edit a bug, click the bug title.
4.6.2 Creating a BugTo create a bug:
1. On the Workspace home page, click the Team Development icon.
2. Click the Bugs icon.
The Bugs Dashboard appears.
3. Click Create Bug.
4. Fill in the appropriate fields. Mandatory fields are marked with a red asterisk (*).
To learn more about an attribute, see field-level Help.
5. To add new values to editable select lists, enter a value in the field with the titleNew.
For example, to add a name to the Assigned To list, enter a value in NewAssignee.
6. Click Create Bug.
Chapter 4Managing Bugs
4-18
4.6.3 Editing a BugTo edit a bug:
1. On the Workspace home page, click the Team Development icon.
2. Click the Bugs icon.
The Bugs Dashboard appears and displays an overview of known softwaredefects.
3. Click the Report tab.
The Bugs Report page appears. Customize the appearance of the page using theSearch bar at the top of the page.
4. Select a bug.
5. Edit the appropriate fields.
To learn more about an attribute, see field-level Help.
6. Click Apply Changes.
4.6.4 Managing Files Attached to a BugIf enabled at the workspace-level, you can attach files to a bug.
• Attaching a File to a Bug (page 4-19)
• Viewing, Editing, and Removing Attached Files (page 4-20)
See Also:
" Downloading File Attachments (page 4-32)" and "Enabling Support for FileUpload in Team Development" in Oracle Application Express AdministrationGuide.
4.6.4.1 Attaching a File to a BugTo use this feature, you must set the Enable File Repository attribute to Yes inAdministration, Manage Service, Set Workspace Preferences.
To attach a file to a bug:
1. On the Workspace home page, click the Team Development icon.
2. Click the Bugs icon.
The Bugs Dashboard appears and displays an overview of known softwaredefects.
3. Click the Report tab.
The Bugs Report page appears. Customize the appearance of the page using theSearch bar at the top of the page.
4. Click the bug title.
Chapter 4Managing Bugs
4-19
5. Under Actions, click Add File.
6. In Add File:
a. File - Locate the file to be uploaded.
b. Description - Enter a description of the file.
c. Click Add File.
A new region, called Files, displays at the bottom of the page.
4.6.4.2 Viewing, Editing, and Removing Attached FilesTo manage attached files:
1. On the Workspace home page, click the Team Development icon.
2. Click the Bugs icon.
The Bugs Dashboard appears and displays an overview of known softwaredefects.
3. Click the Report tab.
The Bugs Report page appears. Customize the appearance of the page using theSearch bar at the top of the page.
4. To edit a bug, click the bug title.
5. Scroll down to Files.
6. Click View and Manage Files.
The Files page appears.
7. To download the file, click the name.
8. To edit the file description:
a. Click the Edit icon.
b. Update the description and click Apply Changes.
9. To delete an attached file:
a. Click the Edit icon.
b. Click Delete. When prompted, confirm your selection.
4.6.5 Viewing Other Bug ReportsClick the tabs at the top of the Bugs page to view other reports including Calendar, ByDeveloper, and By Day.
• Viewing the Bug Calendar (page 4-20)
• Viewing the Bugs By Developer (page 4-21)
• Viewing the Bugs By Day (page 4-21)
4.6.5.1 Viewing the Bug CalendarTo view the Bug Calendar:
1. On the Workspace home page, click the Team Development icon.
Chapter 4Managing Bugs
4-20
2. Click the Bugs icon.
The Bugs Dashboard appears.
3. Click the Calendar tab.
The Calendar appears.
4. Controls at the top of the page include:
• Show - Restrict the report to include open or closed comments.
• Release - Selects a new release. Make a selection from the Release list andclick Set.
• Assigned To - Constrains the report to display only bugs associated with theselected developer. Select a developer and click Set.
• Reset - Resets the Calendar to the default view.
• Create Bug - Creates a new bug.
• Previous/Next - View to the previous month or the next month.
• Month - View the calendar by month.
• List - View the calendar entries in a list format by day.
4.6.5.2 Viewing the Bugs By DeveloperTo view the Bugs By Developer:
1. On the Workspace home page, click the Team Development icon.
2. Click the Bugs icon.
The Bugs Dashboard appears.
3. Click the By Developer tab.
The Bugs by Developer report appears.
4. Controls at the top of the page include:
• Show - Restrict the report to include open or closed comments.
• Release - Selects a new release. Make a selection from the Release list andclick Set.
• Reset - Resets the Calendar to the default view.
• Create Bug - Creates a new bug.
4.6.5.3 Viewing the Bugs By DayTo view the Bugs By Day:
1. On the Workspace home page, click the Team Development icon.
2. Click the Bugs icon.
The Bugs Dashboard appears.
3. Click the By Day tab.
The Bugs by Developer report appears.
4. Controls at the top of the page include:
Chapter 4Managing Bugs
4-21
• Release - Selects a new release. Make a selection from the Release list andclick Set.
• Reset - Resets the Calendar to the default view.
• Create Bug - Creates a new bug.
4.7 Managing FeedbackFeedback provides a mechanism for end users to post general comments forapplication administrators and developers.
• About Feedback (page 4-22)Adding Feedback enables application administrators and developers to gatherreal-time comments, enhancement requests, and bugs from application users.Feedback enhances communication between the user community and theapplication owners.
• Adding Feedback Using the Create Application Wizard (page 4-23)Add a Feedback page when running the Create Application Wizard.
• Adding Feedback Using the Create Page Wizard (page 4-24)Use the Create Page Wizard to add Feedback to an existing application.
• Submitting Feedback Within a Running Application (page 4-25)Users can submit feedback by clicking the Feedback navigation bar icon in theupper right of a running application.
• Reviewing Feedback Within an Application (page 4-25)View feedback within a running application by clicking User Feedback on theAdministration page.
• Configuring Feedback Within an Application (page 4-26)Configure feedback within a running application by clicking Feedback Settings onthe Administration page.
• Tracking Feedback Team in Development (page 4-26)Track all feedback within a workspace in Team Development.
4.7.1 About FeedbackAdding Feedback enables application administrators and developers to gather real-time comments, enhancement requests, and bugs from application users. Feedbackenhances communication between the user community and the application owners.
Feedback provides a mechanism for end users to post general comments forapplication administrators and developers. The posts include useful session stateinformation to help developers determine where the end user sent the feedback from.Providing such an easy feedback loop enhances communication between the usercommunity and the application owners, which leads to greatly improved end usersatisfaction.
Creating Feedback:
• Adds a Feedback navigation bar icon in the running application which users canclick to leave feedback.
• Creates an report for viewing and updating feedback.
Chapter 4Managing Feedback
4-22
• Captures the application and page ID, feedback comments, date and time, anduser information.
Choosing How to Add Feedback
You can create a Feedback page automatically using a wizard when you create a newapplication, or by adding a page to an existing application. In both the CreateApplication Wizard and the Create Page Wizard, you simply select the Feature,Feedback.
How Customers Submit Feedback
Users can submit feedback by clicking the Feedback navigation bar icon in the upperright of a running application. In the Feedback window, they can rate their userexperience by selecting an emogi, entering feedback comments, or uploading files.
Viewing Feedback within an Application
Administrators and developers can track and manage Feedback at the application-level, by running the application and accessing Feedback region on the Administrationpage. To control whether users can upload attachments, click Feedback Settings. Toview feedback entries, select User Feedback to view the Manage Feedback report.
Tracking Feedback in Team Development
Administrators and developers can track all feedback within a workspace in TeamDevelopment, Feedback. Each feedback entry tracks the application and page ID andname, displays any feedback comments. Administrators and developers can assign astatus and classify the information as a Bug, To Do, or Feature.
4.7.2 Adding Feedback Using the Create Application WizardAdd a Feedback page when running the Create Application Wizard.
To create a database application which includes a Feedback page:
1. On the Workspace home page, click the App Builder icon.
2. Click the Create button.
3. Click Application.
4. For Name, enter the name used to identify the application to developers.
5. For Appearance, accept the default Theme Style and menu layout (Vita, SideMenu), or change it by clicking the Set Appearance icon adjacent to theAppearance field.
6. To add a new page (such as a blank page, calendar, chart, form, report, and soon) click Add Page and select the desired page type.
7. Under Features, select Feedback.
8. Under Settings, specify settings used to generate this application. To learn moreabout an attribute, click the Help icon adjacent to Settings.
9. Click Create Application.
Chapter 4Managing Feedback
4-23
See Also::
"Understanding Page Types, Features, and Settings (page 6-4)"
4.7.3 Adding Feedback Using the Create Page WizardUse the Create Page Wizard to add Feedback to an existing application.
Tip:
This section describes how to create a feedback by running the Create PageWizard from the Application home page. You can also run this wizard inPage Designer by clicking the Create menu and selecting Page.
To add a feedback page:
1. On the Workspace home page, click App Builder.
2. Select an application.
The Application home page appears.
3. Click the Create Page button.
4. For Create a Page:
a. User Interface - Select a user interface for the page.
This attribute only displays for applications using older themes and for whichDesktop and Mobile User Interfaces have been defined.
b. Page Type - To create a report, select Feature and then Feedback.
Tip:
Component pages provides page-level functionality and can beadded multiple times within a given application such as reports,forms, charts, or calendars. Feature pages provide application-levelfunctionality and can only be added once per application.
The Create Feedback Page appears.
5. On the Create Feedback Page:
a. Starting Page Number - Enter an unused starting page number. This featurewill create multiple pages starting with the number specified.
b. Page Group - Identify the name of the page group to associate with this page.Page groups help developers manage the pages within an application. To usean existing page group, select the name from the list.
c. Build Option - The listed build option(s) to be created to support this feature.
Chapter 4Managing Feedback
4-24
d. Include in Navigation Bar - Select Yes to create a navigation bar entry withinthe current application to invoke your new feedback page.
e. Navigation Bar Label - Enter the name of the new navigation bar entry used toaccess the new feedback page.
f. Administration Page Preference - Specify the administration page to which alist will be added for this feature.
Options include:
• Create a new page
• Identify an existing page
Depending upon your selection, the UI changes.
g. Follow the on-screen instructions.
6. Click Create.
4.7.4 Submitting Feedback Within a Running ApplicationUsers can submit feedback by clicking the Feedback navigation bar icon in the upperright of a running application.
To submit feedback managed with the application:
1. Run the application for which you want to submit feedback.
2. Click the Feedback navigation bar icon in the upper right corner.
A Feedback window appears.
3. In Feedback:
a. Experience - Select an emoji that reflects your user experience (Positive,Neutral, or Negative).
b. Feedback - Enter a comment.
c. Attachment - Click Choose File to upload an attachment.
Tip:
Administrators can enable and disable attachments by selectingAdministration and editing Feedback Settings.
4. Click Submit Feedback.
4.7.5 Reviewing Feedback Within an ApplicationView feedback within a running application by clicking User Feedback on theAdministration page.
To view feedback within an application:
1. Run the application.
2. Click Administration in the left navigation bar.
3. Click User Feedback.
Chapter 4Managing Feedback
4-25
The Manage Feedback page displays an interactive report.
4. Click the Edit icon adjacent to the entry you wish to view.
5. On the Feedback page
a. Review the user feedback.
b. Response - Respond to the feedback.
c. Status - Select one of the following:
• No Action
• Acknowledged
• Open
• Closed
6. To delete the feedback, click Delete.
7. To save your changes, click Apply Changes.
4.7.6 Configuring Feedback Within an ApplicationConfigure feedback within a running application by clicking Feedback Settings on theAdministration page.
Developer and administrators can also configure Feedback Settings that controlsupport for attachments.
To configure Feedback Settings:
1. Run the application.
2. Click Administration in the left navigation bar.
3. Click Feedback Settings .
Feedback Settings appears.
4. For Enable Attachments, select Yes to enable users to upload attachments or Noto disable this functionality.
5. To save your changes, click Apply Changes.
4.7.7 Tracking Feedback Team in DevelopmentTrack all feedback within a workspace in Team Development.
Administrators and developers can track all feedback within a workspace in TeamDevelopmen. Each feedback entry tracks the application and page ID and name,displays any feedback comments. Administrators and developers can assign a statusand classify the information as a Bug, To Do, or Feature.
• Accessing the Feedback Report in Team Development (page 4-26)
• Viewing Feedback by Filing User (page 4-27)
• Viewing the Feedback Calendar (page 4-28)
4.7.7.1 Accessing the Feedback Report in Team DevelopmentTo access the feedback report in Team Development:
Chapter 4Managing Feedback
4-26
1. On the Workspace home page, click the Team Development icon.
2. Click the Feedback icon.
The Feedback Dashboard appears.
3. Click the Report tab.
4. Select a feedback number.
The View/Edit Feedback dialog appears.
5. On View/Edit Feedback:
a. Review the user feedback.
b. Type - Classify the feedback. Select one of the following:
• General Comment
• Enhancement Request
• Bug
c. Disposition - Determine how to log the feedback. Select one of the following:
• Log as Bug.
Enter the appropriate information and click Create Bug.
• Log as To Do.
Enter the appropriate information and click Create To Do.
• Log as Feature.
Enter the appropriate information and click Create Feature.
6. For Status, select a status of the feedback entry:
• 0. No Status
• 1. Acknowledged
• 2. Additional information requested
• 3. Open Processing Feedback
• 4. Closed
7. To delete a feedback entry, click Delete.
8. To save your changes, click Apply Changes.
4.7.7.2 Viewing Feedback by Filing UserTo view feedback by filing user:
1. On the Workspace home page, click the Team Development icon.
2. Click the Feedback icon.
The Feedback Dashboard appears.
3. Click the By Filing User tab.
The By Filing User report appears.
4. To customize the report, use the Actions menu in Search bar at the top of thepage. Click Reset return the report to the default view.
Chapter 4Managing Feedback
4-27
5. Click user under Filing User to view the associated feedback.
4.7.7.3 Viewing the Feedback CalendarTo view the Feedback Calendar:
1. On the Workspace home page, click the Team Development icon.
2. Click the Feedback icon.
The Feedback Dashboard appears.
3. Click the Calendar tab.
The Calendar appears.
4.8 Managing Team Development UtilitiesUse Team Development Utilities to configure Team Development settings, viewrelease summary information, enable support for file upload, access feature utilities,manage focus areas, update assignees, view uploaded files, purge data, managenews, and update links.
The Utilities region displays on the right side of the Team Development home page.
• Accessing Team Development Utilities (page 4-29)Use Team Development Utilities to manage team development data. You canaccess Team Development Utilities from either the Utilities region on the TeamDevelopment home page or from Utilities page.
• Configuring Team Development Settings (page 4-30)Configure Team Development Settings to specify default behavior for features andTo Dos. Choose default values for the release, owner, and priority, and determinewhat feature attributes are enabled for the current workspace.
• Viewing a Release Summary (page 4-31)View a summary of report by release or milestones on the Release Summarypage.
• Managing Feature Utilities (page 4-31)Use the Feature Utilities page to assign milestones to features, set feature duedates to milestone dates, or push due dates of open features.
• Renaming Focus Areas (page 4-31)When you create or update a feature, you can assign it to a focus area. UseManage Focus Areas, to rename a focus area.
• Downloading File Attachments (page 4-32)If enabled at the workspace-level, you can attach files to a feature, To Do, or bug.Use the Team Development Files page to download attached files.
• Purging Data (page 4-32)Remove data associated with a Team Development component type (that is,features, milestones, To Dos, bugs, or feedback).
• Managing News Entries (page 4-33)Use the News region to communicate with other users in the current workspace.News displays on the Application Express home page, the Team Developmenthome page, and News page.
Chapter 4Managing Team Development Utilities
4-28
• Managing Links with Workspace Members (page 4-33)
See Also:
"Managing Team Development" in Oracle Application Express AdministrationGuide
4.8.1 Accessing Team Development UtilitiesUse Team Development Utilities to manage team development data. You can accessTeam Development Utilities from either the Utilities region on the Team Developmenthome page or from Utilities page.
To access Team Development Utilities:
1. On the Workspace home page, click the Team Development icon.
2. Note the Utilities region on the right side of the page.
Tip:
You can access most utilities by either clicking links in the Utilities regionor by accessing the Utilities page.
3. From the Utilities region on the right side of the page, click All Utilities.
4. The Utilities page features the following links:
• Team Development Settings - Specify how To Dos and bugs display,configure default values for release, owner, and priority, and determine whattracking attributes are enabled for the current workspace.
• Release Summary - Review workspace and developer statistics.
• Disable Files/Enable Files - Links to an administration page that where youcan enable or disable support for file upload. The text that displays changesbased on the current configuration.
• Feature Utilities - Manage milestones for multiple features at once. Use thispage to assign milestones to features, set the feature due date to a milestonedate, change milestone for overdue features, and push due dates for openfeatures.
• Manage Focus Areas - Manage focus areas that display on the Featurepage.
• Update Assignees - Enables you to reassign selected components. Onlyincomplete components can reassigned (that is, those components having astatus less than 100% or milestone date in the future).
• View Files - Manage uploaded files attached to features, To Dos, and bugs.
This option toggles between View Files and Enable Files depending uponwhether your administrator has enabled file upload capability. If Enable Filesdisplays, then file upload capability has not yet been enabled by youradministrator.
Chapter 4Managing Team Development Utilities
4-29
• Purge Data - Delete all entries for the selected components. This is usefulwhen beginning a new development cycle or after using a workspace fortesting.
• Manage News - Manage news entries that display on the Team Developmenthome page and Workspace home page.
• Manage Links - Manage links to share with other workspace users.
• Auto Create To Dos - Automatically create a To Do for every page in anapplication.
• Push Past Due Bugs - Extend the estimated fix date of open bugs. You canfilter and then select just the bugs you want to push and then extend for anynumber of days.
4.8.2 Configuring Team Development SettingsConfigure Team Development Settings to specify default behavior for features and ToDos. Choose default values for the release, owner, and priority, and determine whatfeature attributes are enabled for the current workspace.
To edit Team Development settings:
1. On the Workspace home page, click the Team Development icon.
2. Under Utilities, click Team Development Settings.
The Settings page appears.
3. Edit the appropriate attributes.
To learn more about an attribute, see field-level Help.
a. Release - Default release used when creating new tasks.
b. Owner - Default owner when creating features and To Do tasks.
c. Priority - Default priority when creating features.
d. Enable Approval Status - Enables or disables feature approval status.
4. Under, Track Attributes specify which attributes are available. For each group ofattributes, select Yes to include the group or No to hide the group.
a. User Interface
b. Testing
c. Documentation
d. Globalization
e. Security
f. Accessibility
5. Click Apply Changes.
Tip:
Click Reset to Default to return the settings to the default values.
Chapter 4Managing Team Development Utilities
4-30
4.8.3 Viewing a Release SummaryView a summary of report by release or milestones on the Release Summary page.
To access the Release Summary report:
1. On the Workspace home page, click the Team Development icon.
2. Under Utilities, click Release Summary.
The Release Summary page appears.
3. Use the Search bar at the top of the page to filter the view.
• From Show, select Milestones Details or Summary.
• To filter the view, select a developer or release and click Set.
4. To email the report:
a. Click Email.
b. On the Email Report page, fill in the appropriate fields. Mandatory fields aremarked with a red asterisk (*).
To learn more about an attribute, see field-level Help.
c. Click Email.
5. Click Reset to return the report to the default view.
4.8.4 Managing Feature UtilitiesUse the Feature Utilities page to assign milestones to features, set feature due datesto milestone dates, or push due dates of open features.
To access Feature Utilities:
1. On the Workspace home page, click the Team Development icon.
2. Under Utilities, click Feature Utilities.
3. On the Feature Utilities, select a utility:
• Assign milestones to features (only those with no milestone currentlyassigned)
• Set feature due date to milestone date (only affects features)
• Push due date of open features
4. Click Next.
5. Follow the on-screen instructions.
4.8.5 Renaming Focus AreasWhen you create or update a feature, you can assign it to a focus area. Use ManageFocus Areas, to rename a focus area.
To rename an existing feature focus area:
1. On the Workspace home page, click the Team Development icon.
Chapter 4Managing Team Development Utilities
4-31
2. Under Utilities, click Manage Focus Areas.
The Manage Focus Areas page appears.
3. Locate the focus area and click the Edit icon.
4. In Rename To, enter your edits and click Apply Changes.
4.8.6 Downloading File AttachmentsIf enabled at the workspace-level, you can attach files to a feature, To Do, or bug. Usethe Team Development Files page to download attached files.
Tip:
To use this feature, you must set the Enable File Repository attribute to Yesin Administration, Manage Service, Set Workspace Preferences.Administrators can also access this page in Team Development by clickingEnable Files on the Team Actions list.
To download files attached to features, To Dos, and bugs:
1. On the Workspace home page, click the Team Development icon.
2. Under Utilities, click the View Files.
The Team Development Files page appears.
3. To download a file, click the name.
4.8.7 Purging DataRemove data associated with a Team Development component type (that is, features,milestones, To Dos, bugs, or feedback).
To purge data associated with a component type:
1. On the Workspace home page, click the Team Development icon.
2. Under Utilities, click the Purge Data.
3. Under Purge Data, select the type of data to purge:
• Features
• Milestones
• To Dos
• Bugs
• Feedback
4. Click Purge.
Chapter 4Managing Team Development Utilities
4-32
4.8.8 Managing News EntriesUse the News region to communicate with other users in the current workspace. Newsdisplays on the Application Express home page, the Team Development home page,and News page.
To add, edit, or delete new entries:
1. On the Workspace home page, click the Team Development icon.
2. Under Utilities, click Manage News.
The News page appears.
3. To add a news item:
a. Click Add News.
b. On the News page, enter text in the News Entry field.
c. Click Add News.
4. To edit a news item:
a. Select the news item.
b. Edit the News Entry.
c. Click Apply Changes.
5. To delete a news item:
a. Select the news item.
b. Click Delete.
4.8.9 Managing Links with Workspace MembersTo add, edit, or delete links:
1. On the Workspace home page, click the Team Development icon.
2. Under Utilities, click Manage Links.
The News page appears.
3. To add a link:
a. Click Create Link.
b. On the Links page, edit the appropriate fields. Mandatory fields are markedwith a red asterisk (*). To learn more about an attribute, see field-level Help.
c. Click Create Link.
d. To access the link, click the Link Name.
4. To edit a link:
a. Click the Edit icon adjacent to the Link Name.
b. On the Links page, edit the appropriate fields. Mandatory fields.
c. Click Apply Changes.
5. To delete a link:
Chapter 4Managing Team Development Utilities
4-33
a. Click the Edit icon adjacent to the Link Name.
b. On the Links page, edit the appropriate fields. Mandatory fields.
c. Click Delete.
Chapter 4Managing Team Development Utilities
4-34
5Creating Websheet Applications
Websheet applications enable end users to manage structured and unstructured datawithout developer assistance.
Websheet application pages contain sections, reports, and data grids linked togetherusing navigation. Websheets can include navigation controls, search capabilities, andthe ability to add annotations such as files, notes, and tags. You can secure Websheetapplications using access control lists and several built-in authentication models.
• Creating a Websheet Application (page 5-2)Create a Websheet application in App Builder by running the Create ApplicationWizard, or by clicking Create in a running Websheet.
• Copying an Existing Websheet Page (page 5-4)Copy a Websheet application by selecting New Page as a Copy from the Createmenu.
• Running a Websheet (page 5-4)To view a rendered version of your application, you run or submit it to theApplication Express engine.
• Editing Page Details (page 5-6)Edit Page Details to change the page name, alias, parent page, or pagedescription.
• Understanding Websheet Properties (page 5-6)Use the Websheet Properties page to control general application defaults andbehavior.
• Deleting a Websheet Application (page 5-11)Delete a Websheet on the Websheet Properties page.
• Viewing the Websheet Dashboard (page 5-11)Use the Websheet dashboard to view details about the current Websheetapplication including recent changes, top users, and top pages.
• Monitoring Websheet Activity (page 5-11)Use the Monitor Activity page to analyze usage, performance, and popularity ofpages and content.
• Controlling Websheet Access (page 5-12)Control access to a Websheet application by selecting an authenticationmechanism (such as Oracle Application Express Account, Single Sign-OnVerification, or LDAP Credentials Verification), or by creating a custom accesscontrol list.
5-1
See Also:
• "What is the Difference Between a Database and Websheet Application?(page 2-2)"
• "Understanding AnyCo IT Department Websheet (page 3-19)"
• "Using Websheets" in Oracle Application Express End User Guide
• "Removing and Validating Websheet Database Objects" and "Disablingthe Creation of Sample Websheet Objects" in Oracle ApplicationExpress Administration Guide
5.1 Creating a Websheet ApplicationCreate a Websheet application in App Builder by running the Create ApplicationWizard, or by clicking Create in a running Websheet.
• Creating a Websheet from App Builder (page 5-2)
• Creating a Websheet Application from a Running Websheet (page 5-3)
See Also:
• "Using Websheets" in Oracle Application Express End User Guide
• "Removing and Validating Websheet Database Objects"
• "Disabling the Creation of Sample Websheet Objects"
• Oracle Application Express Administration Guide
5.1.1 Creating a Websheet from App BuilderTo create a Websheet application:
1. On the Workspace home page, click the App Builder icon.
2. Click the Create button.
The Create Application Wizardappears.
3. Select Websheet and click Next.
4. On Create Websheet:
a. Websheet - Enter a unique integer value to identify the application. ApplicationIDs between 3000 to 9000 are reserved for internal use.
b. Name - Enter a unique integer value to identify the application.
c. Include Getting Started Guide - Select this option to include basic informationabout using Websheets in the first text section of the Websheet home page.Once reviewed, you can edit or remove this text section.
Chapter 5Creating a Websheet Application
5-2
5. Confirm your selections and click Create Websheet.
A success message appears.
6. To view a rendered version of your application:
a. Click Run Websheet.
b. Enter your Websheet credentials:
i. Username - Enter your username.
ii. Password - Enter your password.
iii. Click Log In or Sign In.
Tip:
The language that displays differs depending upon who creates theapplication. For Oracle-supplied applications, including packagedapplications and the Oracle Application Express developmentenvironment, Sign In/Sign out displays. For applications you or yourdevelopers create, Log In/Log Out displays.
The Websheet application appears in a new window.
5.1.2 Creating a Websheet Application from a Running WebsheetTo create a Websheet application from a running Websheet:
1. Run a Websheet application.
2. From the Create menu, click New Websheet.
3. On Create Websheet:
a. Websheet - Enter a unique integer value to identify the application. ApplicationIDs between 3000 to 9000 are reserved for internal use.
b. Name - Enter a name to identify the application.
c. Click Next.
4. Confirm your selections and click Create .
A success message appears.
5. To view a rendered version of your application:
a. Click Run Websheet.
b. Enter your Websheet credentials:
i. Username - Enter your username.
ii. Password - Enter your password.
iii. Click Log In or Sign In.
Chapter 5Creating a Websheet Application
5-3
Tip:
The language that displays differs depending upon who creates theapplication. For Oracle-supplied applications, including packagedapplications and the Oracle Application Express developmentenvironment, Sign In/Sign out displays. For applications you or yourdevelopers create, Log In/Log Out displays.
The Websheet application appears in a new window.
5.2 Copying an Existing Websheet PageCopy a Websheet application by selecting New Page as a Copy from the Createmenu.
To copy an existing Websheet page:
1. Run the Websheet application.
2. From the Create menu, select New Page as a Copy.
3. On New Page as a Copy, enter the name of the new page.
4. Click Copy Page.
A success message appears.
5. Select one of the following:
• View Current Page
• View New Page
Tip:
You can change the parent page by editing the Page Details. See "EditingPage Details (page 5-6)."
5.3 Running a WebsheetTo view a rendered version of your application, you run or submit it to the ApplicationExpress engine.
• Running a Websheet from the App Builder Home Page (page 5-5)
• Running a Websheet from the Application Home Page (page 5-5)
• Determining a Websheet URL (page 5-6)
Chapter 5Copying an Existing Websheet Page
5-4
See Also:
• "Using Websheets" in Oracle Application Express End User Guide
• "About Publishing the Websheet Application URL (page 24-22)"
5.3.1 Running a Websheet from the App Builder Home PageTo run a Websheet from the App Builder home page:
1. On the Workspace home page, click the App Builder icon.
2. From the Search bar, click the View Report icon.
3. Locate the Websheet application in the Applications list.
4. Click the Run icon in the far right column.
5. Enter your Websheet credentials:
a. Username - Enter your username.
b. Password - Enter your password.
c. Click Log In or Sign In.
Tip:
The language that displays differs depending upon who creates theapplication. For Oracle-supplied applications, including packagedapplications and the Oracle Application Express developmentenvironment, Sign In/Sign out displays. For applications you or yourdevelopers create, Log In/Log Out displays.
The Websheet application appears in a new window.
5.3.2 Running a Websheet from the Application Home PageTo run an entire application from the Application home page:
1. On the Workspace home page, click the App Builder icon.
The App Builder home page appears.
2. Select the Websheet application.
The Websheet Properties page appears.
3. Click the Run button.
4. Enter your Websheet credentials:
a. Username - Enter your username.
b. Password - Enter your password.
c. Click Log In or Sign In.
Chapter 5Running a Websheet
5-5
Tip:
The language that displays differs depending upon who creates theapplication. For Oracle-supplied applications, including packagedapplications and the Oracle Application Express developmentenvironment, Sign In/Sign out displays. For applications you or yourdevelopers create, Log In/Log Out displays.
The Websheet application appears in a new window.
5.3.3 Determining a Websheet URLOnce you complete your Websheet application, you can publish your production URLTo learn more, see "About Publishing the Websheet Application URL (page 24-22)."
5.4 Editing Page DetailsEdit Page Details to change the page name, alias, parent page, or page description.
To edit page details:
1. Run the Websheet application.
2. From the Edit menu, select Edit Page.
3. One Page Details.
• Name - Identifies the name of the page. The page name displays in thewindow title and in the breadcrumb.
• Alias - A page alias enables you to create links in page sections to otherpages. A page alias must be unique within an application.
• Owner - Identifies the owner of the page.
• Page Description - Descriptive text that describes the page.
4. Click Apply Changes.
A success message appears.
Tip:
You can also edit page details by clicking Edit Page on the Control Panel.
5.5 Understanding Websheet PropertiesUse the Websheet Properties page to control general application defaults andbehavior.
• Editing Websheet Properties (page 5-7)
• Websheet Properties (page 5-7)
Chapter 5Editing Page Details
5-6
See Also:
"Deleting a Websheet Application (page 5-11)"
5.5.1 Editing Websheet PropertiesYou can access the Websheet Properties page from inside or outside a runningWebsheet. The Home page identifies the default starting page users land on whenrunning the Websheet.
To edit Websheet properties:
1. From the Application home page:
a. On the Workspace home page, click the App Builder icon.
b. On the App Builder home page appears, select the Websheet application.
The Websheet Properties appears.
2. From a running Websheet:
a. Run the Websheet.
b. From the Administration menu, select Websheet Properties.
The Websheet Properties appears.
3. To show or hide a section, click the greater than sign (>) to the left of the sectiontitle.
4. Edit the appropriate Websheet properties as described in the next section.
5. Click Apply Changes.
5.5.2 Websheet PropertiesDevelopers use the Websheet Properties page to control general application defaultsand behavior. The Home Page attribute identifies the page, data grid, or report thatusers will land on by default.
• Websheet (page 5-7)
• Details (page 5-8)
• Logo (page 5-8)
• Style (page 5-9)
• Authentication (page 5-9)
• Authorization (page 5-10)
• SQL (page 5-10)
5.5.2.1 WebsheetWebsheet properties control general Websheet application behavior.
Chapter 5Understanding Websheet Properties
5-7
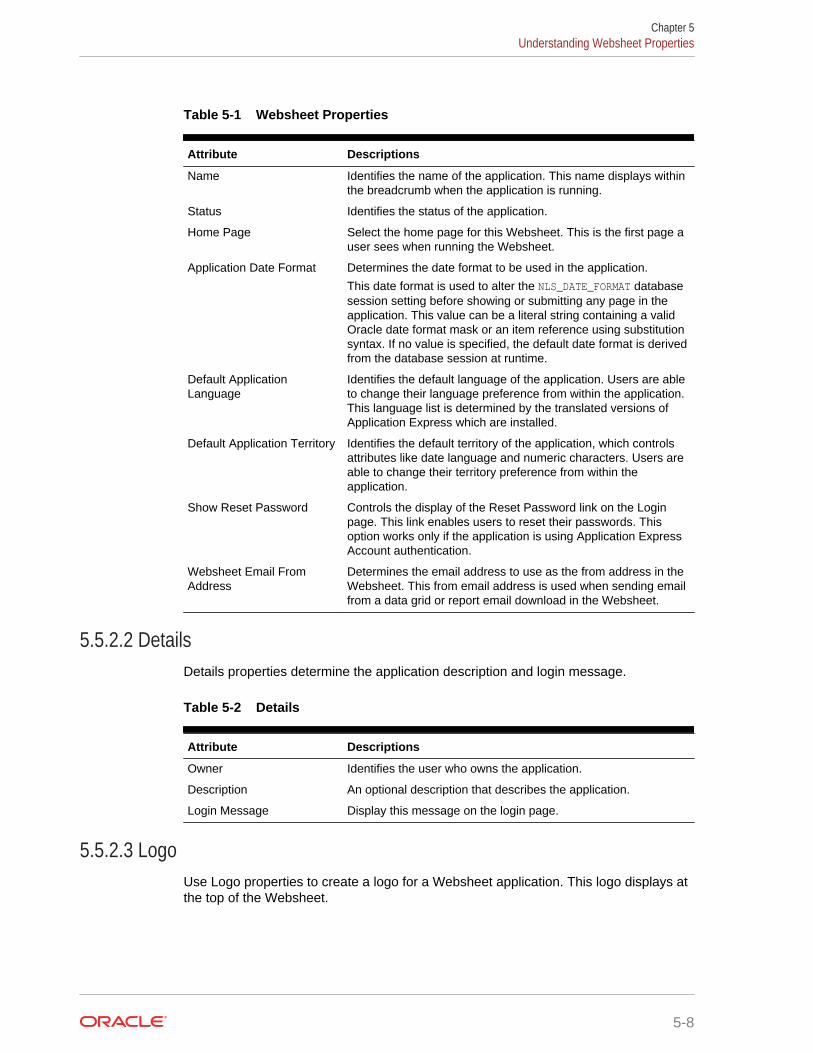
Table 5-1 Websheet Properties
Attribute Descriptions
Name Identifies the name of the application. This name displays withinthe breadcrumb when the application is running.
Status Identifies the status of the application.
Home Page Select the home page for this Websheet. This is the first page auser sees when running the Websheet.
Application Date Format Determines the date format to be used in the application.
This date format is used to alter the NLS_DATE_FORMAT databasesession setting before showing or submitting any page in theapplication. This value can be a literal string containing a validOracle date format mask or an item reference using substitutionsyntax. If no value is specified, the default date format is derivedfrom the database session at runtime.
Default ApplicationLanguage
Identifies the default language of the application. Users are ableto change their language preference from within the application.This language list is determined by the translated versions ofApplication Express which are installed.
Default Application Territory Identifies the default territory of the application, which controlsattributes like date language and numeric characters. Users areable to change their territory preference from within theapplication.
Show Reset Password Controls the display of the Reset Password link on the Loginpage. This link enables users to reset their passwords. Thisoption works only if the application is using Application ExpressAccount authentication.
Websheet Email FromAddress
Determines the email address to use as the from address in theWebsheet. This from email address is used when sending emailfrom a data grid or report email download in the Websheet.
5.5.2.2 DetailsDetails properties determine the application description and login message.
Table 5-2 Details
Attribute Descriptions
Owner Identifies the user who owns the application.
Description An optional description that describes the application.
Login Message Display this message on the login page.
5.5.2.3 LogoUse Logo properties to create a logo for a Websheet application. This logo displays atthe top of the Websheet.
Chapter 5Understanding Websheet Properties
5-8
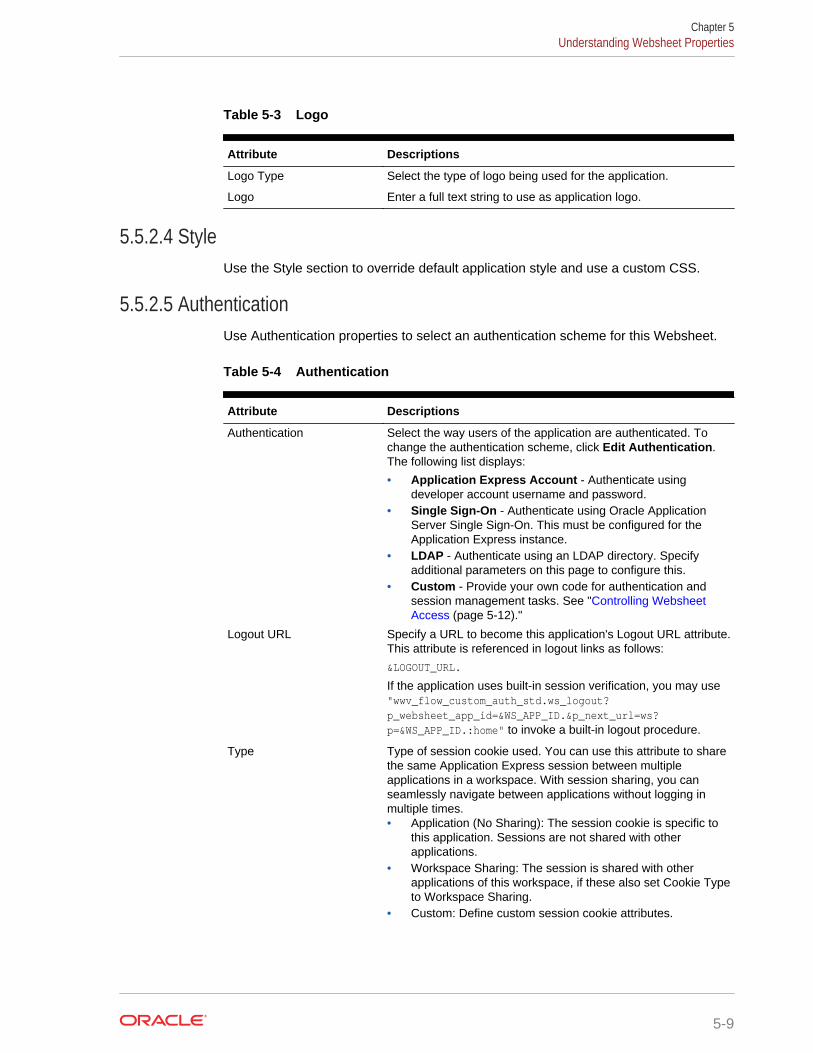
Table 5-3 Logo
Attribute Descriptions
Logo Type Select the type of logo being used for the application.
Logo Enter a full text string to use as application logo.
5.5.2.4 StyleUse the Style section to override default application style and use a custom CSS.
5.5.2.5 AuthenticationUse Authentication properties to select an authentication scheme for this Websheet.
Table 5-4 Authentication
Attribute Descriptions
Authentication Select the way users of the application are authenticated. Tochange the authentication scheme, click Edit Authentication.The following list displays:
• Application Express Account - Authenticate usingdeveloper account username and password.
• Single Sign-On - Authenticate using Oracle ApplicationServer Single Sign-On. This must be configured for theApplication Express instance.
• LDAP - Authenticate using an LDAP directory. Specifyadditional parameters on this page to configure this.
• Custom - Provide your own code for authentication andsession management tasks. See "Controlling WebsheetAccess (page 5-12)."
Logout URL Specify a URL to become this application's Logout URL attribute.This attribute is referenced in logout links as follows:
&LOGOUT_URL.
If the application uses built-in session verification, you may use"wwv_flow_custom_auth_std.ws_logout?p_websheet_app_id=&WS_APP_ID.&p_next_url=ws?p=&WS_APP_ID.:home" to invoke a built-in logout procedure.
Type Type of session cookie used. You can use this attribute to sharethe same Application Express session between multipleapplications in a workspace. With session sharing, you canseamlessly navigate between applications without logging inmultiple times.• Application (No Sharing): The session cookie is specific to
this application. Sessions are not shared with otherapplications.
• Workspace Sharing: The session is shared with otherapplications of this workspace, if these also set Cookie Typeto Workspace Sharing.
• Custom: Define custom session cookie attributes.
Chapter 5Understanding Websheet Properties
5-9
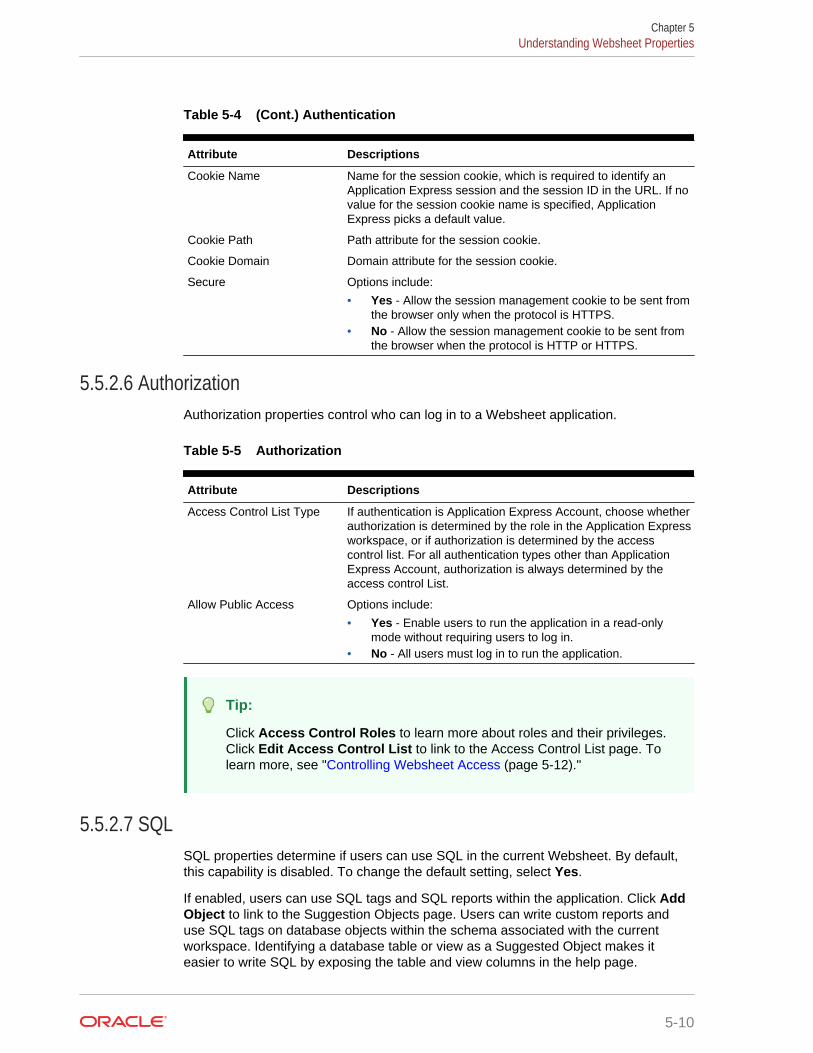
Table 5-4 (Cont.) Authentication
Attribute Descriptions
Cookie Name Name for the session cookie, which is required to identify anApplication Express session and the session ID in the URL. If novalue for the session cookie name is specified, ApplicationExpress picks a default value.
Cookie Path Path attribute for the session cookie.
Cookie Domain Domain attribute for the session cookie.
Secure Options include:
• Yes - Allow the session management cookie to be sent fromthe browser only when the protocol is HTTPS.
• No - Allow the session management cookie to be sent fromthe browser when the protocol is HTTP or HTTPS.
5.5.2.6 AuthorizationAuthorization properties control who can log in to a Websheet application.
Table 5-5 Authorization
Attribute Descriptions
Access Control List Type If authentication is Application Express Account, choose whetherauthorization is determined by the role in the Application Expressworkspace, or if authorization is determined by the accesscontrol list. For all authentication types other than ApplicationExpress Account, authorization is always determined by theaccess control List.
Allow Public Access Options include:
• Yes - Enable users to run the application in a read-onlymode without requiring users to log in.
• No - All users must log in to run the application.
Tip:
Click Access Control Roles to learn more about roles and their privileges.Click Edit Access Control List to link to the Access Control List page. Tolearn more, see "Controlling Websheet Access (page 5-12)."
5.5.2.7 SQLSQL properties determine if users can use SQL in the current Websheet. By default,this capability is disabled. To change the default setting, select Yes.
If enabled, users can use SQL tags and SQL reports within the application. Click AddObject to link to the Suggestion Objects page. Users can write custom reports anduse SQL tags on database objects within the schema associated with the currentworkspace. Identifying a database table or view as a Suggested Object makes iteasier to write SQL by exposing the table and view columns in the help page.
Chapter 5Understanding Websheet Properties
5-10
Tip:
Instance administrators can control the ability to use SQL for an entireinstance. To learn more, see "Enabling and Disabling SQL Access inWebsheets" in Oracle Application Express Administration Guide.
5.6 Deleting a Websheet ApplicationDelete a Websheet on the Websheet Properties page.
To delete a Websheet application:
1. On the Workspace home page, click the App Builder icon.
The App Builder home page appears.
2. Select the Websheet application.
The Websheet Properties page appears.
3. Click Delete.
5.7 Viewing the Websheet DashboardUse the Websheet dashboard to view details about the current Websheet applicationincluding recent changes, top users, and top pages.
To view the Websheet Dashboard:
1. Run the Websheet.
2. From the Administration menu, select Dashboard.
The Dashboard appears and is divided into the following sections:
• Application Details
• Recent Changes
• Top Users
• Top Pages
3. To edit the time frame, select a new value from the Timeframe list.
4. Click Reset to return to the default setting.
5.8 Monitoring Websheet ActivityUse the Monitor Activity page to analyze usage, performance, and popularity of pagesand content.
To access the Monitor Activity page:
1. Log in to and run the Websheet.
2. From the Administration menu, select Monitor Activity.
Chapter 5Deleting a Websheet Application
5-11
The Monitor Activity page appears and is divided into the following sections:
• Activity
– Page Views
– Top Pages
– Top Data Grids
– Top Reports
– Top Users
• Annotations
– Top Files
– Top Notes
– Top Tags
Each report displays as an interactive report. To learn more about interactivereports and the Actions menu, see "Customizing Interactive Reports in a RunningApplication (page 9-72)."
5.9 Controlling Websheet AccessControl access to a Websheet application by selecting an authentication mechanism(such as Oracle Application Express Account, Single Sign-On Verification, or LDAPCredentials Verification), or by creating a custom access control list.
• How Websheet Access Works (page 5-12)
• Specifying the Access Control List Type (page 5-13)
• Creating Access Control List Entries (page 5-13)
5.9.1 How Websheet Access WorksAn administrator controls who can log in to a Websheet application by specifying oneof the following authentication mechanisms:
• Public access (no authentication)
• Oracle Application Express Account
• Single Sign-On Verification
• LDAP Credentials Verification
• Custom
If authentication is defined as Custom, an access control list manages the privilegesof this application's users.
If authentication is Oracle Application Express Account, you must specify whetherauthorization is determined by the user role defined in the Application Expressworkspace, or if authorization is determined by the access control list. For allauthentication types other than Oracle Application Express Accounts, authorization isalways determined by the access control list.
Once a user logs in to an application, a user's assigned role determines access. Userassigned roles include:
Chapter 5Controlling Websheet Access
5-12
• Reader - May view, but not edit content.
• Contributor - May view and edit content.
• Administrator - May view and edit content and edit Websheet Properties andmanage the Access Control List.
5.9.2 Specifying the Access Control List TypeTo use an access control list, you must edit the Websheet Properties and define theAccess Control List Type as Custom.
To access the Websheet Properties page:
1. On the Workspace home page, click the App Builder icon.
2. On the App Builder home page appears, select the Websheet application.
The Websheet Properties appears.
3. Under Authorization:
a. Access Control List Type - Select Custom.
b. Allow Public Access - When set to Yes to enable users to run the applicationin a read-only mode without requiring users to log in. When set to No, all usersneed to log in to run the application.
4. Click Apply Changes.
5.9.3 Creating Access Control List EntriesTo create access control list entries:
1. Run the Websheet.
2. From the Administration menu, select Access Control.
3. Click Create Entry.
The Entry Details page appears.
4. On the Entry Details page:
a. Username - Identify the username that you wish to control access for.
b. Privilege - Identify the privilege level for the user. If the application is usingcustom authorization, the access control list manages the privileges of thisapplication's users. Option include:
• Reader - May view, but not edit content.
• Contributor - May view and edit content.
• Administrator - May view and edit content and edit Websheet Propertiesand manage the Access Control List.
5. Click either Create or Create and Create Another.
Chapter 5Controlling Websheet Access
5-13
6Creating Database Applications
A database application is a collection of pages linked together using navigationmenus, tabs, buttons, or hypertext links. Application pages share a common sessionstate and authentication.
To create a database application, a developer runs wizards to declaratively assemblepages and navigation. Individual pages are organized using containers calledregions. Once created, developers can modify an application by editing applicationattributes and add new pages using the Create Page Wizard. Developers can furthermanage the development process by creating page groups, locking and unlockingpages, adding developer and application comments, and accessing a variety ofapplication, page, and cross page utilities and reports.
• About the Create Application Wizard (page 6-2)To create an Oracle Application Express application, a developer runs the CreateApplication Wizard.
• Understanding Page Types, Features, and Settings (page 6-4)Use the Create Application Wizard to build a complete application containingmultiple pages. How the Create Application Wizard works depends upon the typeof pages your are creating.
• Creating a Database Application Based on a Table or Query (page 6-9)Select New Application in the Create Application Wizard to create a databaseapplication containing multiple pages based on a table you select, or by providinga valid SQL query.
• Creating a Database Application from a Spreadsheet (page 6-10)Select From a Spreadsheet in the Create Application Wizard to load spreadsheetdata and then create report on that data.
• Using Application Blueprints (page 6-16)View an application blueprint and directly edit the application definition in JSONformat.
• Copying a Database Application (page 6-17)Create a copy of an existing application.
• Creating Applications for Mobile Devices (page 6-19)Build applications for mobile devices with mobile-specific design patterns that canprovide an optimal user experience for small screens.
• Deleting an Application (page 6-21)You can delete an application from the Application home page, or while editingapplication attributes.
• Managing Application Attributes (page 6-22)Application attributes (also known as the Application Definition) control thebehavior of an entire application and are divided into the categories: Definition,Security, Globalization, and User Interface.
6-1
• Adding Developer Comments (page 6-55)Add comments to an application, a page, or a group of pages using the DeveloperComment, Bug, or To Do button. You can use developer comments tocommunicate application changes, report issues, or record developer suggestions.
• Using the Find Icon (page 6-58)The Find icon resembles a flashlight and displays on many pages in App Builderincluding Application home page, Shared Components, and the Edit ApplicationDefinition. Click the Find icon to search for items, pages, queries, tables, PL/SQLcode, or images, view debug reports, view session state, and view errors.
• Adding Database Application Comments (page 6-63)Use Application Comments to describe an application or track developers involvedin the application development.
• Managing Application Groups (page 6-63)Organize applications by assigning them to application groups. To use applicationgroups, first create a group and then assign applications to it.
• Using Application Utilities (page 6-65)Access the Utilities page to view useful application summaries and reports.
See Also:
"What is the Difference Between a Database and Websheet Application?(page 2-2)"
6.1 About the Create Application WizardTo create an Oracle Application Express application, a developer runs the CreateApplication Wizard.
To run the Create Application Wizard, click the Create button on the App Builder homepage.
Tip:
The first time you access the App Builder home page, grey box labeledCreate a New App appears. Clicking Create New App is a shortcut toaccessing the Create Application Wizard.
Chapter 6About the Create Application Wizard
6-2
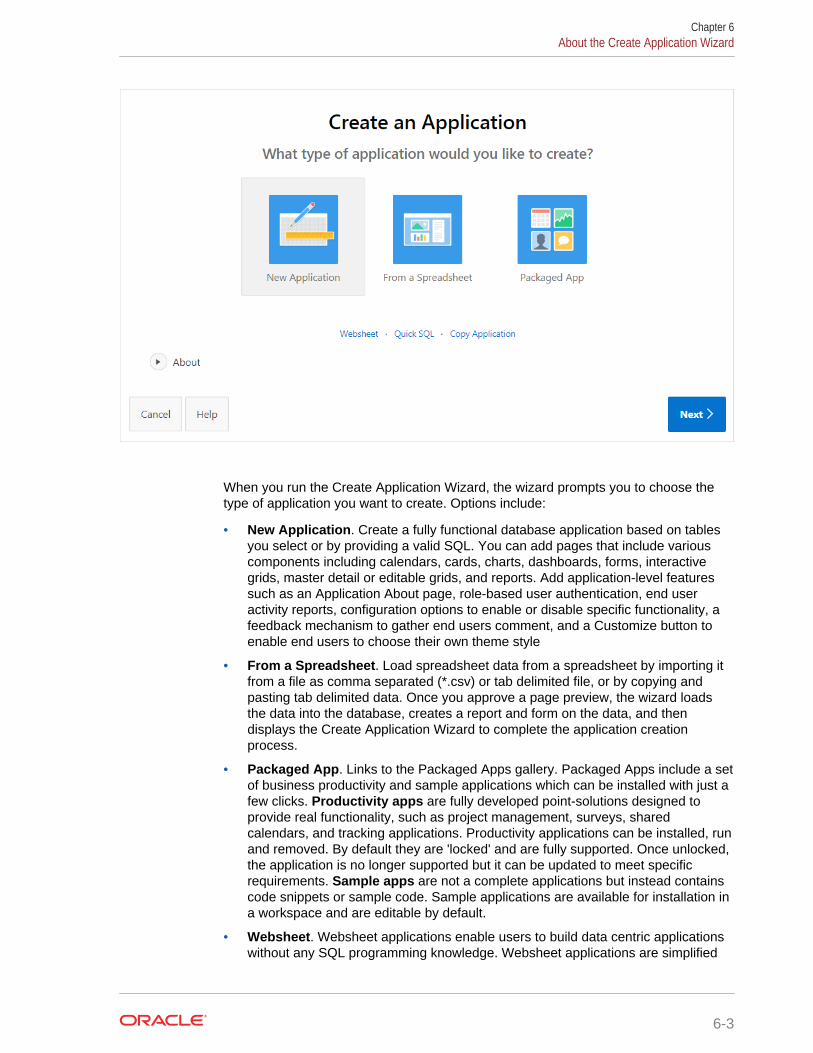
When you run the Create Application Wizard, the wizard prompts you to choose thetype of application you want to create. Options include:
• New Application. Create a fully functional database application based on tablesyou select or by providing a valid SQL. You can add pages that include variouscomponents including calendars, cards, charts, dashboards, forms, interactivegrids, master detail or editable grids, and reports. Add application-level featuressuch as an Application About page, role-based user authentication, end useractivity reports, configuration options to enable or disable specific functionality, afeedback mechanism to gather end users comment, and a Customize button toenable end users to choose their own theme style
• From a Spreadsheet. Load spreadsheet data from a spreadsheet by importing itfrom a file as comma separated (*.csv) or tab delimited file, or by copying andpasting tab delimited data. Once you approve a page preview, the wizard loadsthe data into the database, creates a report and form on the data, and thendisplays the Create Application Wizard to complete the application creationprocess.
• Packaged App. Links to the Packaged Apps gallery. Packaged Apps include a setof business productivity and sample applications which can be installed with just afew clicks. Productivity apps are fully developed point-solutions designed toprovide real functionality, such as project management, surveys, sharedcalendars, and tracking applications. Productivity applications can be installed, runand removed. By default they are 'locked' and are fully supported. Once unlocked,the application is no longer supported but it can be updated to meet specificrequirements. Sample apps are not a complete applications but instead containscode snippets or sample code. Sample applications are available for installation ina workspace and are editable by default.
• Websheet. Websheet applications enable users to build data centric applicationswithout any SQL programming knowledge. Websheet applications are simplified
Chapter 6About the Create Application Wizard
6-3
applications that support pages, data grids, and reports. By creating Theseapplications are very easy to build and are designed to support communitycontributions.
• Quick SQL. Generate the SQL required to create a relational data model from anindented text document. Quick SQL is designed to reduce the time and effortrequired to create SQL tables, triggers, and index structures.
• Copy Application. Create a copy of an existing application.
6.2 Understanding Page Types, Features, and SettingsUse the Create Application Wizard to build a complete application containing multiplepages. How the Create Application Wizard works depends upon the type of pagesyour are creating.
• About Creating a New Database Application (page 6-4)Use the Create Application Wizard to design and quickly create Oracle ApplicationExpress applications.
• Available Page Types in the Create Application Wizard (page 6-5)Learn about available page types when running the Create Application Wizard.
• Available Features in the Create Application Wizard (page 6-6)Learn about available features when running the Create Application Wizard.Features provide application-level functionality and can only be added once perapplication.
• Available Settings in the Create Application Wizard (page 6-8)Learn about Settings available when running the Create Application Wizard.Settings are used in the generation of the application and include the applicationID, the database schema, Advanced Settings (such as the application definition,security, and globalization attributes), and application authentication.
• About Removing Features Created with the Create Application Wizard(page 6-8)Remove features created with a wizard using build options.
See Also:
• "Creating a Database Application Based on a Table or Query(page 6-9)"
• "Creating Applications for Mobile Devices (page 6-19)"
6.2.1 About Creating a New Database ApplicationUse the Create Application Wizard to design and quickly create Oracle ApplicationExpress applications.
Creating a new database application with the Create Application Wizard is a multiplestep process. Once you specify the application name and appearance, you add pages.Database applications can contain multiple pages that include various componentssuch as calendars, cards, charts, dashboards, forms, interactive grids, master detail or
Chapter 6Understanding Page Types, Features, and Settings
6-4
editable grids, and reports. Once created, you can edit the page names, alter the pageorder, and delete them.
Features provide application-level functionality and can only be added once perapplication. Available features include an Application About page, role-based userauthentication, end user activity reports, configuration options to enable or disablespecific functionality, a feedback mechanism to gather end users comment, and aCustomize button to enable end users to choose their own theme style.
Then, you configure Settings. Settings are used in the generation of the applicationand include the application ID, the database schema, Advanced Settings (such as theapplication definition, security, and globalization attributes), and applicationauthentication.
After you create an application using the Create Application Wizard, you can modifypages and add additional pages using the Create Page Wizard.
6.2.2 Available Page Types in the Create Application WizardLearn about available page types when running the Create Application Wizard.
Available Page Types
Table 6-1 Create Application Wizard - Available Page Types
Page Type Description To Learn More
Blank Create a blank page as a placeholder. Once you create theapplication, you can create regions on the page in PageDesigner.
See online Help when creating thispage.
Calendar Generates a calendar with monthly, weekly, and dailyviews.
See "Creating Calendars(page 11-5)"
Cards Create a page which displays cards. See online Help when creating thispage.
Chart Create a page which displays either an area, bar, line, orpie chart.
See "Creating Charts(page 11-27)"
Dashboard Create a dashboard page with multiple charts. See online Help when creating thispage.
Form Create a page containing a form which enables end usersto maintain data. Select the table on which to build theform and specify whether or not to include a report.
See "Developing Forms(page 10-1)"
Interactive Grid Create a page which displays as an interactive grid (similarto a spreadsheet). Functionally, an interactive grid includesmost customization capabilities available in interactivereports plus the ability to rearrange the report interactivelyusing the mouse.
You choose a table or view on which to build theinteractive grid, or provide valid SQL statement whichreturns distinct columns.
You also specify whether or not it is editable. In an editableinteractive grid, users can also add to, modify, and refreshthe data set directly on the page.
See "Managing Interactive Grids(page 9-18)"
Chapter 6Understanding Page Types, Features, and Settings
6-5

Table 6-1 (Cont.) Create Application Wizard - Available Page Types
Page Type Description To Learn More
Master Detail Create a master detail that enables users to query, insert,update, and delete values from two related tables or views.You choose the tables on which to build the master anddetail regions. Master Detail options include:
• Master Detail - A single page master detail whichincludes a classic report and form.
• Editable Master Detail - A single page master detailwhich include two editable interactive grids.
See "Managing Master DetailForms (page 10-11)"
Report Creates a page that contains the formatted result of a SQLquery. You choose a table on which to build a report, orprovide a custom SQL SELECT statement or a PL/SQLfunction returning a SQL SELECT statement. You thenchoose the report type (that is, (that is, Interactive Reportor Classic Report).Select Include Form to include a form page for creating orupdating records.
See "Creating an Interactive orClassic Report Using the CreateApplication Wizard (page 9-6)"
Timeline Create a page which displays a timeline. Especially usefulfor displaying updates.
See online Help when creating thispage.
Wizard Create a collection of pages to be used as a wizard.Generally wizards are used for entering data acrossmultiple steps.
See online Help when creating thispage.
Multiple Reports Create multiple interactive reports based on the tables youselect.
Not applicable.
6.2.3 Available Features in the Create Application WizardLearn about available features when running the Create Application Wizard. Featuresprovide application-level functionality and can only be added once per application.
This table lists available Features when running the Create Application Wizard.
Table 6-2 Create Application Wizard — Features
Page Type Description To Learn More
About Page Include an About page in the application whichdisplays the application description.
See online Help whencreating feature.
Access Control Incorporate role based user authentication withinyour application. Users can be defined asAdministrators, Contributors, or Readers. You canthen readily define different access to different rolesfor various components throughout your application,such as pages, menu entries, regions, columns,items, buttons and so forth.
See "Controlling Access toApplications, Pages, andPage Components(page 20-36)"
Chapter 6Understanding Page Types, Features, and Settings
6-6
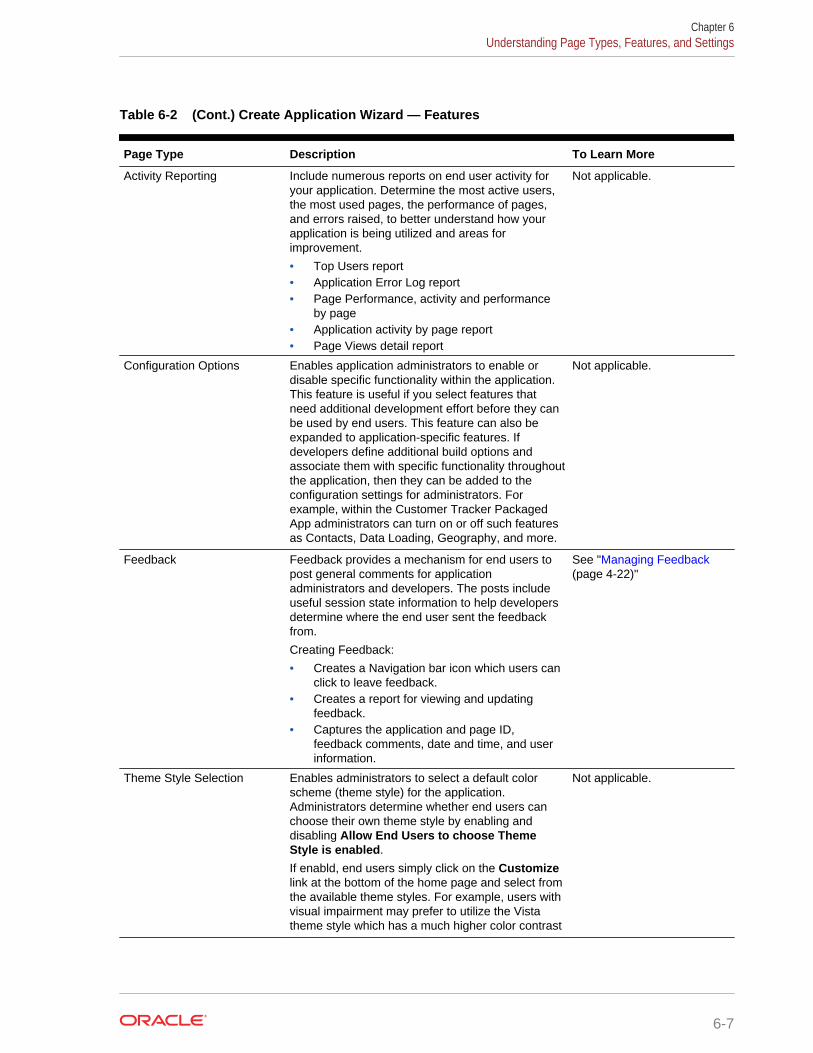
Table 6-2 (Cont.) Create Application Wizard — Features
Page Type Description To Learn More
Activity Reporting Include numerous reports on end user activity foryour application. Determine the most active users,the most used pages, the performance of pages,and errors raised, to better understand how yourapplication is being utilized and areas forimprovement.
• Top Users report• Application Error Log report• Page Performance, activity and performance
by page• Application activity by page report• Page Views detail report
Not applicable.
Configuration Options Enables application administrators to enable ordisable specific functionality within the application.This feature is useful if you select features thatneed additional development effort before they canbe used by end users. This feature can also beexpanded to application-specific features. Ifdevelopers define additional build options andassociate them with specific functionality throughoutthe application, then they can be added to theconfiguration settings for administrators. Forexample, within the Customer Tracker PackagedApp administrators can turn on or off such featuresas Contacts, Data Loading, Geography, and more.
Not applicable.
Feedback Feedback provides a mechanism for end users topost general comments for applicationadministrators and developers. The posts includeuseful session state information to help developersdetermine where the end user sent the feedbackfrom.
Creating Feedback:
• Creates a Navigation bar icon which users canclick to leave feedback.
• Creates a report for viewing and updatingfeedback.
• Captures the application and page ID,feedback comments, date and time, and userinformation.
See "Managing Feedback(page 4-22)"
Theme Style Selection Enables administrators to select a default colorscheme (theme style) for the application.Administrators determine whether end users canchoose their own theme style by enabling anddisabling Allow End Users to choose ThemeStyle is enabled.
If enabld, end users simply click on the Customizelink at the bottom of the home page and select fromthe available theme styles. For example, users withvisual impairment may prefer to utilize the Vistatheme style which has a much higher color contrast
Not applicable.
Chapter 6Understanding Page Types, Features, and Settings
6-7
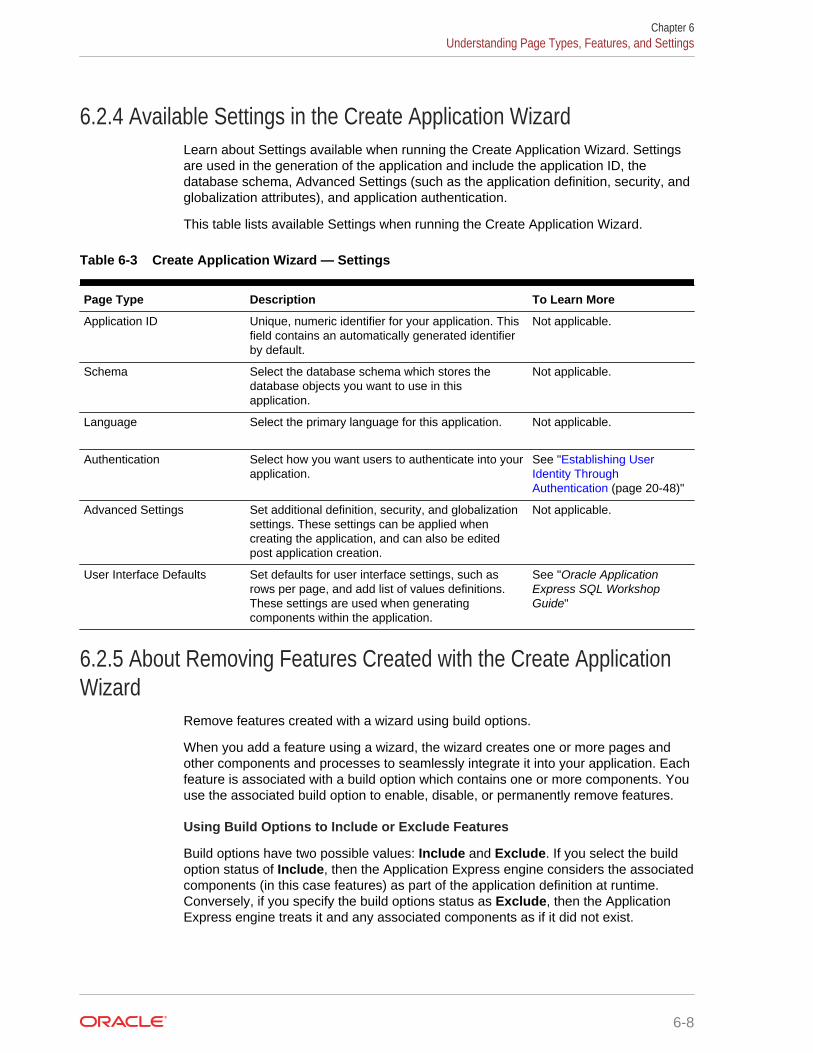
6.2.4 Available Settings in the Create Application WizardLearn about Settings available when running the Create Application Wizard. Settingsare used in the generation of the application and include the application ID, thedatabase schema, Advanced Settings (such as the application definition, security, andglobalization attributes), and application authentication.
This table lists available Settings when running the Create Application Wizard.
Table 6-3 Create Application Wizard — Settings
Page Type Description To Learn More
Application ID Unique, numeric identifier for your application. Thisfield contains an automatically generated identifierby default.
Not applicable.
Schema Select the database schema which stores thedatabase objects you want to use in thisapplication.
Not applicable.
Language Select the primary language for this application. Not applicable.
Authentication Select how you want users to authenticate into yourapplication.
See "Establishing UserIdentity ThroughAuthentication (page 20-48)"
Advanced Settings Set additional definition, security, and globalizationsettings. These settings can be applied whencreating the application, and can also be editedpost application creation.
Not applicable.
User Interface Defaults Set defaults for user interface settings, such asrows per page, and add list of values definitions.These settings are used when generatingcomponents within the application.
See "Oracle ApplicationExpress SQL WorkshopGuide"
6.2.5 About Removing Features Created with the Create ApplicationWizard
Remove features created with a wizard using build options.
When you add a feature using a wizard, the wizard creates one or more pages andother components and processes to seamlessly integrate it into your application. Eachfeature is associated with a build option which contains one or more components. Youuse the associated build option to enable, disable, or permanently remove features.
Using Build Options to Include or Exclude Features
Build options have two possible values: Include and Exclude. If you select the buildoption status of Include, then the Application Express engine considers the associatedcomponents (in this case features) as part of the application definition at runtime.Conversely, if you specify the build options status as Exclude, then the ApplicationExpress engine treats it and any associated components as if it did not exist.
Chapter 6Understanding Page Types, Features, and Settings
6-8
Removing Features Permanently
You remove features by first removing the components associated with the buildoption and then deleting the build option.
6.3 Creating a Database Application Based on a Table orQuery
Select New Application in the Create Application Wizard to create a databaseapplication containing multiple pages based on a table you select, or by providing avalid SQL query.
To create a database application:
1. On the Workspace home page, click the App Builder icon.
2. Click the Create button.
The Create Application Wizard appears.
3. Click New Application.
The Create an Application page appears.
4. For Name, enter the name used to identify the application to developers.
5. For Appearance, you can either:
• Accept the default (Vita, Side Menu).
• Change the appearance by clicking the Set Appearance icon adjacent to theAppearance field. The Appearance dialog appears.
– Theme Style - Select the default theme style used to display theapplication.
Tip:
You can change the style to another pre-defined style, or modifyit post generation. To change the style run the application andthen click Theme Roller in the Developer toolbar.
– Navigation - Select if the menu displays on the side of the application oracross the top of the application.
– Application Icon - Click Choose New Icon to select the icon color and oneof the available icons. Your selection displays on the home page of theapplication.
– Click Save Changes.
6. To add a page, click Add Page and select the desired page type. The userinterface changes based on the selected page type.
Pages you create display under the Home page.
You can edit existing pages as follows:
Chapter 6Creating a Database Application Based on a Table or Query
6-9
• Change the page order. To change the order in which pages appear in yourapplication, click and hold the Drag to reorder page icon and drag and drop itto a new location in the list.
The Home page always displays first and cannot be reordered. Administrativepages always display at the bottom of the list and the order dictates the orderthey appear in the Application Administration list on the Administration page.
• Edit a page. To edit a page click Edit. In the dialog, edit the page name,change the icon, specify if the page is a Home Page or Administration Page,or define Page Help.
• Delete a page. To delete a page, click Edit and the click Delete .
7. For Features, select features to include with your application. Features provideapplication-level functionality and can only be added once per application. To learnmore, see Help.
Tip:
Click the Check All button to select all features.
8. For Settings:
a. Application ID - Enter a unique, numeric identifier for your application. Thisfield contains an automatically generated identifier by default. Application IDsbetween 3000 to 9000 are reserved for internal use by Oracle ApplicationExpress.
b. Schema - Select the database schema which stores the database objects youwant to use in this application. Each application obtains its privileges byparsing all SQL as a specific database schema.
c. Languages - The primary language used in the app. To change the primarylanguage or translate the app into additional languages, click the SelectLanguages icon.
d. Authentication - Select how you want users to authenticate into yourapplication..
e. Advanced Settings - Click the icon adjacent to the Advanced Settings to editthe application definition settings and preferences and security andglobalization attributes. To learn more, see Help.
f. User Interface Defaults - Click the icon to apply User Interface Defaults to thisapplication.
9. Click Create Application.
6.4 Creating a Database Application from a SpreadsheetSelect From a Spreadsheet in the Create Application Wizard to load spreadsheetdata and then create report on that data.
• About Creating an Application from a Spreadsheet (page 6-11)Load spreadsheet data from a file or by copying and pasting and then create aninteractive report on that data.
Chapter 6Creating a Database Application from a Spreadsheet
6-10
• Loading Spreadsheet Data from a File (page 6-11)Load spreadsheet data from a file as comma separated (*.csv) or tab delimited fileand then create an interactive report on that data.
• Loading Spreadsheet Data by Copying and Pasting (page 6-14)Select From a Spreadsheet in the Create Application Wizard to load spreadsheetdata and then create report on that data.
6.4.1 About Creating an Application from a SpreadsheetLoad spreadsheet data from a file or by copying and pasting and then create aninteractive report on that data.
When you run the Create Application Wizard and select From a Spreadsheet, theCreate From a Spreadsheet Wizard appears.
You then choose how to upload the spreadsheet data. Options include:
• From a file. Select this option to upload spreadsheet data from a file as commaseparated (*.csv) or tab delimited file.
• Copy and paste. Select this option to copy and paste tab delimited data.
Once you approve a page preview, the wizard loads the data into the database,creates a report and form on the data, and then displays the Create ApplicationWizard. A new interactive report with form page named after the table you importeddisplays under Pages. You then finish the application creation process by naming theapplication, specifying the application appearance, editing the report, create additionalpages, selecting features, and configuring settings.
Copy and Paste Sample Data
If you choose the Copy and paste option, the wizard includes Sample Data. Simplyexpand the Sample Data region and select a sample.
Support for Uploading JSON Data
The Create From a Spreadsheet Wizard supports the upload of JSON data. To viewtwo examples, select Copy and paste option, expand the Sample Data region, andselect either JSON and Structured Test Data or JSON only Test Data.
6.4.2 Loading Spreadsheet Data from a FileLoad spreadsheet data from a file as comma separated (*.csv) or tab delimited file andthen create an interactive report on that data.
To load spreadsheet data from a file:
1. On the Workspace home page, click the App Builder icon.
2. Click the Create button.
The Create Application Wizard appears.
3. Select From a Spreadsheet.
4. When prompted how to load your spreadsheet data, select From a File.
You can upload a comma separated (*.csv) or tab delimited file. The file youupload must be text-based. To upload a *.xls file, you must first save it as *.csv.
Chapter 6Creating a Database Application from a Spreadsheet
6-11
5. On From a Spreadsheet:
a. Text File - Click Choose File to locate the file to be uploaded.
b. Separator - Specify the column separator character. Use \t for tab separators.
c. Optionally Enclosed By - Enter a delimiter character. You can use thischaracter to deliminate the starting and ending boundary of a data value. Ifyou specify a delimiter character, the wizard ignores white space occurringbefore the starting and ending boundary of a data value. You can also use thisoption to enclose a data value with the specified delimiter character.
d. First row contains column names - If you enable this option and your datacontains column names in the first row, the wizard will use the column namesfor the Oracle database table. Otherwise, you are prompted t update thecolumn names manually.
e. File Character Set - Choose the character set in which the text file is encoded.
f. Globalization - Expand the region and specify the Currency Symbol, GroupSeparator, and Decimal Character..
To learn more about an attribute, see field-level Help.
g. Click Next.
6.
7. On Page Preview:
a. Schema - Identify the database schema owner. Your application obtains itsprivileges by parsing all SQL as a specific database schema.
b. Table Name - Enter a name for the table being created.
c. Preserve Case - If applicable, select this option to preserve the existing case.
d. Set Table Properties - Review the table properties. The wizard determines thedata types and column length for each column by reviewing the data containedin the first 20 rows of data.
• Modify the data types or enter format masks.
• Specify whether to include a column by selecting Yes or No from theUpload list.
8. Click Load Spreadsheet.
9. Click Continue to Create Application Wizard.
The Create Application Wizard appears. A new Interactive Report with Formpage named after the table you created displays under Pages. From here you canedit the report (such as change the report name) or create additional pages basedon the imported data.
Tip:
The steps that follow summarize how to use the Create ApplicationWizard. For more information, see field-level help.
10. For Name, enter the name used to identify the application to developers.
Chapter 6Creating a Database Application from a Spreadsheet
6-12
11. For Appearance, you can either Accept the default (Vita, Side Menu), or changethe appearance by clicking the Set Appearance icon and edit the attributes in theAppearance dialog.
12. To add a page, click Add Page and select the desired page type. The userinterface changes based on the selected page type.
Pages you create display under Add Page. You can edit existing pages as follows:
• Change the page order. To change the order in which pages appear in yourapplication, click and hold the Drag to reorder page icon and drag and drop itto a new location in the list.
The Home page always displays first and cannot be reordered. Administrativepages always display at the bottom of the list and the order dictates the orderthey appear in the Application Administration list on the Administration page.
• Edit a page. To edit a page click Edit. In the dialog, edit the page name,change the icon, specify if the page is a Home Page or Administration Page,or define Page Help.
• Delete a page. To delete a page, click Edit and the click Delete .
13. For Features, select features to include with your application. Features provideapplication-level functionality and can only be added once per application. To learnmore, see Help.
Tip:
Click the Check All button to select all features.
14. For Settings:
a. Application ID - Enter a unique, numeric identifier for your application. Thisfield contains an automatically generated identifier by default. Application IDsbetween 3000 to 9000 are reserved for internal use by Oracle ApplicationExpress.
b. Schema - Select the database schema which stores the database objects youwant to use in this application. Each application obtains its privileges byparsing all SQL as a specific database schema.
c. Application Languages - The primary language used in the app. To changethe primary language or translate the app into additional languages, click theSelect Languages icon.
d. Advanced Settings - Click the icon adjacent to the Advanced Settings to editthe application definition settings and preferences and security andglobalization attributes. To learn more, see Help.
e. Authentication - Select how authenticate users.
f. User Interface Defaults - Click the icon to apply User Interface Defaults to thisapplication.
15. Click Create Application.
Chapter 6Creating a Database Application from a Spreadsheet
6-13
6.4.3 Loading Spreadsheet Data by Copying and PastingSelect From a Spreadsheet in the Create Application Wizard to load spreadsheet dataand then create report on that data.
To load spreadsheet data by copying and pasting:
1. On the Workspace home page, click the App Builder icon.
2. Click the Create button.
The Create Application Wizard appears.
3. Select From a Spreadsheet.
4. When prompted how to load your spreadsheet data, select Copy and paste.
You can upload a comma separated (*.csv) or tab delimited file. The file youupload must be text-based. To upload a *.xls file, you must first save it as *.csv.
5. On From a Spreadsheet:
a. Copy and Paste Tab Delimited Data - Copy and paste the tab delimited datayou want to import.
b. First row contains column names - If you enable this option and your datacontains column names in the first row, the wizard will use the column namesfor the Oracle database table. Otherwise, you are prompted t update thecolumn names manually.
c. File Character Set - Choose the character set in which the text file is encoded.
d. Globalization - Expand the region and specify the Currency Symbol, GroupSeparator, and Decimal Character. To learn more, see field-level Help.
To learn more about an attribute, see field-level Help.
e. Sample Data - Expand the region and select a sample. Once selected, thesample appears in Copy and Paste Tab Delimited Data.
f. Click Next.
6.
7. On Page Preview:
a. Schema - Identify the database schema owner. Your application obtains itsprivileges by parsing all SQL as a specific database schema.
b. Table Name - Enter a name for the table being created.
c. Preserve Case - If applicable, select this option to preserve the existing case.
d. Set Table Properties - Review the table properties. The wizard determines thedata types and column length for each column by reviewing the data containedin the first 20 rows of data.
• Modify the data types or enter format masks.
• Specify whether to include a column by selecting Yes or No from theUpload list.
8. Click Load Spreadsheet.
9. Click Continue to Create Application Wizard.
Chapter 6Creating a Database Application from a Spreadsheet
6-14
The Create Application Wizard appears. A new Interactive Report with Formpage named after the table you created displays under Pages. From here you canedit the report (such as change the report name) or create additional pages basedon the imported data.
Tip:
The steps that follow summarize how to use the Create ApplicationWizard. For more information, see field-level help.
10. For Name, enter the name used to identify the application to developers.
11. For Appearance, you can either Accept the default (Vita, Side Menu), or changethe appearance by clicking the Set Appearance icon and edit the attributes in theAppearance dialog.
12. To add a page, click Add Page and select the desired page type. The userinterface changes based on the selected page type.
Pages you create display under Add Page. You can edit existing pages as follows:
• Change the page order. To change the order in which pages appear in yourapplication, click and hold the Drag to reorder page icon and drag and drop itto a new location in the list.
The Home page always displays first and cannot be reordered. Administrativepages always display at the bottom of the list and the order dictates the orderthey appear in the Application Administration list on the Administration page.
• Edit a page. To edit a page click Edit. In the dialog, edit the page name,change the icon, specify if the page is a Home Page or Administration Page,or define Page Help.
• Delete a page. To delete a page, click Edit and the click Delete .
13. For Features, select features to include with your application. Features provideapplication-level functionality and can only be added once per application. To learnmore, see Help.
Tip:
Click the Check All button to select all features.
14. For Settings:
a. Application ID - Enter a unique, numeric identifier for your application. Thisfield contains an automatically generated identifier by default. Application IDsbetween 3000 to 9000 are reserved for internal use by Oracle ApplicationExpress.
b. Schema - Select the database schema which stores the database objects youwant to use in this application. Each application obtains its privileges byparsing all SQL as a specific database schema.
c. Application Languages - The primary language used in the app. To changethe primary language or translate the app into additional languages, click theSelect Languages icon.
Chapter 6Creating a Database Application from a Spreadsheet
6-15
d. Advanced Settings - Click the icon adjacent to the Advanced Settings to editthe application definition settings and preferences and security andglobalization attributes. To learn more, see Help.
e. Authentication - Select how authenticate users.
f. User Interface Defaults - Click the icon to apply User Interface Defaults to thisapplication.
15. Click Create Application.
6.5 Using Application BlueprintsView an application blueprint and directly edit the application definition in JSONformat.
• What Is an Application Blueprint? (page 6-16)
• Viewing an Application Blueprint (page 6-16)
• Loading an Application Blueprint (page 6-17)
See Also:
To learn more about JSON, see https://www.json.org/
6.5.1 What Is an Application Blueprint?You can view the application blueprint by running the Create Application Wizard andclicking the View Blueprint link at the top of the Create Application Wizard. TheApplication Blueprint window transforms and displays the current application definitionas a JSON document. Edit the document to update application properties and thenclick Apply Blueprint to change the current application details.
If you need to create a large number of similar pages you can copy the relevant JSONcode for one page, paste it numerous times, and then make small adjustments to theJSON. This approach can be significantly quicker than manually clicking the AddPage button for each page in the wizard.
You can also replace the blueprint with the definition from a previously generatedapplication. Click Load a Previous Blueprint to replace the blueprint with thedefinition from a previously generated application. This approach is a simple way toiterate the application design by adding additional pages, changing the features, ortweaking the settings, before generating the application again.
6.5.2 Viewing an Application BlueprintTo view an application blueprint:
1. On the Workspace home page, click the App Builder icon.
2. Click the Create button.
3. Click New Application.
4. At the top of the page, click the View Blueprint link.
Chapter 6Using Application Blueprints
6-16
The Application Blueprint window appears displaying the application definition inJSON format.
5. To edit the document:
a. Update application definition.
The following buttons display at the top of the Script Editor:
• Undo - Ctrl+Z — Removes, or undoes, the most recent line edit made inthe Script Editor.
• Redo - Ctrl+Y — Repeats the most recent line edit made in the ScriptEditor.
• Find - Ctrl+F — Find resembles a magnifying glass. Click Find to performa basic search.
• Replace - Ctrl+Shift+F — Replace resembles a two-sided arrow. ClickReplace to search and replace existing code.
b. Click Apply Blueprint to change the current application definition.
6. To replace the blueprint with the definition from a previously generated application:
a. Click Load Previous Blueprint.
b. In Load Blueprint, locate the blueprint and click Select.
c. Click Apply Blueprint to change the current application details.
6.5.3 Loading an Application BlueprintTo view an application blueprint:
1. On the Workspace home page, click the App Builder icon.
2. Click the Create button.
3. Click New Application.
4. At the top of the page, click the Load Blueprint link.
The Load Blueprint window appears.
5. On Load Blueprint, you can:
• Load a new blueprint. Locate the blueprint to load and click Select.
• Delete a blueprint. Click the Delete Blue icon.
6.6 Copying a Database ApplicationCreate a copy of an existing application.
Create a copy of an existing application by running the Create Application Wizard andselecting Copy an existing application, or by selecting the application and thenCopy this Application from the Tasks list on the Application home page.
• Copying a Database Application Using the Create Application Wizard (page 6-18)
• Copying an Application from the Application Home Page (page 6-19)
Chapter 6Copying a Database Application
6-17
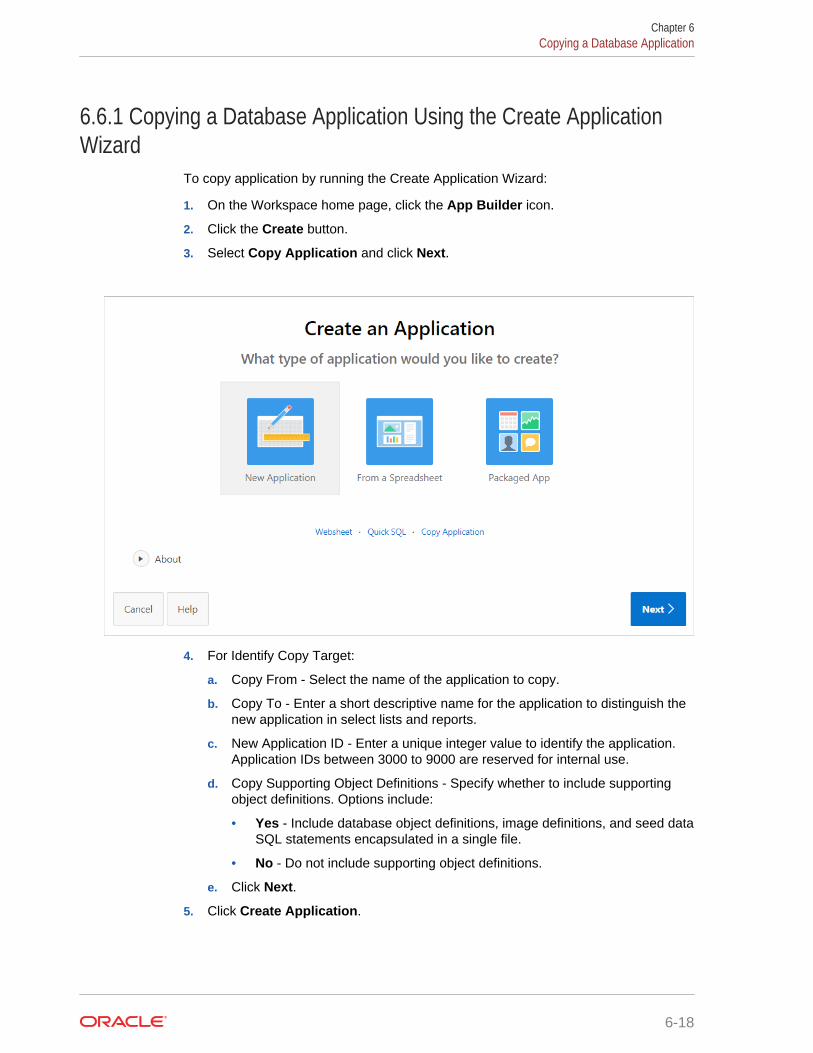
6.6.1 Copying a Database Application Using the Create ApplicationWizard
To copy application by running the Create Application Wizard:
1. On the Workspace home page, click the App Builder icon.
2. Click the Create button.
3. Select Copy Application and click Next.
4. For Identify Copy Target:
a. Copy From - Select the name of the application to copy.
b. Copy To - Enter a short descriptive name for the application to distinguish thenew application in select lists and reports.
c. New Application ID - Enter a unique integer value to identify the application.Application IDs between 3000 to 9000 are reserved for internal use.
d. Copy Supporting Object Definitions - Specify whether to include supportingobject definitions. Options include:
• Yes - Include database object definitions, image definitions, and seed dataSQL statements encapsulated in a single file.
• No - Do not include supporting object definitions.
e. Click Next.
5. Click Create Application.
Chapter 6Copying a Database Application
6-18
6.6.2 Copying an Application from the Application Home PageTo copy a database application from the Application home page:
1. On the Workspace home page, click the App Builder icon.
2. Select an application to copy.
The Application home page appears.
3. From the Tasks list, click Copy this Application.
4. For Identify Copy Target:
a. New Application ID - Enter a unique integer value to identify the application.Application IDs between 3000 to 9000 are reserved for internal use.
b. New Application Name - Enter a short descriptive name for the application todistinguish the new application in select lists and reports.
c. Copy Supporting Object Definitions - Specify whether to include supportingobject definitions. Options include:
• Yes - Include database object definitions, image definitions, and seed dataSQL statements encapsulated in a single file.
• No - Do not include supporting object definitions.
d. Click Next.
5. Click Copy Application.
6.7 Creating Applications for Mobile DevicesBuild applications for mobile devices with mobile-specific design patterns that canprovide an optimal user experience for small screens.
• About Mobile Application Design (page 6-19)
• About Mobile Support (page 6-20)
• Creating Mobile Applications (page 6-21)
6.7.1 About Mobile Application DesignMobile applications developed with Oracle Application Express are browser-basedapplications that run inside the browser on the mobile device. Therefore, theseapplications must have a connection in order to communicate with the OracleDatabase and cannot operate in a disconnected environment.
Mobile devices that have HTML5 capabilities can utilize all of the capabilities that canbe built into the applications, including HTML5 date-pickers, sub-types that displaydifferent keypads based on field definition, and so. Older devices will still render theapplication they will offer less advanced features. The major advantage of developingbrowser-based applications is that you only need to develop them once for desktopand mobile devices. However, one major limitation is accessing on-device featuressuch as contact lists. This limitation can be alleviated by integrating with solutions suchas PhoneGap that support the creation of hybrid solutions, which use a nativeapplication wrapper to display the web applications. Solutions such as Phonegap
Chapter 6Creating Applications for Mobile Devices
6-19
provide various APIs to access many of the native phone features not currentlyavailable using HTML5 or JavaScript. To learn more, see:
http://phonegap.com/
6.7.2 About Mobile SupportAdvantages of the Universal Theme
Universal Theme - 42 (Universal Theme) enables developers to build modern webapplications without requiring extensive knowledge of HTML, CSS, or JavaScript
Key advantages of the Universal Theme include:
• Responsive Design - Designed to work just as well on small screen devices(such as smartphones and tablets) as it does on larger screen devices (includinglaptops and desktops). The UI components in Universal Theme work acrossvarying screen resolutions while maintaining the same or similar functionality. Inaddition, Universal Theme takes full advantage of ultra high screen resolutions byutilizing vector graphics where possible, and relying upon CSS3 features for UIstyling.
• Versatile User Interface - Provides all the components and building blocksnecessary to build practically any type of business application user interface. Tobrowse all of the components provided with Universal Theme go to the UniversalTheme application at https://apex.oracle.com/ut and select Components.
• Easy Customization - Effortlessly customize and fully control the look and feel ofyour applications without becoming an expert in UI design, HTML, CSS, orJavaScript. Using Theme Roller and Template Options, you can easily customizeyour application to fit your company's brand and customize the look and feel ofvarious components using Template Options.
About Migrating Existing Mobile Apps to the Universal Theme
jQuery Mobile and the jQuery Mobile User Interface used in previous releases havebeen desupported and will removed in a future release. If you have an existing mobileapplication that uses the jQuery Mobile User Interface, you should migrate yourexisting application to the Universal Theme.
Tip:
To learn more about migrating existing applications to the Universal Theme,go to the Universal Theme application at https://apex.oracle.com/ut andselect Migration Guide.
Reports Optimized for Mobile Environments
Although the Universal Theme is optimized to work well on mobile devices, not allcomponents are mobile friendly. For example, interactive reports and interactive gridsdo not work well in mobile environments. When creating reports for mobile devices,Oracle recommends the following report types:
• List View
Chapter 6Creating Applications for Mobile Devices
6-20
Features a responsive design to display data and provide easy navigation onSmartphones. Creates a page that contains the formatted result of a SQL query.You choose a table on which to build the List view and select a database columnto be used for the List view entry.
• Column Toggle Report
Creates a responsive report designed for mobile applications and Smartphones.By default, column toggle reports are created with all columns set to the samepriority. However, the developer can edit the report column attributes and rankcolumns by importance. Columns with a lesser priority (larger number) are hiddenat narrower screen widths. The report includes a Columns button which enablesend users to select which columns they want to view.
• Reflow Report
Creates a responsive report designed for mobile applications and Smartphones.When there is not enough space available to display the report horizontally, thereport responds by collapsing the table columns into a vertical value pairs layoutwhere each column displays on a separate row.
6.7.3 Creating Mobile ApplicationsTo create a mobile application:
1. Create a new application by running the Create Application Wizard. See "Creatinga Database Application Based on a Table or Query (page 6-9)."
2. Run the Create Page Wizard and add mobile pages. See "Adding a New Page toan Application (page 7-2)."
Tip:
To learn more about the Universal Theme and mobile-friendly design, goto the Universal Theme application at https://apex.oracle.com/ut.
6.8 Deleting an ApplicationYou can delete an application from the Application home page, or while editingapplication attributes.
When you delete an application, you are prompted whether to remove the applicationdefinition and/or drop supporting objects.
• Deleting an Application from the Application Home Page (page 6-22)
• Deleting an Application from the Edit Application Definition Page (page 6-22)
See Also:
"Deinstalling Supporting Objects (page 24-13)" and "Removing an InstalledPackaged Application (page 3-5)"
Chapter 6Deleting an Application
6-21
6.8.1 Deleting an Application from the Application Home PageTo delete an application from App Builder:
1. On the Workspace home page, click the App Builder icon.
2. Select an application.
The Application home page appears.
3. On the Application home appears, verify the application ID and name at the top ofthe page.
4. On the Tasks list, click Delete this Application.
5. When prompted, click Permanently Delete Now.
6.8.2 Deleting an Application from the Edit Application Definition PageTo delete an application from the Edit Application Definition page:
1. On the Workspace home page, click the App Builder icon.
2. Select an application.
3. Click the Edit Application Properties button to the right of the application name.
The Edit Application Definition page appears.
4. Verify the application ID and name.
5. Click Delete at the top of the page.
6. When prompted, click Permanently Delete Now.
6.9 Managing Application AttributesApplication attributes (also known as the Application Definition) control the behavior ofan entire application and are divided into the categories: Definition, Security,Globalization, and User Interface.
Once you create an application, you can review and update all application attributeson the Edit Application Definition page.
• Editing Application Attributes (page 6-23)Use the Edit Application Definition page to change general application attributessuch as the application name, version number, and control various properties andbehaviors (such as logging, debugging, feedback, compatibility mode, applicationavailability, error handling, and substitution strings).
• Configuring Security Attributes (page 6-32)Configure security for all pages in an application on the Edit Security Attributespage. The security attributes are divided into the categories: Authentication,Authorization, Session Management, Session State Protection, Browser Security,and Database Session.
Chapter 6Managing Application Attributes
6-22
• Configuring Globalization Attributes (page 6-40)Edit attributes on the Edit Globalization Attributes to configure applicationglobalization options. In App Builder you can develop applications that can runconcurrently in different languages.
• Managing the Application User Interface (page 6-45)Edit attributes on the User Interface page to determines the default characteristicsof the application and optimizes the display for the target environment (such asDesktop or Mobile). You can customize the user interface by editing generalattributes on the User Interface page and specific attributes on the User InterfaceDetails page.
See Also:
"How to Create a Custom Packaged Application (page 24-6)" forinformation on using the Supporting Objects utility to create a packagedapplication
6.9.1 Editing Application AttributesUse the Edit Application Definition page to change general application attributes suchas the application name, version number, and control various properties and behaviors(such as logging, debugging, feedback, compatibility mode, application availability,error handling, and substitution strings).
• Accessing the Edit Application Definition Page (page 6-23)
• Edit Application Definition Page (page 6-24)
6.9.1.1 Accessing the Edit Application Definition PageTo access the Edit Application Definition page:
1. On the Workspace home page, click the App Builder icon.
2. Select an application.
The Application home page appears.
3. From Application home page, you can access the Edit Application Definition pageby clicking the Edit Application Properties button or Shared Components.
Chapter 6Managing Application Attributes
6-23
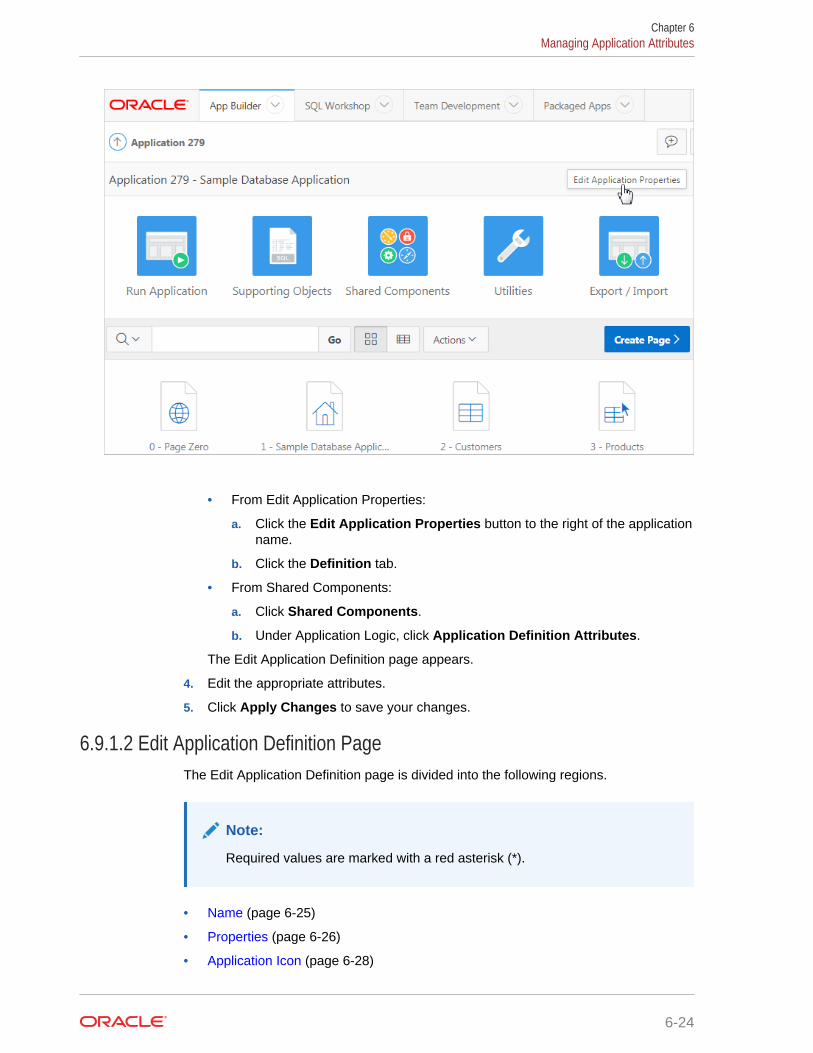
• From Edit Application Properties:
a. Click the Edit Application Properties button to the right of the applicationname.
b. Click the Definition tab.
• From Shared Components:
a. Click Shared Components.
b. Under Application Logic, click Application Definition Attributes.
The Edit Application Definition page appears.
4. Edit the appropriate attributes.
5. Click Apply Changes to save your changes.
6.9.1.2 Edit Application Definition PageThe Edit Application Definition page is divided into the following regions.
Note:
Required values are marked with a red asterisk (*).
• Name (page 6-25)
• Properties (page 6-26)
• Application Icon (page 6-28)
Chapter 6Managing Application Attributes
6-24
• Availability (page 6-28)
• Error Handling (page 6-30)
• Global Notification (page 6-31)
• Substitutions (page 6-31)
• Build Options (page 6-32)
6.9.1.2.1 NameUse Name attributes to define basic characteristics of your application, including theapplication name, an optional alphanumeric alias, and a version number.
Table 6-4 Application Definition, Name
Attribute Description To Learn More
Name A short descriptive name for theapplication to distinguish it from otherapplications in your developmentenvironment.
n/a
ApplicationAlias
Assigns an alternate alphanumericapplication identifier. You can use thisidentifier for the application ID.
For example, suppose you create analias of myapp for application 105.Using f?p syntax, you could callapplication 105 as either:
• f?p=105:1
• f?p=myapp:1
See "About Using f?p Syntax to LinkPages (page 2-12)"
Version Enter the application's versionnumber. The value enter displays onthe page. You can also automaticallytie the version to the date of lastmodification using the followingformat masks:
• YYYY.MM.DD
• MM.DD.YYYY
• DD.MM.YYYY
If your application version usesYYYY.MM.DD, then App Builderreplaces this format mask with thedate of last modification of anyapplication attribute.
n/a
ApplicationGroup
Displays the application groupcurrently associated with thisapplication. To select anotherapplication group, make a selectionfrom the list. To remove anapplication from an existing group,select Unassigned.
See "Managing Application Groups(page 6-63)"
Chapter 6Managing Application Attributes
6-25
6.9.1.2.2 PropertiesUse Properties attributes to configure logging, debug behavior, feedback,compatibility, email from address, and the application proxy server.
Table 6-5 Application Definition, Properties
Attribute Description To Learn More
Logging Determines whether user activity isrecorded in the Oracle ApplicationExpress activity log. Select Yes to logevery page view and enable anadministrator to monitor user activityfor each application.
Disabling logging may be advisablefor high volume applications.
This attribute can only be modified ifthe Application Activity Loggingattribute in Oracle Application ExpressAdministration Services is set to UseApplication Setting.
See "Enabling Application Activity" inLogging in Oracle Application ExpressAdministration Guide.
Debugging Controls debug mode for the currentapplication. Available options include:
• Yes - Enables the application torun in a debug mode from abrowser at runtime.
• No - Disables the applicationfrom enabling in debug from abrowser.
Running an application in debugmode is useful when an application isunder development. For productionapplications, Oracle recommendsdisabling debugging and thuspreventing users from viewingapplication logic.
Debug can be enabledprogrammatically regardless of thisdebug setting. If the application is runfrom the Application Expressdevelopment environment, debuggingcan always be enabled.
n/a
AllowFeedback
Enables support for end userfeedback for this application. SelectYes or No.
If you select Yes and enable thisoption, you must create a feedbackpage and navigation bar icon to callthat page. If you later disablefeedback, the navigation bar icon ishidden. This enables you to turn onfeedback for testing and turn it off forproduction.
See "Managing Feedback(page 4-22)"
Chapter 6Managing Application Attributes
6-26
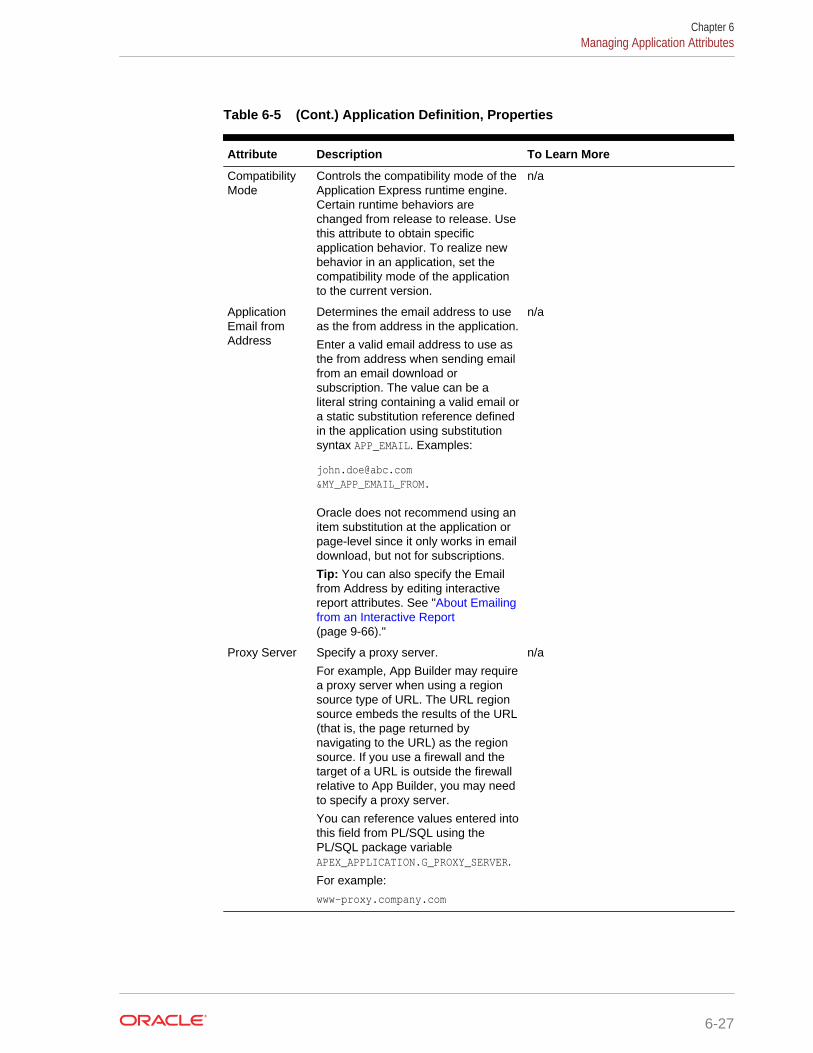
Table 6-5 (Cont.) Application Definition, Properties
Attribute Description To Learn More
CompatibilityMode
Controls the compatibility mode of theApplication Express runtime engine.Certain runtime behaviors arechanged from release to release. Usethis attribute to obtain specificapplication behavior. To realize newbehavior in an application, set thecompatibility mode of the applicationto the current version.
n/a
ApplicationEmail fromAddress
Determines the email address to useas the from address in the application.
Enter a valid email address to use asthe from address when sending emailfrom an email download orsubscription. The value can be aliteral string containing a valid email ora static substitution reference definedin the application using substitutionsyntax APP_EMAIL. Examples:
[email protected]&MY_APP_EMAIL_FROM.
Oracle does not recommend using anitem substitution at the application orpage-level since it only works in emaildownload, but not for subscriptions.
Tip: You can also specify the Emailfrom Address by editing interactivereport attributes. See "About Emailingfrom an Interactive Report(page 9-66)."
n/a
Proxy Server Specify a proxy server.
For example, App Builder may requirea proxy server when using a regionsource type of URL. The URL regionsource embeds the results of the URL(that is, the page returned bynavigating to the URL) as the regionsource. If you use a firewall and thetarget of a URL is outside the firewallrelative to App Builder, you may needto specify a proxy server.
You can reference values entered intothis field from PL/SQL using thePL/SQL package variableAPEX_APPLICATION.G_PROXY_SERVER.
For example:
www-proxy.company.com
n/a
Chapter 6Managing Application Attributes
6-27
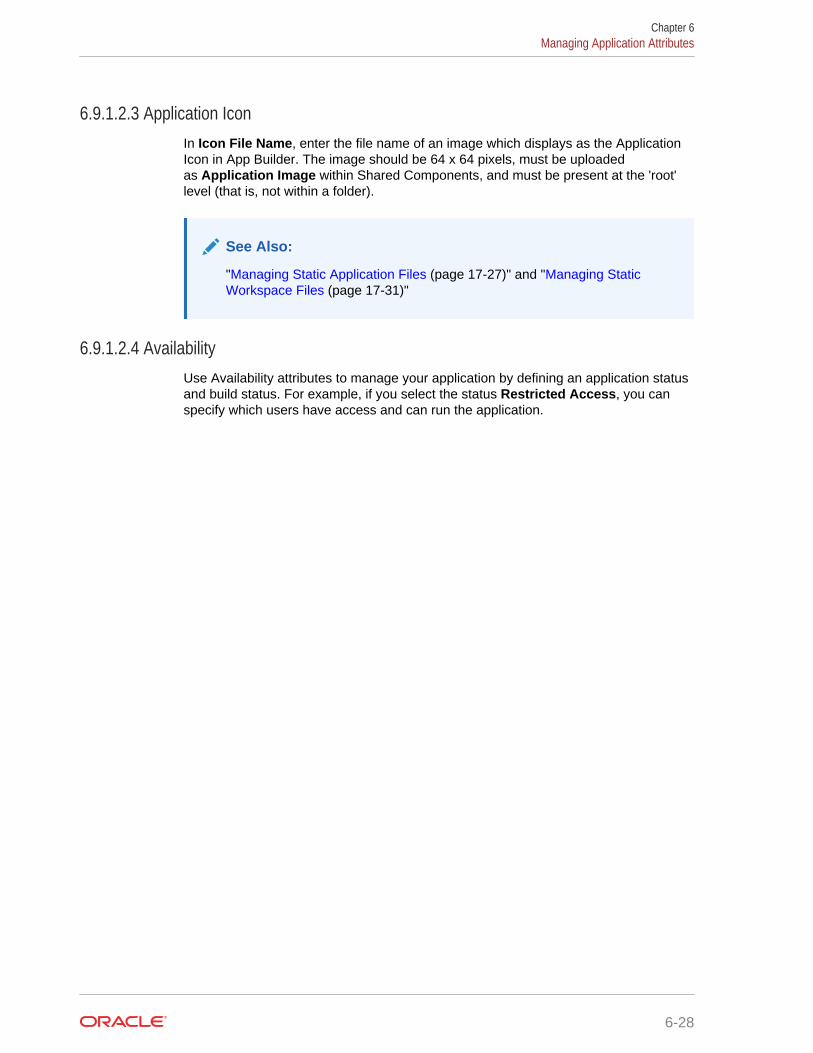
6.9.1.2.3 Application IconIn Icon File Name, enter the file name of an image which displays as the ApplicationIcon in App Builder. The image should be 64 x 64 pixels, must be uploadedas Application Image within Shared Components, and must be present at the 'root'level (that is, not within a folder).
See Also:
"Managing Static Application Files (page 17-27)" and "Managing StaticWorkspace Files (page 17-31)"
6.9.1.2.4 AvailabilityUse Availability attributes to manage your application by defining an application statusand build status. For example, if you select the status Restricted Access, you canspecify which users have access and can run the application.
Chapter 6Managing Application Attributes
6-28
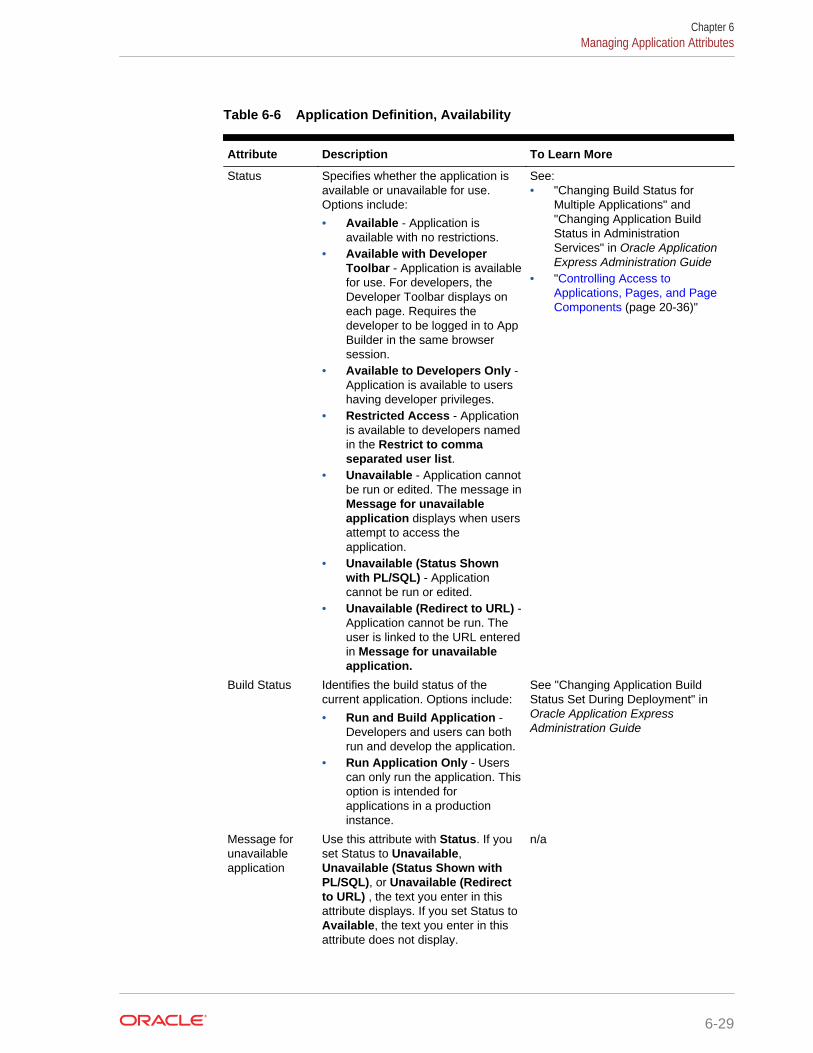
Table 6-6 Application Definition, Availability
Attribute Description To Learn More
Status Specifies whether the application isavailable or unavailable for use.Options include:
• Available - Application isavailable with no restrictions.
• Available with DeveloperToolbar - Application is availablefor use. For developers, theDeveloper Toolbar displays oneach page. Requires thedeveloper to be logged in to AppBuilder in the same browsersession.
• Available to Developers Only -Application is available to usershaving developer privileges.
• Restricted Access - Applicationis available to developers namedin the Restrict to commaseparated user list.
• Unavailable - Application cannotbe run or edited. The message inMessage for unavailableapplication displays when usersattempt to access theapplication.
• Unavailable (Status Shownwith PL/SQL) - Applicationcannot be run or edited.
• Unavailable (Redirect to URL) -Application cannot be run. Theuser is linked to the URL enteredin Message for unavailableapplication.
See:• "Changing Build Status for
Multiple Applications" and"Changing Application BuildStatus in AdministrationServices" in Oracle ApplicationExpress Administration Guide
• "Controlling Access toApplications, Pages, and PageComponents (page 20-36)"
Build Status Identifies the build status of thecurrent application. Options include:
• Run and Build Application -Developers and users can bothrun and develop the application.
• Run Application Only - Userscan only run the application. Thisoption is intended forapplications in a productioninstance.
See "Changing Application BuildStatus Set During Deployment" in Oracle Application ExpressAdministration Guide
Message forunavailableapplication
Use this attribute with Status. If youset Status to Unavailable,Unavailable (Status Shown withPL/SQL), or Unavailable (Redirectto URL) , the text you enter in thisattribute displays. If you set Status toAvailable, the text you enter in thisattribute does not display.
n/a
Chapter 6Managing Application Attributes
6-29
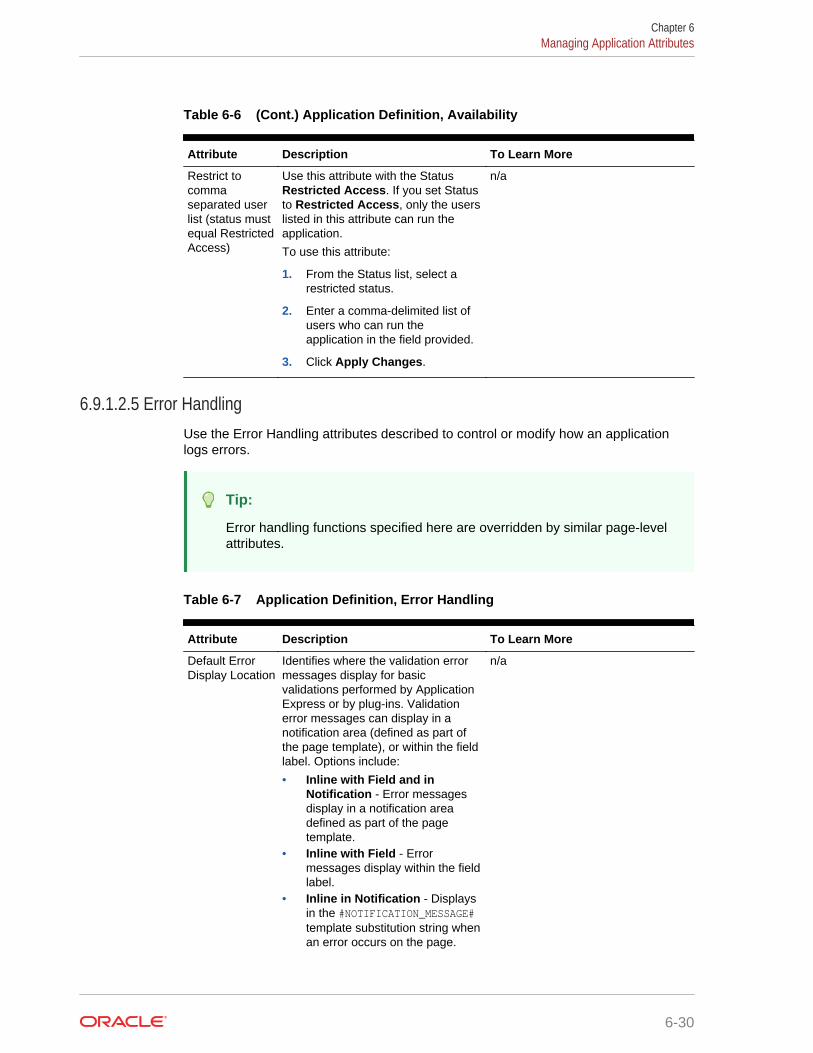
Table 6-6 (Cont.) Application Definition, Availability
Attribute Description To Learn More
Restrict tocommaseparated userlist (status mustequal RestrictedAccess)
Use this attribute with the StatusRestricted Access. If you set Statusto Restricted Access, only the userslisted in this attribute can run theapplication.
To use this attribute:
1. From the Status list, select arestricted status.
2. Enter a comma-delimited list ofusers who can run theapplication in the field provided.
3. Click Apply Changes.
n/a
6.9.1.2.5 Error HandlingUse the Error Handling attributes described to control or modify how an applicationlogs errors.
Tip:
Error handling functions specified here are overridden by similar page-levelattributes.
Table 6-7 Application Definition, Error Handling
Attribute Description To Learn More
Default ErrorDisplay Location
Identifies where the validation errormessages display for basicvalidations performed by ApplicationExpress or by plug-ins. Validationerror messages can display in anotification area (defined as part ofthe page template), or within the fieldlabel. Options include:
• Inline with Field and inNotification - Error messagesdisplay in a notification areadefined as part of the pagetemplate.
• Inline with Field - Errormessages display within the fieldlabel.
• Inline in Notification - Displaysin the #NOTIFICATION_MESSAGE#template substitution string whenan error occurs on the page.
n/a
Chapter 6Managing Application Attributes
6-30
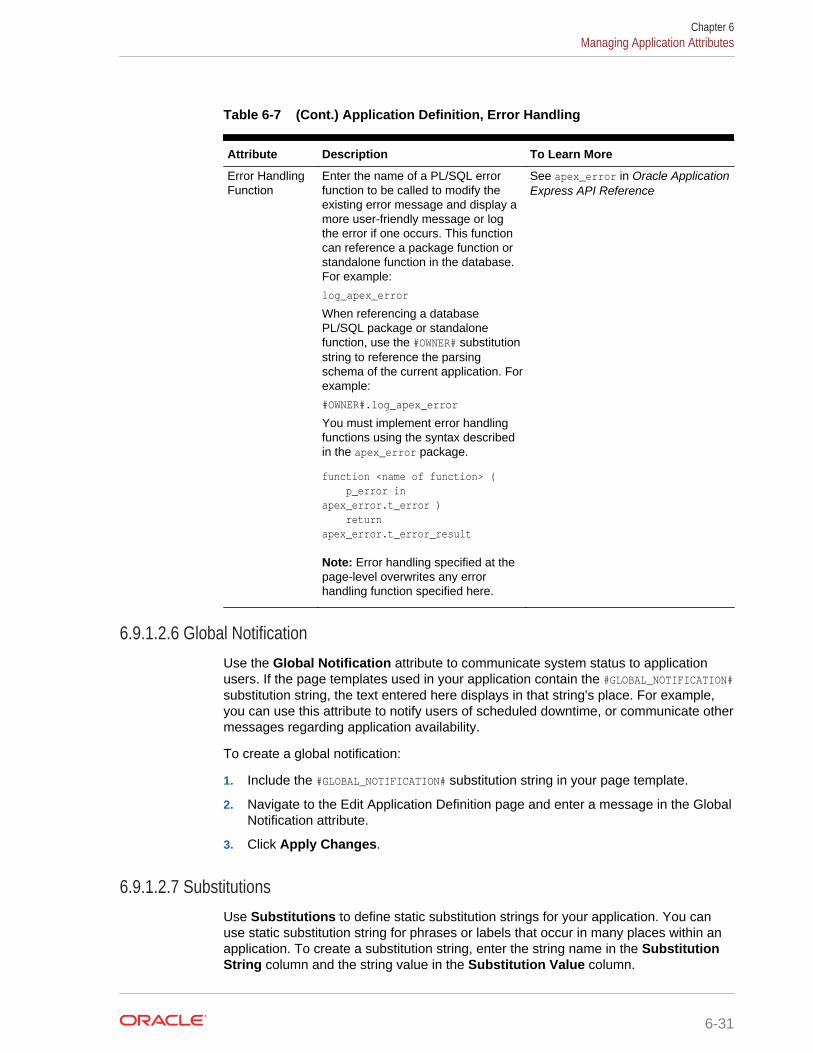
Table 6-7 (Cont.) Application Definition, Error Handling
Attribute Description To Learn More
Error HandlingFunction
Enter the name of a PL/SQL errorfunction to be called to modify theexisting error message and display amore user-friendly message or logthe error if one occurs. This functioncan reference a package function orstandalone function in the database.For example:
log_apex_error
When referencing a databasePL/SQL package or standalonefunction, use the #OWNER# substitutionstring to reference the parsingschema of the current application. Forexample:
#OWNER#.log_apex_error
You must implement error handlingfunctions using the syntax describedin the apex_error package.
function <name of function> ( p_error in apex_error.t_error ) return apex_error.t_error_result
Note: Error handling specified at thepage-level overwrites any errorhandling function specified here.
See apex_error in Oracle ApplicationExpress API Reference
6.9.1.2.6 Global NotificationUse the Global Notification attribute to communicate system status to applicationusers. If the page templates used in your application contain the #GLOBAL_NOTIFICATION#substitution string, the text entered here displays in that string's place. For example,you can use this attribute to notify users of scheduled downtime, or communicate othermessages regarding application availability.
To create a global notification:
1. Include the #GLOBAL_NOTIFICATION# substitution string in your page template.
2. Navigate to the Edit Application Definition page and enter a message in the GlobalNotification attribute.
3. Click Apply Changes.
6.9.1.2.7 SubstitutionsUse Substitutions to define static substitution strings for your application. You canuse static substitution string for phrases or labels that occur in many places within anapplication. To create a substitution string, enter the string name in the SubstitutionString column and the string value in the Substitution Value column.
Chapter 6Managing Application Attributes
6-31
Defining static substitution strings centrally enables you to change text strings inmultiple places in your application by making a single change to the SubstitutionValue defined on this page.
6.9.1.2.8 Build OptionsThe Build Options displays existing build options in the current application. Mostapplications have a build option attribute. Build Options have two possible values:INCLUDE and EXCLUDE. If you specify an attribute to be included, then the ApplicationExpress engine includes and enables it at runtime. However, if you specify an attributeto be excluded, then the Application Express engine disables it and excludes it atruntime.
Do not specify a build option unless you plan to exclude that object from specificinstallations.
6.9.2 Configuring Security AttributesConfigure security for all pages in an application on the Edit Security Attributes page.The security attributes are divided into the categories: Authentication, Authorization,Session Management, Session State Protection, Browser Security, and DatabaseSession.
• Accessing the Edit Security Attributes Page (page 6-32)
• Security Attributes Page (page 6-33)
See Also:
"Managing Application Security (page 20-1)"
6.9.2.1 Accessing the Edit Security Attributes PageTo access the Edit Security Attributes page:
1. On the Workspace home page, click the App Builder icon.
2. Select an application.
The Application home page appears.
3. From the Application home page, you can access the Edit Security Attributes pagein two ways:
• From Shared Components:
a. Click Shared Components.
b. Under Security, click Security Attributes.
• From Edit Application Properties:
a. Click the Edit Application Properties button to the right of the applicationname.
b. Click the Security tab.
Chapter 6Managing Application Attributes
6-32
The Edit Security Attributes page appears.
4. Edit the appropriate attributes.
5. Click Apply Changes to save your changes.
6.9.2.2 Security Attributes PageUse the Edit Security Attributes page to set application-wide security settings. Editapplication components directly to manage more granular settings. The Edit SecurityAttributes page is divided into the following sections:
Note:
Required values are marked with a red asterisk (*).
• Authentication (page 6-33)
• Authorization (page 6-34)
• Session Management (page 6-35)
• Session State Protection (page 6-38)
• Browser Security (page 6-38)
• Database Session (page 6-40)
6.9.2.2.1 AuthenticationAuthentication is the process of establishing users' identities before they can accessan application. Although you can define multiple authentication schemes for yourapplication, only one scheme can be current at a time.
Chapter 6Managing Application Attributes
6-33
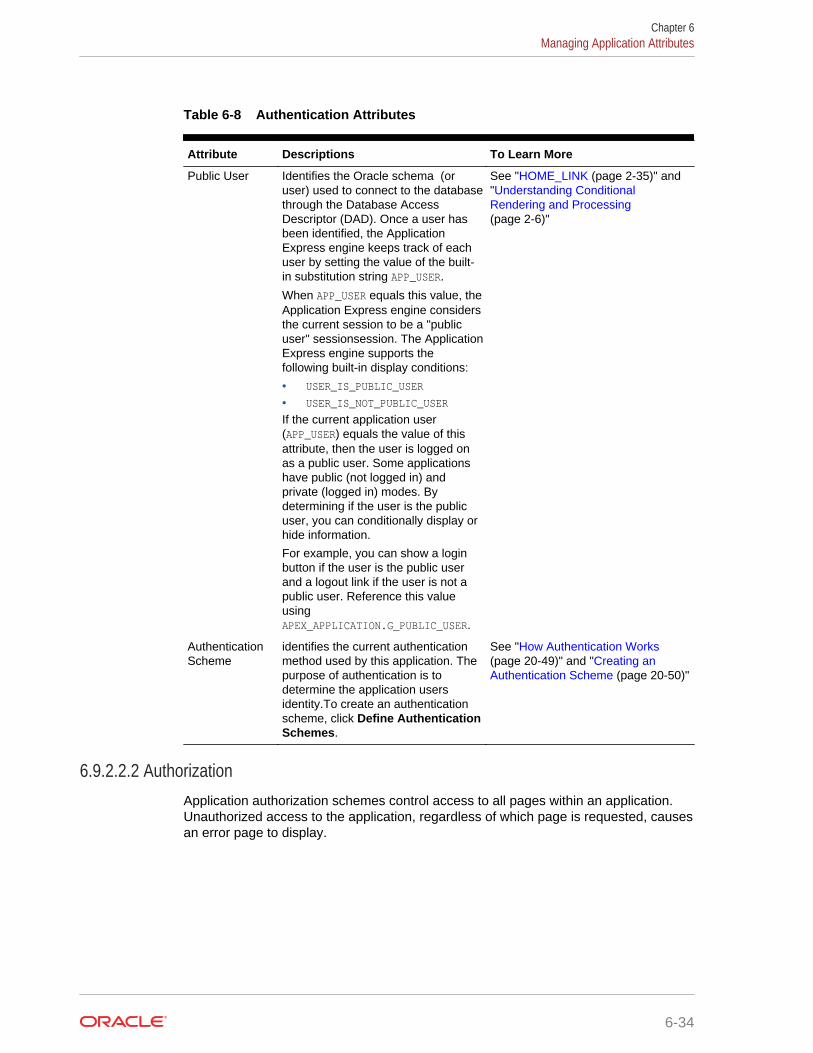
Table 6-8 Authentication Attributes
Attribute Descriptions To Learn More
Public User Identifies the Oracle schema (oruser) used to connect to the databasethrough the Database AccessDescriptor (DAD). Once a user hasbeen identified, the ApplicationExpress engine keeps track of eachuser by setting the value of the built-in substitution string APP_USER.
When APP_USER equals this value, theApplication Express engine considersthe current session to be a "publicuser" sessionsession. The ApplicationExpress engine supports thefollowing built-in display conditions:
• USER_IS_PUBLIC_USER
• USER_IS_NOT_PUBLIC_USER
If the current application user(APP_USER) equals the value of thisattribute, then the user is logged onas a public user. Some applicationshave public (not logged in) andprivate (logged in) modes. Bydetermining if the user is the publicuser, you can conditionally display orhide information.
For example, you can show a loginbutton if the user is the public userand a logout link if the user is not apublic user. Reference this valueusingAPEX_APPLICATION.G_PUBLIC_USER.
See "HOME_LINK (page 2-35)" and"Understanding ConditionalRendering and Processing(page 2-6)"
AuthenticationScheme
identifies the current authenticationmethod used by this application. Thepurpose of authentication is todetermine the application usersidentity.To create an authenticationscheme, click Define AuthenticationSchemes.
See "How Authentication Works(page 20-49)" and "Creating anAuthentication Scheme (page 20-50)"
6.9.2.2.2 AuthorizationApplication authorization schemes control access to all pages within an application.Unauthorized access to the application, regardless of which page is requested, causesan error page to display.
Chapter 6Managing Application Attributes
6-34
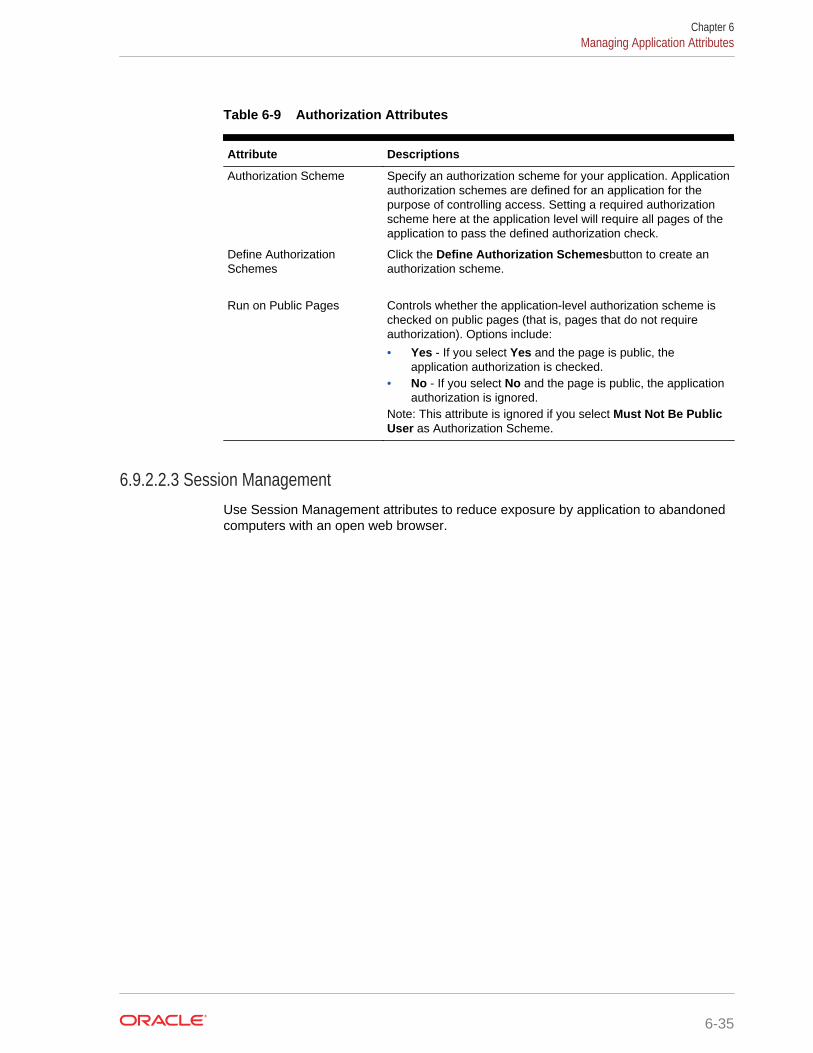
Table 6-9 Authorization Attributes
Attribute Descriptions
Authorization Scheme Specify an authorization scheme for your application. Applicationauthorization schemes are defined for an application for thepurpose of controlling access. Setting a required authorizationscheme here at the application level will require all pages of theapplication to pass the defined authorization check.
Define AuthorizationSchemes
Click the Define Authorization Schemesbutton to create anauthorization scheme.
Run on Public Pages Controls whether the application-level authorization scheme ischecked on public pages (that is, pages that do not requireauthorization). Options include:
• Yes - If you select Yes and the page is public, theapplication authorization is checked.
• No - If you select No and the page is public, the applicationauthorization is ignored.
Note: This attribute is ignored if you select Must Not Be PublicUser as Authorization Scheme.
6.9.2.2.3 Session ManagementUse Session Management attributes to reduce exposure by application to abandonedcomputers with an open web browser.
Chapter 6Managing Application Attributes
6-35
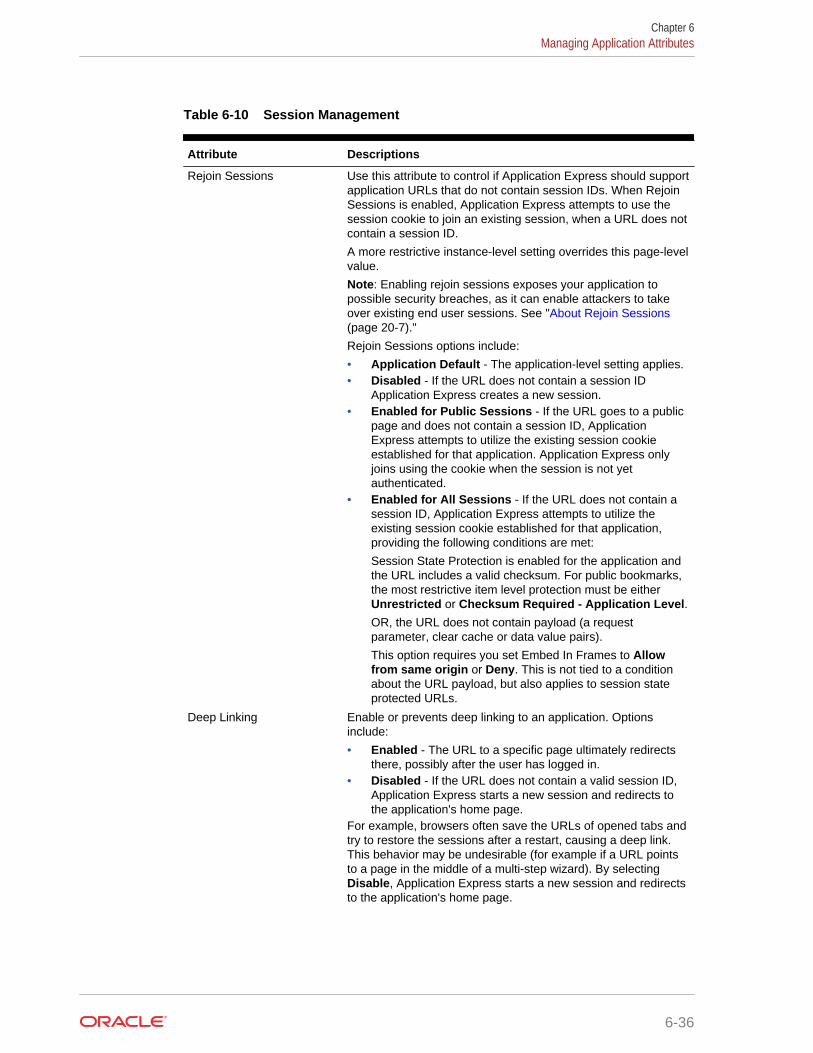
Table 6-10 Session Management
Attribute Descriptions
Rejoin Sessions Use this attribute to control if Application Express should supportapplication URLs that do not contain session IDs. When RejoinSessions is enabled, Application Express attempts to use thesession cookie to join an existing session, when a URL does notcontain a session ID.
A more restrictive instance-level setting overrides this page-levelvalue.
Note: Enabling rejoin sessions exposes your application topossible security breaches, as it can enable attackers to takeover existing end user sessions. See "About Rejoin Sessions(page 20-7)."
Rejoin Sessions options include:
• Application Default - The application-level setting applies.• Disabled - If the URL does not contain a session ID
Application Express creates a new session.• Enabled for Public Sessions - If the URL goes to a public
page and does not contain a session ID, ApplicationExpress attempts to utilize the existing session cookieestablished for that application. Application Express onlyjoins using the cookie when the session is not yetauthenticated.
• Enabled for All Sessions - If the URL does not contain asession ID, Application Express attempts to utilize theexisting session cookie established for that application,providing the following conditions are met:
Session State Protection is enabled for the application andthe URL includes a valid checksum. For public bookmarks,the most restrictive item level protection must be eitherUnrestricted or Checksum Required - Application Level.OR, the URL does not contain payload (a requestparameter, clear cache or data value pairs).
This option requires you set Embed In Frames to Allowfrom same origin or Deny. This is not tied to a conditionabout the URL payload, but also applies to session stateprotected URLs.
Deep Linking Enable or prevents deep linking to an application. Optionsinclude:
• Enabled - The URL to a specific page ultimately redirectsthere, possibly after the user has logged in.
• Disabled - If the URL does not contain a valid session ID,Application Express starts a new session and redirects tothe application's home page.
For example, browsers often save the URLs of opened tabs andtry to restore the sessions after a restart, causing a deep link.This behavior may be undesirable (for example if a URL pointsto a page in the middle of a multi-step wizard). By selectingDisable, Application Express starts a new session and redirectsto the application's home page.
Chapter 6Managing Application Attributes
6-36
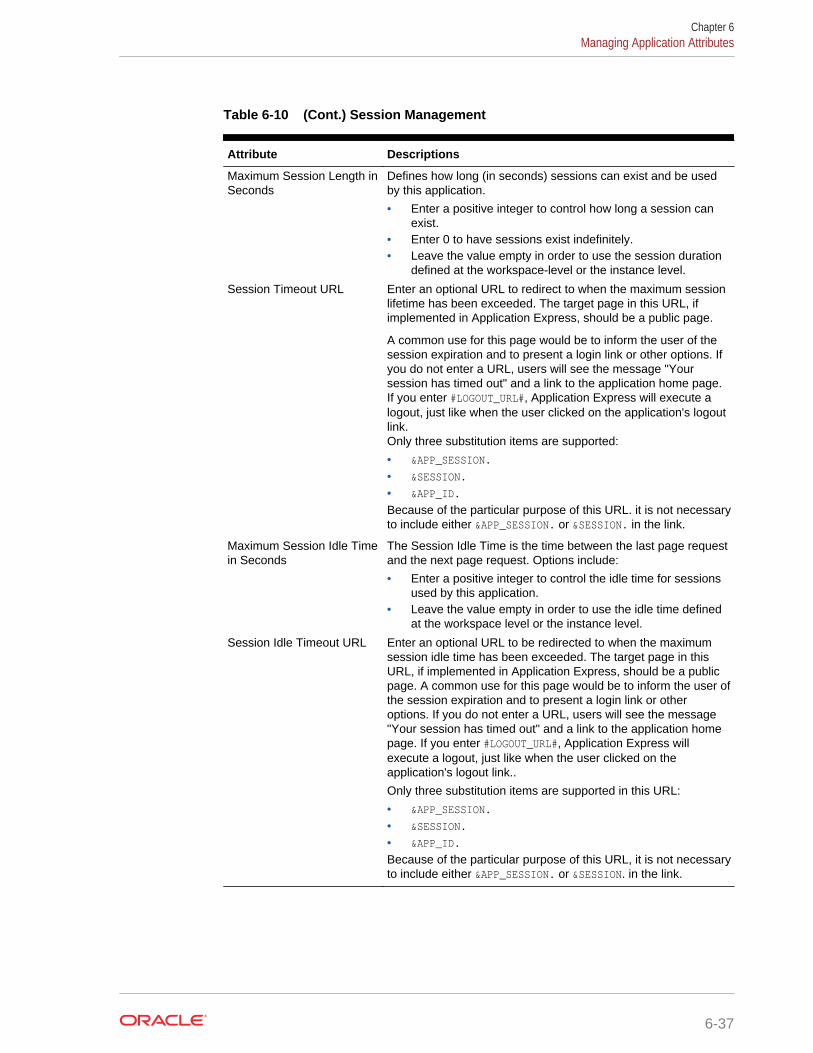
Table 6-10 (Cont.) Session Management
Attribute Descriptions
Maximum Session Length inSeconds
Defines how long (in seconds) sessions can exist and be usedby this application.
• Enter a positive integer to control how long a session canexist.
• Enter 0 to have sessions exist indefinitely.• Leave the value empty in order to use the session duration
defined at the workspace-level or the instance level.
Session Timeout URL Enter an optional URL to redirect to when the maximum sessionlifetime has been exceeded. The target page in this URL, ifimplemented in Application Express, should be a public page.
A common use for this page would be to inform the user of thesession expiration and to present a login link or other options. Ifyou do not enter a URL, users will see the message "Yoursession has timed out" and a link to the application home page.If you enter #LOGOUT_URL#, Application Express will execute alogout, just like when the user clicked on the application's logoutlink.Only three substitution items are supported:
• &APP_SESSION.
• &SESSION.
• &APP_ID.
Because of the particular purpose of this URL. it is not necessaryto include either &APP_SESSION. or &SESSION. in the link.
Maximum Session Idle Timein Seconds
The Session Idle Time is the time between the last page requestand the next page request. Options include:
• Enter a positive integer to control the idle time for sessionsused by this application.
• Leave the value empty in order to use the idle time definedat the workspace level or the instance level.
Session Idle Timeout URL Enter an optional URL to be redirected to when the maximumsession idle time has been exceeded. The target page in thisURL, if implemented in Application Express, should be a publicpage. A common use for this page would be to inform the user ofthe session expiration and to present a login link or otheroptions. If you do not enter a URL, users will see the message"Your session has timed out" and a link to the application homepage. If you enter #LOGOUT_URL#, Application Express willexecute a logout, just like when the user clicked on theapplication's logout link..
Only three substitution items are supported in this URL:
• &APP_SESSION.
• &SESSION.
• &APP_ID.
Because of the particular purpose of this URL, it is not necessaryto include either &APP_SESSION. or &SESSION. in the link.
Chapter 6Managing Application Attributes
6-37
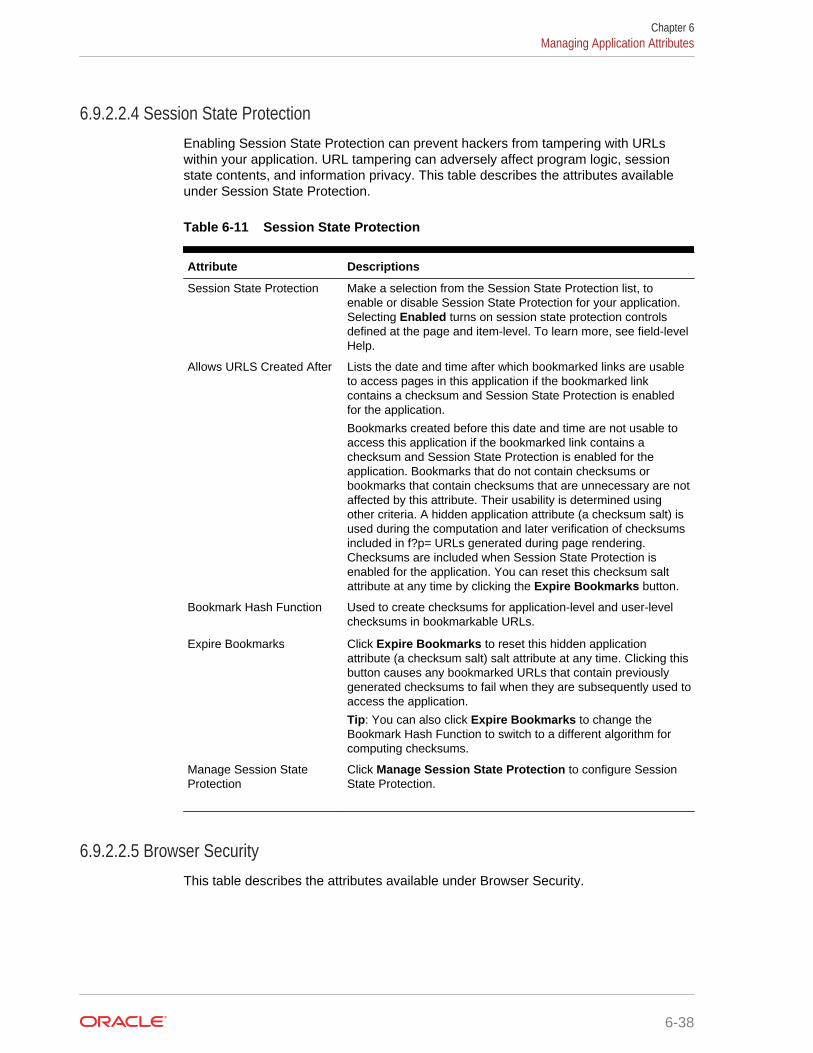
6.9.2.2.4 Session State ProtectionEnabling Session State Protection can prevent hackers from tampering with URLswithin your application. URL tampering can adversely affect program logic, sessionstate contents, and information privacy. This table describes the attributes availableunder Session State Protection.
Table 6-11 Session State Protection
Attribute Descriptions
Session State Protection Make a selection from the Session State Protection list, toenable or disable Session State Protection for your application.Selecting Enabled turns on session state protection controlsdefined at the page and item-level. To learn more, see field-levelHelp.
Allows URLS Created After Lists the date and time after which bookmarked links are usableto access pages in this application if the bookmarked linkcontains a checksum and Session State Protection is enabledfor the application.
Bookmarks created before this date and time are not usable toaccess this application if the bookmarked link contains achecksum and Session State Protection is enabled for theapplication. Bookmarks that do not contain checksums orbookmarks that contain checksums that are unnecessary are notaffected by this attribute. Their usability is determined usingother criteria. A hidden application attribute (a checksum salt) isused during the computation and later verification of checksumsincluded in f?p= URLs generated during page rendering.Checksums are included when Session State Protection isenabled for the application. You can reset this checksum saltattribute at any time by clicking the Expire Bookmarks button.
Bookmark Hash Function Used to create checksums for application-level and user-levelchecksums in bookmarkable URLs.
Expire Bookmarks Click Expire Bookmarks to reset this hidden applicationattribute (a checksum salt) salt attribute at any time. Clicking thisbutton causes any bookmarked URLs that contain previouslygenerated checksums to fail when they are subsequently used toaccess the application.
Tip: You can also click Expire Bookmarks to change theBookmark Hash Function to switch to a different algorithm forcomputing checksums.
Manage Session StateProtection
Click Manage Session State Protection to configure SessionState Protection.
6.9.2.2.5 Browser SecurityThis table describes the attributes available under Browser Security.
Chapter 6Managing Application Attributes
6-38
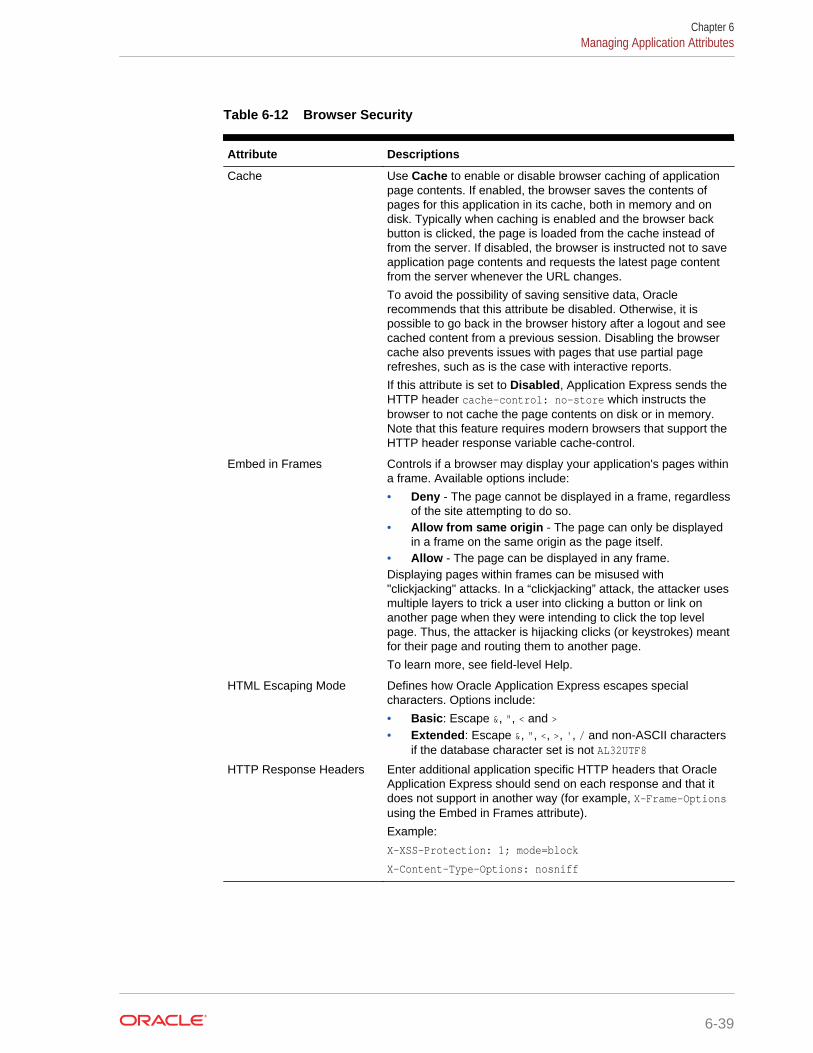
Table 6-12 Browser Security
Attribute Descriptions
Cache Use Cache to enable or disable browser caching of applicationpage contents. If enabled, the browser saves the contents ofpages for this application in its cache, both in memory and ondisk. Typically when caching is enabled and the browser backbutton is clicked, the page is loaded from the cache instead offrom the server. If disabled, the browser is instructed not to saveapplication page contents and requests the latest page contentfrom the server whenever the URL changes.
To avoid the possibility of saving sensitive data, Oraclerecommends that this attribute be disabled. Otherwise, it ispossible to go back in the browser history after a logout and seecached content from a previous session. Disabling the browsercache also prevents issues with pages that use partial pagerefreshes, such as is the case with interactive reports.
If this attribute is set to Disabled, Application Express sends theHTTP header cache-control: no-store which instructs thebrowser to not cache the page contents on disk or in memory.Note that this feature requires modern browsers that support theHTTP header response variable cache-control.
Embed in Frames Controls if a browser may display your application's pages withina frame. Available options include:
• Deny - The page cannot be displayed in a frame, regardlessof the site attempting to do so.
• Allow from same origin - The page can only be displayedin a frame on the same origin as the page itself.
• Allow - The page can be displayed in any frame.Displaying pages within frames can be misused with"clickjacking" attacks. In a “clickjacking” attack, the attacker usesmultiple layers to trick a user into clicking a button or link onanother page when they were intending to click the top levelpage. Thus, the attacker is hijacking clicks (or keystrokes) meantfor their page and routing them to another page.
To learn more, see field-level Help.
HTML Escaping Mode Defines how Oracle Application Express escapes specialcharacters. Options include:
• Basic: Escape &, ", < and >• Extended: Escape &, ", <, >, ', / and non-ASCII characters
if the database character set is not AL32UTF8
HTTP Response Headers Enter additional application specific HTTP headers that OracleApplication Express should send on each response and that itdoes not support in another way (for example, X-Frame-Optionsusing the Embed in Frames attribute).
Example:
X-XSS-Protection: 1; mode=block
X-Content-Type-Options: nosniff
Chapter 6Managing Application Attributes
6-39
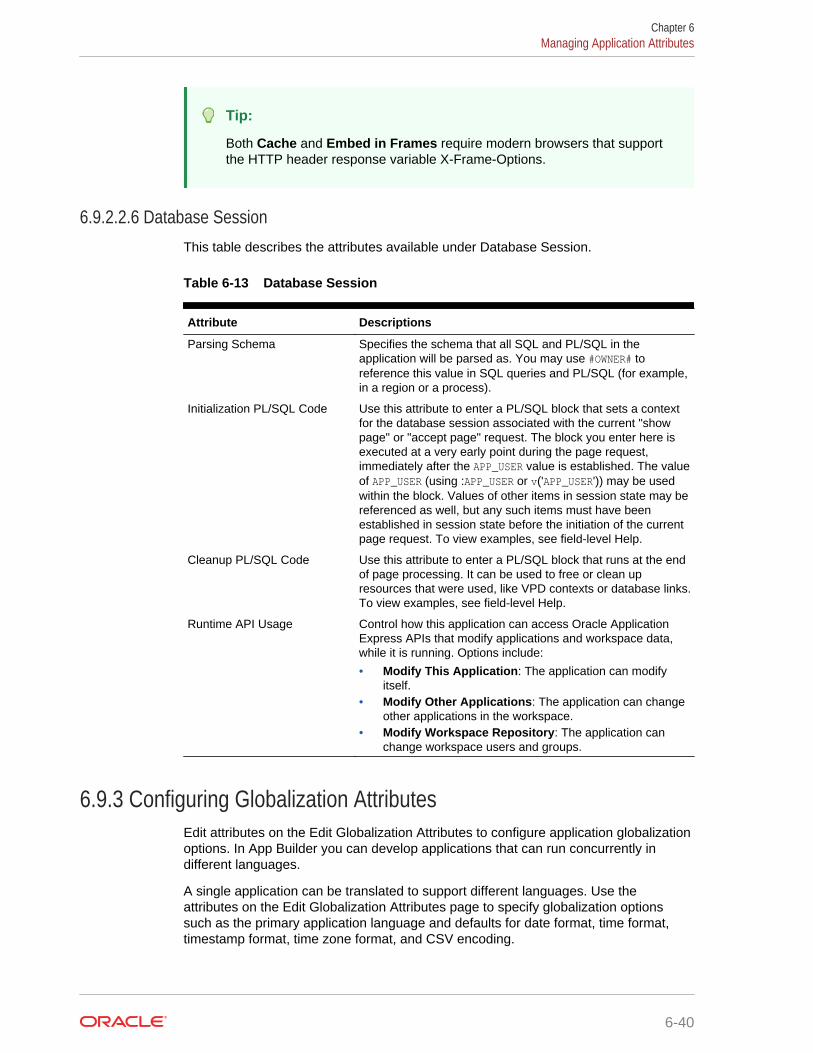
Tip:
Both Cache and Embed in Frames require modern browsers that supportthe HTTP header response variable X-Frame-Options.
6.9.2.2.6 Database SessionThis table describes the attributes available under Database Session.
Table 6-13 Database Session
Attribute Descriptions
Parsing Schema Specifies the schema that all SQL and PL/SQL in theapplication will be parsed as. You may use #OWNER# toreference this value in SQL queries and PL/SQL (for example,in a region or a process).
Initialization PL/SQL Code Use this attribute to enter a PL/SQL block that sets a contextfor the database session associated with the current "showpage" or "accept page" request. The block you enter here isexecuted at a very early point during the page request,immediately after the APP_USER value is established. The valueof APP_USER (using :APP_USER or v('APP_USER')) may be usedwithin the block. Values of other items in session state may bereferenced as well, but any such items must have beenestablished in session state before the initiation of the currentpage request. To view examples, see field-level Help.
Cleanup PL/SQL Code Use this attribute to enter a PL/SQL block that runs at the endof page processing. It can be used to free or clean upresources that were used, like VPD contexts or database links.To view examples, see field-level Help.
Runtime API Usage Control how this application can access Oracle ApplicationExpress APIs that modify applications and workspace data,while it is running. Options include:
• Modify This Application: The application can modifyitself.
• Modify Other Applications: The application can changeother applications in the workspace.
• Modify Workspace Repository: The application canchange workspace users and groups.
6.9.3 Configuring Globalization AttributesEdit attributes on the Edit Globalization Attributes to configure application globalizationoptions. In App Builder you can develop applications that can run concurrently indifferent languages.
A single application can be translated to support different languages. Use theattributes on the Edit Globalization Attributes page to specify globalization optionssuch as the primary application language and defaults for date format, time format,timestamp format, time zone format, and CSV encoding.
Chapter 6Managing Application Attributes
6-40
• Accessing the Globalization Attributes Page (page 6-41)
• Edit Globalization Attributes Page (page 6-41)
See Also:
"Managing Application Globalization (page 21-1)"
6.9.3.1 Accessing the Globalization Attributes PageTo access the Edit Globalization Attributes page:
1. On the Workspace home page, click the App Builder icon.
2. Select an application.
The Application home page appears.
3. Click Shared Components.
The Shared Components page appears.
4. Under Globalization, click Globalization Attributes.
The Edit Globalization Attributes page appears.
5. Edit the appropriate attributes and click Apply Changes.
Tip:
You can also access to the Edit Globalization Attributes page by navigatingto the Edit Application Definition and then clicking the Globalization tab. See"Accessing the Edit Application Definition Page (page 6-23)."
6.9.3.2 Edit Globalization Attributes PageThe following sections describe the attributes available on the Edit GlobalizationAttributes page.
Note:
Required values are marked with a red asterisk (*).
• Application Primary Language (page 6-42)
• Application Language Derived From (page 6-42)
• Document Direction (page 6-42)
• Application Date Format (page 6-42)
• Application Date Time Format (page 6-43)
Chapter 6Managing Application Attributes
6-41
• Application Timestamp Format (page 6-43)
• Application Timestamp Time Zone Format (page 6-43)
• Character Value Comparison (page 6-43)
• Character Value Comparison Behavior (page 6-44)
• Automatic Time Zone (page 6-44)
• Automatic CSV Encoding (page 6-44)
See Also:
"Specifying the Primary Language for an Application (page 21-6)"
6.9.3.2.1 Application Primary LanguageIdentifies the language in which an application is developed. This language is the baselanguage from which all translations are made. For example, suppose application 100was authored in English, translated into French, and published as application 101.English would be the Application Primary Language.
All modifications to the application should be made to the primary language specifiedhere.
6.9.3.2.2 Application Language Derived FromSpecifies how Application Express derives the translated application language. Theapplication primary language can be static, derived from the Web browser language,or determined from a user preference or item.
To learn more about the available options, see Field-level Help.
6.9.3.2.3 Document Direction
Sets the document direction. Options include:
• Left-To-Right
• Right-To-Left
6.9.3.2.4 Application Date FormatDetermines the date format to be used in the application.
Use this date format to alter the NLS_DATE_FORMAT database session setting beforeshowing or submitting any page in the application. This value can be a literal stringcontaining a valid Oracle date format mask or an item reference using substitutionsyntax. If no value is specified, the default date format is derived from the databasesession at runtime. Consider the following examples:
Month DD, YYYY&MY_DATE_FORMAT.
Chapter 6Managing Application Attributes
6-42
6.9.3.2.5 Application Date Time FormatSpecify the date time format to be used in the application.
This date time format can be referenced in an application using the substitutionreference&APP_DATE_TIME_FORMAT., or in PL/SQL using the functionv('APP_DATE_TIME_FORMAT'). This attribute does not alter any NLS settings. This valuecan be a literal string containing a valid Oracle date format mask or an item referenceusing substitution syntax. If this attribute value is not specified, then a reference toAPP_DATE_TIME_FORMAT returns the NLS database session date format and the NLS timeformat. Consider the following examples:
Month DD, RRRR HH24:MI&MY_DATE_TIME_FORMAT.
6.9.3.2.6 Application Timestamp FormatDetermines the timestamp format to be used in the application. Select a timestampformat from the list of values.
Use this timestamp format to alter the NLS_TIMESTAMP_FORMAT database session settingbefore showing or submitting any page in the application. This value can be a literalstring containing a valid Oracle timestamp format mask or an item reference usingsubstitution syntax. If no value is specified, the default timestamp format is derivedfrom the database session at runtime. Consider the following examples:
DD-MON-RR HH.MI.SSXFF AM&MY_TIMESTAMP_FORMAT.
6.9.3.2.7 Application Timestamp Time Zone FormatDetermines the timestamp with time zone format to be used in the application.
Use this date format to alter the NLS_TIMESTAMP_TZ_FORMAT database session settingbefore showing or submitting any page in the application. This value can be a literalstring containing a valid Oracle timestamp with time zone format mask or an itemreference using substitution syntax. If no value is specified, the default timestamp withtime zone format is derived from the database session at runtime. Consider thefollowing examples:
DD-MON-RR HH.MI.SSXFF AM TZR&MY_TIMESTAMP_TZ_FORMAT.
6.9.3.2.8 Character Value ComparisonDetermines the collating sequence for character value comparison in various SQLoperations and clauses, for example, ORDER BY, LIKE, MIN/MAX.
Use this value to alter NLS_SORT database session parameter for the execution of SQLqueries in classic report and interactive report regions. If no value is specified, thedefault value is derived from the database session at runtime. Consider the followingexamples:
BINARYGERMANCANADIAN_M
Chapter 6Managing Application Attributes
6-43
6.9.3.2.9 Character Value Comparison BehaviorDetermines the collation behavior of SQL operations, for example, LIKE, MIN/MAX.
This value is used to alter NLS_COMP database session parameter for the execution ofSQL queries in classic report, interactive report, and List view regions, as well as inplug-in API. Options include:
• Database session NLS setting (default) - The NLS_COMP value is derived fromthe database session at runtime.
• Binary - Comparisons in WHERE clauses and other SQL operations are binary.
• Linguistic - Comparisons in WHERE clauses and other SQL operations use thelinguistic sort specified in the Character Value Comparison attribute (NLS_SORT).
6.9.3.2.10 Automatic Time ZoneControls the setting of the database session time zone. When set to Yes, the clienttime zone is derived from the client's web browser and set for the duration of theApplication Express session.
Subsequent page views have the database session time zone set properly per pageview. Once set, this setting can be overridden using APEX_UTIL.SET_SESSION_TIME_ZONE,or reset using APEX_UTIL.RESET_SESSION_TIME_ZONE.
6.9.3.2.11 Automatic CSV EncodingAutomatic CSV Encoding controls the encoding of all comma-delimited (CSV) reportoutput in an application. The default value for Automatic CSV Encoding is Yes. WhenAutomatic CSV Encoding is set to Yes, CSV report output is converted to a characterset compatible with localized desktop applications. The character set for the CSVencoding is determined by the Application Language Derived From setting.
The encoding of pages in App Builder is determined by the character set of theDatabase Access Descriptor (DAD) used to access Oracle Application Express. Forexample, if the character set of the Database Access Descriptor is AL32UTF8, allpages in all applications in the Oracle Application Express user interface are encodedin UTF-8.
By default, the CSV output from report regions is encoded in the same character setas the Database Access Descriptor. However, some desktop spreadsheet applicationsrequire that the data is encoded in the client desktop operating system character set.In the case of multibyte data, the CSV output from report regions often appearscorrupted when opened by a desktop spreadsheet application. This is because theCSV output from report regions is encoded differently than what is required by thedesktop application. Enabling Automatic CSV Encoding resolves this issue.
For example, if the user's language preference for an application is de, the CSV data isencoded in Western European Windows 1252, regardless of the Database AccessDescriptor character set setting. If the user's language preference is zh-cn, the CSVdata is encoded in Chinese GBK.
Chapter 6Managing Application Attributes
6-44
6.9.4 Managing the Application User InterfaceEdit attributes on the User Interface page to determines the default characteristics ofthe application and optimizes the display for the target environment (such as Desktopor Mobile). You can customize the user interface by editing general attributes on theUser Interface page and specific attributes on the User Interface Details page.
• Accessing User Interface Attributes (page 6-45)
• User Interface Page (page 6-45)
• Defining an Application Logo (page 6-48)
• Adding Desktop UI to a Mobile UI Only Application (page 6-49)
• Editing User Interface Details (page 6-50)
• User Interface Details Page (page 6-51)
6.9.4.1 Accessing User Interface AttributesTo access user interface attributes:
1. On the Workspace home page, click the App Builder icon.
2. Select an application.
The Application home page appears.
3. From the Application home page, you can access the User Interfaces page in twoways:
• From Shared Components:
a. Click Shared Components.
b. Under User Interface, click User Interface Attributes.
• From Edit Application Properties:
a. Click the Edit Application Properties button to the right of the applicationname.
b. Click the User Interface tab.
The User Interfaces page appears.
4. To edit attributes for a specific user interface, select a previously defined userinterface in User Interfaces region.
The User Interfaces page appears. Defined User Interfaces display in the UserInterfaces region at the top of the page.
5. Edit the appropriate attributes.
6. Click Apply Changes to save your changes.
6.9.4.2 User Interface PageThe User Interface page is divided into the following sections:
Chapter 6Managing Application Attributes
6-45
Tip:
To learn more about the attributes on this page, see field-level Help.
• User Interfaces (page 6-46)
• General Properties (page 6-46)
• Logo (page 6-47)
• Favicon (page 6-48)
• User Interface Detection (page 6-48)
6.9.4.2.1 User InterfacesDisplays user interfaces defined for the current application. To edit an existing userinterface, click the user interface name. The User Interface Details page appears.
For applications with only a Mobile User Interface, developers can add the DesktopUser Interface. To add a new Desktop User Interface, click Add New User Interfaceand edit the attributes.
6.9.4.2.2 General PropertiesUse General Properties to define basic characteristics of the application user interface.
Table 6-14 User Interface, General Properties
Attribute Description
Static File Prefix Determines the virtual path the Web server uses to point to thestatic files when using the #APP_IMAGES# substitution string.
Do not specify anything to reference files which are stored withyour application definition in the database.
For performance reasons you can also store your application fileson your Web Server. Use any valid URL to reference them.
Examples:
• /myFiles/
• http://contentDeliveryNetwork.com/myFiles/
Chapter 6Managing Application Attributes
6-46
Table 6-14 (Cont.) User Interface, General Properties
Attribute Description
Image Prefix Determines the virtual path the web server uses to point to theimages directory distributed with App Builder. During installation,the virtual path is configured as /i/. If you are unsure, contactyour administrator.
When embedding an image in static text (for example, in page orregion headers or footers), you can reference an image using thesubstitution string #IMAGE_PREFIX#. For example, to reference theimage go.gif, you would use the following syntax:
<img src="#IMAGE_PREFIX#go.gif">
Note: If the entered image prefix is equal to the instance imageprefix, then the application-level attribute will always be null. Thiseasily facilities the movement of an application across differentinstances that may have different image prefixes.
See Also: "IMAGE_PREFIX (page 2-35)"
Media Type Enter the Internet media type. An Internet media type is two-partidentifier for file formats on the internet. A Media Type iscomposed of at least two parts: a type, a subtype, and one ormore optional parameters. This Media Type is used in theContent-Type HTTP header when rendering the page.
The page-level Media Type overrides the application-level MediaType. The default value for this attribute is NULL. If both the page-level and application-level values for Media Type are NULL, theMedia Type text/html is used.
6.9.4.2.3 LogoUse Logo attributes to define an application logo. An application logo can be text-based or image-based. To use this feature, your page template must include the#LOGO# substitution string.
Table 6-15 User Interface, Logo
Attribute Description
Logo Type For Logo Type, select an image type:
• Select Image to use an image for the application logo.• Select Text to use text for the application logo.
Logo For Logo Type, select an image type:• For an image, enter the complete image name, including the
filename extension, for example:
/i/oracle.gif
• For text, enter the full text string, for example:
Sample Application
Note that to use this feature, your page template must include the#LOGO# substitution string.
Chapter 6Managing Application Attributes
6-47
Table 6-15 (Cont.) User Interface, Logo
Attribute Description
Logo Attributes In Logo Attributes, enter the attributes for the logo.
Image example:
width="100" height="20" alt="Company Logo"
Text example:
style="font-family:Arial; color:#000000; font-size:18;white-space:nowrap; font-weight:bold;"
Note that to use this feature, your page template must include the#LOGO# substitution string.
6.9.4.2.4 FaviconEnter Favicon HTML code in this attribute to create a favicon (or shortcut icon). To usethis feature, your page template must include the #FAVICONS# substitution string.Example:
<link rel="shortcut icon" href="/i51/favicon.ico"><link rel="icon" sizes="16x16" href="/i51/favicon-16x16.png"><link rel="icon" sizes="32x32" href="/i51/favicon-32x32.png"><link rel="apple-touch-icon" sizes="180x180" href="/i51/favicon-180x180.png">
6.9.4.2.5 User Interface DetectionEnter CSS file URLs for stylesheets that should be loaded when Application Expressdisplays the available user interfaces, when automatic detection fails. Each URL hasto be written into a new line. If you provide a minified version of your file you can usethe substitution string #MIN# to include .min , or #MIN_DIRECTORY# to include minified/ inyour file URL for a regular page view and an empty string if the page is viewed indebug mode. You also have access to the substitution string #APP_VERSION# if you wantto include the application's version in the file URL.
To view examples, see field-level Help.
6.9.4.3 Defining an Application LogoTo define an application logo:
1. Access the User Interface page.
2. Specify the logo attributes.
• If the logo is an image:
a. Logo Type - Select Image.
b. Logo - Enter the complete image name, including the file name extension(for example, /i/oracle.gif) or a fully qualified URL if you a referencingthe image.
c. Logo Attributes - Enter the appropriate attributes for the logo or make aselection from the list.
• If the logo is text:
Chapter 6Managing Application Attributes
6-48
a. Logo Type - Select Text.
b. Logo - Enter the full text string, for example:
Sample Application
c. Logo Attributes - Enter the appropriate attributes for the logo or make aselection from the list.
3. Click Apply Changes.
Tip:
You can also reference an image uploaded to the static file repository usinga substitution string. See "Referencing Static Application Files (page 17-29)"and "About Referencing Static Workspace Files (page 17-32)."
6.9.4.4 Adding Desktop UI to a Mobile UI Only ApplicationFor applications with only a Mobile User Interface, developers can add the DesktopUser Interface to facilitate the migration from the desupported Mobile User Interface tothe Desktop User Interface and the Universal Theme.
Note:
Oracle recommends rebuilding the Mobile UI pages using the Desktop UIand then once functionally complete, removing the pages associated with theMobile UI and deleting the Mobile UI from the application. To learn moreabout migrating existing applications to the Universal Theme, go to theUniversal Theme application at https://apex.oracle.com/ut.
To add a new user interface:
1. On the Workspace home page, click the App Builder icon.
2. Select an application.
The Application home page appears.
3. From the Application home page, you can access the User Interfaces page in twoways:
• From Shared Components:
a. Click Shared Components.
b. Under User Interface, click User Interface Attributes.
• From Edit Application Properties:
a. Click the Edit Application Properties button to the right of the applicationname.
b. Click the User Interface tab.
The User Interfaces page appears.
Chapter 6Managing Application Attributes
6-49
4. In the User Interfaces region, click Add New User Interface.
5. On User Interface:
a. Type - Select a user interface type (for example, Mobile). If no types display,then all available user interfaces are associated with the current application.
b. Review the remaining attributes.
To learn more about an attribute, see field-level Help.
c. Click Next.
6. On Create Theme:
a. Theme Type - Select a theme type. Standard themes are supplied withApplication Express. Custom themes are additional themes available for use.
b. Theme - Select a theme (for example, Mobile (Theme 51).
c. Click Next.
7. Confirm your selections and click Create.
The user interface is added to the User Interface page. You can edit the user interfaceby editing User Interface Details.
6.9.4.5 Editing User Interface DetailsUse User Interface Details to define the specific settings for a selected user interfacetype. For example, you can select the application home and login page, configure theNavigation Menu and Navigation Bar as well as configure attributes for JavaScript,Cascading Style Sheet, and Concatenated Files.
To edit user interface details:
1. On the Workspace home page, click the App Builder icon.
2. Select an application.
The Application home page appears.
3. From the Application home page, you can access the User Interfaces page in twoways:
• From Shared Components:
a. Click Shared Components.
b. Under User Interface, click User Interface Attributes.
• From Edit Application Properties:
a. Click the Edit Application Properties button to the right of the applicationname.
b. Click the User Interface tab.
The User Interfaces page appears. Defined User Interfaces display in the UserInterfaces region at the top of the page.
4. To edit attributes for a specific user interface, click the Edit icon adjacent to theUser Interface.
The User Interface Details page appears.
5. Edit the appropriate attributes. To learn more about an attribute, see field-levelHelp.
Chapter 6Managing Application Attributes
6-50
6. Click Apply Changes to save your changes.
6.9.4.6 User Interface Details PageUse User Interface Details to define the specific settings for the selected user interfacetype.
The User Interface Details page is divided into the following sections:
• Identification (page 6-51)
• Attributes (page 6-51)
• Navigation Menu (page 6-52)
• Navigation Bar (page 6-53)
• JavaScript (page 6-53)
• Cascading Style Sheets (page 6-55)
• Concatenated Files (page 6-55)
See Also:
"Accessing User Interface Attributes (page 6-45)"
6.9.4.6.1 Identification
Table 6-16 User Interface Details, Identification
Attribute Description
User Interface Type Displays the selected interface type. A Desktop user interface isused for applications primarily designed for desktop use. AMobile user interface is used for applications primarily designedfor use on smartphones and tablets.
Display Name Specify a display name for the user interface. The display namesis shown in wizards, such as the Create Theme Wizard.
Sequence Specify the display sequence for the user interface.
6.9.4.6.2 Attributes
Table 6-17 User Interface Details, Attributes
Attribute Description To Learn More
Auto Detect Select whether the user interfaceshould be automatically detected. Ifauto-detection is enabled, the userwill be redirected to the correspondinglogin page or home page.
n/a
Chapter 6Managing Application Attributes
6-51
Table 6-17 (Cont.) User Interface Details, Attributes
Attribute Description To Learn More
Default Select whether the user interface isthe default interface for theapplication.
n/a
Enable EndUsers tochoose ThemeStyle
If set to Yes, end users can choose aTheme Style for their sessions withina customization dialog. Only ThemeStyles marked as Public are eligiblefor selection.
See "Enabling Users to Select aTheme Style (page 12-6)"
Add "Built withAPEX" toFooter
If set to Yes, Oracle ApplicationExpress will add the text "Built with ♥using Oracle APEX" to the footer ofevery page.
n/a
Home URL Specify the home page of theapplication for the current userinterface.
n/a
Login URL Specify the login page of theapplication for the current userinterface.
n/a
Theme Shows the theme currently associatedwith the user interface.
See "Switching Themes(page 12-21)"
Theme Style Select a theme style. This option onlydisplays for newer themes thatsupport theme styles.
See "Using Theme Styles and ThemeRoller (page 12-3)"
Global Page If defined, displays the global page forthe application.
See "Creating a Global Page toDisplay Components on Every Page(page 13-3)"
6.9.4.6.3 Navigation MenuApplications using newer themes, such as Universal Theme - 42, provide navigationwith navigation menus.
Table 6-18 User Interface Details, Navigation Menu
Attribute Description
Display Navigation Select Yes or No.
Navigation Menu List Select the list utilized for the navigation menu for the application.
Chapter 6Managing Application Attributes
6-52

Table 6-18 (Cont.) User Interface Details, Navigation Menu
Attribute Description
Position Select the position where you would like your navigation menu tobe placed on this application.
• Side renders the navigation menu list template in the#SIDE_GLOBAL_NAVIGATION_LIST# position on your pagetemplate.
• Top renders the navigation menu list template in the#TOP_GLOBAL_NAVIGATION_LIST# position on your pagetemplate.
For example, if you choose Side, your navigation could berendered as a tree on the left side of your pages; andchoosing Top can render your navigation as a menu bar in theheader of your pages.
List Template Select the List Template used to render the navigation menu forthis application.
Template Options Set Template Options for the List Template used for thenavigation menu list for the application.
6.9.4.6.4 Navigation BarApplications using newer themes, such as Universal Theme - 42, include navigationbar lists. Navigation Bar settings enable you to select list and list templates. Selectingclassic implementation uses tabs instead of a list. Navigation Bar attributes onlydisplay with newer themes.
Table 6-19 User Interface Details, Navigation Bar
Attribute Description
Inplementation Select how to you wish to implement the navigation bar in thisapplication.
• Classic renders the navigation bar as a classic navigationbar in the #NAVIGATION_BAR# position on your pagetemplate.
• List renders the navigation bar as a list, using the selectedlist and list template in the #NAVIGATION_BAR# position onyour page template.
Navigation Bar List Select the list utilized for the navigation bar on this application.
List Template Select the List Template used to render the navigation menu forthis application.
Template Options Set Template Options for the List Template used for thenavigation menu list for the application.
6.9.4.6.5 JavaScriptUse these attributes to control or modify how an application handles JavaScript.
Chapter 6Managing Application Attributes
6-53
Table 6-20 User Interface Details, JavaScript
Attribute Description
Content Delivery Network Specify the Content Delivery Network (CDN) that ApplicationExpress will try to use to load the libraries jQuery and jQueryMobile. If Application Express cannot load these libraries fromthe CDN, they will be loaded from your web server instead.
Using a CDN can reduce the loading time of your application ifthe user has already visited other web sites which also use thesame CDN to load the same libraries.
File URLs Enter JavaScript file URLs for code to be loaded on every page.Each URL has to be written into a new line. If you provide aminified version of your file, you can use the substitution string#MIN# to include .min or #MIN_DIRECTORY# to include minified/ inyour file URL for a regular page view and an empty string if thepage is viewed in debug mode.
JavaScript file URLs you enter here replaces the#APPLICATION_JAVASCRIPT# substitution string in the pagetemplate.
Note: You do not need to include opening or closing script tags.Just write the URL.
Examples:
• Standard file reference:
/myjs/main.js
• Standard file reference which loads the minified filemain.min.js for regular page views and main.js in Debugmode:
/myjs/main#MIN#.js
• Conditional file for Internet Explorer
[if IE]/myjs/ie.js
Include Deprecated orDesupported JavascriptFunctions
Specifies if deprecated or desupported JavaScript functions areincluded on every page in the application. The functionsdeprecated or desupported are listed in the Release Notes forevery release. If you are confident your application does notcontain any references to those deprecated or desupportedfunctions, set this to No to reduce the overall size of theJavaScript files loaded.
See Also: "Legacy JavaScript APIs" in Oracle ApplicationExpress API Reference
Include jQuery Migrate Specifies if the jQuery Migrate plug-in should be included onevery page in the application.
The plug-in restores deprecated features and behaviors ofjQuery so that old JavaScript code and jQuery plug-ins will stillrun properly with the jQuery version loaded by ApplicationExpress.
If you are confident your application and any used jQuery plug-indoes not contain any references to deprecated jQuery features,set this to No to reduce the overall size of the JavaScript filesloaded.
Chapter 6Managing Application Attributes
6-54

6.9.4.6.6 Cascading Style SheetsIn File URLs, enter Cascading Style Sheet file URLs to be loaded on every page.Each URL has to be written into a new line. If you provide a minified version of your fileyou can use the substitution string #MIN# to include .min or #MIN_DIRECTORY# to includeminified/ in your file URL for a regular page view and an empty string if the page isviewed in debug mode. You also have access to the substitution string #APP_VERSION# ifyou want to include the application's version in the file URL.
File URLs you enter here will replace the #APPLICATION_CSS# substitution string inthe page template.
For examples, see field-level Help.
6.9.4.6.7 Concatenated FilesUsing a concatenated file can increase the performance of loading your page becauseinstead of issuing multiple HTTP requests for each single file, the browser only loadsone file. This approach gives you the option to use smaller, more modular files duringdevelopment and to use a single concatenated file when running the applicationoutside of the Application Express development environment.
To create a concatenated file, click Concatenated File and follow the on-screeninstructions. To learn more and view examples, see field-level Help.
6.10 Adding Developer CommentsAdd comments to an application, a page, or a group of pages using the DeveloperComment, Bug, or To Do button. You can use developer comments to communicateapplication changes, report issues, or record developer suggestions.
• Developer Comment, Bug, or To Do Button (page 6-55)
• Adding Developer Comments to an Application (page 6-56)
• Viewing and Editing Developer Comments (page 6-56)
• Deleting Developer Comments (page 6-57)
• Accessing the Developer Comments from Shared Components (page 6-57)
• Viewing the Developer Comments Calendar (page 6-58)
See Also:
"Adding Database Application Comments (page 6-63)"
6.10.1 Developer Comment, Bug, or To Do ButtonThe Developer Comment, Bug, or To Do button resembles a small word balloon. Thisbutton displays on most pages in App Builder that relate to a specific application orapplication page.
Chapter 6Adding Developer Comments
6-55
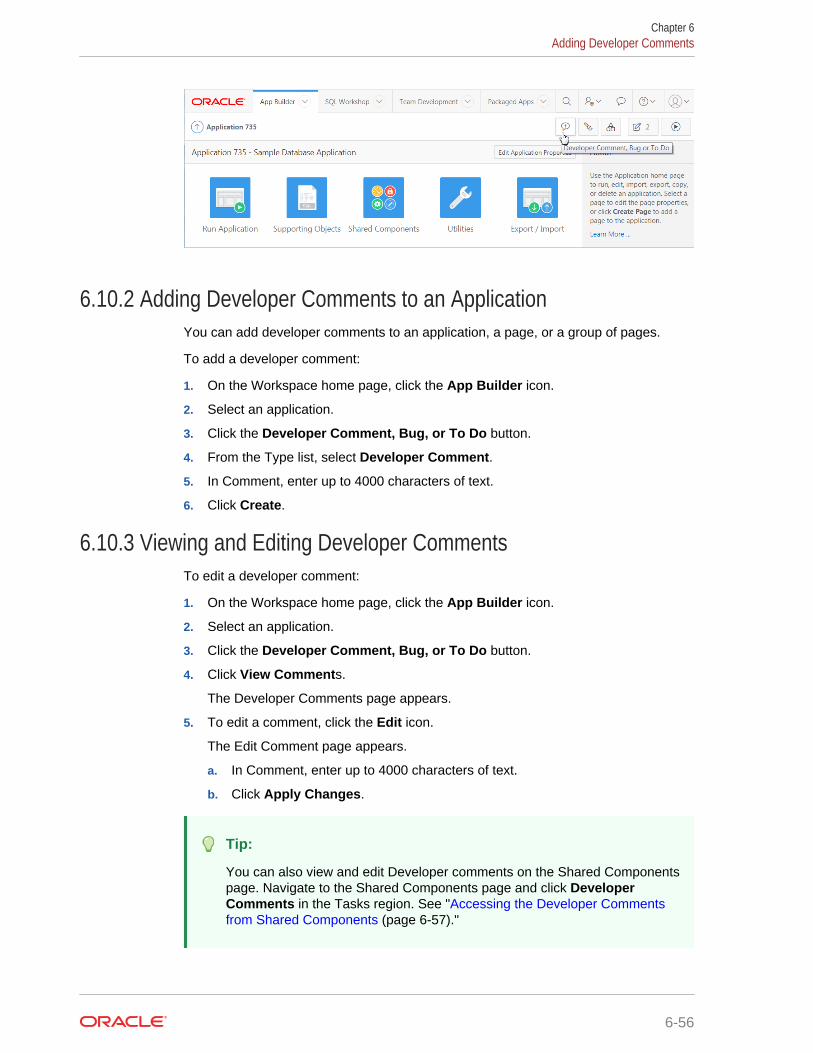
6.10.2 Adding Developer Comments to an ApplicationYou can add developer comments to an application, a page, or a group of pages.
To add a developer comment:
1. On the Workspace home page, click the App Builder icon.
2. Select an application.
3. Click the Developer Comment, Bug, or To Do button.
4. From the Type list, select Developer Comment.
5. In Comment, enter up to 4000 characters of text.
6. Click Create.
6.10.3 Viewing and Editing Developer CommentsTo edit a developer comment:
1. On the Workspace home page, click the App Builder icon.
2. Select an application.
3. Click the Developer Comment, Bug, or To Do button.
4. Click View Comments.
The Developer Comments page appears.
5. To edit a comment, click the Edit icon.
The Edit Comment page appears.
a. In Comment, enter up to 4000 characters of text.
b. Click Apply Changes.
Tip:
You can also view and edit Developer comments on the Shared Componentspage. Navigate to the Shared Components page and click DeveloperComments in the Tasks region. See "Accessing the Developer Commentsfrom Shared Components (page 6-57)."
Chapter 6Adding Developer Comments
6-56
6.10.4 Deleting Developer CommentsYou can delete specific developer comments or delete multiple comments at once.
• Deleting a Specific Developer Comment (page 6-57)
• Deleting Multiple Developer Comments (page 6-57)
6.10.4.1 Deleting a Specific Developer CommentTo delete a developer comment:
1. On the Workspace home page, click the App Builder icon.
2. Select an application.
3. Click the Developer Comment, Bug, or To Do icon.
4. Click View Comments.
The Developer Comments page appears.
5. Locate the comment to be deleted.
6. Click the Edit icon.
The Edit Comment page appears.
7. Click Delete.
6.10.4.2 Deleting Multiple Developer CommentsTo delete multiple developer comments:
1. On the Workspace home page, click the App Builder icon.
2. Select an application.
3. Click the Developer Comment, Bug, or To Do icon.
4. Click View Comments.
5. Click Delete Comments.
6. Select one of the following actions:
• Delete all comments
• Delete comments created by a developer
• Delete comments by date
7. Follow the on-screen instructions.
6.10.5 Accessing the Developer Comments from Shared ComponentsTo access the Developer Comments report from Shared Components:
1. On the Workspace home page, click the App Builder icon.
2. Select an application.
3. Click Shared Components
Chapter 6Adding Developer Comments
6-57
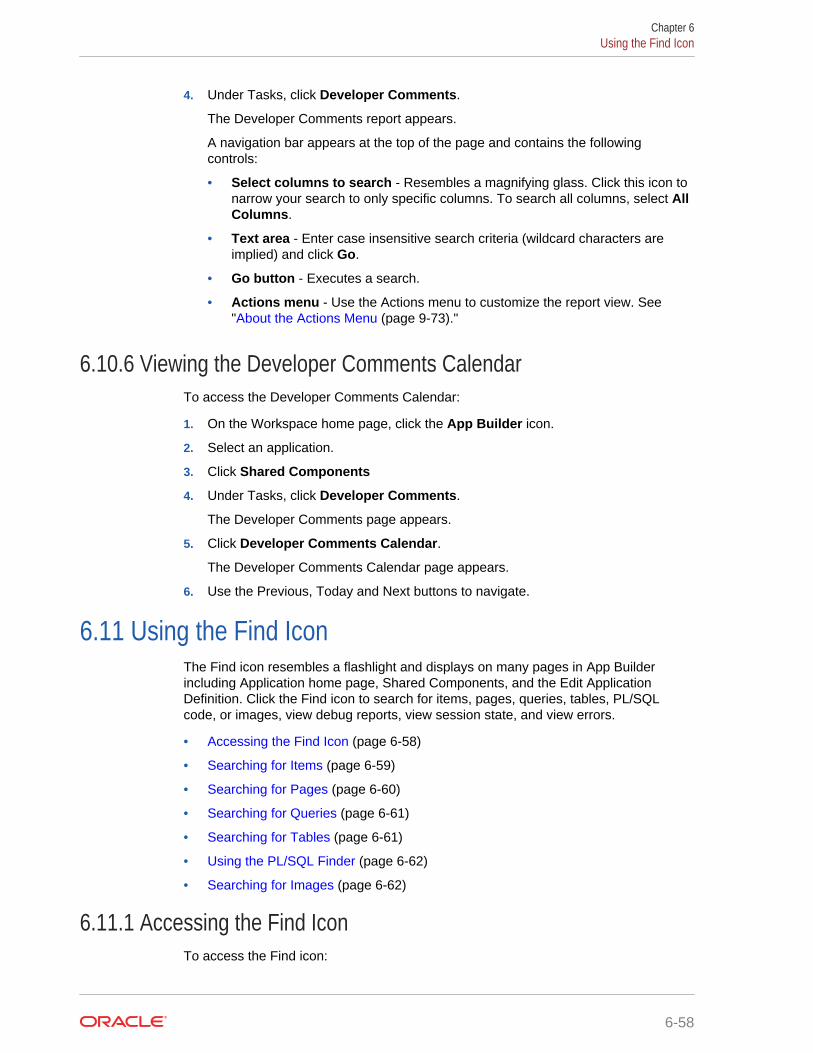
4. Under Tasks, click Developer Comments.
The Developer Comments report appears.
A navigation bar appears at the top of the page and contains the followingcontrols:
• Select columns to search - Resembles a magnifying glass. Click this icon tonarrow your search to only specific columns. To search all columns, select AllColumns.
• Text area - Enter case insensitive search criteria (wildcard characters areimplied) and click Go.
• Go button - Executes a search.
• Actions menu - Use the Actions menu to customize the report view. See"About the Actions Menu (page 9-73)."
6.10.6 Viewing the Developer Comments CalendarTo access the Developer Comments Calendar:
1. On the Workspace home page, click the App Builder icon.
2. Select an application.
3. Click Shared Components
4. Under Tasks, click Developer Comments.
The Developer Comments page appears.
5. Click Developer Comments Calendar.
The Developer Comments Calendar page appears.
6. Use the Previous, Today and Next buttons to navigate.
6.11 Using the Find IconThe Find icon resembles a flashlight and displays on many pages in App Builderincluding Application home page, Shared Components, and the Edit ApplicationDefinition. Click the Find icon to search for items, pages, queries, tables, PL/SQLcode, or images, view debug reports, view session state, and view errors.
• Accessing the Find Icon (page 6-58)
• Searching for Items (page 6-59)
• Searching for Pages (page 6-60)
• Searching for Queries (page 6-61)
• Searching for Tables (page 6-61)
• Using the PL/SQL Finder (page 6-62)
• Searching for Images (page 6-62)
6.11.1 Accessing the Find IconTo access the Find icon:
Chapter 6Using the Find Icon
6-58
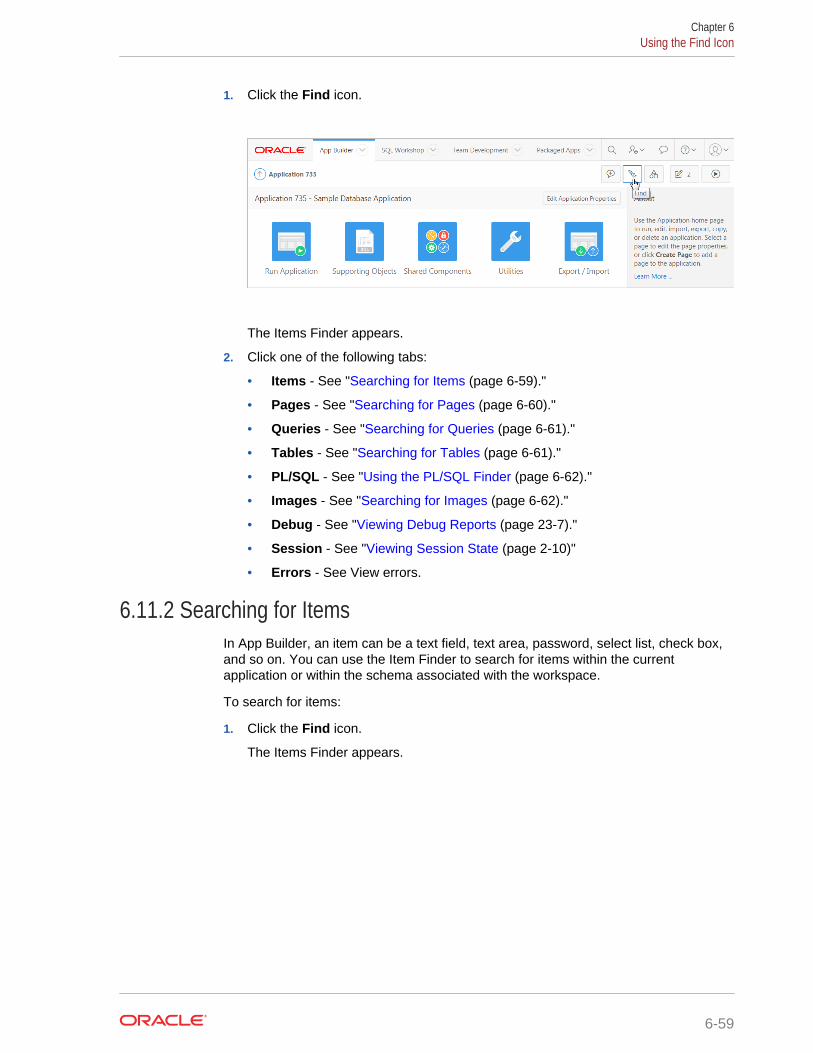
1. Click the Find icon.
The Items Finder appears.
2. Click one of the following tabs:
• Items - See "Searching for Items (page 6-59)."
• Pages - See "Searching for Pages (page 6-60)."
• Queries - See "Searching for Queries (page 6-61)."
• Tables - See "Searching for Tables (page 6-61)."
• PL/SQL - See "Using the PL/SQL Finder (page 6-62)."
• Images - See "Searching for Images (page 6-62)."
• Debug - See "Viewing Debug Reports (page 23-7)."
• Session - See "Viewing Session State (page 2-10)"
• Errors - See View errors.
6.11.2 Searching for ItemsIn App Builder, an item can be a text field, text area, password, select list, check box,and so on. You can use the Item Finder to search for items within the currentapplication or within the schema associated with the workspace.
To search for items:
1. Click the Find icon.
The Items Finder appears.
Chapter 6Using the Find Icon
6-59
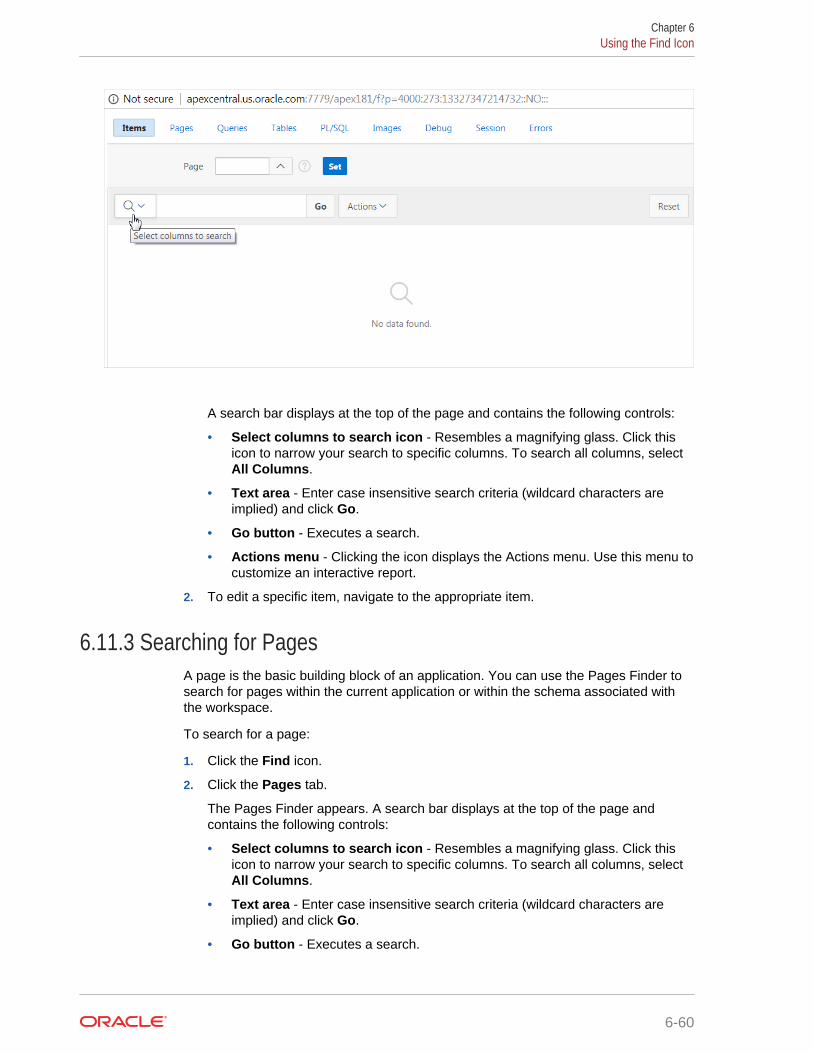
A search bar displays at the top of the page and contains the following controls:
• Select columns to search icon - Resembles a magnifying glass. Click thisicon to narrow your search to specific columns. To search all columns, selectAll Columns.
• Text area - Enter case insensitive search criteria (wildcard characters areimplied) and click Go.
• Go button - Executes a search.
• Actions menu - Clicking the icon displays the Actions menu. Use this menu tocustomize an interactive report.
2. To edit a specific item, navigate to the appropriate item.
6.11.3 Searching for PagesA page is the basic building block of an application. You can use the Pages Finder tosearch for pages within the current application or within the schema associated withthe workspace.
To search for a page:
1. Click the Find icon.
2. Click the Pages tab.
The Pages Finder appears. A search bar displays at the top of the page andcontains the following controls:
• Select columns to search icon - Resembles a magnifying glass. Click thisicon to narrow your search to specific columns. To search all columns, selectAll Columns.
• Text area - Enter case insensitive search criteria (wildcard characters areimplied) and click Go.
• Go button - Executes a search.
Chapter 6Using the Find Icon
6-60
• Actions menu - Clicking the icon displays the Actions menu. Use this menu tocustomize an interactive report.
3. To link to the Items page, click the page number.
6.11.4 Searching for QueriesYou can use the Queries Finder to locate a query within your application or within theschema associated with the workspace.
To search for a query using the Queries Finder:
1. Click the Find icon.
2. Click the Queries tab.
The Queries Finder appears. A search bar displays at the top of the page andcontains the following controls:
• Select columns to search icon - Resembles a magnifying glass. Click thisicon to narrow your search to specific columns. To search all columns, selectAll Columns.
• Text area - Enter case insensitive search criteria (wildcard characters areimplied) and click Go.
• Go button - Executes a search.
• Actions menu - Clicking the icon displays the Actions menu. Use this menu tocustomize an interactive report. See "About the Actions Menu (page 9-73)."
3. To link to the Items page, click the page number.
6.11.5 Searching for TablesYou can use the Tables Finder to view tables within the schema associated with theworkspace.
To view tables associated within the current schema:
1. Click the Find icon.
2. Click the Tables tab.
The Tables Finder appears. A search bar displays at the top of the page andcontains the following controls:
• Select columns to search icon - Resembles a magnifying glass. Click thisicon to narrow your search to specific columns. To search all columns, selectAll Columns.
• Text area - Enter case insensitive search criteria (wildcard characters areimplied) and click Go.
• Go button - Executes a search.
• Actions menu - Clicking the icon displays the Actions menu. Use this menu tocustomize an interactive report.
3. Select a table name.
A table definition appears.
Chapter 6Using the Find Icon
6-61
This report displays the column names, data type, length, precision, and scale andthe SQL necessary to re-create the table appears at the bottom of the page.
6.11.6 Using the PL/SQL FinderYou can use the PL/SQL Finder to locate and view details about stored procedures,functions, and packages associated with each object within the schema associatedwith the workspace.
To search for PL/SQL code in the current schema:
1. Click the Find icon.
2. Click the PL/SQL tab.
The PL/SQL Finder appears. A search bar displays at the top of the page andcontains the following controls:
• Select columns to search icon - Resembles a magnifying glass. Click thisicon to narrow your search to specific columns. To search all columns, selectAll Columns.
• Text area - Enter case insensitive search criteria (wildcard characters areimplied) and click Go.
• Go button - Executes a search.
• Actions menu - Clicking the icon displays the Actions menu. Use this menu tocustomize an interactive report.
3. To view additional details, select the procedure, function, or package name.
The procedure, package, or function name appears and additional informationincluding the owner, source name, source type, return type, argument names, datatypes, and IN/OUT parameters.
6.11.7 Searching for ImagesYou can use the Images Finder to identify images available to the current application.
To view available images:
1. Click the Find icon.
2. Click the Images tab.
The Images Finder appears.
3. From Show, select the type of images to view. Options include:
• Standard Images
• Workspace Images
• Application Images
Chapter 6Using the Find Icon
6-62
6.12 Adding Database Application CommentsUse Application Comments to describe an application or track developers involved inthe application development.
To create an application comment:
1. Navigate to the Workspace home page.
2. Click the App Builder icon.
3. Select an application.
4. On the Application home page, click Shared Components.
The Shared Components page appears.
5. Under Tasks, click Edit Application Comment.
The Application Comments page appears.
6. Enter comments in the Comments field and click Apply Changes.
6.13 Managing Application GroupsOrganize applications by assigning them to application groups. To use applicationgroups, first create a group and then assign applications to it.
• Viewing Database Application Groups (page 6-63)
• Creating a Database Application Group (page 6-64)
• Assigning a Database Application to an Application Group (page 6-64)
• Removing a Database Application from an Application Group (page 6-64)
• Deleting an Database Application Group (page 6-65)
See Also:
"Accessing Page Specific Utilities (page 6-71)"
6.13.1 Viewing Database Application GroupsTo view database application groups:
1. On the Workspace home page, click the App Builder icon.
2. Click Workspace Utilities.
3. Click Application Groups.
The Application Group page appears.
A Search bar displays at the top of the page. Available controls include:
• Select columns to search - Resembles a magnifying glass. Click this icon tonarrow your search. To search all columns, select All Columns.
Chapter 6Adding Database Application Comments
6-63
• Text area - Enter case insensitive search criteria (wildcard characters areimplied) to search for a group by name and click Go.
• Go button - Executes a search or applies a filter.
• View Icons (the default) displays each group as a large icon. To edit a group,click the appropriate icon.
• View Report displays each group as a line in a report. To edit a group, clickthe name.
4. To view the applications associated with a group, you click the group name.
6.13.2 Creating a Database Application GroupTo create a database application group:
1. On the Workspace home page, click the App Builder icon
2. Click Workspace Utilities.
3. Click Application Groups.
4. On the Application Group page, click Create.
5. Enter a name, a description (optional), and click Create.
6.13.3 Assigning a Database Application to an Application GroupTo assign a database application to a group:
1. On the Workspace home page, click the App Builder icon.
2. Click Workspace Utilities.
3. Click Application Groups.
4. On the Tasks list, click Manage Unassigned.
The Manage Application Group Assignments page appears.
5. From the New Group list, select a group.
6. Select the applications to be assigned and click Assigned Checked.
Tip:
You can also assign an application to an application group by editing theapplication definition. Select the group from the Application Group list. See"Editing Application Attributes (page 6-23)."
6.13.4 Removing a Database Application from an Application GroupTo remove an application from an application group:
1. On the Workspace home page, click the App Builder icon.
2. Click Workspace Utilities.
3. Click Application Groups.
Chapter 6Managing Application Groups
6-64
4. On the Tasks list, click Manage Assignments.
The Manage Application Group Assignments page appears.
5. From the New Group list, select Unassign.
6. Select the pages to be unassigned and click Assigned Checked.
Tip:
You can also remove an application from an application group by editing theapplication definition. Select Unassigned from the Application Group list.See "Editing Application Attributes (page 6-23)."
6.13.5 Deleting an Database Application GroupTo delete an application group:
1. On the Workspace home page, click the App Builder icon.
2. Click Workspace Utilities.
3. Click Application Groups.
4. Assign all applications in the group to Unassign:
a. On the Tasks list, click Manage Assignments.
b. From the New Group list, select Unassign.
c. Select the pages to be unassigned and click Assigned Checked.
5. Return to the Application Groups page.
6. Select the application group to be deleted.
7. On the Application Group page, click Delete.
A confirmation page appears.
8. Confirm your request.
6.14 Using Application UtilitiesAccess the Utilities page to view useful application summaries and reports.
• Application Utilities (page 6-66)Learn about the links available on the application Utilities page.
• Accessing the Utilities Page (page 6-67)Access the Utilities page by selecting the application and then clicking the Utilitiesicon.
• Viewing the Application Dashboard (page 6-68)View a report that summarizes application components and attributes.
• Upgrading an Application to Include New Components (page 6-69)Upgrade an existing application to include new components available in thecurrent release.
Chapter 6Using Application Utilities
6-65
• Viewing the Recently Updated Pages Report (page 6-69)Displays a report of pages recently updated by the current user.
• Viewing the Change History Report (page 6-70)The Change History report displays a summary report of edits to the currentapplications by developer, component type, and page number
• Using the Database Object Dependencies Report (page 6-70)The Database Object Dependencies report identifies database objects referencedby the current application. Review this report to determine what objects to movewhen deploying an application.
• Accessing Application Express Views (page 6-71)Query various views against Application Express metadata.
• Accessing Page Specific Utilities (page 6-71)Use the links in the Page Specific Utilities region to access Cross Page Utilitiesand Page Groups as well as access handy utilities for regions, buttons, items,computations, validations, process, dynamic actions, and branches.
• Accessing Cross Page Utilities (page 6-72)Use Cross Page Utilities to perform edits across pages in the application.
• Using Interactive Report Utilities (page 6-72)View and delete saved interactive reports and interactive report subscriptions.
See Also:
"Creating Custom Activity Reports Using APEX_ACTIVITY_LOG(page 22-7)"
6.14.1 Application UtilitiesLearn about the links available on the application Utilities page.
The following table describes the links on the application Utilities page.
Table 6-21 Links on the Application Utilities Page
Link Description To Learn More
ApplicationDashboard
View a summary of applicationcomponents and attributes
See "Viewing the ApplicationDashboard (page 6-68)"
Advisor Performs various checks on yourapplication, including checks forprogramming errors, security issues,quality assurance, and other bestpractice
See: "Running Advisor to CheckApplication Integrity (page 23-1)"
UpgradeApplication
Upgrade the current application to anew release. Review componentseligible for upgrading to include thelatest features.
See "Running Upgrade Application(page 6-69)"
RecentlyUpdated Pages
View a history of page updates madeto this application.
See "Viewing the Recently UpdatedPages Report (page 6-69)"
Chapter 6Using Application Utilities
6-66
Table 6-21 (Cont.) Links on the Application Utilities Page
Link Description To Learn More
AttributeDictionary
Manage item and column userinterface defaults for a selected page.
See "Using the Attribute Dictionary(page 16-21)"
Change History View a report of component updatesmade in this application.
See "Viewing the Change HistoryReport (page 6-70)"
DatabaseObjectDependencies
View a report of database objectreferenced by this application.
See "Using the Database ObjectDependencies Report (page 6-70)"
DebugMessages
Review debug messages generatedby this application.
See "Debugging an Application(page 23-1)"
ApplicationExpress Views
Query various views againstApplication Express metadata.
See "Accessing Application ExpressViews (page 6-71)"
ExportRepository
View a history of application exports. See "Accessing the Export Repository(page 24-40)"
Page SpecificUtilities
Page Specific Utilities display in aregion on the right-side of the Utilitiespage. Use the links in this region toaccess Cross Page Utilities and PageGroups as well as access handyutilities for managing regions, buttons,items, computations, validations,process, dynamic actions, andbranches.
See:
• "Accessing Page Specific Utilities(page 6-71)"
• "Accessing Cross Page Utilities(page 6-72)"
InteractiveReport Utilities
Interactive Report Utilities display in aregion on the lower right-side of theUtilities page. Click Saved Reports todelete saved interactive reports in thecurrent application. ClickSubscriptions to manage interactivereport subscriptions.
See "Using Interactive Report Utilities(page 6-72)"
6.14.2 Accessing the Utilities PageAccess the Utilities page by selecting the application and then clicking the Utilitiesicon.
To access App Builder Utilities page:
1. On the Workspace home page, click the App Builder icon.
2. Select the application.
3. Click the Utilities icon.
The Utilities page features links to the following tools and reports:
• Application Dashboard
• Advisor
• Upgrade Application
• Recently Updated Pages
• Attribute Dictionary
Chapter 6Using Application Utilities
6-67
• Change History
• Database Object Dependencies
• Debug Messages
• Application Express Views
• Export Repository
6.14.3 Viewing the Application DashboardView a report that summarizes application components and attributes.
To view the Application Dashboard:
1. Navigate to the Workspace home page.
2. Click the App Builder icon.
3. Select an application.
The Application home page appears.
4. Click Utilities.
5. Click Application Dashboard.
The Application Dashboard appears and contains the following sections:
• Application Overview lists detailed information and statistics about thecurrent application, including the ID, name, alias, parsing schema, associatedgroup, number of pages, and associated theme.
• Security lists the current authentication scheme, number of public and nonpublic pages, and the number of authorization schemes used within thecurrent application.
• Templates contains links to reports of templates used within the currentapplication.
• Pages by Type lists counts of components, including types of reports andforms and dynamic HTML.
• Application Components contains links to reports of application-levelcontrols and logic, including lists, shortcuts, lists of value, tabs, applicationcomputations, application items, plug-ins, and application processes.
• Page Components contains links to reports of page-level controls and logic,including regions, items, branches, computations, validations, dynamicactions, classic report columns, interactive report columns, and button.
• Native Region Component Utilization charts the total number of all types ofregion components used in the app. This is a visualization of the informationprovided in the Pages by Type section, the Page Components, and others.
• Plugin Region Utilization charts the total number of plug-ins used in the app.
6. To view a specific report, click the number link to the right of the component typeor template.
Chapter 6Using Application Utilities
6-68
6.14.4 Upgrading an Application to Include New ComponentsUpgrade an existing application to include new components available in the currentrelease.
• About Upgrading to Include New Components (page 6-69)
• Running Upgrade Application (page 6-69)
6.14.4.1 About Upgrading to Include New ComponentsThe Upgrade Application page displays the available upgrade types along with thenumber of objects that can be upgraded. Click on the number under Candidate Objectto review the candidates and upgrade.
6.14.4.2 Running Upgrade ApplicationTo upgrade an application to use new components:
1. Navigate to the Workspace home page.
2. Click the App Builder icon.
3. Select an application.
The Application home page appears.
4. Click Utilities.
5. Click Upgrade Application.
The available upgrade types display along with the number of objects that can beupgraded.
6. To review the candidates and upgrade, click the number link under CandidateObjects.
7. Follow the on-screen instructions.
6.14.5 Viewing the Recently Updated Pages ReportDisplays a report of pages recently updated by the current user.
To view the Recently Updated Pages report:
1. Navigate to the Workspace home page.
2. Click the App Builder icon.
3. Select an application.
The Application home page appears.
4. Click Utilities.
5. Click Recently Updated Pages.
The Recently Updated Pages report appears.
Chapter 6Using Application Utilities
6-69
6.14.6 Viewing the Change History ReportThe Change History report displays a summary report of edits to the currentapplications by developer, component type, and page number
To view the Change History report:
1. Navigate to the Workspace home page.
2. Click the App Builder icon.
3. Select an application.
The Application home page appears.
4. Click Utilities.
5. Click Change History.
The Change History report appears. Use the Since list to control the amount oftime to include in your report.
6. From Since at the top of the page, select the amount of time to include in yourreport and click Set.
6.14.7 Using the Database Object Dependencies ReportThe Database Object Dependencies report identifies database objects referenced bythe current application. Review this report to determine what objects to move whendeploying an application.
To view the Database Object Dependencies report:
1. Navigate to the Workspace home page.
2. Click the App Builder icon.
3. Select an application.
The Application home page appears.
4. Click Utilities.
5. Click Database Object Dependencies.
The Database Object Dependencies page appears.
6. Click Compute Dependencies.
Tip:
Display of the report may take a moment depending on the size andcomplexity of your application.
The Database Object Dependencies report appears.
7. To view the components that reference a specific database object, click thenumber under Reference Count.
Chapter 6Using Application Utilities
6-70
6.14.8 Accessing Application Express ViewsQuery various views against Application Express metadata.
Application Express Views are data dictionary views that expose the metadata forapplications. In Application Express Views, you cannot only see the view, but you canalso see the data they contain.
To access the Application Express Views page:
1. Navigate to the Workspace home page.
2. Click the App Builder icon.
3. Select an application.
The Application home page appears.
4. Click Utilities.
5. Click Application Express Views.
The Application Express Views report appears. Use the Search bar at the top ofthe page to customize the display.
Tip:
Click Tree View to switch to a relational view of this information withexpandable parent and children entries.
6. Select a view.
7. On Selected Columns, select columns from Select Columns and click theResults button.
The Results report appears.
8. On Results:
• To view the query that was executed, expand the Query region . You cancopy this query for reuse with SQL Commands or SQL Developer.
• Click Download, to download to a file.
6.14.9 Accessing Page Specific UtilitiesUse the links in the Page Specific Utilities region to access Cross Page Utilities andPage Groups as well as access handy utilities for regions, buttons, items,computations, validations, process, dynamic actions, and branches.
To access Page Specific Utilities page:
1. Navigate to the Workspace home page.
2. Click the App Builder icon.
The App Builder home page appears
3. Select an application.
The Application home page appears.
Chapter 6Using Application Utilities
6-71
4. Click Utilities.
5. Under Page Specific Utilities, select one of the following:
• Cross Page Utilities
• Page Groups
• Region Utilities
• Button Utilities
• Item Utilities
• Computations Utilities
• Validation Utilities
• Process Utilities
• Dynamic Action Utilities
• Branch Utilities
6.14.10 Accessing Cross Page UtilitiesUse Cross Page Utilities to perform edits across pages in the application.
To access the Cross Page Utilities page:
1. On the Workspace home page, click the App Builder icon.
2. Select an application.
3. Click Utilities.
4. From Page Specific Utilities, click Cross Page Utilities.
The Cross Page Utilities page provides access to the following tools and reports:
• Grid Edit of all Pages. Use this report to edit the page name, alias, title, pagetemplate, and security options. To link to a specific page, click the Edit iconadjacent to the page number. To save your changes, click Apply Changes.
• Delete Multiple Pages. Delete multiple pages at once.
• Page Attributes. View a report of details for all pages in the currentapplication including the page name, page title, defined groups, type andnumber of components and controls, and application logic. To customize thereport, use the search bar at the top of the page. To link to a specific page,click the page number.
• Page Locks. Use Page Locks to prevent conflicts during applicationdevelopment. By locking a page, you prevent other developers from editing it.See and
6.14.11 Using Interactive Report UtilitiesView and delete saved interactive reports and interactive report subscriptions.
• Deleting Saved Interactive Reports (page 6-73)View and delete saved interactive reports in the current application.
Chapter 6Using Application Utilities
6-72
• Viewing Subscriptions (page 6-73)View and delete interactive report subscriptions.
6.14.11.1 Deleting Saved Interactive ReportsView and delete saved interactive reports in the current application.
To delete saved interactive reports:
1. On the Workspace home page, click the App Builder icon.
2. Select an application.
The Application home page appears.
3. Click Utilities.
4. Under Interactive Report Utilities, select Saved Reports.
The report displays all of the saved report for the application which are not primarydefaults. Each row includes the page number, region name, report type, reportname, report alias, and owner.
5. To view private saved reports, deselect the checkbox for the Primary Default filterlocated below the search bar.
6. To delete a report, select the check box adjacent to the page number and clickDelete Checked.
7. To view the page containing the report, click the page number.
6.14.11.2 Viewing SubscriptionsView and delete interactive report subscriptions.
End users can receive updated versions of a report by subscribing to it. Workspaceadministrators can view and manage these subscriptions on the Subscriptions page.
To manage interactive report subscriptions:
1. On the Workspace home page, click the App Builder icon.
2. Select an application.
The Application home page appears.
3. Click Utilities.
4. Under Interactive Report Utilities, select Subscriptions.
The Subscriptions report appears.
5. To delete a subscriptions, select the check box adjacent to the page number andclick Delete Checked.
Chapter 6Using Application Utilities
6-73
7Managing Pages in a Database Application
A page is the basic building block of an application. Developers add pages to anapplication by running the Create Page Wizard.
• About Creating New Pages (page 7-1)Developers add pages to an application by running the Create Page Wizard.
• Adding a New Page to an Application (page 7-2)Add a new page by running the Create Page Wizard from the Application homepage.
• Understanding Page Types in the Create Page Wizard (page 7-4)Run the Create Page Wizard to add a new page to existing application. How thewizard works depends upon the type of page your are creating.
• Creating Dialog Pages (page 7-9)Oracle Application Express includes support for modal and non-modal dialogpages. Modal and non-modal dialog pages are only supported if the currentapplication theme contains at least one page template of template type DialogPage.
• About Copying Database Application Pages (page 7-13)Copy a page from the current application or from another application.
• About Deleting Database Application Pages (page 7-14)Deleting a page deletes the corresponding tabs, breadcrumbs, and list entries.You can only delete unlocked pages or pages that you have locked.
• Creating Page Groups (page 7-14)Organize pages into page groups to make them access easier. To use pagegroups, you create a group and then assign pages to the group.
• Locking and Unlocking a Page (page 7-17)Prevent conflicts during application development by locking pages in yourapplication. By locking a page, you prevent other developers from editing it.
See Also:
"Editing Pages in Page Designer (page 8-1)" and "Using ApplicationUtilities (page 6-65)"
7.1 About Creating New PagesDevelopers add pages to an application by running the Create Page Wizard.
The Create Page Wizard includes two types of pages:
• Component pages provide page-level functionality and can only be added oncewithin a given application. Available Component pages include Report, Form,
7-1
Plug-ins, Chart, Calendar, Tree, Wizard, Data Loading, Legacy Page, andDashboard Page.
• Feature pages provide application-level functionality and can only be added onceper application. Available Features include About Page, Access Control, ActivityReporting, Configuration Options, Email Reporting, Feedback, Login Page, andTheme Style Selection.
You can access the Create Page Wizard as follows:
• Application home page — Click Create Page. See "Adding a New Page to anApplication (page 7-2)."
• Viewing a page in Page Designer — Click Create on the Page DesignerDeveloper toolbar and select Page. See "Page Designer Toolbar (page 8-4)"
7.2 Adding a New Page to an ApplicationAdd a new page by running the Create Page Wizard from the Application home page.
To create a new page:
1. On the Workspace home page, click App Builder.
2. Select an application.
The Application home page appears.
3. Click the Create Page button.
The Create Page Wizard appears.
Chapter 7Adding a New Page to an Application
7-2
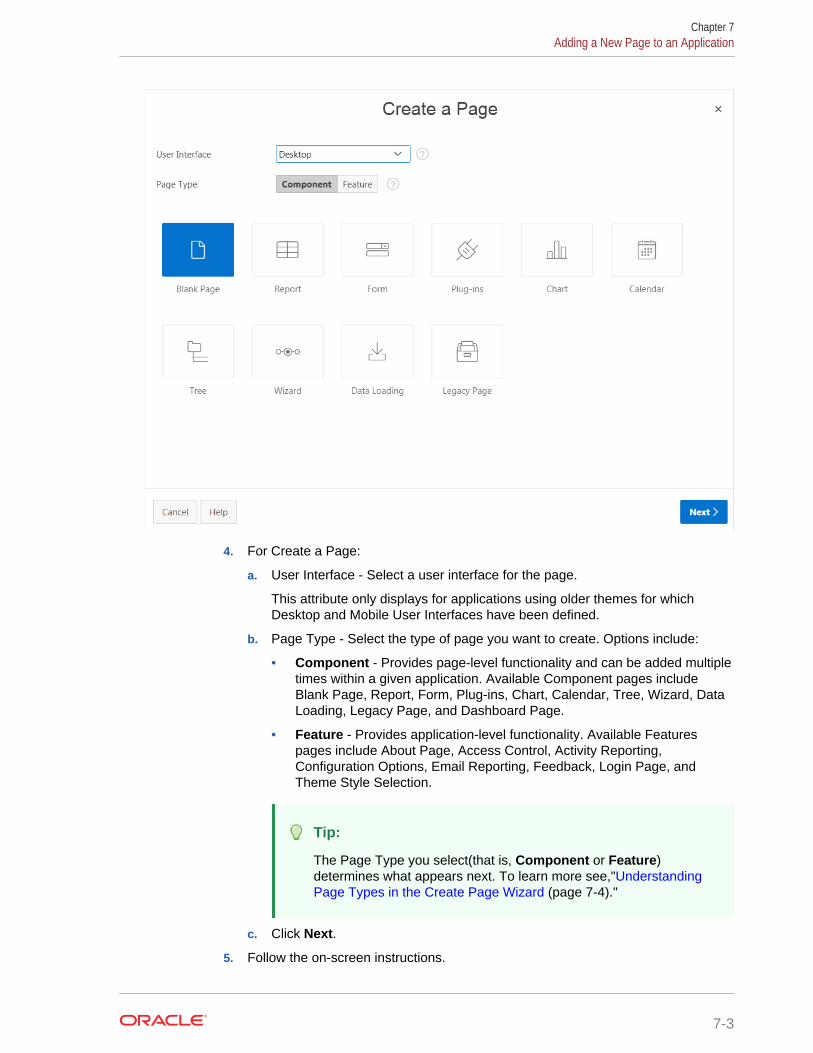
4. For Create a Page:
a. User Interface - Select a user interface for the page.
This attribute only displays for applications using older themes for whichDesktop and Mobile User Interfaces have been defined.
b. Page Type - Select the type of page you want to create. Options include:
• Component - Provides page-level functionality and can be added multipletimes within a given application. Available Component pages includeBlank Page, Report, Form, Plug-ins, Chart, Calendar, Tree, Wizard, DataLoading, Legacy Page, and Dashboard Page.
• Feature - Provides application-level functionality. Available Featurespages include About Page, Access Control, Activity Reporting,Configuration Options, Email Reporting, Feedback, Login Page, andTheme Style Selection.
Tip:
The Page Type you select(that is, Component or Feature)determines what appears next. To learn more see,"UnderstandingPage Types in the Create Page Wizard (page 7-4)."
c. Click Next.
5. Follow the on-screen instructions.
Chapter 7Adding a New Page to an Application
7-3
7.3 Understanding Page Types in the Create Page WizardRun the Create Page Wizard to add a new page to existing application. How thewizard works depends upon the type of page your are creating.
Tip:
Universal Theme - 42 is optimized to work equally well in either a mobile ordesktop environment. In previous releases and in earlier themes, the Mobileuser interface is based on jQuery Mobile. Oracle recommends migratingexisting mobile applications to the Universal Theme as soon as possible.
• Available Component Page Types (page 7-4)Learn about available components when running the Create Page Wizard usingthe Universal Theme.
• Available Features Page Types (page 7-6)Learn about available features when running the Create Page Wizard using theUniversal Theme.
• Available Components for Mobile User Interface Applications (page 7-7)Learn about available components when running the Create Page Wizard usingthe Mobile User Interface.
• About Removing Features Created with the Create Page Wizard (page 7-9)Remove features created with a wizard using build options.
7.3.1 Available Component Page TypesLearn about available components when running the Create Page Wizard using theUniversal Theme.
Table 7-1 Desktop Applications — Component Types
Page Type Description To Learn More
Blank Page Creates a page with no built-in functionality. See online Help whencreating this page.
Report A report is the formatted result of a SQL query.Report options include:
• Interactive Report• Interactive Grid• Classic Report• Report and Form on Table• List View (Optimized for mobile)• Column toggle Report (Optimized for mobile)• Reflow Report (Optimized for mobile)• Report on Web Service
See:
• "Developing Reports(page 9-1)"
• "Understanding ReportTypes (page 9-2)"
• "Report Options WhenRunning the Create PageWizard (page 9-13)"
Chapter 7Understanding Page Types in the Create Page Wizard
7-4
Table 7-1 (Cont.) Desktop Applications — Component Types
Page Type Description To Learn More
Form Forms enable users to update a single row ormultiple rows in a table. Form options include:
• Report with Form on Table• Report with List View on Table (Optimized for
mobile)• Editable Interactive Grid• Single Page Master Detail• Two Page Master Detail• Form on a Table• Form on a Procedure• Form on a SQL Query• Form on a Web Service• Report and Form on a Web Service
See:
• "Creating a Form(page 10-5)"
• "Understanding FormTypes (page 10-1)"
• "Form Options WhenRunning the Create PageWizard (page 10-7)"
Plug-ins Creates a new page based on a region type plug-in.Plug-ins enable developers to declaratively extend,share, and reuse the built-in types available withOracle Application Express.
See "Importing a Plug-in fromthe Plug-in Page(page 19-10)"
Chart Enables you to create graphical charts. See "Creating Charts(page 11-27)"
Calendar Generates a calendar with monthly, weekly, anddaily views.
See "Creating Calendars(page 11-5)"
Tree Creates a tree to graphically communicatehierarchical or multiple level data and optionallynavigating to a page or URL specific to each treenode.
See "Managing Trees(page 14-34)"
Wizard Create a collection of pages to be used as a wizard.Generally wizards are used for entering data acrossmultiple steps.
See online Help whencreating this page.
Data Loading Creates a Data Loading wizard allowing the enduser to manage the loading of data into a table to allschemas for which the user has privileges.
See "Creating Applicationswith Data Loading Capability(page 18-1)"
Legacy Page Legacy pages contains components Oracle stillsupports but does not recommend using. Optionsinclude:
• Tabular Form• Legacy Master Detail• AnyChart Chart• Summary Page• Legacy Calendar
See "Managing ApplicationLegacy Components(page 25-1)"
Dashboard Page Create a dashboard page with multiple charts. See online Help whencreating this page.
Chapter 7Understanding Page Types in the Create Page Wizard
7-5
7.3.2 Available Features Page TypesLearn about available features when running the Create Page Wizard using theUniversal Theme.
This table lists available Features for Desktop Applications when running the CreatePage Wizard.
Table 7-2 Create Page Wizard — Features
Page Type Description To Learn More
About Page Include an About this Application page whichfeatures a description field that describes theapplication, includes the application version, and acount of the number of pages
See online Help whencreating feature.
Access Control Creates pages to manage an access control list.Use the Application Access Control sharedcomponent to associate application roles withapplication users. This wizard also addsa reader, contributor and administrator role andcorresponding authorization scheme to yourapplication. Apply these authorization schemes topages and page components to manage access byuser and role.
See "Controlling Access toApplications, Pages, andPage Components(page 20-36)"
Activity Monitoring Include numerous reports on end user activity foryour application. Determine the most active users,the most used pages, the performance of pages,and errors raised, to better understand how yourapplication is being utilized and areas forimprovement.
Not applicable.
Configuration Options Enables application administrators to enable ordisable specific functionality within the application.This feature is useful if you select features thatneed additional development effort before they canbe used by end users.
You can expand this feature to application-specificfeatures. If developers define additional buildoptions and associate them with specificfunctionality throughout the application, then theycan be added to the configuration settings foradministrators.
Not applicable.
Email Reporting Include numerous reports on emails queued fromthis application, emails sent, and errors sendingemails.
Not applicable.
Chapter 7Understanding Page Types in the Create Page Wizard
7-6
Table 7-2 (Cont.) Create Page Wizard — Features
Page Type Description To Learn More
Feedback Feedback provides a mechanism for end users topost general comments for applicationadministrators and developers. The posts includeuseful session state information to help developersdetermine where the end user sent the feedbackfrom.
Creating Feedback:
• Creates Navigation bar icon which users canclick to leave feedback.
• Creates an report for viewing and updatingfeedback.
• Captures the application and page ID,feedback comments, date and time, and userinformation.
See "Managing Feedback(page 4-22)".
Job Reporting This option only appears if you have database jobsassociated with the underlying schemas for theworkspace.
Include reports on jobs and job run details withinthe schema associated with this application.
Not applicable.
Login Page Creates a Login Page which enables the user toenter login credentials for accessing yourapplication. Developers can select a template andlabels for the Username and Password fields aswell as determine if the Username value is stored asystem-generated cookies.
Not applicable.
Theme Style Selection Enables administrators to select a default colorscheme (theme style) for the application.Administrators can also choose to allow end usersto choose their own theme style. End users cansimply click on the Customize button at the bottomof the home page, and select from the availabletheme styles. For example, users with visualimpairment may prefer to utilize the Vista themestyle which has a much higher color contrast.
Not applicable.
7.3.3 Available Components for Mobile User Interface ApplicationsLearn about available components when running the Create Page Wizard using theMobile User Interface.
The Mobile User Interface based on jQuery Mobile has been desupported inApplication Express 18.1. Only apps built in previous releases can have an associatedMobile User Interface.
Chapter 7Understanding Page Types in the Create Page Wizard
7-7
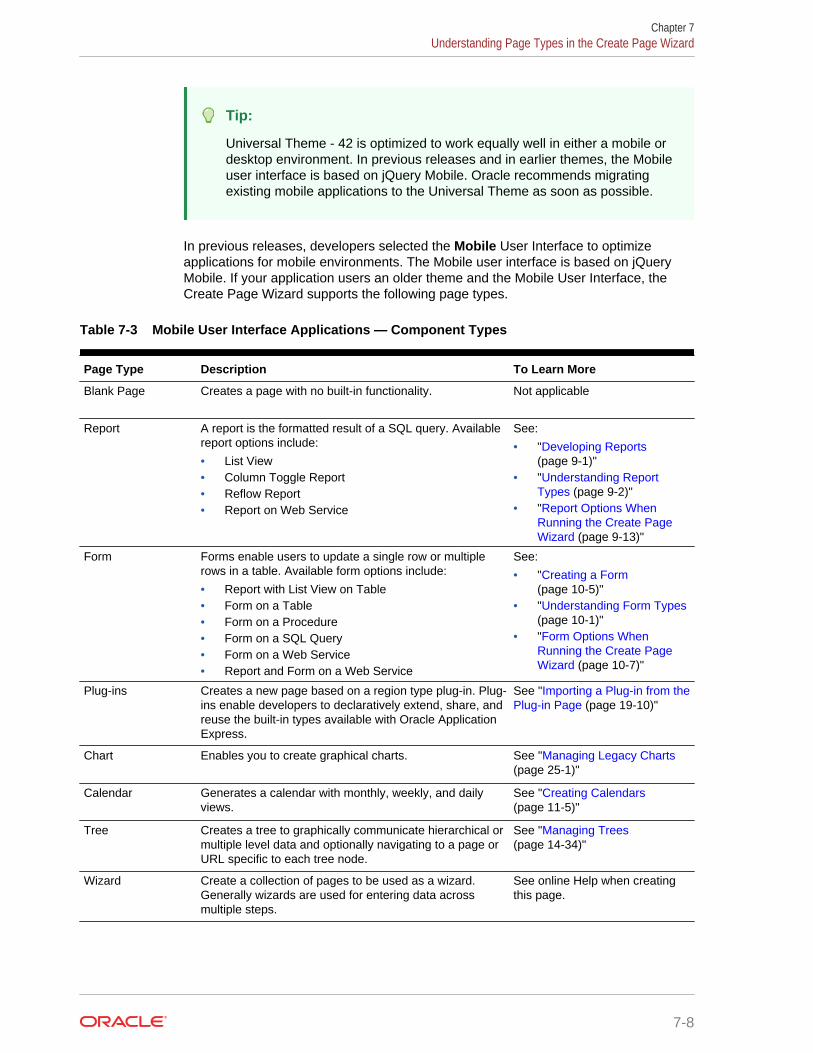
Tip:
Universal Theme - 42 is optimized to work equally well in either a mobile ordesktop environment. In previous releases and in earlier themes, the Mobileuser interface is based on jQuery Mobile. Oracle recommends migratingexisting mobile applications to the Universal Theme as soon as possible.
In previous releases, developers selected the Mobile User Interface to optimizeapplications for mobile environments. The Mobile user interface is based on jQueryMobile. If your application users an older theme and the Mobile User Interface, theCreate Page Wizard supports the following page types.
Table 7-3 Mobile User Interface Applications — Component Types
Page Type Description To Learn More
Blank Page Creates a page with no built-in functionality. Not applicable
Report A report is the formatted result of a SQL query. Availablereport options include:
• List View• Column Toggle Report• Reflow Report• Report on Web Service
See:
• "Developing Reports(page 9-1)"
• "Understanding ReportTypes (page 9-2)"
• "Report Options WhenRunning the Create PageWizard (page 9-13)"
Form Forms enable users to update a single row or multiplerows in a table. Available form options include:
• Report with List View on Table• Form on a Table• Form on a Procedure• Form on a SQL Query• Form on a Web Service• Report and Form on a Web Service
See:
• "Creating a Form(page 10-5)"
• "Understanding Form Types(page 10-1)"
• "Form Options WhenRunning the Create PageWizard (page 10-7)"
Plug-ins Creates a new page based on a region type plug-in. Plug-ins enable developers to declaratively extend, share, andreuse the built-in types available with Oracle ApplicationExpress.
See "Importing a Plug-in from thePlug-in Page (page 19-10)"
Chart Enables you to create graphical charts. See "Managing Legacy Charts(page 25-1)"
Calendar Generates a calendar with monthly, weekly, and dailyviews.
See "Creating Calendars(page 11-5)"
Tree Creates a tree to graphically communicate hierarchical ormultiple level data and optionally navigating to a page orURL specific to each tree node.
See "Managing Trees(page 14-34)"
Wizard Create a collection of pages to be used as a wizard.Generally wizards are used for entering data acrossmultiple steps.
See online Help when creatingthis page.
Chapter 7Understanding Page Types in the Create Page Wizard
7-8

Table 7-3 (Cont.) Mobile User Interface Applications — Component Types
Page Type Description To Learn More
Data Loading Creates a Data Loading wizard allowing the end user tomanage the loading of data into a table to all schemas forwhich the user has privileges.
See "Creating Applications withData Loading Capability(page 18-1)"
Legacy Page Legacy pages contains components Oracle still supportsbut does not recommend using. Options include:
• Tabular Form• Legacy Master Detail• AnyChart Chart• Summary Page• Legacy Calendar
See "Managing ApplicationLegacy Components(page 25-1)"
7.3.4 About Removing Features Created with the Create Page WizardRemove features created with a wizard using build options.
When you add a feature using a wizard, the wizard creates one or more pages andother components and processes to seamlessly integrate it into your application. Eachfeature is associated with a build option which contains one or more components. Youuse the associated build option to enable, disable, or permanently remove features.
Using Build Options to Include or Exclude Features
Build options have two possible values: Include and Exclude. If you select the buildoption status of Include, then the Application Express engine considers the associatedcomponents (in this case features) as part of the application definition at runtime.Conversely, if you specify the build options status as Exclude, then the ApplicationExpress engine treats it and any associated components as if it did not exist.
Removing Features Permanently
You remove features created with a wizard by first removing the componentsassociated with the build option and then deleting the build option.
7.4 Creating Dialog PagesOracle Application Express includes support for modal and non-modal dialog pages.Modal and non-modal dialog pages are only supported if the current application themecontains at least one page template of template type Dialog Page.
• About Supported Dialogs (page 7-10)
• Using a Dialog Page Template (page 7-10)
• Defining a Dialog Page as a in Page Designer (page 7-11)
• Generating a Cancel Dialog Dynamic Action on the Dialog Page (page 7-12)
• Generating a Close Dialog Page Process on the Dialog Page (page 7-12)
• About Branching with Dialog Pages (page 7-13)
Chapter 7Creating Dialog Pages
7-9

• Handling Refresh Actions on Parent Page (page 7-13)
7.4.1 About Supported DialogsWhen you create a new page, the wizard prompts you to select a Page Mode. ThePage Mode determines if the page is a normal application page or a dialog page.Oracle Application Express supports two types of dialog pages:
• Modal Dialog - A modal dialog is an overlay window positioned within the withinthe same browser window. A modal dialog remains active and focused until theuser has finished with it and closes it. While a modal dialog is active, the user isunable to interact with the rest of the page until the dialog is closed.
• Non-modal Dialog - A non-modal dialog displays a separate popup browserwindow. A user can interact with a non-modal dialog and content on the page. Usea non-modal dialog when the requested information is not essential to continue.This type of window can be left open while work continues elsewhere.
7.4.2 Using a Dialog Page TemplateOracle Application Express includes dialog page templates in the Universal Theme -42. When you set the Page Mode to either Modal or Non-Modal, Oracle ApplicationExpress automatically uses the default dialog page template. This section describeshow to create a dialog template if your theme does not include one and how to editdialog template attributes.
• Creating a Dialog Page Template (page 7-10)
• About Defining Dialog Page Template Attributes (page 7-11)
7.4.2.1 Creating a Dialog Page TemplateIf you are using an existing application and the theme does not contain such a dialogpage template, then you must create one. While you can create one from scratch, theeasiest option is to copy an existing dialog template.
To create a dialog page template:
1. Copy the dialog page template from the Sample Database application:
a. On the Workspace home page, click the App Builder icon.
b. Select the application to which you want to copy the template.
c. Click Shared Components.
d. Under User Interface, select Templates.
e. Click Create.
f. In the Create Template Wizard:
• Template Type - Select Page and click Next.
• Creation Method - Select As a Copy of an Existing Template and clickNext.
• Copy From - Select Sample Database Application and click Next.
• Identify Theme - Select the theme you are copying from and the themeyou are copying to and click Next.
Chapter 7Creating Dialog Pages
7-10
• New Template - Locate the Modal Dialog template. Under Copy, selectYes.
• Select Create Copy Page Templates.
2. Verify the dialog page template is active in the current theme. See "Selecting aDefault Page Template (page 12-32)."
7.4.2.2 About Defining Dialog Page Template AttributesThe dialog page template contains JavaScript function calls that handle theinitialization, closure, and cancellation of a dialog page. When you create a dialogpage template you must define these and other Dialog Page Templates attributes.
7.4.3 Defining a Dialog Page as a in Page DesignerTo define a page as a dialog in Page Designer:
1. View the page in Page Designer:
a. On the Workspace home page, click the App Builder icon.
b. Select an application.
c. Select a page.
Page Designer appears.
2. In Page Designer locate the Appearance.
3. For Page Mode, select one of the following:
• Modal Dialog - The page is presented as a modal dialog. A modal dialog is anoverlay window positioned within the viewport, which remains active andfocused until the end user dismisses (closes) it. The underlying page is grayedout and the end user is prevented from interacting with the rest of the pageuntil the dialog is closed.
• Non-Modal Dialog - The page is presented as a non-modal dialog. A non-modal dialog is an overlay window positioned within the viewport, where theend user can interact with the dialog, and content on the page that launchedthe dialog. A non-modal dialog can be used when the requested information isnot essential to continue, work can continue elsewhere while the window is stillopen.
4. Edit other Appearance attributes as needed.
Tip:
To learn more about an attribute, see field-level Help.
5. Under Dialog, edit the appropriate attributes:
a. Width - Enter the width of the dialog, in pixels or a percentage. Thesubstitution string #DIALOG_WIDTH# in the dialog initialization code of the pagetemplate is replaced with the value entered in this item. For a page using aDesktop user interface, the value is set in pixels, such as 500. However, for apage using the jQuery Mobile Smartphone user interface, the value is set inpercent, such as 80%.
Chapter 7Creating Dialog Pages
7-11
b. Height - Enter the height of the dialog, in pixels, for example, 500. Thesubstitution string #DIALOG_HEIGHT# in the dialog initialization code of the pagetemplate is replaced with the value entered.
c. Maximum Width - Enter the maximum width of the dialog in pixels. Thesubstitution string #DIALOG_MAX_WIDTH# in the dialog initialization code of thepage template is replaced with the value entered in this item.
d. Attributes - Dialog support varies depending on the user interface of thepage. A subset of dialog attributes are declaratively supported: height, width,and maximum width. To define any additional attributes for the dialog, enterthe name/value pairings in a comma separated list. The substitution string#DIALOG_ATTRIBUTES# in the dialog initialization code defined at page templatelevel, is replaced by any value(s) entered in this item.
e. CSS Classes - Enter classes to add to this component. You may add multipleclasses by separating them with spaces.
f. Chained - Select Yes if this dialog is opened by another dialog, and shouldreuse the same dialog window. For example, if this dialog is part of a multiplepage dialog wizard and you wish to reuse the dialog window for each step ofthe wizard. Select No if this dialog is opened by another dialog and should beopened in a new dialog window. For example, when this dialog is modal, andyou wish to open it within a parent modal dialog window.
6. To save your changes, click Save.
7.4.4 Generating a Cancel Dialog Dynamic Action on the Dialog PageIf your dialog page contains a Cancel button, then you must generate a dynamic actionbased upon the Click of that button, with its True Action event being set to CancelDialog. This dynamic action will use the cancellation JavaScript call contained in thepage template (apex.navigation.dialog.cancel) to handle the cancelling the dialog.
7.4.5 Generating a Close Dialog Page Process on the Dialog PageYou close a dialog page in Oracle Application Express by creating a Close Dialogpage process. In previous releases, this page process was referred to as a ClosePopup Window. This dialog will use the closure JavaScript call contained in the pagetemplate (apex.navigation.dialog.close), to handle the closing of the dialog. The pageprocess also supports the return of dialog page items, which you may wish toreference on the parent page. To view examples, edit any of the Dialog pages in theSample Database Application.
Tip:
You can also close a dialog page with the Close Dialog dynamic action. Boththe dynamic action and the process support returning dialog page items. Usethe page process when the page needs to be submitted and use the dynamicaction when the page does not need to be submitted. Both end up calling theclosure JavaScript call. Alternatively, you can create a page branch, whichwill close a dialog page and redirect to the page specified in the branch.
Chapter 7Creating Dialog Pages
7-12
7.4.6 About Branching with Dialog PagesYou can open dialog pages using buttons or links. Dialog pages support the followingbranching options:
• Dialog page to dialog page.
You can branch from one dialog page to another dialog page if:
– Both pages have the same Page Mode, for example Modal Dialog and thedialog Chained attribute is set to Yes. Setting the Chained attribute to Yesenables support for chained or nested dialogs such as the dialogs that appearmany internal Application Express wizards. Chained or nested dialogs enableyou to re-use a dialog window to display each page.
• Dialog page to Normal page.
– When branching from a dialog page to a normal page, the dialog page isclosed and the user navigates to a new page in the browser. The new pagecan be parent (or launching) page or another Normal page in an application.
7.4.7 Handling Refresh Actions on Parent PageIf you have generated a Close Dialog page process on the dialog page, you mustimplement refresh actions on the parent page using the new Dialog Closed dynamicaction event type. You can use the set type Dialog Return Item when creating a SetValue True Action, to set a single value, based on the return item of a dialog.
To see an example, go to the Products page in the Sample Database Application. Onthe Products page, the Create Product button has an associated dynamic action thatlaunches the dialog. Closing the dialog triggers the Dialog Closed dynamic action. Youcan use this type of dynamic action for whatever True Actions you wish to define. Inthis example, it refreshes the report on the parent page and submits the page.
Tip:
For a partial page refresh of a parent page, implement the close dialog withdynamic action (for example, for report and form pages where you want toedit data in a modal dialog form and only want the report refreshed on close).In contrast, branching is the best approach if you have a multi step modalwizard or if you have several possible target pages when closing the dialog.
7.5 About Copying Database Application PagesCopy a page from the current application or from another application.
During the copy process, you can also copy shared components or change mappingsto shared components in the target application.
Chapter 7About Copying Database Application Pages
7-13
About Copying Pages Between User Interfaces in Older Themes
The Copy Page Wizard enables you to copy a page to a different user interface.During the copying process, the user can select the user interface for the new page. Ifthe application contains a Desktop and a Mobile theme, both user interface optionsdisplay.
Note:
If your application is using an older theme, Oracle does not support copyingDesktop pages to jQuery Mobile Smartphone pages or copying jQueryMobile Smartphone pages to Desktop pages. Attempting to copy thefollowing Desktop pages to a Mobile user interface results in an error:
• Interactive report
• Flash map
• Flash chart
• Tree region
7.6 About Deleting Database Application PagesDeleting a page deletes the corresponding tabs, breadcrumbs, and list entries. Youcan only delete unlocked pages or pages that you have locked.
7.7 Creating Page GroupsOrganize pages into page groups to make them access easier. To use page groups,you create a group and then assign pages to the group.
Tip:
Page groups do not have any function other than to aid developers inorganizing their application pages.
• Viewing Page Groups (page 7-15)
• Creating a Page Group (page 7-15)
• Editing a Page Group Definition (page 7-15)
• Assigning a Page to a Page Group (page 7-16)
• Viewing Pages by Page Group (page 7-16)
• Deleting a Page Group (page 7-16)
Chapter 7About Deleting Database Application Pages
7-14
7.7.1 Viewing Page GroupsTo access the Page Groups page:
1. On the Workspace home page, click the App Builder icon.
2. Select the application.
3. Click the Utilities icon.
4. From Page Specific Utilities, click Page Groups.
The Page Groups page appears.
A Search bar displays at the top of the page. Available controls include:
• Select columns to search - Resembles a magnifying glass. Click this icon tonarrow your search. To search all columns, select All Columns.
• Text area - Enter case insensitive search criteria (wildcard characters areimplied) to search for a page group by name and click Go.
• Go button - Executes a search or applies a filter.
• View Icons - Displays each group as a large icon. To edit a group, click theappropriate icon.
• View Report - Displays each group as a line in a report. To edit a group, clickthe name.
• Actions menu - Use the Actions menu to customize the report view.
5. To view the pages associated with a group, click Pages by Page Group.
7.7.2 Creating a Page GroupTo create a page group:
1. On the Workspace home page, click the App Builder icon.
2. Select the application.
3. Click the Utilities icon.
4. From Page Specific Utilities, click Page Groups.
5. On the Page Groups page, click Create.
6. Enter a name, a description (optional), and click Create.
7.7.3 Editing a Page Group DefinitionWhen you create a page group you specify a name and description.
To edit the Page Group definition:
1. On the Workspace home page, click the App Builder icon.
2. Select the application.
3. Click the Utilities icon.
4. From Page Specific Utilities, click Page Groups.
Chapter 7Creating Page Groups
7-15
5. Select a page group.
6. On the Page Group page, edit the name or description and click Apply Changes.
7. To move to the next Page Group definition, click the Previous (<) and Next (>)buttons and repeat the previous step.
7.7.4 Assigning a Page to a Page GroupTo assign pages to a group:
1. On the Workspace home page, click the App Builder icon.
2. Select the application.
3. Click the Utilities icon.
4. From Page Specific Utilities, click Page Groups.
5. Click the Page Assignments tab.
The Page Assignments page appears.
6. Click the page number.
The Page Attributes page appears.
7. Locate the Name region and select a group from the Group list.
8. Click Apply Changes.
7.7.5 Viewing Pages by Page GroupTo view pages by page group:
1. On the Workspace home page, click the App Builder icon.
2. Select the application.
3. Click the Utilities icon.
4. From Page Specific Utilities, click Page Groups.
5. Click the Pages by Page Group tab.
The Pages by Page Group page appears. Click the Page Name to view the page.
6. To remove a page from a group:
a. Click the page number.
The Page Attributes page appears.
b. Under Name, Group, select - No Group Assigned -.
c. Click Apply Changes.
7. To create a new group, click Create and follow the on-screen instructions.
7.7.6 Deleting a Page GroupTo delete a page group:
1. Remove all pages from the group to be deleted:
a. On the Workspace home page, click the App Builder icon.
Chapter 7Creating Page Groups
7-16
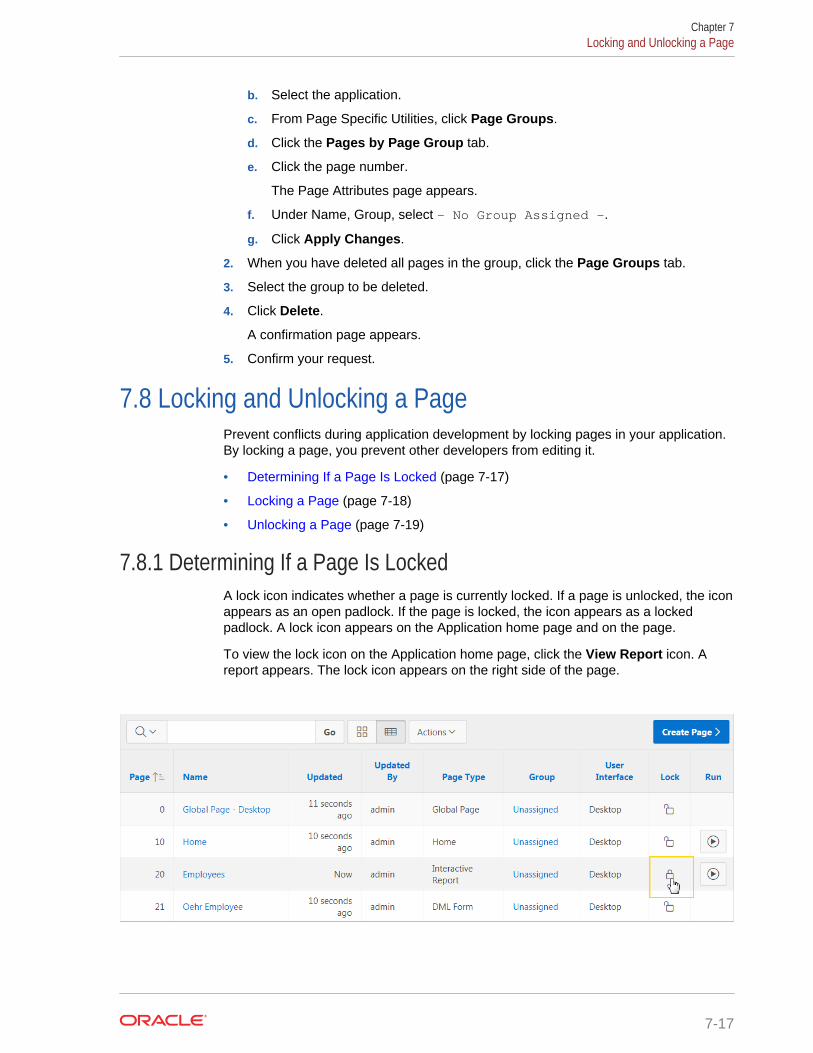
b. Select the application.
c. From Page Specific Utilities, click Page Groups.
d. Click the Pages by Page Group tab.
e. Click the page number.
The Page Attributes page appears.
f. Under Name, Group, select - No Group Assigned -.
g. Click Apply Changes.
2. When you have deleted all pages in the group, click the Page Groups tab.
3. Select the group to be deleted.
4. Click Delete.
A confirmation page appears.
5. Confirm your request.
7.8 Locking and Unlocking a PagePrevent conflicts during application development by locking pages in your application.By locking a page, you prevent other developers from editing it.
• Determining If a Page Is Locked (page 7-17)
• Locking a Page (page 7-18)
• Unlocking a Page (page 7-19)
7.8.1 Determining If a Page Is LockedA lock icon indicates whether a page is currently locked. If a page is unlocked, the iconappears as an open padlock. If the page is locked, the icon appears as a lockedpadlock. A lock icon appears on the Application home page and on the page.
To view the lock icon on the Application home page, click the View Report icon. Areport appears. The lock icon appears on the right side of the page.
Chapter 7Locking and Unlocking a Page
7-17
7.8.2 Locking a PageDevelopers can lock a page on the Application home page, Page Locks page, and inPage Designer.
• Locking a Page from the Application Home Page (page 7-18)
• Locking a Page from the Page Locks Page (page 7-18)
• Locking a Page in Page Designer (page 7-18)
7.8.2.1 Locking a Page from the Application Home PageTo lock a page from the Application Home Page:
1. On the Workspace home page, click the App Builder icon.
2. Select an application.
3. On the search bar, click the View Report or View Detail icon.
4. Click the Lock icon.
5. Enter a comment in the Comment field.
6. Click Lock Page(s).
7.8.2.2 Locking a Page from the Page Locks PageTo lock a page from the Page Locks Page:
1. On the Workspace home page, click the App Builder icon.
2. Select an application.
3. Click the Utilities icon.
4. On the Page Specific Utilities list, click Cross Page Utilities.
5. Click Page Locks.
6. Select the appropriate pages and click Lock Checked.
7. Enter a comment in the Comment field.
8. Click Lock Page(s).
7.8.2.3 Locking a Page in Page DesignerThe Page Lock button on the Page Designer toolbar indicates whether a page islocked. If the page is unlocked, the Page Lock button displays as an unlocked padlock.
To lock a page in Page Designer:
1. Navigate to the appropriate page in Page Designer.
2. On the Page Designer toolbar, click the Page Unlocked button.
3. Enter a comment in the Comment field.
4. Click Lock.
When a page is locked, the Page Lock button displays as a locked padlock.
Chapter 7Locking and Unlocking a Page
7-18
7.8.3 Unlocking a PageOnly the developer who locks a page can unlock it. However, a developer withadministrative privileges can unlock pages locked by other developers.
Tip:
To view information about an existing page lock, navigate to the Lock Detailspage and expand the Lock History region.
• Unlocking Pages from Utilities (page 7-19)
• Unlocking Pages from the Application Home Page (page 7-19)
• Unlocking a Page in Page Designer (page 7-19)
• Unlocking Pages As a Workspace Administrator (page 7-20)
7.8.3.1 Unlocking Pages from UtilitiesTo unlock a page from the Page Locks page:
1. On the Workspace home page, click the App Builder icon.
2. Select an application.
3. Click the Utilities icon.
4. On the Page Specific Utilities list, click Cross Page Utilities.
5. Click Page Locks.
6. Select the appropriate pages.
7. Click Unlock Checked.
7.8.3.2 Unlocking Pages from the Application Home PageTo unlock a page from the Application Home Page:
1. On the Workspace home page, click the App Builder icon.
2. Select an application.
3. On the search bar, click the View Report icon.
4. Click the Lock icon.
The Lock Details page appears.
5. Click Unlock.
7.8.3.3 Unlocking a Page in Page DesignerThe Page Lock button on the Page Designer toolbar indicates whether a page islocked. If the page is locked, the Page Lock button displays as a locked padlock.Passing your cursor over a locked Page Lock button displays a tooltip which indicatedwho locked it.
Chapter 7Locking and Unlocking a Page
7-19
To unlock a page in Page Designer:
1. Navigate to the appropriate page in Page Designer.
If a page is locked, the Page Lock button displays as a locked padlock.
2. On the Page Designer toolbar, click the Page locked by you button.
If the page has been locked by another user the Lock button appears in red. Youcannot unlock a page locked by another user.
3. Click Unlock.
When a page is unlocked, the Page Lock button displays as an unlocked padlock.
"Viewing a Page in Page Designer (page 8-20)"
7.8.3.4 Unlocking Pages As a Workspace AdministratorTo unlock pages as a Workspace Administrator:
1. On the Workspace home page, click the App Builder icon.
2. Select an application.
3. Click the Utilities icon.
4. On the Page Specific Utilities list, click Cross Page Utilities.
5. Click Page Locks.
6. Click Lock Administration.
7. Select the appropriate pages.
8. Click Unlock Page(s).
Chapter 7Locking and Unlocking a Page
7-20
8Editing Pages in Page Designer
Developers view and edit application pages in Page Designer. Page Designer is a fullfeatured Integrated Development Environment (IDE) that includes a toolbar andmultiple panes.
• About Page Designer (page 8-2)Use Page Designer to maintain and enhance pages within an Oracle ApplicationExpress application. Page Designer is a full featured Integrated DevelopmentEnvironment (IDE) that includes a toolbar and multiple panes.
• Understanding Page Designer UI Elements (page 8-3)The Page Designer window features three panes: a left pane, a central pane, anda right pane. You select a component in the left or central pane and then edit thecomponent’s attributes in the Property Editor located in the right pane.
• Using Page Designer (page 8-20)Use Page Designer to view and edit database application pages.
• Managing Page Attributes (page 8-30)Edit page attributes to control basic information and functionality for a given page,including the page name or title, header and footer text, navigation menus,inclusion of page-level JavaScript or CSS files, error handling, and the selectedauthorization scheme.
• Running a Page from Page Designer (page 8-35)The Application Express engine dynamically renders and processes pages basedon data stored in database tables. To view a rendered version of an application,you run or submit it to the Application Express engine.
• Runtime Developer Toolbar (page 8-35)Use the Developer toolbar to quickly edit the current application or currentlyrunning page, or view session state.
• Copying a Database Application Page (page 8-37)You can copy a page from the current application or from another application.During the copy process, you can also copy shared components or changemappings to shared components in the target application.
• Deleting Pages (page 8-38)Deleting a page deletes the corresponding tabs, breadcrumbs, and list entries.
See Also:
• "Adding Developer Comments (page 6-55)"
• "Creating Database Applications (page 6-1)"
• "Controlling Page Layout (page 13-1)"
• "Adding Navigation (page 15-1)"
8-1
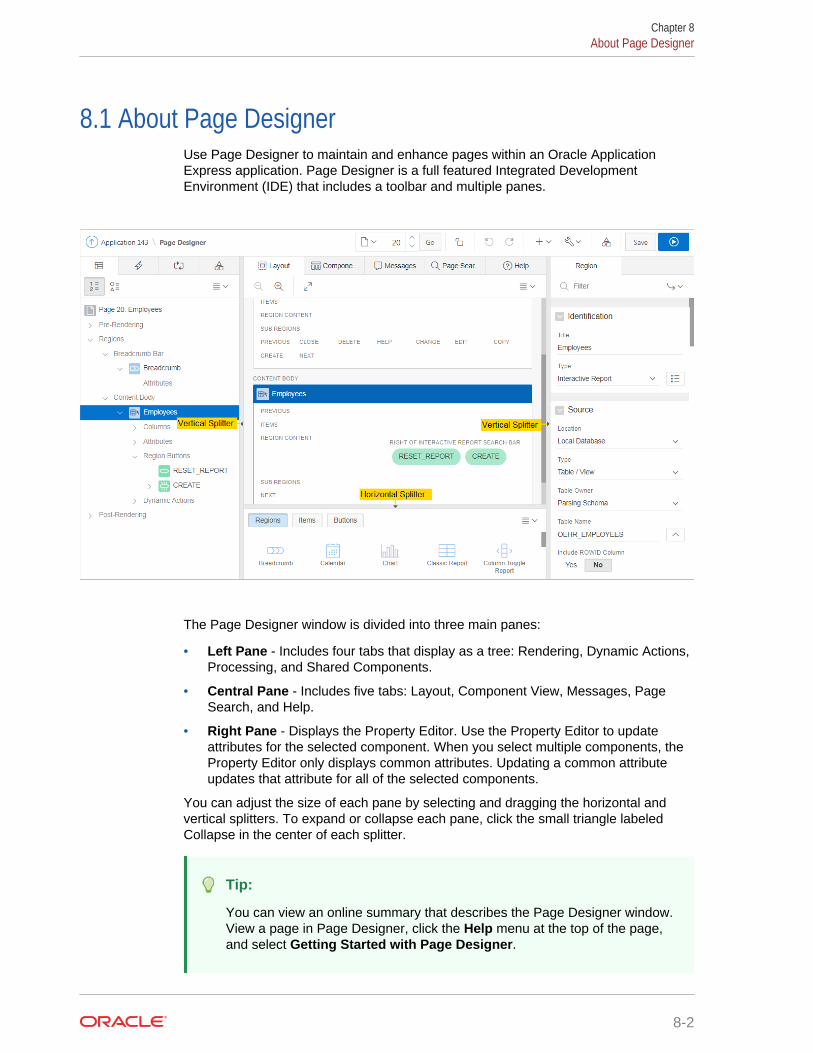
8.1 About Page DesignerUse Page Designer to maintain and enhance pages within an Oracle ApplicationExpress application. Page Designer is a full featured Integrated DevelopmentEnvironment (IDE) that includes a toolbar and multiple panes.
The Page Designer window is divided into three main panes:
• Left Pane - Includes four tabs that display as a tree: Rendering, Dynamic Actions,Processing, and Shared Components.
• Central Pane - Includes five tabs: Layout, Component View, Messages, PageSearch, and Help.
• Right Pane - Displays the Property Editor. Use the Property Editor to updateattributes for the selected component. When you select multiple components, theProperty Editor only displays common attributes. Updating a common attributeupdates that attribute for all of the selected components.
You can adjust the size of each pane by selecting and dragging the horizontal andvertical splitters. To expand or collapse each pane, click the small triangle labeledCollapse in the center of each splitter.
Tip:
You can view an online summary that describes the Page Designer window.View a page in Page Designer, click the Help menu at the top of the page,and select Getting Started with Page Designer.
Chapter 8About Page Designer
8-2
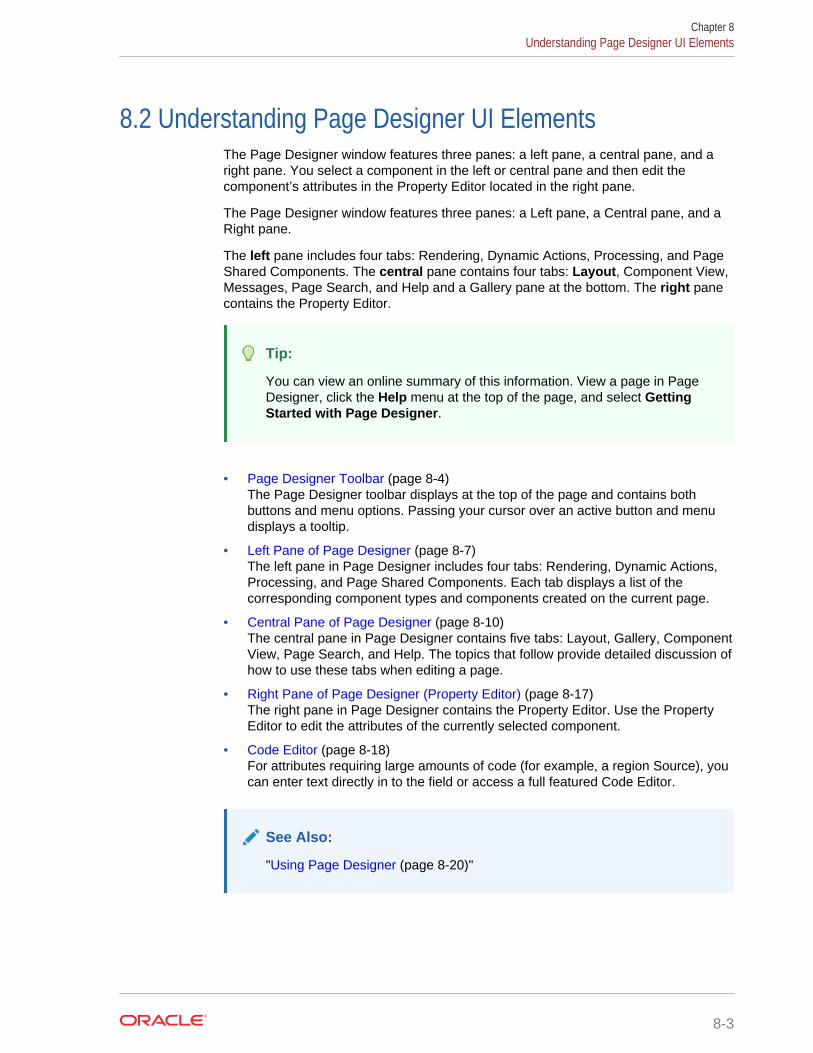
8.2 Understanding Page Designer UI ElementsThe Page Designer window features three panes: a left pane, a central pane, and aright pane. You select a component in the left or central pane and then edit thecomponent’s attributes in the Property Editor located in the right pane.
The Page Designer window features three panes: a Left pane, a Central pane, and aRight pane.
The left pane includes four tabs: Rendering, Dynamic Actions, Processing, and PageShared Components. The central pane contains four tabs: Layout, Component View,Messages, Page Search, and Help and a Gallery pane at the bottom. The right panecontains the Property Editor.
Tip:
You can view an online summary of this information. View a page in PageDesigner, click the Help menu at the top of the page, and select GettingStarted with Page Designer.
• Page Designer Toolbar (page 8-4)The Page Designer toolbar displays at the top of the page and contains bothbuttons and menu options. Passing your cursor over an active button and menudisplays a tooltip.
• Left Pane of Page Designer (page 8-7)The left pane in Page Designer includes four tabs: Rendering, Dynamic Actions,Processing, and Page Shared Components. Each tab displays a list of thecorresponding component types and components created on the current page.
• Central Pane of Page Designer (page 8-10)The central pane in Page Designer contains five tabs: Layout, Gallery, ComponentView, Page Search, and Help. The topics that follow provide detailed discussion ofhow to use these tabs when editing a page.
• Right Pane of Page Designer (Property Editor) (page 8-17)The right pane in Page Designer contains the Property Editor. Use the PropertyEditor to edit the attributes of the currently selected component.
• Code Editor (page 8-18)For attributes requiring large amounts of code (for example, a region Source), youcan enter text directly in to the field or access a full featured Code Editor.
See Also:
"Using Page Designer (page 8-20)"
Chapter 8Understanding Page Designer UI Elements
8-3
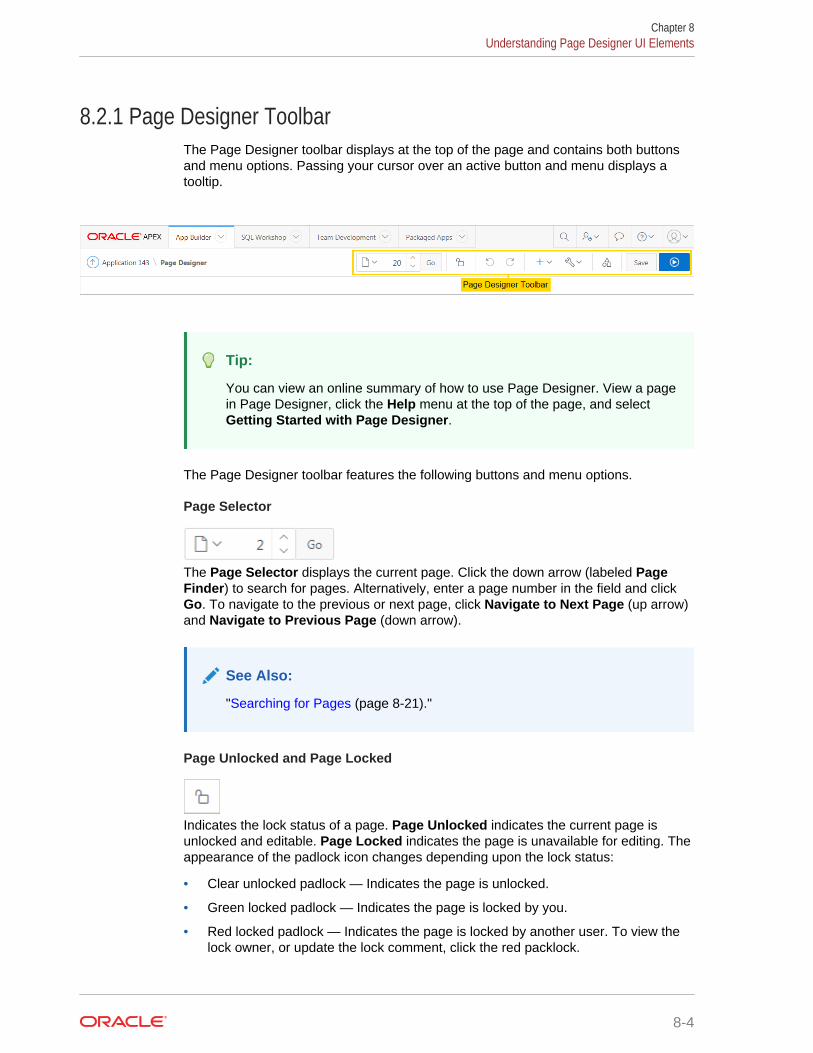
8.2.1 Page Designer ToolbarThe Page Designer toolbar displays at the top of the page and contains both buttonsand menu options. Passing your cursor over an active button and menu displays atooltip.
Tip:
You can view an online summary of how to use Page Designer. View a pagein Page Designer, click the Help menu at the top of the page, and selectGetting Started with Page Designer.
The Page Designer toolbar features the following buttons and menu options.
Page Selector
The Page Selector displays the current page. Click the down arrow (labeled PageFinder) to search for pages. Alternatively, enter a page number in the field and clickGo. To navigate to the previous or next page, click Navigate to Next Page (up arrow)and Navigate to Previous Page (down arrow).
See Also:
"Searching for Pages (page 8-21)."
Page Unlocked and Page Locked
Indicates the lock status of a page. Page Unlocked indicates the current page isunlocked and editable. Page Locked indicates the page is unavailable for editing. Theappearance of the padlock icon changes depending upon the lock status:
• Clear unlocked padlock — Indicates the page is unlocked.
• Green locked padlock — Indicates the page is locked by you.
• Red locked padlock — Indicates the page is locked by another user. To view thelock owner, or update the lock comment, click the red packlock.
Chapter 8Understanding Page Designer UI Elements
8-4
See Also:
"Locking and Unlocking a Page (page 7-17)."
Undo and Redo
Applies to actions that result in a change to the page data. Undo reverts the previousupdate you made within Page Designer. Redo reapplies the last update that wasundone using Undo.
Create
Features a graphical plus sign (+). Create menu options include:
• Page. Access to the Create Page Wizard. See "About Creating New Pages(page 7-1)."
• Page as Copy. Access the Copy Page Wizard. See "Copying a DatabaseApplication Page (page 8-37)."
• Page Component. Provides a summary of how to create page components inPage Designer.
• Form Region. Access to the Create Form Region Wizard. See "Creating a FormRegion (page 10-10)."
• Breadcrumb Region. Access to the Create Breadcrumb Wizard. See "CreatingBreadcrumbs (page 15-8)" and "Creating a Breadcrumb Region Using the CreateBreadcrumb Wizard (page 15-10)."
• Shared Component. Access to the Create Application Component Wizard.Shared components are common elements that can display or be applied on anypage within an application. See "Managing Shared Components (page 17-1)."
• Page Group. Links to the Page Group page. Use page groups to organize pages.See "Creating Page Groups (page 7-14)."
• Developer Comment. Access the Developer Comments dialog. Developers canadd comments to an application, a page, or a group of pages. See "AddingDeveloper Comments (page 6-55)."
• Team Development. Displays the submenus Feature, To Do, and Bug. See"Tracking Features (page 4-3)," "Tracking To Dos (page 4-14)," and "ManagingBugs (page 4-18)."
Utilities
Features a graphic of a wrench. Utilities menu options include:
Chapter 8Understanding Page Designer UI Elements
8-5
• Delete Page. Delete the current page. See "Deleting Pages (page 8-38)."
• Advisor. Access Oracle Application Express Advisor (Advisor). Use Advisor tocheck the integrity and quality of your Oracle Application Express application. See"Running Advisor to Check Application Integrity (page 23-1)."
• Caching. Links to the Caching page. Enabling caching is an effective way toimprove the performance. See "Utilizing Region Caching in Page Designer(page 13-8)"
• Attribute Dictionary. Access the Attribute Dictionary. See "Using the AttributeDictionary (page 16-21)."
• History. Displays a report of changes to the current page.
• Export. Export the current page. See "Exporting an Application and ApplicationComponents (page 24-22)."
• Cross Page Utilities. Access Cross Page Utilities. See "Accessing Cross PageUtilities (page 6-72)."
• Application Utilities. Access Application Utilities. See "Using Application Utilities(page 6-65)"
• Page Groups. Links to the Page Group page. Use page groups to organizepages. See "Creating Page Groups (page 7-14)."
• Upgrade Application. Upgrade an existing application. See "Running UpgradeApplication (page 6-69)."
• Show Tooltips. Disable and enable tooltips within the UI.
• Layout. Controls the number of panes that display in Page Designer. See"Switching Between Three Pane and Two Pane Mode (page 8-22)."
Team Development
Features a graphical outline of two people. Options include:
• Features. Links to Create Feature. See "Tracking Features (page 4-3)."
• To Do - Links to Create To Do. See "Tracking To Dos (page 4-14)."
• Bugs - Links Create Bug. See "Managing Bugs (page 4-18)."
• Feedback Entries - Links to the Feedback report. See "Tracking Feedback Teamin Development (page 4-26)."
Tip:
This button only displays if Team Development must be enabled for theworkspace or there is a feature, To Do, bug, or feedback entry linked to thecurrent page. See "Managing Team Development" in Oracle ApplicationExpress Administration Guide.
Chapter 8Understanding Page Designer UI Elements
8-6
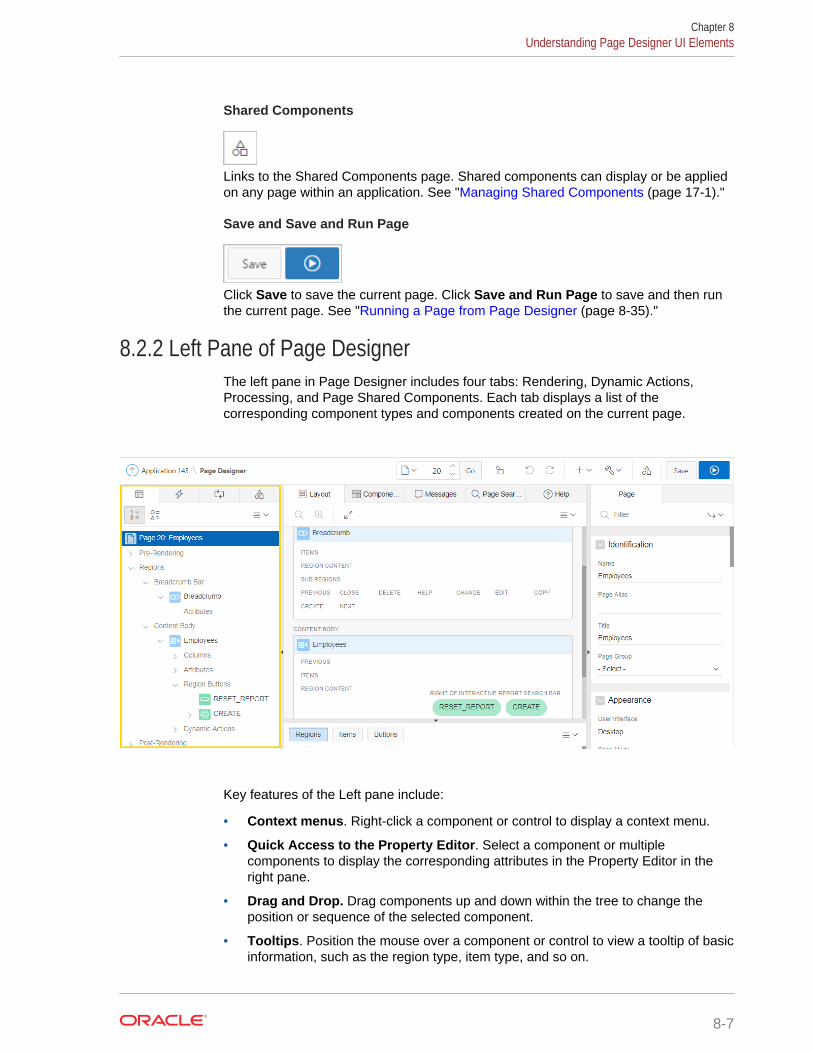
Shared Components
Links to the Shared Components page. Shared components can display or be appliedon any page within an application. See "Managing Shared Components (page 17-1)."
Save and Save and Run Page
Click Save to save the current page. Click Save and Run Page to save and then runthe current page. See "Running a Page from Page Designer (page 8-35)."
8.2.2 Left Pane of Page DesignerThe left pane in Page Designer includes four tabs: Rendering, Dynamic Actions,Processing, and Page Shared Components. Each tab displays a list of thecorresponding component types and components created on the current page.
Key features of the Left pane include:
• Context menus. Right-click a component or control to display a context menu.
• Quick Access to the Property Editor. Select a component or multiplecomponents to display the corresponding attributes in the Property Editor in theright pane.
• Drag and Drop. Drag components up and down within the tree to change theposition or sequence of the selected component.
• Tooltips. Position the mouse over a component or control to view a tooltip of basicinformation, such as the region type, item type, and so on.
Chapter 8Understanding Page Designer UI Elements
8-7
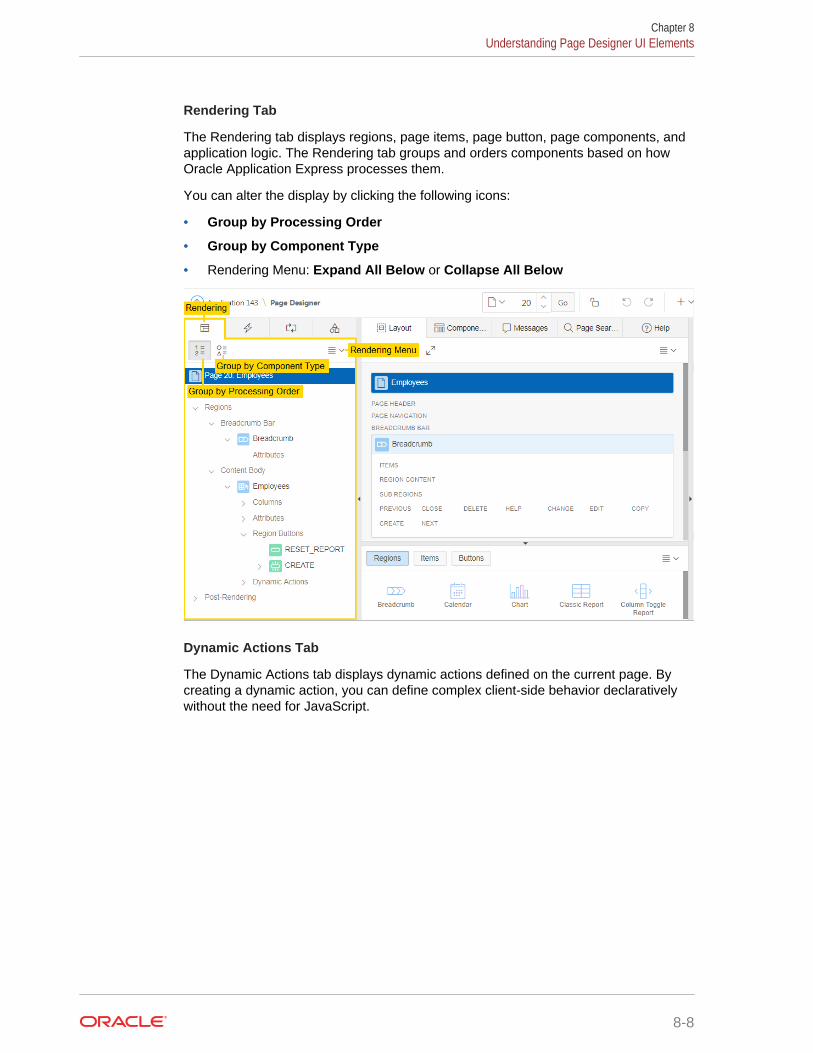
Rendering Tab
The Rendering tab displays regions, page items, page button, page components, andapplication logic. The Rendering tab groups and orders components based on howOracle Application Express processes them.
You can alter the display by clicking the following icons:
• Group by Processing Order
• Group by Component Type
• Rendering Menu: Expand All Below or Collapse All Below
Dynamic Actions Tab
The Dynamic Actions tab displays dynamic actions defined on the current page. Bycreating a dynamic action, you can define complex client-side behavior declarativelywithout the need for JavaScript.
Chapter 8Understanding Page Designer UI Elements
8-8
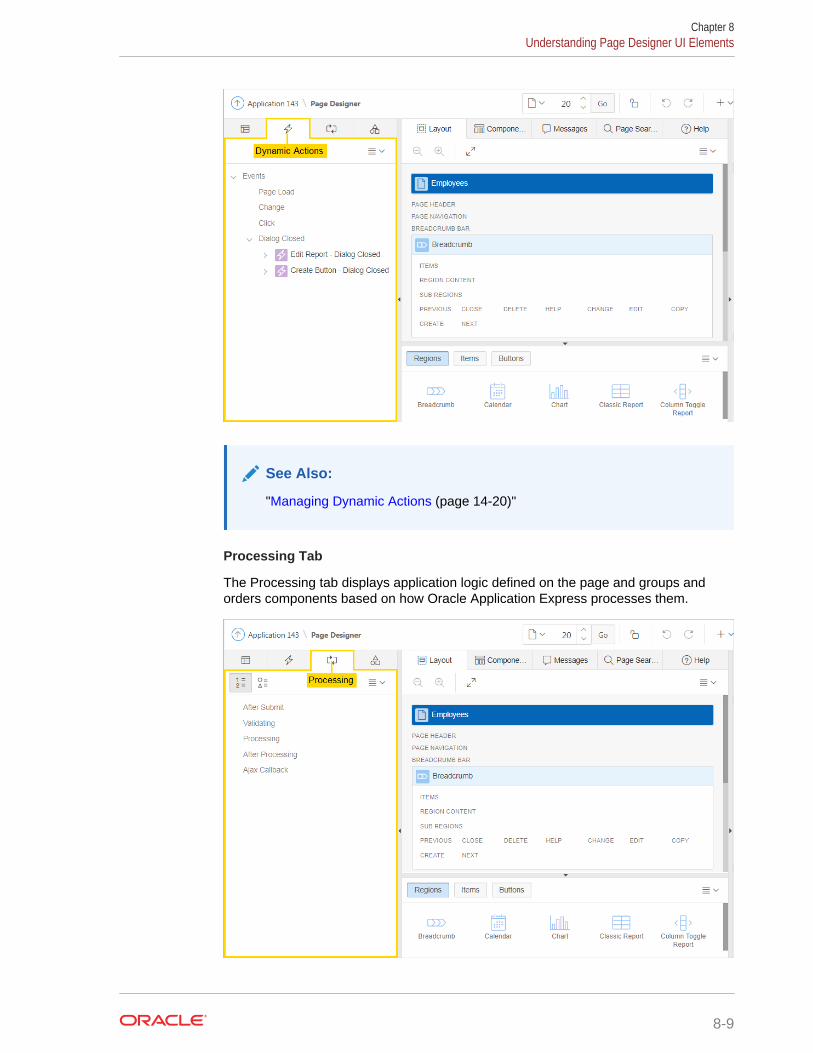
See Also:
"Managing Dynamic Actions (page 14-20)"
Processing Tab
The Processing tab displays application logic defined on the page and groups andorders components based on how Oracle Application Express processes them.
Chapter 8Understanding Page Designer UI Elements
8-9
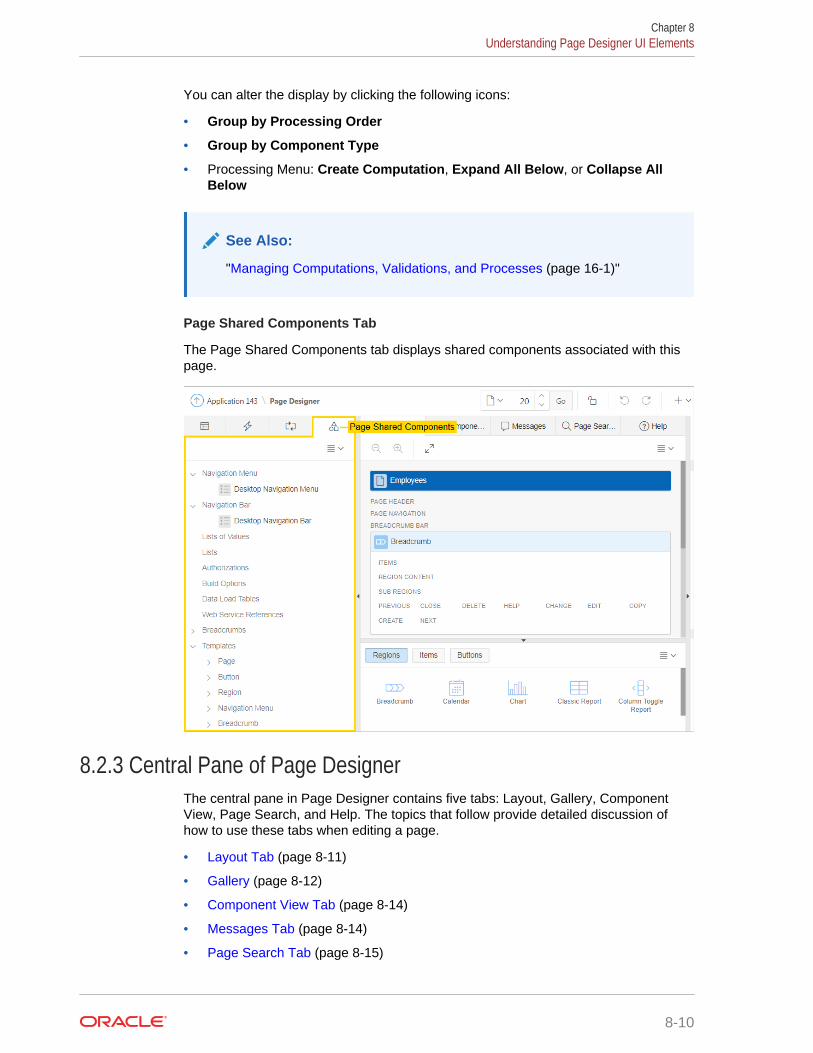
You can alter the display by clicking the following icons:
• Group by Processing Order
• Group by Component Type
• Processing Menu: Create Computation, Expand All Below, or Collapse AllBelow
See Also:
"Managing Computations, Validations, and Processes (page 16-1)"
Page Shared Components Tab
The Page Shared Components tab displays shared components associated with thispage.
8.2.3 Central Pane of Page DesignerThe central pane in Page Designer contains five tabs: Layout, Gallery, ComponentView, Page Search, and Help. The topics that follow provide detailed discussion ofhow to use these tabs when editing a page.
• Layout Tab (page 8-11)
• Gallery (page 8-12)
• Component View Tab (page 8-14)
• Messages Tab (page 8-14)
• Page Search Tab (page 8-15)
Chapter 8Understanding Page Designer UI Elements
8-10
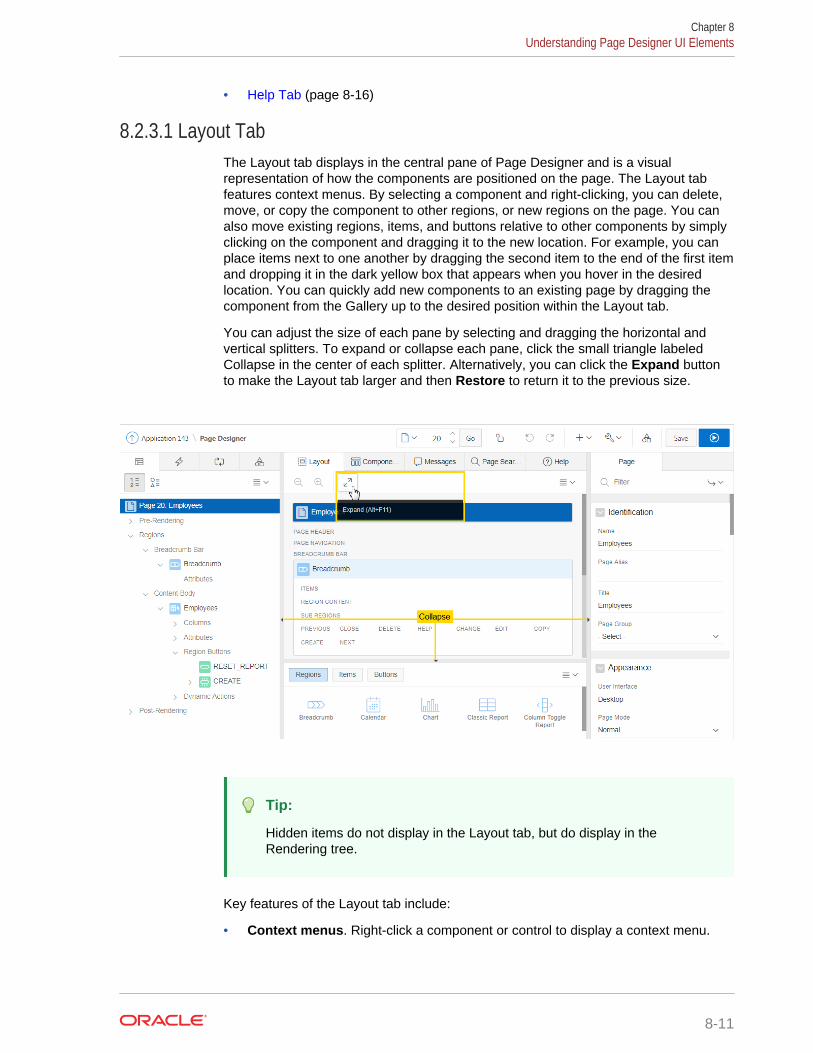
• Help Tab (page 8-16)
8.2.3.1 Layout TabThe Layout tab displays in the central pane of Page Designer and is a visualrepresentation of how the components are positioned on the page. The Layout tabfeatures context menus. By selecting a component and right-clicking, you can delete,move, or copy the component to other regions, or new regions on the page. You canalso move existing regions, items, and buttons relative to other components by simplyclicking on the component and dragging it to the new location. For example, you canplace items next to one another by dragging the second item to the end of the first itemand dropping it in the dark yellow box that appears when you hover in the desiredlocation. You can quickly add new components to an existing page by dragging thecomponent from the Gallery up to the desired position within the Layout tab.
You can adjust the size of each pane by selecting and dragging the horizontal andvertical splitters. To expand or collapse each pane, click the small triangle labeledCollapse in the center of each splitter. Alternatively, you can click the Expand buttonto make the Layout tab larger and then Restore to return it to the previous size.
Tip:
Hidden items do not display in the Layout tab, but do display in theRendering tree.
Key features of the Layout tab include:
• Context menus. Right-click a component or control to display a context menu.
Chapter 8Understanding Page Designer UI Elements
8-11
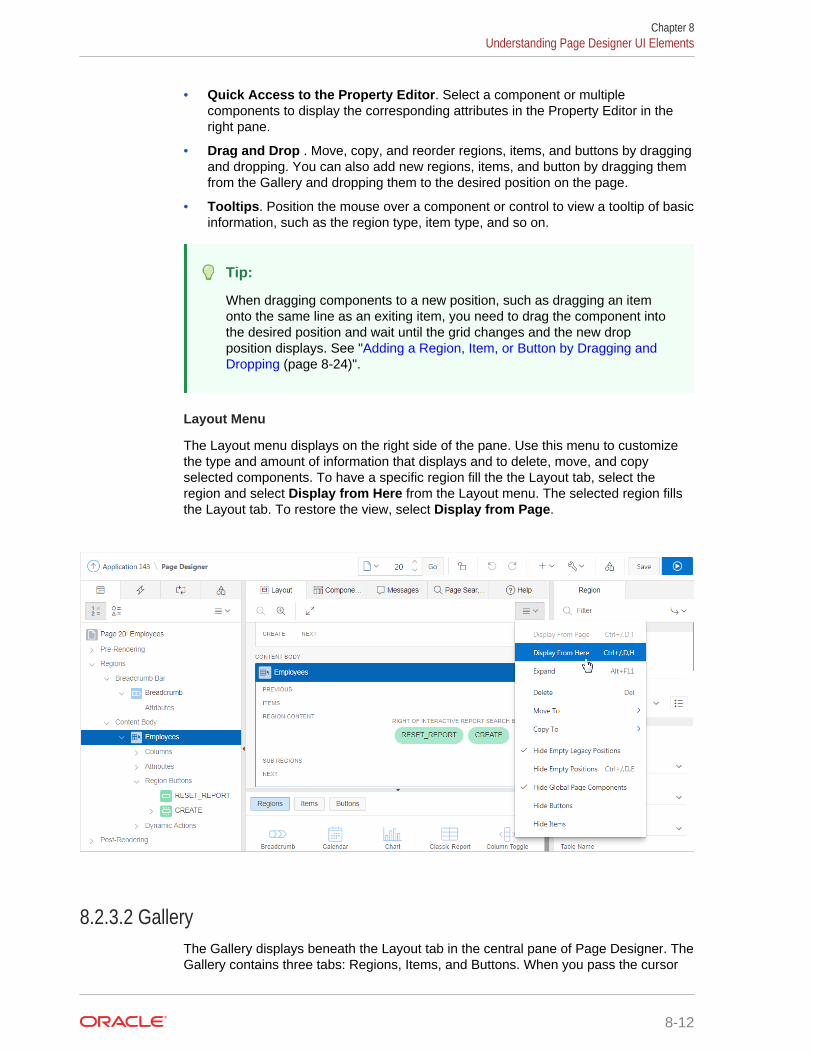
• Quick Access to the Property Editor. Select a component or multiplecomponents to display the corresponding attributes in the Property Editor in theright pane.
• Drag and Drop . Move, copy, and reorder regions, items, and buttons by draggingand dropping. You can also add new regions, items, and button by dragging themfrom the Gallery and dropping them to the desired position on the page.
• Tooltips. Position the mouse over a component or control to view a tooltip of basicinformation, such as the region type, item type, and so on.
Tip:
When dragging components to a new position, such as dragging an itemonto the same line as an exiting item, you need to drag the component intothe desired position and wait until the grid changes and the new dropposition displays. See "Adding a Region, Item, or Button by Dragging andDropping (page 8-24)".
Layout Menu
The Layout menu displays on the right side of the pane. Use this menu to customizethe type and amount of information that displays and to delete, move, and copyselected components. To have a specific region fill the the Layout tab, select theregion and select Display from Here from the Layout menu. The selected region fillsthe Layout tab. To restore the view, select Display from Page.
8.2.3.2 GalleryThe Gallery displays beneath the Layout tab in the central pane of Page Designer. TheGallery contains three tabs: Regions, Items, and Buttons. When you pass the cursor
Chapter 8Understanding Page Designer UI Elements
8-12
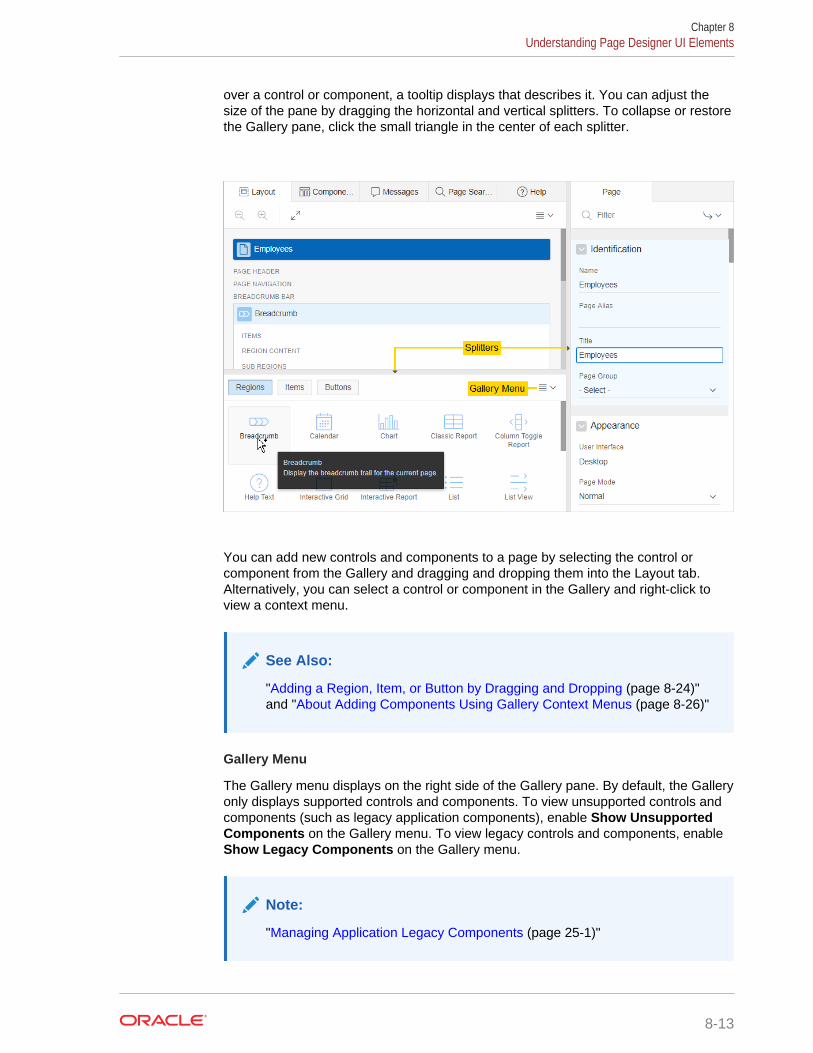
over a control or component, a tooltip displays that describes it. You can adjust thesize of the pane by dragging the horizontal and vertical splitters. To collapse or restorethe Gallery pane, click the small triangle in the center of each splitter.
You can add new controls and components to a page by selecting the control orcomponent from the Gallery and dragging and dropping them into the Layout tab.Alternatively, you can select a control or component in the Gallery and right-click toview a context menu.
See Also:
"Adding a Region, Item, or Button by Dragging and Dropping (page 8-24)"and "About Adding Components Using Gallery Context Menus (page 8-26)"
Gallery Menu
The Gallery menu displays on the right side of the Gallery pane. By default, the Galleryonly displays supported controls and components. To view unsupported controls andcomponents (such as legacy application components), enable Show UnsupportedComponents on the Gallery menu. To view legacy controls and components, enableShow Legacy Components on the Gallery menu.
Note:
"Managing Application Legacy Components (page 25-1)"
Chapter 8Understanding Page Designer UI Elements
8-13
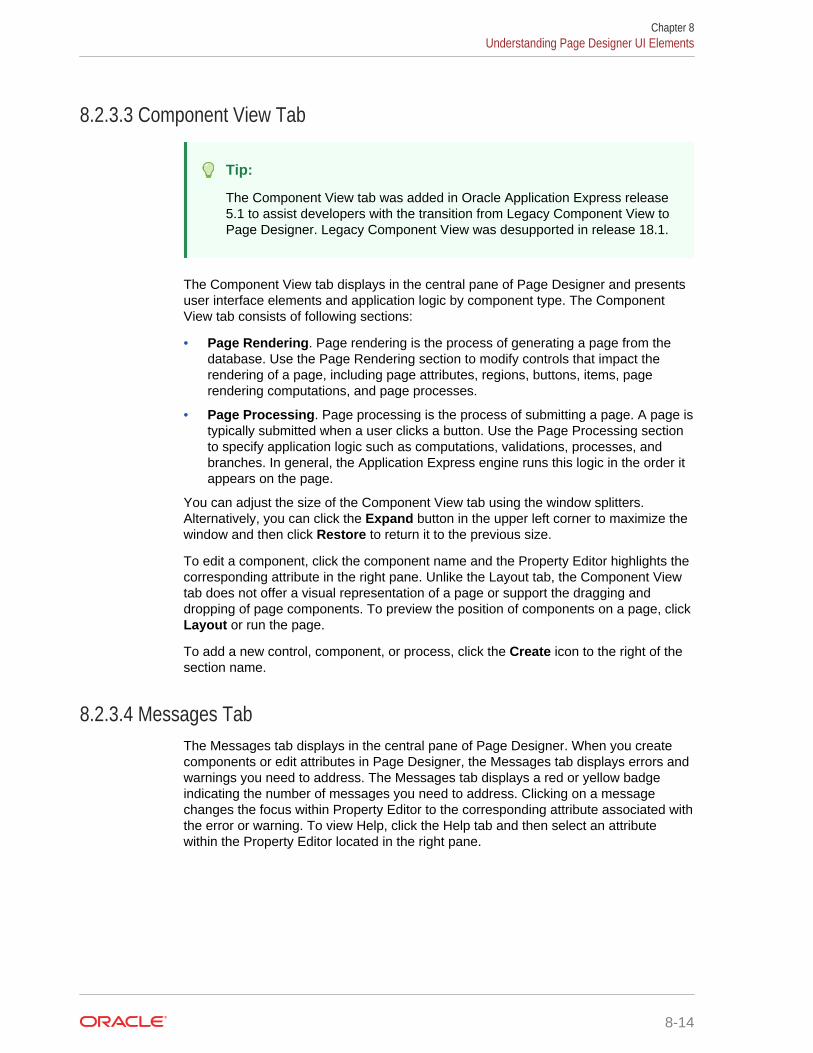
8.2.3.3 Component View Tab
Tip:
The Component View tab was added in Oracle Application Express release5.1 to assist developers with the transition from Legacy Component View toPage Designer. Legacy Component View was desupported in release 18.1.
The Component View tab displays in the central pane of Page Designer and presentsuser interface elements and application logic by component type. The ComponentView tab consists of following sections:
• Page Rendering. Page rendering is the process of generating a page from thedatabase. Use the Page Rendering section to modify controls that impact therendering of a page, including page attributes, regions, buttons, items, pagerendering computations, and page processes.
• Page Processing. Page processing is the process of submitting a page. A page istypically submitted when a user clicks a button. Use the Page Processing sectionto specify application logic such as computations, validations, processes, andbranches. In general, the Application Express engine runs this logic in the order itappears on the page.
You can adjust the size of the Component View tab using the window splitters.Alternatively, you can click the Expand button in the upper left corner to maximize thewindow and then click Restore to return it to the previous size.
To edit a component, click the component name and the Property Editor highlights thecorresponding attribute in the right pane. Unlike the Layout tab, the Component Viewtab does not offer a visual representation of a page or support the dragging anddropping of page components. To preview the position of components on a page, clickLayout or run the page.
To add a new control, component, or process, click the Create icon to the right of thesection name.
8.2.3.4 Messages TabThe Messages tab displays in the central pane of Page Designer. When you createcomponents or edit attributes in Page Designer, the Messages tab displays errors andwarnings you need to address. The Messages tab displays a red or yellow badgeindicating the number of messages you need to address. Clicking on a messagechanges the focus within Property Editor to the corresponding attribute associated withthe error or warning. To view Help, click the Help tab and then select an attributewithin the Property Editor located in the right pane.
Chapter 8Understanding Page Designer UI Elements
8-14
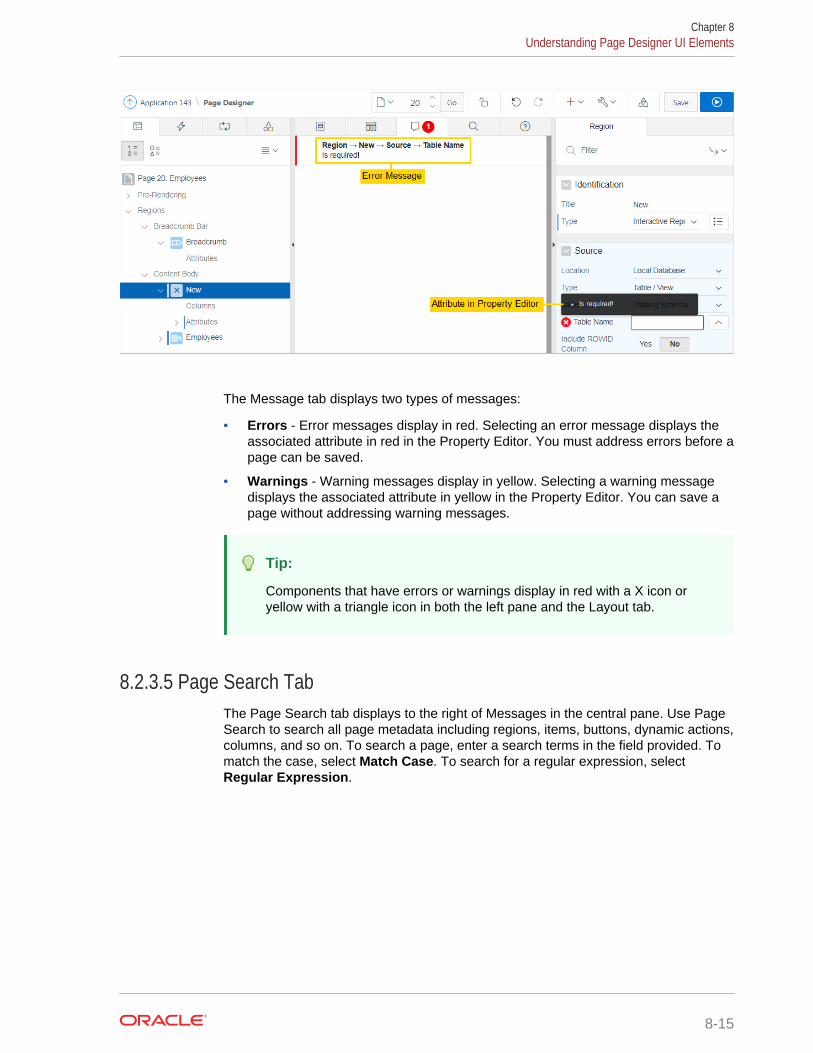
The Message tab displays two types of messages:
• Errors - Error messages display in red. Selecting an error message displays theassociated attribute in red in the Property Editor. You must address errors before apage can be saved.
• Warnings - Warning messages display in yellow. Selecting a warning messagedisplays the associated attribute in yellow in the Property Editor. You can save apage without addressing warning messages.
Tip:
Components that have errors or warnings display in red with a X icon oryellow with a triangle icon in both the left pane and the Layout tab.
8.2.3.5 Page Search TabThe Page Search tab displays to the right of Messages in the central pane. Use PageSearch to search all page metadata including regions, items, buttons, dynamic actions,columns, and so on. To search a page, enter a search terms in the field provided. Tomatch the case, select Match Case. To search for a regular expression, selectRegular Expression.
Chapter 8Understanding Page Designer UI Elements
8-15

8.2.3.6 Help TabPage Designer includes Help for every Property Editor attribute. To view Help, selectthe attribute and click the Help tab. Once you activate the Help pane, the content thatdisplays changes every time you select another attribute. In this example, the Source,Type attribute is selected and the Help tab describes what the attribute is for and theavailable options.
Chapter 8Understanding Page Designer UI Elements
8-16
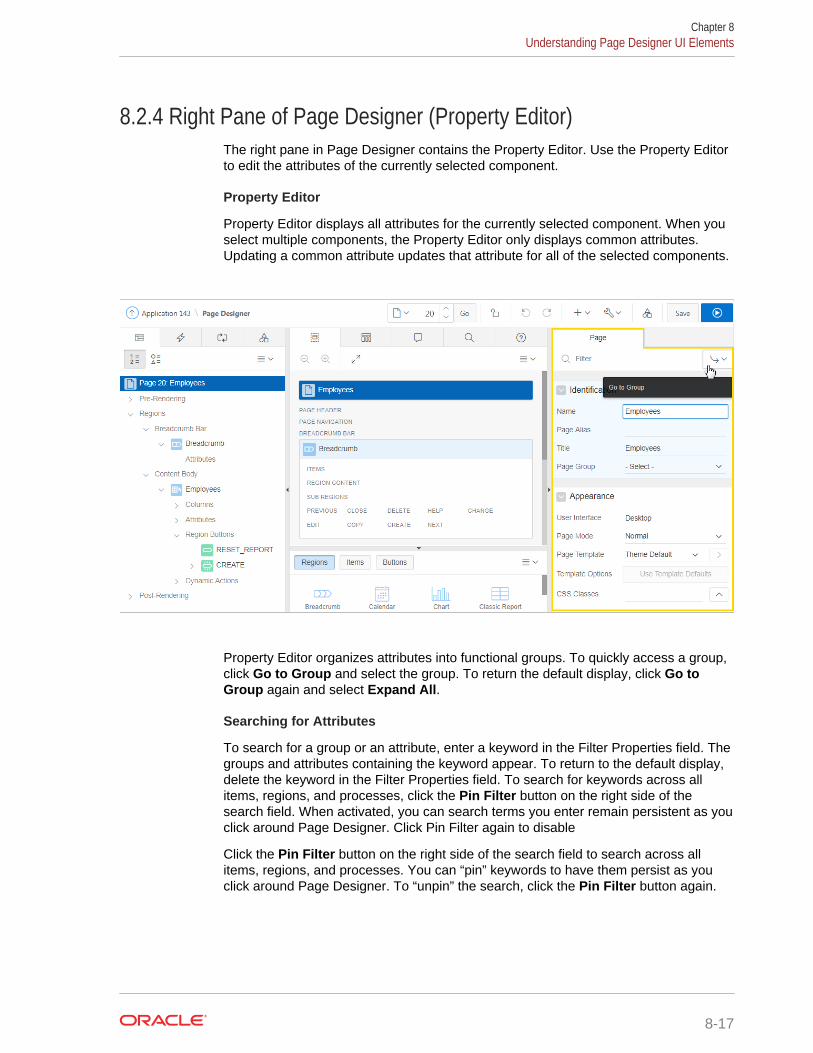
8.2.4 Right Pane of Page Designer (Property Editor)The right pane in Page Designer contains the Property Editor. Use the Property Editorto edit the attributes of the currently selected component.
Property Editor
Property Editor displays all attributes for the currently selected component. When youselect multiple components, the Property Editor only displays common attributes.Updating a common attribute updates that attribute for all of the selected components.
Property Editor organizes attributes into functional groups. To quickly access a group,click Go to Group and select the group. To return the default display, click Go toGroup again and select Expand All.
Searching for Attributes
To search for a group or an attribute, enter a keyword in the Filter Properties field. Thegroups and attributes containing the keyword appear. To return to the default display,delete the keyword in the Filter Properties field. To search for keywords across allitems, regions, and processes, click the Pin Filter button on the right side of thesearch field. When activated, you can search terms you enter remain persistent as youclick around Page Designer. Click Pin Filter again to disable
Click the Pin Filter button on the right side of the search field to search across allitems, regions, and processes. You can “pin” keywords to have them persist as youclick around Page Designer. To “unpin” the search, click the Pin Filter button again.
Chapter 8Understanding Page Designer UI Elements
8-17
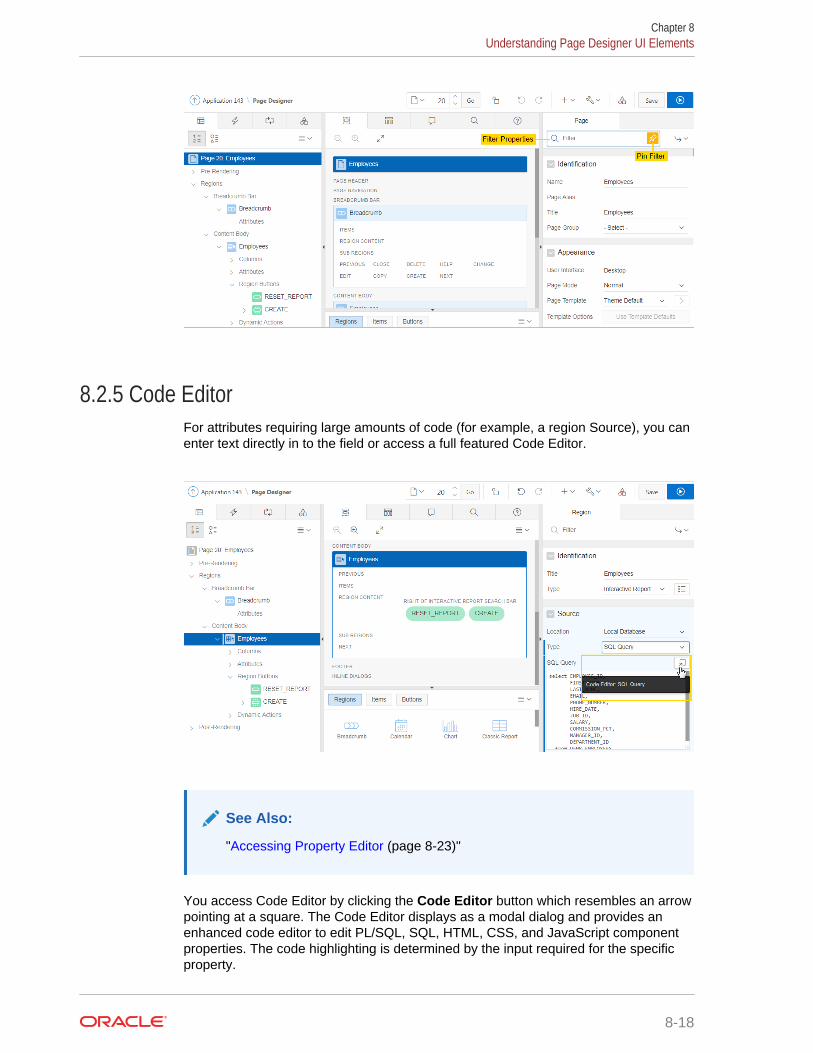
8.2.5 Code EditorFor attributes requiring large amounts of code (for example, a region Source), you canenter text directly in to the field or access a full featured Code Editor.
See Also:
"Accessing Property Editor (page 8-23)"
You access Code Editor by clicking the Code Editor button which resembles an arrowpointing at a square. The Code Editor displays as a modal dialog and provides anenhanced code editor to edit PL/SQL, SQL, HTML, CSS, and JavaScript componentproperties. The code highlighting is determined by the input required for the specificproperty.
Chapter 8Understanding Page Designer UI Elements
8-18
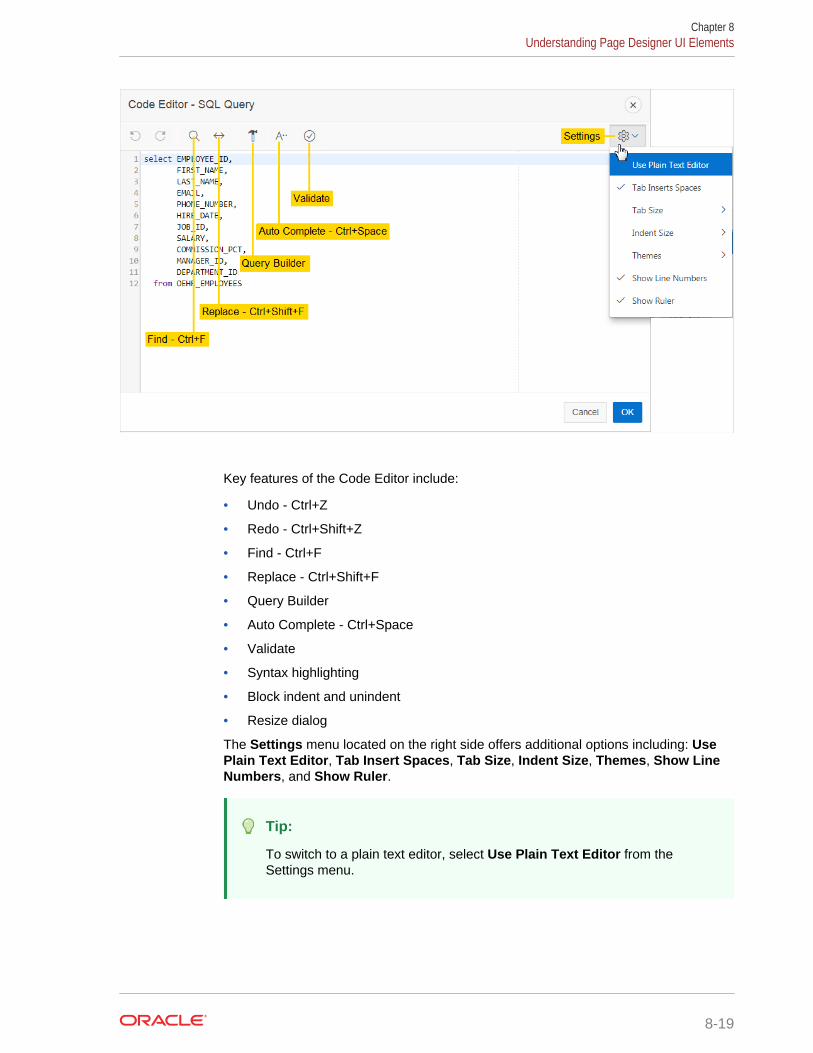
Key features of the Code Editor include:
• Undo - Ctrl+Z
• Redo - Ctrl+Shift+Z
• Find - Ctrl+F
• Replace - Ctrl+Shift+F
• Query Builder
• Auto Complete - Ctrl+Space
• Validate
• Syntax highlighting
• Block indent and unindent
• Resize dialog
The Settings menu located on the right side offers additional options including: UsePlain Text Editor, Tab Insert Spaces, Tab Size, Indent Size, Themes, Show LineNumbers, and Show Ruler.
Tip:
To switch to a plain text editor, select Use Plain Text Editor from theSettings menu.
Chapter 8Understanding Page Designer UI Elements
8-19
8.3 Using Page DesignerUse Page Designer to view and edit database application pages.
Tip:
To view a list of keyboard shortcuts, click Alt+Shift+F1. Alternately, click theHelp menu at the top of the page and select Shortcuts.
• Viewing a Page in Page Designer (page 8-20)
• Searching for Pages (page 8-21)
• Dragging and Dropping Tabs Between Panes (page 8-21)
• Switching Between Three Pane and Two Pane Mode (page 8-22)
• Accessing Property Editor (page 8-23)
• Adding a Region, Item, or Button by Dragging and Dropping (page 8-24)
• About Adding Components Using Gallery Context Menus (page 8-26)
• Adding a Region, Item, or Button from the Rendering Tab (page 8-26)
• Adding a Region, Item, or Button from the Component View Tab (page 8-27)
• Copying a Region, Item, or Button (page 8-27)
• Creating Pre-Rendering Branches, Computations, and Processes (page 8-28)
• Creating Page Submission Branches, Validations, Computations, and Processes(page 8-29)
See Also:
"Understanding Page Designer UI Elements (page 8-3)" and "Viewing Helpin Page Designer (page 1-30)"
8.3.1 Viewing a Page in Page DesignerTo view a page in Page Designer:
1. Navigate to the Workspace home page.
2. Click the App Builder icon.
3. Select an application.
4. Select a page.
The default view, Page Designer appears.
You preview a page by running it. Running an application page displays therendered version as end users would see it.
Chapter 8Using Page Designer
8-20
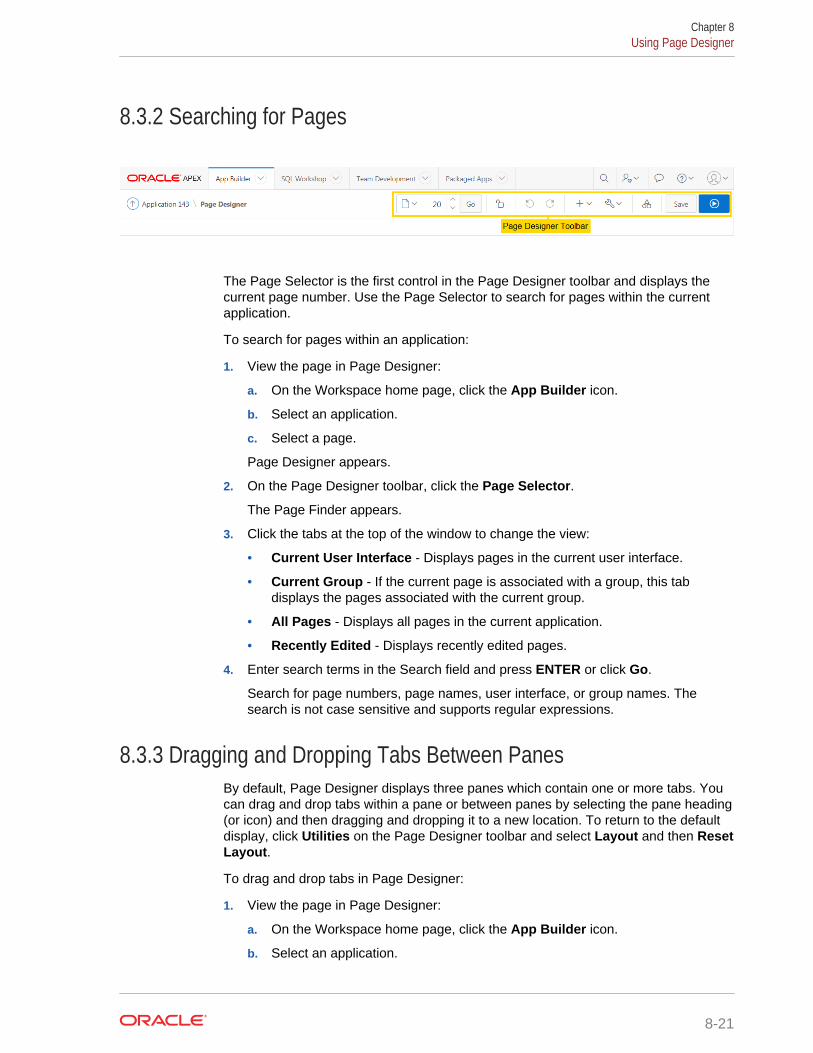
8.3.2 Searching for Pages
The Page Selector is the first control in the Page Designer toolbar and displays thecurrent page number. Use the Page Selector to search for pages within the currentapplication.
To search for pages within an application:
1. View the page in Page Designer:
a. On the Workspace home page, click the App Builder icon.
b. Select an application.
c. Select a page.
Page Designer appears.
2. On the Page Designer toolbar, click the Page Selector.
The Page Finder appears.
3. Click the tabs at the top of the window to change the view:
• Current User Interface - Displays pages in the current user interface.
• Current Group - If the current page is associated with a group, this tabdisplays the pages associated with the current group.
• All Pages - Displays all pages in the current application.
• Recently Edited - Displays recently edited pages.
4. Enter search terms in the Search field and press ENTER or click Go.
Search for page numbers, page names, user interface, or group names. Thesearch is not case sensitive and supports regular expressions.
8.3.3 Dragging and Dropping Tabs Between PanesBy default, Page Designer displays three panes which contain one or more tabs. Youcan drag and drop tabs within a pane or between panes by selecting the pane heading(or icon) and then dragging and dropping it to a new location. To return to the defaultdisplay, click Utilities on the Page Designer toolbar and select Layout and then ResetLayout.
To drag and drop tabs in Page Designer:
1. View the page in Page Designer:
a. On the Workspace home page, click the App Builder icon.
b. Select an application.
Chapter 8Using Page Designer
8-21
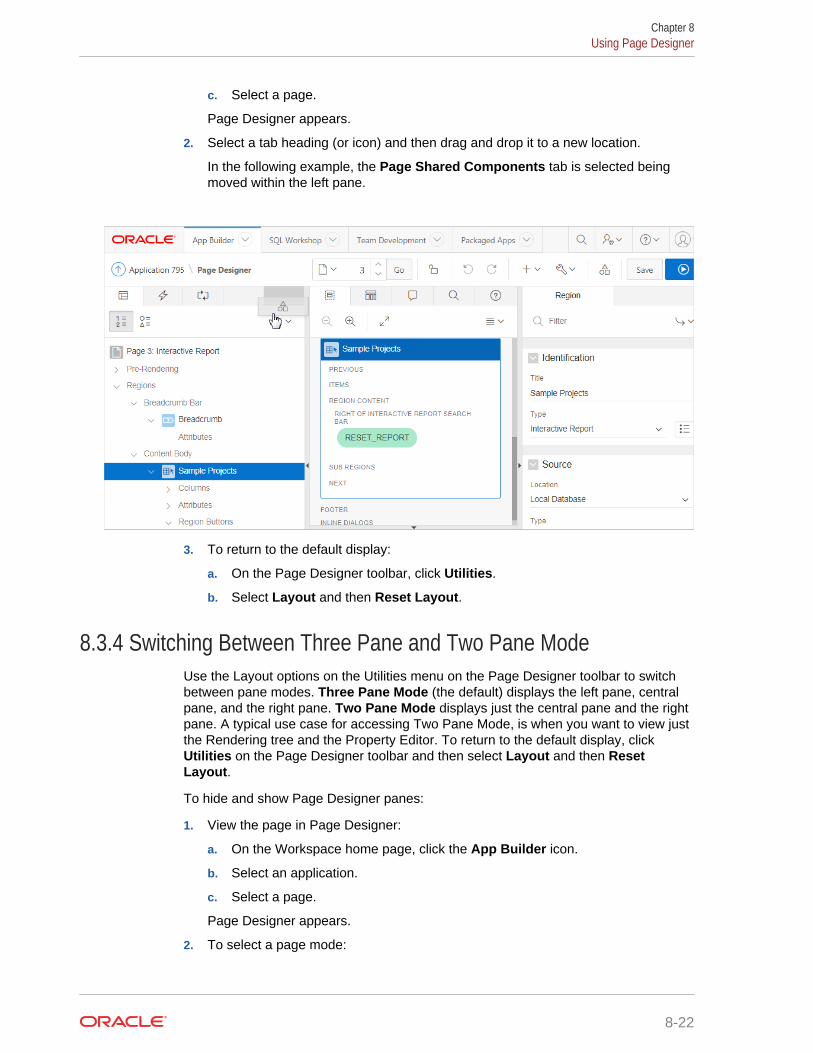
c. Select a page.
Page Designer appears.
2. Select a tab heading (or icon) and then drag and drop it to a new location.
In the following example, the Page Shared Components tab is selected beingmoved within the left pane.
3. To return to the default display:
a. On the Page Designer toolbar, click Utilities.
b. Select Layout and then Reset Layout.
8.3.4 Switching Between Three Pane and Two Pane ModeUse the Layout options on the Utilities menu on the Page Designer toolbar to switchbetween pane modes. Three Pane Mode (the default) displays the left pane, centralpane, and the right pane. Two Pane Mode displays just the central pane and the rightpane. A typical use case for accessing Two Pane Mode, is when you want to view justthe Rendering tree and the Property Editor. To return to the default display, clickUtilities on the Page Designer toolbar and then select Layout and then ResetLayout.
To hide and show Page Designer panes:
1. View the page in Page Designer:
a. On the Workspace home page, click the App Builder icon.
b. Select an application.
c. Select a page.
Page Designer appears.
2. To select a page mode:
Chapter 8Using Page Designer
8-22
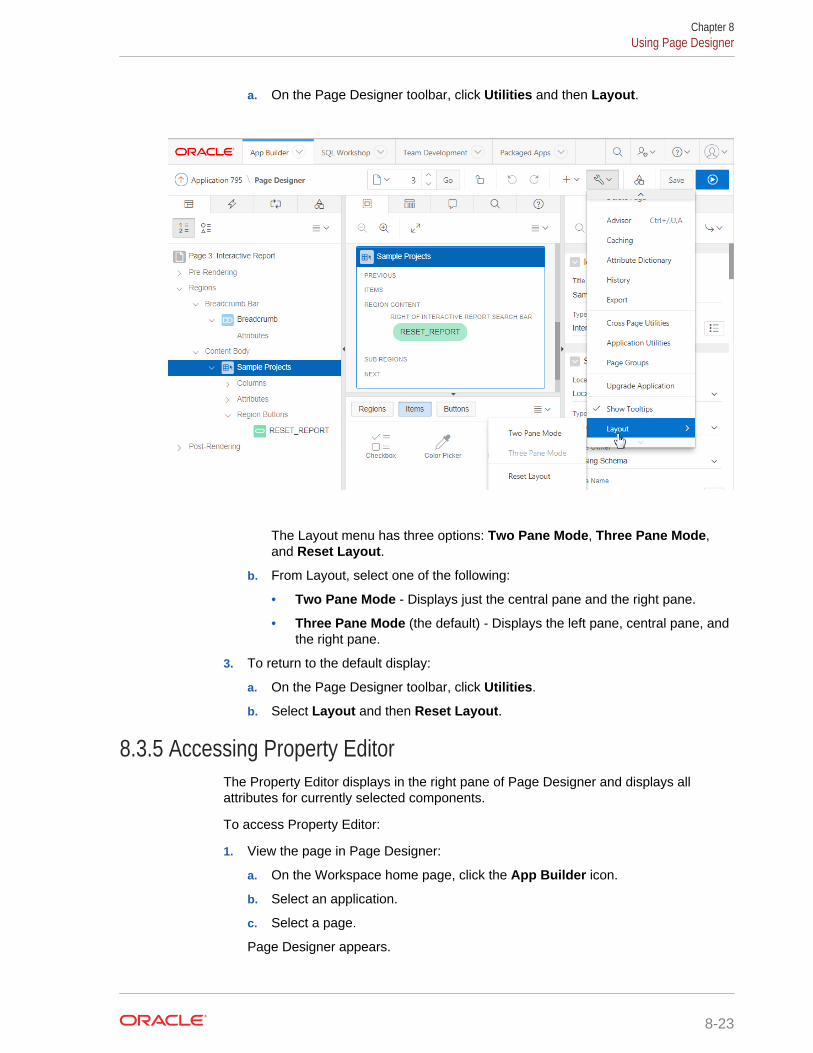
a. On the Page Designer toolbar, click Utilities and then Layout.
The Layout menu has three options: Two Pane Mode, Three Pane Mode,and Reset Layout.
b. From Layout, select one of the following:
• Two Pane Mode - Displays just the central pane and the right pane.
• Three Pane Mode (the default) - Displays the left pane, central pane, andthe right pane.
3. To return to the default display:
a. On the Page Designer toolbar, click Utilities.
b. Select Layout and then Reset Layout.
8.3.5 Accessing Property EditorThe Property Editor displays in the right pane of Page Designer and displays allattributes for currently selected components.
To access Property Editor:
1. View the page in Page Designer:
a. On the Workspace home page, click the App Builder icon.
b. Select an application.
c. Select a page.
Page Designer appears.
Chapter 8Using Page Designer
8-23
2. In either the left pane or the Layout tab, select components or controls to edit.Passing the cursor over a control or component, displays a tooltip that describes it.
Tip:
Once you select a component, press ALT+6 to navigate directly to theProperty Editor. To learn more, see Oracle Application ExpressAccessibility Guide
The Property Editor displays attributes for the selected component or control. Asyou select different components in either the left pane or the Layout tab, theProperty Editor automatically updates to reflect the selected component. Whenyou select multiple components, the Property Editor only displays commonattributes. Updating a common attribute updates that attribute for all of theselected components.
Tip:
To view help for an attribute, select the attribute in the Property Editorand click the Help tab in the central pane.
8.3.6 Adding a Region, Item, or Button by Dragging and DroppingEach application page can have buttons and fields (called items) which are groupedinto containers called regions. You can add regions, items, and buttons to a page bydragging and dropping them from the Gallery.
To add a region, item, or button by dragging and dropping from the Gallery:
1. View the page in Page Designer:
a. On the Workspace home page, click the App Builder icon.
b. Select an application.
c. Select a page.
Page Designer appears.
2. If needed, select the Layout tab in the central pane.
3. In the Gallery at the bottom of the central pane, locate the component or controlyou want to create.
The Gallery lists all controls or components you can add to a page. Passing thecursor over a control or component displays a tooltip that describes it.
Chapter 8Using Page Designer
8-24

Tip:
In addition to dragging and dropping components from the Gallery, youcan also right-click a component in the Gallery to view a context menu.Select Add To and then the location where you want to add thecomponent.
4. Click and hold the mouse on the component to be created and drag it the desiredlocation in the Layout tab.
When the mouse is over the appropriate location, the Layout tab displays as adarkened yellow tile. Release the mouse to drop the component. You can onlydrop components into appropriate drop positions, as determined by the componenttype.
Based on the type of component you add, Page Designer indicates what actionsare required next. The Messages tab displays a red or yellow badge indicating thenumber of messages you need to address. The following example shows a newInteractive Grid region with an error message indicating that you need to select atable name.
5. Edit the appropriate attributes in the Property Editor.
Tip:
To view help for an attribute, select the attribute in the Property Editorand click the Help tab in the central pane.
6. Click Save or Save and Run Page.
Chapter 8Using Page Designer
8-25

8.3.7 About Adding Components Using Gallery Context MenusIn addition to dragging and dropping components from the Gallery, you can also right-click a component in the Gallery to view a context menu. Each context menu featuresan Add To option which displays the actual locations where you can add thecomponent. In this example, the developer is adding a new report to before theContent Body region.
8.3.8 Adding a Region, Item, or Button from the Rendering TabTo create new components within the Rendering tab:
1. View the page in Page Designer:
a. On the Workspace home page, click the App Builder icon.
b. Select an application.
c. Select a page.
2. In the left pane, select the Rendering tab.
3. Locate and select the appropriate region, item, or region button.
4. Right-click an existing component or container to display the context menu for thatcomponent type.
5. Select a command (for example, Create Region, Create Sub Region, Create PageItem, Create Button and so on). The options available depend upon the node youselect.
Chapter 8Using Page Designer
8-26
6. Edit the appropriate attributes in the Property Editor.
Tip:
To view help for an attribute, select the attribute in the Property Editorand click the Help tab in the central pane.
7. Click Save or Save and Run Page.
8.3.9 Adding a Region, Item, or Button from the Component View TabTo assist developers with the transition to Page Designer, Page Designer includes aComponent View tab. Similar in appearance to Legacy Component View, the PageDesigner Component View tab presents user interface elements and application logicby component type.
To create new components from the Component View tab:
1. View the page in Page Designer. See "Viewing a Page in Page Designer(page 8-20)."
Page Designer appears.
2. In the central pane, select the Component View tab.
3. Under the appropriate component type, click the Create icon.
Page Designer identifies the new component as “New” in the left pane and in thecentral pane.
4. Edit the appropriate attributes in the Property Editor.
Tip:
To view help for an attribute, select the attribute in the Property Editorand click the Help tab in the central pane.
5. Click Save or Save and Run Page.
8.3.10 Copying a Region, Item, or ButtonEach application page can have buttons and fields (called items) which are groupedinto containers called regions. Developers can copy regions, items, and buttons byusing context menus or pressing CTRL and dragging and dropping with the mouse.
Copying a Region, Item, or Button Using Context Menus
To copy a region, item, or button using context menus:
1. In the central pane, select the Layout tab.
2. Locate and select the appropriate region, item, or region button.
3. Right-click to display the context menu.
4. From the context menu, select Copy To and then select the location.
Chapter 8Using Page Designer
8-27
5. Edit the component attributes.
Copying a Region, Item, or Button by Dragging and Dropping
To copy a region, item, or button by dragging and dropping:
1. In the left pane, select the Rendering tab.
2. Locate and select the appropriate region, item, or region button.
3. Press CTRL and then use the mouse to drag and drop the component to the newlocation.
A copy of the component appears in the new location.
4. Edit the component attributes.
Copying a Region, Item, or Button to Another Page
To copy a region, item, or button to another page:
1. In the left pane, select the Rendering tab.
2. Locate and select the appropriate region, item, or region button.
3. Right-click the component, and select Copy to other Page.
The appropriate wizard appears.
4. Follow the on-screen instructions.
8.3.11 Creating Pre-Rendering Branches, Computations, andProcesses
To create branches, computations, and processes that execute before rendering thepage:
1. View the page in Page Designer:
a. On the Workspace home page, click the App Builder icon.
b. Select an application.
c. Select a page.
Page Designer appears.
2. In the left pane, select the Rendering tab.
3. Expand the Pre-Rending node at the top of the Rendering tab.
4. Determine the processing point. Right-click Before Header, After Header, orBefore Regions to display the context menu for that processing point.
5. Select the appropriate option:Create Branch, Create Computation, or CreateProcess.
6. Edit the appropriate attributes in the Property Editor.
Chapter 8Using Page Designer
8-28
Tip:
To view help for an attribute, select the attribute in the Property Editorand click the Help tab in the central pane.
7. Click Save or Save and Run Page.
Tip:
If you have changed the default display to group components by componenttype, then you must to navigate to the Processing tab to maintain pre-rendering components.
8.3.12 Creating Page Submission Branches, Validations,Computations, and Processes
To create branches, validations, computations, and processes that execute when thepage is submitted:
1. View the page in Page Designer:
a. On the Workspace home page, click the App Builder icon.
b. Select an application.
c. Select a page.
Page Designer appears.
2. In the left pane, select the Processing tab.
3. Navigate to After Submit, Validating, Processing, or After Processing asappropriate within the processing tree.
4. Right-click the identifier or an existing component to display the context menu forthat processing point.
5. Select Create Branch, Create Validation, Create Computation, or CreateProcess.
6. Edit the appropriate attributes in the Property Editor.
Tip:
To view help for an attribute, select the attribute in the Property Editorand click the Help tab in the central pane.
7. Click Save or Save and Run Page.
Chapter 8Using Page Designer
8-29
Tip:
You can use context menus to duplicate, delete, and copy a component toother pages.
8.4 Managing Page AttributesEdit page attributes to control basic information and functionality for a given page,including the page name or title, header and footer text, navigation menus, inclusion ofpage-level JavaScript or CSS files, error handling, and the selected authorizationscheme.
• Editing Page Attributes (page 8-30)
• Incorporating JavaScript Using Page Designer (page 8-31)
• Configuring Rejoin Sessions (page 8-32)
• Configuring Dialog Attributes (page 8-33)
• Configuring Page Attributes to Warn Users of Unsaved Changes (page 8-34)
See Also:
"Right Pane of Page Designer (Property Editor) (page 8-17)"
8.4.1 Editing Page AttributesTo edit page attributes in the Page Designer:
1. View the page in Page Designer:
a. On the Workspace home page, click the App Builder icon.
b. Select an application.
c. Select a page.
Page Designer appears.
2. In either the Rendering tab or the Layout tab, select the page name.
3. Edit the appropriate attributes in the Property Editor.
Edited attributes display a blue marker to the left of the attribute name until thepage is saved.
Note:
To learn more about an attribute, see field-level Help.
Chapter 8Managing Page Attributes
8-30
4. To save your changes, click Save or Save and Run Page.
8.4.2 Incorporating JavaScript Using Page DesignerYou can include JavaScript on a page by editing the attributes in the JavaScript group.This is a good approach for functions that are very specific to a page and a convenientway to test a function before you include it in a .js file.
To add JavaScript code to the JavaScript attribute:
1. View the page in Page Designer:
a. On the Workspace home page, click the App Builder icon.
b. Select an application.
c. Select a page.
Page Designer appears.
2. In the Rendering tab, select the page name.
The Property Editor displays the Page attributes.
3. In the Property Editor, find the JavaScript group.
4. Under JavaScript, edit following attributes:
a. File URLs - Enter JavaScript file URLs for code to be loaded on this page.Each URL has to be written into a new line. If you provide a minified version ofyour file you can use the substitution string #MIN# to include .min or#MIN_DIRECTORY# to include minified/ in your file URL for a regular page viewand an empty string if the page is viewed in debug mode. You also haveaccess to the substitution string #APP_VERSION# if you want to include theapplication's version in the file URL.
b. Function and Global Variable Declaration - Enter JavaScript code such asfunctions or global variable declarations referenced on this page. If the sameJavaScript is required on multiple pages, consider putting the code into anexternal JavaScript file to avoid duplication and to leverage browser caching ofstatic files.
Code you enter here replaces the #PAGE_JAVASCRIPT# substitution string in thepage template.
Tip:
Do not to include opening or closing script tags. Just include theJavaScript code.
To reference a shortcut, use:
"SHORTCUTNAME"
c. Execute When Page Loads - Enter JavaScript code to execute when thepage loads. The code is executed after the JavaScript code generated byOracle Application Express.
Chapter 8Managing Page Attributes
8-31
Tip:
To learn more about an attribute and view examples, select the attributeand click the Help tab in the central pane.
For example, adding the following to the Function and Global Variable Declarationattribute would test a function accessible from anywhere on the current page.
function test(){ alert('This is a test.'); }
5. Click Save.
8.4.3 Configuring Rejoin SessionsThe Rejoin Sessions attribute controls support for joining existing sessions (similar todeep linking). Technically, this attribute determines whether URLs to this applicationcontain session IDs.
Warning:
Enabling rejoin sessions may expose your application to possible securitybreaches, as it can enable attackers to take over existing end user sessions.To learn more, see "About Rejoin Sessions (page 20-7)."
To use Rejoin Sessions, administrators must enable Rejoin Sessions at the instance-level. A more restrictive value of Rejoin Sessions at the instance-level overridesapplication and page settings.
To configure Rejoin Sessions in Page Designer:
1. View the page in Page Designer:
a. On the Workspace home page, click the App Builder icon.
b. Select an application.
c. Select a page.
Page Designer appears.
2. In the Rendering tab, select the page name.
The Property Editor displays the Page attributes.
3. In the Property Editor, find the Security group.
4. Under Security, Rejoin Sessions, select an option:
• Application Default - Inherits the setting defined at application-level.
• Disabled - If the URL does not contain a session ID Application Expresscreates a new session.
• Enabled for Public Sessions - If the URL goes to a public page and does notcontain a session ID, Application Express attempts to utilize the existing
Chapter 8Managing Page Attributes
8-32
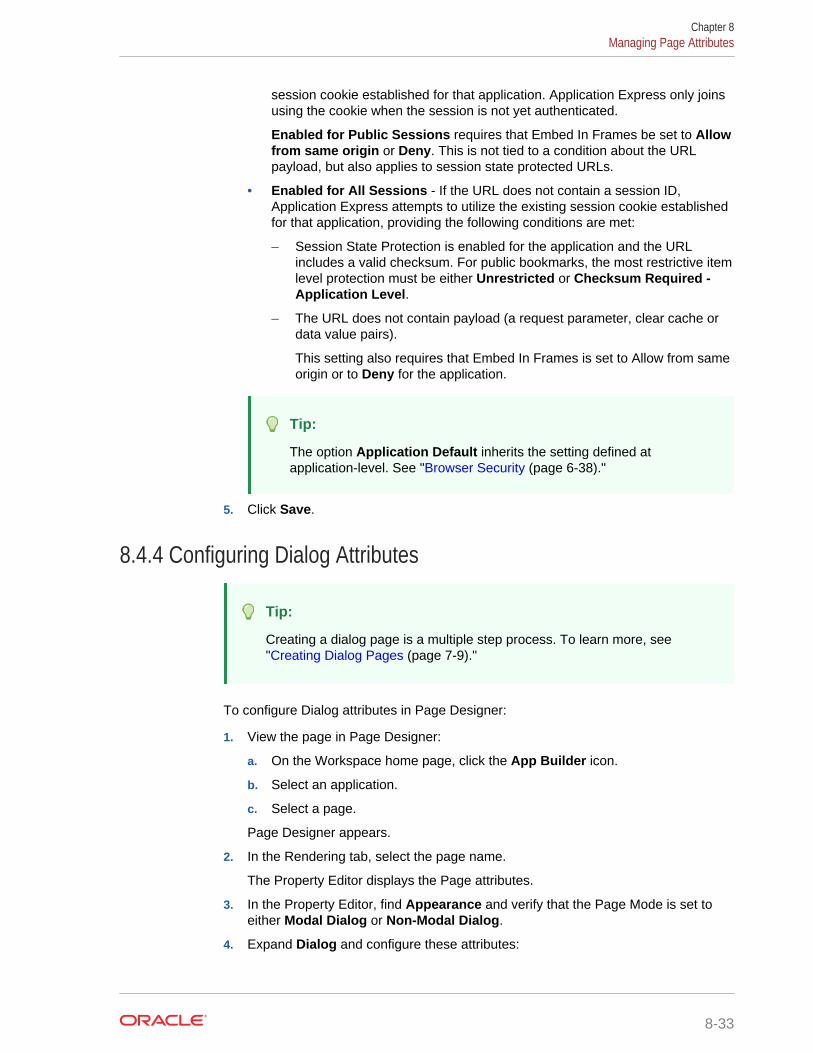
session cookie established for that application. Application Express only joinsusing the cookie when the session is not yet authenticated.
Enabled for Public Sessions requires that Embed In Frames be set to Allowfrom same origin or Deny. This is not tied to a condition about the URLpayload, but also applies to session state protected URLs.
• Enabled for All Sessions - If the URL does not contain a session ID,Application Express attempts to utilize the existing session cookie establishedfor that application, providing the following conditions are met:
– Session State Protection is enabled for the application and the URLincludes a valid checksum. For public bookmarks, the most restrictive itemlevel protection must be either Unrestricted or Checksum Required -Application Level.
– The URL does not contain payload (a request parameter, clear cache ordata value pairs).
This setting also requires that Embed In Frames is set to Allow from sameorigin or to Deny for the application.
Tip:
The option Application Default inherits the setting defined atapplication-level. See "Browser Security (page 6-38)."
5. Click Save.
8.4.4 Configuring Dialog Attributes
Tip:
Creating a dialog page is a multiple step process. To learn more, see"Creating Dialog Pages (page 7-9)."
To configure Dialog attributes in Page Designer:
1. View the page in Page Designer:
a. On the Workspace home page, click the App Builder icon.
b. Select an application.
c. Select a page.
Page Designer appears.
2. In the Rendering tab, select the page name.
The Property Editor displays the Page attributes.
3. In the Property Editor, find Appearance and verify that the Page Mode is set toeither Modal Dialog or Non-Modal Dialog.
4. Expand Dialog and configure these attributes:
Chapter 8Managing Page Attributes
8-33
Tip:
To view help for an attribute, select the attribute in the Property Editorand click the Help tab in the central pane.
a. Width
b. Height
c. Maximum Width
d. Attributes
e. CSS Classes
f. Chained
5. To save your changes, click Save or Save and Run Page.
8.4.5 Configuring Page Attributes to Warn Users of Unsaved ChangesDevelopers can enable the Warn on Unsaved Changes page attribute to warn usersof unsaved changes on a page when they attempt to navigate away from it.
To enable the Warn on Unsaved Changes page attribute:
1. View the page in Page Designer:
a. On the Workspace home page, click the App Builder icon.
b. Select an application.
c. Select a page.
Page Designer appears.
2. In the Rendering tab, select the page name.
The Property Editor displays the Page attributes.
3. In the Property Editor, find the Navigation group.
4. For Warn on Unsaved Changes, select Yes to warn users.
5. Click Save.
Tip:
The Warn on Unsaved Changes attribute is implemented using theapex.page.warnOnUnsavedChanges API.
Chapter 8Managing Page Attributes
8-34

8.5 Running a Page from Page DesignerThe Application Express engine dynamically renders and processes pages based ondata stored in database tables. To view a rendered version of an application, you runor submit it to the Application Express engine.
Tip:
You cannot run Modal and Non-Modal dialog pages directly using the Saveand Run Page button. To view a Modal and Non-Modal dialog page, run thenormal page that is responsible for opening the dialog page and access itfrom there.
To run a page in Page Designer:
1. View the page in Page Designer. See "Viewing a Page in Page Designer(page 8-20)."
You preview a page by running it. Running an application page displays therendered version as end users would see it.
2. Click the Save and Run Page button in the upper right corner. The Save and RunPage button resembles a blue right-facing arrow.
A rendered version of the application page appears.
8.6 Runtime Developer ToolbarUse the Developer toolbar to quickly edit the current application or currently runningpage, or view session state.
When you run a application from App Builder and view a page, the Runtime Developertoolbar displays at the bottom of any editable running page.
Chapter 8Running a Page from Page Designer
8-35
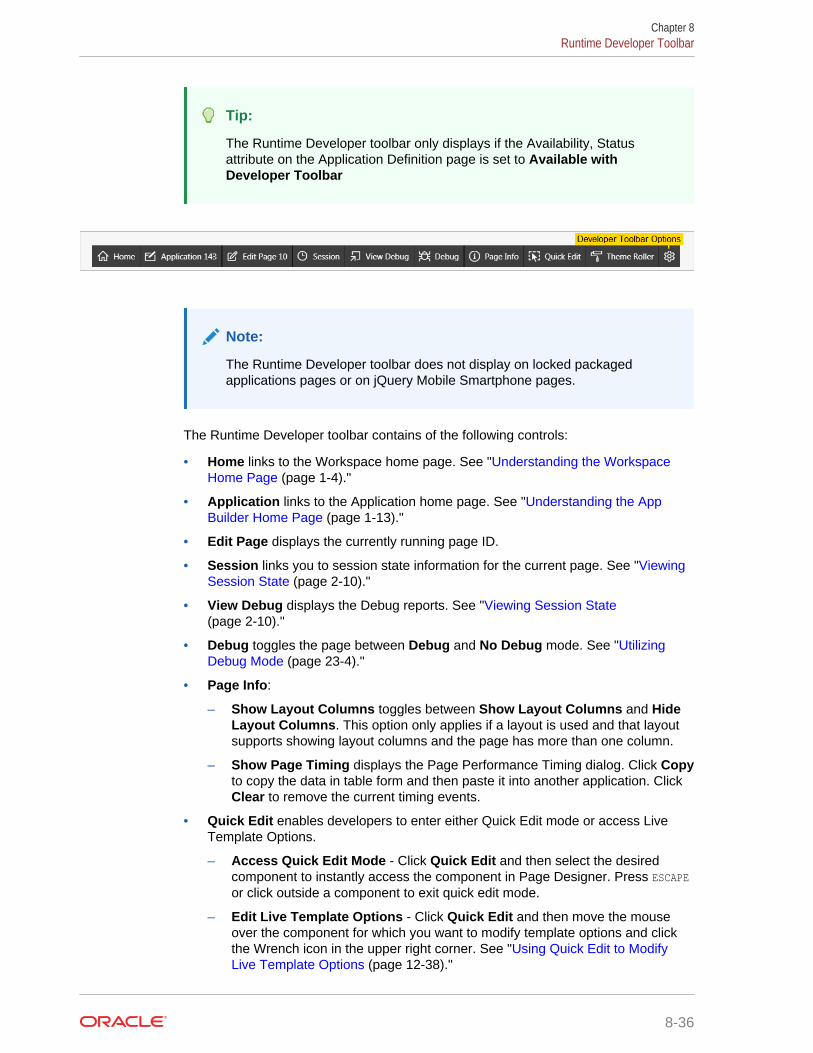
Tip:
The Runtime Developer toolbar only displays if the Availability, Statusattribute on the Application Definition page is set to Available withDeveloper Toolbar
Note:
The Runtime Developer toolbar does not display on locked packagedapplications pages or on jQuery Mobile Smartphone pages.
The Runtime Developer toolbar contains of the following controls:
• Home links to the Workspace home page. See "Understanding the WorkspaceHome Page (page 1-4)."
• Application links to the Application home page. See "Understanding the AppBuilder Home Page (page 1-13)."
• Edit Page displays the currently running page ID.
• Session links you to session state information for the current page. See "ViewingSession State (page 2-10)."
• View Debug displays the Debug reports. See "Viewing Session State(page 2-10)."
• Debug toggles the page between Debug and No Debug mode. See "UtilizingDebug Mode (page 23-4)."
• Page Info:
– Show Layout Columns toggles between Show Layout Columns and HideLayout Columns. This option only applies if a layout is used and that layoutsupports showing layout columns and the page has more than one column.
– Show Page Timing displays the Page Performance Timing dialog. Click Copyto copy the data in table form and then paste it into another application. ClickClear to remove the current timing events.
• Quick Edit enables developers to enter either Quick Edit mode or access LiveTemplate Options.
– Access Quick Edit Mode - Click Quick Edit and then select the desiredcomponent to instantly access the component in Page Designer. Press ESCAPEor click outside a component to exit quick edit mode.
– Edit Live Template Options - Click Quick Edit and then move the mouseover the component for which you want to modify template options and clickthe Wrench icon in the upper right corner. See "Using Quick Edit to ModifyLive Template Options (page 12-38)."
Chapter 8Runtime Developer Toolbar
8-36
Theme Roller enables developers to easily customize the appearance of anapplication by selecting colors from color picker and setting values. Only displaysfor themes supporting Theme Roller. See "Using Theme Styles and Theme Roller(page 12-3)."
• Developer Toolbar Options displays on the far right and resembles a mechanicalgear. Clicking Developer Toolbar Options to customize how the RuntimeDeveloper Toolbar displays. Available controls include:
– Auto Hide
– Show Icons Only
– Display Position (Top, Left, Bottom, Right)
About JavaScript Error Detection
If a page has one or more JavaScript errors, a red error button displays on the left sideof the Runtime Developer toolbar. If you have enabled Auto Hide, the RuntimeDeveloper toolbar displays indicating the error.
Click the red error button to view an alert dialog which explains you should view theBrowser console. The red error button persists until error has been resolved, theBrowser console is cleared, and you refresh the page.
8.7 Copying a Database Application PageYou can copy a page from the current application or from another application. Duringthe copy process, you can also copy shared components or change mappings toshared components in the target application.
To copy a page:
1. View the page you want to copy in Page Designer:
a. On the Workspace home page, click the App Builder icon.
b. Select an application.
c. Select a page.
Page Designer appears.
2. On the Page Designer toolbar, click the Create menu and then select Page asCopy.
Chapter 8Copying a Database Application Page
8-37
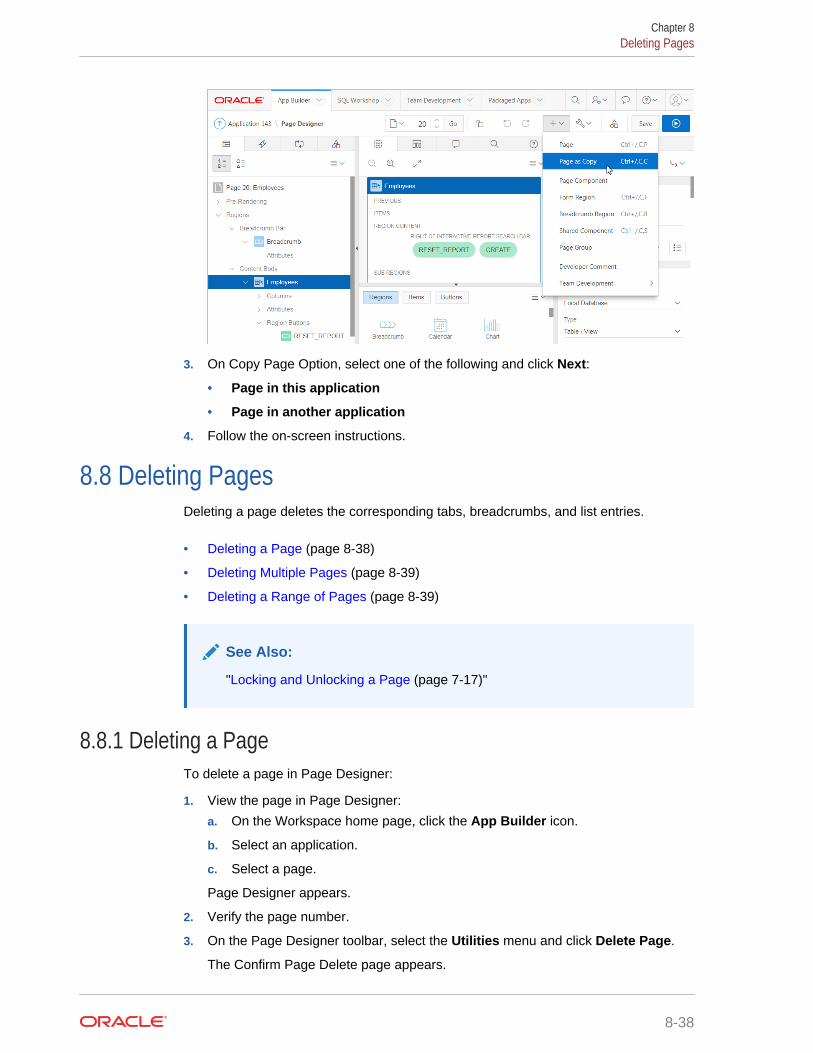
3. On Copy Page Option, select one of the following and click Next:
• Page in this application
• Page in another application
4. Follow the on-screen instructions.
8.8 Deleting PagesDeleting a page deletes the corresponding tabs, breadcrumbs, and list entries.
• Deleting a Page (page 8-38)
• Deleting Multiple Pages (page 8-39)
• Deleting a Range of Pages (page 8-39)
See Also:
"Locking and Unlocking a Page (page 7-17)"
8.8.1 Deleting a PageTo delete a page in Page Designer:
1. View the page in Page Designer:
a. On the Workspace home page, click the App Builder icon.
b. Select an application.
c. Select a page.
Page Designer appears.
2. Verify the page number.
3. On the Page Designer toolbar, select the Utilities menu and click Delete Page.
The Confirm Page Delete page appears.
Chapter 8Deleting Pages
8-38
4. Click Permanently Delete Page.
8.8.2 Deleting Multiple PagesTo delete multiple pages:
1. On the Workspace home page, click the App Builder icon.
2. Select an application.
3. Click Utilities.
4. From Page Specific Utilities, click Cross Page Utilities.
5. Click Delete Multiple Pages.
6. Select the pages to be deleted and click Delete Pages.
8.8.3 Deleting a Range of PagesTo delete a range of pages:
1. On the Workspace home page, click the App Builder icon.
2. Select an application.
3. Click Utilities.
4. From Page Specific Utilities, click Cross Page Utilities.
5. Click Delete Multiple Pages.
6. Click the Delete Pages by Range tab.
7. Enter the pages to be deleted and click Delete Pages.
Chapter 8Deleting Pages
8-39
9Developing Reports
In Oracle Application Express, a report is the formatted result of a SQL query. You cangenerate the SQL query by selecting a table or view in a wizard, or by defining theSQL query manually.
• Understanding Report Types (page 9-2)When creating a database application, developers can create four basic reporttypes: interactive grid, interactive report, report on form on table, or a classicreport.
• Creating a Report Using the Create Application Wizard (page 9-6)Run the Create Application Wizard to create a new application containing one ormore pages. Supported reports include interactive report, classic report, andinteractive grid.
• Creating a Report Using the Create Page Wizard (page 9-10)Run the Create Page Wizard from an existing application to create a variety ofdifferent reports. Supported reports include interactive report, interactive grid,classic report, report with form on table, list view, column toggle report, reflowreport, or report on a web service.
• Creating a Report by Dragging and Dropping from the Gallery (page 9-16)Create a report by dragging and dropping a report type from the Gallery.
• Managing Interactive Grids (page 9-18)An interactive grid presents users a set of data in a searchable and customizablereport. Developers control how an interactive grid works by editing the followingattributes in Page Designer: region attributes, report Attributes, and Columnattributes.
• Managing Interactive Reports (page 9-45)An interactive report is the formatted result of a SQL query that is only supportedon Desktop pages. End users can customize the report layout and data displayedby selecting options on the Actions menu. Developers control how a interactivereport works by editing the following attributes in Page Designer: region attributes,report Attributes, and Column attributes.
• Managing Classic Reports (page 9-85)A classic report is the formatted result of a SQL query. Developers choose a tableon which to build a report, or provide a custom SQL SELECT statement or aPL/SQL function returning a SQL SELECT statement. Developers control how aclassic report works by editing the following attributes in Page Designer: regionattributes, report Attributes, and Column attributes.
• Printing Report Regions (page 9-98)Configure a report region to print by exporting it to several different formats.
• Understanding BLOB Support in Forms and Reports (page 9-103)Oracle Application Express includes declarative BLOB support to enable developersto declaratively upload files in forms, and download or display files in reports.
9-1
See Also:
"Developing Forms (page 10-1)" and "Managing Database ApplicationComponents (page 11-1)"
9.1 Understanding Report TypesWhen creating a database application, developers can create four basic report types:interactive grid, interactive report, report on form on table, or a classic report.
The main difference between these different report types is the extent and way inwhich end users can customize the appearance of the data through searching,filtering, sorting, column selection, highlighting, and other data manipulations.
Tip:
When creating reports for mobile devices, Oracle recommends creatingcomponents that are optimized to work well on mobile devices. To learnmore, see "Creating Applications for Mobile Devices (page 6-19)."
• Interactive Grid (page 9-2)
• Interactive Report (page 9-3)
• Classic Report (page 9-4)
• Report and Form (page 9-5)
9.1.1 Interactive GridAn interactive grid presents users a set of data in a searchable, customizable report.Functionally, an interactive grid includes most customization capabilities available ininteractive reports plus the ability to rearrange the report interactively using the mouseand keyboard.
Users can lock, hide, filter, freeze, highlight, sort individual columns, and create controlbreaks on specific columns using the Actions and Column Heading menus.Advanced users can also define breaks and aggregations against columns. Users canalso directly customize the appearance of an interactive grid. Users can use themouse and keyboard to resize the width of a column and drag and drop columns intodifferent places in the grid. Once customized, the report can be saved as either aprivate or public report. Both the Create Application Wizard and Create Page Wizardsupport the creation of interactive grids.
The following is an example of an interactive grid.
Chapter 9Understanding Report Types
9-2
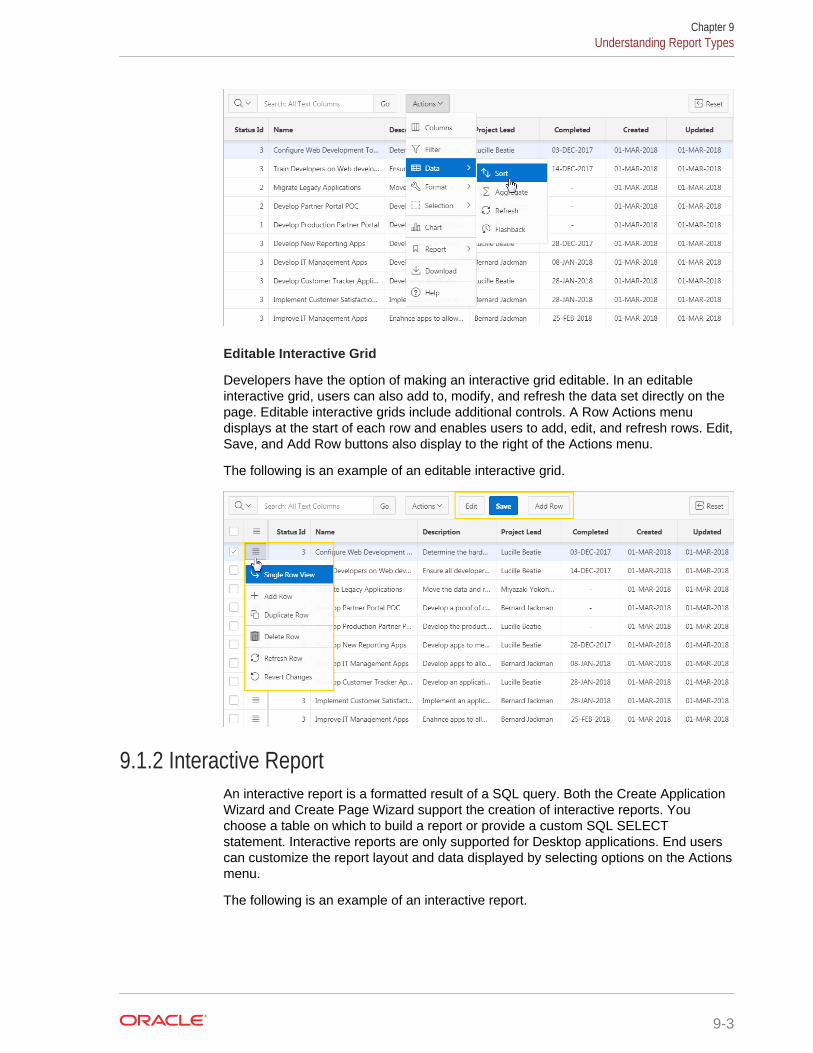
Editable Interactive Grid
Developers have the option of making an interactive grid editable. In an editableinteractive grid, users can also add to, modify, and refresh the data set directly on thepage. Editable interactive grids include additional controls. A Row Actions menudisplays at the start of each row and enables users to add, edit, and refresh rows. Edit,Save, and Add Row buttons also display to the right of the Actions menu.
The following is an example of an editable interactive grid.
9.1.2 Interactive ReportAn interactive report is a formatted result of a SQL query. Both the Create ApplicationWizard and Create Page Wizard support the creation of interactive reports. Youchoose a table on which to build a report or provide a custom SQL SELECTstatement. Interactive reports are only supported for Desktop applications. End userscan customize the report layout and data displayed by selecting options on the Actionsmenu.
The following is an example of an interactive report.
Chapter 9Understanding Report Types
9-3
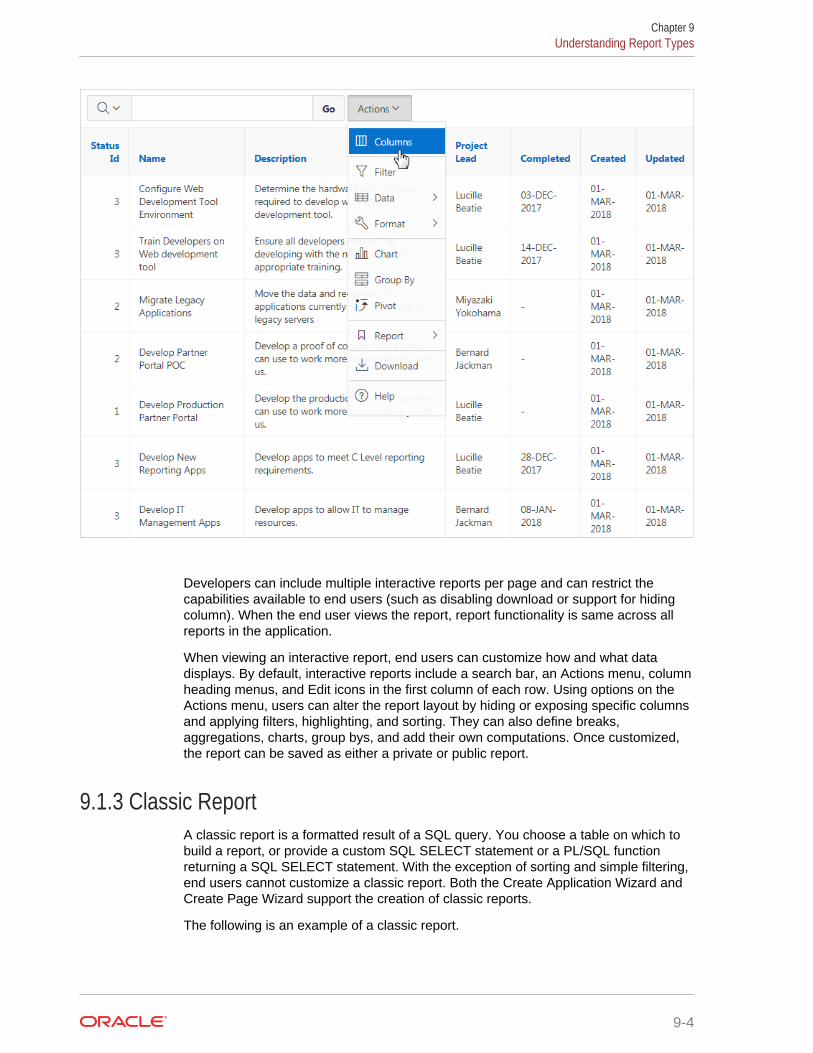
Developers can include multiple interactive reports per page and can restrict thecapabilities available to end users (such as disabling download or support for hidingcolumn). When the end user views the report, report functionality is same across allreports in the application.
When viewing an interactive report, end users can customize how and what datadisplays. By default, interactive reports include a search bar, an Actions menu, columnheading menus, and Edit icons in the first column of each row. Using options on theActions menu, users can alter the report layout by hiding or exposing specific columnsand applying filters, highlighting, and sorting. They can also define breaks,aggregations, charts, group bys, and add their own computations. Once customized,the report can be saved as either a private or public report.
9.1.3 Classic ReportA classic report is a formatted result of a SQL query. You choose a table on which tobuild a report, or provide a custom SQL SELECT statement or a PL/SQL functionreturning a SQL SELECT statement. With the exception of sorting and simple filtering,end users cannot customize a classic report. Both the Create Application Wizard andCreate Page Wizard support the creation of classic reports.
The following is an example of a classic report.
Chapter 9Understanding Report Types
9-4
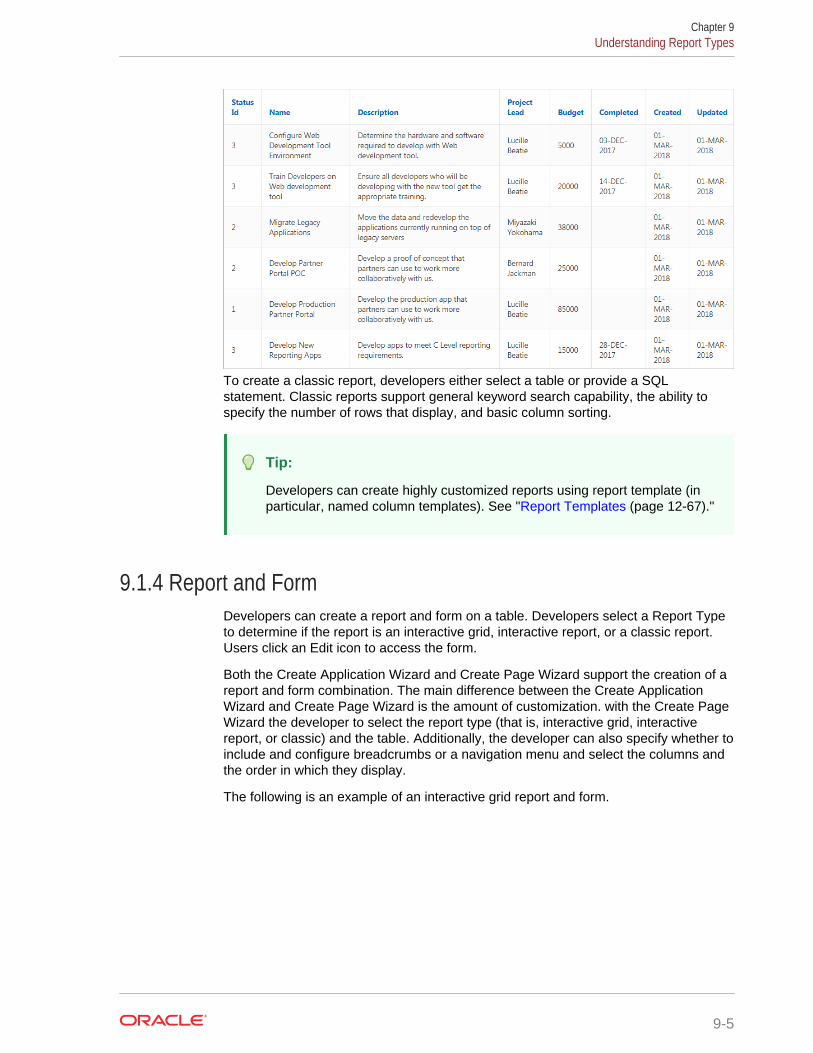
To create a classic report, developers either select a table or provide a SQLstatement. Classic reports support general keyword search capability, the ability tospecify the number of rows that display, and basic column sorting.
Tip:
Developers can create highly customized reports using report template (inparticular, named column templates). See "Report Templates (page 12-67)."
9.1.4 Report and FormDevelopers can create a report and form on a table. Developers select a Report Typeto determine if the report is an interactive grid, interactive report, or a classic report.Users click an Edit icon to access the form.
Both the Create Application Wizard and Create Page Wizard support the creation of areport and form combination. The main difference between the Create ApplicationWizard and Create Page Wizard is the amount of customization. with the Create PageWizard the developer to select the report type (that is, interactive grid, interactivereport, or classic) and the table. Additionally, the developer can also specify whether toinclude and configure breadcrumbs or a navigation menu and select the columns andthe order in which they display.
The following is an example of an interactive grid report and form.
Chapter 9Understanding Report Types
9-5
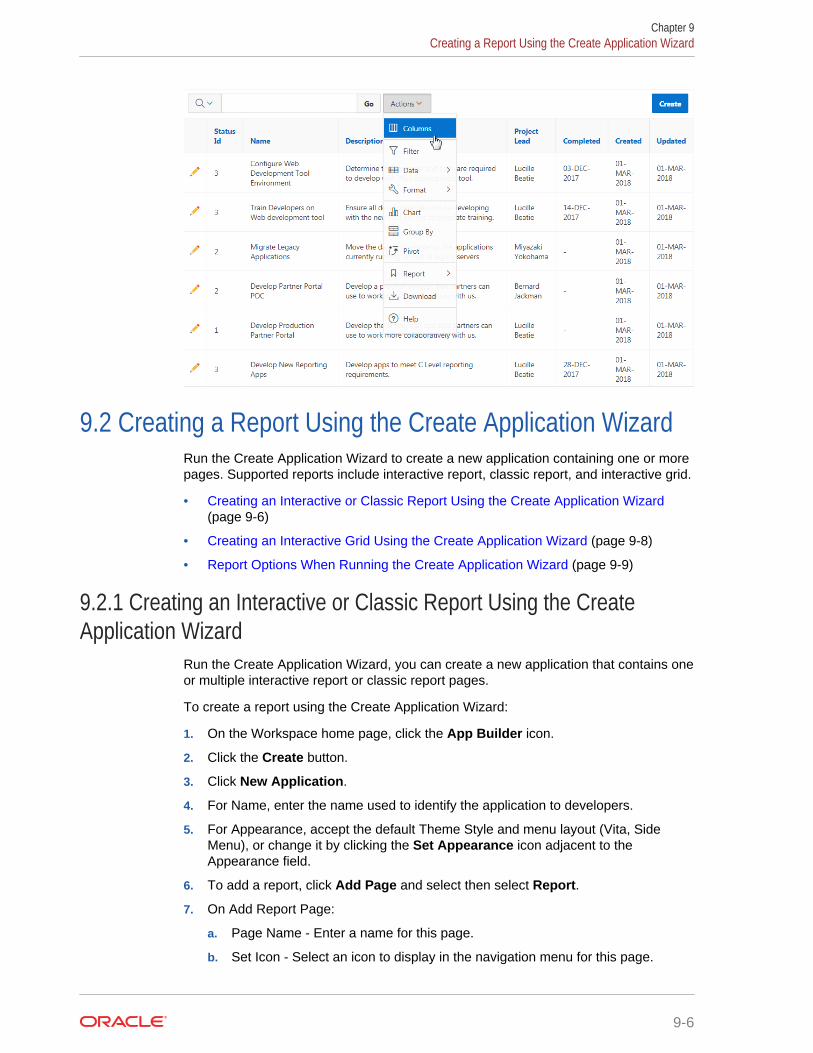
9.2 Creating a Report Using the Create Application WizardRun the Create Application Wizard to create a new application containing one or morepages. Supported reports include interactive report, classic report, and interactive grid.
• Creating an Interactive or Classic Report Using the Create Application Wizard(page 9-6)
• Creating an Interactive Grid Using the Create Application Wizard (page 9-8)
• Report Options When Running the Create Application Wizard (page 9-9)
9.2.1 Creating an Interactive or Classic Report Using the CreateApplication Wizard
Run the Create Application Wizard, you can create a new application that contains oneor multiple interactive report or classic report pages.
To create a report using the Create Application Wizard:
1. On the Workspace home page, click the App Builder icon.
2. Click the Create button.
3. Click New Application.
4. For Name, enter the name used to identify the application to developers.
5. For Appearance, accept the default Theme Style and menu layout (Vita, SideMenu), or change it by clicking the Set Appearance icon adjacent to theAppearance field.
6. To add a report, click Add Page and select then select Report.
7. On Add Report Page:
a. Page Name - Enter a name for this page.
b. Set Icon - Select an icon to display in the navigation menu for this page.
Chapter 9Creating a Report Using the Create Application Wizard
9-6
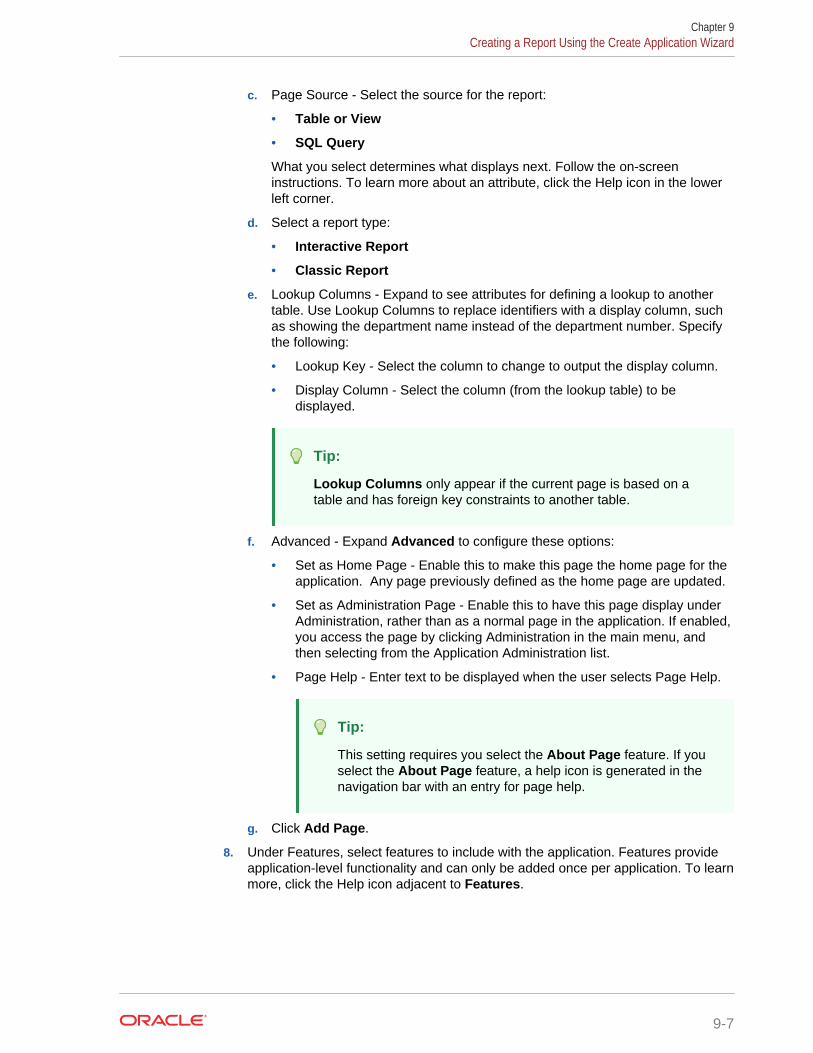
c. Page Source - Select the source for the report:
• Table or View
• SQL Query
What you select determines what displays next. Follow the on-screeninstructions. To learn more about an attribute, click the Help icon in the lowerleft corner.
d. Select a report type:
• Interactive Report
• Classic Report
e. Lookup Columns - Expand to see attributes for defining a lookup to anothertable. Use Lookup Columns to replace identifiers with a display column, suchas showing the department name instead of the department number. Specifythe following:
• Lookup Key - Select the column to change to output the display column.
• Display Column - Select the column (from the lookup table) to bedisplayed.
Tip:
Lookup Columns only appear if the current page is based on atable and has foreign key constraints to another table.
f. Advanced - Expand Advanced to configure these options:
• Set as Home Page - Enable this to make this page the home page for theapplication. Any page previously defined as the home page are updated.
• Set as Administration Page - Enable this to have this page display underAdministration, rather than as a normal page in the application. If enabled,you access the page by clicking Administration in the main menu, andthen selecting from the Application Administration list.
• Page Help - Enter text to be displayed when the user selects Page Help.
Tip:
This setting requires you select the About Page feature. If youselect the About Page feature, a help icon is generated in thenavigation bar with an entry for page help.
g. Click Add Page.
8. Under Features, select features to include with the application. Features provideapplication-level functionality and can only be added once per application. To learnmore, click the Help icon adjacent to Features.
Chapter 9Creating a Report Using the Create Application Wizard
9-7
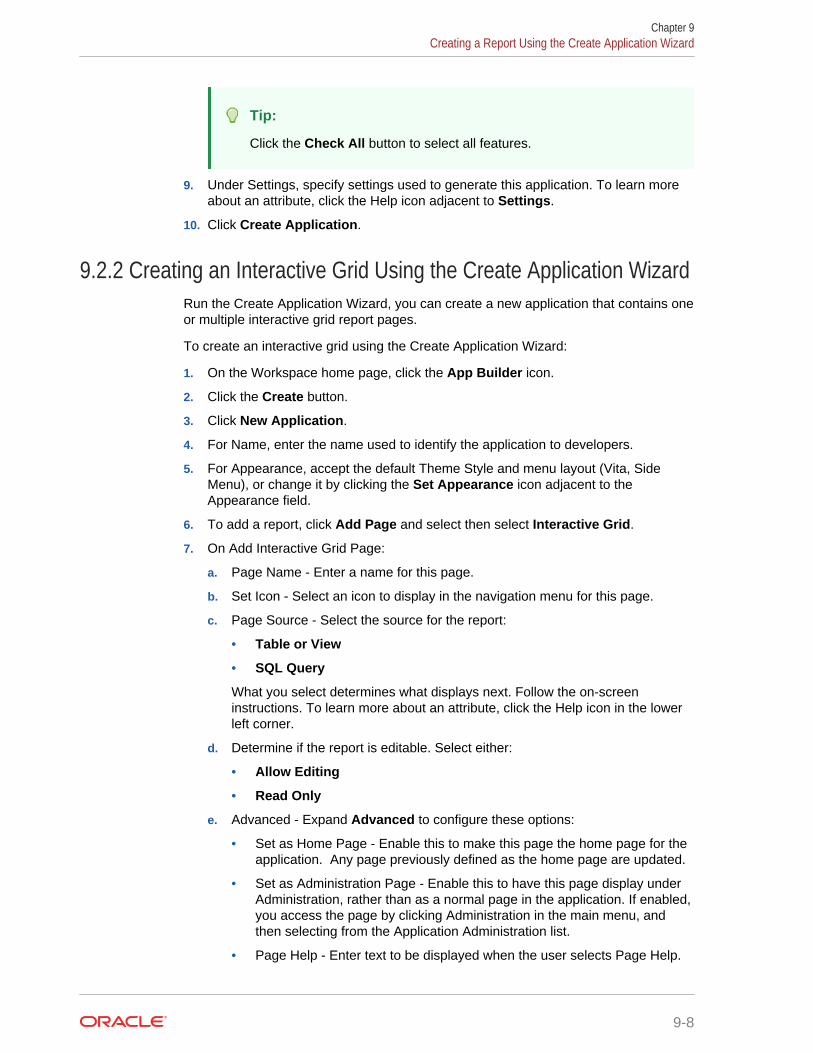
Tip:
Click the Check All button to select all features.
9. Under Settings, specify settings used to generate this application. To learn moreabout an attribute, click the Help icon adjacent to Settings.
10. Click Create Application.
9.2.2 Creating an Interactive Grid Using the Create Application WizardRun the Create Application Wizard, you can create a new application that contains oneor multiple interactive grid report pages.
To create an interactive grid using the Create Application Wizard:
1. On the Workspace home page, click the App Builder icon.
2. Click the Create button.
3. Click New Application.
4. For Name, enter the name used to identify the application to developers.
5. For Appearance, accept the default Theme Style and menu layout (Vita, SideMenu), or change it by clicking the Set Appearance icon adjacent to theAppearance field.
6. To add a report, click Add Page and select then select Interactive Grid.
7. On Add Interactive Grid Page:
a. Page Name - Enter a name for this page.
b. Set Icon - Select an icon to display in the navigation menu for this page.
c. Page Source - Select the source for the report:
• Table or View
• SQL Query
What you select determines what displays next. Follow the on-screeninstructions. To learn more about an attribute, click the Help icon in the lowerleft corner.
d. Determine if the report is editable. Select either:
• Allow Editing
• Read Only
e. Advanced - Expand Advanced to configure these options:
• Set as Home Page - Enable this to make this page the home page for theapplication. Any page previously defined as the home page are updated.
• Set as Administration Page - Enable this to have this page display underAdministration, rather than as a normal page in the application. If enabled,you access the page by clicking Administration in the main menu, andthen selecting from the Application Administration list.
• Page Help - Enter text to be displayed when the user selects Page Help.
Chapter 9Creating a Report Using the Create Application Wizard
9-8
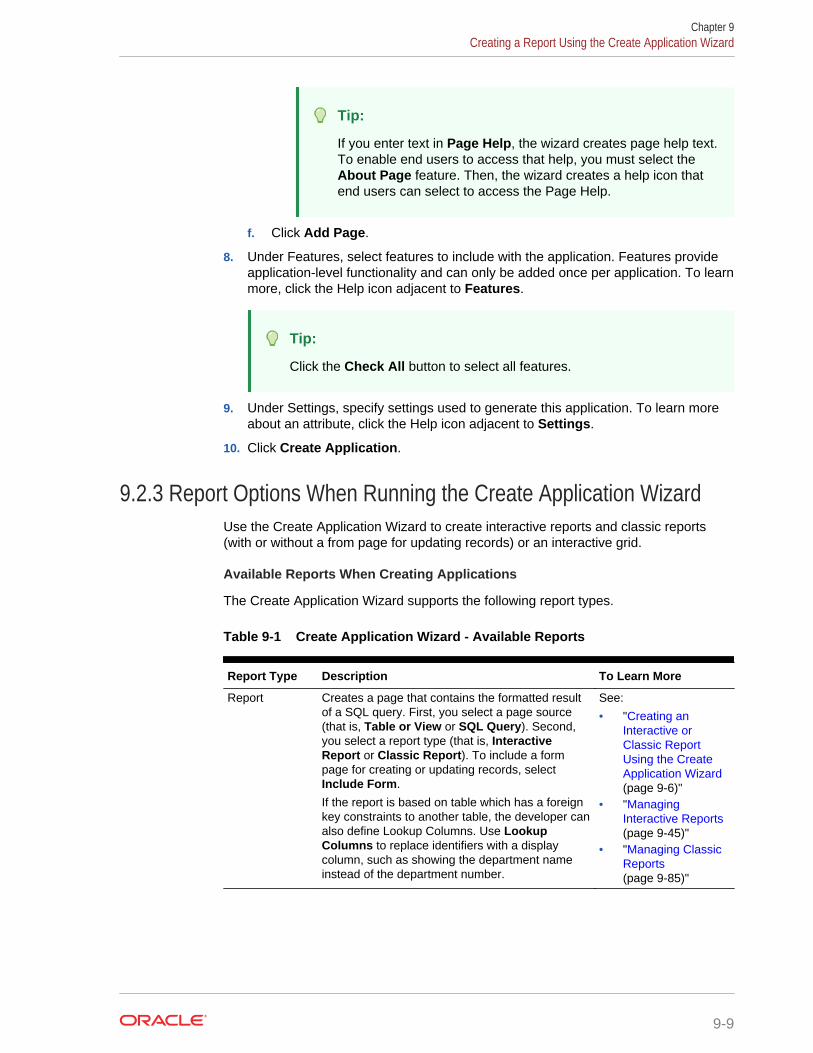
Tip:
If you enter text in Page Help, the wizard creates page help text.To enable end users to access that help, you must select theAbout Page feature. Then, the wizard creates a help icon thatend users can select to access the Page Help.
f. Click Add Page.
8. Under Features, select features to include with the application. Features provideapplication-level functionality and can only be added once per application. To learnmore, click the Help icon adjacent to Features.
Tip:
Click the Check All button to select all features.
9. Under Settings, specify settings used to generate this application. To learn moreabout an attribute, click the Help icon adjacent to Settings.
10. Click Create Application.
9.2.3 Report Options When Running the Create Application WizardUse the Create Application Wizard to create interactive reports and classic reports(with or without a from page for updating records) or an interactive grid.
Available Reports When Creating Applications
The Create Application Wizard supports the following report types.
Table 9-1 Create Application Wizard - Available Reports
Report Type Description To Learn More
Report Creates a page that contains the formatted resultof a SQL query. First, you select a page source(that is, Table or View or SQL Query). Second,you select a report type (that is, InteractiveReport or Classic Report). To include a formpage for creating or updating records, selectInclude Form.
If the report is based on table which has a foreignkey constraints to another table, the developer canalso define Lookup Columns. Use LookupColumns to replace identifiers with a displaycolumn, such as showing the department nameinstead of the department number.
See:
• "Creating anInteractive orClassic ReportUsing the CreateApplication Wizard(page 9-6)"
• "ManagingInteractive Reports(page 9-45)"
• "Managing ClassicReports(page 9-85)"
Chapter 9Creating a Report Using the Create Application Wizard
9-9
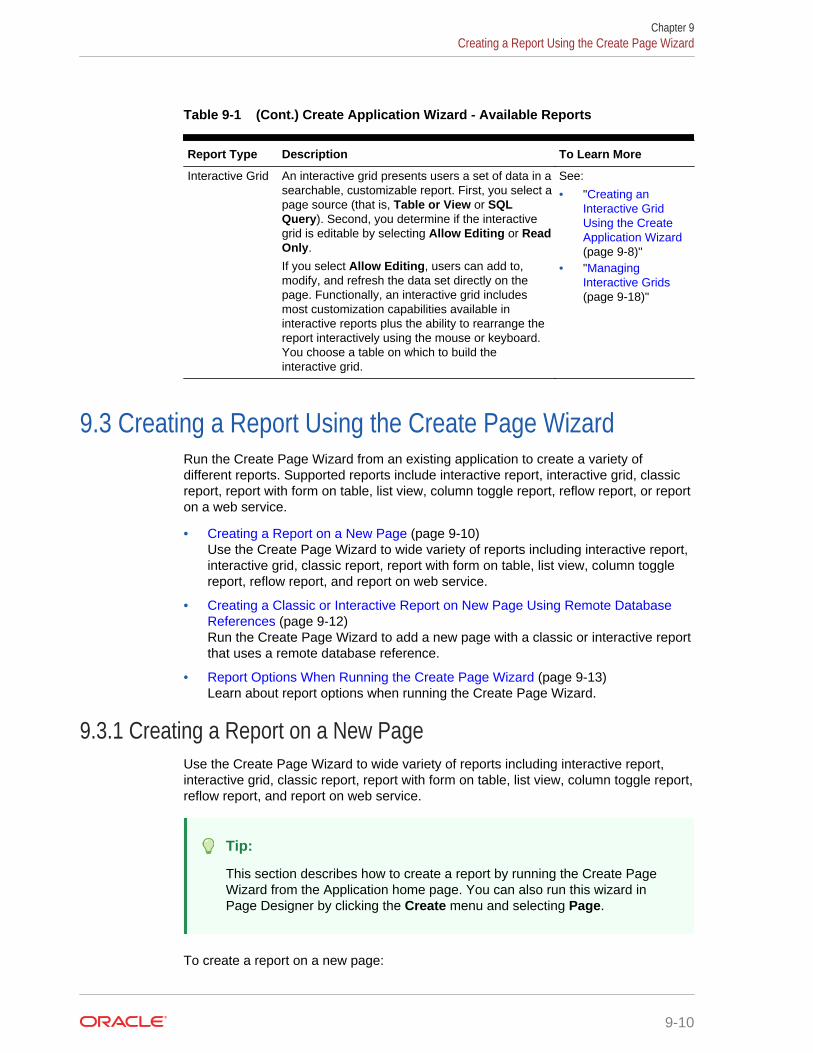
Table 9-1 (Cont.) Create Application Wizard - Available Reports
Report Type Description To Learn More
Interactive Grid An interactive grid presents users a set of data in asearchable, customizable report. First, you select apage source (that is, Table or View or SQLQuery). Second, you determine if the interactivegrid is editable by selecting Allow Editing or ReadOnly.
If you select Allow Editing, users can add to,modify, and refresh the data set directly on thepage. Functionally, an interactive grid includesmost customization capabilities available ininteractive reports plus the ability to rearrange thereport interactively using the mouse or keyboard.You choose a table on which to build theinteractive grid.
See:
• "Creating anInteractive GridUsing the CreateApplication Wizard(page 9-8)"
• "ManagingInteractive Grids(page 9-18)"
9.3 Creating a Report Using the Create Page WizardRun the Create Page Wizard from an existing application to create a variety ofdifferent reports. Supported reports include interactive report, interactive grid, classicreport, report with form on table, list view, column toggle report, reflow report, or reporton a web service.
• Creating a Report on a New Page (page 9-10)Use the Create Page Wizard to wide variety of reports including interactive report,interactive grid, classic report, report with form on table, list view, column togglereport, reflow report, and report on web service.
• Creating a Classic or Interactive Report on New Page Using Remote DatabaseReferences (page 9-12)Run the Create Page Wizard to add a new page with a classic or interactive reportthat uses a remote database reference.
• Report Options When Running the Create Page Wizard (page 9-13)Learn about report options when running the Create Page Wizard.
9.3.1 Creating a Report on a New PageUse the Create Page Wizard to wide variety of reports including interactive report,interactive grid, classic report, report with form on table, list view, column toggle report,reflow report, and report on web service.
Tip:
This section describes how to create a report by running the Create PageWizard from the Application home page. You can also run this wizard inPage Designer by clicking the Create menu and selecting Page.
To create a report on a new page:
Chapter 9Creating a Report Using the Create Page Wizard
9-10
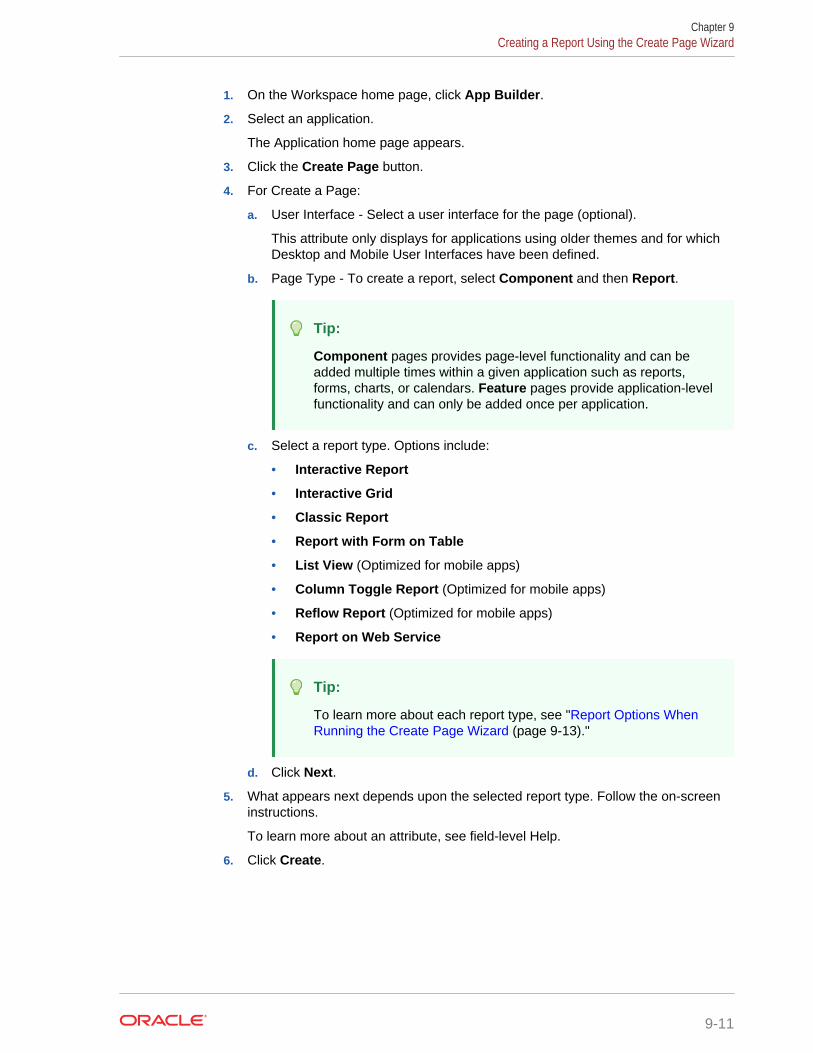
1. On the Workspace home page, click App Builder.
2. Select an application.
The Application home page appears.
3. Click the Create Page button.
4. For Create a Page:
a. User Interface - Select a user interface for the page (optional).
This attribute only displays for applications using older themes and for whichDesktop and Mobile User Interfaces have been defined.
b. Page Type - To create a report, select Component and then Report.
Tip:
Component pages provides page-level functionality and can beadded multiple times within a given application such as reports,forms, charts, or calendars. Feature pages provide application-levelfunctionality and can only be added once per application.
c. Select a report type. Options include:
• Interactive Report
• Interactive Grid
• Classic Report
• Report with Form on Table
• List View (Optimized for mobile apps)
• Column Toggle Report (Optimized for mobile apps)
• Reflow Report (Optimized for mobile apps)
• Report on Web Service
Tip:
To learn more about each report type, see "Report Options WhenRunning the Create Page Wizard (page 9-13)."
d. Click Next.
5. What appears next depends upon the selected report type. Follow the on-screeninstructions.
To learn more about an attribute, see field-level Help.
6. Click Create.
Chapter 9Creating a Report Using the Create Page Wizard
9-11
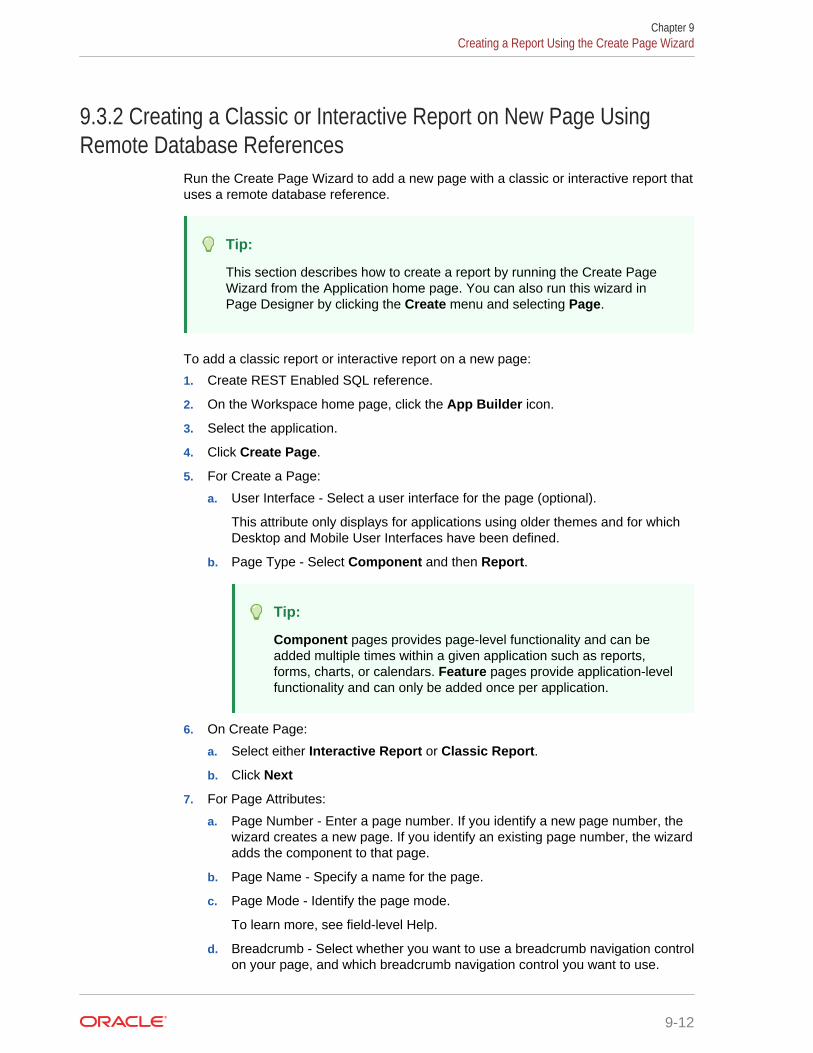
9.3.2 Creating a Classic or Interactive Report on New Page UsingRemote Database References
Run the Create Page Wizard to add a new page with a classic or interactive report thatuses a remote database reference.
Tip:
This section describes how to create a report by running the Create PageWizard from the Application home page. You can also run this wizard inPage Designer by clicking the Create menu and selecting Page.
To add a classic report or interactive report on a new page:
1. Create REST Enabled SQL reference.
2. On the Workspace home page, click the App Builder icon.
3. Select the application.
4. Click Create Page.
5. For Create a Page:
a. User Interface - Select a user interface for the page (optional).
This attribute only displays for applications using older themes and for whichDesktop and Mobile User Interfaces have been defined.
b. Page Type - Select Component and then Report.
Tip:
Component pages provides page-level functionality and can beadded multiple times within a given application such as reports,forms, charts, or calendars. Feature pages provide application-levelfunctionality and can only be added once per application.
6. On Create Page:
a. Select either Interactive Report or Classic Report.
b. Click Next
7. For Page Attributes:
a. Page Number - Enter a page number. If you identify a new page number, thewizard creates a new page. If you identify an existing page number, the wizardadds the component to that page.
b. Page Name - Specify a name for the page.
c. Page Mode - Identify the page mode.
To learn more, see field-level Help.
d. Breadcrumb - Select whether you want to use a breadcrumb navigation controlon your page, and which breadcrumb navigation control you want to use.
Chapter 9Creating a Report Using the Create Page Wizard
9-12
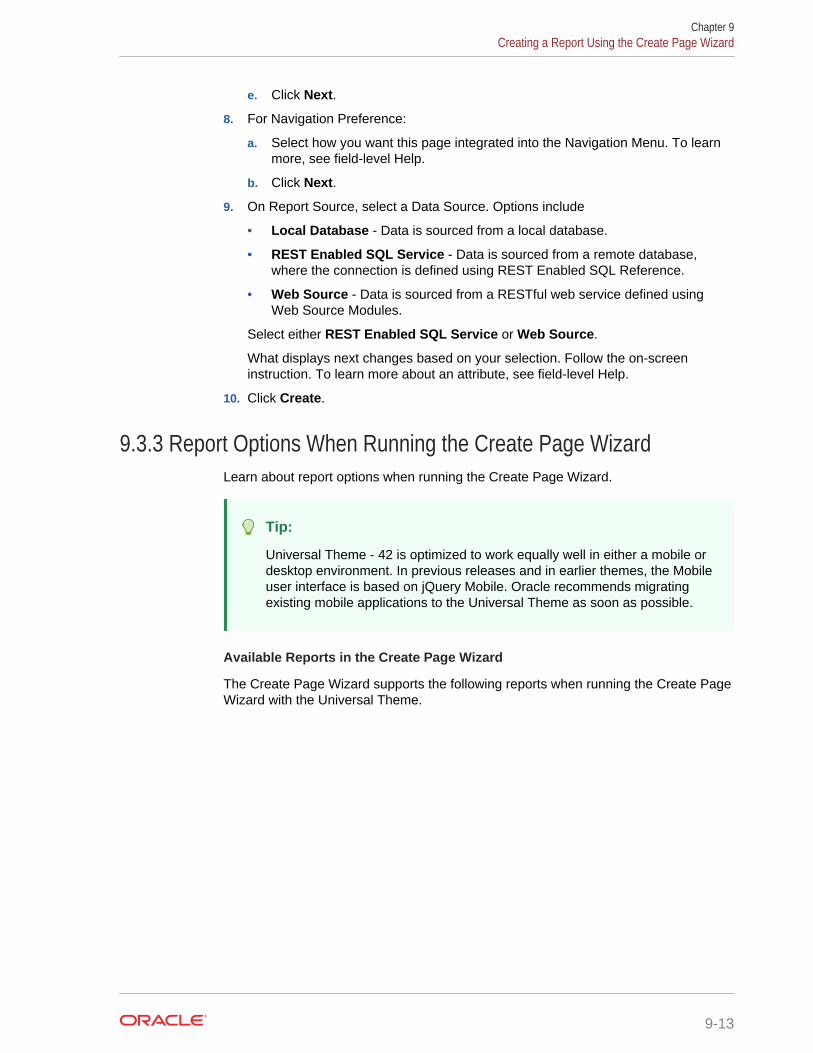
e. Click Next.
8. For Navigation Preference:
a. Select how you want this page integrated into the Navigation Menu. To learnmore, see field-level Help.
b. Click Next.
9. On Report Source, select a Data Source. Options include
• Local Database - Data is sourced from a local database.
• REST Enabled SQL Service - Data is sourced from a remote database,where the connection is defined using REST Enabled SQL Reference.
• Web Source - Data is sourced from a RESTful web service defined usingWeb Source Modules.
Select either REST Enabled SQL Service or Web Source.
What displays next changes based on your selection. Follow the on-screeninstruction. To learn more about an attribute, see field-level Help.
10. Click Create.
9.3.3 Report Options When Running the Create Page WizardLearn about report options when running the Create Page Wizard.
Tip:
Universal Theme - 42 is optimized to work equally well in either a mobile ordesktop environment. In previous releases and in earlier themes, the Mobileuser interface is based on jQuery Mobile. Oracle recommends migratingexisting mobile applications to the Universal Theme as soon as possible.
Available Reports in the Create Page Wizard
The Create Page Wizard supports the following reports when running the Create PageWizard with the Universal Theme.
Chapter 9Creating a Report Using the Create Page Wizard
9-13
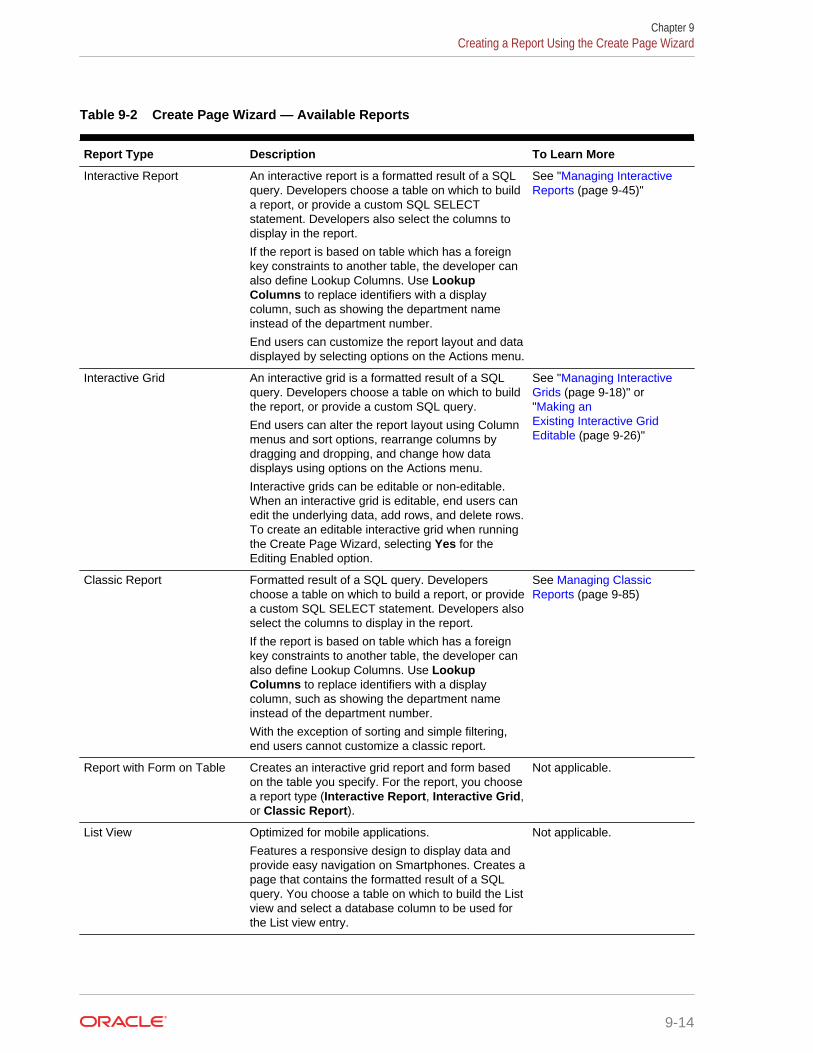
Table 9-2 Create Page Wizard — Available Reports
Report Type Description To Learn More
Interactive Report An interactive report is a formatted result of a SQLquery. Developers choose a table on which to builda report, or provide a custom SQL SELECTstatement. Developers also select the columns todisplay in the report.
If the report is based on table which has a foreignkey constraints to another table, the developer canalso define Lookup Columns. Use LookupColumns to replace identifiers with a displaycolumn, such as showing the department nameinstead of the department number.
End users can customize the report layout and datadisplayed by selecting options on the Actions menu.
See "Managing InteractiveReports (page 9-45)"
Interactive Grid An interactive grid is a formatted result of a SQLquery. Developers choose a table on which to buildthe report, or provide a custom SQL query.
End users can alter the report layout using Columnmenus and sort options, rearrange columns bydragging and dropping, and change how datadisplays using options on the Actions menu.
Interactive grids can be editable or non-editable.When an interactive grid is editable, end users canedit the underlying data, add rows, and delete rows.To create an editable interactive grid when runningthe Create Page Wizard, selecting Yes for theEditing Enabled option.
See "Managing InteractiveGrids (page 9-18)" or"Making anExisting Interactive GridEditable (page 9-26)"
Classic Report Formatted result of a SQL query. Developerschoose a table on which to build a report, or providea custom SQL SELECT statement. Developers alsoselect the columns to display in the report.
If the report is based on table which has a foreignkey constraints to another table, the developer canalso define Lookup Columns. Use LookupColumns to replace identifiers with a displaycolumn, such as showing the department nameinstead of the department number.
With the exception of sorting and simple filtering,end users cannot customize a classic report.
See Managing ClassicReports (page 9-85)
Report with Form on Table Creates an interactive grid report and form basedon the table you specify. For the report, you choosea report type (Interactive Report, Interactive Grid,or Classic Report).
Not applicable.
List View Optimized for mobile applications.
Features a responsive design to display data andprovide easy navigation on Smartphones. Creates apage that contains the formatted result of a SQLquery. You choose a table on which to build the Listview and select a database column to be used forthe List view entry.
Not applicable.
Chapter 9Creating a Report Using the Create Page Wizard
9-14
Table 9-2 (Cont.) Create Page Wizard — Available Reports
Report Type Description To Learn More
Column Toggle Report Optimized for mobile applications.
Creates a responsive report designed for mobileapplications and Smartphones. By default, columntoggle reports are created with all columns set tothe same priority. However, the developer can editthe report column attributes and rank columns byimportance. Columns with a lesser priority (largernumber) are hidden at narrower screen widths. Thereport includes a Columns button which enablesend users to select which columns they want toview.
Not applicable.
Reflow Report Optimized for mobile applications.
Creates a responsive report designed for mobileapplications and Smartphones. When there is notenough space available to display the reporthorizontally, the report responds by collapsing thetable columns into a vertical value pairs layoutwhere each column displays on a separate row.
See "Developing Reports(page 9-1)"
Report on Web Service Creates a report on a Web Service result. "See Managing Legacy WebServices (page 18-39)"
Available Reports for Mobile User Interface Applications
In previous releases, developers selected the Mobile User Interface to optimizeapplications for mobile environments. The Mobile user interface is based on jQueryMobile. If your application users an older theme and the Mobile User Interface, theCreate Page Wizard supports the following reports.
Table 9-3 Create Page Wizard — Supported Reports for Mobile User Interface Applications
Page Type Description To Learn More
List View Optimized for mobile applications.
Features a responsive design to display data andprovide easy navigation on Smartphones. Createsa page that contains the formatted result of a SQLquery. You choose a table on which to build theList view and select a database column to be usedfor the List view entry.
See "Developing Reports(page 9-1)"
Chapter 9Creating a Report Using the Create Page Wizard
9-15
Table 9-3 (Cont.) Create Page Wizard — Supported Reports for Mobile User InterfaceApplications
Page Type Description To Learn More
Column Toggle Report Optimized for mobile applications.
Creates a responsive report designed for mobileapplications and Smartphones. By default, columntoggle reports are created with all columns set tothe same priority. However, the developer can editthe report column attributes and rank columns byimportance. Columns with a lesser priority displaysat narrower widths. The report includes a Columnsbutton which enables end users to select whichcolumns they want to view.
See "Developing Reports(page 9-1)"
Reflow Report Optimized for mobile applications.
Creates a responsive report designed for mobileapplications and Smartphones. When there is notenough space available to display the reporthorizontally, the report responds by collapsing thetable columns into a vertical value pairs layoutwhere each column displays on a separate row.
See "Developing Reports(page 9-1)"
Report on Web Service Creates a report on a Web Service result. See "Managing Legacy WebServices (page 18-39)"
9.4 Creating a Report by Dragging and Dropping from theGallery
Create a report by dragging and dropping a report type from the Gallery.
Tip:
When you drag and drop a report region from the Gallery, you must providethe underlying SQL query.
To add a report by dragging and dropping from the Gallery:
1. View the page in Page Designer:
a. On the Workspace home page, click the App Builder icon.
b. Select an application.
c. Select a page.
Page Designer appears.
2. In the Gallery at the bottom of the central pane, locate the report type you want tocreate.
Chapter 9Creating a Report by Dragging and Dropping from the Gallery
9-16
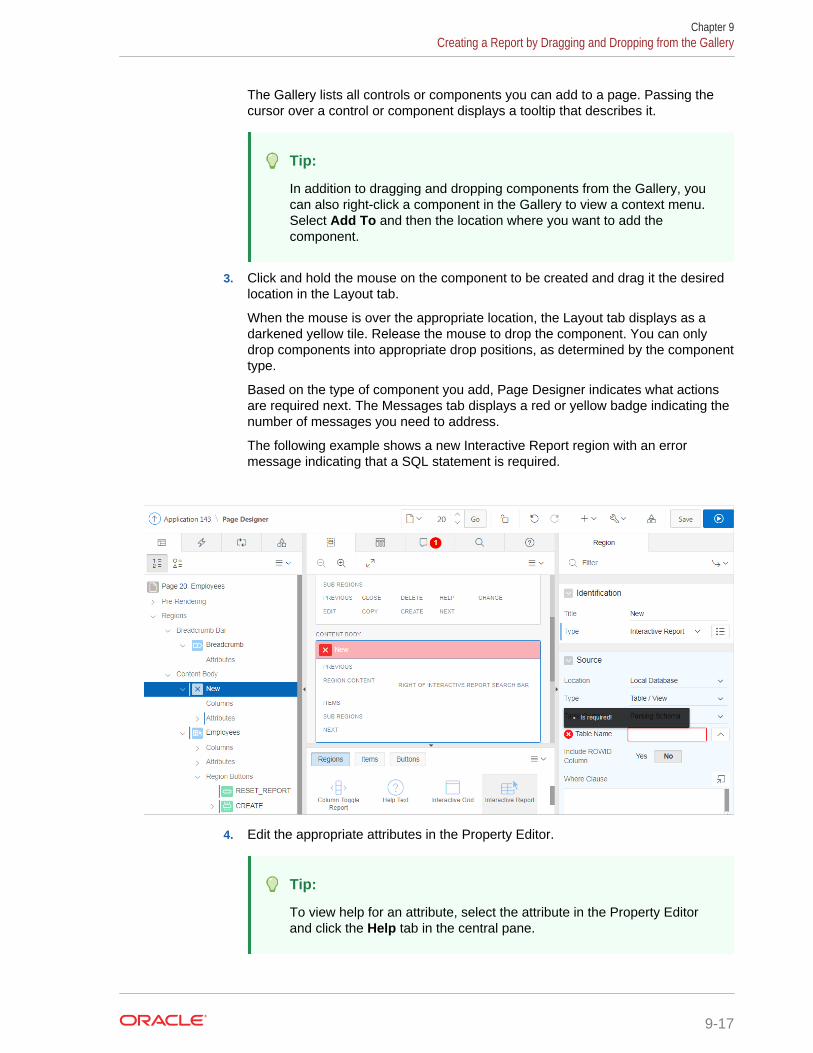
The Gallery lists all controls or components you can add to a page. Passing thecursor over a control or component displays a tooltip that describes it.
Tip:
In addition to dragging and dropping components from the Gallery, youcan also right-click a component in the Gallery to view a context menu.Select Add To and then the location where you want to add thecomponent.
3. Click and hold the mouse on the component to be created and drag it the desiredlocation in the Layout tab.
When the mouse is over the appropriate location, the Layout tab displays as adarkened yellow tile. Release the mouse to drop the component. You can onlydrop components into appropriate drop positions, as determined by the componenttype.
Based on the type of component you add, Page Designer indicates what actionsare required next. The Messages tab displays a red or yellow badge indicating thenumber of messages you need to address.
The following example shows a new Interactive Report region with an errormessage indicating that a SQL statement is required.
4. Edit the appropriate attributes in the Property Editor.
Tip:
To view help for an attribute, select the attribute in the Property Editorand click the Help tab in the central pane.
Chapter 9Creating a Report by Dragging and Dropping from the Gallery
9-17
5. To save your changes click Save. To save and run the page, click Save and RunPage.
9.5 Managing Interactive GridsAn interactive grid presents users a set of data in a searchable and customizablereport. Developers control how an interactive grid works by editing the followingattributes in Page Designer: region attributes, report Attributes, and Column attributes.
Note:
To learn more about features and capabilities of interactive grids, install thesample application, Sample Interactive Grids. See "Installing a PackagedApplication (page 3-4)."
• Managing Interactive Grid Region Attributes (page 9-19)Each application page contains one or more regions. A region is an area on apage that serves as a container for content. Developers edit region attributes toalter the SQL source, change the region layout and appearance, define a regiondisplays selector, and create region conditions.
• Managing Interactive Grid Attributes (page 9-25)Report Attributes control how an interactive grid works. Developers edit interactivegrid Attributes to control if end users can edit the underlying data, configure reportpagination, create error messages, configure the toolbar and download options,control if users can save public reports, and add Icon and Detail Views.
• Managing Interactive Grid Column Attributes (page 9-36)Column attributes enable developers to control the display, features, and behaviorof interactive grid columns. Developers edit Column attributes to alter nearly allaspects of column behavior, including altering the layout and appearance, creatingvalidations, defining column links, creating column filters, and adding support forexport and printing.
• About Customizing Interactive Grids in a Running Application (page 9-40)When running an application, users can alter the report layout using Columnmenus and sort options, rearrange columns by dragging and dropping, andchange how data displays using options on the Actions menu.
• Saving Interactive Grids (page 9-40)After users customize an interactive grid they can save it as either a Private orPublic report.
See Also:
• "Interactive Grid (page 9-2)"
• Oracle Application Express End User’s Guide
• "Making an Existing Interactive Grid Editable (page 9-26)"
Chapter 9Managing Interactive Grids
9-18
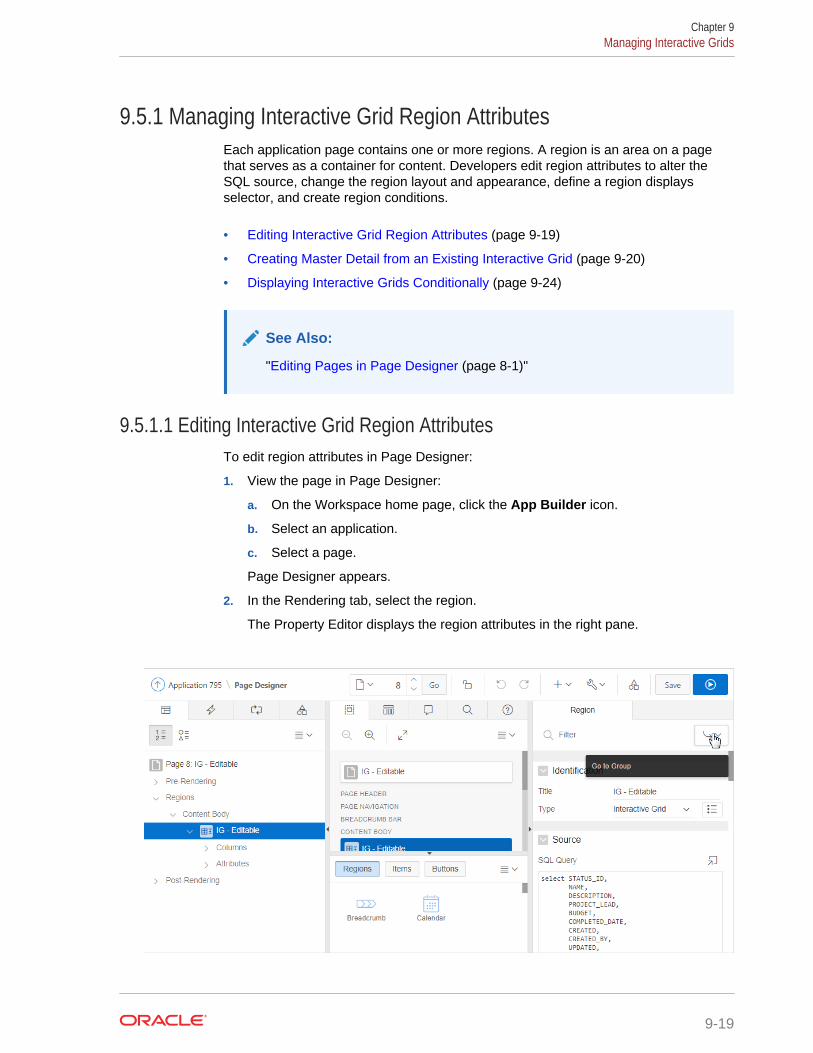
9.5.1 Managing Interactive Grid Region AttributesEach application page contains one or more regions. A region is an area on a pagethat serves as a container for content. Developers edit region attributes to alter theSQL source, change the region layout and appearance, define a region displaysselector, and create region conditions.
• Editing Interactive Grid Region Attributes (page 9-19)
• Creating Master Detail from an Existing Interactive Grid (page 9-20)
• Displaying Interactive Grids Conditionally (page 9-24)
See Also:
"Editing Pages in Page Designer (page 8-1)"
9.5.1.1 Editing Interactive Grid Region AttributesTo edit region attributes in Page Designer:
1. View the page in Page Designer:
a. On the Workspace home page, click the App Builder icon.
b. Select an application.
c. Select a page.
Page Designer appears.
2. In the Rendering tab, select the region.
The Property Editor displays the region attributes in the right pane.
Chapter 9Managing Interactive Grids
9-19
Use region attributes to alter the SQL source, change the region layout andappearance, create a master detail, define a region displays selector, or createconditions.
3. To find a group or attribute:
• Search for the group or attribute - Enter keywords in the Filter Propertiesfield. The Property Editor displays the group or attributes. To return to thedefault display, delete the keywords.
• Use Go to Group - Click Go to Group and select the group. To return thedefault display, click Go to Group again and select Expand All.
4. Edit the appropriate attributes.
Tip:
To view help for an attribute, select the attribute in the Property Editorand click the Help tab in the central pane.
5. To save your changes click Save. To save and run the page, click Save and RunPage.
9.5.1.2 Creating Master Detail from an Existing Interactive GridA single page master detail features two editable interactive grids based on tworelated tables or views. You can define any number of master detail relationships on asingle page by simply adding a related interactive grid to the page. If you have anexisting interactive grid, you can add another related interactive grid by doing thefollowing:
• Create the parent interactive grid.
• Define the primary key (if needed).
• Create the child interactive grid.
• For the child interactive grid, specify the Master Region and Master Column.
The following example demonstrates how to create an interactive grid on thedepartments table, OEHR_DEPARTMENTS by running the Create Page Wizard. This wizardcreates the parent interactive grid and enables you to define the primary key. Then,you create a child interactive grid on the employees table, OEHR_EMPLOYEES.
To add a related interactive grid below an existing grid:
1. Create an application.
2. Run the Create Page Wizard. On the Application home page, click Create Page
3. In the Create Page Wizard:
a. Select a Page Type - Select Report and then select Interactive Grid.
b. Page Attributes - For Page Name enter Departments and click Next
c. Navigation Menu - Select how you want this page integrated into theNavigation Menu and click Next.
d. On Report Source:
Chapter 9Managing Interactive Grids
9-20
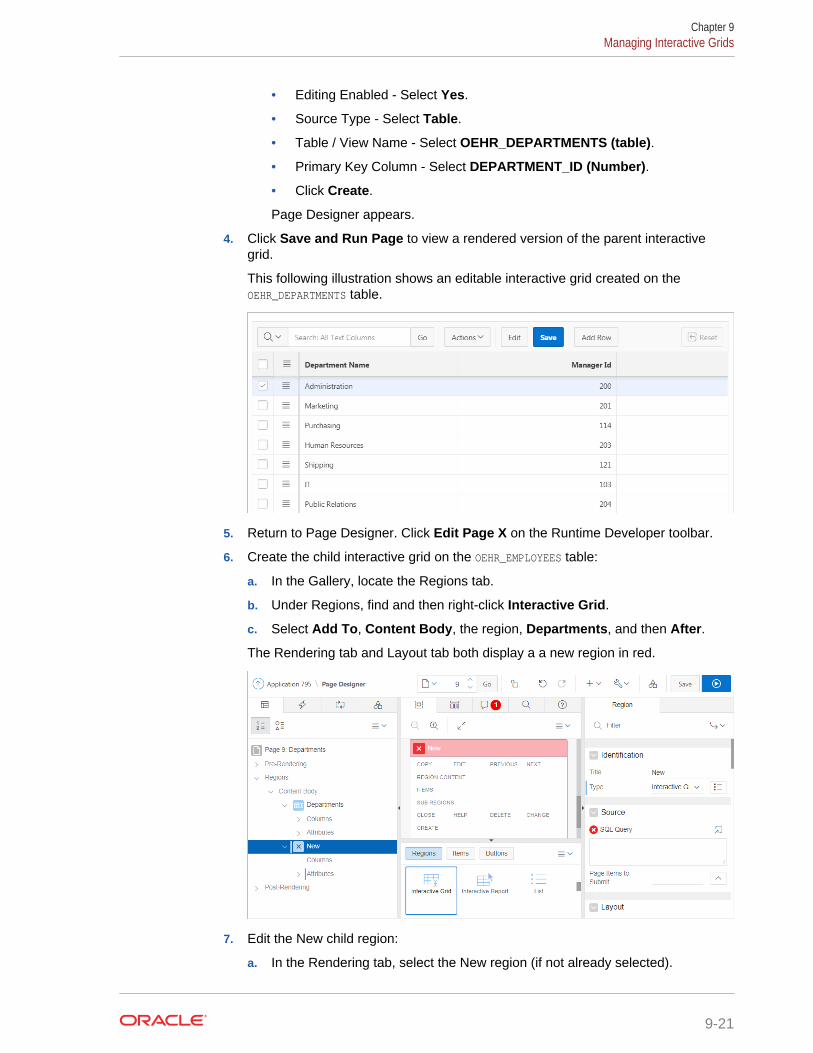
• Editing Enabled - Select Yes.
• Source Type - Select Table.
• Table / View Name - Select OEHR_DEPARTMENTS (table).
• Primary Key Column - Select DEPARTMENT_ID (Number).
• Click Create.
Page Designer appears.
4. Click Save and Run Page to view a rendered version of the parent interactivegrid.
This following illustration shows an editable interactive grid created on theOEHR_DEPARTMENTS table.
5. Return to Page Designer. Click Edit Page X on the Runtime Developer toolbar.
6. Create the child interactive grid on the OEHR_EMPLOYEES table:
a. In the Gallery, locate the Regions tab.
b. Under Regions, find and then right-click Interactive Grid.
c. Select Add To, Content Body, the region, Departments, and then After.
The Rendering tab and Layout tab both display a a new region in red.
7. Edit the New child region:
a. In the Rendering tab, select the New region (if not already selected).
Chapter 9Managing Interactive Grids
9-21
b. In the Property Editor, edit the region attributes:
Note:
To find a group or attribute, enter keywords in the Filter Propertiesfield. The Property Editor displays the group or attributes. To returnto the default display, delete the keywords.
• Identification, Title - Enter Employees.
• Source, SQL Query - Enter the query:
select OEHR_EMPLOYEES.EMPLOYEE_ID as EMPLOYEE_ID, OEHR_EMPLOYEES.FIRST_NAME as FIRST_NAME, OEHR_EMPLOYEES.LAST_NAME as LAST_NAME, OEHR_EMPLOYEES.HIRE_DATE as HIRE_DATE, OEHR_EMPLOYEES.EMAIL as EMAIL, OEHR_EMPLOYEES.PHONE_NUMBER as PHONE_NUMBER, OEHR_EMPLOYEES.JOB_ID as JOB_ID, OEHR_EMPLOYEES.SALARY as SALARY, OEHR_EMPLOYEES.DEPARTMENT_ID as DEPARTMENT_ID from OEHR_EMPLOYEES
• Layout, Start New Row - Select Yes.
• Appearance, Template - Select Standard
• Master Detail, Master Region - Select the region, Departments.
8. For the child interactive grid, Employees, define DEPARTMENTS as the MasterColumn:
a. In the Rendering tab, under the child interactive grid, Employees, expand theColumns node and select DEPARTMENT_ID.
b. In Property Editor, edit the following:
• Find Master Detail.
• For Master Column, select DEPARTMENT_ID.
9. Click Save. To run the page, click Save and Run Page.
Chapter 9Managing Interactive Grids
9-22

Note that parent, Department, filters the results in Employees, the child.
Next, make the child, Employees, editable.
10. Make Employees report editable:
a. Access Page Designer. Click the Edit Page XX on the Developer Toolbar.
b. In the Rendering tab, under Employees, select Attributes.
c. In the Property Editor, edit the following:
• Edit, Enabled - select Yes.
• Allowed Operations - Verify the following operations are enabled: AddRow, Update Row, and Delete Row.
11. Define the EMPLOYEE_ID column as the Primary Key Column:
a. In the Rendering tab, under Employees, expand Columns and selectEMPLOYEE_ID.
b. In the Property Editor, find Source, Primary Key and select Yes.
12. Click Save. To run the page, click Save and Run Page.
The child interactive grid, Employees, is now editable
Chapter 9Managing Interactive Grids
9-23

9.5.1.3 Displaying Interactive Grids ConditionallyYou can choose to have interactive grids display conditionally by editing regionattributes.
To display an interactive grid conditionally:
1. View the page in Page Designer:
a. On the Workspace home page, click the App Builder icon.
b. Select an application.
c. Select a page.
Page Designer appears.
2. In the Rendering tab, select the region.
The Property Editor displays the region attributes in the right pane.
Tip:
To find a group or attribute, enter keywords in the Filter Propertiesfield. The Property Editor displays the group or attributes. Or, you canclick Go to Group and select the group.
3. Edit Server-side Condition:
a. Find the Server-side Condition group.
b. For Type, select a condition type and follow the on-screen instructions.
When you edit attributes in Page Designer, the Messages tab displays errors andwarnings you need to address. The Messages tab displays a red or yellow badgeindicating the number of messages you need to address. Click the Messages tabto review the messages.
Chapter 9Managing Interactive Grids
9-24
Tip:
To view help for an attribute, select the attribute in the Property Editorand click the Help tab in the central pane.
4. To save your changes click Save. To save and run the page, click Save and RunPage.
9.5.2 Managing Interactive Grid AttributesReport Attributes control how an interactive grid works. Developers edit interactive gridAttributes to control if end users can edit the underlying data, configure reportpagination, create error messages, configure the toolbar and download options,control if users can save public reports, and add Icon and Detail Views.
• Editing Interactive Grid Attributes (page 9-25)
• Making an Existing Interactive Grid Editable (page 9-26)
• Controlling Interactive Grid Pagination (page 9-27)
• Customizing the Interactive Grid Toolbar (page 9-28)
• Enabling Users to Save Public Reports in Interactive Grids (page 9-30)
• Restricting Who Can Save Public Reports (page 9-30)
• Enabling Icon View in an Interactive Grid (page 9-31)
• Enabling Detail View in an Interactive Grid (page 9-34)
See Also:
"Editing Pages in Page Designer (page 8-1)"
9.5.2.1 Editing Interactive Grid AttributesTo edit interactive grid Attributes:
1. View the page in Page Designer:
a. On the Workspace home page, click the App Builder icon.
b. Select an application.
c. Select a page.
Page Designer appears.
2. In the Rendering tab, locate the region containing the interactive grid.
3. Under the region, select the Attributes node.
The Property Editor displays the attributes. Attributes are organized in groups.
Chapter 9Managing Interactive Grids
9-25
Tip:
To find a group or attribute, enter keywords in the Filter Propertiesfield. The Property Editor displays the group or attributes. Or, you canclick Go to Group and select the group.
4. Edit the appropriate attributes.
Tip:
To view help for an attribute, select the attribute in the Property Editorand click the Help tab in the central pane.
5. To save your changes click Save. To save and run the page, click Save and RunPage.
9.5.2.2 Making an Existing Interactive Grid EditableEnd users can alter the report layout using Column menus and sort options, rearrangecolumns by dragging and dropping, and change how data displays using options onthe Actions menu. However, developers determine whether the underlying data isread-only or editable by users. When an interactive grid is editable, end users can editthe underlying data, add rows, delete rows, and refresh rows. By default, editableinteractive grids include a Save button on the toolbar. Developers can determine
To make an interactive grid editable:
1. View the page in Page Designer:
a. On the Workspace home page, click the App Builder icon.
b. Select an application.
c. Select a page.
Page Designer appears.
2. In the Rendering tab, locate the region containing the interactive grid.
3. Under the region, select the Attributes node.
The Property Editor displays the attributes. Attributes are organized in groups. Tofind a group or attribute, enter keywords in the Filter Properties field. The PropertyEditor displays the group or attributes. Or, you can click Go to Group and selectthe group.
Tip:
To view help for an attribute, select the attribute in the Property Editorand click the Help tab in the central pane.
4. In the Property Editor, find Edit and update the following attributes:
a. Edit - Select Yes.
Chapter 9Managing Interactive Grids
9-26
Selecting Yes automatically creates a process to process the records. WhenEnabled is set to Yes, additional options appear.
b. Allowed Operations - Select supported data manipulation operations.Options include: Add Row, Update Row, Delete Row
c. Allowed Row Operations Column - Select a column where the column valueindicates if the row can be updated and/or deleted.
d. Lost Update Type - Select how to protect data against lost updates.
Lost updates occur when two or more users try to update the same data, andthe last update overwrites updates made by the previous user. To prevent this,updates can check the existing column value(s) in the database with thevalue(s) retrieved when the record was originally queried. For an example, seePage Designer Help.
• Row Values - A checksum value is calculated for each row, when initiallyquerying the data. The checksum is calculated by concatenating all of theupdateable columns into a string and then generating a unique value.When committing the updated record, this checksum is compared to thechecksum value.
• Row Version Column - If your database table includes a column which isincremented every time a record is updated, preferably by a databasetrigger, then this column can be used instead of calculating checksums.Oracle does not recommend this option if your interactive grid updatesdata in multiple tables.
e. Add Row If Empty - Specify whether to add a new row if the interactive gridcurrently has no records returned. When enabled, the No Data Found messagenever displays since there will always be at least one record. If no updatesare made to the record that was added it will not be inserted when the regionis saved.
5. To save your changes click Save. To save and run the page, click Save and RunPage.
9.5.2.3 Controlling Interactive Grid PaginationPagination provides the end user with information about the number of rows displayedand the current position within the result set.
To change interactive grid pagination:
1. View the page in Page Designer:
a. On the Workspace home page, click the App Builder icon.
b. Select an application.
c. Select a page.
Page Designer appears.
2. In the Rendering tab, locate the region containing the interactive grid.
3. Under the region, select the Attributes node.
The Property Editor displays the attributes. Attributes are organized in groups.
Chapter 9Managing Interactive Grids
9-27
Tip:
To find a group or attribute, enter keywords in the Filter Propertiesfield. The Property Editor displays the group or attributes. Or, click Go toGroup and select the group.
4. Find Pagination.
Pagination attributes provide the end user with information about the number ofrows displayed and the current position within the result set.
Tip:
To view help for an attribute, select the attribute in the Property Editorand click the Help tab in the central pane.
5. Under Pagination, edit the following attributes:
a. Type - Select an option:
• Page - Rows display based on what the end users select in the Actionsmenu, Format, Rows per Page option. If there are additional rows,controls are added to the report footer which enables users to navigateforwards and backwards between row sets.
• Scroll - Rows display to fill the height of the interactive grid. As the enduser scrolls, additional rows display as needed.
b. Show Total Row Count - Select Yes or No.
Selecting Yes displays the total row count in the report footer. Enabling thisoption requires an additional query which may hinder performance on verylarge data sets
6. To save your changes click Save. To save and run the page, click Save and RunPage.
Tip:
Install the sample application, Sample Interactive Grids, to see interactivegrid pagination examples. See "Installing a Packaged Application(page 3-4)."
9.5.2.4 Customizing the Interactive Grid ToolbarAll interactive grids include a toolbar at the top of the page. Developers can customizewhat controls display on the toolbar or remove it.
Chapter 9Managing Interactive Grids
9-28
Note:
Some of the options described in this procedure only apply if the interactivegrid is editable. See "Making an Existing Interactive Grid Editable(page 9-26)".
To customize the interactive grid toolbar:
1. View the page in Page Designer:
a. On the Workspace home page, click the App Builder icon.
b. Select an application.
c. Select a page.
Page Designer appears.
2. In the Rendering tab, locate the region containing the interactive grid.
3. Under the region, select the Attributes node.
The Property Editor displays the attributes. Attributes are organized in groups.
Tip:
To find a group or attribute, enter keywords in the Filter Propertiesfield. The Property Editor displays the group or attributes. Or, click Go toGroup and select the group.
4. In the Property Editor, find the Toolbar group:
a. For Show, select Yes or No to determine if a toolbar displays above the report.
b. For Buttons, select which buttons display in the toolbar.
Options include:
• Reset - Reset removes any customizations (such as filters, column width,ordering, and so on) and reloads the report definition from the server.
• Save - Save is only functional when an interactive grid is editable and theend user has authorization to add, update or delete. Save saves changesmade to the interactive grid, without needing to save the whole page.
c. Add Button Label only displays when the interactive grid is editable. For AddButton Label, enter an alternative label for the Add button. The default labelis Add Row.
5. To save your changes click Save. To save and run the page, click Save and RunPage.
Tip:
To view an example of adding a toolbar button, install the sample application,Sample Interactive Grids, and go to Reporting, Add Toolbar Button. See"Installing a Packaged Application (page 3-4)."
Chapter 9Managing Interactive Grids
9-29
9.5.2.5 Enabling Users to Save Public Reports in Interactive GridsUsers can save an interactive grid as a Public report if the report developer enablesthat capability. Public reports display on the Saved Reports list on the toolbar and areavailable to all users. However, only the user who creates a Public report can save,rename, or delete it.
Tip:
The Save Public Report attribute is only available to authenticated users andcan be further restricted by the defined Authorization scheme. See"Restricting Who Can Save Public Reports (page 9-30)."
To enable end users to save Public reports:
1. View the page in Page Designer:
a. On the Workspace home page, click the App Builder icon.
b. Select an application.
c. Select a page.
Page Designer appears.
2. In the Rendering tab, locate the region containing the interactive grid.
3. Under the region, select the Attributes node.
The Property Editor displays the attributes. Attributes are organized in groups.
Tip:
To find a group or attribute, enter keywords in the Filter Propertiesfield. The Property Editor displays the group or attributes. Or, you canclick Go to Group and select the group.
4. In the Property Editor:
a. Find Enable Users To.
b. Save Public Report - Select Yes
5. To save your changes click Save. To save and run the page, click Save and RunPage.
9.5.2.6 Restricting Who Can Save Public ReportsDevelopers can select an authorization scheme to restrict who can save Publicreports. To enable an end user to save a Public report, this authorization scheme mustevaluate to TRUE for that user. If an authorization scheme is not selected, then anyuser may save Public reports.
To restrict who can save a Public report:
1. View the page in Page Designer:
Chapter 9Managing Interactive Grids
9-30

a. On the Workspace home page, click the App Builder icon.
b. Select an application.
c. Select a page.
Page Designer appears.
2. In the Rendering tab, locate the region containing the interactive grid.
3. Under the region, select the Attributes node.
The Property Editor displays the attributes. Attributes are organized in groups.
Tip:
To find a group or attribute, enter keywords in the Filter Propertiesfield. The Property Editor displays the group or attributes. Or, click Go toGroup and select the group.
4. In the Property Editor:
a. Find Enable Users To.
b. Save Public Report - Select Yes
c. Save Public Report Authorization - Select an authorization scheme.
Select an authorization scheme to restrict who can save public reportdefinitions. To enable an end user to save a public report, this authorizationscheme must evaluate to TRUE for that user. If you do not select anauthorization scheme, then any user may save public reports.
5. To save your changes click Save. To save and run the page, click Save and RunPage.
9.5.2.7 Enabling Icon View in an Interactive GridInteractive grids support different views of data. By default, interactive grids displaydata in a Grid view. Developers can optionally display data as icons. Enabling Iconview adds an Icon button to the select view button group.
• About Icon View in an Interactive Grid (page 9-31)
• Adding Icon View to an Interactive Grid (page 9-32)
• Adding a Custom Icon View Link to an Interactive Grid (page 9-33)
9.5.2.7.1 About Icon View in an Interactive GridInteractive grids support different views of data. Users can switch between these viewsby clicking the buttons in the select view button group. The following illustration showsan interactive grid with Icon view enabled and the Icon button selected. To enable Iconview, you must identify the columns used to identify the icon, the label, and the target(that is, the link).
Chapter 9Managing Interactive Grids
9-31
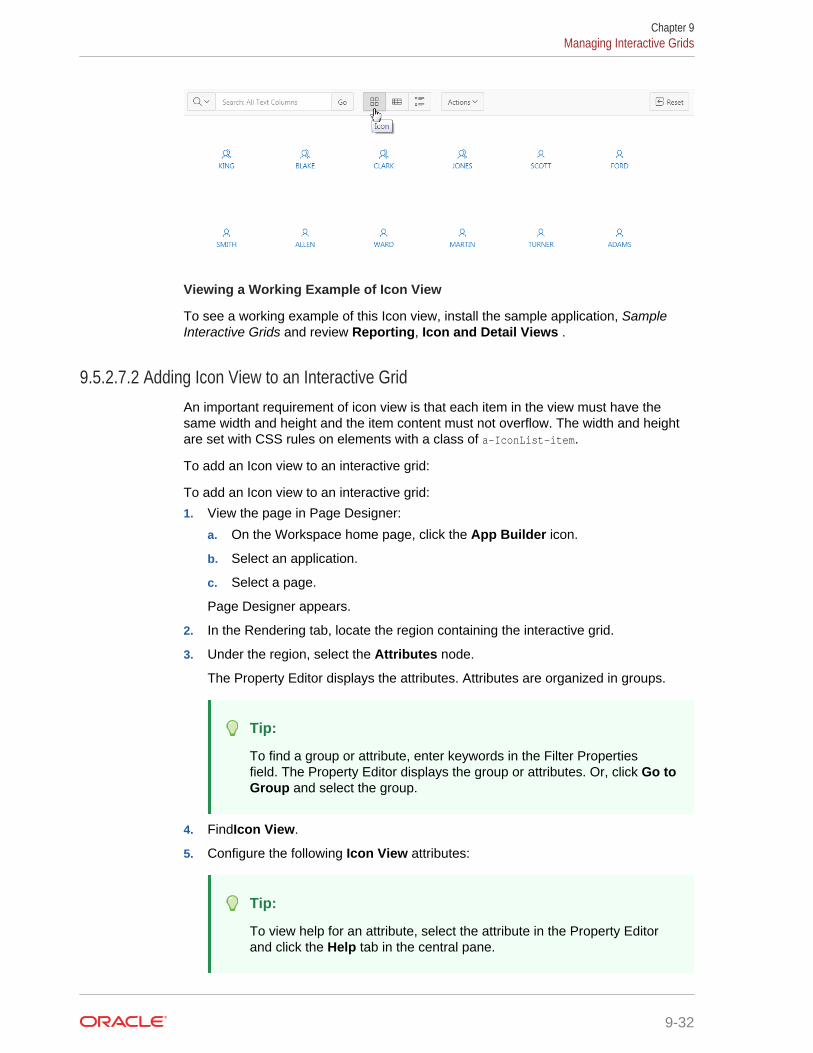
Viewing a Working Example of Icon View
To see a working example of this Icon view, install the sample application, SampleInteractive Grids and review Reporting, Icon and Detail Views .
9.5.2.7.2 Adding Icon View to an Interactive GridAn important requirement of icon view is that each item in the view must have thesame width and height and the item content must not overflow. The width and heightare set with CSS rules on elements with a class of a-IconList-item.
To add an Icon view to an interactive grid:
To add an Icon view to an interactive grid:
1. View the page in Page Designer:
a. On the Workspace home page, click the App Builder icon.
b. Select an application.
c. Select a page.
Page Designer appears.
2. In the Rendering tab, locate the region containing the interactive grid.
3. Under the region, select the Attributes node.
The Property Editor displays the attributes. Attributes are organized in groups.
Tip:
To find a group or attribute, enter keywords in the Filter Propertiesfield. The Property Editor displays the group or attributes. Or, click Go toGroup and select the group.
4. FindIcon View.
5. Configure the following Icon View attributes:
Tip:
To view help for an attribute, select the attribute in the Property Editorand click the Help tab in the central pane.
Chapter 9Managing Interactive Grids
9-32
a. Show - Specify whether the Icon View is enabled. Select Yes.
b. Custom - Select No. Selecting Yes provides full control over the icon view itemmarkup but also requires a full understanding of HTML markup.
c. Icon Type - Select the column type that holds the icon image source. SelectIcon CSS Classes. You must also add a column to your SQL statement thathas a value that is a CSS class for an icon (for example, a Font APEX iconclass name). As an alternative, you can also select Image in URL and thenspecify the column that contains the URL and Icon Attributes.
d. Icon - Select the interactive grid column that returns the CSS classes for theicon image source.
e. Link Target - Click Link Target to display the Link Builder - Link Target dialog.The link target defined is followed when the user activates the icon link withmouse or keyboard.
f. Link Attributes - Enter HTML attributes that are associated with the display ofeach Link Target.
g. Label Column - Select the report column that returns the image label.
6. To save your changes click Save. To save and run the page, click Save and RunPage.
9.5.2.7.3 Adding a Custom Icon View Link to an Interactive GridA custom Icon View link provides greater flexibility in defining the content of the IconView, including the ability to utilize more than one column.
To add custom Icon View link to an interactive grid:
1. View the page in Page Designer:
a. On the Workspace home page, click the App Builder icon.
b. Select an application.
c. Select a page.
Page Designer appears.
2. In the Rendering tab, locate the region containing the interactive grid.
3. Under the region, select the Attributes node.
The Property Editor displays the attributes. Attributes are organized in groups.
Tip:
To find a group or attribute, enter keywords in the Filter Propertiesfield. The Property Editor displays the group or attributes. Or, click Go toGroup and select the group.
4. Find Icon View.
5. Configure the following Icon View attributes:
Chapter 9Managing Interactive Grids
9-33
Tip:
To view help for an attribute, select the attribute in the Property Editorand click the Help tab in the central pane.
a. Show - Select Yes.
b. Custom - Select Yes. Selecting Yes provides full control over the icon viewitem markup but also requires a full understanding of HTML markup..
c. Icon Type - Select the column type that holds the icon image source. SelectIcon CSS Classes. You must also add a column to your SQL statement thathas a value that is a CSS class for an icon (for example, a Font APEX iconclass name). As an alternative, you can also select Image in URL and thenspecify the column that contains the URL and Icon Attributes.
d. Icon - Select the interactive grid column that returns the CSS classes for theicon image source.
e. Link Target - Click Link Target to display the Link Builder - Link Target dialog.The link target defined is followed when the user activates the icon link withmouse or keyboard.
f. Link Attributes - Enter HTML attributes that are associated with the display ofeach Link Target.
g. Label Column - Select the report column that returns the image label.
6. To save your changes click Save. To save and run the page, click Save and RunPage.
9.5.2.8 Enabling Detail View in an Interactive GridInteractive grids support different views of data. By default, interactive grids displaydata in a Grid view. Developers can optionally display data as in a Detail view.Enabling Detail view adds an Detail button to the select view button group.
• About Detail View in an Interactive Grid (page 9-34)
• Adding a Detail View to an Interactive Grid (page 9-35)
9.5.2.8.1 About Detail View in an Interactive GridInteractive grids support different views of data. Users can switch between these viewsby clicking the buttons in the select view button group. The following illustration showsan interactive grid with Detail view enabled and the Detail button selected. Detail viewdisplays column values using developer defined HTML markup as shown in thefollowing illustration.
Chapter 9Managing Interactive Grids
9-34
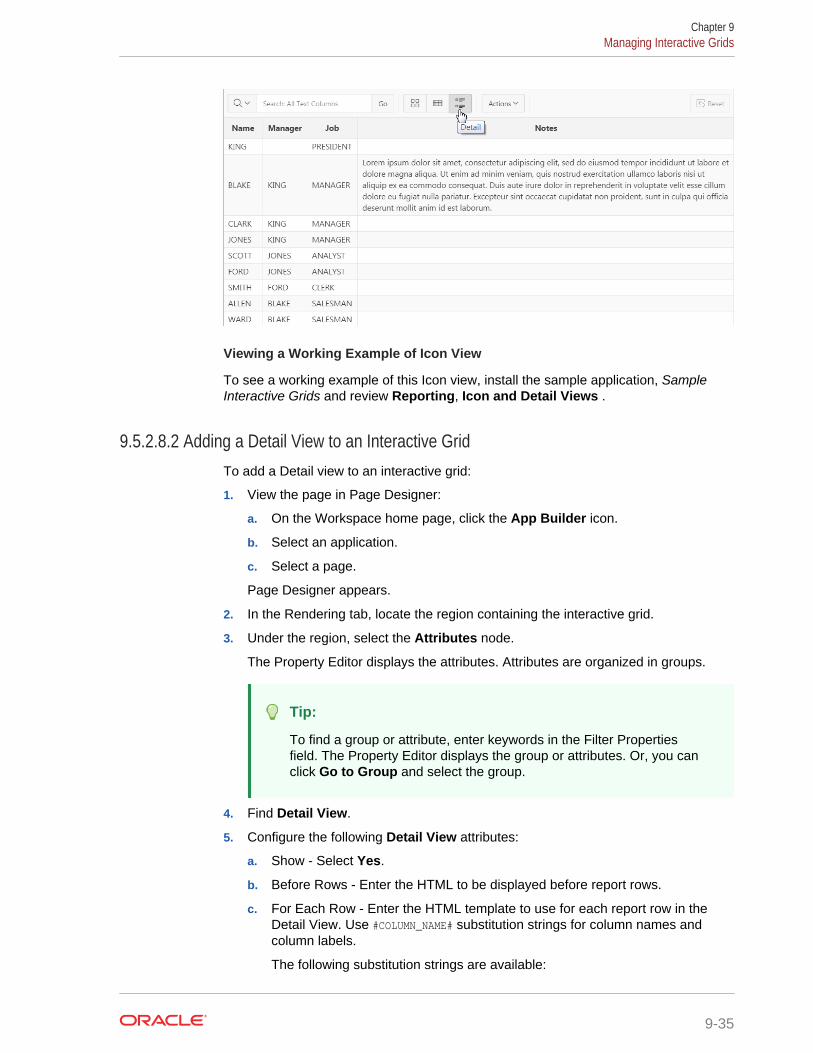
Viewing a Working Example of Icon View
To see a working example of this Icon view, install the sample application, SampleInteractive Grids and review Reporting, Icon and Detail Views .
9.5.2.8.2 Adding a Detail View to an Interactive GridTo add a Detail view to an interactive grid:
1. View the page in Page Designer:
a. On the Workspace home page, click the App Builder icon.
b. Select an application.
c. Select a page.
Page Designer appears.
2. In the Rendering tab, locate the region containing the interactive grid.
3. Under the region, select the Attributes node.
The Property Editor displays the attributes. Attributes are organized in groups.
Tip:
To find a group or attribute, enter keywords in the Filter Propertiesfield. The Property Editor displays the group or attributes. Or, you canclick Go to Group and select the group.
4. Find Detail View.
5. Configure the following Detail View attributes:
a. Show - Select Yes.
b. Before Rows - Enter the HTML to be displayed before report rows.
c. For Each Row - Enter the HTML template to use for each report row in theDetail View. Use #COLUMN_NAME# substitution strings for column names andcolumn labels.
The following substitution strings are available:
Chapter 9Managing Interactive Grids
9-35
• &COLUMN_NAME. - substitution strings for column labels and names.
• &APEX$ROW_ID. - the record identifier for the row.
• &APEX$ROW_INDEX. - the record display sequence number.
Example:
<tr><td align="right">&ENAME_LABEL.:</td><td>&ENAME.</td></tr> <tr><td align="right">&JOB_LABEL.:</td><td>&JOB.</td></tr>
d. After Rows - Enter the HTML to be displayed after report rows.
6. To save your changes click Save. To save and run the page, click Save and RunPage.
9.5.3 Managing Interactive Grid Column AttributesColumn attributes enable developers to control the display, features, and behavior ofinteractive grid columns. Developers edit Column attributes to alter nearly all aspectsof column behavior, including altering the layout and appearance, creating validations,defining column links, creating column filters, and adding support for export andprinting.
Note:
Some settings are configured at runtime by the report developer and savedas part of the primary or alternate report (for example, column display order,the columns the report is sorted on, and column widths. To learn more aboutsave options, see "Saving Interactive Grids (page 9-40)."
• Editing Common Grid Column Attributes (page 9-36)
• Defining a Column as a List of Values for Filtering (page 9-38)
• Creating a Column Link in an Interactive Grid (page 9-39)
See Also:
"Editing Pages in Page Designer (page 8-1)"
9.5.3.1 Editing Common Grid Column AttributesThis section describes how to edit common grid columns attributes such as changingthe column heading, determining how a column renders, how users can edit a columnvalue, and how users can manipulate a column.
To edit interactive grid Column attributes:
1. View the page in Page Designer:
a. On the Workspace home page, click the App Builder icon.
b. Select an application.
Chapter 9Managing Interactive Grids
9-36
c. Select a page.
Page Designer appears.
2. In the Rendering tab, locate the region and expand the Columns node.
The columns appear in the Rendering tab.
3. Select a column to edit.
4. Edit the appropriate attributes.
The Property Editor displays the attributes.
Tip:
To find a group or attribute, enter keywords in the Filter Propertiesfield. The Property Editor displays the group or attributes. Or, click Go toGroup and select the group.
5. To edit the column heading:
a. Find Heading.
b. Heading - Enter the report column heading text.
c. Alignment - Select the heading alignment. Note that your alignment selectionmust be supported by the selected report template..
d. Alternative Label - Enter the alternative label to use in dialogs and in theSingle Row View. Use an alternative label when the heading contains extraformatting, such as HTML tags, which do not display properly.
6. To control how column values display and for editable grids how the column valueis edited:
a. Find Identification.
b. Type - Select how the column is rendered.
Different settings are available depending on the selected Type. For example,for an editable grid, select the Type Display Only to make a columnuneditable. Choose the Type Hidden for primary key columns that should notbe seen or other columns that are only used in templates such as icon ordetail view, link targets, or columns of type HTML Expression.
Note:
To view help for an attribute, select the attribute in the PropertyEditor and click the Help tab in the central pane.
7. To control how users can manipulate a column:
a. Find Enable Users To.
b. Sort/Control Break/Aggregate - Select whether end users can use this columnin sorts, control breaks, and aggregates. Select Yes or No.
Chapter 9Managing Interactive Grids
9-37
Tip:
Enabling these operations can cause performance issues, especially onlarge data sets or where appropriate column indexes are not available.
8. To save your changes click Save. To save and run the page, click Save and RunPage.
See Also:
"Right Pane of Page Designer (Property Editor) (page 8-17)"
9.5.3.2 Defining a Column as a List of Values for FilteringYou can define an interactive grid column as a list of values to improve the speed ofbuilt-in filter tools.
To define a report column as a list of values:1. View the page in Page Designer:
a. On the Workspace home page, click the App Builder icon.
b. Select an application.
c. Select a page.
Page Designer appears.
2. In the Rendering tab, locate the region and expand the Columns node.
3. Select the desired column.
The Property Editor displays the attributes for the column. Attributes are organizedin groups.
Tip:
To find a group or attribute, enter keywords in the Filter Propertiesfield. The Property Editor displays the group or attributes. Or, click Go toGroup and select the group.
4. In the Property Editor, find Column Filter. Specify the following:a. Enabled - Specify whether end users can filter this column. Select Yes or No.
b. LOV Type - Select how to derive the list of values for the filter when a userclicks on the column header or in filter dialogs. See Page Designer Help formore details.
Tip:
To view help for an attribute, select the attribute in the PropertyEditor and click the Help tab in the central pane.
Chapter 9Managing Interactive Grids
9-38
5. To save your changes click Save. To save and run the page, click Save and RunPage.
9.5.3.3 Creating a Column Link in an Interactive GridUse Column Attributes to create a link from a report to another page in yourapplication or to a URL.
To create a column link to another page:
1. View the page in Page Designer:
a. On the Workspace home page, click the App Builder icon.
b. Select an application.
c. Select a page.
Page Designer appears.
2. In the Rendering tab, locate the region and expand the Columns node.
3. Select the desired column.
The Column attributes appear in the Property Editor. Attributes are organized ingroups.
Tip:
To find a group or attribute, enter keywords in the Filter Propertiesfield. The Property Editor displays the group or attributes. Or, click Go toGroup and select the group.
4. FindIdentification. From Type, select Link.
5. Find Link and click No Link Defined.
The Link Builder - Target dialog appears. The Target Type you select determinesthe steps that follow.
6. To create a link to another page, in the Link Builder - Target dialog:
a. Type - Select Page in this application.
b. Page - Specify the target page number.
c. Set Items - Select a Name and Value to specify session state for an item.
d. Clear Session State, Clear Cache - Specify the page numbers on which toclear cache. To specify multiple pages, enter a comma-delimited list of pagenumbers.
e. Rest Pagination - Select Yes to reset pagination for this page.
f. Advanced, Request - Specify the request to be used.
g. Click OK.
7. To create a link to another page in another application, in the Link Builder - Targetdialog:
a. Type - Select Page in a different application.
b. Application - Specify the application.
Chapter 9Managing Interactive Grids
9-39
c. Page - Specify the target page number.
d. Set Items - Select a Name and Value to specify session state for an item.
e. Clear Session State, Clear Cache - Specify the page numbers on which toclear cache. To specify multiple pages, enter a comma-delimited list of pagenumbers.
f. Rest Pagination - Select Yes to reset pagination for this page.
g. Advanced, Request - Specify the request to be used.
h. Click OK.
8. To create a link to a URL, in the Link Builder - Target dialog:
a. Type - Select URL.
b. URL - Enter the URL address.
c. Click OK.
9. To save your changes click Save. To save and run the page, click Save and RunPage.
9.5.4 About Customizing Interactive Grids in a Running ApplicationWhen running an application, users can alter the report layout using Column menusand sort options, rearrange columns by dragging and dropping, and change how datadisplays using options on the Actions menu.
When an interactive grid is editable, users can also edit the underlying data, add rows,delete rows, and refresh rows. After users customize an interactive grid they can saveit. However, the available save capabilities differ depending upon the user type.
9.5.5 Saving Interactive GridsAfter users customize an interactive grid they can save it as either a Private or Publicreport.
Only the user who creates a Private report can view, save, rename, or delete it.Report developers have additional save capabilities in that they can save the Primaryreport (that is, the report that displays to all users), or create an Alternative report totest multiple report layouts.
Tip:
To see a working examples of saved interactive grids, install the sampleapplication, Sample Interactive Grids and review Reporting, Saved Reports .See "Installing a Packaged Application (page 3-4)."
• How the User Type Effects Available Save Options (page 9-41)
• About Configuration Dependencies When Saving Interactive Grids (page 9-41)
• Saving a Private Interactive Grid (page 9-42)
• Saving a Public Interactive Grid (page 9-42)
Chapter 9Managing Interactive Grids
9-40
• Saving or Renaming a Primary Interactive Grid (page 9-43)
• Saving an Alternative Interactive Grid (page 9-43)
• Renaming a Saved Interactive Grid Report (page 9-44)
• Deleting a Saved Interactive Grid Report (page 9-44)
• Resetting a Saved Interactive Grid Report (page 9-44)
9.5.5.1 How the User Type Effects Available Save OptionsAfter users customize an interactive grid they can save it. However, the available savecapabilities differ depending upon the user type.
End Users
End users can save an interactive grid as follows:
• Private report. Only the user who creates a Private report can view, save, rename,or delete it. All users (that is, end users and developers) can create interactive gridPrivate reports.
• Public report. All users can view a Public report. However, only the user whocreates a Public report can save, rename, or delete it. All other users can view aPublic report and save it under a new report name.
Tip:
End users can only save Public reports if the report developer has enabledthat capability. See "Enabling Users to Save Public Reports in InteractiveGrids (page 9-30)."
Developers
In addition to Private and Public reports, a developer can save two other reportformats:
• Primary report. The Primary report displays to all users. Only a developer cansave a new Primary report, rename it, or delete it.
• Alternative report. An Alternative report enables developers to create multiplereport layouts. Only developers can save, rename, or delete an Alternative report.
9.5.5.2 About Configuration Dependencies When Saving Interactive GridsTo save a customized version of an interactive grid, users select the Actions menu andthen click Report and then Save or Save As. End users can only access Save optionsif the application developer defines an authentication scheme at the application-level.
Other configuration issues that impact a user’s ability to save an interactive gridinclude:
• Interactive Grid Toolbar Availability. Developers can edit the interactive gridAttribute, Toolbar to determine if an interactive grid includes a toolbar. If thetoolbar is disabled, all the options on the Actions menu, including Save and SaveAs, are unavailable.
Chapter 9Managing Interactive Grids
9-41

• Support for Saving Public Reports. By default, end users cannot save Publicreports. To enable support for Public reports, developers edit the report Attribute,Enables Users To, Save Public Report.
9.5.5.3 Saving a Private Interactive GridAll users (that is, both end users and developers) can save a Private interactive grid.Only the user who creates a Private interactive grid can view, save, rename, or deleteit.
To save a Private interactive grid:
1. Run the interactive grid.
2. Customize the report (for example, show, hide, or move columns, create filters,and so on).
3. Click the Actions menu.
4. Select Report and then Save As.
5. In the Report - Save As dialog:
• Type - Select Private.
• Name - Enter a name for the report.
• Click Save.
Private reports display on the Saved Reports list on the toolbar under the heading,Private.
9.5.5.4 Saving a Public Interactive GridAll users (that is, both end users and developers) can save a Public interactive grid.However, only the user who creates a Public interactive grid can save, rename, ordelete it. Users who did not create the public report can view it and also have theoption to make their own copy of it using the Save As option.
Note:
End users can only save Public interactive grids if the report developer hasenabled that capability. See "Enabling Users to Save Public Reports inInteractive Grids (page 9-30)".
To save a Public interactive grid:
1. Run the interactive grid.
2. Customize the report (for example, show, hide, or move columns, create filters,and so on).
3. Click the Actions menu.
4. Select Report and then Save As.
5. In the Report - Save As dialog:
• Type - Select Public.
Chapter 9Managing Interactive Grids
9-42
• Name - Enter a name for the report.
• Click Save.
Public reports display on the Saved Reports list on the toolbar under the heading,Public.
9.5.5.5 Saving or Renaming a Primary Interactive GridA Primary interactive grid displays to all users. Only developers can save or renamePrimary reports. It is impossible to delete a primary report.
To save or rename a Primary interactive grid:
1. Run the interactive grid as a developer.
2. To customize and then save a primary interactive grid:
a. Customize the report (for example, show, hide, or move columns, createfilters, and so on).
b. Click the Actions menu.
c. Select Report and then Save.
3. To rename a primary report:
a. Click the Actions menu.
b. Select Report and then Edit.
The Report - Edit dialog appears.
c. In Name, enter a new name and click Save.
4. Select Report and then Save.
If multiple reports have been redefined, the Primary report displays on the SavedReports list on the toolbar under the heading, Default.
9.5.5.6 Saving an Alternative Interactive GridAlternative reports enable a developers to optionally define multiple report layouts,which are available to all users (subject to any authorization scheme, if defined). Onlydevelopers can save, rename or delete an alternative report. Only the developer whocreates an interactive grid can save, rename, or delete an Alternative report.
To save an Alternative interactive grid:
1. Run the interactive grid as a developer.
2. Customize the report (for example, show, hide, or move columns, create filters,and so on).
3. Click the Actions menu.
4. Select Report and then Save As.
• Type - Select Alternative.
• Name - Enter a name for the report.
• Authorization - Select an alternative authorization scheme to restrict who canview this report.
• Click Save.
Chapter 9Managing Interactive Grids
9-43
An Alternative report displays on the Saved Reports list on the toolbar under theheading, Default.
9.5.5.7 Renaming a Saved Interactive Grid ReportAll users can rename the interactive grid reports they create.
To rename an interactive grid report:
1. Run the interactive grid.
2. From the Saved Report list on the toolbar, select the report.
3. Click the Actions menu and then select Report and then Edit.
4. In the Report - Edit dialog:
a. Type - Select the type of report to be edited.
b. Name - Enter a new name.
c. Click Save.
The new report name displays in the Saved Reports list on the toolbar.
9.5.5.8 Deleting a Saved Interactive Grid ReportAll users can delete the interactive grid reports they create.
To delete an interactive grid report:
1. Run the interactive grid.
2. From the Saved Report list on the toolbar, select the report.
3. Click the Actions menu and then select Report and then Delete.
A confirmation dialog appears.
4. Confirm your request and click OK.
The report disappears from the Saved Reports list on the toolbar.
9.5.5.9 Resetting a Saved Interactive Grid ReportAll users can reset an interactive grid report to the last saved version.
To reset an interactive grid report:
1. Run the interactive grid.
2. From the Saved Report list on the toolbar, select the report.
3. Customize the report (for example, show, hide, or move columns, create filters,and so on).
4. Reset the report to the last saved version. Click the Actions menu and then selectReport and then Reset.
Tip:
Alternatively, you can also click the Reset button on the toolbar.
Chapter 9Managing Interactive Grids
9-44
The revised report appears.
9.6 Managing Interactive ReportsAn interactive report is the formatted result of a SQL query that is only supported onDesktop pages. End users can customize the report layout and data displayed byselecting options on the Actions menu. Developers control how a interactive reportworks by editing the following attributes in Page Designer: region attributes, reportAttributes, and Column attributes.
Tip:
Interactive grids include the customization capabilities available in interactivereports plus the ability to rearrange the report interactively using the mouseand keyboard. To learn more see "Interactive Grid (page 9-2)".
• Managing Interactive Report Region Attributes (page 9-45)Each application page contains one or more regions. A region is an area on apage that serves as a container for content. Developers edit region attributes toalter the SQL source, change the region layout and appearance, define a regiondisplays selector, and create region conditions.
• Managing Interactive Report Attributes (page 9-47)Report Attributes control how an interactive report works. Developers editinteractive grid Attributes to control if end users can edit the underlying data,configure report pagination, create error messages, configure the toolbar anddownload options, control if users can save public reports, and add Icon and DetailViews.
• Managing Interactive Report Column Attributes (page 9-66)Column attributes enable developers to control the display, features, and behaviorof interactive grid columns. Developers edit Column attributes to alter nearly allaspects of column behavior, including altering the layout and appearance, creatingvalidations, defining column links, creating column filters, and adding support forexport and printing.
• Customizing Interactive Reports in a Running Application (page 9-72)When running an application, users (that is, both end users and developers) canalter the layout of interactive reports data by choosing the columns they areinterested in, applying filters, highlighting, and sorting. They can also definebreaks, aggregations, charts, group bys, and add their own computations.
• Linking to Interactive Reports (page 9-80)Developers can use the syntax in the Request value and ItemNames section of theURL to link to interactive reports.
9.6.1 Managing Interactive Report Region AttributesEach application page contains one or more regions. A region is an area on a pagethat serves as a container for content. Developers edit region attributes to alter theSQL source, change the region layout and appearance, define a region displaysselector, and create region conditions.
Chapter 9Managing Interactive Reports
9-45
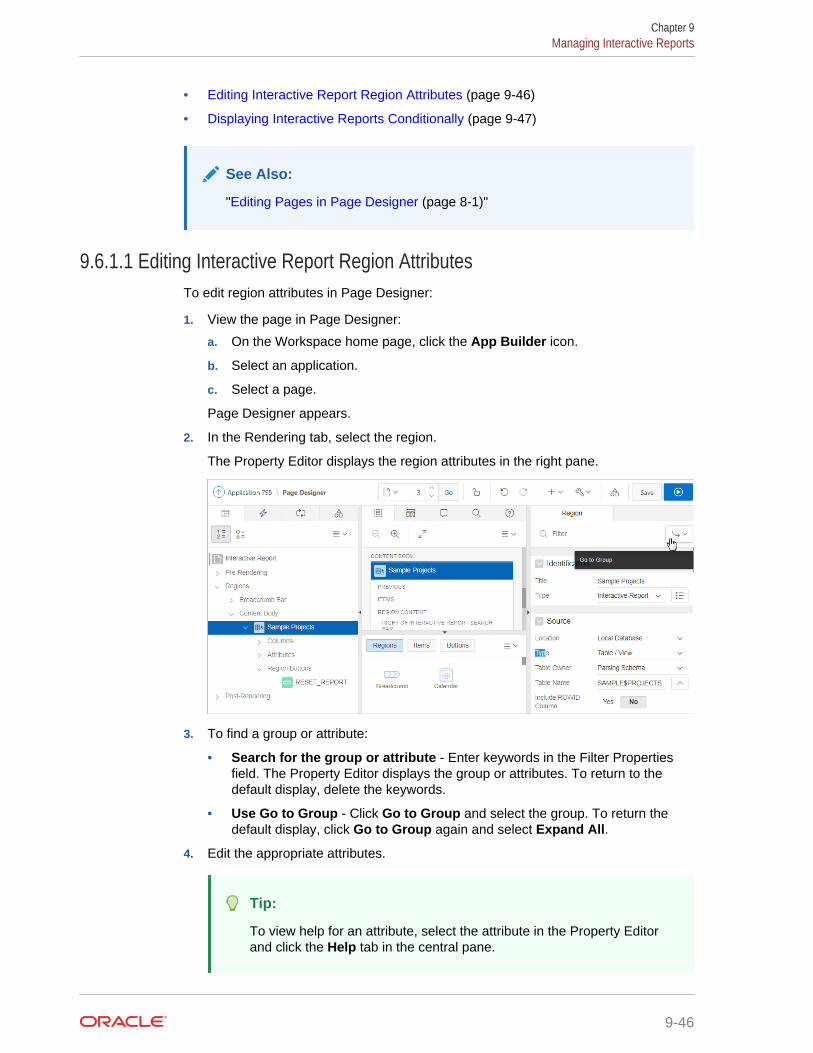
• Editing Interactive Report Region Attributes (page 9-46)
• Displaying Interactive Reports Conditionally (page 9-47)
See Also:
"Editing Pages in Page Designer (page 8-1)"
9.6.1.1 Editing Interactive Report Region AttributesTo edit region attributes in Page Designer:
1. View the page in Page Designer:
a. On the Workspace home page, click the App Builder icon.
b. Select an application.
c. Select a page.
Page Designer appears.
2. In the Rendering tab, select the region.
The Property Editor displays the region attributes in the right pane.
3. To find a group or attribute:
• Search for the group or attribute - Enter keywords in the Filter Propertiesfield. The Property Editor displays the group or attributes. To return to thedefault display, delete the keywords.
• Use Go to Group - Click Go to Group and select the group. To return thedefault display, click Go to Group again and select Expand All.
4. Edit the appropriate attributes.
Tip:
To view help for an attribute, select the attribute in the Property Editorand click the Help tab in the central pane.
Chapter 9Managing Interactive Reports
9-46
5. To save your changes click Save. To save and run the page, click Save and RunPage.
9.6.1.2 Displaying Interactive Reports ConditionallyYou can choose to have interactive reports display conditionally by editing regionattributes.
To display an interactive report conditionally:
1. View the page in Page Designer:
a. On the Workspace home page, click the App Builder icon.
b. Select an application.
c. Select a page.
Page Designer appears.
2. In the Rendering tab, locate and select the region containing the report.
The Property Editor displays the attributes. Attributes are organized in groups.
Tip:
To find a group or attribute, enter keywords in the Filter Propertiesfield. The Property Editor displays the group or attributes. Or, you canclick Go to Group and select the group..
3. Configure Server-side Condition:
a. Find Server-side Condition.
b. For Type, select a condition type and follow the on-screen instructions
Page Designer notifies you of errors and warnings you need to address beforeyou can save the page. The Messages tab displays a red or yellow badgeindicating the number of messages you need to address
4. To save your changes click Save. To save and run the page, click Save and RunPage.
Tip:
Asynchronous JavaScript and XML (Ajax) is used throughout interactivereports. Because Ajax is asynchronous, the value evaluated for conditionaldisplay must be in the session. To display an interactive report conditionallybased on specified value, use a page item instead of using a :REQUEST value.Using :REQUEST in a conditional display causes the interactive report functionincorrectly.
9.6.2 Managing Interactive Report AttributesReport Attributes control how an interactive report works. Developers edit interactivegrid Attributes to control if end users can edit the underlying data, configure report
Chapter 9Managing Interactive Reports
9-47
pagination, create error messages, configure the toolbar and download options,control if users can save public reports, and add Icon and Detail Views.
• Editing Interactive Report Attributes (page 9-48)
• Managing Link Columns (page 9-49)
• Customizing the Interactive Report Search Bar (page 9-53)
• Customizing the Actions Menu (page 9-55)
• Configuring Actions Menu Download Options (page 9-56)
• Controlling Interactive Report Pagination (page 9-61)
• Enabling Icon View (page 9-61)
• Enabling Detail View (page 9-64)
• Configuring Advanced Attributes for Interactive Reports (page 9-65)
See Also:
"Editing Pages in Page Designer (page 8-1)"
9.6.2.1 Editing Interactive Report AttributesTo edit interactive report Attributes in Page Designer:
1. View the page in Page Designer:
a. On the Workspace home page, click the App Builder icon.
b. Select an application.
c. Select a page.
Page Designer appears.
2. In the Rendering tab, locate the region containing the report.
3. Under the region, select the Attributes node.
The Property Editor displays the attributes. Attributes are organized in groups.
Tip:
To find a group or attribute, enter keywords in the Filter Propertiesfield. The Property Editor displays the group or attributes. Or, you canclick Go to Group and select the group.
4. Edit the appropriate attributes.
Tip:
To view help for an attribute, select the attribute in the Property Editorand click the Help tab in the central pane.
Chapter 9Managing Interactive Reports
9-48
5. To save your changes click Save. To save and run the page, click Save and RunPage.
9.6.2.2 Managing Link ColumnsA Link Column displays on the left side of an interactive report. Developers canconfigure a Link Column to link to a single row view, a custom target, or be excludedfrom the report.
Tip:
A Link Column cannot be sorted, hidden, or moved by an end user and doesnot interact with the standard column link defined on the Column Attributespage.
• Linking to a Single Row View (page 9-49)
• Linking to a Specific Page (page 9-50)
• Linking to a URL (page 9-51)
• Excluding a Link Column (page 9-52)
9.6.2.2.1 Linking to a Single Row ViewTo link to a single row view in an interactive report:
1. View the page in Page Designer:
a. On the Workspace home page, click the App Builder icon.
b. Select an application.
c. Select a page.
Page Designer appears.
2. In the Rendering tab, locate the region containing the report.
3. Under Region, select the Attributes node.
The Property Editor displays the attributes. Attributes are organized in groups. Tofind a group or attribute, enter keywords in the Filter Properties field. The PropertyEditor displays the group or attributes. Or, you can click Go to Group and selectthe group.
Tip:
To view help for an attribute, select the attribute in the Property Editorand click the Help tab in the central pane.
4. Configure Link attributes:
a. Find the Link group.
b. Link Column - Select Link to Single Row View.
Chapter 9Managing Interactive Reports
9-49
c. Uniquely Identify Rows by - Select ROWID or Unique Column.
If you select, Unique Column, specify the column in the Unique Column field.
d. Link Icon - Accept the default or specify the path to another icon.
e. Link Attributes - Optionally specify additional column link attributes to beincluded in the <a href= > tag (for example, a link target, classes, or styles).
f. Authorization Scheme - Select an authorization scheme to associate with theLink Column. This authorization scheme must evaluate to TRUE in order forthe Link Column to be rendered in the report.
g. Condition Type - Select a condition type from the list that must be met in orderfor this link to be rendered.
5. Find the Single Row View group:
a. Exclude Null Values - Specify whether null columns are hidden on the SingleRecord View
b. Only Displayed Columns - Specify whether only those columns currentlydisplayed are displayed in the Single Record View. If you specify No thenhidden report columns may also be shown on the Single Record View.
6. To save your changes click Save. To save and run the page, click Save and RunPage.
Tip:
If an interactive report links to single row view and the link icon is missing ALTtext or has empty ALT text, the alt="Single Row View" gets includedautomatically to improve accessibility. This can be further improved bymaking the ALT text something specific to the row, for example alt="ViewRow: #COLUMN_NAME#" (where COLUMN_NAME should be a column that helpsuniquely identify the current row).
9.6.2.2.2 Linking to a Specific PageTo link to a specific page:
1. View the page in Page Designer:
a. On the Workspace home page, click the App Builder icon.
b. Select an application.
c. Select a page.
Page Designer appears.
2. In the Rendering tab, locate the region containing the report.
3. Under Region, select the Attributes node.
The Property Editor displays the attributes. Attributes are organized in groups. Tofind a group or attribute, enter keywords in the Filter Properties field. The PropertyEditor displays the group or attributes. Or, you can click Go to Group and selectthe group.
Chapter 9Managing Interactive Reports
9-50
Tip:
To view help for an attribute, select the attribute in the Property Editorand click the Help tab in the central pane.
4. Configure Link attributes:
a. Find the Link group.
b. Link Column - Select Link to Custom Target.
c. Target - Click No Link Defined.
The Link Builder - Target dialog appears.
• Target Type - Select Page in this Application.
• Page - Select the target page number.
• Set Items - Select a Name and Value to specify session state for an item.
• Clear Session State, Clear Cache - Specify the page numbers on which toclear cache. To specify multiple page, enter a comma-delimited list ofpage numbers.
• Clear Session State, Reset Pagination - To reset the pagination for thispage, select Yes for Reset Pagination.
• Advanced, Request - Specify the request to be used.
• Click OK.
d. Link Icon - Enter the HTML to be used for the link. Use an image tag to displayimages, or pick from the list of default images. If notdefined, #IMAGE_PREFIX#ws/small_page.gif is used.
e. Link Attributes (Optional) - Enter additional column link attributes to beincluded in the <a href= > tag (for example, a link target, classes, or styles).
To view examples, select the attribute in the Property Editor and click the Helptab in the central pane.
5. To save your changes click Save. To save and run the page, click Save and RunPage.
9.6.2.2.3 Linking to a URLTo link to a URL:
1. View the page in Page Designer:
a. On the Workspace home page, click the App Builder icon.
b. Select an application.
c. Select a page.
Page Designer appears.
2. In the Rendering tab, locate the region containing the report.
3. Under Region, select the Attributes node.
The Property Editor displays the attributes. Attributes are organized in groups.
Chapter 9Managing Interactive Reports
9-51
Tip:
To find a group or attribute, enter keywords in the Filter Propertiesfield. The Property Editor displays the group or attributes. Or, you canclick Go to Group and select the group.
4. Configure Link attributes:
a. Find the Link group.
b. Link Column - Select Link to Custom Target.
c. Target - Click the No Link Defined.
The Link Builder - Target dialog appears.
• Target Type - Select URL.
• Click OK.
d. Link Icon - Enter the HTML to be used for the link. Use an image tag to displayimages, or pick from the list of default images. If notdefined, #IMAGE_PREFIX#ws/small_page.gif is used.
e. Link Attributes (Optional) - Enter additional column link attributes to beincluded in the <a href= > tag (for example, a link target, classes, or styles).
To view examples, select the attribute in the Property Editor and click the Helptab in the central pane.
5. To save your changes click Save. To save and run the page, click Save and RunPage.
9.6.2.2.4 Excluding a Link ColumnTo exclude a column link:
1. View the page in Page Designer:
a. On the Workspace home page, click the App Builder icon.
b. Select an application.
c. Select a page.
Page Designer appears.
2. In the Rendering tab, locate the region containing the report.
3. Under Region, select the Attributes node.
The Property Editor displays the attribute. Attributes are organized in groups. Tofind a group or attribute, enter keywords in the Filter Properties field. The PropertyEditor displays the group or attributes. Or, you can click Go to Group and selectthe group.
Tip:
To view help for an attribute, select the attribute in the Property Editorand click the Help tab in the central pane.
Chapter 9Managing Interactive Reports
9-52
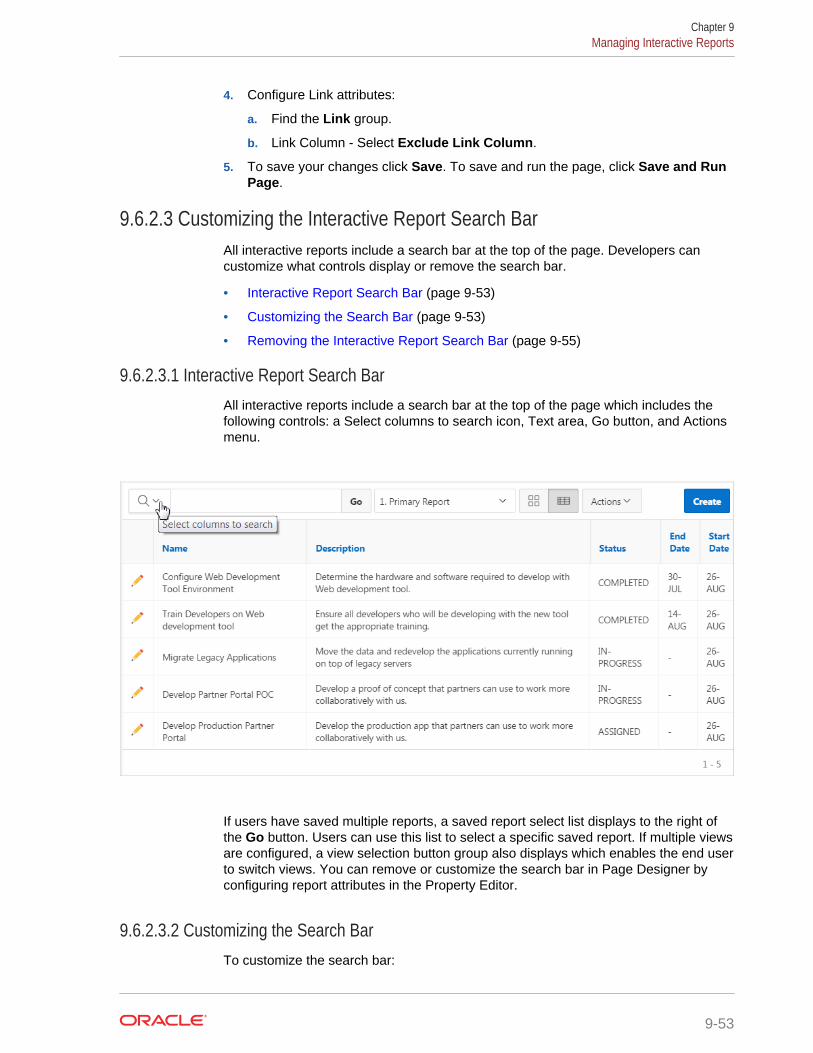
4. Configure Link attributes:
a. Find the Link group.
b. Link Column - Select Exclude Link Column.
5. To save your changes click Save. To save and run the page, click Save and RunPage.
9.6.2.3 Customizing the Interactive Report Search BarAll interactive reports include a search bar at the top of the page. Developers cancustomize what controls display or remove the search bar.
• Interactive Report Search Bar (page 9-53)
• Customizing the Search Bar (page 9-53)
• Removing the Interactive Report Search Bar (page 9-55)
9.6.2.3.1 Interactive Report Search BarAll interactive reports include a search bar at the top of the page which includes thefollowing controls: a Select columns to search icon, Text area, Go button, and Actionsmenu.
If users have saved multiple reports, a saved report select list displays to the right ofthe Go button. Users can use this list to select a specific saved report. If multiple viewsare configured, a view selection button group also displays which enables the end userto switch views. You can remove or customize the search bar in Page Designer byconfiguring report attributes in the Property Editor.
9.6.2.3.2 Customizing the Search BarTo customize the search bar:
Chapter 9Managing Interactive Reports
9-53
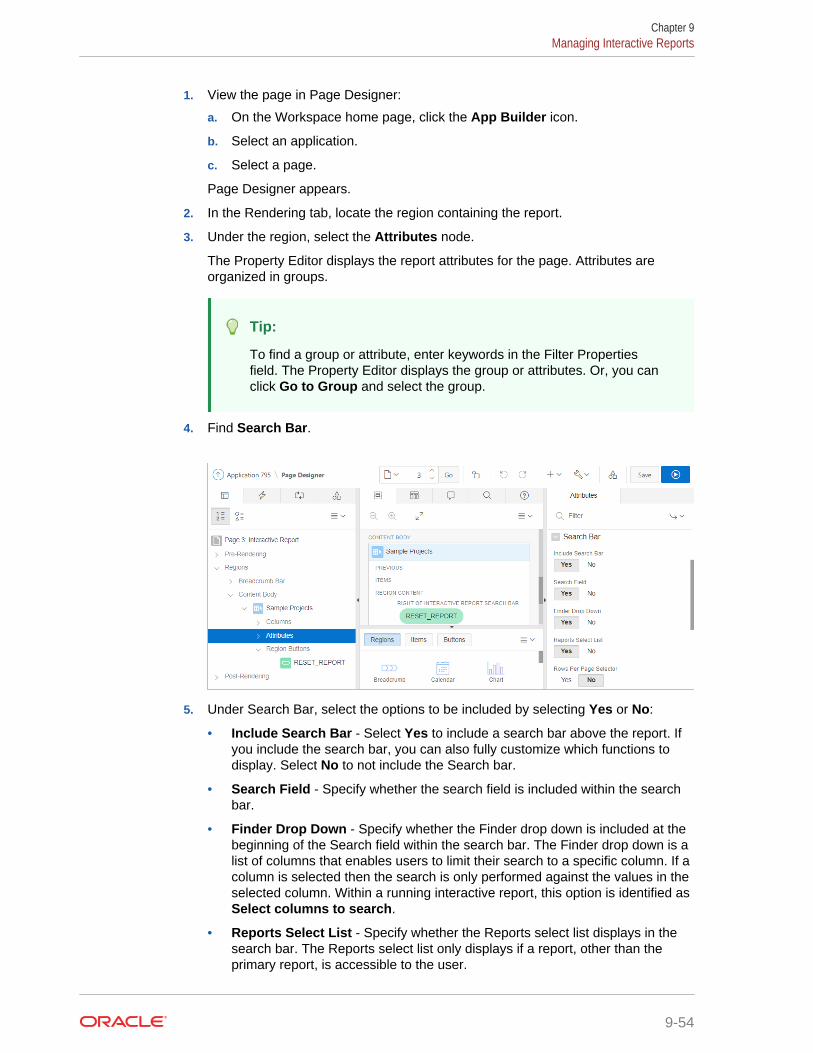
1. View the page in Page Designer:
a. On the Workspace home page, click the App Builder icon.
b. Select an application.
c. Select a page.
Page Designer appears.
2. In the Rendering tab, locate the region containing the report.
3. Under the region, select the Attributes node.
The Property Editor displays the report attributes for the page. Attributes areorganized in groups.
Tip:
To find a group or attribute, enter keywords in the Filter Propertiesfield. The Property Editor displays the group or attributes. Or, you canclick Go to Group and select the group.
4. Find Search Bar.
5. Under Search Bar, select the options to be included by selecting Yes or No:
• Include Search Bar - Select Yes to include a search bar above the report. Ifyou include the search bar, you can also fully customize which functions todisplay. Select No to not include the Search bar.
• Search Field - Specify whether the search field is included within the searchbar.
• Finder Drop Down - Specify whether the Finder drop down is included at thebeginning of the Search field within the search bar. The Finder drop down is alist of columns that enables users to limit their search to a specific column. If acolumn is selected then the search is only performed against the values in theselected column. Within a running interactive report, this option is identified asSelect columns to search.
• Reports Select List - Specify whether the Reports select list displays in thesearch bar. The Reports select list only displays if a report, other than theprimary report, is accessible to the user.
Chapter 9Managing Interactive Reports
9-54
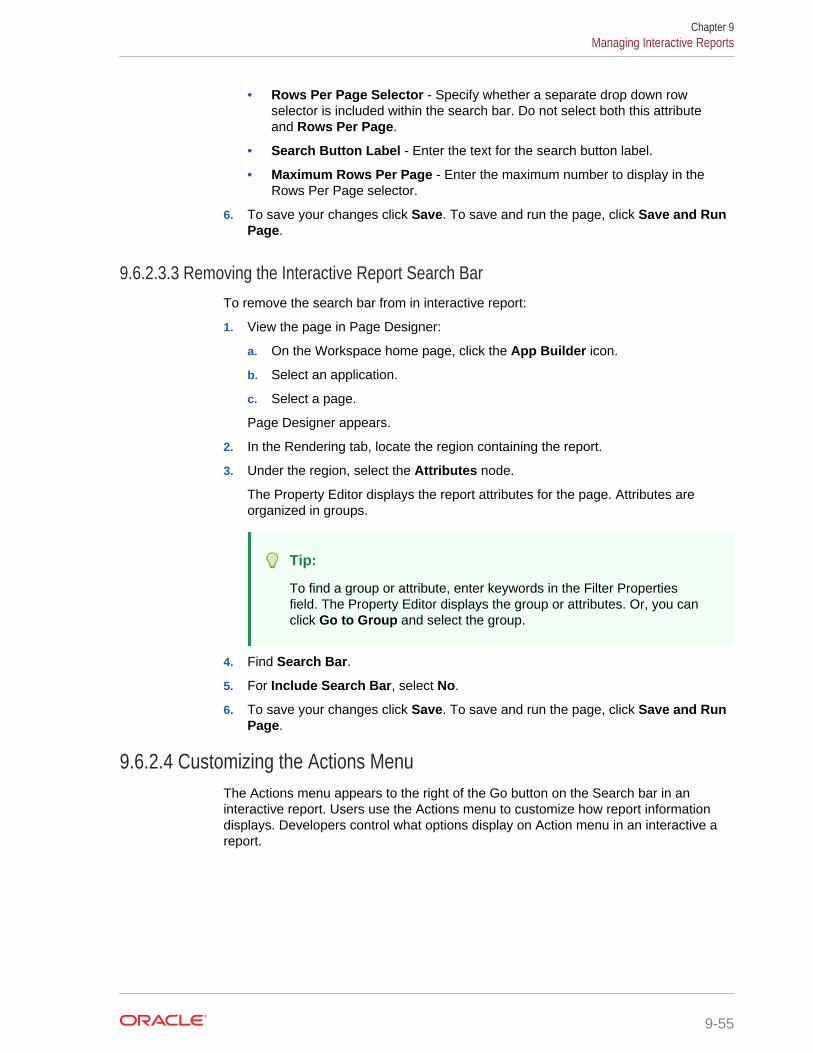
• Rows Per Page Selector - Specify whether a separate drop down rowselector is included within the search bar. Do not select both this attributeand Rows Per Page.
• Search Button Label - Enter the text for the search button label.
• Maximum Rows Per Page - Enter the maximum number to display in theRows Per Page selector.
6. To save your changes click Save. To save and run the page, click Save and RunPage.
9.6.2.3.3 Removing the Interactive Report Search BarTo remove the search bar from in interactive report:
1. View the page in Page Designer:
a. On the Workspace home page, click the App Builder icon.
b. Select an application.
c. Select a page.
Page Designer appears.
2. In the Rendering tab, locate the region containing the report.
3. Under the region, select the Attributes node.
The Property Editor displays the report attributes for the page. Attributes areorganized in groups.
Tip:
To find a group or attribute, enter keywords in the Filter Propertiesfield. The Property Editor displays the group or attributes. Or, you canclick Go to Group and select the group.
4. Find Search Bar.
5. For Include Search Bar, select No.
6. To save your changes click Save. To save and run the page, click Save and RunPage.
9.6.2.4 Customizing the Actions MenuThe Actions menu appears to the right of the Go button on the Search bar in aninteractive report. Users use the Actions menu to customize how report informationdisplays. Developers control what options display on Action menu in an interactive areport.
Chapter 9Managing Interactive Reports
9-55
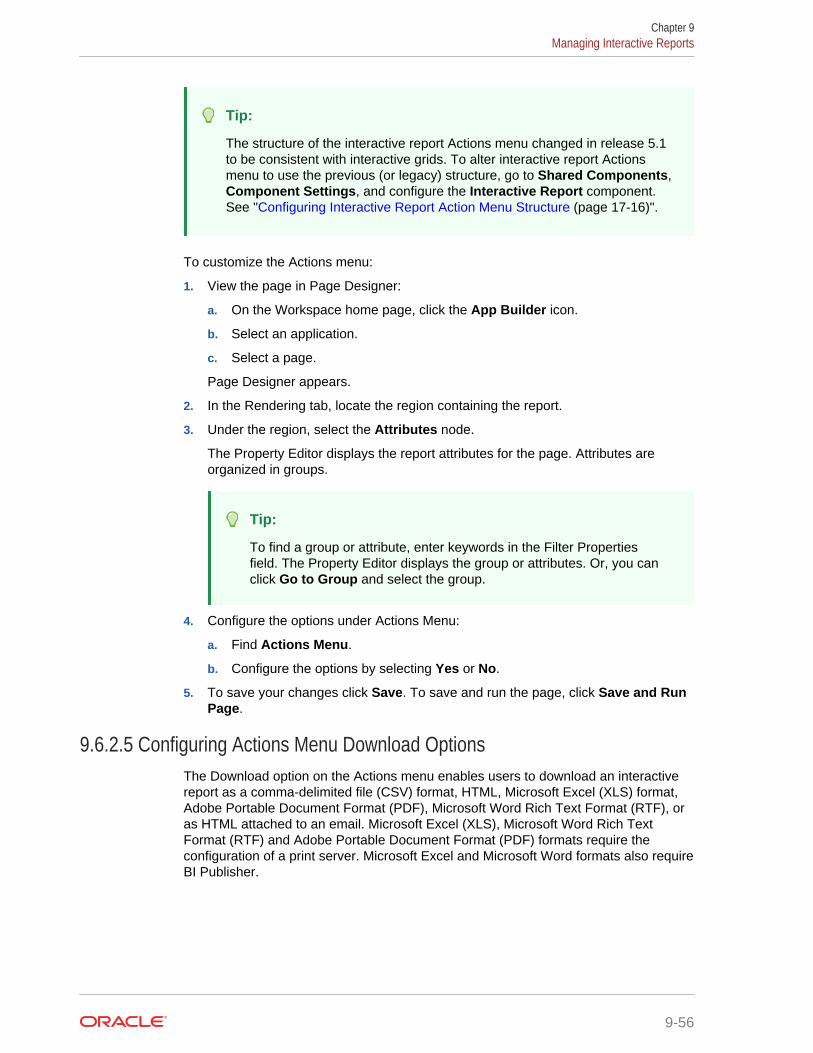
Tip:
The structure of the interactive report Actions menu changed in release 5.1to be consistent with interactive grids. To alter interactive report Actionsmenu to use the previous (or legacy) structure, go to Shared Components,Component Settings, and configure the Interactive Report component.See "Configuring Interactive Report Action Menu Structure (page 17-16)".
To customize the Actions menu:
1. View the page in Page Designer:
a. On the Workspace home page, click the App Builder icon.
b. Select an application.
c. Select a page.
Page Designer appears.
2. In the Rendering tab, locate the region containing the report.
3. Under the region, select the Attributes node.
The Property Editor displays the report attributes for the page. Attributes areorganized in groups.
Tip:
To find a group or attribute, enter keywords in the Filter Propertiesfield. The Property Editor displays the group or attributes. Or, you canclick Go to Group and select the group.
4. Configure the options under Actions Menu:
a. Find Actions Menu.
b. Configure the options by selecting Yes or No.
5. To save your changes click Save. To save and run the page, click Save and RunPage.
9.6.2.5 Configuring Actions Menu Download OptionsThe Download option on the Actions menu enables users to download an interactivereport as a comma-delimited file (CSV) format, HTML, Microsoft Excel (XLS) format,Adobe Portable Document Format (PDF), Microsoft Word Rich Text Format (RTF), oras HTML attached to an email. Microsoft Excel (XLS), Microsoft Word Rich TextFormat (RTF) and Adobe Portable Document Format (PDF) formats require theconfiguration of a print server. Microsoft Excel and Microsoft Word formats also requireBI Publisher.
Chapter 9Managing Interactive Reports
9-56
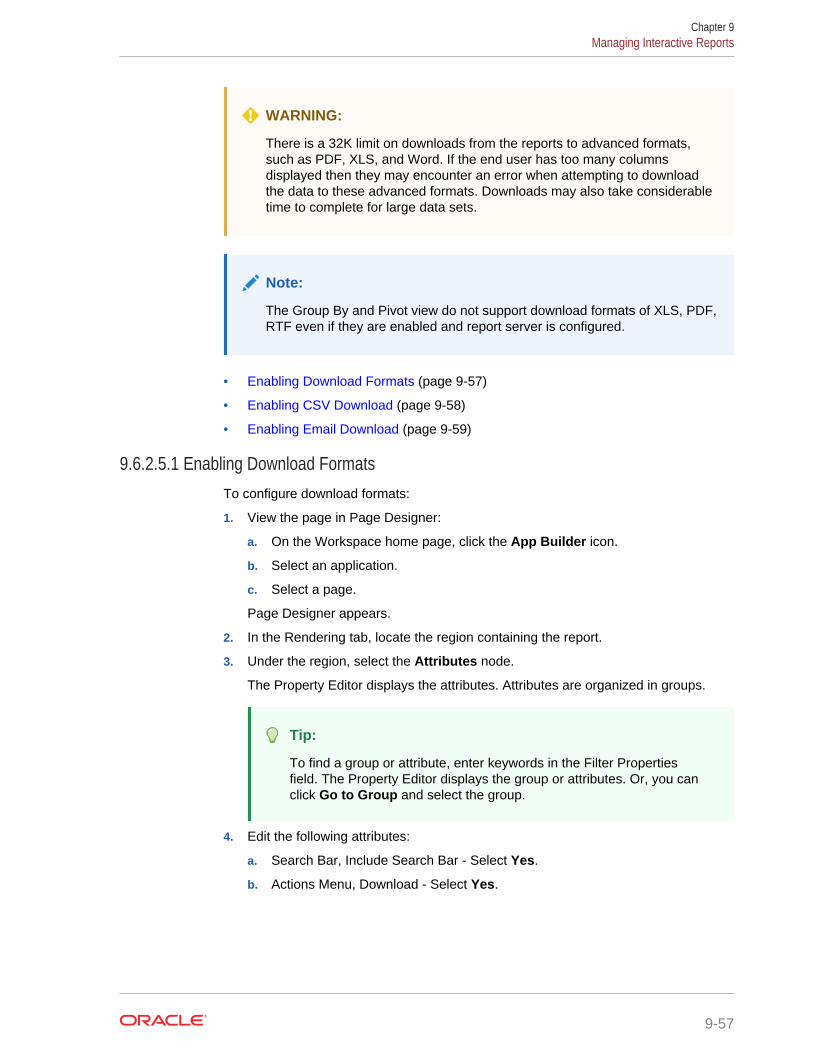
WARNING:
There is a 32K limit on downloads from the reports to advanced formats,such as PDF, XLS, and Word. If the end user has too many columnsdisplayed then they may encounter an error when attempting to downloadthe data to these advanced formats. Downloads may also take considerabletime to complete for large data sets.
Note:
The Group By and Pivot view do not support download formats of XLS, PDF,RTF even if they are enabled and report server is configured.
• Enabling Download Formats (page 9-57)
• Enabling CSV Download (page 9-58)
• Enabling Email Download (page 9-59)
9.6.2.5.1 Enabling Download FormatsTo configure download formats:
1. View the page in Page Designer:
a. On the Workspace home page, click the App Builder icon.
b. Select an application.
c. Select a page.
Page Designer appears.
2. In the Rendering tab, locate the region containing the report.
3. Under the region, select the Attributes node.
The Property Editor displays the attributes. Attributes are organized in groups.
Tip:
To find a group or attribute, enter keywords in the Filter Propertiesfield. The Property Editor displays the group or attributes. Or, you canclick Go to Group and select the group.
4. Edit the following attributes:
a. Search Bar, Include Search Bar - Select Yes.
b. Actions Menu, Download - Select Yes.
Chapter 9Managing Interactive Reports
9-57
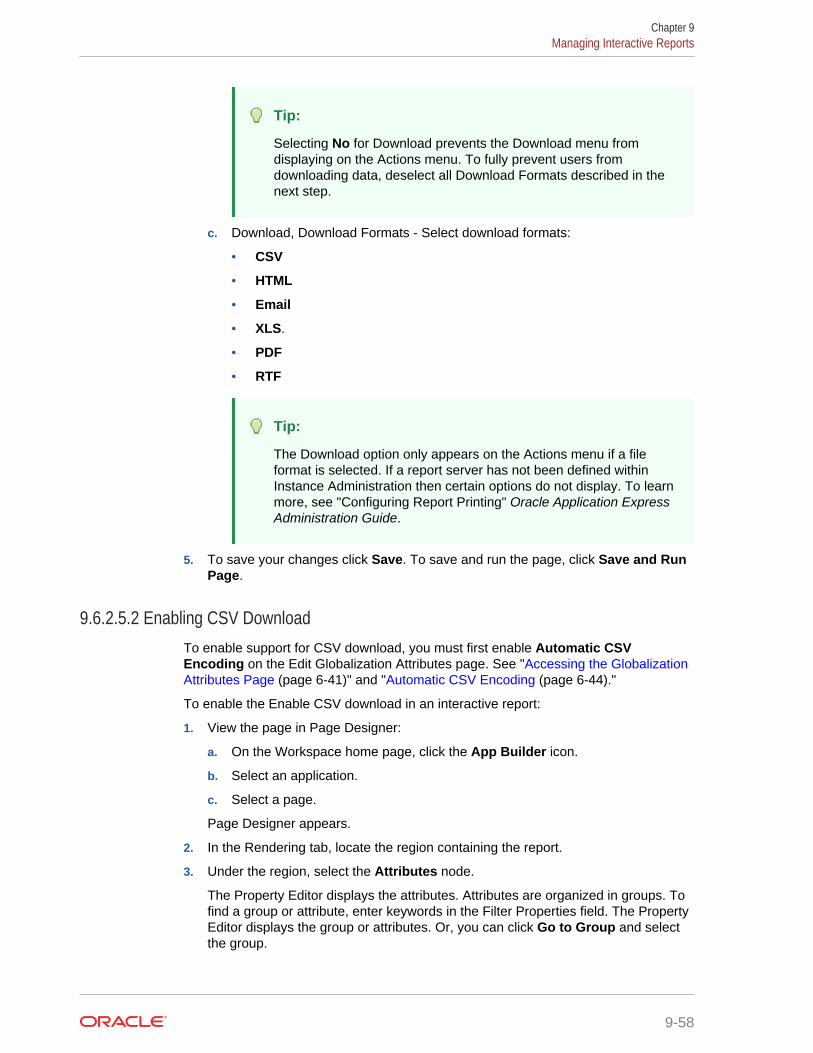
Tip:
Selecting No for Download prevents the Download menu fromdisplaying on the Actions menu. To fully prevent users fromdownloading data, deselect all Download Formats described in thenext step.
c. Download, Download Formats - Select download formats:
• CSV
• HTML
• XLS.
• RTF
Tip:
The Download option only appears on the Actions menu if a fileformat is selected. If a report server has not been defined withinInstance Administration then certain options do not display. To learnmore, see "Configuring Report Printing" Oracle Application ExpressAdministration Guide.
5. To save your changes click Save. To save and run the page, click Save and RunPage.
9.6.2.5.2 Enabling CSV DownloadTo enable support for CSV download, you must first enable Automatic CSVEncoding on the Edit Globalization Attributes page. See "Accessing the GlobalizationAttributes Page (page 6-41)" and "Automatic CSV Encoding (page 6-44)."
To enable the Enable CSV download in an interactive report:
1. View the page in Page Designer:
a. On the Workspace home page, click the App Builder icon.
b. Select an application.
c. Select a page.
Page Designer appears.
2. In the Rendering tab, locate the region containing the report.
3. Under the region, select the Attributes node.
The Property Editor displays the attributes. Attributes are organized in groups. Tofind a group or attribute, enter keywords in the Filter Properties field. The PropertyEditor displays the group or attributes. Or, you can click Go to Group and selectthe group.
Chapter 9Managing Interactive Reports
9-58
Tip:
To view help for an attribute, select the attribute in the Property Editorand click the Help tab in the central pane.
4. Search Bar, Include Search Bar - Select Yes.
5. Actions Menu, Download - Select Yes.
Tip:
Selecting No for Download prevents the Download menu from displayingon the Actions menu. To fully prevent users from downloading data,deselect all Download Formats described in the next step.
6. Download, Download Formats:
a. Download Formats - Select CSV.
Tip:
The Download option only appears on the Actions menu if a fileformat is selected.
b. CSV Separator - Define the column separator. If no value is entered, acomma or semicolon is used depending on your current NLS settings.
c. CSV Enclosed By - Enter a delimiter character. This character delineates thestarting and ending boundary of a data value. Default delimiter is doublequotation marks (" ").
d. Filename - Enter a name for the downloaded document. Do not specify a fileextension, the extension is added automatically. If you leave this blank, theregion name is used as the file name.
7. To save your changes click Save. To save and run the page, click Save and RunPage.
9.6.2.5.3 Enabling Email DownloadYou can configure the Download option to send a static HTML report to specific emailaddresses.
Tip:
Email download is only supported on authenticated pages. If you enableEmail download on a public page, the Email download option does notdisplay in Download dialog.
Chapter 9Managing Interactive Reports
9-59

To enable support for email download, an Oracle Application Express administratormust configure email at the Instance level. See "Configuring Mail" in Oracle ApplicationExpress Administration Guide.
To enable email download:
1. View the page in Page Designer:
a. On the Workspace home page, click the App Builder icon.
b. Select an application.
c. Select a page.
Page Designer appears.
2. In the Rendering tab, locate the region containing the report.
3. Under the region, select the Attributes node.
The Property Editor displays the attributes. Attributes are organized in groups.
Tip:
To view help for an attribute, select the attribute in the Property Editorand click the Help tab in the central pane.
4. To find a group or attribute:
• Search for the group or attribute - Enter keywords in the Filter Propertiesfield. The Property Editor displays the group or attributes. To return to thedefault display, delete the keywords.
• Use Go to Group - Click Go to Group and select the group. To return thedefault display, click Go to Group again and select Expand All.
5. Search Bar, Include Search Bar - Select Yes.
6. Actions Menu, Download - Select Yes.
Tip:
Selecting No for Download prevents the Download menu from displayingon the Actions menu. To fully prevent users from downloading data,deselect all Download Formats described in the next step.
7. Download Formats - Select Email.
Tip:
The Download option only appears on the Actions menu if a file format isselected.
8. To save your changes click Save. To save and run the page, click Save and RunPage.
Chapter 9Managing Interactive Reports
9-60
Note:
Email sent from an Email Download contains a system generated emailsignature identifying who sent the email. This signature cannot beremoved.
9.6.2.6 Controlling Interactive Report PaginationPagination provides the end user with information about the number of rows and thecurrent position within the result set. You control how pagination displays by makingselections from Pagination attributes on the Attributes page in the Property Editor.
To edit interactive report pagination:
1. View the page in Page Designer:
a. On the Workspace home page, click the App Builder icon.
b. Select an application.
c. Select a page.
Page Designer appears.
2. In the Rendering tab, locate the region containing the report.
3. Under the region, select the Attributes node.
The Property Editor displays the attributes. Attributes are organized in groups.
Tip:
To find a group or attribute, enter keywords in the Filter Propertiesfield. The Property Editor displays the group or attributes. Or, you canclick Go to Group and select the group.
4. Configure Pagination attributes:
a. Find Pagination.
b. Type - Select the pagination type for this report. Often only a certain number ofrows of a report display on a page. In order to include additional rows, theapplication end user must to navigate to the next page of the report.
c. Display Position - Select where the report pagination displays.
Pagination can be shown above or below the report (or both) and can bepositioned on the left or right.
5. To save your changes click Save. To save and run the page, click Save and RunPage.
9.6.2.7 Enabling Icon ViewBy default, most interactive reports display as a report. You can optionally displaycolumns as icons. When configured to display columns as icons, a View Icons icondisplays on the Search bar.
Chapter 9Managing Interactive Reports
9-61
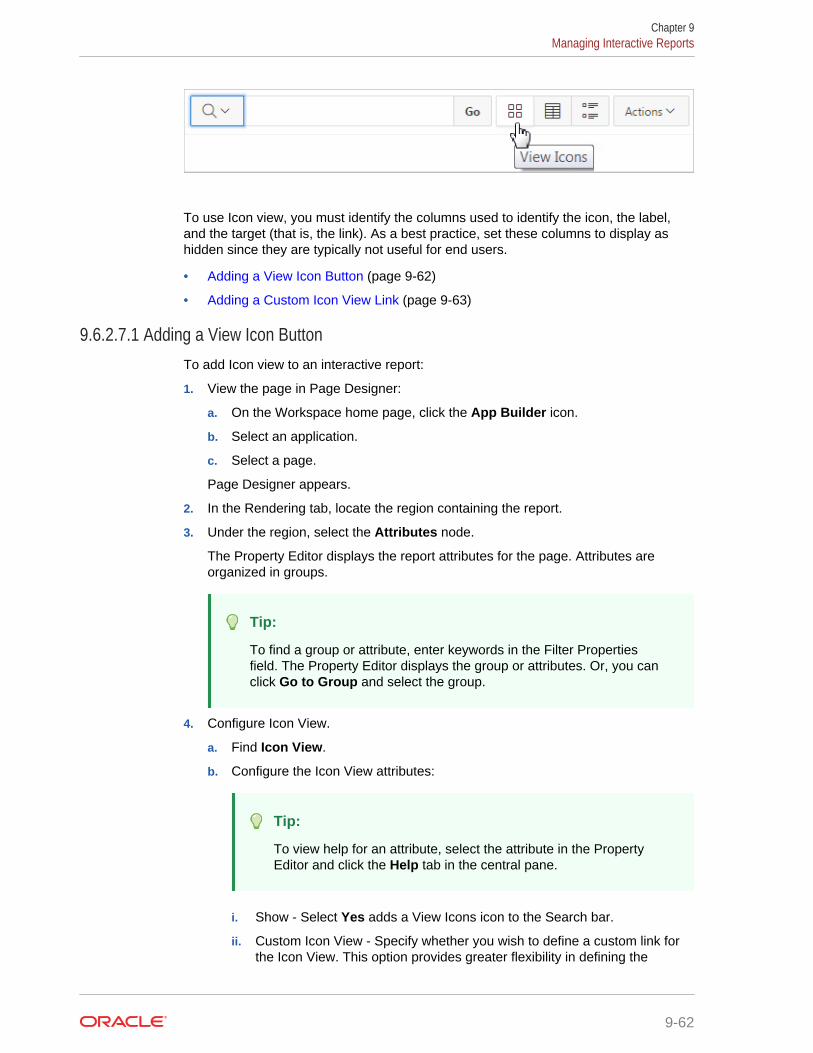
To use Icon view, you must identify the columns used to identify the icon, the label,and the target (that is, the link). As a best practice, set these columns to display ashidden since they are typically not useful for end users.
• Adding a View Icon Button (page 9-62)
• Adding a Custom Icon View Link (page 9-63)
9.6.2.7.1 Adding a View Icon ButtonTo add Icon view to an interactive report:
1. View the page in Page Designer:
a. On the Workspace home page, click the App Builder icon.
b. Select an application.
c. Select a page.
Page Designer appears.
2. In the Rendering tab, locate the region containing the report.
3. Under the region, select the Attributes node.
The Property Editor displays the report attributes for the page. Attributes areorganized in groups.
Tip:
To find a group or attribute, enter keywords in the Filter Propertiesfield. The Property Editor displays the group or attributes. Or, you canclick Go to Group and select the group.
4. Configure Icon View.
a. Find Icon View.
b. Configure the Icon View attributes:
Tip:
To view help for an attribute, select the attribute in the PropertyEditor and click the Help tab in the central pane.
i. Show - Select Yes adds a View Icons icon to the Search bar.
ii. Custom Icon View - Specify whether you wish to define a custom link forthe Icon View. This option provides greater flexibility in defining the
Chapter 9Managing Interactive Reports
9-62
content of the Icon View, including the ability to utilize more than onecolumn. Select Yes or No.
iii. Columns Per Row - Select the number of icons to display per row in IconView. A value of 5 displays 5 icons per row of the report.
iv. Link Column - Select the column that returns the link target of the icon.
v. Image Source Column - Identify the column that returns the image source.
vi. Label Column - Select the column that returns the image label.
5. To save your changes click Save. To save and run the page, click Save and RunPage.
9.6.2.7.2 Adding a Custom Icon View LinkA custom Icon View link provides greater flexibility in defining the content of the IconView, including the ability to utilize more than one column.
To add a custom Icon View link:
1. View the page in Page Designer:
a. On the Workspace home page, click the App Builder icon.
b. Select an application.
c. Select a page.
Page Designer appears.
2. In the Rendering tab, locate the region containing the report.
3. Under the region, select the Attributes node.
The Property Editor displays the report attributes for the page. Attributes areorganized in groups.
Tip:
To find a group or attribute, enter keywords in the Filter Propertiesfield. The Property Editor displays the group or attributes. Or, you canclick Go to Group and select the group.
4. Find Icon View.
5. Configure Icon View attributes:
a. Show - Select Yes.
b. Custom - Select Yes.
c. Columns Per Page - Select the number of icons to display per row in IconView. A value of 5 displays 5 icons per row of the report.
d. Custom Link - Enter the column link for the Icon view. Use substitution stringsfor column names, for example:
<a href="#EMP_LINK#"><img src="#EMP_IMG#" title="#ENAME#"
alt=""><br>#ENAME#</a>
6. To save your changes click Save. To save and run the page, click Save and RunPage.
Chapter 9Managing Interactive Reports
9-63
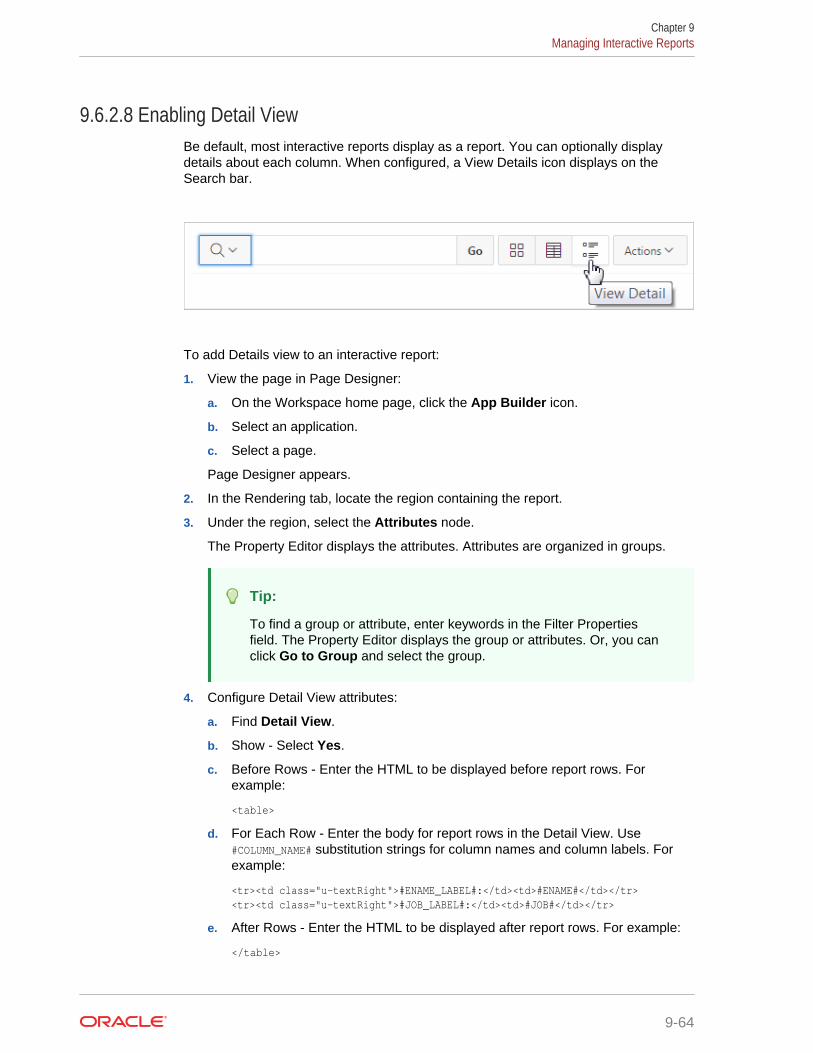
9.6.2.8 Enabling Detail ViewBe default, most interactive reports display as a report. You can optionally displaydetails about each column. When configured, a View Details icon displays on theSearch bar.
To add Details view to an interactive report:
1. View the page in Page Designer:
a. On the Workspace home page, click the App Builder icon.
b. Select an application.
c. Select a page.
Page Designer appears.
2. In the Rendering tab, locate the region containing the report.
3. Under the region, select the Attributes node.
The Property Editor displays the attributes. Attributes are organized in groups.
Tip:
To find a group or attribute, enter keywords in the Filter Propertiesfield. The Property Editor displays the group or attributes. Or, you canclick Go to Group and select the group.
4. Configure Detail View attributes:
a. Find Detail View.
b. Show - Select Yes.
c. Before Rows - Enter the HTML to be displayed before report rows. Forexample:
<table>
d. For Each Row - Enter the body for report rows in the Detail View. Use#COLUMN_NAME# substitution strings for column names and column labels. Forexample:
<tr><td class="u-textRight">#ENAME_LABEL#:</td><td>#ENAME#</td></tr><tr><td class="u-textRight">#JOB_LABEL#:</td><td>#JOB#</td></tr>
e. After Rows - Enter the HTML to be displayed after report rows. For example:
</table>
Chapter 9Managing Interactive Reports
9-64
5. To save your changes click Save. To save and run the page, click Save and RunPage.
9.6.2.9 Configuring Advanced Attributes for Interactive ReportsBy configuring advanced interactive report attributes, developers can define the regionalias, specify an item whose value stores the saved report ID, and define a fromaddress in an interactive report subscription or email download.
• Configuring Advanced Attributes (page 9-65)
• About Emailing from an Interactive Report (page 9-66)
9.6.2.9.1 Configuring Advanced AttributesTo configure Advanced Attributes:
1. View the page in Page Designer:
a. On the Workspace home page, click the App Builder icon.
b. Select an application.
c. Select a page.
Page Designer appears.
2. In the Rendering tab, locate the region containing the report.
3. Under the region, select the Attributes node.
The Property Editor displays the attributes. Attributes are organized in groups.
Tip:
To find a group or attribute, enter keywords in the Filter Propertiesfield. The Property Editor displays the group or attributes. Or, you canclick Go to Group and select the group.
4. Find Advanced and configure the appropriate options.
a. Region Alias:
Enter an alphanumeric alias for this interactive report region. The alias mustbe unique within the application. You can use an alias to reference aninteractive report region in your custom API call. For example, you can write afunction to return the INTERACTIVE_REPORT_ID by querying the ALIAS column inthe APEX_APPLICATION_PAGE_IR view. Since the INTERACTIVE_REPORT_ID value canchange when you export or import the application to different instance,referencing interactive report regions using an alias may be preferable.
b. Report ID Item:
Select a page or application item whose value stores the saved report ID.Interactive report uses this item value to link to a saved report. For example,you can define list of saved reports with links with defined item name andsaved report ID as its value to link to a saved default reports, public or privatereports. The saved report IDs can be retrieved from theAPEX_APPLICATION_PAGE_IR_RPT view.
c. Email From Address:
Chapter 9Managing Interactive Reports
9-65
Enter a valid email address to use as the From address when sending emailfrom this report. Emails are sent from this report for Downloads of type Emailand for Subscriptions. The value can be a literal string containing a valid emailaddress or a static substitution reference defined in the application usingsubstitution syntax.
Oracle does not recommend using an item substitution at the application orpage-level since it only works in an email download, but not for subscriptions.
Examples:
[email protected]&MY_APP_EMAIL_FROM.&APP_EMAIL.
5. To save your changes click Save. To save and run the page, click Save and RunPage.
9.6.2.9.2 About Emailing from an Interactive ReportYou can define the from address for emails sent from an interactive report in two ways:
• Application-level — Edit the Application Email From Address attribute on theEdit Application Definition page.
• Report-level — Access the report Attributes. Under Advanced, edit the Emailfrom Address attribute.
In either case, the value can be a literal string containing a valid email or anapplication substitution defined at the application-level using substitution syntax or&APP_EMAIL. substitution which returns the Application Email From Address defined atthe application-level. Examples:
[email protected]&MY_APP_EMAIL_FROM.&APP_EMAIL.
Note:
Oracle does not recommend using an item substitution at the application orpage-level since it only works in email download, but not for subscriptions.
9.6.3 Managing Interactive Report Column AttributesColumn attributes enable developers to control the display, features, and behavior ofinteractive grid columns. Developers edit Column attributes to alter nearly all aspectsof column behavior, including altering the layout and appearance, creating validations,defining column links, creating column filters, and adding support for export andprinting.
Chapter 9Managing Interactive Reports
9-66
Note:
Some settings are configured at runtime by the report developer and savedas part of the primary or alternate report (for example, column display order,the columns the report is sorted on, and column widths. To learn more aboutsave options, see "Saving Interactive Grids (page 9-40)."
• Editing Interactive Report Column Attributes (page 9-67)
• Creating a Column Link in an Interactive Report (page 9-68)
• Defining a Column as a List of Values in an Interactive Report (page 9-69)
• Formatting Columns in an Interactive Report (page 9-70)
• About Filtering on Conditional Links in Interactive Report Columns (page 9-71)
See Also:
"Editing Pages in Page Designer (page 8-1)"
9.6.3.1 Editing Interactive Report Column AttributesEdit Column attributes to precisely control the report layout. For example, you can usethese attributes to alter a column heading, change column positioning, hide a column,or control how users can manipulate a column.
To edit column attributes:
To edit column attributes:
1. View the page in Page Designer:
a. On the Workspace home page, click the App Builder icon.
b. Select an application.
c. Select a page.
Page Designer appears.
2. In the Rendering tab, locate the region and expand the Columns node.
The columns appear in the Rendering tab.
3. Select a column to edit.
The Property Editor displays the attributes for that column. Attributes areorganized in groups. To find a group or attribute, enter keywords in the FilterProperties field. The Property Editor displays the group or attributes. Or, you canclick Go to Group and select the group.
4. Edit the appropriate attributes.
Chapter 9Managing Interactive Reports
9-67
Tip:
To view help for an attribute, select the attribute in the Property Editorand click the Help tab in the central pane.
5. To edit the column heading, find the Heading group:
a. Heading - Enter the report column heading text.
b. Alignment - Select the heading alignment. Note that your alignment selectionmust be supported by the selected report template.
6. To control how users can manipulate a column::
a. Find the Enable Users To group.
b. For Enable Users To - For each attribute select Yes or No to control howusers can manipulate the report.
7. To save your changes click Save. To save and run the page, click Save and RunPage.
9.6.3.2 Creating a Column Link in an Interactive ReportUse Column Attributes to create a link from a report to another page in yourapplication or to a URL.
To create a column link to another page:
1. View the page in Page Designer:
a. On the Workspace home page, click the App Builder icon.
b. Select an application.
c. Select a page.
Page Designer appears.
2. In the Rendering tab, locate the region and expand the Columns node.
The columns appear in the Rendering tab.
3. Select a column to edit.
The Property Editor displays the attributes for that column. Attributes areorganized in groups. To find a group or attribute, enter keywords in the FilterProperties field. The Property Editor displays the group or attributes. Or, you canclick Go to Group and select the group.
Tip:
To view help for an attribute, select the attribute in the Property Editorand click the Help tab in the central pane.
4. Find Identification. From Type, select Link
5. Find Link and click No Link Defined.
The Link Builder - Target dialog appears.
Chapter 9Managing Interactive Reports
9-68
6. To create a link to another page, in the Link Builder - Target dialog:
a. Type - Select Page in this Application.
b. Page - Specify the target page number.
c. Set Items - Select a Name and Value to specify session state for an item.
d. Clear Session State, Clear Cache - Specify the page numbers on which toclear cache. To specify multiple page, enter a comma-delimited list of pagenumbers.
e. Rest Pagination - Select Yes to reset pagination for this page.v
f. Advanced, Request - Specify the request to be used.
g. Click OK.
7. To create a link to a URL, in the Link Builder - Target dialog:
a. Type - Select URL.
b. URL - Enter the URL address.
c. Click OK.
8. To save your changes click Save. To save and run the page, click Save and RunPage.
9.6.3.3 Defining a Column as a List of Values in an Interactive ReportAdd a list of values in an interactive report to improve the speed of built-in filter tools.
To define a report column as a list of values:
1. View the page in Page Designer:
a. On the Workspace home page, click the App Builder icon.
b. Select an application.
c. Select a page.
Page Designer appears.
2. In the Rendering tab, locate the region containing the report.
3. In the Rendering tab, locate the region and expand the Columns node.
The columns appear in the Rendering tab.
4. Select a column to edit.
The Property Editor displays the attributes for that column. Attributes areorganized in groups. To find a group or attribute, enter keywords in the FilterProperties field. The Property Editor displays the group or attributes. Or, you canclick Go to Group and select the group.
Tip:
To view help for an attribute, select the attribute in the Property Editorand click the Help tab in the central pane.
5. Configure Column Filter:
Chapter 9Managing Interactive Reports
9-69
a. Find Column Filter.
b. For Type, select how to derive the filters provided in the report column dropdown list. Options include:
• None - No column filter is provided for this report.
• Default Based on Column Type - STRING and NUMBER columns derive thelist of values from distinct column values. DATE columns derive the list ofvalues from predefined date ranges.
• Use Defined List of Values to Filter Word Contains - Derive the list ofvalues from a defined list of values SQL query to create a contains filter.
• Use Named List of Values to Filter Exact Match - Derive the list ofvalues from the named list of values to create an equal filter.
• Use Named List of Values to Filter Word Contains - Derive the list ofvalues from the named list of values to create a contains filter.
6. To save your changes click Save. To save and run the page, click Save and RunPage.
9.6.3.4 Formatting Columns in an Interactive ReportYou can use HTML expressions in interactive reports to further the customize columndisplay.
To define column formatting:
1. View the page in Page Designer:
a. On the Workspace home page, click the App Builder icon.
b. Select an application.
c. Select a page.
Page Designer appears.
2. In the Rendering tab, locate the region and expand the Columns node.
The columns appear in the Rendering tab.
3. Select a column to edit.
The Property Editor displays the attributes for that column. Attributes areorganized in groups.
Tip:
To find a group or attribute, enter keywords in the Filter Propertiesfield. The Property Editor displays the group or attributes. Or, you canclick Go to Group and select the group.
4. Configure the column format:
a. Find Column Formatting.
b. In HTML Expression, enter HTML expressions to be shown in this column.Use #COLUMN# syntax to show column values in HTML.
• Example 1: Change the background and text colors
Chapter 9Managing Interactive Reports
9-70
<span style="background-color: yellow; color: red;">#EMPLOYEE_STATUS#</span>
• Example 2: Use Heading 2
<h2>#EMPLOYEE_NAME#</h2>
• Example 3: Use a dynamic class from the SQL query
<span class="#COLUMN_CLASS#">#EMPLOYEE_STATUS#</span>
The #COLUMN_CLASS# and #EMPLOYEE_STATUS# substitutions in this exampleare columns selected in the report SQL query.
• Example 4: Show an image, and a tooltip on hover
<img src="#IMAGE_NAME#" alt="#EMPLOYEE_NAME#" title="#EMPLOYEE_NAME#">
5. To save your changes click Save. To save and run the page, click Save and RunPage.
9.6.3.5 About Filtering on Conditional Links in Interactive Report ColumnsIf an interactive report has a column value that is a link and the link markup isconstructed in the report query, attempting to define a filter on this value from thecolumn header menu fails. Oracle Application Express is not be able to render the linkcorrectly in the column header menu because the column values are themselvesrendered as links, such that they can be selected to apply the filter. If the developerwanted to conditionally render the link based on query logic, the link may have beendefined in the report query as opposed to using the declarative column link support.
For filtering to work on conditional links in columns, developers have two options:
• Option 1: Use an HTML Expression column:
1. Add another column to your query that selects the equivalent of the link textfrom the link and define a column alias of my_link_display. This column aliaswill be the value used in the column header menu.
2. Change the my_link column to be of type Hidden Column.
3. In the my_link_display column, set the column heading to be the same as themy_link column and set HTML Expression to be #MY_LINK#. Keep the defaultEscape Special Characters as Yes.
4. Run the page.
If needed, reorder the columns so that the new column in the same position asthe old one. Select the Actions menu and then Select Columns.
5. Save a new default report. Select the Actions menu, Save Report, and thenSave as Default Report Settings.
The link still renders fine in the report and the column header menu now rendersjust the my_link_display value which sets the filter correctly.
• Option 2: Use a custom Column Filter for the link column, where you couldquery for the link text.
Chapter 9Managing Interactive Reports
9-71
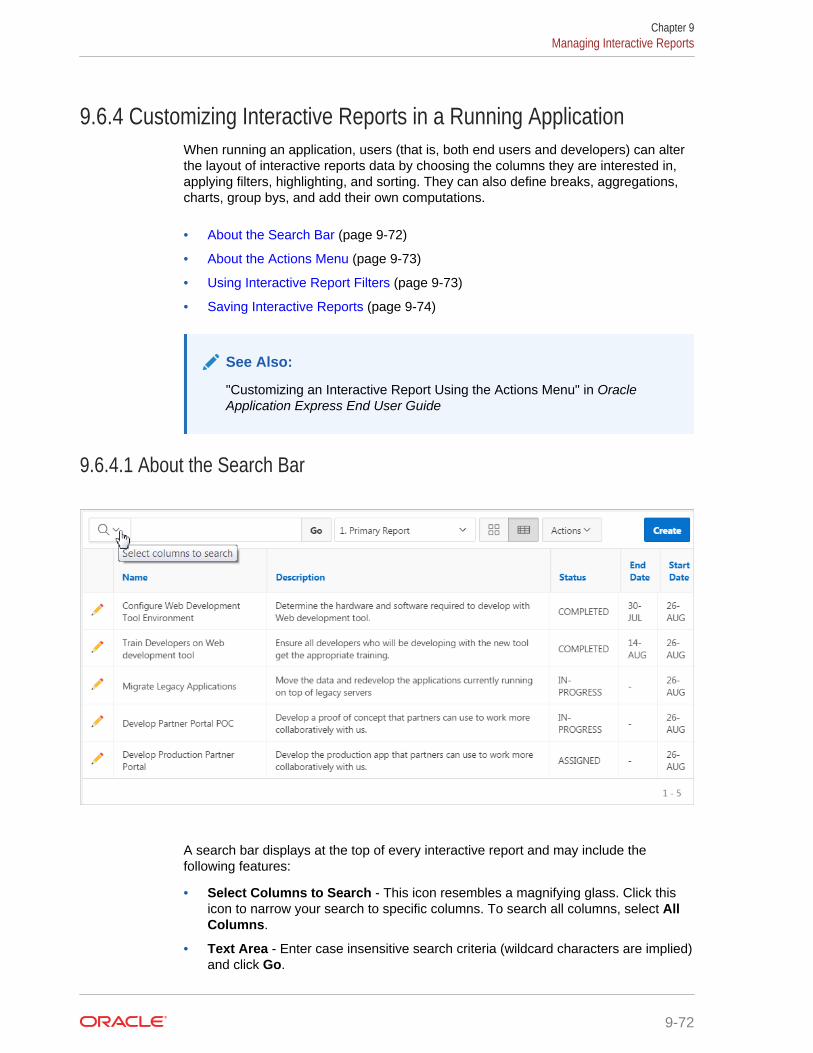
9.6.4 Customizing Interactive Reports in a Running ApplicationWhen running an application, users (that is, both end users and developers) can alterthe layout of interactive reports data by choosing the columns they are interested in,applying filters, highlighting, and sorting. They can also define breaks, aggregations,charts, group bys, and add their own computations.
• About the Search Bar (page 9-72)
• About the Actions Menu (page 9-73)
• Using Interactive Report Filters (page 9-73)
• Saving Interactive Reports (page 9-74)
See Also:
"Customizing an Interactive Report Using the Actions Menu" in OracleApplication Express End User Guide
9.6.4.1 About the Search Bar
A search bar displays at the top of every interactive report and may include thefollowing features:
• Select Columns to Search - This icon resembles a magnifying glass. Click thisicon to narrow your search to specific columns. To search all columns, select AllColumns.
• Text Area - Enter case insensitive search criteria (wildcard characters are implied)and click Go.
Chapter 9Managing Interactive Reports
9-72
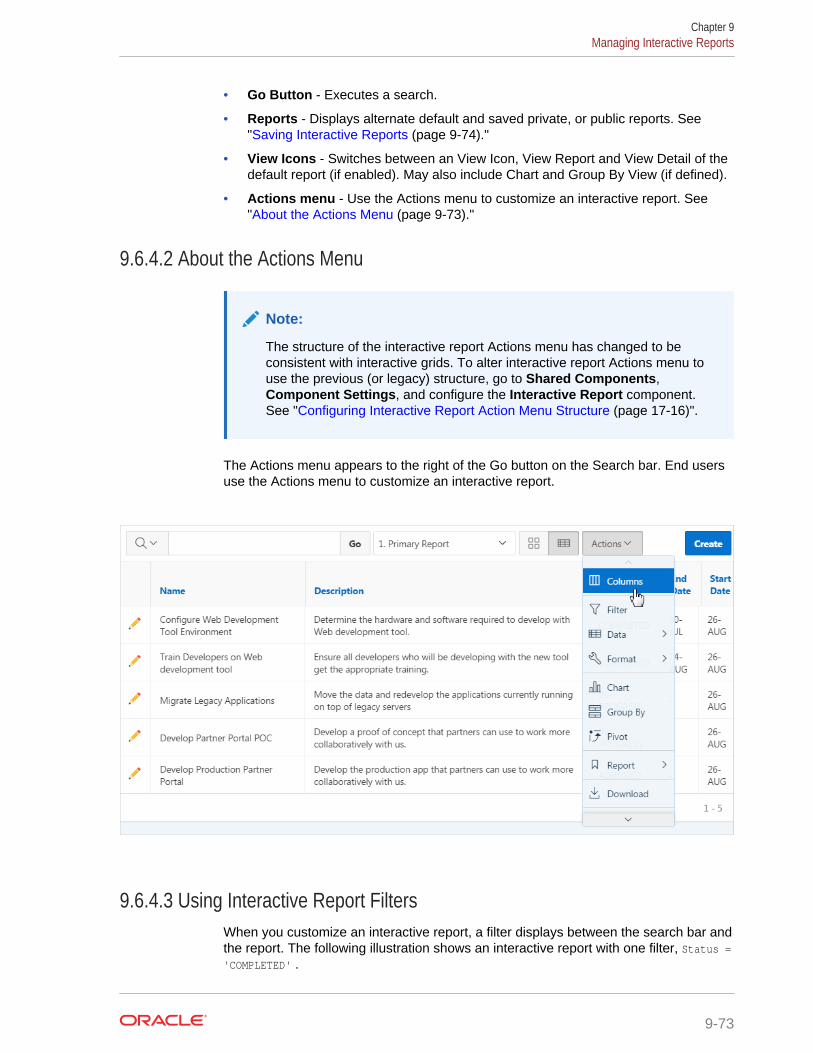
• Go Button - Executes a search.
• Reports - Displays alternate default and saved private, or public reports. See"Saving Interactive Reports (page 9-74)."
• View Icons - Switches between an View Icon, View Report and View Detail of thedefault report (if enabled). May also include Chart and Group By View (if defined).
• Actions menu - Use the Actions menu to customize an interactive report. See"About the Actions Menu (page 9-73)."
9.6.4.2 About the Actions Menu
Note:
The structure of the interactive report Actions menu has changed to beconsistent with interactive grids. To alter interactive report Actions menu touse the previous (or legacy) structure, go to Shared Components,Component Settings, and configure the Interactive Report component.See "Configuring Interactive Report Action Menu Structure (page 17-16)".
The Actions menu appears to the right of the Go button on the Search bar. End usersuse the Actions menu to customize an interactive report.
9.6.4.3 Using Interactive Report FiltersWhen you customize an interactive report, a filter displays between the search bar andthe report. The following illustration shows an interactive report with one filter, Status ='COMPLETED' .
Chapter 9Managing Interactive Reports
9-73
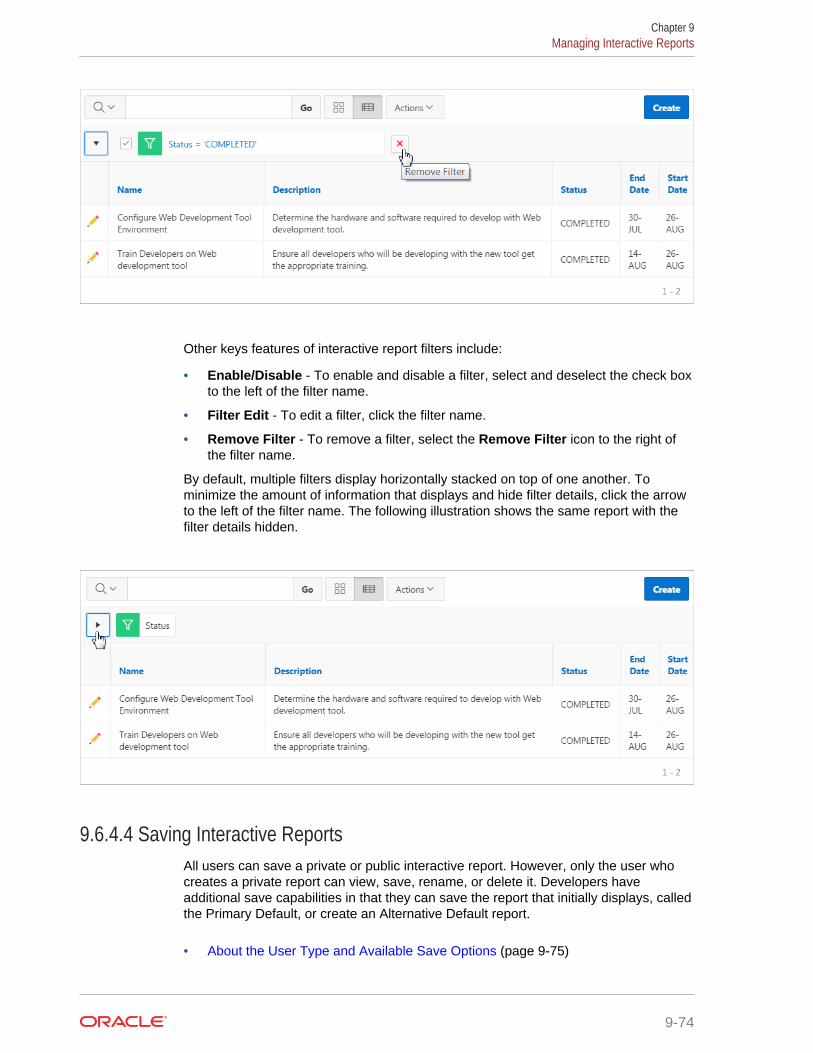
Other keys features of interactive report filters include:
• Enable/Disable - To enable and disable a filter, select and deselect the check boxto the left of the filter name.
• Filter Edit - To edit a filter, click the filter name.
• Remove Filter - To remove a filter, select the Remove Filter icon to the right ofthe filter name.
By default, multiple filters display horizontally stacked on top of one another. Tominimize the amount of information that displays and hide filter details, click the arrowto the left of the filter name. The following illustration shows the same report with thefilter details hidden.
9.6.4.4 Saving Interactive ReportsAll users can save a private or public interactive report. However, only the user whocreates a private report can view, save, rename, or delete it. Developers haveadditional save capabilities in that they can save the report that initially displays, calledthe Primary Default, or create an Alternative Default report.
• About the User Type and Available Save Options (page 9-75)
Chapter 9Managing Interactive Reports
9-74
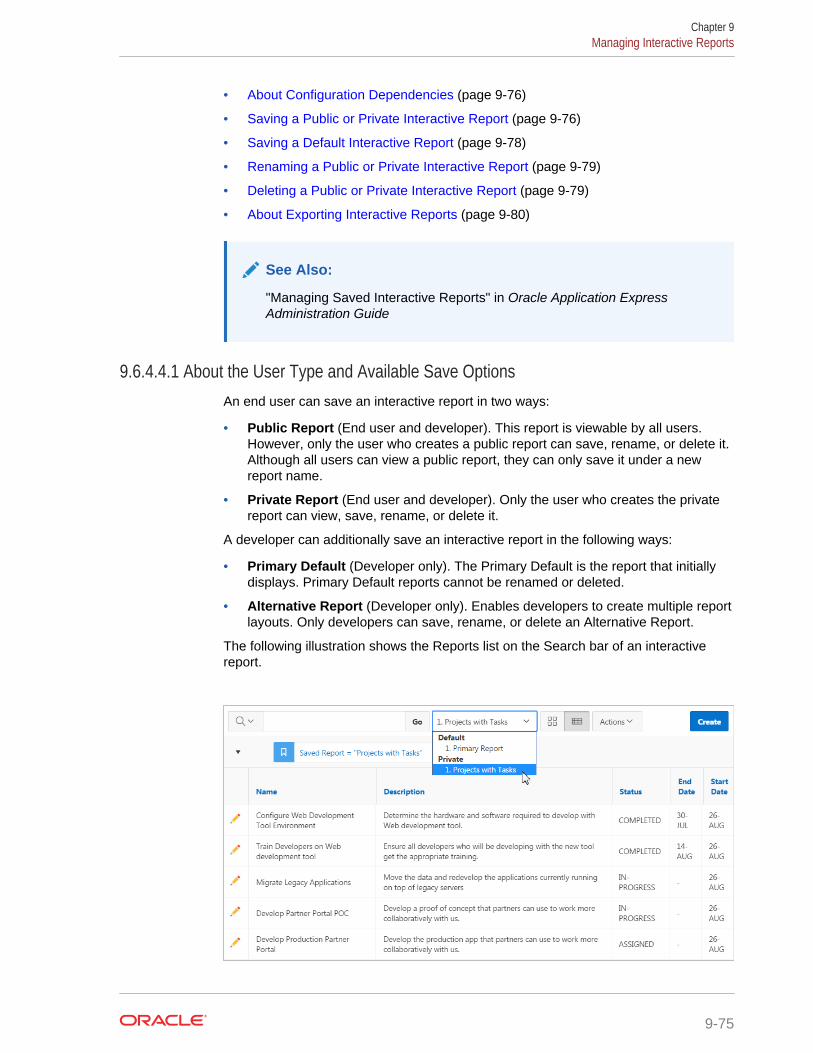
• About Configuration Dependencies (page 9-76)
• Saving a Public or Private Interactive Report (page 9-76)
• Saving a Default Interactive Report (page 9-78)
• Renaming a Public or Private Interactive Report (page 9-79)
• Deleting a Public or Private Interactive Report (page 9-79)
• About Exporting Interactive Reports (page 9-80)
See Also:
"Managing Saved Interactive Reports" in Oracle Application ExpressAdministration Guide
9.6.4.4.1 About the User Type and Available Save OptionsAn end user can save an interactive report in two ways:
• Public Report (End user and developer). This report is viewable by all users.However, only the user who creates a public report can save, rename, or delete it.Although all users can view a public report, they can only save it under a newreport name.
• Private Report (End user and developer). Only the user who creates the privatereport can view, save, rename, or delete it.
A developer can additionally save an interactive report in the following ways:
• Primary Default (Developer only). The Primary Default is the report that initiallydisplays. Primary Default reports cannot be renamed or deleted.
• Alternative Report (Developer only). Enables developers to create multiple reportlayouts. Only developers can save, rename, or delete an Alternative Report.
The following illustration shows the Reports list on the Search bar of an interactivereport.
Chapter 9Managing Interactive Reports
9-75
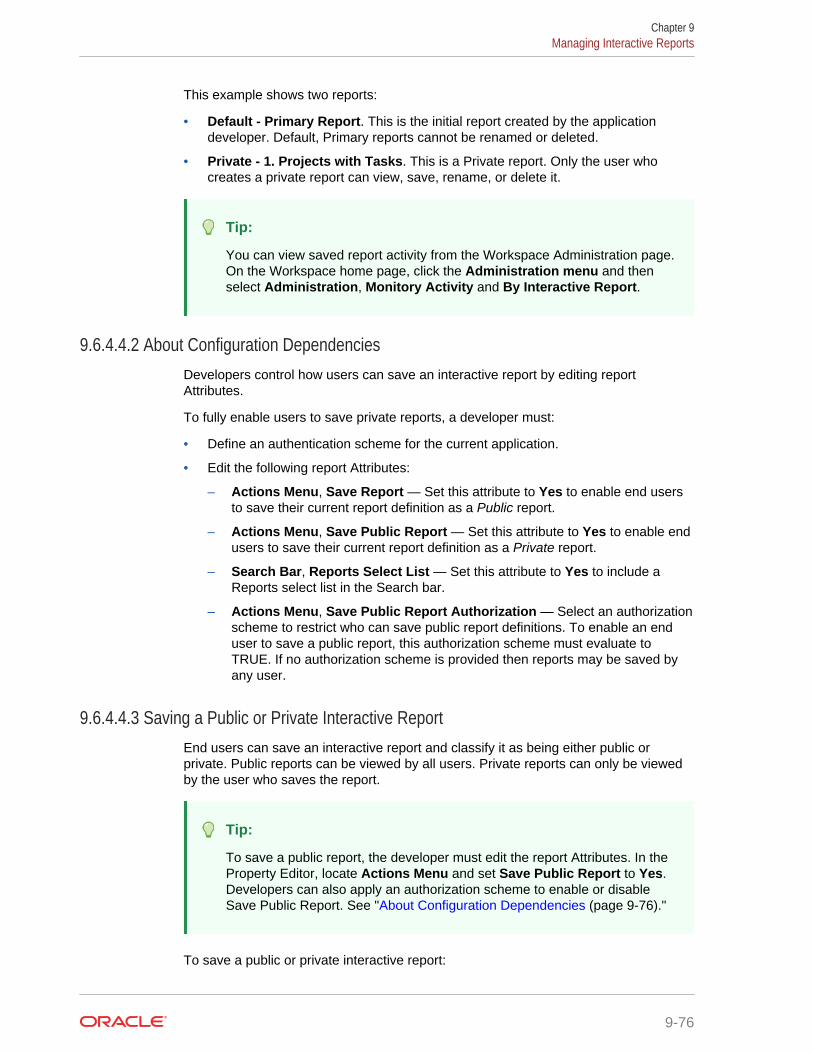
This example shows two reports:
• Default - Primary Report. This is the initial report created by the applicationdeveloper. Default, Primary reports cannot be renamed or deleted.
• Private - 1. Projects with Tasks. This is a Private report. Only the user whocreates a private report can view, save, rename, or delete it.
Tip:
You can view saved report activity from the Workspace Administration page.On the Workspace home page, click the Administration menu and thenselect Administration, Monitory Activity and By Interactive Report.
9.6.4.4.2 About Configuration DependenciesDevelopers control how users can save an interactive report by editing reportAttributes.
To fully enable users to save private reports, a developer must:
• Define an authentication scheme for the current application.
• Edit the following report Attributes:
– Actions Menu, Save Report — Set this attribute to Yes to enable end usersto save their current report definition as a Public report.
– Actions Menu, Save Public Report — Set this attribute to Yes to enable endusers to save their current report definition as a Private report.
– Search Bar, Reports Select List — Set this attribute to Yes to include aReports select list in the Search bar.
– Actions Menu, Save Public Report Authorization — Select an authorizationscheme to restrict who can save public report definitions. To enable an enduser to save a public report, this authorization scheme must evaluate toTRUE. If no authorization scheme is provided then reports may be saved byany user.
9.6.4.4.3 Saving a Public or Private Interactive ReportEnd users can save an interactive report and classify it as being either public orprivate. Public reports can be viewed by all users. Private reports can only be viewedby the user who saves the report.
Tip:
To save a public report, the developer must edit the report Attributes. In theProperty Editor, locate Actions Menu and set Save Public Report to Yes.Developers can also apply an authorization scheme to enable or disableSave Public Report. See "About Configuration Dependencies (page 9-76)."
To save a public or private interactive report:
Chapter 9Managing Interactive Reports
9-76
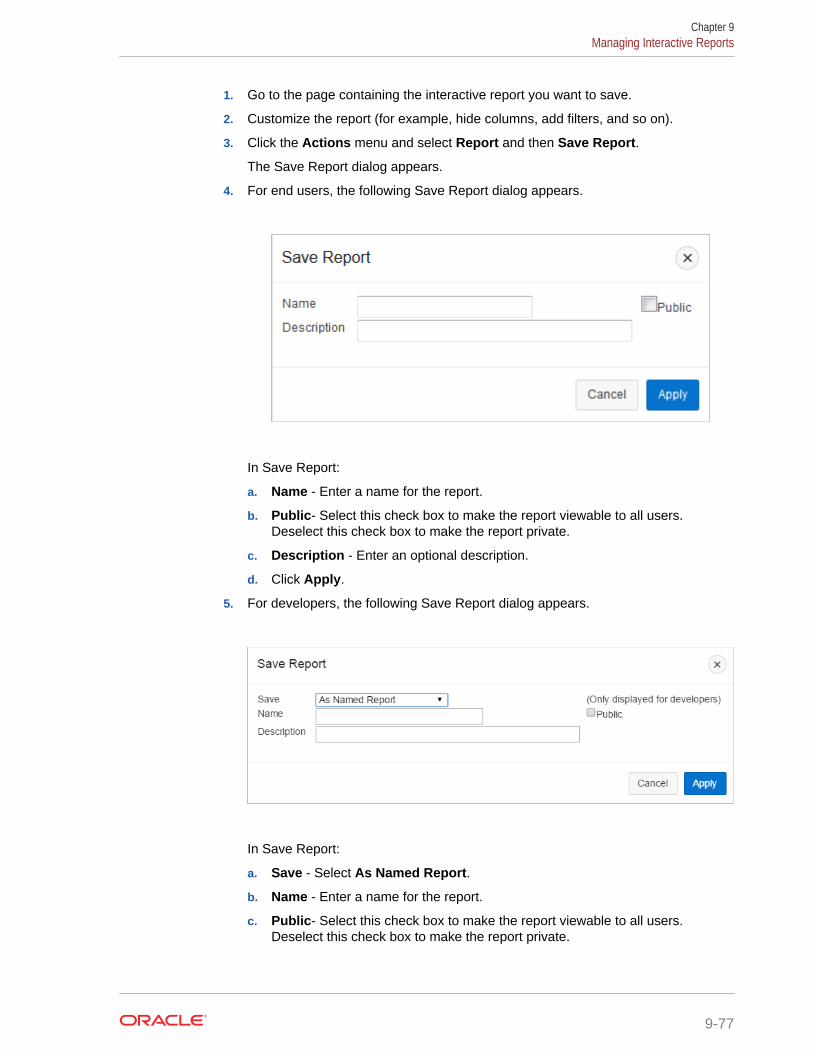
1. Go to the page containing the interactive report you want to save.
2. Customize the report (for example, hide columns, add filters, and so on).
3. Click the Actions menu and select Report and then Save Report.
The Save Report dialog appears.
4. For end users, the following Save Report dialog appears.
In Save Report:
a. Name - Enter a name for the report.
b. Public- Select this check box to make the report viewable to all users.Deselect this check box to make the report private.
c. Description - Enter an optional description.
d. Click Apply.
5. For developers, the following Save Report dialog appears.
In Save Report:
a. Save - Select As Named Report.
b. Name - Enter a name for the report.
c. Public- Select this check box to make the report viewable to all users.Deselect this check box to make the report private.
Chapter 9Managing Interactive Reports
9-77
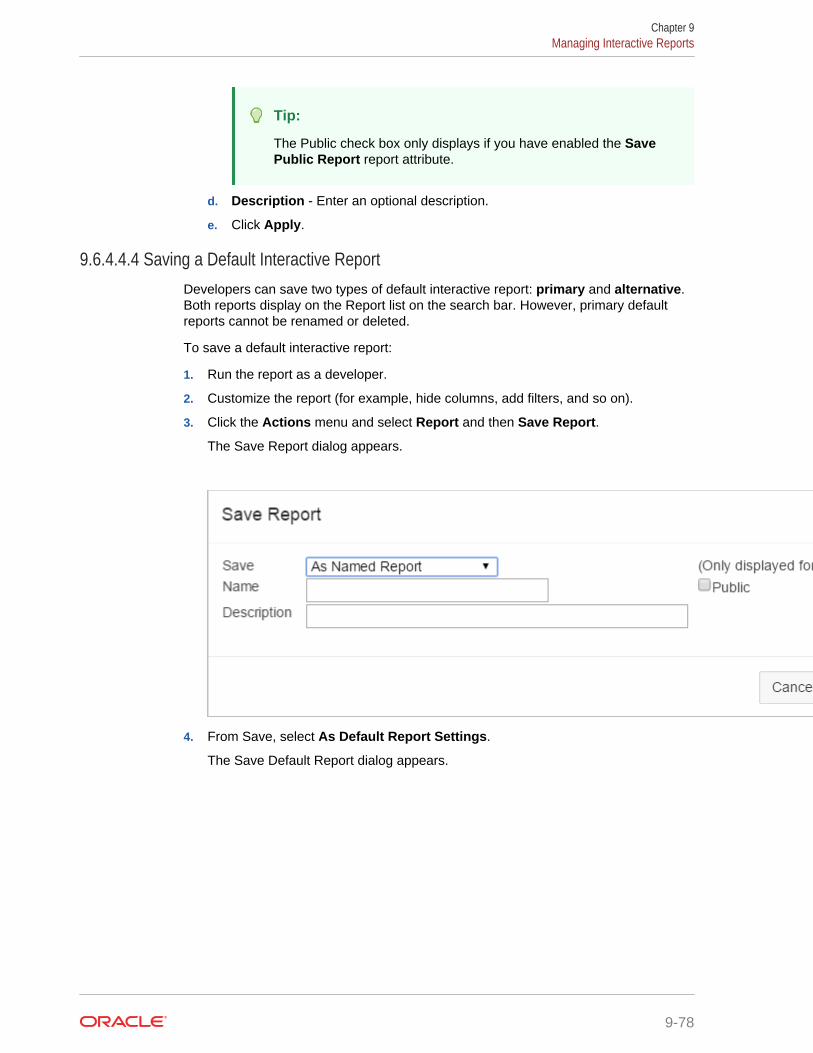
Tip:
The Public check box only displays if you have enabled the SavePublic Report report attribute.
d. Description - Enter an optional description.
e. Click Apply.
9.6.4.4.4 Saving a Default Interactive ReportDevelopers can save two types of default interactive report: primary and alternative.Both reports display on the Report list on the search bar. However, primary defaultreports cannot be renamed or deleted.
To save a default interactive report:
1. Run the report as a developer.
2. Customize the report (for example, hide columns, add filters, and so on).
3. Click the Actions menu and select Report and then Save Report.
The Save Report dialog appears.
4. From Save, select As Default Report Settings.
The Save Default Report dialog appears.
Chapter 9Managing Interactive Reports
9-78
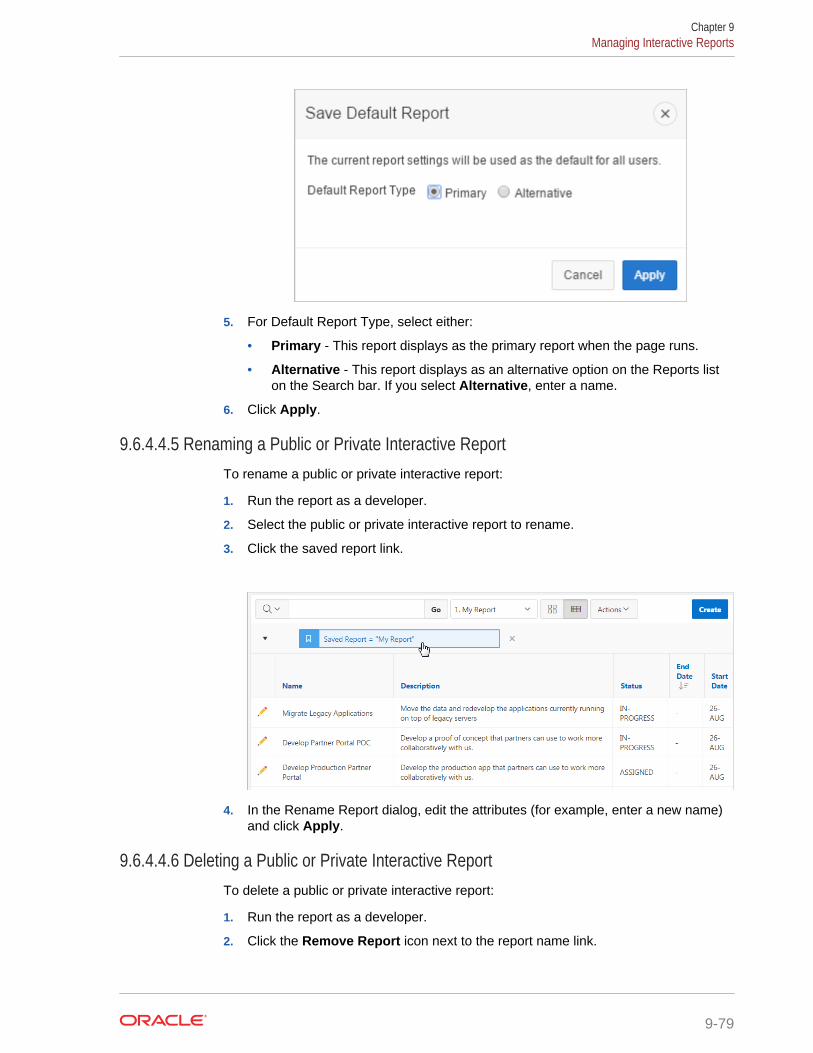
5. For Default Report Type, select either:
• Primary - This report displays as the primary report when the page runs.
• Alternative - This report displays as an alternative option on the Reports liston the Search bar. If you select Alternative, enter a name.
6. Click Apply.
9.6.4.4.5 Renaming a Public or Private Interactive ReportTo rename a public or private interactive report:
1. Run the report as a developer.
2. Select the public or private interactive report to rename.
3. Click the saved report link.
4. In the Rename Report dialog, edit the attributes (for example, enter a new name)and click Apply.
9.6.4.4.6 Deleting a Public or Private Interactive ReportTo delete a public or private interactive report:
1. Run the report as a developer.
2. Click the Remove Report icon next to the report name link.
Chapter 9Managing Interactive Reports
9-79
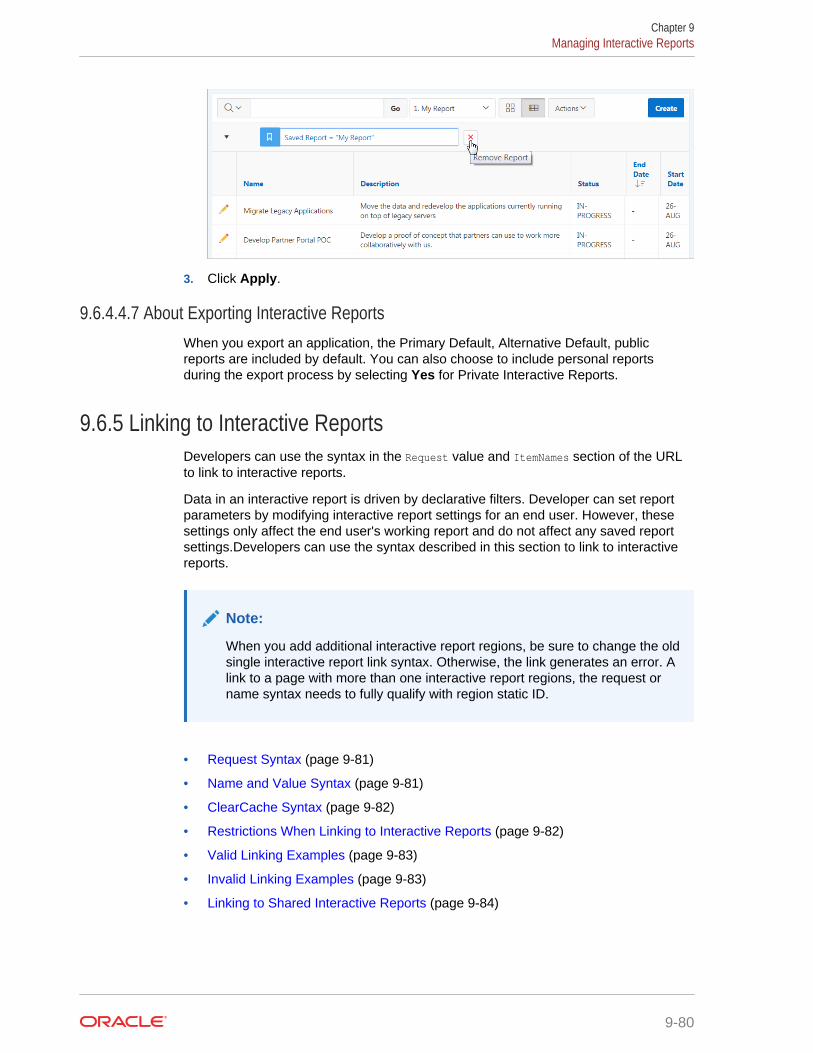
3. Click Apply.
9.6.4.4.7 About Exporting Interactive ReportsWhen you export an application, the Primary Default, Alternative Default, publicreports are included by default. You can also choose to include personal reportsduring the export process by selecting Yes for Private Interactive Reports.
9.6.5 Linking to Interactive ReportsDevelopers can use the syntax in the Request value and ItemNames section of the URLto link to interactive reports.
Data in an interactive report is driven by declarative filters. Developer can set reportparameters by modifying interactive report settings for an end user. However, thesesettings only affect the end user's working report and do not affect any saved reportsettings.Developers can use the syntax described in this section to link to interactivereports.
Note:
When you add additional interactive report regions, be sure to change the oldsingle interactive report link syntax. Otherwise, the link generates an error. Alink to a page with more than one interactive report regions, the request orname syntax needs to fully qualify with region static ID.
• Request Syntax (page 9-81)
• Name and Value Syntax (page 9-81)
• ClearCache Syntax (page 9-82)
• Restrictions When Linking to Interactive Reports (page 9-82)
• Valid Linking Examples (page 9-83)
• Invalid Linking Examples (page 9-83)
• Linking to Shared Interactive Reports (page 9-84)
Chapter 9Managing Interactive Reports
9-80
See Also:
"Understanding URL Syntax (page 2-11)" and "About Using f?p Syntax toLink Pages (page 2-12)"
9.6.5.1 Request SyntaxTo link to a specific saved report, use the following Request syntax:
IR[region static ID]_<report_alias>
Consider the following example:
IR[EMP]_dept20
Note:
The use of Request in the URL is optional. To link to multiple saved reports,separate each Request with comma.
9.6.5.2 Name and Value SyntaxTo create a filter, use the following itemNames and itemValues syntax:
IR[region static ID]<operator>_<target column alias>
Consider the following example:
IR[EMP]C_ENAME:KING
Note:
If there is only one interactive report region on the page, the itemName doesnot need to be fully qualified with the region static ID. If an operator is notdefined, a filter with equal operator is added.
To create a filter on an interactive report in a link, use the itemNames syntax describedpreviously and add the filter value in the corresponding location in the item namessection of the URL.
To create row text which contains a filter on an interactive report, use ROWFILTER as thetarget column alias in the item name syntax and add a filter value in the itemitemValues of the URL. The link will add a Row Text Contains filter which searches allcolumns displayed in the report with type STRING or NUMBER.
Consider the following example:
IR[EMP]_ROWFILTER:SALES
Valid operators include:
Chapter 9Managing Interactive Reports
9-81
• C = Contains
• EQ = Equals (this is the default)
• GTE = Greater than or equal to
• GT = Greater Than
• LIKE = SQL Like operator
• LT = Less than
• LTE = Less than or equal to
• N = Null
• NC = Not Contains
• NEQ = Not Equals
• NLIKE = Not Like
• NN = Not Null
• NIN = Not In (escape the comma separated values with backslash, \)
• IN = In (escape the comma separated values with backslash, \)
• ROWFILTER = Row Text Contains (this searches all columns displayed in the reportwith type STRING or NUMBER)
9.6.5.3 ClearCache Syntax
Tip:
Using ClearCache used without specifying a saved report alias in theRequest, clears the primary default report. To clear a specific interactivereport region on a page with more than one interactive reports, specify theregion static ID along with saved report alias in the Request.
Use the following syntax in the ClearCache section of the URL to reset, clear, or resetpagination the interactive report:
• RIR - Resets an interactive report. This is equivalent to the end user choosing theReset option from the interactive report Actions menu on the target page. Thereport is returned to the default report settings specified by the developer or savedby the user.
• CIR - Clears interactive report. This clears all of the report settings such as controlbreak, aggregate, flashback, chart, number of rows to display, filter, highlight,computation, group by, and pivot.
• RP - Resets interactive report pagination.
9.6.5.4 Restrictions When Linking to Interactive ReportsWhen linking to interactive reports, remember the following restrictions:
1. If a Request value is not defined in the URL, all of the primary default reportsettings will change.
Chapter 9Managing Interactive Reports
9-82
2. If a Request value is not defined and itemNames section does not include a fullyqualified filter column name with region static ID, an error occurs if there are morethan one interactive report region in the target page.
3. If a Request value is not defined and itemNames section do not include a fullyqualified filter column name with region static ID, it will create a filter on theprimary default report if there is only one interactive report region in the targetpage.
9.6.5.5 Valid Linking ExamplesThis section contains valid linking examples.
Valid Linking Example 1
This example includes a link with no Request value, but includes a qualified filtercolumn with region static ID in the itemNames section of the URL. This example createsa filter on the primary default report in the referenced region item name.
f?p=&APP_ID.:2:&SESSION.::::IR[EMP]_ENAME:KING
Valid Linking Example 2
To support backwards compatibility with previous releases, this example uses oldersyntax and works on a page with one interactive report region.
?p=&APP_ID.:1:&SESSION.:IR_REPORT_12345::RIR,CIR::RIR,CIR:IR_ENAME:KING
Valid Linking Example 3
In this example the link has no Request value. The clear cache section has RIR or CIR orRP and will reset, clear, or reset the pagination of the primary default reports of allinteractive report regions.
f?p=&APP_ID.:1:&SESSION.:::RIR:
9.6.5.6 Invalid Linking ExamplesThis section contains invalid linking examples.
Invalid Linking Example 1
This link has no Request value and does not include a fully qualified filter column withregion static ID in the item name section of the URL. This example generates an errorif there is more than one interactive report region in the target page.
f?p=&APP_ID.:2:&SESSION.::::ENAME:KING
Invalid Linking Example 2
This example has a link with two request values separated by commas and does notcontain a fully qualified filter column with region static ID in the item name section ofthe URL. This example generates an error since it is not clear where the filter needs tobe created.
f?p=&APP_ID.:2:&SESSION.:IR[test]_employee,IR[test2]_dept10:::ENAME:KING
Chapter 9Managing Interactive Reports
9-83
Invalid Linking Example 3
This example uses old request value syntax used on a page with multiple interactivereport regions. This example will generate an error. The old syntax only works if thereis one interactive report region.
f?p=&APP_ID.:2:&SESSION.:IR_REPORT_myrpt:::ENAME:KING
9.6.5.7 Linking to Shared Interactive ReportsYou can link to saved primary default, alternative default, and public reports usingIR[region static ID]_<report_alias> in the Request value of the URL.
• Editing the Alias of Default Report in Page Designer (page 9-84)
• Link Examples to a Primary Report (page 9-85)
• Link Examples to Saved Reports (page 9-85)
See Also:
and
• "About Using f?p Syntax to Link Pages (page 2-12)"
• "Saving a Default Interactive Report (page 9-78)"
• "Deleting Saved Interactive Reports (page 6-73)"
• "Managing Saved Interactive Reports" in Oracle Application ExpressAdministration Guide
9.6.5.7.1 Editing the Alias of Default Report in Page DesignerYou can view attributes for default interactive reports in the Property Editor.
To view attributes for a default interactive report:
1. View the page in Page Designer:
a. On the Workspace home page, click the App Builder icon.
b. Select an application.
c. Select a page.
Page Designer appears.
2. Select the Saved Report attributes:
a. In the Rendering tab, locate the region containing the report.
b. Under Region, expand the Attributes node.
c. Expand Saved Reports.
d. Select a saved report.
The Saved Report attributes display in the Property Editor.
3. To find a group or attribute:
Chapter 9Managing Interactive Reports
9-84
• Search for the group or attribute - Enter keywords in the Filter Propertiesfield. The Property Editor displays the group or attributes. To return to thedefault display, delete the keywords.
• Use Go to Group - Click Go to Group and select the group. To return thedefault display, click Go to Group again and select Expand All.
4. FindIdentification.
5. In Alias, enter a new alias for this report. Use this alias to define a moremeaningful URL link to this saved report. This link can be used to link directly fromelsewhere in the application.
6. To save your changes click Save. To save and run the page, click Save and RunPage.
9.6.5.7.2 Link Examples to a Primary ReportThe following examples demonstrate how to link to a primary report(report_alias=PRIMARY):
This example links to a primary report:
f?p=100:1:&APP_SESSION.:IR_PRIMARY
This example links, resets, and clears primary report settings:
f?p=100:1:&APP_SESSION.:IR_PRIMARY::RIR,CIR:
This example links, resets, and clears primary report settings. It additionally creates aENAME = 'KING' filter on the primary report:
f?p=100:1:&APP_SESSION.:IR_PRIMARY::RIR,CIR:IR_ENAME:KING
9.6.5.7.3 Link Examples to Saved ReportsThe following examples demonstrate how to link to a saved report(report_alias=12345):
This example links to a saved report:
f?p=100:1:&SESSION.:IR_REPORT1
This example links, resets, and clears settings for saved report REPORT1:
f?p=100:1:&SESSION.:IR_REPORT1::RIR,CIR:
This example links, resets, and clears saved report REPORT1 settings. It additionallycreates a ENAME = 'KING' filter on saved report REPORT1.
f?p=100:1:&SESSION.:IR_REPORT1::RIR,CIR:IR_ENAME:KING
9.7 Managing Classic ReportsA classic report is the formatted result of a SQL query. Developers choose a table onwhich to build a report, or provide a custom SQL SELECT statement or a PL/SQLfunction returning a SQL SELECT statement. Developers control how a classic reportworks by editing the following attributes in Page Designer: region attributes, reportAttributes, and Column attributes.
Chapter 9Managing Classic Reports
9-85
Tip:
With the exception of sorting and simple filtering, end users cannotcustomize a classic report.
• Managing Classic Report Region Attributes (page 9-86)Each application page contains one or more regions. A region is an area on apage that serves as a container for content. Developers edit region attributes toalter the SQL source, change the region layout and appearance, define a regiondisplays selector, and create region conditions.
• Managing Classic Report Attributes (page 9-87)Report Attributes control how a classic report works. Developers edit reportAttributes to alter the report appearance, configure report pagination, create errormessages, break formatting, and configure download options.
• Managing Classic Report Column Attributes (page 9-92)Column attributes enable developers to control the display, features, and columnbehavior. Developers edit Column attributes to alter nearly all aspects of columnbehavior, including altering the layout and appearance, defining column links,creating column filters, and adding support for export and printing.
9.7.1 Managing Classic Report Region AttributesEach application page contains one or more regions. A region is an area on a pagethat serves as a container for content. Developers edit region attributes to alter theSQL source, change the region layout and appearance, define a region displaysselector, and create region conditions.
• Editing Classic Report Region Attributes (page 9-86)
See Also:
"Editing Pages in Page Designer (page 8-1)"
9.7.1.1 Editing Classic Report Region AttributesTo edit region attributes in Page Designer:
1. View the page in Page Designer:
a. On the Workspace home page, click the App Builder icon.
b. Select an application.
c. Select a page.
Page Designer appears.
2. In the Rendering tab, select the region.
The Property Editor displays the attributes. Attributes are organized in groups.
Chapter 9Managing Classic Reports
9-86
Tip:
To find a group or attribute, enter keywords in the Filter Propertiesfield. The Property Editor displays the group or attributes. Or, you canclick Go to Group and select the group.
3. Edit the appropriate attributes.
Tip:
To view help for an attribute, select the attribute in the Property Editorand click the Help tab in the central pane.
4. To save your changes click Save. To save and run the page, click Save and RunPage.
9.7.2 Managing Classic Report AttributesReport Attributes control how a classic report works. Developers edit report Attributesto alter the report appearance, configure report pagination, create error messages,break formatting, and configure download options.
• Editing Classic Report Attributes (page 9-87)
• Editing Classic Report Pagination (page 9-88)
• Adding Support for XML File or a CSV File Export (page 9-89)
• Enabling Classic Report CSV Output Option (page 9-90)
• Controlling Classic Report Column Breaks (page 9-91)
See Also:
"Editing Pages in Page Designer (page 8-1)"
9.7.2.1 Editing Classic Report AttributesYou can customize a classic report by editing report attributes in Page Designer.
To edit report attributes:
1. View the page in Page Designer:
a. On the Workspace home page, click the App Builder icon.
b. Select an application.
c. Select a page.
Page Designer appears.
2. In the Rendering tab, locate the region containing the report.
Chapter 9Managing Classic Reports
9-87
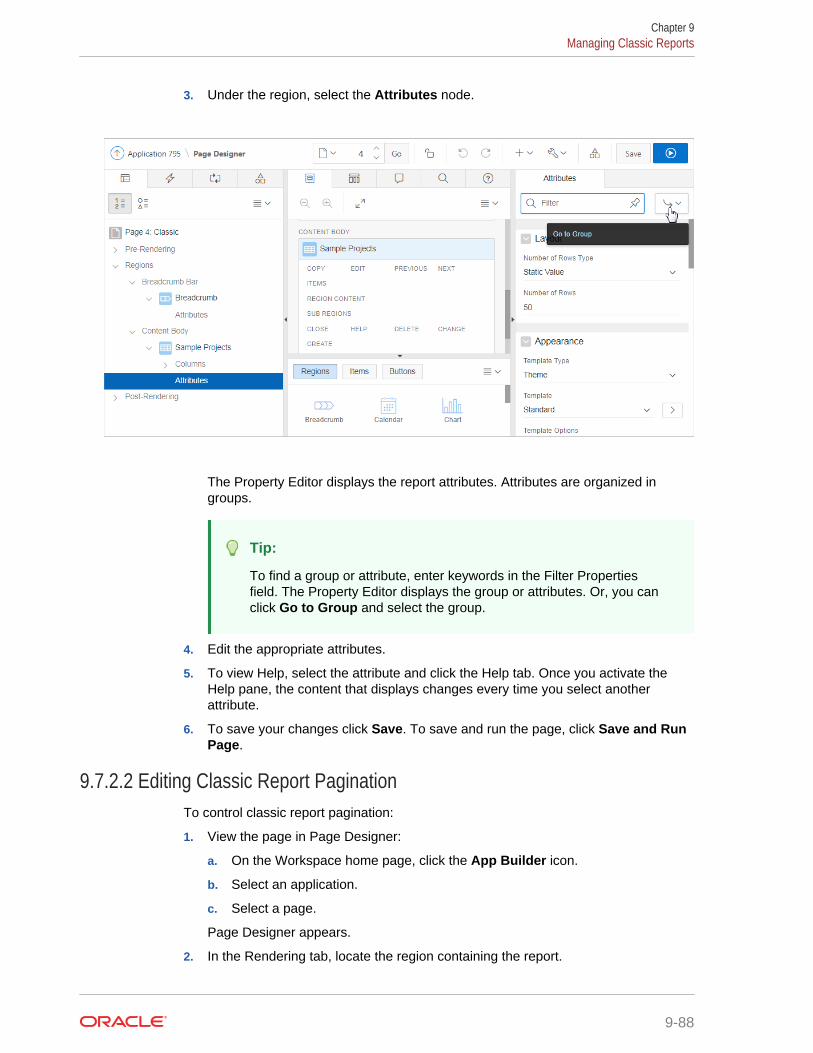
3. Under the region, select the Attributes node.
The Property Editor displays the report attributes. Attributes are organized ingroups.
Tip:
To find a group or attribute, enter keywords in the Filter Propertiesfield. The Property Editor displays the group or attributes. Or, you canclick Go to Group and select the group.
4. Edit the appropriate attributes.
5. To view Help, select the attribute and click the Help tab. Once you activate theHelp pane, the content that displays changes every time you select anotherattribute.
6. To save your changes click Save. To save and run the page, click Save and RunPage.
9.7.2.2 Editing Classic Report PaginationTo control classic report pagination:
1. View the page in Page Designer:
a. On the Workspace home page, click the App Builder icon.
b. Select an application.
c. Select a page.
Page Designer appears.
2. In the Rendering tab, locate the region containing the report.
Chapter 9Managing Classic Reports
9-88
3. Under Region, select the Attributes node.
The Property Editor displays the attributes. Attributes are organized in groups.
Tip:
To find a group or attribute, enter keywords in the Filter Propertiesfield. The Property Editor displays the group or attributes. Or, you canclick Go to Group and select the group.
4. Find Pagination.
5. Under Pagination, edit the following:
Tip:
To view help for an attribute, select the attribute in the Property Editorand click the Help tab in the central pane.
a. Type - Select the pagination type for this report. Generally only a subset of theresults are currently displayed in the report. Pagination provides the user withinformation about the number of rows and the current position within the resultset. Pagination also defines the style of links or buttons that are used tonavigate to the next or previous page.
b. Display Position - Select where the report pagination displays.
c. Partial Page Refresh - Specify whether to use Partial Page Refresh (PPR) toupdate the report display.
If the end user performs an action, such as a pagination request or selection ofa new sort column, the current report rows must be refreshed. Setting thisattribute to Yes, refreshes just the report region. Setting this attribute to No,refreshes the entire page.
6. To save your changes click Save. To save and run the page, click Save and RunPage.
9.7.2.3 Adding Support for XML File or a CSV File ExportYou can add support for exporting a report as an XML or CSV by selecting a reporttemplate.
To export a report as a file:
1. View the page in Page Designer:
a. On the Workspace home page, click the App Builder icon.
b. Select an application.
c. Select a page.
Page Designer appears.
2. In the Rendering tab, locate the region containing the report.
3. Under the region, select the Attributes node.
Chapter 9Managing Classic Reports
9-89
The Property Editor displays the attributes. Attributes are organized in groups.
Tip:
To find a group or attribute, enter keywords in the Filter Propertiesfield. The Property Editor displays the group or attributes. Or, you canclick Go to Group and select the group.
4. Find Appearance.
5. Under Appearance, edit the following:
a. Template Type - Select Predefined.
b. Template - Select XML or CSV.
Selecting XML prevents the Application Express engine from rendering thepage and dumps the content to an XML file.
Tip:
To view help for an attribute, select the attribute in the PropertyEditor and click the Help tab in the central pane.
6. To save your changes click Save. To save and run the page, click Save and RunPage.
9.7.2.4 Enabling Classic Report CSV Output OptionTo use the enable the CSV output option:
1. View the page in Page Designer:
a. On the Workspace home page, click the App Builder icon.
b. Select an application.
c. Select a page.
Page Designer appears.
2. In the Rendering tab, locate the region containing the report.
3. Under the region, select the Attributes node.
The Property Editor displays the attributes. Attributes are organized in groups.
Tip:
To find a group or attribute, enter keywords in the Filter Propertiesfield. The Property Editor displays the group or attributes. Or, you canclick Go to Group and select the group.
4. Find Download.
5. Under Download, edit the following:
Chapter 9Managing Classic Reports
9-90
a. CSV Export Enabled - Specify whether end users can download the reportcontents to a CSV file. To enable CSV Downloads, you must use a reporttemplate with a #CSV_LINK# substitution string and set this option to Yes.
b. CSV Separator - Enter a column separator. If no value is entered, a comma orsemicolon is used depending on your current NLS settings.
c. CSV Enclosed By - Enter a delimiter character to delineate the starting andending boundary of a data value. The default delimiter is double quotationmarks.
d. Link Text - Specify the text for the link to invoke the CSV download.
e. Filename - Specify a name for the CSV download file. If no name is specified,the region name is used followed by the extension *.csv.
Tip:
To view help for an attribute, select the attribute in the Property Editorand click the Help tab in the central pane.
6. To save your changes click Save. To save and run the page, click Save and RunPage.
9.7.2.5 Controlling Classic Report Column BreaksYou can control if a specific column repeats and how column breaks appear whenprinted using Break Formatting attributes. For example, suppose your report displaysemployee information by department number. If multiple employees are members ofthe same department, you can increase the readability by specifying that thedepartment number only appears once.
To create this type of column break:
1. View the page in Page Designer:
a. On the Workspace home page, click the App Builder icon.
b. Select an application.
c. Select a page.
Page Designer appears.
2. In the Rendering tab, locate the region containing the report.
3. Under the region, select the Attributes node.
The Property Editor displays the attributes. Attributes are organized in groups.
Tip:
To find a group or attribute, enter keywords in the Filter Propertiesfield. The Property Editor displays the group or attributes. Or, you canclick Go to Group and select the group.
4. Specify Break Formatting:
Chapter 9Managing Classic Reports
9-91
a. Find Break Formatting.
b. Break Columns - Select how many report columns are incorporated into thebreak formatting. The columns must be consecutive columns, starting from thefirst column displayed in the report.
5. To save your changes click Save. To save and run the page, click Save and RunPage.
9.7.3 Managing Classic Report Column AttributesColumn attributes enable developers to control the display, features, and columnbehavior. Developers edit Column attributes to alter nearly all aspects of columnbehavior, including altering the layout and appearance, defining column links, creatingcolumn filters, and adding support for export and printing.
• Altering Classic Report Column Layout (page 9-92)
• Enabling Column Sorting in a Classic Report (page 9-93)
• Creating a Column Link in a Classic Report (page 9-94)
• Defining an Updatable Column in a Classic Report (page 9-95)
• Defining a Column as a List of Values in a Classic Report (page 9-96)
• Controlling When Classic Report Columns Display (page 9-97)
• Adding a Download Link to a Classic Report (page 9-98)
See Also:
"Editing Pages in Page Designer (page 8-1)"
9.7.3.1 Altering Classic Report Column LayoutYou can use the Column Attributes section of the Report Attributes page to preciselycontrol the report layout. For example, you can use these attributes to alter columnheading text, change column positioning, hide a column, create a sum of a column, orselect a sort sequence.
To edit the Column Attributes:
1. View the page in Page Designer:
a. On the Workspace home page, click the App Builder icon.
b. Select an application.
c. Select a page.
Page Designer appears.
2. In the Rendering tab, locate the region and expand the Columns node.
The columns appear in the Rendering tab.
3. Select a column to edit.
4. To find a group or attribute:
Chapter 9Managing Classic Reports
9-92
• Search for the group or attribute - Enter keywords in the Filter Propertiesfield. The Property Editor displays the group or attributes. To return to thedefault display, delete the keywords.
• Use Go to Group - Click Go to Group and select the group. To return thedefault display, click Go to Group again and select Expand All.
5. Edit the appropriate attributes in the Property Editor. Attributes are organized ingroups.
The following table describes common ways to edit report columns.
Table 9-4 Common Report Column Edits for Classic Reports
Description Developer Action
Hide a column. Find Identification. For Type, select Hidden Column.
Edit the column heading text. Find Heading. Edit the Heading and Alignmentattributes.
Change the column heading textalignment.
Find Heading. Under Heading, make a new selectionfrom Alignment.
Alter the column displaysequence.
Find Layout. Edit the Sequence attribute.
Enable a unique sort sequence. Find Sorting. For Sortable select Yes and select aDefault Sequence.
Any number of columns can be sort enabled. However,at least one column must have a Sort Sequencedefined.
Enable the sum of a column. Find Advanced. For Compute Sum, select Yes.
Tip:
To view Help, select the attribute and click the Help tab. Once youactivate the Help pane, the content that displays changes every time youselect another attribute.
6. To save your changes click Save. To save and run the page, click Save and RunPage.
9.7.3.2 Enabling Column Sorting in a Classic ReportTo enable column sorting:
1. View the page in Page Designer:
a. On the Workspace home page, click the App Builder icon.
b. Select an application.
c. Select a page.
Page Designer appears.
2. In the Rendering tab, locate the region and expand the Columns node.
The columns appear in the Rendering tab.
Chapter 9Managing Classic Reports
9-93
3. Select a column to edit.
The Property Editor displays the attributes for that column. Attributes areorganized in groups.
4. To find a group or attribute:
• Search for the group or attribute - Enter keywords in the Filter Propertiesfield. The Property Editor displays the group or attributes. To return to thedefault display, delete the keywords.
• Use Go to Group - Click Go to Group and select the group. To return thedefault display, click Go to Group again and select Expand All.
5. Find Sorting.
6. Under Sorting, edit the following:
a. Default Sequence - Select the sort sequence for this column. Each columnshould have a unique sequence to correctly order the report output.
b. Sortable -To enable sorting, select Yes. Selecting Yes enables the end user tosort this column in the report.
Tip:
To view help for an attribute, select the attribute in the Property Editorand click the Help tab in the central pane.
7. To save your changes click Save. To save and run the page, click Save and RunPage.
Tip:
Column sorting must be enabled if you want columns with null values todisplay at the top or end of the report. To learn more about the Sort Nullsattribute, see "Editing Classic Report Pagination (page 9-88)."
9.7.3.3 Creating a Column Link in a Classic ReportUse the Column Link attributes to create a link from a report to another page in yourapplication or to a URL.
To create a column link to another page:
1. View the page in Page Designer:
a. On the Workspace home page, click the App Builder icon.
b. Select an application.
c. Select a page.
Page Designer appears.
2. In the Rendering tab, locate the region and expand the Columns node.
The columns appear in the Rendering tab.
Chapter 9Managing Classic Reports
9-94
3. Select a column to edit.
The Property Editor displays the attributes for that column. Attributes areorganized in groups.
4. To find a group or attribute:
• Search for the group or attribute - Enter keywords in the Filter Propertiesfield. The Property Editor displays the group or attributes. To return to thedefault display, delete the keywords.
• Use Go to Group - Click Go to Group and select the group. To return thedefault display, click Go to Group again and select Expand All.
5. Find Identification. From Type, select Link.
6. Find Link and click No Link Defined.
The Link Builder - Target dialog appears.
7. To create a link to another page, in the Link Builder - Target dialog:
a. Type - Select Page in this Application.
b. Page - Specify the target page number.
c. Set Items - Select a Name and Value to specify session state for an item.
d. Clear Session State, Clear Cache - Specify the page numbers on which toclear cache. To specify multiple page, enter a comma-delimited list of pagenumbers.
e. Reset Pagination - Select Yes to reset pagination for this page.
f. Advanced, Request - Specify the request to be used.
g. Click OK.
8. To create a link to a URL, in the Link Builder - Target dialog:
a. Type - Select URL.
b. URL - Enter the URL address.
c. Click OK.
9. To save your changes click Save. To save and run the page, click Save and RunPage.
9.7.3.4 Defining an Updatable Column in a Classic ReportDevelopers can make a column updatable by editing column attributes. Note that theApplication Express engine can only perform updates if:
• A multirow update is defined.
• A PL/SQL process is implemented to process updated data.
• When using the built-in tabular form elements and display types, then the reporthas to be defined using the type SQL Query (updatable report).
To define updatable column attributes:
1. View the page in Page Designer:
a. On the Workspace home page, click the App Builder icon.
b. Select an application.
Chapter 9Managing Classic Reports
9-95
c. Select a page.
Page Designer appears.
2. In the Rendering tab, locate the region and expand the Columns node.
The columns appear in the Rendering tab.
3. Select a column to edit.
The Property Editor displays the attributes for that column. Attributes areorganized in groups.
4. To find a group or attribute:
• Search for the group or attribute - Enter keywords in the Filter Propertiesfield. The Property Editor displays the group or attributes. To return to thedefault display, delete the keywords.
• Use Go to Group - Click Go to Group and select the group. To return thedefault display, click Go to Group again and select Expand All.
5. In the Property Editor, find Identification and edit the Type attribute.
Tip:
To view Help, select the attribute and click the Help tab. Once youactivate the Help pane, the content that displays changes every time youselect another attribute.
6. To save your changes click Save. To save and run the page, click Save and RunPage.
9.7.3.5 Defining a Column as a List of Values in a Classic ReportA column can be rendered as Radio Group or a static, named, or query-based LOV.For example, a column can be rendered using a select list or a popup list of values.Or, a column can be rendered as read-only text based on a list of values.
This last approach is an effective strategy when creating display lookup values and isparticularly useful in regular, nonupdatable reports. This approach enables you todisplay the value of a column without having to write a SQL JOIN statement.
To render a report column as a list of values:
1. View the page in Page Designer:
a. On the Workspace home page, click the App Builder icon.
b. Select an application.
c. Select a page.
Page Designer appears.
2. In the Rendering tab, locate the region and expand the Columns node.
The columns appear in the Rendering tab.
3. Select a column to edit.
The Property Editor displays the attributes for that column. Attributes areorganized in groups.
Chapter 9Managing Classic Reports
9-96
4. To find a group or attribute:
• Search for the group or attribute - Enter keywords in the Filter Propertiesfield. The Property Editor displays the group or attributes. To return to thedefault display, delete the keywords.
• Use Go to Group - Click Go to Group and select the group. To return thedefault display, click Go to Group again and select Expand All.
5. Find Identification. From Type, select Plain Text (based on List of Values).
6. Find List of Values. Select a Type and fill in the appropriate fields.
7. To save your changes click Save. To save and run the page, click Save and RunPage.
9.7.3.6 Controlling When Classic Report Columns DisplayYou can use the Authorization Scheme and Server-side Condition attributes to controlwhen a column displays.
Use Authorization Scheme to control access to resources (such as a report column)based on predefined user privileges. For example, you could create an authorizationscheme in which only managers can view a specific report column. Before you canselect an authorization scheme, you must first create it. Use Server-side Condition
A condition is a small unit of logic that enables you to control the display of a columnbased on a predefined condition type. The condition evaluates to true or false basedon the values you enter in the Expressions fields.
To specify Authorization Scheme and Server-side Condition attributes:
1. View the page in Page Designer:
a. On the Workspace home page, click the App Builder icon.
b. Select an application.
c. Select a page.
Page Designer appears.
2. In the Rendering tab, locate the region and expand the Columns node.
3. Select a column to edit.
The Property Editor displays the attributes for that column. Attributes areorganized in groups.
4. To find a group or attribute:
• Search for the group or attribute - Enter keywords in the Filter Propertiesfield. The Property Editor displays the group or attributes. To return to thedefault display, delete the keywords.
• Use Go to Group - Click Go to Group and select the group. To return thedefault display, click Go to Group again and select Expand All.
5. If controlling a column with an authorization scheme, select an authorizationscheme:
a. Find Security.
b. Authorization Scheme - Make a selection.
6. If controlling the column with a condition define a condition, define a condition:
Chapter 9Managing Classic Reports
9-97
a. Find Server-side Condition.
b. Type - Make a selection.
c. Depending upon your selection, enter an expression or value in the fieldsprovided.
If the authorization is successful and the condition type display evaluates to true,the column displays.
7. To save your changes click Save. To save and run the page, click Save and RunPage.
9.7.3.7 Adding a Download Link to a Classic ReportDevelopers can create a link within a report that enables users to export the report asa comma-delimited file (.csv) file. To add a CSV link to a report, you must enableAutomatic CSV Encoding. When using Automatic CSV Encoding, the report templateis not important. You can include a CSV link with any report template that has the CSVexport substitution string defined.
9.8 Printing Report RegionsConfigure a report region to print by exporting it to several different formats.
Tip:
If you run Oracle Application Express with Oracle Database 11g Release 1(11.1) or later, you must enable network services to use report printing. See"Enabling Network Services in Oracle Database 11g or Later (page 20-13)."
By taking advantage of region report printing, your application users can view and printreports that have a predefined orientation, page size, column headings, and pageheader and footer. Interactive reports also have the ability to export to PDF, RTF,Microsoft Excel and Comma Separated Values (CSV).
Note:
Interactive reports do not support a custom report layout.
Oracle BI Publisher supports Adobe Portable Document Format (PDF), MicrosoftWord Rich Text Format (RTF), or Microsoft Excel format (XLS), or Extensible MarkupLanguage (XML). Oracle Rest Data Services also supports PDF and XML. If youchoose to use other third-party rendering engines, other output formats can also beconfigured.
• About Printing Reports to PDF (page 9-99)
• About Report Printing Configuration Options (page 9-99)
• About Classic Report Printing Methods (page 9-100)
Chapter 9Printing Report Regions
9-98
• Configuring Classic Report Region Print Attributes (page 9-100)
• Configuring Interactive Report Region Print Attributes (page 9-101)
• About Report Queries (page 9-102)
• About Report Layouts (page 9-103)
9.8.1 About Printing Reports to PDFTo print a report to PDF, the data must be transformed using a report server defined atthe instance-level. From an end user's perspective, you simply clicks a print link.However, from a developer's perspective, you must declaratively create regions tosupport PDF printing.
9.8.2 About Report Printing Configuration OptionsOracle Application Express provides three report printing configuration options:
• Oracle REST Data Services - Select this option if you are using the Oracle RESTData Services (formerly called Application Express Listener) release 2.0 or later.This option enables you to use the basic printing functionality, which includescreating report queries and printing report regions using the default templatesprovided in Application Express and using your own customized XSL-FOtemplates.
Note:
The Oracle REST Data Services option does not require an externalprint server, instead the report data and style sheet are downloaded tothe listener, rendered into PDF format by the listener and then sent tothe client. The PDF documents in this setup are not returned back intothe database, thus the print APIs are not supported when using theOracle REST Data Services-based configuration.
• External (Apache FOP) - Select this option if you are using Apache FOP on anexternal J2EE server. This option enables you to use the basic printingfunctionality, which includes creating report queries and printing report regionsusing the default templates provided in Application Express and using your owncustomized XSL-FO templates.
• Oracle BI Publisher - This option requires a valid license of Oracle BI Publisher(also known as Oracle XML Publisher). This option enables you to take reportquery results and convert them from XML to RTF format using Oracle BIPublisher. Select this option to upload your own customized RTF or XSL-FOtemplates for printing reports within Application Express.
Tip:
To learn more about installing and configuring Oracle BI Publisher, see "About Report Printing Configuration Options".
Chapter 9Printing Report Regions
9-99
Note:
To use the full functionality of report printing, your Oracle ApplicationExpress service administrator must enable it for your instance. See"Configuring Report Printing" in Oracle Application Express AdministrationGuide.
9.8.3 About Classic Report Printing MethodsThere are two ways to print classic report regions:
• Configure Printing Attributes for a Report Region. You can print a reportregion by configuring the Printing Attributes for the region. See "ConfiguringClassic Report Region Print Attributes (page 9-100)."
• Create a Report Query. You can print a report by defining a report query as aShared Component. See "Printing a Report Region by Defining a Report Query(page 17-55)."
Both report regions and report queries can be downloaded in the following formats:
• PDF - Adobe Portable Document Format.
• RTF - Microsoft Word Rich Text Format.
• XLS - Microsoft Excel format. Note that this is not a true .xls file because thecontent is HTML-based.
• HTML
• XML - Extensible Markup Language.
To format either a report region or report query, you associate it with a report layout.
Tip:
You can also have the output format specified by an item that determines theoutput format at runtime. Select the item that holds the format value. Validvalues are PDF, RTF (to open the document in Microsoft Word), XLS (toopen the document in Microsoft Excel) and HTML (to download thedocument as an HTML file).
9.8.4 Configuring Classic Report Region Print AttributesOne approach to printing a report region is to configure Print Attributes. Onceconfigured, these attributes apply only to the current region and cannot be usedoutside the context of the region. If the printing feature is set up for your instance, youcan configure a report region to print in various formats.
• Configuring a Classic Report Print Attributes (page 9-101)
Chapter 9Printing Report Regions
9-100

See Also:
"About Classic Report Printing Methods (page 9-100)" and "ConfiguringReport Printing" in Oracle Application Express Administration Guide
9.8.4.1 Configuring a Classic Report Print AttributesTo configure a classic report region for printing:
1. View the page in Page Designer:
a. On the Workspace home page, click the App Builder icon.
b. Select an application.
c. Select a page.
Page Designer appears.
2. In the Rendering tab, locate the region containing the report.
3. Under the report, select the Attributes node.
The Property Editor displays the report attributes for the page. Attributes areorganized in groups.
Tip:
To find a group or attribute, enter keywords in the Filter Propertiesfield. The Property Editor displays the group or attributes. Or, you canclick Go to Group and select the group.
4. Enable printing:
a. In the Property Editor, find the Printing group.
b. Set Enabled to Yes.
5. In the Rendering tab, expand the Attributes node and select the Printing node.
Printing attributes appear in the Property Editor.
6. Edit the Printing attributes.
Tip:
To view help for an attribute, select the attribute in the Property Editorand click the Help tab in the central pane.
7. To save your changes click Save. To save and run the page, click Save and RunPage.
9.8.5 Configuring Interactive Report Region Print AttributesUnlike classic reports, the interactive report Print Attributes can only use the defaultXSL-FO layout and is initiated from the Report Attributes, Download section rather
Chapter 9Printing Report Regions
9-101
than directly from this screen. Once configured, these attributes only apply only to thecurrent region and cannot be used outside the context of the region.
If the printing feature is set up for your instance, you can configure a report region toprint in various formats.
• Configuring Interactive Report Regions for Printing (page 9-102)
9.8.5.1 Configuring Interactive Report Regions for PrintingTo configure an interactive report region for printing:
1. View the page in Page Designer:
a. On the Workspace home page, click the App Builder icon.
b. Select an application.
c. Select a page.
Page Designer appears.
2. In the Rendering tab, locate the region containing the report.
3. Under Regions, select the Attributes node.
The Property Editor displays the attributes. Attributes are organized in groups.
Tip:
To find a group or attribute, enter keywords in the Filter Propertiesfield. The Property Editor displays the group or attributes. Or, you canclick Go to Group and select the group.
4. Under the Attributes, select the Printing node.
The Printing Attributes display in the Property Editor.
5. Edit the appropriate Printing attributes.
Tip:
To view help for an attribute, select the attribute in the Property Editorand click the Help tab in the central pane.
6. To save your changes click Save. To save and run the page, click Save and RunPage.
9.8.6 About Report QueriesYou can print a report region by defining a report query as a Shared Component. Areport query identifies the data to be extracted. Unlike SQL statements contained inregions, report queries contain SQL statements that are validated when you save thequery. Note that report queries must be SQL statements, not functions returning SQLstatements.
Chapter 9Printing Report Regions
9-102
9.8.7 About Report LayoutsTo format either a classic report region or report query, you associate it with a reportlayout. Using report layouts renders the data in a printer-friendly format. If you do notselect a report layout, a default XSL-FO layout is used. The default XSL-FO layout isalways used for rendering Interactive Report regions.
9.9 Understanding BLOB Support in Forms and ReportsOracle Application Express includes declarative BLOB support to enable developers todeclaratively upload files in forms, and download or display files in reports.
BLOB display and download can also be authored procedurally using PL/SQL. Thissection describes how to upload, download and display files, and how to manageadditional file attributes such as MIME type and file name that are important for propermanagement of files stored in BLOB columns. Using this functionality you can easilyextend your Oracle Application Express applications to manage files including images,documents, videos, and so on.
• About BLOB Support in Reports (page 9-103)
• About Providing a Download Link (page 9-103)
• About Displaying the BLOB (page 9-104)
• About Working With BLOBs Procedurally (page 9-105)
9.9.1 About BLOB Support in ReportsOracle Application Express includes BLOB support for both classic and interactivereports. If you use a wizard to create a report and include a column of type BLOB, basicsupport is included. Additional information should be added after generation to makethe download capability more user friendly.
9.9.2 About Providing a Download LinkTo facilitate the inclusion of a download link in a report, the report includes theselection of the length of the BLOB (for example, dbms_lob.getlength(RESUME)). If thelength is 0, the BLOB is NULL and no download link is displayed. In the same way youspecify a format mask for a date or number you can format a download link. TheDOWNLOAD format is more complex however then other format masks in that you arerequired to specify at least three parameters, for example:
DOWNLOAD:EMP:RESUME:EMPNO
The following table describes the parameters of the DOWNLOAD format:
Position
Attribute Required Description
1 DOWNLOAD Yes Identifies the DOWNLOAD report format mask.
2 Table Name Yes Case sensitive name of table containing targetcolumn of type BLOB.
Chapter 9Understanding BLOB Support in Forms and Reports
9-103
Position
Attribute Required Description
3 Column containingBLOB
Yes Case sensitive name of column of type BLOB.
4 Primary Key Column1
Yes Case sensitive name of primary key column 1.
5 Primary Key Column2
No Case sensitive name of primary key column 2.
6 MIME type Column No Case sensitive column name used to store theMIME type.
7 Filename Column No Case sensitive column name used to store thefilename of the BLOB. If NULL, the column name isused as the default when a user downloads thefile.
8 Last Update Column No Case sensitive column name used to store thelast update date of the BLOB. If used, the HTTPheader of the file download indicates the date oflast modification and web browsers will be ableto cache the BLOB. If not specified, the browsermay not be able to cache files.
9 Character SetColumn
No Case sensitive column name used to store thecharacter set of the BLOB. Most relevant for Asianlanguages which may need to maintain thecharacter set encoding.
10 Content Disposition No Specify inline or attachment. All other valuesare ignored. If a MIME type is provided and the fileis a type that can be displayed, the file isdisplayed. If MIME type is not provided, or the filecannot be displayed inline, the user is promptedto download.
11 Download Text No String used for the download link. If nothing isprovided, Download is used. Note that thissupports substitutions (useful for translatedapplications).
12 Table Owner Yes Identifies name of table owner containing targetcolumn of type BLOB.
Consider the following example:
DOWNLOAD:EMP:RESUME:EMPNO::RESUME_MIMETYPE:RESUME_FILENAME:RESUME_LAST_UPDATE::attachment:Resume
To be able to enter these parameters and create the format as described above. Youhave to select Blob Format for Number/Date format item. Once selected, the BlobColumn attributes region displays and you can fill in all parameters as describedabove.
9.9.3 About Displaying the BLOBIf the BLOB you are working with is an image, you can display it in the report using thenew report format mask of 'IMAGE'. Regardless of the MIME type, the report alwaysattempts to display the BLOB. If the BLOB cannot be rendered, a broken image isdisplayed.
Chapter 9Understanding BLOB Support in Forms and Reports
9-104
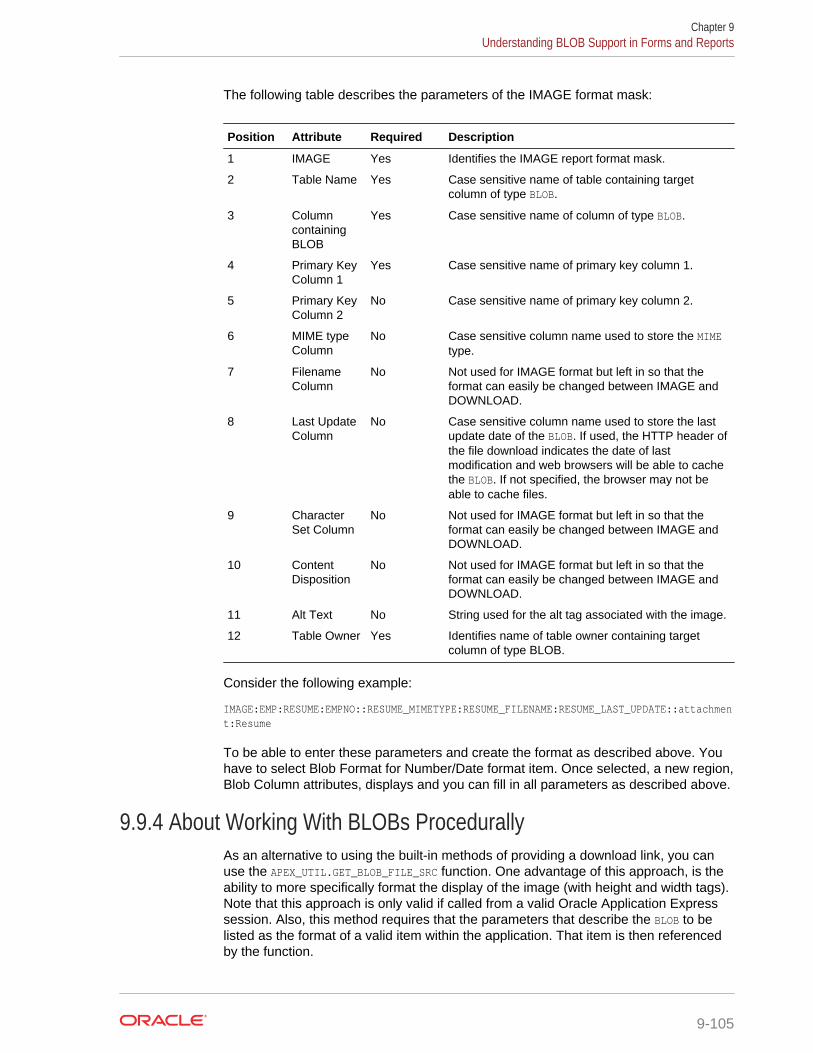
The following table describes the parameters of the IMAGE format mask:
Position Attribute Required Description
1 IMAGE Yes Identifies the IMAGE report format mask.
2 Table Name Yes Case sensitive name of table containing targetcolumn of type BLOB.
3 ColumncontainingBLOB
Yes Case sensitive name of column of type BLOB.
4 Primary KeyColumn 1
Yes Case sensitive name of primary key column 1.
5 Primary KeyColumn 2
No Case sensitive name of primary key column 2.
6 MIME typeColumn
No Case sensitive column name used to store the MIMEtype.
7 FilenameColumn
No Not used for IMAGE format but left in so that theformat can easily be changed between IMAGE andDOWNLOAD.
8 Last UpdateColumn
No Case sensitive column name used to store the lastupdate date of the BLOB. If used, the HTTP header ofthe file download indicates the date of lastmodification and web browsers will be able to cachethe BLOB. If not specified, the browser may not beable to cache files.
9 CharacterSet Column
No Not used for IMAGE format but left in so that theformat can easily be changed between IMAGE andDOWNLOAD.
10 ContentDisposition
No Not used for IMAGE format but left in so that theformat can easily be changed between IMAGE andDOWNLOAD.
11 Alt Text No String used for the alt tag associated with the image.
12 Table Owner Yes Identifies name of table owner containing targetcolumn of type BLOB.
Consider the following example:
IMAGE:EMP:RESUME:EMPNO::RESUME_MIMETYPE:RESUME_FILENAME:RESUME_LAST_UPDATE::attachment:Resume
To be able to enter these parameters and create the format as described above. Youhave to select Blob Format for Number/Date format item. Once selected, a new region,Blob Column attributes, displays and you can fill in all parameters as described above.
9.9.4 About Working With BLOBs ProcedurallyAs an alternative to using the built-in methods of providing a download link, you canuse the APEX_UTIL.GET_BLOB_FILE_SRC function. One advantage of this approach, is theability to more specifically format the display of the image (with height and width tags).Note that this approach is only valid if called from a valid Oracle Application Expresssession. Also, this method requires that the parameters that describe the BLOB to belisted as the format of a valid item within the application. That item is then referencedby the function.
Chapter 9Understanding BLOB Support in Forms and Reports
9-105
10Developing Forms
Developers can create a variety of different application forms either manually or byusing wizards. Some forms enable users to update a single row in a table, while otherforms enable users to update multiple rows in a table.
• Understanding Form Types (page 10-1)When creating a database application, developers can create three basic formtypes: editable interactive grid, form on a table, or a master detail.
• Creating a Form (page 10-5)Developers can create forms using a number of wizards including the CreateApplication Wizard, Create Page Wizard, and Create Region Wizard.
• About Making an Interactive Grid Editable (page 10-11)Developers determine whether the underlying data is read-only or editable byusers. An interactive grid presents users a set of data in a searchable,customizable report. In an editable interactive grid, users can also add to, modify,and refresh the data set directly on the page.
• Managing Master Detail Forms (page 10-11)Developers can create a master detail form with either the Create ApplicationWizard or the Create Page Wizard.
• Validating User Input in Forms (page 10-20)Developers can create validation and an associated error message to check thedata a user enters before processing.
• Understanding BLOB Support in Forms (page 10-21)Oracle Application Express includes BLOB support to enable developers todeclaratively upload and download files in forms.
See Also:
• "Creating a Legacy Master Detail Form (page 25-12)"
• "Managing Legacy Tabular Forms (page 25-15)"
• "Developing Reports (page 9-1)"
10.1 Understanding Form TypesWhen creating a database application, developers can create three basic form types:editable interactive grid, form on a table, or a master detail.
• Editable Interactive Grid (page 10-2)An interactive grid presents users with a set of data in a searchable, customizablereport. In an editable interactive grid, users can also add to, modify, and refreshthe data set directly on the page.
10-1
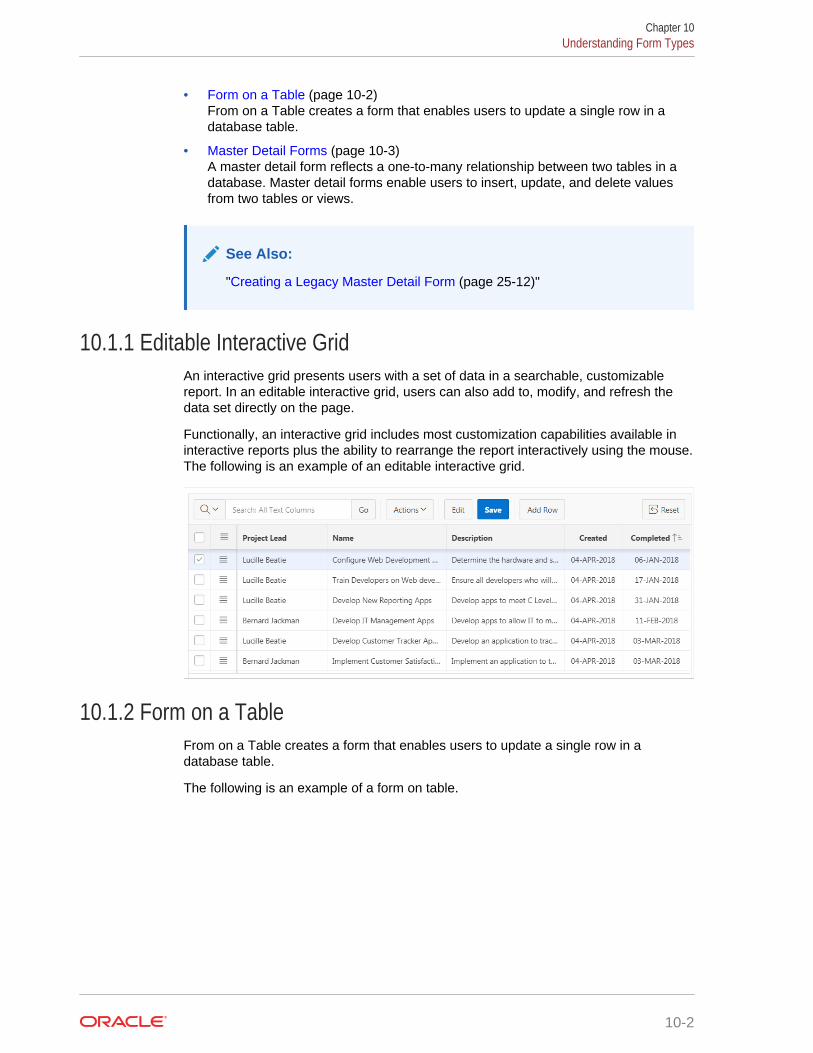
• Form on a Table (page 10-2)From on a Table creates a form that enables users to update a single row in adatabase table.
• Master Detail Forms (page 10-3)A master detail form reflects a one-to-many relationship between two tables in adatabase. Master detail forms enable users to insert, update, and delete valuesfrom two tables or views.
See Also:
"Creating a Legacy Master Detail Form (page 25-12)"
10.1.1 Editable Interactive GridAn interactive grid presents users with a set of data in a searchable, customizablereport. In an editable interactive grid, users can also add to, modify, and refresh thedata set directly on the page.
Functionally, an interactive grid includes most customization capabilities available ininteractive reports plus the ability to rearrange the report interactively using the mouse.The following is an example of an editable interactive grid.
10.1.2 Form on a TableFrom on a Table creates a form that enables users to update a single row in adatabase table.
The following is an example of a form on table.
Chapter 10Understanding Form Types
10-2
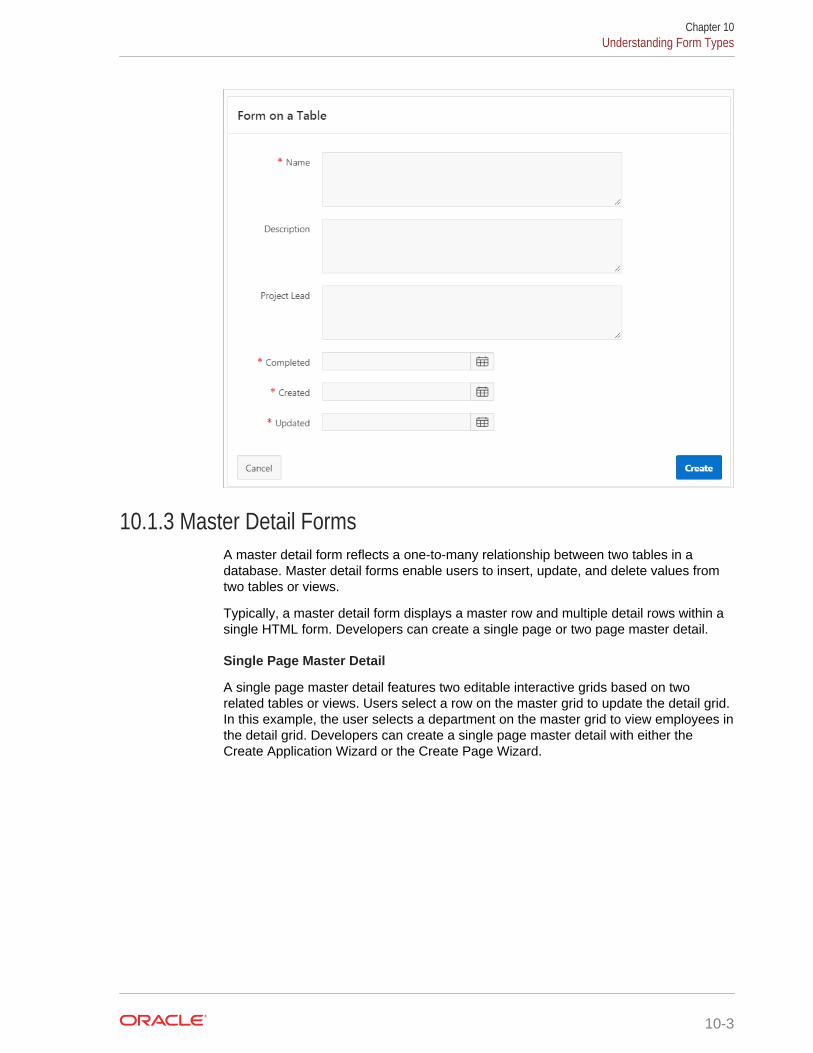
10.1.3 Master Detail FormsA master detail form reflects a one-to-many relationship between two tables in adatabase. Master detail forms enable users to insert, update, and delete values fromtwo tables or views.
Typically, a master detail form displays a master row and multiple detail rows within asingle HTML form. Developers can create a single page or two page master detail.
Single Page Master Detail
A single page master detail features two editable interactive grids based on tworelated tables or views. Users select a row on the master grid to update the detail grid.In this example, the user selects a department on the master grid to view employees inthe detail grid. Developers can create a single page master detail with either theCreate Application Wizard or the Create Page Wizard.
Chapter 10Understanding Form Types
10-3
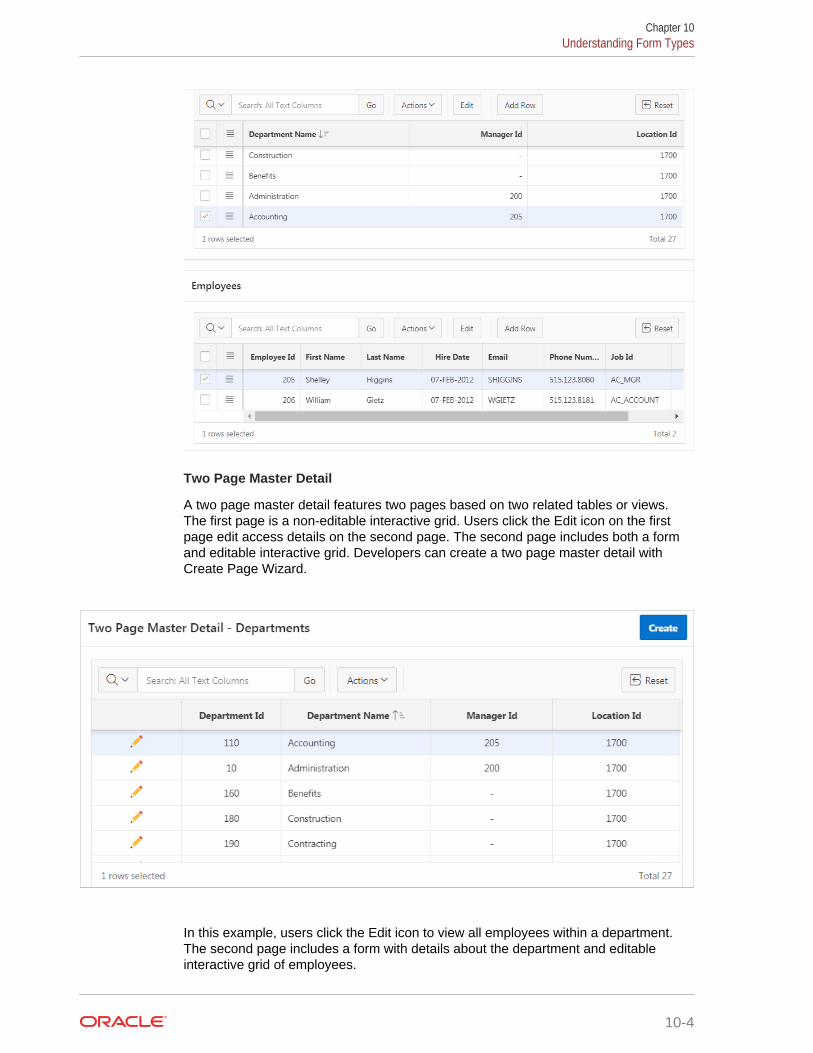
Two Page Master Detail
A two page master detail features two pages based on two related tables or views.The first page is a non-editable interactive grid. Users click the Edit icon on the firstpage edit access details on the second page. The second page includes both a formand editable interactive grid. Developers can create a two page master detail withCreate Page Wizard.
In this example, users click the Edit icon to view all employees within a department.The second page includes a form with details about the department and editableinteractive grid of employees.
Chapter 10Understanding Form Types
10-4
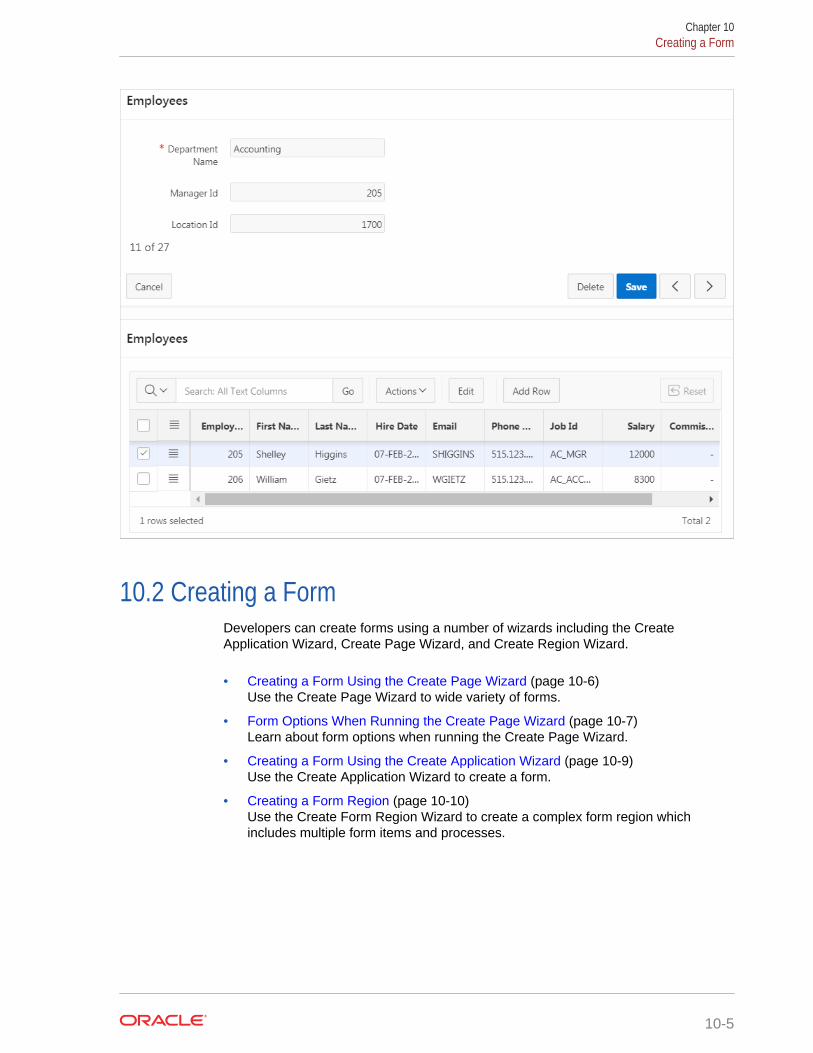
10.2 Creating a FormDevelopers can create forms using a number of wizards including the CreateApplication Wizard, Create Page Wizard, and Create Region Wizard.
• Creating a Form Using the Create Page Wizard (page 10-6)Use the Create Page Wizard to wide variety of forms.
• Form Options When Running the Create Page Wizard (page 10-7)Learn about form options when running the Create Page Wizard.
• Creating a Form Using the Create Application Wizard (page 10-9)Use the Create Application Wizard to create a form.
• Creating a Form Region (page 10-10)Use the Create Form Region Wizard to create a complex form region whichincludes multiple form items and processes.
Chapter 10Creating a Form
10-5
See Also:
• "Developing Reports (page 9-1)"
• "Managing Legacy Tabular Forms (page 25-15)"
• "Creating a Legacy Master Detail Form (page 25-12)"
10.2.1 Creating a Form Using the Create Page WizardUse the Create Page Wizard to wide variety of forms.
To create a form using the Create Page Wizard:
1. On the Workspace home page, click the App Builder icon.
2. Select an application.
3. Click Create Page.
4. For Create a Page:
a. User Interface - Select a user interface for the page.
This attribute only displays for applications using older themes for whichDesktop and Mobile User Interfaces have been defined.
b. Page Type - Select Component and then Form.
Tip:
Component pages provides page-level functionality and can beadded multiple times within a given application such as reports,forms, charts, or calendars. Feature pages provide application-levelfunctionality and can only be added once per application.
c. Select a form type. Options include:
• Report with Form on Table
• Report with List View on Table (Optimized for mobile apps)
• Editable Interactive Grid
• Single Page Master Detail
• Two Page Master Detail
• Form on a Table
• Form on a Procedure
• Form on a SQL Query
• Form on Web Service
• Form on a SQL Query
• Form on a Web Service
• Report and Form on Web Service
Chapter 10Creating a Form
10-6
Tip:
To learn more about each report type, see "Form Options WhenRunning the Create Page Wizard (page 10-7)."
d. Click Next.
5. What appears next depends upon the form you select. Follow the on-screeninstructions.
To learn more about an attribute, see field-level Help.
10.2.2 Form Options When Running the Create Page WizardLearn about form options when running the Create Page Wizard.
Tip:
Universal Theme - 42 is optimized to work equally well in either a mobile ordesktop environment. In previous releases and in earlier themes, the Mobileuser interface is based on jQuery Mobile. Oracle recommends migratingexisting mobile applications to the Universal Theme as soon as possible.
Available Forms in the Create Page Wizard
The Create Page Wizard supports the following forms.
Table 10-1 Create Page Wizard — Available Forms
Form Type Description To Learn More
Report with Form on Table Creates report and form on a table you select. Youselect the report type (Interactive Report,Interactive Grid, or Class Report). One pagedisplays as an interactive grid. Each row provides alink to the form to enable users to update eachrecord.
Note: This wizard does not support tables havingmore than 127 columns. Selecting more than 127columns generates an error.
Not applicable.
Report with a List View onTable
Optimized for mobile applications.
Creates a form and list view that enables users toupdate a single row in a database table. You choosethe table on which to build the form and select thecolumn to be used for displaying text in the ListView.
Not applicable
Chapter 10Creating a Form
10-7
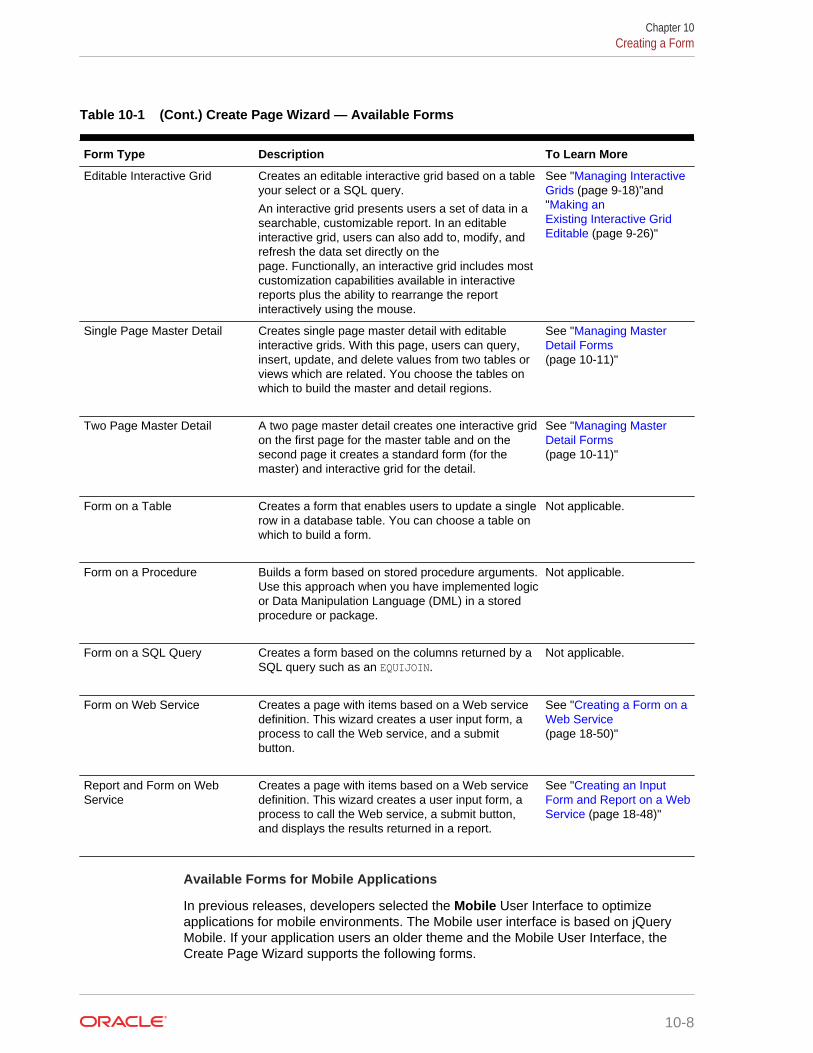
Table 10-1 (Cont.) Create Page Wizard — Available Forms
Form Type Description To Learn More
Editable Interactive Grid Creates an editable interactive grid based on a tableyour select or a SQL query.
An interactive grid presents users a set of data in asearchable, customizable report. In an editableinteractive grid, users can also add to, modify, andrefresh the data set directly on thepage. Functionally, an interactive grid includes mostcustomization capabilities available in interactivereports plus the ability to rearrange the reportinteractively using the mouse.
See "Managing InteractiveGrids (page 9-18)"and"Making anExisting Interactive GridEditable (page 9-26)"
Single Page Master Detail Creates single page master detail with editableinteractive grids. With this page, users can query,insert, update, and delete values from two tables orviews which are related. You choose the tables onwhich to build the master and detail regions.
See "Managing MasterDetail Forms(page 10-11)"
Two Page Master Detail A two page master detail creates one interactive gridon the first page for the master table and on thesecond page it creates a standard form (for themaster) and interactive grid for the detail.
See "Managing MasterDetail Forms(page 10-11)"
Form on a Table Creates a form that enables users to update a singlerow in a database table. You can choose a table onwhich to build a form.
Not applicable.
Form on a Procedure Builds a form based on stored procedure arguments.Use this approach when you have implemented logicor Data Manipulation Language (DML) in a storedprocedure or package.
Not applicable.
Form on a SQL Query Creates a form based on the columns returned by aSQL query such as an EQUIJOIN.
Not applicable.
Form on Web Service Creates a page with items based on a Web servicedefinition. This wizard creates a user input form, aprocess to call the Web service, and a submitbutton.
See "Creating a Form on aWeb Service(page 18-50)"
Report and Form on WebService
Creates a page with items based on a Web servicedefinition. This wizard creates a user input form, aprocess to call the Web service, a submit button,and displays the results returned in a report.
See "Creating an InputForm and Report on a WebService (page 18-48)"
Available Forms for Mobile Applications
In previous releases, developers selected the Mobile User Interface to optimizeapplications for mobile environments. The Mobile user interface is based on jQueryMobile. If your application users an older theme and the Mobile User Interface, theCreate Page Wizard supports the following forms.
Chapter 10Creating a Form
10-8
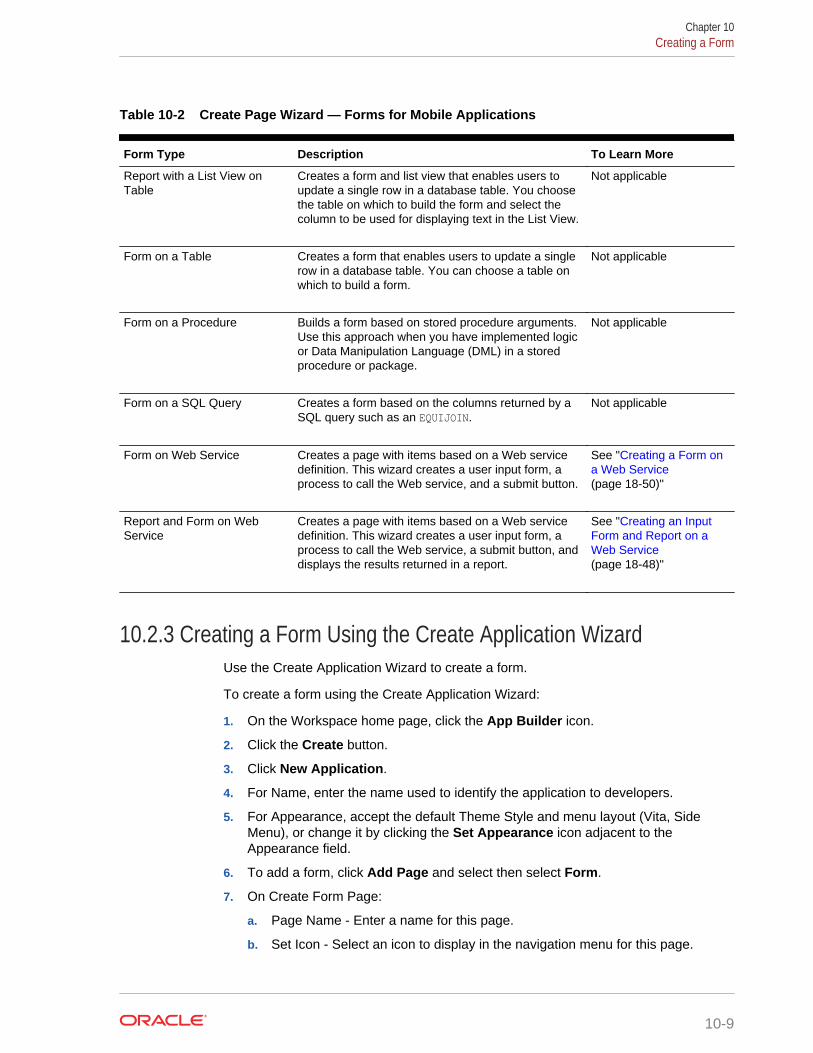
Table 10-2 Create Page Wizard — Forms for Mobile Applications
Form Type Description To Learn More
Report with a List View onTable
Creates a form and list view that enables users toupdate a single row in a database table. You choosethe table on which to build the form and select thecolumn to be used for displaying text in the List View.
Not applicable
Form on a Table Creates a form that enables users to update a singlerow in a database table. You can choose a table onwhich to build a form.
Not applicable
Form on a Procedure Builds a form based on stored procedure arguments.Use this approach when you have implemented logicor Data Manipulation Language (DML) in a storedprocedure or package.
Not applicable
Form on a SQL Query Creates a form based on the columns returned by aSQL query such as an EQUIJOIN.
Not applicable
Form on Web Service Creates a page with items based on a Web servicedefinition. This wizard creates a user input form, aprocess to call the Web service, and a submit button.
See "Creating a Form ona Web Service(page 18-50)"
Report and Form on WebService
Creates a page with items based on a Web servicedefinition. This wizard creates a user input form, aprocess to call the Web service, a submit button, anddisplays the results returned in a report.
See "Creating an InputForm and Report on aWeb Service(page 18-48)"
10.2.3 Creating a Form Using the Create Application WizardUse the Create Application Wizard to create a form.
To create a form using the Create Application Wizard:
1. On the Workspace home page, click the App Builder icon.
2. Click the Create button.
3. Click New Application.
4. For Name, enter the name used to identify the application to developers.
5. For Appearance, accept the default Theme Style and menu layout (Vita, SideMenu), or change it by clicking the Set Appearance icon adjacent to theAppearance field.
6. To add a form, click Add Page and select then select Form.
7. On Create Form Page:
a. Page Name - Enter a name for this page.
b. Set Icon - Select an icon to display in the navigation menu for this page.
Chapter 10Creating a Form
10-9
c. Table - Select the table for the form.
d. Include Report - Select Include Report to create a report and form. The firstpage is an interactive report. Each row provides a link to a form where userscan update a record.
e. Advanced - Expand Advanced:
• Page Help - Enter text to be displayed when the user selects Page Help.
Tip:
This setting requires you select the About Page feature. If youselect the About Page feature, a help icon is generated in thenavigation bar with an entry for page help.
f. Click Add Page.
8. Under Features, select features to include with the application. Features provideapplication-level functionality and can only be added once per application. To learnmore, click the Help icon adjacent to Features.
Tip:
Click the Check All button to select all features.
9. Under Settings, specify settings used to generate this application. To learn moreabout an attribute, click the Help icon adjacent to Settings.
10. Click Create Application.
10.2.4 Creating a Form RegionUse the Create Form Region Wizard to create a complex form region which includesmultiple form items and processes.
Tip:
Using the Create Form Region Wizard creates a complex form region whichincludes multiple form items and processes. Although you can create aregion directly in the Rendering tree or drag a region from the Gallery, theseapproaches will not create these additional components.
To create a form using the Create Form Region Wizard:
1. View the page in Page Designer:
a. On the Workspace home page, click the App Builder icon.
b. Select an application.
c. Select a page.
Page Designer appears.
Chapter 10Creating a Form
10-10
2. Locate the Page Designer Toolbar at the top of the page.
3. On Page Designer Toolbar, click the Create menu and select Form Region.
The Create Region Wizard appears.
4. On Create Form Region:
Options include:
a. Select the type of form you wish to create. Options include:
• Form on a Table
• Form on a SQL Query
• Form on a Procedure
• Form on a Web Service
b. Click Next.
5. What appears next depends upon the form region. Follow the on-screeninstructions.
10.3 About Making an Interactive Grid EditableDevelopers determine whether the underlying data is read-only or editable by users.An interactive grid presents users a set of data in a searchable, customizable report. Inan editable interactive grid, users can also add to, modify, and refresh the data setdirectly on the page.
As described in "Using Interactive Grids" in Oracle Application Express End User’sGuide, users can lock, hide, filter, freeze, highlight, and sort individual columns.Advanced users can also define breaks, aggregations, and computations againstcolumns. Users can also directly customize the appearance of an interactive grid.Users can use the mouse to resize the width of a column and drag and drop columnsinto different places in the grid.
In an editable interactive grid, users can also add to, modify, and refresh the data setdirectly on the page. Editable interactive grids expand the functionality of regularinteractive grids to enable users to more directly update a grid’s structure andcontents. Users can add and delete rows, edit cell contents, and refresh the grid withthe latest updates.
10.4 Managing Master Detail FormsDevelopers can create a master detail form with either the Create Application Wizardor the Create Page Wizard.
Tip:
To see a working examples of one page and two page master detail forms,install the sample application, Sample Projects and view the Projects page.See "Installing a Packaged Application (page 3-4)."
Chapter 10About Making an Interactive Grid Editable
10-11
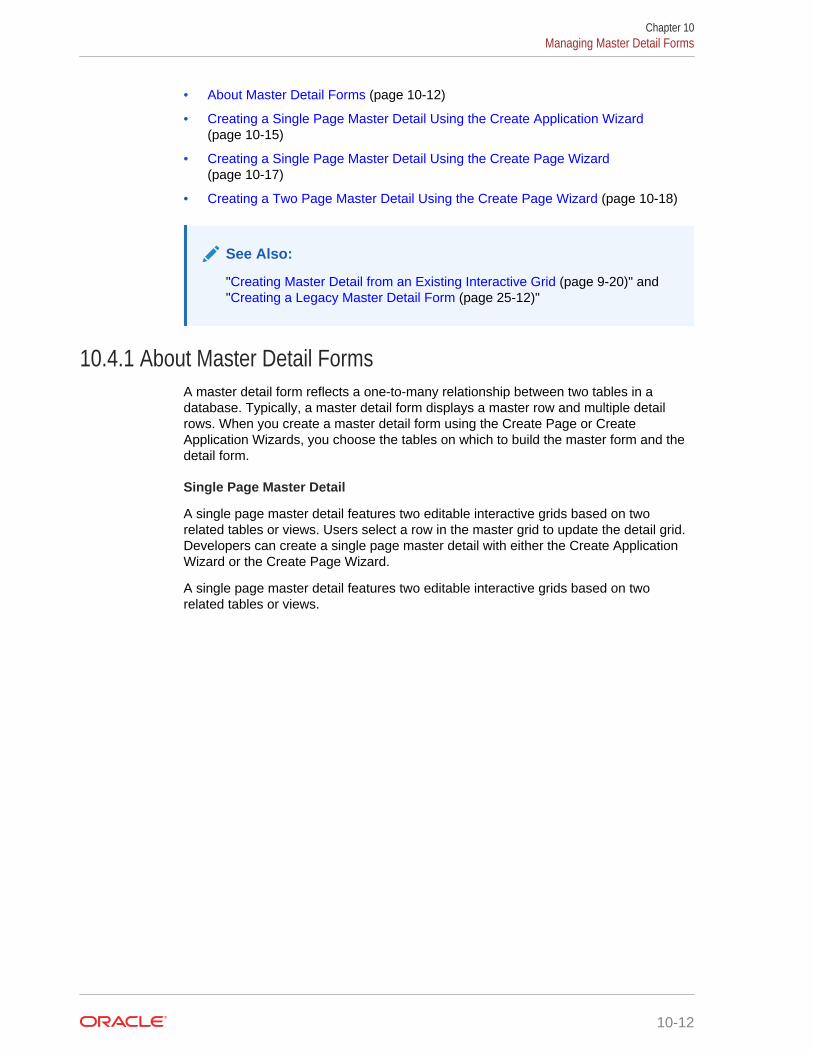
• About Master Detail Forms (page 10-12)
• Creating a Single Page Master Detail Using the Create Application Wizard(page 10-15)
• Creating a Single Page Master Detail Using the Create Page Wizard(page 10-17)
• Creating a Two Page Master Detail Using the Create Page Wizard (page 10-18)
See Also:
"Creating Master Detail from an Existing Interactive Grid (page 9-20)" and"Creating a Legacy Master Detail Form (page 25-12)"
10.4.1 About Master Detail FormsA master detail form reflects a one-to-many relationship between two tables in adatabase. Typically, a master detail form displays a master row and multiple detailrows. When you create a master detail form using the Create Page or CreateApplication Wizards, you choose the tables on which to build the master form and thedetail form.
Single Page Master Detail
A single page master detail features two editable interactive grids based on tworelated tables or views. Users select a row in the master grid to update the detail grid.Developers can create a single page master detail with either the Create ApplicationWizard or the Create Page Wizard.
A single page master detail features two editable interactive grids based on tworelated tables or views.
Chapter 10Managing Master Detail Forms
10-12
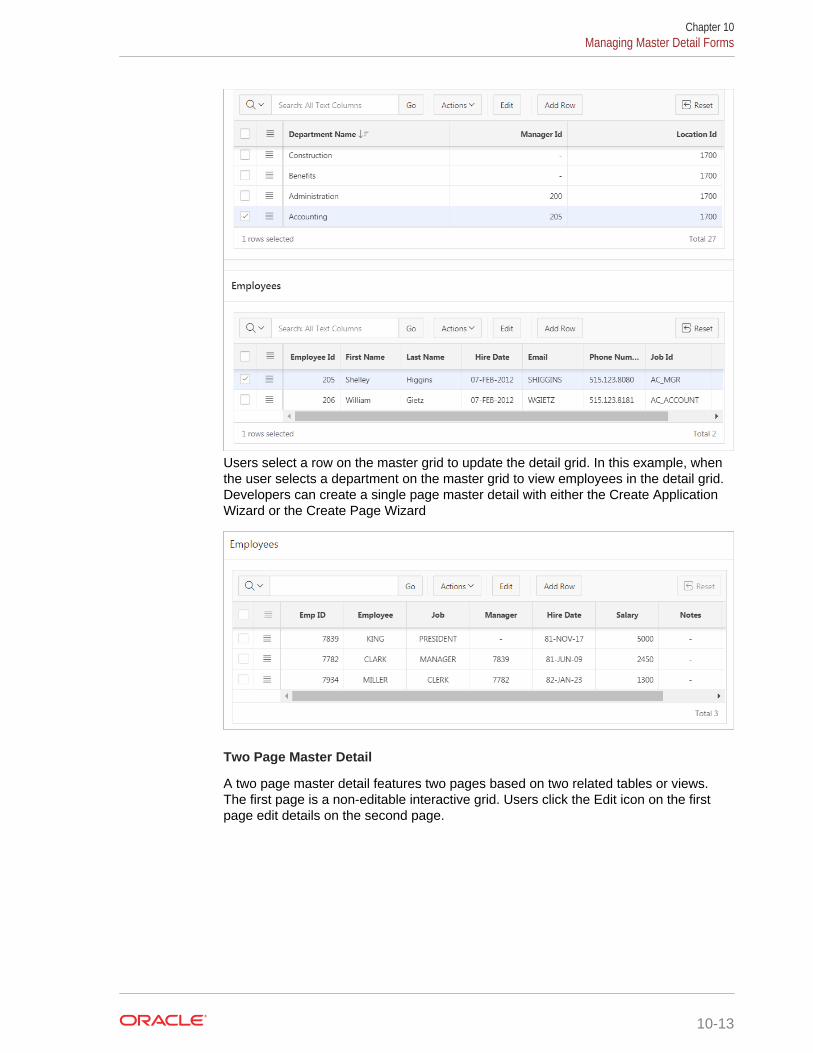
Users select a row on the master grid to update the detail grid. In this example, whenthe user selects a department on the master grid to view employees in the detail grid.Developers can create a single page master detail with either the Create ApplicationWizard or the Create Page Wizard
Two Page Master Detail
A two page master detail features two pages based on two related tables or views.The first page is a non-editable interactive grid. Users click the Edit icon on the firstpage edit details on the second page.
Chapter 10Managing Master Detail Forms
10-13
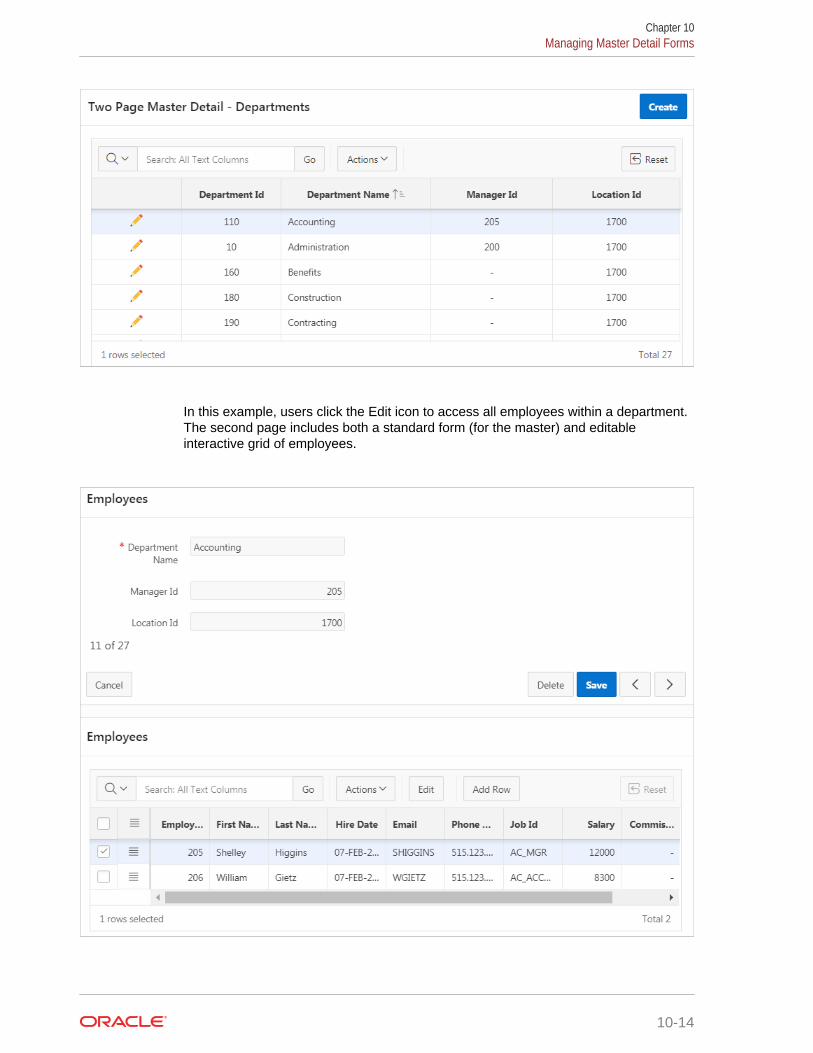
In this example, users click the Edit icon to access all employees within a department.The second page includes both a standard form (for the master) and editableinteractive grid of employees.
Chapter 10Managing Master Detail Forms
10-14
For numeric and date fields, you can also pre-define date and number format masks,or apply those format masks after generating the initial form. Wizard generated masterdetail forms also automatically create validations for some columns. Validations arecreated for columns that are set to NOT NULL in the underlying table and columns oftype NUMBER, DATE or TIMESTAMP. Note that validations are not created for columns if thecolumn is set to read-only, either based on the user's selection, or defined userinterface defaults.
Tip:
You can control the appearance of a specific column by editing columnattributes.
10.4.2 Creating a Single Page Master Detail Using the CreateApplication Wizard
When you create a master detail form using the Create Application Wizard, the wizardcreates single page with two editable interactive grids based on two related tables orviews. With this page, users can query, insert, update, and delete values from twotables or views which are related.
Tip:
The Create Application Wizard uses general best practices to generate theapplication and does not include several advanced options included in theCreate Page Wizard.
To create a master detail form using the Create Application Wizard:
1. On the Workspace home page, click the App Builder icon.
2. Click the Create button.
3. Click New Application.
4. For Name, enter the name used to identify the application to developers.
5. For Appearance, accept the default Theme Style and menu layout (Vita, SideMenu), or change it by clicking the Set Appearance icon adjacent to theAppearance field.
6. To add a report, click Add Page and select then select Master Detail.
7. On Create Form Page:
a. Page Name - Enter a name for this page.
b. Set Icon - Select an icon to display in the navigation menu for this page.
c. Page Type - Select either Master Detail or Editable Grid.
If Page Type is Master Detail:
• Table - Select the master table for the page.
Chapter 10Managing Master Detail Forms
10-15
• Primary Display Column - Select the column to display in the list of masterrecords.
• Secondary Display Column - Select the descriptive column to display inthe list of master records, under the Primary Display Column.
• Detail Table 1 - Select the first detail table for the page.
• Detail Table 2 - Select the second detail table for the page.
• Detail Table 3 - Select the third detail table for the page.
• Detail Table 4 - Select the forth detail table for the page.
If Page Type is Editable Grid:
• Table - Select the master table for the editable interactive grid.
• Detail Table - Select the detail table for the page.
Tip:
You can only add one detail table (editable interactive grid) can beadded using this wizard. Add additional detail tables can easily beadded post-generation using the Create Page Wizard..
d. Advanced - Expand Advanced:
• Page Help - Enter text to be displayed when the user selects Page Help.
Tip:
This setting requires you select the Help Pages feature. If theHelp Pages feature is not selected, the Help icon is not begenerated and end users cannot access page help.
e. Click Add Page.
8. Under Features, select features to include with the application. Features provideapplication-level functionality and are typically added once per application. Tolearn more, click the Help icon adjacent to Features.
Tip:
Click the Check All button to select all features.
9. Under Settings, specify settings used to generate this application. To learn moreabout an attribute, click the Help icon adjacent to Settings.
10. Click Create Application.
11. To view the new master detail page, click Run Page.
The rendered page appears.
Chapter 10Managing Master Detail Forms
10-16
10.4.3 Creating a Single Page Master Detail Using the Create PageWizard
Using the Create Page Wizard, you can create either a Single Page Master Detail. ASingle Page Master Detail features two editable interactive grids based on two relatedtables or views.
To create a single page master detail using the Create Page Wizard:
1. Navigate to the application, or create a new application.
2. On the Workspace home page, click the App Builder icon.
3. Select an application.
4. Click Create Page.
5. For Create a Page:
a. User Interface - Select a user interface for the page.
This attribute only displays for applications using older themes for whichDesktop and Mobile User Interfaces have been defined.
b. Page Type - Select Component and then Form.
Tip:
Component pages provides page-level functionality and can beadded multiple times within a given application such as reports,forms, charts, or calendars. Feature pages provide application-levelfunctionality and can only be added once per application.
6. On Create Page, select Single Page Master Detail.
7. On Page Attributes:
a. Page Number - Enter the page number of the master page. If you identify anew page number, the wizard creates a new page. If you identify an existingpage number, the wizard adds the component to that page.
b. Page Name - Enter the name of the page.
c. Page Mode - Identify the page mode. Options include:
• Normal - The page is presented as a normal Application Expressapplication page.
• Modal Dialog - The page is presented as a modal dialog. A modal dialogis an overlay window positioned within the viewport, which remains activeand focused until the end user dismisses (closes) it. The underlying pageis grayed out and the end user is prevented from interacting with the restof the page until the dialog is closed.
d. Breadcrumb - Select whether you want to use a breadcrumb navigation controlon your page. If you elect to include breadcrumb navigation, additionalattributes appear.
e. Click Next.
Chapter 10Managing Master Detail Forms
10-17
8. For Navigation Preference:
a. Select how you want this page integrated into the Navigation Menu. To learnmore, see field-level Help.
b. Click Next.
9. For Master Source:
a. Master Region Title - Enter a region title for the master region.
b. Table/View Owner - Select the owner of the table on which you are building aninteractive grid.
c. Table / View Name - Select the table or view on which the grid will be based.
d. Primary Key Column - Select the name of the column that uniquely identifies arow in the table.
e. Select Columns - Select one or more columns to be included in the region.Select all columns to be displayed.
f. Click Next.
10. For Detail Source:
a. Detail Region Title - Enter a region title for the detail region.
b. Show Only Related Tables - Specify whether to restrict the list of detail tablesto only those tables related to the master table.
c. Table/View Name - Select the table or view on which the grid is based.
d. Primary Key Column - Select the name of the column that uniquely identifies arow in the table.
e. Master Detail Foreign Key - Select the foreign key that relates between themaster and detail tables.
f. Select Columns - Select one or more columns to be included in the region.Select all columns to be displayed.
g. Click Create.
The Page Designer appears.
11. To view the new master detail, click Save and Run Page.
The rendered page appears.
10.4.4 Creating a Two Page Master Detail Using the Create PageWizard
Use the Create Page Wizard to create either a two page master detail. A two pagemaster detail features two pages based on two related tables or views. The first pageis a non-editable interactive grid. Users click the Edit icon on the first page edit detailson the second page.
To create a two page master detail using the Create Page Wizard:
1. Navigate to the application, or create a new application.
2. On the Workspace home page, click the App Builder icon.
3. Select an application.
Chapter 10Managing Master Detail Forms
10-18
4. Click Create Page.
5. For Create a Page:
a. User Interface - Select a user interface for the page (optional).
This attribute only displays for applications using older themes and for whichDesktop and Mobile User Interfaces have been defined.
b. Page Type - Select Component and then Form.
Tip:
Component pages provides page-level functionality and can beadded multiple times within a given application such as reports,forms, charts, or calendars. Feature pages provide application-levelfunctionality and can only be added once per application.
6. On Create Page, select Two Page Master Detail.
7. On Page Attributes:
a. Master Page Number - Enter the page number of the master page. Themaster page will contain a read-only master interactive grid. Enter a new pagenumber or an existing page number.
b. Master Page Name - Enter the name of the master page.
c. Detail Page Number - Enter the page number of the detail page. The detailpage will contain a form and editable interactive grid..
d. Detail Page Name - Enter the name of the detail page.
e. Breadcrumb - Select whether you want to use a breadcrumb navigation controlon your page. If you elect to include breadcrumb navigation, additionalattributes appear.
f. Click Next.
8. For Navigation Preference:
a. Select how you want this page integrated into the Navigation Menu. To learnmore, see field-level Help.
b. Click Next.
9. For Master Source:
a. Table/View Owner - Select the owner of the table on which you are buildingthe interactive grid.
b. Table/View Name - Select the table or view on which the grid is based.
c. Primary Key Column - Select the name of the column that uniquely identifies arow in the table.
d. Form Navigation Order - Select the navigation order column used by theprevious and next buttons on the Detail Page which navigates to a differentmaster record.
e. Select Columns - Select one or more columns to be included in the region.Select all columns to be displayed.
f. Click Next.
Chapter 10Managing Master Detail Forms
10-19
10. For Detail Source:
a. Table/View Owner - Select the owner of the table on which you are buildingthe interactive grid.
b. Table/View Name - Select the table or view on which the grid is based.
c. Primary Key Column - Select the name of the column that uniquely identifies arow in the table.
d. Master Detail Foreign Key - Select the foreign key that relates between themaster and detail tables.
e. Select Columns - Select one or more columns to be included in the region.Select all columns to be displayed.
f. Click Create.
Page Designer appears.
11. To view the new master detail, click Save and Run Page.
The rendered pages appear.
10.5 Validating User Input in FormsDevelopers can create validation and an associated error message to check the data auser enters before processing.
• About Creating Validations and Error Messages (page 10-20)
• Associating a Validation with a Specific Item (page 10-20)
• About the Error Message Display Location (page 10-21)
10.5.1 About Creating Validations and Error MessagesYou can use validations to check data a user enters before processing. Once youcreate a validation and the associated error message, you can associate it with aspecific item. You can choose to have validation error messages display inline (that is,on the page where the validation is performed) or on a separate error page.
Creating an inline error message involves these steps:
• Step 1 - Create a validation and specify error message text. To learn more, see"Understanding Validations (page 16-5)."
• Step 2 - Associate the validation with a specific item.
10.5.2 Associating a Validation with a Specific ItemTo associate an item with a validation and specify error message text:
1. View the page in Page Designer:
a. On the Workspace home page, click the App Builder icon.
b. Select an application.
c. Select a page.
Page Designer appears.
Chapter 10Validating User Input in Forms
10-20
2. In Page Designer, select the Processing tab in the left pane.
3. Under Validating, select the validation you want to associate.
The Property Editor displays Validation attributes.
4. Under Validation, edit the following attributes:
• Error, Error Message - Enter the text to be displayed in the event that thevalidation does not pass.
• Error, Display Location - Select where the error message displays for thisvalidation. Validation error messages display on a separate error page, orinline with the existing page. Inline error messages display underneaththe associated item label or in a notification area defined as part of the pagetemplate.
• Error, Associated Item - Select the item where this validation error messagedisplays. .
Tip:
To learn more about an attribute, select the attribute in the PropertyEditor and click the Help tab in the central pane.
5. Click Save.
10.5.3 About the Error Message Display LocationThe error message display location identifies where a validation error messagedisplays. Validation error messages can display on an error page or inline within theexisting page. Inline error messages can display in a notification area (defined as partof the page template) or within the field label.
To create a hard error that stops processes, including any remaining validations, youmust display the error on an error page.
10.6 Understanding BLOB Support in FormsOracle Application Express includes BLOB support to enable developers todeclaratively upload and download files in forms.
• About BLOB Support in Forms (page 10-21)
• About Uploading and Downloading Files into a BLOB (page 10-22)
• About Displaying the BLOB (page 10-23)
• About Removing the Image Reference (page 10-23)
10.6.1 About BLOB Support in FormsIf you create a form using the Create Application Wizard, create a page of type ofForm or Report and Form, create a region of type Form, or add an item to anexisting form, any item whose source is a database column of type BLOB results in anitem of type File Browse. When the form is called for INSERT, the file selected by theuser is loaded into the BLOB column. When the form is called for update, a download
Chapter 10Understanding BLOB Support in Forms
10-21
link is displayed to the right of the Browse button. Users can use this link to downloadthe file.
10.6.2 About Uploading and Downloading Files into a BLOBThe defaulted BLOB support does not give you all the information a typical applicationneeds to effectively manage a BLOB. In addition to knowing that the column is a BLOB,more information about the file provides a better experience for the end-user. The FileBrowse page item has additional settings to facilitate managing this additionalinformation completely declaratively.
Tip:
For more information on File Browse settings, see File Browse in "AboutItem Types (page A-1)."
There are two different types of storage types available within the File Browse itemtype:
• BLOB column specific in Item Source Attribute - Completely declarative approachthat supports configuration of the additional settings discussed here. Thisreferences a BLOB in your own database table.
• Table WWV_FLOW_FILES - Available for backwards compatibility. Oracle does notrecommend using this in new applications.
• Table APEX_APPLICATION_TEMP_FILES - Store the uploaded file in a temporarylocation that you can access with the view APEX_APPLICATION_TEMP_FILES. OracleApplication Express automatically deletes the file at the end of the session or atthe end of the upload request, depending on what you choose for Purge File At.
To provide this additional information, it is recommended that you add additionalcolumns to your base table to store and track the MIME type, file name, last updateddate and character set settings. You can accomplish this by extending your table. Forexample:
ALTER TABLE emp ADD (ATTACH_MIMETYPE VARCHAR2(255), ATTACH_FILENAME VARCHAR2(255), ATTACH_LAST_UPDATE DATE, ATTACH_CHARSET VARCHAR2(128));
Note:
The character set of the BLOB is not automatically set on upload. To store thecharacter set value for your BLOB, you must provide an additional page itemon your page which is bound to the column you use to store the characterset, and where the user will be able to specify the character set for thedocument they are uploading.
If you manually create a form on a custom table, you can still take advantage of thisfeature. To do so, use the File Browse item type with a Storage Type setting of BLOB
Chapter 10Understanding BLOB Support in Forms
10-22
column specified in Item Source Attribute, on a page with a DML Process type ofDML_PROCESS_ROW. This process determines the table name and primary key columns.
10.6.3 About Displaying the BLOBIf the BLOB you are working with is an image, you can display it in a form. To handle itdeclaratively, use the Display Image item type as described in "About Item Types(page A-1)." To handle it procedurally, see "Understanding BLOB Support in Formsand Reports (page 9-103)."
10.6.4 About Removing the Image ReferenceBecause there is no set to NULL when using File Browse, if you need to provide amechanism to remove an image reference, you must include a special Remove Imagebutton to nullify the necessary columns. Consider the following example:
UPDATE demo_product_info SET product_image = NULL, MIMETYPE = NULL, FILENAME = NULL, IMAGE_LAST_UPDATE = NULL, CHARSET = NULL WHERE product_id = :P6_PRODUCT_ID;
Chapter 10Understanding BLOB Support in Forms
10-23

11Managing Database ApplicationComponents
Oracle Application Express supports the creation the following database applicationcomponents: calendars, maps, charts, and application Help.
• Understanding Oracle JET Integration with Oracle Application Express(page 11-2)Oracle Application Express includes the Oracle JET (JavaScript Extension Toolkit)library. This section provides information about JET and how it is integrated withOracle Application Express.
• Switching from AnyChart to JET Chart (page 11-4)Convert chart pages from the legacy AnyChart format (which may no longerrender in apps) to Oracle JET Chart. Oracle recommends upgrading to JET Chartwherever possible.
• Creating Calendars (page 11-5)App Builder includes support for creating a calendar with monthly, weekly, daily,and list views. Once you specify the table on which the calendar is based, you cancreate drill-down links to information stored in specific columns and enable dragand drop capability.
• Creating Maps (page 11-20)App Builder includes built-in wizards for generating map charts on pages with aDesktop user interface. How you create a map chart depends upon whether youare adding the map to an existing page, or adding a map on a new page.
• Creating Charts (page 11-27)You can add a chart by running a built-in wizard or creating it manually in PageDesigner.
• Creating Help for Your Application (page 11-39)Help created in App Builder displays on a dedicated Help page. To access Help,users click a link that takes them to a dedicated Help page. This Help pagedisplays page and field-level Help topics specific to the page they are viewing.
See Also:
"Controlling Page Layout (page 13-1)" and "Adding Navigation(page 15-1)"
11-1
11.1 Understanding Oracle JET Integration with OracleApplication Express
Oracle Application Express includes the Oracle JET (JavaScript Extension Toolkit)library. This section provides information about JET and how it is integrated withOracle Application Express.
• About Oracle JET (page 11-2)
• How Oracle JET is integrated with Oracle Application Express (page 11-2)
See Also:
"Oracle Application Express Release Notes " for details of the specificversion of JET.
11.1.1 About Oracle JETOracle JET (JavaScript Extension Toolkit) is a collection of open source JavaScriptlibraries with a set of Oracle contributed JavaScript libraries. Oracle JET is targeted atintermediate and advanced JavaScript developers and provides a rich set of UIcomponents that can be easily integrated into Oracle Application Express. Oracle JETis a modular toolkit which enables developers to use as much or as little of thefeatures that they desire.
11.1.2 How Oracle JET is integrated with Oracle Application ExpressCurrently Oracle Application Express integrates some parts of Oracle JET , primarilywith Chart region types, and Text field with Autocomplete item types.
Note:
Although Oracle JET provides two-way data binding (using knockout.js),currently Oracle Application Express does not natively utilize this aspect ofthe toolkit.
Oracle JET uses a module loader (RequireJS) to only load modules that are requiredfor specific functionality to work. This means that you do not have to load the entireOracle JET library for certain functionality and also enables each module to define it’sown dependencies. At runtime, when a module is requested, the module loader looksat the module being requested for any dependencies to other modules. If there are anydependencies, these will also be loaded.
Module loader can however result in a large number of additional resources beingindividually loaded at runtime, which can have a negative performance impact. For this
Chapter 11Understanding Oracle JET Integration with Oracle Application Express
11-2
reason, Oracle Application Express makes use of the RequireJS Optimization Tool,which:
• provides a way to determine all the dependencies for modules either at designtime or as part of a standard build process
• bundles them up into one combined, minified file
RequireJS Optimization Tool is loaded at runtime to avoid the need for all theadditional requests.
Find the list of the bundles used for Chart and Text field with Autocomplete nativetypes.
• jetCommonBundle.min.js
• inputSearchBundle.min.js
• chartBundle.min.js
Note:
You can utilize the Common bundle jetCommonBundle.min.js in your plug-ins.This Common Bundle gets included on any Oracle Application Express pageas soon as a file is included with your plug-in, which defines the [requirejet] prefix. This means that any module your plug-in uses that is alreadyincluded in the common bundle does not need to be refetched by requireJS.
jetCommonBundle.min.js
• Directory: /images/libraries/apex/minified/
• Included when: When a JavaScript file is requested that defines itself as requiringJET, by using the [require jet] prefix in Oracle Application Express, and the pageis not in Debug mode
When debugging, the bundle is not loaded and requireJS loads all the individualresources separately.
inputSearchBundle.min.js
• Directory: /images/libraries/apex/minified/
• Included when: A Text Field with Autocomplete item is included on a page, andthe page is not in debug mode.
When debugging, the bundle is not loaded and requireJS loads all the individualresources separately.
chartBundle.min.js
• Directory: /images/libraries/apex/minified/
• Included when: A JET chart is included on a page (for example, when a Chartregion, or Interactive Grid region is added to a page), and the page is not indebug mode.
When debugging, the bundle is not loaded and requireJS loads all the individualresources separately.
Chapter 11Understanding Oracle JET Integration with Oracle Application Express
11-3
11.2 Switching from AnyChart to JET ChartConvert chart pages from the legacy AnyChart format (which may no longer render inapps) to Oracle JET Chart. Oracle recommends upgrading to JET Chart whereverpossible.
In a previous release, the AnyChart Flash .swf files were removed from the /imagesfolder. This results in your charts no longer rendering. No error message displays andthe region is blank.
• Upgrading to JET Chart Using Application Upgrade Utility (page 11-4)Use the Application Upgrade utility to quickly upgrade AnyChart components in anapplication to JET Chart.
• Searching a Workspace for AnyChart Using SQL Commands (page 11-4)Use SQL Commands in SQL Workshop to search a workspace for AnyChartcomponents. Upgrade them to JET Chart or implement a workaround by manuallyinstalling a .zip file.
11.2.1 Upgrading to JET Chart Using Application Upgrade UtilityUse the Application Upgrade utility to quickly upgrade AnyChart components in anapplication to JET Chart.
To use the Application Upgrade utility:
1. On the Workspace home page, click the App Builder icon.
The App Builder home page appears.
2. Select an application.
3. Click Utilities.
4. Click Upgrade Application.
5. Under Upgrade Type, review the list for one of the following messages:
• "Upgrade AnyChart Charts to Oracle JET Charts"
• "Upgrade Flash Charts to HTML5 Charts"
6. If either message appears, click the adjacent number in the Candidate Objectscolumn to view pages containing these components.
7. Select objects to convert using the check box column and click the Upgradebutton (top-right).
A success message appears, and the selected objects update and disappear from thelist.
11.2.2 Searching a Workspace for AnyChart Using SQL CommandsUse SQL Commands in SQL Workshop to search a workspace for AnyChartcomponents. Upgrade them to JET Chart or implement a workaround by manuallyinstalling a .zip file.
To locate legacy AnyChart components using SQL Commands:
1. On the Workspace home page, click the SQL Workshop icon.
Chapter 11Switching from AnyChart to JET Chart
11-4
The SQL Workshop home page appears.
2. Click SQL Commands.
Proceed through one or more of the following steps to scan your workspace forAnyChart content:3. (Optional) To identify pages that have AnyGantt charts:
a. Input the following SQL statement:
select application_id, application_name, page_id, region_name, region_idfrom apex_application_page_flash5where chart_type in ('Project Gantt','Resource Gantt')
b. Click Run.
4. (Optional) To identify pages that have AnyChart maps:a. Input the following SQL statement:
select application_id, application_name, page_id, region_name, region_idfrom apex_application_page_flash5where chart_type = 'Map'
b. Click Run.
5. (Optional) To identify pages that have Flash-based AnyChart components:a. Input the following SQL statement:
select application_id, application_name, page_id, region_name, region_idfrom apex_application_page_flash5where chart_rendering = 'Flash Chart'and chart_type not in ('Map','Project Gantt','Resource Gantt')
b. Click Run.
If your searches find no results, no further action is required.6. If you locate pages with AnyChart content, do one of the following:
• (Recommended) Convert Flash-based AnyChart charts to Oracle JET (see"Upgrading to JET Chart Using Application Upgrade Utility (page 11-4)").
• As a workaround, manually install AnyChart Flash content to your instance bydownloading the AnyChart Flash .zip file and following the containedREADME.txt. This populates the files necessary to render legacy AnyChartcontent in your apps. Note that this workaround may not be an option in futurereleases. Upgrade to Oracle JET Chart to avoid further issues.
11.3 Creating CalendarsApp Builder includes support for creating a calendar with monthly, weekly, daily, andlist views. Once you specify the table on which the calendar is based, you can create
Chapter 11Creating Calendars
11-5
drill-down links to information stored in specific columns and enable drag and dropcapability.
• About Supported Calendars (page 11-6)App Builder supports two types of calendars: Calendar and Legacy Calendar.
• Sample Calendar (page 11-7)You can view a sample calendar by installing the sample application, SampleDatabase Application or the Sample Calendar application.
• Adding a Calendar to a New Page Using a Local Database (page 11-8)Run the Create Page Wizard to create a new page with a calendar using a localdatabase.
• Adding a Calendar on a New Page Using Remote Database References(page 11-10)Run the Create Page Wizard to add a new page with a calendar that uses aremote database reference.
• Creating a Calendar in Page Designer (page 11-12)Manually create a calendar in Page Designer by providing the SQL query.
• Managing Calendar Attributes (page 11-13)Once you create a calendar, you can alter the display by editing attributes in theProperty Editor. Each calendar has two sets of editable attributes: region attributesand calendar Attributes.
• About Dynamic Action Support for Calendar (page 11-18)Dynamic actions provide a way to define complex client-side behaviordeclaratively without the need for JavaScript. Using the Dynamic Action Createwizard, you specify an action that is performed when a defined set of conditionsoccur. You can also specify which elements are affected by the action, and whenand how they are affected.
See Also:
"Managing Legacy Calendars (page 25-19)" and "Integrating with GoogleCalendar (page 17-15)"
11.3.1 About Supported CalendarsApp Builder supports two types of calendars: Calendar and Legacy Calendar.
Calendar is based on the FullCalendar jQuery library and can only be customizedthrough CSS. Legacy Calendar is template-based and may be deprecated in thefuture release.
Tip:
In previous releases Legacy Calendar was referred to as Calendar(Template), Classic calendar, Easy calendar, and SQL calendar).
Chapter 11Creating Calendars
11-6

Both Calendar and Legacy Calendar enable you to create a calendar based on atable or SQL query you provide. During the creation process, you are prompted toselect a date column and display column. Because it offers a better user interface andnumerous additional features, Oracle recommends converting all legacy calendars tothe latest calendar.
Calendar
The Calendar option supports:
• Rendering calendar events on multiple views (Month, Week, Day, or List).
• Rendering of duration and non-duration based events.
• Ability to modify the start and end dates by dragging and dropping events ondifferent dates. Drag and drop is only supported for local data sources, that is,database objects in the referenced database schema and not on external datasources such as a Google calendar.
• Ability to change the duration by resizing the length of the events, by changing theend date.
• Ability to Edit or Adding new events on calendar using forms by cllicking either onevents or empty calendar cell.
• Rendering events from external sources using web service calls or GoogleCalendar feeds.
• Ability to render events titles on single or multiple lines.
• Using different CSS classes, developer can choose different styles for differenttype of events.
• Ability to download events in PDF printable format
• Support of multiple formats for sharing events (iCal, CSV, XML).
• Ability to add tooltip on Month/Week/Day views to make it easier for users to havea quick look at details of each event.
Legacy Calendar
Legacy Calendars option supports:
• Creation of one legacy calendar per page.
• Rendering of start date only.
• Look and feel defined by templates.
• Modification of start date by dragging and dropping events.
• Calendars that include daily, weekly, and monthly views.
• The date column determines the days on the calendar which contains entries.
• The display column defines a specific row which displays the calendar.
11.3.2 Sample CalendarYou can view a sample calendar by installing the sample application, SampleDatabase Application or the Sample Calendar application.
The following is a sample calendar from Sample Database Application.
Chapter 11Creating Calendars
11-7
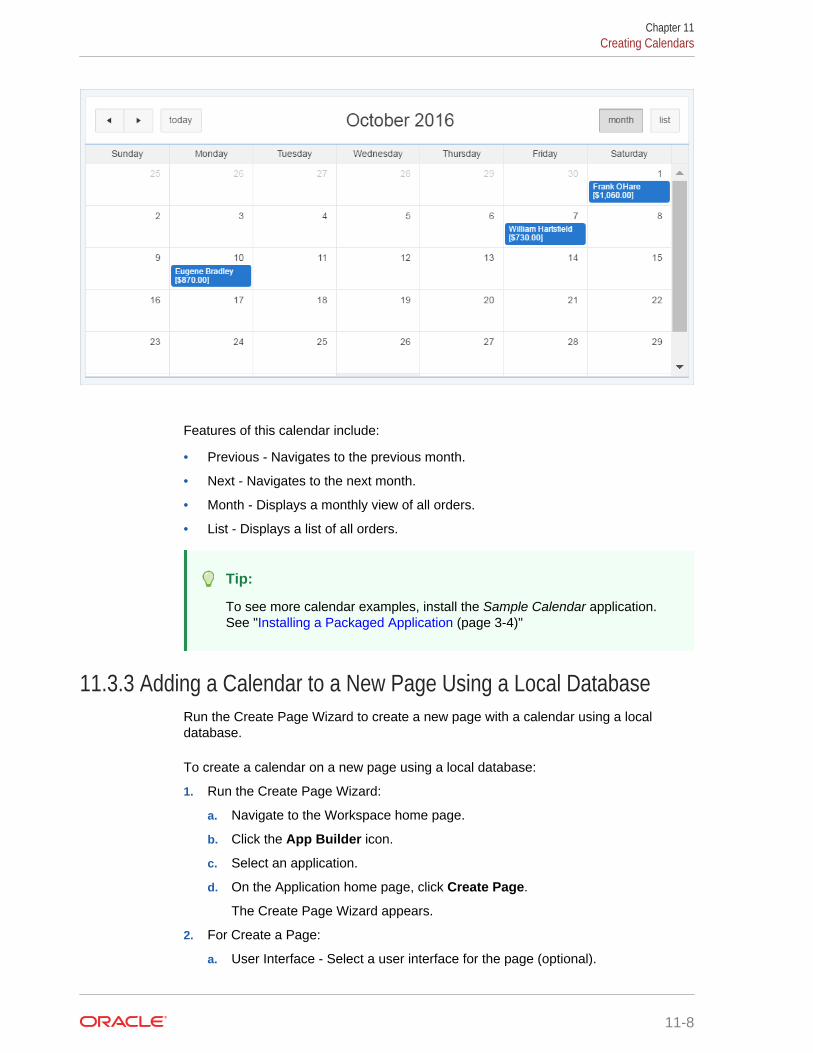
Features of this calendar include:
• Previous - Navigates to the previous month.
• Next - Navigates to the next month.
• Month - Displays a monthly view of all orders.
• List - Displays a list of all orders.
Tip:
To see more calendar examples, install the Sample Calendar application.See "Installing a Packaged Application (page 3-4)"
11.3.3 Adding a Calendar to a New Page Using a Local DatabaseRun the Create Page Wizard to create a new page with a calendar using a localdatabase.
To create a calendar on a new page using a local database:
1. Run the Create Page Wizard:
a. Navigate to the Workspace home page.
b. Click the App Builder icon.
c. Select an application.
d. On the Application home page, click Create Page.
The Create Page Wizard appears.
2. For Create a Page:
a. User Interface - Select a user interface for the page (optional).
Chapter 11Creating Calendars
11-8
This attribute only displays for applications using older themes and for whichDesktop and Mobile User Interfaces have been defined.
b. Select a page type - Select Calendar.
3. For Page Attributes:
Tip:
To learn more about an attribute, see field-level Help. See "ViewingField-Level Help (page 1-29)".
a. Page Number - If you identify a new page number, the wizard creates a newpage. If you identify an existing page number, the wizard adds the componentto that page.
b. Page Name - Enter a title for the page to be created.
c. Page Mode - Select a page mode.
d. Page Group - Identify the name of the page group you would like to associatewith this page.
e. Breadcrumb - Select whether to use a breadcrumb navigation control on yourpage, and which breadcrumb navigation control you want to use.
f. Click Next.
4. For Navigation Menu, specify the type of navigation to include on this page andclick Next. The navigation options that display depend upon the current applicationtheme.
5. For Data Source, select Local Database.
6. For Source Type, do one of the following:
• If the source is a table:
a. Source Type - Select Table.
b. Table/View Owner - Select the owner of the table on which you arebuilding a calendar.
c. Table/View Name - Select the table or view on which the calendar isbased.
d. Select Columns - Select one or more columns to be included in thecalendar.
e. Click Next.
• If the Calendar source is a SQL Query:
a. Source Type - Select SQL Query.
b. Enter Region Source - Enter the SQL SELECT statement to be used forthe calendar. The SQL SELECT statement must include at least twocolumns, of which one must be a DATE column.
c. Click Next.
7. For Settings:
Chapter 11Creating Calendars
11-9
a. Display Column - Select the column which holds the text displayed for eventson this calendar.
b. Start Date Column - Select the column which holds the start date for eventsdisplayed on this calendar.
c. End Date Column - Select the column which holds the end date for eventsdisplayed on this calendar. If this attribute is specified, then the calendardisplays duration-based events.
d. Show Time - Select whether the time portion of the date display.
e. Click Create.
11.3.4 Adding a Calendar on a New Page Using Remote DatabaseReferences
Run the Create Page Wizard to add a new page with a calendar that uses a remotedatabase reference.
To create a calendar on a new page:
1. Run the Create Page Wizard:
a. Navigate to the Workspace home page.
b. Click the App Builder icon.
c. Select an application.
d. On the Application home page, click Create Page.
The Create Page Wizard appears.
2. For Create a Page:
a. (Optional) User Interface - Select a user interface for the page.
This attribute only displays for applications using older themes and for whichDesktop and Mobile User Interfaces have been defined.
b. Page Type - Select Calendar.
3. For Page Attributes:
Tip:
To learn more about an attribute, see field-level Help. See "ViewingField-Level Help (page 1-29)".
a. Page Number - If you identify a new page number, the wizard creates a newpage. If you identify an existing page number, the wizard adds the componentto that page.
b. Page Name - Enter a title for the page to be created.
c. Page Mode - Select a page mode.
d. Page Group - Identify the name of the page group you would like to associatewith this page.
Chapter 11Creating Calendars
11-10
e. Breadcrumb - Select whether to use a breadcrumb navigation control on yourpage, and which breadcrumb navigation control you want to use.
f. Click Next.
4. For Navigation Menu, specify the type of navigation to include on this page andclick Next. The navigation options that display depend upon the current applicationtheme.
5. For Data Source, , select and then configure a remote database reference:
• For a REST Enabled SQL Service reference:
a. Data Source - Select REST Enabled SQL Service.
b. REST Enabled SQL Service - Select a REST Enabled SQL reference.
• For a Web source:
a. Location - Select Web Source.
b. Web Source Module - Select a Web Source Module.
Tip:
The UI changes based on your selection. To learn more about anattribute, see field-level Help.
6. For Source Type, do one of the following:
• If the Calendar source is a Table:
a. Source Type - Select Table.
b. Table/View Owner - Select the owner of the table on which you arebuilding a calendar.
c. Table/View Name - Select the table or view on which the calendar isbased.
d. Select Columns - Select one or more columns to be included in thecalendar.
e. Click Next.
• If the Calendar source is a SQL Query:
a. Source Type - Select SQL Query.
b. Enter Region Source - Enter the SQL SELECT statement to be used forthe calendar. The SQL SELECT statement must include at least twocolumns, of which one must be a DATE column.
c. Click Next.
7. For Settings:
a. Display Column - Select the column which holds the text displayed for eventson this calendar.
b. Start Date Column - Select the column which holds the start date for eventsdisplayed on this calendar.
Chapter 11Creating Calendars
11-11
c. End Date Column - Select the column which holds the end date for eventsdisplayed on this calendar. If this attribute is specified, then the calendardisplays duration-based events.
d. Show Time - Select whether the time portion of the date display.
e. Click Create.
11.3.5 Creating a Calendar in Page DesignerManually create a calendar in Page Designer by providing the SQL query.
Tip:
To create a calendar in Page Designer, you must provide a SQL Query. Tocreate a calendar by selecting a table, use the Create Page Wizard. See"Adding a Calendar to a New Page Using a Local Database (page 11-8)".
To create a calendar in Page Designer:
1. View the page in Page Designer:
a. On the Workspace home page, click the App Builder icon.
b. Select an application.
c. Select a page.
Page Designer appears.
2. If necessary, click the Layout tab in the central pane.
3. In the Gallery, click the Regions tab.
4. Right-click Calendar, click Add To, and select the appropriate location.
Tip:
You also select Calendar with the mouse and drag it to the appropriatelocation in the Layout tab.
The Property Editor displays Region attributes. Attributes are organized in groups.
To find a group or attribute:
• Search for the group or attribute - Enter keywords in the Filter Propertiesfield. The Property Editor displays the group or attributes. To return to thedefault display, delete the keywords.
• Use Go to Group - Click Go to Group and select the group. To return thedefault display, click Go to Group again and select Expand All.
The Messages tab displays a red or yellow badge to identify messages you needto address. Select a message to view the associated attribute in the PropertyEditor. You must address red error message before you can save.
5. In the Property Editor, edit the appropriate Region attributes:
Chapter 11Creating Calendars
11-12
• Identification, Title - Enter a region title.
• Source, Location - Select the location of the database which contains columnwhich holds the CSS Class to style the events displayed on this calendar.Options include:
– Local Database - Data is sourced from the local database.
– Remote Database - Data is sourced from a remote database, where theconnection is defined using REST Enabled SQL.
– Web Source - Data is sourced from a RESTful web service defined usingWeb Source Modules.
What displays next depends upon Source, Location you select.
Tip:
To learn more, select the attribute in the Property Editor and click theHelp tab in the central pane.
6. Edit the calendar Attributes.
• In the Rendering tab, locate the Calendar region and click Attributes.
The Property Editor displays the calendar Attributes.
• Edit the calendar Attributes:
– Settings, Display Column - Select the column which holds the textdisplayed for events on this calendar.
– Settings, Start Date - Select the column which holds the start date forevents displayed on this calendar.
7. Click Save.
11.3.6 Managing Calendar AttributesOnce you create a calendar, you can alter the display by editing attributes in theProperty Editor. Each calendar has two sets of editable attributes: region attributesand calendar Attributes.
Region attributes define the area of the page which functions as a container for thecalendar. Calendar Attributes specify the template, date columns, and generalcalendar formatting.
• Editing Calendar Attributes in the Property Editor (page 11-13)
• Editing an Existing Calendar to Include Add and Edit Functionality (page 11-14)
• Adding Calendar Initialization JavaScript Code (page 11-16)
• Enabling the Dragging and Dropping of Data In an Existing Calendar(page 11-17)
11.3.6.1 Editing Calendar Attributes in the Property EditorTo edit calendar Attributes:
1. View the page in Page Designer:
Chapter 11Creating Calendars
11-13
a. On the Workspace home page, click the App Builder icon.
b. Select an application.
c. Select a page.
Page Designer appears.
2. In the Rendering tab, locate and select the calendar.
The Property Editor displays the region attributes.
3. In the Rendering tab, locate the calendar and select the Attributes node.
The Property Editor displays the calendar attributes. Attributes are organized ingroups.
4. To find a group or attribute:
• Search for the group or attribute - Enter keywords in the Filter Propertiesfield. The Property Editor displays the group or attributes. To return to thedefault display, delete the keywords.
• Use Go to Group - Click Go to Group and select the group. To return thedefault display, click Go to Group again and select Expand All.
5. Edit the calendar attributes.
Tip:
To view help for an attribute, select the attribute in the Property Editorand click the Help tab in the central pane.
6. To save your changes click Save. To save and run the page, click Save and RunPage.
11.3.6.2 Editing an Existing Calendar to Include Add and Edit FunctionalityDevelopers can edit and existing calendar to include add and edit functionality.
Tip:
When defining calendar create and edit links for Desktop applications, Oraclerecommends defining two separate pages. To create an Edit Link, selectone of the table or SQL query columns as the Primary Key Column in theCalendar attributes.
To edit an existing calendar to include add and edit functionality:
1. View the page in Page Designer:
a. On the Workspace home page, click the App Builder icon.
b. Select an application.
c. Select a page.
Page Designer appears.
Chapter 11Creating Calendars
11-14
2. In the Rendering tab, locate and select the calendar.
The Property Editor displays the region attributes.
3. In the Rendering tab, locate the calendar and select the Attributes node.
The Property Editor displays the calendar attributes. Attributes are organized ingroups.
Tip:
To find a group or attribute:
• Search for the group or attribute - Enter keywords in the FilterProperties field. The Property Editor displays the group orattributes. To return to the default display, delete the keywords.
• Use Go to Group - Click Go to Group and select the group. Toreturn the default display, click Go to Group again and selectExpand All.
4. Edit Settings, Create Link to specify a target page to call when the user clicks anempty cell or an existing calendar entry.
a. Settings, Create Link - Click No Link Defined.
The Link Builder - Create Link dialog appears.
b. Type - Select the type of link target.
c. Application - If you select Page in a different application, enter theapplication ID.
d. Page - Specify the target page number.
e. Set Items - Configure the values to be passed from the calendar to the targetpage. The Create Link is called after a date or date range has been selectedin the calendar. Therefore, the selected start and end dates must be passed tothe Create Page.
• To pass the selected date or the start date of a selected date range:
– Name - Specify the name of the target page item containing the startdate of the event. If a form, this should be a date picker element.
– Value - &APEX$NEW_START_DATE.
• When a date range has been selected, pass the end date as follows:
– Name - Specify the name of the target page item containing the enddate of the event. For a form, this should be a date picker element.
– Value - &APEX$NEW_END_DATE.
You can pass additional values in the same way as any other link toan application page.
– Click OK.
Chapter 11Creating Calendars
11-15
Tip:
To learn more about an attribute, select the attribute in the PropertyEditor and click the Help tab in the center pane.
5. Edit Settings, Edit Link to define a target page to be called when the user clicksan existing entry.
Tip:
To create an Edit Link, you must pass a primary key value to the targetpage in order for the form to look up the table row.
a. Settings, Edit Link - Click No Link Defined.
The Link Builder - Create Link dialog appears.
b. Type - Select the type of link target.
c. Application - If you select Page in a different application, enter theapplication ID.
d. Page - Specify the target page number.
e. Set Items - Configure the values to be passed from the calendar to the targetpage. The Create Link is called after a date or date range has been selectedin the calendar. Therefore, the selected start and end dates must be passed tothe Create Page.
• Name - Specify the name of the target page item containing the primarykey value; typically a hidden item, for example:
PX_ID.
• Value - Specify the table or SQL query column containing the primary keyvalue, for example:
&ID.
• Click OK.
6. Click Save.
11.3.6.3 Adding Calendar Initialization JavaScript CodeYou can add a JavaScript function to override the standard jQuery FullCalendarinitialization attributes by editing the Initialization JavaScript Code attribute. Thefunction must return a JavaScript Object containing the calendar initialization attributesas parameters.
To add initialization JavaScript code:
1. View the page in Page Designer:
a. On the Workspace home page, click the App Builder icon.
b. Select an application.
c. Select a page.
Chapter 11Creating Calendars
11-16
Page Designer appears.
2. In the Rendering tab, under the calendar title, select the Attributes node.
The Property Editor displays the calendar attributes. Attributes are organized ingroups.
3. To find a group or attribute:
• Search for the group or attribute - Enter keywords in the Filter Propertiesfield. The Property Editor displays the group or attributes. To return to thedefault display, delete the keywords.
• Use Go to Group - Click Go to Group and select the group. To return thedefault display, click Go to Group again and select Expand All.
4. Find Advanced.
Tip:
To search for a group or an attribute, enter a keyword in the FilterProperties field. The groups and attributes containing the term appear.
5. For Initialization JavaScript Code, enter a JavaScript function to override thestandard jQuery FullCalendar initialization attributes.For example:
function ( pOptions) { pOptions.titleFormat = "[Conference Schedule]"; // custom title pOptions.minTime = "07:00:00"; // hide slots before minTime pOptions.maxTime = "18:00:00"; // hide slots after maxTime pOptions.columnFormat = {month: '', week: 'dddd', day: 'dddd'}; // week view column headings pOptions.slotDuration = "00:15:00"; // custom slot duration pOptions.weekNumbers = true; // show week numbers pOptions.weekNumberTitle = "CW"; return pOptions;}
6. Click Save.
Note:
To view examples of this functionality, run the Sample Calendar sampleapplication. From the Navigation menu, select Custom CalendarInitialization. See "Installing a Packaged Application (page 3-4)."
11.3.6.4 Enabling the Dragging and Dropping of Data In an Existing CalendarThe Calendar Region supports moving or changing calendar events with drag anddrop.
Chapter 11Creating Calendars
11-17
To enable support for drag and drop for a calendar region:
1. View the page in Page Designer:
a. On the Workspace home page, click the App Builder icon.
b. Select an application.
c. Select a page.
Page Designer appears.
2. In the Rendering tab under the calendar title, select the Attributes node.
The Property Editor displays the attributes for the calendar. Attributes areorganized in groups.
3. To find a group or attribute:
• Search for the group or attribute - Enter keywords in the Filter Propertiesfield. The Property Editor displays the group or attributes. To return to thedefault display, delete the keywords.
• Use Go to Group - Click Go to Group and select the group. To return thedefault display, click Go to Group again and select Expand All.
4. Find Settings and edit the following attributes:
a. Settings, Primary Key Column - Select a table or SQL Query column.
The Drag and Drop field appears in the Property Editor, below AdditionalCalendar Views.
b. Settings, Drag and Drop - Select Yes.
Drag and Drop PL/SQL Code appears.
c. Settings, Drag and Drop PL/SQL Code - Enter the PL/SQL code to executewhen the end user finishes a drag and drop for an event.
Within the PL/SQL code, you can reference the ID of the dragged event, thenew start, and end end dates as:
:APEX$PK_VALUE, :APEX$NEW_START_DATE amd :APEX$_NEW_END_DATE
For example, the following code changes the event row in the PROJECTS tableafter the end user has dragged the event to a new date.
begin update projects set start_date = to_date(:APEX$NEW_START_DATE, 'YYYYMMDDHH24MISS'), end_date = to_date(:APEX$NEW_END_DATE, 'YYYYMMDDHH24MISS') where id = :APEX$PK_VALUE; end;
To learn more, click the Help tab in the central pane.
5. Click Save.
11.3.7 About Dynamic Action Support for CalendarDynamic actions provide a way to define complex client-side behavior declarativelywithout the need for JavaScript. Using the Dynamic Action Create wizard, you specifyan action that is performed when a defined set of conditions occur. You can alsospecify which elements are affected by the action, and when and how they areaffected.
Chapter 11Creating Calendars
11-18
When working with dynamic actions, you should be mindful of the fact that the moredynamic actions you add to a page, the greater your overall page size. This is becausethe dynamic action framework emits additional code to the client for each dynamicaction defined, which then also must be downloaded and executed by the frameworkin the client.
Dynamic actions contain a condition that can be specified to control the action. OracleApplication Express components such as reports or charts can react to specificcalendar events. For example, if you view a calendar and click a button to view asubsequent month, you can create a dynamic action to automatically refresh anassociated report.
To use this feature the developer creates a new dynamic action on the Calendar pagein Page Designer. Select the new dynamic action in the Dynamic Action tab in the leftpane of Page Designer. Once created, the new dynamic action displays in red with thelabel New. Then, the developer edits the dynamic action attributes in the PropertyEditor. In Property Editor, locate and expand When attribute. Under the Whenattribute, for Event, select one of the following events:
• Date Selected [Calendar]
This event fires when the user selects an empty date or date range either with themouse or with the keyboard. If the developer provides a "create link" in thecalendar attributes, no event fires.
Information about the current view is being passed as the "data" object:
{ "newStartDate"::: "newEndDate"::: }
{ "newStartDate":{first day of selection} (YYYYMMDDHH24MISS), "newEndDate": {last day of selection} YYYYMMDDHH24MISS }
• Event Selected [Calendar]
This event fires when the user clicks an existing event with the mouse or selects itwith the keyboard. When the developer provided an "edit link" in the Calendarattributes, no event is being fired. The "data" object contains the jQueryFullCalendar JSON representation of the event.
See Also:
Full Calendar documentation Event Data, "Event Object"
• View Changed [Calendar]
This event fires when either the view type changes (day, week, month, list) orwhen the view changes to its previous or next view page. The "data" objectcontains the following information:
{ "viewType": {view type, day, week, month or list}, "startDate": {first day of view} (YYYYMMDDHH24MISS), "endDate": {last day of view} (YYYYMMDDHH24MISS) }
Chapter 11Creating Calendars
11-19
Note:
To view examples of this functionality, run the Sample Calendar sampleapplication. From the navigation menu, select the Calender and DynamicActions and select the calender event. See to "Installing a PackagedApplication (page 3-4)."
11.4 Creating MapsApp Builder includes built-in wizards for generating map charts on pages with aDesktop user interface. How you create a map chart depends upon whether you areadding the map to an existing page, or adding a map on a new page.
• About Map Chart Support (page 11-20)Map chart support in Oracle Application Express is based on the AnyChartAnyMap Interactive Maps Component.
• About Creating SQL Queries for Maps (page 11-20)You define a map chart by providing a SQL query with a specific syntax.
• Adding a Map Chart to a New Page (page 11-23)Add a map chart to a page by running the Create Page Wizard.
• Adding a Map Chart in Page Designer (page 11-24)Add a map chart by manually creating it in Page Designer.
• Managing Map Charts (page 11-25)Once you create a map chart, you can alter its display by editing attributes in theProperty Editor.
11.4.1 About Map Chart SupportMap chart support in Oracle Application Express is based on the AnyChart AnyMapInteractive Maps Component.
AnyMap is a flexible Macromedia Flash-based solution that enables developers tovisualize geographical related data. Map charts are rendered by a browser and requireFlash Player 9 or later. For more information about AnyChart, go to http://www.anychart.com
AnyChart stores map data in files with a *.amap extension, and supports 300 map filesfor the United States of America, Europe, Asia, Europe, Africa, Oceania, NorthAmerica, and South America. To render a desired map, you select the map source inthe wizard (for example, Germany) and the map XML automatically references thedesired map source .amap file, germany.amap. To browse through the available maps,see "Map Reference" in AnyChart User's Guide: http://6.anychart.com/products/anymap/docs/
11.4.2 About Creating SQL Queries for MapsYou define a map chart by providing a SQL query with a specific syntax.
When you define a map chart providing a SQL query using the following syntax:
Chapter 11Creating Maps
11-20
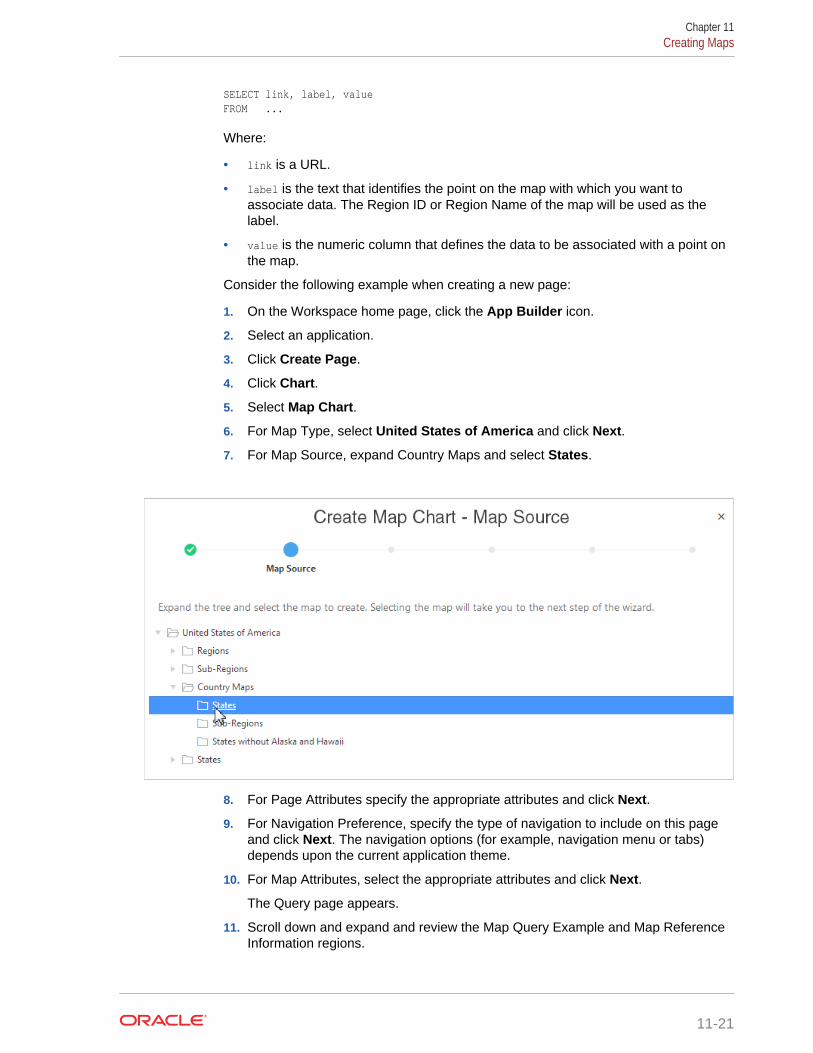
SELECT link, label, valueFROM ...
Where:
• link is a URL.
• label is the text that identifies the point on the map with which you want toassociate data. The Region ID or Region Name of the map will be used as thelabel.
• value is the numeric column that defines the data to be associated with a point onthe map.
Consider the following example when creating a new page:
1. On the Workspace home page, click the App Builder icon.
2. Select an application.
3. Click Create Page.
4. Click Chart.
5. Select Map Chart.
6. For Map Type, select United States of America and click Next.
7. For Map Source, expand Country Maps and select States.
8. For Page Attributes specify the appropriate attributes and click Next.
9. For Navigation Preference, specify the type of navigation to include on this pageand click Next. The navigation options (for example, navigation menu or tabs)depends upon the current application theme.
10. For Map Attributes, select the appropriate attributes and click Next.
The Query page appears.
11. Scroll down and expand and review the Map Query Example and Map ReferenceInformation regions.
Chapter 11Creating Maps
11-21
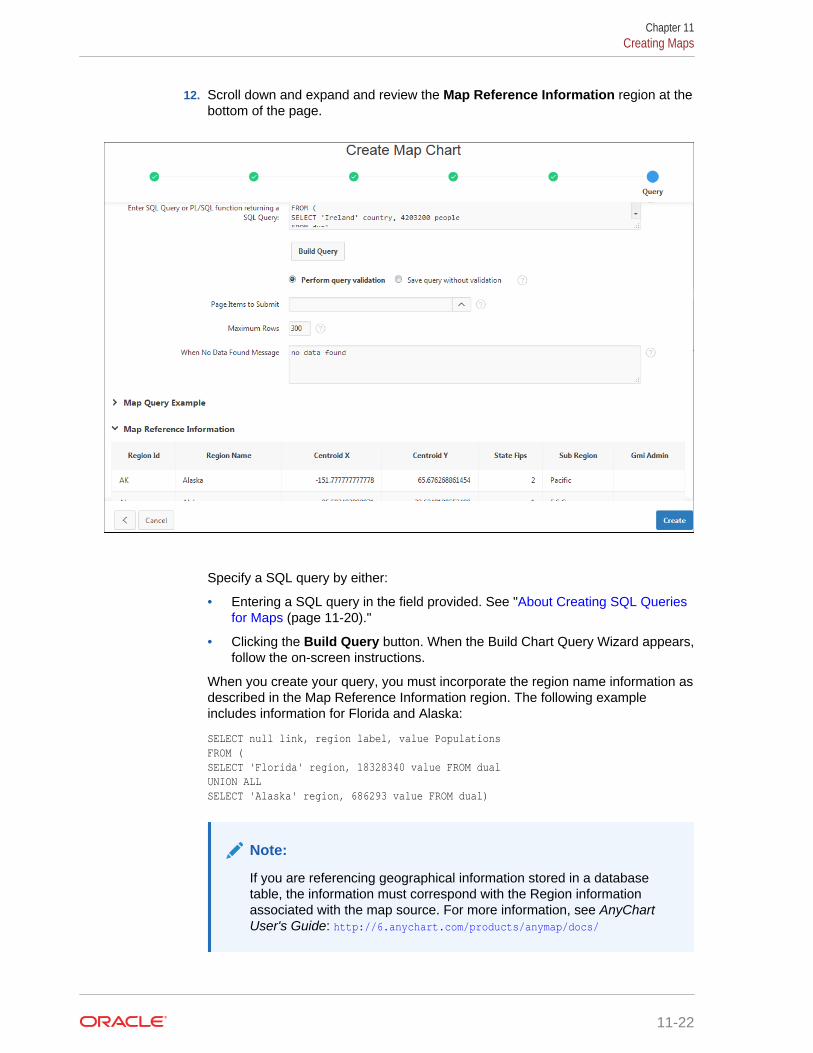
12. Scroll down and expand and review the Map Reference Information region at thebottom of the page.
Specify a SQL query by either:
• Entering a SQL query in the field provided. See "About Creating SQL Queriesfor Maps (page 11-20)."
• Clicking the Build Query button. When the Build Chart Query Wizard appears,follow the on-screen instructions.
When you create your query, you must incorporate the region name information asdescribed in the Map Reference Information region. The following exampleincludes information for Florida and Alaska:
SELECT null link, region label, value PopulationsFROM (SELECT 'Florida' region, 18328340 value FROM dualUNION ALLSELECT 'Alaska' region, 686293 value FROM dual)
Note:
If you are referencing geographical information stored in a databasetable, the information must correspond with the Region informationassociated with the map source. For more information, see AnyChartUser's Guide: http://6.anychart.com/products/anymap/docs/
Chapter 11Creating Maps
11-22
Click Create.
11.4.3 Adding a Map Chart to a New PageAdd a map chart to a page by running the Create Page Wizard.
To add a map chart on a new page:
1. On the Workspace home page, click the App Builder icon.
2. Select an application.
3. Click Create Page.
The Create Page Wizard appears.
4. For Create a Page:
a. User Interface - Select a user interface for the page.
This attribute only displays for applications using older themes and for whichDesktop and Mobile User Interfaces have been defined.
b. Select a page type - Select Chart.
5. On Create Chart, select Map Chart.
6. On Create Page, select a map type (for example, Europe), and click Next.
7. On Create Map Chart, expand the tree and select the map to create.
8. For Page Attributes:
a. Page Number - Select a page in which the chart object is to appear.
b. Page Name - If creating a new page, enter a page name.
c. Page Mode - Select a page mode.
d. Breadcrumb - Select whether you want to use a breadcrumb navigation controlon your page, and which breadcrumb navigation control you want to use
e. Click Next.
9. On Navigation Menu, specify a Navigation Preference to include on this page andclick Next. The navigation options (for example, navigation menu or tabs) dependsupon the current application theme.
10. For Map Attributes, select the appropriate attributes and click Next.
Note:
To learn more about an attribute, see field-level Help.
11. Specify a query by either:
• Entering a SQL query in the field provided.
• Clicking the Build Query button. When the Build Chart Query Wizard appears,follow the on-screen instructions.
Specify relevant attributes. To view map reference information associated withyour selected Map Source, expand the Map Reference Information region at thebottom of the page.
Chapter 11Creating Maps
11-23

To associate data with geographical locations, you must incorporate informationfrom the Region Name or Region ID columns into the Map query.
12. Click Create.
11.4.4 Adding a Map Chart in Page DesignerAdd a map chart by manually creating it in Page Designer.
To add a map chart to an existing page.
1. View the page in Page Designer:
a. On the Workspace home page, click the App Builder icon.
b. Select an application.
c. Select a page.
Page Designer appears.
2. From the Gallery select the Map Chart region and drag it to the appropriatelocation in the Layout tab.
Tip:
You can also right-click Map Chart region, select Add To, and select theappropriate location.
Page Designer indicates what actions are required next.
The Messages tab displays a red or yellow badge indicating messages you needto address. The Message tab displays two types of messages:
• Errors - Error messages display in red. Selecting an error message displaysthe associated attribute in red in the Property Editor. You must address errorsbefore a page can be saved.
• Warnings - Warning messages display in yellow. Selecting a warningmessage displays the associated attribute in yellow in the Property Editor. Youmust address errors before a page can be saved. Note you can save a pagewithout addressing warning messages.
3. In the Property Editor, edit the following attributes.
Tip:
To learn more about an attribute, select the attribute in the PropertyEditor and click the Help tab in the center pane.
a. Title - Enter a title for the region.
b. Layout:
• Sequence - Enter the display sequence for this item.
• Parent Region - Select the parent region to which this region belongs.
Chapter 11Creating Maps
11-24

• Position - Select the template position used to display this region.
c. Appearance:
• Template - Select a region template.
• Item Display Position - Specify where page items display in relation to themain region content.
d. Layout - Specify the Sequence, Parent Region, and Position.
e. Appearance - Specify the template.
4. View the Map Chart attributes. In the Rendering tab, under the map chart title,select the Attributes node.
In the Property Editor, edit the following Map attributes:
a. Map, Level 1 - Select the map level from the available list (for exampleEurope).
b. Map, Level 2 - Select the map level from the available list (for example,Denmark).
c. Source, SQL Query - Enter the SQL Query for the chart series.
d. Edit other attributes as appropriate.
Tip:
To learn more about an attribute, select the attribute in the PropertyEditor and click the Help tab in the center pane.
5. Click Save.
11.4.5 Managing Map ChartsOnce you create a map chart, you can alter its display by editing attributes in theProperty Editor.
• Editing Map Chart Attributes (page 11-25)
• Using Custom XML with Map Charts (page 11-26)
• Enabling Automatic Updates (page 11-27)
11.4.5.1 Editing Map Chart AttributesTo view the map chart attributes:
1. View the page in Page Designer:
a. On the Workspace home page, click the App Builder icon.
b. Select an application.
c. Select a page.
Page Designer appears.
2. To edit region attributes:
a. In the Rendering tab, select the region that containing the map chart.
Chapter 11Creating Maps
11-25

The region attributes display in the Property Editor.
b. Edit the appropriate attributes.
3. To edit chart map attributes:
a. In the Rendering tab, under the region title, select the Attributes node.
The map chart attributes display in the Property Editor.
b. Edit the appropriate attributes.
Tip:
To learn more about an attribute, select the attribute in the PropertyEditor and click the Help tab in the center pane.
4. Click Save.
11.4.5.2 Using Custom XML with Map ChartsThere are additional map settings that cannot be controlled using the standardattributes on the Map Attributes page. To further control the look and feel of a chart,you can use custom XML.
To use custom XML:
1. View the page in Page Designer:
a. On the Workspace home page, click the App Builder icon.
b. Select an application.
c. Select a page.
Page Designer appears.
2. In the Rendering tab, under the region title, select the Attributes node.
The map chart attributes display in the Property Editor.
3. Locate and expand the Custom XML.
4. For Custom XML, Custom, select Yes.
5. Edit the XML.
6. Click Save.
Tip:
For more information on supported XML format for maps, see the OnlineMap XML Reference at:
http://6.anychart.com/products/anymap/docs/
Chapter 11Creating Maps
11-26
11.4.5.3 Enabling Automatic UpdatesYou can create map charts that monitor information by enabling the AsynchronousUpdate attribute on the Map Attributes page. Enabling this attribute updates the mapto reflect changes in the underlying data within a specified time interval.
To enable automatic refresh:
1. View the page in Page Designer:
a. On the Workspace home page, click the App Builder icon.
b. Select an application.
c. Select a page.
Page Designer appears.
2. In the Rendering tab, select the region that contains the map chart.
The region attributes display in the Property Editor.
3. In the Rendering tab, under the region title, select the Attributes node.
The map chart attributes display in the Property Editor.
4. To find a group or attribute:
• Search for the group or attribute - Enter keywords in the Filter Propertiesfield. The Property Editor displays the group or attributes. To return to thedefault display, delete the keywords.
• Use Go to Group - Click Go to Group and select the group. To return thedefault display, click Go to Group again and select Expand All.
5. Find Automatic Refresh.
a. Automatic Refresh - Select Yes.
b. Interval - Enter the interval in seconds between chart updates.
Note:
Oracle discourages very small updates intervals, such as 2 seconds,since they may cause serious database performance issues.
6. Click Save.
11.5 Creating ChartsYou can add a chart by running a built-in wizard or creating it manually in PageDesigner.
• About Supported Charts (page 11-28)App Builder supports two types of charts: Charts (based on the Oracle JavaScriptExtension Toolkit (Oracle JET) Data Visualizations) and AnyChart Charts.
• Sample Charts (page 11-29)Developers can view chart examples by installing the Sample Charts sampleapplication.
Chapter 11Creating Charts
11-27
• Adding a Chart by Running the Create Page Wizard (page 11-29)Add a chart to a new page by running the Create Page Wizard.
• Adding a Chart on a New Page Using Remote Database References(page 11-31)Run the Create Page Wizard to add a new page with a chart using a remotedatabase reference.
• Adding a Chart in Page Designer (page 11-33)Add a chart by creating it manually in Page Designer.
• Managing Charts (page 11-35)You can alter how a chart displays by editing chart attributes in Page Designer.
• Using Custom JavaScript with Charts (page 11-38)Control the look and feel of a chart by adding custom JavaScript.
See Also:
"Managing Legacy Charts (page 25-1)"
11.5.1 About Supported ChartsApp Builder supports two types of charts: Charts (based on the Oracle JavaScriptExtension Toolkit (Oracle JET) Data Visualizations) and AnyChart Charts.
App Builder supports the following charts:
• Chart - Chart support in Oracle Application Express is based on the Oracle JETData Visualizations. Oracle JET empowers developers by providing a modularopen source toolkit based on modern JavaScript, CSS3, and HTML5 design anddevelopment principles. The Oracle JET data visualization components includecustomizable charts, gauges, and other components that you can use to presentflat or hierarchical data in a graphical display for data analysis. Each Oracle JETvisualization supports animation, accessibility, responsive layout,internationalization, test automation, and a range of inter activity features. Thecharts provide dozens of different ways to visualize a data set, including bar, line,area, range, combination, scatter, bubble, polar, radar, pie, donut, funnel, andstock charts..
See Also:
"Working with Data Visualizations" in JavaScript Extension Toolkit (JET)Developing Applications with Oracle JET.
• AnyChart Chart - AnyChart chart support is based on a third party chartingsolution provided by AnyChart. This is a flexible Flash and JavaScript (HTML5)based solution that enables developers to create animated and compactinteractive charts. AnyChart charts have been categorized as a legacy componentand may be deprecated in the future release.
Chapter 11Creating Charts
11-28
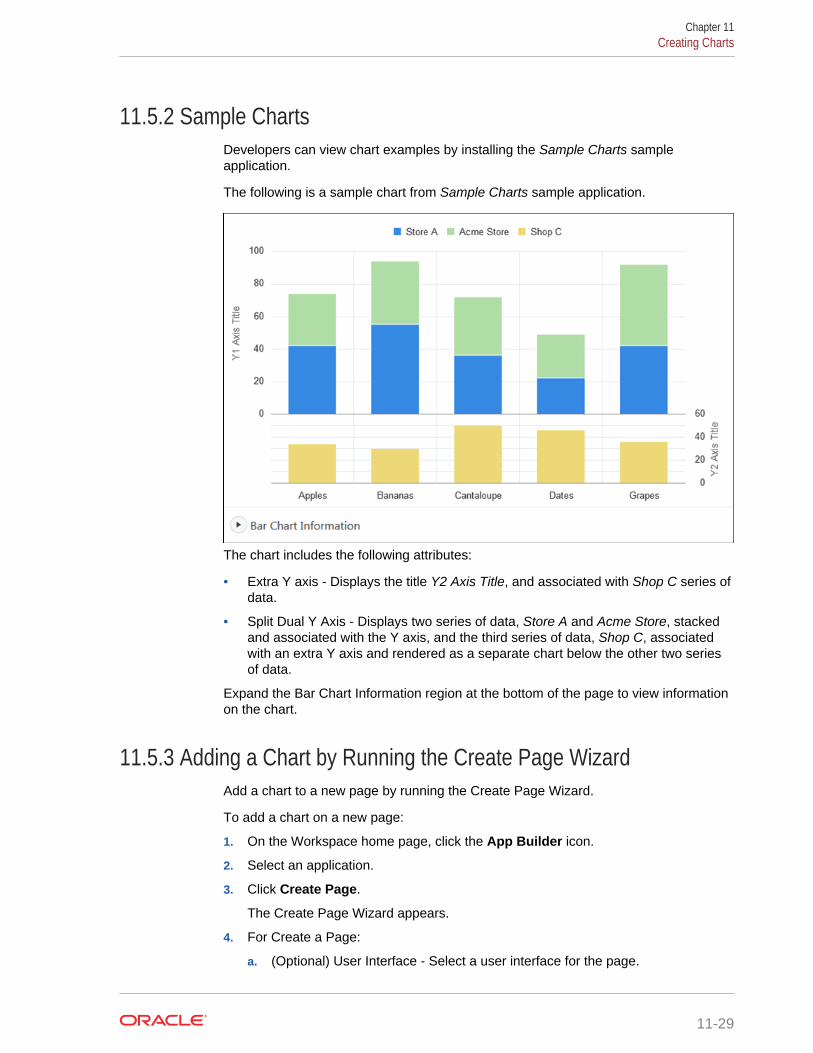
11.5.2 Sample ChartsDevelopers can view chart examples by installing the Sample Charts sampleapplication.
The following is a sample chart from Sample Charts sample application.
The chart includes the following attributes:
• Extra Y axis - Displays the title Y2 Axis Title, and associated with Shop C series ofdata.
• Split Dual Y Axis - Displays two series of data, Store A and Acme Store, stackedand associated with the Y axis, and the third series of data, Shop C, associatedwith an extra Y axis and rendered as a separate chart below the other two seriesof data.
Expand the Bar Chart Information region at the bottom of the page to view informationon the chart.
11.5.3 Adding a Chart by Running the Create Page WizardAdd a chart to a new page by running the Create Page Wizard.
To add a chart on a new page:
1. On the Workspace home page, click the App Builder icon.
2. Select an application.
3. Click Create Page.
The Create Page Wizard appears.
4. For Create a Page:
a. (Optional) User Interface - Select a user interface for the page.
Chapter 11Creating Charts
11-29
b. Select a page type - Select Chart.
5. For Chart Type, select a chart type.
Note:
If you select Gantt, you are prompted to select a Gantt chart type.
6. For Page and Region Attributes:
a. Page Number - Enter a page in which the chart object is to appear.
b. Page Name - Enter a page name.
c. Page Mode - Select a page mode.
• Normal - The page displays as a normal Application Express applicationpage.
• Modal Dialog - The page displays as a modal dialog. A modal dialog is anoverlay window which remains active and focused until the end usercloses it. The underlying page is grayed out which prevents the end userfrom interacting with the rest of the page until the dialog closes.
d. Breadcrumb - Select whether you want to use a breadcrumb navigation controlon your page.
e. Click Next.
7. For Navigation Preference, specify the type of navigation to include on this pageand click Next. The navigation options (for example, navigation menu or tabs)depends upon the current application theme.
Tip:
The steps that follow assume you selected an Oracle JET chart. If youselect a non-Oracle JET chart (for example, Gantt) the steps that followmay differ. Follow the on-screen instructions.
8. For Source, do one of the following:
• If the Chart source is a Table:
a. Source Type - Select Table.
b. Table/View Owner - Select the owner of the table on which you arebuilding the chart.
c. Table/View Name - Select the table or view on which the chart is based.
d. Page Items to Submit - Enter a comma separated list of page items on thecurrent page to be set into session state when the chart data gets readwith a separate request.
e. Maximum Rows - Enter the maximum number of rows you want to use todisplay the chart.
f. Click Next.
• If the Chart source is a SQL Query:
Chapter 11Creating Charts
11-30
a. Source Type - Select SQL Query.
b. SQL Query - Enter the SQL SELECT statement to be used for the chart. TheSQL SELECT statement must include at least two columns.
c. Page Items to Submit - Enter a comma separated list of page items on thecurrent page to be set into session state when the chart data gets readwith a separate request.
d. Maximum Rows - Enter the maximum number of rows you want to use todisplay the chart.
e. Click Next.
9. For Column Mapping:
a. Select the columns to be mapped to the chart. The options that display varydepending upon the chart type selected. To learn more about an attribute,click the field-level Help.
b. Click Next.
10. Click Create.
11.5.4 Adding a Chart on a New Page Using Remote DatabaseReferences
Run the Create Page Wizard to add a new page with a chart using a remote databasereference.
To add a chart on a new page:
1. On the Workspace home page, click the App Builder icon.
2. Select an application.
3. Click Create Page.
The Create Page Wizard appears.
4. For Create a Page:
a. (Optional) User Interface - Select a user interface for the page.
This attribute only displays for applications using older themes and for whichDesktop and Mobile User Interfaces have been defined.
b. Select a page type - Select Chart.
5. For Chart Type, select a chart type.
Note:
If you select Gantt, you are prompted to select a Gantt chart type.
6. For Page and Region Attributes:
a. Page Number - Enter a page in which the chart object is to appear.
b. Page Name - Enter a page name.
c. Page Mode - Select a page mode.
Chapter 11Creating Charts
11-31
• Normal - The page displays as a normal Application Express applicationpage.
• Modal Dialog - The page displays as a modal dialog. A modal dialog is anoverlay window which remains active and focused until the end usercloses it. The underlying page is grayed out which prevents the end userfrom interacting with the rest of the page until the dialog closes.
d. Breadcrumb - Select whether you want to use a breadcrumb navigation controlon your page.
e. Click Next.
7. For Navigation Preference, specify the type of navigation to include on this pageand click Next. The navigation options (for example, navigation menu or tabs)depends upon the current application theme.
Tip:
The steps that follow assume you selected an Oracle JET chart. If youselect a non-Oracle JET chart (for example, Gantt) the steps that followmay differ. Follow the on-screen instructions.
8. For Source, select and then configure a remote database reference:
• For REST Enabled SQL Service:
a. Location - Select REST Enabled SQL Service.
b. REST Enabled SQL Service - Select a REST Enabled SQL reference.
• For Web source:
a. Location - Select Web Source.
b. Web Source Module - Select a Web Source Module.
9. For Source Type, do one of the following:
• If the Chart source is a Table:
a. Source Type - Select Table.
b. Table/View Owner - Select the owner of the table on which you arebuilding the chart.
c. Table/View Name - Select the table or view on which the chart is based.
d. Page Items to Submit - Enter a comma separated list of page items on thecurrent page to be set into session state when the chart data gets readwith a separate request.
e. Maximum Rows - Enter the maximum number of rows you want to use todisplay the chart.
f. Click Next.
• If the Chart source is a SQL Query:
a. Source Type - Select SQL Query.
b. SQL Query - Enter the SQL SELECT statement to be used for the chart. TheSQL SELECT statement must include at least two columns.
Chapter 11Creating Charts
11-32
c. Page Items to Submit - Enter a comma separated list of page items on thecurrent page to be set into session state when the chart data gets readwith a separate request.
d. Maximum Rows - Enter the maximum number of rows you want to use todisplay the chart.
e. Click Next.
10. For Column Mapping:
a. Select the columns to be mapped to the chart. The options that display varydepending upon the chart type selected. To learn more about an attribute,click the field-level Help.
b. Click Next.
11. Click Create.
11.5.5 Adding a Chart in Page DesignerAdd a chart by creating it manually in Page Designer.
To add a chart to an existing page in Page Designer:
1. View the page to contain the chart in Page Designer.
2. In the Gallery at the bottom of the central pane, click Regions and locate Chart.
The Gallery lists all controls or components you can add to a page. Passing thecursor over a control or component displays a tooltip that describes it.
3. From the Gallery, right-click Chart to view a context menu. Select Add To andthen the desired location.
Tip:
You can also click Chart in the Gallery and drag it to the appropriatelocation in the Layout tab.
Page Designer indicates what actions are required next.
4. (Optional) Click the Messages tab in the central pane.
The Messages tab displays a red or yellow badge indicating messages you needto address. The Message tab displays two types of messages:
• Errors - Error messages display in red. Selecting an error message displaysthe associated attribute in red in the Property Editor. You must address errorsbefore a page can be saved.
• Warnings - Warning messages display in yellow. Selecting a warningmessage displays the associated attribute in yellow in the Property Editor. Youmust address errors before a page can be saved. Note you can save a pagewithout addressing warning messages.
5. Do one of the following to locate the required fields highlighted in the PropertyEditor groups:
Chapter 11Creating Charts
11-33
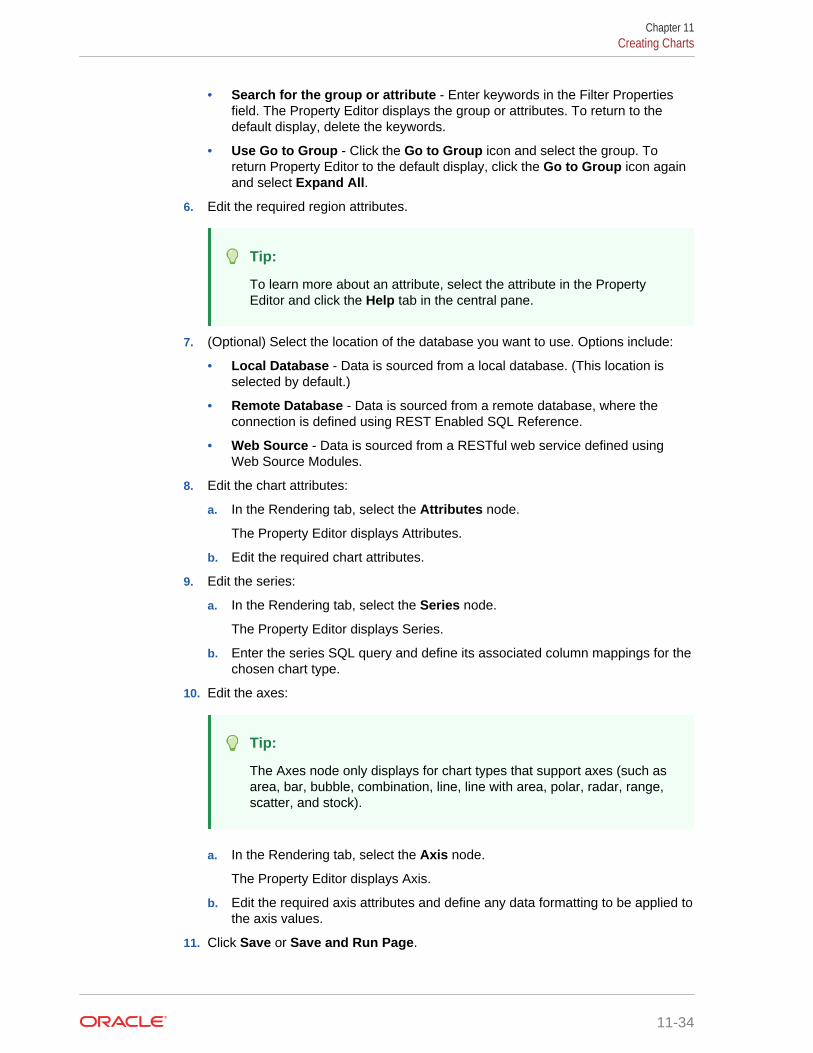
• Search for the group or attribute - Enter keywords in the Filter Propertiesfield. The Property Editor displays the group or attributes. To return to thedefault display, delete the keywords.
• Use Go to Group - Click the Go to Group icon and select the group. Toreturn Property Editor to the default display, click the Go to Group icon againand select Expand All.
6. Edit the required region attributes.
Tip:
To learn more about an attribute, select the attribute in the PropertyEditor and click the Help tab in the central pane.
7. (Optional) Select the location of the database you want to use. Options include:
• Local Database - Data is sourced from a local database. (This location isselected by default.)
• Remote Database - Data is sourced from a remote database, where theconnection is defined using REST Enabled SQL Reference.
• Web Source - Data is sourced from a RESTful web service defined usingWeb Source Modules.
8. Edit the chart attributes:
a. In the Rendering tab, select the Attributes node.
The Property Editor displays Attributes.
b. Edit the required chart attributes.
9. Edit the series:
a. In the Rendering tab, select the Series node.
The Property Editor displays Series.
b. Enter the series SQL query and define its associated column mappings for thechosen chart type.
10. Edit the axes:
Tip:
The Axes node only displays for chart types that support axes (such asarea, bar, bubble, combination, line, line with area, polar, radar, range,scatter, and stock).
a. In the Rendering tab, select the Axis node.
The Property Editor displays Axis.
b. Edit the required axis attributes and define any data formatting to be applied tothe axis values.
11. Click Save or Save and Run Page.
Chapter 11Creating Charts
11-34
11.5.6 Managing ChartsYou can alter how a chart displays by editing chart attributes in Page Designer.
• Editing Chart Attributes (page 11-35)
• Switching Chart Type (page 11-35)
• Enabling Automatic Refresh (page 11-36)
See Also:
"Viewing a Page in Page Designer (page 8-20)"
11.5.6.1 Editing Chart AttributesTo edit chart attributes:
1. View the page in Page Designer:
a. On the Workspace home page, click the App Builder icon.
b. Select an application.
c. Select a page.
Page Designer appears.
2. In the left pane, locate the chart in the Rendering tab.
3. Under the chart, select the Attributes node.
Property Editor displays chart Attributes. Attributes are organized in groups.
4. To find a group or attribute:
• Search for the group or attribute - Enter keywords in the Filter Propertiesfield. The Property Editor displays the group or attributes. To return to thedefault display, delete the keywords.
• Use Go to Group - Click Go to Group and select the group. To return thedefault display, click Go to Group again and select Expand All.
5. Edit the chart attributes.
6. Click Save.
11.5.6.2 Switching Chart TypeOnce you create a chart, you can switch its chart type by editing chart attributes.
To switch a chart type:
1. View the page to contain the chart in Page Designer.
2. In the Rendering tab, select the Attributes node.
Property Editor - Attributes appears.
3. To find a group or attribute:
Chapter 11Creating Charts
11-35
• Search for the group or attribute - Enter keywords in the Filter Propertiesfield. The Property Editor displays the group or attributes. To return to thedefault display, delete the keywords.
• Use Go to Group - Click Go to Group and select the group. To return thedefault display, click Go to Group again and select Expand All.
4. Find Chart section.
5. For Type, select the chart type you want to switch to. For example, Combination.
To learn more about an attribute, see field-level Help.
6. In the Rendering tab, select the Series node
Property Editor - Series appears.
a. Ensure all required Column Mapping columns have been defined.
Note:
Column mappings may differ for different chart types, so you mustensure all required column mappings are defined for the selectedchart type.
b. For Type, select the chart series type. For example, Bar Range.
Note:
Only certain chart types support combining different types of serieson the same data plot. The Series Type attribute will only be visiblefor chart types combination, polar, radar, and range.
7. Click Save or Save and Run Page.
11.5.6.3 Enabling Automatic Refresh
Charts can monitor information by enabling the Automatic Refresh attribute on theChart attributes page, or using a dynamic action with the Refresh action.
• Enabling the Automatic Refresh Attribute (page 11-36)
• Creating a Refresh Dynamic Action (page 11-37)
11.5.6.3.1 Enabling the Automatic Refresh AttributeEnabling the Automatic Refresh attribute updates the chart to reflect changes in theunderlying data within a specified time interval.
To enable automatic refresh updates:
1. View the page in Page Designer:
a. On the Workspace home page, click the App Builder icon.
Chapter 11Creating Charts
11-36
b. Select an application.
c. Select a page.
Page Designer appears.
2. In the Rendering tab, locate the region containing the chart and select theAttributes node
The attributes display in the Property Editor.
3. Find Automatic Refresh.
4. To find a group or attribute:
• Search for the group or attribute - Enter keywords in the Filter Propertiesfield. The Property Editor displays the group or attributes. To return to thedefault display, delete the keywords.
• Use Go to Group - Click Go to Group and select the group. To return thedefault display, click Go to Group again and select Expand All.
5. For Automatic Refresh, select Yes.
6. Click Save .
11.5.6.3.2 Creating a Refresh Dynamic ActionTo create a Refresh dynamic action:
1. View the page in Page Designer:
a. On the Workspace home page, click the App Builder icon.
b. Select an application.
c. Select a page.
Page Designer appears.
2. Click the Dynamic Actions tab in the left pane.
3. Under Dynamic Actions, right-click Events and select Create Dynamic Action.
Attributes for the dynamic action display in the Property Editor.
Tip:
The Messages tab displays a red or yellow badge to identify messagesyou need to address. Selecting a message displays the associatedattribute in the Property Editor. You must address red error messagebefore you can save.
4. In the Property Editor, edit the following Dynamic Action attributes:
Tip:
To learn more about an attribute, select the attribute in the PropertyEditor and click the Help tab in the center pane.
Chapter 11Creating Charts
11-37

a. Identification, Name - Enter a name of the dynamic action.
b. Execution Options, Sequence - Specify the sequence for this component. Thesequence determines the order of evaluation.
c. When, Event - Specify the event that causes the dynamic action to fire.
d. When, Selection Type - Select the type of page element or construct to beused to trigger the event. For examples, select the attribute in the PropertyEditor and click the Help tab in the center pane.
5. In the Rendering tab, select the first action under True:
a. Action - Select Refresh.
b. Selection Type - Select Region.
c. Region - Select the region containing the chart.
6. Click Save.
See Also:
"Managing Dynamic Actions (page 14-20)"
11.5.7 Using Custom JavaScript with ChartsControl the look and feel of a chart by adding custom JavaScript.
To use custom JavaScript:
Tip:
The Sample Charts application contains a number of examples of usingcustom JavaScript with chart. See "Installing a Packaged Application(page 3-4)" for more information on installing packaged applications.
1. View the page in Page Designer:
a. On the Workspace home page, click the App Builder icon.
b. Select an application.
c. Select a page.
Page Designer appears.
2. In the Rendering tab, locate the region containing the chart and select theAttributes node.
The Property Editor displays attributes for the page. Attributes are organized ingroups.
3. To find a group or attribute:
• Search for the group or attribute - Enter keywords in the Filter Propertiesfield. The Property Editor displays the group or attributes. To return to thedefault display, delete the keywords.
Chapter 11Creating Charts
11-38
• Use Go to Group - Click Go to Group and select the group. To return thedefault display, click Go to Group again and select Expand All.
4. Find Advanced.
5. In JavaScript Code, enter the code to customise your chart.
For example:
function( options ){ // Setup a callback function which gets called // when data is retrieved, it allows to manipulate the series options.dataFilter = function( data ) {
// e.g Set the first series of chart to the colour red data.series[ 0 ].color = "red"; }; // Set chart initialization options // e.g. Set chart type to Line options.type = "line"; return options;}
6. Click Save.
Tip:
For more information on supported chart options, see "ojChart" in JSDocpages for the Oracle JavaScript Extension Toolkit (JET).
11.6 Creating Help for Your ApplicationHelp created in App Builder displays on a dedicated Help page. To access Help, usersclick a link that takes them to a dedicated Help page. This Help page displays pageand field-level Help topics specific to the page they are viewing.
• Creating Help (page 11-39)Developers can create both a dedicated Help page and item Help text for anapplication.
• Using the Bulk Edit Item Help Report (page 11-42)Edit all Help topics within an application at once using the Bulk Edit Item Helpreport
• Seeding Item Help Topics (page 11-43)For applications that do not yet contain Help, you can perform a mass update (orseed) of default Help text.
• Creating a Help Navigation Bar Entry (page 11-43)Once you have created your Help, the next step is to create a navigation bar entryso users can link to it.
11.6.1 Creating HelpDevelopers can create both a dedicated Help page and item Help text for anapplication.
Chapter 11Creating Help for Your Application
11-39
• About Creating Help (page 11-40)
• Creating a Help Page and Region (page 11-40)
• Defining Page Help (page 11-41)
• Defining Item Help (page 11-42)
11.6.1.1 About Creating HelpApp Builder includes built-in attributes to create Help for your application. CreatingHelp for your application involves the following steps:
• Step 1: Create a dedicated Help page and Help region. See "Creating a HelpPage and Region (page 11-40)."
• Step 2: Define page Help text. See "Defining Page Help (page 11-41)."
• Step 3: Define item Help text. See "Defining Item Help (page 11-42)."
• Step 4: Create a navigation bar icon to link to your Help page. See "Creating aHelp Navigation Bar Entry (page 11-43)."
11.6.1.2 Creating a Help Page and RegionTo create a Help page and region in Page Designer:
1. Create a blank page for your Help.
2. View the new page in Page Designer:
a. On the Workspace home page, click the App Builder icon.
b. Select an application.
c. Select a page.
Page Designer appears.
3. In the Gallery, right-click Help Text region, select Add To, and select theappropriate location.
Tip:
You can also drag and drop from the Gallery. From the Gallery select theHelp Text region and drag it to the appropriate location in the Layouttab.
4. To find a group or attribute:
• Search for the group or attribute - Enter keywords in the Filter Propertiesfield. The Property Editor displays the group or attributes. To return to thedefault display, delete the keywords.
• Use Go to Group - Click Go to Group and select the group. To return thedefault display, click Go to Group again and select Expand All.
5. Edit the following attributes:
a. Identification, Title - Enter a title for the region.
Chapter 11Creating Help for Your Application
11-40
b. Layout, Sequence - Enter the display sequence for this item. The sequenceand other layout settings determine where this item is displayed in relation toother items within the region.
c. Layout, Parent Region - Select the parent region to which this region belongs.If a parent region is selected then this region is rendered completely inside theparent region.
d. Layout, Position - Specify the Sequence, Parent Region, and Position.
e. Appearance, Template - Select a region template to define the appearanceand layout of this region. Region templates are defined in the applicationtheme. When a region is created, the template is automatically set to thedefault region template defined in the current theme.
f. Appearance, Item Display Position - Select where page items display inrelation to the main region content.
Tip:
To learn more about an attribute, select the attribute in the PropertyEditor and click the Help tab in the center pane.
6. Click Save.
Tip:
For more information on supported chart options, see "ojChart" in JSDocpages for the Oracle JavaScript Extension Toolkit (JET).
7. Click Save.
11.6.1.3 Defining Page HelpTo define Page Help text:
1. View the new page in Page Designer:
a. On the Workspace home page, click the App Builder icon.
b. Select an application.
c. Select a page.
Page Designer appears.
2. In the Rendering tab, click the page name.
3. To find a group or attribute:
• Search for the group or attribute - Enter keywords in the Filter Propertiesfield. The Property Editor displays the group or attributes. To return to thedefault display, delete the keywords.
• Use Go to Group - Click Go to Group and select the group. To return thedefault display, click Go to Group again and select Expand All.
4. In Property Editor - Page, find Help and enter text in Help Text attribute.
Chapter 11Creating Help for Your Application
11-41
5. Click Save.
11.6.1.4 Defining Item HelpTo define item Help:
1. View the new page in Page Designer:
a. On the Workspace home page, click the App Builder icon.
b. Select an application.
c. Select a page.
Page Designer appears.
2. In the Rendering tab, click item for which you want to define Help.
3. To find a group or attribute:
• Search for the group or attribute - Enter keywords in the Filter Propertiesfield. The Property Editor displays the group or attributes. To return to thedefault display, delete the keywords.
• Use Go to Group - Click Go to Group and select the group. To return thedefault display, click Go to Group again and select Expand All.
4. In the Property Editor, findHelp and enter text in Help attribute.
5. Click Save.
6. Repeat the previous steps for each item requiring Help text.
11.6.2 Using the Bulk Edit Item Help ReportEdit all Help topics within an application at once using the Bulk Edit Item Help report
Developers can use the Bulk Edit Item Help report to view the item Label and Name,access the item, or link to the page containing the item.to the associate page
If you are including Help in your application, you can edit multiple Help topics at onceusing the Bulk Edit Item Help report.
To view the Bulk Edit Item Help report:
1. On the Workspace home page, click the App Builder icon.
2. Select an application.
3. Click the Utilities icon.
4. From Page Specific Utilities, select Item Utilities.
5. Click Grid Edit of All Item Help Text.
6. In Bulk Item Help Report, you can:
• Update existing Help topics. Edit the Help text that appears and click ApplyChanges.
• Link to the page containing the item by clicking the page number.
• Link to the Page Item by clicking the item name.
Chapter 11Creating Help for Your Application
11-42

11.6.3 Seeding Item Help TopicsFor applications that do not yet contain Help, you can perform a mass update (orseed) of default Help text.
To seed Help topics:
1. On the Workspace home page, click the App Builder icon.
2. Select an application.
3. Click the Utilities icon.
4. From Page Specific Utilities, select Item Utilities.
5. Click Grid Edit of All Item Help Text.
6. Click Seed Item Help Text.
7. To edit existing item Help:
a. In Item Help Text, enter the default text to appear in all Help topics.
b. Click Apply Changes.
8. To create help text for all items that currently do not have help text, click SeedItem Help Text and follow the on-screen instructions.
9. Click Apply Changes.
11.6.4 Creating a Help Navigation Bar EntryOnce you have created your Help, the next step is to create a navigation bar entry sousers can link to it.
To create a navigation bar entry:
1. Navigate to the Navigation Bar Entries page:
a. Navigate to the Workspace home page.
b. Click the App Builder icon.
c. Select an application.
d. On the Application home page, click Shared Components.
e. Under Navigation, click Classic Navigation Bar Entries.
2. Click Create.
The Create Navigation Bar Entry Wizard appears.
3. For Method, select From Scratch and click Next.
4. For Type, select Navigation to URL and click Next.
5. For Attributes, specify the following:
a. Sequence - Specify the order of evaluation for this component.
b. Entry Label - Enter display text for this navigation bar entry.
c. Icon Image Name - Enter an image name. For naming conventions, see field-level Help.
Chapter 11Creating Help for Your Application
11-43
d. Image ALT - Enter ALT text for navigation icons that are images. If you do notspecify an image name, then this text displays.
e. Image Height - Defines the height of the image.
f. Width - Defines the width of the image.
g. Click Next.
6. For Target:
a. Target is a - Select Page in this application.
b. Page - Specify the page number of the help page you created in "CreatingHelp (page 11-39)."
c. Request - Enter the following:
&APP_PAGE_ID.
By specifying substitution string &APP_PAGE_ID as the Request, you areinstructing the Application Express engine to display Help text for the currentpage when the user clicks this icon.
d. Click Next.
7. To set a condition for displaying the navigation bar entry, select a condition type.
8. Click Create.
Chapter 11Creating Help for Your Application
11-44
12Using Themes and Theme Styles
Developers can alter a database application's user interface and page layout throughthemes and templates.
• Using Themes (page 12-1)Use themes and theme styles to increase your productivity when building anapplication.
• Managing Themes and Subscriptions (page 12-16)Developers can manage themes directly or through the use of themesubscriptions.
• Creating Custom Themes (page 12-30)Create a custom theme by modifying an existing templates.
• Using Custom Cascading Style Sheets (page 12-76)Upload or reference a cascading style sheet.
12.1 Using ThemesUse themes and theme styles to increase your productivity when building anapplication.
• About Themes (page 12-2)Themes are collections of templates that enable developers to define the layoutand style of an entire application.
• About Responsive Design and the Universal Theme (page 12-2)Universal Theme - 42 (Universal Theme) enables developers to build modern webapplications without requiring extensive knowledge of HTML, CSS, or JavaScript
• Using Theme Styles and Theme Roller (page 12-3)A theme style is a CSS that is added to the base CSS. Using the Theme Rollerutility, developers can change the appearance of an application. Universal Theme- 42 includes theme styles.
• Understanding Template Options (page 12-8)Template options provide developers with a declarative approach to applyingdifferent styles to components on an Oracle Application Express page.
• Accessing the Themes Page (page 12-10)Manage themes on the Themes page.
• Editing Themes (page 12-10)Edit a theme by editing theme attributes.
12-1
See Also:
"Managing Themes and Subscriptions (page 12-16)" and "ManagingThemes and Subscriptions (page 12-16)"
12.1.1 About ThemesThemes are collections of templates that enable developers to define the layout andstyle of an entire application.
Themes provide developers with a complete set of templates that accommodate everyUI pattern that may be needed in an application. Templates are organized first bytemplate type and then by template class. Template types include page, region, report,list, button, label, and popup list of values (LOV).
Each template type has a number of template classes. A template class defines thepurpose of a template within a template type. For example, a region template can beclassified as a form region template, a report region template, and so on. Theseclassifications enable Oracle Application Express to map templates among themes,making it easy to quickly change the entire look and feel of an application.
Administrators can add themes to the theme repository as follows:
• Workspace Themes - Workspace administrators can create themes that areavailable to all developers within the workspace. See "Managing WorkspaceThemes (page 12-24)."
• Public Themes - Instance administrators can create public themes by addingthem to the Oracle Application Express Administration Services. Once added,these public themes are available to all developers across all workspaces in aninstance. See "Managing Public Themes" in Oracle Application ExpressAdministration Guide.
12.1.2 About Responsive Design and the Universal ThemeUniversal Theme - 42 (Universal Theme) enables developers to build modern webapplications without requiring extensive knowledge of HTML, CSS, or JavaScript
About Responsive Design
Responsive design enables you to design web pages so that the layout fits theavailable space regardless of the device on which page displays (for example, adesktop computer, laptop computer, tablet, or smartphone).
By implementing a responsive design, the user gets the same full experience as theywould on larger screens. On smart phones and tablets, the layout can adjusts to thesize of the specific device. During this resizing process, elements shift position, re-size, or become hidden. The goal of responsive design is to present all essentialcontent in a user friendly way for all possible screen sizes. Keep in mind, thatresponsive design is not just a matter of picking the correct set of templates. As theapplication developer, you are responsible for using the templates and the availablecomponents to design a page that is truly responsive. The Universal Theme is anexample of a responsive user interface theme.
Chapter 12Using Themes
12-2
About the Universal Theme
When you create a new application, the Create Application Wizard uses the UniversalTheme.
Key advantages of the Universal Theme include:
• Responsive Design - Designed to work just as well on small screen devices(such as smartphones and tablets) as it does on larger screen devices (includinglaptops and desktops). The UI components in Universal Theme work acrossvarying screen resolutions while maintaining the same or similar functionality. Inaddition, Universal Theme takes full advantage of ultra high screen resolutions byutilizing vector graphics where possible, and relying upon CSS3 features for UIstyling.
• Versatile User Interface - Provides all the components and building blocksnecessary to build practically any type of business application user interface. Tobrowse all of the components provided with Universal Theme go to the UniversalTheme application at https://apex.oracle.com/ut and select Components.
• Easy Customization - Effortlessly customize and fully control the look and feel ofyour applications without becoming an expert in UI design, HTML, CSS, orJavaScript. Using Theme Roller and Template Options, you can easily customizeyour application to fit your company's brand and customize the look and feel ofvarious components using Template Options.
The Universal Theme includes support for theme styles. A theme style is a CSS stylesheet that is added to the base CSS. Developers can change the appearance of anapplication by altering the theme style using the Theme Roller utility.
About Migrating Existing Mobile Applications to the Universal Theme
jQuery Mobile and the jQuery Mobile User Interface used in previous releases havebeen desupported. If you have an existing mobile application that uses the jQueryMobile User Interface, you should migrate your existing application to the UniversalTheme.
Tip:
To learn more about migrating existing applications to the Universal Theme,go to the Universal Theme application at https://apex.oracle.com/ut andselect Migration Guide.
12.1.3 Using Theme Styles and Theme RollerA theme style is a CSS that is added to the base CSS. Using the Theme Roller utility,developers can change the appearance of an application. Universal Theme - 42includes theme styles.
• About Theme Styles (page 12-4)
• Creating a Theme Style (page 12-4)
• Editing a Theme Style from the Themes Page (page 12-5)
Chapter 12Using Themes
12-3
• Editing a Theme Style from the User Interface Page (page 12-5)
• Enabling Users to Select a Theme Style (page 12-6)
• Using Theme Roller (page 12-6)
12.1.3.1 About Theme StylesA theme style defines a CSS style sheet that is added to the base CSS to alter thelook and feel of an application. Newer themes such as Universal Theme - 42 can havea base CSS file plus the theme style CSS file. The theme style CSS file are referencedin the page template using the #THEME_STYLE_CSS# substitution string. The ApplicationExpress engine replaces this substitution string with the CSS file references defined inthe theme style attributes. Use theme styles to customize themes, to switch to adifferent color scheme, apply a flat look, or make a theme responsive. A theme canhave multiple theme styles with one style set as active. You can modify a theme styleCSS file using Theme Roller.
Once defined, developers can select a theme style by:
• Editing the Theme Styles attribute when running the Create Application Wizard.See "Understanding Page Types, Features, and Settings (page 6-4)."
• Editing the User Interface. See "Editing a Theme Style from the User InterfacePage (page 12-5)."
• Accessing the Create/Edit Theme page. See "Editing a Theme (page 12-10)" and"Creating a Theme Style (page 12-4)."
12.1.3.2 Creating a Theme StyleTo create a theme style:
1. Navigate to the Themes page:
a. On the Workspace home page, click the App Builder icon.
b. Select an application.
c. Click Shared Components.
d. Under User Interface, select Themes.
2. Select a theme and click the Styles tab.
3. Click Add Style.
The Theme Styles page appears.
4. For Settings:
a. Name - Provide a short descriptive name for the theme style.
b. Is Current - Select whether this style is the current style used by the theme.
c. Is Public - Select whether this style can be chosen by end users.
d. File URLs - Select whether this style is the current style used by the theme.
To learn more about an attribute, see field-level help.
5. For Theme Roller Attributes:
a. Read Only - Select Yes to prevent any updates to the theme style. Select Noto enable the theme style to be edited and overwritten using Theme Roller.
Chapter 12Using Themes
12-4
b. Input Parameter File URLs - Enter the LESS file URLs that will be used togenerate this theme style when using Theme Roller.
c. Output CSS File URL- Enter the URL for the CSS file that will be generated byTheme Roller for this theme style. .
d. Theme Roller JSON Configuration, JSON Configuration - The JSONconfiguration is generated by Theme Roller when the theme style is saved.
Oracle does not recommend manually updating the configuration. However,you can copy a JSON configuration from another theme style, such as atheme style in another application, to manually update the configuration.
6. Click Create.
12.1.3.3 Editing a Theme Style from the Themes PageTo edit a Theme Style:
1. Navigate to the Themes page:
a. On the Workspace home page, click the App Builder icon.
b. Select an application.
c. Click Shared Components.
d. Under User Interface, select Themes.
2. Click the theme name.
3. Select a theme and click the Styles tab.
4. Select a theme style.
The Theme Styles page appears.
5. To make changes to the current theme style, edit the appropriate attributes andclick Apply Changes.
To learn more about an attribute, see field-level help.
6. To delete the current theme style, click Delete.
7. Click Create.
12.1.3.4 Editing a Theme Style from the User Interface PageTo edit a Theme Style from the User Interface page:
1. Navigate to the User Interface page:
a. On the Workspace home page, click the App Builder icon.
b. Select an application.
c. Click Shared Components.
d. Under User Interface, click User Interface Attributes.
The User Interface page appears.
2. Locate the user interface (for example, Desktop) and click the Theme Style name.
The Theme Styles page appears.
Chapter 12Using Themes
12-5
3. To make changes to the current theme style, edit the appropriate attributes andclick Apply Changes.
To learn more about an attribute, see field-level help.
4. To delete the current theme style, click Delete.
5. Click Create.
12.1.3.5 Enabling Users to Select a Theme StyleDevelopers can enable users to select a theme style in a running application. Onceenabled, a Customize link appears in the running application, typically in the lower leftcorner. When the user clicks the Customize link a pop-up displays listing availabletheme styles. When a user selects a theme style, the theme style is stored persistentlyas a user preference and will be retained during future sessions.
To enable users to select a theme style:
1. Create an application which has at least two theme styles.
2. Go to the application User Interface page:
a. Click Shared Components.
b. Under User Interface, click User Interface Attributes.
The User Interface Attributes page appears. Defined User Interfaces display atthe top of the page.
3. Edit the User Interface Details.
a. Click the Edit icon adjacent to the appropriate user Interface (for example,Desktop).
b. Under Attributes, set Enable End Users to choose Theme Style to Yes.
c. Click Apply Changes.
4. Edit each theme style and set the Is Public attribute to Yes.
a. On the User Interface page, click the theme style name (for example, Vita).
b. Under Settings, set Is Public to Yes.
c. Click Apply Changes.
The User Interface page reappears.
12.1.3.6 Using Theme RollerTheme Roller is a live CSS editor that enables developers to quickly change thecolors, rounded corners and other attributes of their applications without touching aline of code. Theme Roller displays in the Runtime Developer Toolbar if at least one ofyour theme styles has the Input Parameter File URLs attribute defined.
Tip:
Install and run a packaged application that uses the Universal Theme - 42 tosee an example of Theme Roller. See "Utilizing Packaged Applications(page 3-1)."
Chapter 12Using Themes
12-6
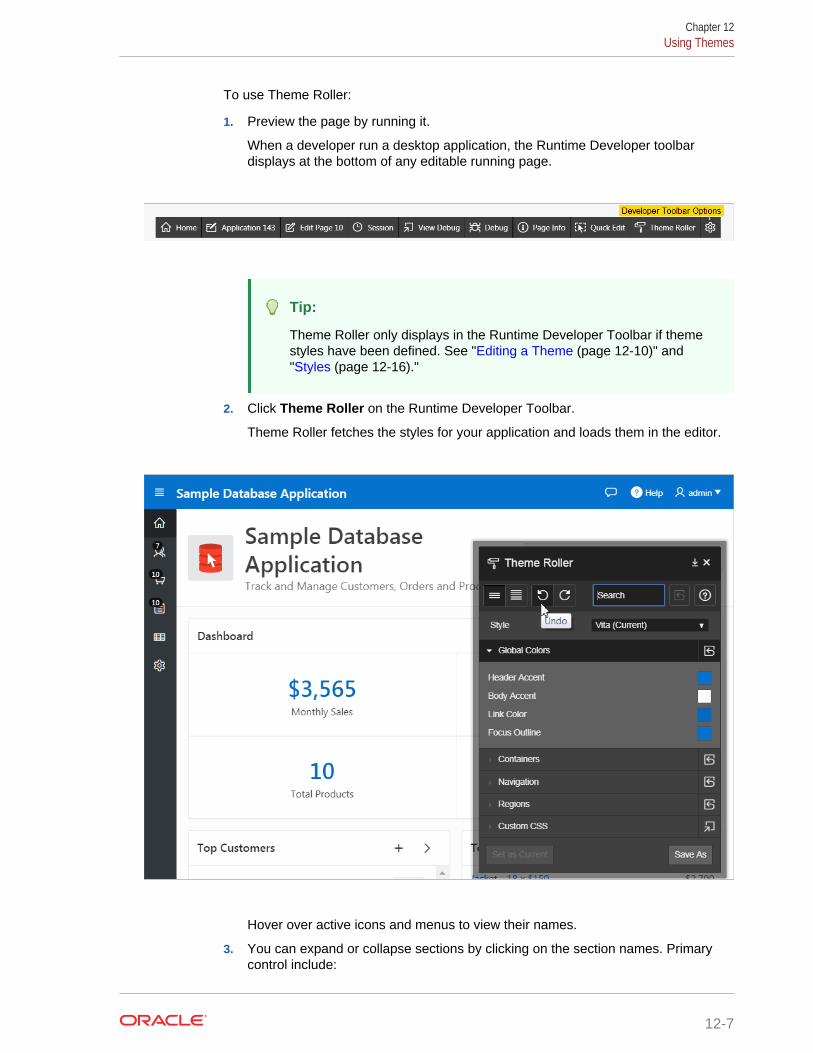
To use Theme Roller:
1. Preview the page by running it.
When a developer run a desktop application, the Runtime Developer toolbardisplays at the bottom of any editable running page.
Tip:
Theme Roller only displays in the Runtime Developer Toolbar if themestyles have been defined. See "Editing a Theme (page 12-10)" and"Styles (page 12-16)."
2. Click Theme Roller on the Runtime Developer Toolbar.
Theme Roller fetches the styles for your application and loads them in the editor.
Hover over active icons and menus to view their names.
3. You can expand or collapse sections by clicking on the section names. Primarycontrol include:
Chapter 12Using Themes
12-7
• Show Common - Displays all attributes.
Tip:
Altering the Custom CSS section can override the theme style ofUniversal Theme. Be careful with the selector you use in this section.Hiding or obscuring content may degrade your user's experience.
• Show All - Displays all attributes.
• Undo - Reverts the currently edited theme to the previous action. This featurewill not work if you have switched themes.
• Redo - Dismisses the current Undo revision and goes to the next one in thehistory. This feature will not work if you have switched themes.
• Search - Search for properties, groups, and colors. As you search, ThemeRoller automatically displays only properties that match your search string.
• Reset - Reverts the selected theme to the last version saved on the server.After resetting your theme and reloading your page, you can use Undo andRedo to restore your changes.
• Help - Displays a Help window.
4. From Style, select a new style, choose an existing style from the list.
5. Under Global Colors, click the color swatch to select new colors.
6. To edit a specific component, expand a group and select new colors or styling ofthe component you wish to edit.
For attributes that support the selection of foreground and background colors, thecheck box preceding the two color selections indicates color contrast informationbased on Web Content Accessibility Guidelines (WCAG) 2.0. A higher calculatedcontrast score indicates that the color combination is more accessible.
Tip:
to set the theme style you are working as the current one for theapplication, click Set as Current.
7. To set the theme style you are working as the current one for the application.
8. Click Save to commit your changes to the server. If the selected theme is readonly, then click Save As to save your changes as a new theme.
12.1.4 Understanding Template OptionsTemplate options provide developers with a declarative approach to applying differentstyles to components on an Oracle Application Express page.
• About Template Options (page 12-9)
• About Default Template Options (page 12-9)
• About Template Option Groups and Presets (page 12-9)
Chapter 12Using Themes
12-8
See Also:
"Using Template Options (page 12-33)" and "Using Quick Edit to ModifyLive Template Options (page 12-38)"
12.1.4.1 About Template OptionsTemplate options enable developers to declaratively apply CSS modifiers to thetemplates they have chosen for pages, regions, reports, lists, breadcrumbs, items andbuttons. A CSS modifier is a reference to a CSS class defined in a CSS style sheet.CSS modifiers enable a developer to use the same HTML markup but present it in avariety of different styles simply by applying a CSS. Template options reduce the needto have a large number of nearly identical templates defined in a theme in order toachieve different styles for button colors, region widths, font settings, item labelmarkup, and so on.
Examples of how developers can use template options include:
• Applying different colors or accents
• Applying different spacing and padding
• Rendering buttons in different styles, with and without icons
• Displaying form fields with different alignments.
Without template options, applying these variations would require a large number ofnearly identical templates, or in-depth knowledge of CSS. Components that supporttemplate options include: pages; regions; classic reports; breadcrumbs; lists; itemsand labels; and buttons.
12.1.4.2 About Default Template OptionsDevelopers can select template options that are not part of a template option group tobe the default for a template. App Builder automatically applies default templateoptions by rendering the component that references the template. Default templateoptions are not written to an actual component. Instead, a #DEFAULT# substitution stringis defined for the component, thus enabling developers to centrally modify thetemplate option defaults.
Developers can choose not to use the template option defaults, which removes the#DEFAULT# substitution string from the component. If template option defaults aredisabled, then developers can selectively apply available template options to acomponent. All template options that are selected directly when editing the componentare written to the component's metadata, represented by their corresponding CSSclasses string. At runtime, the selected template options and default template optionare part of the default are combined with the component's CSS classes string andapplied to the component.
12.1.4.3 About Template Option Groups and PresetsDevelopers can define the purpose of related template options by creating templateoption groups. Examples of template option groups include Button Size, Button Style,List Examples, List Style, and Form Label Position. When developers create atemplate option group, they can specify a template option preset at the template-level.
Chapter 12Using Themes
12-9
For example, suppose you have a button template that has the template options Largeand Small. If you define Small as the preset, then any new button referencing thetemplate would automatically have the template option Small applied to it when is itcreated. Template options that are part of a group are optional unless a present isdefined at the template-level.
12.1.5 Accessing the Themes PageManage themes on the Themes page.
Tip:
You can change the selected default templates for a theme on the Create/Edit Theme page. See "Editing Themes (page 12-10)".
To access the Themes page:
1. On the Workspace home page, click the App Builder icon.
2. Select an application.
3. Click Shared Components.
4. Under User Interface, select Themes.
The Themes page appears.
5. Click the View Report icon.
The Themes page appears as a report. A check mark in the Is Current columnindicates which theme is selected.
6. Click the theme name.
The Edit Theme page appears.
12.1.6 Editing ThemesEdit a theme by editing theme attributes.
• Editing a Theme (page 12-10)
• Theme Attributes (page 12-11)
See Also:
"Creating Custom Themes (page 12-30)"
12.1.6.1 Editing a ThemeTo review or edit a theme:
1. On the Workspace home page, click the App Builder icon.
Chapter 12Using Themes
12-10

2. Select an application.
3. Click Shared Components.
4. Under User Interface, select Themes.
The Themes page appears.
5. On the Themes page, click the View Report icon.
The Themes page appears as a report. A check mark in the Is Current columnindicates which theme is selected.
6. Click the theme name.
The Create/Edit Theme page appears and is divided into sections.
7. Edit the appropriate Theme attributes as described in "Theme Attributes(page 12-11)."
8. To save any changes, click Apply Changes.
12.1.6.2 Theme AttributesLearn about Theme attributes available on the Create/Edit Theme Attributes page. Tolearn more about an attribute and view examples, see field-level Help.
• Name (page 12-11)
• Theme Subscription (page 12-12)
• JavaScript and Cascading Style Sheets (page 12-12)
• Component Defaults (page 12-12)
• Region Defaults (page 12-14)
• Dialog Defaults (page 12-14)
• Transition Defaults (page 12-15)
• Global Templates Options (page 12-15)
• Icons (page 12-15)
• Image (page 12-16)
• Styles (page 12-16)
• Files (page 12-16)
12.1.6.2.1 NameTable 12-1 (page 12-11) describes the attributes under Name.
Table 12-1 Name
Attribute Description
Application Identifies the current application ID.
See Also: "Editing Application Attributes (page 6-23)"
Theme Number Identifies the number of a theme. A theme is a collection of templateswhich define the user interface of an application.
Name Enter a short descriptive name for the theme.
Chapter 12Using Themes
12-11

Table 12-1 (Cont.) Name
Attribute Description
User Interface Specifies the user interface for which the theme is designed.
See Also: "User Interface Details Page (page 6-51)"
Navigation Type Identifies the selected Navigation Type. Valid options include: Tabs orList.
See Also: "Creating Tabs (page 15-2)" and "Creating Lists(page 17-38)"
Navigation BarImplementation
Identifies the selected Navigation Bar Implementation. Valid optionsinclude: Classic or List.
See Also: "User Interface Details Page (page 6-51)"
Description Enter a description for the theme.
12.1.6.2.2 Theme SubscriptionDisplays themes to which this application subscribes. When an application subscribesto a theme, all theme attributes, subscribed template options, and subscribedtemplates are set to read-only.
12.1.6.2.3 JavaScript and Cascading Style SheetsTable 12-2 (page 12-12) describes the attributes under JavaScript and CascadingStyle Sheets.
Table 12-2 JavaScript and Cascading Style Sheets
Attribute Description
JavaScript File URLs Enter JavaScript file URLs for code to be loaded on every page. EachURL has to be written into a new line. If you provide a minified versionof your file, you can use the substitution string #MIN# to include .min or#MIN_DIRECTORY# to include minified/ in your file URL for a regularpage view and an empty string if the page is viewed in debugmode.JavaScript file URLs you enter here replaces the#THEME_JAVASCRIPT# substitution string in the page template
To view examples, see field-level Help.
CSS File URLs Enter Cascading Style Sheet file URLs to be loaded on every page.Each URL has to be written into a new line. If you provide a minifiedversion of your file you can use the substitution string #MIN# toinclude .min or #MIN_DIRECTORY# to include minified/ in your file URLfor a regular page view and an empty string if the page is viewed indebug mode. You also have access to the substitution string#APP_VERSION# if you want to include the application's version in the fileURL.File URLs you enter here will replace the #THEME_CSS#substitution string in the page template.
To view examples, see field-level Help.
12.1.6.2.4 Component DefaultsTable 12-3 (page 12-13) describes the default templates by component type.
Chapter 12Using Themes
12-12
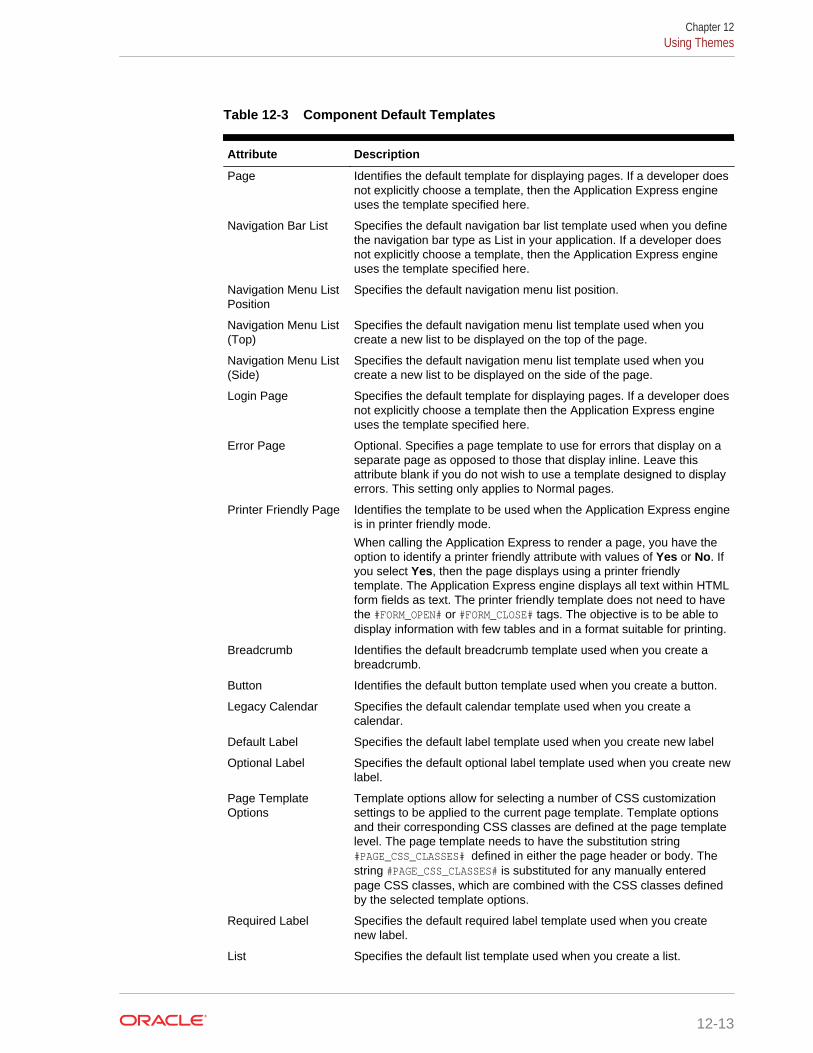
Table 12-3 Component Default Templates
Attribute Description
Page Identifies the default template for displaying pages. If a developer doesnot explicitly choose a template, then the Application Express engineuses the template specified here.
Navigation Bar List Specifies the default navigation bar list template used when you definethe navigation bar type as List in your application. If a developer doesnot explicitly choose a template, then the Application Express engineuses the template specified here.
Navigation Menu ListPosition
Specifies the default navigation menu list position.
Navigation Menu List(Top)
Specifies the default navigation menu list template used when youcreate a new list to be displayed on the top of the page.
Navigation Menu List(Side)
Specifies the default navigation menu list template used when youcreate a new list to be displayed on the side of the page.
Login Page Specifies the default template for displaying pages. If a developer doesnot explicitly choose a template then the Application Express engineuses the template specified here.
Error Page Optional. Specifies a page template to use for errors that display on aseparate page as opposed to those that display inline. Leave thisattribute blank if you do not wish to use a template designed to displayerrors. This setting only applies to Normal pages.
Printer Friendly Page Identifies the template to be used when the Application Express engineis in printer friendly mode.
When calling the Application Express to render a page, you have theoption to identify a printer friendly attribute with values of Yes or No. Ifyou select Yes, then the page displays using a printer friendlytemplate. The Application Express engine displays all text within HTMLform fields as text. The printer friendly template does not need to havethe #FORM_OPEN# or #FORM_CLOSE# tags. The objective is to be able todisplay information with few tables and in a format suitable for printing.
Breadcrumb Identifies the default breadcrumb template used when you create abreadcrumb.
Button Identifies the default button template used when you create a button.
Legacy Calendar Specifies the default calendar template used when you create acalendar.
Default Label Specifies the default label template used when you create new label
Optional Label Specifies the default optional label template used when you create newlabel.
Page TemplateOptions
Template options allow for selecting a number of CSS customizationsettings to be applied to the current page template. Template optionsand their corresponding CSS classes are defined at the page templatelevel. The page template needs to have the substitution string#PAGE_CSS_CLASSES# defined in either the page header or body. Thestring #PAGE_CSS_CLASSES# is substituted for any manually enteredpage CSS classes, which are combined with the CSS classes definedby the selected template options.
Required Label Specifies the default required label template used when you createnew label.
List Specifies the default list template used when you create a list.
Chapter 12Using Themes
12-13
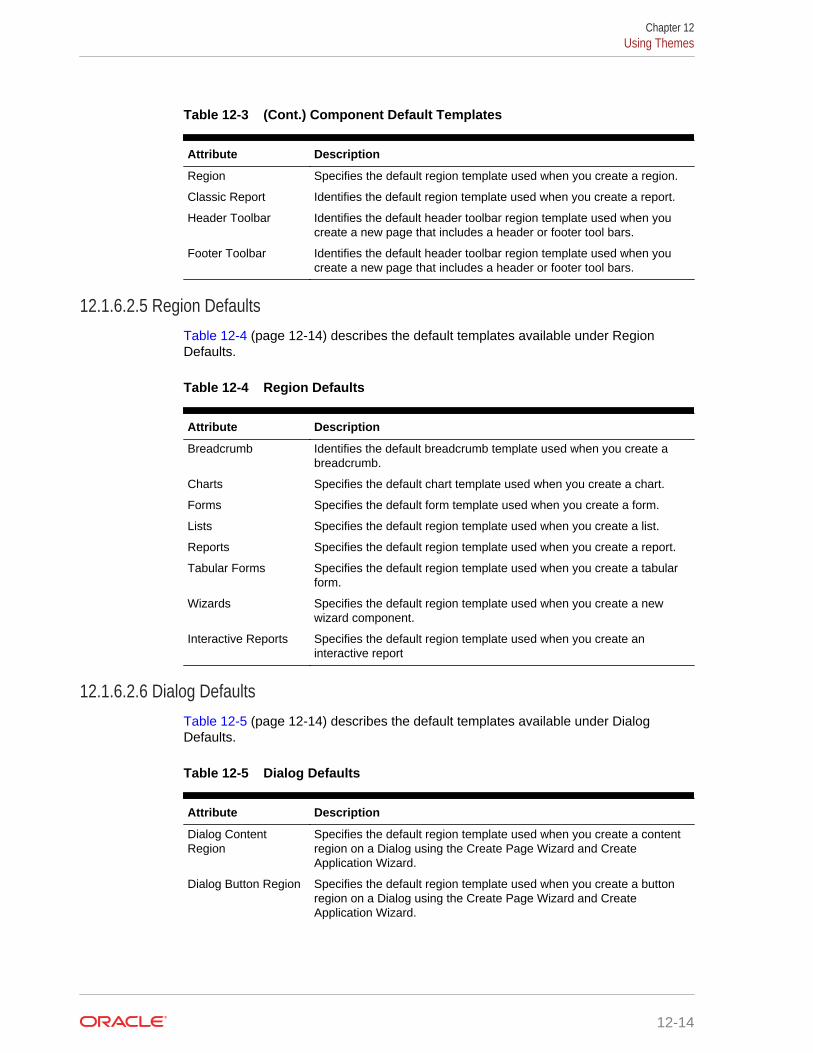
Table 12-3 (Cont.) Component Default Templates
Attribute Description
Region Specifies the default region template used when you create a region.
Classic Report Identifies the default region template used when you create a report.
Header Toolbar Identifies the default header toolbar region template used when youcreate a new page that includes a header or footer tool bars.
Footer Toolbar Identifies the default header toolbar region template used when youcreate a new page that includes a header or footer tool bars.
12.1.6.2.5 Region DefaultsTable 12-4 (page 12-14) describes the default templates available under RegionDefaults.
Table 12-4 Region Defaults
Attribute Description
Breadcrumb Identifies the default breadcrumb template used when you create abreadcrumb.
Charts Specifies the default chart template used when you create a chart.
Forms Specifies the default form template used when you create a form.
Lists Specifies the default region template used when you create a list.
Reports Specifies the default region template used when you create a report.
Tabular Forms Specifies the default region template used when you create a tabularform.
Wizards Specifies the default region template used when you create a newwizard component.
Interactive Reports Specifies the default region template used when you create aninteractive report
12.1.6.2.6 Dialog DefaultsTable 12-5 (page 12-14) describes the default templates available under DialogDefaults.
Table 12-5 Dialog Defaults
Attribute Description
Dialog ContentRegion
Specifies the default region template used when you create a contentregion on a Dialog using the Create Page Wizard and CreateApplication Wizard.
Dialog Button Region Specifies the default region template used when you create a buttonregion on a Dialog using the Create Page Wizard and CreateApplication Wizard.
Chapter 12Using Themes
12-14
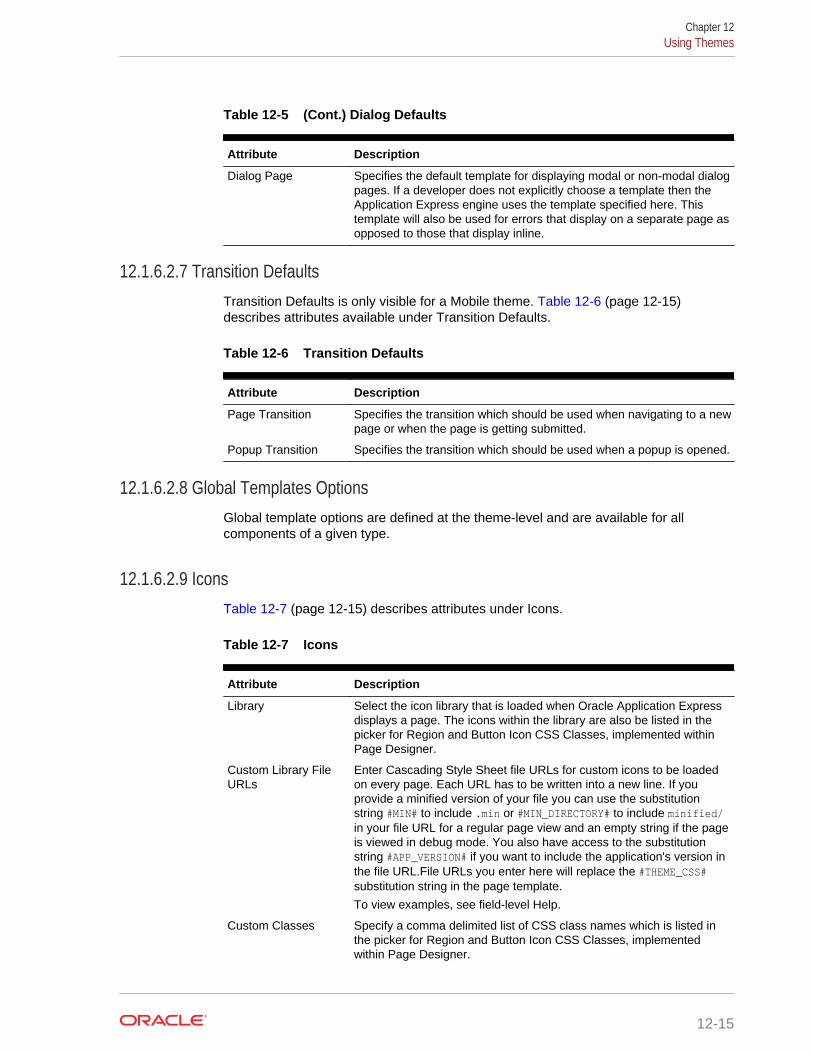
Table 12-5 (Cont.) Dialog Defaults
Attribute Description
Dialog Page Specifies the default template for displaying modal or non-modal dialogpages. If a developer does not explicitly choose a template then theApplication Express engine uses the template specified here. Thistemplate will also be used for errors that display on a separate page asopposed to those that display inline.
12.1.6.2.7 Transition DefaultsTransition Defaults is only visible for a Mobile theme. Table 12-6 (page 12-15)describes attributes available under Transition Defaults.
Table 12-6 Transition Defaults
Attribute Description
Page Transition Specifies the transition which should be used when navigating to a newpage or when the page is getting submitted.
Popup Transition Specifies the transition which should be used when a popup is opened.
12.1.6.2.8 Global Templates OptionsGlobal template options are defined at the theme-level and are available for allcomponents of a given type.
12.1.6.2.9 IconsTable 12-7 (page 12-15) describes attributes under Icons.
Table 12-7 Icons
Attribute Description
Library Select the icon library that is loaded when Oracle Application Expressdisplays a page. The icons within the library are also be listed in thepicker for Region and Button Icon CSS Classes, implemented withinPage Designer.
Custom Library FileURLs
Enter Cascading Style Sheet file URLs for custom icons to be loadedon every page. Each URL has to be written into a new line. If youprovide a minified version of your file you can use the substitutionstring #MIN# to include .min or #MIN_DIRECTORY# to include minified/in your file URL for a regular page view and an empty string if the pageis viewed in debug mode. You also have access to the substitutionstring #APP_VERSION# if you want to include the application's version inthe file URL.File URLs you enter here will replace the #THEME_CSS#substitution string in the page template.
To view examples, see field-level Help.
Custom Classes Specify a comma delimited list of CSS class names which is listed inthe picker for Region and Button Icon CSS Classes, implementedwithin Page Designer.
Chapter 12Using Themes
12-15
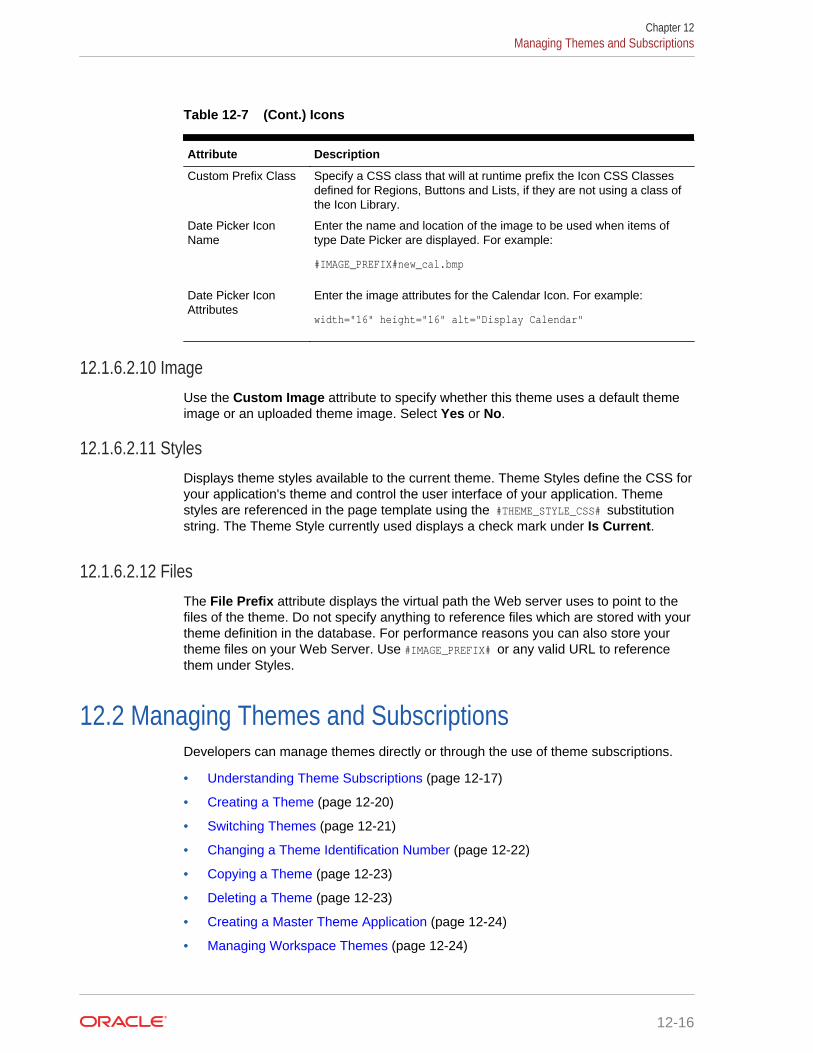
Table 12-7 (Cont.) Icons
Attribute Description
Custom Prefix Class Specify a CSS class that will at runtime prefix the Icon CSS Classesdefined for Regions, Buttons and Lists, if they are not using a class ofthe Icon Library.
Date Picker IconName
Enter the name and location of the image to be used when items oftype Date Picker are displayed. For example:
#IMAGE_PREFIX#new_cal.bmp
Date Picker IconAttributes
Enter the image attributes for the Calendar Icon. For example:
width="16" height="16" alt="Display Calendar"
12.1.6.2.10 ImageUse the Custom Image attribute to specify whether this theme uses a default themeimage or an uploaded theme image. Select Yes or No.
12.1.6.2.11 StylesDisplays theme styles available to the current theme. Theme Styles define the CSS foryour application's theme and control the user interface of your application. Themestyles are referenced in the page template using the #THEME_STYLE_CSS# substitutionstring. The Theme Style currently used displays a check mark under Is Current.
12.1.6.2.12 FilesThe File Prefix attribute displays the virtual path the Web server uses to point to thefiles of the theme. Do not specify anything to reference files which are stored with yourtheme definition in the database. For performance reasons you can also store yourtheme files on your Web Server. Use #IMAGE_PREFIX# or any valid URL to referencethem under Styles.
12.2 Managing Themes and SubscriptionsDevelopers can manage themes directly or through the use of theme subscriptions.
• Understanding Theme Subscriptions (page 12-17)
• Creating a Theme (page 12-20)
• Switching Themes (page 12-21)
• Changing a Theme Identification Number (page 12-22)
• Copying a Theme (page 12-23)
• Deleting a Theme (page 12-23)
• Creating a Master Theme Application (page 12-24)
• Managing Workspace Themes (page 12-24)
Chapter 12Managing Themes and Subscriptions
12-16
• Managing Instance Themes (page 12-27)
• About Exporting and Importing Themes (page 12-27)
• Viewing Theme Reports (page 12-27)
12.2.1 Understanding Theme SubscriptionsDevelopers can manage themes using of theme subscriptions.
• About Theme Subscriptions (page 12-17)
• About Modifying a Theme Subscription (page 12-17)
• Verifying if a Theme Refresh Is Needed (page 12-18)
• Refreshing a Subscribed Theme (page 12-18)
• Unsubscribing to a Theme (page 12-19)
• Re-subscribing to a Built-in Theme (page 12-19)
12.2.1.1 About Theme SubscriptionsSubscribing to a master theme enables the theme to be upgraded during future OracleApplication Express releases.
Developers subscribe to a theme when:
• Running the Create Application Wizard.
When a developer runs the Create Application Wizard and selects a built-in theme,the theme is automatically subscribed to a master theme. As an alternative tousing a built-in theme, the Create Application Wizard provides the option to copy atheme from an existing application. When copying a theme from an existingapplications, developers can choose if they wish to have this theme be subscribedto. See "Understanding Page Types, Features, and Settings (page 6-4)."
• Creating a new theme from the Theme repository.
When you create a new theme the associated application automatically subscribesto it. See "Creating a Theme (page 12-20)."
Once an application subscribes to a master theme only the default templates can bechanged. All theme attributes, subscribed template options, and subscribed templatesare set to read-only. In other words, only the default templates can be changed. Theadvantage of subscribing to a master theme is that the theme can be upgraded duringfuture Oracle Application Express releases. When a theme is subscribed to,developers cannot modify the theme or template metadata when they access it fromthe theme or template edit pages.
12.2.1.2 About Modifying a Theme SubscriptionTo modify a template without breaking a subscription to the master theme, a developercan create a local copy of the template in their workspace. Local template copies arenot subscribed to and are therefore editable. You can take the same approach withtheme styles. You can create a local copy of a theme style and then add it to asubscribed theme. Theme styles created locally are editable but will be excluded fromtheme refreshes.
Chapter 12Managing Themes and Subscriptions
12-17
12.2.1.3 Verifying if a Theme Refresh Is NeededThe Verify Theme Subscription Wizard reviews all theme attributes, templates, andtemplate options in the subscribing theme and raises errors for those that are not insync with the master theme. The wizard also highlights any templates that are definedin the master theme but not yet published to the subscribing theme.
To run the Verify Theme Subscription Wizard:
1. On the Workspace home page, click the App Builder icon.
2. Select an application.
3. Click Shared Components.
4. Under User Interface, select Themes.
The Themes page appears.
5. On the Themes page, click the View Report icon.
The Themes page appears as a report. A check mark in the Is Current columnindicates which theme is selected.
6. Select the theme.
The Create/Edit Theme page appears.
7. Locate Theme Subscription and click Verify.
8. Follow the on-screen instructions.
To publish changes from the master theme to the subscribing theme, clickRefresh at the end of the wizard.
12.2.1.4 Refreshing a Subscribed ThemeTo refresh a subscribed theme:
1. On the Workspace home page, click the App Builder icon.
2. Select an application.
3. Click Shared Components.
4. Under User Interface, select Themes.
The Themes page appears.
5. On the Themes page, click the View Report icon.
The Themes page appears as a report. A check mark in the Is Current columnindicates which theme is selected.
6. Select the theme.
The Create/Edit Theme page appears.
7. Locate Theme Subscription and click Refresh Theme.
Chapter 12Managing Themes and Subscriptions
12-18
Tip:
If the theme is not subscribed, the Refresh Theme button does notappear. See "Re-subscribing to a Built-in Theme (page 12-19)."
8. Click Apply Changes.
12.2.1.5 Unsubscribing to a Theme
Note:
Unsubscribing to a theme prevents future theme updates. Be aware that re-subscribing to a theme is multiple step process that involves copying andswitching themes. To learn more, see "Re-subscribing to a Built-in Theme(page 12-19)."
Unsubscribing a theme also removes the subscription from all templates, styles, filesand so on that are part of the theme.
To unsubscribe to a theme:
1. On the Workspace home page, click the App Builder icon.
2. Select an application.
3. Click Shared Components.
4. Under User Interface, select Themes.
The Themes page appears.
5. On the Themes page, click the View Report icon.
The Themes page appears as a report. A check mark in the Is Current columnindicates which theme is selected.
6. Select the theme.
The Create/Edit Theme page appears.
7. Locate Theme Subscription and click Unsubscribe.
A warning dialog displays.
8. Click Unsubscribe Theme.
12.2.1.6 Re-subscribing to a Built-in ThemeIf a theme is currently unsubscribed, you can return to a subscribed version of thistheme.
To re-subscribe to a theme.
1. Navigate to the Themes page:
a. On the Workspace home page, click the App Builder icon.
b. Select an application.
Chapter 12Managing Themes and Subscriptions
12-19
c. Click Shared Components.
d. Under User Interface, select Themes.
The Themes page appears.
2. From the Tasks list, select Change Identification Number and change the themeto a new identification number. See "Changing a Theme Identification Number(page 12-22)."
3. Run the Create Theme Wizard and create the theme again. See "Creating aTheme (page 12-20)."
4. Switch the current application to the use the new theme. See "Switching Themes(page 12-21)."
5. Delete the original theme from which you created a new identification number. See"Deleting a Theme (page 12-23)."
12.2.2 Creating a ThemeOnly themes currently associated with an application display on the Themes page. Toaccess other themes, you must run the Create Theme Wizard. Once you create atheme, you can access it on the Themes page. You can create a theme from scratchor select an existing theme from the repository.
Tip:
When you create a new theme, the associated application automaticallysubscribes to it. See "Managing Themes and Subscriptions (page 12-16)."
To create a theme:
1. Navigate to the Themes page:
a. On the Workspace home page, click the App Builder icon.
b. Select an application.
c. Click Shared Components.
d. Under User Interface, select Themes.
The Themes page appears.
2. Click Create.
3. Select a creation method:
• From the Repository - View and select a theme from the repository.
• As a copy from another application - Select the application and then thetheme.
• From Scratch - Create a theme from scratch.
• From Export - Create a theme to import from the export repository.
4. Follow the on-screen instructions.
To learn more about an attribute, see field-level Help.
Chapter 12Managing Themes and Subscriptions
12-20

12.2.3 Switching ThemesThis section describes how to change the active theme for an application.
• About Switching the Active Theme (page 12-21)
• Switching an Active Theme (page 12-21)
12.2.3.1 About Switching the Active ThemeWhen you switch to a theme, all components with assigned templates are assigned toa corresponding template in the theme. App Builder accomplishes template mappingthrough the assignment of template class identifiers.
When switching an active theme, remember:
• You can only switch to a theme if the theme exists. For example, before you canswitch to a theme available in the repository, you must first create it. See "Creatinga Theme (page 12-20)".
• If the wizard locates multiple matches (that is, when several templates share thesame template type and templates class), the wizard defaults to a templatematching type, class, and name. If no match is found, you must select anothertemplate with the same type and class.
• If no matching template is found (that is, no template with the same type and classexists) then you are prompted to select a template with the same type but with adifferent class. Then, a warning displays explaining this issue might lead toproblems with page functionality, or issues with the page display.When notemplate of the same template type exists, then the theme cannot be switched.You are blocked from switching themes.
12.2.3.2 Switching an Active Theme
Tip:
To complete this procedure, you must have at least two themes installed. Ifyou do not have at least two themes installed, on the Themes page clickCreate Theme. You can create a theme from scratch or simply select anexisting theme from the repository. See "Creating a Theme (page 12-20)."
To switch an active theme:
1. Navigate to the Themes page:
a. On the Workspace home page, click the App Builder icon.
b. Select an application.
c. Click Shared Components.
d. Under User Interface, select Themes.
The Themes page appears.
2. Click Switch Theme.
Chapter 12Managing Themes and Subscriptions
12-21

The Switch Theme page appears.
3. For Identify Theme:
a. Currently Active Theme - Select the current theme for the application. A themeidentifies a collection of templates which define the look and feel of theapplication.
b. Switch to Theme - Select the new theme for the application.
c. Click Next.
The Verify Compatibility page appears.
4. Review the Status column to identify problematic mappings:
• A check indicates the mapping was successful.
• A warning indicates there are more than one template in the theme you areswitching to with the identified class. The warning provides a select list fromwhich to choose the appropriate template.
• An error indicates that App Builder was unable to map the class among thethemes. Ensure that a class is identified for the templates in both themes.
Note:
Failure to resolve warnings may result in a loss of functionality andapplications that do not display well.
5. Click Next to continue.
6. Click Switch Theme.
12.2.4 Changing a Theme Identification NumberEach theme has an identification number (ID). You can use the Change Theme IDutility to change a theme ID to another identification number. Changing a theme ID isuseful when you want to export a theme with a different number and then import it intoanother application.
To change a theme identification number:
1. Navigate to the Themes page:
a. On the Workspace home page, click the App Builder icon.
b. Select an application.
c. Click Shared Components.
d. Under User Interface, select Themes.
The Themes page appears.
2. On the Tasks list, click Change Identification Number.
3. For Theme Number:
a. Identify Theme - Select a theme.
b. New Theme Identification Number - Specify an identification number.
Chapter 12Managing Themes and Subscriptions
12-22
c. Click Next.
4. Confirm your changes and click Change Theme ID.
12.2.5 Copying a ThemeEach theme is identified by a numeric identification number (ID). When you copy atheme, you specify a theme ID. Copying a theme is useful when experimenting withediting a theme or to export a theme with a different ID.
To copy a theme:
1. Navigate to the Themes page:
a. On the Workspace home page, click the App Builder icon.
b. Select an application.
c. Click Shared Components.
d. Under User Interface, select Themes.
The Themes page appears.
2. On the Tasks list, click Copy Theme.
3. For Theme Number:
a. Application - Identifies the current application.
b. Copy From Theme - Select the theme you want to copy.
c. Copy to this Theme ID - Enter a new ID for the theme.
d. Subscribe Theme - Select Yes or No.
e. Click Next.
4. Confirm your changes and click Copy Theme.
12.2.6 Deleting a ThemeYou can only delete inactive themes. When you delete a theme, App Builder onlyremoves inactive templates.
Tip:
Themes are tied to an application. If you modify a theme, those changes onlyapply to the application being edited. If you delete a theme, any templatemodifications are lost. To keep template modifications, you must export thetheme. See "Exporting Themes (page 24-31)."
To delete a theme:
1. Navigate to the Themes page:
a. On the Workspace home page, click the App Builder icon.
b. Select an application.
c. Click Shared Components.
Chapter 12Managing Themes and Subscriptions
12-23
d. Under User Interface, select Themes.
The Themes page appears.
2. On the Tasks list, click Delete Theme.
3. From Delete Theme, select the theme you want to delete and click Next.
4. Click Delete Theme.
12.2.7 Creating a Master Theme ApplicationDevelopers can create a master theme application. As a best practice, Oraclerecommends starting with an existing packaged application that uses Universal Theme- 42 (for example, Sample Database Application).
• Creating a Master Theme Application by Creating a New Application(page 12-24)
• Creating a Master Theme Application from an Existing Application (page 12-24)
12.2.7.1 Creating a Master Theme Application by Creating a New ApplicationTo create a master theme application by creating a new application:
1. Create a new application by running the Create Application Wizard:
a. On the Workspace home page, click the App Builder icon.
b. Click the Create button.
2. Select Copy an existing application and select an application that usesUniversal Theme - 42 (for example, Sample Database Application).
3. Follow the on-screen instructions.
12.2.7.2 Creating a Master Theme Application from an Existing ApplicationTo create a master theme application from an existing application:
1. Copy the theme from an application that uses Universal Theme - 42 (for example,Sample Database Application) and subscribe to it. See "Copying a Theme(page 12-23)."
2. Switch to the new theme. See "Switching Themes (page 12-21)."
3. Follow the on-screen instructions.
12.2.8 Managing Workspace ThemesWorkspace administrators manage the theme repository for a workspace. Workspaceadministrators can add a theme to the repository, making it available to all developerswithin a workspace, or delete it.
• Adding a Workspace Theme to the Theme Repository (page 12-25)
• Viewing an Existing Workspace Theme (page 12-25)
• Deleting a Workspace Theme (page 12-26)
• Modifying a Workspace Theme (page 12-26)
Chapter 12Managing Themes and Subscriptions
12-24
• Exporting a Workspace Theme (page 12-27)
See Also:
"Managing Public Themes" in Oracle Application Express AdministrationGuide
12.2.8.1 Adding a Workspace Theme to the Theme RepositoryTo add a theme to the Theme repository:
1. Navigate to the Themes page:
a. On the Workspace home page, click the App Builder icon.
b. Select an application.
c. Click Shared Components.
d. Under User Interface, select Themes.
The Themes page appears.
2. On the Tasks list, click Manage Workspace Themes.
3. Select Create Workspace Theme and click Next.
Tip:
If no workspace themes exist, the wizard selects Create for you.
4. For Create Workspace Theme:
a. Application - Select the application.
b. Application Theme to Copy - Select the theme to copy to the workspace themerepository.
c. Subscribe Theme - Select whether to subscribe the workspace theme to theselected application theme. This option enables you to refresh the workspacetheme with changes made to the selected application theme.
d. Click Next.
5. a. Theme Number - Enter a number with a value greater than 100. This numberuniquely identifies this theme within a workspace.
b. Theme Name - Enter a theme name. This name can be the same or differentfrom the application theme name.
c. Description - Enter a description of the theme.
d. Click Next.
6. Click Create Workspace Theme.
12.2.8.2 Viewing an Existing Workspace ThemeTo view an existing workspace theme:
Chapter 12Managing Themes and Subscriptions
12-25
1. Navigate to the Themes page:
a. On the Workspace home page, click the App Builder icon.
b. Select an application.
c. Click Shared Components.
d. Under User Interface, select Themes.
The Themes page appears.
2. From the Tasks List, click Manage Workspace Themes.
The Workspace Themes page appears.
Tip:
You cannot edit a workspace theme directly. To modify a workspacetheme, you must create an application using the theme, modify it, andthen manually add it to the workspace theme repository. See "Modifyinga Workspace Theme (page 12-26)."
12.2.8.3 Deleting a Workspace ThemeTo delete a workspace theme:
1. Navigate to the Themes page:
a. On the Workspace home page, click the App Builder icon.
b. Select an application.
c. Click Shared Components.
d. Under User Interface, select Themes.
The Themes page appears.
2. From the Tasks List, click Manage Workspace Themes.
The Workspace Themes page appears.
3. Select the theme name.
4. Click Delete.
5. Confirm your delete request and click OK.
12.2.8.4 Modifying a Workspace ThemeYou cannot edit a workspace theme directly. To modify a workspace theme, you mustcreate an application using the theme, modify it, and then manually add it to theworkspace theme repository.
To modify a workspace theme:
1. Create an application using the theme you want to modify. See "CreatingDatabase Applications (page 6-1)."
2. Modify the theme. See "Editing Themes (page 12-10)."
3. Delete the existing workspace theme. See "Deleting a Workspace Theme(page 12-26)."
Chapter 12Managing Themes and Subscriptions
12-26
4. Add the modified theme to the workspace theme repository. See "Adding aWorkspace Theme to the Theme Repository (page 12-25)."
12.2.8.5 Exporting a Workspace ThemeYou export a theme in the same way you export any related application files. Exportinga workspace theme involves the following steps:
1. Create an application using the theme. See "Creating Database Applications(page 6-1)."
2. Export the application. See "Exporting an Application (page 24-25)."
3. Import the exported file into the target Oracle Application Express instance. See"Importing an Application, Page or Component Export (page 24-35)."
4. Install the exported file from the Export Repository. See "Installing Export Files(page 24-39)."
12.2.9 Managing Instance ThemesInstance administrators manage the theme repository for an entire Oracle ApplicationExpress instance. Only an Instance administrators can add or delete a theme from therepository.
12.2.10 About Exporting and Importing ThemesYou export a theme in the same way you export any related application files. Exportinga theme from one development instance to another involves the following steps:
1. Create an application using the theme. See "Creating Database Applications(page 6-1)."
2. Export the theme. See "Exporting Themes (page 24-31)."
3. Import the exported file into the target Oracle Application Express instance. See"Importing Export Files (page 24-34)."
4. Install the exported file from the Export Repository. See "Installing Export Files(page 24-39)."
12.2.11 Viewing Theme ReportsAccess the following reports to better manage themes and templates.
• Viewing All Templates in a Theme (page 12-27)
• Viewing Theme Template Counts (page 12-28)
• Viewing File References (page 12-28)
• Viewing Class References (page 12-29)
• Viewing Template Substitution Strings (page 12-30)
12.2.11.1 Viewing All Templates in a ThemeTo view all templates that comprise a theme:
Chapter 12Managing Themes and Subscriptions
12-27
1. Navigate to the Themes page:
a. On the Workspace home page, click the App Builder icon.
b. Select an application.
c. Click Shared Components.
d. Under User Interface, select Themes.
The Themes page appears.
2. Click Reports.
3. On the Theme Reports page:
a. Report - Select Application Templates.
b. Theme - Select either 42. Universal Theme or All Themes.
c. Click Go.
A list of templates appears with the template type, template name, theme, andtemplate class.
4. To edit a template, select the template name.
12.2.11.2 Viewing Theme Template CountsThe Theme Template Count report lists which template classes currently havetemplates created for them.
To view the Theme Template Count report:
1. Navigate to the Themes page:
a. On the Workspace home page, click the App Builder icon.
b. Select an application.
c. Click Shared Components.
d. Under User Interface, select Themes.
The Themes page appears.
2. Click Reports.
3. On the Theme Reports page:
a. Report - Select Theme Template Counts.
b. Theme - Select a theme or select All.
c. Click Go.
12.2.11.3 Viewing File ReferencesThe File References report displays a list of all files associated with templates, sharedcomponents, or page components in the current application.
To view the File References report:
1. Navigate to the Themes page:
a. On the Workspace home page, click the App Builder icon.
b. Select an application.
Chapter 12Managing Themes and Subscriptions
12-28
c. Click Shared Components.
d. Under User Interface, select Themes.
The Themes page appears.
2. Click Reports.
3. On the Theme Reports page:
a. Report - Select File References.
b. Theme - Select a theme or select All.
c. Click Go.
4. On the File References page:
a. Show - Select the type of component to include in the report. If you do notmake a selection, no results are returned.
b. Show Files - Select one of the following:
• With context displays the component, the theme identification number,the component name, the image (if applicable), and the page number.Select the page number.
• Without context displays only the file name and the image (if applicable).
c. File Extensions - Select the type of extensions for which to search.
d. Click Go.
5. To download a comma-delimited file (.csv) version of this report, click Downloadat the bottom of the page.
12.2.11.4 Viewing Class ReferencesAccessing the Class References report displays a list of classes associated withtemplates, shared components, or page components in the current application.
To view the Class References report:
1. Navigate to the Themes page:
a. On the Workspace home page, click the App Builder icon.
b. Select an application.
c. Click Shared Components.
d. Under User Interface, select Themes.
The Themes page appears.
2. Click Reports.
3. On the Theme Reports page:
a. Report - Select Class References.
b. Theme - Select a theme or select All.
c. Click Go.
4. On the Class References page:
a. Show - Select the components to check for a class reference. If you do notmake a selection, no results are returned.
Chapter 12Managing Themes and Subscriptions
12-29

b. Show Class Names - Select one of the following:
• With context displays the component, the theme identification number,the component name, the image (if applicable), and the page number.
• Without context displays only the referenced class.
c. Click Go.
5. To download a comma-delimited file (.csv) version of this report, click Downloadat the bottom of the page.
12.2.11.5 Viewing Template Substitution StringsUse the Template Substitution Strings report to view all supported substitution stringsby component.
To view the Substitution String report:
1. Navigate to the Themes page:
a. On the Workspace home page, click the App Builder icon.
b. Select an application.
c. Click Shared Components.
d. Under User Interface, select Themes.
The Themes page appears.
2. Click Reports.
3. On the Theme Reports page:
a. Report - Select Template Substitution Strings.
b. Theme - Select which themes to include in the report.
c. Click Go.
4. To link to a template definition, select the component name.
12.3 Creating Custom ThemesCreate a custom theme by modifying an existing templates.
The Application Express engine creates an application user interface based on anamed collection of templates called a theme. Templates control the look and feel ofthe components in an application. If you must create a custom template, it is generallyeasier to start with an existing template and then modify it. Once you have created oneor more default templates, you can modify those templates to fit your specific needs.
• About Cascading Style Sheets (page 12-31)
• About Calling the JavaScript File from the Page Template (page 12-31)
• About Using Escaping Syntax in Substitution Strings (page 12-32)
• Selecting a Default Page Template (page 12-32)
• Creating a New Template (page 12-33)
• Using Template Options (page 12-33)
Chapter 12Creating Custom Themes
12-30
• Viewing Template Reports (page 12-39)
• Managing Templates (page 12-40)
• Breadcrumb Templates (page 12-43)
• Button Templates (page 12-46)
• Legacy Calendar Templates (page 12-48)
• Label Templates (page 12-49)
• List Templates (page 12-52)
• Page Templates (page 12-55)
• Popup LOV Templates (page 12-64)
• Region Templates (page 12-65)
• Report Templates (page 12-67)
See Also:
"Using Themes (page 12-1)" and "Managing Themes and Subscriptions(page 12-16)"
12.3.1 About Cascading Style SheetsA Cascading Style Sheet (CSS) provides a way to control the style of a web pagewithout changing its structure. When used properly, a CSS separates visual attributessuch as color, margins, and fonts from the structure of the HTML document. OracleApplication Express includes themes that contain templates that reference their ownCSS. The style rules defined in each CSS for a particular theme also determine theway reports and regions display.
When using built-in themes, you can find the theme specific CSS files in the followinglocations:
/i/themes/theme_xx /i/themes/theme_xx/css
Theme specific image can be found in the following locations:
/i/themes/theme_xx /i/themes/theme_xx/images
Where xx is the theme number. Theme specific CSS files include the OracleApplication Express version number to preserve backward compatibility for importedapplications using older versions of a theme.
12.3.2 About Calling the JavaScript File from the Page TemplateIn Oracle Application Express, you can reference a .js file in the page template. Thisapproach makes all the JavaScript in that file accessible to the application. This is themost efficient approach since a .js file loads on the first page view of your applicationand is then cached by the browser.
Chapter 12Creating Custom Themes
12-31
12.3.3 About Using Escaping Syntax in Substitution StringsDevelopers can append an exclamation mark (!) followed by a predefined filter nameto substitution strings to escape special characters in the substitution value. Outputescaping is an important security technique to avoid Cross Site Scripting (XSS)attacks in the browser.
12.3.4 Selecting a Default Page TemplateThis section describes how to select a default page template. You can specify adefault page template in two ways:
• Select a default page template within a specific theme.
• Select a specific page template on a page-by-page basis.
By default, the Application Express engine uses the Page template specified on theThemes page.
• Selecting a Page-level Template Within a Theme (page 12-32)
• Selecting a Page-level Template for a Specific Page (page 12-32)
12.3.4.1 Selecting a Page-level Template Within a ThemeTo specify a default page template within a theme:
1. Navigate to the Themes page:
a. On the Workspace home page, click the App Builder icon.
b. Select an application.
c. Click Shared Components.
d. Under User Interface, select Themes.
The Themes page appears.
2. Select a theme name.
The Create/Edit Theme page appears.
3. Scroll down to Component Defaults.
4. From Page, make a new selection.
5. Click Apply Changes at the top of the page.
12.3.4.2 Selecting a Page-level Template for a Specific PageTo specify a page-level template for a specific page:
1. On the Workspace home page, click the App Builder icon.
2. Select an application.
3. To edit the page-level template:
a. View the page in Page Designer.
Chapter 12Creating Custom Themes
12-32
b. In the Rendering tab, click the page title.
c. In the Property Editor, locate the Appearance. From Page Template, select anew template.
d. Click Save.
12.3.5 Creating a New TemplateIf you must create a custom template, start with an existing template, copy it, and thenmodify it. Once you have created one or more default templates, you can modify thosetemplates to fit your specific needs.
To create a custom template:
1. On the Workspace home page, click the App Builder icon.
2. Select the application to which you want to copy the template.
3. Click Shared Components.
4. Under User Interface, select Templates.
5. Click Create.
6. Select the type of template you want to create and click Next.
7. Select a creation method:
• From Scratch
• As a Copy of an Existing Template
8. Follow the on-screen instructions.
Tip:
Make sure you associate your template with the correct theme.
12.3.6 Using Template OptionsTemplate options provide a declarative way for developers to apply different styles tocomponents on an Oracle Application Express page.
• Managing Global Template Option Groups (page 12-34)
• Managing Global Template Options (page 12-35)
• Managing Template Options (page 12-37)
See Also:
"Understanding Template Options (page 12-8)"
Chapter 12Creating Custom Themes
12-33
12.3.6.1 Managing Global Template Option GroupsGlobal template option groups are defined at the theme-level and are available for allcomponents of a given type. This section describes how to create and edit globaltemplate option groups.
• Creating a Global Template Option Group (page 12-34)
• Editing Global Template Option Groups (page 12-34)
See Also:
"About Template Option Groups and Presets (page 12-9)" and"Understanding Template Options (page 12-8)"
12.3.6.1.1 Creating a Global Template Option GroupTo create a global template option group:
1. Navigate to the Themes page:
a. On the Workspace home page, click the App Builder icon.
b. Select an application.
c. Click Shared Components.
d. Under User Interface, select Themes.
The Themes page appears.
2. Select a theme.
3. Locate Global Template Options.
4. Click Edit Template Option Groups.
Template Options Groups dialog appears.
5. To create a group:
a. Click Create.
b. Edit the appropriate attributes.
To learn more about an attribute, see field-level Help.
c. Click Create.
12.3.6.1.2 Editing Global Template Option GroupsTo edit global template option groups:
1. Navigate to the Themes page:
a. On the Workspace home page, click the App Builder icon.
b. Select an application.
c. Click Shared Components.
Chapter 12Creating Custom Themes
12-34
d. Under User Interface, select Themes.
The Themes page appears.
2. Select a theme.
3. Locate Global Template Options.
4. Click Edit Template Option Groups.
Template Options Groups dialog appears.
5. To edit a group:
a. Click the group name.
b. Edit the appropriate attributes.
To learn more about an attribute, see field-level Help.
c. Click Apply Changes.
6. To delete a group:
a. Click the group name.
b. Click Delete.
12.3.6.2 Managing Global Template OptionsThis section describes how to create and edit global template options.
• Creating Global Template Options (page 12-35)
• Editing Global Template Options (page 12-36)
See Also:
"About Template Options (page 12-9)"
12.3.6.2.1 Creating Global Template OptionsTo create a global template option:
1. Navigate to the Themes page:
a. On the Workspace home page, click the App Builder icon.
b. Select an application.
c. Click Shared Components.
d. Under User Interface, select Themes.
The Themes page appears.
2. Select a theme.
3. Locate Global Template Options.
4. Click Add Template Option.
Template Options Groups dialog appears.
Chapter 12Creating Custom Themes
12-35
5. On Template Options:
a. Display Sequence - Specify the sequence for this option.
b. Template Type - Select the type of template for which the template option isdefined.
c. Group - Enter a unique group name. Group names enable you to grouptemplate options and avoid the selection of conflicting option.
Display Name - Enter a name for the template option.
d. Option Identifier - Enter an alphanumeric, upper case identifier for the templateoption. Identifiers map a template option to a corresponding template optionwhen switching themes.
e. CSS Classes - Enter one or more CSS classes that define this templateoption.
f. Help Text - Enter a description of the template option.
g. Click Create or Create and Add Another.
12.3.6.2.2 Editing Global Template OptionsTo edit a global template option:
1. Navigate to the Themes page:
a. On the Workspace home page, click the App Builder icon.
b. Select an application.
c. Click Shared Components.
d. Under User Interface, select Themes.
The Themes page appears.
2. Select a theme.
3. Locate Global Template Options.
4. To edit a template option:
a. Click the display name.
b. Edit the appropriate attributes. To learn more about an attribute, see field-levelHelp.
Tip:
If you edit the name of a CSS class, all components that referencethat CSS class name must be updated manually. The OptionIdentifier cannot be modified since it is needed for mappingpurposes.
c. Click Apply Changes.
5. To delete a template option:
a. Click the display name.
b. Click Delete.
Chapter 12Creating Custom Themes
12-36
12.3.6.3 Managing Template OptionsThis section describes how to create and edit template options.
• Creating Template Options (page 12-37)
• Editing Template Options (page 12-37)
• Using Quick Edit to Modify Live Template Options (page 12-38)
See Also:
"Understanding Template Options (page 12-8)"
12.3.6.3.1 Creating Template OptionsTo create a template option:
1. Navigate to the Themes page:
a. On the Workspace home page, click the App Builder icon.
b. Select an application.
c. Click Shared Components.
d. Under User Interface, select Templates.
The Templates page appears.
2. Select a template.
3. Select Template Options.
4. Click Add Template Option.
5. Edit the appropriate attributes. To learn more about an attribute, see field-levelHelp.
6. Click Create or Create and Add Another.
12.3.6.3.2 Editing Template OptionsTo edit a template option:
1. Navigate to the Themes page:
a. On the Workspace home page, click the App Builder icon.
b. Select an application.
c. Click Shared Components.
d. Under User Interface, select Templates.
The Templates page appears.
2. Select a template.
3. Select Template Options.
Chapter 12Creating Custom Themes
12-37
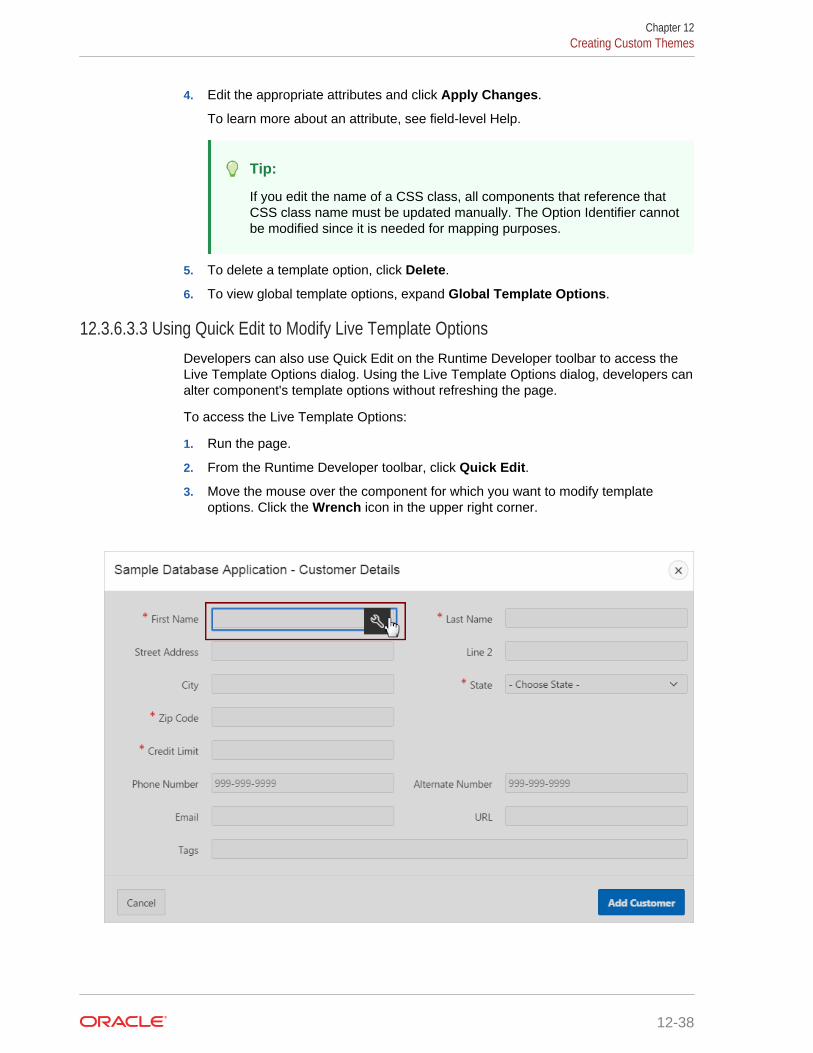
4. Edit the appropriate attributes and click Apply Changes.
To learn more about an attribute, see field-level Help.
Tip:
If you edit the name of a CSS class, all components that reference thatCSS class name must be updated manually. The Option Identifier cannotbe modified since it is needed for mapping purposes.
5. To delete a template option, click Delete.
6. To view global template options, expand Global Template Options.
12.3.6.3.3 Using Quick Edit to Modify Live Template OptionsDevelopers can also use Quick Edit on the Runtime Developer toolbar to access theLive Template Options dialog. Using the Live Template Options dialog, developers canalter component's template options without refreshing the page.
To access the Live Template Options:
1. Run the page.
2. From the Runtime Developer toolbar, click Quick Edit.
3. Move the mouse over the component for which you want to modify templateoptions. Click the Wrench icon in the upper right corner.
Chapter 12Creating Custom Themes
12-38
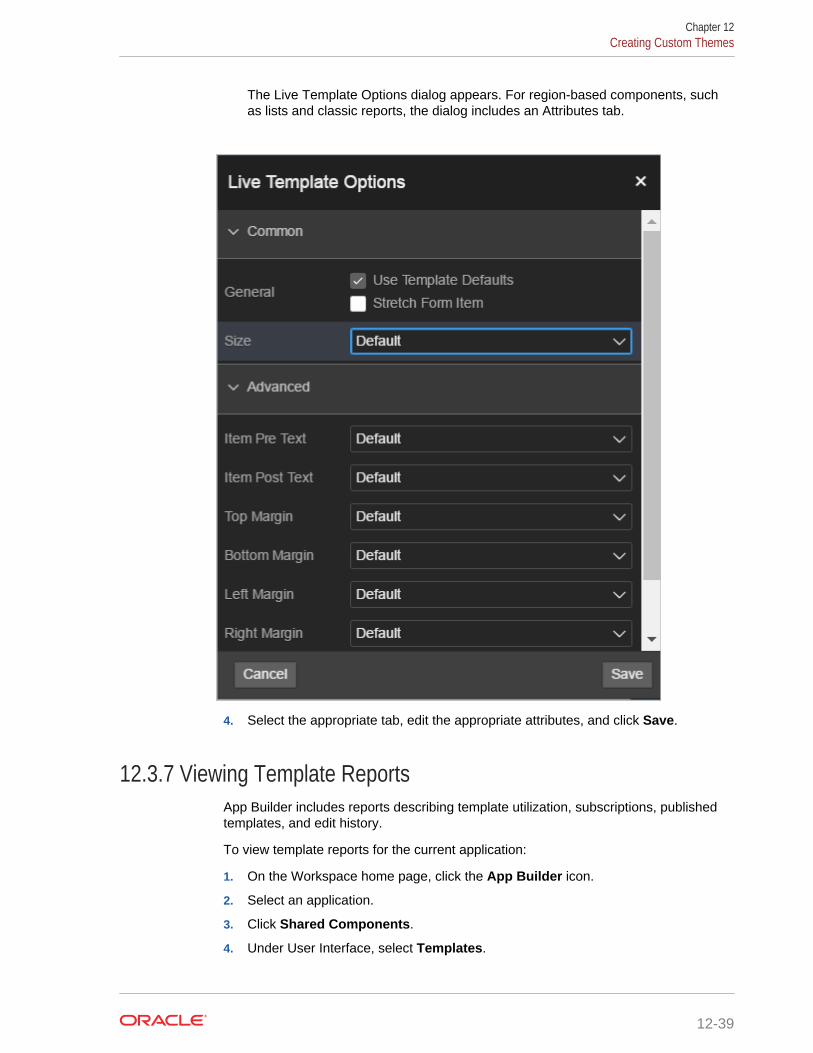
The Live Template Options dialog appears. For region-based components, suchas lists and classic reports, the dialog includes an Attributes tab.
4. Select the appropriate tab, edit the appropriate attributes, and click Save.
12.3.7 Viewing Template ReportsApp Builder includes reports describing template utilization, subscriptions, publishedtemplates, and edit history.
To view template reports for the current application:
1. On the Workspace home page, click the App Builder icon.
2. Select an application.
3. Click Shared Components.
4. Under User Interface, select Templates.
Chapter 12Creating Custom Themes
12-39
The Templates page displays as an interactive report. To customize the view, usethe Search bar at the top of the page.
5. To view template reports, click the following tabs:
• Subscription - Displays subscribed templates in your application.
• Publish - displays templates that have been subscribed to by other templatesin your workspace. To publish master template content to subscribingtemplates, select those you want to publish and click Publish Checked.
• Utilization - Displays template utilization in the current application for alltemplate types. The number in the References column indicates the totalnumber of pages that use the specific template.
• History - Displays recent modifications made to Page and Region Templatesin this application.
12.3.8 Managing TemplatesYou can view all available templates on the Templates page. Alternatively, you canaccess a template associated with a specific page.
• Viewing Templates on the Templates Page (page 12-40)
• Viewing Templates Associated with a Specific Page (page 12-41)
• Replacing Templates (page 12-41)
• Replacing All Templates within an Application (page 12-42)
• Viewing Region Position Utilization by Page Template (page 12-42)
• Unsubscribing to Templates (page 12-42)
• Publishing Templates (page 12-43)
See Also:
"Viewing All Templates in a Theme (page 12-27)"
12.3.8.1 Viewing Templates on the Templates PageTo view existing templates:
1. On the Workspace home page, click the App Builder icon.
2. Select an application.
3. Click Shared Components.
4. Under User Interface, select Templates.
The Templates page displays as an interactive report. To customize the view, usethe Search bar at the top of the page.
5. To view or edit a template definition, click the template name.
The template definition appears.
Chapter 12Creating Custom Themes
12-40
6. Edit the appropriate attributes. To learn more about an attribute, see field-levelHelp.
If you edit a template, you can make changes in one window and run yourapplication in another by selecting the Return to Page check box on the right sideof the template definition page. Selecting this check box keeps the page you areediting current after you click Apply Changes.
7. Click Apply Changes.
12.3.8.2 Viewing Templates Associated with a Specific PageTo view templates associated with a specific page:
1. On the Workspace home page, click the App Builder icon.
2. Select an application.
3. View the page in Page Designer:
a. In the Rendering tab, click the page title.
b. In the Property Editor, locate Appearance. Page Template displays thecurrent template.
c. To save any changes, click Save.
12.3.8.3 Replacing TemplatesYou can update the template associated with a component using the ReplaceTemplates Wizard.
To replace the template associated with a component:
1. On the Workspace home page, click the App Builder icon.
2. Select the application.
3. Click Shared Components.
4. Under User Interface, select Templates.
To customize the view, use the Search bar at the top of the page.
5. From the Task list, select Replace Templates.
6. For Template Type:
a. User Interface- Select user interface.
b. Template Type - Identifies the template type to be replaced.
c. Click Next.
7. For Replace Templates:
a. Change From - Select the template you want to change.
b. Change To - Select the template you want to change to.
c. Click Next.
8. Click Finish.
Chapter 12Creating Custom Themes
12-41

12.3.8.4 Replacing All Templates within an ApplicationTo replace all templates within an application with templates from another application:
1. On the Workspace home page, click the App Builder icon.
2. Select the application.
3. Click Shared Components.
4. Under User Interface, select Templates.
To customize the view, use the Search bar at the top of the page.
5. From the Task list, select Replace templates in this application with templatesfrom another application.
6. For Replace Templates:
a. Replace from Application - Select an application.
b. User Interface - Select the type of user interface for which this application hasbeen developed.
c. Click Next.
7. On Replace Templates, select a New Template for each component and thenselect an Action:
a. Replace copies the template definition
b. Replace/Subscribe copies the templates and adds a subscription.
8. Click Replace Templates.
12.3.8.5 Viewing Region Position Utilization by Page TemplateRegions are organized on a page by position (or Display Point). The possible displaypoints for a region are determined by the page-level template.
To view region position utilization by page template:
1. On the Workspace home page, click the App Builder icon.
2. Select the application.
3. Click Shared Components.
4. Under User Interface, select Templates.
To customize the view, use the Search bar at the top of the page.
5. From the Task list, select View page template region position utilization.
The Region Display Point Utilization report appears.
12.3.8.6 Unsubscribing to TemplatesA subscribed template is a template that has its definition maintained in anothertemplate, the referenced template. If your application uses subscribed templates, youcan unsubscribe to templates on the Unsubscribe Templates page.
To unsubscribe to templates:
Chapter 12Creating Custom Themes
12-42
1. On the Workspace home page, click the App Builder icon.
2. Select the application.
3. Click Shared Components.
4. Under User Interface, select Templates.
To customize the view, use the Search bar at the top of the page.
5. From the Task list, select Unsubscribe Templates.
The Unsubscribe Templates page appears.
6. Select a theme.
7. To unsubscribe to a specific template type within the current theme, select thetemplate type and click Unsubscribe.
12.3.8.7 Publishing TemplatesUse the Publish Templates page to view templates that are subscribed to by othertemplates in your workspace.
To publish master template content to subscribing templates:
1. On the Workspace home page, click the App Builder icon.
2. Select the application.
3. Click Shared Components.
4. Under User Interface, select Templates.
To customize the view, use the Search bar at the top of the page.
5. Click the Publish tab.
The Published Templates page appears.
6. Select those you want to publish and click Publish Checked.
12.3.9 Breadcrumb TemplatesA breadcrumb template controls the display of breadcrumb entries. You select abreadcrumb template when you create a region.
See also:
"Using Themes (page 12-1)"
• About Breadcrumb Style Navigation (page 12-43)
• Breadcrumb Template Attributes (page 12-44)
12.3.9.1 About Breadcrumb Style NavigationBreadcrumbs usually indicate where the current page is relative to other pages in theapplication. In addition, users can click a specific page to instantly view it. For
Chapter 12Creating Custom Themes
12-43
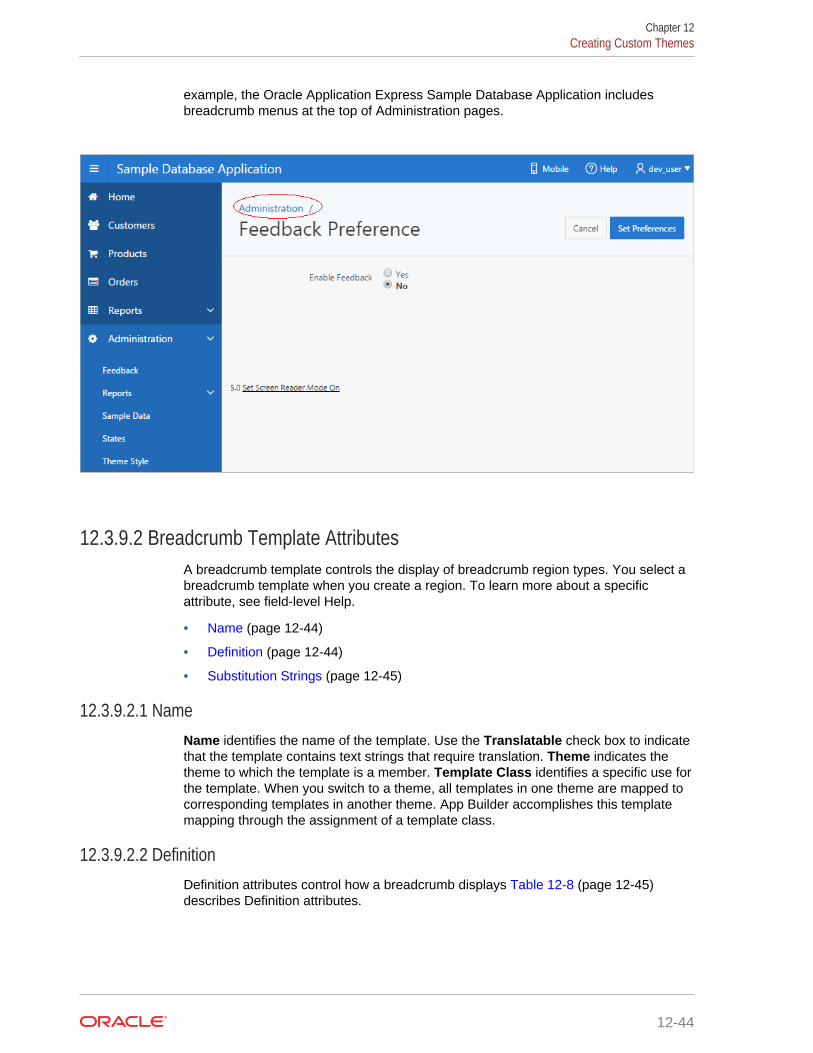
example, the Oracle Application Express Sample Database Application includesbreadcrumb menus at the top of Administration pages.
12.3.9.2 Breadcrumb Template AttributesA breadcrumb template controls the display of breadcrumb region types. You select abreadcrumb template when you create a region. To learn more about a specificattribute, see field-level Help.
• Name (page 12-44)
• Definition (page 12-44)
• Substitution Strings (page 12-45)
12.3.9.2.1 NameName identifies the name of the template. Use the Translatable check box to indicatethat the template contains text strings that require translation. Theme indicates thetheme to which the template is a member. Template Class identifies a specific use forthe template. When you switch to a theme, all templates in one theme are mapped tocorresponding templates in another theme. App Builder accomplishes this templatemapping through the assignment of a template class.
12.3.9.2.2 DefinitionDefinition attributes control how a breadcrumb displays Table 12-8 (page 12-45)describes Definition attributes.
Chapter 12Creating Custom Themes
12-44
Table 12-8 Definition attributes
Attribute Description
Before First Defines text that displays before the first breadcrumb entry. Usethe substitution string #COMPONENT_CSS_CLASSES# to apply a CSSclass to your breadcrumb template. You edit component CSSclasses by editing the region attributes.
See Also: "Editing Region Attributes (page 13-6)"
Current Page BreadcrumbEntry
Defines the look of a breadcrumb entry that corresponds to thecurrent page.
Non Current PageBreadcrumb Entry
Defines the look of a breadcrumb entry that does not correspondto the current page.
After Last Defines text that displays after the last breadcrumb entry.
Between Level Defines text that displays between levels of breadcrumb entries.
Maximum Levels Specifies the number of levels that appear when displayingbreadcrumbs in a breadcrumb style.
12.3.9.2.3 Substitution StringsSubstitution strings are used within subtemplates to reference componentvalues.Table 12-9 (page 12-45) describes the available button template substitutionstrings.
Tip:
All template substitution strings must be in uppercase letters and begin andend with a number sign (#). To view a report of substitution strings supportedby a given template, see the Substitution Stings section of the EditBreadcrumb Template page.
Table 12-9 Breadcrumb Template Substitution Strings
Referenced From Substitution String Description
Before First #COMPONENT_CSS_CLASSES# Component CSS classes.
The #COMPONENT_CSS_CLASSES# string must be includedin the before-first attribute for templates that havetemplate options defined. The#COMPONENT_CSS_CLASSES# string is where thecorresponding template option classes are injected atruntime.
Current Entry #LINK# URL Link.
Current Entry #LONG_NAME# Breadcrumb Long Name.
Current Entry #NAME# Breadcrumb Label.
Current Entry #NAME_ESC_SC# Breadcrumb Label (escaping HTML characters).
Non Current Entry #LINK# URL Link.
Non Current Entry #LONG_NAME# Breadcrumb Long Name.
Chapter 12Creating Custom Themes
12-45
Table 12-9 (Cont.) Breadcrumb Template Substitution Strings
Referenced From Substitution String Description
Non Current Entry #NAME# Breadcrumb Label.
Non Current Entry #NAME_ESC_SC# Breadcrumb Label (escaping HTML characters).
12.3.10 Button TemplatesButton templates enable developers to customize the look and feel of a button. Tobuild a button, you can use multiple images or HTML tags. Using button templates isoptional.
See also:
"Using Themes (page 12-1)"
• Button Template Attributes (page 12-46)
12.3.10.1 Button Template AttributesThis section describes some sections of the Edit Button Template page. To learn moreabout a specific attribute, see field-level Help.
• Name (page 12-46)
• Definition (page 12-47)
• Substitution Strings (page 12-47)
See Also:
"Understanding Template Options (page 12-8)" and "Understanding ThemeSubscriptions (page 12-17)"
12.3.10.1.1 NameTemplate Name identifies the name of the template. Use the Translatable check boxto indicate if the template contains text strings that require translation. Themeindicates the theme to which the template is a member.
Template Class identifies a specific use for the template. When you switch to atheme, all templates in one theme are mapped to corresponding templates in anothertheme. App Builder accomplishes this template mapping through the assignment of atemplate class.
Chapter 12Creating Custom Themes
12-46
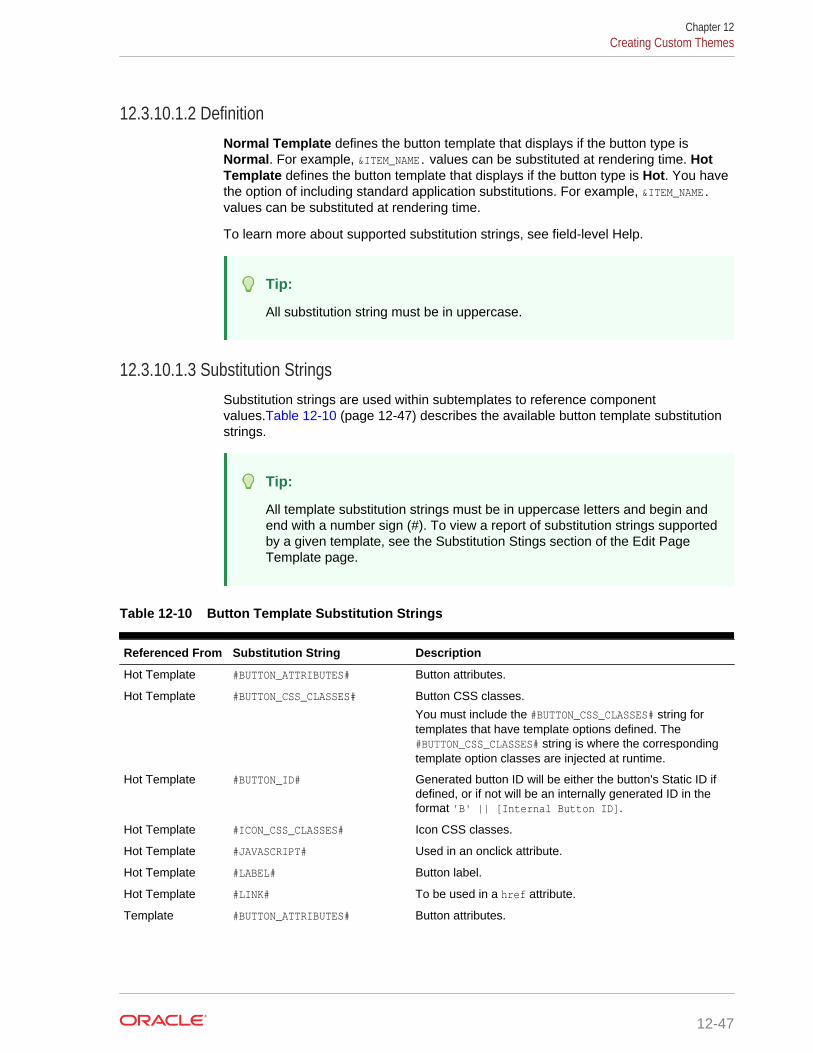
12.3.10.1.2 DefinitionNormal Template defines the button template that displays if the button type isNormal. For example, &ITEM_NAME. values can be substituted at rendering time. HotTemplate defines the button template that displays if the button type is Hot. You havethe option of including standard application substitutions. For example, &ITEM_NAME.values can be substituted at rendering time.
To learn more about supported substitution strings, see field-level Help.
Tip:
All substitution string must be in uppercase.
12.3.10.1.3 Substitution StringsSubstitution strings are used within subtemplates to reference componentvalues.Table 12-10 (page 12-47) describes the available button template substitutionstrings.
Tip:
All template substitution strings must be in uppercase letters and begin andend with a number sign (#). To view a report of substitution strings supportedby a given template, see the Substitution Stings section of the Edit PageTemplate page.
Table 12-10 Button Template Substitution Strings
Referenced From Substitution String Description
Hot Template #BUTTON_ATTRIBUTES# Button attributes.
Hot Template #BUTTON_CSS_CLASSES# Button CSS classes.
You must include the #BUTTON_CSS_CLASSES# string fortemplates that have template options defined. The#BUTTON_CSS_CLASSES# string is where the correspondingtemplate option classes are injected at runtime.
Hot Template #BUTTON_ID# Generated button ID will be either the button's Static ID ifdefined, or if not will be an internally generated ID in theformat 'B' || [Internal Button ID].
Hot Template #ICON_CSS_CLASSES# Icon CSS classes.
Hot Template #JAVASCRIPT# Used in an onclick attribute.
Hot Template #LABEL# Button label.
Hot Template #LINK# To be used in a href attribute.
Template #BUTTON_ATTRIBUTES# Button attributes.
Chapter 12Creating Custom Themes
12-47

Table 12-10 (Cont.) Button Template Substitution Strings
Referenced From Substitution String Description
Template #BUTTON_CSS_CLASSES# Button CSS classes.
You must include the #BUTTON_CSS_CLASSES# string fortemplates that have template options defined. The#BUTTON_CSS_CLASSES# string is where the correspondingtemplate option classes are injected at runtime.
Template #BUTTON_ID# Generated button ID will be either the button's Static ID ifdefined, or if not will be an internally generated ID in theformat 'B' || [Internal Button ID].
Template #ICON_CSS_CLASSES# Icon CSS classes.
Template #JAVASCRIPT# Used in an onclick attribute.
Template #LABEL# Button label.
Template #LINK# To be used in a href attribute.
12.3.11 Legacy Calendar TemplatesLegacy Calendar templates control the appearance and placement of a calendar.Calendar templates frequently use HTML tables to arrange dates. You place calendarattributes using substitution strings such as #DD# and #MONTH#.
• Supported Legacy Calendar Template Substitution Strings (page 12-48)
• Legacy Calendar Template Attributes (page 12-48)
See Also:
"About Supported Calendars (page 11-6)," "Creating Calendars (page 11-5),"and "Using Themes (page 12-1)"
12.3.11.1 Supported Legacy Calendar Template Substitution StringsA list of supported substitution strings appears on the right side of the Edit CalendarTemplate page. Note that template substitution strings must be in uppercase lettersand begin and end with a number sign (#).
12.3.11.2 Legacy Calendar Template AttributesThis section describes some sections of the Edit Calendar Template page. To learnmore about a specific attribute, see field-level Help.
Chapter 12Creating Custom Themes
12-48
See Also:
"Understanding Template Options (page 12-8)" and "Understanding ThemeSubscriptions (page 12-17)"
Calendar Definition
• Name (page 12-49)
• Subscription (page 12-49)
• Comments (page 12-49)
12.3.11.2.1 NameName identifies the name of the template. Use the Translatable check box to indicateif the template contains text strings that require translation.Theme indicates the themeto which the template is a member.
Template Class identifies a specific use for the template. When you switch to atheme, all templates in one theme are mapped to corresponding templates in anothertheme. App Builder accomplishes this template mapping through the assignment of atemplate class.
12.3.11.2.2 SubscriptionUse Subscription to apply an existing template to the current application.
Use Reference Master Label Template From to select an existing template in thisworkspace or another template in your workspace's schema. By selecting an existingtemplate, you become a subscriber to that template.
To load a copy of a master template, click Refresh.
12.3.11.2.3 CommentsUse this attribute to record comments about this component.
Monthly Calendar, Weekly Calendar, Daily Calendar, Custom Calendar and ListCalendar
Use the Monthly Calendar, Weekly Calendar, Daily Calendar, and List Calendarattributes to control the appearance and placement of specific calendars.
12.3.12 Label TemplatesLabel templates are designed to centrally manage HTML markup of page item labels.Each item can have an optional label. You can control how these labels display usinglabel templates. For example, you could create a label template called Required Fieldthat references an image (such as an asterisk) to indicate to the user that the field isrequired.
Label templates enable you to define a before-and-after text string that getsprepended and appended to the item.
Chapter 12Creating Custom Themes
12-49
• Label Template Attributes (page 12-50)
• About Using #CURRENT_ITEM_HELP_TEXT# to Create Item Help (page 12-52)
See Also:
"Using Themes (page 12-1)"
12.3.12.1 Label Template Attributes
See Also:
"Understanding Template Options (page 12-8)" and "Understanding ThemeSubscriptions (page 12-17)"
This section describes specific sections of the Edit Label Template page. To learnmore about a specific attribute, see field-level Help.
• Name (page 12-50)
• Definition (page 12-50)
• Error Display (page 12-51)
• Field Container (page 12-51)
• Substitution Strings (page 12-52)
12.3.12.1.1 NameTemplate Name identifies the name of the template. Use the Translatable check boxto indicate that the template contains text strings that require translation. Themeindicates the theme to which the template is a member.
Template Class identifies a specific use for the template. When you switch to atheme, all templates in one theme are mapped to corresponding templates in anothertheme. App Builderaccomplishes this template mapping through the assignment of atemplate class.
12.3.12.1.2 DefinitionDefinition attributes include:
Tip:
For a list of supported substitution strings and to view examples, see field-level Help.
Chapter 12Creating Custom Themes
12-50
• Before Label - Enter HTML to display before the item label. The#ITEM_CSS_CLASSES# substitution string must be included for templates that havetemplate options defined.
• After Label - Enter HTML to display after the item label. Since the labelautomatically displays before the HTML in this region, any open HTML tags in theBefore Label region should be closed.
• Before Item - Enter HTML to be displayed directly before the form item. This istypically used to wrap an item into a DIV container or to display a help buttonbefore or after the form item.
• After Item - Enter HTML to be displayed directly after the form item. This istypically used to wrap an item into a DIV container or to display a help buttonbefore or after the form item.
• Item Pre Text - Enter HTML for the Item Pre Text subtemplate to format thecontent stored as Pre Text in the item attributes. This subtemplate can bereferenced in the Before Element template with the #ITEM_PRE_TEXT# substitution.
• Item Post Text - Enter HTML for the Item Post Text subtemplate to format thecontent stored as Post Text in the item attributes. This subtemplate can then bereferenced in the After Element template with the #ITEM_POST_TEXT# substitution
• Help Template - The help sub template enables developers to define the link orbutton used to invoke the item level help. This sub template is only rendered foritems that have help defined. See "About Using #CURRENT_ITEM_HELP_TEXT#to Create Item Help (page 12-52)."
• Inline Help Template - The help sub template enables developers to define inlinehelp text to be displayed immediately with the item. This sub template is onlyrendered for items that have inline help text defined
12.3.12.1.3 Error DisplayError Display attributes include:
Tip:
For a list of supported substitution strings and to view examples, see field-level Help.
• On Error Before Label - Enter HTML to precede the item label when anapplication displays an inline validation error message for the item.
• On Error After Label - Enter HTML to be appended to the item label when anapplication displays an inline validation error message for the item.
• Error Template - Enter the HTML rendered to display the inline validation errormessage. Use the #ERROR_MESSAGE# substitution string to reference the messagetext. The error template can be included in the before and after item attributesusing the #ERROR_TEMPLATE# substitution string.
12.3.12.1.4 Field ContainerField Container attributes include:
Chapter 12Creating Custom Themes
12-51
Tip:
For a list of supported substitution strings and to view examples, see field-level Help.
• Before Label and Item - Enter HTML to be displayed before the label and item.This is typically used to wrap an item into a DIV container or field set. The BeforeLabel and Item attribute is only rendered for pages that do not use a table grid todisplay form items. This includes any page using a mobile page template.
• After Label and Item - Enter HTML to be displayed after the label and item. Thisis typically used to wrap an item into a DIV container or field set. The after itemand label attribute is only rendered for pages that don't use a table grid to displayform items. This includes any page using a mobile page template.
12.3.12.1.5 Substitution StringsLists substitution string usage for this template. Substitution strings are used withinsubtemplates to reference component values.
12.3.12.2 About Using #CURRENT_ITEM_HELP_TEXT# to Create Item HelpYou can use the #CURRENT_ITEM_HELP_TEXT# substitution string to create inline page Helptext when a page is rendered. For example, you can use this substitution string tocreate page Help text which displays as a tooltip when the mouse hovers over thepage item label. This placeholder enables you to include help text on the page when itis rendered without having to perform an expensive Ajax call.
Tip:
Only use this placeholder if the Help text is short. The generated pagealways includes the help text of all page items.
Example Label Template
Before Label:
<label for="#CURRENT_ITEM_NAME#" id="#LABEL_ID#"><span class="helpText">#CURRENT_ITEM_HELP_TEXT#</span>
After Label:
</label>
12.3.13 List TemplatesA list is a shared collection of links. You control the appearance of a list through listtemplates. Using template attributes, you can also define a list element to be eithercurrent or non current for a specific page.
• About Hierarchical Lists (page 12-53)
Chapter 12Creating Custom Themes
12-52
• List Template Attributes (page 12-53)
See Also:
"Creating Lists (page 17-38)" and "Using Themes (page 12-1)"
12.3.13.1 About Hierarchical ListsOracle Application Express supports hierarchical lists. To create a hierarchical list, youmust:
• Select a list template that supports hierarchical lists. To determine which listtemplates support hierarchical lists, look for templates having the namingconvention "with Sublist."
• Select a Parent List Entry when you create each list entry.
12.3.13.2 List Template Attributes
See Also:
"Understanding Template Options (page 12-8)" and "Understanding ThemeSubscriptions (page 12-17)"
This section describes some sections of the Edit List Template page. To learn moreabout a specific attribute, see field-level Help.
• Name (page 12-53)
• Before List Entry (page 12-54)
• Template Definition (page 12-54)
• Template Definitions for First Entry (page 12-54)
• Before Sublist Entry (page 12-54)
• Sublist Entry (page 12-55)
• After Sub List Entry (page 12-55)
• After List Entry (page 12-55)
• Substitution Strings (page 12-55)
12.3.13.2.1 NameName identifies the name of the template. Use the Translatable check box to indicatethat the template contains text strings that require translation. Theme indicates thetheme to which the template is a member.
Template Class identifies a specific use for the template. When you switch to a newtheme, all templates in one theme are mapped to corresponding templates in another
Chapter 12Creating Custom Themes
12-53
theme. App Builderaccomplishes this template mapping through the assignment of atemplate class.
12.3.13.2.2 Before List EntryEnter HTML that displays before any list elements. You can use this attribute to openan HTML table or HTML table row. The #COMPONENT_CSS_CLASSES# substitution stringmust be included in the List Template Before Rows attribute for templates that havetemplate options defined.
12.3.13.2.3 Template DefinitionDefines current and noncurrent list templates. Supported substitution strings include#LINK#, #TEXT#, #TEXT_ESC_SC#, #ICON_CSS_CLASSES#, #IMAGE_PREFIX#, #IMAGE#,#IMAGE_ATTR#, and #A01#...#A10#.
Template Definition attributes include:
• List Template Current. Enter HTML or text to be substituted for the selected (orcurrent) list template.
• List Template Current with Sub List Items. Enter HTML or text to be substitutedfor the selected (or current) list template when an item has sublist items. If notspecified, the current list item template is used.
• List Template Noncurrent. Enter HTML or text to be substituted for theunselected (or noncurrent) list template.
• List Template Noncurrent with Sub List Items. Enter HTML or text to besubstituted for the unselected (or noncurrent) list template used when an item hassublist items. If not specified, the current list item template is used.
• Between List Elements. Enter HTML that displays between list elements. Thisattribute is ignored if no HTML is specified.
12.3.13.2.4 Template Definitions for First EntryAvailable attributes include:
• List Template Current (First). If defined, this is used for the first list item. EnterHTML or text to be substituted for the selected (or current) list template.
• List Template Current with Sub List Items (First). If defined, this is used for thefirst list item. HTML or text to be substituted for the selected (or current) listtemplate used when item has sub list items.
• List Template Noncurrent (First). If defined, this is used for the first list item.Enter HTML or text to be substituted for the unselected (or noncurrent) listtemplate.
• List Template Noncurrent with Sub List Items (First). If defined, this is used forthe first list item. HTML or text to be substituted for the unselected (or noncurrent)list template used when item has sub list items.
12.3.13.2.5 Before Sublist EntryEnter HTML that displays before any sublist elements.
Chapter 12Creating Custom Themes
12-54
12.3.13.2.6 Sublist EntryDefines current and noncurrent list templates. Supported substitution strings include#LINK#, #TEXT#, #ICON_CSS_CLASSES#, #IMAGE_PREFIX#, #IMAGE#, #IMAGE_ATTR#,#ICON_CSS_CLASSES#, #A01#...#A10#, #LIST_ITEM_ID#, and #PARENT_LIST_ITEM_ID#.
Sub List Entry attributes include:
• Sub List Template Current. Enter HTML or text to be substituted for the selected(or current) list template.
• Sub List Template Current with Sub List Items. Enter HTML or text to besubstituted for the selected (or current) list template when an item has sublistitems. If not specified, the current list item template is used.
• Sub List Template Noncurrent. Enter HTML or text to be substituted for theunselected (or noncurrent) list template.
• Sub List Template Noncurrent with Sub List Items. Enter HTML or text to besubstituted for the unselected (or noncurrent) list template used when an item hassublist items. If not specified, the current list item template is used.
• Between Sub List Items. Enter HTML that displays between list elements. Thisattribute is ignored if no HTML is specified.
12.3.13.2.7 After Sub List EntryEnter HTML that displays after displaying sublist elements.
12.3.13.2.8 After List EntryEnter HTML that displays after displaying all list elements. You can use this attribute toclose an HTML table opened in the Before List Elements attribute.
12.3.13.2.9 Substitution StringsLists substitution string usage for this template. Substitution strings are used withinsubtemplates to reference component values.
12.3.14 Page TemplatesPage templates define the appearance of a page. Each template consists of a headertemplate, a body template, a footer template, and several subtemplates. If you do notspecify a page template as a page-level attribute, then the Application Express engineuses the default page template defined on the Create/Edit Theme page.
Page templates combine static HTML with substitution strings that are replaced atruntime. You use substitution strings to indicate the existence and placement of acomponent within a page template. You can further specify how a component shoulddisplay using subtemplates.
• Page Template Attributes (page 12-56)
• Required Dialog Page Template Attributes (page 12-63)
Chapter 12Creating Custom Themes
12-55
See Also:
"Using Themes (page 12-1)"
12.3.14.1 Page Template Attributes
See Also:
"Understanding Template Options (page 12-8)" and "Understanding ThemeSubscriptions (page 12-17)"
This section describes specific sections of the Edit Page Template page. To learnmore about a specific attribute, such as supported substitution strings, see field-levelHelp.
• Name (page 12-56)
• Definition (page 12-57)
• JavaScript (page 12-57)
• Cascading Style Sheet (page 12-58)
• Subtemplate (page 12-58)
• Image Based Tab Attributes (page 12-59)
• Layout (page 12-59)
• Display Points (page 12-59)
• Dialog (page 12-59)
• Error Page Template Control (page 12-60)
• Substitution Strings (page 12-60)
12.3.14.1.1 NameName identifies the name of the template. Theme indicates the theme to which thetemplate is a member.
Template Class identifies a specific use for the template. When you switch to a newtheme, all templates in one theme are mapped to corresponding templates in anothertheme. App Builder accomplishes this template mapping through the assignment of atemplate class.
Use the Translatable check box to indicate if this template contains text strings thatrequire translation.
Template Type identifies the page template type. If set to Dialog Page, the templateis only be available for selection by a page with a page mode of Modal or Non-Modal.If set to Normal Page, the template is only be available for selection by a page with apage mode of Normal.
Chapter 12Creating Custom Themes
12-56
12.3.14.1.2 DefinitionEach template consists of a header, a body, a footer, and subtemplates. Usesubstitution strings to include dynamic content. All template substitution strings mustbe in uppercase letters and begin and end with a number sign (#).
Tip:
For a list of supported substitution strings and to view examples, see field-level Help.
Definition attributes include:
• Header - Enter HTML that defines the <Head> section of the HTML document.Oracle recommends you include at least #TITLE# and #HEAD# in this templatesection.
• Body - Enter HTML that makes up the <Body> section of the HTML document.Include substitution strings to define where the body content is placed and todefine additional positions for regions.
• Footer - Enter HTML to define third section in the page template that displaysafter the Body.
12.3.14.1.3 JavaScriptAvailable attributes include:
Tip:
For a list of supported substitution strings and to view examples, see field-level Help.
• File URLs - Enter JavaScript file URLs for code to be loaded on this page. EachURL must be written into a new line. If you provide a minified version of your fileyou can use the substitution string #MIN# to include .min in your file URL for aregular page view and an empty string if the page is viewed in debug mode. Youcan also use the substitution string #APP_VERSION# to include the application'sversion in the file URL. JavaScript file URLs you enter here replaces the#TEMPLATE_JAVASCRIPT# substitution string in the page template.
Do not include opening or closing script tags, just write the URL.
• Function and Global Variable Declaration - Enter JavaScript code (for example,functions or global variable declarations) for code to be used in this page template.Consider putting it into an external file to avoid duplication and to leverage browsercaching of static files. Code you enter here replaces the #TEMPLATE_JAVASCRIPT#substitution string in the page template.
Do not include opening or closing script tags, just include the JavaScript code.
To reference a shortcut, use "SHORTCUTNAME".
Chapter 12Creating Custom Themes
12-57
• Execute when Page Loads - Enter JavaScript code to execute when the pageloads. The code is executed after the JavaScript code generated by OracleApplication Express. Code you enter here replaces the #GENERATED_JAVASCRIPT#substitution string in the page template.
• Dialog Initialization Code - This attribute only displays if the Template Type isDialog Page. Enter JavaScript code to initialize the page as a dialog. Thesubstitution strings will be replaced with their respective values at rendering time.
• Dialog Closure Code. This attribute only displays if the Template Type is DialogPage. Enter JavaScript code to close the dialog page.
• Dialog Cancel Code. This attribute only applies if the Template Type is DialogPage. Enter JavaScript code to cancel the dialog page.
12.3.14.1.4 Cascading Style SheetAvailable attributes include:
• File URLs - Enter Cascading Style Sheet file URLs to be loaded for this pagetemplate. Each URL has to be written into a new line. If you provide a minifiedversion of your file you can use the substitution string #MIN# to include .min in yourfile URL for a regular page view and an empty string if the page is viewed in debugmode. You can also use the substitution string #APP_VERSION# to include theapplication's version in the file URL. File URLs you enter here replace the#TEMPLATE_CSS# substitution string in the template.
Do not include opening or closing script tags, just include the file URL.
• Inline - Enter Cascading Style Sheet code to be used for this page template.Consider putting it into an external file to avoid duplication and to leverage browsercaching of static files. Code you enter here replaces the #TEMPLATE_CSS#substitution string in the template.
Do not include opening or closing style tags, just include the cascading style sheetcode.
12.3.14.1.5 SubtemplateEnter the HTML for subtemplates below. Subtemplates are placed inside the body ofthe page template using substitution strings.
Subtemplates include:
• Success Message - Enter HTML to replace the string #SUCCESS_MESSAGE# in thetemplate body, header, or footer.
• Navigation Bar - Enter HTML or text to replace the string #NAVIGATION_BAR# in thetemplate header, body, or footer. Use the substitution string #BAR_BODY# to indicatewhere in the Navigation Bar the entries should appear.
• Navigation Bar Entry - Enter HTML or text to be substituted into the navigationbar #BAR_BODY# substitution string for each navigation bar entry.
• Notification - Enter HTML or text to be substituted when the#NOTIFICATION_MESSAGE# substitution string is referenced in the template header,body, or footer.
Chapter 12Creating Custom Themes
12-58
12.3.14.1.6 Image Based Tab AttributesUse this subtemplate for tabs that are entirely based on images. Available attributesinclude:
• Current Image Tab - Enter HTML to be used to indicate that an image-based tabis currently selected. Include the #TAB_TEXT# substitution string to show thedisplayed name of the tab.
• Non Current Image Tab - Enter the HTML to be used to indicate that an imagetab is not currently selected. Include the #TAB_TEXT# substitution string to show thedisplayed name of the tab.
12.3.14.1.7 LayoutSpecified the type of layout used for the page. The Type you select determines whatattributes displays. To learn more about an attribute, see field-level Help.
From Type, select a layout:
• HTML Table - Uses HTML Tables to position regions, page items, and buttons.
• Fixed Number of Columns - Used for grids which divide the screen into a fixednumber of grid columns.
• Variable Number of Columns - Used for grids which can display up to "n"number of grid columns depending on how the regions, page items and buttonsare positioned.
12.3.14.1.8 Display PointsAvailable attributes include:
• Breadcrumb Display Point - Applies to generated components that usebreadcrumbs. It defines where the breadcrumbs are placed on the page. SidebarDisplay Point
• Sidebar Display Point - Applies to generated components that use Sidebars. Itdefines where sidebars are placed on the page.
12.3.14.1.9 DialogDialog attributes only appear if you select a Template Type of Dialog Page. Thesesettings are overwritten by a similar attributes specified at page-level.
Available Dialog attributes include:
• Width - Enter the width of the dialog, in pixels or a percentage.
• Height - Enter the height of the dialog in pixels, for example, 500.
• Maximum Width - Enter the maximum width of the dialog, in pixels. For a pageusing the jQuery Mobile Smartphone user interface, the maximum width is 500.
• CSS Classes - Enter additional CSS classes you wish to be applied to the dialog,as a space delimited list.
• Allow Embed in Frames - Your page template level browser frame options arelisted below, along with the current setting for each. Make a selection to control ifthe browser is allowed to display your application's pages within a frame. The
Chapter 12Creating Custom Themes
12-59
current setting will be the default for each modal and non-modal page using thispage template. To learn more, see field-level Help.
Oracle Application Express embeds modal dialogs in iframes. If you set theapplication security attribute Browser Frame to Deny, checking Allow Embed InFrame for Modal Dialog will instead use Allow from same origin for dialog pagesthat use this template
12.3.14.1.10 Error Page Template ControlUse this attribute when a page template is designated as an error template.
12.3.14.1.11 Substitution StringsTable 12-11 (page 12-60) describes the available page template substitution strings.Substitution strings are used within subtemplates to reference component values.
Tip:
All template substitution strings must be in uppercase letters and begin andend with a number sign (#). To view a report of substitution strings supportedby a given template, see the Substitution Stings section of the Edit PageTemplate page.
Table 12-11 Page Template Substitution Strings
Referenced From Substitution String Description
All #HIGH_CONTRAST_TOGGLE# High Contrast toggle.
All #PAGE_STATIC_ID# Page Static ID (for example 'P100')
All #PARENT_TAB_CELLS# Display of parent tabs.
All #REGION_POSITION_01# Region Position 1.
All #REGION_POSITION_02# Region Position 2.
All #REGION_POSITION_03# Region Position 3.
All #REGION_POSITION_04# Region Position 4.
All #REGION_POSITION_05# Region Position 5.
All #REGION_POSITION_06# Region Position 6.
All #REGION_POSITION_07# Region Position 7.
All #REGION_POSITION_08# Region Position 8.
All #REQUESTED_URL# Page URL requested by the browser
All #SCREEN_READER_TOGGLE# Screen Reader toggle.
All #SWITCH_UI_TO_DESKTOP# Hyperlink for home page of desktop user interface.
All #SWITCH_UI_TO_JQM_SMARTPHONE# Hyperlink for home page of smart phone userinterface.
All #TITLE# Defines the page title. Typically included withinHTML title tags.
Body #BODY# Page Body.
Chapter 12Creating Custom Themes
12-60
Table 12-11 (Cont.) Page Template Substitution Strings
Referenced From Substitution String Description
Body #BOX_BODY# Where the Body displays. If the Body is null, then#BOX_BODY# is used instead.
Body #FORM_OPEN# Where the HTML open form tag <form> is placed.You must include this substitution string to submit aform.
Body #GENERATED_CSS# Cascading style sheet files created by components.
Body #GLOBAL_NOTIFICATION# Displays the Global Notification attribute. Globalnotifications are intended to communicate systemstatus, such as pending system downtime. You canalso use APEX_APPLICATION.G_GLOBAL_NOTIFICATIONto set this value programmatically.
See Also: "Global Notification (page 6-31)"
Body #LOGO# Application image or log.
In the Logo section of the Edit Application Definitionpage, you can identify an image and image attributesfor an application logo. To use this feature, you mustalso include the #LOGO# substitution string in theHeader or Body page template.
See Also: "Logo (page 6-47)"
Body #NAVIGATION_BAR# Navigation bar.
See Also: "Subtemplate (page 12-58)" forinformation about the Navigation Bar subtemplate
Body #NOTIFICATION_MESSAGE# Defines where a summary of inline error messagesdisplays. Inline error messages can display next to afield, inline in the notification area, or both.
Body #POPUP_TRANSITION# Default page transition used to open a dialog in ajQuery Mobile application. You must use this newplaceholders in a DIV of type role="page". Forexample:
<div id="#PAGE_STATIC_ID#" data-role="page" data-apex-page-transition="#PAGE_TRANSITION#" data-apex-popup-transition="#POPUP_TRANSITION#" data-url="#REQUESTED_URL#">
Body #SUCCESS_MESSAGE# Success message. Defines where page success anderror messages appear. If the page process runswithout raising errors, then this text displays.
You can customize the display of the successmessage for each template by adding HTML to bedisplayed before and after the success message.
Body #TAB_CELLS# Display of standard tabs.
Body #TEMPLATE_JAVASCRIPT# Display of standard tabs.
Footer #CUSTOMIZE# Customize link.
Footer #FORM_CLOSE# Where the HTML close form tag <form> is placed.
Footer #BUILT_WITH_LOVE_USING_APEX# Displays "Built with ♥ using Oracle APEX."
Chapter 12Creating Custom Themes
12-61
Table 12-11 (Cont.) Page Template Substitution Strings
Referenced From Substitution String Description
Header #APEX_CSS# Cascading Style Sheet files used by ApplicationExpress.
Header #APEX_JAVASCRIPT# JavaScript files and code used by Oracle ApplicationExpress.
Header #APPLICATION_CSS# CSS files defined on user interface level.
Header #APPLICATION_JAVASCRIPT# JavaScript files defined on user interface level.
Header #GENERATED_JAVASCRIPT# JavaScript code created by components as needed.
Header #HEAD# Used after the <head> open tag but before the </head> close tag. You can optionally define thecontents of #HEAD# for each page (for example, toreference additional style sheets or JavaScriptlibraries).
Header #ONLOAD# Page onload.
Use this string as a substitute in a JavaScript call tobe executed when a page is loaded by the webbrowser. The JavaScript to be called can vary foreach page.
Header #PAGE_CSS# Cascading style sheet files and inline style definedon the page-level.
Header #PAGE_JAVASCRIPT# JavaScript files and code defined on the page-level.
Header #TEMPLATE_CSS# Cascading style sheet files and inline style definedon page template-level.
Header #THEME_CSS# Cascading Style Sheet files defined at the theme-level.
Header #THEME_JAVASCRIPT# JavaScript files defined on theme-level.
Header #THEME_STYLE_CSS# Cascading Style Sheet files defined on the themestyle level.
Page #FAVICONS# Enables support for the application User Interfaceattribute, Favicon. Developers can use the Faviconattribute for creating a favicon (or shortcut icon). Touse this feature, your page template must includethe#FAVICONS# substitution string.
Page #PAGE_TRANSITION# Default page transition used to navigate to otherpages in a jQuery Mobile application. You must usethis new placeholders in a DIV of type role="page".For example:
<div id="#PAGE_STATIC_ID#" data-role="page" data-apex-page-transition="#PAGE_TRANSITION#" data-apex-popup-transition="#POPUP_TRANSITION#" data-url="#REQUESTED_URL#">
Page #PAGE_URL# Page URL.
JavaScript #DIALOG_ATTRIBUTES# Defines dialog attributes not declaratively supported.
JavaScript #DIALOG_CSS_CLASSES# Dialog CSS Classes.
Chapter 12Creating Custom Themes
12-62
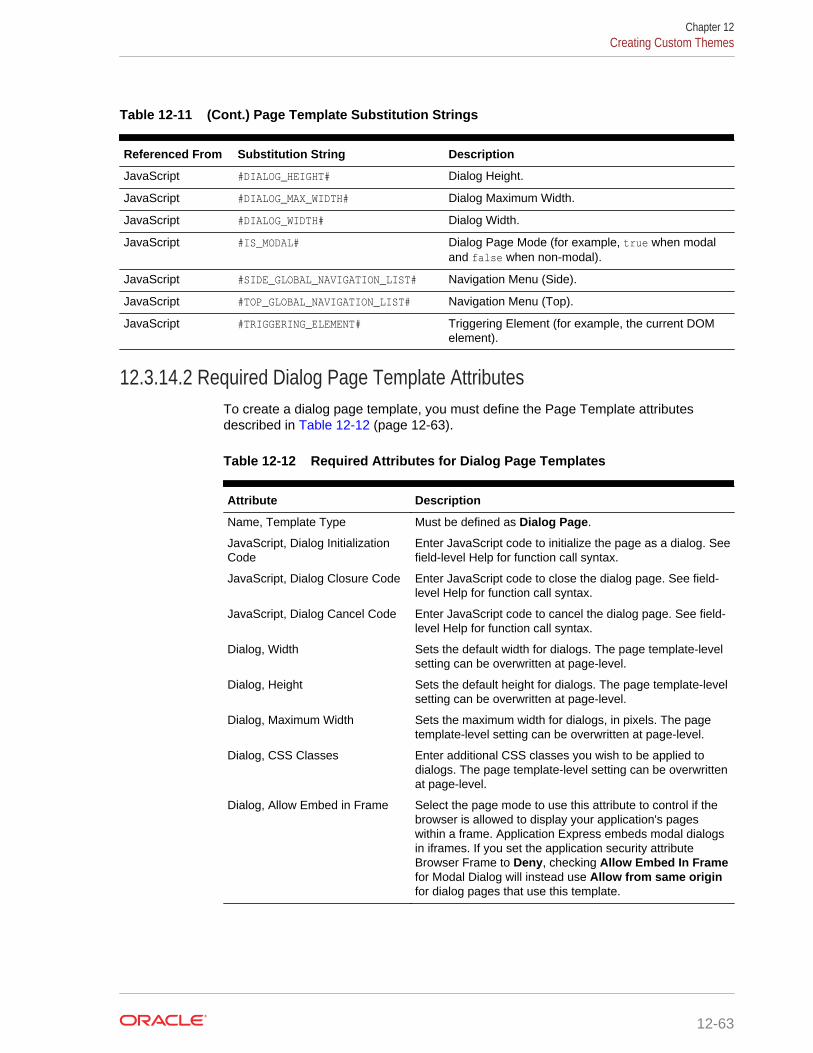
Table 12-11 (Cont.) Page Template Substitution Strings
Referenced From Substitution String Description
JavaScript #DIALOG_HEIGHT# Dialog Height.
JavaScript #DIALOG_MAX_WIDTH# Dialog Maximum Width.
JavaScript #DIALOG_WIDTH# Dialog Width.
JavaScript #IS_MODAL# Dialog Page Mode (for example, true when modaland false when non-modal).
JavaScript #SIDE_GLOBAL_NAVIGATION_LIST# Navigation Menu (Side).
JavaScript #TOP_GLOBAL_NAVIGATION_LIST# Navigation Menu (Top).
JavaScript #TRIGGERING_ELEMENT# Triggering Element (for example, the current DOMelement).
12.3.14.2 Required Dialog Page Template AttributesTo create a dialog page template, you must define the Page Template attributesdescribed in Table 12-12 (page 12-63).
Table 12-12 Required Attributes for Dialog Page Templates
Attribute Description
Name, Template Type Must be defined as Dialog Page.
JavaScript, Dialog InitializationCode
Enter JavaScript code to initialize the page as a dialog. Seefield-level Help for function call syntax.
JavaScript, Dialog Closure Code Enter JavaScript code to close the dialog page. See field-level Help for function call syntax.
JavaScript, Dialog Cancel Code Enter JavaScript code to cancel the dialog page. See field-level Help for function call syntax.
Dialog, Width Sets the default width for dialogs. The page template-levelsetting can be overwritten at page-level.
Dialog, Height Sets the default height for dialogs. The page template-levelsetting can be overwritten at page-level.
Dialog, Maximum Width Sets the maximum width for dialogs, in pixels. The pagetemplate-level setting can be overwritten at page-level.
Dialog, CSS Classes Enter additional CSS classes you wish to be applied todialogs. The page template-level setting can be overwrittenat page-level.
Dialog, Allow Embed in Frame Select the page mode to use this attribute to control if thebrowser is allowed to display your application's pageswithin a frame. Application Express embeds modal dialogsin iframes. If you set the application security attributeBrowser Frame to Deny, checking Allow Embed In Framefor Modal Dialog will instead use Allow from same originfor dialog pages that use this template.
Chapter 12Creating Custom Themes
12-63
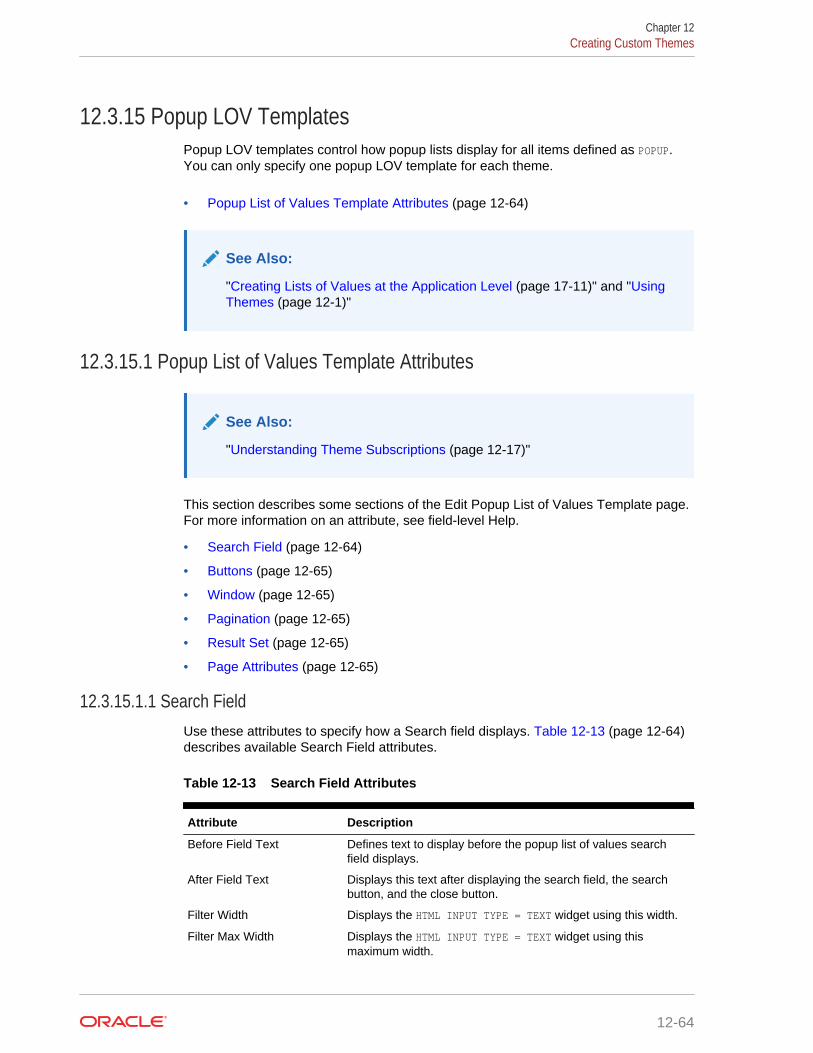
12.3.15 Popup LOV TemplatesPopup LOV templates control how popup lists display for all items defined as POPUP.You can only specify one popup LOV template for each theme.
• Popup List of Values Template Attributes (page 12-64)
See Also:
"Creating Lists of Values at the Application Level (page 17-11)" and "UsingThemes (page 12-1)"
12.3.15.1 Popup List of Values Template Attributes
See Also:
"Understanding Theme Subscriptions (page 12-17)"
This section describes some sections of the Edit Popup List of Values Template page.For more information on an attribute, see field-level Help.
• Search Field (page 12-64)
• Buttons (page 12-65)
• Window (page 12-65)
• Pagination (page 12-65)
• Result Set (page 12-65)
• Page Attributes (page 12-65)
12.3.15.1.1 Search FieldUse these attributes to specify how a Search field displays. Table 12-13 (page 12-64)describes available Search Field attributes.
Table 12-13 Search Field Attributes
Attribute Description
Before Field Text Defines text to display before the popup list of values searchfield displays.
After Field Text Displays this text after displaying the search field, the searchbutton, and the close button.
Filter Width Displays the HTML INPUT TYPE = TEXT widget using this width.
Filter Max Width Displays the HTML INPUT TYPE = TEXT widget using thismaximum width.
Chapter 12Creating Custom Themes
12-64
Table 12-13 (Cont.) Search Field Attributes
Attribute Description
Filter Text Attribute Displays the HTML INPUT TYPE = TEXT widget using theseattributes. This is included within the HTML input tag.
12.3.15.1.2 ButtonsUse these attributes to define the button name and attributes for the Find, Close, Next,and Previous buttons.
12.3.15.1.3 WindowPopup lists of values are executed using JavaScript. Use these attribute to control thevalues of scrollbars=, resizable=, width=, and height=.
12.3.15.1.4 PaginationDefines how row count results display.
12.3.15.1.5 Result SetUse these attributes to define text or HTML to display before and after a result set.
12.3.15.1.6 Page AttributesUse these attributes to define popup pages.
12.3.16 Region Templates
See Also:
"Understanding Template Options (page 12-8)" and "Understanding ThemeSubscriptions (page 12-17)"
Region templates control the appearance and placement of region attributes. Youplace region attributes using substitution strings such as #BODY# and #EDIT#. Templatesubstitution strings must be in upper case and begin and end with a pound sign (#).
• Region Template Attributes (page 12-66)
See Also:
"About Regions (page 13-4)" and "Using Themes (page 12-1)"
Chapter 12Creating Custom Themes
12-65
12.3.16.1 Region Template Attributes
See Also:
"Understanding Template Options (page 12-8)" and "Understanding ThemeSubscriptions (page 12-17)"
This section describes some attributes on the Edit Region Template page. To learnmore about a specific attribute, see field-level Help.
• Name (page 12-66)
• Definition (page 12-66)
• Layout (page 12-67)
• Sub Regions (page 12-67)
• Substitution Strings (page 12-67)
12.3.16.1.1 NameTheme indicates the theme to which the template is a member. Name identifies thename of the template.
Template Class identifies a specific use for the template. When you switch to a newtheme, all templates in one theme are mapped to corresponding templates in anothertheme. App Builder accomplishes this template mapping through the assignment of atemplate class. Use the Translatable check box to indicate that the template containstext strings that require translation.
12.3.16.1.2 Definition
Region templates provide the appearance for a portion of a page called a region. Usesubstitution strings to indicate the existence and placement of a component within theregion. #BODY# is the only required substitution string and identifies where the source ofthe region should be placed. All other substitution strings are optional. The followingare valid substitution strings:
• #TITLE#
• #PAGE_TITLE#
• #EXPAND#
• #CHANGE#
• #BODY#
• #SUB_REGION_HEADERS#
• #SUB_REGIONS#
• #FORM_OPEN#
• #FORM_CLOSE#
Chapter 12Creating Custom Themes
12-66
• #REGION_ID#
• #REGION_STATIC_ID#
• #REGION_CSS_CLASSES#
• #REGION_ATTRIBUTES#
• #REGION_HEADER#
• #REGION_FOOTER#
When you create a button in a region position, the positions you define appear in aselect list. Use the following substitution strings to define positions for the placement ofbuttons in a region:
• #EDIT#
• #CLOSE#
• #CREATE#
• #CREATE2#
• #EXPAND#
• #HELP#
• #DELETE#
• #COPY#
• #NEXT#
• #PREVIOUS#
12.3.16.1.3 LayoutPage items display within regions. If the layout in the page template is set to Table,each item is part of an HTML table. Use this attribute to set the attributes of this table.
12.3.16.1.4 Sub RegionsUse Header Templates and Header Entry Templates to generate a list of regiontitles of all the subregions of the current region. For either template, #ENTRIES# is theonly required substitution string.
Use Template to wrap a subregion with additional HTML code. #SUB_REGION# is theonly required substitution string. It identifies where the source of the subregion shouldbe placed. All other substitution strings are optional.
12.3.16.1.5 Substitution StringsLists substitution string used within templates to reference component values.
12.3.17 Report TemplatesReport column templates provide you with control over the results of a row from a SQLquery. This type of template defines a cell, not an entire row.
Each report template identifies column names using the syntax #1#, #2#, #3#, and soon. You can also name columns using column name substitution syntax such as
Chapter 12Creating Custom Themes
12-67
#ENAME# or #EMPNO#. You can reference any item from your application within yourtemplate. For example, to reference an item called ABC. in your template, you couldinclude the exact substitution string &ABC.. The actual value of ABC. would be providedby an end user editing an item in your application named ABC.
• Generic Column Templates and Named Column Templates (page 12-68)
• Report Column Template Attributes for Generic Column Templates (page 12-69)
• Report Column Template Attributes for Named Column Templates (page 12-73)
• About Using JavaScript in Column Templates (page 12-76)
See Also:
"Using Themes (page 12-1)," "Understanding Template Options(page 12-8)," and "Understanding Theme Subscriptions (page 12-17)"
12.3.17.1 Generic Column Templates and Named Column TemplatesOracle Application Express includes two types of report templates:
• Generic Column Templates (page 12-68)
• Named Column Templates (page 12-69)
12.3.17.1.1 Generic Column TemplatesA generic column template determines the appearance of a report by defining the lookof the column once. This look is then repeated as many times as is necessary, basedon the number of columns specified in the report's definition. This type of template islimited to reports that have a standard row and column structure. Additional style canbe applied to a report using this type of template through the use of conditions.
The following example demonstrates how to have each column use a specific style:
<td class="tabledata" align="#ALIGN#">#COLUMN_VALUE#</td>
This example assumes your page template includes a CSS containing the classtabledata. This example also demonstrates the use the substitution strings #ALIGN# and#COLUMN_VALUE#. If you actually ran this report, these substitution strings would bereplaced with values generated by the results of a SQL query.
If your query uses an expression in the select list, it is a good idea to create an aliasfor the columns to avoid runtime errors. For example, suppose your query was asfollows:
SELECT ename, (sal + comm) * 12 FROM emp
You could rewrite the query to alias the columns as follows:
SELECT ename, (sal + comm) * 12 yearly_comp FROM emp
Chapter 12Creating Custom Themes
12-68
12.3.17.1.2 Named Column TemplatesNamed column templates allow for more flexibility in report design. However, becausethey reference columns by name, they can only be used by reports that are based onthose columns. For example:
<tr><td>#ENAME#</td><td>#SAL#</td></tr>
Although named column templates offer flexibility, you may need to create a newtemplate for each query. You can also include a position notation. The followingexample demonstrates how to use following HTML and substitution strings:
<tr><td>#ENAME#</td><td>#SAL#</td></tr>
<tr><td>#1#</td><td>#2#</td></tr>
12.3.17.2 Report Column Template Attributes for Generic Column TemplatesThis section describes specific sections of the Edit Report Template page for GenericColumn Templates. To learn more about a specific attribute, see field-level Help.
• Report Template (page 12-69)
• Before Rows (page 12-69)
• Column Headings (page 12-70)
• Before Each Row (page 12-70)
• Column Templates (page 12-70)
• After Each Row (page 12-71)
• After Rows (page 12-71)
• Row Highlighting (page 12-72)
• Pagination Subtemplate (page 12-72)
• Comments (page 12-73)
12.3.17.2.1 Report TemplateTemplate Name identifies the name of the template. Template Type indicates thetype of template. Named Column templates reference column names in the template.Generic Column Templates reference the #COLUMN_VALUE# substitution string in thetemplate.
Theme indicates the theme to which the template is a member. Template Classidentifies a specific use for the template. When you switch to a new theme, alltemplates in one theme are mapped to corresponding templates in another theme.App Builder accomplishes this template mapping through the assignment of a templateclass. Use the Translatable check box to indicate the template contains text stringsthat require translation.
12.3.17.2.2 Before RowsIn Before Rows, enter HTML that displays once at the beginning of a report template.
Chapter 12Creating Custom Themes
12-69
Opening an HTML table is a common use of this attribute as shown in the followingexample:
<table>
You can include pagination above a report by including the substitution string#TOP_PAGINATION#. This substitution string generates HTML that starts with an opening<tr> tag and ends with a closing </tr> tag. For example, to include an open table tagand the #TOP_PAGINATION# substitution string, you would enter the following:
<table>#TOP_PAGINATION#
You can also include the substitution string #CSV_LINK# to include support for exportingyour report to comma-separated value (CSV) format, a format compatible with mostspreadsheet programs.
You can also use the substitution string #REPORT_ATTRIBUTES#. This substitution string isset per report region on the report attributes page.
12.3.17.2.3 Column HeadingsUse Before Column Heading to display text before report heading.
Use Column Heading Template to colorize each column header cell. The text of thisattribute must include Help to indicate where the cell heading text should be colorized.For example:
<th >Item Help Text</th>
If you do not want any column headings, enter the following:
OMIT
If you do use this attribute, Application Express engine applies the default columnheading template.
Use After Column Heading to display text after report headings.
12.3.17.2.4 Before Each RowIn Before Each Row, enter text to display before all columns in the report. Use thisattribute to open a new HTML row. Before Each Row supports the followingsubstitution strings:
• #ROWNUM#
Use this substitution string to specify the current row.
• #COLCOUNT#
Use this substitution string to specify the number of columns.
• #HIGHLIGHT_ROW#
Use this substitution string to specify the number of highlighted rows.
12.3.17.2.5 Column TemplatesColumn templates define the look of each column. You can define up to four columntemplates; each can be conditional. For example, you can have different backgroundcolors for even and odd rows, or highlight rows that meet a PL/SQL defined condition.
Chapter 12Creating Custom Themes
12-70
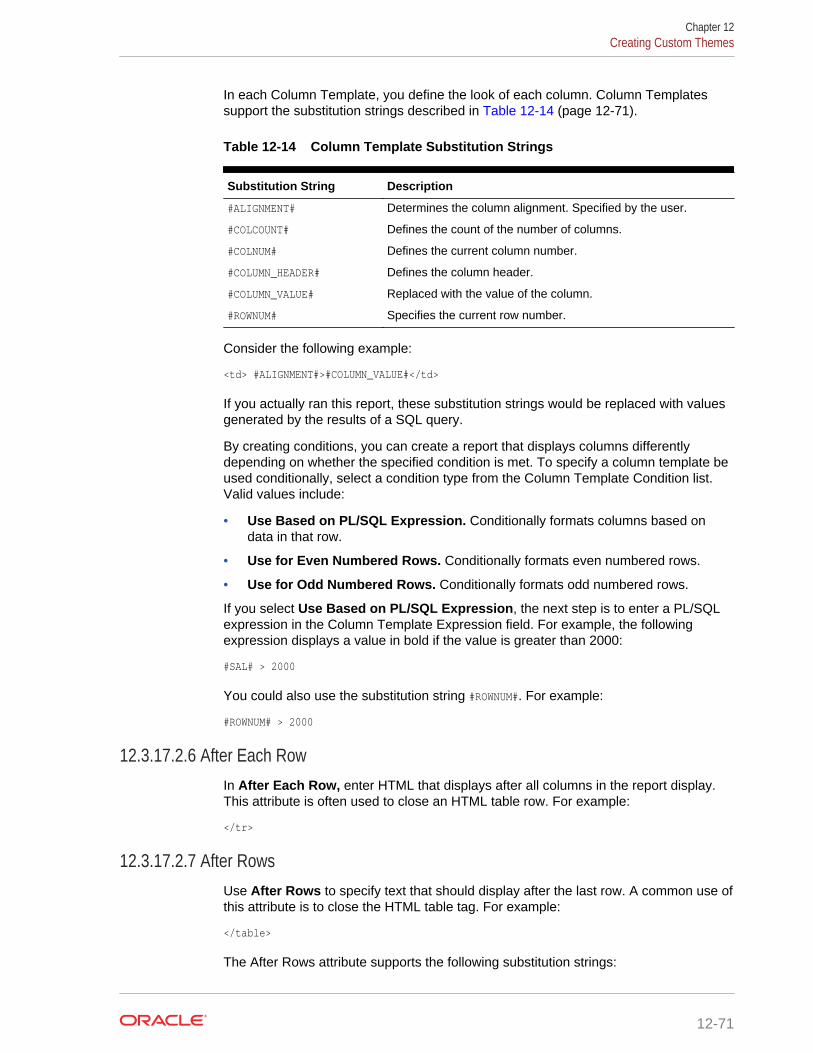
In each Column Template, you define the look of each column. Column Templatessupport the substitution strings described in Table 12-14 (page 12-71).
Table 12-14 Column Template Substitution Strings
Substitution String Description
#ALIGNMENT# Determines the column alignment. Specified by the user.
#COLCOUNT# Defines the count of the number of columns.
#COLNUM# Defines the current column number.
#COLUMN_HEADER# Defines the column header.
#COLUMN_VALUE# Replaced with the value of the column.
#ROWNUM# Specifies the current row number.
Consider the following example:
<td> #ALIGNMENT#>#COLUMN_VALUE#</td>
If you actually ran this report, these substitution strings would be replaced with valuesgenerated by the results of a SQL query.
By creating conditions, you can create a report that displays columns differentlydepending on whether the specified condition is met. To specify a column template beused conditionally, select a condition type from the Column Template Condition list.Valid values include:
• Use Based on PL/SQL Expression. Conditionally formats columns based ondata in that row.
• Use for Even Numbered Rows. Conditionally formats even numbered rows.
• Use for Odd Numbered Rows. Conditionally formats odd numbered rows.
If you select Use Based on PL/SQL Expression, the next step is to enter a PL/SQLexpression in the Column Template Expression field. For example, the followingexpression displays a value in bold if the value is greater than 2000:
#SAL# > 2000
You could also use the substitution string #ROWNUM#. For example:
#ROWNUM# > 2000
12.3.17.2.6 After Each RowIn After Each Row, enter HTML that displays after all columns in the report display.This attribute is often used to close an HTML table row. For example:
</tr>
12.3.17.2.7 After RowsUse After Rows to specify text that should display after the last row. A common use ofthis attribute is to close the HTML table tag. For example:
</table>
The After Rows attribute supports the following substitution strings:
Chapter 12Creating Custom Themes
12-71
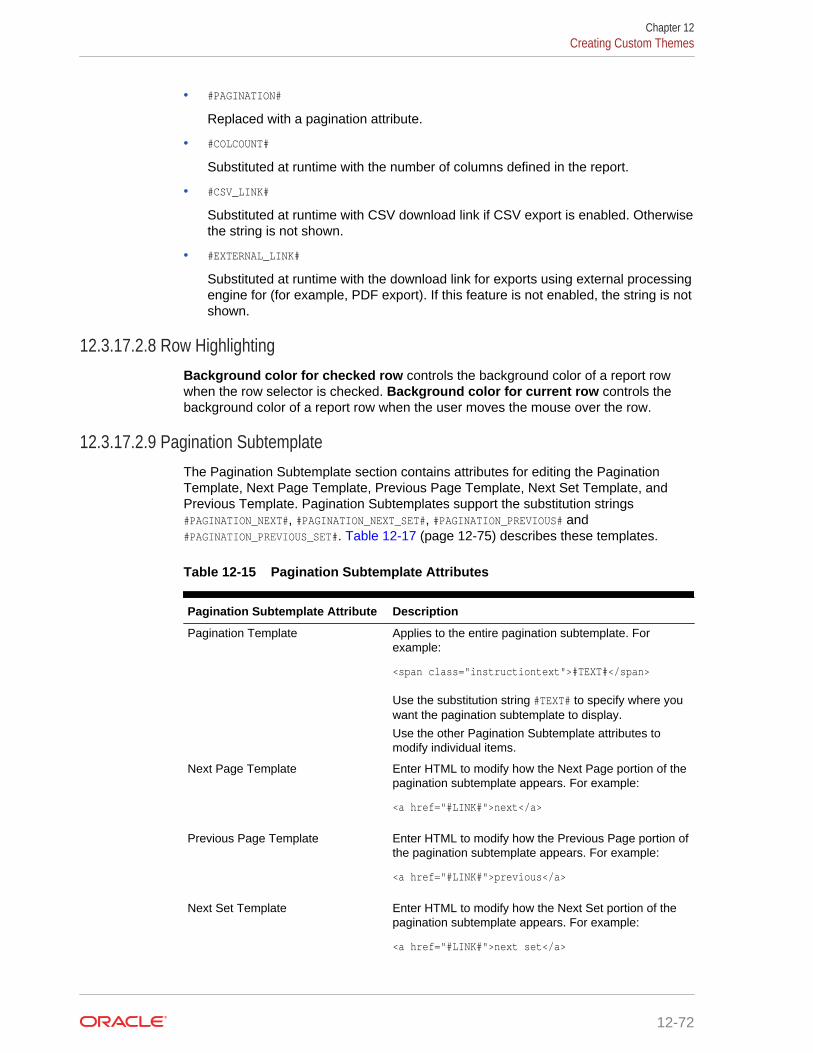
• #PAGINATION#
Replaced with a pagination attribute.
• #COLCOUNT#
Substituted at runtime with the number of columns defined in the report.
• #CSV_LINK#
Substituted at runtime with CSV download link if CSV export is enabled. Otherwisethe string is not shown.
• #EXTERNAL_LINK#
Substituted at runtime with the download link for exports using external processingengine for (for example, PDF export). If this feature is not enabled, the string is notshown.
12.3.17.2.8 Row HighlightingBackground color for checked row controls the background color of a report rowwhen the row selector is checked. Background color for current row controls thebackground color of a report row when the user moves the mouse over the row.
12.3.17.2.9 Pagination SubtemplateThe Pagination Subtemplate section contains attributes for editing the PaginationTemplate, Next Page Template, Previous Page Template, Next Set Template, andPrevious Template. Pagination Subtemplates support the substitution strings#PAGINATION_NEXT#, #PAGINATION_NEXT_SET#, #PAGINATION_PREVIOUS# and#PAGINATION_PREVIOUS_SET#. Table 12-17 (page 12-75) describes these templates.
Table 12-15 Pagination Subtemplate Attributes
Pagination Subtemplate Attribute Description
Pagination Template Applies to the entire pagination subtemplate. Forexample:
<span class="instructiontext">#TEXT#</span>
Use the substitution string #TEXT# to specify where youwant the pagination subtemplate to display.
Use the other Pagination Subtemplate attributes tomodify individual items.
Next Page Template Enter HTML to modify how the Next Page portion of thepagination subtemplate appears. For example:
<a href="#LINK#">next</a>
Previous Page Template Enter HTML to modify how the Previous Page portion ofthe pagination subtemplate appears. For example:
<a href="#LINK#">previous</a>
Next Set Template Enter HTML to modify how the Next Set portion of thepagination subtemplate appears. For example:
<a href="#LINK#">next set</a>
Chapter 12Creating Custom Themes
12-72
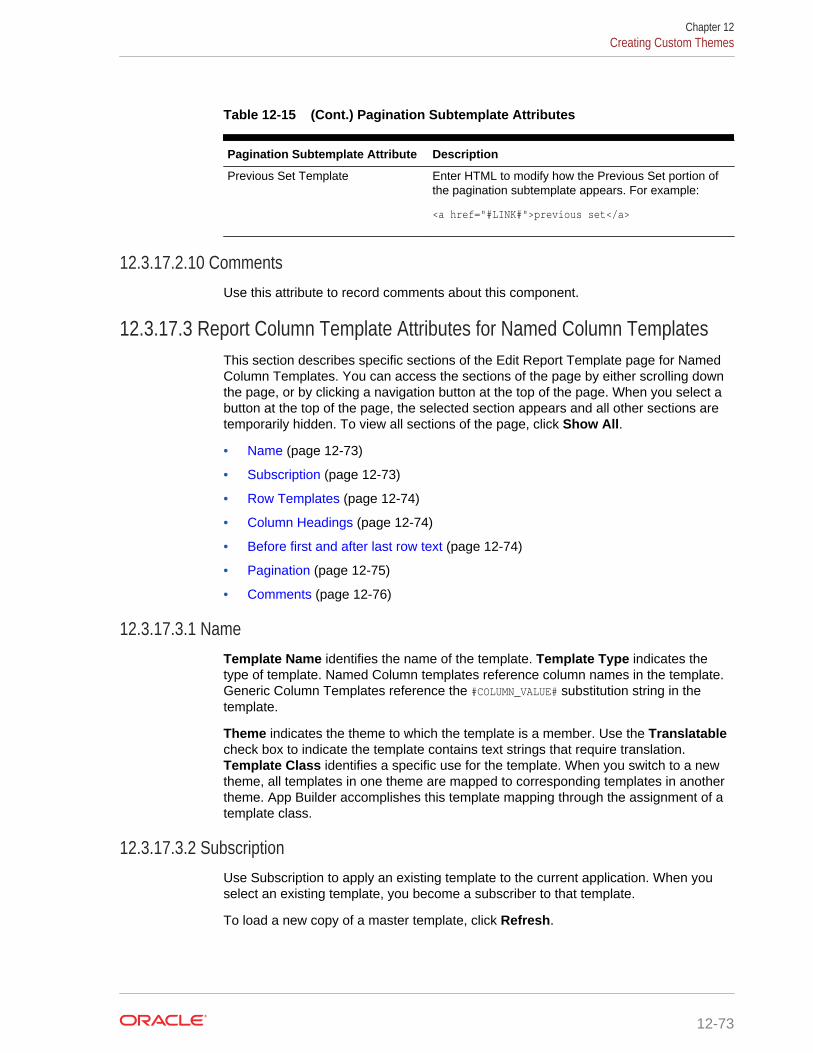
Table 12-15 (Cont.) Pagination Subtemplate Attributes
Pagination Subtemplate Attribute Description
Previous Set Template Enter HTML to modify how the Previous Set portion ofthe pagination subtemplate appears. For example:
<a href="#LINK#">previous set</a>
12.3.17.2.10 CommentsUse this attribute to record comments about this component.
12.3.17.3 Report Column Template Attributes for Named Column TemplatesThis section describes specific sections of the Edit Report Template page for NamedColumn Templates. You can access the sections of the page by either scrolling downthe page, or by clicking a navigation button at the top of the page. When you select abutton at the top of the page, the selected section appears and all other sections aretemporarily hidden. To view all sections of the page, click Show All.
• Name (page 12-73)
• Subscription (page 12-73)
• Row Templates (page 12-74)
• Column Headings (page 12-74)
• Before first and after last row text (page 12-74)
• Pagination (page 12-75)
• Comments (page 12-76)
12.3.17.3.1 NameTemplate Name identifies the name of the template. Template Type indicates thetype of template. Named Column templates reference column names in the template.Generic Column Templates reference the #COLUMN_VALUE# substitution string in thetemplate.
Theme indicates the theme to which the template is a member. Use the Translatablecheck box to indicate the template contains text strings that require translation.Template Class identifies a specific use for the template. When you switch to a newtheme, all templates in one theme are mapped to corresponding templates in anothertheme. App Builder accomplishes this template mapping through the assignment of atemplate class.
12.3.17.3.2 SubscriptionUse Subscription to apply an existing template to the current application. When youselect an existing template, you become a subscriber to that template.
To load a new copy of a master template, click Refresh.
Chapter 12Creating Custom Themes
12-73
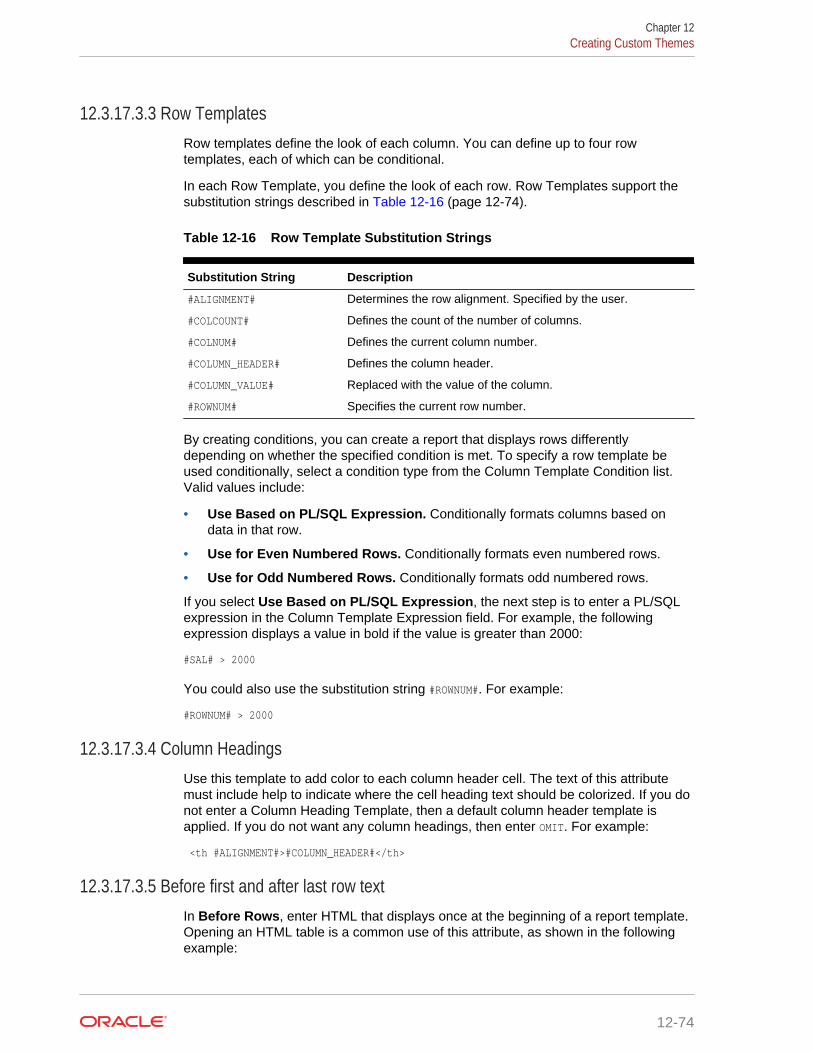
12.3.17.3.3 Row TemplatesRow templates define the look of each column. You can define up to four rowtemplates, each of which can be conditional.
In each Row Template, you define the look of each row. Row Templates support thesubstitution strings described in Table 12-16 (page 12-74).
Table 12-16 Row Template Substitution Strings
Substitution String Description
#ALIGNMENT# Determines the row alignment. Specified by the user.
#COLCOUNT# Defines the count of the number of columns.
#COLNUM# Defines the current column number.
#COLUMN_HEADER# Defines the column header.
#COLUMN_VALUE# Replaced with the value of the column.
#ROWNUM# Specifies the current row number.
By creating conditions, you can create a report that displays rows differentlydepending on whether the specified condition is met. To specify a row template beused conditionally, select a condition type from the Column Template Condition list.Valid values include:
• Use Based on PL/SQL Expression. Conditionally formats columns based ondata in that row.
• Use for Even Numbered Rows. Conditionally formats even numbered rows.
• Use for Odd Numbered Rows. Conditionally formats odd numbered rows.
If you select Use Based on PL/SQL Expression, the next step is to enter a PL/SQLexpression in the Column Template Expression field. For example, the followingexpression displays a value in bold if the value is greater than 2000:
#SAL# > 2000
You could also use the substitution string #ROWNUM#. For example:
#ROWNUM# > 2000
12.3.17.3.4 Column HeadingsUse this template to add color to each column header cell. The text of this attributemust include help to indicate where the cell heading text should be colorized. If you donot enter a Column Heading Template, then a default column header template isapplied. If you do not want any column headings, then enter OMIT. For example:
<th #ALIGNMENT#>#COLUMN_HEADER#</th>
12.3.17.3.5 Before first and after last row textIn Before Rows, enter HTML that displays once at the beginning of a report template.Opening an HTML table is a common use of this attribute, as shown in the followingexample:
Chapter 12Creating Custom Themes
12-74
<table>
You can identify column headers using the syntax #1#, #2#, #3#. For example:
<th>#1#</th><th>#2#</th><th>#3#</th>
You can include pagination above a report by including the substitution string#TOP_PAGINATION#. This substitution string generates HTML that starts with an opening<tr> tag and ends with a closing </tr> tag. For example, to include an open table tagand #TOP_PAGINATION# substitution string, you would enter the following:
<table>#TOP_PAGINATION#
You can also include the substitution string #CSV_LINK# to include support for exportingyour report to CSV format, a format compatible with most spreadsheet programs.
Use After Rows to specify text that should display after the last row. A common use ofthis attribute is to close the HTML table tag. For example:
</table>
The After Rows attribute supports the following substitution strings:
• #PAGINATION#
Replaced with a pagination attribute.
• #COLCOUNT#
Substituted at runtime with the number of columns defined in the report.
12.3.17.3.6 PaginationThe Pagination section contains attributes for editing the Pagination Template, NextPage Template, Previous Page Template, Next Set Template, and Previous Template.Pagination Subtemplates support the substitution strings #PAGINATION_NEXT#,#PAGINATION_NEXT_SET#, #PAGINATION_PREVIOUS# and #PAGINATION_PREVIOUS_SET#. Table 12-17 (page 12-75) describes these templates.
Table 12-17 Pagination Subtemplate Attributes
Pagination Subtemplate Attribute Description
Pagination Template Applies to the entire pagination subtemplate. Forexample:
<span class="instructiontext">#TEXT#</span>
Use the substitution string #TEXT# to specify where youwant the pagination subtemplate to display.
Use the other Pagination Subtemplate attributes tomodify individual items.
Next Page Template Enter HTML to modify how the Next Page portion of thepagination subtemplate appears. For example:
<a href="#LINK#">next</a>
Chapter 12Creating Custom Themes
12-75
Table 12-17 (Cont.) Pagination Subtemplate Attributes
Pagination Subtemplate Attribute Description
Previous Page Template Enter HTML to modify how the Previous Page portion ofthe pagination subtemplate appears. For example:
<a href="#LINK#">previous</a>
Next Set Template Enter HTML to modify how the Next Set portion of thepagination subtemplate appears. For example:
<a href="#LINK#">next set</a>
Previous Set Template Enter HTML to modify how the Previous Set portion ofthe pagination subtemplate appears. For example:
<a href="#LINK#">previous set</a>
12.3.17.3.7 CommentsUse this attribute to record comments about this component.
12.3.17.4 About Using JavaScript in Column TemplatesYou can conditionally display HTML depending upon values in the database usingJavaScript. The following example displays an HTML row only if the GROUP_DESC querycolumn is not null:
<script language="javascript">IF ( "#GROUP_DESC#" != "" )document.writeln( "<TR>;<TD BGCOLOR=#336699>;</TD></TR></TR><TD>#GROUP_DESC#</TD> </TR>" ); </TR>" );
12.4 Using Custom Cascading Style SheetsUpload or reference a cascading style sheet.
A cascading style sheet (CSS) enables a developer to control the style of a web pagewithout changing its structure. When used properly, a CSS separates visual attributessuch as color, margins, and fonts from the structure of the HTML document. OracleApplication Express includes themes that contain templates that reference their ownCSS. The style rules defined in each CSS for a particular theme also determine theway reports and regions display.
Chapter 12Using Custom Cascading Style Sheets
12-76
Tip:
If your application uses Universal Theme - 42, you can also take advantageof theme styles and update the appearance of your application using ThemeRoller. See "Using Theme Styles and Theme Roller (page 12-3)" and "UsingTheme Roller (page 12-6)."
• About Uploading Cascading Style Sheets (page 12-77)
• Referencing an Uploaded Cascading Style Sheet in the Page Template(page 12-77)
12.4.1 About Uploading Cascading Style SheetsYou can upload files (including CSS files) for use by a specific application or allapplications within a workspace. To learn more, see "Managing Static Application Files(page 17-27)" and "Managing Static Application Files (page 17-27)."
12.4.2 Referencing an Uploaded Cascading Style Sheet in the PageTemplate
You can reference an uploaded cascading style sheet within the Header section of thepage template. You use the Header section to enter the HTML that makes up the<HEAD> section of the HTML document.
To reference an uploaded cascading style sheet:
1. On the Workspace home page, click the App Builder icon.
2. Select an application.
3. Click Shared Components.
4. Under User Interface, select Themes.
The Themes page appears.
5. Select a theme.
6. On the Tasks list, click View Templates.
7. Select the name of the page template you want to edit.
8. Use a <link> tag within the Header section to reference the appropriate stylesheet.
To reference an uploaded file that is associated with a specific application, youwould use the substitution string #APP_IMAGES#. For example:
<html><head> <title>#TITLE#</title> #HEAD# <link rel="stylesheet" href="#APP_IMAGES#sample2.css" type="text/css"></head>...
Chapter 12Using Custom Cascading Style Sheets
12-77

To reference an uploaded file that is associated with a specific workspace, youwould use the substitution string #WORKSPACE_IMAGES#. For example:
<html><head> <title>#TITLE#</title> #HEAD# <link rel="stylesheet" href="#WORKSPACE_IMAGES#sample3.css" type="text/css"></head>...
Chapter 12Using Custom Cascading Style Sheets
12-78
13Controlling Page Layout
Developers can customize their database application's page layout by using a globalpage, customizing regions, and editing item attributes.
This section also describes how to manage images and static files as well as explainshow to render HTML using custom POL/SQL.
• About Page Layout in Oracle Application Express (page 13-1)The Application Express engine renders pages by combining templates withapplication components defined by the developer and data in the database.
• Optimizing a Page for Printing (page 13-2)You can optimize a page for printing by creating a specific Printer Friendlytemplate and selecting that template on the Create/Edit Theme page.
• Creating a Global Page to Display Components on Every Page (page 13-3)A global page functions as a master page.
• Managing Regions (page 13-4)Developers create regions to function as containers for content.
• About Incorporating Content from Other Web Sites (page 13-13)To incorporate content from other servers, you can create a region based on aURL to display content.
• About Managing Images (page 13-14)To reference an image within an application, you must upload it to the static filerepository. During the upload process, you specify whether the file is available toall applications or just a specific application.
• Rendering HTML Using Custom PL/SQL (page 13-14)If you must generate specific HTML content not handled by Oracle ApplicationExpress forms, reports, and charts, you can use the PL/SQL region type.
See Also:
• "Adding Navigation (page 15-1)"
• "Managing the Application User Interface (page 6-45)"
• "Using Themes and Theme Styles (page 12-1)"
13.1 About Page Layout in Oracle Application ExpressThe Application Express engine renders pages by combining templates withapplication components defined by the developer and data in the database.
The overall framework (or structure of a page) is determined by the page template. Forexample, the page template controls if a page uses tabs and a navigation bar. It can
13-1
also define if a page includes a bar on the left side that serves as a placeholder fornavigation or secondary content. Finally, a page template can include definitions ofregion positions, which enable precise control over placement of regions using HTMLtables or style sheet definitions. The page template itself is composed of HTMLcombined with substitution strings, which are substituted with the appropriatecomponents at runtime.
As a developer, you add content to a page by creating a region. A region is an area ofa page that serves as a container for content. Each region contains a different type ofcontent such as HTML, a report, a form, a chart, a list, a breadcrumb, PL/SQL, a tree,a URL, or a calendar. You position a region either relative to other regions (that is,based on its sequence number and column), or by using a region position defined inthe page template. The style of the region is also controlled by the region template.Like the page template, the region template defines the structure of the area that theregion takes up on a page. It defines if the region title is displayed and where it isdisplayed relative to the main content or the body. A region can also define absolutepositions for buttons.
13.2 Optimizing a Page for PrintingYou can optimize a page for printing by creating a specific Printer Friendly templateand selecting that template on the Create/Edit Theme page.
Generally, a Printer Friendly template optimizes a page for printing. For example, aPrinter Friendly template might:
• Not display tabs or navigation bars
• Display items as text instead of as form elements
If the theme you select does not include a printer friendly template, you can create aPrinter Friendly template by creating a new page template.
• Selecting a Printer Friendly Template for an Application (page 13-2)
• Using f?p Syntax to Toggle to Printer Friendly Mode (page 13-3)
See Also:
"Editing Themes (page 12-10)" and "Creating a Theme (page 12-20)"
13.2.1 Selecting a Printer Friendly Template for an ApplicationTo select a Printer Friendly template:
1. Navigate to the Themes page:
a. On the Workspace home page, click the App Builder icon.
b. Select an application.
c. Click Shared Components.
d. Under User Interface, select Themes.
The Themes page appears.
Chapter 13Optimizing a Page for Printing
13-2
2. Select a theme.
3. Scroll down to Component Defaults.
4. Make a selection from the Printer Friendly Page list.
5. Confirm your changes and click Apply Changes.
13.2.2 Using f?p Syntax to Toggle to Printer Friendly ModeOnce you create a Printer Friendly template and select it, you can use f?p syntax totoggle to Printer Friendly mode. Including the ninth f?p syntax argument(PrinterFriendly) renders the page in printer friendly mode (optimizing printed output).For example, you could include this argument when coding a link or creating anavigation bar icon.
13.3 Creating a Global Page to Display Components onEvery Page
A global page functions as a master page.
A global page (previously referred to as Page 0) functions as a master page.Developers can create a separate Global page for each user interface. The ApplicationExpress engine renders all components you add to a Global page on every pagewithin your application. You can further control whether the Application Express enginerenders a component or runs a computation, validation, or process by definingconditions.
• Creating a Global Page (page 13-3)
• Navigating to the Global Page (page 13-4)
See Also:
• "Managing Pages in a Database Application (page 7-1)"
• "Understanding Conditional Rendering and Processing (page 2-6)"
• "Available Conditions (page C-1)"
13.3.1 Creating a Global PageTo create a Global page:
1. On the Workspace home page, click App Builder.
2. Select an application.
The Application home page appears.
3. Click the Create Page button.
4. For Create a Page:
Chapter 13Creating a Global Page to Display Components on Every Page
13-3
a. User Interface - Select a user interface for the page.
b. Select a page type - Select Global Page.
Note that the Global Page option only appears if the application does not havea Global page for the specified user interface.
5. For Page Number, enter an integer value that identifies a page within theapplication.
6. Click Finish.
13.3.2 Navigating to the Global PageTo navigate to the Global page:
1. On the Workspace home page, click the App Builder icon.
The App Builder home page appears.
2. Select an application.
The Application home page appears.
3. Select Global Page (or Page Zero is this is an older application).
13.4 Managing RegionsDevelopers create regions to function as containers for content.
• About Regions (page 13-4)
• Creating a Region (page 13-5)
• Editing Regions (page 13-6)
• Copying a Region (page 13-12)
• Deleting Regions (page 13-12)
13.4.1 About RegionsEach page in an Oracle Application Express application contains one or more regions.A region is a area on a page that serves as a container for content. Each page canhave any number of regions. You control the appearance of a region through a specificregion template. The region template controls the look of the region, the size,determines whether there is a border or a background color, and what type of fontsdisplay. A region template also determines the standard placement for any buttonsplaced in region positions.
You can use regions to group page controls (such as items or buttons). You cancreate simple regions that do not generate additional HTML, or create elaborateregions that frame content within HTML tables or images.
Regions display in sequence in the page template body or can be placed explicitly intoregion positions. The page structure can be defined using HTML tables or morecommonly today using DIV tags.
Chapter 13Managing Regions
13-4
13.4.2 Creating a Region
Tip:
You can also create a form or breadcrumb region from the Page Designertoolbar. On the Page Designer toolbar, click the Create menu and thenselecting Form Region or Breadcrumb Region.
To create a region in Page Designer:
1. View the page in Page Designer:
a. On the Workspace home page, click the App Builder icon.
b. Select an application.
c. Select a page.
Page Designer appears.
2. In the Gallery at the bottom of the central pane, locate the type of region you wantto create. Pass the cursor over a control or component to view a tooltip thatdescribes it.
Tip:
In addition to dragging and dropping components from the Gallery, youcan also right-click a component in the Gallery to view a context menu.Select Add To and then the location where you want to add thecomponent.
3. Click and hold the mouse on the region to be created and drag it the desiredlocation in the Layout tab.
When the mouse is over the appropriate location, the Layout tab displays as adarkened yellow tile. Release the mouse to drop the component. You can onlydrop components into appropriate drop positions, as determined by the componenttype.
Based on the type of component you add, Page Designer indicates what actionsare required next. The Messages tab displays a red or yellow badge indicating thenumber of messages you need to address.
4. Edit the appropriate attributes in the Property Editor.
Tip:
To view help for an attribute, select the attribute in the Property Editorand click the Help tab in the central pane.
5. Click Save or Save and Run Page.
Chapter 13Managing Regions
13-5
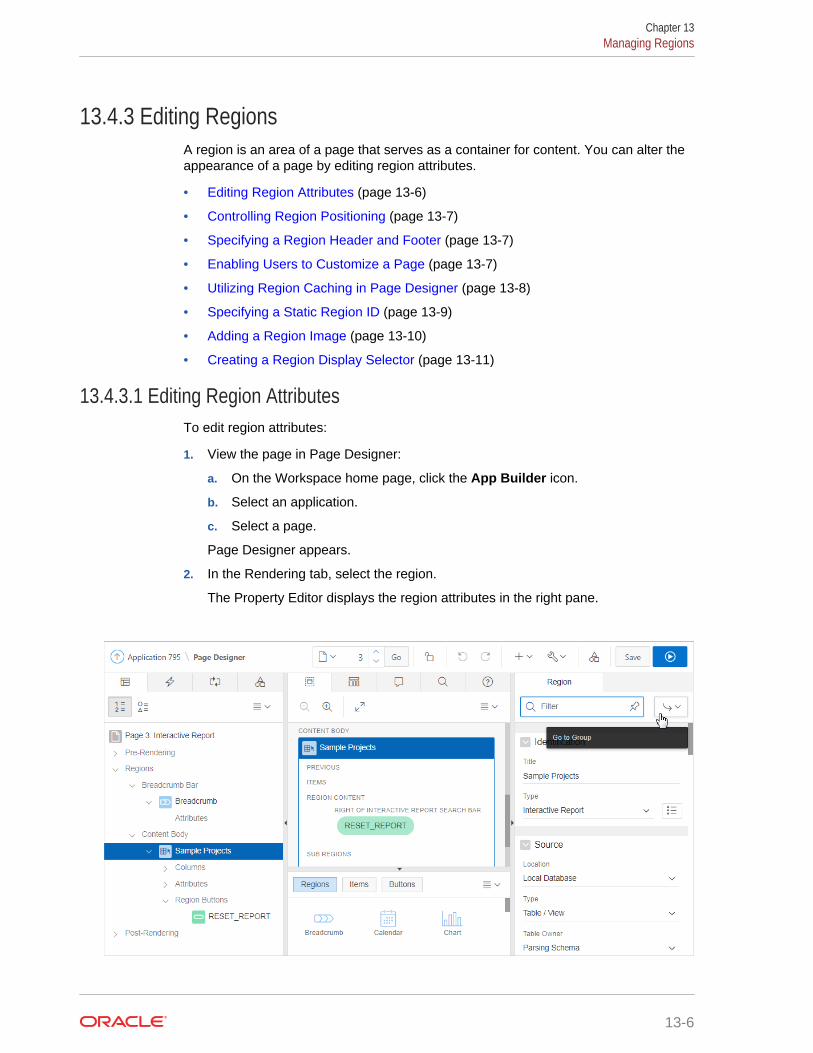
13.4.3 Editing RegionsA region is an area of a page that serves as a container for content. You can alter theappearance of a page by editing region attributes.
• Editing Region Attributes (page 13-6)
• Controlling Region Positioning (page 13-7)
• Specifying a Region Header and Footer (page 13-7)
• Enabling Users to Customize a Page (page 13-7)
• Utilizing Region Caching in Page Designer (page 13-8)
• Specifying a Static Region ID (page 13-9)
• Adding a Region Image (page 13-10)
• Creating a Region Display Selector (page 13-11)
13.4.3.1 Editing Region AttributesTo edit region attributes:
1. View the page in Page Designer:
a. On the Workspace home page, click the App Builder icon.
b. Select an application.
c. Select a page.
Page Designer appears.
2. In the Rendering tab, select the region.
The Property Editor displays the region attributes in the right pane.
Chapter 13Managing Regions
13-6
3. To find a group or attribute:
• Search for the group or attribute - Enter keywords in the Filter Propertiesfield. The Property Editor displays the group or attributes. To return to thedefault display, delete the keywords.
• Use Go to Group - Click Go to Group and select the group. To return thedefault display, click Go to Group again and select Expand All.
4. Edit the appropriate attributes in the Property Editor.
To learn more about an attribute, see field-level Help.
5. To save your changes click Save. To save and run the page, click Save and RunPage.
13.4.3.2 Controlling Region PositioningWhen you create a region, you can specify its position in the Property Editor by editingthe Layout, Position attribute. The template positions defined within the current themefor the page's user interface determine the available selections.
13.4.3.3 Specifying a Region Header and FooterIn addition to the body content of a region, you can specify additional HTML to beplaced above and below a region by editing the Header and Footer attributes in theProperty Editor.
For all report regions, the substitution string #TIMING# shows the elapsed time inseconds used when rendering a region. You can use this substitution string fordebugging purposes.
For classic report regions, the region footer supports the following substitution strings:
• #ROWS_FETCHED# shows the number of rows fetched by the Oracle ApplicationExpress reporting engine (the page size). You can use these substitution strings todisplay customized messages to the user. For example:
Fetched #ROWS_FETCHED# rows in #TIMING# seconds.
• #TOTAL_ROWS# displays the total number of rows that satisfy a SQL query used for areport.
• #FIRST_ROW_FETCHED# and #LAST_ROW_FETCHED# display the range of rows displayed.For example:
Row(s) #FIRST_ROW_FETCHED# through #LAST_ROW_FETCHED# of #ROWS_FETCHED# displayed
13.4.3.4 Enabling Users to Customize a PageYou can use the Customization attribute to control whether display attributes in aregion can be customized by users. To use this feature, you must include the#CUSTOMIZE# substitution string in the Header, Body, or Footer section of the pagetemplate.
If at least one region supports end-user customization, a Customize link appearswherever you include the #CUSTOMIZE# substitution string in the page template. Whenusers click this link, a window appears, enabling them to display or hide regions on thepage.
Chapter 13Managing Regions
13-7
To enable end user customization:
1. View the page in Page Designer:
a. On the Workspace home page, click the App Builder icon.
b. Select an application.
c. Select a page.
Page Designer appears.
2. Select the region in the Rendering tab or the Layout tab.
The Property Editor displays attributes for the page. Attributes are organized ingroups.
3. To find a group or attribute:
• Search for the group or attribute - Enter keywords in the Filter Propertiesfield. The Property Editor displays the group or attributes. To return to thedefault display, delete the keywords.
• Use Go to Group - Click Go to Group and select the group. To return thedefault display, click Go to Group again and select Expand All.
4. Find Customization. For Customizable, select one of the following:
• Not Customizable By End Users
• Customizable and Not Shown By Default
• Customizable and Shown By Default
5. Click Save.
13.4.3.5 Utilizing Region Caching in Page DesignerEnabling region caching is an effective way to improve the performance of staticregions such as regions containing lists that do not use conditions or regionscontaining static HTML.
Tip:
Region caching is not available for interactive report regions.
• About Region Caching (page 13-9)
• Enabling Region Caching in Page Designer (page 13-9)
See Also:
"Managing Page and Region Caching" in Oracle Application ExpressAdministration Guide
Chapter 13Managing Regions
13-8
13.4.3.5.1 About Region CachingEnabling region caching is an effective way to improve the performance of staticregions such as regions containing lists that do not use conditions or regionscontaining static HTML.
When you enable region caching, the Application Express engine renders a regionfrom a cached (or stored) repository instead of rendering it dynamically. Keep in mindthat the actual session identifiers are not cached. Instead, the Application Expressengine caches a &SESSION. substitution string and the current session rendering thecached region is substituted on display. For example, if a region contains a link andthe link includes a session, the exact session is not cached to ensure that the linksworks for all sessions.
The Application Express engine only renders a region from cache if it meets thedefined condition. Additionally, regions can be cached specific to a user or cachedindependent of a user.
13.4.3.5.2 Enabling Region Caching in Page DesignerTo enable region caching:
1. View the page in Page Designer:
a. On the Workspace home page, click the App Builder icon.
b. Select an application.
c. Select a page.
Page Designer appears.
2. Select the region in the Rendering tab or the Layout tab.
The Property Editor displays attributes for the page. Attributes are organized ingroups.
3. To find a group or attribute:
• Search for the group or attribute - Enter keywords in the Filter Propertiesfield. The Property Editor displays the group or attributes. To return to thedefault display, delete the keywords.
• Use Go to Group - Click Go to Group and select the group. To return thedefault display, click Go to Group again and select Expand All.
4. Find Server Cache. For Caching, select one of the following:
• Disabled - Content is not cached and computed for each request.
• Enabled - Content is cached and utilized by all users.
• Cached by User - Content is cached specifically for each user.
• Cache by Session - Content is cached specifically for each session.
5. Click Save.
13.4.3.6 Specifying a Static Region IDSpecifying a static region ID is useful when creating custom JavaScript or cascadingstyle sheets. You can use the Static ID attribute on the Edit Region page to uniquely
Chapter 13Managing Regions
13-9
identify a region. You can then reference the region using the #REGION_STATIC_ID#substitution string in a region templates, the header, the footer, or the body.
A static region ID is included by assigning it as an HTML element ID to the regioncontainer object (that is, the table or DIV). The ID of an HTML element must be uniquefor the entire page. For example, to keep the page HTML valid you cannot have abutton and region with the same ID.
To specify a static region ID:
1. View the page in Page Designer:
a. On the Workspace home page, click the App Builder icon.
b. Select an application.
c. Select a page.
Page Designer appears.
2. Select the region in the Rendering tab or the Layout tab.
The Property Editor displays attributes for the page. Attributes are organized ingroups.
3. To find a group or attribute:
• Search for the group or attribute - Enter keywords in the Filter Propertiesfield. The Property Editor displays the group or attributes. To return to thedefault display, delete the keywords.
• Use Go to Group - Click Go to Group and select the group. To return thedefault display, click Go to Group again and select Expand All.
4. Find Advanced. Edit the Static ID attribute:
a. Find Advanced and then Static ID.
b. In Static ID, enter the static ID for this region. If defined, this is used as the IDfor the region, using the substitution string #REGION_STATIC_ID#, which can beuseful if developing custom JavaScript behavior for the region. If this is notdefined, the region generates an internal ID.
Tip:
The template must include the #REGION_STATIC_ID# substitution string, inorder for the region to utilize the static ID entered.
5. Click Save.
13.4.3.7 Adding a Region ImageUse the Region Image and Image tag attributes to add an image to the upper left sideof a region.
To add a region image:
1. View the page in Page Designer:
a. On the Workspace home page, click the App Builder icon.
b. Select an application.
Chapter 13Managing Regions
13-10
c. Select a page.
Page Designer appears.
2. Select the region in the Rendering tab or the Layout tab.
The Property Editor displays Region attributes. Attributes are organized in groups.
3. To find a group or attribute:
• Search for the group or attribute - Enter keywords in the Filter Propertiesfield. The Property Editor displays the group or attributes. To return to thedefault display, delete the keywords.
• Use Go to Group - Click Go to Group and select the group. To return thedefault display, click Go to Group again and select Expand All.
4. Find Advanced. Edit the following attributes:
• Region Image - Enter a reference to an image that displays in the upper left ofthe region. There is no control over the table tag used to display this image.
• Image Tag Attributes - Enter image tag attributes included in the imageHTML. This can be used for attributes such as height, width or image ALT text(if the image is non-decorative).
If no ALT is defined in the image tag attributes, Application Express defaults torendering the image as a decorative image, for example with an empty ALTtag.
5. Click Save.
13.4.3.8 Creating a Region Display SelectorRegion Display Selector region enables you to include show and hide controls for eachregion on a page.
To create a Region Display Selector:
1. Create the page and regions to be included in the Region Page Selector.
2. For each region to be included in the selector, set the Region Display Selectorattribute to Yes.
3. In the Gallery, right-click Region Display Selector region, select Add To, andselect the appropriate location.
Tip:
You can also drag and drop from the Gallery. From the Gallery select theRegion Display Selector region and drag it to the appropriate locationin the Layout tab.
4. To find a group or attribute:
• Search for the group or attribute - Enter keywords in the Filter Propertiesfield. The Property Editor displays the group or attributes. To return to thedefault display, delete the keywords.
• Use Go to Group - Click Go to Group and select the group. To return thedefault display, click Go to Group again and select Expand All.
Chapter 13Managing Regions
13-11
5. Edit the region attributes in the Property Editor:
a. Identification, Title - Enter a region title. The region title only displays when itis defined in the region template.
b. Advanced, Region Display Selector - Select Yes if you want this regionincluded in the Region Display Selector. This attribute is only utilized if aregion type of Region Display Selector is defined and viewable on the page.
Tip:
To learn more about an attribute, select the attribute in the PropertyEditor and click the Help tab in the central pane.
6. Click Save.
13.4.4 Copying a Region
Note:
You cannot copy a Tree region since this type of region encompasses morethan one region.
To copy a region:
1. View the page in Page Designer:
a. On the Workspace home page, click the App Builder icon.
b. Select an application.
c. Select a page.
Page Designer appears.
2. Right-click the region in Layout tab, select Copy To, and select a destination fromthe submenu.
Tip:
To copy a region to another page, select the region in the Rendering tab,right-click, and select Copy to Other Page. Follow the on-screeninstructions.
13.4.5 Deleting RegionsTo delete regions:
1. View the page in Page Designer:
a. On the Workspace home page, click the App Builder icon.
b. Select an application.
Chapter 13Managing Regions
13-12
c. Select a page.
Page Designer appears.
2. Select one or more regions in the Rendering tab.
3. Right-click and select Delete.
4. Click Save.
13.5 About Incorporating Content from Other Web SitesTo incorporate content from other servers, you can create a region based on a URL todisplay content.
Typically, pages in an application are based on data stored in an Oracle database. Forexample, suppose you wanted to reference the current Oracle stock price. You couldcreate a region of type URL based on a URL. For example:
http://quote.yahoo.com/q?d=b&s=ORCL
You could then create an item called STOCK_SYMBOL and base your region on astock price entered by the user. For example:
http://quote.yahoo.com/q?d=b&s=&STOCK_SYMBOL.
Sometimes (as is the case with the previous example) the HTML returned to theregion is more than is needed. To restrict the HTML displayed, you can use thefollowing region attributes:
• URL (discard until but not including this text)
• URL (discard after and including this text)
Tip:
The previous example may require that you set the Proxy Server applicationattribute. If you do not set the Proxy Server application attribute, you get anerror message. Oracle Application Express uses the Oracleutl_http.request_pieces function to obtain the HTML generated from thegiven URL. See "Editing Application Attributes (page 6-23)."
Developers can also use the Region attribute Inclusion Mode to control how OracleApplication Express retrieves and displays the content. Options include:
• IFrame - The browser displays the remote content in an HTML iframe. OracleApplication Express does not have to fetch this content into the database fordisplay.
• Inline (escape special characters) - Causes the database to load the remotecontent at page rendering time. It then displays the fetched data inline, at theposition of the region. Special HTML characters in the content are escaped, toprevent cross site scripting.
• Inline (no escaping) - This mode is similar to Inline (escape special characters)except the HTML characters are not escaped. Developers should only use thismode if the remote content is always safe.
Chapter 13About Incorporating Content from Other Web Sites
13-13
See Also:
"Editing Region Attributes (page 13-6)"
Working with SSL-Enabled URLs
If you call a SSL-enabled URL (for example, by invoking a Web service), or create aregion of type URL that is SSL-enabled, you must create a wallet. A wallet is apassword-protected container that stores authentication and signing credentials(including private keys, certificates, and trusted certificates) needed by SSL.
Tip:
See "Configuring Wallet Information" in Oracle Application ExpressAdministration Guide
13.6 About Managing ImagesTo reference an image within an application, you must upload it to the static filerepository. During the upload process, you specify whether the file is available to allapplications or just a specific application.
13.7 Rendering HTML Using Custom PL/SQLIf you must generate specific HTML content not handled by Oracle ApplicationExpress forms, reports, and charts, you can use the PL/SQL region type.
To generate HTML in this type of region, you need to use the PL/SQL Web Toolkit.You can reference session state using bind variable syntax. Keep in mind that whenyou generate HTML in this way, you do not get the same consistency and controlprovided with templates.
To give you more control over HTML dynamically generated within a region, you canuse PL/SQL. For example, to print the current date, you could create a region with thefollowing source:
htp.p(TO_CHAR(SYSDATE,'Day Month DD, YYYY'));
This next example accesses tables:
DECLARE l_max_sal NUMBER;BEGIN SELECT max(sal) INTO l_max_sal FROM emp; htp.p('The maximum salary is: '||TO_CHAR(l_max_sal,'999,999.00'));END;
Chapter 13About Managing Images
13-14
14Managing Database Application Controls
Developers can create and manage a variety of database application page controls,including page-level items, dynamic actions, buttons, and trees.
• Managing Page-Level Items (page 14-1)An item is part of an HTML form. Examples of page-level item include a checkbox, a date picker, plain text, a file browse field, a popup list of values, a select list,a text area, and so on.
• Managing Dynamic Actions (page 14-20)Dynamic actions enable developers to define complex client-side behaviordeclaratively without the need for JavaScript.
• Managing Buttons (page 14-29)You can use buttons to direct users to a specific page or URL, or to post orprocess information (for example, by creating Create, Cancel, Next, Previous, orDelete buttons). You can also configure buttons to display conditionally or warnusers of unsaved changes.
• Managing Trees (page 14-34)Trees to display hierarchical information in a clear, easy-to-use format. You cancreate a tree control using a SQL query.
• About Incorporating JavaScript into an Application (page 14-40)Oracle Application Express includes multiple built-in interfaces especially designedfor adding JavaScript.
See Also:
• "Controlling Page Layout (page 13-1)"
• "Adding Navigation (page 15-1)"
• "Manually Refreshing Oracle Application Express Components(page 19-13)"
14.1 Managing Page-Level ItemsAn item is part of an HTML form. Examples of page-level item include a check box, adate picker, plain text, a file browse field, a popup list of values, a select list, a textarea, and so on.
This section describes what a page-level item is, how to view existing page-levelitems, how to create new page-level items, and how to edit an item in Page Designerto change its appearance or behavior.
14-1
• Understanding Page-Level Items (page 14-16)An item is part of an HTML form such as a check box, date picker, display as text,file browse field, popup list of values, select list, or a text area.
• Viewing Page-Level Items (page 14-2)Learn how to view page-level attributes in Page Designer.
• Creating Page-Level Items (page 14-3)You create page-level items in Page Designer in either the Rendering tab or byadding an item from the Gallery.
• Editing Page-Level Items (page 14-8)Developers edit Item attributes in Page Designer to control how items display on apage.
14.1.2 Viewing Page-Level ItemsLearn how to view page-level attributes in Page Designer.
Item attributes affect the display of items on a page. For example, these attributes canimpact where a label displays, how large an item is, and if the item displays next to orbelow the previous item.
To view page-level attributes in Page Designer:
1. View the page in Page Designer:
a. On the Workspace home page, click the App Builder icon.
b. Select an application.
c. Select a page.
Page Designer appears.
2. In either the Rendering tab or the Layout tab, select the item to edit.
The Property Editor changes to display the attributes. Attributes are organized ingroups.
3. To find a group or attribute:
• Search for the group or attribute - Enter keywords in the Filter Propertiesfield. The Property Editor displays the group or attributes. To return to thedefault display, delete the keywords.
• Use Go to Group - Click Go to Group and select the group. To return thedefault display, click Go to Group again and select Expand All.
4. Edit the appropriate attributes in the Property Editor.
Tip:
To learn more about an attribute, select the attribute in the PropertyEditor and click the Help tab in the center pane.
5. Click Save.
6. Click Save and Run to view the page.
Chapter 14Managing Page-Level Items
14-2
14.1.3 Creating Page-Level ItemsYou create page-level items in Page Designer in either the Rendering tab or by addingan item from the Gallery.
• Creating a Page-Level Item from the Rendering Tab (page 14-3)
• Adding a Page-Level Item from the Gallery (page 14-3)
• Creating a Static List of Values (page 14-4)
• Creating a Cascading List of Values (page 14-6)
• Creating a Shuttle Item (page 14-7)
14.1.3.1 Creating a Page-Level Item from the Rendering TabTo create a page-level item from the Rendering tab:
1. View the page to contain the item in Page Designer.
2. If necessary, create a region to contain the item.
3. In the Rendering tab, right-click the region to contain the item and select CreatePage Item.
The Property Editor displays attributes for the item. Attributes are organized ingroups.
4. To find a group or attribute:
• Search for the group or attribute - Enter keywords in the Filter Propertiesfield. The Property Editor displays the group or attributes. To return to thedefault display, delete the keywords.
• Use Go to Group - Click Go to Group and select the group. To return thedefault display, click Go to Group again and select Expand All.
5. Edit the appropriate attributes in the Property Editor.
Tip:
To learn more about an attribute, select the attribute in the PropertyEditor and click the Help tab in the center pane.
6. Click Save.
14.1.3.2 Adding a Page-Level Item from the GalleryTo create a page-level item by adding if from the Gallery:
1. View the page in Page Designer:
a. On the Workspace home page, click the App Builder icon.
b. Select an application.
c. Select a page.
Page Designer appears.
Chapter 14Managing Page-Level Items
14-3
2. If necessary, create a region to contain the item.
3. In the central pane, click Layout and then the Items tab in the Gallery.
Passing the cursor over an item displays a tooltip that describes it.
4. Select an item and drag it to the appropriate location in the Layout tab.
Tip:
You also right-click the item, click Add To, and select the appropriatelocation.
The Property Editor displays Page Item attributes.
The Messages tab displays a red or yellow badge to identify messages you needto address. Selecting a message displays the associated attribute in the PropertyEditor. You must address red error message before you can save.
5. Edit the appropriate attributes in the Property Editor.
Tip:
To learn more about an attribute, select the attribute in the PropertyEditor and click the Help tab in the central pane.
6. Click Save.
14.1.3.3 Creating a Static List of ValuesOne way to create a static list of values is to edit an item's List of Values definition.Note that this type of list of values is not reusable. As a best practice, create a list ofvalues as a shared component whenever possible.
To create a static list of values:
1. View the page in Page Designer:
a. On the Workspace home page, click the App Builder icon.
b. Select an application.
c. Select a page.
Page Designer appears.
2. Create a new item.
The Property Editor displays the Page Item attributes. Attributes are organized ingroups.
3. To find a group or attribute:
• Search for the group or attribute - Enter keywords in the Filter Propertiesfield. The Property Editor displays the group or attributes. To return to thedefault display, delete the keywords.
• Use Go to Group - Click Go to Group and select the group. To return thedefault display, click Go to Group again and select Expand All.
Chapter 14Managing Page-Level Items
14-4
4. Edit the appropriate attributes in the Property Editor.
Tip:
To learn more about an attribute, select the attribute in the PropertyEditor and click the Help tab in the center pane.
5. Under Identification:
a. Name - Enter the name of this item. Item names must be valid Oracleidentifiers. Oracle recommends that item names be no longer then 30 bytes sothey can be used as bind variables in SQL Queries.
b. Type - Select Select List.
6. Under List of Values:
a. Name - Select Static Values.
b. Static Values - Enter the text for this static list of values using the followingsyntax:
STATIC[2]:Display Value[;Return Value],Display Value[;Return Value]
Where:
• The first keyword may be STATIC or STATIC2.
If the text starts with STATIC:, the list values displays alphabetically.Alternatively, if the text starts with STATIC2:, the list values displays in thesame order they are specified in the text.
• A semicolon separates the display value from the return value in eachentry.
• Return Value is optional. If a Return Value is not included, the return valueequals the display value.
To see examples, click the Help tab in the central pane.
7. Click Save.
8. Click Save and Run to view the page.
• Example 1: Four Values Displayed in Alphabetical Order (page 14-5)
• Example 2: Ten Values Displayed in the Order Listed (page 14-6)
• Example 3: A List of Values with Having Both a Return and Display Value(page 14-6)
See Also:
"Creating Lists of Values at the Application Level (page 17-11)" and "AboutItem Naming Conventions (page 14-17)"
14.1.3.3.1 Example 1: Four Values Displayed in Alphabetical OrderIn this example, the list of values has four values (Cow, Dog, Cat, and Lion) thatdisplay in alphabetical order. The return value of each entry equals the display value.
Chapter 14Managing Page-Level Items
14-5
STATIC:Cow,Dog,Cat,Lion
14.1.3.3.2 Example 2: Ten Values Displayed in the Order ListedIn this example, the list of values has ten values that display in the order listed in thedefinition. The return value of each entry equals the display value.
STATIC2:10,15,20,25,50,100,200,500,1000,10000
14.1.3.3.3 Example 3: A List of Values with Having Both a Return and Display ValueIn this example, the list of values has two values: Yes and No (the display value Yes andits return value Y, and the display value No and its return value N).
STATIC:Yes;Y,No;N
14.1.3.4 Creating a Cascading List of ValuesBy creating a cascading list of values (LOV), one item on a page determines the list ofvalues for another item. App Builder includes cascading LOV support for the followingitem types: Select List, Shuttle, Checkbox, Radio Group, Popup LOV, and ListManager.
You create a cascading LOV by creating two items. To populate the second item, youspecify a Cascading LOV Parent Item when running the Create Item Wizard or byediting the item's attributes.
The following example demonstrates how to create two related select lists where thevalue of the first list populates the second.
To create a cascading list of values:
1. Create the first item and name it P1_DEPTNO:
a. Create a select list item.
b. For Identification, Type, select Select List.
c. For Identification:
• Name - Enter:
P1_DEPTNO
• Type - Select Select List.
d. For Label:
• Label - Enter:
Department
e. For List of Values:
• Type - Select SQL Query.
• For SQL Query, enter:
SELECT dname as d, deptno as r FROM dept ORDER BY dname
• Display Null Value - Select Yes.
Chapter 14Managing Page-Level Items
14-6
• Null Display Value - Enter - Select:
- Select Department -
f. Accept the remaining defaults.
g. Click Save.
2. Create the second item named P1_EMPNO:
a. Create a select list item.
b. For Identification, Type, select Select List.
c. For Identification:
• Name - Enter:
P1_EMPNO
• Type - Select Select List.
d. For Label:
• Label - Enter:
Employee
e. For List of Values:
• Type - Select SQL Query.
• For SQL Query, enter:
SELECT ename as d, empno as r FROM emp WHERE deptno = :P1_DEPTNO ORDER BY ename
• Display Null Value - Select Yes.
• Null Display Value - Enter - Select:
- Select Employee -
f. Accept the remaining defaults.
g. Click Save.
Two select lists appear. Making a selection in the Department select list, determineswhich individuals display in the Employees select list.
14.1.3.5 Creating a Shuttle ItemThis section demonstrates how to create shuttle item type. First, you first create areport and form on the DEPT table that shows which employees are assigned to a givendepartment. Second, you create a shuttle item that lists employees alphabetically tomake it easier to assign employees to a department.
• Creating a Shuttle Item on the Form Page in Page Designer (page 14-7)
14.1.3.5.1 Creating a Shuttle Item on the Form Page in Page DesignerTo create a shuttle on the form page:
1. View the form page in Page Designer.
Chapter 14Managing Page-Level Items
14-7

2. In Page Rendering, right-click region containing the form and select Create PageItem.
Next, enter attributes in Property Editor - Page Item.
3. Under Identification:
a. Name - Enter the name of this item (for example, PX_EMP_LIST).
Tip:
In this example, PX in the item name (for example P2_EMP_LIST)indicates the page on which the item resides.
b. Type - Select Shuttle.
4. Under List of Values:
a. Type - Select SQL Query.
b. SQL Statement - Enter the SQL query definition to populate this list ofvalues. For example:
SELECT ename, empno FROM emp ORDER BY 1
5. Under Source:
• Type - Select SQL Query (return colon separated value)
• Item Source Value - Enter the SQL Query that returns one or more rows to beused as the source for this item value. If the result contains multiple rows thenthe value from each row is formed into a single colon delimited value. Forexample:
SELECT empno FROM emp WHERE deptno = :P8_DEPTNO ORDER BY ename
6. Click Save.
7. Click Save and Run to view the page.
14.1.4 Editing Page-Level ItemsDevelopers edit Item attributes in Page Designer to control how items display on apage.
For example, item attributes can determine where a label displays, how large an itemis, and if the item displays next to or below the previous item. Item attributes alsocontrol item behavior such as the item’s default value, whether the item displaysconditionally, or if the item is read-only.
• Editing Page Item Attributes in the Property Editor (page 14-9)
• Defining Default Values for Page Items (page 14-9)
• Configuring Page Item Security (page 14-10)
• Creating a Quick Pick Selection (page 14-12)
• Displaying Conditional Page Items (page 14-13)
• Displaying Read Only Page Items (page 14-13)
• Applying a Format Mask to an Item (page 14-14)
Chapter 14Managing Page-Level Items
14-8
• Configuring Item Attributes to Warn Users of Unsaved Changes (page 14-15)
• Viewing Item Utilities (page 14-16)
14.1.4.1 Editing Page Item Attributes in the Property EditorTo edit item attributes in the Property Editor:
1. View the page in Page Designer:
a. On the Workspace home page, click the App Builder icon.
b. Select an application.
c. Select a page.
Page Designer appears.
2. In either the Rendering tab or the Layout tab, select the item to edit.
The Property Editor displays attributes for the item. Attributes are organized ingroups.
3. To find a group or attribute:
• Search for the group or attribute - Enter keywords in the Filter Propertiesfield. The Property Editor displays the group or attributes. To return to thedefault display, delete the keywords.
• Use Go to Group - Click Go to Group and select the group. To return thedefault display, click Go to Group again and select Expand All.
4. Edit the appropriate attributes.
Edited attributes display a blue marker to the left of the attribute name until thepage is saved.
Note:
To learn more about an attribute, see field-level Help. See "ViewingField-Level Help (page 1-29)."
5. Click Save.
14.1.4.2 Defining Default Values for Page ItemsYou define default values for an item using the attributes under Default on the EditPage Item page. The default value is used when the item's value is not derived fromsession state and when the source value is NULL.
To define a default value for an item:
1. View the page in Page Designer:
a. On the Workspace home page, click the App Builder icon.
b. Select an application.
c. Select a page.
Page Designer appears.
Chapter 14Managing Page-Level Items
14-9
2. In either the Rendering tab or the Layout tab, select the item to edit.
The Property Editor displays the item attributes. Attributes are organized ingroups.
3. To find a group or attribute:
• Search for the group or attribute - Enter keywords in the Filter Propertiesfield. The Property Editor displays the group or attributes. To return to thedefault display, delete the keywords.
• Use Go to Group - Click Go to Group and select the group. To return thedefault display, click Go to Group again and select Expand All.
4. Find Default.
5. Select a Type:
• Static Value
• PL/SQL Expression
• PL/SQL Function Body
6. Click Save.
14.1.4.3 Configuring Page Item SecurityTo configure page item security:
1. View the page in Page Designer:
a. On the Workspace home page, click the App Builder icon.
b. Select an application.
c. Select a page.
Page Designer appears.
2. In either the Rendering tab or the Layout tab, select the item to edit.
The Property Editor displays the item attributes. Attributes are organized ingroups.
3. To find a group or attribute:
• Search for the group or attribute - Enter keywords in the Filter Propertiesfield. The Property Editor displays the group or attributes. To return to thedefault display, delete the keywords.
• Use Go to Group - Click Go to Group and select the group. To return thedefault display, click Go to Group again and select Expand All.
4. Find Security. Configure the following Security attributes.
Table 14-1 Property Editor - Page Item, Security
Attribute Description
AuthorizationScheme
Select an authorization scheme which must evaluate to TRUE inorder for this component to be rendered or otherwise processed.
See Also: "Providing Security Through Authorization(page 20-63)"
Chapter 14Managing Page-Level Items
14-10
Table 14-1 (Cont.) Property Editor - Page Item, Security
Attribute Description
Session StateProtection
Select a Session State Protection level. Options include:
• Unrestricted - The item can be set by passing the item in aURL or in a form. No checksum is required in the URL.
• Checksum Required - User Level - The item can be set bypassing the item in a URL that includes a checksum specific tothe workspace, application and user.
• Checksum Required - Session Level - The item can be setby passing the item in a URL that includes a checksum specificto the the session.
• Restricted - May not be set from browser - The item cannotbe altered using the URL or POSTDATA. Select this option torestrict what can set the item value to internal processes,computations, and so on. This attribute only applies to itemsthat are not used as data entry items and is always observed,even if Session State Protection is disabled. Use this attributefor page or application items that have the following Display Astypes
– Display Only (Save State=No)– Text Field (Disabled, does not save state)
See Also: "Preventing URL Tampering (page 20-24)"
Store valueencrypted in sessionstate
Specify whether to encrypt this item when stored in session state. Ifthe contents of an item contain sensitive data, then you shouldencrypt the value when it is stored in the Application Expresssession state management tables. Otherwise, anyone with rights toread the Application Express meta data tables could potentiallywrite a query to extract this sensitive data.
Values up to 4000 bytes in length can be encrypted. Attempts toencrypt values longer than 4000 bytes produce an error message.
Escape SpecialCharacters
This attribute only displays with some item types. Select Yes toprevent Cross-Site Scripting (XSS) attacks. Select No if you wantthat HTML tags which are stored in the page item or in the entriesof a list of value are actually rendered.
See Also: "Understanding Cross-Site Scripting Protection(page 20-19)"
Chapter 14Managing Page-Level Items
14-11
Table 14-1 (Cont.) Property Editor - Page Item, Security
Attribute Description
RestrictedCharacters
Select how to restrict the characters that can be saved in sessionstate. Application Express displays an error message if a user triesto save data that does not conform to the selected characterrestriction. Restricting the characters hardens application securityand is a possible counter measure to cross-site scripting (XSS)attacks.
Available options include:
• All characters can be saved.No restriction applies.
• Whitelist for a-Z, 0-9 and spaceOnly allow characters a-z, A-Z, 0-9, and space.
• Blacklist HTML command characters (<>").Do not allow reserved HTML characters
• Blacklist &<>"/;,*|=% and --:Do not allow &, <, >, ", /, ;, ",", *, |, =, % and "--" (PL/SQLcomment).
• Blacklist &<>"/;,*|=% or -- and new lineDo not allow &, <, >, ", /, ;, ",", *, |, =, %, "--", and new linecharacters
See Also: "Understanding Cross-Site Scripting Protection(page 20-19)"
14.1.4.4 Creating a Quick Pick SelectionQuick picks enable users to select predefined values with just one click, rather thantyping in text or selecting from a list of available options. If the item type supports quickpick selection, use the Quick Picks attributes to define up to ten selections that displayunder a give item. Clicking on a quick pick sets the value of item. The followingexample shows quick picks for 5%, 10%, 15%, and 20%.
To create a quick pick:
1. View the page in Page Designer:
a. On the Workspace home page, click the App Builder icon.
b. Select an application.
c. Select a page.
Page Designer appears.
2. In either the Rendering tab or the Layout tab, select the item to edit.
The Property Editor displays the item attributes. Attributes are organized ingroups.
3. To find a group or attribute:
• Search for the group or attribute - Enter keywords in the Filter Propertiesfield. The Property Editor displays the group or attributes. To return to thedefault display, delete the keywords.
• Use Go to Group - Click Go to Group and select the group. To return thedefault display, click Go to Group again and select Expand All.
Chapter 14Managing Page-Level Items
14-12
4. Under Quick Picks:
a. Show Quick Picks - Select Yes.
b. Link Attributes - Enter HTML attributes that are associated with the display ofeach Quick Pick link
c. Label - Enter the label for the each Quick Pick. This label is the text the enduser of the application sees.
d. Value - Enter the value associated with each Quick Pick. This value replacesthe existing item value when the user clicks the quick pick.
5. Click Save.
14.1.4.5 Displaying Conditional Page ItemsTo display a conditional item:
1. View the page in Page Designer:
a. On the Workspace home page, click the App Builder icon.
b. Select an application.
c. Select a page.
Page Designer appears.
2. In either the Rendering tab or the Layout tab, select the item to edit.
The Property Editor displays the item attributes. Attributes are organized ingroups.
3. To find a group or attribute:
• Search for the group or attribute - Enter keywords in the Filter Propertiesfield. The Property Editor displays the group or attributes. To return to thedefault display, delete the keywords.
• Use Go to Group - Click Go to Group and select the group. To return thedefault display, click Go to Group again and select Expand All.
4. Find Server-side Condition. Select a condition Type and enter appropriateinformation in the field provided.
Tip:
To learn more about an attribute, select the attribute in the PropertyEditor and click the Help tab in the central pane.
5. Click Save.
14.1.4.6 Displaying Read Only Page ItemsTo display a read-only item:
1. View the page in Page Designer:
a. On the Workspace home page, click the App Builder icon.
b. Select an application.
Chapter 14Managing Page-Level Items
14-13
c. Select a page.
Page Designer appears.
2. In either the Rendering tab or the Layout tab, select the item to edit.
The Property Editor displays the item attributes. Attributes are organized ingroups.
3. To find a group or attribute:
• Search for the group or attribute - Enter keywords in the Filter Propertiesfield. The Property Editor displays the group or attributes. To return to thedefault display, delete the keywords.
• Use Go to Group - Click Go to Group and select the group. To return thedefault display, click Go to Group again and select Expand All.
4. Under Read Only , select a Type, and enter appropriate information in the fieldprovided.
Tip:
To learn more about an attribute, select the attribute in the PropertyEditor and click the Help tab in the central pane.
5. Click Save.
14.1.4.7 Applying a Format Mask to an ItemYou can apply a format mask to an item by selecting the item in Page Designer andediting the Format Mask attribute. Developers commonly select a format mask todetermine how numbers and dates display.
To apply a format mask to an item:
1. View the page in Page Designer:
a. On the Workspace home page, click the App Builder icon.
b. Select an application.
c. Select a page.
Page Designer appears.
2. In either the Rendering tab or the Layout tab, select the item to edit.
The Property Editor displays the item attributes. Attributes are organized ingroups.
3. To find a group or attribute:
• Search for the group or attribute - Enter keywords in the Filter Propertiesfield. The Property Editor displays the group or attributes. To return to thedefault display, delete the keywords.
• Use Go to Group - Click Go to Group and select the group. To return thedefault display, click Go to Group again and select Expand All.
4. Under Appearance, Format Mask - Select a format mask.
Chapter 14Managing Page-Level Items
14-14
Tip:
Only apply number format masks to items that contain numbers and onlyapply date format masks to items that contain dates. Otherwise, is raisedsince the component contains a value that can not be converted usingthe specified format mask.
5. Click Save.
14.1.4.8 Configuring Item Attributes to Warn Users of Unsaved ChangesDevelopers can use the Warn on Unsaved Changes item attribute to specify if thepage item should be included in the unsaved changes check. This check warns theuser when they try to navigate away from a page and when the page containsunsaved changes. Items not based on a database column (for example, a search item)may not need to be checked. For those items, set Warn on Unsaved Changes to DoNot Check.
To configure the Warn on Unsaved Changes attribute:
1. View the page in Page Designer:
a. On the Workspace home page, click the App Builder icon.
b. Select an application.
c. Select a page.
Page Designer appears.
2. In either the Rendering tab or the Layout tab, select the item to edit.
The Property Editor displays the item attributes. Attributes are organized ingroups.
3. To find a group or attribute:
• Search for the group or attribute - Enter keywords in the Filter Propertiesfield. The Property Editor displays the group or attributes. To return to thedefault display, delete the keywords.
• Use Go to Group - Click Go to Group and select the group. To return thedefault display, click Go to Group again and select Expand All.
4. Find Advanced.
5. For Warn on Unsaved Changes, select one of the following:
• Page Default - Check for unsaved changes when the button is clicked if Warnon Unsaved Changes is enabled at the page-level.
• Do Not Check - Changes to the item are ignored by the unsaved changescheck. Select this option for items not based on a database column (forexample, a search item).
6. Click Save.
Chapter 14Managing Page-Level Items
14-15
Tip:
The Warn on Unsaved Changes attribute is implemented using theapex.page.warnOnUnsavedChanges API.
14.1.4.9 Viewing Item UtilitiesThe Utilities page includes Grid Edit pages and reports that enable you to edit items onmultiple pages within a selected application.
To access the Utilities page:
1. On the Workspace home page, click the App Builder icon.
2. Select an application.
3. Click Utilities.
4. From Page Specific Utilities region, click Item Utilities.
5. Select one of the following reports:
• Grid Edit of all Item Labels
• Grid Edit of all Item Help Text
• Item Help Subscriptions
• All Page Items
• Password Items
• Conditional Items
14.1.1 Understanding Page-Level ItemsAn item is part of an HTML form such as a check box, date picker, display as text, filebrowse field, popup list of values, select list, or a text area.
When defining an item, developers must follow defined naming conventions and followspecific rules when referencing item values stored in session state.
• About the Differences Between Page Items and Application Items (page 14-17)Page items are placed on a page and have associated user interface propertiesand Application items are not associated with a page.
• About Item Naming Conventions (page 14-17)When creating an item name, developers must follow very specific item namingconventions.
• Referencing Item Values (page 14-17)You can reference item values stored in session state in regions, computations,processes, validation, and branches.
• About Referencing Items Using JavaScript (page 14-18)When you reference an item, the best approach is to reference by ID.
• Working with Multiple Select List Item (page 14-19)Learn how to handle values returned from a multiple select list item.
Chapter 14Managing Page-Level Items
14-16
14.1.1.1 About the Differences Between Page Items and Application ItemsPage items are placed on a page and have associated user interface properties andApplication items are not associated with a page.
There are two types of items: page items and application items. Page items areplaced on a page and have associated user interface properties, such as Display Only,Label and Label Template. Examples of page-level items include a check box, datepicker, display as text, file browse field, popup list of values, select list, or a text area.In contrast Application items are not associated with a page and therefore have nouser interface properties. You can use an application item as a global variable.
14.1.1.2 About Item Naming ConventionsWhen creating an item name, developers must follow very specific item namingconventions.
When specifying an item name, remember the following rules. Item names must:
• Be unique within an application.
• Not include quotation marks.
• Begin with a letter or a number, and subsequent characters can be letters,numbers, or underscore characters.
• Be case-insensitive.
• Should not exceed 30 characters. Items longer than 30 characters cannot bereferenced using bind variable syntax. See "Referencing Session State Using BindVariable Syntax (page 2-18)."
• Cannot contain letters outside the base ASCII character set.
As a best practice Oracle recommends including the page number when namingitems. By default, wizards prefix page item names with P<page no>_<item name> (forexample, P1_NAME).
14.1.1.3 Referencing Item ValuesYou can reference item values stored in session state in regions, computations,processes, validation, and branches.
Table 14-2 (page 14-17) describes the supported syntax for referencing item values.
Table 14-2 Syntax for Referencing Item Values
Type Syntax Description
SQL :MY_ITEM Standard bind variable syntax for items whose names are nolonger than 30 bytes. Use this syntax for references within aSQL query and within PL/SQL code.
PL/SQL V('MY_ITEM') PL/SQL syntax referencing the item value using the Vfunction. Use this syntax in PL/SQL code of packages orstored procedures and functions.
Avoid this syntax in SQL statements. It may result inperformance problems.
Chapter 14Managing Page-Level Items
14-17
Table 14-2 (Cont.) Syntax for Referencing Item Values
Type Syntax Description
PL/SQL NV('MY_NUMERIC_ITEM') Standard PL/SQL syntax referencing the numeric item valueusing the NV function. Use this syntax in PL/SQL code ofpackages or stored procedures and functions.
Avoid this syntax in SQL statements. It may result inperformance problems.
Static Text (exact) &MY_ITEM. Static text. Exact Substitution.
Note: Exact substitution syntax should be avoided in SQL orPL/SQL code because it can result in SQL Injectionvulnerabilities.
You can set the value of an item in your application using any of the followingmethods:
• For page-level items, use the Source Attribute to set the item value.
From the page, select the item name to view the Edit Page Item page. Scroll downto Source and edit the appropriate fields.
You can also set the value of an item in any region based on PL/SQL or a processusing the following syntax:
BEGIN :MY_ITEM := 'new value';END;
• Pass the value on a URL reference using f?p syntax. For example:
f?p=100:101:10636547268728380919::NO::MY_ITEM:ABC
• Set the value using a computation. Computations are designed to set item values.For example:
TO_CHAR(SYSDATE,'Day DD Month, YYYY');
• Use the PL/SQL API to set an item value within a PL/SQL context. For example:
APEX_UTIL.SET_SESSION_STATE('MY_ITEM',SYSDATE);F
14.1.1.4 About Referencing Items Using JavaScriptWhen you reference an item, the best approach is to reference by ID.
If you view the HTML source of an Oracle Application Express page in a web browser,you would notice that all items have an id attribute. This ID corresponds to the name ofthe item, not the item label. For example, if you create an item with the nameP1_FIRST_NAME and a label of First Name, the ID is P1_FIRST_NAME.
You can get and set item attributes and values using the JavaScriptfunctions $v('P1_FIRST_NAME') and $s('P1_FIRST_NAME', 'Joe');. Consider the followingexample:
function showFirstName(){ alert('First Name is ' +$v('P1_FIRST_NAME'))};
Chapter 14Managing Page-Level Items
14-18
function setFirstName(pFirstName){ $s('P1_FIRST_NAME', pFirstName);};
These functions can be called by other JavaScript functions or with the ExecuteJavaScript code dynamic action.
14.1.1.5 Working with Multiple Select List ItemLearn how to handle values returned from a multiple select list item.
• About Handling Values Returned from a Multiple Select List Item (page 14-19)
• Using APEX_UTIL.STRING_TO_TABLE to Convert Selected Values(page 14-19)
14.1.1.5.1 About Handling Values Returned from a Multiple Select List ItemA multiple select item renders as a multiple select list form element which can beeither a Multiselect List or Shuttle item type. When submitted, selected values arereturned in a single colon-delimited string. You can handle values in this format inthree ways:
• Using the INSTR function
• Using the APEX_UTIL.STRING_TO_TABLE function
• Creating a shuttle
14.1.1.5.2 Using APEX_UTIL.STRING_TO_TABLE to Convert Selected ValuesSuppose you had a report on the EMP and DEPT tables that is limited by the departmentsselected from a Department multiple select list. First, you create the multiple selectitem, P1_DEPTNO, using the following query:
SELECT dname, deptnoFROM dept
Second, you return only those employees within the selected departments as follows:
SELECT ename, job, sal, comm, dnameFROM emp e, dept dWHERE d.deptno = e.deptnoAND instr(':'||:P1_DEPTNO||':',':'||e.deptno||':') > 0
Next, assume you want to programmatically step through the values selected in themultiple select item, P1_DEPTNO. To accomplish this task, convert the colon-delimited string into a PL/SQL array using the APEX_UTIL.STRING_TO_TABLE function. Thefollowing example demonstrates how to insert the selected departments into an audittable containing the date of the query.
DECLARE l_selected APEX_APPLICATION_GLOBAL.VC_ARR2;BEGIN -- -- Convert the colon separated string of values into -- a PL/SQL array
Chapter 14Managing Page-Level Items
14-19
l_selected := APEX_UTIL.STRING_TO_TABLE(:P1_DEPTNO);
-- -- Loop over array to insert department numbers and sysdate --
FOR i IN 1..l_selected.count LOOP INSERT INTO report_audit_table (report_date, selected_department) VALUES (sysdate, l_selected(i)); END LOOP;END;
14.2 Managing Dynamic ActionsDynamic actions enable developers to define complex client-side behaviordeclaratively without the need for JavaScript.
• About Dynamic Actions (page 14-21)Dynamic actions provide a way to define complex client-side behaviordeclaratively without the need for JavaScript. Using the Dynamic Action Createwizard, you specify an action that is performed when a defined set of conditionsoccur. You can also specify which elements are affected by the action, and whenand how they are affected.
• About Dynamic Action Events (page 14-21)You can define dynamic actions can to fire based on events that happen on thepage. Oracle Application Express includes four different categories of events:Browser events, Framework events, Component events, and Custom events. Thissection describes all supported events, including the internal JavaScript eventname in brackets.
• Creating a Dynamic Action (page 14-24)Creating a dynamic action involves specifying when the action happens (withoptional conditions), what action or actions are performed, and what elements areaffected by the action. To learn more about any Property Editor attribute, selectthe attribute and click the Help tab in the central pane.
• Editing Dynamic Actions (page 14-26)Once you create a dynamic action, you can modify attributes defined during thecreation process, specify attributes not available during the process (such asspecifying an Authorization Scheme) and add additional true actions.
• Defining Dynamic Action Event Scope (page 14-27)After creating the dynamic action, the scope of the action can be modified totrigger only once, for the lifetime of the current page, or until triggering elementsare updated by a Partial Page Refresh (PPR).
• Deleting a Dynamic Action (page 14-27)Delete a dynamic action by selecting it in Page Designer and selecting Delete fromthe context menu.
• About Calling JavaScript Using a Dynamic Action (page 14-28)You can execute JavaScript code by creating a dynamic action.
• Debugging Dynamic Actions (page 14-28)Learn how to debug dynamic actions in Oracle Application Express.
Chapter 14Managing Dynamic Actions
14-20
See Also:
"Accessing Page Specific Utilities (page 6-71)"
14.2.1 About Dynamic ActionsDynamic actions provide a way to define complex client-side behavior declarativelywithout the need for JavaScript. Using the Dynamic Action Create wizard, you specifyan action that is performed when a defined set of conditions occur. You can alsospecify which elements are affected by the action, and when and how they areaffected.
When working with dynamic actions, you should be mindful of the fact that the moredynamic actions you add to a page, the greater your overall page size. This is becausethe dynamic action framework emits additional code to the client for each dynamicaction defined, which then also must be downloaded and executed by the frameworkin the client.
The process of implementing a dynamic action involves the following steps:
1. Edit or create an interactive grid column, item, button, region, JavaScriptExpression, or jQuery selector on a page. This component is referenced within thedynamic action in defining when it fires.
2. Create a dynamic action from the application page that invokes the action.
3. Run your application to test the dynamic action.
Tip:
See "Debugging Dynamic Actions (page 14-28)" for information on how todebug problems.
Viewing Dynamic Action Examples
To view dynamic action examples, install the Sample Dynamic Actions sampleapplication. As an alternative, go to the Oracle Learning Library at http://www.oracle.com/oll/apex. Enter search criteria in the field provided (for example,dynamic actions) and click Search.
14.2.2 About Dynamic Action EventsYou can define dynamic actions can to fire based on events that happen on the page.Oracle Application Express includes four different categories of events: Browserevents, Framework events, Component events, and Custom events. This section
Chapter 14Managing Dynamic Actions
14-21
describes all supported events, including the internal JavaScript event name inbrackets.
Browser Events
Note:
The events displayed differ according to the page's current User Interfacetype. If you want to select an event that corresponds to a different type, thenyou have the option of selecting Show unsupported, which displays allevents including those that do not correspond to the current type.
• Change (change) - Fires when a control loses the input focus and its value hasbeen modified since gaining focus.
• Click (click) - Fires when the pointing device button is clicked over the triggeringelement.
• Double Click (dblclick) - Fires when the pointing device button is double clickedover the triggering element.
• Double Tap (apexdoubletap) - Fires when the pointer is doing a double tap/click.
• Get Focus (focusing) - Fires when the triggering element receives focus by eithera pointing device or by tabbing into the element.
• Key Down (keydown) - Fires when a key on the keyboard is pressed. Use this eventwhen you want to capture special keystrokes such as arrow keys, after a key hasbeen pressed.
• Key Press (keypress) - Fires when a key on the keyboard is pressed resulting intext being entered. Use this event when you want to capture actual text entry.
• Key Release (keyup) - Fires when a key on the keyboard is released. Use thisevent when you want to capture special keystrokes such as arrow keys, after akey has been released.
• Lose Focus (focusout) - Fires when the triggering element loses focus either bythe pointing device or by tabbing out of the element.
• Mouse Button Press (mousedown) - Fires when the pointing device button is pressedover the triggering element.
• Mouse Button Release (mouseup) - Fires when the pointing device button isreleased over the triggering element.
• Mouse Enter (mouseenter) - Fires once when the pointing device is moved into thetriggering element.
• Mouse Leave (mouseleave) - Fires once when the pointing device is moved awayfrom the triggering element.
• Mouse Move (mousemove) - Fires when the pointing device is moved while it is overthe triggering element.
• Pan (apexpan) - Fires when the pointer is down, then moved in a horizontaldirection.
• Page Load ready – Fires when the page loads.
Chapter 14Managing Dynamic Actions
14-22
• Page Unload (unload) - Fires when a page is unloaded.
• Press (apexpress) - Fires when the pointer is down for greater than 250ms.
• Resize (resize) - Fires when the browser window is resized.
• Resource Load (load) - When the triggering element is the window element (usinga JavaScript Expression value of window in the When attributes), the event fireswhen the browser finishes loading all content within a document, includingwindow, frames, objects and images. For other elements, this event can only beused for elements associated with a URL: images, scripts, frames, iframes.
• Scroll (scroll) - Fires when a scrollable triggering element is scrolled. This couldbe the browser window (using a JavaScript Expression value of window in theWhen attributes), scrollable frames or elements with the overflow CSS property setto scroll (or auto when the element's explicit height is less than the height of itscontents).
• Select (select) - Fires when a user selects some text in a text field.
• Swipe (apexswipe) - Fires when the pointer is moving fast in a horizontal direction.
• Tap (apextap) - Fires when the pointer is doing a small tap click.
Framework Events
• After Refresh (apexafterrefresh) - Fires after the triggering element has beenrefreshed. The event is only valid for triggering elements that perform Partial PageRefresh and fire this event. The native components that support this areInteractive Reports, Classic Reports, Charts, List View and all item types withcascading LOV support. Plug-ins might support this event as well.
• Before Page Submit (apexbeforepagesubmit) - Fires before a page being submitted.
• Before Refresh (apexbeforerefresh) - Fires before the triggering element has beenrefreshed. The event is only valid for triggering elements that perform Partial PageRefresh and fire this event. The native components that support this areInteractive Reports, Classic Reports, Charts, List View and all item types withcascading LOV support. Plug-ins might support this event as well.
• Dialog Closed (apexafterclosedialog) - Fires when an Application Express dialogis closed. This event only fires when the dialog is closed using the 'Close Dialog'page process, or the 'Close Dialog' dynamic action.
Component Events
These events are available when there is a component (either an item, region, ordynamic action) available to your application that triggers a custom event. Theseevents appear in the following format Event name [Component Name], for example theChange Order event triggered by the Shuttle native item type appears as ChangeOrder [Shuttle]. Component events are either triggered from native componentsshipped with Oracle Application Express, or from plug-in components you haveinstalled into your application.
• Events triggered by native components:
Change Order [Shuttle] (shuttlechangeorder) – Fires when the order of a value inthe right hand select list is changed (either using Move Top, Move Up, MoveDown, or Move Bottom). There are currently no other events triggered by nativecomponents in Oracle Application Express.
• Events triggered by plug-in components:
Chapter 14Managing Dynamic Actions
14-23
These will be available when added to your current application and will be in theformat Event name [Component Name]. For help related to events raised by plug-ins, refer to Help text on the plug-in configuration page, by navigating to SharedComponents, Plug-ins, plug-in name, Help Text, where the plug-in author mayhave included documentation.
• Custom Event:
By selecting Custom an additional field displays enabling you to define of a customevent. This is useful when the native or plug-in provided events are insufficient.
14.2.3 Creating a Dynamic ActionCreating a dynamic action involves specifying when the action happens (with optionalconditions), what action or actions are performed, and what elements are affected bythe action. To learn more about any Property Editor attribute, select the attribute andclick the Help tab in the central pane.
To create a dynamic action in Page Designer:
1. View the page in Page Designer:
a. On the Workspace home page, click the App Builder icon.
b. Select an application.
c. Select a page.
Page Designer appears.
2. Click the Dynamic Actions tab in the left pane.
3. Under Dynamic Actions, right-click Events and select Create Dynamic Action.
Tip:
You can also select an event type and then right-click to select CreateDynamic Action.
The Property Editor displays Dynamic Action attributes.
The Messages tab displays a red or yellow badge to identify messages you needto address. Selecting a message displays the associated attribute in the PropertyEditor. You must address red error message before you can save.
4. In the Property Editor, edit the following Dynamic Action attributes:
Tip:
To learn more about an attribute, select the attribute in the PropertyEditor and click the Help tab in the central pane.
a. Identification, Name - Enter the name of the dynamic action.
b. Execution Options, Sequence - Enter the sequence for this computation.The sequence determines the order of execution.
Chapter 14Managing Dynamic Actions
14-24
c. When, Event - Specify the event that causes the dynamic action to fire.
d. When, Selection - Select the type of page element or construct to be used totrigger the event.
Note:
Only available if the event selected supports definition of a pageelement. Selecting any of the following events hides this attribute:Page Load, Page Unload, Resize, Before Page Submit, OrientationChange. All other event types show this field.
e. Client-side Condition, Type - Optionally select the type of condition you wantto control the true and false action processing of the dynamic action. If noclient-side condition is defined, only true actions will fire. If a client-sidecondition is defined, the true action will fire when the condition is met, and thefalse action will fire when it is not.
Note:
Other properties will display conditionally based on the type, todeclaratively allow you to define the condition. For example for thecondition type Item = Value, you will see an Item and Value property,which will be checked in evaluating the condition.
Next, define the action that to be performed if the event evaluates to True or False.
5. To edit an existing action:
a. Expand the Dynamic Action tree and select an existing action (that is, selecteither True or False).
b. In Property Editor, edit the following Action attributes:
• Action - Specify which action you want to perform.
• Affected Elements - Select how to define the page components to beaffected when this action is executed. Additional options displaydepending upon the type of element selected.
• Execution Options, Fire When Event Result Is - Specify whether thisaction fires when the triggering element condition is met by selecting True(True Action), or when it is not met by selecting False (False Action). If nocondition is specified, only True actions fire.
• Selection Type - Select how to define the page components to beaffected when this action executes.
• Fire on Initialization - Specify if the action fires on initialization.
Initialization has a slightly different meaning depending on how thedynamic action is defined. For dynamic actions defined to fire oninteractive grid columns, this specifies if the action fires when theinteractive grid row is activated for editing. For all other dynamic actions,this specifies if the action fires when the page loads.
6. To add a new action:
Chapter 14Managing Dynamic Actions
14-25
a. Expand the Dynamic Action tree.
b. Right-click the dynamic action and select either Create TRUE Action orCreate FALSE Action.
c. Edit the action in the Property Editor as described in the previous step.
7. Click Save.
14.2.4 Editing Dynamic ActionsOnce you create a dynamic action, you can modify attributes defined during thecreation process, specify attributes not available during the process (such asspecifying an Authorization Scheme) and add additional true actions.
To edit a dynamic action:
1. View the page in Page Designer:
a. On the Workspace home page, click the App Builder icon.
b. Select an application.
c. Select a page.
Page Designer appears.
2. Click the Dynamic Actions tab in the left pane. Dynamic actions are organized byevents.
3. Expand the appropriate event and select the dynamic action.
Attributes for the dynamic action display in the Property Editor.
4. In Property Editor, edit the appropriate Dynamic Action attributes.
Tip:
To learn more about an attribute, select the attribute in the PropertyEditor and click the Help tab in the central pane.
5. To edit an existing action:
a. Expand the Dynamic Action tree to view the True or False nodes.
b. Under True or False, select the action.
c. Edit the action in the Property Editor.
6. To add a new action:
a. Expand the Dynamic Action tree.
b. Right-click the dynamic action and select either Create TRUE Action orCreate FALSE Action.
c. Edit the action in the Property Editor.
7. Click Save.
Chapter 14Managing Dynamic Actions
14-26
14.2.5 Defining Dynamic Action Event ScopeAfter creating the dynamic action, the scope of the action can be modified to triggeronly once, for the lifetime of the current page, or until triggering elements are updatedby a Partial Page Refresh (PPR).
To specify scope:
1. View the page in Page Designer:
a. On the Workspace home page, click the App Builder icon.
b. Select an application.
c. Select a page.
Page Designer appears.
2. Click the Dynamic Actions tab in the left pane.
3. Under Dynamic Actions, select the dynamic action.
The Property Editor displays attributes for the dynamic action. Attributes areorganized in groups.
4. To find a group or attribute:
• Search for the group or attribute - Enter keywords in the Filter Propertiesfield. The Property Editor displays the group or attributes. To return to thedefault display, delete the keywords.
• Use Go to Group - Click Go to Group and select the group. To return thedefault display, click Go to Group again and select Expand All.
5. Under Advanced, select Event Scope. The scope of the event determines whenthe event is evaluated a second or successive time. Options include:
• Static - Binds the event handler to the triggering element(s) for the lifetime ofthe current page, but is no longer bound if a triggering element is updated viaPartial Page Refresh (PPR).
• Dynamic - Binds the event handler to the triggering element(s) for the lifetimeof the current page, irrespective of any triggering elements being recreated viaPartial Page Refresh (PPR).
• Once - Binds the event handler to the triggering element(s) only once. Thedynamic action is not triggered again until after the page has been fullyrefreshed.
6. Click Save.
14.2.6 Deleting a Dynamic ActionDelete a dynamic action by selecting it in Page Designer and selecting Delete from thecontext menu.
To delete a dynamic action:
1. View the page in Page Designer:
a. On the Workspace home page, click the App Builder icon.
b. Select an application.
Chapter 14Managing Dynamic Actions
14-27
c. Select a page.
Page Designer appears.
2. Click the Dynamic Actions tab in the left pane.
3. Expand the appropriate event and locate the dynamic action to be deleted.
4. Right-click the dynamic action and select Delete.
5. Click Save.
14.2.7 About Calling JavaScript Using a Dynamic ActionYou can execute JavaScript code by creating a dynamic action.
You can also execute JavaScript code by creating a dynamic action with theActionExecute JavaScript Code and Set Value. You can also use JavaScript codefor the condition of a dynamic action by setting the Client-side Condition type toJavaScript Expression.
14.2.8 Debugging Dynamic ActionsLearn how to debug dynamic actions in Oracle Application Express.
• About Debugging Dynamic Actions (page 14-28)
• Debugging Dynamic Actions (page 14-28)
14.2.8.1 About Debugging Dynamic ActionsDebugging dynamic actions in Oracle Application Express is slightly different thanother debugging, because much of the processing done with the dynamic actionframework is done on the client, not on the server. To debug dynamic actions, OracleApplication Express outputs debug information to the browser's JavaScript console ifyour browser supports it (for example Firefox with Firebug installed shows the debuginformation in its Console pane). The debug information tells you when an action of adynamic action fires, along with some additional information about the dynamic action,in the following format:
Dynamic Action Fired: [Dynamic Action name] ([Action name]) {JavaScript object containing all Dynamic Action information}
This format enables you to identify the dynamic action name, the action name whichindicates which action is triggered, and the JavaScript object which contains a lot ofinformation about the dynamic action, including the when element, the affectedelements, the event object and any data that may be associated with the dynamicaction.
14.2.8.2 Debugging Dynamic ActionsTo debug a dynamic action:
1. Ensure the application containing the dynamic action has Debugging enabled. See"Utilizing Debug Mode (page 23-4)."
2. Run the page containing the dynamic action.
3. Open the browser's JavaScript console.
Chapter 14Managing Dynamic Actions
14-28
4. From the Developer toolbar, click Debug.
The page refreshes. If you have any dynamic actions that are set to fire on pageload, you will see the debug output in the browser console.
Since debug information is only output when running in Debug mode, leavingDebug mode switched on enables you to further test if dynamic actions are firingwhen you expect them to. For example if you have defined a dynamic action thatfires when a certain item's value changes, change that item's value and theconsole shows the debug output if the dynamic action fires.
14.3 Managing ButtonsYou can use buttons to direct users to a specific page or URL, or to post or processinformation (for example, by creating Create, Cancel, Next, Previous, or Deletebuttons). You can also configure buttons to display conditionally or warn users ofunsaved changes.
• What Actions Can a Button Perform? (page 14-29)Use buttons to submit a page or redirect to a different page.
• Creating a Button (page 14-30)Create buttons in Page Designer.
• Editing a Button (page 14-31)Edit buttons in Page Designer.
• Displaying a Button Conditionally (page 14-31)You can choose to have a button display conditionally by editing the Server-sideCondition attribute in Page Designer.
• Configuring Button Attributes to Warn Users of Unsaved Changes (page 14-32)Use the Warn on Unsaved Changes attribute to warn users of unsaved changeswhen they attempt to navigate away from a page.
• About Calling JavaScript from a Button (page 14-33)Call JavaScript from a button to confirm a request. Oracle Application Expressuses this technique for the delete operation of most objects.
• About the Relationship Between Button Names and REQUEST (page 14-34)The name you give a Submit button (that is, a button with an Action of SubmitPage) determines the value of the built-in attribute REQUEST when the page issubmitted.
• About Branching with Buttons (page 14-34)Learn about branching with buttons.
See Also:
"Calling a Page from a Button URL (page 2-14)" and "Accessing PageSpecific Utilities (page 6-71)"
14.3.1 What Actions Can a Button Perform?Use buttons to submit a page or redirect to a different page.
Chapter 14Managing Buttons
14-29
Buttons can perform different types of actions. A button can:
• Submit a page (for example to save changes to a form page).
• Redirect to either a different page or a custom URL.
• Do nothing (for example if the button's behavior is defined in a Dynamic Action).
14.3.2 Creating a ButtonCreate buttons in Page Designer.
To create a button in Page Designer:
1. View the page in Page Designer:
a. On the Workspace home page, click the App Builder icon.
b. Select an application.
c. Select a page.
Page Designer appears.
2. If necessary, create a region to contain the item.
3. In the Gallery, click the Buttons tab.
Passing the cursor over a button displays a tooltip that describes it.
4. Right-click the button, select Add To, and select the appropriate location.
Tip:
You also select the button with the mouse and drag it to the appropriatelocation in the Layout tab.
The Property Editor displays Button attributes. Attributes are organized in groups.
5. To find a group or attribute:
• Search for the group or attribute - Enter keywords in the Filter Propertiesfield. The Property Editor displays the group or attributes. To return to thedefault display, delete the keywords.
• Use Go to Group - Click Go to Group and select the group. To return thedefault display, click Go to Group again and select Expand All.
6. Edit the appropriate attributes in the Property Editor.
Tip:
To learn more about an attribute, select the attribute in the PropertyEditor and click the Help tab in the central pane.
7. Click Save.
Chapter 14Managing Buttons
14-30
14.3.3 Editing a ButtonEdit buttons in Page Designer.
To create a region button in Page Designer:
1. View the page in Page Designer:
a. On the Workspace home page, click the App Builder icon.
b. Select an application.
c. Select a page.
Page Designer appears.
2. In either the Rendering tab or the Layout tab, select the button to edit.
The Property Editor displays the button attributes in the right pane.
3. To find a group or attribute:
• Search for the group or attribute - Enter keywords in the Filter Propertiesfield. The Property Editor displays the group or attributes. To return to thedefault display, delete the keywords.
• Use Go to Group - Click Go to Group and select the group. To return thedefault display, click Go to Group again and select Expand All.
4. Edit the button attributes.
Edited attributes display a blue marker to the left of the attribute name until thepage is saved.
Note:
To learn more about an attribute, see field-level Help.
5. Click Save.
14.3.4 Displaying a Button ConditionallyYou can choose to have a button display conditionally by editing the Server-sideCondition attribute in Page Designer.
To have a button display conditionally:
1. View the page in Page Designer:
a. On the Workspace home page, click the App Builder icon.
b. Select an application.
c. Select a page.
Page Designer appears.
2. In either the Rendering tab or the Layout tab, select the button to edit.
The Property Editor changes to display Button attributes. Attributes are organizedin groups.
Chapter 14Managing Buttons
14-31
3. To find a group or attribute:
• Search for the group or attribute - Enter keywords in the Filter Propertiesfield. The Property Editor displays the group or attributes. To return to thedefault display, delete the keywords.
• Use Go to Group - Click Go to Group and select the group. To return thedefault display, click Go to Group again and select Expand All.
4. Find Server-side Condition. Select a Type and enter appropriate information inthe field provided.
Tip:
To learn more about an attribute, select the attribute in the PropertyEditor and click the Help tab in the central pane.
5. Click Save.
14.3.5 Configuring Button Attributes to Warn Users of UnsavedChanges
Use the Warn on Unsaved Changes attribute to warn users of unsaved changes whenthey attempt to navigate away from a page.
To configure the Warn on Unsaved Changes attribute:
1. View the page in Page Designer:
a. On the Workspace home page, click the App Builder icon.
b. Select an application.
c. Select a page.
Page Designer appears.
2. In either the Rendering tab or the Layout tab, select the button to edit.
The Property Editor changes to display button attributes. Attributes are organizedin groups.
3. To find a group or attribute:
• Search for the group or attribute - Enter keywords in the Filter Propertiesfield. The Property Editor displays the group or attributes. To return to thedefault display, delete the keywords.
• Use Go to Group - Click Go to Group and select the group. To return thedefault display, click Go to Group again and select Expand All.
4. Find Behavior.
5. For Warn on Unsaved Changes, select one of the following:
• Page Default - Check for unsaved changes when the button is clicked if Warnon Unsaved Changes is enabled at page level.
• Do Not Check - The unsaved changes check will not be performed when thebutton is clicked. Use this setting for Cancel, Delete, and Apply Changesbuttons.
Chapter 14Managing Buttons
14-32
6. Click Save.
Tip:
The Warn on Unsaved Changes attribute is implemented using theapex.page.warnOnUnsavedChanges API.
14.3.6 About Calling JavaScript from a ButtonCall JavaScript from a button to confirm a request. Oracle Application Express usesthis technique for the delete operation of most objects.
For example, when you delete a button, a JavaScript message appears asking you toconfirm your request. Consider the following example:
function deleteConfirm(msg) {var confDel = msg;if(confDel ==null) confDel= confirm("Would you like to perform this delete action?");else confDel= confirm(msg); if (confDel== true) doSubmit('Delete'); }
This example creates a function to confirm a delete action and then calls that functionfrom a button. Note that the function optionally submits the page and sets the value ofthe internal variable :REQUEST to Delete, thus performing the deletion using a processthat conditionally executes based on the value of the request.
When you create the button, you must select Redirect to URL. Then, you wouldspecify a URL target such as the following:
javascript:confirmDelete('Would you like to perform this delete action?');
Oracle recommends using dynamic actions as the preferred way of executingJavaScript code. Consider the following example:
1. Create a button with action of Defined by Dynamic Action.
Create a dynamic action and using the action type Execute JavaScript Code toexecute the previous code, for example:
if (confirm("Would you like to perform this delete action?")) { apex.submit('Delete');}
This example uses JavaScript, but you could also easily implement this examplewithout having to use JavaScript. Instead, you can use the declarative actions Confirmand Submit Page which are also translatable.
Chapter 14Managing Buttons
14-33
14.3.7 About the Relationship Between Button Names and REQUESTThe name you give a Submit button (that is, a button with an Action of Submit Page)determines the value of the built-in attribute REQUEST when the page is submitted.
You can reference the value of REQUEST from within PL/SQL using the bindvariable :REQUEST. By using this bind variable, you can conditionally process, validate,or branch based on which button the user clicks. You can also create processes thatexecute when the user clicks a button. And you can use a more complex condition asdemonstrated in the following examples:
If :REQUEST in ('EDIT','DELETE') then ...If :REQUEST != 'DELETE' then ...
These examples assume the existence of buttons named EDIT and DELETE. You canalso use this syntax in PL/SQL Expression conditions. Be aware, however, that thebutton name capitalization (case) is preserved. In other words, if you name a buttonLOGIN, then a request looking for the name Login fails. For example:
<input type="BUTTON" value="Finish" onclick="apex.submit('Finish');">
In this example Finish is the name of the REQUEST and this example is case-sensitive.
14.3.8 About Branching with ButtonsLearn about branching with buttons.
Each page can include any number of branches. A branch links to another page inyour application or to a URL. The Application Express engine considers branching atdifferent times during page processing. You can choose to branch before processing,before computation, before validation, and after processing. Like any other control inApp Builder, branching can be conditional. For example, you can branch when a userclicks a button. When you create a branch, you associate it with a specific button. Thebranch is only be considered if a user clicks the button.
14.4 Managing TreesTrees to display hierarchical information in a clear, easy-to-use format. You can createa tree control using a SQL query.
• About Trees (page 14-35)Tree controls in Oracle Application Express use APEX Tree.
• Creating a Tree on New Page (page 14-35)Create a tree on a new page by running the Create Page Wizard.
• Creating a Tree in Page Designer (page 14-37)Create a tree control by providing a SQL query that specifies a hierarchicalrelationship by identifying an ID and parent ID column in a table or view.
• Editing Tree Attributes (page 14-40)Developers can customize tree behavior by editing tree attributes.
Chapter 14Managing Trees
14-34
14.4.1 About TreesTree controls in Oracle Application Express use APEX Tree.
App Builder includes a built-in wizard for generating a tree hierarchical navigationmechanism. Trees are implemented using a single hierarchical query that identifies therow to be used as the start of your query and the relationship between parent rowsand child rows of the hierarchy. Trees use the APEX Tree implementation. This is aJavaScript-based, cross browser tree component that features optional keyboardnavigation, and optional state saving.
When you implement a tree control, the SQL query specifies a hierarchical relationshipby identifying an ID and parent ID column in a table or view. The tree query mustutilizes a START WITH .. CONNECT BY clause to generate the hierarchical query.
Tip:
The creation of APEX Tree regions is only supported on pages using aDesktop user interface.
About Desupported jsTrees
Prior to release 5.2, Oracle Application Express supported the rendering of jsTree treeregions. Oracle Application Express no longer supports jsTree tree regions. OracleApplication Express now supports the generation of an APEX Tree tree region. APEXTree is a JavaScript based, cross browser tree component. jsTree regions areautomatically upgraded to APEX Tree regions when upgrading from a previousrelease or when importing to release 18.1.
Viewing Tree Examples
To view tree examples, install the packaged application, Sample Trees.
14.4.2 Creating a Tree on New PageCreate a tree on a new page by running the Create Page Wizard.
A tree is based on a query and returns data that can be represented in a hierarchy.When you create a tree using the Create Page Wizard, the wizard generates thehierarchical query for you based on the options you select.
To create a tree on a new page:
1. On the Workspace home page, click the App Builder icon.
2. Select an application.
3. Click Create Page.
4. For Create a Page:
a. User Interface - Select a user interface for the page (optional).
This attribute only displays for applications using older themes and for whichDesktop and Mobile User Interfaces have been defined.
Chapter 14Managing Trees
14-35
b. Select a page type - Select Tree.
5. For Page Attributes, specify the following:
a. Page Number - Specify the page on which the tree should be created.
b. Page Name - If the tree will be created on a new page, enter the page name.
c. Page Mode - Select a page mode.
d. Page Group - Select the name of the page group you would like to associatewith this page. This option will only be visible when the application containsgroups.
e. Region Template - Select a region template for the tree region.
f. Region Name - Enter a name for the region to contain the tree.
g. Breadcrumb - Select whether you want to use a breadcrumb navigation controlon your page, and which breadcrumb navigation control you want to use. Ifyou select Breadcrumb, enter the following:
• Entry Name - Enter a name for the breadcrumb entry.
• Select Parent Entry - Select a parent entry.
h. Click Next.
6. For Navigation Preference:
a. Select how you want this page integrated into the Navigation Menu. To learnmore, see field-level Help.
b. Click Next.
7. For Table/View Owner and Name:
a. Table/View Owner - Select the owner of the table from which the tree will bebased.
b. Table / View Name - Select the table or view which contains the columns to beincluded in the master page.
c. Click Next.
8. For Query, identify the column you want to use as the ID, the Parent ID, and textthat should appear on the nodes:
a. ID - Select the column to use as the ID.
b. Parent ID - Select the column to use as the parent ID.
c. Node Text - Select the text to appear on the tree nodes.
d. Start With - Select the column to be used to specify the root of the hierarchicaltree query.
e. Start Tree - Choose how to start your query. Options include:
• Based on Existing Item - Select an existing application or page item.
• Based on a SQL Query - Enter a SQL query that returns a single row orsingle column.
• Based on a Static Value - Enter a static value.
• Value is NULL.
f. Click Next.
Chapter 14Managing Trees
14-36
9. For Where and Order by, specify the following:
a. Where Clause - Enter a WHERE clause. To learn more, expand Current Query.
b. Order Siblings By - Select the order siblings by column, such as ENAME. Thedefault value is based on the Node Text column selected.
c. Click Next.
10. For Tree Attributes, specify the following:
a. Include Buttons - Select the buttons to include.
b. Selected Node Page Item - Select the page or application item to hold theselected node value. This item can be used to save the tree state, by holdingthe value of the last selected node. The value of the selected node can besaved to the selected item using the node link attribute or a page process.When the tree is reloaded, the tree opens to the last selected tree node.
c. Tooltip - Displays a tooltip when the mouse hovers over a leaf node. Optionsinclude:
• Static Assignment - Specifies a static value to be used as the tooltip text.Substitution strings can be used in the static text, to incorporateinformation from the SQL query in the tooltip text. The followingsubstitution strings can be used:
#VALUE# - refers to the value of ID column.
#TITLE# - refers to the value of Node Text column.
#LINK# - refers to the value of Link option.
• Database Column - Select the column to use as the tooltip text.
d. Link Option - To make leaf node text a link, choose Existing applicationsitem and click Next.
Existing Application Item makes the leaf node text a link. If you select thisoption, you must specify a page to link to and an existing application item tolink leaf node text.
11. Confirm your selections and click Create.
Tip:
The creation of APEX Tree regions is supported on pages using aDesktop user interface.
14.4.3 Creating a Tree in Page DesignerCreate a tree control by providing a SQL query that specifies a hierarchicalrelationship by identifying an ID and parent ID column in a table or view.
The tree query you provide must utilizes a START WITH .. CONNECT BY clause togenerate the hierarchical query.
To create a tree on an existing page:
1. View the page in Page Designer:
a. On the Workspace home page, click the App Builder icon.
Chapter 14Managing Trees
14-37
b. Select an application.
c. Select a page.
Page Designer appears.
2. Click the Layout tab in the central pane.
3. In the Gallery, click the Regions tab. Then, right-click Tree, select Add To, andselect the appropriate location.
Tip:
You can also select the Tree region in the Gallery and drag it to theappropriate location in the Layout tab.
Page Designer indicates what actions are required next.
The Messages tab displays a red or yellow badge indicating messages you needto address. The Message tab displays two types of messages:
• Errors - Error messages display in red. Selecting an error message displaysthe associated attribute in red in the Property Editor. You must address errorsbefore a page can be saved.
• Warnings - Warning messages display in yellow. Selecting a warningmessage displays the associated attribute in yellow in the Property Editor. Youmust address errors before a page can be saved. Note you can save a pagewithout addressing warning messages.
4. In either the Rendering tab or the Layout tab, select the new tree region.
The Property Editor displays attributes in the right pane. Attributes are organizedin groups.
5. To find a group or attribute:
• Search for the group or attribute - Enter keywords in the Filter Propertiesfield. The Property Editor displays the group or attributes. To return to thedefault display, delete the keywords.
• Use Go to Group - Click Go to Group and select the group. To return thedefault display, click Go to Group again and select Expand All.
6. In the Property Editor, edit the attributes:
a. Identification, Title - Enter a region title. The region title only displays when itis defined in the region template.
b. For Source, select one of the following:
• Local Database - Data is sourced from the local database.
• Remote Database - Data is sourced from a remote database, where theconnection is defined using REST Enabled SQL.
• Web Source - Data is sourced from a RESTful web service defined usingWeb Source Modules.
c. Layout - Edit the attributes:
Chapter 14Managing Trees
14-38
• Sequence - Enter the display sequence for this item. The sequence andother layout settings determine where this item is displayed in relation toother items within the region.
• Parent Region - Select the parent region to which this region belongs. If aparent region is selected then this region is rendered completely inside theparent region.
• Position - Select the template position used to display this region. Theselections available are derived from the appropriate template positionsdefined within the current theme, for the page's user interface.
d. Appearance, Template - Specify the template. Select a region template todefine the appearance and layout of this region.
To learn more, click the Help tab in the central pane.
7. Edit the region Attributes:
a. In the Rendering tab, locate the region and click Attributes.
The Property Editor displays the Attributes.
b. In the Property Editor, edit the region Attributes:
• Node Label Column - Select the data source column containing the valuefor the node label. The value cannot contain markup.
• Node Value Column - Select the data source column containing the valuefor the node value. This value is not displayed but added to the treeadapter node id property that can be accessed using JavaScript.
• Hierarchy - Indicate whether Application Express should compute the treehierarchy from the data or whether the data already contains all hierarchyinformation.
– Computed With SQL:
* Node ID Column – Select the data source column containing theID for a node. This is required when the hierarchy is beingcomputed by Application Express. Typically, a primary key columnis chosen here.
* Parent Key Column – Select the data source column containingthe value for the parent key of a node. Required when ApplicationExpress computes the hierarchy.
– Not Computed:
* Node Status Column – Select the data source column containingthe value for the node status. Required when the Hierarchyattribute is set to Not Computed. The column must contain 0 forleaf nodes and 1 for nodes with children.
* Hierarchy Level Column – Select the data source columncontaining the value for the hierarchy level of the node. Requiredwhen the Hierarchy attribute is set to Not Computed.
• Tooltip - Select whether tooltips are displayed, and the source for thetooltip.
• Link - Specify the link to be executed when a node is clicked.
• Link Column - Select the data source column containing the value for thelink to be executed when a node is clicked.
Chapter 14Managing Trees
14-39
• Icon CSS Class Column - Select the data source column containing thevalue for the icon CSS class to be applied to the node.
8. Click Save.
14.4.4 Editing Tree AttributesDevelopers can customize tree behavior by editing tree attributes.
By default, a tree does not have focus and node links are activated with a single clickaction.
To access the Tree attributes page:
1. View the page in Page Designer:
a. On the Workspace home page, click the App Builder icon.
b. Select an application.
c. Select a page.
Page Designer appears.
2. Select the region containing the tree in the Rendering tab or the Layout tab.
The Property Editor displays attributes in the right pane. Attributes are organizedin groups.
3. To find a group or attribute:
• Search for the group or attribute - Enter keywords in the Filter Propertiesfield. The Property Editor displays the group or attributes. To return to thedefault display, delete the keywords.
• Use Go to Group - Click Go to Group and select the group. To return thedefault display, click Go to Group again and select Expand All.
4. Edit the tree attributes.
Edited attributes display a blue marker to the left of the attribute name until thepage is saved.
Tip:
To learn more about an attribute, select the attribute in the PropertyEditor and click the Help tab in the center pane.
5. Click Save.
14.5 About Incorporating JavaScript into an ApplicationOracle Application Express includes multiple built-in interfaces especially designed foradding JavaScript.
Adding JavaScript to a web application is a great way to add features that mimic thosefound in client/server applications without sacrificing all the benefits of webdeployment.
Chapter 14About Incorporating JavaScript into an Application
14-40
Remember that JavaScript is not appropriate for data intensive validations. Forexample, to verify that a name is contained within a large database table, you mustpull down every record to the client, creating a huge HTML document. In general,complex operations are much better suited for server-side Application Expressvalidations instead of JavaScript. To learn more, see the JavaScript discussion for theappropriate control or component.
Chapter 14About Incorporating JavaScript into an Application
14-41

15Adding Navigation
Create application navigation controls including tabs, navigation menus, breadcrumbs,navigation bar entries, and branches
When you build a database application, you can include different types of navigationcontrols. However, available navigation options depend upon the application theme.Common navigation controls include tabs, lists (including navigation menus),breadcrumbs, navigation bar entries, and branches.
• About Using Lists as Navigation (page 15-1)You can add navigation to your application by creating a list (or a shared collectionof links).
• Creating Tabs (page 15-2)Navigate users between pages in an application using tabs.
• Creating Breadcrumbs (page 15-8)Provide users with hierarchical navigation by creating breadcrumbs. You candisplay a breadcrumb as a list of links or as a breadcrumb path.
• Creating Classic Navigation Bar (page 15-16)In older themes, developers add navigation by creating classic navigation barentries.
• Controlling Navigation Using Branches (page 15-21)Add navigation to application pages by creating branches. A branch is aninstruction to link to a specific page, procedure, or URL after a given page issubmitted.
See Also:
"Managing Trees (page 14-34)"
15.1 About Using Lists as NavigationYou can add navigation to your application by creating a list (or a shared collection oflinks).
You add a list to a page by creating a region and specifying the region type as List.You control the appearance of a list through list templates. For example, you cancreate static list that functions as navigation using the template Vertical Unordered Listwith Bullets. Newer themes, such as Universal Theme - 42, support the creation ofnavigation menus and navigation bars. Navigation menus are lists that render at thetop of the page (similar to tabs) or display as a side bar. A navigation bar displayswith a list template in the #NAVIGATION_BAR# position on your page template.
The Sample Database Application includes a navigation menu and a navigation bar.
15-1
15.2 Creating TabsNavigate users between pages in an application using tabs.
Note:
Tabs only appear if the associated application uses an older theme. In newthemes, Tabs have been replaced with Navigation Menu.
• About Tabs (page 15-2)
• About the Tabs Page (page 15-3)
• Checking for Tab Template Support (page 15-4)
• Creating a Tab (page 15-5)
• Editing Tabs (page 15-6)
• Accessing Tab Reports (page 15-7)
See Also:
• "Creating Lists (page 17-38)"
• "Managing Navigation Menus (page 17-51)"
• "Creating Database Applications (page 6-1)"
15.2.1 About TabsA standard tab can have a one-to-one relationship with a page, or a standard tab canbe the current tab for many pages. App Builder includes two different types of tabs:
• Standard tabs
An application having only one level of tabs uses a standard tab set. A standardtab set is associated with a specific page and page number. You can use standardtabs to link users to a specific page.
• Parent tabs
Parent tabs can control the display of standard tab sets. Clicking a parent tabdisplays the corresponding standard tab, with the default page as the currentpage. Parent tabs give users another level of navigation and a context (or sense ofplace) within the application. You can use parent tabs to link users to a specificURL associated with a specific page.
You can group tabs into collections called a tab set. Each tab must be part of a tab set.
Chapter 15Creating Tabs
15-2
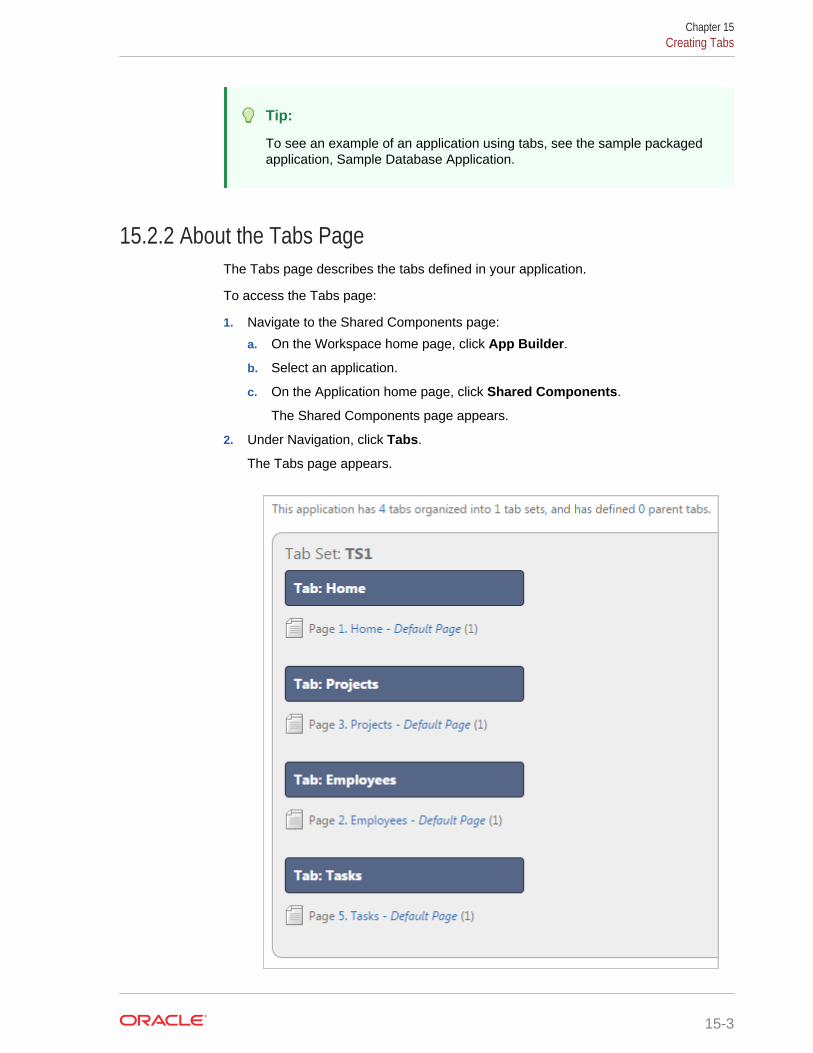
Tip:
To see an example of an application using tabs, see the sample packagedapplication, Sample Database Application.
15.2.2 About the Tabs PageThe Tabs page describes the tabs defined in your application.
To access the Tabs page:
1. Navigate to the Shared Components page:
a. On the Workspace home page, click App Builder.
b. Select an application.
c. On the Application home page, click Shared Components.
The Shared Components page appears.
2. Under Navigation, click Tabs.
The Tabs page appears.
Chapter 15Creating Tabs
15-3
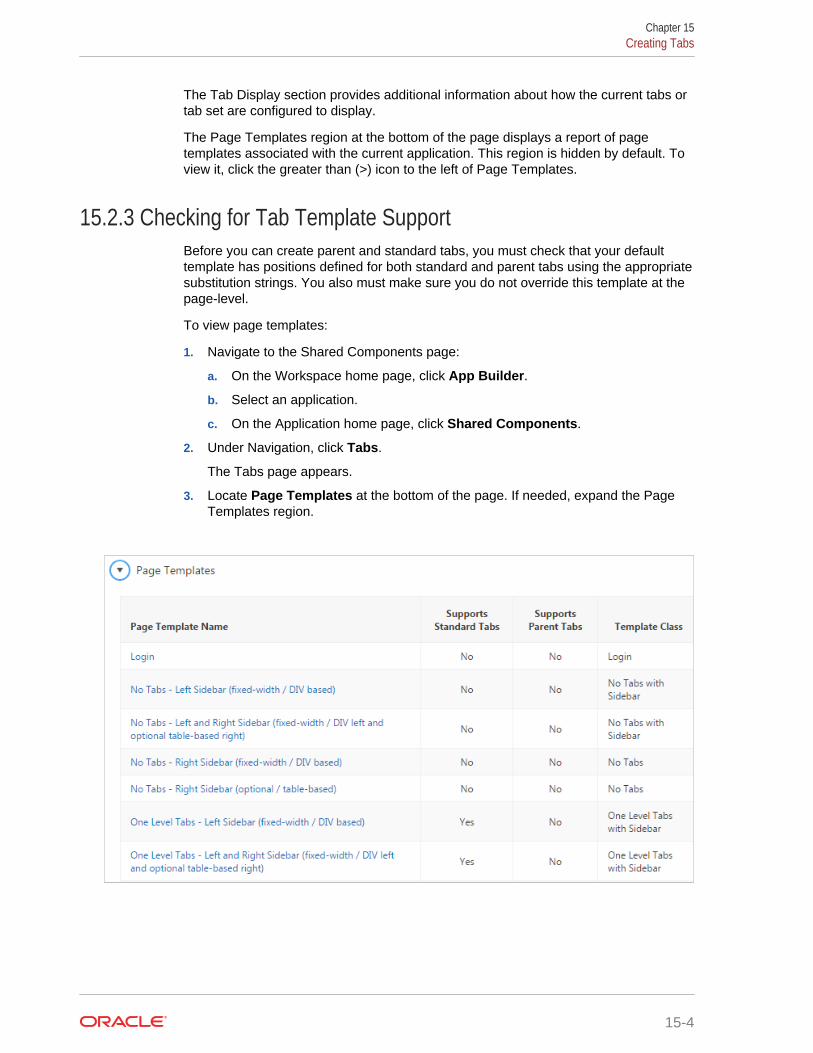
The Tab Display section provides additional information about how the current tabs ortab set are configured to display.
The Page Templates region at the bottom of the page displays a report of pagetemplates associated with the current application. This region is hidden by default. Toview it, click the greater than (>) icon to the left of Page Templates.
15.2.3 Checking for Tab Template SupportBefore you can create parent and standard tabs, you must check that your defaulttemplate has positions defined for both standard and parent tabs using the appropriatesubstitution strings. You also must make sure you do not override this template at thepage-level.
To view page templates:
1. Navigate to the Shared Components page:
a. On the Workspace home page, click App Builder.
b. Select an application.
c. On the Application home page, click Shared Components.
2. Under Navigation, click Tabs.
The Tabs page appears.
3. Locate Page Templates at the bottom of the page. If needed, expand the PageTemplates region.
Chapter 15Creating Tabs
15-4
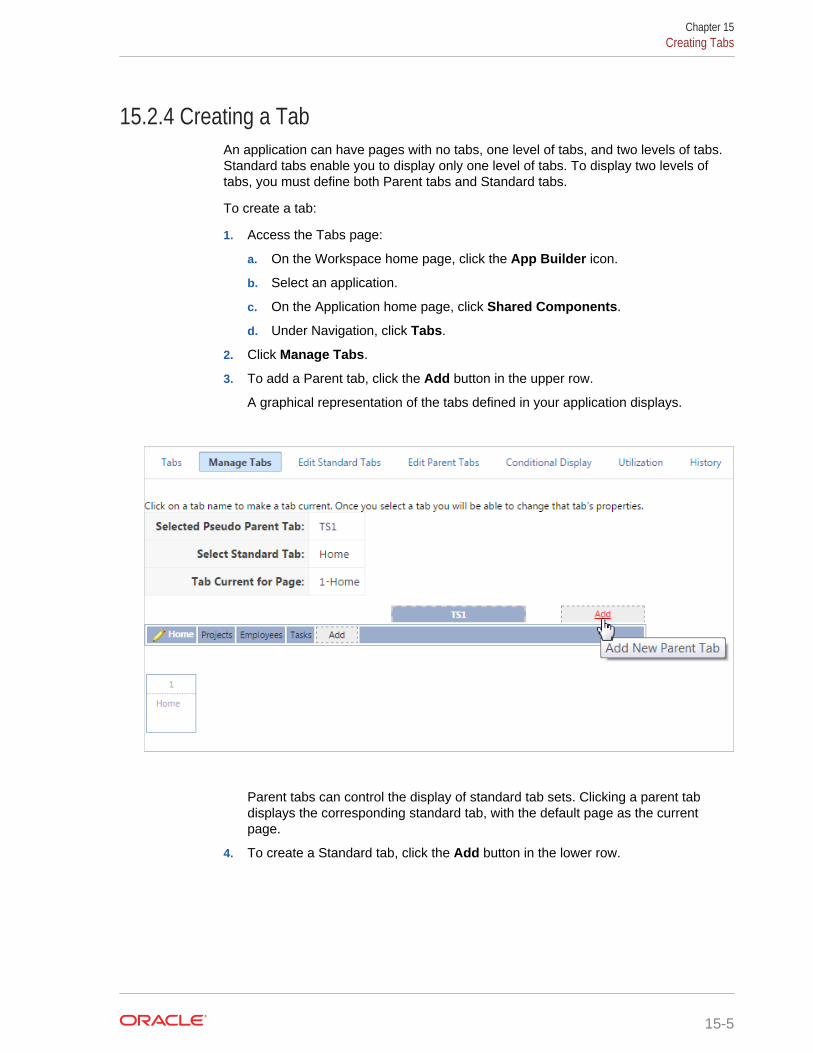
15.2.4 Creating a TabAn application can have pages with no tabs, one level of tabs, and two levels of tabs.Standard tabs enable you to display only one level of tabs. To display two levels oftabs, you must define both Parent tabs and Standard tabs.
To create a tab:
1. Access the Tabs page:
a. On the Workspace home page, click the App Builder icon.
b. Select an application.
c. On the Application home page, click Shared Components.
d. Under Navigation, click Tabs.
2. Click Manage Tabs.
3. To add a Parent tab, click the Add button in the upper row.
A graphical representation of the tabs defined in your application displays.
Parent tabs can control the display of standard tab sets. Clicking a parent tabdisplays the corresponding standard tab, with the default page as the currentpage.
4. To create a Standard tab, click the Add button in the lower row.
Chapter 15Creating Tabs
15-5

The Create Parent Tab or Create Standard Tab Wizard appears.
5. Follow the on-screen instructions.
15.2.5 Editing TabsThis section describes how to edit tabs. You can edit multiple tabs simultaneously.Also, for standard tabs, you can update tab properties, such as their labels and ordersequence, by using the Standard Tab Tasks list.
• Editing Multiple Tabs Simultaneously (page 15-6)
• Managing Standard Tabs (page 15-7)
15.2.5.1 Editing Multiple Tabs SimultaneouslyTo edit multiple tabs simultaneously:
1. Navigate to the Tabs page:
a. On the Workspace home page, click the App Builder icon.
b. Select an application.
c. Click Shared Components.
d. Under Navigation, click Tabs.
2. Click one of the following tabs at the top of the page:
• Edit Standard Tabs
• Edit Parent Tabs
A report appears.
3. To edit a specific tab, click the Edit icon.
4. Edit the appropriate attributes and click Apply Changes.
Chapter 15Creating Tabs
15-6
15.2.5.2 Managing Standard TabsThe Standard Tab Task list displays on the right side of the Tabs page. You canaccess the links on this list to move a standard tab to different parent tab, rename astandard tab set, resequence the display order, associate pages with a tab set, createa new standard tab, or create a new standard tab set.
To access the Standard Tab Task list:
1. Navigate to the Tabs page:
a. On the Workspace home page, click the App Builder icon.
b. Select an application.
c. Click Shared Components.
d. Under Navigation, click Tabs.
2. Click Manage Tabs.
3. Make a selection from the Standard Tab Task list on the right side of the page:
• Move Highlighted Standard Tab t a Different Parent Tab
• Rename Standard Tab Set
• Resequence Display Order
• Associate Page(s) with Selected Standard Tab
• Create New Standard Tab
• Create New Standard Tab Set
15.2.6 Accessing Tab ReportsThis section describes the Conditional Display, Utilization, and History reports.
To view the Conditional Display report:
1. Navigate to the Tabs page:
a. Navigate to the Workspace home page.
b. Click the App Builder icon.
c. Select an application.
d. On the Application home page, click Shared Components.
e. Under Navigation, click Tabs.
The Tabs page appears.
2. Click the appropriate tab:
• Conditional Display - The Conditional Display report displays Standard Tabsand Parent tabs that are configured to display conditionally. To filter thedisplay, select tab type and click Go.
• Utilization - The Utilization report lists the standard tabs used in the currentapplication.
• History - History report displays a history of changes to tab attributes for thecurrent application.
Chapter 15Creating Tabs
15-7
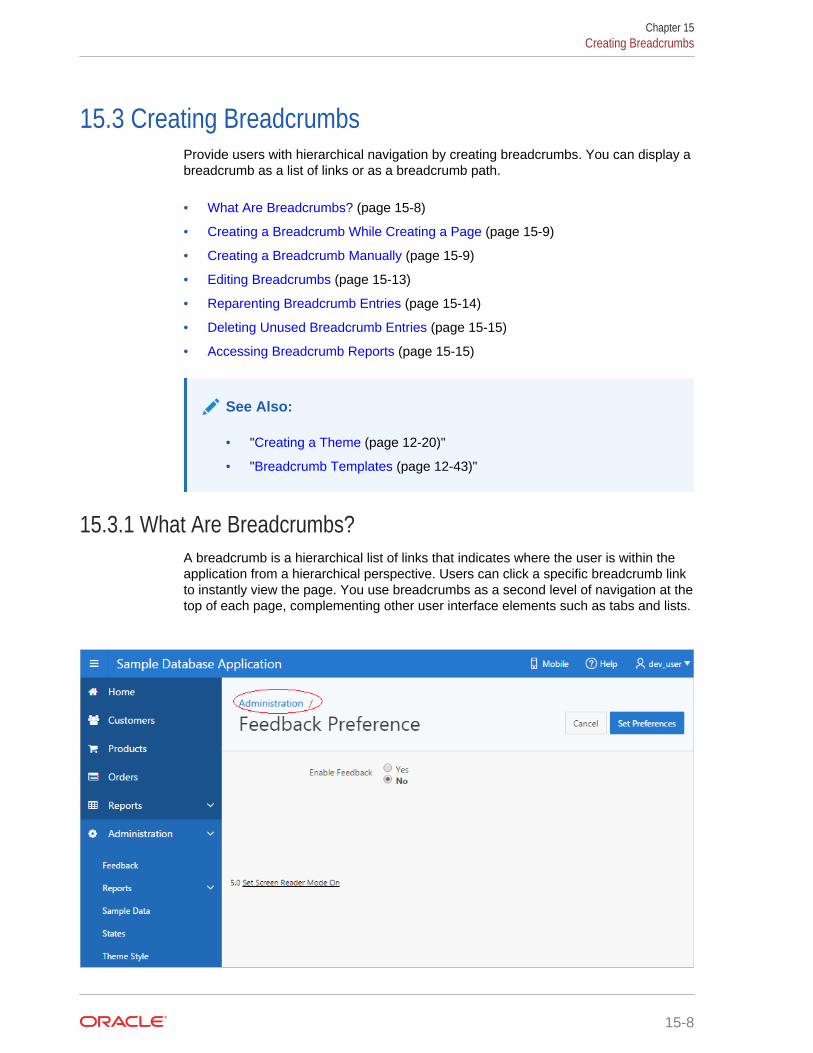
15.3 Creating BreadcrumbsProvide users with hierarchical navigation by creating breadcrumbs. You can display abreadcrumb as a list of links or as a breadcrumb path.
• What Are Breadcrumbs? (page 15-8)
• Creating a Breadcrumb While Creating a Page (page 15-9)
• Creating a Breadcrumb Manually (page 15-9)
• Editing Breadcrumbs (page 15-13)
• Reparenting Breadcrumb Entries (page 15-14)
• Deleting Unused Breadcrumb Entries (page 15-15)
• Accessing Breadcrumb Reports (page 15-15)
See Also:
• "Creating a Theme (page 12-20)"
• "Breadcrumb Templates (page 12-43)"
15.3.1 What Are Breadcrumbs?A breadcrumb is a hierarchical list of links that indicates where the user is within theapplication from a hierarchical perspective. Users can click a specific breadcrumb linkto instantly view the page. You use breadcrumbs as a second level of navigation at thetop of each page, complementing other user interface elements such as tabs and lists.
Chapter 15Creating Breadcrumbs
15-8
15.3.2 Creating a Breadcrumb While Creating a PageTo create a breadcrumb while creating a page:
1. Run the Create Page Wizard to add a new page.
During the wizard, a Breadcrumb option appears. The actual page on which thislist displays depends upon the type of page you are creating.
2. From the Breadcrumb list, select Breadcrumb or select an existing breadcrumb (ifapplicable).
3. If you select Breadcrumb:
a. Parent Entry - Select a parent page (if applicable) or select No parent entry.
b. Entry Name - Enter a name for the breadcrumb.
4. Follow the on-screen instructions.
15.3.3 Creating a Breadcrumb ManuallyThis section describes how to create breadcrumbs manually.
• About Creating a Breadcrumb Manually (page 15-9)
• Creating Breadcrumbs as Shared Components (page 15-9)
• Creating a Breadcrumb Region Using the Create Breadcrumb Wizard(page 15-10)
• Adding a Breadcrumb Region to a Page (page 15-10)
• Adding Entries to a Breadcrumb (page 15-12)
• About Creating Dynamic Breadcrumbs (page 15-13)
15.3.3.1 About Creating a Breadcrumb ManuallyTo create breadcrumbs manually, you must add a breadcrumb to each page in yourapplication as follows:
1. Create the breadcrumb by running the Create/Edit Breadcrumb Wizard. You canaccess this wizard in two ways:
• Go the Shared Component page and select Create Breadcrumb.
• In Page Designer, select the Create menu and then Breadcrumb Region.
2. Add entries to the breadcrumb.
3. Add the breadcrumb to a page by creating a region.
15.3.3.2 Creating Breadcrumbs as Shared ComponentsTo create breadcrumbs from the Shared Components page:
1. On the Workspace home page, click the App Builder icon.
2. Select an application.
Chapter 15Creating Breadcrumbs
15-9

3. On the Application home page, click Shared Components.
4. Under Navigation, click Breadcrumbs.
The Breadcrumbs page appears.
5. Click Create Breadcrumb.
6. Enter a name and click Create.
7. Add breadcrumb entries.
15.3.3.3 Creating a Breadcrumb Region Using the Create Breadcrumb WizardTo create a breadcrumb region in Page Designer:
1. View the page in Page Designer.
a. On the Workspace home page, click the App Builder icon.
b. Select an application.
c. Select a page.
Page Designer appears.
2. Locate the Page Designer Toolbar at the top of the page.
3. On Page Designer Toolbar, click the Create menu and select BreadcrumbRegion.
The Create Breadcrumb Wizard appears.
4. For Region Attributes:
a. Region Title — Enter a title for the region.
b. Region Template — Select a region template.
c. Display Point — Identify the display point.
d. Sequence — Specify the sequence for this component. The sequencedetermines the order of evaluation.
e. Click Next.
5. For Breadcrumb:
a. Breadcrumb — Select the Breadcrumb to be associated with this region.
b. Breadcrumb Template — Identify breadcrumb template.
c. Click Next.
6. For Breadcrumb Entry:
a. Breadcrumb — Specify the label for this breadcrumb entry.
b. Parent Entry— Select this breadcrumb entry's hierarchical parent..
c. Click Next.
7. Confirm your selections and click Finish.
15.3.3.4 Adding a Breadcrumb Region to a PageTo add a breadcrumb region to a page:
Chapter 15Creating Breadcrumbs
15-10
1. View the page in Page Designer:
a. On the Workspace home page, click the App Builder icon.
b. Select an application.
c. Select a page.
Page Designer appears.
Note:
Note the Gallery at the bottom of the page. Pass the cursor over acontrol or component to view a tooltip that describes it.
2. In the Gallery, click the Regions tab. Then, right-click Breadcrumb, select AddTo, and select the appropriate location.
Tip:
You can also select the Breadcrumb region in the Gallery and drag it tothe appropriate location in the Layout tab.
Page Designer indicates what actions are required next.
The Messages tab displays a red or yellow badge indicating messages you needto address. The Message tab displays two types of messages:
• Errors - Error messages display in red. Selecting an error message displaysthe associated attribute in red in the Property Editor. You must address errorsbefore a page can be saved.
• Warnings - Warning messages display in yellow. Selecting a warningmessage displays the associated attribute in yellow in the Property Editor. Youmust address errors before a page can be saved. Note you can save a pagewithout addressing warning messages.
3. To find a group or attribute:
• Search for the group or attribute - Enter keywords in the Filter Propertiesfield. The Property Editor displays the group or attributes. To return to thedefault display, delete the keywords.
• Use Go to Group - Click Go to Group and select the group. To return thedefault display, click Go to Group again and select Expand All.
4. In the Property Editor, edit the Breadcrumb attributes:
Tip:
To learn more about an attribute, select the attribute in the PropertyEditor and click the Help tab in the center pane.
a. Identification, Title - Enter a region title. The region title only displays when it isdefined in the region template.
Chapter 15Creating Breadcrumbs
15-11
b. Layout, Sequence - Enter the display sequence for this item. The sequenceand other layout settings determine where this item is displayed in relation toother items within the region.
c. Layout, Position - Select the template position used to display this region. Theselections available are derived from the appropriate template positionsdefined within the current theme, for the page's user interface.
d. Appearance, Template - Select a region template to define the appearanceand layout of this region. To learn more, click the Help tab in the central pane.
e. Appearance, Item Display Position - Specify where page items display inrelation to the main region content.
5. Click Save.
Repeat these procedures for each page where you would like to add breadcrumbnavigation.
15.3.3.5 Adding Entries to a BreadcrumbTo add entries to a breadcrumb:
1. Navigate to the Breadcrumbs page:
a. Navigate to the Workspace home page.
b. Click the App Builder icon.
c. Select an application.
d. Click Shared Components.
e. Under Navigation, click Breadcrumbs.
The Breadcrumbs page appears.
2. Select a breadcrumb to which to add entries.
3. Click Create Breadcrumb Entry.
4. Under Breadcrumb, select the page where this breadcrumb entry displays.
5. Under Entry:
a. Sequence - Indicate the order in which breadcrumb entries appear. Thesequence determines the order of evaluation.
b. Parent Entry - Identify the parent of this entry. Any given breadcrumb shouldhave only one root node, identified as an item with no parent ID.
c. Short Name - Identify the short name of this breadcrumb entry. Both the shortand long names can be referenced from the breadcrumb template.
d. Long Name - Identify the long name of this breadcrumb entry. Both the shortand long names can be referenced from the breadcrumb template.
6. Under Target, specify the target location:
a. Target is a - Select Page in this Application.
b. Page - Specify the target page number.
To reset pagination for that page, select reset pagination for this page.
c. Request - Enter text for which you would like to set the built-in application itemcalled REQUEST. This is also the item that is set with the name of a button thatwas clicked.
Chapter 15Creating Breadcrumbs
15-12

d. Clear Cache - Enter the page numbers (separated by commas) for thosepages for which you would like to clear the user's session state.
e. To set session state (that is, give a listed item a value):
• Set these items - Enter the list of application item names (separated bycommas) for which you would like to set the session state (give the listeditem a value).
• With these values - Enter a comma delimited list of values for the itemsspecified in Set these items. You can specify static values or substitutionsyntax (for example, &APP_ITEM_NAME.).
You can specify static values or substitution syntax (for example,&APP_ITEM_NAME.). Note that item values passed to f?p= in the URL cannotcontain a colon. Additionally, item values cannot contain commas unless youenclose the entire value in backslashes (for example, \1234,56\).
7. For Conditions:
a. Condition Type - Select a condition type from the list. This condition must bemet in order for this component to be rendered or processed.
b. Enter an expression in the fields provided.
8. For Authorization, optionally select an authorization scheme. This authorizationscheme must evaluate to TRUE in order for this component to be rendered orotherwise processed.
9. For Configuration, select a build option for this component. Build options arepredefined settings that determine whether or not components within anapplication are enabled.
10. Click Create Breadcrumb Entry.
Repeat these procedures for each breadcrumb entry you create.
15.3.3.6 About Creating Dynamic BreadcrumbsTo give users more exact context, you can include session state in breadcrumbs,making your breadcrumbs dynamic. For example, suppose a page in your applicationdisplays a list of orders for a particular company and you want to include the followingbreadcrumb:
Home > Orders > Orders for ACME Inc
In this example, ACME Inc not only indicates the page a user is on but also thenavigation path. The Application Express engine stores the value of ACME Inc. insession state.
To create this type of dynamic menu, you must include a reference to a session stateitem in the breadcrumb's short name or long name. For example:
&COMPANY_NAME.
15.3.4 Editing BreadcrumbsOnce you create a breadcrumb, you can edit it on the Breadcrumbs page.
To edit a breadcrumb:
1. Navigate to the Breadcrumbs page:
Chapter 15Creating Breadcrumbs
15-13
a. Navigate to the Workspace home page.
b. Click the App Builder icon.
c. Select an application.
d. On the Application home page, click Shared Components.
e. Under Navigation, select Breadcrumbs.
The Breadcrumbs page appears.
2. Select a breadcrumb.
3. Select a breadcrumb entry.
The Create/Edit page appears.
4. Edit the appropriate attributes.
To learn more about a specific item, see field-level Help.
5. Optional) In the Breadcrumb Entry list on the right side of the page, you can selectthe Synchronize Breadcrumb With Page Name and Title option.
Selecting this option makes changing the name of a page and breadcrumb a one-step process. The information you provide for breadcrumb names is used toupdate the referenced page name and title.
6. Click Apply Changes.
15.3.5 Reparenting Breadcrumb EntriesYou can select a new parent for selected breadcrumb entries on the Reparent Entriespage.
To reparent breadcrumb entries:
1. Navigate to the Breadcrumbs page:
a. Navigate to the Workspace home page.
b. Click the App Builder icon.
c. Select an application.
d. On the Application home page, click Shared Components.
e. Under Navigation, select Breadcrumbs.
The Breadcrumbs page appears.
2. Select a breadcrumb.
The Entries page appears.
3. From the Tasks list, click Reparent Entries within this Breadcrumb.
The Reparent Entries page appears.
4. Use the navigation bar to edit or filter the view:
• Breadcrumb - Identify the breadcrumb you want to edit and click Go.
• Start With - Make a selection to restrict your view to a subset of thebreadcrumb hierarchy and click Go.
5. From Reparent to, select the new parent.
Chapter 15Creating Breadcrumbs
15-14
6. Select the breadcrumbs entries you want to move and click Reparent CheckedEntries.
15.3.6 Deleting Unused Breadcrumb EntriesTo delete unused breadcrumb entries:
1. Navigate to the Breadcrumbs page:
a. Navigate to the Workspace home page.
b. Click the App Builder icon.
c. Select an application.
d. On the Application home page, click Shared Components.
e. Under Navigation, select Breadcrumbs.
The Breadcrumbs page appears.
2. Select a breadcrumb.
The Breadcrumb Entries page appears.
3. From the Tasks list, click Delete Unused Breadcrumb Entries.
The Delete page appears.
4. Select the entries to remove and click Delete Checked.
15.3.7 Accessing Breadcrumb ReportsYou can view the Breadcrumb Hierarchy, Grid Edit Breadcrumb, BreadcrumbExceptions, Breadcrumb Utilization and Breadcrumb History reports by clicking theappropriate tab at the top of the Breadcrumbs page.
Note:
These reports only appear after you create a breadcrumb.
To view Breadcrumb reports:
1. Navigate to the Breadcrumbs page:
a. Navigate to the Workspace home page.
b. Click the App Builder icon.
c. Select an application.
d. On the Application home page, click Shared Components.
e. Under Navigation, select Breadcrumbs.
The Breadcrumbs page appears.
2. Click the appropriate tab:
• Hierarchy - Click Hierarchy to view breadcrumbs by page and hierarchy.Click the page number to link to a page.
Chapter 15Creating Breadcrumbs
15-15
• Grid Edit - Click Grid Edit to edit all breadcrumb names at once. Click thepage number to link to a page.
• Exceptions - Click Exceptions to view the Exceptions page.
• Utilization - Click Utilization to access the Breadcrumb Utilization report. Thisreport lists breadcrumbs by page. Click the page number to go to a specificpage.
• History - Click History to view the Breadcrumb History report. This report listsrecent changes to breadcrumbs.
You can change the appearance of the page by using the Search bar at the top of thepage.
15.4 Creating Classic Navigation BarIn older themes, developers add navigation by creating classic navigation bar entries.
Tip:
Applications using the Universal Theme - 42 theme provide navigationsupport through the creation of navigation menus.
• About Classic Navigation Bar Entries (page 15-16)
• Creating a Classic Navigation Bar Entry (page 15-17)
• Copying a Classic Navigation Bar Entry (page 15-19)
• Editing a Classic Navigation Bar Entry (page 15-20)
• Editing Multiple Classic Navigation Bar Entries Simultaneously (page 15-20)
• Accessing Classic Navigation Bar Entry Reports (page 15-20)
See Also:
• "Creating Custom Themes (page 12-30)"
• "Managing Navigation Menus (page 17-51)"
15.4.1 About Classic Navigation Bar EntriesFor applications using older themes, navigation bar entries offer an easy way to moveusers between application pages. The associated page template determines thelocation of a navigation bar. A navigation bar entry can be an image, text, or an imagewith text beneath it. You must supply the images and text to use in the navigation barentries.
Navigation bars are different from other shared components in that you do not need toreference them on a page-by-page basis. If your page template includes the
Chapter 15Creating Classic Navigation Bar
15-16
#NAVIGATION_BAR# substitution string, the Application Express engine automaticallyincludes any defined navigation bars when it renders the page.
15.4.2 Creating a Classic Navigation Bar EntryBefore adding a navigation bar, you must create entries for the navigation bar. Youcan create a navigation bar entry from scratch or by copying an existing entry.
• Creating a Classic Navigation Bar Entry from Scratch (page 15-17)
• Creating a Classic Navigation Bar Entry for Feedback (page 15-18)
15.4.2.1 Creating a Classic Navigation Bar Entry from ScratchTo create a navigation bar entry from scratch:
1. Navigate to the Navigation Bar Entries page:
a. Navigate to the Workspace home page.
b. Click the App Builder icon.
c. Select an application.
d. On the Application home page, click Shared Components.
e. Under Navigation, click Classic Navigation Bar Entries.
2. Click Create.
The Create Navigation Bar Entry Wizard appears.
3. For Method, select From Scratch.
4. For Type, select Navigation to URL.
5. For Attributes, specify the following:
a. Sequence - Specify the order of evaluation for this component.
Tip:
To review the existing entries, click the Existing Navigation BarEntries link at the bottom of the page.
b. Entry Label - Enter display text for this navigation bar entry.
c. Icon Image Name - Enter an image name. For naming conventions, see field-level Help.
d. Image ALT - Enter ALT text for navigation icons that are images. If you do notspecify an image name, then this text displays.
e. Image Height - Define the height of the image in pixels.
f. Width - Defines the width of the image.
g. Click Next.
6. For Target, specify the following
a. If the target location is a URL, specify:
Chapter 15Creating Classic Navigation Bar
15-17
• Target is a - Select URL.
• URL Target - Enter a URL. For example:
http://www.yahoo.com
b. If the target location is a page, specify:
• Target is a - Select Page in this Application.
• Page - Specify the target page number.
To reset pagination, select reset pagination for this page.
Select Printer Friendly to display the target page using the application'sPrinter Friendly template. Printer friendly templates optimize a page forprinting.
• Request - Enter text that defines the built-in application item calledREQUEST.
• Clear Cache - Enter the page numbers where you would like to clear theuser's session state. Separate multiple entries with commas.
c. To set session state (that is, give a listed item a value):
• Set these items - Enter the list of application item names for which youwould like to set session state. Separate multiple items with commas.Setting the session state gives the listed item a value.
• With these values - Enter a comma-delimited list of values for the itemsyour specified.
You can specify static values or substitution syntax (for example,&APP_ITEM_NAME.). Note that item values passed to f?p= in the URL cannotcontain a colon. Additionally, item values cannot contain commas unlessyou enclose the entire value in backslashes (for example, \1234,56\).
d. Click Next.
7. To set a condition for displaying the navigation bar entry, select a condition type.
8. Click Create.
Tip:
In order for a navigation bar to appear, your page template must include the#NAVIGATION_BAR# substitution string. To learn more, see "Page Templates(page 12-55)."
15.4.2.2 Creating a Classic Navigation Bar Entry for FeedbackFeedback is the process of gathering real-time comments, enhancement requests,and bugs from your application users. To add a feedback page to an application, youadd a Feedback page.
To create a navigation bar entry for feedback:
1. Navigate to the Navigation Bar Entries page:
a. Navigate to the Workspace home page.
Chapter 15Creating Classic Navigation Bar
15-18
b. Click the App Builder icon.
c. Select an application.
d. On the Application home page, click Shared Components.
e. Under Navigation, click Classic Navigation Bar Entries.
2. Click Create.
The Create Navigation Bar Entry Wizard appears. Each wizard page displays aseries of blocks on the left, representing the sequence of steps. The highlightedblock indicates the step you are performing.
3. For Method, select From Scratch.
4. For Type, select Feedback.
5. For Feedback:
a. Feedback Page - Select your feedback page.
b. Entry Label - Enter the label of the new navigation bar entry.
c. Display Sequence - The sequence for the new navigation bar entry. Thesequence determines the order of evaluation.
6. Click Create.
Tip:
In order for a navigation bar to appear, your page template must include the#NAVIGATION_BAR# substitution string. See"Page Templates (page 12-55)."
15.4.3 Copying a Classic Navigation Bar EntryTo copy a navigation bar entry:
1. Navigate to the Navigation Bar Entries page:
a. Navigate to the Workspace home page.
b. Click the App Builder icon.
c. Select an application.
d. On the Application home page, click Shared Components.
e. Under Navigation, click Classic Navigation Bar Entries.
2. Click Create.
The Create Navigation Bar Entry Wizard appears.
3. For Method, select As a Copy of an Existing Navigation Bar and click Next.
4. For Copy From Application, select an application and click Next.
5. For New Names, enter the name on the new entry, and select whether to copy andsubscribe.
6. Click Copy Navigation Bar Entries.
Chapter 15Creating Classic Navigation Bar
15-19
15.4.4 Editing a Classic Navigation Bar EntryOnce you create a navigation bar entry, you can edit it on the Navigation Bar Entriespage.
To edit a navigation bar entry:
1. Navigate to the Navigation Bar Entries page:
a. Navigate to the Workspace home page.
b. Click the App Builder icon.
c. Select an application.
d. On the Application home page, click Shared Components.
e. Under Navigation, click Classic Navigation Bar Entries.
2. Select a navigation bar entry.
The Edit page appears.
3. Edit the appropriate attributes.
4. To learn more about a specific item on a page, see field-level Help.
5. Click Apply Changes.
15.4.5 Editing Multiple Classic Navigation Bar Entries SimultaneouslyTo edit multiple navigation bar entries simultaneously:
1. Navigate to the Lists page:
a. Navigate to the Workspace home page.
b. Click the App Builder.
c. Select an application.
d. On the Application home page, click Shared Components.
e. Under Navigation, click Classic Navigation Bar Entries.
2. Select a list.
3. Click Grid Edit at the top of the page.
4. Edit the appropriate attributes and click Apply Changes.
15.4.6 Accessing Classic Navigation Bar Entry ReportsYou can view the Navigation Bar Entry Subscription and Navigation Bar Entry Historyreports by clicking the appropriate tab at the top of the Navigation Bar Entries page.
Note:
The Subscription and History buttons only appear after you create anavigation bar.
Chapter 15Creating Classic Navigation Bar
15-20
1. Navigate to the Navigation Bar Entries page:
a. Navigate to the Workspace home page.
b. Click the App Builder icon.
c. Select an application.
d. On the Application home page, click Shared Components.
e. Under Navigation, click Classic Navigation Bar Entries.
2. Click the appropriate tab:
• Subscription - Click Subscription to access the Subscribed NavBars report.This report displays subscribed navigation bar entries in your application.
• History - Click History to view the Navigation Bar History report. This reportlists recent changes to navigation bars.
15.5 Controlling Navigation Using BranchesAdd navigation to application pages by creating branches. A branch is an instruction tolink to a specific page, procedure, or URL after a given page is submitted.
• Creating a Branch (page 15-21)
• About Branching Conditionally (page 15-23)
See Also:
"Accessing Page Specific Utilities (page 6-71)"
15.5.1 Creating a BranchTo create a branch:
1. View the page in Page Designer:
a. On the Workspace home page, click the App Builder icon.
b. Select an application.
c. Select a page.
Page Designer appears.
2. In either the Rendering or Processing tab, right-click Branches and select CreateBranch.
The Property Editor displays the Branch attributes.
Chapter 15Controlling Navigation Using Branches
15-21
Tip:
The Messages tab displays a red or yellow badge to identify messagesyou need to address. Selecting a message displays the associatedattribute in the Property Editor. You must address red error messagebefore you can save.
a. Identification, Name - Specify the name of the branch for easy identification bydevelopers.
b. Execution Options:
i. Sequence - Specify the sequence for this component. The sequencedetermines the order of execution.
ii. Point - Select the point in the processing at which this branch action isconsidered. Options include:
• After Submit (previously named Before Computation)
• Validating (previously named Before Validation)
• Processing (previously named Before Processing)
• After Processing (previously named After Processing)
• Before Header (previously named Before Header)
c. Behavior, Type - Select a page branch type. To learn more, click the Help tabin the central pane.
The attributes that display in the Property Editor depend on the branch typeyou select.
If Type is Page or URL (Redirect), click Target and edit the attributes in theLink Builder Target dialog.
d. Server-Side Condition:
i. When Button Pressed - If you want this page processing component toexecute only when the specified button is clicked, select a button from thelist. You can incorporate this button condition with other conditions tofurther refine when this page processing component executes.
ii. Condition Type - Select a condition type from the list that must be met inorder for this component to be rendered or processed. To learn more, clickthe Help tab in the central pane.
3. Edit the Branch attributes:
Tip:
To learn more about an attribute, select the attribute in the PropertyEditor and click the Help tab in the central pane.
4. Click Save.
Chapter 15Controlling Navigation Using Branches
15-22
15.5.2 About Branching ConditionallyLike other controls, branches can be made conditional. To a branch conditional, viewthe branch attributes in the Property Editor. Under Server-side Condition, edit theappropriate attributes.
Chapter 15Controlling Navigation Using Branches
15-23
16Managing Computations, Validations, andProcesses
Enhance your application by including computations, validations, and processes.
Computations enable you to assign values to items.Validations are edit checks onspecific items, pages, or columns. A page process performs an action at a specifiedpoint during the rendering or submission of the page. Application processes areblocks of PL/SQL logic that are set to run at specific points using processes frommultiple pages of an application.
• Understanding Page Computations (page 16-1)Use computations to assign a value to an identified item when a page is submittedor displayed.
• Understanding Validations (page 16-5)Use validations to create edit checks on specific items, pages, or columns.
• Understanding Page Processes (page 16-10)Create page processes to perform an action at a specified point during therendering or submission of the page.
• About Branches (page 16-14)A branch is an instruction to go to a specific page, procedure, or URL. Forexample, you can branch from page 1 to page 2 after page 1 is submitted. Whenyou create a branch, you specify a Branch Point and Branch Type.
• Understanding Application Processes (page 16-14)Create an application process to run a block of PL/SQL logic at a specific pointfrom multiple pages of an application. By default, application processes execute atthe same point for every page in the application. However, you can applyconditions for specific pages to control when the process executes.
• Understanding Application Computations (page 16-19)Create an application computation to set the value of a single page or application-level item. Application computations run at the same point across multiple pages inan application.
• Using the Attribute Dictionary (page 16-21)Use the Manage Attribute Dictionary page to update values on the current pagewith those in the Attribute Dictionary, or to update the Attribute Dictionary with thevalues on the current page.
16.1 Understanding Page ComputationsUse computations to assign a value to an identified item when a page is submitted ordisplayed.
• About Page Computations (page 16-2)
• Creating a Page Computation (page 16-2)
16-1
• Editing Page Computation Attributes (page 16-3)
• Editing the Computation Point and Source (page 16-3)
• Computation Points and Computation Syntax Example (page 16-4)
See Also:
"Understanding Application Computations (page 16-19)"
16.1.1 About Page ComputationsA page computation assigns a value to an identified item when a page is displayed orsubmitted (rendered and processed). You create a page computation by running theCreate Page Computation Wizard. For each computation, specify the item for whichyou are creating the computation and a computation type.
You can also use application-level computations to assign values to items. Most page-level computations populate page items. In contrast, most application-levelcomputations populate application items.
16.1.2 Creating a Page ComputationTo create a page computation:
1. Navigate to the appropriate page in Page Designer.
2. In the Rendering tab, expand the Pre-Rendering or Post-Rendering node andlocate where the computation should be.
3. Right-click the location and select Create Computation.
Page Designer appears.
In the Property Editor, attributes are organized into groups. To find a group orattribute, enter keywords in the Filter Properties field. The Property Editor displaysthe group or attributes. Or, you can click Go to Group and select the group.
Tip:
To learn more about an attribute, select the attribute in the PropertyEditor and click the Help tab in the central pane.
4. Edit the following attributes:
a. Identification, Item Name - Enter the page or application item populated by thiscomputation.
b. Execution Options, Sequence - Specify the sequence for this computation.The sequence determines the order of execution.
c. Execution Options, Point - Select at what point in page rendering orprocessing this computation is executed. The most typical computation point isAfter Submit.
Chapter 16Understanding Page Computations
16-2
d. Computation, Type - Select a computation type. To view a list of options, seeHelp.
5. Click Save.
16.1.3 Editing Page Computation AttributesOnce you create a computation, you can edit it on the Edit Page Computation page.
To edit a page computation:
1. View the page in Page Designer.
2. In the Rendering tab, expand the Pre-Rendering or Post-Rendering node andselect the computation.
Page Designer appears.
In the Property Editor, attributes are organized into groups. To find a group orattribute, enter keywords in the Filter Properties field. The Property Editor displaysthe group or attributes. Or, you can click Go to Group and select the group.
3. In the Property Editor, edit the appropriate attributes.
Tip:
To learn more about an attribute, select the attribute in the PropertyEditor and click the Help tab in the center pane.
4. Click Save.
16.1.4 Editing the Computation Point and SourceYou control when a computation executes by editing the Sequence and Pointattributes. The Sequence attribute determines the order of evaluation. The Pointattribute determines the point in page rendering or processing at which thecomputation executes. The most typical computation point is After Submit.
To edit a computation point and source:
1. View the page in Page Designer.
2. In the Rendering tab, expand the Pre-Rendering or Post-Rendering node andselect the computation.
Page Designer appears.
In the Property Editor, attributes are organized into groups. To find a group orattribute, enter keywords in the Filter Properties field. The Property Editor displaysthe group or attributes. Or, you can click Go to Group and select the group.
3. In the Property Editor, edit the following attributes.
a. Execution Options, Sequence - Specify the sequence for this component. Thesequence determines the order of execution. If two components have thesame sequence value, then they may be executed in a different order whenthe application is exported and imported into another environment.
Chapter 16Understanding Page Computations
16-3
b. Execution Options, Point - Select at what point in page rendering orprocessing this computation is executed.
For example, selecting On New Instance executes the computation when anew session (or instance) is generated. The most typical computation point isAfter Submit.
c. Computation - Define expression or query to compute an item's value.
d. Error, Error Message - Enter an error message that displays if thiscomputation fails.
Tip:
To learn more about an attribute, select the attribute in the PropertyEditor and click the Help tab in the center pane.
4. Click Save.
16.1.5 Computation Points and Computation Syntax ExampleA good example of using computations can be illustrated by a page containing formfields for entering phone numbers. In this example, the phone number is stored in onedatabase column; however, the data entry form breaks the phone number into threecomponents: area code, prefix, and line number. In this example, the page items arecalled P10_AREA_CODE, P10_PREFIX, and P10_LINE_NUMBER.
Next, suppose you need to combine the values stored in these items into a singlestring. You could accomplish this by using an After Submit computation and store thecombined values in an item called P10_PHONE_NUMBER.
To create a computation to store the combined values of P10_AREA_CODE, P10_PREFIX,and P10_LINE_NUMBER in new items:
1. Navigate to the appropriate page.
2. Create an item named P10_PHONE_NUMBER to store the combined values ofP10_AREA_CODE, P10_PREFIX, and P10_LINE_NUMBER.
3. Create the computation:
a. In the Rendering tab, expand the Pre-Rendering.
b. Select a location, and then right-click and select Create Computation.
Page Designer appears.
In the Property Editor, attributes are organized into groups. To find a group orattribute, enter keywords in the Filter Properties field. The Property Editordisplays the group or attributes. Or, you can click Go to Group and select thegroup.
Tip:
To learn more about an attribute, select the attribute in the PropertyEditor and click the Help tab in the central pane.
Chapter 16Understanding Page Computations
16-4
4. In the Property Editor, edit the following attributes:
a. Identification, Item Name - Select P10_PHONE_NUMBER.
b. Execution Options, Sequence - Specify the sequence for this computation.The sequence determines the order of execution.
c. Execution Options, Point - Select at what point in page rendering orprocessing this computation is executed. The most typical computation point isAfter Submit.
5. For Computation Type, you can create the following computation types:
a. Static Value:
• Computation, Type - Select Static Value .
• Computation, Static Value - Enter the following computation:
(&P10_AREA_CODE.) &P10_PREFIX.-&P10_LINE_NUMBER.
b. PL/SQL Function Body:
• Computation, Type - Select PL/SQL Function Body .
• Computation, PL/SQL Function Body - Enter the computation:
DECLAREl_return_value VARCHAR2(300) DEFAULT NULL;BEGIN l_return_value :='('||:P10_AREA_CODE||')'||:P10_PREFIX||'-'||:P10_LINE_NUMBER;RETURN l_return_value;END;
c. SQL Query (return colon separated value):
• Computation, Type - Select SQL Query (return colon separated value) .
• Computation Type, SQL Query - Enter the computation:
SELECT '('||:P10_AREA_CODE||')'||:P10_PREFIX||'-'||:P10_LINE_NUMBER FROM DUAL
d. PLSQL Expression:
• Computation, Type - Select PLSQL Expression .
• Computation Type, PLSQL Expression - Enter the computation:
'('||:P10_AREA_CODE||')'||:P10_PREFIX||'-'||:P10_LINE_NUMBER
6. Click Save.
16.2 Understanding ValidationsUse validations to create edit checks on specific items, pages, or columns.
• About Validations (page 16-6)
• Creating a Validation (page 16-6)
• Editing a Validation (page 16-7)
• About Determining When Validations Execute (page 16-8)
• About Defining How Validation Error Messages Display (page 16-8)
Chapter 16Understanding Validations
16-5

• Processing Validations Conditionally (page 16-9)
• About Altering the Go to Error Link (page 16-10)
• What Happens When a Validation Fails? (page 16-10)
16.2.1 About ValidationsA validation is an edit check. Validations specific to a single item are page itemvalidations. Validations that apply to an entire page are page validations. Validationsfor tabular forms specific to a single column are column level validations. Validationsfor tabular forms that do not apply to a single column are tabular form rowvalidations.
You can define a validation declaratively by selecting a validation method. You enterthe actual validation edit check in the Validation Messages field. Be aware that if avalidation fails, subsequent page processes or computations do not occur. Alsoremember that the validation you enter must be consistent with the validation type youselected.
16.2.2 Creating a ValidationTo create a validation in Page Designer:
Note:
Text entered for validations may not exceed 3,950 characters.
1. View the page in Page Designer:
a. On the Workspace home page, click the App Builder icon.
b. Select an application.
c. Select a page.
Page Designer appears.
2. Click the Processing tab in the left pane.
3. Right-click Validations and select Create Validation.
Validation attributes display in the Property Editor. Attributes are organized ingroups.
4. To find a group or attribute:
• Search for the group or attribute - Enter keywords in the Filter Propertiesfield. The Property Editor displays the group or attributes. To return to thedefault display, delete the keywords.
• Use Go to Group - Click Go to Group and select the group. To return thedefault display, click Go to Group again and select Expand All.
5. Edit the following attributes:
Chapter 16Understanding Validations
16-6
Tip:
To learn more about an attribute, select the attribute in the PropertyEditor and click the Help tab in the central pane.
a. Identification, Name - Enter the name of the validation.
b. Execution Options, Sequence - Enter the sequence for this validation. Thesequence determines the order of execution.
c. Validation, Editable Region - Select the associated region.
d. Validation, Type - Select the type of equality to be tested for this validation.Depending on your selection, one or more additional attributes are required tofully define this validation.
If the validation passes the equality test, or evaluates to TRUE, then thevalidation error message does not display. Validation error messages displaywhen the validation fails the equality test, or evaluates to FALSE, or a non-empty text string is returned.
e. Validation, Always Execute - Specify whether this validation always executes.
If set to Yes, this validation is always evaluated, irrespective of the ExecuteValidations setting defined against the button that submitted the page. If setto No, this validation is only evaluated if the triggering button has an ExecuteValidations setting of Yes.
f. Error, Error Message - Enter text for the error message.
g. Error, Display Location - Select where the error message displays for thisvalidation.
Validation error messages display on a separate error page, or inline with theexisting page. Inline error messages display underneath the AssociatedItem label and/or in a Notification area, defined as part of the page template.
h. Error, Associated Item/Column - Select the item or column where thisvalidation error message displays.
If you select an item and the Error message display location includes Inlinewith Field, the error message displays underneath the label of the specifieditem. If the Error message display location does not include Inline with Field,this attribute has no impact on the display of the error message.
6. Click Save.
16.2.3 Editing a ValidationTo edit a validation in Page Designer:
1. View the page in Page Designer:
a. On the Workspace home page, click the App Builder icon.
b. Select an application.
c. Select a page.
Page Designer appears.
Chapter 16Understanding Validations
16-7
2. Click the Processing tab in the left pane.
3. Expand Validating and then Validations and select the validation.
Property Editor displays Validation attributes. Attributes are organized in groups.
4. To find a group or attribute:
• Search for the group or attribute - Enter keywords in the Filter Propertiesfield. The Property Editor displays the group or attributes. To return to thedefault display, delete the keywords.
• Use Go to Group - Click Go to Group and select the group. To return thedefault display, click Go to Group again and select Expand All.
5. In the Property Editor, edit the appropriate attributes.
Tip:
To learn more about an attribute, select the attribute in the PropertyEditor and click the Help tab in the center pane.
6. Click Save.
16.2.4 About Determining When Validations ExecuteWhen creating a validation, the Always Execute attribute determines if validationsexecute when a page is submitted. Use this attribute for buttons or certain page itemsthat submit a page. The Always Execute attribute has two options:
• Yes - The validation always executes independent of validation settings forbuttons or items on a page.
For example, select Yes if your validation is a security check which determines ifthe current user is allowed to modify or delete the current record. This ensures thevalidation executes for any operation and prevents unprivileged users frommodifying data.
• No - The validation only executes if the button or item used to submit the page hasthe Execute Validations attributes set to Yes.
For example, it is not useful to verify that an item be numeric and display an errormessage if the user is simply deleting a record. In that example, the validationsshould only execute when the user clicks the Create or Apply Changes buttons.
To accomplish this behavior:
– For the validation, set Always Execute to No
– For the Create and Apply Changes buttons, set Execute Validations to Yes.
– For the Delete button, set Execute Validations to No to avoid unnecessaryvalidations.
16.2.5 About Defining How Validation Error Messages DisplayYou can choose to have validation error messages display inline (that is, on the pagewhere the validation is performed) or on a separate error page.
Chapter 16Understanding Validations
16-8
You define how a validation error message displays by configuring the followingvalidation attributes:
1. Error Message - Enter the error message text in this field.
2. Display Location - Select where the error message displays for this validation.Validation error messages display on a separate error page, or inline with theexisting page. Inline error messages display underneath the Associated Item labeland/or in a Notification area, defined as part of the page template.
Tip:
From Component View, this attribute is named Error Message displaylocation.
Options include:
• Inline with Field and in Notification - Error displays inline within the fieldlabel and within a notification area (defined as part of the page template).
• Inline with Field - Error displays inline within the field label.
• Inline in Notification - Error displays inline within a notification area (definedas part of the page template).
• On Error Page - Displays the error on a separate error page. To create a harderror that stops all processing (including validations), you must display theerror on an error page.
3. Associated Item (or Column) - Select the item (or column) where this validationerror message displays.
If you select an item and the Error message display location includes Inline withField, the error message displays underneath the label of the specified item. If theError message display location does not include Inline with Field, this attributehas no impact on the display of the error message.
16.2.6 Processing Validations ConditionallyYou can control when and if a validation is performed by configuring the followingConditions attributes:
1. When Button Pressed - If you want this page processing component to executeonly when the specified button is clicked, select a button from the list. You canincorporate this button condition with other conditions to further refine when thispage processing component executes.
If no button is pressed, other conditions are evaluated before performing thevalidation.
2. Execution Scope - Applicable only to tabular forms. Specify the execution scope:
• For Created and Modified Rows - The validation executes only for createdand modified rows in your tabular form.
• All Submitted Rows - The validation executes for every submitted row.
Chapter 16Understanding Validations
16-9
3. Condition Type - Select a condition type from the list that must be met in order forthis component to be rendered or processed. To view a list of options, click theHelp tab.
16.2.7 About Altering the Go to Error LinkIf you define an associated item, Oracle Application Express renders a Go to Errorlink in the Notification display location next to the corresponding error message. Whenclicked, the user's focus is set to the associated item.
You can alter the Go to Error text to change the default text or to translate it into alanguage that is not translated by default with Oracle Application Express. In eithercase, define a text message called APEX.GO_TO_ERROR with the text and language ofyour choice. Additionally, you can disable this functionality and remove the Go toError link by setting the text of the APEX.GO_TO_ERROR text message to just a singlespace.
16.2.8 What Happens When a Validation Fails?If a page is submitted and some of the validations fail, Oracle Application Expressredisplays the existing page with all inline validation errors. While displaying inlineerrors, Oracle Application Express does not execute computations, applicationprocesses, or page processes (for example, Automated Row Fetch) which are definedto execute during Page Rendering (in other words, all "On Load %" display points).The one exception is if the computations and processes use the condition type InlineValidation Errors Displayed.
The reason for skipping these computations and processes is that any of they couldpotentially alter the data entered by the user. For example, an Automated Row Fetchprocess would fetch and overwrite the modified data with the values from the databasewhen the user actually wants to get the entered data in order to fix the validation error.
If a computation is skipped, the following displays in the debug output:
Do not perform computation because inline validation errors found.
If an application or page process is skipped, the following displays in the debug output:
Skip because inline validation errors found.
16.3 Understanding Page ProcessesCreate page processes to perform an action at a specified point during the renderingor submission of the page.
• About Page Processes (page 16-11)
• Creating Page Processes (page 16-11)
• Editing Page Process Attributes (page 16-12)
• Controlling When a Page Process Executes (page 16-13)
• Creating Page Process Success and Error Messages (page 16-13)
• Making a Page Process Conditional (page 16-14)
Chapter 16Understanding Page Processes
16-10
16.3.1 About Page ProcessesA page process performs an action at a specified point during the rendering orsubmission of the page. For example, you can create a page process to execute logicor to make a call to the Application Express engine. A page process is a unit of logicthat runs when a specific event occurs, such as loading or submitting a page.
From a functional perspective, there is no difference between page-level andapplication-level processes. The difference between these two process types is wherethe process is defined, that is at the page-level or at the application level.
16.3.2 Creating Page ProcessesTo create a page process:
1. View the page in Page Designer.
a. On the Workspace home page, click the App Builder icon.
b. Select an application.
c. Select a page.
Page Designer appears.
2. In either the Rendering or Processing tab, locate the node where the process willoccur. Right-click and select Create Process.
Process attributes display in the Property Editor. Attributes are organized ingroups.
Tip:
The Messages tab displays a red or yellow badge to identify messagesyou need to address. Selecting a message displays the associatedattribute in the Property Editor. You must address red error messagebefore you can save.
3. To find a group or attribute:
• Search for the group or attribute - Enter keywords in the Filter Propertiesfield. The Property Editor displays the group or attributes. To return to thedefault display, delete the keywords.
• Use Go to Group - Click Go to Group and select the group. To return thedefault display, click Go to Group again and select Expand All.
Tip:
To learn more about an attribute, select the attribute in the PropertyEditor and click the Help tab in the center pane.
4. Under Identification:
a. Name - Enter the name of the process.
Chapter 16Understanding Page Processes
16-11
b. Type - Specify which process type to execute. The Type you selectdetermines what Setting attributes display.
5. Under Settings, edit the appropriate attributes.
6. Under Execution Options:
a. Sequence - Specify the sequence for this computation. The sequencedetermines the order of execution.
If two components have the same sequence value, then they may be executedin a different order when the application is exported and imported into anotherenvironment.
b. Point - Select the point at which this process is executed.
c. Run Process - Select the frequency that this process is executed.
7. Under Success Message:
a. Error Message - Enter the success message for this process.
If the process runs and does not generate an error, then this process successmessage displays in the notification section of the resulting page displayed.
8. Under Error:
a. Error Message - Enter the error message for this process.
This message displays if an unhandled exception is raised. After any errorprocessing stops, a rollback is issued and an error message displays.
b. Display Location - Select where this process error message displays, whenthe process fails to complete successfully.
9. Click Save.
16.3.3 Editing Page Process AttributesTo edit an existing page process:
1. View the page in Page Designer.
a. On the Workspace home page, click the App Builder icon.
b. Select an application.
c. Select a page.
Page Designer appears.
2. In either the Rendering or Processing tab, expand the nodes to locate and selectthe process.
Process attributes display in the Property Editor. Attributes are organized ingroups.
3. To find a group or attribute:
• Search for the group or attribute - Enter keywords in the Filter Propertiesfield. The Property Editor displays the group or attributes. To return to thedefault display, delete the keywords.
• Use Go to Group - Click Go to Group and select the group. To return thedefault display, click Go to Group again and select Expand All.
Chapter 16Understanding Page Processes
16-12
4. Edit the appropriate attributes:
Tip:
To learn more about an attribute, select the attribute in the PropertyEditor and click the Help tab in the central pane.
5. Click Save.
16.3.4 Controlling When a Page Process ExecutesTo control when a process executes, edit the following attributes:
1. View the process attributes in the Property Editor.
2. Edit the following attributes:
a. Execution Options, Sequence - Specify the sequence for this component. Thesequence determines the order of execution.
b. Execution Options, Point - Select the point in the processing at which thisbranch action is considered.
3. Click Save.
16.3.5 Creating Page Process Success and Error MessagesYou can define both success and error messages that display when a process runs.How an error message displays depends upon the processing point. For processeswith a processing point of On Submit - Before Computation and Validations or OnSubmit - After Computations and Validations, you can specify whether the errormessage displays inline on the current page (the default) or on a separate page. Forall other page processes, error messages display on a separate error page.
To create a page process error or success message:
1. View the process attributes in the Property Editor.
2. Edit the following attributes:
a. Success Message, Success Message - Enter the success message for thisprocess. If the process runs and does not generate an error, then this processsuccess message displays in the notification section of the resulting pagedisplayed. If you are branching to another page via a URL redirect, you mayneed to check the preserve success message attribute.
b. Error, Error Message - Enter the error message for this process. Thismessage displays if an unhandled exception is raised. After any errorprocessing stops, a rollback is issued and an error message displays.
c. Error, Display Location - Select where this process error message displays,when the process fails to complete successfully.
Option include:
• Inline in Notification - The process error message displays in theNotification area (defined as part of the page template).
• On Error Page - Error displays on a separate error page.
Chapter 16Understanding Page Processes
16-13
3. Click Save.
16.3.6 Making a Page Process ConditionalTo create a conditional page process, edit the following attributes:
1. View the process attributes in the Property Editor.
2. Under Server-side Condition, edit the following attributes:
a. When Button Pressed - If you want this page processing component toexecute only when the specified button is clicked, select a button from the list.You can incorporate this button condition with other conditions to further refinewhen this page processing component executes.
b. Execution Scope - Applicable only to editable interactive grids. Specify theexecution scope:
• For Created and Modified Rows - The validation executes only forcreated and modified rows in your tabular form.
• All Submitted Rows - The validation executes for every submitted row.
c. Condition Type - Select a condition type from the list that must be met in orderfor this component to be rendered or processed.
3. Click Save.
16.4 About BranchesA branch is an instruction to go to a specific page, procedure, or URL. For example,you can branch from page 1 to page 2 after page 1 is submitted. When you create abranch, you specify a Branch Point and Branch Type.
16.5 Understanding Application ProcessesCreate an application process to run a block of PL/SQL logic at a specific point frommultiple pages of an application. By default, application processes execute at thesame point for every page in the application. However, you can apply conditions forspecific pages to control when the process executes.
Tip:
To learn more about execution behavior in the case of a validation error, see"What Happens When a Validation Fails? (page 16-10)."
• On Demand Application Processes (page 16-15)
• About Application Processes that Execute On New Instance (page 16-15)
• About Running an On Demand Process from a Page Request (page 16-15)
• Application Process Example (page 16-16)
Chapter 16About Branches
16-14
• Creating an Application Process (page 16-16)
• Editing Application Process Attributes (page 16-17)
• Creating Application Process Error Messages (page 16-17)
• Viewing the Application Processes History Report (page 16-18)
See Also:
"Understanding Page Processes (page 16-10)"
16.5.1 On Demand Application ProcessesAn On Demand process is special type of application process which has a ProcessPoint of On Demand, is of type PL/SQL, and executes when called from a page-levelOn Demand process or from an Ajax call from the browser. On Demand processes areuseful when you have PL/SQL logic that you would like to run from different executionpoints across multiple pages.
On Demand processes should typically be created on a page and not at theapplication-level. On Demand processes created at the application-level are createdwith an initial authorization scheme of Must Not Be Public User. This prohibits theprocesses being invoked from users in unauthenticated sessions.
16.5.2 About Application Processes that Execute On New InstanceTypically an application process runs at the same point across multiple pages in anapplication. Processes having a Process Point of On New Instance are the exception.These types of processes are useful when you only need to retrieve information oncewithin a user's session. For example, if the application items do not depend on thelogged in user, you can initialize them using the Process Point On New Instance. Tolook up information that depends on the user, you can also use After Authentication.
If you configure applications to share the same session by setting the same cookiename in the authentication scheme, On New Instance and After Login, theapplication processes fire whenever Oracle Application Express first processes arequest for the application (that is, On New Instance), or processes a request of anauthenticated user for the application (that is, After Authentication).
16.5.3 About Running an On Demand Process from a Page RequestYou can have a page request run an On Demand process by using the followingsyntax:
f?p=application_id:page_id:session:APPLICATION_PROCESS=process_id
Where:
• application_id is the application ID or alphanumeric alias
• page_id is the page number or alphanumeric alias
• session is the session ID
Chapter 16Understanding Application Processes
16-15
• APPLICATION_PROCESS=process_id is the keyword APPLICATION_PROCESS= followed byeither the process ID or an alphanumeric name of an application-level processhaving a Process Point of On Demand
When you use this syntax, the Application Express engine recognizes the request andprocesses it using the following rules:
• The page number in the URL can be the current page number or alias. A pagenumber or alias is required in the request only as a syntactic placeholder becauseno specific page is accessed for this type of request.
• The process authorization scheme, the application's authorization scheme, andthe process conditions are supported.
• Session state (that is, item names and values) may be set in the URL, but clearcache options are ignored.
• Any failures of authentication, authorization, or process conditions do not result invisible error messages or other indicators of such failures and most often result ina blank page being displayed. Note that if you are logged in to App Builder as adeveloper, an error messages displays.
• Specifying the process by name locates the first process with the specified (case-preserved) name.
16.5.4 Application Process ExampleA shopping cart application is a good example of when you might use an applicationprocess. For example, to display the contents of a user's shopping cart with each pageview, you create a region on page zero of your application that displays the values ofthe application-level items TOTAL_CART_ITEMS and TOTAL_PURCHASE_PRICE.
Instead of writing a process for each page to set the values of TOTAL_CART_ITEMS andTOTAL_PURCHASE_PRICE, you could write an application process of type On Load: BeforeHeader to compute these values. Then, the Application Express engine would executethe process on each page as it renders the application. As a result, each page, woulddisplay the most current values for TOTAL_CART_ITEMS and TOTAL_PURCHASE_PRICE.
16.5.5 Creating an Application ProcessTo create an application process:
1. Navigate to the Shared Components page:
a. On the Workspace home page, click App Builder.
b. Select an application.
c. On the Application home page, click Shared Components.
The Shared Components page appears.
2. Under Application Logic, select Application Processes.
The Application Processes page appears.
3. Click Create.
4. For Identification:
a. Name - Enter a name for the application process.
Chapter 16Understanding Application Processes
16-16
b. Sequence - Specify the sequence number for this process. The sequencenumber determines the order in which the process is evaluated relative toother processes that execute at the same point.
c. Point - Identify the point during the processing of each page in the applicationthat this process would run. Note the option, On Demand, only runs whenrequested by a page process.
d. Click Next.
5. For Source:
a. PL/SQL code - Enter the PL/SQL code of your application process. The codewill automatically be wrapped with a Begin and End;.
b. Error Message - Enter the error message that displays if the process raises anerror.
c. Click Next.
6. For Conditionality:
a. Condition Type - Select a condition type that must be met in order for thisprocess to execute.
b. Expression 1 and Expression 2 - Use these attributes to conditionally controlwhether the process executes. Enter values in this attribute based on thespecific condition type you select. The process executes if the specifiedcondition is met.
c. Click Create Process.
16.5.6 Editing Application Process AttributesTo edit an existing page process:
1. Navigate to the Shared Components page:
a. On the Workspace home page, click App Builder.
b. Select an application.
c. On the Application home page, click Shared Components.
The Shared Components page appears.
2. Under Logic, select Application Processes.
The Application Processes page appears.
3. Click the process name.
4. Edit the appropriate attributes. For more information, see field-level Help.
5. Click Apply Changes.
16.5.7 Creating Application Process Error MessagesIf a process raises an error, you can define an error messages that displays to theuser. How the error message displays depends upon the processing point. Forprocesses with a processing point of On Submit - Before Computation and Validationsor On Submit - After Computations and Validations, you can specify whether the errormessage displays inline on the current page (the default) or on a separate page. Forall other application processes, error messages display on a separate error page.
Chapter 16Understanding Application Processes
16-17
To create an application process error message:
1. Access the application process attributes.
2. Edit the following attributes:
a. Source, Process Error Message - Enter the message that displays when anunhandled exception is raised.
b. Error message display location - Applies to processes with a processing pointof On Submit - Before Computation and Validations or On Submit - AfterComputations and Validations, you can specify where the error messagedisplays.
Select one of the following:
• Inline in Notification - Error displays inline on the page in the"notification" area (defined as part of the page template).
• On Error Page - Error displays on a separate error page.
If the application contains a manually created tabular form (usingAPEX_ITEM calls in the SQL statement), select On Error Page. Otherwise,changes made by the user are discarded when the page is re-rendered.When errors are displayed on a separate error page, the user can use thebrowser's Back button to preserve the entered values.
3. Click Apply Changes.
16.5.8 Viewing the Application Processes History ReportThe Application Process History report displays recent modifications made toapplication processes.
To access application processes History reports:
1. Navigate to the Shared Components page:
a. On the Workspace home page, click App Builder.
b. Select an application.
c. On the Application home page, click Shared Components.
The Shared Components page appears.
2. Under Logic, select Application Processes.
The Application Processes page appears.
3. Select the History tab at the top of the page.
4. You can customize the appearance the page using the Search bar at the top of thepage. Available controls include:
• Select columns to search - Resembles a magnifying glass. Click this icon tonarrow your search. To search all columns, select All Columns.
• Text area - Enter case insensitive search criteria (wildcard characters areimplied) to search for a process by name and click Go.
• Go button - Executes a search or applies a filter.
• Actions menu - Use the Actions menu to customize the report view.
Chapter 16Understanding Application Processes
16-18

16.6 Understanding Application ComputationsCreate an application computation to set the value of a single page or application-levelitem. Application computations run at the same point across multiple pages in anapplication.
Tip:
To learn more about execution behavior in the case of a validation error, see"What Happens When a Validation Fails? (page 16-10)."
• About Application Computations (page 16-19)
• About Application Computations that Execute On New Instance (page 16-19)
• Creating an Application Computation (page 16-20)
• Accessing the Application Computation History Report (page 16-20)
16.6.1 About Application ComputationsApplication Computations are units of logic that set the value of a single page orapplication-level item and are run at the same point across multiple pages in anapplication. Like page-level computation, application computations can be based onstatic values, item values, PL/SQL, or SQL.
A common use of an application item is to store the value of the last page viewed inthe application. By storing the value in an item, you can add a back button and thenredirect the user to the page number captured by the computation. This type ofcomputation works well, for example, when you need to enable users to back out of anerror page.
The following is an example of a computation that stores the last page visited. In thisexample, the computation:
• Stores the last application page visited to an item named LAST_PAGE
• Checks that the value of a CURRENT_PAGE_ITEM is of type PL/SQL Function Body witha Computation body of:
BEGIN :LAST_PAGE := nvl(:CURRENT_PAGE,:APP_PAGE_ID); :CURRENT_PAGE := :APP_PAGE_ID; RETURN :LAST_PAGE;END;
16.6.2 About Application Computations that Execute On New InstanceTypically an application computation runs at the same point across multiple pages inan application. The exception is computations having a Computation Point of On NewInstance. These types of computations are useful when you only need to retrieveinformation once within a user's session. For example, if the application items do notdepend on the logged in user, you can initialize them using the Computation Point On
Chapter 16Understanding Application Computations
16-19
New Instance. To look up information that depends on the user, you can also useAfter Authentication.
If you configure applications to share the same session by setting the same cookiename in the authentication scheme, On New Instance and After Login, theapplication processes fire whenever Oracle Application Express first processes arequest for the application (that is, On New Instance), or processes a request of anauthenticated user for the application (that is, After Authentication).
16.6.3 Creating an Application ComputationTo create an application computation:
1. Navigate to the Shared Components page:
a. On the Workspace home page, click App Builder.
b. Select an application.
c. On the Application home page, click Shared Components.
The Shared Components page appears.
2. Under Logic, select Application Computations.
3. Click Create.
4. Edit the following attributes:
a. Item, Sequence - Specify the sequence for this component. The sequencedetermines the order of evaluation.
b. Item, Computation Item - Select the item this computation affects.
c. Frequency, Computation Point - Select a process point at which thiscomputation should be performed. Selecting After Submit causes thecomputation to be performed only after the page is displayed and thensubmitted.
d. Computation, Computation Type - Select the manner in which thiscomputation is performed.
e. Computation, Computation - Enter the computation logic that corresponds tothe computation type. See field-level Help for examples.
f. Computation, Computation Error Message - Enter the error message thatdisplays if the computation fails.
g. Authorization, Authorization Scheme (optional) - Select an authorizationscheme which must evaluate to True in order for this computation to execute.
h. Condition, Condition Type (optional) - Select a condition type that must be metin order for this computation to execute.
i. Build Option (optional) - Select a build option for this component.
5. Click Create Computation.
16.6.4 Accessing the Application Computation History ReportOnce you create an application computation, you can view the ApplicationComputation History report. The Application Computation History report displays ahistory of recently changed application computations by date.
Chapter 16Understanding Application Computations
16-20
To access the Application Computation History report:
1. Navigate to the Shared Components page:
a. On the Workspace home page, click App Builder.
b. Select an application.
c. On the Application home page, click Shared Components.
The Shared Components page appears.
2. Under Logic, select Application Computations.
3. Select the History at the top of the page.
4. You can customize the appearance the page using the Search bar at the top of thepage. Available controls include:
• Select columns to search - Resembles a magnifying glass. Click this icon tonarrow your search. To search all columns, select All Columns.
• Text area - Enter case insensitive search criteria (wildcard characters areimplied) and click Go.
• Go button - Executes a search or applies a filter.
• Actions menu - Use the Actions menu to customize the report view.
16.7 Using the Attribute DictionaryUse the Manage Attribute Dictionary page to update values on the current page withthose in the Attribute Dictionary, or to update the Attribute Dictionary with the valueson the current page.
• About the Attribute Dictionary (page 16-21)
• Accessing the Manage Attribute Dictionary (page 16-21)
16.7.1 About the Attribute DictionaryThe Attribute Dictionary contains a set of attributes about a column that are used increating forms and reports. The definitions are matched by column name and aparticular definition can be shared among several columns by using synonyms.
16.7.2 Accessing the Manage Attribute DictionaryTo access the Manage Attribute Dictionary page:
1. On the Workspace home page, click the App Builder icon.
The App Builder home page appears.
2. Select an application.
3. Click Utilities.
4. Click Utilities and click Attribute Dictionary.
The page is divided into two sections: Page Items and Report Columns.
Chapter 16Using the Attribute Dictionary
16-21
Use Page Item and Report Column definitions to update the Attribute Dictionary.You can also use the Attribute Dictionary to update Page Items and ReportColumns.
Hidden objects (that is, those in hidden regions and button items) are not countedin the number of candidate Items and Report Columns as these are not used inthe updates.
5. To update the current page or update the Attribute dictionary, select theappropriate page link.
The Attribute Dictionary appears.
Only Items and Report Columns that have different values for at least one attributeare shown. You choose which objects to insert or update and which attributes toinclude. The number of Items and Report Columns that can be used might be lessthan the total because hidden objects, objects in hidden regions, and button itemsare not included.
Tip:
You can access the Attribute Dictionary in Page Designer by clickingUtilities and then selecting Attribute Dictionary.
Chapter 16Using the Attribute Dictionary
16-22
17Managing Shared Components
Shared components can display or be applied on any page within an application.Developers can use the tools and wizards on the Shared Components page either atthe application-level or on specific pages.
• Accessing the Shared Components Page (page 17-2)Access the Shared Components page by selecting an application and then clickingShared Components.
• Shared Components Page (page 17-2)Use the tools and wizards on the Shared Components page either at theapplication-level or on specific pages.
• Managing Application Settings (page 17-9)Create Application Settings to define application-level configuration options.
• Creating Lists of Values at the Application Level (page 17-11)Create a static or dynamic list of values (LOV) at the application-level to display aspecific type of page item.
• Managing Component Settings (page 17-14)Use Component Settings to set application level values for built-in ApplicationExpress components and installed plug-ins.
• Using Shortcuts (page 17-19)Use shortcuts to avoid repetitive coding of HTML or PL/SQL functions.
• Managing Email Templates (page 17-23)Enable users to send emails from your application by creating email templates.
• Managing Static Application Files (page 17-27)Learn how to upload, view, download, and delete static application files (includingimages, CSS files, and other files which must be managed independently).
• Managing Static Workspace Files (page 17-31)Learn how to upload, view, download, and delete static workspace files (includingimages, CSS files, and other files which must be managed independently).
• Managing Application-Level Items (page 17-34)Application-level items do not display, but are used as global variables to theapplication. You can use an application item as a global variable.
• Creating Lists (page 17-38)Add a shared collection of links (or a list) to a database application. To add a list toa page, create a region and specify the region type as List. You control theappearance of a list through list templates.
• Managing Report Output (page 17-55)Learn how to print a report region by defining a report query and how to use areport layout to format a report region.
17-1
See Also:
• " App Builder Concepts (page 2-1)"
• "Creating Database Applications (page 6-1)"
• "Controlling Page Layout (page 13-1)"
• "Adding Navigation (page 15-1)"
17.1 Accessing the Shared Components PageAccess the Shared Components page by selecting an application and then clickingShared Components.
To access the Shared Components page:
1. On the Workspace home page, click App Builder.
2. Select an application.
3. On the Application home page, click Shared Components in the center of thepage.
The Shared Components page appears.
4. To create a shared component, select the appropriate link.
Tip:
Once you select an application, you can also access the SharedComponents page by clicking the Shared Components icon at the top of thepage. The Shared Components icon consists of a triangle above a circle anda square. This icon displays at the top of most App Builder pages includingthe Application home page, Page Designer, Supporting Objects, and Utilities.
17.2 Shared Components PageUse the tools and wizards on the Shared Components page either at the application-level or on specific pages.
The Shared Components page is divided into regions.
• Application Logic (page 17-3)
• Security (page 17-4)
• Other Components (page 17-4)
• Navigation (page 17-5)
• User Interface (page 17-6)
• Files (page 17-6)
Chapter 17Accessing the Shared Components Page
17-2
• Data Sources (page 17-7)
• Reports (page 17-7)
• Globalization (page 17-8)
• Tasks Region (page 17-8)
• Workspace Objects Region (page 17-9)
17.2.1 Application LogicThe following table describes the links under Application Logic on the SharedComponents page.
Table 17-1 Application Logic Links on the Shared Components Page
Link Description
Application DefinitionAttributes
Links to the Edit Application Definition page. Use this page toedit attributes for an application. Attributes are grouped into fourcategories: Definition, Security, Globalization, and UserInterface.
See Also: "Managing Application Attributes (page 6-22)"
Application Items Application-level items do not display, but are used as globalvariables to the application. Commonly, you set the value of apage-level item using an application or page computations. .
See Also: "Managing Application-Level Items (page 17-34)"
Application Processes Use application processes to run PL/SQL logic:
• At specific points for each page in an application• As defined by the conditions under which the process is set
to execute• Upon the creation of a new sessionNote that On Demand processes execute only when calledfrom a page-level On Demand process or when called usingAjax from the browser.
See Also: "Understanding Application Processes (page 16-14)"
Application Settings Application Settings enable developers to define applicationlevel configuration options.
See Also: "Managing Application Settings (page 17-9)"
Application Computations Use application-level computations to assign values toapplication and page-level items for each page displayed orupon the creation of a new application session. You can alsocreate an application-level computation and execute itconditionally on multiple pages.
See Also: "Understanding Application Computations(page 16-19)"
Build Options Use build options to conditionally display or process specificfunctionality within an application. You can use build options tocontrol which features of an application are turned on for eachapplication deployment.
See Also: "Using Build Options to Control Configuration(page 24-14)".
Chapter 17Shared Components Page
17-3

17.2.2 SecurityThe following table describes the links under Security on the Shared Componentspage.
Table 17-2 Security Links on the Shared Components Page
Link Description
Security Attributes Use the Edit Security Attributes page to configure generalsecurity attributes for all pages within an application.
See Also: "Configuring Security Attributes (page 6-32)"
Authentication Schemes Authentication is the process of establishing each user's identitybefore they can access your application. Authentication mayrequire a user to enter a user name and password or mayinvolve verification of a user's identity or use of a secure key.
See Also: "Establishing User Identity Through Authentication(page 20-48)"
Authorization Schemes Authorization restricts user access to specific controls orcomponents based on predefined user privileges.
See Also: "Providing Security Through Authorization(page 20-63)"
Session State Protection Session State Protection is a built-in functionality that preventshackers from tampering with the URLs within your application.URL tampering can adversely affect program logic, sessionstate contents, and information privacy.
See Also: "Preventing URL Tampering (page 20-24)"
Web Credentials Web Credentials to connect to REST Enabled SQL or otherexternal REST services. Oracle Application Express storesthese securely stores and encrypts these credentials for use byOracle Application Express components. Credentials cannot beretrieved back in clear text.
See Also: "Managing Web Credentials (page 18-35)"
Application Access Control Manage application access control roles and user roleassignments.
See Also: "Managing Roles and User Assignments(page 20-44)"
17.2.3 Other ComponentsThe following table describes the links under Other Components on the SharedComponents page.
Table 17-3 Other Component Links on the Shared Components Page
Link Description
List of Values A list of values (LOV) is a static or dynamic set of values usedto display a popup list of values, select list, check box, or radiogroup.
See Also: "Creating Lists of Values at the Application Level(page 17-11)"
Chapter 17Shared Components Page
17-4

Table 17-3 (Cont.) Other Component Links on the Shared Components Page
Link Description
Plug-ins App Builder includes built-in item types, region types, dynamicactions, and processes. Use plug-ins to add new declarativetypes in to your application.
See Also: "Implementing Plug-ins (page 19-3)"
Component Settings Use Component Settings to set application-level values forbuilt-in Oracle Application Express components and installedplug-ins.
See Also: " Managing Component Settings (page 17-14)"
Shortcuts Use shortcuts to avoid repetitive coding of HTML or PL/SQLfunctions. You can create a shortcut to define a page controlsuch as a button, HTML text, a PL/SQL procedure, or HTML.Once you define a shortcut, it is stored in a central repository soyou can reference it from various locations within yourapplication.
See Also: "Using Shortcuts (page 17-19)"
Email Templates Create templates to define the HTML format and Plain Textformats for the emails you wish to send from an application.
See Also: "Managing Email Templates (page 17-23)"
17.2.4 NavigationThe following table describes the links under Navigation on the Shared Componentspage.
Table 17-4 Navigation Links on the Shared Components Page
Link Description
Lists A list is a shared collection of links. You control the appearanceof a list through list templates. Each list element has a displaycondition that enables you to control when it displays.
See Also: "Creating Lists (page 17-38)"
Navigation Menu A navigation menu is a list links that enables users to navigatethe pages in an application. Navigation menus are onlysupported in applications using the Universal Theme - 42.
See Also: "Managing Navigation Menus (page 17-51)"
Tabs Note: Tabs only appear if the associated application uses anolder theme. In new themes, Tabs have been replaced withNavigation Menu.
Tabs are an effective way to navigate users between pages inan application. You can create two types of tabs: standard tabsor parent tabs. A standard tab set is associated with a specificpage and page number. A parent tab set functions as acontainer to hold a group of standard tabs.
See Also: "Creating Tabs (page 15-2)"
Chapter 17Shared Components Page
17-5
Table 17-4 (Cont.) Navigation Links on the Shared Components Page
Link Description
Breadcrumbs Breadcrumbs provide users with hierarchical navigation. Abreadcrumb is a hierarchical list of links that display usingtemplates. You can display a breadcrumb as a list of links or asa breadcrumb path.
See Also: "Creating Breadcrumbs (page 15-8)"
Navigation Bar List Navigation bar lists offer users a simple navigation path formoving between pages in an application. The location of anavigation bar depends upon the associated page template. Alist entry can be an image, an image with text beneath it, or text.
See Also: "Creating Classic Navigation Bar (page 15-16)"
17.2.5 User InterfaceThe following table describes the links under User interface on the SharedComponents page.
Table 17-5 User interface Links on the Shared Components Page
Link Description
User Interface Attributes Use User Interface page to specify user interface options for anapplication.
See Also: "Managing the Application User Interface(page 6-45)"
Themes A theme is a named collection of templates that defines theapplication user interface.
See Also: "Using Themes (page 12-1)"
Templates Templates control the look and feel of specific constructs withinyour application, such as pages, regions, items, and menus.
See Also: "Creating Custom Themes (page 12-30)"
17.2.6 FilesThe following table describes the links under Files on the Shared Components page.
Table 17-6 Files Links on the Shared Components Page
Link Description
Static Application Files Use this link to upload, edit, and delete static files associatedwith the current application, including style sheets (CSS),images and JavaScript files.
See Also: "Managing Static Application Files (page 17-27)"
Static Workspace Files Use this link to upload, edit, and delete static files associatedwith the current application, including style sheets (CSS),images and JavaScript files.
See Also: "Managing Static Workspace Files (page 17-31)"
Chapter 17Shared Components Page
17-6
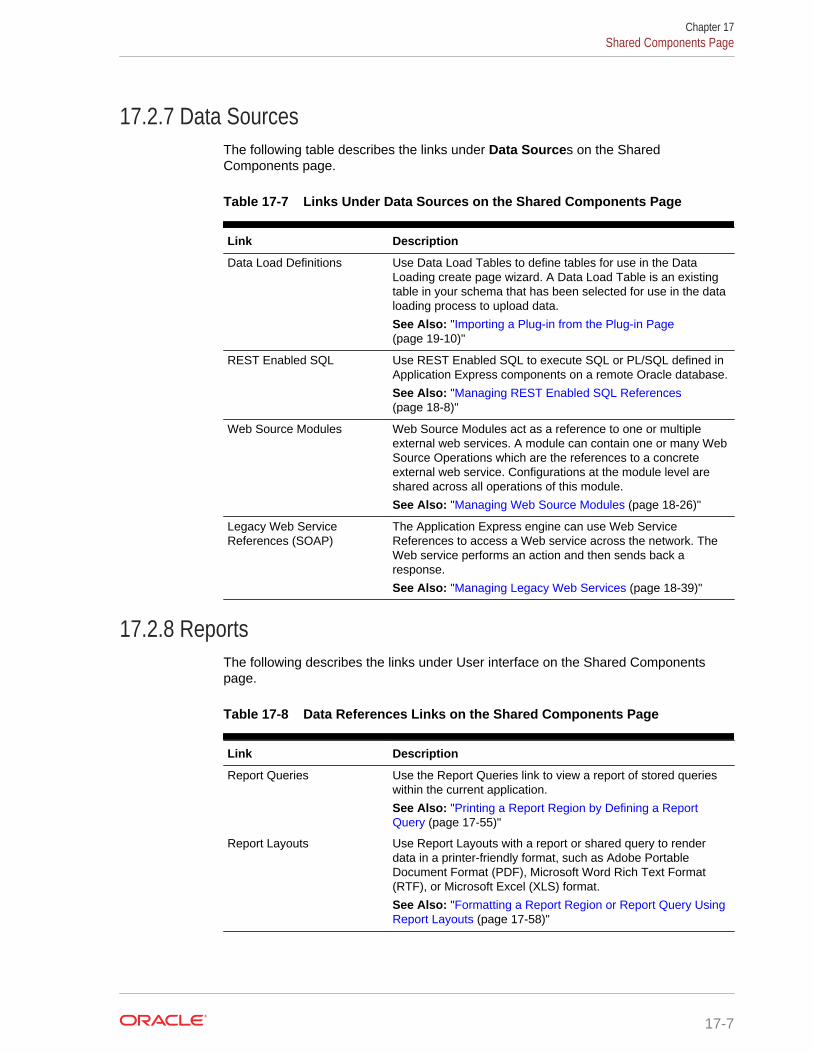
17.2.7 Data SourcesThe following table describes the links under Data Sources on the SharedComponents page.
Table 17-7 Links Under Data Sources on the Shared Components Page
Link Description
Data Load Definitions Use Data Load Tables to define tables for use in the DataLoading create page wizard. A Data Load Table is an existingtable in your schema that has been selected for use in the dataloading process to upload data.
See Also: "Importing a Plug-in from the Plug-in Page(page 19-10)"
REST Enabled SQL Use REST Enabled SQL to execute SQL or PL/SQL defined inApplication Express components on a remote Oracle database.
See Also: "Managing REST Enabled SQL References(page 18-8)"
Web Source Modules Web Source Modules act as a reference to one or multipleexternal web services. A module can contain one or many WebSource Operations which are the references to a concreteexternal web service. Configurations at the module level areshared across all operations of this module.
See Also: "Managing Web Source Modules (page 18-26)"
Legacy Web ServiceReferences (SOAP)
The Application Express engine can use Web ServiceReferences to access a Web service across the network. TheWeb service performs an action and then sends back aresponse.
See Also: "Managing Legacy Web Services (page 18-39)"
17.2.8 ReportsThe following describes the links under User interface on the Shared Componentspage.
Table 17-8 Data References Links on the Shared Components Page
Link Description
Report Queries Use the Report Queries link to view a report of stored querieswithin the current application.
See Also: "Printing a Report Region by Defining a ReportQuery (page 17-55)"
Report Layouts Use Report Layouts with a report or shared query to renderdata in a printer-friendly format, such as Adobe PortableDocument Format (PDF), Microsoft Word Rich Text Format(RTF), or Microsoft Excel (XLS) format.
See Also: "Formatting a Report Region or Report Query UsingReport Layouts (page 17-58)"
Chapter 17Shared Components Page
17-7
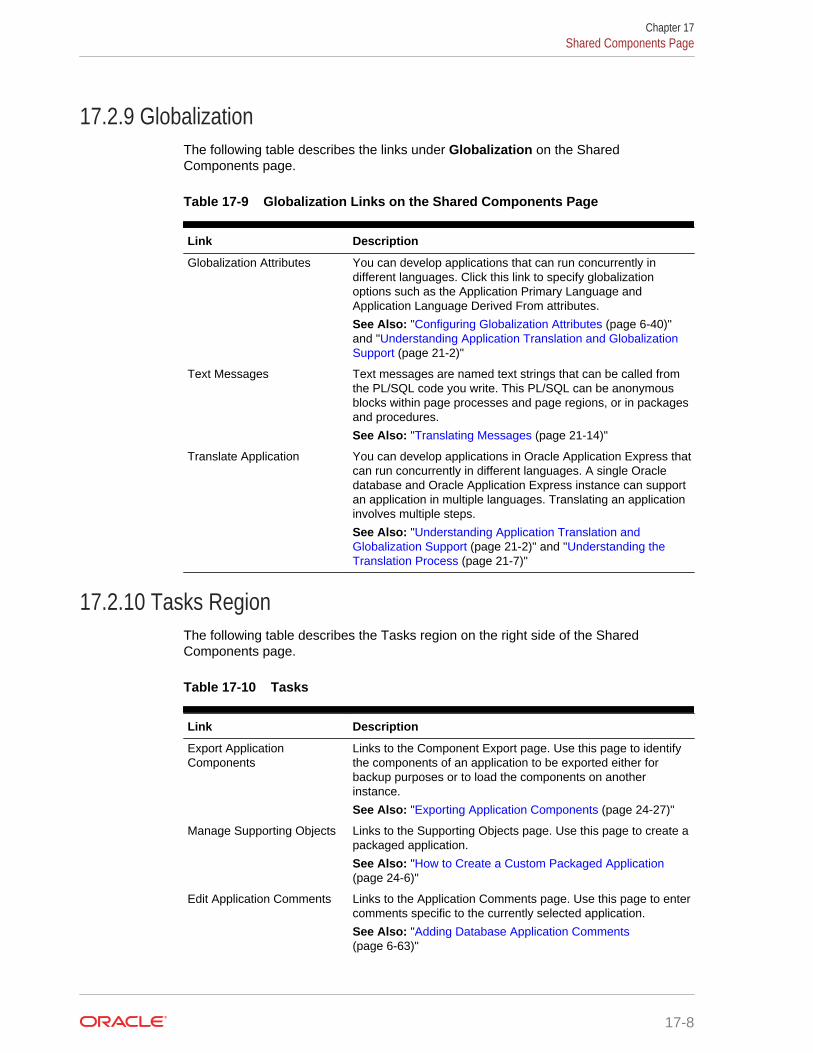
17.2.9 GlobalizationThe following table describes the links under Globalization on the SharedComponents page.
Table 17-9 Globalization Links on the Shared Components Page
Link Description
Globalization Attributes You can develop applications that can run concurrently indifferent languages. Click this link to specify globalizationoptions such as the Application Primary Language andApplication Language Derived From attributes.
See Also: "Configuring Globalization Attributes (page 6-40)"and "Understanding Application Translation and GlobalizationSupport (page 21-2)"
Text Messages Text messages are named text strings that can be called fromthe PL/SQL code you write. This PL/SQL can be anonymousblocks within page processes and page regions, or in packagesand procedures.
See Also: "Translating Messages (page 21-14)"
Translate Application You can develop applications in Oracle Application Express thatcan run concurrently in different languages. A single Oracledatabase and Oracle Application Express instance can supportan application in multiple languages. Translating an applicationinvolves multiple steps.
See Also: "Understanding Application Translation andGlobalization Support (page 21-2)" and "Understanding theTranslation Process (page 21-7)"
17.2.10 Tasks RegionThe following table describes the Tasks region on the right side of the SharedComponents page.
Table 17-10 Tasks
Link Description
Export ApplicationComponents
Links to the Component Export page. Use this page to identifythe components of an application to be exported either forbackup purposes or to load the components on anotherinstance.
See Also: "Exporting Application Components (page 24-27)"
Manage Supporting Objects Links to the Supporting Objects page. Use this page to create apackaged application.
See Also: "How to Create a Custom Packaged Application(page 24-6)"
Edit Application Comments Links to the Application Comments page. Use this page to entercomments specific to the currently selected application.
See Also: "Adding Database Application Comments(page 6-63)"
Chapter 17Shared Components Page
17-8
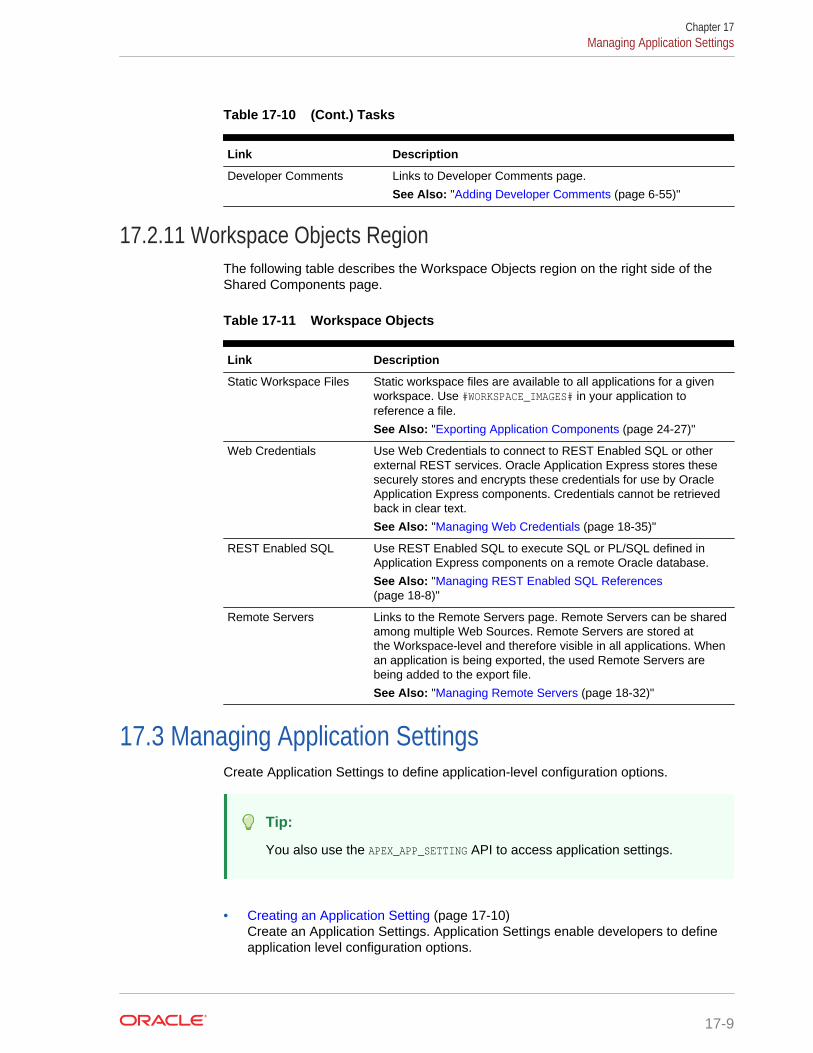
Table 17-10 (Cont.) Tasks
Link Description
Developer Comments Links to Developer Comments page.
See Also: "Adding Developer Comments (page 6-55)"
17.2.11 Workspace Objects RegionThe following table describes the Workspace Objects region on the right side of theShared Components page.
Table 17-11 Workspace Objects
Link Description
Static Workspace Files Static workspace files are available to all applications for a givenworkspace. Use #WORKSPACE_IMAGES# in your application toreference a file.
See Also: "Exporting Application Components (page 24-27)"
Web Credentials Use Web Credentials to connect to REST Enabled SQL or otherexternal REST services. Oracle Application Express stores thesesecurely stores and encrypts these credentials for use by OracleApplication Express components. Credentials cannot be retrievedback in clear text.
See Also: "Managing Web Credentials (page 18-35)"
REST Enabled SQL Use REST Enabled SQL to execute SQL or PL/SQL defined inApplication Express components on a remote Oracle database.
See Also: "Managing REST Enabled SQL References(page 18-8)"
Remote Servers Links to the Remote Servers page. Remote Servers can be sharedamong multiple Web Sources. Remote Servers are stored atthe Workspace-level and therefore visible in all applications. Whenan application is being exported, the used Remote Servers arebeing added to the export file.
See Also: "Managing Remote Servers (page 18-32)"
17.3 Managing Application SettingsCreate Application Settings to define application-level configuration options.
Tip:
You also use the APEX_APP_SETTING API to access application settings.
• Creating an Application Setting (page 17-10)Create an Application Settings. Application Settings enable developers to defineapplication level configuration options.
Chapter 17Managing Application Settings
17-9
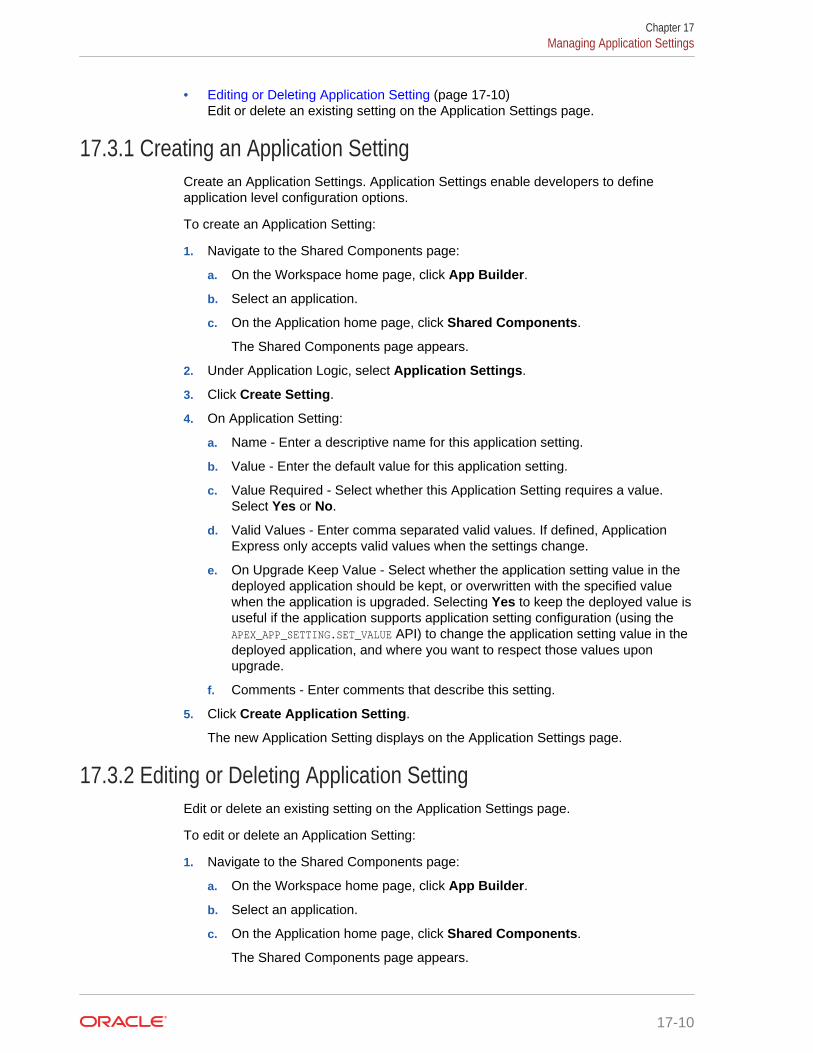
• Editing or Deleting Application Setting (page 17-10)Edit or delete an existing setting on the Application Settings page.
17.3.1 Creating an Application SettingCreate an Application Settings. Application Settings enable developers to defineapplication level configuration options.
To create an Application Setting:
1. Navigate to the Shared Components page:
a. On the Workspace home page, click App Builder.
b. Select an application.
c. On the Application home page, click Shared Components.
The Shared Components page appears.
2. Under Application Logic, select Application Settings.
3. Click Create Setting.
4. On Application Setting:
a. Name - Enter a descriptive name for this application setting.
b. Value - Enter the default value for this application setting.
c. Value Required - Select whether this Application Setting requires a value.Select Yes or No.
d. Valid Values - Enter comma separated valid values. If defined, ApplicationExpress only accepts valid values when the settings change.
e. On Upgrade Keep Value - Select whether the application setting value in thedeployed application should be kept, or overwritten with the specified valuewhen the application is upgraded. Selecting Yes to keep the deployed value isuseful if the application supports application setting configuration (using theAPEX_APP_SETTING.SET_VALUE API) to change the application setting value in thedeployed application, and where you want to respect those values uponupgrade.
f. Comments - Enter comments that describe this setting.
5. Click Create Application Setting.
The new Application Setting displays on the Application Settings page.
17.3.2 Editing or Deleting Application SettingEdit or delete an existing setting on the Application Settings page.
To edit or delete an Application Setting:
1. Navigate to the Shared Components page:
a. On the Workspace home page, click App Builder.
b. Select an application.
c. On the Application home page, click Shared Components.
The Shared Components page appears.
Chapter 17Managing Application Settings
17-10
2. Under Application Logic, select Application Settings..
The Application Settings page appears.
3. To edit an existing setting:
a. Select the setting.
The Application Setting dialog appears.
b. Edit the appropriate attributes.
To learn more about an attribute, see field-level Help.
c. Click Apply Changes.
4. To delete an existing setting:
a. Select the setting.
The Application Setting dialog appears.
b. Click Delete.
17.4 Creating Lists of Values at the Application LevelCreate a static or dynamic list of values (LOV) at the application-level to display aspecific type of page item.
• What is a List of Values? (page 17-11)A list of values (LOV) is a static or dynamic set of values used to display a specifictype of page item, such as popup lists of values, a select list, a check box, a radiogroup, or multiple select lists.
• Creating a Named LOV at the Application Level (page 17-12)You define named (or shared) LOVs at the application-level by running the CreateLOV Wizard and adding them to the List of Values repository.
• About Static LOVs (page 17-12)Static LOVs are based on a static list of display values and return values youspecify when you run the Create LOV Wizard.
• Editing an Existing LOV (page 17-12)To edit an existing LOV, select the LOV on the Lists of Values page.
• About Referencing Session State Within an LOV (page 17-13)You can reference session state in an LOV by using bind variables.
• Accessing LOV Reports (page 17-13)Access LOV reports by selecting a report on the List of Values page.
17.4.1 What is a List of Values?A list of values (LOV) is a static or dynamic set of values used to display a specifictype of page item, such as popup lists of values, a select list, a check box, a radiogroup, or multiple select lists.
. By creating a list of values at the application-level, you are creating sharedcomponent. Creating a LOV as a shared component has several advantages:
• You can add it to any page within an application.
• All LOV definitions are stored in one location, making them easy to locate andupdate.
Chapter 17Creating Lists of Values at the Application Level
17-11
17.4.2 Creating a Named LOV at the Application LevelYou define named (or shared) LOVs at the application-level by running the CreateLOV Wizard and adding them to the List of Values repository.
All LOVs can be defined as static or dynamic. Static lists are based on predefinedpairs of display values and return values. Dynamic lists are based on a SQL query youwrite that selects values from a table.
To create a named LOV:
1. Navigate to the Shared Components page:
a. On the Workspace home page, click App Builder.
b. Select an application.
c. On the Application home page, click Shared Components.
The Shared Components page appears.
2. Under Other Components, select List of Values.
The Lists of Values page appears.
3. To create a LOV, click Create.
4. Follow the on-screen instructions.
New named LOVs are added to the List of Values repository. To add the LOV to apage, you must edit the appropriate item or column and select the named LOV.
17.4.3 About Static LOVsStatic LOVs are based on a static list of display values and return values you specifywhen you run the Create LOV Wizard.
To create a static LOV, run the Create LOV Wizard and select the LOV type Static.Oracle Application Express stores the display values, return values, and sort sequenceyou specify in the List of Values repository. Once you add a static LOV to therepository, you can create an item and display it as a check box, radio group, selectlist, or popup list based on this definition.
17.4.4 Editing an Existing LOVTo edit an existing LOV, select the LOV on the Lists of Values page.
• Editing a LOV (page 17-12)
• Editing LOVs in Bulk (page 17-13)
17.4.4.1 Editing a LOVTo edit a LOV:
1. Navigate to the Shared Components page:
a. On the Workspace home page, click App Builder.
b. Select an application.
Chapter 17Creating Lists of Values at the Application Level
17-12
c. On the Application home page, click Shared Components.
The Shared Components page appears.
2. Under Other Components, select List of Values.
The Lists of Values page appears.
3. Select an LOV.
The Edit page appears.
4. Edit the attributes.
To learn more about an attribute, see field-level Help.
5. Click Apply Changes.
17.4.4.2 Editing LOVs in BulkYou can edit the display values of all static LOVs by clicking the Grid Edit button onthe Edit List of Values page.
To perform a bulk edit of static LOVs:
1. Navigate to the Shared Components page:
a. On the Workspace home page, click App Builder.
b. Select an application.
c. On the Application home page, click Shared Components.
The Shared Components page appears.
2. Under Other Components, select List of Values.
By default, LOVs display as icons.
3. Click the Grid Edit tab.
4. Edit the display text and click Apply Changes.
17.4.5 About Referencing Session State Within an LOVYou can reference session state in an LOV by using bind variables.
Keep in mind that referencing session state makes an LOV a bit less reusable, but isstill a recommended development practice. In the following example, this LOV onlyworks if the item called my_deptno contains a valid department number.
SELECT ename, empno FROM emp WHERE deptno = :P1_DEPTNO
17.4.6 Accessing LOV ReportsAccess LOV reports by selecting a report on the List of Values page.
To access LOV reports:
1. Navigate to the Shared Components page:
a. On the Workspace home page, click App Builder.
b. Select an application.
Chapter 17Creating Lists of Values at the Application Level
17-13
c. On the Application home page, click Shared Components.
The Shared Components page appears.
2. Under Other Components, select List of Values.
By default, LOVs display as icons.
3. Select one of the following tabs at the top of the page:
• Edit Null Text - Edit null text for all LOVs in your application.
• Locally Defined - Displays all LOVs that are defined locally with the definitionof an item. LOVs that are usable by multiple pages can be converted intoshared lists of values. Converting locally defined lists of values into a sharedlist of values promotes reuse.
• Grid Edit - Enables you to edit the display values of all static LOVs.
• Conditional Entries - Displays all LOVs that display conditionally.
• Subscription - Displays all subscribed LOVs in your application.
• Utilization - Displays where LOVs are used in your application.
• History - Displays a history of recently changed LOVs by date.
4. Follow the on-screen instructions.
17.5 Managing Component SettingsUse Component Settings to set application level values for built-in Application Expresscomponents and installed plug-ins.
Tip:
The Component Settings in your environment will vary based on the currentlyselected application.
• Configuring Component Settings (page 17-15)Developers can configure Component Settings to set application level values forbuilt-in Application Express components and installed plug-ins.
• Integrating with Google Calendar (page 17-15)Developers can enable calendars within an application to integrate with Googlecalendar data by configuring the Component Settings, Calendar.
• Configuring Color Picker Display (page 17-16)Developers can control the Color Picker display style by configuring theComponent Setting, Color Picker.
• Configuring Interactive Report Action Menu Structure (page 17-16)Developers can configure Component Settings, Interactive Report to use the newstructure or keep the legacy structure from earlier releases.
• Dynamically Adding Sliders to Regions (page 17-17)Developers can dynamically add a slider to the region if the displayed region nameexceeds the width of the region.
Chapter 17Managing Component Settings
17-14
• Configuring Switch Defaults (page 17-17)The Switch item type displays as a flip toggle switch. Developers can configuredefault switch behavior by configuring the Component Settings, Switch.
• Configuring Rich Text Editor Responsiveness (page 17-18)Developers can configure whether the Rich Text Editor automatically adjusts to thewidth of the container region by configuring Component Settings, Rich Text Editor.
• Viewing the Component Settings History Report (page 17-18)You can view a report of modifications made to Oracle Application Expresscomponents and installed plug-ins on the Component Settings History page.
17.5.1 Configuring Component SettingsDevelopers can configure Component Settings to set application level values for built-in Application Express components and installed plug-ins.
To configure Component Settings:
1. On the Workspace home page, click App Builder.
2. Select an application.
3. On the Application home page, click Shared Components.
The Shared Components page appears.
4. Under Other Components, click Component Settings.
5. Click the component name.
6. In the Component Settings configure the appropriate settings and click ApplyChanges.
Tip:
To learn more about a specific setting, see item Help.
17.5.2 Integrating with Google CalendarDevelopers can enable calendars within an application to integrate with Googlecalendar data by configuring the Component Settings, Calendar.
To configure the Component Settings, Calendar:
1. On the Workspace home page, click App Builder.
2. Select an application.
3. On the Application home page, click Shared Components.
The Shared Components page appears.
4. Under Other Components, click Component Settings.
5. Click the component name, Calendar.
6. In the Component Settings dialog:
a. Google Calendar API Key - Enter the Google Calendar API key to enablecalendars within this application to integrate with Google calendar data.
Chapter 17Managing Component Settings
17-15
b. Click Apply Changes.
17.5.3 Configuring Color Picker DisplayDevelopers can control the Color Picker display style by configuring the ComponentSetting, Color Picker.
To configure the Component Settings, Color Picker:
1. On the Workspace home page, click App Builder.
2. Select an application.
3. On the Application home page, click Shared Components.
The Shared Components page appears.
4. Under Other Components, click Component Settings.
5. Click the component name, Color Picker.
6. In the Component Settings dialog:
a. Display Style - Options include:
• Modern - Renders the color preview as a small circle inside the text field.
• No Preview - Do not render a preview of the chosen color.
b. Click Apply Changes.
17.5.4 Configuring Interactive Report Action Menu StructureDevelopers can configure Component Settings, Interactive Report to use the newstructure or keep the legacy structure from earlier releases.
The structure of the interactive report Actions menu has changed to be consistent withinteractive grids.
To configure the Component Settings, Interactive Report:
1. On the Workspace home page, click App Builder.
2. Select an application.
3. On the Application home page, click Shared Components.
The Shared Components page appears.
4. Under Other Components, click Component Settings.
5. Click the component name, Interactive Report.
6. In the Component Settings dialog:
a. Actions Menu Structure - Specify how the Actions menu displays in interactivereports. Options include:
• Interactive Grid - Select Interactive Grid to have the interactive reportActions menu match interactive grid.
• Legacy - Select Legacy to have the interactive report Actions menu usethe legacy structure.
b. Click Apply Changes.
Chapter 17Managing Component Settings
17-16
17.5.5 Dynamically Adding Sliders to RegionsDevelopers can dynamically add a slider to the region if the displayed region nameexceeds the width of the region.
To configure Component Settings, Region Display Selector:
1. On the Workspace home page, click App Builder.
2. Select an application.
3. On the Application home page, click Shared Components.
The Shared Components page appears.
4. Under Other Components, click Component Settings.
5. Click the component name, Region Display Selector.
6. In the Component Settings dialog:
a. Include Slider - Select Yes to dynamically add a slider to the region if thedisplayed region name exceeds the width of the region.
b. Click Apply Changes.
17.5.6 Configuring Switch DefaultsThe Switch item type displays as a flip toggle switch. Developers can configure defaultswitch behavior by configuring the Component Settings, Switch.
To configure the Component Settings, Switch:
1. On the Workspace home page, click App Builder.
2. Select an application.
3. On the Application home page, click Shared Components.
The Shared Components page appears.
4. Under Other Components, click Component Settings.
5. Under Component Settings, click Switch.
6. In the Component Settings dialog:
a. On Value - Enter the value stored in the page item if the end user picksthe On option.
b. On Label - Enter the text displayed for the On option. If no text is entered, thesystem default label is used.
c. Off Value - Enter the value stored in the page item if the user picksthe Off option.
Note:
This value is used if the page item is populated with a value whichdoes not match either the On Value or Off Value.
Chapter 17Managing Component Settings
17-17
d. Off Label - Enter the text displayed for the Off option. If no text is entered, thesystem default label is used.
e. Click Apply Changes.
17.5.7 Configuring Rich Text Editor ResponsivenessDevelopers can configure whether the Rich Text Editor automatically adjusts to thewidth of the container region by configuring Component Settings, Rich Text Editor.
For new apps, this setting is enabled by default. For older apps (pre-18.1), this isdisabled by default.
This setting requires a responsive application theme (such as Universal Theme).
To configure Component Settings, Rich Text Editor:
1. On the Workspace home page, click App Builder.
2. Select an application.
3. On the Application home page, click Shared Components.
The Shared Components page appears.
4. Under Other Components, click Component Settings.
5. Under Component Settings, click Rich Text Editor.
6. For Responsive in the Component Settings dialog:
• Yes - The Rich Text Editor is responsive and automatically adjusts its width tothe container region.
• No - The Rich Text Editor is not responsive. Choose this option for older appsthat use a non-responsive legacy theme.
7. Click Apply Changes.
17.5.8 Viewing the Component Settings History ReportYou can view a report of modifications made to Oracle Application Expresscomponents and installed plug-ins on the Component Settings History page.
To view the Component Settings History report:
1. Navigate to the Shared Components page:
a. On the Workspace home page, click App Builder.
b. Select an application.
c. On the Application home page, click Shared Components.
The Shared Components page appears.
2. Under Other Components, click Component Settings.
3. Click the History tab.
The History page displays as an interactive report. To customize the report, usethe Search bar at the top of the page.
Chapter 17Managing Component Settings
17-18
17.6 Using ShortcutsUse shortcuts to avoid repetitive coding of HTML or PL/SQL functions.
• What is a Shortcut? (page 17-19)Use a shortcut to define frequently used code once and then reference it in manyplaces thus reducing code redundancy. For example, you can create a shortcut todefine a page control such as a button, HTML text, a PL/SQL procedure, or HTML.
• Supported Shortcut Types (page 17-20)Oracle Application Express supports six types of shortcuts.
• Defining a Shortcut from Scratch (page 17-20)Define a shortcut on the Shortcuts page.
• Copying an Existing Shortcuts (page 17-21)Copy existing shortcuts from the Shortcut repository.
• Editing Existing Shortcuts (page 17-22)Once you create a shortcut, you can alter it by editing attributes on the EditShortcut page.
• Accessing Shortcut Reports (page 17-22)View the shortcut Subscription and History reports.
17.6.1 What is a Shortcut?Use a shortcut to define frequently used code once and then reference it in manyplaces thus reducing code redundancy. For example, you can create a shortcut todefine a page control such as a button, HTML text, a PL/SQL procedure, or HTML.
You can use a shortcut within the following locations:
• The Region Source attribute of regions defined as HTML Text (with shortcuts).
• Region Header and Footer Text attribute.
• Item Label attributes, Pre Element Text, Post Element Text, and Default Valueattribute.
• Region Templates attributes.
Referencing a Shortcut
Once you define a shortcut, you can invoke it using specific syntax unique to thelocation in which the shortcut is used.
You reference shortcuts using the following syntax:
"MY_SHORTCUT"
The shortcut name must be capitalized and enclosed in quotation marks.
Chapter 17Using Shortcuts
17-19
17.6.2 Supported Shortcut TypesOracle Application Express supports six types of shortcuts.
When you create a shortcut you select a shortcut type. Supported shortcut typesinclude:
• PL/SQL Function Body
• HTML Text
• HTML Text with Escaped Special Characters
• Image
• Text with JavaScript Escaped Single Quotes
• Message
• Message with JavaScript Escaped Special Quotes
Text with JavaScript Escaped Single Quotes
Use this type of shortcut to reference a shortcut inside of a JavaScript literal string.This shortcut defines a text string. When the shortcut is referenced, it escapes thesingle quotation marks required for JavaScript.
Message
Use this type of shortcut to reference a translatable message at runtime. Since thisshortcut does not have a shortcut body, the name of the shortcut must match thecorresponding message name. At runtime, the name of the shortcut expands to thetext of the translatable message for the current language.
Message with JavaScript Escaped Single Quotes
Use this type of shortcut to reference a shortcut inside of JavaScript literal string andreference a translatable message at runtime.
17.6.3 Defining a Shortcut from ScratchDefine a shortcut on the Shortcuts page.
To define a shortcut:
1. Navigate to the Shared Components page:
a. On the Workspace home page, click App Builder.
b. Select an application.
c. On the Application home page, click Shared Components.
The Shared Components page appears.
2. Under Other Components, select Shortcuts.
3. Click Create.
4. For Create Shortcut, select From Scratch and click Next.
5. On Shortcut Attributes:
Chapter 17Using Shortcuts
17-20
a. Name - Enter the name by which the shortcut will be referenced.
b. Type - Select a shortcut type. Options include:
• PL/SQL Function Body
• HTML Text
• HTML Text with Escaped Special Characters
• Image
• Text with JavaScript Escaped Single Quotes
• Message
• Message with JavaScript Escaped Special Quotes
c. Shortcut - Enter the text of the shortcut. The shortcut must be less then 30,000characters in length.
d. Error Text - Enter the text to display if an error should occur during theprocessing of a shortcut.
e. Build Option - Select a build option for this component.
6. Click Create.
New shortcuts are added to the Shortcuts page (also referred to as the Shortcutrepository).
17.6.4 Copying an Existing ShortcutsCopy existing shortcuts from the Shortcut repository.
To copy an existing shortcut:
1. Navigate to the Shared Components page:
a. On the Workspace home page, click App Builder.
b. Select an application.
c. On the Application home page, click Shared Components.
The Shared Components page appears.
2. Under Other Components, select Shortcuts.
3. Click Create.
4. For Create Shortcut, select As a Copy of an Existing Shortcut and click Next.
5. On Copy From Application, Select the application you want to copy shortcuts fromand click Next.
6. On New Shortcuts: Click Copy Shortcut.
a. To Name - Enter the new name of the shortcut to be copied.
b. Copy - Select Yes, No, or Copy and Subscribe.
c. Click Copy Shortcut.
New shortcuts are added to the Shortcuts page (also referred to as the Shortcutrepository).
Chapter 17Using Shortcuts
17-21
17.6.5 Editing Existing ShortcutsOnce you create a shortcut, you can alter it by editing attributes on the Edit Shortcutpage.
To edit an existing shortcut:
1. Navigate to the Shared Components page:
a. On the Workspace home page, click App Builder.
b. Select an application.
c. On the Application home page, click Shared Components.
The Shared Components page appears.
2. Under Other Components, select Shortcuts.
3. Select a shortcut.
The Edit Shortcut page appears.
4. Edit the attributes.
To learn more about an attribute, see field-level Help.
5. Click Apply Changes.
17.6.6 Accessing Shortcut ReportsView the shortcut Subscription and History reports.
To access shortcut reports:
1. Navigate to the Shared Components page:
a. On the Workspace home page, click App Builder.
b. Select an application.
c. On the Application home page, click Shared Components.
The Shared Components page appears.
2. Under Other Components, select Shortcuts.
3. Click one of the following tabs:
• Subscription - Displays the Subscribed Shortcuts page which displays allsubscribed shortcuts in your application.
• History - Display the Shortcut History page which displays a history ofrecently changed shortcuts by date.
Note:
The Subscription and History tabs only appear after you create ashortcut.
Chapter 17Using Shortcuts
17-22
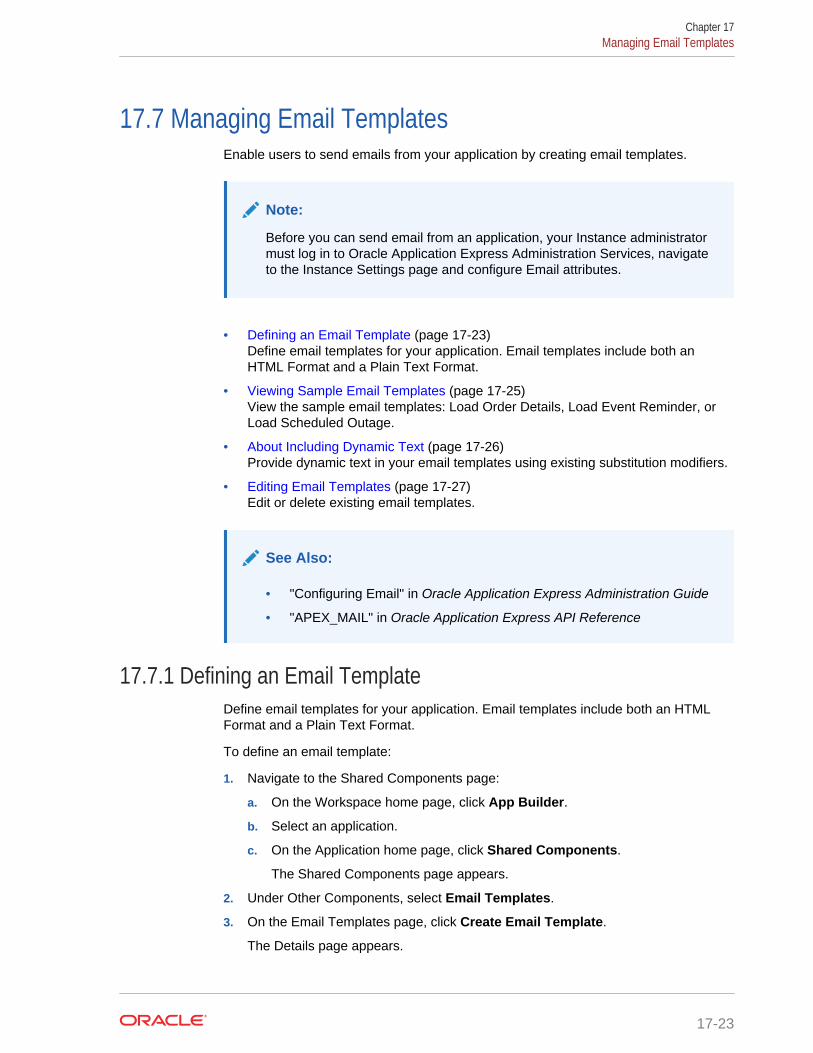
17.7 Managing Email TemplatesEnable users to send emails from your application by creating email templates.
Note:
Before you can send email from an application, your Instance administratormust log in to Oracle Application Express Administration Services, navigateto the Instance Settings page and configure Email attributes.
• Defining an Email Template (page 17-23)Define email templates for your application. Email templates include both anHTML Format and a Plain Text Format.
• Viewing Sample Email Templates (page 17-25)View the sample email templates: Load Order Details, Load Event Reminder, orLoad Scheduled Outage.
• About Including Dynamic Text (page 17-26)Provide dynamic text in your email templates using existing substitution modifiers.
• Editing Email Templates (page 17-27)Edit or delete existing email templates.
See Also:
• "Configuring Email" in Oracle Application Express Administration Guide
• "APEX_MAIL" in Oracle Application Express API Reference
17.7.1 Defining an Email TemplateDefine email templates for your application. Email templates include both an HTMLFormat and a Plain Text Format.
To define an email template:
1. Navigate to the Shared Components page:
a. On the Workspace home page, click App Builder.
b. Select an application.
c. On the Application home page, click Shared Components.
The Shared Components page appears.
2. Under Other Components, select Email Templates.
3. On the Email Templates page, click Create Email Template.
The Details page appears.
Chapter 17Managing Email Templates
17-23
Tip:
To get started, review the sample email templates available underSample Templates on the right side of the page. To load a sampleemail template, simply select it. See "Viewing Sample Email Templates(page 17-25)".
4. Next, define your template.
Tip:
For Email Subject, HTML Format or Plain Text Format, supportsubstitution strings using the format #STRING_NAME# . You can pass invalues for these strings using the APEX_MAIL API.
5. Under Identification:
a. Template Name - Enter a descriptive name for this template .
b. Static Identifier - Static string identifier used to refer to the template whencalling the APEX_MAIL APIs.
c. Email Subject - Enter the text to display for the email subject.
6. Under HTML Format:
a. Define the Header, Body, and Footer. Body supports basic HTML markup.
b. Under Advanced, optionally click Load Default HTML.
The default HTML appears in the HTML Template. If needed, edit the defaultHTML Template.
7. Under Plain Text Format, enter the appropriate template defaults.
8. Under Comments, optionally enter comments that describe this template.
9. Click Create Email Template.
Next, create a button and process to call the APEX_MAIL API.
10. Add a “Send Mail” button:
a. Return to the application from which you want to send email.
b. Navigate to the appropriate page or create a new page.
c. Add a button to send the email.
d. Create a PL/SQL process which calls the APEX_MAIL API.
Consider the following example:
begin apex_mail.send ( p_to => '[email protected]', p_template_static_id => 'ORDER_CONFIRMATION', p_placeholders => q'~ { "CUSTOMER_NAME": "Steven King", "ORDER_NUMBER": 1234, "ORDER_DATE": "02-Feb-2018",
Chapter 17Managing Email Templates
17-24

"SHIP_TO": "Steven King", "SHIPPING_ADDRESS_LINE_1": "2004 Charade Rd", "SHIPPING_ADDRESS_LINE_2": "Seattle, Washinton", "ITEMS_ORDERED": 3, "ORDER_TOTAL": "$ 1,200.99", "ORDER_URL": "http://domain/apex/f?p=&APP_ID" }~' ); apex_mail.push_queue;end;
e. Run the page and click the Send Mail button.
17.7.2 Viewing Sample Email TemplatesView the sample email templates: Load Order Details, Load Event Reminder, or LoadScheduled Outage.
To view sample email template:
1. Navigate to the Shared Components page:
a. On the Workspace home page, click App Builder.
b. Select an application.
c. On the Application home page, click Shared Components.
The Shared Components page appears.
2. Under Other Components, select Email Templates.
3. On the Email Templates page, click Create Email Template.
The Details page appears.
4. On the right side of the page, find the Sample Templates region.
The Sample Templates region contains three templates:
• Load Order Details
• Load Event Reminder
• Load Scheduled Outage
5. Select a template. For example, select Load Order Details.
The template appears.
6. Expand the Sample API Usage region at the bottom of the page to see anexample. The following is the Load Order Details API example.
begin apex_mail.send ( p_to => email_address_of_user, p_template_static_id => '', p_placeholders => '{' ' "CUSTOMER_NAME":' || apex_json.stringify( some_value ) ' ,"ITEMS_ORDERED":' || apex_json.stringify( some_value ) ' ,"MY_APPLICATION_LINK":' || apex_json.stringify( some_value ) ' ,"ORDER_DATE":' || apex_json.stringify( some_value ) ' ,"ORDER_NUMBER":' || apex_json.stringify( some_value ) ' ,"ORDER_TOTAL":' || apex_json.stringify( some_value ) ' ,"ORDER_URL":' || apex_json.stringify( some_value ) ' ,"SHIPPING_ADDRESS_LINE_1":' || apex_json.stringify( some_value ) ' ,"SHIPPING_ADDRESS_LINE_2":' || apex_json.stringify( some_value )
Chapter 17Managing Email Templates
17-25
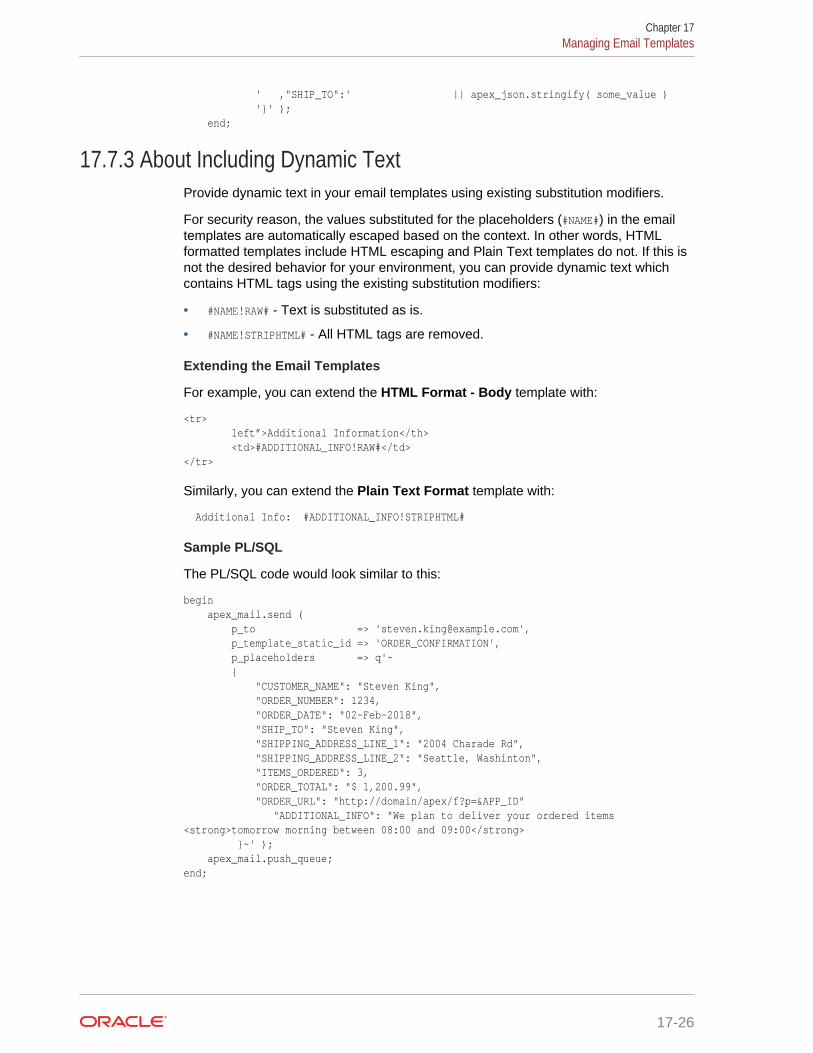
' ,"SHIP_TO":' || apex_json.stringify( some_value ) '}' );end;
17.7.3 About Including Dynamic TextProvide dynamic text in your email templates using existing substitution modifiers.
For security reason, the values substituted for the placeholders (#NAME#) in the emailtemplates are automatically escaped based on the context. In other words, HTMLformatted templates include HTML escaping and Plain Text templates do not. If this isnot the desired behavior for your environment, you can provide dynamic text whichcontains HTML tags using the existing substitution modifiers:
• #NAME!RAW# - Text is substituted as is.
• #NAME!STRIPHTML# - All HTML tags are removed.
Extending the Email Templates
For example, you can extend the HTML Format - Body template with:
<tr> left”>Additional Information</th> <td>#ADDITIONAL_INFO!RAW#</td></tr>
Similarly, you can extend the Plain Text Format template with:
Additional Info: #ADDITIONAL_INFO!STRIPHTML#
Sample PL/SQL
The PL/SQL code would look similar to this:
begin apex_mail.send ( p_to => '[email protected]', p_template_static_id => 'ORDER_CONFIRMATION', p_placeholders => q'~ { "CUSTOMER_NAME": "Steven King", "ORDER_NUMBER": 1234, "ORDER_DATE": "02-Feb-2018", "SHIP_TO": "Steven King", "SHIPPING_ADDRESS_LINE_1": "2004 Charade Rd", "SHIPPING_ADDRESS_LINE_2": "Seattle, Washinton", "ITEMS_ORDERED": 3, "ORDER_TOTAL": "$ 1,200.99", "ORDER_URL": "http://domain/apex/f?p=&APP_ID" "ADDITIONAL_INFO": "We plan to deliver your ordered items <strong>tomorrow morning between 08:00 and 09:00</strong> }~' ); apex_mail.push_queue;end;
Chapter 17Managing Email Templates
17-26
17.7.4 Editing Email TemplatesEdit or delete existing email templates.
To edit or delete an email template:
1. Navigate to the Shared Components page:
a. On the Workspace home page, click App Builder.
b. Select an application.
c. On the Application home page, click Shared Components.
The Shared Components page appears.
2. Under Other Components, select Email Templates.
The Email Templates page appears.
3. To edit an email template:
a. Click the email template name.
b. Edit the appropriate attributes.
c. Click Apply Changes.
4. To delete an email template:
a. Click the email template name.
b. Click Delete.
17.8 Managing Static Application FilesLearn how to upload, view, download, and delete static application files (includingimages, CSS files, and other files which must be managed independently).
• Specifying the Location of Static Application Files (page 17-28)
• Uploading Static Application Files (page 17-28)
• Viewing the Static Application File Report (page 17-29)
• Referencing Static Application Files (page 17-29)
• Downloading Static Application Files (page 17-29)
• Deleting Static Application Files (page 17-30)
See Also:
• "Managing Static Workspace Files (page 17-31)"
• "About Managing Images (page 13-14)"
Chapter 17Managing Static Application Files
17-27
17.8.1 Specifying the Location of Static Application FilesApplication files are stored with your application definition in the Oracle database. Forperformance reasons, you can also store your application files on your Web server.
To verify the Static File Prefix attribute for an application:
1. Navigate to the Shared Components page:
a. On the Workspace home page, click App Builder.
b. Select an application.
c. On the Application home page, click Shared Components.
The Shared Components page appears.
2. Under User Interface, select User Interface Attributes.
3. Click the User Interface tab.
4. In Static File Prefix, enter the virtual path the Web server uses to point to staticapplication files. Leave this attribute blank to reference files stored with yourapplication definition in the database. For performance reasons you can also storeyour application files on your Web server and reference them using a valid URL.Example:
/myFiles/http://contentDeveliveryNetwork.com/myFiles/
5. Click Apply Changes.
17.8.2 Uploading Static Application FilesTo upload a static application file:
1. Navigate to the Shared Components page:
a. On the Workspace home page, click App Builder.
b. Select an application.
c. On the Application home page, click Shared Components.
The Shared Components page appears.
2. Under Files, select Static Application Files.
The Static Application Files page appears.
3. To upload a file, click Upload File.
4. On Upload:
a. Directory - Enter the name of the directory where the file should be stored. Ifno directory is specified, the file is stored in the root directory.
b. File - Enter the location of the file to be added to the application.
c. File Character Set - Indicate the character set encoding for the file to beuploaded. This attribute only applies to text files.
d. Unzip File - If Yes, the uploaded Zip file is automatically unzipped and storedin the specified directory. Note that the actual Zip file is not stored. Thisattribute is ignored if the uploaded file is not a Zip file.
Chapter 17Managing Static Application Files
17-28
5. Click Upload or Upload and Upload Another.
17.8.3 Viewing the Static Application File ReportTo view details about an uploaded static application file:
1. Navigate to the Shared Components page:
a. On the Workspace home page, click App Builder.
b. Select an application.
c. On the Application home page, click Shared Components.
The Shared Components page appears.
2. Under Files, select Static Application Files.
The Static Application Files page appears.
3. If not already selected, click View Report icon.
A report appears. To customize the report, use the Search bar at the top of thepage.
The Static Application Files report displays the filename, MIME type, file size, adownload link, and substitution string syntax.
4. To view additional details, click the Edit icon. If the file is an image, the imagedisplays.
5. To delete the file, click Delete.
6. To exit, click Cancel.
17.8.4 Referencing Static Application FilesYou can reference a static application file in your application using #APP_IMAGES#substitution string.
Static application files are only available to the currently selected application. To viewsample syntax for uploaded images, see the Reference column on the StaticApplication Files report.
17.8.5 Downloading Static Application FilesLearn how to download an uploaded static application file or download all staticapplication files in a Zip.
• Downloading a Static Application File (page 17-29)
• Downloading All Static Application Files in a Zip (page 17-30)
17.8.5.1 Downloading a Static Application FileTo download an uploaded static application file:
1. Navigate to the Shared Components page:
a. On the Workspace home page, click App Builder
Chapter 17Managing Static Application Files
17-29
b. Select an application.
c. On the Application home page, click Shared Components.
The Shared Components page appears.
2. Under Files, select Static Application Files.
The Static Application Files page appears.
3. If not already selected, click View Report icon.
A report appears.
4. Locate the file to be downloaded and click the Download link.
17.8.5.2 Downloading All Static Application Files in a ZipTo download all static application files in a Zip:
1. Navigate to the Shared Components page:
a. On the Workspace home page, click App Builder.
b. Select an application.
c. On the Application home page, click Shared Components.
The Shared Components page appears.
2. Under Files, select Static Application Files.
The Static Application Files page appears.
3. Click Download as Zip.
17.8.6 Deleting Static Application FilesLearn how to delete uploaded static application files.
• Deleting a Static Application File (page 17-30)
• Deleting All Static Application Files (page 17-31)
17.8.6.1 Deleting a Static Application FileTo delete an uploaded static application file:
1. Navigate to the Shared Components page:
a. On the Workspace home page, click App Builder.
b. Select an application.
c. On the Application home page, click Shared Components.
The Shared Components page appears.
2. Under Files, select Static Application Files.
The Static Application Files page appears.
3. If not already selected, click the View Report icon.
A report appears. To customize the report, use the Search bar at the top of thepage.
Chapter 17Managing Static Application Files
17-30
4. Select the file to be deleted.
5. On the Edit page, click Delete.
17.8.6.2 Deleting All Static Application FilesTo delete all uploaded static application files:
1. Navigate to the Shared Components page:
a. On the Workspace home page, click App Builder.
b. Select an application.
c. On the Application home page, click Shared Components.
The Shared Components page appears.
2. Under Files, select Static Application Files.
The Static Application Files page appears.
3. Click Delete All Files.
17.9 Managing Static Workspace FilesLearn how to upload, view, download, and delete static workspace files (includingimages, CSS files, and other files which must be managed independently).
• Uploading Static Workspace Files (page 17-31)
• Viewing Static Workspace File Report (page 17-32)
• About Referencing Static Workspace Files (page 17-32)
• Downloading Static Workspace Files (page 17-32)
• Deleting Static Workspace Files (page 17-33)
See Also:
• "Managing Static Application Files (page 17-27)"
• "About Managing Images (page 13-14)"
17.9.1 Uploading Static Workspace FilesTo upload a static workspace file:
1. Navigate to the Shared Components page:
a. On the Workspace home page, click App Builder.
b. Select an application.
c. On the Application home page, click Shared Components.
The Shared Components page appears.
Chapter 17Managing Static Workspace Files
17-31
2. Under Files, select Static Workspace Files.
The Static Workspace Files page appears.
3. To upload a file, click Upload File.
4. On Upload:
a. Directory - Enter the name of the directory where the file should be stored. Ifno directory is specified, the file is stored in the root directory.
b. File - Enter the location of the file to be added to the application.
c. File Character Set - Indicate the character set encoding for the file to beuploaded. This attribute only applies to text files.
d. Unzip File - If Yes, the uploaded Zip file is automatically unzipped and storedin the specified directory. Note that the actual Zip file is not stored. Thisattribute is ignored if the uploaded file is not a Zip file
5. Click Upload or Upload and Upload Another.
17.9.2 Viewing Static Workspace File ReportTo view the Static Workspace File report:
1. Navigate to the Shared Components page:
a. On the Workspace home page, click App Builder.
b. Select an application.
c. On the Application home page, click Shared Components.
The Shared Components page appears.
2. Under Files, select Static Workspace Files.
The Static Workspace Files page appears. To customize the report, use theSearch bar at the top of the page.
3. If not already selected, click View Report icon.
The Static Application Files report displays the filename, MIME type, file size, adownload link, and substitution string syntax.
4. To view additional details, select the file. If the file is an image, the image displays.
5. To delete the file, click Delete.
6. To exit, click Cancel.
17.9.3 About Referencing Static Workspace FilesYou can reference static workspace files in any application in the current workspace.To reference a static workspace file in your application, use the #WORKSPACE_IMAGES#substitution string. To view sample syntax for uploaded images, see the Referencecolumn on the Static Workspace Files report.
17.9.4 Downloading Static Workspace FilesLearn how to download static workspace files.
Chapter 17Managing Static Workspace Files
17-32
• Downloading a Static Workspace File (page 17-33)
• Downloading All Static Workspace Files in a Zip (page 17-33)
17.9.4.1 Downloading a Static Workspace FileTo download an uploaded static workspace file:
1. Navigate to the Shared Components page:
a. On the Workspace home page, click App Builder.
b. Select an application.
c. On the Application home page, click Shared Components.
The Shared Components page appears.
2. Under Files, select Static Workspace Files.
The Static Workspace Files page appears.
3. If not already selected, click View Report icon.
A report appears.
4. Locate the file to be downloaded and click the Download link.
17.9.4.2 Downloading All Static Workspace Files in a ZipTo download all static workspace files in a Zip:
1. Navigate to the Shared Components page:
a. On the Workspace home page, click App Builder.
b. Select an application.
c. On the Application home page, click Shared Components.
The Shared Components page appears.
2. Under Files, select Static Workspace Files.
The Static Application Files page appears.
3. Click Download as Zip.
17.9.5 Deleting Static Workspace FilesLearn how to delete uploaded static workspace files.
• Deleting a Static Workspace File (page 17-33)
• Deleting All Static Workspace Files (page 17-34)
17.9.5.1 Deleting a Static Workspace FileTo delete an uploaded static workspace file:
1. Navigate to the Shared Components page:
a. On the Workspace home page, click App Builder.
b. Select an application.
Chapter 17Managing Static Workspace Files
17-33
c. On the Application home page, click Shared Components.
The Shared Components page appears.
2. Under Files, select Static Workspace Files.
The Static Workspace Files page appears.
3. If not already selected, click the View Report icon.
A report appears. To customize the report, use the Search bar at the top of thepage.
4. Select the file to be deleted.
5. On the Edit page, click Delete.
17.9.5.2 Deleting All Static Workspace FilesTo delete all uploaded static workspace files:
1. Navigate to the Shared Components page:
a. On the Workspace home page, click App Builder.
b. Select an application.
c. On the Application home page, click Shared Components.
The Shared Components page appears.
2. Under Files, select Static Workspace Files.
The Static Workspace Files page appears.
3. Click Delete All Files.
17.10 Managing Application-Level ItemsApplication-level items do not display, but are used as global variables to theapplication. You can use an application item as a global variable.
• Creating an Application-Level Item (page 17-35)Create a application-level item on the shared Shared Components page.
• Viewing Application Item Usage (page 17-36)You can view a list of where application items are used by clicking the Utilizationtab at the top of the Application Items page.
• Editing Application-Level Item Attributes (page 17-37)Once you create an application-level item, you can edit it on the Create/EditApplication Item page.
• About Creating an Application-Level Item that Functions as a Global Variable(page 17-37)You can create a global variable by creating an application-level item with thesame name across all applications and setting the scope to Global.
Chapter 17Managing Application-Level Items
17-34
See Also:
• "About the Differences Between Page Items and Application Items(page 14-17)"
• "Referencing Item Values (page 14-17)"
17.10.1 Creating an Application-Level ItemCreate a application-level item on the shared Shared Components page.
To create an application-level item:
1. Navigate to the Shared Components page:
a. On the Workspace home page, click App Builder.
b. Select an application.
c. On the Application home page, click Shared Components.
The Shared Components page appears.
2. Under Application Logic, select Application Items.
The Application Items page appears.
3. To create an application item, click Create.
The Create/Edit page appears.
4. For Name:
a. Name - Enter a name for the application-level item.
b. Scope - Options include:
• Global - Select this option if the application shares session state with otherapplications in the same workspace.
• Application - Select this option if the application does share session statewith another application.
5. For Security, Datatype - Select datatype for this item.
6. For Security, Session State Protection - Select session state protection for thisitem. Options include:
• Unrestricted - The item's session state may be set by passing the item name/value in a URL or in a form. No checksum is required in the URL.
Note:
If you must set this item's value in session state using Ajax, then anUnrestricted protection level must be used for the item (for examplein Dynamic Actions, Set Value, Page Items to Submit or CascadingLOVs, Page Items to Submit).
• Restricted - May not be set from browser - The item may not be alteredusing the URL or POSTDATA. Use this option when you want to restrict the
Chapter 17Managing Application-Level Items
17-35
way that the item value can be set to internal processes, computations, and soon. This attribute is only applicable only to items that cannot be used as dataentry items and is always observed even if Session State Protection isdisabled. This attribute may be used for application items or for page itemswith any of these Display As types:
– Display Only (Save State=No)
– Display Only (Save State=No)
– Stop and Start Grid Layout (Displays label only)
• Checksum Required: Application Level - The item's session state may beset by passing the item name/value in a URL if a checksum specific to theschema is provided. A user-level checksum or a session-level checksum willalso suffice (see next bullets). Use this option when you want to allow the itemto be set only by URLs having checksums that were generated by any userrunning the same application in the current workspace but in a differentsession.
• Checksum Required: User Level - The item's session state may be set bypassing the item name/value in a URL if a checksum specific to theworkspace, application, and user is provided. A session-level checksum willalso suffice (see next bullet). Use this option when you want to allow the itemto be set only by URLs having checksums that were generated by the samenamed user, running the same application in the current workspace but in adifferent session.
• Checksum Required: Session Level - The item's session state may be setby passing the item name/value in a URL if a checksum specific to the currentsession is provided. Use this option when you want to allow this item to be setonly by URLs having checksums that were generated in the current session.
7. For Configuration, Build Option - Select a build option for this component. Buildoptions are predefined settings that determine whether components within anapplication are enabled.
8. In Comments, enter any notes regarding this item.
9. Click Create Application Item.
17.10.2 Viewing Application Item UsageYou can view a list of where application items are used by clicking the Utilization tabat the top of the Application Items page.
To view the Utilization report:
1. Navigate to the Shared Components page:
a. On the Workspace home page, click App Builder.
b. Select an application.
c. On the Application home page, click Shared Components.
The Shared Components page appears.
2. Under Application Logic, select Application Items.
The Application Items page appears.
3. Click the Utilization tab at the top of the page.
Chapter 17Managing Application-Level Items
17-36
17.10.3 Editing Application-Level Item AttributesOnce you create an application-level item, you can edit it on the Create/EditApplication Item page.
To edit application-level item attributes:
1. Navigate to the Shared Components page:
a. On the Workspace home page, click App Builder.
b. Select an application.
c. On the Application home page, click Shared Components.
The Shared Components page appears.
2. Under Application Logic, select Application Items.
The Application Items page appears.
3. Select an application item.
The Create/Edit page appears.
4. Edit the attributes.
To learn more about an attribute, see field-level Help
5. Click Apply Changes.
17.10.4 About Creating an Application-Level Item that Functions as aGlobal Variable
You can create a global variable by creating an application-level item with the samename across all applications and setting the scope to Global.
Large applications are often separated into several physical applications that reside inthe same workspace. These applications often share session state by configuring thesame cookie name in each application.
Another requirement of this type of architecture is the need to share a few globalvariables. While the number global variables should be kept small, global variablesfunction as an effective means to facilitate communicate between the applications. Forexample:
• Properties of the current user (such as email address, employee number, and soon).
• Current company in a multitenant application.
To create an application-level item that functions as a global variable:
1. Create an application-level item with the same name in each application to sharesession state.
2. For Scope, select Global.
3. For Security, Session State Protection, select Restricted.
Chapter 17Managing Application-Level Items
17-37
17.11 Creating ListsAdd a shared collection of links (or a list) to a database application. To add a list to apage, create a region and specify the region type as List. You control the appearanceof a list through list templates.
• About Static and Dynamic Lists (page 17-38)You can create two types of lists in Oracle Application Express: Static Lists andDynamic Lists.
• Creating Static Lists (page 17-39)A Static List is based on predefined display and return values.
• Creating Dynamic Lists (page 17-44)A Dynamic List is based on a SQL query or a PL/SQL function executed atruntime.
• Copying a List (page 17-47)You can copy a list from another application or from a list in the existingapplication.
• Adding a List to a Page (page 17-48)Once you create a list and list entries, the next step is to add it to a page bycreating a list region.
• Editing List Attributes (page 17-49)Once you create a list, you can edit it on the Lists page.
• Accessing List Reports (page 17-50)You can view the Unused, Conditional Entries, Utilization, and History reports byclicking the appropriate tab at the top of the Lists page. Note that these reportsonly display after you create a list.
• Managing Navigation Menus (page 17-51)Applications using newer themes, such as Universal Theme - 42, providenavigation with navigation menus.
• Managing Navigation Bar Lists (page 17-53)Applications using newer themes, such as Universal Theme - 42, includenavigation bar lists.
See Also:
• "Creating a New Template (page 12-33)"
• "List Templates (page 12-52)"
17.11.1 About Static and Dynamic ListsYou can create two types of lists in Oracle Application Express: Static Lists andDynamic Lists.
A Static List is based on predefined display and return values. When you create astatic list you define a list entry label and a target (either a page or URL). You can add
Chapter 17Creating Lists
17-38
list entries when you create the list (creating from scratch), by copying existing entries,or by adding the list entries. You can control when list entries display by definingdisplay conditions.
A Dynamic list is based on a SQL query or a PL/SQL function executed at runtime. Adynamic list enables you to dynamically create styled list items that support mobileframeworks.
The list definition displays a specific type of page item, such as progress bars, sidebar,bullet navigation list, or navigation menu. You can control how a list displays throughtemplates.
17.11.2 Creating Static ListsA Static List is based on predefined display and return values.
• About the Process of Creating a Static List (page 17-39)
• Creating a Static List from Scratch (page 17-39)
• About Adding Entries and Sublists to a Static List (page 17-40)
• Adding Entries or Sublists from Scratch (page 17-41)
• Copying Static List Entries Between Lists (page 17-43)
• Reparenting Static List Entries (page 17-43)
• Managing Orphaned Static List Entries (page 17-44)
• Resequencing Static List Entries (page 17-44)
17.11.2.1 About the Process of Creating a Static ListThe process of creating a static list involves the following steps:
• Step 1: Create the list by running the Create List Wizard.
• Step 2: Specify whether to create the list from scratch or by copying an existinglist.
You can add list entries by either creating them from scratch or by coping entriesfrom an existing list. If you copy an entire list, you also copy all of its list entries.
• Step 3: If creating a list from scratch, you are prompted to select a list type. SelectStatic.
Each list element has a display condition, which enables you to control when itdisplays. You can define a list element to be either current or non-current for aspecific page.
• Step 4: Add the list to a page by creating a List region.
How you perform these steps is a personal preference. You can perform the first threesteps when you run the Create List Wizard. Alternatively, you can perform these stepsone at a time.
17.11.2.2 Creating a Static List from ScratchTo create a list from scratch:
Chapter 17Creating Lists
17-39
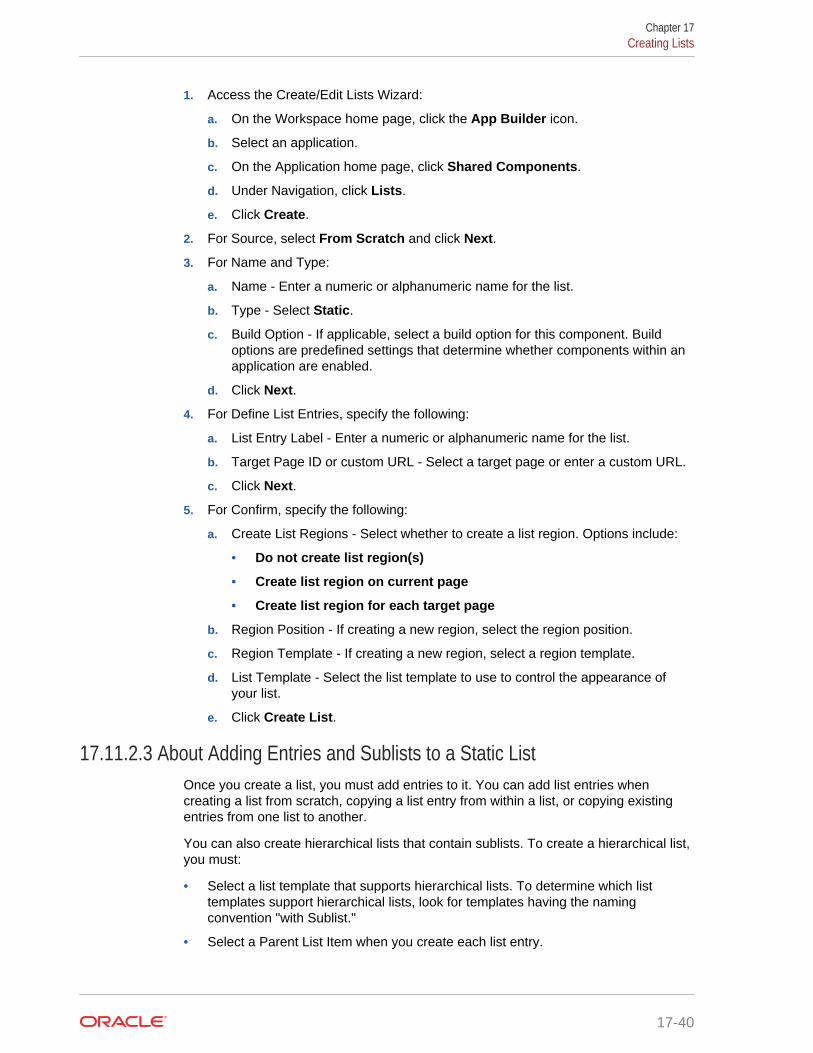
1. Access the Create/Edit Lists Wizard:
a. On the Workspace home page, click the App Builder icon.
b. Select an application.
c. On the Application home page, click Shared Components.
d. Under Navigation, click Lists.
e. Click Create.
2. For Source, select From Scratch and click Next.
3. For Name and Type:
a. Name - Enter a numeric or alphanumeric name for the list.
b. Type - Select Static.
c. Build Option - If applicable, select a build option for this component. Buildoptions are predefined settings that determine whether components within anapplication are enabled.
d. Click Next.
4. For Define List Entries, specify the following:
a. List Entry Label - Enter a numeric or alphanumeric name for the list.
b. Target Page ID or custom URL - Select a target page or enter a custom URL.
c. Click Next.
5. For Confirm, specify the following:
a. Create List Regions - Select whether to create a list region. Options include:
• Do not create list region(s)
• Create list region on current page
• Create list region for each target page
b. Region Position - If creating a new region, select the region position.
c. Region Template - If creating a new region, select a region template.
d. List Template - Select the list template to use to control the appearance ofyour list.
e. Click Create List.
17.11.2.3 About Adding Entries and Sublists to a Static ListOnce you create a list, you must add entries to it. You can add list entries whencreating a list from scratch, copying a list entry from within a list, or copying existingentries from one list to another.
You can also create hierarchical lists that contain sublists. To create a hierarchical list,you must:
• Select a list template that supports hierarchical lists. To determine which listtemplates support hierarchical lists, look for templates having the namingconvention "with Sublist."
• Select a Parent List Item when you create each list entry.
Chapter 17Creating Lists
17-40

17.11.2.4 Adding Entries or Sublists from ScratchTo add an entry or sublist from scratch:
1. Navigate to the Lists page:
a. On the Workspace home page, click the App Builder icon.
b. Select an application.
c. On the Application home page, click Shared Components.
d. Under Navigation, select Lists.
The Lists page appears.
2. Select a list.
The List Details page appears.
3. Click Create Entry.
4. Under Entry:
a. Parent List Entry - If applicable, select the parent for this list entry. Use thisattribute if you are creating a hierarchical list that contains a sublist.
Note this attribute does not appear if you are creating the parent list entry.
b. Sequence - Indicate the order in which list the list entry appears. Thesequence determines the order of evaluation.
c. Image/Class - Identify the image filename or Font Awesome css class to beused to display this list entry. Control over this attribute is provided by listtemplates.
d. Attributes - Identify the image attributes (such as width="12" height="12") forthe list element image.
Use the #LIST_LABEL# substitution string to reference the list label text. Thissubstitution string enables the title image attribute to be automatically setbased on the value of the list label text. For example:
title="#LIST_LABEL#"
e. Alt Attribute - Identify the image alt attribute for the list element image.
Use the #LIST_LABEL# substitution string to reference the list label text. Thissubstitution string enables the Alt attribute to be automatically set based onthe value of the list label text. For example:
...alt="#LIST_LABEL#"...
f. List Entry Label - Enter the label text for this link.
5. Specify a target type. Options include: URL or Page in this Application.
If the target location is a URL, specify the following:
a. Target Type - Select URL.
b. URL Target - Enter a URL. For example:
http://www.example.com
If the target location is a page:
a. Target Type - Select Page in this Application.
Chapter 17Creating Lists
17-41
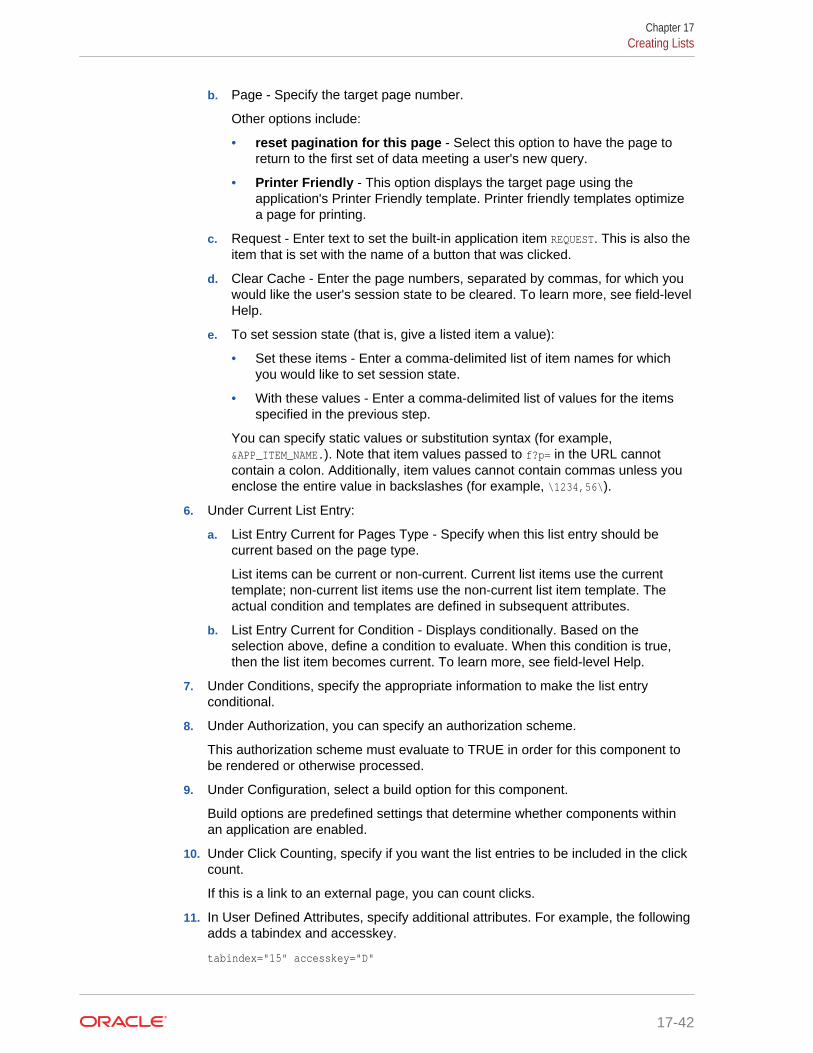
b. Page - Specify the target page number.
Other options include:
• reset pagination for this page - Select this option to have the page toreturn to the first set of data meeting a user's new query.
• Printer Friendly - This option displays the target page using theapplication's Printer Friendly template. Printer friendly templates optimizea page for printing.
c. Request - Enter text to set the built-in application item REQUEST. This is also theitem that is set with the name of a button that was clicked.
d. Clear Cache - Enter the page numbers, separated by commas, for which youwould like the user's session state to be cleared. To learn more, see field-levelHelp.
e. To set session state (that is, give a listed item a value):
• Set these items - Enter a comma-delimited list of item names for whichyou would like to set session state.
• With these values - Enter a comma-delimited list of values for the itemsspecified in the previous step.
You can specify static values or substitution syntax (for example,&APP_ITEM_NAME.). Note that item values passed to f?p= in the URL cannotcontain a colon. Additionally, item values cannot contain commas unless youenclose the entire value in backslashes (for example, \1234,56\).
6. Under Current List Entry:
a. List Entry Current for Pages Type - Specify when this list entry should becurrent based on the page type.
List items can be current or non-current. Current list items use the currenttemplate; non-current list items use the non-current list item template. Theactual condition and templates are defined in subsequent attributes.
b. List Entry Current for Condition - Displays conditionally. Based on theselection above, define a condition to evaluate. When this condition is true,then the list item becomes current. To learn more, see field-level Help.
7. Under Conditions, specify the appropriate information to make the list entryconditional.
8. Under Authorization, you can specify an authorization scheme.
This authorization scheme must evaluate to TRUE in order for this component tobe rendered or otherwise processed.
9. Under Configuration, select a build option for this component.
Build options are predefined settings that determine whether components withinan application are enabled.
10. Under Click Counting, specify if you want the list entries to be included in the clickcount.
If this is a link to an external page, you can count clicks.
11. In User Defined Attributes, specify additional attributes. For example, the followingadds a tabindex and accesskey.
tabindex="15" accesskey="D"
Chapter 17Creating Lists
17-42

12. When you are finished defining list attributes, click Create or Create and CreateAnother.
17.11.2.5 Copying Static List Entries Between ListsYou can copy static list entries from one list to another.
To copy list entries between lists:
1. Navigate to the Lists page.
a. Navigate to the Workspace home page.
b. Click the App Builder icon.
c. Select an application.
d. On the Application home page, click Shared Components.
e. Under Navigation, click Lists.
The Lists page appears.
2. Select the list to copy.
3. On the Tasks list, click Copy List Entries from one List to Another.
4. From Copy List Entries, select the list to copy to and click Next.
5. Click Copy List Entries.
17.11.2.6 Reparenting Static List EntriesUse the Reparent List Entries page to manage list entry hierarchy.
To reparent list entries:
1. Navigate to the Lists page.
a. Navigate to the Workspace home page.
b. Click the App Builder icon.
c. Select an application.
d. On the Application home page, click Shared Components.
e. Under Navigation, click Lists.
The Lists page appears.
2. Select the list.
3. From the Tasks list, click Reparent List Entries within this List.
4. Use Start With to restrict your view to a subset of hierarchy. Make a selection andclick Go.
5. From Reparent To, select a new parent.
6. Select the entries to move.
7. Click Reparent Checked Entries.
Chapter 17Creating Lists
17-43
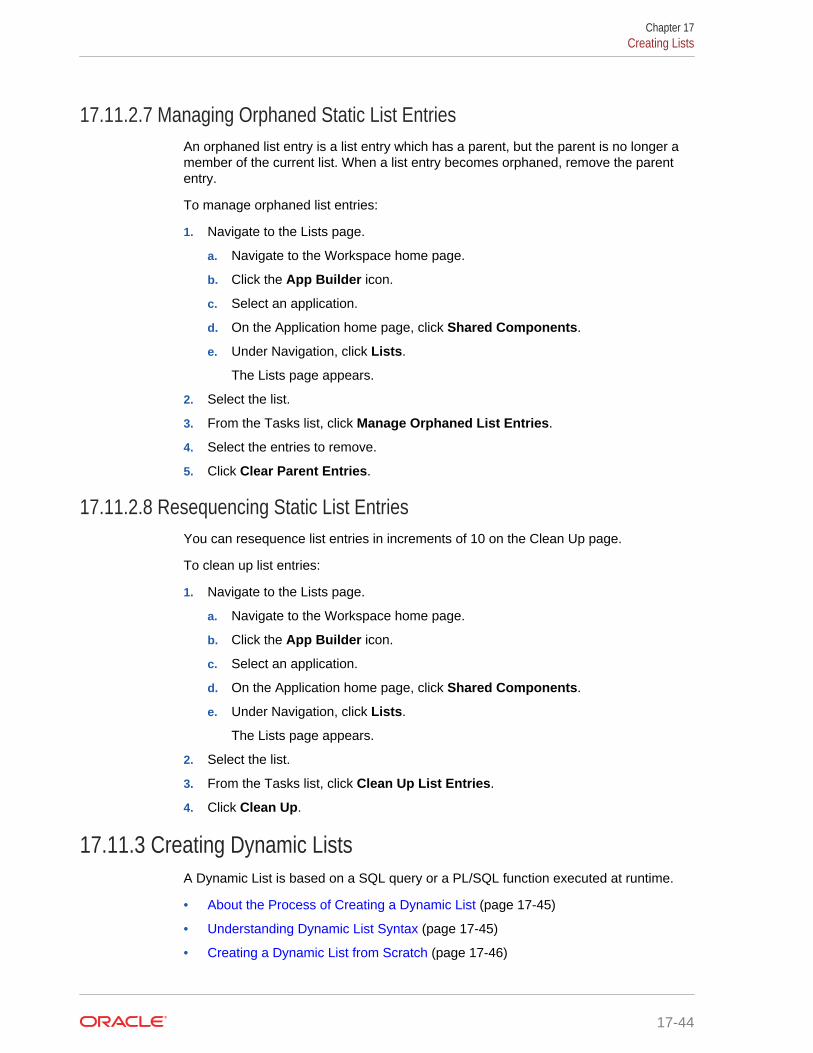
17.11.2.7 Managing Orphaned Static List EntriesAn orphaned list entry is a list entry which has a parent, but the parent is no longer amember of the current list. When a list entry becomes orphaned, remove the parententry.
To manage orphaned list entries:
1. Navigate to the Lists page.
a. Navigate to the Workspace home page.
b. Click the App Builder icon.
c. Select an application.
d. On the Application home page, click Shared Components.
e. Under Navigation, click Lists.
The Lists page appears.
2. Select the list.
3. From the Tasks list, click Manage Orphaned List Entries.
4. Select the entries to remove.
5. Click Clear Parent Entries.
17.11.2.8 Resequencing Static List EntriesYou can resequence list entries in increments of 10 on the Clean Up page.
To clean up list entries:
1. Navigate to the Lists page.
a. Navigate to the Workspace home page.
b. Click the App Builder icon.
c. Select an application.
d. On the Application home page, click Shared Components.
e. Under Navigation, click Lists.
The Lists page appears.
2. Select the list.
3. From the Tasks list, click Clean Up List Entries.
4. Click Clean Up.
17.11.3 Creating Dynamic ListsA Dynamic List is based on a SQL query or a PL/SQL function executed at runtime.
• About the Process of Creating a Dynamic List (page 17-45)
• Understanding Dynamic List Syntax (page 17-45)
• Creating a Dynamic List from Scratch (page 17-46)
Chapter 17Creating Lists
17-44
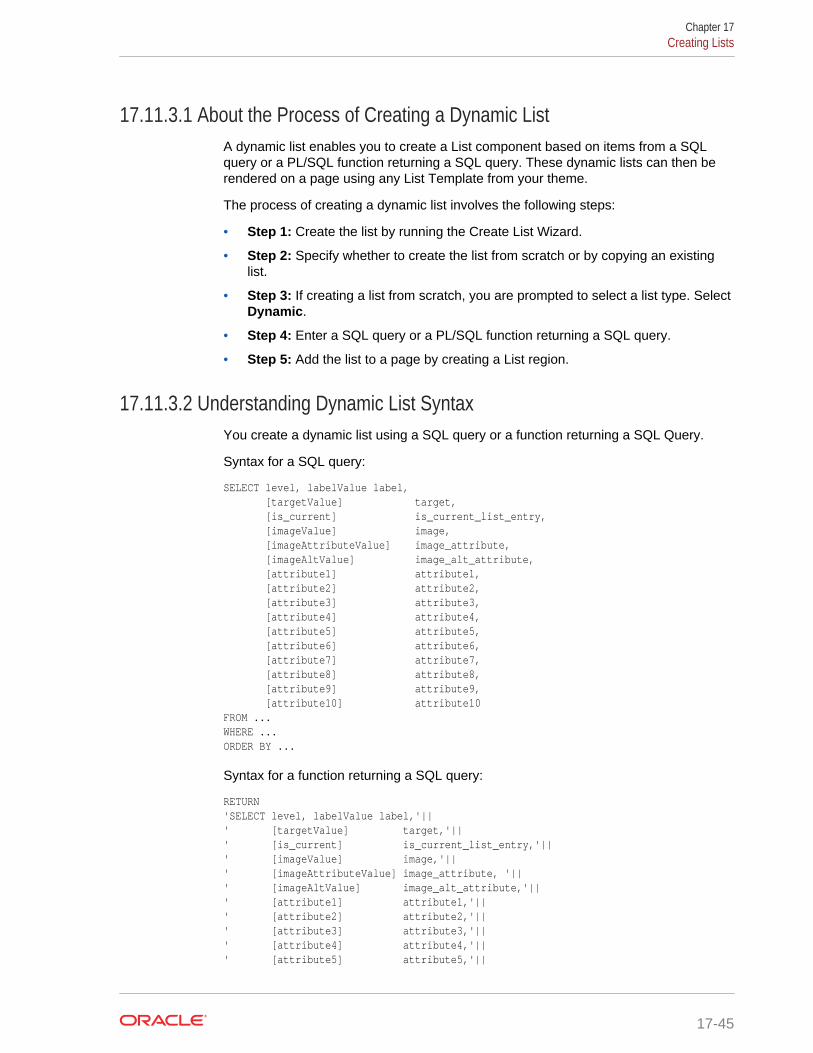
17.11.3.1 About the Process of Creating a Dynamic ListA dynamic list enables you to create a List component based on items from a SQLquery or a PL/SQL function returning a SQL query. These dynamic lists can then berendered on a page using any List Template from your theme.
The process of creating a dynamic list involves the following steps:
• Step 1: Create the list by running the Create List Wizard.
• Step 2: Specify whether to create the list from scratch or by copying an existinglist.
• Step 3: If creating a list from scratch, you are prompted to select a list type. SelectDynamic.
• Step 4: Enter a SQL query or a PL/SQL function returning a SQL query.
• Step 5: Add the list to a page by creating a List region.
17.11.3.2 Understanding Dynamic List SyntaxYou create a dynamic list using a SQL query or a function returning a SQL Query.
Syntax for a SQL query:
SELECT level, labelValue label, [targetValue] target, [is_current] is_current_list_entry, [imageValue] image, [imageAttributeValue] image_attribute, [imageAltValue] image_alt_attribute, [attribute1] attribute1, [attribute2] attribute2, [attribute3] attribute3, [attribute4] attribute4, [attribute5] attribute5, [attribute6] attribute6, [attribute7] attribute7, [attribute8] attribute8, [attribute9] attribute9, [attribute10] attribute10FROM ...WHERE ...ORDER BY ...
Syntax for a function returning a SQL query:
RETURN'SELECT level, labelValue label,'||' [targetValue] target,'|| ' [is_current] is_current_list_entry,'||' [imageValue] image,'||' [imageAttributeValue] image_attribute, '||' [imageAltValue] image_alt_attribute,'||' [attribute1] attribute1,'||' [attribute2] attribute2,'||' [attribute3] attribute3,'||' [attribute4] attribute4,'||' [attribute5] attribute5,'||
Chapter 17Creating Lists
17-45

' [attribute6] attribute6,'||' [attribute7] attribute7,'||' [attribute8] attribute8,'||' [attribute9] attribute9,'||' [attribute10] attribute10'||'FROM ...'||'WHERE ...'||'ORDER BY ...';
Where:
• level and labelvalue are required.
• level - For hierarchical lists, the level parameter should be supplied. For non-hierarchical lists, this parameter can be set to NULL.
• labelvalue - Text to appear as list entry.
• targetvalue - Target URL to branch to when list entry is selected.
• is_current - Controls the behavior of the list entry. Values include:
– NULL - Currency of target is based upon Target URL.
– 'YES' - List entry is always current.
– 'NO' - List entry is not current.
• imagevalue - The name of image to be display on the list entry
• imageattributevalue - Attributes of the image, such as the width or height
• imagealtvalue - Value for Image ALT tag, required for accessibility purposes intemplates where the user must click the image.
• attribute1 to 10: These attributes tie in with the existing ten User Attributesexposed on the Static List Entry page.
17.11.3.3 Creating a Dynamic List from ScratchTo create a dynamic list:
1. Access the Create/Edit Lists Wizard:
a. On the Workspace home page, click the App Builder icon.
b. Select an application.
c. On the Application home page, click Shared Components.
d. Under Navigation, click Lists.
e. Click Create.
2. Click From Scratch and click Next.
3. For Name and Type:
a. Name - Enter a numeric or alphanumeric name for the list.
b. Type - Select Dynamic.
c. Build Option - If applicable, select a build option for this component. Buildoptions are predefined settings that determine whether components within anapplication are enabled.
d. Click Next.
Chapter 17Creating Lists
17-46
4. For Query or Static Values:
a. Query Source Type - Select SQL Query or Function Returning SQL Query.
b. Query - Enter a SQL query or function returning a SQL query. To view SQLQuery examples, expand the Examples region.
Build Query - Click Build Query to use a wizard to build a query on the tableor view you select. Follow the on-screen instructions.
c. Click Next.
5. For Create List, specify whether to create a list region:
a. If you select Create list region on current page, the following attribute display:
• Region Position - If creating a new region, select the region position.
• Region Template - If creating a new region, select a region template.
• List Template - If creating a new region, select a list template.
b. Region Position - If creating a new region, select the region position.
c. Region Template - If creating a new region, select a region template.
d. Click Create.
17.11.4 Copying a ListYou can copy a list from another application or from a list in the existing application.
• Copying a List from the Current Application (page 17-47)
• Copying a List Between Applications (page 17-48)
17.11.4.1 Copying a List from the Current ApplicationYou can copy list entries from one list to another.
To copy list entries between lists:
1. Navigate to the Lists page.
a. Navigate to the Workspace home page.
b. Click the App Builder icon.
c. Select an application.
d. On the Application home page, click Shared Components.
e. Under Navigation, click Lists.
The Lists page appears.
2. Select the list to copy.
3. On the Tasks list, click Copy List.
4. On Copy List, select List in this application and click Next.
5. For Identify List:
a. Copy List - Select the list to be copied.
b. New List Name - Enter a new name for the copied list.
Chapter 17Creating Lists
17-47
c. Click Copy.
17.11.4.2 Copying a List Between ApplicationsYou can copy a list from the current application or from another application.
To copy a list:
1. Navigate to the Lists page.
a. Navigate to the Workspace home page.
b. Click the App Builder icon.
c. Select an application.
d. On the Application home page, click Shared Components.
e. Under Navigation, click Lists.
The Lists page appears.
2. Select the list to copy.
3. On the Tasks list, click Copy List.
4. On Copy List, select List in another application and click Next.
5. For Identify List:
a. Copy From Application - Select the application from which you want to copy alist.
b. Copy List - Select the list you are copying.
c. New List Name - Enter a name for the new list.
d. Click Copy.
17.11.5 Adding a List to a PageOnce you create a list and list entries, the next step is to add it to a page by creating alist region.
To add a list to a page:
1. View the page in Page Designer:
a. On the Workspace home page, click the App Builder icon.
b. Select an application.
c. Select a page.
Page Designer appears.
2. Create a new list region:
a. In the Gallery at the bottom of the central pane, click Regions and locate List.
b. Right-click List and from the context menu, select Add To and then thelocation.
Chapter 17Creating Lists
17-48
Tip:
In addition using the context menus, you can also use your mouse todrag and drop components to the appropriate location.
3. In the Property Editor, edit the appropriate attributes:
Tip:
To view help for an attribute, select the attribute in the Property Editorand click the Help tab in the central pane.
4. Identification:
a. Identification, Title - Enter a region title. The region title only displays when it isdefined in the region template.
b. Identification, Type - Select List.
5. Source, List - Select the source for this list.
6. Layout:
a. Layout, Sequence - Enter the display sequence for this item. The sequenceand other layout settings determine where this item is displayed in relation toother items within the region.
b. Layout, Parent Region - Select the parent region to which this region belongs.If a parent region is selected then this region is rendered completely inside theparent region..
c. Layout, Position - Identify a display point for this region.
7. Appearance, Template - Choose a template to control the look of the region.
8. Server-side Condition, Type - Optionally select a condition type from the list thatmust be met in order for this component to be rendered or processed. Additionalattributes appear based on your selection.
9. Security, Authorization Scheme - Optionally select an authorization scheme tocontrol this component. The authorization must evaluate to TRUE in order for thiscomponent to be rendered or executed.
10. Click Save.
Repeat these procedures for each page where you would like to add a list.
17.11.6 Editing List AttributesOnce you create a list, you can edit it on the Lists page.
To edit a list:
1. Navigate to the Lists page.
a. Navigate to the Workspace home page.
b. Click the App Builder icon.
Chapter 17Creating Lists
17-49
c. Select an application.
d. On the Application home page, click Shared Components.
e. Under Navigation, click Lists.
The Lists page appears.
2. Select a list.
The List Details page appears.
3. To change the list name or build options, click the Edit List button.
4. To change the list name or build options:
a. Click the Edit List button.
b. Edit the appropriate attributes.
c. Click Apply Changes.
5. To edit the list sequence, link text, target, or current status for all list entries, clickGrid Edit.
a. To edit the list sequence, link text, target, or current status for all list entries,click Grid Edit.
b. Edit the appropriate attributes.
c. Click Apply Changes.
17.11.7 Accessing List ReportsYou can view the Unused, Conditional Entries, Utilization, and History reports byclicking the appropriate tab at the top of the Lists page. Note that these reports onlydisplay after you create a list.
To view list reports:
1. Navigate to the Lists page.
a. Navigate to the Workspace home page.
b. Click the App Builder icon.
c. Select an application.
d. On the Application home page, click Shared Components.
e. Under Navigation, click Lists.
The Lists page appears.
2. Click the appropriate tab:
• Unused - Click the Unused tab to identify lists that are not used in the currentapplication.
• Conditional Entries - Click the Conditional Entries tab to view conditionallists.
• Utilization - Click the List Utilization tab to access the Utilization report. Thisreport displays all lists included in the current application. From the report, youcan:
– Edit list entries by selecting the list name.
Chapter 17Creating Lists
17-50
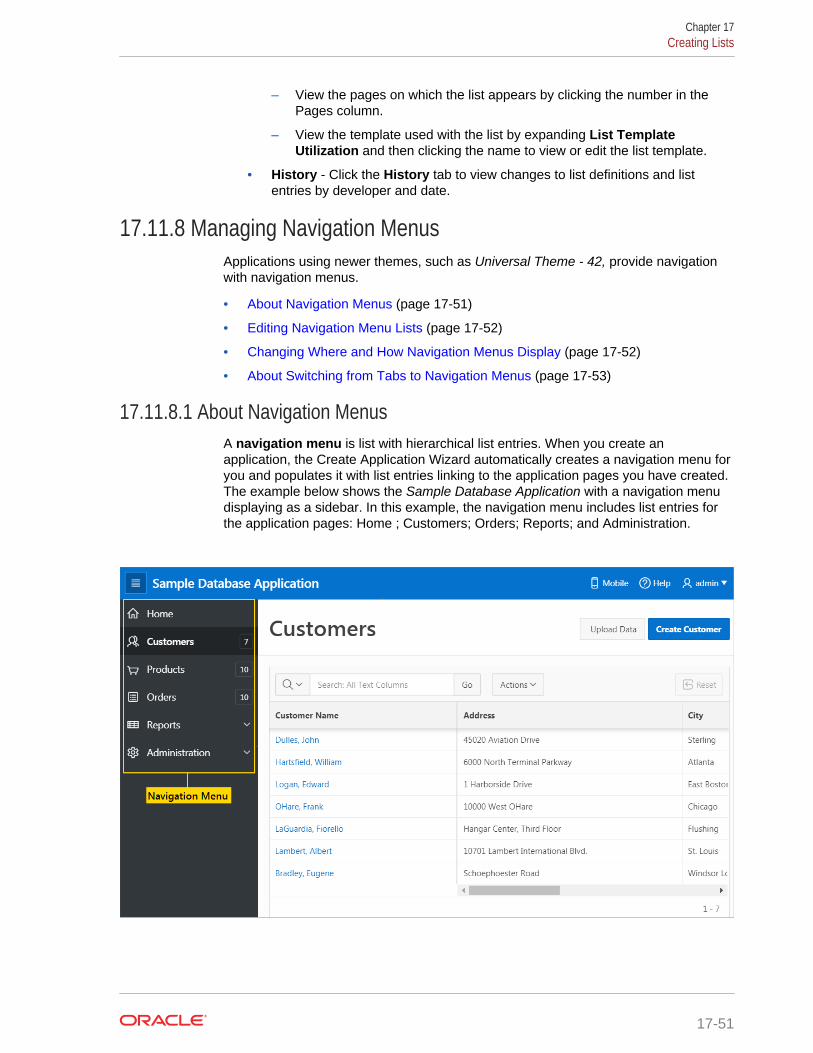
– View the pages on which the list appears by clicking the number in thePages column.
– View the template used with the list by expanding List TemplateUtilization and then clicking the name to view or edit the list template.
• History - Click the History tab to view changes to list definitions and listentries by developer and date.
17.11.8 Managing Navigation MenusApplications using newer themes, such as Universal Theme - 42, provide navigationwith navigation menus.
• About Navigation Menus (page 17-51)
• Editing Navigation Menu Lists (page 17-52)
• Changing Where and How Navigation Menus Display (page 17-52)
• About Switching from Tabs to Navigation Menus (page 17-53)
17.11.8.1 About Navigation MenusA navigation menu is list with hierarchical list entries. When you create anapplication, the Create Application Wizard automatically creates a navigation menu foryou and populates it with list entries linking to the application pages you have created.The example below shows the Sample Database Application with a navigation menudisplaying as a sidebar. In this example, the navigation menu includes list entries forthe application pages: Home ; Customers; Orders; Reports; and Administration.
Chapter 17Creating Lists
17-51
17.11.8.2 Editing Navigation Menu ListsSince a Navigation menu is a list, you create and edit in the same way as any otherlist.
You can access Navigation menus in Shared Components in the Navigation region intwo ways:
• Select the application and then click Shared Components. Under the Navigationregion, select Navigation Menu.
• Select the application and then click Shared Components. Under the Navigationregion, select Lists.
Once you select the Navigation Menu, you edit it as you would any other list.
17.11.8.3 Changing Where and How Navigation Menus DisplayNavigation menus can display either as a side bar or at the top of the window.Navigation menus displaying as a side bar are responsive. In other words, based onthe available space, the navigation menu displays a full menu or collapses to a narrowicon bar. Navigation menus are controlled at the theme and user interface level. Youcan change how and where a navigation menu displays by editing the application UserInterface Details
To edit the Navigation menu attributes in User Interface Details:
1. On the Workspace home page, click the App Builder icon.
2. Select the application.
The Application home page appears.
3. Access the User Interfaces page:
a. Click Shared Components.
b. Under User Interface, click User Interface Attributes.
The User Interfaces page appears. Defined User Interfaces display in the UserInterfaces region at the top of the page.
4. To edit attributes for a specific user interface, click the Edit icon adjacent to theUser Interface.
The User Interface Details page appears.
5. Under Navigation Menu, edit the following attributes.
• Display Navigation - Turn navigation on or off by selecting Yes or No.
• Navigation Menu List - Select the list utilized for the navigation menu for theapplication.
• Position - Select the position where you would like your navigation menu to beplaced in this application.
• List Template - Select the List Template used to render the navigation menufor the application.
• Template Options - Set Template Options for the List Template used for thenavigation menu list for the application.
Chapter 17Creating Lists
17-52
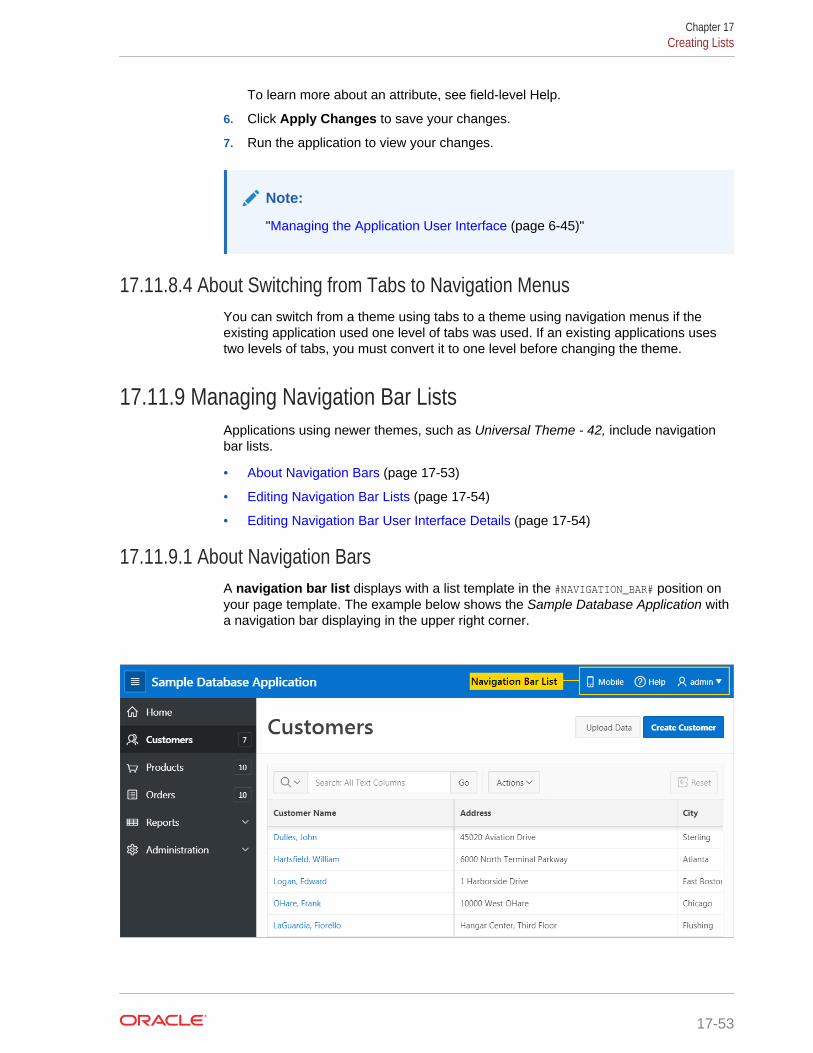
To learn more about an attribute, see field-level Help.
6. Click Apply Changes to save your changes.
7. Run the application to view your changes.
Note:
"Managing the Application User Interface (page 6-45)"
17.11.8.4 About Switching from Tabs to Navigation MenusYou can switch from a theme using tabs to a theme using navigation menus if theexisting application used one level of tabs was used. If an existing applications usestwo levels of tabs, you must convert it to one level before changing the theme.
17.11.9 Managing Navigation Bar ListsApplications using newer themes, such as Universal Theme - 42, include navigationbar lists.
• About Navigation Bars (page 17-53)
• Editing Navigation Bar Lists (page 17-54)
• Editing Navigation Bar User Interface Details (page 17-54)
17.11.9.1 About Navigation BarsA navigation bar list displays with a list template in the #NAVIGATION_BAR# position onyour page template. The example below shows the Sample Database Application witha navigation bar displaying in the upper right corner.
Chapter 17Creating Lists
17-53
17.11.9.2 Editing Navigation Bar ListsSince a navigation bar is a list, you create and edit in the same way as any other list.
You can access navigation bars in Shared Components in the Navigation region in twoways:
• Select the application and then click Shared Components. Under the Navigationregion, select Navigation Bar List.
• Select the application and then click Shared Components. Under the Navigationregion, select Lists.
Once you select the navigation bar list, you edit it as you would any other list.
17.11.9.3 Editing Navigation Bar User Interface DetailsNavigation Bar User Interface Details settings enable you to select list and listtemplates. Selecting classic implementation uses tabs instead of a list.
To edit the Navigation Bar User Interface Details:
1. On the Workspace home page, click the App Builder icon.
2. Select the application.
The Application home page appears.
3. Access the User Interfaces page:
a. Click Shared Components.
b. Under User Interface, click User Interface Attributes.
The User Interfaces page appears. Defined User Interfaces display in the UserInterfaces region at the top of the page.
4. To edit attributes for a specific user interface, click the Edit icon adjacent to theUser Interface.
The User Interface Details page appears.
5. Under Navigation Bar, edit the following attributes:
• Implementation - Select how to you wish to implement the navigation bar inthis application. Options include:
– Classic renders the navigation bar as a classic navigation bar in the#NAVIGATION_BAR# position on your page template.
– List renders the navigation bar as a list, using the selected list and listtemplate in the #NAVIGATION_BAR# position on your page template.
• Navigation Bar List - Select the list utilized for the navigation bar on thisapplication.
• List Template - Select the List Template used to render the navigation menufor the application.
• Template Options - Set Template Options for the List Template used for thenavigation menu list for the application.
6. Click Apply Changes to save your changes.
Chapter 17Creating Lists
17-54
7. Run the application again to view your changes.
Note:
"Managing the Application User Interface (page 6-45)"
17.12 Managing Report OutputLearn how to print a report region by defining a report query and how to use a reportlayout to format a report region.
• Printing a Report Region by Defining a Report Query (page 17-55)
• Formatting a Report Region or Report Query Using Report Layouts (page 17-58)
17.12.1 Printing a Report Region by Defining a Report QueryPrint a report region by defining a report query.
• About Report Queries (page 17-55)
• Creating a Report Query (page 17-55)
• Editing a Report Query (page 17-58)
• Copying a Report Query (page 17-58)
17.12.1.1 About Report QueriesYou can print a report region by defining a report query as a Shared Component. Areport query identifies the data to be extracted. Unlike SQL statements contained inregions, report queries contain SQL statements that are validated when you save thequery. Note that report queries must be SQL statements, not functions returning SQLstatements.
You can associate a report query with a report layout and download it as a formatteddocument. If no report layout is selected, a generic layout is used. The generic layoutis intended to be used to test and verify a report query. When using the generic layoutoption and multiple source queries are defined, only the first result set is included inthe print document. The reports can include session state of the current application.
To make these reports available to end users, you then integrate them with anapplication. For example, you can associate a report query with a button, list item,branch, or other navigational component that enables you to use URLs as targets.Selecting that item then initiates the printing process.
17.12.1.2 Creating a Report QueryNote that the availability of the report query options depends on how your serviceadministrator configures report printing for your instance. All options described in thesesteps may not be available to you.
To create a report query:
1. Navigate to the Shared Components page:
Chapter 17Managing Report Output
17-55
a. On the Workspace home page, click App Builder.
b. Select an application.
c. On the Application home page, click Shared Components.
The Shared Components page appears.
2. Under Reports, click Report Queries.
3. Click Create.
4. For Query, specify the following information:
a. Report Query Name - Enter a name to identify the report query. Whenreferencing a report query as a link target, the report query name is part of therequest string.
b. Output Format - Select the report output format. Valid options include:
• PDF - Adobe Portable Document Format.
• Word - Microsoft Word Rich Text Format.
• Excel - Microsoft Excel format. Note that this is not a true .xls file becausethe content is HTML-based.
• HTML
• XML - Extensible Markup Language.
c. Item - Select the item to hold the format value. You can use this item todetermine the output format at runtime.
d. View File As - Select how the web browser opens the report query document.Options include:
• Attachment - Displays a File Open/Save dialog box when the user clicksthe report query download button.
• Inline - Displays the report query document inside the Browser window.
e. Session State - Select this check box to reference session state values, suchas the values of page items in the XML structure of your report.
f. Click Next.
5. For SQL Query, enter a SQL statement directly or click Query Builder to build aSQL statement by clicking and pointing.
To reference applications and page items in the SQL statement, reference themas bind variables. Click Set Bind Variables to be able to enter in values for eachbind variable and test the query to ensure the expected output is returned.
6. For Download Definition, specify the following:
a. Data Source for Report Layout - Use this option to download a report definitionexport file.
Chapter 17Managing Report Output
17-56
Tip:
The report query definition is what a developer would use as thesource for tools like BI Publisher Desktop or Altova Stylevision tocreate the report layout. Some tools accept both an XML export ofthe data as well as an XML scheme definitions as source, other toolsmay only accept one or the other. If the source query does not returndata at design time, then XML schema provides a way to export thedefinition without data.
Select XML Data or XML Schema and click Download.
XML Schema creates XSD file (that is, a XML schema definition of your XMLstructure.)
b. Add Query - Click this button to add another query to the report query. Addinganother query enables the production of complex reports with more than oneoutput component (for example, a chart and a report based on two differentqueries).
c. Create Report Query - Click this button to exit the wizard early. The ReportLayout Source defaults to use the generic report layout.
d. Click Next.
7. For Upload Report Layout, specify the following:
a. Report Layout Source - Specify how the report layout is derived. If you choosethe report based file layout then the layout name and report layout file must beprovided.
b. Layout Name - Enter a layout name (optional). The default is the report queryname.
c. Report Layout File - Click Browse and select a Rich Text Format (RTF).
d. Click Next.
8. For Confirm:
a. Query Name - Identifies the query.
b. Report Layout - Identifies the report layout you selected.
c. Output Format - Identifies the format for this report query.
d. Derive from Item - Identifies the item to hold the format information.
e. URL - To integrate this report with your application, use the displayed URL asthe target for a button, list item, link, or other navigational component. Endusers can click a button, for example, to start the printing process.
f. Test Report - Click this to preview your report. If you have chosen to use ageneric report layout then the Test Report does not produce an output.
g. Click Finish.
The Report Query is created and saved to Shared Components.
Chapter 17Managing Report Output
17-57
17.12.1.3 Editing a Report QueryTo edit a report query:
1. Navigate to the Shared Components page:
a. On the Workspace home page, click App Builder.
b. Select an application.
c. On the Application home page, click Shared Components.
The Shared Components page appears.
2. Under Reports, click Report Queries.
3. Select the appropriate report query.
4. On the Edit page, edit the appropriate attributes.
5. Click Apply Changes.
17.12.1.4 Copying a Report QueryTo copy a report query:
1. Navigate to the Shared Components page:
a. On the Workspace home page, click App Builder.
b. Select an application.
c. On the Application home page, click Shared Components.
The Shared Components page appears.
2. Under Reports, click Report Queries.
3. On the Report Queries page, click Copy.
4. On the Copy Report Query, select the query you want to copy, enter a name forthe report query, and click Copy.
The copy appears in the query list.
17.12.2 Formatting a Report Region or Report Query Using ReportLayouts
Create a report layout to format a report region or report layout.
• About Report Layouts (page 17-58)
• About Report Layout Options (page 17-59)
• Creating a Report Layout (page 17-59)
• Editing a Report Layout (page 17-60)
• Copying a Report Layout (page 17-61)
17.12.2.1 About Report LayoutsTo format either a classic report region or report query, you associate it with a reportlayout. Using report layouts renders the data in a printer-friendly format. If you do not
Chapter 17Managing Report Output
17-58
select a report layout, a default XSL-FO layout is used. The default XSL-FO layout isalways used for rendering Interactive Report regions.
When creating and using report layouts, you can:
• Take advantage of the default layouts for report regions and generic layouts forreport queries provided with Oracle Application Express.
• Utilize the built-in XSL-FO-based layouts for report regions by copying andcustomizing the code. You can edit several attributes for report regions that controlpage size, fonts, colors, and so on.
• Create RTF or XSL-FO report layouts to customize the report look and feel. Touse RTF report layouts, your Oracle Application Express service administratormust select the Advanced setting for your site.
Note:
Interactive reports do not support a custom report layout.
17.12.2.2 About Report Layout OptionsYou can create a report layout based on one of these options:
• Generic Columns - A generic report layout works with most query result sets.With this layout, the number of columns is automatically adjusted when generatingthe printable document.
Many report layout attributes can be defined declaratively for report regions usingthe built-in XSL-FO default layout. This step allows for creating customizablecopies of the built-in default XSL-FO layout, if additional control over the reportlayout is needed.
• Named Columns - A named column report layout is a query-specific report layoutdesigned to work with a defined list of columns in the query result set. This type oflayout is used for custom-designed layouts when precise control of the positioningof page items and query columns is required.
Note that the availability of the Report Layout options depends on how your siteadministrator configured the report printing settings at your site. All options describedin these steps may not be available to you.
17.12.2.3 Creating a Report LayoutTo create a report layout:
1. Navigate to the Shared Components page:
a. On the Workspace home page, click App Builder.
b. Select an application.
c. On the Application home page, click Shared Components.
The Shared Components page appears.
2. Under Reports, click Report Layouts.
Chapter 17Managing Report Output
17-59
3. Click Create.
The Create Report Layout wizard appears.
4. For Report Layout Type, select an option and click Next:
• Generic Columns (XSL-FO) - Uses the default template to populate the report.In the next step, you can customize the default code.
• Named Columns (XSL-FO) - Requires that you upload an XSL-FO or RTF filein the next step.
5. For Layout Source, review and edit the appropriate information. The options thatappear on this page depend on the layout type you select:
• If you selected Generic Columns:
a. Report Layout Name - Enter a name to identify the report layout whenassociating it with a report query or report region.
b. Report Layout - The report layout is the XSL-FO based definition of the pageformatting. All attributes defining page size, orientation, fonts, styles, and soon, are defined in this section.
c. Report Column Heading - Defines the look of each cell in the report headingrow.
d. Report Column - Defines the look of each cell for all report rows.
e. Report Column Width - This width is computed at runtime or can be derivedfrom the report column definition of a report region.
• If you selected Named Columns:
a. Layout Name - Enter a name to identify the report layout when associating itwith a report query or report region.
b. Report Layout File - Upload the file containing the report layout.
6. Click Create Layout.
17.12.2.4 Editing a Report LayoutYou can edit a generic column report layout directly in Application Express. However,to edit a named column report layout, you must download the current file, edit it, andthen upload it again.
To edit a report layout:
1. Navigate to the Shared Components page:
a. On the Workspace home page, click App Builder.
b. Select an application.
c. On the Application home page, click Shared Components.
The Shared Components page appears.
2. Under Reports, click Report Layouts.
3. On the Report Layouts page, select the layout you want to edit.
4. For generic column layouts, edit the layout directly on the Edit Report Layout pageand click Apply Changes.
5. For named column layouts, click Download and save the file to your computer.
Chapter 17Managing Report Output
17-60
Edit the file and then upload the updated version as a new report layout.
17.12.2.5 Copying a Report LayoutYou can copy a report layout to edit and save.
To copy a report layout:
1. Navigate to the Shared Components page:
a. On the Workspace home page, click App Builder.
b. Select an application.
c. On the Application home page, click Shared Components.
The Shared Components page appears.
2. Under Reports, click Report Layouts.
3. On the Report Layouts page, click Copy.
4. On the Copy Report Layout page, select the layout you want to copy, enter aname for the copy, and click Copy.
The copy appears in the layout list.
5. On Copy Report Layout:
a. Copy Report Layout - Select the layout you want to copy.
b. Report Layout Name - Enter a name for the copy.
c. Click Copy.
Chapter 17Managing Report Output
17-61
18Managing Application Data
Learn how to manage application data: add data loading capability, use collections totemporarily store information, execute SQL or PL/SQL defined at the component-levelon a remote database, manage external web services through Web Source Modules,Remote Servers, and Web Credentials, manage legacy Web services, accessing datawith database links, and utilizing Data Manipulation Language (DML) to update ordelete rows of a table.
• Creating Applications with Data Loading Capability (page 18-1)Create applications with data loading capability that enable end users todynamically import data into a table within any schema to which the they haveaccess.
• About Using Collections (page 18-8)Collections enable you to temporarily capture one or more nonscalar values. Youcan use collections to store rows and columns currently in session state so theycan be accessed, manipulated, or processed during a user's specific session.
• Managing REST Enabled SQL References (page 18-8)Execute SQL queries or PL/SQL defined at the component-level on a remotedatabase using REST Enabled SQL References.
• Managing Web Source Modules (page 18-26)Web Source Modules act as a reference to one or multiple external web services.A module can contain one or many Web Source Operations which are thereferences to a concrete external web service.
• Managing Remote Servers (page 18-32)A Remote Server is separate entity that stores Web Source server information.Remote Servers can be shared among multiple Web Sources, thus enabling youto information such as the Base URL or Authentication.
• Managing Web Credentials (page 18-35)Manage secure credentials to connect to REST Enabled SQL or other RESTservices.
• Managing Legacy Web Services (page 18-39)Legacy Web services enable applications to interact with one another over theweb in a platform-neutral, language independent environment.
• Accessing Data with Database Links (page 18-56)Access data remotely by creating a database link.
• About DML Locking (page 18-57)Use automatic Data Manipulation Language (DML) in Oracle Application Expressto update or delete rows of a table.
18.1 Creating Applications with Data Loading CapabilityCreate applications with data loading capability that enable end users to dynamicallyimport data into a table within any schema to which the they have access.
18-1
To import data, end users run a Data Load Wizard that uploads data from a file orcopies and pastes data entered by the end user directly into the wizard.
• About Creating a Data Load Wizard (page 18-2)
• Creating a Data Load Wizard (page 18-3)
• Re-creating Data Load Pages (page 18-6)
• Editing the Data Load Definition (page 18-6)
See Also:
"Data Loading Wizard Examples" in Oracle Application Express End UserGuide to learn about using the Data Load Wizard.
18.1.1 About Creating a Data Load WizardTo create a Data Load Wizard, an application developer creates a Data Load pagewith the Create Page Wizard. During the process of creating the Data Load Wizard,developers can specify the upload table and its unique columns, table lookups, anddata transformation rules.
Note:
A Data Load Wizard is not designed or intended to load hundreds ofthousands of rows of data. While it is possible to use a Data Load Wizard toload this high volume of data, you may encounter performance issues withboth transmitting and loading large data files. Tools like Oracle SQLDeveloper and Oracle SQL*Loader are better suited to loading large volumesof data.
The Data Load Wizard includes support for the following:
• Table Definitions - This definition specifies the data upload table name with itsunique key columns.
• Data Transformation Rules - For formatting transformations such as changingimport data to uppercase, lowercase, and so on, you must define datatransformation rules. For example, if the import file includes column data with bothupper and lowercase and the upload table requires all uppercase, you can definea data transformation rule to insert only uppercase into the target column.
• Table Lookups - If data existing in the import file must be mapped to data inanother table, specify a table lookup to perform the mapping. For example, if theimport file contains a department name for the DEPTNO column but the upload tablerequires a number for that column, use a table lookup rule to find thecorresponding department number for that department name in another table.
• Column Name Aliases - There are many situations when a developer does notwish to expose the table column names to the end user, or to expose all columns
Chapter 18Creating Applications with Data Loading Capability
18-2
to the end user. In those situations, you can create a column aliases for thecolumns that need to exposed.
• Manage Concurrency - If multiple users are uploading data at the same time,developers can use extra column to track the version of data in the underlyingtable. The Data Load Wizard can use this column to check and signal the end userif anyone else is working with the same data at the same time. This is particularlyimportant if uploading into a table that is regularly updated.
• Multiple Spreadsheet Columns - There are many situations when a spreadsheet tobe uploaded has multiple columns that the developer wants to concatenate andupload in to one table column (for example FirstName and LastName on spreadsheetcan be uploaded into ENAME of the EMP table).
• Skip Validation - You can improve data loading performance when uploading alarge number of records by skipping the validation step. If uploading thousands ofrecords, the end user might not be interested in validating each record. If you arecertain that each record will be inserted as new record, the data loading processdoes not need to check for duplicates.
The newly generated Data Load Wizard consists of four pages that provide users withthe ability to upload data from a file or by copy and paste, define data and tablemappings, validate the data, and finally to upload the data to the table. The developercan later edit the Data Load Wizard's definitions such as table lookups and datatransformation rules, by accessing Shared Components, Data References, Data LoadDefinitions.
Supported Data Types
Data Load Wizards support the following data types:
• VARCHAR2
• DATE
• TIMESTAMP
• NUMBER
Unsupported Data Types
Data Load Wizards do not support the following data types:
• Large objects (BLOB and CLOB)
• Complex types (XMLTYPE and SDO_GEOMETRY)
• CHAR
18.1.2 Creating a Data Load WizardTo create a Data Load Wizard:
1. On the Workspace home page, click the App Builder icon.
2. Select the application.
3. Click Create Page.
4. For Create a Page:
a. User Interface - Select a user interface for the page (optional).
Chapter 18Creating Applications with Data Loading Capability
18-3
This attribute only displays for applications using older themes and for whichDesktop and Mobile User Interfaces have been defined.
b. Page Type - Select Component and then Data Loading.
Tip:
Component pages provides page-level functionality and can beadded multiple times within a given application such as reports,forms, charts, or calendars. Feature pages provide application-levelfunctionality and can only be added once per application.
5. For Data Load Table:
a. Data Load Definition - Choose whether to create a new or to re-use an existingData Load definition.
b. Definition Name - Enter the name of this data load definition.
c. Owner - Select the owner of the table on which the form will be based..
d. Table Name - Select the table to use for data loading (also known as theupload table).
e. Unique Column 1 - Identify the column name(s) to be used as the primaryunique key column during the data load process. You can define up to 3unique key columns.
f. Case Sensitive - Identify whether the selected unique key column is casesensitive. By default, this is set to No.
g. Define additional Unique Columns. You can define up to 3 unique keycolumns.
h. Click Next.
6. For Add Transformation Rules (optional), specify the following then click Add.
a. Select Column(s) to create a transformation rule - Select the column on whichthe transformation rule definition is to be based and move them to the right.
b. Rule Name - Enter a name for this transformation rule.
c. Sequence - Specify the sequence for the transformation rule. The sequencedetermines the order of execution.
d. Type - Select the type of transformation rule you want to perform.
e. Provide additional details based on the transformation type you have chosen.
f. Click Add Transformation.
g. Click Next.
7. For Table Lookups:
a. Add new table lookup for Column (optional) - Identify the column on which thetable lookup definition is to be based.
b. Lookup Table Owner - Select the owner of the lookup table.
c. Lookup Table Name - Identify the table to be used for this table lookupdefinition.
Chapter 18Creating Applications with Data Loading Capability
18-4
d. Return Column - Select the name of the column returned by the table lookup.This value will be inserted into the load column specified and is generally thekey value of the parent in a foreign key relationship (for example: DEPTNO).
e. Upload Column - Select the name of the column end users will upload insteadof the return column. This is the column that contains the display value fromthe lookup table (for example: DNAME).
f. Upload Column 2 - Select the name of the second column to be uploaded touniquely identify the return column if necessary. For example, to uniquelyidentify a State Code it may be necessary to upload the State Name andCountry.
g. Upload Column 3 - Select the name of the third column to be uploaded touniquely identify the return column.
h. Click Add lookup to add the lookup definition. Repeat the previous steps toadd additional table lookups.
i. Click Next finish creating lookups.
8. For Page Attributes:
a. Page Name - Enter a page name for each step.
b. Page Number - Enter a page number for each step.
c. Page Mode - Identify the page mode. To learn more, see field-level Help.
d. Breadcrumb - Select whether you want to use a breadcrumb navigation controlon your page and which breadcrumb navigation control you want to use.
e. Click Next.
9. For Navigation Menu:
a. Navigation Preference - Select how you want this page integrated into theNavigation Menu. To learn more, see field-level Help.
b. Click Next.
10. For Buttons and Branching, specify the branching for the buttons on the data loadwizard pages:
a. New Button Label - Enter text to display on the Next button.
b. Previous Button Label - Enter text to display on the Previous button.
c. Cancel Button Label - Enter text to display on the Cancel button.
d. Cancel Button Branch to Page - Specify the page number to branch to whenthe user clicks Cancel.
e. Finish Button Label - Enter text to display on the Submit button.
f. Finish Button Branch to Page - Specify the number of the page to branch to.You can choose to branch back to the same page or any other page in yourapplication.
g. Click Create.
11. Click Save and Run Page to test the Data Load Wizard.
Chapter 18Creating Applications with Data Loading Capability
18-5
Tip:
After creating Data Load Wizard pages, if you wish to make changes, Oraclerecommends re-creating new pages without deleting the data loadingdefinitions as described in the next section.
18.1.3 Re-creating Data Load PagesIf you wish to make changes to your Data Load Wizard pages, Oracle recommends re-creating new pages without deleting the data loading definitions.
To re-create Data Load Wizard pages without deleting the data loading definitions:
1. Navigate to the Data Load Definitions page:
a. On the Workspace home page, click App Builder.
b. Select an application.
c. On the Application home page, click Shared Components.
The Shared Components page appears.
d. Under Data References, click Data Load Definitions.
2. Click the Data Load Definition you want to re-create.
The Data Load Table Details page appears.
3. From Tasks, click Re-create Data Load Pages.
The Page Attributes page of the Create Data Load Wizard appears.
4. For each page, edit the appropriate attributes and click Next.
To learn more about any attributes, see field-level Help.
5. Click Confirm.
18.1.4 Editing the Data Load DefinitionA Data Load Definition is comprised of a data load table, table rules, and lookup tablesused by the Data Load Wizard in your application. A data load table is an existing tablein your schema that has been selected for use in the data loading process, to uploaddata.
To edit a Data Load Definition:
1. Navigate to the Data Load Definitions page:
a. On the Workspace home page, click App Builder.
b. Select an application.
c. On the Application home page, click Shared Components.
The Shared Components page appears.
d. Under Data References, click Data Load Definitions.
2. Click the Data Load Definition you want to edit.
Chapter 18Creating Applications with Data Loading Capability
18-6
The Data Load Table Details page appears. To learn more about any attributes,see field-level Help.
3. For Data Load Definition:
• Name - Name for the Data Load Definition.
• Data Load Table - Edit the data load table name and add, remove or editunique columns.
• Unique column 1 - The column name used as the primary unique key columnduring the data load process.
• Case Sensitive - Identify whether the selected unique key column 1 is casesensitive. By default, this is set to No.
• Unique column 2 - If the unique key definition of the selected table is acompound key, consisting of 2 or more columns, this column name is used asthe second unique key column during the data load process.
• Case Sensitive - Identify whether the selected unique key column 2 is casesensitive. By default, this is set to No.
• Unique column 3 - If the unique key definition of the selected table is acompound key, consisting of 2 or more columns, this column name is used asthe third unique key column during the data load process.
• Case Sensitive - Identify whether the selected unique key column 3 is casesensitive. By default, this is set to No.
• Skip Validation - One step in data loading is to validate actions to be taken onrecords to be uploaded. Select Yes to skip validation.
4. Transformation Rules lists previously defined transformation rules.
• To create a new rule:
a. Click Create Transformation Rule.
b. Edit the attributes.
To learn more about an attribute, see field-level Help.
c. Click Create.
• To edit an existing rule:
a. Click the rule name.
b. Edit the attributes.
c. Click Apply Changes.
5. Table Lookups map data in the import file to data found in another table.
• To create a new Table Lookups:
a. Click Create Table Lookup.
b. Edit the attributes.
c. Click Create.
• To edit an existing Table Lookup:
a. Click column name.
b. Edit the attributes.
c. Click Apply Changes.
Chapter 18Creating Applications with Data Loading Capability
18-7
6. Column Name Aliases define aliases to help users correctly identify the columns toupload.
To add Column Name Aliases:
a. Click Edit List of Values.
b. Edit the attributes.
c. Click Create.
7. From Concurrency Column Name, select a column to be used for concurrencymanagement.
Concurrency gives the developer the option to select a column to check theversion of the data in the underlying table. This is particularly important ifuploading into a table that is regularly updated.
8. Click Apply Changes.
18.2 About Using CollectionsCollections enable you to temporarily capture one or more nonscalar values. You canuse collections to store rows and columns currently in session state so they can beaccessed, manipulated, or processed during a user's specific session.
You can think of a collection as a bucket in which you temporarily store and namerows of information.
The following are examples of when you might use collections:
• When you are creating a data-entry wizard in which multiple rows of informationfirst need to be collected within a logical transaction. You can use collections totemporarily store the contents of the multiple rows of information, beforeperforming the final step in the wizard when both the physical and logicaltransactions are completed.
• When your application includes an update page on which a user updates multipledetail rows on one page. The user can make many updates, apply these updatesto a collection and then call a final process to apply the changes to the database.
• When you are building a wizard where you are collecting an arbitrary number ofattributes. At the end of the wizard, the user then performs a task that takes theinformation temporarily stored in the collection and applies it to the database.
You insert, update, and delete collection information using the PL/SQL APIAPEX_COLLECTION.
18.3 Managing REST Enabled SQL ReferencesExecute SQL queries or PL/SQL defined at the component-level on a remote databaseusing REST Enabled SQL References.
• About REST Enabled SQL Service (page 18-9)Create REST Enabled SQL Service references to execute SQL or PL/SQL definedon a remote Oracle database.
• Before You Begin: REST Enabled SQL Service Requirements (page 18-10)Prior to creating a REST enabled SQL reference, developers must complete theserequirements.
Chapter 18About Using Collections
18-8
• Creating a REST Enabled SQL Service Reference (page 18-11)Create REST Enabled SQL service references on the REST Enabled SQL page.
• Example: Creating a REST Enabled SQL Service Reference (page 18-13)Review an example of creating REST Enabled SQL service reference on a remotedatabase.
• Editing a REST Enabled SQL Service Reference (page 18-15)Edit existing REST Enabled SQL references on the Edit page.
• Deleting a REST Enabled SQL Service Reference (page 18-16)Delete REST Enabled SQL references on the Edit page by clicking Delete.
• Creating or Updating Components to Use a REST Enabled SQL (page 18-17)Create or update classic reports, interactive reports, CSS calendars, JET charts,Tree regions, Toggle Column reports, and Reflow Table reports to point to data ona remote database using a REST Enabled SQL reference.
18.3.1 About REST Enabled SQL ServiceCreate REST Enabled SQL Service references to execute SQL or PL/SQL defined ona remote Oracle database.
Because REST Enabled SQL services are stored at the workspace-level withinApplication Express components, they are available to all applications within aworkspace. To use REST Enabled SQL services, the remote database must includeOracle REST Data Services (ORDS) release 17.3 or later on the front-end and havethe REST Enabled SQL feature enabled. All SQL and PL/SQL is sent to the OracleREST Data Services (ORDS) instance which executes it on the remote database.
How Do REST Enabled SQL Service References Differ from Database Links?
Both REST Enabled SQL services and database links enable developers to accessdata remotely. However, these features access remote data differently. Keydifferences between database links and REST Enabled SQL Services include:
• Database Link:
– Functions at the SQL-level which enables developers to use remote tablesand local tables in the same SQL query.
– Works over SQL*Net, which can be problematic when connecting to a Cloudinstance over the internet.
• REST Enabled SQL Service:
– Functions at the workspace-level. Developers can create an ApplicationExpress component with a query on a REST enabled SQL service but cannotjoin it to a local table.
– Works with JSON over HTTP(s) which makes it easy-to-use it in Cloudenvironments or over the internet.
Both Database Links and REST Enabled SQL fetch data over the network which issignificantly slower than fetching data from a table in the local database. Whenevaluating the best approach for your environment, be sure to evaluate the impact onpage view performance and always consider replicating remote data in local tables,with an appropriate refresh algorithm.
Chapter 18Managing REST Enabled SQL References
18-9
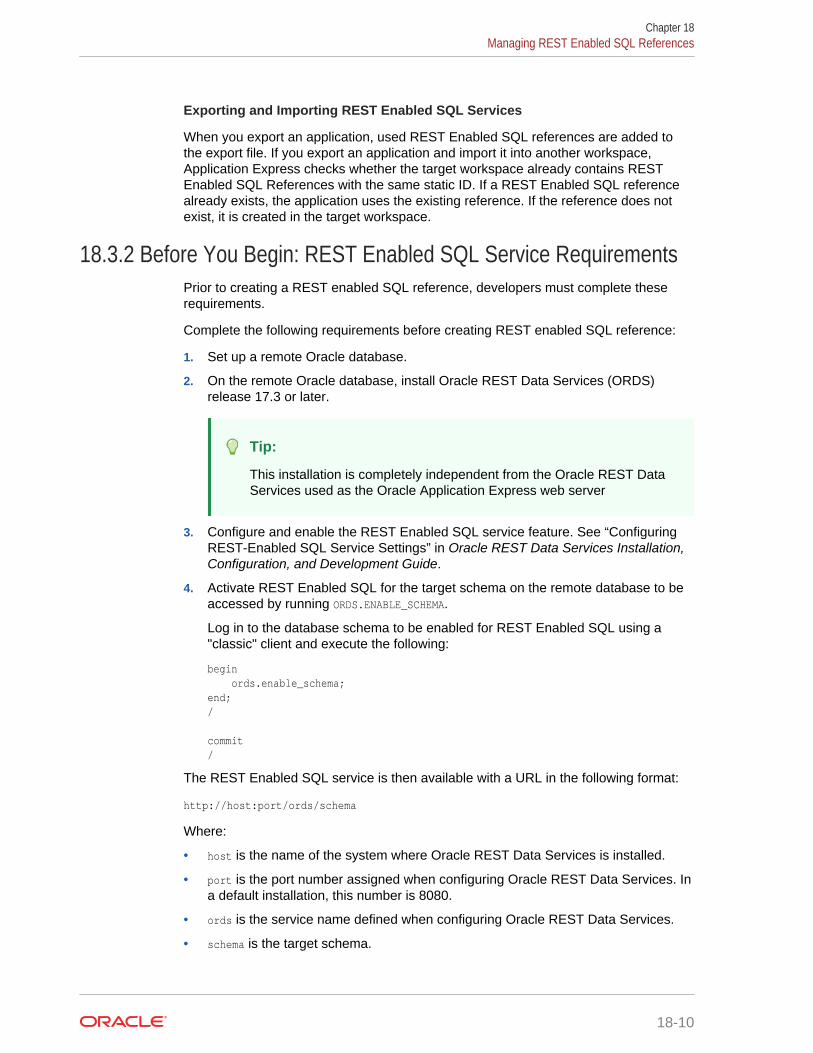
Exporting and Importing REST Enabled SQL Services
When you export an application, used REST Enabled SQL references are added tothe export file. If you export an application and import it into another workspace,Application Express checks whether the target workspace already contains RESTEnabled SQL References with the same static ID. If a REST Enabled SQL referencealready exists, the application uses the existing reference. If the reference does notexist, it is created in the target workspace.
18.3.2 Before You Begin: REST Enabled SQL Service RequirementsPrior to creating a REST enabled SQL reference, developers must complete theserequirements.
Complete the following requirements before creating REST enabled SQL reference:
1. Set up a remote Oracle database.
2. On the remote Oracle database, install Oracle REST Data Services (ORDS)release 17.3 or later.
Tip:
This installation is completely independent from the Oracle REST DataServices used as the Oracle Application Express web server
3. Configure and enable the REST Enabled SQL service feature. See “ConfiguringREST-Enabled SQL Service Settings” in Oracle REST Data Services Installation,Configuration, and Development Guide.
4. Activate REST Enabled SQL for the target schema on the remote database to beaccessed by running ORDS.ENABLE_SCHEMA.
Log in to the database schema to be enabled for REST Enabled SQL using a"classic" client and execute the following:
begin ords.enable_schema;end;/ commit/
The REST Enabled SQL service is then available with a URL in the following format:
http://host:port/ords/schema
Where:
• host is the name of the system where Oracle REST Data Services is installed.
• port is the port number assigned when configuring Oracle REST Data Services. Ina default installation, this number is 8080.
• ords is the service name defined when configuring Oracle REST Data Services.
• schema is the target schema.
Chapter 18Managing REST Enabled SQL References
18-10
Tip:
When providing the URL for the target schema in Oracle ApplicationExpress, do not append /_/sql;.
You will use a URL using the above format when creating the REST Enabled SQLservice reference in Oracle Application Express.
For example, the following is a REST Enabled SQL service for the scott_obe schemawith ORDS running in standalone mode:
http://server.example.com:8080/ords/scott_obe
18.3.3 Creating a REST Enabled SQL Service ReferenceCreate REST Enabled SQL service references on the REST Enabled SQL page.
Tip:
Before creating a REST enabled SQL reference, developers must completethe requirements described in "Before You Begin: REST Enabled SQLService Requirements (page 18-10)".
To create a REST Enabled SQL service reference:
1. Navigate to the REST Enabled SQL page:
a. On the Workspace home page, click App Builder.
b. Select a existing application.
c. On the Application home page, click Shared Components in the center of thepage.
d. Under Data Sources, select REST Enabled SQL.
Tip:
You can also access the REST Enabled SQL page from WorkspaceUtilities. On the Workspace home page, click Workspace Utilities andthen click REST Enabled SQL.
2. On the REST Enabled SQL page, click Create.
3. On General, specify:
a. Name - Enter a descriptive name for this REST Enabled SQL service.
b. Endpoint URL - Enter the base URL for this REST Enabled SQL service.
Chapter 18Managing REST Enabled SQL References
18-11
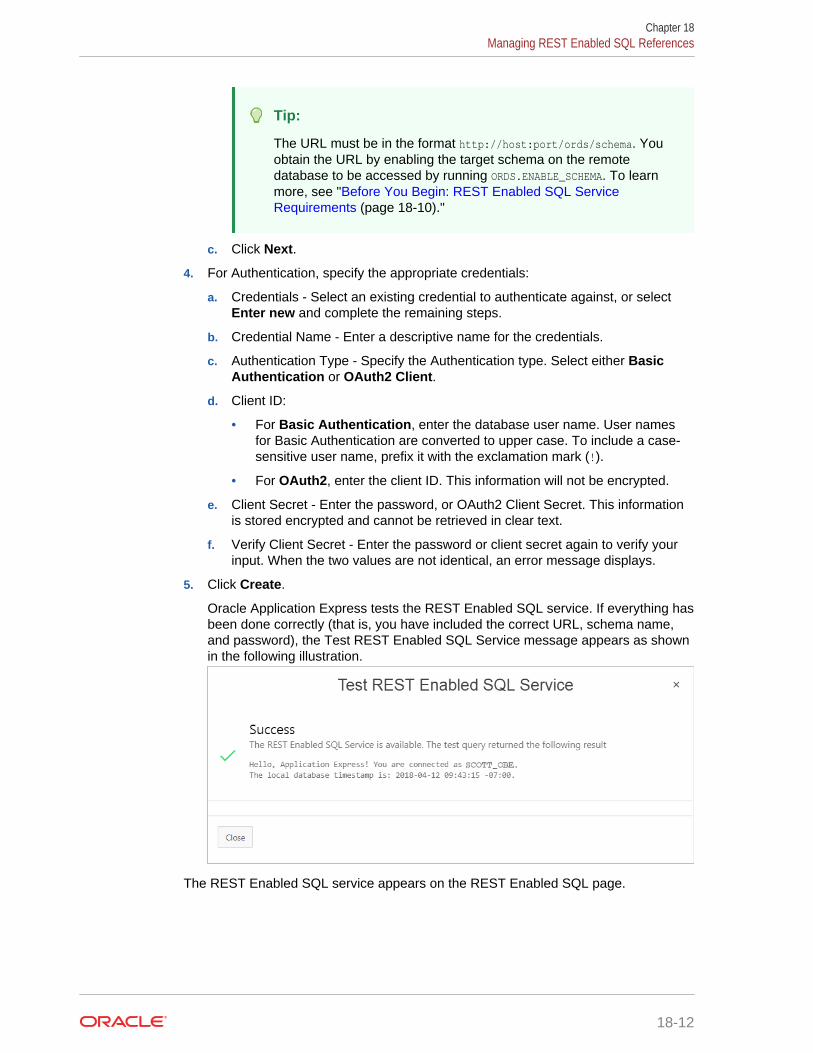
Tip:
The URL must be in the format http://host:port/ords/schema. Youobtain the URL by enabling the target schema on the remotedatabase to be accessed by running ORDS.ENABLE_SCHEMA. To learnmore, see "Before You Begin: REST Enabled SQL ServiceRequirements (page 18-10)."
c. Click Next.
4. For Authentication, specify the appropriate credentials:
a. Credentials - Select an existing credential to authenticate against, or selectEnter new and complete the remaining steps.
b. Credential Name - Enter a descriptive name for the credentials.
c. Authentication Type - Specify the Authentication type. Select either BasicAuthentication or OAuth2 Client.
d. Client ID:
• For Basic Authentication, enter the database user name. User namesfor Basic Authentication are converted to upper case. To include a case-sensitive user name, prefix it with the exclamation mark (!).
• For OAuth2, enter the client ID. This information will not be encrypted.
e. Client Secret - Enter the password, or OAuth2 Client Secret. This informationis stored encrypted and cannot be retrieved in clear text.
f. Verify Client Secret - Enter the password or client secret again to verify yourinput. When the two values are not identical, an error message displays.
5. Click Create.
Oracle Application Express tests the REST Enabled SQL service. If everything hasbeen done correctly (that is, you have included the correct URL, schema name,and password), the Test REST Enabled SQL Service message appears as shownin the following illustration.
The REST Enabled SQL service appears on the REST Enabled SQL page.
Chapter 18Managing REST Enabled SQL References
18-12
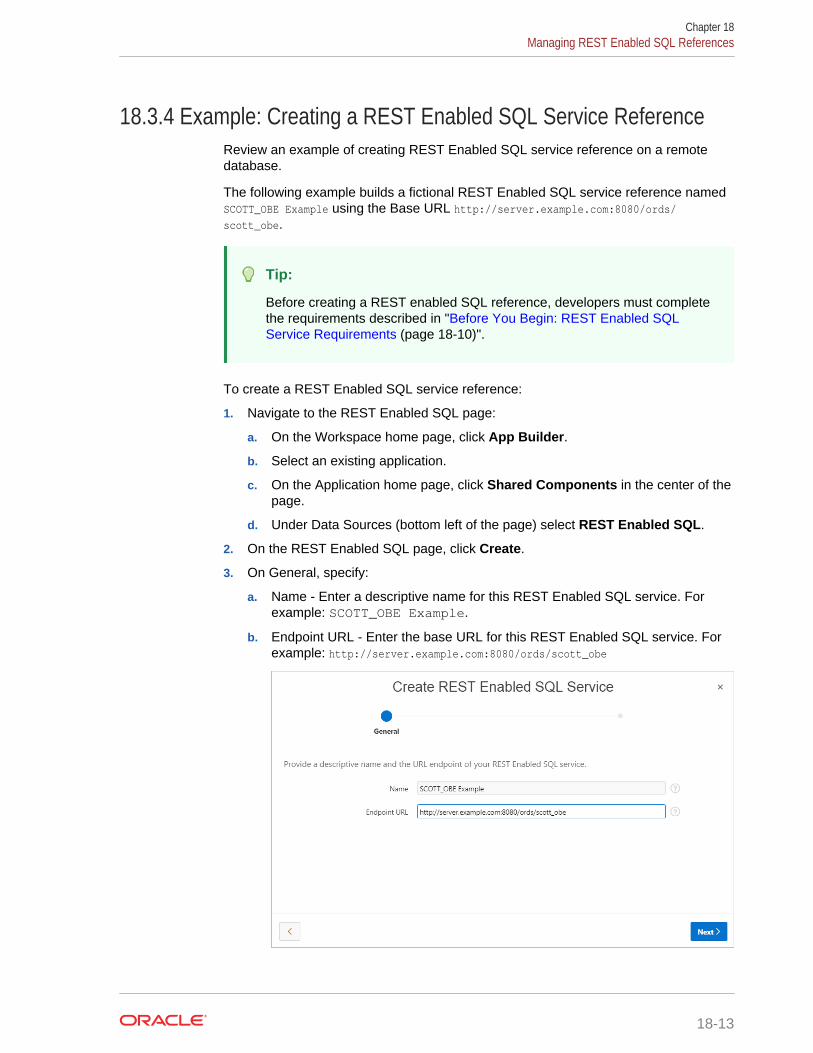
18.3.4 Example: Creating a REST Enabled SQL Service ReferenceReview an example of creating REST Enabled SQL service reference on a remotedatabase.
The following example builds a fictional REST Enabled SQL service reference namedSCOTT_OBE Example using the Base URL http://server.example.com:8080/ords/scott_obe.
Tip:
Before creating a REST enabled SQL reference, developers must completethe requirements described in "Before You Begin: REST Enabled SQLService Requirements (page 18-10)".
To create a REST Enabled SQL service reference:
1. Navigate to the REST Enabled SQL page:
a. On the Workspace home page, click App Builder.
b. Select an existing application.
c. On the Application home page, click Shared Components in the center of thepage.
d. Under Data Sources (bottom left of the page) select REST Enabled SQL.
2. On the REST Enabled SQL page, click Create.
3. On General, specify:
a. Name - Enter a descriptive name for this REST Enabled SQL service. Forexample: SCOTT_OBE Example.
b. Endpoint URL - Enter the base URL for this REST Enabled SQL service. Forexample: http://server.example.com:8080/ords/scott_obe
Chapter 18Managing REST Enabled SQL References
18-13
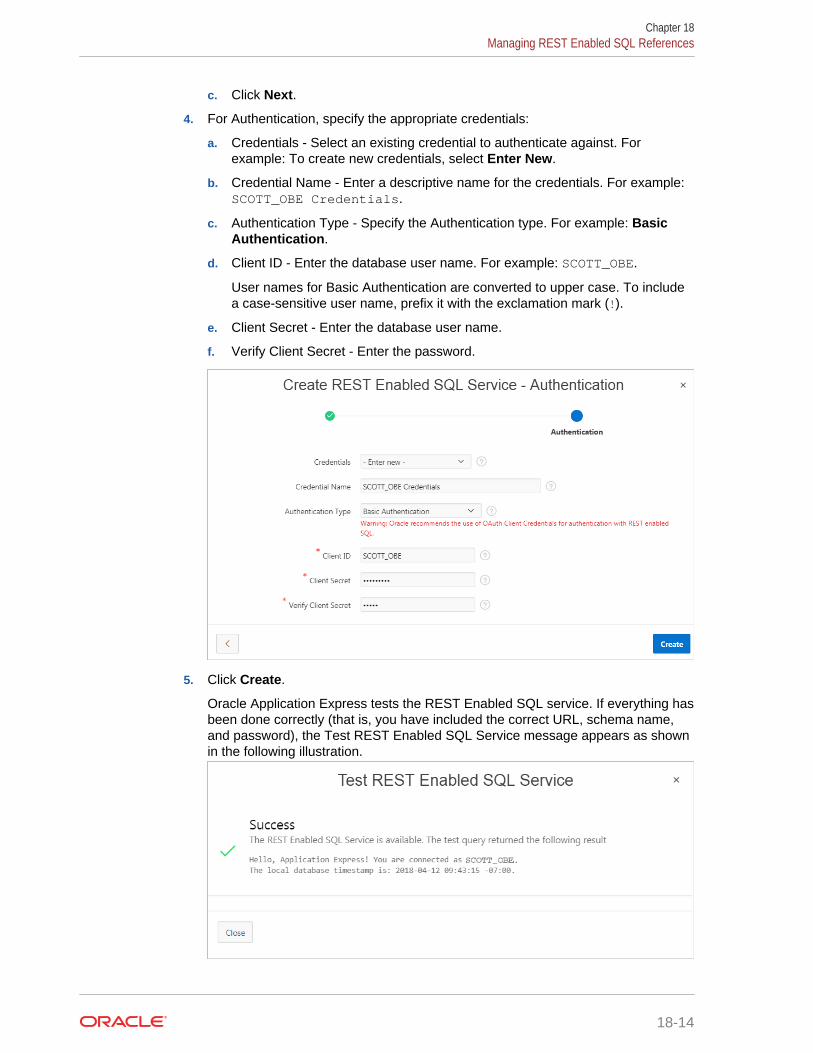
c. Click Next.
4. For Authentication, specify the appropriate credentials:
a. Credentials - Select an existing credential to authenticate against. Forexample: To create new credentials, select Enter New.
b. Credential Name - Enter a descriptive name for the credentials. For example:SCOTT_OBE Credentials.
c. Authentication Type - Specify the Authentication type. For example: BasicAuthentication.
d. Client ID - Enter the database user name. For example: SCOTT_OBE.
User names for Basic Authentication are converted to upper case. To includea case-sensitive user name, prefix it with the exclamation mark (!).
e. Client Secret - Enter the database user name.
f. Verify Client Secret - Enter the password.
5. Click Create.
Oracle Application Express tests the REST Enabled SQL service. If everything hasbeen done correctly (that is, you have included the correct URL, schema name,and password), the Test REST Enabled SQL Service message appears as shownin the following illustration.
Chapter 18Managing REST Enabled SQL References
18-14
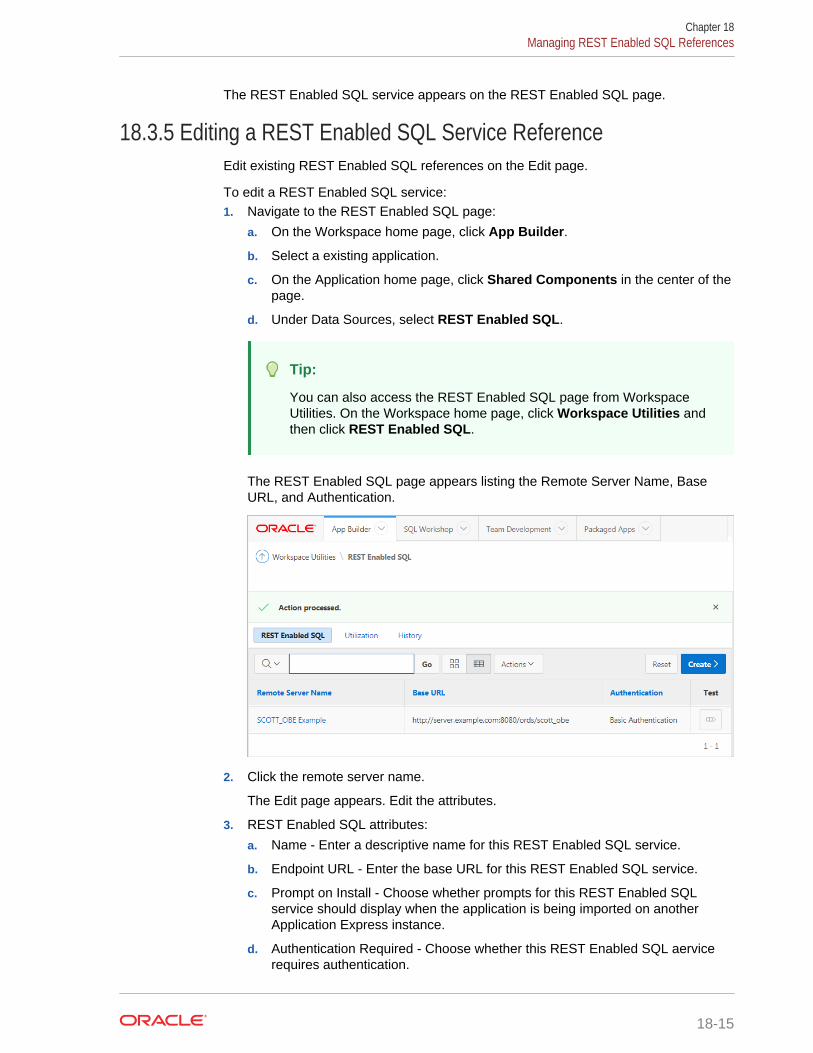
The REST Enabled SQL service appears on the REST Enabled SQL page.
18.3.5 Editing a REST Enabled SQL Service ReferenceEdit existing REST Enabled SQL references on the Edit page.
To edit a REST Enabled SQL service:1. Navigate to the REST Enabled SQL page:
a. On the Workspace home page, click App Builder.
b. Select a existing application.
c. On the Application home page, click Shared Components in the center of thepage.
d. Under Data Sources, select REST Enabled SQL.
Tip:
You can also access the REST Enabled SQL page from WorkspaceUtilities. On the Workspace home page, click Workspace Utilities andthen click REST Enabled SQL.
The REST Enabled SQL page appears listing the Remote Server Name, BaseURL, and Authentication.
2. Click the remote server name.
The Edit page appears. Edit the attributes.
3. REST Enabled SQL attributes:
a. Name - Enter a descriptive name for this REST Enabled SQL service.
b. Endpoint URL - Enter the base URL for this REST Enabled SQL service.
c. Prompt on Install - Choose whether prompts for this REST Enabled SQLservice should display when the application is being imported on anotherApplication Express instance.
d. Authentication Required - Choose whether this REST Enabled SQL aervicerequires authentication.
Chapter 18Managing REST Enabled SQL References
18-15
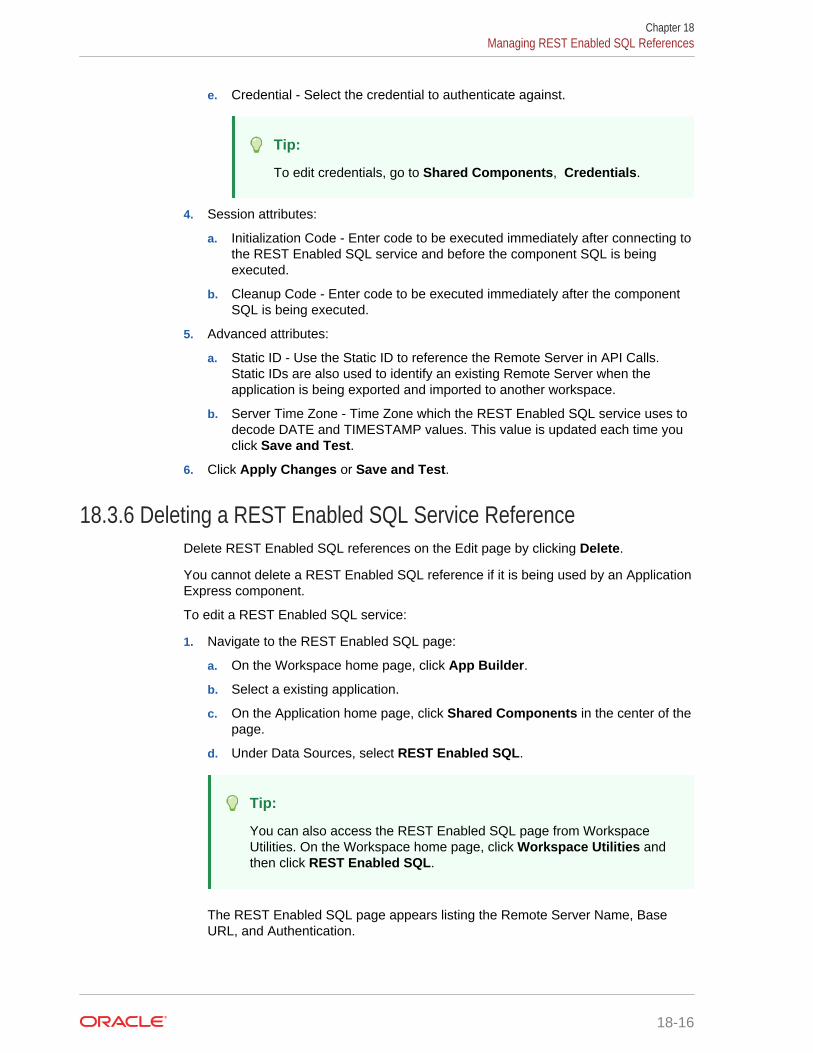
e. Credential - Select the credential to authenticate against.
Tip:
To edit credentials, go to Shared Components, Credentials.
4. Session attributes:
a. Initialization Code - Enter code to be executed immediately after connecting tothe REST Enabled SQL service and before the component SQL is beingexecuted.
b. Cleanup Code - Enter code to be executed immediately after the componentSQL is being executed.
5. Advanced attributes:
a. Static ID - Use the Static ID to reference the Remote Server in API Calls.Static IDs are also used to identify an existing Remote Server when theapplication is being exported and imported to another workspace.
b. Server Time Zone - Time Zone which the REST Enabled SQL service uses todecode DATE and TIMESTAMP values. This value is updated each time youclick Save and Test.
6. Click Apply Changes or Save and Test.
18.3.6 Deleting a REST Enabled SQL Service ReferenceDelete REST Enabled SQL references on the Edit page by clicking Delete.
You cannot delete a REST Enabled SQL reference if it is being used by an ApplicationExpress component.
To edit a REST Enabled SQL service:
1. Navigate to the REST Enabled SQL page:
a. On the Workspace home page, click App Builder.
b. Select a existing application.
c. On the Application home page, click Shared Components in the center of thepage.
d. Under Data Sources, select REST Enabled SQL.
Tip:
You can also access the REST Enabled SQL page from WorkspaceUtilities. On the Workspace home page, click Workspace Utilities andthen click REST Enabled SQL.
The REST Enabled SQL page appears listing the Remote Server Name, BaseURL, and Authentication.
Chapter 18Managing REST Enabled SQL References
18-16

2. Click the remote server name.
The Edit page appears.
3. Click Delete.
18.3.7 Creating or Updating Components to Use a REST EnabledSQL
Create or update classic reports, interactive reports, CSS calendars, JET charts, Treeregions, Toggle Column reports, and Reflow Table reports to point to data on a remotedatabase using a REST Enabled SQL reference.
• Creating an Interactive or Classic Report Using a REST Enabled SQL Reference(page 18-17)Create a classic or interactive report on a remote database using a REST EnabledSQL reference.
• Creating a Chart Using a REST Enabled SQL Reference (page 18-19)Create a chart on a remote database using a REST Enabled SQL reference.
• Creating a Calendar Using a REST Enabled SQL Reference (page 18-22)Create a calendar on a remote database using a REST Enabled SQL reference.
• Specifying a REST Enabled SQL Reference in an Existing Component(page 18-24)Configure existing classic reports, interactive reports, CSS calendars, JET charts,Tree regions, Toggle Column reports, and Reflow Table reports to point to aremote database using a REST Enabled SQL service reference.
18.3.7.1 Creating an Interactive or Classic Report Using a REST Enabled SQLReference
Create a classic or interactive report on a remote database using a REST EnabledSQL reference.
The following example demonstrates how to create interactive report based on a tableusing a REST Enabled SQL reference. The procedure for creating a classic report issimilar.
Chapter 18Managing REST Enabled SQL References
18-17
Tip:
Before creating a report using a using a REST Enabled SQL reference, youmust complete the tasks described in "Before You Begin: REST EnabledSQL Service Requirements (page 18-10)" and create the reference asdescribed in "Creating a REST Enabled SQL Service Reference(page 18-11)."
To create an interactive report using REST Enabled SQL reference:
1. Create a REST Enabled SQL reference.
2. On the Workspace home page, click the App Builder icon.
3. Select the application.
4. Click Create Page.
5. On Create a Page:
a. User Interface - Select a user interface for the page (optional).
This attribute only displays for applications using older themes and for whichDesktop and Mobile User Interfaces have been defined.
b. Page Type - Select Component and then Report.
6. On Create Page, select Interactive Report.
Tip:
To create a Classic report, select Classic Report instead.
7. For Page Attributes:
a. Page Number - Enter a page number. If you identify a new page number, thewizard creates a new page. If you identify an existing page number, the wizardadds the component to that page.
b. Page Name - Specify a name for the page.
c. Page Mode - Identify the page mode.
d. Breadcrumb - Select whether you want to use a breadcrumb navigation controlon your page, and which breadcrumb navigation control you want to use.
e. Click Next.
8. For Navigation Preference:
a. Select how you want this page integrated into the Navigation Menu. To learnmore, see field-level Help.
b. Click Next.
9. On Report Source:
a. Data Source - Select REST Enabled SQL Service.
b. REST Enabled SQL Service - Select a previously defined reference.
Chapter 18Managing REST Enabled SQL References
18-18
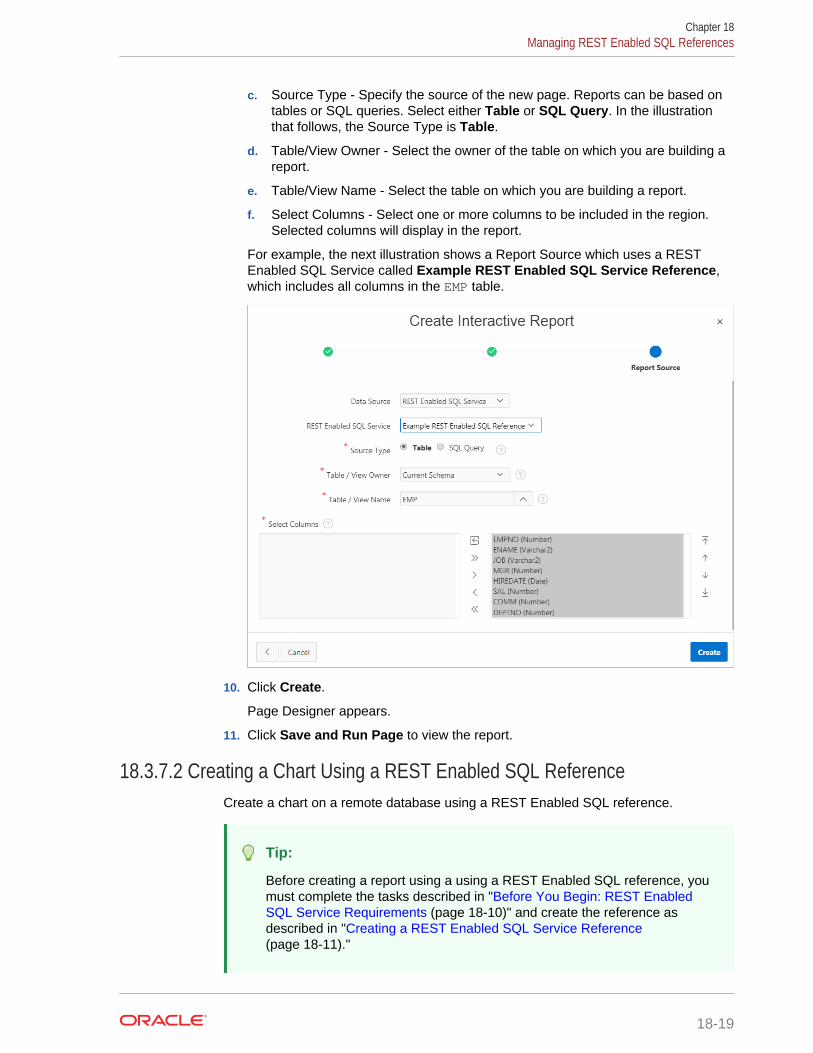
c. Source Type - Specify the source of the new page. Reports can be based ontables or SQL queries. Select either Table or SQL Query. In the illustrationthat follows, the Source Type is Table.
d. Table/View Owner - Select the owner of the table on which you are building areport.
e. Table/View Name - Select the table on which you are building a report.
f. Select Columns - Select one or more columns to be included in the region.Selected columns will display in the report.
For example, the next illustration shows a Report Source which uses a RESTEnabled SQL Service called Example REST Enabled SQL Service Reference,which includes all columns in the EMP table.
10. Click Create.
Page Designer appears.
11. Click Save and Run Page to view the report.
18.3.7.2 Creating a Chart Using a REST Enabled SQL ReferenceCreate a chart on a remote database using a REST Enabled SQL reference.
Tip:
Before creating a report using a using a REST Enabled SQL reference, youmust complete the tasks described in "Before You Begin: REST EnabledSQL Service Requirements (page 18-10)" and create the reference asdescribed in "Creating a REST Enabled SQL Service Reference(page 18-11)."
Chapter 18Managing REST Enabled SQL References
18-19
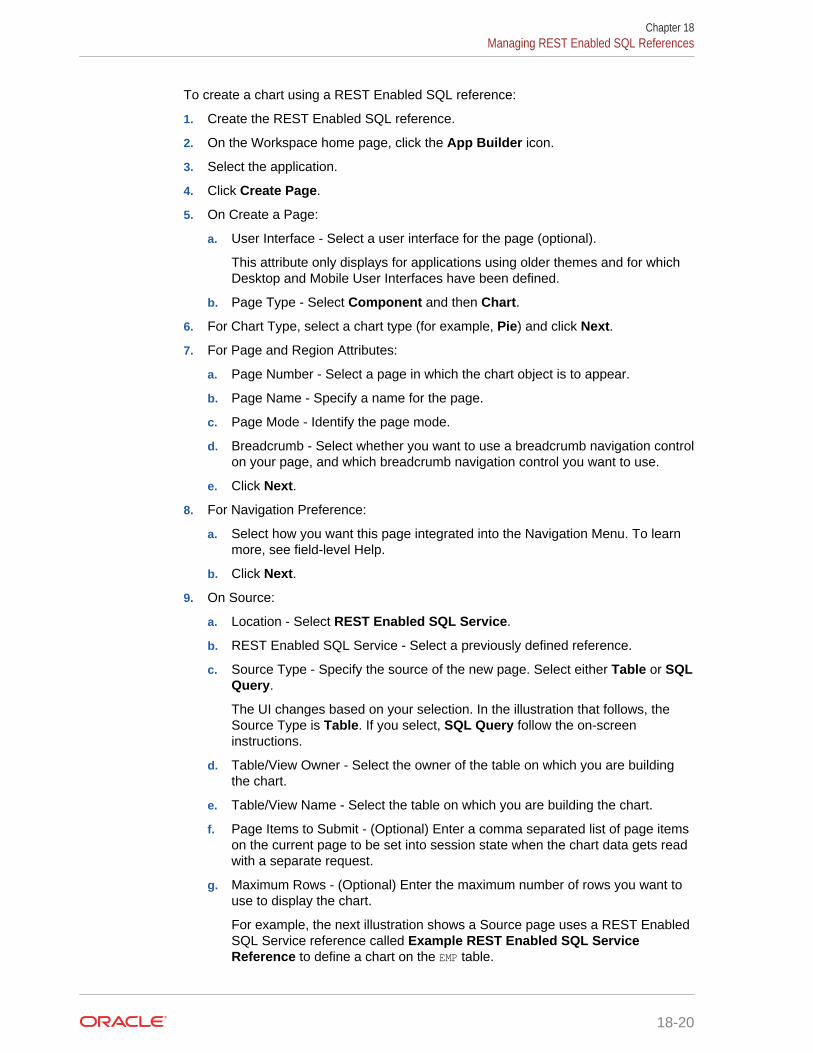
To create a chart using a REST Enabled SQL reference:
1. Create the REST Enabled SQL reference.
2. On the Workspace home page, click the App Builder icon.
3. Select the application.
4. Click Create Page.
5. On Create a Page:
a. User Interface - Select a user interface for the page (optional).
This attribute only displays for applications using older themes and for whichDesktop and Mobile User Interfaces have been defined.
b. Page Type - Select Component and then Chart.
6. For Chart Type, select a chart type (for example, Pie) and click Next.
7. For Page and Region Attributes:
a. Page Number - Select a page in which the chart object is to appear.
b. Page Name - Specify a name for the page.
c. Page Mode - Identify the page mode.
d. Breadcrumb - Select whether you want to use a breadcrumb navigation controlon your page, and which breadcrumb navigation control you want to use.
e. Click Next.
8. For Navigation Preference:
a. Select how you want this page integrated into the Navigation Menu. To learnmore, see field-level Help.
b. Click Next.
9. On Source:
a. Location - Select REST Enabled SQL Service.
b. REST Enabled SQL Service - Select a previously defined reference.
c. Source Type - Specify the source of the new page. Select either Table or SQLQuery.
The UI changes based on your selection. In the illustration that follows, theSource Type is Table. If you select, SQL Query follow the on-screeninstructions.
d. Table/View Owner - Select the owner of the table on which you are buildingthe chart.
e. Table/View Name - Select the table on which you are building the chart.
f. Page Items to Submit - (Optional) Enter a comma separated list of page itemson the current page to be set into session state when the chart data gets readwith a separate request.
g. Maximum Rows - (Optional) Enter the maximum number of rows you want touse to display the chart.
For example, the next illustration shows a Source page uses a REST EnabledSQL Service reference called Example REST Enabled SQL ServiceReference to define a chart on the EMP table.
Chapter 18Managing REST Enabled SQL References
18-20
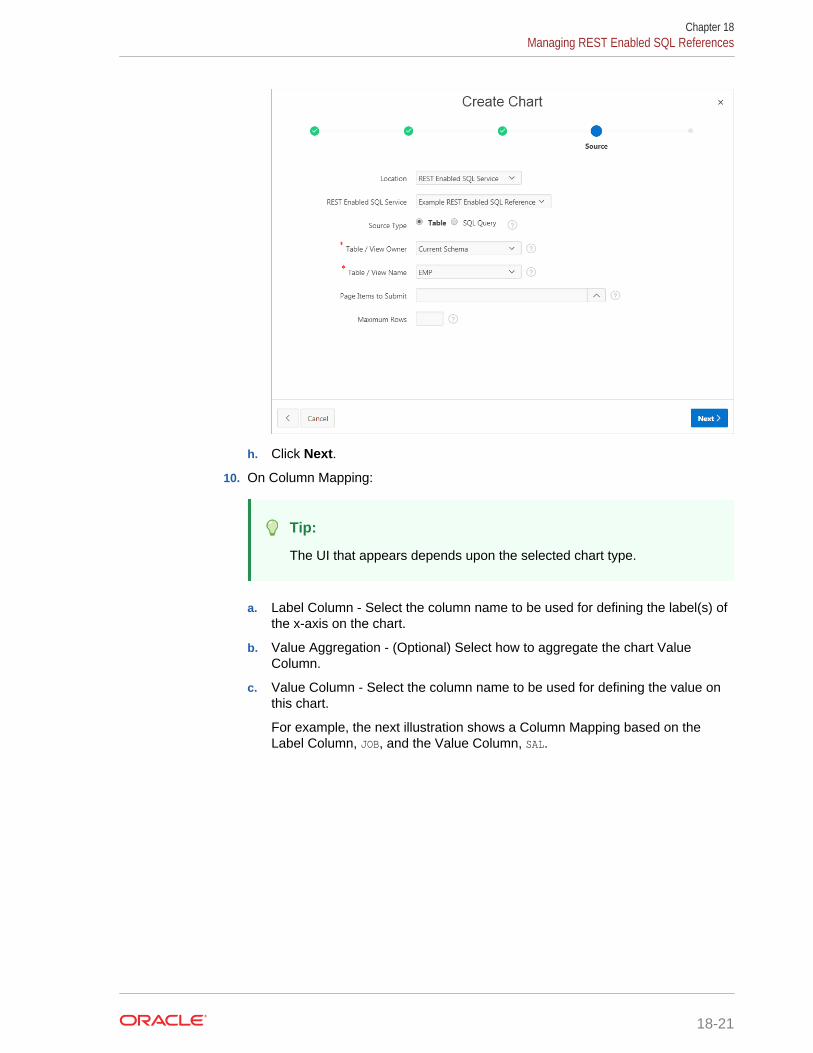
h. Click Next.
10. On Column Mapping:
Tip:
The UI that appears depends upon the selected chart type.
a. Label Column - Select the column name to be used for defining the label(s) ofthe x-axis on the chart.
b. Value Aggregation - (Optional) Select how to aggregate the chart ValueColumn.
c. Value Column - Select the column name to be used for defining the value onthis chart.
For example, the next illustration shows a Column Mapping based on theLabel Column, JOB, and the Value Column, SAL.
Chapter 18Managing REST Enabled SQL References
18-21
11. Click Create.
Page Designer appears.
12. Click Save and Run Page to view the chart.
18.3.7.3 Creating a Calendar Using a REST Enabled SQL ReferenceCreate a calendar on a remote database using a REST Enabled SQL reference.
Tip:
Before creating a report using a using a REST Enabled SQL reference, youmust complete the tasks described in "Before You Begin: REST EnabledSQL Service Requirements (page 18-10)" and create the reference asdescribed in "Creating a REST Enabled SQL Service Reference(page 18-11)."
To create an calendar REST Enabled SQL Reference:
1. Create REST Enabled SQL reference.
2. On the Workspace home page, click the App Builder icon.
3. Select the application.
4. Click Create Page.
5. On Create a Page:
a. User Interface - Select a user interface for the page (optional).
This attribute only displays for applications using older themes and for whichDesktop and Mobile User Interfaces have been defined.
Chapter 18Managing REST Enabled SQL References
18-22

b. Page Type - Select Component and then Calendar.
6. For Page Attributes:
a. Page Number - Enter a page number. If you identify a new page number, thewizard creates a new page. If you identify an existing page number, the wizardadds the component to that page.
b. Page Name - Specify a name for the page.
c. Page Mode - Identify the page mode.
d. Page Group - Identify the name of the page group you would like to associatewith this page.
e. Breadcrumb - Select whether you want to use a breadcrumb navigation controlon your page, and which breadcrumb navigation control you want to use.
f. Click Next.
7. For Navigation Menu:
a. Select how you want this page integrated into the Navigation Menu. To learnmore, see field-level Help.
b. Click Next.
8. On Source:
a. Data Source - Select REST Enabled SQL Service.
b. REST Enabled SQL Service - Select a previously defined reference.
c. Source Type - Specify the source of the new page. Reports can be based ontables or SQL queries. Select either Table or SQL Query. In the illustrationthat follows, the Source Type is Table.
d. Table/View Owner - Select the owner of the table on which you are building areport.
e. Table/View Name - Select the table on which you are building a report.
f. Select Columns - Select one or more columns to be included in the region.Selected columns will display in the report.
9. For Settings:
a. Display Column - Select the column which holds the text displayed for eventson this calendar.
b. Start Column - Select the column which holds the start date for eventsdisplayed on this calendar.
c. End Date Column - Select the column which holds the end date for eventsdisplayed on this calendar. If this attribute is specified, then the calendardisplays duration based events
d. Show Time - Select whether the time portion of the date should be displayed.The Week and Day views only be display when Show Time is set to Yes. If thestart date or end date columns do not include time components they will beshown as 12:00 am.
For example, the next illustration shows Settings in which the Display Colum isName, the Label Column, START_DATE, and the End Date Column is END_DATE.
Chapter 18Managing REST Enabled SQL References
18-23
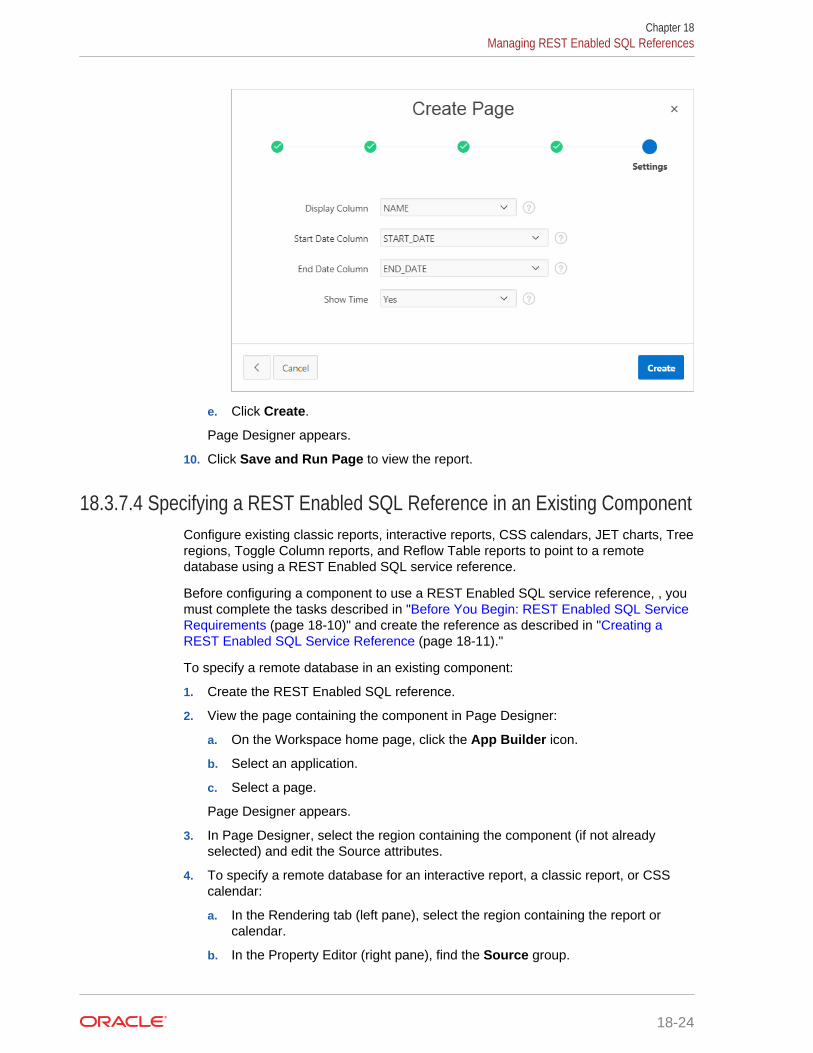
e. Click Create.
Page Designer appears.
10. Click Save and Run Page to view the report.
18.3.7.4 Specifying a REST Enabled SQL Reference in an Existing ComponentConfigure existing classic reports, interactive reports, CSS calendars, JET charts, Treeregions, Toggle Column reports, and Reflow Table reports to point to a remotedatabase using a REST Enabled SQL service reference.
Before configuring a component to use a REST Enabled SQL service reference, , youmust complete the tasks described in "Before You Begin: REST Enabled SQL ServiceRequirements (page 18-10)" and create the reference as described in "Creating aREST Enabled SQL Service Reference (page 18-11)."
To specify a remote database in an existing component:
1. Create the REST Enabled SQL reference.
2. View the page containing the component in Page Designer:
a. On the Workspace home page, click the App Builder icon.
b. Select an application.
c. Select a page.
Page Designer appears.
3. In Page Designer, select the region containing the component (if not alreadyselected) and edit the Source attributes.
4. To specify a remote database for an interactive report, a classic report, or CSScalendar:
a. In the Rendering tab (left pane), select the region containing the report orcalendar.
b. In the Property Editor (right pane), find the Source group.
Chapter 18Managing REST Enabled SQL References
18-24
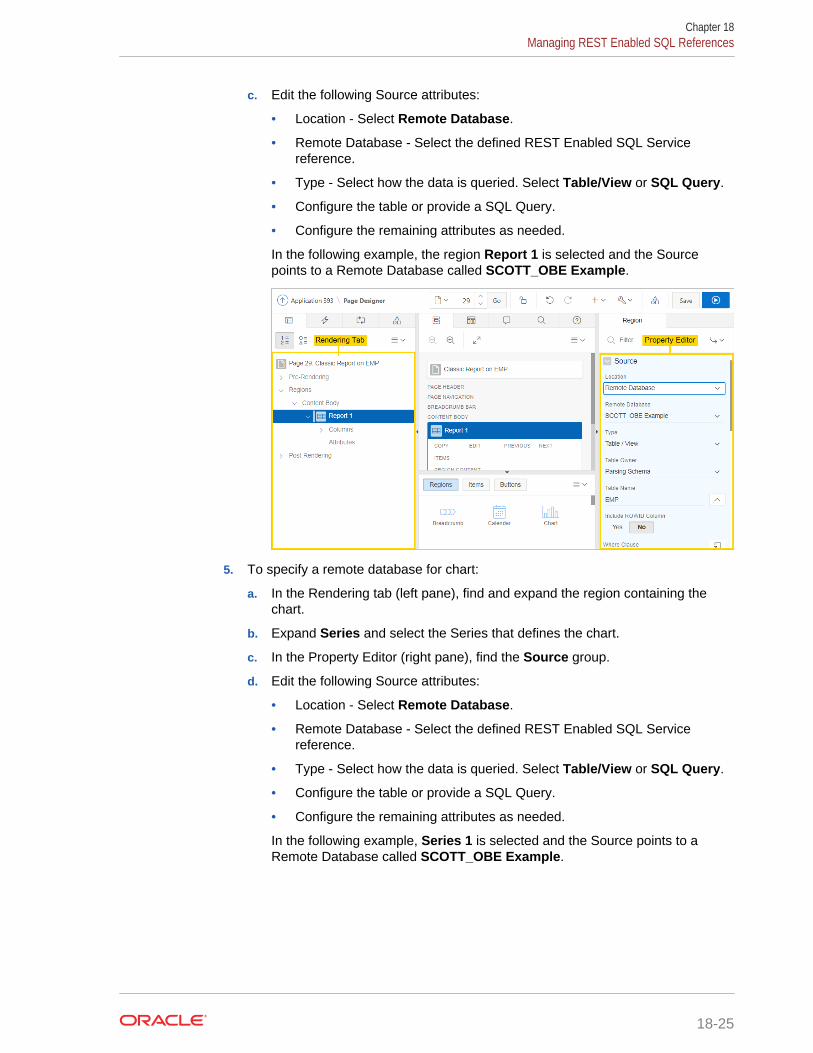
c. Edit the following Source attributes:
• Location - Select Remote Database.
• Remote Database - Select the defined REST Enabled SQL Servicereference.
• Type - Select how the data is queried. Select Table/View or SQL Query.
• Configure the table or provide a SQL Query.
• Configure the remaining attributes as needed.
In the following example, the region Report 1 is selected and the Sourcepoints to a Remote Database called SCOTT_OBE Example.
5. To specify a remote database for chart:
a. In the Rendering tab (left pane), find and expand the region containing thechart.
b. Expand Series and select the Series that defines the chart.
c. In the Property Editor (right pane), find the Source group.
d. Edit the following Source attributes:
• Location - Select Remote Database.
• Remote Database - Select the defined REST Enabled SQL Servicereference.
• Type - Select how the data is queried. Select Table/View or SQL Query.
• Configure the table or provide a SQL Query.
• Configure the remaining attributes as needed.
In the following example, Series 1 is selected and the Source points to aRemote Database called SCOTT_OBE Example.
Chapter 18Managing REST Enabled SQL References
18-25
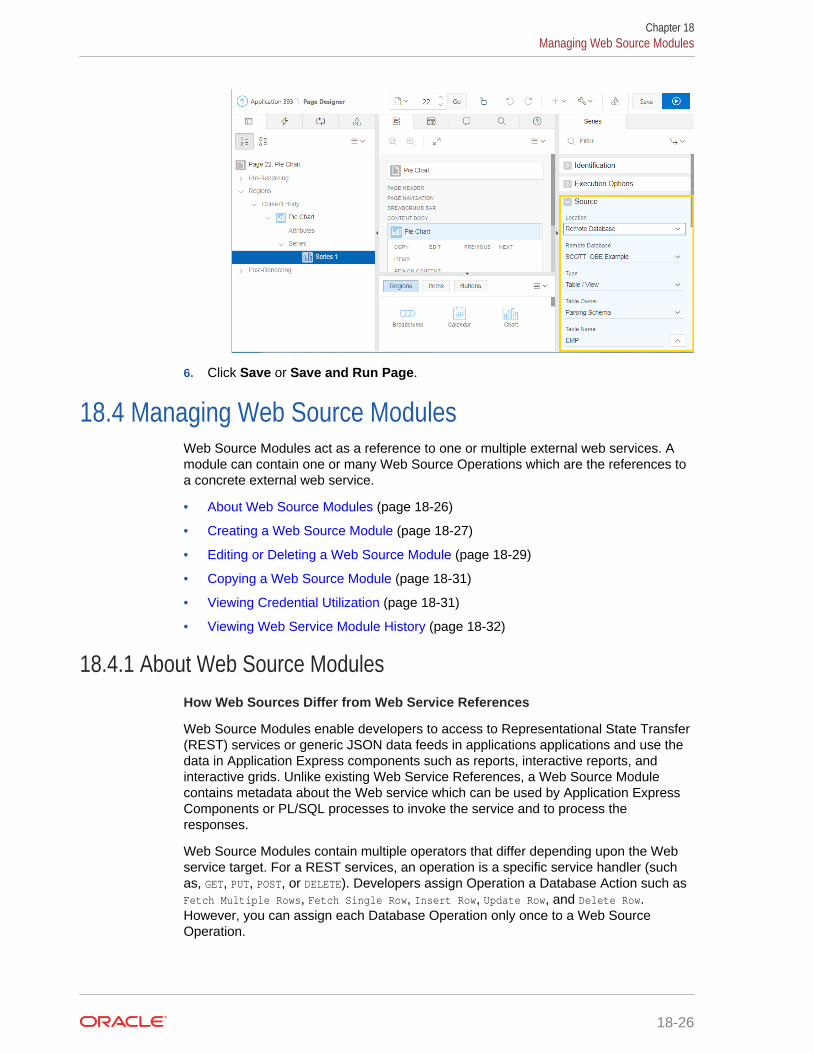
6. Click Save or Save and Run Page.
18.4 Managing Web Source ModulesWeb Source Modules act as a reference to one or multiple external web services. Amodule can contain one or many Web Source Operations which are the references toa concrete external web service.
• About Web Source Modules (page 18-26)
• Creating a Web Source Module (page 18-27)
• Editing or Deleting a Web Source Module (page 18-29)
• Copying a Web Source Module (page 18-31)
• Viewing Credential Utilization (page 18-31)
• Viewing Web Service Module History (page 18-32)
18.4.1 About Web Source ModulesHow Web Sources Differ from Web Service References
Web Source Modules enable developers to access to Representational State Transfer(REST) services or generic JSON data feeds in applications applications and use thedata in Application Express components such as reports, interactive reports, andinteractive grids. Unlike existing Web Service References, a Web Source Modulecontains metadata about the Web service which can be used by Application ExpressComponents or PL/SQL processes to invoke the service and to process theresponses.
Web Source Modules contain multiple operators that differ depending upon the Webservice target. For a REST services, an operation is a specific service handler (suchas, GET, PUT, POST, or DELETE). Developers assign Operation a Database Action such asFetch Multiple Rows, Fetch Single Row, Insert Row, Update Row, and Delete Row.However, you can assign each Database Operation only once to a Web SourceOperation.
Chapter 18Managing Web Source Modules
18-26
Integration with Application Express Components
Oracle Application Express provides direct integration of Web Source Modules classicreports, interactive reports, CSS Calendar, and JET Charts.
About Remote Servers
Oracle Application Express splits the endpoint URL of a Web Service into two parts.The server-specific part is stored as a separate entity called the Remote Server. Youcan reuse a Remote Server with multiple Web Source Modules if it uses the sameserver, port and URL Path Prefix (context root).
If you change the attributes of a Remote Server, the change impacts all Web SourceModules using the Remote Server. Remote Servers make it easy to move a collectionof Web Source Modules. For example, you can move from test system to a productionsystem by changing the URL within the Remote Server object.
About Authentication and Credentials
Web Source Modules support both Basic Authentication and the OAuth ClientCredentials flow. Authentication credentials can be specified at the Remote Server-level for all Web Source Modules using the Remote Server). If credentials are set atthe Web Source Module-level, that setting supersedes credentials stored at theRemote Server level.
A Credential denotes the Authentication method, a Client ID (or user name) and aClient Secret (or password). Credentials are stored as a named entity within SharedComponents and can be re-used across multiple Web Source Modules or RemoteServers.
18.4.2 Creating a Web Source ModuleTo create a Web Source Module:
1. Navigate to the Web Service Modules page:
a. On the Workspace home page, click App Builder.
b. Select an application.
c. On the Application home page, click Shared Components in the center of thepage.
d. Under Data Sources, select Web Source Modules.
2. On the Web Source Modules page, click Create.
3. For Create Web Source Module - Method, select From Scratch and click Next.
Tip:
If you select, As copy of an existing web source module select theapplication to copy from and follow the on-screen instructions.
4. Specify the following attributes:
a. Web Source Type - Select a web source type.
Chapter 18Managing Web Source Modules
18-27
If the REST service you are about to access is provided by Oracle REST DataServices (ORDS), select Oracle REST Data Services. Otherwise, selectSimple HTTP. To learn more, see field-level Help.
b. Name - Enter a descriptive name for this Web Source Module.
c. Endpoint URL - Enter the Endpoint URL (starting with http:// or https://) forthis web source.
d. HTTPS Host Name - This attribute only displays if your configuration isrunning on Oracle Database 12.2 or higher.
Enter the The host name to be matched against the common name (CN) ofthe remote server's certificate for an HTTPS request. For example, enter adomain name such as *.example.com. If NULL, the host name in the given URLis used.
e. HTTP Method - Choose the HTTP Method to use for Service Discovery.
f. Click Next.
Application Express tests the URL endpoint once you click Next. If the URL isincorrect, an error message displays. If that is the case, click Back and correct theURL. If the URL works, Remote Server appears.
5. For Remote Server:
Tip:
To learn more about an attribute, see field-level Help.
a. Remote Server - Choose an existing Remote Server object. The HTTPEndpoint URL of a Web Source Module consists of the remote server (or BaseURL) and the service specific part.
b. Base URL - Base URL of the chosen Remote Server object.
c. Service URL Path - Enter the service-specific URL Path for the Web SourceModule. The HTTP Endpoint URL is built by appending this to the Base URLspecified in the Remote Server object.
For example:/services/customers/
/products/4711/details
d. Click Next.
6. Authentication Required - Choose whether the new Web Source Module requiresauthentication. Select Yes or No. If you select Yes, follow the on-screeninstructions.
7. To proceed, select one of the following buttons:
• Create Module Manually - This option does not include Web SourceDiscovery mode. Based on the previously entered information, a Web SourceModule is created with a few sample operations and a sample data profile.Create Module Manually creates an incomplete Web Source Module that isunusable with an Oracle Application Express component. To correctly reflect
Chapter 18Managing Web Source Modules
18-28
the external web service, you will need to edit the web source operations andthe data profile.
• Discover - Starts Web Source Discovery mode. Oracle Application Expressexecutes multiple HTTP requests in order to get information about the externalWeb service. Application Express samples the data (JSON or XML) returnedby the Web service and derives a Data Profile (consisting of metadata aboutthe JSON attributes). Discovery results then display and confirms whether tocreate the Web Source Module.
• Advanced - Presents advanced parameters for the Data Profile includingHTTP Headers, URL Parameters, and additional details.
8. If you click Advanced, the Parameter page appears. Advanced enables you toconfigure some initial Web source parameters which might be required fordiscovery. Some Web sources may require you set specific HTTP Headers (forexample, User-Agent). After setting advanced parameters, selecteither Discover or Create Module Manually buttons.
9. If you select Discover, the Web Source Discovery Preview page appears.
The information that displays depends upon the complexity of the target service.For simple HTTP services or ORDS services which do not provide metadata abouttheir JSON response attributes, Application Express investigates the JSON orXML response, samples the data, and creates a proposal for a data profile. TheData tab displays the sample response data, formatted as a report.
The columns tab shows information about the data profile columns ApplicationExpress has found during discovery. Use this tab to verify whether the columndata types are correct.
Click More Detail to view additional tabs that show more detailed informationabout the Web Source response, such as the response body, response headersand the Web Source operations.
10. Click Create Web Source.
18.4.3 Editing or Deleting a Web Source ModuleTo edit a Web Source Module:
1. Navigate to the Web Service Modules page:
a. On the Workspace home page, click App Builder.
b. Select an application.
c. On the Application home page, click Shared Components in the center of thepage.
d. Under Data Sources, select Web Source Modules.
2. On the Web Source Modules page, click Module Name.
3. To delete the Web Service Module, click Delete. Otherwise, edit the attributes.
4. Under Web Source Module:
a. Name - Enter a descriptive name for this Web Source Module.
b. Web Source Type - Options include:
• Simple HTTP - Select this option for a simple HTTP data feed.Application Express assumes that all data is returned with the first request
Chapter 18Managing Web Source Modules
18-29
and that the server does not support server-side filtering, ordering or otheradvanced REST service feature. All invocation details and parametersmust be configured manually.
• Oracle REST Data Services - Select this option for Oracle REST DataServices (ORDS) REST Services. These REST services follow the OracleREST standard, which means that GET, POST, PUT or DELETE operations arestandardized. Server-side filtering and ordering are supported. ApplicationExpress can leverage these features by delegating report
• Oracle REST Data Services (Legacy Syntax) - Select this option forservices powered by older versions of ORDS (Oracle REST DataServices). These services are not completely compliant to the OracleREST Standard.
• ORDS (Legacy) - Select this option for services powered by olderversions of Oracle REST Data Services (ORDS). These services are notcompletely compliant to the Oracle REST Standard.
c. Remote Server - Indicates the remote server on which the Web Source ishosted.
d. HTTPS Host Name - Enter the The host name to be matched against thecommon name (CN) of the remote server's certificate for an HTTPS request.For example, the HTTPS Host Name can be a domain name like*.example.com. If NULL, the host name in the given URL is used.
e. Base URL - Lists the Base URL.
f. URL Prefix - URL Path Prefix pointing to this Web Source Module. This prefixis being appended to the Remote Server Base URL.
5. Under Data Profile:
a. Click Edit Data Profile to change how Web source responses (in XML orJSON) format are being parsed and converted to rows and columns.
The Data Profile page appears.
b. Under Data Profile and Columns, edit the attributes.
Row Selector stores an XML or JSON path expression pointing to the nodecontaining the collection of rows. Columns determine how one row is parsedand converted to multiple columns.
c. Click Apply Change to save your changes.
6. Subscription lists Web Source Modules that subscribe to this module.
7. Under Operations:
a. Operation - Click Add Operation to add a Web Source Operation. A websource Operation contains the actual information about the external webservice handler.
The Web Source Operation page appears.
b. Under Operation and Operation Parameters, edit the attributes.
Operations can be mapped to Database Operations which enables ApplicationExpress components to pick up the correct operation. Reports, interactivereports or CSS calendars will pick up the operation which is mapped to theFetch Rows database operation.
c. Click Create .
Chapter 18Managing Web Source Modules
18-30
8. Authentication Required - Choose stored Credentials for Authentication.
9. Under Module Parameters:
a. Click Add Parameter to configure a Web Source Parameters.
Use thee parameters to pass HTTP Request Headers, use dynamic URLs, orrequest bodies. When a parameter, its type, default value, and direction isdeclared on the Edit Web Source Parameter page, Application Expresscomponents can reference it.
b. Click Add Parameter .
10. Under Advanced attributes, configure thes HTTP Transfer Timeout or addComments.
a. HTTP Transfer Timeout - Specify a timeout value here. When an HTTPrequest for this web source value exceeds the timeout value, the end user willsee an error message. This is to prevent non-responding pages due to anunresponsive web service.
b. Comments - Enter Comments or notes.
11. To save your changes, click Apply Changes.
18.4.4 Copying a Web Source ModuleTo copy a Web Source Module:
1. Navigate to the Web Service Modules page:
a. On the Workspace home page, click App Builder.
b. Select an application.
c. On the Application home page, click Shared Components in the center of thepage.
d. Under Data Sources, select Web Source Modules.
2. On the Web Source Modules page, click Copy.
3. On Copy Web Source Module:
a. Copy Web Source Module - Select an existing Web Source Module.
b. New Web Source Module Name - Enter a new name.
c. Click Copy.
18.4.5 Viewing Credential UtilizationTo view Web Source Modules utilization:
1. Navigate to the Web Service Modules page:
a. On the Workspace home page, click App Builder.
b. Select an application.
c. On the Application home page, click Shared Components in the center of thepage.
d. Under Data Sources, select Web Source Modules.
2. On the Web Source Modules page, click Utilization.
Chapter 18Managing Web Source Modules
18-31
The Utilization page displays where a Web Source Module is used within theapplication.
18.4.6 Viewing Web Service Module HistoryTo view recent modifications to Web Source Modules:
1. Navigate to the Web Service Modules page:
a. On the Workspace home page, click App Builder.
b. Select an application.
c. On the Application home page, click Shared Components in the center of thepage.
d. Under Data Sources, select Web Source Modules.
2. On the Web Source Modules page, click History.
The History page displays recent modifications made to Web Service Modules inthe current workspace.
18.5 Managing Remote ServersA Remote Server is separate entity that stores Web Source server information.Remote Servers can be shared among multiple Web Sources, thus enabling you toinformation such as the Base URL or Authentication.
• About Remote Servers (page 18-32)
• Creating a Remote Server (page 18-33)
• Editing or Deleting a Remote Server (page 18-33)
• Viewing Remote Server Utilization (page 18-34)
• Viewing Remote Server History (page 18-35)
18.5.1 About Remote ServersOracle Application Express splits the endpoint URL of a Web Source Module into twoparts. The first part is server-specific part and is stored as a separate entity called theRemote Server. You can reuse a Remote Server with multiple Web Source Modules ifeach one uses the same server, port, and URL Path Prefix (context root). RemoteServers are stored at the workspace-level and therefore visible in all applications.
The second part of the endpoint URL and is specific to the Web Source module.Multiple Web Source modules can share one Remote Server, thus sharing informationsuch as the Base URL and Authentication. If you change Remote Server attributes,the change impacts all Web Source Modules using the Remote Server. RemoteServers make it easy to move a collection of Web Source Modules. For example, youcan move from a test system to a production system by changing the URL within theRemote Server object.
Exporting and Importing Remove Server Information
When you export an application, referenced Remote Servers are added to the exportfile. When you import the application into another workspace, Application Expresschecks whether the target workspace already contains Remote Servers with the
Chapter 18Managing Remote Servers
18-32
same static ID. If a Remote Server already exists, the application uses it. Otherwisethe Remote Servers from the import file are created in the target workspace.
18.5.2 Creating a Remote ServerTo create a Remote Server object:
1. Navigate to the Remove Server page:
• From Workspace Utilities:
a. On the Workspace home page, click App Builder.
b. Click Workspace Utilities.
c. Click Remote Server.
• From Shared Components:
a. On the Workspace home page, click App Builder.
b. Select an application.
c. On the Application home page, click Shared Components in the center ofthe page.
d. Under Workspace Objects, select Remote Servers.
2. On the Remote Servers page, click Create.
3. Name - Enter a name for the remote server object. Remote Server names must beunique within the application.
4. Static ID - Enter a static ID for the Remote Server.
5. Server Type - Select one of the following:
• Web Source
• Authentication
6. Base URL - Enter the base URL of the remote server.
7. Prompt on Install - Select Yes to have Oracle Application Express prompt for theBase URL after the application installs into another workspace.
8. Comments - Enter any comments or notes here. These comments never displaywhen running the application.
9. Click Create.
18.5.3 Editing or Deleting a Remote ServerTo edit a Remote Server:
1. Navigate to the Credentials page:
• From Workspace Utilities:
a. On the Workspace home page, click App Builder.
b. Click Workspace Utilities.
c. Click Remote Server.
• From Shared Components:
Chapter 18Managing Remote Servers
18-33
a. On the Workspace home page, click App Builder.
b. Select an application.
c. On the Application home page, click Shared Components in the center ofthe page.
d. Under Security, select Remote Server.
2. On the Remote Server page, click the name of the Remote Server.
The Edit Remote Server dialog appears.
3. To delete the current Remote Server, click Delete. Otherwise, edit the appropriateattributes.
Tip:
Remote Servers which are referenced within an application cannot bedeleted.
4. To edit the attributes:
a. Name - Enter a descriptive name.
b. Static ID - Enter a name for the remote server object here. Remote Servernames must be unique within the application.
c. Server Type - Select either:
• Web Source
• Authentication
d. Base URL - Enter the base URL of the remote server.
e. Prompt on Install - If Yes, Application Express prompts for the Base URL afterthe application has been installed into another workspace.
f. HTTPS Host Name - The host name to be matched against the common name(CN) of the remote server's certificate for an HTTPS request. It can also be adomain name like *.example.com. If NULL, the host name in the given URL isused.
HTTPS Host Name only displays if you are using Oracle Database 12.2 orhigher.
g. Comments - Enter any comments or notes. These comments only displaywithin App Builder and never display when running the application.
h. To save your changes, click Apply Changes.
18.5.4 Viewing Remote Server UtilizationTo view Web Source Modules utilization:
1. Navigate to the Remove Server page:
• From Workspace Utilities:
a. On the Workspace home page, click App Builder.
b. Click Workspace Utilities.
Chapter 18Managing Remote Servers
18-34
c. Click Remote Server.
• From Shared Components:
a. On the Workspace home page, click App Builder.
b. Select an application.
c. On the Application home page, click Shared Components in the center ofthe page.
d. Under Workspace Objects, select Remote Servers.
2. On the Remote Servers page, click Utilization.
The Utilization page displays where Remote Servers page used within the currentworkspace.
18.5.5 Viewing Remote Server HistoryTo view recent modifications to Remote Servers:
1. Navigate to the Remove Server page:
• From Workspace Utilities:
a. On the Workspace home page, click App Builder.
b. Click Workspace Utilities.
c. Click Remote Server.
• From Shared Components:
a. On the Workspace home page, click App Builder.
b. Select an application.
c. On the Application home page, click Shared Components in the center ofthe page.
d. Under Workspace Objects, select Remote Servers.
2. On the Remote Servers page, click History.
The History page displays recent modifications made to Remote Servers in thecurrent workspace.
18.6 Managing Web CredentialsManage secure credentials to connect to REST Enabled SQL or other REST services.
• About Credentials (page 18-36)
• Creating Web Credentials (page 18-36)
• Editing or Deleting Credentials (page 18-37)
• Viewing Credential Utilization (page 18-38)
• Viewing Credential History (page 18-38)
Chapter 18Managing Web Credentials
18-35
18.6.1 About CredentialsUse Credentials to connect to REST Enabled SQL or other external REST services.Oracle Application Express securely stores and encrypts these credentials for use byApplication Express components. Credentials cannot be retrieved back in clear text.Credentials are stored at the workspace-level and therefore are visible in allapplications.
Exporting and Importing Credentials
When you export an application, used credentials are added to the export file. Whenyou import the application into another workspace, Application Express checkswhether the target workspace already contains credentials with the same static ID. If acredential already exists, the application uses it. Otherwise the credential from theimport file is created in the target workspace.
18.6.2 Creating Web CredentialsYou can create credentials from either Workspace Utilities or Shared Components.
To create credentials:
1. Navigate to the Web Credentials page:
• From Workspace Utilities:
a. On the Workspace home page, click App Builder.
b. Click Workspace Utilities.
c. Click Web Credentials.
• From Shared Components:
a. On the Workspace home page, click App Builder.
b. Select an application.
c. On the Application home page, click Shared Components in the center ofthe page.
d. Under Security, select Web Credentials.
2. On the Web Credentials page, click Create.
3. Configure the Attributes on the Web Credentials page.
4. For Name - Enter a descriptive name.
5. Authentication Type - Select one of the following:
• Basic Authentication
• OAuth2 Client Credentials
6. Client ID or User Name - Select one of the following:
• For Basic Authentication, enter the user name.
• For OAuth2 Client Credentials, enter the client ID.
This information is not be encrypted.
Chapter 18Managing Web Credentials
18-36
7. Client Secret or Password - Enter the password or OAuth2 Client Secret.
This information will be stored encrypted and cannot be retrieved in clear text.
8. Verify Client Secret or Password - Enter the password or client secret again toverify your input. When the two values are not identical, an error messagedisplays.
9. Prompt On Install - Choose whether prompts for this credential display when theapplication is imported on another Oracle Application Express instance.
10. Comments - Enter any comments or notes here. These comments never displaywhen running the application.
11. Click Create.
18.6.3 Editing or Deleting CredentialsTo edit credentials:
1. Navigate to the Web Credentials page:
• From Workspace Utilities:
a. On the Workspace home page, click App Builder.
b. Click Workspace Utilities.
c. Click Web Credentials.
• From Shared Components:
a. On the Workspace home page, click App Builder.
b. Select an application.
c. On the Application home page, click Shared Components in the center ofthe page.
d. Under Security, select Web Credentials.
2. On the Web Credentials page, select the credential name.
3. To delete the credentials, click Delete. Otherwise, edit the appropriate attributes.
Tip:
A credential cannot be deleted when it is being referenced somewhere inthe workspace.
4. To edit the attributes:
a. Name - Enter a descriptive name.
b. Authentication Type - Select a type:
• Basic Authentication
• OAuth2 Client Credentials
c. Client ID or User Name: For Basic Authentication, enter the user name. ForOAuth2, enter the client ID. This information will not be encrypted.
d. Client Secret or Password - Enter the password or OAuth2 Client Secret.
Chapter 18Managing Web Credentials
18-37
This information is stored encrypted and cannot be retrieved in clear text.
e. Verify Client Secret or Password - Enter the password or client secret again toverify your input. When the two values are not identical, an error messagedisplays.
f. Prompt on Install - Choose whether prompts for this credential display whenthe application is imported on another Application Express instance. Sincecredentials are not part of an application export file, Application Expressalways generates prompts after install, when the client ID or username is notempty.
g. Comments - Enter any comments or notes. These comments only displaywithin App Builder and never display when running the application.
h. To save your changes, click Apply Changes.
18.6.4 Viewing Credential UtilizationTo view Web credential utilization:
1. Navigate to the Web Credentials page:
• From Workspace Utilities:
a. On the Workspace home page, click App Builder.
b. Click Workspace Utilities.
c. Click Web Credentials.
• From Shared Components:
a. On the Workspace home page, click App Builder.
b. Select an application.
c. On the Application home page, click Shared Components in the center ofthe page.
d. Under Security, select Web Credentials.
2. On the Web Credentials page, click Utilization.
The top of the Utilization page displays used credentials, the associatedcomponent type, and the component name. Unused credentials display at thebottom of the page.
3. To delete unused credentials, click Delete Unused.
18.6.5 Viewing Credential HistoryTo view recent modifications to Web credentials:
1. Navigate to the Web Credentials page:
• From Workspace Utilities:
a. On the Workspace home page, click App Builder.
b. Click Workspace Utilities.
c. Click Web Credentials.
• From Shared Components:
Chapter 18Managing Web Credentials
18-38
a. On the Workspace home page, click App Builder.
b. Select an application.
c. On the Application home page, click Shared Components in the center ofthe page.
d. Under Security, select Web Credentials.
2. On the Web Credentials page, click History.
The History page displays recent modifications made to Credentials in the currentworkspace.
18.7 Managing Legacy Web ServicesLegacy Web services enable applications to interact with one another over the web ina platform-neutral, language independent environment.
Note:
The SOAP 1.1 specification is a W3C note. SOAP Version 1.2 specificationis a W3C recommendation.
For information about Simple Object Access Protocol (SOAP) see:
http://www.w3.org/TR/SOAP/
• About Web Services (page 18-39)
• Creating Web Service References (page 18-40)
• About Working with SSL Enabled Web Services (page 18-41)
• Creating Web Service References Based on a WSDL (page 18-41)
• Creating Web Service References Manually (page 18-43)
• Creating RESTful Web Service References (page 18-45)
• Using the Web Service Reference Repository (page 18-48)
• Creating an Input Form and Report on a Web Service (page 18-48)
• Creating a Form on a Web Service (page 18-50)
• Creating a Report on a Web Service (page 18-51)
• How to Invoke a Web Service as a Process (page 18-53)
• Viewing a Web Service Reference History (page 18-56)
18.7.1 About Web ServicesIn a typical Web services scenario, a business application sends a request to a serviceat a given URL by using the protocol over HTTP. The service receives the request,processes it, and returns a response. You can incorporate calls with external Webservices in applications developed in App Builder.
Chapter 18Managing Legacy Web Services
18-39
Web services are typically based on Simple Object Access Protocol (SOAP) orRepresentational State Transfer (REST) architectures. SOAP is a World Wide WebConsortium (W3C) standard protocol for sending and receiving requests andresponses across the Internet. SOAP messages can be sent back and forth between aservice provider and a service user in SOAP envelopes. RESTful Web services areresource oriented. The scope of the Web service is found in the URI and the methodof the service is described by the HTTP method that is used such as GET, POST,PUT, HEAD, and DELETE.
SOAP offers two primary advantages:
• SOAP is based on XML, and therefore easy to use.
• SOAP messages are not blocked by firewalls because this protocol uses simpletransport protocols, such as HTTP.
Tip:
If you run Oracle Application Express with Oracle Database 11g Release 1(11.1), you must enable network services to use Web services.
REST offers similar advantages:
• REST messages are also not blocked by firewalls because this protocol uses theHTTP protocol.
• REST requests do not require the overhead of XML and SOAP envelopes andinputs are typically provided in the URI.
18.7.2 Creating Web Service ReferencesTo use Web services in Oracle Application Express, you create a Web servicereference using a wizard. Web service references can be based on a Web ServicesDescription Language (WSDL) document, RESTful style, or created manually bysupplying information about the service.
• Accessing the Web Service References Page (page 18-40)
• Specifying an Application Proxy Server Address (page 18-41)
See Also:
• "Creating Web Service References Based on a WSDL (page 18-41)"
• "Creating Web Service References Manually (page 18-43)"
• "Creating RESTful Web Service References (page 18-45)"
18.7.2.1 Accessing the Web Service References PageYou manage Web service references on the Web Service References page.
Chapter 18Managing Legacy Web Services
18-40
To access the Web Service References page:
1. Navigate to the Shared Components page:
a. On the Workspace home page, click App Builder.
b. Select an application.
c. On the Application home page, click Shared Components.
The Shared Components page appears.
2. Under Data Sources, click Legacy Web Service References.
The Web Service References page appears.
18.7.2.2 Specifying an Application Proxy Server AddressIf your environment requires a proxy server to access the Internet, you must eitherspecify a proxy server address on the Application Attributes page, or your instanceadministrator must define an instance proxy, before you can create a Web servicereference.
To specify a proxy address for an application:
1. On the Workspace home page, click the App Builder icon.
The App Builder home page appears.
2. Select an application.
Application home page appears.
3. Click Edit Application Properties.
4. Under Properties, enter the proxy server in the Proxy Server field.
5. Click Apply Changes.
18.7.3 About Working with SSL Enabled Web ServicesSecure Sockets Layer (SSL) is an industry standard protocol that uses RSA public keycryptography with symmetric key cryptography to provide authentication, encryption,and data integrity.
If the Web service that you need to interact with is SSL-enabled (that is, https displaysin the URL to the Web service), you must create a wallet and configure OracleApplication Express to use the wallet. A wallet is a password-protected container thatstores authentication and signing credentials (including private keys, certificates, andtrusted certificates) needed by SSL.
18.7.4 Creating Web Service References Based on a WSDLYou can create Web service reference based on a Web Services DescriptionLanguage (WSDL) document.
• About Creating Web Service References Based on a WSDL (page 18-42)
• Creating a Web Service Reference by Specifying a WSDL Document(page 18-42)
• Testing a Web Service Reference Created from a WSDL (page 18-43)
Chapter 18Managing Legacy Web Services
18-41
18.7.4.1 About Creating Web Service References Based on a WSDLBefore you create a Web service reference based on a WSDL, you must decide howto locate the WSDL. You locate a WSDL by entering the URL to the WSDL document.
You then run a wizard which analyzes the WSDL and collects all the necessaryinformation to create a valid SOAP message, including:
• The URL used to post the SOAP request over HTTP(S)
• A Universal Resource Identifier (URI) identifying the SOAP HTTP request
• Operations of the Web Service
• Input parameters for each operation
• Output parameters for each operation
18.7.4.2 Creating a Web Service Reference by Specifying a WSDL DocumentTo create a Web service by specifying a URL to a specific WSDL document:
1. Navigate to the Web Service References page.
a. On the Workspace home page, click App Builder.
b. Select a existing application.
c. On the Application home page, click Shared Components in the center of thepage.
d. Under Data Sources, select Legacy Web Service References.
2. Click Create.
3. For Web Reference Type, select Based on WSDL and click Next.
4. If prompted to search a UDDI registry to find a WSDL, click No then Next.
5. In WSDL Location, enter the URL to the WSDL document.
6. For Username, enter the username required to access the WSDL.
7. For Password, enter the password required to access the WSDL.
8. Click Next.
The Web Service Details page appears.
9. For Basic Authentication, select:
• No - Select this option if authentication credentials are not sent as part of theHTTP request.
• Yes - Select this option if authentication credentials are sent as part of theHTTP request. Web services that employ basic authentication usually also usethe HTTPS (SSL) protocol since the username and password are sent in cleartext.
10. Click Create Reference.
The Web service reference is added to the Web Service References Repository.
11. On the Create page, the following selections are available:
Chapter 18Managing Legacy Web Services
18-42
• View Web Service References - Select to go to the Web Service Referencepage.
• Create Form on Web Service - Select to create a Form for this Web ServiceReference.
• Create Form & Report on Web Service - Select to create a Form and Reportfor this Web Service Reference.
18.7.4.3 Testing a Web Service Reference Created from a WSDLAfter you have created a Web service reference, you can test it on the Test WebService Reference page.
To test a Web service reference:
1. Navigate to the Web Service References page.
a. On the Workspace home page, click App Builder.
b. Select a existing application.
c. On the Application home page, click Shared Components in the center of thepage.
d. Under Data Sources, select Legacy Web Service References.
2. Select the View Report icon.
3. Click the Test icon for the Web Service reference you want to test.
The Test Web Service Reference page appears. The Web service name and URLendpoint display at the top of the page.
4. From Operation, select an operation (that is, the method to be executed).
5. Under Input Parameters, enter the appropriate values.
6. Click Test.
The message request and response appear at the bottom of the page underMessages.
18.7.5 Creating Web Service References ManuallyYou can create a Web service reference manually.
• About Creating Web Service References Manually (page 18-43)
• Creating a Web Service Reference Manually (page 18-44)
• Testing a Web Service Reference Created Manually (page 18-44)
18.7.5.1 About Creating Web Service References ManuallyWhen you create a Web service reference manually, you supply the necessaryinformation to create a valid SOAP request, including:
• The URL used to post the SOAP request over HTTP(S)
• A Universal Resource Identifier (URI) identifying the SOAP HTTP request
• The SOAP envelope for the request, including any item substitutions
Chapter 18Managing Legacy Web Services
18-43
• Optionally the name of a collection to store the response from the Web service
18.7.5.2 Creating a Web Service Reference ManuallyCreating a Web service reference manually, adds it to Web Service ReferencesRepository.
To create a Web service reference manually:
1. Navigate to the Web Service References page.
a. On the Workspace home page, click App Builder.
b. Select a existing application.
c. On the Application home page, click Shared Components in the center of thepage.
d. Under Data Sources, select Legacy Web Service References.
2. Click Create.
3. Select Manual and click Next.
4. On Create Web Service Reference:
a. Name - Enter a name to identify the reference.
b. URL - Enter the URL used to post the SOAP request over HTTP. Thiscorresponds to the soap:address location of a service port in the WSDL.
c. Action - Enter the intent of the SOAP HTTP request (optional). The value is aURI identifying the intent. SOAP places no restrictions on the format orspecificity of the URI or requires that it is resolvable.
d. Proxy - Enter a proxy to override the application proxy for this service.
e. SOAP Version - Select 1.1 or 1.2.
f. Basic Authentication - Choose whether the Web service requiresauthentication. Select Yes or No.
g. SOAP Envelope - Specify the SOAP envelope to be used for the SOAPrequest to the Web service..
Note:
You can reference items from session state in the SOAP envelopeby using #ITEM_NAME# syntax.
h. Store Response in Collection - Enter the name of a collection to store the Webservice response. The response will be stored in the CLOB001 column of thecollection entered here.
i. Click Create.
18.7.5.3 Testing a Web Service Reference Created ManuallyAfter you have created a Web service reference, you can test it on the Test WebService Reference page.
Chapter 18Managing Legacy Web Services
18-44
To test a Web service reference:
1. Navigate to the Web Service References page.
a. On the Workspace home page, click App Builder.
b. Select a existing application.
c. On the Application home page, click Shared Components in the center of thepage.
d. Under Data Sources, select Legacy Web Service References.
2. Select the View Report icon.
3. Click the Test icon for the Web Service reference you want to test.
The Test Web Service Reference page appears. The Web service name and URLendpoint display at the top of the page.
4. If required, enter the username and password under Basic Authentication.
5. In SOAP Envelope text area, optionally edit the SOAP request envelope.
6. Click Test.
The message request and response appear at the bottom of the page underMessages.
18.7.6 Creating RESTful Web Service ReferencesYou can create a Representational State Transfer (REST) or RESTful web service.
• About Creating RESTful Web Service References (page 18-45)
• Creating a RESTful Web Service Reference (page 18-45)
• Testing a REST Web Service Reference (page 18-47)
18.7.6.1 About Creating RESTful Web Service ReferencesRESTful Web services are resource oriented. The scope of the Web service is foundin the URI and the method of the service is described by the HTTP method that isused such as GET, POST, PUT, HEAD, and DELETE. When you create a RESTfulWeb service reference, you supply the necessary information about the structure ofthe request and response including:
• A Universal Resource Identifier (URI) identifying the RESTful request
• The HTTP method identifying the method of the Web service
• HTTP Headers, if required, that are part of the request
• The type of input expected by the Web service
• The format of the response and how to identify the response parameters
18.7.6.2 Creating a RESTful Web Service ReferenceTo create a RESTful Web service reference:
1. Navigate to the Web Service References page.
a. On the Workspace home page, click App Builder.
Chapter 18Managing Legacy Web Services
18-45
b. Select a existing application.
c. On the Application home page, click Shared Components in the center of thepage.
d. Under Data Sources, select Legacy Web Service References.
2. Click Create.
3. Select REST and click Next.
4. For REST Details, specify the following:
a. Name - Enter a name to identify the reference.
b. URL - Enter the URL endpoint of the Web service.
c. Proxy - Enter a proxy to override the application proxy for this service(optional). This setting is overridden by the proxy setting for this instance.
d. HTTP Method - Choose the http method used for the request to the Webservice. Select GET, HEAD, POST, PUT or DELETE.
e. Basic Authentication - Select Yes to require HTTP Basic Authentication.Otherwise, select No.
f. REST HTTP Headers - Enter the names of the HTTP headers to send with therequest.
g. Click Next.
5. For REST Input parameters, specify the following:
a. Name - Enter the name of the input parameter expected by the method.
b. Type - Select the input type.
c. Click Add Parameter.
d. Repeat steps a though c for each expected input.
e. Click Next.
6. For REST Output parameters, specify the following:
a. Output Format - Select XML, Text or JSON for the response format expectedfrom the Web service.
b. XPath to Output Parameters (XML only) - Enter an XPath expression to therelevant part of the response.
For example:
/ListBucketResult/Contents
c. Response Namespace (XML only) - Enter the namespace corresponding tothe Response XPath.
For example:
http://s3.amazonaws.com/doc/2006-03-01/
d. Parameter Delimiter (Text only) - Enter the character or sequence thatseparates parameters returned from the Web service. Use \n to indicate a newline and \t to indicate a tab character.
e. New Record Delimiter (Text only) - Enter the character or sequence thatdetermines a new record in a text response from the Web service. Use \n toindicate a new line and \t to indicate a tab character.
Chapter 18Managing Legacy Web Services
18-46
f. Name - Enter the name of the output parameter returned by the method.
g. Path - Enter the path. If the response is XML, the path is an XPath expressionto the node. If the response is Text, the path is a number. If the response isJSON, the entire response is stored in the CLOB001 column of a collection youspecify.
h. Type - Select the output type.
i. Click Add Parameter.
j. Repeat steps f though h for each returned output parameter.
Note:
Click Test to send a request to a RESTful Web service and see theresponse. This test process helps you specify the appropriate Outputparameters.
7. Click Create.
The Create Web Service Reference Success page appears. The Web servicereference is added to the Web Service References Repository.
18.7.6.3 Testing a REST Web Service ReferenceAfter you have created a Web service reference, you can test it on the Test WebService Reference page.
To test a Web service reference:
1. Navigate to the Web Service References page.
a. On the Workspace home page, click App Builder.
b. Select a existing application.
c. On the Application home page, click Shared Components in the center of thepage.
d. Under Data Sources, select Legacy Web Service References.
2. Select the View Report icon.
3. Click the Test icon for the Web Service reference you want to test.
The Test Web Service Reference page appears. The Web service name and URLendpoint display at the top of the page.
4. In the URL and Proxy Override fields, optionally edit the values for the test.
5. If required, enter the username and password under Basic Authentication.
6. Under HTTP Headers, enter appropriate values.
7. Under Input Parameters, enter appropriate values.
8. Click Test.
The message response appears at the bottom of the page under Messages.
Chapter 18Managing Legacy Web Services
18-47
18.7.7 Using the Web Service Reference RepositoryWeb service references are stored in the Web Service Reference Repository.
To access the Web Service References Repository:
1. Navigate to the Web Service References page.
a. On the Workspace home page, click App Builder.
b. Select a existing application.
c. On the Application home page, click Shared Components in the center of thepage.
d. Under Data Sources, select Legacy Web Service References.
The Web Service Reference page appears.
A Search bar displays at the top of the page. Available controls include:
• Search columns icon - Resembles a magnifying glass. Click this icon tonarrow your search. To search all columns, select All Columns.
• Text area - Enter case insensitive search criteria (wildcard characters areimplied) and click Go.
• Go button - Executes a search or applies a filter.
• View Icons - Displays each Web service reference as a large icon. To edit aWeb service reference, click the appropriate icon.
• View Report - Displays each Web service reference as a line in a report.
• Actions menu - Displays the Actions menu. Use this menu to customize thereport view.
2. Click the View Report icon.
3. In report view you can:
• Edit a reference by clicking the reference name.
• Test a reference by clicking the Test icon.
• View details about a reference by clicking the View icon. Note that this optionis not available for manually created or REST Web service references.
18.7.8 Creating an Input Form and Report on a Web ServiceThis section describes how to create an input form and report on a Web service.
• About the Create Form and Report on Web Service Wizard (page 18-48)
• Creating a Form and Report by Adding a New Page (page 18-49)
18.7.8.1 About the Create Form and Report on Web Service WizardThe Create Form and Report on Web Service Wizard creates an input form, a submitbutton, and a report for displaying results. You can execute this wizard directly aftercreating the Web service reference from a WSDL or a RESTful style Web service, orby adding a page.
Chapter 18Managing Legacy Web Services
18-48
Use this wizard when you expect a nonscalar result from the Web service. TheAmazon Product API Web service is a good example. This Web service returns manyresults based on the search criteria entered in an input form.
18.7.8.2 Creating a Form and Report by Adding a New PageIf you have an existing Web service reference, you can create an input form and reportby adding a new page.
To create a form and report by adding a new page:
1. Create the Web service reference.
2. Run the Create Page Wizard. On Create a Page:
a. For User Interface, if applicable select a user interface for the page.
This attribute only displays for applications using older themes for whichDesktop and Mobile User Interfaces have been defined.
b. For Page Type, select Component and then Form.
c. On Create page, select Report and Form on Web Service.
3. For Choose Service and Operation:
a. Web Service Reference - Select the Web service reference.
b. Operation - Select the method to be executed. For RESTful style Webreferences, doREST is selected automatically. The Operation option does notappear for Manual style Web references.
c. Click Next.
4. For Page and Region Attributes, review and update the page and region attributesand click Next.
Note:
If the page you specify does not exist, the wizard creates the page foryou.
5. For Input Items:
a. Identify which items to add to the form. To include an item, select Yes in theCreate column. Otherwise, select No.
b. If necessary, edit the Item Name.
c. If necessary, edit the Item Label.
d. Click Next.
6. If applicable, specify the Item Names and Item Labels for basic authentication,then click Next.
Note:
This step only appears if basic authentication was specified for this Webservice reference when it was created.
Chapter 18Managing Legacy Web Services
18-49
7. Follow the on-screen instructions.
8. Click Create.
18.7.9 Creating a Form on a Web ServiceThis section describes how to create a form on a Web service.
• About the Create Form on Web Service Wizard (page 18-50)
• Creating a Form by Adding a New Page (page 18-50)
18.7.9.1 About the Create Form on Web Service WizardThe Create Form on Web Service Wizard creates a form and a submit button. You canexecute this wizard after creating the Web service reference from a WSDL or on aRESTful style Web service, or by running the Create Page Wizard.
Use this wizard when you expect a scalar result from the Web service. A Web servicethat looks up a stock price is a good example because the input is a stock symbol andthe output is the scalar value price.
18.7.9.2 Creating a Form by Adding a New PageIf you have an existing Web service reference, you can create a form based on a Webservice reference by adding a new page.
To create a form by adding a new page:
1. Create the Web service reference.
2. Run the Create Page Wizard. On Create a Page:
a. For User Interface, if applicable select a user interface for the page.
This attribute only displays for applications using older themes for whichDesktop and Mobile User Interfaces have been defined.
b. For Page Type, select Component and then Form.
c. On Create page, select Form on Web Service.
3. For Page Attributes:
a. Page Number - Select a page to contain the new form, or enter a new pagenumber.
b. Page Name - Specify a name for the page.
c. Page Mode - Identify the page mode.
To learn more, see field-level Help.
d. Page Group - Identify the name of the page group you would like to associatewith this page. Page groups help developers manage the pages within anapplication. To create a page group, enter the name. To use an existing pagegroup, select the name from the list of values.
e. Region Title - Select whether you want to use a breadcrumb navigation controlon your page, and which breadcrumb navigation control you want to use.
f. Breadcrumb - Enter a title for the region in which the form will appear.
Chapter 18Managing Legacy Web Services
18-50
g. Click Next.
4. For Navigation Preference:
a. Select how you want this page integrated into the Navigation Menu. To learnmore, see field-level Help.
b. Click Next.
5. For Choose Service:
a. Web Service Reference - Select the Web service reference.
b. Operation - Select the method to be executed. For RESTful style Webreferences, doREST is selected automatically. The Operation option does notappear for Manual style Web references.
c. Click Next.
6. For Input Items, make these selections and click Next:
a. Identify which items to add to the form. To include an item, select Yes in theCreate column. Otherwise, select No.
b. If necessary, edit the Item Name.
c. If necessary, edit the Item Label.
7. If applicable, specify the Item Names and Item Labels for basic authentication andclick Next.
Note:
This step only appears if basic authentication was specified for this Webservice reference when it was created.
8. If applicable, specify the Item Names and Item Labels for basic authentication.
Note that this step only appears if basic authentication was specified for this Webservice reference when it was created.
9. For Output Items, make these selections and click Next:
a. Identify which items to add to the form. To include an item, select Yes in theCreate column. Otherwise, select No.
b. If necessary, edit the Item Name.
c. If necessary, edit the Item Label.
10. Click Create.
18.7.10 Creating a Report on a Web ServiceTo create a report in which to display Web Service request results:
1. Create the Web service reference.
2. Run the Create Page Wizard. On Create a Page:
a. For User Interface, if applicable select a user interface for the page.
This attribute only displays for applications using older themes for whichDesktop and Mobile User Interfaces have been defined.
Chapter 18Managing Legacy Web Services
18-51
b. For Page Type, select Component and then Report.
c. On Create page, select Report on Web Service.
3. For Page Attributes:
a. Page Number - Select a page to contain the new form, or enter a new pagenumber.
b. Page Name - Specify a name for the page.
c. Page Mode - Identify the page mode.
To learn more, see field-level Help.
d. Breadcrumb - Enter a title for the region in which the form will appear.
e. Click Next.
4. For Navigation Preference:
a. Select how you want this page integrated into the Navigation Menu. To learnmore, see field-level Help.
b. Click Next.
5. If Web Reference Type is REST:
a. Web Reference Type - Choose REST.
b. Web Service Reference - Select the name of the Web service reference andclick Next.
c. Result Stored in Collection - Enter the name of the temporary result set namewhere the Web service result is stored. The temporary result set is stored inan Application Express collection.
d. Report Template - Choose the report template to be used by this report region.
e. Rows Per Page- Select the number of rows to display per page.
f. Select the parameters to be included in the report.
g. Click Next.
6. For Web Reference Type, choose REST, Generated from WSDL , or ManuallyCreated.
What appears next depends upon your selection.
7. If Web Reference Type is Generated from WSDL:
a. Web Reference Type - Choose Generated from WSDL.
b. Web Service Reference - Select the name of the Web service reference.
c. Operation - Select the operation. The operation is the method that will beexecuted..
d. Result Tree to Report On - Select the portion of the resulting XML documentthat contains the information you want to include in the report.
e. Report Parameters and Options:
• Temporary Result Set Name - Enter a name for the collection that storesthe Web service result.
• Select and deselect the appropriate parameters.
f. Click Next.
Chapter 18Managing Legacy Web Services
18-52
8. If Web Reference Type is Manually Created:
a. Web Reference Type - Choose Manually Created.
b. Web Service Reference - Select the name of the Web service reference.
c. SOAP Style - Choose the style of the SOAP response. The style can bedetermined from the style attribute of the soap:binding element from theWSDL for this operation.
d. Message Format - Choose the message format. The encoding can bedetermined from the use attribute of the soap:body element of the outputmessage in the WSDL for this operation.
e. Result Node Path (XPath)(Value Required)- Enter the XPath expression to thenode of the response message that you are creating the report on. The nodeis a child of the soap:Body element.
For example:
/result/myNode
f. Message Namespace - Enter the namespace for the response message. Thiscan typically be determined by looking for the targetNamespace attribute ofthe WSDL and click Next.
g. Enter the name of the collection where the response message is stored.
h. Enter the names of the parameters that you want to be included in the report.
i. Click Next.
9. Click Create.
18.7.11 How to Invoke a Web Service as a ProcessYou can invoke a Web service as a process on the page. The process is created foryou if you run one of the Create Form wizards for Web services. Running the processsubmits the request to the service provider. You can then display the request results inthe report.
• Invoking a Web Service as a Process (page 18-53)
• Editing a Web Service Process (page 18-55)
18.7.11.1 Invoking a Web Service as a ProcessTo invoke a Web service as a process:
1. Create a Web Service Reference.
2. Run the Create Page Wizard. On Create a Page:
a. For User Interface, if applicable select a user interface for the page.
This attribute only displays for applications using older themes for whichDesktop and Mobile User Interfaces have been defined.
b. For Page Type, select Component and then Blank Page.
3. For Page Attributes:
a. Page Number - Select a page to contain the new form, or enter a new pagenumber.
Chapter 18Managing Legacy Web Services
18-53
b. Page Name - Specify a name for the page.
c. Page Mode - Identify the page mode.
To learn more, see field-level Help.
d. Page Group - Identify the name of the page group you would like to associatewith this page. Page groups help developers manage the pages within anapplication. To create a page group, enter the name. To use an existing pagegroup, select the name from the list of values.
e. Breadcrumb - Enter a title for the region in which the form will appear.
f. Click Next.
4. For Navigation Preference:
a. Select Do not associate this page with a navigation menu entry.
b. Click Next.
5. Click Finish.
Page Designer appears.
6. Under Page Rendering or Page Processing, locate the Processes section, right-click and select Create Process.
The New process appears.
7. Edit the process attributes in the Property Editor.
Attributes are organized in groups. To find a group or attribute, enter keywords inthe Filter Properties field. The Property Editor displays the group or attributes. Or,you can click Go to Group and select the group.
Tip:
To view help for an attribute, select the attribute in the Property Editorand click the Help tab in the central pane.
8. Edit Identification attributes:
a. Find the Identification group.
b. Name - Enter the name of the page process for easy identification bydevelopers.
c. Type - Select Web Service.
9. Edit Settings:
a. Find the Settings group.
b. Web Service Operation - Select a Web Service Operation.
c. Store Result In - Select Item(s) or Collection.
10. Edit Execution Options Options:
a. Find the Execution Options group.
b. Sequence - Specify the sequence for this component. The sequencedetermines the order of execution.
c. Point - Select the processing point.
Chapter 18Managing Legacy Web Services
18-54
11. Edit Success Message:
a. Find the Success Message group.
b. Success Message - Enter the success message for this process. If theprocess runs and does not generate an error, then this process successmessage displays in the notification section of the resulting page displayed.
To learn more, click the Help tab.
12. Edit Error Message:
a. Find the Error Message group.
b. Error Message - Enter the error message for this process. This messagedisplays if an unhandled exception is raised. After any error processing stops,a rollback is issued and an error message displays..
To learn more, click the Help tab.
13. Edit Server-side Condition:
a. Find the Server-side Condition group.
b. When Button Pressed - If you want this page processing component toexecute only when the specified button is clicked, select a button from the list.You can incorporate this button condition with other conditions to further refinewhen this page processing component executes.
c. Condition Type - Select a condition type that must be met in order for thiscomponent to be processed. Depending upon your selection, additionalattributes may appear.
14. Click Save.
18.7.11.2 Editing a Web Service ProcessAfter you create a process of type Web service on a Web service reference createdfrom a WSDL or a RESTful style Web reference, you can change the attributes of theinput and output parameters to the service.
To edit a Web service process:
1. Create a Web service process.
2. Navigate to the page containing the Web service process.
Page Designer appears.
3. In the left pane, find the process name and expand the tree.
In Parameters and Out Parameters display under the process.
4. Expand In Parameters and Out Parameters. Defined parameters apear.
5. Select a parameter and edit the attributes in the Property Editor.
Attributes are organized in groups. To find a group or attribute, enter keywords inthe Filter Properties field. The Property Editor displays the group or attributes. Or,you can click Go to Group and select the group.
Chapter 18Managing Legacy Web Services
18-55
Tip:
To view help for an attribute, select the attribute in the Property Editorand click the Help tab in the central pane.
6. Click Save.
18.7.12 Viewing a Web Service Reference HistoryThe Web Services History displays changes to Web service references for the currentapplication by application ID, Web service references name, developer, and date.
To view a history of Web service reference changes:
1. Navigate to the Shared Components page:
a. On the Workspace home page, click App Builder.
b. Select an application.
c. On the Application home page, click Shared Components.
The Shared Components page appears.
2. Under Data Sources, click Legacy Web Service References.
The Web Service References page appears.
3. Click History.
Note:
The History button only appears on the Web Service Reference page if atleast one reference exists.
18.8 Accessing Data with Database LinksAccess data remotely by creating a database link.
• About Database Links (page 18-57)
• Creating a Database Link (page 18-57)
• Viewing an Existing Database Link (page 18-57)
See Also:
• "Managing Database Objects with Object Browser" in Oracle ApplicationExpress SQL Workshop Guide
• "Database Links" in Oracle Database Administrator's Guide
Chapter 18Accessing Data with Database Links
18-56
18.8.1 About Database LinksBecause Oracle Application Express runs in the Oracle database, you have access toall distributed Oracle database capabilities. Typically, you perform distributed databaseoperations using database links.
A database link is a schema object in one database that enables you to access objectson another database. Once you have created the database link you can access theremote objects by appending @dblink to the table or view name where dblink is theDatabase Link Name you specify in the Create Database Object Wizard.
Note:
By default, the CREATE DATABASE LINK system privilege is not granted toa provisioned workspace or database user. To use this feature, a DBA oradministrator must grant this specific privilege to the database user in theuser's workspace. See "Creating Database Links" in Oracle DatabaseAdministrator's Guide.
18.8.2 Creating a Database LinkTo create a database link:
1. On the Workspace home page, click SQL Workshop and then Object Browser.
Object Browser home page appears.
2. Click Create.
3. Select Database Link and click Next.
4. Follow the on-screen instructions.
Note that Database Link names must conform to Oracle naming conventions andcannot contain spaces, or start with a number or underscore.
18.8.3 Viewing an Existing Database LinkTo view an existing a database link:
1. On the Workspace home page, click SQL Workshop and then Object Browser.
Object Browser appears.
2. Select the object type Database Links at the top of the page.
18.9 About DML LockingUse automatic Data Manipulation Language (DML) in Oracle Application Express toupdate or delete rows of a table.
• About DML Locking (page 18-58)
• APEX_DML_LOCK_WAIT_TIME (page 18-58)
Chapter 18About DML Locking
18-57

• FSP_DML_LOCK_ROW (page 18-58)
18.9.1 About DML LockingWhen you use automatic Data Manipulation Language (DML) in Oracle ApplicationExpress to update or delete rows of a table, a transaction is initiated to first lock therow, verify if it has changed since it was displayed on the page, and then finally issuethe actual UPDATE or DELETE statement for the row.
In some environments where locking of rows is prevalent, you may want to control theDML operation and determine if the DML operation:
• waits indefinitely
• fails immediately
• waits for a specified period of time
18.9.2 APEX_DML_LOCK_WAIT_TIMEYou can set the value of an application substitution string, an application item, or apage item to APEX_DML_LOCK_WAIT_TIME to control the DML operation.APEX_DML_LOCK_WAIT_TIME supports the following values:
• NULL (the default), results in the same behavior as previous versions of OracleApplication Express, that is, wait indefinitely.
• 0 fails immediately if the row is locked by another database session.
• > 0 and the row is locked, waits for the specified number of seconds.
When set in an application, the value for APEX_DML_LOCK_WAIT_TIME applies to all UPDATEand DELETE DML operations using Automatic DML in the entire application. To control aspecific Automatic DML process, update the value of APEX_DML_LOCK_WAIT_TIME beforethe Automatic DML process and reset it after the Automatic DML process. Note thatthis does not affect updates and deletes using tabular forms.
18.9.3 FSP_DML_LOCK_ROWYou can also set the value of an application substitution string, an application item, ora page item to FSP_DML_LOCK_ROW to control the DML operation. FSP_DML_LOCK_ROWsupports the following values:
• If the value is set to FALSE, then no SELECT FOR UPDATE is issued.
• If the value is anything other than FALSE, the default behavior of SELECT FOR UPDATEis performed when issuing an UPDATE or DELETE DML operation using AutomaticDML.
Chapter 18About DML Locking
18-58
19Extending Application Capabilities
Learn about how to extend application capabilities including managing email, runningbackground PL/SQL, utilizing plug-ins, and understanding jQuery support.
• Sending Email from an Application (page 19-1)To configure and manage email in Oracle Application Express, an Instanceadministrator must log in to Oracle Application Express Administration Services.
• Implementing Plug-ins (page 19-3)Create plug-ins to declaratively extend, share, and reuse the built-in typesavailable with Oracle Application Express.
• Understanding jQuery and jQuery UI Support (page 19-12)Oracle Application Express includes the jQuery 3.1.1 and jQuery UI 1.12.x.
• Manually Refreshing Oracle Application Express Components (page 19-13)Trigger the apexrefresh event for the relevant component.
See Also:
• Oracle Application Express API Reference
• "Deploying an Application (page 24-1)"
19.1 Sending Email from an ApplicationTo configure and manage email in Oracle Application Express, an Instanceadministrator must log in to Oracle Application Express Administration Services.
• About Configuring Email (page 19-2)To enable Oracle Application Express to send email, an Instance administratormust configure email settings.
• About Email Provisioning (page 19-2)You can configure Oracle Application Express to automatically email users theirlogin credentials when a new workspace request has been approved. Toaccomplish this, you must complete the email configuration process and select theprovisioning status, Request with Email Verification.
• About the Mail Queue (page 19-2)Instance administrators can manage email sent from applications by monitoringemail messages in the mail queue and mail log.
• About the APEX_MAIL Package (page 19-3)You can send email from an Oracle Application Express application using theAPEX_MAIL package.
19-1
19.1.1 About Configuring EmailTo enable Oracle Application Express to send email, an Instance administrator mustconfigure email settings.
• About Enabling Network Services (page 19-2)
• About Configuring Email in a Full Development Environment (page 19-2)
See Also:
"Configuring Email" in Oracle Application Express Administration Guide
19.1.1.1 About Enabling Network ServicesBy default, the ability to interact with network services is disabled in Oracle Database11g Release 1 or 2 or later. Therefore, if you are running Oracle Application Expresswith Oracle Database 11g Release 1 or 2 or later, you must use the newDBMS_NETWORK_ACL_ADMIN package to grant connect privileges to any host for theapex_180100 database user. Failing to grant these privileges results in issues with:
• Sending outbound mail in Oracle Application Express.
• Using Web services in Oracle Application Express.
• PDF/report printing.
19.1.1.2 About Configuring Email in a Full Development EnvironmentTo configure Oracle Application Express to send mail in a full developmentenvironment your Instance administrator must log in to Oracle Application ExpressAdministration Services, navigate to the Instance Settings page and configure Emailattributes.
19.1.2 About Email ProvisioningYou can configure Oracle Application Express to automatically email users their logincredentials when a new workspace request has been approved. To accomplish this,you must complete the email configuration process and select the provisioning status,Request with Email Verification.
19.1.3 About the Mail QueueInstance administrators can manage email sent from applications by monitoring emailmessages in the mail queue and mail log.
Chapter 19Sending Email from an Application
19-2
19.1.4 About the APEX_MAIL PackageYou can send email from an Oracle Application Express application using theAPEX_MAIL package.
The APEX_MAIL package is built on top of the Oracle supplied UTL_SMTP package.Because of this dependence, the UTL_SMTP package must be installed and functioningto use APEX_MAIL.
19.2 Implementing Plug-insCreate plug-ins to declaratively extend, share, and reuse the built-in types availablewith Oracle Application Express.
• About Plug-ins (page 19-3)
• Accessing the Plug-ins Page (page 19-4)
• Creating a Plug-in (page 19-4)
• Editing a Plug-in (page 19-6)
• Adding Custom Attributes to a Plug-in (page 19-6)
• Uploading Files Associated with a Plug-in (page 19-7)
• Adding Events to a Plug-in (page 19-9)
• Deleting a Plug-in (page 19-9)
• Viewing the Plug-in Repository (page 19-10)
• Importing a Plug-in from the Plug-in Page (page 19-10)
• Exporting a Plug-in from the Plug-in Page (page 19-11)
• Resetting the Plug-in Interactive Report (page 19-11)
• Viewing Plug-in Utilization Page (page 19-11)
• Viewing Plug-in History (page 19-12)
19.2.1 About Plug-insOracle Application Express supports a set group of authentication scheme,authorization scheme, item, region, dynamic action, and process types. Plug-ins offera means of augmenting these built-in types by declaratively creating and using newtypes in your application. Because plug-ins are designed for reuse, developers canexport and import them to other workspaces and also share them with the OracleApplication Express Plug-in community by using the Plug-in Repository.
The process of implementing a plug-in involves the following steps:
1. Create a plug-in or import a plug-in into your application workspace.
2. Edit or create an authorization scheme, item, region, process, or dynamic actiontype to use the plug-in.
3. Run your application to test the plug-in.
Chapter 19Implementing Plug-ins
19-3
Viewing Plug-in Examples
You can view plug-in implementation examples in the following locations:
• Go to the Oracle Plug-in Repository.
See "Viewing the Plug-in Repository (page 19-10)."
• Install the packaged application, Sample Database Application.
See "Managing Packaged Applications in a Full Development Environment(page 3-2)" and "Installing and Running Sample Database Application (page 3-7)."
• Go to the Oracle Learning Library at http://www.oracle.com/oll/apex. Enter searchcriteria in the field provided and click Search.
19.2.2 Accessing the Plug-ins PageTo access the Plug-ins page
1. Navigate to the Shared Components page:
a. On the Workspace home page, click App Builder.
b. Select an application.
c. On the Application home page, click Shared Components.
The Shared Components page appears.
2. Under Other Components, click Plug-ins.
The Plug-ins page displays with the Plug-ins tab selected by default. All availableplug-ins appear.
You can customize the appearance of the page using the Search bar at the top ofthe page.
19.2.3 Creating a Plug-inTo create a plug-in:
Tip:
To learn more about an attributes described in this section see field-levelHelp. See "Viewing Field-level Help in Oracle Application Express(page 1-29)."
1. Navigate to the Shared Components page:
a. On the Workspace home page, click App Builder.
b. Select an application.
c. On the Application home page, click Shared Components.
The Shared Components page appears.
2. Under Other Components, click Plug-ins.
Chapter 19Implementing Plug-ins
19-4
3. Click Create.
The Create Plug-in wizard appears.
4. For Create Plug-in, select the method by which you would like to create a plug-inand click Next.
5. Under Name:
a. Name (Required) - Enter name of the plug-in.
b. Internal Name (Required) - Enter the internal name of the plug-in. This namemust be unique within the current application.
Note:
To insure the internal name is a globally unique name worldwide,Oracle recommends that your organization domain name be used asa prefix to internal plug-in names. For example, a domain name ofexample.com.com prefixed to a plug-in named Slider, would result inan internal name of COM.EXAMPLE.SLIDER.
c. Type (Required) - Select the type of component that can use this plug-in.Depending upon the plug-in type you select, the options under Callbacks andStandard Attributes differ. To learn more, see field-level Help.
d. Category - Only displays if the selected type is Dynamic Action. Select thecategory the plug-in is displayed under on the user interface.
6. Under Subscription:
• Reference Master Plug-in From - To base this plug-in on another plug-in in thisworkspace, select the plug-in from the list. Otherwise, leave the field blank tomake this the master copy of this plug-in.
7. Under Source:
a. PL/SQL Code - Enter a PL/SQL anonymous block of code that contains theprocedures for rendering, validating, executing, and performing Ajax callbacksfor this plug-in. For performance reasons you can also store this code in aPL/SQL package in the database.
b. Do not validate PL/SQL code (parse PL/SQL code at runtime only) - Selectthis option to parse the PL/SQL code at runtime only. Otherwise, the code isparsed when the plug-in is created.
8. Under Callbacks, configure that appropriate attributes. The attributes that displaydepend upon the plug-in type. To learn more about an attribute and viewexamples, see field-level Help.
Tip:
All Callback function names can reference a function of the anonymousPL/SQL code block, a function within a package or a standalone functionin the database.
9. Under User Interfaces, select the display devices the App Builder must support forthis plug-in. Options include:
Chapter 19Implementing Plug-ins
19-5
• Desktop
• Mobile
10. For Standard Attributes, select the attributes that apply to this plug-in. StandardAttributes do not display for some plug-ins. To learn more, see field-level Help.
11. Under Information:
a. Version - Enter a string to identify the plug-in version.
b. About URL - Enter a URL to the plug-in authors home page or to additionalinformation about the plug-in.
12. For Help Text, enter help text used by the user to understand how the plug-inworks.
13. For Comments, enter comments and notes that never display when the applicationis running.
To learn more about each option, see field-level Help.
14. Click Create. Plug-in.
Now that the plug-in is created, you can specify additional custom attributes,upload files such as image, CSS and JavaScript files to associate with your plug-inand add events.
19.2.4 Editing a Plug-inTo edit a plug-in:
1. Navigate to the Shared Components page:
a. On the Workspace home page, click App Builder.
b. Select an application.
c. On the Application home page, click Shared Components.
The Shared Components page appears.
2. Under Other Components, click Plug-ins.
3. Click the plug-in you want to edit or view.
The Plug-in Create/Edit page appears.
4. Make modifications.
To learn more about each option, see field-level Help.
5. Click Apply Changes.
19.2.5 Adding Custom Attributes to a Plug-inCustom Attributes specified by the developer might contain items referenced withsubstitution syntax.
To add custom attributes to the plug-in:
1. Navigate to the Shared Components page:
a. On the Workspace home page, click App Builder.
b. Select an application.
Chapter 19Implementing Plug-ins
19-6
c. On the Application home page, click Shared Components.
The Shared Components page appears.
2. Under Other Components, click Plug-ins.
3. Click the plug-in you want to modify.
The Plug-in Create/Edit page appears.
4. Under Custom Attributes, enable or disable the substitution of attribute values.
• Substitute Attribute Values - Custom attribute values specified by thedeveloper might contain items referenced with substitution syntax, for example&P1_DNAME.
If set to Yes, Application Express automatically replaces substitution syntaxwith their actual values.
If set to No, substitution syntax is written unchanged into the attribute_01through attribute_15 record type attributes of p_plugin, p_item, p_region, andso on. The plug-in developer is responsible for replacing those substitutionsyntax references with a call to apex_plugin_util.replace_substitutions orperform similar replacements. See item help for further details.
To learn more, see field-level Help.
5. To add an attribute click Add Attribute.
The Edit Attribute page appears. Edit the appropriate attributes.
To learn more about a specific attribute, see field-level Help.
6. Click Create to create the attribute and go back to the Edit page, or click Createand Create Another to create the attribute and continue to create anotherattribute.
Note:
If you click Create or Create and Create Another and the Return To Pagecheck box on the right panel under Plug-ins is checked, this same EditAttribute page displays.
19.2.6 Uploading Files Associated with a Plug-inLearns how to upload the files associated with a plug-in.
• Uploading a File to Associate with a Plug-in (page 19-7)
• Automatically Loading CSS and JavaScript Files (page 19-8)
19.2.6.1 Uploading a File to Associate with a Plug-inTo upload a file:
1. Navigate to the Shared Components page:
a. On the Workspace home page, click App Builder.
b. Select an application.
Chapter 19Implementing Plug-ins
19-7
c. On the Application home page, click Shared Components.
The Shared Components page appears.
2. Under Other Components, click Plug-ins.
3. Select the plug-in.
The Plug-in Create/Edit page appears.
4. Locate the Files section.
File Prefix determines the virtual path the Web server uses to point to the files ofthe plug-in. Do not specify anything to reference files which are stored with yourplug-in definition in the database.
5. To upload a file:
a. Click Upload File.
b. Browse to and select the file you want to upload.
c. Click Upload.
The Create/Edit page appears. The name of the uploaded file appears underFiles.
6. Click Apply Changes.
19.2.6.2 Automatically Loading CSS and JavaScript FilesYou can have Oracle Application Express automatically load CSS and JavaScript fileswhen a plug-in is used on a page by configuring the File URLs to Load attributes. Tospecify which of the uploaded files should be loaded and in what order.
To automatically load a CSS or JavaScript file:
1. Navigate to the Shared Components page:
a. On the Workspace home page, click App Builder.
b. Select an application.
c. On the Application home page, click Shared Components.
The Shared Components page appears.
2. Under Other Components, click Plug-ins.
3. Select the plug-in.
The Plug-in Create/Edit page appears.
4. Under File URLs to Load:
a. Cascading Style Sheet - Enter Cascading Style Sheet file URLs to be loadedwith this plug-in.
b. JavaScript - Enter JavaScript file URLs for code to be loaded with this plug-in.
You can substitute with the value of the plug-in's file prefix by using substitutionstring #PLUGIN_FILES#. For example:
#PLUGIN_FILES#my_plugin.css
To learn more and view examples, see field-level Help.
5. Click Apply Changes.
Chapter 19Implementing Plug-ins
19-8
19.2.7 Adding Events to a Plug-inThis section describes how to add events to an item, region, or dynamic action typeplug-in, enables them to be exposed to dynamic actions. For example, a Slider plug-inthat exposes events such as Start Slide, Sliding, and Stop Slide, allows the creation ofdynamic actions that can react when these events occur.
To add events to a plug-in:
1. Navigate to the Shared Components page:
a. On the Workspace home page, click App Builder.
b. Select an application.
c. On the Application home page, click Shared Components.
The Shared Components page appears.
2. Under Other Components, click Plug-ins.
3. Click the plug-in you want to edit.
The Plug-in Create/Edit page appears
4. Under Events and click Add Event.
A new row displays under Events.
5. Under Events:
a. Name - The display name under which the plug-in event appears in thedynamic action, for example: Start Slide.
b. Internal Name - The name of the assigned JavaScript event that triggers thedynamic action, for example: slidestart.
6. Click Add Event.
7. Repeat steps 3 through 4 to add another event.
8. Click Apply Changes.
19.2.8 Deleting a Plug-inYou can delete a plug-in if it is not in use. If it is in use, the Delete button does notdisplay.
To delete a plug-in:
1. Navigate to the Shared Components page:
a. On the Workspace home page, click App Builder.
b. Select an application.
c. On the Application home page, click Shared Components.
The Shared Components page appears.
2. Under Other Components, click Plug-ins.
3. Click the plug-in you want to delete.
The Plug-in Create/Edit page appears.
Chapter 19Implementing Plug-ins
19-9
4. Click Delete.
5. To confirm, click OK.
19.2.9 Viewing the Plug-in RepositoryThe Plug-in Repository provides a central location where developers can share anddownload plug-ins. The repository is located on the Oracle Technology Network.
To view the Plug-in repository:
1. Navigate to the Shared Components page:
a. On the Workspace home page, click App Builder.
b. Select an application.
c. On the Application home page, click Shared Components.
The Shared Components page appears.
2. Under Other Components, click Plug-ins.
3. Click View Plug-in Repository.
The Oracle Application Express Plug-in Repository displays.
19.2.10 Importing a Plug-in from the Plug-in PageUse this option to import an exported plug-in to your application. Importing a plug-incan be done from the Plug-ins page under Shared Components, as described here, orfrom the App Builder home page.
To import a plug-in:
1. Navigate to the Shared Components page:
a. On the Workspace home page, click App Builder.
b. Select an application.
c. On the Application home page, click Shared Components.
The Shared Components page appears.
2. Under Other Components, click Plug-ins.
3. Click Import.
The import Plug-in page appears.
4. For Specify File:
a. Import file - Enter or browse to the name of the import file.
b. File Type - Select Plug-in.
c. File Character Set - Select the import file character set encoding.
d. Click Next.
5. For File Import Confirmation, click Next.
6. For Install, click Install Plug-in.
Chapter 19Implementing Plug-ins
19-10
19.2.11 Exporting a Plug-in from the Plug-in PageUse this option to export a plug-in definition to a file. This file can be imported into anyAPEX application. Exporting a plug-in can be done from the Plug-ins page underShared Components, as described here, or from the workspace home page.
To export a plug-in from the Plug-in page:
1. Navigate to the Shared Components page:
a. On the Workspace home page, click App Builder.
b. Select an application.
c. On the Application home page, click Shared Components.
The Shared Components page appears.
2. Under Other Components, click Plug-ins.
3. Under Tasks, click Export Plug-in.
The Export Plug-in page appears.
4. On the Export Plug-in page:
a. Application - Select the application to export the plug-in from.
b. Plug-in - Select plug-in.
c. File Format - Select file format of the plug-in export.
d. Click Export
5. Click Export.
A downloads complete message appears.
19.2.12 Resetting the Plug-in Interactive ReportYou can reset the plug-in interactive report to clear all current filters applied to thereport.
To reset the interactive report:
1. Navigate to the Shared Components page:
a. On the Workspace home page, click App Builder.
b. Select an application.
c. On the Application home page, click Shared Components.
The Shared Components page appears.
2. Under Other Components, click Plug-ins.
3. On the Plug-ins page, click Reset.
19.2.13 Viewing Plug-in Utilization PageThe Plug-in Utilization page displays which pages, components, and regions use eachplug-in.
To view plug-in utilization:
Chapter 19Implementing Plug-ins
19-11
1. Navigate to the Shared Components page:
a. On the Workspace home page, click App Builder.
b. Select an application.
c. On the Application home page, click Shared Components.
The Shared Components page appears.
2. Under Other Components, click Plug-ins.
3. Click Utilization.
The Utilization page appears.
19.2.14 Viewing Plug-in HistoryThe Plug-in History page shows the actions taken on each plug-in, the developer thatperformed the action and the date of each action.
To view plug-in history:
1. Navigate to the Shared Components page:
a. On the Workspace home page, click App Builder.
b. Select an application.
c. On the Application home page, click Shared Components.
The Shared Components page appears.
2. Under Other Components, click Plug-ins.
3. Click History.
The History page appears.
19.3 Understanding jQuery and jQuery UI SupportOracle Application Express includes the jQuery 3.1.1 and jQuery UI 1.12.x.
• About Upgrading to jQuery 3.1.1 (page 19-12)
• About Upgrading to jQuery UI 1.12.x (page 19-13)
19.3.1 About Upgrading to jQuery 3.1.1jQuery 3.1.1 breaks compatibility with earlier 2.x versions. If you application relies onremoved jQuery 2.x functionality, you can use the jQuery Migrate plug-in. To includethe jQuery Migrate plug-in, go to Desktop User Interface Details and set IncludejQuery Migrate to Yes.
If your application relies on removed 1.x jQuery APIs, be aware that this functionalityno longer works as of Oracle Application Express release 18.1. You must update theJavaScript to only use jQuery 3.1 APIs. See the jQuery migration guides to learn more:
• To migrate from 1.x to 2.x see http://jquery.com/upgrade-guide/1.9/
• To migrate from 2.x to 3.x see https://jquery.com/upgrade-guide/3.0/
Chapter 19Understanding jQuery and jQuery UI Support
19-12
19.3.2 About Upgrading to jQuery UI 1.12.xjQuery UI 1.12.x has changed the folder structure and files that make up the librarycompared to jQuery UI 1.10.4. If you have direct references to any of the old filefilenames, you must update them to the new name. For example, if you previouslyreferenced the tabs widget with #JQUERYUI_DIRECTORY#ui/#MIN_DIRECTORY#jquery.ui.tabs#MIN#.js, you must change it to #JQUERYUI_DIRECTORY#ui/widgets/#MIN_DIRECTORY#tabs#MIN#.js.
The Oracle Application Express specific bundle jquery-ui-apex[.min].js that loads bydefault for Application Express desktop UI pages (either as jquery-ui-apex.js or aspart of desktop[_all].min.js) includes all the core files, the drop effect, and thefollowing widgets:
• button
• checkboxradio
• controlgroup
• datepicker
• dialog
• draggable
• droppable
• resizable
• selectable
• sortable
• tooltip
This is essentially the same set as in 1.10.4 with the addition of sortable. If you have aseparate reference to sortable, you can remove it.
The jquery-ui-apex[.min].css file loads by default and includes all the jQuery UI CSSfiles. If you had references to individual jQuery UI css files, you can remove them.
19.4 Manually Refreshing Oracle Application ExpressComponents
Trigger the apexrefresh event for the relevant component.
Although the Dynamic Action framework provides refresh capability for supportedOracle Application Express components, there may be cases where you wish tomanually invoke a refresh from JavaScript code. To do this, you can trigger theapexrefresh event for the relevant component, as follows:
apex.event.trigger( "#myRegionStaticID", "apexrefresh" );
Chapter 19Manually Refreshing Oracle Application Express Components
19-13
20Managing Application Security
Administrators are primarily responsible for ensuring the security of the OracleApplication Express installation and developers are responsible for building secureapplications. Learn about how to implement best practices for Oracle ApplicationExpress application security.
• Understanding Administrator Security Best Practices (page 20-1)Learn about security best practices for Oracle Application Express administrators.
• Understanding Developer Security Best Practices (page 20-16)
• Controlling Access to Applications, Pages, and Page Components (page 20-36)Control access to an application, individual pages, or page components bycreating an access control list.
• Establishing User Identity Through Authentication (page 20-48)Use authentication to establish a user's identity to control access to an application.Authentication may require a user identify a user name and password or couldinvolve the use of digital certificates or a secure key.
• Providing Security Through Authorization (page 20-63)Extend the security of your application by creating an authorization scheme.
See Also:
"Running Advisor to Check Application Integrity (page 23-1)"
20.1 Understanding Administrator Security Best PracticesLearn about security best practices for Oracle Application Express administrators.
Tip:
This section references many settings in the Oracle Application ExpressAdministration Services application. Functionality in the AdministrationServices application is not available in Oracle Database Cloud Service(Database Schema).
• About Oracle Application Express Administrator Roles (page 20-3)Oracle Application Express includes two different types of administrators:Workspace administrators and Instance administrators.
20-1
• About Configuring Oracle REST Data Services with Oracle Application Express(page 20-3)Oracle recommends using Oracle REST Data Services with Oracle ApplicationExpress.
• About Configuring Oracle HTTP Server with mod_plsql with Oracle ApplicationExpress (page 20-4)Oracle HTTP Server uses the mod_plsql plug-in to communicate with the OracleApplication Express engine within the Oracle database. mod_plsql functions act asa communication broker between the web server and the Oracle ApplicationExpress engine in the Oracle database.
• About Security Considerations When Using the Embedded PL/SQL Gateway(page 20-4)The embedded PL/SQL gateway runs in the database as part of the Oracle XMLDB HTTP listener. The Oracle XML DB HTTP listener and embedded PL/SQLgateway provides the equivalent core features of Oracle HTTP Server andmod_plsql.
• Managing Instance Security (page 20-4)Learn about security best practices when managing an Oracle Application Expressinstance.
• Configuring Instance Settings (page 20-10)Security best practices when configuring an Oracle Application Express instanceinclude determining whether to automate the creation workspaces., enabling andconfiguring email, configuring storage options, and creating wallets.
• About Configuring Workspace Purge Settings (page 20-11)Save storage space and improve system performance by purging inactiveworkspaces.
• Understanding Workspace Management (page 20-11)Instance administrators can define associations between workspaces andschemas. Administrators can manage developers and users at the workspace orinstance-level and control user access to key components such App Builder, TeamDevelopment, and SQL Workshop, and PL/SQL editing.
• About Integrating with Oracle BI Publisher (page 20-12)Oracle recommends that you employ Secure Sockets Layer (SSL) whenintegrating Oracle Application Express with Oracle BI Publisher. Once SSL(HTTPS protocol) is configured for your Oracle BI Publisher server, you mustcreate a wallet and specify the HTTPS protocol for the Report Server in theinternal administration Environment Settings.
• About the Advantages of the Application Express Runtime Environment(page 20-13)An Oracle Application Express runtime environment enables you to run productionapplications, but does not provide a web interface for administration or directdevelopment of these applications
• Enabling Network Services in Oracle Database 11g or Later (page 20-13)You must enable network services in Oracle Database 11g or later versions tosend outbound mail, use Web services, or use PDF report printing in OracleApplication Express.
Chapter 20Understanding Administrator Security Best Practices
20-2
See Also:
"Understanding Developer Security Best Practices (page 20-16)"
20.1.1 About Oracle Application Express Administrator RolesOracle Application Express includes two different types of administrators: Workspaceadministrators and Instance administrators.
To access the Oracle Application Express development environment, users log in to ashared work area called a workspace. Workspace administrators are users whoperform administrator tasks specific to a workspace such as managing user accounts,monitoring workspace activity, and viewing log files. Instance administrators aresuperusers that manage an entire hosted instance using the Application ExpressAdministration Services application.
Tip:
The role of Instance administrator is not available in Oracle Database CloudService (Database Schema).
20.1.2 About Configuring Oracle REST Data Services with OracleApplication Express
Oracle recommends using Oracle REST Data Services with Oracle ApplicationExpress.
Oracle REST Data Services (formerly known as Oracle Oracle Application ExpressListener) is a J2EE application which communicates with the Oracle Database bymapping browser requests to the Application Express engine database over aSQL*Net connection. Oracle REST Data Services is the strategic direction for OracleApplication Express and Oracle recommends using it in practically all circumstances.In a production environment, you deploy Oracle REST Data Services web archive filesto a supported Java EE application server, like Oracle Web Logic Server. Eachdeployment can be configured individually and serves the same purpose as amod_plsql Database Access Descriptor, which is to communicate with an Oracledatabase.
An Oracle REST Data Services deployment configuration contains several securityrelated parameters. In a configuration for Oracle Application Express, Oraclerecommends to set the parameter security.requestValidationFunction towwv_flow_epg_include_modules.authorize. This activates the white list of callableprocedures which ships with Oracle Application Express and prohibits calls to otherprocedures. This can be extended using the validation functions shipped with OracleApplication Express.
Chapter 20Understanding Administrator Security Best Practices
20-3
20.1.3 About Configuring Oracle HTTP Server with mod_plsql withOracle Application Express
Oracle HTTP Server uses the mod_plsql plug-in to communicate with the OracleApplication Express engine within the Oracle database. mod_plsql functions act as acommunication broker between the web server and the Oracle Application Expressengine in the Oracle database.
Tip:
mod_plsql is deprecated as of Oracle HTTP Server 12c (12.1.3). For moreinformation about this deprecation, please see My Oracle Support Note1576588.1. Oracle recommends using Oracle REST Data Services instead.
Each mod_plsql request is associated with a set of configuration values used to accessthe database called a Database Access Descriptor (DAD). mod_plsql provides a DADparameter called PlsqlRequestValidationFunction which enables you to allow ordisallow further processing of a requested procedure. You can utilize this parameter toimplement tighter security for your PL/SQL application by blocking package andprocedure calls which should not be allowed to run from the DAD. Oracle recommendsa DAD configuration for Oracle Application Express which utilizes thePlsqlRequestValidationFunction directive with a value ofwwv_flow_epg_include_modules.authorize.
The purpose of the PlsqlRequestValidationFunction parameter is to control whichprocedures can be invoked through mod_plsql. By default, the only procedurespermitted are the public entry points of Oracle Application Express. This can beextended using the validation functions shipped with Oracle Application Express.
20.1.4 About Security Considerations When Using the EmbeddedPL/SQL Gateway
The embedded PL/SQL gateway runs in the database as part of the Oracle XML DBHTTP listener. The Oracle XML DB HTTP listener and embedded PL/SQL gatewayprovides the equivalent core features of Oracle HTTP Server and mod_plsql.
Because the HTTP Listener runs in the same database where Oracle ApplicationExpress is installed, it is not possible to separate the HTTP listener from the database.For this reason, Oracle does not recommend the embedded PL/SQL gateway forapplications that run on the Internet or for production applications. Oracle recommendsusing Oracle REST Data Services instead. Additionally, the embedded PL/SQLgateway does not provide the same flexibility of configuration and detailed logging asOracle REST Data Services.
20.1.5 Managing Instance SecurityLearn about security best practices when managing an Oracle Application Expressinstance.
Chapter 20Understanding Administrator Security Best Practices
20-4

• About Creating Login Controls (page 20-6)Administrators can configure login controls for an entire instance or for individualworkspaces.
• About Enabling Public File Upload (page 20-6)Administrators can use the Allow Public File Upload attribute to control whetherunauthenticated users can upload files in applications that provide file uploadcapability
• About Restricting User Access by IP Address (page 20-6)Administrators can restrict user access to an Oracle Application Express instanceby entering a comma-delimited list of allowable IP addresses in the RestrictAccess by IP Address attribute on the Manage Instance, Security page.
• About Specifying an Instance Proxy (page 20-6)Administrators can use the Instance Proxy attribute to configure an entire OracleApplication Express instance to use a proxy for all outbound HTTP traffic.
• About Utilizing Secure Sockets Layer (page 20-6)Secure Sockets Layer (SSL) is a protocol for managing the security of datatransmitted on the Internet. For web applications, SSL is implemented by using theHTTPS protocol. Oracle recommends that you run Oracle Application Expressapplications using SSL (HTTPS protocol) to prevent any sensitive data from beingsent over an unencrypted (cleartext) communication channel.
• About Enabling RESTful Access (page 20-7)Administrators can use the Allow RESTful Access attribute to control whetherdevelopers can expose report regions as RESTful services.
• About Rejoin Sessions (page 20-7)Use the Rejoin Sessions attribute to control if Oracle Application Express supportsapplication URLs that do not contain session IDs.
• About Isolating Workspaces (page 20-8)Isolating workspaces is an effective approach to preventing browser attacks.
• About Utilizing Session Timeout (page 20-8)By configuring Session Timeout attributes, you can reduce your application'sexposure.
• Restricting Password Reuse (page 20-8)Site administrators can restrict password reuse for all administrator, developer,and end-user accounts based on a history of passwords previously used for theaccounts.
• About Using SQL in Websheets (page 20-9)Disabling the Allow SQL Websheet attribute enables administrators to preventWebsheet users from accessing underlying database objects using SQL tags orfrom creating SQL reports.
• About Enabling RESTful Services (page 20-9)Administrators can control the ability to create and access RESTful Services ateither the workspace or instance-level.
See Also:
"Configuring Security Settings" in Oracle Application Express AdministrationGuide
Chapter 20Understanding Administrator Security Best Practices
20-5
20.1.5.1 About Creating Login ControlsAdministrators can configure login controls for an entire instance or for individualworkspaces.
Workspace administrators and developers can create user accounts for the purpose oflogging in to the Oracle Application Express development environment and for end-user authentication to applications developed within their workspaces.
Administrators can configure login controls at the instance or workspace level. Forexample, if an Instance administrator configures account login controls in OracleApplication Express Administration Services that configuration applies to allApplication Express accounts in all workspaces across an entire developmentinstance.
If the Instance administrator does not enable login controls across an entire instance,then each Workspace administrator can enable the following controls on a workspace-by-workspace basis:
• End-user account expiration and locking.
• A maximum number of failed login attempts for end-user accounts.
• The password lifetime (or number of days an end-user account password can beused before it expires for end-user accounts).
20.1.5.2 About Enabling Public File UploadAdministrators can use the Allow Public File Upload attribute to control whetherunauthenticated users can upload files in applications that provide file uploadcapability
20.1.5.3 About Restricting User Access by IP AddressAdministrators can restrict user access to an Oracle Application Express instance byentering a comma-delimited list of allowable IP addresses in the Restrict Access by IPAddress attribute on the Manage Instance, Security page.
20.1.5.4 About Specifying an Instance ProxyAdministrators can use the Instance Proxy attribute to configure an entire OracleApplication Express instance to use a proxy for all outbound HTTP traffic.
Setting a proxy at the instance-level supersedes any proxies defined at theapplication-level or in web service references. If a proxy is specified, regions of typeURL, Web services, and report printing will use the proxy.
20.1.5.5 About Utilizing Secure Sockets LayerSecure Sockets Layer (SSL) is a protocol for managing the security of data transmittedon the Internet. For web applications, SSL is implemented by using the HTTPSprotocol. Oracle recommends that you run Oracle Application Express applications
Chapter 20Understanding Administrator Security Best Practices
20-6
using SSL (HTTPS protocol) to prevent any sensitive data from being sent over anunencrypted (cleartext) communication channel.
Instance administrators can configure both their Oracle Application Express instanceand all related applications to require HTTPS by configuring the Require HTTPS andRequire Outbound HTTPS attributes. Configuring these attributes forcesauthenticated pages within the App Builder to require HTTPS which encrypts networkcommunications. Changing the Require HTTPS option does not affect the web serverin any way. You will still need to enable the web server for HTTPS for these options tohave any meaning. To learn more about enabling HTTPS, see the documentation foryour specific web server.
Require HTTPS options include:
• Always - Enforces HTTPS for all applications (including the Oracle ApplicationExpress development and administration applications) to require HTTPS.
• Development and Administration - Forces all internal applications within OracleApplication Express (that is, App Builder, SQL Workshop, Instance Administrationand so on) to require HTTPS.
• Application specific - Makes HTTPS dependent on application-level settings.
20.1.5.6 About Enabling RESTful AccessAdministrators can use the Allow RESTful Access attribute to control whetherdevelopers can expose report regions as RESTful services.
20.1.5.7 About Rejoin SessionsUse the Rejoin Sessions attribute to control if Oracle Application Express supportsapplication URLs that do not contain session IDs.
Tip:
For security reasons, Oracles recommends that administrators disableRejoin Sessions unless they implement workspace isolation by configuringthe Allow Hostname attribute at the workspace or instance-level. See "AboutIsolating Workspaces (page 20-8)."
When rejoin sessions is enabled, Oracle Application Express attempts to use thesession cookie to join an existing session, when a URL does not contain a session ID.To use Rejoin Sessions, administrators must enable Rejoin Sessions at the applicationor page-level. Note that a more restrictive value of Rejoin Sessions at the instance-level overrides application and page settings.
While supporting session joins is convenient, it does present some serious securityrisks:
• Triggering malicious session state changes or other modifications.
If an attacker tricks the user into clicking an application link, this can triggermalicious session state changes or other modifications. Because of this risk,
Chapter 20Understanding Administrator Security Best Practices
20-7
Application Express requires a checksum that the attacker will not be able toguess when processing requests that alters data.
• Triggering unintended changes between applications.
If a user has two applications open in separate tabs on the same OracleApplication Express instance, one application could trigger unintended changes inthe other one. The attacking application could be written by a hacker or it couldhave an XSS vulnerability that enables an attacker to inject code. This applicationcould use Ajax calls that simulate user interactions with the other application.
20.1.5.8 About Isolating WorkspacesIsolating workspaces is an effective approach to preventing browser attacks.
The only way to truly isolate a workspace is to enforce different domains in the URL byconfiguring the Allow Hostnames attribute in Oracle Application ExpressAdministration Services. When the URLs of the attacker and the victim have differentdomains and hostnames, the browser's same-origin policy prevents attacks.
Workspace isolation by configuring Allow Hostnames is a counter measure againstclient side attacks that attempt to cross workspace boundaries. This security measureis not necessary if you trust all applications that are accessible using the instance'shost which includes applications that are written in other frameworks and languagessuch as Oracle Application Development Framework (ADF) and Java.
20.1.5.9 About Utilizing Session TimeoutBy configuring Session Timeout attributes, you can reduce your application'sexposure.
Users often leave their computers unattended for extended periods and do not closeapplications before departing. Therefore, an unauthorized person can easily assumethe user's identity within the application. By setting the session and idle timeout, usersare automatically logged out of their application after the specified timeout.
Session Timeout attributes include:
• Maximum Session Length in Seconds
• Session Timeout URL
• Maximum Session Idle Time in Seconds
• Idle Timeout URL
Developers can configure session time out for a specific application, or administratorscan configure sessions time out for an entire instance.
20.1.5.10 Restricting Password ReuseSite administrators can restrict password reuse for all administrator, developer, andend-user accounts based on a history of passwords previously used for the accounts.
To restrict password reuse:
Chapter 20Understanding Administrator Security Best Practices
20-8
1. Start SQL*Plus and connect to the database where Oracle Application Express isinstalled having the apex_administrator_role role or as SYS specifying the SYSDBArole. For example:
• On Windows:
SYSTEM_DRIVE:\ sqlplus /nologSQL> CONNECT SYS as SYSDBAEnter password: SYS_password
• On UNIX and Linux:
$ sqlplus /nologSQL> CONNECT SYS as SYSDBAEnter password: SYS_password
Tip:
The APEX_ADMINISTRATOR_ROLE must be granted directly to a user and notthrough another database role.
2. Execute the following statement:
ALTER SESSION SET CURRENT_SCHEMA = apex_180100;
3. Execute the following statement:
BEGINAPEX_INSTANCE_ADMIN.SET_PARAMETER('PASSWORD_HISTORY_DAYS',365);COMMIT;END;/
This restricts new or updated passwords to those that have not been used for theaccount for the previous 365 days. Recording of previously used passwords(actually, hashed representations of passwords) begins upon installation of OracleApplication Express.
4. To disable this feature, run the block above, providing 0 for the parameter value.For example:
BEGINAPEX_INSTANCE_ADMIN.SET_PARAMETER('PASSWORD_HISTORY_DAYS',0);COMMIT;END;/
20.1.5.11 About Using SQL in WebsheetsDisabling the Allow SQL Websheet attribute enables administrators to preventWebsheet users from accessing underlying database objects using SQL tags or fromcreating SQL reports.
20.1.5.12 About Enabling RESTful ServicesAdministrators can control the ability to create and access RESTful Services at eitherthe workspace or instance-level.
Chapter 20Understanding Administrator Security Best Practices
20-9
Disabling the Enable RESTful Services attribute prevents developers from creatingand editing RESTful Web Services mapped to SQL and PL/SQL in conjunction withOracle REST Data Services 2.0 or later.
To configure Enable RESTful Services:
• In Workspace Administration — Sign in to Oracle Application Express and click theAdministration menu. Select Manage Service, Set Workspace Preferences,SQL Workshop and find the Enable RESTful Services attribute.
• In Instance Administration — Sign in to Oracle Application Express AdministrationServices. Under Instance Settings, click Feature Configuration and click FeatureConfiguration. Find the REST tab and then Enable RESTful Services attribute.
20.1.6 Configuring Instance SettingsSecurity best practices when configuring an Oracle Application Express instanceinclude determining whether to automate the creation workspaces., enabling andconfiguring email, configuring storage options, and creating wallets.
• About Enabling Automation When Creating Workspaces (page 20-10)
• About Enabling and Configuring Email (page 20-11)
• About Configuring Storage Options (page 20-11)
• About Creating Wallets (page 20-11)
See Also:
"Configuring Instance Settings" in Oracle Application Express AdministrationGuide
20.1.6.1 About Enabling Automation When Creating WorkspacesAdministrators determine the amount of automation when provisioning (or creating)new workspaces.
To determine how provisioning works, an Instance Administrator selects one of thefollowing options on the Instance Settings page:
• Manual - The administrator creates new workspaces and manually notifies theWorkspace administrator of the login information.
• Request - Users request workspaces directly in a self-service fashion.
• Request with Email Verification - In this mode, users request workspacesdirectly by clicking a link on the login page to access a request form. Each userreceives an initial email containing a verification link. When the user clicks theverification link, the request is processed. The user can then access theworkspace using the Sign In page.
Chapter 20Understanding Administrator Security Best Practices
20-10
20.1.6.2 About Enabling and Configuring EmailIn order to send email from an Oracle Application Express application, an Instanceadministrator must define the email SMTP settings and set the Use SSL/TLS attributeto use a secure connection for Oracle Database 11g R2 or later.
20.1.6.3 About Configuring Storage OptionsAdministrators can configure the following storage options: require a new schemawhen requesting a workspace, auto extend tablespaces, or delete uploaded files are aspecified number of days.
20.1.6.4 About Creating WalletsA wallet is a password-protected container that stores authentication and signingcredentials (including private keys, certificates, and trusted certificates) needed bySSL. You must create a wallet if you:
• Call a SSL-enabled URL (for example, by invoking a Web service).
• Create a region of type URL that is SSL-enabled.
• Configure secure SMTP by setting the Use SSL/TLS attribute to Yes.
• Have applications with LDAP authentication schemes that are configured to useSSL with Authentication.
20.1.7 About Configuring Workspace Purge SettingsSave storage space and improve system performance by purging inactiveworkspaces.
Inactive workspaces consume valuable storage space and degrade systemperformance. By enabling Workspace Purge Settings, administrators can configureOracle Application Express to purge inactive workspaces.
20.1.8 Understanding Workspace ManagementInstance administrators can define associations between workspaces and schemas.Administrators can manage developers and users at the workspace or instance-leveland control user access to key components such App Builder, Team Development,and SQL Workshop, and PL/SQL editing.
• About Managing Workspace to Schema Assignments (page 20-12)
• About Managing Developers and Users (page 20-12)
• About Managing Component Availability (page 20-12)
Chapter 20Understanding Administrator Security Best Practices
20-11
See Also:
"Managing Existing Workspaces" in Oracle Application ExpressAdministration Guide
20.1.8.1 About Managing Workspace to Schema AssignmentsWhen users log in to Oracle Application Express, they log in to a shared work areacalled a workspace. Each workspace can have multiple associated (or mapped)schemas. Instance administrators can define associations between workspaces andschemas as appropriate. By associating a workspace with a schema, developers inthat workspace can create new database objects in that schema and build applicationsthat interact with the database objects in that schema.
20.1.8.2 About Managing Developers and UsersAdministrators can define what schemas specific users have access to and also theiruser role, that is if they are a workspace administrator, a developer, or an end user.Administrators can also limit developer access to specific Application Expresscomponents and lock accounts. Oracle Application Express includes two separateinterfaces for managing developers and users. Workspace administrators manageuser accounts within their workspace and Instance administrators manage all useraccounts across an Application Express development instance.
20.1.8.3 About Managing Component AvailabilityWorkspace administrators can control user access to key components such as AppBuilder, Team Development, SQL Workshop, and PL/SQL editing, which determineswhether developers have the ability to edit and compile PL/SQL program units fromObject Browser. For example, suppose an administrator wants users to be able tobuild database components, run SQL statements, but not create applications, he orshe could define a workspace with rights to a specific schema and then configure theusers as developers using the options on the Set Workspace Preferences page.
20.1.9 About Integrating with Oracle BI PublisherOracle recommends that you employ Secure Sockets Layer (SSL) when integratingOracle Application Express with Oracle BI Publisher. Once SSL (HTTPS protocol) isconfigured for your Oracle BI Publisher server, you must create a wallet and specifythe HTTPS protocol for the Report Server in the internal administration EnvironmentSettings.
Chapter 20Understanding Administrator Security Best Practices
20-12
20.1.10 About the Advantages of the Application Express RuntimeEnvironment
An Oracle Application Express runtime environment enables you to run productionapplications, but does not provide a web interface for administration or directdevelopment of these applications
Oracle recommends that you run any sensitive production Oracle Application Expressapplications with a runtime installation of Oracle Application Express. A runtimeinstallation does not expose the web-based application development environment,thus preventing the use of App Builder, SQL Workshop, and related utilities on aproduction installation. Additionally, a runtime environment only includes the OracleApplication Express database objects and privileges necessary to run applications,making it a more hardened environment.
20.1.11 Enabling Network Services in Oracle Database 11g or LaterYou must enable network services in Oracle Database 11g or later versions to sendoutbound mail, use Web services, or use PDF report printing in Oracle ApplicationExpress.
• When and Why Network Services Must be Enabled (page 20-13)Enabling network services enables support for sending outbound mail in OracleApplication Express, use of Web services in Oracle Application Express, and PDFreport printing.
• Granting Connect Privileges Prior to Oracle Database 12c (page 20-14)Demonstrates how to grant connect privileges to any host for the APEX_180100database user.
• Granting Connect Privileges in Oracle Database 12c or Later (page 20-15)Procedures CREATE_ACL, ASSIGN_ACL, ADD_PRIVILEGE and CHECK_PRIVILEGE inDBMS_NETWORK_ACL_ADMIN are deprecated in Oracle Database 12c. Oraclerecommends to use APPEND_HOST_ACE.
• Troubleshooting an Invalid ACL Error (page 20-15)Learn how to identify a invalid ACL error by running the query.
20.1.11.1 When and Why Network Services Must be EnabledEnabling network services enables support for sending outbound mail in OracleApplication Express, use of Web services in Oracle Application Express, and PDFreport printing.
By default, the ability to interact with network services is disabled in Oracle Database11g Release 2 or later. Therefore, if you are running Oracle Application Express withOracle Database 11g Release 2 or later, you must use the new DBMS_NETWORK_ACL_ADMINpackage to grant connect privileges to any host for the APEX_180100 database user.Failing to grant these privileges results in issues with:
• Sending outbound mail in Oracle Application Express.
Users can call methods from the APEX_MAIL package, but issues arise whensending outbound email.
Chapter 20Understanding Administrator Security Best Practices
20-13
• Using Web services in Oracle Application Express.
• PDF report printing.
Tip:
To run the examples described in this section, the compatible initializationparameter of the database must be set to at least 11.1.0.0.0. By default a11g or 12c database will already have the parameter set properly, but adatabase upgraded to 11g or 12c from a prior version may not. Forinformation about changing database initialization parameters, see "Creatingand Configuring an Oracle Database" in Oracle Database Administrator’sGuide.
20.1.11.2 Granting Connect Privileges Prior to Oracle Database 12cDemonstrates how to grant connect privileges to any host for the APEX_180100 databaseuser.
The following example demonstrates how to grant connect privileges to any host forthe APEX_180100 database user. This example assumes you connected to the databasewhere Oracle Application Express is installed as SYS specifying the SYSDBA role.
DECLARE ACL_PATH VARCHAR2(4000);BEGIN -- Look for the ACL currently assigned to '*' and give APEX_180100 -- the "connect" privilege if APEX_180100 does not have the privilege yet. SELECT ACL INTO ACL_PATH FROM DBA_NETWORK_ACLS WHERE HOST = '*' AND LOWER_PORT IS NULL AND UPPER_PORT IS NULL; IF DBMS_NETWORK_ACL_ADMIN.CHECK_PRIVILEGE(ACL_PATH, 'APEX_180100', 'connect') IS NULL THEN DBMS_NETWORK_ACL_ADMIN.ADD_PRIVILEGE(ACL_PATH, 'APEX_180100', TRUE, 'connect'); END IF; EXCEPTION -- When no ACL has been assigned to '*'. WHEN NO_DATA_FOUND THEN DBMS_NETWORK_ACL_ADMIN.CREATE_ACL('power_users.xml', 'ACL that lets power users to connect to everywhere', 'APEX_180100', TRUE, 'connect'); DBMS_NETWORK_ACL_ADMIN.ASSIGN_ACL('power_users.xml','*');END;/COMMIT;
The following example demonstrates how to provide less privileged access to localnetwork resources. This example enables access to servers on the local host only,such as email and report servers.
DECLARE ACL_PATH VARCHAR2(4000);BEGIN -- Look for the ACL currently assigned to 'localhost' and give APEX_180100
Chapter 20Understanding Administrator Security Best Practices
20-14
-- the "connect" privilege if APEX_180100 does not have the privilege yet. SELECT ACL INTO ACL_PATH FROM DBA_NETWORK_ACLS WHERE HOST = 'localhost' AND LOWER_PORT IS NULL AND UPPER_PORT IS NULL; IF DBMS_NETWORK_ACL_ADMIN.CHECK_PRIVILEGE(ACL_PATH, 'APEX_180100', 'connect') IS NULL THEN DBMS_NETWORK_ACL_ADMIN.ADD_PRIVILEGE(ACL_PATH, 'APEX_180100', TRUE, 'connect'); END IF; EXCEPTION -- When no ACL has been assigned to 'localhost'. WHEN NO_DATA_FOUND THEN DBMS_NETWORK_ACL_ADMIN.CREATE_ACL('local-access-users.xml', 'ACL that lets users to connect to localhost', 'APEX_180100', TRUE, 'connect'); DBMS_NETWORK_ACL_ADMIN.ASSIGN_ACL('local-access-users.xml','localhost');END;/COMMIT;
20.1.11.3 Granting Connect Privileges in Oracle Database 12c or LaterProcedures CREATE_ACL, ASSIGN_ACL, ADD_PRIVILEGE and CHECK_PRIVILEGE inDBMS_NETWORK_ACL_ADMIN are deprecated in Oracle Database 12c. Oracle recommendsto use APPEND_HOST_ACE.
The following example demonstrates how to grant connect privileges to any host forthe APEX_180100 database user. This example assumes you connected to the databasewhere Oracle Application Express is installed as SYS specifying the SYSDBA role.
BEGIN DBMS_NETWORK_ACL_ADMIN.APPEND_HOST_ACE( host => '*', ace => xs$ace_type(privilege_list => xs$name_list('connect'), principal_name => 'APEX_180100', principal_type => xs_acl.ptype_db));END;/
The following example demonstrates how to provide less privileged access to localnetwork resources. This example enables access to servers on the local host only,such as email and report servers.
BEGIN DBMS_NETWORK_ACL_ADMIN.APPEND_HOST_ACE( host => 'localhost', ace => xs$ace_type(privilege_list => xs$name_list('connect'), principal_name => 'APEX_180100', principal_type => xs_acl.ptype_db));END;/
20.1.11.4 Troubleshooting an Invalid ACL ErrorLearn how to identify a invalid ACL error by running the query.
If you receive an ORA-44416: Invalid ACL error after running the previous script, use thefollowing query to identify the invalid ACL:
Chapter 20Understanding Administrator Security Best Practices
20-15
REM Show the dangling references to dropped users in the ACL that is assignedREM to '*'.
SELECT ACL, PRINCIPAL FROM DBA_NETWORK_ACLS NACL, XDS_ACE ACE WHERE HOST = '*' AND LOWER_PORT IS NULL AND UPPER_PORT IS NULL AND NACL.ACLID = ACE.ACLID AND NOT EXISTS (SELECT NULL FROM ALL_USERS WHERE USERNAME = PRINCIPAL);
Next, run the following code to fix the ACL:
DECLARE ACL_ID RAW(16); CNT NUMBER;BEGIN -- Look for the object ID of the ACL currently assigned to '*' SELECT ACLID INTO ACL_ID FROM DBA_NETWORK_ACLS WHERE HOST = '*' AND LOWER_PORT IS NULL AND UPPER_PORT IS NULL;
-- If just some users referenced in the ACL are invalid, remove just those -- users in the ACL. Otherwise, drop the ACL completely. SELECT COUNT(PRINCIPAL) INTO CNT FROM XDS_ACE WHERE ACLID = ACL_ID AND EXISTS (SELECT NULL FROM ALL_USERS WHERE USERNAME = PRINCIPAL);
IF (CNT > 0) THEN
FOR R IN (SELECT PRINCIPAL FROM XDS_ACE WHERE ACLID = ACL_ID AND NOT EXISTS (SELECT NULL FROM ALL_USERS WHERE USERNAME = PRINCIPAL)) LOOP UPDATE XDB.XDB$ACL SET OBJECT_VALUE = DELETEXML(OBJECT_VALUE, '/ACL/ACE[PRINCIPAL="'||R.PRINCIPAL||'"]') WHERE OBJECT_ID = ACL_ID; END LOOP;
ELSE DELETE FROM XDB.XDB$ACL WHERE OBJECT_ID = ACL_ID; END IF;
END;/
REM commit the changes.
COMMIT;
Once the ACL has been fixed, you must run the first script in this section to apply theACL to the APEX_180100 user.
20.2 Understanding Developer Security Best PracticesDeveloper security best practices include configuring password item types, identifyingrisky password items, viewing the Security Profiles report, understanding cross site-scripting protection, managing session state, preventing URL tampering, and securingfile uploads.
Chapter 20Understanding Developer Security Best Practices
20-16
• About Items of Type Password (page 20-17)Password items do not emit the text entered to the web browser screen. Whencreating password items, Oracle recommends using password attributes that donot save session state to prevent the password from being saved in the databasein the session state tables.
• Identifying At Risk Password Items (page 20-18)Use the Security Profiles report and Password Items report to help identify at riskpassword items.
• Understanding Cross-Site Scripting Protection (page 20-19)Learn about best practices for protecting your application from a cross site-scripting security breach.
• About Session State and Security (page 20-23)Learn about managing session state and security.
• Preventing URL Tampering (page 20-24)Session State Protection is a built-in functionality that prevents hackers fromtampering with the URLs within your application. URL tampering can adverselyaffect program logic, session state contents, and information privacy.
• About Securing File Uploads (page 20-36)Learn about developer best practices for securing file uploads.
See Also:
• "Understanding Administrator Security Best Practices (page 20-1)"
• "About Oracle Application Express Administrator Roles (page 20-3)"
20.2.1 About Items of Type PasswordPassword items do not emit the text entered to the web browser screen. Whencreating password items, Oracle recommends using password attributes that do notsave session state to prevent the password from being saved in the database in thesession state tables.
Configurable password item type attributes include:
• Value Required - If set to Yes and the page item is visible, Oracle ApplicationExpress automatically performs a NOT NULL validation when the page issubmitted. If set to No, no validation a NULL value is accepted.
• Submit when Enter pressed - If set to Yes, when the user presses the ENTERkey in the field the page is submitted.
• Does not save state - If set to Yes, the password is not saved into session state.For security reasons you should always set this attribute to Yes. If you set it to No,consider to set the attribute Store value encrypted in session state to Yes.
• Authorization Scheme - Optionally select an authorization scheme which mustevaluate to TRUE in order for this component to be rendered or otherwiseprocessed.
• Session State Protection - You can select the level of session state protection bysetting this attribute to Unrestricted or Restricted.
Chapter 20Understanding Developer Security Best Practices
20-17
– Unrestricted means the item may be set by passing the item in a URL or in aform. No checksum is required in the URL.
– Restricted means the item may not be set from a browser. Use this when youwant to restrict the way that the item value can be set to internal processes,computations, and so on. This attribute is applicable only to items that cannotbe used as data entry items and is always observed, even if Session StateProtection is disabled.
• Store value encrypted in session state - Session state that is sensitive can beencrypted when stored in Application Express session state management tables.To maintain session state encrypted for this item set the value to Yes. To learnmore, see "About Session State and Security (page 20-23)".
20.2.2 Identifying At Risk Password ItemsUse the Security Profiles report and Password Items report to help identify at riskpassword items.
At risk password items are those that either:
• Do not use a password item type that does not save session state.
• Store an unencrypted value in session state .
• Viewing the Security Profiles Report (page 20-18)
• Viewing the Password Items Report (page 20-19)
20.2.2.1 Viewing the Security Profiles ReportTo view the Security Profiles Report:
1. Navigate to the Workspace home page.
2. Click the App Builder icon.
The App Builder home page appears.
3. Click the Workspace Utilities icon.
4. Locate Cross Application Reports on the right side of the window.
5. Under Cross Application Reports, click Security Profiles report.
This report list the following information about all applications in the currentworkspace:
• Application
• Name
• Parsing Schema
• Application Level Authorization Scheme
• Authentication
• Authorization Schemes
• Authorization Schemes
• Pages
• Encrypted Items
Chapter 20Understanding Developer Security Best Practices
20-18
• At Risk Password Items
20.2.2.2 Viewing the Password Items ReportTo identify at risk password items:
1. Navigate to the Workspace home page.
2. Click the App Builder icon.
The App Builder home page appears.
3. Click the Workspace Utilities icon.
4. Locate Cross Application Reports on the right side of the window.
5. Under Cross Application Reports, click Password Items.
The Password Items report shows all of the password items within the applicationand indicates if they use encryption and whether they save state. Password itemsthat do neither are highlighted as At Risk.
Tip:
For pages that contain password items, set the page attribute Form AutoComplete to Off. Setting that attribute to Off prevents the web browser fromattempting to auto complete items on the page.
20.2.3 Understanding Cross-Site Scripting ProtectionLearn about best practices for protecting your application from a cross site-scriptingsecurity breach.
• What Is Cross Site-scripting Security Breach? (page 20-19)
• Protecting HTML Regions and Other Static Areas (page 20-20)
• About Protecting Dynamic Output (page 20-21)
• About Protecting Report Regions (page 20-21)
• About Protecting Form Items (page 20-22)
• About Restricting Characters Entered on an Item (page 20-23)
20.2.3.1 What Is Cross Site-scripting Security Breach?Cross site-scripting (also referred to as XSS) is a security breach that takes advantageof dynamically generated web pages. In a XSS attack, a web application is sent ascript that activates when it is read by a user's browser. Once activated, these scriptscan steal data, even session credentials, and return the information to the attacker.
If malicious code were introduced into an Oracle Application Express application, itcould be rendered into HTML regions and other places within the application duringnormal page rendering. To prevent the introduction of malicious code into sessionstate, the Application Express engine escapes characters in certain cases.
Chapter 20Understanding Developer Security Best Practices
20-19
20.2.3.2 Protecting HTML Regions and Other Static AreasLearn how to protect HTML regions and other static display areas.
• About Protecting HTML Regions and Other Static Areas (page 20-20)
• About Safe Item Display Types (page 20-20)
• About the Rules Used to Determine Whether to Escape Values (page 20-20)
• About Using Safe Item Types to Hold and Emit HTML Markup (page 20-21)
20.2.3.2.1 About Protecting HTML Regions and Other Static AreasIn HTML regions and other static display areas, you can reference session state usingthe substitution strings. Special substitution strings available within a template aredenoted by the number symbol (#), for example, #ABC#. To reference page orapplication items use the &ITEM. notation.
Examples of static display areas include HTML regions, page headers and footers,region headers and footers, region titles, button labels, help text, form item labels andpost-element text, templates, radiogroup (before and after field text), event successmessages, event error messages, navigation bar attributes, application staticsubstitution string values, chart labels and legends, breadcrumbs and list framing text,and calendar text, labels, or legends.
Developers can also append an exclamation mark (!) followed by a predefined filtername to a page or application item name or to a report column reference to escapespecial characters in the substitution value.
20.2.3.2.2 About Safe Item Display TypesWhen session state is referenced in this way, the value emitted to the page will nothave special characters (<, >, &, ") escaped if the referenced item is Display Only withthe attribute Save Session State set to No and Escape Special set to No.
If the referenced item has a display type other than Display Only with the attributeSave Session State set to No, the value emitted to the page will have specialcharacters escaped. Although application-level items are also considered to have asafe display type, they do not actually have display properties like form items do.
20.2.3.2.3 About the Rules Used to Determine Whether to Escape ValuesThe Application Express engine uses predefined smart escaping rules to determine ifand when to escape values fetched from session state.
The reason for these rules is that items that use the display types listed previously areoften for text containing HTML that is intended to be emitted to the browser withoutbeing filtered (that is, escaped). The only way this can be made safe is by theenforcement of the rule that these types of items are always escaped on input to theapplication. For example, if a user passes some text into a safe item using an OracleApplication Express f?p URL syntax, the Application Express engine escapes specialcharacters when saving the value into session state. This has two intended results:
1. If the value contained no special characters, the value passed in is saved intosession state exactly as it was provided.
Chapter 20Understanding Developer Security Best Practices
20-20
2. If the value contained special characters, those characters are escaped when thevalue is saved into session state.
In either situation, the item can now safely be referenced using an &ITEM. notation inany HTML region or other static area mentioned previously.
20.2.3.2.4 About Using Safe Item Types to Hold and Emit HTML MarkupYou can use the safe item types listed previously to hold and emit HTML markup tothe browser. For example, suppose you have a requirement to render some text inbold face by referencing a safe page item named P1_XXX (using &P1_XXX.) The itemP1_XXX is presumed to contain the following HTML:
<b>ABABABAB</b>
You can achieve this by using application controls (computations, processes, itemsource expressions, item default values, and so on) to store values into these safeitems. When values are introduced in this way, you ensure the safety of the content.When you use these methods, the Application Express engine does not escape anyspecial characters when saving the values into session state.
Finally, the safety of safe items is ensured by a rule that prevents those items frombeing posted on a page and submitted to the Application Express engine as part of apage submission.
20.2.3.3 About Protecting Dynamic OutputItems fetched from session state and rendered using htp.p or other methods should beexplicitly escaped by the code where it is appropriate to do so. For example, supposea PL/SQL dynamic content region on a page uses the following:
htp.p(v('SOME_ITEM'));
If the value of the item fetched from session state could contain unintended tags orscripts, you might want to use the following in the region:
htp.p(apex_escape.html(:SOME_ITEM));
However, if you are confident that the fetched value is safe for rendering, you do notneed to escape the value. As a developer, you must determine when it is appropriateto not escape output.
As a best practice, follow this rule:
• Never emit an item fetched from session state without escaping it unless the itemis a safe type.
The reason for this is that as a developer, there is no way you can prevent a hackerfrom posting a malicious value into a non-safe item. Even if your application does notpresent these items visibly to ordinary users, be aware that a hacker can mount a XSSattack using your application if you do not follow this rule.
20.2.3.4 About Protecting Report RegionsThe Application Express engine escapes data rendered in the body of a report.References to session state in report headings and messages are fetched from
Chapter 20Understanding Developer Security Best Practices
20-21
session state using the smart escaping rules so that the values of safe item types arenot escaped and the values of other item types are escaped.
Oracle Application Express automatically escapes HTML special characters of a reportcolumn when the column's Escape special characters attribute is set to Yes. If youneed to render HTML fragments instead of plain column values (for example, forhighlighting), instead of concatenating the HTML fragment in the query itself (whichprevents you from using Escape special characters), you should use the reportcolumn's HTML Expression attribute. In the HTML Expression attribute, you can enterstatic HTML and embed escaped column values with the #COLUMN# notation. Theextended column notation gives you control regarding how Oracle Application Expressshould escape a column value:
• #COLUMN!HTML# - Escapes reserved HTML characters.
• #COLUMN!ATTR# - Escapes reserved characters in a HTML attribute context.
• #COLUMN!JS# - Escapes reserved characters in a JavaScript context.
• #COLUMN!RAW# - Preserves the original item value and does not escape characters.
• #COLUMN!STRIPHTML# - Removes HTML tags from the output and escapes reservedHTML characters.
For example, suppose you have a report based on this query:
SELECT empno, ename, NULL DELETE_LINKFROM emp
In this example, all columns are escaped. You could define a HTML Expression onDELETE_LINK as follows:
<a href="javascript:if (confirm('Do you really want to delete #ENAME!JS#?')) doSubmit('DELETE-#EMPNO#');">Delete</a>
This example renders a link that asks if you would like to delete an employee andsubmits a request to delete the row if the user is confirmed. If you had not used#ENAME!JS# but #ENAME#, a name like O'Neill would cause a syntax error and an attackercould exploit the improper escaping for cross-site scripting.
20.2.3.5 About Protecting Form ItemsWhen form items, including hidden items, obtain their values during the generation ofthe form page to be sent to the browser, the resulting text is escaped before rendering.Some of the safe item types are exceptions to this rule to support the intendedbehavior of each display type.
Some item types have the Security attribute Escape special characters. Use theEscape special characters attribute to specify if the value should be escaped or not.The default is set to Yes. To display HTML code, set this attribute to No.
Developers can also append an exclamation mark (!) followed by a predefined filtername to a page or application item name or to a report column reference, to escapespecial characters in the substitution value.
Chapter 20Understanding Developer Security Best Practices
20-22
20.2.3.6 About Restricting Characters Entered on an ItemYou can limit cross site-scripting and other injection attacks by restricting thecharacters users can enter on an item. To accomplish this, use the RestrictedCharacters attribute in the Security region of the Edit Page Item page. RestrictedCharacters can be saved in session state. Available options include:
• All Characters Allowed
No restriction applies.
• Whitelist for a-Z, 0-9 and space
Only allow characters a-z, A-Z, 0-9, and space.
• Blacklist HTML command characters (<>").
Do not allow reserved HTML characters
• Blacklist &<>"/;,*|=% and --:
Do not allow &, <, >, ", /, ;, ",", *, |, =, % and "--" (PL/SQL comment).
• Blacklist &<>"/;,*|=% or -- and new line
Do not allow &, <, >, ", /, ;, ",", *, |, =, %, "--", and new line characters
If you select a restriction, Oracle Application Express displays an error message if auser tries to save data which does not conform to the selected character restriction.
20.2.4 About Session State and SecurityLearn about managing session state and security.
Oracle Application Express persists session state in database tables. Session state ispreserved in database tables because it is more secure to store the session state onthe server side than on the client. Because Oracle Application Express applicationsuse the stateless HTTP protocol, an application's session state across multiple pageviews is preserved in database tables. Not maintaining a synchronous databaseconnection for each Oracle Application Express application user significantly lessensmemory and database resource requirements.
Developers can query the session state stored by Oracle Application Expressapplications using the App Builder and built-in monitoring pages. Developers andadministrators can access session state for any application in the workspace to whichthey are authenticated.
Developer best practices for managing session state include:
• As a standard part of implementing program control flow, clear the session state ofunneeded values using clear-cache page processes or clear-cache directives inURLs used to navigate to pages.
• Use password page item types that do not save state. This prevents the enteredpasswords from being saved in session state tables in the database.
• When sensitive data must persist in a session, it should be saved in OracleApplication Express session state tables in encrypted form. To use this feature, setthe page item's Store value encrypted in session state attribute to Yes. Encryptedstored values are automatically decrypted when read.
Chapter 20Understanding Developer Security Best Practices
20-23
Note:
The objective of encrypted session state is to persist session state such thatthe unencrypted values cannot be read by other Oracle Application Expressdevelopers or database administrators who might have access to the OracleApplication Express session state tables, debug output, or database datafiles. Oracle recommends that database backups be performed usingfacilities that encrypt data in the backup files.
Tip:
You can encrypt item values up to 4000 bytes in length. Attempts to encryptvalues longer than 4000 bytes produces an error message.
20.2.5 Preventing URL TamperingSession State Protection is a built-in functionality that prevents hackers fromtampering with the URLs within your application. URL tampering can adversely affectprogram logic, session state contents, and information privacy.
• How Session State Protection Works (page 20-24)
• Enabling Session State Protection (page 20-24)
• Configuring Session State Protection (page 20-26)
20.2.5.1 How Session State Protection WorksWhen enabled, Session State Protection uses the Page Access Protection attributesand the Session State Protection item attributes with checksums positioned in f?p=URLs to prevent URL tampering and unauthorized access to and alteration of sessionstate. When Session State Protection is disabled, the page and item attributes relatedto session state protection are ignored and checksums are not included checksums ingenerated f?p= URLs.
20.2.5.2 Enabling Session State ProtectionYou can enable session state protection from either the Edit Security Attributes pageor the Session State Protection page.
Enabling Session State Protection is a two-step process. First, you enable the feature.Second, you set page and item security attributes. You can perform these steps usinga wizard, or you can set security attributes for pages and items manually on theSession State Protection page.
• Enabling Session State Protection from Edit Security Attributes (page 20-24)
• Enabling Session State Protection from Session State Protection (page 20-26)
20.2.5.2.1 Enabling Session State Protection from Edit Security AttributesTo enable Session State Protection from the Edit Security Attributes page:
Chapter 20Understanding Developer Security Best Practices
20-24
1. On the Workspace home page, click the App Builder icon.
2. Select an application.
3. Click the Shared Components icon.
4. Under Security, click Security Attributes.
5. Scroll down to Session State Protection and select Enabled from the SessionState Protection list.
6. To configure session Session State Protection, click Manage Session StateProtection.
The Session State Projection page appears.
7. To enable, disable, or configure Session State Protection using a wizard, click SetProtection.
8. Otherwise, navigate to the appropriate page or item attributes page and configurethe Security attributes.
Tip:
To disable Session State Protection, perform the same steps again, butselect Disabled instead of Enabled. Disabling Session State Protectiondoes not change existing security attribute settings, but those attributes areignored at runtime.
• About the Expire Bookmarks Button (page 20-25)
20.2.5.2.1.1 About the Expire Bookmarks Button
Enabling Session State Protection affects whether bookmarked links to the currentapplication work. Consider the following rules:
1. Bookmarked links created after Session State Protection is enabled work if thebookmarked link contains a checksum.
2. Bookmarked links created before Session State Protection is enabled do not workif the bookmarked link contains a checksum.
3. Bookmarks that do not contain checksums or contain unnecessary checksums arenot affected by Session State Protection.
During page rendering, the Application Express engine uses a hidden applicationattribute (a checksum salt) during computation and to verify checksums included in f?pURLs. When you enable Session State Protection, the Application Express engineincludes checksums. You can reset the checksum salt attribute by clicking ExpireBookmarks on the Edit Security Attributes page.
Tip:
Be aware that if you click Expire Bookmarks, bookmarked URLs used toaccess your application that contain previously generated checksums willfail.
Chapter 20Understanding Developer Security Best Practices
20-25
On the Confirm Invalidate Bookmarks page, you can also configure the BookmarkChecksum Function which is the hash algorithm used for computing bookmarkchecksums.
20.2.5.2.2 Enabling Session State Protection from Session State ProtectionTo enable Session State Protection:
1. Navigate to the Shared Components page:
a. On the Workspace home page, click the App Builder icon.
b. Select an application.
c. Click Shared Components.
d. Under Security, select Session State Protection.
The Session State Protection page appears. Note the current Session StateProtection status (Enabled or Disabled) displays at the top of the page.
2. Click the Set Protection button.
The Session State Protection wizard appears.
3. Under Select Action, select Enable and click Next.
Next, determine whether to set security attributes for pages and items.
4. Select Enable and click Next.
5. Click Enable Session State Protection.
Tip:
To disable Session State Protection, perform the same steps, but selectDisable instead of Enable. Disabling Session State Protection does notchange existing security attribute settings, but those attributes are ignored atruntime.
20.2.5.3 Configuring Session State Protection
Tip:
Before you can configure security attributes, you must first enable SessionState Protection. See "Enabling Session State Protection (page 20-24)".
• About Configuring Session State Protection (page 20-27)
• Reviewing Existing Session State Protection Settings (page 20-27)
• Configuring Session State Protection Using a Wizard (page 20-27)
• Configuring Session State Protection for Pages (page 20-30)
• Configuring Session State Protection for Page Items (page 20-32)
• Configuring Session State Protection for Application Items (page 20-34)
Chapter 20Understanding Developer Security Best Practices
20-26
20.2.5.3.1 About Configuring Session State ProtectionOnce you have enabled Session State Protection, the next step is to configure securityattributes. You can configure security attributes in two ways:
• Use a wizard and select a value for specific attribute categories. Those selectionsare then applied to all pages and items within the application.
• Configure values for individual pages, items, or application items.
20.2.5.3.2 Reviewing Existing Session State Protection SettingsYou can review a summary of Session State Protection settings for pages, items, andapplication items on the first page of the Session State Protection wizard.
To view summaries of existing Session State Protection settings:
1. Navigate to the Session State Protection page:
a. On the Workspace home page, click the App Builder icon.
b. Select an application.
c. Click Shared Components.
d. Under Security, select Session State Protection.
The Session State Protection page appears.
2. Click Set Protection.
3. Expand the following reports at the bottom of the page:
• Page Level Session State Protection Summary
• Page Item Session State Protection Summary
• Application Item Session State Protection
20.2.5.3.3 Configuring Session State Protection Using a WizardWhen you configure Session State Protection using a wizard, you set a value forspecific attribute categories. Those selections are then applied to all pages and itemswithin the application.
To configure Session State Protection using a wizard:
1. Navigate to the Session State Protection page:
a. On the Workspace home page, click the App Builder icon.
b. Select an application.
c. Click Shared Components.
d. Under Security, select Session State Protection.
The Session State Protection page appears.
2. Click Set Protection.
The Session State Protection wizard appears.
3. Under Select Action, select Configure and click Next.
4. For Page Access Protection, select one of the following:
Chapter 20Understanding Developer Security Best Practices
20-27
• Unrestricted - The page may be requested using a URL with or withoutsession state arguments (Request, Clear Cache, Name/Values).
• Arguments Must Have Checksum - If Request, Clear Cache, or Name/Valuearguments appear in the URL, a checksum must also be provided. Thechecksum type must be compatible with the most stringent Session StateProtection attribute of all the items passed as arguments.
• No Arguments Allowed - A URL may be used to request the page but noRequest, Clear Cache, or Name/Value arguments are allowed.
• No URL Access - The page may not be accessed using a URL; however, thepage may be the target of a Branch to Page branch type, which does not do aURL redirect.
5. For Application Item Protection, select one of the following:
• Unrestricted - The item's session state may be set by passing the item name/value in a URL or in a form. No checksum is required in the URL.
Note: If you must set this item's value in session state using Ajax, then anUnrestricted protection level must be used for the item (for example inDynamic Actions, Set Value, Page Items to Submit or Cascading LOVs, PageItems to Submit).
• Checksum Required: Application Level - The item's session state may beset by passing the item name/value in a URL if a checksum specific to theschema is provided. You can also use a user-level checksum or a session-level checksum (see next bullets). Use this option when you want to allow theitem to be set only by URLs having checksums that were generated by anyuser running the same application in the current workspace but in a differentsession.
• Checksum Required: User Level - The item's session state may be set bypassing the item name/value in a URL if a checksum specific to theworkspace, application, and user is provided. You can also use a session-levelchecksum (see next bullet). Use this option when you want to allow the item tobe set only by URLs having checksums that were generated by the samenamed user, running the same application in the current workspace but in adifferent session.
• Checksum Required: Session Level - The item's session state may be setby passing the item name/value in a URL if a checksum specific to the currentsession is also provided. Use this option when you want to allow this item tobe set only by URLs having checksums that were generated in the currentsession.
• Restricted - May not be set from browser - The item may not be alteredusing the URL or POSTDATA. Use this option when you want to restrict theway that the item value can be set to internal processes, computations, and soon. This attribute is applicable only to items that cannot be used as data entryitems and is always observed even if Session State Protection is disabled.
Use this attribute for application items or for page items with any of theseDisplay As types:
– Display as Text (escape special characters, does not save state)
– Display as Text (does not save state)
– Display as Text (based on LOV, does not save state)
– Display as Text (based on PLSQL, does not save state)
Chapter 20Understanding Developer Security Best Practices
20-28
– Text Field (Disabled, does not save state)
– Stop and Start HTML Table (Displays label only)
6. For Page Data Entry Item Protection, select one of the following:
• Unrestricted - The item's session state may be set by passing the item name/value in a URL or in a form. No checksum is required in the URL.
Note: If you must set this item's value in session state using Ajax, then anUnrestricted protection level must be used for the item (for example inDynamic Actions, Set Value, Page Items to Submit or Cascading LOVs, PageItems to Submit).
• Checksum Required: Application Level - The item's session state may beset by passing the item name/value in a URL if a checksum specific to theschema is provided. You can also use a user-level checksum or a session-level checksum (see next bullets). Use this option when you want to allow theitem to be set only by URLs having checksums that were generated by anyuser running the same application in the current workspace but in a differentsession.
• Checksum Required: User Level - The item's session state may be set bypassing the item name/value in a URL if a checksum specific to theworkspace, application, and user is provided. You can also use a session-levelchecksum (see next bullet). Use this option when you want to allow the item tobe set only by URLs having checksums that were generated by the samenamed user, running the same application in the current workspace but in adifferent session.
• Checksum Required: Session Level - The item's session state may be setby passing the item name/value in a URL if a checksum specific to the currentsession is provided. Use this option when you want to allow this item to be setonly by URLs having checksums that were generated in the current session.
7. For Page Display-Only Item Protection, select one of the following:
• Unrestricted - The item may be set by passing the item name/value in a URLor in a form. No checksum is required in the URL.
Note: If you must set this item's value in session state using Ajax, then anUnrestricted protection level must be used for the item (for example inDynamic Actions, Set Value, Page Items to Submit or Cascading LOVs, PageItems to Submit).
• Checksum Required: Application Level - The item's session state may beset by passing the item name/value in a URL if a checksum specific to theschema is provided. You can also use a user-level checksum or a session-level checksum (see next bullets). Use this option when you want to allow theitem to be set only by URLs having checksums that were generated by anyuser running the same application in the current workspace but in a differentsession.
• Checksum Required: Session Level - The item's session state may be setby passing the item name/value in a URL if a checksum specific to the currentsession is provided. Use this option when you want to allow this item to be setonly by URLs having checksums that were generated in the current session.
• Checksum Required: User Level - The item's session state may be set bypassing the item name/value in a URL if a checksum specific to theworkspace, application, and user is provided. You can also use a session-levelchecksum. Use this option when you want to allow the item to be set only by
Chapter 20Understanding Developer Security Best Practices
20-29
URLs having checksums that were generated by the same named user,running the same application in the current workspace but in a differentsession.
• Restricted: May not be set from browser - The item may not be alteredusing the URL or POSTDATA. Use this when you want to restrict the way thatthe item value can be set to internal processes, computations, and so on. Thisattribute is always observed, even if Session State Protection is disabled.
This attribute may be used with any of these Display As types:
– Display as Text (escape special characters, does not save state)
– Display as Text (does not save state)
– Display as Text (based on LOV, does not save state)
– Display as Text (based on PLSQL, does not save state)
– Text Field (Disabled, does not save state)
– Stop and Start HTML Table (Displays label only)
8. Click Next.
9. Click Finish.
20.2.5.3.4 Configuring Session State Protection for PagesTo configure Session State Protection for Pages:
1. Navigate to the Session State Protection page:
a. On the Workspace home page, click the App Builder icon.
b. Select an application.
c. Click Shared Components.
d. Under Security, select Session State Protection.
The Session State Protection page appears.
2. Click the Page icon.
3. You can customize the appearance the page using the Search bar at the top of thepage.
4. Select a page number.
The Set Page and Item Protection page appears. The following informationdisplays at the top of the page:
• Application ID and name
• Session State Protection status (Enabled or Disabled)
• Page Number
• Page name
5. For Page Access Protection, select one of the following:
• Unrestricted - The page may be requested using a URL with or withoutsession state arguments (Request, Clear Cache, Name/Values).
• Arguments Must Have Checksum - If Request, Clear Cache, or Name/Valuearguments appear in the URL, a checksum must also be provided. The
Chapter 20Understanding Developer Security Best Practices
20-30
checksum type must be compatible with the most stringent Session StateProtection attribute of all the items passed as arguments.
• No Arguments Allowed - A URL may be used to request the page but noRequest, Clear Cache, or Name/Value arguments are allowed.
• No URL Access - The page may not be accessed using a URL; however, thepage may be the target of a Branch to Page branch type, which does not do aURL redirect.
6. For Item Types, select Data Entry Items or Display-only Items.
Data Entry items are items that can be altered using forms and include hiddenitems. Display-Only items are rendered only and are not submitted with the form.
7. If you select Data Entry Items, select a session state protection level for eachitem:
• Unrestricted - The item's session state may be set by passing the item name/value in a URL or in a form. No checksum is required in the URL.
Note: If you must set this item's value in session state using Ajax, then anUnrestricted protection level must be used for the item (for example inDynamic Actions, Set Value, Page Items to Submit or Cascading LOVs, PageItems to Submit).
• Checksum Required: Application Level - The item's session state may beset by passing the item name/value in a URL if a checksum specific to theschema is provided. You can also use a user-level checksum or a session-level checksum (see next bullets). Use this option when you want to allow theitem to be set only by URLs having checksums that were generated by anyuser running the same application in the current workspace but in a differentsession.
• Checksum Required: User Level - The item's session state may be set bypassing the item name/value in a URL if a checksum specific to theworkspace, application, and user is provided. You can also use a session-levelchecksum (see next bullet). Use this option when you want to allow the item tobe set only by URLs having checksums that were generated by the samenamed user, running the same application in the current workspace but in adifferent session.
• Checksum Required: Session Level - The item's session state may be setby passing the item name/value in a URL if a checksum specific to the currentsession is provided. Use this option when you want to allow this item to be setonly by URLs having checksums that were generated in the current session.
8. If you select Display-only Item, select a session state protection level for eachitem:
• Unrestricted - The item may be set by passing the item name/value in a URLor in a form. No checksum is required in the URL.
Note: If you must set this item's value in session state using Ajax, then anUnrestricted protection level must be used for the item (for example inDynamic Actions, Set Value, Page Items to Submit or Cascading LOVs, PageItems to Submit).
• Restricted: May not be set from browser - The item may not be alteredusing the URL or POSTDATA. Use this when you want to restrict the way thatthe item value can be set to internal processes, computations, and so on. This
Chapter 20Understanding Developer Security Best Practices
20-31
attribute is always observed, even if Session State Protection is disabled. Thisattribute may be used with any of these Display As types:
– Display as Text (escape special characters, does not save state)
– Display as Text (does not save state)
– Display as Text (based on LOV, does not save state)
– Display as Text (based on PLSQL, does not save state)
– Text Field (Disabled, does not save state)
– Stop and Start HTML Table (Displays label only)
• Checksum Required: Application Level - The item's session state may beset by passing the item name/value in a URL if a checksum specific to theschema is provided. You can also use a user-level checksum or a session-level checksum (see next bullets). Use this option when you want to allow theitem to be set only by URLs having checksums that were generated by anyuser running the same application in the current workspace but in a differentsession.
• Checksum Required: User Level - The item's session state may be set bypassing the item name/value in a URL if a checksum specific to theworkspace, application, and user is provided. You can also use a session-levelchecksum (see next bullet). Use this option when you want to allow the item tobe set only by URLs having checksums that were generated by the samenamed user, running the same application in the current workspace but in adifferent session.
• Checksum Required: Session Level - The item's session state may be setby passing the item name/value in a URL if a checksum specific to the currentsession is provided. Use this option when you want to allow this item to be setonly by URLs having checksums that were generated in the current session.
9. Click Apply Changes.
20.2.5.3.5 Configuring Session State Protection for Page ItemsTo configure Session State Protection for items:
1. Navigate to the Session State Protection page:
a. On the Workspace home page, click the App Builder icon.
b. Select an application.
c. Click Shared Components.
d. Under Security, select Session State Protection.
The Session State Protection page appears.
2. Click the Page Item icon.
3. You can customize the appearance the page using the Search bar at the top of thepage.
4. Select a page number.
The Edit Session State Protection for Page and Items page appears. The followinginformation displays at the top of the page:
• Application ID and name
Chapter 20Understanding Developer Security Best Practices
20-32

• Session State Protection status (Enabled or Disabled)
• Page Number
• Page name
5. For Page Access Protection, select a session state protection level for each item:
• Unrestricted - The page may be requested using a URL with or withoutsession state arguments (Request, Clear Cache, Name/Values).
• Arguments Must Have Checksum - If Request, Clear Cache, or Name/Valuearguments appear in the URL, a checksum must also be provided. Thechecksum type must be compatible with the most stringent Session StateProtection attribute of all the items passed as arguments.
• No Arguments Allowed - A URL may be used to request the page but noRequest, Clear Cache, or Name/Value arguments are allowed.
• No URL Access - The page may not be accessed using a URL, however thepage may be the target of a Branch to Page branch type, which does not do aURL redirect.
6. For Item Types, select Data Entry Items or Display-only Items.
Data Entry items are items that can be altered using forms and include hiddenitems. Display-Only items are rendered only and are not submitted with the form.
7. If you select Data Entry Items, select a session state protection level for eachitem:
• Unrestricted - The item's session state may be set by passing the item name/value in a URL or in a form. No checksum is required in the URL.
Note: If you must set this item's value in session state using Ajax, then anUnrestricted protection level must be used for the item (for example inDynamic Actions, Set Value, Page Items to Submit or Cascading LOVs, PageItems to Submit).
• Checksum Required: Application Level - The item's session state may beset by passing the item name/value in a URL if a checksum specific to theschema is provided. You can also use a user-level checksum or a session-level checksum (see next bullets). Use this option when you want to allow theitem to be set only by URLs having checksums that were generated by anyuser running the same application in the current workspace but in a differentsession.
• Checksum Required: User Level - The item's session state may be set bypassing the item name/value in a URL if a checksum specific to theworkspace, application, and user is provided. You can also use a session-levelchecksum (see next bullet). Use this option when you want to allow the item tobe set only by URLs having checksums that were generated by the samenamed user, running the same application in the current workspace but in adifferent session.
• Checksum Required: Session Level - The item's session state may be setby passing the item name/value in a URL if a checksum specific to the currentsession is provided. Use this option when you want to allow this item to be setonly by URLs having checksums that were generated in the current session.
8. If you select Display-only Item, select a session state protection level for eachitem:
Chapter 20Understanding Developer Security Best Practices
20-33
• Unrestricted - The item may be set by passing the item name/value in a URLor in a form. No checksum is required in the URL.
Note: If you must set this item's value in session state using Ajax, then anUnrestricted protection level must be used for the item (for example inDynamic Actions, Set Value, Page Items to Submit or Cascading LOVs, PageItems to Submit).
• Restricted: May not be set from browser - The item may not be alteredusing the URL or POSTDATA. Use this when you want to restrict the way thatthe item value can be set to internal processes, computations, and so on. Thisattribute is always observed, even if Session State Protection is disabled. Thisattribute may be used with any of these Display As types:
– Display as Text (escape special characters, does not save state)
– Display as Text (does not save state)
– Display as Text (based on LOV, does not save state)
– Display as Text (based on PLSQL, does not save state)
– Text Field (Disabled, does not save state)
– Stop and Start HTML Table (Displays label only)
• Checksum Required: Application Level - The item's session state may beset by passing the item name/value in a URL if a checksum specific to theschema is provided. You can also use a user-level checksum or a session-level checksum (see next bullets). Use this option when you want to allow theitem to be set only by URLs having checksums that were generated by anyuser running the same application in the current workspace but in a differentsession.
• Checksum Required: User Level - The item's session state may be set bypassing the item name/value in a URL if a checksum specific to theworkspace, application, and user is provided. You can also use a session-levelchecksum (see next bullet). Use this option when you want to allow the item tobe set only by URLs having checksums that were generated by the samenamed user, running the same application in the current workspace but in adifferent session.
• Checksum Required: Session Level - The item's session state may be setby passing the item name/value in a URL if a checksum specific to the currentsession is provided. Use this option when you want to allow this item to be setonly by URLs having checksums that were generated in the current session.
9. Click Apply Changes.
20.2.5.3.6 Configuring Session State Protection for Application ItemsTo configure Session State Protection for application items:
1. Navigate to the Session State Protection page:
a. On the Workspace home page, click the App Builder icon.
b. Select an application.
c. Click Shared Components.
d. Under Security, select Session State Protection.
The Session State Protection page appears.
Chapter 20Understanding Developer Security Best Practices
20-34
2. Click the Application Item icon.
3. You can customize the appearance the page using the Search bar at the top of thepage.
4. Select an application item.
5. Under Security, select one of the following from the Session State Protection list:
• Unrestricted - The item's session state may be set by passing the item name/value in a URL or in a form. No checksum is required in the URL.
Note: If you must set this item's value in session state using Ajax, then anUnrestricted protection level must be used for the item (for example inDynamic Actions, Set Value, Page Items to Submit or Cascading LOVs, PageItems to Submit).
• Restricted - May not be set from browser - The item may not be alteredusing the URL or POSTDATA. Use this option when you want to restrict theway that the item value can be set to internal processes, computations, and soon. This attribute is only applicable only to items that cannot be used as dataentry items and is always observed even if Session State Protection isdisabled. This attribute may be used for application items or for page itemswith any of these Display As types:
– Display as Text (escape special characters, does not save state)
– Display as Text (does not save state)
– Display as Text (based on LOV, does not save state)
– Display as Text (based on PLSQL, does not save state)
– Text Field (Disabled, does not save state)
– Stop and Start HTML Table (Displays label only)
• Checksum Required: Application Level - The item's session state may beset by passing the item name/value in a URL if a checksum specific to theschema is provided. You can also use a user-level checksum or a session-level checksum (see next bullets). Use this option when you want to allow theitem to be set only by URLs having checksums that were generated by anyuser running the same application in the current workspace but in a differentsession.
• Checksum Required: User Level - The item's session state may be set bypassing the item name/value in a URL if a checksum specific to theworkspace, application, and user is provided. You can also use a session-levelchecksum (see next bullet). Use this option when you want to allow the item tobe set only by URLs having checksums that were generated by the samenamed user, running the same application in the current workspace but in adifferent session.
• Checksum Required: Session Level - The item's session state may be setby passing the item name/value in a URL if a checksum specific to the currentsession is provided. Use this option when you want to allow this item to be setonly by URLs having checksums that were generated in the current session.
6. Click Apply Changes.
Chapter 20Understanding Developer Security Best Practices
20-35
20.2.6 About Securing File UploadsLearn about developer best practices for securing file uploads.
Oracle Application Express enables you to easily build an application that can be usedto upload files and to access uploaded files. These files are uploaded into a commonfile storage table. Although the database view APEX_APPLICATION_FILES shows thosefiles associated with your database account (or workspace), programmatic access tothe common file storage table does not always require authentication, enabling otherusers to see your uploaded files.:
20.3 Controlling Access to Applications, Pages, and PageComponents
Control access to an application, individual pages, or page components by creating anaccess control list.
Tip:
To create an access control page, the application schema must have CREATETABLE, CREATE TRIGGER, and CREATE SEQUENCE privileges.
• Understanding Access Control (page 20-37)Adding the Access Control feature to an application, creates multiple pages andthe following components: an Access Control region, access roles, authorizationschemes, a build option, and an Application Setting.
• Creating an Access Control Using the Create Application Wizard (page 20-40)Create an access control list using the Create Application Wizard.
• Creating an Access Control Using the Create Page Wizard (page 20-41)Create an access control list using the Create Page Wizard.
• Managing User Access (page 20-42)Manage user access on the Administration page.
• Configuring Access Control (page 20-43)Configure user access on the Administration page.
• About Controlling Access for Pages and Page Components (page 20-43)Control access to a specific page or page component by editing the page orcomponent and selecting an authorization schemes.
• About Removing an Access Control Created with a Wizard (page 20-44)Remove an access control created with a wizard using build options.
• Managing Roles and User Assignments (page 20-44)Manage application access control roles and user role assignments on theApplication Access Control page..
Chapter 20Controlling Access to Applications, Pages, and Page Components
20-36
See Also:
"Managing Roles and User Assignments (page 20-44)"
20.3.1 Understanding Access ControlAdding the Access Control feature to an application, creates multiple pages and thefollowing components: an Access Control region, access roles, authorization schemes,a build option, and an Application Setting.
• About Adding Access Control (page 20-37)
• About Access Control Authorization Schemes (page 20-38)
• About Configuring Access Control (page 20-38)
• About Exporting an Application with Access Control (page 20-40)
20.3.1.1 About Adding Access ControlRunning the Access Control Wizard creates multiple pages and the followingcomponents:
• Adds an Access Control region to the Administration page you specify.
• Creates the access roles: Administrator, Contributor, and Reader.
• Creates the authorization schemes: Administration Rights, Contribution Rights,and Reader Rights.
Note:
When you add a new Access Control to an existing application, theseauthorization schemes are only be created if the names do not exist. Forexample, if Administration Rights already exists (case sensitivecomparison), the wizard will not recreate. Instead, the Access Controlpage will re-use the existing authorization scheme.
• Creates the build option, Feature: Access Control.
• Creates the Application Setting, ACCESS_CONTROL_SCOPE.
Developers use the access control list to associate the privileges, view, edit, andadministration, with application users. Within the final Access Control UI, eachprivileges correlates to an access role:
• View correlates to the Reader role.
• Edit correlates to the Contributor role.
• Administration correlates to the Administrator role.
Chapter 20Controlling Access to Applications, Pages, and Page Components
20-37
20.3.1.2 About Access Control Authorization SchemesWhen you add the Access Control feature to an application, the PL/SQL Body Wizardcreates the following authorization schemes:
• Administration Rights – This authorization scheme checks if the current user inthe application is assigned ADMINISTRATOR role.
return APEX_ACL.HAS_USER_ROLE ( p_application_id=>:APP_ID, p_user_name => :APP_USER, p_role_static_id => 'ADMINISTRATOR');
• Contribution Rights – This authorization scheme checks if the current user in theapplication is assigned the ADMINISTRATOR role or the CONTRIBUTOR role.
if apex_acl.has_user_role ( p_application_id=>:APP_ID, p_user_name => :APP_USER, p_role_static_id => 'ADMINISTRATOR') or apex_acl.has_user_role ( p_application_id=>:APP_ID, p_user_name=> :APP_USER, p_role_static_id=> 'CONTRIBUTOR') then return true;else return false;end if;
• Reader Rights – This authorization scheme returns TRUE if the access control isconfigured to allow any authenticated user access the application. If this behavioris not allowed, it checks if the current user in the application is assigned to anyapplication role.
if nvl(apex_app_setting.get_value( p_name => 'ACCESS_CONTROL_SCOPE'),'x') = 'ALL_USERS' then -- allow user not in the ACL to access the application return true;else -- require user to have at least one role return apex_acl.has_user_any_roles ( p_application_id => :APP_ID, p_user_name => :APP_USER);end if;
20.3.1.3 About Configuring Access ControlOnce you add the Access Control feature, you configure it by running the applicationand accessing the Access Control region on the Administration page.
Chapter 20Controlling Access to Applications, Pages, and Page Components
20-38
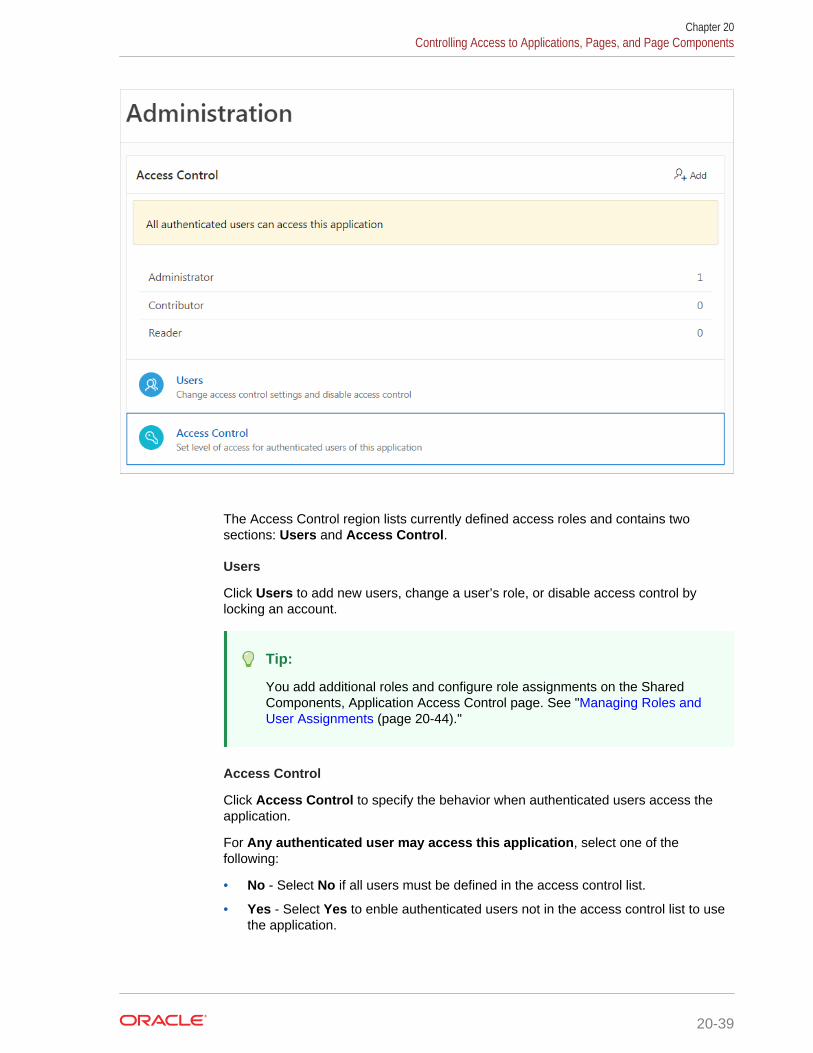
The Access Control region lists currently defined access roles and contains twosections: Users and Access Control.
Users
Click Users to add new users, change a user’s role, or disable access control bylocking an account.
Tip:
You add additional roles and configure role assignments on the SharedComponents, Application Access Control page. See "Managing Roles andUser Assignments (page 20-44)."
Access Control
Click Access Control to specify the behavior when authenticated users access theapplication.
For Any authenticated user may access this application, select one of thefollowing:
• No - Select No if all users must be defined in the access control list.
• Yes - Select Yes to enble authenticated users not in the access control list to usethe application.
Chapter 20Controlling Access to Applications, Pages, and Page Components
20-39
20.3.1.4 About Exporting an Application with Access ControlWhen your export an application with the Access Control feature, the application roles,Administrator, Contributor, and Reader, are exported. However, the users assigned tothese roles are not exported. If you deploy a exported application with the AccessControl feature, navigation menu entry for Administration page will not display. Whenyou deploy an application with Access Control feature, your can add user roles asneeded by going to Shared Components, Application Access Control. If theapplication is being deployed in a runtime environment, you can add user roles usingAPEX_ACL API. For example, the following example adds the user name 'SCOTT' asAdministrator in application 255:
begin APEX_ACL.ADD_USER_ROLE ( p_application_id => 255, p_user_name => 'SCOTT', p_role_static_id => 'ADMINISTRATOR' );end;
You can also execute the APEX_ACL API from the command line or create an installscript in application supporting objects.
20.3.2 Creating an Access Control Using the Create ApplicationWizard
Create an access control list using the Create Application Wizard.
To create an access control list using the Create Application Wizard:
1. On the Workspace home page, click the App Builder icon.
2. Click the Create button.
3. Click Application.
4. For Name, enter the name used to identify the application to developers.
5. For Appearance, accept the default Theme Style and menu layout (Vita, SideMenu), or change it by clicking the Set Appearance icon adjacent to theAppearance field.
6. To add a new page (such as a blank page, calendar, chart, form, report, and soon) click Add Page and select the desired page type.
7. Under Features, select Access Control.
8. Under Settings, specify settings used to generate this application. To learn moreabout an attribute, click the Help icon adjacent to Settings.
9. Click Create Application.
See Also::
"Understanding Page Types, Features, and Settings (page 6-4)"
Chapter 20Controlling Access to Applications, Pages, and Page Components
20-40
20.3.3 Creating an Access Control Using the Create Page WizardCreate an access control list using the Create Page Wizard.
Tip:
This section describes how to create an access control list by running theCreate Page Wizard from the Application home page. You can also run thiswizard in Page Designer by clicking the Create menu and selecting Page.
To create an access control list using the Create Page Wizard:
1. On the Workspace home page, click App Builder.
2. Select an application.
The Application home page appears.
3. Click the Create Page button.
4. For Create a Page:
a. User Interface - Select a user interface for the page (optional). This attributeonly displays for applications using older themes and for which Desktop andMobile User Interfaces have been defined
b. Page Type - Select the type of page you want to create.
• Component - Provides page-level functionality and can be added multipletimes within a given application. Examples include reports, forms, plug-ins,charts, calendar and so on.
• Feature - Provide application-level functionality and can only be addedonce per application.
Tip:
The options that appear change based on the selected Page Type.To learn more,"Understanding Page Types in the Create PageWizard (page 7-4)."
5. For Page Type, select Feature and then Access Control.
6. On the Create Access Control:
a. Administration Page Number - Enter an unused starting page number. Thiswizard creates multiple pages starting with the number specified.
b. Page Group - Identify the name of the page group you to associate with thispage. Page groups help developers manage the pages within an application.To create a page group, enter the name. To use an existing page group,select the name from the list.
c. Build Option - The wizard creates this build option to support this feature. Youcan use the build option to control whether the feature appears or to remove itlater on.
Chapter 20Controlling Access to Applications, Pages, and Page Components
20-41
d. Administration Page Preference - Specify the administration page to which thisaccess control list will be added. Options include:
• Create a new page
• Identify an existing page
What appears next depends upon your selection. Follow the on-screeninstructions.
e. Click Next.
A summary page appears.
7. Click Create.
20.3.4 Managing User AccessManage user access on the Administration page.
Use Manage User Access page to add new users, change a user’s role, or disableaccess control by locking an account.
Tip:
You can also add users by clicking the Add button adjacent to the AccessControl region heading.
To manage user access:
1. Run the application and navigate to Access Control.
By default, navigate to the Administration page and locate Access Controlregion.
2. Under Access Control, click Users.
The Manage User Access appears.
3. To add a user:
a. Click the Add User .
b. On Manage User Access, edit the attributes:
• Username
• Role - Select role (for example, Administrator, Contributor, or Reader).
c. Click Add User.
4. To edit an existing user:
a. Click the Edit icon adjacent to the Username.
b. On Manage User Access, edit the following:
• Username
• Role - Select role (for example, Administrator, Contributor, or Reader).
Chapter 20Controlling Access to Applications, Pages, and Page Components
20-42
• Account Locked - Select Yes or No.
c. Click Apply Changes.
5. To add multiple users:
a. Role - Select a role (such as Administrator, Contributor, or Reader).
b. Username - Enter usernames separated by commas, semicolons, or whitespace. Existing or duplicate usernames are automatically be ignored.
c. Confirm the additions and click Apply Changes.
6. To delete a user:
a. Click the Edit icon adjacent to the Username.
b. Click Delete
7. To revert you changes, click Reset.
20.3.5 Configuring Access ControlConfigure user access on the Administration page.
Use Configure Access Control to specify the behavior when authenticated usersaccess the application, determine the default role for users not in the access controllist, and determine the userame format (email or string).
To configure access control:
1. Run the application and navigate to Access Control.
By default, navigate to the Administration page and locate Access Controlsection.
2. Under Access Control, click Access Control.
3. For Any authenticated user may access this application, select either:
• No - Select No if all defined users are included in the access control list.
• Yes - Select Yes if authenticated users not in the access control list may alsouse this application.
4. For Treat authenticated users not in ACL as, select either:
• Readers - Readers only have view privileges.
• Contributors - Contributors have view and edit privileges
5. For Username format, select:
• E-mail Address
• String
6. To save your changes, click Apply Changes.
20.3.6 About Controlling Access for Pages and Page ComponentsControl access to a specific page or page component by editing the page orcomponent and selecting an authorization schemes.
The Access Control Wizard creates authorization schemes that correspond to theapplication mode list options and the privileges available in the Access Control List.
Chapter 20Controlling Access to Applications, Pages, and Page Components
20-43
You can control access to a specific page or page component by editing the page orcomponent and selecting one of the following authorization schemes:
• Administration Rights - Only users with Administrator privileges can view thepage or component.
• Contribution Rights - Users with both Edit and Administrator privileges can viewthe page or component. Users with View privileges cannot view the page orcomponent.
• Reader Rights - Users with Administrator, Edit, or View privileges can view thepage or component.
• Not Administration Rights - Users with Administrator privileges cannot view thepage or component.
• Not Contribution Rights - Users with both Edit and Administrator privilegescannot view the page or component. Users with View privileges can view the pageor component.
• Not Reader Rights - Users with Administrator, Edit, or View privileges cannotview the page or component.
20.3.7 About Removing an Access Control Created with a WizardRemove an access control created with a wizard using build options.
When you add an access control list using a wizard, the wizard creates one or morepages and other components and processes to seamlessly integrate it into yourapplication. Each feature is associated with a build option which contains one or morecomponents. You use the associated build option to enable, disable, or permanentlyremove features.
Using Build Options to Include or Exclude Features
Build options have two possible values: Include and Exclude. If you select the buildoption status of Include, then the Application Express engine considers the associatedcomponents (in this case features) as part of the application definition at runtime.Conversely, if you specify the build options status as Exclude, then the ApplicationExpress engine treats it and any associated components as if it did not exist.
Removing Features Permanently
You remove features created with a wizard by first removing the componentsassociated with the build option and then deleting the build option.
20.3.8 Managing Roles and User AssignmentsManage application access control roles and user role assignments on the ApplicationAccess Control page..
Tip:
You also use the APEX_APP_ACL API.
Chapter 20Controlling Access to Applications, Pages, and Page Components
20-44
• About Application Access Control (page 20-45)Learn about managing access control application users and roles.
• Creating Access Control Roles (page 20-46)Create application access control roles.
• Editing or Deleting Access Control Roles (page 20-46)Edit or delete application access control roles.
• Adding User Role Assignments (page 20-47)Define additional user role assignments on the Application Access Control page.
• Editing User Role Assignments (page 20-47)Edit or delete user role assignments.
See Also:
• "Controlling Access to Applications, Pages, and Page Components(page 20-36)"
• "APEX_ACL" in Oracle Application Express API Reference
20.3.8.1 About Application Access ControlLearn about managing access control application users and roles.
You create an access control list by running the Access Control Wizard from either theCreate Application Wizard or Create Page Wizard. The Access Control Wizard createsa page to manage an access control list and creates two tables within the application'sdefault parsing schema to manage the access control list. Use the access control listwithin the application to associate the privileges (view, edit, and administration, withapplication users. Each privileges correlates to an access level role:
• View correlates to the READER role.
• Edit correlates to the CONTRIBUTOR role.
• Administration correlates to the ADMINISTRATOR role.
To control access to application pages and components, you need to create anAuthorization Scheme and associate it with the application.
About Defining Additional Roles
You can define additional roles on the Application Access Control page. Since rolesare applied to users you must create the roles before adding users. Roles and usersdefined on the Application Access Control page can be reviewed using the followingview:
• APEX_APPL_ACL_USERS
• APEX_APPL_ACL_USER_ROLES
• APEX_APPL_ACL_ROLES
Chapter 20Controlling Access to Applications, Pages, and Page Components
20-45
20.3.8.2 Creating Access Control RolesCreate application access control roles.
Tip:
Since roles are applied to users, you must create the roles before addingusers.
To create an application access control role:
1. Navigate to the Shared Components page:
a. On the Workspace home page, click App Builder.
b. Select an application.
c. On the Application home page, click Shared Components.
The Shared Components page appears.
2. Under Application Logic, select Application Access Control.
The Application Access Control page appears.
3. Under Roles, click Add Role.
The Role dialog appears.
4. On Role:
a. Name - Enter a descriptive name for this role. Name may only containalphanumeric characters and underscores (_).
b. Static Identifier - Alternate application identifier for this role.
c. Description - Enter an optional description of this role.
5. Click Create Role.
The new role displays under Roles on the Application Access Control page.
20.3.8.3 Editing or Deleting Access Control RolesEdit or delete application access control roles.
To edit an application access control role:
1. Navigate to the Shared Components page:
a. On the Workspace home page, click App Builder.
b. Select an application.
c. On the Application home page, click Shared Components.
The Shared Components page appears.
2. Under Application Logic, select Application Access Control.
The Application Access Control page appears.
3. To edit a role:
Chapter 20Controlling Access to Applications, Pages, and Page Components
20-46
a. Under Roles, select the role.
The Role dialog appears.
b. Edit the attributes.
c. Click Apply Changes.
4. To delete a role:
a. Under Roles, select the role.
The Role dialog appears.
b. Click Delete.
20.3.8.4 Adding User Role AssignmentsDefine additional user role assignments on the Application Access Control page.
To add user role assignments:
1. Navigate to the Shared Components page:
a. On the Workspace home page, click App Builder.
b. Select an application.
c. On the Application home page, click Shared Components.
The Shared Components page appears.
2. Under Application Logic, select Application Access Control.
The Application Access Control page appears.
3. Under User Role Assignments, click Add User Role Assignment.
The User Assignment dialog appears.
4. On User Assignment:
a. User Name - Enter a descriptive name for this role. Name may only containalphanumeric characters and underscores (_).
b. Application Role - Select a role.
5. Click Create Assignment.
The new user assignment displays under User Role Assignments.
Tip:
Application users are not exported as part of your application. When youdeploy your application you will need to manually manage your user to roleassignments. Roles are exported as part of an application export andimported with application imports.
20.3.8.5 Editing User Role AssignmentsEdit or delete user role assignments.
To edit user role assignments:
Chapter 20Controlling Access to Applications, Pages, and Page Components
20-47
1. Navigate to the Shared Components page:
a. On the Workspace home page, click App Builder.
b. Select an application.
c. On the Application home page, click Shared Components.
The Shared Components page appears.
2. Under Application Logic, select Application Access Control.
The Application Access Control page appears.
3. To edit an existing user role assignment:
a. Under User Role Assignments, select a user name.
The User Assignment dialog appears.
b. For Application Role, celect a new role.
c. Click Save.
4. To delete a user role assignment:
a. Under User Role Assignments, select a user name.
The User Assignment dialog appears.
b. Click Delete.
Tip:
Application users are not exported as part of your application. When youdeploy your application you will need to manually manage your user to roleassignments. Roles are exported as part of an application export andimported with application imports.
20.4 Establishing User Identity Through AuthenticationUse authentication to establish a user's identity to control access to an application.Authentication may require a user identify a user name and password or could involvethe use of digital certificates or a secure key.
• Understanding Authentication (page 20-49)Learn about authentication.
• Creating an Authentication Scheme (page 20-50)Create an authentication scheme on the Shared Components page.
• Understanding Preconfigured Authentication Schemes (page 20-51)Learn about the preconfigured authentication schemes.
• Managing Existing Authentication Schemes (page 20-61)Manage available authentication schemes in the Authentication SchemesRepository.
• Viewing the Authentication Scheme Associated with an Application (page 20-61)View the current authentication scheme associated with an application.
Chapter 20Establishing User Identity Through Authentication
20-48
• Changing the Authentication Scheme Associated with an Application(page 20-62)Change the authentication scheme associated with an application.
• Creating a Login Page (page 20-62)Create an application login page.
• Viewing Authentication Scheme Reports (page 20-63)View authentication scheme reports.
20.4.1 Understanding AuthenticationLearn about authentication.
• How Authentication Works (page 20-49)
• About Support for Deep Linking (page 20-50)
• About Determining Whether to Include Authentication (page 20-50)
20.4.1.1 How Authentication WorksYou determine how your application interacts with users. If all users have the samerights and privileges, they are referred to as public users. However, if your applicationmust track each user individually, you must specify an authentication method.
Authentication establishes the identity of each user who accesses your application.Many authentication processes require that a user provide some type of credentialssuch as a user name and password. These credentials are then evaluated and theyeither pass or fail. If the credentials pass, the user has access to the application.Otherwise, access is denied.
Once a user has been identified, the Application Express engine keeps track of eachuser by setting the value of the built-in substitution string APP_USER. As a user navigatesfrom page to page, the Application Express engine sets the value of APP_USER toidentify the user. The Application Express engine uses APP_USER as one component ofa key for tracking each user's session state.
From a programming perspective, you can access APP_USER using the following syntax:
• As a bind variable from either PL/SQL or SQL:
:APP_USER
• From PL/SQL packages and triggers:
V('APP_USER')
• As an attribute of the context APEX$SESSION:
sys_context('APEX$SESSION', 'APP_USER')
You can use APP_USER to perform your own security checks and conditional processing.For example, suppose you created the following table:
CREATE TABLE my_security_table ( user_id VARCHAR2(30), privilege VARCHAR2(30));
Once created, you could populate this table with user privilege information and thenuse it to control the display of pages, tabs, navigation bars, buttons, regions, or anyother control or component.
Chapter 20Establishing User Identity Through Authentication
20-49
20.4.1.2 About Support for Deep LinkingOracle Application Express applications that use authentication schemes support deeplinking. Deep linking refers to the ability to link to an Oracle Application Express pageout of context (for example, from a hyperlink in an email or workflow notification).When you link to a page out of context and the application requires the user beauthenticated, the user is taken to the login page. After credentials verification, theApplication Express engine automatically displays the page that was referenced in theoriginal link.
20.4.1.3 About Determining Whether to Include AuthenticationAs you create your application, you must determine whether to include authentication.You can:
• Choose to not require authentication. Oracle Application Express does notcheck any user credentials. All pages of your application are accessible to allusers.
• Select a built-in authentication scheme. Create an authentication method basedon available preconfigured authentication schemes. Depending on which schemeyou choose, you may also have to configure the corresponding components ofOracle 10giAS, Oracle Internet Directory, or other external services.
• Create custom authentication scheme. Create a custom authentication methodto have complete control over the authentication interface. To implement thisapproach, you must provide a PL/SQL function the Application Express engineexecutes before processing each page request. This function's Boolean returnvalue determines whether the Application Express engine processes the pagenormally or displays a failure page.
20.4.2 Creating an Authentication SchemeCreate an authentication scheme on the Shared Components page.
To create an authentication scheme:
1. On the Workspace home page, click the App Builder icon.
2. Select an application.
3. On the Application home page, click Shared Components.
The Shared Components page appears.
4. Under Security, select Authentication Schemes.
The Authentication Schemes page appears.
5. You can customize the appearance the page using the Search bar at the top of thepage.
6. To create a new authentication scheme, click Create.
7. Specify how the scheme should be created by selecting one of the following:
• Based on a pre-configured scheme from the gallery.
• As a copy of an existing authentication scheme.
Chapter 20Establishing User Identity Through Authentication
20-50
8. Follow the on-screen instructions.
20.4.3 Understanding Preconfigured Authentication SchemesLearn about the preconfigured authentication schemes.
When you create an authentication scheme from the gallery you can select apreconfigured authentication scheme which follows a standard behavior forauthentication and session management. Note that if you create a new authenticationscheme, it automatically becomes the current authentication scheme for the selectedapplication. This section describes all preconfigured authentication schemes that shipwith Oracle Application Express.
Tip:
Authentication schemes support plug-ins. To learn more, see "ImplementingPlug-ins (page 19-3)."
• Application Express Accounts (page 20-52)Application Express Accounts are user accounts that are created within andmanaged in the Oracle Application Express user repository. When you use thismethod, your application is authenticated against these accounts.
• Custom Authentication (page 20-52)Creating a Custom Authentication scheme from scratch to have complete controlover your authentication interface.
• Database Accounts (page 20-54)Database Account Credentials authentication utilizes database schema accountsto authenticate users.
• HTTP Header Variable (page 20-55)Authenticate users externally by storing the username in a HTTP Header variableset by the web server.
• LDAP Directory Verification (page 20-55)Authenticate a user and password with an authentication request to a LDAPserver.
• No Authentication (using DAD) (page 20-57)Adopts the current database user. This approach can be used in combination witha mod_plsql Database Access Descriptor (DAD) configuration that uses basicauthentication to set the database session user.
• Open Door Credentials (page 20-58)Enable anyone to access your application using a built-in login page that capturesa user name.
• Oracle Application Server Single Sign-On Server (page 20-59)Delegates authentication to the Oracle AS Single Sign-On (SSO) Server. To usethis authentication scheme, your site must have been registered as a partnerapplication with the SSO server.
• Social Sign-In (page 20-60)Supports authentication with Google, Facebook, and other social network thatsupports OpenID Connect or OAuth2 standards.
Chapter 20Establishing User Identity Through Authentication
20-51
20.4.3.1 Application Express AccountsApplication Express Accounts are user accounts that are created within and managedin the Oracle Application Express user repository. When you use this method, yourapplication is authenticated against these accounts.
• About Application Express Accounts (page 20-52)
• Setting Up Application Express Accounts Authentication (page 20-52)
20.4.3.1.1 About Application Express AccountsApplication Express Accounts is a good solution when:
• You want control of the user account repository.
• User name and password-based approach to security is sufficient.
• You do not need to integrate into a single sign-on framework.
Application Express Accounts is an especially good approach when you must get agroup of users up and running on a new application quickly.
20.4.3.1.2 Setting Up Application Express Accounts AuthenticationTo set up Application Express Accounts:
1. On the Workspace home page, click the App Builder icon.
2. Select an application.
3. On the Application home page, click Shared Components.
The Shared Components page appears.
4. Under Security, select Authentication Schemes.
5. On the Authentication Schemes page, click Create.
6. Select Based on a pre-configured scheme from the gallery and click Next.
7. Under Name:
a. Name - Enter the name used to reference the authentication scheme by otherapplication developers.
b. Scheme Type - Select Application Express Accounts.
c. Click Create Authentication Scheme.
20.4.3.2 Custom AuthenticationCreating a Custom Authentication scheme from scratch to have complete control overyour authentication interface.
• About Custom Authentication (page 20-53)
• Setting Up Custom Authentication (page 20-53)
• About Session Management Security (page 20-54)
Chapter 20Establishing User Identity Through Authentication
20-52
20.4.3.2.1 About Custom AuthenticationCustom Authentication is the best approach for applications when any of the followingis true:
• Database authentication or other methods are not adequate.
• You want to develop your own login form and associated methods.
• You want to control security aspects of session management.
• You want to record or audit activity at the user or session level.
• You want to enforce session activity or expiry limits.
• You want to program conditional one-way redirection logic before OracleApplication Express page processing.
• You want to integrate your application with non-Oracle Application Expressapplications using a common session management framework.
• Your application consists of multiple applications that operate seamlessly (forexample, more than one application ID).
Tip:
If you are planning on using the same authentication scheme for multipleapplications, consider writing a custom authentication plug-in. See"Implementing Plug-ins (page 19-3)."
20.4.3.2.2 Setting Up Custom AuthenticationTo create a custom authentication scheme:
1. On the Workspace home page, click the App Builder icon.
2. Select an application.
3. On the Application home page, click Shared Components.
The Shared Components page appears.
4. Under Security, select Authentication Schemes.
5. On the Authentication Schemes page, click Create.
6. Select Based on a pre-configured scheme from the gallery and click Next.
7. Under Name:
a. Name - Enter the name used to reference the authentication scheme by otherapplication developers.
b. Scheme Type - Select Custom.
8. Fill in the appropriate fields.
To learn more about a specific field, see field-level Help. If Help is available, theitem label changes to include a question mark when you pass your cursor over it.
9. Click Create Authentication Scheme.
Chapter 20Establishing User Identity Through Authentication
20-53
20.4.3.2.3 About Session Management SecurityWhen running custom authentication, Oracle Application Express attempts to preventtwo improper situations:
• Intentional attempts by a user to access session state belonging to someone else.However, users can still type in an arbitrary application session ID into the URL.
• Inadvertent access to a stale session state (probably belonging to the same userfrom an earlier time). This would commonly result from using bookmarks toapplication pages.
Oracle Application Express checks that the user identity token set by the customauthentication function matches the user identity recorded when the applicationsession was first created. If the user has not yet been authenticated and the useridentity is not yet known, the session state being accessed does not belong tosomeone else. These checks determine whether the session ID in the request can beused. If not, the Application Express engine redirects back the same page using anappropriate session ID.
20.4.3.3 Database AccountsDatabase Account Credentials authentication utilizes database schema accounts toauthenticate users.
• About Database Account Credentials (page 20-54)
• Setting Up Database Account Credentials (page 20-54)
20.4.3.3.1 About Database Account CredentialsDatabase Account Credentials requires that a database user (schema) exist in thelocal database. This authentication method uses the database account user name andpassword to authenticate the user. Choose Database Account Credentials if havingone database account for each named user of your application is feasible and accountmaintenance using database tools meets your needs.
20.4.3.3.2 Setting Up Database Account CredentialsTo set up Database Account Credentials:
1. On the Workspace home page, click the App Builder icon.
2. Select an application.
3. On the Application home page, click Shared Components.
The Shared Components page appears.
4. Under Security, select Authentication Schemes.
5. On the Authentication Schemes page, click Create.
6. Select Based on a pre-configured scheme from the gallery and click Next.
7. Under Name:
a. Name - Enter the name used to reference the authentication scheme by otherapplication developers.
b. Scheme Type - Select Database Accounts.
Chapter 20Establishing User Identity Through Authentication
20-54
c. Click Create Authentication Scheme.
20.4.3.4 HTTP Header VariableAuthenticate users externally by storing the username in a HTTP Header variable setby the web server.
• About HTTP Header Variable (page 20-55)
• Setting Up HTTP Header Variable (page 20-55)
20.4.3.4.1 About HTTP Header VariableHTTP Header Variable supports the use of header variables to identify a user and tocreate an Application Express user session. Use HTTP Header Variable authenticationscheme if your company employs a centralized web authentication solution like OracleAccess Manager which provides single sign-on across applications and technologies.User credential verification is performed by these systems and they pass the user'sname to Oracle Application Express using a HTTP header variable such as"REMOTE_USER" (which is the default).
20.4.3.4.2 Setting Up HTTP Header VariableTo set up HTTP Header Variable:
1. On the Workspace home page, click the App Builder icon.
2. Select an application.
3. On the Application home page, click Shared Components.
The Shared Components page appears.
4. Under Security, select Authentication Schemes.
5. On the Authentication Schemes page, click Create.
6. Select Based on a pre-configured scheme from the gallery and click Next.
7. Under Name:
a. Name - Enter the name used to reference the authentication scheme by otherapplication developers.
b. Scheme Type - Select HTTP Header Variable.
8. Fill in the appropriate fields.
To learn more about a specific field, see field-level Help.
9. Click Create Authentication Scheme.
20.4.3.5 LDAP Directory VerificationAuthenticate a user and password with an authentication request to a LDAP server.
• About LDAP Directory Verification (page 20-56)
• Setting Up LDAP Directory Verification (page 20-56)
Chapter 20Establishing User Identity Through Authentication
20-55
20.4.3.5.1 About LDAP Directory VerificationYou can configure any authentication scheme that uses a login page to useLightweight Directory Access Protocol (LDAP) to verify the user name and passwordsubmitted on the login page.
App Builder includes wizards and edit pages that explain how to configure this option.These wizards assume that an LDAP directory accessible to your application for thispurpose already exists and that it can respond to a SIMPLE_BIND_S call for credentialsverification. When you create an LDAP Credentials authentication scheme, the wizardrequests and saves the LDAP host name, LDAP port, DN string, and determineswhether to use SSL, exact DN, and optionally a search filter if not using exact DN. Anoptional preprocessing function can be specified to adjust formatting of the user namepassed to the API.
20.4.3.5.2 Setting Up LDAP Directory VerificationTo set up LDAP Directory:
1. On the Workspace home page, click the App Builder icon.
2. Select an application.
3. On the Application home page, click Shared Components.
The Shared Components page appears.
4. Under Security, select Authentication Schemes.
5. On the Authentication Schemes page, click Create.
6. Select Based on a pre-configured scheme from the gallery and click Next.
7. Under Name:
a. Name - Enter the name used to reference the authentication scheme by otherapplication developers.
b. Scheme Type - Select LDAP Directory.
8. Under Settings:
a. Host - Enter the hostname of your LDAP directory server.
b. Port - Enter the port number of your LDAP directory host. The default is 389.
c. Use SSL - Choose whether to use SSL to bind to the LDAP directory. If SSLwith Authentication is chosen, a wallet must be configured for the ApplicationExpress instance.
d. Distinguished Name (DN) String - Enter the pattern used to construct the fullyqualified distinguished name (DN) string to DBMS_LDAP.SIMPLE_BIND_S if usingexact DN or the search base if using non-exact DN. Use %LDAP_USER% as aplaceholder for the username. For example:
Exact DN:
cn=%LDAP_USER%,l=amer,dc=yourdomain,dc=com
Non-Exact DN (Search Base):
Non-Exact DN (Search Base)
Chapter 20Establishing User Identity Through Authentication
20-56
e. Use Distinguished Name (DN) - Choose whether the LDAP DistinguishedName (DN) String is exact or non-exact. If non-exact, LDAP DistinguishedName (DN) is the search base and you must supply a Search Filter.
f. LDAP Username Edit Function - You may provide additional code to beexecuted to transform the username into a format perfectly suited to the LDAPdirectory entry or LDAP username. The bind variable :USERNAME contains thename the end user specified. For example, the following code calls a functionwhich replaces all periods (.) with underscores (_) in the DN string:
return apex_custom_auth.ldap_dnprep(p_username => :USERNAME);
g. Username Escaping - Choose how Oracle Application Express escapesspecial characters in %LDAP_USER%. The correct value for this attribute dependson the used LDAP server and whether a LDAP Username Edit Functionalready escapes special characters.
To learn more about a specific field, see field-level Help.
9. Click Create Authentication Scheme.
Note:
If you choose SSL with Authentication as the SSL mode, a wallet mustbe set up using the Oracle Application Express instance settings.Additionally, the root certification of the LDAP server must be importedinto that wallet as a trusted certificate.
20.4.3.6 No Authentication (using DAD)Adopts the current database user. This approach can be used in combination with amod_plsql Database Access Descriptor (DAD) configuration that uses basicauthentication to set the database session user.
• About DAD Credentials Verification (page 20-57)
• Setting Up DAD Credentials Verification (page 20-58)
20.4.3.6.1 About DAD Credentials VerificationDAD credentials verification uses the Oracle database native authentication and usermechanisms to authenticate users using a basic authentication scheme. Thisauthentication scheme gets the user name from the DAD either as the value stored inthe DAD configuration or, if the account information is not stored in the DADconfiguration, as the user name captured using the basic authentication challenge.
To use DAD credentials verification:
• Each application user must have a user account in the Oracle database.
• You must configure a PL/SQL DAD for basic authentication (without accountinformation).
This results in one user name/password challenge for browser session for yourapplication users. The user identity token is then made available in the APP_USERitem.
Chapter 20Establishing User Identity Through Authentication
20-57
DAD database authentication is useful when you must implement an authenticationmethod that requires minimal setup for a manageable number of users. Ideally theseusers would have self-managed accounts in the database and your use of thisauthentication method would be short lived (for example, during the demonstration orprototyping stages of development).
The main drawback of this approach is burdensome account maintenance, especiallyif users do not administer their own passwords, or if their database accounts exist onlyto facilitate authentication to your application.
20.4.3.6.2 Setting Up DAD Credentials VerificationTo set up DAD Credentials Verification:
1. On the Workspace home page, click the App Builder icon.
2. Select an application.
3. On the Application home page, click Shared Components.
The Shared Components page appears.
4. Under Security, select Authentication Schemes.
5. On the Authentication Schemes page, click Create.
6. Select Based on a pre-configured scheme from the gallery and click Next.
7. Under Name:
a. Name - Enter the name used to reference the authentication scheme by otherapplication developers.
b. Scheme Type - Select No Authentication.
8. Click Create Authentication Scheme.
20.4.3.7 Open Door CredentialsEnable anyone to access your application using a built-in login page that captures auser name.
Open Door Credentials authentication is useful during application development.
• Setting Up Open Door Credentials (page 20-58)
20.4.3.7.1 Setting Up Open Door CredentialsTo set up Open Door Credentials:
1. On the Workspace home page, click the App Builder icon.
2. Select an application.
3. On the Application home page, click Shared Components.
he Shared Components page appears.
4. Under Security, select Authentication Schemes.
5. On the Authentication Schemes page, click Create.
6. Select Based on a pre-configured scheme from the gallery and click Next.
7. Under Name:
Chapter 20Establishing User Identity Through Authentication
20-58
a. Name - Enter the name used to reference the authentication scheme by otherapplication developers.
b. Scheme Type - Select Open Door Credentials.
8. Click Create Authentication Scheme.
20.4.3.8 Oracle Application Server Single Sign-On ServerDelegates authentication to the Oracle AS Single Sign-On (SSO) Server. To use thisauthentication scheme, your site must have been registered as a partner applicationwith the SSO server.
• About Application Server Single Sign-On Server (page 20-59)
• Setting Up Oracle Application Server Single Sign-On (page 20-59)
20.4.3.8.1 About Application Server Single Sign-On ServerOracle Application Express applications can operate as partner applications withOracle Application Server's Single Sign-On (SSO) infrastructure. You must registeryour application (or register the Application Express engine) as the partner applicationby following the Oracle Application Server instructions for registering partnerapplications and install the Oracle 9iAS SSO Software Developer Kit (SDK).
If you choose this approach, your application will not use an integrated login page.Instead, when a user accesses your application in a new browser session, theApplication Express engine redirects to the Single Sign-On login page. After the useris authenticated by SSO, the SSO components redirect back to your application,passing the user identity and other information to the Application Express engine. Theuser can then continue to use the application until they log off, terminate their browsersession, or until some other session-terminating event occurs.
20.4.3.8.2 Setting Up Oracle Application Server Single Sign-OnTo set up Oracle Application Server Single Sign-On:
1. On the Workspace home page, click the App Builder icon.
2. Select an application.
3. On the Application home page, click Shared Components.
The Shared Components page appears.
4. Under Security, select Authentication Schemes.
5. On the Authentication Schemes page, click Create.
6. Select Based on a pre-configured scheme from the gallery and click Next.
7. Under Name:
a. Name - Enter the name used to reference the authentication scheme by otherapplication developers.
b. Scheme Type - Select Oracle Application Server Single Sign-On.
8. Fill in the appropriate fields.
To learn more about a specific field, see field-level Help.
9. Click Create Authentication Scheme.
Chapter 20Establishing User Identity Through Authentication
20-59
20.4.3.9 Social Sign-InSupports authentication with Google, Facebook, and other social network thatsupports OpenID Connect or OAuth2 standards.
• About Social Sign-In (page 20-60)
• Setting Up Social Sign-In Authentication (page 20-60)
20.4.3.9.1 About Social Sign-InSocial Sign-In authentication is primarily useful for the following use cases:
• Your application is internet facing and you expect an unknown number of usersfrom social networks to use your application.
• Your company has standardized on one of these providers, Oracle Identity CloudService, an internal OpenID Connect or OAuth2 system for authentication.
User credential verification is performed by these systems. Be aware that anyone whois registered at this provider can use your application, unless you use authorizationschemes for protection.
Social network authentication providers store a multitude of information about users.You can configure the Social Login authentication scheme to request this information,using the Scope attribute (see Item Help). In the authentication scheme's Post-Authentication procedure, you can access this information using APEX_JSON.GET_%function calls.
You can use multiple authentication schemes in your application, to support more thanone Social Login provider and other schemes.
20.4.3.9.2 Setting Up Social Sign-In Authentication
Note:
As a prerequisite for creating the Social Sign-In Authentication , you have torequest OAuth2 credentials from the authentication provider and configureyour account to support redirects to your application. Check yourauthentication provider's documentation for the details. The steps belowassume that this has been done and that you saved the OAuth2 credentials inthe application's shared components.
To set up Social Sign-In Authentication:
1. On the Workspace home page, click the App Builder icon.
2. Select an application.
3. On the Application home page, click Shared Components.
The Shared Components page appears.
4. Under Security, select Authentication Schemes.
5. On the Authentication Schemes page, click Create.
Chapter 20Establishing User Identity Through Authentication
20-60
6. Select Based on a pre-configured scheme from the gallery and click Next.
7. Under Name:
a. Name - Enter the name used to reference the authentication scheme by otherapplication developers.
b. Scheme Type - Select Social Sign-In.
8. Fill in the appropriate fields.
To learn more about a specific field, see field-level Help.
9. Click Create Authentication Scheme.
20.4.4 Managing Existing Authentication SchemesManage available authentication schemes in the Authentication Schemes Repository.
Once created, available authentication schemes display in the AuthenticationSchemes Repository.
To navigate to the Authentication Schemes Repository:
1. On the Workspace home page, click the App Builder icon.
2. Select an application.
3. On the Application home page, click Shared Components.
The Shared Components page appears.
4. Under Security, select Authentication Schemes.
5. You can customize the appearance the page using the Search bar at the top of thepage.
6. To edit a specific authentication scheme as a report, click the authenticationscheme name.
The Authentication Scheme page appears.
To learn more about a specific field, see field-level Help.
7. Edit the appropriate attributes and click Apply Changes.
20.4.5 Viewing the Authentication Scheme Associated with anApplication
View the current authentication scheme associated with an application.
To view the current authentication scheme for an application:
1. On the Workspace home page, click the App Builder icon.
2. Select an application.
3. Click Shared Components.
4. Under Security, click Security Attributes.
5. Locate the Authentication section. The current authentication scheme displaysnext to Authentication Scheme.
Chapter 20Establishing User Identity Through Authentication
20-61
6. To edit the Authentication Scheme, Define Authentication Schemes.
20.4.6 Changing the Authentication Scheme Associated with anApplication
Change the authentication scheme associated with an application.
To change the authentication scheme for an application:
1. Navigate to the Authentication Schemes:
a. On the Workspace home page, click the App Builder icon.
b. Select an application.
c. On the Application home page, click Shared Components.
The Shared Components page appears.
d. Under Security, select Authentication Schemes.
2. Select the authentication scheme you want to activate.
The Create/Edit page appears.
3. Click Make Current Scheme.
20.4.7 Creating a Login PageCreate an application login page.
When you create an application in Oracle Application Express, a login page is created.The alias for the page is 'LOGIN'. You can use this page as the "invalid session page"in an authentication scheme. The page is constructed with processes that call theOracle Application Express login API to perform credentials verification and sessionregistration.
You can also build your own login pages using the pre-built pages as models andtailoring all of the user interface and processing logic to your requirements.
To create a login page for your application:
1. On the Workspace home page, click the App Builder icon.
2. Select an application.
3. Click Create Page.
4. For Create a Page:
a. User Interface - Select a user interface for the page.
b. Select a page type - Select Login Page.
c. Click Next.
5. Select Login Page.
6. Specify Login page attributes and click Create.
Chapter 20Establishing User Identity Through Authentication
20-62
20.4.8 Viewing Authentication Scheme ReportsView authentication scheme reports.
To view authentication scheme reports:
1. On the Workspace home page, click the App Builder icon.
2. Select an application.
3. On the Application home page, click Shared Components.
The Shared Components page appears.
4. Under Security, select Authentication Schemes.
5. Click the appropriate tab at the top of the page:
• Subscription - Use the Authentication Scheme Subscription report to viewsubscribed authentication schemes in your application.
• History - Use the Authentication Scheme History report to view recentmodifications made to items in this application.
20.5 Providing Security Through AuthorizationExtend the security of your application by creating an authorization scheme.
Authorization is a broad term for controlling access to resources based on userprivileges. While conditions control the rendering and processing of specific pagecontrols or components, authorization schemes control user access to specific controlsor components.
• How Authorization Schemes Work (page 20-63)Learn about how an authorization scheme extends the security of yourapplication's authentication scheme.
• Creating and Editing an Authorization Scheme (page 20-64)Learn how to create and edit an authorization scheme. Before you can attach anauthorization scheme to an application or an application component or control, youmust first create it.
• Attaching an Authorization Scheme to an Application, Page, or Components(page 20-67)
• Viewing Authorization Reports (page 20-69)
20.5.1 How Authorization Schemes WorkLearn about how an authorization scheme extends the security of your application'sauthentication scheme.
You can specify an authorization scheme for an entire application, page, or specificcontrol such as a region, item, or button. For example, you could use an authorizationscheme to selectively determine which tabs, regions, or navigation bars a user sees.An authorization scheme either succeeds or fails. Common authorization schemetypes include Exists, Not Exists SQL Queries, and PL/SQL Function ReturningBoolean. If a component or control level authorization scheme succeeds, the user canview the component or control. If it fails, the user cannot view the component or
Chapter 20Providing Security Through Authorization
20-63

control. If an application or page-level authorization scheme fails, then OracleApplication Express displays a previously defined message.
When you define an authorization scheme, you give it a unique name. Once defined,you can attach it to any component or control in your application. To attach anauthorization scheme to a component or control in your application, simply navigate tothe appropriate attributes page and select an authorization scheme from theAuthorization Scheme list.
20.5.2 Creating and Editing an Authorization SchemeLearn how to create and edit an authorization scheme. Before you can attach anauthorization scheme to an application or an application component or control, youmust first create it.
• About Authorization Scheme Types (page 20-64)
• Creating an Authorization Scheme (page 20-65)Create an authorization scheme on the Shared Components page.
• Editing Attributes of an Existing Authorization Scheme (page 20-66)Edit attributes of an existing authorization scheme.
• Changing the Evaluation Point Attribute (page 20-66)Control when an authorization scheme is validated using the Evaluation Point,Validate authorization scheme attribute.
• About Resetting Authorization Scheme State (page 20-67)Call an API to reset a session's authorization scheme state.
20.5.2.1 About Authorization Scheme TypesWhen you create an authorization scheme you select an authorization scheme type.The authorization scheme type determines how an authorization scheme is applied.Developers can create new authorization type plug-ins to extend this list.
Table 20-1 Authorization Scheme Types
Authorization Scheme Types Description
Exists SQL Query Enter a query that causes the authorization scheme to pass if it returns atleast one row and causes the scheme to fail if it returns no rows
NOT Exists SQL Query Enter a query that causes the authorization scheme to pass if it returns norows and causes the scheme to fail if it returns one or more rows
PL/SQL Function Returning Boolean Enter a function body. If the function returns true, the authorizationsucceeds.
Item in Expression 1 is NULL Enter an item name. If the item is null, the authorization succeeds.
Item in Expression1 is NOT NULL Enter an item name. If the item is not null, the authorization succeeds.
Value of Item in Expression 1 EqualsExpression 2
Enter and item name and value.The authorization succeeds if the item'svalue equals the authorization value.
Value of Item in Expression 1 DoesNOT Equal Expression 2
Enter an item name and a value. The authorization succeeds if the item'svalue is not equal to the authorization value.
Value of Preference in Expression 1Does NOT Equal Expression 2
Enter an preference name and a value. The authorization succeeds if thepreference's value is not equal to the authorization value.
Chapter 20Providing Security Through Authorization
20-64
Table 20-1 (Cont.) Authorization Scheme Types
Authorization Scheme Types Description
Value of Preference in Expression 1Equals Expression 2
Enter an preference name and a value. The authorization succeeds if thepreference's value equal the authorization value.
Is In Group Enter a group name. The authorization succeeds if the group is enabledas a dynamic group for the session. See"APEX_AUTHORIZATION.ENABLE_DYNAMIC_GROUPS" in OracleApplication Express API Reference.
If the application uses Application Express Accounts Authentication, thischeck also includes workspace groups that are granted to the user. If theapplication uses Database Authentication, this check also includesdatabase roles that are granted to the user.
Is Not In Group Enter a group name. The authorization succeeds if the group is notenabled as a dynamic group for the session.
20.5.2.2 Creating an Authorization SchemeCreate an authorization scheme on the Shared Components page.
To create an authorization scheme:
1. On the Workspace home page, click the App Builder icon.
2. Select an application.
3. On the Application home page, click Shared Components.
The Shared Components page appears.
4. Under Security, select Authorization Schemes.
5. Click Create.
6. Specify how to create an authorization scheme by selecting one of the following:
• From Scratch
• As a Copy of an Existing Authorization Scheme
7. On Create Authorization Scheme - Details:
a. Name - Enter an unique name that identifies this authorization scheme.
b. Scheme Type - Select how this authorization scheme will be applied. See"About Authorization Scheme Types (page 20-64)."
c. Identify error message displayed when scheme violated - Enter error text thatdisplays if the authorization scheme fails (that is, the current user fails thesecurity check).
d. Validate Authorization Scheme - Authorization schemes are evaluated on firstuse in a session. Use this option to controls if future uses cause re-evaluationsand when a memorized result can be taken instead.
For more details, see field-level Help.
8. Click Create Authorization Scheme.
Chapter 20Providing Security Through Authorization
20-65
20.5.2.3 Editing Attributes of an Existing Authorization SchemeEdit attributes of an existing authorization scheme.
To edit attributes of an existing authorization scheme:
1. On the Workspace home page, click the App Builder icon.
2. Select an application.
3. On the Application home page, click Shared Components.
The Shared Components page appears.
4. Under Security, select Authorization Schemes.
The Authorization Schemes page appears. By default, each scheme displays asan icon. You can customize the appearance the page using the Search bar at thetop of the page.
5. Select an authorization scheme.
6. Edit the appropriate attributes.
To learn more, see field-level Help.
7. To save your changes, click Apply Changes.
20.5.2.4 Changing the Evaluation Point AttributeControl when an authorization scheme is validated using the Evaluation Point, Validateauthorization scheme attribute.
To change the authorization scheme evaluation point:
1. On the Workspace home page, click the App Builder icon.
2. Select an application.
3. On the Application home page, click Shared Components.
The Shared Components page appears.
4. Under Security, select Authorization Schemes.
The Authorization Schemes page appears.
By default, each scheme displays as an icon. You can customize the appearancethe page using the Search bar at the top of the page.
5. Select an authorization scheme.
6. Scroll down to Evaluation Point and edit the Validate authorization schemeattribute. Options include:
• Once per session - Evaluate only once and always use the memorized resultafterwards.
• Once per page view - Evaluate once for each request that is processed. Usethe memorized result if the authorization scheme is referenced in more thanone component on the page.
• Once per component - Evaluate once for each component that referencesthe authorization scheme, but save the result in the session. Further requests
Chapter 20Providing Security Through Authorization
20-66
to render or process the scheme use the result that was memorized for thecomponent.
• Always (No Caching) - The authorization scheme will always be evaluated.
To learn more, see field-level Help.
7. To save your changes, click Apply Changes.
Tip:
The default value Once per session is the most efficient. You shouldchoose another value if the authorization check depends on changingsession state or other factors that are not consistent over an entire session.
20.5.2.5 About Resetting Authorization Scheme StateCall an API to reset a session's authorization scheme state.
If an authorization scheme is validated once for each session, Oracle ApplicationExpress caches the validation results in each user's session cache. You can reset asession's authorization scheme state by calling the APEX_AUTHORIZATION.RESET_CACHEAPI.
20.5.3 Attaching an Authorization Scheme to an Application, Page, orComponents
Once you have created an authorization scheme you can attach it to an entireapplication, page, control, or component.
• Attaching an Authorization Scheme to an Application (page 20-67)
• Attaching an Authorization Scheme to a Page (page 20-68)
• Attaching an Authorization Scheme to a Control or Component (page 20-68)
20.5.3.1 Attaching an Authorization Scheme to an ApplicationTo attach an authorization scheme to an application:
1. On the Workspace home page, click the App Builder icon.
2. Select an application.
3. Click the Shared Components icon.
The Shared Components page appears.
4. Under Security, click Security Attributes.
5. Scroll down to Authorization and make a selection from the Authorization Schemelist.
6. For Run on Public Pages, select Yes or No to specify whether the application-levelauthorization scheme is checked on public pages (that is, pages that do notrequire authorization). To learn more, see "Authorization (page 6-34)."
Chapter 20Providing Security Through Authorization
20-67
7. To define a new authorization scheme, click Define Authorization Schemes.
20.5.3.2 Attaching an Authorization Scheme to a PageTo attach an authorization scheme to a page:
1. On the Workspace home page, click the App Builder icon.
2. Select an application.
3. Select a page.
Page Designer appears.
4. In the Rendering tab on the left side, click the page title at the top of the tree.
5. In the Property Editor, locate Security and make a selection from the AuthorizationScheme attribute.
Tip:
To find a group or attribute:
• Search for the group or attribute - Enter keywords in the FilterProperties field. The Property Editor displays the group orattributes. To return to the default display, delete the keywords.
• Use Go to Group - Click Go to Group and select the group. Toreturn the default display, click Go to Group again and selectExpand All.
6. Click Save.
20.5.3.3 Attaching an Authorization Scheme to a Control or ComponentTo attach an authorization scheme to a page component or control:
1. On the Workspace home page, click the App Builder icon.
2. Select an application.
3. Select a page.
Page Designer appears.
4. Select the component or control to which you want to apply the authorizationscheme.
5. In the Property Editor, locate Security and make a selection from the AuthorizationScheme attribute.
Chapter 20Providing Security Through Authorization
20-68
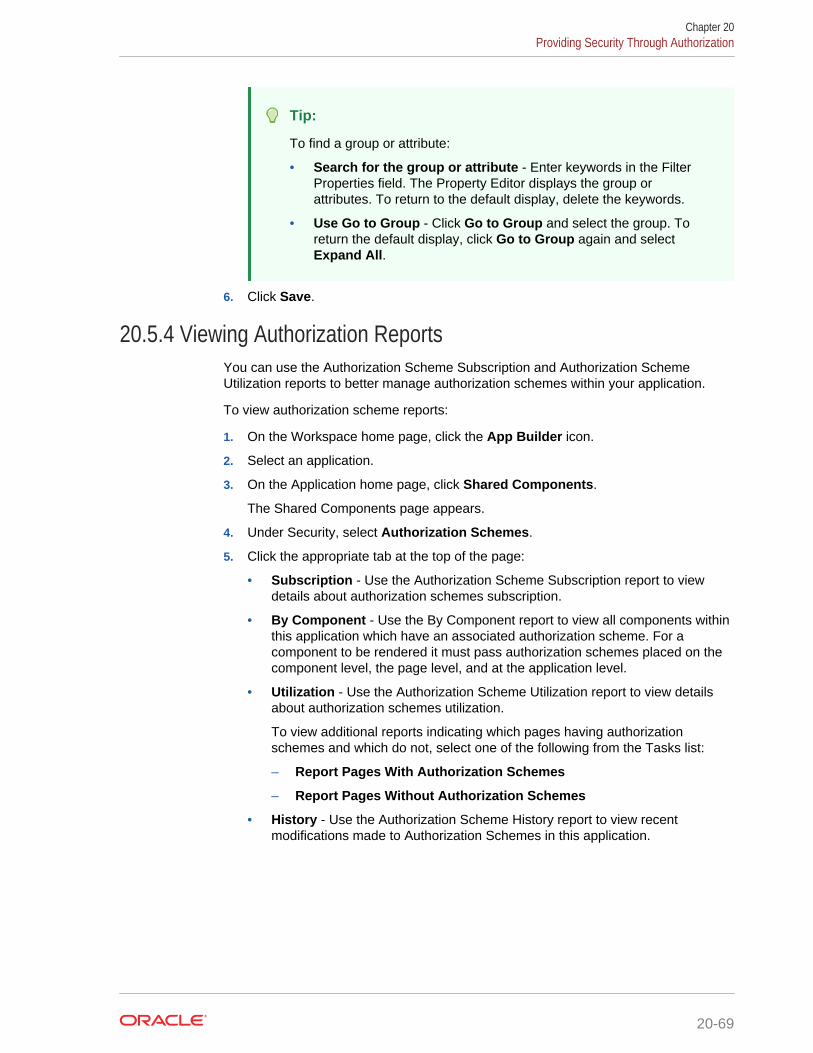
Tip:
To find a group or attribute:
• Search for the group or attribute - Enter keywords in the FilterProperties field. The Property Editor displays the group orattributes. To return to the default display, delete the keywords.
• Use Go to Group - Click Go to Group and select the group. Toreturn the default display, click Go to Group again and selectExpand All.
6. Click Save.
20.5.4 Viewing Authorization ReportsYou can use the Authorization Scheme Subscription and Authorization SchemeUtilization reports to better manage authorization schemes within your application.
To view authorization scheme reports:
1. On the Workspace home page, click the App Builder icon.
2. Select an application.
3. On the Application home page, click Shared Components.
The Shared Components page appears.
4. Under Security, select Authorization Schemes.
5. Click the appropriate tab at the top of the page:
• Subscription - Use the Authorization Scheme Subscription report to viewdetails about authorization schemes subscription.
• By Component - Use the By Component report to view all components withinthis application which have an associated authorization scheme. For acomponent to be rendered it must pass authorization schemes placed on thecomponent level, the page level, and at the application level.
• Utilization - Use the Authorization Scheme Utilization report to view detailsabout authorization schemes utilization.
To view additional reports indicating which pages having authorizationschemes and which do not, select one of the following from the Tasks list:
– Report Pages With Authorization Schemes
– Report Pages Without Authorization Schemes
• History - Use the Authorization Scheme History report to view recentmodifications made to Authorization Schemes in this application.
Chapter 20Providing Security Through Authorization
20-69
21Managing Application Globalization
You can run applications built in App Builder concurrently in different languages.
This section describes how to translate an application built in App Builder.
• Understanding Application Translation and Globalization Support (page 21-2)A single Oracle database instance and Oracle Application Express can supportmultiple database sessions customized to support different languages.
• Specifying the Primary Language for an Application (page 21-6)Globalization attributes specify how the Application Express engine determines theprimary language of an application.
• About Apply Format Masks to Items (page 21-2)The Application Express engine applies globalization settings for each renderedpage. This default behavior can impact the display of certain items such asnumbers and dates.
• About Translating Applications for Multibyte Languages (page 21-7)If your application must run in several languages simultaneously (such as Chineseand Japanese), consider configuring your database with a character set to supportall of the languages.
• Understanding the Translation Process (page 21-7)To translate an application developed in App Builder, you must map the primaryand target language, seed and export text to a translation file, translate the text,apply the translation file, and publish the translated application.
• Translating Messages (page 21-14)Learn when and how to translate messages is an Oracle Application Expressapplication.
• Translating Data That Supports List of Values (page 21-57)You create a dynamic translation to translate dynamic pieces of data. Forexample, you might use a dynamic translation on a list of values based on adatabase query.
• Understanding Supported Globalization Codes (page 21-58)If you are building a multilingual application, it is important to understand howglobalization codes affect the way in which your application runs. These codes areset automatically based on the application-level Globalization attributes you select.
See Also:
"Viewing Installed Translations" in Oracle Application Express AdministrationGuide
21-1
21.3 About Apply Format Masks to ItemsThe Application Express engine applies globalization settings for each rendered page.This default behavior can impact the display of certain items such as numbers anddates.
For example, suppose your application determines the application language based onthe user's browser language preference. If the Application Express engine determinesthe users's browser language preference is French, it displays dates and numbers in aformat that conforms to French standards. You can override this default behavior andexplicitly control how items display by applying a format mask. You apply a formatmask by making a selection from the Display As list:
• When you create the item.
• After you create the item by editing the item attributes.
21.1 Understanding Application Translation andGlobalization Support
A single Oracle database instance and Oracle Application Express can supportmultiple database sessions customized to support different languages.
You can develop applications in App Builder that can run concurrently in differentlanguages.
• About the Translation Process (page 21-2)Learn about translating an application built in App Builder.
• About Language Identification (page 21-3)After you create an application, you specify a language preference. Then youselect a primary application language and determine how the Application Expressengine determines the application language. The application primary language canbe static, derived from the Web browser language, or determined from a userpreference or item.
• About the Rules for Translating Database Applications (page 21-3)Learn about rules for translating database applications.
• How Translated Applications Are Rendered (page 21-3)After Oracle Application Express determines the language for an application, theApplication Express engine alters the database language for a specific pagerequest. It then looks for a translated application in the appropriate language. If theApplication Express engine finds that language, it renders the application usingthat definition. Otherwise, it renders the application in the base (or primary)application language.
• Making Application Attributes Translatable (page 21-4)Learn about best practices to make application attributes within your applicationtranslatable.
21.1.1 About the Translation ProcessLearn about translating an application built in App Builder.
Chapter 21About Apply Format Masks to Items
21-2
In general, translating an application built in App Builder involves the following steps:
1. Map the primary and target application IDs.
2. Seed and export the text to a file for translation.
3. Translate the text in the file.
4. Apply the translated file.
5. Publish the translated file.
21.1.2 About Language IdentificationAfter you create an application, you specify a language preference. Then you select aprimary application language and determine how the Application Express enginedetermines the application language. The application primary language can be static,derived from the Web browser language, or determined from a user preference oritem.
21.1.3 About the Rules for Translating Database ApplicationsLearn about rules for translating database applications.
Use the following rules to determine which translated version to use:
• Look for an exact match between the user language preference and the languagecode of the translated application.
• Look for a truncated match. That is, see if the language and locale exist. Forexample, if the user language preference is en-us and the translated version of en-us does not exist, look for a translated application that has the language code en.
• Use the primary application language.
For example, suppose you create an application with the primary language of German,de, and you create a translated version of the application with a language code of en-us. Users accessing this application with a browser language of en-us execute theEnglish en-us version of the application. Users accessing the application with abrowser language of en-gb view the application in the application's primary language,that is, in German. For this example, you should create the translated English versionusing language code en to encompass all variations of en.
21.1.4 How Translated Applications Are RenderedAfter Oracle Application Express determines the language for an application, theApplication Express engine alters the database language for a specific page request. Itthen looks for a translated application in the appropriate language. If the ApplicationExpress engine finds that language, it renders the application using that definition.Otherwise, it renders the application in the base (or primary) application language.
Note that the text that displays within an application is not translated on the fly. OracleApplication Express dynamically collects page attributes from either a base languageapplication definition or an alternative application definition.
Chapter 21Understanding Application Translation and Globalization Support
21-3
21.1.5 Making Application Attributes TranslatableLearn about best practices to make application attributes within your applicationtranslatable.
When you build an application in App Builder, you define a large number of declarativeattributes such as field labels, region headings, page header text, and so on.
• About Shortcuts that Support Translatable Messages (page 21-4)
• About Messages (page 21-4)
• About Dynamic Translation Text Strings (page 21-4)
• About Translating Region Titles (page 21-4)
• About Translating Templates (page 21-5)
21.1.5.1 About Shortcuts that Support Translatable MessagesApp Builder includes two shortcut types that enable you to reference translatablemessages:
• Message. Use this shortcut to reference a translatable message at runtime. Notethat the name of the shortcut must match the corresponding message name. Atruntime, the name of the shortcut expands to the text of the translatable messagefor the current language.
• Message with JavaScript Escaped Single Quotes. Use this shortcut toreference a shortcut inside of a JavaScript literal string and reference atranslatable message at runtime. This shortcut defines a text string. When theshortcut is referenced, it escapes the single quotation marks required forJavaScript.
21.1.5.2 About MessagesIf your application includes PL/SQL regions or PL/SQL processes, you must translateany generated HTML or text. You may also need to translate messages used inreports if your application uses a language that is not one of the ten languages intowhich Oracle Application Express is translated.
21.1.5.3 About Dynamic Translation Text StringsDynamic translations are used for database data that must be translated at runtime.For example, you might use a dynamic translation to translate a list of values based ona database query. A dynamic translation consists of a translate-from language string, alanguage code, and a translate-to string. You can also use the APEX_LANG.LANG API toretrieve dynamic translations programmatically.
21.1.5.4 About Translating Region TitlesBy default, page region titles are included in the generated translation file. However,you can mark a region title as not translatable.
• Marking a Region as Not Translatable in Page Designer (page 21-5)
Chapter 21Understanding Application Translation and Globalization Support
21-4
21.1.5.4.1 Marking a Region as Not Translatable in Page DesignerTo mark a region title as not translatable:
1. View the page in Page Designer:
a. On the Workspace home page, click the App Builder icon.
b. Select an application.
c. Select a page.
Page Designer appears.
2. In the Rendering tab, select the region.
The Property Editor displays the region attributes. Attributes are organized ingroups.
3. To find a group or attribute:
• Search for the group or attribute - Enter keywords in the Filter Propertiesfield. The Property Editor displays the group or attributes. To return to thedefault display, delete the keywords.
• Use Go to Group - Click Go to Group and select the group. To return thedefault display, click Go to Group again and select Expand All.
4. Expand the Advanced section.
5. For Exclude Title from Translation, select Yes.
6. Click Save.
21.1.5.5 About Translating TemplatesBy default, templates are not translatable, and therefore are not included in thegenerated translation file. Generally, templates do not and should not containtranslatable text. However, if you must mark a template as translatable, select theTranslatable check box on the Edit Page Template page.
To identify a template as translatable:
1. On the Workspace home page, click the App Builder icon.
2. Select an application.
3. On the Application home page, click Shared Components.
4. Under User Interface, select Templates.
The Templates page appears.
5. Locate the template you want to edit and select the template name.
6. Under Name, select Translatable.
You can include translatable text at the application-level by defining the translatabletext using static substitution strings. Because application-level attributes aretranslated, any text defined as a static substitution string is included in the generatedtranslation file.
Chapter 21Understanding Application Translation and Globalization Support
21-5
21.2 Specifying the Primary Language for an ApplicationGlobalization attributes specify how the Application Express engine determines theprimary language of an application.
To edit globalization attributes:
1. On the Workspace home page, click the App Builder icon.
2. Select an application.
3. Click Shared Components.
4. Under Globalization, select Globalization Attributes.
5. For Application Primary Language, select the language in which the applicationis being developed.
6. For Application Language Derived From, specify how the Application Expressengine determines (or derives) the application language. The application primarylanguage can be static, derived from the Web browser language, or determinedfrom a user preference or item. Table 21-1 (page 21-6) describes availableoptions:
Table 21-1 Application Language Derived From Options
Option Description
No NLS (Application nottranslated)
Select this option if the application will not betranslated.
Application Primary Language Determines the application's primary language basedon the Application Primary Language attribute. (Seestep 5.)
Browser (use browser languagepreference)
Determines the application's primary language basedon the user's browser language preference.
Application Preference (useFSP_LANGUAGE_PREFERENCE)
Determines the application's primary language basedon a value defined using theAPEX_UTIL.SET_PREFERENCE API. Select this option tomaintain the selected language preference acrossmultiple logins.
See Also: "SET_PREFERENCE Procedure" in OracleApplication Express API Reference
Item Preference (use itemcontaining preference)
Determines the application's primary language basedon an application-level item calledFSP_LANGUAGE_PREFERENCE. Using this option requiresOracle Application Express to determine theappropriate language preference every time the userlogs in.
Session Determines the translated application language fromthe session setting. The Application Express sessionlanguage can be set through either theAPEX_UTIL.SET_SESSION_LANG procedure or by usingthe p_lang parameter of the "f" procedure in the URL.
7. Configure other options as appropriate. To learn more about an attribute, see field-level Help.
Chapter 21Specifying the Primary Language for an Application
21-6
8. Click Apply Changes.
21.4 About Translating Applications for Multibyte LanguagesIf your application must run in several languages simultaneously (such as Chinese andJapanese), consider configuring your database with a character set to support all ofthe languages.
UTF8 and AL32UTF8 are the character sets you can use to support almost all languagesaround the world.
21.5 Understanding the Translation ProcessTo translate an application developed in App Builder, you must map the primary andtarget language, seed and export text to a translation file, translate the text, apply thetranslation file, and publish the translated application.
This section describes the process of translating an application.
• Step 1: Define Application Language (page 21-8)The first step in translating an application is to map the primary and targetapplication language. The primary application is the application to be translated.The target application is the resulting translated application.
• Step 2: Seed and Download to a Translation File (page 21-8)Seed the translation table and then export the translation text to a translation file.
• Step 3: Translate the XLIFF File (page 21-11)After you export a translatable file to XLIFF format, you can translate it into theappropriate languages.
• Step 4: Upload and Apply a Translated XLIFF Document (page 21-11)After your XLIFF document has been translated, the next step is to upload andthen apply it.
• Step 5: Publish the Application (page 21-13)Publishing your application creates a copy of the base language application,substituting the translated text strings from your translations table. This publishedapplication can then be used to render your application in alternate languages.
• Manually Editing a Translation (page 21-13)Once you have mapped the target language and seeded the translatable text, youmanually edit a translation.
See Also:
• "Translating Messages (page 21-14)"
• "Translating Data That Supports List of Values (page 21-57)"
Chapter 21About Translating Applications for Multibyte Languages
21-7
21.5.1 Step 1: Define Application LanguageThe first step in translating an application is to map the primary and target applicationlanguage. The primary application is the application to be translated. The targetapplication is the resulting translated application.
To map the primary and target application language:
1. Navigate to the Translate Application page:
a. On the Workspace home page, click the App Builder icon.
b. Select an application.
c. Click Shared Components.
d. Under Globalization, click Translate Application.
The Translate page appears.
2. Click Define application languages.
The Mappings page appears.
3. Click Create.
4. On the Create/Edit Language Application Mapping:
• Translation Application - Enter a unique integer value that identifies anapplication. The application ID must be unique on your instance of OracleApplication Express.
• Language - Select the language to be translated.
• Image Directory - Enter the directory where images are obtained. Unless youare using static files from the images directory which are translated, leave thisfield blank. This is the default and most common option.
5. Click Create.
21.5.2 Step 2: Seed and Download to a Translation FileSeed the translation table and then export the translation text to a translation file.
• Seeding Translatable Text (page 21-8)
• Downloading an XLIFF File (page 21-9)
21.5.2.1 Seeding Translatable TextSeeding the translation copies all translatable text into the Translation Text repository.After you specify the language and seed the Translation Text, you can then generateand export an XLIFF file for translation.
The seeding process keeps your primary language application synchronized with theTranslation Text repository. You should run the seed process any time your primarylanguage application changes.
To seed translatable text:
1. Navigate to the Translate Application page:
Chapter 21Understanding the Translation Process
21-8
a. On the Workspace home page, click the App Builder icon.
b. Select an application.
c. Click Shared Components.
d. Under Globalization, click Translate Application.
The Translate page appears.
2. Click Seed translatable text.
3. Select the appropriate target application.
4. Click Seed.
When completed, the following message displays:
Successfully seeded translatable text.
21.5.2.2 Downloading an XLIFF FileOnce the translation mappings are established the translatable text within theapplication is seeded into a translation repository. This repository is then exported toan XML Localization Interchange File Format (XLIFF) file for translation.
• About the XLIFF Export Page (page 21-9)
• Downloading a XLIFF file for an Application (page 21-9)
• Downloading an XLIFF File for an Application Page (page 21-10)
• About Including XLIFF Target Elements (page 21-10)
21.5.2.2.1 About the XLIFF Export PageThe XLIFF Export page is divided into two sections. Use the upper section to exporttranslatable text for an entire application (that is, all pages, lists of values, messages,and so on). Use the lower section to export translatable text for a specific page.
Note:
XML Localization Interchange File Format (XLIFF) is an XML-based formatfor exchanging localization data. For more information about XLIFF and theXLIFF 1.0 specification, see:
https://www.oasis-open.org/committees/tc_home.php?wg_abbrev=xliff
21.5.2.2.2 Downloading a XLIFF file for an ApplicationTo download an XLIFF file for an complete application:
1. Seed the translatable text.
2. Navigate to the Translate Application page:
a. On the Workspace home page, click the App Builder icon.
b. Select an application.
c. Click Shared Components.
Chapter 21Understanding the Translation Process
21-9
d. Under Globalization, click Translate Application.
The Translate page appears.
3. On the Translate page, click Download XLIFF translation files.
4. Under Download XLIFF file for complete Application:
a. Language - Choose the language to be downloaded in the XLIFF file.
b. Include XLIFF Target Elements - Specify whether to include XLIFF targetelements. To include then, select Include XLIFF Target Elements.
c. Export - Choose to export all translatable elements of the application or onlythose elements which are new or have been updated.
d. Click Export XLIFF.
5. Follow the on-screen instructions.
21.5.2.2.3 Downloading an XLIFF File for an Application PageTo download an XLIFF file for a specific page:
1. Seed the translatable text.
2. Navigate to the Translate Application page:
a. On the Workspace home page, click the App Builder icon.
b. Select an application.
c. Click Shared Components.
d. Under Globalization, click Translate Application.
The Translate page appears.
3. On the Translate page, click Download XLIFF translation files.
4. Under Download XLIFF file for Application Page:
a. Language - Choose the language to be downloaded in the XLIFF file.
b. Page - Select a page.
c. Include XLIFF Target Elements - Specify whether to include XLIFF targetelements. To include then, select Include XLIFF Target Elements.
d. Export - Choose to export all translatable elements of the page or only thoseelements which are new or have been updated.
e. Click Export XLIFF.
5. Follow the on-screen instructions.
21.5.2.2.4 About Including XLIFF Target ElementsWhen Oracle Application Express generates an XLIFF document, each documentcontains multiple translation units. Each translation unit consists of a source elementand a target element. The XLIFF document can be generated with both the source andtarget elements for each translation unit. You have the option of generating a filecontaining only source elements. The updated translations will be applied from thetarget elements of the translation units.
Chapter 21Understanding the Translation Process
21-10
21.5.3 Step 3: Translate the XLIFF FileAfter you export a translatable file to XLIFF format, you can translate it into theappropriate languages.
Because XLIFF is an open standard XML file for exchanging translations, mosttranslation vendors should support it. Oracle Application Express only supports XLIFFfiles encoded in UTF-8 character sets. In other words, it exports XLIFF files fortranslation in UTF-8 and assumes that the translated XLIFF files are in the samecharacter set.
Translation is a time-consuming task. Oracle Application Express supports incrementaltranslation so that application development can be done in parallel with the translation.An XLIFF file can be translated and uploaded to Oracle Application Express evenwhen only part of the XLIFF file is translated. For strings that have no translation in thecorresponding translated application, Oracle Application Express uses thecorresponding ones in the primary language.
21.5.4 Step 4: Upload and Apply a Translated XLIFF DocumentAfter your XLIFF document has been translated, the next step is to upload and thenapply it.
• Uploading a Translated XLIFF Document (page 21-11)
• Applying an Uploaded XLIFF Document (page 21-12)
• Deleting an Uploaded XLIFF Document (page 21-12)
21.5.4.1 Uploading a Translated XLIFF DocumentTo upload a translated XLIFF document:
1. Navigate to the Translate Application page:
a. On the Workspace home page, click the App Builder icon.
b. Select an application.
c. Click Shared Components.
d. Under Globalization, click Translate Application.
The Translate page appears.
2. Click Apply XLIFF translation files.
The XLIFF Translation Files page appears.
3. Click Upload Files.
4. On the XLIFF Upload page:
a. Locate the file to be uploaded.
b. Click Upload.
The uploaded document appears on the XLIFF Translation Files page.
Chapter 21Understanding the Translation Process
21-11
21.5.4.2 Applying an Uploaded XLIFF DocumentAfter you upload an XLIFF document, the next step is to apply the XLIFF documentand then publish the translated application. When you apply an XLIFF document, theApplication Express engine parses the file and then updates the translation tables withthe new translatable text.
Publishing your application creates a copy of the base language application,substituting the translated text strings from your translations table. This publishedapplication can then be used to render your application in alternate languages.
Remember that to run an application in an alternative language, you must run it withglobalization settings that cause an alternative language version to display. Forexample, if the language is derived from the browser language, you must set thebrowser language to the same language as the translated application.
To apply a translated XLIFF document:
1. Navigate to the Translate Application page:
a. On the Workspace home page, click the App Builder icon.
b. Select an application.
c. Click Shared Components.
d. Under Globalization, click Translate Application.
The Translate Application page appears.
2. Click Apply XLIFF translation files.
The XLIFF Translation Files page appears.
3. To apply the XLIFF files:
a. Select the XLIFF files you want to apply.
b. From Apply to Translation, choose a translation mapping.
c. Click Apply Checked.
The XLIFF file is parsed and the contents is applied to the translation repository.Once this process is complete, you must publish the application for eachtranslation.
21.5.4.3 Deleting an Uploaded XLIFF DocumentTo delete an uploaded XLIFF document:
1. Navigate to the Translate Application page:
a. On the Workspace home page, click the App Builder icon.
b. Select an application.
c. Click Shared Components.
d. Under Globalization, click Translate Application.
The Translate page appears.
2. Click Apply XLIFF translation files.
The XLIFF Translation Files page appears.
Chapter 21Understanding the Translation Process
21-12
3. In the XLIFF Files repository, select the check box to the left of the Filenamecolumn.
4. Click Delete Checked.
21.5.5 Step 5: Publish the ApplicationPublishing your application creates a copy of the base language application,substituting the translated text strings from your translations table. This publishedapplication can then be used to render your application in alternate languages.
Remember that to run an application in an alternative language, you must run it withglobalization settings that cause an alternative language version to display. Forexample, if the language is derived from the browser language, you must set thebrowser language to the same language as the translated application.
To publish an application:
1. Navigate to the Translate Application page:
a. On the Workspace home page, click the App Builder icon.
b. Select an application.
c. Click Shared Components.
d. Under Globalization, click Translate Application.
The Translate Application page appears.
2. Click Publish translated applications.
The XLIFF Translation Files page appears
3. Select the items you want to publish and click Publish.
You should verify the existence of the translated application after it is published.Translated applications do not display in the Available Applications list on the AppBuilder home page. Instead, use the Application Navigate list on the left side of thepage.
Note that in order for a translated application to appear in App Builder, you mustensure that you have correctly configured the application Globalization attributes.
21.5.6 Manually Editing a TranslationOnce you have mapped the target language and seeded the translatable text, youmanually edit a translation.
To manually edit a translation:
1. Define the application language.
2. Seed the translatable text.
3. Navigate to the Translatable Text:
a. On the Workspace home page, click the App Builder icon.
b. Select an application.
c. Click Shared Components.
Chapter 21Understanding the Translation Process
21-13
d. Under Globalization, click Translate Application.
4. Under Translation Utilities, click Translation Repository.
The Translatable Text page appears.
5. Select a Language Mapping or page and click Set.
6. To further customize the report, use the Search bar at the top of the page.
7. To edit translatable text:
a. Click the Edit icon.
The Translatable Text page appears.
b. Translate From Text - Identifies the primary language text.
c. Translate to Text - Identifies the translated text.
d. Update all occurrences of this string - Enable this option to update alloccurrences of the string in the Translation Repository.
e. Click Apply Changes.
8. To access a Grid Edit page:
a. Click Grid Edit.
The Translatable Text - Grid Edit page appears.
b. Translate To - Enter the translated text..
c. Click Apply Changes.
21.6 Translating MessagesLearn when and how to translate messages is an Oracle Application Expressapplication.
• About Translating Messages (page 21-14)You translate messages when your application includes PL/SQL regions,processes, package, procedure or function.
• Translating Messages Used in PL/SQL Procedures (page 21-15)Learn about how to translate messages used in PL/SQL procedures.
• Interactive Grid Messages Requiring Translation (page 21-16)Interactive Grid Messages Requiring Translation lists the interactive gridmessages that require translation.
• Translating Messages Used Internally by Oracle Application Express(page 21-34)If your application uses a language that is not among the ten languages into whichOracle Application Express is translated, you must translate messages displayedby the Application Express reporting engine.
21.6.1 About Translating MessagesYou translate messages when your application includes PL/SQL regions, processes,package, procedure or function.
You may need to translate messages if your application:
Chapter 21Translating Messages
21-14
• Includes PL/SQL regions or PL/SQL processes, or calls a PL/SQL package,procedure, or function. If it does, you may need to translate the generated HTML.
• Uses a language that is not one of the ten languages into which Oracle ApplicationExpress is translated. If it does, you may need to translate messages used inreports.
21.6.2 Translating Messages Used in PL/SQL ProceduresLearn about how to translate messages used in PL/SQL procedures.
• About Translating Messages Used in PL/SQL Procedures (page 21-15)
• Defining a Translation Message (page 21-15)
See Also:
APEX_LANG in Oracle Application Express API Reference
21.6.2.1 About Translating Messages Used in PL/SQL ProceduresIf your application includes PL/SQL regions or PL/SQL processes or calls PL/SQLpackage, procedures, or functions, you may need to translate generated HTML. First,you define each message on the Translatable Messages page. Second, you use theAPEX_LANG.MESSAGE API to translate the messages from PL/SQL stored procedures,functions, triggers, or packaged procedures and functions.
21.6.2.2 Defining a Translation MessageYou create translatable messages on the Translate Messages page.
To define a new translation message:
1. Navigate to the Translate Application page:
a. On the Workspace home page, click the App Builder icon.
b. Select an application.
c. Click Shared Components.
d. Under Globalization, click Text Messages.
2. On the Translate Messages page, click Create Text Message.
3. On Identify Text Message:
a. Name - Enter a name to identify the message.
b. Language - Select the language for which the message would be used.
c. Used in JavaScript - Select Yes if the message is used in APEX.LANG API callsin JavaScript code.
d. Text - Enter the text to be returned when the text message is called.
For example, you could define the message GREETING_MSG in English as:
Good morning %0
Chapter 21Translating Messages
21-15
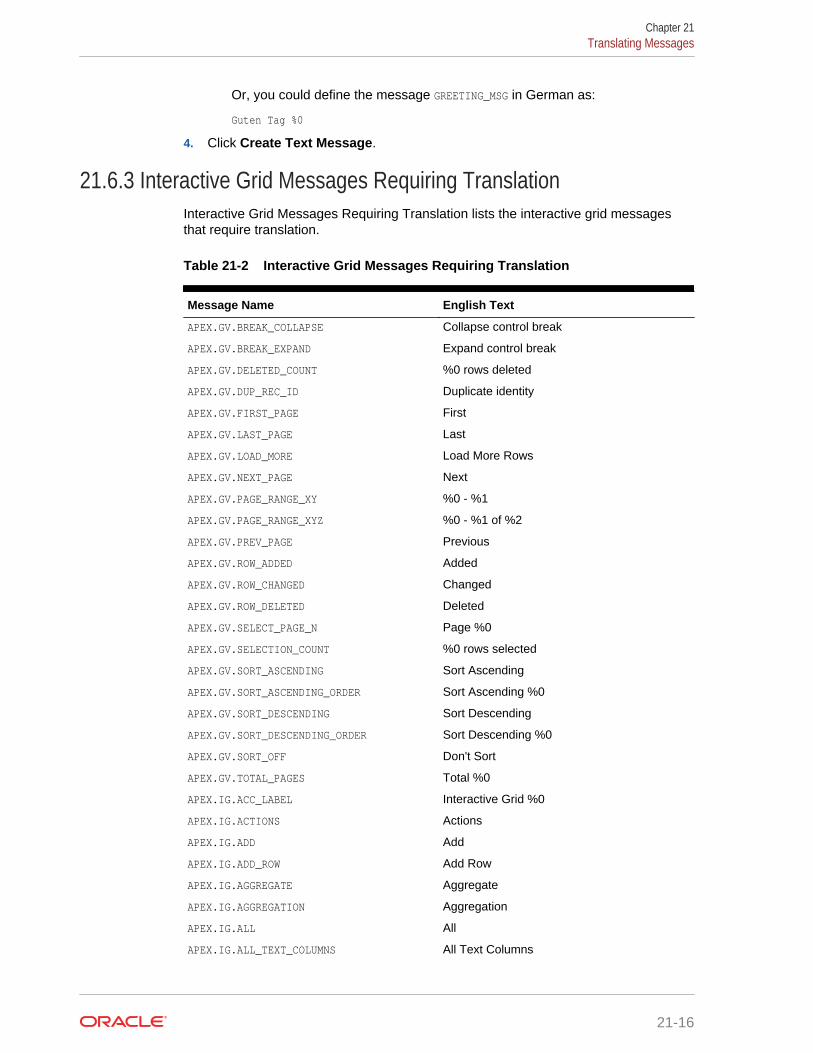
Or, you could define the message GREETING_MSG in German as:
Guten Tag %0
4. Click Create Text Message.
21.6.3 Interactive Grid Messages Requiring TranslationInteractive Grid Messages Requiring Translation lists the interactive grid messagesthat require translation.
Table 21-2 Interactive Grid Messages Requiring Translation
Message Name English Text
APEX.GV.BREAK_COLLAPSE Collapse control break
APEX.GV.BREAK_EXPAND Expand control break
APEX.GV.DELETED_COUNT %0 rows deleted
APEX.GV.DUP_REC_ID Duplicate identity
APEX.GV.FIRST_PAGE First
APEX.GV.LAST_PAGE Last
APEX.GV.LOAD_MORE Load More Rows
APEX.GV.NEXT_PAGE Next
APEX.GV.PAGE_RANGE_XY %0 - %1
APEX.GV.PAGE_RANGE_XYZ %0 - %1 of %2
APEX.GV.PREV_PAGE Previous
APEX.GV.ROW_ADDED Added
APEX.GV.ROW_CHANGED Changed
APEX.GV.ROW_DELETED Deleted
APEX.GV.SELECT_PAGE_N Page %0
APEX.GV.SELECTION_COUNT %0 rows selected
APEX.GV.SORT_ASCENDING Sort Ascending
APEX.GV.SORT_ASCENDING_ORDER Sort Ascending %0
APEX.GV.SORT_DESCENDING Sort Descending
APEX.GV.SORT_DESCENDING_ORDER Sort Descending %0
APEX.GV.SORT_OFF Don't Sort
APEX.GV.TOTAL_PAGES Total %0
APEX.IG.ACC_LABEL Interactive Grid %0
APEX.IG.ACTIONS Actions
APEX.IG.ADD Add
APEX.IG.ADD_ROW Add Row
APEX.IG.AGGREGATE Aggregate
APEX.IG.AGGREGATION Aggregation
APEX.IG.ALL All
APEX.IG.ALL_TEXT_COLUMNS All Text Columns
Chapter 21Translating Messages
21-16

Table 21-2 (Cont.) Interactive Grid Messages Requiring Translation
Message Name English Text
APEX.IG.ALTERNATIVE Alternative
APEX.IG.AND and
APEX.IG.APPROX_COUNT_DISTINCT Approx. Count Distinct
APEX.IG.APPROX_COUNT_DISTINCT_OVERALL Overal Approx. Count Distinct
APEX.IG.AREA Area
APEX.IG.ASCENDING Ascending
APEX.IG.AUTHORIZATION Authorization
APEX.IG.AUTO Auto
APEX.IG.AVG Average
APEX.IG.AVG_OVERALL Overall Average
APEX.IG.AXIS_LABEL_TITLE Label Axis Title
APEX.IG.AXIS_VALUE_DECIMAL Decimal Places
APEX.IG.AXIS_VALUE_TITLE Value Axis Title
APEX.IG.BACKGROUND_COLOR Background Color
APEX.IG.BAR Bar
APEX.IG.BETWEEN between
APEX.IG.BOTH Both
APEX.IG.BUBBLE Bubble
APEX.IG.CANCEL Cancel
APEX.IG.CASE_SENSITIVE Case Sensitive
APEX.IG.CASE_SENSITIVE_WITH_BRACKETS (Case Sensitive)
APEX.IG.CHANGE_VIEW Change View
APEX.IG.CHANGES_SAVED Changes saved
APEX.IG.CHART Chart
APEX.IG.CHART_VIEW Chart View
APEX.IG.CLOSE_COLUMN Close
APEX.IG.COLOR_BLUE Blue
APEX.IG.COLOR_GREEN Green
APEX.IG.COLOR_ORANGE Orange
APEX.IG.COLOR_RED Red
APEX.IG.COLOR_YELLOW Yellow
APEX.IG.COLORS Colors
APEX.IG.COLUMN Column
APEX.IG.COLUMN_CONTEXT Column %0
APEX.IG.COLUMN_TYPE Column Purpose
APEX.IG.COLUMNS Columns
APEX.IG.COMPLEX Complex
Chapter 21Translating Messages
21-17
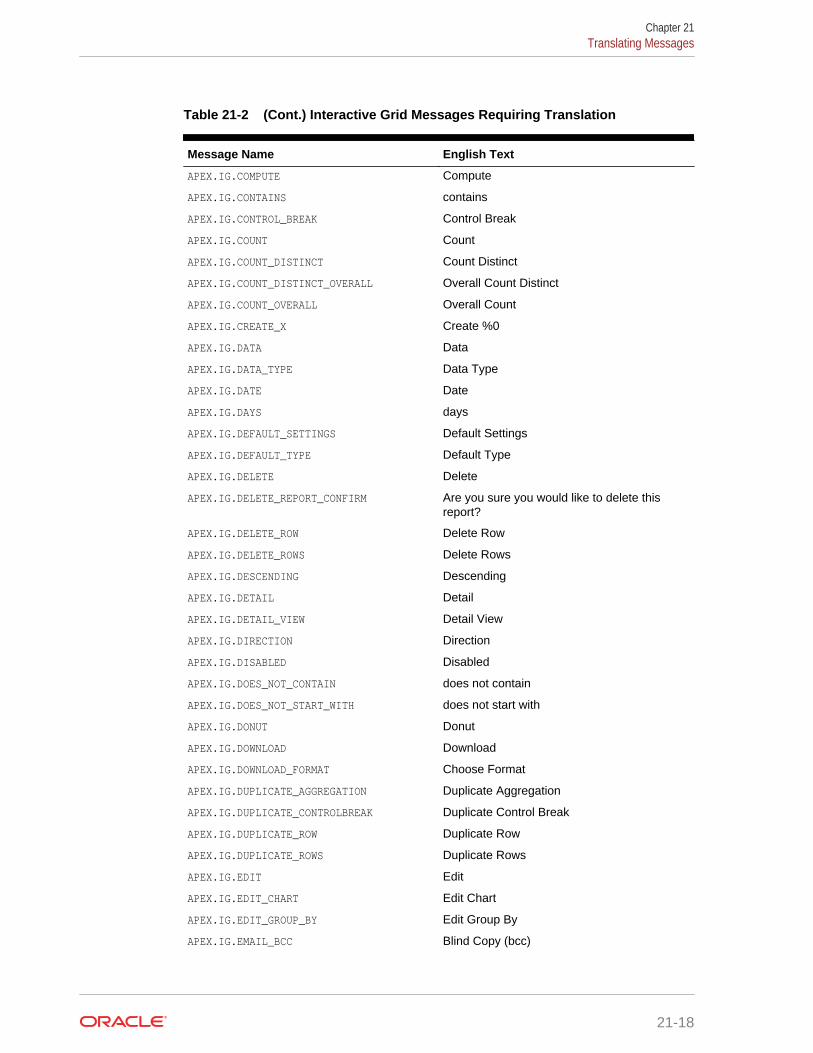
Table 21-2 (Cont.) Interactive Grid Messages Requiring Translation
Message Name English Text
APEX.IG.COMPUTE Compute
APEX.IG.CONTAINS contains
APEX.IG.CONTROL_BREAK Control Break
APEX.IG.COUNT Count
APEX.IG.COUNT_DISTINCT Count Distinct
APEX.IG.COUNT_DISTINCT_OVERALL Overall Count Distinct
APEX.IG.COUNT_OVERALL Overall Count
APEX.IG.CREATE_X Create %0
APEX.IG.DATA Data
APEX.IG.DATA_TYPE Data Type
APEX.IG.DATE Date
APEX.IG.DAYS days
APEX.IG.DEFAULT_SETTINGS Default Settings
APEX.IG.DEFAULT_TYPE Default Type
APEX.IG.DELETE Delete
APEX.IG.DELETE_REPORT_CONFIRM Are you sure you would like to delete thisreport?
APEX.IG.DELETE_ROW Delete Row
APEX.IG.DELETE_ROWS Delete Rows
APEX.IG.DESCENDING Descending
APEX.IG.DETAIL Detail
APEX.IG.DETAIL_VIEW Detail View
APEX.IG.DIRECTION Direction
APEX.IG.DISABLED Disabled
APEX.IG.DOES_NOT_CONTAIN does not contain
APEX.IG.DOES_NOT_START_WITH does not start with
APEX.IG.DONUT Donut
APEX.IG.DOWNLOAD Download
APEX.IG.DOWNLOAD_FORMAT Choose Format
APEX.IG.DUPLICATE_AGGREGATION Duplicate Aggregation
APEX.IG.DUPLICATE_CONTROLBREAK Duplicate Control Break
APEX.IG.DUPLICATE_ROW Duplicate Row
APEX.IG.DUPLICATE_ROWS Duplicate Rows
APEX.IG.EDIT Edit
APEX.IG.EDIT_CHART Edit Chart
APEX.IG.EDIT_GROUP_BY Edit Group By
APEX.IG.EMAIL_BCC Blind Copy (bcc)
Chapter 21Translating Messages
21-18
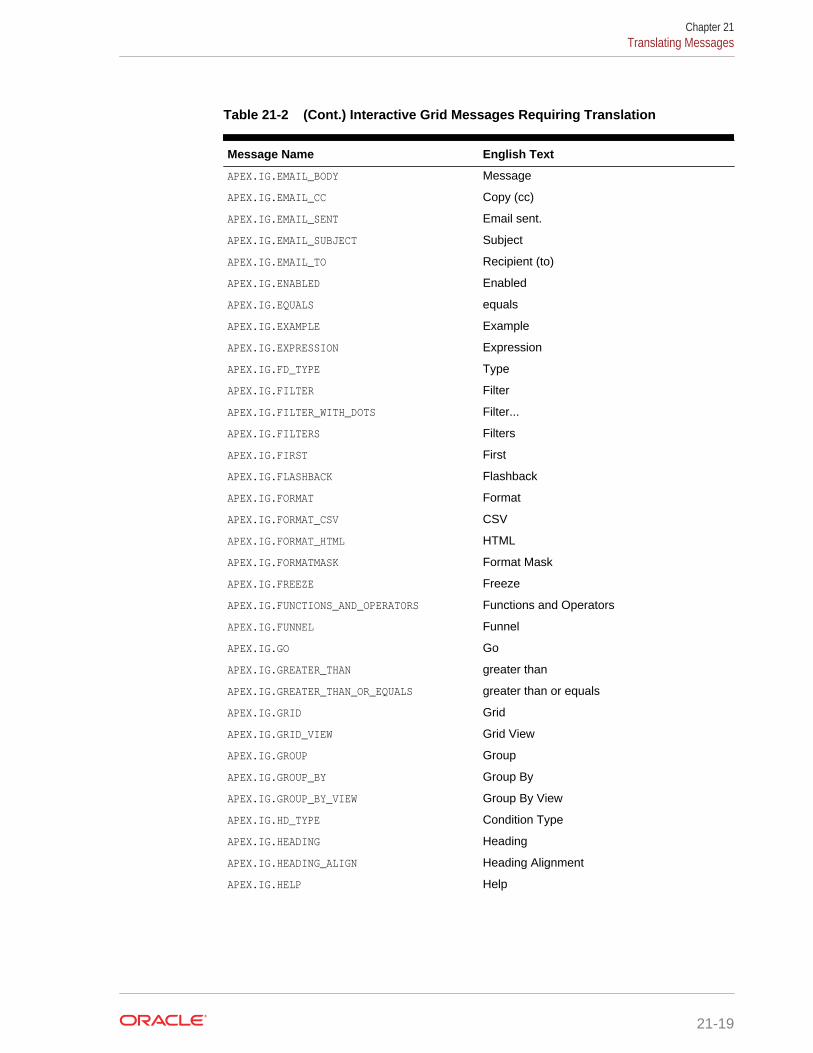
Table 21-2 (Cont.) Interactive Grid Messages Requiring Translation
Message Name English Text
APEX.IG.EMAIL_BODY Message
APEX.IG.EMAIL_CC Copy (cc)
APEX.IG.EMAIL_SENT Email sent.
APEX.IG.EMAIL_SUBJECT Subject
APEX.IG.EMAIL_TO Recipient (to)
APEX.IG.ENABLED Enabled
APEX.IG.EQUALS equals
APEX.IG.EXAMPLE Example
APEX.IG.EXPRESSION Expression
APEX.IG.FD_TYPE Type
APEX.IG.FILTER Filter
APEX.IG.FILTER_WITH_DOTS Filter...
APEX.IG.FILTERS Filters
APEX.IG.FIRST First
APEX.IG.FLASHBACK Flashback
APEX.IG.FORMAT Format
APEX.IG.FORMAT_CSV CSV
APEX.IG.FORMAT_HTML HTML
APEX.IG.FORMATMASK Format Mask
APEX.IG.FREEZE Freeze
APEX.IG.FUNCTIONS_AND_OPERATORS Functions and Operators
APEX.IG.FUNNEL Funnel
APEX.IG.GO Go
APEX.IG.GREATER_THAN greater than
APEX.IG.GREATER_THAN_OR_EQUALS greater than or equals
APEX.IG.GRID Grid
APEX.IG.GRID_VIEW Grid View
APEX.IG.GROUP Group
APEX.IG.GROUP_BY Group By
APEX.IG.GROUP_BY_VIEW Group By View
APEX.IG.HD_TYPE Condition Type
APEX.IG.HEADING Heading
APEX.IG.HEADING_ALIGN Heading Alignment
APEX.IG.HELP Help
Chapter 21Translating Messages
21-19
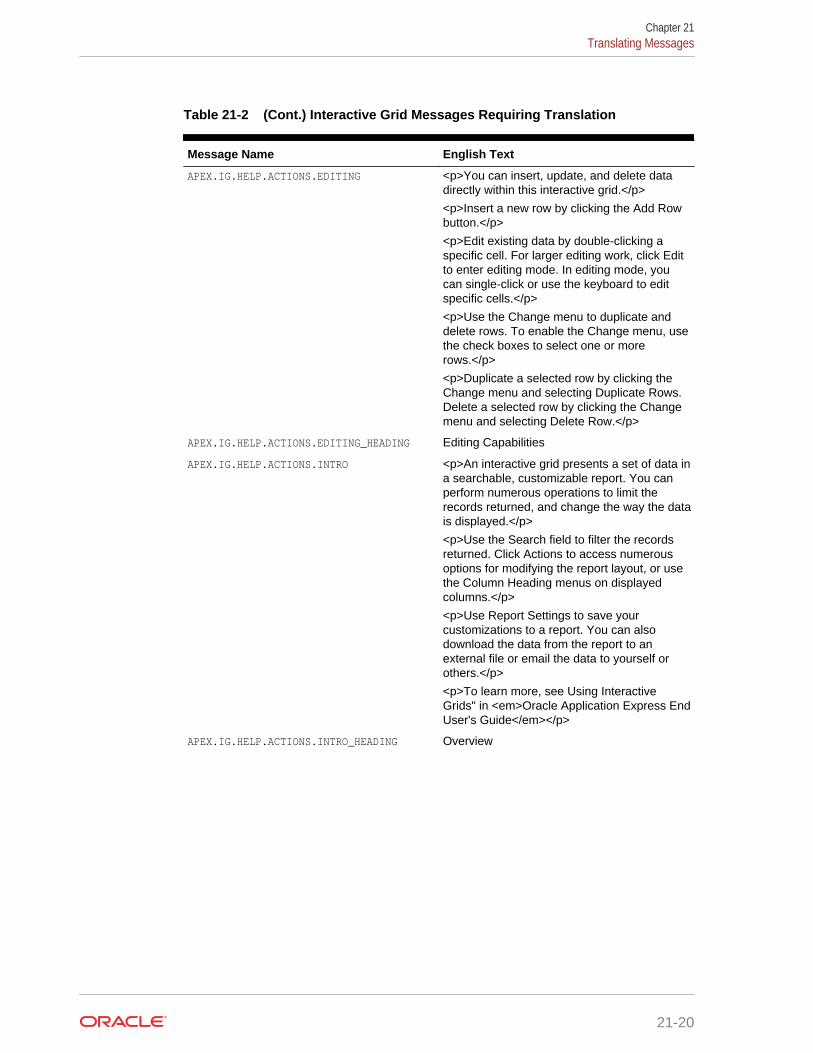
Table 21-2 (Cont.) Interactive Grid Messages Requiring Translation
Message Name English Text
APEX.IG.HELP.ACTIONS.EDITING <p>You can insert, update, and delete datadirectly within this interactive grid.</p>
<p>Insert a new row by clicking the Add Rowbutton.</p>
<p>Edit existing data by double-clicking aspecific cell. For larger editing work, click Editto enter editing mode. In editing mode, youcan single-click or use the keyboard to editspecific cells.</p>
<p>Use the Change menu to duplicate anddelete rows. To enable the Change menu, usethe check boxes to select one or morerows.</p>
<p>Duplicate a selected row by clicking theChange menu and selecting Duplicate Rows.Delete a selected row by clicking the Changemenu and selecting Delete Row.</p>
APEX.IG.HELP.ACTIONS.EDITING_HEADING Editing Capabilities
APEX.IG.HELP.ACTIONS.INTRO <p>An interactive grid presents a set of data ina searchable, customizable report. You canperform numerous operations to limit therecords returned, and change the way the datais displayed.</p>
<p>Use the Search field to filter the recordsreturned. Click Actions to access numerousoptions for modifying the report layout, or usethe Column Heading menus on displayedcolumns.</p>
<p>Use Report Settings to save yourcustomizations to a report. You can alsodownload the data from the report to anexternal file or email the data to yourself orothers.</p>
<p>To learn more, see Using InteractiveGrids" in <em>Oracle Application Express EndUser's Guide</em></p>
APEX.IG.HELP.ACTIONS.INTRO_HEADING Overview
Chapter 21Translating Messages
21-20
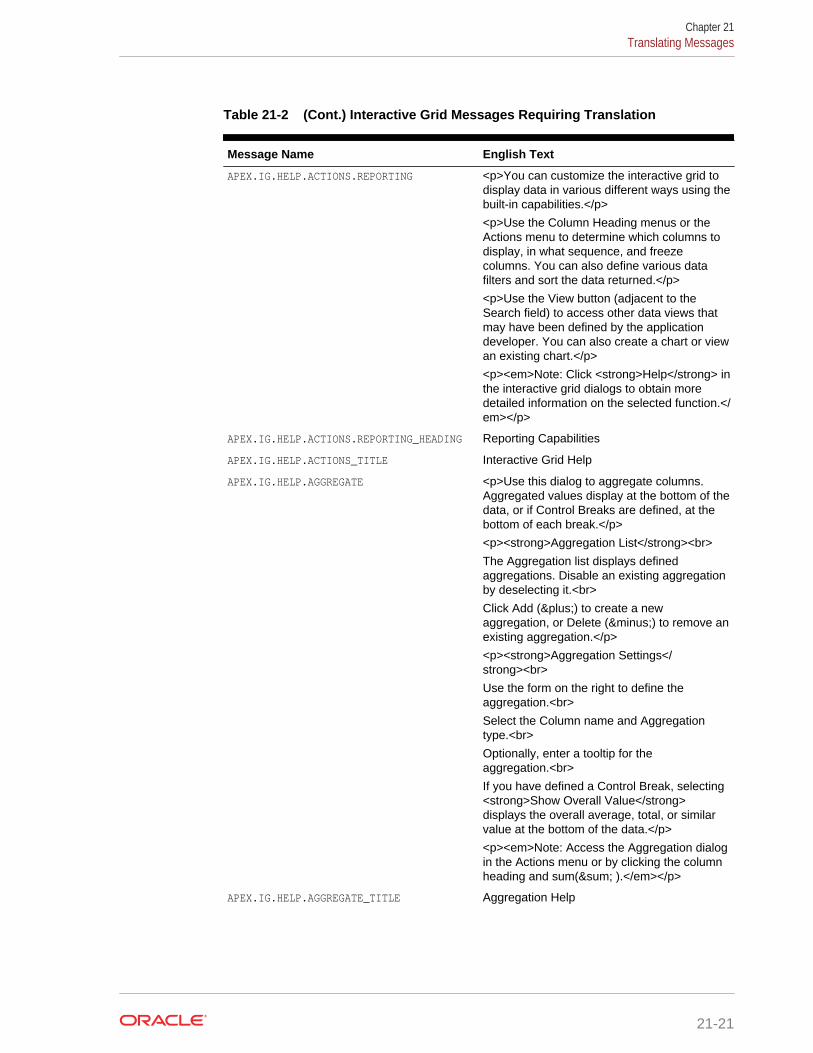
Table 21-2 (Cont.) Interactive Grid Messages Requiring Translation
Message Name English Text
APEX.IG.HELP.ACTIONS.REPORTING <p>You can customize the interactive grid todisplay data in various different ways using thebuilt-in capabilities.</p>
<p>Use the Column Heading menus or theActions menu to determine which columns todisplay, in what sequence, and freezecolumns. You can also define various datafilters and sort the data returned.</p>
<p>Use the View button (adjacent to theSearch field) to access other data views thatmay have been defined by the applicationdeveloper. You can also create a chart or viewan existing chart.</p>
<p><em>Note: Click <strong>Help</strong> inthe interactive grid dialogs to obtain moredetailed information on the selected function.</em></p>
APEX.IG.HELP.ACTIONS.REPORTING_HEADING Reporting Capabilities
APEX.IG.HELP.ACTIONS_TITLE Interactive Grid Help
APEX.IG.HELP.AGGREGATE <p>Use this dialog to aggregate columns.Aggregated values display at the bottom of thedata, or if Control Breaks are defined, at thebottom of each break.</p>
<p><strong>Aggregation List</strong><br>
The Aggregation list displays definedaggregations. Disable an existing aggregationby deselecting it.<br>
Click Add (+) to create a newaggregation, or Delete (−) to remove anexisting aggregation.</p>
<p><strong>Aggregation Settings</strong><br>
Use the form on the right to define theaggregation.<br>
Select the Column name and Aggregationtype.<br>
Optionally, enter a tooltip for theaggregation.<br>
If you have defined a Control Break, selecting<strong>Show Overall Value</strong>displays the overall average, total, or similarvalue at the bottom of the data.</p>
<p><em>Note: Access the Aggregation dialogin the Actions menu or by clicking the columnheading and sum(∑ ).</em></p>
APEX.IG.HELP.AGGREGATE_TITLE Aggregation Help
Chapter 21Translating Messages
21-21
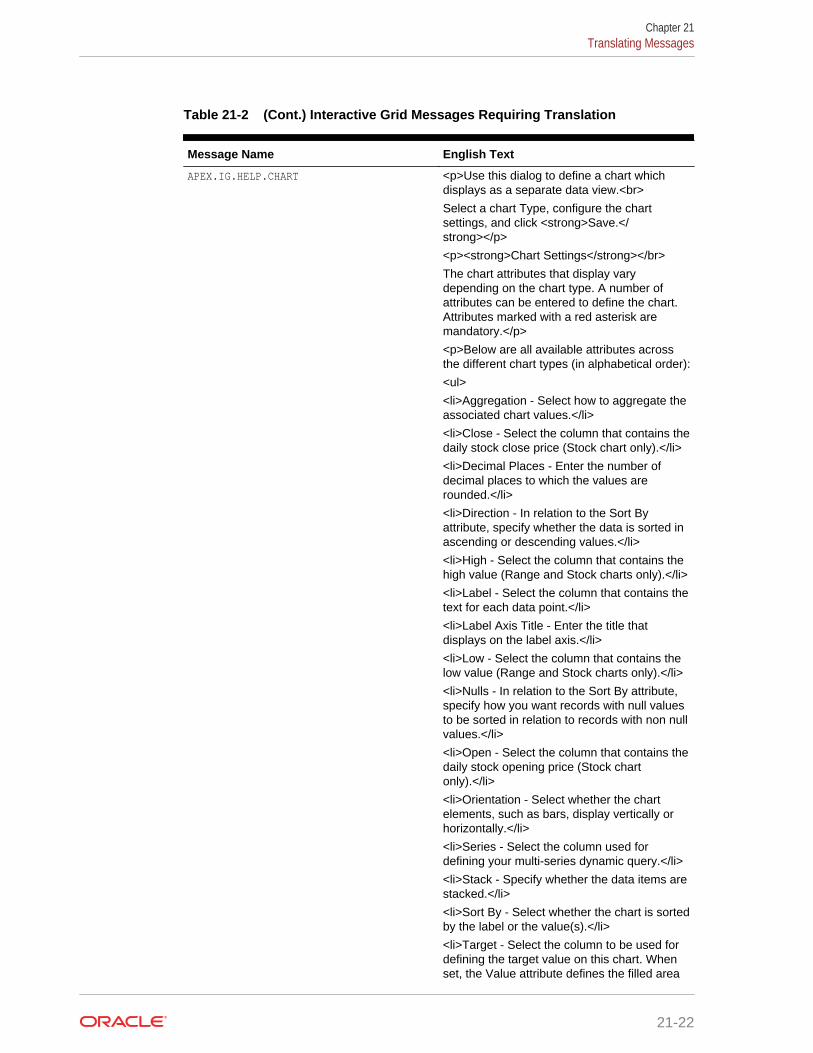
Table 21-2 (Cont.) Interactive Grid Messages Requiring Translation
Message Name English Text
APEX.IG.HELP.CHART <p>Use this dialog to define a chart whichdisplays as a separate data view.<br>
Select a chart Type, configure the chartsettings, and click <strong>Save.</strong></p>
<p><strong>Chart Settings</strong></br>
The chart attributes that display varydepending on the chart type. A number ofattributes can be entered to define the chart.Attributes marked with a red asterisk aremandatory.</p>
<p>Below are all available attributes acrossthe different chart types (in alphabetical order):
<ul>
<li>Aggregation - Select how to aggregate theassociated chart values.</li>
<li>Close - Select the column that contains thedaily stock close price (Stock chart only).</li>
<li>Decimal Places - Enter the number ofdecimal places to which the values arerounded.</li>
<li>Direction - In relation to the Sort Byattribute, specify whether the data is sorted inascending or descending values.</li>
<li>High - Select the column that contains thehigh value (Range and Stock charts only).</li>
<li>Label - Select the column that contains thetext for each data point.</li>
<li>Label Axis Title - Enter the title thatdisplays on the label axis.</li>
<li>Low - Select the column that contains thelow value (Range and Stock charts only).</li>
<li>Nulls - In relation to the Sort By attribute,specify how you want records with null valuesto be sorted in relation to records with non nullvalues.</li>
<li>Open - Select the column that contains thedaily stock opening price (Stock chartonly).</li>
<li>Orientation - Select whether the chartelements, such as bars, display vertically orhorizontally.</li>
<li>Series - Select the column used fordefining your multi-series dynamic query.</li>
<li>Stack - Specify whether the data items arestacked.</li>
<li>Sort By - Select whether the chart is sortedby the label or the value(s).</li>
<li>Target - Select the column to be used fordefining the target value on this chart. Whenset, the Value attribute defines the filled area
Chapter 21Translating Messages
21-22
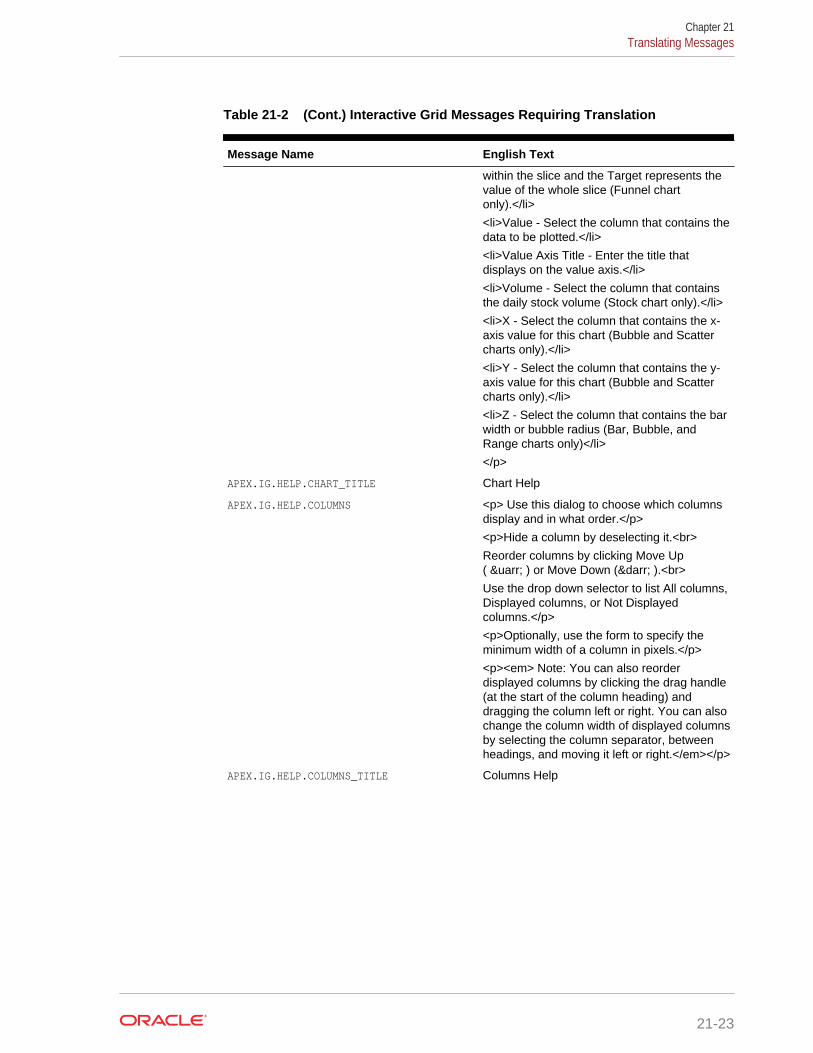
Table 21-2 (Cont.) Interactive Grid Messages Requiring Translation
Message Name English Text
within the slice and the Target represents thevalue of the whole slice (Funnel chartonly).</li>
<li>Value - Select the column that contains thedata to be plotted.</li>
<li>Value Axis Title - Enter the title thatdisplays on the value axis.</li>
<li>Volume - Select the column that containsthe daily stock volume (Stock chart only).</li>
<li>X - Select the column that contains the x-axis value for this chart (Bubble and Scattercharts only).</li>
<li>Y - Select the column that contains the y-axis value for this chart (Bubble and Scattercharts only).</li>
<li>Z - Select the column that contains the barwidth or bubble radius (Bar, Bubble, andRange charts only)</li>
</p>
APEX.IG.HELP.CHART_TITLE Chart Help
APEX.IG.HELP.COLUMNS <p> Use this dialog to choose which columnsdisplay and in what order.</p>
<p>Hide a column by deselecting it.<br>
Reorder columns by clicking Move Up( ↑ ) or Move Down (↓ ).<br>
Use the drop down selector to list All columns,Displayed columns, or Not Displayedcolumns.</p>
<p>Optionally, use the form to specify theminimum width of a column in pixels.</p>
<p><em> Note: You can also reorderdisplayed columns by clicking the drag handle(at the start of the column heading) anddragging the column left or right. You can alsochange the column width of displayed columnsby selecting the column separator, betweenheadings, and moving it left or right.</em></p>
APEX.IG.HELP.COLUMNS_TITLE Columns Help
Chapter 21Translating Messages
21-23
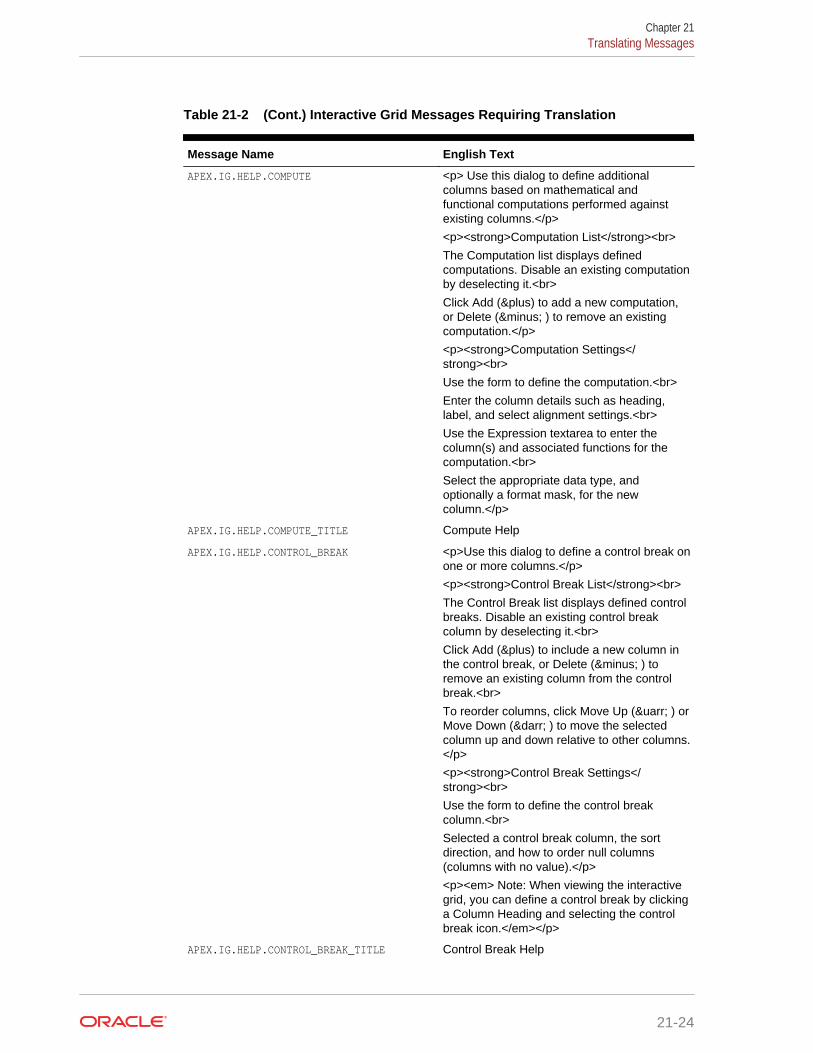
Table 21-2 (Cont.) Interactive Grid Messages Requiring Translation
Message Name English Text
APEX.IG.HELP.COMPUTE <p> Use this dialog to define additionalcolumns based on mathematical andfunctional computations performed againstexisting columns.</p>
<p><strong>Computation List</strong><br>
The Computation list displays definedcomputations. Disable an existing computationby deselecting it.<br>
Click Add (&plus) to add a new computation,or Delete (− ) to remove an existingcomputation.</p>
<p><strong>Computation Settings</strong><br>
Use the form to define the computation.<br>
Enter the column details such as heading,label, and select alignment settings.<br>
Use the Expression textarea to enter thecolumn(s) and associated functions for thecomputation.<br>
Select the appropriate data type, andoptionally a format mask, for the newcolumn.</p>
APEX.IG.HELP.COMPUTE_TITLE Compute Help
APEX.IG.HELP.CONTROL_BREAK <p>Use this dialog to define a control break onone or more columns.</p>
<p><strong>Control Break List</strong><br>
The Control Break list displays defined controlbreaks. Disable an existing control breakcolumn by deselecting it.<br>
Click Add (&plus) to include a new column inthe control break, or Delete (− ) toremove an existing column from the controlbreak.<br>
To reorder columns, click Move Up (↑ ) orMove Down (↓ ) to move the selectedcolumn up and down relative to other columns.</p>
<p><strong>Control Break Settings</strong><br>
Use the form to define the control breakcolumn.<br>
Selected a control break column, the sortdirection, and how to order null columns(columns with no value).</p>
<p><em> Note: When viewing the interactivegrid, you can define a control break by clickinga Column Heading and selecting the controlbreak icon.</em></p>
APEX.IG.HELP.CONTROL_BREAK_TITLE Control Break Help
Chapter 21Translating Messages
21-24
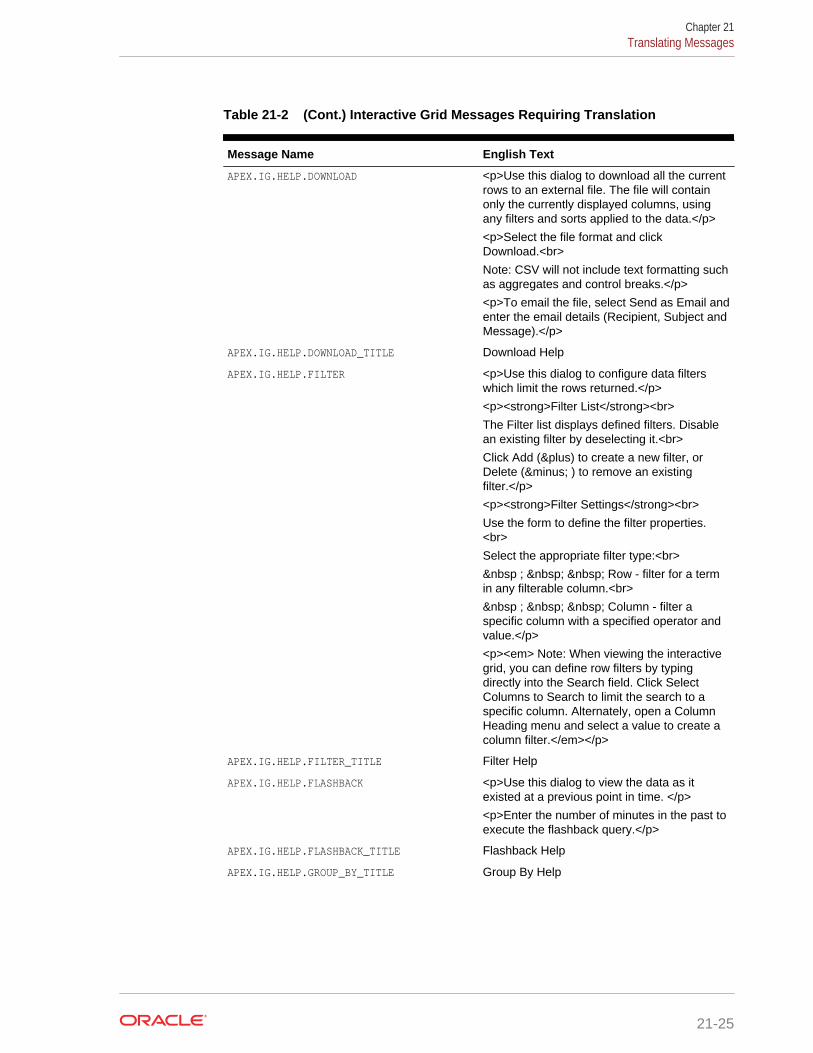
Table 21-2 (Cont.) Interactive Grid Messages Requiring Translation
Message Name English Text
APEX.IG.HELP.DOWNLOAD <p>Use this dialog to download all the currentrows to an external file. The file will containonly the currently displayed columns, usingany filters and sorts applied to the data.</p>
<p>Select the file format and clickDownload.<br>
Note: CSV will not include text formatting suchas aggregates and control breaks.</p>
<p>To email the file, select Send as Email andenter the email details (Recipient, Subject andMessage).</p>
APEX.IG.HELP.DOWNLOAD_TITLE Download Help
APEX.IG.HELP.FILTER <p>Use this dialog to configure data filterswhich limit the rows returned.</p>
<p><strong>Filter List</strong><br>
The Filter list displays defined filters. Disablean existing filter by deselecting it.<br>
Click Add (&plus) to create a new filter, orDelete (− ) to remove an existingfilter.</p>
<p><strong>Filter Settings</strong><br>
Use the form to define the filter properties.<br>
Select the appropriate filter type:<br>
  ; Row - filter for a termin any filterable column.<br>
  ; Column - filter aspecific column with a specified operator andvalue.</p>
<p><em> Note: When viewing the interactivegrid, you can define row filters by typingdirectly into the Search field. Click SelectColumns to Search to limit the search to aspecific column. Alternately, open a ColumnHeading menu and select a value to create acolumn filter.</em></p>
APEX.IG.HELP.FILTER_TITLE Filter Help
APEX.IG.HELP.FLASHBACK <p>Use this dialog to view the data as itexisted at a previous point in time. </p>
<p>Enter the number of minutes in the past toexecute the flashback query.</p>
APEX.IG.HELP.FLASHBACK_TITLE Flashback Help
APEX.IG.HELP.GROUP_BY_TITLE Group By Help
Chapter 21Translating Messages
21-25
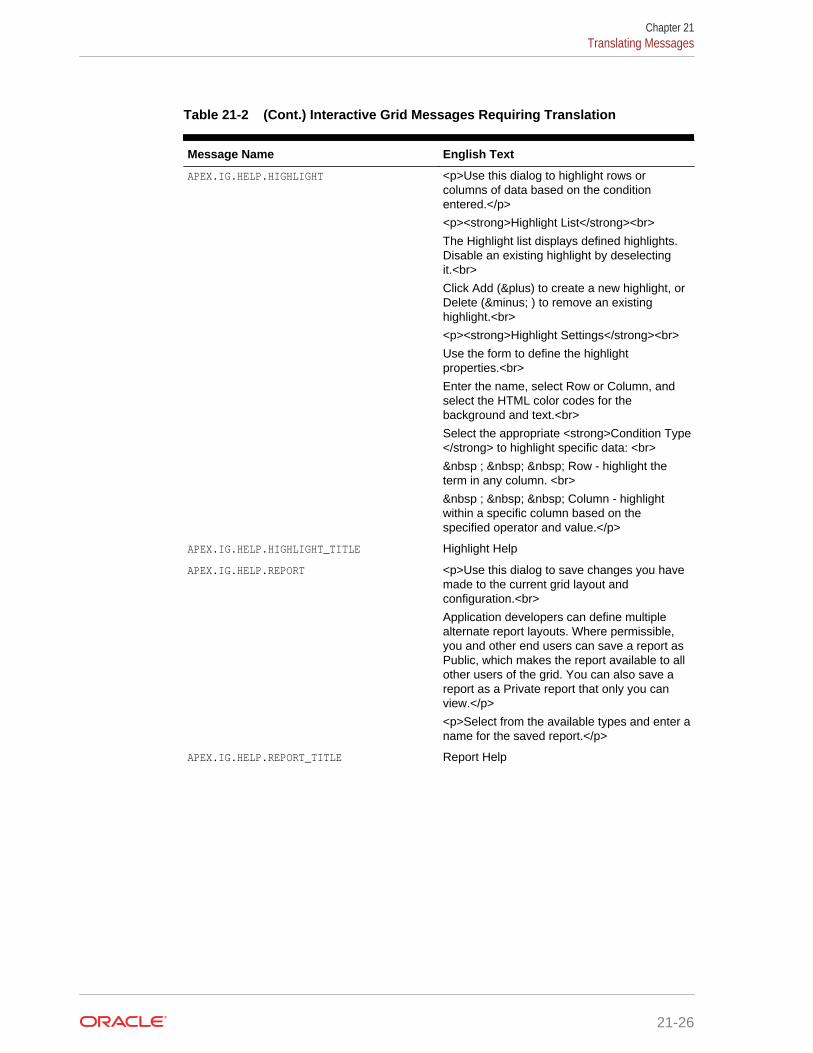
Table 21-2 (Cont.) Interactive Grid Messages Requiring Translation
Message Name English Text
APEX.IG.HELP.HIGHLIGHT <p>Use this dialog to highlight rows orcolumns of data based on the conditionentered.</p>
<p><strong>Highlight List</strong><br>
The Highlight list displays defined highlights.Disable an existing highlight by deselectingit.<br>
Click Add (&plus) to create a new highlight, orDelete (− ) to remove an existinghighlight.<br>
<p><strong>Highlight Settings</strong><br>
Use the form to define the highlightproperties.<br>
Enter the name, select Row or Column, andselect the HTML color codes for thebackground and text.<br>
Select the appropriate <strong>Condition Type</strong> to highlight specific data: <br>
  ; Row - highlight theterm in any column. <br>
  ; Column - highlightwithin a specific column based on thespecified operator and value.</p>
APEX.IG.HELP.HIGHLIGHT_TITLE Highlight Help
APEX.IG.HELP.REPORT <p>Use this dialog to save changes you havemade to the current grid layout andconfiguration.<br>
Application developers can define multiplealternate report layouts. Where permissible,you and other end users can save a report asPublic, which makes the report available to allother users of the grid. You can also save areport as a Private report that only you canview.</p>
<p>Select from the available types and enter aname for the saved report.</p>
APEX.IG.HELP.REPORT_TITLE Report Help
Chapter 21Translating Messages
21-26
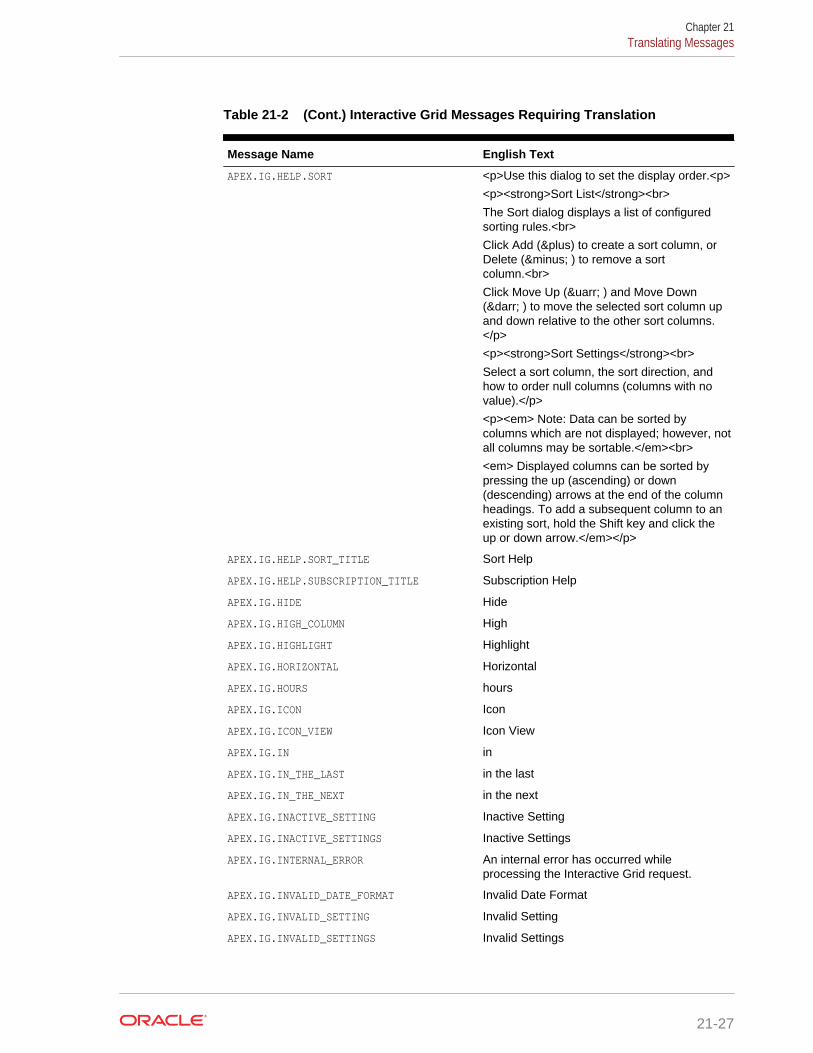
Table 21-2 (Cont.) Interactive Grid Messages Requiring Translation
Message Name English Text
APEX.IG.HELP.SORT <p>Use this dialog to set the display order.<p>
<p><strong>Sort List</strong><br>
The Sort dialog displays a list of configuredsorting rules.<br>
Click Add (&plus) to create a sort column, orDelete (− ) to remove a sortcolumn.<br>
Click Move Up (↑ ) and Move Down(↓ ) to move the selected sort column upand down relative to the other sort columns.</p>
<p><strong>Sort Settings</strong><br>
Select a sort column, the sort direction, andhow to order null columns (columns with novalue).</p>
<p><em> Note: Data can be sorted bycolumns which are not displayed; however, notall columns may be sortable.</em><br>
<em> Displayed columns can be sorted bypressing the up (ascending) or down(descending) arrows at the end of the columnheadings. To add a subsequent column to anexisting sort, hold the Shift key and click theup or down arrow.</em></p>
APEX.IG.HELP.SORT_TITLE Sort Help
APEX.IG.HELP.SUBSCRIPTION_TITLE Subscription Help
APEX.IG.HIDE Hide
APEX.IG.HIGH_COLUMN High
APEX.IG.HIGHLIGHT Highlight
APEX.IG.HORIZONTAL Horizontal
APEX.IG.HOURS hours
APEX.IG.ICON Icon
APEX.IG.ICON_VIEW Icon View
APEX.IG.IN in
APEX.IG.IN_THE_LAST in the last
APEX.IG.IN_THE_NEXT in the next
APEX.IG.INACTIVE_SETTING Inactive Setting
APEX.IG.INACTIVE_SETTINGS Inactive Settings
APEX.IG.INTERNAL_ERROR An internal error has occurred whileprocessing the Interactive Grid request.
APEX.IG.INVALID_DATE_FORMAT Invalid Date Format
APEX.IG.INVALID_SETTING Invalid Setting
APEX.IG.INVALID_SETTINGS Invalid Settings
Chapter 21Translating Messages
21-27

Table 21-2 (Cont.) Interactive Grid Messages Requiring Translation
Message Name English Text
APEX.IG.INVALID_SORT_BY Sort By has been set to %0, but no column asbeen selected for %0.
APEX.IG.INVALID_VALUE Invalid Value
APEX.IG.INVISIBLE Not Displayed
APEX.IG.IS_NOT_NULL is not empty
APEX.IG.IS_NULL is empty
APEX.IG.LABEL Label
APEX.IG.LABEL_COLUMN Label
APEX.IG.LAST Last
APEX.IG.LAST.DAY Last Day
APEX.IG.LAST.HOUR Last Hour
APEX.IG.LAST.MINUTE Last Minute
APEX.IG.LAST.MONTH Last Month
APEX.IG.LAST.WEEK Last Week
APEX.IG.LAST.X_DAYS Last %0 Days
APEX.IG.LAST.X_HOURS Last %0 Hours
APEX.IG.LAST.X_MINUTES Last %0 Minutes
APEX.IG.LAST.X_MONTHS Last %0 Months
APEX.IG.LAST.X_WEEKS Last %0 Weeks
APEX.IG.LAST.X_YEARS Last %0 Years
APEX.IG.LAST.YEAR Last Year
APEX.IG.LAYOUT_ALIGN Cell Alignment
APEX.IG.LAYOUT_USEGROUPFOR Use Group For
APEX.IG.LESS_THAN less than
APEX.IG.LESS_THAN_OR_EQUALS less than or equals
APEX.IG.LINE Line
APEX.IG.LINE_WITH_AREA Line with Area
APEX.IG.LISTAGG Listagg
APEX.IG.LOW_COLUMN Low
APEX.IG.MAILADDRESSES_COMMASEP Separate multiple Addresses with commas
APEX.IG.MATCHES_REGULAR_EXPRESSION matches regular expression
APEX.IG.MAX Maximum
APEX.IG.MAX_OVERALL Overall Maximum
APEX.IG.MEDIAN Median
APEX.IG.MEDIAN_OVERALL Overall Median
APEX.IG.MIN Minimum
APEX.IG.MIN_OVERALL Overall Minimum
Chapter 21Translating Messages
21-28

Table 21-2 (Cont.) Interactive Grid Messages Requiring Translation
Message Name English Text
APEX.IG.MINUTES minutes
APEX.IG.MINUTES_AGO Minutes ago
APEX.IG.MONTHS months
APEX.IG.MORE_DATA_FOUND The data contains more than %0 rows whichexceeds the maximum allowed. Please applyadditional filters in order to view the results.
APEX.IG.NAME Name
APEX.IG.NAMED_REPORT Named Report
APEX.IG.NEXT.DAY Next Day
APEX.IG.NEXT.HOUR Next Hour
APEX.IG.NEXT.MINUTE Next Minute
APEX.IG.NEXT.MONTH Next Month
APEX.IG.NEXT.WEEK Next Week
APEX.IG.NEXT.X_DAYS Next %0 Days
APEX.IG.NEXT.X_HOURS Next %0 Hours
APEX.IG.NEXT.X_MINUTES Next %0 Minutes
APEX.IG.NEXT.X_MONTHS Next %0 Months
APEX.IG.NEXT.X_WEEKS Next %0 Weeks
APEX.IG.NEXT.X_YEARS Next %0 Years
APEX.IG.NEXT.YEAR Next Year
APEX.IG.NO_DATA_FOUND No data found
APEX.IG.NOT_BETWEEN not between
APEX.IG.NOT_EQUALS not equals
APEX.IG.NOT_EXIST Region with ID %0 is not an Interactive Gridregion or does not exist in application %1.
APEX.IG.NOT_IN not in
APEX.IG.NOT_IN_THE_LAST not in the last
APEX.IG.NOT_IN_THE_NEXT not in the next
APEX.IG.NULLS Nulls
APEX.IG.NUMBER Numeric
APEX.IG.OFF Off
APEX.IG.ON On
APEX.IG.ONE_MINUTE_AGO 1 minute ago
APEX.IG.OPEN_COLORPICKER Open Color Picker: %0
APEX.IG.OPEN_COLUMN Open
APEX.IG.OPERATOR Operator
APEX.IG.ORIENTATION Orientation
APEX.IG.PIE Pie
Chapter 21Translating Messages
21-29
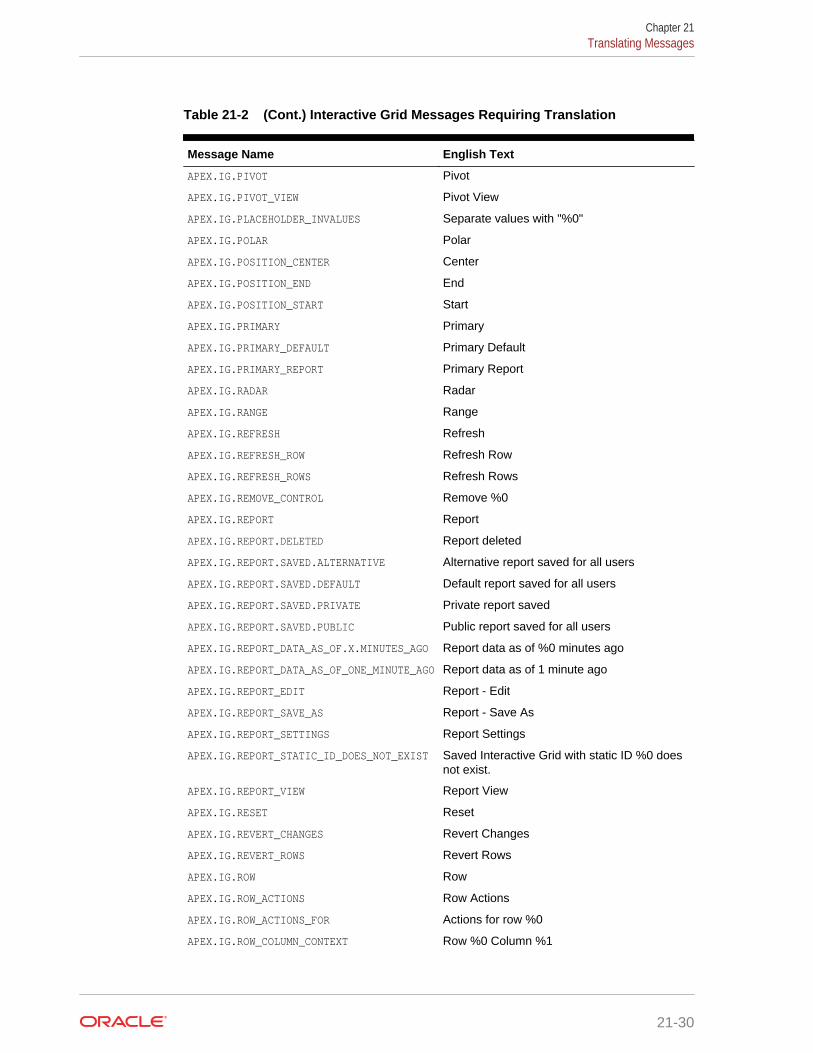
Table 21-2 (Cont.) Interactive Grid Messages Requiring Translation
Message Name English Text
APEX.IG.PIVOT Pivot
APEX.IG.PIVOT_VIEW Pivot View
APEX.IG.PLACEHOLDER_INVALUES Separate values with "%0"
APEX.IG.POLAR Polar
APEX.IG.POSITION_CENTER Center
APEX.IG.POSITION_END End
APEX.IG.POSITION_START Start
APEX.IG.PRIMARY Primary
APEX.IG.PRIMARY_DEFAULT Primary Default
APEX.IG.PRIMARY_REPORT Primary Report
APEX.IG.RADAR Radar
APEX.IG.RANGE Range
APEX.IG.REFRESH Refresh
APEX.IG.REFRESH_ROW Refresh Row
APEX.IG.REFRESH_ROWS Refresh Rows
APEX.IG.REMOVE_CONTROL Remove %0
APEX.IG.REPORT Report
APEX.IG.REPORT.DELETED Report deleted
APEX.IG.REPORT.SAVED.ALTERNATIVE Alternative report saved for all users
APEX.IG.REPORT.SAVED.DEFAULT Default report saved for all users
APEX.IG.REPORT.SAVED.PRIVATE Private report saved
APEX.IG.REPORT.SAVED.PUBLIC Public report saved for all users
APEX.IG.REPORT_DATA_AS_OF.X.MINUTES_AGO Report data as of %0 minutes ago
APEX.IG.REPORT_DATA_AS_OF_ONE_MINUTE_AGO Report data as of 1 minute ago
APEX.IG.REPORT_EDIT Report - Edit
APEX.IG.REPORT_SAVE_AS Report - Save As
APEX.IG.REPORT_SETTINGS Report Settings
APEX.IG.REPORT_STATIC_ID_DOES_NOT_EXIST Saved Interactive Grid with static ID %0 doesnot exist.
APEX.IG.REPORT_VIEW Report View
APEX.IG.RESET Reset
APEX.IG.REVERT_CHANGES Revert Changes
APEX.IG.REVERT_ROWS Revert Rows
APEX.IG.ROW Row
APEX.IG.ROW_ACTIONS Row Actions
APEX.IG.ROW_ACTIONS_FOR Actions for row %0
APEX.IG.ROW_COLUMN_CONTEXT Row %0 Column %1
Chapter 21Translating Messages
21-30

Table 21-2 (Cont.) Interactive Grid Messages Requiring Translation
Message Name English Text
APEX.IG.ROW_CONTEXT Row %0
APEX.IG.ROWS_PER_PAGE Rows Per Page
APEX.IG.SAVE Save
APEX.IG.SAVE_AS Save As
APEX.IG.SAVE_REPORT_SETTINGS Save Report Settings
APEX.IG.SAVED_REPORT_DEFAULT Default
APEX.IG.SAVED_REPORT_PRIVATE Private
APEX.IG.SAVED_REPORT_PUBLIC Public
APEX.IG.SAVED_REPORTS Saved Reports
APEX.IG.SCATTER Scatter
APEX.IG.SEARCH Search
APEX.IG.SEARCH.ALL_COLUMNS Search: All Text Columns
APEX.IG.SEARCH.COLUMN Search: %0
APEX.IG.SEARCH.ORACLE_TEXT Search: Full Text
APEX.IG.SEARCH_FOR.X Search for '%0'
APEX.IG.SEL_ACTIONS Selection Actions
APEX.IG.SELECT - Select -
APEX.IG.SELECT_1_ROW_IN_MASTER Select 1 row in the master region
APEX.IG.SELECT_COLUMNS_TO_SEARCH Select columns to search
APEX.IG.SEND_AS_EMAIL Send as Email
APEX.IG.SERIES_COLUMN Series
APEX.IG.SHOW_OVERALL_VALUE Show Overall Value
APEX.IG.SINGLE_ROW_VIEW Single Row View
APEX.IG.SORT Sort
APEX.IG.SORT_BY Sort By
APEX.IG.SORT_ONLY_ONE_PER_COLUMN You can define only one sort per column.
APEX.IG.SRV_CHANGE_MENU Change Menu
APEX.IG.STACK Stack
APEX.IG.STARTS_WITH starts with
APEX.IG.STOCK Stock
APEX.IG.SUBSCRIPTION Subscription
APEX.IG.SUM Sum
APEX.IG.SUM_OVERALL Overall Sum
APEX.IG.SUMMARY Interactive Grid with %0 rows and %1columns. Report: %2, View: %3, DisplayedRows Start: %4, Displayed Rows End: %5
APEX.IG.TARGET_COLUMN Target
APEX.IG.TEXT_COLOR Text Color
Chapter 21Translating Messages
21-31
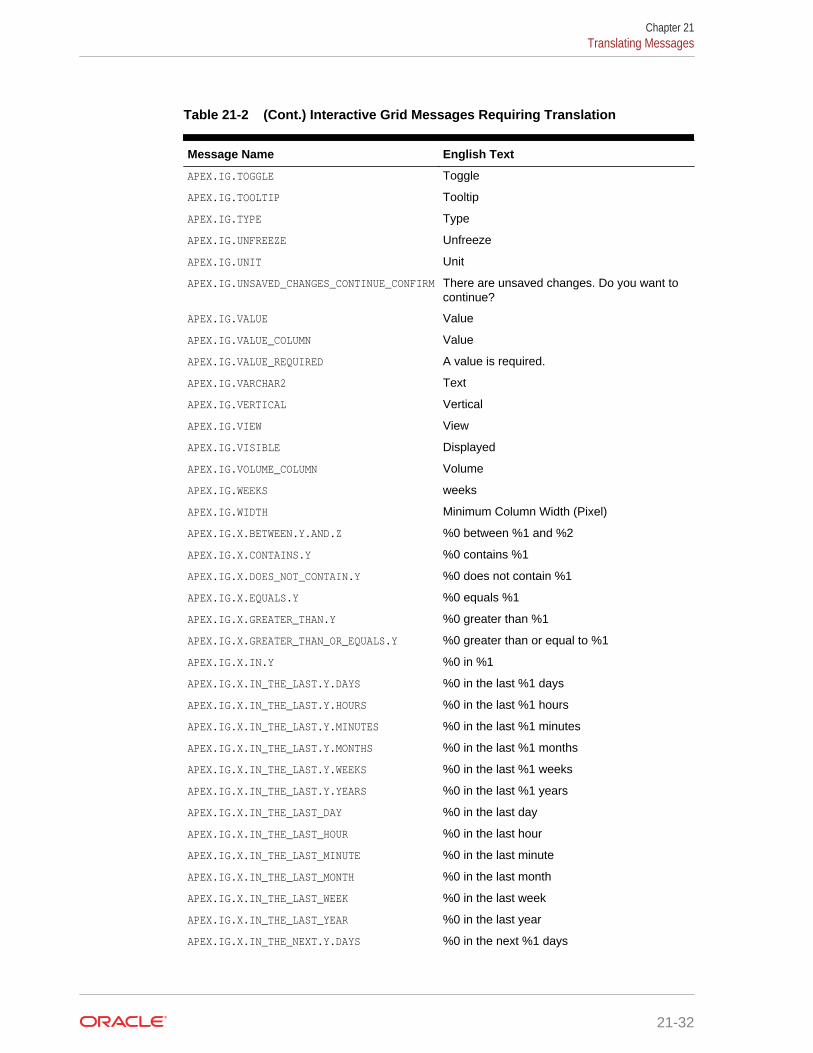
Table 21-2 (Cont.) Interactive Grid Messages Requiring Translation
Message Name English Text
APEX.IG.TOGGLE Toggle
APEX.IG.TOOLTIP Tooltip
APEX.IG.TYPE Type
APEX.IG.UNFREEZE Unfreeze
APEX.IG.UNIT Unit
APEX.IG.UNSAVED_CHANGES_CONTINUE_CONFIRM There are unsaved changes. Do you want tocontinue?
APEX.IG.VALUE Value
APEX.IG.VALUE_COLUMN Value
APEX.IG.VALUE_REQUIRED A value is required.
APEX.IG.VARCHAR2 Text
APEX.IG.VERTICAL Vertical
APEX.IG.VIEW View
APEX.IG.VISIBLE Displayed
APEX.IG.VOLUME_COLUMN Volume
APEX.IG.WEEKS weeks
APEX.IG.WIDTH Minimum Column Width (Pixel)
APEX.IG.X.BETWEEN.Y.AND.Z %0 between %1 and %2
APEX.IG.X.CONTAINS.Y %0 contains %1
APEX.IG.X.DOES_NOT_CONTAIN.Y %0 does not contain %1
APEX.IG.X.EQUALS.Y %0 equals %1
APEX.IG.X.GREATER_THAN.Y %0 greater than %1
APEX.IG.X.GREATER_THAN_OR_EQUALS.Y %0 greater than or equal to %1
APEX.IG.X.IN.Y %0 in %1
APEX.IG.X.IN_THE_LAST.Y.DAYS %0 in the last %1 days
APEX.IG.X.IN_THE_LAST.Y.HOURS %0 in the last %1 hours
APEX.IG.X.IN_THE_LAST.Y.MINUTES %0 in the last %1 minutes
APEX.IG.X.IN_THE_LAST.Y.MONTHS %0 in the last %1 months
APEX.IG.X.IN_THE_LAST.Y.WEEKS %0 in the last %1 weeks
APEX.IG.X.IN_THE_LAST.Y.YEARS %0 in the last %1 years
APEX.IG.X.IN_THE_LAST_DAY %0 in the last day
APEX.IG.X.IN_THE_LAST_HOUR %0 in the last hour
APEX.IG.X.IN_THE_LAST_MINUTE %0 in the last minute
APEX.IG.X.IN_THE_LAST_MONTH %0 in the last month
APEX.IG.X.IN_THE_LAST_WEEK %0 in the last week
APEX.IG.X.IN_THE_LAST_YEAR %0 in the last year
APEX.IG.X.IN_THE_NEXT.Y.DAYS %0 in the next %1 days
Chapter 21Translating Messages
21-32
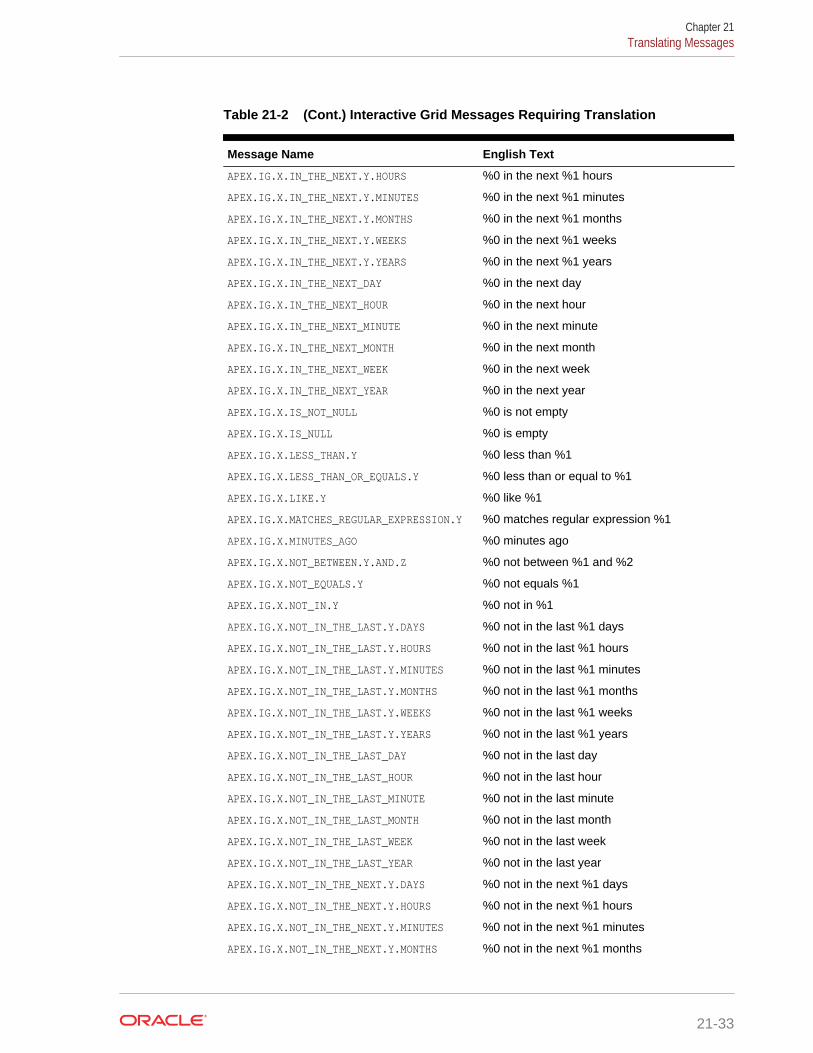
Table 21-2 (Cont.) Interactive Grid Messages Requiring Translation
Message Name English Text
APEX.IG.X.IN_THE_NEXT.Y.HOURS %0 in the next %1 hours
APEX.IG.X.IN_THE_NEXT.Y.MINUTES %0 in the next %1 minutes
APEX.IG.X.IN_THE_NEXT.Y.MONTHS %0 in the next %1 months
APEX.IG.X.IN_THE_NEXT.Y.WEEKS %0 in the next %1 weeks
APEX.IG.X.IN_THE_NEXT.Y.YEARS %0 in the next %1 years
APEX.IG.X.IN_THE_NEXT_DAY %0 in the next day
APEX.IG.X.IN_THE_NEXT_HOUR %0 in the next hour
APEX.IG.X.IN_THE_NEXT_MINUTE %0 in the next minute
APEX.IG.X.IN_THE_NEXT_MONTH %0 in the next month
APEX.IG.X.IN_THE_NEXT_WEEK %0 in the next week
APEX.IG.X.IN_THE_NEXT_YEAR %0 in the next year
APEX.IG.X.IS_NOT_NULL %0 is not empty
APEX.IG.X.IS_NULL %0 is empty
APEX.IG.X.LESS_THAN.Y %0 less than %1
APEX.IG.X.LESS_THAN_OR_EQUALS.Y %0 less than or equal to %1
APEX.IG.X.LIKE.Y %0 like %1
APEX.IG.X.MATCHES_REGULAR_EXPRESSION.Y %0 matches regular expression %1
APEX.IG.X.MINUTES_AGO %0 minutes ago
APEX.IG.X.NOT_BETWEEN.Y.AND.Z %0 not between %1 and %2
APEX.IG.X.NOT_EQUALS.Y %0 not equals %1
APEX.IG.X.NOT_IN.Y %0 not in %1
APEX.IG.X.NOT_IN_THE_LAST.Y.DAYS %0 not in the last %1 days
APEX.IG.X.NOT_IN_THE_LAST.Y.HOURS %0 not in the last %1 hours
APEX.IG.X.NOT_IN_THE_LAST.Y.MINUTES %0 not in the last %1 minutes
APEX.IG.X.NOT_IN_THE_LAST.Y.MONTHS %0 not in the last %1 months
APEX.IG.X.NOT_IN_THE_LAST.Y.WEEKS %0 not in the last %1 weeks
APEX.IG.X.NOT_IN_THE_LAST.Y.YEARS %0 not in the last %1 years
APEX.IG.X.NOT_IN_THE_LAST_DAY %0 not in the last day
APEX.IG.X.NOT_IN_THE_LAST_HOUR %0 not in the last hour
APEX.IG.X.NOT_IN_THE_LAST_MINUTE %0 not in the last minute
APEX.IG.X.NOT_IN_THE_LAST_MONTH %0 not in the last month
APEX.IG.X.NOT_IN_THE_LAST_WEEK %0 not in the last week
APEX.IG.X.NOT_IN_THE_LAST_YEAR %0 not in the last year
APEX.IG.X.NOT_IN_THE_NEXT.Y.DAYS %0 not in the next %1 days
APEX.IG.X.NOT_IN_THE_NEXT.Y.HOURS %0 not in the next %1 hours
APEX.IG.X.NOT_IN_THE_NEXT.Y.MINUTES %0 not in the next %1 minutes
APEX.IG.X.NOT_IN_THE_NEXT.Y.MONTHS %0 not in the next %1 months
Chapter 21Translating Messages
21-33
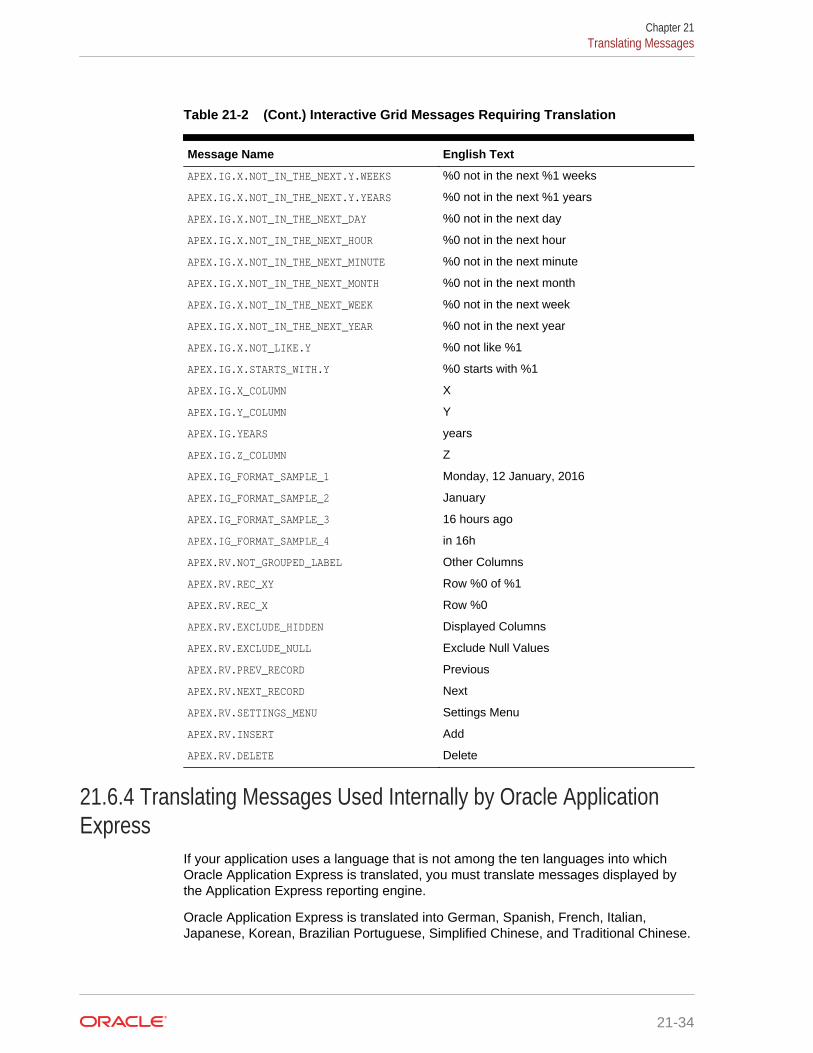
Table 21-2 (Cont.) Interactive Grid Messages Requiring Translation
Message Name English Text
APEX.IG.X.NOT_IN_THE_NEXT.Y.WEEKS %0 not in the next %1 weeks
APEX.IG.X.NOT_IN_THE_NEXT.Y.YEARS %0 not in the next %1 years
APEX.IG.X.NOT_IN_THE_NEXT_DAY %0 not in the next day
APEX.IG.X.NOT_IN_THE_NEXT_HOUR %0 not in the next hour
APEX.IG.X.NOT_IN_THE_NEXT_MINUTE %0 not in the next minute
APEX.IG.X.NOT_IN_THE_NEXT_MONTH %0 not in the next month
APEX.IG.X.NOT_IN_THE_NEXT_WEEK %0 not in the next week
APEX.IG.X.NOT_IN_THE_NEXT_YEAR %0 not in the next year
APEX.IG.X.NOT_LIKE.Y %0 not like %1
APEX.IG.X.STARTS_WITH.Y %0 starts with %1
APEX.IG.X_COLUMN X
APEX.IG.Y_COLUMN Y
APEX.IG.YEARS years
APEX.IG.Z_COLUMN Z
APEX.IG_FORMAT_SAMPLE_1 Monday, 12 January, 2016
APEX.IG_FORMAT_SAMPLE_2 January
APEX.IG_FORMAT_SAMPLE_3 16 hours ago
APEX.IG_FORMAT_SAMPLE_4 in 16h
APEX.RV.NOT_GROUPED_LABEL Other Columns
APEX.RV.REC_XY Row %0 of %1
APEX.RV.REC_X Row %0
APEX.RV.EXCLUDE_HIDDEN Displayed Columns
APEX.RV.EXCLUDE_NULL Exclude Null Values
APEX.RV.PREV_RECORD Previous
APEX.RV.NEXT_RECORD Next
APEX.RV.SETTINGS_MENU Settings Menu
APEX.RV.INSERT Add
APEX.RV.DELETE Delete
21.6.4 Translating Messages Used Internally by Oracle ApplicationExpress
If your application uses a language that is not among the ten languages into whichOracle Application Express is translated, you must translate messages displayed bythe Application Express reporting engine.
Oracle Application Express is translated into German, Spanish, French, Italian,Japanese, Korean, Brazilian Portuguese, Simplified Chinese, and Traditional Chinese.
Chapter 21Translating Messages
21-34
For example, if you develop a Russian application and want to include reportmessages, such as pagination, in Russian, you must translate the strings used inmessages displayed in reports.
• Creating Text Messages (page 21-35)
• Editing Text Messages (page 21-35)
• Internal Messages Requiring Translation (page 21-36)
• Interactive Report Messages Requiring Translation (page 21-40)
21.6.4.1 Creating Text MessagesTo create a translation message:
1. Navigate to the Translate Application page:
a. On the Workspace home page, click the App Builder icon.
b. Select an application.
c. Click Shared Components.
d. Under Globalization, click Text Messages.
2. On the Translate Messages page, click Create Text Message.
3. On Identify Text Message, specify the following:
a. Name - Enter the name of each message that must be translated.
b. Language - Select the language for which the message will be used.
c. Text - Enter the text to be returned when the text message is called. If theEnglish text message contains positional substitution values (for example, %0,%1), ensure that your defined message also contains the same named andnumber of positional substitution values.
4. Click Create Text Message.
21.6.4.2 Editing Text MessagesTo edit text messages:
1. Navigate to the Translate Application page:
a. On the Workspace home page, click the App Builder icon.
b. Select an application.
c. Click Shared Components.
d. Under Globalization, click Text Messages.
2. On edit a text message:
a. Click the message name.
b. Make the appropriate edits.
If the English text message contains positional substitution values (forexample, %0, %1), ensure that your defined message also contains the samenamed and number of positional substitution values.
c. Click Apply Changes.
Chapter 21Translating Messages
21-35
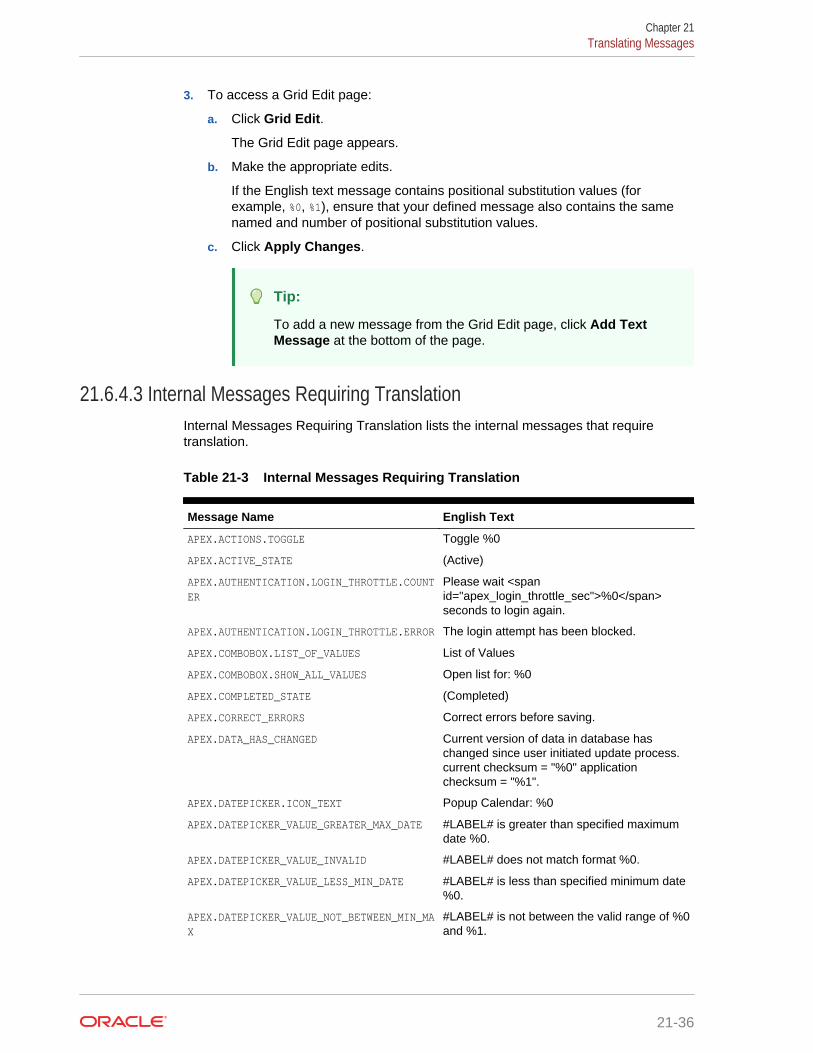
3. To access a Grid Edit page:
a. Click Grid Edit.
The Grid Edit page appears.
b. Make the appropriate edits.
If the English text message contains positional substitution values (forexample, %0, %1), ensure that your defined message also contains the samenamed and number of positional substitution values.
c. Click Apply Changes.
Tip:
To add a new message from the Grid Edit page, click Add TextMessage at the bottom of the page.
21.6.4.3 Internal Messages Requiring TranslationInternal Messages Requiring Translation lists the internal messages that requiretranslation.
Table 21-3 Internal Messages Requiring Translation
Message Name English Text
APEX.ACTIONS.TOGGLE Toggle %0
APEX.ACTIVE_STATE (Active)
APEX.AUTHENTICATION.LOGIN_THROTTLE.COUNTER
Please wait <spanid="apex_login_throttle_sec">%0</span>seconds to login again.
APEX.AUTHENTICATION.LOGIN_THROTTLE.ERROR The login attempt has been blocked.
APEX.COMBOBOX.LIST_OF_VALUES List of Values
APEX.COMBOBOX.SHOW_ALL_VALUES Open list for: %0
APEX.COMPLETED_STATE (Completed)
APEX.CORRECT_ERRORS Correct errors before saving.
APEX.DATA_HAS_CHANGED Current version of data in database haschanged since user initiated update process.current checksum = "%0" applicationchecksum = "%1".
APEX.DATEPICKER.ICON_TEXT Popup Calendar: %0
APEX.DATEPICKER_VALUE_GREATER_MAX_DATE #LABEL# is greater than specified maximumdate %0.
APEX.DATEPICKER_VALUE_INVALID #LABEL# does not match format %0.
APEX.DATEPICKER_VALUE_LESS_MIN_DATE #LABEL# is less than specified minimum date%0.
APEX.DATEPICKER_VALUE_NOT_BETWEEN_MIN_MAX
#LABEL# is not between the valid range of %0and %1.
Chapter 21Translating Messages
21-36
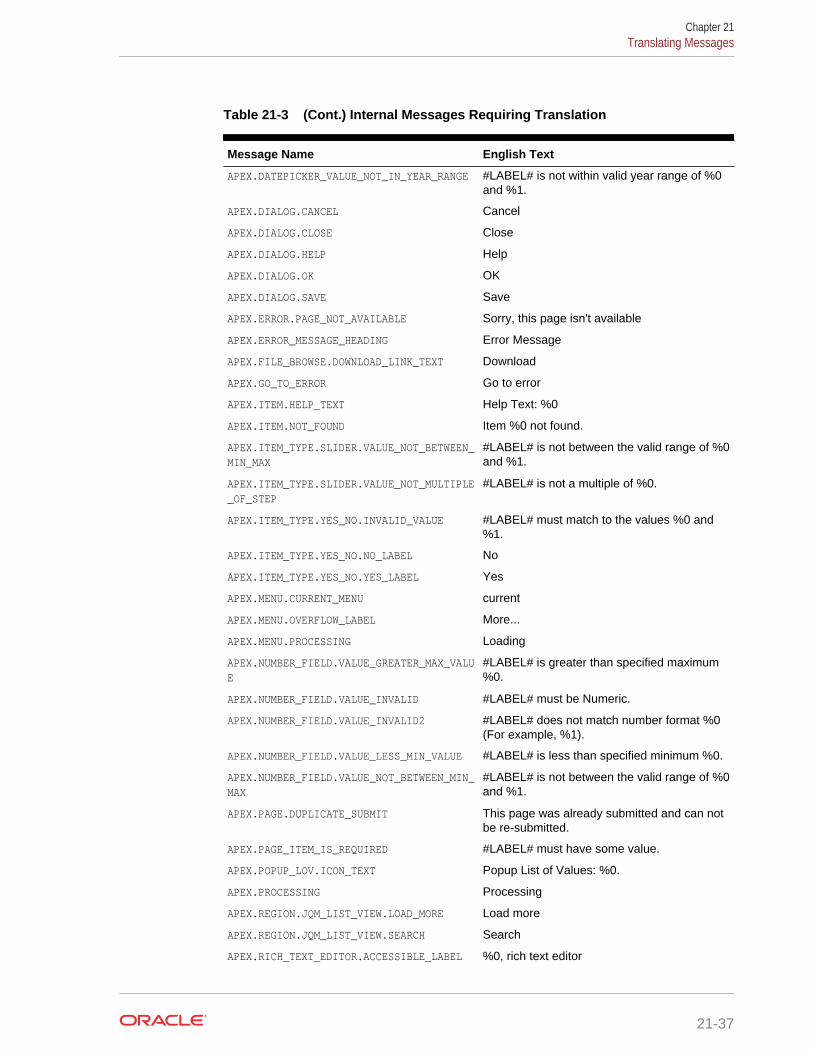
Table 21-3 (Cont.) Internal Messages Requiring Translation
Message Name English Text
APEX.DATEPICKER_VALUE_NOT_IN_YEAR_RANGE #LABEL# is not within valid year range of %0and %1.
APEX.DIALOG.CANCEL Cancel
APEX.DIALOG.CLOSE Close
APEX.DIALOG.HELP Help
APEX.DIALOG.OK OK
APEX.DIALOG.SAVE Save
APEX.ERROR.PAGE_NOT_AVAILABLE Sorry, this page isn't available
APEX.ERROR_MESSAGE_HEADING Error Message
APEX.FILE_BROWSE.DOWNLOAD_LINK_TEXT Download
APEX.GO_TO_ERROR Go to error
APEX.ITEM.HELP_TEXT Help Text: %0
APEX.ITEM.NOT_FOUND Item %0 not found.
APEX.ITEM_TYPE.SLIDER.VALUE_NOT_BETWEEN_MIN_MAX
#LABEL# is not between the valid range of %0and %1.
APEX.ITEM_TYPE.SLIDER.VALUE_NOT_MULTIPLE_OF_STEP
#LABEL# is not a multiple of %0.
APEX.ITEM_TYPE.YES_NO.INVALID_VALUE #LABEL# must match to the values %0 and%1.
APEX.ITEM_TYPE.YES_NO.NO_LABEL No
APEX.ITEM_TYPE.YES_NO.YES_LABEL Yes
APEX.MENU.CURRENT_MENU current
APEX.MENU.OVERFLOW_LABEL More...
APEX.MENU.PROCESSING Loading
APEX.NUMBER_FIELD.VALUE_GREATER_MAX_VALUE
#LABEL# is greater than specified maximum%0.
APEX.NUMBER_FIELD.VALUE_INVALID #LABEL# must be Numeric.
APEX.NUMBER_FIELD.VALUE_INVALID2 #LABEL# does not match number format %0(For example, %1).
APEX.NUMBER_FIELD.VALUE_LESS_MIN_VALUE #LABEL# is less than specified minimum %0.
APEX.NUMBER_FIELD.VALUE_NOT_BETWEEN_MIN_MAX
#LABEL# is not between the valid range of %0and %1.
APEX.PAGE.DUPLICATE_SUBMIT This page was already submitted and can notbe re-submitted.
APEX.PAGE_ITEM_IS_REQUIRED #LABEL# must have some value.
APEX.POPUP_LOV.ICON_TEXT Popup List of Values: %0.
APEX.PROCESSING Processing
APEX.REGION.JQM_LIST_VIEW.LOAD_MORE Load more
APEX.REGION.JQM_LIST_VIEW.SEARCH Search
APEX.RICH_TEXT_EDITOR.ACCESSIBLE_LABEL %0, rich text editor
Chapter 21Translating Messages
21-37
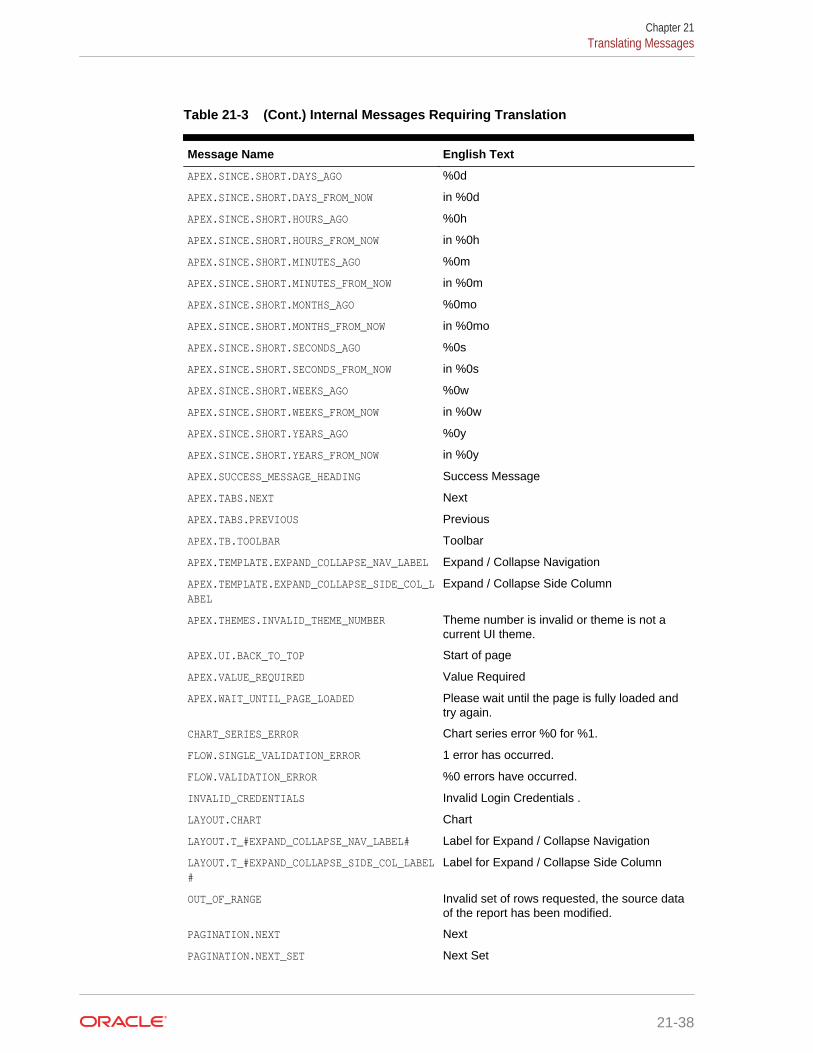
Table 21-3 (Cont.) Internal Messages Requiring Translation
Message Name English Text
APEX.SINCE.SHORT.DAYS_AGO %0d
APEX.SINCE.SHORT.DAYS_FROM_NOW in %0d
APEX.SINCE.SHORT.HOURS_AGO %0h
APEX.SINCE.SHORT.HOURS_FROM_NOW in %0h
APEX.SINCE.SHORT.MINUTES_AGO %0m
APEX.SINCE.SHORT.MINUTES_FROM_NOW in %0m
APEX.SINCE.SHORT.MONTHS_AGO %0mo
APEX.SINCE.SHORT.MONTHS_FROM_NOW in %0mo
APEX.SINCE.SHORT.SECONDS_AGO %0s
APEX.SINCE.SHORT.SECONDS_FROM_NOW in %0s
APEX.SINCE.SHORT.WEEKS_AGO %0w
APEX.SINCE.SHORT.WEEKS_FROM_NOW in %0w
APEX.SINCE.SHORT.YEARS_AGO %0y
APEX.SINCE.SHORT.YEARS_FROM_NOW in %0y
APEX.SUCCESS_MESSAGE_HEADING Success Message
APEX.TABS.NEXT Next
APEX.TABS.PREVIOUS Previous
APEX.TB.TOOLBAR Toolbar
APEX.TEMPLATE.EXPAND_COLLAPSE_NAV_LABEL Expand / Collapse Navigation
APEX.TEMPLATE.EXPAND_COLLAPSE_SIDE_COL_LABEL
Expand / Collapse Side Column
APEX.THEMES.INVALID_THEME_NUMBER Theme number is invalid or theme is not acurrent UI theme.
APEX.UI.BACK_TO_TOP Start of page
APEX.VALUE_REQUIRED Value Required
APEX.WAIT_UNTIL_PAGE_LOADED Please wait until the page is fully loaded andtry again.
CHART_SERIES_ERROR Chart series error %0 for %1.
FLOW.SINGLE_VALIDATION_ERROR 1 error has occurred.
FLOW.VALIDATION_ERROR %0 errors have occurred.
INVALID_CREDENTIALS Invalid Login Credentials .
LAYOUT.CHART Chart
LAYOUT.T_#EXPAND_COLLAPSE_NAV_LABEL# Label for Expand / Collapse Navigation
LAYOUT.T_#EXPAND_COLLAPSE_SIDE_COL_LABEL#
Label for Expand / Collapse Side Column
OUT_OF_RANGE Invalid set of rows requested, the source dataof the report has been modified.
PAGINATION.NEXT Next
PAGINATION.NEXT_SET Next Set
Chapter 21Translating Messages
21-38
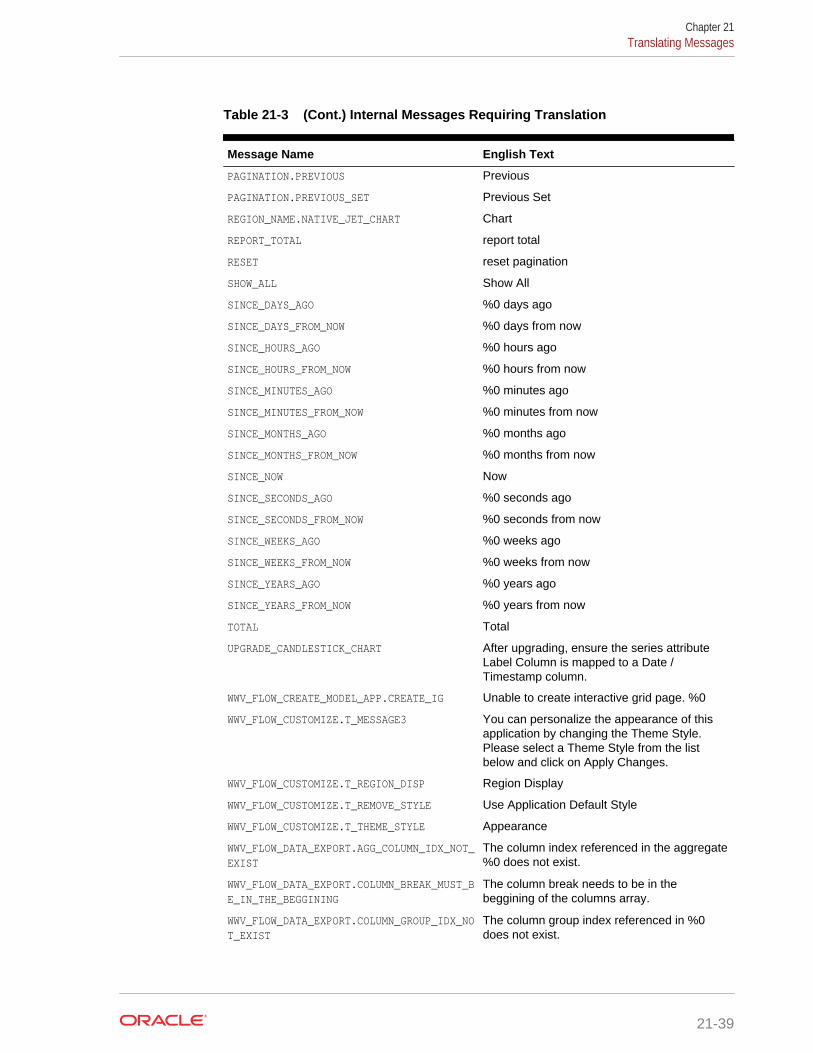
Table 21-3 (Cont.) Internal Messages Requiring Translation
Message Name English Text
PAGINATION.PREVIOUS Previous
PAGINATION.PREVIOUS_SET Previous Set
REGION_NAME.NATIVE_JET_CHART Chart
REPORT_TOTAL report total
RESET reset pagination
SHOW_ALL Show All
SINCE_DAYS_AGO %0 days ago
SINCE_DAYS_FROM_NOW %0 days from now
SINCE_HOURS_AGO %0 hours ago
SINCE_HOURS_FROM_NOW %0 hours from now
SINCE_MINUTES_AGO %0 minutes ago
SINCE_MINUTES_FROM_NOW %0 minutes from now
SINCE_MONTHS_AGO %0 months ago
SINCE_MONTHS_FROM_NOW %0 months from now
SINCE_NOW Now
SINCE_SECONDS_AGO %0 seconds ago
SINCE_SECONDS_FROM_NOW %0 seconds from now
SINCE_WEEKS_AGO %0 weeks ago
SINCE_WEEKS_FROM_NOW %0 weeks from now
SINCE_YEARS_AGO %0 years ago
SINCE_YEARS_FROM_NOW %0 years from now
TOTAL Total
UPGRADE_CANDLESTICK_CHART After upgrading, ensure the series attributeLabel Column is mapped to a Date /Timestamp column.
WWV_FLOW_CREATE_MODEL_APP.CREATE_IG Unable to create interactive grid page. %0
WWV_FLOW_CUSTOMIZE.T_MESSAGE3 You can personalize the appearance of thisapplication by changing the Theme Style.Please select a Theme Style from the listbelow and click on Apply Changes.
WWV_FLOW_CUSTOMIZE.T_REGION_DISP Region Display
WWV_FLOW_CUSTOMIZE.T_REMOVE_STYLE Use Application Default Style
WWV_FLOW_CUSTOMIZE.T_THEME_STYLE Appearance
WWV_FLOW_DATA_EXPORT.AGG_COLUMN_IDX_NOT_EXIST
The column index referenced in the aggregate%0 does not exist.
WWV_FLOW_DATA_EXPORT.COLUMN_BREAK_MUST_BE_IN_THE_BEGGINING
The column break needs to be in thebeggining of the columns array.
WWV_FLOW_DATA_EXPORT.COLUMN_GROUP_IDX_NOT_EXIST
The column group index referenced in %0does not exist.
Chapter 21Translating Messages
21-39
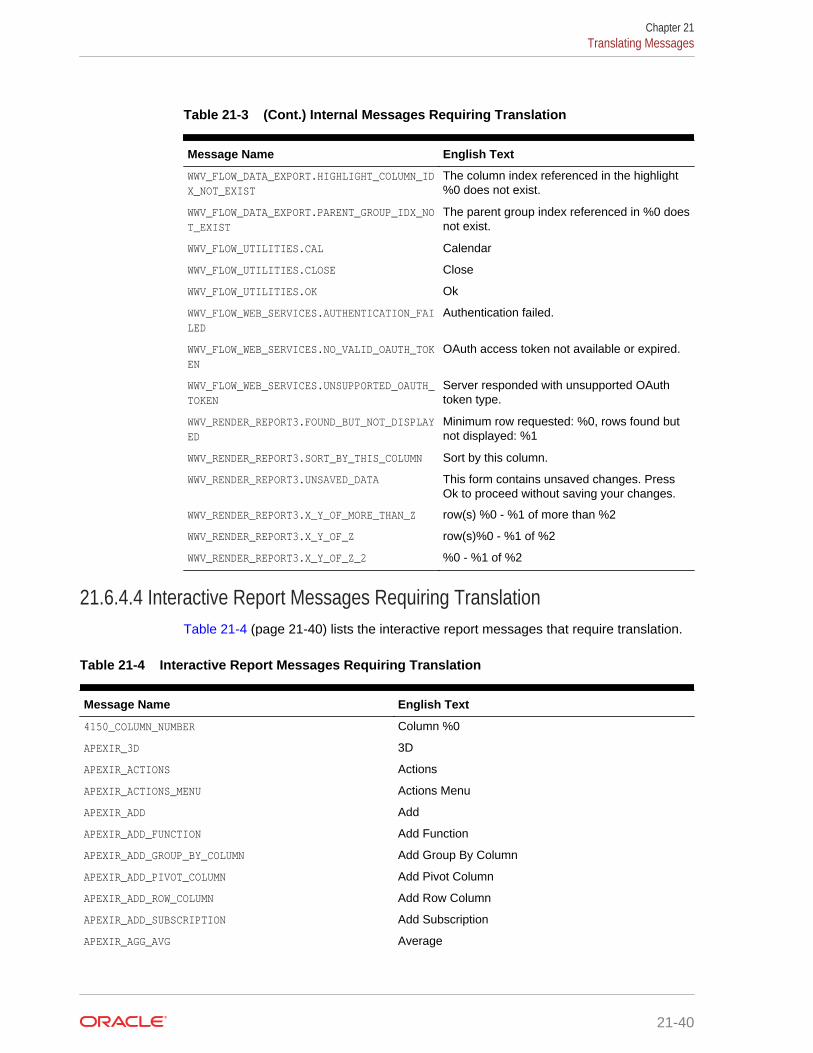
Table 21-3 (Cont.) Internal Messages Requiring Translation
Message Name English Text
WWV_FLOW_DATA_EXPORT.HIGHLIGHT_COLUMN_IDX_NOT_EXIST
The column index referenced in the highlight%0 does not exist.
WWV_FLOW_DATA_EXPORT.PARENT_GROUP_IDX_NOT_EXIST
The parent group index referenced in %0 doesnot exist.
WWV_FLOW_UTILITIES.CAL Calendar
WWV_FLOW_UTILITIES.CLOSE Close
WWV_FLOW_UTILITIES.OK Ok
WWV_FLOW_WEB_SERVICES.AUTHENTICATION_FAILED
Authentication failed.
WWV_FLOW_WEB_SERVICES.NO_VALID_OAUTH_TOKEN
OAuth access token not available or expired.
WWV_FLOW_WEB_SERVICES.UNSUPPORTED_OAUTH_TOKEN
Server responded with unsupported OAuthtoken type.
WWV_RENDER_REPORT3.FOUND_BUT_NOT_DISPLAYED
Minimum row requested: %0, rows found butnot displayed: %1
WWV_RENDER_REPORT3.SORT_BY_THIS_COLUMN Sort by this column.
WWV_RENDER_REPORT3.UNSAVED_DATA This form contains unsaved changes. PressOk to proceed without saving your changes.
WWV_RENDER_REPORT3.X_Y_OF_MORE_THAN_Z row(s) %0 - %1 of more than %2
WWV_RENDER_REPORT3.X_Y_OF_Z row(s)%0 - %1 of %2
WWV_RENDER_REPORT3.X_Y_OF_Z_2 %0 - %1 of %2
21.6.4.4 Interactive Report Messages Requiring TranslationTable 21-4 (page 21-40) lists the interactive report messages that require translation.
Table 21-4 Interactive Report Messages Requiring Translation
Message Name English Text
4150_COLUMN_NUMBER Column %0
APEXIR_3D 3D
APEXIR_ACTIONS Actions
APEXIR_ACTIONS_MENU Actions Menu
APEXIR_ADD Add
APEXIR_ADD_FUNCTION Add Function
APEXIR_ADD_GROUP_BY_COLUMN Add Group By Column
APEXIR_ADD_PIVOT_COLUMN Add Pivot Column
APEXIR_ADD_ROW_COLUMN Add Row Column
APEXIR_ADD_SUBSCRIPTION Add Subscription
APEXIR_AGG_AVG Average
Chapter 21Translating Messages
21-40
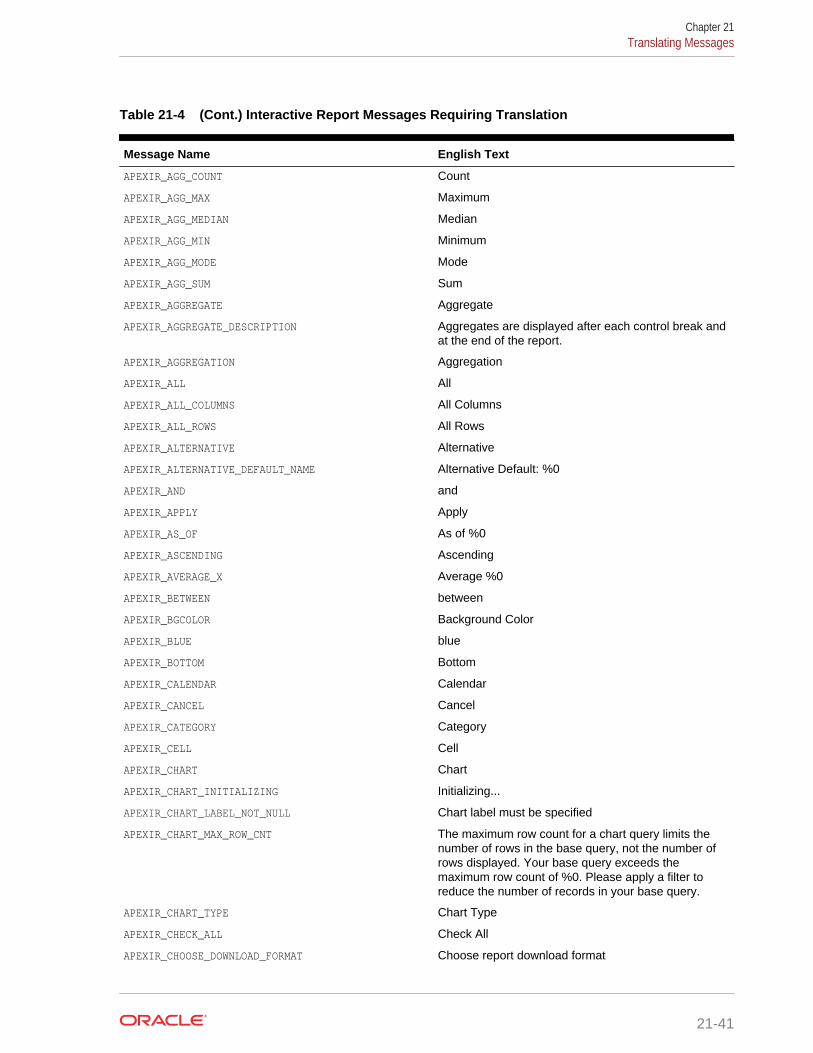
Table 21-4 (Cont.) Interactive Report Messages Requiring Translation
Message Name English Text
APEXIR_AGG_COUNT Count
APEXIR_AGG_MAX Maximum
APEXIR_AGG_MEDIAN Median
APEXIR_AGG_MIN Minimum
APEXIR_AGG_MODE Mode
APEXIR_AGG_SUM Sum
APEXIR_AGGREGATE Aggregate
APEXIR_AGGREGATE_DESCRIPTION Aggregates are displayed after each control break andat the end of the report.
APEXIR_AGGREGATION Aggregation
APEXIR_ALL All
APEXIR_ALL_COLUMNS All Columns
APEXIR_ALL_ROWS All Rows
APEXIR_ALTERNATIVE Alternative
APEXIR_ALTERNATIVE_DEFAULT_NAME Alternative Default: %0
APEXIR_AND and
APEXIR_APPLY Apply
APEXIR_AS_OF As of %0
APEXIR_ASCENDING Ascending
APEXIR_AVERAGE_X Average %0
APEXIR_BETWEEN between
APEXIR_BGCOLOR Background Color
APEXIR_BLUE blue
APEXIR_BOTTOM Bottom
APEXIR_CALENDAR Calendar
APEXIR_CANCEL Cancel
APEXIR_CATEGORY Category
APEXIR_CELL Cell
APEXIR_CHART Chart
APEXIR_CHART_INITIALIZING Initializing...
APEXIR_CHART_LABEL_NOT_NULL Chart label must be specified
APEXIR_CHART_MAX_ROW_CNT The maximum row count for a chart query limits thenumber of rows in the base query, not the number ofrows displayed. Your base query exceeds themaximum row count of %0. Please apply a filter toreduce the number of records in your base query.
APEXIR_CHART_TYPE Chart Type
APEXIR_CHECK_ALL Check All
APEXIR_CHOOSE_DOWNLOAD_FORMAT Choose report download format
Chapter 21Translating Messages
21-41
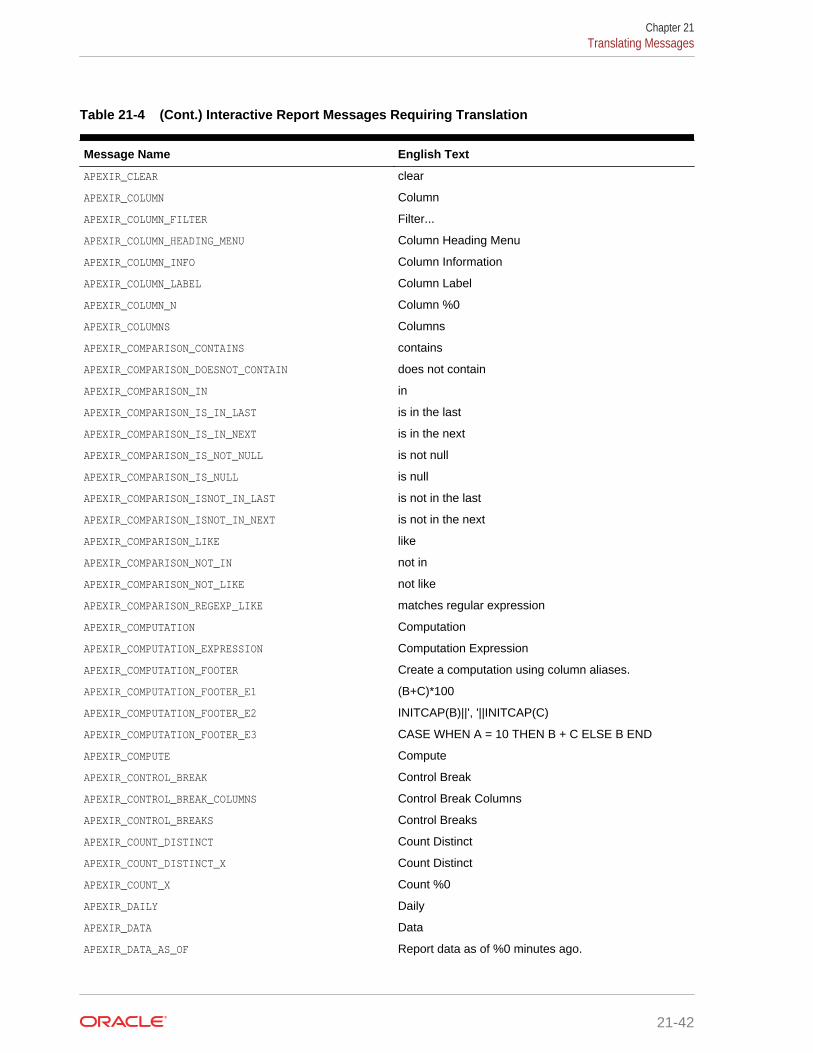
Table 21-4 (Cont.) Interactive Report Messages Requiring Translation
Message Name English Text
APEXIR_CLEAR clear
APEXIR_COLUMN Column
APEXIR_COLUMN_FILTER Filter...
APEXIR_COLUMN_HEADING_MENU Column Heading Menu
APEXIR_COLUMN_INFO Column Information
APEXIR_COLUMN_LABEL Column Label
APEXIR_COLUMN_N Column %0
APEXIR_COLUMNS Columns
APEXIR_COMPARISON_CONTAINS contains
APEXIR_COMPARISON_DOESNOT_CONTAIN does not contain
APEXIR_COMPARISON_IN in
APEXIR_COMPARISON_IS_IN_LAST is in the last
APEXIR_COMPARISON_IS_IN_NEXT is in the next
APEXIR_COMPARISON_IS_NOT_NULL is not null
APEXIR_COMPARISON_IS_NULL is null
APEXIR_COMPARISON_ISNOT_IN_LAST is not in the last
APEXIR_COMPARISON_ISNOT_IN_NEXT is not in the next
APEXIR_COMPARISON_LIKE like
APEXIR_COMPARISON_NOT_IN not in
APEXIR_COMPARISON_NOT_LIKE not like
APEXIR_COMPARISON_REGEXP_LIKE matches regular expression
APEXIR_COMPUTATION Computation
APEXIR_COMPUTATION_EXPRESSION Computation Expression
APEXIR_COMPUTATION_FOOTER Create a computation using column aliases.
APEXIR_COMPUTATION_FOOTER_E1 (B+C)*100
APEXIR_COMPUTATION_FOOTER_E2 INITCAP(B)||', '||INITCAP(C)
APEXIR_COMPUTATION_FOOTER_E3 CASE WHEN A = 10 THEN B + C ELSE B END
APEXIR_COMPUTE Compute
APEXIR_CONTROL_BREAK Control Break
APEXIR_CONTROL_BREAK_COLUMNS Control Break Columns
APEXIR_CONTROL_BREAKS Control Breaks
APEXIR_COUNT_DISTINCT Count Distinct
APEXIR_COUNT_DISTINCT_X Count Distinct
APEXIR_COUNT_X Count %0
APEXIR_DAILY Daily
APEXIR_DATA Data
APEXIR_DATA_AS_OF Report data as of %0 minutes ago.
Chapter 21Translating Messages
21-42
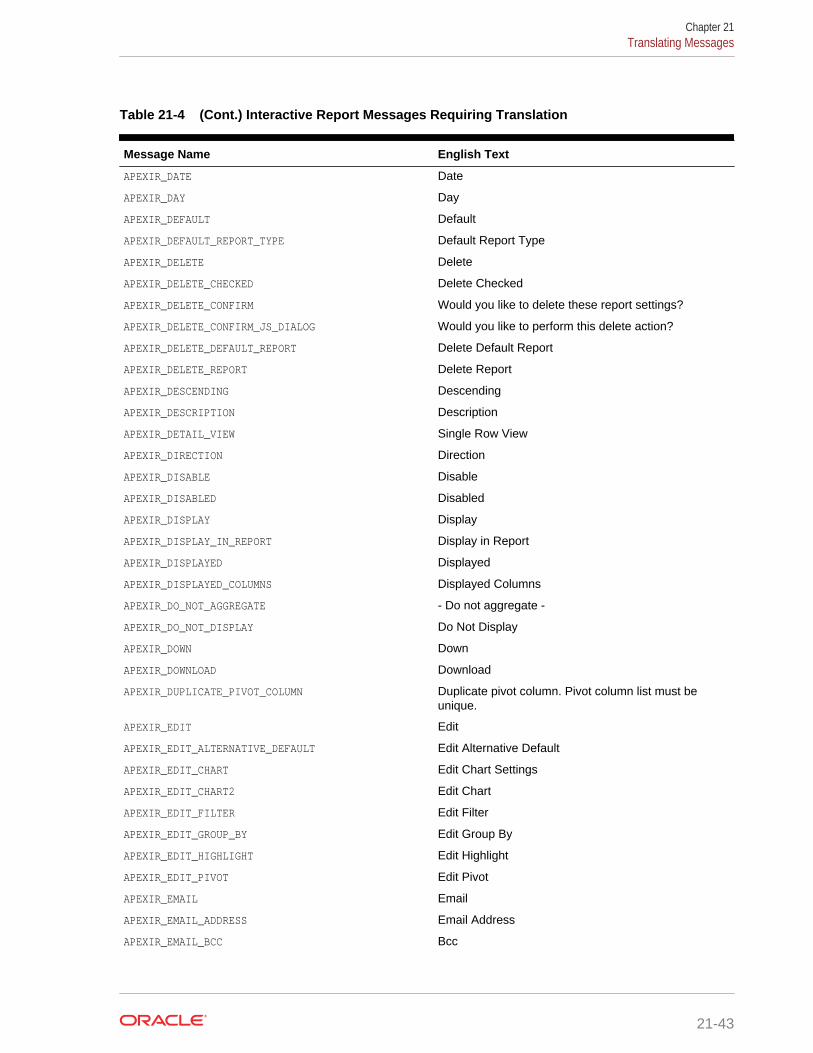
Table 21-4 (Cont.) Interactive Report Messages Requiring Translation
Message Name English Text
APEXIR_DATE Date
APEXIR_DAY Day
APEXIR_DEFAULT Default
APEXIR_DEFAULT_REPORT_TYPE Default Report Type
APEXIR_DELETE Delete
APEXIR_DELETE_CHECKED Delete Checked
APEXIR_DELETE_CONFIRM Would you like to delete these report settings?
APEXIR_DELETE_CONFIRM_JS_DIALOG Would you like to perform this delete action?
APEXIR_DELETE_DEFAULT_REPORT Delete Default Report
APEXIR_DELETE_REPORT Delete Report
APEXIR_DESCENDING Descending
APEXIR_DESCRIPTION Description
APEXIR_DETAIL_VIEW Single Row View
APEXIR_DIRECTION Direction
APEXIR_DISABLE Disable
APEXIR_DISABLED Disabled
APEXIR_DISPLAY Display
APEXIR_DISPLAY_IN_REPORT Display in Report
APEXIR_DISPLAYED Displayed
APEXIR_DISPLAYED_COLUMNS Displayed Columns
APEXIR_DO_NOT_AGGREGATE - Do not aggregate -
APEXIR_DO_NOT_DISPLAY Do Not Display
APEXIR_DOWN Down
APEXIR_DOWNLOAD Download
APEXIR_DUPLICATE_PIVOT_COLUMN Duplicate pivot column. Pivot column list must beunique.
APEXIR_EDIT Edit
APEXIR_EDIT_ALTERNATIVE_DEFAULT Edit Alternative Default
APEXIR_EDIT_CHART Edit Chart Settings
APEXIR_EDIT_CHART2 Edit Chart
APEXIR_EDIT_FILTER Edit Filter
APEXIR_EDIT_GROUP_BY Edit Group By
APEXIR_EDIT_HIGHLIGHT Edit Highlight
APEXIR_EDIT_PIVOT Edit Pivot
APEXIR_EMAIL Email
APEXIR_EMAIL_ADDRESS Email Address
APEXIR_EMAIL_BCC Bcc
Chapter 21Translating Messages
21-43
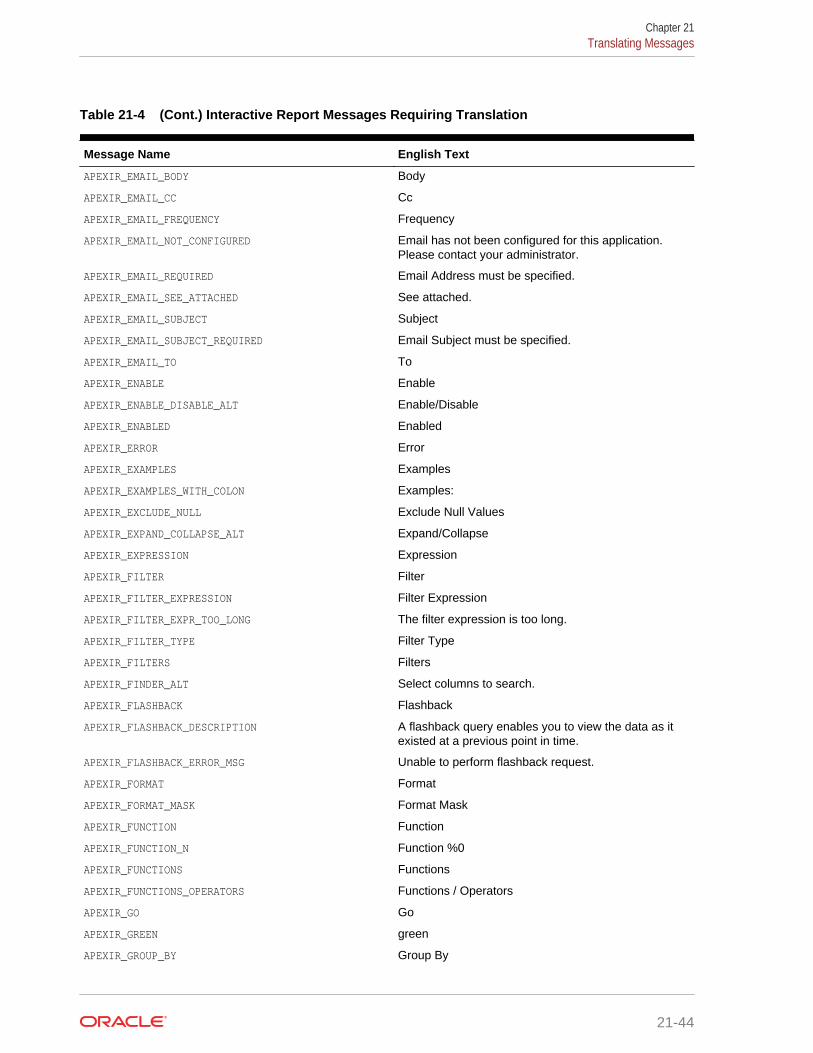
Table 21-4 (Cont.) Interactive Report Messages Requiring Translation
Message Name English Text
APEXIR_EMAIL_BODY Body
APEXIR_EMAIL_CC Cc
APEXIR_EMAIL_FREQUENCY Frequency
APEXIR_EMAIL_NOT_CONFIGURED Email has not been configured for this application.Please contact your administrator.
APEXIR_EMAIL_REQUIRED Email Address must be specified.
APEXIR_EMAIL_SEE_ATTACHED See attached.
APEXIR_EMAIL_SUBJECT Subject
APEXIR_EMAIL_SUBJECT_REQUIRED Email Subject must be specified.
APEXIR_EMAIL_TO To
APEXIR_ENABLE Enable
APEXIR_ENABLE_DISABLE_ALT Enable/Disable
APEXIR_ENABLED Enabled
APEXIR_ERROR Error
APEXIR_EXAMPLES Examples
APEXIR_EXAMPLES_WITH_COLON Examples:
APEXIR_EXCLUDE_NULL Exclude Null Values
APEXIR_EXPAND_COLLAPSE_ALT Expand/Collapse
APEXIR_EXPRESSION Expression
APEXIR_FILTER Filter
APEXIR_FILTER_EXPRESSION Filter Expression
APEXIR_FILTER_EXPR_TOO_LONG The filter expression is too long.
APEXIR_FILTER_TYPE Filter Type
APEXIR_FILTERS Filters
APEXIR_FINDER_ALT Select columns to search.
APEXIR_FLASHBACK Flashback
APEXIR_FLASHBACK_DESCRIPTION A flashback query enables you to view the data as itexisted at a previous point in time.
APEXIR_FLASHBACK_ERROR_MSG Unable to perform flashback request.
APEXIR_FORMAT Format
APEXIR_FORMAT_MASK Format Mask
APEXIR_FUNCTION Function
APEXIR_FUNCTION_N Function %0
APEXIR_FUNCTIONS Functions
APEXIR_FUNCTIONS_OPERATORS Functions / Operators
APEXIR_GO Go
APEXIR_GREEN green
APEXIR_GROUP_BY Group By
Chapter 21Translating Messages
21-44
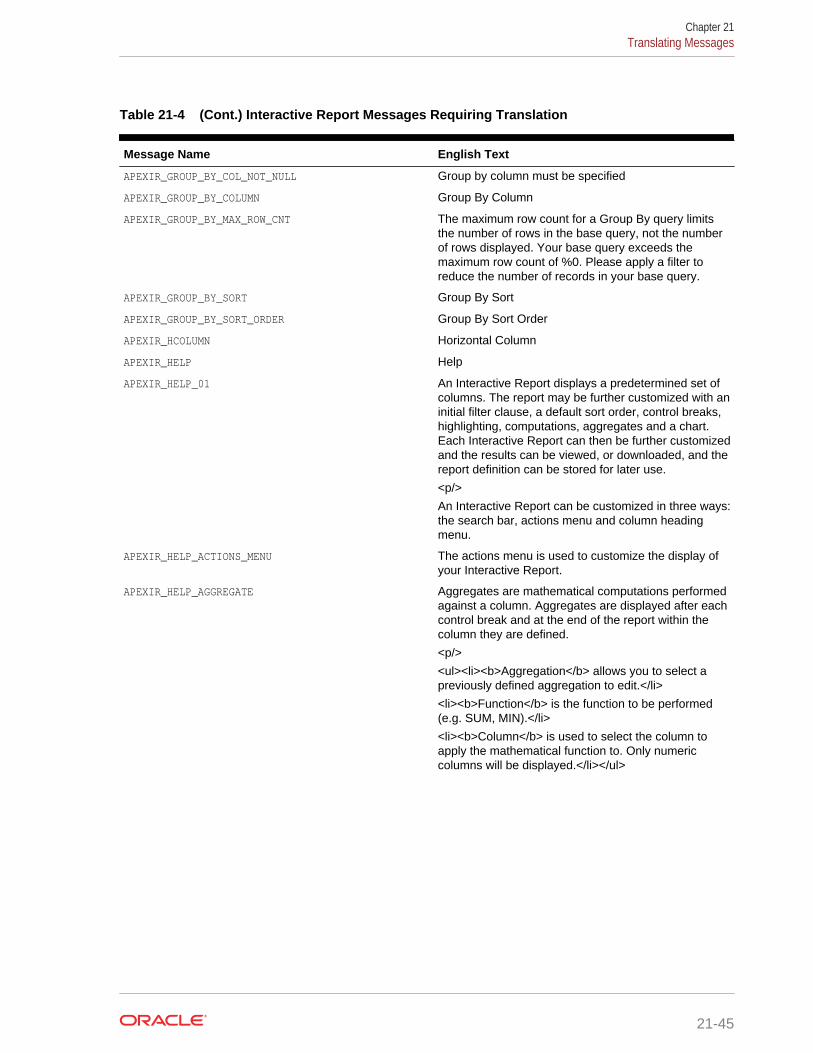
Table 21-4 (Cont.) Interactive Report Messages Requiring Translation
Message Name English Text
APEXIR_GROUP_BY_COL_NOT_NULL Group by column must be specified
APEXIR_GROUP_BY_COLUMN Group By Column
APEXIR_GROUP_BY_MAX_ROW_CNT The maximum row count for a Group By query limitsthe number of rows in the base query, not the numberof rows displayed. Your base query exceeds themaximum row count of %0. Please apply a filter toreduce the number of records in your base query.
APEXIR_GROUP_BY_SORT Group By Sort
APEXIR_GROUP_BY_SORT_ORDER Group By Sort Order
APEXIR_HCOLUMN Horizontal Column
APEXIR_HELP Help
APEXIR_HELP_01 An Interactive Report displays a predetermined set ofcolumns. The report may be further customized with aninitial filter clause, a default sort order, control breaks,highlighting, computations, aggregates and a chart.Each Interactive Report can then be further customizedand the results can be viewed, or downloaded, and thereport definition can be stored for later use.
<p/>
An Interactive Report can be customized in three ways:the search bar, actions menu and column headingmenu.
APEXIR_HELP_ACTIONS_MENU The actions menu is used to customize the display ofyour Interactive Report.
APEXIR_HELP_AGGREGATE Aggregates are mathematical computations performedagainst a column. Aggregates are displayed after eachcontrol break and at the end of the report within thecolumn they are defined.
<p/>
<ul><li><b>Aggregation</b> allows you to select apreviously defined aggregation to edit.</li>
<li><b>Function</b> is the function to be performed(e.g. SUM, MIN).</li>
<li><b>Column</b> is used to select the column toapply the mathematical function to. Only numericcolumns will be displayed.</li></ul>
Chapter 21Translating Messages
21-45
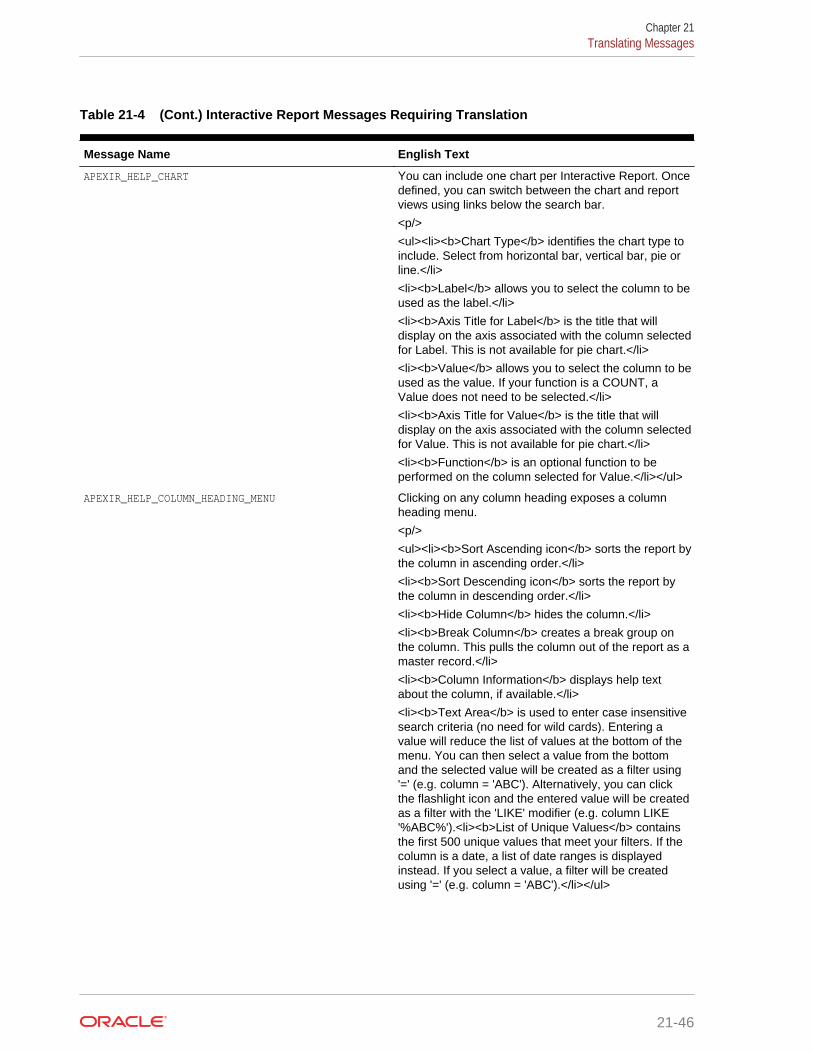
Table 21-4 (Cont.) Interactive Report Messages Requiring Translation
Message Name English Text
APEXIR_HELP_CHART You can include one chart per Interactive Report. Oncedefined, you can switch between the chart and reportviews using links below the search bar.
<p/>
<ul><li><b>Chart Type</b> identifies the chart type toinclude. Select from horizontal bar, vertical bar, pie orline.</li>
<li><b>Label</b> allows you to select the column to beused as the label.</li>
<li><b>Axis Title for Label</b> is the title that willdisplay on the axis associated with the column selectedfor Label. This is not available for pie chart.</li>
<li><b>Value</b> allows you to select the column to beused as the value. If your function is a COUNT, aValue does not need to be selected.</li>
<li><b>Axis Title for Value</b> is the title that willdisplay on the axis associated with the column selectedfor Value. This is not available for pie chart.</li>
<li><b>Function</b> is an optional function to beperformed on the column selected for Value.</li></ul>
APEXIR_HELP_COLUMN_HEADING_MENU Clicking on any column heading exposes a columnheading menu.
<p/>
<ul><li><b>Sort Ascending icon</b> sorts the report bythe column in ascending order.</li>
<li><b>Sort Descending icon</b> sorts the report bythe column in descending order.</li>
<li><b>Hide Column</b> hides the column.</li>
<li><b>Break Column</b> creates a break group onthe column. This pulls the column out of the report as amaster record.</li>
<li><b>Column Information</b> displays help textabout the column, if available.</li>
<li><b>Text Area</b> is used to enter case insensitivesearch criteria (no need for wild cards). Entering avalue will reduce the list of values at the bottom of themenu. You can then select a value from the bottomand the selected value will be created as a filter using'=' (e.g. column = 'ABC'). Alternatively, you can clickthe flashlight icon and the entered value will be createdas a filter with the 'LIKE' modifier (e.g. column LIKE'%ABC%').<li><b>List of Unique Values</b> containsthe first 500 unique values that meet your filters. If thecolumn is a date, a list of date ranges is displayedinstead. If you select a value, a filter will be createdusing '=' (e.g. column = 'ABC').</li></ul>
Chapter 21Translating Messages
21-46

Table 21-4 (Cont.) Interactive Report Messages Requiring Translation
Message Name English Text
APEXIR_HELP_COMPUTE Computations allow you to add computed columns toyour report. These can be mathematical computations(e.g. NBR_HOURS/24) or standard Oracle functionsapplied to existing columns (some have been displayedfor example, others, like TO_DATE, can also be used).
<p/>
<ul><li><b>Computation</b> allows you to select apreviously defined computation to edit.</li>
<li><b>Column Heading</b> is the column heading forthe new column.</li>
<li><b>Format Mask</b> is an Oracle format mask tobe applied against the column (e.g. S9999).</li>
<li><b>Format Mask</b> is an Oracle format mask tobe applied against the column (e.g. S9999).</li>
<li><b>Computation</b> is the computation to beperformed. Within the computation, columns arereferenced using the aliases displayed.</li>
</ul>
<p/>
Below computation, the columns in your query aredisplayed with their associated alias. Clicking on thecolumn name or alias will write them into theComputation. Next to Columns is a Keypad. These aresimply shortcuts of commonly used keys. On the farright are Functions.
<p/>
An example computation to display TotalCompensation is:
<p/>
<pre>CASE WHEN A = 'SALES' THEN B + C ELSE BEND</pre>
(where A is ORGANIZATION, B is SALARY and C isCOMMISSION)
APEXIR_HELP_CONTROL_BREAK Used to create a break group on one or severalcolumns. This pulls the columns out of the InteractiveReport and displays them as a master record.
APEXIR_HELP_DETAIL_VIEW To view the details of a single row at a time, click thesingle row view icon on the row you want to view. Ifavailable, the single row view will always be the firstcolumn. Depending on the customization of theInteractive Report, the single row view may be thestandard view or a custom page that may allow update.
APEXIR_HELP_DOWNLOAD Allows the current result set to be downloaded. Thedownload formats will differ depending upon yourinstallation and report definition but may include CSV,XLS, PDF, or RTF.
Chapter 21Translating Messages
21-47
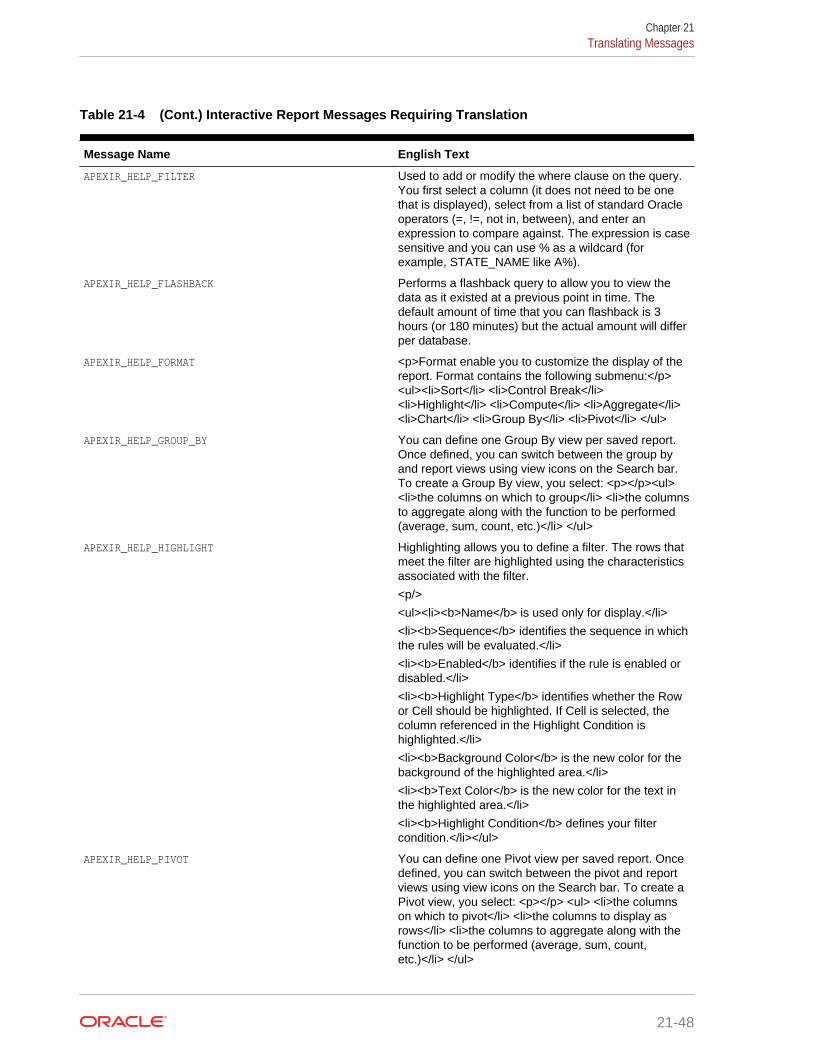
Table 21-4 (Cont.) Interactive Report Messages Requiring Translation
Message Name English Text
APEXIR_HELP_FILTER Used to add or modify the where clause on the query.You first select a column (it does not need to be onethat is displayed), select from a list of standard Oracleoperators (=, !=, not in, between), and enter anexpression to compare against. The expression is casesensitive and you can use % as a wildcard (forexample, STATE_NAME like A%).
APEXIR_HELP_FLASHBACK Performs a flashback query to allow you to view thedata as it existed at a previous point in time. Thedefault amount of time that you can flashback is 3hours (or 180 minutes) but the actual amount will differper database.
APEXIR_HELP_FORMAT <p>Format enable you to customize the display of thereport. Format contains the following submenu:</p><ul><li>Sort</li> <li>Control Break</li><li>Highlight</li> <li>Compute</li> <li>Aggregate</li><li>Chart</li> <li>Group By</li> <li>Pivot</li> </ul>
APEXIR_HELP_GROUP_BY You can define one Group By view per saved report.Once defined, you can switch between the group byand report views using view icons on the Search bar.To create a Group By view, you select: <p></p><ul><li>the columns on which to group</li> <li>the columnsto aggregate along with the function to be performed(average, sum, count, etc.)</li> </ul>
APEXIR_HELP_HIGHLIGHT Highlighting allows you to define a filter. The rows thatmeet the filter are highlighted using the characteristicsassociated with the filter.
<p/>
<ul><li><b>Name</b> is used only for display.</li>
<li><b>Sequence</b> identifies the sequence in whichthe rules will be evaluated.</li>
<li><b>Enabled</b> identifies if the rule is enabled ordisabled.</li>
<li><b>Highlight Type</b> identifies whether the Rowor Cell should be highlighted. If Cell is selected, thecolumn referenced in the Highlight Condition ishighlighted.</li>
<li><b>Background Color</b> is the new color for thebackground of the highlighted area.</li>
<li><b>Text Color</b> is the new color for the text inthe highlighted area.</li>
<li><b>Highlight Condition</b> defines your filtercondition.</li></ul>
APEXIR_HELP_PIVOT You can define one Pivot view per saved report. Oncedefined, you can switch between the pivot and reportviews using view icons on the Search bar. To create aPivot view, you select: <p></p> <ul> <li>the columnson which to pivot</li> <li>the columns to display asrows</li> <li>the columns to aggregate along with thefunction to be performed (average, sum, count,etc.)</li> </ul>
Chapter 21Translating Messages
21-48
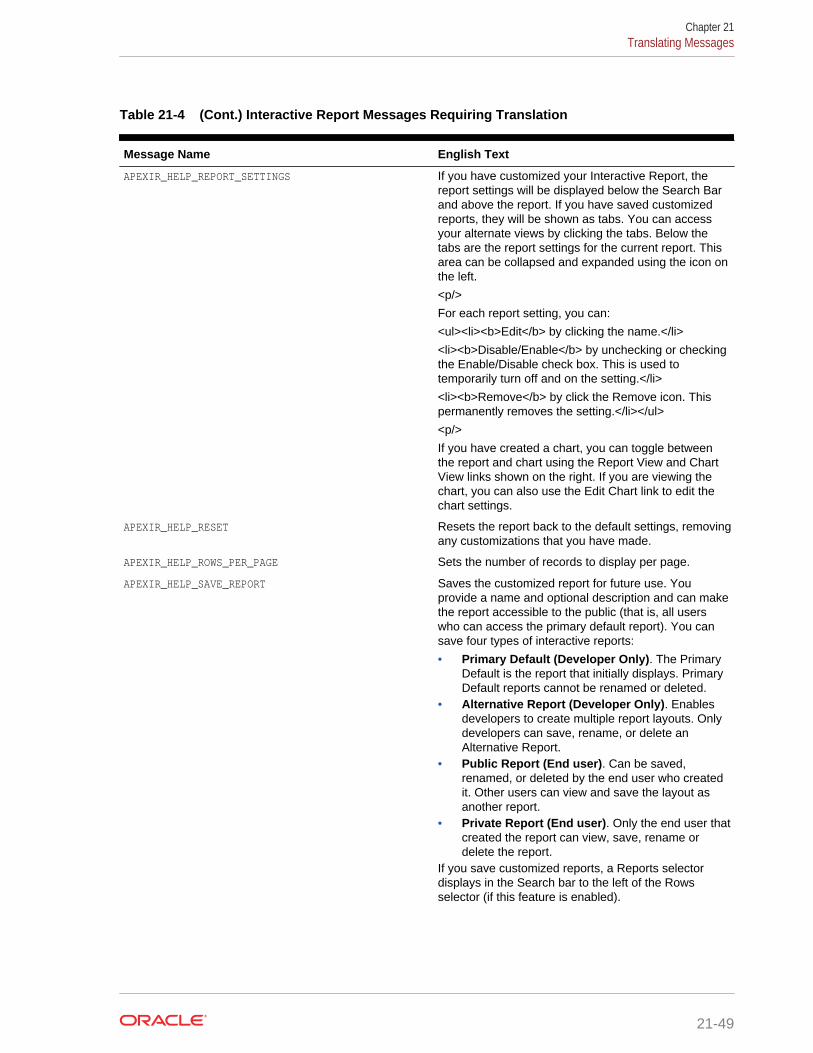
Table 21-4 (Cont.) Interactive Report Messages Requiring Translation
Message Name English Text
APEXIR_HELP_REPORT_SETTINGS If you have customized your Interactive Report, thereport settings will be displayed below the Search Barand above the report. If you have saved customizedreports, they will be shown as tabs. You can accessyour alternate views by clicking the tabs. Below thetabs are the report settings for the current report. Thisarea can be collapsed and expanded using the icon onthe left.
<p/>
For each report setting, you can:
<ul><li><b>Edit</b> by clicking the name.</li>
<li><b>Disable/Enable</b> by unchecking or checkingthe Enable/Disable check box. This is used totemporarily turn off and on the setting.</li>
<li><b>Remove</b> by click the Remove icon. Thispermanently removes the setting.</li></ul>
<p/>
If you have created a chart, you can toggle betweenthe report and chart using the Report View and ChartView links shown on the right. If you are viewing thechart, you can also use the Edit Chart link to edit thechart settings.
APEXIR_HELP_RESET Resets the report back to the default settings, removingany customizations that you have made.
APEXIR_HELP_ROWS_PER_PAGE Sets the number of records to display per page.
APEXIR_HELP_SAVE_REPORT Saves the customized report for future use. Youprovide a name and optional description and can makethe report accessible to the public (that is, all userswho can access the primary default report). You cansave four types of interactive reports:
• Primary Default (Developer Only). The PrimaryDefault is the report that initially displays. PrimaryDefault reports cannot be renamed or deleted.
• Alternative Report (Developer Only). Enablesdevelopers to create multiple report layouts. Onlydevelopers can save, rename, or delete anAlternative Report.
• Public Report (End user). Can be saved,renamed, or deleted by the end user who createdit. Other users can view and save the layout asanother report.
• Private Report (End user). Only the end user thatcreated the report can view, save, rename ordelete the report.
If you save customized reports, a Reports selectordisplays in the Search bar to the left of the Rowsselector (if this feature is enabled).
Chapter 21Translating Messages
21-49
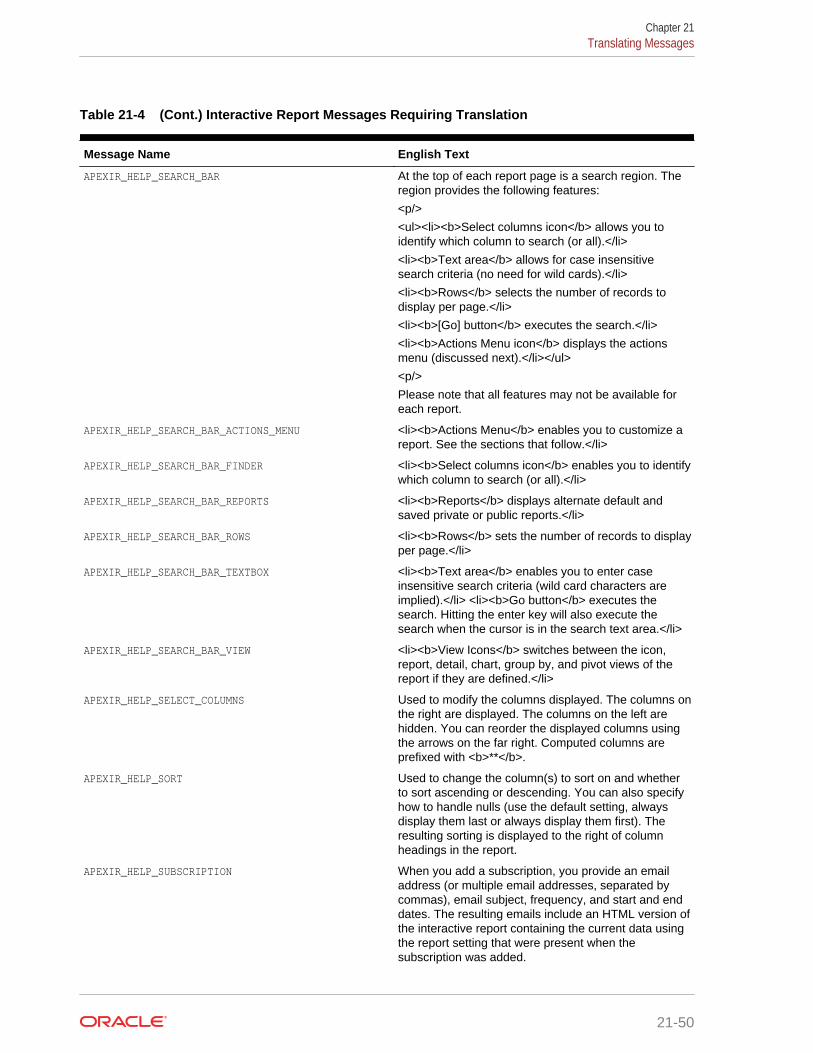
Table 21-4 (Cont.) Interactive Report Messages Requiring Translation
Message Name English Text
APEXIR_HELP_SEARCH_BAR At the top of each report page is a search region. Theregion provides the following features:
<p/>
<ul><li><b>Select columns icon</b> allows you toidentify which column to search (or all).</li>
<li><b>Text area</b> allows for case insensitivesearch criteria (no need for wild cards).</li>
<li><b>Rows</b> selects the number of records todisplay per page.</li>
<li><b>[Go] button</b> executes the search.</li>
<li><b>Actions Menu icon</b> displays the actionsmenu (discussed next).</li></ul>
<p/>
Please note that all features may not be available foreach report.
APEXIR_HELP_SEARCH_BAR_ACTIONS_MENU <li><b>Actions Menu</b> enables you to customize areport. See the sections that follow.</li>
APEXIR_HELP_SEARCH_BAR_FINDER <li><b>Select columns icon</b> enables you to identifywhich column to search (or all).</li>
APEXIR_HELP_SEARCH_BAR_REPORTS <li><b>Reports</b> displays alternate default andsaved private or public reports.</li>
APEXIR_HELP_SEARCH_BAR_ROWS <li><b>Rows</b> sets the number of records to displayper page.</li>
APEXIR_HELP_SEARCH_BAR_TEXTBOX <li><b>Text area</b> enables you to enter caseinsensitive search criteria (wild card characters areimplied).</li> <li><b>Go button</b> executes thesearch. Hitting the enter key will also execute thesearch when the cursor is in the search text area.</li>
APEXIR_HELP_SEARCH_BAR_VIEW <li><b>View Icons</b> switches between the icon,report, detail, chart, group by, and pivot views of thereport if they are defined.</li>
APEXIR_HELP_SELECT_COLUMNS Used to modify the columns displayed. The columns onthe right are displayed. The columns on the left arehidden. You can reorder the displayed columns usingthe arrows on the far right. Computed columns areprefixed with <b>**</b>.
APEXIR_HELP_SORT Used to change the column(s) to sort on and whetherto sort ascending or descending. You can also specifyhow to handle nulls (use the default setting, alwaysdisplay them last or always display them first). Theresulting sorting is displayed to the right of columnheadings in the report.
APEXIR_HELP_SUBSCRIPTION When you add a subscription, you provide an emailaddress (or multiple email addresses, separated bycommas), email subject, frequency, and start and enddates. The resulting emails include an HTML version ofthe interactive report containing the current data usingthe report setting that were present when thesubscription was added.
Chapter 21Translating Messages
21-50
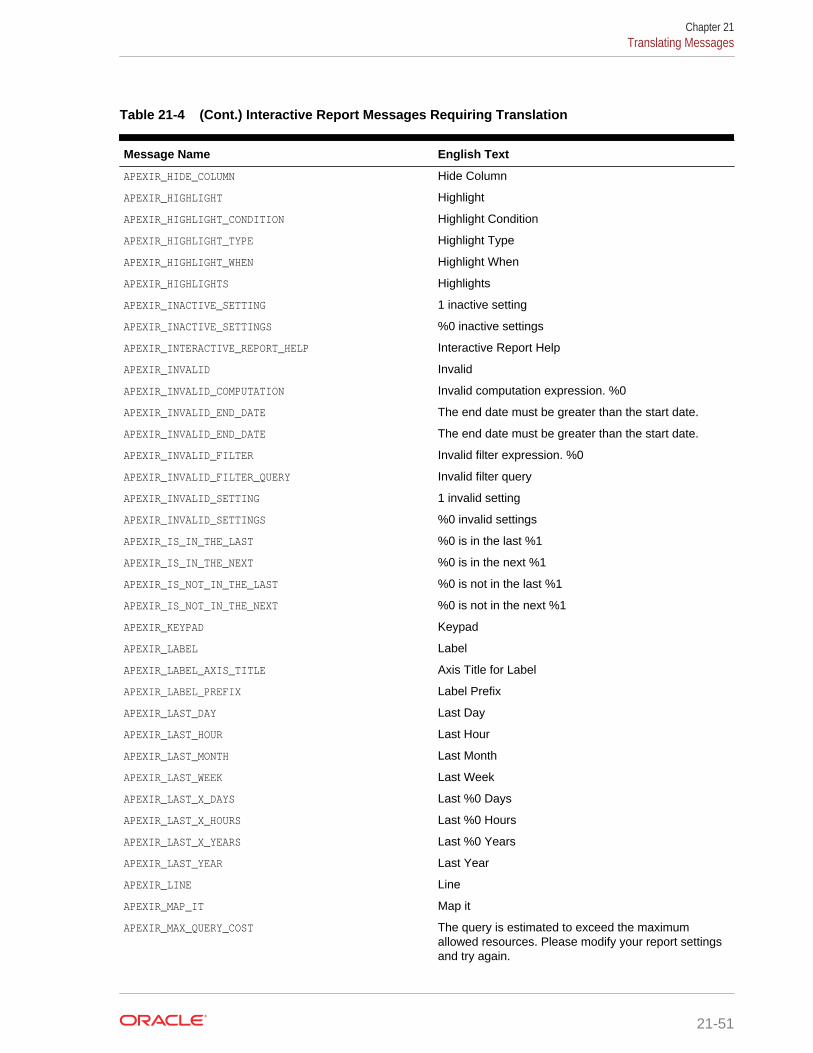
Table 21-4 (Cont.) Interactive Report Messages Requiring Translation
Message Name English Text
APEXIR_HIDE_COLUMN Hide Column
APEXIR_HIGHLIGHT Highlight
APEXIR_HIGHLIGHT_CONDITION Highlight Condition
APEXIR_HIGHLIGHT_TYPE Highlight Type
APEXIR_HIGHLIGHT_WHEN Highlight When
APEXIR_HIGHLIGHTS Highlights
APEXIR_INACTIVE_SETTING 1 inactive setting
APEXIR_INACTIVE_SETTINGS %0 inactive settings
APEXIR_INTERACTIVE_REPORT_HELP Interactive Report Help
APEXIR_INVALID Invalid
APEXIR_INVALID_COMPUTATION Invalid computation expression. %0
APEXIR_INVALID_END_DATE The end date must be greater than the start date.
APEXIR_INVALID_END_DATE The end date must be greater than the start date.
APEXIR_INVALID_FILTER Invalid filter expression. %0
APEXIR_INVALID_FILTER_QUERY Invalid filter query
APEXIR_INVALID_SETTING 1 invalid setting
APEXIR_INVALID_SETTINGS %0 invalid settings
APEXIR_IS_IN_THE_LAST %0 is in the last %1
APEXIR_IS_IN_THE_NEXT %0 is in the next %1
APEXIR_IS_NOT_IN_THE_LAST %0 is not in the last %1
APEXIR_IS_NOT_IN_THE_NEXT %0 is not in the next %1
APEXIR_KEYPAD Keypad
APEXIR_LABEL Label
APEXIR_LABEL_AXIS_TITLE Axis Title for Label
APEXIR_LABEL_PREFIX Label Prefix
APEXIR_LAST_DAY Last Day
APEXIR_LAST_HOUR Last Hour
APEXIR_LAST_MONTH Last Month
APEXIR_LAST_WEEK Last Week
APEXIR_LAST_X_DAYS Last %0 Days
APEXIR_LAST_X_HOURS Last %0 Hours
APEXIR_LAST_X_YEARS Last %0 Years
APEXIR_LAST_YEAR Last Year
APEXIR_LINE Line
APEXIR_MAP_IT Map it
APEXIR_MAX_QUERY_COST The query is estimated to exceed the maximumallowed resources. Please modify your report settingsand try again.
Chapter 21Translating Messages
21-51
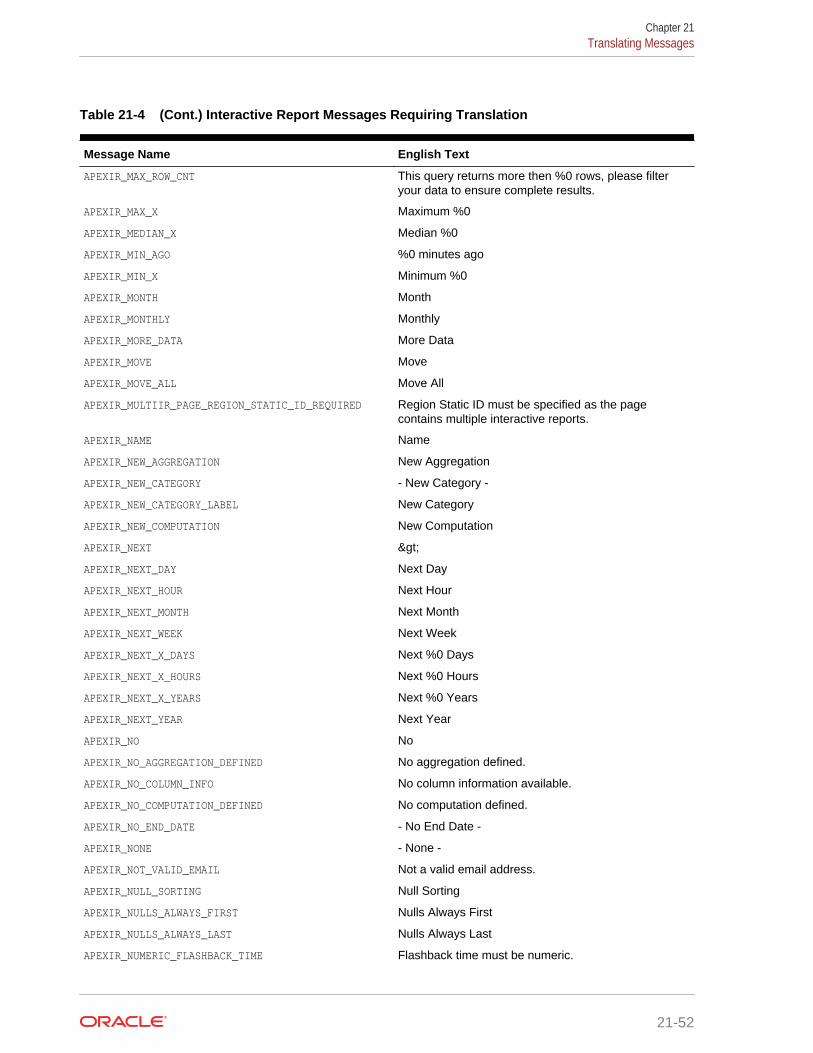
Table 21-4 (Cont.) Interactive Report Messages Requiring Translation
Message Name English Text
APEXIR_MAX_ROW_CNT This query returns more then %0 rows, please filteryour data to ensure complete results.
APEXIR_MAX_X Maximum %0
APEXIR_MEDIAN_X Median %0
APEXIR_MIN_AGO %0 minutes ago
APEXIR_MIN_X Minimum %0
APEXIR_MONTH Month
APEXIR_MONTHLY Monthly
APEXIR_MORE_DATA More Data
APEXIR_MOVE Move
APEXIR_MOVE_ALL Move All
APEXIR_MULTIIR_PAGE_REGION_STATIC_ID_REQUIRED Region Static ID must be specified as the pagecontains multiple interactive reports.
APEXIR_NAME Name
APEXIR_NEW_AGGREGATION New Aggregation
APEXIR_NEW_CATEGORY - New Category -
APEXIR_NEW_CATEGORY_LABEL New Category
APEXIR_NEW_COMPUTATION New Computation
APEXIR_NEXT >
APEXIR_NEXT_DAY Next Day
APEXIR_NEXT_HOUR Next Hour
APEXIR_NEXT_MONTH Next Month
APEXIR_NEXT_WEEK Next Week
APEXIR_NEXT_X_DAYS Next %0 Days
APEXIR_NEXT_X_HOURS Next %0 Hours
APEXIR_NEXT_X_YEARS Next %0 Years
APEXIR_NEXT_YEAR Next Year
APEXIR_NO No
APEXIR_NO_AGGREGATION_DEFINED No aggregation defined.
APEXIR_NO_COLUMN_INFO No column information available.
APEXIR_NO_COMPUTATION_DEFINED No computation defined.
APEXIR_NO_END_DATE - No End Date -
APEXIR_NONE - None -
APEXIR_NOT_VALID_EMAIL Not a valid email address.
APEXIR_NULL_SORTING Null Sorting
APEXIR_NULLS_ALWAYS_FIRST Nulls Always First
APEXIR_NULLS_ALWAYS_LAST Nulls Always Last
APEXIR_NUMERIC_FLASHBACK_TIME Flashback time must be numeric.
Chapter 21Translating Messages
21-52

Table 21-4 (Cont.) Interactive Report Messages Requiring Translation
Message Name English Text
APEXIR_NUMERIC_SEQUENCE Sequence must be numeric.
APEXIR_OPERATOR Operator
APEXIR_ORANGE orange
APEXIR_OTHER Other
APEXIR_PERCENT_OF_TOTAL_COUNT_X Percent of Total Count %0 (%)
APEXIR_PERCENT_OF_TOTAL_SUM_X Percent of Total Sum %0 (%)
APEXIR_PERCENT_TOTAL_COUNT Percent of Total Count
APEXIR_PERCENT_TOTAL_SUM Percent of Total Sum
APEXIR_PIE Pie
APEXIR_PIVOT Add Pivot Column
APEXIR_PIVOT_AGG_NOT_NULL Aggregate must be specified.
APEXIR_PIVOT_AGG_NOT_ON_ROW_COL You cannot aggregate on a column selected to as rowcolumn.
APEXIR_PIVOT_COLUMN_N Pivot Column %0
APEXIR_PIVOT_COLUMN_NOT_NULL Pivot column must be specified.
APEXIR_PIVOT_COLUMNS Pivot Columns
APEXIR_PIVOT_MAX_ROW_CNT The maximum row count for a Pivot query limits thenumber of rows in the base query, not the number ofrows displayed. Your base query exceeds themaximum row count of %0. Please apply a filter toreduce the number of records in your base query.
APEXIR_PIVOT_ROW_COLUMN_INVALID Select different row column. The HTML expression orlink in the row column contains column defined as pivotor aggregate column.
APEXIR_PIVOT_SORT Pivot Sort
APEXIR_PREVIOUS <
APEXIR_PRIMARY Primary
APEXIR_PRIMARY_REPORT Primary Report
APEXIR_PRIVATE Private
APEXIR_PUBLIC Public
APEXIR_RED red
APEXIR_REGION_STATIC_ID_DOES_NOT_EXIST Region Static ID %0 does not exist.
APEXIR_REMOVE Remove
APEXIR_REMOVE_AGGREGATE Remove Aggregate
APEXIR_REMOVE_ALL Remove All
APEXIR_REMOVE_CHART Remove Chart
APEXIR_REMOVE_CONTROL_BREAK Remove Control Break
APEXIR_REMOVE_FILTER Remove Filter
APEXIR_REMOVE_FLASHBACK Remove Flashback
Chapter 21Translating Messages
21-53
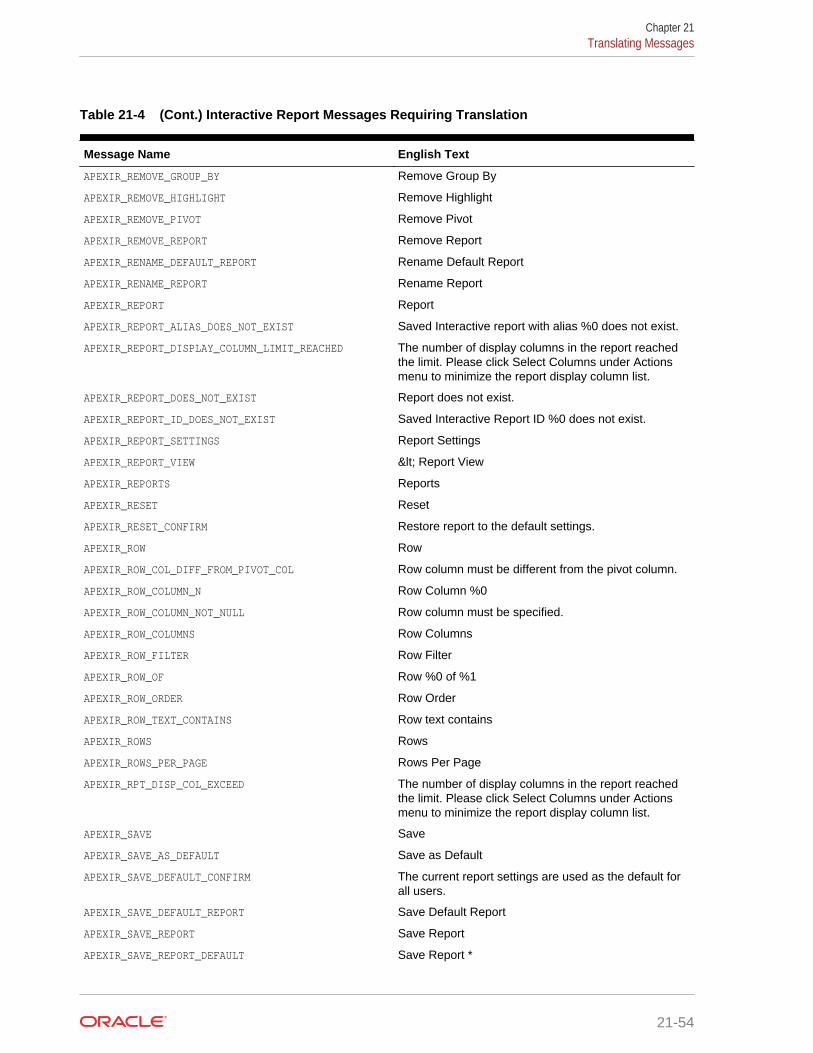
Table 21-4 (Cont.) Interactive Report Messages Requiring Translation
Message Name English Text
APEXIR_REMOVE_GROUP_BY Remove Group By
APEXIR_REMOVE_HIGHLIGHT Remove Highlight
APEXIR_REMOVE_PIVOT Remove Pivot
APEXIR_REMOVE_REPORT Remove Report
APEXIR_RENAME_DEFAULT_REPORT Rename Default Report
APEXIR_RENAME_REPORT Rename Report
APEXIR_REPORT Report
APEXIR_REPORT_ALIAS_DOES_NOT_EXIST Saved Interactive report with alias %0 does not exist.
APEXIR_REPORT_DISPLAY_COLUMN_LIMIT_REACHED The number of display columns in the report reachedthe limit. Please click Select Columns under Actionsmenu to minimize the report display column list.
APEXIR_REPORT_DOES_NOT_EXIST Report does not exist.
APEXIR_REPORT_ID_DOES_NOT_EXIST Saved Interactive Report ID %0 does not exist.
APEXIR_REPORT_SETTINGS Report Settings
APEXIR_REPORT_VIEW < Report View
APEXIR_REPORTS Reports
APEXIR_RESET Reset
APEXIR_RESET_CONFIRM Restore report to the default settings.
APEXIR_ROW Row
APEXIR_ROW_COL_DIFF_FROM_PIVOT_COL Row column must be different from the pivot column.
APEXIR_ROW_COLUMN_N Row Column %0
APEXIR_ROW_COLUMN_NOT_NULL Row column must be specified.
APEXIR_ROW_COLUMNS Row Columns
APEXIR_ROW_FILTER Row Filter
APEXIR_ROW_OF Row %0 of %1
APEXIR_ROW_ORDER Row Order
APEXIR_ROW_TEXT_CONTAINS Row text contains
APEXIR_ROWS Rows
APEXIR_ROWS_PER_PAGE Rows Per Page
APEXIR_RPT_DISP_COL_EXCEED The number of display columns in the report reachedthe limit. Please click Select Columns under Actionsmenu to minimize the report display column list.
APEXIR_SAVE Save
APEXIR_SAVE_AS_DEFAULT Save as Default
APEXIR_SAVE_DEFAULT_CONFIRM The current report settings are used as the default forall users.
APEXIR_SAVE_DEFAULT_REPORT Save Default Report
APEXIR_SAVE_REPORT Save Report
APEXIR_SAVE_REPORT_DEFAULT Save Report *
Chapter 21Translating Messages
21-54
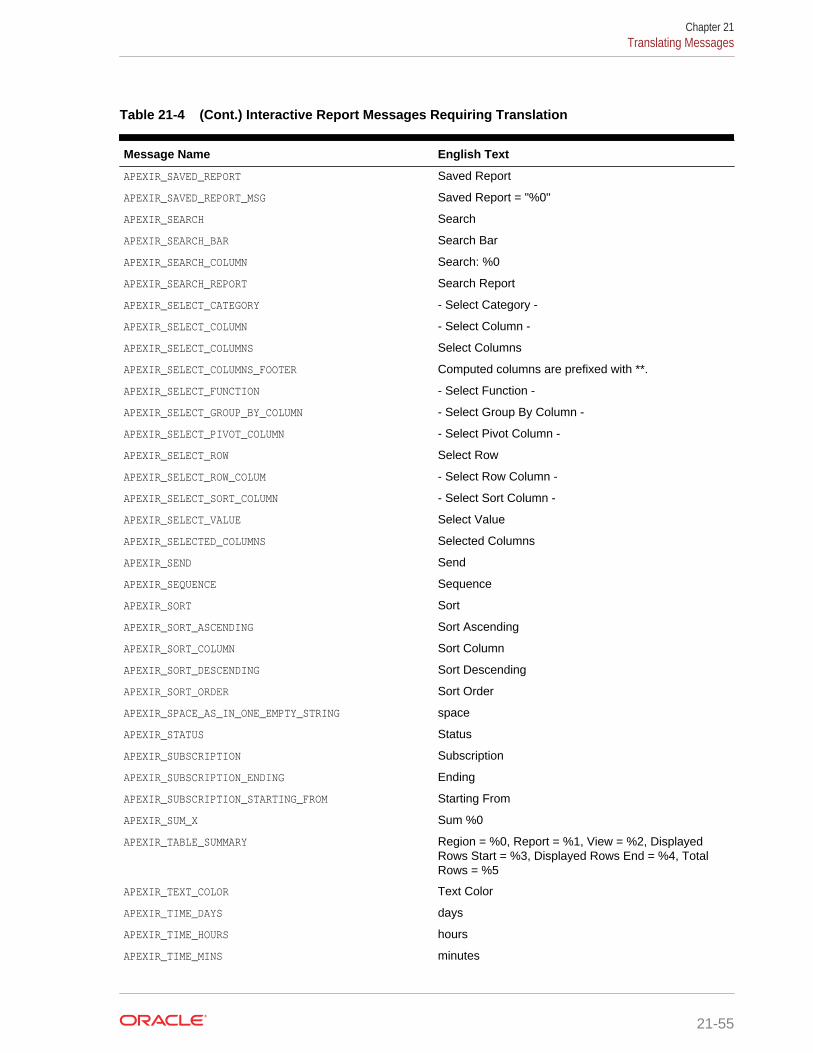
Table 21-4 (Cont.) Interactive Report Messages Requiring Translation
Message Name English Text
APEXIR_SAVED_REPORT Saved Report
APEXIR_SAVED_REPORT_MSG Saved Report = "%0"
APEXIR_SEARCH Search
APEXIR_SEARCH_BAR Search Bar
APEXIR_SEARCH_COLUMN Search: %0
APEXIR_SEARCH_REPORT Search Report
APEXIR_SELECT_CATEGORY - Select Category -
APEXIR_SELECT_COLUMN - Select Column -
APEXIR_SELECT_COLUMNS Select Columns
APEXIR_SELECT_COLUMNS_FOOTER Computed columns are prefixed with **.
APEXIR_SELECT_FUNCTION - Select Function -
APEXIR_SELECT_GROUP_BY_COLUMN - Select Group By Column -
APEXIR_SELECT_PIVOT_COLUMN - Select Pivot Column -
APEXIR_SELECT_ROW Select Row
APEXIR_SELECT_ROW_COLUM - Select Row Column -
APEXIR_SELECT_SORT_COLUMN - Select Sort Column -
APEXIR_SELECT_VALUE Select Value
APEXIR_SELECTED_COLUMNS Selected Columns
APEXIR_SEND Send
APEXIR_SEQUENCE Sequence
APEXIR_SORT Sort
APEXIR_SORT_ASCENDING Sort Ascending
APEXIR_SORT_COLUMN Sort Column
APEXIR_SORT_DESCENDING Sort Descending
APEXIR_SORT_ORDER Sort Order
APEXIR_SPACE_AS_IN_ONE_EMPTY_STRING space
APEXIR_STATUS Status
APEXIR_SUBSCRIPTION Subscription
APEXIR_SUBSCRIPTION_ENDING Ending
APEXIR_SUBSCRIPTION_STARTING_FROM Starting From
APEXIR_SUM_X Sum %0
APEXIR_TABLE_SUMMARY Region = %0, Report = %1, View = %2, DisplayedRows Start = %3, Displayed Rows End = %4, TotalRows = %5
APEXIR_TEXT_COLOR Text Color
APEXIR_TIME_DAYS days
APEXIR_TIME_HOURS hours
APEXIR_TIME_MINS minutes
Chapter 21Translating Messages
21-55
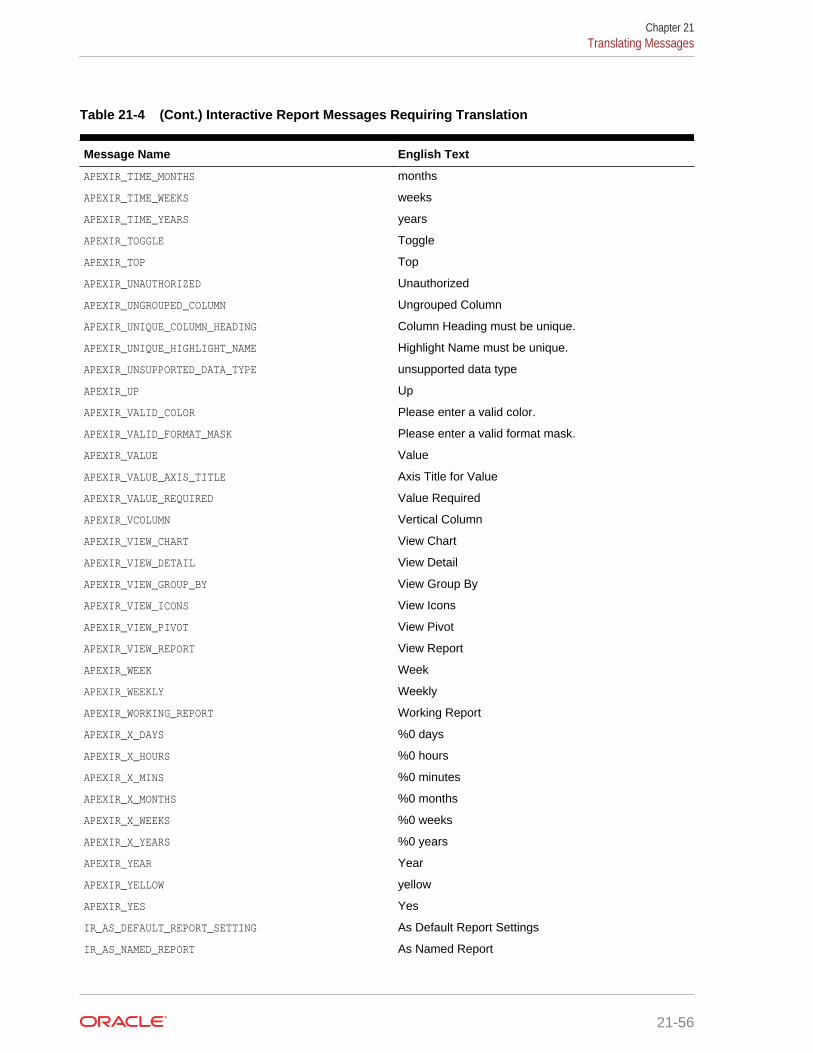
Table 21-4 (Cont.) Interactive Report Messages Requiring Translation
Message Name English Text
APEXIR_TIME_MONTHS months
APEXIR_TIME_WEEKS weeks
APEXIR_TIME_YEARS years
APEXIR_TOGGLE Toggle
APEXIR_TOP Top
APEXIR_UNAUTHORIZED Unauthorized
APEXIR_UNGROUPED_COLUMN Ungrouped Column
APEXIR_UNIQUE_COLUMN_HEADING Column Heading must be unique.
APEXIR_UNIQUE_HIGHLIGHT_NAME Highlight Name must be unique.
APEXIR_UNSUPPORTED_DATA_TYPE unsupported data type
APEXIR_UP Up
APEXIR_VALID_COLOR Please enter a valid color.
APEXIR_VALID_FORMAT_MASK Please enter a valid format mask.
APEXIR_VALUE Value
APEXIR_VALUE_AXIS_TITLE Axis Title for Value
APEXIR_VALUE_REQUIRED Value Required
APEXIR_VCOLUMN Vertical Column
APEXIR_VIEW_CHART View Chart
APEXIR_VIEW_DETAIL View Detail
APEXIR_VIEW_GROUP_BY View Group By
APEXIR_VIEW_ICONS View Icons
APEXIR_VIEW_PIVOT View Pivot
APEXIR_VIEW_REPORT View Report
APEXIR_WEEK Week
APEXIR_WEEKLY Weekly
APEXIR_WORKING_REPORT Working Report
APEXIR_X_DAYS %0 days
APEXIR_X_HOURS %0 hours
APEXIR_X_MINS %0 minutes
APEXIR_X_MONTHS %0 months
APEXIR_X_WEEKS %0 weeks
APEXIR_X_YEARS %0 years
APEXIR_YEAR Year
APEXIR_YELLOW yellow
APEXIR_YES Yes
IR_AS_DEFAULT_REPORT_SETTING As Default Report Settings
IR_AS_NAMED_REPORT As Named Report
Chapter 21Translating Messages
21-56
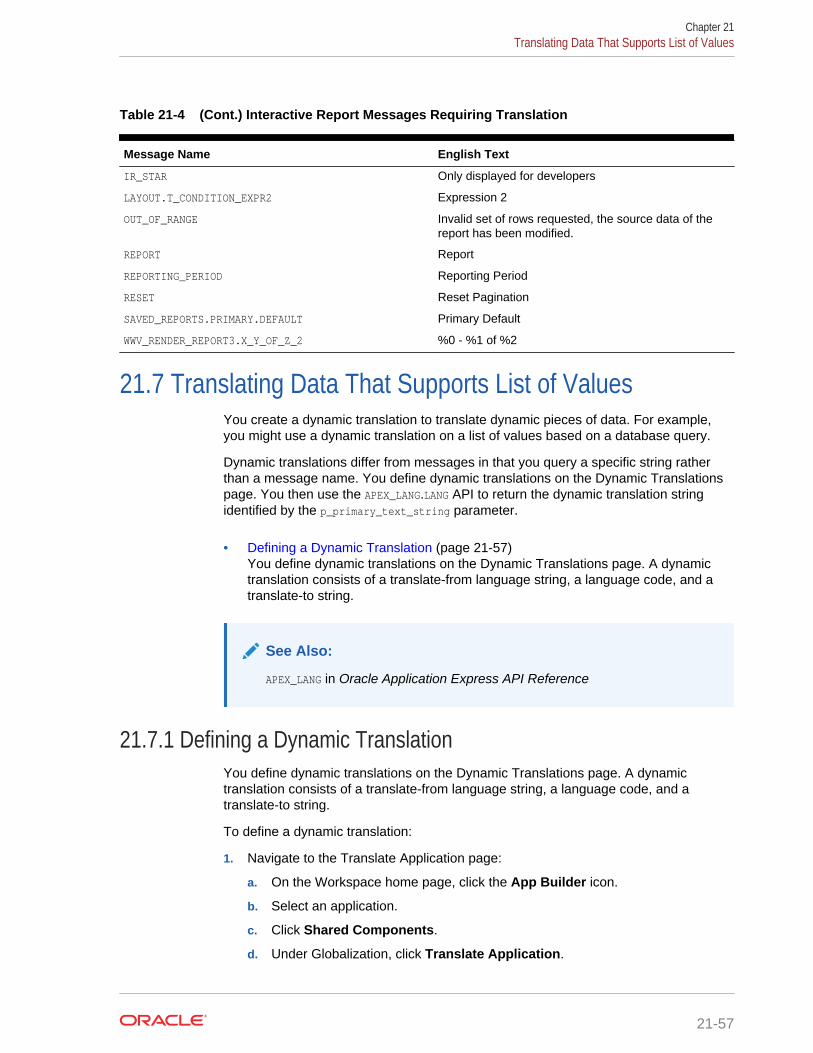
Table 21-4 (Cont.) Interactive Report Messages Requiring Translation
Message Name English Text
IR_STAR Only displayed for developers
LAYOUT.T_CONDITION_EXPR2 Expression 2
OUT_OF_RANGE Invalid set of rows requested, the source data of thereport has been modified.
REPORT Report
REPORTING_PERIOD Reporting Period
RESET Reset Pagination
SAVED_REPORTS.PRIMARY.DEFAULT Primary Default
WWV_RENDER_REPORT3.X_Y_OF_Z_2 %0 - %1 of %2
21.7 Translating Data That Supports List of ValuesYou create a dynamic translation to translate dynamic pieces of data. For example,you might use a dynamic translation on a list of values based on a database query.
Dynamic translations differ from messages in that you query a specific string ratherthan a message name. You define dynamic translations on the Dynamic Translationspage. You then use the APEX_LANG.LANG API to return the dynamic translation stringidentified by the p_primary_text_string parameter.
• Defining a Dynamic Translation (page 21-57)You define dynamic translations on the Dynamic Translations page. A dynamictranslation consists of a translate-from language string, a language code, and atranslate-to string.
See Also:
APEX_LANG in Oracle Application Express API Reference
21.7.1 Defining a Dynamic TranslationYou define dynamic translations on the Dynamic Translations page. A dynamictranslation consists of a translate-from language string, a language code, and atranslate-to string.
To define a dynamic translation:
1. Navigate to the Translate Application page:
a. On the Workspace home page, click the App Builder icon.
b. Select an application.
c. Click Shared Components.
d. Under Globalization, click Translate Application.
Chapter 21Translating Data That Supports List of Values
21-57
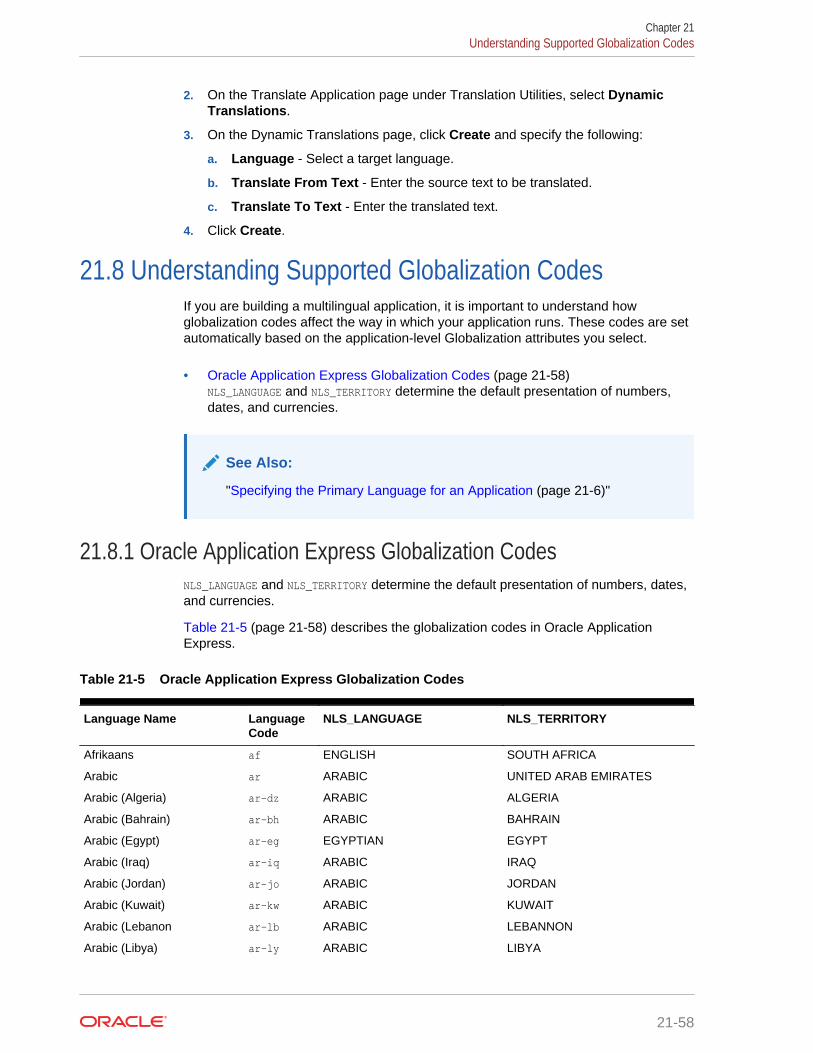
2. On the Translate Application page under Translation Utilities, select DynamicTranslations.
3. On the Dynamic Translations page, click Create and specify the following:
a. Language - Select a target language.
b. Translate From Text - Enter the source text to be translated.
c. Translate To Text - Enter the translated text.
4. Click Create.
21.8 Understanding Supported Globalization CodesIf you are building a multilingual application, it is important to understand howglobalization codes affect the way in which your application runs. These codes are setautomatically based on the application-level Globalization attributes you select.
• Oracle Application Express Globalization Codes (page 21-58)NLS_LANGUAGE and NLS_TERRITORY determine the default presentation of numbers,dates, and currencies.
See Also:
"Specifying the Primary Language for an Application (page 21-6)"
21.8.1 Oracle Application Express Globalization CodesNLS_LANGUAGE and NLS_TERRITORY determine the default presentation of numbers, dates,and currencies.
Table 21-5 (page 21-58) describes the globalization codes in Oracle ApplicationExpress.
Table 21-5 Oracle Application Express Globalization Codes
Language Name LanguageCode
NLS_LANGUAGE NLS_TERRITORY
Afrikaans af ENGLISH SOUTH AFRICA
Arabic ar ARABIC UNITED ARAB EMIRATES
Arabic (Algeria) ar-dz ARABIC ALGERIA
Arabic (Bahrain) ar-bh ARABIC BAHRAIN
Arabic (Egypt) ar-eg EGYPTIAN EGYPT
Arabic (Iraq) ar-iq ARABIC IRAQ
Arabic (Jordan) ar-jo ARABIC JORDAN
Arabic (Kuwait) ar-kw ARABIC KUWAIT
Arabic (Lebanon ar-lb ARABIC LEBANNON
Arabic (Libya) ar-ly ARABIC LIBYA
Chapter 21Understanding Supported Globalization Codes
21-58
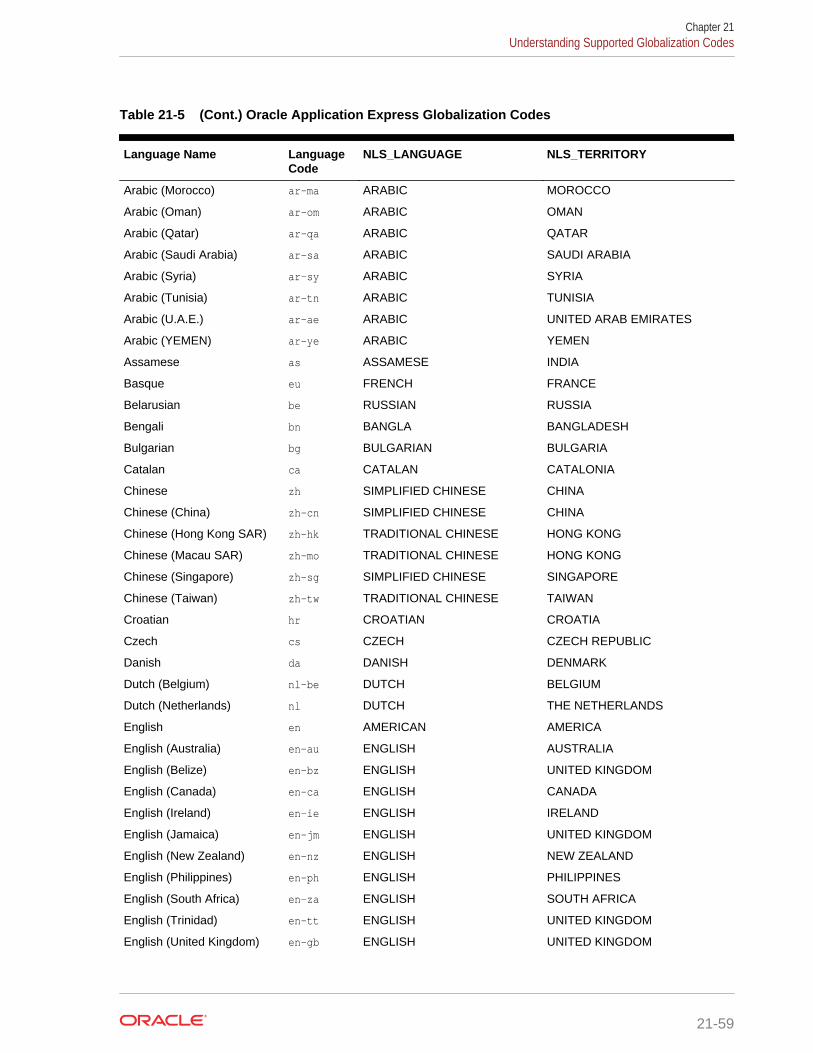
Table 21-5 (Cont.) Oracle Application Express Globalization Codes
Language Name LanguageCode
NLS_LANGUAGE NLS_TERRITORY
Arabic (Morocco) ar-ma ARABIC MOROCCO
Arabic (Oman) ar-om ARABIC OMAN
Arabic (Qatar) ar-qa ARABIC QATAR
Arabic (Saudi Arabia) ar-sa ARABIC SAUDI ARABIA
Arabic (Syria) ar-sy ARABIC SYRIA
Arabic (Tunisia) ar-tn ARABIC TUNISIA
Arabic (U.A.E.) ar-ae ARABIC UNITED ARAB EMIRATES
Arabic (YEMEN) ar-ye ARABIC YEMEN
Assamese as ASSAMESE INDIA
Basque eu FRENCH FRANCE
Belarusian be RUSSIAN RUSSIA
Bengali bn BANGLA BANGLADESH
Bulgarian bg BULGARIAN BULGARIA
Catalan ca CATALAN CATALONIA
Chinese zh SIMPLIFIED CHINESE CHINA
Chinese (China) zh-cn SIMPLIFIED CHINESE CHINA
Chinese (Hong Kong SAR) zh-hk TRADITIONAL CHINESE HONG KONG
Chinese (Macau SAR) zh-mo TRADITIONAL CHINESE HONG KONG
Chinese (Singapore) zh-sg SIMPLIFIED CHINESE SINGAPORE
Chinese (Taiwan) zh-tw TRADITIONAL CHINESE TAIWAN
Croatian hr CROATIAN CROATIA
Czech cs CZECH CZECH REPUBLIC
Danish da DANISH DENMARK
Dutch (Belgium) nl-be DUTCH BELGIUM
Dutch (Netherlands) nl DUTCH THE NETHERLANDS
English en AMERICAN AMERICA
English (Australia) en-au ENGLISH AUSTRALIA
English (Belize) en-bz ENGLISH UNITED KINGDOM
English (Canada) en-ca ENGLISH CANADA
English (Ireland) en-ie ENGLISH IRELAND
English (Jamaica) en-jm ENGLISH UNITED KINGDOM
English (New Zealand) en-nz ENGLISH NEW ZEALAND
English (Philippines) en-ph ENGLISH PHILIPPINES
English (South Africa) en-za ENGLISH SOUTH AFRICA
English (Trinidad) en-tt ENGLISH UNITED KINGDOM
English (United Kingdom) en-gb ENGLISH UNITED KINGDOM
Chapter 21Understanding Supported Globalization Codes
21-59

Table 21-5 (Cont.) Oracle Application Express Globalization Codes
Language Name LanguageCode
NLS_LANGUAGE NLS_TERRITORY
English (United States) en-us AMERICAN AMERICA
English (Zimbabwe) en-zw ENGLISH UNITED KINGDOM
Estonian et ESTONIAN ESTONIA
Faeroese fo ENGLISH UNITED KINGDOM
Farsi fa ENGLISH UNITED KINGDOM
Finnish fi FINNISH FINLAND
French (Belgium) fr-be FRENCH BELGIUM
French (Canada) fr-ca CANADIAN FRENCH CANADA
French (France) fr FRENCH FRANCE
French (Luxembourg) fr-lu FRENCH LUXEMBOURG
French (Monaco) fr-mc FRENCH FRANCE
French (Switzerland) fr-ch FRANCH SWITZERLAND
FYRO Macedonian mk MACEDONIAN FYR MACEDONIA
Gaelic gd ENGLISH UNITED KINGDOM
Galician gl SPANISH SPAIN
German (Austria) de-at GERMAN AUSTRIA
German (Germany) de GERMAN GERMANY
German (Liechtenstein) de-li GERMAN GERMANY
German (Luxemgourg) de-lu GERMAN LUXEMBOURG
German (Switzerland) de-ch GERMAN SWITZERLAND
Greek el GREEK GREECE
Gujarati gu GUJARATI INDIA
Hebrew he HEBREW ISRAEL
Hindi hi HINDI INDIA
Hungarian hu HUNGARIAN HUNGARY
Icelandic is ICELANDIC ICELAND
Indonesian id INDONESIAN INDONESIA
Italian (Italy) it ITALIAN ITALY
Italian (Switzerland) it-ch ITALIAN SWITZERLAND
Japanese ja JAPANESE JAPAN
Kannada kn KANNADA INDIA
Kazakh kk CYRILLIC KAZAKH KAZAKHSTAN
Konkani kok KOREAN KOREA
Korean ko KOREAN KOREA
Kyrgyz kz RUSSIAN RUSSIA
Latvian lv LATVIAN LATVIA
Chapter 21Understanding Supported Globalization Codes
21-60
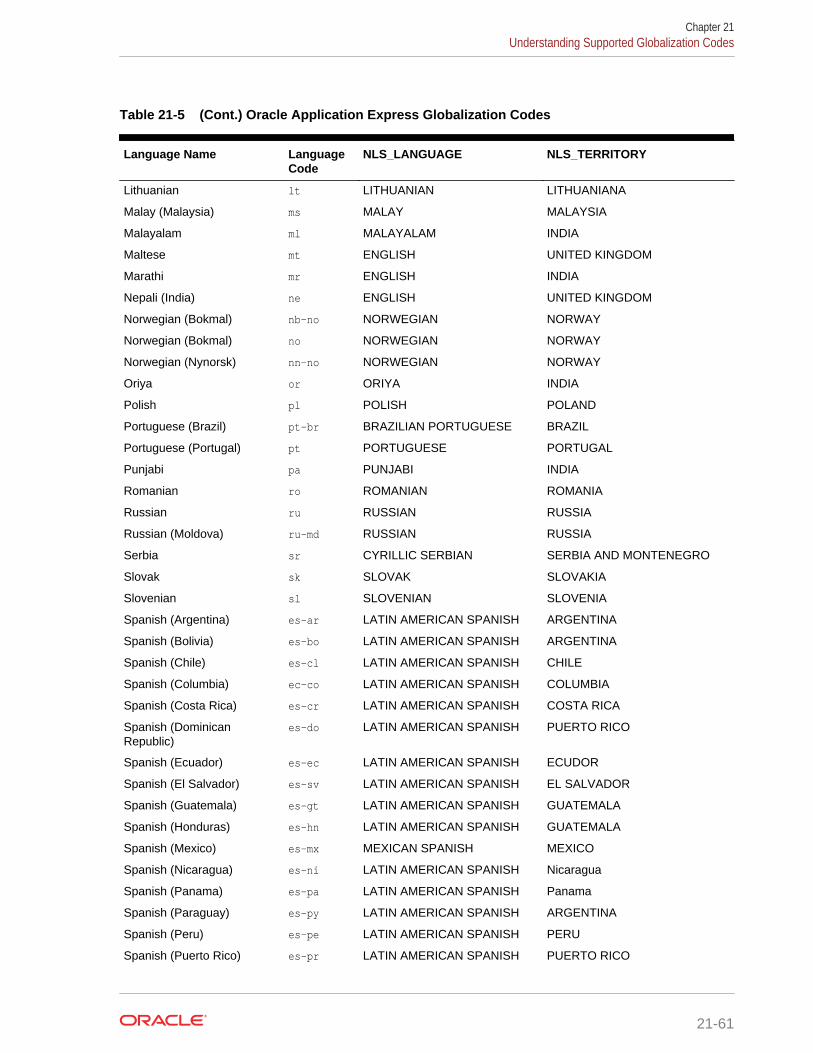
Table 21-5 (Cont.) Oracle Application Express Globalization Codes
Language Name LanguageCode
NLS_LANGUAGE NLS_TERRITORY
Lithuanian lt LITHUANIAN LITHUANIANA
Malay (Malaysia) ms MALAY MALAYSIA
Malayalam ml MALAYALAM INDIA
Maltese mt ENGLISH UNITED KINGDOM
Marathi mr ENGLISH INDIA
Nepali (India) ne ENGLISH UNITED KINGDOM
Norwegian (Bokmal) nb-no NORWEGIAN NORWAY
Norwegian (Bokmal) no NORWEGIAN NORWAY
Norwegian (Nynorsk) nn-no NORWEGIAN NORWAY
Oriya or ORIYA INDIA
Polish pl POLISH POLAND
Portuguese (Brazil) pt-br BRAZILIAN PORTUGUESE BRAZIL
Portuguese (Portugal) pt PORTUGUESE PORTUGAL
Punjabi pa PUNJABI INDIA
Romanian ro ROMANIAN ROMANIA
Russian ru RUSSIAN RUSSIA
Russian (Moldova) ru-md RUSSIAN RUSSIA
Serbia sr CYRILLIC SERBIAN SERBIA AND MONTENEGRO
Slovak sk SLOVAK SLOVAKIA
Slovenian sl SLOVENIAN SLOVENIA
Spanish (Argentina) es-ar LATIN AMERICAN SPANISH ARGENTINA
Spanish (Bolivia) es-bo LATIN AMERICAN SPANISH ARGENTINA
Spanish (Chile) es-cl LATIN AMERICAN SPANISH CHILE
Spanish (Columbia) ec-co LATIN AMERICAN SPANISH COLUMBIA
Spanish (Costa Rica) es-cr LATIN AMERICAN SPANISH COSTA RICA
Spanish (DominicanRepublic)
es-do LATIN AMERICAN SPANISH PUERTO RICO
Spanish (Ecuador) es-ec LATIN AMERICAN SPANISH ECUDOR
Spanish (El Salvador) es-sv LATIN AMERICAN SPANISH EL SALVADOR
Spanish (Guatemala) es-gt LATIN AMERICAN SPANISH GUATEMALA
Spanish (Honduras) es-hn LATIN AMERICAN SPANISH GUATEMALA
Spanish (Mexico) es-mx MEXICAN SPANISH MEXICO
Spanish (Nicaragua) es-ni LATIN AMERICAN SPANISH Nicaragua
Spanish (Panama) es-pa LATIN AMERICAN SPANISH Panama
Spanish (Paraguay) es-py LATIN AMERICAN SPANISH ARGENTINA
Spanish (Peru) es-pe LATIN AMERICAN SPANISH PERU
Spanish (Puerto Rico) es-pr LATIN AMERICAN SPANISH PUERTO RICO
Chapter 21Understanding Supported Globalization Codes
21-61
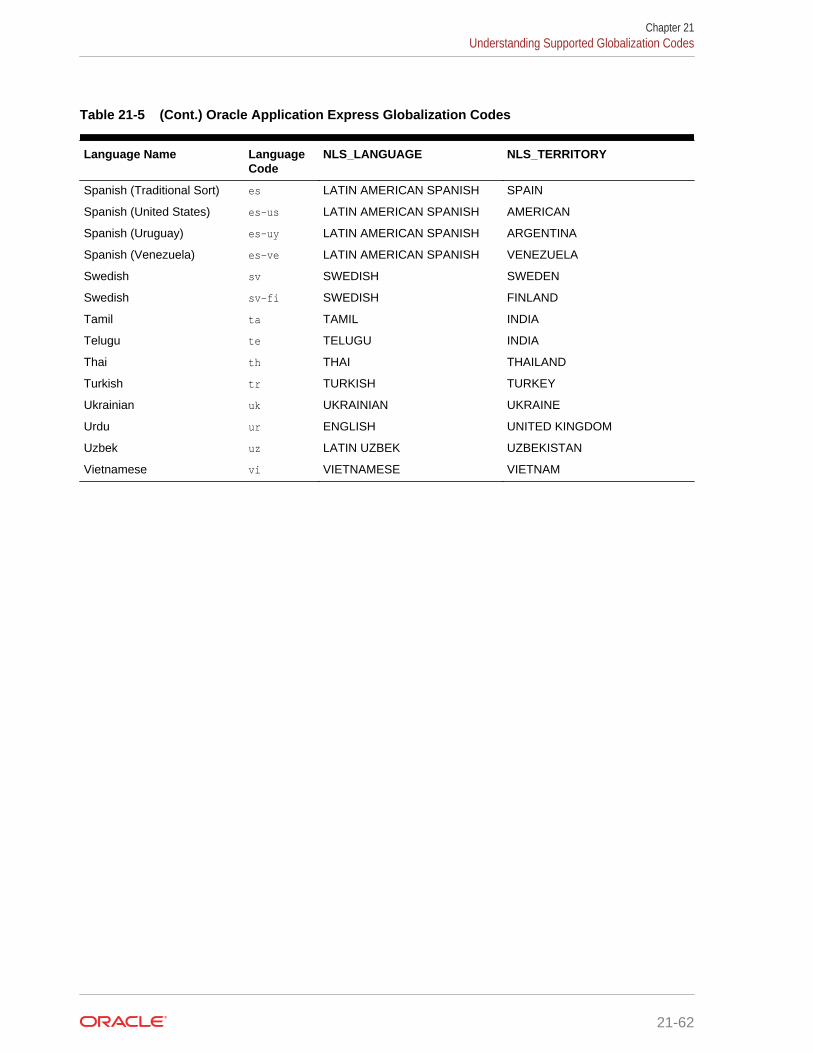
Table 21-5 (Cont.) Oracle Application Express Globalization Codes
Language Name LanguageCode
NLS_LANGUAGE NLS_TERRITORY
Spanish (Traditional Sort) es LATIN AMERICAN SPANISH SPAIN
Spanish (United States) es-us LATIN AMERICAN SPANISH AMERICAN
Spanish (Uruguay) es-uy LATIN AMERICAN SPANISH ARGENTINA
Spanish (Venezuela) es-ve LATIN AMERICAN SPANISH VENEZUELA
Swedish sv SWEDISH SWEDEN
Swedish sv-fi SWEDISH FINLAND
Tamil ta TAMIL INDIA
Telugu te TELUGU INDIA
Thai th THAI THAILAND
Turkish tr TURKISH TURKEY
Ukrainian uk UKRAINIAN UKRAINE
Urdu ur ENGLISH UNITED KINGDOM
Uzbek uz LATIN UZBEK UZBEKISTAN
Vietnamese vi VIETNAMESE VIETNAM
Chapter 21Understanding Supported Globalization Codes
21-62
22Managing Application Performance
Learn about how to improve application performance.
This section describes how to improve application performance.
• About Best Practices to Improve Performance (page 22-1)Improve performance by using bind variables and including a #TIMING# substitutionstring in the region footer.
• Identifying Performance Issues (page 22-2)Consider the following key strategies to help identify and resolve performanceissues with your Oracle Application Express application.
• Utilizing Logs and Reports (page 22-3)Review application logs and reports to help identify problematic pages.
• About Utilizing Database Reporting (page 22-6)Improve application performance by utilizing database reporting.
• About Database Parameters that Impact Performance (page 22-6)Evaluate whether or not database parameters are impacting performance.
• About Limiting Resources (page 22-7)Use Resource Manager to limit the types of system resources available to eachuser request.
• About Uploading Static Files to Your Web Server (page 22-7)To improve performance you should place static files on the Web server.
• Creating Custom Activity Reports Using APEX_ACTIVITY_LOG (page 22-7)Learn how to use the APEX_ACTIVITY_LOG view to query activity for the currentworkspace.
See Also:
"Debugging an Application (page 23-1)"
22.1 About Best Practices to Improve PerformanceImprove performance by using bind variables and including a #TIMING# substitutionstring in the region footer.
For applications having a large number of concurrent users, maintaining optimalperformance is critical. Best practices to consider include:
• Use bind variables within your application whenever possible. You can referencesession state values using bind variable syntax in SQL queries and applicationlogic such as PL/SQL executed from processes and validations. Accessing
22-1
session state using bind variables is the most efficient way to reference sessionstate.
• Include a #TIMING# substitution string in the region footer so that you can view thetiming of each region.
22.2 Identifying Performance IssuesConsider the following key strategies to help identify and resolve performance issueswith your Oracle Application Express application.
• About Troubleshooting Slow Running Applications (page 22-2)
• Diagnosing Performance Issues (page 22-2)
• About Debugging Problematic SQL Queries (page 22-3)
• About Addressing Slow Queries (page 22-3)
22.2.1 About Troubleshooting Slow Running ApplicationsThe first step in troubleshooting a slow running application is to determine the locationof the bottleneck. You can evaluate application performance by reviewing the time ittakes for the database to return a specific page request or submission. If this time isshorter than the time it takes to render the page on the user's browser, then othercomponents are likely causing the perception that the application is slow. As a bestpractice, always check all of the components involved including client machines, thenetwork, the middle-tier, the database, and disk and storage devices. Regarding thedatabase, check the System Global Area (SGA), CPU utilization, locks, and databaseparameters. It is also important to determine if anything else is running within thedatabase such as legacy applications, data warehouse, batch programs, and databasejobs.
The majority of the time, performance issues with Oracle Application Expressapplications are due to developer-authored SQL and PL/SQL. You should utilizestandard database performance tuning techniques to address these issues.Performance issues are rarely related to a bug with Oracle Application Express or theOracle database.
22.2.2 Diagnosing Performance IssuesTo diagnose performance issues, follow these steps:
1. Identify the time window.
2. Isolate the largest consumers of database time.
3. Identify the Oracle Application Express workspace and application.
4. Correlate the offending SQL with a specific location within the application.
Once you have identified the slow running pages, you should run the application indebug mode to identify the specific components consuming the most time.
Chapter 22Identifying Performance Issues
22-2
22.2.3 About Debugging Problematic SQL QueriesIf your query does not seem to be running correctly, try running it in SQL*Plus, SQLDeveloper, or in SQL Commands. Any of these approaches will test your queryoutside the context of your application, making it easier to define the problem.
22.2.4 About Addressing Slow QueriesFor optimized queries that still take more than a second to process, considerimplementing a progress bar and preventing multiple page submissions. Users expectinstant results and often resubmit a page if it does not return immediately. Unlessmanaged properly, each page submission instigates a new session in the databaseand continues until completion. Multiple page submissions often degrade performanceand may lead to database locks. This is especially true with interactive reports. As analternative approach, try using Oracle Application Express collections to hold queryresults. By using collections, expensive and time consuming queries are only executedonce for each user rather than each time they perform pagination or create a filter.
Tip:
You control whether end users may submit the same page more than onceby configuring the page attribute, Advanced, Enable duplicate pagesubmissions.
22.3 Utilizing Logs and ReportsReview application logs and reports to help identify problematic pages.
The Application Express engine records activity logs to capture usage andperformance data. This information displays in various reports. If a particular page isaccessed extensively or a page renders slowly then these reports can help you identifyproblematic pages.
You can then further analyze the problematic pages. For example, you can run areport query in SQL Developer to review the Explain Plan.
Tip:
Another method of determining expensive elements within a page or processis to review the Application Express Debug mode.
• How to Manage Log Files (page 22-4)An Instance administrator can delete activity log files and manage the interval atwhich log file information is retained.
• Viewing the Application Dashboard Report (page 22-4)Learn how to view the Application Dashboard report.
Chapter 22Utilizing Logs and Reports
22-3

• Workspace Activity Reports (page 22-5)Workspace administrators are users who perform administrator tasks specific to aworkspace and have the access to various types of activity reports.
• Instance Activity Reports (page 22-5)Instance administrators are superusers that manage an entire hosted instanceusing the Application Express Administration Services application.
See Also:
• "APEX_DEBUG" in Oracle Application Express API Reference
• "Utilizing Debug Mode (page 23-4)"
22.3.1 How to Manage Log FilesAn Instance administrator can delete activity log files and manage the interval at whichlog file information is retained.
If you wish to keep the activity log files indefinitely, you must create a batch job to copyrecords from the activity log table to another table.
22.3.2 Viewing the Application Dashboard ReportLearn how to view the Application Dashboard report.
To view the Application Dashboard:
1. Navigate to the Workspace home page.
2. Click the App Builder icon.
3. Select an application.
The Application home page appears.
4. Click Utilities.
5. Click Application Dashboard.
The Application Dashboard appears. The first two regions on the left, ApplicationOverview, and Pages by Types, list detailed information and statistics about thecurrent application. The remaining regions are divided into the following sections:
• Security lists the current authentication scheme, number of public and nonpublic pages, and the number of authorization schemes used within thecurrent application.
• Templates contains links to reports of templates used within the currentapplication.
• Pages by Type lists pages by type.
• Application Components contains links to reports of application-levelcontrols and logic, including lists of values, tabs, lists, application items,application processes, and application computations.
Chapter 22Utilizing Logs and Reports
22-4
• Page Components contains links to reports of page-level controls and logic,including items, buttons, processes, regions, branches, validations, anddynamic actions.
6. To view a specific report, click the number to the right of the component type ortemplate.
22.3.3 Workspace Activity ReportsWorkspace administrators are users who perform administrator tasks specific to aworkspace and have the access to various types of activity reports.
Workspace administrators can access the following activity reports:
• Page Views - Contains reports of page views organized by view, user, application,application and page, day, hour, and by interactive report.
• Developer Activity - Offers reports of developer activity organized by developer,day, application, application changes, and day or month.
• Page View Analysis - Contains reports analyzing page views, such most viewedpages, page views by day, usage by day (chart), weighted page performance, andWebsheet page views.
• Sessions - Lists active sessions with the current workspace (report or chart).
• Login Attempts - Offers reports listing login attempts, login attempts byauthentication result, and a developer login summary.
• Environment - Contains reports of environments organized by user agent,browser, external clicks, or operating system.
• Application Errors - Contains a report of application errors.
• Workspace Schema Reports - Offers summaries of schema tablespaceutilization and database privileges by schema, workspace schemas, and reporttablespace utilization.
22.3.4 Instance Activity ReportsInstance administrators are superusers that manage an entire hosted instance usingthe Application Express Administration Services application.
Instance administrators can access the following activity reports:
• Page Views - View activity by application, user, workspace, day, or REST access.
• Workspace Purge - View a dashboard summary, inactive workspaces,workspaces purged, workspaces that became active, or a workspace purge log.
• Environment Reports - View a summary of used operating systems, browsertypes, user agent, or external sites.
• Calendar Reports - View workspaces by date last used, page views by day andthen by application and user, or by hour.
• Service Requests - View new service requests or sign up survey activity.
• Logs - View the mail log, jobs log, automatic delete log, or monitor packagedapplication installations.
• Login Attempts - View login attempts or developer last login.
Chapter 22Utilizing Logs and Reports
22-5
• Developer Activity - View application changes by developer or workspace.
22.4 About Utilizing Database ReportingImprove application performance by utilizing database reporting.
Oracle Application Express establishes a physical connection from the database poolas APEX_PUBLIC_USER, which calls the Application Express engine. The ApplicationExpress engine utilizes SQL.DBMS_SYS_SQL to parse SQL as another user, the parsingschema. Database V$SESSION records contain useful information for each SQLexecuted including Oracle Application Express specific information for the clientinformation, client identifier, and module. You can use this information to identify theassociated SQL when you generate Oracle Trace files and use TKPROF to analyzethem. You can also add &p_trace=YES to the end of the Application Express URL or useALTER SESSION.
Automatic Workload Repository (AWR) reports collect performance statistics everyhour, by default. Active Session History (ASH) reports are a system-wide record ofdatabase activity. You can use these reports to identify resource intensive SQLstatements. For PL/SQL packages, procedures and functions that in turn call otherPL/SQL programs, you can use PL/SQL hierarchical profiler in Oracle Database 11g.These subprograms account for execution times separately.
Oracle Application Express also includes views which catalog everything related toOracle Application Express. You can use these views to access information fromOracle Application Express using tools such as SQL Developer, SQL*Plus and SQLCommands (Oracle Application Express SQL Workshop). If you are granted theAPEX_ADMINISTRATOR_READ_ROLE or APEX_ADMINISTRATOR_ROLE then you can query acrossthe entire instance, rather than just the workspace your schema user is associatedwith. You should grant APEX_ADMINISTRATOR_READ_ROLE to monitoring users, whileAPEX_ADMINISTRATOR_ROLE should be used for instance administrators, who manageinstance parameters, workspaces, and so on.
22.5 About Database Parameters that Impact PerformanceEvaluate whether or not database parameters are impacting performance.
There are certain database parameters that can impact performance. In particular, youshould review the memory related parameters (MEMORY_TARGET, SGA_TARGET,PGA_AGGREGATE_TARGET, SHARED_POOL_SIZE) parameters to ensure they are sized correctly.If you are using the Embedded PL/SQL Gateway, you should make sure thatSHARED_SERVERS is sized correctly, to improve performance for multiple concurrentrequests.You should also check that the database System Global Area (SGA) fits inreal memory. An undersized SGA can dramatically impact Application Expressperformance. There needs to be sufficient memory in the Shared Pool for PL/SQL andin Buffer Cache for the Application Express metadata. If the SGA is sized correctly itshould not be necessary to pin PL/SQL programs from the Application Express engineas they are accessed regularly and should not be swapped out of memory. Becausethe Application Express engine resides in the database, it is strongly recommendedthat you gather statistics on the apex_180100 schema. Accurate statistics allow the cost-based optimizer to develop better query plans for accessing the application metadata.
Chapter 22About Utilizing Database Reporting
22-6
22.6 About Limiting ResourcesUse Resource Manager to limit the types of system resources available to each userrequest.
Database Resource Manager, an Oracle Database Enterprise Edition option, isexceedingly useful for maintaining an Oracle Application Express instance. UsingResource Manager you can limit the types of system resources (CPU_PER_CALL andLOGICAL_READS_PER_CALL) available to each user request. By setting up multiple resourceprofiles, with automatic switches between the profiles, as a user request exceeds acertain threshold you can reduce the CPU available to that transaction. For exampleyou may define a default profile APEX_HIGH which can utilize 70% of CPU for 10seconds, APEX_MEDIUM with 8% CPU for 120 seconds, APEX_LOW with 2% CPUfor 1800 seconds, and OTHERS with 20% CPU. When a specific transaction exceeds10 seconds, it is switched to the APEX_MEDIUM profile which drastically reduces theCPU available. If the transaction switches to APEX_LOW and exceeds 1800 secondsthen you can cancel the SQL or kill the session. This approach ensures that onespecific user or poorly written application cannot monopolize the CPU causing otherusers and applications to respond poorly.
Tip:
Instance administrators can define Resource Manager profiles for individualworkspaces.
22.7 About Uploading Static Files to Your Web ServerTo improve performance you should place static files on the Web server.
As a best practice, you should also enable gzip compression on the Web server sothat the file size is minimized when transmitting the static files to the browser.Furthermore, you should also enable file caching for browsers by sending expirationheaders.
22.8 Creating Custom Activity Reports UsingAPEX_ACTIVITY_LOG
Learn how to use the APEX_ACTIVITY_LOG view to query activity for the currentworkspace.
• Enabling Logging for an Application (page 22-8)You enable logging for an application on the Edit Application Definition page.
• APEX_ACTIVITY_LOG (page 22-8)Use APEX_ACTIVITY_LOG to view and query all activity for the current workspace.
• APEX_ACTIVITY_LOG Sample Query (page 22-9)
Chapter 22About Limiting Resources
22-7
22.8.1 Enabling Logging for an ApplicationYou enable logging for an application on the Edit Application Definition page.
To edit the application definition:
1. On the Workspace home page, click the App Builder icon.
2. Select an application.
3. Click the Edit Application Properties button to the right of the application name.
The Edit Application Definition page appears.
4. Under Properties, locate Logging. Select Yes or No.
When set to Yes, every page view is logged, enabling an administrator to monitoruser activity for each application. Disabling logging may be advisable for highvolume applications.
Tip:
You can only modify the Logging attribute if the Application Activity Loggingattribute in Oracle Application Express Administration Services is set to UseApplication Setting.
22.8.2 APEX_ACTIVITY_LOGUse APEX_ACTIVITY_LOG to view and query all activity for the current workspace.
The APEX_ACTIVITY_LOG view records all activity in a workspace, including developeractivity and application runtime activity. You can use APEX_ACTIVITY_LOG to view andquery all activity for the current workspace. For example, you can use this view todevelop monitoring reports within a specific application to provide real-timeperformance statistics.
Table 22-1 (page 22-8) describes the columns in the APEX_ACTIVITY_LOG view.
Table 22-1 Columns in APEX_ACTIVITY_LOG
Column Type Description
time_stamp DATE Date and time that activity was loggedat the end of the page view.
component_type VARCHAR2(255) Reserved for future use.
component_name VARCHAR2(255) Reserved for future use.
component_attribute VARCHAR2(4000) Title of page.
information VARCHAR2(4000) Reserved for future use.
elap NUMBER Elapsed time of page view in seconds.
num_rows NUMBER Number of rows processed on page.
userid VARCHAR2(255) User ID performing page view.
Chapter 22Creating Custom Activity Reports Using APEX_ACTIVITY_LOG
22-8
Table 22-1 (Cont.) Columns in APEX_ACTIVITY_LOG
Column Type Description
ip_address VARCHAR2(4000) IP address of client.
ir_report_id NUMBER Interactive report ID
ir_search VARCHAR2 Interactive report search criteria enteredby users.
user_agent VARCHAR2(4000) web browser user agent of client.
flow_id NUMBER Application ID.
step_id NUMBER Page number.
session_id NUMBER Oracle Application Express sessionidentifier.
sqlerrm VARCHAR2(4000) SQL Error message.
sqlerrm_component_type VARCHAR2(255) Reserved for future use.
sqlerrm_component_name VARCHAR2(255) Reserved for future use.
To conserve space in the activity log, only the first log entry of each unique sessioncontains the IP address and web browser user agent.
22.8.3 APEX_ACTIVITY_LOG Sample QueryThe following example demonstrates how to create a report that displays the totalnumber of page views and the average page view time in the past 24 hours forapplication 9529, and grouped by userid:
SELECT COUNT(*), AVG(elap), userid FROM APEX_ACTIVITY_LOG WHERE time_stamp > (SYSDATE-1) AND flow_id = 9529GROUP BY userid
Keep in mind that activity logging in an Oracle Application Express instance is rotatedbetween two different log tables. Because there are two log tables, logging informationis only as current as the oldest available entry in the logs. To persist your applicationspecific log information for all time, you must either copy the log information into yourown application table or implement logging directly in your application.
Chapter 22Creating Custom Activity Reports Using APEX_ACTIVITY_LOG
22-9
23Debugging an Application
Learn about best practices for debugging an Oracle Application Express application.
• Running Advisor to Check Application Integrity (page 23-1)Use Oracle Application Express Advisor (Advisor) to check the integrity and qualityof your Oracle Application Express application.
• Reviewing Session State (page 23-3)View current session state for your application by clicking the Session link on theRuntime Developer Toolbar.
• About Monitoring Application and Page Resource Use (page 23-3)Query the V$SESSION and V$SQLAREA views to monitor application and page resourceuse..
• Enabling SQL Tracing and Using TKPROF (page 23-3)Enable SQL tracing and then analyze the temporary file Oracle ApplicationExpress creates using the TKPROF utility.
• Utilizing Debug Mode (page 23-4)Use Debug mode to track down unexpected application behavior.
• About Removing Controls and Components to Isolate a Problem (page 23-8)If you have problems running a page, try removing controls and components oneat a time.
See Also:
• "APEX_DEBUG" in Oracle Application Express API Reference
• "Managing Application Performance (page 22-1)"
23.1 Running Advisor to Check Application IntegrityUse Oracle Application Express Advisor (Advisor) to check the integrity and quality ofyour Oracle Application Express application.
Oracle Application Express Advisor functions like a compiler or LINT and flagssuspicious behavior or errors. Running Advisor checks the integrity of your applicationbased on the underlying metadata.
• About Oracle Application Express Advisor (page 23-2)
• Running Advisor on an Entire Application (page 23-2)
• Running Advisor on a Single Page (page 23-3)
23-1
23.1.1 About Oracle Application Express AdvisorBefore deploying your application, you can use the Oracle Application Express Advisorto perform various sanity checks on your application. The Advisor checks for errors,security issues, performance bottlenecks, quality assurance, and other best practices.
Tip:
Oracle Application Express Advisor includes checks specific to ensuringapplication accessibility. To learn more, see Oracle Application ExpressAccessibility Guide.
23.1.2 Running Advisor on an Entire ApplicationTo run Advisor on an entire application:
1. Navigate to the appropriate application:
a. On the Workspace home page, click the App Builder icon.
The App Builder home page appears.
b. Select the application.
The Application home page appears.
2. Click Utilities.
3. Click Advisor.
The Advisor page appears.
4. Under Checks to Perform:
a. Expand Checks to Perform.
b. Review the selected options. Select and deselect options as appropriate.
5. In Pages(s), enter a comma separated list of pages in the field provided. To checkall pages, leave this option blank.
6. Click Perform Check at the top of the page.
A Results page appears.
Tip:
Current Advisor settings are used next time the check is performed.
7. To alter the existing preferences:
a. Under Filter Result, deselect the appropriate options.
b. Click Apply Filter.
8. To run Advisor again, click Perform Check.
Chapter 23Running Advisor to Check Application Integrity
23-2
23.1.3 Running Advisor on a Single PageTo run Advisor on a single page:
1. Navigate to the appropriate page.
2. Click the Utilities menu and select Advisor.
Advisor appears.
3. Under Checks to Perform, review the selected options. Select and deselectoptions as appropriate.
4. Click Perform Check at the top of the page.
A Results page appears.
5. To alter the existing preferences:
a. Under Filter Result, deselect the appropriate options.
b. Click Apply Filter
6. To re-run the Advisor and see if reported problems are fixed, click PerformCheck.
23.2 Reviewing Session StateView current session state for your application by clicking the Session link on theRuntime Developer Toolbar.
Session state enables developers to store and retrieve values for a user as the usernavigates between different application pages. Many applications are based on datacontained within application controls. For example, buttons can display conditionallybased on a value stored in session state.
23.3 About Monitoring Application and Page Resource UseQuery the V$SESSION and V$SQLAREA views to monitor application and page resourceuse..
Oracle Application Express facilitates the monitoring of resources used by applicationsand pages by calling the package DBMS_APPLICATION_INFO. Whenever the ApplicationExpress engine renders or processes a page, the module is set to APEX and includesthe application ID and page number. Once set, you can query the V$SESSION andV$SQLAREA views to monitor transactions.
23.4 Enabling SQL Tracing and Using TKPROFEnable SQL tracing and then analyze the temporary file Oracle Application Expresscreates using the TKPROF utility.
Tracing your session can be a very effective way to debug an application. From adatabase perspective, each page request is a single database session. If you enableSQL tracing, then Oracle Application Express creates a temporary file you can thenanalyze using the TKPROF utility.
Chapter 23Reviewing Session State
23-3
You enable SQL tracing in Oracle Application Express by using f?p syntax to set theargument p_trace=YES. For example, to trace the display of page 1 in application 100,you would use the syntax:
http:/.../f?p=100:1&p_trace=YES
To use the TKPROF utility:
1. Log in to SQL*Plus as a privileged user.
2. Execute the following statement:
show parameter USER_DUMP_DEST
3. Navigate to the directory in which the trace file is created.
4. Run the TKPROF utility from the operating system prompt using the followingsyntax:
tkprof filename1 filename2 [waits=yes|no] [sort=option] [print=n] [aggregate=yes|no] [insert=filename3] [sys=yes|no] [table=schema.table] [explain=user/password] [record=filename4] [width=n]
The input and output files are the only required arguments.
5. To view online Help, invoke TKPROF without arguments.
23.5 Utilizing Debug ModeUse Debug mode to track down unexpected application behavior.
• About Debug Mode (page 23-4)
• Enabling and Disabling Debug Mode for an Application (page 23-5)
• Running an Application in Debug Mode (page 23-5)
• Viewing Debug Reports in Development Mode (page 23-6)
• About Using f?p Syntax to Access Debug Mode (page 23-6)
• Viewing Debug Reports from a Running Application (page 23-6)
• Viewing Debug Reports (page 23-7)
See Also:
"APEX_DEBUG" in Oracle Application Express API Reference
23.5.1 About Debug ModeThe Debug mode is a built in mechanism used to track down unexpected applicationbehavior. You enable and disable debug mode for the current page and session byclicking the Debug and No Debug links in the Runtime Developer Toolbar. To viewDebug reports, click the View Debug link in the Runtime Developer Toolbar.
Chapter 23Utilizing Debug Mode
23-4
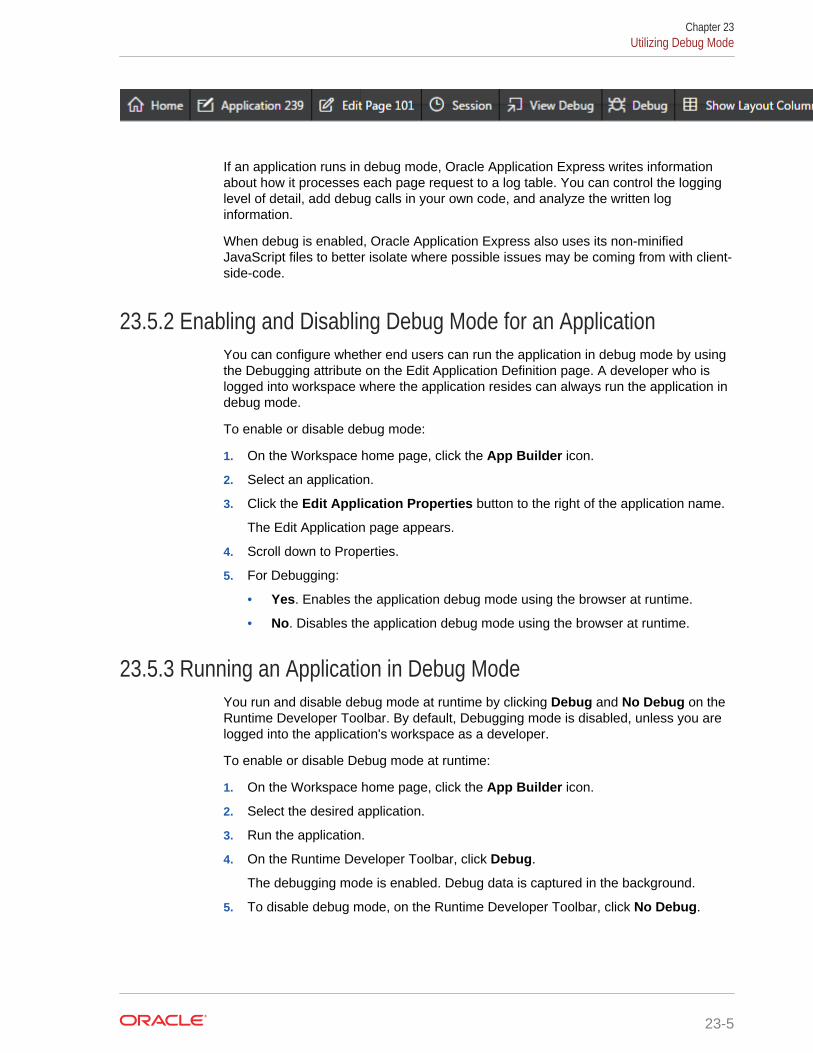
If an application runs in debug mode, Oracle Application Express writes informationabout how it processes each page request to a log table. You can control the logginglevel of detail, add debug calls in your own code, and analyze the written loginformation.
When debug is enabled, Oracle Application Express also uses its non-minifiedJavaScript files to better isolate where possible issues may be coming from with client-side-code.
23.5.2 Enabling and Disabling Debug Mode for an ApplicationYou can configure whether end users can run the application in debug mode by usingthe Debugging attribute on the Edit Application Definition page. A developer who islogged into workspace where the application resides can always run the application indebug mode.
To enable or disable debug mode:
1. On the Workspace home page, click the App Builder icon.
2. Select an application.
3. Click the Edit Application Properties button to the right of the application name.
The Edit Application page appears.
4. Scroll down to Properties.
5. For Debugging:
• Yes. Enables the application debug mode using the browser at runtime.
• No. Disables the application debug mode using the browser at runtime.
23.5.3 Running an Application in Debug ModeYou run and disable debug mode at runtime by clicking Debug and No Debug on theRuntime Developer Toolbar. By default, Debugging mode is disabled, unless you arelogged into the application's workspace as a developer.
To enable or disable Debug mode at runtime:
1. On the Workspace home page, click the App Builder icon.
2. Select the desired application.
3. Run the application.
4. On the Runtime Developer Toolbar, click Debug.
The debugging mode is enabled. Debug data is captured in the background.
5. To disable debug mode, on the Runtime Developer Toolbar, click No Debug.
Chapter 23Utilizing Debug Mode
23-5
23.5.4 Viewing Debug Reports in Development ModeTo view debug reports in development mode:
1. On the Workspace home page, click the App Builder icon.
2. Select the desired application.
3. Click Utilities.
4. On the Utilities page, click Debug Messages.
The Debug page appears.
5. Click the View Identifier to the left of the session you want to view.
The Debug Message Data page appears.
6. To view steps that took the longest, hover over that step on the graph above thereport.
The step details display.
7. To go to that step in the report, click the bar.
Note:
Debug sessions listed in the report live for at least 2 weeks and age outalong with the activity log. This is usually more than adequate fordebugging purposes.
23.5.5 About Using f?p Syntax to Access Debug ModeYou can also use f?p syntax to run an application in Debugging mode. Simply call thepage and set the Debug argument to YES or LEVELn, where n is between 1 (leastdetailed) and 9 (most detailed). For example:
f?p=100:1:&APP_SESSION.::YES
23.5.6 Viewing Debug Reports from a Running ApplicationTo view debug report from a running application:
1. Locate and run the application in Debug mode.
2. Click View Debug on the Runtime Developer Toolbar.
A list of Debug reports displays.
3. Click the View Identifier to the left of the session you want to view.
The Debug Message Data page appears.
4. To view steps that took the longest, hover over that step on the graph above thereport.
The step details display.
Chapter 23Utilizing Debug Mode
23-6
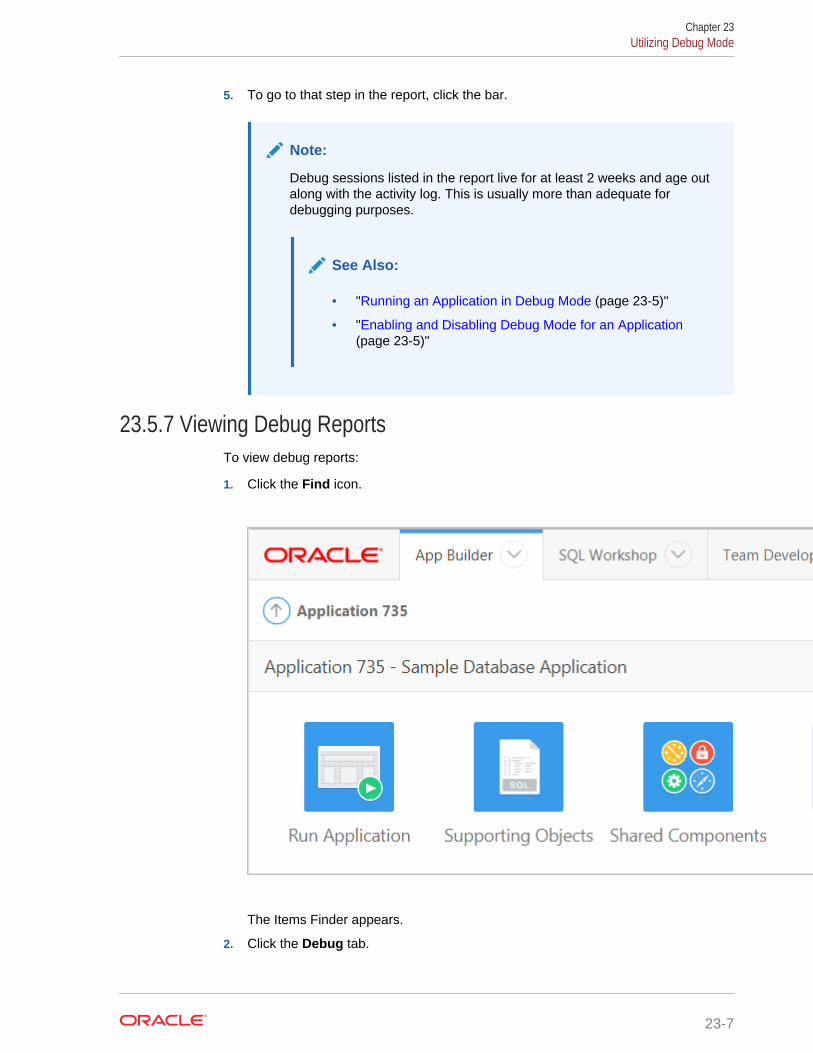
5. To go to that step in the report, click the bar.
Note:
Debug sessions listed in the report live for at least 2 weeks and age outalong with the activity log. This is usually more than adequate fordebugging purposes.
See Also:
• "Running an Application in Debug Mode (page 23-5)"
• "Enabling and Disabling Debug Mode for an Application(page 23-5)"
23.5.7 Viewing Debug ReportsTo view debug reports:
1. Click the Find icon.
The Items Finder appears.
2. Click the Debug tab.
Chapter 23Utilizing Debug Mode
23-7
3. Click the View Identifier to the left of the session you want to view.
The Debug report appears.
4. To view steps that took the longest, hover over that step on the graph above thereport.
The step details display.
5. To go to that step in the report, click the bar.
Note:
Debug sessions listed in the report live for at least 2 weeks and age outalong with the activity log. This is usually more than adequate fordebugging purposes.
See Also:
"Enabling and Disabling Debug Mode for an Application (page 23-5)"
23.6 About Removing Controls and Components to Isolate aProblem
If you have problems running a page, try removing controls and components one at atime.
Using this approach, you can quickly determine which control or component may bethe source of your problem. You can disable a control or component creating a buildoptions. Build options enable you to conditionally display specific functionality within anapplication.
Build options enable you to conditionally display specific functionality within anapplication. Build options have two possible values: INCLUDE and EXCLUDE. If youspecify an attribute as being included, then the Application Express engine considers itpart of the application definition at runtime. Conversely, if you specify an attribute asbeing excluded, then the Application Express engine treats it as if it did not exist.
Disadvantages of Using Conditions to Remove Controls or Components
Prior releases of Oracle Application Express recommended that developers disablecontrols or components by setting the Condition attribute to Never. Although thisapproach is still valid, a major disadvantage is it overwrites the existing condition.
Chapter 23About Removing Controls and Components to Isolate a Problem
23-8
24Deploying an Application
Learn about best practices for deploying an application. Deployment is the process ofmoving an application from the testing phase to the production phase.
Tip:
To review recommendations about optimizing the development anddeployment of Oracle Application Express applications throughout their life-cycle, see Life Cycle Management with Oracle Application Express. Go to http://www.oracle.com/technetwork/developer-tools/apex/learnmore/apex-life-cycle-management-wp-3030229.pdf.
Tip:
To review a tutorial that demonstrates deployment options, go to the OracleOnline Learning Library at http://www.oracle.com/oll/apex and search forAdvanced Deployment of Your Application.
• About Suggested Environments (page 24-2)Oracle recommends developers follow standard system development life cyclepractices when developing applications by having different environments fordevelopment, testing, and production.
• System Development Life Cycle Methodologies to Consider (page 24-2)The system development life cycle (SDLC) is the overall process of developingsoftware using a series of defined steps. There are several system SDLC modelsthat work well for developing applications in Oracle Application Express.
• Understanding the Deployment Process (page 24-4)Oracle recommends developing Oracle Application Express applications inseparate environments: development, testing, and finally production. Learn aboutdifferent approaches and best practices during when deploying applications.
• How to Create a Custom Packaged Application (page 24-6)Simplify the steps needed to deploy an application by creating a custom packagedapplication on the Supporting Objects page.
• Using Build Options to Control Configuration (page 24-14)Use build options to conditionally include or exclude application components andfunctionality.
• About Publishing the Database Application URL (page 24-21)Once you deploy your application, load the data, and create users, you canpublish your production URL.
24-1
• About Publishing the Websheet Application URL (page 24-22)Once you complete your Websheet application, you can publish your productionURL.
• Exporting an Application and Application Components (page 24-22)Developers can export an application and related files to another OracleApplication Express instance.
• Importing Export Files (page 24-34)Once you export an application and any related files, you must import them intothe target Oracle Application Express instance and then install them.
• Installing Export Files (page 24-39)After you export an application and any related files and you import them into thetarget Oracle Application Express instance, the files are stored in the ExportRepository. Next, you must install them.
See Also:
• "Oracle Application Express Administration Guide"
• "Extending Application Capabilities (page 19-1)"
24.1 About Suggested EnvironmentsOracle recommends developers follow standard system development life cyclepractices when developing applications by having different environments fordevelopment, testing, and production.
As a best practice, developers should only make changes to applications and relateddatabase objects in the development environment. To further enforce this policyOracle recommends that you install runtime-only Oracle Application Expressenvironments in your test and production environments. This will prohibit developersfrom accessing the App Builder and SQL Workshop in these environments. As ageneral rule, your administrator (DBA) should be the only ones with permission toupdate the test and production environments. DBAs should use the appropriateprovided APIs and import applications from an SQL interface, such as SQL Developeror SQL*Plus.
24.2 System Development Life Cycle Methodologies toConsider
The system development life cycle (SDLC) is the overall process of developingsoftware using a series of defined steps. There are several system SDLC models thatwork well for developing applications in Oracle Application Express.
• About Iterative Vs Planned Development (page 24-3)
• About the Advantages of Creating Prototypes (page 24-3)
• Waterfall (page 24-3)
• Spiral (page 24-4)
Chapter 24About Suggested Environments
24-2
• Rapid Application Development (page 24-4)
24.2.1 About Iterative Vs Planned DevelopmentWhen developing applications using App Builder, you must find a balance betweentwo dramatically different development methodologies:
• Iterative, rapid application development
• Planned, linear style development
Iterative, rapid application development offers so much flexibility that you run the riskof never completing your project. In contrast, Planned, linear style development canyield applications that do not meet the needs of end users even if they meet the statedrequirements on paper.
24.2.2 About the Advantages of Creating PrototypesThe Oracle Application Express development environment enables developers to takea more iterative approach to development. Unlike many other developmentenvironments, creating prototypes is easy. With Oracle Application Express,developers can:
• Use built-in wizards to quickly design an application user interface.
• Make prototypes available to users and gather feedback.
• Implement changes in real time, creating new prototypes instantly.
Methodologies that work well with Oracle Application Express include Spiral and RapidApplication Development (RAD).
24.2.3 WaterfallThe Waterfall is probably the best known SDLC model. In this methodology, thedevelopment process is broken down into the following stages:
1. Project Planning
2. Requirements Definition
3. Design
4. Development
5. Integration and Testing
6. Installation and Acceptance
7. Maintenance
This methodology is referred to as a waterfall because the output from one stage is theinput for the next stage.
A primary problem with this approach is that it is assumed that all requirements can beestablished in advance. Unfortunately, requirements often change and evolve duringthe development process.
Chapter 24System Development Life Cycle Methodologies to Consider
24-3
24.2.4 SpiralA Spiral methodology is actually a series of short waterfall cycles. Each waterfall cycleyields new requirements and enables the development team to create a robust seriesof prototypes. One advantage of this approach is that it accommodates changingrequirements. Disadvantages include complex project management and the riskdevelopment goes on indefinitely.
24.2.5 Rapid Application DevelopmentA Rapid Application Development (RAD) methodology has a heavy emphasis oncreating a prototype that closely resembles the final product. The prototype is anessential part of the requirements phase. Advantages of this model include the abilityto accommodate changing requirements, rapid development cycles, and progress canbe easily measured. The major disadvantage of this model is that the emphasis onprototyping can result in scope creep. As a result, developers can lose sight of theirinitial goals in the attempt to create the perfect application.
24.3 Understanding the Deployment ProcessOracle recommends developing Oracle Application Express applications in separateenvironments: development, testing, and finally production. Learn about differentapproaches and best practices during when deploying applications.
• About Moving an Application to Another Instance (page 24-4)
• Deployment Options to Consider (page 24-4)
• How to Move an Application to Another Instance (page 24-5)
24.3.1 About Moving an Application to Another InstanceTo move an application from one Oracle Application Express instance to another, youmust move both the metadata and supporting objects used by the application asfollows:
1. Move the application definition and all associated files.
2. Move the supporting objects. Review the Database Object Dependencies report todetermine what objects to move.
24.3.2 Deployment Options to ConsiderWhen you develop an application, you create the application within a specificworkspace. Each workspace has a unique ID and name. A common scenario is tocreate the application in a development instance and then deploy it to a productioninstance.
Deployment options to consider include:
1. Use the same workspace and same schema. Export and then import theapplication and install it using a different application ID. This approach works wellwhen there are few changes to the underlying objects, but frequent changes to theapplication functionality.
Chapter 24Understanding the Deployment Process
24-4
2. Use a different workspace and same schema. Export and then import theapplication into a different workspace. This is an effective way to prevent aproduction application from being modified by developers.
3. Use a different workspace and different schema. Export and then import theapplication into a different workspace and install it so that it uses a differentschema. This new schema needs to have the database objects required by yourapplication.
4. Use a different database with all its variations. Export and then import theapplication into a different Oracle Application Express instance and install it usinga different workspace, schema, and database.
Whether to Copy the Workspace
Deciding whether to copy an existing workspace is a matter of preference. Keep inmind that the production version must have access to all the appropriate objects. Forexample, you might want to copy a workspace in the following situations:
• When you want to keep the same application identifiers between development andother environments.
• When the application relies on Oracle Application Express authentication. Copyingthe workspace automatically migrates all the required user data.
Whether to Copy the Database
When deciding whether to copy the database, remember that the schema againstwhich the application runs must have access to the same objects as the developmentinstance. The actual name of the schema is unimportant. You can change it during theimport process.
About the Application ID
It is not necessary to have matching application IDs for a development version andproduction version of an application. In fact, as a best practice never hard code theapplication ID into your application. Instead, use the application alias (defined on theEdit Application page), or use a built-in substitution string (such as APP_ID andAPP_ALIAS). Using a substitution string is the better approach because it enables you tochange the application ID without affecting any application functionality.
24.3.3 How to Move an Application to Another InstanceWhether you are moving an application to another workspace or just making a copy ofit, deployment involves the following steps:
1. Move the supporting database objects (if appropriate). Review the DatabaseObject Dependencies report to determine what objects to move.
See "Using the Database Object Dependencies Report (page 6-70)."
2. Package the application definition with its supporting objects to create a custompackaged application.
See "How to Create a Custom Packaged Application (page 24-6)."
3. Export the custom packaged application.
See "Exporting an Application and Application Components (page 24-22)."
Chapter 24Understanding the Deployment Process
24-5
4. Import the exported files into the target Oracle Application Express instance.
See "Importing Export Files (page 24-34)."
Tip:
You can also move the application definition and all supporting objectsmanually. See "Exporting an Application and Application Components(page 24-22)."
• About Managing Database Objects (page 24-6)
24.3.3.1 About Managing Database ObjectsBefore you export an application and the appropriate related files, you must determineif you also need to migrate the database objects referenced by the application. If youare unsure of which database objects to move, review the Database ObjectDependencies report.
If the target schema is different from the schema used in the developmentenvironment, you must migrate the database objects referenced by the application. Inmany cases, this process can be as simple as using Oracle database export andimport utilities to copy the application schema from the development environment totarget instance. The following are two common scenarios where this approach doesnot work:
• When the object development schema refers to tablespaces to which the targetinstance schema does not have access.
• When the development instance schema has sample data that you do not want tomigrate to the target instance schema.
If a database administrator or an Oracle Application Express administrator is theperson responsible for exporting Oracle Application Express applications, be sure toclearly communicate if he or she:
• Should include all data when exporting your application.
• Should NOT include data from specific tables you identify.
Tip:
"Using the Data Workshop to Manage Data" in Oracle Application ExpressSQL Workshop Guide
24.4 How to Create a Custom Packaged ApplicationSimplify the steps needed to deploy an application by creating a custom packagedapplication on the Supporting Objects page.
Chapter 24How to Create a Custom Packaged Application
24-6
• How Creating a Custom Packaged Application Simplifies Deployment(page 24-7)
• Creating a Custom Packaged Application (page 24-8)
• Adding an Access Control List to a Custom Packaged Application (page 24-11)
• Installing Supporting Objects (page 24-11)
• Deleting Supporting Objects Scripts, Messages, and Installation Options(page 24-12)
• Upgrading a Custom Packaged Application (page 24-12)
• Deinstalling Supporting Objects (page 24-13)
• Viewing an Install Summary (page 24-14)
See Also:
• "How to Move an Application to Another Instance (page 24-5)"
• "Exporting an Application and Application Components (page 24-22)"
24.4.1 How Creating a Custom Packaged Application SimplifiesDeployment
From a developer's perspective, importing and installing an application is acomplicated process. First, you create the target database objects and seed data.Second, you import and install the application definition and all related files, includingimages, themes, and any other required static files.
Creating a custom packaged application using the Supporting Objects utility greatlysimplifies this process. Instead of performing numerous steps to create the databaseobjects and then import and install the application and all supporting files, you candefine the supporting objects so that the application and supporting files can bemigrated in a few easy steps.
After users import and install the application definition, a wizard guides them through afew simple configuration steps. Then, the wizard asks whether to install the supportingapplication objects. Users have the option of installing the supporting applicationobjects then or doing it later.
From a developer's perspective, creating a custom packaged application has thefollowing advantages:
• Ensures that the supporting objects are created in the correct order.
• Provides an automated process for deploying an application quickly using very fewsteps.
• Gives users the option to install supporting application objects when they importand install the application definition or at a later time.
• Enables users and developers with a convenient method for removing theapplication definition, supporting files, and all database objects.
Chapter 24How to Create a Custom Packaged Application
24-7
• Provides users and developers with an easy way to upgrade a previously releasedcustom packaged application.
Plus, you can also take advantage of the Deinstall and Install features to quickly editthe underlying database objects that support an application. For example, you candeinstall and remove all database objects, edit the underlying database object creationscripts, and reinstall to create the redefined application objects.
24.4.2 Creating a Custom Packaged ApplicationTo create a custom packaged application, you must create installation scripts thatdefine your application's supporting objects (including database objects, images, andseed data) and any preinstallation validations. You define these objects and theinstallation and deinstallation scripts and the messages that display when the userinstalls or deinstalls on the Supporting Objects page.
• Accessing the Supporting Objects Page (page 24-8)
• Supporting Objects Page (page 24-8)
24.4.2.1 Accessing the Supporting Objects PageYou create a custom packaged application on the Supporting Objects page.
To access the Supporting Objects Page application:
1. On the Workspace home page, click the App Builder icon.
2. Select the application.
The Application home page appears.
3. Click the Supporting Objects icon.
The Supporting Objects page appears.
24.4.2.2 Supporting Objects PageThe top of the Supporting Objects page displays the application name and indicatescurrent selections for the following: Check for Objects, Verify System Privileges,Required Free KB, Prompt for License, and Include in Export. To learn more aboutthese options, see field-level Help.
To specify whether to include supporting objects with an application export, select Yesor No from the Include in Export list and click Apply Changes.
Chapter 24How to Create a Custom Packaged Application
24-8
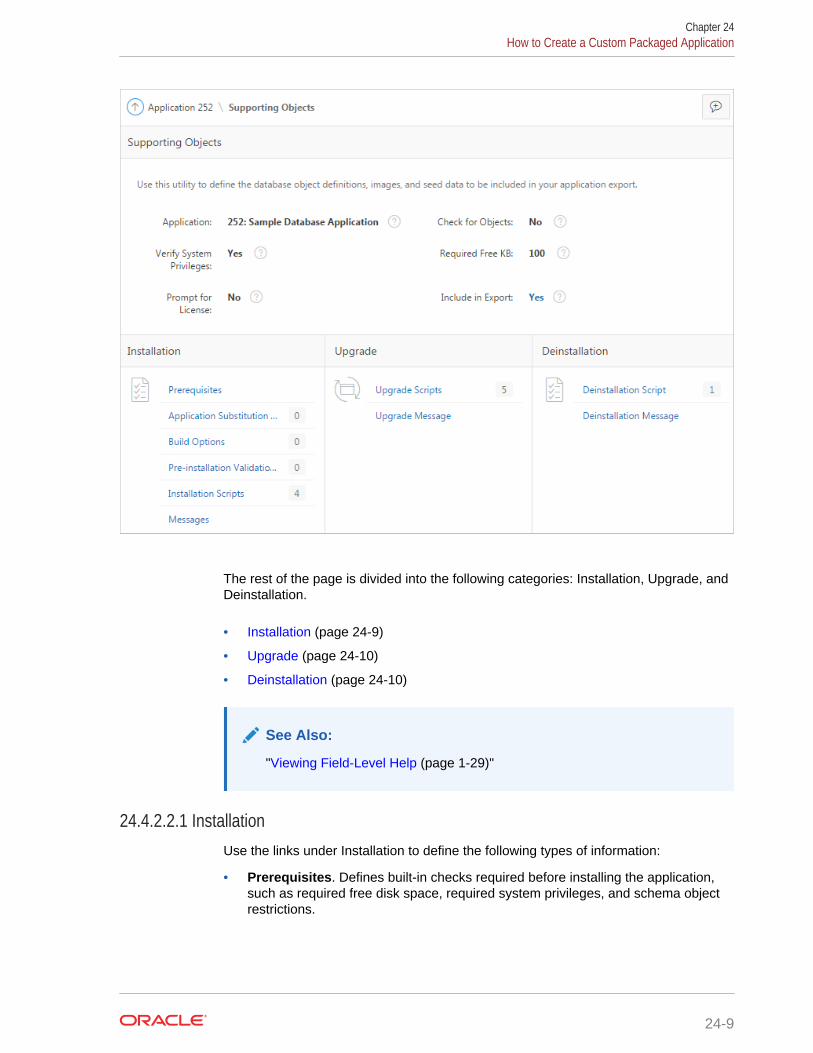
The rest of the page is divided into the following categories: Installation, Upgrade, andDeinstallation.
• Installation (page 24-9)
• Upgrade (page 24-10)
• Deinstallation (page 24-10)
See Also:
"Viewing Field-Level Help (page 1-29)"
24.4.2.2.1 InstallationUse the links under Installation to define the following types of information:
• Prerequisites. Defines built-in checks required before installing the application,such as required free disk space, required system privileges, and schema objectrestrictions.
Chapter 24How to Create a Custom Packaged Application
24-9
• Application Substitution Strings. Lists static substitution strings defined for theapplication. You can define static substitution strings for phrases or labels thatoccur in many places within an application.
When packaging an application, you can include prompts for substitution stringswhich users can specify when they install the custom packaged application.
• Build Options. Lists build options defined for this application. You can use buildoptions to conditionally display specific functionality within an application.
When packaging an application, you can include prompts for specific build optionswhich display when the application is installed.
• Pre-installation Validations. Lists validations defined for the custom packagedapplication. Similar to normal page validations, these validations prevent a userfrom installing database objects if the user-defined conditions are not satisfied. Tocreate a new validation, click Create and follow the on-screen instructions.
• Installation Scripts. Enables a you to define multiple installation scripts thatinstall supporting objects for the application. To create a new script, click Createand follow the on-screen instructions. To edit an existing script, click the Edit icon.To prevent another developer from editing a script, click the Lock icon. If the scriptis locked, the Lock icon appears as a closed padlock. If the script is unlocked, theLock icon appears as an open padlock.
• Messages. Enables you to define messages that display when the user installs ordeinstalls the application. Supported HTML tags include <b>, <i>, <u>, <p>, <br>,<hr>, <ul>, <ol>, <li>, and <pre>.
When these messages display, only a limited set of HTML tags are recognized toprevent a cross site-scripting (XSS) attack.
24.4.2.2.2 UpgradeUse the links under Upgrade to define the following types of information:
• Upgrade Scripts. Click Upgrade Scripts to define scripts to upgrade databaseobjects, images, and seed data when upgrading an existing application.
• Upgrade Message. Enables you to define messages that display when the userupgrades the application. Supported HTML tags include <b>, <i>, <u>, <p>, <br>,<hr>, <ul>, <ol>, <li>, and <pre>.
When these messages display, only a limited set of HTML tags are recognized toprevent a cross site-scripting (XSS) attack.
24.4.2.2.3 DeinstallationUse the links under Deinstallation to define the following types of information:
• Deinstallation Script. Click Deinstallation Script to define a script to dropdatabase objects and static files created by the installation scripts. To edit anexisting script, click the Edit icon.
• Deinstallation Message. Allows you to define messages that display when theuser deinstalls the application. Supported HTML tags include <b>, <i>, <u>, <p>,<br>, <hr>, <ul>, <ol>, <li>, and <pre>.
When these messages display, only a limited set of HTML tags are recognized toprevent a cross site-scripting (XSS) attack.
Chapter 24How to Create a Custom Packaged Application
24-10
24.4.3 Adding an Access Control List to a Custom PackagedApplication
You can control access to an application, individual pages, or page components bycreating an access control list.
To add an access control list of a custom packaged application:
1. Create an access control list.
2. Navigate to the Supporting Objects page:
a. On the Workspace home page, click the App Builder icon.
b. Select the application.
The Application home page appears.
c. Click Supporting Objects.
The Supporting Objects page appears.
3. Under Installation, click Installation Scripts.
The Installation Scripts page appears.
4. Click Create.
5. At the bottom of the page, expand the Tasks region and click Create Scripts forAccess Control Tables.
If Access Control tables are defined, the Create Script page displays the tables tobe included.
6. Click Create Script.
24.4.4 Installing Supporting ObjectsAfter you edit your supporting objects and create the appropriate scripts, you can runyour installation scripts by clicking Install Supporting Objects on the Tasks list.
End users can also use this feature if they elect to not install the custom packagedapplication (or supporting objects) after they import and install the applicationdefinition.
To install supporting objects:
1. On the Workspace home page, click the App Builder icon.
2. Select the application.
3. Click Supporting Objects.
The Supporting Objects page appears.
4. Click the Install Supporting Objects on the Tasks list.
5. To view details about the installation script before running it, expand the Tasksregion and click Preview Installation Script.
The Preview Scripts page appears listing summary information, prerequisites, andthe actual scripts to be run.
Chapter 24How to Create a Custom Packaged Application
24-11
6. To exit the Preview Scripts page and continue, click Close.
7. From Install Supporting Objects, click Yes and click Next.
8. Follow the on-screen instructions.
24.4.5 Deleting Supporting Objects Scripts, Messages, and InstallationOptions
You can delete the metadata that defines supporting object scripts, messages, andinstallation options associated with a custom packaged application by clickingRemove Supporting Object Installation on the Tasks list on the Supporting Objectspage.
To delete the metadata that defines supporting object scripts, messages, andinstallation options:
1. On the Workspace home page, click the App Builder icon.
2. Select an application.
3. Click Supporting Objects.
The Supporting Objects page appears.
4. On the Tasks list on the right side of the page, click Remove Supporting ObjectInstallation.
5. Follow the on-screen instructions.
24.4.6 Upgrading a Custom Packaged ApplicationYou can define scripts to upgrade a previously published application on the Upgradepage.
• Defining an Upgrade Script (page 24-12)
• Upgrading a Custom Packaged Application (page 24-13)
24.4.6.1 Defining an Upgrade ScriptYou can use the Upgrade page to define scripts to upgrade database objects, images,and seed data when upgrading an existing application.
To create an upgrade script:
1. On the Workspace home page, click the App Builder icon.
2. Select an application.
3. Click Supporting Objects.
The Supporting Objects page appears.
4. Under Upgrade, click Upgrade Scripts.
5. Use the Detect Existing Supporting Objects section to determine if the appropriateobjects are installed or must be upgraded.
6. In Query to Detect Existing Supporting Objects, enter a query in the field thatreturns at least one row if the supporting objects exist.
Chapter 24How to Create a Custom Packaged Application
24-12
This query determines whether the user who installs the custom packagedapplication is prompted to run the installation scripts or the upgrade scripts.
7. To create a script, click Create.
Tip:
To enable users to upgrade from various earlier versions of thisapplication, you can add conditions to the upgrade scripts by going to theScript Properties page.
8. To prevent another developer from editing a script, click the Lock icon.
If the script is locked, the Lock icon appears as a closed padlock. If the script isunlocked, the Lock icon appears as an open padlock.
9. To edit an existing script, click the Edit icon.
10. Follow the on-screen instructions.
24.4.6.2 Upgrading a Custom Packaged ApplicationAfter you create your upgrade script, you can test it by clicking Upgrade SupportingObjects on Tasks list on the Supporting Object page.
End users can also use this feature to upgrade an existing custom packagedapplication.
To upgrade a custom packaged application:
1. Import a new version of application to be upgraded (if applicable).
2. On the Workspace home page, click the App Builder icon.
3. Select the application.
4. Click Supporting Objects.
The Supporting Objects page appears.
5. From the Tasks list, click Upgrade Supporting Objects.
6. Follow the on-screen instructions.
24.4.7 Deinstalling Supporting ObjectsOnce you create or install a custom packaged application, you can deinstall it byeither:
• Clicking the Deinstall Supporting Objects on the Supporting Objects page.
• Clicking Delete this Application on the Application home page.
When you deinstall an application, you have the option of removing the currentapplication definition and running the deinstallation script defined in the SupportingObjects.
To deinstall a custom packaged application:
1. On the Workspace home page, click the App Builder icon.
Chapter 24How to Create a Custom Packaged Application
24-13
2. Select the application.
3. Click Supporting Objects.
The Supporting Objects page appears.
4. From the Tasks list, click Deinstall Supporting Objects.
5. Select a deinstallation option:
• Remove Application Definition removes the current application definition.
• Deinstall Database Objects runs the deinstallation script defined in thedeployment attributes for this application.
6. Follow the on-screen instructions.
24.4.8 Viewing an Install SummaryYou can view a log of recent installation and deinstallation by clicking View InstallSummary on the Tasks list on the Supporting Objects page. Note that this log onlydisplays results from the most recent installation or deinstallation that occurred duringthe current Application Express session.
To view the Install Summary:
1. On the Workspace home page, click the App Builder icon.
2. Select the application.
3. Click Supporting Objects.
The Supporting Objects page appears.
4. On the Tasks list on the right side of the page, click View Install Summary.
A Summary page appears.
24.5 Using Build Options to Control ConfigurationUse build options to conditionally include or exclude application components andfunctionality.
• About Build Options (page 24-15)Build options enable developers to enable or disable application components andfunctionality when the application installs or at runtime using theAPEX_UTIL.GET_BUILD_OPTION_STATUS and APEX_UTIL.SET_BUILD_OPTION_STATUS APIs.
• Creating Build Options (page 24-16)Create build options by selecting the application and accessing Build Options onthe Shared Components page.
• Including or Excluding Build Options (page 24-17)Specify Include to enable a component and include it with the application. SpecifyExclude to disable a component and exclude it from the application.
• Selecting a Build Option (page 24-17)Apply build options to a page, component, page control, or shared component inPage Designer.
Chapter 24Using Build Options to Control Configuration
24-14
• Deleting Build Options and Associated Components (page 24-17)Delete a build option by first removing the associated components and thendeleting the build option.
• Viewing Build Option Reports (page 24-19)Access the Utilization report where build options are utilized in the currentapplication. View the History report to see what modifications have been made tobuild options in the current application.
• Exporting Build Options or Build Option Status (page 24-20)Export build option status to toggle build options on or off within anotherenvironment.
24.5.1 About Build OptionsBuild options enable developers to enable or disable application components andfunctionality when the application installs or at runtime using theAPEX_UTIL.GET_BUILD_OPTION_STATUS and APEX_UTIL.SET_BUILD_OPTION_STATUS APIs.
You can apply build options to most application components (such as pages, regions,items, validations, and so on) and specify whether to include or exclude them in theruntime application.
Build options have two possible values:
• Include - Application components are enabled and included with the application.
• Exclude - Application components are disabled and excluded from the application.
If you specify Include, then the Application Express engine considers the componentas part of the application definition at runtime. Conversely, if you specify Exclude,then the Application Express engine treats the component as if it did not exist.
See Also:
APEX_UTIL.GET_BUILD_OPTION_STATUS and APEX_UTIL.SET_BUILD_OPTION_STATUS in Oracle Application Express API Reference
Use Case 1: Enable and Disable Functionality Based on Installation Type
You are developing an application that has many installation types. For eachinstallation type, users may choose to enable or disable certain applicationfunctionality. With build options, you can develop one application and when it installs,you can configure build options to include or exclude associated functionality. You mayalso use an API to expose features within the application. This enables privileged endusers to selectively enable or disable application functionality.
Use Case 2: Hiding Incomplete Functionality in Various Environments
You are developing functionality which is not yet complete, so you do not wish toexpose it to end users. You can use build options to disable functionality when theapplication is built for test and production environments. The benefit of this approach isthat the application can still be deployed without including incomplete functionality.
Chapter 24Using Build Options to Control Configuration
24-15
Use Case 3: Determining the Consequences of Removing Functionality
You are removing functionality you think is not needed by the application, but areunsure if removing the functionality is a safe operation. In this case, you can use buildoptions to essentially "comment out" specific functionality. When the application isdeployed and you determine the functionality is necessary, you can re-instate it. If thefunctionality is deemed as unnecessary, you can then safely remove it from theapplication.
24.5.2 Creating Build OptionsCreate build options by selecting the application and accessing Build Options on theShared Components page.
To create a build option:
1. On the Workspace home page, click the App Builder icon.
2. Select an application.
3. On the Application home page, click Shared Components.
4. Under Application Logic, click Build Options.
5. To create a new build option, click Create.
6. Under Attributes:
a. Application - Identifies the application to which this build option applies.
b. Build Option - Enter a descriptive name for this build option. Build options arepredefined settings that determine whether or not components within anapplication are enabled.
c. Status - Options:
• Include - Include this feature or component. Associated applicationcomponents are enabled and included with the application.
• Exclude - Do not include this feature or component. Associatedapplication components are disabled and excluded from the application.
d. Default on Export - When this application is exported, set the build option tothis value.
e. On Upgrade Keep Status - Select whether the build option status in thedeployed application should be kept, or overwritten with the specified statuswhen the application is upgraded. Yes keeps the deployed status and isuseful if the application supports build option configuration (usingthe APEX_UTIL.SET_BUILD_OPTION_STATUS API) to enable or disable the buildoption in the deployed application, and where you want to respect thosesettings upon upgrade.
f. Comments - Enter any comments or notes. These comments never displaywhen running the application.
7. Click Create Build Option.
Chapter 24Using Build Options to Control Configuration
24-16
24.5.3 Including or Excluding Build OptionsSpecify Include to enable a component and include it with the application. SpecifyExclude to disable a component and exclude it from the application.
Build options have two possible values: Include and Exclude. If you specify anattribute as being included, then the Application Express engine considers it part of theapplication definition at runtime. Conversely, if you specify an attribute as beingexcluded, then the Application Express engine treats it as if it did not exist.
To include or exclude a build option:
1. On the Workspace home page, click the App Builder icon.
2. Select an application.
3. On the Application home page, click Shared Components.
4. Under Application Logic, click Build Options.
The Build Options page appears.
5. Select a build option name.
The Create/Edit Build Option page appears.
6.
7. For Status, select either:
• Include - Include this feature or component. Associated applicationcomponents are enabled and included with the application.
• Exclude - Do not include this feature or component. Associated applicationcomponents are disabled and excluded from the application.
8. Edit any additional attributes as needed.
To learn more about an attribute, see field-level Help.
9. To save your changes, click Apply Changes.
24.5.4 Selecting a Build OptionApply build options to a page, component, page control, or shared component in PageDesigner.
Once you create a build option, you can select it for a page, a component (report,chart, or form), a specific page control (button, item, list of value), and another sharedcomponent (breadcrumb, list, or tab). You apply build options to a page, component,page control, or shared component by navigating to the appropriate page. In PageDesigner, select the page, component, control, or shared component and findConfiguration, Build Option.
24.5.5 Deleting Build Options and Associated ComponentsDelete a build option by first removing the associated components and then deletingthe build option.
• Removing Components Associated with a Build Options (page 24-18)
Chapter 24Using Build Options to Control Configuration
24-17
• Deleting Build Options Permanently (page 24-18)
24.5.5.1 Removing Components Associated with a Build OptionsRemoving components associated with a build option permanently deletes them.
To remove components associated with a build option:
1. On the Workspace home page, click the App Builder icon.
2. Select an application.
3. On the Application home page, click Shared Components.
4. Under Application Logic, click Build Options.
The Build Options page appears.
5. Select the build option .
The Create/Edit Build Option page appears. Note that Associated Componentsdisplay at the bottom of the page.
6. Scroll down to Associated Components and click Remove Components.
A verification window appears.
7. Click Yes - remove components and then click Remove Components.
The components are removed.
24.5.5.2 Deleting Build Options Permanently
Tip:
Deleting a build option does not delete the Associated Components. Beforedeleting a build option, review the Associated Components to determine ifthe components should be removed.
To delete a build option:
1. On the Workspace home page, click the App Builder icon.
2. Select an application.
3. On the Application home page, click Shared Components.
4. Under Application Logic, click Build Options.
The Build Options page appears.
5. Select the build option.
The Create/Edit Build Option page appears.
6. Click Delete.
A verification window appears.
7. Click Delete Build Option.
The build option is removed.
Chapter 24Using Build Options to Control Configuration
24-18
24.5.6 Viewing Build Option ReportsAccess the Utilization report where build options are utilized in the current application.View the History report to see what modifications have been made to build options inthe current application.
• Viewing Build Option Utilization (page 24-19)
• Viewing Build Option History (page 24-19)
24.5.6.1 Viewing Build Option UtilizationOnce you create a build option, a Utilization tab appears on the Build Options page.This report details build option utilization in the current application.
Note:
The Utilization tab only appears on the Build Options page after you create abuild option.
To view the Build Option Utilization report:
1. On the Workspace home page, click the App Builder icon.
2. Select an application.
3. On the Application home page, click Shared Components.
4. Under Application Logic, click Build Options.
5. On the Build Options page, click Utilization.
The Build Option Utilization report appears.
6. Select a build option and click Go.
24.5.6.2 Viewing Build Option HistoryTo view the Build Option History report:
1. On the Workspace home page, click the App Builder icon.
2. Select an application.
3. On the Application home page, click Shared Components.
4. Under Application Logic, click Build Options.
5. On the Build Options page, click History.
The Build Option History report appears.
Chapter 24Using Build Options to Control Configuration
24-19
24.5.7 Exporting Build Options or Build Option StatusExport build option status to toggle build options on or off within another environment.
You can export build options or build option status on the Component Export page. Forexample, you can use this feature to deploy a production application with a hiddenfeature by associating the components of the hidden feature with a build option havingthe status of EXCLUDE. After deployment, you can enable the hidden feature bychanging the status of the build option to INCLUDE and then exporting the Build OptionStatus.
Once you apply the Build Options Status to the production instance, the new featureappears.
To export build options or build option status:
1. Navigate to the Component Export page:
a. On the Workspace home page, click the App Builder icon.
b. Select an application.
c. Click Shared Components.
d. From the Tasks list, click Export Application Components.
2. On the Component Export page, select the build options to export:
a. Click the Build Options Status tab and select the build options to export.
b. Click Add to Export.
3. Click Next.
4. On Components Export:
a. File Format - Select how rows in the export file are formatted:
• UNIX - The resulting file contains rows delimited by line feeds.
• DOS - The resulting file contains rows delimited by carriage returns andline feeds.
b. As of - Specify a time in minutes to go to back to for your export. This optionenables you to go back in time in your application, perhaps to get back adeleted object.
This utility uses the DBMS_FLASHBACK package. Because the timestamp toSystem Change Number (SCN) mapping is refreshed approximately every fiveminutes, you may have to wait that amount of time to locate the version forwhich you are looking. The time undo information is retained and influenced bythe startup parameter UNDO_RETENTION (the default is three hours). However,this only influences the size of the undo tablespace. While two databases mayhave the same UNDO_RETENTION parameter, you are able to go back further intime on a database with fewer transactions because it is not filling the undotablespace, forcing older data to be archived.
c. Click Export Components.
Chapter 24Using Build Options to Control Configuration
24-20
Tip:
For translated applications, the Export Translations field displays. Toexport the selected shared components for the primary languageapplication and all translated applications, from Export Translations field,select Yes. To ensure text strings and markup are up-to-date, rememberto synchronize the translated applications prior to exporting thetranslated components.
24.6 About Publishing the Database Application URLOnce you deploy your application, load the data, and create users, you can publishyour production URL.
You can determine the production URL for your application by either:
• Selecting the application on the Application home page and right-clicking the Runbutton. Then, select Copy link address or Copy link location depending on yourbrowser.
• Running the application and then copying the URL.
The Run button gets its value from the Home link attribute on the Edit SecurityAttributes page. This link is only referenced by this icon and by applications that do notuse the Oracle Application Express Login API. Consider the following example:
http://apex.somewhere.com/pls/apex/f?p=11563:1:3397731373043366363
Where:
• apex.somewhere.com is the URL of the server.
• pls is the indicator to use the mod_plsql cartridge.
• apex is the database access descriptor (DAD) name. The DAD describes howOracle HTTP Server connects to the database server so that it can fulfill an HTTPrequest. The default value is apex.
• f?p= is a prefix used by Oracle Application Express.
• 11563 is the application being called.
• 1 is the page within the application to be displayed.
• 3397731373043366363 is the session number.
To run this example, a user would use the URL:
http://apex.somewhere.com/pls/apex/f?p=11563:1
Tip:
When users log in, they receive unique session numbers. This numberdisplays after :home in the URL. Do not include the session number as part ofthe URL. When another user tries to run a URL containing a session ID, anerror displays.
Chapter 24About Publishing the Database Application URL
24-21
24.7 About Publishing the Websheet Application URLOnce you complete your Websheet application, you can publish your production URL.
You can determine the URL to your Websheet application by running the applicationand copying the URL.
Consider the following example:
http://apex.somewhere.com/pls/apex/ws?p=123:home
Where:
• apex.somewhere.com is the URL of the server.
• pls is the indicator to use the mod_plsql cartridge.
• apex is the database access descriptor (DAD) name. The DAD describes howOracle HTTP Server connects to the database server so that it can fulfill an HTTPrequest. The default value is apex.
• ws?p= is a prefix used by Oracle Application Express to link to a Websheetapplication.
• 123 is the Websheet application being called.
• home is the home page alias defined as Home Page on the Application Propertiespage.
To run this example application, you would use the URL:
http://apex.somewhere.com/pls/apex/ws?p=123:home
Tip:
When users log in, they receive unique session numbers. This numberdisplays after :home in the URL. Do not include the session number as part ofthe URL. When another user tries to run a URL containing a session ID, anerror displays.
24.8 Exporting an Application and Application ComponentsDevelopers can export an application and related files to another Oracle ApplicationExpress instance.
Tip:
You can also export workspaces, applications, and related files from acommand-line using the APEXExport program located in the Utilities folder inthe downloaded installation zip file. See Oracle Application ExpressAdministration Guide
• About the Export Process (page 24-23)
Chapter 24About Publishing the Websheet Application URL
24-22
• About The Export Page (page 24-23)
• Exporting an Application (page 24-25)
• Exporting Application Components (page 24-27)
• Exporting a Workspace (page 24-28)
• Exporting a Page in an Application (page 24-29)
• About Exporting Static Files (page 24-31)
• Exporting Themes (page 24-31)
• Exporting Plug-ins (page 24-31)
• Exporting User Interface Defaults (page 24-32)
• Exporting Team Development Feedback (page 24-34)
• Exporting Script Files from the Script Repository (page 24-34)
24.8.1 About the Export ProcessExporting an application from Oracle Application Express is very straightforwardprocess and produces a readable script file with a .SQL extension. You can run thisSQL script in any Oracle Application Express environment which is the same releaseor later than the environment from which you are exporting. For example, anapplication exported from Oracle Application Express release 4.0 can be imported intoan environment running Oracle Application Express release 4.0, 4.1, or 4.2 or a laterrelease. However, you cannot export an application to an earlier Oracle ApplicationExpress release (for example, an application exported from Application Expressrelease 4.2 cannot be imported into an environment running Application Express 4.1 orearlier).
An application export includes the application definition, supporting objects, andshared components (including plug-ins, images, CSS files, JavaScript files and otherfiles which must be managed independently). Instead of exporting completeapplications you can also choose to export specific components, such as a page. Thisalso creates a SQL script file. There are limitations when importing components into adifferent environments. As a best practice, Oracle recommends you export completeapplications rather than individual components. If you wish to export an applicationand there are components, such as pages that are not yet ready for testing, Oraclerecommends you use Build Options to include or exclude various applicationcomponents.
24.8.2 About The Export PageYou export an application definition and all associated files using the following tabs atthe top of the Export page: Export, Workspace, Applications, Websheet, Themes,Plug-ins, User Interface Defaults, and Feedback.
Chapter 24Exporting an Application and Application Components
24-23
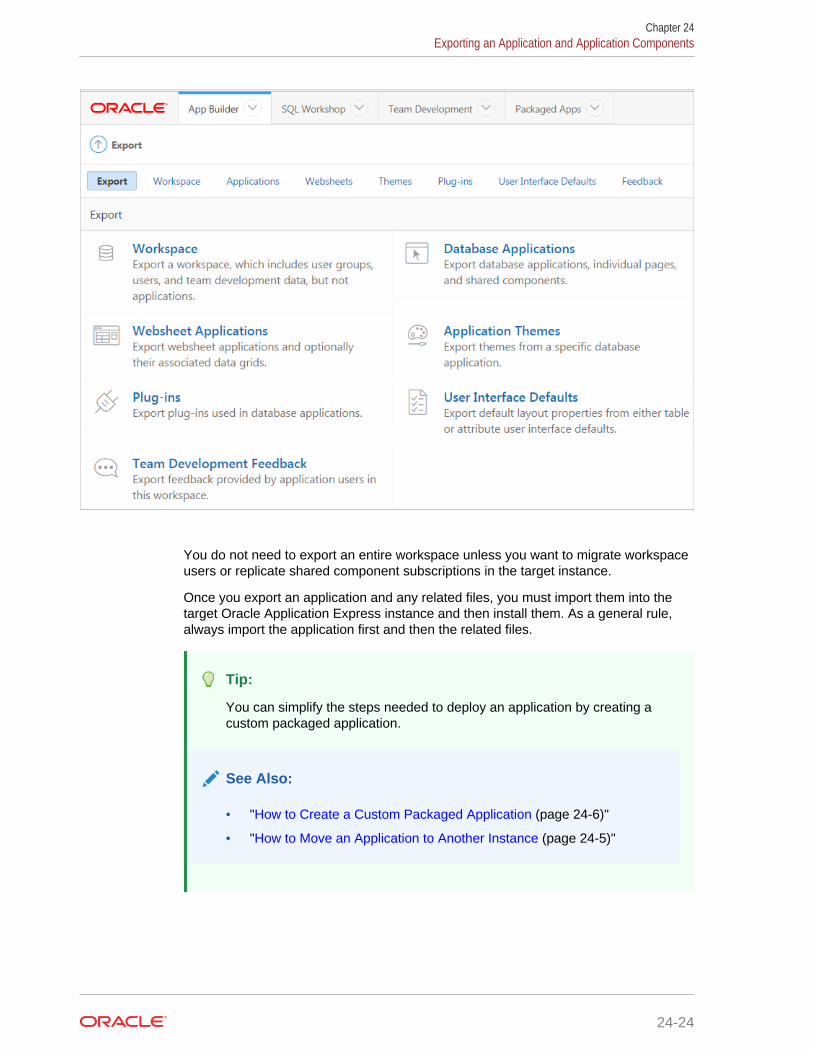
You do not need to export an entire workspace unless you want to migrate workspaceusers or replicate shared component subscriptions in the target instance.
Once you export an application and any related files, you must import them into thetarget Oracle Application Express instance and then install them. As a general rule,always import the application first and then the related files.
Tip:
You can simplify the steps needed to deploy an application by creating acustom packaged application.
See Also:
• "How to Create a Custom Packaged Application (page 24-6)"
• "How to Move an Application to Another Instance (page 24-5)"
Chapter 24Exporting an Application and Application Components
24-24

24.8.3 Exporting an ApplicationWhen you export an application, Oracle Application Express generates a text filecontaining PL/SQL API calls. An application export includes the application definition,supporting objects, and shared components (including plug-ins, images, CSS files,JavaScript files, and other files which must be managed independently).
To export an application:
1. Navigate to the Export page:
a. On the Workspace home page, click the App Builder icon.
b. On the App Builder home page, click Workspace Utilities.
c. Click Export.
2. Click the Applications tab.
3. Under Choose Application, select the application to export.
4. Under Export Application:
a. File Format - Select how rows in the export file are formatted. Options:
• UNIX - The resulting file contains lines terminated by line feeds.
• DOS - The resulting file contains lines terminated by carriage returns andline feeds.
• Database - Saves the resulting file to the Export Repository instead ofdownloading it.
b. Owner Override - By default, the application is owned by the owner identifiedin the application attribute owner. Use this attribute if you wish to import thisapplication as a different schema owner then you are exporting.
c. Build Status Override - Select the build status of the exported application.Options include:
• Run Application Only - Users can only run an application. Selecting thisoption is an effective way to protect an application from modifications fromother developers.
• Run and Build Application - Developers and users can both run and editan application.
Tip:
If you select Run Application Only, you cannot set the argumentp_trace to Yes. The only way to change this setting after you importthe application, is to log in to Oracle Application ExpressAdministration Services. .
d. Debugging - Options:
• Yes - Exports the application with debugging enabled.
• No - Exports the application with debugging disabled.
Chapter 24Exporting an Application and Application Components
24-25
e. As of - Specify a time in minutes to go to back to for your export. This optionenables you to go back in time in your application, perhaps to get back adeleted object.
This utility uses the DBMS_FLASHBACK package. Because the timestamp toSystem Change Number (SCN) mapping is refreshed approximately every fiveminutes, you may have to wait that amount of time to locate the version forwhich you are looking. The time undo information is retained and influenced bythe startup parameter UNDO_RETENTION (the default is three hours). However,this only influences the size of the undo tablespace. While two databases canhave the same UNDO_RETENTION parameter, you are able to go back further intime on a database with fewer transactions because it is not filling the undotablespace, forcing older data to be archived.
5. Under Export Preferences:
a. Export Supporting Object Definitions - Specify whether to export supportingobject definitions with your application.
• Yes - Includes supporting object definitions in the application export. Doesnot automatically load supporting objects when invoked from a commandline.
• No - Does not include the supporting object definitions in the export.
• Yes and Install on Import Automatically - Includes supporting objectdefinitions and a call to install supporting objects in the application export.This option is valid only for command line installs. When applicationimports from the command line, it automatically installs or upgrades thesupporting objects.
Supporting object definitions include all configuration options and scripts andenable an application export to include database object definitions, imagedefinitions, and seed data SQL statements encapsulated in a single file.
b. Export Public Reports - Specify whether to include public reports with yourapplication. Public reports are the public shared report settings saved by usersfrom an interactive report or interactive grid.
• Yes - Includes Public reports in the application export.
• No - Does not include Public reports in the application export.
c. Export Private Reports - Specify whether to include Private reports with yourapplication. Private reports are the private customized settings saved by usersfrom an interactive report or interactive grid.
• Yes - Includes public reports in the application export.
• No - Does not include public reports in the application export.
d. Export Report Subscriptions - Specify whether to include interactive reportor interactive grid subscription settings with your application. This will belimited to the unexpired subscription settings of all users for all interactivereports or interactive grids in the application.
• Yes - Includes report subscriptions for the reports you are exporting in theapplication export.
• No - Does not include report subscriptions for the reports in the applicationexport.
e. Export Developer Comments - Specify whether to include DeveloperComments in your application export.
Chapter 24Exporting an Application and Application Components
24-26
• Yes - Includes Developer Comments in the application export.
• No - Does not include Developer Comments in the export.
f. Export Translations - Specify whether to include Translations with yourapplication export.
• Yes - Includes the translation mappings and all text from the translationrepository.
• No - Does not include translation mappings or the translation repository.
Translation Text Messages and Dynamic Translations are always included inthe application export.
g. Export with Original IDs - Specify whether the export file should contain theapplication component IDs as of now or as of the last import of this application.
• Yes - Includes the IDs as of the last import.
• No - Includes the current IDs of the components.
6. Click Export.
Tip:
In addition to exporting the actual application file, you may also need toexport other related files such as cascading style sheets, images, and scriptfiles.
24.8.4 Exporting Application ComponentsYou can use the Component Export Wizard to export shared components or pagecomponents to another application or workspace, back up a component before editingit, or create an export that functions as a patch to another Oracle Application Expressinstance.
To export shared components or page components:
1. Navigate to the Component Export page:
a. On the Workspace home page, click the App Builder icon.
b. Select an application.
c. Click Shared Components.
d. From the Tasks list, click Export Application Components.
The Component Export page appears.
2. Click the following tabs and select the components to export:
• Components displays shared application components and entire pages. Usethe navigation bar at the top of the page to search for components.
• Components by Page lists components of the selected page. Navigate to aspecific page by making a selection from the Page list.
• Build Option Status displays available build options. Use this page to turnbuild options on and off.
Chapter 24Exporting an Application and Application Components
24-27
For each tab, select the appropriate components and click Add to Export.
3. Click Next.
4. For Component Export:
a. File Format - Select how rows in the export file are formatted:
• UNIX - The resulting file contains lines terminated by line feeds.
• DOS - The resulting file contains lines terminated by carriage returns andline feeds.
b. As of - Specify a time in minutes to go to back to for your export. This optionenables you to go back in time in your application, perhaps to get back adeleted object.
This utility uses the DBMS_FLASHBACK package. Because the timestamp toSystem Change Number (SCN) mapping is refreshed approximately every fiveminutes, you may have to wait that amount of time to locate the version forwhich you are looking. The time undo information is retained and influenced bythe startup parameter UNDO_RETENTION (the default is three hours). However,this only influences the size of the undo tablespace. While two databases mayhave the same UNDO_RETENTION parameter, you are able to go back further intime on a database with fewer transactions because it is not filling the undotablespace, forcing older data to be archived.
c. Click Export Components.
Tip:
For translated applications, the Export Translations field displays. Toexport the selected shared components for the primary languageapplication and all translated applications, from Export Translations field,select Yes. To ensure text strings and markup are up-to-date, rememberto synchronize the translated applications prior to exporting thetranslated components.
See Also:
• "Managing Shared Components (page 17-1)"
• "Importing an Application, Page or Component Export(page 24-35)"
• "Exporting Build Options or Build Option Status (page 24-20)"
24.8.5 Exporting a WorkspaceYou can move or copy a workspace to another Oracle Application Express instance byexporting a workspace. When you export a workspace, Oracle Application Expresscreates an ASCII text SQL script of users, defined user groups, Team Developmentdata, and workspace artifacts including SQL Scripts, SQL Command History, savedSQL, user preferences, developer login history, email logs, and user interface defaults.
Chapter 24Exporting an Application and Application Components
24-28
To export a workspace:
1. Navigate to the Export page:
a. On the Workspace home page, click the App Builder icon.
b. On the App Builder home page, click Workspace Utilities.
c. Click Export.
2. On the Export page, click the Workspace tab.
3. Under Export Workspace:
a. Include Team Development - Select Yes to include Team Development datasuch as Features, Milestones, To Do, Bugs, Feedback, Links and News. Onlyselect Yes if the target instance for this workspace is not a runtime onlyinstance. Otherwise, select No.
b. Export Type - In most cases, you should not change the default valueMinimal. Only select Full if you want to replicate to another instance allworkspace artifacts including SQL Scripts, SQL Command History, savedSQL, user preferences, developer login history, email logs, and user interfacedefaults.
c. File Format - Select how rows in the export file are formatted:
• DOS - The resulting file contains lines terminated by line feeds.
• UNIX - The resulting file contains lines terminated by carriage returns andline feeds.
d. File Character Set - The export file will be encoded in the specified characterset.
4. Click Export.
See Also:
"Managing Application Express Users" in Oracle Application ExpressAdministration Guide
24.8.6 Exporting a Page in an Application
WARNING:
Exporting and importing a single page to a different system is an advanceddeployment technique with the following restrictions:
• Both systems have to have the same application ID and workspace ID.
• Both systems have to have the same IDs for Shared Components.
• If the page references new or updated Shared Components, those haveto be exported and imported first.
If these restrictions are not fulfilled, the import will fail.
Chapter 24Exporting an Application and Application Components
24-29
.To export a page in an application:
1. Navigate to the appropriate application page:
2. Click the Utilities menu and select Export.
The Export Page Wizard appears.
3. For Page, Identify the page you wish to export. You can select only one page forexport at a time.
4. From File Format, select how rows in the export file are formatted. Optionsinclude:
• UNIX - The resulting file contains rows delimited by line feeds.
• DOS - The resulting file contains rows delimited by carriage returns and linefeeds.
5. For As of, specify a time in minutes to go to back to for your export. This optionenables you to go back in time in your application, perhaps to get back a deletedobject.
This utility uses the DBMS_FLASHBACK package. Because the timestamp to SystemChange Number (SCN) mapping is refreshed approximately every five minutes,you may have to wait that amount of time to locate the version for which you arelooking. The time undo information is retained and influenced by the startupparameter UNDO_RETENTION (the default is three hours). However, this onlyinfluences the size of the undo tablespace. While two databases may have thesame UNDO_RETENTION parameter, you are able to go back further in time on adatabase with fewer transactions because it is not filling the undo tablespace,forcing older data to be archived.
6. Click Export Page.
• Exporting a Websheet (page 24-30)
See Also:
• "Viewing a Page in Page Designer (page 8-20)"
• "Exporting Application Components (page 24-27)"
• "Exporting an Application (page 24-25)"
• "Importing an Application, Page or Component Export (page 24-35)"
24.8.6.1 Exporting a WebsheetUse the Export Websheet utility to make a Websheet application available to otherusers.
To export a Websheet application:
1. Navigate to the Export page:
a. On the Workspace home page, click the App Builder icon.
b. On the App Builder home page, click Workspace Utilities.
Chapter 24Exporting an Application and Application Components
24-30
c. Click Export.
2. On the Export page, click the Websheets tab.
3. On Export Websheet:
a. Websheet Application - Select the Websheet to export.
b. File Format - Select how rows in the export file are formatted. Options:
• UNIX - The resulting file contains lines terminated by line feeds.
• DOS - The resulting file contains lines terminated by carriage returns andline feeds.
c. Export Preferences - Select the appropriate options.
d. Click Export.
24.8.7 About Exporting Static FilesYou can export static application files and static workspace files by creating a ZIP file.
24.8.8 Exporting ThemesUse the Export Theme utility to export themes from one Oracle Application Expressdevelopment instance to a file.
To export an application theme:
1. Navigate to the Export page:
a. On the Workspace home page, click the App Builder icon.
b. On the App Builder home page, click Workspace Utilities.
c. Click Export.
2. Click the Themes tab.
3. On the Themes page:
a. Application - Select an application.
b. Export Theme - Select the theme to export.
c. File Format - Select how rows in the export file are formatted. Optionsinclude:
• UNIX - The resulting file contains lines terminated by line feeds.
• DOS - The resulting file contains lines terminated by carriage returns andline feeds.
d. Click Export.
24.8.9 Exporting Plug-insUse the Export Plug-in utility to export plug-ins from one Oracle Application Expressdevelopment instance to a file.
To export a Plug-in from the Export page:
Chapter 24Exporting an Application and Application Components
24-31
1. Navigate to the Export page:
a. On the Workspace home page, click the App Builder icon.
b. On the App Builder home page, click Workspace Utilities.
c. Click Export.
2. Click the Plug-ins tab.
3. On the Plug-ins page:
a. Application - Select an application.
b. Plug-in - Select the plug-in to export.
c. File Format - Select how rows in the export file are formatted. Optionsinclude:
• UNIX - The resulting file contains rows delimited by line feeds.
• DOS - The resulting file contains rows delimited by carriage returns andline feeds.
d. Click Export.
24.8.10 Exporting User Interface DefaultsThis section describes how to export User Interface Defaults.
• About Exporting User Interface Defaults (page 24-32)
• Exporting User Interface Defaults from the Export Page (page 24-32)
• Exporting User Interface Defaults from the User Interface Defaults Page(page 24-33)
24.8.10.1 About Exporting User Interface DefaultsExporting User Interface Defaults is useful when you plan to develop on a targetsystem. User Interface Defaults are divided into two categories, the Table Dictionary,and the Attribute Dictionary.
• The Table Dictionary consists is specific to tables and columns within a selectedschema. These defaults are used over those defined in the Attribute Dictionary.
• The Attribute Dictionary contains a set of attributes about a column that is used increating forms and reports. The definitions are matched by column name and aparticular definition can be shared among several columns by using synonyms.
When you export User Interface Defaults, all User Interface Defaults for the selecteddictionary and schema are exported to a single SQL Command script. Whenprompted, save this file to your hard drive. The file contains an API call to create tablehints by making calls to the application PL/SQL API. You can use this file to importUser Interface Defaults to another database and Oracle Application Express instance.
24.8.10.2 Exporting User Interface Defaults from the Export PageTo export User Interface Defaults from the Export page:
1. Navigate to the Export page:
Chapter 24Exporting an Application and Application Components
24-32
a. On the Workspace home page, click the App Builder icon.
b. On the App Builder home page, click Workspace Utilities.
c. Click Export.
2. Click the User Interface Defaults tab.
3. On the Table Dictionary page:
a. Schema - Select the schema that owns the table associated with the UserInterface Defaults.
b. File Format - Select how rows in the export file are formatted. Optionsinclude:
• UNIX - The resulting file contains lines terminated by line feeds.
• DOS - The resulting file contains lines terminated by carriage returns andline feeds.
c. Click Export.
4. On the Attribute Dictionary page:
a. File Format - Select how rows in the export file are formatted. Optionsinclude:
• UNIX - The resulting file contains rows delimited by line feeds.
• DOS - The resulting file contains rows delimited by carriage returns andline feeds.
b. Click Export.
24.8.10.3 Exporting User Interface Defaults from the User Interface DefaultsPage
To export User Interface Defaults from the User Interface Defaults page:
1. On the Workspace home page, click the SQL Workshop icon.
2. Click Utilities.
3. Click User Interface Defaults.
The User Interface Defaults page appears.
4. Select a dictionary:
• Table Dictionary - Exports specific tables and columns within a selectedschema.
• Attribute Dictionary - Exports a set of column attributes used to create formsand reports.
5. Under Tasks, click Export.
6. For File format, select an option:
• UNIX - The resulting file contains rows delimited by line feeds.
• DOS - The resulting file contains rows delimited by carriage returns and linefeeds.
• Database - Exports to the file repository instead of producing a file todownload.
Chapter 24Exporting an Application and Application Components
24-33
7. Click Export.
24.8.11 Exporting Team Development FeedbackUse the Export Feedback utility to synchronize feedback from a production or testsystem to the development system. The development system is identified by using theworkspace setting Feedback Synchronization Source Identifier which is set on the EditWorkspace Information page. If exporting from a development system, the exportprocess has an additional attribute called Deployment System where you specify towhich deployment system, production or test, you want to synchronize the updatedfeedback to.
To export Team Development Feedback:
1. Navigate to the Export page:
a. On the Workspace home page, click the App Builder icon.
b. On the App Builder home page, click Workspace Utilities.
c. Click Export.
2. Click the Feedback tab.
3. On the Feedback page:
a. Changes Since - Select the date of the oldest feedback to export. Allfeedback from this selected date until the current date is exported.
b. File Format - Select how rows in the export file are formatted. Optionsinclude:
• UNIX - The resulting file contains rows delimited by line feeds.
• DOS - The resulting file contains rows delimited by carriage returns andline feeds.
c. Click Export.
24.8.12 Exporting Script Files from the Script RepositoryYou can transfer selected scripts from your current Script Repository to a ScriptRepository in a different Workspace by using the Export and Import tasks.
To export script files:
1. On the Workspace home page, click the SQL Workshop icon.
2. Click SQL Scripts.
3. On the Tasks list, click Export.
4. Select the appropriate script files and click Add to Export.
5. Review the file name and click Export All.
Select the Remove check box to remove the script.
24.9 Importing Export FilesOnce you export an application and any related files, you must import them into thetarget Oracle Application Express instance and then install them.
Chapter 24Importing Export Files
24-34
Note that you cannot import an application created in a specific release into an earlierversion. As a general rule, always import the application first and then the related files.
Tip:
You can simplify the steps needed to deploy an application by creating acustom packaged application.
• Importing an Application, Page or Component Export (page 24-35)
• About Importing Application Groups (page 24-36)
• Importing a Websheet (page 24-36)
• Importing Plug-ins (page 24-37)
• Importing Themes (page 24-38)
• Importing User Interface Defaults (page 24-38)
• Importing Team Development Feedback (page 24-39)
See Also:
• "How to Create a Custom Packaged Application (page 24-6)"
• "How to Move an Application to Another Instance (page 24-5)"
24.9.1 Importing an Application, Page or Component ExportTo import an Application, Page or Component Export into a target Oracle ApplicationExpress instance:
1. Navigate to the Import page:
a. On the Workspace home page, click the App Builder icon.
b. On the App Builder home page, click Import.
2. For Import:
a. Import file - Navigate to the file.
b. File Type - Select Application, Page, or Component Export.
c. Verify that File Character Set is correct.
d. Click Next.
Once you import a file, you have the option to install it.
3. To install the file, click Next.
The Install Application wizard appears.
4. For the Install wizard:
a. Parsing Schema - Select a schema.
Chapter 24Importing Export Files
24-35
This is the schema against which all of the application's SQL and PL/SQL areparsed.
b. Build Status - Select one of the following:
• Run Application Only - Users can only run an application.
• Run and Build Application - Users can run an application anddevelopers can both run and edit an application.
Selecting Run Application Only is an effective way to protect an applicationfrom modifications from other developers.
Tip:
If you select Run Application Only, the only way to change thissetting after you import the application is to log in to OracleApplication Express Administration Services.
c. Install As Application - Select one of the following:
• Auto Assign New Application ID
• Reuse Application ID From Export File
• Change Application ID
Use these options to avoid application ID conflicts. These options come inhandy when you have two versions of the same application in the sameinstance. For example, you might be migrating an application to a productioninstance and still need to maintain the development version.
d. Click Install Application.
24.9.2 About Importing Application GroupsApplication groups are exported with an application, application exports include angroup ID, name, and comments. When importing an application, the application importfollows these rules:
• On import, an application uses an existing group if the ID matches.
• If no application group exists with the same ID on the target system, thenapplication import looks for another group ID with the same name. If a namematch is found, the application is imported with the ID corresponding to thisapplication group name.
• If no ID or name matches existing application groups on the target system then anew application group is created. The new application group uses the applicationgroup ID if that ID is not used in that Oracle Application Express instance. If thegroup ID is being used, then a new ID is generated.
24.9.3 Importing a WebsheetTo import a Websheet into a target Oracle Application Express instance:
1. Navigate to the Import page:
a. On the Workspace home page, click the App Builder icon.
Chapter 24Importing Export Files
24-36
b. On the App Builder home page, click Import.
2. For Specify File:
a. Import file - Navigate to the file.
b. File Type - Select Websheet Application Export.
c. Click Next.
Once you import a file, you have the option to install it.
3. To install an imported file, click Next.
The Install Application wizard appears.
4. For the Install Application wizard:
a. Install As Application - Select one of the following:
• Auto Assign New Application ID
• Reuse Application ID From Export File
• Change Application ID
Use these options to avoid application ID conflicts. These options come inhandy when you have two versions of the same application in the sameinstance. For example, you might be migrating an application to a productioninstance and still need to maintain the development version.
b. Click Install.
24.9.4 Importing Plug-insTo import an exported plug-in file:
1. Navigate to the Import page:
a. On the Workspace home page, click the App Builder icon.
b. On the App Builder home page, click Import.
2. For Specify File:
a. Import file - Navigate to the file.
b. File Type - Select Plug-in.
c. Verify that File Character Set is correct.
d. Click Next.
Once you import a file, you have the option to install it.
3. To install an imported file, click Next.
4. Click Install Plug-in.
Note:
If the plug-in with the same name exists, a dialog displays requestingpermission to write over the existing plug-in.
Chapter 24Importing Export Files
24-37
24.9.5 Importing ThemesAfter you import an application into the target Oracle Application Express instance, youmust import all related files.
To import a Theme Export file:
1. Navigate to the Import page:
a. On the Workspace home page, click the App Builder icon.
b. On the App Builder home page, click Import.
2. On Import Definition, select the following:
a. Import file - Navigate to the file.
b. File Type - Select Theme Export.
c. File Character Set - Verify that File Character Set is correct.
d. Click Next.
Once you import a file, you have the option to install it.
3. To install an imported file, click Next.
4. Click Install Theme.
24.9.6 Importing User Interface DefaultsUser Interface Defaults enables you to assign default user interface properties to atable, column, or view within a specified schema.
After you import an application into the target Oracle Application Express instance, youmust import all related files.
To import User Interface Defaults:
1. Navigate to the Import page:
a. On the Workspace home page, click the App Builder icon.
b. On the App Builder home page, click Import.
2. Select an application.
3. On Import Definition:
a. Import file - Navigate to the file.
b. File Type - Select User Interface Defaults.
c. File Character Set - Verify that File Character Set is correct.
d. Click Next.
Once you import a file, you have the option to install it.
4. To install an imported file, click Next.
5. Click Install User Interface Defaults.
Chapter 24Importing Export Files
24-38
24.9.7 Importing Team Development FeedbackTo import Team Development Feedback:
1. Navigate to the Import page:
a. On the Workspace home page, click the App Builder icon.
b. On the App Builder home page, click Import.
2. Select Feedback.
3. For File Character Set, verify that File Character Set is correct and click Next.
Once you import a file, you have the option to install it.
4. To install an imported file, click Next.
5. Click Install Feedback.
24.10 Installing Export FilesAfter you export an application and any related files and you import them into thetarget Oracle Application Express instance, the files are stored in the ExportRepository. Next, you must install them.
• About Installing Export Files (page 24-39)
• Accessing the Export Repository (page 24-40)
• Installing an Application Export from the Export Repository (page 24-40)
• Installing Other Files from the Export Repository (page 24-41)
• Deleting Files from the Export Repository (page 24-41)
• Installing Export Files from SQL*Plus (page 24-41)
• Using SQL*Plus to Install Export Files (page 24-41)
24.10.1 About Installing Export FilesYou can install export files in the following ways:
• After you import the export file, click the Install button and follow the on-screeninstructions.
• Import the export files into App Builder and then install the files from the ExportRepository.
• Install the export files from SQL*Plus.
Tip:
You can simplify the steps needed to deploy an application by creating acustom packaged application.
Chapter 24Installing Export Files
24-39
24.10.2 Accessing the Export RepositoryWhen you import an application and any related files into a target Oracle ApplicationExpress instance, the files are stored in the Export Repository. You can use the ExportRepository to manage archived application exports, imports, and other files.
To access the Export Repository:
1. On the Workspace home page, click the App Builder icon.
2. Select an application.
3. On the Application home page, click Utilities.
4. Click Export Repository.
The Export Repository appears.
24.10.3 Installing an Application Export from the Export RepositoryAfter you import an application export into an Oracle Application Express instance, youmust install it before it can become active or available in App Builder.
To install an application export from the Export Repository:
1. Navigate to the Export Repository.
2. Select an application export and click Install in the Action column.
3. Specify the following:
a. Parsing Schema - Select a schema.
This is the schema against which all of the application's SQL and PL/SQL areparsed.
b. Build Status - Select one of the following:
• Run Application Only
• Run and Build Application
Select Run Application Only to run the application in the target instance andmake it inaccessible to developers.
Tip:
If you select Run Application Only, the only way to change thissetting after you import the application is to log in to OracleApplication Express Administration Services.
c. Install As Application - Select one of the following:
• Auto Assign New Application ID
• Reuse Application ID from Export File
• Change Application ID
Use these options to avoid application ID conflicts. Use these options whenyou must have two versions of the same application in the same instance. For
Chapter 24Installing Export Files
24-40
example, you might be migrating an application to a production instance andstill need to maintain the development version.
d. Click Install.
Tip:
If you are installing a custom packaged application, the installerprompts you to install the custom packaged installation scripts.Follow the on-screen instructions.
24.10.4 Installing Other Files from the Export RepositoryAfter you import files into an Oracle Application Express instance, you must installthem before they can become active or available in App Builder.
To install files stored in the Export Repository:
1. Navigate to the Export Repository.
2. Select the file to be installed and click Install in the Action column.
3. Follow the on-screen instructions.
24.10.5 Deleting Files from the Export RepositoryYou can delete a file from the Export Repository.
To delete a file from the Export Repository:
1. Navigate to the Export Repository.
2. Select the file to be deleted and click Delete Checked.
24.10.6 Installing Export Files from SQL*PlusYou can also install export files from SQL*Plus. The export file must originate from thesame user database account as the one into which you are installing.
The following restrictions apply for export files:
• If the export file is a database application, then the application ID is overwritten.Therefore, the target workspace must own the ID of the application being installed.
• If the export file is a Websheet application, then the target workspace must haveWebsheet Database objects set-up.
• If the export file is a Websheet application, then the export file must be installedusing the Websheet schema in the target workspace.
• If the export file is a Websheet application, then the application ID is overwritten.
24.10.7 Using SQL*Plus to Install Export FilesTo install Oracle Application Express export files from SQL*Plus:
Chapter 24Installing Export Files
24-41
1. Log in to SQL*Plus.
2. Run the export file.
For example, if your export file is names f144.sql by default, you would type @f144at the command prompt.
Chapter 24Installing Export Files
24-42
25Managing Application Legacy Components
Although Oracle still supports legacy application components, Oracle does notrecommend using them.
• Managing Legacy Charts (page 25-1)Legacy charts in Oracle Application Express are based on the AnyChart HTML5Chart Component and the AnyChart Flash Chart Component.
• Creating a Legacy Master Detail Form (page 25-12)Create a legacy master detail form by running the Create Page Wizard andselecting Legacy Page and then Legacy Master Detail.
• Managing Legacy Tabular Forms (page 25-15)Create a legacy tabular form by running the Create Page Wizard and selectingLegacy Page and then Tabular Form.
• Managing Legacy Calendars (page 25-19)Legacy calendars are template-based. In previous releases Legacy Calendar wasreferred to as Calendar (Template, Classic calendar, Easy calendar, and SQLcalendar).
• Viewing Legacy Components in Gallery (page 25-20)View legacy and unsupported components in the Page Designer gallery byselecting the Gallery Menu and then Show Legacy Components.
25.1 Managing Legacy ChartsLegacy charts in Oracle Application Express are based on the AnyChart HTML5 ChartComponent and the AnyChart Flash Chart Component.
Tip:
AnyChart charts are legacy application components. Although Oracle stillsupports legacy components, Oracle recommends creating new chartsbased on Oracle JET charts. See "Creating Charts (page 11-27). "
• About Chart Legacy Types (page 25-2)HTML5 charts and Flash charts support in Oracle Application Express is based onthe AnyChart HTML5 Chart Component and AnyChart Flash Chart Component.AnyChart is a flexible Flash and JavaScript-based solution that enablesdevelopers to create animated, compact, interactive charts.
• Creating SQL Queries for Legacy Charts (page 25-2)Use the following syntax when creating legacy charts.
• Adding a Legacy Chart to a New Page (page 25-5)Add a legacy chart to a new page using the Create Page Wizard.
25-1
• Adding a Legacy Chart in Page Designer (page 25-6)Add a legacy chart to an existing page in Page Designer.
• Editing Legacy Charts (page 25-8)Edit legacy charts in Page Designer.
• About Saving Flash Charts (page 25-11)You can add support to save Flash charts locally.
• Using Custom XML with Flash and HTML5 Charts (page 25-11)Further customize the look and feel of a legacy chart by adding custom XML.
25.1.1 About Chart Legacy TypesHTML5 charts and Flash charts support in Oracle Application Express is based on theAnyChart HTML5 Chart Component and AnyChart Flash Chart Component. AnyChartis a flexible Flash and JavaScript-based solution that enables developers to createanimated, compact, interactive charts.
• About Legacy HTML5 Charts (page 25-2)
• About Legacy Flash Charts (page 25-2)
25.1.1.1 About Legacy HTML5 ChartsHTML5 chart support in Oracle Application Express is based on the AnyChart HTML5Chart Component. HTML5 charts use a JavaScript chart engine, rendering the chart inSVG format. Flash cannot be rendered on most of the modern mobile devices,however you can now take advantage of our new HTML5 charting solution toincorporate charts in your mobile applications. HTML5 charts are compatible withpopular browsers for the following mobile platforms:
• Android: Versions 3.1, 3.2, 4.0, 4.0.3, and 4.1
• IOS (iPhone, iPad, iPod Touch): Safari 3.2 and higher is required
Tip:
To learn more, see http://6.anychart.com/products/anychart/docs.
25.1.1.2 About Legacy Flash ChartsFlash chart support in Oracle Application Express is based on the AnyChart FlashChart Component. Flash charts are rendered by a browser and require Flash player 9or later. With AnyChart 6.0, Flash charts are rendered using the FLASH_PREFERREDrendering type. If Flash Player is not available on the device displaying the chart (forexample, pages displayed on an iPhone), AnyChart automatically switches to theHTML5 chart engine and displays an SVG-based chart.
25.1.2 Creating SQL Queries for Legacy ChartsUse the following syntax when creating legacy charts.
• Legacy Chart Syntax (page 25-3)
Chapter 25Managing Legacy Charts
25-2
• Dial Chart Syntax (Flash and HTML5) (page 25-3)
• Legacy Multiple Series Syntax (Flash and HTML5) (page 25-3)
• Legacy Range Chart Syntax (Flash and HTML5) (page 25-4)
• Legacy Scatter Chart Syntax (Flash and HTML5) (page 25-4)
• Legacy Candlestick Chart Syntax (Flash and HTML5) (page 25-4)
• Legacy Gantt Chart Syntax (Flash Only) (page 25-4)
25.1.2.1 Legacy Chart SyntaxWhen define a chart, you select a chart type and provide a SQL query using thefollowing syntax:
SELECT link, label, valueFROM ...
Where:
• link is a URL.
• label is the text that displays in the bar.
• value is the numeric column that defines the bar size.
For example:
SELECT null, last_name, salaryFROM employeesWHERE DEPARTMENT_ID = :P101_DEPARTMENT_ID
25.1.2.2 Dial Chart Syntax (Flash and HTML5)To create a dial chart, select a dial chart type and provide a SQL query using thefollowing syntax:
SELECT value , maximum_value [ ,low_value [ ,high_value] ]FROM ...
Where:
• value is the starting point on the dial.
• maximum_value is the possible highest point on the dial.
• low_value and high_value are the historical low and high values.
For example:
SELECT dbms_random.value(500, 1200), 1300, dbms_random.value(100, 200)FROM DUAL
25.1.2.3 Legacy Multiple Series Syntax (Flash and HTML5)For column charts and line charts, you can define multiple series in one SQL query.The series names for these chart types are derived from the corresponding columnaliases in the query. To define a multiple series chart, use the following syntax:
SELECT link, label, series_1_value [, series_2_value [, ...]]FROM ...
Chapter 25Managing Legacy Charts
25-3
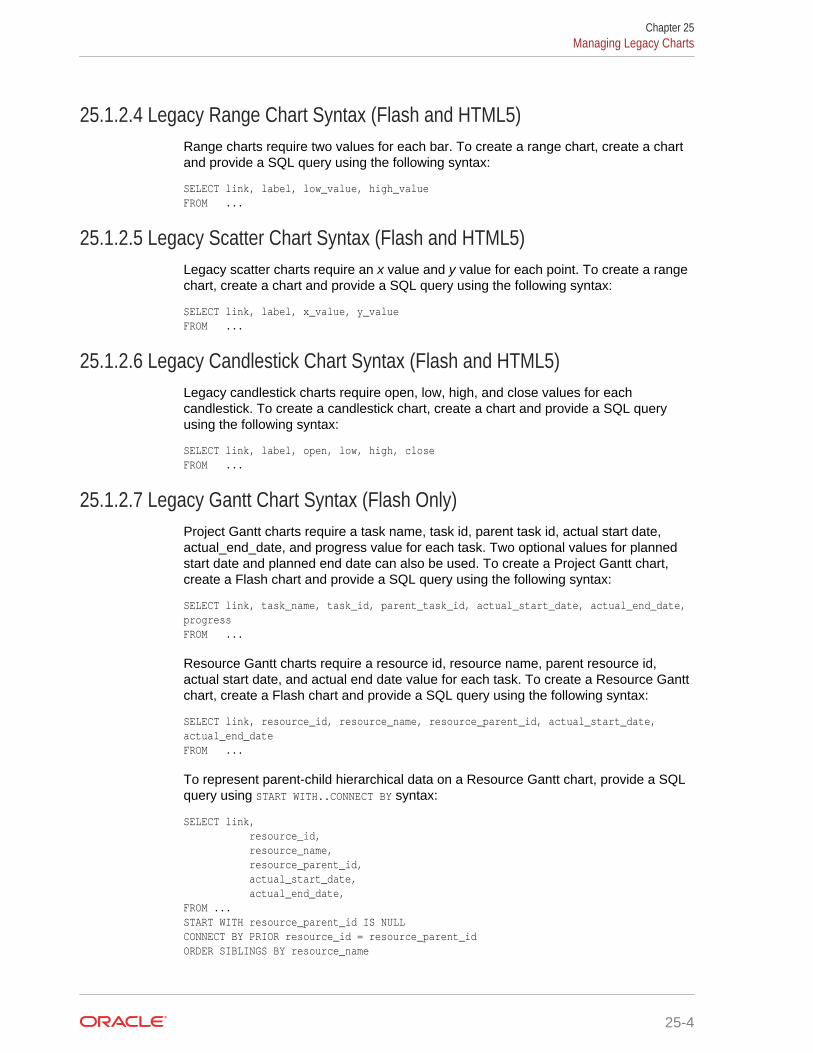
25.1.2.4 Legacy Range Chart Syntax (Flash and HTML5)Range charts require two values for each bar. To create a range chart, create a chartand provide a SQL query using the following syntax:
SELECT link, label, low_value, high_value FROM ...
25.1.2.5 Legacy Scatter Chart Syntax (Flash and HTML5)Legacy scatter charts require an x value and y value for each point. To create a rangechart, create a chart and provide a SQL query using the following syntax:
SELECT link, label, x_value, y_value FROM ...
25.1.2.6 Legacy Candlestick Chart Syntax (Flash and HTML5)Legacy candlestick charts require open, low, high, and close values for eachcandlestick. To create a candlestick chart, create a chart and provide a SQL queryusing the following syntax:
SELECT link, label, open, low, high, closeFROM ...
25.1.2.7 Legacy Gantt Chart Syntax (Flash Only)Project Gantt charts require a task name, task id, parent task id, actual start date,actual_end_date, and progress value for each task. Two optional values for plannedstart date and planned end date can also be used. To create a Project Gantt chart,create a Flash chart and provide a SQL query using the following syntax:
SELECT link, task_name, task_id, parent_task_id, actual_start_date, actual_end_date, progressFROM ...
Resource Gantt charts require a resource id, resource name, parent resource id,actual start date, and actual end date value for each task. To create a Resource Ganttchart, create a Flash chart and provide a SQL query using the following syntax:
SELECT link, resource_id, resource_name, resource_parent_id, actual_start_date, actual_end_dateFROM ...
To represent parent-child hierarchical data on a Resource Gantt chart, provide a SQLquery using START WITH..CONNECT BY syntax:
SELECT link, resource_id, resource_name, resource_parent_id, actual_start_date, actual_end_date,FROM ...START WITH resource_parent_id IS NULLCONNECT BY PRIOR resource_id = resource_parent_idORDER SIBLINGS BY resource_name
Chapter 25Managing Legacy Charts
25-4

25.1.3 Adding a Legacy Chart to a New PageAdd a legacy chart to a new page using the Create Page Wizard.
To add a chart on a new page:
Note:
Legacy AnyChart Charts are legacy application components. AlthoughOracle still supports legacy components, Oracle recommends creating newcharts based on Oracle JET Data Visualizations instead.
1. On the Workspace home page, click the App Builder icon.
2. Select an application.
3. Click Create Page.
4. For Create a Page:
a. User Interface - Select a user interface for the page (optional).
This attribute only displays for applications using older themes and for whichDesktop and Mobile User Interfaces have been defined.
b. Page Type - Select Legacy Page and then AnyChart Chart.
Tip:
Component pages provides page-level functionality and can beadded multiple times within a given application such as reports,forms, charts, or calendars. Feature pages provide application-levelfunctionality and can only be added once per application.
5. For Chart Type:
a. Chart Rendering - Select a chart type.
To learn more about an attribute, see field-level Help.
b. Chart Type - Specify a chart type. Depending upon the chart type, you may beprompted to make additional selections.
c. Click Next.
6. For Chart Type - Select a chart type and click Next.
7. For Page and Region Attributes:
a. Page Number - Enter a page number on which the chart is to be created.
b. Page Name - Enter a page name.
c. Page Mode - Select a page mode.
To learn more, see field-level Help.
d. Breadcrumb - Select whether to use a breadcrumb navigation control on yourpage, and which breadcrumb navigation control you want to use.
Chapter 25Managing Legacy Charts
25-5
e. Click Next.
8. For Navigation Preference, specify the type of navigation to include on this pageand click Next. The navigation options (for example, navigation menu or tabs)depends upon the current application theme.
9. For Chart Attributes, specify the appropriate attributes.
Tip:
The attributes that appear depend upon the chart type. To learn moreabout an attribute, see field-level Help.
10. For Source:
Enter the query that will return the data to display the chart. Depending on thechart type, the required query format is different.
a. Enter SQL Query or PL/SQL function returning a SQL Query - Specify theSQL query that will populate your chart. For examples, see see field-levelHelp.
b. Specify a query by either:
• Entering a SQL query in the field provided.
• Clicking the Build Query button. When the Build Chart Query Wizardappears, follow the on-screen instructions.
c. Perform Query validation/Save query without validation - Specify whether ornot to validate the chart query. Queries should be validated wheneverpossible. However when referring to items in your session, this may notpossible until running the page, in this case chose to save without validation.
d. Page Items to Submit - Enter a comma separated list of page items on thecurrent page to be set into session state when the chart data gets read with aseparate request.
e. Maximum Rows - Enter the maximum number of rows you want to use todisplay the chart.
f. When No Data Found Message - Enter the text you want to use if the querydoes not return any rows.
g. Specify relevant chart attributes.
To learn more about an attribute, see field-level Help.
11. Click Create.
25.1.4 Adding a Legacy Chart in Page DesignerAdd a legacy chart to an existing page in Page Designer.
To add a legacy chart in Page Designer:
1. View the page to contain the chart in Page Designer.
2. In the Gallery click the Gallery menu and select Show Legacy Components.
Chapter 25Managing Legacy Charts
25-6
3. In the Gallery, right-click Chart - AnyChart [Legacy], select Add To, and selectthe appropriate location.
Tip:
In the Gallery, you can also select Chart - AnyChart [Legacy] with themouse and drag it to the appropriate location in the Layout tab.
Page Designer indicates what actions are required next.
The Messages tab displays a red or yellow badge indicating messages you needto address. The Message tab displays two types of messages:
• Errors - Error messages display in red. Selecting an error message displaysthe associated attribute in red in the Property Editor. You must address errorsbefore a page can be saved.
• Warnings - Warning messages display in yellow. Selecting a warningmessage displays the associated attribute in yellow in the Property Editor. Youmust address errors before a page can be saved. Note you can save a pagewithout addressing warning messages.
4. Edit the chart.
Charts have three types of attributes: Region attributes, chart Attributes, andSeries attributes.
Attributes are organized into groups. To find a group or attribute, enter keywords inthe Filter Properties field. The Property Editor displays the group or attributes. Or,you can click Go to Group and select the group.
Tip:
To view help for an attribute, select the attribute in the Property Editorand click the Help tab in the central pane.
5. Edit the region attributes.
a. In the Rendering tab, locate and select the chart.
The Property Editor displays the chart region attributes
b. Under Identification, edit the Title.
c. Review and edit the other attributes.
6. Edit the chart Attributes.
a. In the Rendering tab, locate the chart and select the Attributes node.
b. Review and edit the attributes.
7. Edit the Series:
a. In the Rendering tab, select the Series node.
b. Edit the attributes under Source.
c. Review and edit the other attributes.
Chapter 25Managing Legacy Charts
25-7
8. Click Save.
25.1.5 Editing Legacy ChartsEdit legacy charts in Page Designer.
• Editing Chart Attributes (page 25-8)
• Switching an HTML5 Chart to a Flash Chart (page 25-9)
• Enabling Asynchronous Updates (page 25-9)
25.1.5.1 Editing Chart AttributesTo edit chart attributes:
1. View the page containing the calendar in Page Designer:
a. On the Workspace home page, click the App Builder icon.
b. Select an application.
c. Select a page.
Page Designer appears.
Charts have three types of attributes: Region attributes, chart Attributes, andSeries attributes. In the Property Editor, attributes are organized into groups. Tofind a group or attribute, enter keywords in the Filter Properties field. The PropertyEditor displays the group or attributes. Or, you can click Go to Group and selectthe group.
Tip:
To view help for an attribute, select the attribute in the Property Editorand click the Help tab in the central pane.
2. To edit the region attributes.
a. In the Rendering tab, locate and select the chart.
The Property Editor displays the chart region attributes
b. Review and edit the region attributes in the Property Editor.
3. To edit the chart Attributes.
a. In the Rendering tab, locate the chart and select the Attributes node.
b. Review and edit the chart Attributes in the Property Editor.
4. To edit the Series:
a. In the Rendering tab, select the Series node.
b. Review and edit the Series attributes in the Property Editor.
5. Click Save.
Chapter 25Managing Legacy Charts
25-8
Note:
"Viewing a Page in Page Designer (page 8-20)"
25.1.5.2 Switching an HTML5 Chart to a Flash ChartOnce you create an HTML5 chart, you can switch its rendering to Flash by editingchart attributes on the Chart Attributes page.
To switch an HTML5 chart to a Flash Chart:
1. View the page in Page Designer.
2. Edit the chart Attributes.
a. In the Rendering tab, locate the chart and select the Attributes node.
b. Review and edit the attributes.
Attributes are organized into groups. To find a group or attribute, enter keywords inthe Filter Properties field. The Property Editor displays the group or attributes. Or,you can click Go to Group and select the group.
Tip:
To view help for an attribute, select the attribute in the Property Editorand click the Help tab in the central pane.
3. Find Appearance.
4. For Rendering, select Flash Chart.
5. Click Save.
25.1.5.3 Enabling Asynchronous Updates
Flash and and HTML5 charts can monitor information by enabling the AsynchronousUpdate attribute on the Chart attributes page, or using a dynamic action with theRefresh action.
• Enabling the Asynchronous Update Attribute (page 25-9)
• Creating a Refresh Dynamic Action in Page Designer (page 25-10)
25.1.5.3.1 Enabling the Asynchronous Update AttributeEnabling the Asynchronous Update attribute updates the chart to reflect changes inthe underlying data within a specified time interval.
To enable asynchronous updates:
1. View the page in Page Designer.
2. In the Rendering tab, locate the chart and select the Attributes node.
Chapter 25Managing Legacy Charts
25-9
Attributes are organized into groups. To find a group or attribute, enter keywords inthe Filter Properties field. The Property Editor displays the group or attributes. Or,you can click Go to Group and select the group.
Tip:
To view help for an attribute, select the attribute in the Property Editorand click the Help tab in the central pane.
3. Find the Automatic Refresh group:
a. For Automatic Refresh, select Yes..
b. For Interval, specify the refresh interval, in seconds.
4. Click Save.
Note:
"Viewing a Page in Page Designer (page 8-20)"
25.1.5.3.2 Creating a Refresh Dynamic Action in Page DesignerTo create a Refresh dynamic action:
1. View the page in Page Designer.
2. Click the Dynamic Actions tab in the left pane.
3. Under Dynamic Actions, right-click Events and select Create Dynamic Action.
The Messages tab displays a red or yellow badge to identify messages you needto address. Selecting a message displays the associated attribute in the PropertyEditor. You must address red error message before you can save.
Attributes in Page Designer are organized into groups. To find a group or attribute,enter keywords in the Filter Properties field. The Property Editor displays the groupor attributes. Or, you can click Go to Group and select the group.
4. In the Property Editor, edit the following Dynamic Actions attributes:
Tip:
To learn more about an attribute, select the attribute in the PropertyEditor and click the Help tab in the central pane.
a. Identification, Name - Enter a name of the dynamic action.
b. Execution Options, Sequence - Specify the sequence for this component. Thesequence determines the order of execution.
c. When, Event - Specify the event that causes the dynamic action to fire.
Chapter 25Managing Legacy Charts
25-10
d. When, Selection Type - Select the type of page element or construct to beused to trigger the event. For examples of using a specific selection type, seeHelp on the associated attribute.
Next, define the action that to be performed if the event evaluates to True.
5. In the Rendering tab, select the first action under True. In the Property Editor, editthe following Action attributes:
a. Identification, Action - Select Refresh.
b. Affected Elements, Selection Type - Select Region.
c. Affected Elements, Region - Select the region containing the chart.
6. Click Save.
Note:
"Viewing a Page in Page Designer (page 8-20)"
25.1.6 About Saving Flash ChartsYou can add support to save Flash charts locally.
To support the saving of an image, AnyChart requires the use of a server-side scriptthat resides on http://www.anychart.com. When you attempt to save an image, the datais sent to the server in Base64 encoding. It is then decoded on the server and thedecoded response is returned.
If you want to support the saving of charts locally, you must host the decoding scripton your local server. The Flash chart would also require you use of the AnyChartJavaScript function getPNG. By default, the chart region uses embedded HTML tagsand does not use any AnyChart JavaScript calls. To make use of the AnyChartJavaScript call, you must modify the region source of your Flash charts.
25.1.7 Using Custom XML with Flash and HTML5 ChartsFurther customize the look and feel of a legacy chart by adding custom XML.
To use customize XML to control the look and feel of a legacy chart:
1. View the page in Page Designer.
2. In the Rendering tab, locate the chart and select the Attributes node.
Attributes are organized into groups. To find a group or attribute, enter keywords inthe Filter Properties field. The Property Editor displays the group or attributes. Or,you can click Go to Group and select the group.
Tip:
To view help for an attribute, select the attribute in the Property Editorand click the Help tab in the central pane.
Chapter 25Managing Legacy Charts
25-11
3. Find Custom XML:
a. Custom - Select Yes.
b. XML - Enter the custom Chart XML for this chart. Please refer to the AnyChartXML Reference for further details:
4. Click Save.
Tip:
For more information on supported chart XML formats, see the AnyChartXML Reference at:
http://6.anychart.com/products/anychart/docs/
25.2 Creating a Legacy Master Detail FormCreate a legacy master detail form by running the Create Page Wizard and selectingLegacy Page and then Legacy Master Detail.
Note:
Legacy master detail forms are legacy application components. AlthoughOracle still supports legacy components, Oracle recommends developersuse the new master detail format which includes one or multiple interactivegrids. See "Managing Master Detail Forms (page 10-11)."
Developers can create a legacy master detail form using the Create Page Wizard fromtwo tables that do not have foreign key relationship defined in the database. AlthoughOracle recommends the use of foreign keys and properly defined relationships in theunderlying database, developers do not always have the ability to modify theirdatabase model.
In a legacy master detail form, the master detail form page includes buttons thatenable the user to move forward and backward within the master result set. Whilerunning the wizard, you choose which columns determine the navigation order. Youalso have the option to choose whether to create a two-page or three-page masterdetail form, with the detail records shown in a report with single-record editing on aseparate page.
To create a legacy master detail form using the create page wizard:
1. On the Workspace home page, click the App Builder icon.
2. Select an application.
3. Click Create Page.
4. For Create a Page:
a. User Interface - Select a user interface for the page (optional).
This attribute only displays for applications using older themes and for whichDesktop and Mobile User Interfaces have been defined.
Chapter 25Creating a Legacy Master Detail Form
25-12
b. Page Type - Select Legacy Page and then Legacy Master Detail.
Tip:
Component pages provides page-level functionality and can beadded multiple times within a given application such as reports,forms, charts, or calendars. Feature pages provide application-levelfunctionality and can only be added once per application.
5. On Master Table and Columns:
a. Table/ View Owner- Choose the schema that owns the master table.
b. Table/ View Name - Select the table or view which contains the columns to beincluded in the master page.
c. Select Columns- Select the columns to display in your master page. You mayadd additional columns later.
d. Use User Interface Defaults -Select whether to use User Interface Defaultvalues to create the form. If you select No, the wizard does not use UserInterface Default values.
e. Click Next.
6. On Detail Table and Columns:
a. Show Only Related Tables - Specify whether to restrict the list of detail tablesto only those tables related to the master table. Select Yes or No.
b. Table / View Owner - Select the table or view owner. The default selectedowner for the table or view is the same owner as for your application. If theowner of your application has select privileges on tables or views in otherschemas, you may select another schema.
c. Table/View Name - Select the table or view which contains the columns to beincluded in the detail page.
d. Select Columns - Select the columns to display in your detail page. You mayadd columns later.
e. Click Next.
Next, define a primary key. Forms perform insert, update and deleteoperations on table rows in the database. You identify the rows by using eithera primary key defined on the table, or the ROWID pseudo column, whichuniquely identifies a row in a table.
7. On Define Primary Key:
Select one for each table.
a. Managed by Database (ROWID) - Use the ROWID pseudo column to identifyrows to update and delete.
b. Select Primary Key Column(s) - Use the source table's primary key column.If selected, specify Primary Key Column 1 and optionally Primary Key Column2. See See field-level Help for more information.
c. Click Next.
8. On Master Detail Link:
Chapter 25Creating a Legacy Master Detail Form
25-13
Define the relationship between the Master and Detail tables. You may type in thecolumn names (fully qualified with table names), or choose them from the list.
a. Link Master Column - Select the master column.
b. Link Detail Column - Select the detail column.
c. Click Next.
9. On Master Options:
If a navigation order column is not defined, the master update form will navigate bythe primary key column. By default, this wizard creates a master report page. Youcan choose to not create master report page if you already have a report page.
a. Include master row navigation? - Select Yes or No. If you select Yes, definethe navigation order columns. If a navigation order column is not defined, themaster update form will navigate by the primary key column.
If a navigation order column is not defined, the master update form willnavigate by the primary key column. By default, this wizard creates a masterreport page. You can choose to not create master report page if you alreadyhave a report page.
b. Master Row Navigation Order- Select the master row navigation order.
c. Secondary Navigation Order - Select the secondary navigation order.
d. Include master report? - Click No to if you already have a report page.
e. Click Next.
10. On Layout:
a. Edit detail as tabular form on same page - Select to create a two page masterdetail.
b. Edit detail on separate page - Select to create three page master detail.
c. Click Next.
11. On Page Attributes:
Note:
This page specifies master and detail page information. If the pages youspecify do not exist, the pages will be created for you.
Master Page
a. Page Number - Enter the page numbers that will display master and detail. Anew page will be created if one does not already exist.
b. Page Title - Enter page titles for the new pages. If the pages already exist, theexisting page names display.
c. Region Title - Enter names for the regions containing the master and detail.
d. Page Mode - Identify the page mode, See field-level Help for moreinformation.
Detail Page
a. Page Number - Enter the page number.
Chapter 25Creating a Legacy Master Detail Form
25-14
b. Page Title - Enter the page title.
c. Click Next.
12. On Navigation Menu, select how you want this page integrated into the NavigationMenu and click Next. See field-level Help for more information.
13. On Confirm:
Verify the attributes and confirm your selections.
14. Click Create.
25.3 Managing Legacy Tabular FormsCreate a legacy tabular form by running the Create Page Wizard and selecting LegacyPage and then Tabular Form.
Note:
A tabular form is a legacy application component. Although still supported,Oracle recommends developers create interactive grids instead.
A legacy tabular form enables users to update multiple rows in a table at once from asingle page. When created using a wizard, a legacy tabular form enables you toperform update, insert, and delete operations on multiple rows in a database table.Tabular forms include a built-in multiple row update process that performs optimisticlocking behind the scenes to maintain the data integrity.
• About Creating Tabular Forms (page 25-15)
• About Running a Tabular Form (page 25-16)
• How Tabular Forms Work (page 25-17)
• Creating a Legacy Tabular Form (page 25-18)
See Also:
• "Upgrading an Application to Include New Components (page 6-69)"
• "Managing Interactive Grids (page 9-18)"
• "Developing Forms (page 10-1)"
25.3.1 About Creating Tabular FormsTabular forms created using wizards include automatic DML processes. Thesewizards create a form that performs update, insert, and delete operations on multiplerows in a database table. Alternatively, you can build a tabular form manually either bycreating a updatable report region or standard report region with updatable columnswith custom PL/SQL page processes to process the tabular form data.
Chapter 25Managing Legacy Tabular Forms
25-15
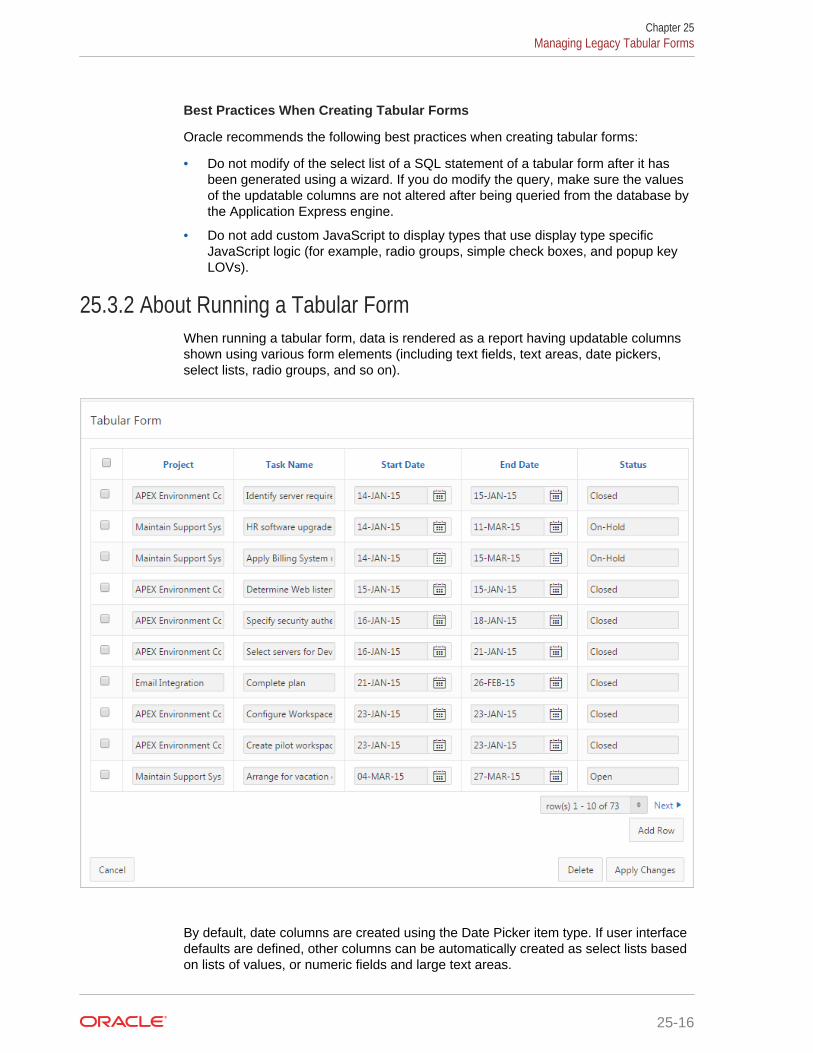
Best Practices When Creating Tabular Forms
Oracle recommends the following best practices when creating tabular forms:
• Do not modify of the select list of a SQL statement of a tabular form after it hasbeen generated using a wizard. If you do modify the query, make sure the valuesof the updatable columns are not altered after being queried from the database bythe Application Express engine.
• Do not add custom JavaScript to display types that use display type specificJavaScript logic (for example, radio groups, simple check boxes, and popup keyLOVs).
25.3.2 About Running a Tabular FormWhen running a tabular form, data is rendered as a report having updatable columnsshown using various form elements (including text fields, text areas, date pickers,select lists, radio groups, and so on).
By default, date columns are created using the Date Picker item type. If user interfacedefaults are defined, other columns can be automatically created as select lists basedon lists of values, or numeric fields and large text areas.
Chapter 25Managing Legacy Tabular Forms
25-16
For numeric and date fields, you can also pre-define date and number format masks,or apply those format masks after generating the initial form.
Each report also includes a check box column (called a row selector). Users use thisrow selector to select one or more columns and update or delete data. To add a row,users click Add Row.
Tip:
You can control the appearance of a specific column by editing columnattributes.
25.3.3 How Tabular Forms WorkTabular forms are based on a SQL query in which the query columns are tied to theunderlying table columns. Unlike a single record from, tabular forms do not store datain session state. When a tabular form page is submitted, the tabular form data isprocessed using built-in data manipulation language (DML), or a custom PL/SQL pageprocesses.
A tabular form with automatic DML has two processes for multi-row operations:
• A Multi Row Update (MRU) process performs create and update operations.
• Multi Row Delete (MRD) process deletes requests on one or more rows.
MRU and MRD processes reference the underlying table name and the primary keycolumns. The primary key columns must be part of the tabular form SQL query, andthe report columns must be either hidden or display-only (save state) in order for theDML processes to be able to identify the correct records. For new records, the primarykey values must be NULL to be identified as new records. Delete operations areperformed by referencing row number of the row to be deleted. Users can check oneor more rows on the current page and when they click the Delete button, the rownumbers identify the corresponding primary key value(s) and the matching rows aredeleted.
Wizard generated tabular forms built-in DMLinclude a checksum column to preventlost updates. Using a method called optimistic locking, a checksum is computed foreach row when rendering a tabular form. This checksum is stored in an extra hiddentabular form column. Upon submission of the form for update, an additional set ofchecksums is computed on the then current data stored in the database. The newchecksums are compared to those built when the tabular form was first rendered, andif there are any mismatches, the update is rejected, because the data in the databasewas either modified by another user or anther process in the time between the tabularform was rendered and the time the data was submitted.
Wizard generated tabular forms also automatically create validations for somecolumns. Validations are created for columns that are set to NOT NULL in the underlyingtable and columns of type NUMBER, DATE or TIMESTAMP. Note that validations are notcreated for columns if the column is set to read-only, either based on the user'sselection, or defined user interface defaults.
Chapter 25Managing Legacy Tabular Forms
25-17
25.3.4 Creating a Legacy Tabular FormUse the Create Page Wizard to add a legacy tabular form on a new page. Once youprovide a table name on which to build the tabular form, the wizard reads the tablecolumns from the database data dictionary. When creating a tabular form, Oraclerecommends using a generic column template and avoiding column report templates.
Note:
Legacy tabular forms are legacy application components. Although Oraclestill supports legacy components, Oracle recommends creating interactivegrids instead.
To create a legacy tabular form using the Create Page Wizard:
1. On the Workspace home page, click the App Builder icon.
2. Select an application.
3. Click Create Page.
4. For Create a Page:
a. User Interface - Select a user interface for the page (optional).
This attribute only displays for applications using older themes and for whichDesktop and Mobile User Interfaces have been defined.
b. Page Type - Select Legacy Page and then Tabular Form.
Tip:
Component pages provides page-level functionality and can beadded multiple times within a given application such as reports,forms, charts, or calendars. Feature pages provide application-levelfunctionality and can only be added once per application.
5. For Page Attributes:
a. Page Number - If you identify a new page number, the wizard creates a newpage. If you identify an existing page number, the wizard adds the componentto that page.
b. Page Name - Specify a name for the page.
c. Page Mode - Identify the page mode. Options include:
• Normal - The page is presented as a normal Application Expressapplication page.
• Modal Dialog - The page is presented as a modal dialog. A modal dialogis an overlay window positioned within the viewport, which remains activeand focused until the end user dismisses (closes) it. The underlying pageis grayed out and the end user is prevented from interacting with the restof the page until the dialog is closed.
Chapter 25Managing Legacy Tabular Forms
25-18
d. Breadcrumb - Select whether you want to use a breadcrumb navigation controlon your page. If you elect to include breadcrumb navigation, additionalattributes appear.
e. Click Next.
6. For Navigation Preference:
a. Select how you want this page integrated into the Navigation Menu. To learnmore, see field-level Help.
b. Click Next.
7. For Tabular Form Source:
a. Table/View Owner - Select the owner of the table on which you are building areport.
b. Table/View Name - Select the table or view on which the form will be based.
c. Select Columns - Select one or more columns to be included in the tabularform. In the pages that follow you define which columns should be updatable.
d. Click Create.
25.4 Managing Legacy CalendarsLegacy calendars are template-based. In previous releases Legacy Calendar wasreferred to as Calendar (Template, Classic calendar, Easy calendar, and SQLcalendar).
Tip:
Legacy calendars are legacy application components. Although Oracle stillsupports legacy components, the creation of new calendars is based on theFullCalendar jQuery library.
• Editing Calendar Attributes in the Property Editor (page 25-19)
• About Supported Calendar Substitution Strings in Legacy Calendars(page 25-20)
25.4.1 Editing Calendar Attributes in the Property EditorTo edit calendar Attributes:
1. View the page containing the calendar in Page Designer:
a. On the Workspace home page, click the App Builder icon.
b. Select an application.
c. Select a page.
Page Designer appears.
In the Property Editor, attributes are organized into groups. To find a group orattribute, enter keywords in the Filter Properties field. The Property Editor displaysthe group or attributes. Or, you can click Go to Group and select the group.
Chapter 25Managing Legacy Calendars
25-19
Tip:
To view help for an attribute, select the attribute in the Property Editorand click the Help tab in the central pane.
2. To edit the region attributes.
a. In the Rendering tab, locate and select the calendar.
b. Review and edit the region attributes in the Property Editor.
3. To edit the calendar Attributes.
a. In the Rendering tab, locate the calendar and select the Attributes node.
b. Review and edit the calendar Attributes in the Property Editor.
4. To save your changes click Save. To save and run the page, click Save and RunPage.
25.4.2 About Supported Calendar Substitution Strings in LegacyCalendars
App Builder supports many date format substitution strings. You can view a completelist of supported substitution strings on the Calendar Templates page.
To view a list of supported substitution strings for calendars:
1. Navigate to the appropriate calendar template.
2. View the Substitution Stings list on the right side of the page.
25.5 Viewing Legacy Components in GalleryView legacy and unsupported components in the Page Designer gallery by selectingthe Gallery Menu and then Show Legacy Components.
To view legacy components in the gallery:
1. Navigate to the Workspace home page.
2. Click the App Builder icon.
3. Select an application.
4. Select a page.
The page appears in Page Designer.
5. Click Gallery Menu and select Show Legacy Components.
Chapter 25Viewing Legacy Components in Gallery
25-20
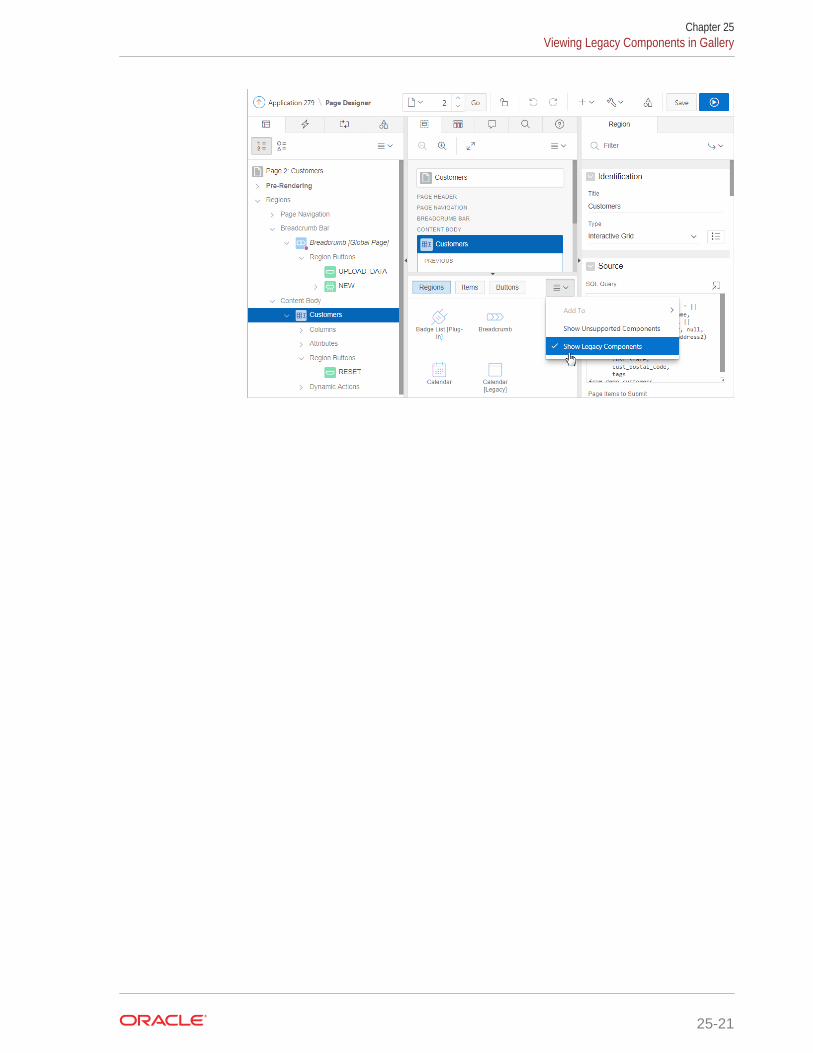
Chapter 25Viewing Legacy Components in Gallery
25-21
AAbout Item Types
Learn about key attributes that control item functionality.
An item is part of an HTML form. An item can be a text field, text area, password,select list, check box, and so on. Developers can control how a page item works byediting the page item attributes. To learn more about specific item attributes, see field-level Help
• Available Item Types (page A-1)
See Also:
• "Viewing Field-Level Help (page 1-29)"
• "Understanding Page-Level Items (page 14-16)"
• "Editing Page-Level Items (page 14-8)"
A.1 Available Item TypesThe following table describes available item types in App Builder and notes importantattributes that control item behavior.
A-1
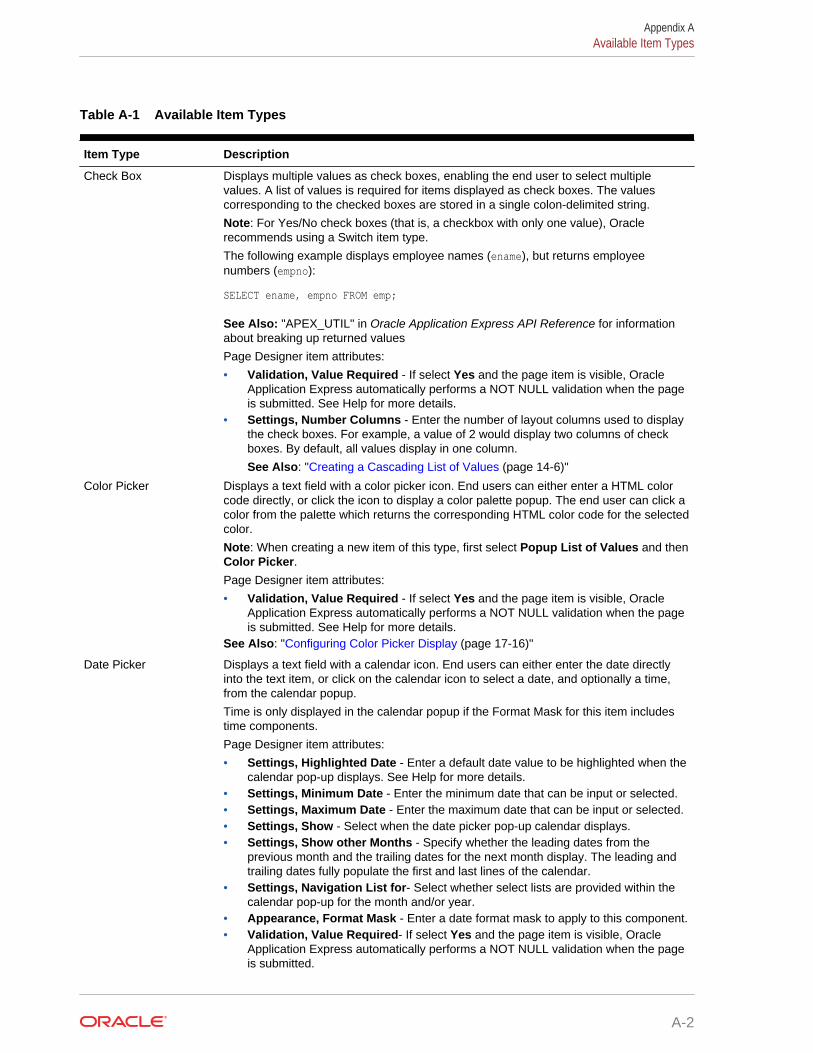
Table A-1 Available Item Types
Item Type Description
Check Box Displays multiple values as check boxes, enabling the end user to select multiplevalues. A list of values is required for items displayed as check boxes. The valuescorresponding to the checked boxes are stored in a single colon-delimited string.
Note: For Yes/No check boxes (that is, a checkbox with only one value), Oraclerecommends using a Switch item type.
The following example displays employee names (ename), but returns employeenumbers (empno):
SELECT ename, empno FROM emp;
See Also: "APEX_UTIL" in Oracle Application Express API Reference for informationabout breaking up returned values
Page Designer item attributes:
• Validation, Value Required - If select Yes and the page item is visible, OracleApplication Express automatically performs a NOT NULL validation when the pageis submitted. See Help for more details.
• Settings, Number Columns - Enter the number of layout columns used to displaythe check boxes. For example, a value of 2 would display two columns of checkboxes. By default, all values display in one column.
See Also: "Creating a Cascading List of Values (page 14-6)"
Color Picker Displays a text field with a color picker icon. End users can either enter a HTML colorcode directly, or click the icon to display a color palette popup. The end user can click acolor from the palette which returns the corresponding HTML color code for the selectedcolor.
Note: When creating a new item of this type, first select Popup List of Values and thenColor Picker.Page Designer item attributes:
• Validation, Value Required - If select Yes and the page item is visible, OracleApplication Express automatically performs a NOT NULL validation when the pageis submitted. See Help for more details.
See Also: "Configuring Color Picker Display (page 17-16)"
Date Picker Displays a text field with a calendar icon. End users can either enter the date directlyinto the text item, or click on the calendar icon to select a date, and optionally a time,from the calendar popup.
Time is only displayed in the calendar popup if the Format Mask for this item includestime components.
Page Designer item attributes:
• Settings, Highlighted Date - Enter a default date value to be highlighted when thecalendar pop-up displays. See Help for more details.
• Settings, Minimum Date - Enter the minimum date that can be input or selected.• Settings, Maximum Date - Enter the maximum date that can be input or selected.• Settings, Show - Select when the date picker pop-up calendar displays.• Settings, Show other Months - Specify whether the leading dates from the
previous month and the trailing dates for the next month display. The leading andtrailing dates fully populate the first and last lines of the calendar.
• Settings, Navigation List for- Select whether select lists are provided within thecalendar pop-up for the month and/or year.
• Appearance, Format Mask - Enter a date format mask to apply to this component.• Validation, Value Required- If select Yes and the page item is visible, Oracle
Application Express automatically performs a NOT NULL validation when the pageis submitted.
Appendix AAvailable Item Types
A-2
Table A-1 (Cont.) Available Item Types
Item Type Description
Display Image Displays an image stored in a database BLOB columns, or based on an image URL.
Page Designer item attributes:
• Settings, Based On - Determines where the item is retrieved from. To learn moreabout an attribute, see field-level Help.
• Settings, Alternative Text Column - Enter the uppercase page or application itemname which holds the alternative text for this image. This text is read by screenreaders when an end user navigates to this item.
• Settings, Filename Column - Enter the uppercase page or application item namethat holds the filename column value associated with the BLOB column.
• Settings, BLOB Last Updated Column - If specified, the column is used forbrowser caching. It identifies if the image changed since the last browser request. Ifnot entered, no caching is done. Note: This attribute is case sensitive and thecolumn must be of type DATE.
Display Only Displays a non-enterable text item.
Page Designer item attributes:
• Settings, Save Session State - Stores the current value in session state when thepage gets submitted.
• Settings, Based On - Specifies what gets displayed in the field. Options include:
– Page Item Value - The current value of the page item displays.– Display Value of List of Values - The current value of the page item maps to
a different display value using a list of values.– Output of PL/SQL Code - The specified PL/SQL code takes care of emitting
the necessary output for the page item.Settings, Show Line Breaks - Select Yes to convert line breaks in the displayvalue to an HTML line break and display them in HTML output.
Appendix AAvailable Item Types
A-3
Table A-1 (Cont.) Available Item Types
Item Type Description
File Browse Displays a text field with a Browse button. The Browse button enables the user to locateand upload a file from a local file system.
See Also: "About Securing File Uploads (page 20-36)"
Page Designer attributes:
• Settings, Storage Type - Identify where the uploaded file is stored. Optionsinclude:– BLOB column specified in Item Source attribute - Stores the uploaded file
in the table used by the Automatic Row Processing (DML) process and thecolumn specified in the item source attribute. The column has to be of datatype BLOB. If the file gets downloaded, the table name of the Automatic RowFetch process is used.
– Table APEX_APPLICATION_TEMP_FILES - Stores the uploaded file(s) in atemporary location that you can access with the viewAPEX_APPLICATION_TEMP_FILES. Application Express will automatically deletethe file(s) at the end of the session or at the end of the upload request,depending on what you choose for Purge File At.
If Storage Type equals Table APEX_APPLICATION_TEMP_FILES:
– Purge File at - Define when Application Express should remove the temporaryfile.
– Allow Multiple Files - Specify whether multiple files can be uploaded at once.Multiple file names will be stored as a colon delimited list in the page item..
– File Types - Specify a comma delimited list of file types which might be usedby the browser to restrict which files can be uploaded.
If Storage Type equals BLOB column specified in Item Source:
– MIME Type Column - Enter the uppercase page or application item nameused to store the mime type of the uploaded file. The mime type is used by thebrowser to identify which application is used to display the content of the BLOBwhen the file is downloaded.
– Filename Column - Enter the page or application item used to store thefilename of the uploaded file. .
– Character Set Column - Enter the uppercase page or application item nameused to store the character set of the uploaded file. The character set of theBLOB is not automatically set on upload. End users should set the character setfor the document they are uploading.
– BLOB Last Updated Column - Enter the uppercase page or application itemname used to store the current timestamp when a file is uploaded. This datevalue is used for browser caching..
– Display Download Link - Specify whether the download link displays whenthere is a non-empty BLOB associated with this item.
– Download Link Text - Enter the text that displays as part of the download link.If not specified, the text stored in the Text Messagefor APEX.FILE_BROWSE.DOWNLOAD_LINK_TEXTwithin Shared Components,displays.
– Content Disposition - Select how the browser handles the content whendownloading.
• Settings, File Types - Specify a comma delimited list of file types which might beused by the browser to restrict which files can be uploaded.
Appendix AAvailable Item Types
A-4

Table A-1 (Cont.) Available Item Types
Item Type Description
Hidden Items that are included within the page source but are not rendered. Hidden item valuesare saved in session state. They are generally used to store values required by pageprocessing or other page items, but should not be displayed to the end user.
Page Designer attribute:
• Settings, Value is Protected - Select Yes to prevent hidden values from beingmanipulated when a page is posted.
List Manager Displays a text item with a popup list of values icon, Add and Remove buttons, and a listof selected values.
You can type in the value or pick from the list of available items. You can then utilize thebuttons to manage the values selected. The selected values are stored in a singlecolon-delimited string.
Page Designer attributes:
• Settings, Fetch - Select how data is displayed when the Popup LOV is opened.• Validation, Value Required- If select Yes and the page item is visible, Oracle
Application Express automatically performs a NOT NULL validation when the pageis submitted.
See Also: "Creating a Cascading List of Values (page 14-6)"
Number Field Displays a number field. You can configure number range checks for values entered byconfiguring the Minimum Value and Maximum Value attributes. This item typeautomatically checks if the entered value is a number. No extra validations are required.
Page Designer attributes:
• Settings, Minimum Value - Enter the minimum value permitted. The value can bea static value or a dynamic value using substitution syntax.
• Settings, Maximum Value - Enter the maximum value permitted. The value can bea static value or a dynamic value using substitution syntax.
• Settings, Number Alignment - Select how to align the number that displays. Thissetting does not apply when the item is rendered as Read Only or where HTMLForm Element Attributes are specified.
• Validation, Value Required- If select Yes and the page item is visible, OracleApplication Express automatically performs a NOT NULL validation when the pageis submitted.
Password Displays an HTML password form element. As the end user enters text a black dot isdisplayed for that character, instead of the actual character entered.
Page Designer attributes:
• Settings, Submit when Enter Pressed - Specify whether pressing the Enter keywhile in this field automatically submits the page.
• Settings, Does not save state - Specify whether the password is saved in sessionstate.
Oracle strongly recommends that you do not write the password into session state,for security reasons. The value can potentially be read from browser cache andApplication Express session tables. If you do set this attribute to No, considersetting Store value encrypted in session state to Yes.
• Validation, Value Required - If select Yes and the page item is visible, OracleApplication Express automatically performs a NOT NULL validation when the pageis submitted. See Help for more details.
See Also: "About Session State and Security (page 20-23)".
Percent Graph Displays the value as a percentage graph. The value retrieved must be between 0 and100.
Appendix AAvailable Item Types
A-5
Table A-1 (Cont.) Available Item Types
Item Type Description
Popup LOV Displays a text item with a popup list of values icon. When the end user clicks the icon,a popup window appears with a search field, and a list of supported values.
Popup LOV is best suited for large lists since end users can enter search criteria toreduce the available values displayed. For relatively small lists Select List is often bettersuited.
SELECT ename name, empno id FROM emp
If one of the columns is an expression, remember to use an alias. For example:
SELECT ename||' '||job display_value, empno FROM emp
Page Designer item attributes:
• Settings, Input Field - Select whether the item is enterable.• Settings, Fetch - Select how data is initially fetched for the list of values.• Validation, Value Required- If select Yes and the page item is visible, Oracle
Application Express automatically performs a NOT NULL validation when the pageis submitted. See Help for more details.
See Also: "Creating a Cascading List of Values (page 14-6)"
Radio Group Displays multiple values as radio group options, enabling the end user to select a singlevalue.
The following example displays employee names (ename), but returns employeenumbers (empno):
SELECT ename, empno FROM emp
Page Designer item attributes:
• Settings, Number of Columns - Enter the number of radio group columns todisplay. For example, a value of 2 would display two columns. If there were fivevalues then it would display over three rows.
• Settings, Page Action on Selection - Select what action is taken when a radiogroup value is selected. See Help for more details.
• Settings, Execute Validations - Displays if Page Action when Value Changed isset to Submit Page. Controls the execution of validations when a page issubmitted. Set this attribute to No to prevent the execution of validations andassociated error messages. Set this attribute to Yes to execute all page and built-invalidations and associated error messages when the page is submitted. Use thisattribute in conjunction with the validation attribute, Always Execute. To learnmore, see "About Determining When Validations Execute (page 16-8)."
See Also: "Creating a Cascading List of Values (page 14-6)"• Validation, Value Required- If select Yes and the page item is visible, Oracle
Application Express automatically performs a NOT NULL validation when the pageis submitted. See Help for more details.
Appendix AAvailable Item Types
A-6
Table A-1 (Cont.) Available Item Types
Item Type Description
Rich Text Editor Displays a text area with comprehensive text formatting options. End users can enhancethe content displayed in a similar fashion to using a word processor, such as MicrosoftWord. End users can also cut and paste documents that are in rich text format (RTF) fileformat into this item.
Page Designer item attributes:
• Settings, Editor - Select the editor used to display the text formatting optionsavailable.
• Settings, Toolbar - Select the number of text formatting options available withinthe editor.
• Settings, Toolbar Expanded - Specify whether the editor is initially expandedwithin the text area.
• Settings, Skin - Select the editor skin used to style the editor.• Settings, Toolbar Position - Specify where in the text area the editor displays.• Validation, Value Required- If select Yes and the page item is visible, Oracle
Application Express automatically performs a NOT NULL validation when the pageis submitted. See Help for more details.
Select List Displays an item with a built-in list of values selector. When the end user clicks the item,the list of supported values displays directly inline with the current item.
Select List is best suited for relatively small, discrete lists. End users can very quicklyselect a value from the list without needing to change focus to a popup dialog. For largelists, consider using a Popup LOV.
select [displayValue], [returnValue] from ... where ... order by ...
Page Designer item attributes:
• Settings, Page Action on Selection - Select what action is taken when a list valueis selected. See help for options.
• Settings, Execute Validations - Displays if Page Action on Selection is set toSubmit Page. Controls the execution of validations when a page is submitted. Setthis attribute to No to prevent the execution of validations and associated errormessages. Set this attribute to Yes to execute all page and built-in validations andassociated error messages when the page is submitted. Use this attribute inconjunction with the validation attribute, Always Execute. To learn more, see"About Determining When Validations Execute (page 16-8)."
• Validation, Value Required- If select Yes and the page item is visible, OracleApplication Express automatically performs a NOT NULL validation when the pageis submitted. See Help for more details.
Appendix AAvailable Item Types
A-7
Table A-1 (Cont.) Available Item Types
Item Type Description
Shuttle Displays as a multiple select list that includes two boxes containing lists. The left listdisplays the source list of values that have not been selected and the right list shows thecurrently selected values. End users can select one or more values in a list then use theshuttle controls to move the selected values or all values.
The current values are stored in a single colon-delimited string.
Page Designer item attributes:
• Settings, Show Controls - Select what data movement controls displays in themiddle of the shuttle. Options include: None, Moving Only, Ordering Only, or All.
• Validation, Value Required- If select Yes and the page item is visible, OracleApplication Express automatically performs a NOT NULL validation when the pageis submitted. See Help for more details.
Note: To create this item type, you must define a list of values. See "Creating Listsof Values at the Application Level (page 17-11)," "Working with Multiple Select ListItem (page 14-19)," and "Creating a Cascading List of Values (page 14-6)."
Switch Displays as a flip toggle switch.
Page Designer item attributes:
• Settings, Settings - Select whether application level component settings are used,or if custom settings are used for this item. Options include: Use ComponentSettings or Custom. If Settings is set to Custom, the additional attributes display.
• Validation, Value Required - If select Yes and the page item is visible, OracleApplication Express automatically performs a NOT NULL validation when the pageis submitted. See Help for more details.
See Also: "Configuring Switch Defaults (page 17-17)"
Slider Only applicable for jQuery Mobile applications. Displays a slider item type, whichenables users to update the item value by sliding the control left or right.
Page Designer item attributes:
• Settings, Minimum Value - Enter the minimum value permitted. The value can bea static value or a dynamic value using substitution syntax.
• Settings, Maximum Value - Enter the maximum value permitted. The value can bea static value or a dynamic value using substitution syntax.
• Settings, Step Increment - Enter a value to force the slider to snap to a specificincrement. The value can be a static value or a dynamic value using substitutionsyntax.
• Settings, Highlight Selected - Specify whether the slider highlights the track up tothe current slider handle position.
• Validation, Value Required - If select Yes and the page item is visible, OracleApplication Express automatically performs a NOT NULL validation when the pageis submitted. See Help for more details.
Appendix AAvailable Item Types
A-8
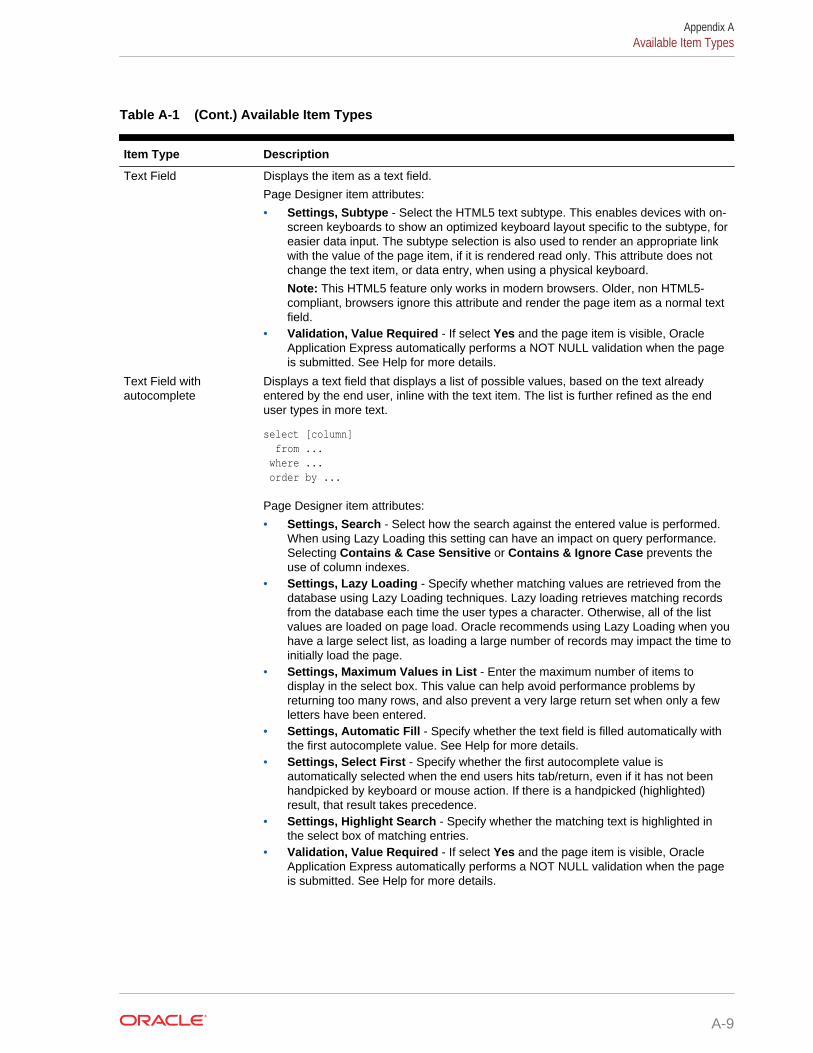
Table A-1 (Cont.) Available Item Types
Item Type Description
Text Field Displays the item as a text field.
Page Designer item attributes:
• Settings, Subtype - Select the HTML5 text subtype. This enables devices with on-screen keyboards to show an optimized keyboard layout specific to the subtype, foreasier data input. The subtype selection is also used to render an appropriate linkwith the value of the page item, if it is rendered read only. This attribute does notchange the text item, or data entry, when using a physical keyboard.
Note: This HTML5 feature only works in modern browsers. Older, non HTML5-compliant, browsers ignore this attribute and render the page item as a normal textfield.
• Validation, Value Required - If select Yes and the page item is visible, OracleApplication Express automatically performs a NOT NULL validation when the pageis submitted. See Help for more details.
Text Field withautocomplete
Displays a text field that displays a list of possible values, based on the text alreadyentered by the end user, inline with the text item. The list is further refined as the enduser types in more text.
select [column] from ... where ... order by ...
Page Designer item attributes:
• Settings, Search - Select how the search against the entered value is performed.When using Lazy Loading this setting can have an impact on query performance.Selecting Contains & Case Sensitive or Contains & Ignore Case prevents theuse of column indexes.
• Settings, Lazy Loading - Specify whether matching values are retrieved from thedatabase using Lazy Loading techniques. Lazy loading retrieves matching recordsfrom the database each time the user types a character. Otherwise, all of the listvalues are loaded on page load. Oracle recommends using Lazy Loading when youhave a large select list, as loading a large number of records may impact the time toinitially load the page.
• Settings, Maximum Values in List - Enter the maximum number of items todisplay in the select box. This value can help avoid performance problems byreturning too many rows, and also prevent a very large return set when only a fewletters have been entered.
• Settings, Automatic Fill - Specify whether the text field is filled automatically withthe first autocomplete value. See Help for more details.
• Settings, Select First - Specify whether the first autocomplete value isautomatically selected when the end users hits tab/return, even if it has not beenhandpicked by keyboard or mouse action. If there is a handpicked (highlighted)result, that result takes precedence.
• Settings, Highlight Search - Specify whether the matching text is highlighted inthe select box of matching entries.
• Validation, Value Required - If select Yes and the page item is visible, OracleApplication Express automatically performs a NOT NULL validation when the pageis submitted. See Help for more details.
Appendix AAvailable Item Types
A-9
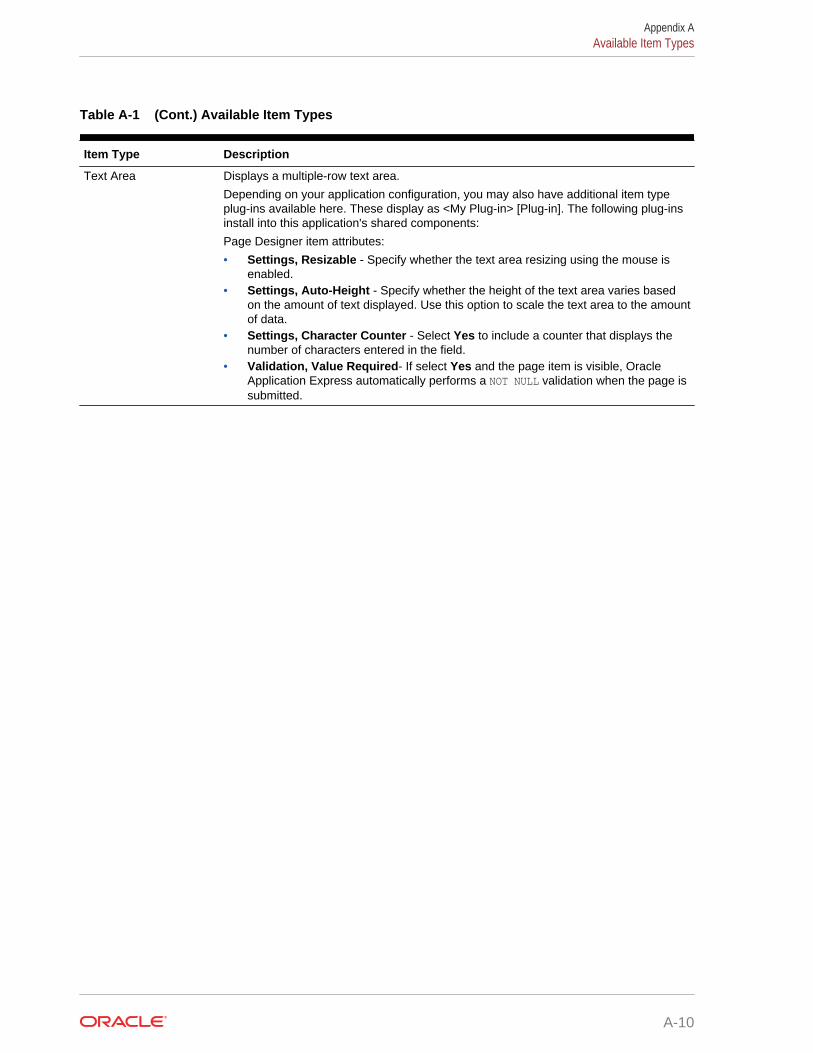
Table A-1 (Cont.) Available Item Types
Item Type Description
Text Area Displays a multiple-row text area.
Depending on your application configuration, you may also have additional item typeplug-ins available here. These display as <My Plug-in> [Plug-in]. The following plug-insinstall into this application's shared components:
Page Designer item attributes:
• Settings, Resizable - Specify whether the text area resizing using the mouse isenabled.
• Settings, Auto-Height - Specify whether the height of the text area varies basedon the amount of text displayed. Use this option to scale the text area to the amountof data.
• Settings, Character Counter - Select Yes to include a counter that displays thenumber of characters entered in the field.
• Validation, Value Required- If select Yes and the page item is visible, OracleApplication Express automatically performs a NOT NULL validation when the page issubmitted.
Appendix AAvailable Item Types
A-10
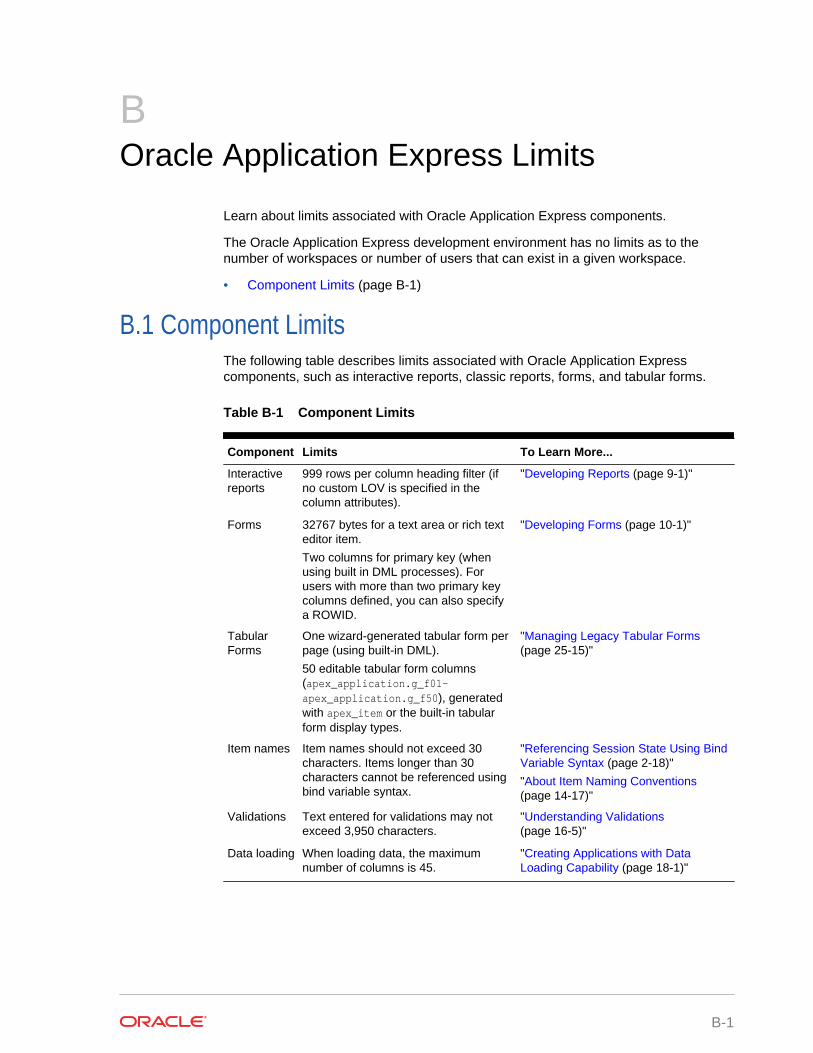
BOracle Application Express Limits
Learn about limits associated with Oracle Application Express components.
The Oracle Application Express development environment has no limits as to thenumber of workspaces or number of users that can exist in a given workspace.
• Component Limits (page B-1)
B.1 Component LimitsThe following table describes limits associated with Oracle Application Expresscomponents, such as interactive reports, classic reports, forms, and tabular forms.
Table B-1 Component Limits
Component Limits To Learn More...
Interactivereports
999 rows per column heading filter (ifno custom LOV is specified in thecolumn attributes).
"Developing Reports (page 9-1)"
Forms 32767 bytes for a text area or rich texteditor item.
Two columns for primary key (whenusing built in DML processes). Forusers with more than two primary keycolumns defined, you can also specifya ROWID.
"Developing Forms (page 10-1)"
TabularForms
One wizard-generated tabular form perpage (using built-in DML).
50 editable tabular form columns(apex_application.g_f01-apex_application.g_f50), generatedwith apex_item or the built-in tabularform display types.
"Managing Legacy Tabular Forms(page 25-15)"
Item names Item names should not exceed 30characters. Items longer than 30characters cannot be referenced usingbind variable syntax.
"Referencing Session State Using BindVariable Syntax (page 2-18)"
"About Item Naming Conventions(page 14-17)"
Validations Text entered for validations may notexceed 3,950 characters.
"Understanding Validations(page 16-5)"
Data loading When loading data, the maximumnumber of columns is 45.
"Creating Applications with DataLoading Capability (page 18-1)"
B-1
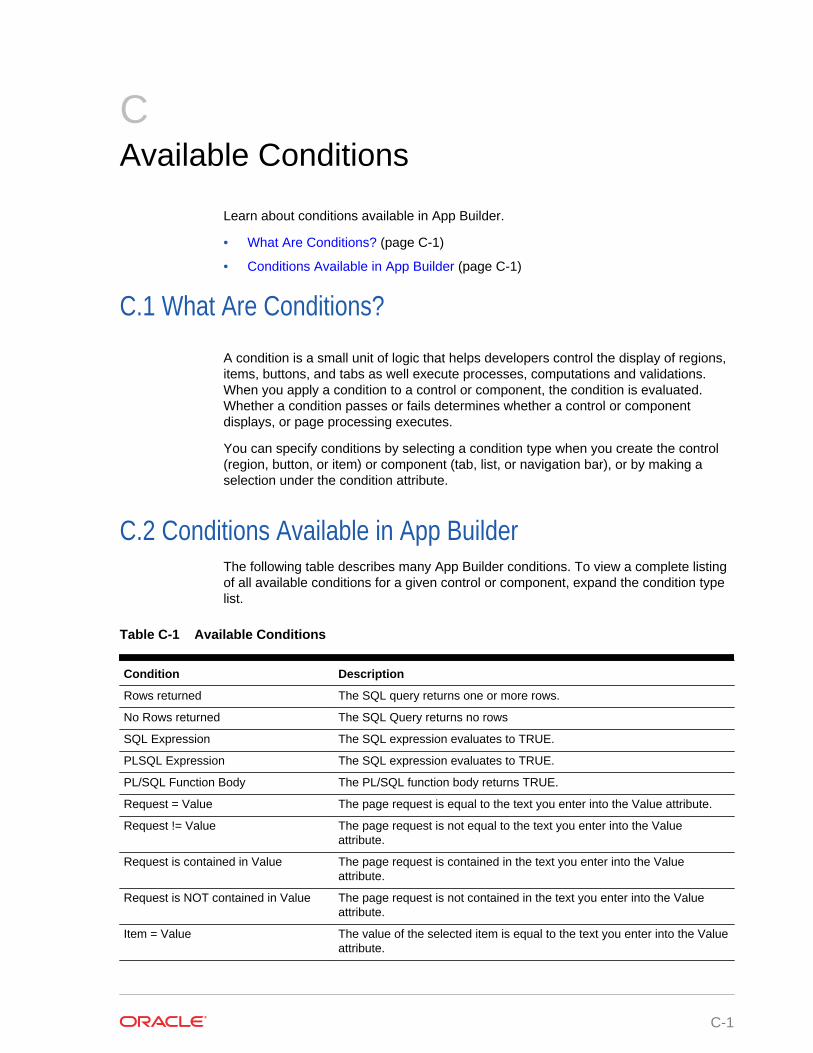
CAvailable Conditions
Learn about conditions available in App Builder.
• What Are Conditions? (page C-1)
• Conditions Available in App Builder (page C-1)
C.1 What Are Conditions?
A condition is a small unit of logic that helps developers control the display of regions,items, buttons, and tabs as well execute processes, computations and validations.When you apply a condition to a control or component, the condition is evaluated.Whether a condition passes or fails determines whether a control or componentdisplays, or page processing executes.
You can specify conditions by selecting a condition type when you create the control(region, button, or item) or component (tab, list, or navigation bar), or by making aselection under the condition attribute.
C.2 Conditions Available in App BuilderThe following table describes many App Builder conditions. To view a complete listingof all available conditions for a given control or component, expand the condition typelist.
Table C-1 Available Conditions
Condition Description
Rows returned The SQL query returns one or more rows.
No Rows returned The SQL Query returns no rows
SQL Expression The SQL expression evaluates to TRUE.
PLSQL Expression The SQL expression evaluates to TRUE.
PL/SQL Function Body The PL/SQL function body returns TRUE.
Request = Value The page request is equal to the text you enter into the Value attribute.
Request != Value The page request is not equal to the text you enter into the Valueattribute.
Request is contained in Value The page request is contained in the text you enter into the Valueattribute.
Request is NOT contained in Value The page request is not contained in the text you enter into the Valueattribute.
Item = Value The value of the selected item is equal to the text you enter into the Valueattribute.
C-1
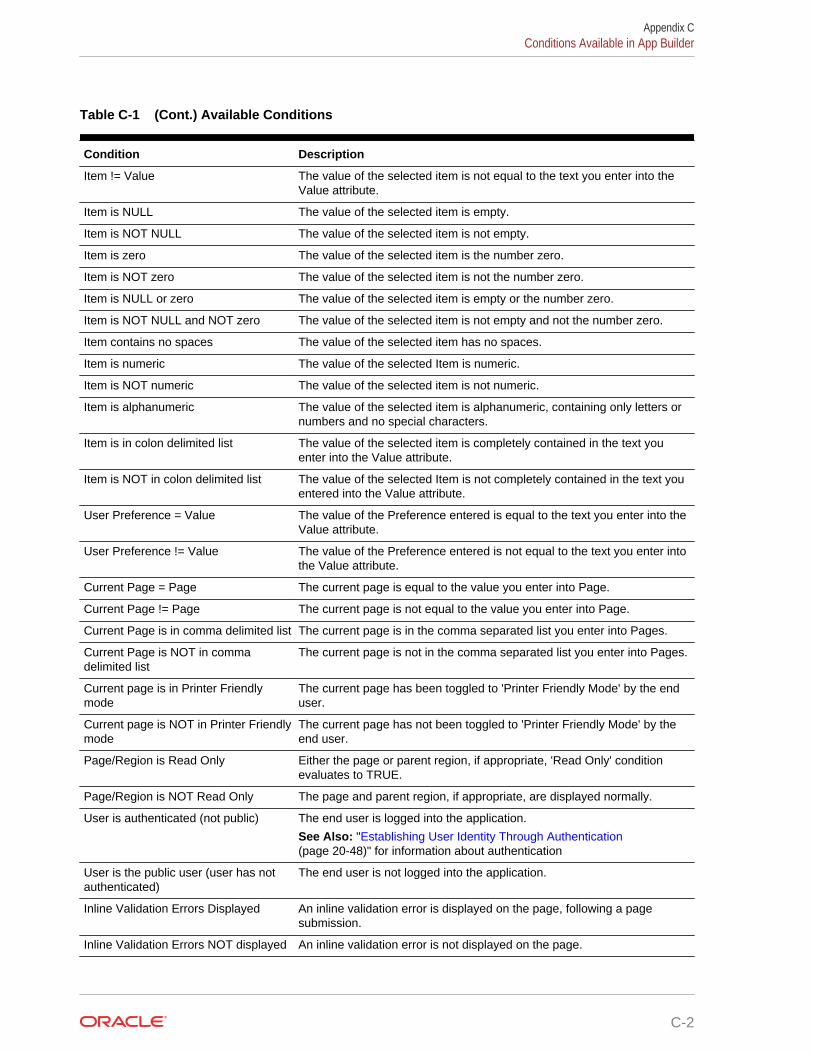
Table C-1 (Cont.) Available Conditions
Condition Description
Item != Value The value of the selected item is not equal to the text you enter into theValue attribute.
Item is NULL The value of the selected item is empty.
Item is NOT NULL The value of the selected item is not empty.
Item is zero The value of the selected item is the number zero.
Item is NOT zero The value of the selected item is not the number zero.
Item is NULL or zero The value of the selected item is empty or the number zero.
Item is NOT NULL and NOT zero The value of the selected item is not empty and not the number zero.
Item contains no spaces The value of the selected item has no spaces.
Item is numeric The value of the selected Item is numeric.
Item is NOT numeric The value of the selected item is not numeric.
Item is alphanumeric The value of the selected item is alphanumeric, containing only letters ornumbers and no special characters.
Item is in colon delimited list The value of the selected item is completely contained in the text youenter into the Value attribute.
Item is NOT in colon delimited list The value of the selected Item is not completely contained in the text youentered into the Value attribute.
User Preference = Value The value of the Preference entered is equal to the text you enter into theValue attribute.
User Preference != Value The value of the Preference entered is not equal to the text you enter intothe Value attribute.
Current Page = Page The current page is equal to the value you enter into Page.
Current Page != Page The current page is not equal to the value you enter into Page.
Current Page is in comma delimited list The current page is in the comma separated list you enter into Pages.
Current Page is NOT in commadelimited list
The current page is not in the comma separated list you enter into Pages.
Current page is in Printer Friendlymode
The current page has been toggled to 'Printer Friendly Mode' by the enduser.
Current page is NOT in Printer Friendlymode
The current page has not been toggled to 'Printer Friendly Mode' by theend user.
Page/Region is Read Only Either the page or parent region, if appropriate, 'Read Only' conditionevaluates to TRUE.
Page/Region is NOT Read Only The page and parent region, if appropriate, are displayed normally.
User is authenticated (not public) The end user is logged into the application.
See Also: "Establishing User Identity Through Authentication(page 20-48)" for information about authentication
User is the public user (user has notauthenticated)
The end user is not logged into the application.
Inline Validation Errors Displayed An inline validation error is displayed on the page, following a pagesubmission.
Inline Validation Errors NOT displayed An inline validation error is not displayed on the page.
Appendix CConditions Available in App Builder
C-2
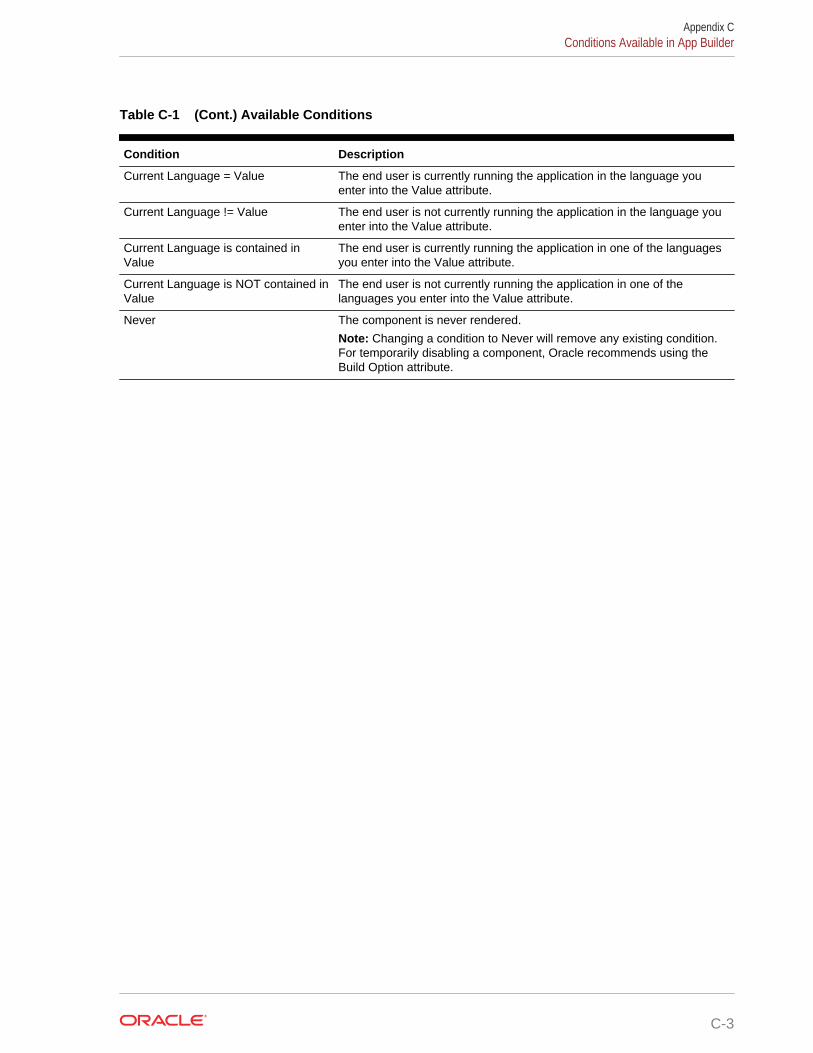
Table C-1 (Cont.) Available Conditions
Condition Description
Current Language = Value The end user is currently running the application in the language youenter into the Value attribute.
Current Language != Value The end user is not currently running the application in the language youenter into the Value attribute.
Current Language is contained inValue
The end user is currently running the application in one of the languagesyou enter into the Value attribute.
Current Language is NOT contained inValue
The end user is not currently running the application in one of thelanguages you enter into the Value attribute.
Never The component is never rendered.
Note: Changing a condition to Never will remove any existing condition.For temporarily disabling a component, Oracle recommends using theBuild Option attribute.
Appendix CConditions Available in App Builder
C-3
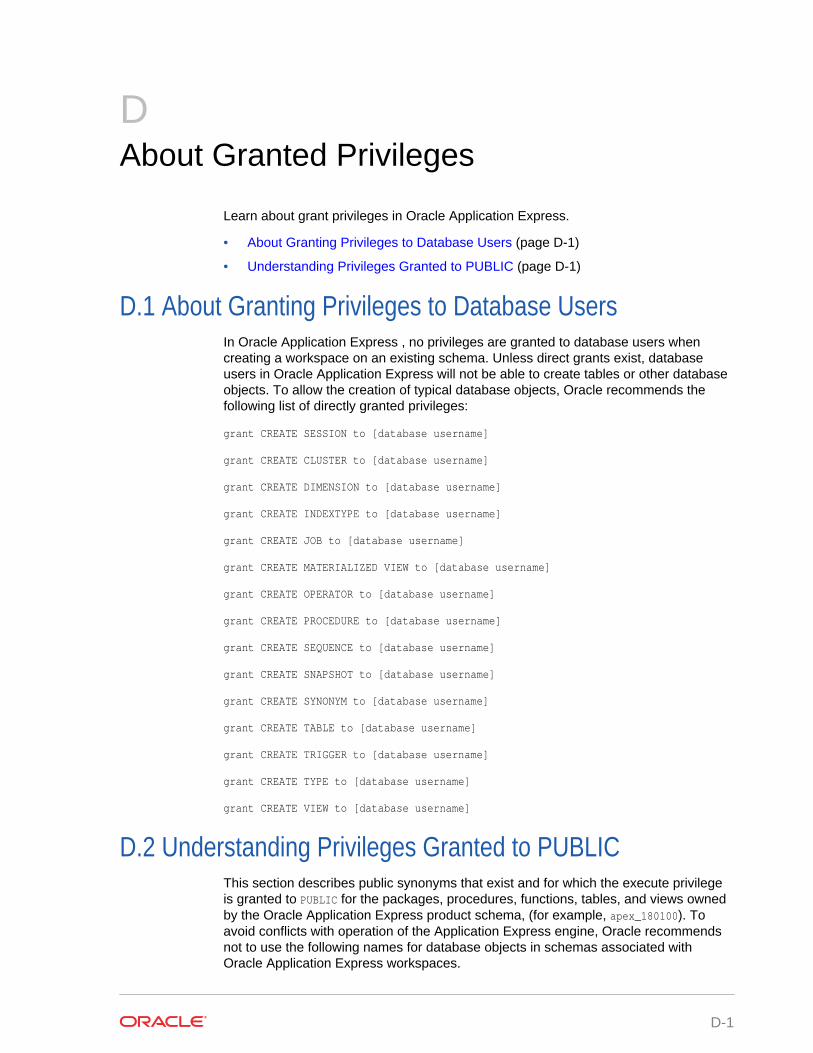
DAbout Granted Privileges
Learn about grant privileges in Oracle Application Express.
• About Granting Privileges to Database Users (page D-1)
• Understanding Privileges Granted to PUBLIC (page D-1)
D.1 About Granting Privileges to Database UsersIn Oracle Application Express , no privileges are granted to database users whencreating a workspace on an existing schema. Unless direct grants exist, databaseusers in Oracle Application Express will not be able to create tables or other databaseobjects. To allow the creation of typical database objects, Oracle recommends thefollowing list of directly granted privileges:
grant CREATE SESSION to [database username]
grant CREATE CLUSTER to [database username]
grant CREATE DIMENSION to [database username]
grant CREATE INDEXTYPE to [database username]
grant CREATE JOB to [database username]
grant CREATE MATERIALIZED VIEW to [database username]
grant CREATE OPERATOR to [database username]
grant CREATE PROCEDURE to [database username]
grant CREATE SEQUENCE to [database username]
grant CREATE SNAPSHOT to [database username]
grant CREATE SYNONYM to [database username]
grant CREATE TABLE to [database username]
grant CREATE TRIGGER to [database username]
grant CREATE TYPE to [database username]
grant CREATE VIEW to [database username]
D.2 Understanding Privileges Granted to PUBLICThis section describes public synonyms that exist and for which the execute privilegeis granted to PUBLIC for the packages, procedures, functions, tables, and views ownedby the Oracle Application Express product schema, (for example, apex_180100). Toavoid conflicts with operation of the Application Express engine, Oracle recommendsnot to use the following names for database objects in schemas associated withOracle Application Express workspaces.
D-1
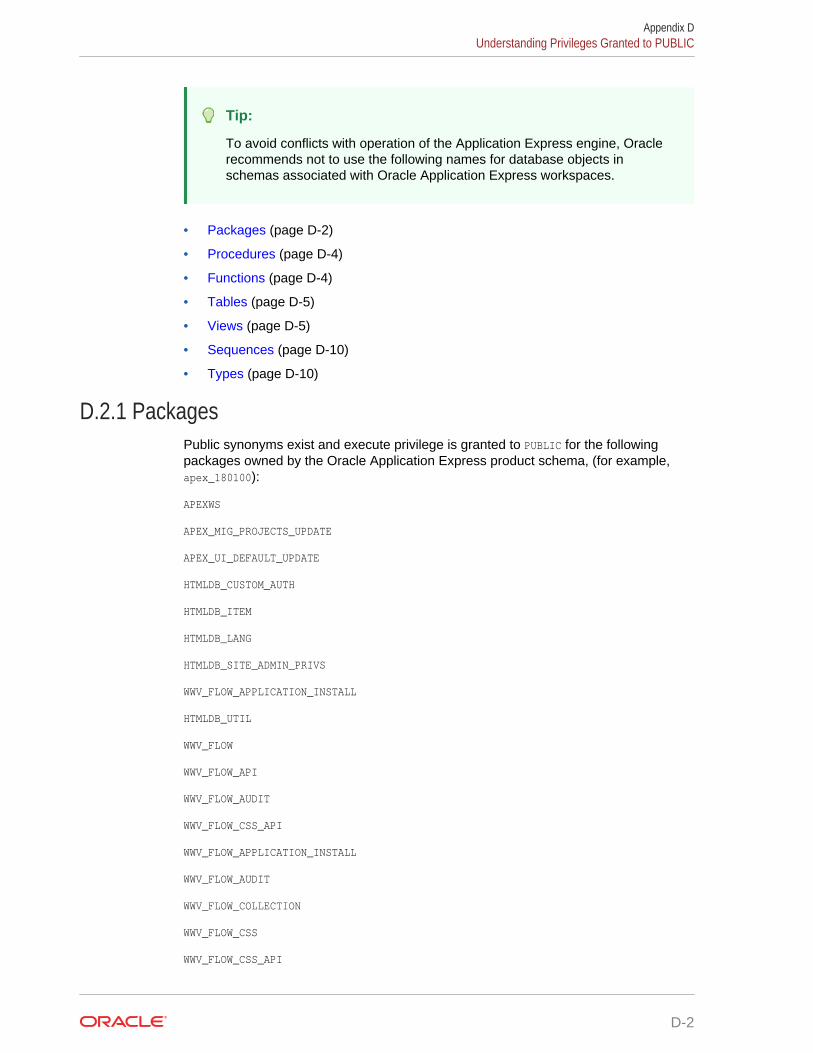
Tip:
To avoid conflicts with operation of the Application Express engine, Oraclerecommends not to use the following names for database objects inschemas associated with Oracle Application Express workspaces.
• Packages (page D-2)
• Procedures (page D-4)
• Functions (page D-4)
• Tables (page D-5)
• Views (page D-5)
• Sequences (page D-10)
• Types (page D-10)
D.2.1 PackagesPublic synonyms exist and execute privilege is granted to PUBLIC for the followingpackages owned by the Oracle Application Express product schema, (for example,apex_180100):
APEXWS
APEX_MIG_PROJECTS_UPDATE
APEX_UI_DEFAULT_UPDATE
HTMLDB_CUSTOM_AUTH
HTMLDB_ITEM
HTMLDB_LANG
HTMLDB_SITE_ADMIN_PRIVS
WWV_FLOW_APPLICATION_INSTALL
HTMLDB_UTIL
WWV_FLOW
WWV_FLOW_API
WWV_FLOW_AUDIT
WWV_FLOW_CSS_API
WWV_FLOW_APPLICATION_INSTALL
WWV_FLOW_AUDIT
WWV_FLOW_COLLECTION
WWV_FLOW_CSS
WWV_FLOW_CSS_API
Appendix DUnderstanding Privileges Granted to PUBLIC
D-2
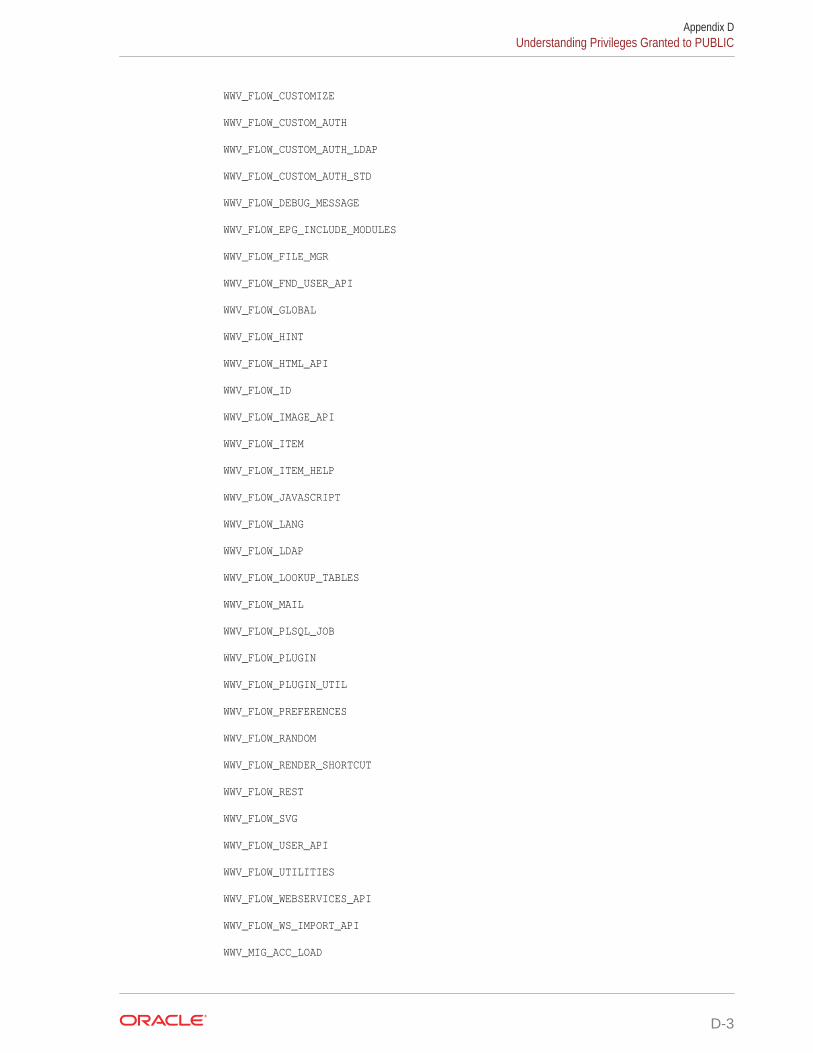
WWV_FLOW_CUSTOMIZE
WWV_FLOW_CUSTOM_AUTH
WWV_FLOW_CUSTOM_AUTH_LDAP
WWV_FLOW_CUSTOM_AUTH_STD
WWV_FLOW_DEBUG_MESSAGE
WWV_FLOW_EPG_INCLUDE_MODULES
WWV_FLOW_FILE_MGR
WWV_FLOW_FND_USER_API
WWV_FLOW_GLOBAL
WWV_FLOW_HINT
WWV_FLOW_HTML_API
WWV_FLOW_ID
WWV_FLOW_IMAGE_API
WWV_FLOW_ITEM
WWV_FLOW_ITEM_HELP
WWV_FLOW_JAVASCRIPT
WWV_FLOW_LANG
WWV_FLOW_LDAP
WWV_FLOW_LOOKUP_TABLES
WWV_FLOW_MAIL
WWV_FLOW_PLSQL_JOB
WWV_FLOW_PLUGIN
WWV_FLOW_PLUGIN_UTIL
WWV_FLOW_PREFERENCES
WWV_FLOW_RANDOM
WWV_FLOW_RENDER_SHORTCUT
WWV_FLOW_REST
WWV_FLOW_SVG
WWV_FLOW_USER_API
WWV_FLOW_UTILITIES
WWV_FLOW_WEBSERVICES_API
WWV_FLOW_WS_IMPORT_API
WWV_MIG_ACC_LOAD
Appendix DUnderstanding Privileges Granted to PUBLIC
D-3
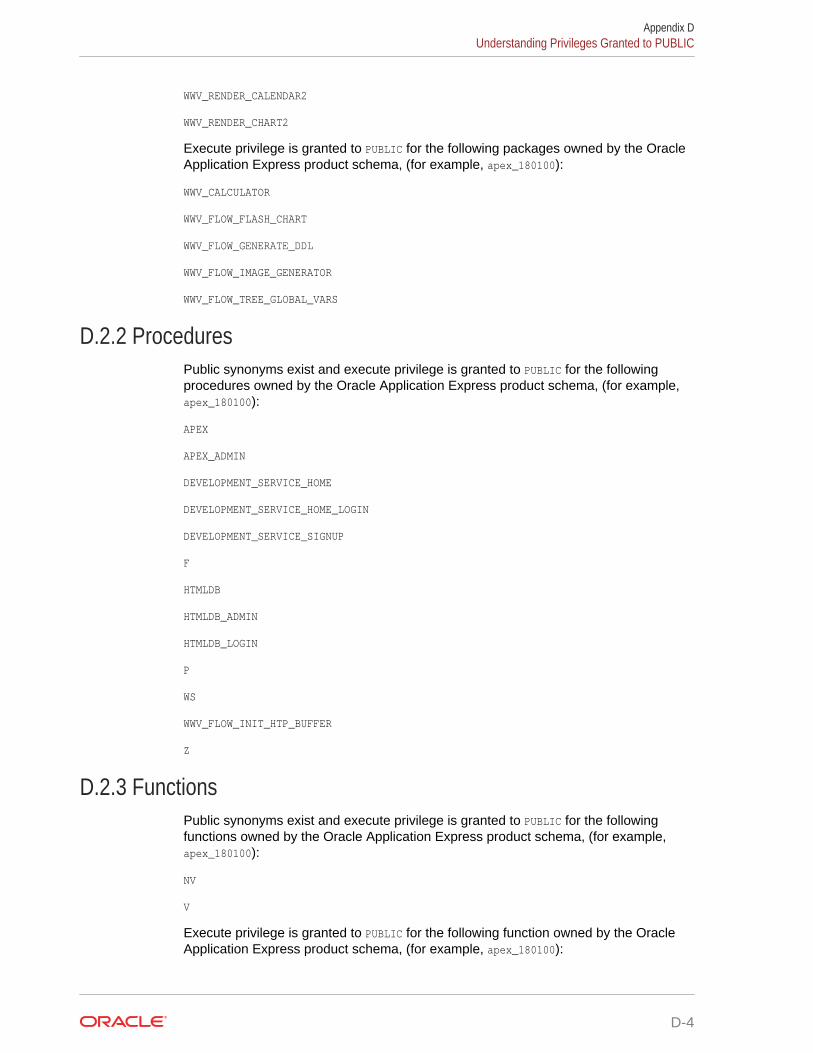
WWV_RENDER_CALENDAR2
WWV_RENDER_CHART2
Execute privilege is granted to PUBLIC for the following packages owned by the OracleApplication Express product schema, (for example, apex_180100):
WWV_CALCULATOR
WWV_FLOW_FLASH_CHART
WWV_FLOW_GENERATE_DDL
WWV_FLOW_IMAGE_GENERATOR
WWV_FLOW_TREE_GLOBAL_VARS
D.2.2 ProceduresPublic synonyms exist and execute privilege is granted to PUBLIC for the followingprocedures owned by the Oracle Application Express product schema, (for example,apex_180100):
APEX
APEX_ADMIN
DEVELOPMENT_SERVICE_HOME
DEVELOPMENT_SERVICE_HOME_LOGIN
DEVELOPMENT_SERVICE_SIGNUP
F
HTMLDB
HTMLDB_ADMIN
HTMLDB_LOGIN
P
WS
WWV_FLOW_INIT_HTP_BUFFER
Z
D.2.3 FunctionsPublic synonyms exist and execute privilege is granted to PUBLIC for the followingfunctions owned by the Oracle Application Express product schema, (for example,apex_180100):
NV
V
Execute privilege is granted to PUBLIC for the following function owned by the OracleApplication Express product schema, (for example, apex_180100):
Appendix DUnderstanding Privileges Granted to PUBLIC
D-4
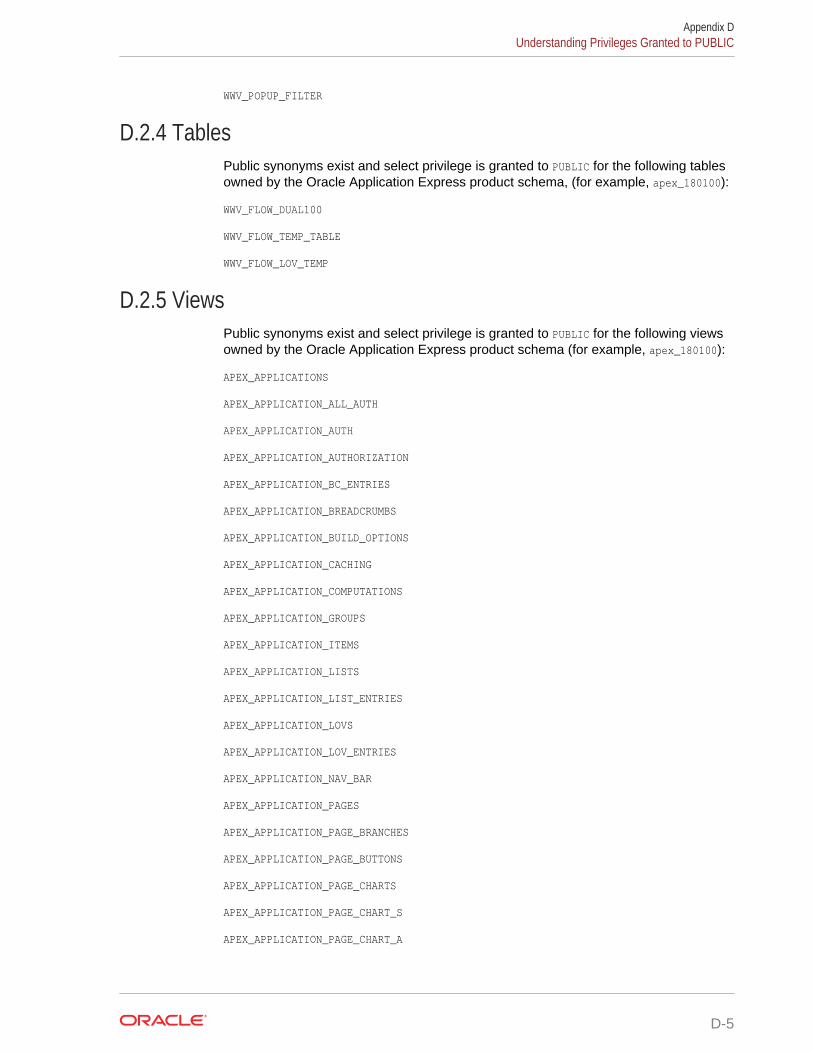
WWV_POPUP_FILTER
D.2.4 TablesPublic synonyms exist and select privilege is granted to PUBLIC for the following tablesowned by the Oracle Application Express product schema, (for example, apex_180100):
WWV_FLOW_DUAL100
WWV_FLOW_TEMP_TABLE
WWV_FLOW_LOV_TEMP
D.2.5 ViewsPublic synonyms exist and select privilege is granted to PUBLIC for the following viewsowned by the Oracle Application Express product schema (for example, apex_180100):
APEX_APPLICATIONS
APEX_APPLICATION_ALL_AUTH
APEX_APPLICATION_AUTH
APEX_APPLICATION_AUTHORIZATION
APEX_APPLICATION_BC_ENTRIES
APEX_APPLICATION_BREADCRUMBS
APEX_APPLICATION_BUILD_OPTIONS
APEX_APPLICATION_CACHING
APEX_APPLICATION_COMPUTATIONS
APEX_APPLICATION_GROUPS
APEX_APPLICATION_ITEMS
APEX_APPLICATION_LISTS
APEX_APPLICATION_LIST_ENTRIES
APEX_APPLICATION_LOVS
APEX_APPLICATION_LOV_ENTRIES
APEX_APPLICATION_NAV_BAR
APEX_APPLICATION_PAGES
APEX_APPLICATION_PAGE_BRANCHES
APEX_APPLICATION_PAGE_BUTTONS
APEX_APPLICATION_PAGE_CHARTS
APEX_APPLICATION_PAGE_CHART_S
APEX_APPLICATION_PAGE_CHART_A
Appendix DUnderstanding Privileges Granted to PUBLIC
D-5
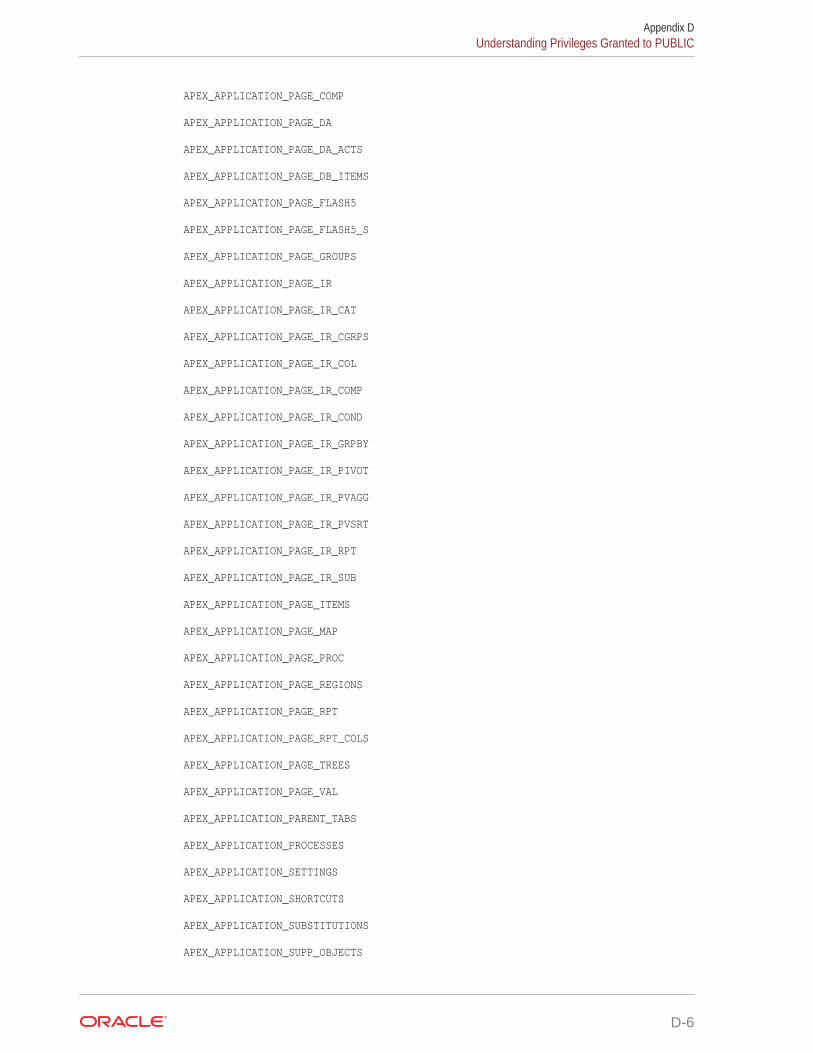
APEX_APPLICATION_PAGE_COMP
APEX_APPLICATION_PAGE_DA
APEX_APPLICATION_PAGE_DA_ACTS
APEX_APPLICATION_PAGE_DB_ITEMS
APEX_APPLICATION_PAGE_FLASH5
APEX_APPLICATION_PAGE_FLASH5_S
APEX_APPLICATION_PAGE_GROUPS
APEX_APPLICATION_PAGE_IR
APEX_APPLICATION_PAGE_IR_CAT
APEX_APPLICATION_PAGE_IR_CGRPS
APEX_APPLICATION_PAGE_IR_COL
APEX_APPLICATION_PAGE_IR_COMP
APEX_APPLICATION_PAGE_IR_COND
APEX_APPLICATION_PAGE_IR_GRPBY
APEX_APPLICATION_PAGE_IR_PIVOT
APEX_APPLICATION_PAGE_IR_PVAGG
APEX_APPLICATION_PAGE_IR_PVSRT
APEX_APPLICATION_PAGE_IR_RPT
APEX_APPLICATION_PAGE_IR_SUB
APEX_APPLICATION_PAGE_ITEMS
APEX_APPLICATION_PAGE_MAP
APEX_APPLICATION_PAGE_PROC
APEX_APPLICATION_PAGE_REGIONS
APEX_APPLICATION_PAGE_RPT
APEX_APPLICATION_PAGE_RPT_COLS
APEX_APPLICATION_PAGE_TREES
APEX_APPLICATION_PAGE_VAL
APEX_APPLICATION_PARENT_TABS
APEX_APPLICATION_PROCESSES
APEX_APPLICATION_SETTINGS
APEX_APPLICATION_SHORTCUTS
APEX_APPLICATION_SUBSTITUTIONS
APEX_APPLICATION_SUPP_OBJECTS
Appendix DUnderstanding Privileges Granted to PUBLIC
D-6
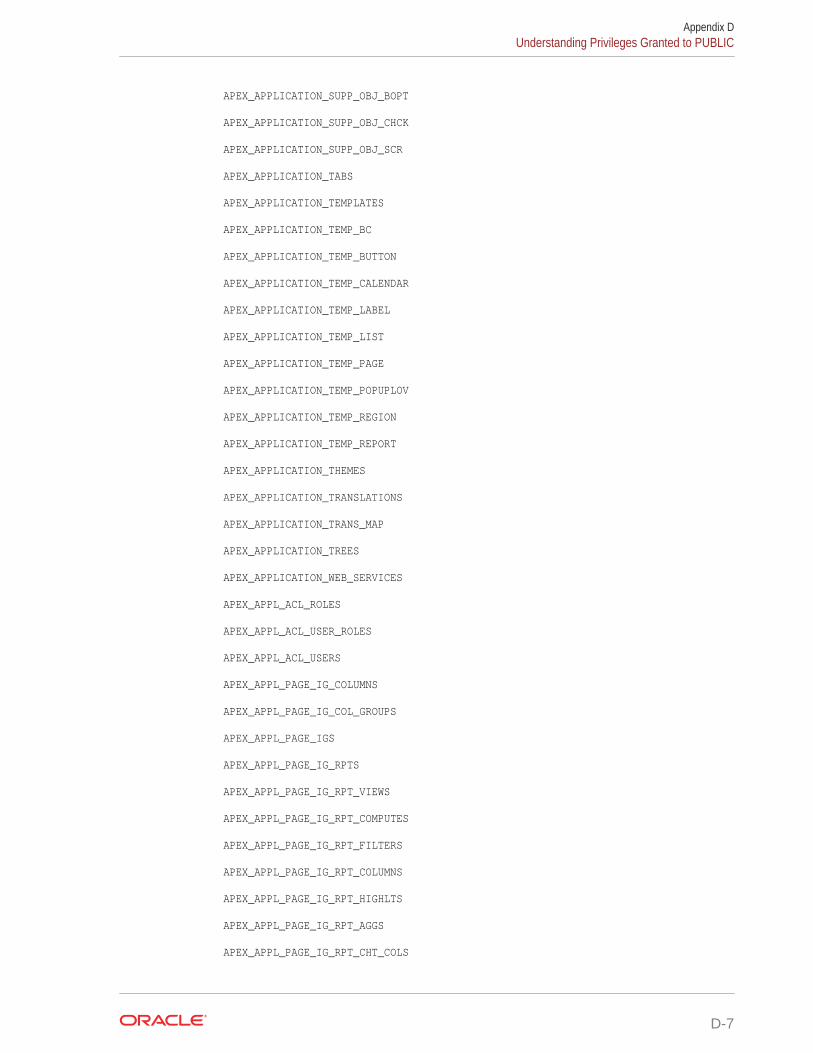
APEX_APPLICATION_SUPP_OBJ_BOPT
APEX_APPLICATION_SUPP_OBJ_CHCK
APEX_APPLICATION_SUPP_OBJ_SCR
APEX_APPLICATION_TABS
APEX_APPLICATION_TEMPLATES
APEX_APPLICATION_TEMP_BC
APEX_APPLICATION_TEMP_BUTTON
APEX_APPLICATION_TEMP_CALENDAR
APEX_APPLICATION_TEMP_LABEL
APEX_APPLICATION_TEMP_LIST
APEX_APPLICATION_TEMP_PAGE
APEX_APPLICATION_TEMP_POPUPLOV
APEX_APPLICATION_TEMP_REGION
APEX_APPLICATION_TEMP_REPORT
APEX_APPLICATION_THEMES
APEX_APPLICATION_TRANSLATIONS
APEX_APPLICATION_TRANS_MAP
APEX_APPLICATION_TREES
APEX_APPLICATION_WEB_SERVICES
APEX_APPL_ACL_ROLES
APEX_APPL_ACL_USER_ROLES
APEX_APPL_ACL_USERS
APEX_APPL_PAGE_IG_COLUMNS
APEX_APPL_PAGE_IG_COL_GROUPS
APEX_APPL_PAGE_IGS
APEX_APPL_PAGE_IG_RPTS
APEX_APPL_PAGE_IG_RPT_VIEWS
APEX_APPL_PAGE_IG_RPT_COMPUTES
APEX_APPL_PAGE_IG_RPT_FILTERS
APEX_APPL_PAGE_IG_RPT_COLUMNS
APEX_APPL_PAGE_IG_RPT_HIGHLTS
APEX_APPL_PAGE_IG_RPT_AGGS
APEX_APPL_PAGE_IG_RPT_CHT_COLS
Appendix DUnderstanding Privileges Granted to PUBLIC
D-7
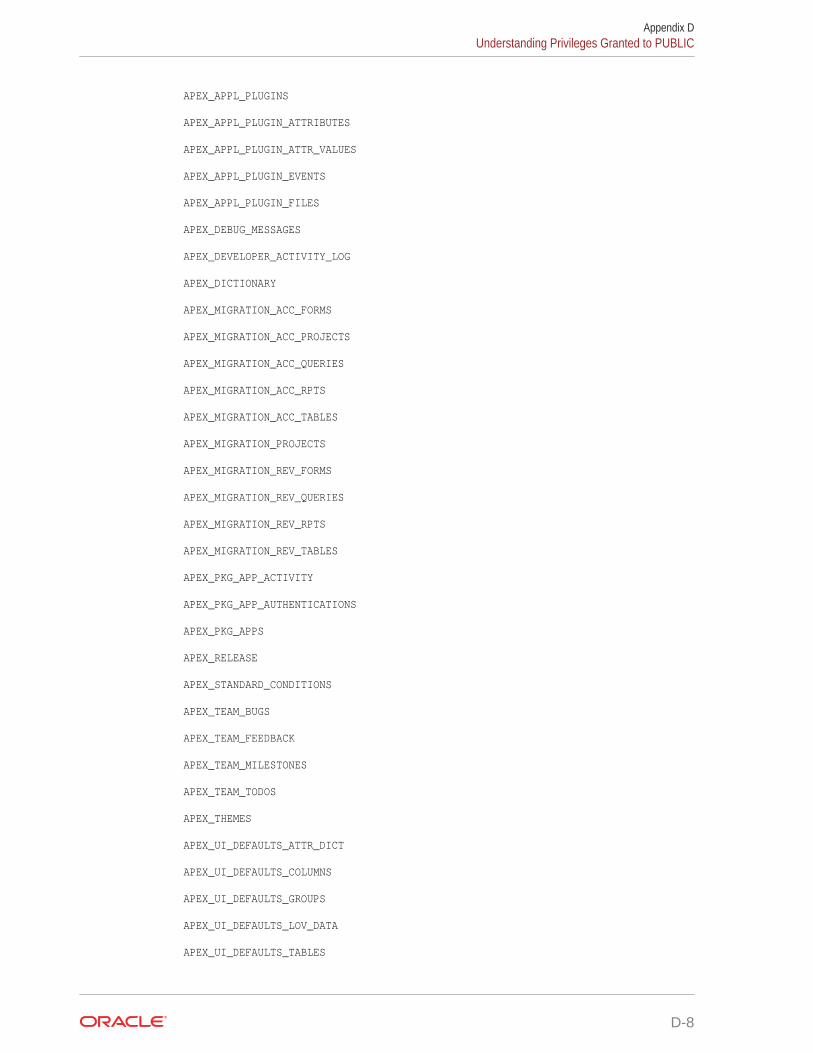
APEX_APPL_PLUGINS
APEX_APPL_PLUGIN_ATTRIBUTES
APEX_APPL_PLUGIN_ATTR_VALUES
APEX_APPL_PLUGIN_EVENTS
APEX_APPL_PLUGIN_FILES
APEX_DEBUG_MESSAGES
APEX_DEVELOPER_ACTIVITY_LOG
APEX_DICTIONARY
APEX_MIGRATION_ACC_FORMS
APEX_MIGRATION_ACC_PROJECTS
APEX_MIGRATION_ACC_QUERIES
APEX_MIGRATION_ACC_RPTS
APEX_MIGRATION_ACC_TABLES
APEX_MIGRATION_PROJECTS
APEX_MIGRATION_REV_FORMS
APEX_MIGRATION_REV_QUERIES
APEX_MIGRATION_REV_RPTS
APEX_MIGRATION_REV_TABLES
APEX_PKG_APP_ACTIVITY
APEX_PKG_APP_AUTHENTICATIONS
APEX_PKG_APPS
APEX_RELEASE
APEX_STANDARD_CONDITIONS
APEX_TEAM_BUGS
APEX_TEAM_FEEDBACK
APEX_TEAM_MILESTONES
APEX_TEAM_TODOS
APEX_THEMES
APEX_UI_DEFAULTS_ATTR_DICT
APEX_UI_DEFAULTS_COLUMNS
APEX_UI_DEFAULTS_GROUPS
APEX_UI_DEFAULTS_LOV_DATA
APEX_UI_DEFAULTS_TABLES
Appendix DUnderstanding Privileges Granted to PUBLIC
D-8
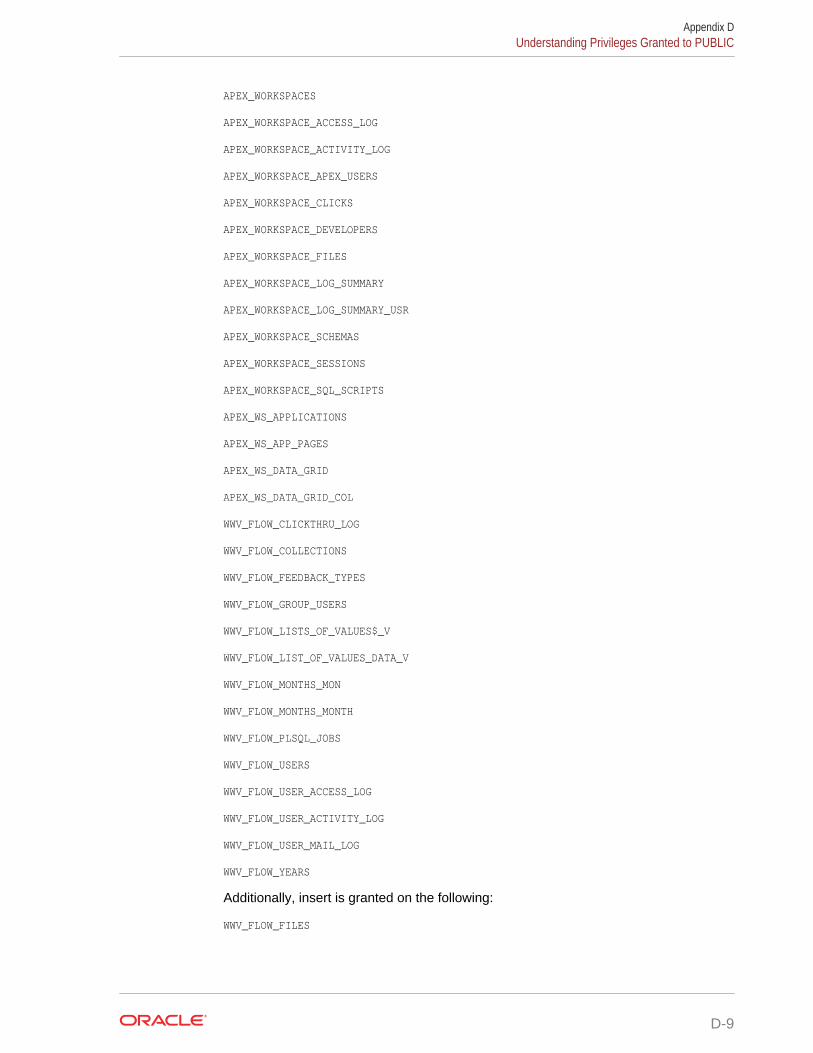
APEX_WORKSPACES
APEX_WORKSPACE_ACCESS_LOG
APEX_WORKSPACE_ACTIVITY_LOG
APEX_WORKSPACE_APEX_USERS
APEX_WORKSPACE_CLICKS
APEX_WORKSPACE_DEVELOPERS
APEX_WORKSPACE_FILES
APEX_WORKSPACE_LOG_SUMMARY
APEX_WORKSPACE_LOG_SUMMARY_USR
APEX_WORKSPACE_SCHEMAS
APEX_WORKSPACE_SESSIONS
APEX_WORKSPACE_SQL_SCRIPTS
APEX_WS_APPLICATIONS
APEX_WS_APP_PAGES
APEX_WS_DATA_GRID
APEX_WS_DATA_GRID_COL
WWV_FLOW_CLICKTHRU_LOG
WWV_FLOW_COLLECTIONS
WWV_FLOW_FEEDBACK_TYPES
WWV_FLOW_GROUP_USERS
WWV_FLOW_LISTS_OF_VALUES$_V
WWV_FLOW_LIST_OF_VALUES_DATA_V
WWV_FLOW_MONTHS_MON
WWV_FLOW_MONTHS_MONTH
WWV_FLOW_PLSQL_JOBS
WWV_FLOW_USERS
WWV_FLOW_USER_ACCESS_LOG
WWV_FLOW_USER_ACTIVITY_LOG
WWV_FLOW_USER_MAIL_LOG
WWV_FLOW_YEARS
Additionally, insert is granted on the following:
WWV_FLOW_FILES
Appendix DUnderstanding Privileges Granted to PUBLIC
D-9
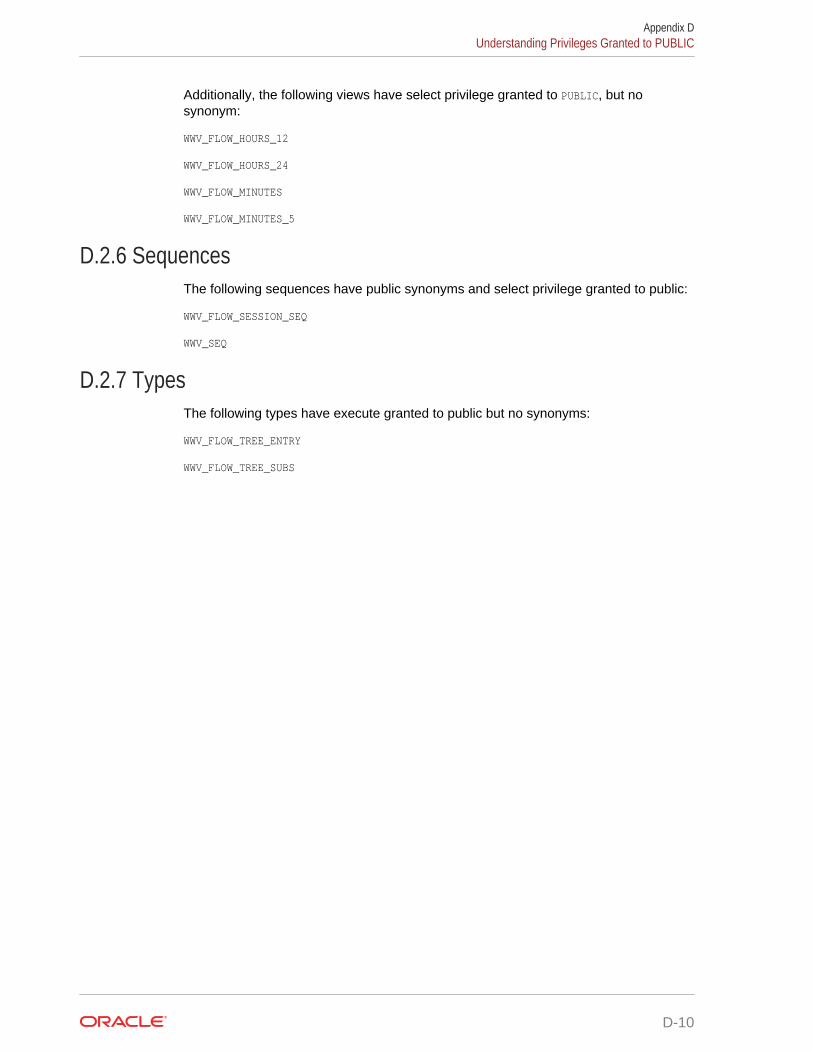
Additionally, the following views have select privilege granted to PUBLIC, but nosynonym:
WWV_FLOW_HOURS_12
WWV_FLOW_HOURS_24
WWV_FLOW_MINUTES
WWV_FLOW_MINUTES_5
D.2.6 SequencesThe following sequences have public synonyms and select privilege granted to public:
WWV_FLOW_SESSION_SEQ
WWV_SEQ
D.2.7 TypesThe following types have execute granted to public but no synonyms:
WWV_FLOW_TREE_ENTRY
WWV_FLOW_TREE_SUBS
Appendix DUnderstanding Privileges Granted to PUBLIC
D-10
Index
AAccept Page, 2-6access control, 20-44
configuring, 20-38creating, 20-37creating with Create Application Wizard, 6-6creating with Create Page Wizard, 7-6
Access Controlabout exporting, 20-40authorization schemes, 20-38
access control list, 20-36adding multiple users, 20-42adding users, 20-42adding with Create Application Wizard, 20-40adding with Create Page Wizard, 20-41configuring, 20-43deleting users, 20-42editing users, 20-42
access control, authorization schemes, 20-43Account menu, 1-11activity log, 22-7Activity Monitoring
creating with Create Page Wizard, 7-6Activity Reporting
creating with Create Application Wizard, 6-7activity reports, creating custom, 22-7Administration menu, 1-9Administration Menu
Administration, 1-9Change My Password, 1-9Dashboards, 1-9Manage Service, 1-9Manage Users and Groups, 1-9Monitory Activity, 1-9
Allow Feedback attribute, 6-26Allows URLS Created After attribute, 6-38AnyChart, 11-4AnyCo IT Department
about, 3-19installing, 3-20navigating, 3-21running, 3-20
AnyGantt, 11-4APEX_ACTIVITY_LOG view, 22-7
APEX_MAIL, 19-3App Builder
accessing, 1-13, 1-20home page, 1-13page, 2-2
App Builder home page, 1-13, 1-20Create button, 1-16Migrations, 1-17navigation bar, 1-14Recent, 1-17Reset button, 1-16
App Builder TasksRecent list, 1-17
APP_AJAX_X01, 2-27APP_AJAX_X10, 2-27application
adding content from Web sites, 13-13adding Data Load Wizard, 18-1adding data loading, 18-1attaching an authorization scheme, 20-67changing authentication scheme, 20-61,
20-62controlling navigation using branches, 15-21copying, 1-24creating, 2-2debugging, 22-1, 23-1defining primary language, 21-6deleting, 1-24deploying, 24-4, 24-5, 24-25exporting, 24-5, 24-25grouping, 6-63hiding features, 24-20importing export file, 24-34importing from SQL*Plus, 24-41language preference, 21-3resource use, 23-3translatable components, 21-3translating, 21-2translating multibye languages, 21-7translation rendering, 21-3upgrading, 6-69
application access controlabout, 20-45adding user role assignments, 20-47creating roles, 20-46
Index-1
application access control (continued)deleting roles, 20-46deleting user role assignments, 20-47editing roles, 20-46editing user role assignments, 20-47
Application Alias attribute, 6-25application attributes
Build Options, 6-32Database Session, 6-40editing, 6-23Error Handling, 6-30exporting, 24-27Substitutions, 6-31
application blueprintabout, 6-16blueprint
using, 6-16loading, 6-17using, 6-16viewing, 6-16
application computationsabout, 16-19creating, 16-20executing On New Instance, 16-15, 16-19history report, 16-20
Application Dashboard report, 22-4Application Date Format attribute, 6-42Application Date Time Format attribute, 6-43application definition, editing, 6-23Application Express Accounts authentication
setting up, 20-52, 20-60Application Express Views, 6-71application groups, 6-63Application Groups attribute, 6-25application Help, creating, 11-39Application home page
adding new page, 7-2Export/Import icon, 1-22Export/Install icon, 3-18Run Application button, 1-22Shared Components icon, 1-22, 3-18Supporting Objects icon, 1-22, 3-18Utilities icon, 1-22, 3-18
Application home Task listCopy this Application, 1-24Delete this Application, 1-24
application itemabout, 14-17, 17-34creating, 17-35creating a global variable, 17-37editing attributes, 17-37history, 17-36
application language, 6-40Application Language Derived From attribute,
6-42, 21-6
application layoutprint preview mode, 13-2shortcuts, 17-19
Application Primary Language attribute, 6-42,21-6
application processescreating, 16-16creating error message, 16-17editing attributes, 16-17example, 16-16On Demand, 16-15reports, 16-18understanding, 16-14
application settings, 17-9creating, 17-10deleting, 17-10editing, 17-10
Application Timestamp Format, 6-43Application Timestamp Time Zone Format, 6-43application utilities
accessing, 6-67Advisor, 6-66Application Dashboard, 6-66Application Express Views, 6-66Attribute Dictionary, 6-66Change History, 6-66Database Object Dependencies, 6-66Debug Messages, 6-66Export Repository, 6-66Recently Updated Pages, 6-66Upgrade Application, 6-66using, 6-65
architecture, 1-3asynchronous updates
charts, 25-9maps, 11-27
Attribute Dictionary, 16-21about, 16-21accessing, 16-21
attributesviewing field-level help, 1-29
authentication, 2-7, 20-48Authentication Schemes Repository, 20-61changing, 20-61, 20-62creating an authentication scheme, 20-50managing existing schemes, 20-61preconfigured authentication schemes, 20-51reports, 20-63security attributes, 6-33understanding, 20-49viewing current scheme, 20-61
authentication reportAuthentication Scheme History, 20-63Authentication Scheme Subscription, 20-63
Authentication Scheme attribute, 6-34
Index
Index-2

Authentication Scheme History report, 20-63Authentication Scheme Subscription report,
20-63authentication schemes
Application Express Accounts, 20-52cookie user accounts, 20-52Custom authentication, 20-52DAD Credentials, 20-57Database Account Credentials, 20-54HTTP Header Variable, 20-55LDAP Directory Verification, 20-55Open Door Credentials, 20-58Single Sign-On verification, 20-59Social Sign-In, 20-60
authorization, 2-8Authorization attributes, 6-34authorization scheme
attaching to application, 20-67attaching to component, 20-68attaching to control, 20-68attaching to page, 20-68By Component report, 20-69History report, 20-69of an application, 6-34reports, 20-69specifying, 6-34Subscription report, 20-69Utilization report, 20-69
Authorization Scheme attribute, 6-35Authorization Scheme History report, 20-69Authorization Scheme Subscription report, 20-69Authorization Scheme Utilization report, 20-69authorization schemes, 20-63
attaching to application, 20-67attaching to component, 20-68attaching to control, 20-68attaching to page, 20-68creating, 20-64for controlling access, 20-43
Automatic CSV Encoding attribute, 6-44Automatic Time Zone, 6-44
Bbind variables
syntax, 2-18using in regions, 2-19using in regions based on PL/SQL, 2-19
blank pagecreating with Create App Wizard, 6-5
BLOB support in formsabout, 10-21displaying the BLOB, 10-23downloading files, 10-22removing the image reference, 10-23
BLOB support in forms (continued)uploading files, 10-22
BLOB support in reportsabout, 9-103displaying the BLOB, 9-104providing download link, 9-103
BLOBsAPEX_UTIL.GET_BLOB_FILE_SRC, 9-105download support, 10-21populating, 10-21support, 9-103support in forms, 10-21working with procedurally, 9-105
Bookmark Hash Function attribute, 6-38branch
about, 16-14creating, 15-21page submission, 8-29pre-rendering, 8-28When Button Pressed attribute, 2-39
BRANCH_TO_PAGE_ACCEPT, 2-40branching
making conditional, 15-23using buttons, 14-34
breadcrumb reports, 15-15Breadcrumb Exceptions, 15-15Breadcrumb Hierarchy, 15-15Breadcrumb History, 15-15Breadcrumb Utilization, 15-15Grid Edit Breadcrumb, 15-15
breadcrumb template, 12-43Definition, 12-44Name, 12-44Substitution Strings, 12-45
breadcrumb template substitution strings#LINK#, 12-45#LONG_NAME#, 12-45#NAME#, 12-45, 12-46NAME_ESC_SC#, 12-45, 12-46
breadcrumbsabout, 15-8about creating manually, 15-9adding a breadcrumb region, 15-10adding entries, 15-12adding to a page, 15-10creating, 15-8creating as shared components, 15-9creating dynamic, 15-13creating with Breadcrumb Region Wizard,
15-10deleting unused, 15-15editing, 15-13Exceptions report, 15-15Grid Edit report, 15-15Hierarchy report, 15-15
Index
3
breadcrumbs (continued)History report, 15-15navigations, 12-43reparenting entries, 15-14Utilization report, 15-15
Browse button, A-4bug reports
By Day, 4-21By Day page, 4-21By Developer, 4-21Calendar page, 4-20
bugsattaching files, 4-19Bugs page, 4-18creating, 4-18editing, 4-19managing, 4-18viewing, 4-18viewing reports, 4-20
build options, 24-14about, 24-15changing status, 24-17creating, 24-16deleting, 24-17, 24-18excluding, 24-17exporting, 24-20exporting status, 24-20history, 24-19including, 24-17removing associated components, 24-17,
24-18reports, 24-19
Build Options attribute, 6-32Build Status attribute, 6-29built-in substitution strings, 2-23Bulk Edit Item Help report
accessing, 11-42button
branching, 14-34creating, 14-30displaying conditionally, 14-31editing, 14-31, 14-32managing, 14-29names, 14-34template, 12-46Warn on Unsaved Changes, 14-32
button templateDefinition, 12-47Name, 12-46Substitution Strings, 12-47
button template substitution strings##ICON_CSS_CLASSES##, 12-48#BUTTON_ATTRIBUTES#, 12-47, 12-48#BUTTON_CSS_CLASSES#, 12-47, 12-48#BUTTON_ID#, 12-47, 12-48
button template substitution strings (continued)#LABEL#, 12-47, 12-48#LINK#, 12-47, 12-48
CCache attribute, 6-39caching regions, 13-8calendar
accessing attributes, 11-13, 25-19add initialization JavaScript code, 11-16adding, 11-8, 11-10adding to new page, 11-8, 11-10creating, 11-5creating in Page Designer, 11-12creating legacy calendar, 25-19creating with Create App Wizard, 6-5creating with Create Page Wizard, 7-5creating with REST Enabled SQL, 18-22editing attributes, 11-13enabling drag and drop, 11-17including add and edit functions, 11-14integrating with Google calendar, 17-15supported substitution strings, 25-20viewing sample, 11-7
calendar attributesaccessing, 11-13, 25-19
cardscreating with Create App Wizard, 6-5
cascading style sheetsabout, 12-31referencing in page template, 12-77uploading, 12-77using custom, 12-76
Change History report, 6-70Character Value Comparison, 6-43Character Value Comparison Behavior, 6-44chart
creating with Create Page Wizard, 7-5chart synchronous update
creating refresh dynamic action, 11-37chart type
switching in page designer, 11-35charts
adding to a page, 11-33adding to new page, 11-29, 11-31altering display, 11-35AnyChart, 11-4AnyGantt, 11-4asynchronous updates, 25-9automatic refresh, 11-36automatic refresh attribute
enabling, 11-36creating, 11-27creating with Create App Wizard, 6-5
Index
Index-4
charts (continued)creating with REST Enabled SQL, 18-19custom JavaScript, 11-38dynamic action, 11-36editing attributes, 11-35legacy, 25-1managing in Page Designer, 11-35monitoring information, 25-9switching to Flash, 25-9upgrading AnyChart to JET Chart, 11-4
check box, A-2classic calendar template
comments, 12-49Daily Calendar, 12-49Monthly Calendar, 12-49Name, 12-49Template Subscription, 12-49Weekly Calendar, 12-49
classic navigation bar, 15-16about, 15-16copying entry, 15-19creating entry, 15-17creating for feedback, 15-18editing entry, 15-20editing multiple entries, 15-20History report, 15-20reports, 15-20Subscription report, 15-20
classic reportadding download link, 9-98changing pagination, 9-88controlling column breaks, 9-91editing attributes, 9-87support for file export, 9-89
classic report regionsconfiguring print attributes, 9-100printing methods, 9-100
classic reportsabout, 9-4controlling column display, 9-97creating a column link, 9-94creating updatable columns, 9-95creating with Create Application Wizard, 9-6defining a column as a list of values, 9-96editing column layout, 9-92managing Attributes, 9-87managing column attributes, 9-92managing region attributes, 9-86sorting columns, 9-93
Cleanup PL/SQL Code, 6-40collections, 18-8color picker, A-2
configure display style, 17-15, 17-16columns templates, using JavaScript, 12-76commit points, 2-6
Compatibility Mode attribute, 6-27Component Settings
adding sliders, 17-17Color Picker, 17-15, 17-16integrating with Google calendar, 17-15interactive report Action menu, 17-16managing, 17-14switch defaults, 17-17viewing History report, 17-18
Component View tabadding buttons, 8-27adding items, 8-27adding regions, 8-27
componentsattaching an authorization scheme, 20-68controlling access to, 2-8displaying on all pages, 13-3displaying on every page, 13-2managing availability, 20-12translating messages, 21-14, 21-15, 21-34
condition type, 2-7conditional
processing, 2-6rendering, 2-6
conditionslist of, C-1using, 2-6using with buttons, 14-31
Configuration Optionscreating with Create Application Wizard, 6-7creating with Create Page Wizard, 7-6
configuration, controlling, 24-14controls, controlling access to, 2-8Create Application Wizard, 2-2
about, 6-2, 6-4About Page
creating with Create Application Wizard,6-6
access control, 6-6Activity Monitoring, 6-7adding blank page, 6-5adding calendar, 6-5adding cards, 6-5adding chart, 6-5adding classic report, 9-9adding dashboard, 6-5adding form, 6-5adding interactive grid, 6-5, 9-10adding interactive report, 9-9adding master detail, 6-6adding multiple reports, 6-6adding report, 6-6adding timeline, 6-6adding wizard, 6-6Configuration Options, 6-7
Index
5
Create Application Wizard (continued)creating Feedback, 6-7creating forms, 10-9creating reports, 9-6, 9-8page types, 6-5report options, 9-9Theme Style Selection, 6-7
Create Application Wizard, SettingApplication ID, 6-8Authentication, 6-8Schema, 6-8User Interface Defaults, 6-8
Create Branch Wizard, 15-21Create Navigation Bar Entry Wizard, 11-43,
15-19Create Page Computation Wizard, 16-2Create Page Wizard, 7-1
About Page, 7-6About this Application
creating with Create Page Wizard, 7-6access control, 7-6Activity Monitoring, 7-6adding interactive grid, 10-8adding master detail, 10-8blank page
creating with Create Page Wizard, 7-4,7-8
Configuration Options, 7-6creating blank page, 7-4, 7-8creating calendar, 7-5, 7-8creating chart, 7-5, 7-8creating classic report, 9-14creating column toggle report, 9-15, 9-16creating Dashboard page, 7-5creating Data Load Wizard
Data Load Wizard, 18-2creating data loading wizard, 7-9creating Data Loading wizard, 7-5, 7-9creating Feedback, 7-7creating form, 7-5, 7-8creating form on a procedure, 10-9creating form on a SQL query, 10-8creating form on procedure, 10-8creating form on SQL Query, 10-9creating form on table, 10-8creating form on Web service, 10-8creating forms, 10-6creating interactive grid, 9-14creating interactive report, 9-14creating Legacy page, 7-5, 7-9creating list view, 9-14, 9-15creating Login Page, 7-7creating plug-ins, 7-5, 7-8creating reflow report, 9-15, 9-16creating report, 7-4, 7-8
Create Page Wizard (continued)creating report and form on table, 9-14creating report and form on Web Service,
10-9creating report on Web service, 9-15, 9-16creating report with a list view on table, 10-7,
10-9creating report with form on table, 10-7creating reports, 9-10, 9-12creating single page master detail, 10-8creating tree, 7-5, 7-8creating with Create Page Wizard, 10-8creating wizard, 7-5, 7-8Data Load Wizard
about pages created, 18-2Data Load Definition, 18-2
Email Reporting, 7-6Form and Report on Web Service, 10-8form on table, 10-9form on Web Service, 10-9form options, 10-7Job Reporting, 7-7Legacy pages
creating with Create Page Wizard, 7-5report options, 9-13Theme Style Selection, 7-7
Create Region Wizardcreating breadcrumb, 15-10creating forms, 10-10
credentialsabout, 18-36deleting, 18-37exporting, 18-36managing, 18-35
cross page utilitiesaccessing, 6-72Delete Multiple Pages, 6-72Grid Edit of all Pages, 6-72Page Attributes, 6-72Page Locks, 6-72
cross site-scriptingabout, 20-19about safe item types, 20-20dynamic output, 20-21escaping values, 20-20HTML region, 20-20protecting dynamic output, 20-21protecting form items, 20-22protecting report regions, 20-21report regions, 20-21restricting characters on items, 20-23static display areas, 20-20using safe item types, 20-21
CSS Finder, 6-58Custom Authentication
Index
Index-6
Custom Authentication (continued)setting up, 20-53
custom packaged applicationabout, 24-7about Supporting Objects page, 24-8adding access control list, 24-11build options, 24-9creating supporting objects, 24-8defining an upgrade script, 24-12deinstallation scripts, 24-10deinstalling, 24-13deleting installation options, 24-12deleting messages, 24-12deleting supporting object scripts, 24-12how to create, 24-6installation scripts, 24-9installing supporting objects, 24-11messages, 24-9, 24-10prerequisites, 24-9substitutions strings, 24-9testing installation scripts, 24-11upgrade messages, 24-10upgrade scripts, 24-10upgrading, 24-13validations, 24-9viewing an install summary, 24-14
DDAD Credentials Verification
setting up, 20-58Dashboard
creating with Create App Wizard, 6-5data
accessing with database links, 18-56accessing with REST Enabled SQL
Reference, 18-8Data Load Wizard
about creating, 18-2adding to application, 18-1creating, 18-3creating with Create Page Wizard, 18-2re-creating pages, 18-6
data loadingadding, 18-1
Data Loadingcreating with Create Page Wizard, 7-5, 7-9
Database Account Credentials authenticationsetting up, 20-54
database applicationabout, 2-2adding a page, 7-1adding components, 7-1adding pages, 7-1assigning to groups, 6-64
database application (continued)based on queries, 6-9based on spreadsheet, 6-10, 6-11copying, 6-17copying from Application home page, 6-19copying with Create Application Wizard, 6-18creating groups, 6-64creating on tables, 6-9deleting, 6-21, 6-22groups, 6-63loading application blueprint, 6-17loading from spreadsheet, 6-14loading from spreadsheet file, 6-11removing from groups, 6-64running, 2-3using application blueprint, 6-16viewing application blueprint, 6-16
database application groupsassigning pages, 6-64creating, 6-64removing, 6-65removing pages, 6-64
database application pageadding, 7-1assigning to groups, 7-16copying in Page Designer, 8-37creating from Application home, 7-2deleting, 8-38deleting in Page Designer, 8-38deleting multiple, 8-39deleting range of, 8-39determining lock status, 7-17grouping, 7-14locking, 7-17, 7-18managing, 7-1preventing conflicts, 7-17removing from groups, 7-16running, 2-3unlocking, 7-17, 7-19
database application page groups, 7-15assigning pages, 7-16creating, 7-15editing group definition, 7-15removing, 7-16removing pages, 7-16viewing, 7-15
database link, 18-56about, 18-57creating, 18-57viewing existing database links, 18-57
Database Object Dependencies report, 6-70Database Session attribute, 6-40database users
granted privileges, D-1granting privileges, D-1
Index
7
date picker, A-2DBMS_APPLICATION_INFO, 23-3debugging, 22-1, 23-1
checking for errors, 23-1enabling and disabling, 23-5isolating a problem, 23-8running with application, 23-5SQL queries, 22-3SQL tracing, 23-3using debug mode, 23-4using f?p to access, 23-6viewing reports at runtime, 23-6viewing reports from Component View, 23-7viewing reports in development mode, 23-6
Debugging attribute, 6-26deep linking, 20-50Deep Linking attribute, 6-36Define Authorization Scheme, 6-35defining, 18-41deleting export files, 24-41demonstration application
about Sample Database Application, 3-7deployment, 24-5
creating supporting objects, 24-8exporting a page, 24-29exporting a Websheet, 24-30exporting application definition, 24-25exporting feedback, 24-34exporting script files, 24-34exporting static files, 24-31exporting themes, 24-31exporting User Interface Defaults, 24-32exporting workspaces, 24-28importing application from SQL*Plus, 24-41importing export files, 24-34importing files, 24-34installing application export, 24-40installing files, 24-41managing database objects, 24-6of an application, 24-4options, 24-4publishing the URL, 24-21publishing the Websheet application URL,
24-22understanding the process, 24-4
detail viewinteractive grids, 9-34
developer commentsadding in Page Designer, 6-55adding to an application, 6-56adding to application, 6-56deleting, 6-57editing, 6-56viewing, 6-56viewing reports, 6-57
Developer Comments calendar, 6-58Developer Navigation tools
about, 1-6Account menu, 1-11Administration menu, 1-9Help menu, 1-10
development processmanaging, 4-1
development process, managing, 4-1dialog
configuring attributes in Page Designer, 8-33dialog page template, 7-10dialog page template attributes, 12-63dialog pages, 7-9
About branching, 7-13about supported, 7-10creating a dialog page template, 7-10defining, 7-11generating a Cancel dynamic action, 7-12generating a close dialog page process, 7-12handling refresh actions, 7-13Modal Dialog, 7-10non-modal dialog, 7-10required template attributes, 12-63using dialog page template, 7-10
DMLabout locking, 18-57APEX_DML_LOCK_WAIT_TIME, 18-58FSP_DML_LOCK_ROW, 18-58
Document Direction attribute, 6-42documentation
about, 1-27accessing, 1-26
documentsdownloading, 1-28
dynamic actioncalendars, 11-18
Dynamic Actionscreating, 14-24debugging, 14-28deleting, 14-27editing, 14-26frequency and scope, 14-27managing, 14-20understanding, 14-21
dynamic listabout creating, 17-44creating from scratch, 17-46syntax, 17-45
dynamic translation, 21-57
EEdit Application Definition
Allow Feedback, 6-26
Index
Index-8

Edit Application Definition (continued)Application Alias, 6-25Application Groups, 6-25Build Status, 6-29Compatibility Mode, 6-27Debugging, 6-26Email from Address, 6-27Error Handling, Default Error Display
Location, 6-30Error Handling, Error Handling Function, 6-31Global Notifications, 6-31Logging, 6-26Message for unavailable application, 6-29Name attribute, 6-25Proxy Server, 6-27restrict access, 6-30Status, 6-29Version, 6-25
Edit Application Definition pageabout, 6-24accessing, 6-23
Edit Application pageDatabase Session, 6-40
Edit Globalization Attributes, 6-40Application Date Format, 6-42Application Date Time Format, 6-43Application Language Derived From, 6-42Application Primary Language, 6-42Application Timestamp Format, 6-43Application Timestamp Time Zone Format,
6-43Automatic CSV Encoding, 6-44Automatic Time Zone, 6-44Character Value Comparison, 6-43Character Value Comparison Behavior, 6-44Document Direction, 6-42
Edit Security Attributes, 6-32accessing, 6-32Authentication, 6-33Authorization, 6-34Session Management, 6-35Session State Protection, 6-38
editable interactive grid, 10-2email
configuring for instance, 19-2email log, 19-1email queue, 19-1enabling, 20-11managing, 19-1sending with APEX_MAIL package, 19-3
Email from Address attribute, 6-27Email Reporting
creating with Create Page Wizard, 7-6email templates, 17-23
creating, 17-23
email templates (continued)deleting, 17-27editing, 17-27including dynamic text, 17-26viewing samples, 17-25
Embed in Frames attribute, 6-39embedded PL/SQL gateway
security practices, 20-4engine, 1-3error message
creating for a page process, 16-13creating for application processes, 16-17
errors, handling, 6-30Expire Bookmarks attribute, 6-38export
application, 24-25application attributes, 24-27build option status, 24-27database application, 24-22database application components, 24-22feedback, 24-34managing database objects, 24-6page, 24-29page components, 24-27plug-in, 24-31script file, 24-34shared components, 24-27static files, 24-31text for translations, 21-8themes, 24-31User Interface Defaults, 24-32Websheet, 24-30workspaces, 24-28
Export Repository, 24-40, 24-41accessing, 24-40
Export/Import icon, 1-22exported application, importing, 24-34
Ff?p syntax, 2-12feature reports
Approval Statuses, 4-11Calendar page, 4-9Focus Areas, 4-10History, 4-9Owners, 4-11Progress Log, 4-10Select a Utility, 4-11Tree page, 4-8
feature utilitiesassigning milestones, 4-31change milestones for overdue features, 4-31push due date of open features, 4-31set feature due date to milestone, 4-31
Index
9
featuresattaching files, 4-6creating, 4-4deleting, 4-6removing, 6-8, 7-9, 20-44tracking, 4-3updating, 4-6viewing, 4-4viewing reports, 4-8
feedbackabout Feedback, 4-22adding with Create Application Wizard, 4-23adding with Create Page Wizard, 4-24By Filing User, 4-27Calendar page, 4-28configuring feedback, 4-26configuring support for attachments, 4-26Feedback page, 4-25managing feedback, 4-26reviewing, 4-25submitting, 4-25track in Team Development, 4-26
Feedbackcreating with Create Application Wizard, 6-7creating with Create Page Wizard, 7-7
field-level Help, 1-29viewing, 1-29viewing in Page Designer, 1-30
file upload tablesecurity risks, 20-36
Find icon, 6-58focus areas
renaming, 4-31footer, substitution strings, 13-7form
creating with Create App Wizard, 6-5creating with Create Page Wizard, 7-5
Formlegacy master detail form, 25-12
form on a table, 10-2forms
creating a tabular form, 25-15creating single page master detail, 10-17creating two page master detail, 10-18creating using Create Page Wizard, 10-6creating with Create Application Wizard, 10-9creating with Create Region Wizard, 10-10editable interactive grid, 10-2form on a table, 10-2managing master detail, 10-11master detail, 10-12understanding types, 10-1validating input, 10-20
full development environment, 1-3functions, searching for, 6-62
GGallery
about, 8-12using, 8-24, 8-26viewing legacy components, 25-20
Gallery menuShow Legacy Components, 25-20
Global Notifications attribute, 6-31Global page, 13-3
creating, 13-3navigating to, 13-4
Global Search, 1-7global template option group, 12-34
creating, 12-34editing, 12-34
global template optionscreating, 12-37editing, 12-37managing, 12-35
Global Templates, 12-15global variable, creating, 17-37globalization
attributes, 21-6determining application language, 6-40understanding, 21-2
graphicsmanaging, 13-14
grid messages requiring translationinteractive grid, 21-16
groupsof applications, 6-63of database application pages, 7-14
HHelp
accessing, 1-26creating, 11-39creating navigation bar entry, 11-43searching, 1-26using, 1-26
Help menu, 1-10Help text
seeding, 11-43hidden item, A-5HTML
generated using custom PL/SQL, 13-14not handled by Application Express, 13-14
HTML Escaping Mode attribute, 6-39HTML password form element, A-5HTML text area, A-7HTML5 chart
switching to Flash chart, 25-9HTTP Header Variable authentication
Index
Index-10
HTTP Header Variable authentication (continued)setting up, 20-55
HTTP Response Headers attribute, 6-39
Iicon view
interactive grids, 9-31Image Finder, 6-58Image Prefix attribute, 6-47Image Repository, 13-14image, displaying from URL, A-3images
managing, 13-14searching for, 6-62viewing available, 6-62
Images Finder, 6-62implementing
plug-ins, 19-3import
feedback, 24-39Websheet, 24-36
importingapplication, 24-35application using SQL*Plus, 24-41export files, 24-34page, 24-35plug-in, 24-37themes, 24-38User Interface Defaults, 24-38
Initialization PL/SQL Code, 6-40injection attacks, restricting characters on items,
20-23installation
enabling network services, 20-13installing
application files, 24-40export files, 24-41
installing application export, 24-40installing export files, 24-41instance proxy, specifying, 20-6instance settings
configuring, 20-10configuring email, 19-2
interactive gridcreating with Create App Wizard, 6-5creating with Create Application Wizard, 9-8creating with Create Page Wizard, 10-8managing, 9-18message requiring translation, 21-16
interactive grid messages, translating, 21-16interactive grids
about, 9-2controlling pagination, 9-27creating a column link, 9-39
interactive grids (continued)creating master detail form, 9-20customizing in runtime, 9-40customizing toolbar, 9-28defining a column as list of values, 9-38deleting a report, 9-44displaying conditionally, 9-24editing Attributes, 9-25editing column attributes, 9-36enabling Detail view, 9-34enabling icon view, 9-31enabling saving public reports, 9-30making editable, 9-26managing Attributes, 9-25managing column attributes, 9-36managing region attributes, 9-19renaming saved report, 9-44resetting a report, 9-44restricting saving of Public reports, 9-30saving, 9-40saving and authentication, 9-41saving configuration dependencies, 9-41saving Primary report, 9-43saving private report, 9-42saving public report, 9-42user save options, 9-41
interactive report filters, 9-73editing, 9-73enabling and disabling, 9-73removing, 9-73showing and hiding details, 9-73
interactive report messages, translating, 21-40interactive report regions
configuring print attributes, 9-101interactive reports
about, 9-3about link columns, 9-49about Search bar, 9-72Actions menu, 9-73
configuring structure, 17-16adding download option, 9-56advanced attributes, 9-65Attributes, 9-48changing pagination, 9-61column attributes, 9-67configuring Actions menu structure, 17-16creating a column link, 9-68creating with Create Application Wizard, 9-6creating with REST Enabled SQL, 18-17customizing in runtime, 9-72defining a column as a list of values, 9-69deleting private report, 9-79deleting public report, 9-79displaying conditionally, 9-47Email From Address, 9-65
Index
11
interactive reports (continued)enabling Icon view, 9-61exporting, 9-56filtering on conditional links, 9-71formatting columns, 9-70invalid linking examples, 9-83linking restrictions, 9-82linking to, 9-80linking with clear cache syntax, 9-82linking with name and value syntax, 9-81linking with Request syntax, 9-81managing Attributes, 9-47managing column attributes, 9-66managing region attributes, 9-45managing saved reports, 6-72managing subscriptions, 6-72message requiring translation, 21-40Region Alias, 9-65renaming private report, 9-79renaming public report, 9-79Report ID Item, 9-65saving, 9-74saving alternative, 9-78saving Alternative report, 9-43saving as private, 9-76saving as public, 9-76saving primary default, 9-78user save options, 9-75using filters, 9-73valid linking examples, 9-83
internal messages, requiring translation, 21-36IP address, restricting access, 20-6isolating workspaces, about, 20-8item
naming conventions, 14-17referencing values, 14-17searching for, 6-59
Item Finder, 6-58, 6-59item help
editing multiple topics, 11-42item Help
viewing, 1-29item type
check box, A-2Color Picker, A-2Date Picker, A-2Display Image, A-3Display Only, A-3File Browse, A-4Hidden, A-5List Manager, A-5Number Field, A-5Password, A-5Percent Graph, A-5Popup LOV, A-6
item type (continued)Radio, A-6Rich Text Editor, A-7Select list, A-7Shuttle, A-8Slider, A-8Switch, A-8Text Area, A-10Text Field, A-9Text Field with autocomplete, A-9
JJavaScript, 12-62
adding using Page Designer, 8-31calling from button, 14-33in row templates, 12-76including in .js file, 12-31including in page template, 12-31incorporating, 14-40libraries, 12-62referencing items, 14-18using a dynamic action, 14-28
JavaScript Finder, 6-58JET Chart, 11-4Job Reporting
creating with Create Page Wizard, 7-7jQuery
support, 19-12jQuery Mobile
support, 6-20jQuery UI
support, 19-12
Llabel template
#CURRENT_ITEM_HELP_TEXT#, 12-52creating page item Help, 12-52Definition, 12-50editing, 12-49Error Display, 12-51Field Container, 12-51Name, 12-50Substitution Strings, 12-52
languagedefining for application, 21-6multibyte, 21-7preference, 21-3
layoutcontrolling, 12-1
LDAP Directory Verificationsetting up, 20-56
legacy calendar, 25-19legacy calendar template, 12-48
Index
Index-12
legacy chartcreating refresh dynamic action, 25-10
legacy chart syntax, 25-3legacy charts
about Flash, 25-2adding to a page, 25-6adding to new page, 25-5altering display, 25-8candlestick syntax, 25-4chart syntax, 25-3dial chart syntax, 25-3editing, 25-8editing attributes, 25-8enabling asynchronous updates, 25-9Gantt syntax, 25-4legacy HTML5 chart about, 25-2multiple series syntax, 25-3range syntax, 25-4scatter syntax, 25-4SQL query syntax, 25-2
legacy componentsviewing in Gallery, 25-20
legacy dial chart syntax, 25-3legacy Flash chart
candlestick syntax, 25-4Gantt syntax, 25-4multiple series syntax, 25-3range syntax, 25-4saving locally, 25-11scatter syntax, 25-4using custom XML, 25-11
legacy HTML5 chartabout, 25-2multiple series syntax, 25-3using custom XML, 25-11
Legacy pagescreating with Create Page Wizard, 7-5, 7-9
limitsforms, B-1interactive reports, B-1item names, B-1tabular forms, B-1validations, B-1
Link Columnabout, 9-49excluding, 9-52linking a single row view, 9-49linking to a page, 9-50linking to URL, 9-51
linkingdeep, 20-50
linksadding, 4-33deleting, 4-33editing, 4-33
listabout creating, 17-38about dynamic, 17-44about navigation menus, 17-38about static, 17-39adding to a page, 17-48Conditional Entries report, 17-50copying, 17-47copying between applications, 17-48copying from current application, 17-47creating hierarchical, 12-53editing, 17-49editing attributes, 17-49History report, 17-50Lists page, 17-49navigation menu
about creating, 17-38reports, 17-50tab
switching to navigation menu, 17-38types, 17-38Unused report, 17-50Utilization report, 17-50
list of valuesbulk edit of static LOVs, 17-13Conditional Entries report, 17-13creating, 17-11creating at application-level, 17-12Edit Null Text report, 17-13editing, 17-12Grid Edit report, 17-13History report, 17-13Locally Defined report, 17-13named, 17-12referencing session state, 17-13reports, 17-13shared, 17-12static, 17-12Subscription report, 17-13translating, 21-57Utilization report, 17-13
list reportsConditional Entries, 17-50History, 17-50Unused, 17-50Utilization, 17-50
list templateAfter List Entry, 12-55After Sub List Entry, 12-55Before List Entry, 12-54Before Sub List Entry, 12-54editing, 12-52Name, 12-53Sub List Entry, 12-55Substitution Strings, 12-55, 12-60
Index
13

list template (continued)Template Definition, 12-54Template Definitions for First Entry, 12-54
lists of terms, A-5Lists page, 17-49Lists Wizard, 17-39, 17-45live template options
using, 12-38locks
determining lock status, 7-17for database application page, 7-17
Logging attribute, 6-26login controls, creating, 20-6login page
creating, 20-62Login Page
creating with Create Page Wizard, 7-7logo
defining, 6-48Logo attribute, 6-47logs
managing, 22-4performance, 22-3
MManage Session State Protection attribute, 6-38map chart
about support for, 11-20creating SQL queries, 11-20
maps, 11-20adding by running a wizard, 11-23adding in Page Designer, 11-24creating, 11-20editing map attributes, 11-25enabling automatic updates (Page Designer),
11-27managing in Page Designer, 11-25using custom XML, 11-26
master application, creating, 12-24master detail
creating single page, 10-17, 10-18creating with Create App Wizard, 6-6creating with Create Application Wizard, 10-8creating with Create Page Wizard, 10-17,
10-18managing, 10-11
master detail form, about, 10-12master detail forms
about, 10-3master detail, single page
about, 10-3master detail, two page
about, 10-3
Maximum Session Idle Time in Second attribute,6-37
Maximum Session Length in Seconds attribute,6-37
menu, 1-11Message for unavailable application, 6-29messages
creating for translation, 21-35editing text messages, 21-35in PL/SQL procedures, 21-15in reports
translating, 21-34translating, 21-14, 21-15translating internal, 21-34
messages in reports, 21-34messages requiring translation
interactive reports, 21-40internal, 21-36
milestone reportsBy Owner report, 4-13Feature by Milestone report, 4-14Milestone Calendar, 4-13
milestonescreating, 4-12deleting, 4-12tracking, 4-11updating, 4-12viewing, 4-12viewing reports, 4-13
mobile applicationsabout, 6-20about designing, 6-19creating, 6-19, 6-21
monitor activityCalendar Reports, 22-5Developer Activity, 22-6Environment Reports, 22-5Login Attempts, 22-5Logs, 22-5Page Views, 22-5Service Requests, 22-5Workspace Purge, 22-5
multiple reportscreating with Create App Wizard, 6-6
multiple select list item, 14-19handling return values, 14-19using APEX_UTIL.STRING_TO_TABLE,
14-19
Nnavigation
branch, 15-21breadcrumb, 15-8list, 17-38
Index
Index-14
navigation (continued)navigation menu, 17-51parent tabs, 15-2standard tabs, 15-2tab, 15-2
navigation barcreating from scratch, 15-17
navigation bar listabout, 17-53editing, 17-54managing, 17-53
navigation menuabout, 17-51changing display, 17-52, 17-54editing, 17-52managing, 17-51switching from tabs, 17-53
network servicesenabling, 20-13granting connect privileges, 20-14granting connect privileges, Oracle Database
12c, 20-15invalid ACL error, 20-15
news entries, 1-6adding, 4-33deleting, 4-33editing, 4-33
number field, A-5NV function, 2-15
Oonline Help, 1-26
searching, 1-26Open Door Credentials
setting up, 20-58Oracle Application Express
about, 1-2architecture, 1-3component limits, B-1signing in, 1-2user roles, 20-3
Oracle Application Express administrator, 20-3Oracle Application Express Advisor
about, 23-2checking application integrity, 23-1running on a page, 23-3running on application, 23-2
Oracle Application Express Engine, 1-3Oracle BI Publisher, integrating with, 20-12Oracle Help Center
searching, 1-27, 1-28Oracle HTTP Server
about security, 20-4Oracle JET
Oracle JET (continued)about, 11-2integrated with Oracle Application Express,
11-2integration, 11-2
output escapingsubstitution strings, 2-22, 12-32
Ppackaged application
changing authentication, 3-6installing, 3-4, 3-5managing, 3-2productivity application, 3-1removing, 3-5sample application, 3-1updating, 3-7
Packaged Applicationsabout, 3-3
Packaged Applications page, 3-3accessing, 3-3
Packaged Apps Administrationmaking service requests, 3-35managing saved interactive reports, 3-37managing subscriptions, 3-37Request Storage, 3-35Request Termination, 3-35setting workspace preferences, 3-36
Packaged Apps Only workspace, 3-38accessing, 3-39account expiration, 3-36Dashboard, 3-39definition, 3-39end user account lifetime, 3-36locking, 3-36managing users, 3-36maximum login failures, 3-36Packaged App Administration, 3-34, 3-39Packaged App Gallery, 3-39, 3-40requesting, 3-39viewing activity reports, 3-37viewing page views, 3-38viewing top users, 3-38
packages, searching for, 6-62page attributes
editing in Page Designer, 8-30viewing in Page Designer, 8-30Warn on Unsaved Changes, 8-34
page components, controlling access, 20-43page computation
computation point, 16-4creating, 16-2defining computation point, 16-3defining computation source, 16-3
Index
15
page computation (continued)editing attributes, 16-3page submission, 8-29pre-rendering, 8-28syntax, 16-4
Page Designeraccessing, 8-20accessing the Property Editor, 8-23adding a report, dragging and dropping, 9-16adding buttons, 8-24, 8-26adding items, 8-24, 8-26adding regions, 8-24, 8-26Code Editor, 8-18Component View tab, 8-14configuring dialog attributes, 8-33copying buttons, 8-27copying items, 8-27copying page, 8-37copying regions, 8-27deleting application page, 8-38dragging and dropping tabs, 8-21editing page attributes, 8-30Gallery, 8-12Help, 8-16Layout, 8-11managing page attributes, 8-30marking region titles as translatable, 21-5Messages tab, 8-14Page Search tab, 8-15Property Editor, 8-17Reset Layout, 8-21, 8-22Right Pane, 8-17running a page, 8-35Runtime Developer toolbar, 8-35searching for pages, 8-21Three Pane mode, 8-22Tree pane, 8-7Two Pane mode, 8-22using, 8-20viewing field-level help, 1-30
Page Designer Toolbar, 8-4Create Form Region, 8-5Create menu, 8-4Create, Create Breadcrumb Region, 8-5Create, Developer Comment, 8-4Create, Page, 8-4Create, Page as Copy, 8-4Create, Page Group, 8-4Create, Shared Components, 8-4Create, Team Development, 8-4Developer Comment, Bug, or To Do button,
8-6Go To Page, 8-4Page Lock, 8-4Page Unlock, 8-4
Page Designer Toolbar (continued)Redo, 8-4Save and Run Page button, 8-4Save button, 8-4Settings, Bugs, 8-6Settings, Features, 8-4Settings, Feedback Entries, 8-6Settings, To Dos, 8-4Settings, Two Pane Mode, 8-4Shared Components, 8-4Undo, 8-4Utilities, 8-4Utilities, Application Utilities, 8-4Utilities, Attribute Dictionary, 8-4Utilities, Delete, 8-4Utilities, Delete Page, 8-4Utilities, Export, 8-4Utilities, History, 8-4Utilities, Layout, 8-6Utilities, Page Groups, 8-4Utilities, Upgrade Application, 8-4
Page Designer, page attributesDialog: Attributes, 8-34Dialog: Chained, 8-34Dialog: CSS Classes, 8-34Dialog: Height, 8-34Dialog: Maximum Width, 8-34Dialog: Width, 8-34
Page Finder, 6-58page item
types, A-1page layout, about, 13-1page processes
changing processing points, 16-13changing source, 16-13creating, 16-11creating error message, 16-13creating success message, 16-13editing attributes, 16-12making conditional, 16-14page submission, 8-29pre-rendering, 8-28When Button Pressed attribute, 2-39
page processing, 2-6understanding, 2-5
page rendering, 2-6understanding, 2-5
Page Selector, 8-21page specific utilities, 6-71
Branch Utilities, 6-71Button Utilities, 6-71Computations Utilities, 6-71Cross Page Utilities, 6-71Dynamic Action Utilities, 6-71Item Utilities, 6-71
Index
Index-16
page specific utilities (continued)Page Groups, 6-71Process Utilities, 6-71Region Utilities, 6-71Validation Utilities, 6-71
page templateBody, 12-57Cascading Style Sheet, 12-58Definition, 12-57Dialog, 12-59Display Points, 12-59editing, 12-55Error Page Template Control, 12-60Footer, 12-57Header, 12-57Image Based Tab Attributes, 12-59JavaScript, 12-57JavaScript, Dialog Cancel Code, 12-57JavaScript, Dialog Closure Code, 12-57JavaScript, Dialog Initialization Code, 12-57JavaScript, Execute when Page Loads,
12-57JavaScript, File URLs, 12-57JavaScript, Function and Global Variable
Declaration, 12-57Layout, 12-59Name, 12-56selecting, 12-32specifying defaults, 12-32substitution strings, 12-55Subtemplate, 12-58
page template substitution strings, 12-55#APEX_CSS#, 12-62#APP_VERSION#, 12-60–12-62#APPLICATION_CSS#, 12-62#APPLICATION_JAVASCRIPT#, 12-62#BOX_BODY#, 12-60, 12-61#BUILT_WITH_LOVE_USING_APEX#,
12-61#DIALOG_CSS_CLASSES#, 12-62#DIALOG_HEIGHT#, 12-63#DIALOG_MAX_WIDTH#, 12-63#DIALOG_WIDTH#, 12-63#FAVICONS#, 12-62#FORM_CLOSE#, 12-61#FORM_OPEN#, 12-61#GLOBAL_NOTIFICATION#, 12-61#HEAD#, 12-62#IS_MODAL#, 12-62, 12-63#LOGO#, 12-61#NAVIGATION_BAR#, 12-61#NOTIFICATION_MESSAGE#, 12-60, 12-61#ONLOAD#, 12-62#PAGE_TRANSITION#, 12-62#REGION_POSITION_NN#, 12-60
page template substitution strings (continued)#SUCCESS_MESSAGE#, 12-61#TAB_CELLS#, 12-60, 12-61#TEMPLATE_JAVASCRIPT#, 12-61#THEME_STYLE_CSS#, 12-62#TITLE#, 12-60PAGE_URL, 12-62
page zero, 13-2page-level item
about, 14-17applying format mask., 14-14configuring Escape Special Characters,
14-11configuring Restricted Characters, 14-12configuring security, 14-10configuring Session State Protection, 14-11configuring Store value encrypted in session
state, 14-11creating, 14-3, 14-16creating a shuttle, 14-7creating cascading list of values (LOV), 14-6creating from Gallery, 14-3creating from Rendering tab, 14-3defining default values, 14-9defining quick picks, 14-12displaying as conditional, 14-13displaying as read only, 14-13editing in Property Editor, 14-9multiple select list item, 14-19naming conventions, 14-17referencing using JavaScript, 14-18referencing values, 14-17specifying Authorization Scheme, 14-10static list of values, 14-4viewing, 14-2viewing utilities, 14-16Warn on Unsaved Changes, 14-15
page-level item reportsAll Page Items, 14-16Conditional Items, 14-16Grid Edit of all Item Help Text, 14-16Grid Edit of all Item Labels, 14-16Item Help Subscriptions, 14-16
page-level template, 12-32page, attaching authorization scheme, 20-68pages
about, 2-2about Global page, 13-3calling from a button, 2-14calling with an alias, 2-14controlling access to, 20-43enabling user customization, 13-7exporting, 24-29linking with f?p syntax, 2-12optimizing for printing, 13-2
Index
17
pages (continued)resource use, 23-3searching for, 6-60specifying page template, 12-32
Pages Finder, 6-60pagination
classic report, 9-88interactive reports, 9-61reports, 12-69, 12-74
Pagination SubtemplateNext Page Template, 12-75Next Set Template, 12-76Pagination Template, 12-75Previous Page Template, 12-76Previous Set Template, 12-76
parent tabs, creating, 15-2Parsing Schema, 6-40password
best practices, 20-17identifying risks, 20-18restricting reuse, 20-8Security Profiles Report, 20-18
passwordsPassword Items Report, 20-19
patch, creating, 24-27Percent Graph, A-5performance, 22-1
best practices, 22-1database parameters, 22-6debugging problematic SQL queries, 22-3diagnosing issues, 22-2identifying issues, 22-2limiting resources, 22-6slow queries, 22-3slow running applications, 22-2uploading static files to Web server, 22-7using logs and report, 22-3
PL/SQL code, searching for, 6-62PL/SQL Finder, 6-58plug-ins
about, 19-3accessing, 19-4adding events, 19-9creating, 19-4creating with Create Page Wizard, 7-5custom attributes, 19-6deleting, 19-9editing, 19-6examples, 19-3exporting, 19-11implementing, 19-3importing, 19-10, 24-37resetting, 19-11uploading associated files, 19-7utilization, 19-11
plug-ins (continued)viewing history, 19-12viewing Plug-in Repository, 19-10
Popup LOV, A-6Popup LOV template
Buttons, 12-65editing, 12-64Page Attributes, 12-65Pagination, 12-65Result Set, 12-65Search Field, 12-64Window, 12-65
preconfigured authentication schemes, 20-51Printer Friendly template, 13-2printing reports, 9-98privileges
about granting to database users, D-1granted to database users, D-1
Procedure Finder, 6-62procedures, searching for, 6-62process
Cache Management, 16-11Data Manipulation, 16-11Form Pagination, 16-11On Demand, 16-11PL/SQL, 16-11Report Pagination, 16-11Web Services, 16-11
productivity application, unlocking, 3-6programming techniques
collections, 18-8implementing Web services, 18-39
proxy server, 18-41Proxy Server attribute, 6-27public file upload, enabling, 20-6public synonyms, D-1Public User attribute, 6-34
QQuery Finder, 6-58, 6-61query, searching for, 6-61
Rradio group, A-6Recently Updated Pages report, 6-69region
adding an image, 13-10adding sliders to regions, 17-17based on a URL, 13-13controlling positioning, 13-7copying, 13-12creating, 13-5creating for a list, 17-48
Index
Index-18
region (continued)creating region display selector, 13-11deleting, 13-12editing attributes, 13-6editing region attributes, 13-6enabling customization, 13-7enabling users to customize a page, 13-7specifying a static region ID, 13-9specifying header and footer, 13-7understanding, 13-4
region attributesCache, 13-8Static ID, 13-9
region display selector, creating, 13-11region template
Definition, 12-66editing, 12-65Form Table Attributes, 12-67Name, 12-66Sub Regions Attributes, 12-67Substitution Strings, 12-67
region titlesmarking as translatable, 21-4
Rejoin Sessionsabout security risks, 20-7configuring at application-level, 6-36configuring at page-level, 8-32
Rejoin Sessions attribute, 6-36remote database
accessing from existing components, 18-24Remote Server
about, 18-32creating, 18-33deleting, 18-33editing, 18-33exporting, 18-32viewing history, 18-35viewing utilization, 18-34
reportbased on spreadsheet, 6-10, 6-11creating with Create App Wizard, 6-6creating with Create Page Wizard, 7-4Oracle database, 22-6
report column templatescolorizing cell headings, 12-70omitting headings, 12-70
report column templates (generic)After Rows, 12-71Before Each Row, 12-70, 12-71Before Rows, 12-69Column Headings, 12-70Column Templates, 12-70displaying HTML after all columns, 12-71displaying HTML after last row, 12-71Next Page Template, 12-72
report column templates (generic) (continued)Next Set Template, 12-72Pagination Subtemplate, 12-72Previous Page Template, 12-72Previous Set Template, 12-73Report Template, 12-69Row Highlighting, 12-72
report column templates (named)Before Rows attribute, 12-74colorizing column header cell, 12-74Column Headings, 12-74Pagination Subtemplate, 12-75Report Template Identification, 12-73Row Templates, 12-74Subscription, 12-73
report layoutsabout, 17-58copying, 17-61creating, 17-59editing, 17-60options, 17-59
report on a form on table, 9-5report queries
about, 17-55copying, 17-58creating, 17-55editing, 17-58
report regionsabout configuration options, 9-99printing, 9-98printing to PDF, 9-99
report templates, 12-67editing, 12-67generic column templates, 12-68named column templates, 12-69using JavaScript, 12-76
reports, 12-39about, 9-1Active Session History (ASH) reports, 22-6adding by dragging and dropping, 9-16Application Dashboard, 6-68, 22-4Automatic Workload Repository (AWR)
reports, 22-6Change History, 6-70class references, 12-29creating with Create Application Wizard, 9-6,
9-8creating with Create Page Wizard, 9-10, 9-12CSV export, 12-70exporting to CSV format, 12-69, 12-74including pagination above, 12-69, 12-74managing interactive grids, 9-18monitor activity, 22-5performance, 22-3printing, 9-98
Index
19
reports (continued)report and form, 9-5supported substitution strings, 12-30template subscription, 12-39template utilization, 12-39templates in a theme, 12-27theme file references, 12-28theme template counts, 12-28themes, 12-27understanding types, 9-2workspace activity, 22-4, 22-5
REQUESTabout scope and value, 2-39about When Button Pressed attribute, 2-39button names, 14-34referencing using declarative conditions, 2-40referencing value of, 2-38substitution string, 2-38using for Show processing, 2-40
resource use, monitoring, 23-3REST Enabled SQL
creating calendars, 18-22creating charts, 18-19creating interactive reports, 18-17editing existing components, 18-24
REST Enabled SQL Reference, 18-8REST Enabled SQL service
creating reference, 18-11, 18-13deleting, 18-16editing, 18-15requirements, 18-10
REST Enabled SQL Servicesabout, 18-9exporting, 18-9
RESTful access, enabling, 20-7restrict access, to application, 6-30Rich Text Editor
responsiveness, 17-18Run Application button, 1-22Run on Public Pages attribute, 6-35Runtime API Usage, 6-40Runtime Developer toolbar, 8-35
Application, 8-35Debug, 8-35Developer Toolbar Options, 8-35Edit Page, 8-35Home, 8-35Page Info, 8-35Quick Edit, 8-35, 12-38Session, 8-35View Debug, 8-35
runtime environment, 1-3advantages, 20-13
Ssafe item types, 20-20sample charts
viewing sample, 11-29Sample Database Application
about, 3-7Administration page, 3-16Customers page, 3-10, 3-11editing, 3-17, 3-18editing an application, 3-18Home page, 3-9installing, 3-7modifying, 3-17, 3-18Navigation Menu, 3-10running, 3-7understanding, 3-7, 3-8
Save Public Report Authorization, 9-30SDLC
rapid application development, 24-4Spiral, 24-4
secure sockets layer, best practices, 20-6security
attributes, 6-32security attributes
Allows URLS Created After, 6-38authentication, 6-33Authentication Scheme, 6-34Authorization Scheme, 6-34, 6-35Bookmark Hash Function, 6-38Browser Security, 6-38Cache, 6-39Database Session, 6-40Deep Linking, 6-36Define Authorization Schemes, 6-35Embed in Frames, 6-39Expire Bookmarks, 6-38HTML Escaping Mode, 6-39HTTP Response Headers, 6-39Manage Session State Protection, 6-38Maximum Session Idle Time in Seconds,
6-37Maximum Session Length in Seconds, 6-37Public User, 6-34Rejoin Sessions, 6-36Run on Public Pages, 6-35Session Idle Timeout URL, 6-37Session Management, 6-35Session State Protection, 6-38Session Timeout URL, 6-37
security best practicesconfiguring instance settings, 20-10configuring storage options, 20-11configuring workspace settings, 20-11controlling SQL access in Websheets, 20-9
Index
Index-20
security best practices (continued)creating login controls, 20-6creating wallets, 20-11cross site-scripting protection, 20-19embedded PL/SQL gateway, 20-4enabling email, 20-11enabling public file upload, 20-6enabling RESTful access, 20-7enabling RESTful services, 20-9for administrators, 20-1for developers, 20-16identifying risk passwords, 20-18isolating workspaces, 20-8items of type password, 20-17managing component availability, 20-12managing instance security, 20-4managing users, 20-12managing workspace to schema
assignments, 20-12managing workspaces, 20-11Oracle BI Publisher, 20-12Oracle HTTP Server, 20-4restricting access by IP address, 20-6restricting password reuse, 20-8runtime environment, 20-13secure sockets layer, 20-6session joins, 20-7session state, 20-23session timeout, 20-8specifying instance proxy, 20-6
security best practicessecurity best practicesautomating workspace provisioning, 20-10self service provisioning, 20-10
security risks, file upload table, 20-36seeding, 21-8select list, A-7session cloning
enabling, 2-19session ID, 2-9Session Idle Timeout URL, 6-37session joins
preventing browser attacks, 20-7security best practices, 20-7
Session Management, 6-35specifying, 6-35
session stateclearing, 2-16clearing application cache, 2-18clearing cache by item, 2-16clearing cache by page, 2-17clearing cache for current user session, 2-18enabling projection, 6-38management, 2-8referencing, 2-15resetting an application completely, 2-18
session state (continued)security best practices, 20-23sharing across applications, 17-37
session state protectionconfiguring all attributes, 20-27configuring security attributes, 20-26disabling, 20-24enabling, 20-24enabling from Edit Security Attributes, 20-24enabling from Session State Protection,
20-26enabling using a wizard, 20-26preventing URL tampering, 20-24reports, 20-27understanding, 20-24viewing existing settings, 20-27viewing summaries, 20-27
Session State Protection attribute, 6-38session state values, managing, 2-14Session Timeout URL, 6-37session timeout, utilizing, 20-8shared components
about, 17-2accessing, 17-2backing up, 24-27creating, 17-2exporting, 24-27
Shared Components icon, 1-22Shared Components page
Application Access Control, 17-4Application Computations, 17-3Application Definition Attributes, 17-3Application Items, 17-3Application Processes, 16-14, 17-3Application Settings, 17-3Authentication Schemes, 17-4Authorization Schemes, 17-4Breadcrumbs, 17-6Component Settings, 17-5Credentials, 17-4, 17-9Data Load Definitions, 17-7Edit Application Comments, 17-8Email Templates, 17-5Export Application Components, 17-8Globalization Attributes, 17-8Legacy Web Service References (SOAP),
17-7List of Values, 17-4Lists, 17-5Manage Supporting Objects, 17-8Navigation Bar List, 17-6Navigation Menu, 17-5Plug-ins, 17-5Remote Servers, 17-9Report Layouts, 17-7
Index
21
Shared Components page (continued)Report Queries, 17-7REST Enabled SQL, 17-7, 17-9Review Developer Comments, 17-9Security Attributes, 17-4Session State Protection, 17-4Shortcuts, 17-5Static Application Files, 17-6Static Workspace Files, 17-6, 17-9Tabs, 17-5Templates, 17-6Text Messages, 17-8Themes, 17-6Translate Application, 17-8User Interface Attributes, 17-6Web Source Modules, 17-7
shared interactive reports, linking to, 9-84shortcuts, 17-19
about, 17-19copying an existing shortcut, 17-21defining, 17-20, 17-21defining from scratch, 17-20editing attributes, 17-22History report, 17-22HTML Text, 17-20, 17-21HTML Text with Escaped Special
Characters, 17-20, 17-21Image, 17-20, 17-21Message, 17-20, 17-21Message with JavaScript Escaped Special
Quotes, 17-20, 17-21PL/SQL Function Body, 17-20, 17-21referencing, 17-19reports, 17-22Subscription report, 17-22supporting translatable messages, 21-4syntax, 17-19Text with JavaScript Escaped Single Quotes,
17-20, 17-21Show Page, 2-6shuttle multiple select list, A-8sign in page, 1-2Single Sign-On
setting up, 20-59Slider item type, A-8SOAP, 18-39Social Sign-In Authentication, 20-60spreadsheet
creating app from, 6-10, 6-11SQL tracing, enabling, 23-3standard tabs, creating, 15-2static application files
deleting, 17-30deleting all, 17-31downloading, 17-29
static application files (continued)downloading in Zip file, 17-30managing, 17-27referencing using #APP_IMAGES#, 17-29uploading, 17-28viewing details, 17-29
static filesexporting, 24-31importing into another instance, 24-31
static listabout, 17-39adding list entries, 17-40adding sublists, 17-40copying entries, 17-43creating from scratch, 17-39managing orphaned list entries, 17-44reparenting entries, 17-43resequencing entries, 17-44
static substitution string, 6-31static workspace files
deleting, 17-33deleting all, 17-34downloading, 17-33downloading all in Zip file, 17-33managing, 17-31referencing using
#WORKSPACE_IMAGES#, 17-32uploading, 17-31viewing details, 17-32
Status attribute, 6-29storage options, configuring, 20-11style sheet, 12-31substitution strings, 2-27
#CSV_LINK#, 12-70, 12-75#GLOBAL_NOTIFICATION#, 6-31about built-in, 2-23APEX$ROW_NUM, 2-25APEX$ROW_SELECTOR, 2-25APEX$ROW_STATUS, 2-26APP_ALIAS, 2-26APP_BUILDER_SESSION, 2-27APP_DATE_TIME_FORMAT, 2-28APP_ID, 2-26APP_IMAGES, 2-28APP_NLS_DATE_FORMAT, 2-28APP_NLS_TIMESTAMP_FORMAT, 2-29APP_NLS_TIMESTAMP_TZ_FORMAT, 2-29APP_PAGE_ALIAS, 2-29APP_PAGE_ID, 2-30APP_REQUEST_DATA_HASH, 2-30APP_SESSION, 2-31APP_SESSION_VISIBLE, 2-31APP_TEXT$Message_Name,
APP_TEXT$Message_Name$Lang,2-37
Index
Index-22
substitution strings (continued)APP_TITLE, 2-32APP_UNIQUE_PAGE_ID, 2-32APP_USER, 2-33Application Express SCHEMA OWNER, 2-40AUTHENTICATED_URL_PREFIX, 2-34BROWSER_LANGUAGE, 2-34calendar, 25-20CURRENT_PARENT_TAB_TEXT, 2-34DEBUG, 2-35for application items, 2-20for page items, 2-20IMAGE_PREFIX, 2-35in page templates, 12-55JET_BASE_DIRECTORY, 2-36JET_CSS_DIRECTORY, 2-36JET_JS_DIRECTORY, 2-36LOGOUT_URL, 2-37output escaping, 2-22, 12-32PRINTER_FRIENDLY, 2-38PROXY SERVER, 2-38PUBLIC_URL_PREFIX, 2-38report of supported, 12-30REQUEST, 2-38SQLERRM, 2-41static, 6-31supported in region footer, 13-7SYSDATE_YYYYMMDD, 2-41THEME_DB_IMAGES, 2-41THEME_IMAGES, 2-41understanding, 2-20usage within templates, 2-23using, 2-20within templates, 2-20WORKSPACE_ID, 2-42WORKSPACE_IMAGES, 2-41
success message, creating for a page process,16-13
Supported ChartsOracle JavaScript Extension Toolkit (Oracle
JET), 11-28supporting objects
creating, 24-8deinstalling, 24-13
Supporting Objects icon, 1-22Switch
configuring, 17-17Switch item type, A-8syntax, for dynamic list, 17-45system message, 1-6
Ttab
about Tabs page, 15-3
tab (continued)adding, 15-2Conditional Display report, 15-7create Standard tab, 15-7create Standard tab set, 15-7creating, 15-3, 15-5editing, 15-6editing multiple, 15-6History report, 15-7managing, 15-3move standard to different parent, 15-7Parent, 15-2rename standard, 15-7reports, 15-7resequence, 15-7Standard, 15-2Standard Tab Task, 15-7template support, 15-4Utilization report, 15-7
tab reportsConditional Display, 15-7History, 15-7
Table Finder, 6-58Tables Finder, 6-61tables, searching for, 6-61Tabs page, 15-3tabular form
creating, 25-15Team Development
accessing, 4-2Feature Approval Statuses, 4-11Feature Focus Areas, 4-10Feature History, 4-9Feature Progress Log, 4-10Features Calendar, 4-9Features dashboard, 4-11Features Tree, 4-8home page, 4-2managing bugs, 4-18managing feedback, 4-22managing news entries, 4-33managing To Dos, 4-14News Region, 4-2purging data, 4-32To Dos Calendar, 4-17tracking features, 4-3tracking milestones, 4-11Utilities, 4-2
Team Development file attachmentsdownloading, 4-32
Team Development utilities, 4-28accessing, 4-29assigning milestones, 4-31configuring Team Development settings,
4-30
Index
23
Team Development utilities (continued)downloading file attachments, 4-32enable support for file upload, 4-29manage focus areas, 4-29manage links, 4-29manage news, 4-29manage uploaded files, 4-29managing news entries, 4-33Purge Data, 4-29purging data, 4-32push due date of open features, 4-31push past due bugs, 4-29Release Summary, 4-31Release Summary report, 4-29renaming focus areas, 4-31set feature due date to milestone, 4-31Team Development settings, 4-29update assignee, 4-29
template edit history, 12-39template option presets, 12-9template options
about, 12-9default, 12-9groups, 12-9presets, 12-9using, 12-8
template options groups, 12-9templates
breadcrumbs, 12-43button, 12-46changing defaults, 12-10columns, 12-70, 12-76creating, 12-33customizing, 12-30labels, 12-49legacy calendar, 12-48lists, 12-52managing, 12-40page, 12-55popup LOV, 12-64publishing, 12-43regions, 12-65replacing, 12-41replacing all, 12-42reports, 12-67selecting for a page, 12-32selecting theme default, 12-32supported substitution strings, 12-30unsubscribing to, 12-42viewing for specific page, 12-41viewing History report, 12-39viewing on Templates page, 12-40viewing Publish report, 12-40viewing region position utilization, 12-42viewing reports, 12-39
templates (continued)viewing Subscription report, 12-39viewing Utilization report, 12-39
text area item type, A-10Text Field item type, A-9text strings, 21-34
translating, 21-15text strings, translating, 21-14Text Text Field with autocomplete item type, A-9theme attributes, 12-11
Breadcrumb, 12-13, 12-14Button, 12-13Charts, 12-14Classic Report, 12-14CSS File URLs, 12-12Custom Classes, 12-15Custom Image, 12-16Custom Library File URLs, 12-15Custom Prefix Class, 12-16Date Picker Icon Attributes, 12-16Date Picker Icon Name, 12-16Default Label, 12-13Dialog Button Region, 12-14Dialog Content Region, 12-14Dialog Page, 12-15Error Page, 12-13Files, 12-16Footer Toolbar, 12-14Forms, 12-14Global Template Options, 12-15Header Toolbar, 12-14Interactive Reports, 12-14JavaScript File URLs, 12-12Legacy Calendar, 12-13Library, 12-15List, 12-13Lists, 12-14Login Page, 12-13Name, Application, 12-11Name, Description, 12-12Name, Name, 12-11Name, Navigation Bar Implementation, 12-12Name, Navigation Type, 12-12Name, Theme Number, 12-11Name, User Interface, 12-12Navigation Bar List, 12-13Navigation Menu List (Top), 12-13Navigation Menu List Position, 12-13Optional Label, 12-13Page, 12-13Page Template Options, 12-13Page Transition, 12-15Popup Transition, 12-15Printer Friendly Page, 12-13Region, 12-14
Index
Index-24
theme attributes (continued)Report, 12-14Required Label, 12-13Styles, 12-16Tabular Forms, 12-14Theme Subscription, 12-12Wizards, 12-14
theme reportsApplication Templates, 12-27class references, 12-29Class References, 12-29File References, 12-28files references, 12-28supported substitution strings, 12-30template counts, 12-28Template Substitution Strings, 12-30templates in a theme, 12-27Theme Template Counts, 12-28
Theme Roller, 8-35using, 12-6
Theme Style Selectioncreating with Create Application Wizard, 6-7creating with Create Page Wizard, 7-7
theme styles, 12-3about, 12-4creating, 12-4deleting, 12-5editing, 12-5editing from User Interface page, 12-5Theme Roller, 12-6using, 12-1
theme subscriptionsabout, 12-17modifying, 12-17re-subscribing, 12-19refreshing, 12-18unsubscribing, 12-19verifying refresh, 12-18
themesabout, 12-2about subscriptions, 12-17about Universal Theme, 12-2accessing, 12-10changing ID, 12-22changing identification number (ID), 12-22copying, 12-23creating, 12-20creating master application, 12-24default templates, 12-10deleting, 12-23editing, 12-10editing theme attributes, 12-11exporting, 12-27, 24-31exporting and importing, 12-27exporting with different ID, 12-22
themes (continued)importing, 12-27, 24-38live template options, 12-38managing, 12-1reports, 12-27selecting page-level template, 12-32switching, 12-21switching to Universal Theme, 12-2theme styles, 12-3Themes page, 12-10using, 12-1
Themes pageaccessing from Shared Components, 12-10
timelinecreating with Create App Wizard, 6-6
To Do reportsProgress Log, 4-17
To Dosattaching files, 4-15creating, 4-15managing, 4-14To Dos page, 4-14updating a task, 4-15viewing, 4-14viewing reports, 4-17
To Dos reportsCalendar page, 4-17
translatable messages, defining, 21-15translating, 21-34
messages in PL/SQL procedures, 21-15translation, 21-2
applications, 21-2dynamic, 21-57dynamic text strings, 21-4dynamic translations, 21-4editing manually, 21-13exporting text, 21-8globalization support, 21-2language identification, 21-3mapping primary application ID, 21-8mapping target application ID, 21-8messages, 21-4region titles, 21-4rules, 21-3seeding, 21-8shortcuts, 21-4steps, 21-7templates, 21-5translation file, 21-9understanding, 21-7understanding application rendering, 21-3XLIFF, 21-9XLIFF Target Elements, 21-10
translation file, 21-9publishing, 21-11
Index
25
translation file (continued)uploading, 21-11
treecreating with Create Page Wizard, 7-5, 7-8
treesabout, 14-35creating, 14-37creating on new page, 14-35editing attributes, 14-40managing, 14-34
UUniversal Theme
Migration Guide, 12-2Mobile Theme - 51, 12-2responsive design, about, 12-2switching to, 12-2Universal Theme - 42, 12-2
unlocking, productivity application, 3-6unsaved changes
warning users, 8-34, 14-15, 14-32Upgrade Application icon, 6-69URL
publishing, 24-21, 24-22SSL-enabled, 13-13syntax, 2-11
URL tamperingpreventing, 20-24
user identityestablishing, 20-48verifying, 2-7
user interfaceabout, 1-2controlling, 12-1
User Interfaceadding, 6-49
User Interface attributesaccessing, 6-45Add New User Interface, 6-46configuring, 6-45CSS file URLs, 6-48Favicon, 6-48Favicon HTML, 6-48Image Prefix, 6-47Logo, 6-47Logo Attributes, 6-48Logo Type, 6-47Media Type, 6-47Static File Prefix, 6-46User Interface Detection, 6-48User Interfaces, 6-46
User Interface Defaultsexporting, 24-32importing, 24-38
User Interface Details, 6-51Add "Built with APEX" to Footer, 6-52Auto Detect, 6-51Concatenated Files, 6-55Content Delivery Network, 6-54Default, 6-52Display Name, 6-51Display Navigationt, 6-52editing, 6-50Enable End Users to choose Theme Style,
6-52File URLs, 6-54, 6-55Global Page, 6-52Home URL, 6-52Include deprecated JavaScript, 6-54Include desupported JavaScript, 6-54Include jQuery Migrate, 6-54Inplementation, 6-53List Template, 6-53Login URL, 6-52Navigation Bar List, 6-53Navigation Menu List, 6-52Position, 6-53Sequence, 6-51Template Options, 6-53Theme, 6-52Theme Style, 6-52User Interface Type, 6-51
user preferencesdefault schema, 1-25editing, 1-25enabling legacy Component View, 1-25running in new window, 1-25using single window, 1-25
user rolesdeveloper, 20-3Oracle Application Express administrator,
20-3Workspace administrator, 20-3
usersabout managing, 20-12
Utilities icon, 1-22
VV function, 2-15validations
about, 16-5, 16-6associating with item, 10-20creating, 16-6, 16-7creating with error messages, 10-20defining error messages, 16-8Go to Error link, 16-10making conditional, 16-9When Button Pressed attribute, 2-39
Index
Index-26
Version attribute, 6-25
Wwallets, creating, 20-11Warn on Unsaved Changes, 8-34, 14-15Web credentials
creating, 18-36deleting unused, 18-38editing, 18-37viewing history, 18-38viewing utilization, 18-38
Web service processediting a process, 18-55mapping input parameters to static values,
18-55Web service reference, 18-40
creating, 18-41creating a report, 18-51creating forms, 18-50creating forms and reports, 18-48creating manually, 18-43, 18-44specifying WSDL, 18-42viewing a history, 18-56
Web Service Reference page, 18-40Web services, 18-39
creating a reference from a WSDL, 18-43creating RESTful Web services, 18-45editing a Web service process, 18-55invoking as a process, 18-53specifying proxy server address, 18-41SSL enabled, 18-41testing a RESTful Web service reference,
18-47testing Web service reference manually,
18-44using, 18-40viewing Web service reference history, 18-56Web service reference repository, 18-48Web Services References page, 18-40
Web Source Modulesabout, 18-26copying, 18-31creating, 18-27deleting, 18-29deleting unused, 18-31editing, 18-29exporting, 18-26managing, 18-26, 18-32viewing history, 18-32viewing utilization, 18-31
Websheet applicationsabout, 5-1access control list, 5-12controlling access, 5-12
Websheet applications (continued)copying a page, 5-4creating, 5-1creating access control list entries, 5-13creating from App Builder, 5-2creating from running Websheet, 5-3deleting, 5-11editing page details, 5-6monitoring activity, 5-11running, 5-4specifying access control list, 5-13understanding Websheet properties, 5-6viewing Websheet dashboard, 5-11
Websheet authenticationApplication Express Account, 5-9Custom, 5-9LDAP, 5-9Single Sign-On, 5-9
Websheet dashboard, viewing, 5-11Websheet properties
about, 5-7Access Control List Type, 5-10Allow Public Access, 5-10Authentication, 5-9Cookie Domain, 5-9Cookie Name, 5-9Cookie Path, 5-9Default Application Language, 5-7Default Application Territory, 5-7Description, 5-8editing, 5-7editing SQL access, 5-10Home Page, 5-7Login Message, 5-8Logo, 5-8Logo Type, 5-8Logout URL, 5-9Name, 5-7Owner, 5-8Secure, 5-9Show Reset Password, 5-7Status, 5-7Style, 5-9Websheet Email From Address, 5-7
Websheetsabout navigation, 3-22editing, 3-32modifying, 3-32navigating, 3-21understanding navigation, 3-22using breadcrumbs, 3-21
wizardcreating with Create App Wizard, 6-6creating with Create Page Wizard, 7-5, 7-8
wizards
Index
27
wizards (continued)Create Page, 7-1creating a calendar, 11-5creating a chart, 11-27creating a list, 17-39, 17-45creating a LOV, 17-12creating a page computation, 16-2creating applications, 2-2creating navigation bar entry, 11-43, 15-19
Workspace Activity reportsApplication Errors, 22-5Developer Activity, 22-5Environment, 22-5Login Attempts, 22-5Page View Analysis, 22-5Page Views, 22-5Sessions, 22-5Workspace Schema Reports, 22-5
Workspace administrator, 20-3Workspace home page
Administration menu, 1-9Available Updates region, 1-12News entries, 1-6system message, 1-6Top Apps region, 1-6Top Users region, 1-6
workspace newsmanaging, 4-33
workspace provisioning, enabling self service,20-10
workspace settings, configuring, 20-11workspace themes
adding, 12-25deleting, 12-26
workspace themes (continued)exporting, 12-27managing, 12-24, 12-27modifying, 12-26viewing existing, 12-25
workspace to schema assignments, managing,20-12
Workspace UtilitiesApp Builder Defaults, 1-18Application Express Views, 1-19Credentials, 1-18Cross Application Reports, 1-19Export, 1-19Manage News, 1-18Remote Servers, 1-18REST Enabled SQL Services, 1-18Workspace Themes, 1-19
workspaces, managing, 20-11WSDL document, 18-40
XXLIFF, 21-9
applying, 21-12deleting an uploaded document, 21-12Target Elements, 21-10uploading, 21-11uploading and publishing, 21-11
ZZip file
downloading static application files, 17-30downloading static workspace files, 17-33
Index
Index-28