format builder - oracle help center
TRANSCRIPT
BEAAquaLogic Service Bus™
Format Builder
Version 2.1Document Revised: December 2005
CopyrightCopyright © 2005 BEA Systems, Inc. All Rights Reserved.
Restricted Rights LegendThis software and documentation is subject to and made available only pursuant to the terms of the BEA Systems License Agreement and may be used or copied only in accordance with the terms of that agreement. It is against the law to copy the software except as specifically allowed in the agreement. This document may not, in whole or in part, be copied, photocopied, reproduced, translated, or reduced to any electronic medium or machine readable form without prior consent, in writing, from BEA Systems, Inc.
Use, duplication or disclosure by the U.S. Government is subject to restrictions set forth in the BEA Systems License Agreement and in subparagraph (c)(1) of the Commercial Computer Software-Restricted Rights Clause at FAR 52.227-19; subparagraph (c)(1)(ii) of the Rights in Technical Data and Computer Software clause at DFARS 252.227-7013, subparagraph (d) of the Commercial Computer Software--Licensing clause at NASA FAR supplement 16-52.227-86; or their equivalent.
Information in this document is subject to change without notice and does not represent a commitment on the part of BEA Systems. THE SOFTWARE AND DOCUMENTATION ARE PROVIDED “AS IS” WITHOUT WARRANTY OF ANY KIND INCLUDING WITHOUT LIMITATION, ANY WARRANTY OF MERCHANTABILITY OR FITNESS FOR A PARTICULAR PURPOSE. FURTHER, BEA Systems DOES NOT WARRANT, GUARANTEE, OR MAKE ANY REPRESENTATIONS REGARDING THE USE, OR THE RESULTS OF THE USE, OF THE SOFTWARE OR WRITTEN MATERIAL IN TERMS OF CORRECTNESS, ACCURACY, RELIABILITY, OR OTHERWISE.
Trademarks or Service MarksBEA, BEA JRockit, BEA Liquid Data for WebLogic, BEA WebLogic Server, Built on BEA, Jolt, JoltBeans, SteelThread, Top End, Tuxedo, and WebLogic are registered trademarks of BEA Systems, Inc. BEA AquaLogic, BEA AquaLogic Data Services Platform, BEA AquaLogic Enterprise Security, BEA AquaLogic Service Bus, BEA AquaLogic Service Registry, BEA Builder, BEA Campaign Manager for WebLogic, BEA eLink, BEA Manager, BEA MessageQ, BEA WebLogic Commerce Server, BEA WebLogic Enterprise, BEA WebLogic Enterprise Platform, BEA WebLogic Enterprise Security, BEA WebLogic Express, BEA WebLogic Integration, BEA WebLogic Java Adapter for Mainframe, BEA WebLogic JDriver, BEA WebLogic JRockit, BEA WebLogic Log Central, BEA WebLogic Personalization Server, BEA WebLogic Platform, BEA WebLogic Portal, BEA WebLogic Server Process Edition, BEA WebLogic WorkGroup Edition, BEA WebLogic Workshop, and Liquid Computing are trademarks of BEA Systems, Inc. BEA Mission Critical Support is a service mark of BEA Systems, Inc. All other company and product names may be the subject of intellectual property rights reserved by third parties.
All other trademarks are the property of their respective companies.
Format Builder iii
Contents
What is Format Builder?Overview . . . . . . . . . . . . . . . . . . . . . . . . . . . . . . . . . . . . . . . . . . . . . . . . . . . . . . . . . . . . . . 1-1
Format Builder Main WindowUsing the Menu Bar . . . . . . . . . . . . . . . . . . . . . . . . . . . . . . . . . . . . . . . . . . . . . . . . . . . . . . 2-1
Using the Toolbar. . . . . . . . . . . . . . . . . . . . . . . . . . . . . . . . . . . . . . . . . . . . . . . . . . . . . . . . 2-2
Using the Tree Pane . . . . . . . . . . . . . . . . . . . . . . . . . . . . . . . . . . . . . . . . . . . . . . . . . . . . . . 2-4
Using the Shortcut Menus . . . . . . . . . . . . . . . . . . . . . . . . . . . . . . . . . . . . . . . . . . . . . . . . . 2-6
Using Drag and Drop . . . . . . . . . . . . . . . . . . . . . . . . . . . . . . . . . . . . . . . . . . . . . . . . . . . . . 2-6
Valid Names. . . . . . . . . . . . . . . . . . . . . . . . . . . . . . . . . . . . . . . . . . . . . . . . . . . . . . . . . . . . 2-7
Message Format Detail Window
Group Detail Window
Field Detail Window
Reference Detail Window
Comment Detail Window
Format Builder Options
Format TesterFormat Tester Window . . . . . . . . . . . . . . . . . . . . . . . . . . . . . . . . . . . . . . . . . . . . . . . . . . . 9-1
Format Tester Menus . . . . . . . . . . . . . . . . . . . . . . . . . . . . . . . . . . . . . . . . . . . . . . . . . . . . . 9-1
iv Format Builder
File Menu . . . . . . . . . . . . . . . . . . . . . . . . . . . . . . . . . . . . . . . . . . . . . . . . . . . . . . . . . . . . . 9-2
Edit Menu . . . . . . . . . . . . . . . . . . . . . . . . . . . . . . . . . . . . . . . . . . . . . . . . . . . . . . . . . . . . . 9-2
Display Menu . . . . . . . . . . . . . . . . . . . . . . . . . . . . . . . . . . . . . . . . . . . . . . . . . . . . . . . . . . 9-3
Generate Menu . . . . . . . . . . . . . . . . . . . . . . . . . . . . . . . . . . . . . . . . . . . . . . . . . . . . . . . . . 9-3
Translate Menu . . . . . . . . . . . . . . . . . . . . . . . . . . . . . . . . . . . . . . . . . . . . . . . . . . . . . . . . . 9-4
Shortcut Menu . . . . . . . . . . . . . . . . . . . . . . . . . . . . . . . . . . . . . . . . . . . . . . . . . . . . . . . . . . 9-4
Using the Non-XML Window. . . . . . . . . . . . . . . . . . . . . . . . . . . . . . . . . . . . . . . . . . . . . . 9-5
Using the Data Offset Feature. . . . . . . . . . . . . . . . . . . . . . . . . . . . . . . . . . . . . . . . . . . . . . 9-5
Using the Text Feature . . . . . . . . . . . . . . . . . . . . . . . . . . . . . . . . . . . . . . . . . . . . . . . . . . . 9-6
Using the XML Window. . . . . . . . . . . . . . . . . . . . . . . . . . . . . . . . . . . . . . . . . . . . . . . . . . 9-6
Using the Debug Window. . . . . . . . . . . . . . . . . . . . . . . . . . . . . . . . . . . . . . . . . . . . . . . . . 9-6
Using the Resize Bars . . . . . . . . . . . . . . . . . . . . . . . . . . . . . . . . . . . . . . . . . . . . . . . . . . . . 9-6
Debugging Format Definitions . . . . . . . . . . . . . . . . . . . . . . . . . . . . . . . . . . . . . . . . . . . . . 9-6
Searching for Values . . . . . . . . . . . . . . . . . . . . . . . . . . . . . . . . . . . . . . . . . . . . . . . . . . . . . 9-7
Searching for Offsets. . . . . . . . . . . . . . . . . . . . . . . . . . . . . . . . . . . . . . . . . . . . . . . . . . . . . 9-8
Using the Debug Log . . . . . . . . . . . . . . . . . . . . . . . . . . . . . . . . . . . . . . . . . . . . . . . . . . . . 9-8
Importing Meta DataImporting a Guideline XML File . . . . . . . . . . . . . . . . . . . . . . . . . . . . . . . . . . . . . . . . . . 10-1
Importing an XML Schema. . . . . . . . . . . . . . . . . . . . . . . . . . . . . . . . . . . . . . . . . . . . . . . 10-2
Importing a COBOL Copybook . . . . . . . . . . . . . . . . . . . . . . . . . . . . . . . . . . . . . . . . . . . 10-3
Importing C Structures . . . . . . . . . . . . . . . . . . . . . . . . . . . . . . . . . . . . . . . . . . . . . . . . . . 10-4
Starting the C Structure Importer . . . . . . . . . . . . . . . . . . . . . . . . . . . . . . . . . . . . . . . . . . 10-4
Generating MFL Data . . . . . . . . . . . . . . . . . . . . . . . . . . . . . . . . . . . . . . . . . . . . . . . . . . . 10-5
Generating C Code . . . . . . . . . . . . . . . . . . . . . . . . . . . . . . . . . . . . . . . . . . . . . . . . . . . . . 10-6
Importing an FML Field Table Class . . . . . . . . . . . . . . . . . . . . . . . . . . . . . . . . . . . . . . . 10-7
FML Field Table Class Importer Prerequisites . . . . . . . . . . . . . . . . . . . . . . . . . . . . 10-7
Sample FML Field Table Class Files . . . . . . . . . . . . . . . . . . . . . . . . . . . . . . . . . . . . 10-8
Format Builder v
Creating XML with the FML Field Table Class Importer . . . . . . . . . . . . . . . . . . . . 10-8
Format Builder MenusFile Menu. . . . . . . . . . . . . . . . . . . . . . . . . . . . . . . . . . . . . . . . . . . . . . . . . . . . . . . . . . . . . 11-1
Edit Menu . . . . . . . . . . . . . . . . . . . . . . . . . . . . . . . . . . . . . . . . . . . . . . . . . . . . . . . . . . . . 11-2
Insert Menu . . . . . . . . . . . . . . . . . . . . . . . . . . . . . . . . . . . . . . . . . . . . . . . . . . . . . . . . . . . 11-3
View Menu . . . . . . . . . . . . . . . . . . . . . . . . . . . . . . . . . . . . . . . . . . . . . . . . . . . . . . . . . . . 11-4
Tools Menu . . . . . . . . . . . . . . . . . . . . . . . . . . . . . . . . . . . . . . . . . . . . . . . . . . . . . . . . . . . 11-4
Help Menu . . . . . . . . . . . . . . . . . . . . . . . . . . . . . . . . . . . . . . . . . . . . . . . . . . . . . . . . . . . . 11-4
Shortcut Menu . . . . . . . . . . . . . . . . . . . . . . . . . . . . . . . . . . . . . . . . . . . . . . . . . . . . . . . . . 11-5
Using the PaletteDisplaying the Palette Window . . . . . . . . . . . . . . . . . . . . . . . . . . . . . . . . . . . . . . . . . . . . 12-1
Adding Items to the Palette . . . . . . . . . . . . . . . . . . . . . . . . . . . . . . . . . . . . . . . . . . . . . . . 12-1
Adding Palette Items to a Message Format . . . . . . . . . . . . . . . . . . . . . . . . . . . . . . . . . . . 12-2
Using the File Menu . . . . . . . . . . . . . . . . . . . . . . . . . . . . . . . . . . . . . . . . . . . . . . . . . . . . 12-2
Using the Shortcut Menu. . . . . . . . . . . . . . . . . . . . . . . . . . . . . . . . . . . . . . . . . . . . . . . . . 12-2
How Do I?Create a Message Format. . . . . . . . . . . . . . . . . . . . . . . . . . . . . . . . . . . . . . . . . . . . . . . . . 13-1
Create a Group. . . . . . . . . . . . . . . . . . . . . . . . . . . . . . . . . . . . . . . . . . . . . . . . . . . . . . . . . 13-2
Create a Field. . . . . . . . . . . . . . . . . . . . . . . . . . . . . . . . . . . . . . . . . . . . . . . . . . . . . . . . . . 13-2
Create a Comment . . . . . . . . . . . . . . . . . . . . . . . . . . . . . . . . . . . . . . . . . . . . . . . . . . . . . . 13-3
Create a Reference. . . . . . . . . . . . . . . . . . . . . . . . . . . . . . . . . . . . . . . . . . . . . . . . . . . . . . 13-3
Save a Document . . . . . . . . . . . . . . . . . . . . . . . . . . . . . . . . . . . . . . . . . . . . . . . . . . . . . . . 13-4
Use Format Tester . . . . . . . . . . . . . . . . . . . . . . . . . . . . . . . . . . . . . . . . . . . . . . . . . . . . . . 13-4
Debug Format Definitions . . . . . . . . . . . . . . . . . . . . . . . . . . . . . . . . . . . . . . . . . . . . . . . . 13-5
Search for Values. . . . . . . . . . . . . . . . . . . . . . . . . . . . . . . . . . . . . . . . . . . . . . . . . . . . . . . 13-5
Search for Offsets . . . . . . . . . . . . . . . . . . . . . . . . . . . . . . . . . . . . . . . . . . . . . . . . . . . . . . 13-5
vi Format Builder
Use the Debug Log . . . . . . . . . . . . . . . . . . . . . . . . . . . . . . . . . . . . . . . . . . . . . . . . . . . . . 13-6
Specify Delimiters. . . . . . . . . . . . . . . . . . . . . . . . . . . . . . . . . . . . . . . . . . . . . . . . . . . . . . 13-6
Supported Data TypesMFL Data Types . . . . . . . . . . . . . . . . . . . . . . . . . . . . . . . . . . . . . . . . . . . . . . . . . . . . . . . . A-1
COBOL Copybook Importer Data Types . . . . . . . . . . . . . . . . . . . . . . . . . . . . . . . . . . . . . A-7
Unsupported C Language Features . . . . . . . . . . . . . . . . . . . . . . . . . . . . . . . . . . . . . . . . . A-10
GlossaryBig Endian . . . . . . . . . . . . . . . . . . . . . . . . . . . . . . . . . . . . . . . . . . . . . . . . . . . . . B-1
COBOL Copybook Importer . . . . . . . . . . . . . . . . . . . . . . . . . . . . . . . . . . . . . . . B-1
Code Page . . . . . . . . . . . . . . . . . . . . . . . . . . . . . . . . . . . . . . . . . . . . . . . . . . . . . . B-1
Copybook . . . . . . . . . . . . . . . . . . . . . . . . . . . . . . . . . . . . . . . . . . . . . . . . . . . . . . B-1
Data Transformation . . . . . . . . . . . . . . . . . . . . . . . . . . . . . . . . . . . . . . . . . . . . . . B-2
Delimiter . . . . . . . . . . . . . . . . . . . . . . . . . . . . . . . . . . . . . . . . . . . . . . . . . . . . . . . B-2
Document Type Definition (DTD) . . . . . . . . . . . . . . . . . . . . . . . . . . . . . . . . . . . B-2
Field . . . . . . . . . . . . . . . . . . . . . . . . . . . . . . . . . . . . . . . . . . . . . . . . . . . . . . . . . . B-2
Group . . . . . . . . . . . . . . . . . . . . . . . . . . . . . . . . . . . . . . . . . . . . . . . . . . . . . . . . . B-2
Group Choice . . . . . . . . . . . . . . . . . . . . . . . . . . . . . . . . . . . . . . . . . . . . . . . . . . . B-2
Little Endian . . . . . . . . . . . . . . . . . . . . . . . . . . . . . . . . . . . . . . . . . . . . . . . . . . . . B-2
Message Format . . . . . . . . . . . . . . . . . . . . . . . . . . . . . . . . . . . . . . . . . . . . . . . . . B-2
Message Format Language (MFL) . . . . . . . . . . . . . . . . . . . . . . . . . . . . . . . . . . . B-2
Metadata . . . . . . . . . . . . . . . . . . . . . . . . . . . . . . . . . . . . . . . . . . . . . . . . . . . . . . . B-3
MFL Character Encoding . . . . . . . . . . . . . . . . . . . . . . . . . . . . . . . . . . . . . . . . . . B-3
Non-XML Data. . . . . . . . . . . . . . . . . . . . . . . . . . . . . . . . . . . . . . . . . . . . . . . . . . B-3
Reference . . . . . . . . . . . . . . . . . . . . . . . . . . . . . . . . . . . . . . . . . . . . . . . . . . . . . . B-3
XML - Extensible Markup Language. . . . . . . . . . . . . . . . . . . . . . . . . . . . . . . . . B-3
XML schema. . . . . . . . . . . . . . . . . . . . . . . . . . . . . . . . . . . . . . . . . . . . . . . . . . . . B-3
Format Builder 1-1
C H A P T E R 1
What is Format Builder?
The BEA Format Builder tool assists you in creating descriptions of non-XML data records. Format Builder allows you to describe the layout and hierarchy of the non-XML data so that it can be transformed to or from XML. With Format Builder, you can describe sequences of bytes as fields. Each field description includes the type of data (floating point, string, etc.), the size of the data, and the name of the field. Format Builder allows you to further define groupings of fields (Groups), repetition of fields and groups, and aggregation.
The descriptions you create in Format Builder are saved in an XML grammar called Message Format Language (MFL). MFL documents are used by BEA AquaLogic Service Bus at run-time to transform an instance of a non-XML data record to an instance of an XML document (or vice-versa).
OverviewThis help system describes how to use Format Builder to define schemas for non-XML documents. These schemas can then be used by xquery mapping tools to automatically transform data between XML and non-XML formats.
The following topics are included:
Format Builder Main Window describes how to navigate the main window of Format Builder.
Message Format Detail Window describes the fields on the Message Format detail window.
Group Detail Window describes the fields on the Group Details detail window.
What i s Format Bu i lder ?
1-2 Format Builder
Field Detail Window describes the fields on the Field Details detail window.
Reference Detail Window describes the fields on the Reference Details detail window.
Comment Detail Window describes the fields on the Comment Details detail window.
Format Builder Options describes the fields on the Format Builder Options detail window.
Format Tester describes how to use Format Tester.
Importing Meta Data describes how to use Format Builder to import a COBOL Copybook, or C Structure to generate XML files.
Format Builder Menus describes the commands you can execute from the Format Builder menus.
Using the Palette describes the Format Builder palette feature and how to use it.
How Do I? gives you step-by-step instructions for performing the basic tasks in Format Builder.
Supported Data Types lists the MFL and COBOL Copybook Importer data types supported by AquaLogic Service Bus.
Glossary provides definitions of some of the unfamiliar terms you may encounter when using Format Builder.
Format Builder 2-1
C H A P T E R 2
Format Builder Main Window
The main window of BEA Format Builder is split into two panes. The left pane shows the structural information for the data format. The right pane shows the detail for the item selected in the left pane.
You can navigate in and execute commands from the main window by using one of the following methods:
Using the Menu Bar
Using the Toolbar
Using the Tree Pane
Using the Shortcut Menus
Using the Menu BarThe Menu bar displays the menu headings. The menus that are available depend on what is selected in the left pane. You can open menus from the menu bar or by holding down the ALT key while pressing the underscored letter in the menu heading. For example, pressing ALT + F opens the File Menu.
Note: Menu items that appear in gray are unavailable for the current selection.
For a complete description of the menu commands, see Format Builder Menus.

Fo rmat Bu i lder Main Window
2-2 Format Builder
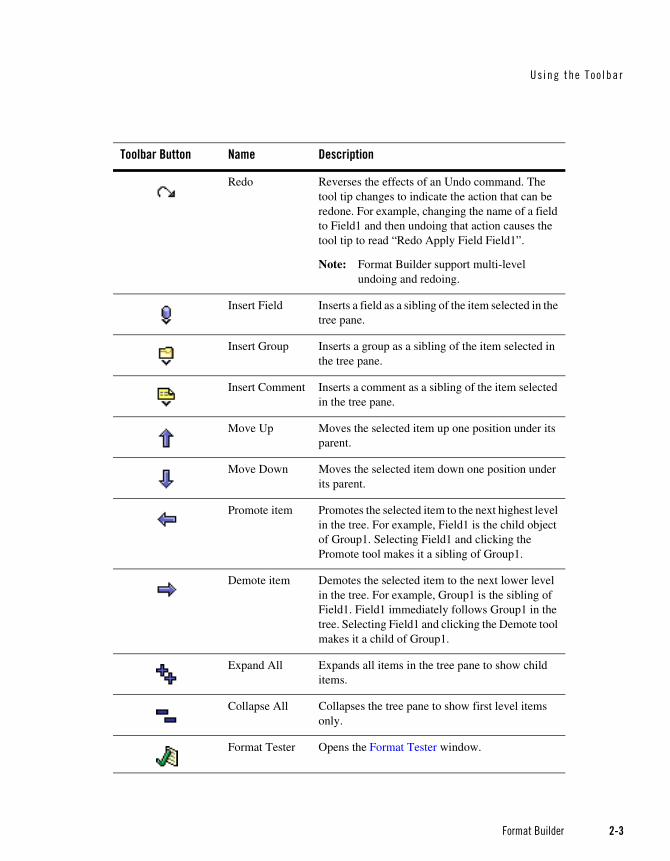
Using the ToolbarThe Format Builder toolbar provides buttons that access some of the frequently used commands in the menus. If a command is unavailable, its button appears “grayed-out.”
The toolbar buttons provided with Format Builder are described below:
Toolbar Button Name Description
New Creates a new Message Format
Open/Retrieve Opens an existing Message Format.
Save/Store Saves the current Message Format
Cut Removes the item currently selected in the left-hand pane, and its child objects, from the tree. The item can be pasted elsewhere in the tree.
Note: This action is not available if the Message Format (root) item is selected.
Copy Makes a copy of the item currently selected in the left-hand pane for insertion elsewhere in the tree.
Note: This action is not available if the Message Format (root) item is selected.
Paste as Sibling Inserts the cut or copied item as a sibling object of the selected item.
Paste as Reference
Inserts a reference to the cut or copied item as a sibling object of the selected item.
Undo Reverses the previous action. The tool tip changes to indicate the action that can be undone. For example, changing the name of a field to Field1 and clicking Apply causes the tool tip to read “Undo Apply Field Field1”.
Note: Format Builder supports multi-level undoing and redoing.
Usi ng the Too lba r
Format Builder 2-3
Redo Reverses the effects of an Undo command. The tool tip changes to indicate the action that can be redone. For example, changing the name of a field to Field1 and then undoing that action causes the tool tip to read “Redo Apply Field Field1”.
Note: Format Builder support multi-level undoing and redoing.
Insert Field Inserts a field as a sibling of the item selected in the tree pane.
Insert Group Inserts a group as a sibling of the item selected in the tree pane.
Insert Comment Inserts a comment as a sibling of the item selected in the tree pane.
Move Up Moves the selected item up one position under its parent.
Move Down Moves the selected item down one position under its parent.
Promote item Promotes the selected item to the next highest level in the tree. For example, Field1 is the child object of Group1. Selecting Field1 and clicking the Promote tool makes it a sibling of Group1.
Demote item Demotes the selected item to the next lower level in the tree. For example, Group1 is the sibling of Field1. Field1 immediately follows Group1 in the tree. Selecting Field1 and clicking the Demote tool makes it a child of Group1.
Expand All Expands all items in the tree pane to show child items.
Collapse All Collapses the tree pane to show first level items only.
Format Tester Opens the Format Tester window.
Toolbar Button Name Description
Fo rmat Bu i lder Main Window
2-4 Format Builder
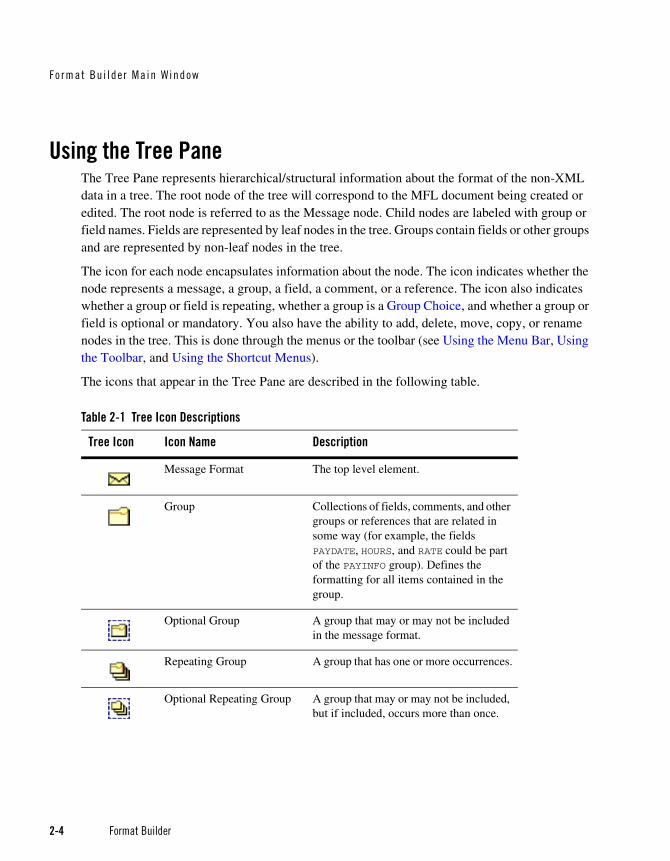
Using the Tree PaneThe Tree Pane represents hierarchical/structural information about the format of the non-XML data in a tree. The root node of the tree will correspond to the MFL document being created or edited. The root node is referred to as the Message node. Child nodes are labeled with group or field names. Fields are represented by leaf nodes in the tree. Groups contain fields or other groups and are represented by non-leaf nodes in the tree.
The icon for each node encapsulates information about the node. The icon indicates whether the node represents a message, a group, a field, a comment, or a reference. The icon also indicates whether a group or field is repeating, whether a group is a Group Choice, and whether a group or field is optional or mandatory. You also have the ability to add, delete, move, copy, or rename nodes in the tree. This is done through the menus or the toolbar (see Using the Menu Bar, Using the Toolbar, and Using the Shortcut Menus).
The icons that appear in the Tree Pane are described in the following table.
Table 2-1 Tree Icon Descriptions
Tree Icon Icon Name Description
Message Format The top level element.
Group Collections of fields, comments, and other groups or references that are related in some way (for example, the fields PAYDATE, HOURS, and RATE could be part of the PAYINFO group). Defines the formatting for all items contained in the group.
Optional Group A group that may or may not be included in the message format.
Repeating Group A group that has one or more occurrences.
Optional Repeating Group A group that may or may not be included, but if included, occurs more than once.
Us ing the Tr ee Pane
Format Builder 2-5
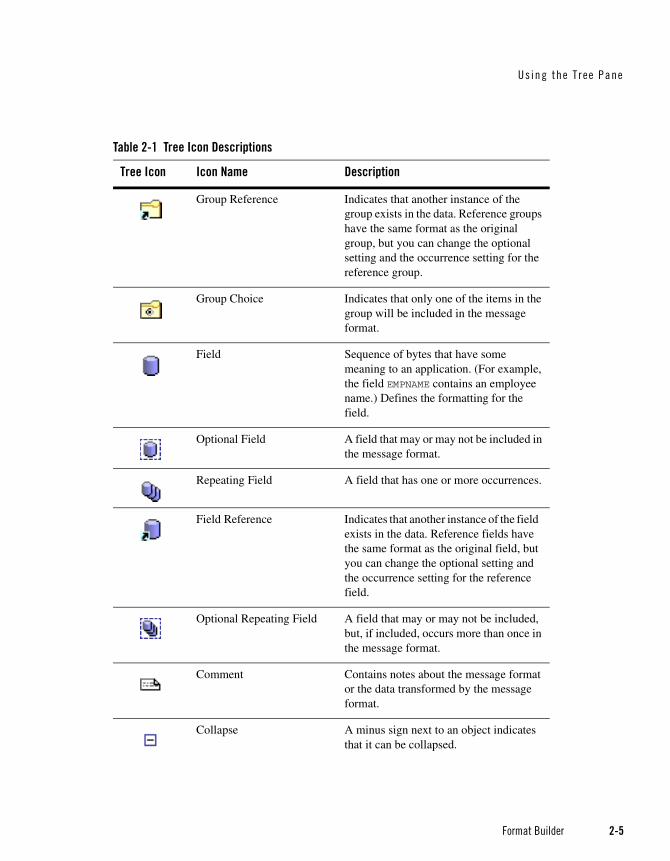
Group Reference Indicates that another instance of the group exists in the data. Reference groups have the same format as the original group, but you can change the optional setting and the occurrence setting for the reference group.
Group Choice Indicates that only one of the items in the group will be included in the message format.
Field Sequence of bytes that have some meaning to an application. (For example, the field EMPNAME contains an employee name.) Defines the formatting for the field.
Optional Field A field that may or may not be included in the message format.
Repeating Field A field that has one or more occurrences.
Field Reference Indicates that another instance of the field exists in the data. Reference fields have the same format as the original field, but you can change the optional setting and the occurrence setting for the reference field.
Optional Repeating Field A field that may or may not be included, but, if included, occurs more than once in the message format.
Comment Contains notes about the message format or the data transformed by the message format.
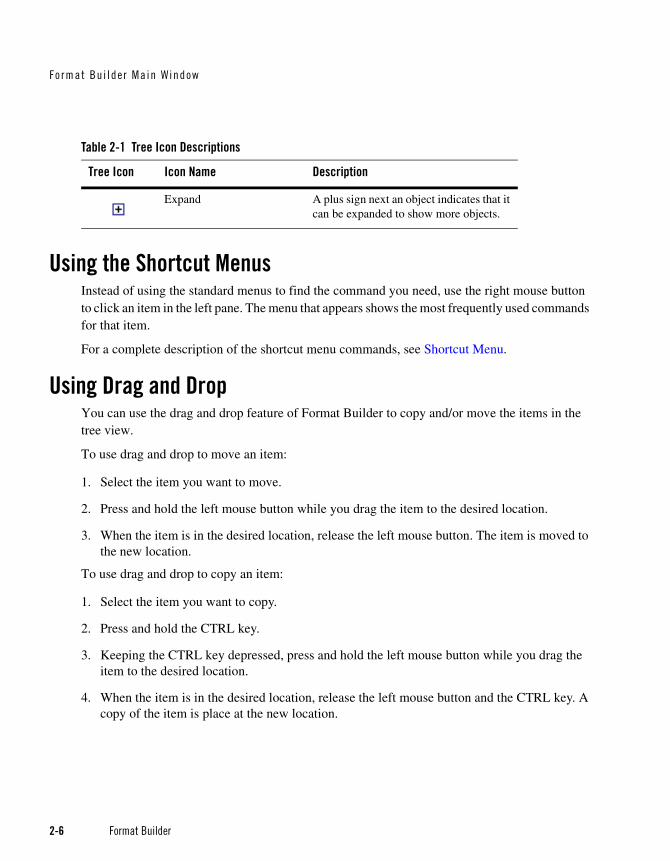
Collapse A minus sign next to an object indicates that it can be collapsed.
Table 2-1 Tree Icon Descriptions
Tree Icon Icon Name Description
Fo rmat Bu i lder Main Window
2-6 Format Builder
Using the Shortcut MenusInstead of using the standard menus to find the command you need, use the right mouse button to click an item in the left pane. The menu that appears shows the most frequently used commands for that item.
For a complete description of the shortcut menu commands, see Shortcut Menu.
Using Drag and DropYou can use the drag and drop feature of Format Builder to copy and/or move the items in the tree view.
To use drag and drop to move an item:
1. Select the item you want to move.
2. Press and hold the left mouse button while you drag the item to the desired location.
3. When the item is in the desired location, release the left mouse button. The item is moved to the new location.
To use drag and drop to copy an item:
1. Select the item you want to copy.
2. Press and hold the CTRL key.
3. Keeping the CTRL key depressed, press and hold the left mouse button while you drag the item to the desired location.
4. When the item is in the desired location, release the left mouse button and the CTRL key. A copy of the item is place at the new location.
Expand A plus sign next an object indicates that it can be expanded to show more objects.
Table 2-1 Tree Icon Descriptions
Tree Icon Icon Name Description

Val i d Names
Format Builder 2-7
Valid NamesMessage Formats, Fields, and Groups are identified by a Name. The name that is specified is used as the XML tag when non-XML data is transformed to XML by AquaLogic Service Bus. Thus the name must conform to the XML rules for a name.
The format guidelines for a name are as follows:
Must start with a letter or underscore.
Can contain letters, digits, the period character, the hyphen character, or the underscore character.
The following are valid name examples:
MyField
MyField1
MyField_again
MyField-again
The following are invalid name examples:
1MyField - may not start with a digitMy>Field - the greater-than sign (>) is an illegal characterMy Field - a space is not permittedMy/Field - the back slash (/), which is an illegal characterMy\Field - the forward slash (\), which is an illegal characterMy:Field - colon (:), which is an illegal characterMy:Field - a semi-colon (;), which is an illegal character

Fo rmat Bu i lder Main Window
2-8 Format Builder
Format Builder 3-1
C H A P T E R 3
Message Format Detail Window
Defines the data for which you are creating a message format (the root node of a message format file).
Note: The Apply and Reset buttons are only enabled once changes are made to the detail panel’s components.
Field Description
Message Format Properties
Name/XML Root The name of the message format. This value will be used as the root element in the transformed XML document. This name must comply with XML element naming conventions.
Message Format Update Buttons
Apply Saves your changes to the message format document.
Reset Discards your changes to the detail window and resets all fields to the last saved values.
Help Displays online help information for this detail window.

Message Format De ta i l W indow
3-2 Format Builder
Format Builder 4-1
C H A P T E R 4
Group Detail Window
Defines the groups contained in the message format. Groups are collections of fields, comments, and other groups or references that are related in some way (for example, the fields PAYDATE, HOURS, and RATE could be part of the PAYINFO group). You can create a group as a child of the message format item, as a child of another group, or as a sibling of a group or field.
Field Description
Group Description
Name The name of the group. This name must comply with XML element naming conventions (see Valid Names for more information).
Optional Choose Optional if this is an optional group.
Choice of Children Choose Choice of Children if only one of the items in the group will be included in the message format.
Group Occurrence
Group Deta i l W indow
4-2 Format Builder
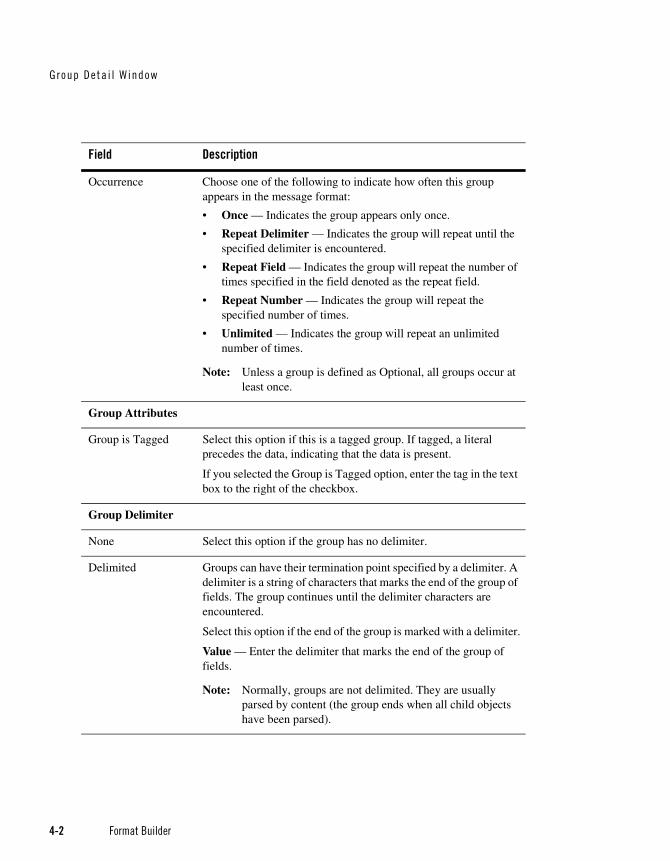
Occurrence Choose one of the following to indicate how often this group appears in the message format:
• Once — Indicates the group appears only once.
• Repeat Delimiter — Indicates the group will repeat until the specified delimiter is encountered.
• Repeat Field — Indicates the group will repeat the number of times specified in the field denoted as the repeat field.
• Repeat Number — Indicates the group will repeat the specified number of times.
• Unlimited — Indicates the group will repeat an unlimited number of times.
Note: Unless a group is defined as Optional, all groups occur at least once.
Group Attributes
Group is Tagged Select this option if this is a tagged group. If tagged, a literal precedes the data, indicating that the data is present.
If you selected the Group is Tagged option, enter the tag in the text box to the right of the checkbox.
Group Delimiter
None Select this option if the group has no delimiter.
Delimited Groups can have their termination point specified by a delimiter. A delimiter is a string of characters that marks the end of the group of fields. The group continues until the delimiter characters are encountered.
Select this option if the end of the group is marked with a delimiter.
Value — Enter the delimiter that marks the end of the group of fields.
Note: Normally, groups are not delimited. They are usually parsed by content (the group ends when all child objects have been parsed).
Field Description
Format Builder 4-3
Note: The Apply and Reset buttons are only enabled once changes are made to the detail panel’s components.
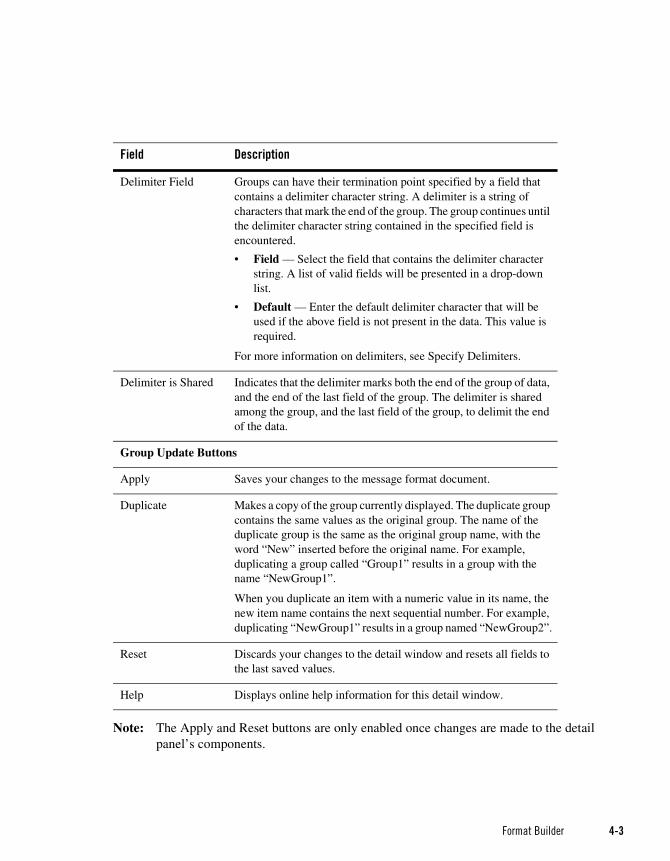
Delimiter Field Groups can have their termination point specified by a field that contains a delimiter character string. A delimiter is a string of characters that mark the end of the group. The group continues until the delimiter character string contained in the specified field is encountered.
• Field — Select the field that contains the delimiter character string. A list of valid fields will be presented in a drop-down list.
• Default — Enter the default delimiter character that will be used if the above field is not present in the data. This value is required.
For more information on delimiters, see Specify Delimiters.
Delimiter is Shared Indicates that the delimiter marks both the end of the group of data, and the end of the last field of the group. The delimiter is shared among the group, and the last field of the group, to delimit the end of the data.
Group Update Buttons
Apply Saves your changes to the message format document.
Duplicate Makes a copy of the group currently displayed. The duplicate group contains the same values as the original group. The name of the duplicate group is the same as the original group name, with the word “New” inserted before the original name. For example, duplicating a group called “Group1” results in a group with the name “NewGroup1”.
When you duplicate an item with a numeric value in its name, the new item name contains the next sequential number. For example, duplicating “NewGroup1” results in a group named “NewGroup2”.
Reset Discards your changes to the detail window and resets all fields to the last saved values.
Help Displays online help information for this detail window.
Field Description

Group Deta i l W indow
4-4 Format Builder

Format Builder 5-1
C H A P T E R 5
Field Detail Window
Defines the fields contained in the message format. Fields are a sequence of bytes that have some meaning to an application. (For example, the field EMPNAME contains an employee name.) You can create a field as a child of the message format item, as a child of a group, or as a sibling of a group or another field.
Field Description
Field Description
Name The name of the field. This name must comply with XML element naming conventions (see Valid Names for more information).
Optional Select this option if this is an optional field. Optional means that the data for the field may or may not be present.
If the Optional option is selected for a file, then you must also set the Field is Tagged option from the Field Attributes pane. In addition, in the Field Is Tagged text box enter a unique value for each optional field in a group. Multiple groups can use the same tag value but the tag value for each optional field in a group must be unique.
F i e ld De ta i l Wi ndow
5-2 Format Builder
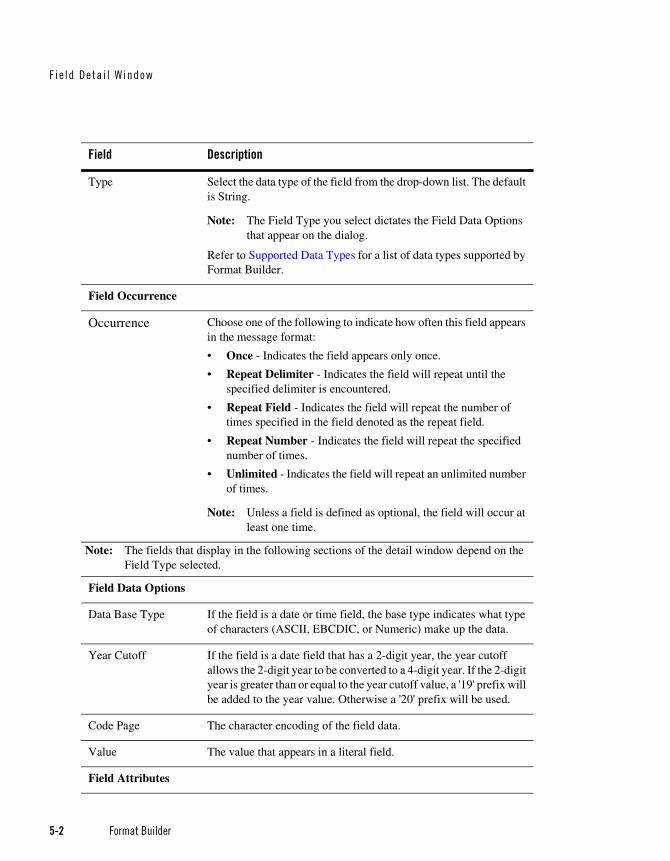
Type Select the data type of the field from the drop-down list. The default is String.
Note: The Field Type you select dictates the Field Data Options that appear on the dialog.
Refer to Supported Data Types for a list of data types supported by Format Builder.
Field Occurrence
Occurrence Choose one of the following to indicate how often this field appears in the message format:
• Once - Indicates the field appears only once.
• Repeat Delimiter - Indicates the field will repeat until the specified delimiter is encountered.
• Repeat Field - Indicates the field will repeat the number of times specified in the field denoted as the repeat field.
• Repeat Number - Indicates the field will repeat the specified number of times.
• Unlimited - Indicates the field will repeat an unlimited number of times.
Note: Unless a field is defined as optional, the field will occur at least one time.
Note: The fields that display in the following sections of the detail window depend on the Field Type selected.
Field Data Options
Data Base Type If the field is a date or time field, the base type indicates what type of characters (ASCII, EBCDIC, or Numeric) make up the data.
Year Cutoff If the field is a date field that has a 2-digit year, the year cutoff allows the 2-digit year to be converted to a 4-digit year. If the 2-digit year is greater than or equal to the year cutoff value, a '19' prefix will be added to the year value. Otherwise a '20' prefix will be used.
Code Page The character encoding of the field data.
Value The value that appears in a literal field.
Field Attributes
Field Description
Format Builder 5-3
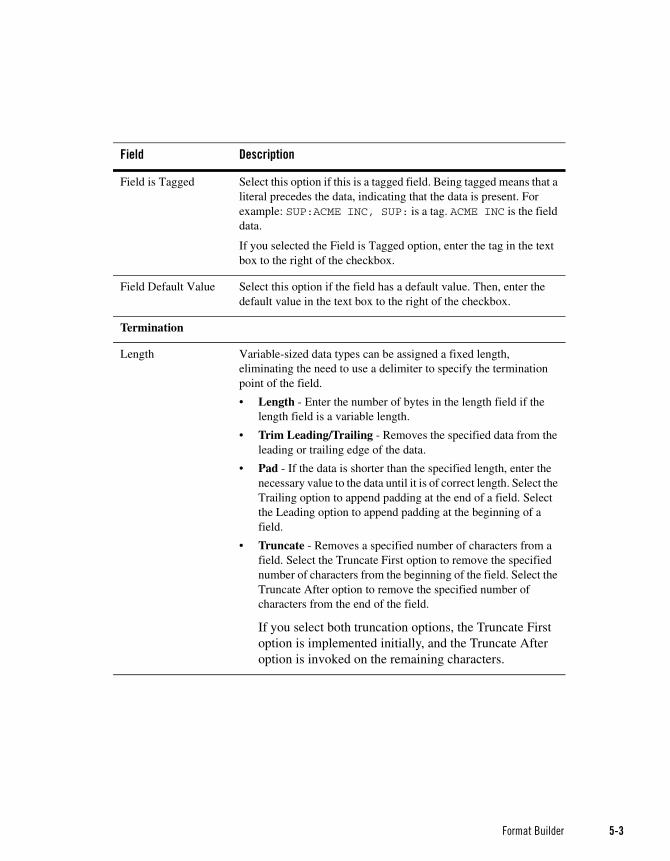
Field is Tagged Select this option if this is a tagged field. Being tagged means that a literal precedes the data, indicating that the data is present. For example: SUP:ACME INC, SUP: is a tag. ACME INC is the field data.
If you selected the Field is Tagged option, enter the tag in the text box to the right of the checkbox.
Field Default Value Select this option if the field has a default value. Then, enter the default value in the text box to the right of the checkbox.
Termination
Length Variable-sized data types can be assigned a fixed length, eliminating the need to use a delimiter to specify the termination point of the field.
• Length - Enter the number of bytes in the length field if the length field is a variable length.
• Trim Leading/Trailing - Removes the specified data from the leading or trailing edge of the data.
• Pad - If the data is shorter than the specified length, enter the necessary value to the data until it is of correct length. Select the Trailing option to append padding at the end of a field. Select the Leading option to append padding at the beginning of a field.
• Truncate - Removes a specified number of characters from a field. Select the Truncate First option to remove the specified number of characters from the beginning of the field. Select the Truncate After option to remove the specified number of characters from the end of the field.
If you select both truncation options, the Truncate First option is implemented initially, and the Truncate After option is invoked on the remaining characters.
Field Description

F i e ld De ta i l Wi ndow
5-4 Format Builder
Imbedded Length Variable-sized data types can have their termination point specified by an imbedded length. An imbedded length precedes the data field and indicates how many bytes the data contains.
• Description - Select the Type from the drop down list. Then, depending on the Type selected, choose Length and enter the number of bytes, or choose Delimiter and enter the delimiter character.
• Tag/Length Order - Specifies the order of tag and length fields when both are present. Default is tag before length.
• Trim Leading/Trailing - Removes the specified data from the leading or trailing edge of the data.
• Truncate - Removes a specified number of characters from a field. For more information on truncation, see the Length field.
Delimiter Variable-sized data types can have their termination point specified by a delimiter. A delimiter is a character that marks the end of the field. The field data continues until the delimiter character is encountered.
• Value - Enter the delimiter that marks the end of the field data.
• Trim Leading/Trailing - Removes the specified data from the leading or trailing edge of the data.
• Truncate - Removes a specified number of characters from a field. For more information on truncation, see the Length field.
Delimiter Field Variable-sized data types can have their termination point specified by a field that contains a delimiter character. A delimiter is a character that marks the end of the field. The field data continues until the field containing the delimiter character is encountered.
• Field - Select the field that contains the delimiter character.
• Default - Enter the delimiter character. You must supply a default value. The default is used when the delimiter field is not present.
• Trim Leading/Trailing - Removes the specified data from the leading or trailing edge of the data.
• Truncate - Removes a specified number of characters from a field. For more information on truncation, see the Length field.
For more information on delimiters, see Specify Delimiters.
Decimal Position Specifies the number of digits (0-16) to the left of the decimal point.
Field Description
Format Builder 5-5
Note: The Apply and Reset buttons are only enabled once changes are made to the detail panel’s components.
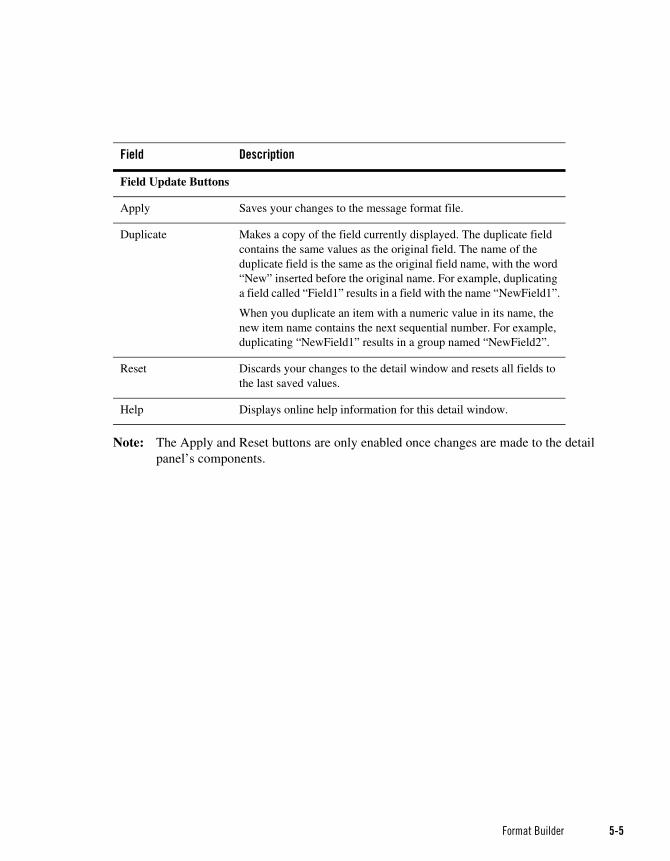
Field Update Buttons
Apply Saves your changes to the message format file.
Duplicate Makes a copy of the field currently displayed. The duplicate field contains the same values as the original field. The name of the duplicate field is the same as the original field name, with the word “New” inserted before the original name. For example, duplicating a field called “Field1” results in a field with the name “NewField1”.
When you duplicate an item with a numeric value in its name, the new item name contains the next sequential number. For example, duplicating “NewField1” results in a group named “NewField2”.
Reset Discards your changes to the detail window and resets all fields to the last saved values.
Help Displays online help information for this detail window.
Field Description

F i e ld De ta i l Wi ndow
5-6 Format Builder
Format Builder 6-1
C H A P T E R 6
Reference Detail Window
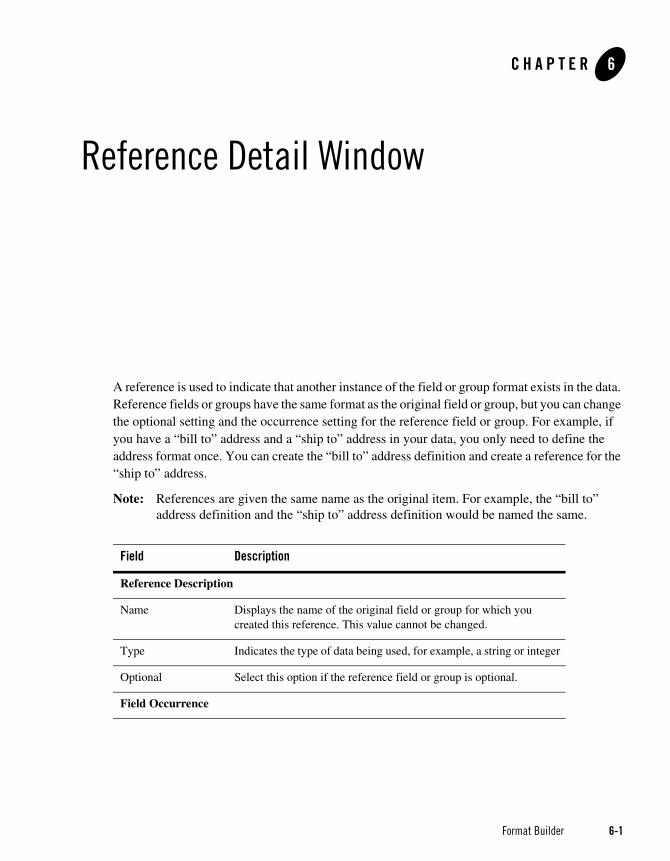
A reference is used to indicate that another instance of the field or group format exists in the data. Reference fields or groups have the same format as the original field or group, but you can change the optional setting and the occurrence setting for the reference field or group. For example, if you have a “bill to” address and a “ship to” address in your data, you only need to define the address format once. You can create the “bill to” address definition and create a reference for the “ship to” address.
Note: References are given the same name as the original item. For example, the “bill to” address definition and the “ship to” address definition would be named the same.
Field Description
Reference Description
Name Displays the name of the original field or group for which you created this reference. This value cannot be changed.
Type Indicates the type of data being used, for example, a string or integer
Optional Select this option if the reference field or group is optional.
Field Occurrence
Refer ence De ta i l W indow
6-2 Format Builder
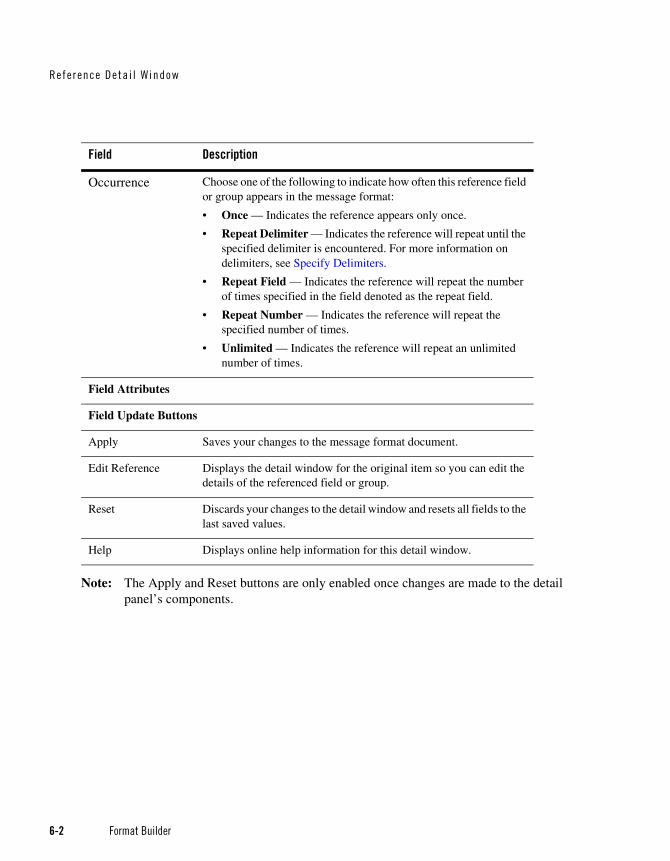
Note: The Apply and Reset buttons are only enabled once changes are made to the detail panel’s components.
Occurrence Choose one of the following to indicate how often this reference field or group appears in the message format:
• Once — Indicates the reference appears only once.
• Repeat Delimiter — Indicates the reference will repeat until the specified delimiter is encountered. For more information on delimiters, see Specify Delimiters.
• Repeat Field — Indicates the reference will repeat the number of times specified in the field denoted as the repeat field.
• Repeat Number — Indicates the reference will repeat the specified number of times.
• Unlimited — Indicates the reference will repeat an unlimited number of times.
Field Attributes
Field Update Buttons
Apply Saves your changes to the message format document.
Edit Reference Displays the detail window for the original item so you can edit the details of the referenced field or group.
Reset Discards your changes to the detail window and resets all fields to the last saved values.
Help Displays online help information for this detail window.
Field Description
Format Builder 7-1
C H A P T E R 7
Comment Detail Window
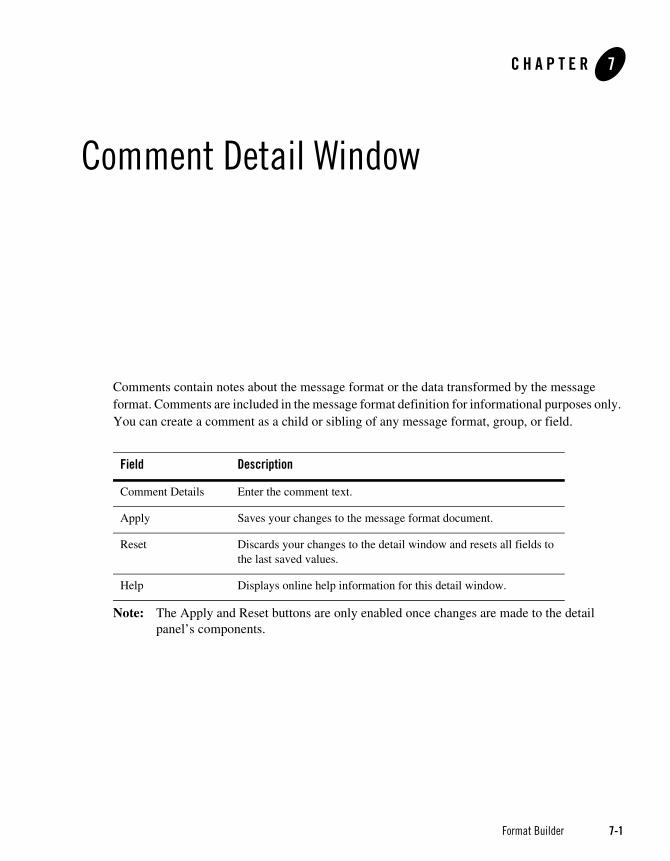
Comments contain notes about the message format or the data transformed by the message format. Comments are included in the message format definition for informational purposes only. You can create a comment as a child or sibling of any message format, group, or field.
Note: The Apply and Reset buttons are only enabled once changes are made to the detail panel’s components.
Field Description
Comment Details Enter the comment text.
Apply Saves your changes to the message format document.
Reset Discards your changes to the detail window and resets all fields to the last saved values.
Help Displays online help information for this detail window.

Comment Deta i l W i ndow
7-2 Format Builder
Format Builder 8-1
C H A P T E R 8
Format Builder Options
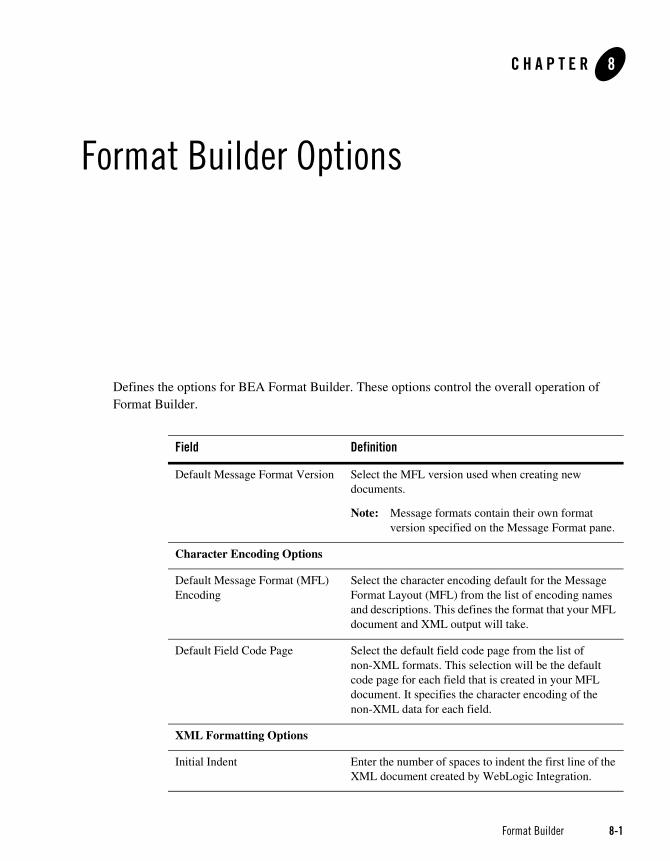
Defines the options for BEA Format Builder. These options control the overall operation of Format Builder.
Field Definition
Default Message Format Version Select the MFL version used when creating new documents.
Note: Message formats contain their own format version specified on the Message Format pane.
Character Encoding Options
Default Message Format (MFL) Encoding
Select the character encoding default for the Message Format Layout (MFL) from the list of encoding names and descriptions. This defines the format that your MFL document and XML output will take.
Default Field Code Page Select the default field code page from the list of non-XML formats. This selection will be the default code page for each field that is created in your MFL document. It specifies the character encoding of the non-XML data for each field.
XML Formatting Options
Initial Indent Enter the number of spaces to indent the first line of the XML document created by WebLogic Integration.
Fo rmat Bu i lder Opt ions
8-2 Format Builder
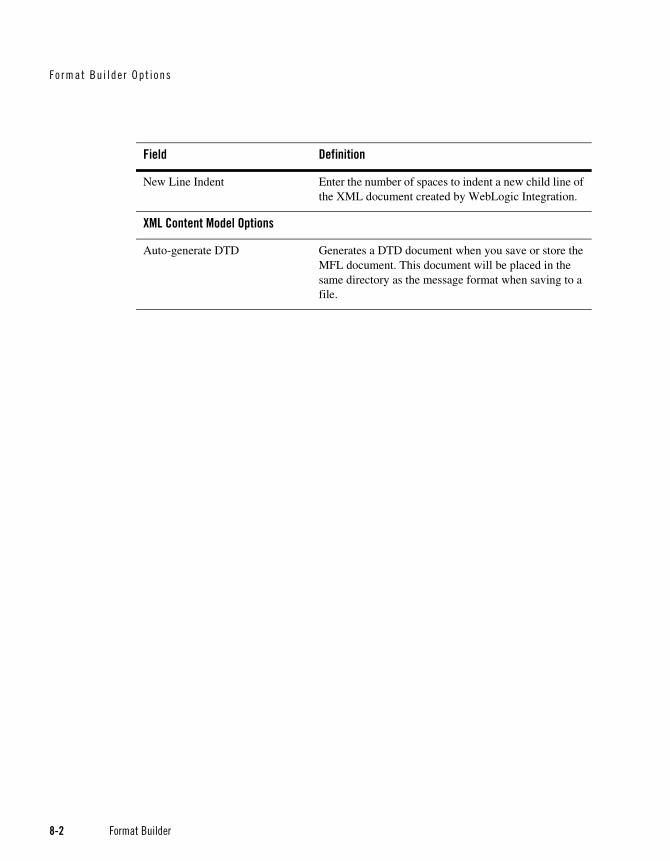
New Line Indent Enter the number of spaces to indent a new child line of the XML document created by WebLogic Integration.
XML Content Model Options
Auto-generate DTD Generates a DTD document when you save or store the MFL document. This document will be placed in the same directory as the message format when saving to a file.
Field Definition
Format Builder 9-1
C H A P T E R 9
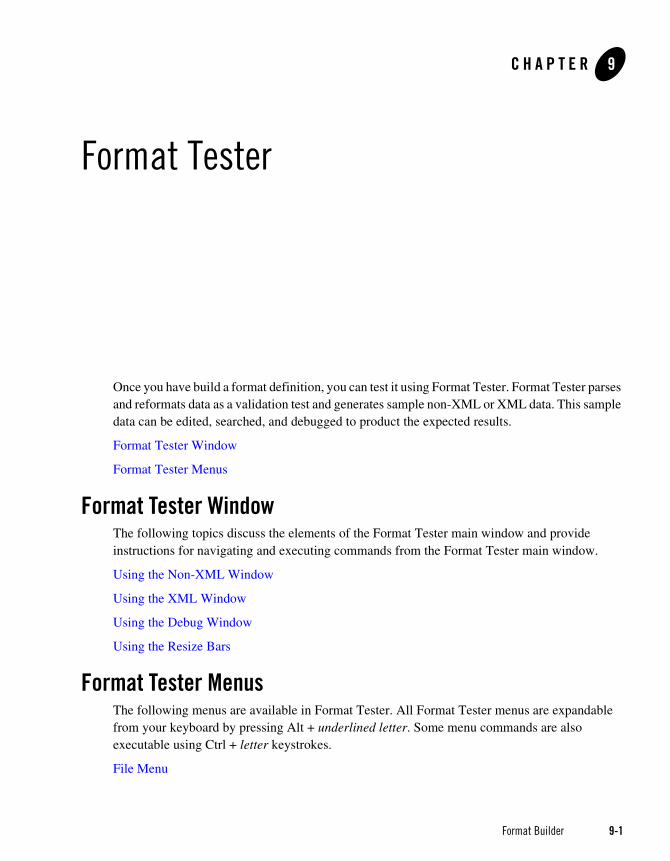
Format Tester
Once you have build a format definition, you can test it using Format Tester. Format Tester parses and reformats data as a validation test and generates sample non-XML or XML data. This sample data can be edited, searched, and debugged to product the expected results.
Format Tester Window
Format Tester Menus
Format Tester WindowThe following topics discuss the elements of the Format Tester main window and provide instructions for navigating and executing commands from the Format Tester main window.
Using the Non-XML Window
Using the XML Window
Using the Debug Window
Using the Resize Bars
Format Tester MenusThe following menus are available in Format Tester. All Format Tester menus are expandable from your keyboard by pressing Alt + underlined letter. Some menu commands are also executable using Ctrl + letter keystrokes.
File Menu
Fo rmat Tes te r
9-2 Format Builder
Edit Menu
Display Menu
Generate Menu
Translate Menu
Shortcut Menu
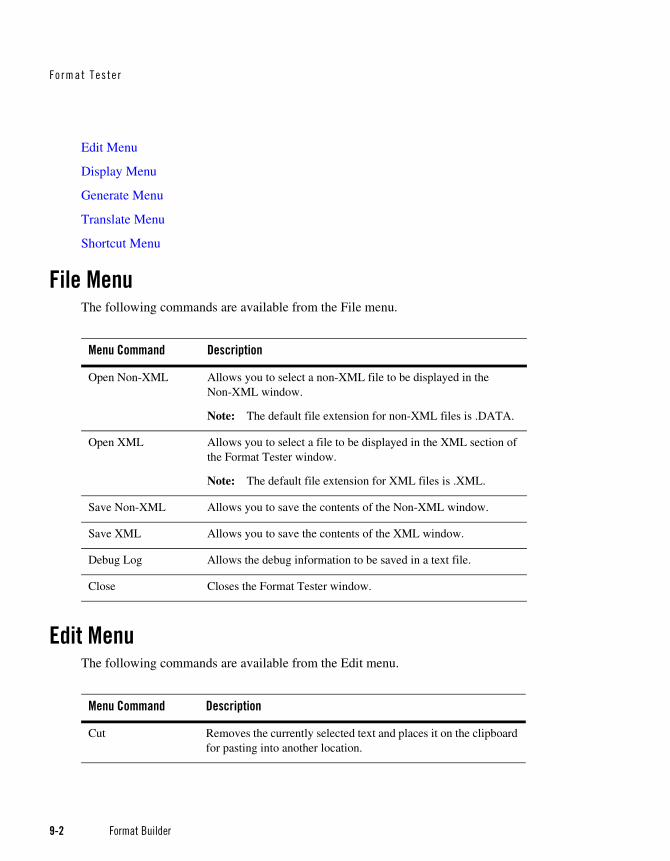
File MenuThe following commands are available from the File menu.
Edit MenuThe following commands are available from the Edit menu.
Menu Command Description
Open Non-XML Allows you to select a non-XML file to be displayed in the Non-XML window.
Note: The default file extension for non-XML files is .DATA.
Open XML Allows you to select a file to be displayed in the XML section of the Format Tester window.
Note: The default file extension for XML files is .XML.
Save Non-XML Allows you to save the contents of the Non-XML window.
Save XML Allows you to save the contents of the XML window.
Debug Log Allows the debug information to be saved in a text file.
Close Closes the Format Tester window.
Menu Command Description
Cut Removes the currently selected text and places it on the clipboard for pasting into another location.
Disp lay Menu
Format Builder 9-3
Display MenuThe following commands are available from the Display menu.
Generate MenuThe following commands are available from the Generate menu.
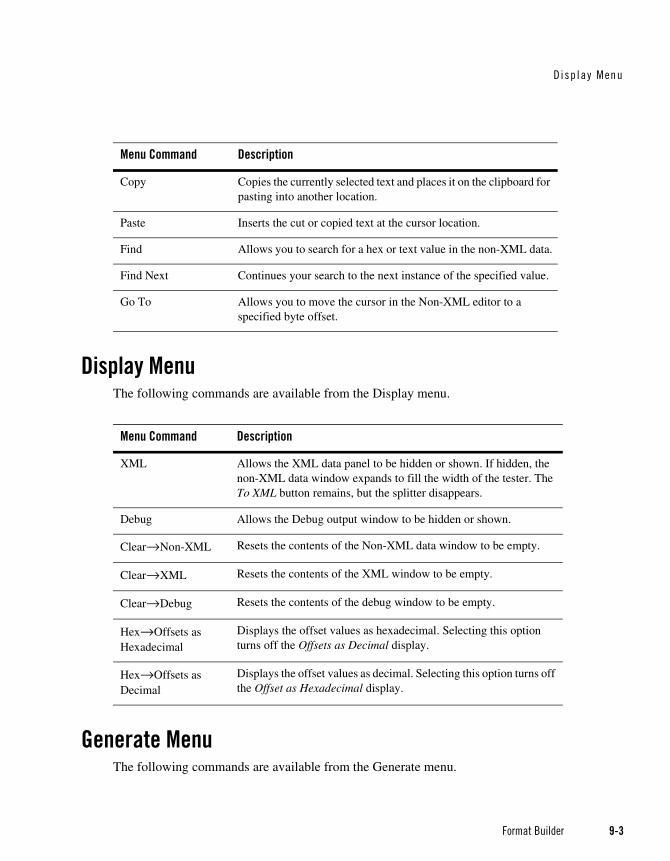
Copy Copies the currently selected text and places it on the clipboard for pasting into another location.
Paste Inserts the cut or copied text at the cursor location.
Find Allows you to search for a hex or text value in the non-XML data.
Find Next Continues your search to the next instance of the specified value.
Go To Allows you to move the cursor in the Non-XML editor to a specified byte offset.
Menu Command Description
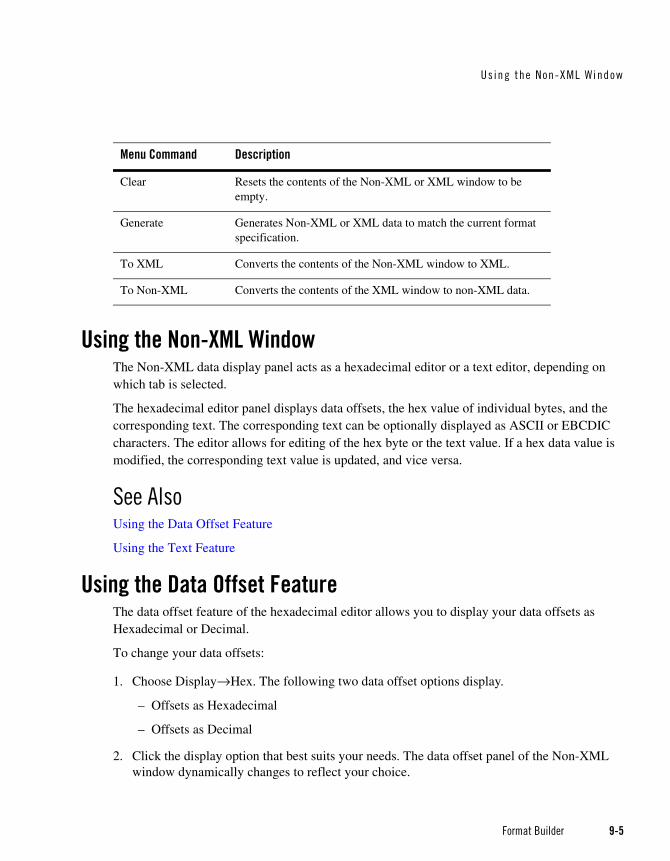
Menu Command Description
XML Allows the XML data panel to be hidden or shown. If hidden, the non-XML data window expands to fill the width of the tester. The To XML button remains, but the splitter disappears.
Debug Allows the Debug output window to be hidden or shown.
Clear→Non-XML Resets the contents of the Non-XML data window to be empty.
Clear→XML Resets the contents of the XML window to be empty.
Clear→Debug Resets the contents of the debug window to be empty.
Hex→Offsets as Hexadecimal
Displays the offset values as hexadecimal. Selecting this option turns off the Offsets as Decimal display.
Hex→Offsets as Decimal
Displays the offset values as decimal. Selecting this option turns off the Offset as Hexadecimal display.
Fo rmat Tes te r
9-4 Format Builder
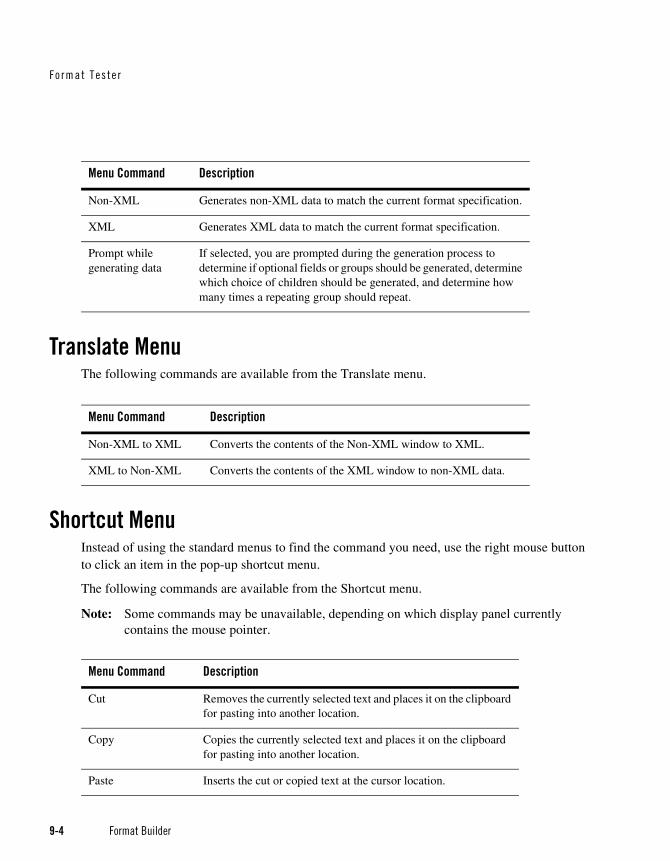
Translate MenuThe following commands are available from the Translate menu.
Shortcut MenuInstead of using the standard menus to find the command you need, use the right mouse button to click an item in the pop-up shortcut menu.
The following commands are available from the Shortcut menu.
Note: Some commands may be unavailable, depending on which display panel currently contains the mouse pointer.
Menu Command Description
Non-XML Generates non-XML data to match the current format specification.
XML Generates XML data to match the current format specification.
Prompt while generating data
If selected, you are prompted during the generation process to determine if optional fields or groups should be generated, determine which choice of children should be generated, and determine how many times a repeating group should repeat.
Menu Command Description
Non-XML to XML Converts the contents of the Non-XML window to XML.
XML to Non-XML Converts the contents of the XML window to non-XML data.
Menu Command Description
Cut Removes the currently selected text and places it on the clipboard for pasting into another location.
Copy Copies the currently selected text and places it on the clipboard for pasting into another location.
Paste Inserts the cut or copied text at the cursor location.
Us ing the Non-XML Wi ndow
Format Builder 9-5
Using the Non-XML WindowThe Non-XML data display panel acts as a hexadecimal editor or a text editor, depending on which tab is selected.
The hexadecimal editor panel displays data offsets, the hex value of individual bytes, and the corresponding text. The corresponding text can be optionally displayed as ASCII or EBCDIC characters. The editor allows for editing of the hex byte or the text value. If a hex data value is modified, the corresponding text value is updated, and vice versa.
See AlsoUsing the Data Offset Feature
Using the Text Feature
Using the Data Offset FeatureThe data offset feature of the hexadecimal editor allows you to display your data offsets as Hexadecimal or Decimal.
To change your data offsets:
1. Choose Display→Hex. The following two data offset options display.
– Offsets as Hexadecimal
– Offsets as Decimal
2. Click the display option that best suits your needs. The data offset panel of the Non-XML window dynamically changes to reflect your choice.
Clear Resets the contents of the Non-XML or XML window to be empty.
Generate Generates Non-XML or XML data to match the current format specification.
To XML Converts the contents of the Non-XML window to XML.
To Non-XML Converts the contents of the XML window to non-XML data.
Menu Command Description
Fo rmat Tes te r
9-6 Format Builder
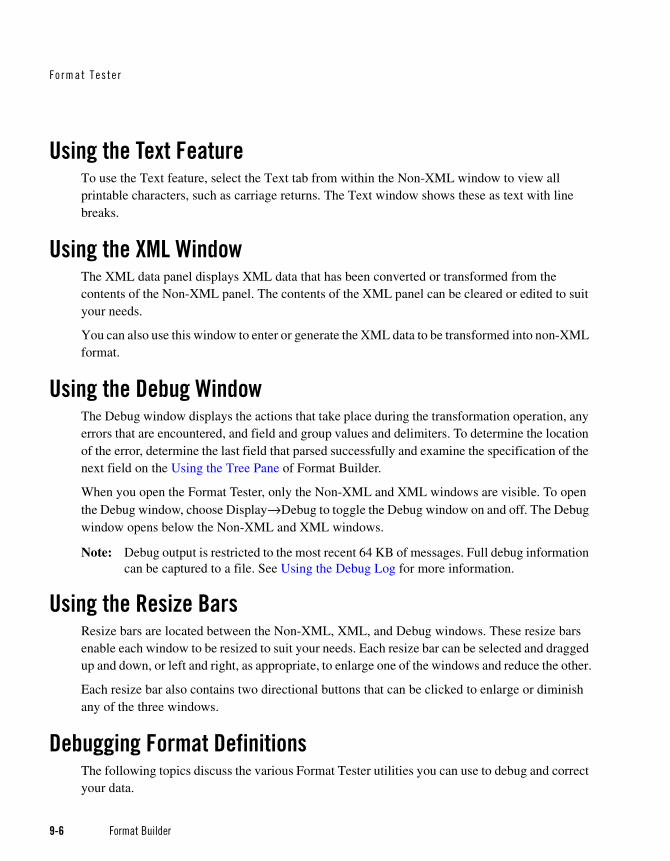
Using the Text FeatureTo use the Text feature, select the Text tab from within the Non-XML window to view all printable characters, such as carriage returns. The Text window shows these as text with line breaks.
Using the XML WindowThe XML data panel displays XML data that has been converted or transformed from the contents of the Non-XML panel. The contents of the XML panel can be cleared or edited to suit your needs.
You can also use this window to enter or generate the XML data to be transformed into non-XML format.
Using the Debug WindowThe Debug window displays the actions that take place during the transformation operation, any errors that are encountered, and field and group values and delimiters. To determine the location of the error, determine the last field that parsed successfully and examine the specification of the next field on the Using the Tree Pane of Format Builder.
When you open the Format Tester, only the Non-XML and XML windows are visible. To open the Debug window, choose Display→Debug to toggle the Debug window on and off. The Debug window opens below the Non-XML and XML windows.
Note: Debug output is restricted to the most recent 64 KB of messages. Full debug information can be captured to a file. See Using the Debug Log for more information.
Using the Resize BarsResize bars are located between the Non-XML, XML, and Debug windows. These resize bars enable each window to be resized to suit your needs. Each resize bar can be selected and dragged up and down, or left and right, as appropriate, to enlarge one of the windows and reduce the other.
Each resize bar also contains two directional buttons that can be clicked to enlarge or diminish any of the three windows.
Debugging Format DefinitionsThe following topics discuss the various Format Tester utilities you can use to debug and correct your data.

Search ing fo r Va lues
Format Builder 9-7
Searching for Values
Searching for Offsets
Using the Debug Log
Searching for ValuesThe Find feature allows you to search for hex or text values in the Non-XML data. The following fields are available from the Find dialog.
Field Description
Find What
Value Enter the value you want to find.
Text Select this option if you want to find a text value.
Hex Select this option if you want to find a hex value.
Direction
Forwards Select this option if you want to search from the selected location to the end of the document.
Backwards Select this option if you want to search from the selected location to the beginning of the document.
From
Beginning of File Select this option if you want to start the search at the beginning of the file.
Current Position Select this option if you want to start the search at the current cursor location.
End of File Select the option if you want to start the search at the end of the file.
Action Buttons
OK Begins the search operation.
Cancel Closes the Find dialog without performing a search.
Fo rmat Tes te r
9-8 Format Builder
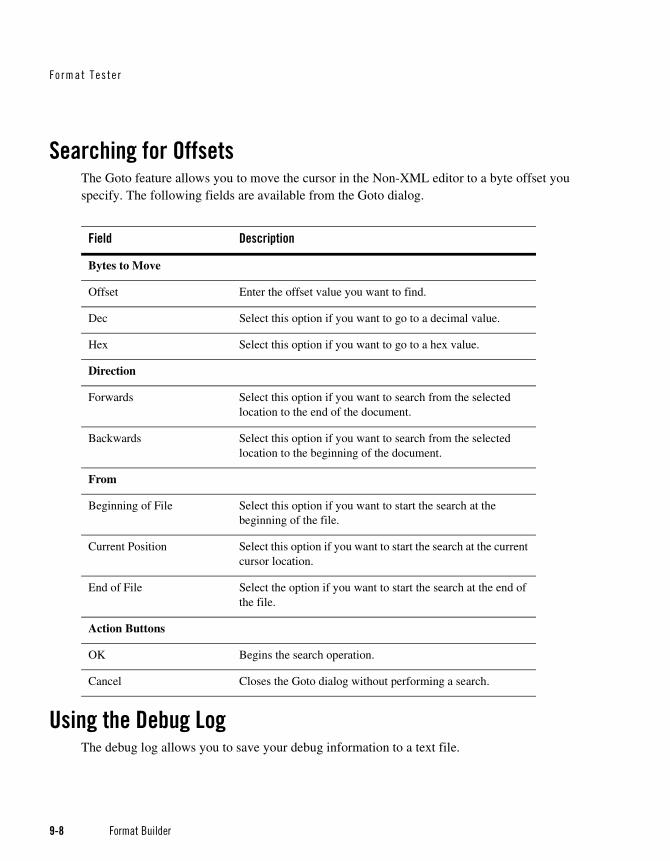
Searching for OffsetsThe Goto feature allows you to move the cursor in the Non-XML editor to a byte offset you specify. The following fields are available from the Goto dialog.
Using the Debug LogThe debug log allows you to save your debug information to a text file.
Field Description
Bytes to Move
Offset Enter the offset value you want to find.
Dec Select this option if you want to go to a decimal value.
Hex Select this option if you want to go to a hex value.
Direction
Forwards Select this option if you want to search from the selected location to the end of the document.
Backwards Select this option if you want to search from the selected location to the beginning of the document.
From
Beginning of File Select this option if you want to start the search at the beginning of the file.
Current Position Select this option if you want to start the search at the current cursor location.
End of File Select the option if you want to start the search at the end of the file.
Action Buttons
OK Begins the search operation.
Cancel Closes the Goto dialog without performing a search.
Using the Debug Log
Format Builder 9-9
To use the debug log, choose File→Debug Log. A dialog displays allowing you to enter a new path and file name or choose an existing file in which to save the debug information.
Note: If you select an existing file, the new debug information is appended to the end of the file.

Fo rmat Tes te r
9-10 Format Builder

Format Builder 10-1
C H A P T E R 10
Importing Meta Data
BEA Format Builder includes the following utilities that allow you to import COBOL copybooks, gXML guideline files, and convert a C structure definition into MFL Message Definition.
Importing a Guideline XML File
Importing an XML Schema
Importing a COBOL Copybook
Importing C Structures
Importing an FML Field Table Class
Importing a Guideline XML File Format Builder includes a feature that allows you to import a guideline XML (gXML) file and convert it into a message definition, which you can modify and customize to suit your needs. gXML is an open specification designed to facilitate exchange of e-commerce guidelines for business documents (like purchase orders, invoices and so on) using XML. gXML version 0.71 is supported in this release.
To import a gXML file:
1. Choose Tools→Import→EDI Importer. The EDI Importer dialog displays.
2. Enter data in the fields as described in the following table:
Impo r t i ng Meta Data
10-2 Format Builder
Importing an XML SchemaFormat Builder includes a feature that allows you to import an XML Schema representing the desired XML representation of your non-XML document. This can provide you with a jump-start on specifying the format of your non-XML document.
To import an XML schema:
1. Choose Tools→Import→XML Schema Importer. The XML Schema Importer dialog displays.
2. Enter data in the fields as described in the following table:
Field Description
gXML File Name Type the complete path and name of the gXML file you want to import.
Browse Click to navigate to the location of the gXML file you want to import.
Action Buttons
OK Imports the gXML file you specified.
Cancel Closes the dialog and returns to Format Builder without importing.
About Displays information about the EDI Importer including the version.
Field Description
File Name Type the path and name of the file you want to import.
Browse Click to navigate to the location of the file you want to import.
Root Element This value will be used as the root element in the transformed XML document. This name must comply with XML element naming conventions
MFL Field Delimiter Default
A delimiter is a character that marks the end of the field. The field data continues until the field containing the delimiter character is encountered.
Impor t ing a COBOL Copybook
Format Builder 10-3
Importing a COBOL CopybookFormat Builder includes a feature that allows you to import a COBOL copybook into Format Builder and create a message definition to transform the COBOL data. When importing a copybook, comments are used to document the imported copybook and the Groups and Fields it contains.
To import a COBOL copybook:
1. Choose Tools→Import→COBOL Copybook Importer. The COBOL Copybook Importer dialog displays.
2. Enter data in the fields as described in the following table:
Action Buttons
OK Imports the XML Schema using the settings you defined.
Cancel Closes the dialog and returns to Format Builder without importing.
Field Description
Field Description
File Name Type the path and name of the file you want to import.
Browse Click to navigate to the location of the file you want to import.
Byte Order
Big Endian Select this option to set the byte order to Big Endian.
Note: This option is used for IBM 370, Motorola, and most RISC designs (IBM mainframes and most Unix platforms).
Little Endian Select this option to set the byte order to Little Endian.
Note: This option is used for Intel, VAX, and Unisys processors (Windows, VMS, Digital, Unix, and Unisys).
Character Set
Impo r t i ng Meta Data
10-4 Format Builder
Once you have imported a copybook, you may work with it as you would any message format definition. If an error or unsupported data type is encountered in the copybook, a message is displayed informing you of the error. You can choose to display the error or save the error to a log file for future reference.
Importing C StructuresFormat Builder includes a C structure importer utility that converts a C structure definition into an MFL Message Definition by generating MFL or C Code output.
Starting the C Structure Importer
Generating MFL Data
Generating C Code
Starting the C Structure ImporterTo start the C Structure Importer:
EBCDIC Select this option to set the character set to EBCDIC.
Note: These values are attributes of the originating host machine.
US-ASCII Select this option to set the character set to US-ASCII.
Note: These values are attributes of the originating host machine.
Other The character encoding of the field data.
Action Buttons
OK Imports the COBOL Copybook using the settings you defined.
Cancel Closes the dialog and returns to Format Builder without importing.
About Displays information about the COBOL Copybook importer including version and supported copybook features.
Field Description
Generat ing MFL Data
Format Builder 10-5
1. From the Format Builder main window, choose Tools→Import→C Struct Importer. The C Structure Importer dialog displays.
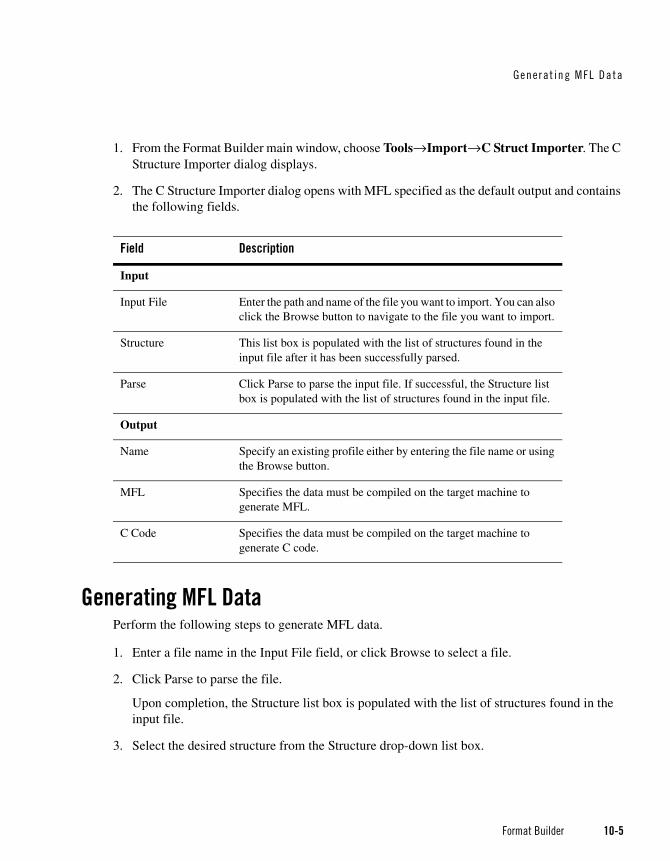
2. The C Structure Importer dialog opens with MFL specified as the default output and contains the following fields.
Generating MFL DataPerform the following steps to generate MFL data.
1. Enter a file name in the Input File field, or click Browse to select a file.
2. Click Parse to parse the file.
Upon completion, the Structure list box is populated with the list of structures found in the input file.
3. Select the desired structure from the Structure drop-down list box.
Field Description
Input
Input File Enter the path and name of the file you want to import. You can also click the Browse button to navigate to the file you want to import.
Structure This list box is populated with the list of structures found in the input file after it has been successfully parsed.
Parse Click Parse to parse the input file. If successful, the Structure list box is populated with the list of structures found in the input file.
Output
Name Specify an existing profile either by entering the file name or using the Browse button.
MFL Specifies the data must be compiled on the target machine to generate MFL.
C Code Specifies the data must be compiled on the target machine to generate C code.
Impo r t i ng Meta Data
10-6 Format Builder
At this point, you must provide some profile configuration data to generate the MFL directly. You can do this by creating a new hardware profile, or specifying an existing profile.
4. Specify an existing profile or create a new one by performing one of the following procedures.
– Specify an existing profile either by entering the file name in the Hardware Profile Name field, or click Browse to select a file. Click Edit to open the hardware profile editor if you need to view or edit the profile parameters.
– Click New to create a new hardware profile. This opens the Hardware Profile editor loaded with the default parameters. Specify a Profile Name, a description, and modify the primitive data types and byte order to suit your needs.
5. Click OK to save your hardware profile changes and return to the C Structure Importer dialog.
6. Click OK to generate your MFL. If the generation is successful, you are returned to Format Builder with an MFL object listed in the navigation tree. The MFL object reflects the same name as the input file used in the parse operation.
If errors are detected during the generation process, the MFL Generation Errors dialog displays providing you the opportunity to view or file the error log.
7. Click Display Error Log to view any errors encountered, click Save Error Log to save the error log to the location of your choice, or click Cancel to dismiss the MFL Generation Errors dialog box.
Once you have determined what errors were generated, you can return to the C Structure Importer and repeat the prior steps.
Generating C CodePerform the following steps to generate C code.
1. Enter a file name in the Input File field, or click Browse to select a file.
2. Click Parse to parse the file.
Upon completion, the Structure list box is populated with the list of structures found in the input file.
3. Select the desired structure from the Structure drop-down list box.
4. Select the C Code option button.
5. Enter a file name in either the MFL Gen or Data Gen fields, or click Browse to select a file.
Impor t ing an FML F ie ld Tab le C lass
Format Builder 10-7
6. Click OK. You will be warned about overwriting existing files and notified about the success or failure of the code generation.
7. Copy the generated source code to the platform in question and compile and execute it.
Note: You must copy the input file containing the structure declarations as well. Both programs, when compiled, take an argument of the output file name.
8. Copy the generated MFL or data back to the platform running Format Builder.
Importing an FML Field Table Class The FML Field Table Class Importer facilitates the integration of WebLogic Tuxedo Connector and business process management (BPM) functionality. Tuxedo application buffers are translated to and from XML by the FML to XML Translator that is a feature of WebLogic Tuxedo Connector.
The integration of Tuxedo with BPM functionality requires the creation of the XML that is passed between the WebLogic Tuxedo Connector Translator and the process engine. To create the necessary XML, use the FML Field Table Class Importer and the XML generation feature of Format Tester.
FML Field Table Class Importer Prerequisites Before starting Format Builder:
1. Move the field tables associated with the FML buffer from the Tuxedo system to the WebLogic Server/WebLogic Tuxedo Connector environment.
2. Use the weblogic/wtc/jatmi/mkfldclass utility to build Java source code representing the field tables. For information about FML Field Table Administration, see the WebLogic Server documentation.
3. Compile the source code. The resulting class files are called fldtbl classes because they implement the FldTbl interface. These classes must be moved to a location specified in the Format Builder CLASSPATH.
The SAMPLES_HOME\integration\samples\di\fml directory contains several fldtbl class fields that you can use as samples. These samples allow you to start Format Builder without completing the previous three steps.
Note: Because most users perform these steps when configuring WebLogic Tuxedo Connector, these class files may already exist.
Impo r t i ng Meta Data
10-8 Format Builder
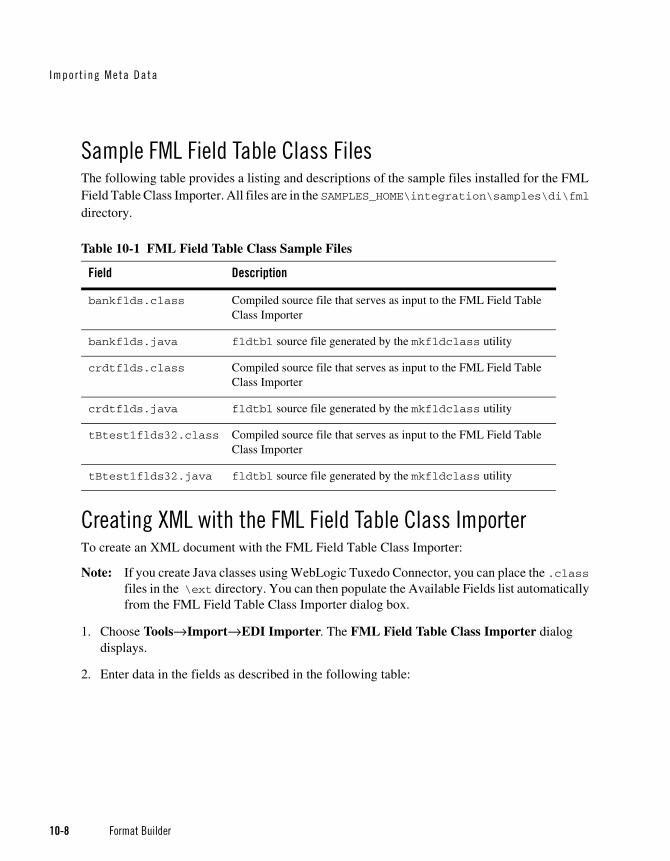
Sample FML Field Table Class Files The following table provides a listing and descriptions of the sample files installed for the FML Field Table Class Importer. All files are in the SAMPLES_HOME\integration\samples\di\fml directory.
Creating XML with the FML Field Table Class Importer To create an XML document with the FML Field Table Class Importer:
Note: If you create Java classes using WebLogic Tuxedo Connector, you can place the .class files in the \ext directory. You can then populate the Available Fields list automatically from the FML Field Table Class Importer dialog box.
1. Choose Tools→Import→EDI Importer. The FML Field Table Class Importer dialog displays.
2. Enter data in the fields as described in the following table:
Table 10-1 FML Field Table Class Sample Files
Field Description
bankflds.class Compiled source file that serves as input to the FML Field Table Class Importer
bankflds.java fldtbl source file generated by the mkfldclass utility
crdtflds.class Compiled source file that serves as input to the FML Field Table Class Importer
crdtflds.java fldtbl source file generated by the mkfldclass utility
tBtest1flds32.class Compiled source file that serves as input to the FML Field Table Class Importer
tBtest1flds32.java fldtbl source file generated by the mkfldclass utility

Impor t ing an FML F ie ld Tab le C lass
Format Builder 10-9
Field Description
Class Names Type the name of the fldtbl class file to be processed.
Because a single FML buffer may contain fields from several field tables, you can enter one or more fldtbl class name files in the Class Names field. Items in the list should be separated by commas. Name are not required to include the .class extension.
Note: If any of the listed classes are not fldtbl classes created by the weblogic/wtc/jatmi/mkfldclass utility, or if they are not included in the Format Builder CLASSPATH, then an error dialog box is displayed. Even if an error occurs, however, the valid fldtbl classes in the list are processed.
Load Click Load to display names of the fields from the field tables in the Available Fields list.
FML Field Selector
Available Fields Displays the list of names from the field tables. Select the desired fields from the Available Fields list and click Add.
The Available Fields list does not allow duplicate names. Even if the name of a field appears in different field tables, it is included only once in the list.
Selected Fields Displays the list of selected fields.
To remove fields from this list, select the fields and click Remove.
Action Buttons
Add Moves the selected field from the list of Fields Available, to the Selected Fields list.
Remove Removes the selected field from the list of Selected Fields, to the Fields Available list.
OK Click OK after completing the list of selected fields. The dialog box closes and the name of the generated MFL is added to the Format Builder navigation tree. The selected fields are listed in the order in which they appear in the Selected Fields list.
Cancel Closes the dialog and returns to Format Builder without importing.
Impo r t i ng Meta Data
10-10 Format Builder
3. Edit the created MFL document to specify the order and number of occurrences of the fields in the XML document to be passed to the WebLogic Tuxedo Connector FML/XML Translator from business process management (BMP).
4. Choose Tools→Test to display the Format Tester tool.
5. From the Format Tester menu bar, choose Generate→XML to create an XML document that conforms to the MFL document in Format Builder.
6. Edit the data content of the fields in the XML document as desired.
7. From the Format Tester menu bar, choose File→Save XML to save the XML document in a file with a specified name and location.
The created XML can be imported and used in business process management functions by using the XML instance editor. For information about importing XML, see the BPM documentation.
Format Builder 11-1
C H A P T E R 11
Format Builder Menus
File Menu
Edit Menu
Insert Menu
View Menu
Tools Menu
Shortcut Menu
File MenuThe following commands are available from the File Menu.
Menu Command Description
New Creates a new Message Format document.
Open Opens an existing Message Format document.
Close Closes the current Message Format document.
Save Saves the current Message Format document.
Save As Saves the current Message Format under a different name document.
Fo rmat Bu i lder Menus
11-2 Format Builder
Edit MenuThe following commands are available from the Edit Menu.
Note: Some commands may be unavailable, depending on the actions you have taken.
Properties Opens the Properties window for the selected file or message format. You can change the MFL encoding or MFL version for the selected item.
Exits Closes the application.
Menu Command Description
Menu Command Description
Undo Reverses the previous action. The Undo command in the Edit Menu changes to indicate the action that can be undone. For example, changing the name of a field to Field1 and clicking Apply causes the Edit Menu to read “Undo Apply Field Field1”.
Redo Reverses the effects of an Undo command. The Redo command in the Edit Menu changes to indicate the action that can be redone. For example, changing the name of a field to Field1 and then undoing that action causes the Edit Menu to read “Redo Apply Field Field1”.
Cut Removes the item currently selected in the left-hand pane, and it’s child objects, from the tree. This item is placed on the clipboard for pasting into another location.
Note: This action is not available if the Message Format (root) item is selected.
Copy Makes a copy of the item currently selected in the left-hand pane for insertion elsewhere in the tree.
Note: This action is not available if the Message Format (root) item is selected.
Paste Inserts the cut or copied item. An additional menu displays when you select Paste. You can choose to paste the item as a child or sibling of the selected item. In addition, you can choose to paste a reference as a sibling of the selected item.
Inse r t Menu
Format Builder 11-3
Insert MenuThe following commands are available from the Insert Menu.
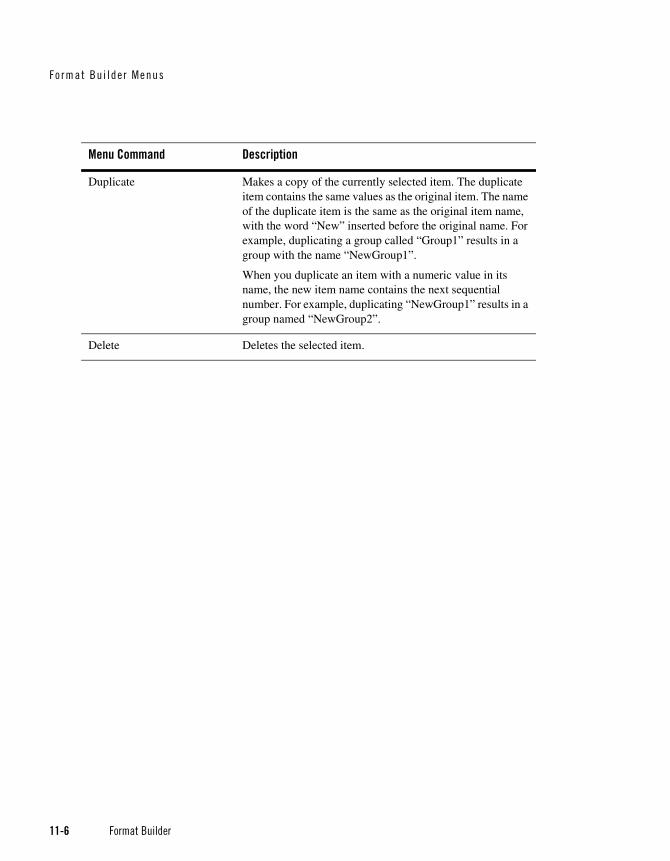
Duplicate Makes a copy of the item selected in the tree. The duplicate item contains the same values as the original item. The name of the duplicate item is the same as the original item name, but the word “New” is inserted before the original name. For example, duplicating an item called “Field1” results in an item with the name “NewField1”.
When you duplicate an item with a numeric value in its name, the new item name contains the next sequential number. For example, duplicating “NewGroup1” results in a group named “NewGroup2”.
Delete Deletes the item selected in the tree, as well as all child objects of that item.
Move Up Moves the selected item up one position under its parent.
Move Down Moves the selected item down one position under its parent.
Promote Promotes the selected item to the next highest level in the tree. For example, Field1 is the child object of Group1. Selecting Field1 and clicking the Promote tool makes it a sibling of Group1.
Demote Demotes the selected item to the next lower level in the tree. For example, Group1 is the sibling of Field1. Field1 immediately follows Group1 in the tree. Selecting Field1 and clicking the Demote tool makes it a child of Group1.
Menu Command Description
Menu Command Description
Field Inserts a new field. You can choose whether to insert the field as a child or sibling of the item selected in the tree.
Group Inserts a new group. You can choose whether to insert the group as a child or sibling of the item selected in the tree.
Fo rmat Bu i lder Menus
11-4 Format Builder
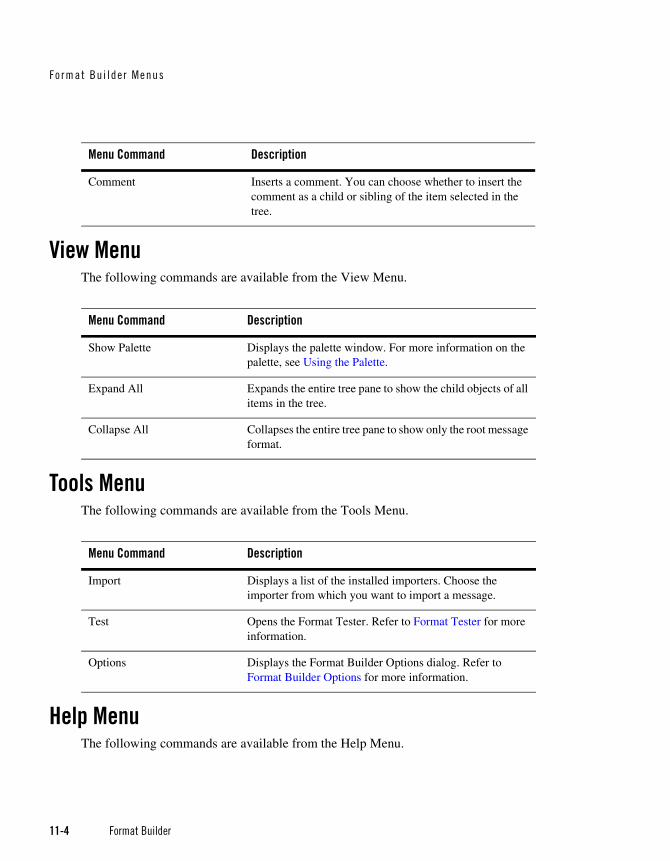
View MenuThe following commands are available from the View Menu.
Tools MenuThe following commands are available from the Tools Menu.
Help MenuThe following commands are available from the Help Menu.
Comment Inserts a comment. You can choose whether to insert the comment as a child or sibling of the item selected in the tree.
Menu Command Description
Menu Command Description
Show Palette Displays the palette window. For more information on the palette, see Using the Palette.
Expand All Expands the entire tree pane to show the child objects of all items in the tree.
Collapse All Collapses the entire tree pane to show only the root message format.
Menu Command Description
Import Displays a list of the installed importers. Choose the importer from which you want to import a message.
Test Opens the Format Tester. Refer to Format Tester for more information.
Options Displays the Format Builder Options dialog. Refer to Format Builder Options for more information.

Shor t cu t Menu
Format Builder 11-5
Shortcut MenuThe following commands are available from the Shortcut Menus. You can access the Shortcut Menus by right-clicking an item in the tree.
Note: Some commands may be unavailable, depending on the item you have selected in the tree.
Menu Command Description
Help Topics Displays the main Help screen.
How Do I. . . Provides step-by-step instructions for performing the basic tasks in Format Builder.
About Displays version and copyright information about Format Builder.
Menu Command Description
Cut Removes the item currently selected in the left-hand pane, and it’s child objects, from the tree.
Copy Makes a copy of the item currently selected in the left-hand pane for insertion elsewhere in the tree.
Paste Inserts the cut or copied item. An additional menu displays when you select Paste. You can choose to paste the item as a child or sibling of the selected item. In addition, you can choose to paste a reference to the cut or copied item as a sibling of the selected item.
Insert Group Inserts a new group. You select whether to insert the group as a child or sibling of the selected item.
Insert Field Inserts a new field. You select whether to insert the field as a child or sibling of the selected item.
Insert Comment Inserts a comment. You select whether to insert the comment as a child or sibling of the selected item.
Fo rmat Bu i lder Menus
11-6 Format Builder
Duplicate Makes a copy of the currently selected item. The duplicate item contains the same values as the original item. The name of the duplicate item is the same as the original item name, with the word “New” inserted before the original name. For example, duplicating a group called “Group1” results in a group with the name “NewGroup1”.
When you duplicate an item with a numeric value in its name, the new item name contains the next sequential number. For example, duplicating “NewGroup1” results in a group named “NewGroup2”.
Delete Deletes the selected item.
Menu Command Description
Format Builder 12-1
C H A P T E R 12
Using the Palette
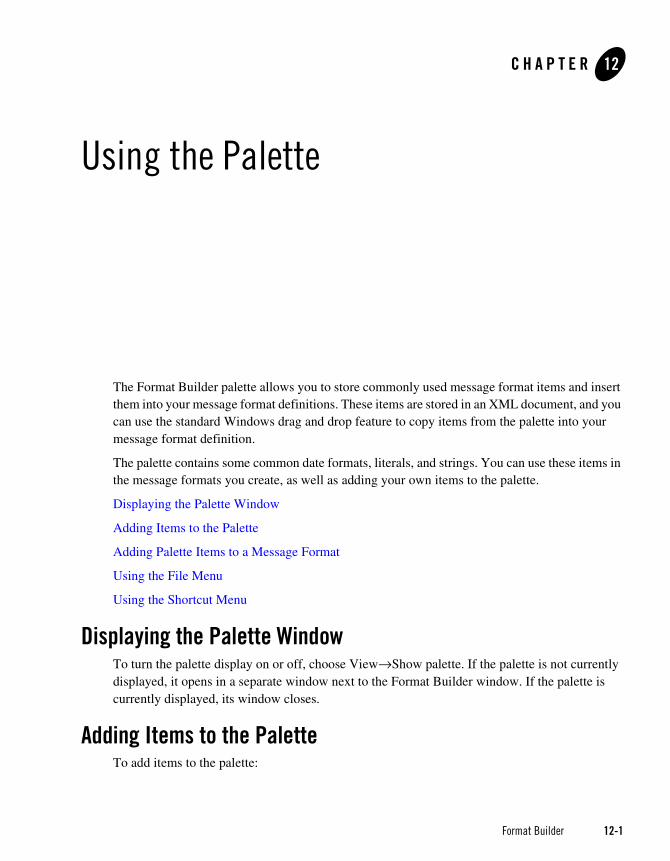
The Format Builder palette allows you to store commonly used message format items and insert them into your message format definitions. These items are stored in an XML document, and you can use the standard Windows drag and drop feature to copy items from the palette into your message format definition.
The palette contains some common date formats, literals, and strings. You can use these items in the message formats you create, as well as adding your own items to the palette.
Displaying the Palette Window
Adding Items to the Palette
Adding Palette Items to a Message Format
Using the File Menu
Using the Shortcut Menu
Displaying the Palette WindowTo turn the palette display on or off, choose View→Show palette. If the palette is not currently displayed, it opens in a separate window next to the Format Builder window. If the palette is currently displayed, its window closes.
Adding Items to the PaletteTo add items to the palette:
Using the Pal et te
12-2 Format Builder
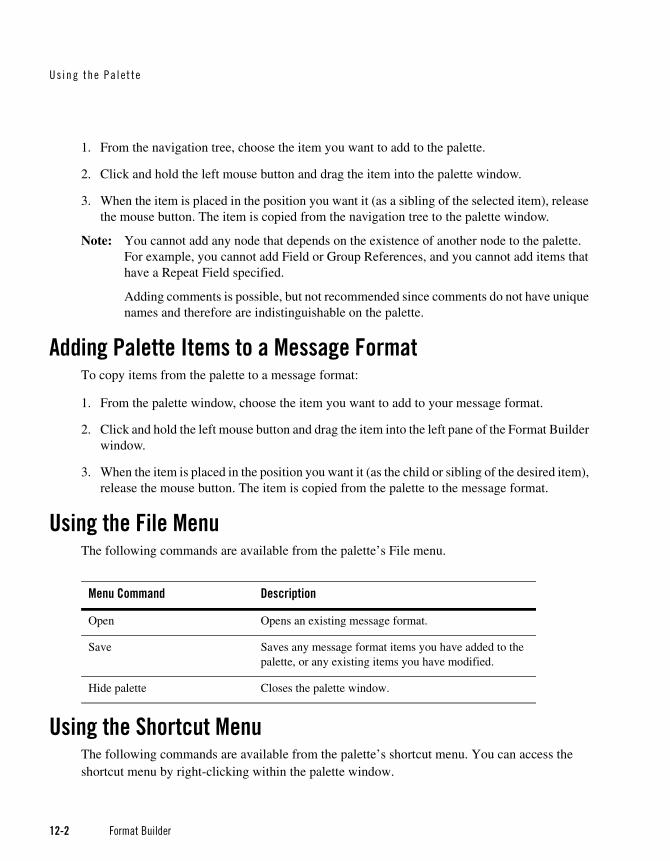
1. From the navigation tree, choose the item you want to add to the palette.
2. Click and hold the left mouse button and drag the item into the palette window.
3. When the item is placed in the position you want it (as a sibling of the selected item), release the mouse button. The item is copied from the navigation tree to the palette window.
Note: You cannot add any node that depends on the existence of another node to the palette. For example, you cannot add Field or Group References, and you cannot add items that have a Repeat Field specified.
Adding comments is possible, but not recommended since comments do not have unique names and therefore are indistinguishable on the palette.
Adding Palette Items to a Message FormatTo copy items from the palette to a message format:
1. From the palette window, choose the item you want to add to your message format.
2. Click and hold the left mouse button and drag the item into the left pane of the Format Builder window.
3. When the item is placed in the position you want it (as the child or sibling of the desired item), release the mouse button. The item is copied from the palette to the message format.
Using the File MenuThe following commands are available from the palette’s File menu.
Using the Shortcut MenuThe following commands are available from the palette’s shortcut menu. You can access the shortcut menu by right-clicking within the palette window.
Menu Command Description
Open Opens an existing message format.
Save Saves any message format items you have added to the palette, or any existing items you have modified.
Hide palette Closes the palette window.
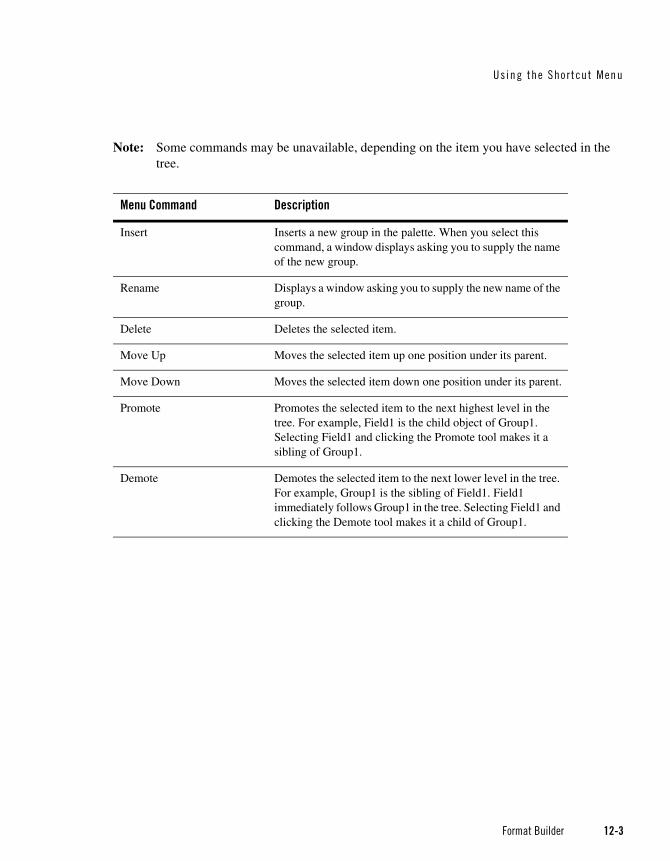
Using the Sho r t cu t Menu
Format Builder 12-3
Note: Some commands may be unavailable, depending on the item you have selected in the tree.
Menu Command Description
Insert Inserts a new group in the palette. When you select this command, a window displays asking you to supply the name of the new group.
Rename Displays a window asking you to supply the new name of the group.
Delete Deletes the selected item.
Move Up Moves the selected item up one position under its parent.
Move Down Moves the selected item down one position under its parent.
Promote Promotes the selected item to the next highest level in the tree. For example, Field1 is the child object of Group1. Selecting Field1 and clicking the Promote tool makes it a sibling of Group1.
Demote Demotes the selected item to the next lower level in the tree. For example, Group1 is the sibling of Field1. Field1 immediately follows Group1 in the tree. Selecting Field1 and clicking the Demote tool makes it a child of Group1.

Using the Pal et te
12-4 Format Builder
Format Builder 13-1
C H A P T E R 13
How Do I?
Create a Message Format
Create a Group
Create a Field
Create a Comment
Create a Reference
Save a Document
Use Format Tester
Debug Format Definitions
Search for Values
Search for Offsets
Use the Debug Log
Specify Delimiters
Create a Message FormatThe first step in creating a Message Format Definition file is to create a message format (the root node of a message format file).
To create a message format:
1. Choose File→New. The Message Format Detail Window displays in the right pane.
How Do I ?
13-2 Format Builder
2. Enter data in the fields as appropriate. See Message Format Detail Window for field definitions.
Create a GroupGroups define fields that are related in some way (for example, the fields PAYDATE, HOURS, and RATE could be part of the PAYINFO group). You can create a group as a child of the message format item, as a child of another group, or as a sibling of a group or field.
To create a group:
1. Select an item in the tree view in the left pane.
2. Choose Insert→Group→As Child if you want to create the group as the child of the message format or another group. Choose Insert→Group→As Sibling if you want to create the group as the sibling of another group or a field. The Group Details window displays in the right pane.
3. Enter data in the fields as appropriate. See Group Detail Window for field definitions.
4. Click Apply to save your changes to the message format file, or click Reset to discard your changes to the detail window and reset all fields to the last saved value.
Note: The Apply and Reset buttons are only enabled once changes are made to the detail panel’s components.
Create a FieldFields are a sequence of bytes that have some meaning to an application. (For example, the field EMPNAME contains an employee name.) You can create a field as a child of the message format item, as a child of a group, or as a sibling of a group or another field.
To create a field:
1. Select an item in the tree view in the left pane.
2. Choose Insert→Field→As Child if you want to create the field as the child of the message format or group. Choose Insert→Field→As Sibling if you want to create the group as the sibling of another group or a field. The Field Details window displays in the right pane.
3. Enter data in the fields as appropriate. See Field Detail Window for field definitions.
4. Click Apply to save your changes to the message format file, or click Reset to discard your changes to the detail window and reset all fields to the last saved value.
Create a Comment
Format Builder 13-3
Note: The Apply and Reset buttons are only enabled once changes are made to the detail panel’s components.
Create a CommentComments contain notes about the message format or the data transformed by the message format. Comments are included in the message format definition for informational purposes only. You can create a comment as a child or sibling of any message format, group, or field.
To create a comment:
1. Select an item in the tree view in the left pane.
2. Choose Insert→Comment→As Child if you want to create the comment as the child of the selected item. Choose Insert→Comment→As Sibling if you want to create the comment as the sibling of the selected item. The Comment Details window displays in the right pane.
3. Enter the desired comment text. For more information, see Comment Detail Window.
4. Click Apply to save your changes to the message format file, or click Reset to discard your changes to the detail window and reset all fields to the last saved value.
Note: The Apply and Reset buttons are only enabled once changes are made to the detail panel’s components.
Create a ReferenceReferences indicate that the description of the field or group format has been previously defined and you want to reuse this description without re-entering the data. Reference fields or groups have the same format as the original field or group, but you can change only the optional setting and the occurrence setting for the reference field or group. For example, if you have a “bill to” address and a “ship to” address in your data and the format for the address is the same, you only need to define the address format once. You can create the “bill to” address definition and create a reference for the “ship to” address.
Note: References are named exactly the same as the original item. For example, the “bill to” address definition and the “ship to” address definition would be named the same. If you want to reuse a group definition, create a generic group and embed it within a specific group. For example, in the previous example, you can create an address group within a bill_to group and reference address within a ship_to group.
To create a reference:
1. Select a field or group in the tree pane.

How Do I ?
13-4 Format Builder
2. Choose Edit→Copy.
3. Choose the proper sibling in the tree.
4. Choose Edit→Paste→As Reference.
5. Enter data in the fields as appropriate. See Reference Detail Window for field definitions.
6. Click Apply to save your changes to the message format file, or click Reset to discard your changes to the detail window and reset all fields to the last saved value.
Note: The Apply and Reset buttons are only enabled once changes are made to the detail panel’s components.
Save a DocumentTo save a message format file for the first time:
1. Choose File→Save As. The Save As dialog displays.
2. Navigate to the directory where you want to save the file.
3. In the File Name text box, type the name you want to assign to the file.
4. If no extension has been given, Format Builder automatically assigns the extension .MFL to message format files.
5. Click Save As to save the file in the specified location with the specified name and extension.
To save a message format file using the same name, choose File→Save. The file is saved in the same location with the same name and extension.
To save a message format file using a different name, choose File→Save As and follow steps 1 through 5 above.
Use Format TesterFormat Tester parses and reformats data as a validation test. Using Format Tester, you can make sure the message formats you build using Format Builder produce the expected results.
Format Tester is available from Format Builder.
To Start Format Tester
1. In Format Builder, open a message format document (MFL file).
Debug Fo rmat De f i n i t i ons
Format Builder 13-5
Note: To run Format Tester, you must have a message format document open in Format Builder.
2. From the Format Builder menu bar, choose Tools→Test.
3. The Format Tester dialog box is displayed.
Note: Format Tester uses the currently loaded message definition document.
Refer to Format Tester for more information.
Debug Format DefinitionsSearch for Values
Search for Offsets
Use the Debug Log
Search for ValuesThe find feature allows you to search for hex or text values in the non-XML data.
To search for values:
1. From within the Format Tester, choose File→Open Non-XML to open the non-XML data file you want to search.
2. Choose Edit→Find. The Find dialog opens.
3. Enter data in the fields as appropriate (see Search for Values for more information).
4. Click OK to begin the Search operation.
Search for OffsetsThe Goto feature allows you to move the cursor in the Non-XML editor to a byte offset you specify.
To move to a specified offset:
1. Choose Edit→Find. The Goto dialog opens.
2. Enter data in the fields as appropriate (see Search for Offsets for more information).
3. Click OK to begin the Search operation.
How Do I ?
13-6 Format Builder
Use the Debug LogThe debug log allows you to save your debug information to a text file.
To use the debug log, choose File→Debug Log. A dialog displays allowing you to enter a new path and file name or choose an existing file in which to save the debug information.
Note: If you select an existing file, the new debug information is appended to the end of the file.
Specify DelimitersYou can specify delimiters in Format Builder by entering the correct syntax. For example, to specify a tab character as the delimiter (‘\u009’), enter the construct \t to match it.
For more information, visit the following URL:
http://java.sun.com/j2se/1.4/docs/api/java/util/regex/Pattern.html
Table 13-1 Character Delimiters
Construct Matches
x The character x
\\ The backlash
\0n The character with octal value 0n (<= n <= 7)
\0nn The character with octal value 0nn (0 <= n <= 7)
\0mnn The character with octal value 0mnn (0 <= m <= 3, 0 <= n <= 7)
\xhh The character with hexadecimal value 0xhh
\uhhhh The character with hexadecimal value 0xhhhh
\t The tab character ('\u0009')
\n The newline (line feed) character ('\u000A')
\r The carriage-return character ('\u000D')
\f The form-feed character ('\u000C')
\a The alert (bell) character ('\u0007')
\e The escape character ('\u001B')
\cx The control character corresponding to x
Format Builder A-1
C H A P T E R A
Supported Data Types
This section provides information about the following topics:
MFL Data Types—This section lists the supported metadata data types used in non-XML to XML or XML to non-XML conversions.
COBOL Copybook Importer Data Types—The Format Builder tool provides a utility for the conversion of COBOL copybooks into MFL files. This section lists the supported COBOL data types that can be converted to metadata data types. (This conversion occurs at design time.)
Unsupported C Language Features—The Format Builder tool provides a utility for the conversion of C Structures into MFL files. This section lists the C Language constructs that cannot be converted to metadata data types. (This conversion occurs at design time.)
MFL Data TypesTable A-1 lists the MFL data types that data transformer supports. These types are specified in the “type” attribute of a FieldFormat element.
Table A-1 Supported MFL Data Types
Data Type Description
Binary (Base64 encoding) Any character value accepted. Requires a length, length field, delimiter, or a delimiter field. Resulting XML data for this field is encoded using base-64.
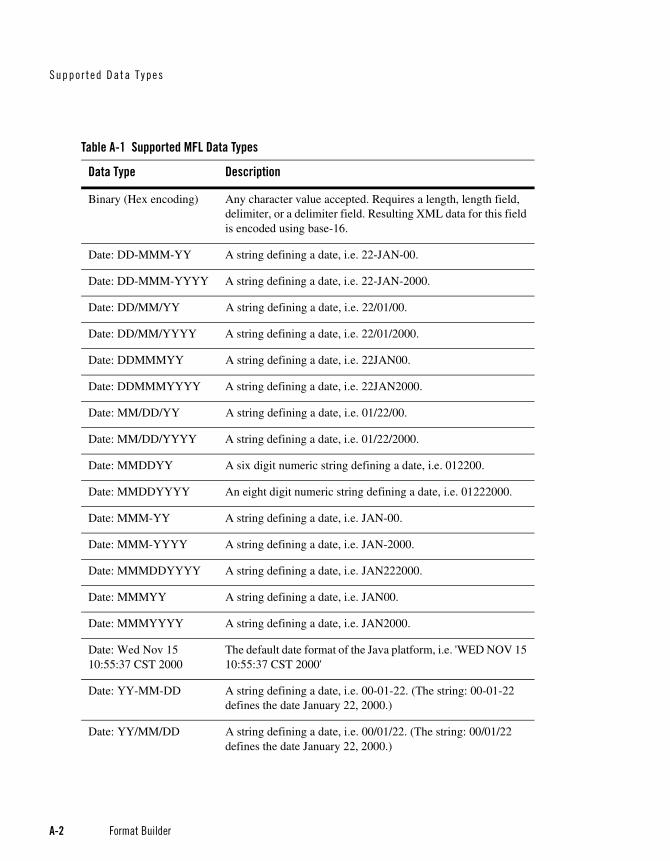
Suppor ted Data T ypes
A-2 Format Builder
Binary (Hex encoding) Any character value accepted. Requires a length, length field, delimiter, or a delimiter field. Resulting XML data for this field is encoded using base-16.
Date: DD-MMM-YY A string defining a date, i.e. 22-JAN-00.
Date: DD-MMM-YYYY A string defining a date, i.e. 22-JAN-2000.
Date: DD/MM/YY A string defining a date, i.e. 22/01/00.
Date: DD/MM/YYYY A string defining a date, i.e. 22/01/2000.
Date: DDMMMYY A string defining a date, i.e. 22JAN00.
Date: DDMMMYYYY A string defining a date, i.e. 22JAN2000.
Date: MM/DD/YY A string defining a date, i.e. 01/22/00.
Date: MM/DD/YYYY A string defining a date, i.e. 01/22/2000.
Date: MMDDYY A six digit numeric string defining a date, i.e. 012200.
Date: MMDDYYYY An eight digit numeric string defining a date, i.e. 01222000.
Date: MMM-YY A string defining a date, i.e. JAN-00.
Date: MMM-YYYY A string defining a date, i.e. JAN-2000.
Date: MMMDDYYYY A string defining a date, i.e. JAN222000.
Date: MMMYY A string defining a date, i.e. JAN00.
Date: MMMYYYY A string defining a date, i.e. JAN2000.
Date: Wed Nov 15 10:55:37 CST 2000
The default date format of the Java platform, i.e. 'WED NOV 15 10:55:37 CST 2000'
Date: YY-MM-DD A string defining a date, i.e. 00-01-22. (The string: 00-01-22 defines the date January 22, 2000.)
Date: YY/MM/DD A string defining a date, i.e. 00/01/22. (The string: 00/01/22 defines the date January 22, 2000.)
Table A-1 Supported MFL Data Types
Data Type Description

MFL Data Types
Format Builder A-3
Date: YYMMDD A string defining a date, i.e. 000122. (The string: 000122 defines the date January 22, 2000.)
Date: YYYY-MM-DD A string defining a date, i.e. 2000-01-22. (The string: 2000-01-22 defines the date January 22, 2000.)
Date: YYYY/MM/DD A string defining a date, i.e. 2000/01/22. (The string: 2000/01/22 defines the date January 22, 2000.)
Date: YYYYMMDD An eight byte numeric string of the format YYYYMMDD. A base data of String or EBCDIC may be specified to indicate the character encoding.
DateTime: DD/MM/YY hh:mm
A string defining a date and time, i.e. 22/01/00 12:24.
DateTime: DD/MM/YY hh:mm AM
A string defining a date and time, i.e. 22/01/00 12:24 AM.
DateTime: DD/MM/YY hh:mm:ss
A string defining a date and time, i.e. 22/01/00 12:24:00.
DateTime: DD/MM/YY hh:mm:ss AM
A string defining a date and time, i.e. 22/01/00 12:24:00 AM.
DateTime: MM/DD/YY hh:mm
A string defining a date and time, i.e. 01/22/00 12:24.
DateTime: MM/DD/YY hh:mi AM
A string defining a date and time, i.e. 01/22/00 12:24 AM.
DateTime: MM/DD/YY hh:mm:ss
A string defining a date and time, i.e. 01/22/00 12:24:00.
DateTime: MM/DD/YY hh:mm:ss AM
A string defining a date and time, i.e. 01/22/00 12:24:00 AM.
DateTime: MMDDYYhhmm
A string of numeric digits defining a date and time, i.e. 0122001224.
DateTime: YYYYMMDDhhmmss
A fourteen byte numeric string of the format YYYYMMDDHHMISS. A Base data type may be specified.
Table A-1 Supported MFL Data Types
Data Type Description

Suppor ted Data T ypes
A-4 Format Builder
DateTime: MMDDYYhhmmss
A string of numeric digits defining a date and time, i.e. 012200122400.
EBCDIC A string of characters in IBM Extended Binary Coded Decimal Interchange Code. Requires a length, length field, delimiter, or a delimiter field.
Filler A sequence of bytes that is not transformed to XML. This field of data is skipped over when transforming non-XML data to XML. When transforming XML to non-XML data, this field is written to the binary output stream as a sequence of spaces.
FloatingPoint: 4 bytes, Big-Endian
A four byte big endian floating point number that conforms to the IEEE Standard 754.
FloatingPoint, 4 bytes, Little-Endian
A four byte little endian floating point number that conforms to the IEEE Standard 754.
FloatingPoint: 8 bytes, Big-Endian
A eight byte big endian floating point number that conforms to the IEEE Standard 754.
FloatingPoint: 8 bytes, Little-Endian
A eight byte little endian floating point number that conforms to the IEEE Standard 754.
Integer: Signed, 1 byte A one byte signed integer, i.e. '56' is 0x38.
Integer: Unsigned, 1 byte A one byte unsigned integer, i.e. '128' is 0x80.
Integer: Signed, 2 byte, Big-Endian
A signed two-byte integer in big endian format, i.e. '4660' is 0x1234.
Integer: Signed, 4 byte, Big-Endian
A signed four-byte integer in big endian format, i.e. '4660' is 0x00001234.
Integer: Signed, 8 bytes, Big-Endian
A signed eight-byte integer in big endian format, i.e. '4660' is 0x0000000000001234.
Integer: Unsigned, 2 byte, Big-Endian
An unsigned two-byte integer in big endian format, i.e. '65000' is 0xFDE8.
Integer: Unsigned, 4 byte, Big-Endian
An unsigned four-byte integer in big endian format, i.e. '65000' is 0x0000FDE8.
Table A-1 Supported MFL Data Types
Data Type Description
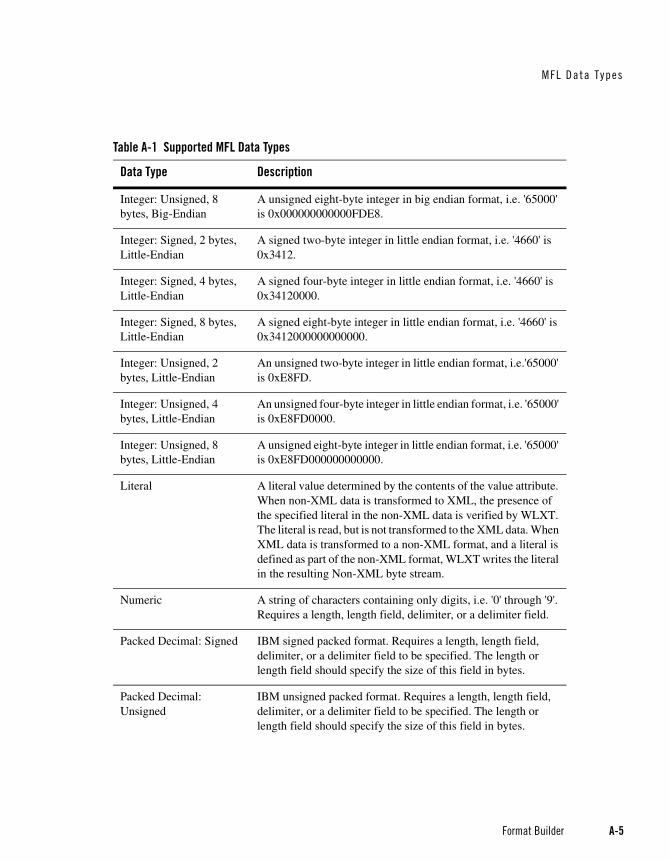
MFL Data Types
Format Builder A-5
Integer: Unsigned, 8 bytes, Big-Endian
A unsigned eight-byte integer in big endian format, i.e. '65000' is 0x000000000000FDE8.
Integer: Signed, 2 bytes, Little-Endian
A signed two-byte integer in little endian format, i.e. '4660' is 0x3412.
Integer: Signed, 4 bytes, Little-Endian
A signed four-byte integer in little endian format, i.e. '4660' is 0x34120000.
Integer: Signed, 8 bytes, Little-Endian
A signed eight-byte integer in little endian format, i.e. '4660' is 0x3412000000000000.
Integer: Unsigned, 2 bytes, Little-Endian
An unsigned two-byte integer in little endian format, i.e.'65000' is 0xE8FD.
Integer: Unsigned, 4 bytes, Little-Endian
An unsigned four-byte integer in little endian format, i.e. '65000' is 0xE8FD0000.
Integer: Unsigned, 8 bytes, Little-Endian
A unsigned eight-byte integer in little endian format, i.e. '65000' is 0xE8FD000000000000.
Literal A literal value determined by the contents of the value attribute. When non-XML data is transformed to XML, the presence of the specified literal in the non-XML data is verified by WLXT. The literal is read, but is not transformed to the XML data. When XML data is transformed to a non-XML format, and a literal is defined as part of the non-XML format, WLXT writes the literal in the resulting Non-XML byte stream.
Numeric A string of characters containing only digits, i.e. '0' through '9'. Requires a length, length field, delimiter, or a delimiter field.
Packed Decimal: Signed IBM signed packed format. Requires a length, length field, delimiter, or a delimiter field to be specified. The length or length field should specify the size of this field in bytes.
Packed Decimal: Unsigned
IBM unsigned packed format. Requires a length, length field, delimiter, or a delimiter field to be specified. The length or length field should specify the size of this field in bytes.
Table A-1 Supported MFL Data Types
Data Type Description
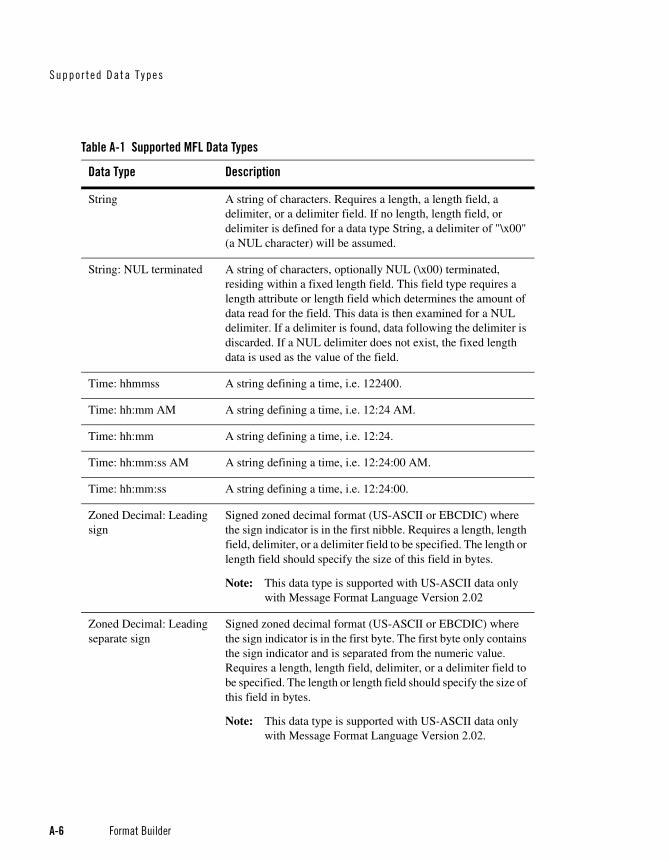
Suppor ted Data T ypes
A-6 Format Builder
String A string of characters. Requires a length, a length field, a delimiter, or a delimiter field. If no length, length field, or delimiter is defined for a data type String, a delimiter of "\x00" (a NUL character) will be assumed.
String: NUL terminated A string of characters, optionally NUL (\x00) terminated, residing within a fixed length field. This field type requires a length attribute or length field which determines the amount of data read for the field. This data is then examined for a NUL delimiter. If a delimiter is found, data following the delimiter is discarded. If a NUL delimiter does not exist, the fixed length data is used as the value of the field.
Time: hhmmss A string defining a time, i.e. 122400.
Time: hh:mm AM A string defining a time, i.e. 12:24 AM.
Time: hh:mm A string defining a time, i.e. 12:24.
Time: hh:mm:ss AM A string defining a time, i.e. 12:24:00 AM.
Time: hh:mm:ss A string defining a time, i.e. 12:24:00.
Zoned Decimal: Leading sign
Signed zoned decimal format (US-ASCII or EBCDIC) where the sign indicator is in the first nibble. Requires a length, length field, delimiter, or a delimiter field to be specified. The length or length field should specify the size of this field in bytes.
Note: This data type is supported with US-ASCII data only with Message Format Language Version 2.02
Zoned Decimal: Leading separate sign
Signed zoned decimal format (US-ASCII or EBCDIC) where the sign indicator is in the first byte. The first byte only contains the sign indicator and is separated from the numeric value. Requires a length, length field, delimiter, or a delimiter field to be specified. The length or length field should specify the size of this field in bytes.
Note: This data type is supported with US-ASCII data only with Message Format Language Version 2.02.
Table A-1 Supported MFL Data Types
Data Type Description
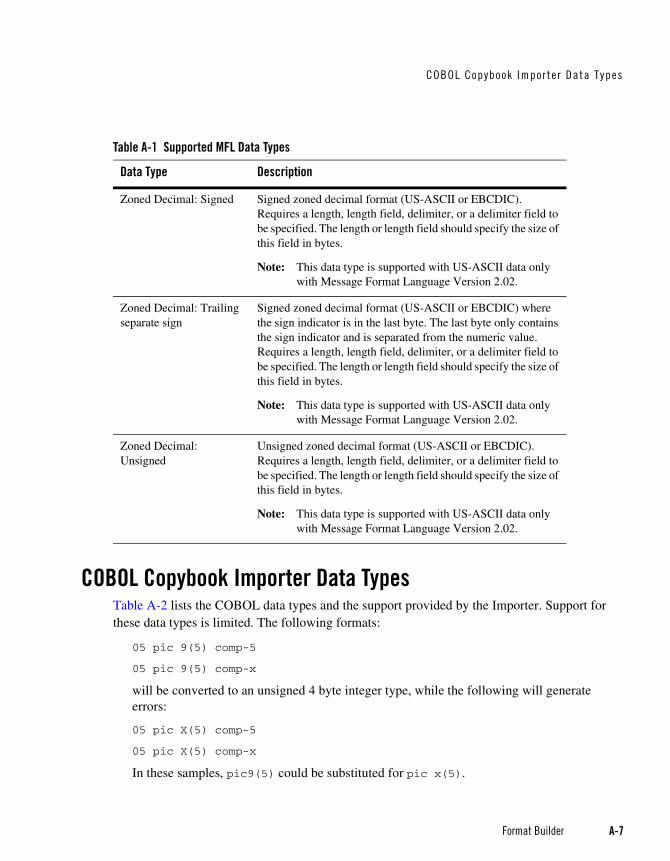
COBOL Copybook Impor t er Data Types
Format Builder A-7
COBOL Copybook Importer Data TypesTable A-2 lists the COBOL data types and the support provided by the Importer. Support for these data types is limited. The following formats:
05 pic 9(5) comp-5
05 pic 9(5) comp-x
will be converted to an unsigned 4 byte integer type, while the following will generate errors:
05 pic X(5) comp-5
05 pic X(5) comp-x
In these samples, pic9(5) could be substituted for pic x(5).
Zoned Decimal: Signed Signed zoned decimal format (US-ASCII or EBCDIC). Requires a length, length field, delimiter, or a delimiter field to be specified. The length or length field should specify the size of this field in bytes.
Note: This data type is supported with US-ASCII data only with Message Format Language Version 2.02.
Zoned Decimal: Trailing separate sign
Signed zoned decimal format (US-ASCII or EBCDIC) where the sign indicator is in the last byte. The last byte only contains the sign indicator and is separated from the numeric value. Requires a length, length field, delimiter, or a delimiter field to be specified. The length or length field should specify the size of this field in bytes.
Note: This data type is supported with US-ASCII data only with Message Format Language Version 2.02.
Zoned Decimal: Unsigned
Unsigned zoned decimal format (US-ASCII or EBCDIC). Requires a length, length field, delimiter, or a delimiter field to be specified. The length or length field should specify the size of this field in bytes.
Note: This data type is supported with US-ASCII data only with Message Format Language Version 2.02.
Table A-1 Supported MFL Data Types
Data Type Description
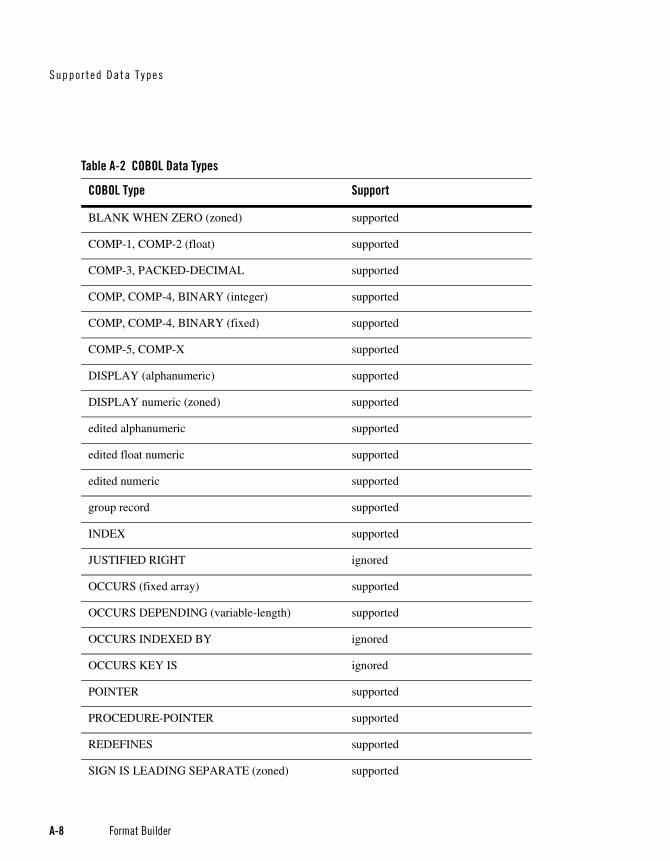
Suppor ted Data T ypes
A-8 Format Builder
Table A-2 COBOL Data Types
COBOL Type Support
BLANK WHEN ZERO (zoned) supported
COMP-1, COMP-2 (float) supported
COMP-3, PACKED-DECIMAL supported
COMP, COMP-4, BINARY (integer) supported
COMP, COMP-4, BINARY (fixed) supported
COMP-5, COMP-X supported
DISPLAY (alphanumeric) supported
DISPLAY numeric (zoned) supported
edited alphanumeric supported
edited float numeric supported
edited numeric supported
group record supported
INDEX supported
JUSTIFIED RIGHT ignored
OCCURS (fixed array) supported
OCCURS DEPENDING (variable-length) supported
OCCURS INDEXED BY ignored
OCCURS KEY IS ignored
POINTER supported
PROCEDURE-POINTER supported
REDEFINES supported
SIGN IS LEADING SEPARATE (zoned) supported
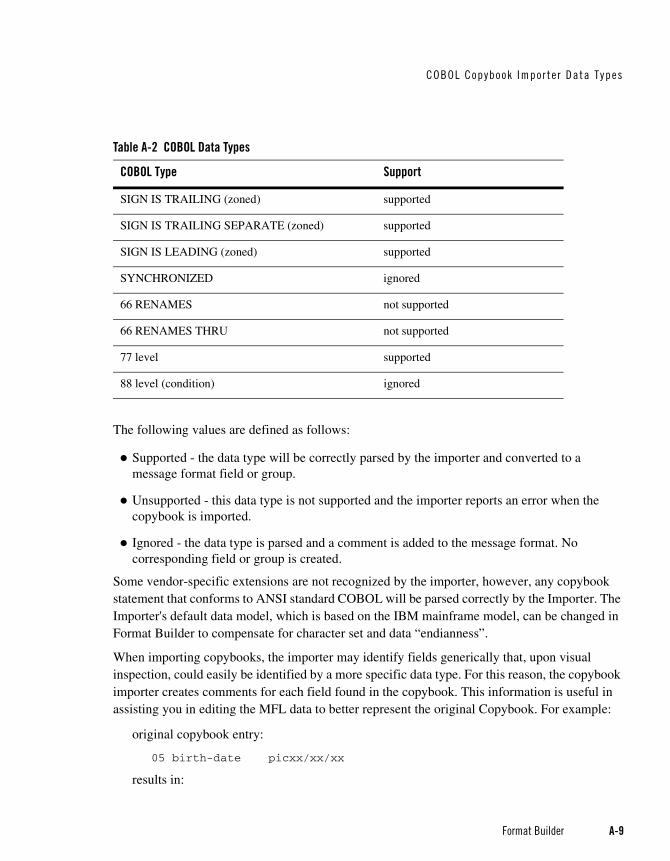
COBOL Copybook Impor t er Data Types
Format Builder A-9
The following values are defined as follows:
Supported - the data type will be correctly parsed by the importer and converted to a message format field or group.
Unsupported - this data type is not supported and the importer reports an error when the copybook is imported.
Ignored - the data type is parsed and a comment is added to the message format. No corresponding field or group is created.
Some vendor-specific extensions are not recognized by the importer, however, any copybook statement that conforms to ANSI standard COBOL will be parsed correctly by the Importer. The Importer's default data model, which is based on the IBM mainframe model, can be changed in Format Builder to compensate for character set and data “endianness”.
When importing copybooks, the importer may identify fields generically that, upon visual inspection, could easily be identified by a more specific data type. For this reason, the copybook importer creates comments for each field found in the copybook. This information is useful in assisting you in editing the MFL data to better represent the original Copybook. For example:
original copybook entry:
05 birth-date picxx/xx/xx
results in:
SIGN IS TRAILING (zoned) supported
SIGN IS TRAILING SEPARATE (zoned) supported
SIGN IS LEADING (zoned) supported
SYNCHRONIZED ignored
66 RENAMES not supported
66 RENAMES THRU not supported
77 level supported
88 level (condition) ignored
Table A-2 COBOL Data Types
COBOL Type Support
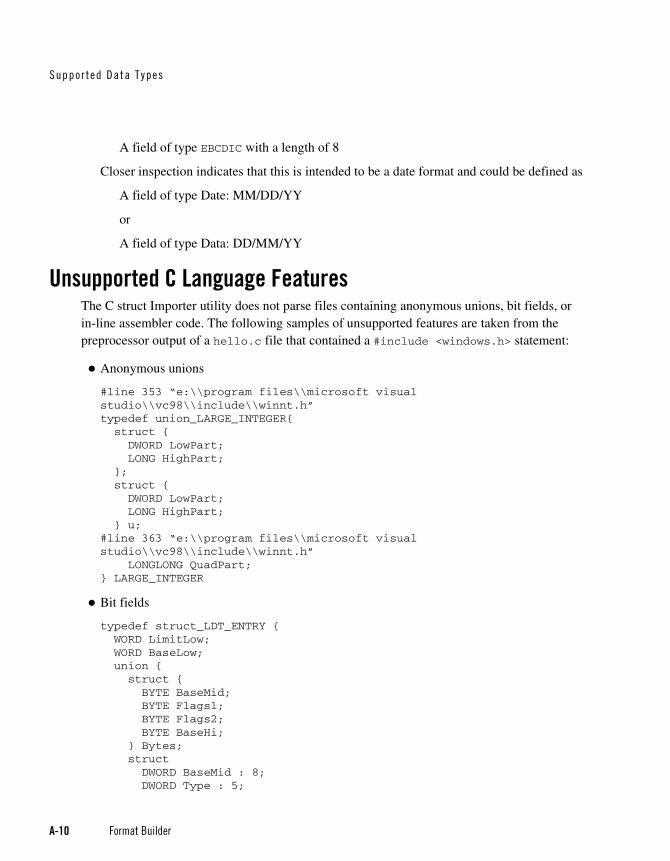
Suppor ted Data T ypes
A-10 Format Builder
A field of type EBCDIC with a length of 8
Closer inspection indicates that this is intended to be a date format and could be defined as
A field of type Date: MM/DD/YY
or
A field of type Data: DD/MM/YY
Unsupported C Language FeaturesThe C struct Importer utility does not parse files containing anonymous unions, bit fields, or in-line assembler code. The following samples of unsupported features are taken from the preprocessor output of a hello.c file that contained a #include <windows.h> statement:
Anonymous unions
#line 353 “e:\\program files\\microsoft visual studio\\vc98\\include\\winnt.h”typedef union_LARGE_INTEGER{ struct { DWORD LowPart; LONG HighPart; }; struct { DWORD LowPart; LONG HighPart; } u;#line 363 “e:\\program files\\microsoft visual studio\\vc98\\include\\winnt.h” LONGLONG QuadPart;} LARGE_INTEGER
Bit fields
typedef struct_LDT_ENTRY { WORD LimitLow; WORD BaseLow; union { struct { BYTE BaseMid; BYTE Flags1; BYTE Flags2; BYTE BaseHi; } Bytes; struct DWORD BaseMid : 8; DWORD Type : 5;
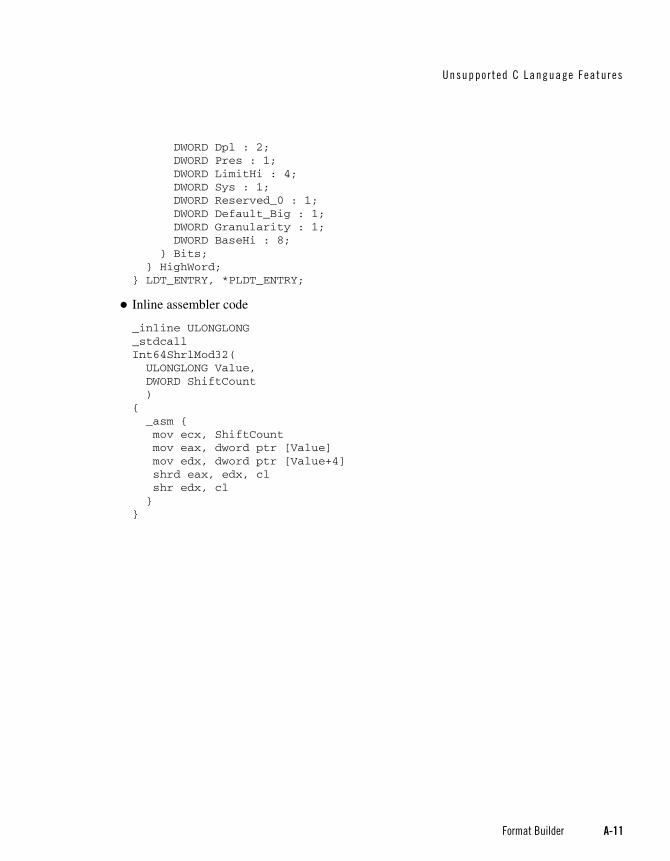
Unsuppor t ed C Language Features
Format Builder A-11
DWORD Dpl : 2; DWORD Pres : 1; DWORD LimitHi : 4; DWORD Sys : 1; DWORD Reserved_0 : 1; DWORD Default_Big : 1; DWORD Granularity : 1; DWORD BaseHi : 8; } Bits; } HighWord;} LDT_ENTRY, *PLDT_ENTRY;
Inline assembler code
_inline ULONGLONG_stdcallInt64ShrlMod32( ULONGLONG Value, DWORD ShiftCount ){ _asm { mov ecx, ShiftCount mov eax, dword ptr [Value] mov edx, dword ptr [Value+4] shrd eax, edx, cl shr edx, cl }}

Suppor ted Data T ypes
A-12 Format Builder
Format Builder B-1
C H A P T E R B
Glossary
Big EndianNon-XML, format where most significant byte has the lowest address. This format is used on IBM 370 and most RISC designs.
COBOL Copybook ImporterReads a COBOL Copybook and generates a message format reflecting the data structure of the COBOL Copybook.
Code PageIn the context of this documentation, the character encoding of the field data.
CopybookA common piece of source code designed to be copied into many source programs, used mainly in IBM DOS mainframe programming. In mainframe DOS (DOS/VS, DOS/VSE, etc.), the copybook was stored as a "book" in a source library. A library was comprised of "books", prefixed with a letter designating the language, (e.g., A.name for Assembler, C.name for Cobol, etc.), because DOS did not support multiple or private libraries. This term is commonly used by COBOL programmers, but is supported by most mainframe languages. The IBM OS series did not use the term "copybook"; instead it referred to such files as "libraries" implemented as "partitioned data sets" or PDS.
Copybooks are functionally equivalent to C and C++ include files.
Glossar y
B-2 Format Builder
Data TransformationIn the context of this documentation, data transformation is the term used to describe the mapping of data in one format to another format. An example would be mapping an instance of a RosettaNet document to an instance of a ebXML document.
DelimiterA sequence of bytes that denote the end of a field or group of data.
Document Type Definition (DTD)Defines what content can exist in an XML document. DTDs are part of the W3C XML Specification 1.0.
Field A sequence of bytes that are interpreted by an application as a unit of data.
GroupA set of fields and/or groups that are to be treated as having a unifying relationship.
Group ChoiceA group comprised of fields or other groups that are mutually exclusive in the actual non-XML data.
Little EndianNon-XML format in which bytes at lower address have lower significance. This format is used on Intel and VAX processors.
Message FormatThe description of a non-XML format produced by Format Builder.
Message Format Language (MFL)An XML language created by BEA that describes the native representation and hierarchy of non-XML data. MFL is an XML description of non-XML data.
Format Builder B-3
MetadataData that is used to describe other data. Message Formats created using Format Builder are the metadata used to parse non-XML data.
MFL Character EncodingSpecifying the character encoding of the non-XML data for each field and defining the format that your MFL document and XML output will take.
Non-XML DataAny structured data that does not use an XML syntax to represent its format. Format Builder allows you to specify a schema for non-XML documents, much like the XML schema standard allows you to specify a schema for XML documents.
ReferenceA group or field that relies on a prior definition to determine its name, type, and termination attributes.
XML - Extensible Markup LanguageData format that is easily read and manipulated by both humans and computers; data and metadata are both included in the data, to provide a standard self-describing syntax for representing information. XML is a World Wide Web Consortium (W3C) standard.
XML schemaAn XML document that defines what can be in an XML document. A XML schema definition is more specific than a DTD and provides much finer-grained control over the content that can exist in an XML document.

Glossar y
B-4 Format Builder
Format Builder Index-1
Index
CC struct importer
starting 10-4C structures
importing 10-4character encoding options 8-1choice of children 4-1COBOL copybook
importing 10-3COBOL copybook importer data types A-7COBOL data types A-7code page
field data option 5-2comment
creating 13-3
Ddata base type
field data options 5-2data types
COBOL A-7MFL A-1supported A-1
debugging formats 9-6, 13-1, 13-5default field code page 8-1default message format (MFL) encoding 8-1delimited
group delimiter 4-2delimiter
field 5-4group 4-2
delimiter field
field delimiter 5-4delimiter is shared
group delimiter 4-3
Eedit menu
copy 11-2cut 11-2delete 11-3demote 11-3duplicate 11-3move down 11-3move up 11-3paste 11-2promote 11-3redo 11-2undo 11-2
Ffield
creating 13-2data type 5-2delimiter 5-2, 5-3name 5-1occurrence 5-2optional 5-1
field data optionsdata base type 5-2value 5-2year cutoff 5-2
field data options, code page 5-2field delimiter 5-2, 5-3
Index-2 Format Builder
delimiter 5-4delimiter field 5-4length 5-3
field occurrenceonce 5-2repeat delimiter 5-2repeat field 5-2repeat number 5-2unlimited 5-2
file menuclose 11-1new 11-1open 11-1save 11-1save as 11-1
FML field table classimporting 10-7
format tester 9-1binary window 9-5data offset 9-5debug window 9-6debugging formats 9-6menus 9-1resize bars 9-6text 9-6window 9-1XML window 9-6
Ggroup
creating 13-2delimiter 4-2description 4-1occurrence 4-1
group delimiterdelimited 4-2delimiter is shared 4-3
group occurrenceonce 4-2repeat delimiter 4-2
repeat field 4-2repeat number 4-2unlimited 4-2
guideline XML (gXML) fileimporting 10-1
Hhelp menu
about 11-5help topics 11-5how do I 11-5
Iimporting
C structures 10-4COBOL copybook 10-3FML field table class 10-7guideline XML (gXML) file 10-1
insert menucomment 11-4field 11-3group 11-3
Llength
field delimiter 5-3
MMessage Format
creating 13-1default version 8-1saving 13-4
message node 2-4MFL data types A-1MFL Gen 10-5
Format Builder Index-3
Nname
field 5-1group 4-1
name/XML root 3-1
Ooccurrence
field 5-2group 4-2
oncefield occurrence 5-2group occurrence 4-2
optionalfield 5-1group 4-1
Ppallet
adding items 12-1adding items to message format 12-2displaying 12-1file menu 12-2shortcut menu 12-2using 12-1
properties 11-2
Rreference
creating 13-3repeat delimiter
field occurrence 5-2group occurrence 4-2
repeat fieldfield occurrence 5-2group occurrence 4-2
repeat numberfield occurrence 5-2
group occurrence 4-2root node 2-4
Sshortcut menu
delete 12-3demote 12-3insert 12-3move down 12-3move up 12-3promote 12-3rename 12-3
Ttester
using 13-4tools menu
import 11-4options 11-4test 11-4
Uunlimited
field occurrence 5-2group occurrence 4-2
Vvalid names 2-7value
field data option 5-2view menu
collapse all 11-4expand all 11-4show pallet 11-4
XXML content model options 8-2

Index-4 Format Builder
XML formatting options 8-1