operation manual - inter-m
TRANSCRIPT
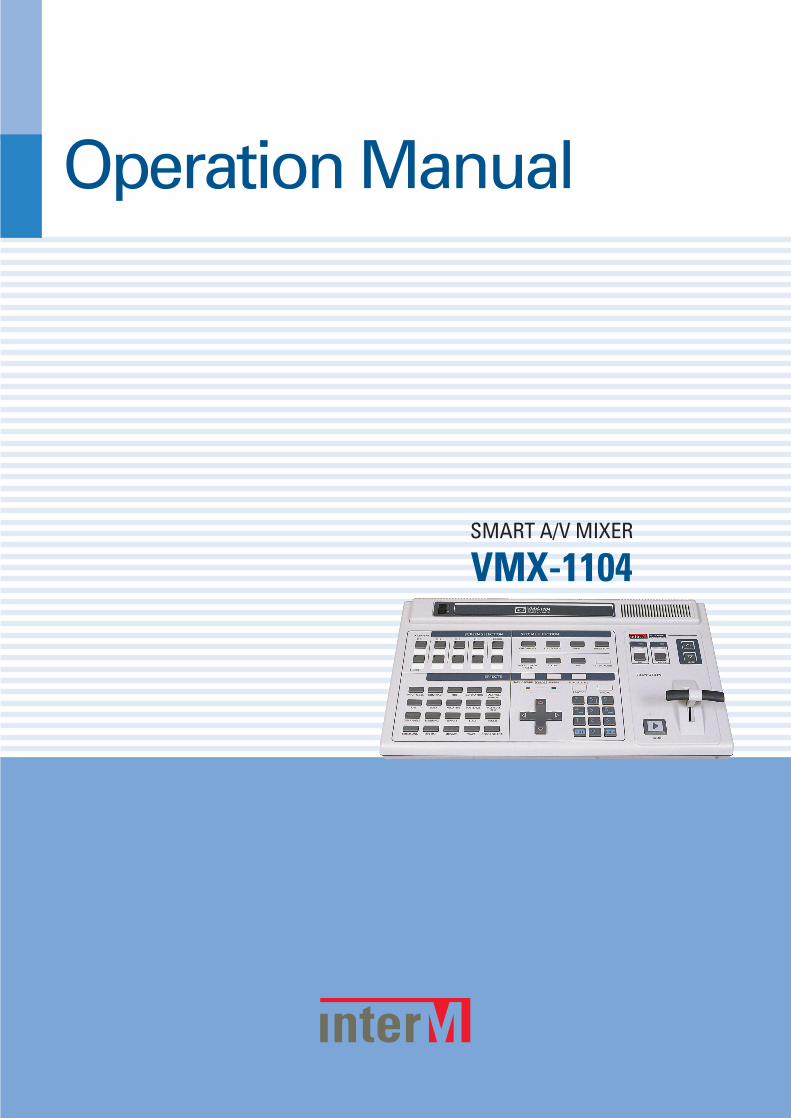
Operation Manual
SMART A/V MIXER
VMX-1104
SMART A/V MIXER
ContentsContentsWelcome
Warning...............................................................................................................................1
Overview ...............................................................................................................................3
System Components.............................................................................................................3
Features..................................................................................................................................4
Front panel ............................................................................................................................6
Rear panel ...........................................................................................................................11
Operator Screen .................................................................................................................141. Thumbnail provided on real-time to the 4 input channels ....................................................152. Color Channel.................................................................................................................153. Color palette ...................................................................................................................164. Border Style ....................................................................................................................165. Transition Effect Display and Setting Window ....................................................................166. Main menu area..............................................................................................................167. Sub-menu Area...............................................................................................................178. Broadcasting Mode .........................................................................................................179. Preview Screen................................................................................................................1810. Manual Transition Lever .................................................................................................1811. Automatic Transition Button ............................................................................................18
Operation Method..............................................................................................................191. PS/2 Mouse Connection ..................................................................................................192. Video Input Connection of Each Channel...........................................................................203. Connection of Video Output .............................................................................................234. Operator Screen Output Connection .................................................................................245. Audio Input Connection ...................................................................................................256. Audio Output Connection ................................................................................................267. GPI (general purpose interface) Connection .......................................................................268. Connection of Adaptor for Power .....................................................................................279. Power On .......................................................................................................................2710. Change of Video In Setting.............................................................................................3011. Optimization of Input Video ...........................................................................................3412. Provide Video Effect to Input Video .................................................................................3713. Prepare Transition Effect.................................................................................................4214. Performance of Transition Effect ......................................................................................4615. VMX-1104 Output Results Check ....................................................................................47
OFFICE :653-5 BANGHAK-DONG, DOBONG-KU, SEOUL, KOREA TEL : 82-2-2289-8140~8, FAX : 82-2-2289-8149
Home Page : http://www.inter-m.comE-mail : [email protected]
SMART A/V MIXER
Transition .............................................................................................................................481. Select of Current Channel and Next Channel .....................................................................482. Setting of Transition Direction ...........................................................................................503. Setting of Transition Speed ...............................................................................................514. Setting of Transition Object ..............................................................................................525. Selection of Transition Pattern ...........................................................................................546. Performance of Automatic Transition.................................................................................567. Performance of Manual Transition ....................................................................................578. Transition Effect Using Color Channel................................................................................589. Transition Effect Using Border Effect ..................................................................................60
Effects ...................................................................................................................................651. Brightness Effect ..............................................................................................................662. Contrast Effect .................................................................................................................673. HUE Effect.......................................................................................................................684. Saturation Effect ..............................................................................................................695. BLACK&WHITE Effect......................................................................................................706. SEPIA Effect ....................................................................................................................717. Negative Effect ................................................................................................................728. POSTERIZE Effect .............................................................................................................739. Mirror Effect....................................................................................................................7510. Half Mirror Effect...........................................................................................................7611. FLIP Effect......................................................................................................................7712. HALF FLIP Effect .............................................................................................................7813. Sharpness Effect ............................................................................................................7914. Blurring Effect................................................................................................................8015. Binary Effect..................................................................................................................8116. Edge Effect....................................................................................................................8317. Pencil Effect...................................................................................................................8418. Embossing Effect............................................................................................................8519. Diffuse Effect .................................................................................................................8620. Mosaic Effect.................................................................................................................8721. Color Selection Effect .....................................................................................................8922. Wave Effect ..................................................................................................................91
Special Effect .......................................................................................................................931. Freeze Effect ...................................................................................................................932. Strobe Special Effect ........................................................................................................993. Special Effect of CHROMA key, LUMINANCE key............................................................1004. Special Effect of Edit Screen ...........................................................................................1095. GHOST Effect................................................................................................................1146. TRAJECTORY Effect........................................................................................................1167. SINGLE PIP Effect...........................................................................................................1188. MULTI PIP Effect .............................................................................................................123
SMART A/V MIXER
Other functions .................................................................................................................1281. AUDIO Function ............................................................................................................1282. MACRO Function ..........................................................................................................1313. Setup Function...............................................................................................................1344. Practice Function ...........................................................................................................1445. DEMO Function.............................................................................................................1456. Color Bar Output Function..............................................................................................1457. Automatic Saving Function .............................................................................................145
System Diagram ...............................................................................................................146
Block Diagram ..................................................................................................................147
Specification ......................................................................................................................148
Before calling for service ................................................................................................149
Appendix I – Summary of the method to operate......................................................151
Appendix II - List of the transition patterns..................................................................162
SMART A/V MIXER
1VMX-1104
WelcomeWelcomeA personal welcome to you from the management and employees of Inter-M
All of the co-workers here at Inter-M are dedicated to providing excellent products with inherently good val-ue, and we are delighted you have purchased one of our products.
We sincerely trust this product will provide years of satisfactory service, but if anything is not to your com-plete satisfaction, we will endeavor to make things right.
Welcome to Inter-M, and thank you for becoming part of our worldwide extended family!
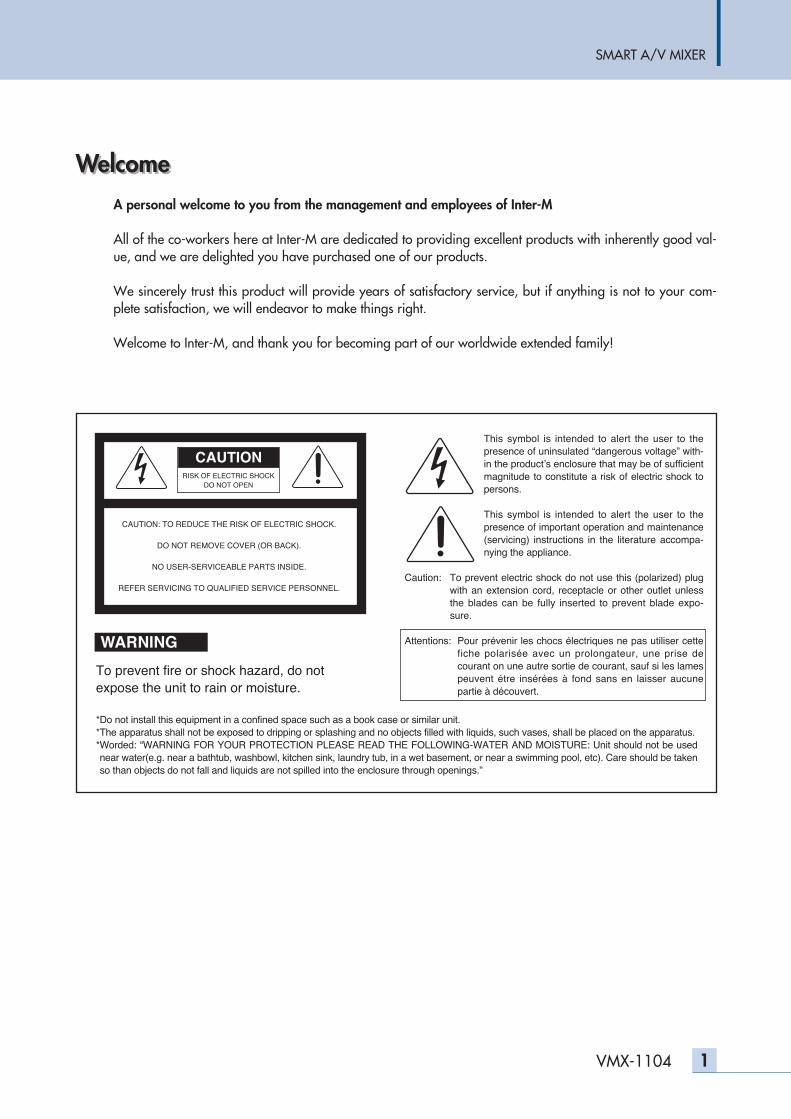
RISK OF ELECTRIC SHOCKDO NOT OPEN
CAUTION
CAUTION: TO REDUCE THE RISK OF ELECTRIC SHOCK.
DO NOT REMOVE COVER (OR BACK).
NO USER-SERVICEABLE PARTS INSIDE.
REFER SERVICING TO QUALIFIED SERVICE PERSONNEL.
WARNING
To prevent fire or shock hazard, do notexpose the unit to rain or moisture.
*Do not install this equipment in a confined space such as a book case or similar unit.*The apparatus shall not be exposed to dripping or splashing and no objects filled with liquids, such vases, shall be placed on the apparatus.*Worded: “WARNING FOR YOUR PROTECTION PLEASE READ THE FOLLOWING-WATER AND MOISTURE: Unit should not be usednear water(e.g. near a bathtub, washbowl, kitchen sink, laundry tub, in a wet basement, or near a swimming pool, etc). Care should be takenso than objects do not fall and liquids are not spilled into the enclosure through openings.”
This symbol is intended to alert the user to thepresence of uninsulated “dangerous voltage” with-in the product’s enclosure that may be of sufficientmagnitude to constitute a risk of electric shock topersons.
This symbol is intended to alert the user to thepresence of important operation and maintenance(servicing) instructions in the literature accompa-nying the appliance.
Caution: To prevent electric shock do not use this (polarized) plugwith an extension cord, receptacle or other outlet unlessthe blades can be fully inserted to prevent blade expo-sure.
Attentions: Pour prévenir les chocs électriques ne pas utiliser cettefiche polarisée avec un prolongateur, une prise decourant on une autre sortie de courant, sauf si les lamespeuvent étre insérées à fond sans en laisser aucunepartie à découvert.
SMART A/V MIXER
2 VMX-1104
OverviewOur Smart A/V Mixer VMX-1104 is product that research and develop strategically to offer high picturequality and effective functions to consumers in satisfied price as A/V Mixer that use mainly in small scalebroadcasting system such as church or school studio.We could offer high picture quality and various image effects and transition to consumer using A/V MixerDSP that develop directly in our company. And, could offer high sound quality using our technology that wasthe company which represent the South Korea in industry sound appliances market during last 20 years.- Offer 4 channels video input of various video format such as Composite video, S-Video, Component
video. And, offer unbalanced audio input of each channel.- Offer output maximum 6 channels same time by video output, and support various video format such as
Composite video, S-Video, Component video, RGB. And, support unbalanced audio and headphone out-put by audio output.
- Offer GUI environment that can work more conveniently in High Resolution monitor of SXGA(1280x1024).
- Offering 22 various effects, effects such as Diffuse, Wave, Color Selection are unique and practical func-tion that only our product offers.
- Offering 11 various special effects, special effects such as Ghost, Trajectory are unique and practicalfunction that only our product offers.
- Offer useful and effective 256 transition patterns.- Offer Practice Mode that can practice effects or transition etc. on the OnAir. And, offer Macro function
that can execute several functions at once using single shortcut key.- Offer stabilize and convenient system with high video quality.
System Components
OverviewOur Smart A/V Mixer VMX-1104 is product that research and develop strategically to offer high picturequality and effective functions to consumers in satisfied price as A/V Mixer that use mainly in small scalebroadcasting system such as church or school studio.We could offer high picture quality and various image effects and transition to consumer using A/V MixerDSP that develop directly in our company. And, could offer high sound quality using our technology that wasthe company which represent the South Korea in industry sound appliances market during last 20 years.- Offer 4 channels video input of various video format such as Composite video, S-Video, Component
video. And, offer unbalanced audio input of each channel.- Offer output maximum 6 channels same time by video output, and support various video format such as
Composite video, S-Video, Component video, RGB. And, support unbalanced audio and headphone out-put by audio output.
- Offer GUI environment that can work more conveniently in High Resolution monitor of SXGA(1280x1024).
- Offering 22 various effects, effects such as Diffuse, Wave, Color Selection are unique and practical func-tion that only our product offers.
- Offering 11 various special effects, special effects such as Ghost, Trajectory are unique and practical func-tion that only our product offers.
- Offer useful and effective 256 transition patterns.- Offer Practice Mode that can practice effects or transition etc. on the OnAir. And, offer Macro function
that can execute several functions at once using single shortcut key.- Offer stabilize and convenient system with high video quality.
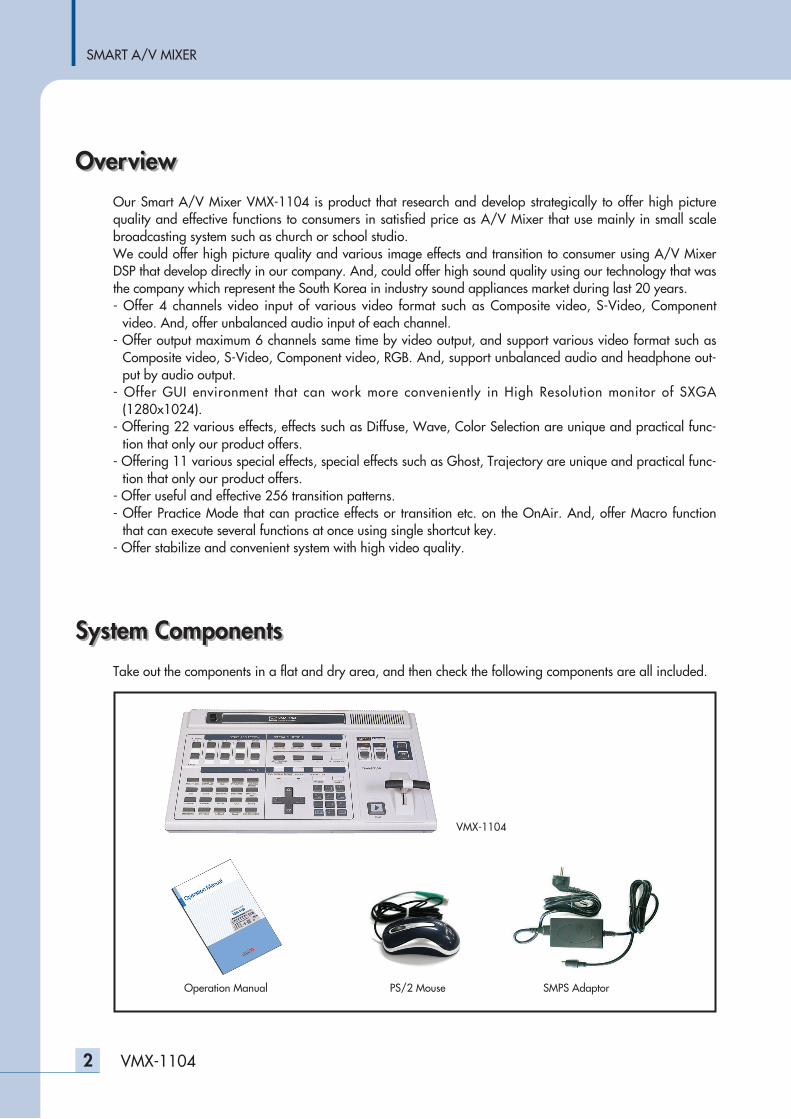
System ComponentsTake out the components in a flat and dry area, and then check the following components are all included.
VMX-1104
Operation Manual PS/2 Mouse SMPS Adaptor
SMART A/V MIXER
3VMX-1104
FeaturesFeatures - Various 4 channels video inputOffer 4 channels video input of various video format such as Composite video, S-Video, Component video.
- Support various video format and output maximum 6 channel same timeOffer output maximum 6 channels same time by video output, and support various video format such asComposite video, S-Video, Component video, RGB.• Output S-Video maximum 2 channels same time• Output Composite Video maximum 4 channel same time• Output RGB maximum 2 channel same time• Output Component Video maximum 2 channel same time• 6 various output form is possible
- NTSC / PAL Switchable (VER.2.0)
- 4 channel unbalanced audio input and unbalanced audio, headphone outputOffer unbalanced audio input of each channel and support unbalanced audio and headphone output.And, offer high sound quality using our technology that was the company which represent the SouthKorea in industry sound appliances market during last 20 years.
- Convenient user environment of high resolutionSmart A/V Mixer VMX-1104 is Stand Alone type of A/V Mixer that PC does not need. But, as offerOperator Screen that use PC monitor of high resolution, and GUI that use PS/2 mouse, user can use con-veniently and familiarly as handle PC.• SXGA(1280x1024) high resolution, support 256 colors• Support PS/2 Mouse• Offer high picture quality and real time thumbnail for input 4 channels• Offer Preview Screen that can confirm effects and transition effects etc. by real time• Offer convenient and intuitional GUI (graphic user interface)
- 22 EffectsOffer various effects to user adding peculiar effects of only our product as well as basic effects.• Brightness : Regulate brightness value of each channel by 256 steps• Contrast : Regulate contrast value of each channel by 256 steps• Hue : Regulate hue value of each channel by 256 steps• Saturation : Regulate saturation value of each channel by 256 steps• Black&White : Black and white effect• Sepia : Effect of brown ton• Binary : Binary picture effect that divided laying stress on brightness value that user specifies• Negative : Reverse effect such as film• Posterize : Poster effect of 8 steps• Mirror : Right and left changes like mirror• Half Mirror : Right and left changes half of screen like mirror• Flip : Top and down changes• Half Flip : Top and down changes half of screen• Sharpness : Emphasize and make clearly border of screen• Blurring : This is effect to blur of the border parts of video and make the whole video not clear• Edge : This is effect to represent the border part of video with white color

SMART A/V MIXER
4 VMX-1104
• Embossing : This is effect to give 3-D effect to the input video• Mosaic : This is function to give mosaic to the input video• Diffuse : This is same effect as when looking the video with a constant pattern in the semi-transparent glass• Pencil : This is effect to give same effect as when sketching the input video with a pencil• Color Selection : This is effect to represent only color(R, G, B, Y) that the user wants in the input video• Wave : This is effect to have same function as when video is cast on water
- Useful and effective 256 transition patternsTransition Direction Select, Transition Object Select, Transition Speed Control• 256 conversion effect offer including all patterns that is used mainly in conversion effect such as Cut,
Fade, Wipe, Edge, various Trajectories• Transition Direction Select function ( Forward, Reverse)• Selection of Transition speed of 9 steps• Video and audio individually selection possibility• Color virtual channel(16 color)• 120 border shape appointment possibility of pattern• Automatic and manual transition function
- 11 Various Special EffectThe VMX-1104 provides special effect that the company has such as single PIP, Trajectory as well asFreeze, Strobe, CHROMA key, Single PIP, Multi PIP, Edit Screen to ensure that the user can perform differ-ential broadcasting in various environment.• Single PIP : Single PIP special effect is effect to represent after-video of movement where movement of a
person or object is found in the video being output, and is special effect of the VMX-1104to give effect as if ghost moves. If using this effect can create differential broadcasting effect.
• Multi PIP : The VMX-1104 provides Multi PIP with 15 various arrays• Current Freeze : This is effect to temporarily stop video being broadcasted to the main output• Next Freeze : This is effect temporarily stop video of the next channel that appears during performance
of transition effect• Transition Freeze : This is effect to temporarily stop the screen that transition is performed• Strobe : Strobe means effect to represent movement of object uninterruptedly as moving object appears
and disappears due to glint of right at a dark place• Chroma Key : CHROMA KEY is special effect mainly used in broadcasting such as virtual (Luminance
Key) studio or weather forecast• Edit Screen : Edit screen is a special effect that the user can optionally compose the screen, and is main-
ly used for manufacturing of title screen• Ghost : GHOST special effect is effect to represent after-video of movement where movement of a person
or object is found in the video being output• Trajectory : TRAJECTORY effect means effect to all trajectories of movement of a person or object in
video
- Practice FunctionPractice function is function checked at only the Preview Window of the operator screen, while results suchas video effect or transition effect is not output to the main output. This is unique function of only VMX-1104 considering the user to ensure that any user who is not familiar with the product can convenientlyuse and previously exercise various effects even in active broadcast or recording.
SMART A/V MIXER
5VMX-1104
- DEMO FunctionDEMO function is function to automatically show main function in constant interval that the VMX-1104has, and is convenient if using in the exhibition show or demonstration of product.
- MACRO FunctionThe VMX-1104 provides MACRO function capable of up to 10 commands for users to carry out a transi-tion effect and performing them with a short cut, allowing users to broadcast more conveniently by usingthe VMX-1104 and menu equivalent.
- GPI (general purpose interface) FunctionGPI is an abbreviated character of General Purpose Interface, and is function used when controlling tran-sition effect of the VMX-1104 or when using an outside caption project, etc in link with the VMX-1104.
- High video qualityOffer stabilize and convenient system with high video quality.
- Practical designSo that is suitable in small scale broadcasting system environment such as church and school studio thatSmart A/V Mixer VMX-1104 is used mainly, selecting practical design, considered to harmonize with oth-er broadcasting equipments.
SMART A/V MIXER
7VMX-1104
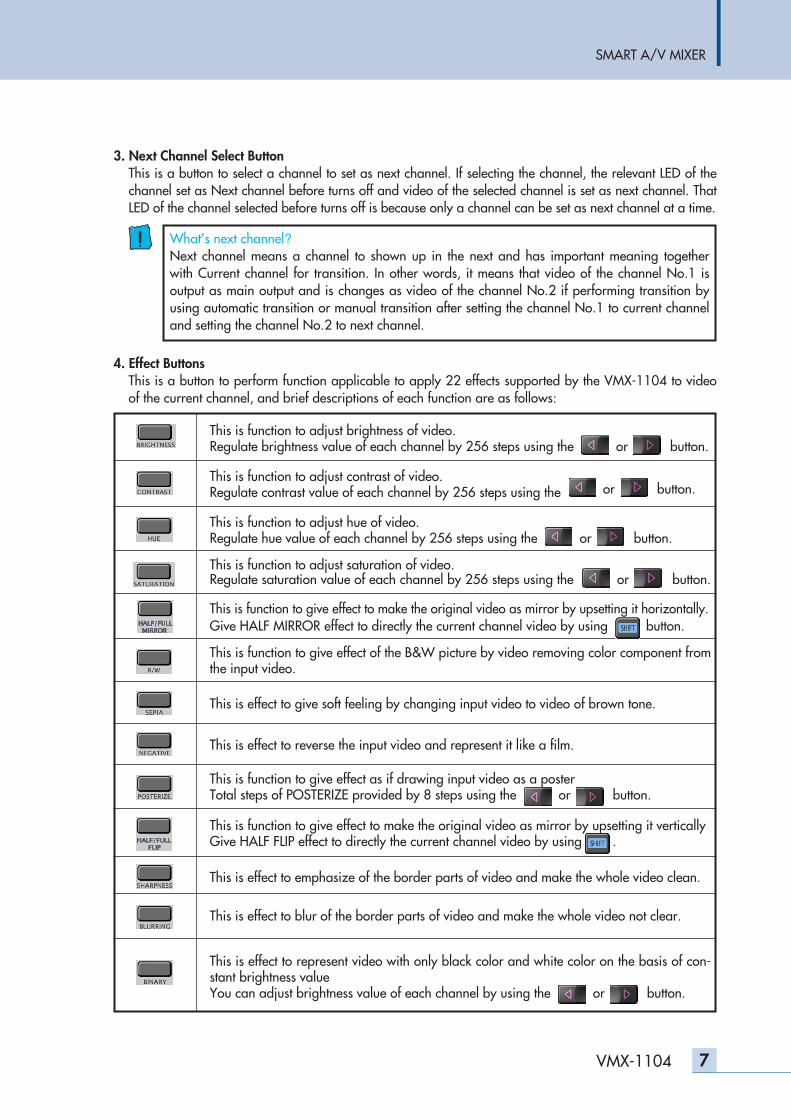
3. Next Channel Select ButtonThis is a button to select a channel to set as next channel. If selecting the channel, the relevant LED of thechannel set as Next channel before turns off and video of the selected channel is set as next channel. ThatLED of the channel selected before turns off is because only a channel can be set as next channel at a time.
4. Effect ButtonsThis is a button to perform function applicable to apply 22 effects supported by the VMX-1104 to videoof the current channel, and brief descriptions of each function are as follows:
What’s next channel?Next channel means a channel to shown up in the next and has important meaning togetherwith Current channel for transition. In other words, it means that video of the channel No.1 isoutput as main output and is changes as video of the channel No.2 if performing transition byusing automatic transition or manual transition after setting the channel No.1 to current channeland setting the channel No.2 to next channel.
This is function to adjust brightness of video.Regulate brightness value of each channel by 256 steps using the or button.
This is function to adjust contrast of video.Regulate contrast value of each channel by 256 steps using the or button.
This is function to adjust hue of video.Regulate hue value of each channel by 256 steps using the or button.
This is function to adjust saturation of video.Regulate saturation value of each channel by 256 steps using the or button.
This is function to give effect to make the original video as mirror by upsetting it horizontally.Give HALF MIRROR effect to directly the current channel video by using button.
This is function to give effect of the B&W picture by video removing color component fromthe input video.
This is effect to give soft feeling by changing input video to video of brown tone.
This is effect to reverse the input video and represent it like a film.
This is function to give effect as if drawing input video as a posterTotal steps of POSTERIZE provided by 8 steps using the or button.
This is function to give effect to make the original video as mirror by upsetting it verticallyGive HALF FLIP effect to directly the current channel video by using .
This is effect to emphasize of the border parts of video and make the whole video clean.
This is effect to blur of the border parts of video and make the whole video not clear.
This is effect to represent video with only black color and white color on the basis of con-stant brightness valueYou can adjust brightness value of each channel by using the or button.
SMART A/V MIXER
8 VMX-1104
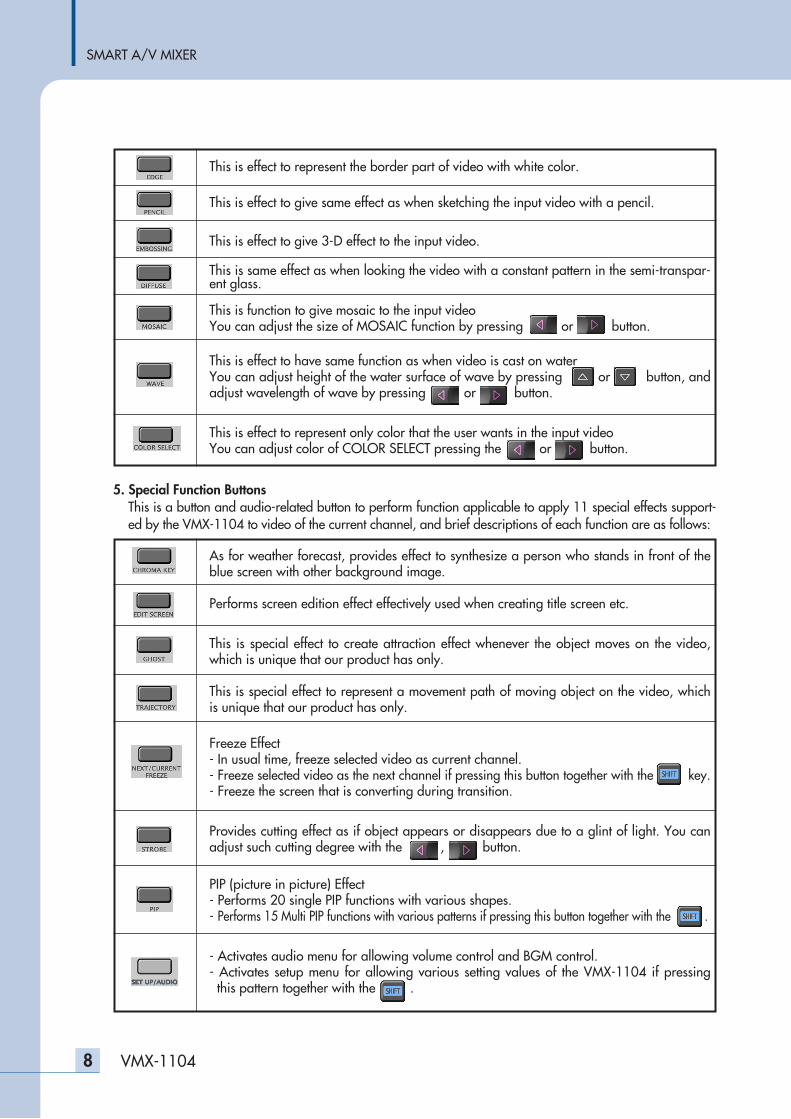
5. Special Function ButtonsThis is a button and audio-related button to perform function applicable to apply 11 special effects support-ed by the VMX-1104 to video of the current channel, and brief descriptions of each function are as follows:
This is effect to represent the border part of video with white color.
This is effect to give same effect as when sketching the input video with a pencil.
This is effect to give 3-D effect to the input video.
This is same effect as when looking the video with a constant pattern in the semi-transpar-ent glass.
This is function to give mosaic to the input videoYou can adjust the size of MOSAIC function by pressing or button.
This is effect to have same function as when video is cast on waterYou can adjust height of the water surface of wave by pressing or button, andadjust wavelength of wave by pressing or button.
This is effect to represent only color that the user wants in the input videoYou can adjust color of COLOR SELECT pressing the or button.
As for weather forecast, provides effect to synthesize a person who stands in front of theblue screen with other background image.
Performs screen edition effect effectively used when creating title screen etc.
This is special effect to create attraction effect whenever the object moves on the video,which is unique that our product has only.
This is special effect to represent a movement path of moving object on the video, whichis unique that our product has only.
Freeze Effect- In usual time, freeze selected video as current channel.- Freeze selected video as the next channel if pressing this button together with the key.- Freeze the screen that is converting during transition.
Provides cutting effect as if object appears or disappears due to a glint of light. You canadjust such cutting degree with the , button.
PIP (picture in picture) Effect- Performs 20 single PIP functions with various shapes.- Performs 15 Multi PIP functions with various patterns if pressing this button together with the .
- Activates audio menu for allowing volume control and BGM control.- Activates setup menu for allowing various setting values of the VMX-1104 if pressingthis pattern together with the .
SMART A/V MIXER
9VMX-1104
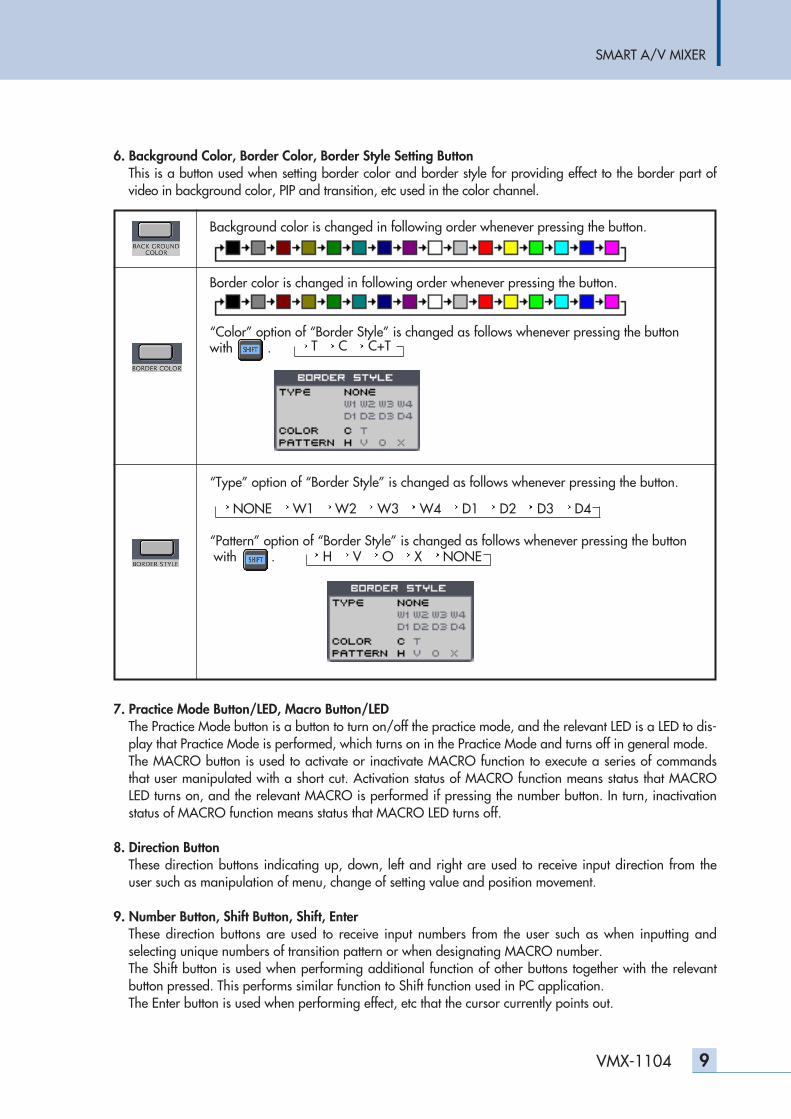
6. Background Color, Border Color, Border Style Setting ButtonThis is a button used when setting border color and border style for providing effect to the border part ofvideo in background color, PIP and transition, etc used in the color channel.
7. Practice Mode Button/LED, Macro Button/LEDThe Practice Mode button is a button to turn on/off the practice mode, and the relevant LED is a LED to dis-play that Practice Mode is performed, which turns on in the Practice Mode and turns off in general mode. The MACRO button is used to activate or inactivate MACRO function to execute a series of commandsthat user manipulated with a short cut. Activation status of MACRO function means status that MACROLED turns on, and the relevant MACRO is performed if pressing the number button. In turn, inactivationstatus of MACRO function means status that MACRO LED turns off.
8. Direction ButtonThese direction buttons indicating up, down, left and right are used to receive input direction from theuser such as manipulation of menu, change of setting value and position movement.
9. Number Button, Shift Button, Shift, EnterThese direction buttons are used to receive input numbers from the user such as when inputting andselecting unique numbers of transition pattern or when designating MACRO number. The Shift button is used when performing additional function of other buttons together with the relevantbutton pressed. This performs similar function to Shift function used in PC application. The Enter button is used when performing effect, etc that the cursor currently points out.
Background color is changed in following order whenever pressing the button.
Border color is changed in following order whenever pressing the button.
“Color” option of “Border Style” is changed as follows whenever pressing the buttonwith . T C C+T
“Type” option of “Border Style” is changed as follows whenever pressing the button.
NONE W1 W2 W3 W4 D1 D2 D3 D4
“Pattern” option of “Border Style” is changed as follows whenever pressing the buttonwith . H V O X NONE
SMART A/V MIXER
10 VMX-1104
10. Transition Direction Select ButtonSets up movement direction of the transition pattern when performing transition function. In other words,if transition is done from the left to the right and transition direction is set to the REV using this button, therelevant transition is performed from the right to the left from that time. Whenever pressing the transitiondirection button, transition direction is changed from REV to FORW, from FORW to REV, and currentlyset direction is displayed on LED.
11. Transition Object Select ButtonIn the VMX-1104, transition is basically to convert both Audio and Video at the same time. However, it ispossible to convert only Video without changing Audio, or to the contrary to convert only audio withoutVideo according to user’s intent. This button is used for such setting. Whenever pressing the button,simultaneous transition of video/audio, transition of only video, transition of only audio and no transitionof all of them are repeatedly selected.
12. Transition Speed Control ButtonThe VMX-1104 supports total speed of 9 steps from 1 through 9. Default is 5 and about 1 second isrequired from start of transition to end of transition. This is a button to increase or decrease this speed.Pressing the button enables to make speed rapid and pressing the button enables to make sp-eed slow.
13. Automatic Transition (Play) ButtonThis is a button to automatically perform transition function. Pressing this button whenever you want toconvert at any time, transition is automatically performed according to the transition pattern, direction,object and speed currently set. This button is also used as a button to perform or release DEMO functionalong with the .
14. Manual Transition LeverThis is a lever to manually perform transition function. Manipulating this lever when you want manualtransition, not automatic transition, manual transition is done according to the transition pattern, direc-tion, object and speed currently set. Transition is completed when moving the lever from either end to theother end. Transition remains as stop status if placing the lever at the other position.
Position of Manual Transition LeverIf placing the manual transition lever between both ends without placing it at either end, theVMX-1104 determine that the user is performing manual transition and thus remains at the tran-sition to equivalent to position of the lever. Therefore please place the manual transition lever ateither end when you do not want manual transition.
SMART A/V MIXER
11VMX-1104
Cautions in Use of PS/2 Mouse1. The VMX-1104 does not control a mouse using the driver provided by each mouse manufac-
turer but directly controls a mouse. Thus normal operation is done only when turns off powerand then turns on power again if you have connected the mouse after removing connection ofthe mouse with power on.
2. The VMX-1104 is developed to enable to use all functions by using a set of buttons even if notusing the mouse. However, it is strongly recommended to use a mouse in order to convenient-ly use all functions provided or to utilize merits of the only VMX-1104.
3. All types of mouse provided as accessory of VMX-1104 is expendable items and thus it is notpossible to replace them or provide after service for them if failure occurs.
Rear PanelRear Panel
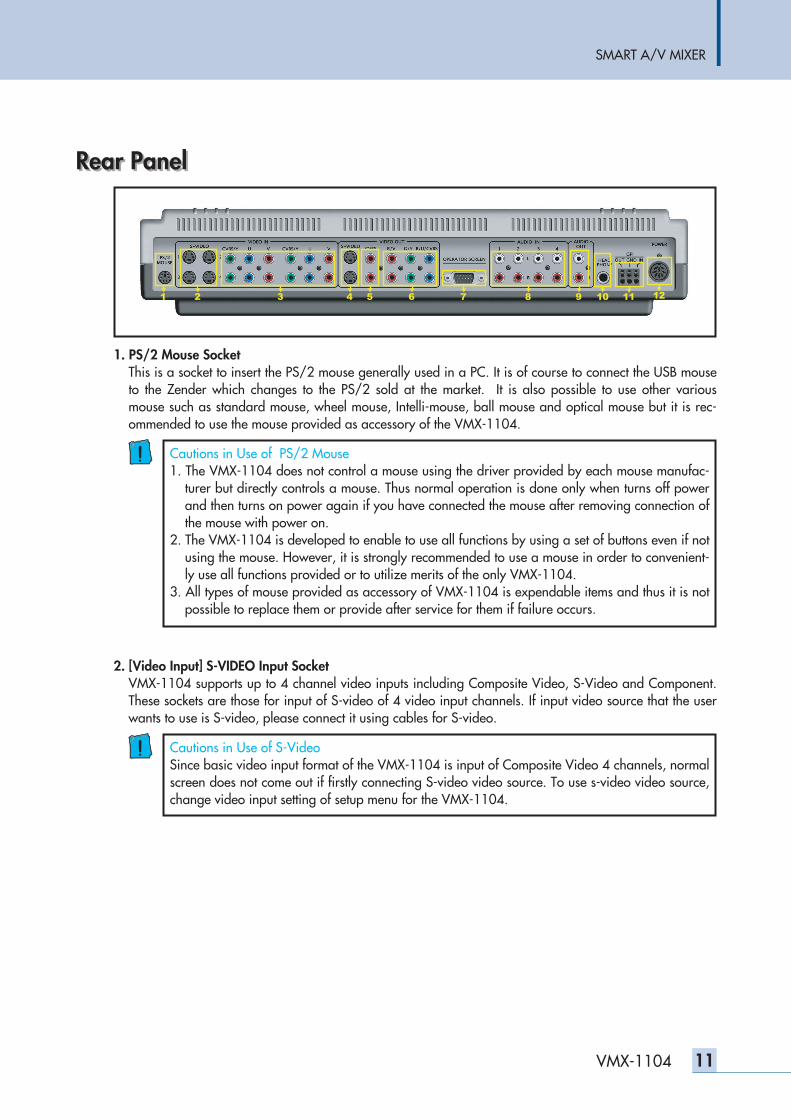
1. PS/2 Mouse SocketThis is a socket to insert the PS/2 mouse generally used in a PC. It is of course to connect the USB mouseto the Zender which changes to the PS/2 sold at the market. It is also possible to use other variousmouse such as standard mouse, wheel mouse, Intelli-mouse, ball mouse and optical mouse but it is rec-ommended to use the mouse provided as accessory of the VMX-1104.
2. [Video Input] S-VIDEO Input SocketVMX-1104 supports up to 4 channel video inputs including Composite Video, S-Video and Component.These sockets are those for input of S-video of 4 video input channels. If input video source that the userwants to use is S-video, please connect it using cables for S-video.
1 2 3 4 5 6 7 8 9 10 11 12
Cautions in Use of S-VideoSince basic video input format of the VMX-1104 is input of Composite Video 4 channels, normalscreen does not come out if firstly connecting S-video video source. To use s-video video source,change video input setting of setup menu for the VMX-1104.
SMART A/V MIXER
6 VMX-1104
Front PanelFront Panel
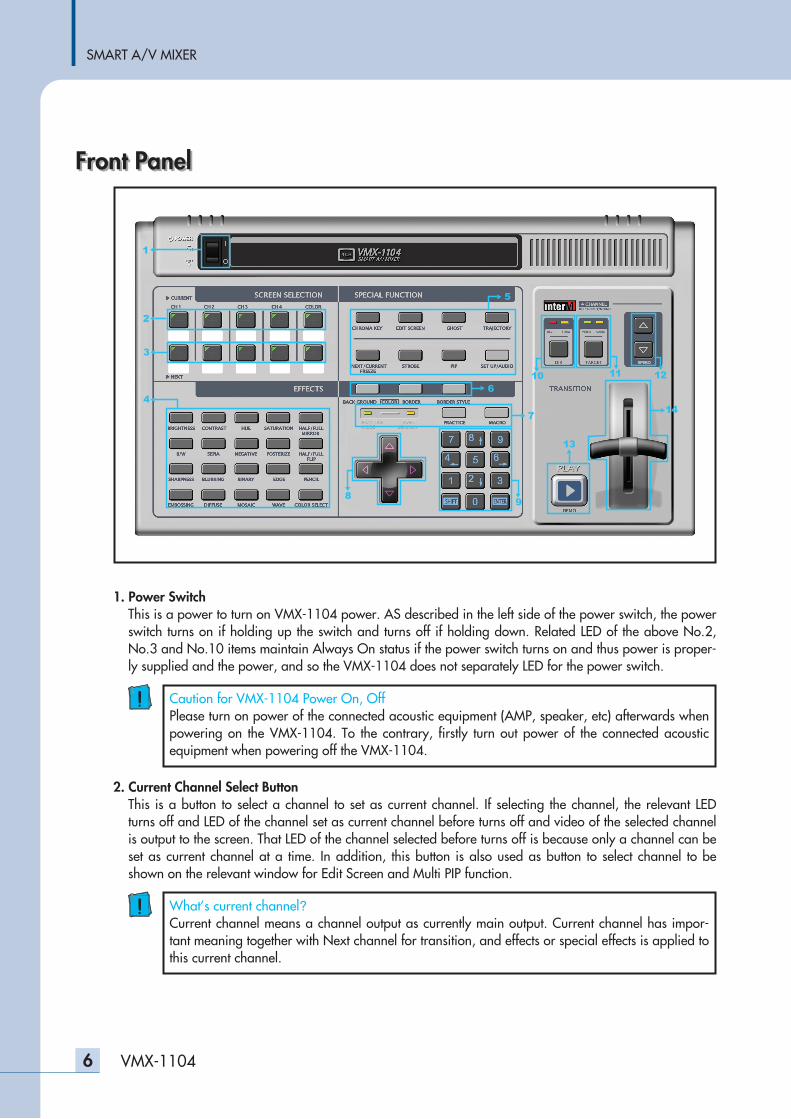
1. Power SwitchThis is a power to turn on VMX-1104 power. AS described in the left side of the power switch, the powerswitch turns on if holding up the switch and turns off if holding down. Related LED of the above No.2,No.3 and No.10 items maintain Always On status if the power switch turns on and thus power is proper-ly supplied and the power, and so the VMX-1104 does not separately LED for the power switch.
2. Current Channel Select ButtonThis is a button to select a channel to set as current channel. If selecting the channel, the relevant LEDturns off and LED of the channel set as current channel before turns off and video of the selected channelis output to the screen. That LED of the channel selected before turns off is because only a channel can beset as current channel at a time. In addition, this button is also used as button to select channel to beshown on the relevant window for Edit Screen and Multi PIP function.
Caution for VMX-1104 Power On, OffPlease turn on power of the connected acoustic equipment (AMP, speaker, etc) afterwards whenpowering on the VMX-1104. To the contrary, firstly turn out power of the connected acousticequipment when powering off the VMX-1104.
What’s current channel?Current channel means a channel output as currently main output. Current channel has impor-tant meaning together with Next channel for transition, and effects or special effects is applied tothis current channel.
SMART A/V MIXER
12 VMX-1104
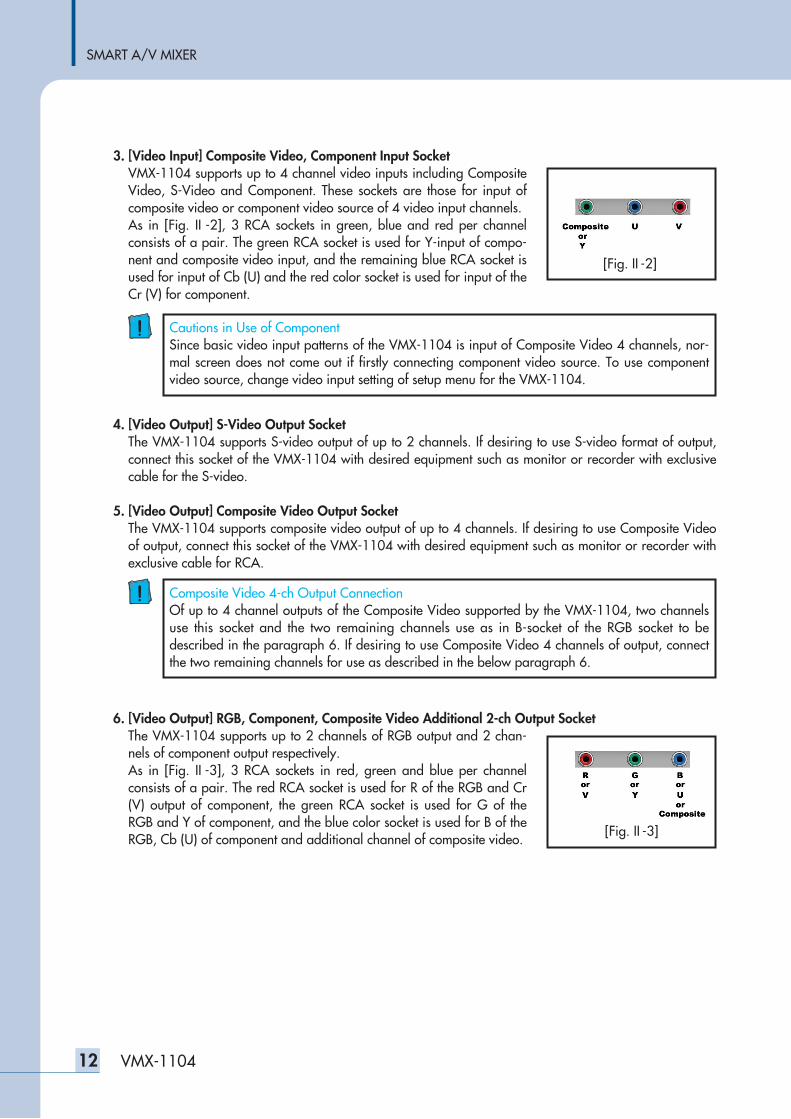
3. [Video Input] Composite Video, Component Input SocketVMX-1104 supports up to 4 channel video inputs including CompositeVideo, S-Video and Component. These sockets are those for input ofcomposite video or component video source of 4 video input channels.As in [Fig. II -2], 3 RCA sockets in green, blue and red per channelconsists of a pair. The green RCA socket is used for Y-input of compo-nent and composite video input, and the remaining blue RCA socket isused for input of Cb (U) and the red color socket is used for input of theCr (V) for component.
4. [Video Output] S-Video Output SocketThe VMX-1104 supports S-video output of up to 2 channels. If desiring to use S-video format of output,connect this socket of the VMX-1104 with desired equipment such as monitor or recorder with exclusivecable for the S-video.
5. [Video Output] Composite Video Output SocketThe VMX-1104 supports composite video output of up to 4 channels. If desiring to use Composite Videoof output, connect this socket of the VMX-1104 with desired equipment such as monitor or recorder withexclusive cable for RCA.
6. [Video Output] RGB, Component, Composite Video Additional 2-ch Output SocketThe VMX-1104 supports up to 2 channels of RGB output and 2 chan-nels of component output respectively.As in [Fig. II -3], 3 RCA sockets in red, green and blue per channelconsists of a pair. The red RCA socket is used for R of the RGB and Cr(V) output of component, the green RCA socket is used for G of theRGB and Y of component, and the blue color socket is used for B of theRGB, Cb (U) of component and additional channel of composite video.
[Fig. II -2]
[Fig. II -3]
Cautions in Use of Component Since basic video input patterns of the VMX-1104 is input of Composite Video 4 channels, nor-mal screen does not come out if firstly connecting component video source. To use componentvideo source, change video input setting of setup menu for the VMX-1104.
Composite Video 4-ch Output ConnectionOf up to 4 channel outputs of the Composite Video supported by the VMX-1104, two channelsuse this socket and the two remaining channels use as in B-socket of the RGB socket to bedescribed in the paragraph 6. If desiring to use Composite Video 4 channels of output, connectthe two remaining channels for use as described in the below paragraph 6.
SMART A/V MIXER
13VMX-1104
7. Operator Screen Output SocketThis is an Operator Screen output socket of the VMX-1104. The VMX-1104 adapted the SXGA of PCmonitor output (1280x1024) for the operator screen to provide GUI (graphic user interface) friendly withthe working environment with high resolution to users. Please connect a PC monitor supporting SXGA ofPC monitor output with this socket for use.
8. Audio Input 4-ch SocketThis is a socket for inputting the Unbalanced audio input for the up to 4 channels supported by the VMX-1104. Please connect L, R of audio source of the channel used to this socket with dedicated RCA cables.
9. Audio Output Socket This is a socket for Unbalanced audio output of the VMX-1104. Please connect this socket to the audiooutput of desired equipment such as monitor or recorder with dedicated RCA cables.
10. Headphone Output Socket This is a socket to output same acoustic sound as audio output specified in the paragraph 9. However, resultof audio transition is not output to the audio output as described in No.9 but output to this headphone out-put in the practice mode as explained above. Please connect a headphone to this socket if necessary.
11. GPI I/O SocketThis is a socket for the GPI (general purpose interface) supporting interface with outside device such ascaption projector.
12. Power Adapter SocketThis is a socket to connect the VMX-1104 power adaptor. Please use only adopter provided as accesso-ry, not adopter sold in the market as the adopter used in the VMX-1104 has special specifications.
Use of Operator ScreenVMX-1104 is developed to use main function of the VMX-1104 even if not using the OperatorScreen. However, to convenient all functions of the VMX-1104, it is strongly recommended thatyou use the Operator Screen. You must use our corporation’s monitor supporting the SXGA res-olution or a monitor of a general PC sold in the market. If desiring to use the existing monitor forPC along with both PC and VMX-1104, you may use an monitor sharer sold in the market.
Audio Output in Practice ModeResults of effects or transition that the user manipulate are not output to the main output but out-put to the only Preview screen of the Operator Screen. Audio output in the practice mode is alsooutput to the audio output socket but output to the only headphone, to ensure that the user notfamiliar with the VMX-1104 can also use with practice even during active air or recording.
SMART A/V MIXER
14 VMX-1104
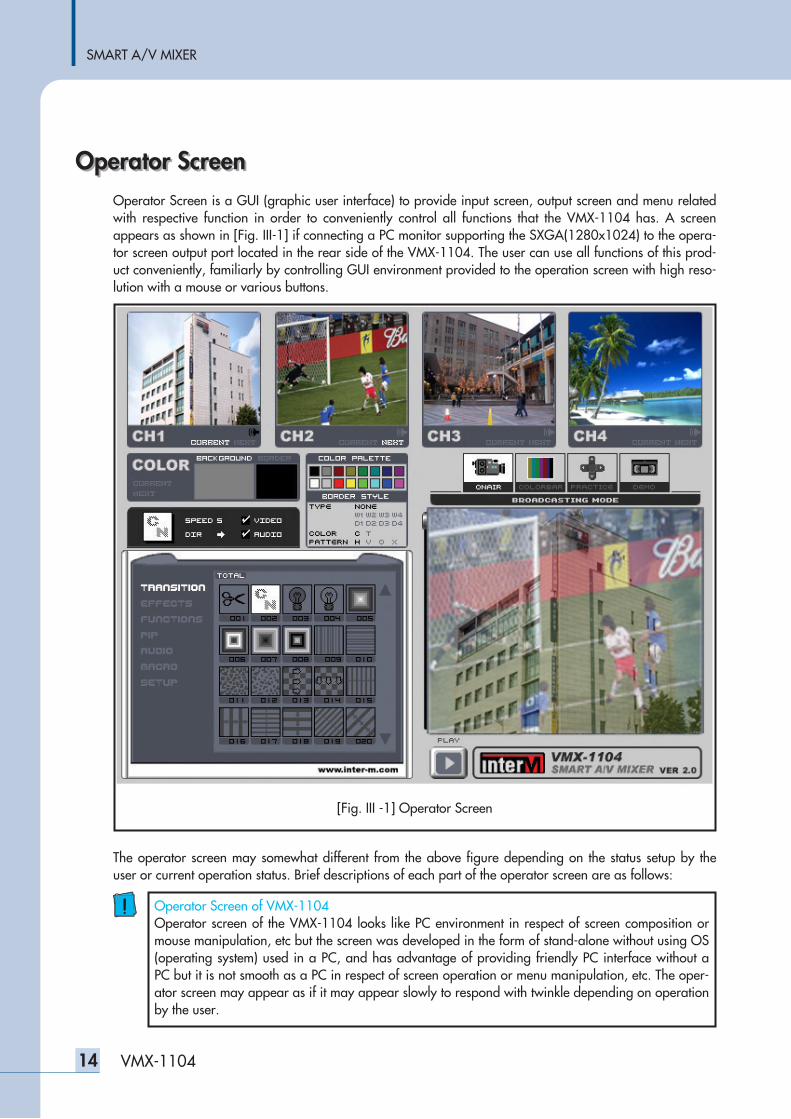
Operator ScreenOperator ScreenOperator Screen is a GUI (graphic user interface) to provide input screen, output screen and menu relatedwith respective function in order to conveniently control all functions that the VMX-1104 has. A screenappears as shown in [Fig. III-1] if connecting a PC monitor supporting the SXGA(1280x1024) to the opera-tor screen output port located in the rear side of the VMX-1104. The user can use all functions of this prod-uct conveniently, familiarly by controlling GUI environment provided to the operation screen with high reso-lution with a mouse or various buttons.
The operator screen may somewhat different from the above figure depending on the status setup by theuser or current operation status. Brief descriptions of each part of the operator screen are as follows:
[Fig. III -1] Operator Screen
Operator Screen of VMX-1104Operator screen of the VMX-1104 looks like PC environment in respect of screen composition ormouse manipulation, etc but the screen was developed in the form of stand-alone without using OS(operating system) used in a PC, and has advantage of providing friendly PC interface without aPC but it is not smooth as a PC in respect of screen operation or menu manipulation, etc. The oper-ator screen may appear as if it may appear slowly to respond with twinkle depending on operationby the user.
SMART A/V MIXER
15VMX-1104
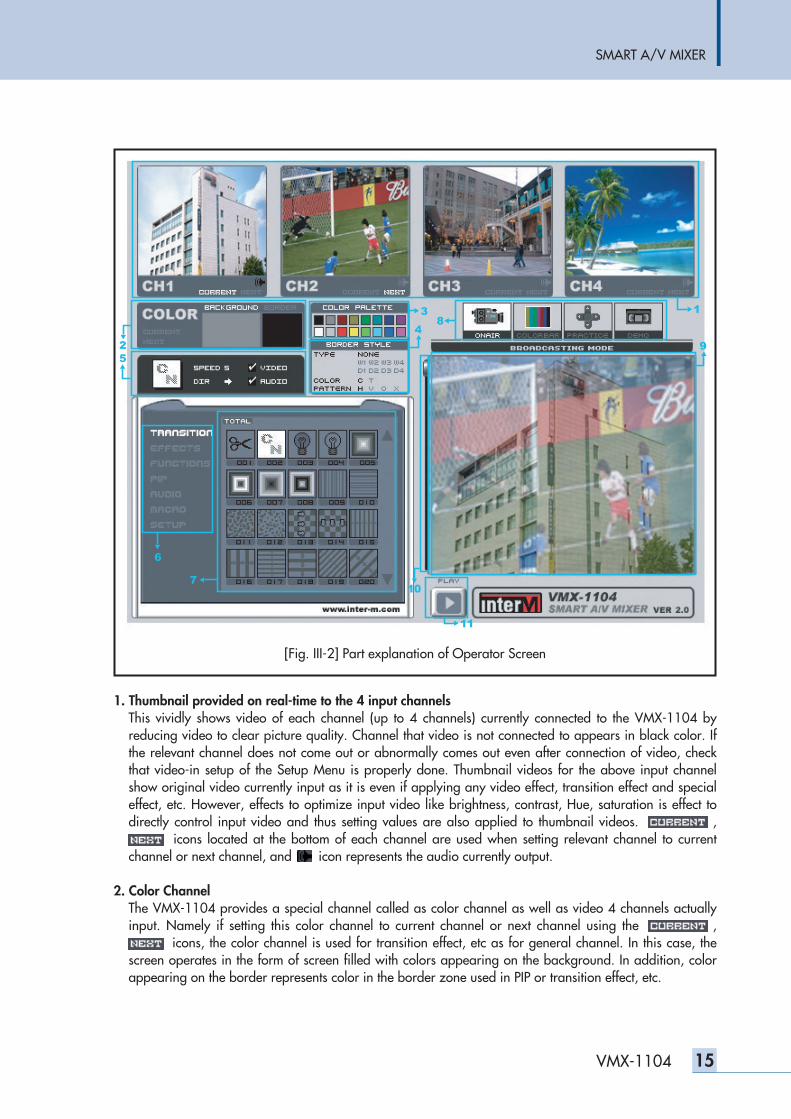
1. Thumbnail provided on real-time to the 4 input channelsThis vividly shows video of each channel (up to 4 channels) currently connected to the VMX-1104 byreducing video to clear picture quality. Channel that video is not connected to appears in black color. Ifthe relevant channel does not come out or abnormally comes out even after connection of video, checkthat video-in setup of the Setup Menu is properly done. Thumbnail videos for the above input channelshow original video currently input as it is even if applying any video effect, transition effect and specialeffect, etc. However, effects to optimize input video like brightness, contrast, Hue, saturation is effect todirectly control input video and thus setting values are also applied to thumbnail videos. bnail videos,bnail v icons located at the bottom of each channel are used when setting relevant channel to currentchannel or next channel, and icon represents the audio currently output.
2. Color ChannelThe VMX-1104 provides a special channel called as color channel as well as video 4 channels actuallyinput. Namely if setting this color channel to current channel or next channel using the channel use,bnail v icons, the color channel is used for transition effect, etc as for general channel. In this case, thescreen operates in the form of screen filled with colors appearing on the background. In addition, colorappearing on the border represents color in the border zone used in PIP or transition effect, etc.
1
9
4
11
107
83
6
25
[Fig. III-2] Part explanation of Operator Screen
SMART A/V MIXER
16 VMX-1104
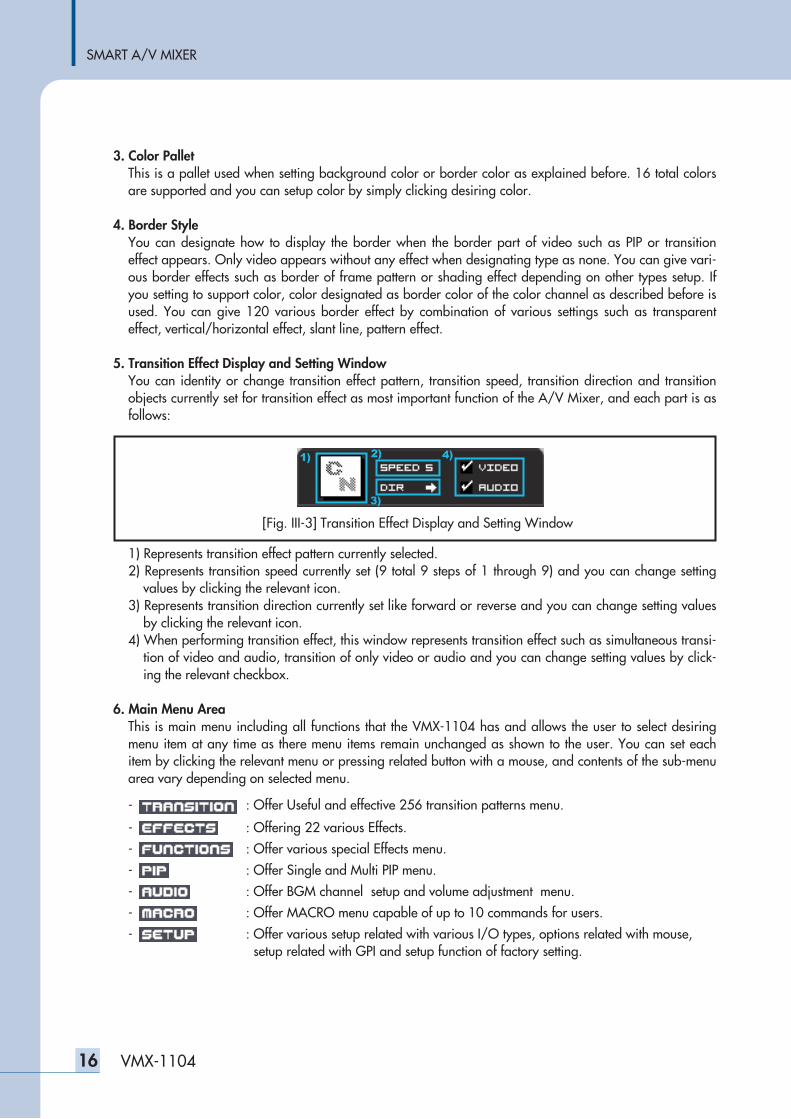
3. Color Pallet This is a pallet used when setting background color or border color as explained before. 16 total colorsare supported and you can setup color by simply clicking desiring color.
4. Border Style You can designate how to display the border when the border part of video such as PIP or transitioneffect appears. Only video appears without any effect when designating type as none. You can give vari-ous border effects such as border of frame pattern or shading effect depending on other types setup. Ifyou setting to support color, color designated as border color of the color channel as described before isused. You can give 120 various border effect by combination of various settings such as transparenteffect, vertical/horizontal effect, slant line, pattern effect.
5. Transition Effect Display and Setting WindowYou can identity or change transition effect pattern, transition speed, transition direction and transitionobjects currently set for transition effect as most important function of the A/V Mixer, and each part is asfollows:
1) Represents transition effect pattern currently selected.2) Represents transition speed currently set (9 total 9 steps of 1 through 9) and you can change setting
values by clicking the relevant icon.3) Represents transition direction currently set like forward or reverse and you can change setting values
by clicking the relevant icon.4) When performing transition effect, this window represents transition effect such as simultaneous transi-
tion of video and audio, transition of only video or audio and you can change setting values by click-ing the relevant checkbox.
6. Main Menu AreaThis is main menu including all functions that the VMX-1104 has and allows the user to select desiringmenu item at any time as there menu items remain unchanged as shown to the user. You can set eachitem by clicking the relevant menu or pressing related button with a mouse, and contents of the sub-menuarea vary depending on selected menu.
- : Offer Useful and effective 256 transition patterns menu.
- : Offering 22 various Effects.
- : Offer various special Effects menu.
- : Offer Single and Multi PIP menu.
- : Offer BGM channel setup and volume adjustment menu.
- : Offer MACRO menu capable of up to 10 commands for users.
- : Offer various setup related with various I/O types, options related with mouse, setup related with GPI and setup function of factory setting.
1) 2)
3)
4)
[Fig. III-3] Transition Effect Display and Setting Window
SMART A/V MIXER
17VMX-1104
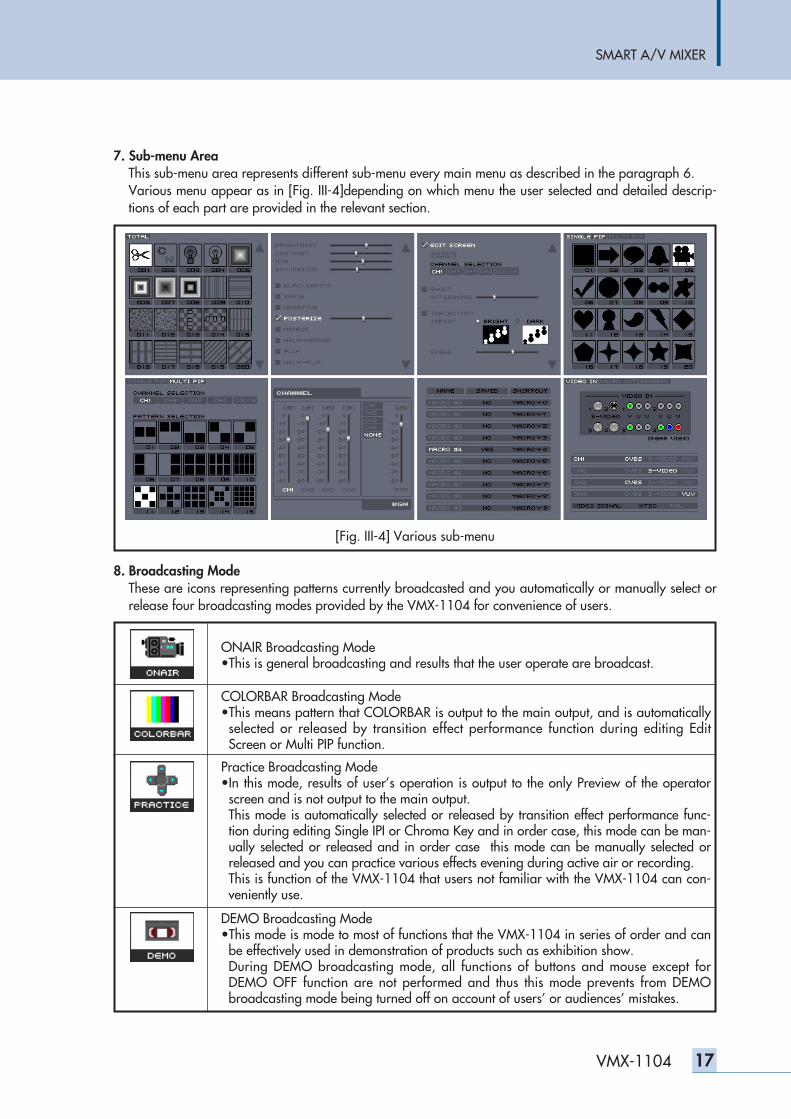
7. Sub-menu AreaThis sub-menu area represents different sub-menu every main menu as described in the paragraph 6.Various menu appear as in [Fig. III-4]depending on which menu the user selected and detailed descrip-tions of each part are provided in the relevant section.
8. Broadcasting ModeThese are icons representing patterns currently broadcasted and you automatically or manually select orrelease four broadcasting modes provided by the VMX-1104 for convenience of users.
[Fig. III-4] Various sub-menu
ONAIR Broadcasting Mode•This is general broadcasting and results that the user operate are broadcast.
COLORBAR Broadcasting Mode•This means pattern that COLORBAR is output to the main output, and is automaticallyselected or released by transition effect performance function during editing EditScreen or Multi PIP function.
Practice Broadcasting Mode•In this mode, results of user’s operation is output to the only Preview of the operatorscreen and is not output to the main output.This mode is automatically selected or released by transition effect performance func-tion during editing Single IPI or Chroma Key and in order case, this mode can be man-ually selected or released and in order case this mode can be manually selected orreleased and you can practice various effects evening during active air or recording. This is function of the VMX-1104 that users not familiar with the VMX-1104 can con-veniently use.
DEMO Broadcasting Mode•This mode is mode to most of functions that the VMX-1104 in series of order and canbe effectively used in demonstration of products such as exhibition show.During DEMO broadcasting mode, all functions of buttons and mouse except forDEMO OFF function are not performed and thus this mode prevents from DEMObroadcasting mode being turned off on account of users’ or audiences’ mistakes.
SMART A/V MIXER
18 VMX-1104
9. Preview ScreenThis is a screen to show video effect, transition effect and special effect, etc that users currently applied inorder to easily identify them. Except for COLORBAR broadcasting mode, results shown on this screen areoutput to the main output in the same time.
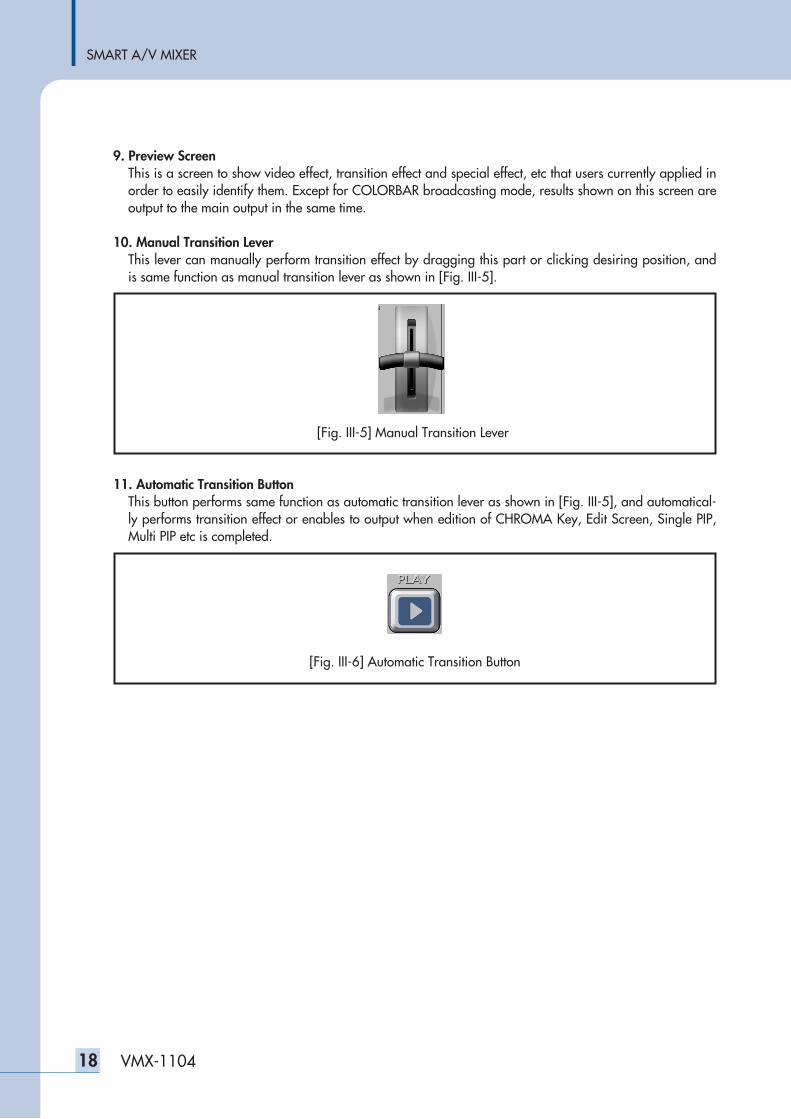
10. Manual Transition LeverThis lever can manually perform transition effect by dragging this part or clicking desiring position, andis same function as manual transition lever as shown in [Fig. III-5].
11. Automatic Transition ButtonThis button performs same function as automatic transition lever as shown in [Fig. III-5], and automatical-ly performs transition effect or enables to output when edition of CHROMA Key, Edit Screen, Single PIP,Multi PIP etc is completed.
[Fig. III-5] Manual Transition Lever
[Fig. III-6] Automatic Transition Button
SMART A/V MIXER
19VMX-1104
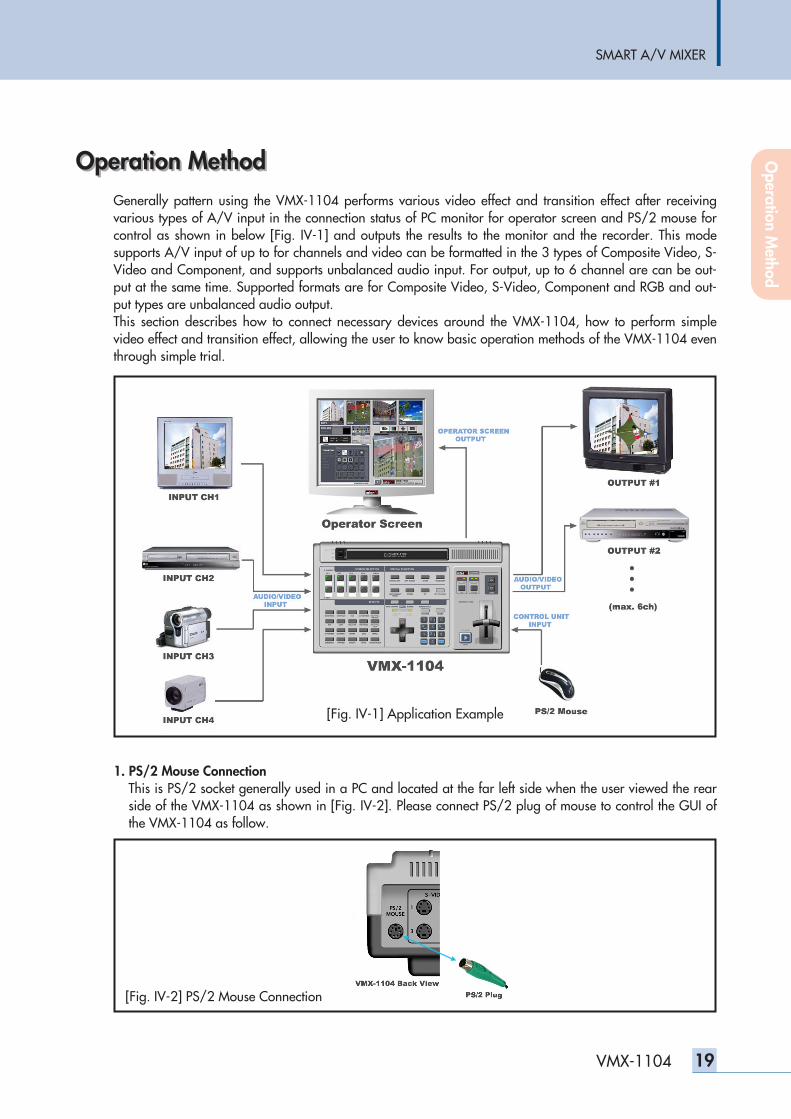
Operation MethodOperation MethodGenerally pattern using the VMX-1104 performs various video effect and transition effect after receivingvarious types of A/V input in the connection status of PC monitor for operator screen and PS/2 mouse forcontrol as shown in below [Fig. IV-1] and outputs the results to the monitor and the recorder. This modesupports A/V input of up to for channels and video can be formatted in the 3 types of Composite Video, S-Video and Component, and supports unbalanced audio input. For output, up to 6 channel are can be out-put at the same time. Supported formats are for Composite Video, S-Video, Component and RGB and out-put types are unbalanced audio output.This section describes how to connect necessary devices around the VMX-1104, how to perform simplevideo effect and transition effect, allowing the user to know basic operation methods of the VMX-1104 eventhrough simple trial.
1. PS/2 Mouse ConnectionThis is PS/2 socket generally used in a PC and located at the far left side when the user viewed the rearside of the VMX-1104 as shown in [Fig. IV-2]. Please connect PS/2 plug of mouse to control the GUI ofthe VMX-1104 as follow.
[Fig. IV-1] Application Example
[Fig. IV-2] PS/2 Mouse Connection
Operation M
ethod
* USB Mouse ConnectionTo use the dedicated mouse for USB in the VMX-1104 that supports only PS/2 mouse, you can purchaseand use the USB to PS/2 zender sold in the market to the USB mouse as shown in [Fig. IV-3].
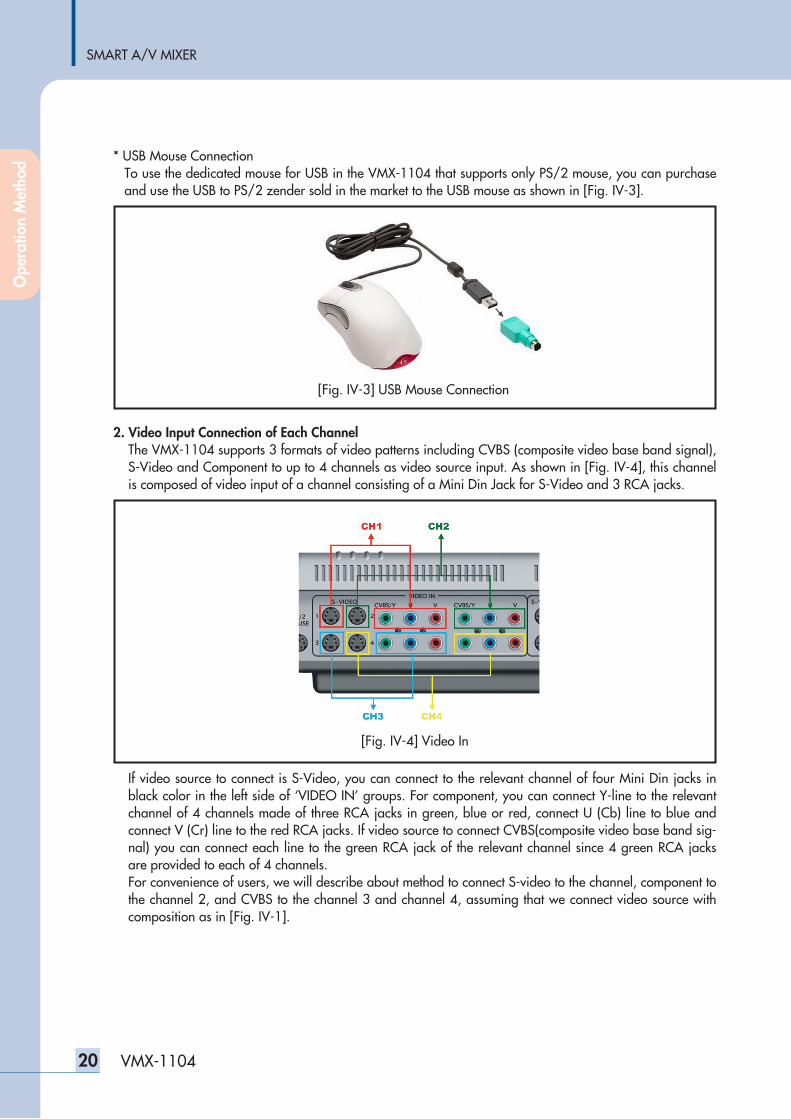
2. Video Input Connection of Each Channel The VMX-1104 supports 3 formats of video patterns including CVBS (composite video base band signal),S-Video and Component to up to 4 channels as video source input. As shown in [Fig. IV-4], this channelis composed of video input of a channel consisting of a Mini Din Jack for S-Video and 3 RCA jacks.
If video source to connect is S-Video, you can connect to the relevant channel of four Mini Din jacks inblack color in the left side of ‘VIDEO IN’ groups. For component, you can connect Y-line to the relevantchannel of 4 channels made of three RCA jacks in green, blue or red, connect U (Cb) line to blue andconnect V (Cr) line to the red RCA jacks. If video source to connect CVBS(composite video base band sig-nal) you can connect each line to the green RCA jack of the relevant channel since 4 green RCA jacksare provided to each of 4 channels.For convenience of users, we will describe about method to connect S-video to the channel, component tothe channel 2, and CVBS to the channel 3 and channel 4, assuming that we connect video source withcomposition as in [Fig. IV-1].
SMART A/V MIXER
20 VMX-1104
[Fig. IV-3] USB Mouse Connection
[Fig. IV-4] Video In
Ope
ratio
n M
etho
d
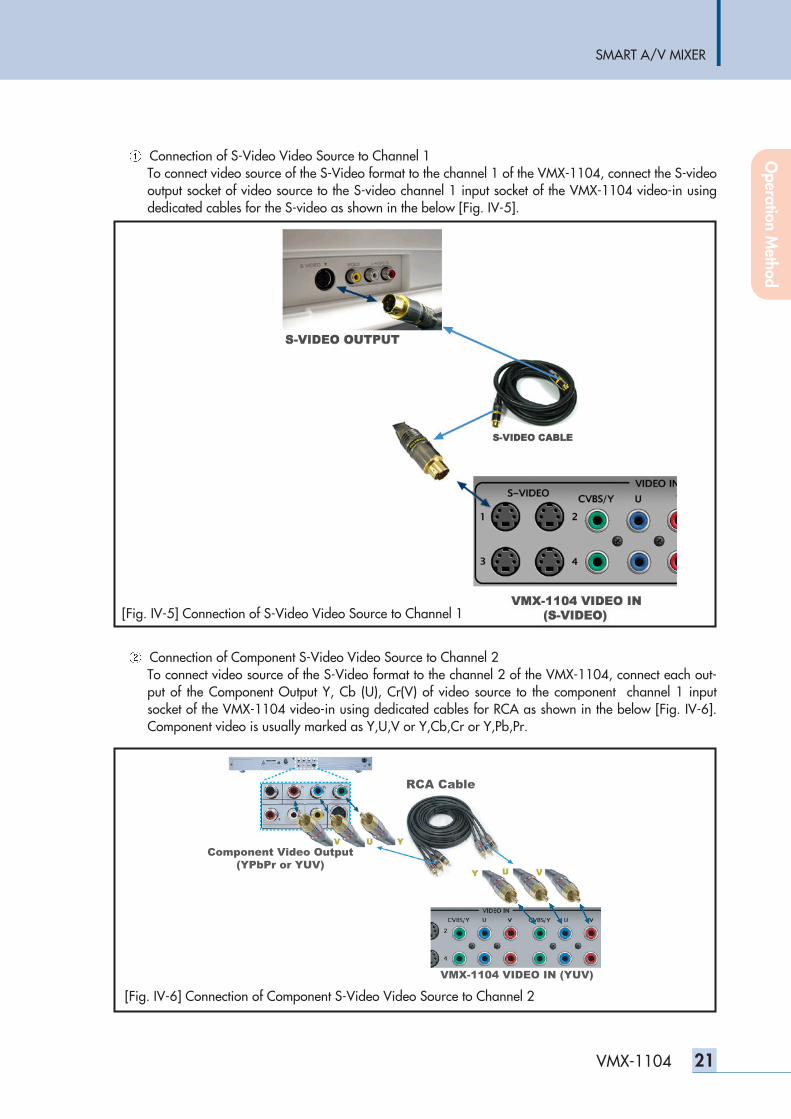
Connection of S-Video Video Source to Channel 1To connect video source of the S-Video format to the channel 1 of the VMX-1104, connect the S-videooutput socket of video source to the S-video channel 1 input socket of the VMX-1104 video-in usingdedicated cables for the S-video as shown in the below [Fig. IV-5].
Connection of Component S-Video Video Source to Channel 2To connect video source of the S-Video format to the channel 2 of the VMX-1104, connect each out-put of the Component Output Y, Cb (U), Cr(V) of video source to the component channel 1 inputsocket of the VMX-1104 video-in using dedicated cables for RCA as shown in the below [Fig. IV-6].Component video is usually marked as Y,U,V or Y,Cb,Cr or Y,Pb,Pr.
SMART A/V MIXER
21VMX-1104
[Fig. IV-5] Connection of S-Video Video Source to Channel 1
[Fig. IV-6] Connection of Component S-Video Video Source to Channel 2
Component Video Output(YPbPr or YUV)
RCA Cable
VMX-1104 VIDEO IN (YUV)
Operation M
ethod
SMART A/V MIXER
22 VMX-1104
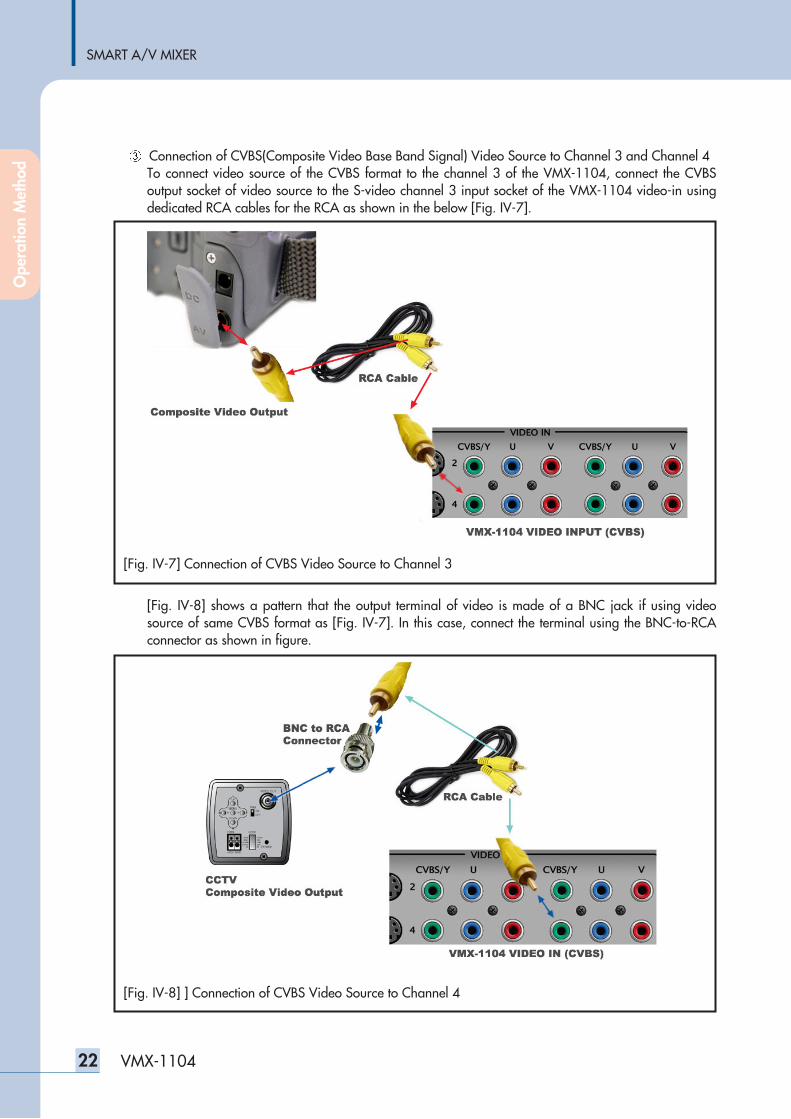
Connection of CVBS(Composite Video Base Band Signal) Video Source to Channel 3 and Channel 4To connect video source of the CVBS format to the channel 3 of the VMX-1104, connect the CVBSoutput socket of video source to the S-video channel 3 input socket of the VMX-1104 video-in usingdedicated RCA cables for the RCA as shown in the below [Fig. IV-7].
[Fig. IV-8] shows a pattern that the output terminal of video is made of a BNC jack if using videosource of same CVBS format as [Fig. IV-7]. In this case, connect the terminal using the BNC-to-RCAconnector as shown in figure.
[Fig. IV-7] Connection of CVBS Video Source to Channel 3
[Fig. IV-8] ] Connection of CVBS Video Source to Channel 4
Ope
ratio
n M
etho
d
SMART A/V MIXER
23VMX-1104
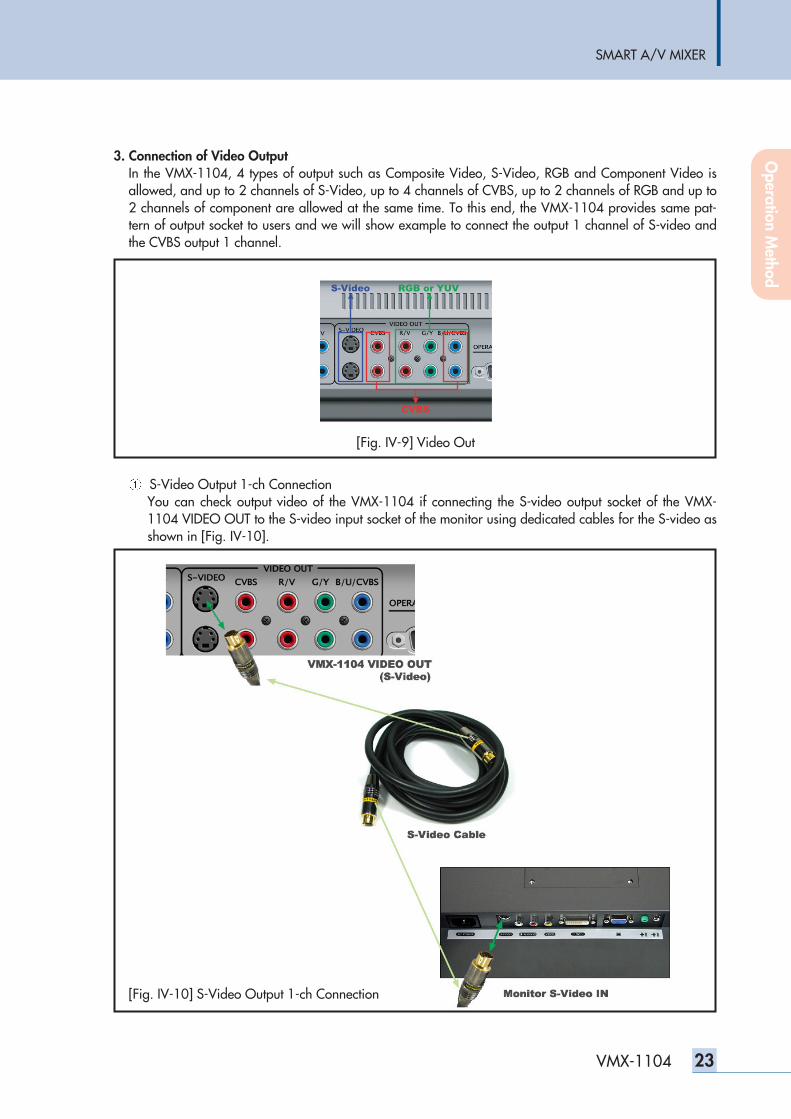
3. Connection of Video OutputIn the VMX-1104, 4 types of output such as Composite Video, S-Video, RGB and Component Video isallowed, and up to 2 channels of S-Video, up to 4 channels of CVBS, up to 2 channels of RGB and up to2 channels of component are allowed at the same time. To this end, the VMX-1104 provides same pat-tern of output socket to users and we will show example to connect the output 1 channel of S-video andthe CVBS output 1 channel.
S-Video Output 1-ch Connection You can check output video of the VMX-1104 if connecting the S-video output socket of the VMX-1104 VIDEO OUT to the S-video input socket of the monitor using dedicated cables for the S-video asshown in [Fig. IV-10].
S-Video RGB or YUV
CVBS
[Fig. IV-9] Video Out
[Fig. IV-10] S-Video Output 1-ch Connection
Operation M
ethod

SMART A/V MIXER
24 VMX-1104
CVBS Output 1-ch Connection You can check output video of the VMX-1104 through the recorder if connecting the SVBS outputsocket of the VMX-1104 VIDEO OUT to the CVBS input socket of the recorder using dedicated cablesfor the RCA as shown in [Fig. IV-11].
4. Operator Screen Output ConnectionThe VMX-1104 adapted the SXGA-class of PC monitor output (1280x1024) for the operator screen toprovide GUI (graphic user interface) friendly with the working environment with high resolution to users.Please connect the CRT monitor for a PC or the LCD monitor supporting SXGA the output socket of VMX-1104 Operator Screen as shown in the below [Fig. IV-12].
[Fig. IV-11] CVBS Output 1-CH Connection
[Fig. IV-12] Operator Screen Output
Ope
ratio
n M
etho
d
SMART A/V MIXER
25VMX-1104
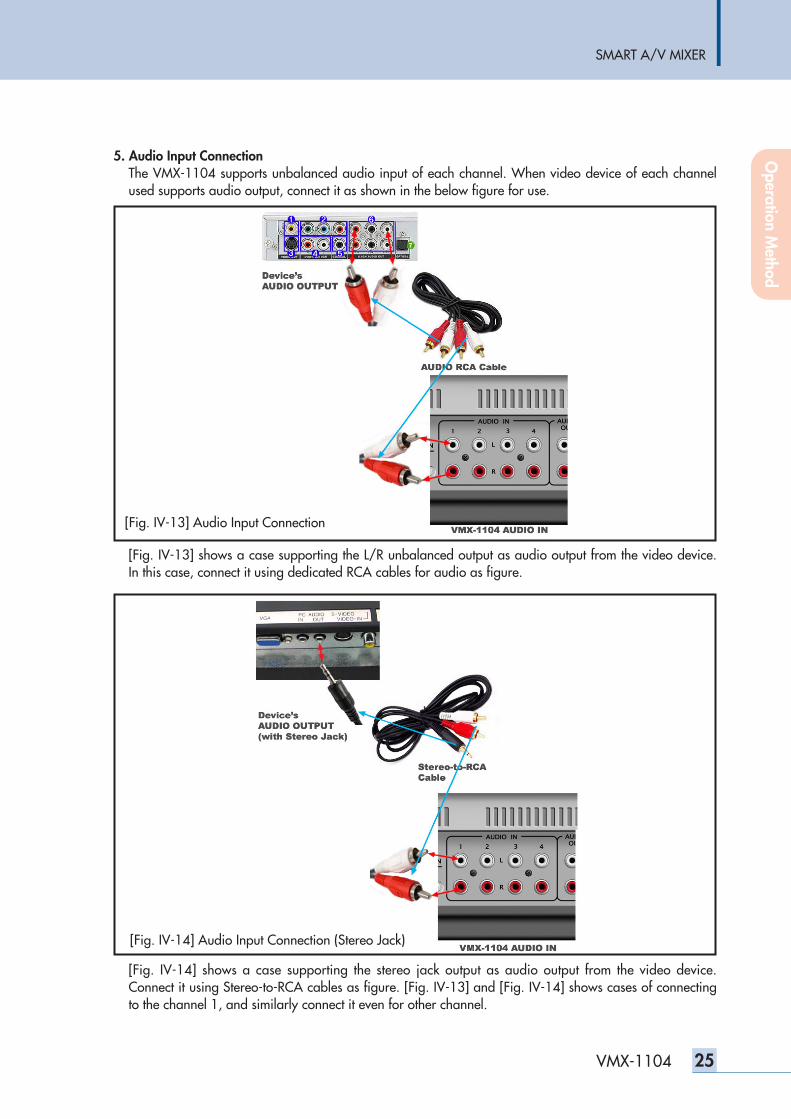
5. Audio Input Connection The VMX-1104 supports unbalanced audio input of each channel. When video device of each channelused supports audio output, connect it as shown in the below figure for use.
[Fig. IV-13] shows a case supporting the L/R unbalanced output as audio output from the video device.In this case, connect it using dedicated RCA cables for audio as figure.
[Fig. IV-14] shows a case supporting the stereo jack output as audio output from the video device.Connect it using Stereo-to-RCA cables as figure. [Fig. IV-13] and [Fig. IV-14] shows cases of connectingto the channel 1, and similarly connect it even for other channel.
[Fig. IV-13] Audio Input Connection
[Fig. IV-14] Audio Input Connection (Stereo Jack)
Operation M
ethod
SMART A/V MIXER
26 VMX-1104
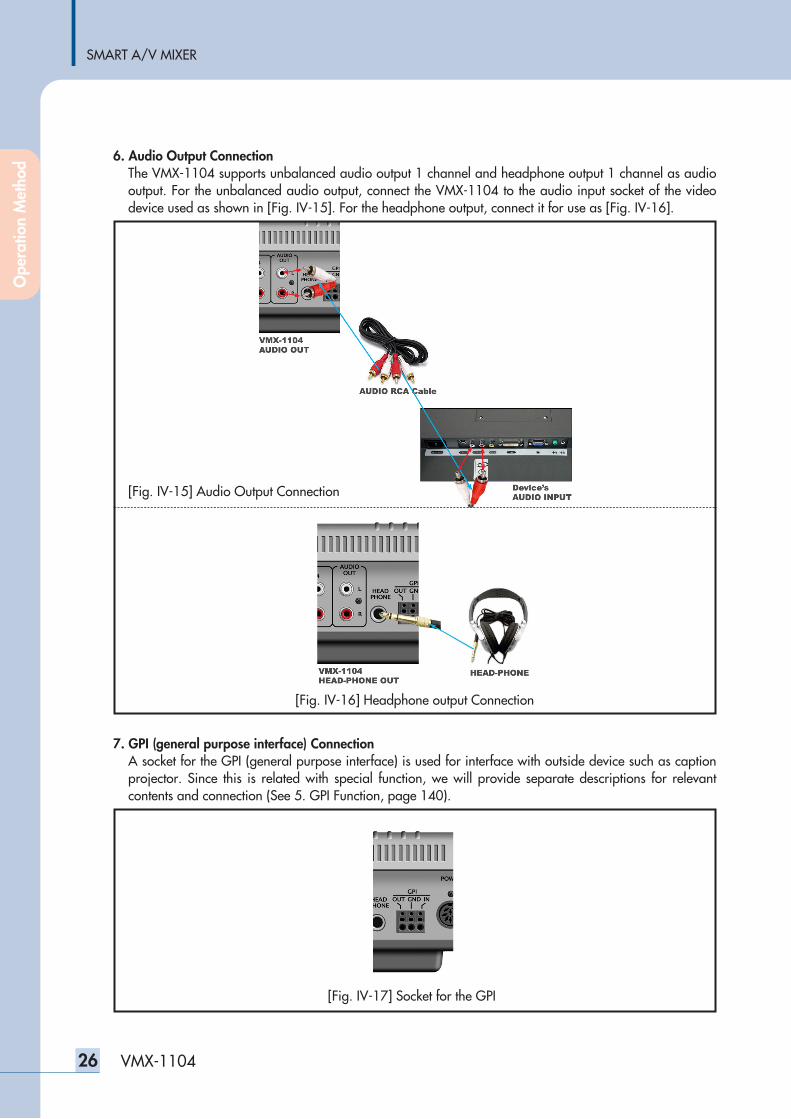
6. Audio Output Connection The VMX-1104 supports unbalanced audio output 1 channel and headphone output 1 channel as audiooutput. For the unbalanced audio output, connect the VMX-1104 to the audio input socket of the videodevice used as shown in [Fig. IV-15]. For the headphone output, connect it for use as [Fig. IV-16].
7. GPI (general purpose interface) ConnectionA socket for the GPI (general purpose interface) is used for interface with outside device such as captionprojector. Since this is related with special function, we will provide separate descriptions for relevantcontents and connection (See 5. GPI Function, page 140).
[Fig. IV-15] Audio Output Connection
[Fig. IV-17] Socket for the GPI
[Fig. IV-16] Headphone output Connection
Ope
ratio
n M
etho
d
SMART A/V MIXER
27VMX-1104
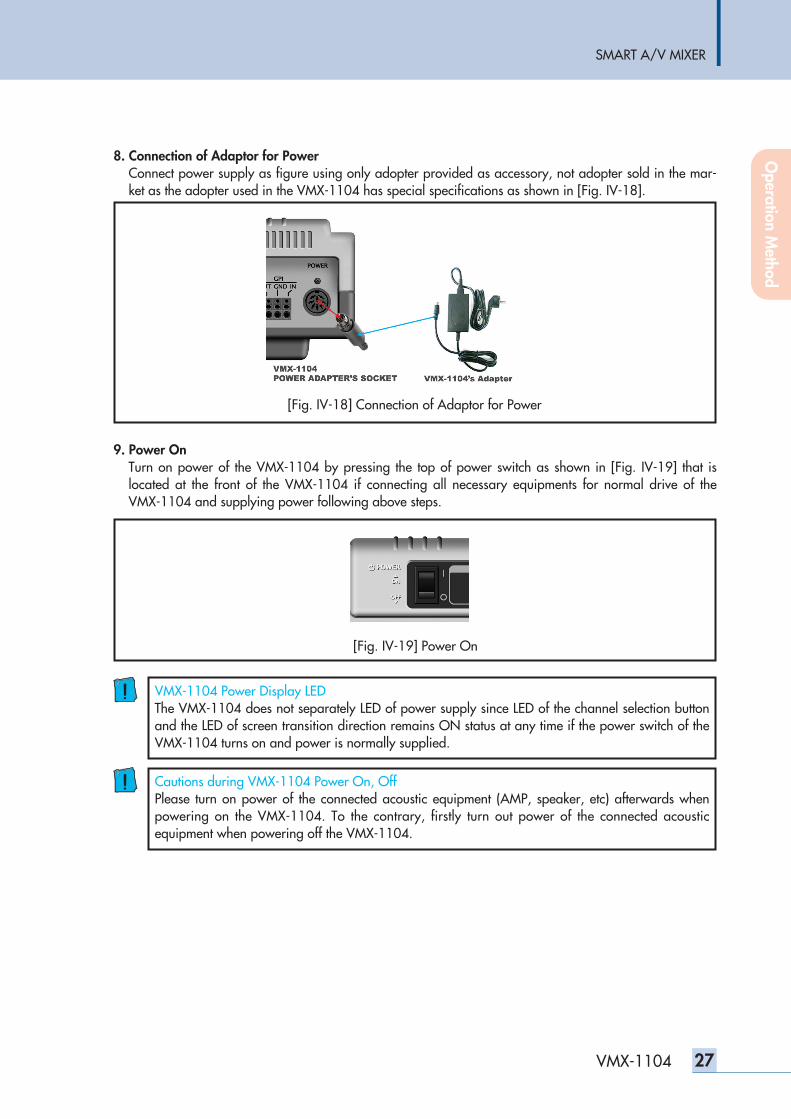
8. Connection of Adaptor for PowerConnect power supply as figure using only adopter provided as accessory, not adopter sold in the mar-ket as the adopter used in the VMX-1104 has special specifications as shown in [Fig. IV-18].
9. Power OnTurn on power of the VMX-1104 by pressing the top of power switch as shown in [Fig. IV-19] that islocated at the front of the VMX-1104 if connecting all necessary equipments for normal drive of theVMX-1104 and supplying power following above steps.
[Fig. IV-18] Connection of Adaptor for Power
[Fig. IV-19] Power On
VMX-1104 Power Display LEDThe VMX-1104 does not separately LED of power supply since LED of the channel selection buttonand the LED of screen transition direction remains ON status at any time if the power switch of theVMX-1104 turns on and power is normally supplied.
Cautions during VMX-1104 Power On, OffPlease turn on power of the connected acoustic equipment (AMP, speaker, etc) afterwards whenpowering on the VMX-1104. To the contrary, firstly turn out power of the connected acousticequipment when powering off the VMX-1104.
Operation M
ethod
SMART A/V MIXER
28 VMX-1104
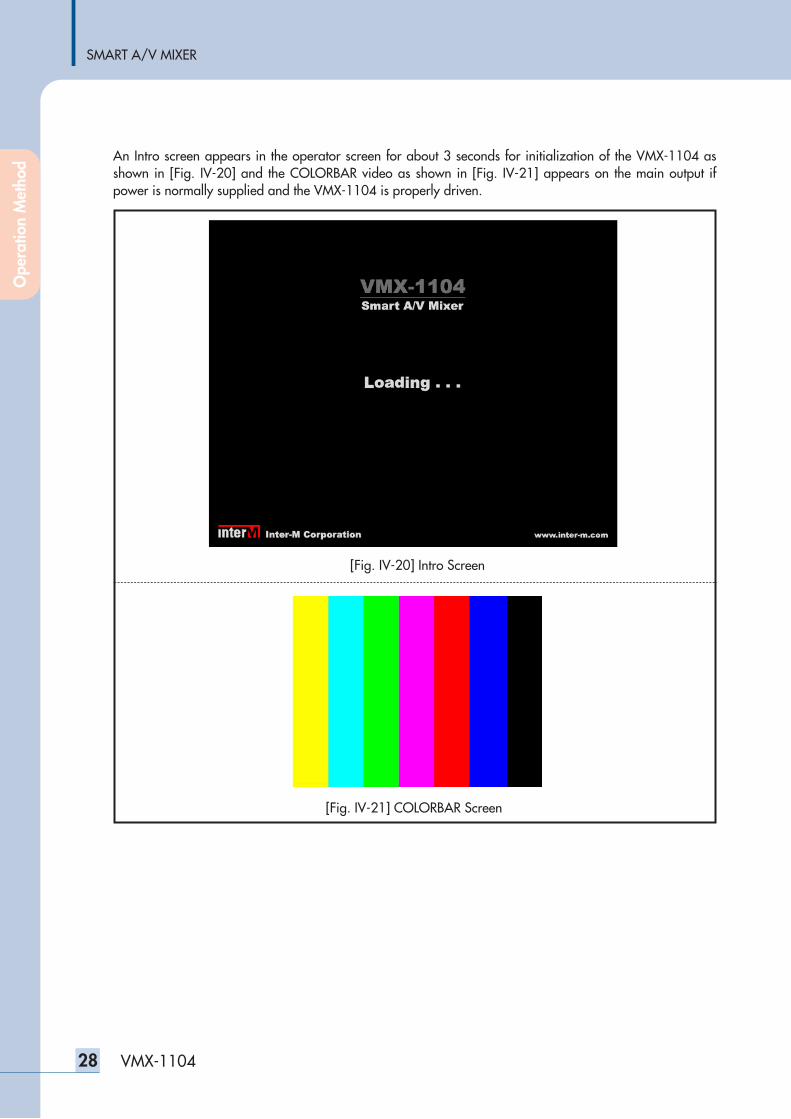
An Intro screen appears in the operator screen for about 3 seconds for initialization of the VMX-1104 asshown in [Fig. IV-20] and the COLORBAR video as shown in [Fig. IV-21] appears on the main output ifpower is normally supplied and the VMX-1104 is properly driven.
[Fig. IV-20] Intro Screen
[Fig. IV-21] COLORBAR Screen
Ope
ratio
n M
etho
d
SMART A/V MIXER
29VMX-1104
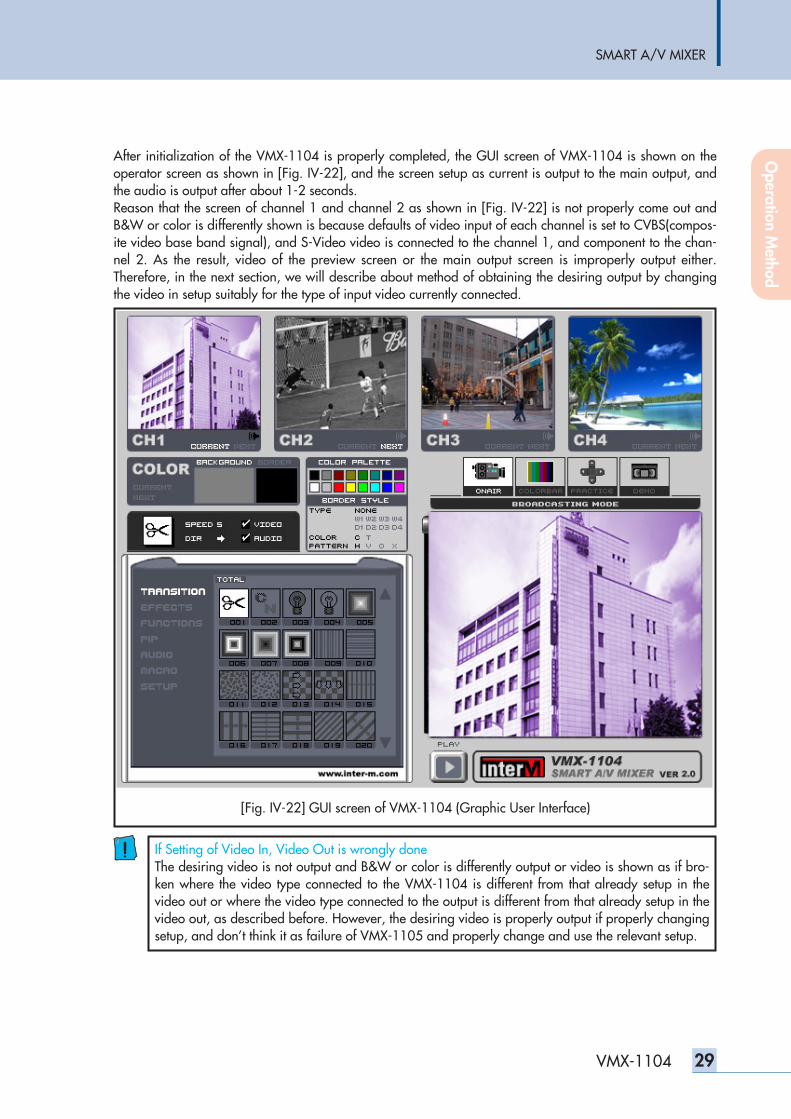
After initialization of the VMX-1104 is properly completed, the GUI screen of VMX-1104 is shown on theoperator screen as shown in [Fig. IV-22], and the screen setup as current is output to the main output, andthe audio is output after about 1-2 seconds.Reason that the screen of channel 1 and channel 2 as shown in [Fig. IV-22] is not properly come out andB&W or color is differently shown is because defaults of video input of each channel is set to CVBS(compos-ite video base band signal), and S-Video video is connected to the channel 1, and component to the chan-nel 2. As the result, video of the preview screen or the main output screen is improperly output either.Therefore, in the next section, we will describe about method of obtaining the desiring output by changingthe video in setup suitably for the type of input video currently connected.
[Fig. IV-22] GUI screen of VMX-1104 (Graphic User Interface)
If Setting of Video In, Video Out is wrongly doneThe desiring video is not output and B&W or color is differently output or video is shown as if bro-ken where the video type connected to the VMX-1104 is different from that already setup in thevideo out or where the video type connected to the output is different from that already setup in thevideo out, as described before. However, the desiring video is properly output if properly changingsetup, and don’t think it as failure of VMX-1105 and properly change and use the relevant setup.
Operation M
ethod
SMART A/V MIXER
30 VMX-1104
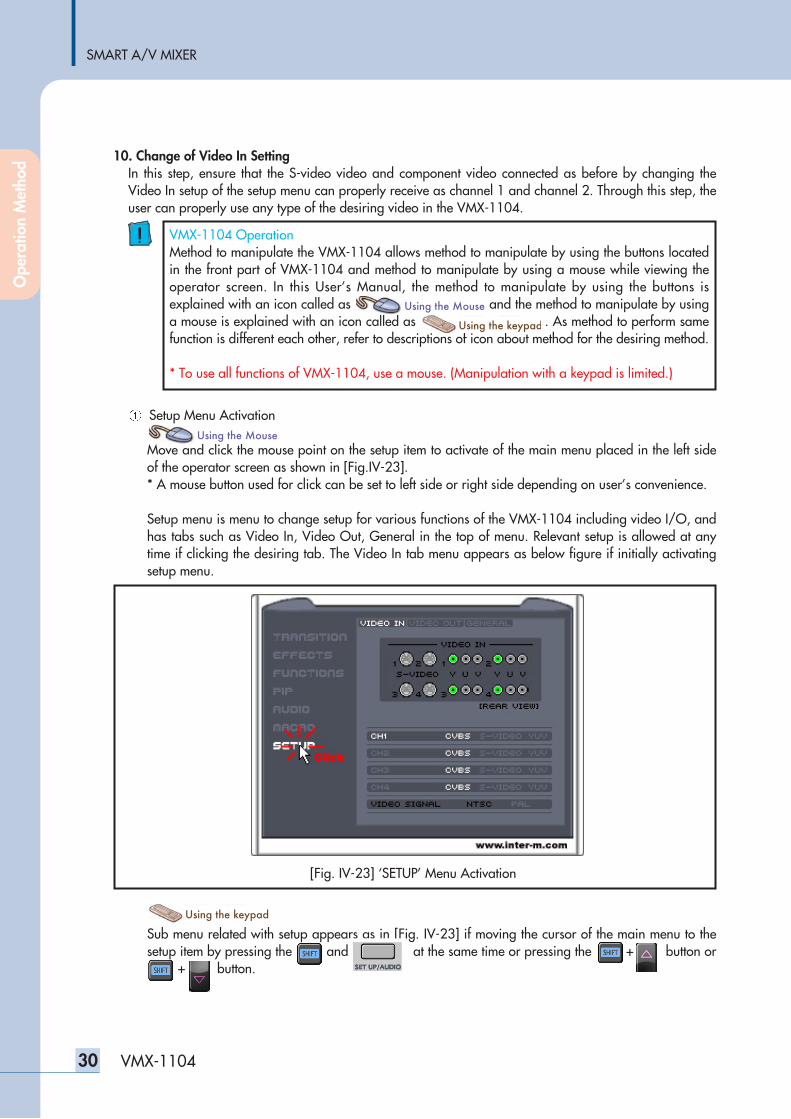
10. Change of Video In SettingIn this step, ensure that the S-video video and component video connected as before by changing theVideo In setup of the setup menu can properly receive as channel 1 and channel 2. Through this step, theuser can properly use any type of the desiring video in the VMX-1104.
Setup Menu Activation
Move and click the mouse point on the setup item to activate of the main menu placed in the left sideof the operator screen as shown in [Fig.IV-23].* A mouse button used for click can be set to left side or right side depending on user’s convenience.
Setup menu is menu to change setup for various functions of the VMX-1104 including video I/O, andhas tabs such as Video In, Video Out, General in the top of menu. Relevant setup is allowed at anytime if clicking the desiring tab. The Video In tab menu appears as below figure if initially activatingsetup menu.
Sub menu related with setup appears as in [Fig. IV-23] if moving the cursor of the main menu to thesetup item by pressing the ththe and tthehetthe at the same time or pressing the ththe + thth button orththe + thth button.
[Fig. IV-23] ‘SETUP’ Menu Activation
VMX-1104 OperationMethod to manipulate the VMX-1104 allows method to manipulate by using the buttons locatedin the front part of VMX-1104 and method to manipulate by using a mouse while viewing theoperator screen. In this User’s Manual, the method to manipulate by using the buttons isexplained with an icon called as and the method t mapu and the method to manipulate by usinga mouse is explained with an icon called as and the method t mu . As method to perform samefunction is different each other, refer to descriptions of icon about method for the desiring method.
* To use all functions of VMX-1104, use a mouse. (Manipulation with a keypad is limited.)
Ope
ratio
n M
etho
d
SMART A/V MIXER
31VMX-1104
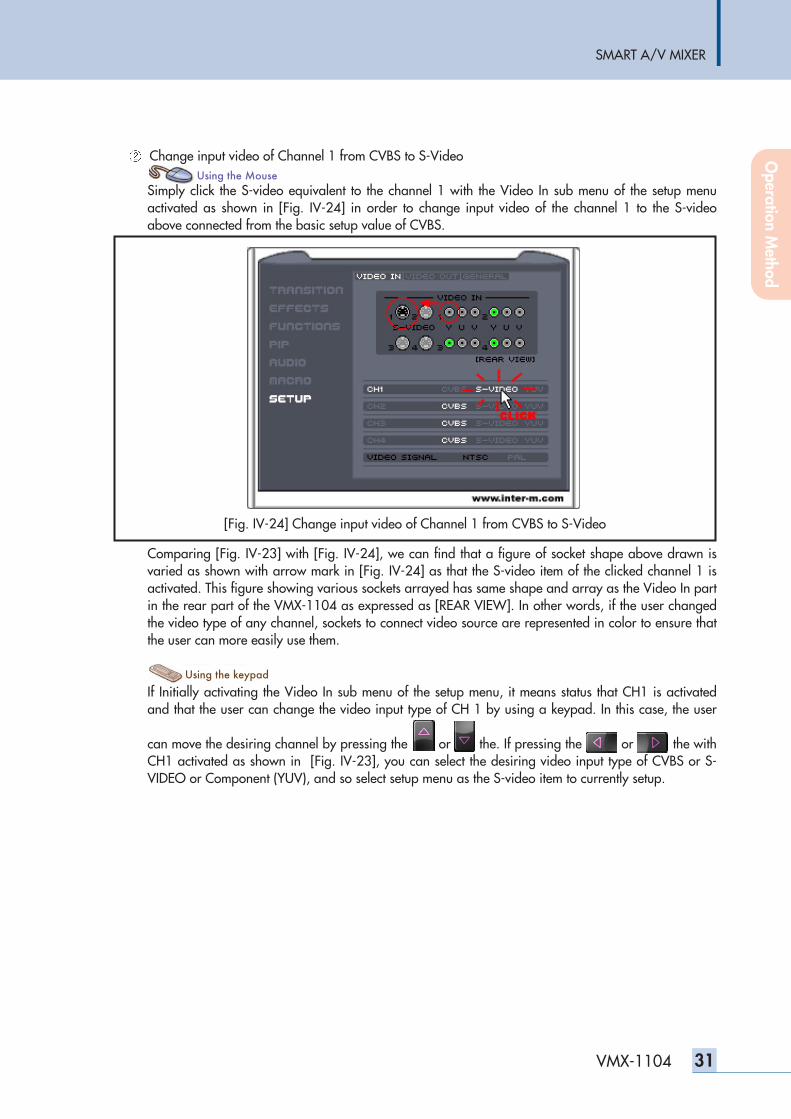
Change input video of Channel 1 from CVBS to S-Video
Simply click the S-video equivalent to the channel 1 with the Video In sub menu of the setup menuactivated as shown in [Fig. IV-24] in order to change input video of the channel 1 to the S-videoabove connected from the basic setup value of CVBS.
Comparing [Fig. IV-23] with [Fig. IV-24], we can find that a figure of socket shape above drawn isvaried as shown with arrow mark in [Fig. IV-24] as that the S-video item of the clicked channel 1 isactivated. This figure showing various sockets arrayed has same shape and array as the Video In partin the rear part of the VMX-1104 as expressed as [REAR VIEW]. In other words, if the user changedthe video type of any channel, sockets to connect video source are represented in color to ensure thatthe user can more easily use them.
If Initially activating the Video In sub menu of the setup menu, it means status that CH1 is activatedand that the user can change the video input type of CH 1 by using a keypad. In this case, the user
can move the desiring channel by pressing the vide or vid the. If pressing the ty pe or ty pe the withCH1 activated as shown in [Fig. IV-23], you can select the desiring video input type of CVBS or S-VIDEO or Component (YUV), and so select setup menu as the S-video item to currently setup.
[Fig. IV-24] Change input video of Channel 1 from CVBS to S-Video
Operation M
ethod
SMART A/V MIXER
32 VMX-1104
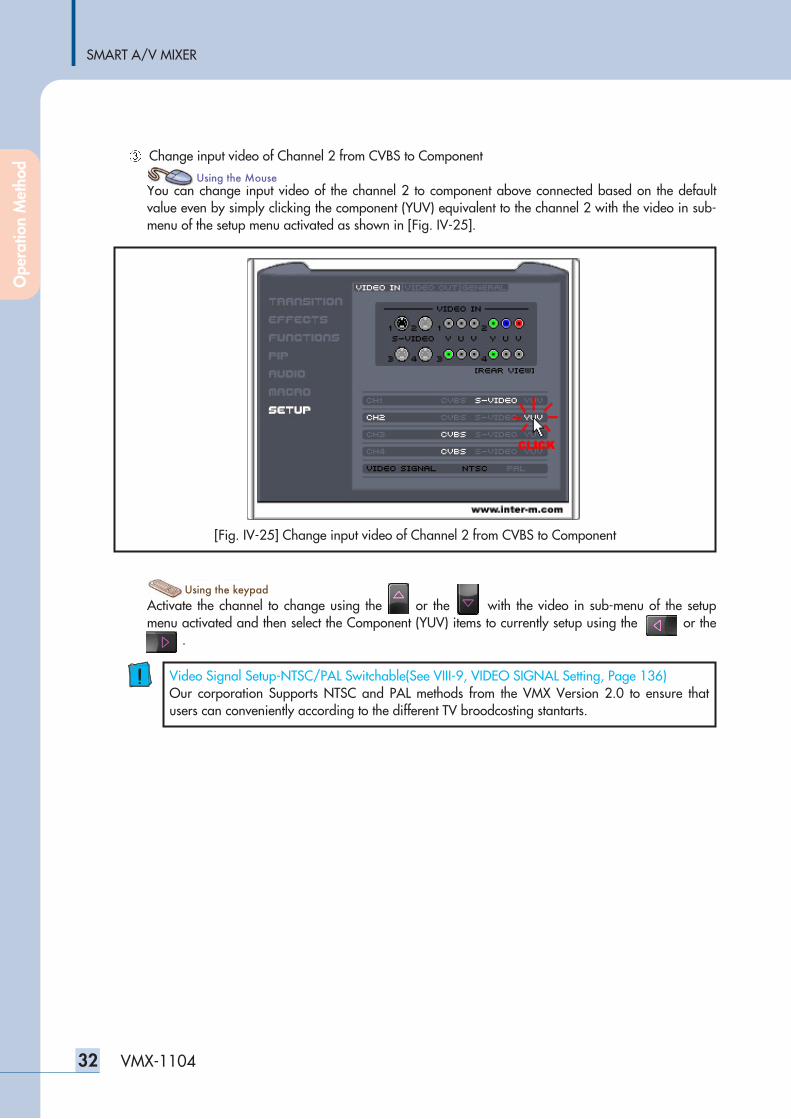
Change input video of Channel 2 from CVBS to Component
You can change input video of the channel 2 to component above connected based on the defaultvalue even by simply clicking the component (YUV) equivalent to the channel 2 with the video in sub-menu of the setup menu activated as shown in [Fig. IV-25].
Activate the channel to change using the vide or the v id with the video in sub-menu of the setupmenu activated and then select the Component (YUV) items to currently setup using the ty pe or thety pe .
Video Signal Setup-NTSC/PAL Switchable(See VIII-9, VIDEO SIGNAL Setting, Page 136)Our corporation Supports NTSC and PAL methods from the VMX Version 2.0 to ensure thatusers can conveniently according to the different TV broodcosting stantarts.
[Fig. IV-25] Change input video of Channel 2 from CVBS to Component
Ope
ratio
n M
etho
d
SMART A/V MIXER
33VMX-1104
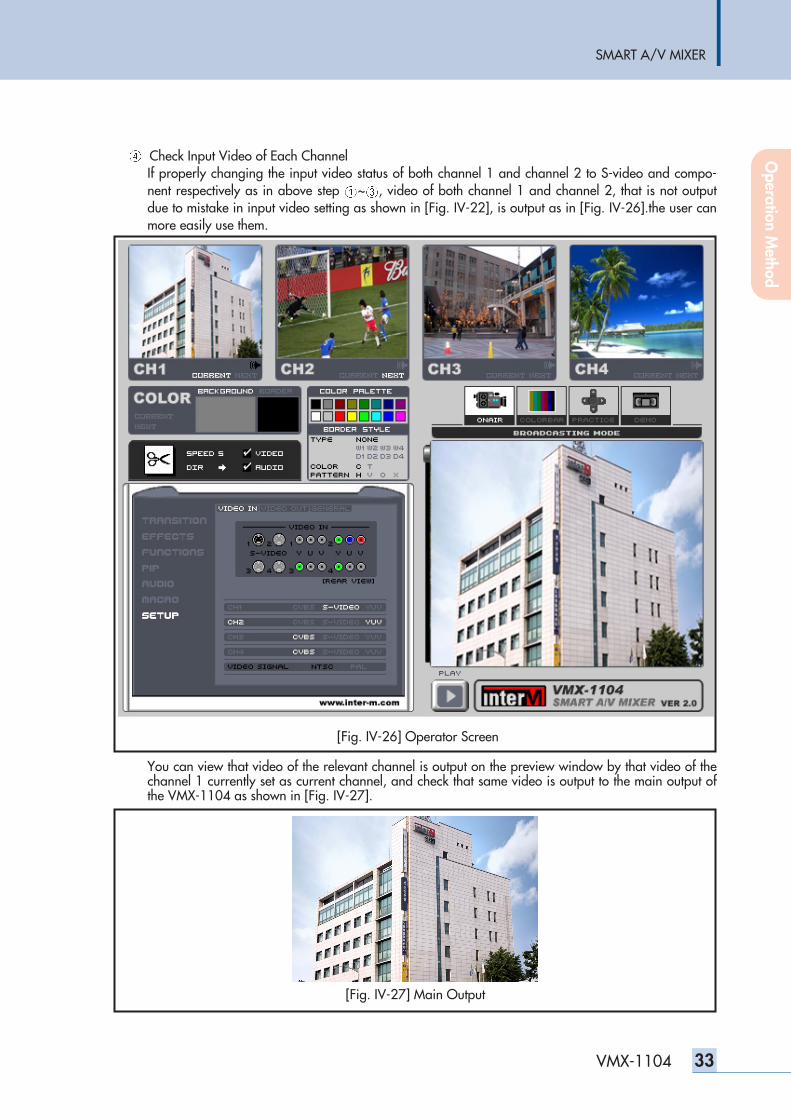
Check Input Video of Each ChannelIf properly changing the input video status of both channel 1 and channel 2 to S-video and compo-nent respectively as in above step ~ , video of both channel 1 and channel 2, that is not outputdue to mistake in input video setting as shown in [Fig. IV-22], is output as in [Fig. IV-26].the user canmore easily use them.
You can view that video of the relevant channel is output on the preview window by that video of thechannel 1 currently set as current channel, and check that same video is output to the main output ofthe VMX-1104 as shown in [Fig. IV-27].
[Fig. IV-26] Operator Screen
[Fig. IV-27] Main Output
Operation M
ethod
SMART A/V MIXER
34 VMX-1104
11. Optimization of Input Video For video to input to each channel, brightness, contrast and color, etc may differ due to various factorssuch as features of device used, picture quality of recorded video or status of lines transmitting video. Inthis section, we will describe about method to optimize input video using brightness, contrast, HUE andsaturation function that the VMX-1104 provides before performing video effect or screen transition.
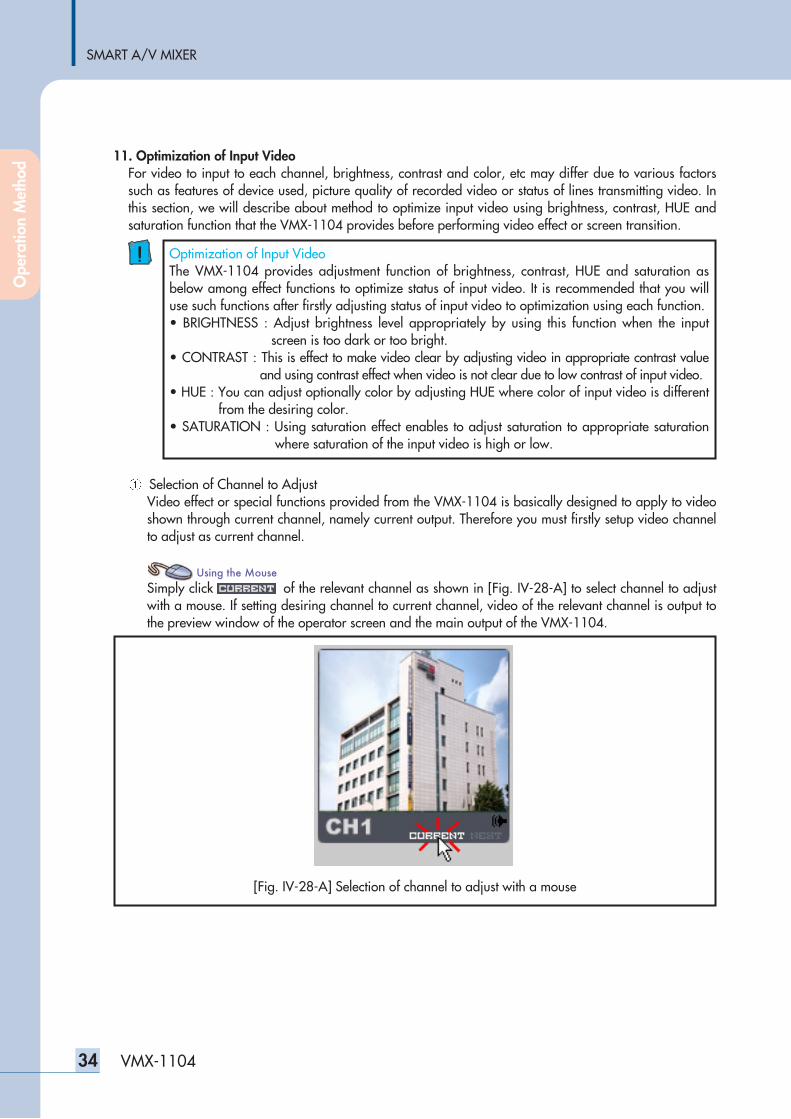
Selection of Channel to AdjustVideo effect or special functions provided from the VMX-1104 is basically designed to apply to videoshown through current channel, namely current output. Therefore you must firstly setup video channelto adjust as current channel.
Simply click relev ant of the relevant channel as shown in [Fig. IV-28-A] to select channel to adjustwith a mouse. If setting desiring channel to current channel, video of the relevant channel is output tothe preview window of the operator screen and the main output of the VMX-1104.
Optimization of Input Video The VMX-1104 provides adjustment function of brightness, contrast, HUE and saturation asbelow among effect functions to optimize status of input video. It is recommended that you willuse such functions after firstly adjusting status of input video to optimization using each function.• BRIGHTNESS : Adjust brightness level appropriately by using this function when the input
screen is too dark or too bright.• CONTRAST : This is effect to make video clear by adjusting video in appropriate contrast value
and using contrast effect when video is not clear due to low contrast of input video.• HUE : You can adjust optionally color by adjusting HUE where color of input video is different
from the desiring color.• SATURATION : Using saturation effect enables to adjust saturation to appropriate saturation
where saturation of the input video is high or low.
[Fig. IV-28-A] Selection of channel to adjust with a mouse
Ope
ratio
n M
etho
d
SMART A/V MIXER
35VMX-1104
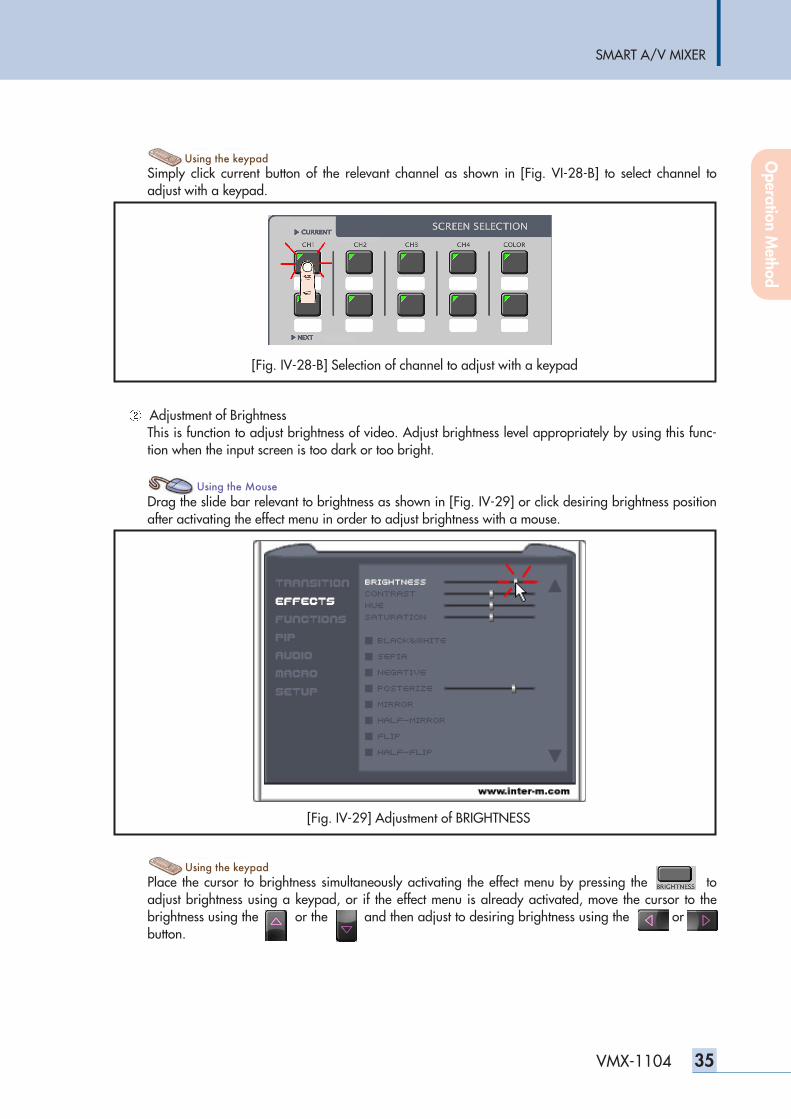
Simply click current button of the relevant channel as shown in [Fig. VI-28-B] to select channel toadjust with a keypad.
Adjustment of Brightness This is function to adjust brightness of video. Adjust brightness level appropriately by using this func-tion when the input screen is too dark or too bright.
Drag the slide bar relevant to brightness as shown in [Fig. IV-29] or click desiring brightness positionafter activating the effect menu in order to adjust brightness with a mouse.
Place the cursor to brightness simultaneously activating the effect menu by pressing the toadjust brightness using a keypad, or if the effect menu is already activated, move the cursor to thebrightness using the the or the the and then adjust to desiring brightness using the the or thebutton.
[Fig. IV-28-B] Selection of channel to adjust with a keypad
[Fig. IV-29] Adjustment of BRIGHTNESS
Operation M
ethod
Adjustment of ContrastContrast is function to adjust contrast of video. To clarify input video further, use this function togetherwith brightness function for adjustment.
Drag the slide bar relevant to contrast or click desiring position after activating the effect menu in thesame manner as brightness to adjust contrast with a mouse.
Place the cursor to contrast simultaneously activating the effect menu by pressing the th e in thesame manner as brightness to contrast using a keypad, or if the effect menu is already activated,move the cursor to the contrast using the the or the the and then adjust to desiring contrast valueusing the the or the button.
Adjustment of HUE HUE is function to adjust color tune of video. If color of input video is different from desiring color,adjust it using this function.
Drag the slide bar relevant to HUE or click desiring position after activating the effect menu in orderto adjust HUE with a mouse.
Place the cursor to HUE simultaneously activating the effect menu by pressing the th e to adjustHUE using a keypad, or if the effect menu is already activated, move the cursor to the HUE using thethe or the th and then adjust to desiring color tune using the the or the button.
Adjustment of SaturationSaturation is function to adjust saturation level of video. If color of input video is different from desir-ing color, adjust it using this function.
Drag the slide bar relevant to saturation or click desiring brightness position after activating the effectmenu in order to adjust saturation with a mouse.
Place the cursor to saturation simultaneously activating the effect menu by pressing the th e toadjust saturation using a keypad, or if the effect menu is already activated, move the cursor to the sat-uration using thethe or the th and then set to desiring saturation value using the the or thebutton.
SMART A/V MIXER
36 VMX-1104
Ope
ratio
n M
etho
d
12. Provide Video Effect to Input VideoIf properly setting connected input video through previous steps and optimizing video, it means thatpreparation of broadcasting by giving video effect or by performing transition effect using the VMX-1104 is completed. In this section, we will describe about method of giving video effect to each channel.
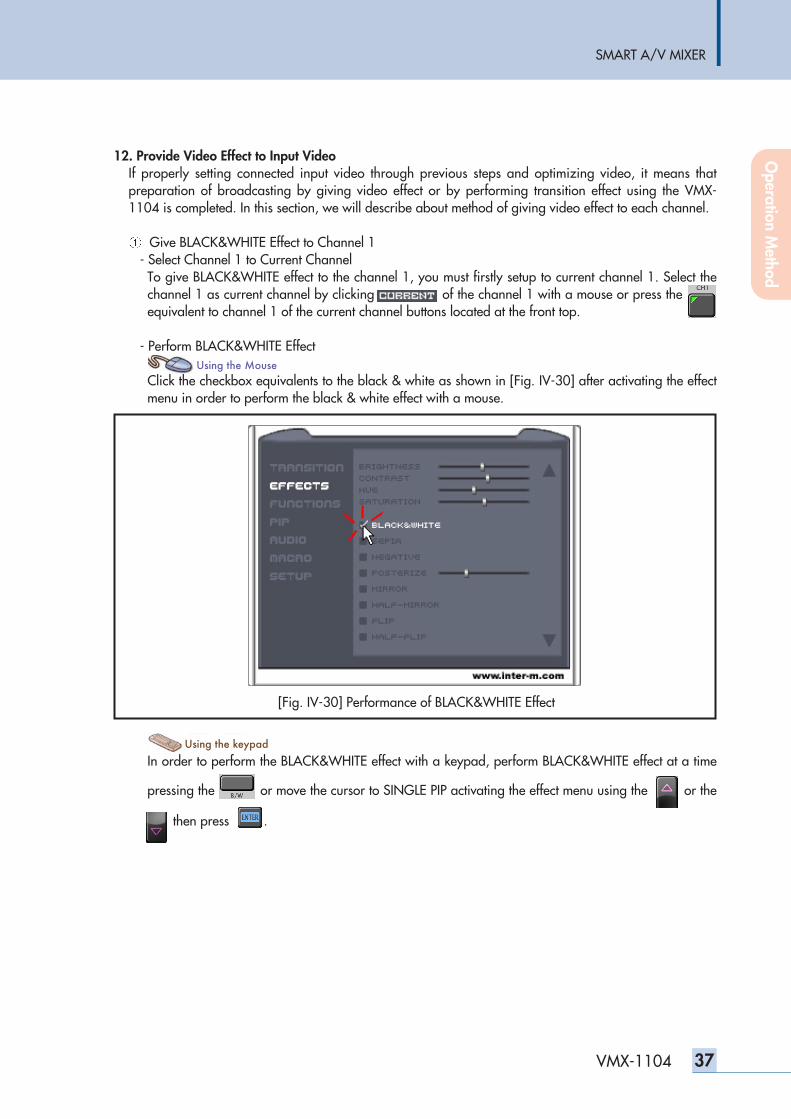
Give BLACK&WHITE Effect to Channel 1- Select Channel 1 to Current ChannelTo give BLACK&WHITE effect to the channel 1, you must firstly setup to current channel 1. Select thechannel 1 as current channel by clicking clickin of the channel 1 with a mouse or press the chanlequivalent to channel 1 of the current channel buttons located at the front top.
- Perform BLACK&WHITE Effect
Click the checkbox equivalents to the black & white as shown in [Fig. IV-30] after activating the effectmenu in order to perform the black & white effect with a mouse.
In order to perform the BLACK&WHITE effect with a keypad, perform BLACK&WHITE effect at a time
pressing the move or move the cursor to SINGLE PIP activating the effect menu using the the or the
th then press .
SMART A/V MIXER
37VMX-1104
[Fig. IV-30] Performance of BLACK&WHITE Effect
Operation M
ethod
SMART A/V MIXER
38 VMX-1104
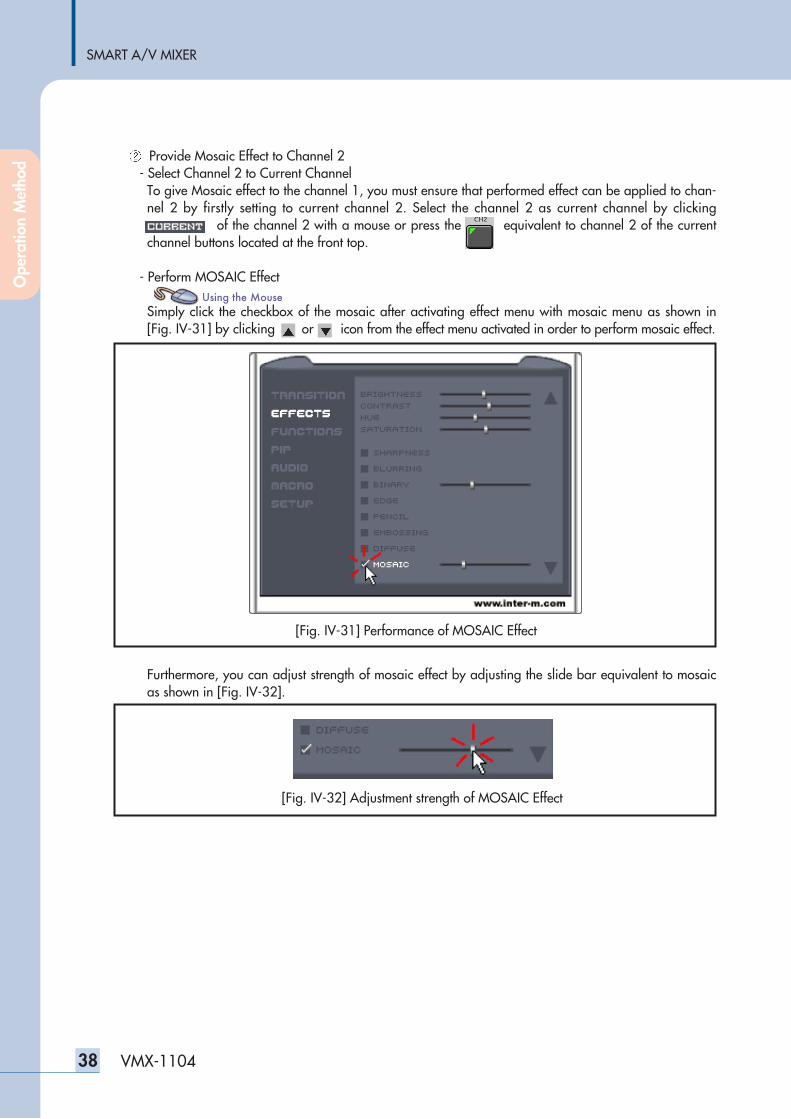
Provide Mosaic Effect to Channel 2- Select Channel 2 to Current ChannelTo give Mosaic effect to the channel 1, you must ensure that performed effect can be applied to chan-nel 2 by firstly setting to current channel 2. Select the channel 2 as current channel by clickingclick ing of the channel 2 with a mouse or press the press equivalent to channel 2 of the current
channel buttons located at the front top.
- Perform MOSAIC Effect
Simply click the checkbox of the mosaic after activating effect menu with mosaic menu as shown in[Fig. IV-31] by clicking or icon from the effect menu activated in order to perform mosaic effect.
Furthermore, you can adjust strength of mosaic effect by adjusting the slide bar equivalent to mosaicas shown in [Fig. IV-32].
[Fig. IV-31] Performance of MOSAIC Effect
[Fig. IV-32] Adjustment strength of MOSAIC Effect
Ope
ratio
n M
etho
d
In order to perform the mosaic effect with a keypad, perform MOSAIC effect at a time pressing the
mosaic or move the cursor to the mosaic effect menu using the using+ usingor the using+ usingwhile the
effect menu activated and then move the cursor to the mosaic menu using usingor usingand perform
mosaic function using using. You can adjust strength of mosaic by pressing usingor usin with the cur-
sor placed at mosaic.
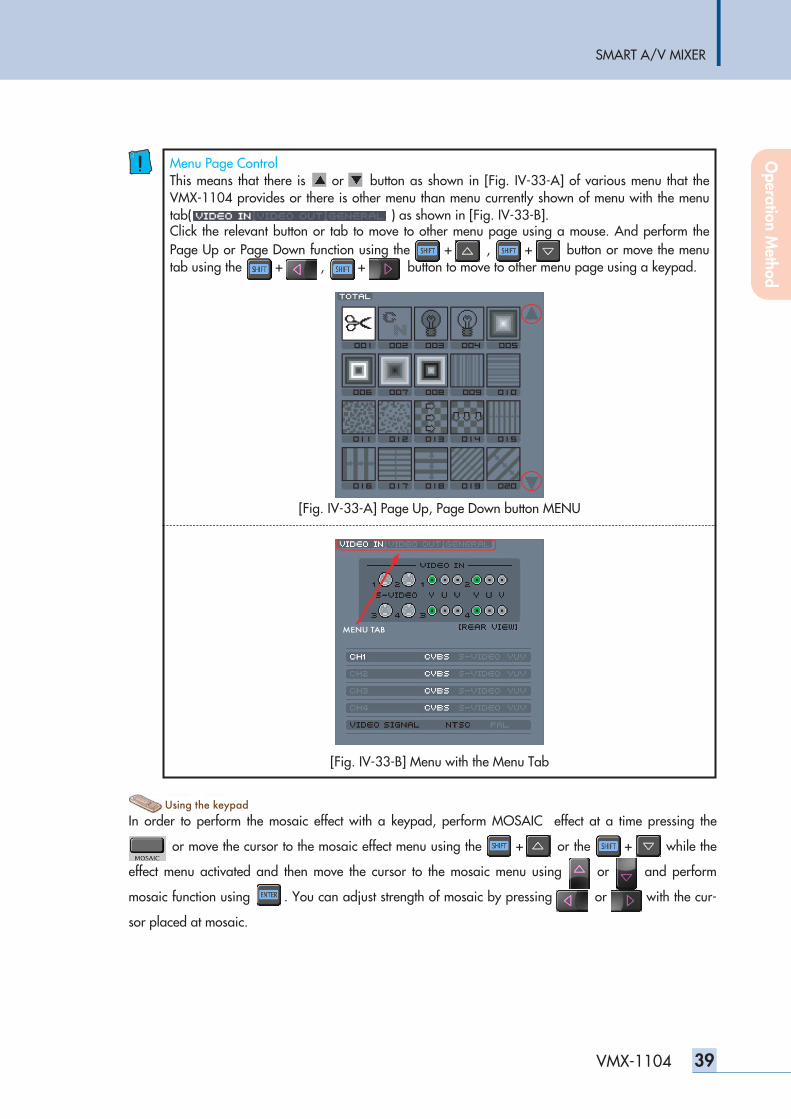
Menu Page ControlThis means that there is or button as shown in [Fig. IV-33-A] of various menu that theVMX-1104 provides or there is other menu than menu currently shown of menu with the menutab( ) as shown in [Fig. IV-33-B].Click the relevant button or tab to move to other menu page using a mouse. And perform thePage Up or Page Down function using the using+ using, using+ usingbutton or move the menutab using the using+ usin , using+ s i ng button to move to other menu page using a keypad.
SMART A/V MIXER
39VMX-1104
[Fig. IV-33-A] Page Up, Page Down button MENU
MENU TAB
[Fig. IV-33-B] Menu with the Menu Tab
Operation M
ethod
SMART A/V MIXER
40 VMX-1104
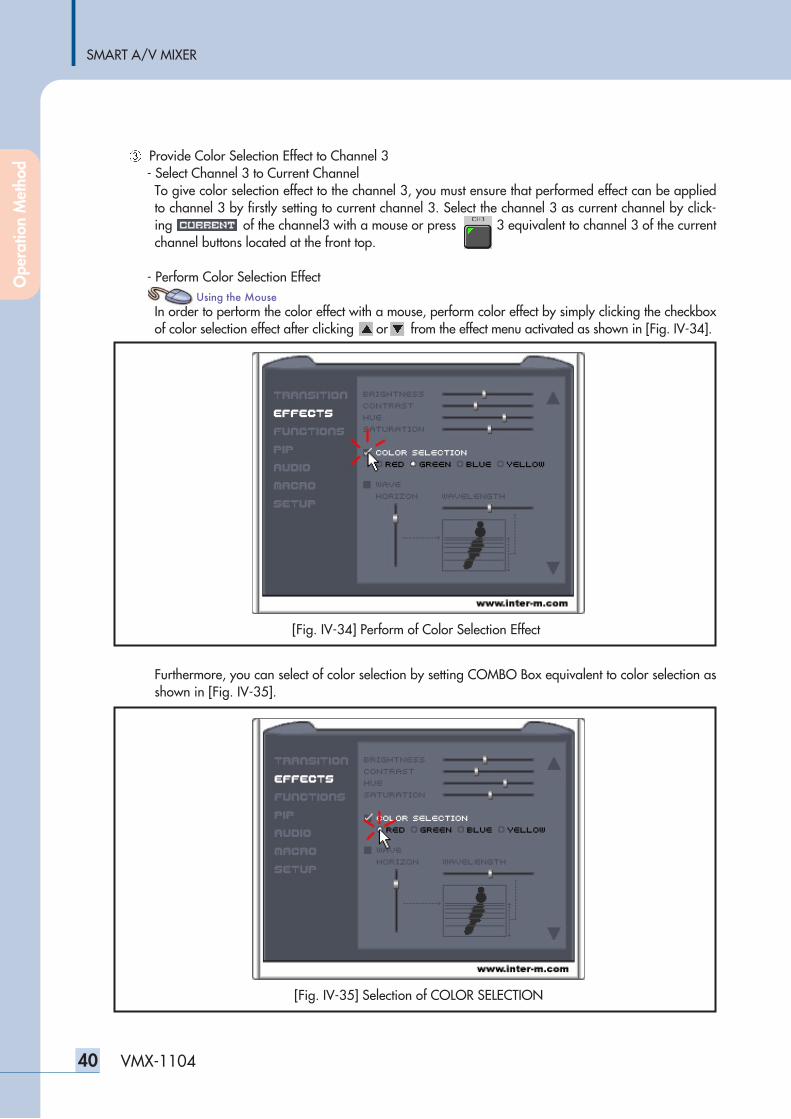
Provide Color Selection Effect to Channel 3- Select Channel 3 to Current ChannelTo give color selection effect to the channel 3, you must ensure that performed effect can be appliedto channel 3 by firstly setting to current channel 3. Select the channel 3 as current channel by click-ing channel3 of the channel3 with a mouse or press press 3 equivalent to channel 3 of the currentchannel buttons located at the front top.
- Perform Color Selection Effect
In order to perform the color effect with a mouse, perform color effect by simply clicking the checkboxof color selection effect after clicking or from the effect menu activated as shown in [Fig. IV-34].
Furthermore, you can select of color selection by setting COMBO Box equivalent to color selection asshown in [Fig. IV-35].
[Fig. IV-34] Perform of Color Selection Effect
[Fig. IV-35] Selection of COLOR SELECTION
Ope
ratio
n M
etho
d
SMART A/V MIXER
41VMX-1104
In order to perform the color selection effect with a keypad, perform color selection effect at a time
by pressing pressing , or move the cursor to the color selection effect menu using usingor usingwhile
the effect menu activated and then move the cursor to the color selection menu by using the using+
using, using+ using button and perform mosaic function using using. You can select color selection
by pressing the usingor usin with the cursor placed at color selection.
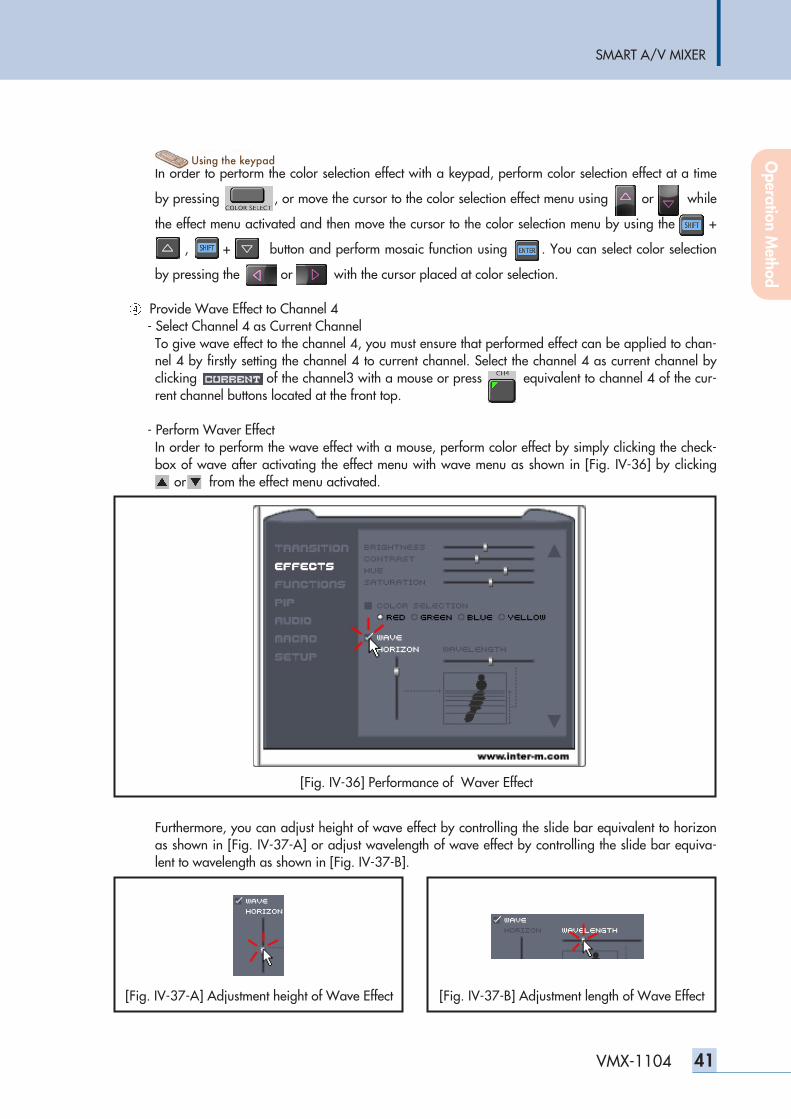
Provide Wave Effect to Channel 4- Select Channel 4 as Current ChannelTo give wave effect to the channel 4, you must ensure that performed effect can be applied to chan-nel 4 by firstly setting the channel 4 to current channel. Select the channel 4 as current channel byclicking equivalent of the channel3 with a mouse or press press equivalent to channel 4 of the cur-rent channel buttons located at the front top.
- Perform Waver EffectIn order to perform the wave effect with a mouse, perform color effect by simply clicking the check-box of wave after activating the effect menu with wave menu as shown in [Fig. IV-36] by clicking
or from the effect menu activated.
Furthermore, you can adjust height of wave effect by controlling the slide bar equivalent to horizonas shown in [Fig. IV-37-A] or adjust wavelength of wave effect by controlling the slide bar equiva-lent to wavelength as shown in [Fig. IV-37-B].
[Fig. IV-36] Performance of Waver Effect
[Fig. IV-37-A] Adjustment height of Wave Effect [Fig. IV-37-B] Adjustment length of Wave Effect
Operation M
ethod
SMART A/V MIXER
42 VMX-1104
In order to perform the wave effect with a keypad, perform wave effect at a time by pressing
In orderor move the cursor to the page with effect menu using the using+ usig, usin+ usin while the
effect menu is activated and then move the cursor to the wave menu by using the usingor usingand
perform mosaic function by pressing mos. You can adjust horizon of wave by pressing usingor
usingwith the cursor placed at horizon of wave. And, you can adjust wavelength of wave by pressing
using + usin with the cursor placed at wavelength of wave.
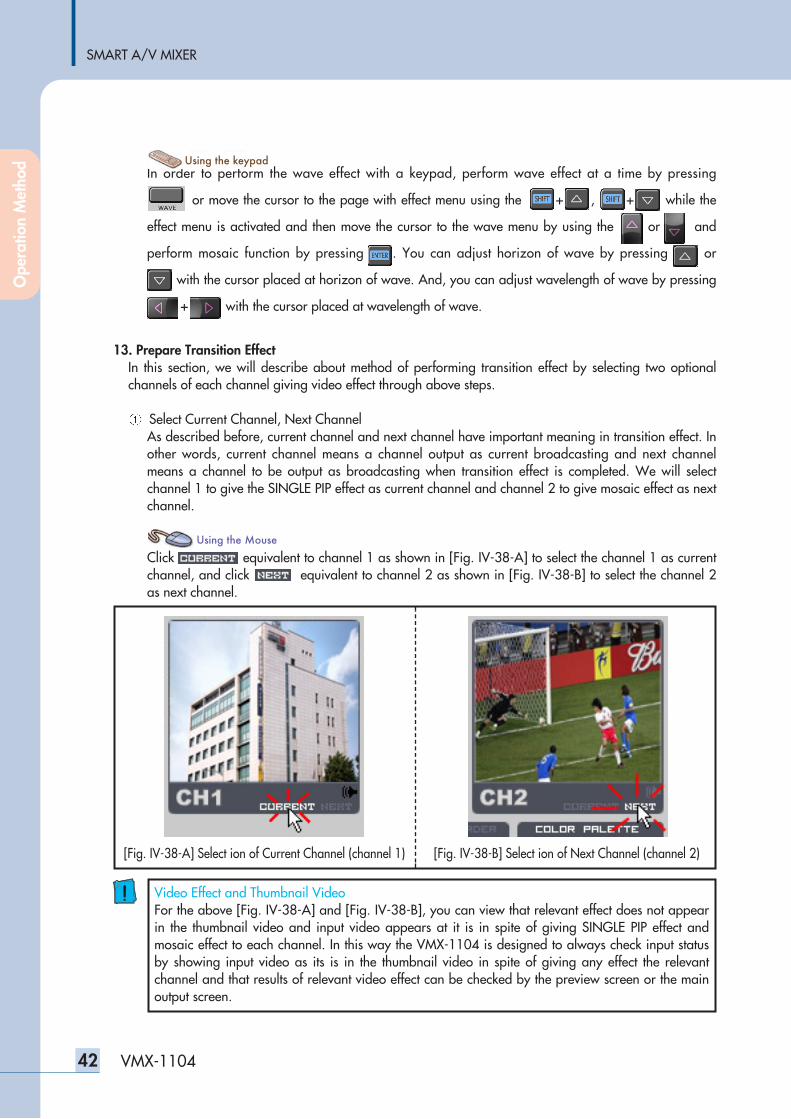
13. Prepare Transition Effect In this section, we will describe about method of performing transition effect by selecting two optionalchannels of each channel giving video effect through above steps.
Select Current Channel, Next ChannelAs described before, current channel and next channel have important meaning in transition effect. Inother words, current channel means a channel output as current broadcasting and next channelmeans a channel to be output as broadcasting when transition effect is completed. We will selectchannel 1 to give the SINGLE PIP effect as current channel and channel 2 to give mosaic effect as nextchannel.
Click Click equivalent to channel 1 as shown in [Fig. IV-38-A] to select the channel 1 as currentchannel, and click click equivalent to channel 2 as shown in [Fig. IV-38-B] to select the channel 2as next channel.
Video Effect and Thumbnail VideoFor the above [Fig. IV-38-A] and [Fig. IV-38-B], you can view that relevant effect does not appearin the thumbnail video and input video appears at it is in spite of giving SINGLE PIP effect andmosaic effect to each channel. In this way the VMX-1104 is designed to always check input statusby showing input video as its is in the thumbnail video in spite of giving any effect the relevantchannel and that results of relevant video effect can be checked by the preview screen or the mainoutput screen.
[Fig. IV-38-A] Select ion of Current Channel (channel 1) [Fig. IV-38-B] Select ion of Next Channel (channel 2)
Ope
ratio
n M
etho
d
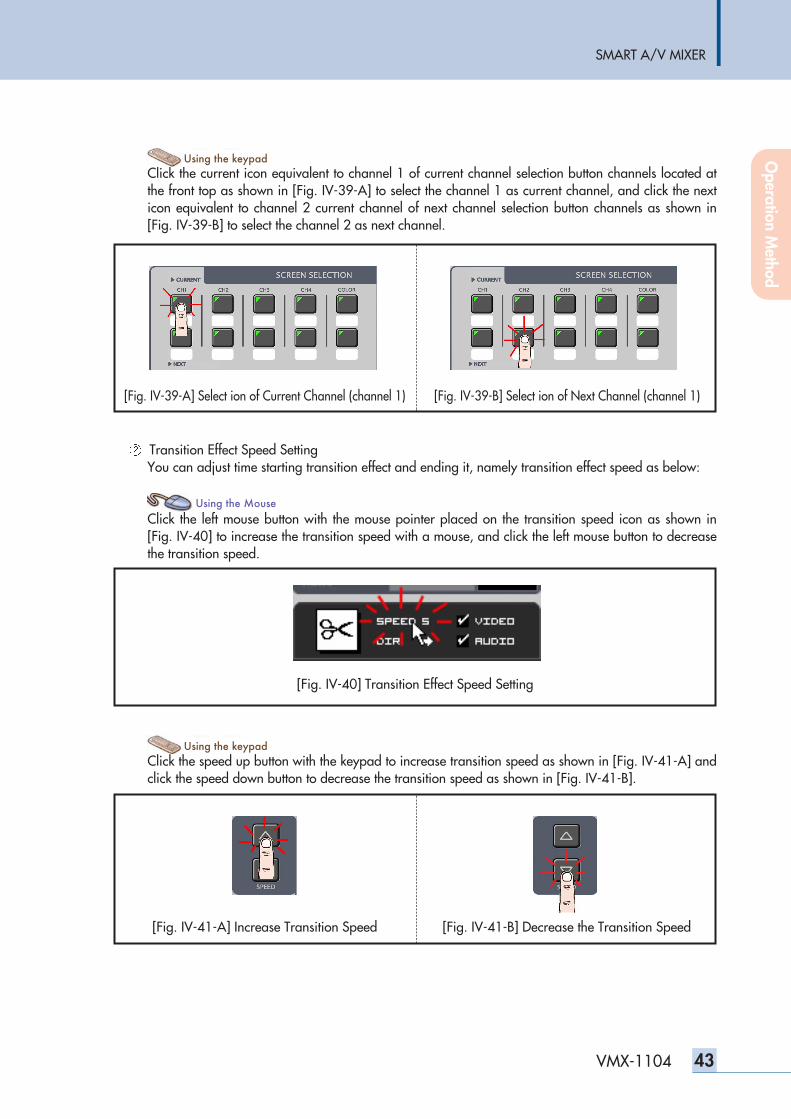
SMART A/V MIXER
43VMX-1104
Click the current icon equivalent to channel 1 of current channel selection button channels located atthe front top as shown in [Fig. IV-39-A] to select the channel 1 as current channel, and click the nexticon equivalent to channel 2 current channel of next channel selection button channels as shown in[Fig. IV-39-B] to select the channel 2 as next channel.
Transition Effect Speed SettingYou can adjust time starting transition effect and ending it, namely transition effect speed as below:
Click the left mouse button with the mouse pointer placed on the transition speed icon as shown in[Fig. IV-40] to increase the transition speed with a mouse, and click the left mouse button to decreasethe transition speed.
Click the speed up button with the keypad to increase transition speed as shown in [Fig. IV-41-A] andclick the speed down button to decrease the transition speed as shown in [Fig. IV-41-B].
[Fig. IV-39-A] Select ion of Current Channel (channel 1) [Fig. IV-39-B] Select ion of Next Channel (channel 1)
[Fig. IV-40] Transition Effect Speed Setting
[Fig. IV-41-A] Increase Transition Speed [Fig. IV-41-B] Decrease the Transition Speed
Operation M
ethod
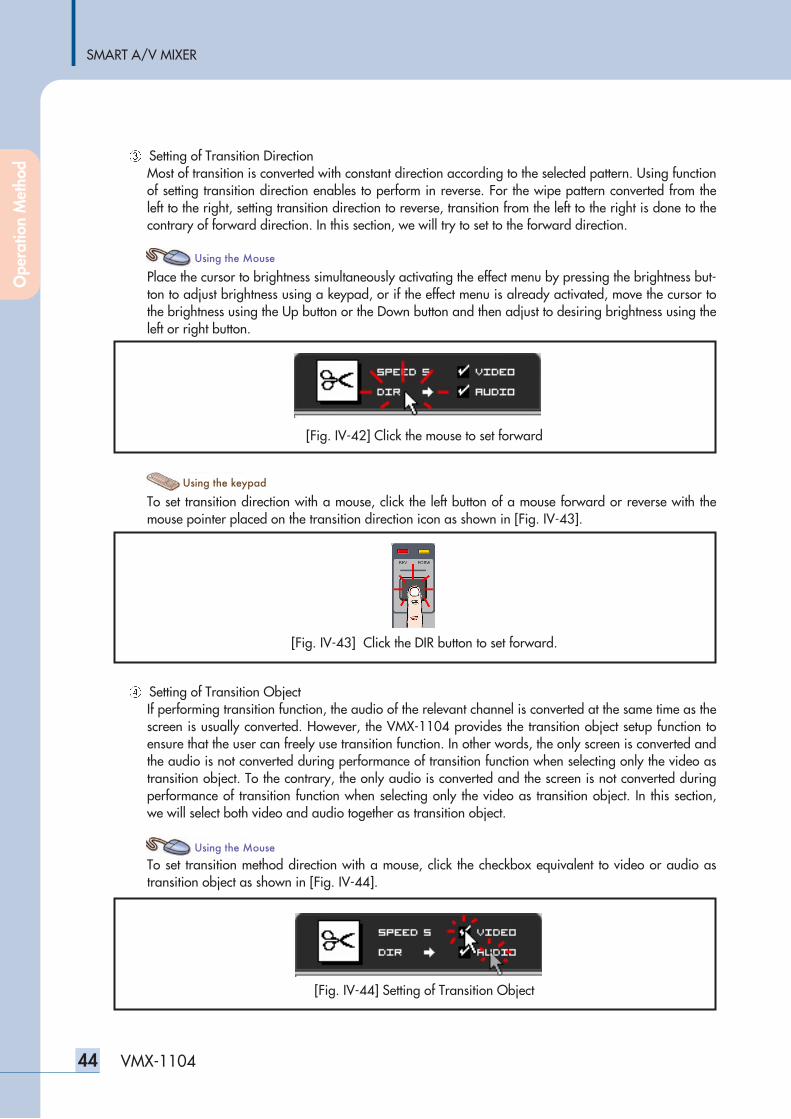
SMART A/V MIXER
44 VMX-1104
Setting of Transition DirectionMost of transition is converted with constant direction according to the selected pattern. Using functionof setting transition direction enables to perform in reverse. For the wipe pattern converted from theleft to the right, setting transition direction to reverse, transition from the left to the right is done to thecontrary of forward direction. In this section, we will try to set to the forward direction.
Place the cursor to brightness simultaneously activating the effect menu by pressing the brightness but-ton to adjust brightness using a keypad, or if the effect menu is already activated, move the cursor tothe brightness using the Up button or the Down button and then adjust to desiring brightness using theleft or right button.
To set transition direction with a mouse, click the left button of a mouse forward or reverse with themouse pointer placed on the transition direction icon as shown in [Fig. IV-43].
Setting of Transition ObjectIf performing transition function, the audio of the relevant channel is converted at the same time as thescreen is usually converted. However, the VMX-1104 provides the transition object setup function toensure that the user can freely use transition function. In other words, the only screen is converted andthe audio is not converted during performance of transition function when selecting only the video astransition object. To the contrary, the only audio is converted and the screen is not converted duringperformance of transition function when selecting only the video as transition object. In this section,we will select both video and audio together as transition object.
To set transition method direction with a mouse, click the checkbox equivalent to video or audio astransition object as shown in [Fig. IV-44].
[Fig. IV-42] Click the mouse to set forward
[Fig. IV-43] Click the DIR button to set forward.
[Fig. IV-44] Setting of Transition Object
Ope
ratio
n M
etho
d
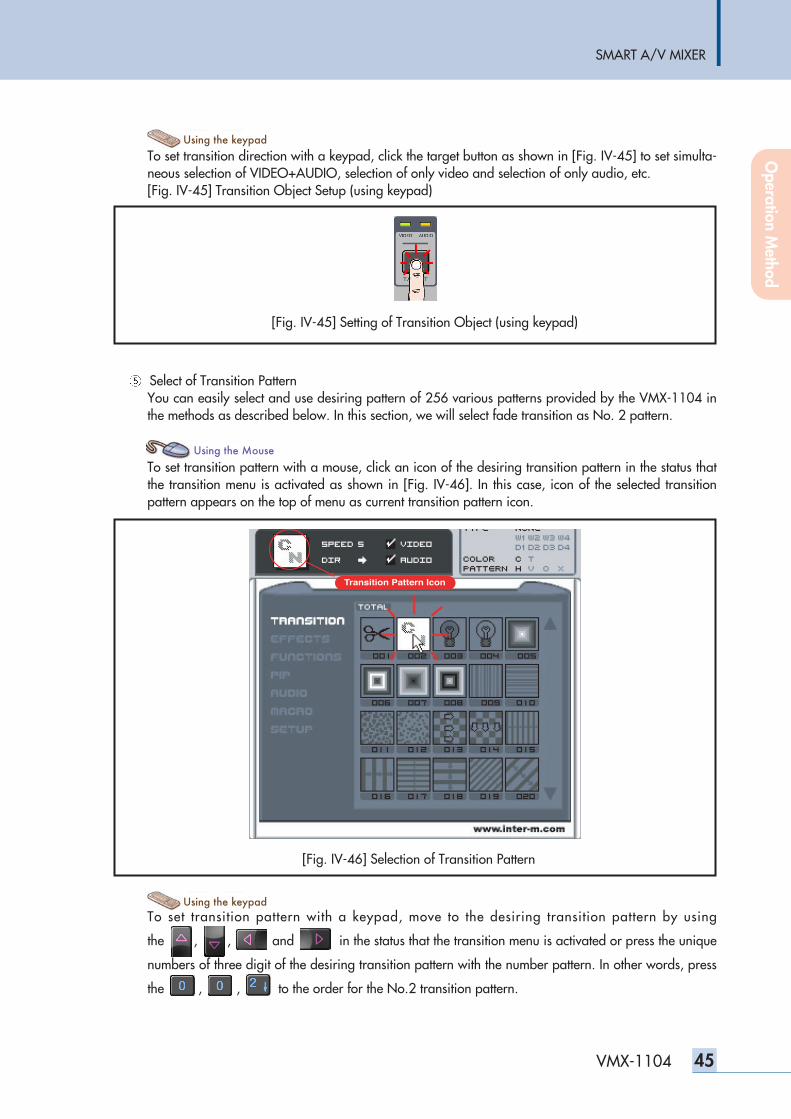
SMART A/V MIXER
45VMX-1104
To set transition direction with a keypad, click the target button as shown in [Fig. IV-45] to set simulta-neous selection of VIDEO+AUDIO, selection of only video and selection of only audio, etc. [Fig. IV-45] Transition Object Setup (using keypad)
Select of Transition PatternYou can easily select and use desiring pattern of 256 various patterns provided by the VMX-1104 inthe methods as described below. In this section, we will select fade transition as No. 2 pattern.
To set transition pattern with a mouse, click an icon of the desiring transition pattern in the status thatthe transition menu is activated as shown in [Fig. IV-46]. In this case, icon of the selected transitionpattern appears on the top of menu as current transition pattern icon.
To set transition pattern with a keypad, move to the desiring transition pattern by using
theusing,using, using andusing in the status that the transition menu is activated or press the unique
numbers of three digit of the desiring transition pattern with the number pattern. In other words, press
the order, order, order to the order for the No.2 transition pattern.
[Fig. IV-45] Setting of Transition Object (using keypad)
Transition Pattern Icon
[Fig. IV-46] Selection of Transition Pattern
Operation M
ethod
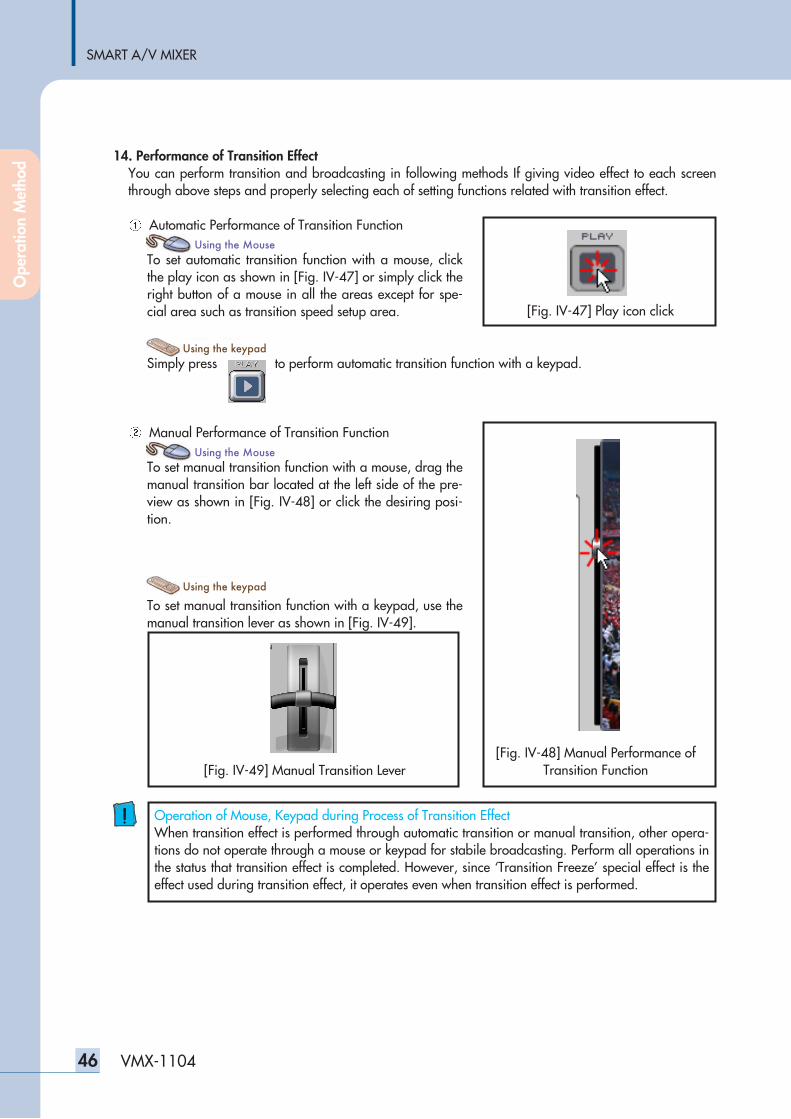
SMART A/V MIXER
46 VMX-1104
14. Performance of Transition Effect You can perform transition and broadcasting in following methods If giving video effect to each screenthrough above steps and properly selecting each of setting functions related with transition effect.
Automatic Performance of Transition Function
To set automatic transition function with a mouse, clickthe play icon as shown in [Fig. IV-47] or simply click theright button of a mouse in all the areas except for spe-cial area such as transition speed setup area.
Simply press to perform automatic transition function with a keypad.
Manual Performance of Transition Function
To set manual transition function with a mouse, drag themanual transition bar located at the left side of the pre-view as shown in [Fig. IV-48] or click the desiring posi-tion.
To set manual transition function with a keypad, use themanual transition lever as shown in [Fig. IV-49].
[Fig. IV-47] Play icon click
[Fig. IV-48] Manual Performance ofTransition Function
Operation of Mouse, Keypad during Process of Transition EffectWhen transition effect is performed through automatic transition or manual transition, other opera-tions do not operate through a mouse or keypad for stabile broadcasting. Perform all operations inthe status that transition effect is completed. However, since ‘Transition Freeze’ special effect is theeffect used during transition effect, it operates even when transition effect is performed.
[Fig. IV-49] Manual Transition Lever
Ope
ratio
n M
etho
d
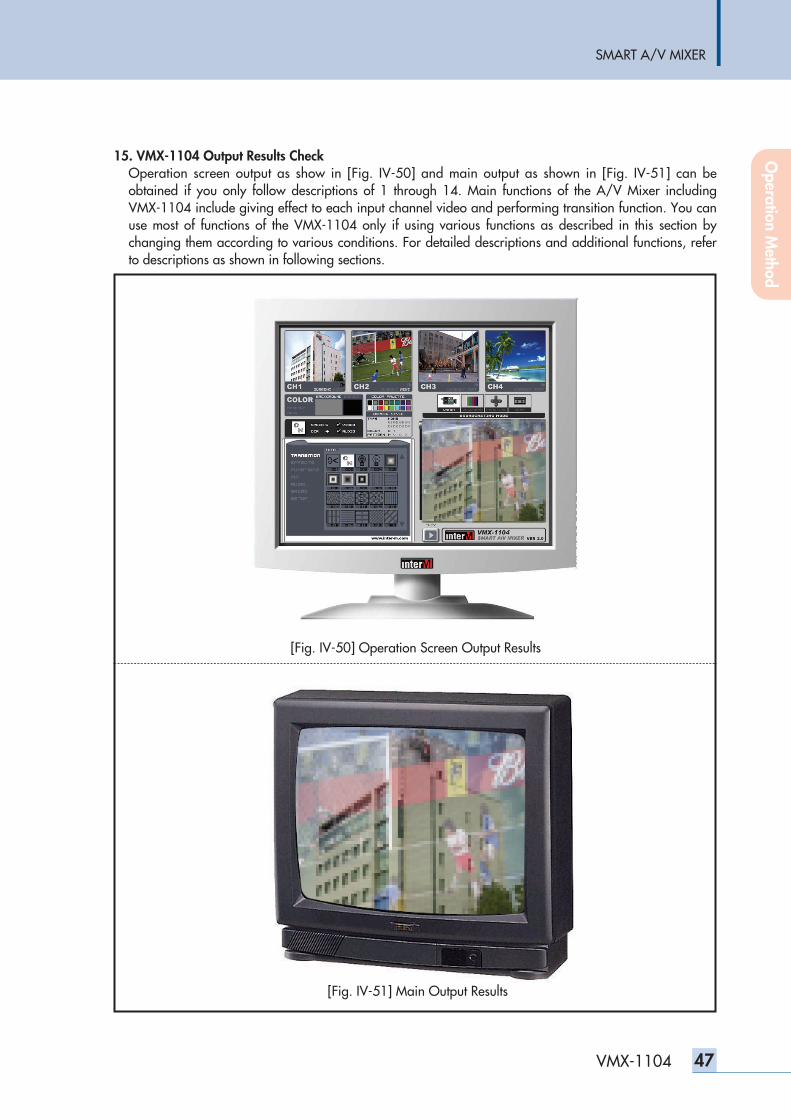
SMART A/V MIXER
47VMX-1104
15. VMX-1104 Output Results Check Operation screen output as show in [Fig. IV-50] and main output as shown in [Fig. IV-51] can beobtained if you only follow descriptions of 1 through 14. Main functions of the A/V Mixer includingVMX-1104 include giving effect to each input channel video and performing transition function. You canuse most of functions of the VMX-1104 only if using various functions as described in this section bychanging them according to various conditions. For detailed descriptions and additional functions, referto descriptions as shown in following sections.
[Fig. IV-50] Operation Screen Output Results
[Fig. IV-51] Main Output Results
Operation M
ethod
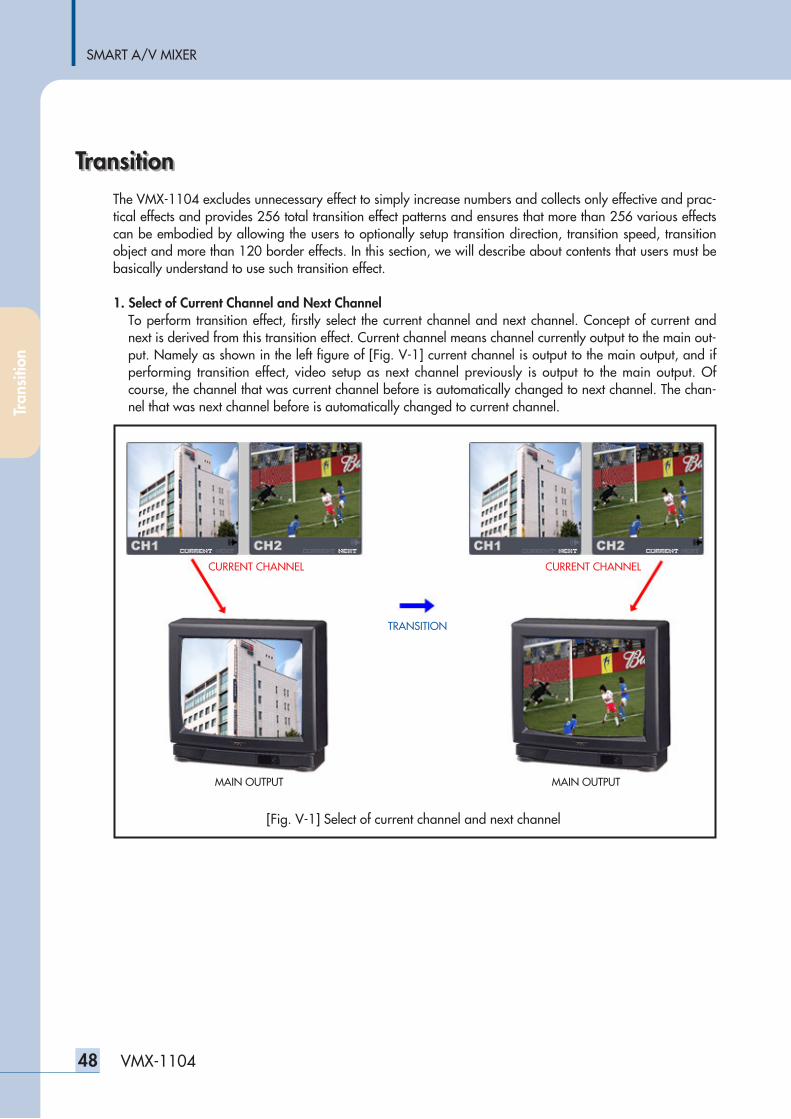
SMART A/V MIXER
48 VMX-1104
TransitionTransition The VMX-1104 excludes unnecessary effect to simply increase numbers and collects only effective and prac-tical effects and provides 256 total transition effect patterns and ensures that more than 256 various effectscan be embodied by allowing the users to optionally setup transition direction, transition speed, transitionobject and more than 120 border effects. In this section, we will describe about contents that users must bebasically understand to use such transition effect.
1. Select of Current Channel and Next ChannelTo perform transition effect, firstly select the current channel and next channel. Concept of current andnext is derived from this transition effect. Current channel means channel currently output to the main out-put. Namely as shown in the left figure of [Fig. V-1] current channel is output to the main output, and ifperforming transition effect, video setup as next channel previously is output to the main output. Ofcourse, the channel that was current channel before is automatically changed to next channel. The chan-nel that was next channel before is automatically changed to current channel.
[Fig. V-1] Select of current channel and next channel
CURRENT CHANNEL CURRENT CHANNEL
MAIN OUTPUT MAIN OUTPUT
TRANSITION
Tran
sitio
n

SMART A/V MIXER
49VMX-1104
To select current channel and next channel with a mouse, click mouse or click at the bottom of thumb-nail of each channel as shown in [Fig. V-2].
To setup transition direction with a mouse, click the DIR part of the transition direction setting window asshown in [Fig. V-5] and if doing so, transition direction is changed to forward from reverse or to reservefrom forward.
[Fig. V-2] Select of current channel and next channel with a mouse
[Fig. V-3] Select of current channel and next channel with a keypad
Transition

SMART A/V MIXER
50 VMX-1104
2. Setting of Transition DirectionTransition direction is function to change direction of the transition pattern. Namely as shown in [Fig. V-4] for the pattern converted to the right from the left, setting transition direction to Forward enables toconvert direction to the right from the left but setting to Reverse enables to convert direction to the leftfrom the right.
To setup transition direction with a mouse, click the DIR part of the transition direction setting window asshown in [Fig. V-5] and if doing so, transition direction is changed to forward from reverse or to reservefrom forward.
To setup transition direction with a keypad, click the DIR button of the right top of the front part of VMX-1104 as shown in [Fig. V-6] and if doing so, transition direction is changed to forward from reverse orto reserve from forward. Of LED located at the top of the button, the REV LED represents reverse, and theFORW LED represents forward.
[Fig. V-4] Transition Direction
[Fig. V-5] Setup of transition direction with a mouse
(a)Forward Direction (b)Reverse Direction
[Fig. V-6] Setup of transition direction with a keypad
Tran
sitio
n
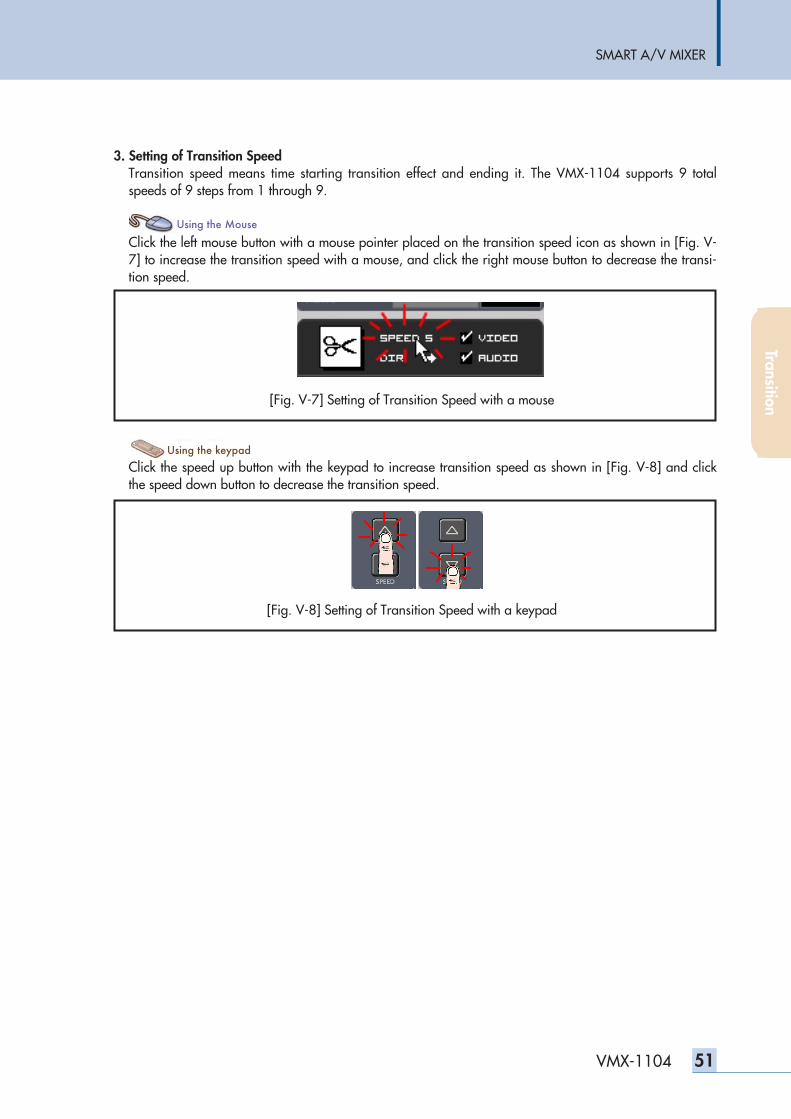
SMART A/V MIXER
51VMX-1104
3. Setting of Transition SpeedTransition speed means time starting transition effect and ending it. The VMX-1104 supports 9 totalspeeds of 9 steps from 1 through 9.
Click the left mouse button with a mouse pointer placed on the transition speed icon as shown in [Fig. V-7] to increase the transition speed with a mouse, and click the right mouse button to decrease the transi-tion speed.
Click the speed up button with the keypad to increase transition speed as shown in [Fig. V-8] and clickthe speed down button to decrease the transition speed.
[Fig. V-7] Setting of Transition Speed with a mouse
[Fig. V-8] Setting of Transition Speed with a keypad
Transition
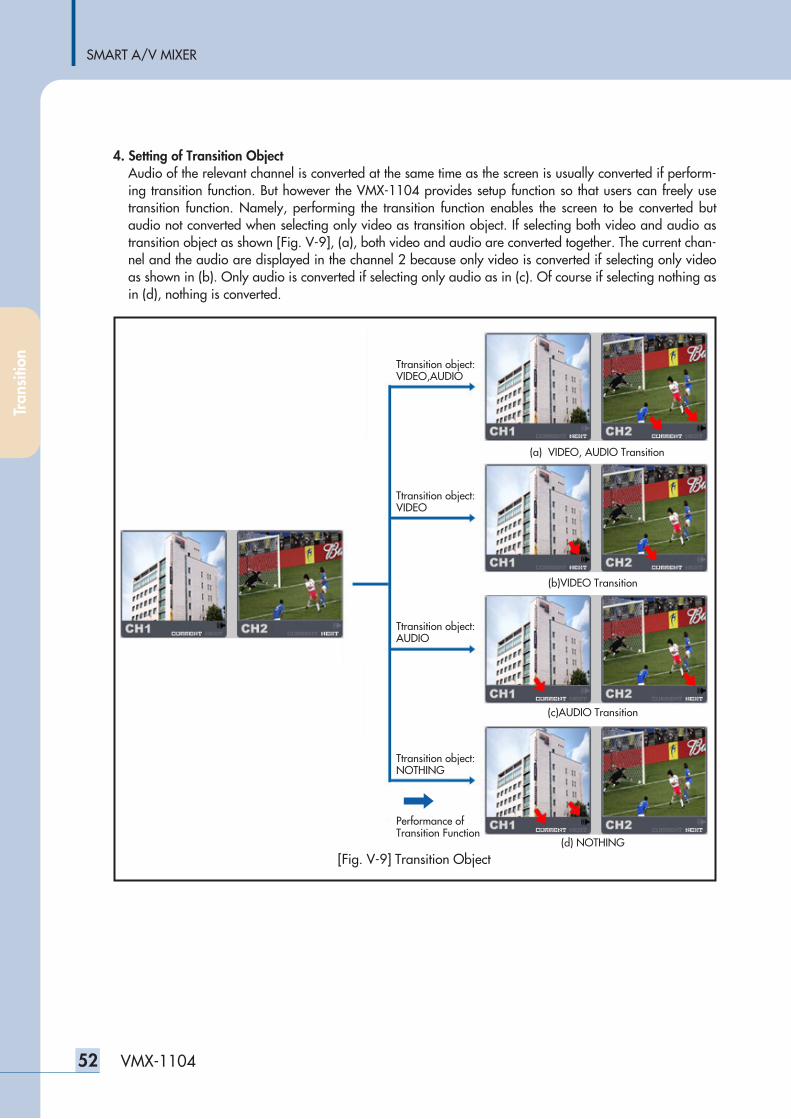
SMART A/V MIXER
52 VMX-1104
4. Setting of Transition ObjectAudio of the relevant channel is converted at the same time as the screen is usually converted if perform-ing transition function. But however the VMX-1104 provides setup function so that users can freely usetransition function. Namely, performing the transition function enables the screen to be converted butaudio not converted when selecting only video as transition object. If selecting both video and audio astransition object as shown [Fig. V-9], (a), both video and audio are converted together. The current chan-nel and the audio are displayed in the channel 2 because only video is converted if selecting only videoas shown in (b). Only audio is converted if selecting only audio as in (c). Of course if selecting nothing asin (d), nothing is converted.
[Fig. V-9] Transition Object
Ttransition object:VIDEO,AUDIO
Ttransition object:VIDEO
Ttransition object:AUDIO
Ttransition object:NOTHING
Performance ofTransition Function
(a) VIDEO, AUDIO Transition
(b)VIDEO Transition
(c)AUDIO Transition
(d) NOTHING
Tran
sitio
n
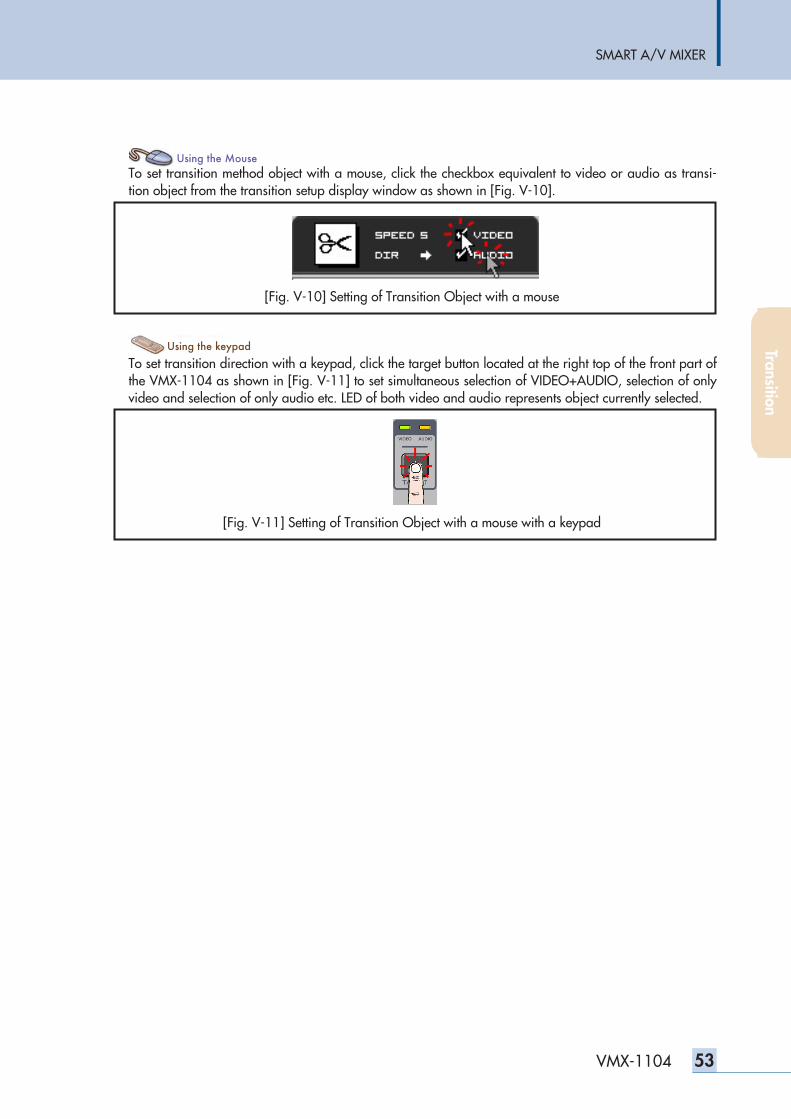
SMART A/V MIXER
53VMX-1104
To set transition method object with a mouse, click the checkbox equivalent to video or audio as transi-tion object from the transition setup display window as shown in [Fig. V-10].
To set transition direction with a keypad, click the target button located at the right top of the front part ofthe VMX-1104 as shown in [Fig. V-11] to set simultaneous selection of VIDEO+AUDIO, selection of onlyvideo and selection of only audio etc. LED of both video and audio represents object currently selected.
[Fig. V-10] Setting of Transition Object with a mouse
[Fig. V-11] Setting of Transition Object with a mouse with a keypad
Transition
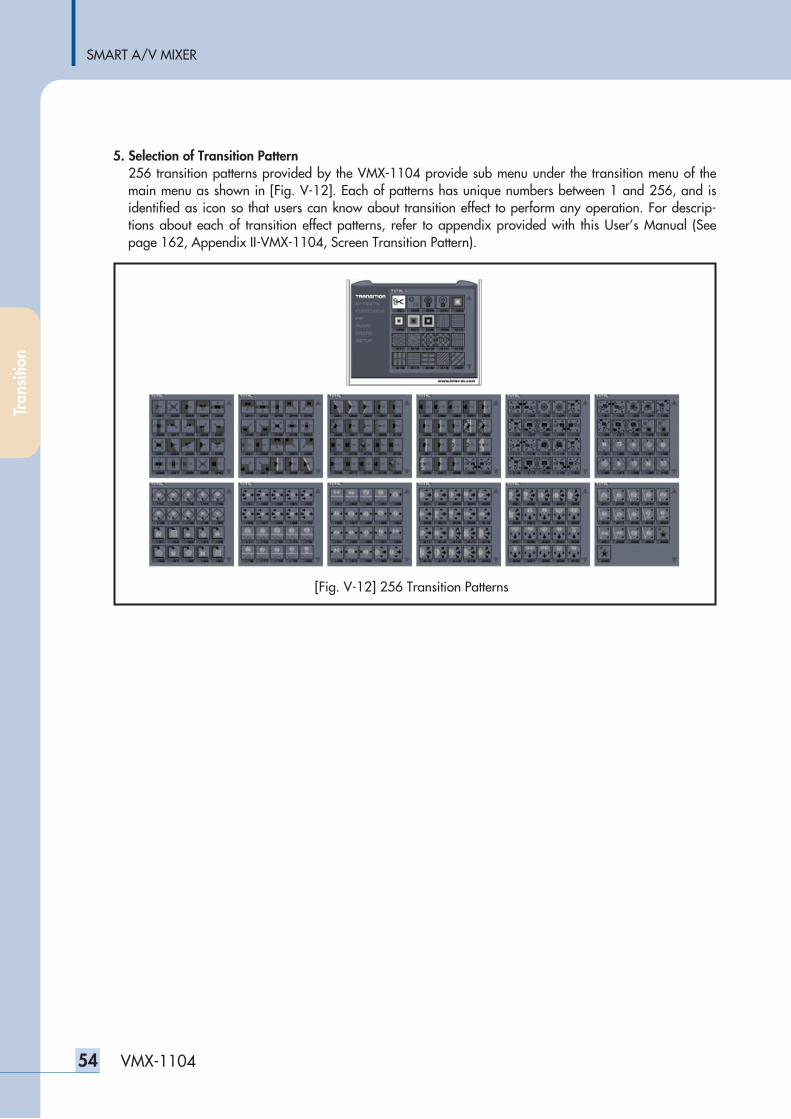
SMART A/V MIXER
54 VMX-1104
5. Selection of Transition Pattern256 transition patterns provided by the VMX-1104 provide sub menu under the transition menu of themain menu as shown in [Fig. V-12]. Each of patterns has unique numbers between 1 and 256, and isidentified as icon so that users can know about transition effect to perform any operation. For descrip-tions about each of transition effect patterns, refer to appendix provided with this User’s Manual (Seepage 162, Appendix II-VMX-1104, Screen Transition Pattern).
[Fig. V-12] 256 Transition Patterns
Tran
sitio
n
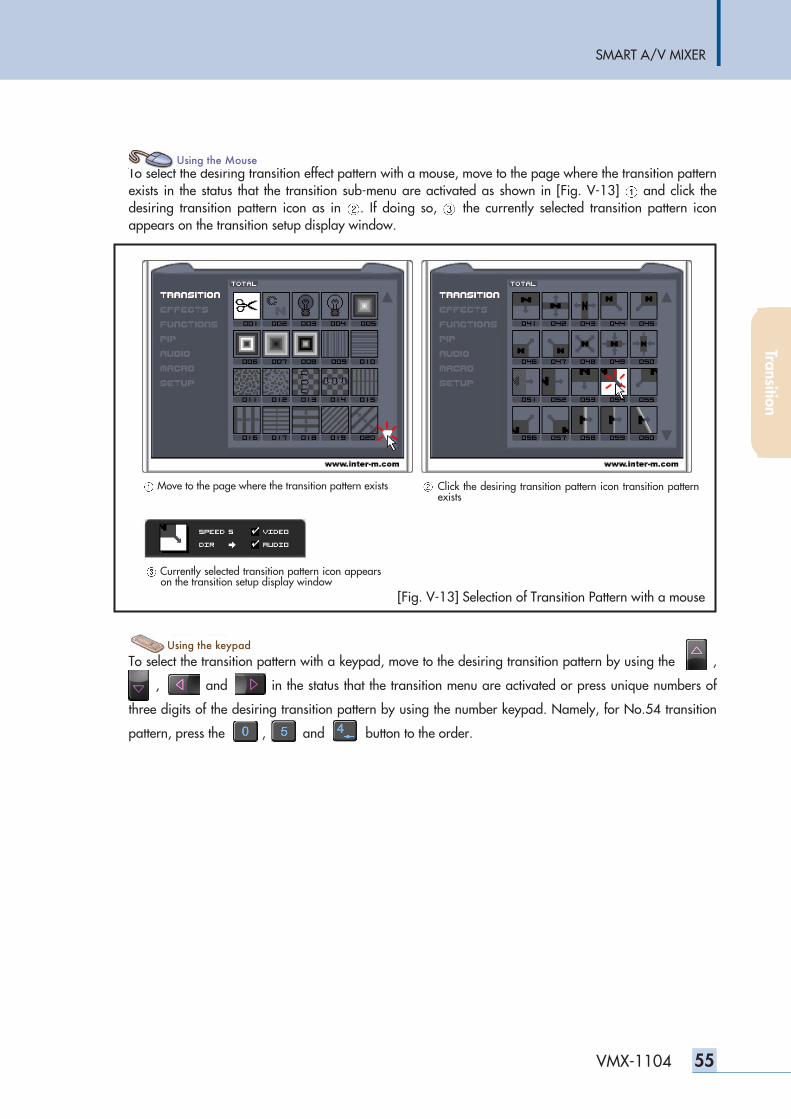
SMART A/V MIXER
55VMX-1104
To select the desiring transition effect pattern with a mouse, move to the page where the transition patternexists in the status that the transition sub-menu are activated as shown in [Fig. V-13] and click thedesiring transition pattern icon as in . If doing so, the currently selected transition pattern iconappears on the transition setup display window.
To select the transition pattern with a keypad, move to the desiring transition pattern by using the using ,
usin, usin and using in the status that the transition menu are activated or press unique numbers of
three digits of the desiring transition pattern by using the number keypad. Namely, for No.54 transition
pattern, press the and , and and and button to the order.
[Fig. V-13] Selection of Transition Pattern with a mouse
Move to the page where the transition pattern exists Click the desiring transition pattern icon transition patternexists
Currently selected transition pattern icon appearson the transition setup display window
Transition
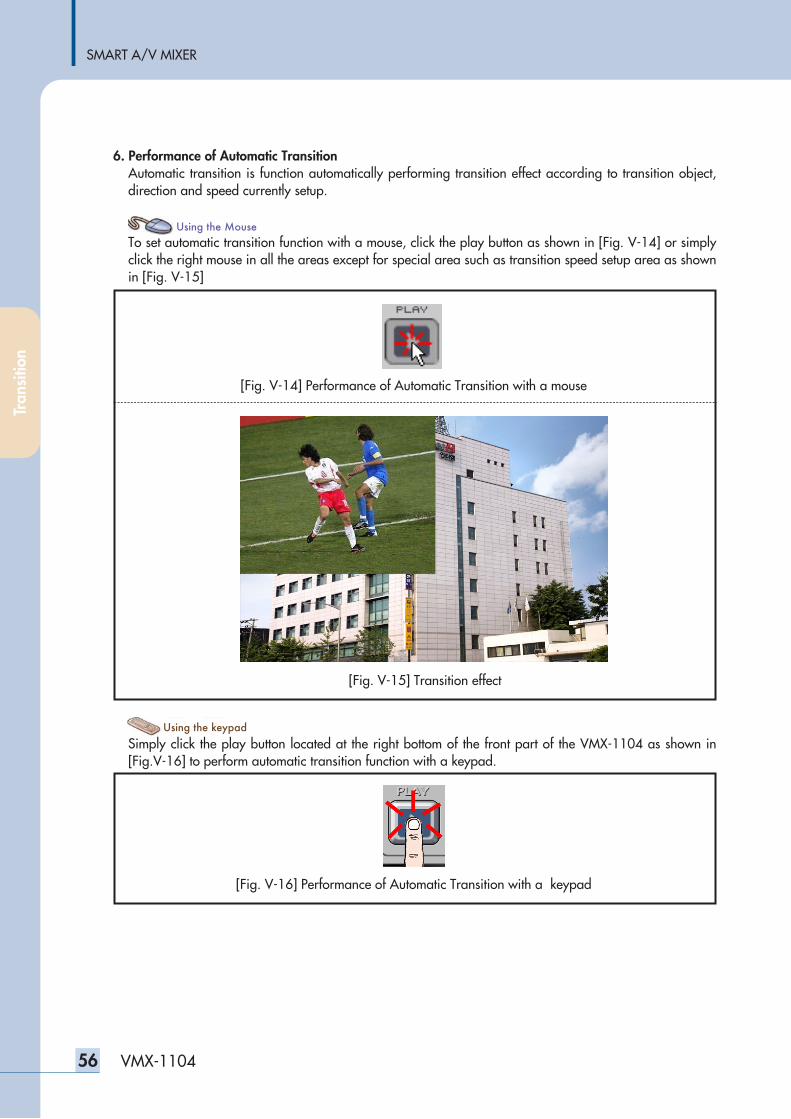
SMART A/V MIXER
56 VMX-1104
6. Performance of Automatic TransitionAutomatic transition is function automatically performing transition effect according to transition object,direction and speed currently setup.
To set automatic transition function with a mouse, click the play button as shown in [Fig. V-14] or simplyclick the right mouse in all the areas except for special area such as transition speed setup area as shownin [Fig. V-15]
Simply click the play button located at the right bottom of the front part of the VMX-1104 as shown in[Fig.V-16] to perform automatic transition function with a keypad.
[Fig. V-14] Performance of Automatic Transition with a mouse
[Fig. V-16] Performance of Automatic Transition with a keypad
[Fig. V-15] Transition effect
Tran
sitio
n
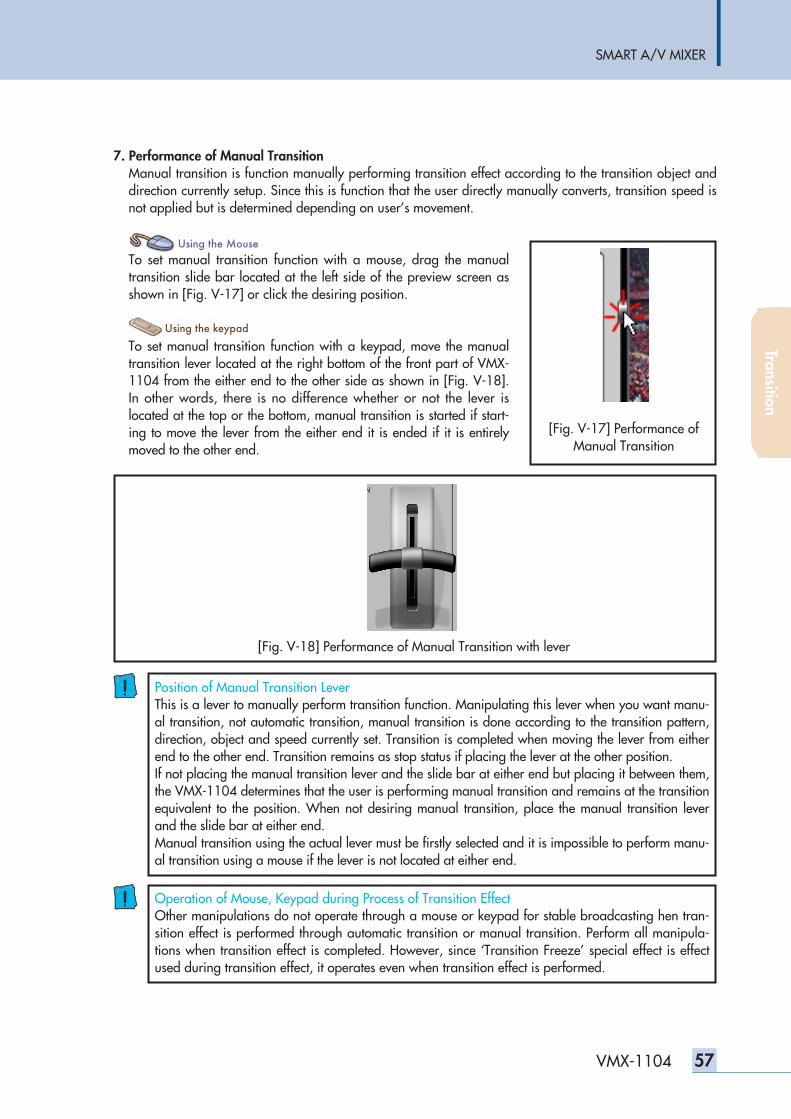
SMART A/V MIXER
57VMX-1104
7. Performance of Manual TransitionManual transition is function manually performing transition effect according to the transition object anddirection currently setup. Since this is function that the user directly manually converts, transition speed isnot applied but is determined depending on user’s movement.
To set manual transition function with a mouse, drag the manualtransition slide bar located at the left side of the preview screen asshown in [Fig. V-17] or click the desiring position.
To set manual transition function with a keypad, move the manualtransition lever located at the right bottom of the front part of VMX-1104 from the either end to the other side as shown in [Fig. V-18].In other words, there is no difference whether or not the lever islocated at the top or the bottom, manual transition is started if start-ing to move the lever from the either end it is ended if it is entirelymoved to the other end.
[Fig. V-17] Performance ofManual Transition
[Fig. V-18] Performance of Manual Transition with lever
Position of Manual Transition LeverThis is a lever to manually perform transition function. Manipulating this lever when you want manu-al transition, not automatic transition, manual transition is done according to the transition pattern,direction, object and speed currently set. Transition is completed when moving the lever from eitherend to the other end. Transition remains as stop status if placing the lever at the other position.If not placing the manual transition lever and the slide bar at either end but placing it between them,the VMX-1104 determines that the user is performing manual transition and remains at the transitionequivalent to the position. When not desiring manual transition, place the manual transition leverand the slide bar at either end. Manual transition using the actual lever must be firstly selected and it is impossible to perform manu-al transition using a mouse if the lever is not located at either end.
Operation of Mouse, Keypad during Process of Transition EffectOther manipulations do not operate through a mouse or keypad for stable broadcasting hen tran-sition effect is performed through automatic transition or manual transition. Perform all manipula-tions when transition effect is completed. However, since ‘Transition Freeze’ special effect is effectused during transition effect, it operates even when transition effect is performed.
Transition
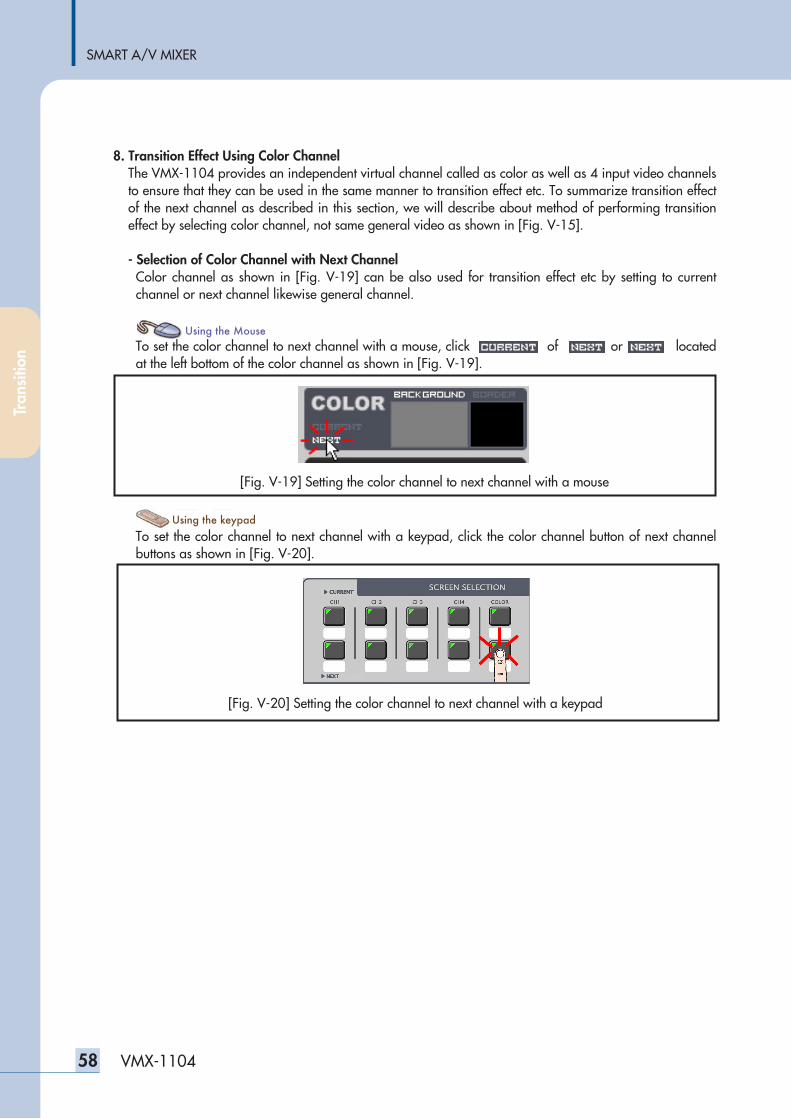
SMART A/V MIXER
58 VMX-1104
8. Transition Effect Using Color ChannelThe VMX-1104 provides an independent virtual channel called as color as well as 4 input video channelsto ensure that they can be used in the same manner to transition effect etc. To summarize transition effectof the next channel as described in this section, we will describe about method of performing transitioneffect by selecting color channel, not same general video as shown in [Fig. V-15].
- Selection of Color Channel with Next ChannelColor channel as shown in [Fig. V-19] can be also used for transition effect etc by setting to currentchannel or next channel likewise general channel.
To set the color channel to next channel with a mouse, click channel of mouse or located locatedat the left bottom of the color channel as shown in [Fig. V-19].
To set the color channel to next channel with a keypad, click the color channel button of next channelbuttons as shown in [Fig. V-20].
[Fig. V-19] Setting the color channel to next channel with a mouse
[Fig. V-20] Setting the color channel to next channel with a keypad
Tran
sitio
n
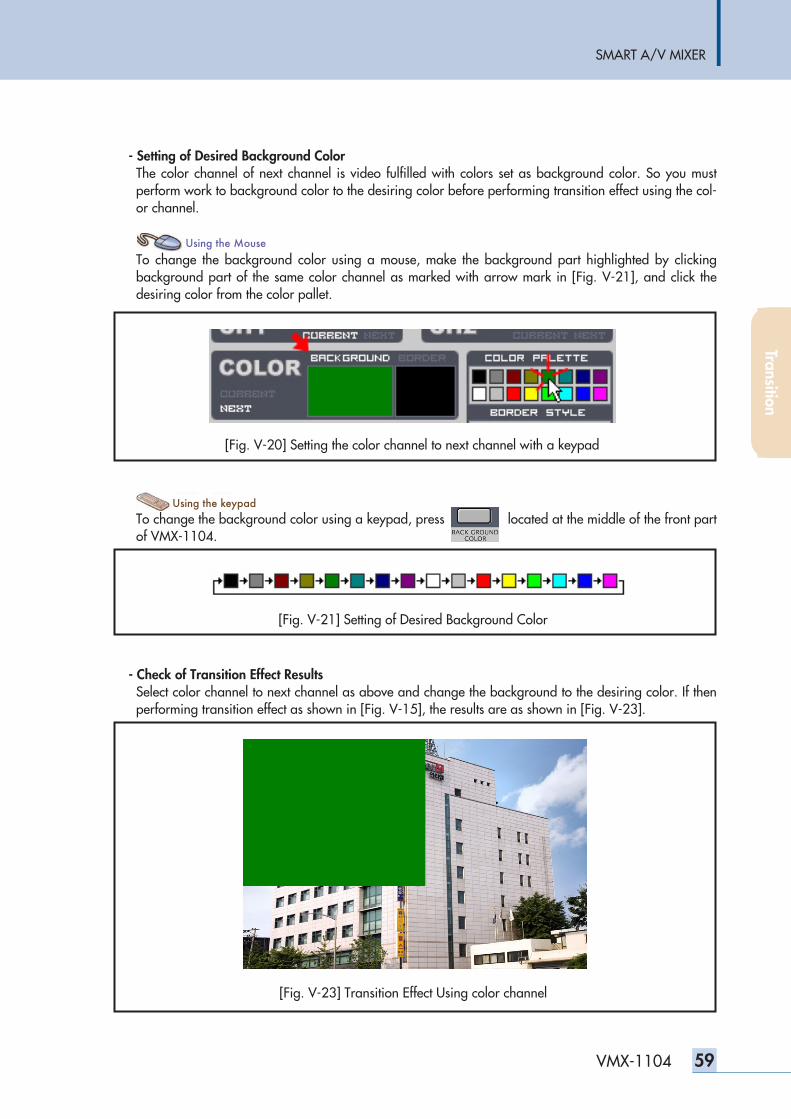
SMART A/V MIXER
59VMX-1104
- Setting of Desired Background ColorThe color channel of next channel is video fulfilled with colors set as background color. So you mustperform work to background color to the desiring color before performing transition effect using the col-or channel.
To change the background color using a mouse, make the background part highlighted by clickingbackground part of the same color channel as marked with arrow mark in [Fig. V-21], and click thedesiring color from the color pallet.
To change the background color using a keypad, press located at the middle of the front partof VMX-1104.
- Check of Transition Effect ResultsSelect color channel to next channel as above and change the background to the desiring color. If thenperforming transition effect as shown in [Fig. V-15], the results are as shown in [Fig. V-23].
[Fig. V-20] Setting the color channel to next channel with a keypad
[Fig. V-21] Setting of Desired Background Color
[Fig. V-23] Transition Effect Using color channel
Transition
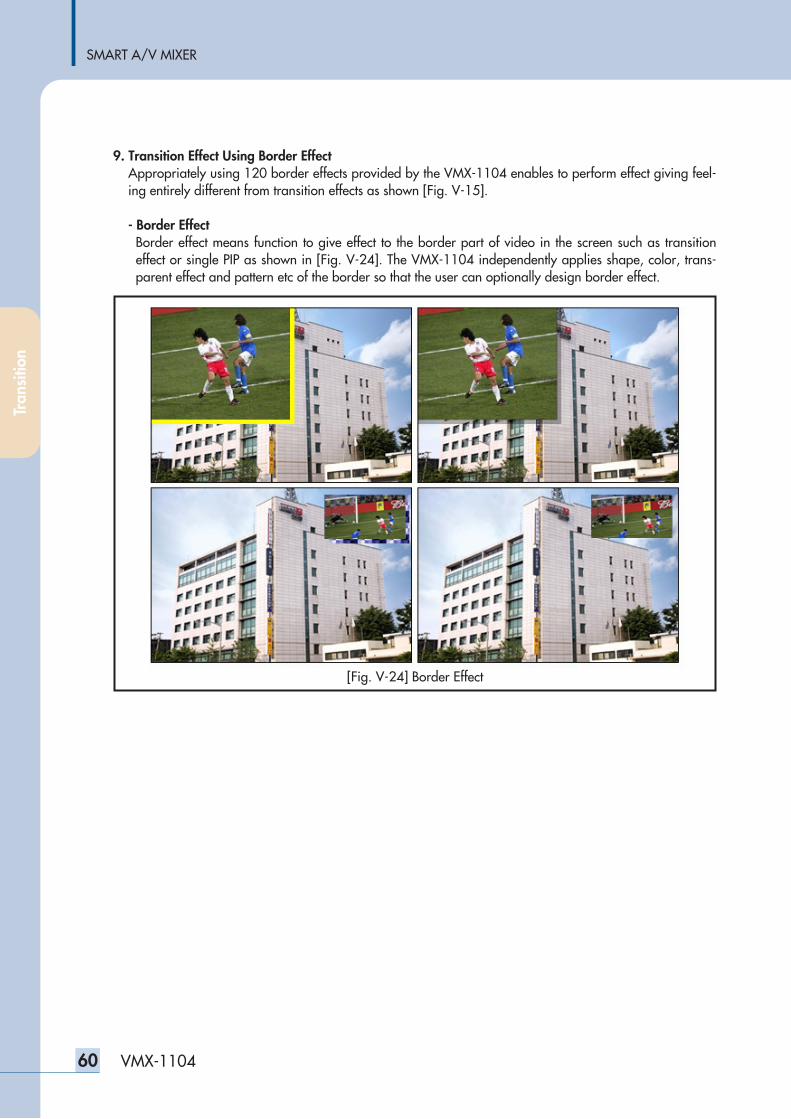
SMART A/V MIXER
60 VMX-1104
9. Transition Effect Using Border EffectAppropriately using 120 border effects provided by the VMX-1104 enables to perform effect giving feel-ing entirely different from transition effects as shown [Fig. V-15].
- Border EffectBorder effect means function to give effect to the border part of video in the screen such as transitioneffect or single PIP as shown in [Fig. V-24]. The VMX-1104 independently applies shape, color, trans-parent effect and pattern etc of the border so that the user can optionally design border effect.
[Fig. V-24] Border Effect
Tran
sitio
n
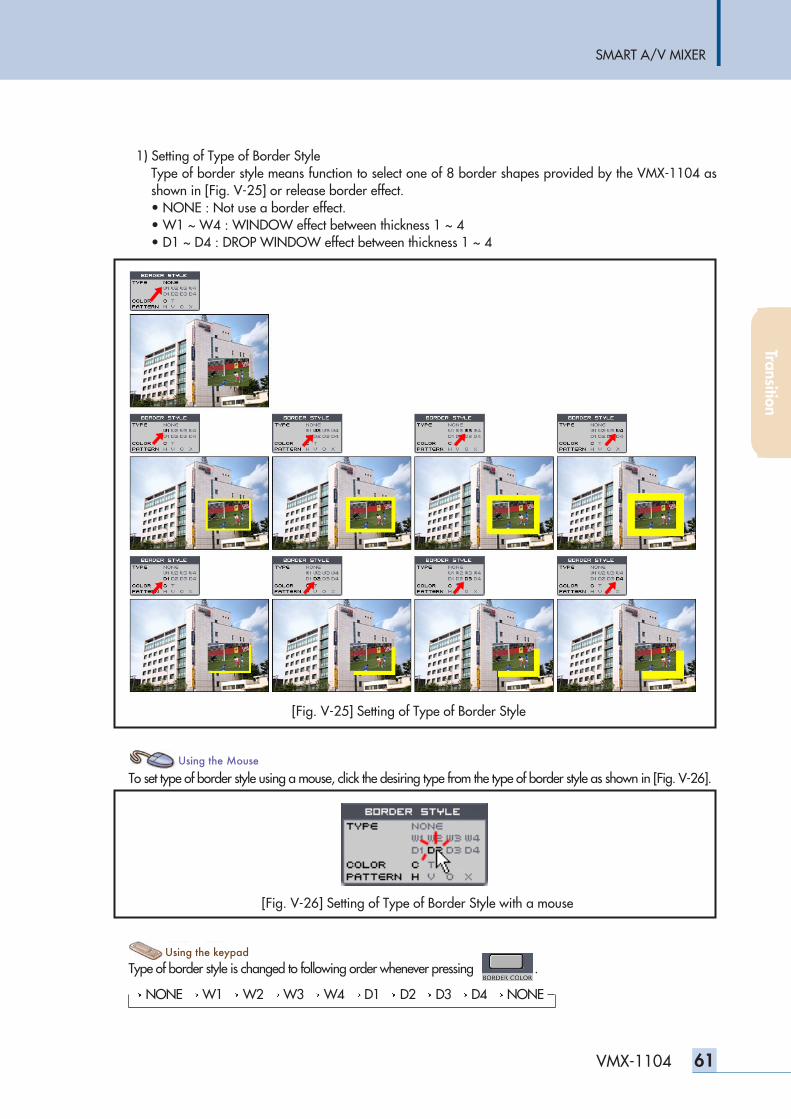
SMART A/V MIXER
61VMX-1104
1) Setting of Type of Border StyleType of border style means function to select one of 8 border shapes provided by the VMX-1104 asshown in [Fig. V-25] or release border effect.• NONE : Not use a border effect.• W1 ~ W4 : WINDOW effect between thickness 1 ~ 4• D1 ~ D4 : DROP WINDOW effect between thickness 1 ~ 4
To set type of border style using a mouse, click the desiring type from the type of border style as shown in [Fig. V-26].
Type of border style is changed to following order whenever pressing .
NONE W1 W2 W3 W4 D1 D2 D3 D4 NONE
[Fig. V-25] Setting of Type of Border Style
[Fig. V-26] Setting of Type of Border Style with a mouse
Transition
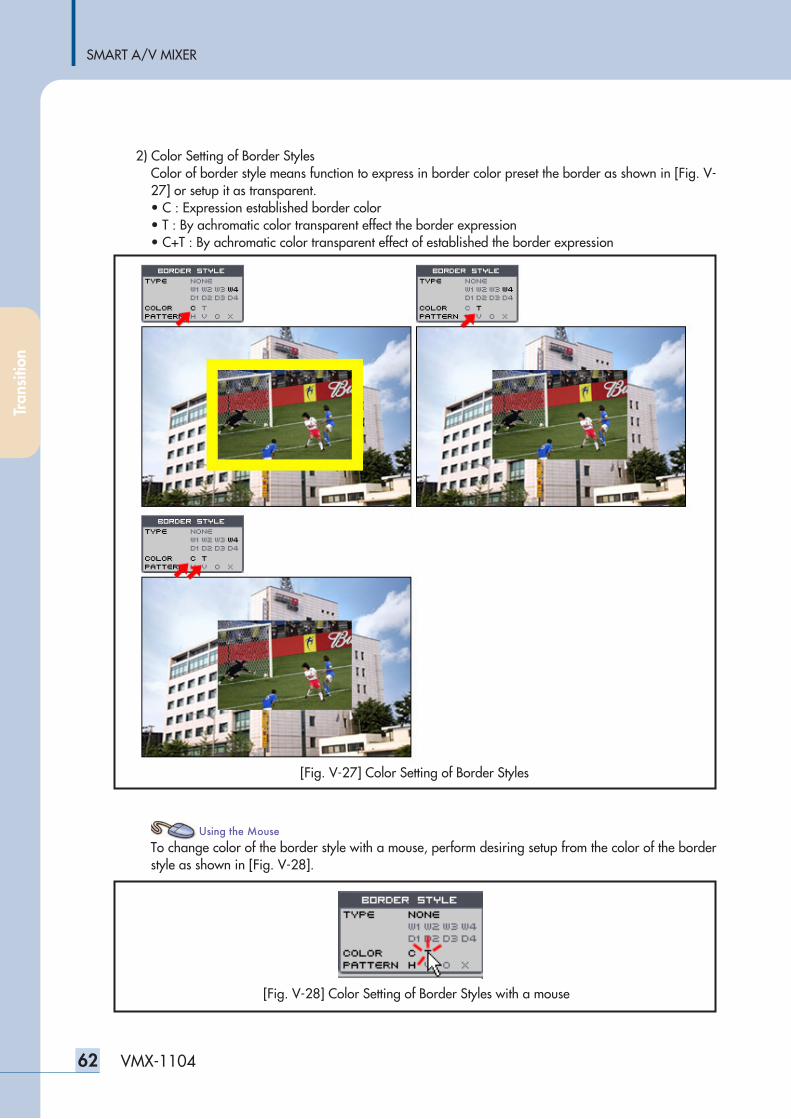
SMART A/V MIXER
62 VMX-1104
2) Color Setting of Border StylesColor of border style means function to express in border color preset the border as shown in [Fig. V-27] or setup it as transparent.• C : Expression established border color• T : By achromatic color transparent effect the border expression• C+T : By achromatic color transparent effect of established the border expression
To change color of the border style with a mouse, perform desiring setup from the color of the borderstyle as shown in [Fig. V-28].
[Fig. V-27] Color Setting of Border Styles
[Fig. V-28] Color Setting of Border Styles with a mouse
Tran
sitio
n
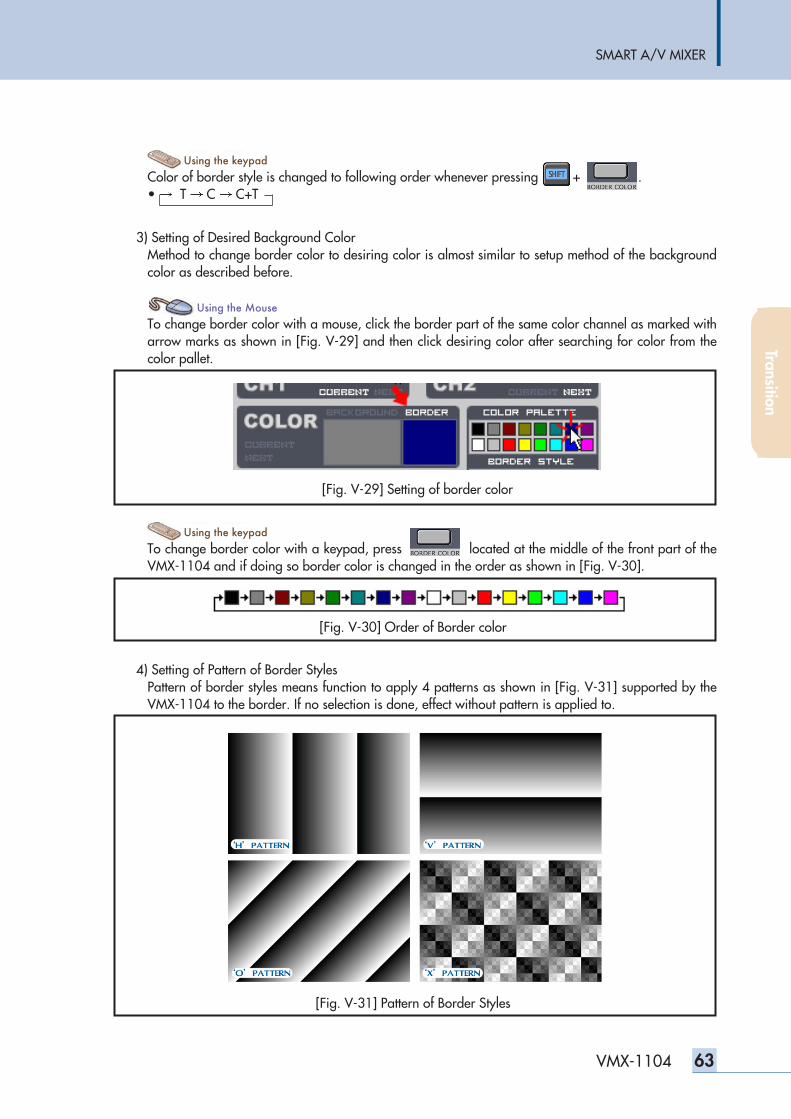
SMART A/V MIXER
63VMX-1104
Transition
Color of border style is changed to following order whenever pressing + . • T C C+T
3) Setting of Desired Background Color Method to change border color to desiring color is almost similar to setup method of the backgroundcolor as described before.
To change border color with a mouse, click the border part of the same color channel as marked witharrow marks as shown in [Fig. V-29] and then click desiring color after searching for color from thecolor pallet.
To change border color with a keypad, press press located at the middle of the front part of theVMX-1104 and if doing so border color is changed in the order as shown in [Fig. V-30].
4) Setting of Pattern of Border Styles Pattern of border styles means function to apply 4 patterns as shown in [Fig. V-31] supported by theVMX-1104 to the border. If no selection is done, effect without pattern is applied to.
[Fig. V-29] Setting of border color
[Fig. V-30] Order of Border color
[Fig. V-31] Pattern of Border Styles
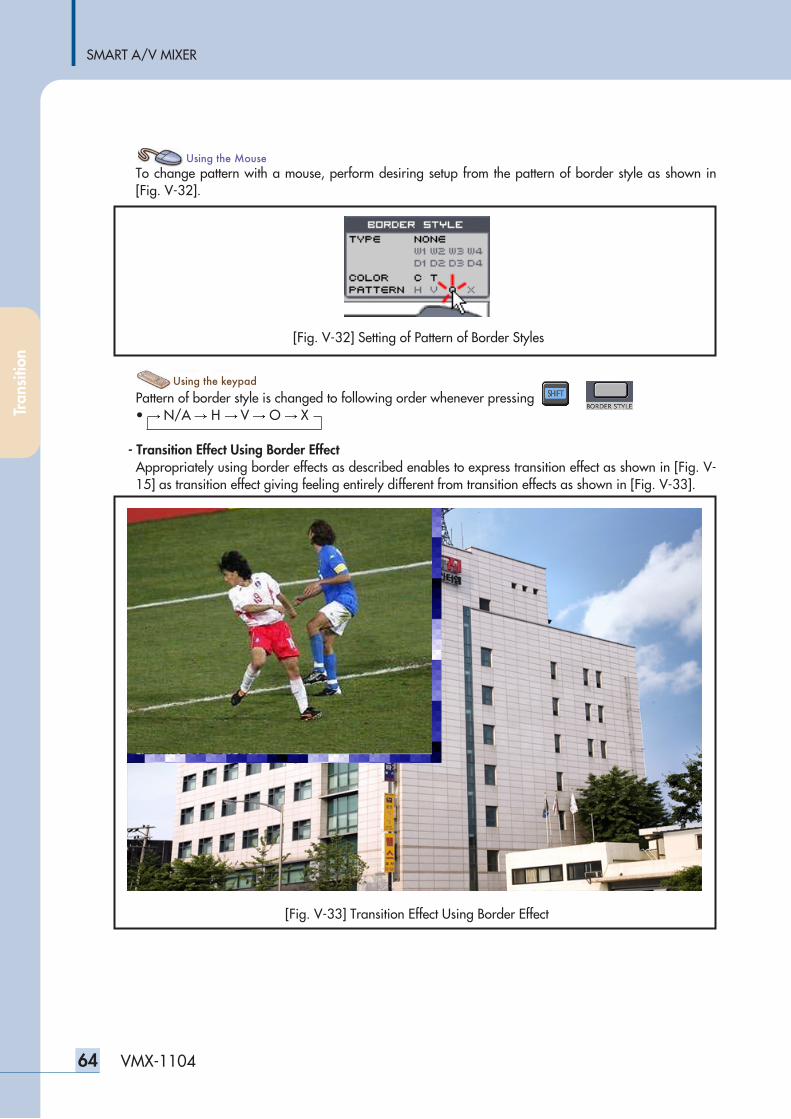
SMART A/V MIXER
64 VMX-1104
Tran
sitio
n
To change pattern with a mouse, perform desiring setup from the pattern of border style as shown in[Fig. V-32].
Pattern of border style is changed to following order whenever pressing + . • N/A H V O X
- Transition Effect Using Border EffectAppropriately using border effects as described enables to express transition effect as shown in [Fig. V-15] as transition effect giving feeling entirely different from transition effects as shown in [Fig. V-33].
[Fig. V-32] Setting of Pattern of Border Styles
[Fig. V-33] Transition Effect Using Border Effect
SMART A/V MIXER
65VMX-1104
EffectsEffects VMX-1104 provides 22 total video effects including special video effect that our corporation only providessuch as color selection and wave as well as video effect basically frequently used in the A/V Mixer toensure that the user can give various video effects. Since video effects as described in this section are independently given each of channel videos, they can beused together with transition effect etc by applying different video effects to each channel video.
Effects
SMART A/V MIXER
66 VMX-1104
1. Brightness EffectBright effect is function to adjust brightness in the appropriate level where input video is too dark or toobright as shown in the left figure of [Fig. VI-1].
- How to Operate Brightness
To perform brightness effect with a mouse, drag or click the slide bar of brightness to the desiring bright-ness position as shown in [Fig. VI-2] after activating the effect menu by clicking effect of the main menu.
In order to perform the brightness effect with a keypad, perform brightness effect at a time by press-
ing htness , or move the cursor to the brightness effect menu using usingor usingwhile the effect menu
activated and then move the cursor to the brightness menu by using the using + usin, using + usin button
and perform mosaic function using the right or left button. You can adjust brightness by pressing
with thorwith th with the cursor placed at brightness.
[Fig. VI-1] BRIGHTNESS Effect
[Fig. VI-2] Adjustment of BRIGHTNESS
Adjustment ofBRIGHTNESS
Effe
cts
SMART A/V MIXER
67VMX-1104
2. Contrast EffectCONTRAST effect is effect to make video clear by adjusting video in appropriate contrast value andusing contrast effect when video is not clear due to low contrast of input video as shown in the left figureof [Fig. VI-3].
- How to Operate Contrast
To perform contrast effect with a mouse, drag or click the slide bar of contrast to the desiring brightnessposition as shown in [Fig. VI-4] after activating the effect menu by clicking effect of the main menu.
In order to perform the contrast effect with a keypad, perform brightness effect at a time by pressing
htness , or move the cursor to the contrast item using usingor usingwhile the effect menu activated with
theusing + usin, using + usin button. You can adjust contrast to the desiring brightness by pressing pressi
or using with the cursor placed at contrast item.
[Fig. VI-3] CONTRAST Effect
[Fig. VI-4] Adjustment of CONTRAST
Original Video Contrast Effect
Effects
SMART A/V MIXER
68 VMX-1104
3. HUE EffectYou can adjust optionally color by adjusting HUE where color of input video is different from the desiringcolor as shown in [Fig. VI-5] by using the HUE effect.
- How to Operate HUE
HUE effect with a mouse, drag or click the slide bar of HUE to the desiring color position as shown in[Fig. VI-6] after activating the effect menu by clicking effect of the main menu.
In order to perform the HUE effect with a keypad, perform hue effect at a time by pressinghtness , or
move the cursor to the HUE item using usingor usingafter activating effect menu by pressing the HUE
button or by using theusing + usin, using + usin button. You can adjust color to the desiring color by
pressing the using or using with the cursor placed at HUE item.
[Fig. VI-5] HUE Effect
[Fig. VI-6] Adjustment of HUE
Original Video Hue Effect
Effe
cts
SMART A/V MIXER
69VMX-1104
4. Saturation EffectUsing saturation effect enables to adjust saturation to appropriate saturation where saturation of theinput video is high or low as shown in the left figure of [Fig. VI-7].
- How to Operate Saturation
To perform saturation effect with a mouse, drag or click the slide bar of saturation to the desiring colorposition as shown in [Fig. VI-8] after activating the effect menu by clicking effect of the main menu.
In order to perform the HUE effect with a keypad, perform brightness effect at a time by pressing tness ,
or move the cursor to the saturation item using usingor usingafter activating effect menu by pressing the
saturation button or by using theusing + usin,using + usin button. You can adjust saturation to the appro-
priate level by pressingressi or using with the cursor placed at saturation item.
[Fig. VI-7] SATURATION Effect
[Fig. VI-8] Adjustment of SATURATION
Original Video Saturation Effect
Effects
SMART A/V MIXER
70 VMX-1104
5. BLACK&WHITE EffectBLACK&WHITE effect represents effect of the B&W picture by video removing color component from theinput video as shown in [Fig. VI-9].
- How to Operate BLACK&WHITE
To perform B&W effect with a mouse, activate the effect menu by clicking effect of the main menu andthen click the checkbox equivalent to the B&W as shown in [Fig. VI-10].
In order to perform the BLACK&WHITE effect with a keypad, give BLACK&WHITE effect to directly the
current channel video by using using or move the cursor to the BLACK&WHITE item using usingor
usingafter activating effect menu by usingusing + usin, sing + usin. You can perform BLACK&WHITE
function by pressing with the cursor placed at BLACK&WHITE item.
[Fig. VI-9] BLACK&WHITE Effect
[Fig. VI-10] Performance of BLACK&WHITE
Effe
cts
SMART A/V MIXER
71VMX-1104
6. SEPIA EffectSEPIA effect is effect to give soft feeling by changing input video to video of brown tone as shown in[Fig. VI-11].
- How to Operate SEPIA
In order to perform the sepia effect with a mouse, activate the effect menu by effect of the main menu andthen click the checkbox equivalent to sepia as shown in [Fig. VI-12].
In order to perform the sepia effect with a keypad, give sepia effect to directly the current channel video
by using or move the cursor to the sepia item using usingor usingafter activating effect menu by
using theusing + usin,using + usin. You can perform sepia function by pressing with the cursor
placed at sepia item.
[Fig. VI-11] SEPIA Effect
[Fig. VI-12] Performance of SEPIA
Effects
SMART A/V MIXER
72 VMX-1104
7. Negative EffectNegative effect means to reverse the input video and represent it like a film as shown in [Fig. VI-13].
- How to Operate Negative
To perform negative effect with a mouse, activate the effect menu by clicking effect of the main menu andthen click the checkbox equivalent to the negative shown in [Fig.VI-14].
In order to perform the negative effect with a keypad, give negative effect to directly the current channel
video by using or move the cursor to the negative item using usingor usingafter activating effect
menu by using theusing + usin, sing + usin. You can perform negative function by pressing with the
cursor placed at negative item.
[Fig. VI-13] NEGATIVE Effect
[Fig. VI-14] Performance of NEGATIVE
Effe
cts
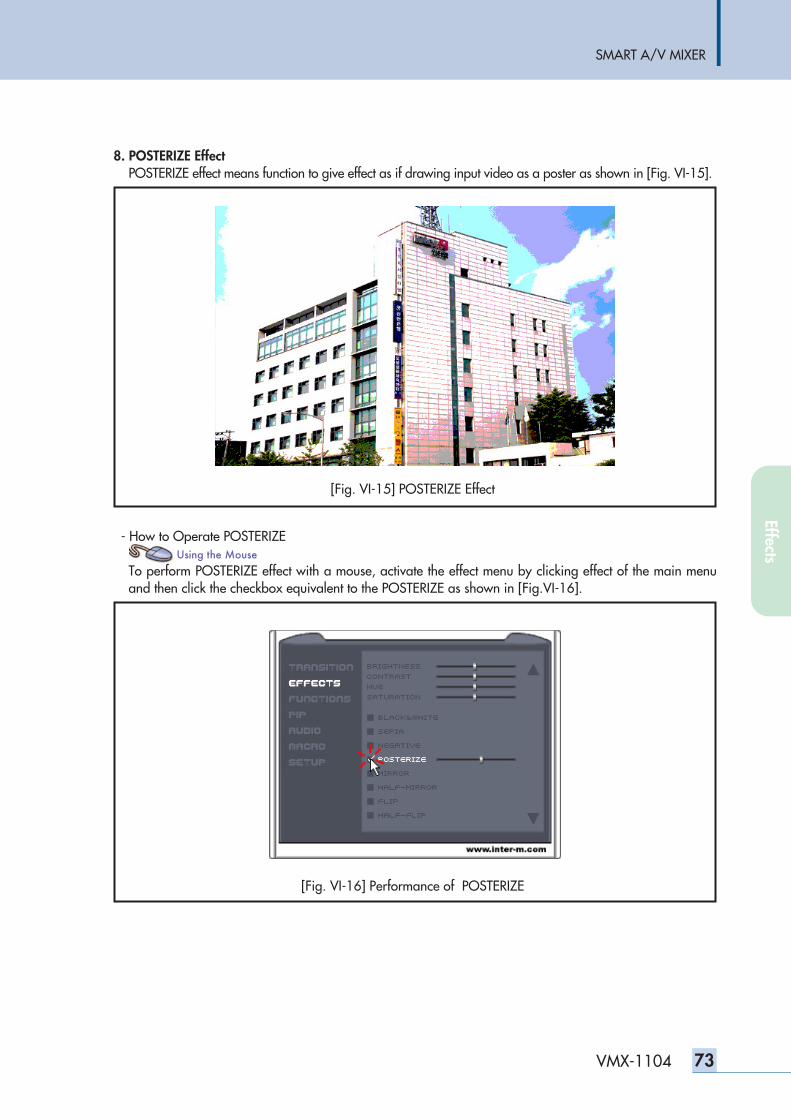
SMART A/V MIXER
73VMX-1104
8. POSTERIZE EffectPOSTERIZE effect means function to give effect as if drawing input video as a poster as shown in [Fig. VI-15].
- How to Operate POSTERIZE
To perform POSTERIZE effect with a mouse, activate the effect menu by clicking effect of the main menuand then click the checkbox equivalent to the POSTERIZE as shown in [Fig.VI-16].
[Fig. VI-15] POSTERIZE Effect
[Fig. VI-16] Performance of POSTERIZE
Effects
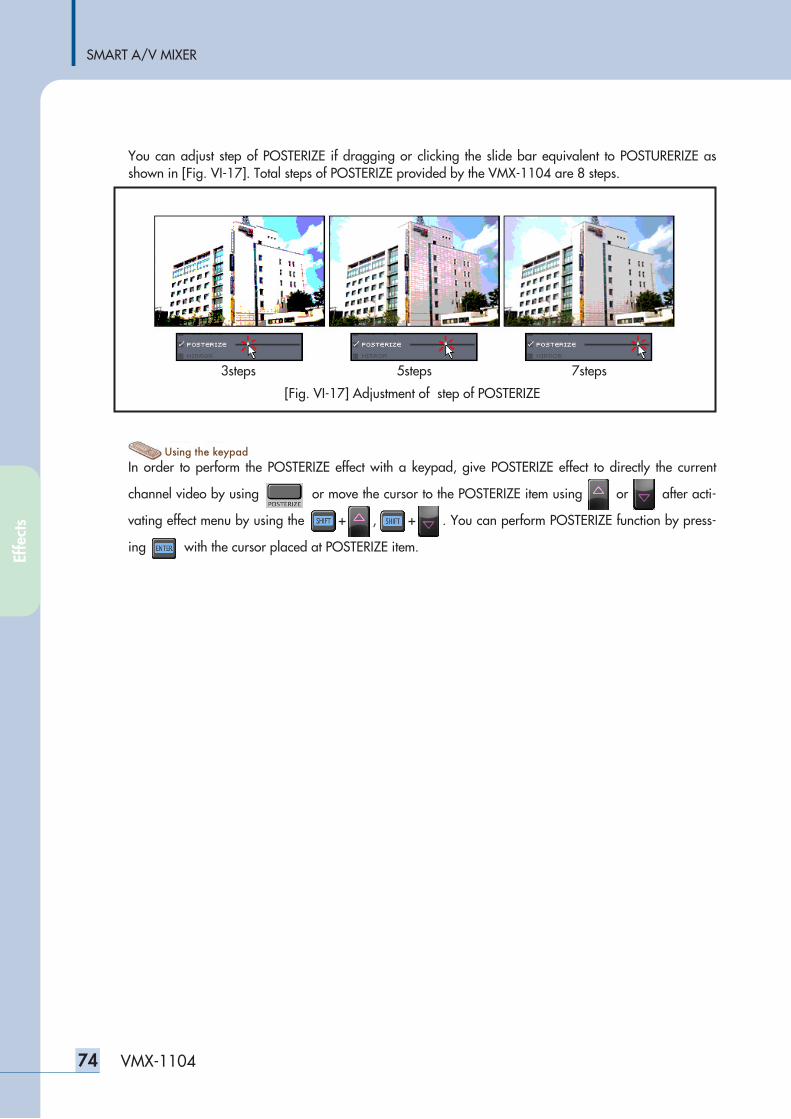
SMART A/V MIXER
74 VMX-1104
You can adjust step of POSTERIZE if dragging or clicking the slide bar equivalent to POSTURERIZE asshown in [Fig. VI-17]. Total steps of POSTERIZE provided by the VMX-1104 are 8 steps.
In order to perform the POSTERIZE effect with a keypad, give POSTERIZE effect to directly the current
channel video by using or move the cursor to the POSTERIZE item using usingor usingafter acti-
vating effect menu by using theusing + usin, sing + usin. You can perform POSTERIZE function by press-
ing with the cursor placed at POSTERIZE item.
[Fig. VI-17] Adjustment of step of POSTERIZE
3steps 5steps 7steps
Effe
cts
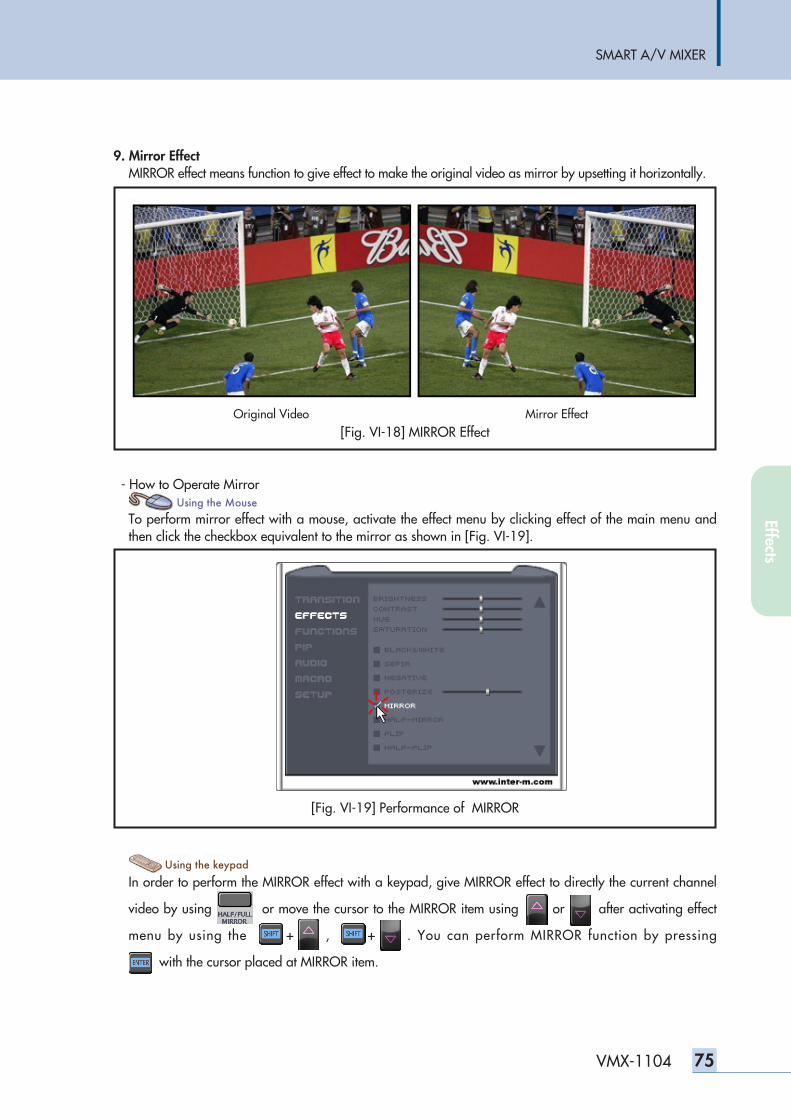
SMART A/V MIXER
75VMX-1104
9. Mirror EffectMIRROR effect means function to give effect to make the original video as mirror by upsetting it horizontally.
- How to Operate Mirror
To perform mirror effect with a mouse, activate the effect menu by clicking effect of the main menu andthen click the checkbox equivalent to the mirror as shown in [Fig. VI-19].
In order to perform the MIRROR effect with a keypad, give MIRROR effect to directly the current channel
video by using or move the cursor to the MIRROR item using usingor usingafter activating effect
menu by using theusing + usin, sing + usin. You can perform MIRROR function by pressing
with the cursor placed at MIRROR item.
[Fig. VI-18] MIRROR EffectOriginal Video Mirror Effect
[Fig. VI-19] Performance of MIRROR
Effects
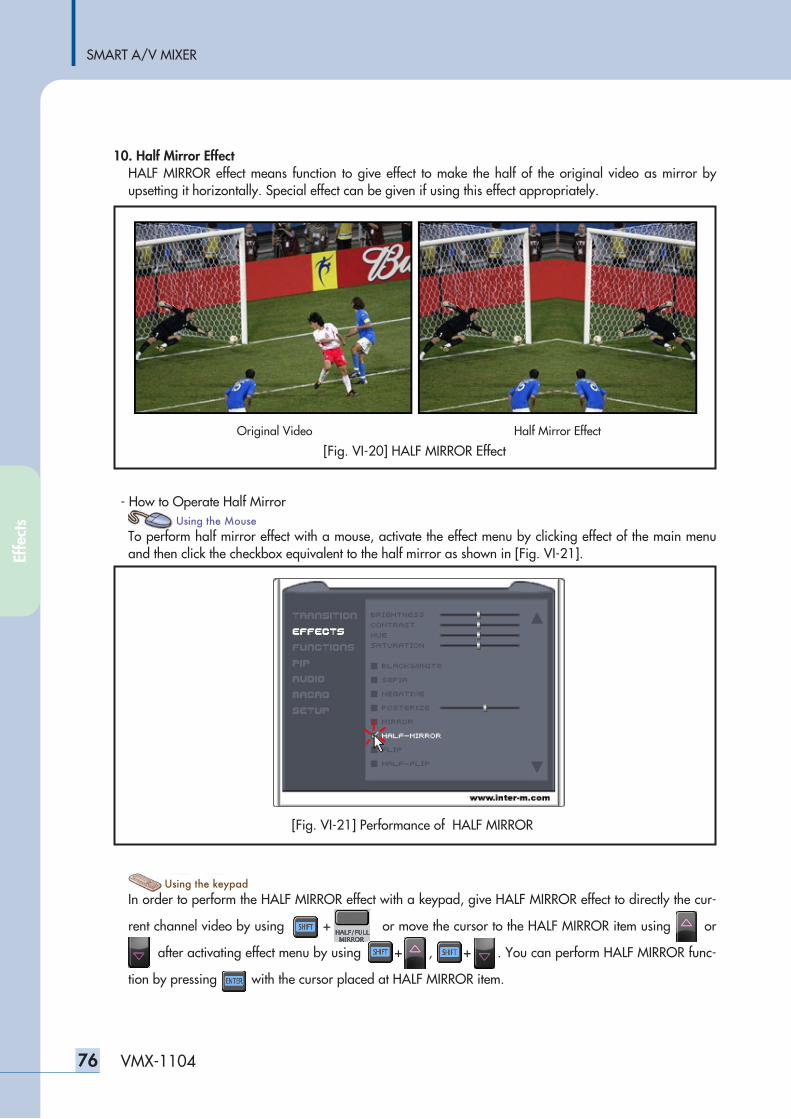
SMART A/V MIXER
76 VMX-1104
10. Half Mirror EffectHALF MIRROR effect means function to give effect to make the half of the original video as mirror byupsetting it horizontally. Special effect can be given if using this effect appropriately.
- How to Operate Half Mirror
To perform half mirror effect with a mouse, activate the effect menu by clicking effect of the main menuand then click the checkbox equivalent to the half mirror as shown in [Fig. VI-21].
In order to perform the HALF MIRROR effect with a keypad, give HALF MIRROR effect to directly the cur-
rent channel video by using + or move the cursor to the HALF MIRROR item using usingor
usingafter activating effect menu by usingusing + usin, sing + usin. You can perform HALF MIRROR func-
tion by pressing with the cursor placed at HALF MIRROR item.
[Fig. VI-20] HALF MIRROR EffectOriginal Video Half Mirror Effect
[Fig. VI-21] Performance of HALF MIRROR
Effe
cts
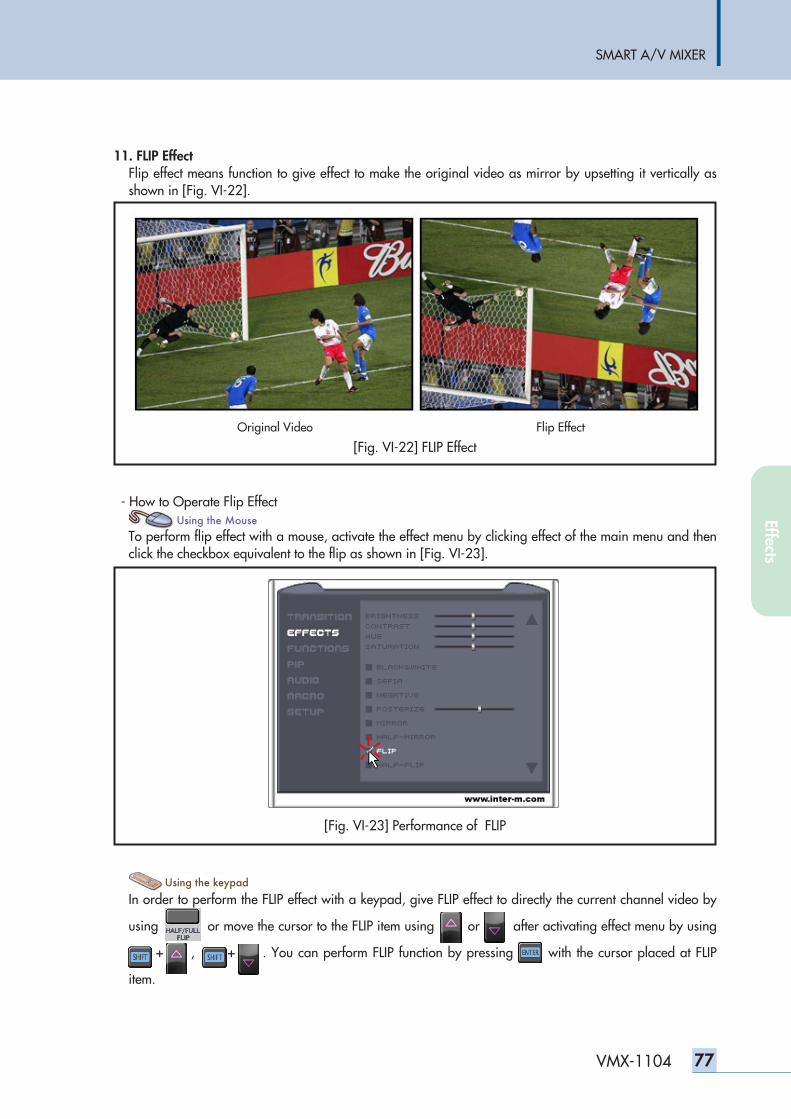
SMART A/V MIXER
77VMX-1104
11. FLIP EffectFlip effect means function to give effect to make the original video as mirror by upsetting it vertically asshown in [Fig. VI-22].
- How to Operate Flip Effect
To perform flip effect with a mouse, activate the effect menu by clicking effect of the main menu and thenclick the checkbox equivalent to the flip as shown in [Fig. VI-23].
In order to perform the FLIP effect with a keypad, give FLIP effect to directly the current channel video by
using or move the cursor to the FLIP item using usingor usingafter activating effect menu by using
usin + usin, sing + usin. You can perform FLIP function by pressing with the cursor placed at FLIP
item.
[Fig. VI-22] FLIP EffectOriginal Video Flip Effect
[Fig. VI-23] Performance of FLIP
Effects
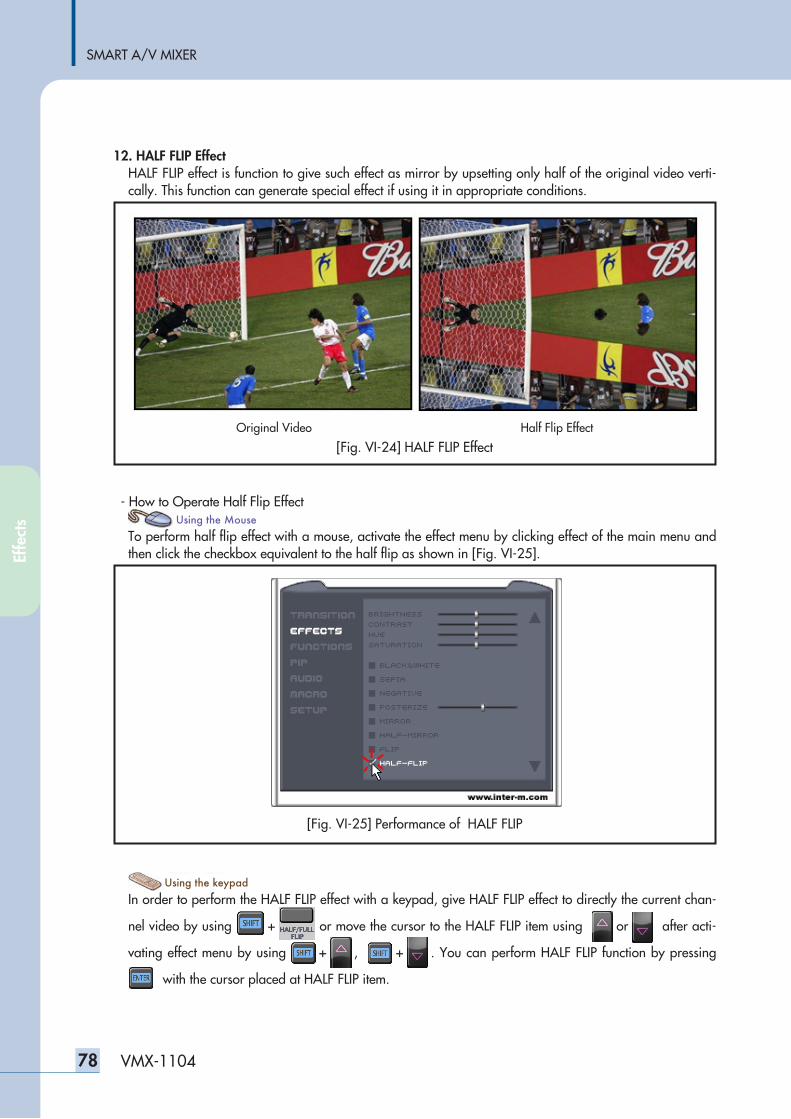
SMART A/V MIXER
78 VMX-1104
12. HALF FLIP EffectHALF FLIP effect is function to give such effect as mirror by upsetting only half of the original video verti-cally. This function can generate special effect if using it in appropriate conditions.
- How to Operate Half Flip Effect
To perform half flip effect with a mouse, activate the effect menu by clicking effect of the main menu andthen click the checkbox equivalent to the half flip as shown in [Fig. VI-25].
In order to perform the HALF FLIP effect with a keypad, give HALF FLIP effect to directly the current chan-
nel video by using sing + usi n or move the cursor to the HALF FLIP item using usingor usingafter acti-
vating effect menu by using sing + usin, sing + usin. You can perform HALF FLIP function by pressing
with the cursor placed at HALF FLIP item.
[Fig. VI-24] HALF FLIP EffectOriginal Video Half Flip Effect
[Fig. VI-25] Performance of HALF FLIP
Effe
cts
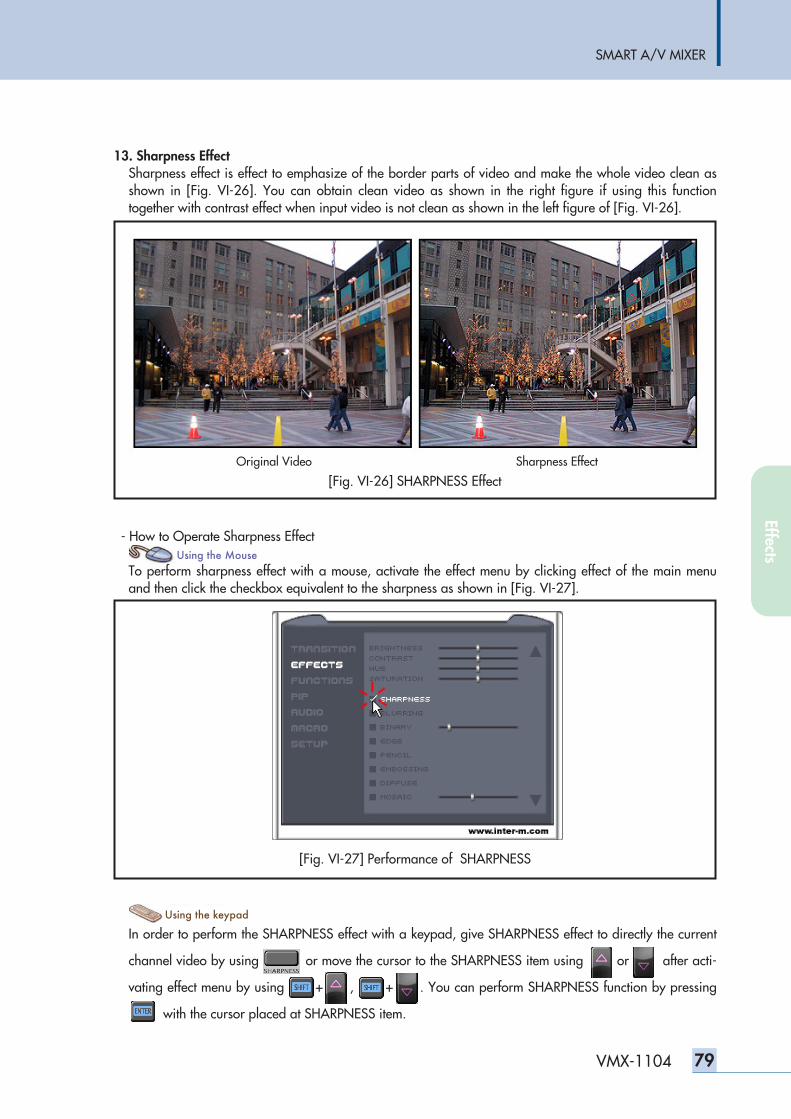
SMART A/V MIXER
79VMX-1104
13. Sharpness EffectSharpness effect is effect to emphasize of the border parts of video and make the whole video clean asshown in [Fig. VI-26]. You can obtain clean video as shown in the right figure if using this functiontogether with contrast effect when input video is not clean as shown in the left figure of [Fig. VI-26].
- How to Operate Sharpness Effect
To perform sharpness effect with a mouse, activate the effect menu by clicking effect of the main menuand then click the checkbox equivalent to the sharpness as shown in [Fig. VI-27].
In order to perform the SHARPNESS effect with a keypad, give SHARPNESS effect to directly the current
channel video by using or move the cursor to the SHARPNESS item using usingor usingafter acti-
vating effect menu by using usin + usin, sing + usin. You can perform SHARPNESS function by pressing
with the cursor placed at SHARPNESS item.
[Fig. VI-26] SHARPNESS EffectOriginal Video Sharpness Effect
[Fig. VI-27] Performance of SHARPNESS
Effects
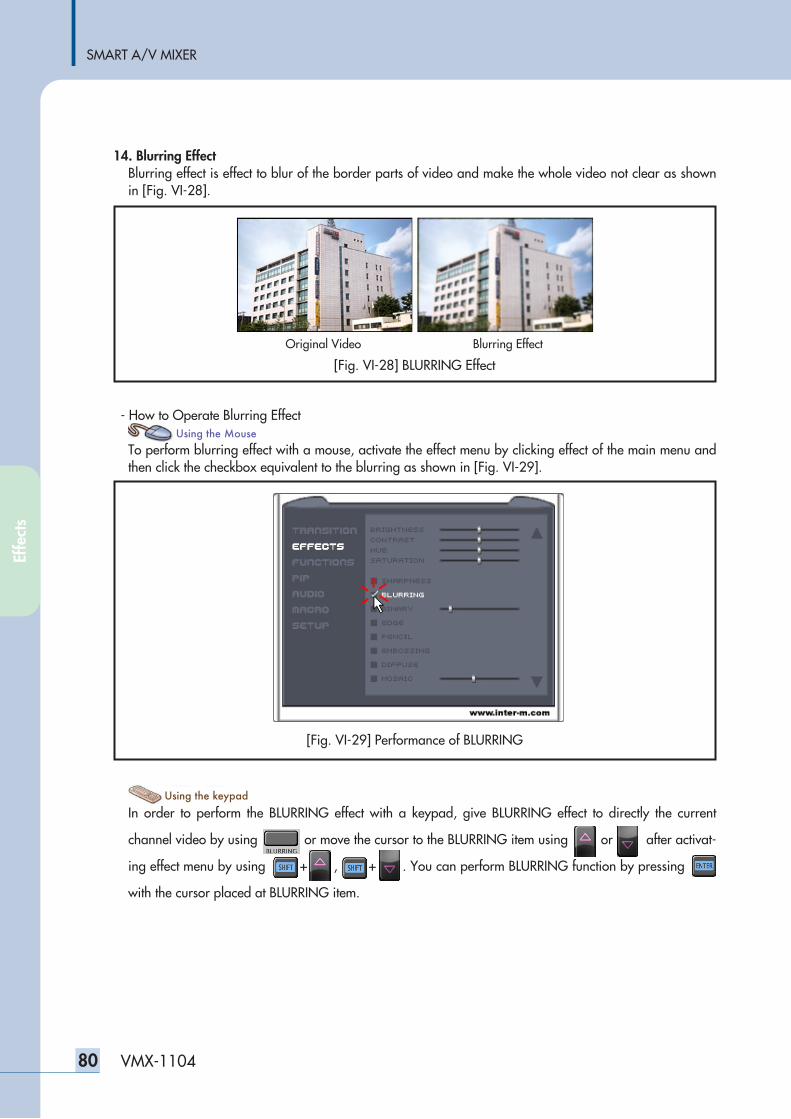
SMART A/V MIXER
80 VMX-1104
14. Blurring EffectBlurring effect is effect to blur of the border parts of video and make the whole video not clear as shownin [Fig. VI-28].
- How to Operate Blurring Effect
To perform blurring effect with a mouse, activate the effect menu by clicking effect of the main menu andthen click the checkbox equivalent to the blurring as shown in [Fig. VI-29].
In order to perform the BLURRING effect with a keypad, give BLURRING effect to directly the current
channel video by using or move the cursor to the BLURRING item using usingor usingafter activat-
ing effect menu by using usin + usin, sing + usin. You can perform BLURRING function by pressing pres
with the cursor placed at BLURRING item.
[Fig. VI-28] BLURRING Effect
Original Video Blurring Effect
[Fig. VI-29] Performance of BLURRING
Effe
cts
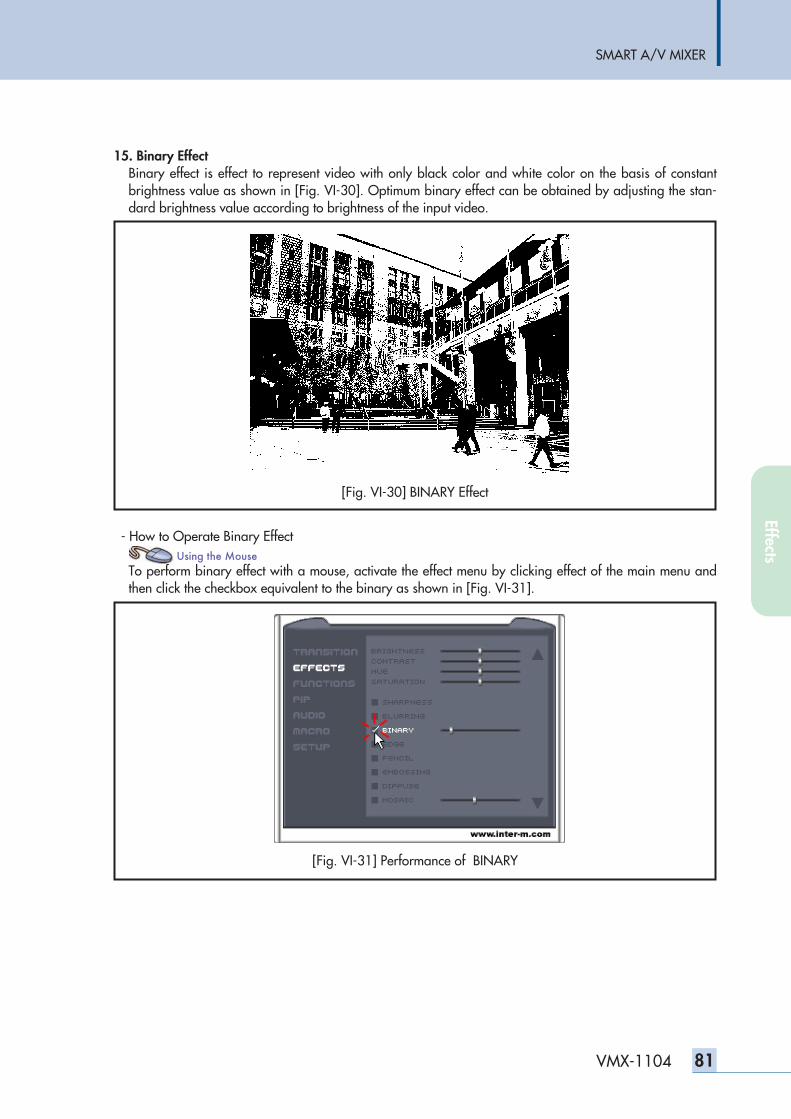
SMART A/V MIXER
81VMX-1104
15. Binary EffectBinary effect is effect to represent video with only black color and white color on the basis of constantbrightness value as shown in [Fig. VI-30]. Optimum binary effect can be obtained by adjusting the stan-dard brightness value according to brightness of the input video.
- How to Operate Binary Effect
To perform binary effect with a mouse, activate the effect menu by clicking effect of the main menu andthen click the checkbox equivalent to the binary as shown in [Fig. VI-31].
[Fig. VI-30] BINARY Effect
[Fig. VI-31] Performance of BINARY
Effects
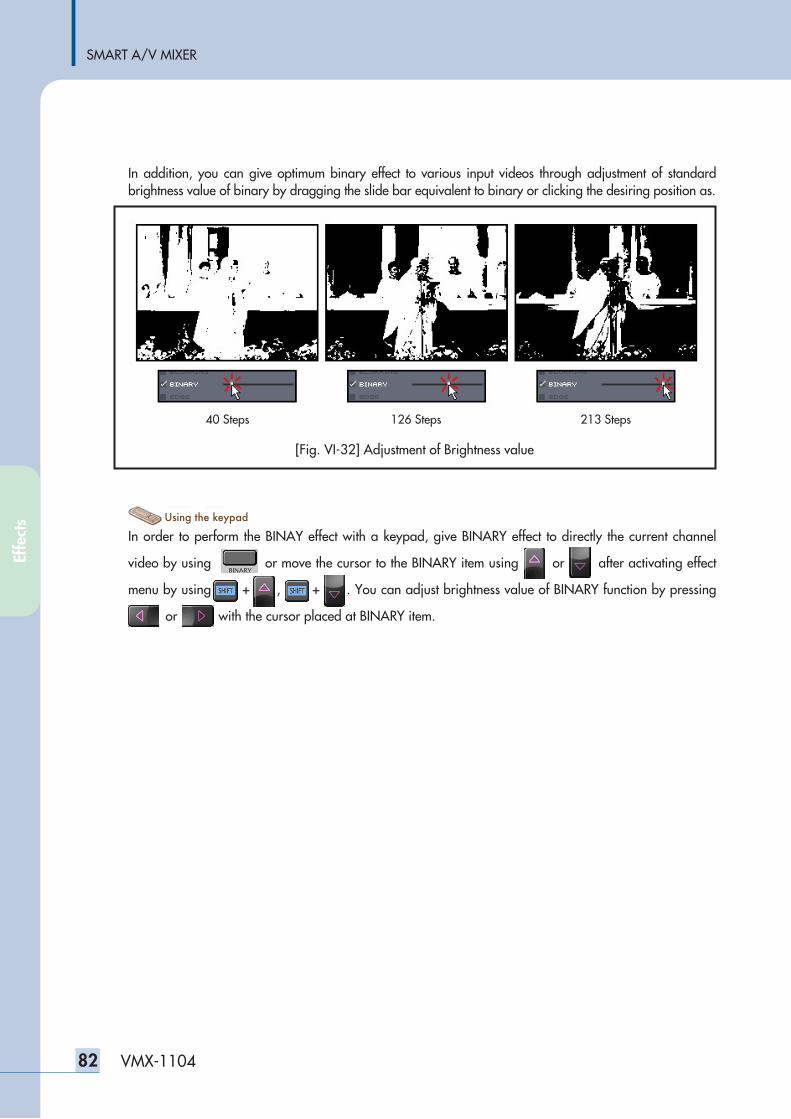
SMART A/V MIXER
82 VMX-1104
In addition, you can give optimum binary effect to various input videos through adjustment of standardbrightness value of binary by dragging the slide bar equivalent to binary or clicking the desiring position as.
In order to perform the BINAY effect with a keypad, give BINARY effect to directly the current channel
video by using or move the cursor to the BINARY item using usingor usingafter activating effect
menu by using usin + usin, sing + usin. You can adjust brightness value of BINARY function by pressing
usi ngor using with the cursor placed at BINARY item.
[Fig. VI-32] Adjustment of Brightness value
40 Steps 126 Steps 213 Steps
Effe
cts
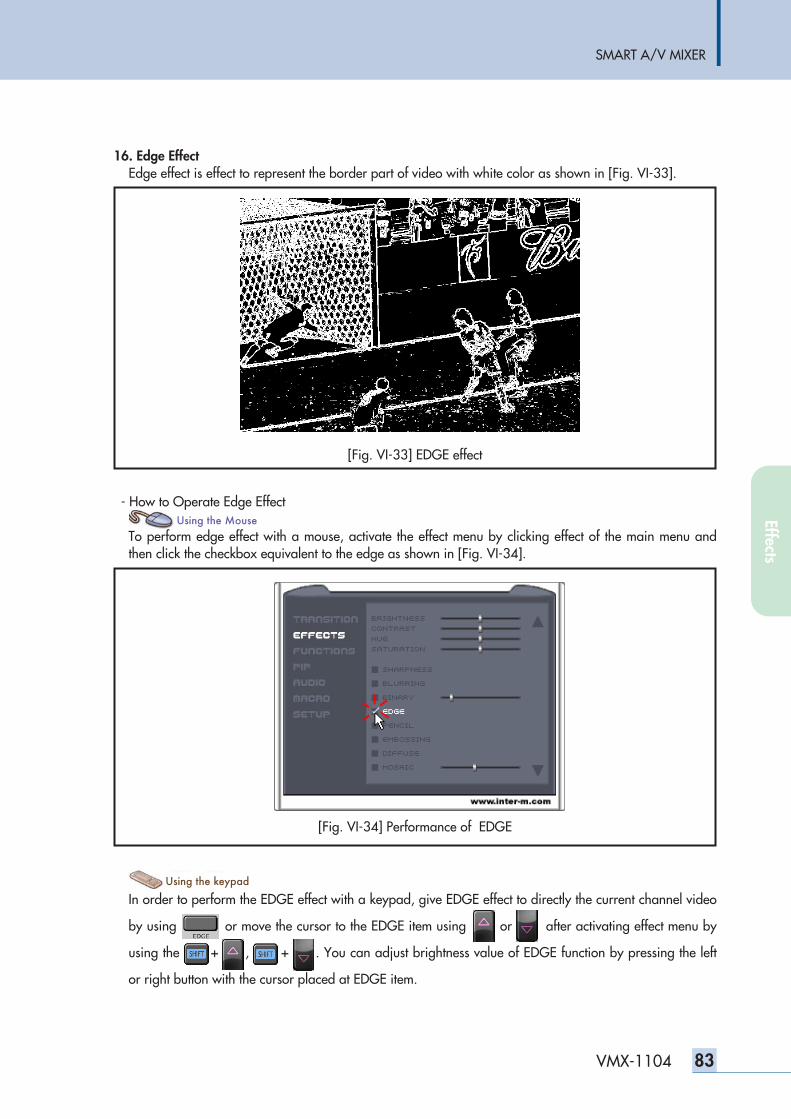
SMART A/V MIXER
83VMX-1104
16. Edge EffectEdge effect is effect to represent the border part of video with white color as shown in [Fig. VI-33].
- How to Operate Edge Effect
To perform edge effect with a mouse, activate the effect menu by clicking effect of the main menu andthen click the checkbox equivalent to the edge as shown in [Fig. VI-34].
In order to perform the EDGE effect with a keypad, give EDGE effect to directly the current channel video
by using or move the cursor to the EDGE item using usingor usingafter activating effect menu by
using the usin + usin, sing + usin. You can adjust brightness value of EDGE function by pressing the left
or right button with the cursor placed at EDGE item.
[Fig. VI-33] EDGE effect
[Fig. VI-34] Performance of EDGE
Effects
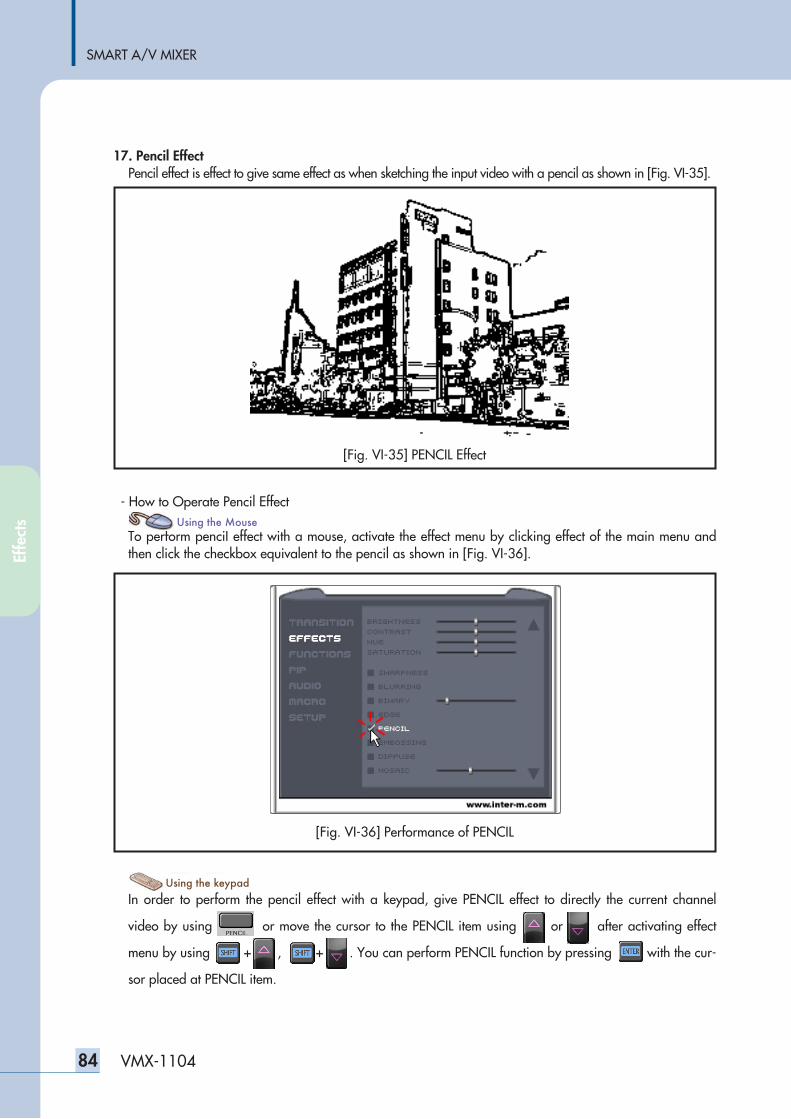
SMART A/V MIXER
84 VMX-1104
17. Pencil EffectPencil effect is effect to give same effect as when sketching the input video with a pencil as shown in [Fig. VI-35].
- How to Operate Pencil Effect
To perform pencil effect with a mouse, activate the effect menu by clicking effect of the main menu andthen click the checkbox equivalent to the pencil as shown in [Fig. VI-36].
In order to perform the pencil effect with a keypad, give PENCIL effect to directly the current channel
video by using or move the cursor to the PENCIL item using usingor usingafter activating effect
menu by using usin + usin, sing + usin. You can perform PENCIL function by pressing with the cur-
sor placed at PENCIL item.
[Fig. VI-35] PENCIL Effect
[Fig. VI-36] Performance of PENCIL
Effe
cts
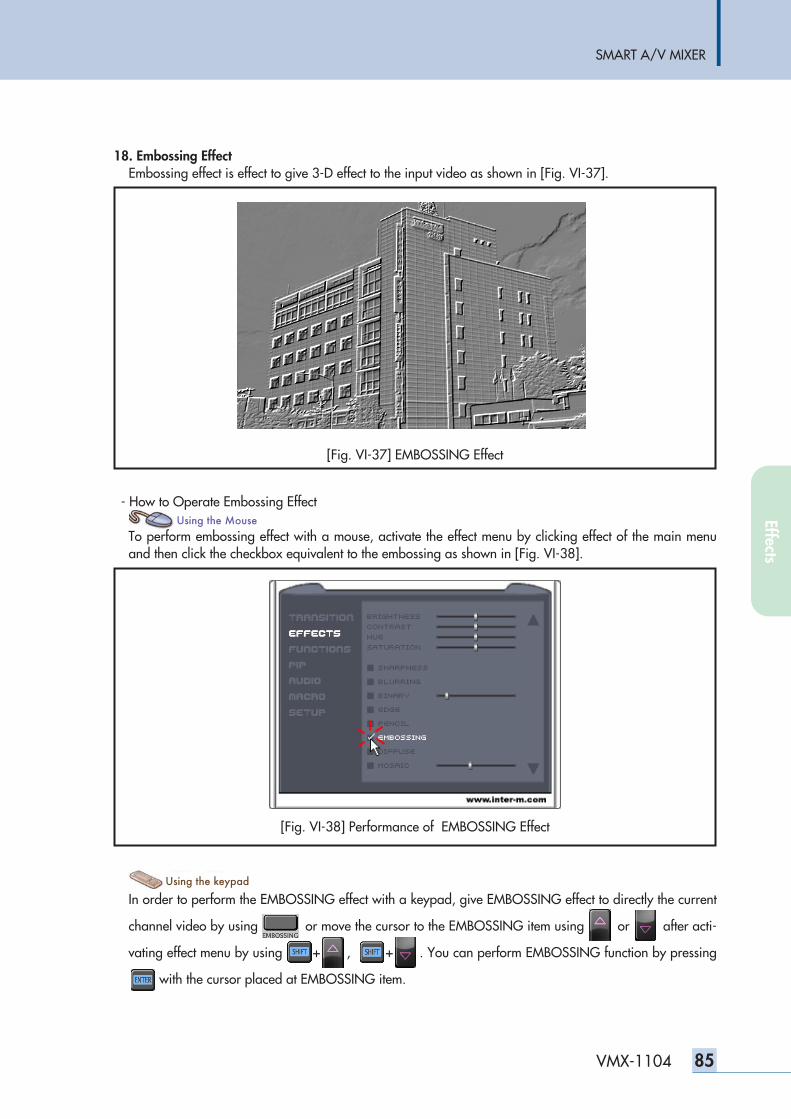
SMART A/V MIXER
85VMX-1104
18. Embossing EffectEmbossing effect is effect to give 3-D effect to the input video as shown in [Fig. VI-37].
- How to Operate Embossing Effect
To perform embossing effect with a mouse, activate the effect menu by clicking effect of the main menuand then click the checkbox equivalent to the embossing as shown in [Fig. VI-38].
In order to perform the EMBOSSING effect with a keypad, give EMBOSSING effect to directly the current
channel video by using or move the cursor to the EMBOSSING item using usingor usingafter acti-
vating effect menu by using usin + usin, sing + usin. You can perform EMBOSSING function by pressing
with the cursor placed at EMBOSSING item.
[Fig. VI-37] EMBOSSING Effect
[Fig. VI-38] Performance of EMBOSSING Effect
Effects
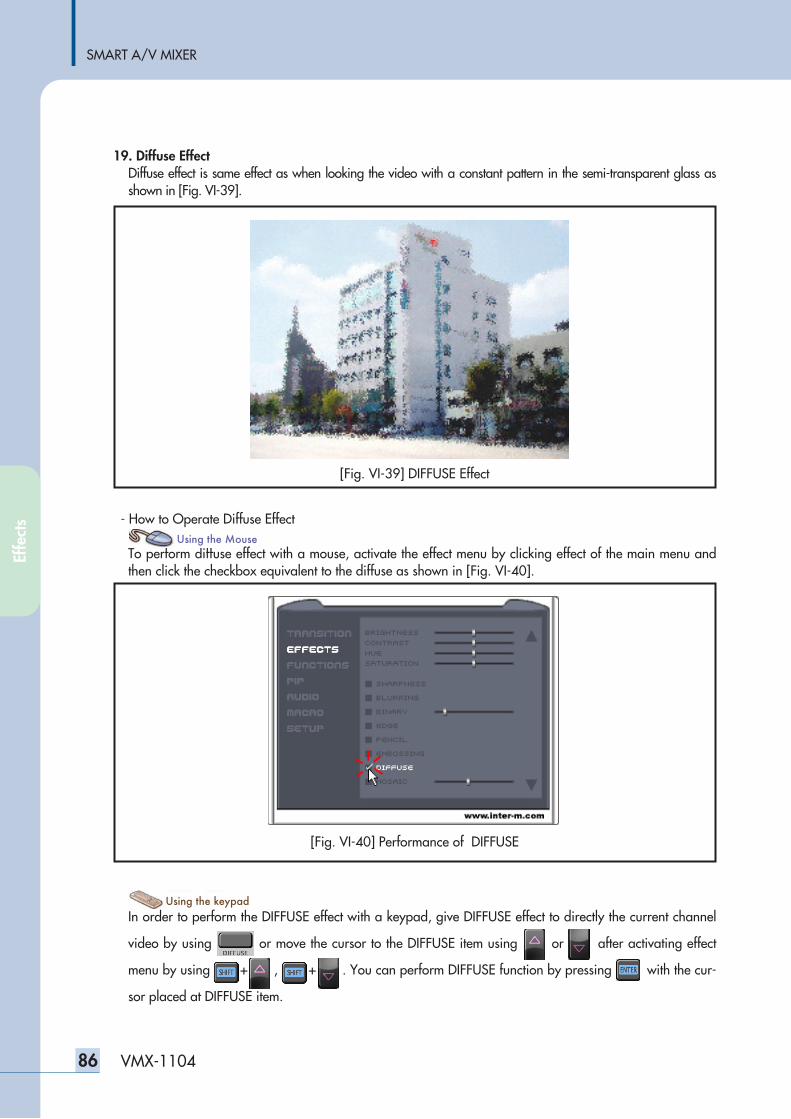
SMART A/V MIXER
86 VMX-1104
19. Diffuse EffectDiffuse effect is same effect as when looking the video with a constant pattern in the semi-transparent glass asshown in [Fig. VI-39].
- How to Operate Diffuse Effect
To perform diffuse effect with a mouse, activate the effect menu by clicking effect of the main menu andthen click the checkbox equivalent to the diffuse as shown in [Fig. VI-40].
In order to perform the DIFFUSE effect with a keypad, give DIFFUSE effect to directly the current channel
video by using or move the cursor to the DIFFUSE item using usingor usingafter activating effect
menu by using usin + usin, sing + usin. You can perform DIFFUSE function by pressing with the cur-
sor placed at DIFFUSE item.
[Fig. VI-39] DIFFUSE Effect
[Fig. VI-40] Performance of DIFFUSE
Effe
cts

SMART A/V MIXER
87VMX-1104
20. Mosaic EffectMosaic effect is function to give mosaic to the input video as shown in [Fig. VI-41].
- How to Operate Mosaic Effect
To perform mosaic effect with a mouse, activate the effect menu by clicking effect of the main menu andthen click the checkbox equivalent to the mosaic as shown in [Fig. VI-42].
[Fig. VI-41] MOSAIC Effect
[Fig. VI-42] Performance of MOSAIC
Effects
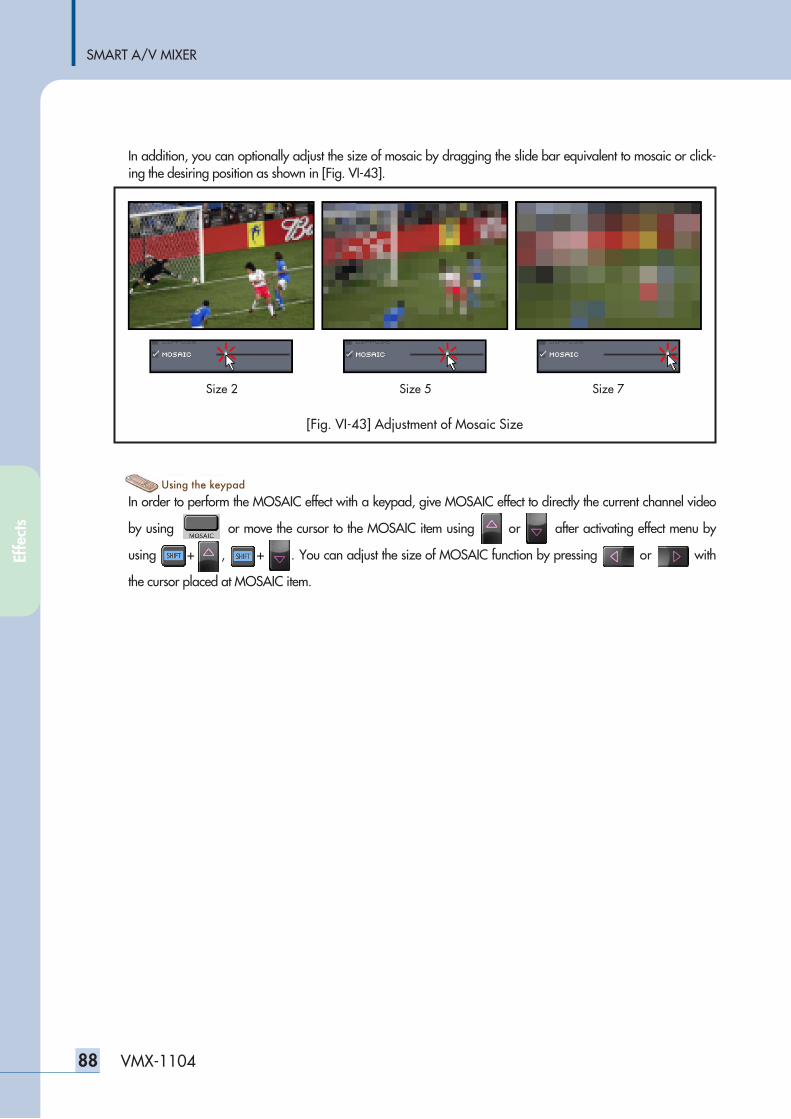
SMART A/V MIXER
88 VMX-1104
In addition, you can optionally adjust the size of mosaic by dragging the slide bar equivalent to mosaic or click-ing the desiring position as shown in [Fig. VI-43].
In order to perform the MOSAIC effect with a keypad, give MOSAIC effect to directly the current channel video
by using or move the cursor to the MOSAIC item using usingor usingafter activating effect menu by
using usin + usin, sing + usin. You can adjust the size of MOSAIC function by pressing usi ngor us ingwith
the cursor placed at MOSAIC item.
[Fig. VI-43] Adjustment of Mosaic Size
Size 2 Size 5 Size 7
Effe
cts
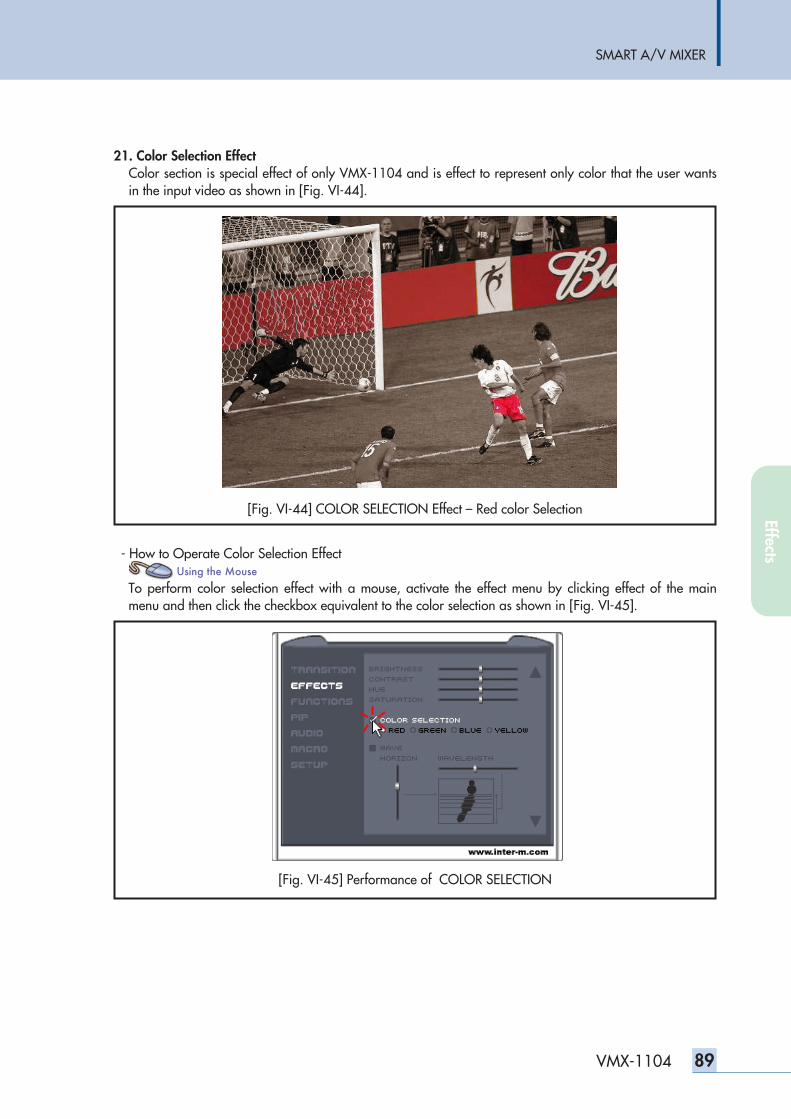
SMART A/V MIXER
89VMX-1104
21. Color Selection EffectColor section is special effect of only VMX-1104 and is effect to represent only color that the user wantsin the input video as shown in [Fig. VI-44].
- How to Operate Color Selection Effect
To perform color selection effect with a mouse, activate the effect menu by clicking effect of the mainmenu and then click the checkbox equivalent to the color selection as shown in [Fig. VI-45].
[Fig. VI-44] COLOR SELECTION Effect – Red color Selection
[Fig. VI-45] Performance of COLOR SELECTION
Effects
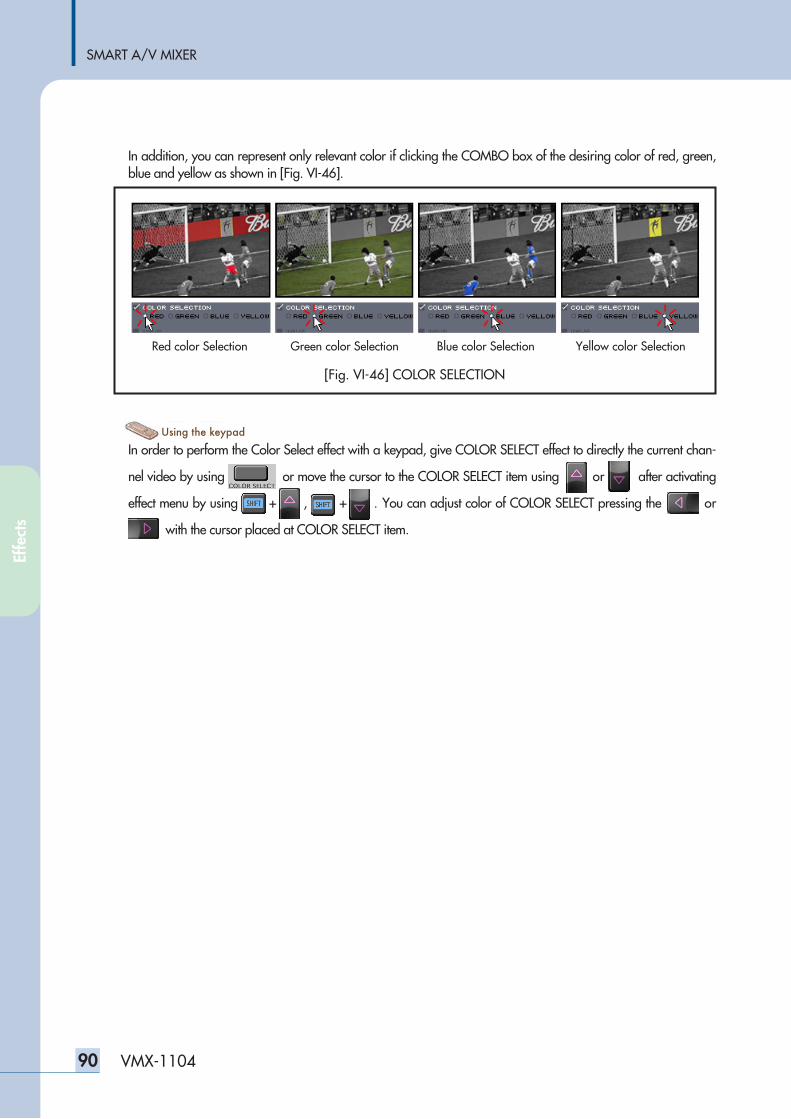
SMART A/V MIXER
90 VMX-1104
In addition, you can represent only relevant color if clicking the COMBO box of the desiring color of red, green,blue and yellow as shown in [Fig. VI-46].
In order to perform the Color Select effect with a keypad, give COLOR SELECT effect to directly the current chan-
nel video by using or move the cursor to the COLOR SELECT item using usingor usingafter activating
effect menu by using usin + usin, sing + usin. You can adjust color of COLOR SELECT pressing the usi ngor
us ingwith the cursor placed at COLOR SELECT item.
[Fig. VI-46] COLOR SELECTION
Red color Selection Green color Selection Blue color Selection Yellow color Selection
Effe
cts
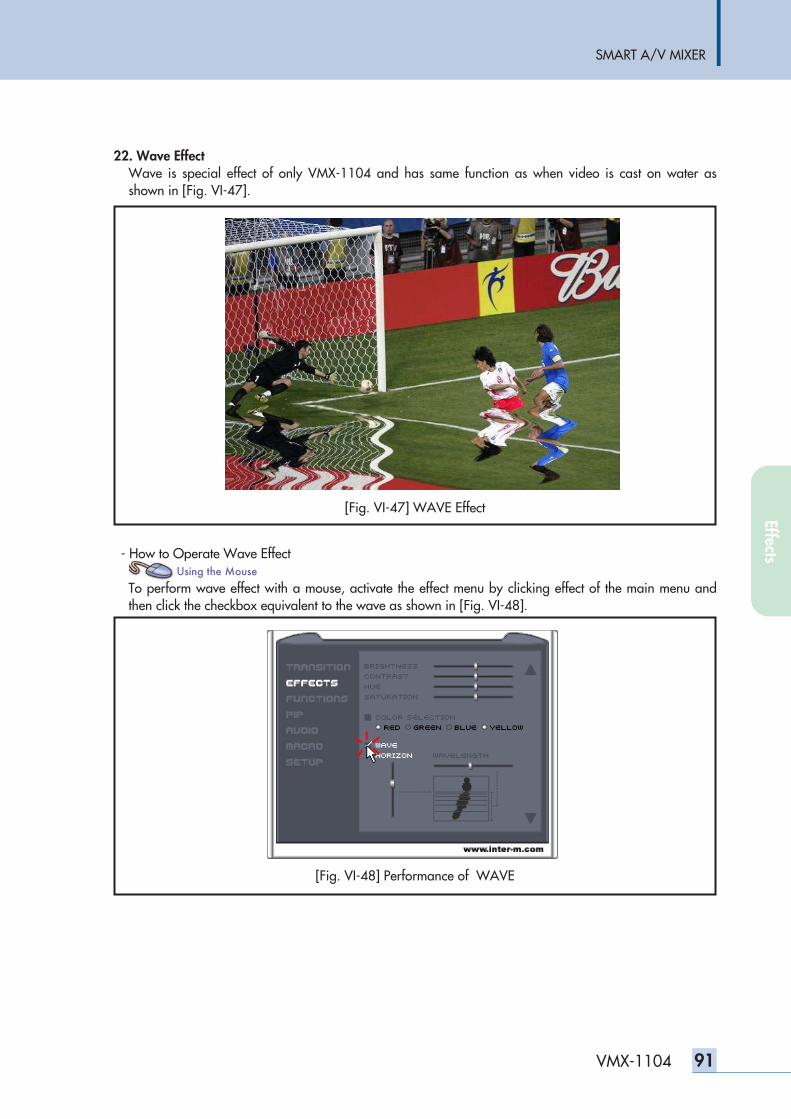
SMART A/V MIXER
91VMX-1104
22. Wave EffectWave is special effect of only VMX-1104 and has same function as when video is cast on water asshown in [Fig. VI-47].
- How to Operate Wave Effect
To perform wave effect with a mouse, activate the effect menu by clicking effect of the main menu andthen click the checkbox equivalent to the wave as shown in [Fig. VI-48].
[Fig. VI-47] WAVE Effect
[Fig. VI-48] Performance of WAVE
Effects
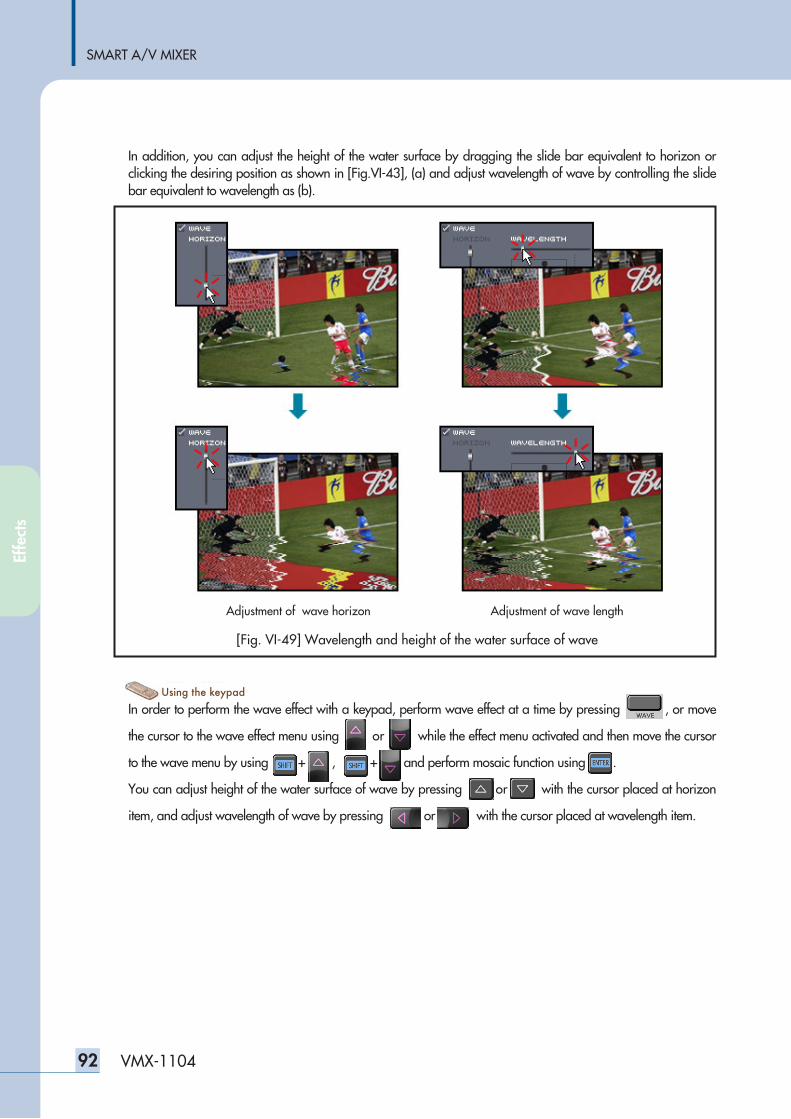
SMART A/V MIXER
92 VMX-1104
In addition, you can adjust the height of the water surface by dragging the slide bar equivalent to horizon orclicking the desiring position as shown in [Fig.VI-43], (a) and adjust wavelength of wave by controlling the slidebar equivalent to wavelength as (b).
In order to perform the wave effect with a keypad, perform wave effect at a time by pressing , or move
the cursor to the wave effect menu using usingor usingwhile the effect menu activated and then move the cursor
to the wave menu by using usin + usin, sing + usinand perform mosaic function using .
You can adjust height of the water surface of wave by pressing usingor usingwith the cursor placed at horizon
item, and adjust wavelength of wave by pressing usin or usin with the cursor placed at wavelength item.
[Fig. VI-49] Wavelength and height of the water surface of wave
Adjustment of wave horizon Adjustment of wave length
Effe
cts
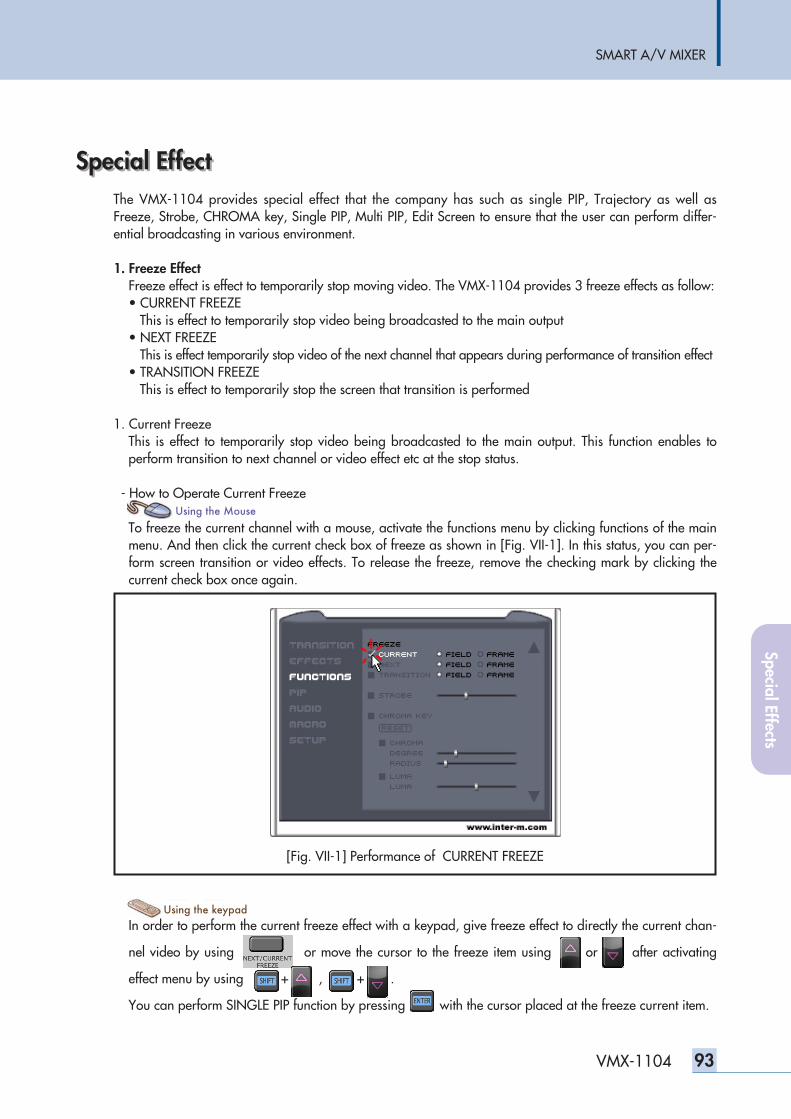
SMART A/V MIXER
93VMX-1104
Special EffectSpecial Effect The VMX-1104 provides special effect that the company has such as single PIP, Trajectory as well asFreeze, Strobe, CHROMA key, Single PIP, Multi PIP, Edit Screen to ensure that the user can perform differ-ential broadcasting in various environment.
1. Freeze EffectFreeze effect is effect to temporarily stop moving video. The VMX-1104 provides 3 freeze effects as follow:• CURRENT FREEZE
This is effect to temporarily stop video being broadcasted to the main output• NEXT FREEZE
This is effect temporarily stop video of the next channel that appears during performance of transition effect• TRANSITION FREEZE
This is effect to temporarily stop the screen that transition is performed
1. Current FreezeThis is effect to temporarily stop video being broadcasted to the main output. This function enables toperform transition to next channel or video effect etc at the stop status.
- How to Operate Current Freeze
To freeze the current channel with a mouse, activate the functions menu by clicking functions of the mainmenu. And then click the current check box of freeze as shown in [Fig. VII-1]. In this status, you can per-form screen transition or video effects. To release the freeze, remove the checking mark by clicking thecurrent check box once again.
In order to perform the current freeze effect with a keypad, give freeze effect to directly the current chan-
nel video by using or move the cursor to the freeze item using usingor usingafter activating
effect menu by using us in + usin, sing + usin.
You can perform SINGLE PIP function by pressing with the cursor placed at the freeze current item.
[Fig. VII-1] Performance of CURRENT FREEZE
Special Effects
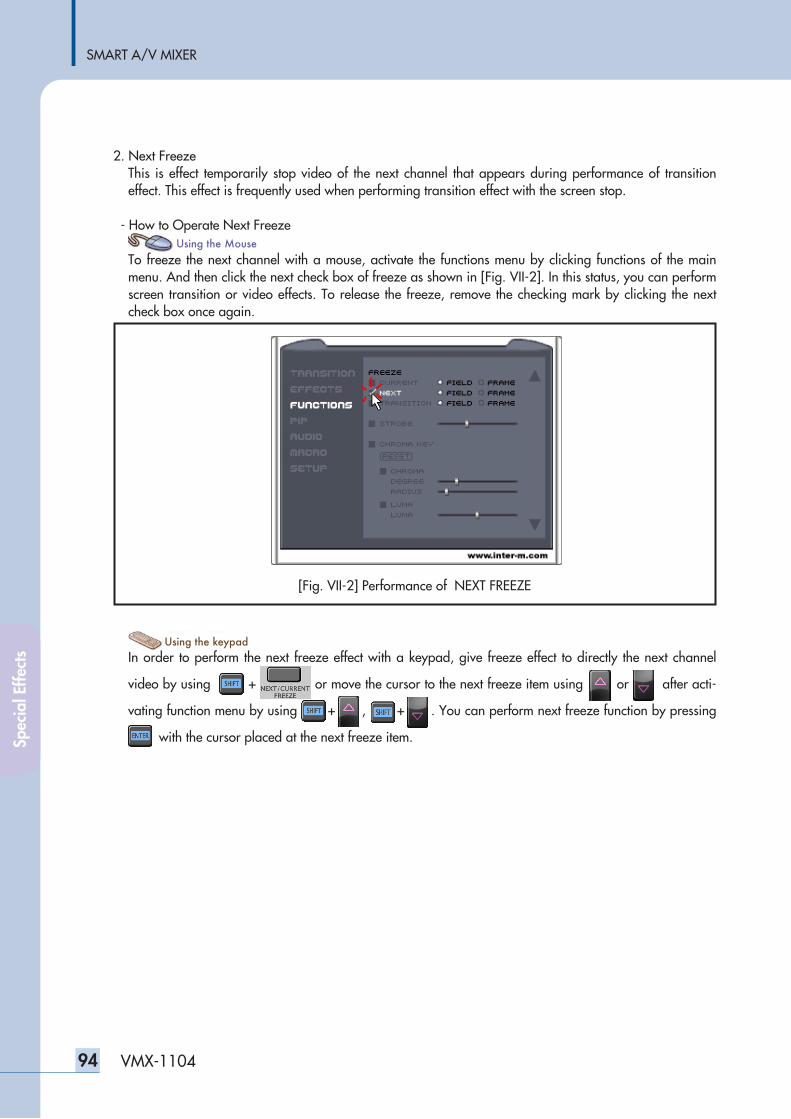
SMART A/V MIXER
94 VMX-1104
2. Next FreezeThis is effect temporarily stop video of the next channel that appears during performance of transitioneffect. This effect is frequently used when performing transition effect with the screen stop.
- How to Operate Next Freeze
To freeze the next channel with a mouse, activate the functions menu by clicking functions of the mainmenu. And then click the next check box of freeze as shown in [Fig. VII-2]. In this status, you can performscreen transition or video effects. To release the freeze, remove the checking mark by clicking the nextcheck box once again.
In order to perform the next freeze effect with a keypad, give freeze effect to directly the next channel
video by using + or move the cursor to the next freeze item using usingor usingafter acti-
vating function menu by using usin + usin, sing + usin. You can perform next freeze function by pressing
with the cursor placed at the next freeze item.
[Fig. VII-2] Performance of NEXT FREEZE
Spec
ial E
ffect
s
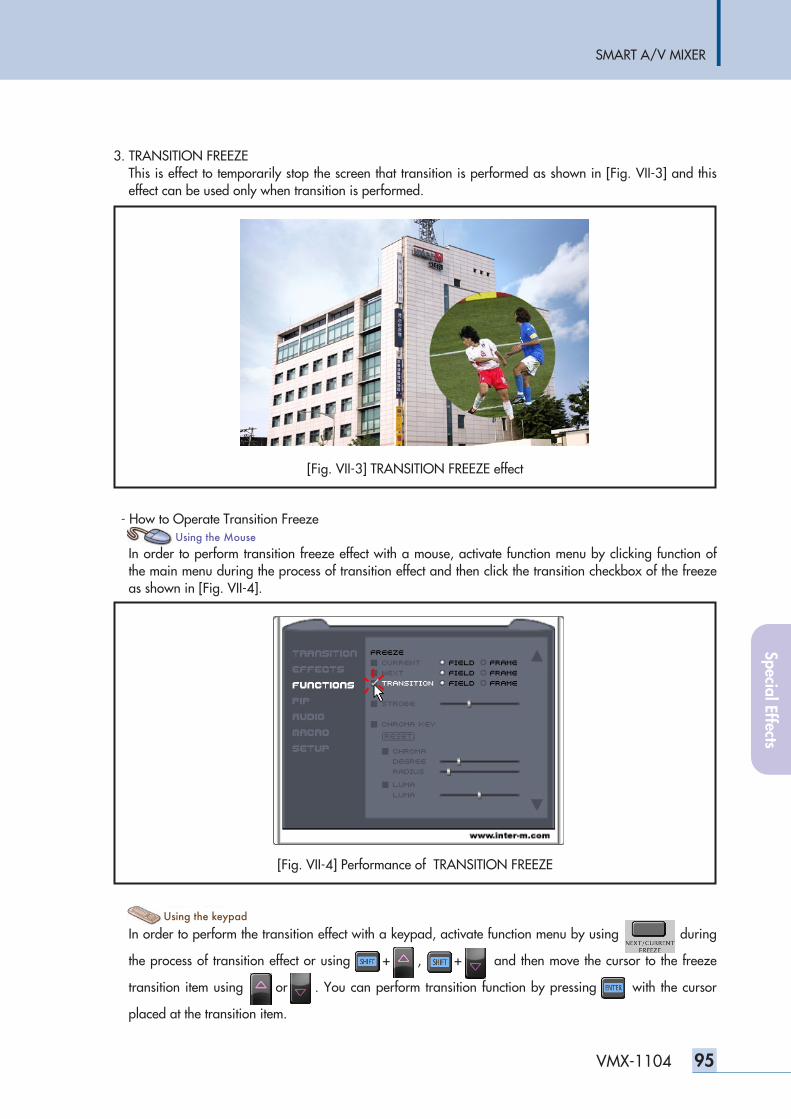
SMART A/V MIXER
95VMX-1104
3. TRANSITION FREEZEThis is effect to temporarily stop the screen that transition is performed as shown in [Fig. VII-3] and thiseffect can be used only when transition is performed.
- How to Operate Transition Freeze
In order to perform transition freeze effect with a mouse, activate function menu by clicking function ofthe main menu during the process of transition effect and then click the transition checkbox of the freezeas shown in [Fig. VII-4].
In order to perform the transition effect with a keypad, activate function menu by using during
the process of transition effect or using usin + usin, sing + usin and then move the cursor to the freeze
transition item using usin or usin. You can perform transition function by pressing with the cursor
placed at the transition item.
[Fig. VII-3] TRANSITION FREEZE effect
[Fig. VII-4] Performance of TRANSITION FREEZE
Special Effects
SMART A/V MIXER
96 VMX-1104
Transition Freeze and
Since the transition freeze is effect to temporarily stop the screen that transition is performed, this
function can be used only during transition and is not used when transition is completed. Due to
such feather, is used in the current freeze and the TRANSITION FREEZE together.
Pressing in the status enables to perform TRANSITION FREEZE in the status that transi-
tion is performed. Pressing in the status enables to perform CURRENT FREEZE in the
status that transition is stop.
Spec
ial E
ffect
s
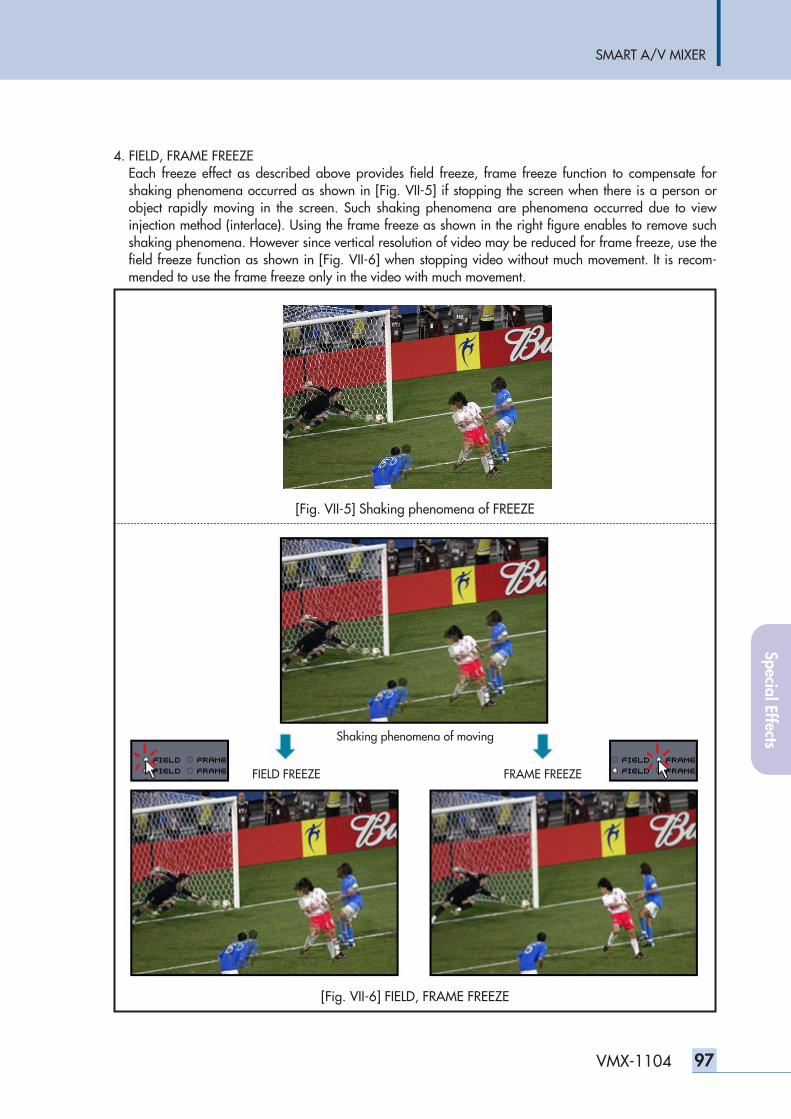
SMART A/V MIXER
97VMX-1104
4. FIELD, FRAME FREEZEEach freeze effect as described above provides field freeze, frame freeze function to compensate forshaking phenomena occurred as shown in [Fig. VII-5] if stopping the screen when there is a person orobject rapidly moving in the screen. Such shaking phenomena are phenomena occurred due to viewinjection method (interlace). Using the frame freeze as shown in the right figure enables to remove suchshaking phenomena. However since vertical resolution of video may be reduced for frame freeze, use thefield freeze function as shown in [Fig. VII-6] when stopping video without much movement. It is recom-mended to use the frame freeze only in the video with much movement.
[Fig. VII-5] Shaking phenomena of FREEZE
[Fig. VII-6] FIELD, FRAME FREEZE
Shaking phenomena of moving
FIELD FREEZE FRAME FREEZE
Special Effects
SMART A/V MIXER
98 VMX-1104
- How to Operate Field Freeze, Frame Freeze
To select field or frame with a mouse, click the desiring item of the field COMBO box and the frameCOMBO box equivalent to each freeze to perform.
To select field or frame with a keypad, select the desiring item by using or with the cursorplaced at each freeze to perform.
Spec
ial E
ffect
s
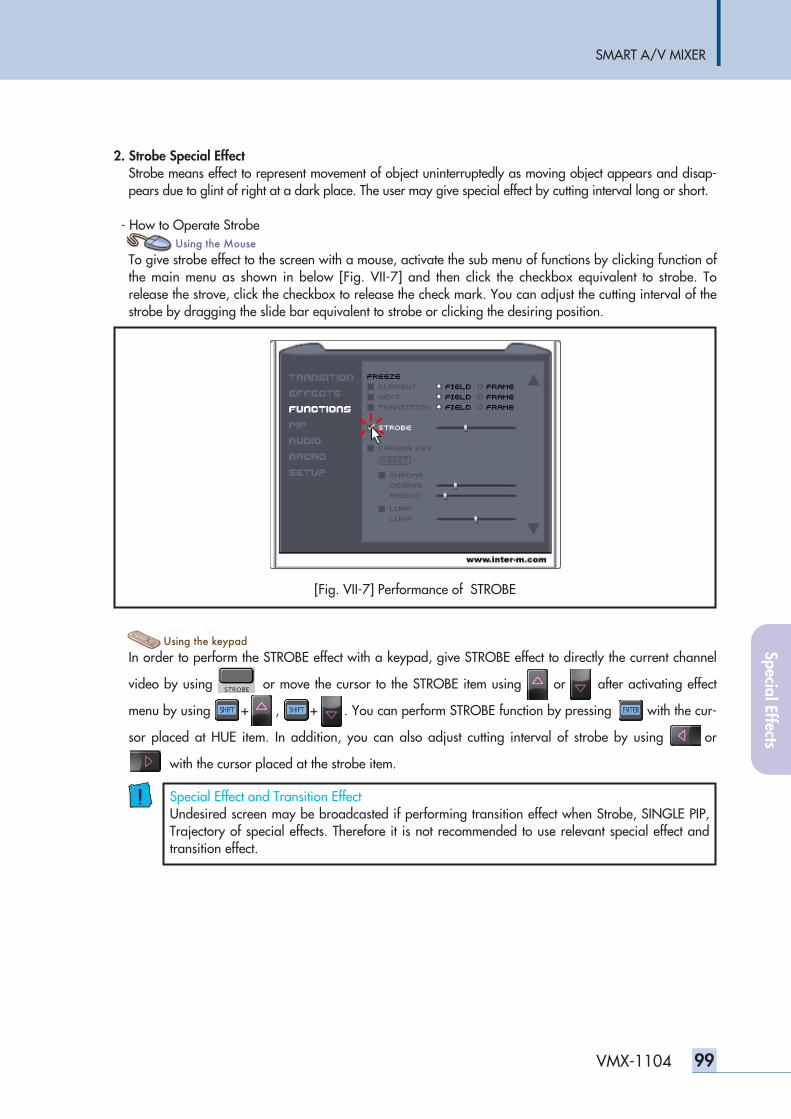
SMART A/V MIXER
99VMX-1104
2. Strobe Special EffectStrobe means effect to represent movement of object uninterruptedly as moving object appears and disap-pears due to glint of right at a dark place. The user may give special effect by cutting interval long or short.
- How to Operate Strobe
To give strobe effect to the screen with a mouse, activate the sub menu of functions by clicking function ofthe main menu as shown in below [Fig. VII-7] and then click the checkbox equivalent to strobe. Torelease the strove, click the checkbox to release the check mark. You can adjust the cutting interval of thestrobe by dragging the slide bar equivalent to strobe or clicking the desiring position.
In order to perform the STROBE effect with a keypad, give STROBE effect to directly the current channel
video by using or move the cursor to the STROBE item using usin or usin after activating effect
menu by using usin + usin, sing + usin. You can perform STROBE function by pressing with the cur-
sor placed at HUE item. In addition, you can also adjust cutting interval of strobe by using usingor
usingwith the cursor placed at the strobe item.
[Fig. VII-7] Performance of STROBE
Special Effect and Transition EffectUndesired screen may be broadcasted if performing transition effect when Strobe, SINGLE PIP,Trajectory of special effects. Therefore it is not recommended to use relevant special effect andtransition effect.
Special Effects
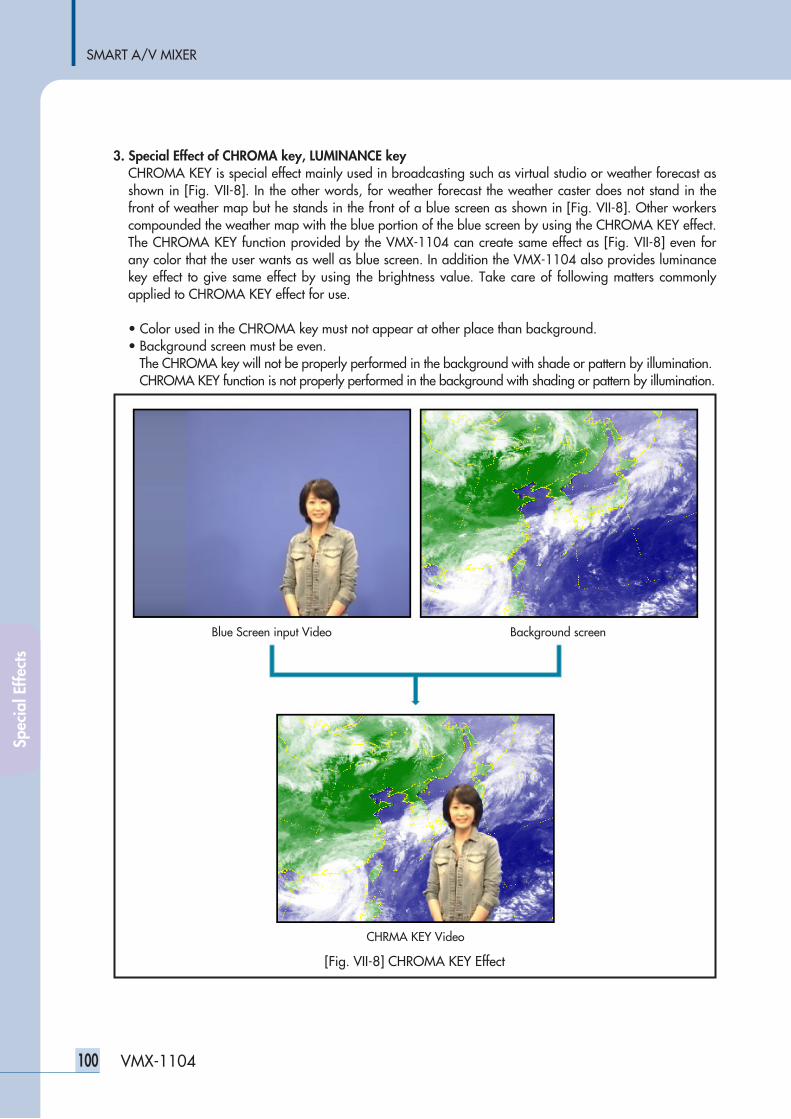
SMART A/V MIXER
100 VMX-1104
3. Special Effect of CHROMA key, LUMINANCE keyCHROMA KEY is special effect mainly used in broadcasting such as virtual studio or weather forecast asshown in [Fig. VII-8]. In the other words, for weather forecast the weather caster does not stand in thefront of weather map but he stands in the front of a blue screen as shown in [Fig. VII-8]. Other workerscompounded the weather map with the blue portion of the blue screen by using the CHROMA KEY effect.The CHROMA KEY function provided by the VMX-1104 can create same effect as [Fig. VII-8] even forany color that the user wants as well as blue screen. In addition the VMX-1104 also provides luminancekey effect to give same effect by using the brightness value. Take care of following matters commonlyapplied to CHROMA KEY effect for use.
• Color used in the CHROMA key must not appear at other place than background.• Background screen must be even.
The CHROMA key will not be properly performed in the background with shade or pattern by illumination.CHROMA KEY function is not properly performed in the background with shading or pattern by illumination.
[Fig. VII-8] CHROMA KEY Effect
Blue Screen input Video Background screen
CHRMA KEY Video
Spec
ial E
ffect
s
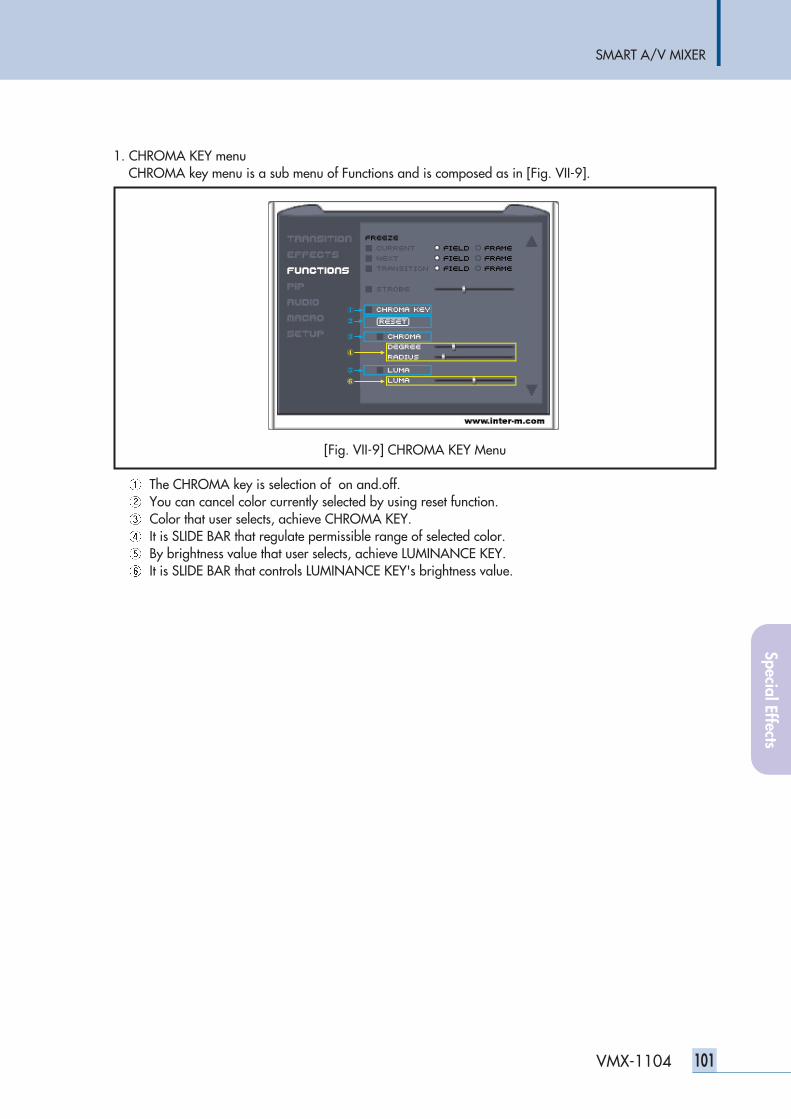
SMART A/V MIXER
101VMX-1104
1. CHROMA KEY menuCHROMA key menu is a sub menu of Functions and is composed as in [Fig. VII-9].
The CHROMA key is selection of on and.off.You can cancel color currently selected by using reset function.Color that user selects, achieve CHROMA KEY.It is SLIDE BAR that regulate permissible range of selected color.By brightness value that user selects, achieve LUMINANCE KEY.It is SLIDE BAR that controls LUMINANCE KEY's brightness value.
①
②
③
④
⑥
⑤
[Fig. VII-9] CHROMA KEY Menu
Special Effects
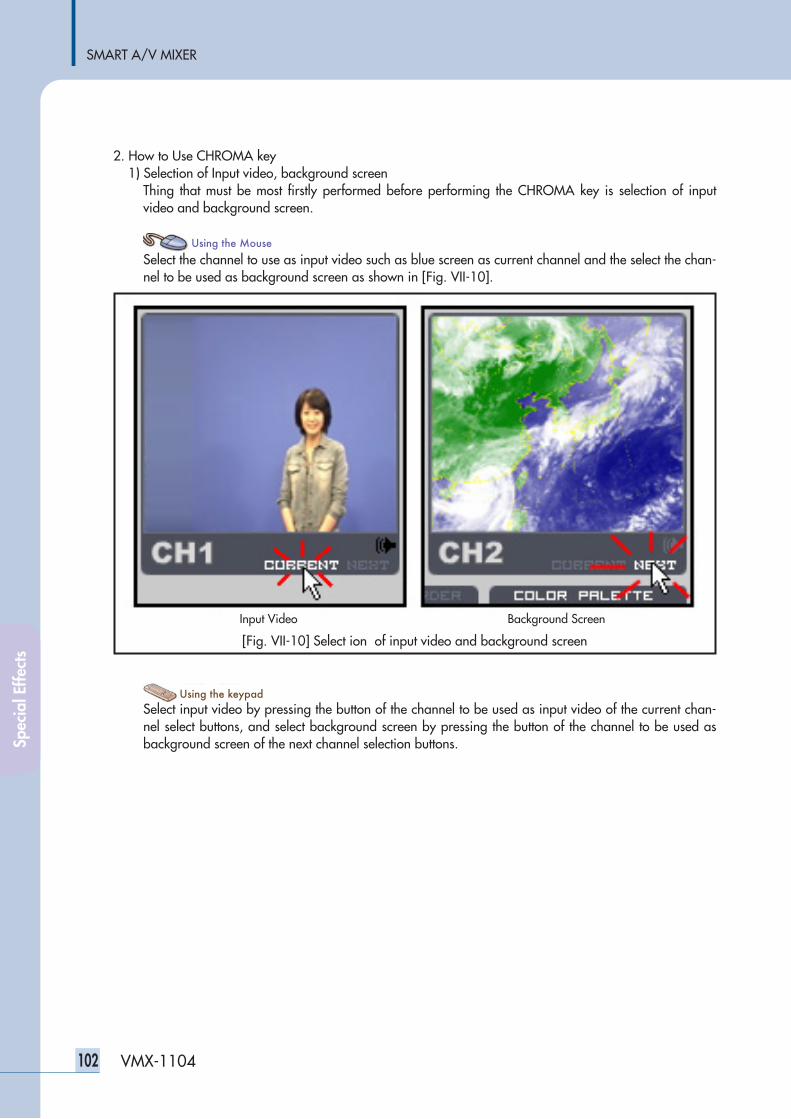
SMART A/V MIXER
102 VMX-1104
2. How to Use CHROMA key1) Selection of Input video, background screen
Thing that must be most firstly performed before performing the CHROMA key is selection of inputvideo and background screen.
Select the channel to use as input video such as blue screen as current channel and the select the chan-nel to be used as background screen as shown in [Fig. VII-10].
Select input video by pressing the button of the channel to be used as input video of the current chan-nel select buttons, and select background screen by pressing the button of the channel to be used asbackground screen of the next channel selection buttons.
[Fig. VII-10] Select ion of input video and background screen
Input Video Background Screen
Spec
ial E
ffect
s
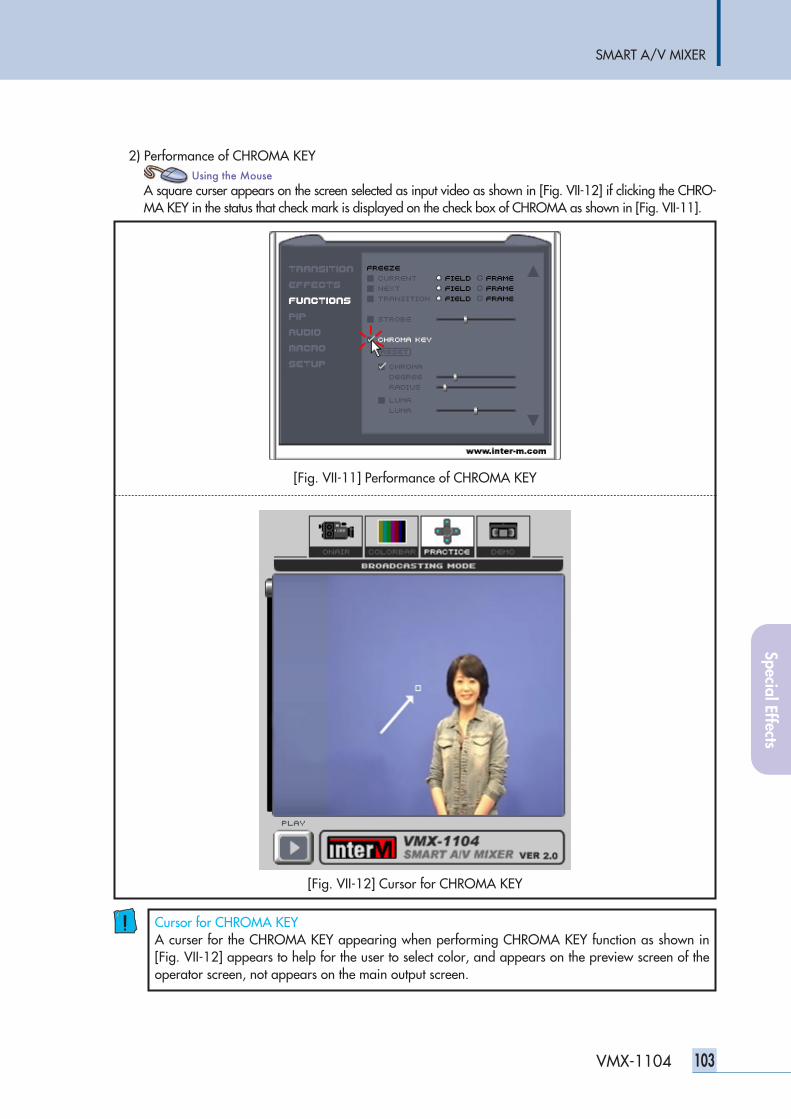
SMART A/V MIXER
103VMX-1104
2) Performance of CHROMA KEY
A square curser appears on the screen selected as input video as shown in [Fig. VII-12] if clicking the CHRO-MA KEY in the status that check mark is displayed on the check box of CHROMA as shown in [Fig. VII-11].
[Fig. VII-11] Performance of CHROMA KEY
[Fig. VII-12] Cursor for CHROMA KEY
Cursor for CHROMA KEYA curser for the CHROMA KEY appearing when performing CHROMA KEY function as shown in[Fig. VII-12] appears to help for the user to select color, and appears on the preview screen of theoperator screen, not appears on the main output screen.
Special Effects
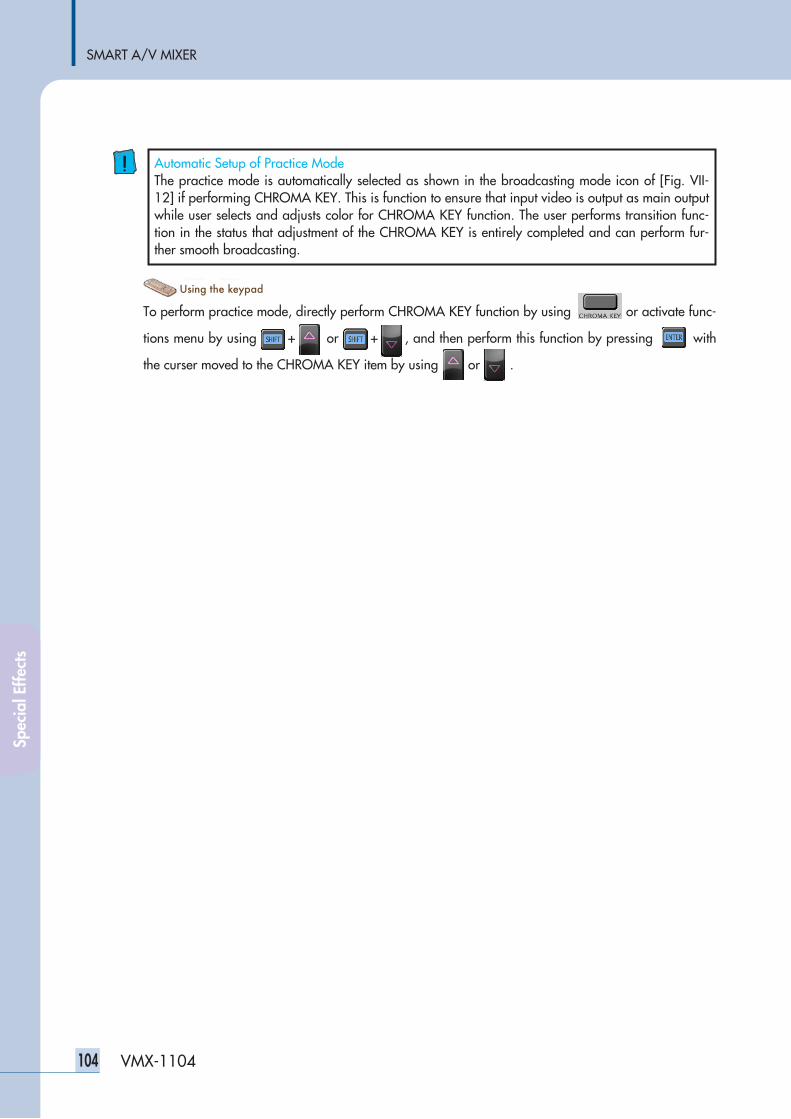
SMART A/V MIXER
104 VMX-1104
To perform practice mode, directly perform CHROMA KEY function by using or activate func-
tions menu by using usin + usin or sing + usin, and then perform this function by pressing with
the curser moved to the CHROMA KEY item by using usin or usin .
Automatic Setup of Practice ModeThe practice mode is automatically selected as shown in the broadcasting mode icon of [Fig. VII-12] if performing CHROMA KEY. This is function to ensure that input video is output as main outputwhile user selects and adjusts color for CHROMA KEY function. The user performs transition func-tion in the status that adjustment of the CHROMA KEY is entirely completed and can perform fur-ther smooth broadcasting.
Spec
ial E
ffect
s
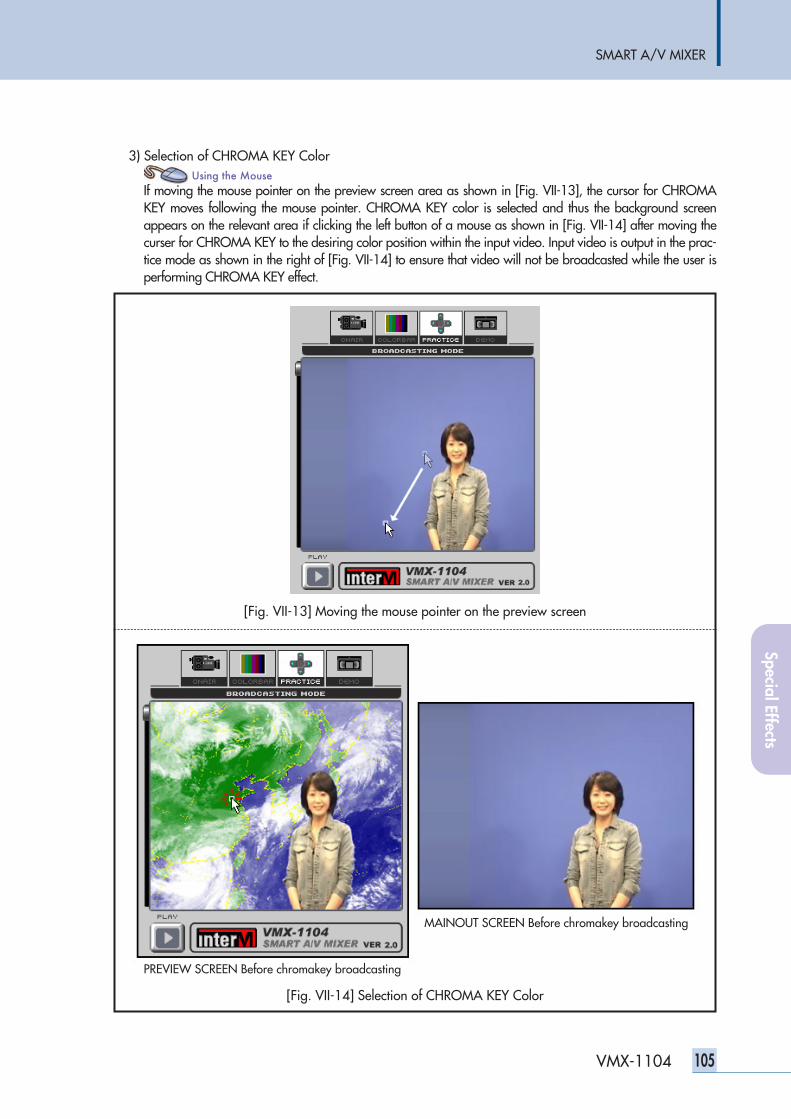
SMART A/V MIXER
105VMX-1104
3) Selection of CHROMA KEY Color
If moving the mouse pointer on the preview screen area as shown in [Fig. VII-13], the cursor for CHROMAKEY moves following the mouse pointer. CHROMA KEY color is selected and thus the background screenappears on the relevant area if clicking the left button of a mouse as shown in [Fig. VII-14] after moving thecurser for CHROMA KEY to the desiring color position within the input video. Input video is output in the prac-tice mode as shown in the right of [Fig. VII-14] to ensure that video will not be broadcasted while the user isperforming CHROMA KEY effect.
[Fig. VII-13] Moving the mouse pointer on the preview screen
[Fig. VII-14] Selection of CHROMA KEY Color
PREVIEW SCREEN Before chromakey broadcasting
MAINOUT SCREEN Before chromakey broadcasting
Special Effects
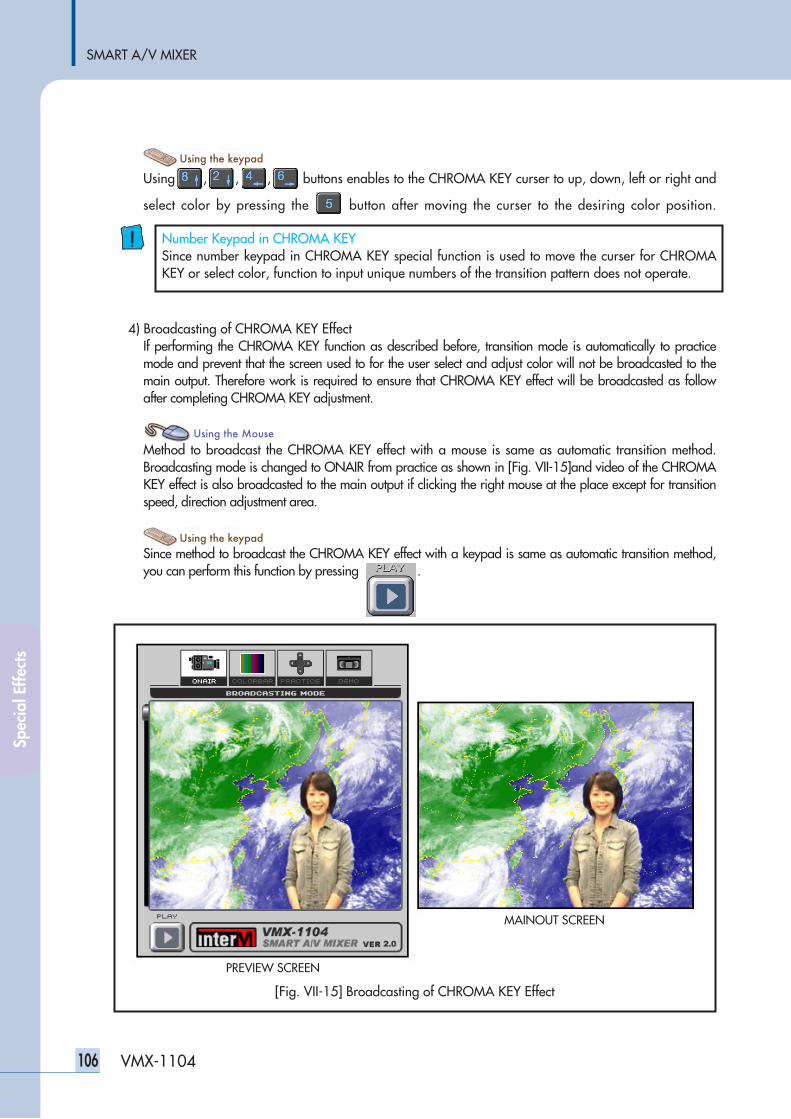
SMART A/V MIXER
106 VMX-1104
Using , , , buttons enables to the CHROMA KEY curser to up, down, left or right and
select color by pressing the button after moving the curser to the desiring color position.
4) Broadcasting of CHROMA KEY EffectIf performing the CHROMA KEY function as described before, transition mode is automatically to practicemode and prevent that the screen used to for the user select and adjust color will not be broadcasted to themain output. Therefore work is required to ensure that CHROMA KEY effect will be broadcasted as followafter completing CHROMA KEY adjustment.
Method to broadcast the CHROMA KEY effect with a mouse is same as automatic transition method.Broadcasting mode is changed to ONAIR from practice as shown in [Fig. VII-15]and video of the CHROMAKEY effect is also broadcasted to the main output if clicking the right mouse at the place except for transitionspeed, direction adjustment area.
Since method to broadcast the CHROMA KEY effect with a keypad is same as automatic transition method,you can perform this function by pressing .
Number Keypad in CHROMA KEYSince number keypad in CHROMA KEY special function is used to move the curser for CHROMAKEY or select color, function to input unique numbers of the transition pattern does not operate.
[Fig. VII-15] Broadcasting of CHROMA KEY Effect
PREVIEW SCREEN
MAINOUT SCREEN
Spec
ial E
ffect
s
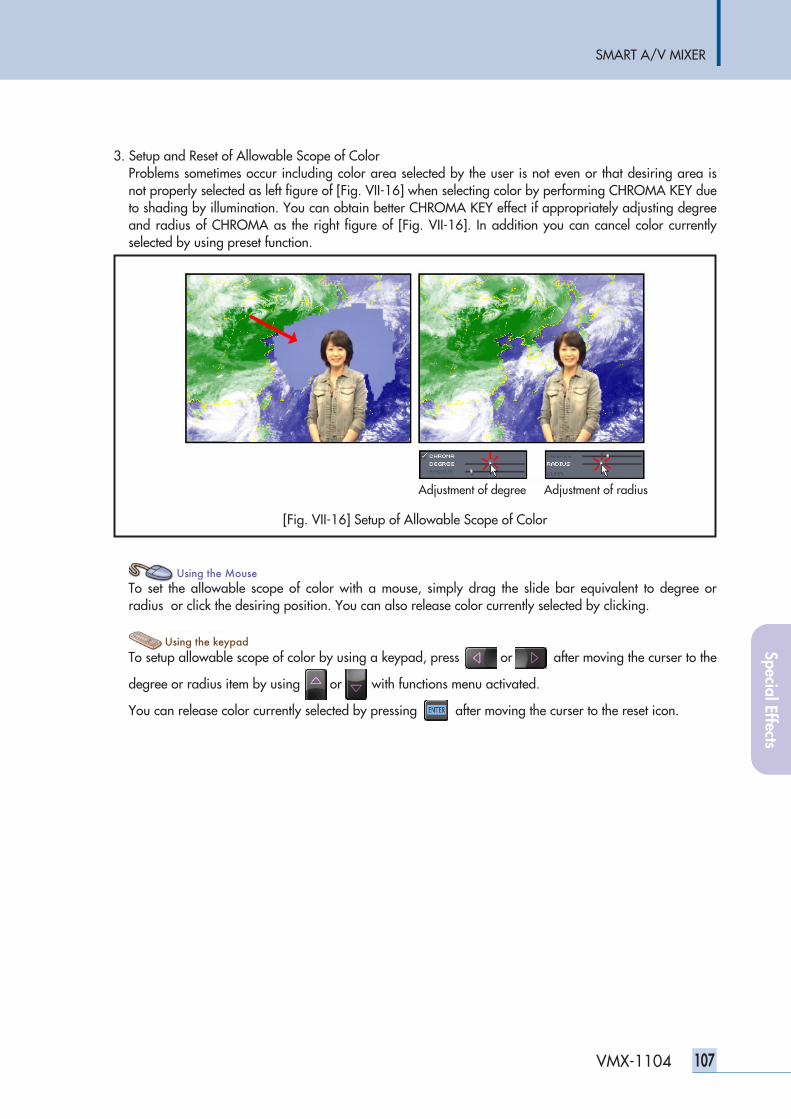
SMART A/V MIXER
107VMX-1104
3. Setup and Reset of Allowable Scope of ColorProblems sometimes occur including color area selected by the user is not even or that desiring area isnot properly selected as left figure of [Fig. VII-16] when selecting color by performing CHROMA KEY dueto shading by illumination. You can obtain better CHROMA KEY effect if appropriately adjusting degreeand radius of CHROMA as the right figure of [Fig. VII-16]. In addition you can cancel color currentlyselected by using preset function.
To set the allowable scope of color with a mouse, simply drag the slide bar equivalent to degree orradius or click the desiring position. You can also release color currently selected by clicking.
To setup allowable scope of color by using a keypad, press usingor using after moving the curser to the
degree or radius item by using usin or usin with functions menu activated.
You can release color currently selected by pressing after moving the curser to the reset icon.
[Fig. VII-16] Setup of Allowable Scope of Color
Adjustment of degree Adjustment of radius
Special Effects
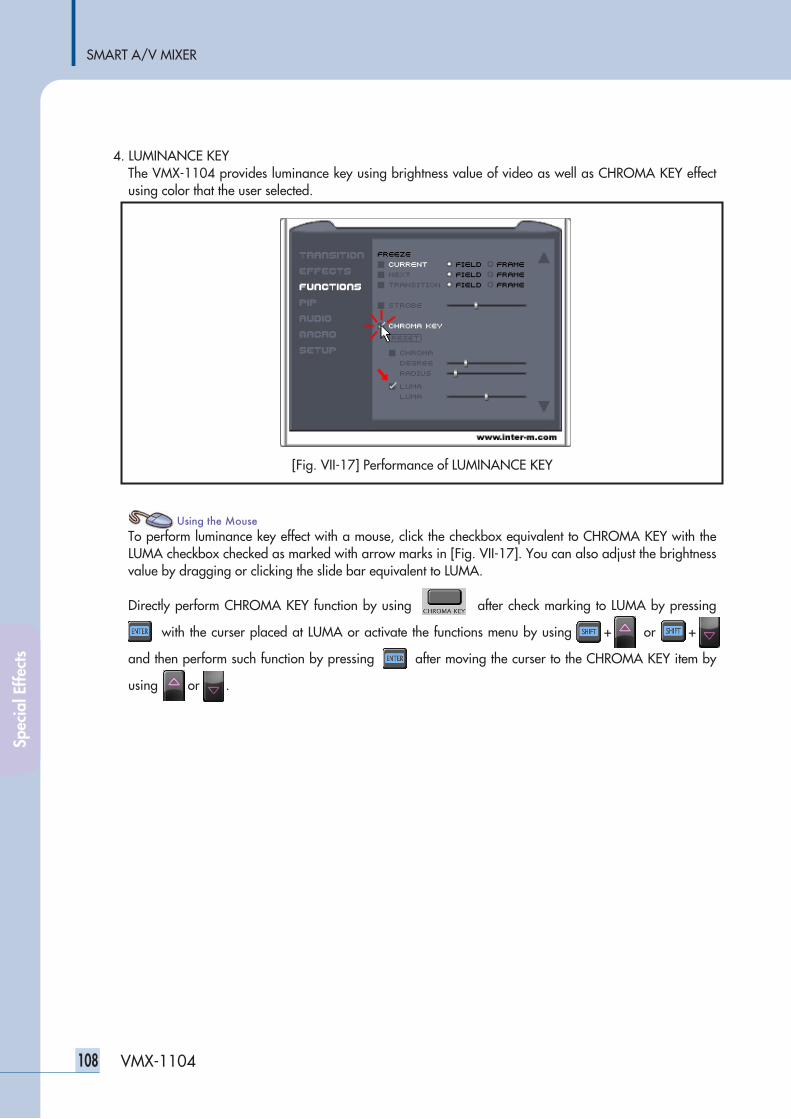
SMART A/V MIXER
108 VMX-1104
4. LUMINANCE KEYThe VMX-1104 provides luminance key using brightness value of video as well as CHROMA KEY effectusing color that the user selected.
To perform luminance key effect with a mouse, click the checkbox equivalent to CHROMA KEY with theLUMA checkbox checked as marked with arrow marks in [Fig. VII-17]. You can also adjust the brightnessvalue by dragging or clicking the slide bar equivalent to LUMA.
Directly perform CHROMA KEY function by using after check marking to LUMA by pressing
ssiwith the curser placed at LUMA or activate the functions menu by using usin + usin or sing + usi
and then perform such function by pressing after moving the curser to the CHROMA KEY item by
using usin or usin.
[Fig. VII-17] Performance of LUMINANCE KEY
Spec
ial E
ffect
s
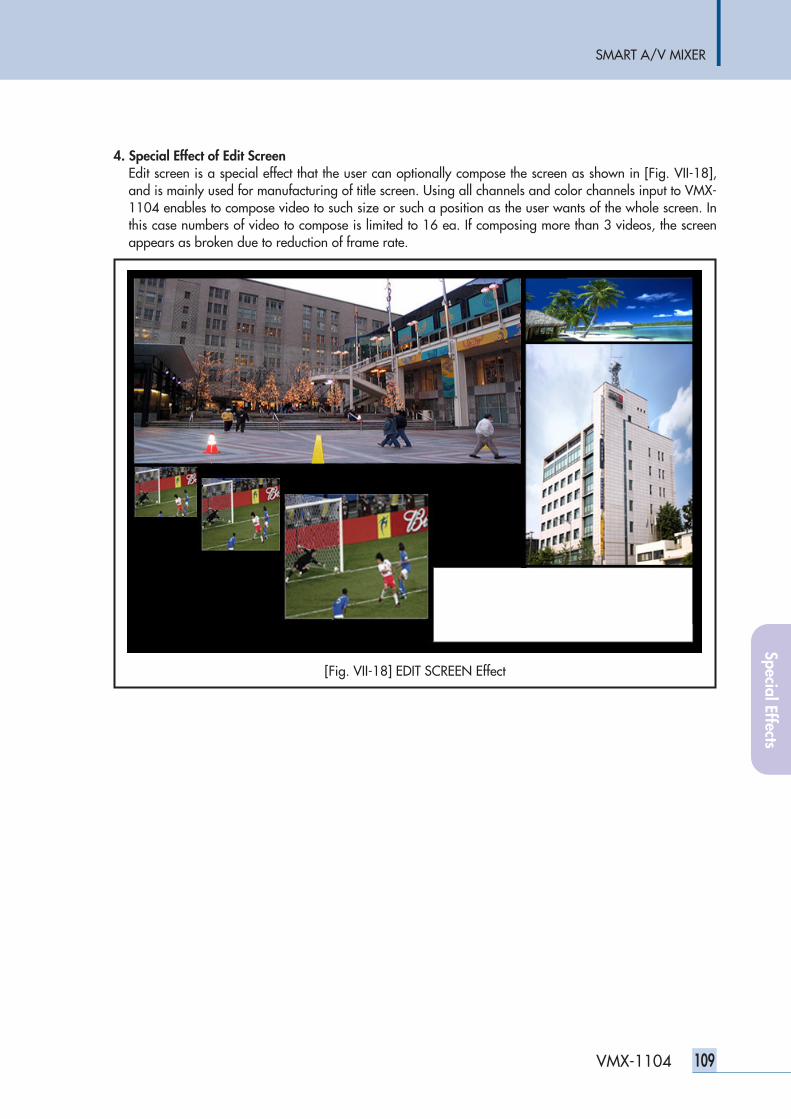
SMART A/V MIXER
109VMX-1104
4. Special Effect of Edit ScreenEdit screen is a special effect that the user can optionally compose the screen as shown in [Fig. VII-18],and is mainly used for manufacturing of title screen. Using all channels and color channels input to VMX-1104 enables to compose video to such size or such a position as the user wants of the whole screen. Inthis case numbers of video to compose is limited to 16 ea. If composing more than 3 videos, the screenappears as broken due to reduction of frame rate.
[Fig. VII-18] EDIT SCREEN Effect
Special Effects
SMART A/V MIXER
110 VMX-1104
1. Performance of Edit Screen
If activating sub menu of the functions by clicking functions of the main menu as shown in [Fig. VII-19],the Preview screen of the operator screen from which the Single PIP is output as shown in [Fig. VII-20]and the main output screen converted to automatically the practice mode appear. The preview screenis filled with border color and type designated and a white square frame representing the size andposition of video to be added by the user. As shown in the Broadcasting Mode, transition mode isautomatically changed to the color bar output mode and you can find that color bar is output to themain output. This mode is for more smooth broadcasting to ensure that broadcasting is done whencomposition of the screen is completed.
To perform edit screen with a keypad, directly perform edit screen by using or activate func-
tions menu b using usin + usin or sing + usi and then move the cursor to the edit screen item by using
or and press .
[Fig. VII-19] Performance of Edit Screen
[Fig. VII-20] Before Broadcasting of EDIT SCREEN
PREVIEW SCREEN
MAINOUT SCREEN
Spec
ial E
ffect
s
SMART A/V MIXER
111VMX-1104
2. Addition of Desiring Video
To add desiring video with a mouse, click the left top position of the desiring area as shown in [Fig.VII-21], and then drag as ~ (mouse movement in click status) and lay the clicking mouse button .
①
②
③
[Fig. VII-21] Addition of Desiring Video
[Fig. VII-22] Addition of EDIT SCREEN
Special Effects
SMART A/V MIXER
112 VMX-1104
Added video is video of the channel setup as channel setup of the edit screen menu as shown in [Fig.VII-23]. Clicking other channel before adding video to other area enables to change the video channel toappear on the relevant area.
To represent video of the desiring channel at the desiring position with a keypad, move the area setup
box as shown in the left of [Fig. VII-20] by using , , and buttons to the desiring posi-
tion, and enlarge or reduce the size of the vertical direction area by using + , + , and
enlarge or reduce the size of the horizontal direction area by using the + , + buttons.
In the status setup desiring area, represent video as shown in [Fig. VII-22] by using . It is also possi-
ble to change video to appear in the selected area by selecting the desiring channel before adding mage
to other area by using the , , , and buttons which are current channel selection
buttons.
[Fig. VII-23] Channel setup of the edit screen menu
Number Keypad in Edit ScreenSince the number keypad is used for moving the boxes for edit screen adjusting of the size inspecial function of edit screen, it no operates as function to enter unique number of the transitionpattern.
Cautions in Setup of Edit Screen AreaIf setting is done so that each area is folded when setting more than 3 edit screen areas, video ofthe folded part is flickering as broken. This is resulted from that frame rate is fallen when settingmore than 3 areas and is not failure. It is recommended to use edit screen function by setting theeach area so that folding will not occur.
Spec
ial E
ffect
s
SMART A/V MIXER
113VMX-1104
3. Broadcasting of Edit Screen Effect As described before, performing the Edit Screen enables to be automatically converted to color barmode, and represent videos that the user want, and ensure that series of works to change channel willnot be broadcast to the main output. Works are required to ensure that edit screen effect can bebroadcast as follow after completion of edit screen work.
In order to broadcast Edit Screen with a mouse is same as automatic method. In other words, click or click the right mouse at the area except for transition speed, direction adjustment area. If do-
ing so, the broadcasting mode is changed to ON AIR from the COLORBAR as shown in [Fig. VII-24]and video of the edit screen output to the preview screen is also broadcasted to the main output.
How to broadcast Edit Screen with a keypad is same as automatic method. In other words, and so canbe performed by pressing .
[Fig. VII-24] After Broadcasting of EDIT SCREEN
PREVIEW SCREEN
MAINOUT SCREEN
Special Effects
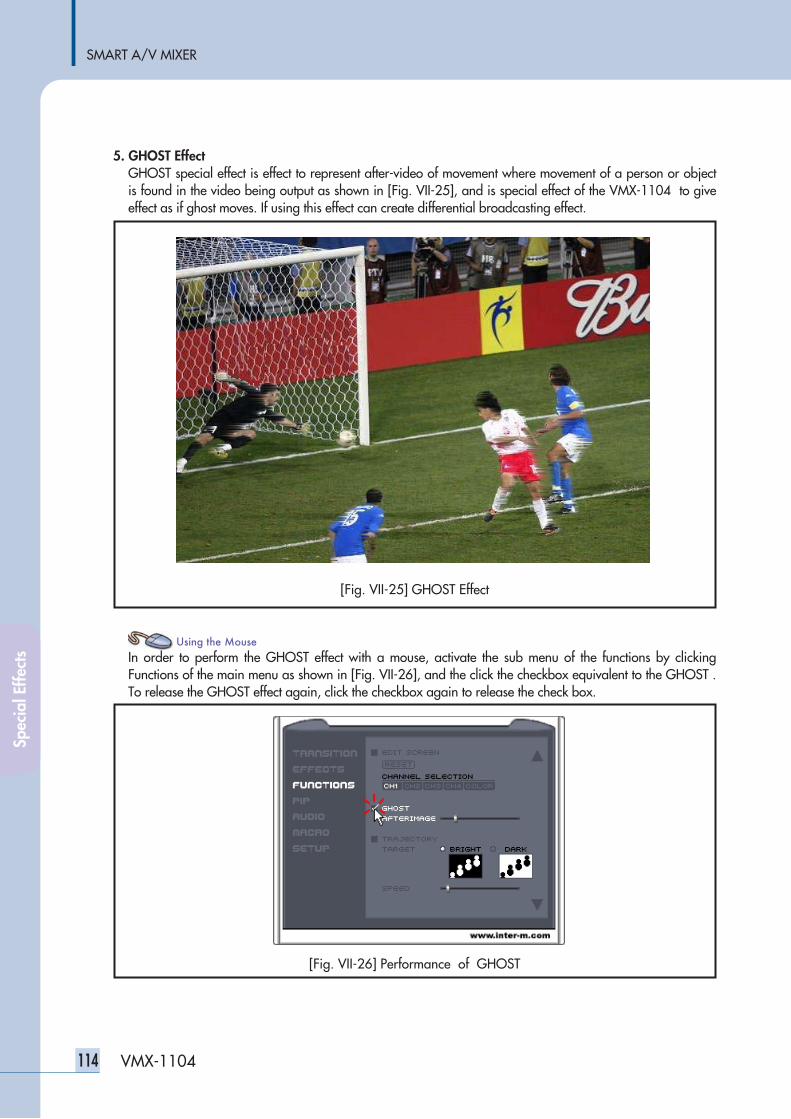
SMART A/V MIXER
114 VMX-1104
5. GHOST EffectGHOST special effect is effect to represent after-video of movement where movement of a person or objectis found in the video being output as shown in [Fig. VII-25], and is special effect of the VMX-1104 to giveeffect as if ghost moves. If using this effect can create differential broadcasting effect.
In order to perform the GHOST effect with a mouse, activate the sub menu of the functions by clickingFunctions of the main menu as shown in [Fig. VII-26], and the click the checkbox equivalent to the GHOST .To release the GHOST effect again, click the checkbox again to release the check box.
[Fig. VII-25] GHOST Effect
[Fig. VII-26] Performance of GHOST
Spec
ial E
ffect
s
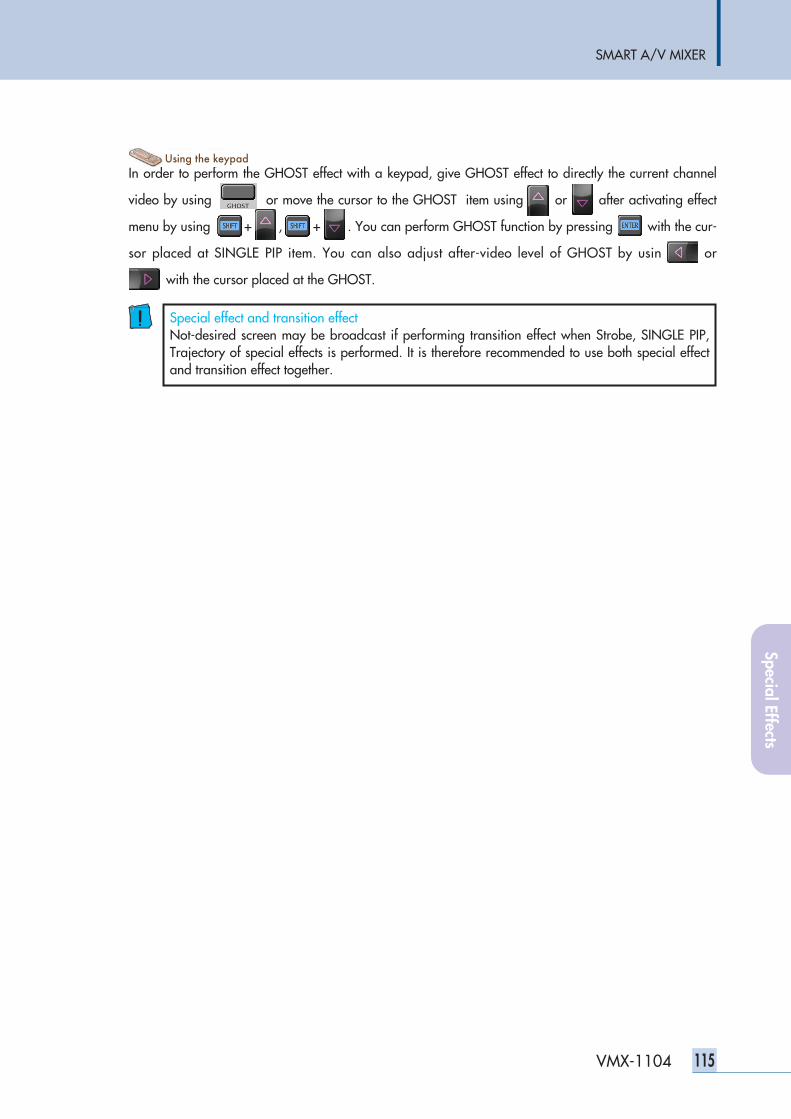
SMART A/V MIXER
115VMX-1104
In order to perform the GHOST effect with a keypad, give GHOST effect to directly the current channel
video by using or move the cursor to the GHOST item using or after activating effect
menu by using usin + usn , sing + usi . You can perform GHOST function by pressing with the cur-
sor placed at SINGLE PIP item. You can also adjust after-video level of GHOST by usin GHO or
GHOSwith the cursor placed at the GHOST.
Special effect and transition effectNot-desired screen may be broadcast if performing transition effect when Strobe, SINGLE PIP,Trajectory of special effects is performed. It is therefore recommended to use both special effectand transition effect together.
Special Effects
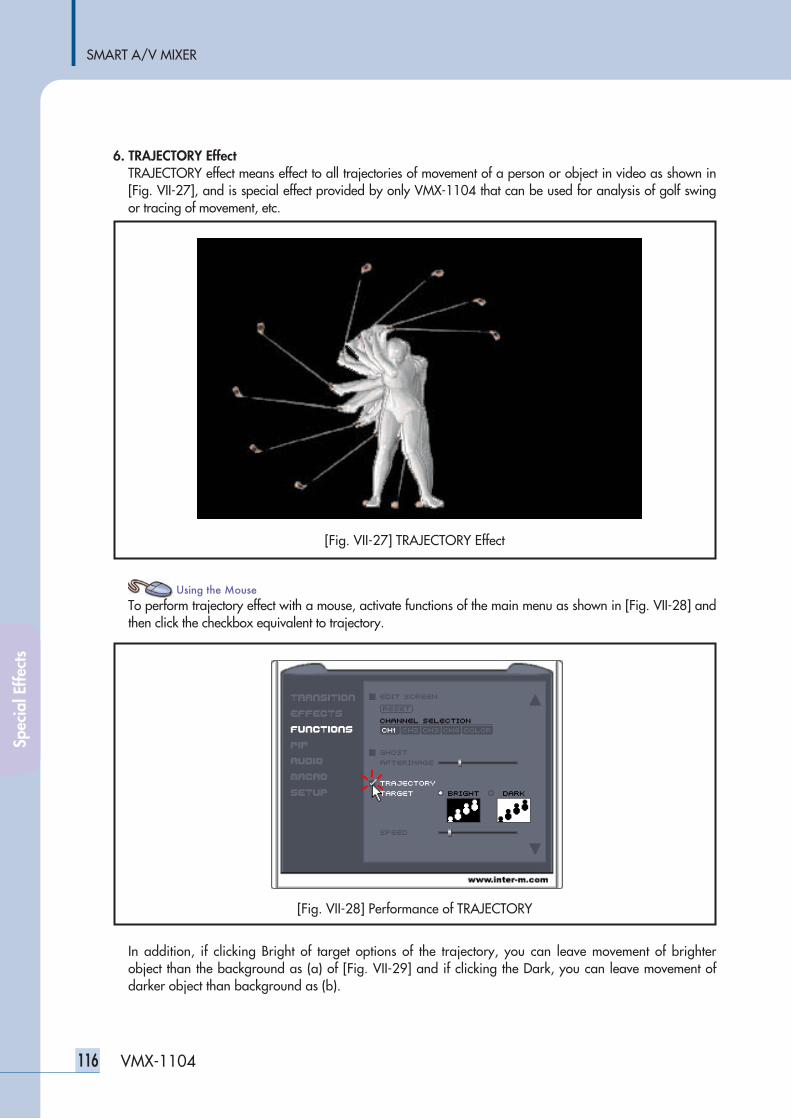
6. TRAJECTORY EffectTRAJECTORY effect means effect to all trajectories of movement of a person or object in video as shown in[Fig. VII-27], and is special effect provided by only VMX-1104 that can be used for analysis of golf swingor tracing of movement, etc.
To perform trajectory effect with a mouse, activate functions of the main menu as shown in [Fig. VII-28] andthen click the checkbox equivalent to trajectory.
In addition, if clicking Bright of target options of the trajectory, you can leave movement of brighterobject than the background as (a) of [Fig. VII-29] and if clicking the Dark, you can leave movement ofdarker object than background as (b).
SMART A/V MIXER
116 VMX-1104
[Fig. VII-27] TRAJECTORY Effect
[Fig. VII-28] Performance of TRAJECTORY
Spec
ial E
ffect
s
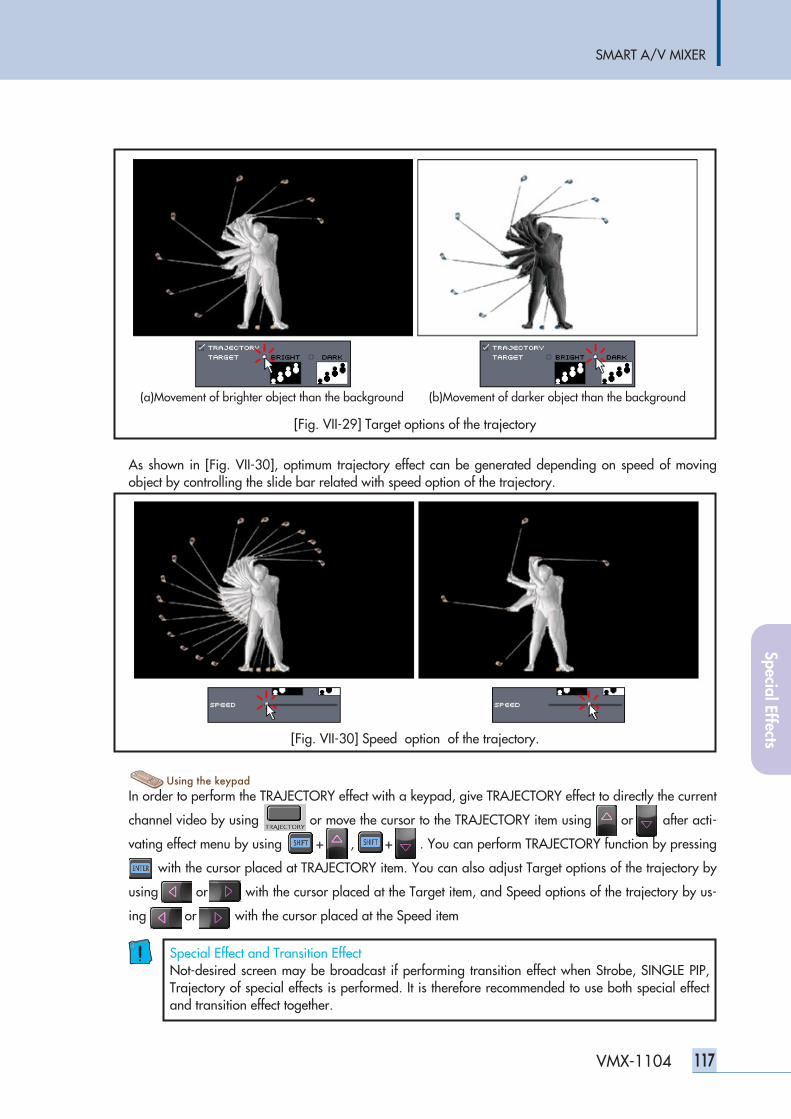
SMART A/V MIXER
117VMX-1104
As shown in [Fig. VII-30], optimum trajectory effect can be generated depending on speed of movingobject by controlling the slide bar related with speed option of the trajectory.
In order to perform the TRAJECTORY effect with a keypad, give TRAJECTORY effect to directly the current
channel video by using or move the cursor to the TRAJECTORY item using or after acti-
vating effect menu by using usin + usn , sing + usi . You can perform TRAJECTORY function by pressing
with the cursor placed at TRAJECTORY item. You can also adjust Target options of the trajectory by
using or with the cursor placed at the Target item, and Speed options of the trajectory by us-
ing or with the cursor placed at the Speed item
[Fig. VII-29] Target options of the trajectory
(a)Movement of brighter object than the background (b)Movement of darker object than the background
[Fig. VII-30] Speed option of the trajectory.
Special Effect and Transition EffectNot-desired screen may be broadcast if performing transition effect when Strobe, SINGLE PIP,Trajectory of special effects is performed. It is therefore recommended to use both special effectand transition effect together.
Special Effects
SMART A/V MIXER
118 VMX-1104
7. SINGLE PIP EffectSINGLE PIP (picture in picture) effect is effect to other screen on a screen as shown in [Fig. VII-31]. TheVMX-1104 can represent the PIP with 20 various shapes as shown in [Fig. VII-32] as well as square shape,in such position and size as users want.
[Fig. VII-31] SINGLE PIP Effect
[Fig. VII-32] SINGLE PIP with 20 various shapes
Spec
ial E
ffect
s
SMART A/V MIXER
119VMX-1104
1. Performance of SINGLE PIP
Only if activating sub menu of the Single PIP by clicking PIP of the main menu as shown in [Fig. VII-33], the Preview screen of the operator screen from which the Single PIP is output as shown in [Fig.VII-34] and the main output screen converted to automatically the practice mode appear. That themain output screen is automatically converted to practice mode is for more smooth broadcasting toensure that current screen is output as it is while the user composes the Single PIP screen and thatbroadcasting is done when composition of the screen is completed.
In order to perform the SINGLE PIP effect with a keypad, perform SINGLE PIP effect by using or
activate SINGLE PIP menu by using usin + usn , sing + usi .
[Fig. VII-33] Performance of SINGLE PIP
[Fig. VII-34] Before Broadcasting of SINGLE PIP
PREVIEW SCREEN
MAINOUT SCREEN
Output channel of SINGLE PIPVideo output to the whole screen during performance of SINGLE PIP is video of the current chan-nel. PIP video output to a small window is video of the next channel. Before performing singlePIP function, appropriately set both current channel and next channel for use. Of course, it ispossible to change both current channel and next channel even when single PIP is performed.
Special Effects
SMART A/V MIXER
120 VMX-1104
2. Setup of Position and Size of PIP
To set position and size of the PIP with a mouse, click the left top position of the desiring area asshown in [Fig. VII-35], and then drag as ~ (mouse movement in click status) and lay the click-ing mouse button.
Using No. , , , buttons enable to move position of the Single PIP and using the
+ , + , + , + buttons enable to enlarge or reduce the size of the
Single PIP.
[Fig. VII-35] Setup of Position and Size of PIP [Fig. VII-36] PIP Screen
Number keypad in Single PIPSince the number keypad is used for position movement and size adjustment of the PIP forSingle PIP, it no operates as function to enter unique number of the transition pattern.
Spec
ial E
ffect
s
SMART A/V MIXER
121VMX-1104
3. Change of SINGLE PIP Screen and Shape
As described above, video output to the whole of screen when performing Single PIP effect is video ofthe current channel, and video of PIP is video of the next channel. Therefore, you can change thescreen of Single PIP effect if appropriately changing the both current channel and the next channelwhen performing the Single PIP. In addition, you can change shape of the output PIP if clicking thedesiring PIP shape of the Single PIP sub menu as shown in [Fig.VII-37].
For video appearing on the whole of screen when performing Single PIP effect, and mage of PIP, youcan change them by both current channel and the next channel. You can change shape of the SinglePIP with , , or buttons.
[Fig. VII-37] Change of SINGLE PIP Screen and Shape
Special Effects
121VMX-1104
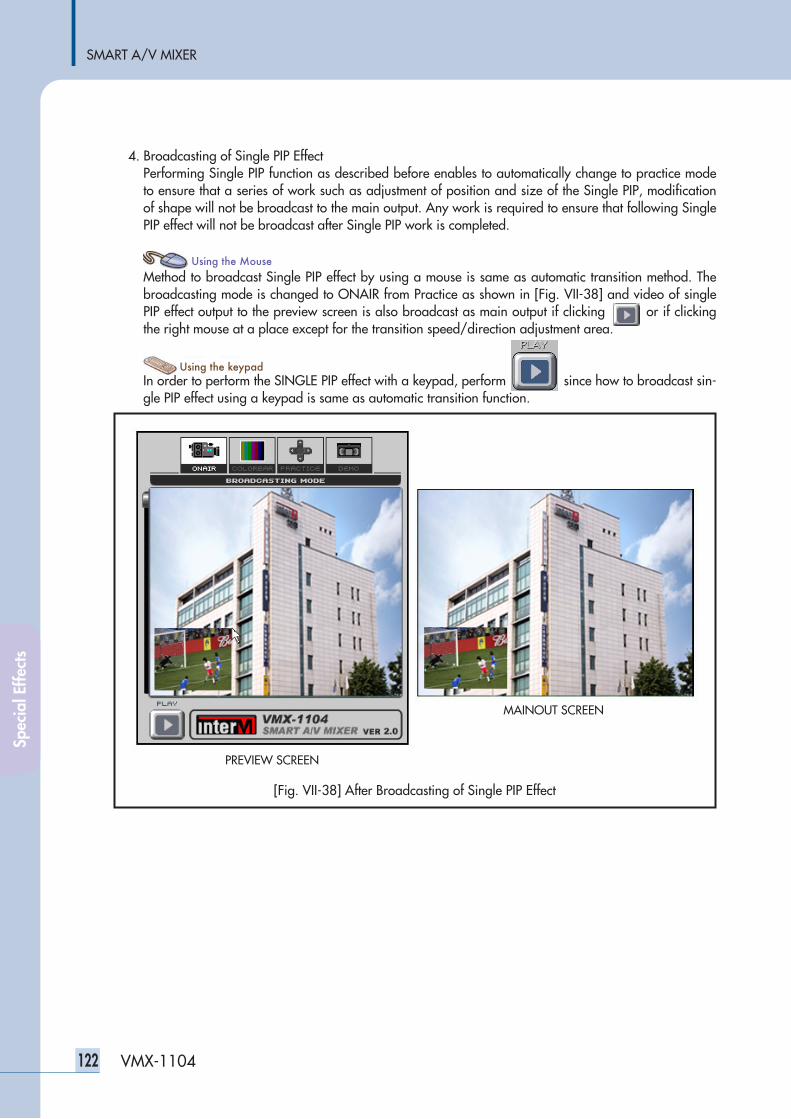
SMART A/V MIXER
122 VMX-1104
4. Broadcasting of Single PIP EffectPerforming Single PIP function as described before enables to automatically change to practice modeto ensure that a series of work such as adjustment of position and size of the Single PIP, modificationof shape will not be broadcast to the main output. Any work is required to ensure that following SinglePIP effect will not be broadcast after Single PIP work is completed.
Method to broadcast Single PIP effect by using a mouse is same as automatic transition method. Thebroadcasting mode is changed to ONAIR from Practice as shown in [Fig. VII-38] and video of singlePIP effect output to the preview screen is also broadcast as main output if clicking or if clickingthe right mouse at a place except for the transition speed/direction adjustment area.
In order to perform the SINGLE PIP effect with a keypad, perform since how to broadcast sin-gle PIP effect using a keypad is same as automatic transition function.
[Fig. VII-38] After Broadcasting of Single PIP Effect
PREVIEW SCREEN
MAINOUT SCREEN
Spec
ial E
ffect
s
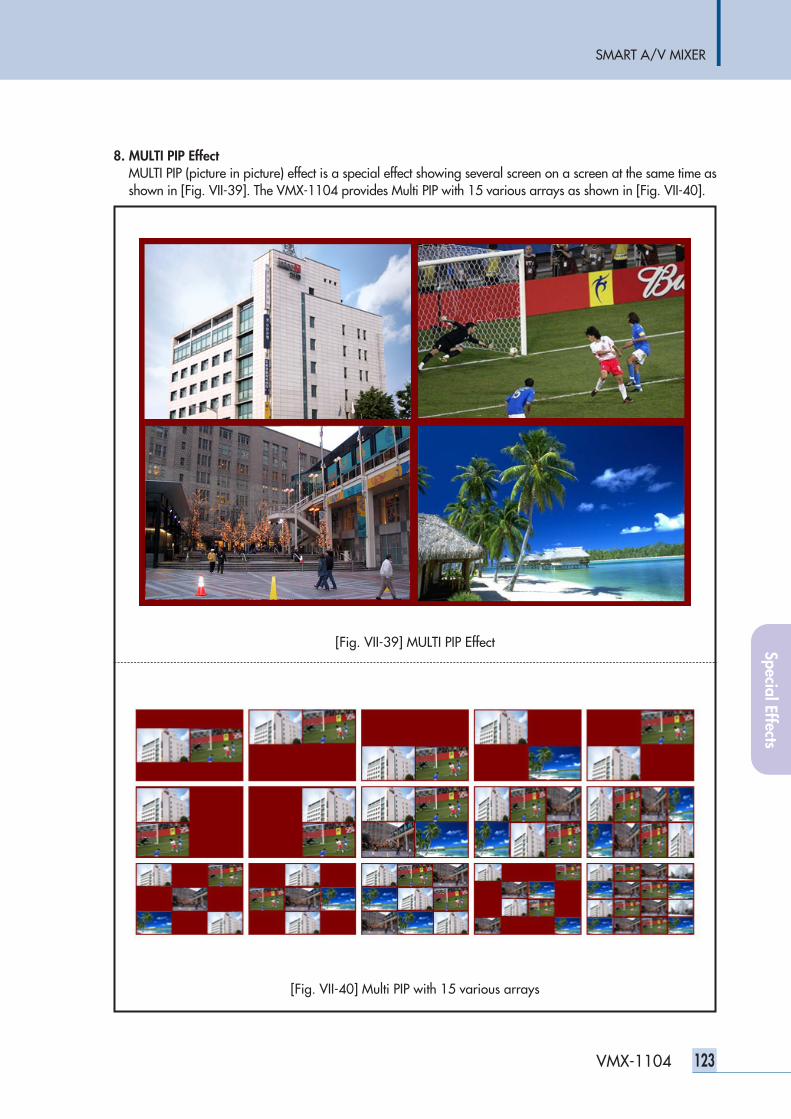
SMART A/V MIXER
123VMX-1104
8. MULTI PIP EffectMULTI PIP (picture in picture) effect is a special effect showing several screen on a screen at the same time asshown in [Fig. VII-39]. The VMX-1104 provides Multi PIP with 15 various arrays as shown in [Fig. VII-40].
[Fig. VII-39] MULTI PIP Effect
[Fig. VII-40] Multi PIP with 15 various arrays
Special Effects
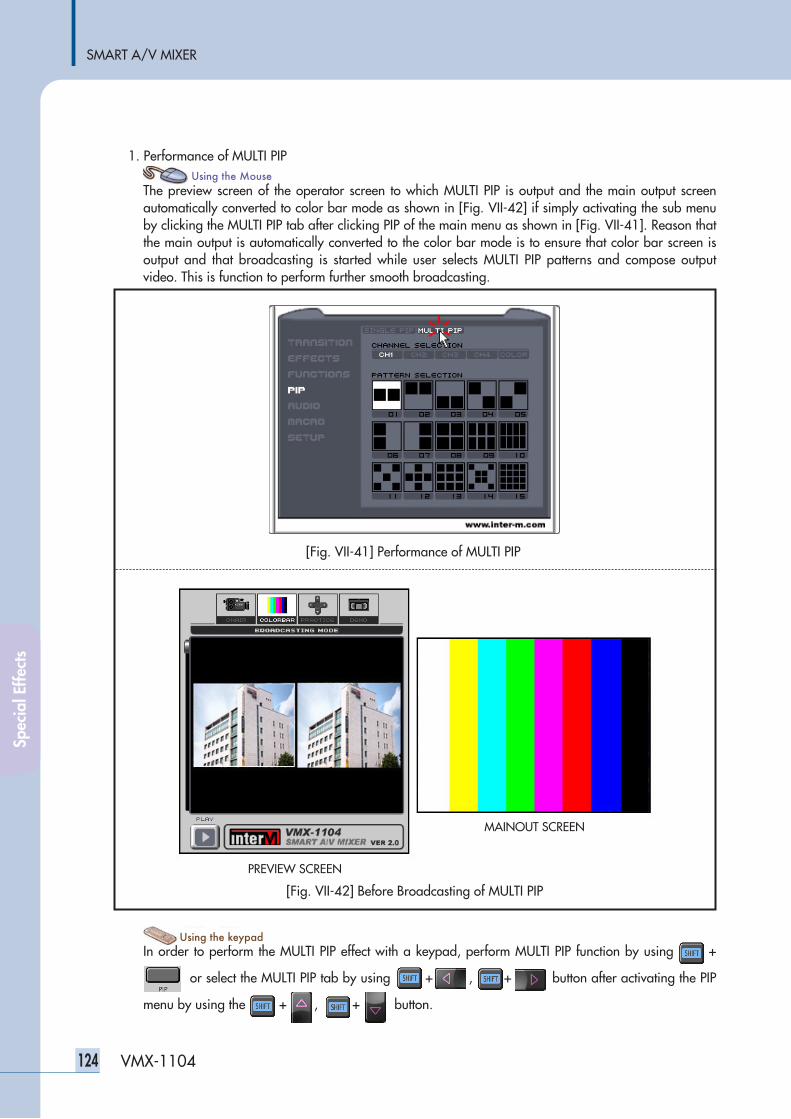
SMART A/V MIXER
124 VMX-1104
1. Performance of MULTI PIP
The preview screen of the operator screen to which MULTI PIP is output and the main output screenautomatically converted to color bar mode as shown in [Fig. VII-42] if simply activating the sub menuby clicking the MULTI PIP tab after clicking PIP of the main menu as shown in [Fig. VII-41]. Reason thatthe main output is automatically converted to the color bar mode is to ensure that color bar screen isoutput and that broadcasting is started while user selects MULTI PIP patterns and compose outputvideo. This is function to perform further smooth broadcasting.
In order to perform the MULTI PIP effect with a keypad, perform MULTI PIP function by using +
or select the MULTI PIP tab by using usin + u sn, sing + usi button after activating the PIP
menu by using the usin + u s, sing + usi button.
[Fig. VII-41] Performance of MULTI PIP
[Fig. VII-42] Before Broadcasting of MULTI PIP
PREVIEW SCREEN
MAINOUT SCREEN
Spec
ial E
ffect
s
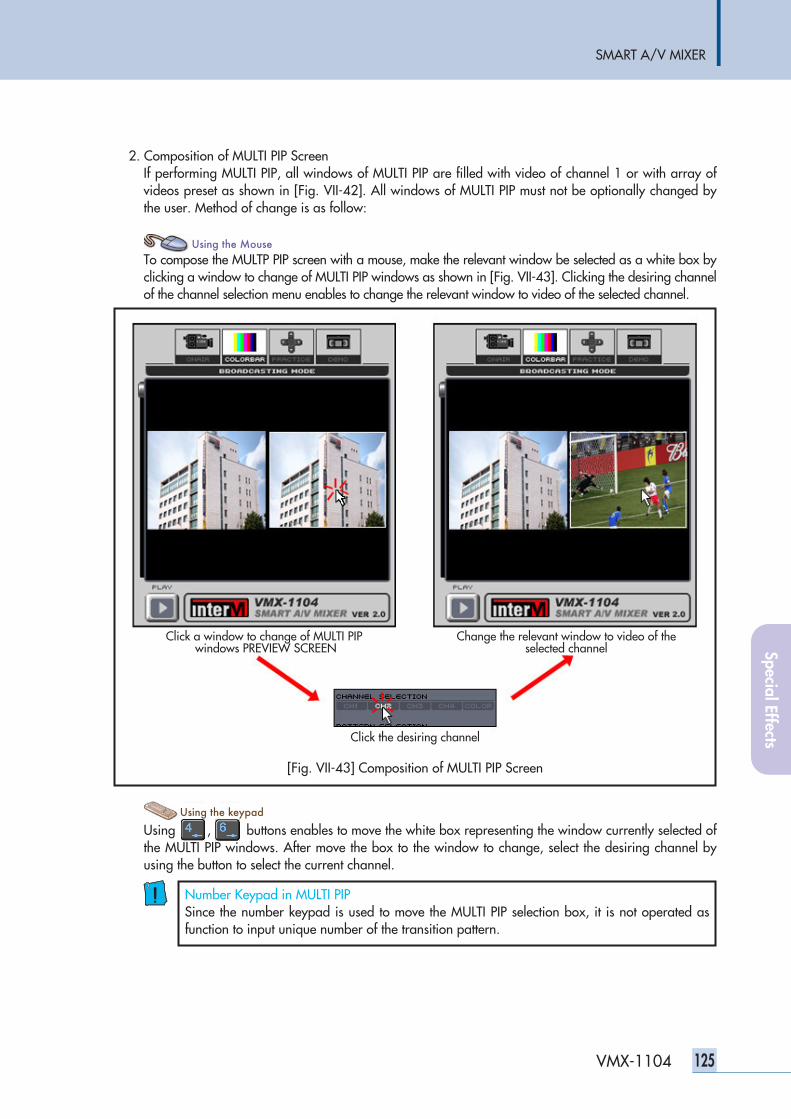
SMART A/V MIXER
125VMX-1104
2. Composition of MULTI PIP ScreenIf performing MULTI PIP, all windows of MULTI PIP are filled with video of channel 1 or with array ofvideos preset as shown in [Fig. VII-42]. All windows of MULTI PIP must not be optionally changed bythe user. Method of change is as follow:
To compose the MULTP PIP screen with a mouse, make the relevant window be selected as a white box byclicking a window to change of MULTI PIP windows as shown in [Fig. VII-43]. Clicking the desiring channelof the channel selection menu enables to change the relevant window to video of the selected channel.
Using , buttons enables to move the white box representing the window currently selected ofthe MULTI PIP windows. After move the box to the window to change, select the desiring channel byusing the button to select the current channel.
[Fig. VII-43] Composition of MULTI PIP Screen
Click a window to change of MULTI PIPwindows PREVIEW SCREEN
Change the relevant window to video of theselected channel
Click the desiring channel
Number Keypad in MULTI PIPSince the number keypad is used to move the MULTI PIP selection box, it is not operated asfunction to input unique number of the transition pattern.
Special Effects
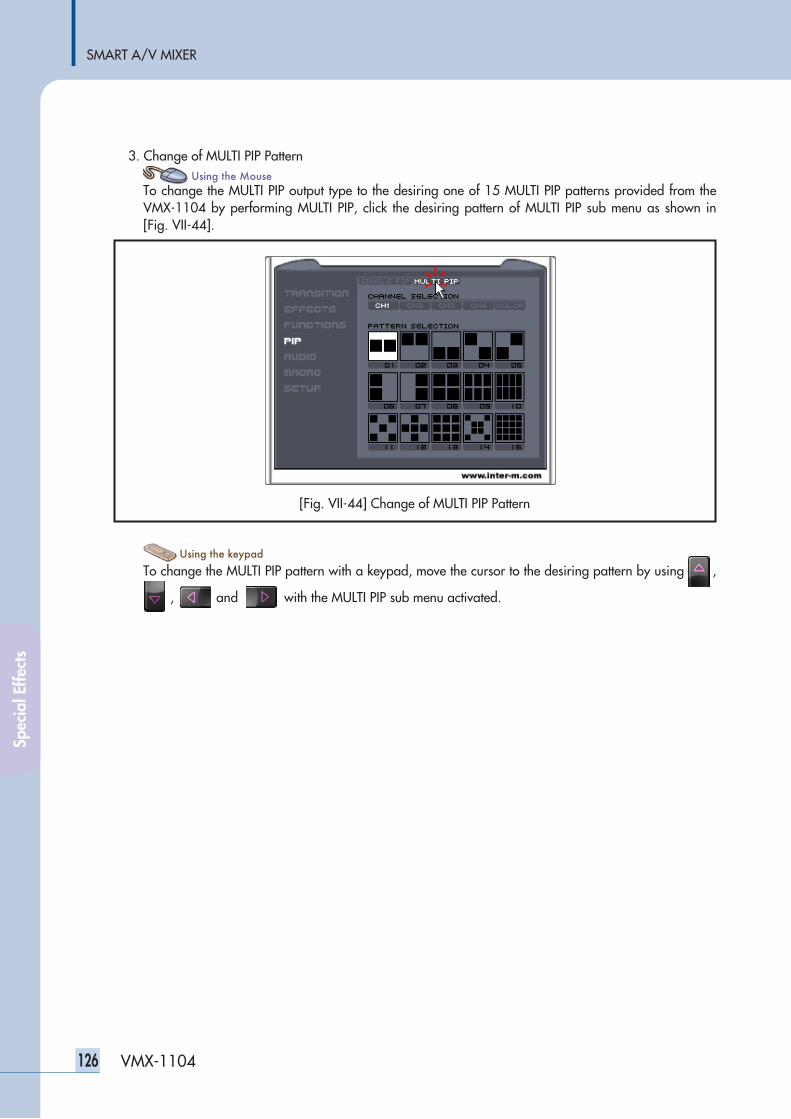
SMART A/V MIXER
126 VMX-1104
3. Change of MULTI PIP Pattern
To change the MULTI PIP output type to the desiring one of 15 MULTI PIP patterns provided from theVMX-1104 by performing MULTI PIP, click the desiring pattern of MULTI PIP sub menu as shown in[Fig. VII-44].
To change the MULTI PIP pattern with a keypad, move the cursor to the desiring pattern by using ,
, and with the MULTI PIP sub menu activated.
[Fig. VII-44] Change of MULTI PIP Pattern
Spec
ial E
ffect
s
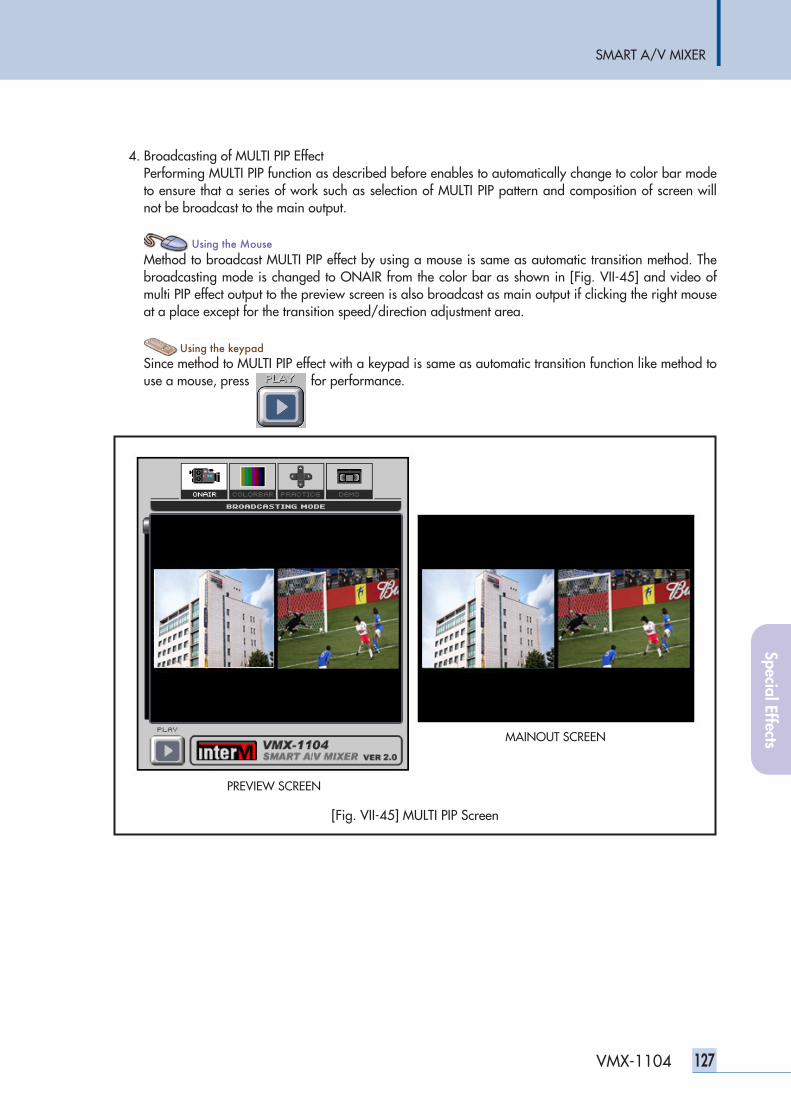
SMART A/V MIXER
127VMX-1104
4. Broadcasting of MULTI PIP EffectPerforming MULTI PIP function as described before enables to automatically change to color bar modeto ensure that a series of work such as selection of MULTI PIP pattern and composition of screen willnot be broadcast to the main output.
Method to broadcast MULTI PIP effect by using a mouse is same as automatic transition method. Thebroadcasting mode is changed to ONAIR from the color bar as shown in [Fig. VII-45] and video ofmulti PIP effect output to the preview screen is also broadcast as main output if clicking the right mouseat a place except for the transition speed/direction adjustment area.
Since method to MULTI PIP effect with a keypad is same as automatic transition function like method touse a mouse, press for performance.
[Fig. VII-45] MULTI PIP Screen
PREVIEW SCREEN
MAINOUT SCREEN
Special Effects

SMART A/V MIXER
128 VMX-1104
Other functionsOther functionsIn this section, descriptions are provided about all functions, practice function and DEMO function providedso that users will experience inconvenience in using the VMX-1104 including audio volume adjustment ofeach channel, audio function related with audio, MACRO function to perform a series of commands per-formed by users with a shortcut key, setup of video input/output, setup related with a mouse, setup relatedwith GIP and setup function of factory setting, etc.
1. AUDIO FunctionThe VMX-1104 provides BGM channel setup and volume adjustment function etc that are always outputas BGM (Back-Ground Music) regardless of transition function or transition function of audio that is inputwith video to each channel as audio function. Related menu is as shown in [Fig. VIII-1].
[Fig. VIII-1] AUDIO Menu
Oth
er fu
nctio
ns
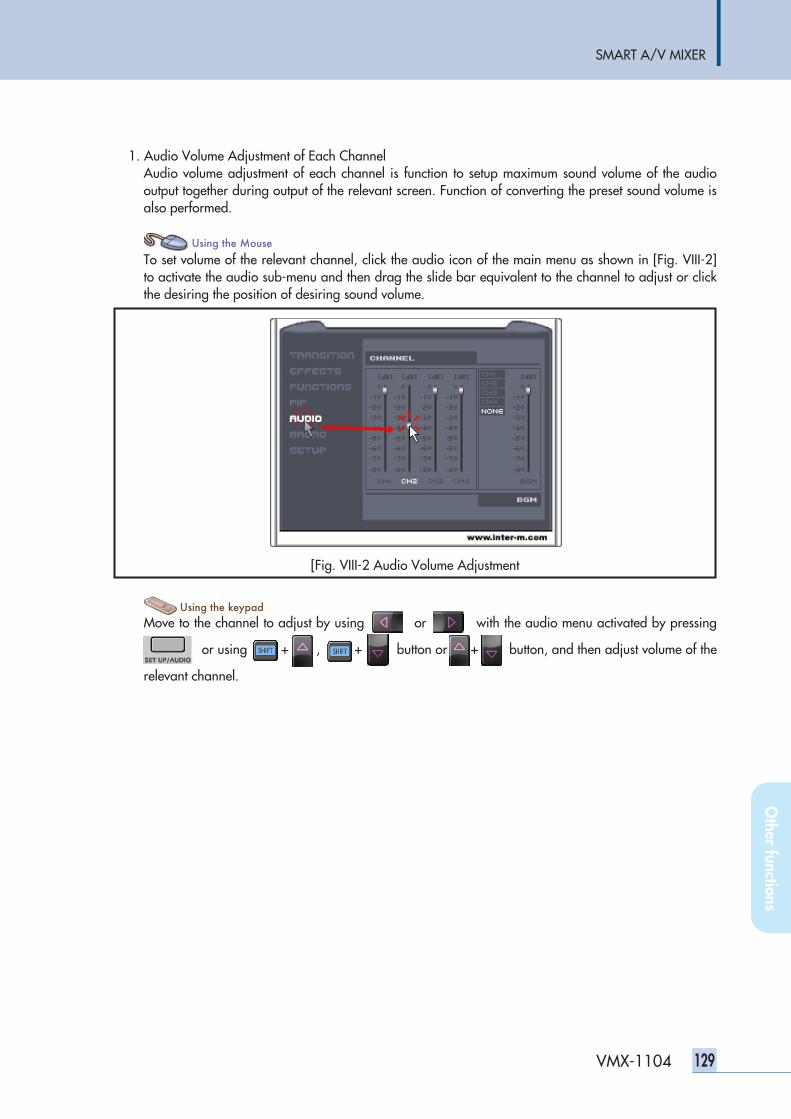
SMART A/V MIXER
129VMX-1104
1. Audio Volume Adjustment of Each ChannelAudio volume adjustment of each channel is function to setup maximum sound volume of the audiooutput together during output of the relevant screen. Function of converting the preset sound volume isalso performed.
To set volume of the relevant channel, click the audio icon of the main menu as shown in [Fig. VIII-2]to activate the audio sub-menu and then drag the slide bar equivalent to the channel to adjust or clickthe desiring the position of desiring sound volume.
Move to the channel to adjust by using or with the audio menu activated by pressing
or using usin + u s, sing + usi button or + button, and then adjust volume of the
relevant channel.
[Fig. VIII-2 Audio Volume Adjustment
Other functions
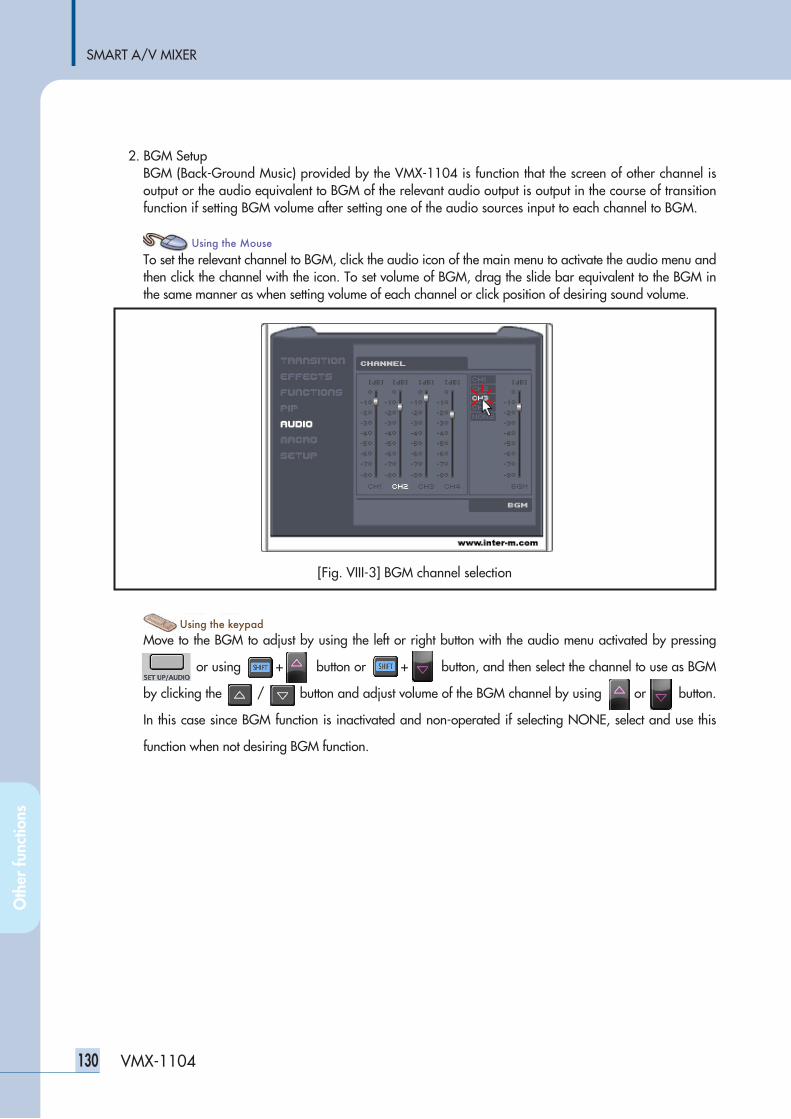
SMART A/V MIXER
130 VMX-1104
2. BGM SetupBGM (Back-Ground Music) provided by the VMX-1104 is function that the screen of other channel isoutput or the audio equivalent to BGM of the relevant audio output is output in the course of transitionfunction if setting BGM volume after setting one of the audio sources input to each channel to BGM.
To set the relevant channel to BGM, click the audio icon of the main menu to activate the audio menu andthen click the channel with the icon. To set volume of BGM, drag the slide bar equivalent to the BGM inthe same manner as when setting volume of each channel or click position of desiring sound volume.
Move to the BGM to adjust by using the left or right button with the audio menu activated by pressing
or using usin + u sbutton or usin + u s button, and then select the channel to use as BGM
by clicking the / button and adjust volume of the BGM channel by using or button.
In this case since BGM function is inactivated and non-operated if selecting NONE, select and use this
function when not desiring BGM function.
[Fig. VIII-3] BGM channel selection
Oth
er fu
nctio
ns
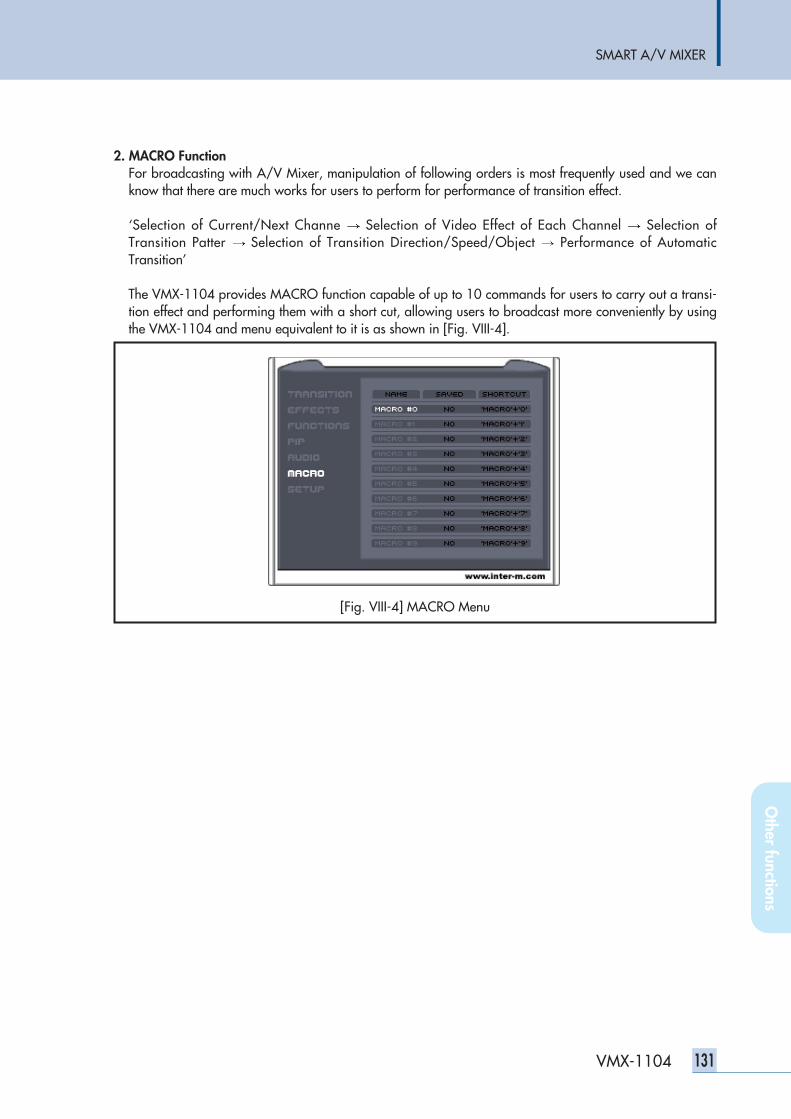
SMART A/V MIXER
131VMX-1104
2. MACRO FunctionFor broadcasting with A/V Mixer, manipulation of following orders is most frequently used and we canknow that there are much works for users to perform for performance of transition effect.
‘Selection of Current/Next Channe Selection of Video Effect of Each Channel Selection ofTransition Patter Selection of Transition Direction/Speed/Object Performance of AutomaticTransition’
The VMX-1104 provides MACRO function capable of up to 10 commands for users to carry out a transi-tion effect and performing them with a short cut, allowing users to broadcast more conveniently by usingthe VMX-1104 and menu equivalent to it is as shown in [Fig. VIII-4].
[Fig. VIII-4] MACRO Menu
Other functions
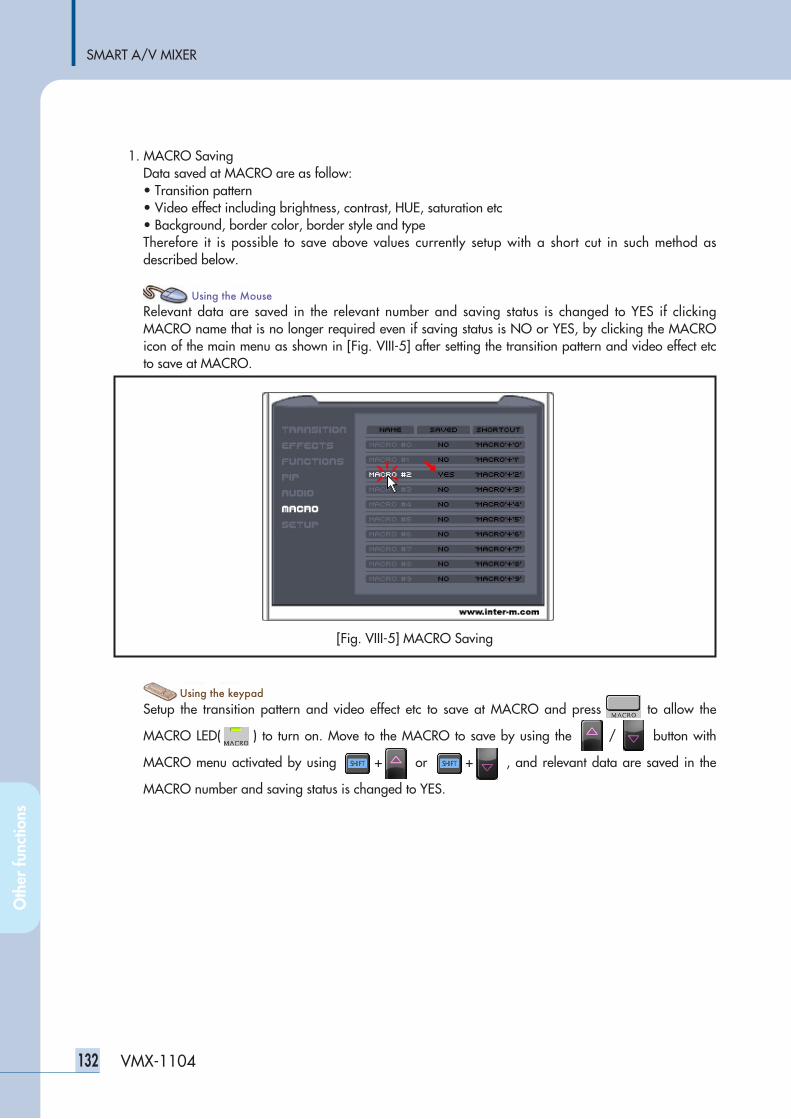
SMART A/V MIXER
132 VMX-1104
1. MACRO SavingData saved at MACRO are as follow:• Transition pattern• Video effect including brightness, contrast, HUE, saturation etc• Background, border color, border style and typeTherefore it is possible to save above values currently setup with a short cut in such method asdescribed below.
Relevant data are saved in the relevant number and saving status is changed to YES if clickingMACRO name that is no longer required even if saving status is NO or YES, by clicking the MACROicon of the main menu as shown in [Fig. VIII-5] after setting the transition pattern and video effect etcto save at MACRO.
Setup the transition pattern and video effect etc to save at MACRO and press to allow the
MACRO LED( ) to turn on. Move to the MACRO to save by using the / button with
MACRO menu activated by using usin + u sor usin + u s, and relevant data are saved in the
MACRO number and saving status is changed to YES.
[Fig. VIII-5] MACRO Saving
Oth
er fu
nctio
ns
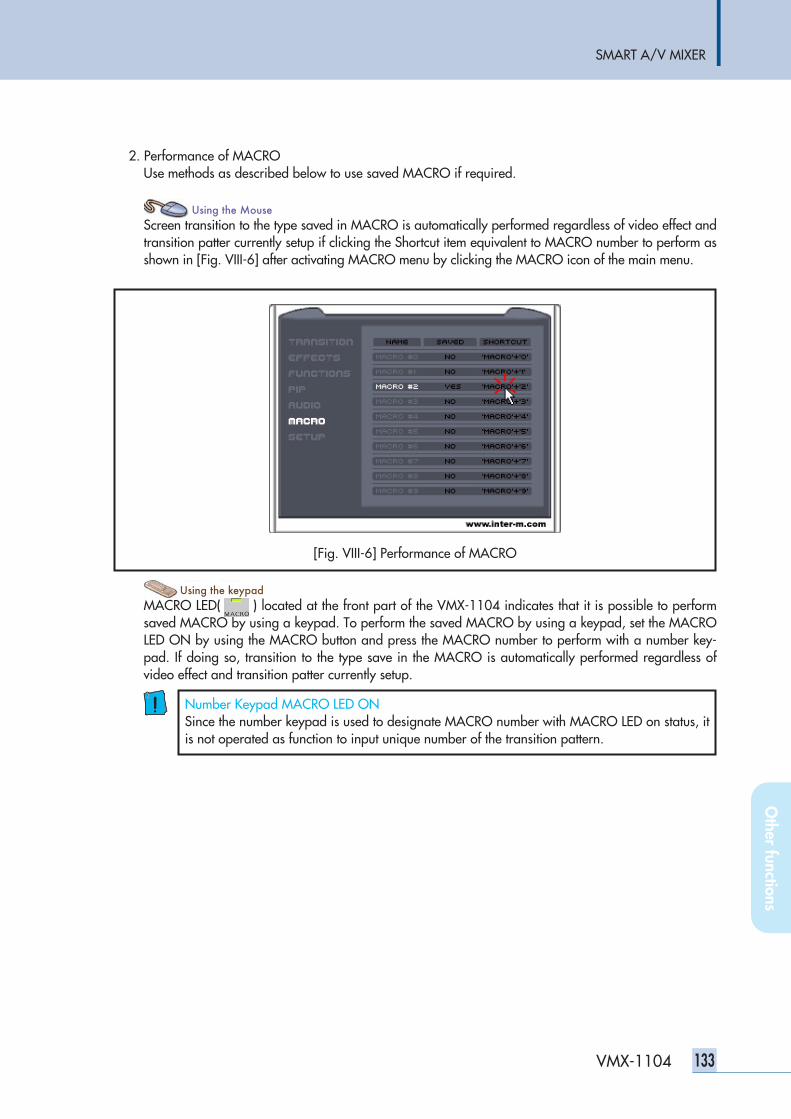
SMART A/V MIXER
133VMX-1104
2. Performance of MACRO Use methods as described below to use saved MACRO if required.
Screen transition to the type saved in MACRO is automatically performed regardless of video effect andtransition patter currently setup if clicking the Shortcut item equivalent to MACRO number to perform asshown in [Fig. VIII-6] after activating MACRO menu by clicking the MACRO icon of the main menu.
MACRO LED( ) located at the front part of the VMX-1104 indicates that it is possible to performsaved MACRO by using a keypad. To perform the saved MACRO by using a keypad, set the MACROLED ON by using the MACRO button and press the MACRO number to perform with a number key-pad. If doing so, transition to the type save in the MACRO is automatically performed regardless ofvideo effect and transition patter currently setup.
[Fig. VIII-6] Performance of MACRO
Number Keypad MACRO LED ONSince the number keypad is used to designate MACRO number with MACRO LED on status, itis not operated as function to input unique number of the transition pattern.
Other functions
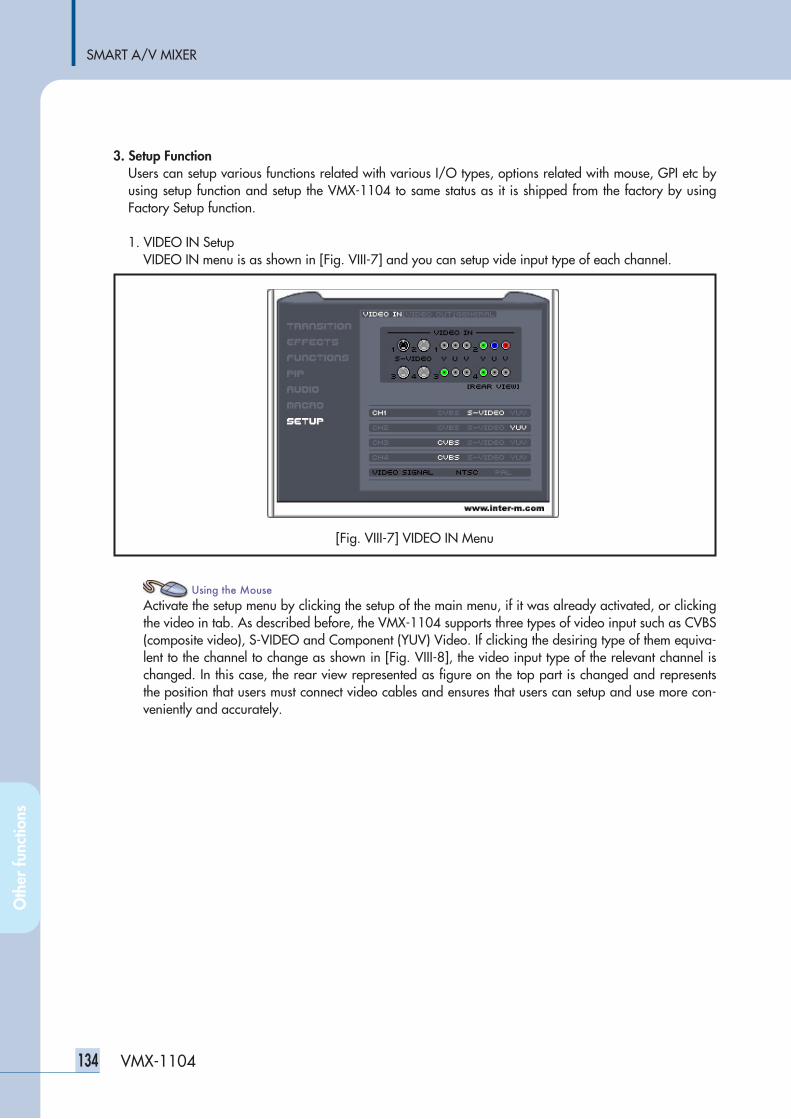
SMART A/V MIXER
134 VMX-1104
3. Setup FunctionUsers can setup various functions related with various I/O types, options related with mouse, GPI etc byusing setup function and setup the VMX-1104 to same status as it is shipped from the factory by usingFactory Setup function.
1. VIDEO IN SetupVIDEO IN menu is as shown in [Fig. VIII-7] and you can setup vide input type of each channel.
Activate the setup menu by clicking the setup of the main menu, if it was already activated, or clickingthe video in tab. As described before, the VMX-1104 supports three types of video input such as CVBS(composite video), S-VIDEO and Component (YUV) Video. If clicking the desiring type of them equiva-lent to the channel to change as shown in [Fig. VIII-8], the video input type of the relevant channel ischanged. In this case, the rear view represented as figure on the top part is changed and representsthe position that users must connect video cables and ensures that users can setup and use more con-veniently and accurately.
[Fig. VIII-7] VIDEO IN Menu
Oth
er fu
nctio
ns
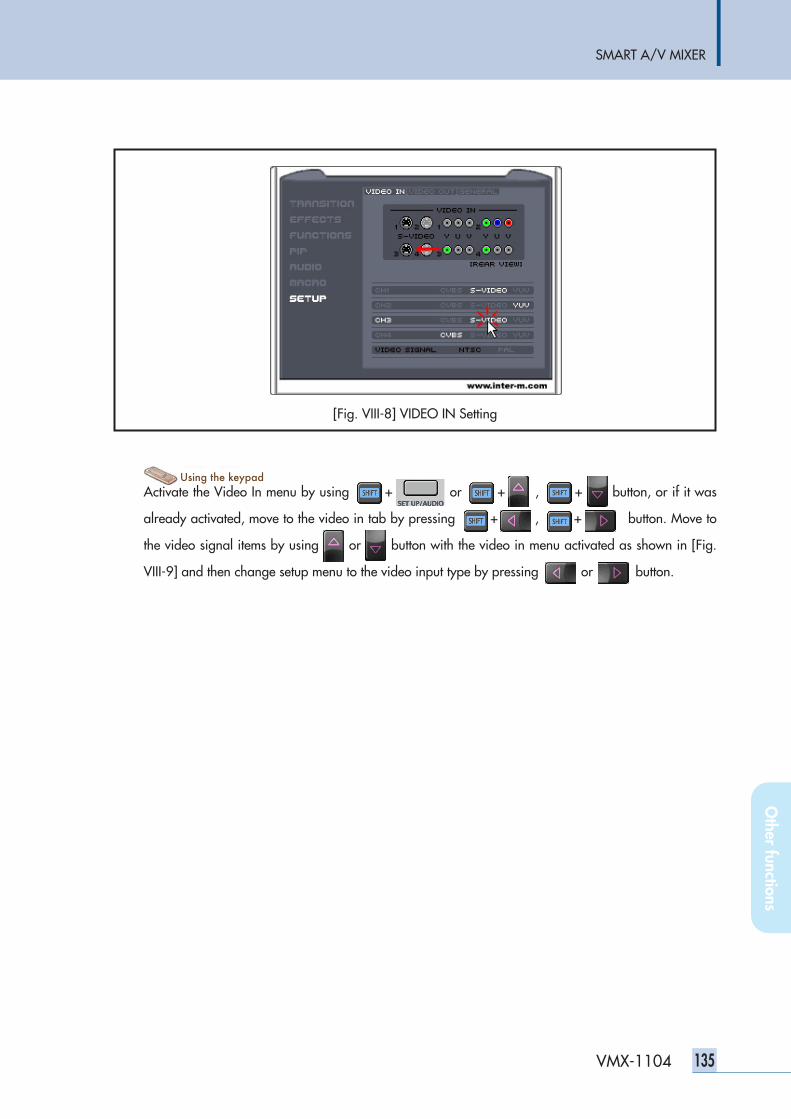
SMART A/V MIXER
135VMX-1104
Activate the Video In menu by using usin + u sor usin + u s, usin + u sbutton, or if it was
already activated, move to the video in tab by pressing usin + u , usin + u sbutton. Move to
the video signal items by using u sor u sbutton with the video in menu activated as shown in [Fig.
VIII-9] and then change setup menu to the video input type by pressing u sor u sbutton.
[Fig. VIII-8] VIDEO IN Setting
Other functions
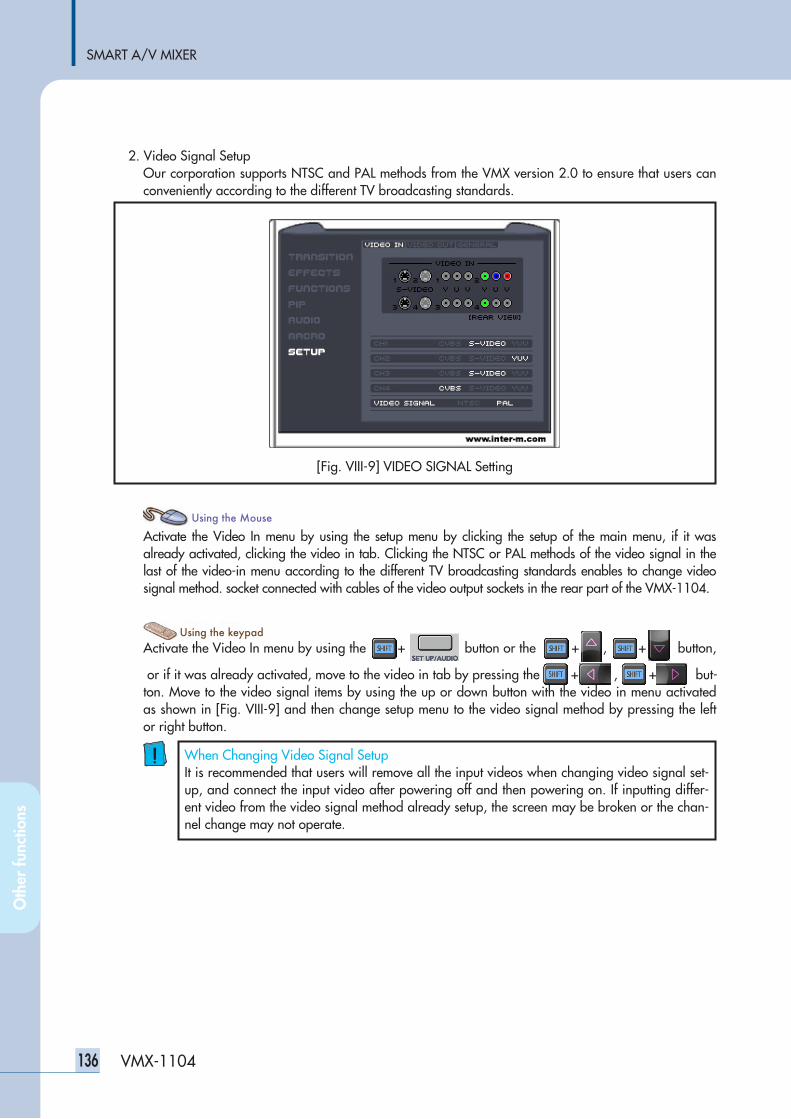
SMART A/V MIXER
136 VMX-1104
2. Video Signal SetupOur corporation supports NTSC and PAL methods from the VMX version 2.0 to ensure that users canconveniently according to the different TV broadcasting standards.
Activate the Video In menu by using the setup menu by clicking the setup of the main menu, if it wasalready activated, clicking the video in tab. Clicking the NTSC or PAL methods of the video signal in thelast of the video-in menu according to the different TV broadcasting standards enables to change videosignal method. socket connected with cables of the video output sockets in the rear part of the VMX-1104.
Activate the Video In menu by using the + button or the + , + button,
or if it was already activated, move to the video in tab by pressing the + , + but-ton. Move to the video signal items by using the up or down button with the video in menu activatedas shown in [Fig. VIII-9] and then change setup menu to the video signal method by pressing the leftor right button.
[Fig. VIII-9] VIDEO SIGNAL Setting
Oth
er fu
nctio
ns
When Changing Video Signal SetupIt is recommended that users will remove all the input videos when changing video signal set-up, and connect the input video after powering off and then powering on. If inputting differ-ent video from the video signal method already setup, the screen may be broken or the chan-nel change may not operate.
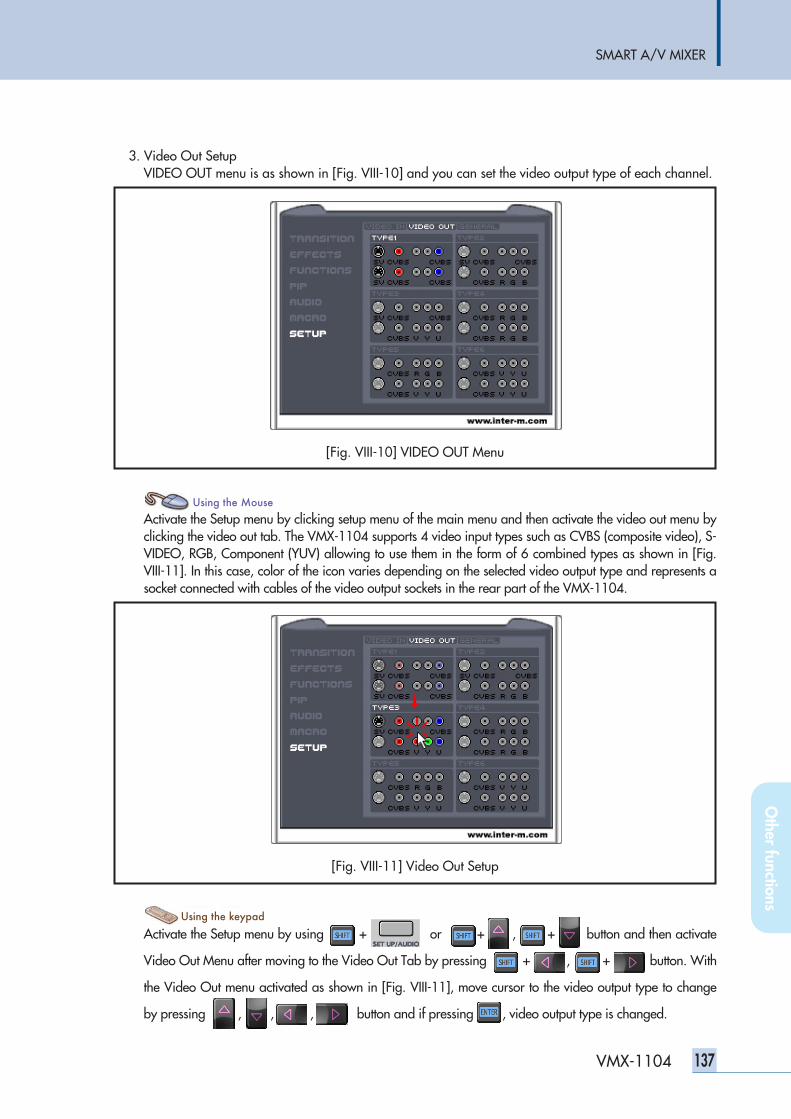
SMART A/V MIXER
137VMX-1104
3. Video Out SetupVIDEO OUT menu is as shown in [Fig. VIII-10] and you can set the video output type of each channel.
Activate the Setup menu by clicking setup menu of the main menu and then activate the video out menu byclicking the video out tab. The VMX-1104 supports 4 video input types such as CVBS (composite video), S-VIDEO, RGB, Component (YUV) allowing to use them in the form of 6 combined types as shown in [Fig.VIII-11]. In this case, color of the icon varies depending on the selected video output type and represents asocket connected with cables of the video output sockets in the rear part of the VMX-1104.
Activate the Setup menu by using + or + , + button and then activate
Video Out Menu after moving to the Video Out Tab by pressing + , + button. With
the Video Out menu activated as shown in [Fig. VIII-11], move cursor to the video output type to change
by pressing , , , button and if pressing , video output type is changed.
[Fig. VIII-10] VIDEO OUT Menu
[Fig. VIII-11] Video Out Setup
Other functions
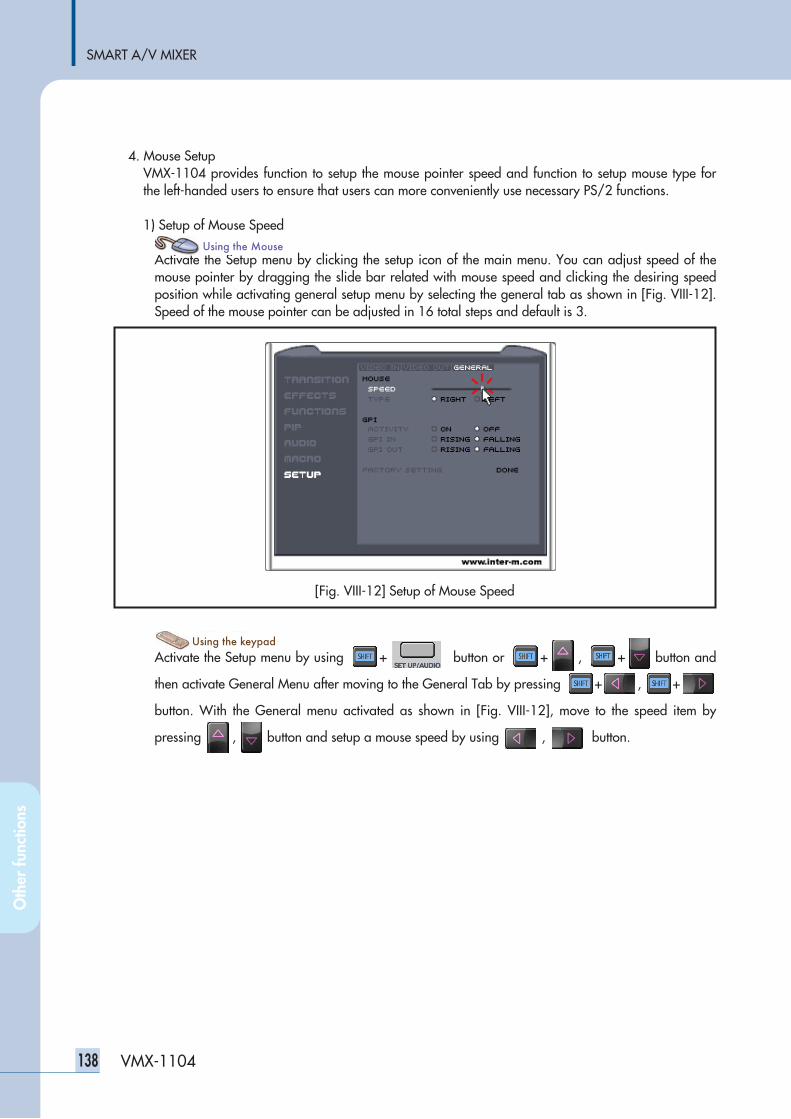
SMART A/V MIXER
138 VMX-1104
4. Mouse SetupVMX-1104 provides function to setup the mouse pointer speed and function to setup mouse type forthe left-handed users to ensure that users can more conveniently use necessary PS/2 functions.
1) Setup of Mouse Speed
Activate the Setup menu by clicking the setup icon of the main menu. You can adjust speed of themouse pointer by dragging the slide bar related with mouse speed and clicking the desiring speedposition while activating general setup menu by selecting the general tab as shown in [Fig. VIII-12].Speed of the mouse pointer can be adjusted in 16 total steps and default is 3.
Activate the Setup menu by using usin + u sbutton or usin + u s, usin + u sbutton and
then activate General Menu after moving to the General Tab by pressing usin + u s, usin + p ress
button. With the General menu activated as shown in [Fig. VIII-12], move to the speed item by
pressingu s, u s button and setup a mouse speed by using u s, u s button.
[Fig. VIII-12] Setup of Mouse Speed
Oth
er fu
nctio
ns
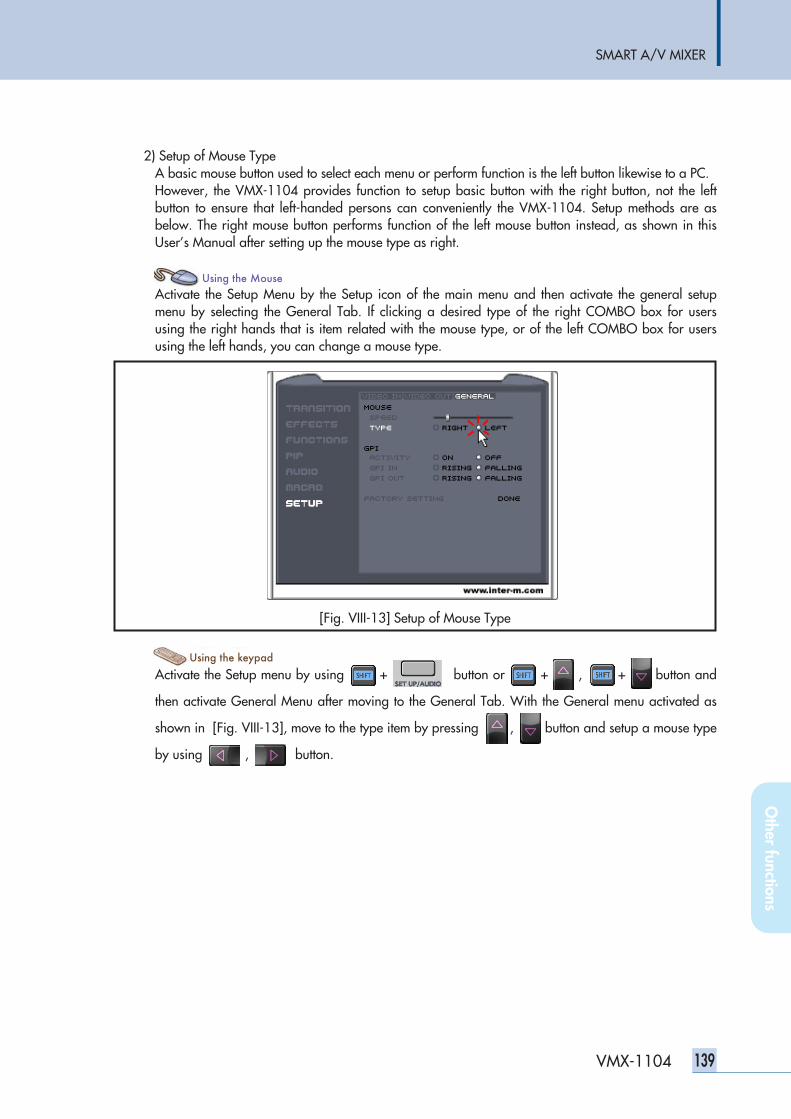
SMART A/V MIXER
139VMX-1104
2) Setup of Mouse TypeA basic mouse button used to select each menu or perform function is the left button likewise to a PC. However, the VMX-1104 provides function to setup basic button with the right button, not the leftbutton to ensure that left-handed persons can conveniently the VMX-1104. Setup methods are asbelow. The right mouse button performs function of the left mouse button instead, as shown in thisUser’s Manual after setting up the mouse type as right.
Activate the Setup Menu by the Setup icon of the main menu and then activate the general setupmenu by selecting the General Tab. If clicking a desired type of the right COMBO box for usersusing the right hands that is item related with the mouse type, or of the left COMBO box for usersusing the left hands, you can change a mouse type.
Activate the Setup menu by using usin + u sbutton or usin + u s, usin + u sbutton and
then activate General Menu after moving to the General Tab. With the General menu activated as
shown in [Fig. VIII-13], move to the type item by pressingu s, u s button and setup a mouse type
by using u s, u s button.
[Fig. VIII-13] Setup of Mouse Type
Other functions

SMART A/V MIXER
140 VMX-1104
5. GPI FunctionGPI is an abbreviated character of General Purpose Interface, and is function used when controllingtransition effect of the VMX-1104 or when using an outside caption project, etc in link with the VMX-1104. This is function to ensure that the VMX-1104 sends trigger signals to the outside caption projec-tor and converts caption together whenever transition effect is performed as shown in the Fig. [VIII-14], (a) or that the VMX-1104 can also perform transition when the VMX-1104 receives trigger signalfrom the outside caption projector as shown in (b) and transition is done from the outside caption pro-jector. In addition, the user may control transition of the VMX-1104 outside as shown in (c) by usingGPI trigger generator that weather casters main use for forecast of weather.
GPI OUT
trigger signal
Outside caption projector
Outside caption projector
VMX-1104
GPI IN
trigger signal
VMX-1104
GPI IN
trigger signal
GPI TriggerVMX-1104
[Fig. VIII-14] GPI Function
(a)
(b)
(c)
Oth
er fu
nctio
ns
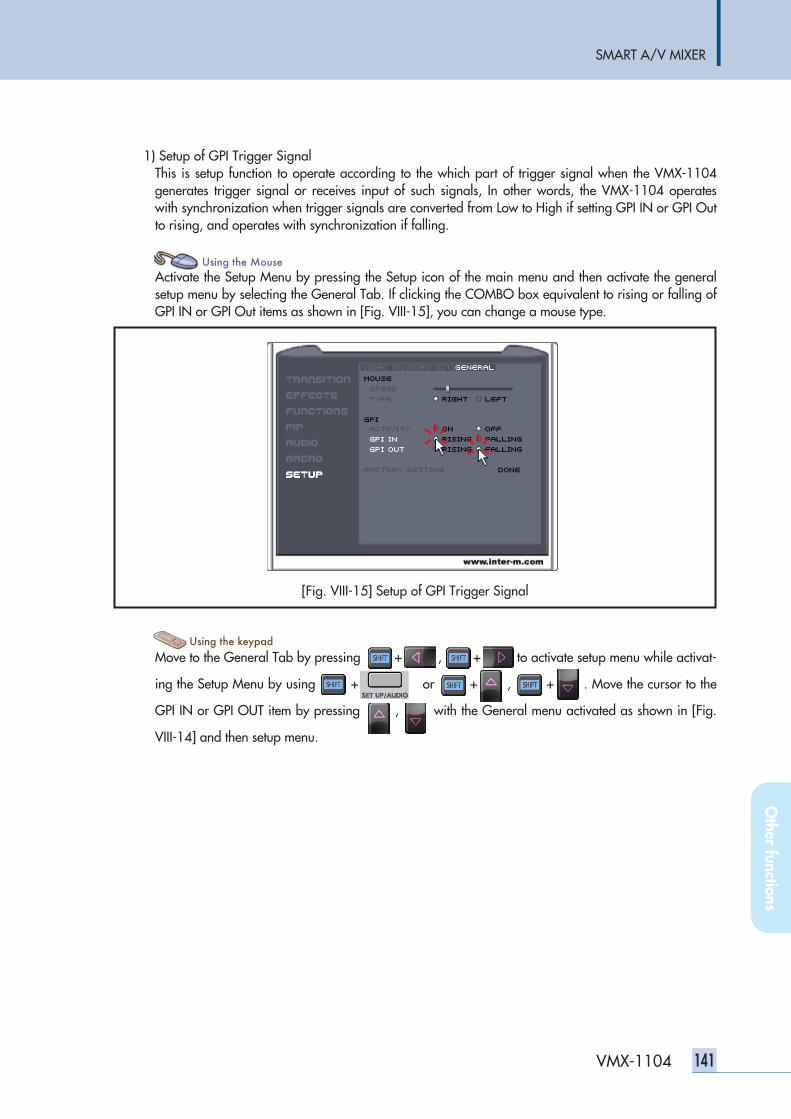
SMART A/V MIXER
141VMX-1104
Other functions
1) Setup of GPI Trigger SignalThis is setup function to operate according to the which part of trigger signal when the VMX-1104generates trigger signal or receives input of such signals, In other words, the VMX-1104 operateswith synchronization when trigger signals are converted from Low to High if setting GPI IN or GPI Outto rising, and operates with synchronization if falling.
Activate the Setup Menu by pressing the Setup icon of the main menu and then activate the generalsetup menu by selecting the General Tab. If clicking the COMBO box equivalent to rising or falling ofGPI IN or GPI Out items as shown in [Fig. VIII-15], you can change a mouse type.
Move to the General Tab by pressing usin + u s, usin + p ressto activate setup menu while activat-
ing the Setup Menu by using usin + u or usin + u s, usin + u s. Move the cursor to the
GPI IN or GPI OUT item by pressingu s, u s with the General menu activated as shown in [Fig.
VIII-14] and then setup menu.
[Fig. VIII-15] Setup of GPI Trigger Signal
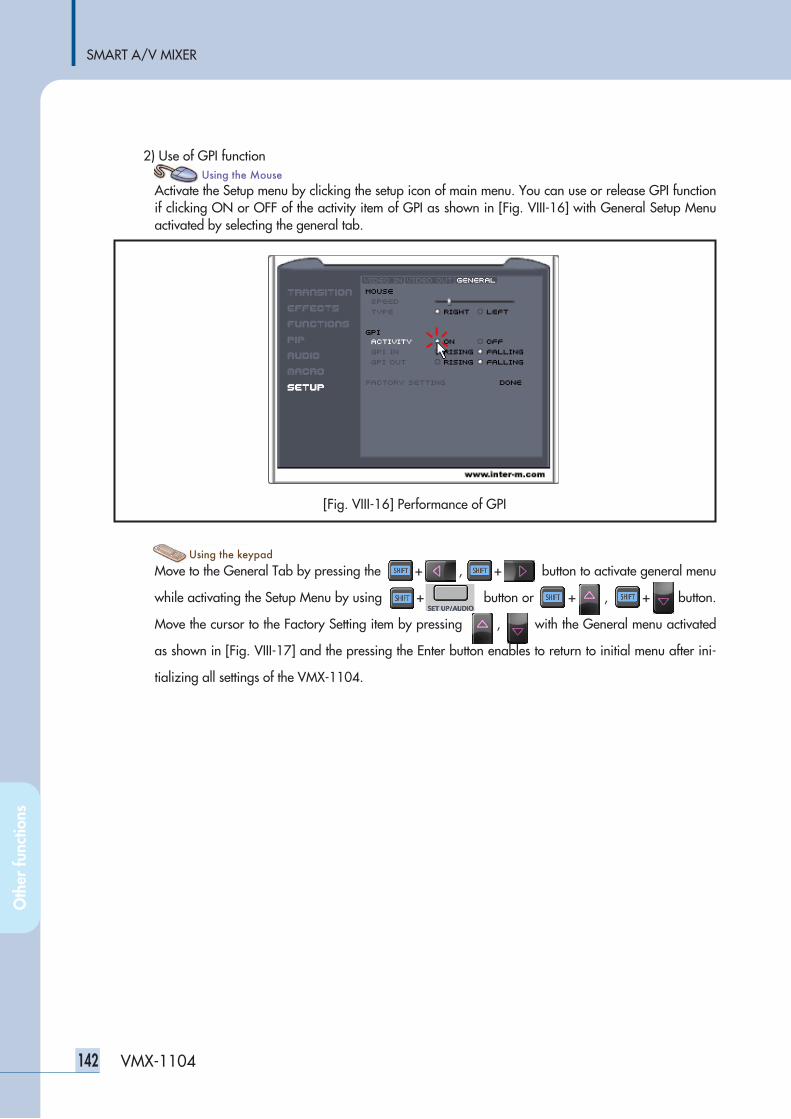
SMART A/V MIXER
142 VMX-1104
2) Use of GPI function
Activate the Setup menu by clicking the setup icon of main menu. You can use or release GPI functionif clicking ON or OFF of the activity item of GPI as shown in [Fig. VIII-16] with General Setup Menuactivated by selecting the general tab.
Move to the General Tab by pressing the usin + u s, usin + p ress button to activate general menu
while activating the Setup Menu by using usin + u button or usin + u s, usin + u sbutton.
Move the cursor to the Factory Setting item by pressingu s, u s with the General menu activated
as shown in [Fig. VIII-17] and the pressing the Enter button enables to return to initial menu after ini-
tializing all settings of the VMX-1104.
[Fig. VIII-16] Performance of GPI
Oth
er fu
nctio
ns
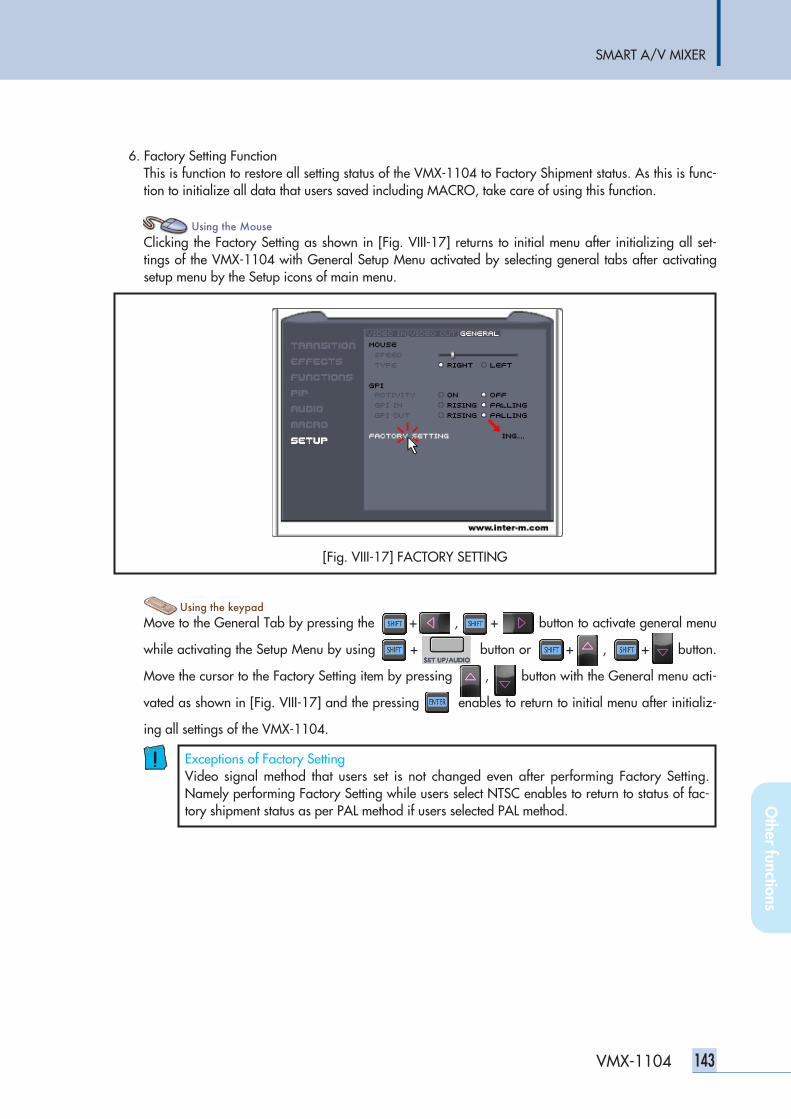
SMART A/V MIXER
143VMX-1104
Other functions
6. Factory Setting FunctionThis is function to restore all setting status of the VMX-1104 to Factory Shipment status. As this is func-tion to initialize all data that users saved including MACRO, take care of using this function.
Clicking the Factory Setting as shown in [Fig. VIII-17] returns to initial menu after initializing all set-tings of the VMX-1104 with General Setup Menu activated by selecting general tabs after activatingsetup menu by the Setup icons of main menu.
Move to the General Tab by pressing the usin + u s, usin + p ress button to activate general menu
while activating the Setup Menu by using usin + u button or usin + u s, usin + u sbutton.
Move the cursor to the Factory Setting item by pressingu s, u s button with the General menu acti-
vated as shown in [Fig. VIII-17] and the pressing enables to return to initial menu after initializ-
ing all settings of the VMX-1104.
[Fig. VIII-17] FACTORY SETTING
Exceptions of Factory SettingVideo signal method that users set is not changed even after performing Factory Setting.Namely performing Factory Setting while users select NTSC enables to return to status of fac-tory shipment status as per PAL method if users selected PAL method.
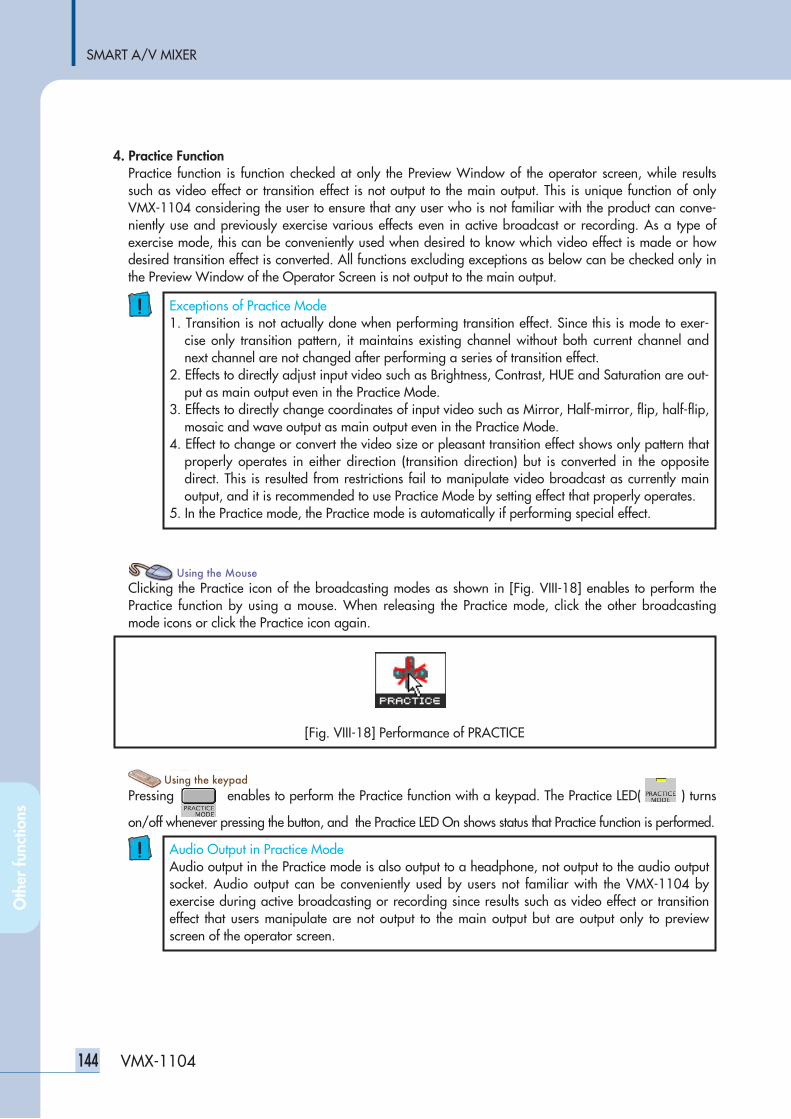
SMART A/V MIXER
144 VMX-1104
4. Practice FunctionPractice function is function checked at only the Preview Window of the operator screen, while resultssuch as video effect or transition effect is not output to the main output. This is unique function of onlyVMX-1104 considering the user to ensure that any user who is not familiar with the product can conve-niently use and previously exercise various effects even in active broadcast or recording. As a type ofexercise mode, this can be conveniently used when desired to know which video effect is made or howdesired transition effect is converted. All functions excluding exceptions as below can be checked only inthe Preview Window of the Operator Screen is not output to the main output.
Clicking the Practice icon of the broadcasting modes as shown in [Fig. VIII-18] enables to perform thePractice function by using a mouse. When releasing the Practice mode, click the other broadcastingmode icons or click the Practice icon again.
Pressing enables to perform the Practice function with a keypad. The Practice LED( ) turns
on/off whenever pressing the button, and the Practice LED On shows status that Practice function is performed.
[Fig. VIII-18] Performance of PRACTICE
Exceptions of Practice Mode1. Transition is not actually done when performing transition effect. Since this is mode to exer-
cise only transition pattern, it maintains existing channel without both current channel andnext channel are not changed after performing a series of transition effect.
2. Effects to directly adjust input video such as Brightness, Contrast, HUE and Saturation are out-put as main output even in the Practice Mode.
3. Effects to directly change coordinates of input video such as Mirror, Half-mirror, flip, half-flip,mosaic and wave output as main output even in the Practice Mode.
4. Effect to change or convert the video size or pleasant transition effect shows only pattern thatproperly operates in either direction (transition direction) but is converted in the oppositedirect. This is resulted from restrictions fail to manipulate video broadcast as currently mainoutput, and it is recommended to use Practice Mode by setting effect that properly operates.
5. In the Practice mode, the Practice mode is automatically if performing special effect.
Audio Output in Practice ModeAudio output in the Practice mode is also output to a headphone, not output to the audio outputsocket. Audio output can be conveniently used by users not familiar with the VMX-1104 byexercise during active broadcasting or recording since results such as video effect or transitioneffect that users manipulate are not output to the main output but are output only to previewscreen of the operator screen.
Oth
er fu
nctio
ns
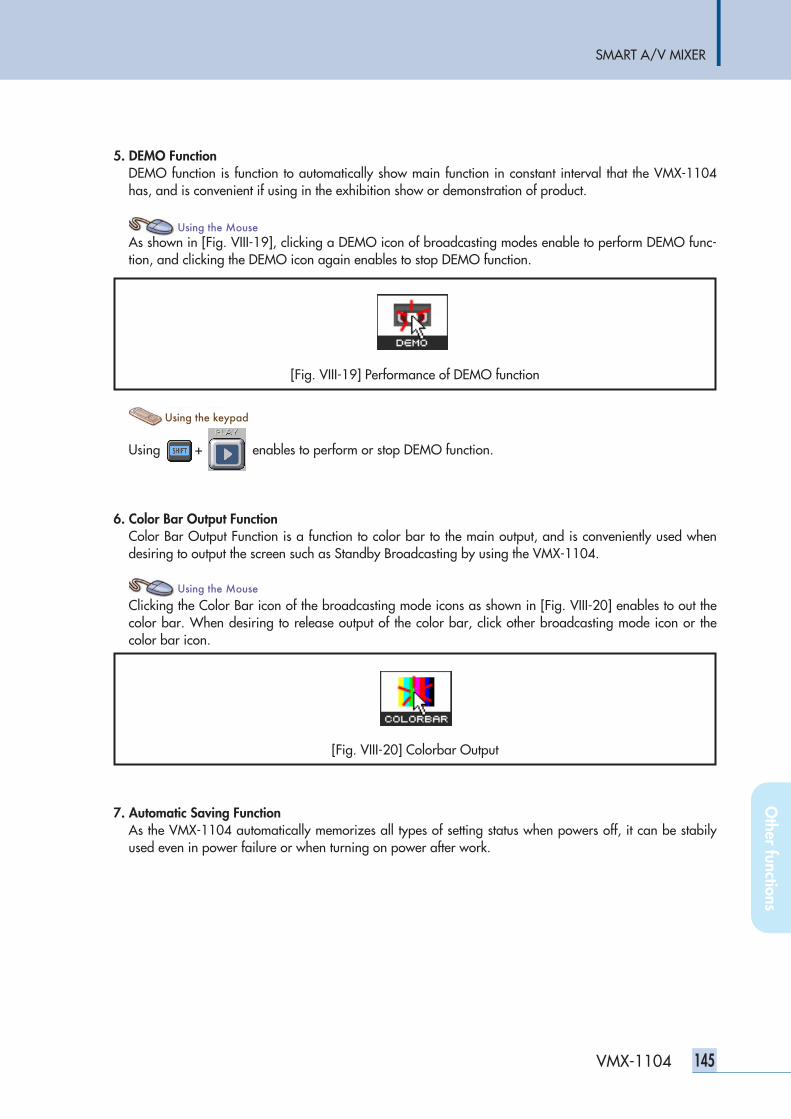
SMART A/V MIXER
145VMX-1104
Other functions
5. DEMO FunctionDEMO function is function to automatically show main function in constant interval that the VMX-1104has, and is convenient if using in the exhibition show or demonstration of product.
As shown in [Fig. VIII-19], clicking a DEMO icon of broadcasting modes enable to perform DEMO func-tion, and clicking the DEMO icon again enables to stop DEMO function.
Using + enables to perform or stop DEMO function.
6. Color Bar Output FunctionColor Bar Output Function is a function to color bar to the main output, and is conveniently used whendesiring to output the screen such as Standby Broadcasting by using the VMX-1104.
Clicking the Color Bar icon of the broadcasting mode icons as shown in [Fig. VIII-20] enables to out thecolor bar. When desiring to release output of the color bar, click other broadcasting mode icon or thecolor bar icon.
7. Automatic Saving FunctionAs the VMX-1104 automatically memorizes all types of setting status when powers off, it can be stabilyused even in power failure or when turning on power after work.
[Fig. VIII-19] Performance of DEMO function
[Fig. VIII-20] Colorbar Output
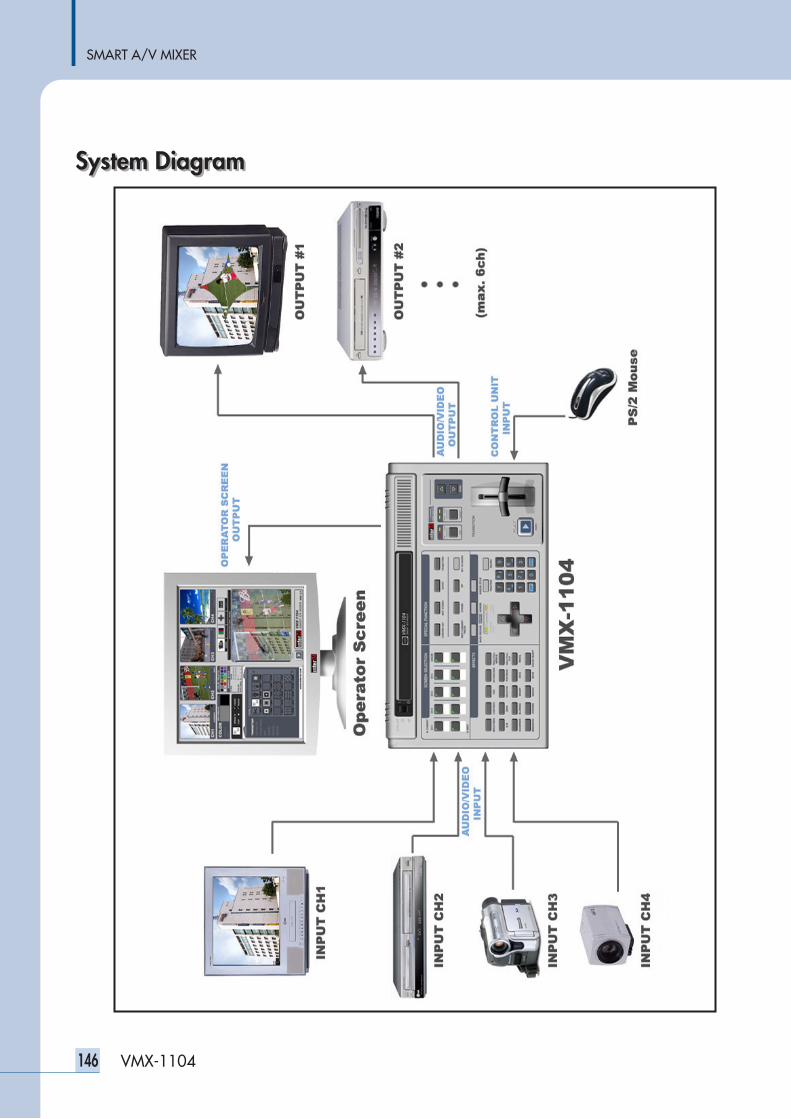
SMART A/V MIXER
146 VMX-1104
System DiagramSystem Diagram
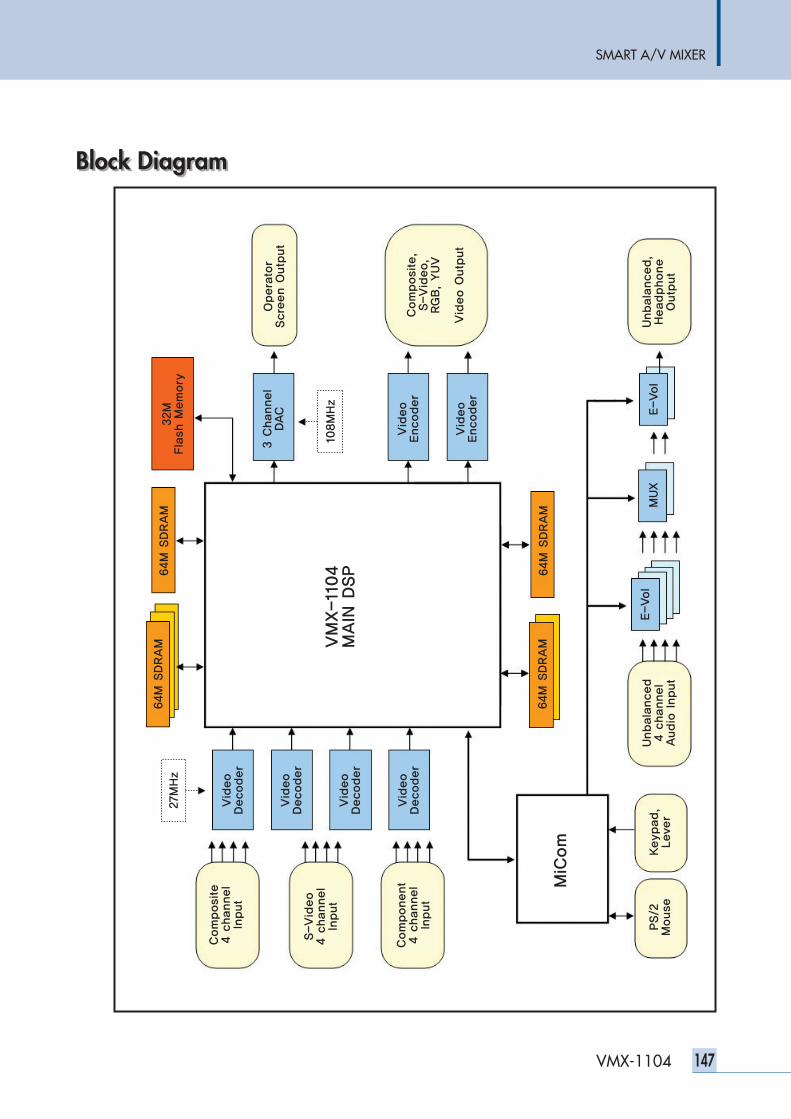
SMART A/V MIXER
147VMX-1104
Block DiagramBlock Diagram
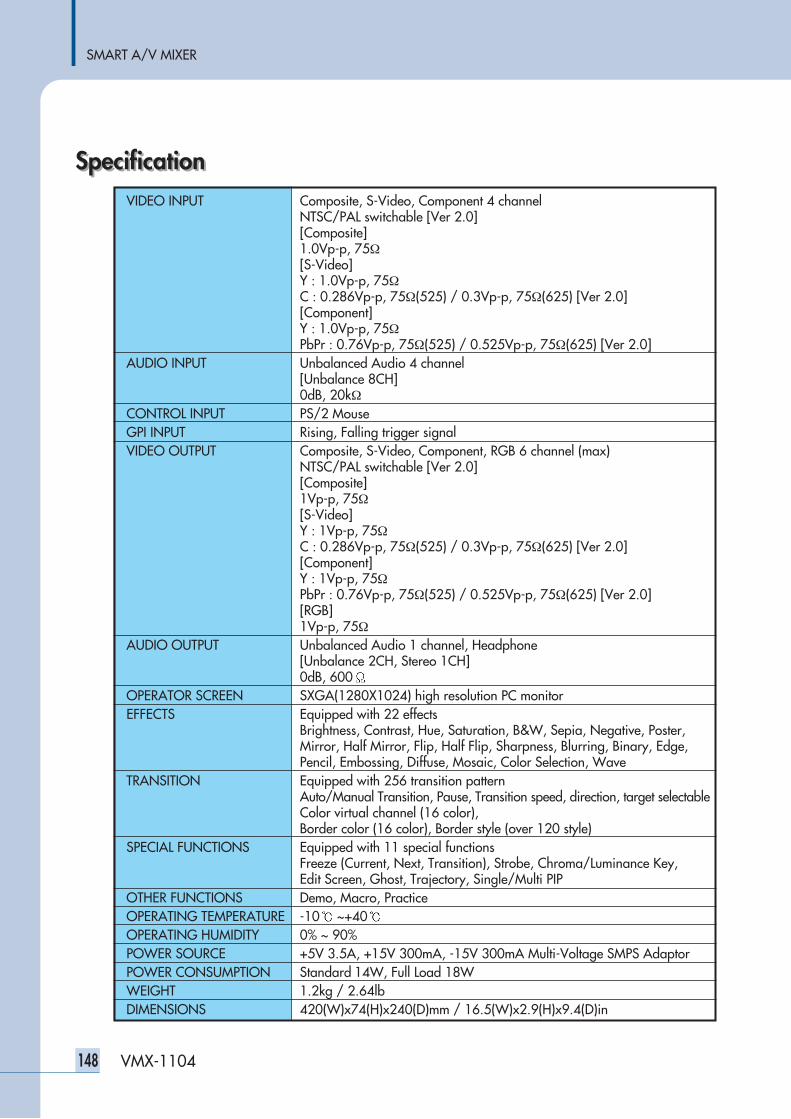
SMART A/V MIXER
148 VMX-1104
SpecificationSpecification VIDEO INPUT Composite, S-Video, Component 4 channel
NTSC/PAL switchable [Ver 2.0][Composite]1.0Vp-p, 75Ω[S-Video]Y : 1.0Vp-p, 75ΩC : 0.286Vp-p, 75Ω(525) / 0.3Vp-p, 75Ω(625) [Ver 2.0][Component]Y : 1.0Vp-p, 75ΩPbPr : 0.76Vp-p, 75Ω(525) / 0.525Vp-p, 75Ω(625) [Ver 2.0]
AUDIO INPUT Unbalanced Audio 4 channel[Unbalance 8CH]0dB, 20kΩ
CONTROL INPUT PS/2 MouseGPI INPUT Rising, Falling trigger signalVIDEO OUTPUT Composite, S-Video, Component, RGB 6 channel (max)
NTSC/PAL switchable [Ver 2.0][Composite]1Vp-p, 75Ω[S-Video]Y : 1Vp-p, 75ΩC : 0.286Vp-p, 75Ω(525) / 0.3Vp-p, 75Ω(625) [Ver 2.0][Component]Y : 1Vp-p, 75ΩPbPr : 0.76Vp-p, 75Ω(525) / 0.525Vp-p, 75Ω(625) [Ver 2.0][RGB]1Vp-p, 75Ω
AUDIO OUTPUT Unbalanced Audio 1 channel, Headphone [Unbalance 2CH, Stereo 1CH]0dB, 600
OPERATOR SCREEN SXGA(1280X1024) high resolution PC monitorEFFECTS Equipped with 22 effects
Brightness, Contrast, Hue, Saturation, B&W, Sepia, Negative, Poster,Mirror, Half Mirror, Flip, Half Flip, Sharpness, Blurring, Binary, Edge,Pencil, Embossing, Diffuse, Mosaic, Color Selection, Wave
TRANSITION Equipped with 256 transition patternAuto/Manual Transition, Pause, Transition speed, direction, target selectableColor virtual channel (16 color),Border color (16 color), Border style (over 120 style)
SPECIAL FUNCTIONS Equipped with 11 special functionsFreeze (Current, Next, Transition), Strobe, Chroma/Luminance Key,Edit Screen, Ghost, Trajectory, Single/Multi PIP
OTHER FUNCTIONS Demo, Macro, Practice OPERATING TEMPERATURE -10 ~+40OPERATING HUMIDITY 0% ~ 90% POWER SOURCE +5V 3.5A, +15V 300mA, -15V 300mA Multi-Voltage SMPS AdaptorPOWER CONSUMPTION Standard 14W, Full Load 18WWEIGHT 1.2kg / 2.64lbDIMENSIONS 420(W)x74(H)x240(D)mm / 16.5(W)x2.9(H)x9.4(D)in
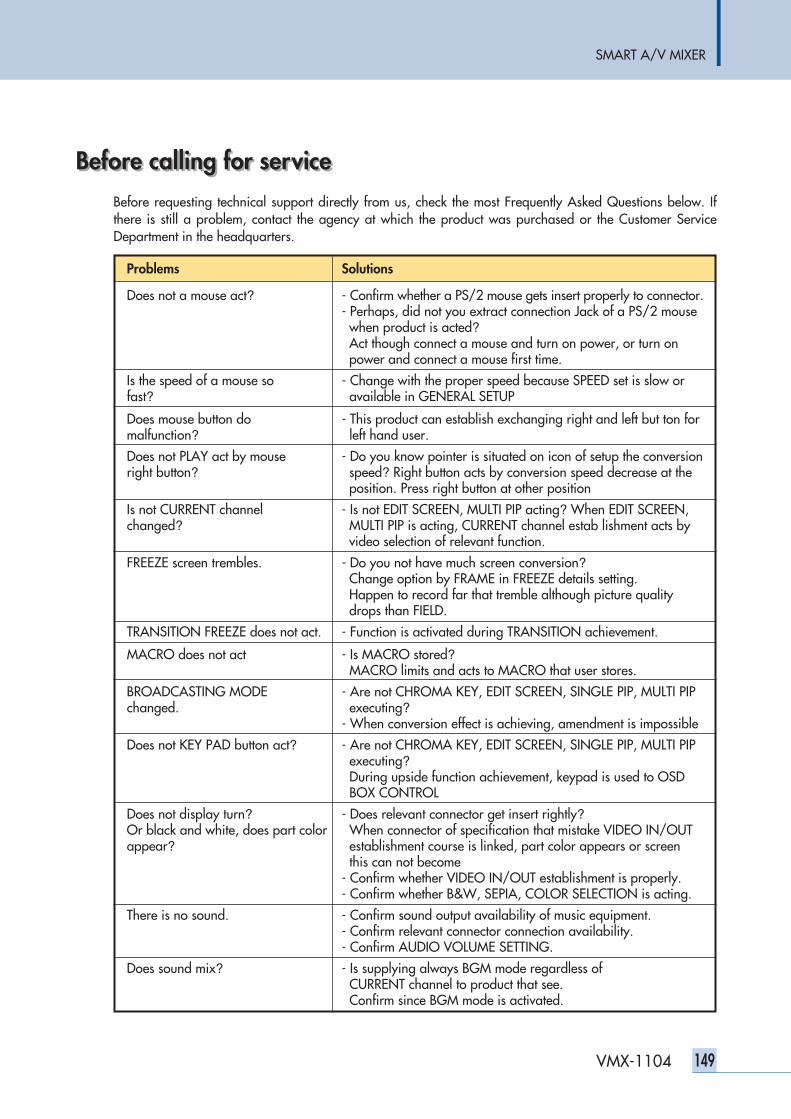
SMART A/V MIXER
149VMX-1104
Before calling for serviceBefore calling for serviceBefore requesting technical support directly from us, check the most Frequently Asked Questions below. Ifthere is still a problem, contact the agency at which the product was purchased or the Customer ServiceDepartment in the headquarters.
Problems Solutions
Does not a mouse act? - Confirm whether a PS/2 mouse gets insert properly to connector.- Perhaps, did not you extract connection Jack of a PS/2 mousewhen product is acted?Act though connect a mouse and turn on power, or turn onpower and connect a mouse first time.
Is the speed of a mouse so - Change with the proper speed because SPEED set is slow or fast? available in GENERAL SETUP
Does mouse button do - This product can establish exchanging right and left but ton for malfunction? left hand user.
Does not PLAY act by mouse - Do you know pointer is situated on icon of setup the conversion right button? speed? Right button acts by conversion speed decrease at the
position. Press right button at other position
Is not CURRENT channel - Is not EDIT SCREEN, MULTI PIP acting? When EDIT SCREEN, changed? MULTI PIP is acting, CURRENT channel estab lishment acts by
video selection of relevant function.
FREEZE screen trembles. - Do you not have much screen conversion?Change option by FRAME in FREEZE details setting.Happen to record far that tremble although picture qualitydrops than FIELD.
TRANSITION FREEZE does not act. - Function is activated during TRANSITION achievement.
MACRO does not act - Is MACRO stored?MACRO limits and acts to MACRO that user stores.
BROADCASTING MODE - Are not CHROMA KEY, EDIT SCREEN, SINGLE PIP, MULTI PIP changed. executing?
- When conversion effect is achieving, amendment is impossible
Does not KEY PAD button act? - Are not CHROMA KEY, EDIT SCREEN, SINGLE PIP, MULTI PIP executing?During upside function achievement, keypad is used to OSD BOX CONTROL
Does not display turn? - Does relevant connector get insert rightly?Or black and white, does part color When connector of specification that mistake VIDEO IN/OUTappear? establishment course is linked, part color appears or screen
this can not become- Confirm whether VIDEO IN/OUT establishment is properly.- Confirm whether B&W, SEPIA, COLOR SELECTION is acting.
There is no sound. - Confirm sound output availability of music equipment.- Confirm relevant connector connection availability.- Confirm AUDIO VOLUME SETTING.
Does sound mix? - Is supplying always BGM mode regardless of CURRENT channel to product that see.Confirm since BGM mode is activated.
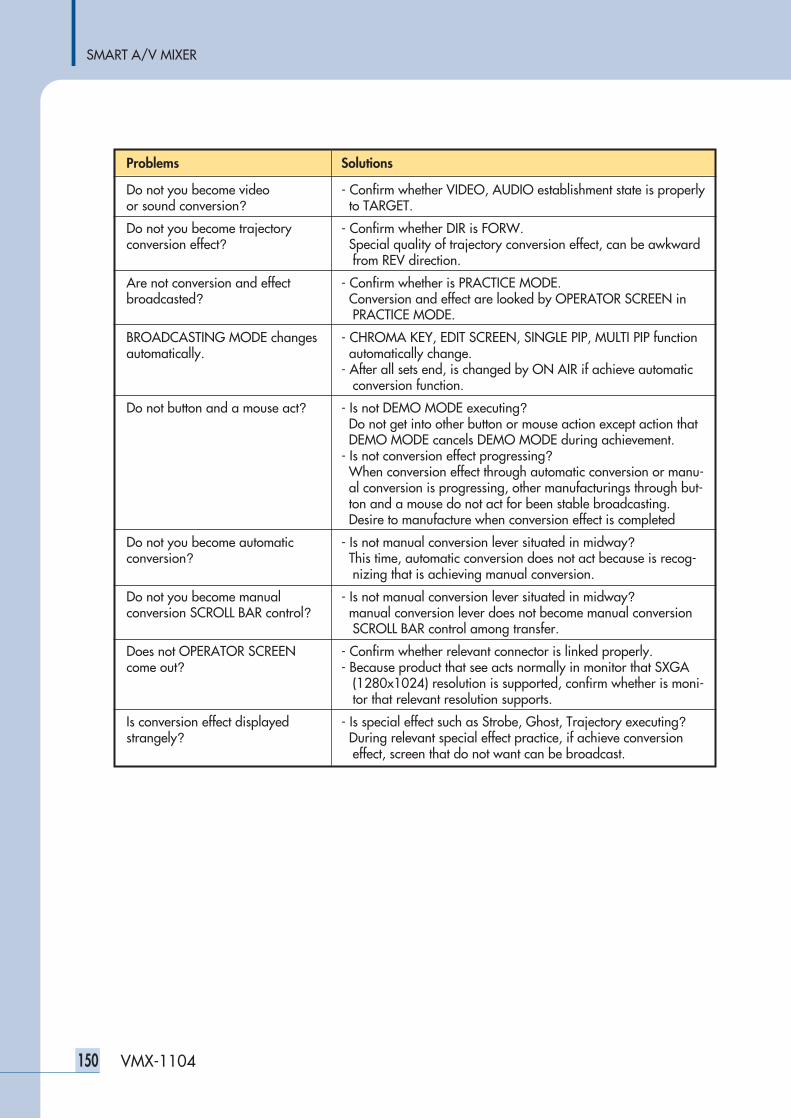
SMART A/V MIXER
150 VMX-1104
Problems Solutions
Do not you become video - Confirm whether VIDEO, AUDIO establishment state is properlyor sound conversion? to TARGET.
Do not you become trajectory - Confirm whether DIR is FORW.conversion effect? Special quality of trajectory conversion effect, can be awkward
from REV direction.
Are not conversion and effect - Confirm whether is PRACTICE MODE.broadcasted? Conversion and effect are looked by OPERATOR SCREEN in
PRACTICE MODE.
BROADCASTING MODE changes - CHROMA KEY, EDIT SCREEN, SINGLE PIP, MULTI PIP function automatically. automatically change.
- After all sets end, is changed by ON AIR if achieve automaticconversion function.
Do not button and a mouse act? - Is not DEMO MODE executing?Do not get into other button or mouse action except action thatDEMO MODE cancels DEMO MODE during achievement.
- Is not conversion effect progressing?When conversion effect through automatic conversion or manu-al conversion is progressing, other manufacturings through but-ton and a mouse do not act for been stable broadcasting.Desire to manufacture when conversion effect is completed
Do not you become automatic - Is not manual conversion lever situated in midway?conversion? This time, automatic conversion does not act because is recog-
nizing that is achieving manual conversion.
Do not you become manual - Is not manual conversion lever situated in midway?conversion SCROLL BAR control? manual conversion lever does not become manual conversion
SCROLL BAR control among transfer.
Does not OPERATOR SCREEN - Confirm whether relevant connector is linked properly.come out? - Because product that see acts normally in monitor that SXGA
(1280x1024) resolution is supported, confirm whether is moni-tor that relevant resolution supports.
Is conversion effect displayed - Is special effect such as Strobe, Ghost, Trajectory executing?strangely? During relevant special effect practice, if achieve conversion
effect, screen that do not want can be broadcast.
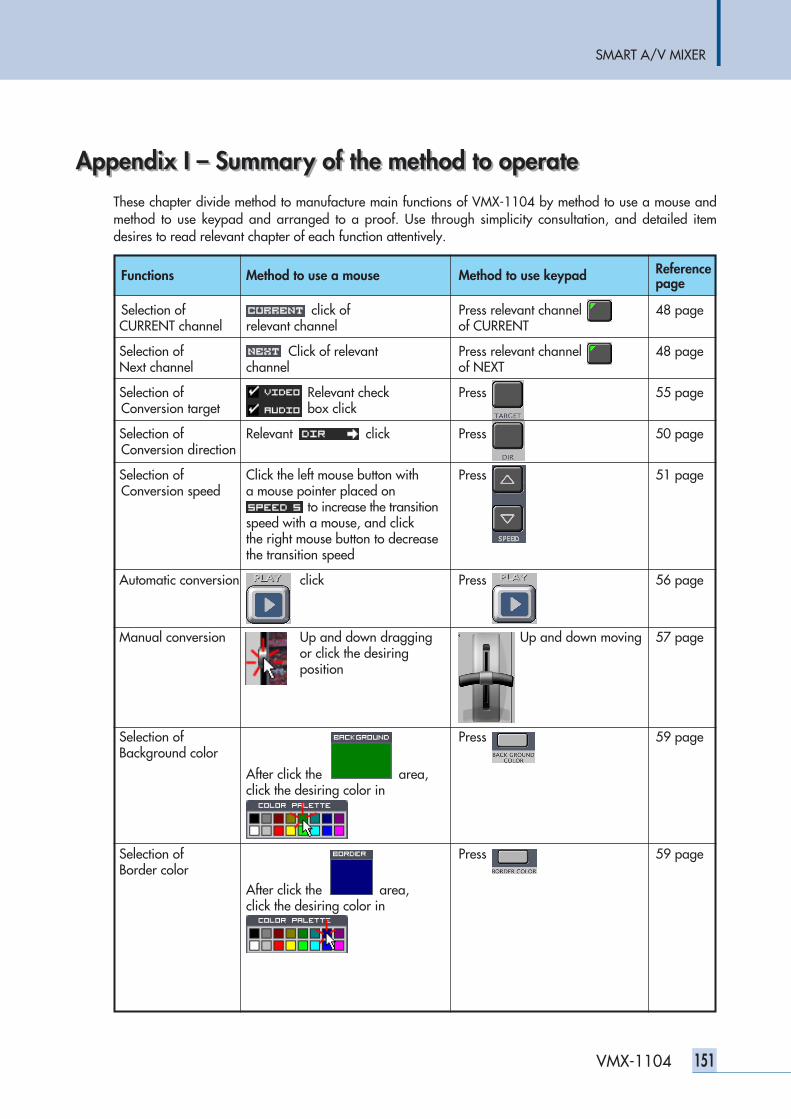
SMART A/V MIXER
151VMX-1104
Appendix I – Summary of the method to operateAppendix I – Summary of the method to operateThese chapter divide method to manufacture main functions of VMX-1104 by method to use a mouse andmethod to use keypad and arranged to a proof. Use through simplicity consultation, and detailed itemdesires to read relevant chapter of each function attentively.
Functions Method to use a mouse Method to use keypad Referencepage
Selection of click of Press relevant channel 48 pageCURRENT channel relevant channel of CURRENT
Selection of Click of relevant Press relevant channel 48 pageNext channel channel of NEXT
Selection of Relevant check Press 55 pageConversion target box click
Selection of Relevant click Press 50 pageConversion direction
Selection of Click the left mouse button with Press 51 pageConversion speed a mouse pointer placed on
to increase the transitionspeed with a mouse, and click the right mouse button to decrease the transition speed
Automatic conversion click Press 56 page
Manual conversion Up and down dragging Up and down moving 57 pageor click the desiring position
Selection of Press 59 pageBackground color
After click the area, click the desiring color in
Selection of Press 59 pageBorder color
After click the area, click the desiring color in
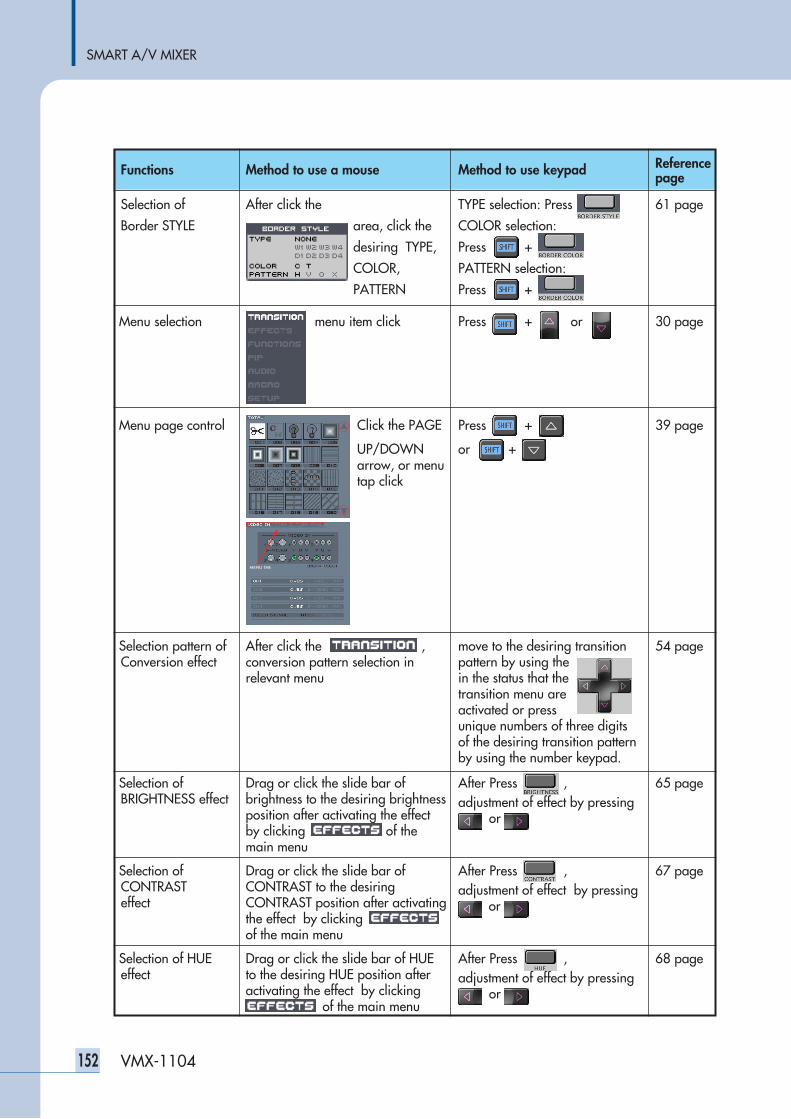
SMART A/V MIXER
152 VMX-1104
Functions Method to use a mouse Method to use keypad Referencepage
Selection of After click the TYPE selection: Press 61 page
Border STYLE area, click the COLOR selection:
desiring TYPE, Press +
COLOR, PATTERN selection:
PATTERN Press +
Menu selection menu item click Press + or 30 page
Menu page control Click the PAGE Press + 39 page
UP/DOWN or + arrow, or menutap click
Selection pattern of After click the , move to the desiring transition 54 pageConversion effect conversion pattern selection in pattern by using the
relevant menu in the status that the transition menu are activated or press unique numbers of three digits of the desiring transition pattern by using the number keypad.
Selection of Drag or click the slide bar of After Press , 65 pageBRIGHTNESS effect brightness to the desiring brightness adjustment of effect by pressing
position after activating the effect orby clicking of the main menu
Selection of Drag or click the slide bar of After Press , 67 pageCONTRAST CONTRAST to the desiring adjustment of effect by pressingeffect CONTRAST position after activating or
the effect by clicking of the main menu
Selection of HUE Drag or click the slide bar of HUE After Press , 68 pageeffect to the desiring HUE position after adjustment of effect by pressing
activating the effect by clicking orof the main menu
MENU TAB
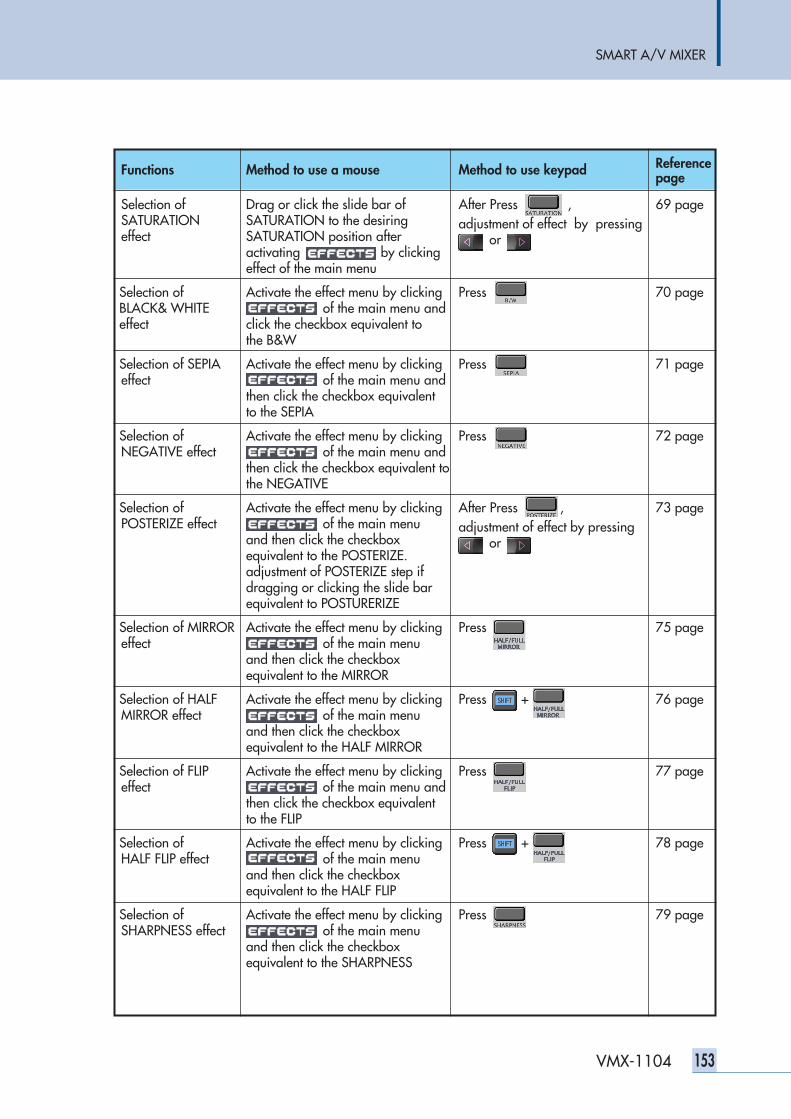
SMART A/V MIXER
153VMX-1104
Functions Method to use a mouse Method to use keypad Referencepage
Selection of Drag or click the slide bar of After Press , 69 pageSATURATION SATURATION to the desiring adjustment of effect by pressingeffect SATURATION position after or
activating by clicking effect of the main menu
Selection of Activate the effect menu by clicking Press 70 pageBLACK& WHITE of the main menu and effect click the checkbox equivalent to
the B&W
Selection of SEPIA Activate the effect menu by clicking Press 71 pageeffect of the main menu and
then click the checkbox equivalent to the SEPIA
Selection of Activate the effect menu by clicking Press 72 pageNEGATIVE effect of the main menu and
then click the checkbox equivalent to the NEGATIVE
Selection of Activate the effect menu by clicking After Press , 73 pagePOSTERIZE effect of the main menu adjustment of effect by pressing
and then click the checkbox orequivalent to the POSTERIZE.adjustment of POSTERIZE step if dragging or clicking the slide bar equivalent to POSTURERIZE
Selection of MIRROR Activate the effect menu by clicking Press 75 pageeffect of the main menu
and then click the checkbox equivalent to the MIRROR
Selection of HALF Activate the effect menu by clicking Press + 76 pageMIRROR effect of the main menu
and then click the checkbox equivalent to the HALF MIRROR
Selection of FLIP Activate the effect menu by clicking Press 77 pageeffect of the main menu and
then click the checkbox equivalent to the FLIP
Selection of Activate the effect menu by clicking Press + 78 pageHALF FLIP effect of the main menu
and then click the checkbox equivalent to the HALF FLIP
Selection of Activate the effect menu by clicking Press 79 pageSHARPNESS effect of the main menu
and then click the checkbox equivalent to the SHARPNESS
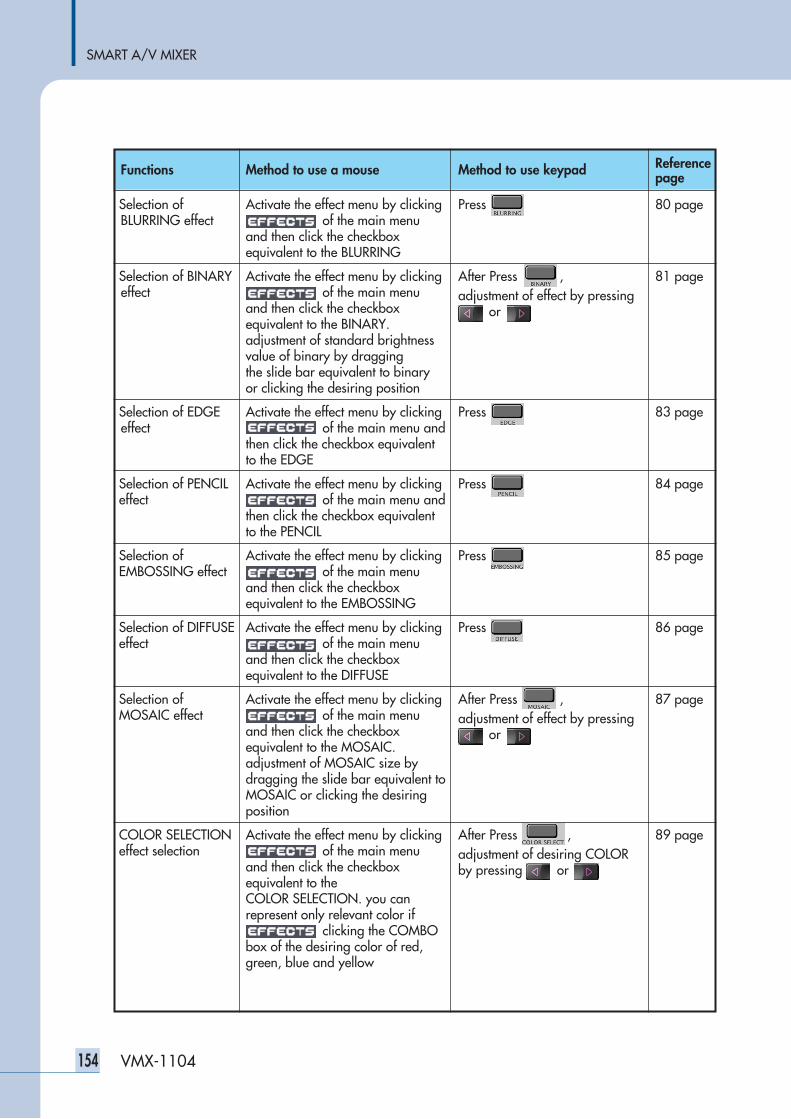
SMART A/V MIXER
154 VMX-1104
Functions Method to use a mouse Method to use keypad Referencepage
Selection of Activate the effect menu by clicking Press 80 pageBLURRING effect of the main menu
and then click the checkbox equivalent to the BLURRING
Selection of BINARY Activate the effect menu by clicking After Press , 81 pageeffect of the main menu adjustment of effect by pressing
and then click the checkbox orequivalent to the BINARY.adjustment of standard brightness value of binary by dragging the slide bar equivalent to binary or clicking the desiring position
Selection of EDGE Activate the effect menu by clicking Press 83 pageeffect of the main menu and
then click the checkbox equivalent to the EDGE
Selection of PENCIL Activate the effect menu by clicking Press 84 pageeffect of the main menu and
then click the checkbox equivalent to the PENCIL
Selection of Activate the effect menu by clicking Press 85 pageEMBOSSING effect of the main menu
and then click the checkbox equivalent to the EMBOSSING
Selection of DIFFUSE Activate the effect menu by clicking Press 86 pageeffect of the main menu
and then click the checkbox equivalent to the DIFFUSE
Selection of Activate the effect menu by clicking After Press , 87 pageMOSAIC effect of the main menu adjustment of effect by pressing
and then click the checkbox orequivalent to the MOSAIC.adjustment of MOSAIC size by dragging the slide bar equivalent to MOSAIC or clicking the desiring position
COLOR SELECTION Activate the effect menu by clicking After Press , 89 pageeffect selection of the main menu adjustment of desiring COLOR
and then click the checkbox by pressing orequivalent to the COLOR SELECTION. you can represent only relevant color if
clicking the COMBO box of the desiring color of red, green, blue and yellow
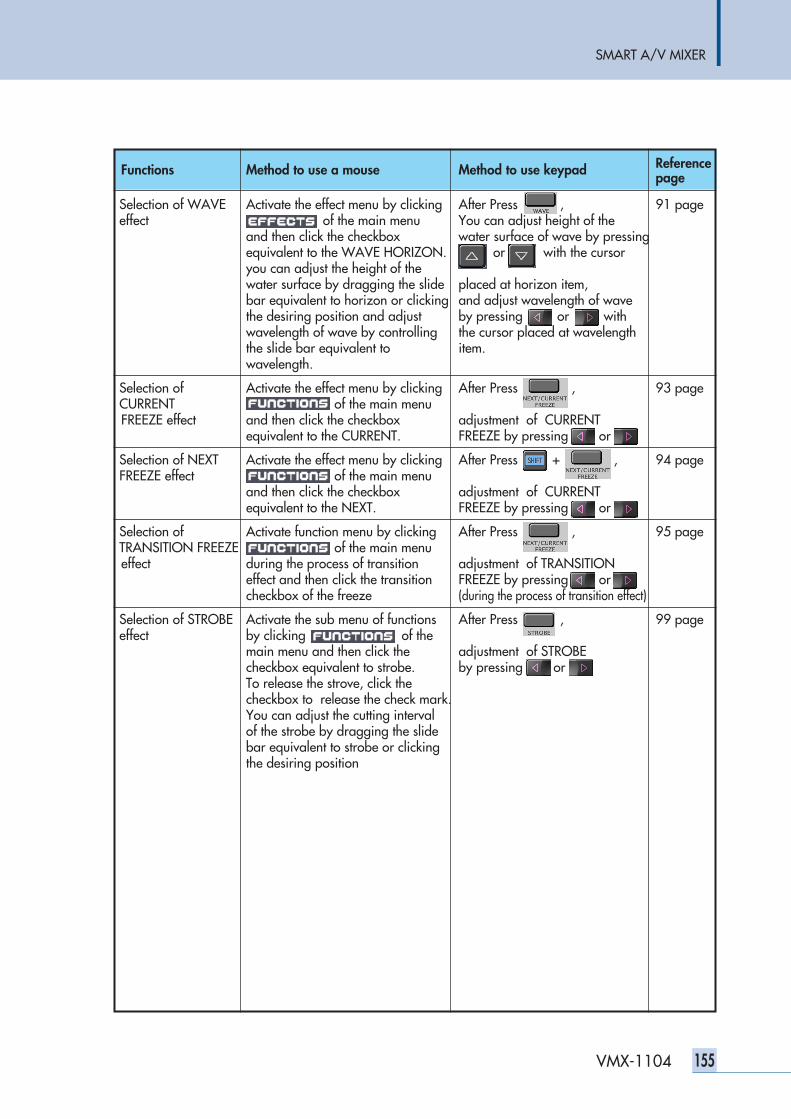
SMART A/V MIXER
155VMX-1104
Functions Method to use a mouse Method to use keypad Referencepage
Selection of WAVE Activate the effect menu by clicking After Press , 91 pageeffect of the main menu You can adjust height of the
and then click the checkbox water surface of wave by pressingequivalent to the WAVE HORIZON. or with the cursor you can adjust the height of the water surface by dragging the slide placed at horizon item, bar equivalent to horizon or clicking and adjust wavelength of wave the desiring position and adjust by pressing or withwavelength of wave by controlling the cursor placed at wavelength the slide bar equivalent to item.wavelength.
Selection of Activate the effect menu by clicking After Press , 93 pageCURRENT of the main menu FREEZE effect and then click the checkbox adjustment of CURRENT
equivalent to the CURRENT. FREEZE by pressing or
Selection of NEXT Activate the effect menu by clicking After Press + , 94 pageFREEZE effect of the main menu
and then click the checkbox adjustment of CURRENTequivalent to the NEXT. FREEZE by pressing or
Selection of Activate function menu by clicking After Press , 95 pageTRANSITION FREEZE of the main menu effect during the process of transition adjustment of TRANSITION
effect and then click the transition FREEZE by pressing orcheckbox of the freeze (during the process of transition effect)
Selection of STROBE Activate the sub menu of functions After Press , 99 pageeffect by clicking of the
main menu and then click the adjustment of STROBE checkbox equivalent to strobe. by pressing or To release the strove, click the checkbox to release the check mark. You can adjust the cutting interval of the strobe by dragging the slide bar equivalent to strobe or clicking the desiring position
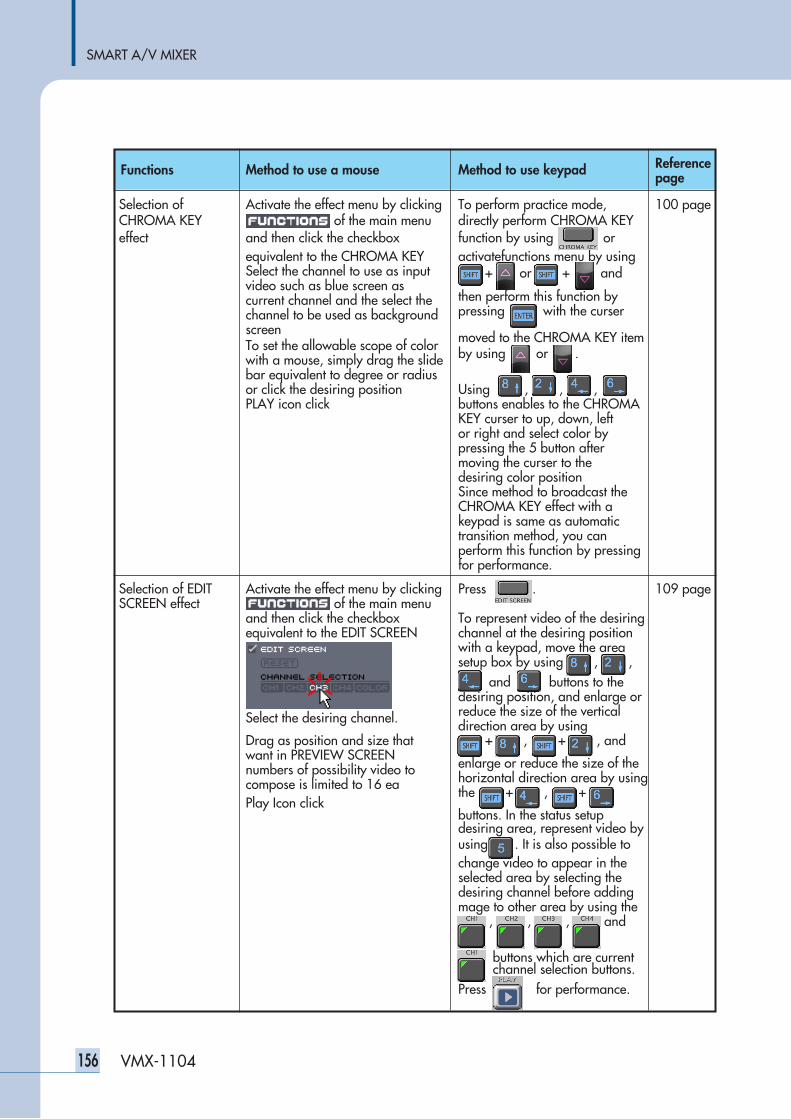
SMART A/V MIXER
156 VMX-1104
Functions Method to use a mouse Method to use keypad Referencepage
Selection of Activate the effect menu by clicking To perform practice mode, 100 pageCHROMA KEY of the main menu directly perform CHROMA KEYeffect and then click the checkbox function by using or
equivalent to the CHROMA KEY activatefunctions menu by using Select the channel to use as input + or + andvideo such as blue screen as current channel and the select the then perform this function bychannel to be used as background pressing with the curserscreenTo set the allowable scope of color moved to the CHROMA KEY item
with a mouse, simply drag the slide by using or .
bar equivalent to degree or radius or click the desiring position Using , , ,PLAY icon click buttons enables to the CHROMA
KEY curser to up, down, left or right and select color by pressing the 5 button after moving the curser to the desiring color positionSince method to broadcast the CHROMA KEY effect with a keypad is same as automatictransition method, you canperform this function by pressing for performance.
Selection of EDIT Activate the effect menu by clicking Press . 109 pageSCREEN effect of the main menu
and then click the checkbox To represent video of the desiringequivalent to the EDIT SCREEN channel at the desiring position
with a keypad, move the area setup box by using , ,
and buttons to the desiring position, and enlarge or
Select the desiring channel. reduce the size of the verticaldirection area by using
Drag as position and size that + , + , andwant in PREVIEW SCREENnumbers of possibility video to enlarge or reduce the size of the
compose is limited to 16 ea horizontal direction area by usingthe + , +
Play Icon clickbuttons. In the status setup desiring area, represent video byusing . It is also possible to change video to appear in the selected area by selecting the desiring channel before adding mage to other area by using the
, , , and
buttons which are current channel selection buttons.
Press for performance.
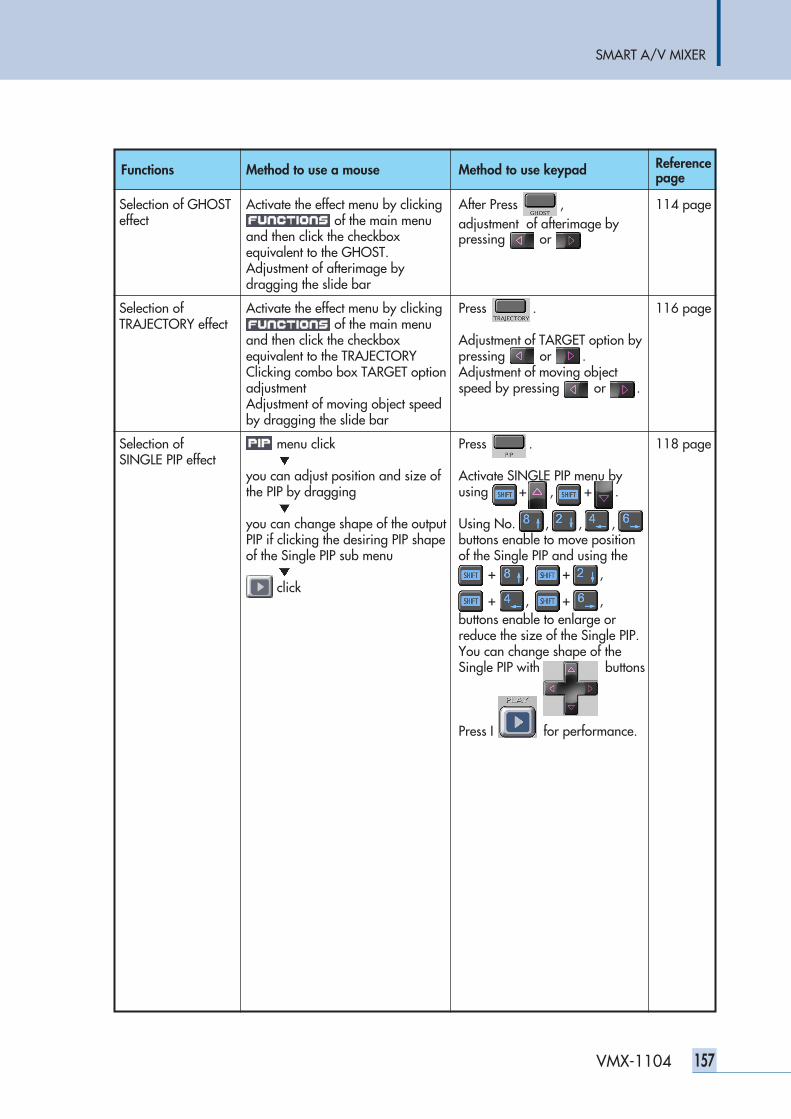
Functions Method to use a mouse Method to use keypad Referencepage
Selection of GHOST Activate the effect menu by clicking After Press , 114 pageeffect of the main menu adjustment of afterimage by
and then click the checkbox pressing orequivalent to the GHOST.Adjustment of afterimage by dragging the slide bar
Selection of Activate the effect menu by clicking Press . 116 pageTRAJECTORY effect of the main menu
and then click the checkbox Adjustment of TARGET option byequivalent to the TRAJECTORY pressing or .Clicking combo box TARGET option Adjustment of moving objectadjustment speed by pressing or .Adjustment of moving object speed by dragging the slide bar
Selection of menu click Press . 118 pageSINGLE PIP effect
you can adjust position and size of Activate SINGLE PIP menu bythe PIP by dragging using + , + .
you can change shape of the output Using No. , , ,PIP if clicking the desiring PIP shape buttons enable to move positionof the Single PIP sub menu of the Single PIP and using the
+ , + ,click
+ , + ,buttons enable to enlarge or reduce the size of the Single PIP.You can change shape of the Single PIP with buttons
Press I for performance.
SMART A/V MIXER
157VMX-1104
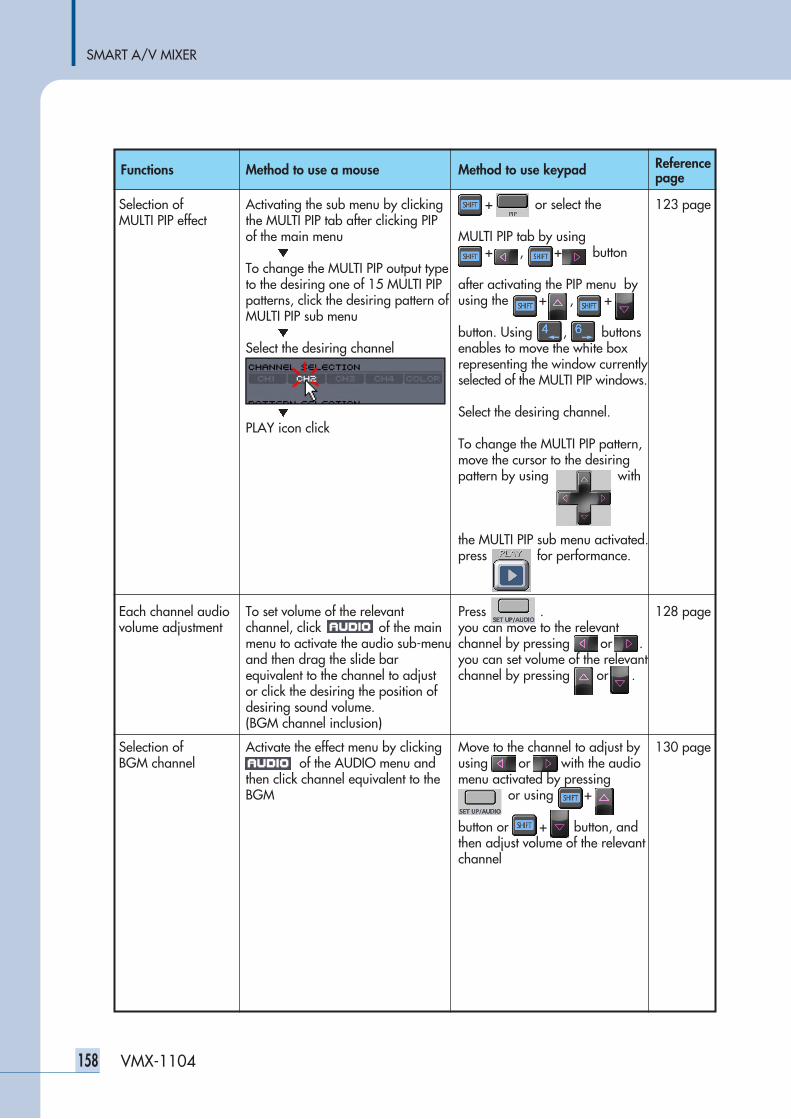
SMART A/V MIXER
158 VMX-1104
Functions Method to use a mouse Method to use keypad Referencepage
Selection of Activating the sub menu by clicking + or select the 123 pageMULTI PIP effect the MULTI PIP tab after clicking PIP
of the main menu MULTI PIP tab by using+ , + button
To change the MULTI PIP output typeto the desiring one of 15 MULTI PIP after activating the PIP menu bypatterns, click the desiring pattern of using the + , + MULTI PIP sub menu
button. Using , buttonsSelect the desiring channel enables to move the white box
representing the window currentlyselected of the MULTI PIP windows.
Select the desiring channel.PLAY icon click
To change the MULTI PIP pattern,move the cursor to the desiring pattern by using with
the MULTI PIP sub menu activated.press for performance.
Each channel audio To set volume of the relevant Press . 128 pagevolume adjustment channel, click of the main you can move to the relevant
menu to activate the audio sub-menu channel by pressing or .and then drag the slide bar you can set volume of the relevantequivalent to the channel to adjust channel by pressing or .or click the desiring the position ofdesiring sound volume.(BGM channel inclusion)
Selection of Activate the effect menu by clicking Move to the channel to adjust by 130 pageBGM channel of the AUDIO menu and using or with the audio
then click channel equivalent to the menu activated by pressing BGM or using +
button or + button, and then adjust volume of the relevant channel
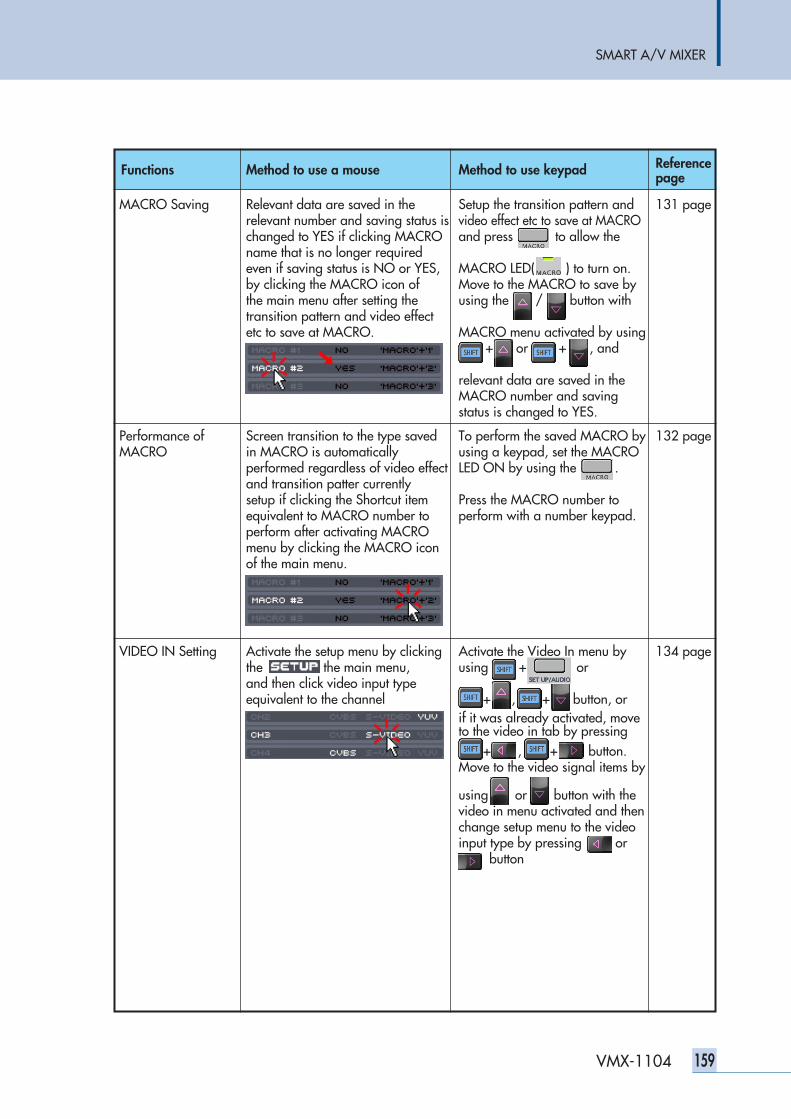
SMART A/V MIXER
159VMX-1104
Functions Method to use a mouse Method to use keypad Referencepage
MACRO Saving Relevant data are saved in the Setup the transition pattern and 131 pagerelevant number and saving status is video effect etc to save at MACROchanged to YES if clicking MACRO and press to allow thename that is no longer required even if saving status is NO or YES, MACRO LED( ) to turn on. by clicking the MACRO icon of Move to the MACRO to save bythe main menu after setting the using the / button withtransition pattern and video effect etc to save at MACRO. MACRO menu activated by using
+ or + , and
relevant data are saved in the MACRO number and saving status is changed to YES.
Performance of Screen transition to the type saved To perform the saved MACRO by 132 pageMACRO in MACRO is automatically using a keypad, set the MACRO
performed regardless of video effect LED ON by using the .and transition patter currently setup if clicking the Shortcut item Press the MACRO number toequivalent to MACRO number to perform with a number keypad. perform after activating MACRO menu by clicking the MACRO icon of the main menu.
VIDEO IN Setting Activate the setup menu by clicking Activate the Video In menu by 134 pagethe of the main menu, using + orand then click video input type equivalent to the channel + , + button, or
if it was already activated, moveto the video in tab by pressing
+ , + button. Move to the video signal items by
using or button with the video in menu activated and then change setup menu to the video input type by pressing or
button
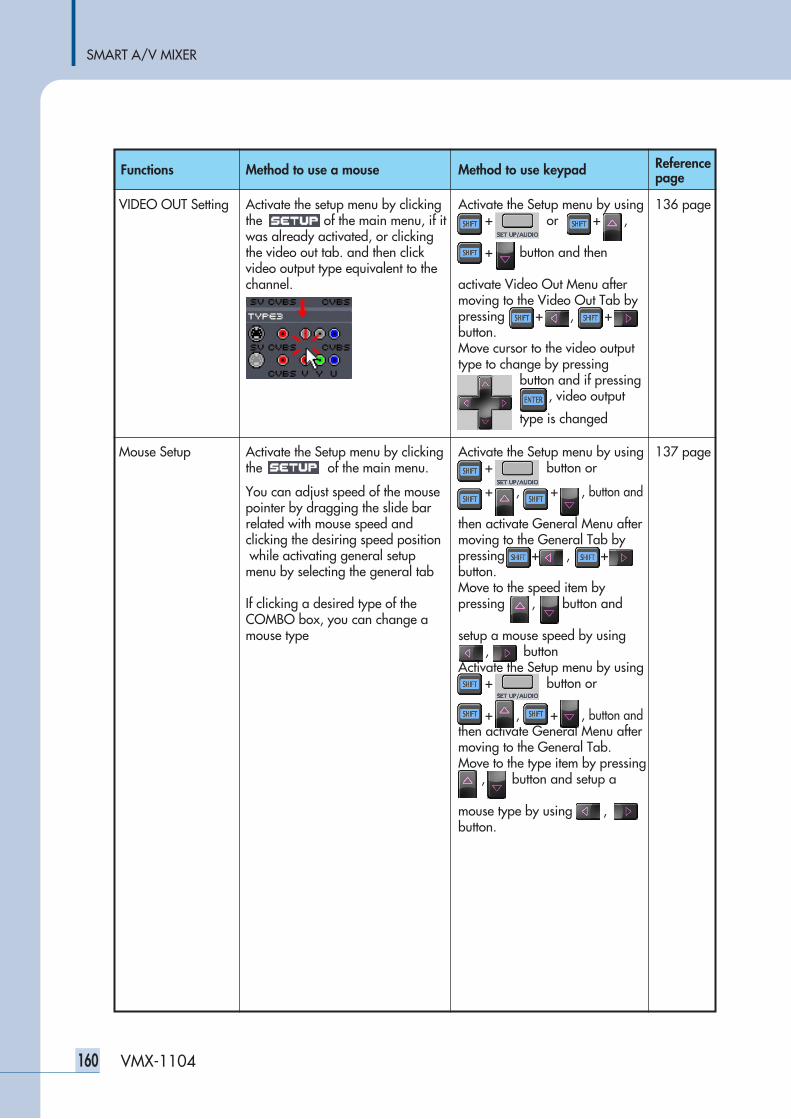
SMART A/V MIXER
160 VMX-1104
Functions Method to use a mouse Method to use keypad Referencepage
VIDEO OUT Setting Activate the setup menu by clicking Activate the Setup menu by using 136 pagethe of the main menu, if it + or + ,was already activated, or clicking the video out tab. and then click + button and thenvideo output type equivalent to the channel. activate Video Out Menu after
moving to the Video Out Tab by pressing + , + button. Move cursor to the video outputtype to change by pressing
button and if pressing, video output
type is changed
Mouse Setup Activate the Setup menu by clicking Activate the Setup menu by using 137 pagethe of the main menu. + button or
You can adjust speed of the mouse + , + , button andpointer by dragging the slide bar related with mouse speed and then activate General Menu afterclicking the desiring speed position moving to the General Tab bywhile activating general setup pressing + , +menu by selecting the general tab button.
Move to the speed item by If clicking a desired type of the pressing , button andCOMBO box, you can change a mouse type setup a mouse speed by using
, buttonActivate the Setup menu by using
+ button or
+ , + , button andthen activate General Menu after moving to the General Tab. Move to the type item by pressing
, button and setup a
mouse type by using , button.
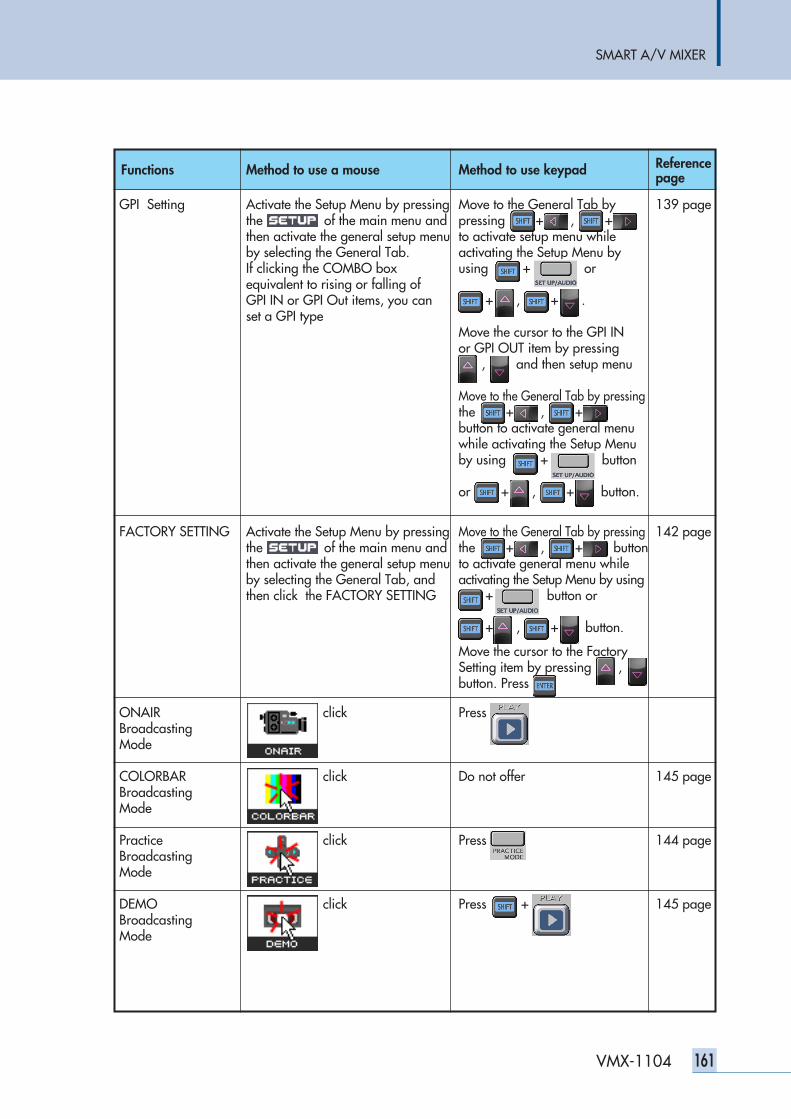
SMART A/V MIXER
161VMX-1104
Functions Method to use a mouse Method to use keypad Referencepage
GPI Setting Activate the Setup Menu by pressing Move to the General Tab by 139 pagethe of the main menu and pressing + , +then activate the general setup menu to activate setup menu while by selecting the General Tab. activating the Setup Menu by If clicking the COMBO box using + orequivalent to rising or falling of GPI IN or GPI Out items, you can + , + .set a GPI type
Move the cursor to the GPI IN or GPI OUT item by pressing
, and then setup menu
Move to the General Tab by pressingthe + , +button to activate general menu while activating the Setup Menu by using + button
or + , + button.
FACTORY SETTING Activate the Setup Menu by pressing Move to the General Tab by pressing 142 pagethe of the main menu and the + , + buttonthen activate the general setup menu to activate general menu whileby selecting the General Tab, and activating the Setup Menu by usingthen click the FACTORY SETTING + button or
+ , + button.
Move the cursor to the Factory Setting item by pressing , button. Press
ONAIR click Press Broadcasting Mode
COLORBAR click Do not offer 145 pageBroadcastingMode
Practice click Press 144 pageBroadcastingMode
DEMO click Press + 145 pageBroadcastingMode
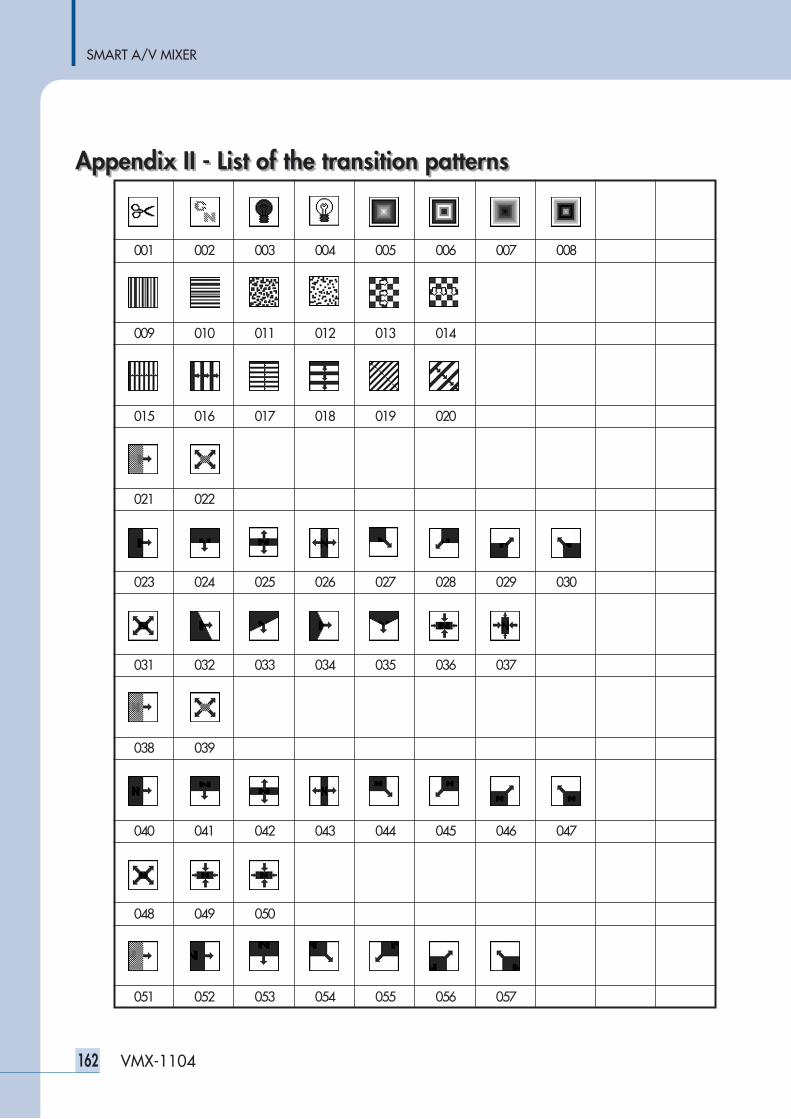
SMART A/V MIXER
162 VMX-1104
Appendix II - List of the transition patternsAppendix II - List of the transition patterns
001 002 003 004 005 006 007 008
009 010 011 012 013 014
015 016 017 018 019 020
021 022
023 024 025 026 027 028 029 030
031 032 033 034 035 036 037
038 039
040 041 042 043 044 045 046 047
048 049 050
051 052 053 054 055 056 057

SMART A/V MIXER
163VMX-1104
058 059 060 061 062 063
064 065 066 067 068 069 070
071 072 073 074 075 076 077
078 079 080 081 082 083 084
085 087 089 091 093 095 097
086 088 090 092 094 096 098
099 100 101 102 103 104 105 106 107 108
109 110 111 112 113 114 115 116 117 118
119 120 121 122 123 124 125 126 127 128
129 130
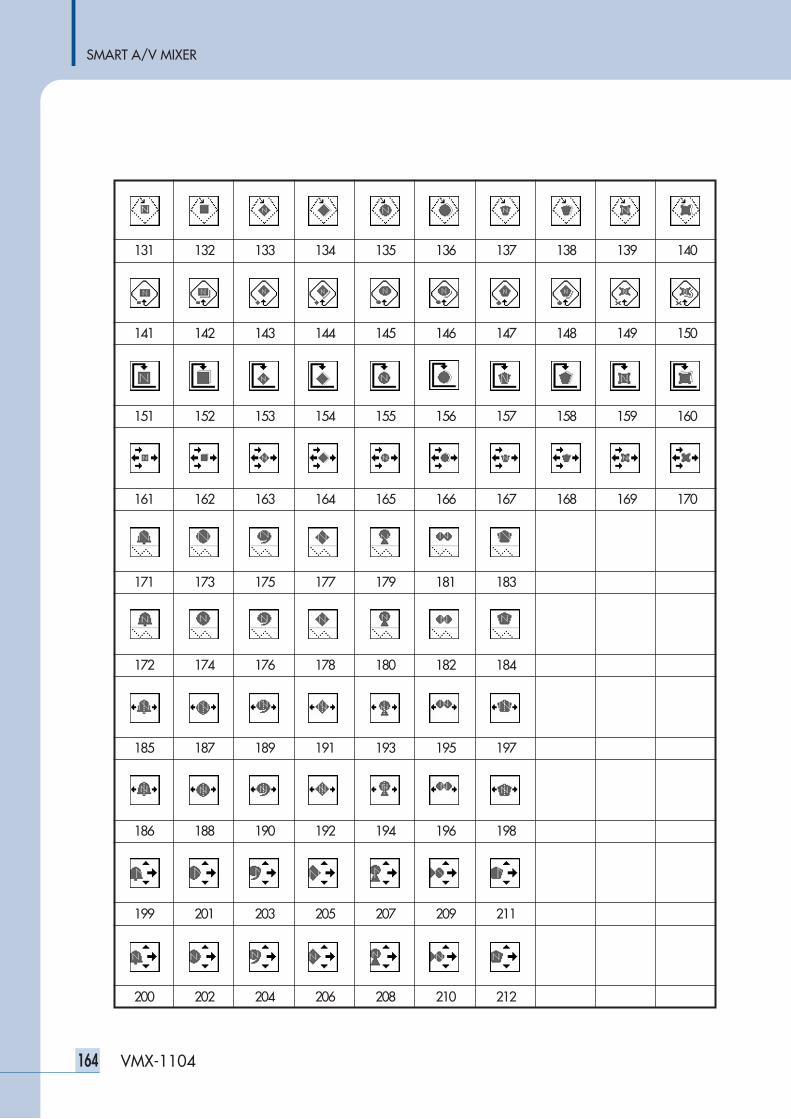
SMART A/V MIXER
164 VMX-1104
131 132 133 134 135 136 137 138 139 140
141 142 143 144 145 146 147 148 149 150
151 152 153 154 155 156 157 158 159 160
161 162 163 164 165 166 167 168 169 170
171 173 175 177 179 181 183
172 174 176 178 180 182 184
185 187 189 191 193 195 197
186 188 190 192 194 196 198
199 201 203 205 207 209 211
200 202 204 206 208 210 212

SMART A/V MIXER
165VMX-1104
213 215 217 219 221 223 225
214 216 218 220 222 224 226
227 229 231 233 235 237 239
228 230 232 234 236 238 240
241 243 245 247 249 251 253
242 244 246 248 250 252 254
255 256

NOTE

MADE IN KOREAMarch 2007 9007504211