operation instructions
TRANSCRIPT
DVD/VCD/CD/MP3/USB/SD/MMC/BLUETOOTH/TV PLAYER WITH FM/AM TUNER
Operation Instructions
�
Safety Information
Thank you for purchasing the player. Please read this manual carefully before operating and reserve it for future reference.
WARNINGTo reduce the risk of fire or electric shock, do not expose this product to rain or moisture.
CAUTIONT h i s p r o d u c t i s a C L A S S 1 L A S E R PRODUCT. Use of controls or adjustments or performance of procedures other than those specified herein may result in hazardous radiation exposure. Do not open covers and do not repair yourself. Refer servicing to qualified personnel.
DO NOT WATCH THE MONITOR WHILE DRIVING.
TWO LASER PRODUCTSWave length: CD:780nm DVD:650nmLaser power: No hazardous radiation is emitted with safety protection.
To reduce the risk of fire electric shock, and annoying interference, use only the included components.
Contents
Safety Information .........................................�Panel Control .................................................3Remote Control .............................................4USB/SD/MMC MP3 Playback........................5General Operation .........................................6 Source Select .......................................6 Panel Action .........................................6 Radio ....................................................6 DVD Playback ......................................8 Video CD Playback ...............................8 DVD/VCD Screen Area ........................9 PHOTO Menu .......................................9 CD/MP3/WMA Playback .....................10 Blue-tooth ...........................................10 TV .......................................................11System Setup ..............................................1� EQ Menu ............................................1� SETUP Menu ......................................1�Electrical Connections .................................14Installation Guide .........................................15Troubleshooting ...........................................15Specifications ..............................................16
CD NOTES• Playing a defective or dusty CD can cause
dropouts in sound.• Hold CDs as illustrated.• Do not touch the unlabeled side.• Do not attach any seal, label or data
protection sheet to either side of a disc.• Do not expose a CD to direct sunlight or
excessive heat.• Wipe a dirty CD from the center outward
with a cleaning cloth.• Never use solvents such as benzine or
alcohol. • This unit cannot play 3-inch (8cm) CDs.
Never insert a 3-inch CD contained in the adapter or an irregularly shaped CD. The unit may not be able to eject it.
3
Contents Panel Control
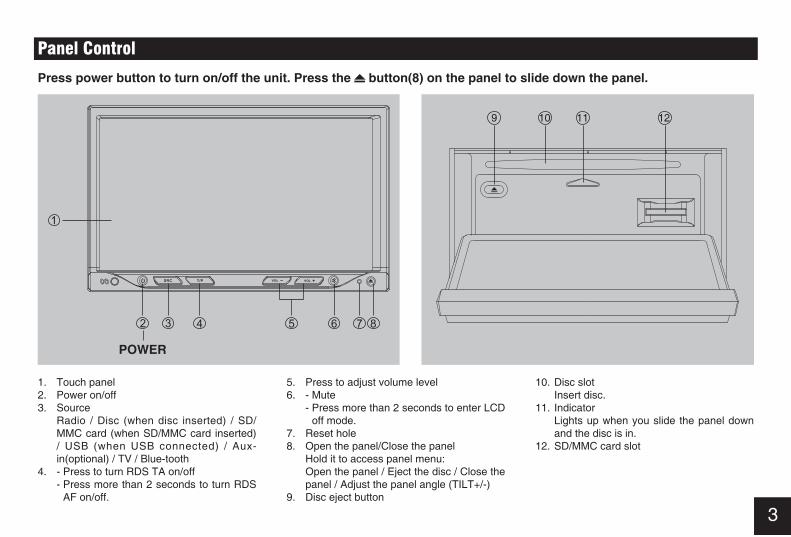
Press power button to turn on/off the unit. Press the button(8) on the panel to slide down the panel.
1. Touch panel�. Power on/off3. Source Radio / Disc (when disc inserted) / SD/
MMC card (when SD/MMC card inserted) / USB (when USB connected) / Aux-in(optional) / TV / Blue-tooth
4. - Press to turn RDS TA on/off - Press more than � seconds to turn RDS
AF on/off.
5. Press to adjust volume level6. - Mute - Press more than � seconds to enter LCD
off mode.7. Reset hole8. Open the panel/Close the panel Hold it to access panel menu: Open the panel / Eject the disc / Close the
panel / Adjust the panel angle (TILT+/-)9. Disc eject button
10. Disc slot Insert disc.11. Indicator Lights up when you slide the panel down
and the disc is in.1�. SD/MMC card slot
9 10 11 12
POWER
4
Remote Control
Press to turn on/off the unit.
161
�
3
17
4
56789
10
11
13
1�
14
15
18
19
�0
�1
��
�3
�4
�5
�6
�7
�8
�9
Replacing the lithium battery of remote control unit.When the range of the operation of the card remote control becomes short or no functions while operating, replace the battery with a new lithium battery. Make sure the battery polarity replacement is correct.
1. Open the back cover of the remote control unit.
�. Insert the button-type battery with the stamped (+) mark facing upward. Close the back cover.
Pull out Push upReplacedthe battery
1. Source - Radio - Disc (when disc
inserted) - USB (when USB
connected) - S D / M M C c a r d
(when SD/MMC card inserted)
- Blue-tooth - TV - Aux-in(optional) - Camera�. Disc eject3. - Menu (DVD)4. Title (DVD)5. Goto search6. - Radio band - V i d e o s y s t e m
P A L / N T S C /AUTO
7. Sound effect8. System setup9. Close the panel10. Open the panel11. - Zoom (DVD/VCD) - Dial/Receive call1�. Enter13. Menu cursor14. Stop/Return15. Digit area
16. Enter source menu17. Power on/off18. Angle (DVD)19. DVD subtitle�0. A-B repeat�1. Repeat��. Information�3. Screen brightness�4. Radio tune Track skip/seek�5. Call off/cancel�6. Volume�7. Play/Pause�8. Mute�9. DVD audio VCD audio L/R/ST
5
Remote Control
Remote control operating rangeThe remote control can operate within a distance of 3~5m.The remote sensor is located to the right of the VOL+ button.
WARNING • Store the battery where children cannot
reach. If a child accidentally swallowed the battery, consult a doctor immediately.
• Do not recharge, short, disassemble or heat the battery or dispose it in a fire.
• Do not expose or bring into contact the battery with other metallic materials.
• Doing this may cause the battery to give off heat, crack or start a fire.
• When throwing away or saving the battery, wrap it in tape and insulate; otherwise, the battery may give off heat, crack or start a fire.
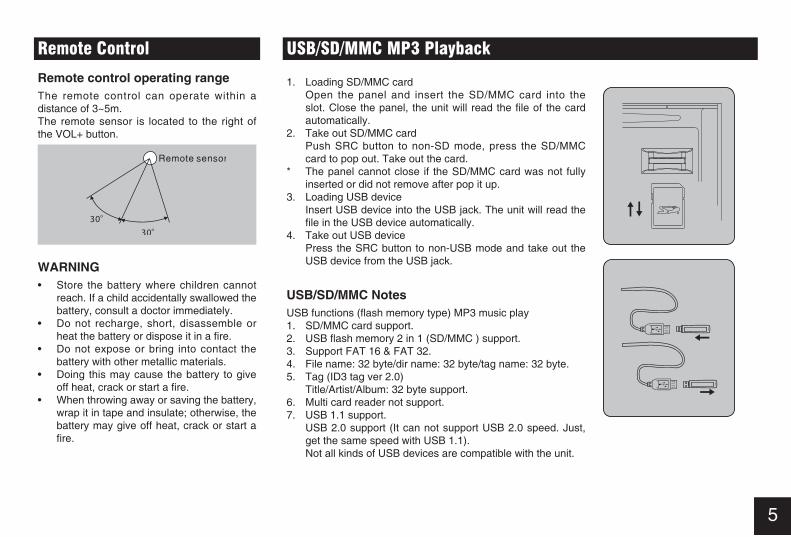
USB/SD/MMC MP3 Playback
1. Loading SD/MMC card Open the panel and insert the SD/MMC card into the
slot. Close the panel, the unit will read the file of the card automatically.
�. Take out SD/MMC card Push SRC button to non-SD mode, press the SD/MMC
card to pop out. Take out the card.* The panel cannot close if the SD/MMC card was not fully
inserted or did not remove after pop it up.3. Loading USB device Insert USB device into the USB jack. The unit will read the
file in the USB device automatically.4. Take out USB device Press the SRC button to non-USB mode and take out the
USB device from the USB jack.
USB/SD/MMC NotesUSB functions (flash memory type) MP3 music play 1. SD/MMC card support. 2. USB flash memory 2 in 1 (SD/MMC ) support. 3. Support FAT 16 & FAT 3�. 4. File name: 3� byte/dir name: 3� byte/tag name: 3� byte. 5. Tag (ID3 tag ver �.0) Title/Artist/Album: 3� byte support. 6. Multi card reader not support. 7. USB 1.1 support. USB 2.0 support (It can not support USB 2.0 speed. Just,
get the same speed with USB 1.1). Not all kinds of USB devices are compatible with the unit.

6
General Operation
Source SelectTouch SRC on the touch screen or press MODE button on the remote control to display SRC menu:
1. Current source�. Blue-tooth indication The icon will display when blue-tooth
device is connected, twinkle when blue-tooth device is unconnected.
3. Touch to enter setup menu.4. Touch to access desired source: Radio,
Disc, USB, SD, Blue-tooth, TV, Aux-in, Camera.
* Press SRC button on the panel or remote control to change mode directly.
Panel ActionPress button to display [OPEN/TILT] menu:
1. Touch to enter SRC menu.�. System time.3. Touch to return to previous mode.4. Touch to open the panel.5. Touch to eject the disc.6. Touch to close the panel.7. Touch and hold to open the panel
gradually.8. Touch and hold to c lose the panel
gradually.
RadioTouch to access desired function:
1. Touch to display source menu.�. Source indication3. System time4. Blue-tooth indication5. Touch to switch the LCD off, touch any position to resume.6. Touch to enter setup menu.7. Radio local/distant indication.8. FM stereo/mono indication.9. Band indication.
7
10. Preset station number.11. Current frequency.1�. Volume level13. Touch to access sound effect menu.14. Touch to listen to a preset station, touch
longer to save current station.15. Touch to page down.16. Band switch: FM1 -> FM� -> FM3 -> AM1 -> AM�17. Touch to scan the preset stations. Touch longer to search and store the
10 strongest stations in current band automatically.
18. Touch to tune automatically. 19. Touch to tune manually.�0. Touch to scan station.�1. Touch to enter radio local or distant mode.
General Operation
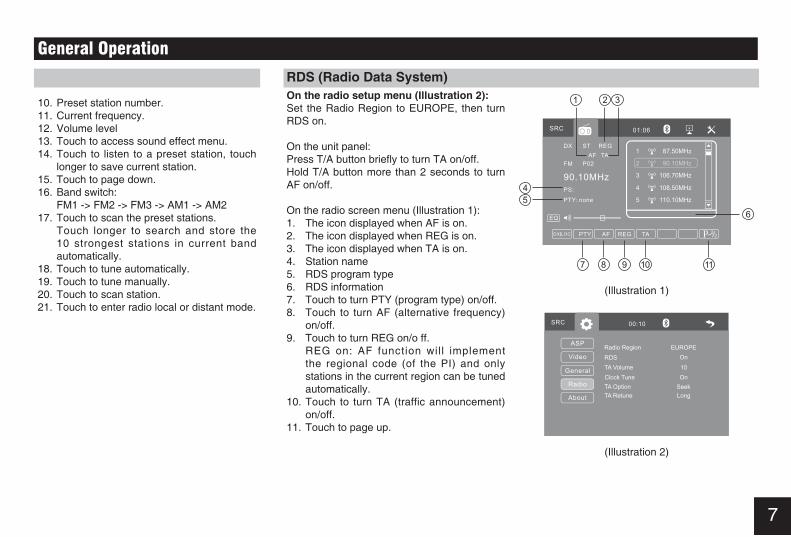
RDS (Radio Data System)On the radio setup menu (Illustration 2):Set the Radio Region to EUROPE, then turn RDS on.
On the unit panel:Press T/A button briefly to turn TA on/off.Hold T/A button more than � seconds to turn AF on/off.
On the radio screen menu (Illustration 1):1. The icon displayed when AF is on.�. The icon displayed when REG is on. 3. The icon displayed when TA is on.4. Station name5. RDS program type6. RDS information7. Touch to turn PTY (program type) on/off.8. Touch to turn AF (alternative frequency)
on/off.9. Touch to turn REG on/o ff. REG on: AF function will implement
the regional code (of the PI) and only stations in the current region can be tuned automatically.
10. Touch to turn TA (traffic announcement) on/off.
11. Touch to page up.
(Illustration �)
(Illustration 1)
8
(Illustration �)
(Illustration 1)
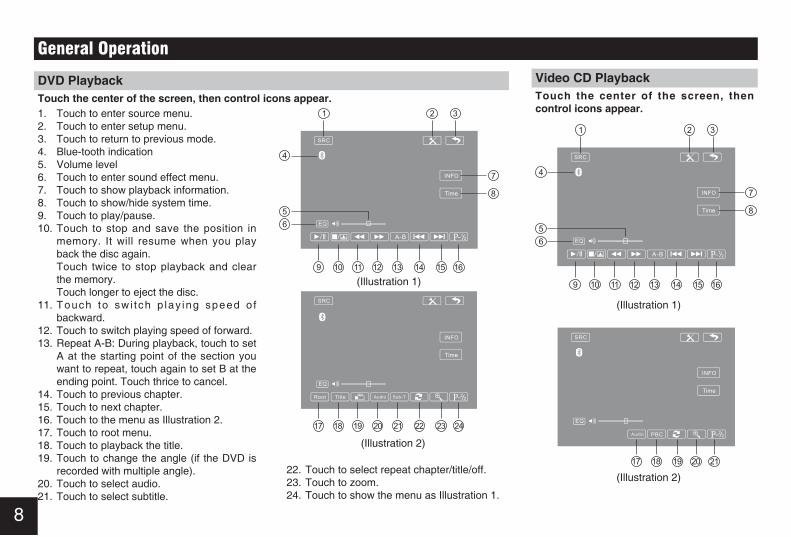
DVD PlaybackTouch the center of the screen, then control icons appear.
(Illustration �)
(Illustration 1)
1. Touch to enter source menu.�. Touch to enter setup menu.3. Touch to return to previous mode.4. Blue-tooth indication5. Volume level6. Touch to enter sound effect menu.7. Touch to show playback information.8. Touch to show/hide system time.9. Touch to play/pause.10. Touch to stop and save the position in
memory. It will resume when you play back the disc again.
Touch twice to stop playback and clear the memory.
Touch longer to eject the disc.11. Touch to sw i tch p lay ing speed o f
backward. 1�. Touch to switch playing speed of forward. 13. Repeat A-B: During playback, touch to set
A at the starting point of the section you want to repeat, touch again to set B at the ending point. Touch thrice to cancel.
14. Touch to previous chapter.15. Touch to next chapter.16. Touch to the menu as Illustration �.17. Touch to root menu.18. Touch to playback the title.19. Touch to change the angle (if the DVD is
recorded with multiple angle).�0. Touch to select audio.�1. Touch to select subtitle.
��. Touch to select repeat chapter/title/off.�3. Touch to zoom.�4. Touch to show the menu as Illustration 1.
General Operation
Video CD PlaybackTouch the center of the screen, then control icons appear.
9
General Operation
1. Touch to enter source menu.�. Touch to enter setup menu.3. Touch to return to previous mode.4. Blue-tooth indication5. Volume level6. Touch to enter sound effect menu.7. Touch to show playback information.8. Touch to show/hide system time.9. Touch to play/pause.10. Touch to stop and save the position in
memory. It will resume when you play back the disc again.
Touch twice to stop playback and clear the memory.
Touch longer to eject the disc.11. Touch to sw i tch p lay ing speed o f
backward. 1�. Touch to switch playing speed of forward. 13. Repeat A-B: During playback, touch to set
A at the starting point of the section you want to repeat, touch again to set B at the ending point. Touch thrice to cancel.
14. Touch to previous track.15. Touch to next track.16. Touch to the menu as Illustration �.17. Touch to select audio.18. Touch to turn PBC on/off.19. Touch to select repeat single/all/off.�0. Touch to zoom.�1. Touch to the menu as Illustration 1.
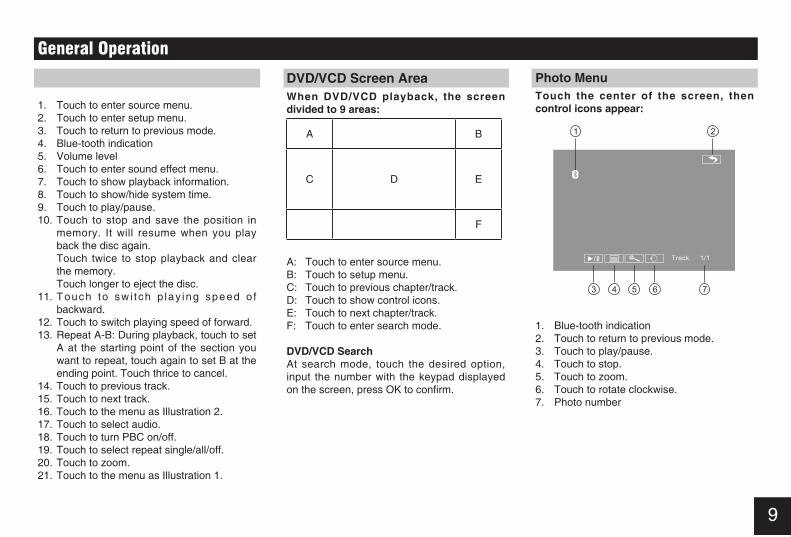
DVD/VCD Screen AreaWhen DVD/VCD playback, the screen divided to 9 areas:
A B
C D E
F
A: Touch to enter source menu.B: Touch to setup menu.C: Touch to previous chapter/track.D: Touch to show control icons.E: Touch to next chapter/track.F: Touch to enter search mode.
DVD/VCD Search At search mode, touch the desired option, input the number with the keypad displayed on the screen, press OK to confirm.
Photo MenuTouch the center of the screen, then control icons appear:
1. Blue-tooth indication�. Touch to return to previous mode.3. Touch to play/pause.4. Touch to stop.5. Touch to zoom.6. Touch to rotate clockwise.7. Photo number
10
General Operation
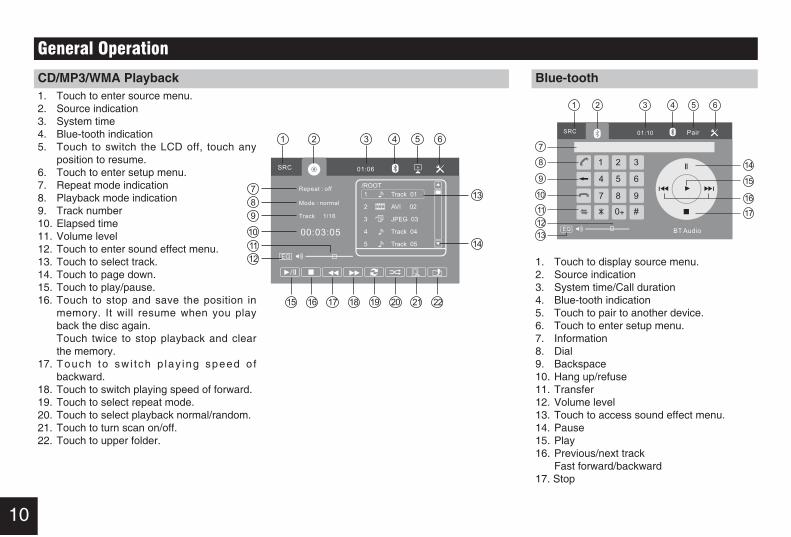
CD/MP3/WMA Playback1. Touch to enter source menu.�. Source indication3. System time4. Blue-tooth indication5. Touch to switch the LCD off, touch any
position to resume.6. Touch to enter setup menu.7. Repeat mode indication8. Playback mode indication9. Track number10. Elapsed time11. Volume level1�. Touch to enter sound effect menu.13. Touch to select track.14. Touch to page down.15. Touch to play/pause.16. Touch to stop and save the position in
memory. It will resume when you play back the disc again.
Touch twice to stop playback and clear the memory.
17. Touch to sw i tch p lay ing speed o f backward.
18. Touch to switch playing speed of forward. 19. Touch to select repeat mode.�0. Touch to select playback normal/random.�1. Touch to turn scan on/off.��. Touch to upper folder.
Blue-tooth
1. Touch to display source menu.�. Source indication3. System time/Call duration4. Blue-tooth indication5. Touch to pair to another device.6. Touch to enter setup menu. 7. Information8. Dial9. Backspace10. Hang up/refuse11. Transfer1�. Volume level13. Touch to access sound effect menu.14. Pause15. Play16. Previous/next track Fast forward/backward17. Stop
11
Pairing • Turn on Blue-tooth function of your
mobile phone and keep phone within 3 meters to the unit.
• Switch the unit to Blue-tooth mode. • Search new device on your phone,
press Pair on the unit’s screen and you will find device “SUN-BMA19“, input 1�34 as password.
• The blue-tooth icon lights up on the screen after pair successfully.
Calling • Input phone numbers by the number
buttons on the screen, then press on the screen to call out.
• Press on the screen to hang up. • While talking, press button on the
screen to transfer the call from the unit to mobile phone.
Receiving • If there is a incoming telegram while
playback, the screen displayed blue-tooth menu, press on the screen to receive or press on the screen to hang up.
Music • The music stored in your mobile phone
could be played by the playback icon on the blue-tooth menu.
General Operation
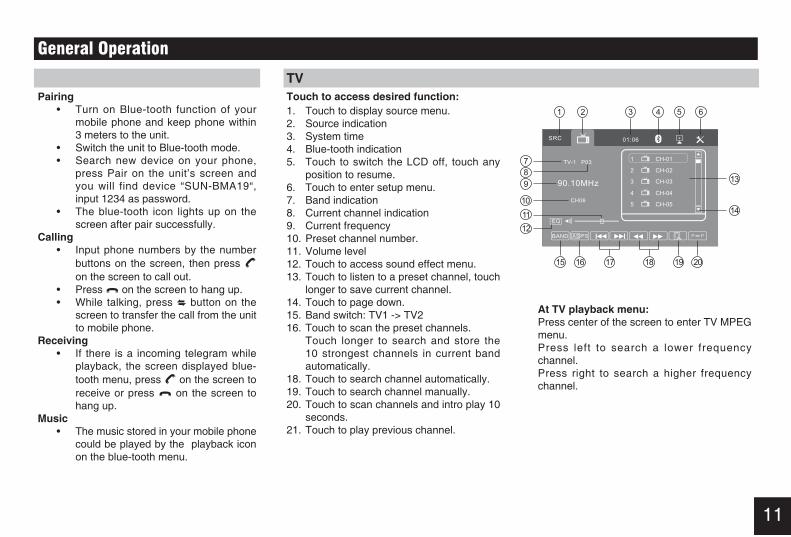
TVTouch to access desired function:1. Touch to display source menu.�. Source indication3. System time4. Blue-tooth indication5. Touch to switch the LCD off, touch any
position to resume.6. Touch to enter setup menu. 7. Band indication8. Current channel indication9. Current frequency10. Preset channel number.11. Volume level1�. Touch to access sound effect menu.13. Touch to listen to a preset channel, touch
longer to save current channel.14. Touch to page down.15. Band switch: TV1 -> TV�16. Touch to scan the preset channels. Touch longer to search and store the
10 strongest channels in current band automatically.
18. Touch to search channel automatically. 19. Touch to search channel manually.�0. Touch to scan channels and intro play 10
seconds.�1. Touch to play previous channel.
At TV playback menu:Press center of the screen to enter TV MPEG menu.Press left to search a lower frequency channel.Press right to search a higher frequency channel.
1�
System Setup
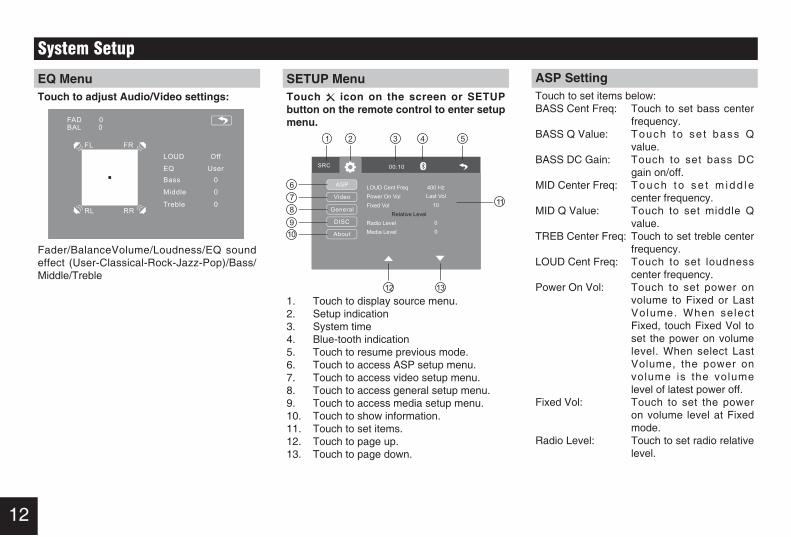
EQ MenuTouch to adjust Audio/Video settings:
Fader/BalanceVolume/Loudness/EQ sound effect (User-Classical-Rock-Jazz-Pop)/Bass/Middle/Treble
SETUP MenuTouch icon on the screen or SETUP button on the remote control to enter setup menu.
1. Touch to display source menu.�. Setup indication3. System time4. Blue-tooth indication5. Touch to resume previous mode.6. Touch to access ASP setup menu.7. Touch to access video setup menu.8. Touch to access general setup menu.9. Touch to access media setup menu.10. Touch to show information.11. Touch to set items.1�. Touch to page up.13. Touch to page down.
ASP SettingTouch to set items below:BASS Cent Freq: Touch to set bass center
frequency.BASS Q Value: Touch to se t bass Q
value.BASS DC Gain: Touch to set bass DC
gain on/off.MID Center Freq: T o u c h t o s e t m i d d l e
center frequency.MID Q Value: Touch to set middle Q
value. TREB Center Freq: Touch to set treble center
frequency.LOUD Cent Freq: Touch to set loudness
center frequency.Power On Vol: Touch to set power on
volume to Fixed or Last Volume. When select Fixed, touch Fixed Vol to set the power on volume level. When select Last Volume, the power on volume is the volume level of latest power off.
Fixed Vol: Touch to set the power on volume level at Fixed mode.
Radio Level: Touch to set radio relative level.
13
System Setup
BlueTooth Level: Touch to set blue-tooth relative level.
Media Level: T o u c h t o s e t m e d i a relative level.
AuxIn Level: T o u c h t o s e t a u x - i n relative level.
Video SettingScreen Saver Touch to select screen saver on/off.
Camera Image Touch to select camera image normal/mirror.
General SettingSystem TimeTouch to set time.
Time FormatTouch to select time format: 1�/�4 hour.
OSD LanguageTouch to select on screen display language.
BeepTouch to set beep sound effect on/off.
TFT Auto OpenTouch to set TFT auto open mode.
TS CalibrateTouch to calibrate the touch screen.
USB Default SettingTouch to load original setting.
Disc SettingSet Rating PasswordTouch to set password for parental control.
Parental ControlWhen play the disc with lock function, you can select the proper age rating according to the rating of the disc and your requirement.The rating of disc is from 1 to 8:Most limit: 1Least limit: 8
Load Factory PasswordTouch to load original password (8888).
DivX SubtitleTouch to select DivX subtitle language.
SubtitleTouch to select subtitle language.
AudioTouch to select audio language.
DVD MenuTouch to select DVD menu language.
Bluetooth SettingAuto Connect Choose auto connect on or off.
Auto AnswerChoose auto answer on or off.
TV Setting
TV mode Select TV mode: PAL D/K, PAL I, PAL BG, NTSC M/N
Sound IF Select sound mode: PAL D/K, PAL I.
14
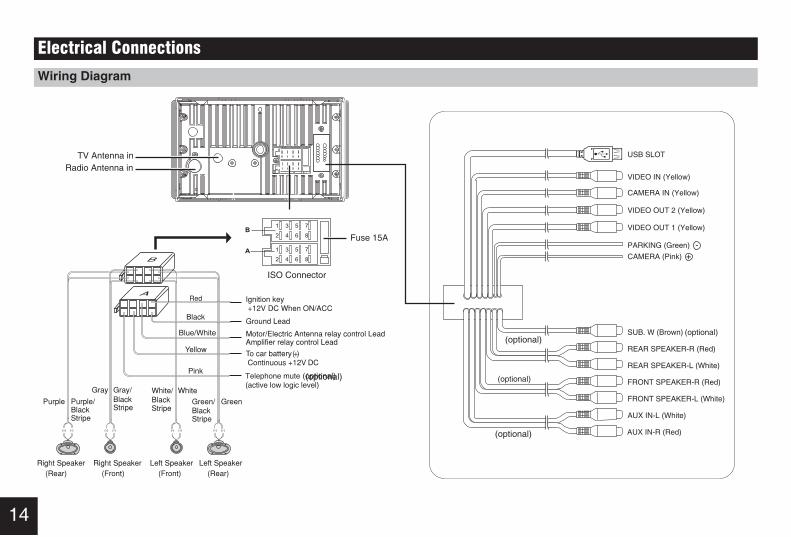
Electrical Connections
ISO Connecto r
Fuse 15A
Radio Antenna in
(optional)
(optional)
(optional)
USB SLOT
CAMERA IN (Yellow)
VIDEO IN (Yellow)
VIDEO OUT 2 (Yellow)
SUB. W (Brown)
REAR SPEAKER-R (Red)
REAR SPEAKER-L (White)
FRONT SPEAKER-R (Red)
FRONT SPEAKER-L (White)
AUX IN-L (White)
AUX IN-R (Red)
VIDEO OUT 1 (Yellow)
PARKING (Green) - CAMERA (Pink) +
TV Antenna in
Wiring Diagram
(optional)
(optional)
(optional)
15
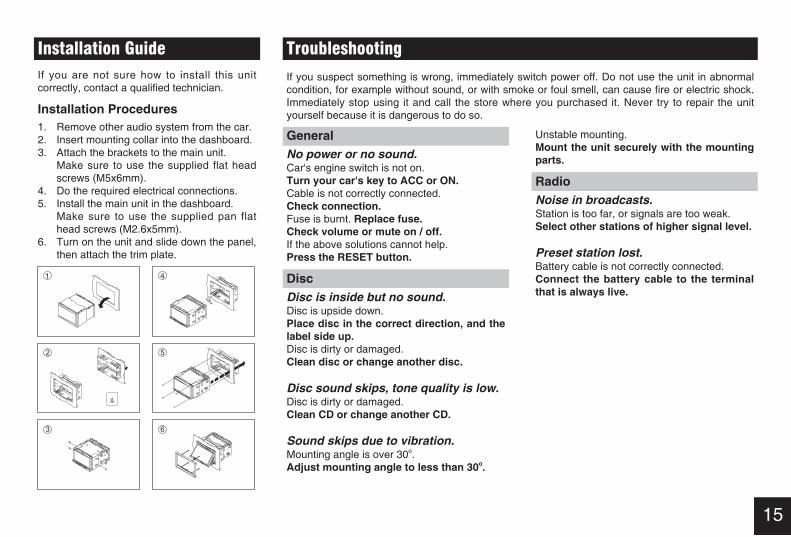
Installation GuideIf you are not sure how to install this unit correctly, contact a qualified technician.
Installation Procedures1. Remove other audio system from the car.�. Insert mounting collar into the dashboard.3. Attach the brackets to the main unit. Make sure to use the supplied flat head
screws (M5x6mm).4. Do the required electrical connections.5. Install the main unit in the dashboard. Make sure to use the supplied pan flat
head screws (M�.6x5mm).6. Turn on the unit and slide down the panel,
then attach the trim plate.
Troubleshooting
If you suspect something is wrong, immediately switch power off. Do not use the unit in abnormal condition, for example without sound, or with smoke or foul smell, can cause fire or electric shock. Immediately stop using it and call the store where you purchased it. Never try to repair the unit yourself because it is dangerous to do so.
GeneralNo power or no sound.Car's engine switch is not on. Turn your car's key to ACC or ON. Cable is not correctly connected. Check connection. Fuse is burnt. Replace fuse. Check volume or mute on / off. If the above solutions cannot help. Press the RESET button.
DiscDisc is inside but no sound. Disc is upside down. Place disc in the correct direction, and the label side up. Disc is dirty or damaged. Clean disc or change another disc.
Disc sound skips, tone quality is low.Disc is dirty or damaged. Clean CD or change another CD.
Sound skips due to vibration.Mounting angle is over 30o. Adjust mounting angle to less than 30o.
Unstable mounting. Mount the unit securely with the mounting parts.
RadioNoise in broadcasts.Station is too far, or signals are too weak. Select other stations of higher signal level.
Preset station lost.Battery cable is not correctly connected. Connect the battery cable to the terminal that is always live.
16
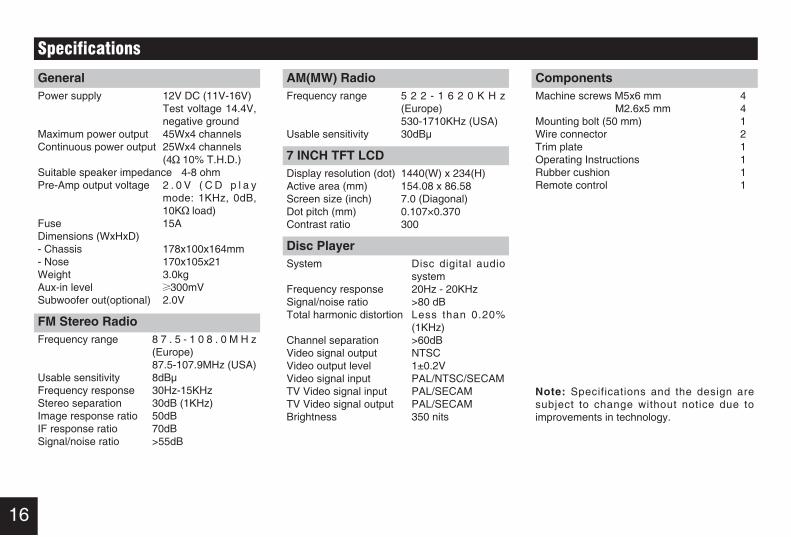
Specifications
GeneralPower supply 1�V DC (11V-16V) Test voltage 14.4V,
negative groundMaximum power output 45Wx4 channelsContinuous power output �5Wx4 channels (4 10% T.H.D.)Suitable speaker impedance 4-8 ohmPre-Amp output voltage � . 0 V ( C D p l a y
mode: 1KHz, 0dB, 10K load)
Fuse 15ADimensions (WxHxD) - Chassis 178x100x164mm- Nose 170x105x�1Weight 3.0kgAux-in level 300mVSubwoofer out(optional) �.0V
FM Stereo RadioFrequency range 8 7 . 5 - 1 0 8 . 0 M H z
(Europe) 87.5-107.9MHz (USA)Usable sensitivity 8dBμFrequency response 30Hz-15KHzStereo separation 30dB (1KHz)Image response ratio 50dBIF response ratio 70dBSignal/noise ratio >55dB
Note: Specifications and the design are subject to change without notice due to improvements in technology.
AM(MW) RadioFrequency range 5 2 2 - 1 6 2 0 K H z
(Europe) 530-1710KHz (USA)Usable sensitivity 30dBμ
7 INCH TFT LCDDisplay resolution (dot) 1440(W) x �34(H)Active area (mm) 154.08 x 86.58Screen size (inch) 7.0 (Diagonal)Dot pitch (mm) 0.107×0.370Contrast ratio 300
Disc PlayerSystem Disc digital audio
systemFrequency response 20Hz - 20KHz Signal/noise ratio >80 dBTotal harmonic distortion Less than 0.�0%
(1KHz)Channel separation >60dBVideo signal output NTSCVideo output level 1±0.�VVideo signal input PAL/NTSC/SECAMTV Video signal input PAL/SECAMTV Video signal output PAL/SECAMBrightness 350 nits
ComponentsMachine screws M5x6 mm 4 M�.6x5 mm 4Mounting bolt (50 mm) 1Wire connector �Trim plate 1Operating Instructions 1Rubber cushion 1Remote control 1