online examination android application - scholarworks
TRANSCRIPT
ONLINE EXAMINATION ANDROID APPLICATION
A Project
Presented to the faculty of the Department of Computer Science
California State University, Sacramento
Submitted in partial satisfaction of
The requirements for the degree of
MASTER OF SCIENCE
in
Computer Science
by
Sameer Bhutada
FALL
2013
ii
ONLINE EXAMINATION ANDROID APPLICATION
A Project
by
Sameer Bhutada
Approved by:
__________________________________, Committee Chair
Jinsong Ouyang, Ph.D.
__________________________________, Second Reader
Bob Buckley, M.S.
____________________________
Date
iii
Student: Sameer Bhutada
I certify that this student has met the requirements for format contained in the University
format manual, and that this project is suitable for shelving in the Library and credit is to
be awarded for the Project.
__________________________, Graduate Coordinator ________________
Nikrouz Faroughi, Ph.D. Date
Department of Computer Science
iv
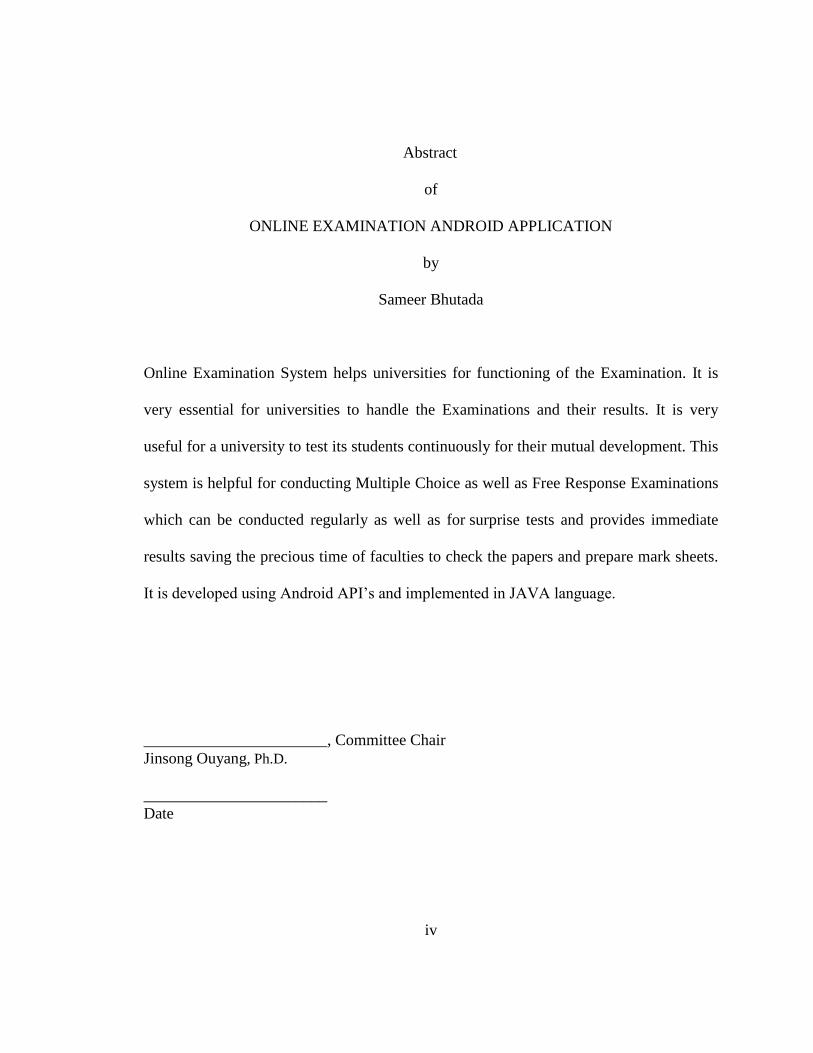
Abstract
of
ONLINE EXAMINATION ANDROID APPLICATION
by
Sameer Bhutada
Online Examination System helps universities for functioning of the Examination. It is
very essential for universities to handle the Examinations and their results. It is very
useful for a university to test its students continuously for their mutual development. This
system is helpful for conducting Multiple Choice as well as Free Response Examinations
which can be conducted regularly as well as for surprise tests and provides immediate
results saving the precious time of faculties to check the papers and prepare mark sheets.
It is developed using Android API’s and implemented in JAVA language.
_______________________, Committee Chair
Jinsong Ouyang, Ph.D.
_______________________
Date
v
ACKNOWLEDGEMENTS
I would like to thank Dr. Jinsong Ouyang, my project advisor for providing me a
wonderful opportunity to work on this project, which provided a great exposure to the
field of Mobile Application Development. I thank him for providing all the help, support
and necessary resources to complete the project successfully. Dr. Ouyang helped me in
understanding the project in detail and provided knowledge and expertise in the field to
understand the project and completing it successfully.
In addition, I would like to thank Prof. Bob Buckley for his willingness to serve on the
committee.
Lastly, I would like to thank the entire faculty and staff of the Department of Computer
Science Engineering at California State University, Sacramento.
vi
TABLE OF CONTENTS
Page
Acknowledgements ..............................................................................................................v
List Of Figures .....................................................................................................................x
Chapter
1. INTRODUCTION ...........................................................................................................1
2. SYSTEM DESIGN ..........................................................................................................3
2.1 User Requirements ................................................................................................... 3
2.2 Context Diagram ...................................................................................................... 4
2.3 Use Case Diagram .................................................................................................... 5
2.3.1 Administrator Use Case Diagram ....................................................................... 5
2.3.2 Approve Faculty ................................................................................................. 7
2.3.3 Approve Student ................................................................................................. 7
2.3.4 Use Case Diagram of Professor .......................................................................... 8
2.3.5 Faculty Manage Test Use Case Diagram ......................................................... 10
2.3.6 Student Appear for Test Use Case Diagram .................................................... 11
2.3.7 Use Case Diagram for Generating Results ....................................................... 12
2.4 Class Diagram ........................................................................................................ 13
vii
3. GOOGLE APP ENGINE AND ANDROID FRAMEWORK .......................................14
3.1 Process for Signing up for Google App Engine ..................................................... 14
3.1.1 Creating Google Web Application Project ....................................................... 18
3.1.2 Directories and Files in Google Web Application Project ............................... 19
3.1.3 Coding for Application that Displays Hello World .......................................... 20
3.1.4 Deploying it into Cloud .................................................................................... 21
3.2. Android Operating System .................................................................................... 23
3.3 Main Components of Android ................................................................................ 23
3.4 Activating and Deactivating Components .............................................................. 24
3.5 Manifest file ........................................................................................................... 24
3.6 Layout File ............................................................................................................. 26
3.7 Architecture of Android Application Processing ................................................... 27
3.8 Tools Required ....................................................................................................... 28
3.9 Android SDK Installation ....................................................................................... 28
3.10 Install ADT Plugin for Eclipse ............................................................................. 30
3.11 Configure ADT Plugin for Eclipse ....................................................................... 32
3.12 Creating Android Project ...................................................................................... 33
3.13 Directories and Files in Android Project .............................................................. 34
viii
3.14 Running Android Application .............................................................................. 34
3.14.1 Running on Emulator ..................................................................................... 34
3.14.2 Running on a Device ...................................................................................... 35
3.15 Coding for Application that Displays Hello World .............................................. 35
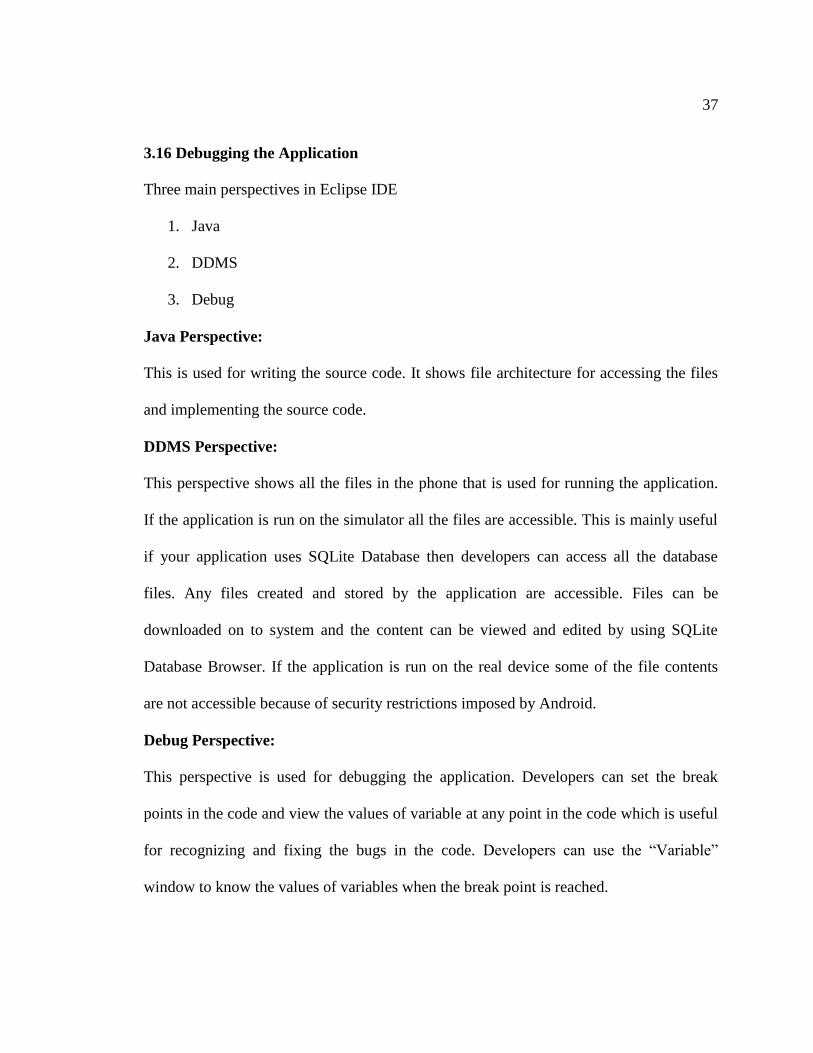
3.16 Debugging the Application .................................................................................. 37
4. SYSTEM IMPLEMENTATION ...................................................................................40
4.1 Administrator .......................................................................................................... 41
4.1.1 Admin - Add Subject Interface ........................................................................ 41
4.1.2 Admin - Delete Subject Interface ..................................................................... 43
4.1.3 Admin – Approve Professor Interface .............................................................. 45
4.1.4 Admin – Approve Student Interface ................................................................ 47
4.1.5 Admin – Assign Subject to Professor Interface ............................................... 49
4.2 Professor ................................................................................................................. 51
4.2.1 Professor Registration Interface ....................................................................... 51
4.2.2 Professor Application Home Screen ................................................................ 54
4.2.3 Maintain Exam Activity ................................................................................... 55
4.2.4 Professor Create Exam Interface ...................................................................... 56
4.2.5 Professor View Exam Interface ........................................................................ 60
ix
4.2.6 Interface to View Examination Details ............................................................ 63
4.2.7 Professor Add question Exam Interface ........................................................... 64
4.2.8 Professor Edit question Exam Interface ........................................................... 69
4.2.9 Professor Edit Exam Exam Schedule Interface ................................................ 72
4.2.10 Grading the Examination ................................................................................ 75
4.2.11 View Exam Statistics ...................................................................................... 78
4.3 Student .................................................................................................................... 80
4.3.1 Student Registration Interface .......................................................................... 80
4.3.2 Student Application Home Screen ................................................................... 84
4.3.3 Start Exam ........................................................................................................ 85
4.3.4 Answer the Examination .................................................................................. 88
4.3.5 View Grades ..................................................................................................... 92
5. CONCLUSION ..............................................................................................................94
5.1 Conclusion .............................................................................................................. 94
5.2 Future Work ........................................................................................................... 96
References ..........................................................................................................................97

x
LIST OF FIGURES
Figures Page
Figure 1 System Context Diagram of Application ............................................................. 4
Figure 2 Administrator Use Case Diagram ......................................................................... 6
Figure 3 Approve Faculty Use Case Diagram .................................................................... 7
Figure 4 Approve Student Use Case Diagram .................................................................... 7
Figure 5 Faculty Use Case Diagram ................................................................................... 9
Figure 6 Faculty Manage Test Use Case Diagram ........................................................... 10
Figure 7 Student Appear for Test Use Case Diagram....................................................... 11
Figure 8 Generate Result Use Case Diagram ................................................................... 12
Figure 9 Class Diagram of Application ............................................................................ 13
Figure 10 Google App Engine Homescreen ..................................................................... 14
Figure 11 Google App Engine Application List ............................................................... 15
Figure 12 Creating New Applications in Google App Engine ......................................... 16
Figure 13 Deploying A Package to Google App Engine .................................................. 17
Figure 14 Creating New Application Project .................................................................... 18
Figure 15 Directory Structure of Google Web Application Project ................................. 19
Figure 16 Code Snippet of HelloWorldActivity.java ....................................................... 21
Figure 17 Code Snippet for web.xml ................................................................................ 21
Figure 18 Deploying application into Cloud .................................................................... 22
Figure 19 Code Snippet of XML File for Text View and Button ..................................... 27
Figure 20 Architecture of Android Application ................................................................ 27
xi
Figure 21 Android SDK Manager Screenshot .................................................................. 28
Figure 22 Install ADT Plugin Screenshot 1 ...................................................................... 30
Figure 23 Install ADT Plugin Screenshot 2 ...................................................................... 31
Figure 24 Install ADT Plugin Screenshot 3 ...................................................................... 31
Figure 25 Configure ADT Plugin ..................................................................................... 32
Figure 26 Creating Android Project and Selecting Target................................................ 33
Figure 27 Android Virtual Device Manager ..................................................................... 35
Figure 28 Code Snippet of HelloWorldActivity.java ....................................................... 36
Figure 29 Code Snippet for main.xml............................................................................... 36
Figure 30 LogCat Screenshot............................................................................................ 38
Figure 31 Error Log Screenshot ........................................................................................ 39
Figure 32 Interface Design of Add Subject page ............................................................. 41
Figure 33 Code Snippet of AddSubjectServlet Class ....................................................... 42
Figure 34 Interface Design of Delete Subject page ......................................................... 43
Figure 35 Code Snippet of DeleteSubjectServlet Class .................................................... 44
Figure 36 Interface Design of Approve Professor page................................................... 45
Figure 37 Code Snippet of ActivateProfessor Class ......................................................... 46
Figure 38 Interface Design of Approve Student page ..................................................... 47
Figure 39 Code Snippet of ActivateStudent Class ............................................................ 48
Figure 40 Interface Design of Assign Subject to Professor page .................................... 49
Figure 41 Code Snippet of AssignedSubjectServlet Class ............................................... 50
xii
Figure 42 Professor Registration Activity ........................................................................ 51
Figure 43 Code Snippet of RegisterActivity Class ........................................................... 52
Figure 44 Code Snippet of AppengineDAO Class ........................................................... 52
Figure 45 Code Snippet of RegisterProfessorServlet Class .............................................. 53
Figure 46 Professor Application Home Screen Activity .................................................. 54
Figure 47 Maintain Exam Activity Home Screen............................................................. 55
Figure 48 Interface Design of Create Exam Activity 1 .................................................... 56
Figure 49 Interface Design of Create Exam Activity 2 .................................................... 57
Figure 50 Code Snippet of SetExamActivity Class .......................................................... 58
Figure 51 Code Snippet of AppengineDAO Class ........................................................... 58
Figure 52 Code Snippet of SetExamServlet Class ............................................................ 59
Figure 53 Interface Design of Professor View Exam Activity ......................................... 60
Figure 54 Code Snippet of DisplayAllExamExamActivity Class .................................... 61
Figure 55 Code Snippet of AppengineDAO Class ........................................................... 61
Figure 56 Code Snippet of GetAllExamServlet Class ...................................................... 62
Figure 57 Interface to View Details of the Examination .................................................. 63
Figure 58 Interface Design of Professor Add question Activity....................................... 64
Figure 59 Interface Design of Add Rubrics Activity ........................................................ 65
Figure 60 Code Snippet of AddQuestionActivity Class ................................................... 66
Figure 61 Code Snippet of AppengineDAO Class ........................................................... 67
Figure 62 Code Snippet of AddQuestionServlet Class ..................................................... 67
xiii
Figure 63 Interface Design of Professor Edit question Page ............................................ 69
Figure 64 Code Snippet of EditQuestionActivity Class ................................................... 70
Figure 65 Code Snippet of AppengineDAO Class ........................................................... 70
Figure 66 Code Snippet of EditQuestionServlet Class ..................................................... 71
Figure 67 Interface Design of Edit Exam Schedule .......................................................... 72
Figure 68 Code Snippet of EditExamDetailsActivity Class ............................................. 73
Figure 69 Code Snippet of AppengineDAO Class ........................................................... 73
Figure 70 Code Snippet of EditExamDetailsServlet Class ............................................... 74
Figure 71 Interface Design of Grading Exam Activity ..................................................... 75
Figure 72 Code Snippet of GradeActivity Class............................................................... 76
Figure 73 Code Snippet of AppengineDAO Class ........................................................... 76
Figure 74 Code Snippet of PutMarksServlet Class........................................................... 77
Figure 75 Interface Design of View Exam Statistics Activity .......................................... 78
Figure 76 Code Snippet to calculate total and average marks .......................................... 79
Figure 77 Code Snippet for Formatting Axis Values ....................................................... 79
Figure 78 Interface Design of Student Registration Page ................................................. 80
Figure 79 Code Snippet of RegisterActivity Class ........................................................... 81
Figure 80 Code Snippet of AppengineDAO Class ........................................................... 82
Figure 81 Code Snippet of RegisterStudentServlet Class ................................................ 82
Figure 82 Student Application Home Screen ................................................................... 84
Figure 83 Interface Design of Start Exam Activity .......................................................... 85
xiv
Figure 84 Code Snippet for Comparing Dates .................................................................. 86
Figure 85 Code Snippet for Comparing Time Range ....................................................... 87
Figure 86 Interface Design of Multiple Choice question.................................................. 88
Figure 87 Interface Design of Free Response question .................................................... 89
Figure 88 Code Snippet for AppEngineDAO ................................................................... 90
Figure 89 Code Snippet of GetExamQuestionsServlet ..................................................... 90
Figure 90 Interface Design of View Grades ..................................................................... 92
Figure 91 Code Snippet of GetAllExamPoints ................................................................. 93
1
Chapter 1
INTRODUCTION
The objective of the project is to develop an online examination system that will help
universities for making the examination process less tedious and easy to process. It is
very essential for universities to handle the Examinations with due attention and their
results as they are very critical for a student’s career. It is very useful for universities to
test its students continuously for their career development. The system designed is useful
for taking two types of examination – Multiple Choice Exam and Subjective (Free
Response) exams. The designed application allows the professor to take examinations
which can be conducted on regular basis (Mid Terms, Finals etc.) as well as surprise tests
anytime in the class with least possible efforts for the quiz and provides immediate results
saving the precious time to give grades and prepare the exam statistics.
The application is divided into Administrator, Faculty and Student module.
The role of an Administrator is to add student and professors in the system after their
registration. Administrator can also add, delete and assign subjects to the faculties.
A professor can create exams for which they can add questions, can check the answer for
subjective questions and can view the statistics of the overall exam given by students.
A registered student can either take exams that are set by the examiner for which the time
duration is set or can choose to practice sample exams that may be provided by the
examiner.
2
The administrator module is implemented in JAVA language and is deployed on Google
App Engine. Professor and Student modules are the android applications and can be
accessed through the cellular devices that support Android Operating System. The
application requires minimum Android operating system 2.2 (API – 8 Froyo) to run.
3
Chapter 2
SYSTEM DESIGN
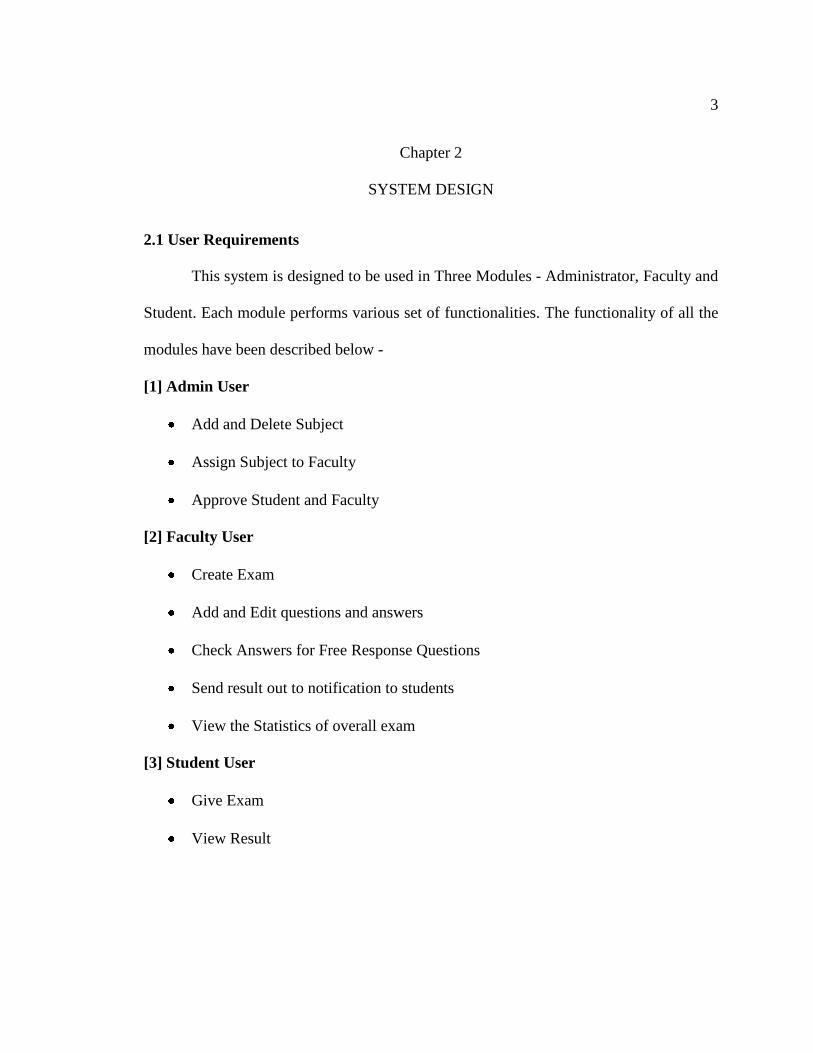
2.1 User Requirements
This system is designed to be used in Three Modules - Administrator, Faculty and
Student. Each module performs various set of functionalities. The functionality of all the
modules have been described below -
[1] Admin User
Add and Delete Subject
Assign Subject to Faculty
Approve Student and Faculty
[2] Faculty User
Create Exam
Add and Edit questions and answers
Check Answers for Free Response Questions
Send result out to notification to students
View the Statistics of overall exam
[3] Student User
Give Exam
View Result
4
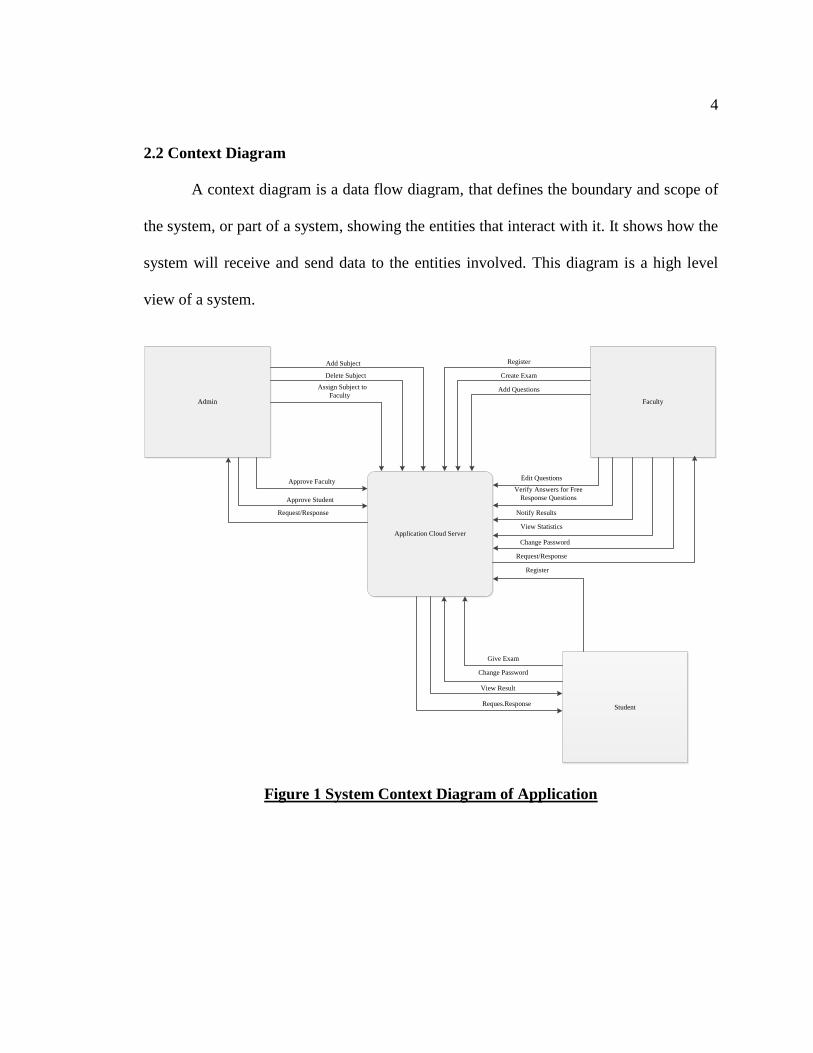
2.2 Context Diagram
A context diagram is a data flow diagram, that defines the boundary and scope of
the system, or part of a system, showing the entities that interact with it. It shows how the
system will receive and send data to the entities involved. This diagram is a high level
view of a system.
Application Cloud Server
Admin Faculty
Student
Add Subject
Delete Subject
Assign Subject to
Faculty
Approve Faculty
Approve Student
Request/Response
Register
Create Exam
Add Questions
Edit Questions
Verify Answers for Free
Response Questions
Notify Results
View Statistics
Request/Response
Change Password
Register
Give Exam
Change Password
View Result
Reques.Response
Figure 1 System Context Diagram of Application
5
2.3 Use Case Diagram
2.3.1 Administrator Use Case Diagram
Once the user logs into the system, a panel is displayed on the left side. This
panel includes options to add a subject, delete a subject, assign a subject, approve the
faculty and approve students. The add subject functionality is used to add new subjects in
the system, this allows the admin to set the subject name, branch for which the subject
would be assigned along with the semester when this subject would be offered. The
delete subject functionality also works on the similar basis, where admin can delete the
subject assigned for a branch and the semester when it was offered. Assign subject
functionality is used to assign a subject to the faculty. Approve faculty and approve
student functionality is used to approve the faculty or student who registers. Once the
student/faculty registers from their app, the request comes to the admin side and as the
admin activates them, a confirmation mail is sent to the requestor with their username
and password.

6
System
Login
Approve Faculty
Approve Student
Logout
User
Add Subject
Delete Subject
Figure 2 Administrator Use Case Diagram
7
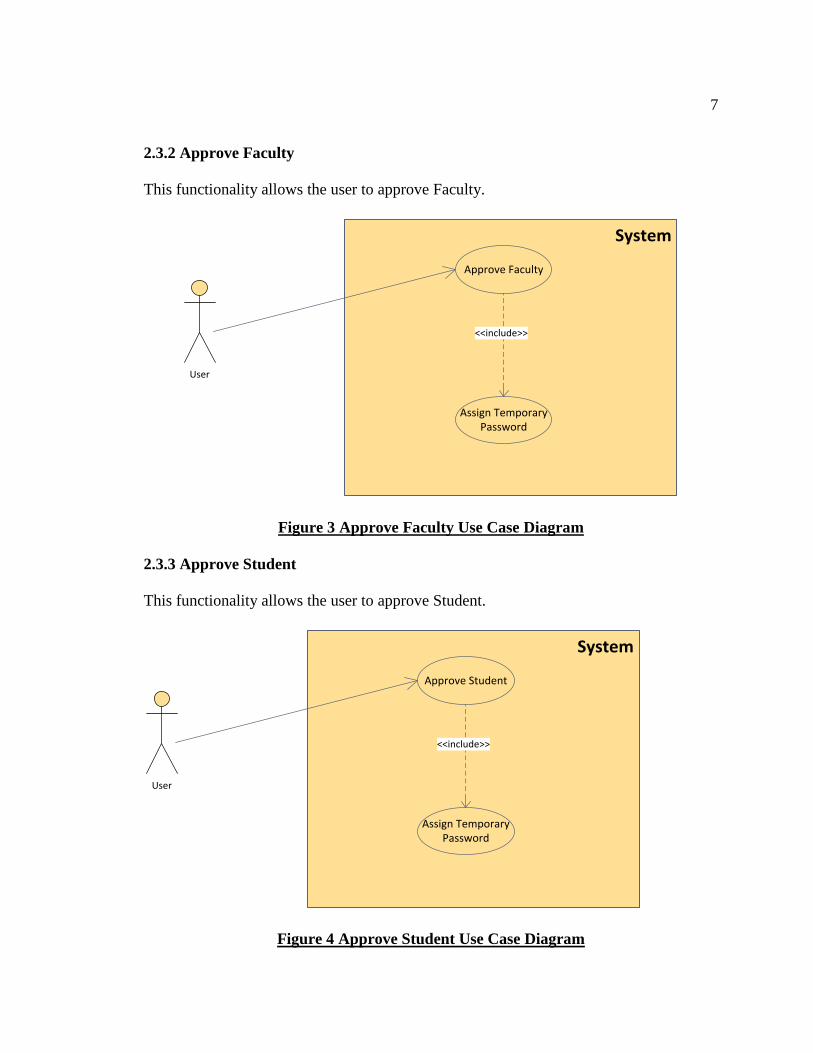
2.3.2 Approve Faculty
This functionality allows the user to approve Faculty.
System
Approve Faculty
User
Assign TemporaryPassword
<<include>>
Figure 3 Approve Faculty Use Case Diagram
2.3.3 Approve Student
This functionality allows the user to approve Student.
System
Approve Student
User
Assign TemporaryPassword
<<include>>
Figure 4 Approve Student Use Case Diagram
8
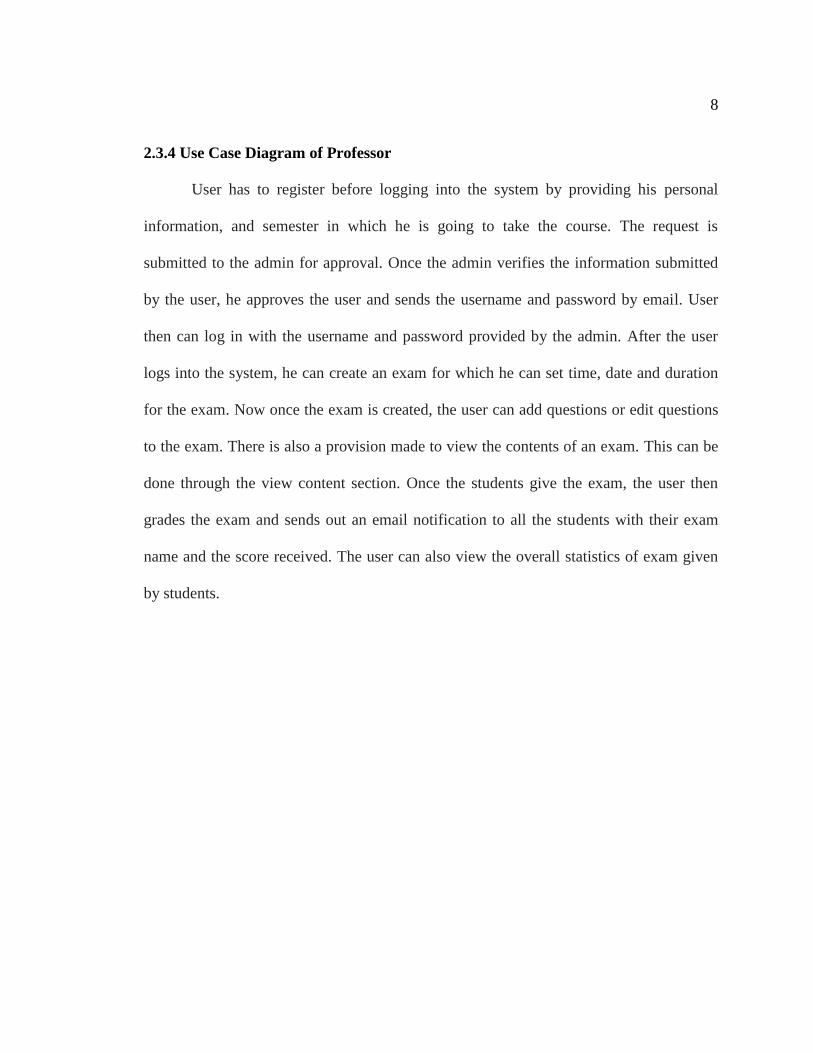
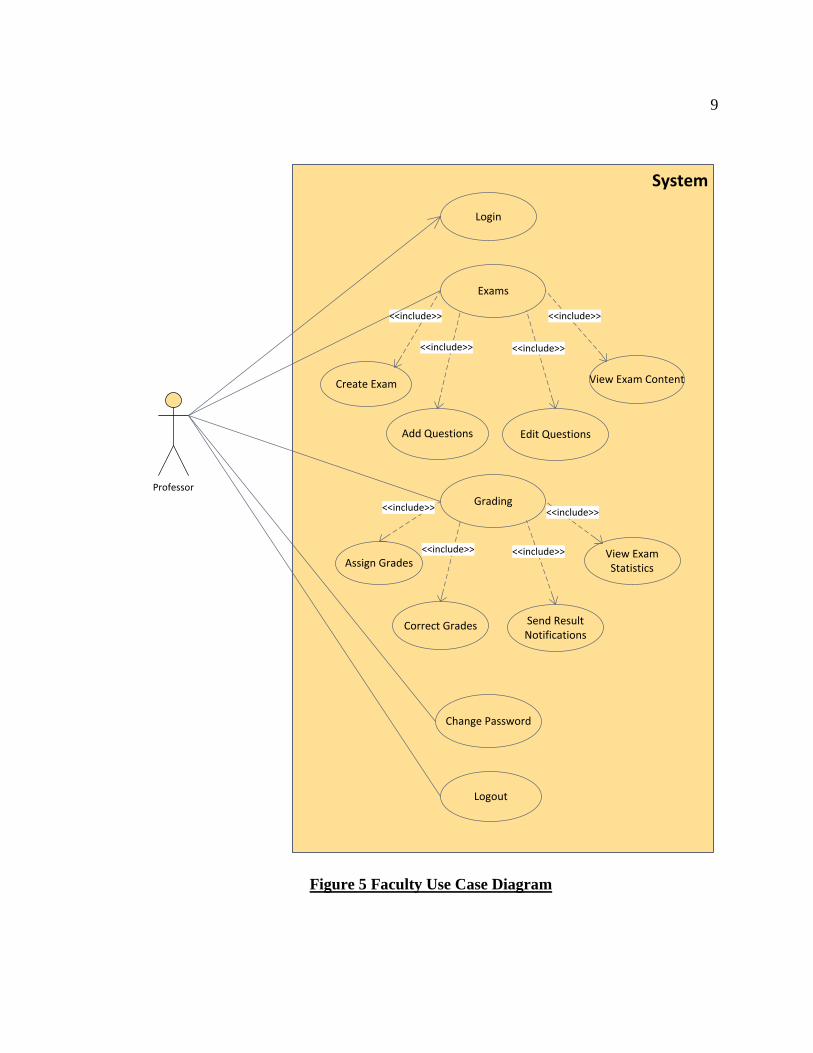
2.3.4 Use Case Diagram of Professor
User has to register before logging into the system by providing his personal
information, and semester in which he is going to take the course. The request is
submitted to the admin for approval. Once the admin verifies the information submitted
by the user, he approves the user and sends the username and password by email. User
then can log in with the username and password provided by the admin. After the user
logs into the system, he can create an exam for which he can set time, date and duration
for the exam. Now once the exam is created, the user can add questions or edit questions
to the exam. There is also a provision made to view the contents of an exam. This can be
done through the view content section. Once the students give the exam, the user then
grades the exam and sends out an email notification to all the students with their exam
name and the score received. The user can also view the overall statistics of exam given
by students.
9
System
Login
Change Password
Logout
Exams
Create Exam View Exam Content
<<include>> <<include>>
Professor
Add Questions
<<include>>
Edit Questions
<<include>>
Grading
Assign Grades
Correct Grades
View ExamStatistics
Send ResultNotifications
<<include>>
<<include>> <<include>>
<<include>>
Figure 5 Faculty Use Case Diagram
10
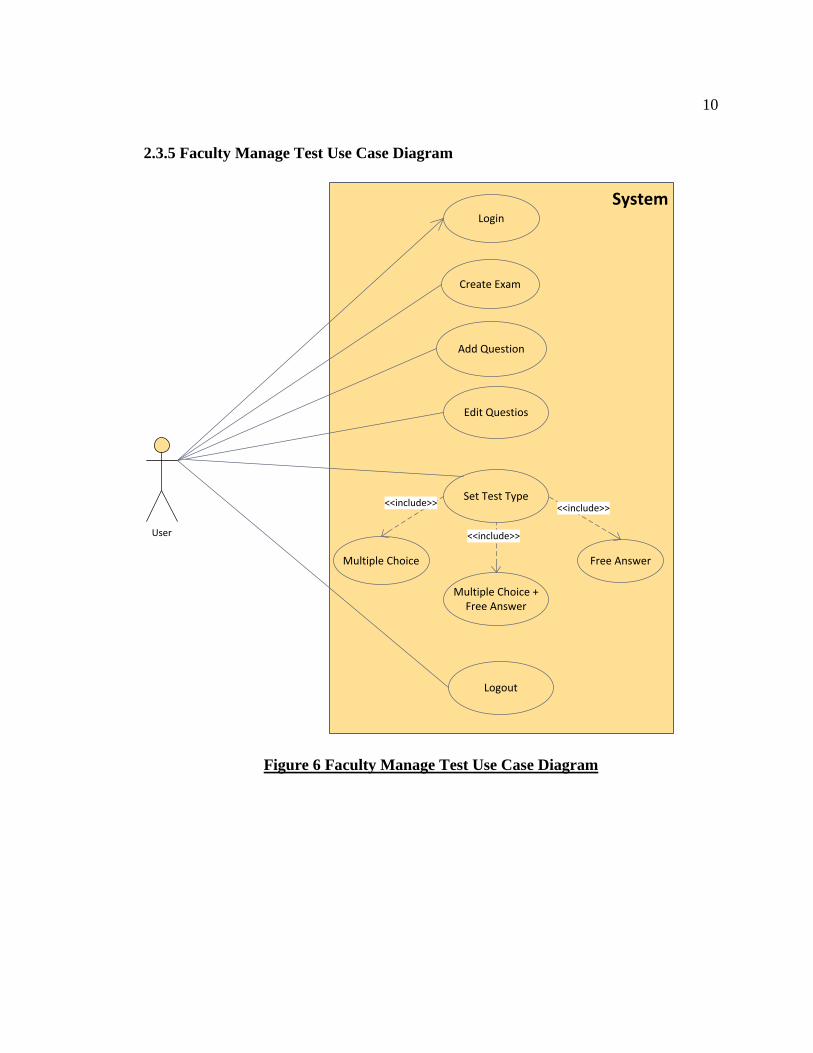
2.3.5 Faculty Manage Test Use Case Diagram
SystemLogin
Create Exam
Add Question
Edit Questios
Set Test Type
Multiple Choice
Multiple Choice +Free Answer
Free Answer
<<include>>
<<include>>
<<include>>
User
Logout
Figure 6 Faculty Manage Test Use Case Diagram
11
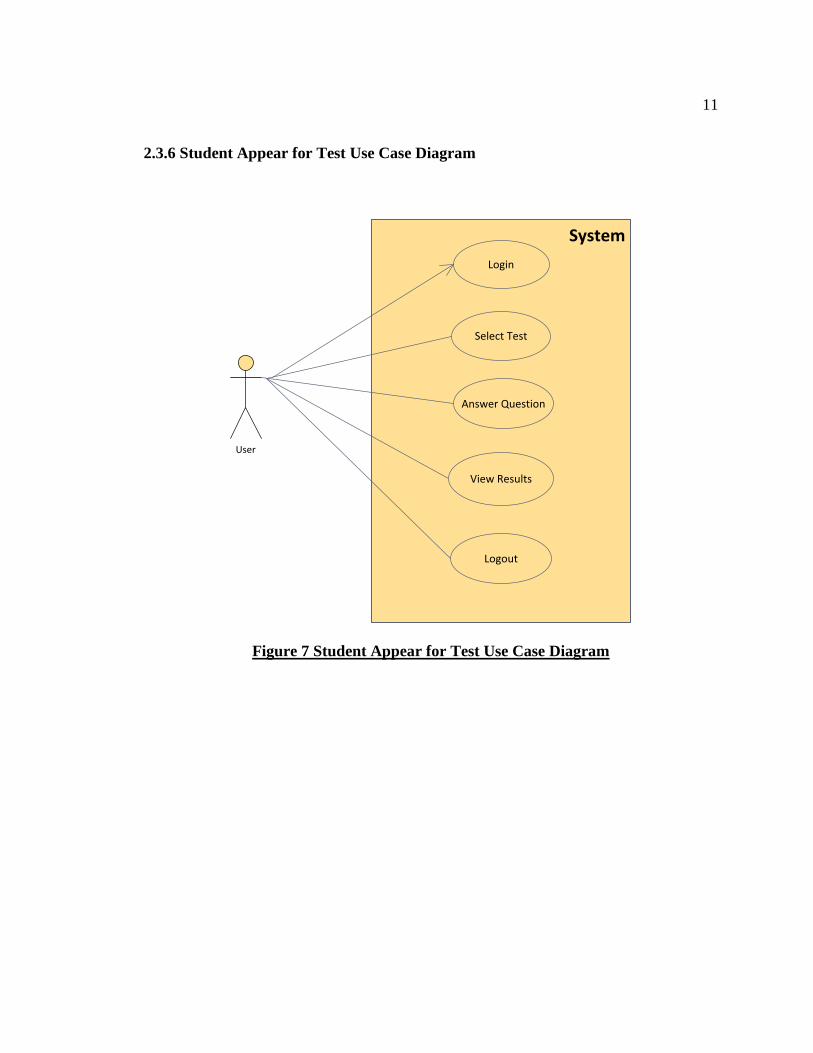
2.3.6 Student Appear for Test Use Case Diagram
System
Login
Select Test
Answer Question
Logout
User
View Results
Figure 7 Student Appear for Test Use Case Diagram
12
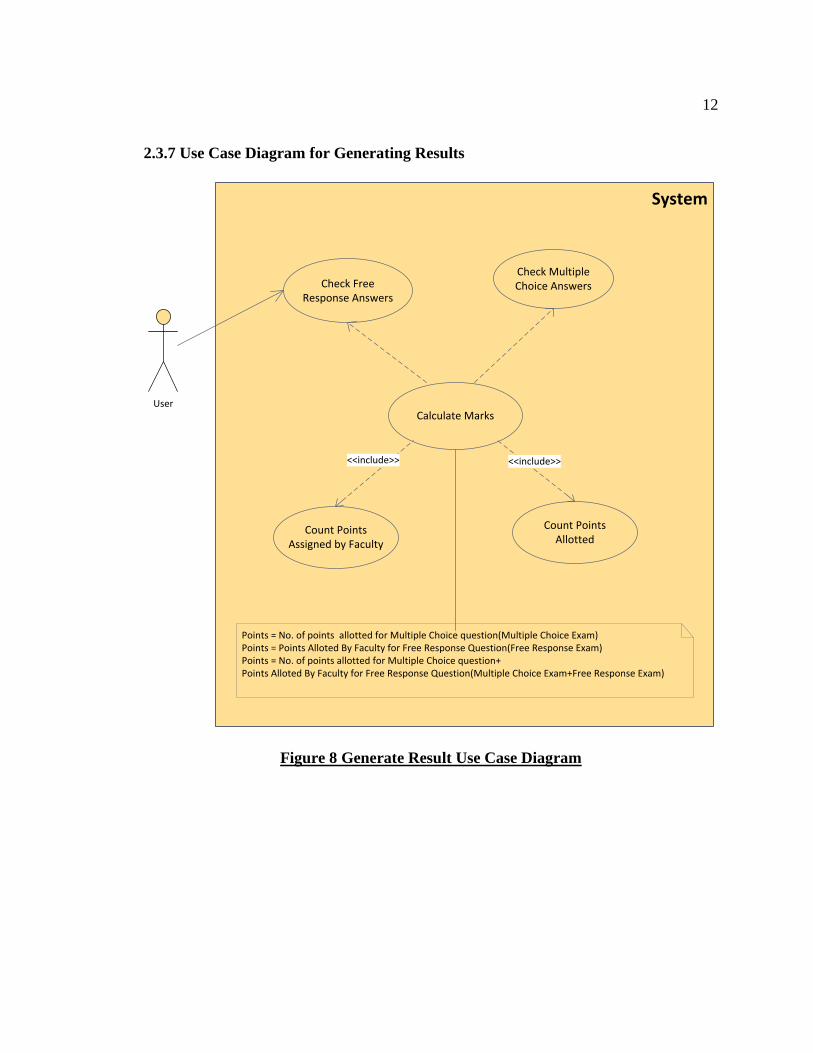
2.3.7 Use Case Diagram for Generating Results
System
Check FreeResponse Answers
User
Check MultipleChoice Answers
Calculate Marks
Count PointsAllotted
Count PointsAssigned by Faculty
<<include>> <<include>>
Points = No. of points allotted for Multiple Choice question(Multiple Choice Exam)Points = Points Alloted By Faculty for Free Response Question(Free Response Exam)Points = No. of points allotted for Multiple Choice question+Points Alloted By Faculty for Free Response Question(Multiple Choice Exam+Free Response Exam)
Figure 8 Generate Result Use Case Diagram
13
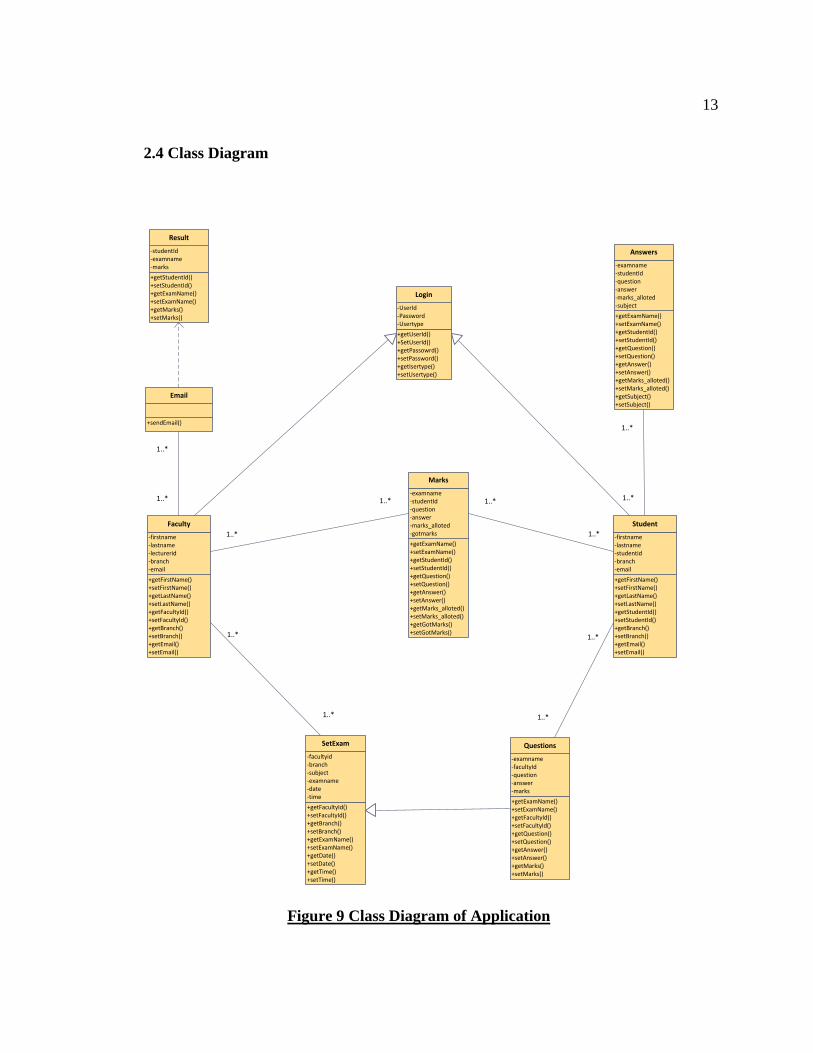
2.4 Class Diagram
+getUserId()+SetUserId()+getPassowrd()+setPassword()+getIsertype()+setUsertype()
-UserId-Password-Usertype
Login
+getFirstName()+setFirstName()+getLastName()+setLastName()+getFacultyId()+setFacultyId()+getBranch()+setBranch()+getEmail()+setEmail()
-firstname-lastname-lecturerid-branch-email
Faculty
+getFirstName()+setFirstName()+getLastName()+setLastName()+getStudentId()+setStudentId()+getBranch()+setBranch()+getEmail()+setEmail()
-firstname-lastname-studentid-branch-email
Student
+getFacultyId()+setFacultyId()+getBranch()+setBranch()+getExamName()+setExamName()+getDate()+setDate()+getTime()+setTime()
-facultyid-branch-subject-examname-date-time
SetExam
+getExamName()+setExamName()+getFacultyId()+setFacultyId()+getQuestion()+setQuestion()+getAnswer()+setAnswer()+getMarks()+setMarks()
-examname-facultyId-question-answer-marks
Questions
+getExamName()+setExamName()+getStudentId()+setStudentId()+getQuestion()+setQuestion()+getAnswer()+setAnswer()+getMarks_alloted()+setMarks_alloted()+getGotMarks()+setGotMarks()
-examname-studentId-question-answer-marks_alloted-gotmarks
Marks
+getExamName()+setExamName()+getStudentId()+setStudentId()+getQuestion()+setQuestion()+getAnswer()+setAnswer()+getMarks_alloted()+setMarks_alloted()+getSubject()+setSubject()
-examname-studentId-question-answer-marks_alloted-subject
Answers
+sendEmail()
+getStudentId()+setStudentId()+getExamName()+setExamName()+getMarks()+setMarks()
-studentId-examname-marks
Result
1..*
1..*
1..*
1..*
1..*
1..*
1..*
1..*
1..*
1..*
1..*
1..*
Figure 9 Class Diagram of Application

14
Chapter 3
GOOGLE APP ENGINE AND ANDROID FRAMEWORK
Google App Engine is a platform as a service (PaaS) cloud computing platform
for developing and hosting web applications in Google-managed data centers.
Applications are sandboxed and run across multiple servers. App Engine offers automatic
scaling for web applications—as the number of requests increases for an application, App
Engine automatically allocates more resources for the web application to handle the
additional demand.
3.1 Process for Signing up for Google App Engine
Navigate to http://appengine.google.com and login with your Google account. In case the
user does not have an account, he can sign up for a Google Account.
Figure 10 Google App Engine Homescreen
15
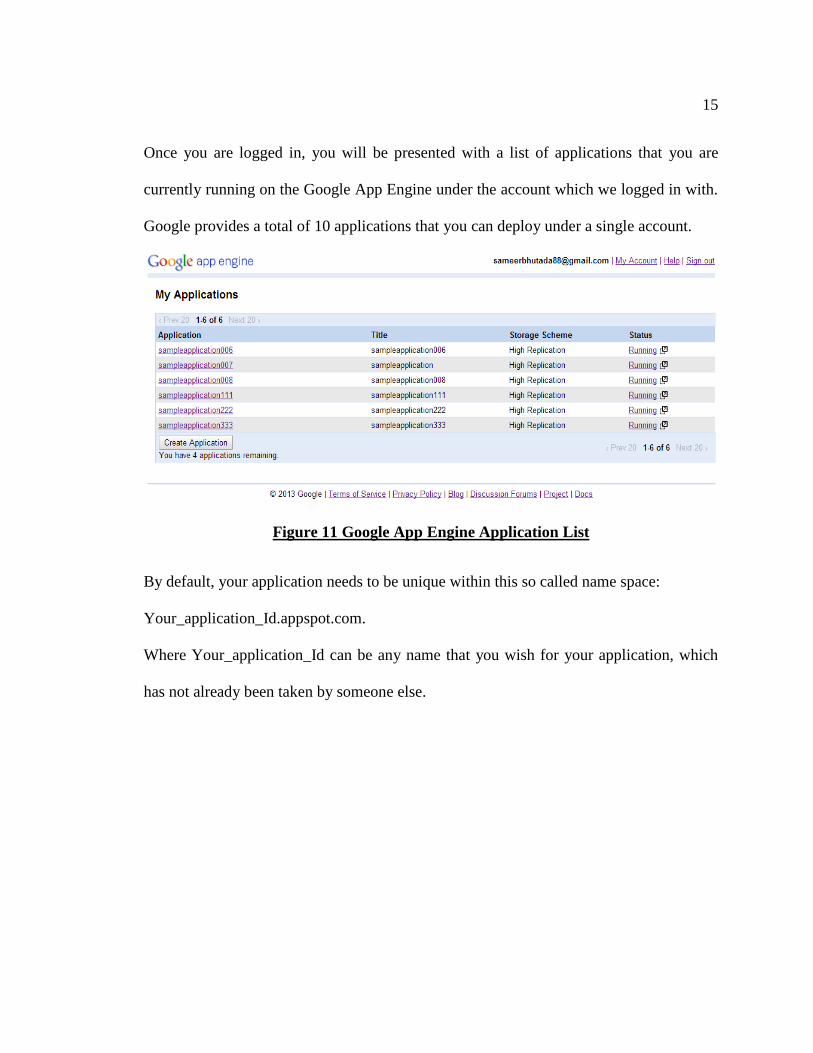
Once you are logged in, you will be presented with a list of applications that you are
currently running on the Google App Engine under the account which we logged in with.
Google provides a total of 10 applications that you can deploy under a single account.
Figure 11 Google App Engine Application List
By default, your application needs to be unique within this so called name space:
Your_application_Id.appspot.com.
Where Your_application_Id can be any name that you wish for your application, which
has not already been taken by someone else.
16
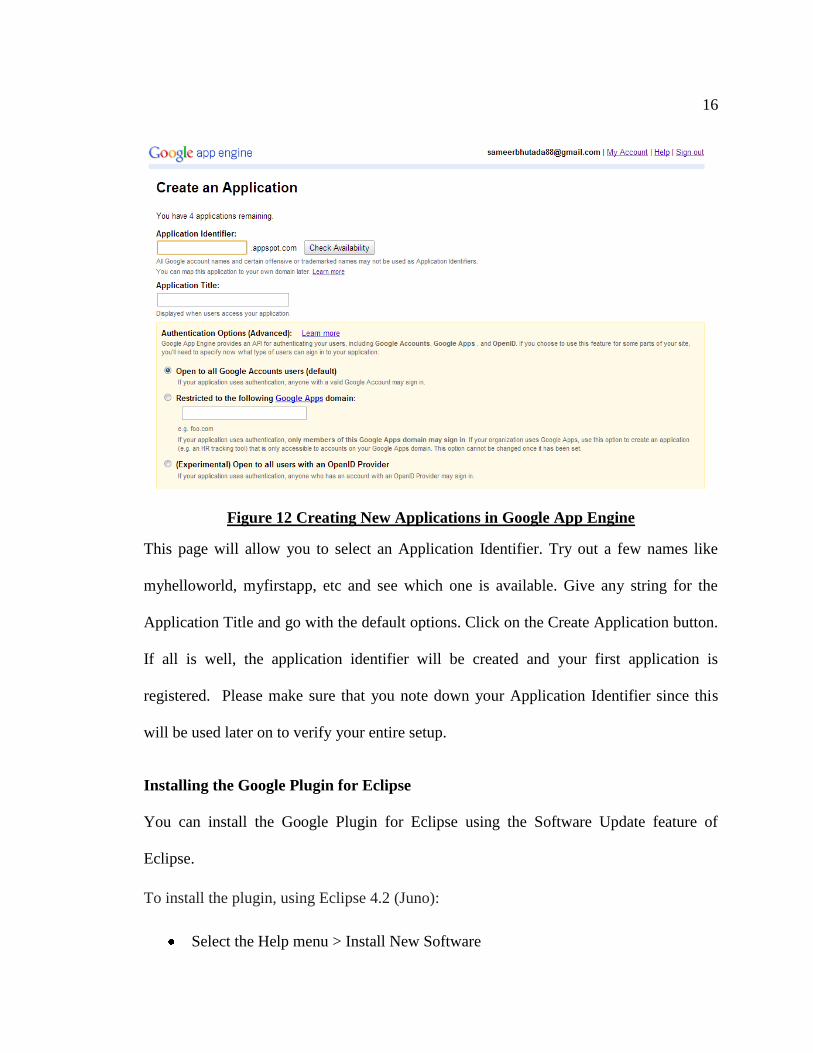
Figure 12 Creating New Applications in Google App Engine
This page will allow you to select an Application Identifier. Try out a few names like
myhelloworld, myfirstapp, etc and see which one is available. Give any string for the
Application Title and go with the default options. Click on the Create Application button.
If all is well, the application identifier will be created and your first application is
registered. Please make sure that you note down your Application Identifier since this
will be used later on to verify your entire setup.
Installing the Google Plugin for Eclipse
You can install the Google Plugin for Eclipse using the Software Update feature of
Eclipse.
To install the plugin, using Eclipse 4.2 (Juno):
Select the Help menu > Install New Software

17
In the Work with text box, enter:
https://dl.google.com/eclipse/plugin/4.2
Click the Add button. In the dialog that shows, click OK (keep the name blank, it
will be retrieved from the update site.)
Click the plus icon next to "Google Plugin for Eclipse" and "SDKs". Check the
boxes next to "Google Plugin for Eclipse 4.2" and "Google App Engine Java
SDK". You can also select the "Google Web Toolkit SDK" if you'd like to
use Google Web Toolkit with your apps. Make sure you check the checkbox
labeled "Contact all update sites during install to find required software." Click
the Next button. Follow the prompts to accept the terms of service and install the
plugin.
When the installation is complete, Eclipse prompts you to restart. Click Yes.
Eclipse restarts. The plugin is installed. you should see the following icons in the
toolbar of the Eclipse IDE.
Figure 13 Deploying A Package to Google App Engine
18
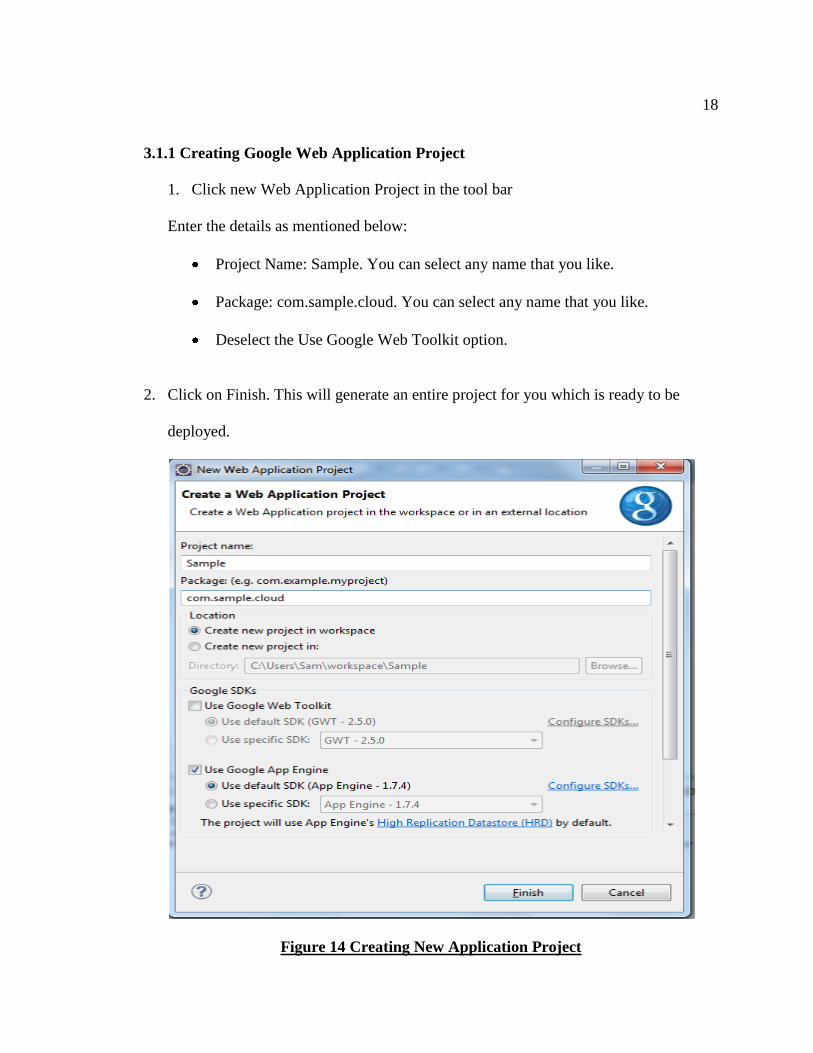
3.1.1 Creating Google Web Application Project
1. Click new Web Application Project in the tool bar
Enter the details as mentioned below:
Project Name: Sample. You can select any name that you like.
Package: com.sample.cloud. You can select any name that you like.
Deselect the Use Google Web Toolkit option.
2. Click on Finish. This will generate an entire project for you which is ready to be
deployed.
Figure 14 Creating New Application Project
19
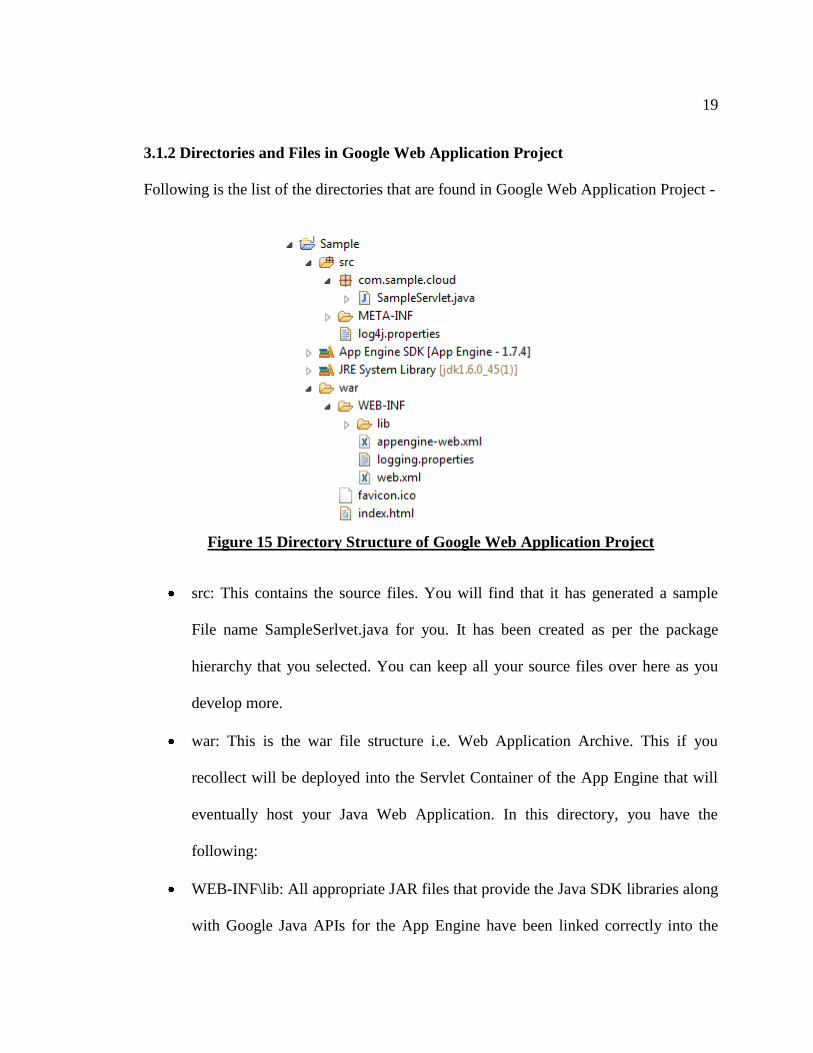
3.1.2 Directories and Files in Google Web Application Project
Following is the list of the directories that are found in Google Web Application Project -
Figure 15 Directory Structure of Google Web Application Project
src: This contains the source files. You will find that it has generated a sample
File name SampleSerlvet.java for you. It has been created as per the package
hierarchy that you selected. You can keep all your source files over here as you
develop more.
war: This is the war file structure i.e. Web Application Archive. This if you
recollect will be deployed into the Servlet Container of the App Engine that will
eventually host your Java Web Application. In this directory, you have the
following:
WEB-INF\lib: All appropriate JAR files that provide the Java SDK libraries along
with Google Java APIs for the App Engine have been linked correctly into the
20
project build path and the necessary JAR files are also present in the WEB-
INF\lib folder
index.html: This is the first page served. You can actually customize it to any that
you want. All your additional html files/resources could go in here.
web.xml: This is a standard web application configuration file. You will find the
Servlet entries present here for the sample servlet that is generated for us.
appengine-web.xml: This is a Google App Engine specific configuration file. And
the main element here of interest to us is the application element that will contain
the Application ID of the application that we registered for Google and which will
be pointing to a hosted version of this WAR.
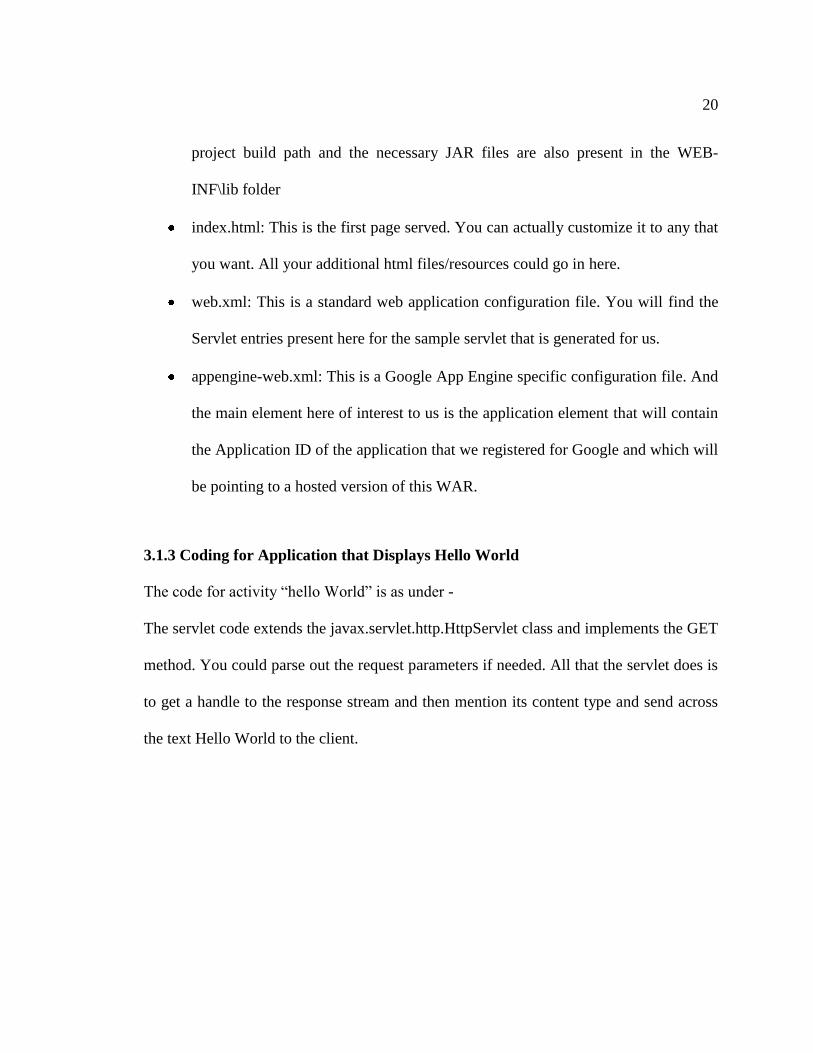
3.1.3 Coding for Application that Displays Hello World
The code for activity “hello World” is as under -
The servlet code extends the javax.servlet.http.HttpServlet class and implements the GET
method. You could parse out the request parameters if needed. All that the servlet does is
to get a handle to the response stream and then mention its content type and send across
the text Hello World to the client.
21
package com.sample.cloud;
import java.io.IOException;
import javax.servlet.http.*;
@SuppressWarnings("serial")
public class SampleServlet extends HttpServlet {
public void doGet(HttpServletRequest req, HttpServletResponse resp) throws
IOException {
resp.setContentType("text/plain");
resp.getWriter().println("Hello, world");
}
}
Figure 16 Code Snippet of HelloWorldActivity.java
In web.xml file and you will find the appropriate entries as shown below:
<servlet>
<servlet-name>Sample</servlet-name>
<servlet-class>com.sample.cloud.SampleServlet</servlet-class>
</servlet>
<servlet-mapping>
<servlet-name>Sample</servlet-name>
<url-pattern>/sample</url-pattern>
</servlet-mapping>
Figure 17 Code Snippet for web.xml
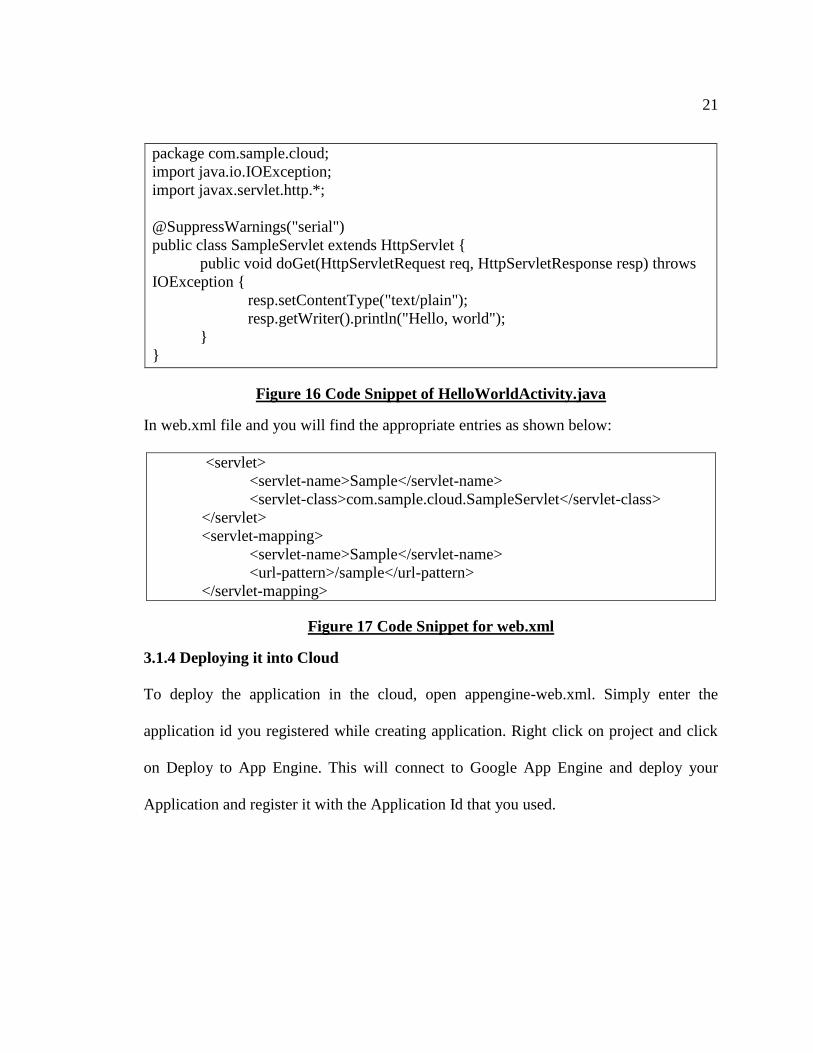
3.1.4 Deploying it into Cloud
To deploy the application in the cloud, open appengine-web.xml. Simply enter the
application id you registered while creating application. Right click on project and click
on Deploy to App Engine. This will connect to Google App Engine and deploy your
Application and register it with the Application Id that you used.
22
Figure 18 Deploying application into Cloud
Your application is available under the url:
http://YOUR_APPLICATION_ID.appspot.com. So if your Application ID is myapp,
the url is http://myapp.appspot.com. Go ahead and access your URL.
23
3.2. Android Operating System
Android Operating System is an operating system that is designed for portable devices.
This operating system is known to work on the cell phones, tablets and other wearable
devices like Watch, Glass etc. It is an open source technology that was developed by
Google Inc. The latest version of the operating system is Android 4.4 (Kit Kat).
Following things are needed by the developer to understand for developing the
applications that are intended to work on the Android Operating system
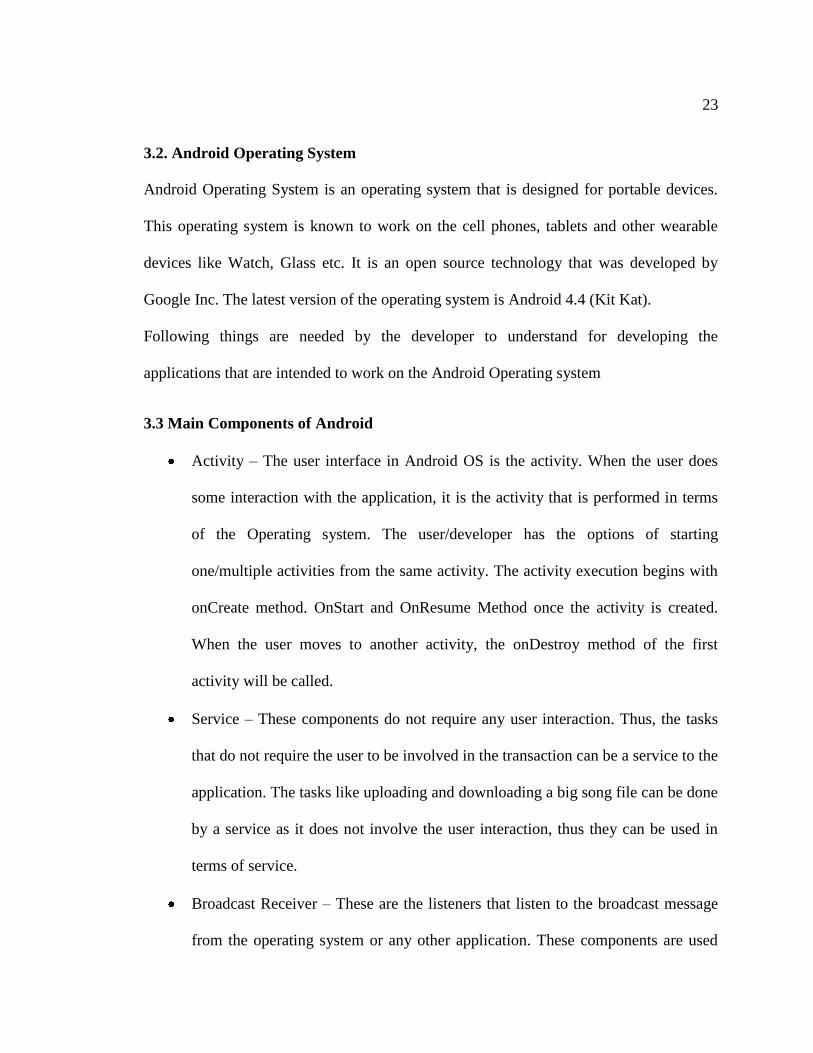
3.3 Main Components of Android
Activity – The user interface in Android OS is the activity. When the user does
some interaction with the application, it is the activity that is performed in terms
of the Operating system. The user/developer has the options of starting
one/multiple activities from the same activity. The activity execution begins with
onCreate method. OnStart and OnResume Method once the activity is created.
When the user moves to another activity, the onDestroy method of the first
activity will be called.
Service – These components do not require any user interaction. Thus, the tasks
that do not require the user to be involved in the transaction can be a service to the
application. The tasks like uploading and downloading a big song file can be done
by a service as it does not involve the user interaction, thus they can be used in
terms of service.
Broadcast Receiver – These are the listeners that listen to the broadcast message
from the operating system or any other application. These components are used

24
when the application has to be triggered based on events that occur in some other
application. For Example, the alarm application, listens to the time in the clock
continuously; when the clock reaches a certain time for which the alarm is set,
than the alarm application will listen to the time broadcasted by clock and start
ringing.
Content Provider – This component allows the application to store the data. This
storage of data can be internal storage of the device, external storage of the device
or can be anywhere on the internet. For the current project, I have used Google
App Engine that will be responsible for storing all the data for the application in
forms of tables.
3.4 Activating and Deactivating Components
Activity: this component can be started using “startActivity()” method. This method
takes the intent as an argument.
Service can be started using the “startService()” method. This method takes the intent as
argument. It can be stopped using “stopService()” method.
3.5 Manifest file
Manifest file is the main configuration file for the application. Android system reads the
manifest file first and knows about the application. All the components used by the
application must be declared in the manifest file. If the component is not declared in the
manifest file the application will never make use of that component. It is an xml file so all
the code must be written using tags like shown below.
25
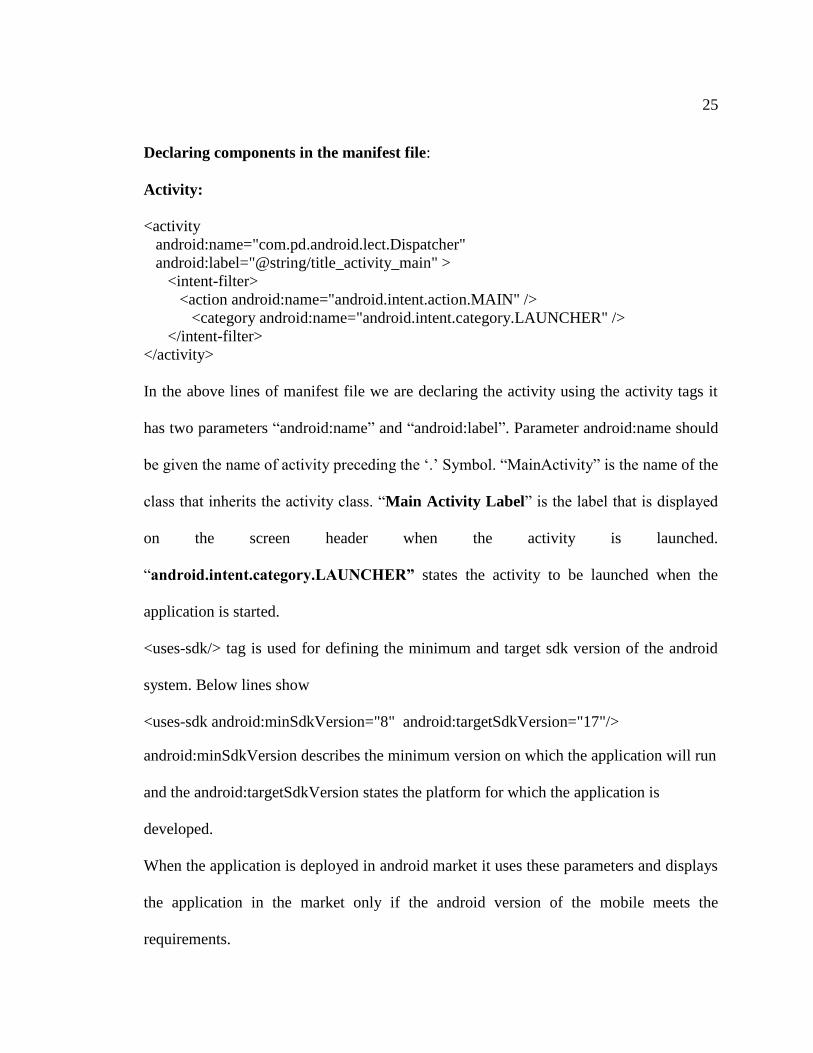
Declaring components in the manifest file:
Activity:
<activity
android:name="com.pd.android.lect.Dispatcher"
android:label="@string/title_activity_main" >
<intent-filter>
<action android:name="android.intent.action.MAIN" />
<category android:name="android.intent.category.LAUNCHER" />
</intent-filter>
</activity>
In the above lines of manifest file we are declaring the activity using the activity tags it
has two parameters “android:name” and “android:label”. Parameter android:name should
be given the name of activity preceding the ‘.’ Symbol. “MainActivity” is the name of the
class that inherits the activity class. “Main Activity Label” is the label that is displayed
on the screen header when the activity is launched.
“android.intent.category.LAUNCHER” states the activity to be launched when the
application is started.
<uses-sdk/> tag is used for defining the minimum and target sdk version of the android
system. Below lines show
<uses-sdk android:minSdkVersion="8" android:targetSdkVersion="17"/>
android:minSdkVersion describes the minimum version on which the application will run
and the android:targetSdkVersion states the platform for which the application is
developed.
When the application is deployed in android market it uses these parameters and displays
the application in the market only if the android version of the mobile meets the
requirements.
26
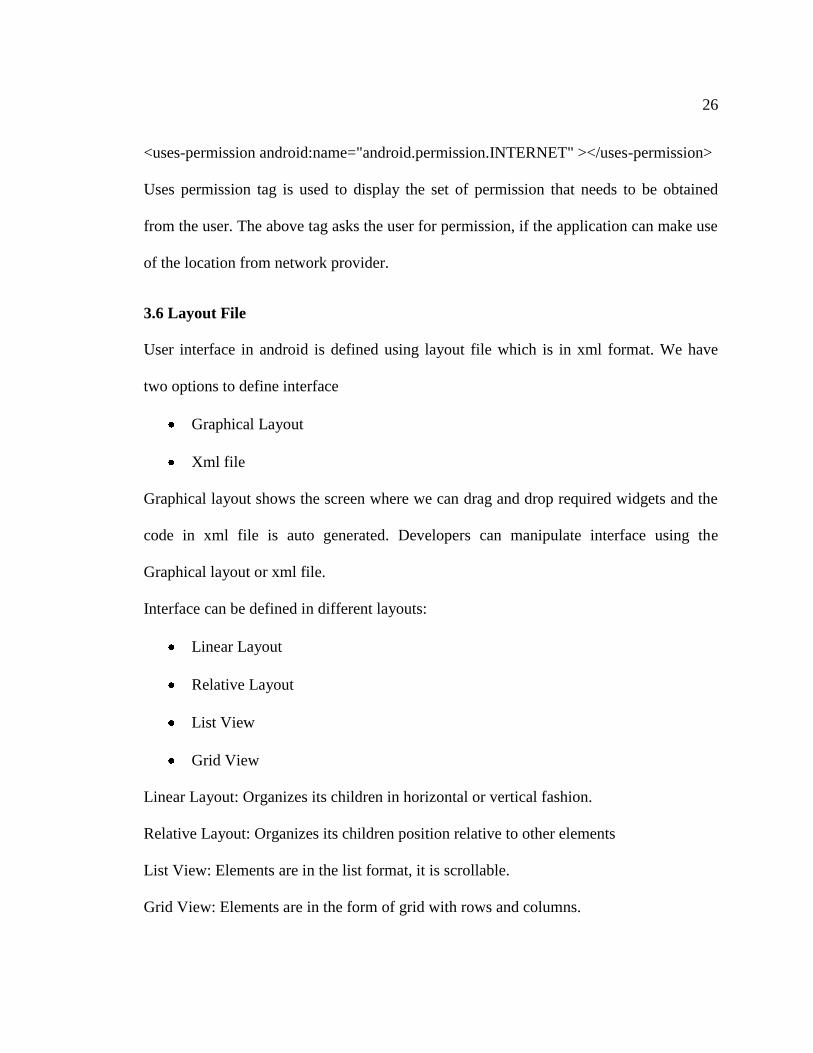
<uses-permission android:name="android.permission.INTERNET" ></uses-permission>
Uses permission tag is used to display the set of permission that needs to be obtained
from the user. The above tag asks the user for permission, if the application can make use
of the location from network provider.
3.6 Layout File
User interface in android is defined using layout file which is in xml format. We have
two options to define interface
Graphical Layout
Xml file
Graphical layout shows the screen where we can drag and drop required widgets and the
code in xml file is auto generated. Developers can manipulate interface using the
Graphical layout or xml file.
Interface can be defined in different layouts:
Linear Layout
Relative Layout
List View
Grid View
Linear Layout: Organizes its children in horizontal or vertical fashion.
Relative Layout: Organizes its children position relative to other elements
List View: Elements are in the list format, it is scrollable.
Grid View: Elements are in the form of grid with rows and columns.
27
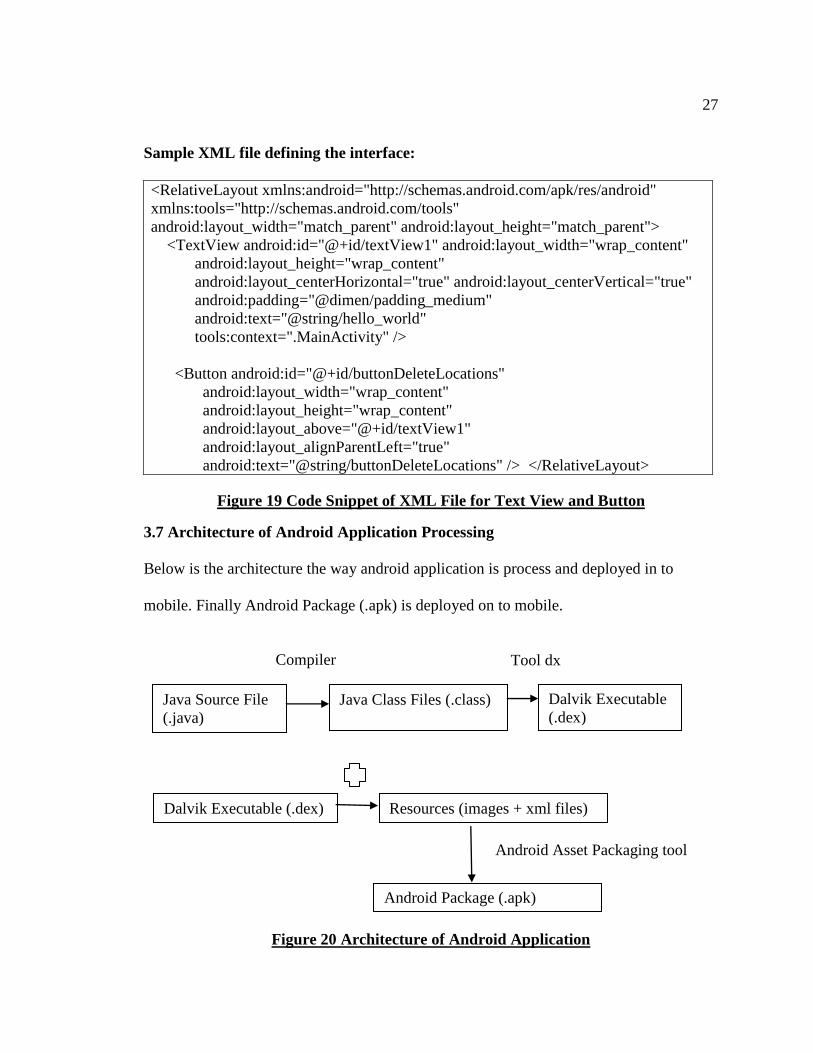
Sample XML file defining the interface:
<RelativeLayout xmlns:android="http://schemas.android.com/apk/res/android"
xmlns:tools="http://schemas.android.com/tools"
android:layout_width="match_parent" android:layout_height="match_parent">
<TextView android:id="@+id/textView1" android:layout_width="wrap_content"
android:layout_height="wrap_content"
android:layout_centerHorizontal="true" android:layout_centerVertical="true"
android:padding="@dimen/padding_medium"
android:text="@string/hello_world"
tools:context=".MainActivity" />
<Button android:id="@+id/buttonDeleteLocations"
android:layout_width="wrap_content"
android:layout_height="wrap_content"
android:layout_above="@+id/textView1"
android:layout_alignParentLeft="true"
android:text="@string/buttonDeleteLocations" /> </RelativeLayout>
Figure 19 Code Snippet of XML File for Text View and Button
3.7 Architecture of Android Application Processing
Below is the architecture the way android application is process and deployed in to
mobile. Finally Android Package (.apk) is deployed on to mobile.
Figure 20 Architecture of Android Application
Java Source File
(.java)
Java Class Files (.class) Dalvik Executable
(.dex)
Dalvik Executable (.dex) Resources (images + xml files)
Android Package (.apk)
Compiler Tool dx
Android Asset Packaging tool
28
3.8 Tools Required
Android SDK
ADT Plugin 20.0.0 or higher
Eclipse
Using SDK Manager download latest SDK tools
Java SE
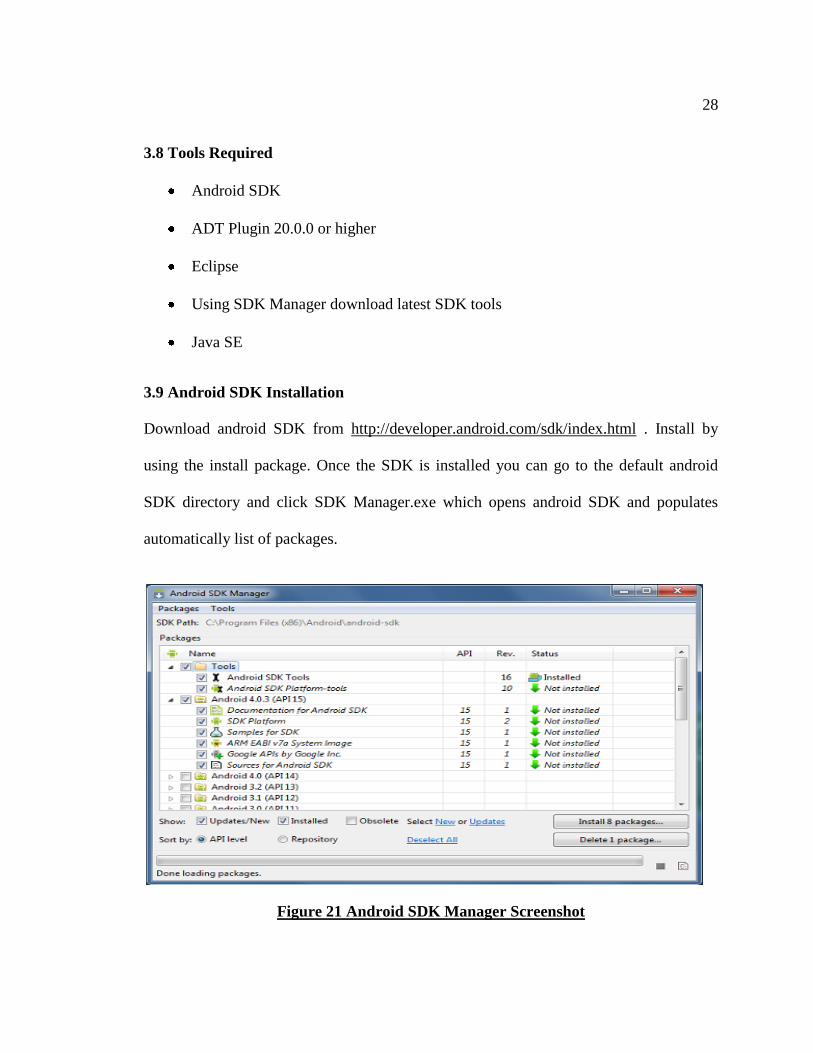
3.9 Android SDK Installation
Download android SDK from http://developer.android.com/sdk/index.html . Install by
using the install package. Once the SDK is installed you can go to the default android
SDK directory and click SDK Manager.exe which opens android SDK and populates
automatically list of packages.
Figure 21 Android SDK Manager Screenshot
29
In the above SDK Manager
Tools: this is required to install for the first time. Make sure to keep the latest SDK Tools.
Install the Android SDK Platform-tools
SDK Platform: Users must at least install one package on which they can run their
application
30
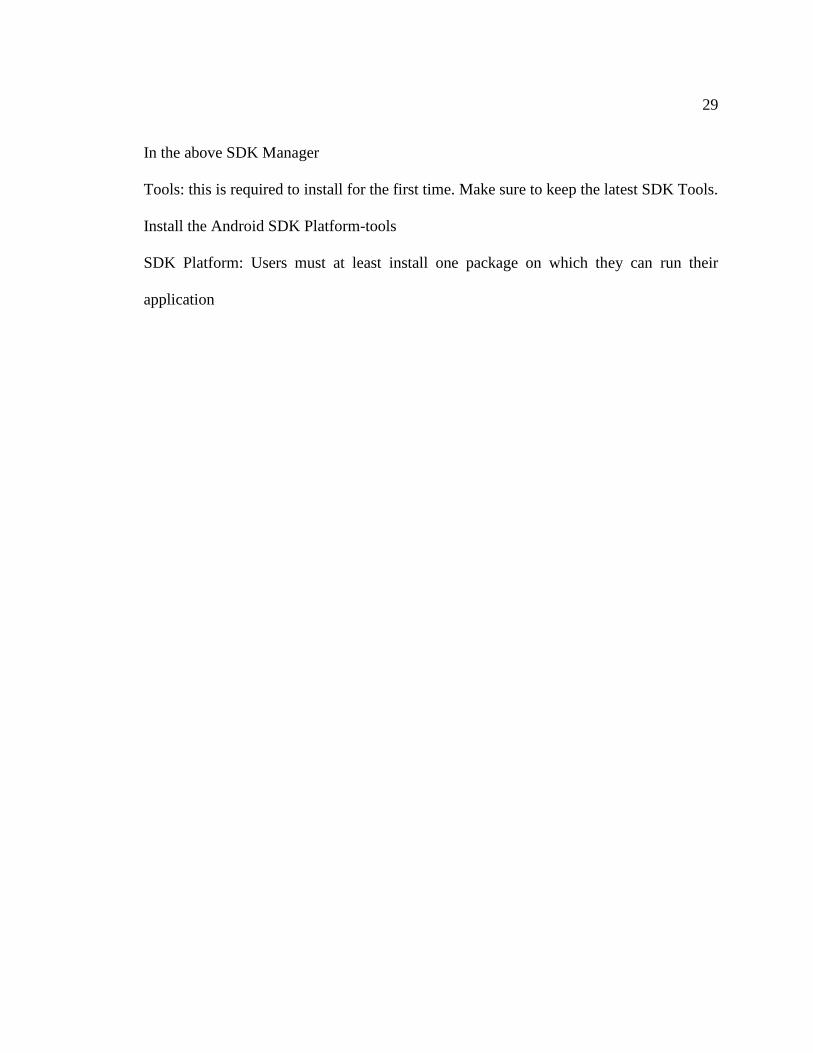
3.10 Install ADT Plugin for Eclipse
Start eclipse then click help -> Install New Software
Figure 22 Install ADT Plugin Screenshot 1
31
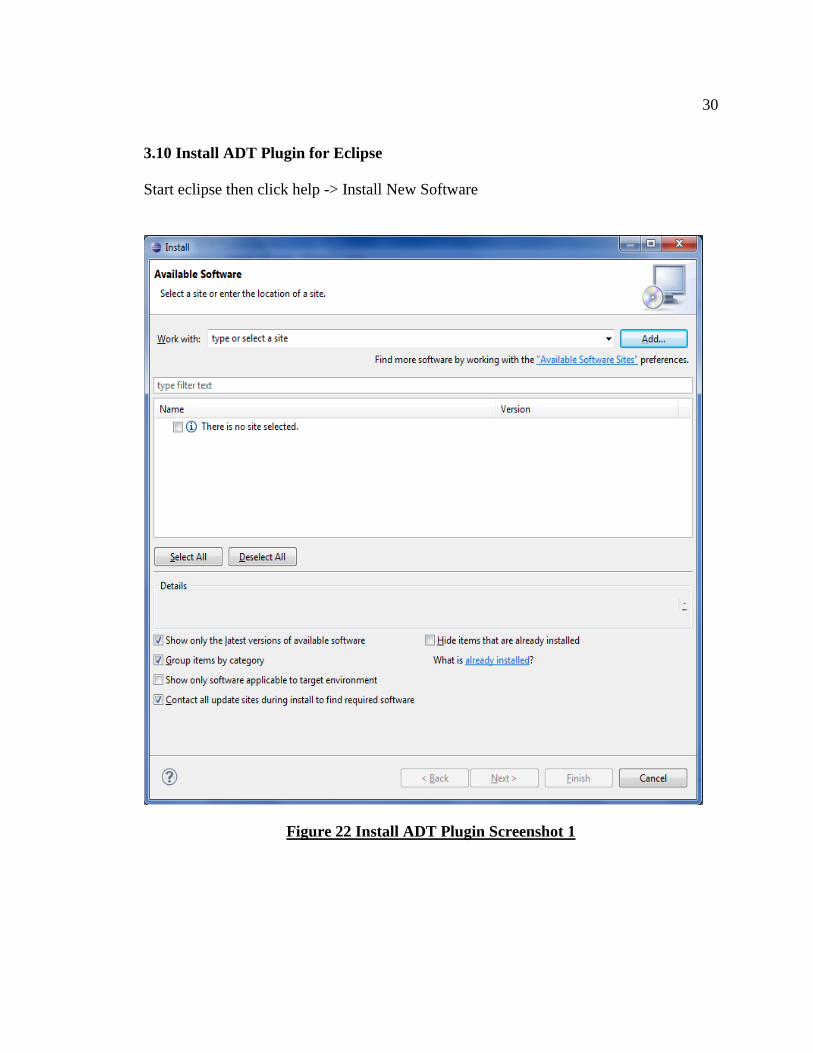
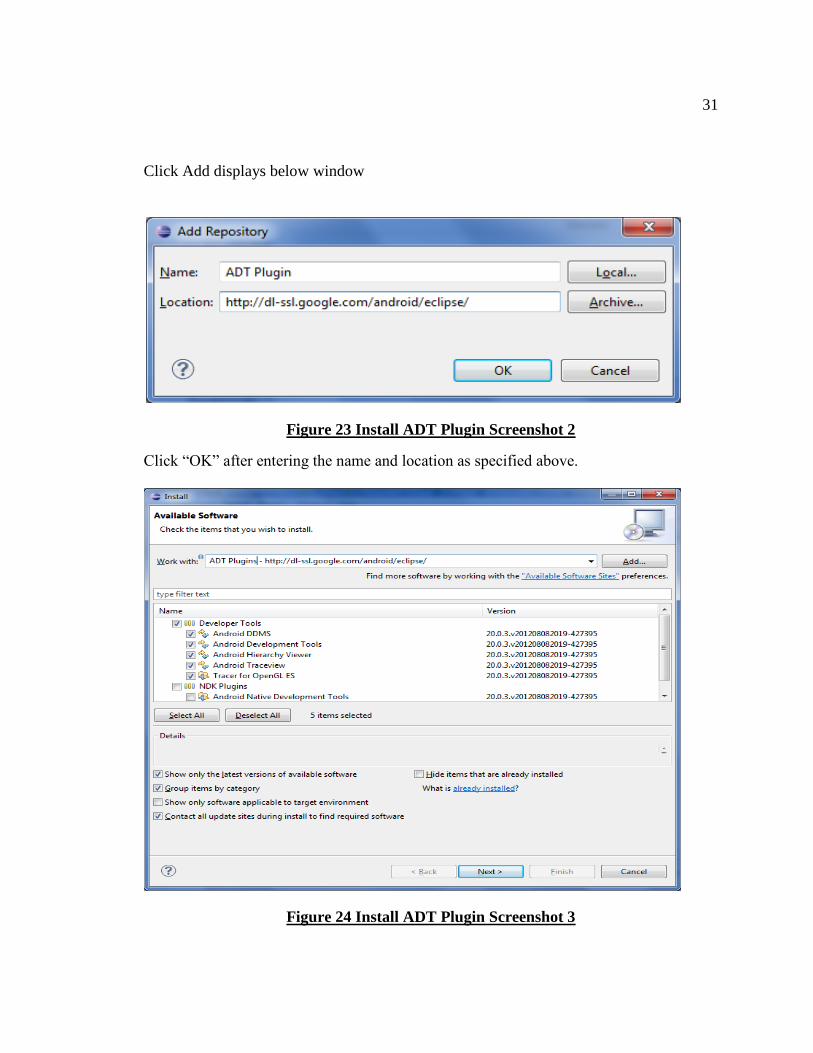
Click Add displays below window
Figure 23 Install ADT Plugin Screenshot 2
Click “OK” after entering the name and location as specified above.
Figure 24 Install ADT Plugin Screenshot 3
32
In the above window check the option Developer Tools and click Next and then window
will pop up showing the list of tools to be downloaded, accept the terms and then click
finish and download, after installing the tools restart the eclipse.
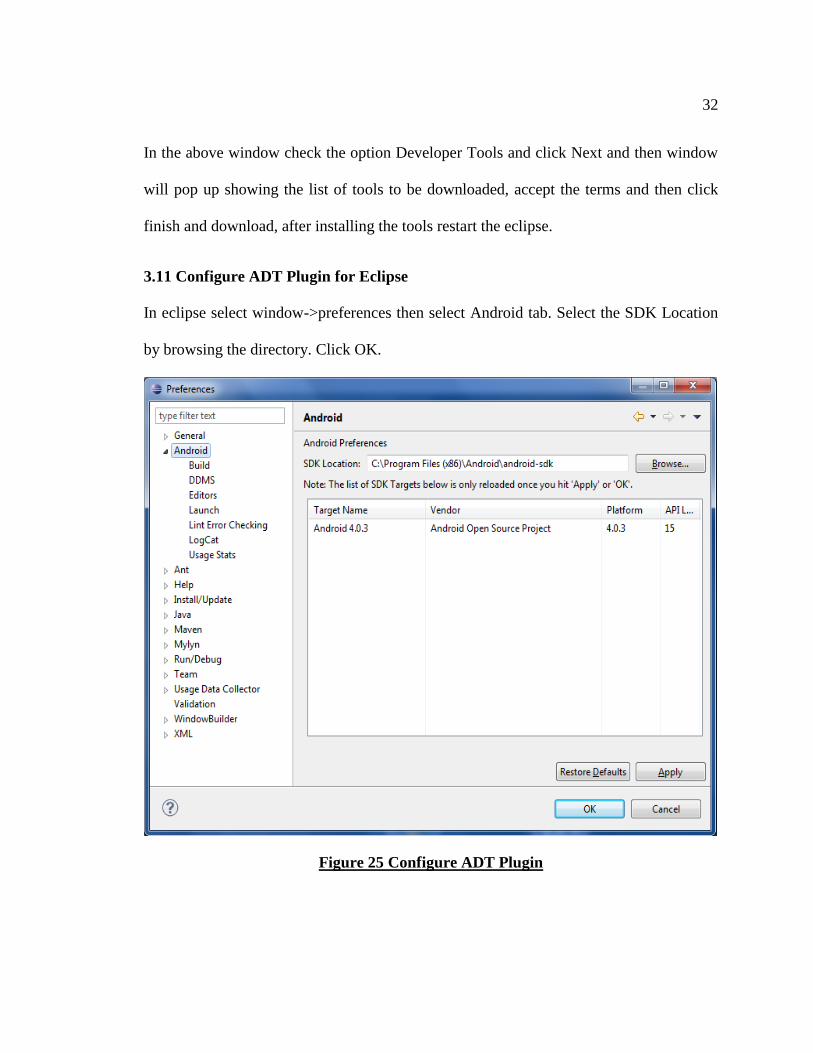
3.11 Configure ADT Plugin for Eclipse
In eclipse select window->preferences then select Android tab. Select the SDK Location
by browsing the directory. Click OK.
Figure 25 Configure ADT Plugin
33
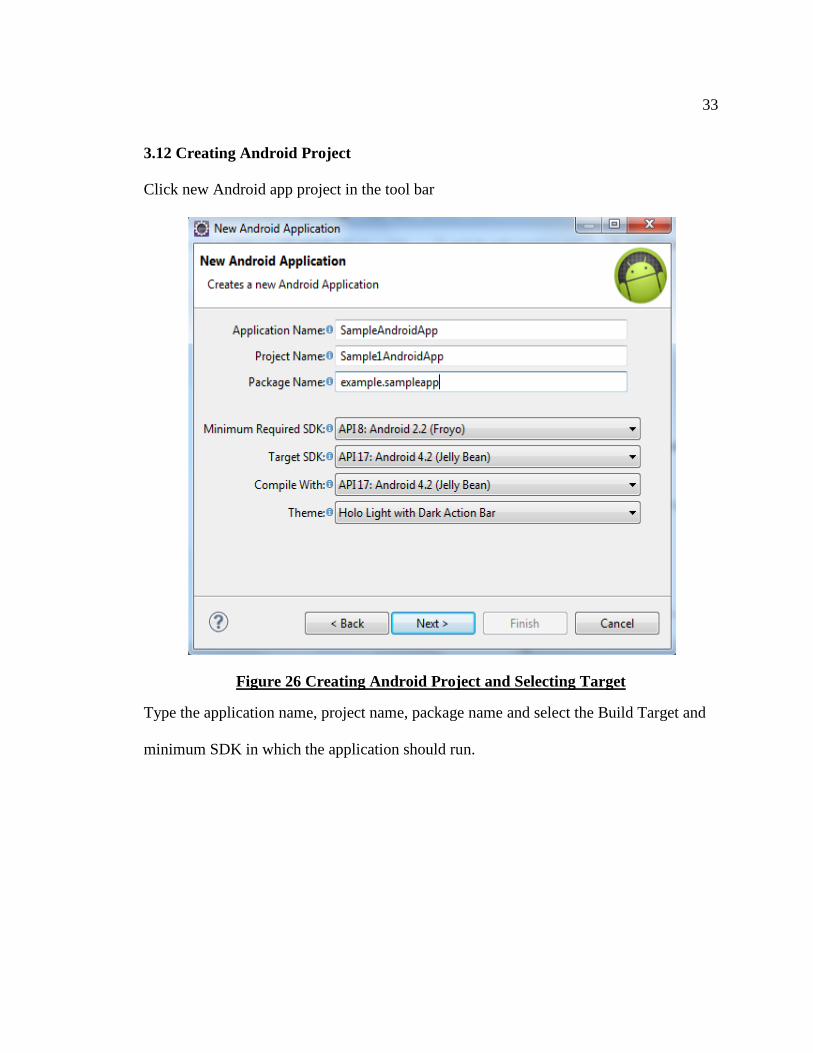
3.12 Creating Android Project
Click new Android app project in the tool bar
Figure 26 Creating Android Project and Selecting Target
Type the application name, project name, package name and select the Build Target and
minimum SDK in which the application should run.

34
3.13 Directories and Files in Android Project
AndroidManifest.xml: this file has all the project configurations.
src/: All the source files are in this directory.
res/: This directory has all the resource files.
res/layout/: This directory has the xml files that define the interface for the application
res/values/: This directory has the values for the resources such as strings to be used in
application.
3.14 Running Android Application
To run android application there are two options:
Running on emulator
Running on Device
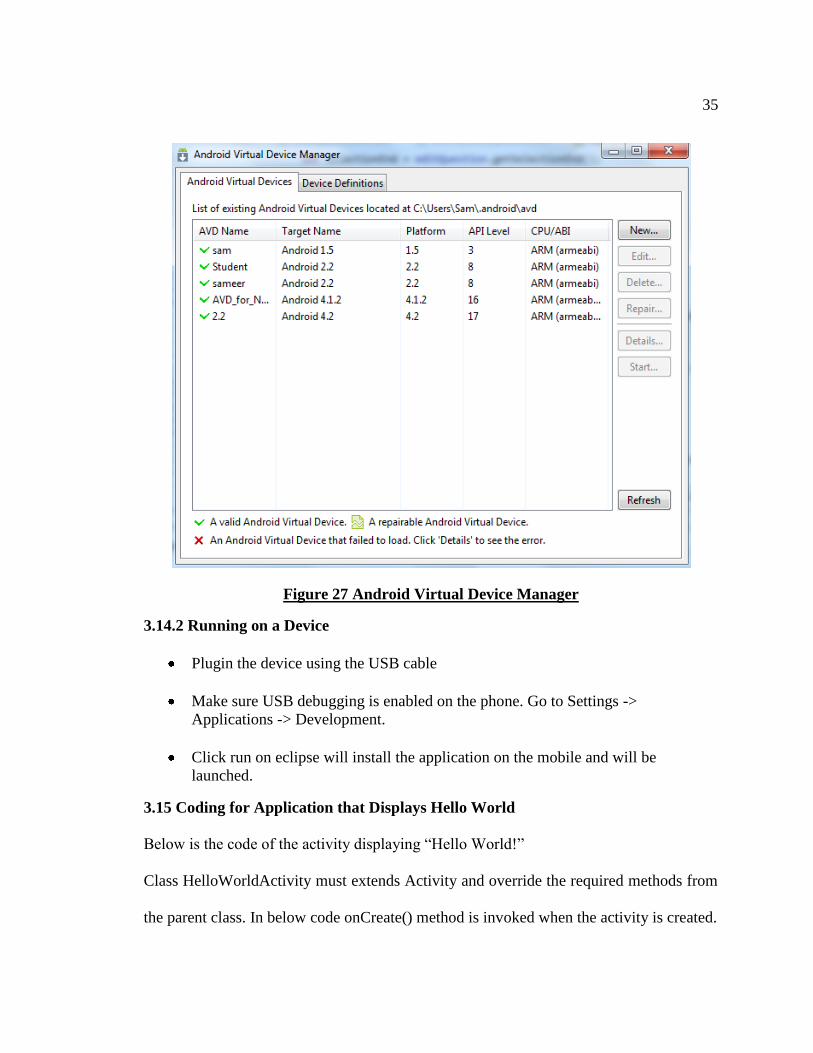
3.14.1 Running on Emulator
To run on emulator, new android virtual device needs to be created using android virtual
device manager icon in the eclipse. After creating the virtual device click run, the .apk
file of the project will be installed on the device and application will run.
35
Figure 27 Android Virtual Device Manager
3.14.2 Running on a Device
Plugin the device using the USB cable
Make sure USB debugging is enabled on the phone. Go to Settings ->
Applications -> Development.
Click run on eclipse will install the application on the mobile and will be
launched.
3.15 Coding for Application that Displays Hello World
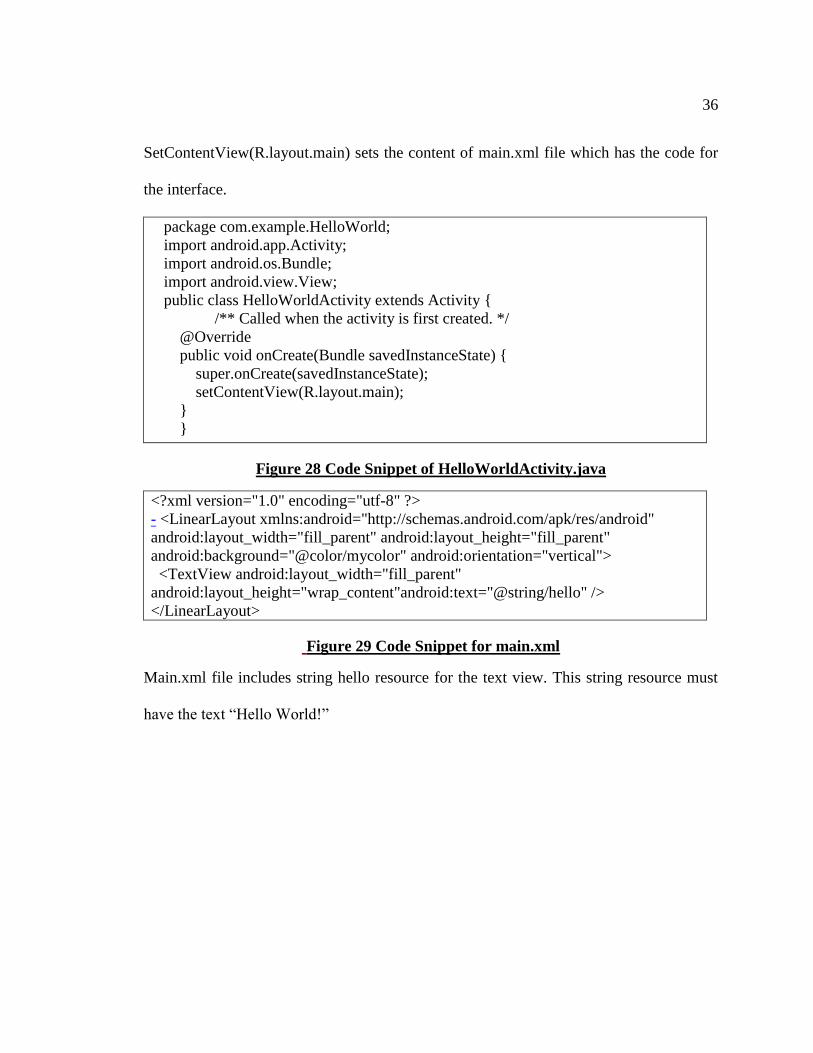
Below is the code of the activity displaying “Hello World!”
Class HelloWorldActivity must extends Activity and override the required methods from
the parent class. In below code onCreate() method is invoked when the activity is created.
36
SetContentView(R.layout.main) sets the content of main.xml file which has the code for
the interface.
package com.example.HelloWorld;
import android.app.Activity;
import android.os.Bundle;
import android.view.View;
public class HelloWorldActivity extends Activity {
/** Called when the activity is first created. */
@Override
public void onCreate(Bundle savedInstanceState) {
super.onCreate(savedInstanceState);
setContentView(R.layout.main);
}
}
Figure 28 Code Snippet of HelloWorldActivity.java
<?xml version="1.0" encoding="utf-8" ?>
- <LinearLayout xmlns:android="http://schemas.android.com/apk/res/android"
android:layout_width="fill_parent" android:layout_height="fill_parent"
android:background="@color/mycolor" android:orientation="vertical">
<TextView android:layout_width="fill_parent"
android:layout_height="wrap_content"android:text="@string/hello" />
</LinearLayout>
Figure 29 Code Snippet for main.xml
Main.xml file includes string hello resource for the text view. This string resource must
have the text “Hello World!”
37
3.16 Debugging the Application
Three main perspectives in Eclipse IDE
1. Java
2. DDMS
3. Debug
Java Perspective:
This is used for writing the source code. It shows file architecture for accessing the files
and implementing the source code.
DDMS Perspective:
This perspective shows all the files in the phone that is used for running the application.
If the application is run on the simulator all the files are accessible. This is mainly useful
if your application uses SQLite Database then developers can access all the database
files. Any files created and stored by the application are accessible. Files can be
downloaded on to system and the content can be viewed and edited by using SQLite
Database Browser. If the application is run on the real device some of the file contents
are not accessible because of security restrictions imposed by Android.
Debug Perspective:
This perspective is used for debugging the application. Developers can set the break
points in the code and view the values of variable at any point in the code which is useful
for recognizing and fixing the bugs in the code. Developers can use the “Variable”
window to know the values of variables when the break point is reached.

38
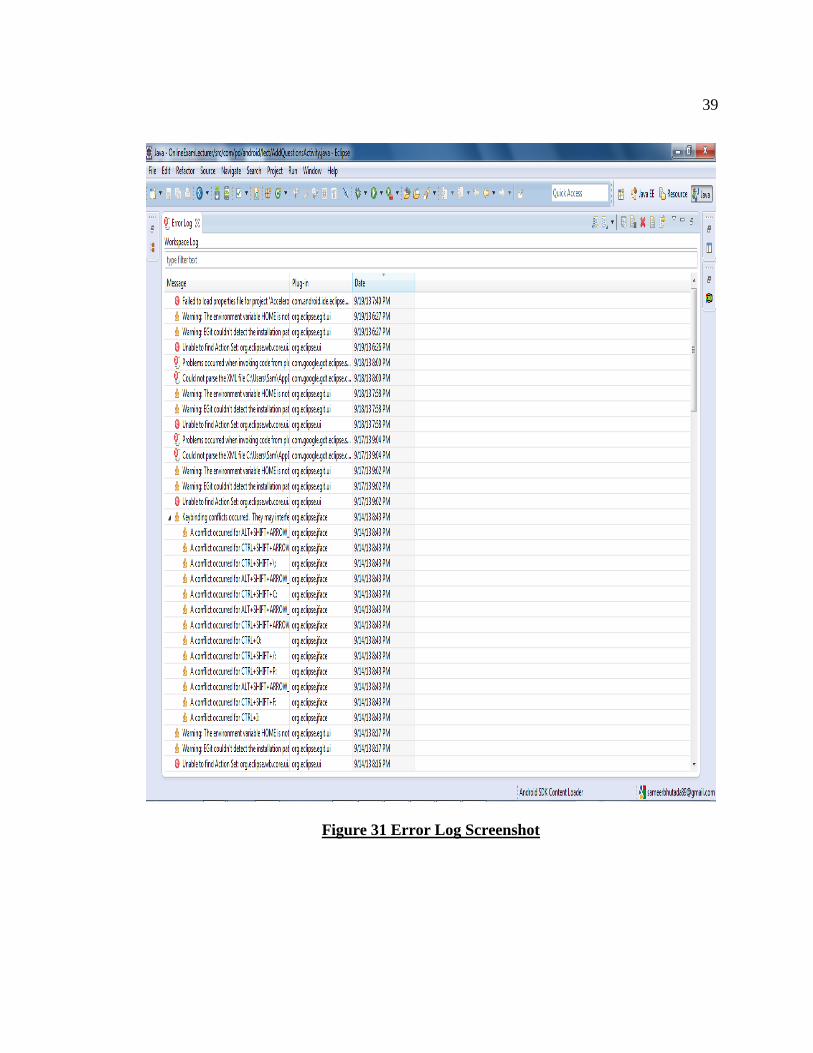
Log Cat window shows all the errors. This is very useful for understanding the errors,
warnings in the code.
Figure 30 LogCat Screenshot
39
Figure 31 Error Log Screenshot
40
Chapter 4
SYSTEM IMPLEMENTATION
The purpose of this application is to eliminate the in class examination. There are
three users who will be using the application – Students, Professor and Administrator.
Following are the main objectives to build the application -
Eliminate the in-class examination
Cost Effectiveness
Environment Friendly
Supports different types of questions - Multiple Choice, Free Response
Easy to take the surprise tests in the class
Quick and Easy analysis of the Exams
Easy to add, delete and modify questions
Understandable interface for creating new exam
Student Performance Charts are easy to manage
Easy to Grade the exams
Allows the professor to create some practice tests for the students
Easy for students to take the practice test to understand the questions or the type
of questions that will be asked in then examination.
41
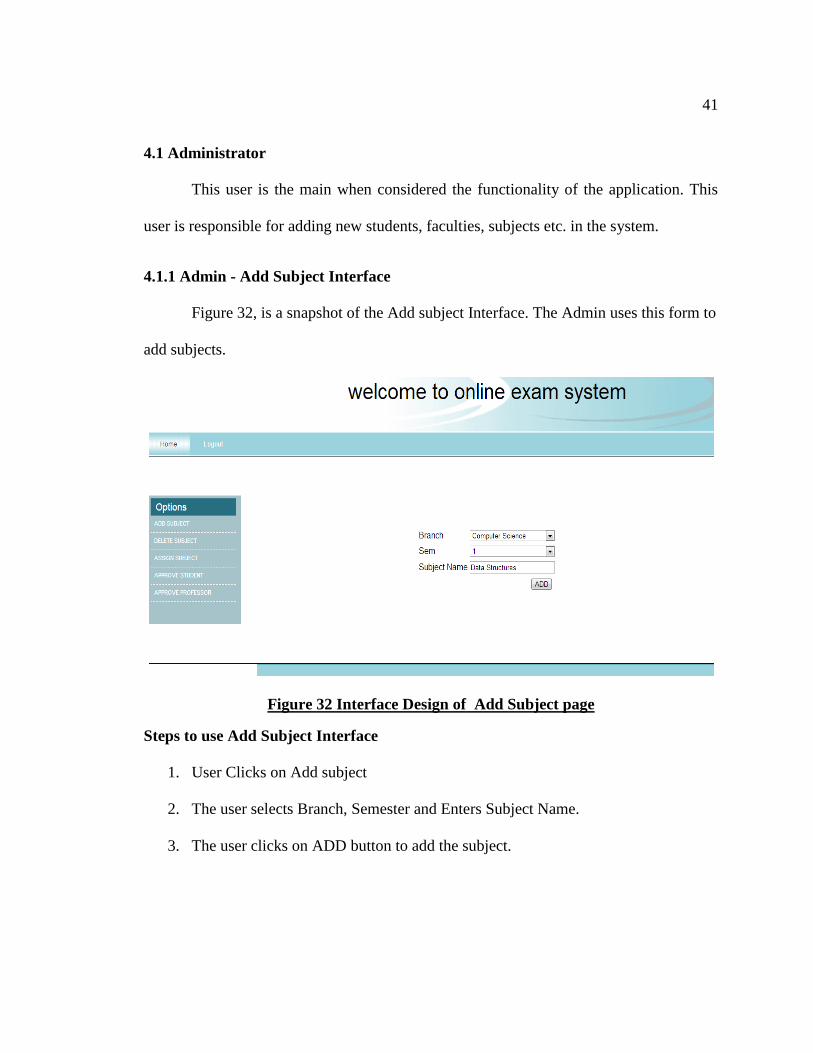
4.1 Administrator
This user is the main when considered the functionality of the application. This
user is responsible for adding new students, faculties, subjects etc. in the system.
4.1.1 Admin - Add Subject Interface
Figure 32, is a snapshot of the Add subject Interface. The Admin uses this form to
add subjects.
Figure 32 Interface Design of Add Subject page
Steps to use Add Subject Interface
1. User Clicks on Add subject
2. The user selects Branch, Semester and Enters Subject Name.
3. The user clicks on ADD button to add the subject.
42
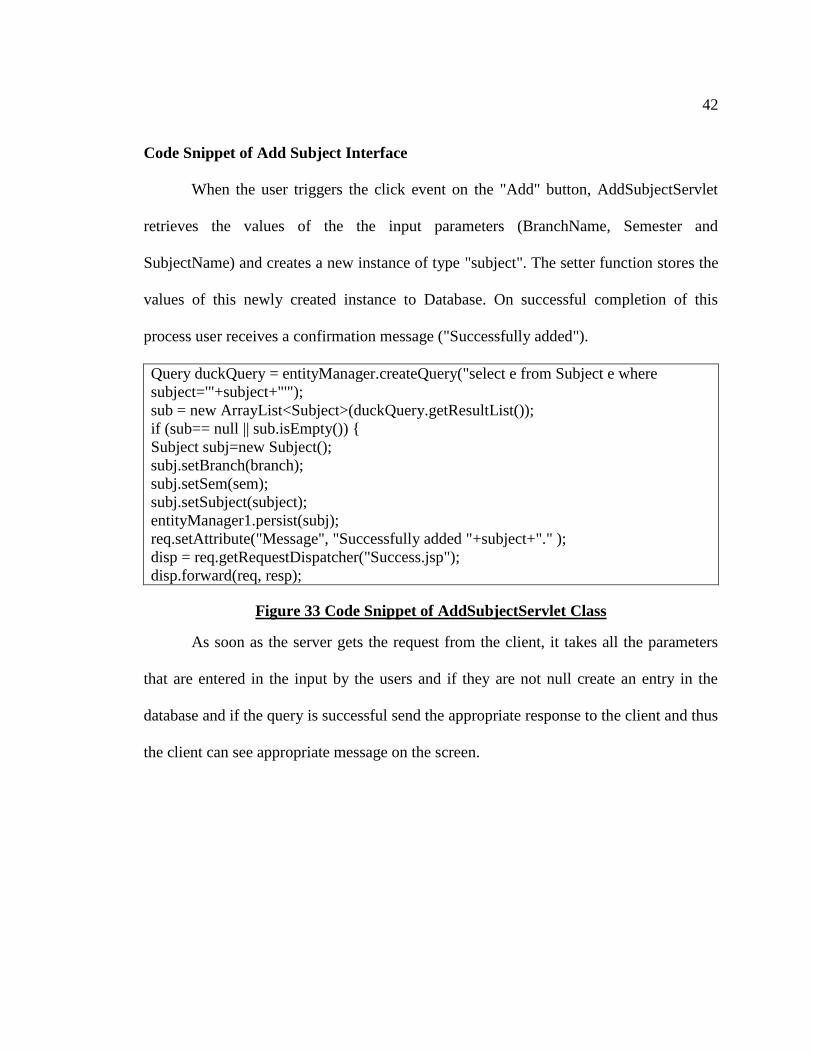
Code Snippet of Add Subject Interface
When the user triggers the click event on the "Add" button, AddSubjectServlet
retrieves the values of the the input parameters (BranchName, Semester and
SubjectName) and creates a new instance of type "subject". The setter function stores the
values of this newly created instance to Database. On successful completion of this
process user receives a confirmation message ("Successfully added").
Query duckQuery = entityManager.createQuery("select e from Subject e where
subject='"+subject+"'");
sub = new ArrayList<Subject>(duckQuery.getResultList());
if (sub== null || sub.isEmpty()) {
Subject subj=new Subject();
subj.setBranch(branch);
subj.setSem(sem);
subj.setSubject(subject);
entityManager1.persist(subj);
req.setAttribute("Message", "Successfully added "+subject+"." );
disp = req.getRequestDispatcher("Success.jsp");
disp.forward(req, resp);
Figure 33 Code Snippet of AddSubjectServlet Class
As soon as the server gets the request from the client, it takes all the parameters
that are entered in the input by the users and if they are not null create an entry in the
database and if the query is successful send the appropriate response to the client and thus
the client can see appropriate message on the screen.
43
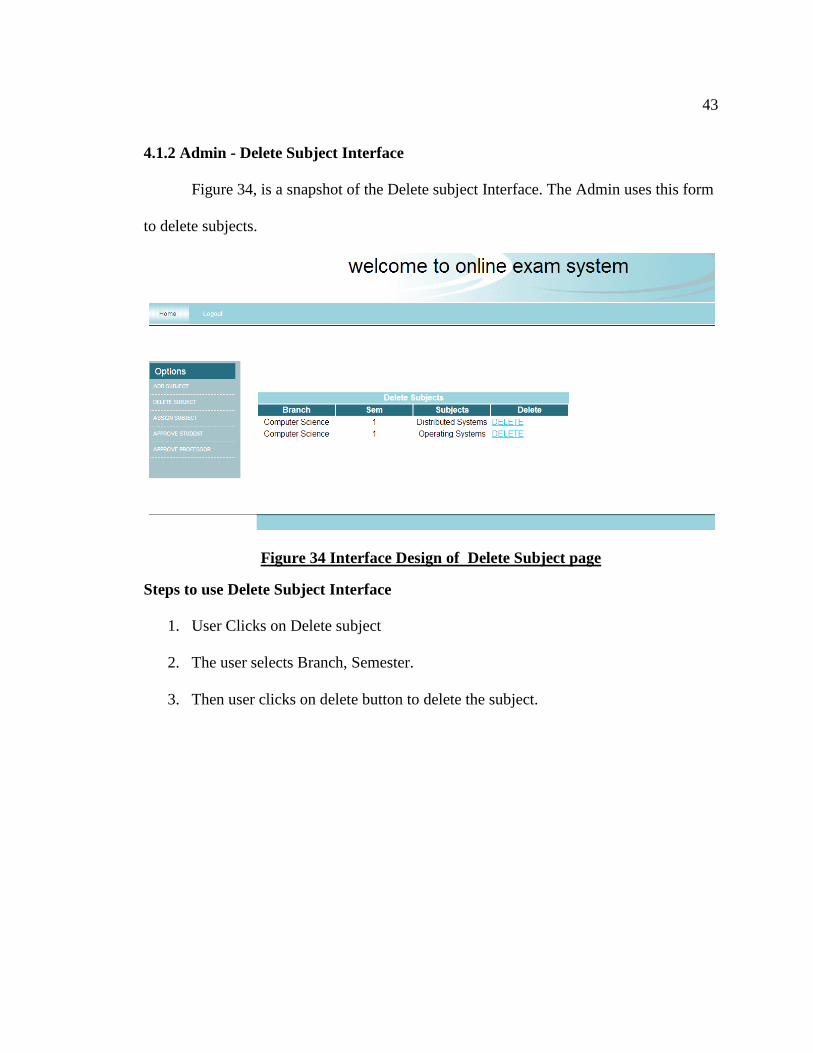
4.1.2 Admin - Delete Subject Interface
Figure 34, is a snapshot of the Delete subject Interface. The Admin uses this form
to delete subjects.
Figure 34 Interface Design of Delete Subject page
Steps to use Delete Subject Interface
1. User Clicks on Delete subject
2. The user selects Branch, Semester.
3. Then user clicks on delete button to delete the subject.
44
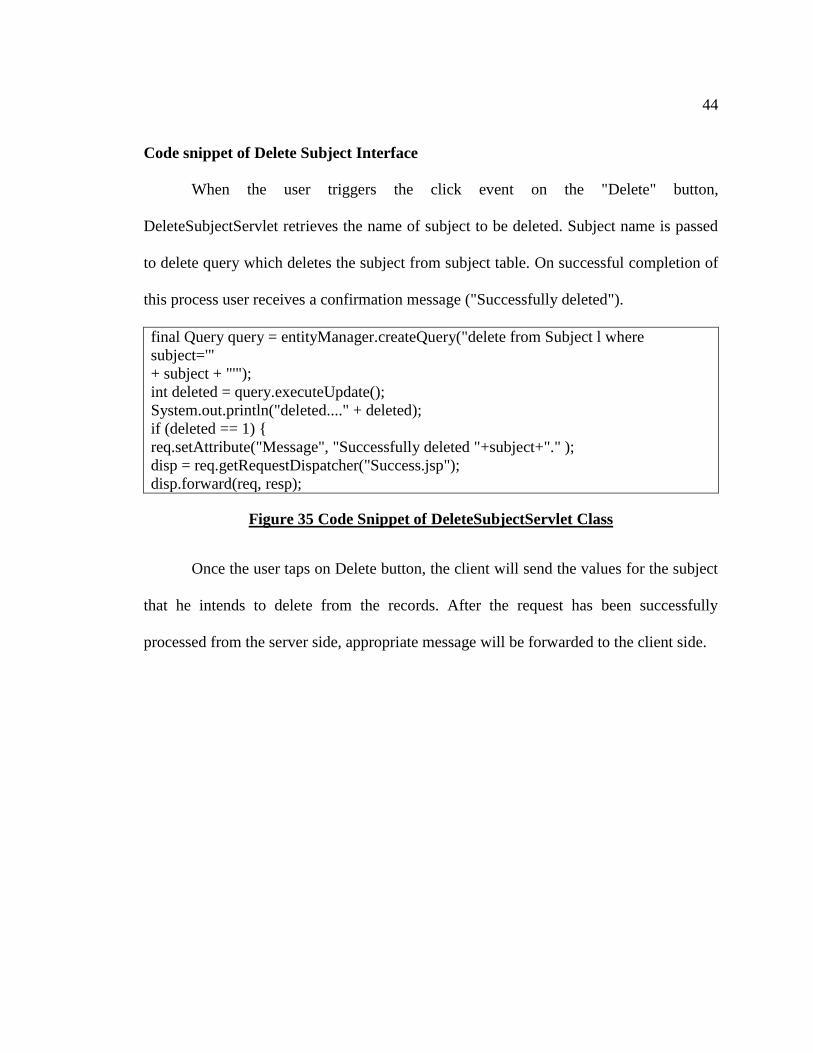
Code snippet of Delete Subject Interface
When the user triggers the click event on the "Delete" button,
DeleteSubjectServlet retrieves the name of subject to be deleted. Subject name is passed
to delete query which deletes the subject from subject table. On successful completion of
this process user receives a confirmation message ("Successfully deleted").
final Query query = entityManager.createQuery("delete from Subject l where
subject='"
+ subject + "'");
int deleted = query.executeUpdate();
System.out.println("deleted...." + deleted);
if (deleted == 1) {
req.setAttribute("Message", "Successfully deleted "+subject+"." );
disp = req.getRequestDispatcher("Success.jsp");
disp.forward(req, resp);
Figure 35 Code Snippet of DeleteSubjectServlet Class
Once the user taps on Delete button, the client will send the values for the subject
that he intends to delete from the records. After the request has been successfully
processed from the server side, appropriate message will be forwarded to the client side.
45
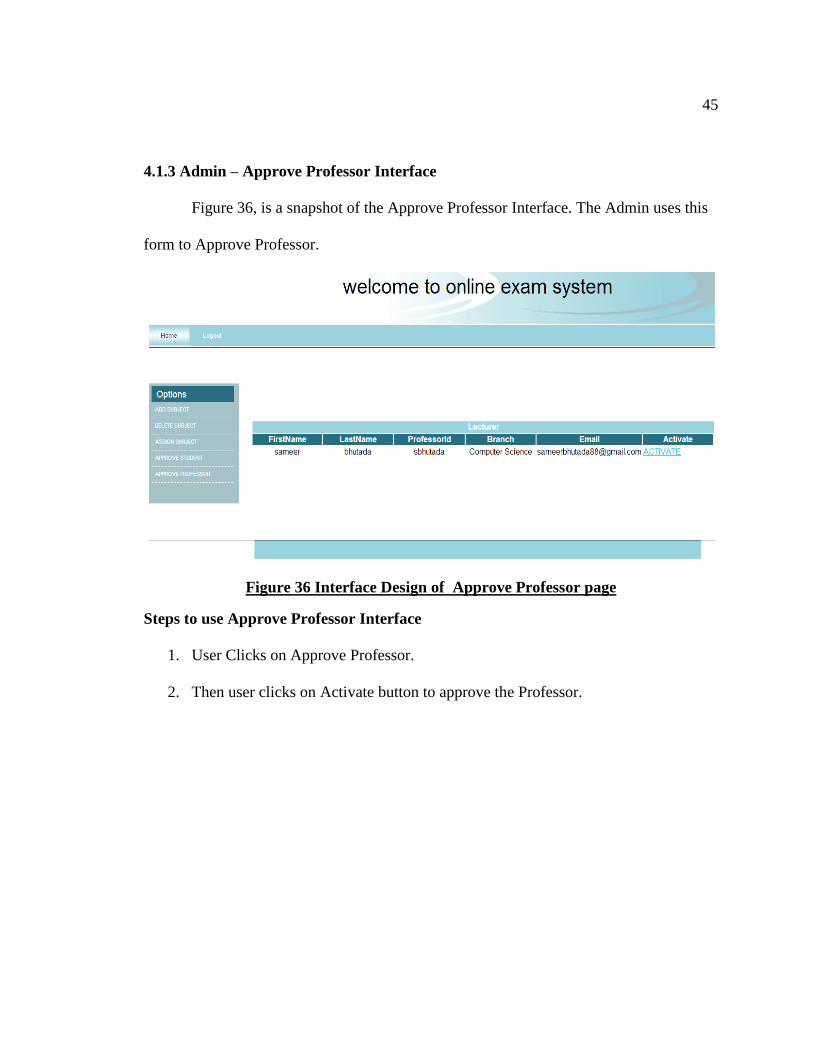
4.1.3 Admin – Approve Professor Interface
Figure 36, is a snapshot of the Approve Professor Interface. The Admin uses this
form to Approve Professor.
Figure 36 Interface Design of Approve Professor page
Steps to use Approve Professor Interface
1. User Clicks on Approve Professor.
2. Then user clicks on Activate button to approve the Professor.
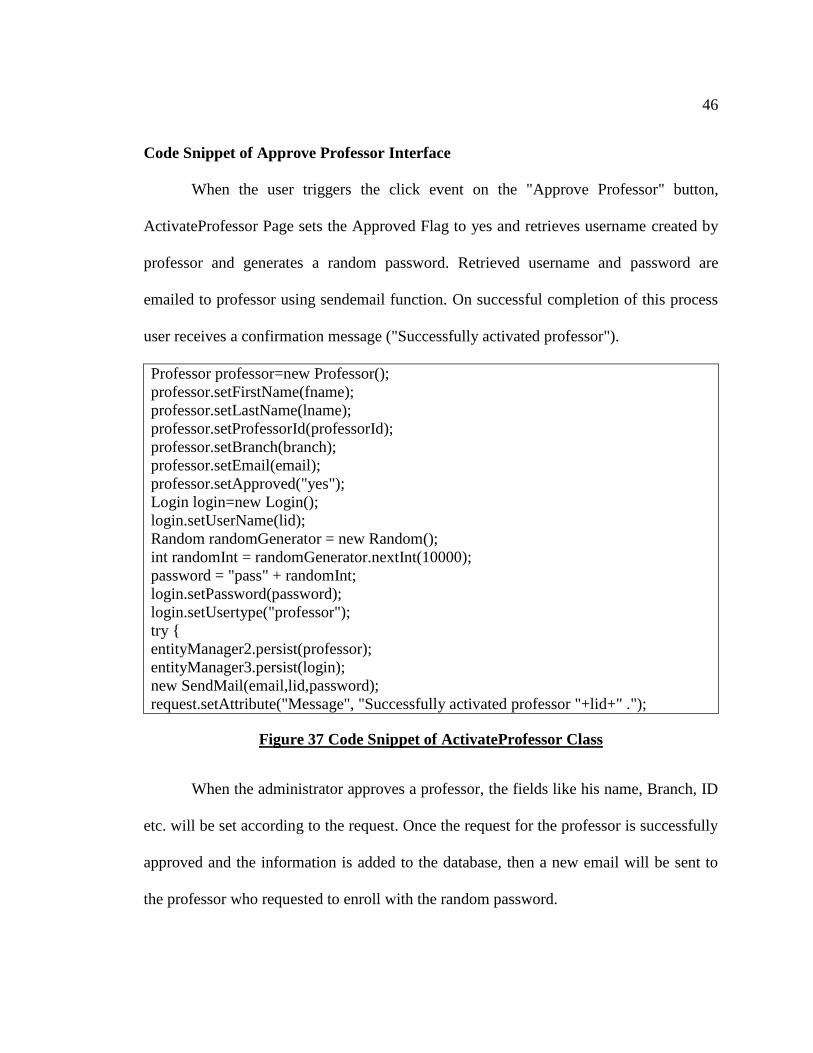
46
Code Snippet of Approve Professor Interface
When the user triggers the click event on the "Approve Professor" button,
ActivateProfessor Page sets the Approved Flag to yes and retrieves username created by
professor and generates a random password. Retrieved username and password are
emailed to professor using sendemail function. On successful completion of this process
user receives a confirmation message ("Successfully activated professor").
Professor professor=new Professor();
professor.setFirstName(fname);
professor.setLastName(lname);
professor.setProfessorId(professorId);
professor.setBranch(branch);
professor.setEmail(email);
professor.setApproved("yes");
Login login=new Login();
login.setUserName(lid);
Random randomGenerator = new Random();
int randomInt = randomGenerator.nextInt(10000);
password = "pass" + randomInt;
login.setPassword(password);
login.setUsertype("professor");
try {
entityManager2.persist(professor);
entityManager3.persist(login);
new SendMail(email,lid,password);
request.setAttribute("Message", "Successfully activated professor "+lid+" .");
Figure 37 Code Snippet of ActivateProfessor Class
When the administrator approves a professor, the fields like his name, Branch, ID
etc. will be set according to the request. Once the request for the professor is successfully
approved and the information is added to the database, then a new email will be sent to
the professor who requested to enroll with the random password.
47
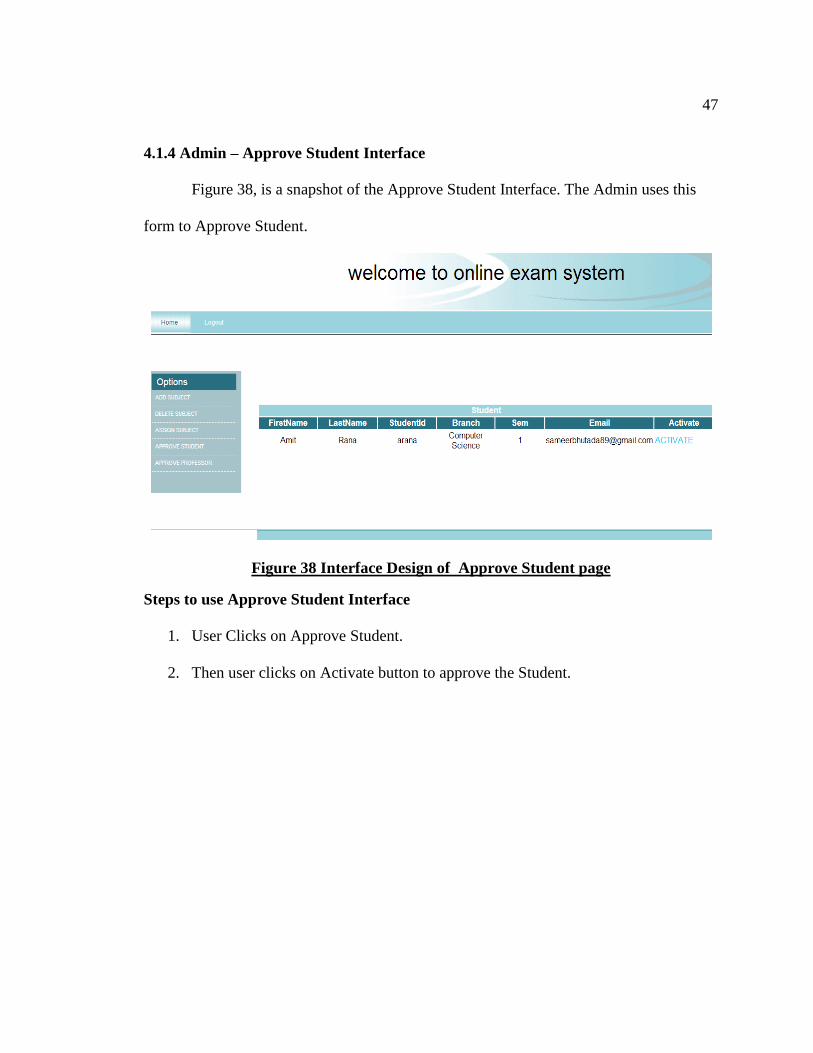
4.1.4 Admin – Approve Student Interface
Figure 38, is a snapshot of the Approve Student Interface. The Admin uses this
form to Approve Student.
Figure 38 Interface Design of Approve Student page
Steps to use Approve Student Interface
1. User Clicks on Approve Student.
2. Then user clicks on Activate button to approve the Student.
48
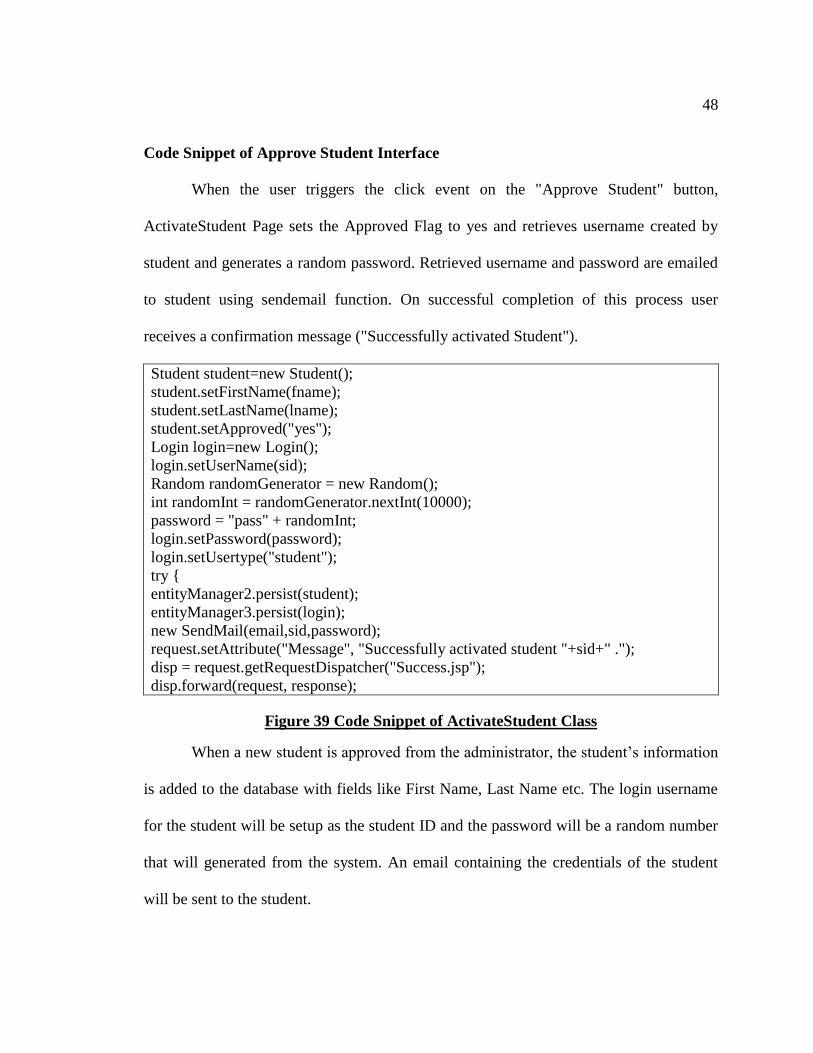
Code Snippet of Approve Student Interface
When the user triggers the click event on the "Approve Student" button,
ActivateStudent Page sets the Approved Flag to yes and retrieves username created by
student and generates a random password. Retrieved username and password are emailed
to student using sendemail function. On successful completion of this process user
receives a confirmation message ("Successfully activated Student").
Student student=new Student();
student.setFirstName(fname);
student.setLastName(lname);
student.setApproved("yes");
Login login=new Login();
login.setUserName(sid);
Random randomGenerator = new Random();
int randomInt = randomGenerator.nextInt(10000);
password = "pass" + randomInt;
login.setPassword(password);
login.setUsertype("student");
try {
entityManager2.persist(student);
entityManager3.persist(login);
new SendMail(email,sid,password);
request.setAttribute("Message", "Successfully activated student "+sid+" .");
disp = request.getRequestDispatcher("Success.jsp");
disp.forward(request, response);
Figure 39 Code Snippet of ActivateStudent Class
When a new student is approved from the administrator, the student’s information
is added to the database with fields like First Name, Last Name etc. The login username
for the student will be setup as the student ID and the password will be a random number
that will generated from the system. An email containing the credentials of the student
will be sent to the student.
49
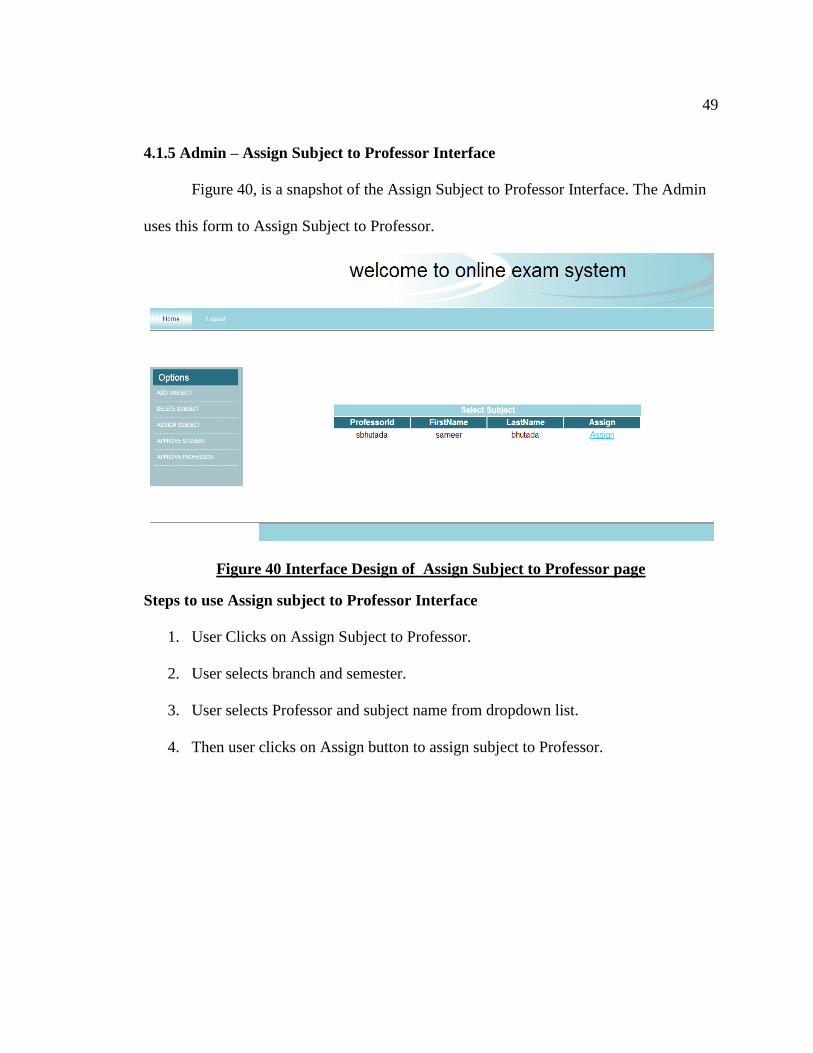
4.1.5 Admin – Assign Subject to Professor Interface
Figure 40, is a snapshot of the Assign Subject to Professor Interface. The Admin
uses this form to Assign Subject to Professor.
Figure 40 Interface Design of Assign Subject to Professor page
Steps to use Assign subject to Professor Interface
1. User Clicks on Assign Subject to Professor.
2. User selects branch and semester.
3. User selects Professor and subject name from dropdown list.
4. Then user clicks on Assign button to assign subject to Professor.
50
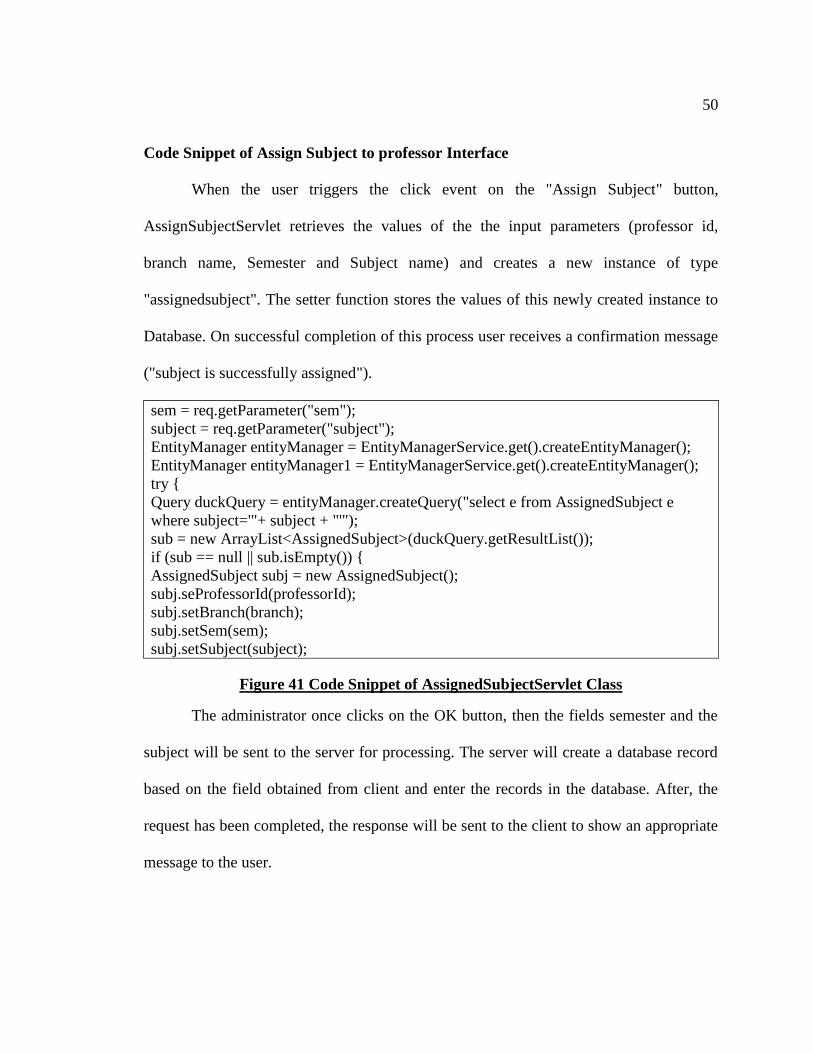
Code Snippet of Assign Subject to professor Interface
When the user triggers the click event on the "Assign Subject" button,
AssignSubjectServlet retrieves the values of the the input parameters (professor id,
branch name, Semester and Subject name) and creates a new instance of type
"assignedsubject". The setter function stores the values of this newly created instance to
Database. On successful completion of this process user receives a confirmation message
("subject is successfully assigned").
sem = req.getParameter("sem");
subject = req.getParameter("subject");
EntityManager entityManager = EntityManagerService.get().createEntityManager();
EntityManager entityManager1 = EntityManagerService.get().createEntityManager();
try {
Query duckQuery = entityManager.createQuery("select e from AssignedSubject e
where subject='"+ subject + "'");
sub = new ArrayList<AssignedSubject>(duckQuery.getResultList());
if (sub == null || sub.isEmpty()) {
AssignedSubject subj = new AssignedSubject();
subj.seProfessorId(professorId);
subj.setBranch(branch);
subj.setSem(sem);
subj.setSubject(subject);
Figure 41 Code Snippet of AssignedSubjectServlet Class
The administrator once clicks on the OK button, then the fields semester and the
subject will be sent to the server for processing. The server will create a database record
based on the field obtained from client and enter the records in the database. After, the
request has been completed, the response will be sent to the client to show an appropriate
message to the user.
51
4.2 Professor
This user is responsible for taking the examinations in the class. He can create
new examinations, set some practice exams or add/modify the questions for the exams.
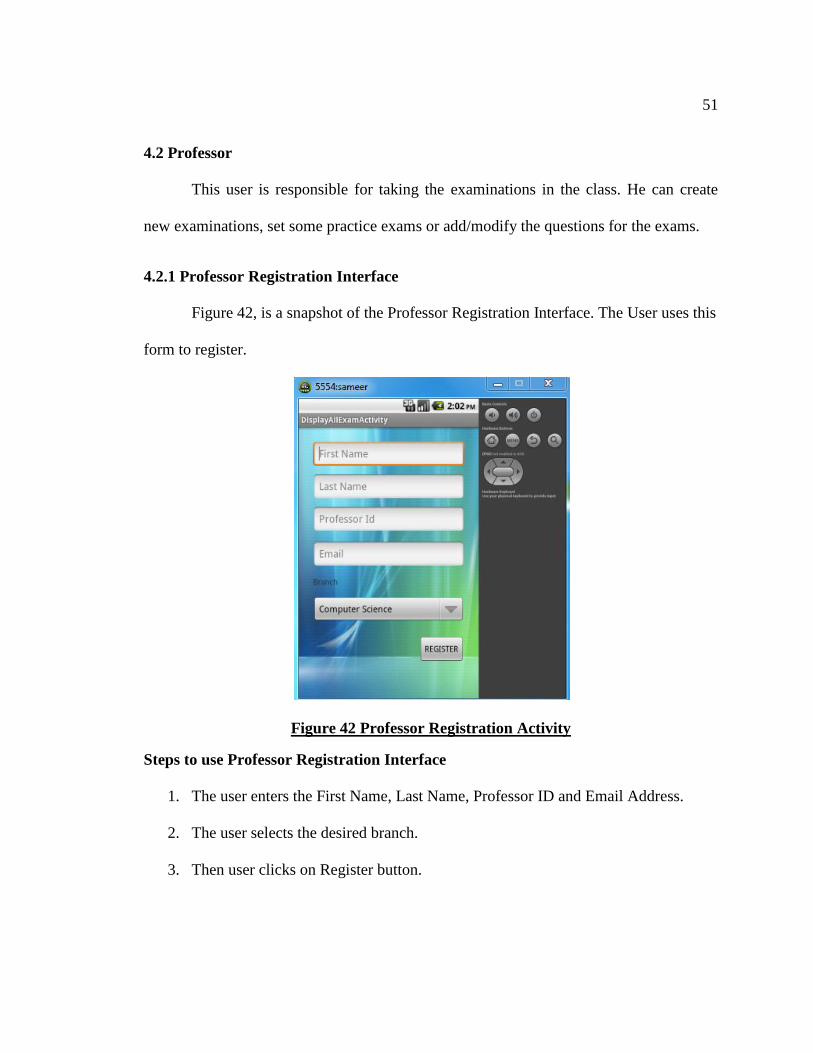
4.2.1 Professor Registration Interface
Figure 42, is a snapshot of the Professor Registration Interface. The User uses this
form to register.
Figure 42 Professor Registration Activity
Steps to use Professor Registration Interface
1. The user enters the First Name, Last Name, Professor ID and Email Address.
2. The user selects the desired branch.
3. Then user clicks on Register button.
52
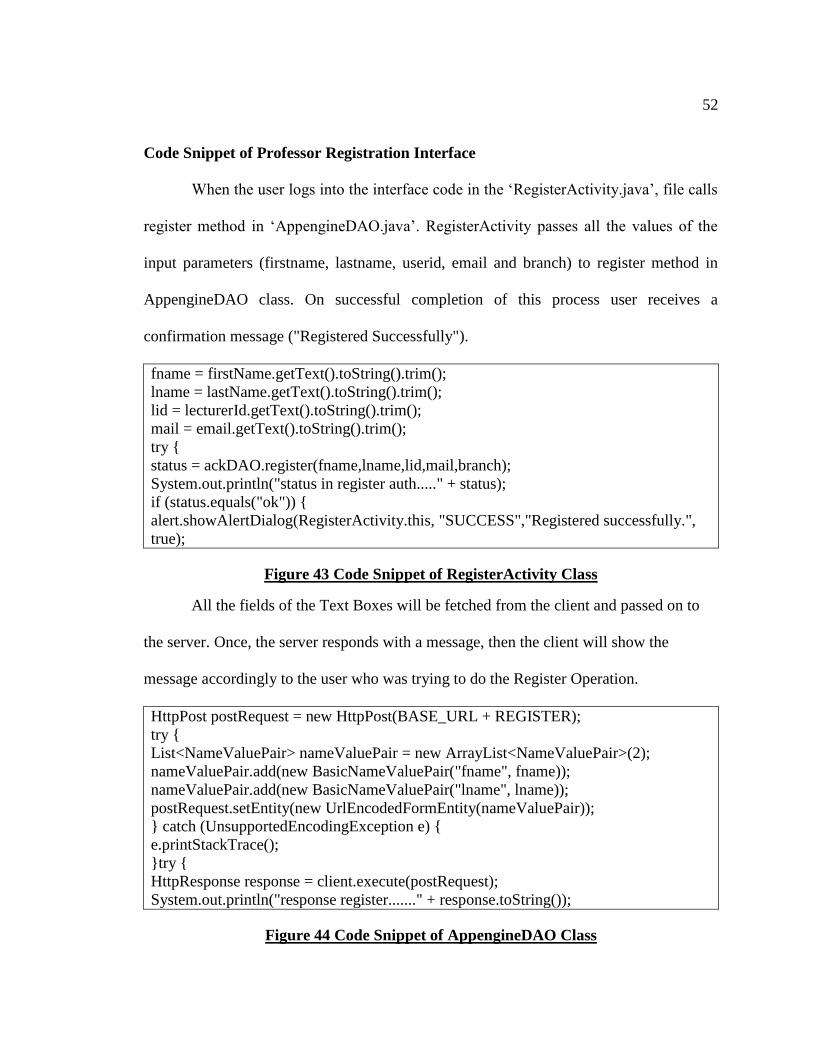
Code Snippet of Professor Registration Interface
When the user logs into the interface code in the ‘RegisterActivity.java’, file calls
register method in ‘AppengineDAO.java’. RegisterActivity passes all the values of the
input parameters (firstname, lastname, userid, email and branch) to register method in
AppengineDAO class. On successful completion of this process user receives a
confirmation message ("Registered Successfully").
fname = firstName.getText().toString().trim();
lname = lastName.getText().toString().trim();
lid = lecturerId.getText().toString().trim();
mail = email.getText().toString().trim();
try {
status = ackDAO.register(fname,lname,lid,mail,branch);
System.out.println("status in register auth....." + status);
if (status.equals("ok")) {
alert.showAlertDialog(RegisterActivity.this, "SUCCESS","Registered successfully.",
true);
Figure 43 Code Snippet of RegisterActivity Class
All the fields of the Text Boxes will be fetched from the client and passed on to
the server. Once, the server responds with a message, then the client will show the
message accordingly to the user who was trying to do the Register Operation.
HttpPost postRequest = new HttpPost(BASE_URL + REGISTER);
try {
List<NameValuePair> nameValuePair = new ArrayList<NameValuePair>(2);
nameValuePair.add(new BasicNameValuePair("fname", fname));
nameValuePair.add(new BasicNameValuePair("lname", lname));
postRequest.setEntity(new UrlEncodedFormEntity(nameValuePair));
} catch (UnsupportedEncodingException e) {
e.printStackTrace();
}try {
HttpResponse response = client.execute(postRequest);
System.out.println("response register......." + response.toString());
Figure 44 Code Snippet of AppengineDAO Class
53
RegisterLecturerServlet class on server retrieves First Name, Last Name,
Professor ID and Email Address and branch name and creates a new instance of type
"professor". The setter function stores the values of this newly created instance to
Database. On successful completion of this process response is send back with a
confirmation message ("Registered Successfully").
firstname = req.getParameter("fname");
lastname = req.getParameter("lname");
professorId = req.getParameter("professorId");
branch = req.getParameter("branch");
email = req.getParameter("email");
//creating entity manager
EntityManager entityManager = EntityManagerService.get()
.createEntityManager();
try {Query duckQuery = entityManager
.createQuery("select e from Professor e where professorId='"+professorId+"'");
lect = new ArrayList<Professor>(duckQuery.getResultList());
if (lect== null || lect.isEmpty()) {
Professor professor=new Professor();
professor.setFirstName(firstname);
professor.setLastName(lastname);
professor.setProfessorId(professorId);
professor.setBranch(branch);
professor.setEmail(email);
Figure 45 Code Snippet of RegisterProfessorServlet Class
The application will fetch the details of the Professor such as First Name, Last
Name, ID etc. and pass it to the server. The server will process the request from the client
and enter the records into the database. Once the process is completed on the server side,
the server will response with the status code and if the status is OK that means the request
is completed successfully the application will show an appropriate message to the client.
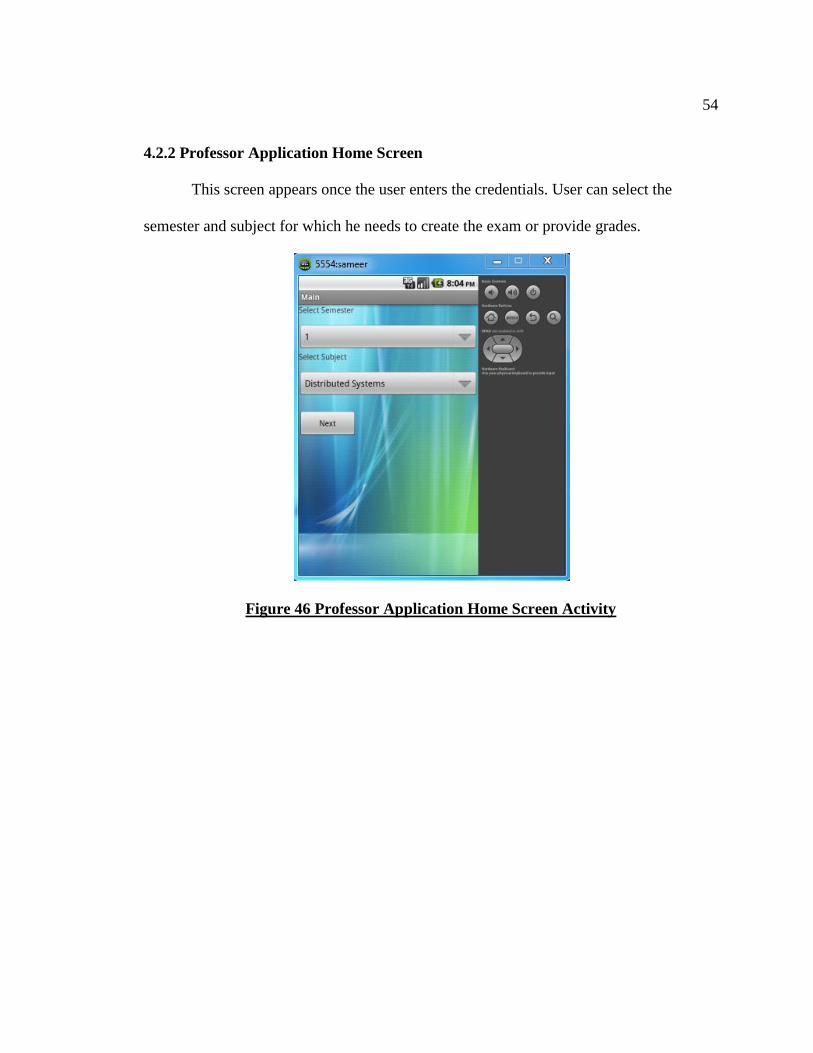
54
4.2.2 Professor Application Home Screen
This screen appears once the user enters the credentials. User can select the
semester and subject for which he needs to create the exam or provide grades.
Figure 46 Professor Application Home Screen Activity
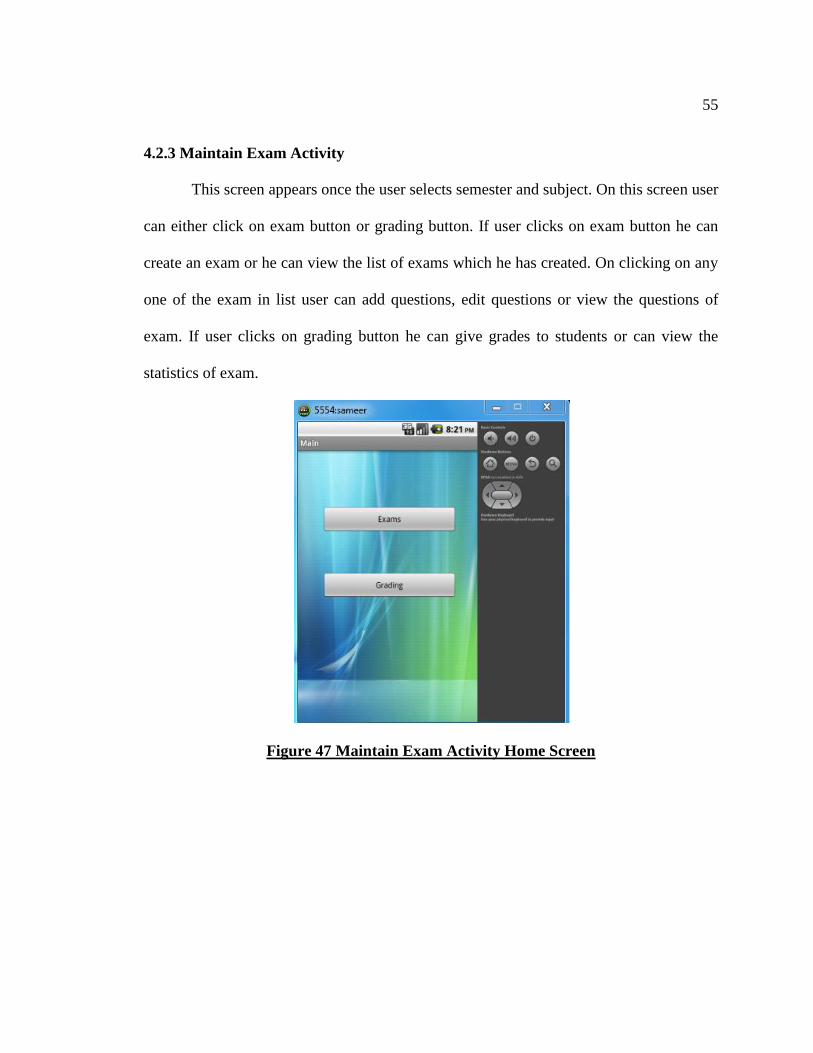
55
4.2.3 Maintain Exam Activity
This screen appears once the user selects semester and subject. On this screen user
can either click on exam button or grading button. If user clicks on exam button he can
create an exam or he can view the list of exams which he has created. On clicking on any
one of the exam in list user can add questions, edit questions or view the questions of
exam. If user clicks on grading button he can give grades to students or can view the
statistics of exam.
Figure 47 Maintain Exam Activity Home Screen
56
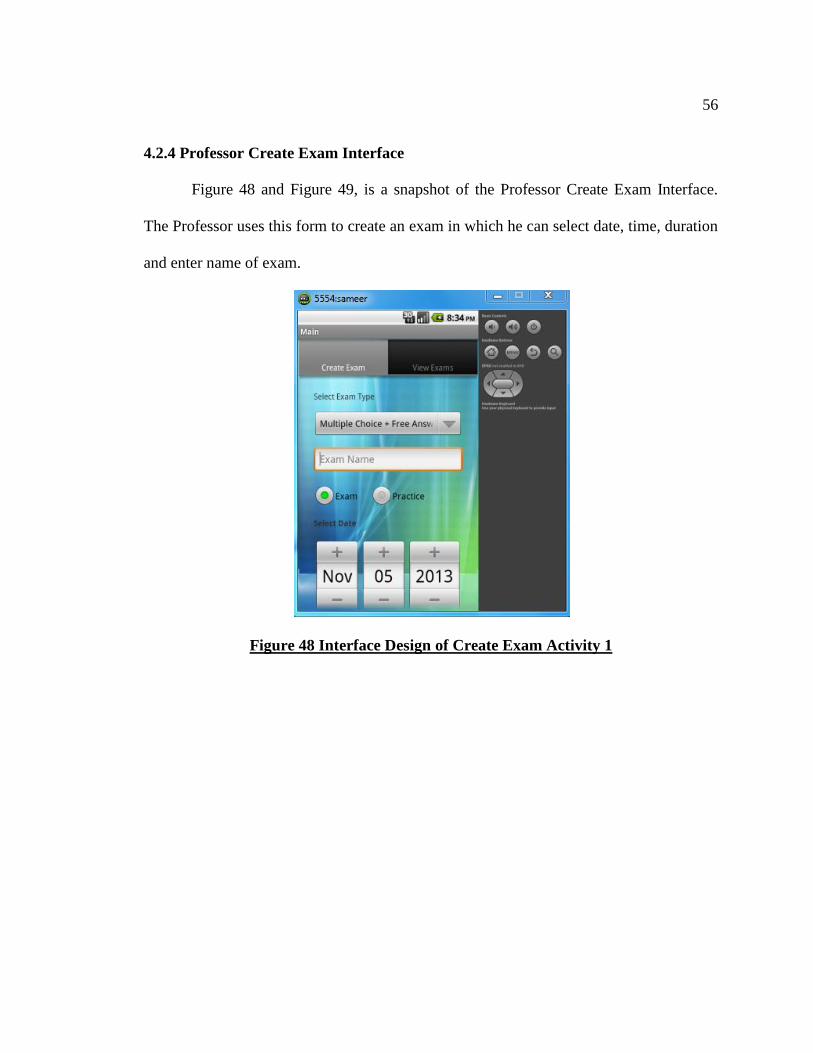
4.2.4 Professor Create Exam Interface
Figure 48 and Figure 49, is a snapshot of the Professor Create Exam Interface.
The Professor uses this form to create an exam in which he can select date, time, duration
and enter name of exam.
Figure 48 Interface Design of Create Exam Activity 1

57
Figure 49 Interface Design of Create Exam Activity 2
Steps to use Create Exam Interface
1. The user selects type of exam.
2. The user enters name of exam.
3. The user selects date of exam.
4. The user selects time range in which student can take the exam.
5. Then user selects duration of exam.
6. Then clicks on set exam button to set the exam.

58
Code Snippet of Professor Create Exam Interface
When the user logs into the interface code in the ‘SetExamActivity.java’, file calls
setExam method in ‘AppengineDAO.java’. While calling setExam method in
‘AppengineDAO.java’ it passes all the values of the input parameters entered by the user
to setExam method in AppengineDAO class.
examName = editExamName.getText().toString().trim();
date1 = pad(day)+"-"+ padMonth(month)+"-"+year;
try { status =
ackDAO.setExam(user,branch,sem,examType,examName,subject,date1,time.trim(),sec
ondtime,duration);
if (status.equals("ok")) {System.out.println("inside STATUS OK.....");
Figure 50 Code Snippet of SetExamActivity Class
The application will get the name of the Exam entered in the Text Box provided
for the Exam Name. It will also get the data from the date picker regarding the time and
date of the examination. After all the values are obtained from the user inputs, the
application passes the data on to the server side to make an entry in the database and
return the appropriate process status. The response obtained from the server will be
shown to the user accordingly.
HttpPost postRequest = new HttpPost(BASE_URL + SET_EXAM);
try {List<NameValuePair> nameValuePair = new ArrayList<NameValuePair>(2);
nameValuePair.add(new BasicNameValuePair("lecturerId", user));
nameValuePair.add(new BasicNameValuePair("branch", branch));
nameValuePair.add(new BasicNameValuePair("sem", sem));
nameValuePair.add(new BasicNameValuePair("examType", examType));
nameValuePair.add(new BasicNameValuePair("duration", duration));
postRequest.setEntity(new UrlEncodedFormEntity(nameValuePair));
} catch (UnsupportedEncodingException e) {
e.printStackTrace();
}try { HttpResponse response = client.execute(postRequest);
Figure 51 Code Snippet of AppengineDAO Class
59
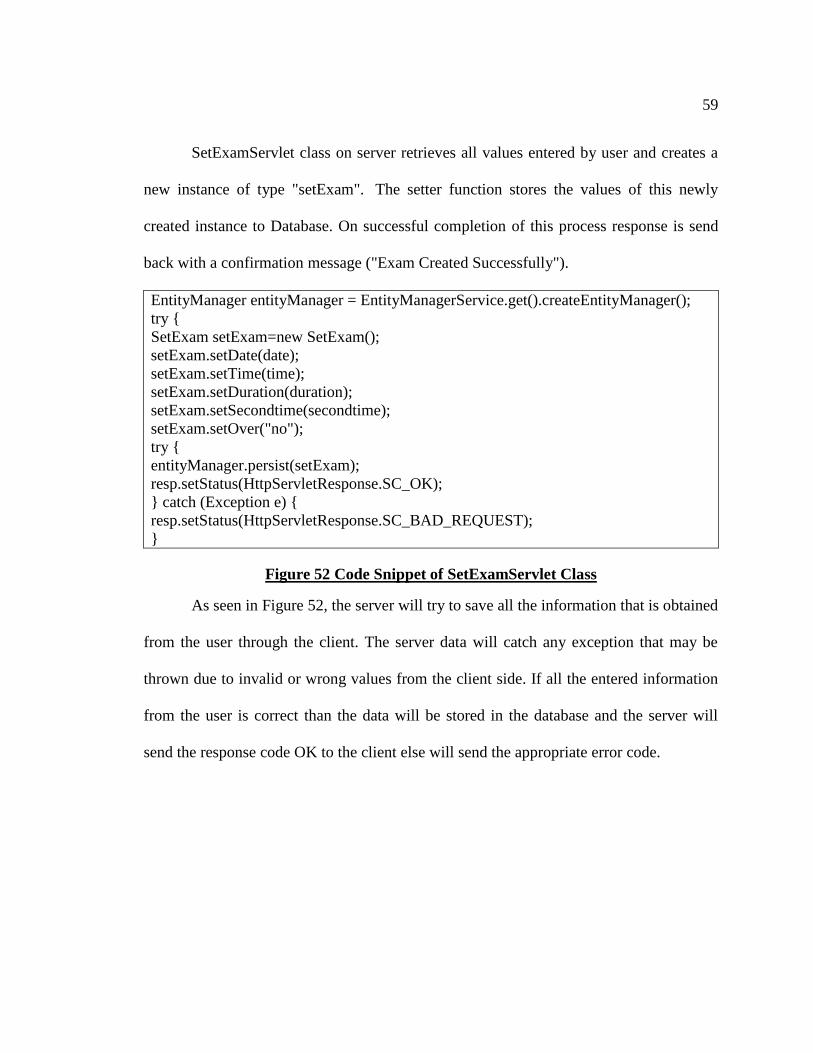
SetExamServlet class on server retrieves all values entered by user and creates a
new instance of type "setExam". The setter function stores the values of this newly
created instance to Database. On successful completion of this process response is send
back with a confirmation message ("Exam Created Successfully").
EntityManager entityManager = EntityManagerService.get().createEntityManager();
try {
SetExam setExam=new SetExam();
setExam.setDate(date);
setExam.setTime(time);
setExam.setDuration(duration);
setExam.setSecondtime(secondtime);
setExam.setOver("no");
try {
entityManager.persist(setExam);
resp.setStatus(HttpServletResponse.SC_OK);
} catch (Exception e) {
resp.setStatus(HttpServletResponse.SC_BAD_REQUEST);
}
Figure 52 Code Snippet of SetExamServlet Class
As seen in Figure 52, the server will try to save all the information that is obtained
from the user through the client. The server data will catch any exception that may be
thrown due to invalid or wrong values from the client side. If all the entered information
from the user is correct than the data will be stored in the database and the server will
send the response code OK to the client else will send the appropriate error code.
60
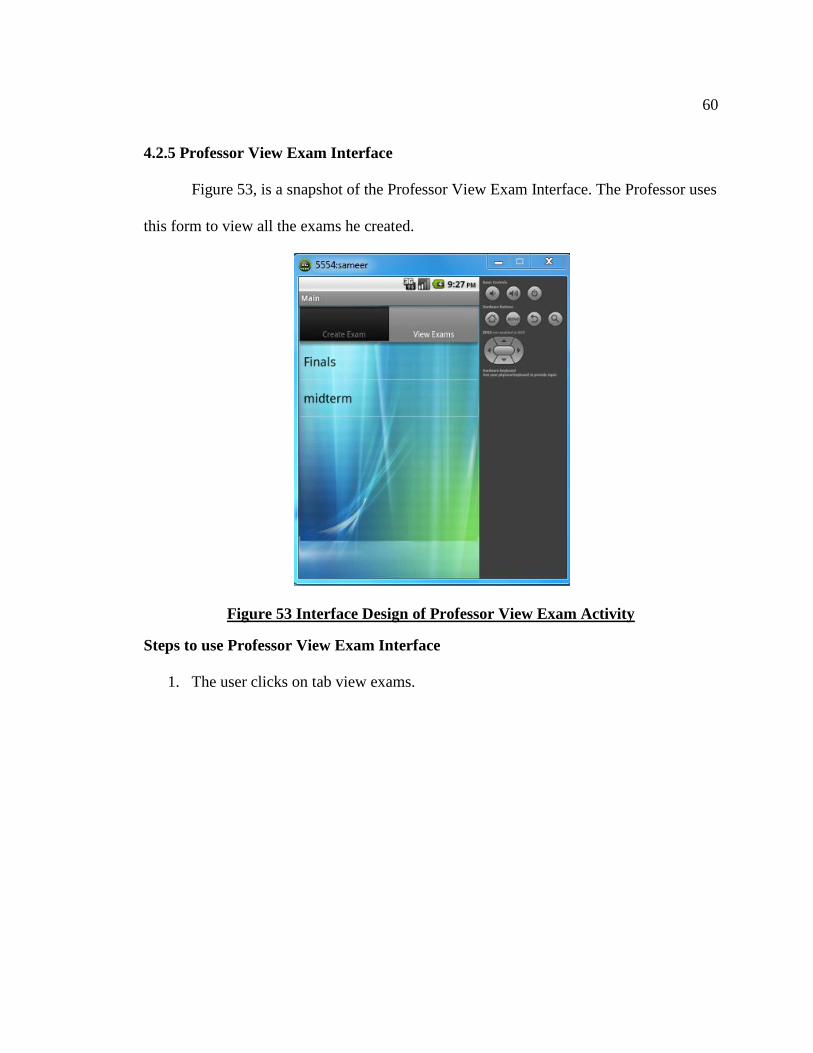
4.2.5 Professor View Exam Interface
Figure 53, is a snapshot of the Professor View Exam Interface. The Professor uses
this form to view all the exams he created.
Figure 53 Interface Design of Professor View Exam Activity
Steps to use Professor View Exam Interface
1. The user clicks on tab view exams.
61
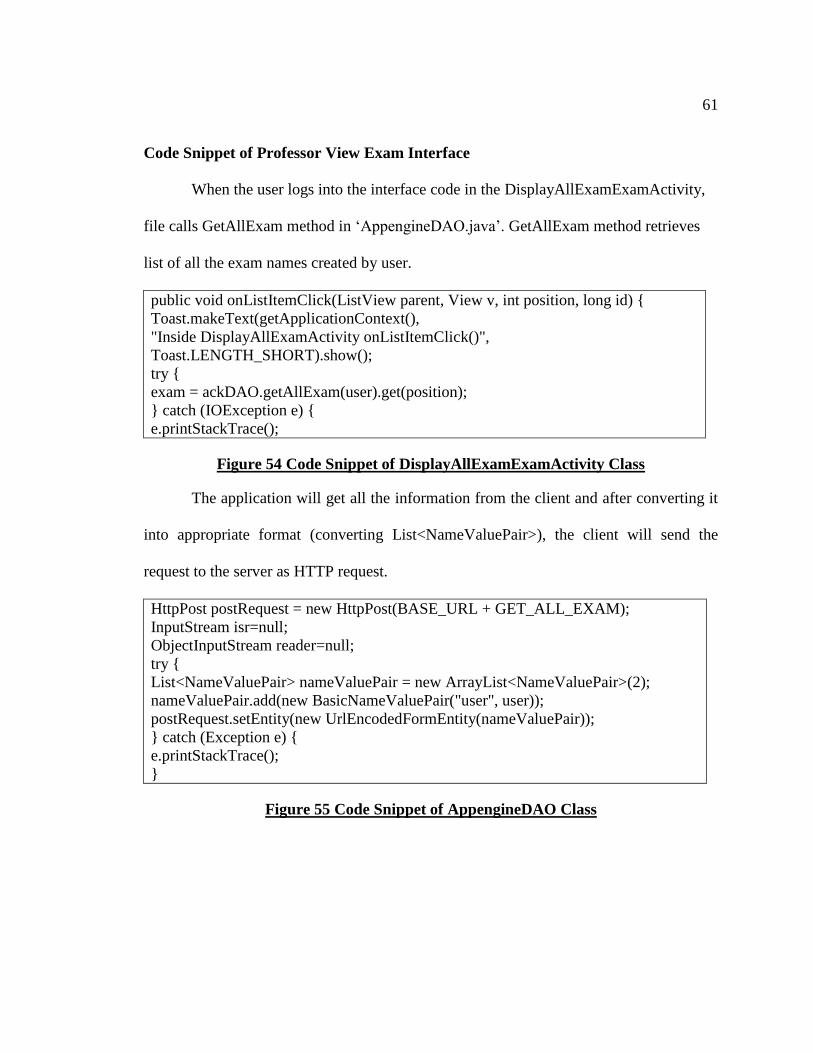
Code Snippet of Professor View Exam Interface
When the user logs into the interface code in the DisplayAllExamExamActivity,
file calls GetAllExam method in ‘AppengineDAO.java’. GetAllExam method retrieves
list of all the exam names created by user.
public void onListItemClick(ListView parent, View v, int position, long id) {
Toast.makeText(getApplicationContext(),
"Inside DisplayAllExamActivity onListItemClick()",
Toast.LENGTH_SHORT).show();
try {
exam = ackDAO.getAllExam(user).get(position);
} catch (IOException e) {
e.printStackTrace();
Figure 54 Code Snippet of DisplayAllExamExamActivity Class
The application will get all the information from the client and after converting it
into appropriate format (converting List<NameValuePair>), the client will send the
request to the server as HTTP request.
HttpPost postRequest = new HttpPost(BASE_URL + GET_ALL_EXAM);
InputStream isr=null;
ObjectInputStream reader=null;
try {
List<NameValuePair> nameValuePair = new ArrayList<NameValuePair>(2);
nameValuePair.add(new BasicNameValuePair("user", user));
postRequest.setEntity(new UrlEncodedFormEntity(nameValuePair));
} catch (Exception e) {
e.printStackTrace();
}
Figure 55 Code Snippet of AppengineDAO Class
62
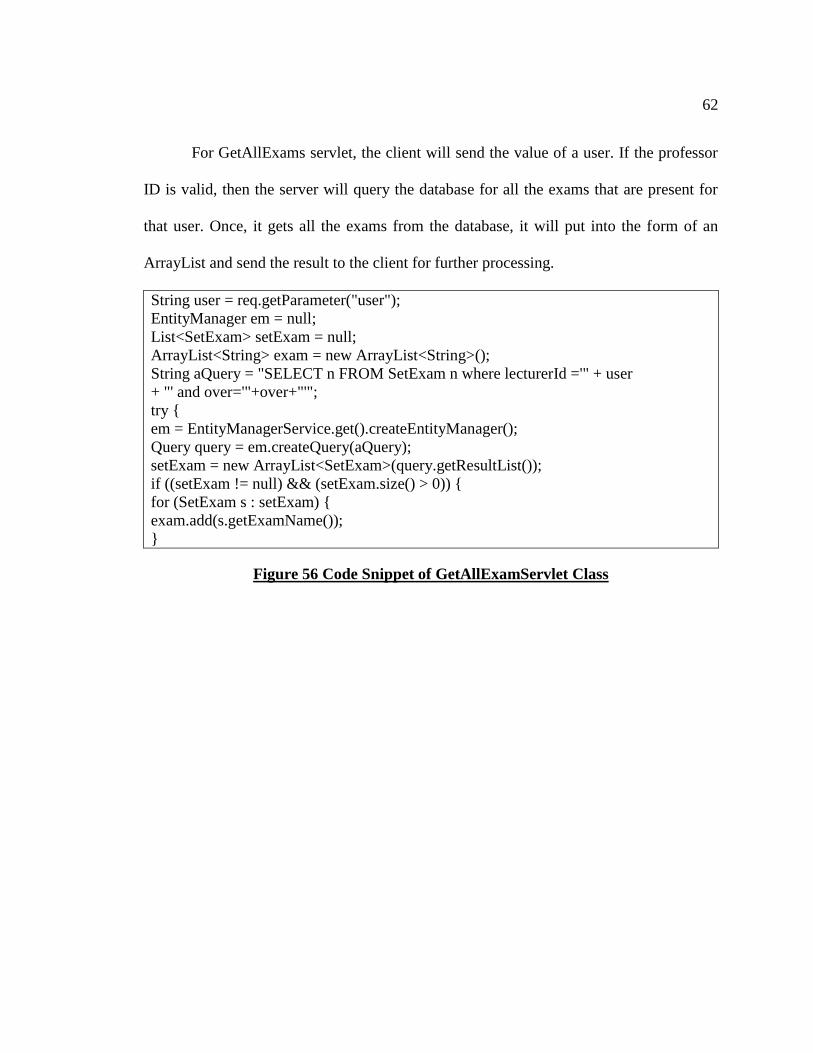
For GetAllExams servlet, the client will send the value of a user. If the professor
ID is valid, then the server will query the database for all the exams that are present for
that user. Once, it gets all the exams from the database, it will put into the form of an
ArrayList and send the result to the client for further processing.
String user = req.getParameter("user");
EntityManager em = null;
List<SetExam> setExam = null;
ArrayList<String> exam = new ArrayList<String>();
String aQuery = "SELECT n FROM SetExam n where lecturerId ='" + user
+ "' and over='"+over+"'";
try {
em = EntityManagerService.get().createEntityManager();
Query query = em.createQuery(aQuery);
setExam = new ArrayList<SetExam>(query.getResultList());
if ((setExam != null) && (setExam.size() > 0)) {
for (SetExam s : setExam) {
exam.add(s.getExamName());
}
Figure 56 Code Snippet of GetAllExamServlet Class
63
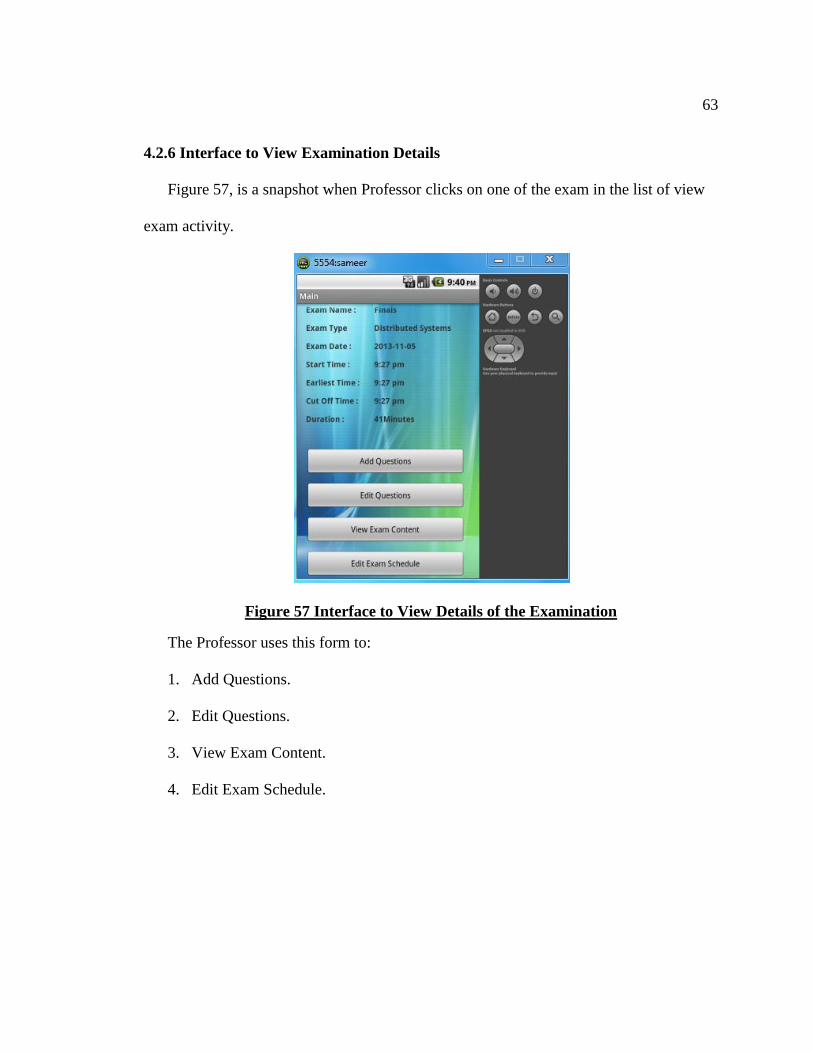
4.2.6 Interface to View Examination Details
Figure 57, is a snapshot when Professor clicks on one of the exam in the list of view
exam activity.
Figure 57 Interface to View Details of the Examination
The Professor uses this form to:
1. Add Questions.
2. Edit Questions.
3. View Exam Content.
4. Edit Exam Schedule.

64
4.2.7 Professor Add question Exam Interface
Figure 58 and figure 59, is a snapshot of the Professor Add Question Interface.
The Professor uses this form to add multiple choice or free response questions to the
exam.
Figure 58 Interface Design of Professor Add question Activity
65
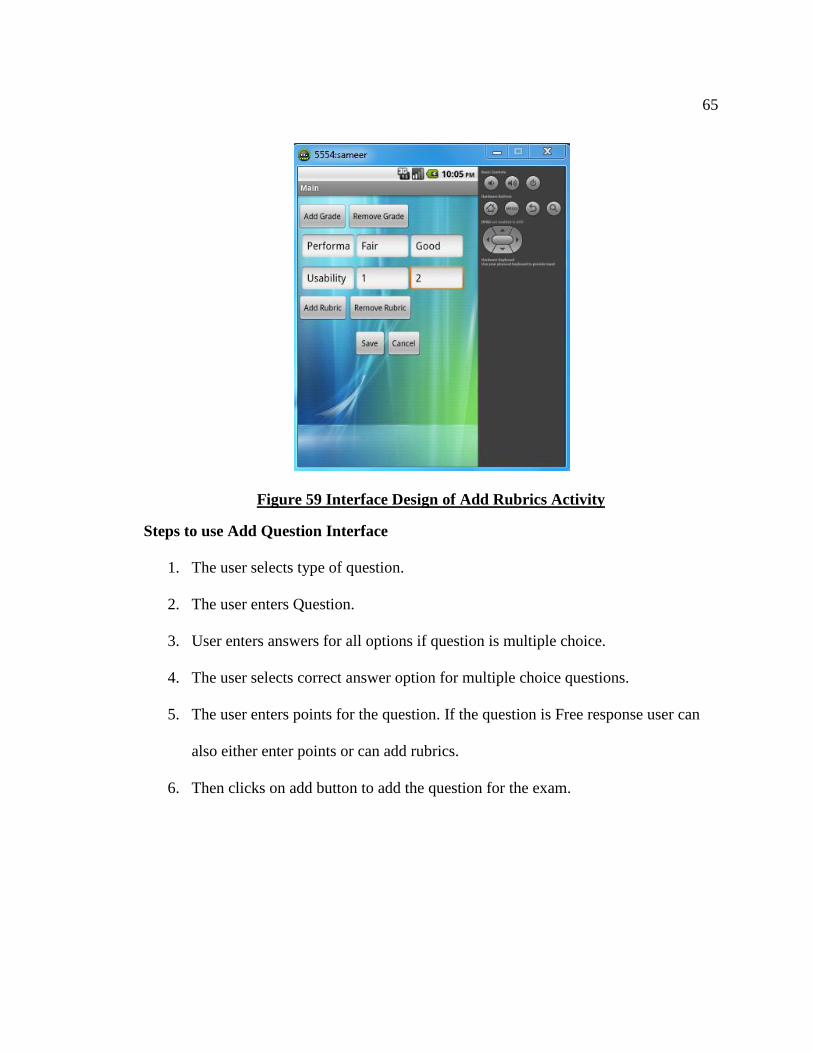
Figure 59 Interface Design of Add Rubrics Activity
Steps to use Add Question Interface
1. The user selects type of question.
2. The user enters Question.
3. User enters answers for all options if question is multiple choice.
4. The user selects correct answer option for multiple choice questions.
5. The user enters points for the question. If the question is Free response user can
also either enter points or can add rubrics.
6. Then clicks on add button to add the question for the exam.
66
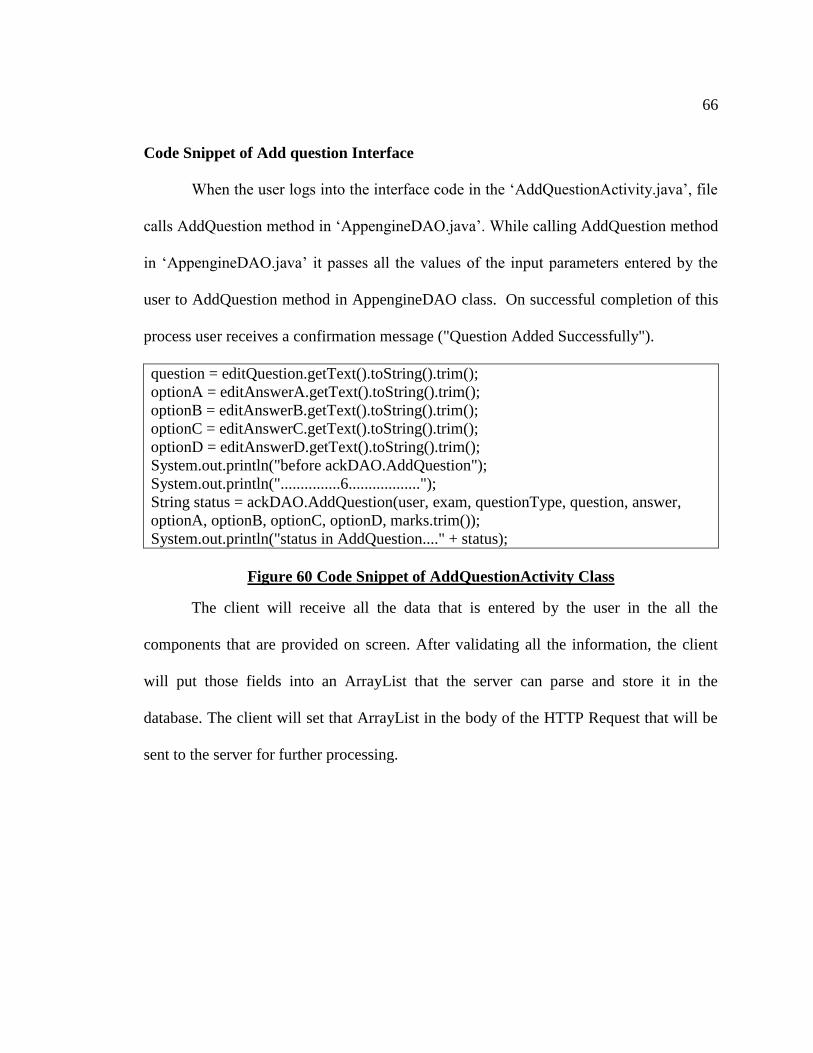
Code Snippet of Add question Interface
When the user logs into the interface code in the ‘AddQuestionActivity.java’, file
calls AddQuestion method in ‘AppengineDAO.java’. While calling AddQuestion method
in ‘AppengineDAO.java’ it passes all the values of the input parameters entered by the
user to AddQuestion method in AppengineDAO class. On successful completion of this
process user receives a confirmation message ("Question Added Successfully").
question = editQuestion.getText().toString().trim();
optionA = editAnswerA.getText().toString().trim();
optionB = editAnswerB.getText().toString().trim();
optionC = editAnswerC.getText().toString().trim();
optionD = editAnswerD.getText().toString().trim();
System.out.println("before ackDAO.AddQuestion");
System.out.println("...............6..................");
String status = ackDAO.AddQuestion(user, exam, questionType, question, answer,
optionA, optionB, optionC, optionD, marks.trim());
System.out.println("status in AddQuestion...." + status);
Figure 60 Code Snippet of AddQuestionActivity Class
The client will receive all the data that is entered by the user in the all the
components that are provided on screen. After validating all the information, the client
will put those fields into an ArrayList that the server can parse and store it in the
database. The client will set that ArrayList in the body of the HTTP Request that will be
sent to the server for further processing.
67
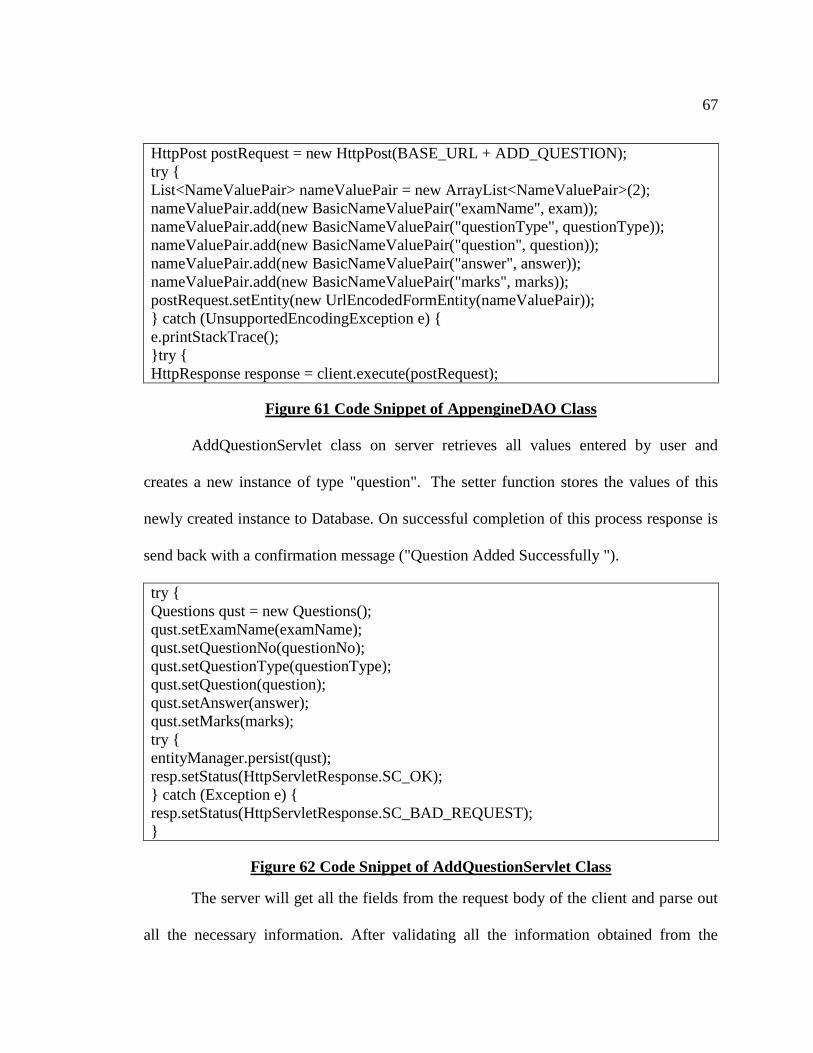
HttpPost postRequest = new HttpPost(BASE_URL + ADD_QUESTION);
try {
List<NameValuePair> nameValuePair = new ArrayList<NameValuePair>(2);
nameValuePair.add(new BasicNameValuePair("examName", exam));
nameValuePair.add(new BasicNameValuePair("questionType", questionType));
nameValuePair.add(new BasicNameValuePair("question", question));
nameValuePair.add(new BasicNameValuePair("answer", answer));
nameValuePair.add(new BasicNameValuePair("marks", marks));
postRequest.setEntity(new UrlEncodedFormEntity(nameValuePair));
} catch (UnsupportedEncodingException e) {
e.printStackTrace();
}try {
HttpResponse response = client.execute(postRequest);
Figure 61 Code Snippet of AppengineDAO Class
AddQuestionServlet class on server retrieves all values entered by user and
creates a new instance of type "question". The setter function stores the values of this
newly created instance to Database. On successful completion of this process response is
send back with a confirmation message ("Question Added Successfully ").
try {
Questions qust = new Questions();
qust.setExamName(examName);
qust.setQuestionNo(questionNo);
qust.setQuestionType(questionType);
qust.setQuestion(question);
qust.setAnswer(answer);
qust.setMarks(marks);
try {
entityManager.persist(qust);
resp.setStatus(HttpServletResponse.SC_OK);
} catch (Exception e) {
resp.setStatus(HttpServletResponse.SC_BAD_REQUEST);
}
Figure 62 Code Snippet of AddQuestionServlet Class
The server will get all the fields from the request body of the client and parse out
all the necessary information. After validating all the information obtained from the
68
client, the server will store the data into the database and return the response code OK to
the client. If the information is not appropriate, then the server will respond with the error
code “BAD REQUEST”.

69
4.2.8 Professor Edit question Exam Interface
Figure 63, is a snapshot of the Professor Edit Question Interface. The Professor
uses this form to edit questions.
Figure 63 Interface Design of Professor Edit question Page
Steps to use Edit Question Interface
1. The user clicks on edit question.
2. Questions set by the user are retrieved in queue.
3. User can modify questions or answers.
4. Then clicks on edit button to edit the question for the exam.
5. User can also click on prev or next button to go back and forth
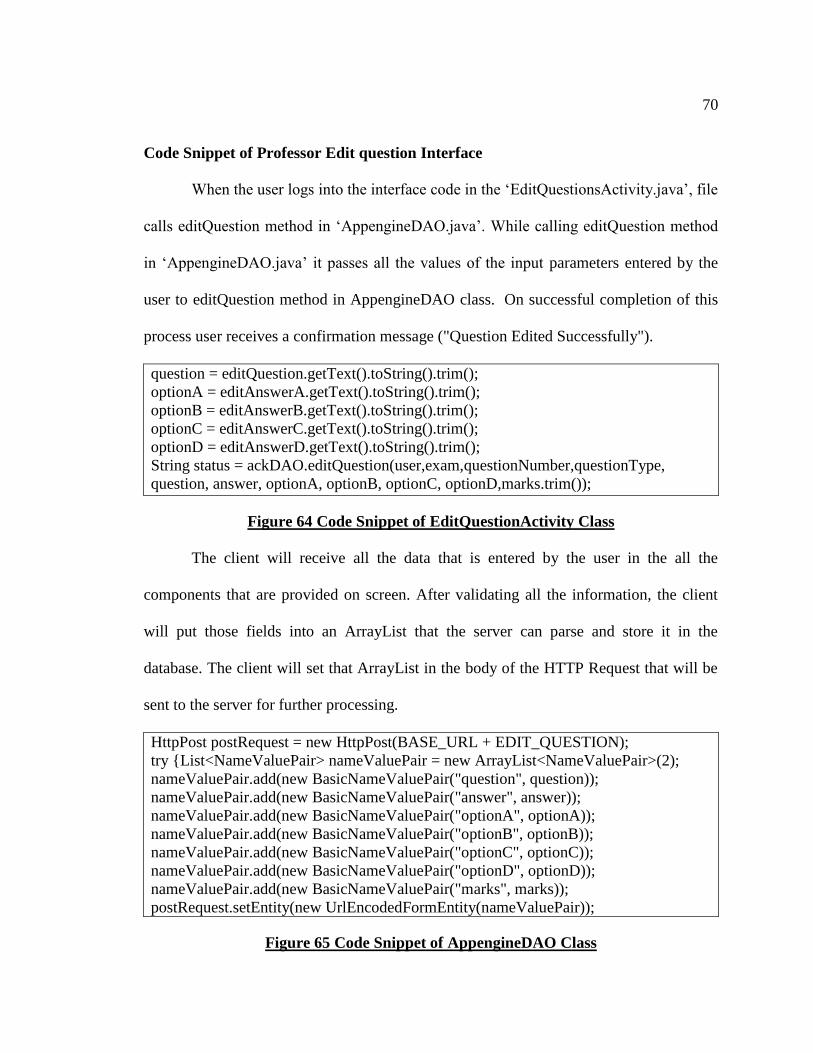
70
Code Snippet of Professor Edit question Interface
When the user logs into the interface code in the ‘EditQuestionsActivity.java’, file
calls editQuestion method in ‘AppengineDAO.java’. While calling editQuestion method
in ‘AppengineDAO.java’ it passes all the values of the input parameters entered by the
user to editQuestion method in AppengineDAO class. On successful completion of this
process user receives a confirmation message ("Question Edited Successfully").
question = editQuestion.getText().toString().trim();
optionA = editAnswerA.getText().toString().trim();
optionB = editAnswerB.getText().toString().trim();
optionC = editAnswerC.getText().toString().trim();
optionD = editAnswerD.getText().toString().trim();
String status = ackDAO.editQuestion(user,exam,questionNumber,questionType,
question, answer, optionA, optionB, optionC, optionD,marks.trim());
Figure 64 Code Snippet of EditQuestionActivity Class
The client will receive all the data that is entered by the user in the all the
components that are provided on screen. After validating all the information, the client
will put those fields into an ArrayList that the server can parse and store it in the
database. The client will set that ArrayList in the body of the HTTP Request that will be
sent to the server for further processing.
HttpPost postRequest = new HttpPost(BASE_URL + EDIT_QUESTION);
try {List<NameValuePair> nameValuePair = new ArrayList<NameValuePair>(2);
nameValuePair.add(new BasicNameValuePair("question", question));
nameValuePair.add(new BasicNameValuePair("answer", answer));
nameValuePair.add(new BasicNameValuePair("optionA", optionA));
nameValuePair.add(new BasicNameValuePair("optionB", optionB));
nameValuePair.add(new BasicNameValuePair("optionC", optionC));
nameValuePair.add(new BasicNameValuePair("optionD", optionD));
nameValuePair.add(new BasicNameValuePair("marks", marks));
postRequest.setEntity(new UrlEncodedFormEntity(nameValuePair));
Figure 65 Code Snippet of AppengineDAO Class

71
EditQuestionServlet class on server retrieves all values of input parameters
entered by user and creates a new instance of type "question". The setter function stores
the values of this newly created instance to Database. On successful completion of this
process response is send back with a confirmation message ("Question Edited
Successfully ").
try {Questions qust = new Questions();
qust.setQuestion(question);
qust.setOptionA(optionA);
qust.setOptionB(optionB);
qust.setOptionC(optionC);
qust.setOptionD(optionD);
qust.setAnswer(answer);
qust.setMarks(marks);
try {entityManager.persist(qust);
resp.setStatus(HttpServletResponse.SC_OK);
} catch (Exception e) {
resp.setStatus(HttpServletResponse.SC_BAD_REQUEST);}
Figure 66 Code Snippet of EditQuestionServlet Class
The server will obtain all the information from the client who is making the
request. After processing all the information if all the fields are valid, then information
will added to the database through entityManager.persist method and the server will
respond will OK status code. If there are some input issues, then server will catch the
Exception and return a BAD REQUEST status code to the client who made the request.
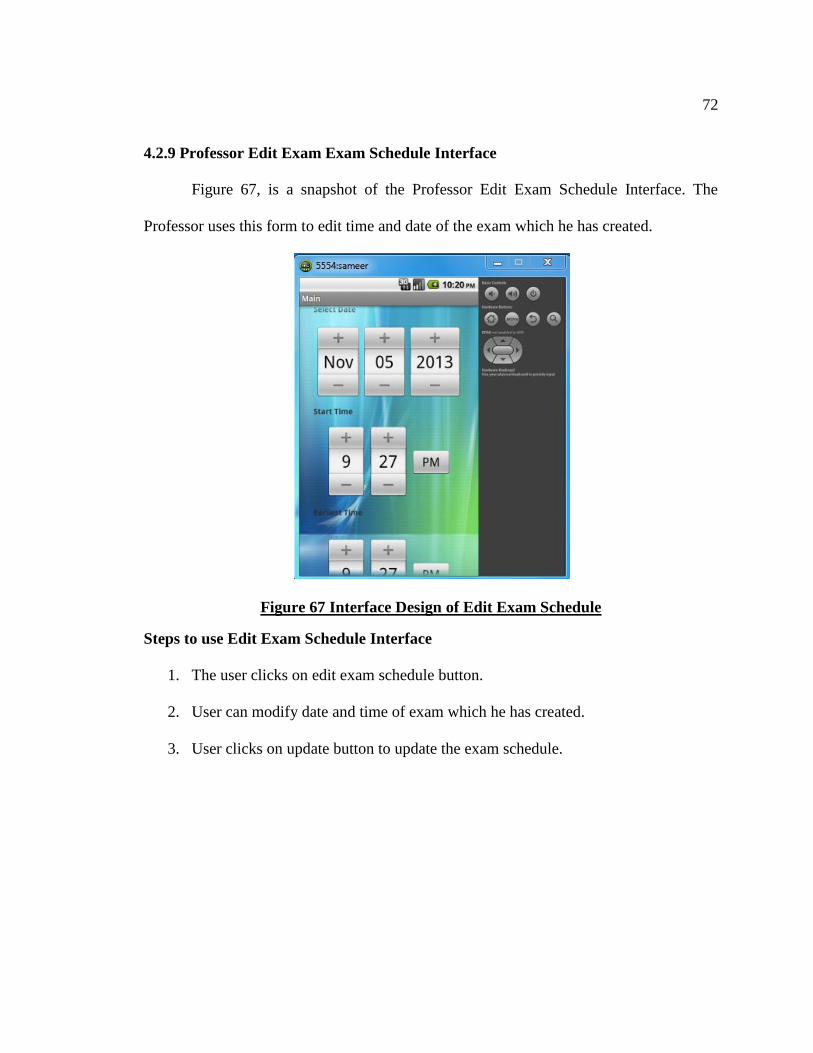
72
4.2.9 Professor Edit Exam Exam Schedule Interface
Figure 67, is a snapshot of the Professor Edit Exam Schedule Interface. The
Professor uses this form to edit time and date of the exam which he has created.
Figure 67 Interface Design of Edit Exam Schedule
Steps to use Edit Exam Schedule Interface
1. The user clicks on edit exam schedule button.
2. User can modify date and time of exam which he has created.
3. User clicks on update button to update the exam schedule.
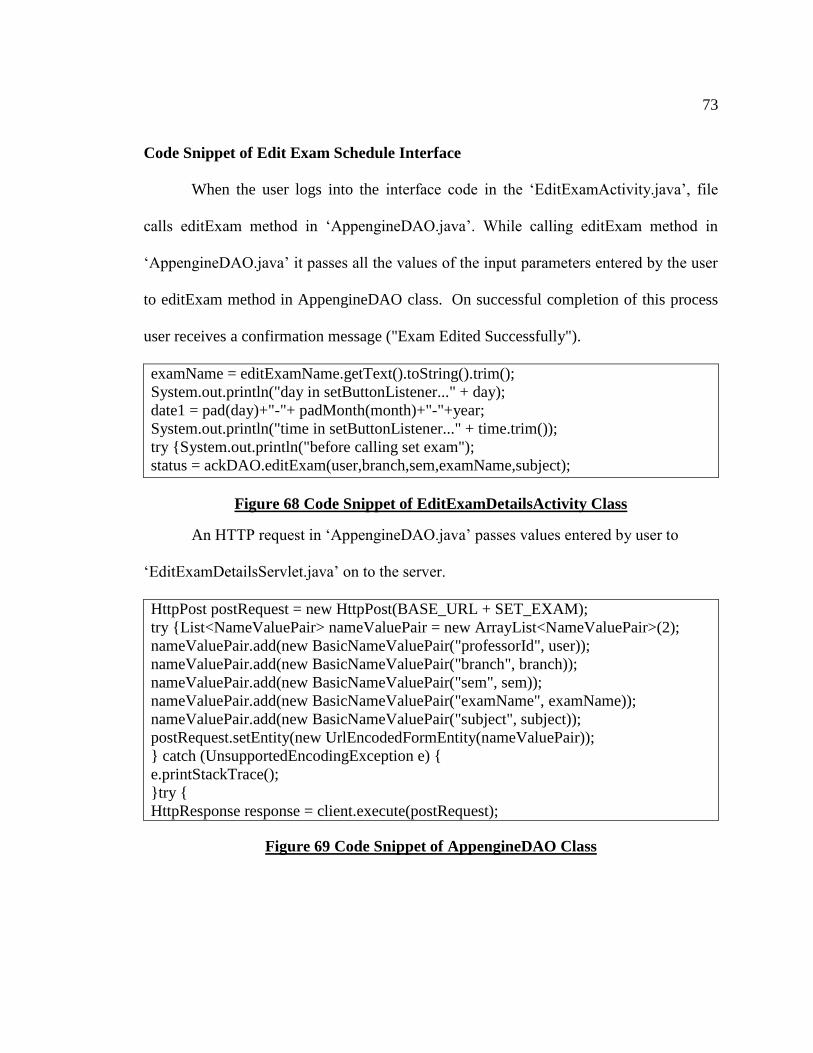
73
Code Snippet of Edit Exam Schedule Interface
When the user logs into the interface code in the ‘EditExamActivity.java’, file
calls editExam method in ‘AppengineDAO.java’. While calling editExam method in
‘AppengineDAO.java’ it passes all the values of the input parameters entered by the user
to editExam method in AppengineDAO class. On successful completion of this process
user receives a confirmation message ("Exam Edited Successfully").
examName = editExamName.getText().toString().trim();
System.out.println("day in setButtonListener..." + day);
date1 = pad(day)+"-"+ padMonth(month)+"-"+year;
System.out.println("time in setButtonListener..." + time.trim());
try {System.out.println("before calling set exam");
status = ackDAO.editExam(user,branch,sem,examName,subject);
Figure 68 Code Snippet of EditExamDetailsActivity Class
An HTTP request in ‘AppengineDAO.java’ passes values entered by user to
‘EditExamDetailsServlet.java’ on to the server.
HttpPost postRequest = new HttpPost(BASE_URL + SET_EXAM);
try {List<NameValuePair> nameValuePair = new ArrayList<NameValuePair>(2);
nameValuePair.add(new BasicNameValuePair("professorId", user));
nameValuePair.add(new BasicNameValuePair("branch", branch));
nameValuePair.add(new BasicNameValuePair("sem", sem));
nameValuePair.add(new BasicNameValuePair("examName", examName));
nameValuePair.add(new BasicNameValuePair("subject", subject));
postRequest.setEntity(new UrlEncodedFormEntity(nameValuePair));
} catch (UnsupportedEncodingException e) {
e.printStackTrace();
}try {
HttpResponse response = client.execute(postRequest);
Figure 69 Code Snippet of AppengineDAO Class
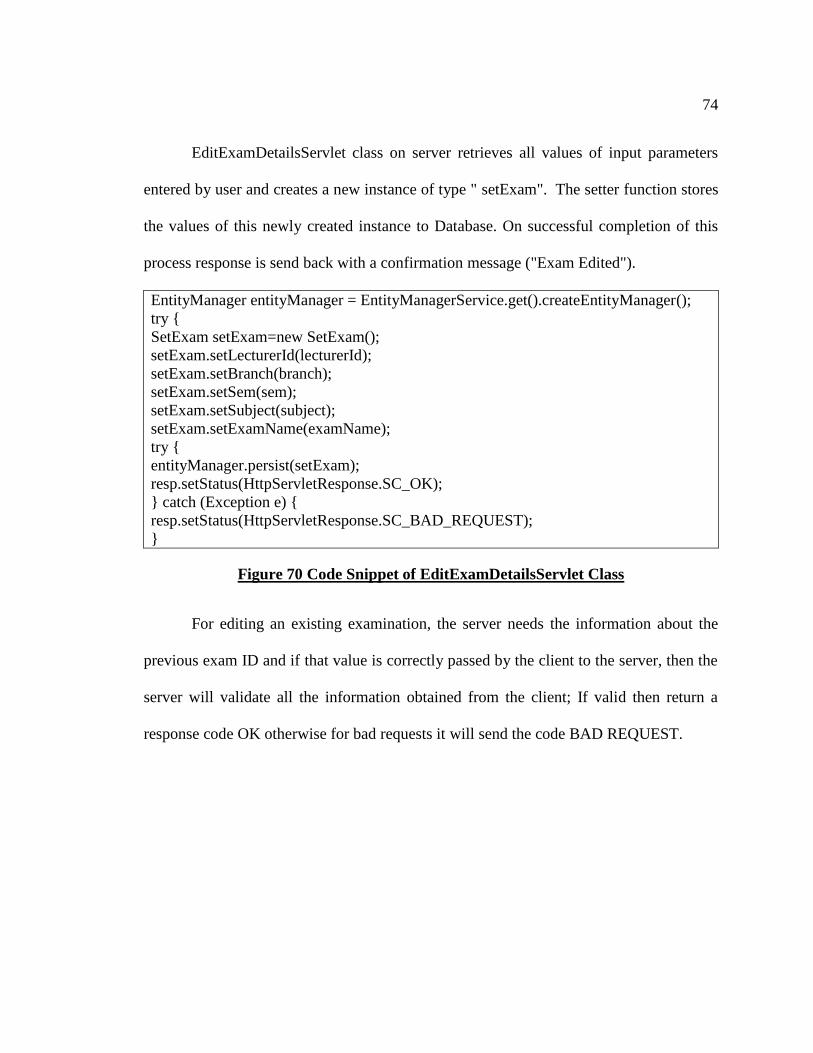
74
EditExamDetailsServlet class on server retrieves all values of input parameters
entered by user and creates a new instance of type " setExam". The setter function stores
the values of this newly created instance to Database. On successful completion of this
process response is send back with a confirmation message ("Exam Edited").
EntityManager entityManager = EntityManagerService.get().createEntityManager();
try {
SetExam setExam=new SetExam();
setExam.setLecturerId(lecturerId);
setExam.setBranch(branch);
setExam.setSem(sem);
setExam.setSubject(subject);
setExam.setExamName(examName);
try {
entityManager.persist(setExam);
resp.setStatus(HttpServletResponse.SC_OK);
} catch (Exception e) {
resp.setStatus(HttpServletResponse.SC_BAD_REQUEST);
}
Figure 70 Code Snippet of EditExamDetailsServlet Class
For editing an existing examination, the server needs the information about the
previous exam ID and if that value is correctly passed by the client to the server, then the
server will validate all the information obtained from the client; If valid then return a
response code OK otherwise for bad requests it will send the code BAD REQUEST.
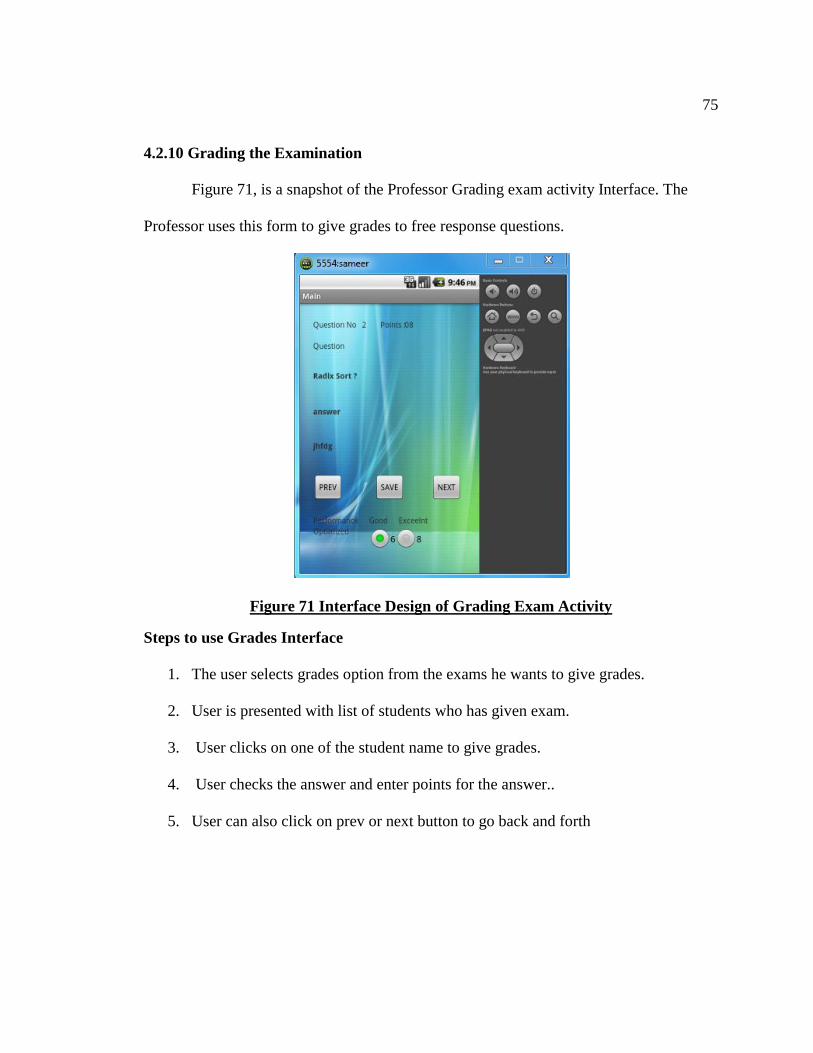
75
4.2.10 Grading the Examination
Figure 71, is a snapshot of the Professor Grading exam activity Interface. The
Professor uses this form to give grades to free response questions.
Figure 71 Interface Design of Grading Exam Activity
Steps to use Grades Interface
1. The user selects grades option from the exams he wants to give grades.
2. User is presented with list of students who has given exam.
3. User clicks on one of the student name to give grades.
4. User checks the answer and enter points for the answer..
5. User can also click on prev or next button to go back and forth
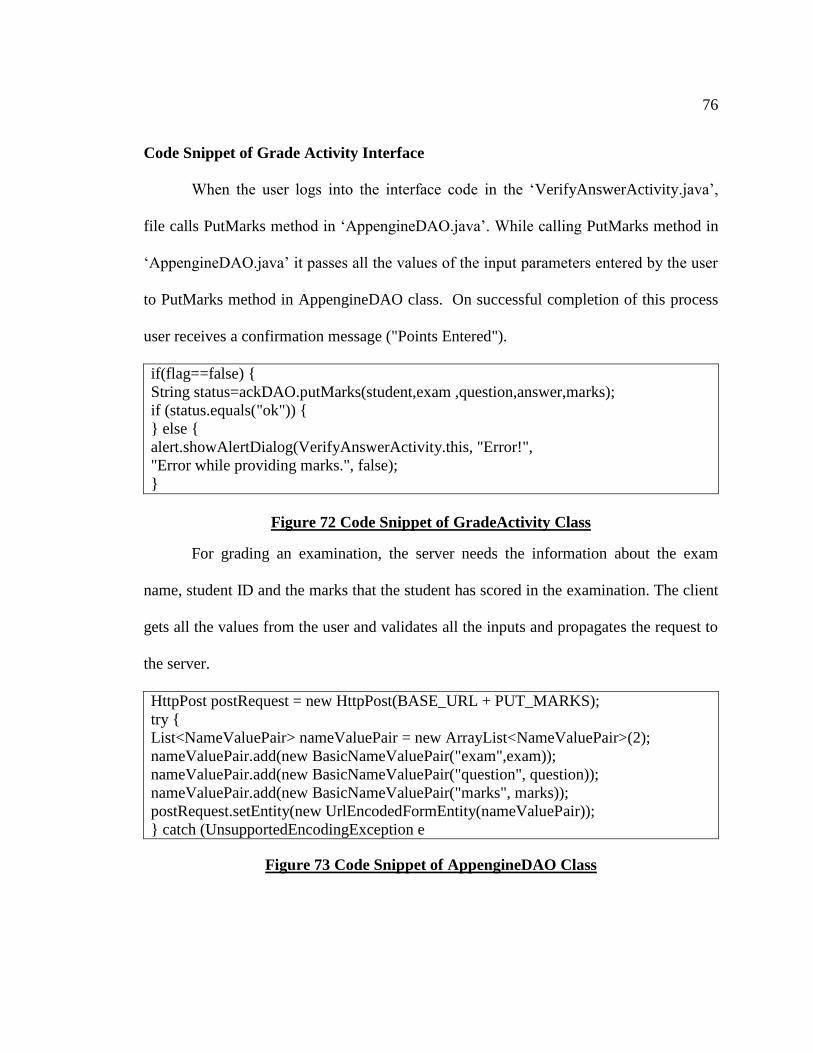
76
Code Snippet of Grade Activity Interface
When the user logs into the interface code in the ‘VerifyAnswerActivity.java’,
file calls PutMarks method in ‘AppengineDAO.java’. While calling PutMarks method in
‘AppengineDAO.java’ it passes all the values of the input parameters entered by the user
to PutMarks method in AppengineDAO class. On successful completion of this process
user receives a confirmation message ("Points Entered").
if(flag==false) {
String status=ackDAO.putMarks(student,exam ,question,answer,marks);
if (status.equals("ok")) {
} else {
alert.showAlertDialog(VerifyAnswerActivity.this, "Error!",
"Error while providing marks.", false);
}
Figure 72 Code Snippet of GradeActivity Class
For grading an examination, the server needs the information about the exam
name, student ID and the marks that the student has scored in the examination. The client
gets all the values from the user and validates all the inputs and propagates the request to
the server.
HttpPost postRequest = new HttpPost(BASE_URL + PUT_MARKS);
try {
List<NameValuePair> nameValuePair = new ArrayList<NameValuePair>(2);
nameValuePair.add(new BasicNameValuePair("exam",exam));
nameValuePair.add(new BasicNameValuePair("question", question));
nameValuePair.add(new BasicNameValuePair("marks", marks));
postRequest.setEntity(new UrlEncodedFormEntity(nameValuePair));
} catch (UnsupportedEncodingException e
Figure 73 Code Snippet of AppengineDAO Class
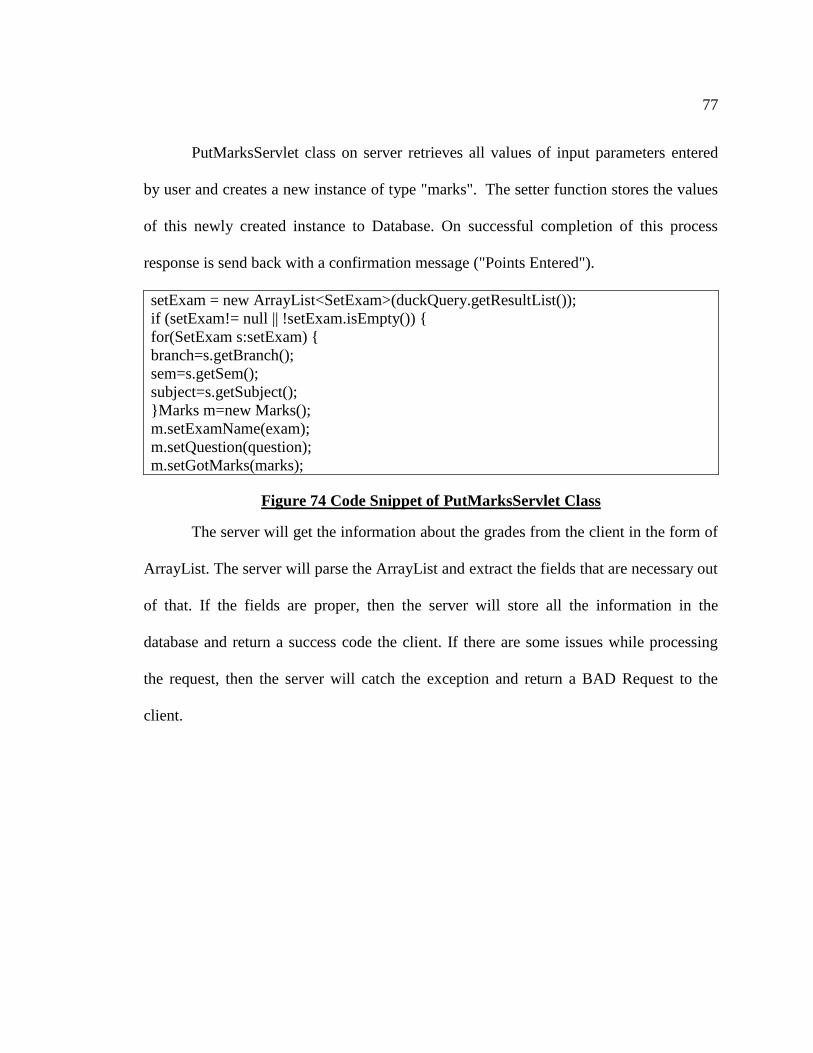
77
PutMarksServlet class on server retrieves all values of input parameters entered
by user and creates a new instance of type "marks". The setter function stores the values
of this newly created instance to Database. On successful completion of this process
response is send back with a confirmation message ("Points Entered").
setExam = new ArrayList<SetExam>(duckQuery.getResultList());
if (setExam!= null || !setExam.isEmpty()) {
for(SetExam s:setExam) {
branch=s.getBranch();
sem=s.getSem();
subject=s.getSubject();
}Marks m=new Marks();
m.setExamName(exam);
m.setQuestion(question);
m.setGotMarks(marks);
Figure 74 Code Snippet of PutMarksServlet Class
The server will get the information about the grades from the client in the form of
ArrayList. The server will parse the ArrayList and extract the fields that are necessary out
of that. If the fields are proper, then the server will store all the information in the
database and return a success code the client. If there are some issues while processing
the request, then the server will catch the exception and return a BAD Request to the
client.
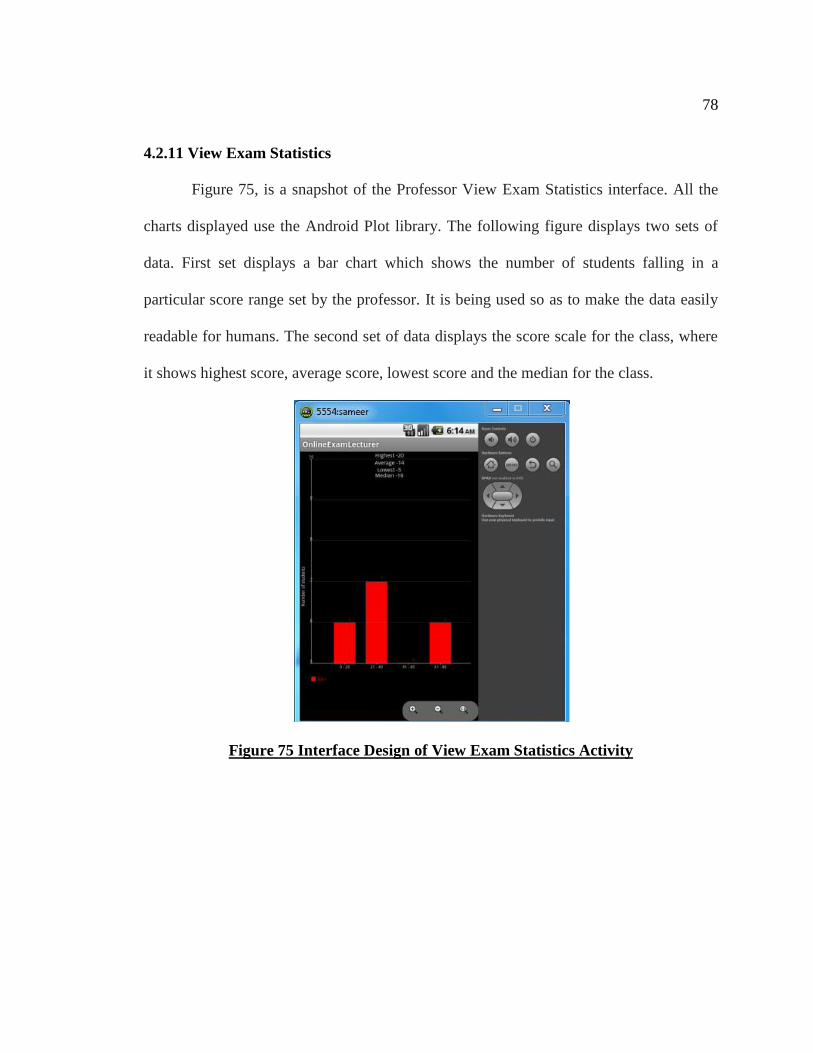
78
4.2.11 View Exam Statistics
Figure 75, is a snapshot of the Professor View Exam Statistics interface. All the
charts displayed use the Android Plot library. The following figure displays two sets of
data. First set displays a bar chart which shows the number of students falling in a
particular score range set by the professor. It is being used so as to make the data easily
readable for humans. The second set of data displays the score scale for the class, where
it shows highest score, average score, lowest score and the median for the class.
Figure 75 Interface Design of View Exam Statistics Activity
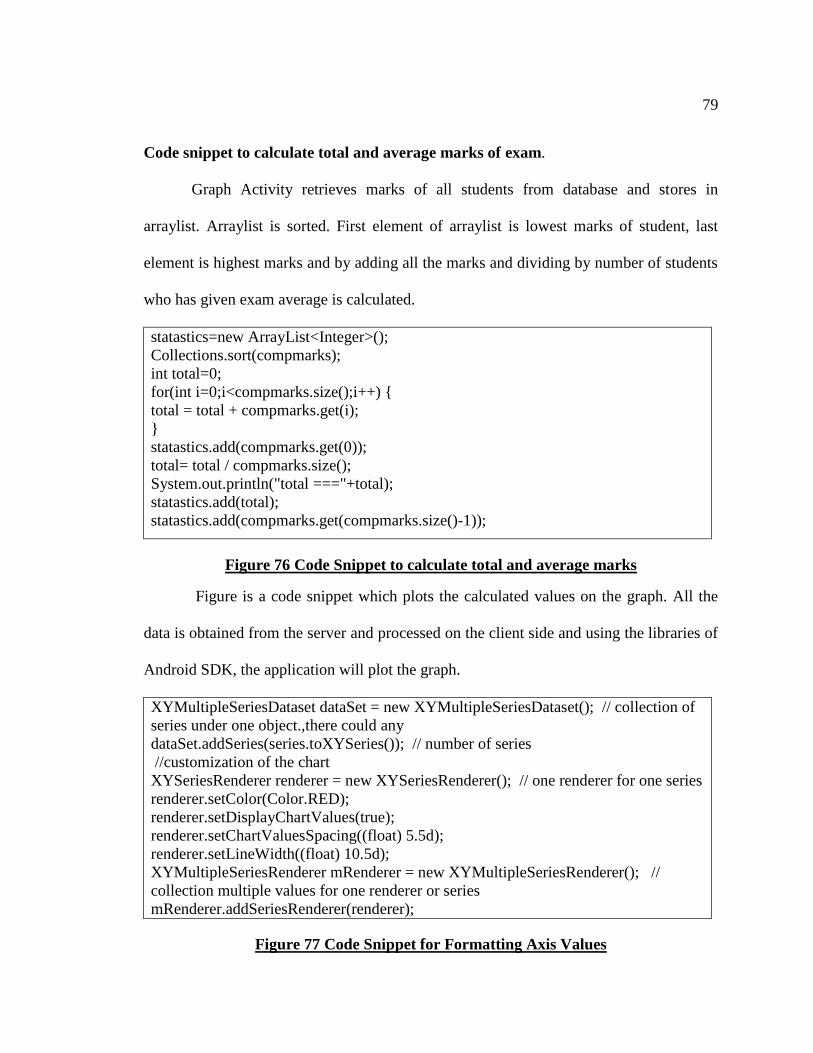
79
Code snippet to calculate total and average marks of exam.
Graph Activity retrieves marks of all students from database and stores in
arraylist. Arraylist is sorted. First element of arraylist is lowest marks of student, last
element is highest marks and by adding all the marks and dividing by number of students
who has given exam average is calculated.
statastics=new ArrayList<Integer>();
Collections.sort(compmarks);
int total=0;
for(int i=0;i<compmarks.size();i++) {
total = total + compmarks.get(i);
}
statastics.add(compmarks.get(0));
total= total / compmarks.size();
System.out.println("total ==="+total);
statastics.add(total);
statastics.add(compmarks.get(compmarks.size()-1));
Figure 76 Code Snippet to calculate total and average marks
Figure is a code snippet which plots the calculated values on the graph. All the
data is obtained from the server and processed on the client side and using the libraries of
Android SDK, the application will plot the graph.
XYMultipleSeriesDataset dataSet = new XYMultipleSeriesDataset(); // collection of
series under one object.,there could any
dataSet.addSeries(series.toXYSeries()); // number of series
//customization of the chart
XYSeriesRenderer renderer = new XYSeriesRenderer(); // one renderer for one series
renderer.setColor(Color.RED);
renderer.setDisplayChartValues(true);
renderer.setChartValuesSpacing((float) 5.5d);
renderer.setLineWidth((float) 10.5d);
XYMultipleSeriesRenderer mRenderer = new XYMultipleSeriesRenderer(); //
collection multiple values for one renderer or series
mRenderer.addSeriesRenderer(renderer);
Figure 77 Code Snippet for Formatting Axis Values
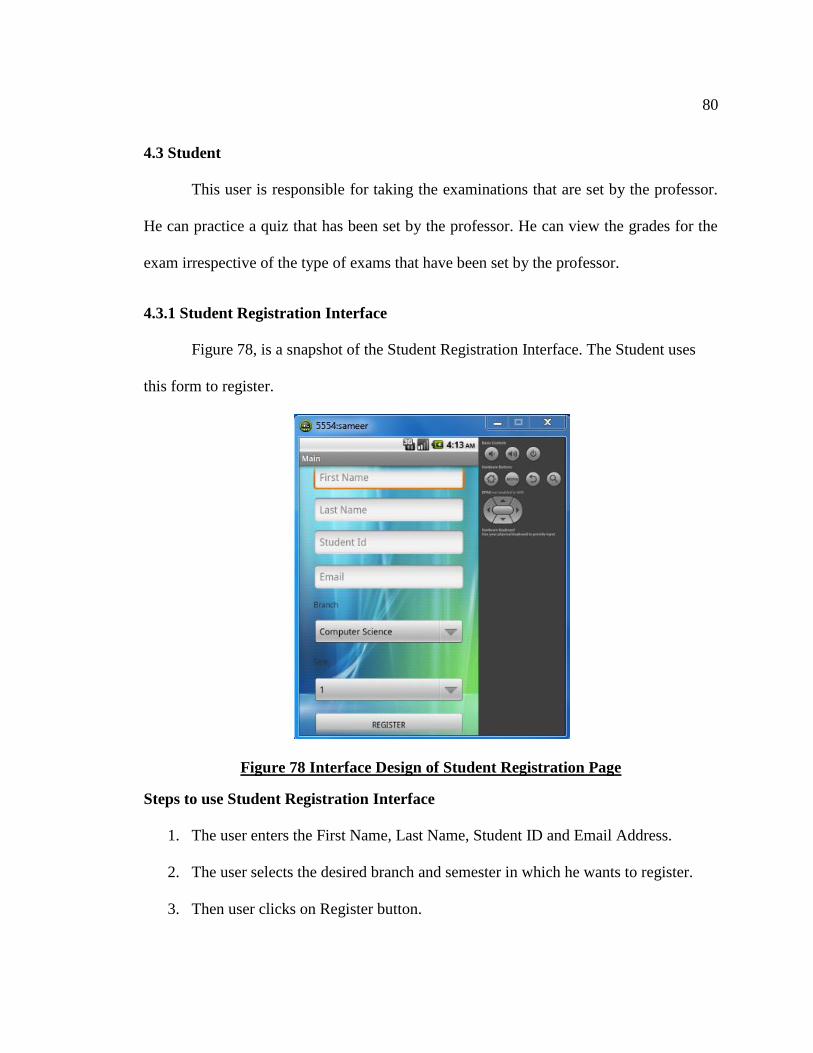
80
4.3 Student
This user is responsible for taking the examinations that are set by the professor.
He can practice a quiz that has been set by the professor. He can view the grades for the
exam irrespective of the type of exams that have been set by the professor.
4.3.1 Student Registration Interface
Figure 78, is a snapshot of the Student Registration Interface. The Student uses
this form to register.
Figure 78 Interface Design of Student Registration Page
Steps to use Student Registration Interface
1. The user enters the First Name, Last Name, Student ID and Email Address.
2. The user selects the desired branch and semester in which he wants to register.
3. Then user clicks on Register button.
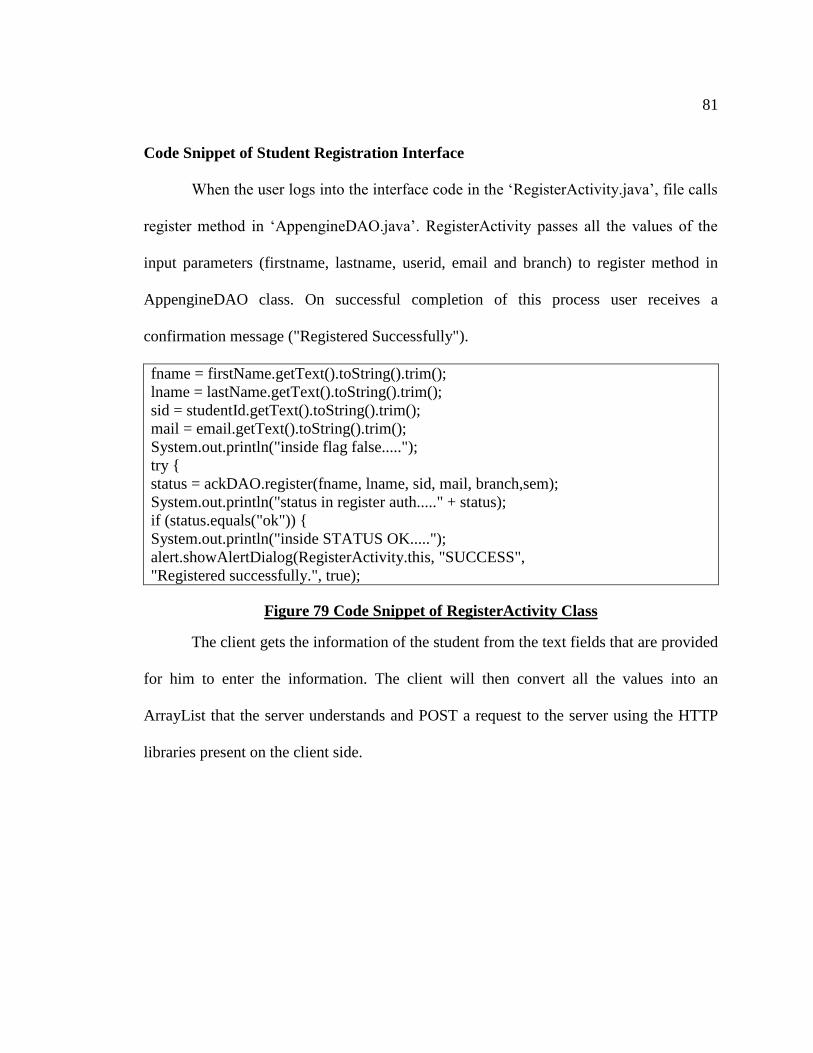
81
Code Snippet of Student Registration Interface
When the user logs into the interface code in the ‘RegisterActivity.java’, file calls
register method in ‘AppengineDAO.java’. RegisterActivity passes all the values of the
input parameters (firstname, lastname, userid, email and branch) to register method in
AppengineDAO class. On successful completion of this process user receives a
confirmation message ("Registered Successfully").
fname = firstName.getText().toString().trim();
lname = lastName.getText().toString().trim();
sid = studentId.getText().toString().trim();
mail = email.getText().toString().trim();
System.out.println("inside flag false.....");
try {
status = ackDAO.register(fname, lname, sid, mail, branch,sem);
System.out.println("status in register auth....." + status);
if (status.equals("ok")) {
System.out.println("inside STATUS OK.....");
alert.showAlertDialog(RegisterActivity.this, "SUCCESS",
"Registered successfully.", true);
Figure 79 Code Snippet of RegisterActivity Class
The client gets the information of the student from the text fields that are provided
for him to enter the information. The client will then convert all the values into an
ArrayList that the server understands and POST a request to the server using the HTTP
libraries present on the client side.
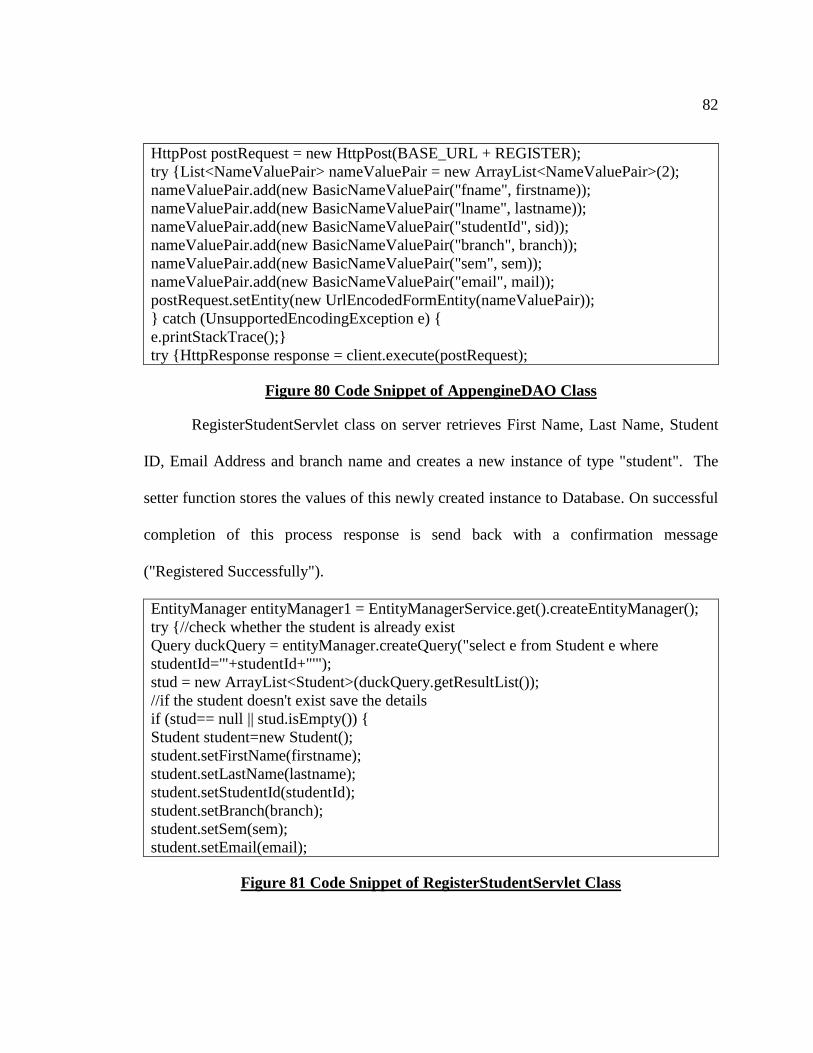
82
HttpPost postRequest = new HttpPost(BASE_URL + REGISTER);
try {List<NameValuePair> nameValuePair = new ArrayList<NameValuePair>(2);
nameValuePair.add(new BasicNameValuePair("fname", firstname));
nameValuePair.add(new BasicNameValuePair("lname", lastname));
nameValuePair.add(new BasicNameValuePair("studentId", sid));
nameValuePair.add(new BasicNameValuePair("branch", branch));
nameValuePair.add(new BasicNameValuePair("sem", sem));
nameValuePair.add(new BasicNameValuePair("email", mail));
postRequest.setEntity(new UrlEncodedFormEntity(nameValuePair));
} catch (UnsupportedEncodingException e) {
e.printStackTrace();}
try {HttpResponse response = client.execute(postRequest);
Figure 80 Code Snippet of AppengineDAO Class
RegisterStudentServlet class on server retrieves First Name, Last Name, Student
ID, Email Address and branch name and creates a new instance of type "student". The
setter function stores the values of this newly created instance to Database. On successful
completion of this process response is send back with a confirmation message
("Registered Successfully").
EntityManager entityManager1 = EntityManagerService.get().createEntityManager();
try {//check whether the student is already exist
Query duckQuery = entityManager.createQuery("select e from Student e where
studentId='"+studentId+"'");
stud = new ArrayList<Student>(duckQuery.getResultList());
//if the student doesn't exist save the details
if (stud== null || stud.isEmpty()) {
Student student=new Student();
student.setFirstName(firstname);
student.setLastName(lastname);
student.setStudentId(studentId);
student.setBranch(branch);
student.setSem(sem);
student.setEmail(email);
Figure 81 Code Snippet of RegisterStudentServlet Class
83
The server will obtain all the information from the client and parse out the necessary
fields from the request body. After validating all the information, if the fields are valid
and appropriate, then the record will be stored in the database and the server will return
success code otherwise in the case of bad fields, the server will response Bad Request
status to the client who made that request.
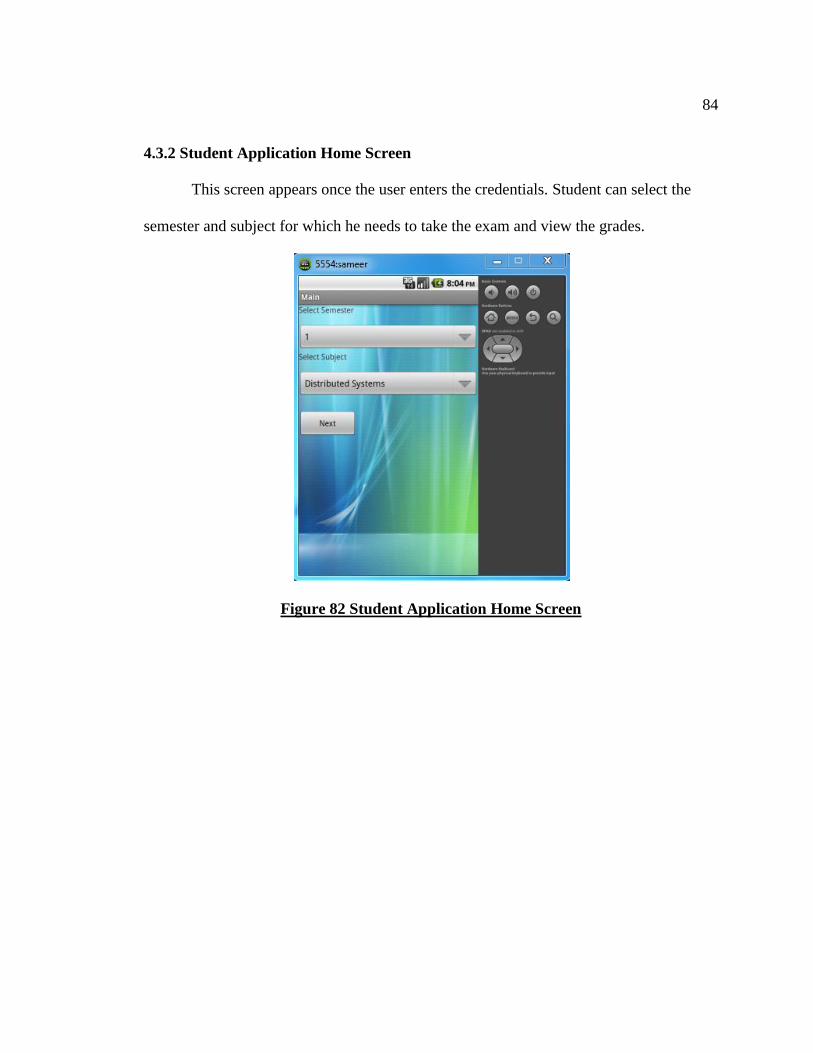
84
4.3.2 Student Application Home Screen
This screen appears once the user enters the credentials. Student can select the
semester and subject for which he needs to take the exam and view the grades.
Figure 82 Student Application Home Screen
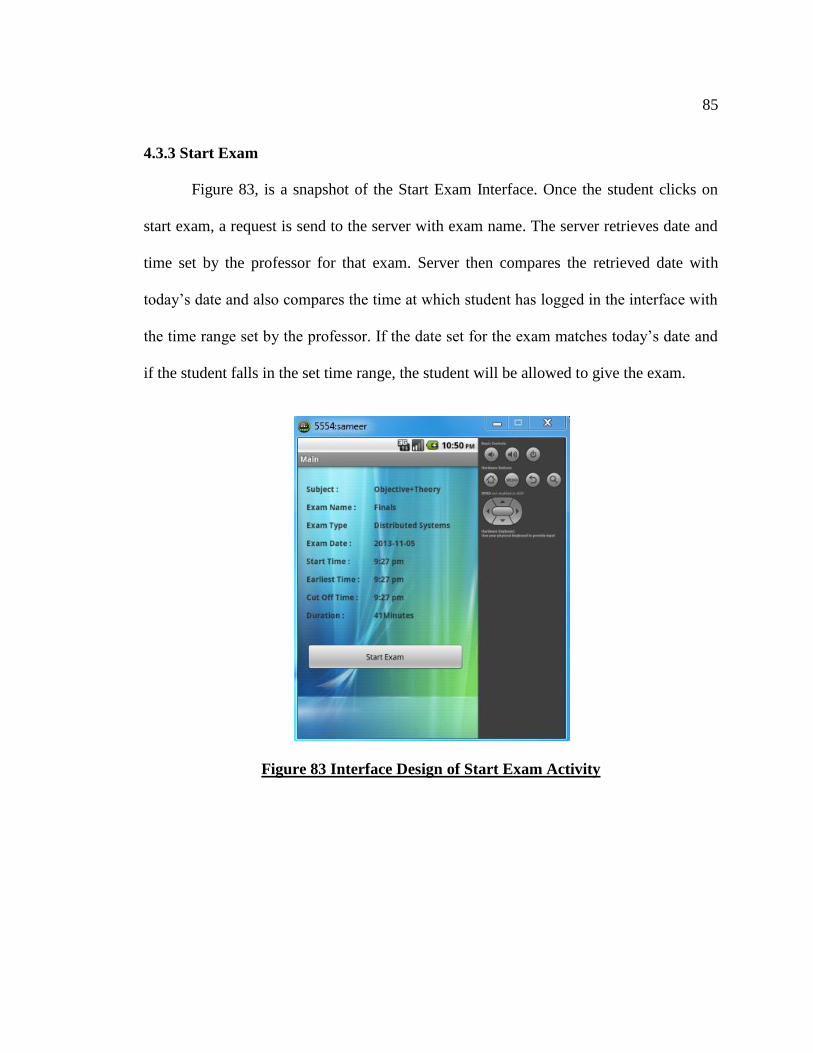
85
4.3.3 Start Exam
Figure 83, is a snapshot of the Start Exam Interface. Once the student clicks on
start exam, a request is send to the server with exam name. The server retrieves date and
time set by the professor for that exam. Server then compares the retrieved date with
today’s date and also compares the time at which student has logged in the interface with
the time range set by the professor. If the date set for the exam matches today’s date and
if the student falls in the set time range, the student will be allowed to give the exam.
Figure 83 Interface Design of Start Exam Activity
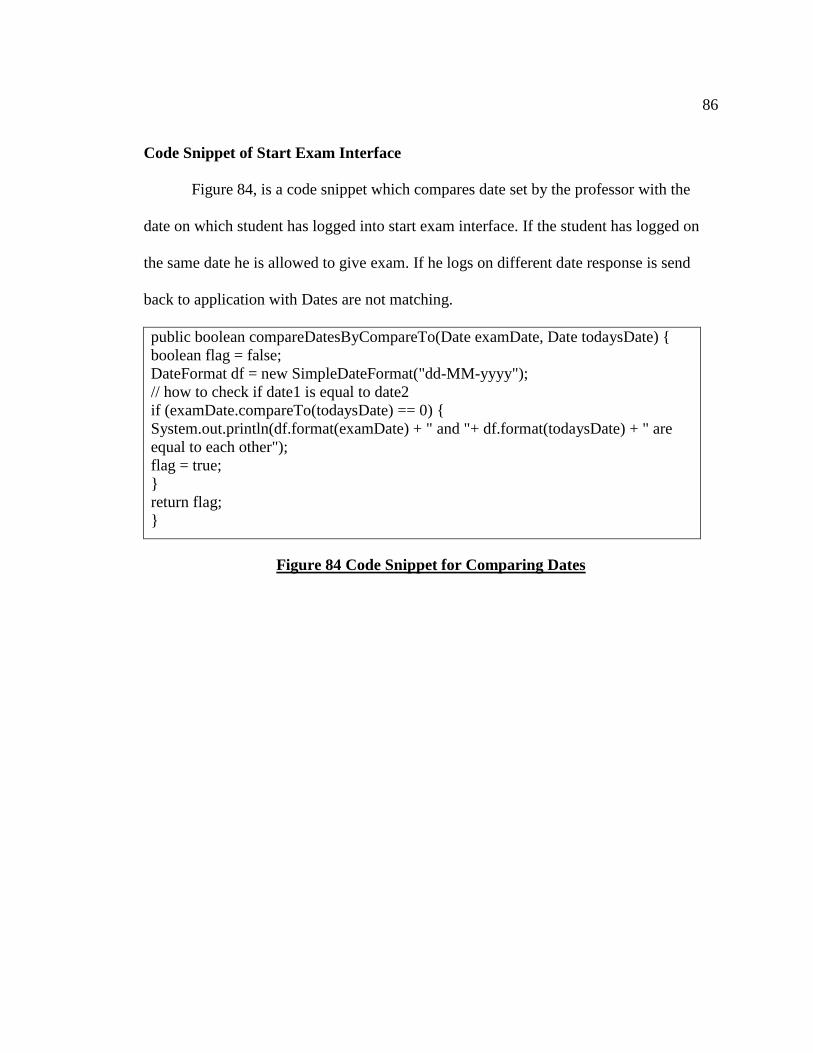
86
Code Snippet of Start Exam Interface
Figure 84, is a code snippet which compares date set by the professor with the
date on which student has logged into start exam interface. If the student has logged on
the same date he is allowed to give exam. If he logs on different date response is send
back to application with Dates are not matching.
public boolean compareDatesByCompareTo(Date examDate, Date todaysDate) {
boolean flag = false;
DateFormat df = new SimpleDateFormat("dd-MM-yyyy");
// how to check if date1 is equal to date2
if (examDate.compareTo(todaysDate) == 0) {
System.out.println(df.format(examDate) + " and "+ df.format(todaysDate) + " are
equal to each other");
flag = true;
}
return flag;
}
Figure 84 Code Snippet for Comparing Dates
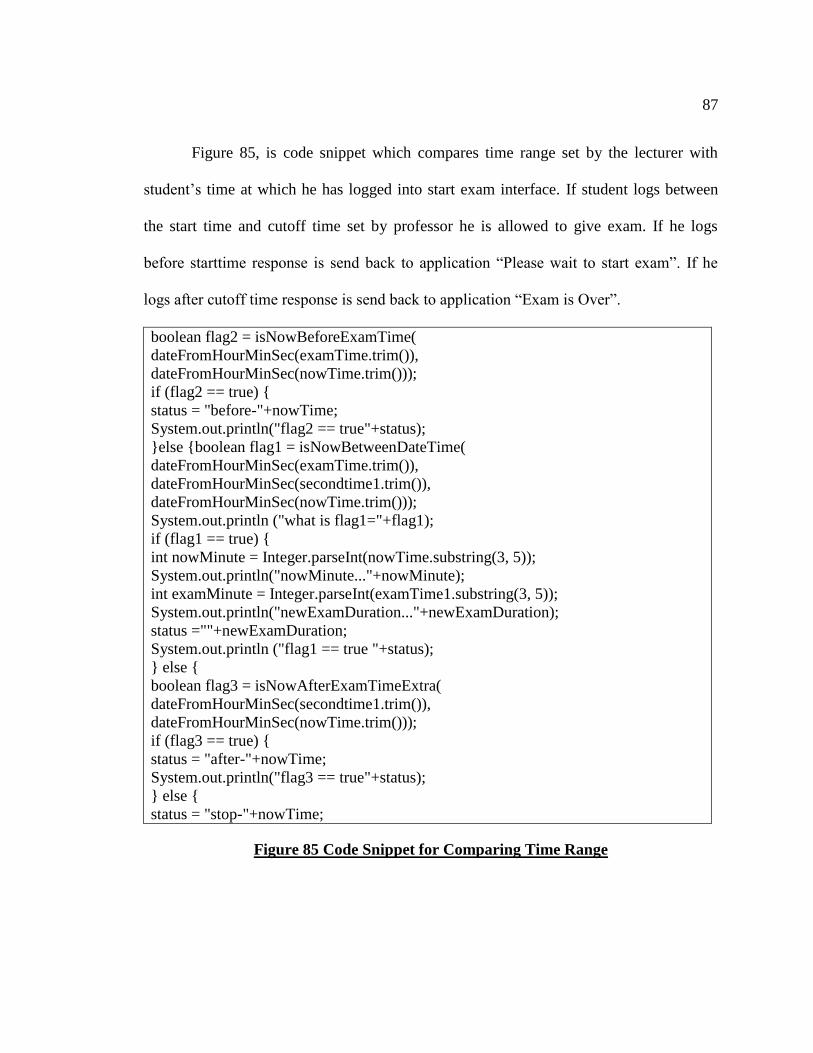
87
Figure 85, is code snippet which compares time range set by the lecturer with
student’s time at which he has logged into start exam interface. If student logs between
the start time and cutoff time set by professor he is allowed to give exam. If he logs
before starttime response is send back to application “Please wait to start exam”. If he
logs after cutoff time response is send back to application “Exam is Over”.
boolean flag2 = isNowBeforeExamTime(
dateFromHourMinSec(examTime.trim()),
dateFromHourMinSec(nowTime.trim()));
if (flag2 == true) {
status = "before-"+nowTime;
System.out.println("flag2 == true"+status);
}else {boolean flag1 = isNowBetweenDateTime(
dateFromHourMinSec(examTime.trim()),
dateFromHourMinSec(secondtime1.trim()),
dateFromHourMinSec(nowTime.trim()));
System.out.println ("what is flag1="+flag1);
if (flag1 == true) {
int nowMinute = Integer.parseInt(nowTime.substring(3, 5));
System.out.println("nowMinute..."+nowMinute);
int examMinute = Integer.parseInt(examTime1.substring(3, 5));
System.out.println("newExamDuration..."+newExamDuration);
status =""+newExamDuration;
System.out.println ("flag1 == true "+status);
} else {
boolean flag3 = isNowAfterExamTimeExtra(
dateFromHourMinSec(secondtime1.trim()),
dateFromHourMinSec(nowTime.trim()));
if (flag3 == true) {
status = "after-"+nowTime;
System.out.println("flag3 == true"+status);
} else {
status = "stop-"+nowTime;
Figure 85 Code Snippet for Comparing Time Range
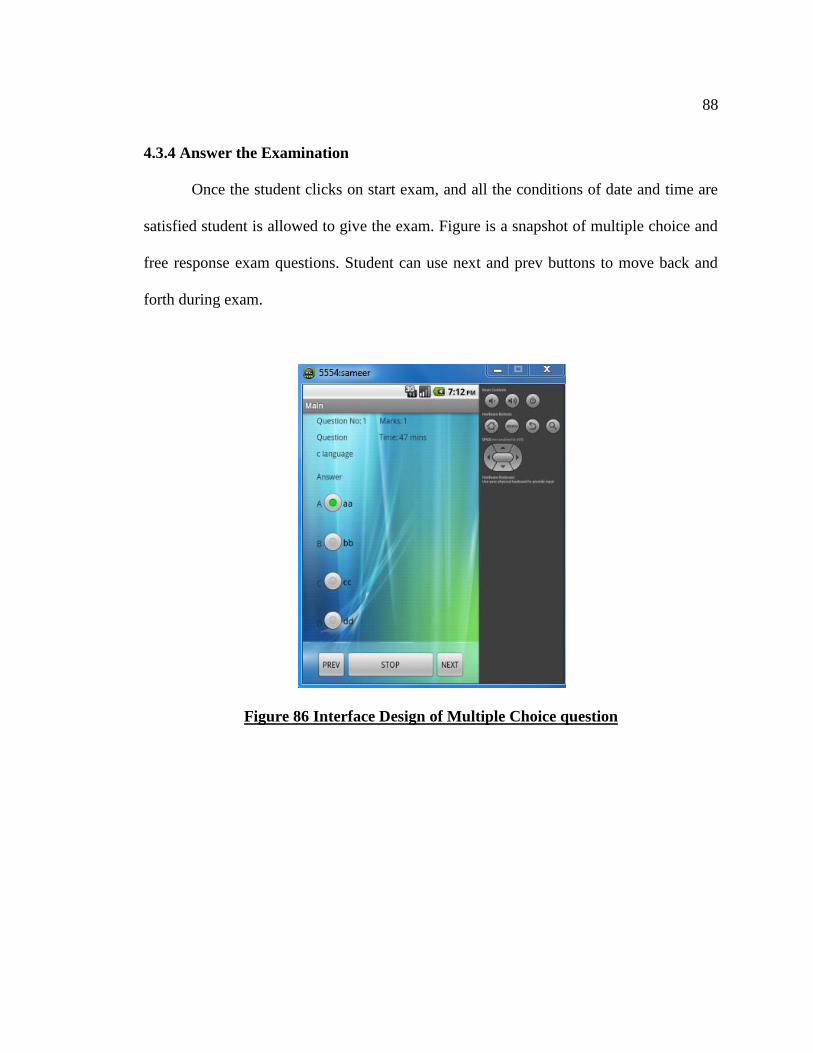
88
4.3.4 Answer the Examination
Once the student clicks on start exam, and all the conditions of date and time are
satisfied student is allowed to give the exam. Figure is a snapshot of multiple choice and
free response exam questions. Student can use next and prev buttons to move back and
forth during exam.
Figure 86 Interface Design of Multiple Choice question
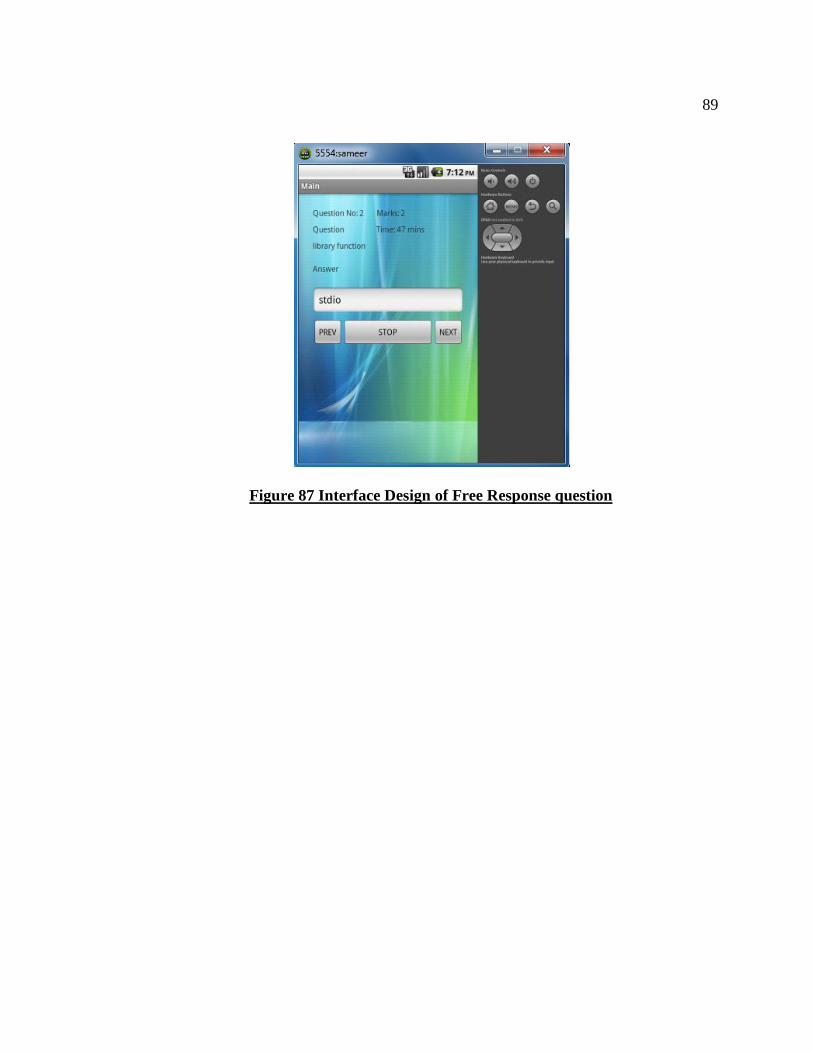
89
Figure 87 Interface Design of Free Response question
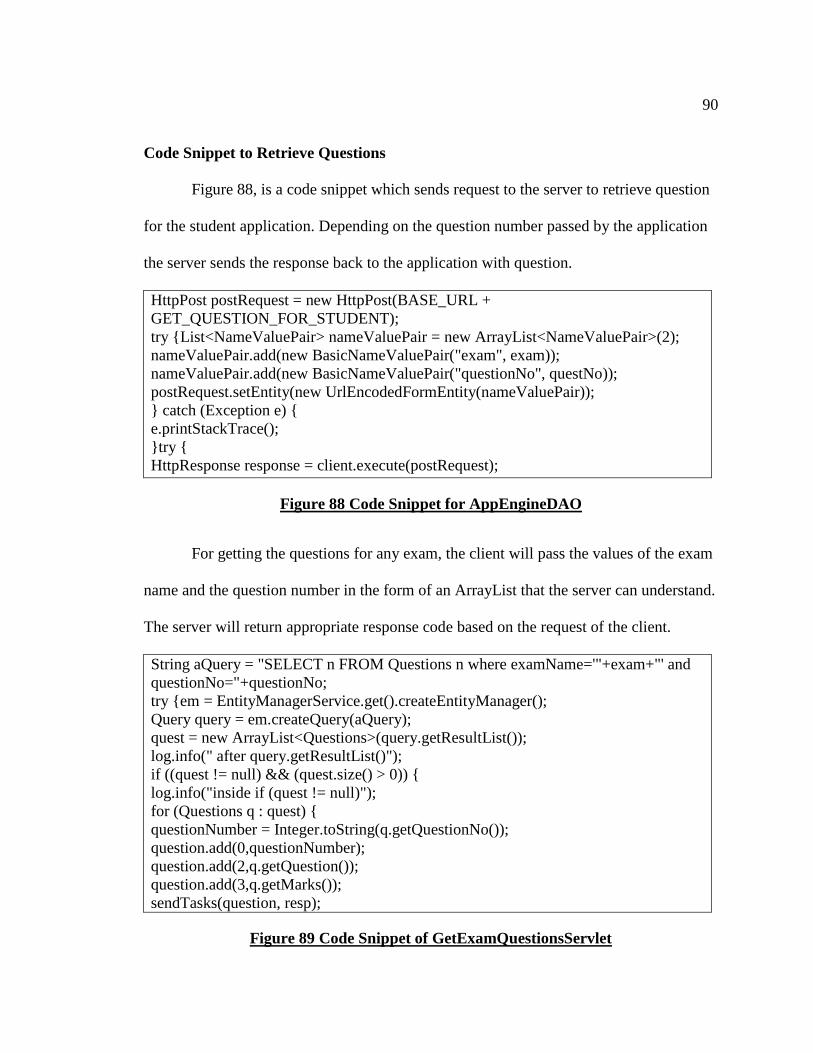
90
Code Snippet to Retrieve Questions
Figure 88, is a code snippet which sends request to the server to retrieve question
for the student application. Depending on the question number passed by the application
the server sends the response back to the application with question.
HttpPost postRequest = new HttpPost(BASE_URL +
GET_QUESTION_FOR_STUDENT);
try {List<NameValuePair> nameValuePair = new ArrayList<NameValuePair>(2);
nameValuePair.add(new BasicNameValuePair("exam", exam));
nameValuePair.add(new BasicNameValuePair("questionNo", questNo));
postRequest.setEntity(new UrlEncodedFormEntity(nameValuePair));
} catch (Exception e) {
e.printStackTrace();
}try {
HttpResponse response = client.execute(postRequest);
Figure 88 Code Snippet for AppEngineDAO
For getting the questions for any exam, the client will pass the values of the exam
name and the question number in the form of an ArrayList that the server can understand.
The server will return appropriate response code based on the request of the client.
String aQuery = "SELECT n FROM Questions n where examName='"+exam+"' and
questionNo="+questionNo;
try {em = EntityManagerService.get().createEntityManager();
Query query = em.createQuery(aQuery);
quest = new ArrayList<Questions>(query.getResultList());
log.info(" after query.getResultList()");
if ((quest != null) && (quest.size() > 0)) {
log.info("inside if (quest != null)");
for (Questions q : quest) {
questionNumber = Integer.toString(q.getQuestionNo());
question.add(0,questionNumber);
question.add(2,q.getQuestion());
question.add(3,q.getMarks());
sendTasks(question, resp);
Figure 89 Code Snippet of GetExamQuestionsServlet
91
The server will receive the information about the exam name and the question
number from the client. The server will validate the request and if the fields are valid will
return the information about the next question from database along with status code OK
and if the fields in the request are not valid, then the server will send the response code of
BAD Request.
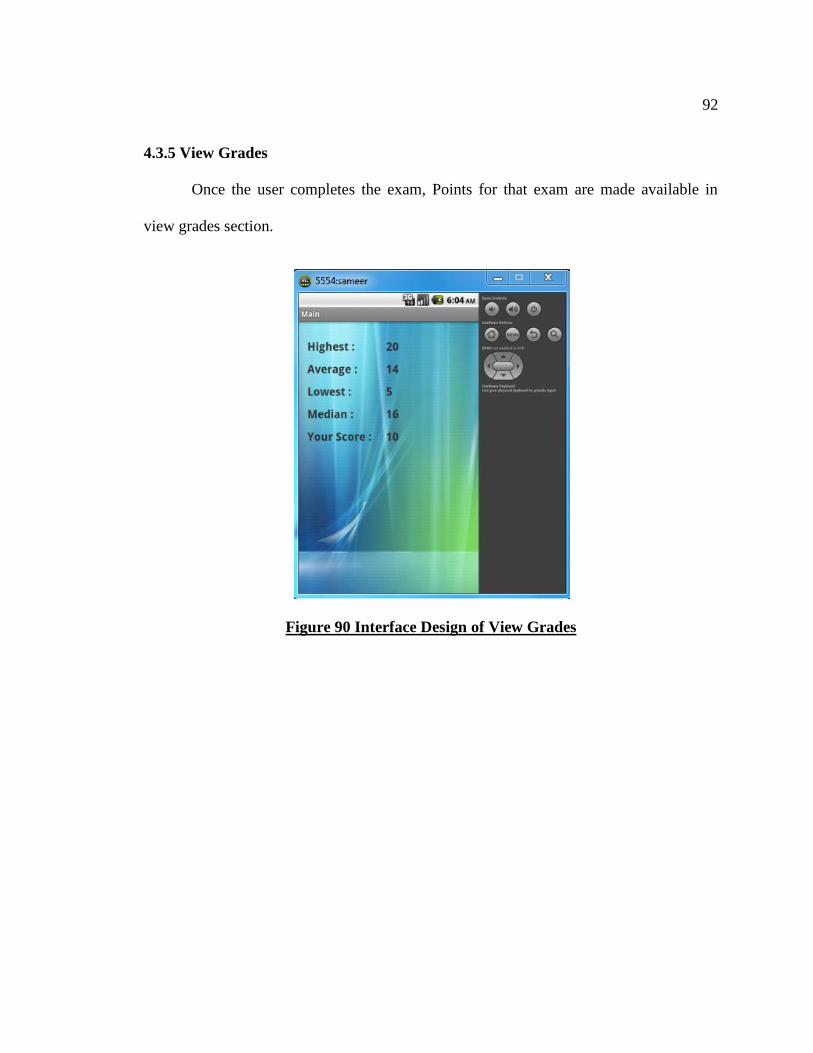
92
4.3.5 View Grades
Once the user completes the exam, Points for that exam are made available in
view grades section.
Figure 90 Interface Design of View Grades
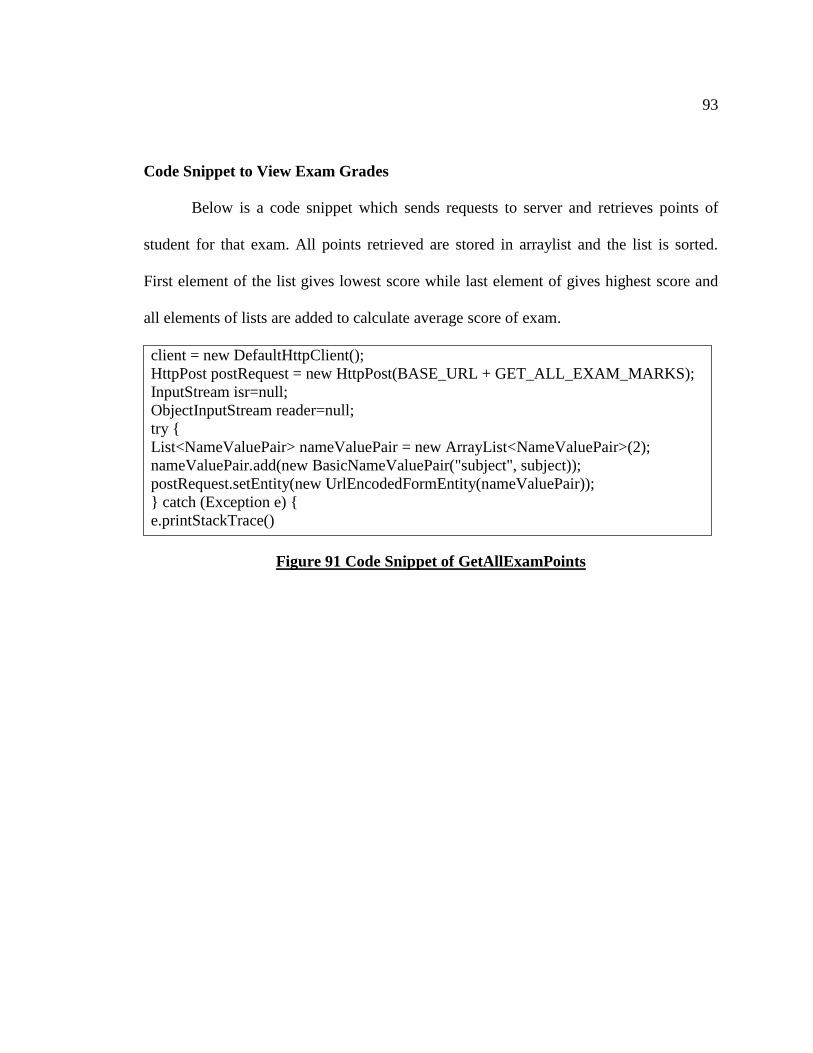
93
Code Snippet to View Exam Grades
Below is a code snippet which sends requests to server and retrieves points of
student for that exam. All points retrieved are stored in arraylist and the list is sorted.
First element of the list gives lowest score while last element of gives highest score and
all elements of lists are added to calculate average score of exam.
client = new DefaultHttpClient();
HttpPost postRequest = new HttpPost(BASE_URL + GET_ALL_EXAM_MARKS);
InputStream isr=null;
ObjectInputStream reader=null;
try {
List<NameValuePair> nameValuePair = new ArrayList<NameValuePair>(2);
nameValuePair.add(new BasicNameValuePair("subject", subject));
postRequest.setEntity(new UrlEncodedFormEntity(nameValuePair));
} catch (Exception e) {
e.printStackTrace()
Figure 91 Code Snippet of GetAllExamPoints
94
Chapter 5
CONCLUSION
5.1 Conclusion
The main objective or motive behind developing this application is to the remove
the need of the traditional (in-class examinations). This in turn may end up saving some
energy and resources for the human being and thus could prove environment friendly. If
this concept or application is implemented worldwide, it will save massive amount of
resources that will be useful for the human race as the application will eliminate the need
of in class examination completely if the designed is fully evolved over a period of time.
This implies that the student can be present in any part of the world to take the
examination. Also, this application can come in handy when the professor wants to take a
surprise quiz in the class and if the student is not present in the class, still he has the
option of attending the exam and scoring some points rather than missing the exam and
losing all the points. All the entities that are involved in the process of School/College
Education can make their lives easier with the applications that are meant for a similar
purpose like this application has.
The administrator will be able to add subjects and professors per semester
according to the registration process. The Administrator will also have the privilege of
deleting the subject that is not present in the current semester.
The professor can choose to create exams for which he can add the questions or
he can choose to modify the existing questions that are already entered by him. The
professor can also set the practice exams for the students so that they can come to know
95
the level or type of the questions that may be asked in the actual examination. If the exam
is theory, the he can set the marks per section of the answer and if the examination is
multiple choice questions, then the professor has to provide the correct answers at the
time of creating the questions. The application will automatically provide the score for
those exams once the student answers all the questions. The professor has the option to
view the class statistics in the graphical format.
The student can choose to answer all the questions in the examination set by the
professor. The student can also choose to take the practice exams and answer those
questions set by the professor.
Since no design is perfect and complete ever, the design and the scope of the
application will keep evolving over the period of time. But presently, this is the first
attempt to implement the ideas and thoughts that I had in my mind for helping the people
associated with the field of Education and making their life easier and adding luxury to
their life.
96
5.2 Future Work
The Existing system supports only multiple choice and free response questions,
the system can be enhanced to support other types of questions like fill in the blanks, true
or false etc.
The existing system has no image support at present so images and diagrams
cannot be included in exams which can make it difficult to ask certain questions.
Application can be extended using higher level of security, as it stores critical data
of student scores.
97
References
[1] Android Developer guide
http://developer.android.com/
[2] Android Operating System
http://en.wikipedia.org/wiki/Android_(operating_system)
[3] Google App Engine Developer guide
https://developers.google.com/appengine/
[4] Study of Google App Engine
http://en.wikipedia.org/wiki/Google_App_Engine
[5] Research and Study of Existing Web Application
http://www.scribd.com/doc/22746893/Online-Examination-Project-Report-
Documentation-Only
[6] Generating Charts using Android Plot
http://androidplot.com/wiki/Home
[7] System context diagram
http://en.wikipedia.org/wiki/System_context_diagram