nginx cookbook
TRANSCRIPT


Derek DeJonghe
NGINX Cookbook
Boston Farnham Sebastopol TokyoBeijing Boston Farnham Sebastopol TokyoBeijing

978-1-491-96893-2
[LSI]
NGINX Cookbookby Derek DeJonghe
Copyright © 2016 O’Reilly Media Inc. All rights reserved.
Printed in the United States of America.
Published by O’Reilly Media, Inc., 1005 Gravenstein Highway North, Sebastopol, CA95472.
O’Reilly books may be purchased for educational, business, or sales promotional use.Online editions are also available for most titles (http://safaribooksonline.com). Formore information, contact our corporate/institutional sales department:800-998-9938 or [email protected].
Editors: Brian Anderson and VirginiaWilsonProduction Editor: Shiny KalapurakkelCopyeditor: Amanda Kersey
Proofreader: Sonia SarubaInterior Designer: David FutatoCover Designer: Karen MontgomeryIllustrator: Rebecca Panzer
August 2016: First Edition
Revision History for the First Edition2016-08-31: First Release
The O’Reilly logo is a registered trademark of O’Reilly Media, Inc. NGINX Cook‐book, the cover image, and related trade dress are trademarks of O’Reilly Media, Inc.
While the publisher and the author have used good faith efforts to ensure that theinformation and instructions contained in this work are accurate, the publisher andthe author disclaim all responsibility for errors or omissions, including without limi‐tation responsibility for damages resulting from the use of or reliance on this work.Use of the information and instructions contained in this work is at your own risk. Ifany code samples or other technology this work contains or describes is subject toopen source licenses or the intellectual property rights of others, it is your responsi‐bility to ensure that your use thereof complies with such licenses and/or rights.

Table of Contents
Foreword. . . . . . . . . . . . . . . . . . . . . . . . . . . . . . . . . . . . . . . . . . . . . . . . . . . . . vii
Introduction. . . . . . . . . . . . . . . . . . . . . . . . . . . . . . . . . . . . . . . . . . . . . . . . . . . ix
1. High-Performance Load Balancing. . . . . . . . . . . . . . . . . . . . . . . . . . . . . 1Introduction 1HTTP Load Balancing 2TCP Load Balancing 3Load-Balancing Methods 4Connection Limiting 6
2. Intelligent Session Persistence. . . . . . . . . . . . . . . . . . . . . . . . . . . . . . . . 9Introduction 9Sticky Cookie 10Sticky Learn 11Sticky Routing 12Connection Draining 13
3. Application-Aware Health Checks. . . . . . . . . . . . . . . . . . . . . . . . . . . . . 15Introduction 15What to Check 15Slow Start 16TCP Health Checks 17HTTP Health Checks 18
4. High-Availability Deployment Modes. . . . . . . . . . . . . . . . . . . . . . . . . . 21Introduction 21
v

NGINX HA Mode 21Load-Balancing Load Balancers with DNS 22Load Balancing on EC2 23
5. Massively Scalable Content Caching. . . . . . . . . . . . . . . . . . . . . . . . . . . 25Introduction 25Caching Zones 25Caching Hash Keys 27Cache Bypass 28Cache Performance 29Purging 30
6. Sophisticated Media Streaming. . . . . . . . . . . . . . . . . . . . . . . . . . . . . . 31Introduction 31Serving MP4 and FLV 31Streaming with HLS 32Streaming with HDS 34Bandwidth Limits 34
7. Advanced Activity Monitoring. . . . . . . . . . . . . . . . . . . . . . . . . . . . . . . . 37Introduction 37NGINX Traffic Monitoring 37The JSON Feed 39
8. DevOps on the Fly Reconfiguration. . . . . . . . . . . . . . . . . . . . . . . . . . . . 41Introduction 41The NGINX API 41Seamless Reload 43SRV Records 44
9. UDP Load Balancing. . . . . . . . . . . . . . . . . . . . . . . . . . . . . . . . . . . . . . . . 47Introduction 47Stream Context 47Load-Balancing Algorithms 49Health Checks 49
10. Cloud-Agnostic Architecture. . . . . . . . . . . . . . . . . . . . . . . . . . . . . . . . . 51Introduction 51The Anywhere Load Balancer 51The Importance of Versatility 52
vi | Table of Contents
Foreword
NGINX has experienced a spectacular rise in usage since its initialopen source release over a decade ago. It’s now used by more thanhalf of the world’s top 10,000 websites, and more than 165 millionwebsites overall.
How did NGINX come to be used so widely? It’s one of the fastest,lightest weight, and most versatile tools available. You can use it ashigh-performance web server to deliver static content, as a load bal‐ancer to scale out applications, as a caching server to build your ownCDN, and much, much more.
NGINX Plus, our commercial offering for enterprise applications,builds on the open source NGINX software with extended capabili‐ties including advanced load balancing, application monitoring andactive health checks, a fully featured web application firewall (WAF),Single Sign-On (SSO) support, and other critical enterprise features.
The NGINX Cookbook shows you how to get the most out of theopen source NGINX and NGINX Plus software. This first set of rec‐ipes provides a set of easy-to-follow how-tos that cover three of themost important uses of NGINX: load balancing, content caching,and high availability (HA) deployments.
vii

Two more installments of recipes will be available for free in thecoming months. We hope you enjoy this first part, and the twoupcoming downloads, and that the NGINX Cookbook contributes toyour success in deploying and scaling your applications withNGINX and NGINX Plus.
— Faisal Memon,Product Marketer, NGINX, Inc.
viii | Foreword
Introduction
This is the first of three installments of NGINX Cookbook. This bookis about NGINX the web server, reverse proxy, load balancer, andHTTP cache. This installment will focus mostly on the load balanc‐ing aspect and the advanced features around load balancing, as wellas some information around HTTP caching. This book will touchon NGINX Plus, the licensed version of NGINX which providesmany advanced features, such as a real-time monitoring dashboardand JSON feed, the ability to add servers to a pool of applicationservers with an API call, and active health checks with an expectedresponse. The following chapters have been written for an audiencethat has some understanding of NGINX, modern web architecturessuch as n-tier or microservice designs, and common web protocolssuch as TCP, UDP, and HTTP. I wrote this book because I believe inNGINX as the strongest web server, proxy, and load balancer wehave. I also believe in NGINX’s vision as a company. When I heardOwen Garrett, head of products at NGINX, Inc. explain that thecore of the NGINX system would continue to be developed andopen source, I knew NGINX, Inc. was good for all of us, leading theWorld Wide Web with one of the most powerful software technolo‐gies to serve a vast number of use cases.
ix

Throughout this report, there will be references to both the free andopen source NGINX software, as well as the commercial productfrom NGINX, Inc., NGINX Plus. Features and directives that areonly available as part of the paid subscription to NGINX Plus will bedenoted as such. Most readers in this audience will be users andadvocates for the free and open source solution; this report’s focus ison just that, free and open source NGINX at its core. However, thisfirst installment provides an opportunity to view some of theadvanced features available in the paid solution, NGINX Plus.
x | Introduction
CHAPTER 1
High-Performance Load Balancing
IntroductionToday’s Internet user experience demands performance and uptime.To achieve this, multiple copies of the same system are run, andthe load is distributed over them. As load increases, another copyof the system can be brought online. The architecture technique iscalled horizontal scaling. Software-based infrastructure is increas‐ing in popularity because of its flexibility, opening up a vast worldof possibility. Whether the use case is as small as a set of two forhigh availability or as large as thousands world wide, there’s a needfor a load-balancing solution that is as dynamic as the infrastruc‐ture. NGINX fills this need in a number of ways, such as HTTP,TCP, and UDP load balancing, the last of which is discussed inChapter 9.
This chapter discusses load-balancing configurations for HTTPand TCP in NGINX. In this chapter, you will learn about theNGINX load-balancing algorithms, such as round robin, least con‐nection, least time, IP hash, and generic hash. They will aid you indistributing load in ways more useful to your application. Whenbalancing load, you also want to control the amount of load beingserved to the application server, which is covered in “ConnectionLimiting” on page 6.
1
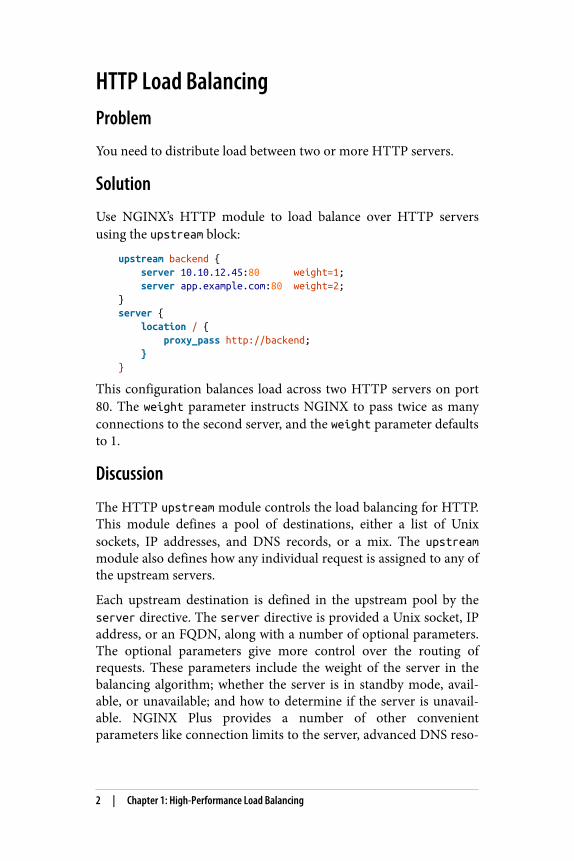
HTTP Load BalancingProblem
You need to distribute load between two or more HTTP servers.
Solution
Use NGINX’s HTTP module to load balance over HTTP serversusing the upstream block:
upstream backend { server 10.10.12.45:80 weight=1; server app.example.com:80 weight=2;}server { location / { proxy_pass http://backend; }}
This configuration balances load across two HTTP servers on port80. The weight parameter instructs NGINX to pass twice as manyconnections to the second server, and the weight parameter defaultsto 1.
Discussion
The HTTP upstream module controls the load balancing for HTTP.This module defines a pool of destinations, either a list of Unixsockets, IP addresses, and DNS records, or a mix. The upstreammodule also defines how any individual request is assigned to any ofthe upstream servers.
Each upstream destination is defined in the upstream pool by theserver directive. The server directive is provided a Unix socket, IPaddress, or an FQDN, along with a number of optional parameters.The optional parameters give more control over the routing ofrequests. These parameters include the weight of the server in thebalancing algorithm; whether the server is in standby mode, avail‐able, or unavailable; and how to determine if the server is unavail‐able. NGINX Plus provides a number of other convenientparameters like connection limits to the server, advanced DNS reso‐
2 | Chapter 1: High-Performance Load Balancing
lution control, and the ability to slowly ramp up connections to aserver after it starts.
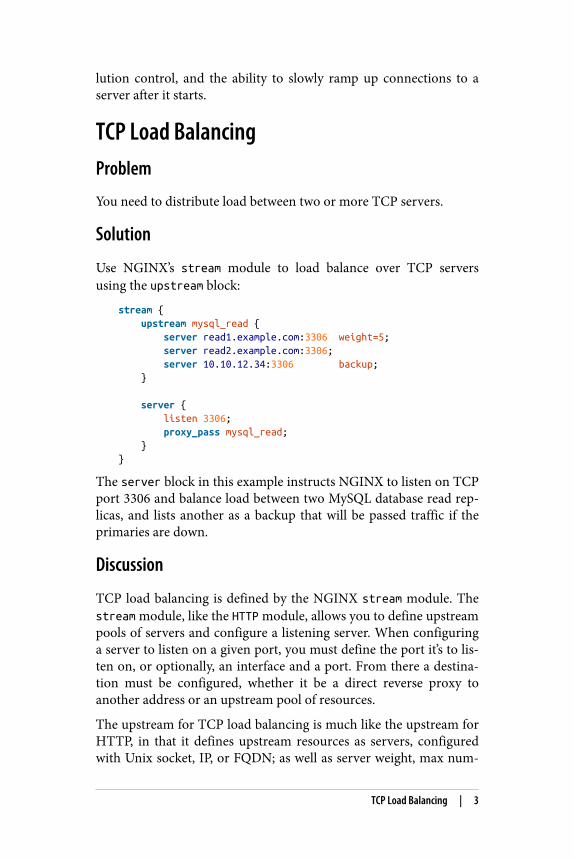
TCP Load BalancingProblem
You need to distribute load between two or more TCP servers.
Solution
Use NGINX’s stream module to load balance over TCP serversusing the upstream block:
stream { upstream mysql_read { server read1.example.com:3306 weight=5; server read2.example.com:3306; server 10.10.12.34:3306 backup; }
server { listen 3306; proxy_pass mysql_read; }}
The server block in this example instructs NGINX to listen on TCPport 3306 and balance load between two MySQL database read rep‐licas, and lists another as a backup that will be passed traffic if theprimaries are down.
Discussion
TCP load balancing is defined by the NGINX stream module. Thestream module, like the HTTP module, allows you to define upstreampools of servers and configure a listening server. When configuringa server to listen on a given port, you must define the port it’s to lis‐ten on, or optionally, an interface and a port. From there a destina‐tion must be configured, whether it be a direct reverse proxy toanother address or an upstream pool of resources.
The upstream for TCP load balancing is much like the upstream forHTTP, in that it defines upstream resources as servers, configuredwith Unix socket, IP, or FQDN; as well as server weight, max num‐
TCP Load Balancing | 3
ber of connections, DNS resolvers, and connection ramp-up peri‐ods; and if the server is active, down, or in backup mode.
NGINX Plus offers even more features for TCP load balancing.These advanced features offered in NGINX Plus can be foundthrough out this installment. Features available in NGINX Plus,such as connection limiting, can be found later in this chap‐ter. Health checks for all load balancing will be covered in Chapter 2.Dynamic reconfiguration for upstream pools, a feature available inNGINX Plus, is covered in Chapter 8.
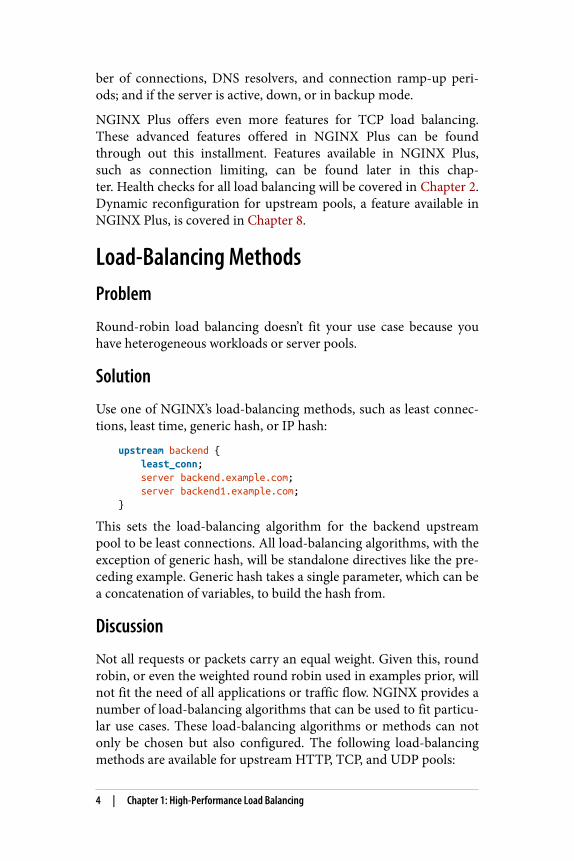
Load-Balancing MethodsProblem
Round-robin load balancing doesn’t fit your use case because youhave heterogeneous workloads or server pools.
Solution
Use one of NGINX’s load-balancing methods, such as least connec‐tions, least time, generic hash, or IP hash:
upstream backend { least_conn; server backend.example.com; server backend1.example.com;}
This sets the load-balancing algorithm for the backend upstreampool to be least connections. All load-balancing algorithms, with theexception of generic hash, will be standalone directives like the pre‐ceding example. Generic hash takes a single parameter, which can bea concatenation of variables, to build the hash from.
Discussion
Not all requests or packets carry an equal weight. Given this, roundrobin, or even the weighted round robin used in examples prior, willnot fit the need of all applications or traffic flow. NGINX provides anumber of load-balancing algorithms that can be used to fit particu‐lar use cases. These load-balancing algorithms or methods can notonly be chosen but also configured. The following load-balancingmethods are available for upstream HTTP, TCP, and UDP pools:
4 | Chapter 1: High-Performance Load Balancing
Round robinThe default load-balancing method which distributes requestsin order of the list of servers in the upstream pool. Weight canbe taken into consideration for a weighted round robin, whichcould be used if the capacity of the upstream servers varies. Thehigher the integer value for the weight, the more favored theserver will be in the round robin. The algorithm behind weightis simply statistical probability of a weighted average. Roundrobin is the default load-balancing algorithm and is used if noother algorithm is specified.
Least connectionsAnother load-balancing method provided by NGINX. Thismethod balances load by proxying the current request to theupstream server with the least number of open connectionsproxied through NGINX. Least connections, like round robin,also takes weights into account when deciding which server tosend the connection. The directive name is least_conn.
Least timeAvailable only in NGINX Plus, is akin to least connections inthat it proxies to the upstream server with the least number ofcurrent connections but favors the servers with the lowest aver‐age response times. This method is one of the most sophistica‐ted load-balancing algorithms out there and fits the need ofhighly performant web applications. The directive name isleast_time.
Generic hashThe administrator defines a hash with the given text, variablesof the request or runtime, or both. NGINX distributes the loadamongst the servers by producing a hash for the current requestand placing it against the upstream servers. This method is veryuseful when you need more control over where requests are sentor determining what upstream server most likely will have thedata cached. Redistribution is to be noted, when a server isadded or removed from the pool, the hashed requests will beredistributed. NGINX Plus has an optional parameter, consistent, to minimize the effect of redistribution. The directivename is hash.
Load-Balancing Methods | 5
IP hashOnly supported for HTTP, is the last of the bunch but not theleast. IP hash uses the client IP address as the hash. Slightly dif‐ferent from using the remote variable in a generic hash, thisalgorithm uses the first three octets of an IPv4 address or theentire IPv6 address. This method ensures that clients get prox‐ied to the same upstream server as long as that server is avail‐able, extremely helpful when the session state is of concern andnot handled by shared memory of the application. This methodalso takes the weight parameter into consideration when dis‐tributing the hash. The directive name is ip_hash.
Connection LimitingProblem
You have too much load overwhelming your upstream servers.
Solution
Use NGINX Plus’s max_conns parameter to limit connections toupstream servers:
upstream backend { zone backends 64k; queue 750 timeout=30s;
server webserver1.example.com max_conns=250; server webserver2.example.com max_conns=150;}
The connection-limiting feature is currently only available inNGINX Plus. This NGINX Plus configuration sets an integer oneach upstream server that specifies the max number of connectionsto be handled at any given time. If the max number of connectionshas been reached on each server, the request can be placed into thequeue for further processing, provided the optional queue directiveis specified. The optional queue directive sets the maximum numberof requests that can be simultaneously in the queue. A shared mem‐ory zone is created by use of the zone directive. The shared memoryzone allows NGINX Plus worker processes to share informationabout how many connections are handled by each server and howmany requests are queued.
6 | Chapter 1: High-Performance Load Balancing
Discussion
In dealing with distribution of load, one concern is overload. Over‐loading a server will cause it to queue connections in a listen queue.If the load balancer has no regard for the upstream server, it canload the server’s listen queue beyond repair. The ideal approach isfor the load balancer to be aware of the connection limitations of theserver and queue the connections itself so that it can send the con‐nection to the next available server with understanding of load as awhole. Depending on the upstream server to process its own queuewill lead to poor user experience as connections start to timeout.NGINX Plus provides a solution by allowing connections to queueat the load balancer and by making informed decisions on where itsends the next request or session.
The max_conns parameter on the server directive within theupstream block provides NGINX Plus with a limit of how manyconnections each upstream server can handle. This parameter isconfigurable in order to match the capacity of a given server. Whenthe number of current connections to a server meets the value of themax_conns parameter specified, NGINX Plus will stop sending newrequests or sessions to that server until those connections arereleased.
Optionally, in NGINX Plus, if all upstream servers are at theirmax_conns limit, NGINX Plus can start to queue new connectionsuntil resources are freed to handle those connections. Specifying aqueue is optional. When queuing, we must take into consideration areasonable queue length. Much like in everyday life, users and appli‐cations would much rather be asked to come back after a shortperiod of time than wait in a long line and still not be served. Thequeue directive in an upstream block specifies the max length of thequeue. The timeout parameter of the queue directive specifies howlong any given request should wait in queue before giving up, whichdefaults to 60 seconds.
Connection Limiting | 7

CHAPTER 2
Intelligent Session Persistence
IntroductionWhile HTTP may be a stateless protocol, if the context it’s to conveywere stateless, the Internet would be a much less interesting place.Many modern web architectures employ stateless application tiers,storing state in shared memory or databases. However, this is notthe reality for all. Session state is immensely valuable and vast ininteractive applications. This state may be stored locally for a num‐ber of reasons, for example, in applications where the data beingworked is so large that network overhead is too expensive in perfor‐mance. When state is stored locally to an application server, it isextremely important to the user experience that the subsequentrequests are continued to be delivered to the same server. Anotherportion of the problem is that servers should not be released untilthe session has finished. Working with stateful applications at scalerequires an intelligent load balancer. NGINX Plus offers multipleways to solve this problem by tracking cookies or routing.
NGINX Plus’s sticky directive alleviates difficulties of server affin‐ity at the traffic controller, allowing the application to focus on itscore. NGINX tracks session persistence in three ways: by creatingand tracking its own cookie, detecting when applications prescribecookies, or routing based on runtime variables.
9
Sticky CookieProblem
You need to bind a downstream client to a upstream server.
Solution
Use the sticky cookie directive to instruct NGINX Plus to createand track a cookie:
upstream backend { server backend1.example.com; server backend2.example.com; sticky cookie affinity expires=1h domain=.example.com httponly secure path=/;}
This configuration creates and tracks a cookie that ties a down‐stream client to an upstream server. The cookie in this example isnamed affinity, is set for example.com, persists an hour, cannot beconsumed client-side, can only be sent over HTTPS, and is valid forall paths.
Discussion
Using the cookie parameter on the sticky directive will create acookie on first request containing information about the upstreamserver. NGINX Plus tracks this cookie, enabling it to continuedirecting subsequent requests to the same server. The first positionalparameter to the cookie parameter is the name of the cookie to becreated and tracked. Other parameters offer additional controlinforming the browser of the appropriate usage, like the expire time,domain, path, and whether the cookie can be consumed client-sideor if it can be passed over unsecure protocols.
10 | Chapter 2: Intelligent Session Persistence
Sticky LearnProblem
You need to bind a downstream client to a upstream server by usingan existing cookie.
Solution
Use the sticky learn directive to discover and track cookies thatare created by the upstream application:
upstream backend { server backend1.example.com:8080; server backend2.example.com:8081;
sticky learn create=$upstream_cookie_cookiename lookup=$cookie_cookiename zone=client_sessions:2m;}
The example instructs NGINX to look for and track sessions bylooking for a cookie named COOKIENAME in response headers, andlooking up existing sessions by looking for the same cookie onrequest headers. This session affinity is stored in a shared memoryzone of 2 megabytes that can track approximately 16,000 sessions.The name of the cookie will always be application specific. Com‐monly used cookie names such as JSESSIONID or PHPSESSIONIDare typically defaults set within the application or the applicationserver configuration.
Discussion
When applications create their own session state cookies, NGINXPlus can discover them in request responses and track them. Thistype of cookie tracking is performed when the sticky directive isprovided the learn parameter. Shared memory for tracking cookiesis specified with the zone parameter, with a name and size. NGINXPlus is told to look for cookies in the response from the upstreamserver with specification of the create parameter, and searches forprior registered server affinity by the lookup parameter. The valueof these parameters are variables exposed by the HTTP module.
Sticky Learn | 11
Sticky RoutingProblem
You need granular control over how your persistent sessions arerouted to the upstream server.
Solution
Use the sticky directive with the route parameter to use variablesabout the request to route:
map $cookie_jsessionid $route_cookie { ~.+\.(?P<route>\w+)$ $route;}
map $request_uri $route_uri { ~jsessionid=.+\.(?P<route>\w+)$ $route;}
upstream backend { server backend1.example.com route=a; server backend2.example.com route=b;
sticky route $route_cookie $route_uri;}
The example attempts to extract a Java session ID, first from acookie by mapping the value of the Java session ID cookie to a vari‐able with the first map block, and then by looking into the requestURI for a parameter called jsessionid, mapping the value to a vari‐able using the second map block. The sticky directive with theroute parameter is passed any number of variables. The first non‐zero or not-empty value is used for the route. If a jsessionid cookieis used, the request is routed to backend1; if a URI parameter isused, the request is routed to backend2. While this example is basedon the Java common session ID, the same applies for other sessiontechnology like phpsessionid, or any guaranteed unique identifieryour application generates for the session ID.
12 | Chapter 2: Intelligent Session Persistence
Discussion
Sometimes you may want to direct traffic to a particular server witha bit more granular control. The route parameter to the stickydirective is built to achieve this goal. Sticky route gives you bettercontrol, actual tracking, and stickiness, as opposed to the generichash load-balancing algorithm. The client is first routed to aupstream server based on the route specified, and then subsequentrequests will carry the routing information in a cookie or the URI.Sticky route takes a number of positional parameters that are evalu‐ated. The first not-empty variable is used to route to a server. Mapblocks can be used to selectively parse variables and save them asanother variable to be used in the routing. Essentially, the stickyroute directive creates a session within the NGINX Plus sharedmemory zone for tracking any client session identifier you specify tothe upstream server, consistently delivering requests with this ses‐sion identifier to the same upstream server as its original request.
Connection DrainingProblem
You need to gracefully remove servers for maintenance or other rea‐sons while still serving sessions.
Solution
Use the drain parameter through the NGINX Plus API, described inmore detail in Chapter 8, to instruct NGINX to stop sending newconnections that are not already tracked:
$ curl 'http://localhost/upstream_conf\?upstream=backend&id=1&drain=1'
Discussion
When session state is stored locally to a server, connections and per‐sistent sessions must be drained before it’s removed from the pool.Draining connections is the process of letting sessions to that serverexpire natively before removing the server from the upstream pool.Draining can be configured for a particular server by adding the
Connection Draining | 13

drain parameter to the server directive. When the drain parameteris set, NGINX Plus will stop sending new sessions to this server butwill allow current sessions to continue being served for the length oftheir session.
14 | Chapter 2: Intelligent Session Persistence
CHAPTER 3
Application-Aware Health Checks
IntroductionFor a number of reasons, applications fail. It could be because ofnetwork connectivity, server failure, or application failure, to name afew. Proxies and load balancers must be smart enough to detect fail‐ure of upstream servers and stop passing traffic to them; otherwise,the client will be waiting, only to be delivered a timeout. A way tomitigate service degradation when a server fails is to have the proxycheck the health of the upstream servers. NGINX offers two differ‐ent types of health checks: passive, available in the open source ver‐sion; as well as active, available only in NGINX Plus. Active healthchecks on a regular interval will make a connection or request to theupstream server and have the ability to verify that the response iscorrect. Passive health checks monitor the connection or responsesof the upstream server as clients make the request or connection.You may want to use passive health checks to reduce the load ofyour upstream servers, and you may want to use active healthchecks to determine failure of a upstream server before a client isserved a failure.
What to CheckProblem
You need to check your application for health but don’t know whatto check.
15

Solution
Use a simple but direct indication of the application health. Forexample, a handler that simply returns a HTTP 200 response tellsthe load balancer that the application process is running.
Discussion
It’s important to check the core of the service you’re load balancingfor. A single comprehensive health check that ensures all of the sys‐tems are available can be problematic. Health checks should checkthat the application directly behind the load balancer is availableover the network and that the application itself is running. Withapplication-aware health checks, you want to pick a endpoint thatsimply ensures that the processes on that machine are running. Itmay be tempting to make sure that the database connection stringsare correct or that the application can contact its resources. How‐ever, this can cause a cascading effect if any particular service fails.
Slow StartProblem
Your application needs to ramp up before taking on full productionload.
Solution
Use the slow_start parameter on the server directive to graduallyincrease the number of connections over a specified time as a serveris reintroduced to the upstream load-balancing pool:
upstream { zone backend 64k;
server server1.example.com slow_start=20s; server server2.example.com slow_start=15s;}
The server directive configurations will slowly ramp up traffic tothe upstream servers after they’re reintroduced to the pool. server1will slowly ramp up its number of connections over 20 seconds, andserver2 over 15 seconds.
16 | Chapter 3: Application-Aware Health Checks
Discussion
Slow start is the concept of slowly ramping up the number ofrequests proxied to a server over a period of time. Slow start allowsthe application to warm up by populating caches, initiating databaseconnections without being overwhelmed by connections as soon asit starts. This feature takes effect when a server that has failed healthchecks begins to pass again and re-enters the load-balancing pool.
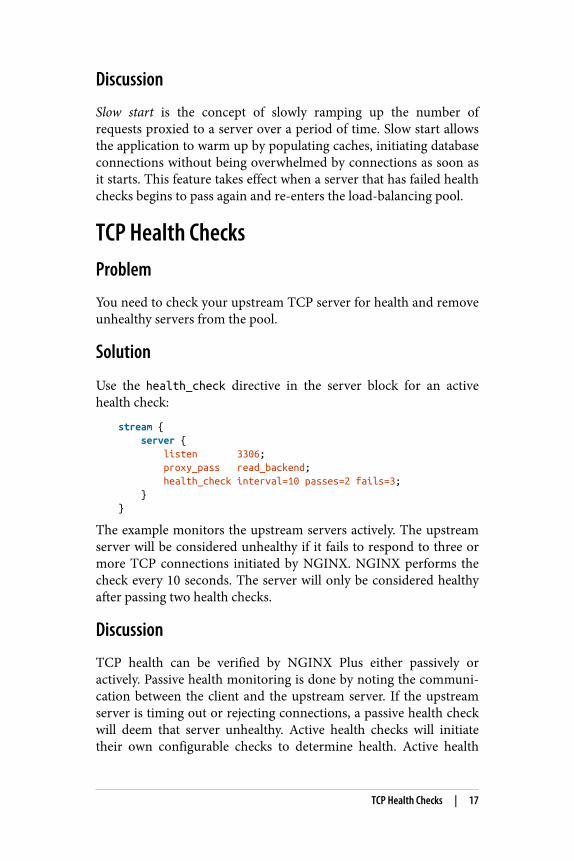
TCP Health ChecksProblem
You need to check your upstream TCP server for health and removeunhealthy servers from the pool.
Solution
Use the health_check directive in the server block for an activehealth check:
stream { server { listen 3306; proxy_pass read_backend; health_check interval=10 passes=2 fails=3; }}
The example monitors the upstream servers actively. The upstreamserver will be considered unhealthy if it fails to respond to three ormore TCP connections initiated by NGINX. NGINX performs thecheck every 10 seconds. The server will only be considered healthyafter passing two health checks.
Discussion
TCP health can be verified by NGINX Plus either passively oractively. Passive health monitoring is done by noting the communi‐cation between the client and the upstream server. If the upstreamserver is timing out or rejecting connections, a passive health checkwill deem that server unhealthy. Active health checks will initiatetheir own configurable checks to determine health. Active health
TCP Health Checks | 17
checks not only test a connection to the upstream server but canexpect a given response.
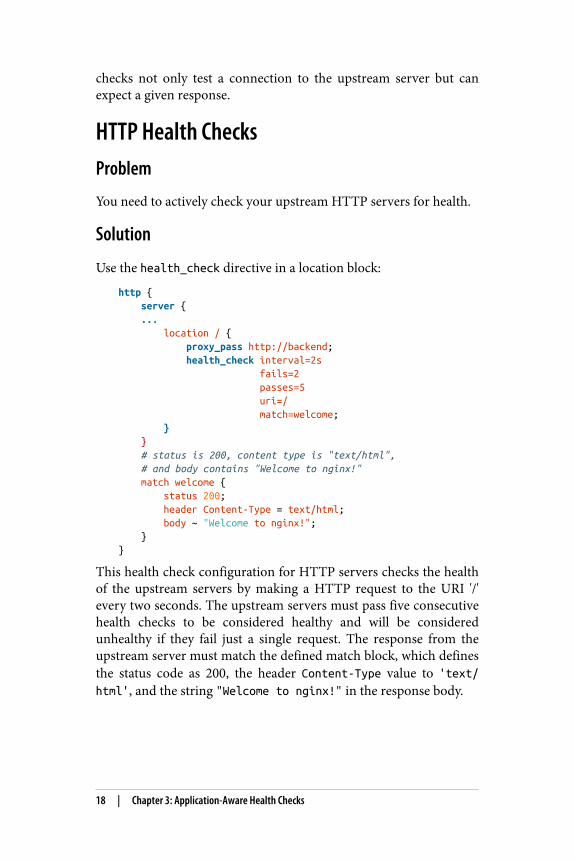
HTTP Health ChecksProblem
You need to actively check your upstream HTTP servers for health.
Solution
Use the health_check directive in a location block:
http { server { ... location / { proxy_pass http://backend; health_check interval=2s fails=2 passes=5 uri=/ match=welcome; } } # status is 200, content type is "text/html", # and body contains "Welcome to nginx!" match welcome { status 200; header Content-Type = text/html; body ~ "Welcome to nginx!"; }}
This health check configuration for HTTP servers checks the healthof the upstream servers by making a HTTP request to the URI '/'every two seconds. The upstream servers must pass five consecutivehealth checks to be considered healthy and will be consideredunhealthy if they fail just a single request. The response from theupstream server must match the defined match block, which definesthe status code as 200, the header Content-Type value to 'text/html', and the string "Welcome to nginx!" in the response body.
18 | Chapter 3: Application-Aware Health Checks
Discussion
HTTP health checks in NGINX Plus can measure more than justthe response code. In NGINX Plus, active HTTP health checksmonitor based on a number of acceptance criteria of the responsefrom the upstream server. Active health check monitoring can beconfigured for how often upstream servers are checked, the URI tocheck, how many times it must pass this check to be consideredhealthy, how many times it can fail before being deemed unhealthy,and what the expected result should be. The match parameter pointsto a match block that defines the acceptance criteria for theresponse. The match block has three directives: status, header, andbody. All three of these directives have comparison flags as well.
HTTP Health Checks | 19

CHAPTER 4
High-Availability DeploymentModes
IntroductionFault-tolerant architecture separates systems into identical, inde‐pendent stacks. Load balancers like NGINX are employed to distrib‐ute load, ensuring that what’s provisioned is utilized. The coreconcepts of high availability are load balancing over multiple activenodes or an active-passive failover. Highly available applicationshave no single points of failure; every component must use one ofthese concepts, including the load balancers themselves. For us, thatmeans NGINX. NGINX is designed to work in either configuration:multiple active or active-passive failover. This chapter will detailtechniques on how to run multiple NGINX servers to ensure highavailability in your load-balancing tier.
NGINX HA ModeProblem
You need a highly available load-balancing solution.
21
Solution
Use NGINX Plus’s HA mode with keepalived by installing thenginx-ha-keepalived package from the NGINX Plus repository.
Discussion
The NGINX Plus repository includes a package called nginx-ha-keepalived. This package, based on keepalived, manages a virtual IPaddress exposed to the client. Another process is run on the NGINXserver that ensures that NGINX Plus and the keepalived process arerunning. Keepalived is a process that utilizes the Virtual RouterRedundancy Protocol (VRRP), sending small messages oftenreferred to as heartbeats to the backup server. If the backup serverdoes not receive the heartbeat for three consecutive periods, thebackup server initiates the failover, moving the virtual IP address toitself and becoming the master. The failover capabilities of nginx-ha-keepalived can be configured to identify custom failure situa‐tions.
Load-Balancing Load Balancers with DNSProblem
You need to distribute load between two or more NGINX servers.
Solution
Use DNS to round robin across NGINX servers by adding multipleIP addresses to a DNS A record.
Discussion
When running multiple load balancers, you can distribute load viaDNS. The A record allows for multiple IP addresses to be listedunder a single, fully qualified domain name. DNS will automaticallyround robin across all the IPs listed. DNS also offers weighted roundrobin with weighted records, which works in the same way asweighted round robin in NGINX described in Chapter 1. Thesetechniques work great. However, a pitfall can be removing the
22 | Chapter 4: High-Availability Deployment Modes
record when an NGINX server encounters a failure. There are DNSproviders—Amazon Route53 for one, and Dyn DNS for another—that offer health checks and failover with their DNS offering, whichalleviates these issues. If using DNS to load balance over NGINX,when an NGINX server is marked for removal, it’s best to follow thesame protocols that NGINX does when removing an upstreamserver. First, stop sending new connections to it by removing its IPfrom the DNS record, then allow connections to drain before stop‐ping or shutting down the service.
Load Balancing on EC2Problem
You’re using NGINX in AWS, and the NGINX Plus HA does notsupport Amazon IPs.
Solution
Put NGINX behind an elastic load balancer by configuring an auto-scaling group of NGINX servers and linking the auto-scaling groupto the elastic load balancer. Alternatively, you can place NGINXservers into the elastic load balancer manually through the AmazonWeb Services console, command-line interface, or API.
Discussion
The HA solution from NGINX Plus based on keepalived will notwork on Amazon Web Services because it does not support thefloating virtual IP address, as EC2 IP addresses work in a differentway. This does not mean that NGINX can’t be HA in the AWS cloud;in fact, it’s the opposite. The AWS elastic load balancer is a productoffering from Amazon that will natively load balance over multiple,physically separated data centers called availability zones, provideactive health checks, and provide a DNS CNAME endpoint. A com‐mon solution for HA NGINX on AWS is to put an NGINX layerbehind the ELB. NGINX servers can be automatically added to andremoved from the ELB pool as needed. The ELB is not a replace‐ment for NGINX; there are many things NGINX offers that the ELBdoes not, such as multiple load-balancing methods, context switch‐ing, and UDP load balancing. In the event that the ELB will not fit
Load Balancing on EC2 | 23

1 Amazon also has a white paper about NGINX Plus failover on AWS: http://bit.ly/2aWAqW8.
your need, there are many other options. One option is the DNS sol‐ution, Route53. The DNS product from AWS offers health checksand DNS failover. Amazon also has a white paper about high-availability NGINX Plus, with use of Corosync and Pacemaker, thatwill cluster the NGINX servers and use an elastic IP to float betweenboxes for automatic failover.1
24 | Chapter 4: High-Availability Deployment Modes

CHAPTER 5
Massively ScalableContent Caching
IntroductionCaching accelerates content serving by storing request responses tobe served again in the future. Content caching reduces load toupstream servers, caching the full response rather than runningcomputations and queries again for the same request. Cachingincreases performance and reduces load, meaning you can servefaster with fewer resources. Scaling and distributing caching serversin strategic locations can have a dramatic effect on user experience.It’s optimal to host content close to the the consumer for the bestperformance. You can also cache your content close to your users.This is the pattern of content delivery networks, or CDNs. WithNGINX you’re able to cache your content wherever you can place aNGINX server, effectively enabling you to create your own CDN.With NGINX caching, you’re also able to passively cache and servecached responses in the event of an upstream failure.
Caching ZonesProblem
You need to cache content and need to define where the cache isstored.
25

Solution
Use the proxy_cache_path directive to define shared memory cachezones and a location for the content:
proxy_cache_path /var/nginx/cache keys_zone=CACHE:60m levels=1:2 inactive=3h max_size=20g;
The cache definition example creates a directory for cached respon‐ses on the file system at /var/nginx/cache and creates a shared mem‐ory space named CACHE with 60 megabytes of memory. Thisexample sets the directory structure levels, defines the release ofcached responses after they have not been requested in 3 hours, anddefines a maximum size of the cache of 20 gigabytes.
Discussion
To configure caching in NGINX, it’s necessary to a declare a pathand zone to be used. A cache zone in NGINX is created with thedirective proxy_cache_path. The proxy_cache_path designates alocation to store the cached information and a shared memory spaceto store active keys and response metadata. Optional parameters tothis directive provide more control of how the cache is maintainedand accessed. The levels parameter defines how the file structure iscreated. The value is a colon-separated value that declares the lengthsubdirectory names, with a maximum of three levels. NGINXcaches based on the cache key, which is a hashed value. NGINX thenstores the result in the file structure provided, using the cache key asa file path and breaking up directories based on the levels value.The inactive parameter allows for control over the length of time acache item will be hosted after its last use. The size of the cache isalso configurable with use of the max_size parameter. Other param‐eters are in relation to the cache loading process, which loads thecache keys into the shared memory zone from the files cached ondisk.
26 | Chapter 5: Massively Scalable Content Caching
1 Any combination of text or variables exposed to NGINX can be used to form a cachekey. A list of variables is available in NGINX: http://nginx.org/en/docs/varindex.html.
Caching Hash KeysProblem
You need to control how your content is cached and looked up.
Solution
Use the proxy_cache_key directive, along with variables to definewhat constitutes a cache hit or miss:
proxy_cache_key "$host$request_uri $cookie_user";
This cache hash key will instruct NGINX to cache pages based onthe host and URI being requested, as well as a cookie that definesthe user. With this you can cache dynamic pages without servingcontent which was generated for a different user.
Discussion
The default proxy_cache_key is "$scheme$proxy_host
$request_uri". This default will fit most use cases. The variablesused include the scheme, HTTP or HTTPS, the proxy_host, wherethe request is being sent, and the request URI. All together, thisreflects the URL that NGINX is proxying the request to. You mayfind that there are many other factors that define a unique requestper application, such as request arguments, headers, session identifi‐ers, and so on, to which you’ll want to create your own hash key.1
Selecting a good hash key is very important and should be thoughtthrough with understanding of the application. Selecting a cache keyfor static content is typically pretty straightforward; using the host‐name and URI will suffice. Selecting a cache key for fairly dynamiccontent like pages for a dashboard application requires more knowl‐edge around how users interact with the application and the degreeof variance between user experiences. The proxy_cache_key direc‐tive configures the string to be hashed for the cache key. Theproxy_cache_key can be set in the context of HTTP, server, and
Caching Hash Keys | 27

location blocks, providing flexible control on how requests arecached.
Cache BypassProblem
You need the ability to bypass the caching.
Solution
Use the proxy_cache_bypass directive with a nonempty or nonzerovalue. One way to do this is by setting a variable within locationblocks that you do not want cached to equal 1:
location ~ /admin/ { set $cachebypass 1; }proxy_cache_bypass $cachebypass;
The configuration tells NGINX to bypass the cache if the URI startswith /admin/.
Discussion
There are many scenarios that demand that the request is notcached. For this, NGINX exposes a proxy_cache_bypass directivethat when the value is nonempty or nonzero, the request will be sentto an upstream server rather than be pulled from cache. Interestingtechniques and solutions for cache bypass are derived from the needof the client and application. These can be as simple as a requestvariable or as intricate as a number of map blocks.
For many reasons, you may want to bypass the cache. One impor‐tant reason is troubleshooting and debugging. Reproducing issuescan be hard if you’re consistently pulling cached pages or if yourcache key is specific to a user identifier. Having the ability to bypassthe cache is vital. One way to do this would be to map a requestheader with an arbitrary name like cache_bypass, and map that to avariable provided to the proxy_cache_bypass directive.
28 | Chapter 5: Massively Scalable Content Caching
Cache PerformanceProblem
You need to increase performance of your cache.
Solution
Use client-side cache control headers and other caching directiveslike proxy_store:
location ~* \.(css|js)$ { expires 1y; add_header Cache-Control "public";}
This location block specifies that the client can cache the content ofCSS and JavaScript files. The expires directive instructs the clientthat their cached resource will no longer be valid after one year. Theadd_header directive adds the HTTP response header Cache-Control to the response, with a value of public, which allows anycaching server along the way to cache the resource. If we specify pri‐vate, only the client is allowed to cache the value.
Discussion
Cache performance has to do with many variables, disk speed beinghigh on the list. There are many things within the NGINX configu‐ration you can do to assist with cache performance. One option is toset headers of the response in such a way that the client actuallycaches the response. NGINX also has the cache notion called a store.This concept is designed for serving large files that do not change. Astore will help serve large files faster as the files do not expire, whichis an extremely ideal scenario when designing your own CDN withNGINX as edge servers.
Cache Performance | 29
PurgingProblem
You need to invalidate an object from the cache.
Solution
Use NGINX Plus’s purge feature, the proxy_cache_purge directive,and a nonempty or zero value variable:
map $request_method $purge_method { PURGE 1; default 0;}server { ... location / { ... proxy_cache_purge $purge_method; }}
Discussion
Common concept for static files is to put a hash of the file in the file‐name. This ensures that as you roll out new code and content, yourCDN recognizes this as a new file because the URI has changed.However, this does not exactly work for dynamic content to whichyou’ve set cache keys that don’t fit this model. In every caching sce‐nario, you must have a way to purge the cache. NGINX Plus hasprovided a simple method of purging cached responses. Theproxy_cache_purge directive, when passed a nonzero or nonemptyvalue, will purge the cached items matching the request. A simpleway to set up purging is by mapping the request method forPURGE. However, you may want to use this in conjunction with thegeo_ip module or a simple authentication to ensure that not anyonecan purge your precious cache items. NGINX has also allowed forthe use of * which will purge cache items that match a common URIprefix.
30 | Chapter 5: Massively Scalable Content Caching
CHAPTER 6
Sophisticated Media Streaming
IntroductionThis section covers streaming media with NGINX in MPEG-4 orFlash Video formats. NGINX is widely used to distribute and streamcontent to the masses. NGINX supports industry-standard formatsand streaming technologies, which will be covered in this chapter.NGINX Plus enables the ability to fragment content on the fly withthe HTTP Live Stream module, as well as the ability to deliverHTTP Dynamic Streaming of already fragmented media. NGINXnatively allows for bandwidth limits, and NGINX Plus’s advancedfeature offers bitrate limiting, enabling your content to be deliveredin the most efficient manner while reserving the servers’ resourcesto reach the most users.
Serving MP4 and FLVProblem
You need to stream digital media, originating in MPEG-4 (MP4) orFlash Video (FLV).
Solution
Designate a HTTP location block as .mp4 or .flv. NGINX will streamthe media using progressive downloads or HTTP pseudostreamingand support seeking:
31
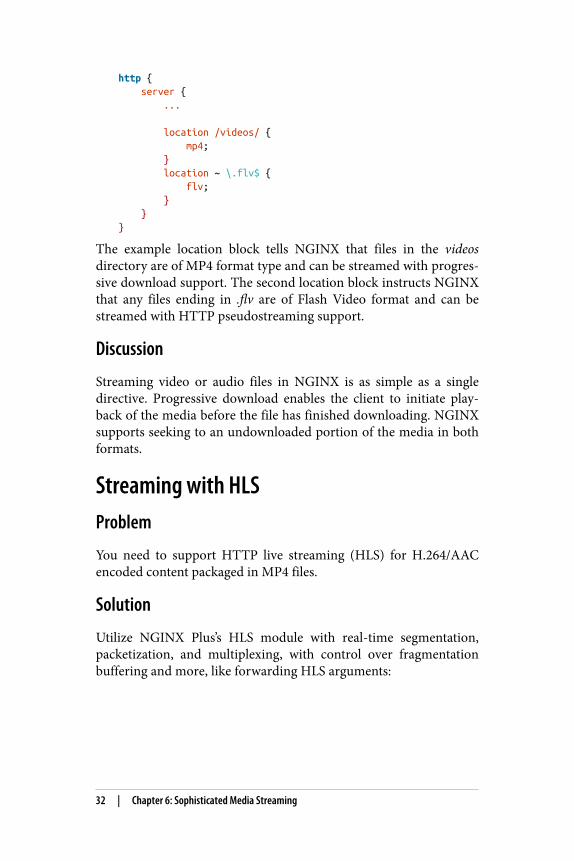
http { server { ... location /videos/ { mp4; } location ~ \.flv$ { flv; } }}
The example location block tells NGINX that files in the videosdirectory are of MP4 format type and can be streamed with progres‐sive download support. The second location block instructs NGINXthat any files ending in .flv are of Flash Video format and can bestreamed with HTTP pseudostreaming support.
Discussion
Streaming video or audio files in NGINX is as simple as a singledirective. Progressive download enables the client to initiate play‐back of the media before the file has finished downloading. NGINXsupports seeking to an undownloaded portion of the media in bothformats.
Streaming with HLSProblem
You need to support HTTP live streaming (HLS) for H.264/AACencoded content packaged in MP4 files.
Solution
Utilize NGINX Plus’s HLS module with real-time segmentation,packetization, and multiplexing, with control over fragmentationbuffering and more, like forwarding HLS arguments:
32 | Chapter 6: Sophisticated Media Streaming
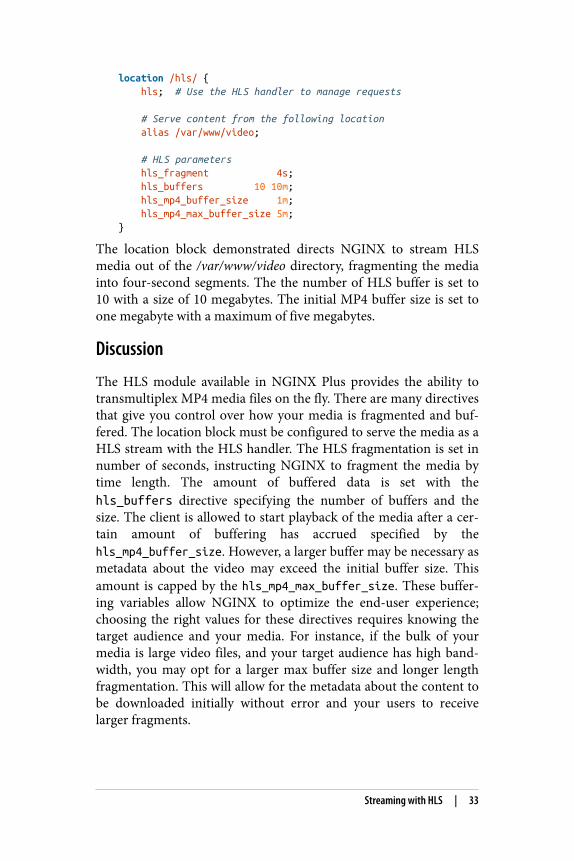
location /hls/ { hls; # Use the HLS handler to manage requests
# Serve content from the following location alias /var/www/video;
# HLS parameters hls_fragment 4s; hls_buffers 10 10m; hls_mp4_buffer_size 1m; hls_mp4_max_buffer_size 5m;}
The location block demonstrated directs NGINX to stream HLSmedia out of the /var/www/video directory, fragmenting the mediainto four-second segments. The the number of HLS buffer is set to10 with a size of 10 megabytes. The initial MP4 buffer size is set toone megabyte with a maximum of five megabytes.
Discussion
The HLS module available in NGINX Plus provides the ability totransmultiplex MP4 media files on the fly. There are many directivesthat give you control over how your media is fragmented and buf‐fered. The location block must be configured to serve the media as aHLS stream with the HLS handler. The HLS fragmentation is set innumber of seconds, instructing NGINX to fragment the media bytime length. The amount of buffered data is set with thehls_buffers directive specifying the number of buffers and thesize. The client is allowed to start playback of the media after a cer‐tain amount of buffering has accrued specified by thehls_mp4_buffer_size. However, a larger buffer may be necessary asmetadata about the video may exceed the initial buffer size. Thisamount is capped by the hls_mp4_max_buffer_size. These buffer‐ing variables allow NGINX to optimize the end-user experience;choosing the right values for these directives requires knowing thetarget audience and your media. For instance, if the bulk of yourmedia is large video files, and your target audience has high band‐width, you may opt for a larger max buffer size and longer lengthfragmentation. This will allow for the metadata about the content tobe downloaded initially without error and your users to receivelarger fragments.
Streaming with HLS | 33
Streaming with HDSProblem
You need to support Adobe’s HTTP Dynamic Streaming (HDS) thathas already been fragmented and separated from the metadata.
Solution
Use NGINX Plus’s support for fragmented FLV files (F4F) moduleto offer Adobe Adaptive Streaming to your users:
location /video/ { alias /var/www/transformed_video; f4f; f4f_buffer_size 512k;}
The example instructs NGINX Plus to server previously fragmentedmedia from a location on disk to the client using the NGINX Plusf4f module. The buffer size for the index file (.f4x) is set to 512 kilo‐bytes.
Discussion
The NGINX Plus F4F module enables NGINX to server previouslyfragmented media to end users. The configuration of such is as sim‐ple as using the f4f handler inside of a HTTP location block. Thef4f_buffer_size directive configures the buffer size for the indexfile of this type of media.
Bandwidth LimitsProblem
You need to limit bandwidth to downstream media streaming cli‐ents without impacting the viewing experience.
Solution
Utilize NGINX Plus’s bitrate limiting support for MP4 media files:
34 | Chapter 6: Sophisticated Media Streaming
location /video/ { mp4; mp4_limit_rate_after 15s; mp4_limit_rate 1.2;}
This configuration allows the downstream client to download for 15seconds before applying a bitrate limit. After 15 seconds, the client isallowed to download media at a rate of 120% of the bitrate, whichenables the client to always download faster than they play.
Discussion
NGINX Plus’s bitrate limiting allows your streaming server to limitbandwidth dynamically based on the media being served, allowingclients to download just as much as they need to ensure a seamlessuser experience. The MP4 handler described in a previous sectiondesignates this location block to stream MP4 media formats. Therate-limiting directives such as mp4_limit_rate_after tells NGINXto only rate-limit traffic after a specified amount of time, in seconds.The other directive involved in MP4 rate limiting ismp4_limit_rate, which specifies the the bitrate at which clients areallowed to download in relation to the bitrate of the media. A valueof 1 provided to the mp4_limit_rate directive specifies that NGINXis to limit bandwidth, 1 to 1 to the bitrate of the media. Providing avalue of more than one to the mp4_limit_rate directive will allowusers to download faster than they watch so they can buffer themedia and watch seamlessly while they download.
Bandwidth Limits | 35

CHAPTER 7
Advanced Activity Monitoring
IntroductionTo ensure your application is running at optimal performance andprecision, you need insight into the monitoring metrics about itsactivity. NGINX Plus offers an advanced monitoring dashboard anda JSON feed to provide in-depth monitoring about all requests thatcome through the heart of your application. The NGINX Plus activ‐ity monitoring provides insight into requests, upstream server pools,caching, health, and more. This chapter will detail the power andpossibilities of the NGINX Plus dashboard and JSON feed.
NGINX Traffic MonitoringProblem
You require in-depth metrics about the traffic flowing through yoursystem.
Solution
Utilize NGINX Plus’s real-time activity monitoring dashboard:
37
server { listen 8080; root /usr/share/nginx/html;
# Redirect requests for / to /status.html location = / { return 301 /status.html; }
location = /status.html { }
# Everything beginning with /status # (except for /status.html) is # processed by the status handler location /status { status; }}
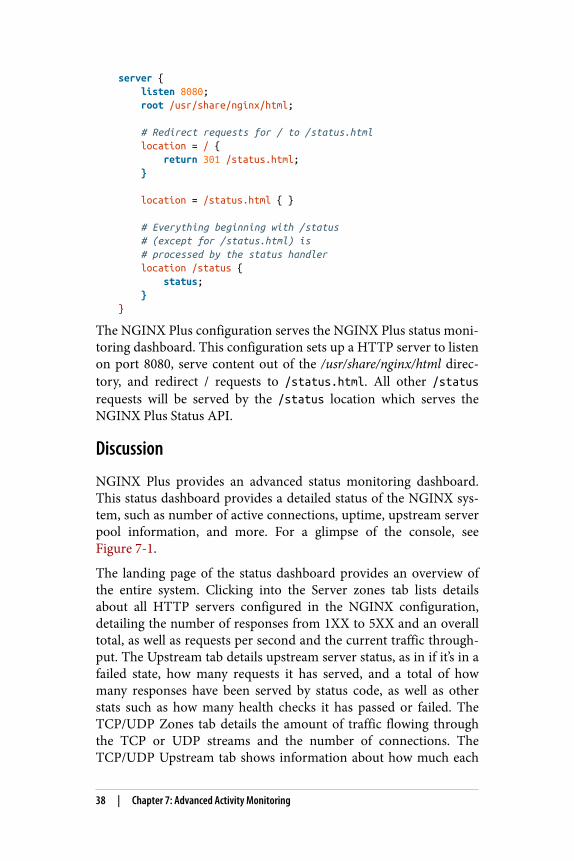
The NGINX Plus configuration serves the NGINX Plus status moni‐toring dashboard. This configuration sets up a HTTP server to listenon port 8080, serve content out of the /usr/share/nginx/html direc‐tory, and redirect / requests to /status.html. All other /statusrequests will be served by the /status location which serves theNGINX Plus Status API.
Discussion
NGINX Plus provides an advanced status monitoring dashboard.This status dashboard provides a detailed status of the NGINX sys‐tem, such as number of active connections, uptime, upstream serverpool information, and more. For a glimpse of the console, seeFigure 7-1.
The landing page of the status dashboard provides an overview ofthe entire system. Clicking into the Server zones tab lists detailsabout all HTTP servers configured in the NGINX configuration,detailing the number of responses from 1XX to 5XX and an overalltotal, as well as requests per second and the current traffic through‐put. The Upstream tab details upstream server status, as in if it’s in afailed state, how many requests it has served, and a total of howmany responses have been served by status code, as well as otherstats such as how many health checks it has passed or failed. TheTCP/UDP Zones tab details the amount of traffic flowing throughthe TCP or UDP streams and the number of connections. TheTCP/UDP Upstream tab shows information about how much each
38 | Chapter 7: Advanced Activity Monitoring
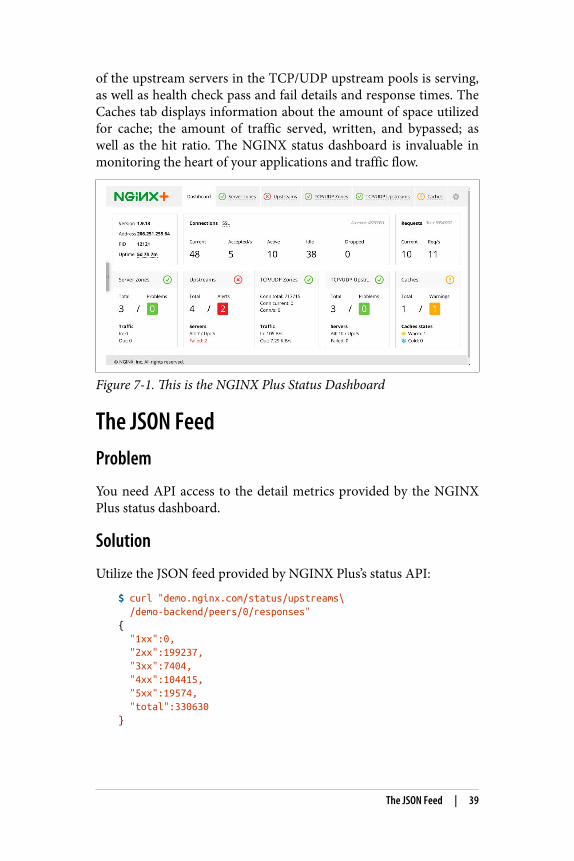
of the upstream servers in the TCP/UDP upstream pools is serving,as well as health check pass and fail details and response times. TheCaches tab displays information about the amount of space utilizedfor cache; the amount of traffic served, written, and bypassed; aswell as the hit ratio. The NGINX status dashboard is invaluable inmonitoring the heart of your applications and traffic flow.
Figure 7-1. This is the NGINX Plus Status Dashboard
The JSON FeedProblem
You need API access to the detail metrics provided by the NGINXPlus status dashboard.
Solution
Utilize the JSON feed provided by NGINX Plus’s status API:
$ curl "demo.nginx.com/status/upstreams\ /demo-backend/peers/0/responses"{ "1xx":0, "2xx":199237, "3xx":7404, "4xx":104415, "5xx":19574, "total":330630}
The JSON Feed | 39
The curl call requests a JSON feed from the NGINX Plus Status APIfor information about an upstream HTTP server pool, and in par‐ticular about the first server in the pool’s responses.
Discussion
The NGINX Plus status API is vast, and requesting just the statuswill return a JSON object with all the information that can be foundon the status dashboard in whole. The JSON feed API allows you todrill down to particular information you may want to monitor oruse in custom logic to make application or infrastructure decisions.The API is intuitive and RESTful, and you’re able to make requestsfor objects within the overall status JSON feed to limit the datareturned. This JSON feed enables you to feed the monitoring datainto any other number of systems you may be utilizing for monitor‐ing, such as Graphite, Datadog, and Splunk.
40 | Chapter 7: Advanced Activity Monitoring

CHAPTER 8
DevOps on the Fly Reconfiguration
IntroductionThe term DevOps has being tossed and spun around more thanyour favorite pizza crust. To the people actually doing the work, theterm has nearly lost meaning; the origin of this term comes from aculture of developers and operations folk working together in anAgile workflow to enhance quality and productivity and shareresponsibility. If you ask a recruiter, it’s a job title; ask someone inmarketing, it’s a hit-generating Swiss army knife. In this context, wemean DevOps to be developing software and tools to solve opera‐tional tasks in the ever-evolving dynamic technology landscape. Inthis chapter, we’ll discuss the NGINX Plus API that allows you todynamically reconfigure the NGINX Plus load balancer, as well asother tools and patterns to allow your load balancer to evolve withthe rest of your environment, such as the seamless reload andNGINX Plus’s ability to utilize DNS SRV records.
The NGINX APIProblem
You have a dynamic environment and need to reconfigure NGINXon the fly.
41
Solution
Configure the NGINX Plus API to enable adding and removingservers through API calls:
location /upstream_conf { upstream_conf; allow 10.0.0.0/8; # permit access from private network deny all; # deny access from everywhere else}
...upstream backend { zone backend 64k; state /var/lib/nginx/state/backend.state; ...}
The NGINX Plus configuration enables the upstream configurationAPI and only allows access from a private network. The configura‐tion of the upstream block defines a shared memory zone namedbackend of 64 kilobytes. The state directive tells NGINX to persistthese changes through a restart by saving them to the file system.
Utilize the API to add servers when they come online:
$ curl 'http://nginx.local/upstream_conf?\ add=&upstream=backend&server=10.0.0.42:8080'
The curl call demonstrated makes a request to NGINX Plus andrequests a new server be added to the backend upstream configura‐tion.
Utilize the NGINX Plus API to list the servers in the upstream pool:
$ curl 'http://nginx.local/upstream_conf?upstream=backend'server 10.0.0.42:8080; # id=0
The curl call demonstrated makes a request to NGINX Plus to list allof the servers in the upstream pool named backend. Currently weonly have the one server that we added in the previous curl call tothe API. The list request will show the IP address, port, and ID ofeach server in the pool.
Use the NGINX Plus API to drain connections from an upstreamserver, preparing it for a graceful removal from the upstream pool.Details about connection draining can be found in Chapter 2, “Con‐nection Draining” on page 13:
42 | Chapter 8: DevOps on the Fly Reconfiguration
$ curl 'http://nginx.local/upstream_conf?\ upstream=backend&id=0&drain=1'server 10.0.0.42:8080; # id=0 draining
In this curl, we specify arguments for the upstream pool, backend,the ID of the server we wish to drain, 0, and set the drain argumentto equal 1. We found the ID of the server by listing the servers in theupstream pool in the previous curl command.
NGINX Plus will begin to drain the connections. This process cantake as long as the length of the sessions of the application. To checkin on how many active connections are being served by the serveryou’ve begin to drain, you can use the NGINX Plus JSON feed thatwas detailed in Chapter 7, “The JSON Feed” on page 39.
After all connections have drained, utilize the NGINX Plus API toremove the server from the upstream pool entirely:
$ curl 'http://nginx.local/upstream_conf?\ upstream=backend&id=0&remove=1'
The curl command passes arguments to the NGINX Plus API toremove server 0 from the upstream pool named backend. This APIcall will return all of the servers and their IDs that are still left in thepool. As we started with an empty pool, added only one serverthrough the API, drained it, and then removed it, we now have anempty pool again.
Discussion
This upstream API enables dynamic application servers to add andremove themselves to the NGINX configuration on the fly. Asservers come online, they can register themselves to the pool, andNGINX will begin to start sending it load. When a server needs tobe removed, the server can request NGINX Plus to drain its connec‐tions, then remove itself from the upstream pool before it’s shutdown. This enables the infrastructure to, through some automation,scale in and out without human intervention.
Seamless ReloadProblem
You need to reload you configuration without dropping packets.
Seamless Reload | 43
Solution
Use the reload method of NGINX to achieve a seamless reload ofthe configuration without stopping the server:
service nginx reload
The command-line example reloads the NGINX system using theNGINX init script generally located in the /etc/init.d/ directory.
Discussion
Reloading the NGINX configuration without stopping the serverprovides the ability to change configuration on the fly without drop‐ping any packets. In a high-uptime, dynamic environment, you willneed to change your load-balancing configuration at some point.NGINX allows you to do this while keeping the load balanceronline. This feature enables countless possibilities, such as rerun‐ning configuration management in a live environment, or buildingan application- and cluster-aware module to dynamically configureand reload NGINX to the needs of the environment.
SRV RecordsProblem
You’d like to use your existing DNS SRV record implementation asthe source for upstream servers.
Solution
Specify the service directive with a value of http on an upstreamserver to instruct NGINX to utilize the SRV record as a load-balancing pool:
http { resolver 10.0.0.2;
upstream backend { zone backends 64k; server api.example.internal service=http resolve; }}
44 | Chapter 8: DevOps on the Fly Reconfiguration

The configuration instructs NGINX to resolve DNS from a DNSserver at 10.0.0.2 and set up an upstream server pool with a singleserver directive. This server directive specified with the resolveparameter is instructed to periodically re-resolve the domain name.The service=http parameter and value tells NGINX that this is aSRV record containing a list of IPs and ports and to load balanceover them as if they were configured with the server directive.
Discussion
Dynamic infrastructure is becoming ever more popular with thedemand and adoption of cloud-based infrastructure. Autoscalingenvironments scale horizontally, increasing and decreasing thenumber of servers in the pool to match the demand of the load.Scaling horizontally demands a load balancer that can add andremove resources from the pool. With an SRV record, you offloadthe responsibility of keeping the list of servers to DNS. This type ofconfiguration is extremely enticing for containerized environmentsbecause you may have containers running applications on variableport numbers, possibly at the same IP address.
SRV Records | 45

CHAPTER 9
UDP Load Balancing
IntroductionUser Datagram Protocol (UDP) is used in many contexts, such asDNS, NTP, and Voice over IP. NGINX can load balance overupstream servers with all the load-balancing algorithms provided tothe other protocols. In this chapter, we’ll cover the UDP load balanc‐ing in NGINX.
Stream ContextProblem
You need to distribute load between two or more UDP servers.
47
Solution
Use NGINX’s stream module to load balance over UDP serversusing the upstream block defined as udp:
stream { upstream dns { server ns1.example.com:53 weight=2; server ns2.example.com:53; }
server { listen 53 udp; proxy_pass dns; }}
This section of configuration balances load between two upstreamDNS servers using the UDP protocol. Specifying UDP load balanc‐ing is as simple as using the udp parameter on the listen directive.
Discussion
One might ask, “Why do you need a load balancer when you canhave multiple hosts in a DNS A or SRV record?” The answer is thatnot only are there alternative balancing algorithms we can balancewith, but we can load balance over the DNS servers themselves.UDP services make up a lot of the services that we depend on innetworked systems such as DNS, NTP, and Voice over IP. UDP loadbalancing may be less common to some but just as useful in theworld of scale.
UDP load balancing will be found in the stream module, just likeTCP, and configured mostly in the same way. The main difference isthat the listen directive specifies that the open socket is for work‐ing with datagrams. When working with datagrams, there are someother directives that may apply where they would not in TCP, suchas the proxy_response directive that tells NGINX how manyexpected responses may be sent from the upstream server, by defaultbeing unlimited until the proxy_timeout limit is reached.
48 | Chapter 9: UDP Load Balancing
Load-Balancing AlgorithmsProblem
You need to distribute load of a UDP service with control over thedestination or for best performance.
Solution
Utilize the different load-balancing algorithms, like IP hash or leastconn, described in Chapter 1:
upstream dns { least_conn; server ns1.example.com:53; server ns2.example.com:53;}
The configuration load balances over two DNS name servers anddirects the request to the name server with the least number of cur‐rent connections.
Discussion
All of the load-balancing algorithms that were described in “Load-Balancing Algorithms” on page 49 are available in UDP load balanc‐ing as well. These algorithms, such as least connections, least time,generic hash, or IP hash, are useful tools to provide the best experi‐ence to the consumer of the service or application.
Health ChecksProblem
You need to check the health of upstream UDP servers.
Solution
Use NGINX health checks with UDP load balancing to ensure onlyhealthy upstream servers are sent datagrams:
Load-Balancing Algorithms | 49
upstream dns { server ns1.example.com:53 max_fails=3 fail_timeout=3s; server ns2.example.com:53 max_fails=3 fail_timeout=3s;}
This configuration passively monitors the upstream health, settingthe max_fails directive to 3, and fail_timeout to 3 seconds.
Discussion
Health checking is important on all types of load balancing not onlyfrom a user experience standpoint but also for business continuity.NGINX can actively and passively monitor upstream UDP serversto ensure they’re healthy and performing. Passive monitoringwatches for failed or timed-out connections as they pass throughNGINX. Active health checks attempt to make a connection to thespecified port, and can optionally expect a response.
50 | Chapter 9: UDP Load Balancing
CHAPTER 10
Cloud-Agnostic Architecture
IntroductionOne thing many companies request when moving to the cloud is tobe cloud agnostic. Being cloud agnostic in their architectures ena‐bles them to pick up and move to another cloud or instantiate theapplication in a location that one cloud provider may have thatanother does not. Cloud-agnostic architecture also reduces risk ofvendor lock-in and enables an insurance fallback for your applica‐tion. It’s very common for disaster-recovery plans to use an entirelyseparate cloud, as failure can sometimes be systematic and affect acloud as a whole. For cloud-agnostic architecture, all of your tech‐nology choices must be able to be run in all of those environments.In this chapter, we’ll talk about why NGINX is the right technologychoice when architecting a solution that will fit in any cloud.
The Anywhere Load BalancerProblem
You need a load-balancer solution that can be deployed in any data‐center, cloud environment, or even local hosts.
51
1 NGINX provides a page to download its software: http://nginx.org/en/download.html.2 Linux packages and repositories can be found at http://nginx.org/en/linux_pack‐
ages.html.
Solution
Load balance with NGINX. NGINX is software that can be deployedanywhere. NGINX runs on Unix; and on multiple flavors of Linuxsuch as Cent OS and Debian, BSD variants, Solaris, OS X, Windows,and others. NGINX can be built from source on Unix and Linuxderivatives as well as installed through package managers such asyum, aptitude, and zypper. On Windows, it can be installed bydownloading a ZIP archive and running the .exe file.
Discussion
The fact that NGINX is a software load balancer rather than strictlyhardware allows it to be deployed on almost any infrastructure.1
Cross-cloud environments and hybrid cloud architectures are on therise, applications are distributed between different clouds for highavailability, and vendor-agnostic architecture limits risk of produc‐tion outages and reduces network latency between the end user andthe application. In these scenarios, the application being hosted typi‐cally doesn’t change and neither should your load-balancing solu‐tion. NGINX can be run in all of these environments with all of thepower of its configuration.2
The Importance of VersatilityProblem
You need versatility in your architecture and the ability to build inan iterative manner.
Solution
Use NGINX as your load balancer or traffic router. NGINX providesversatility on the platform it runs on or its configuration. If you’rearchitecting a solution, and you’re not sure where it’s going to live or
52 | Chapter 10: Cloud-Agnostic Architecture
need the flexibility to be able to move it to another provider,NGINX will fit this need. If you’re working in an iterative workflow,and new services or configurations are continually changing duringthe development cycle, NGINX is a prime resource, as its configura‐tion can change; and with a reload of the service, the new configura‐tion is online without concern of stopping the service. An examplemight be planning to build out a data center, and then for cost andflexibility, switching gears into a cloud environment. Another exam‐ple might be refactoring an existing monolithic application andslowly decoupling the application into microservices, deploying ser‐vice by service as the smaller applications become ready for produc‐tion.
Discussion
Agile workflows have changed how development work is done. Theidea of an Agile workflow is an iterative approach where it’s OK ifrequirements or scope change. Infrastructure architecture can alsofollow an Agile workflow: you may start out aiming to go into a par‐ticular cloud provider and then have to switch to another partwaythrough the project, or want to deploy to multiple cloud providers.NGINX being able to run anywhere makes it an extremely versatiletool. The importance of versatility is that with the inevitable onset ofcloud, things are always changing. In the ever-evolving landscape ofsoftware, NGINX is able to efficiently serve your application needsas it grows with your features and user base.
The Importance of Versatility | 53

About the AuthorDerek DeJonghe has had a lifelong passion for technology. Hisbackground and experience in web development, system adminis‐tration, and networking give him a well-rounded understanding ofmodern web architecture. Derek leads a team of site reliability engi‐neers and produces self-healing, auto-scaling infrastructure fornumerous applications. He specializes in Linux cloud environments.While designing, building, and maintaining highly available applica‐tions for clients, he consults for larger organizations as they embarkon their journey to the cloud. Derek and his team are on the fore‐front of a technology tidal wave and are engineering cloud bestpractices every day. With a proven track record for resilient cloudarchitecture, Derek helps RightBrain Networks be one of the stron‐gest cloud consulting agencies and managed service providers inpartnership with AWS today.